Owner Manual Computing
Using Windows 10
Start Menu
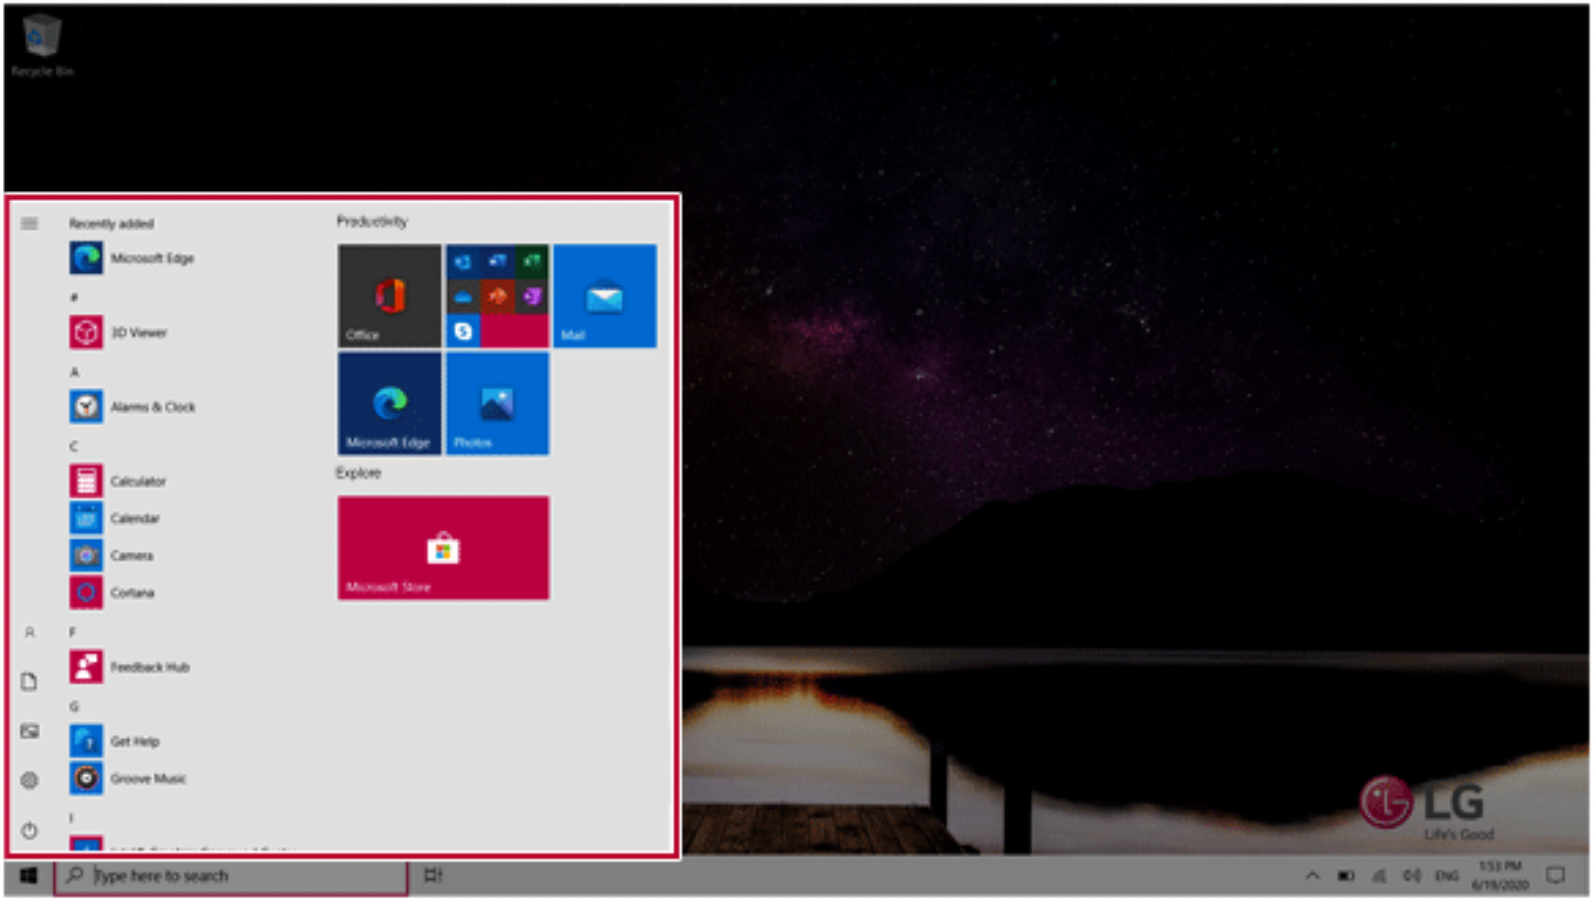
A New Start Menu
The Start menu in Windows 10 has been changed so you can use Windows quickly and easily.

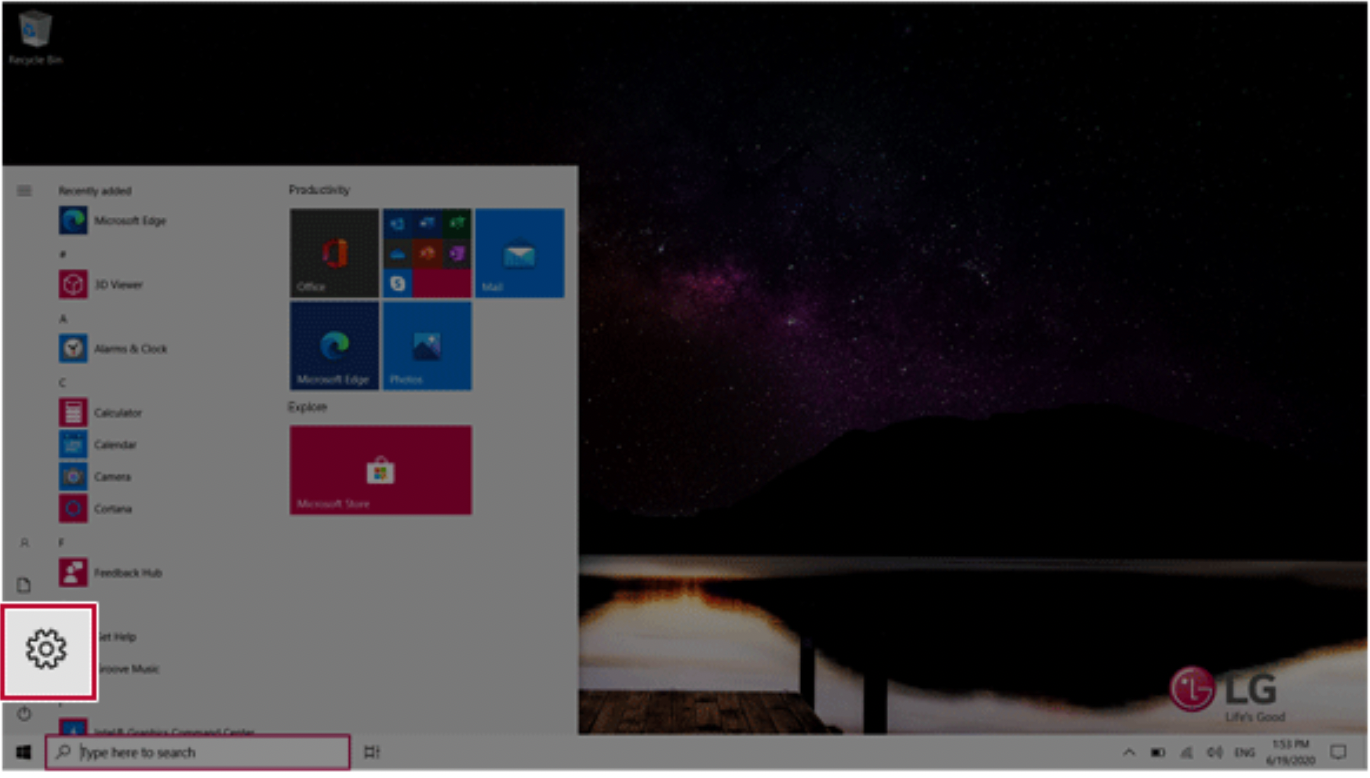
Press the [  ] button in the lower-left corner of the screen to display the Start menu.
TIP: Press the [  ] key or [Ctrl] + [Esc] to display the Start menu.
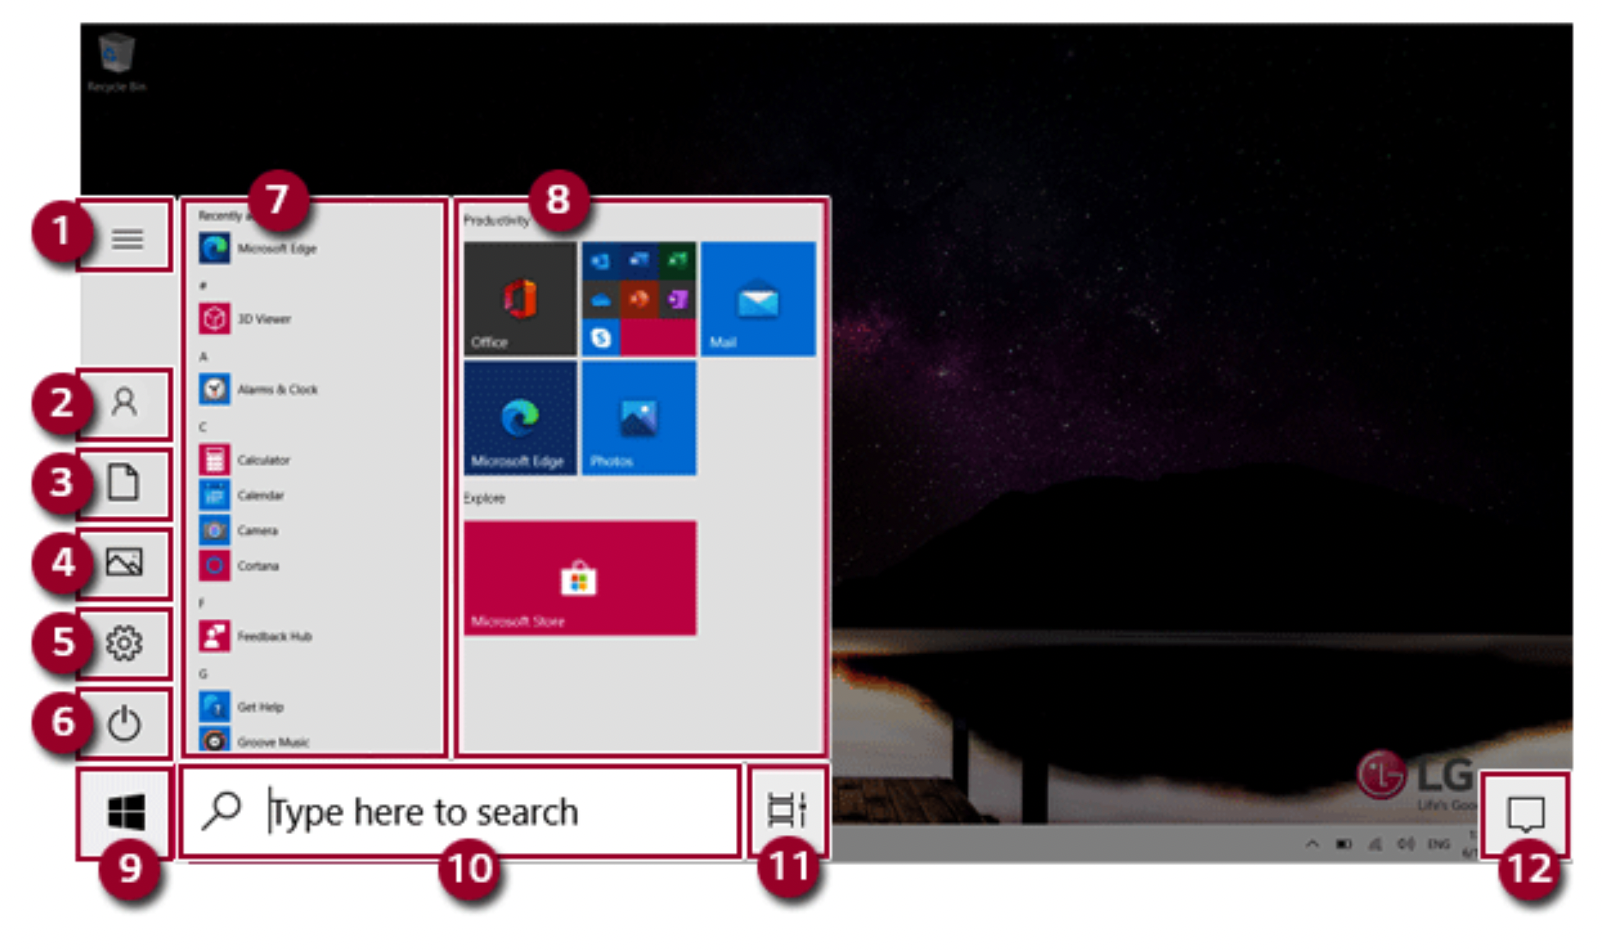
- Expand: Displays the names of all menu items.
- User Account: Displays the current user's information.You can use functions such as Change Account Settings, Lock or Logout.
- Document: Opens the default document folder in Windows.
- Pictures: Opens the default photo folder in Windows.
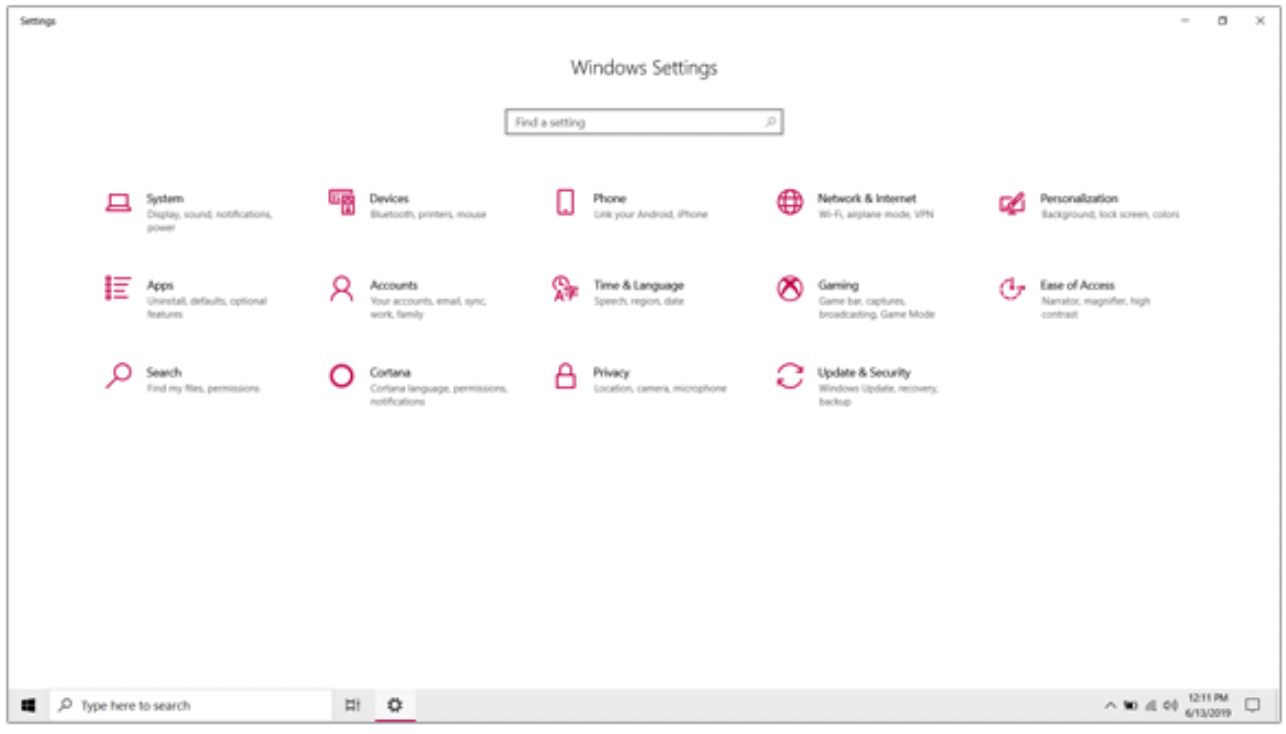
- Settings: You can set up the system including the network settings.
- Power: Sleep, System Shutdown, and Restart menus are available.
- App List: Displays the app list.
- AppTile: Apps added to the Start menu are displayed in tile format.
- Start Button: Opens or closes the Start menu.
- Windows Search: Searches for the text entered by the user in My Items (system) or the Internet. 11
- Task View: You can add a Desktop screen or switch to the screen to display the history of recent PC usage.
- Action Center: You can view the system-related notification messages and change PC settings.
TIP: Press [ ] + [X], and then the [ ] button pop-up menu appears.You can use the pop-up menu to easily access the shortcuts such as Windows Explorer, Search, System Shutdown, and Desktop.
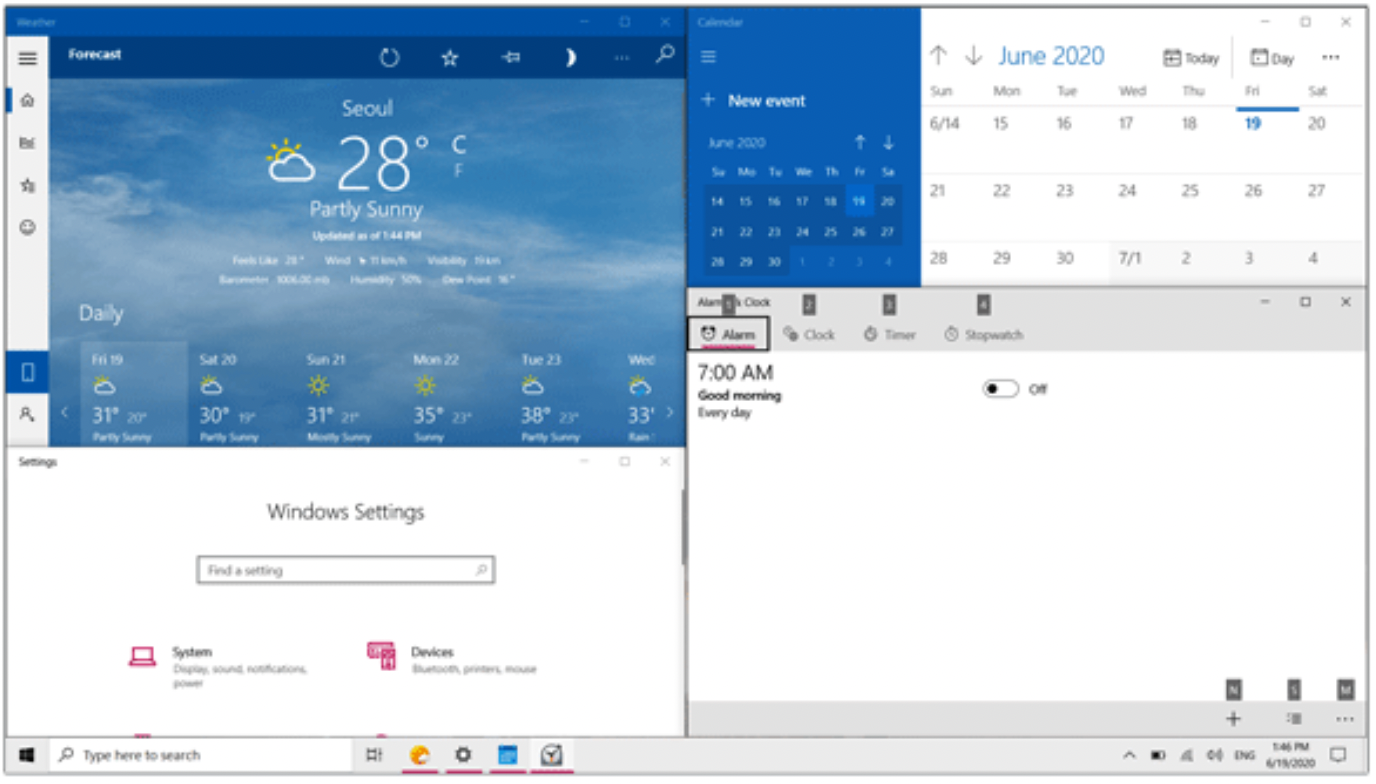
Desktop Apps and Windows Apps
The Desktop apps remain unchanged from the previous Windows apps, but Windows apps have been changed to include various functions.
The Windows apps provide easy-to-use menus according to the window size and a variety of convenient functions such as Update and Alarm.
Using Apps
Running and Exiting Apps
Run apps that were not added to the Start menu or apps that were installed on the system using the following method:
- Press the [ ] button and select and run the app you want from the app list.
TIP: Press the [ ] key or [Ctrl] + [Esc] to display the Start menu.
-
To exit an app, press the [  ] button on the top of the app screen.
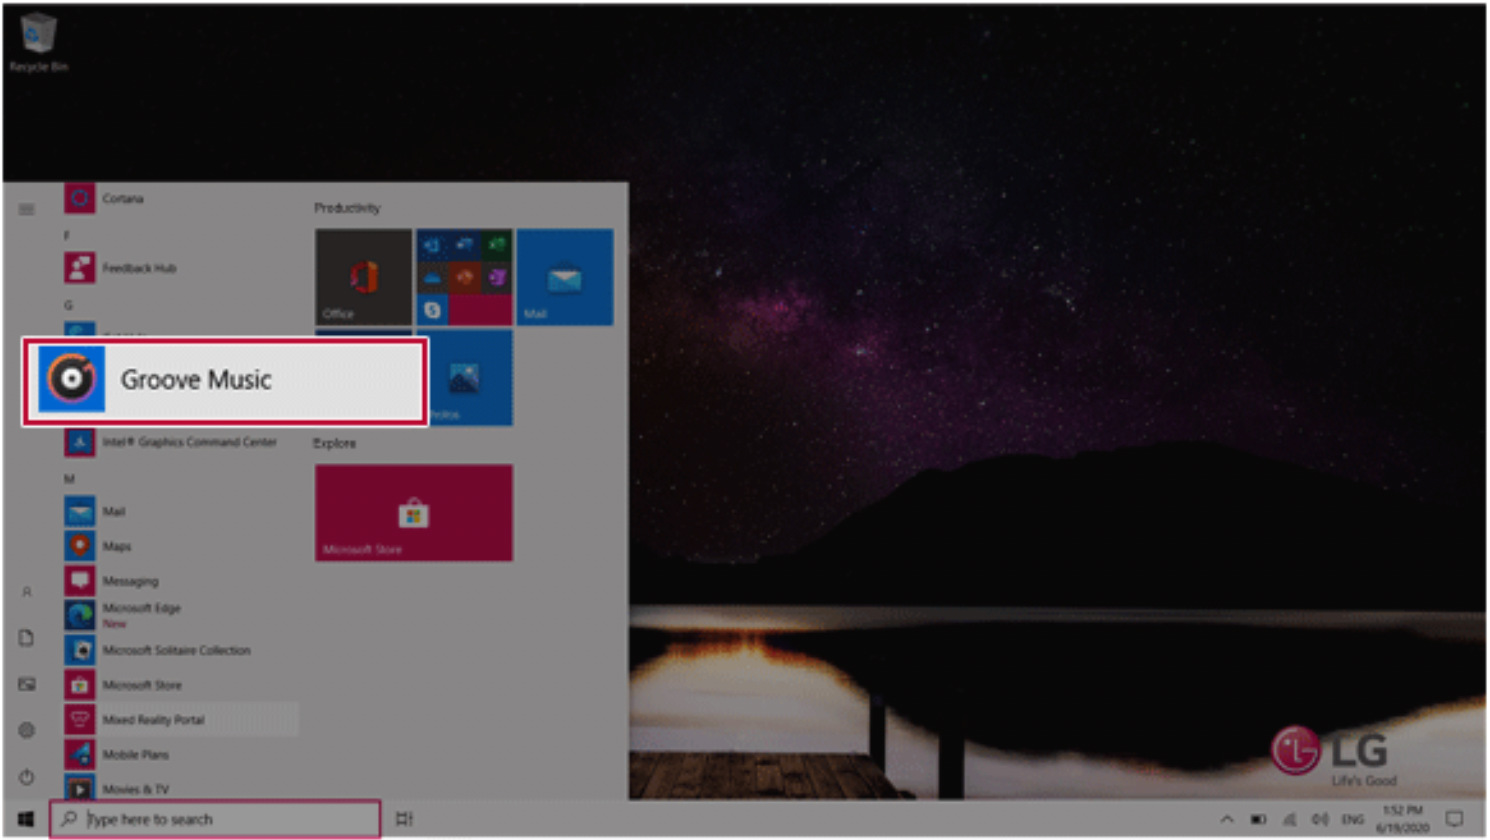
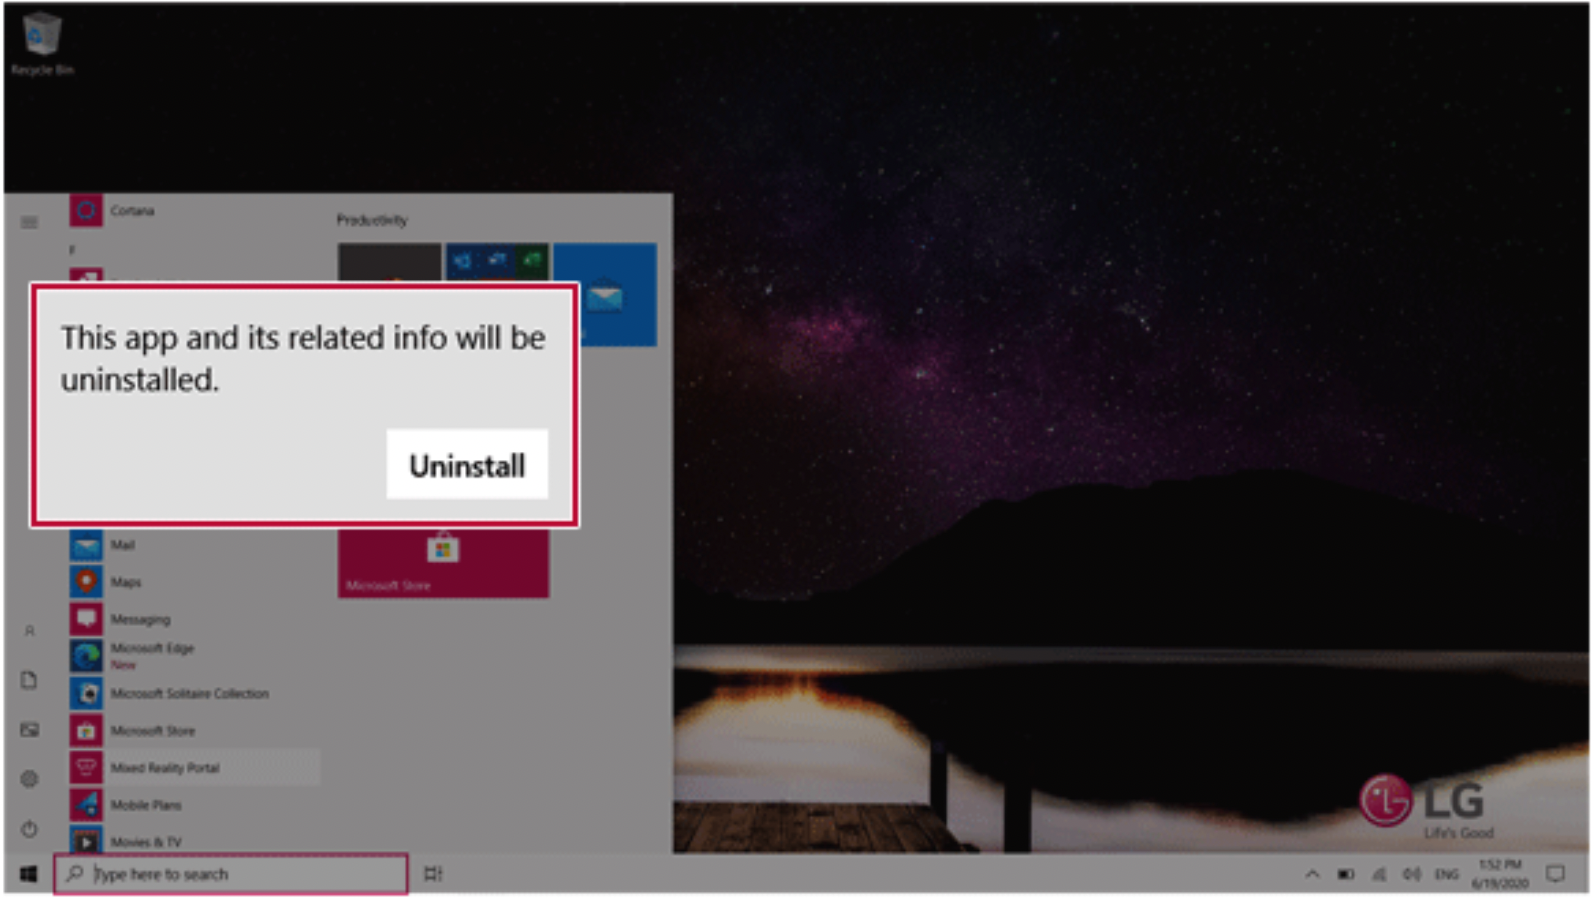
Deleting Apps
You can delete apps from the Start menu tiles or the app list.
TIP: The basic Windows apps that are required may not be deleted.
- Click the [ ] button to display the Start menu.
TIP: Press the [ ] key or [Ctrl] + [Esc] to display the Start menu.
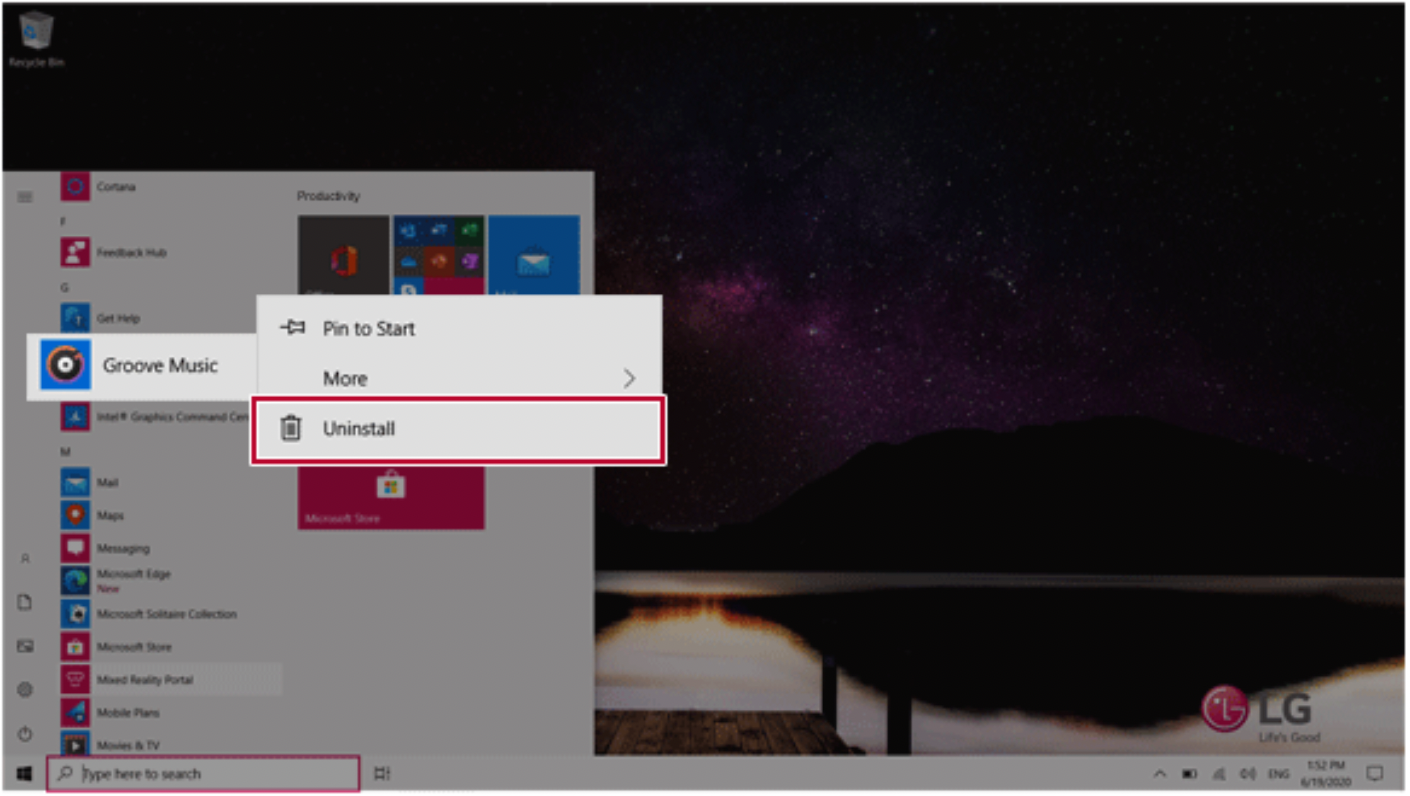
- Go to the Start menu app tiles or the app list and right-click the app you wish to delete.
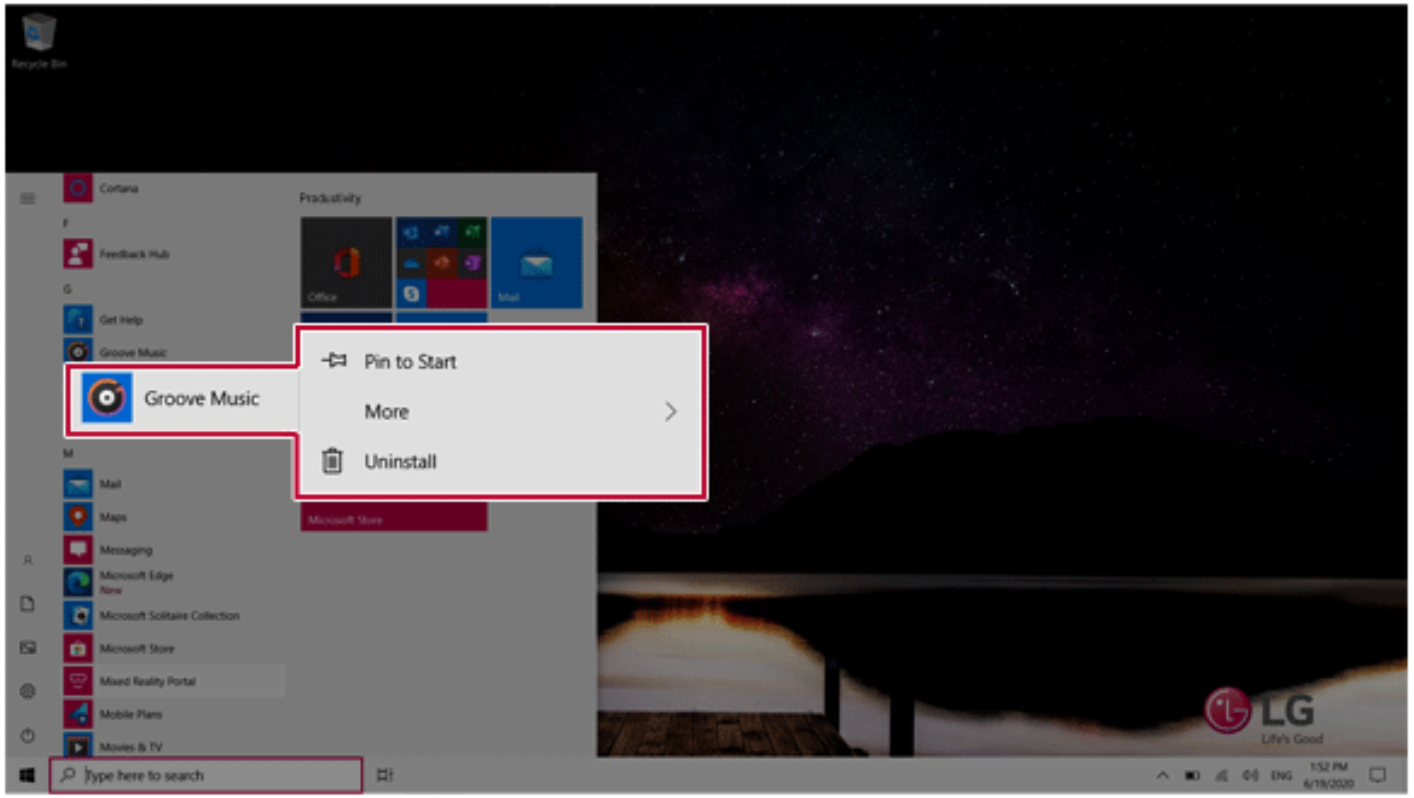
- When the pop-up menu appears, select [Uninstall].
TIP: If you are deleting a desktop app, the [Programs and Features] window appears. Right-click the app you wish to delete and press the [Uninstall/Change] button.
- When prompted to confirm the deletion, click the [Uninstall] button to delete the app.
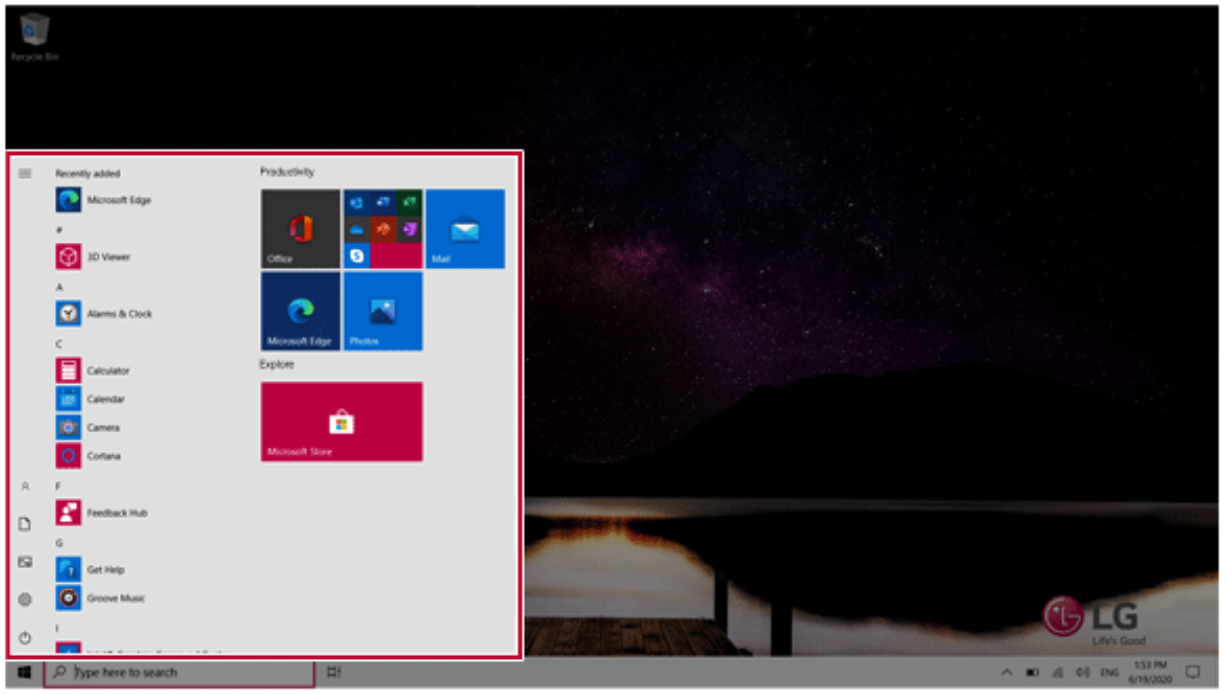
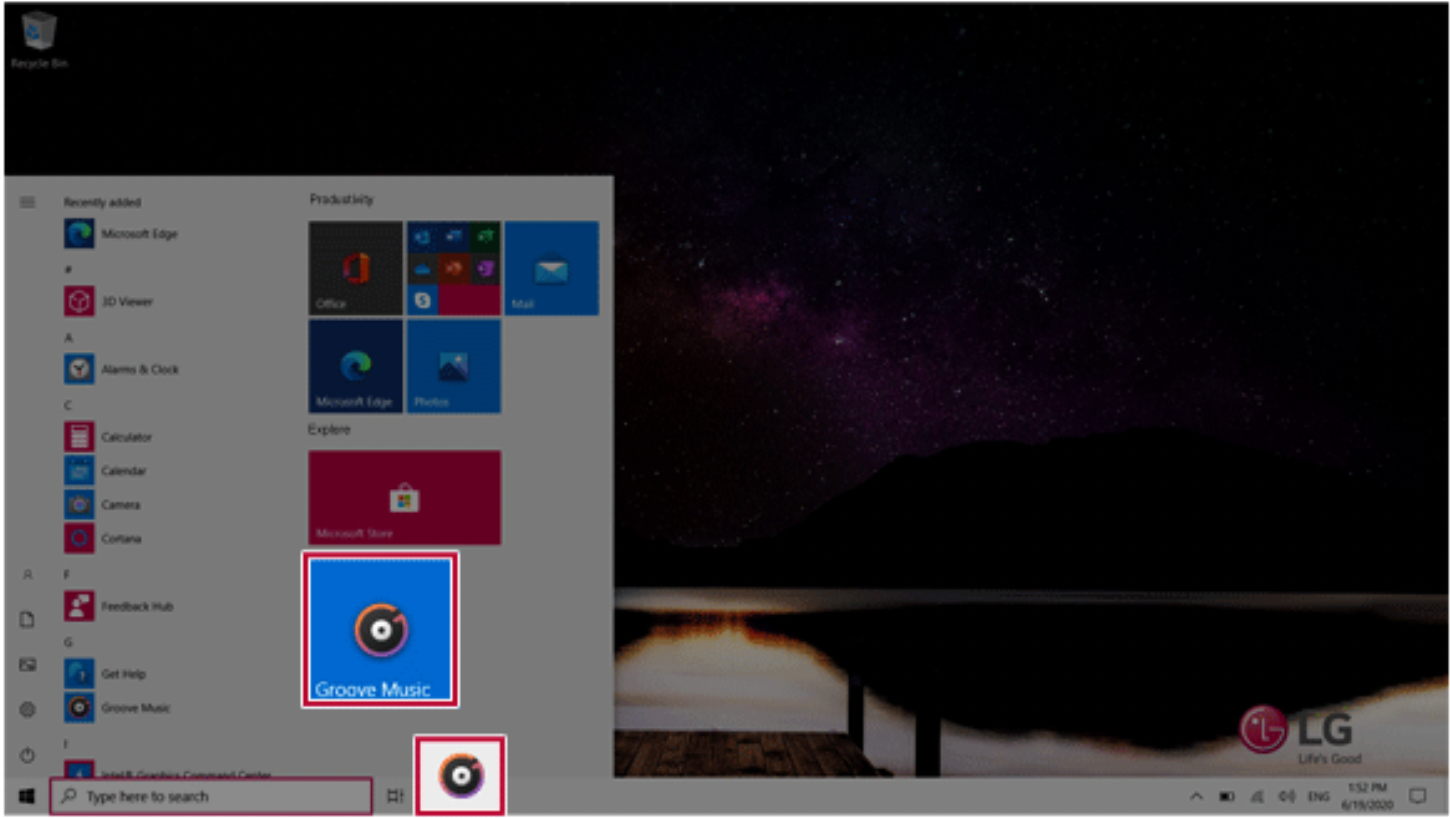
Adding Apps to Start Menu/Taskbar
You can add frequently used apps on the Start menu and taskbar for easy and quick access.
- Press the [ ] button to display the Start menu.
TIP: Press the [ ] key or [Ctrl] + [Esc] to display the Start menu.
- Right-click the app you want from the app list, and then click [Pin to Start] or [More] > [Pin to Taskbar].

- The selected app is added to the Start menu or taskbar.
Toggling and Adding Apps/Desktops
In Windows 10, you can toggle the running apps easily and quickly, and add desktops to use them like multiple PCs.
TIP For an app that does not allow multitasking, you may be switched to the desktop where the app was executed, or you may have an error message.
- In the taskbar, press [
 ].
].
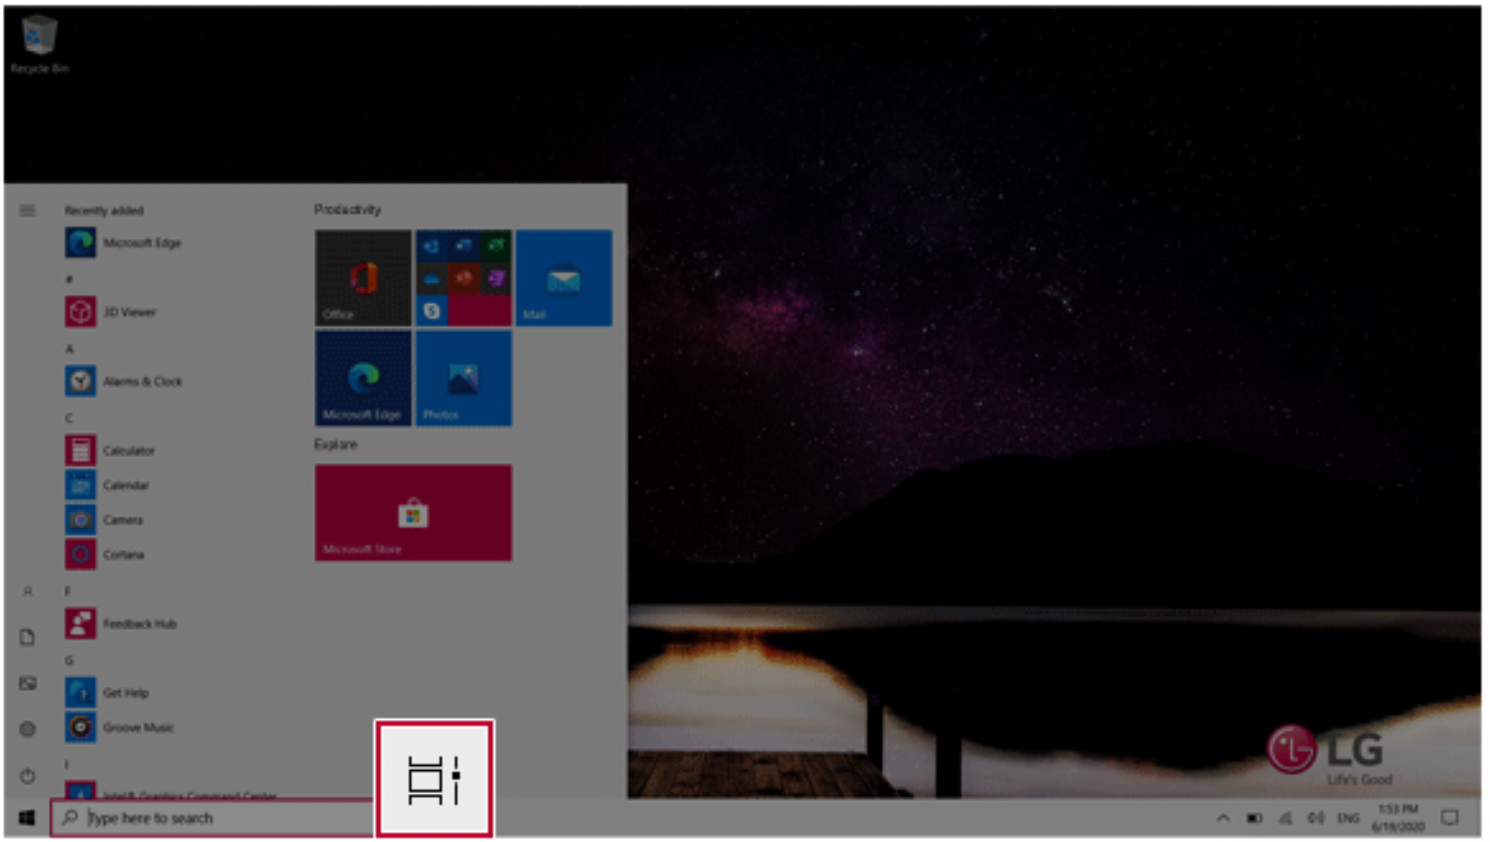
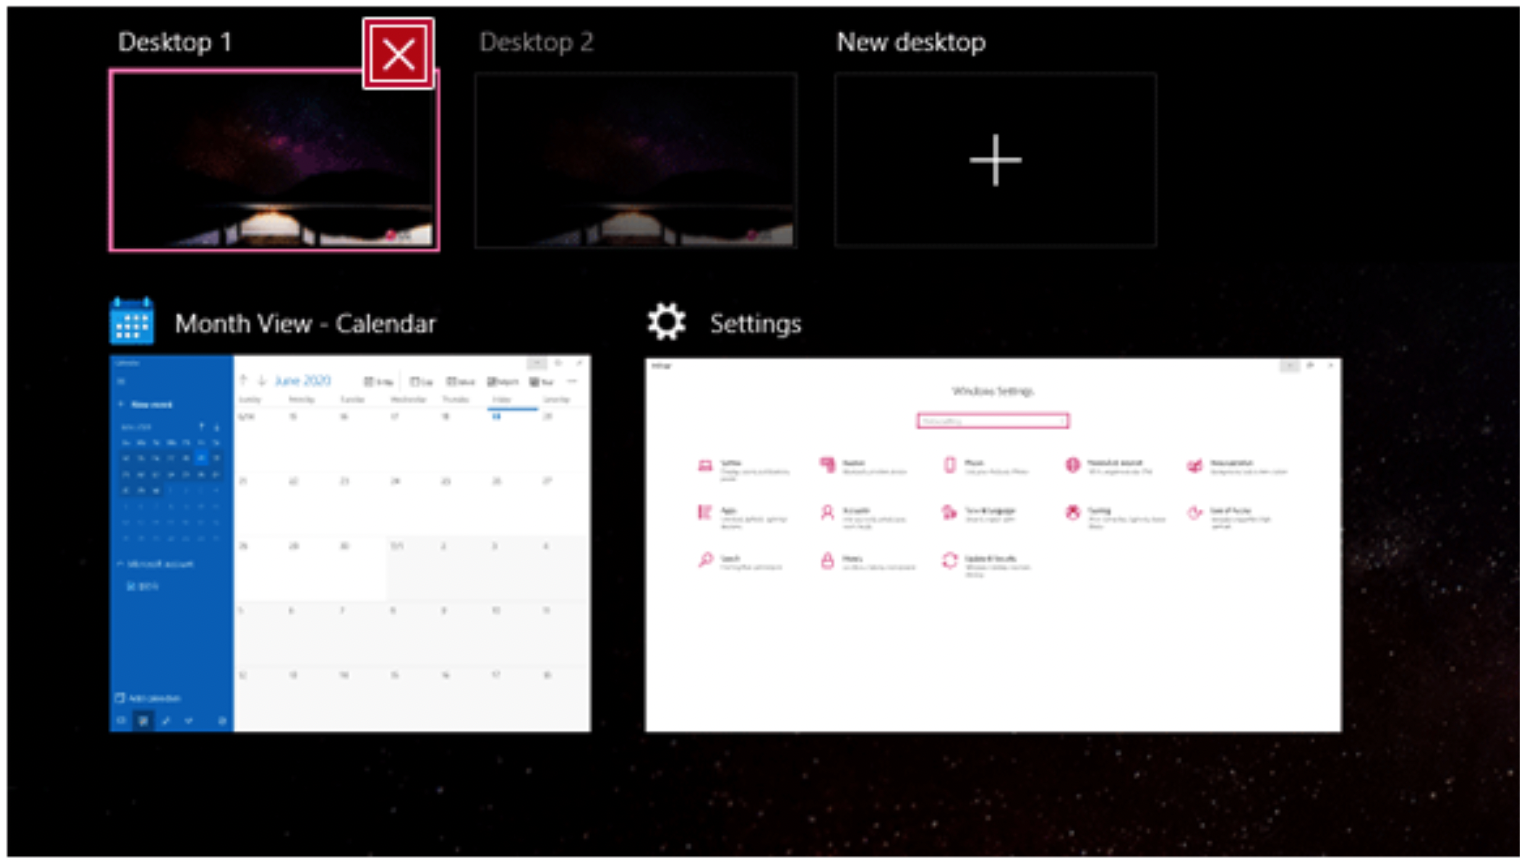
- The screen to switch between apps and desktops appears and the running apps are displayed in the preview.
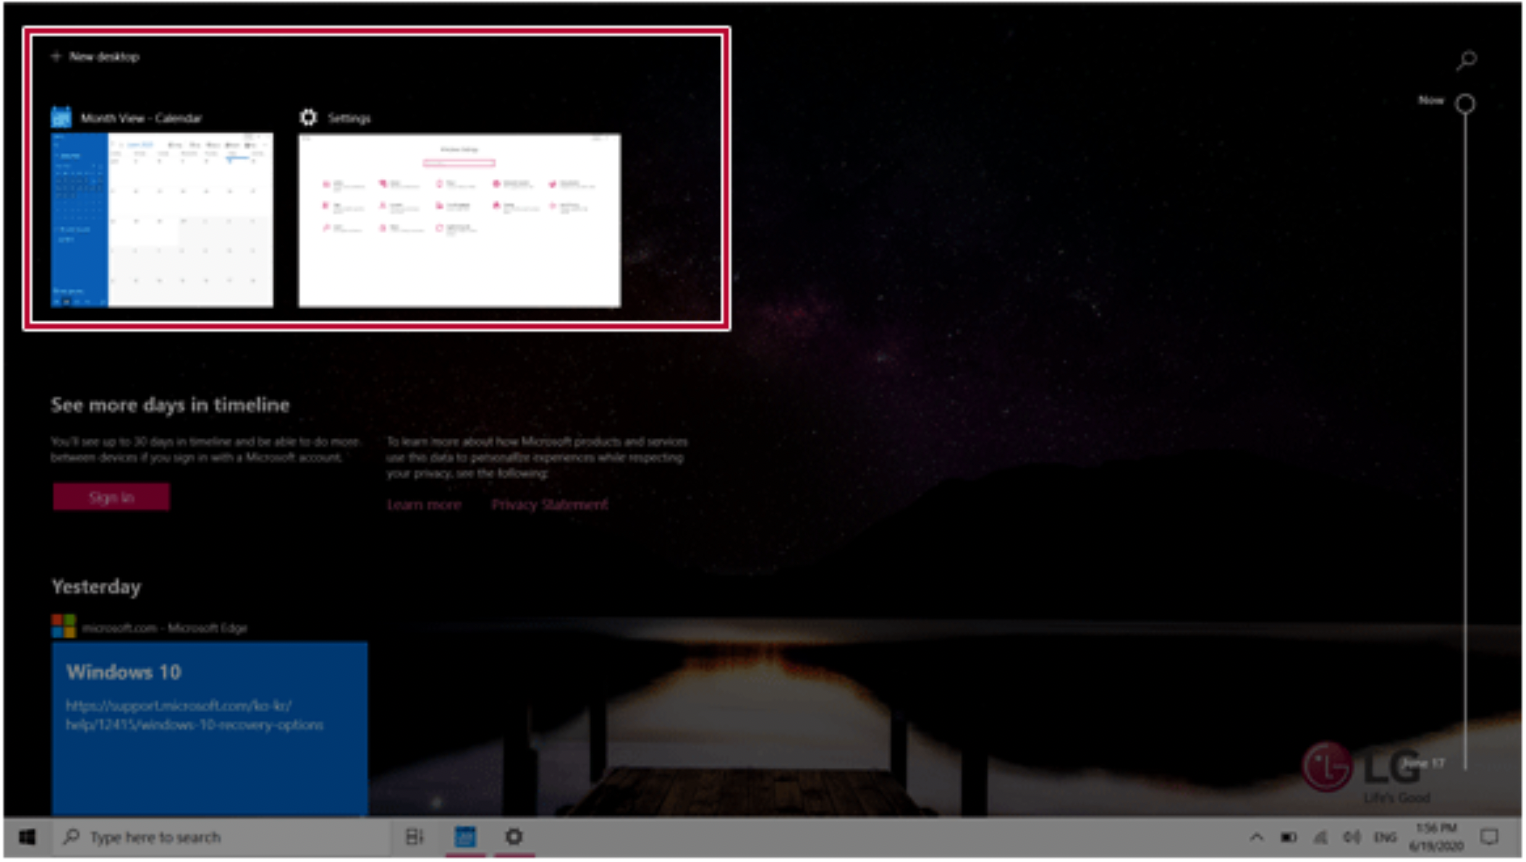
TIP:
Press the [ ] button of an app in the preview to exit the app.
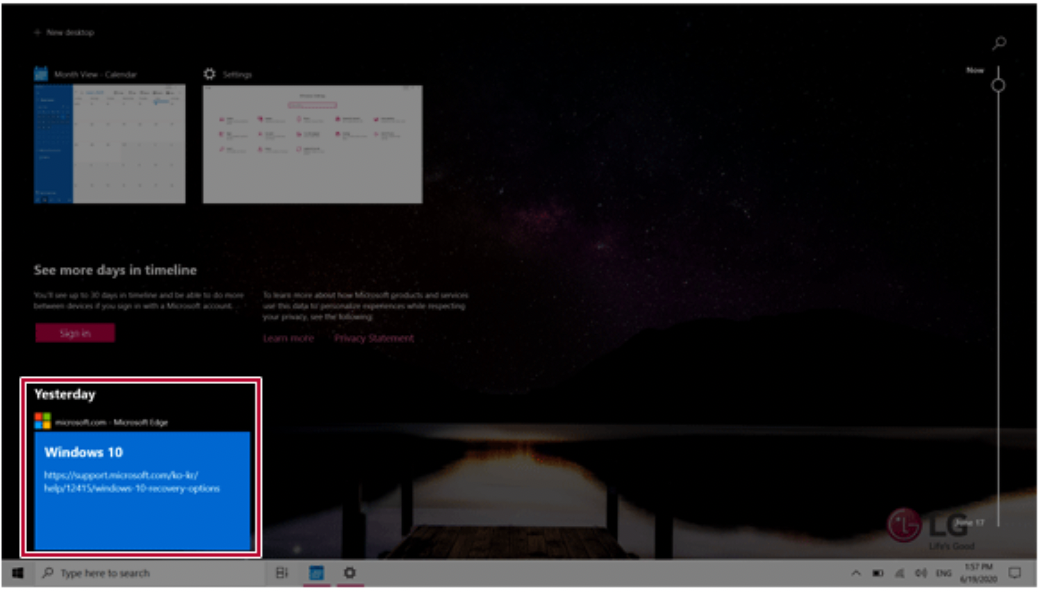
You can use the timeline displayed on the Desktop screen to check the history of PC usage.
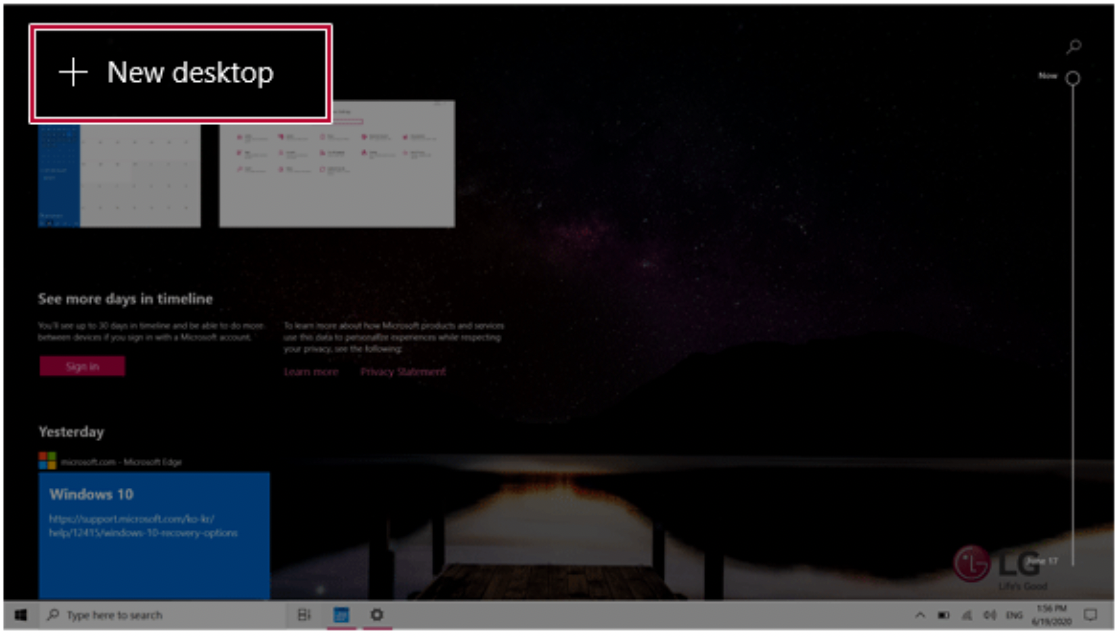
- Click the [New Desktop] tile.
- [Desktop 1] and [Desktop 2] are created.
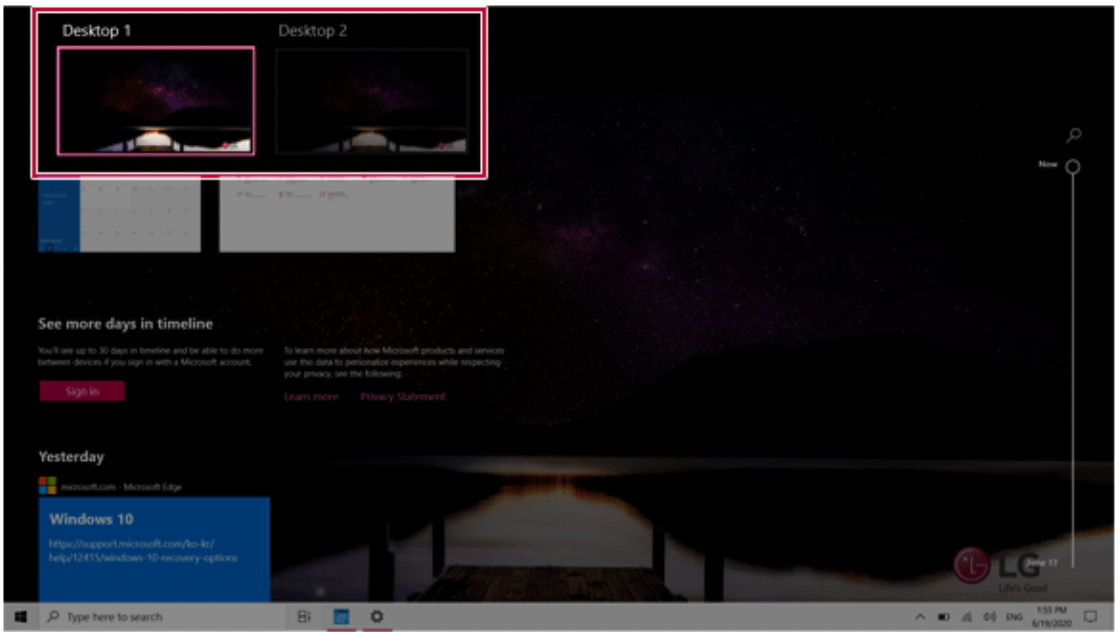
- Select an app in the preview or desktop.
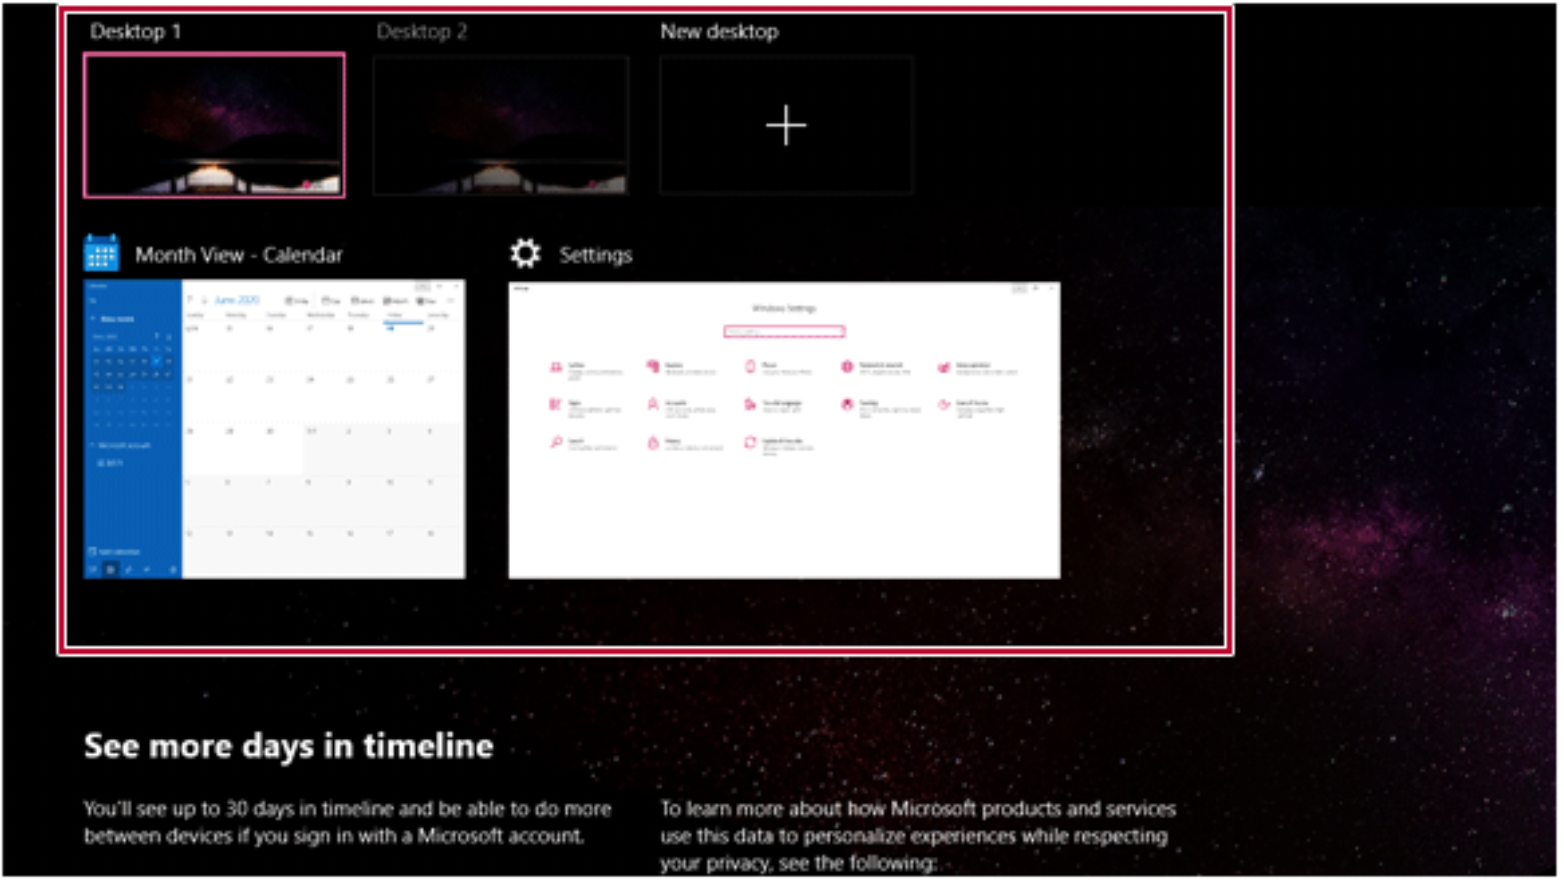
- The screen is toggled to the selected app or desktop.
TIP:
Press the [ ] button in the app preview to exit the app.
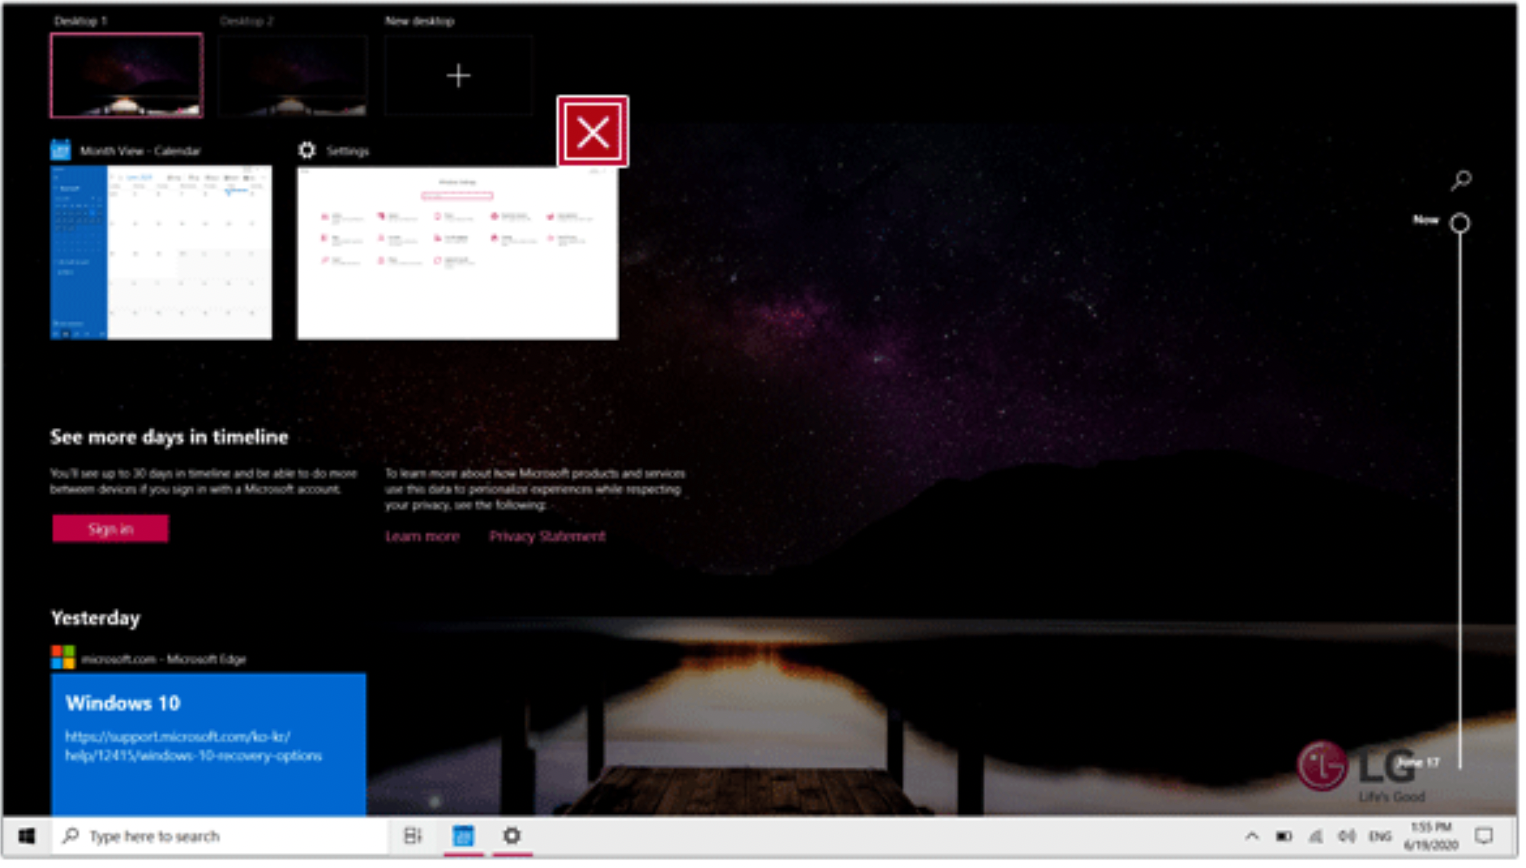
In the desktop preview, press the [ ] button to delete the desktop and move running apps to another desktop.
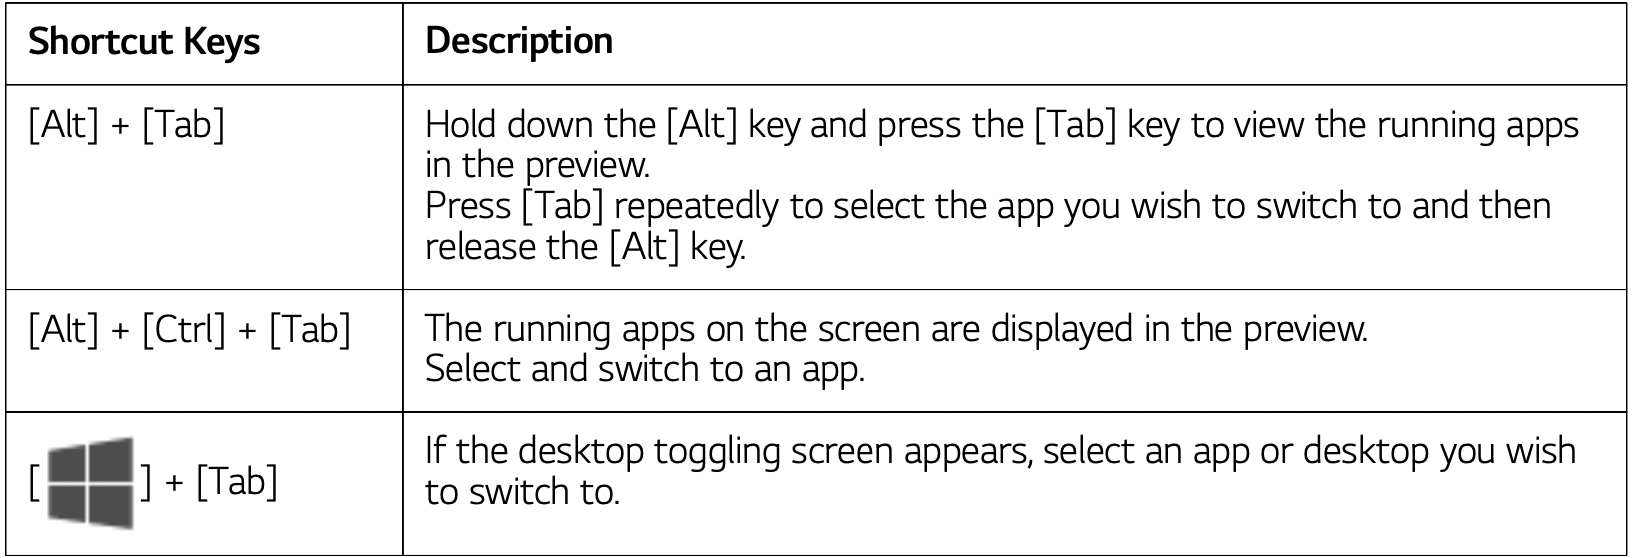
Using Shortcut Keys
Use the shortcut keys to quickly toggle between apps and desktops.
Splitting the App Screen
In Windows 10, you can easily adjust window sizes and split windows if necessary.
TIP: Some apps that cannot adjust the window size do not support the screen split.
Full Screen
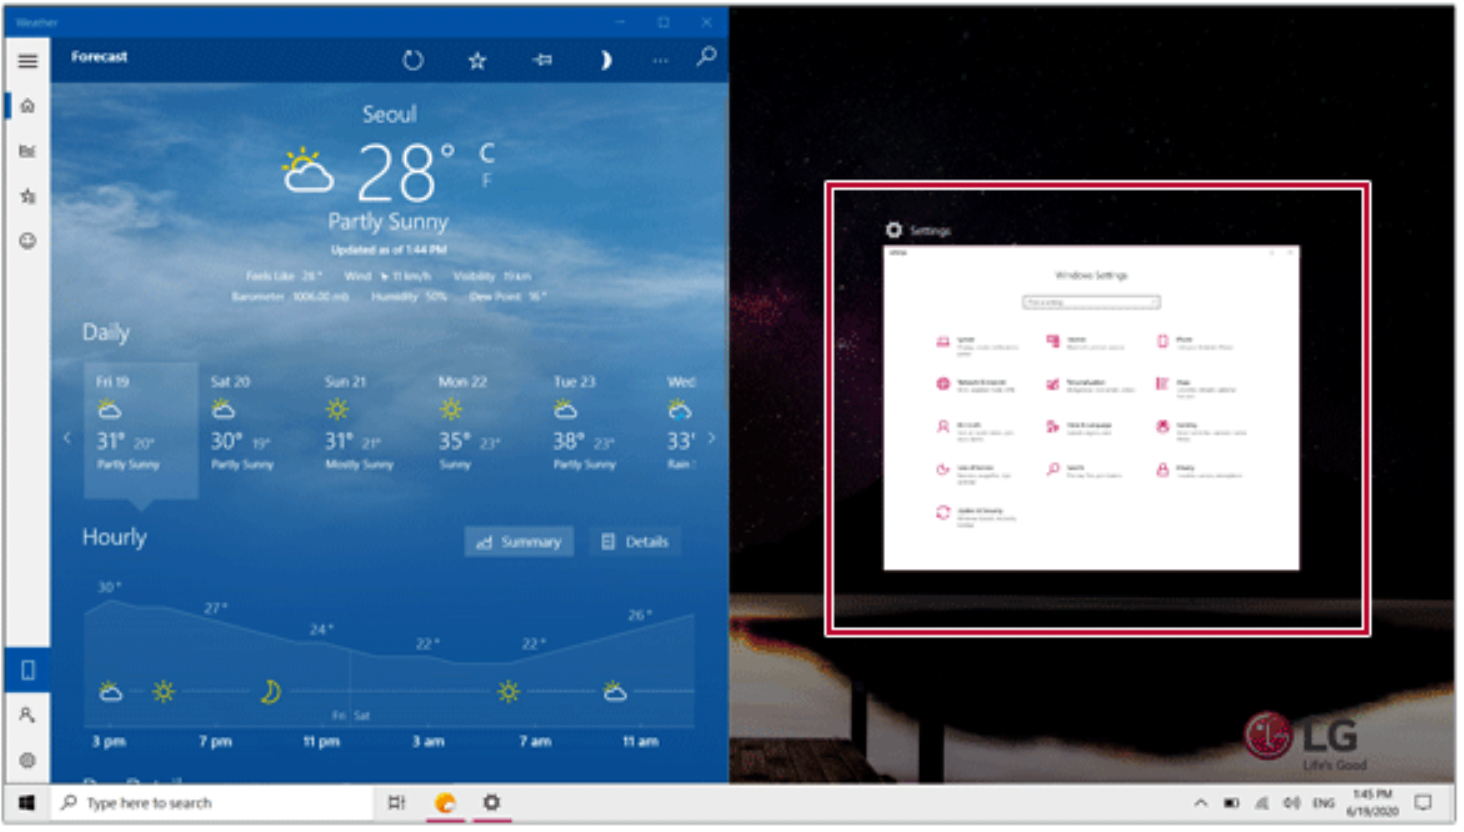
- Drag and drop an app to the top end of the screen to change the app to the full screen size.
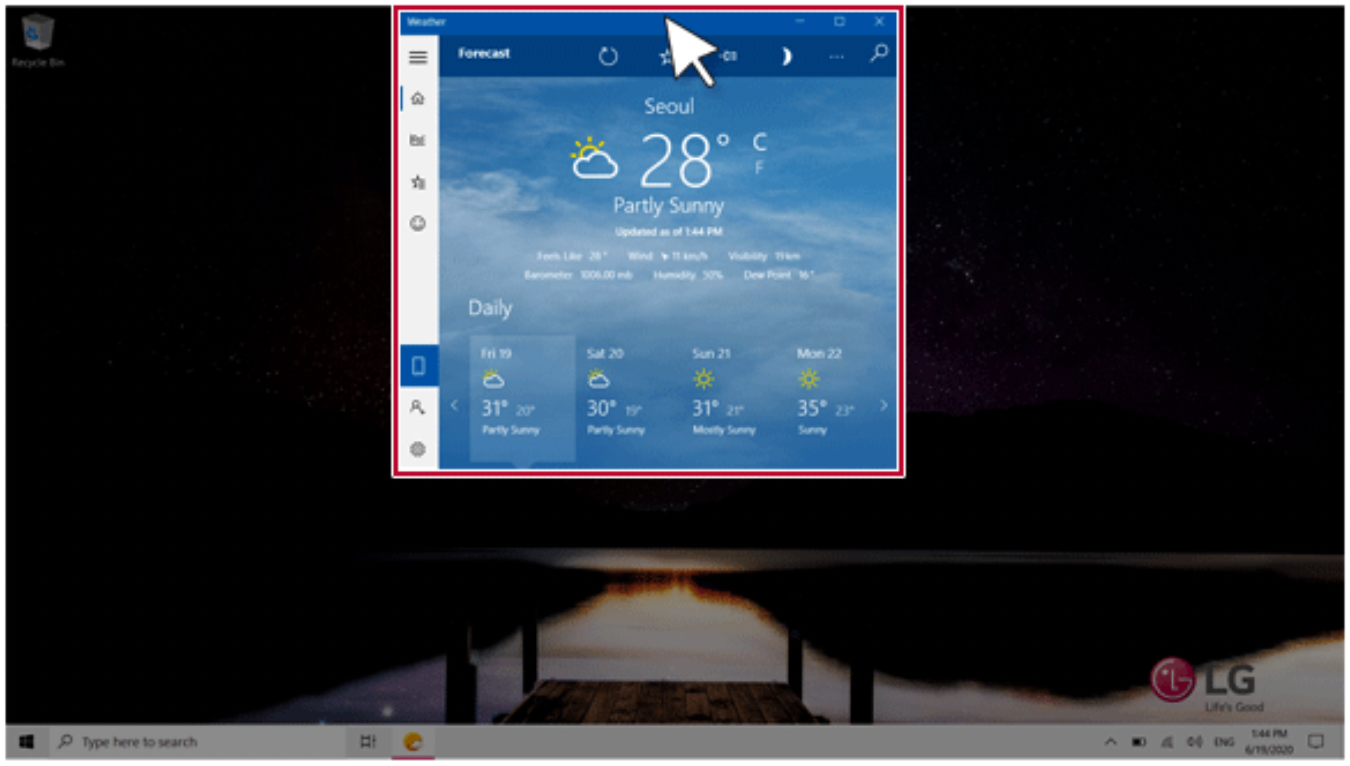
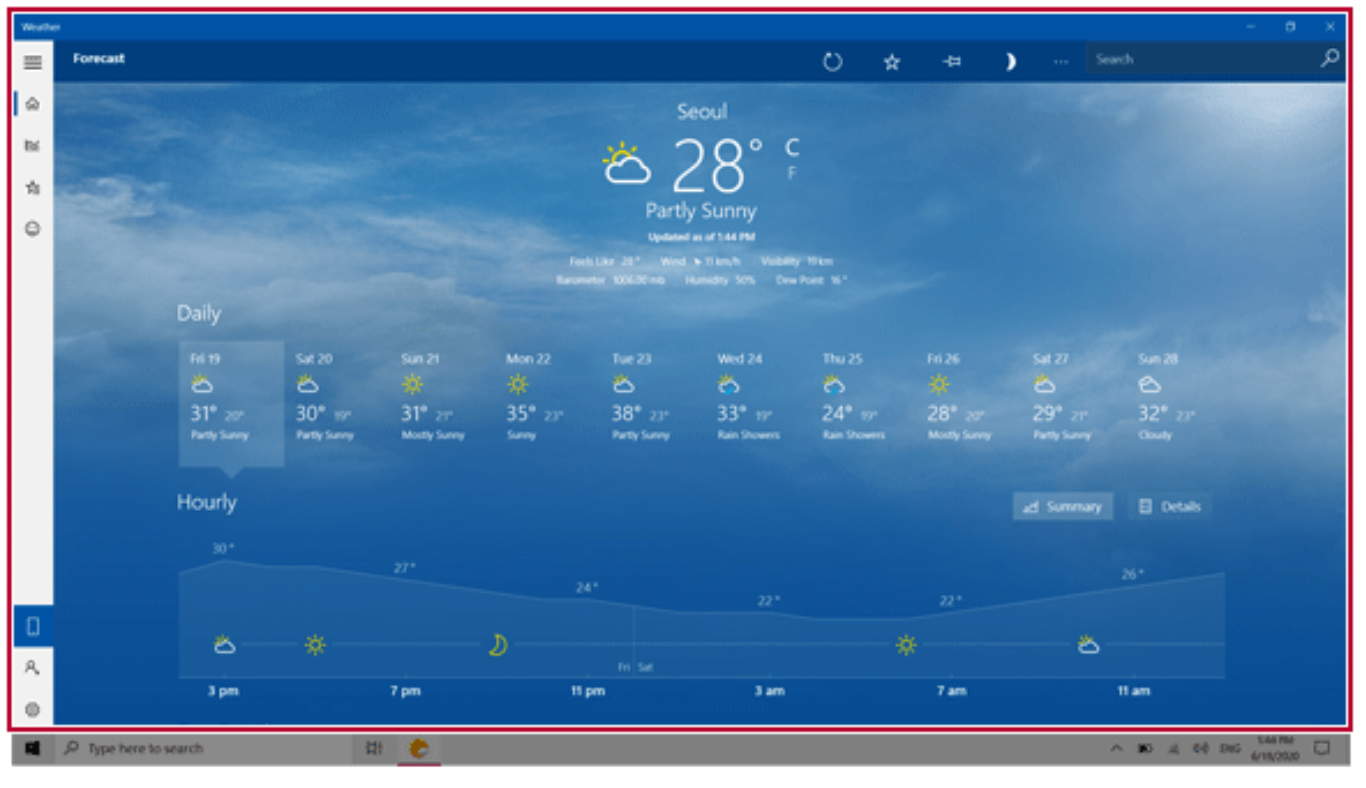
- Drag and drop the app again to a different location to return to its original size.
Screen Split into Two
- Drag and drop an app to the right end or left end to reduce the size by half.
TIP: The screen is split according to the guideline.
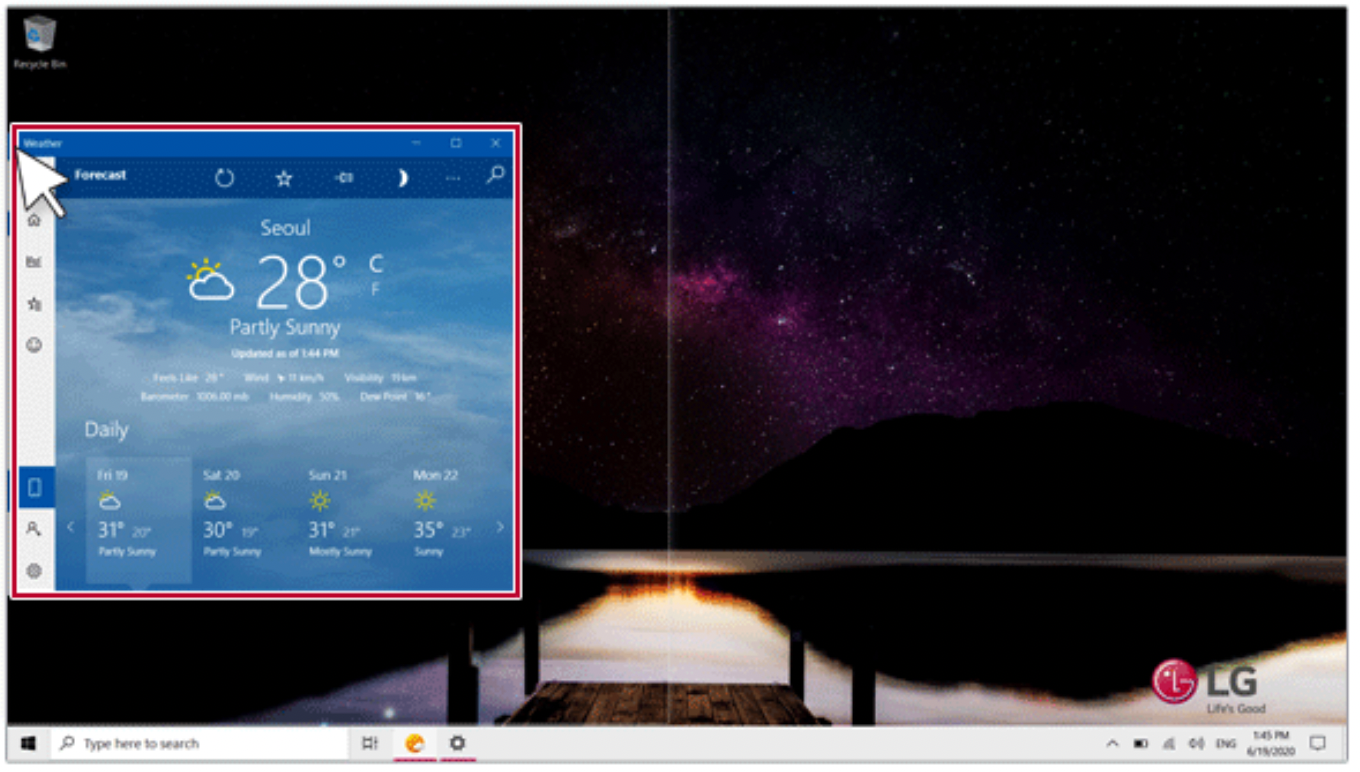
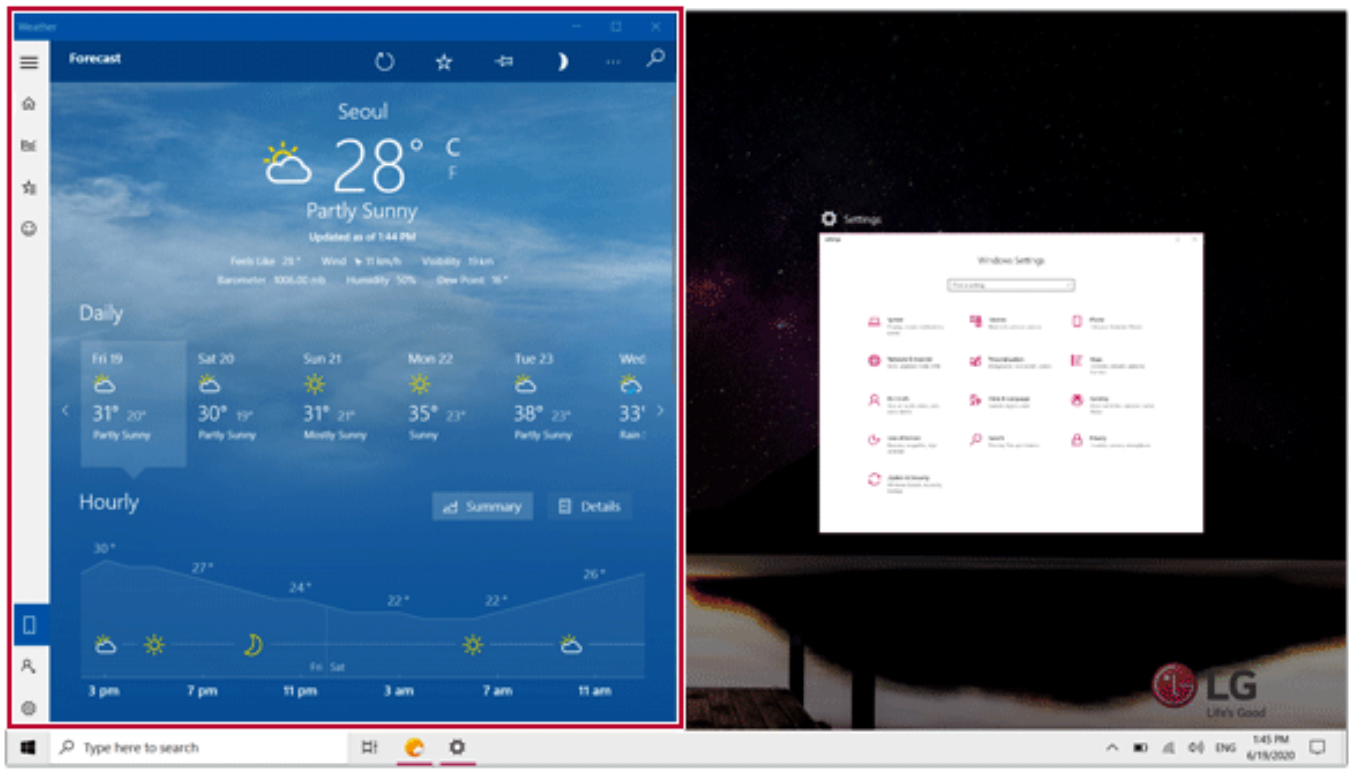
- Select a running app displayed in the preview on the split screen.
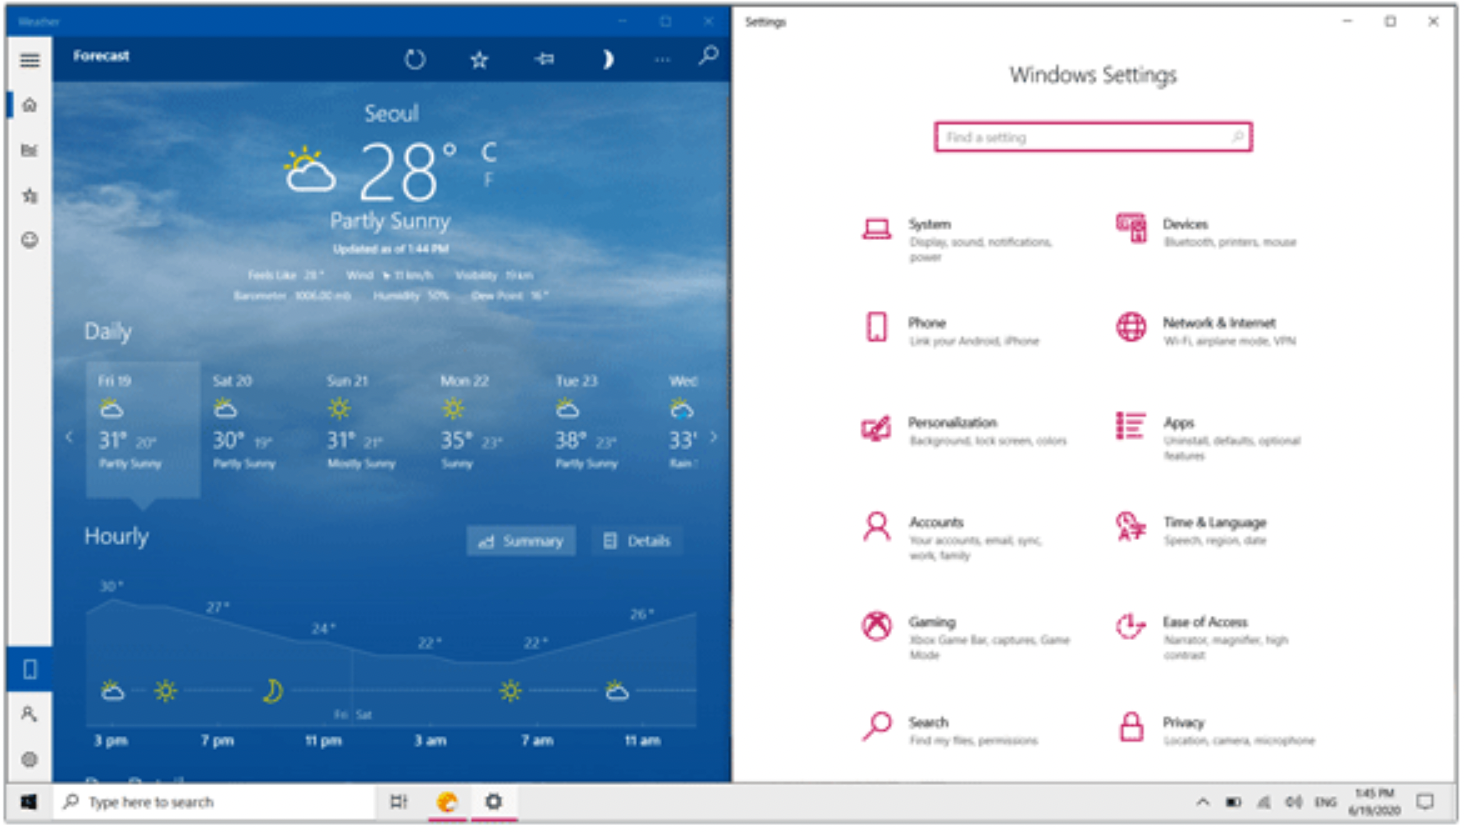
- Drag and drop the app again to a different location to return to its original size.
Screen Split into Four
- Drag and drop an app to the left corner to reduce the app to 1/4 size of the screen.
TIP: The screen is split according to the guideline.
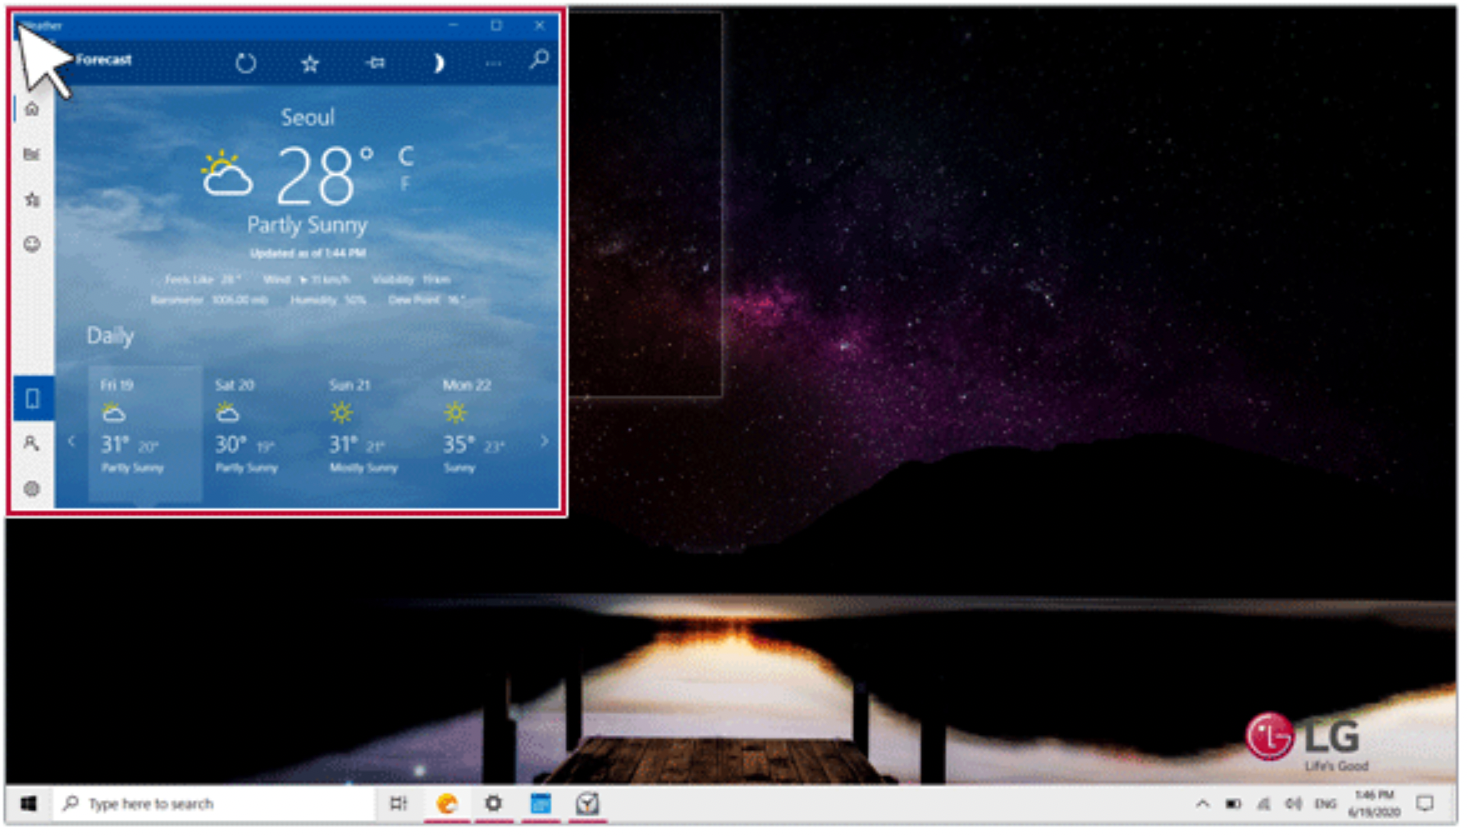
- You can use this method to place up to four apps on the screen.
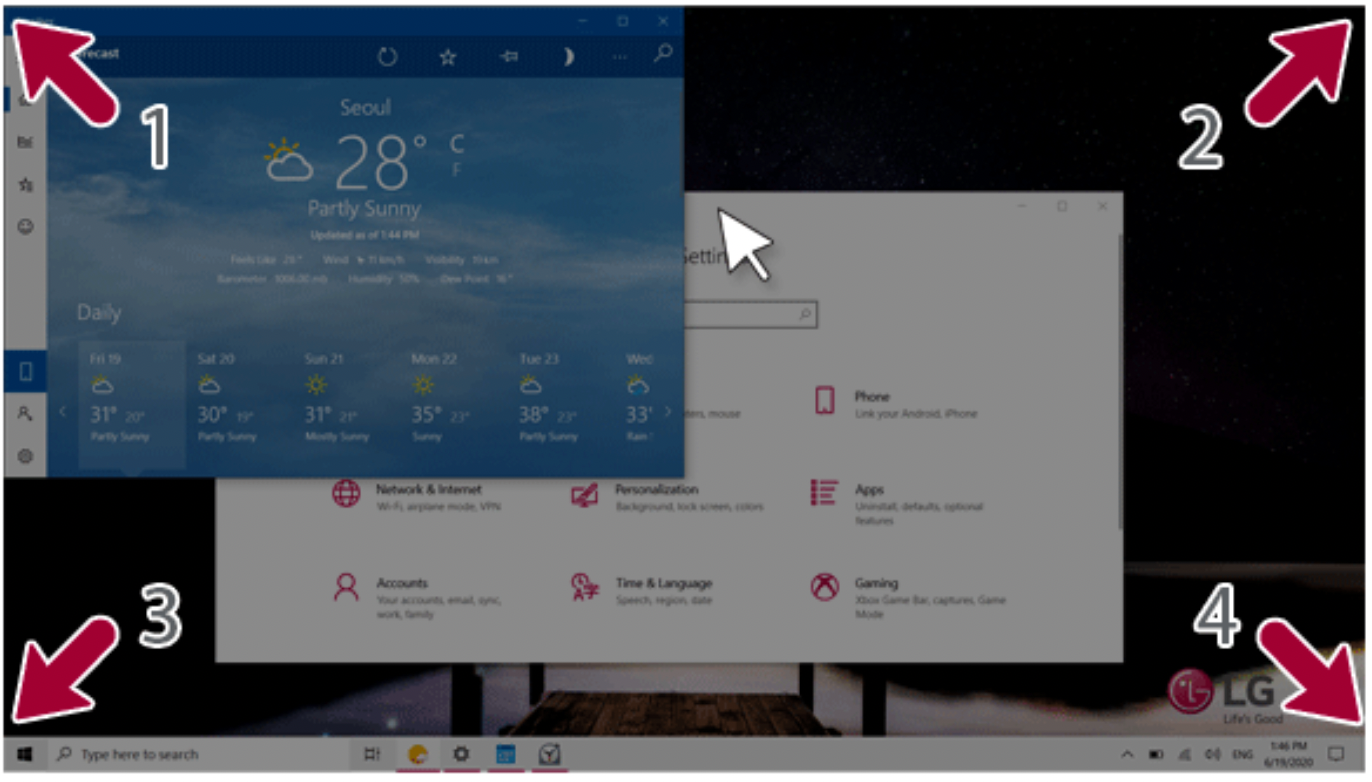
- Drag and drop the app again to a different location to return to its original size.
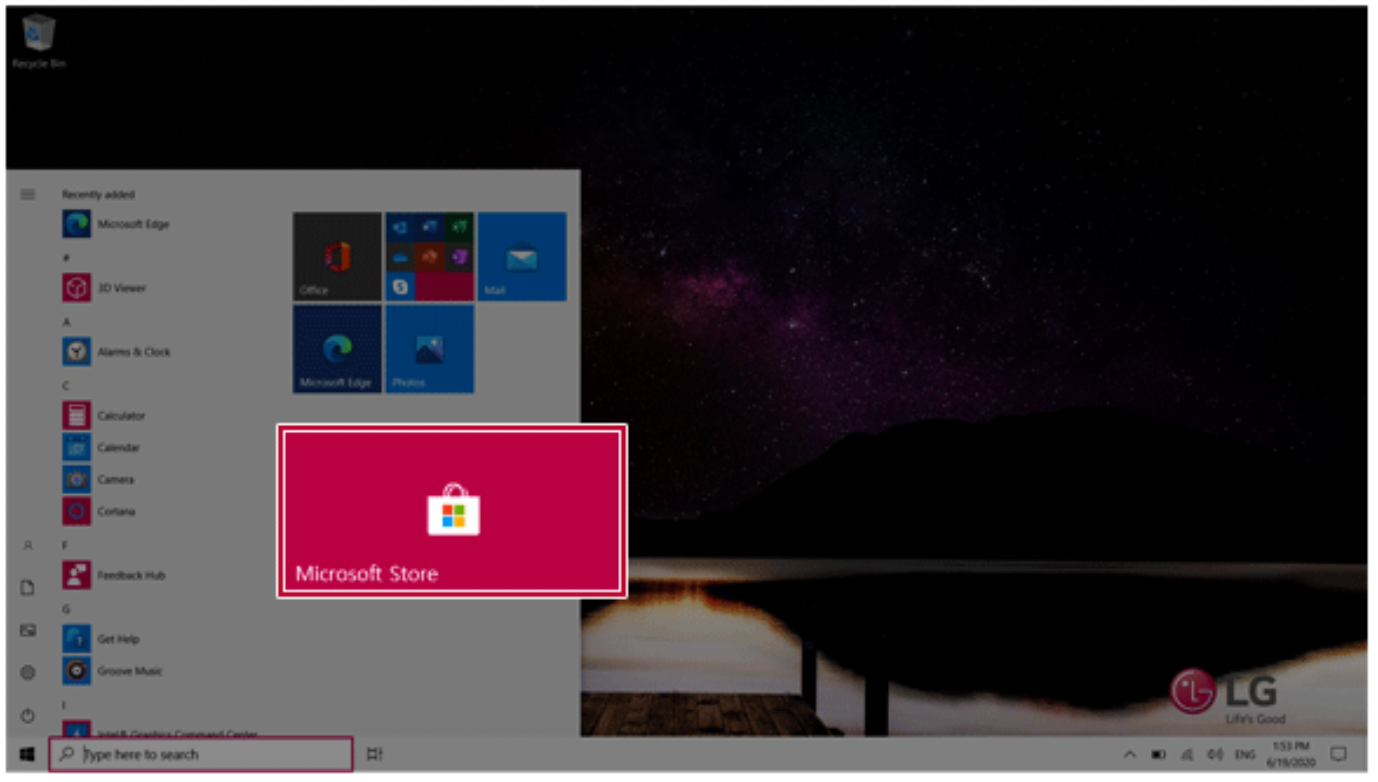
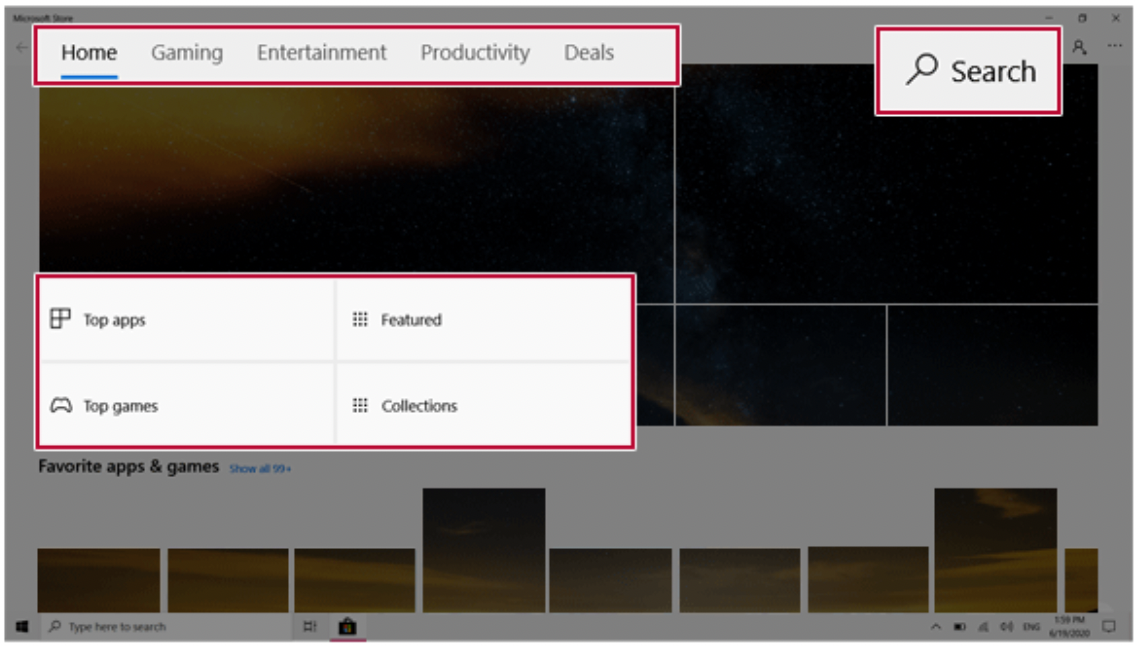
Using the Store
You can purchase apps or get free apps from Windows Store.
TIP:
If a local account is being used, a window to switch to a Microsoft account appears while using Windows Store. Follow the instructions on the screen to switch the local account to a Microsoft account.
You can also do so by selecting [Start menu] > [Account] > [Change Account Settings].
If you switch to a Microsoft account, your PC settings (background, user settings, etc.) may be changed to the previous settings.
- Press the [ ] button to move to the Start menu and select the [Microsoft Store] tile.
TIP: Press the [ ] key or [Ctrl] + [Esc] to display the Start menu.
- Select the app or use the search function on the store screen to install the desired app.
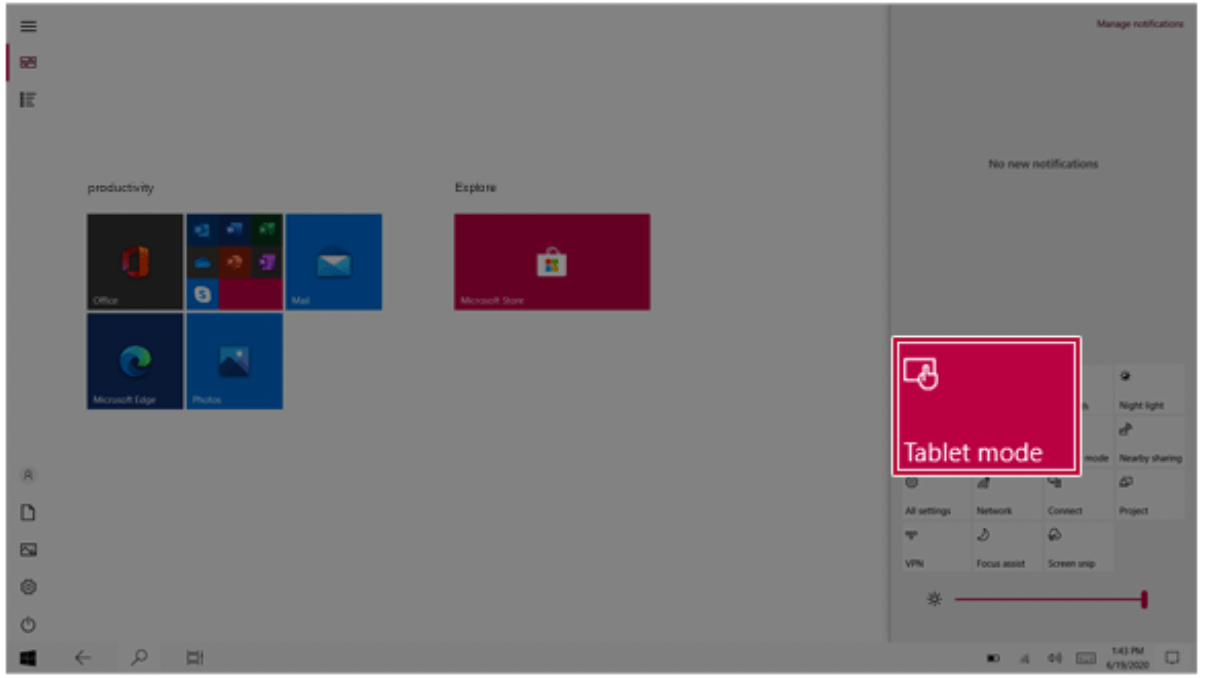
Switching to Tablet Mode
If you are using Windows on a tablet PC, you can easily switch to the tablet mode.
- Press the Action Center [
 ] icon on the right side of the taskbar.

- Select [Tablet Mode] to switch Windows to tablet mode.
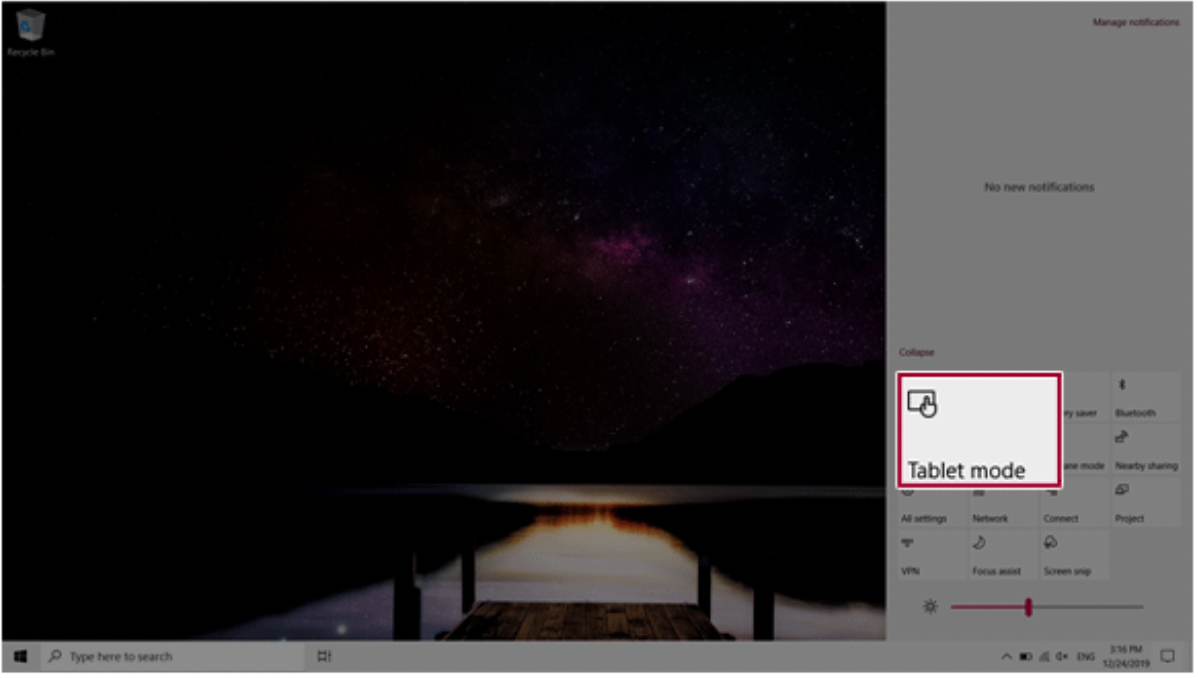
- Select [Tablet Mode] again to deactivate the mode.
Unlocking the Screen
If the PC is not used for an extended period, it goes into a locked state.
When the PC is used again, a lock screen appears for security purposes and may be unlocked by using the following method.
- From the lock screen, press any key on the keyboard or drag up while you click and hold the mouse button.
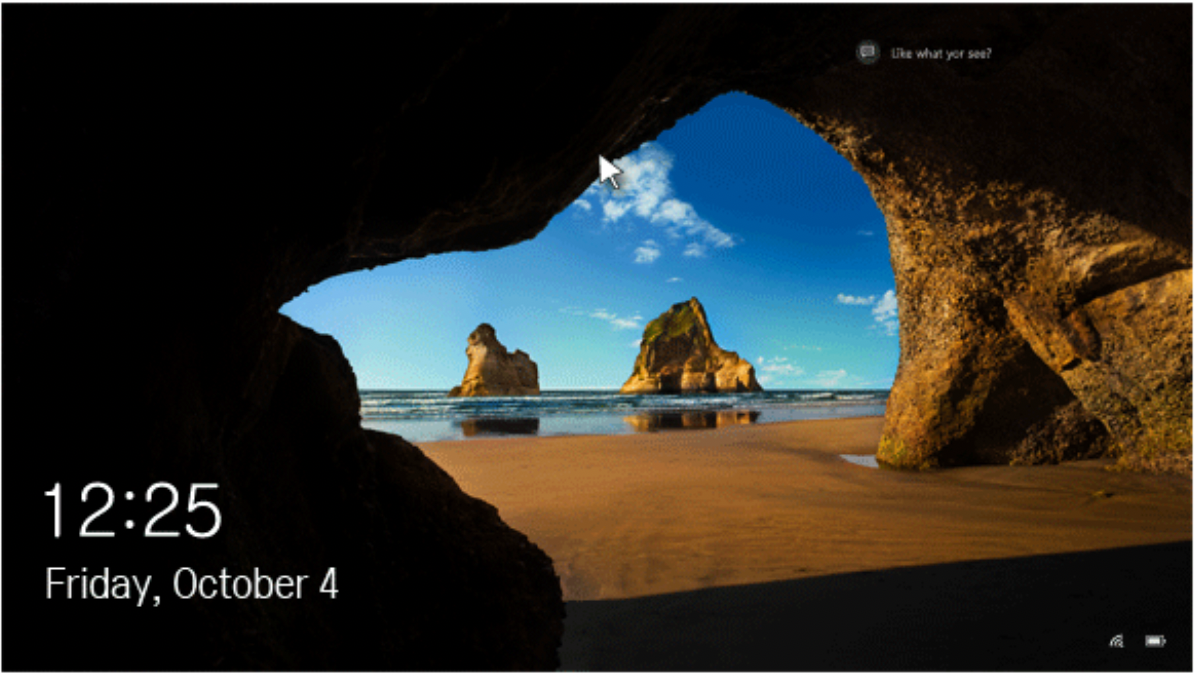
- When the login window appears, enter the password and click [Enter].
(If no password is set, press the login button to immediately unlock the screen.)
Setting the PC
Windows 10 supports various functions so that the user can change the PC setting easily and quickly.
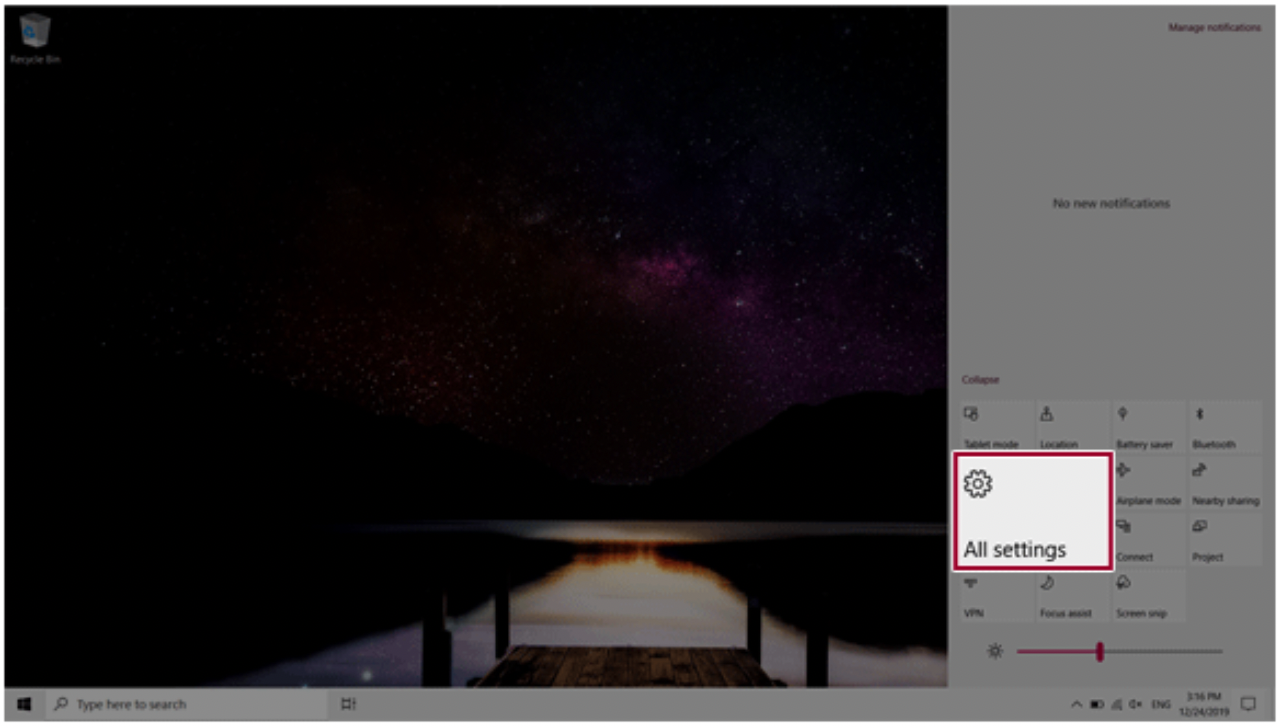
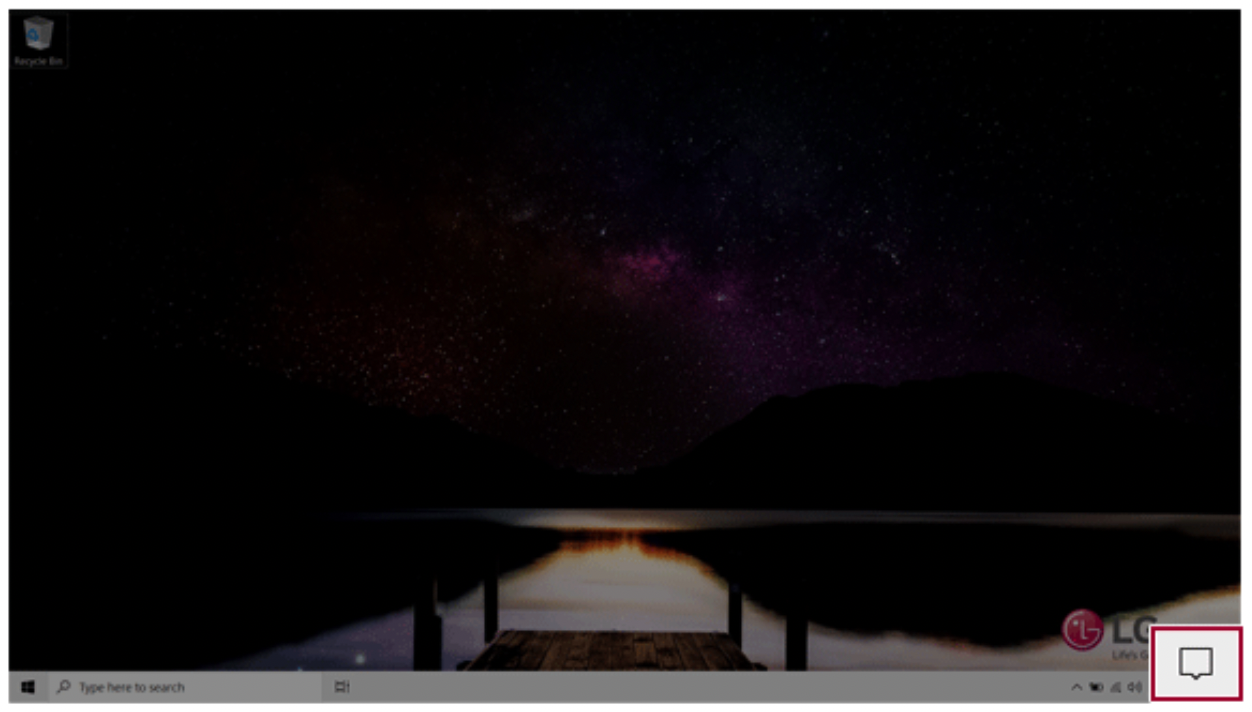
Using Action Center
You can use the Action Center to easily change the settings for tablet mode, display, media connection and network settings.
The functions supported by the Action Center may differ depending on the model.
- Press the Action Center [ ] icon on the right side of the taskbar.

- Change the PC settings as needed.
TIP: If the tile does not appear, press the [Expand] menu.
CAUTION: Using the Reader Mode and the Night light at the same time can cause color distortion. If color distortion occurs, deactivate the Reader Mode or the Night light.
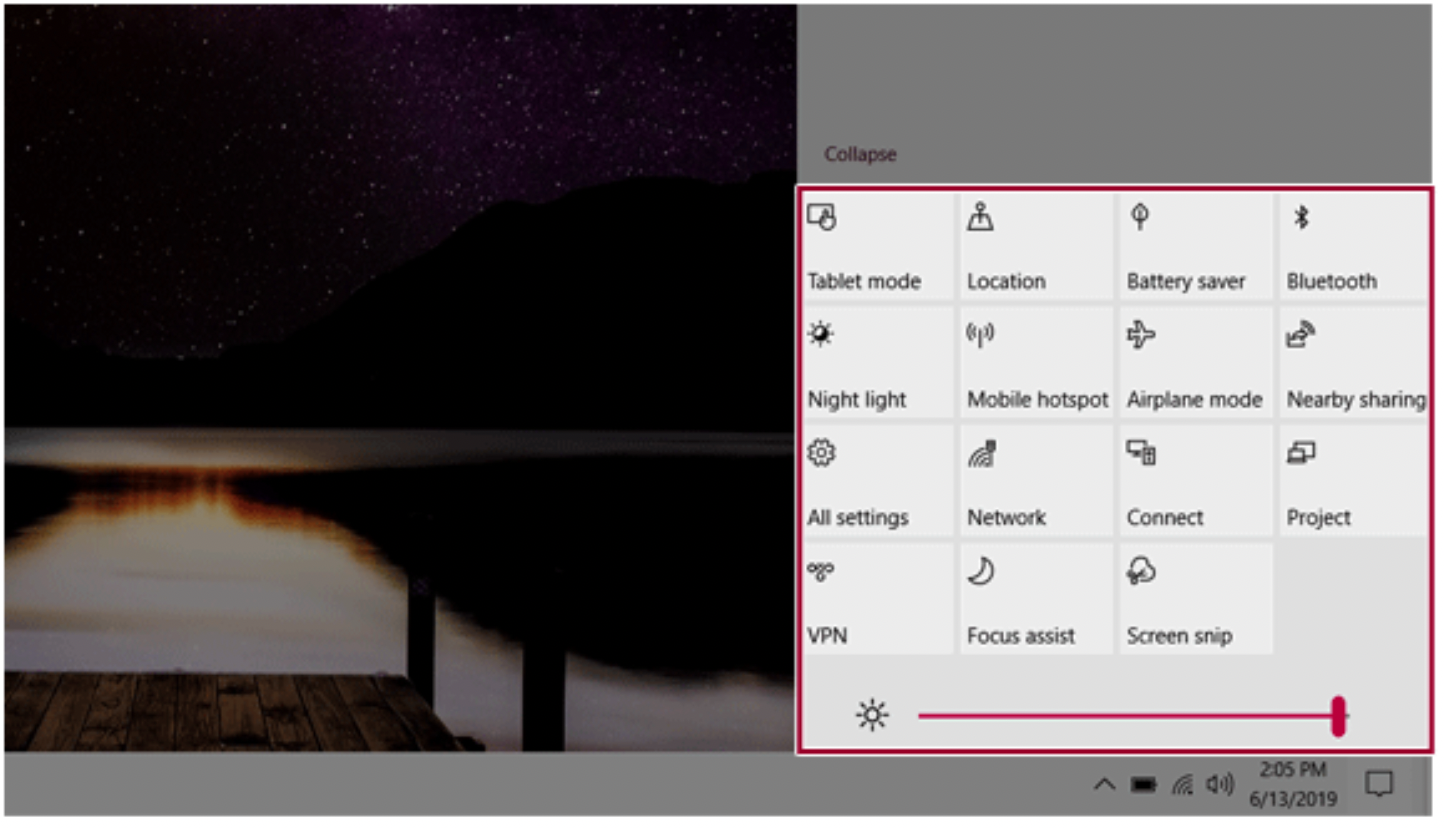
- To change the detailed settings of the PC, press the [All Settings] tile.
Using the Start Menu
- Press the [ ] button and select the [Settings] menu.

- When the screen for PC's detailed settings appears, select and change the settings as needed.
Windows Shutdown Option
In Windows 10, you can use the Windows shutdown option by following these steps:
- Click the [ ] button and select the [Power] menu.
TIP: Press the [ ] key or [Ctrl] + [Esc] to display the Start menu.
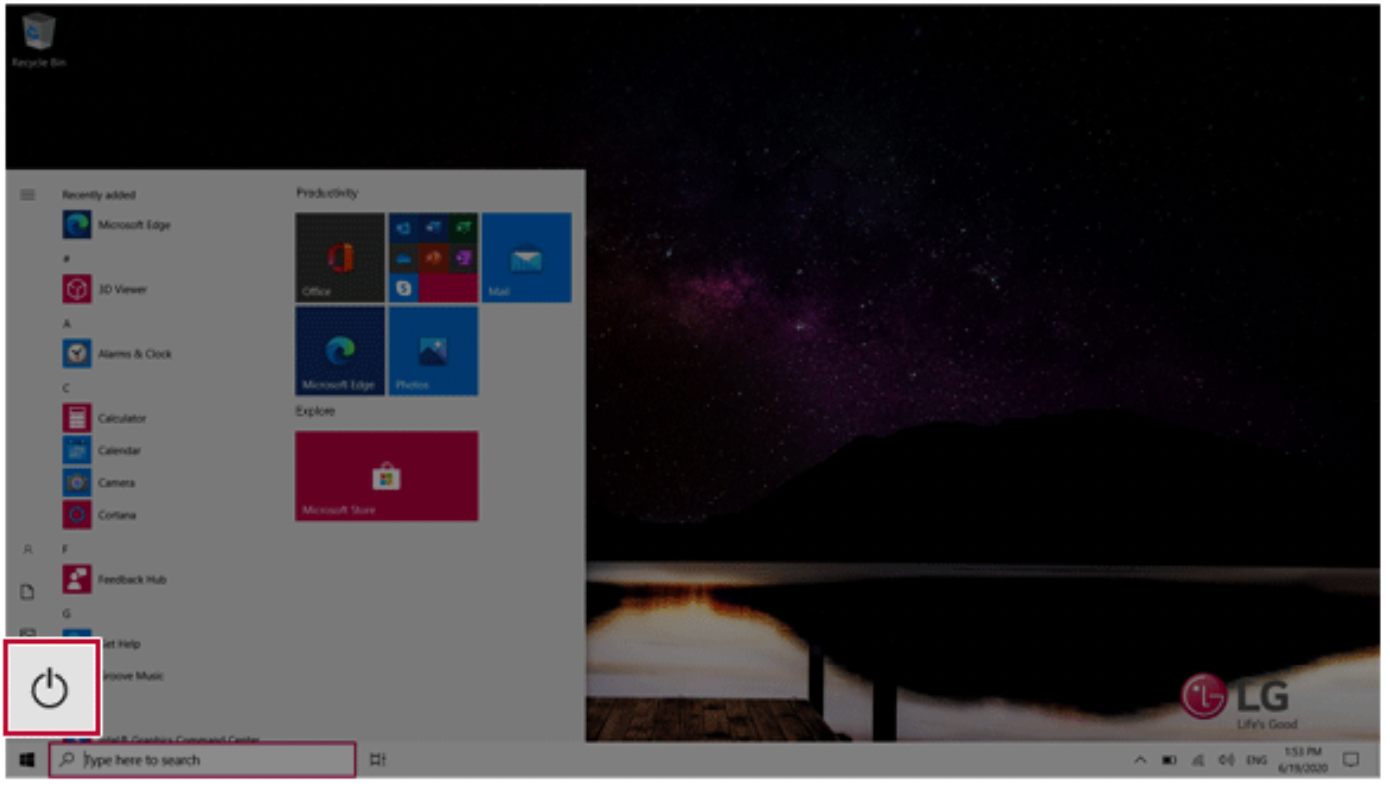
- Select a Windows shutdown option.
TIP: On the Desktop screen, press [Alt] + [F4] to use the Windows shutdown option. (Pressing [Alt] + [F4] on a running app may end the app.)
Using the PC
Using an AC Adapter and a Battery
Connect the AC adapter to power and charge the product.
TIP:
The power cable and the AC adapter type may differ per model type and country and there is no difference in functionality.
This product has a built-in battery pack.
The internal battery should not be arbitrarily disassembled or replaced. Arbitrarily disassembling the product may void the warranty.
If you need to disassemble or replace the battery, please visit the designated LG Electronics Service Center.
We charge a fee for removing or replacing the battery.
Using an AC Adapter
The AC Adapter can be used from 100 V to 240 V.
- Connect the AC adapter to a power outlet.
- Connect the AC adapter jack to the PC USB-C™ port.
- Adjust the LCD to the most comfortable angle.
- Press the PC's power button to turn on the system.
TIP: If you want to use the Intel Type-C fast-charging function, please purchase and use a USB-C™ AC adapter with a USB PD certification of 80 W or higher through the ecommerce site.
CAUTION: Do not leave a liquid container on the PC.
- The system may be short-circuited and damaged.
WARNING
Please use an AC adapter certified by LG Electronics Inc.
- Uncertified batteries may explode.
- It may cause a problem in battery charging or system operation.
When you use an AC adapter, follow the below directions.
- 140 °F or more high-humidity spaces, for example, inside cars or saunas, should be avoided when you use or store it.
- Do not disassemble or modify the AC adapter.
- Do not twist the AC adapter plug.
- When you connect the AC adapter, do not forcefully push the plug.
Checking the Battery State
- Connect the AC adapter to the USB-C™ port on the PC.
- Open the LCD and check the charging state.
When the AC adapter lamp is blinking, charge it fully with the AC adapter before using it.
CAUTION: Use batteries certified and acknowledged by LG Electronics Inc.
- Uncertified batteries may explode.
WARNING:
The battery may explode due to excessive heat, causing fire. For a safe and efficient use of battery, follow the below directions.
- Do not short-circuit the battery.
- Keep the battery out of reach of children.
- A visible swelling of the battery pack indicates a possible danger. When this occurs, contact your local vendor or service center immediately.
- Use only a certified and designated recharger.
- Keep the battery pack away from heat. (Never put it in a microwave.)
- Do not leave inside a car under the summer heat.
- Do not leave or use at a hot and humid place like a sauna.
- Do not use the machine placed on a heating blanket or other heat reserving materials.
- Do not leave the machine turned on inside a closed space.
- Make sure that the battery ports are not touched by any metallic objects like a key, coin, necklace, and watch.
- Use only a lithium secondary battery certified and guaranteed by mobile device manufactures.
- Do not disassemble or modify the battery. Do not compress or pierce the battery.
- Do not apply shock to the battery. For example, do not drop the battery from a high place.
- Keep the room temperature between 23 °F and 104 °F. Do not expose the PC to heat hotter than 140 °F.
- Keep the machine dry.
- Do not discard the battery arbitrarily as you are requested to follow the local procedure for discarding the battery.
- Before using this machine, read this guide carefully.
TIP:
When the PC is not to be used for a long period of time, refer to the following:
- Check the battery charge level on a regular basis and keep it at 50 %.This allows you to extend the battery life.
- If the battery is left fully charged for an extended period of time, the battery capacity and battery running time may be reduced.
- If the battery is left fully discharged for an extended period of time, it may become overdischarged and cannot be charged again.
For more efficient use of the battery, read the following carefully.
- The battery runs low naturally even if it is kept unused.
- To increase battery lifespan, use the battery for a while before charging it rather than keeping the battery completely charged.
- If you don't use the product for a long time with the battery completely discharged, the battery lifespan may decrease.
The battery capacity may change due to chemical reactions during charge and discharge.
- LG Notebook frequently checks the charge level of its battery based on usage conditions, and then calculates and correctly indicates the actual remaining level of the battery.
- The battery is wearable goods and thus the life span may become shorter with use.The battery running time may also become shorter accordingly.
- When the battery is fully charged, the machine stops recharging. It resumes recharging when the battery charge rate drops below 95 %.This feature secures the safe and efficient use of the battery.
- When the temperature of the battery drops below 50 °F, it is charged in a low current to protect the battery cells. In this case, charging time may stretch to up to 32 hours.
If you use the system at a low temperature, refer to the following:
- The battery capacity may be reduced depending on the chemical characteristics of the battery and the system may not be turned on after it freezes or it is turned off.
- If the system freezes or if it is not turned on, connect the AC adapter to the system and charge the battery fully before use.
- If there is any error in the indication of the battery capacity, charge and discharge the battery two or three times at room temperature to return to the normal operation.
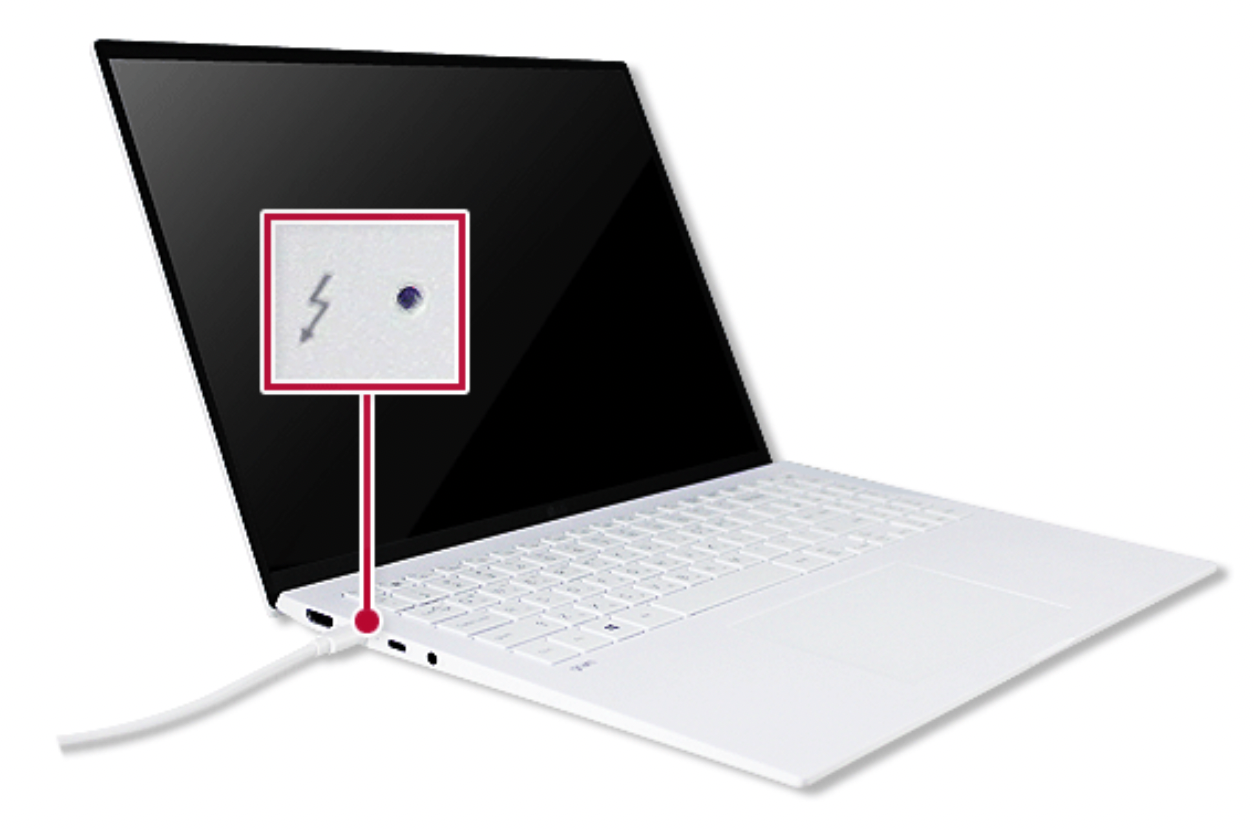
Operation Status Lamps

- AC Adapter Lamp
On: The AC adapter is connected.
Off: The AC adapter is not connected.
If you try to turn on the system that has entered the Hibernate mode or been turned off after a low-battery alarm, the system will not be turned on but the lamp will blink three times. If this is the case, connect the AC adapter and charge the battery sufficiently before using it.
- Caps Lock Lamp
On: When the Caps Lock is activated
Off: When the Caps Lock is deactivated
- Power Lamp
On: The system is on and running by the AC adapter or battery.
Off: When the system is turned off or in Hibernate mode
Blinking: The system is in the standby mode.
- Webcam Operation Status Lamp
On: When the webcam is operating
Off: When the webcam is not operating
Keyboard
The keyboard allows the user to input data or give commands.
The keyboard may differ in appearance and color depending on your country.
CAUTION
- Spilling a watery substance like coffee or juice on the keyboard may cause a fault, malfunction, or electric shock.
- Some of the keys may not work properly when you use several keys at the same time while playing a PC game.
- Please change the key combination settings according to the combinations necessary for the game play or use an external keyboard dedicated for gameplay.
Using Hot Keys
You can use the hot keys shown below to use the PC conveniently.
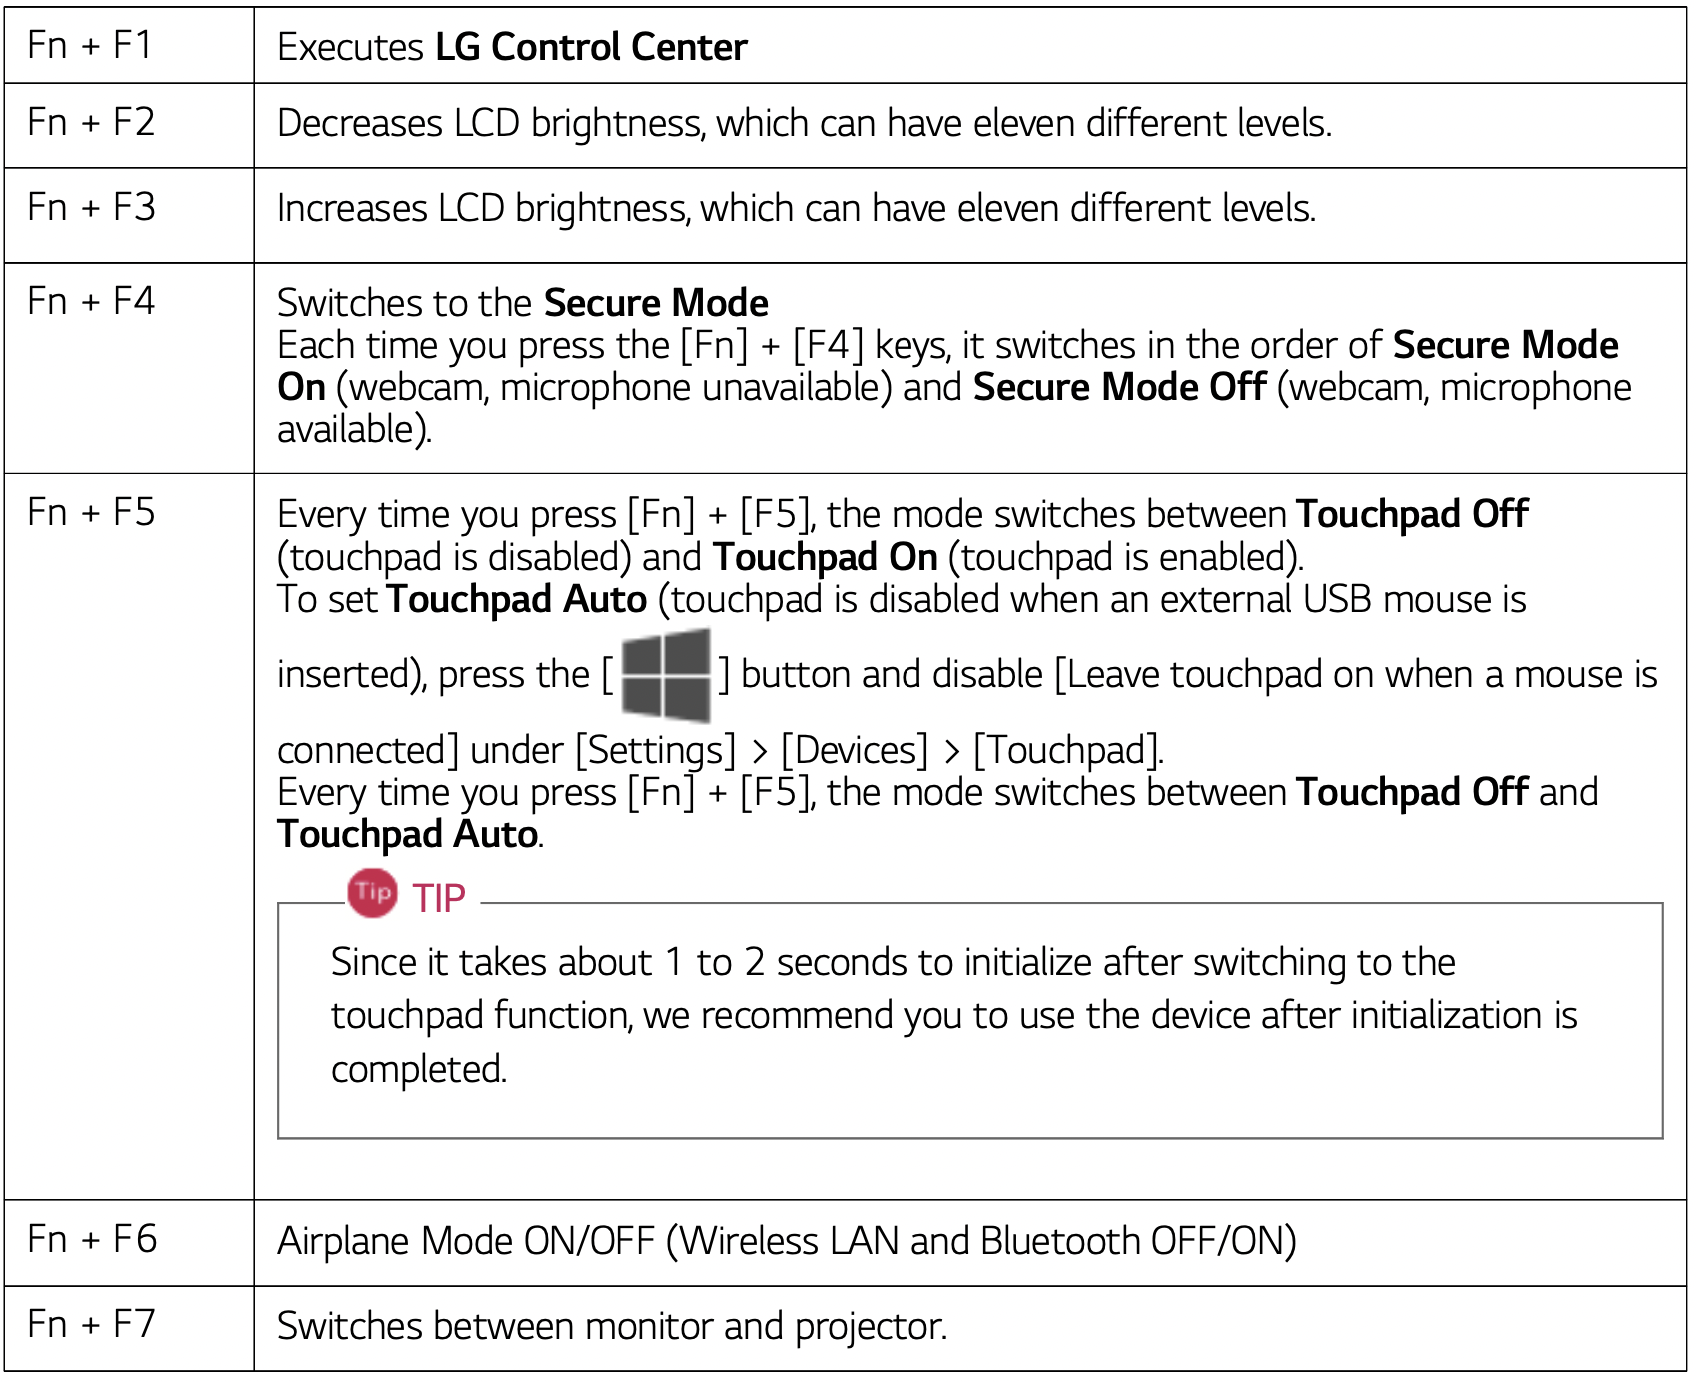
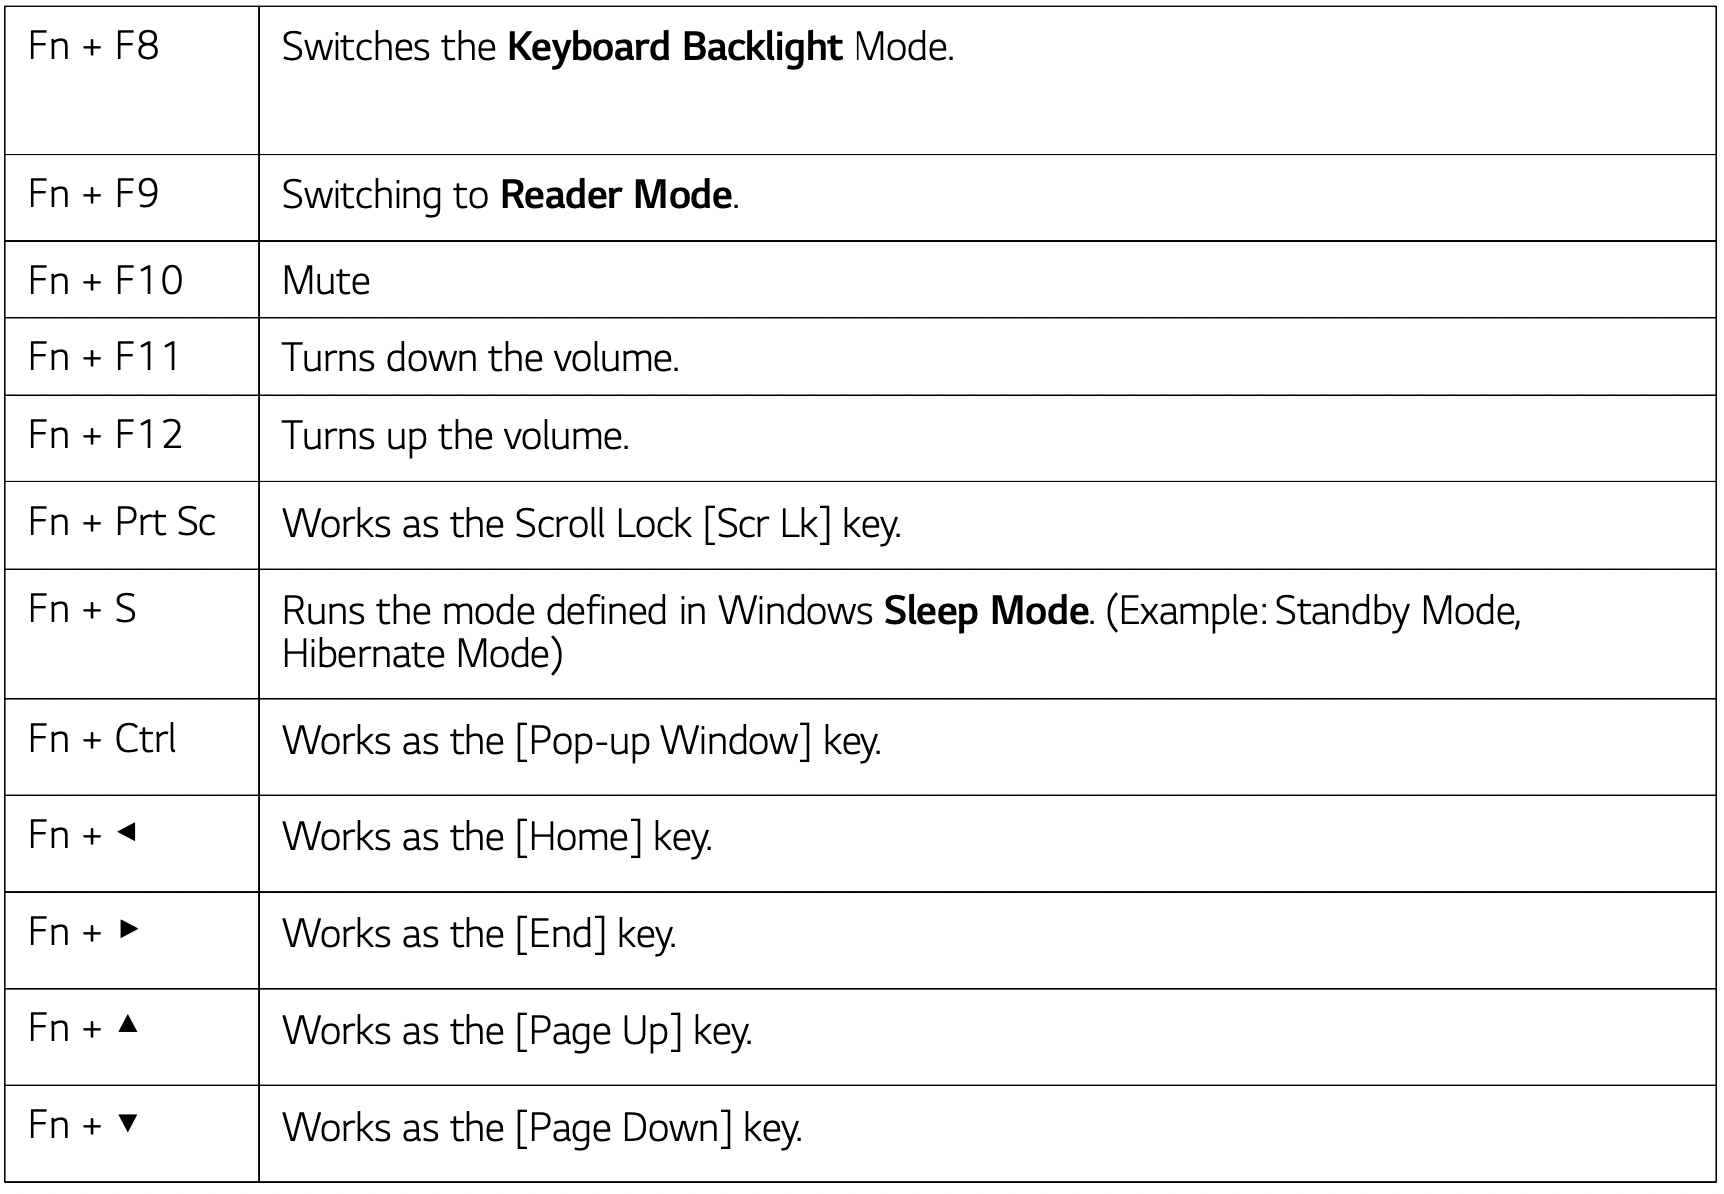
Shortcut Keys
TIP:
- To change the input mode temporarily, you can press the [Shift] key together with the letter you want to enter. By doing so, you can enter an uppercase letter when the Caps Lock key is not pressed and a lowercase letter when it is pressed.
To use Windows more conveniently, remember the following Windows key combinations:
- + R
Displays an input window for program execution.
- + Tab
Displays the running desktop in the preview.
- + M
Minimizes the current window.
Keyboard Backlight
You can set the Keyboard Backlight function to use the product in a dark environment.
The figures herein are subject to change without prior notice.
OPTION: This only applies to the products that have the Keyboard Backlight function.
Configuring Keyboard Backlight
TIP: You can use hot keys to use the Keyboard Backlight function more conveniently.
- Each time you press the [Fn] + [F8] keys, the status changes to KBD Backlight Off, KBD Backlight Low, and then KBD Backlight High in the specified order.
- Select the [ ] button > [LG Software] to run [LG Control Center].
- On the LG Control Center screen, select the [System Settings] menu.

- In the Keyboard Backlight option, set the keyboard lighting and off time.

Adjusting Screen Brightness and Volume
LG PC allows you to use the hot keys to easily adjust the screen brightness and volume.
TIP: According to the model type, a button for volume control (mute, volume up / down, DTS, etc.) may be available.

Hearing Protection Feature
The product is equipped with a hearing protection feature to protect your ears from pressurized sound while using earphones or headphones.
The feature is set to off by default and can be manually turned on as follows:
- Click [ ] button > [Realtek Audio Console] and run Realtek Audio Console.

- Connect an earphone or headphone and select the [Headphones] menu.

- Set [Ear Protection] to [On] to activate the hearing protection feature.
TIP: A warning message will be displayed if the volume is high while this feature is on.

Using the Touchpad
The built-in touchpad provides the same functionality as an external mouse.You can use the touchpad and USB mouse simultaneously.
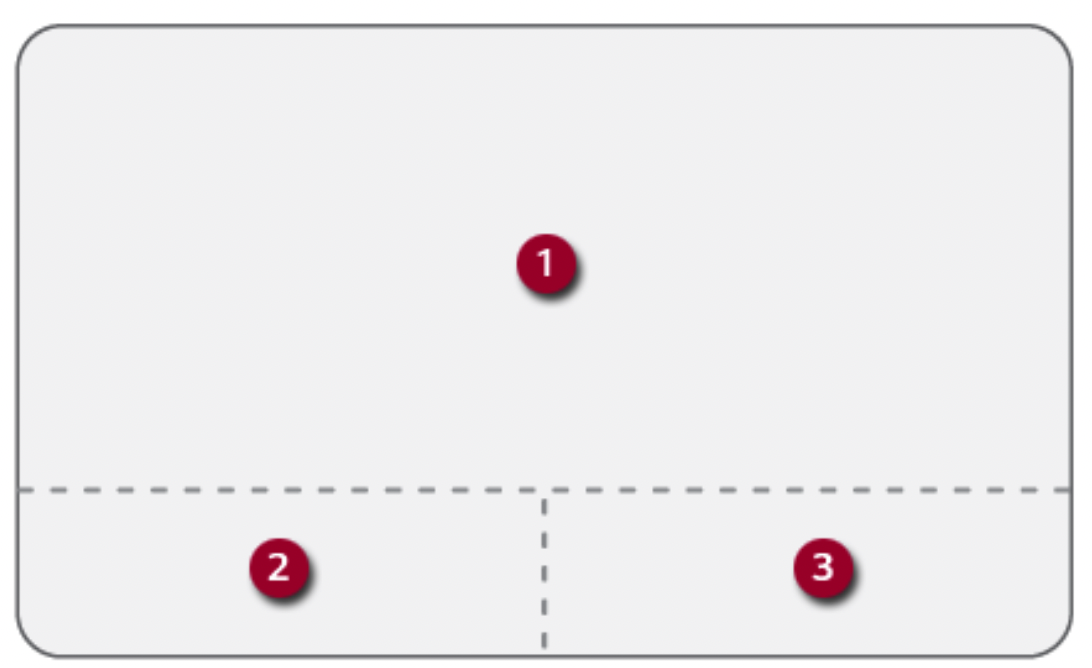
- Touchpad
Moves the cursor.
- Left button
Use to select or execute programs.
- Right button
Functions as the right button of a mouse in most cases. However, the usage may differ depending on programs.
TIP: The scroll function is provided as a gesture. Please refer to the Touchpad Gesture section of this document.
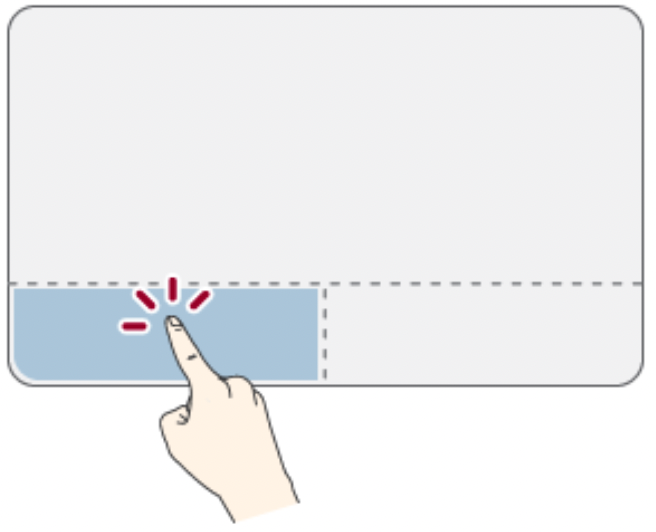
Precautions for Using the Touchpad
- If you are using a touchpad, use the area marked with a red line shown below.Touching an edge or border of the touchpad may not work. (The functioning touch area may differ depending on the product.)

Moving the Cursor (Pointer) on the Screen
Place a finger on the touchpad and glide the finger.

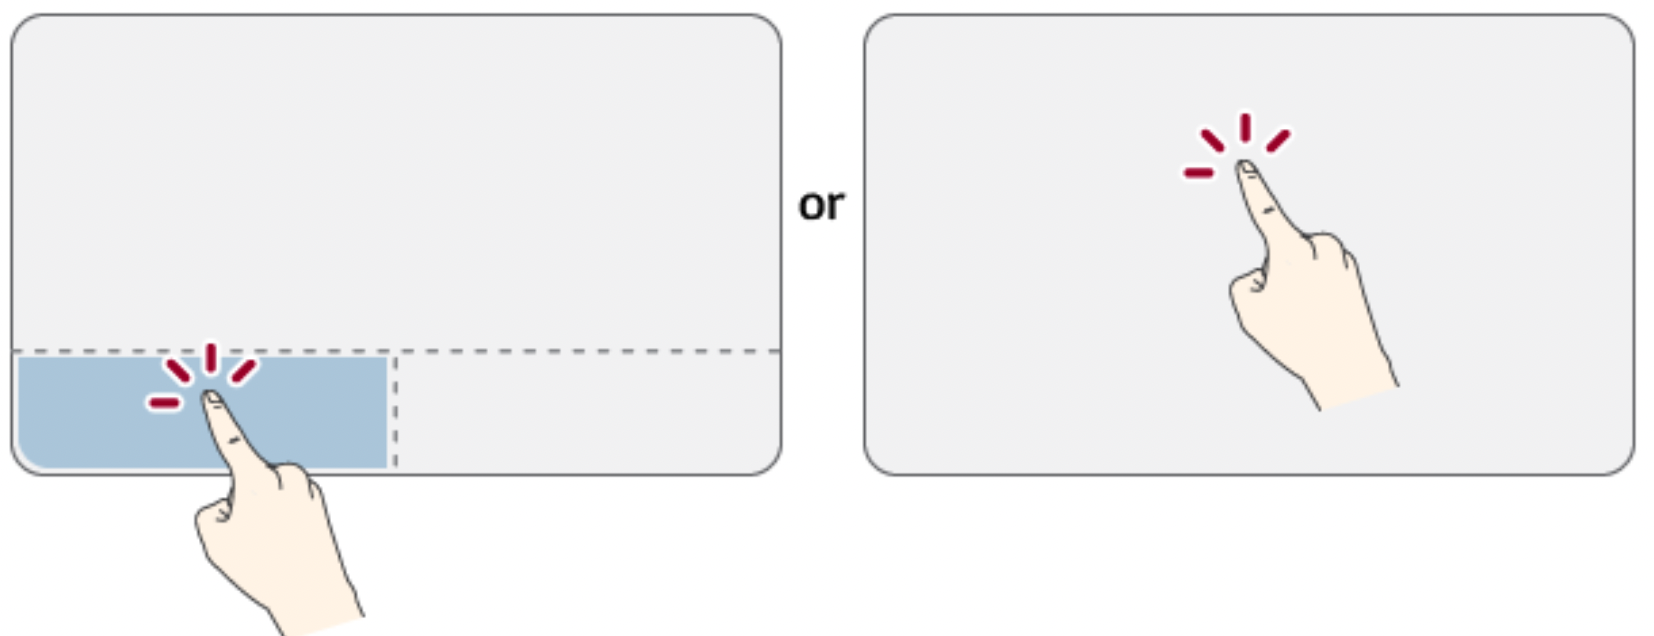
Click (Select)
Press and release the left button swiftly with a finger. (Or tap the touchpad once.)
Do this, for example, to select a menu or icon and to place the cursor to type on a word processor file.
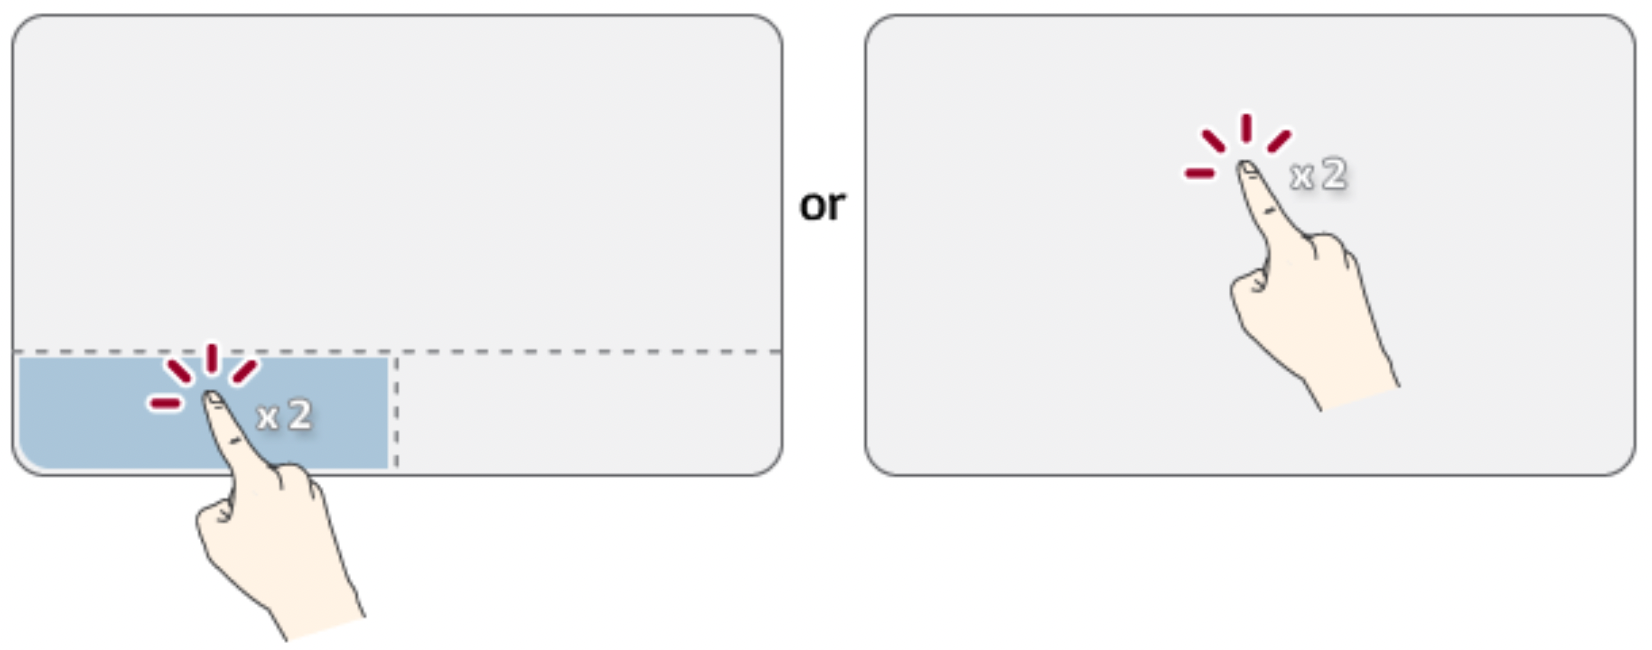
Double-click (Execute)
Press the left button twice consecutively and release the button. (Or tap the touchpad twice.)
Do this, for example, to run a program after selecting its execution file (or icon).
CAUTION: Notes on Using the Touchpad
- Do not use a sharp object such as a pen on the pad nor peel the cover. It may cause an impairment.
- Do not place more than one finger, and do not use while wearing a glove or when the hand is wet.The Touchpad will not work properly. Oil or dirt at the fingertip can also cause an impairment.
- The touchpad is sensitive. Do not impose excessive force or maintain an uncomfortable position. Otherwise, it may result in a finger or wrist injury.
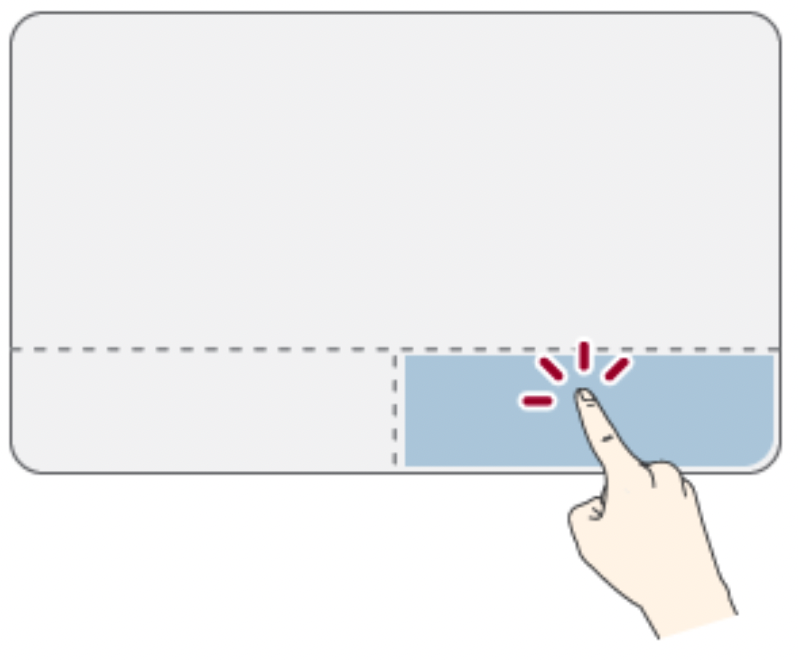
Right button
Press and release the right button swiftly.
Functions as the right button of a mouse, but the usage may differ depending on programs.
Drag & Drop
To drag, click and hold an icon, and move it to another location.
To drop, release the dragged icon in the location you want.
To move a file icon to another folder or to Recycle Bin, place the cursor (or the pointer) on the icon, press and hold the left button, and glide another finger on the touchpad until the icon reaches the aimed location. After reaching the destination, release the left button.
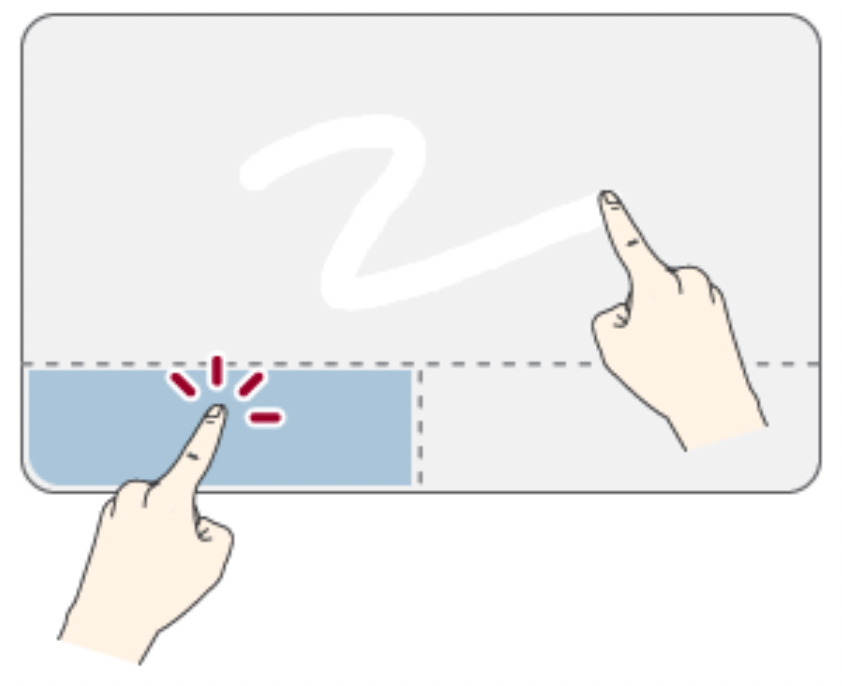
- Drag
Glide one finger on the pad with another finger pressing and holding the left button.
- Drop
Release the left button to drop it into the Recycle Bin. (By using this, you can drop a file into the Recycle Bin at will.)
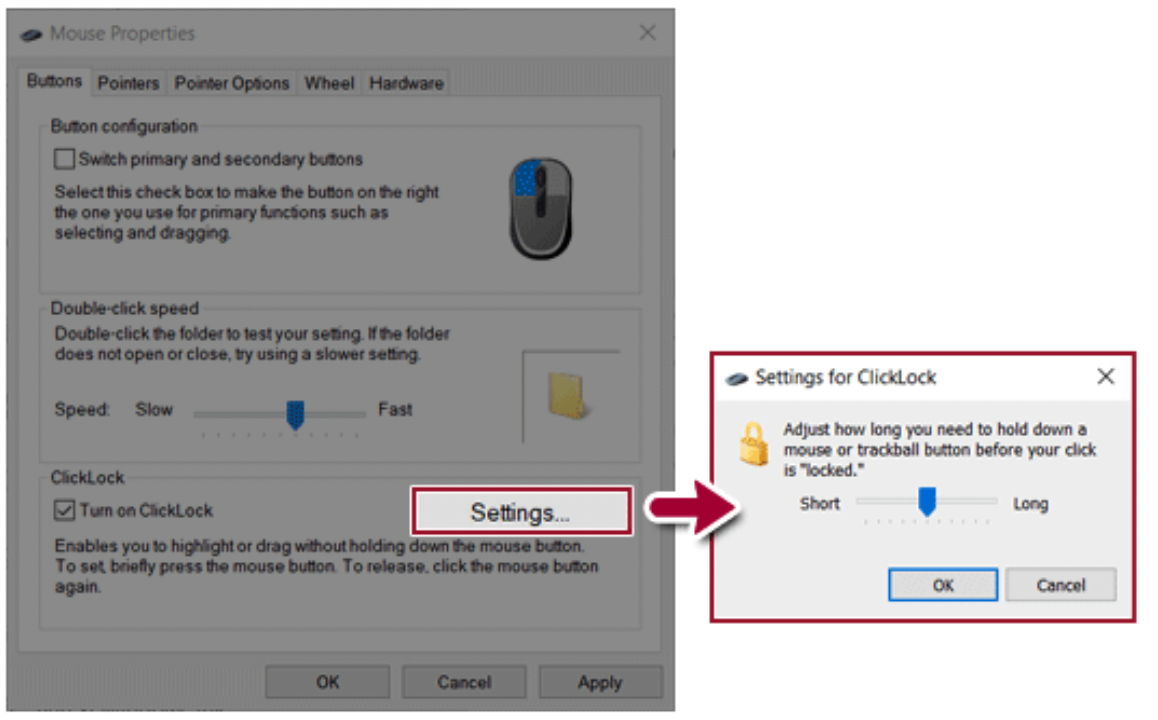
ClickLock
When activated, this feature allows you to drag/scroll without pressing and holding the left button.
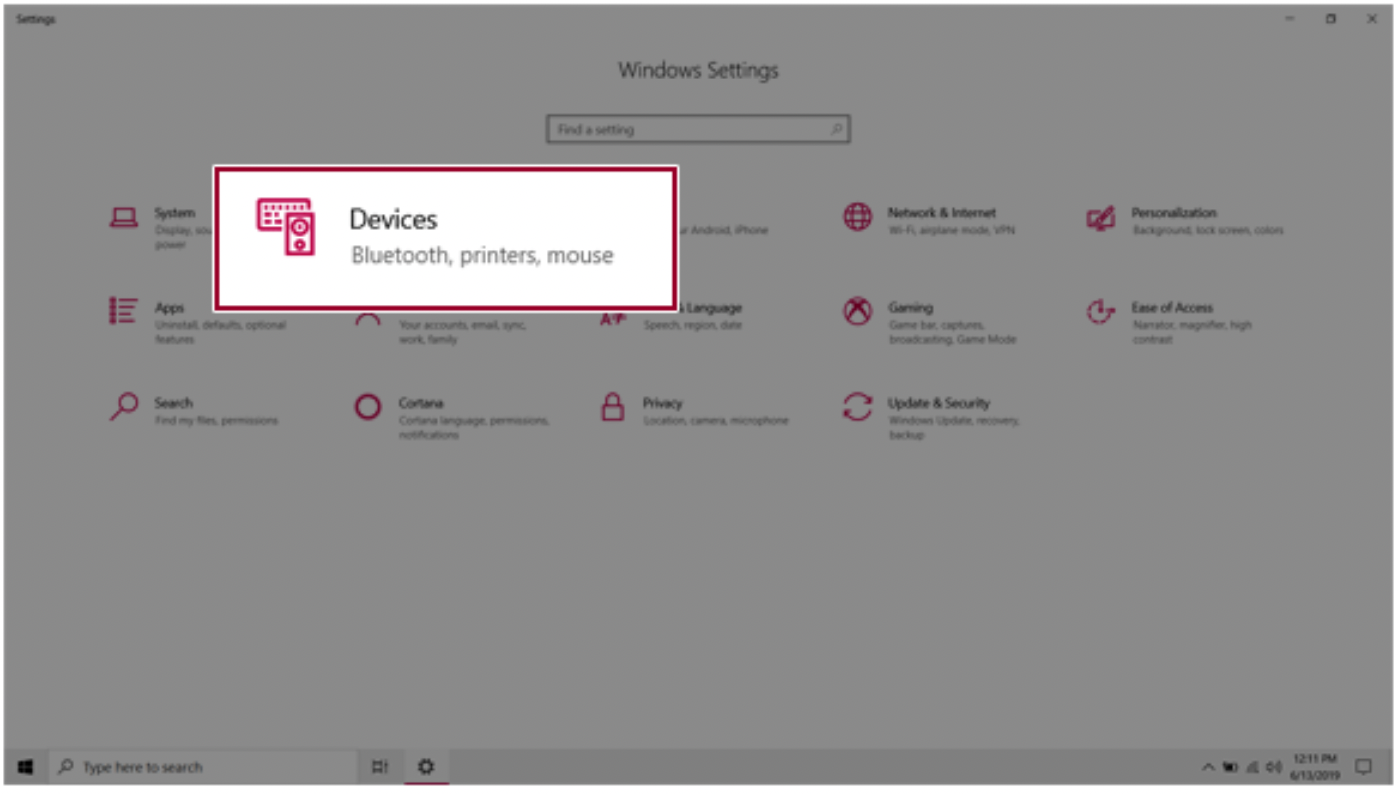
- Click the [ ] button and select the [Settings] menu.
TIP: Press the [ ] key or [Ctrl] + [Esc] to display the Start menu.

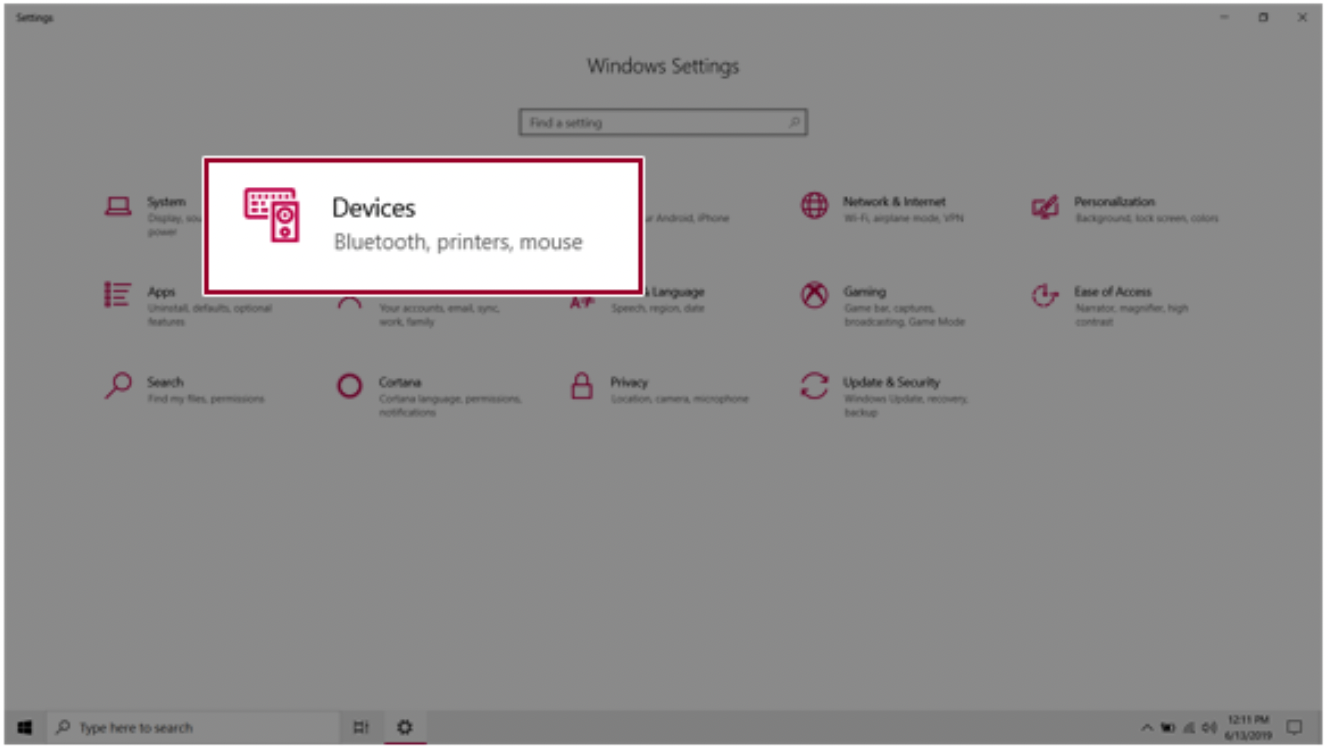
- When the [Settings] screen appears, select [Devices].

- Select [Mouse] > [Additional Mouse Options].
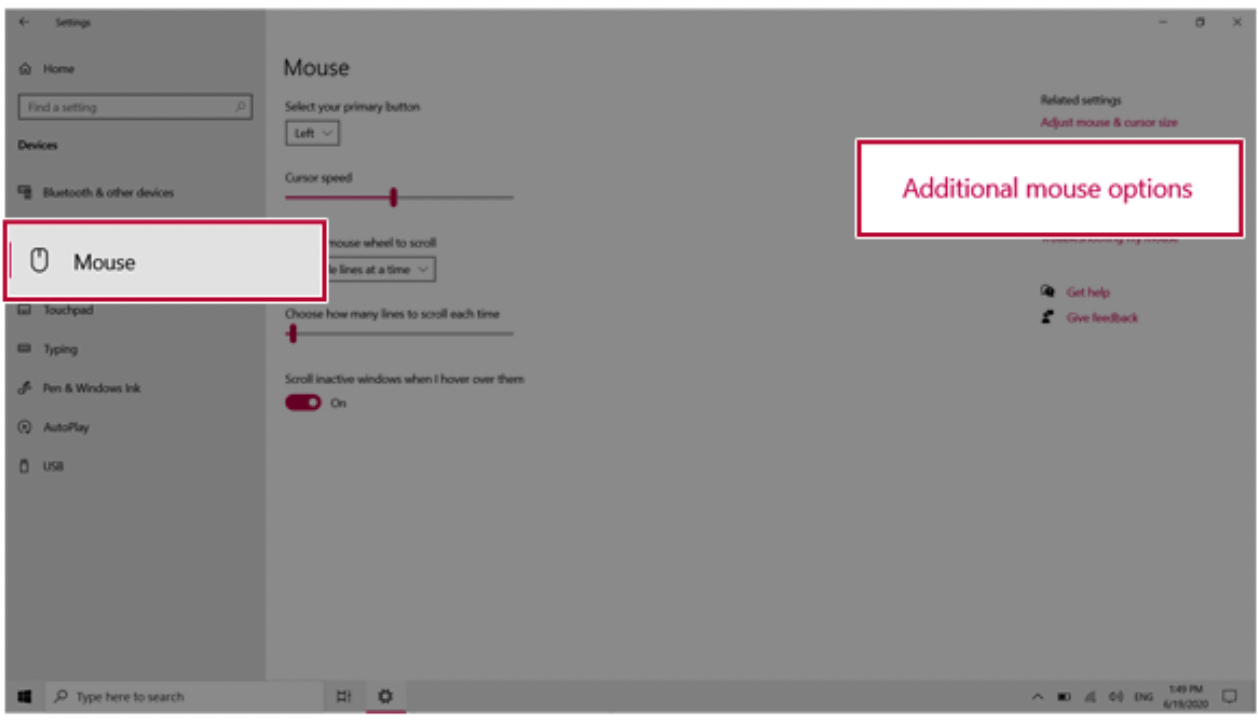
- When [Mouse Properties] screen appears, select [Turn on ClickLock].
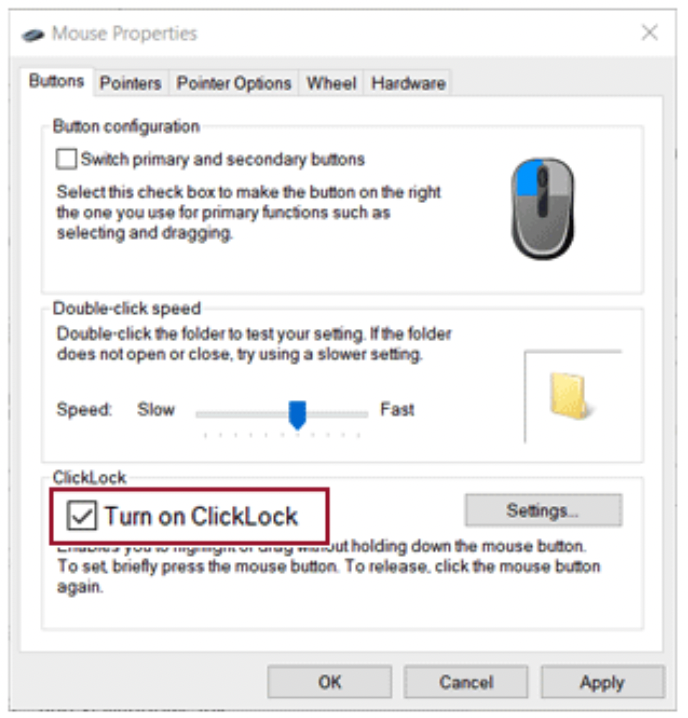
- Press [Settings] to set the time for the ClickLock.
- Press the left button of the touchpad and release it to change the button into the pressed state.
- Move on the touchpad to use the drag/scroll feature.

- Press the left mouse button to turn off the ClickLock.
Touchpad Gesture
The touchpad gesture feature allows you to use Windows programs more easily by utilizing multi-touch functions.
Windows 10 Touchpad Gestures allow you to use the PC more easily.
The touchpad gesture feature may not be supported in some models.
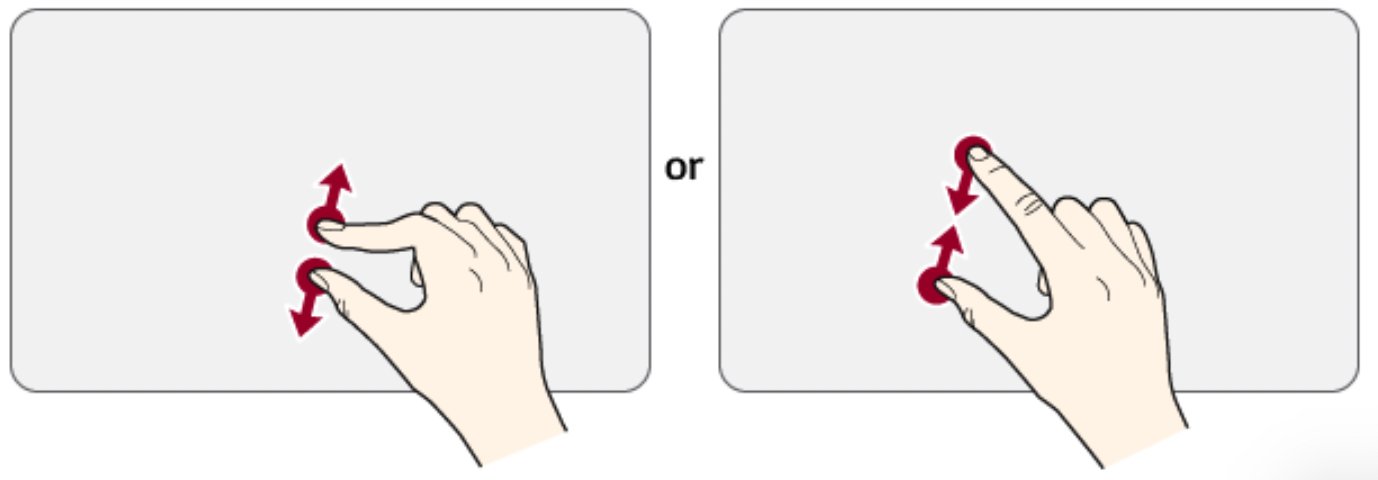
- Place two fingers on the touchpad and move up/down/left/right to scroll the screen.
(It operates only on an app or screen which scrolling is available.)
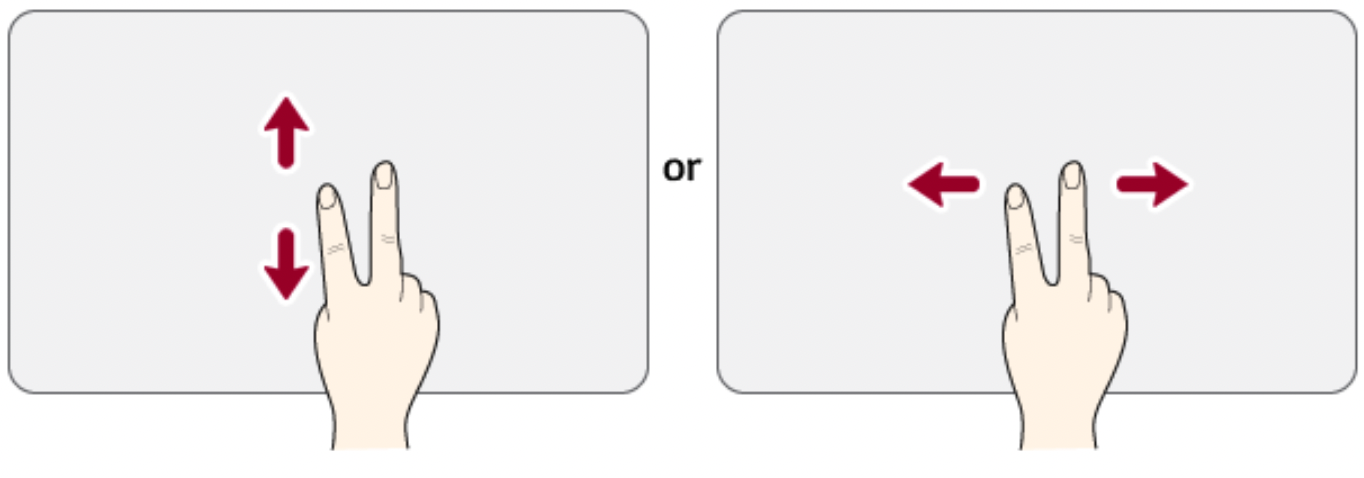
- Place two fingers on the touchpad and widen or narrow them to zoom out or in.
Setting Touchpad
You can change the touchpad features or enable/disable the gesture feature.
The figures herein may differ by language selection and are subject to change without prior notice.
- Click the [ ] button and select the [Settings] menu.
TIP: Press the [ ] key or [Ctrl] + [Esc] to display the Start menu.

- When the [Settings] screen appears, select [Devices].
- Change the settings as needed on the [Touchpad] menu.

Connecting to External Display
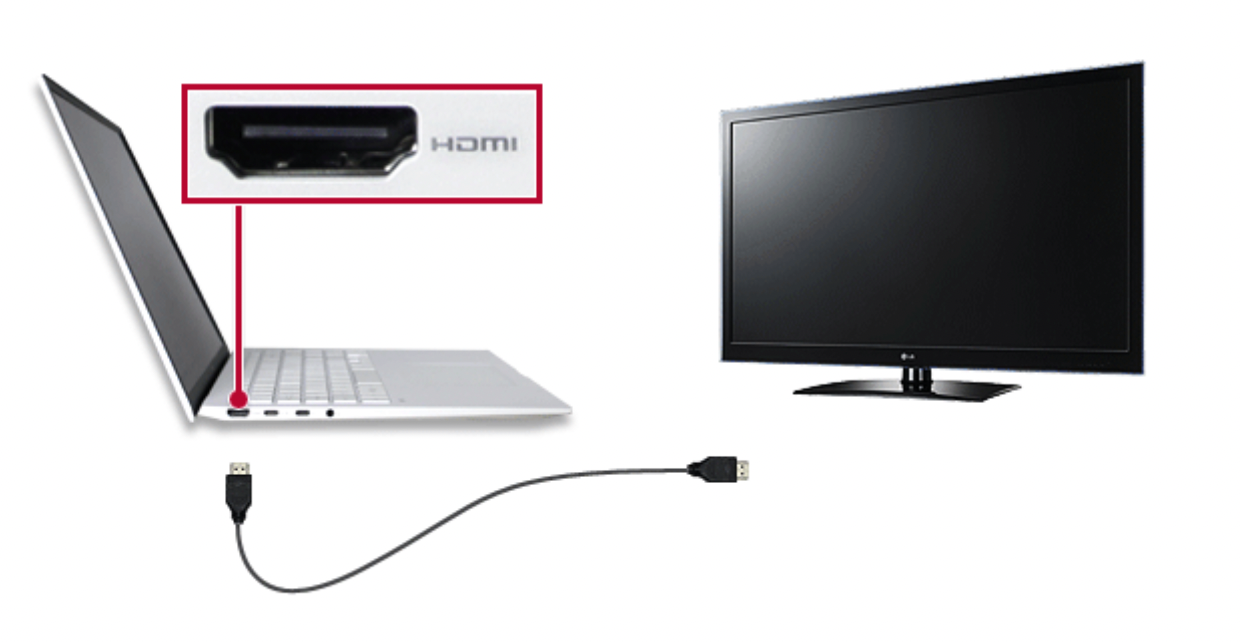
Connecting to the HDMI Port
HDMI is a multimedia interface that can integrate and transmit video and audio signals.
In some models, DTS Audio may not work when you use HDMI.
TIP: Ensure the monitor power is off before connecting the external monitor to the PC.
- Connect the HDMI cable to the PC and the external device (TV, monitor) that supports HDMI.
- HDMI port transfers both video and audio simultaneously. Hence, there is no need for a separate audio connection.
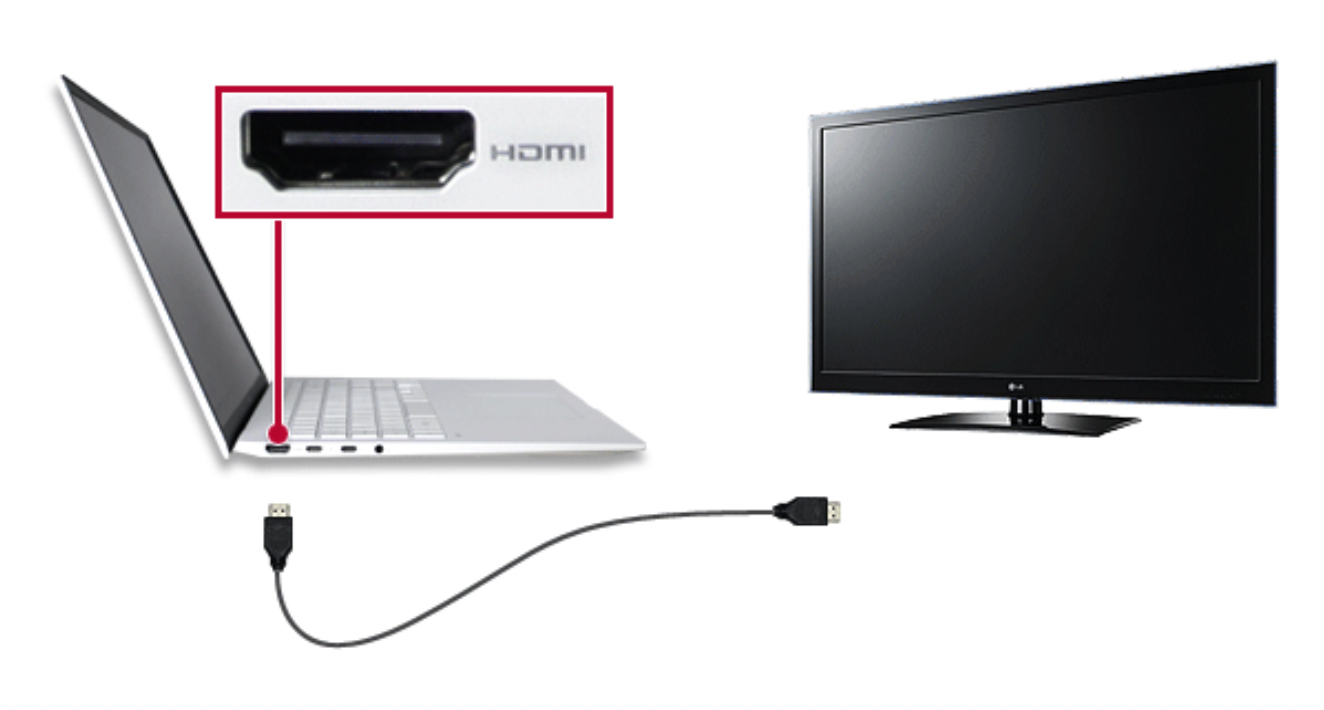
- On the PC, press [Fn] + [F7] to display monitor (projector) toggling screen. Select the desired screen output.
TIP: Everytime [ ] + [P] keys are pressed, the screen output option changes. Release the keys to display the selected screen output.
CAUTION
- If you do not set Speaker as the default value after disconnecting the HDMI cable, the system may not produce any sound.
- If a program was running already, you must exit and restart the program to produce sound.
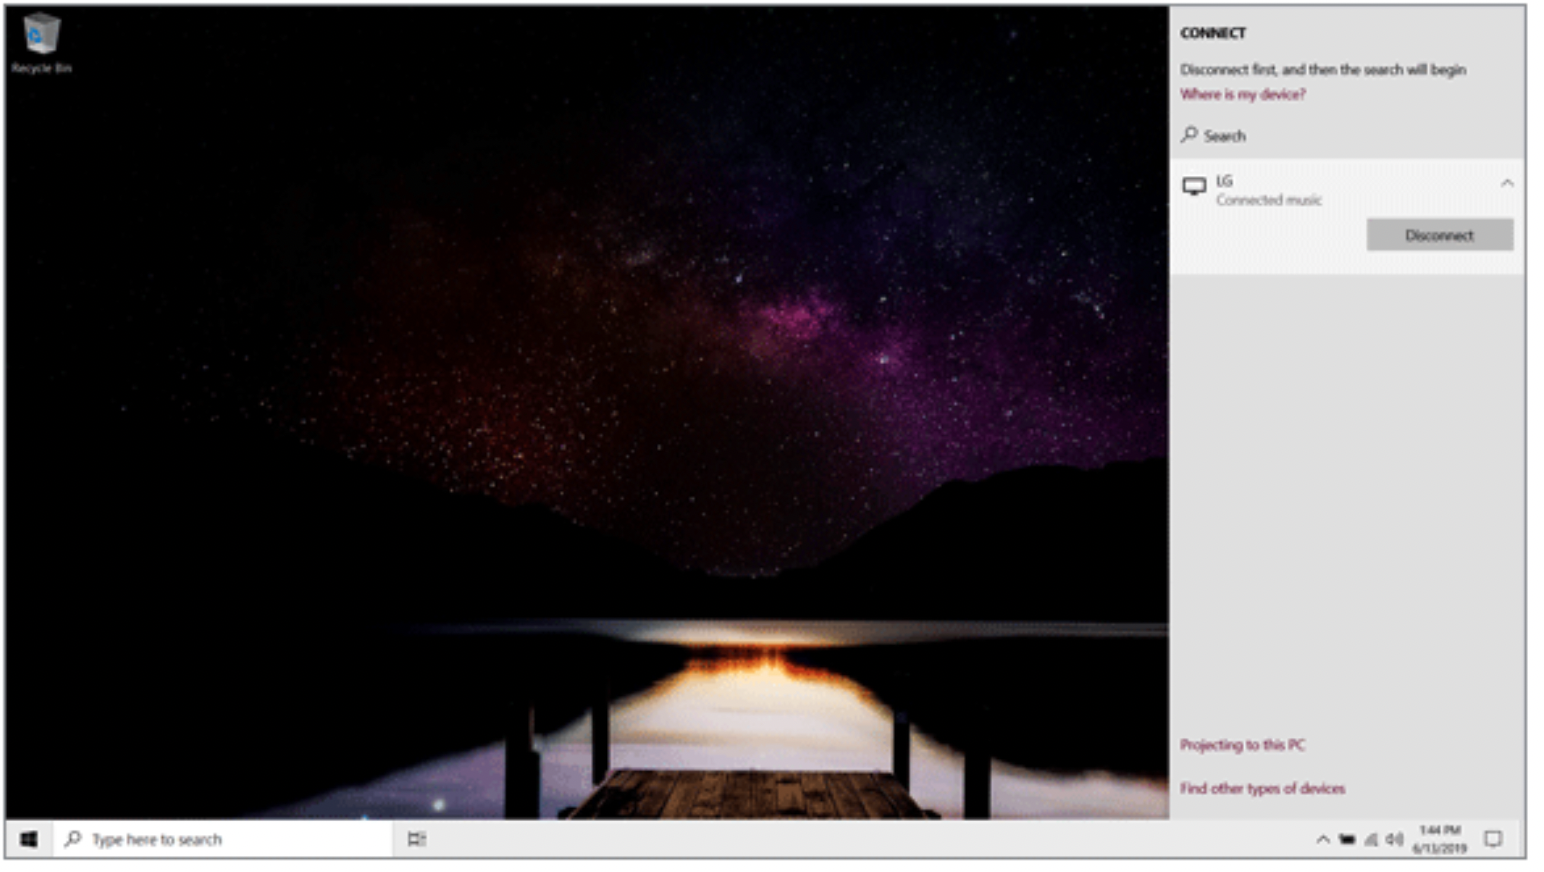
Connecting to Wireless Display
The wireless display feature connects the PC screen and sound to a display (TV, projector, etc.).
OPTION
- To use the wireless display feature, the display device must support this feature.
- To connect to the display device that does not support wireless display, you must separately purchase a wireless display connection device.
- Once the wireless display connection is established, no additional procedures and searching are necessary the next time you try to connect.
Connecting to Wireless Display
- Press the Action Center [ ] icon on the right side of the taskbar.
- When the Action Center screen appears, press the [Connect] tile.
TIP: If the tile does not appear, press the [Expand] menu.
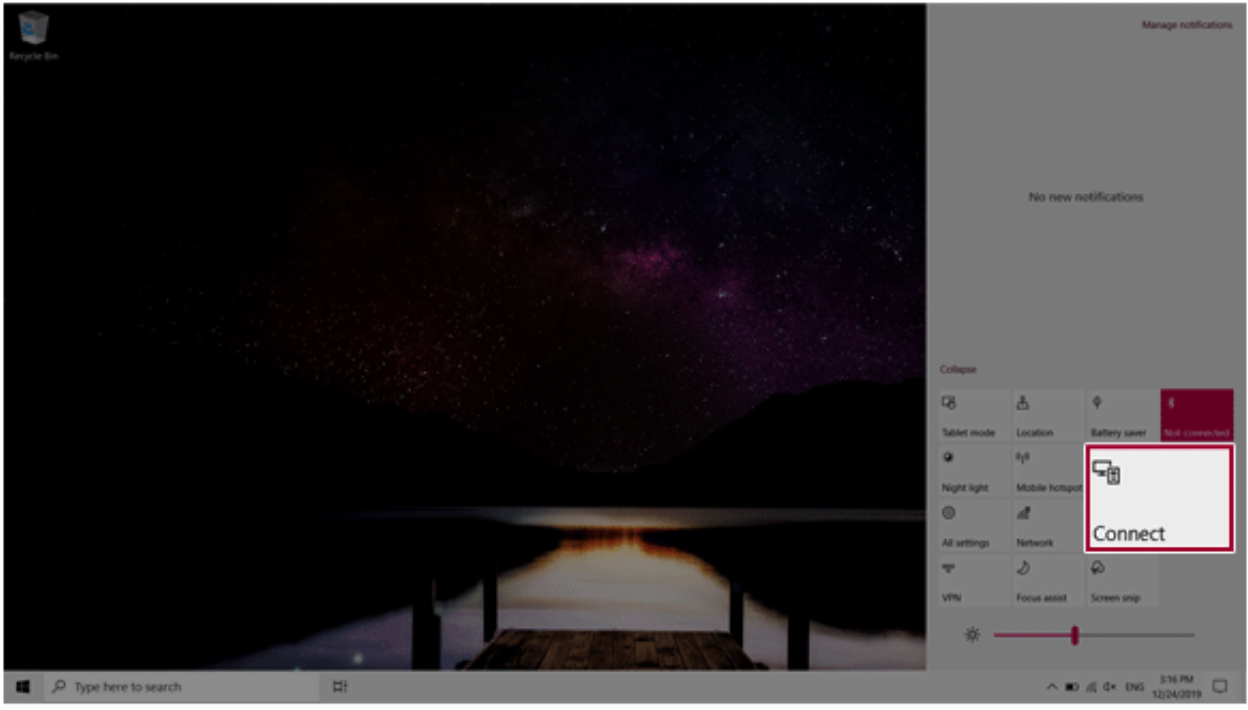
- Search for wireless display devices in the proximity.
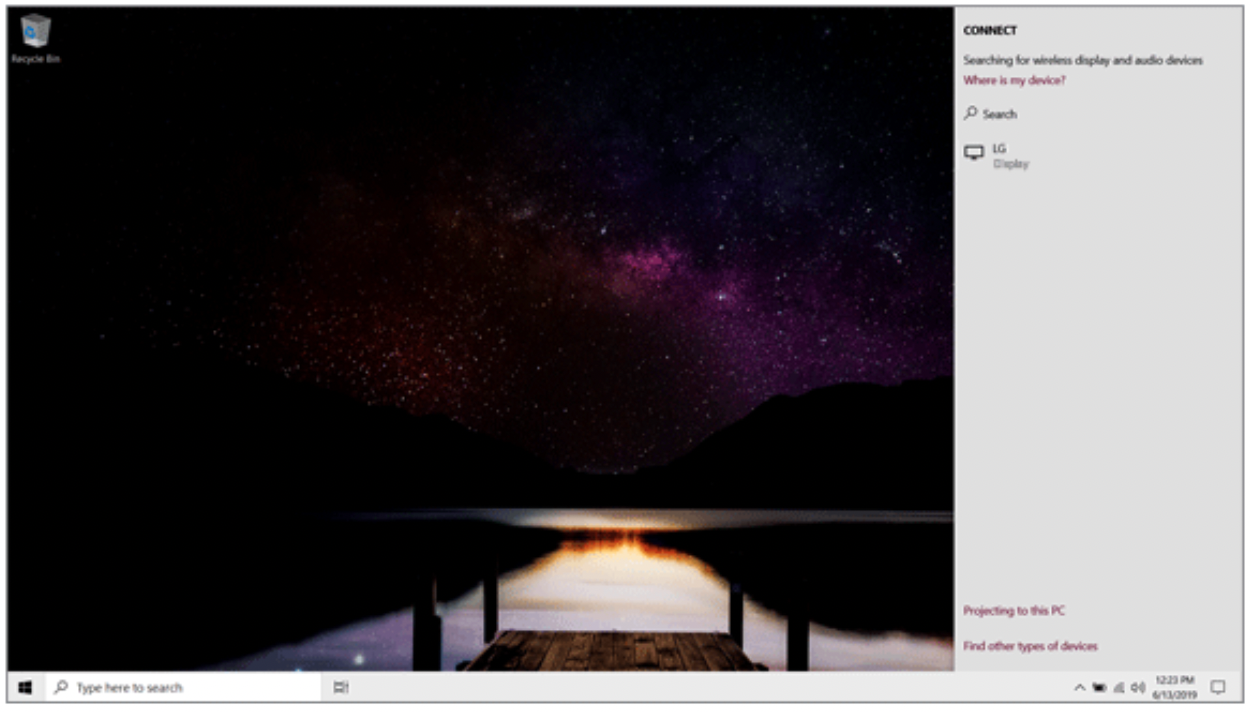
- Once the wireless display device is connected, it outputs the PC screen and its sound.
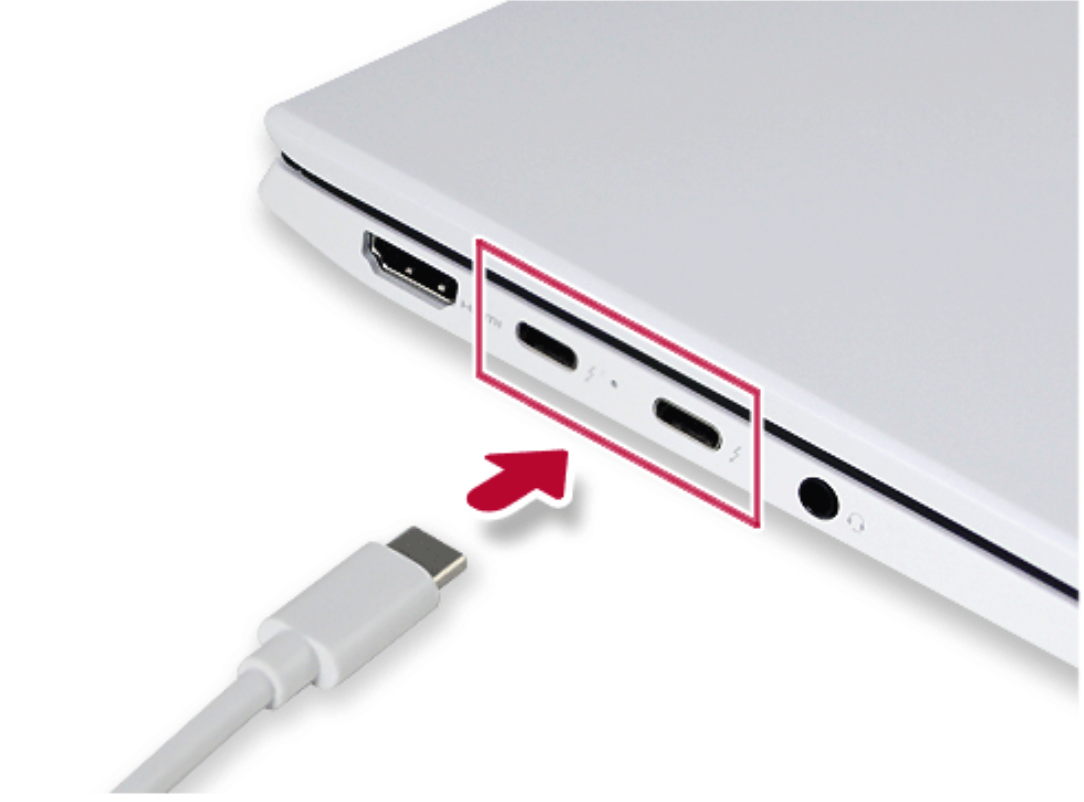
Connecting an External USB-C™ (Thunderbolt™) Device
The USB-C™ port mounted on this product supports USB 4.0 Gen 3x2 standards.
Use the USB-C™ port to connect USB devices or to output a screen to an external display.
TIP: The names of USB versions have changed from USB 3.0 (or USB 3.1 Gen 1) and USB 3.1 (or USB 3.1 Gen 2) to USB 3.2 Gen 1x1 and USB 3.2 Gen 2x1.
Connecting a USB Device
If a USB device is connected to a USB-C™ port, the port works as an ordinary USB port.
TIP: To use a conventional USB device, a separate conversion adapter should be used. (Conversion adapters may be purchased separately.)
Outputting to an External Display
By connecting a display that supports USB-C™ Alternate Mode, you can use the USB-C™ port to output a screen to an external display.
TIP: The Alternate mode allows you to use the DP (DisplayPort) and HDMI outputs through the USB-C™ port.
We support DP (DisplayPort) interface standards.
CAUTION: You must use a cable that supports Alternate Mode to output a screen to another display.
If you use USB-C™ accessories (cables, interface adapters, etc.) that are used for other products, you may have compatibility problems (no screen output or a malfunction).
Connecting a Thunderbolt™ Device
You can connect to the USB-C™ port an external display or a high-performance data device that support the Thunderbolt™ specifications.
Depending on the specifications of the device connected to the USB-C™ port, it acts as a USB or Thunderbolt™ device.
TIP: The Thunderbolt™ cable is not provided with the product. Make sure that you use a certified cable.
Some functions may not be available depending on the product. For more information, refer to the user manual provided with the device to be connected.
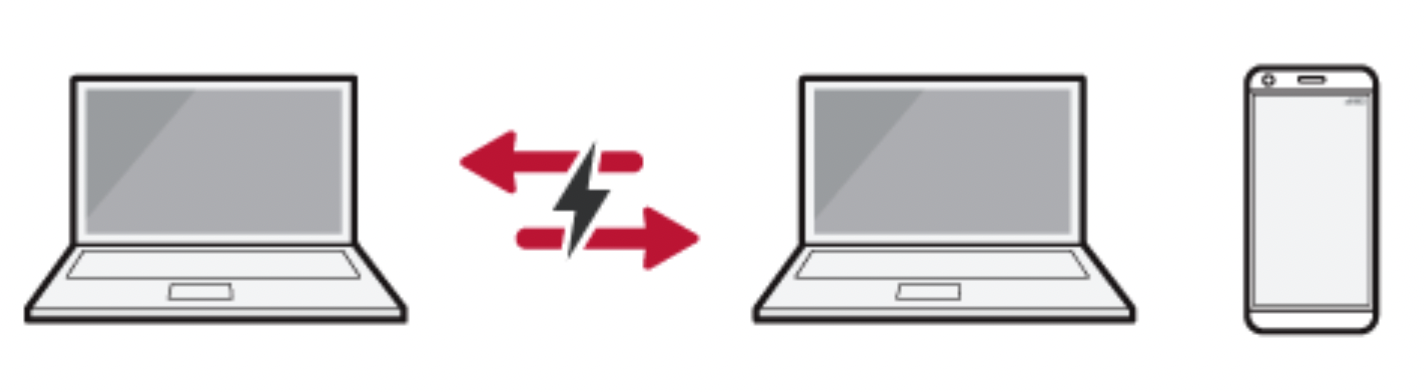
Connecting two notebook PCs that support Thunderbolt™
Use Thunderbolt™ to connect two PCs easily and quickly and send and receive data between them.
- Press the [ ] button and select the [Settings] menu.
TIP: Press the [ ] key or [Ctrl] + [Esc] to display the Start menu.

- Select [Network & Internet] > [Status] > [Network and Sharing Center] > [Change advanced sharing settings].
- Enable [Change sharing options for different network profiles] and save the changes.

- Use the Thunderbolt™ cable to connect two notebook PCs.
- A while later, an icon of the connected computer appears on the desktops of the two notebook PCs.
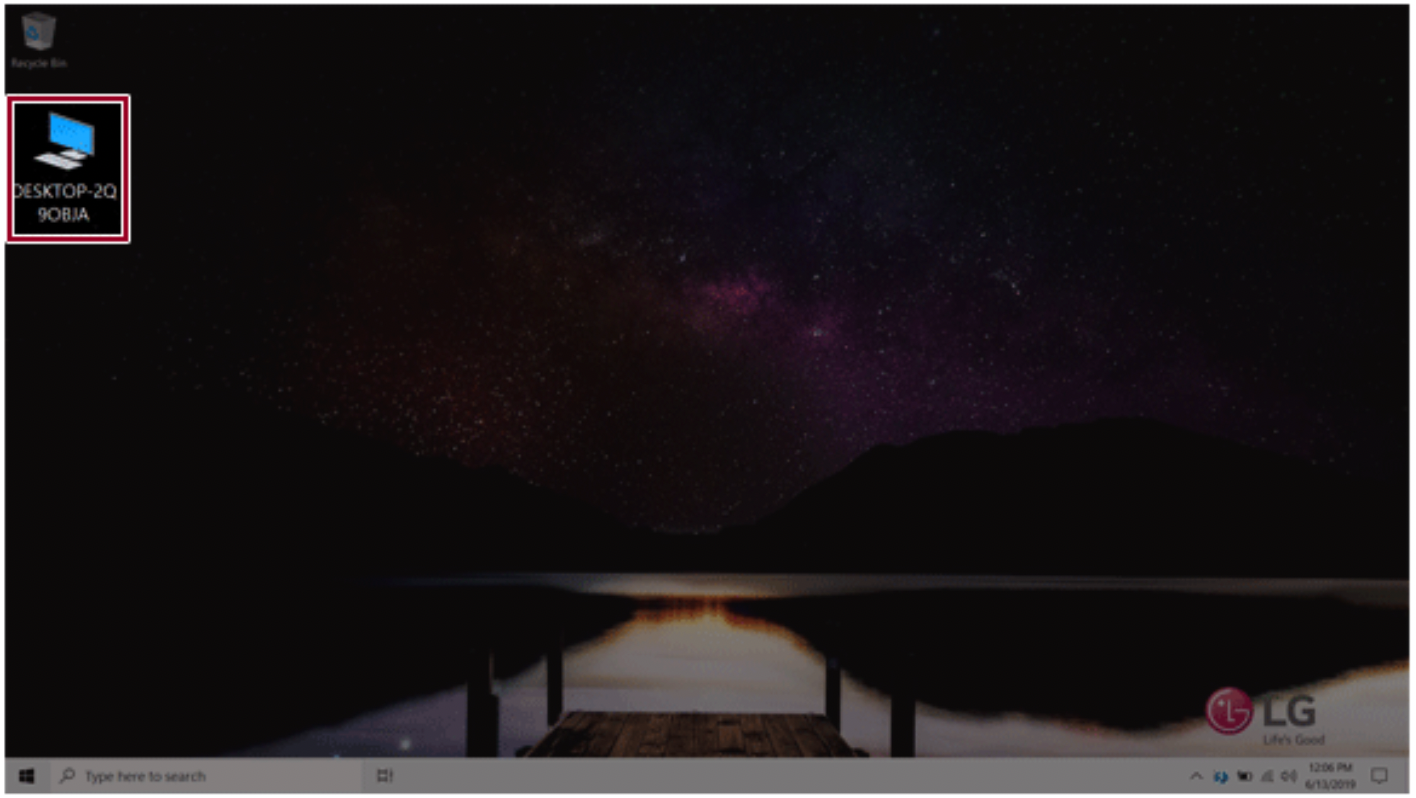
- Double-click the connected computer icon to open the authentication screen.
- Input the user name and password to connect to the other PC.
TIP: If there is no shared folder in the connected PC, nothing may appear on the screen.
Using USB-C™ (Thunderbolt™) Charging Function
You can connect the USB-C™ device to charge a notebook PC battery or an external device, and the operation mode is automatically selected depending the charge settings of the connected device.
- To charge a notebook PC battery, the external device (USB PD Charger, notebook PC, etc.) should support USB Power Delivery 10 W (5 V / 2 A) or higher profile.
- The external devices that use the USB-C™ port support 10 W (5 V / 2 A) and 15 W (5 V / 3 A).
- A USB device compatible with USB PD (Power Delivery) supports charging at 15 W (5 V / 3 A), whereas a regular USB device supports charging at 10 W (5 V / 2 A).
- USB PD batteries cannot be charged using the USB-C™ port of the notebook PC.
- Always-On Charging is supported only with USB-C™ ports, but not with the regular USB ports.
- If you connect an adapter with a lower output than the rated adapter, it may take more time to charge the notebook PC.
- When the connected device is set to Automatic (charging the notebook PC or a connected device. Charging the notebook PC by using the mobile phone is not supported.)
- When the connected device is set to Source (the notebook PC is charged.)
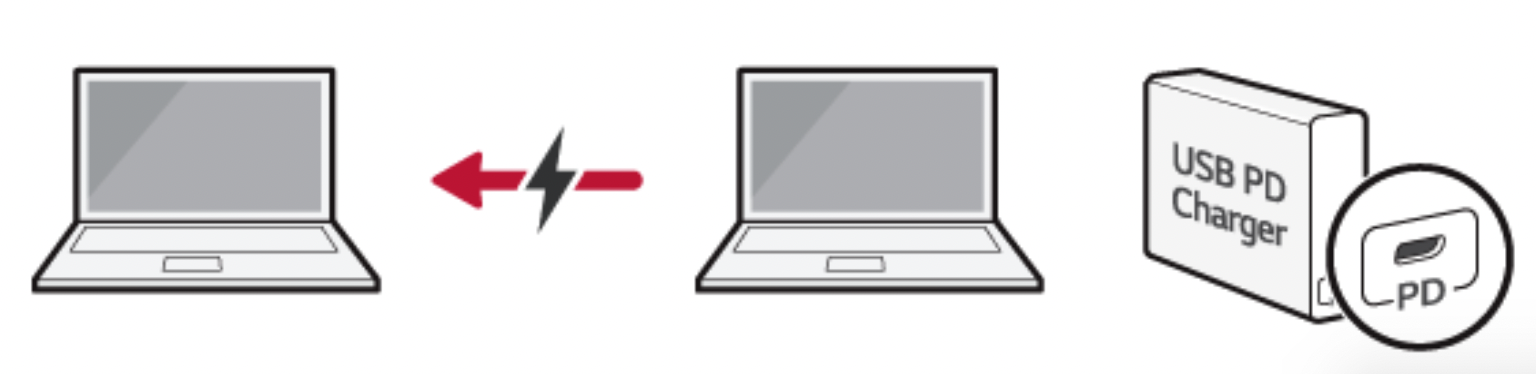
- When the connected device is set to Sink (the connected device is charged.)

TIP: The charging status of the external device being charged is not displayed on the notebook PC.
If you connected a smartphone, you should select "Charge mobile phone" on the smartphone screen to charge the phone battery.
CAUTION: If the power consumption of the notebook PC is larger than the power supply from the external device, the battery may be consumed gradually.
Bluetooth
Bluetooth allows the user to access wirelessly various devices such as camera, cell phone, headset, printer, and GPS receiver that support Bluetooth  . It can also establish a network and exchange data with other Bluetooth
  -enabled PC or smartphone.
OPTION: The Bluetooth device is optional, and it may not be available in some models.
The figures herein may differ by language selection and are subject to change without prior notice.
For details on connecting a Bluetooth device, refer to the user manual that came with the Bluetooth device.
- Click the [ ] button and select the [Settings] menu.
TIP: Press the [ ] key or [Ctrl] + [Esc] to display the Start menu.
- When the [Settings] screen appears, select [Devices].
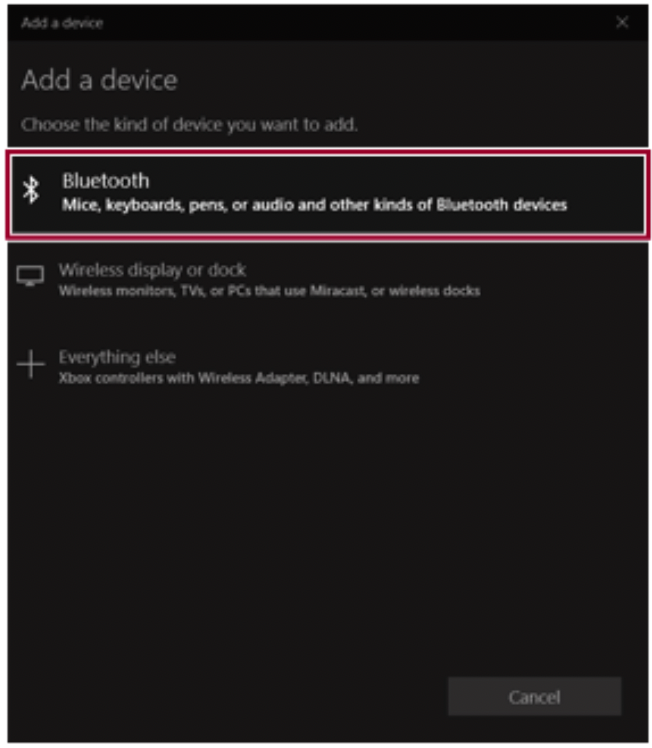
- Select [Bluetooth & other devices] > [Add Bluetooth or other device] > [Bluetooth] to search for Bluetooth devices.
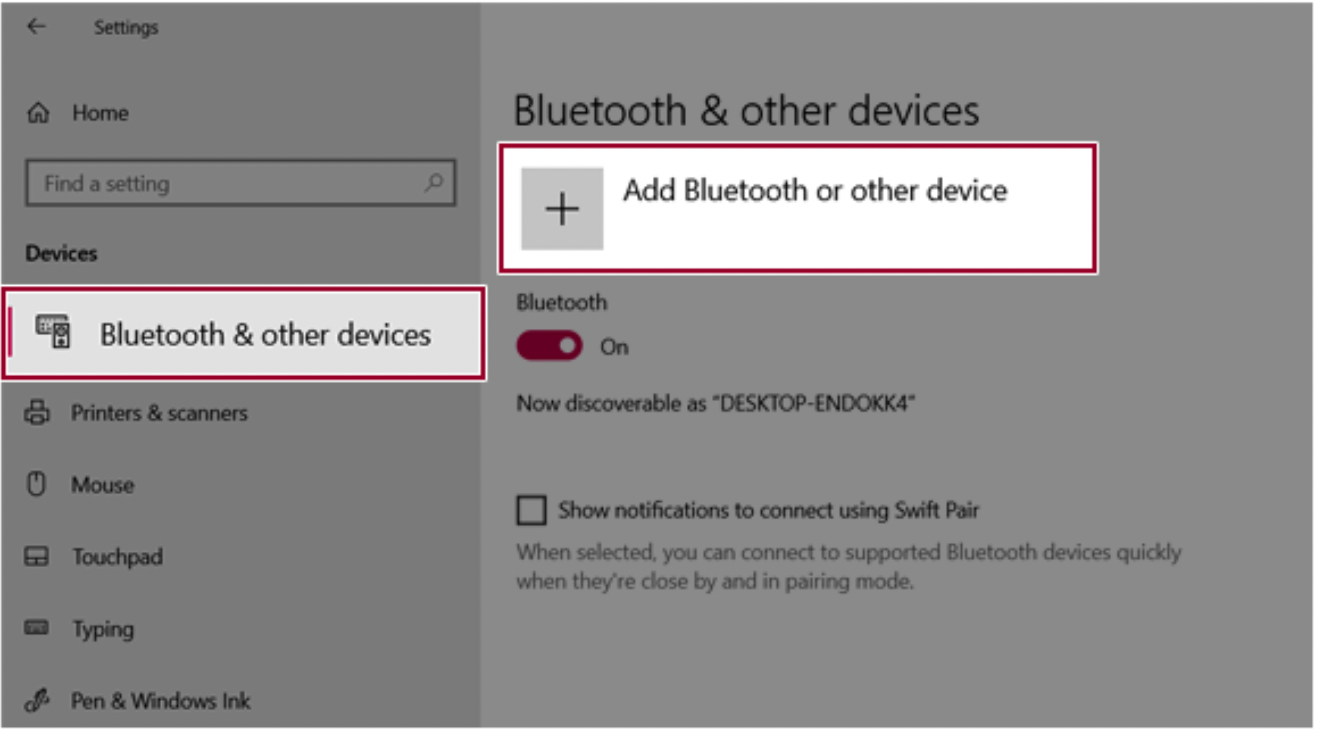
- Select a device to connect to.

- Complete the Bluetooth connection as directed.
Wired LAN
LAN is the network environment that users can connect to by using a cable to connect to their internet providers or the company's network.
Using Wired LAN
LAN is installed with an automatic IP (DHCP) as default value.
Please refer to the following instructions for details on setting up an automatic IP (DHCP) or manual IP.
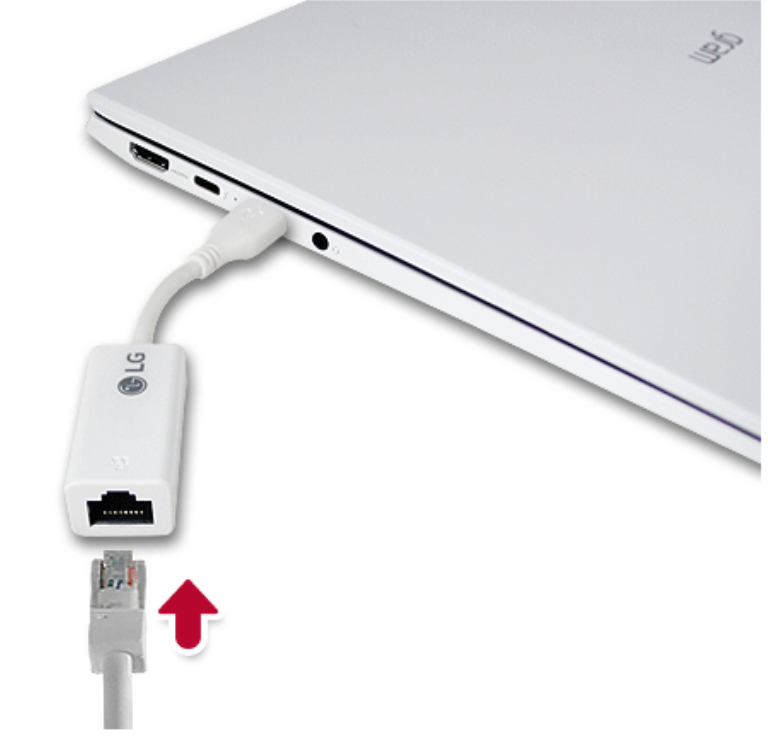
- Connect the LAN adapter to the USB-C™ port on the PC.
TIP: The recommended network cable for the optimal network environment is CAT5 or higher.
The network (LAN) cable may be connected when the LAN adapter is used.
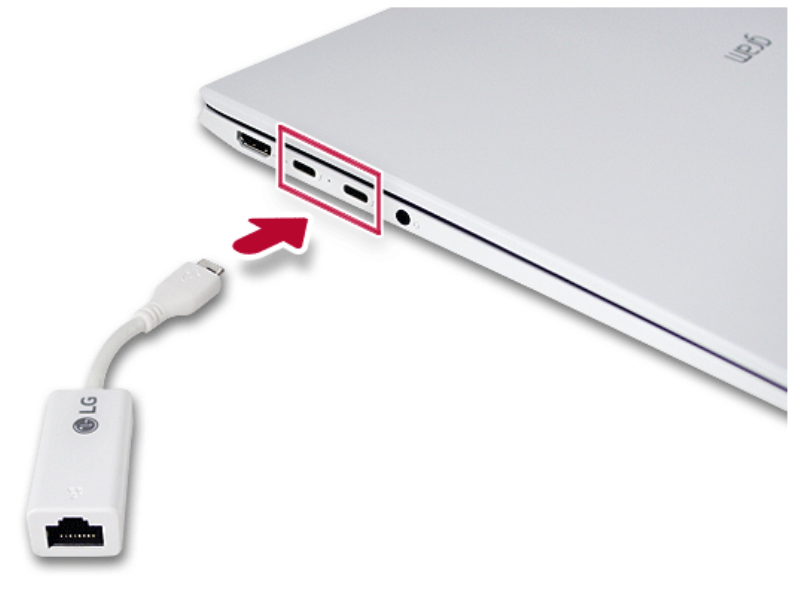
- Connect the wired LAN cable to the LAN port.
- Press the [ ] button and select the [Settings] menu.
TIP: Press the [ ] key or [Ctrl] + [Esc] to display the Start menu.
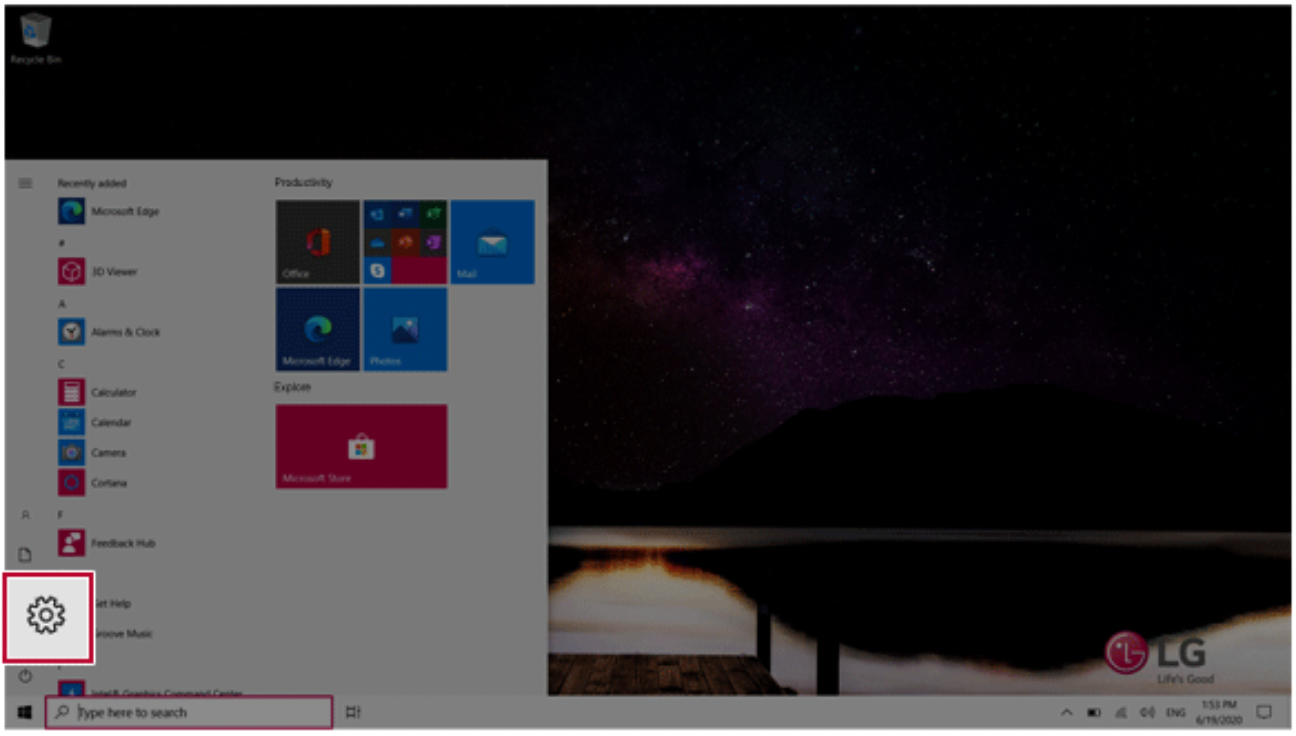
- Select [Network & Internet] > [Status] > [Change adapter options].

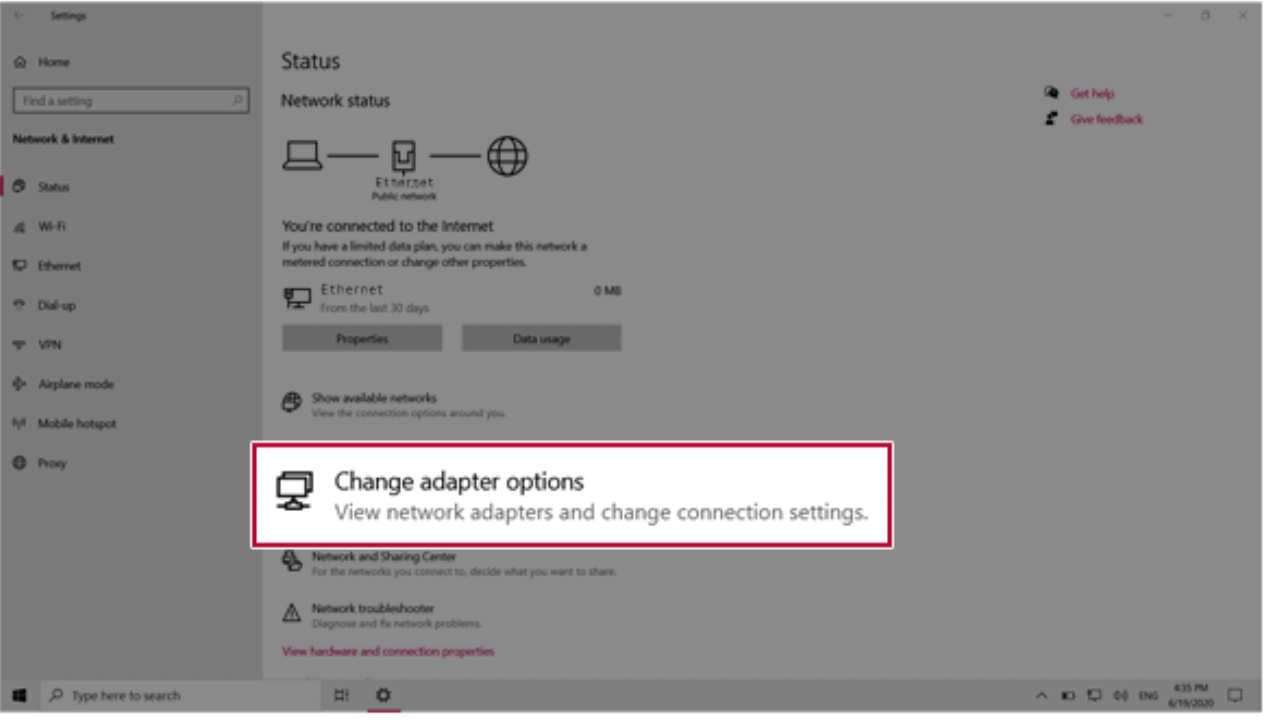
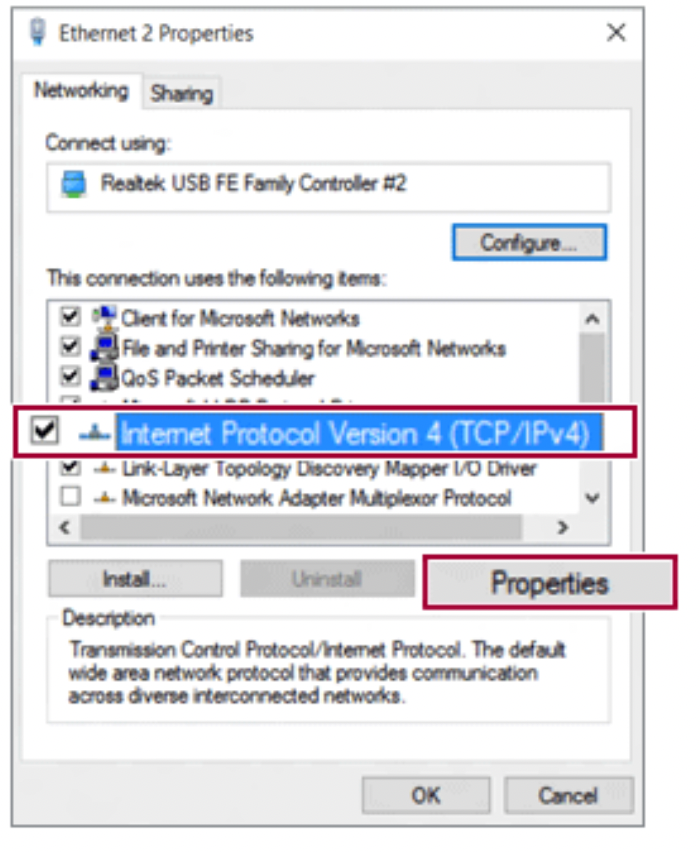
- Right-click [Ethernet] and select the [Properties] menu.

- Select [Internet Protocol Version 4 (TCP/IPv4)] and then click [Properties].
- To use an automatic IP(DHCP), select [Obtain an IP address automatically]. If you wish to use a static IP, select [Use the following IP address] to enter the address.
Contact the network service provider or administrator to use a static IP.
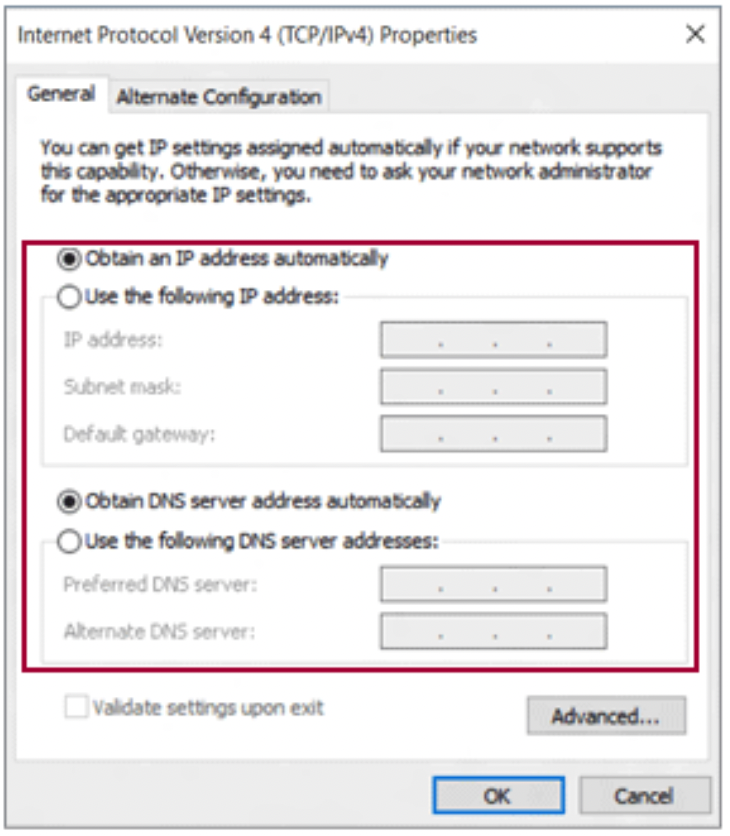
- Press [OK] to complete the network setup.
- Click the Web Browser icon to check whether the Internet is operating normally.
Wireless LAN
The wireless network (Wireless LAN) is the network environment that connects a PC with the internet provider or company network through an Access Point (wireless or regular router).
Turning On/Off Airplane Mode
Prior to using the wireless LAN, press [Fn] + [F6] to turn off Airplane Mode.
Pressing [Fn] + [F6] keys will turn on or off the Airplane Mode. If you are not going to use the product for a while, keep the Airplane Mode turned on to reduce the battery power consumption.
Using the Wireless LAN
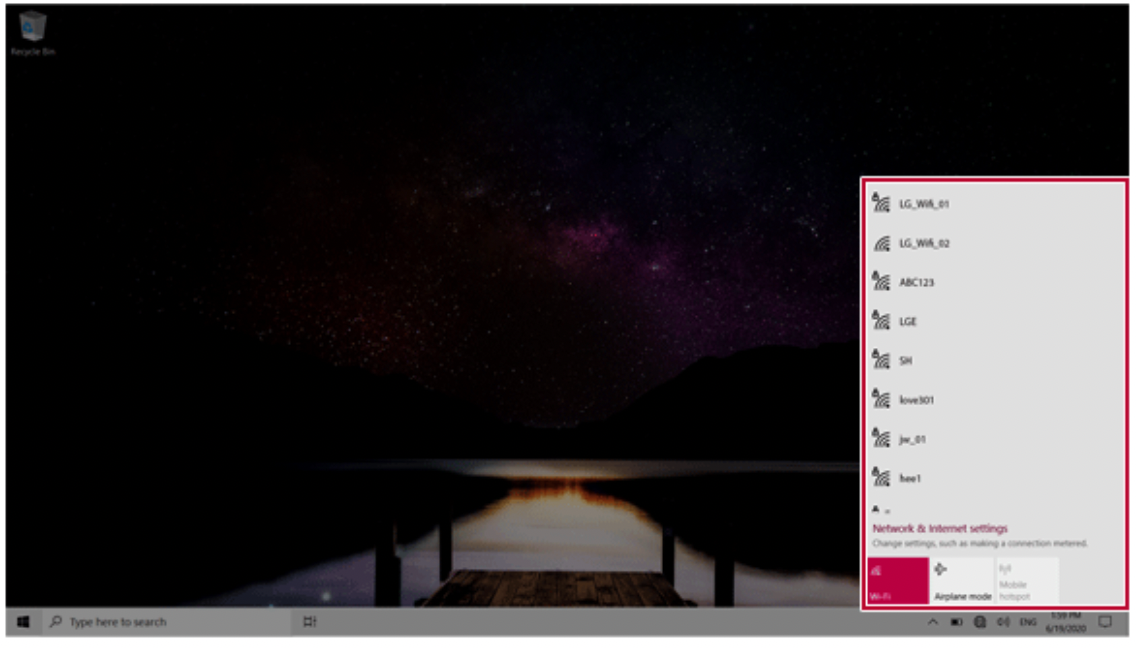
If an Access Point (wired or wireless router) is in the vicinity of the PC, the wireless LAN can easily be accessed.
During the search for a wireless network (Wireless LAN), various Access Points may be found according to the location where the PC is used.
In case there are no accessible wireless networks (Wireless LAN) near the PC, no Access Points may be found.
A password protected Access Point cannot be accessed without the correct password.
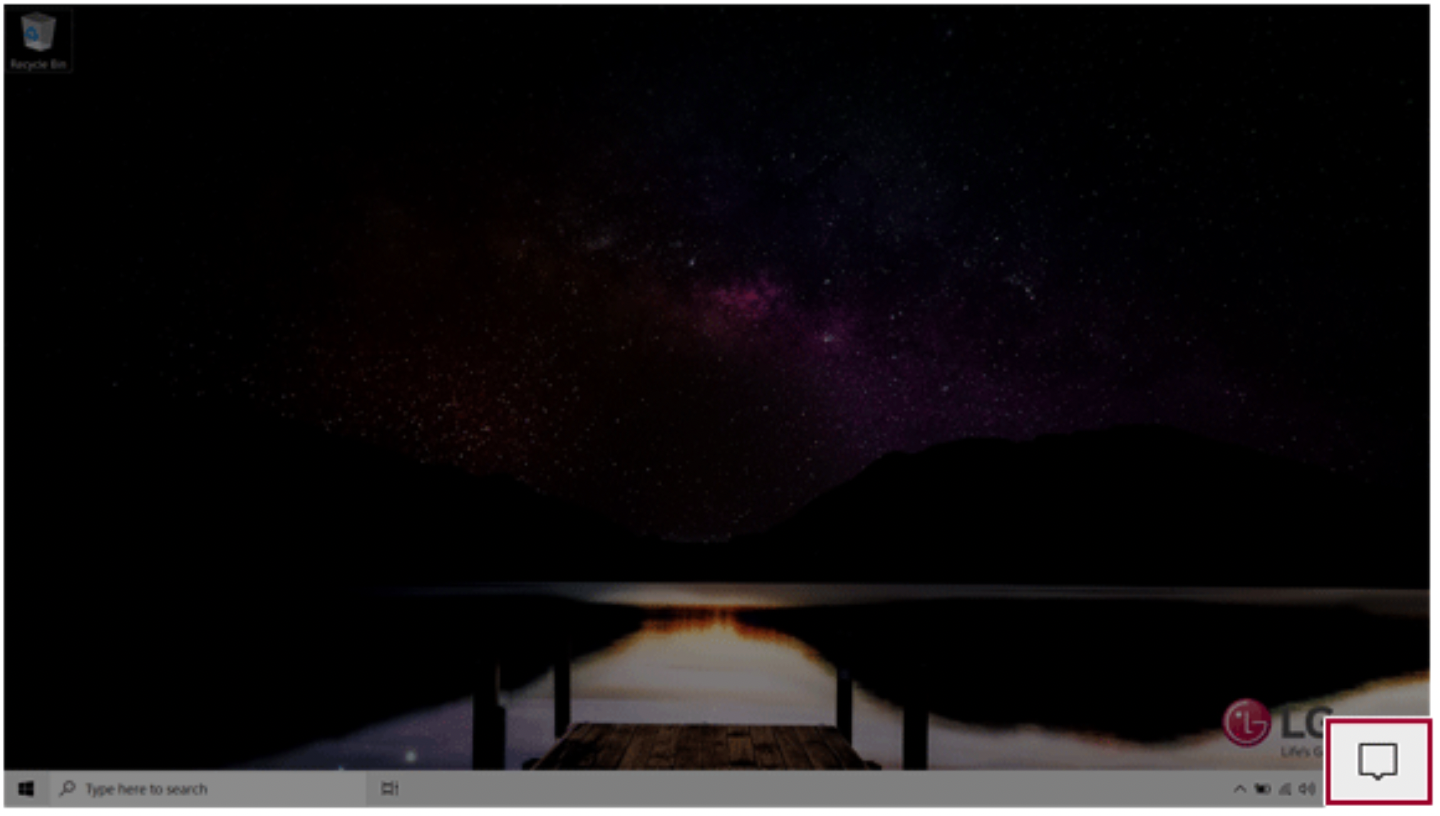
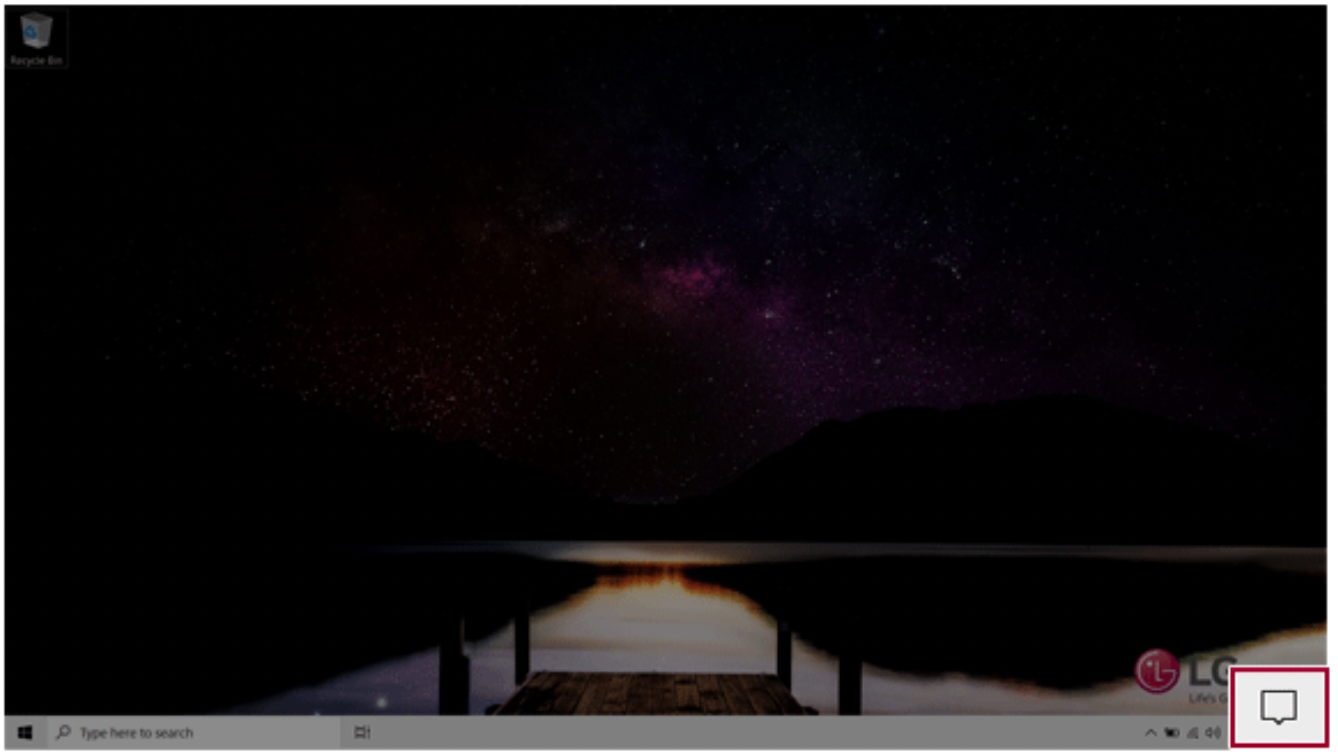
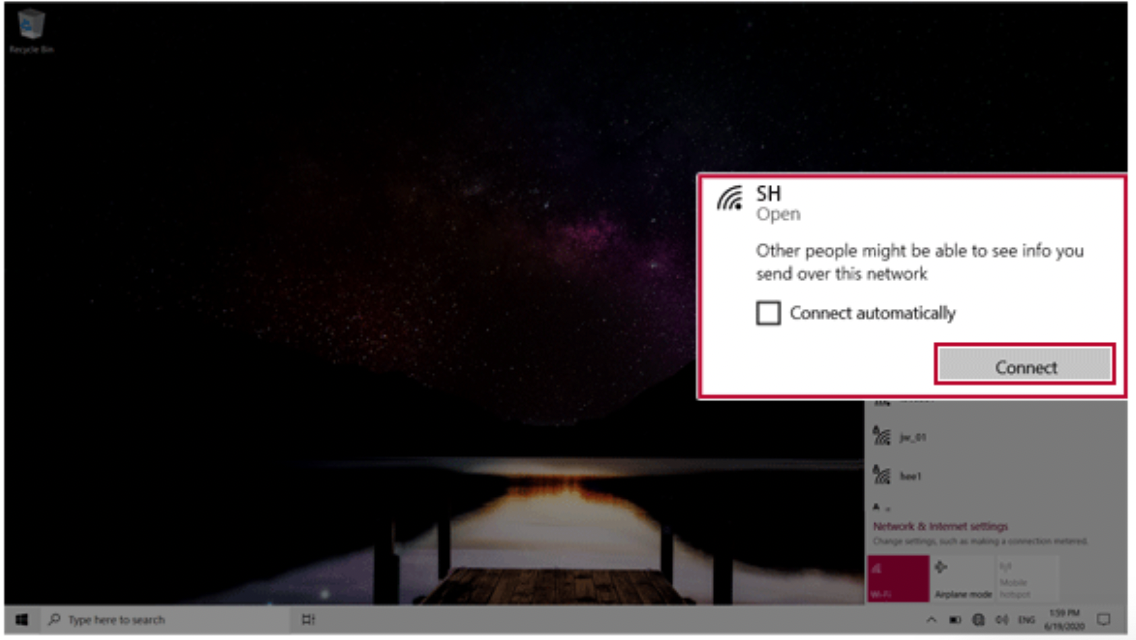
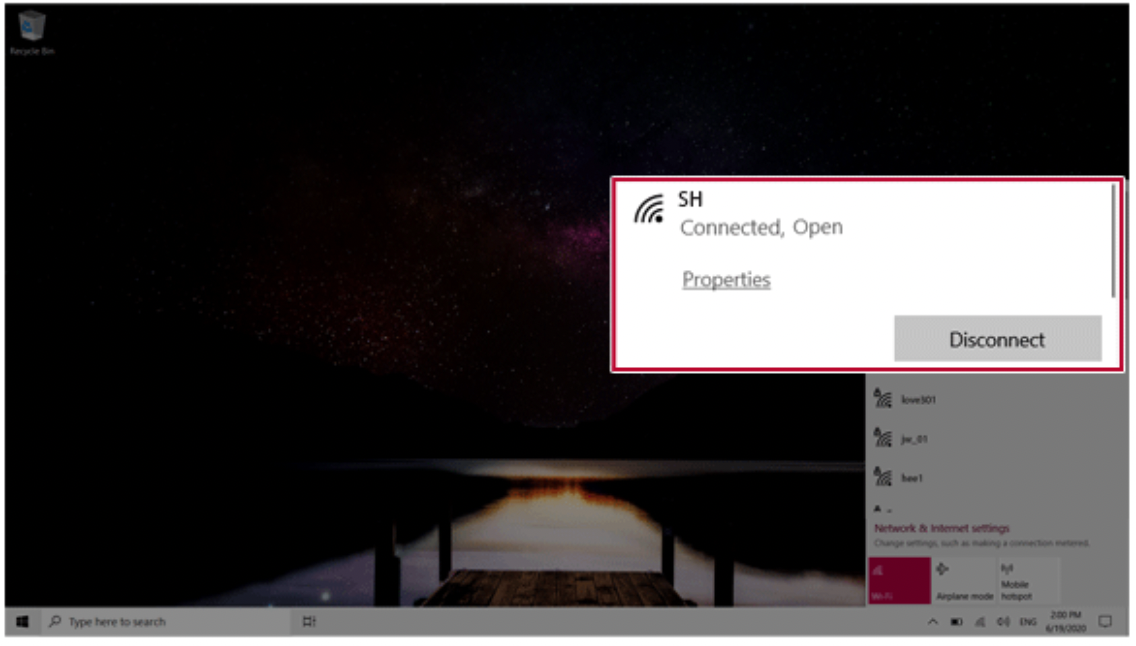
- Press the Action Center [ ] icon on the right side of the taskbar.
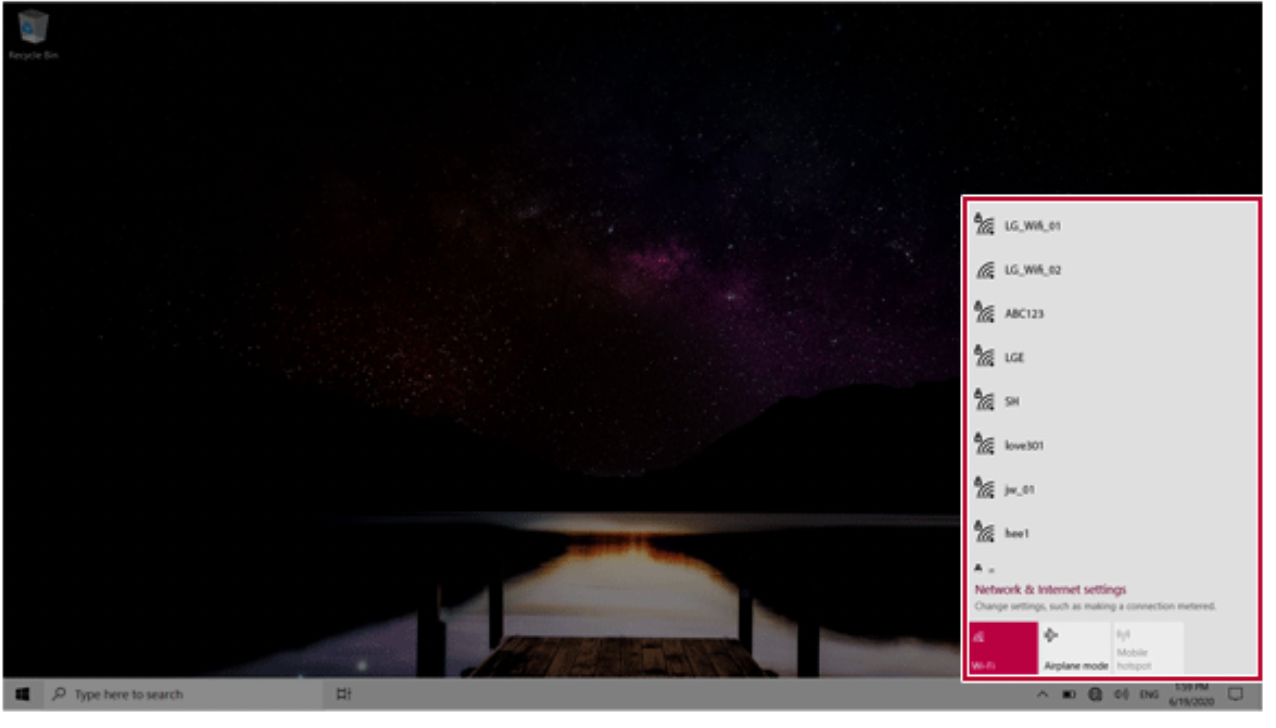
- Press the [Network] tile to search for a nearby Access Point.
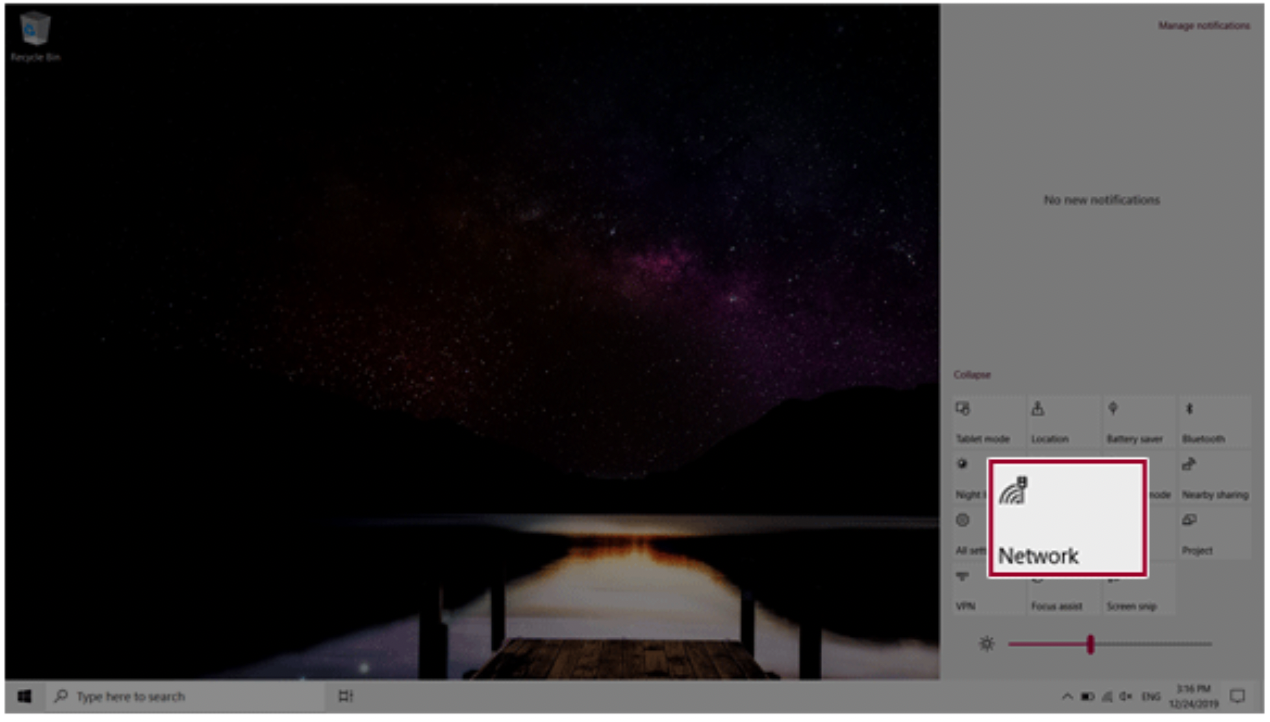
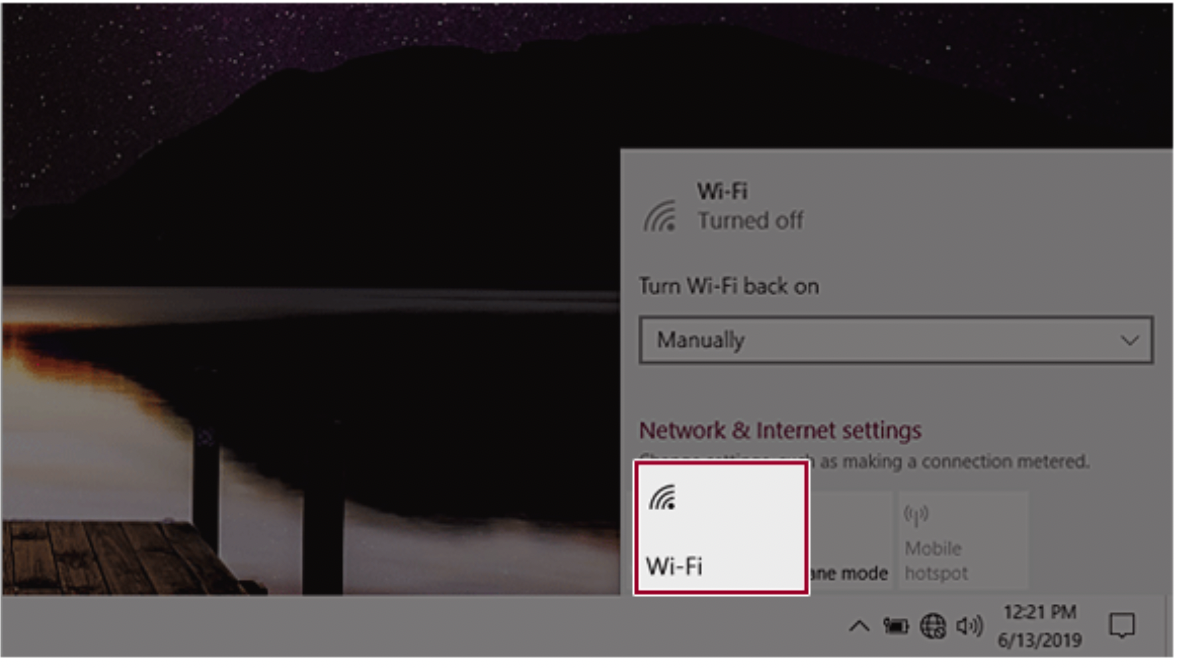
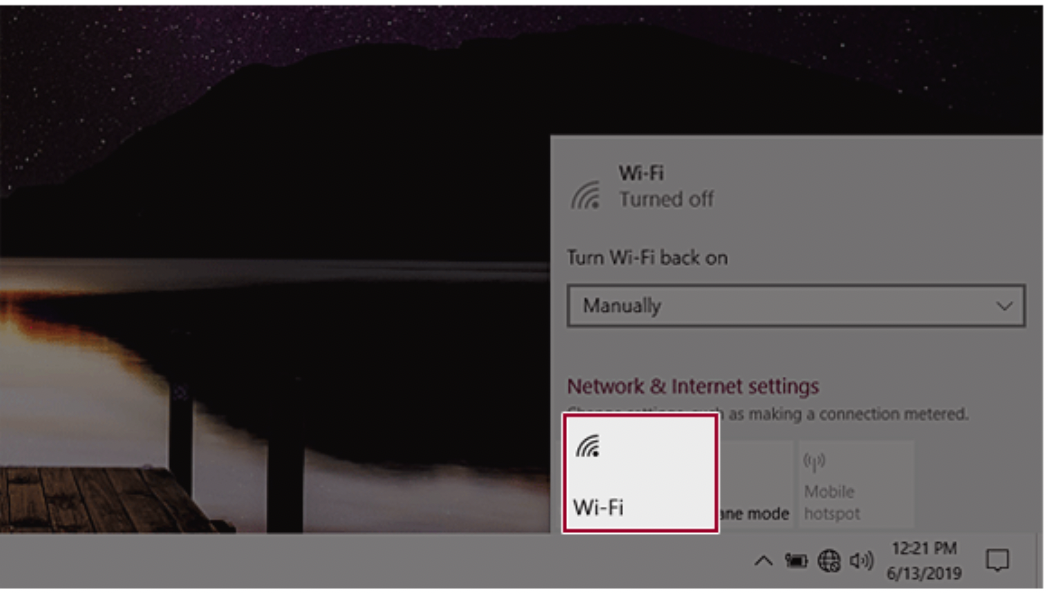
TIP: If Wi-Fi is turned off, press the [Wi-Fi] tile.
- Select the Access Point you want to connect to and press [Connect].
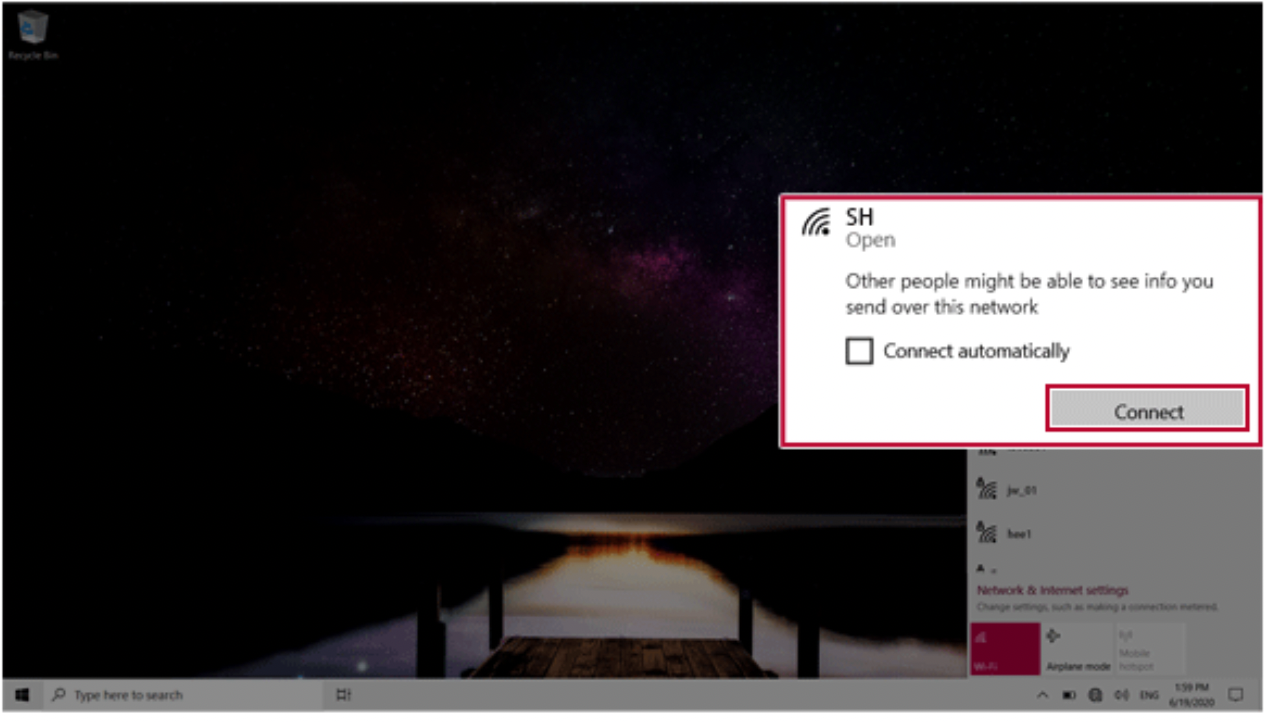
- If a connection is established, [Connected] appears below the Access Point name.

- Click the Web Browser icon to check whether the Internet is operating normally.
Using a Wired/Wireless Router
A wireless / regular router connects several PCs and mobile devices to one internet line and enables the use of internet and the network.
A wireless / regular router has to be bought separately. Refer to the manual provided by the manufacturer for instructions.
Connecting a Wireless or Regular Router
If one internet line is used with a wired / wireless router and several devices are connected, this may result in a slower connection.
In case of a wireless LAN, it is recommended to change the network name and security settings for a more secure connection.
Network speed can differ according to operation environment and specifications.
- Connect the internet cable of the modem that was provided by your internet provider to the router's WAN port.
- Connect all devices (PC, IPTV, internet phone, etc.) with a LAN cable to LAN ports 1 to 4 of the router.
The number of LAN ports can vary for each router model.
- Please refer to the manual provided by the router manufacturer for setup of the network and internet.
FAQ
Using Instant Booting
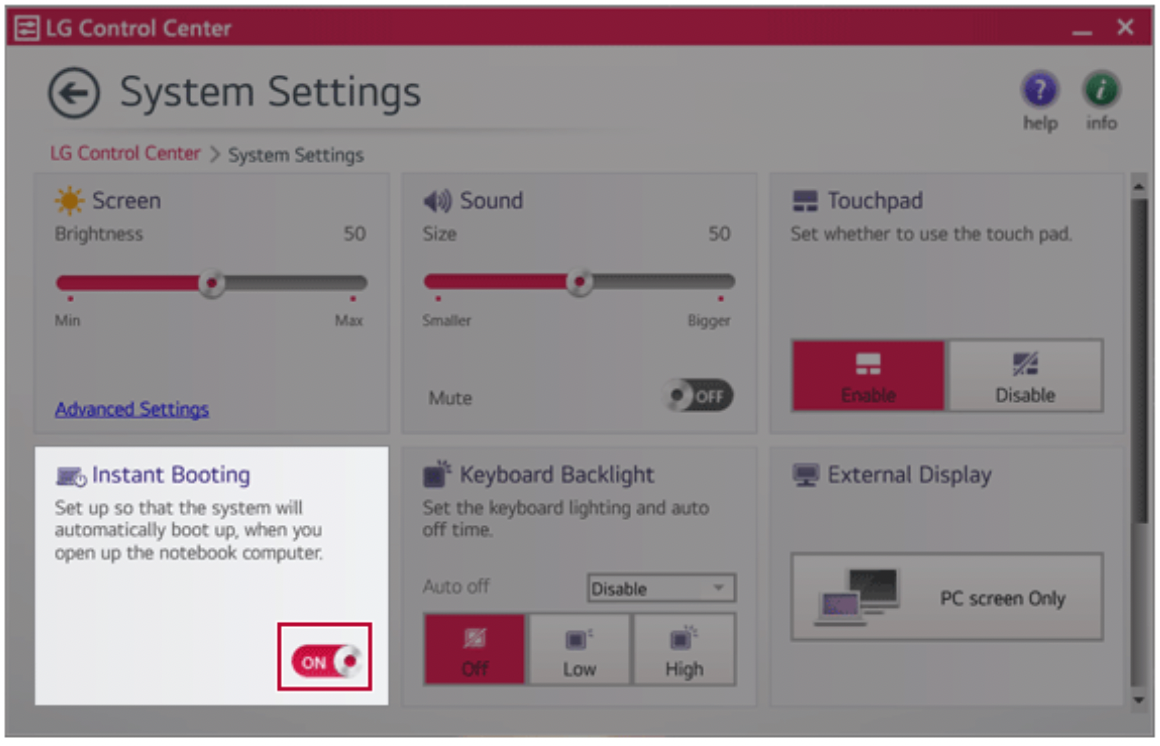
Instant Booting allows the system to boot automatically when the notebook PC cover is opened, so that you can use the system without pressing the power button.
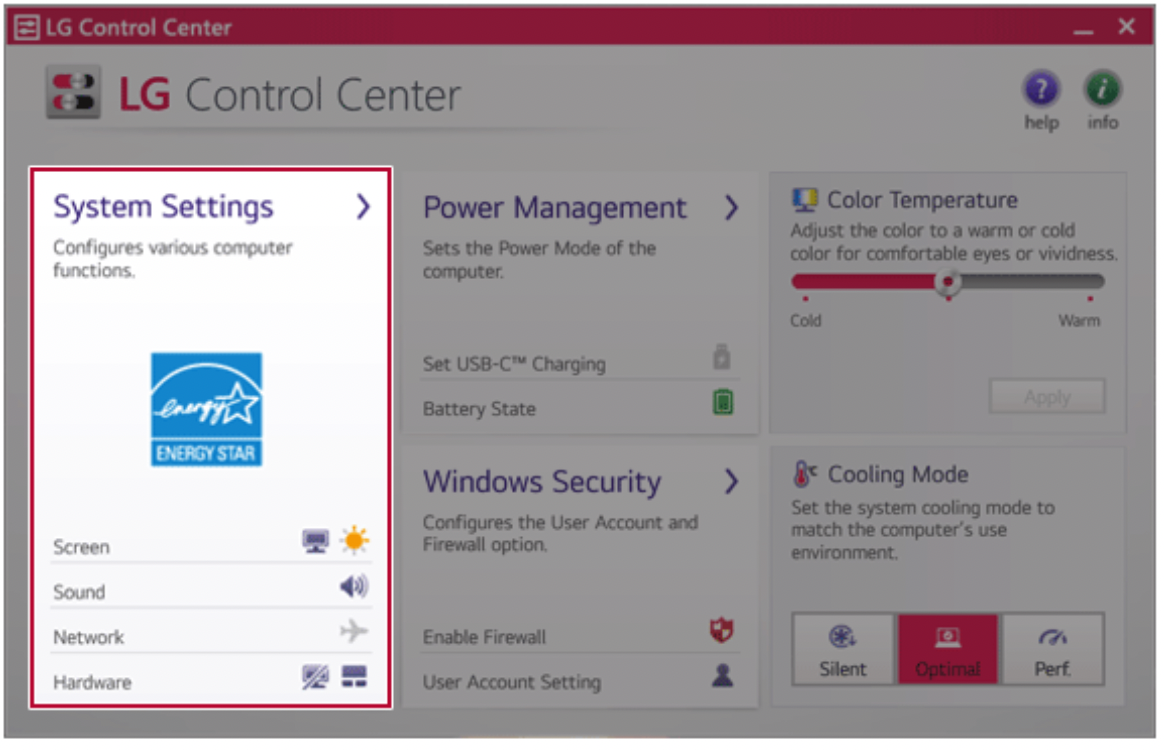
- Select the [ ] button > [LG Software] to run [LG Control Center].
- On the LG Control Center screen, select the [System Settings] menu.
- Set [Instant Booting] to [ON].
- Shutdown the system and close the notebook PC cover.
- When the cover is opened, the notebook PC turns on and the system starts to boot automatically.
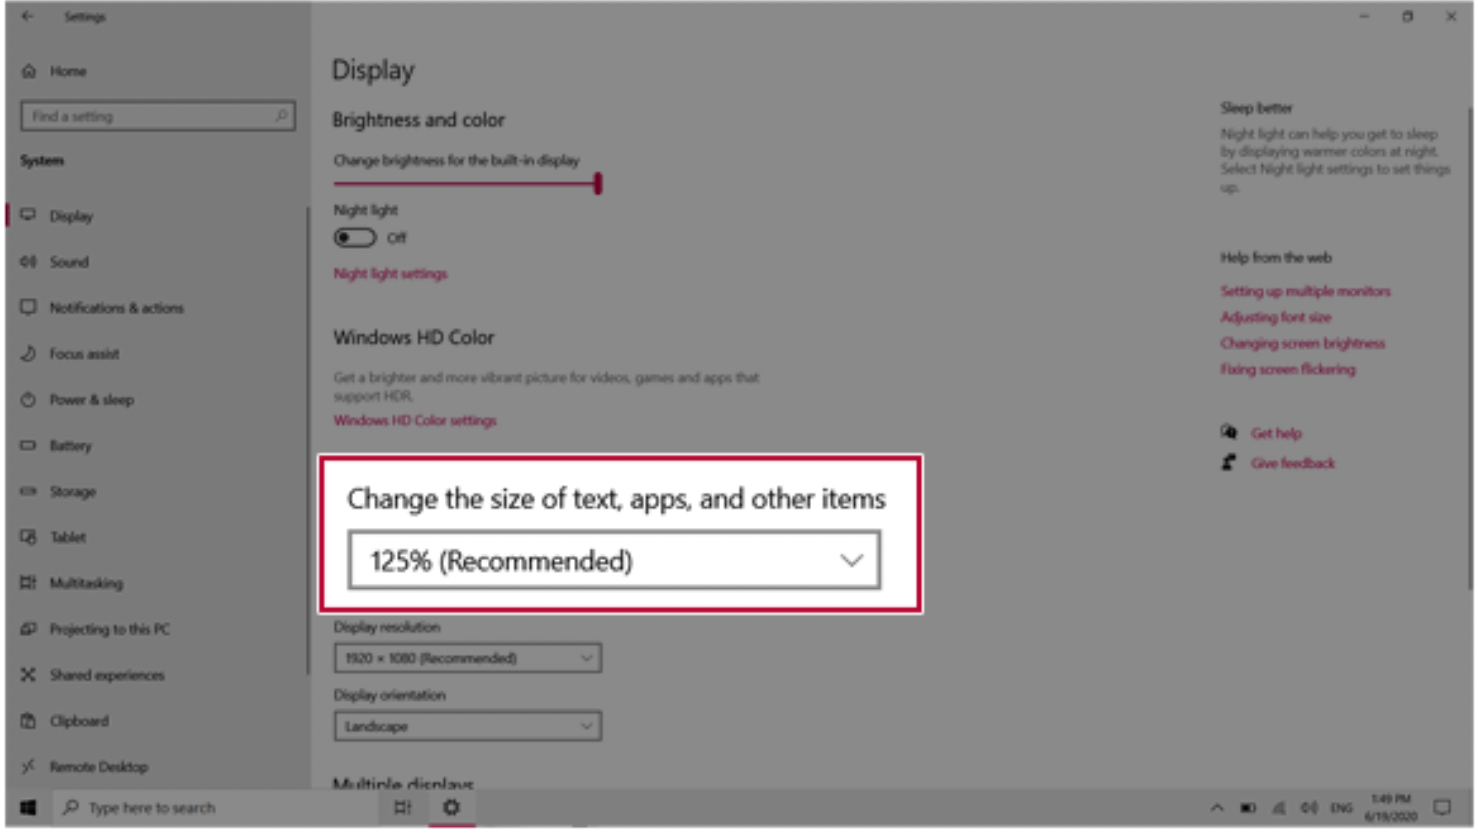
Windows 10 Auto Scaling
The Windows 10 Auto Scaling feature for user's convenience may partially blur the screen or display some icons and texts larger.
Refer to the following information to change the DPI scaling to suit your needs.
- Press the [ ] button and select the [Settings] menu.
TIP: Press the [ ] key or [Ctrl] + [Esc] to display the Start menu.

- Select [System] > [Display].

- Modify the [Change the size of text, apps, and other items] value to change the Auto Scaling settings.
TIP: After auto scaling, you may need to restart some apps to apply the new scale and layout.
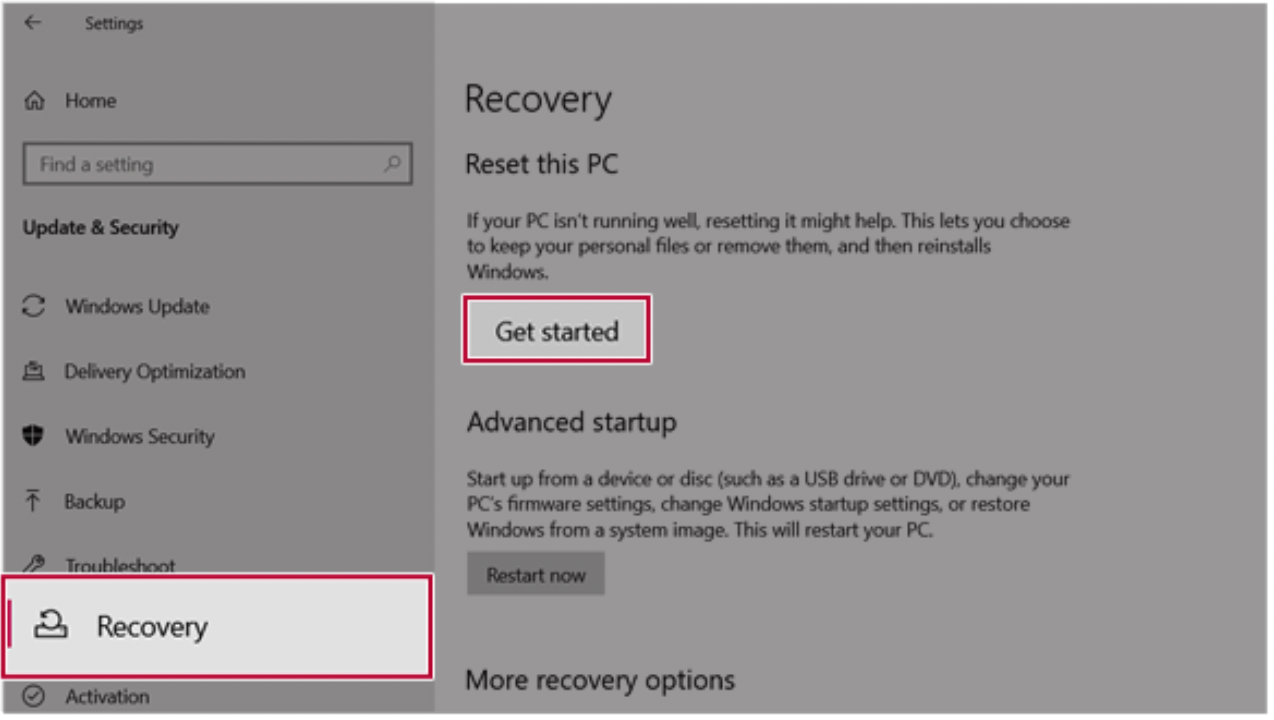
Restoring the System
If the system has an error, you can use Windows 10's recovery function to recover or restore the system to its initial pre-purchase state.
CAUTION: If you have deleted the restoration data in the protected area of the disk, or have arbitrarily installed another operating system, the restore function may not work.
To recover the system, the AC adapter must be connected.
- Click the [ ] button and select the [Settings] menu.
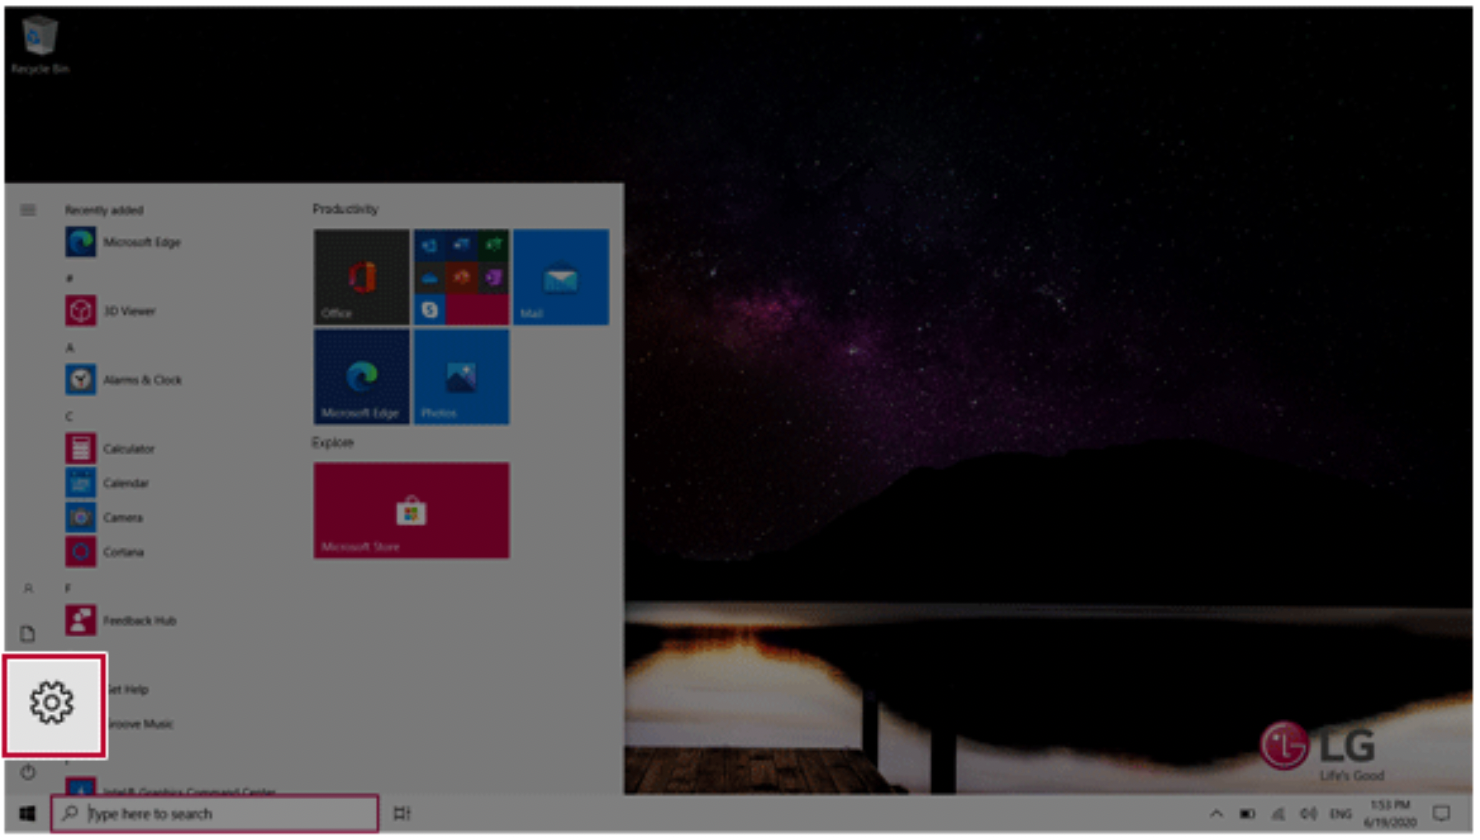
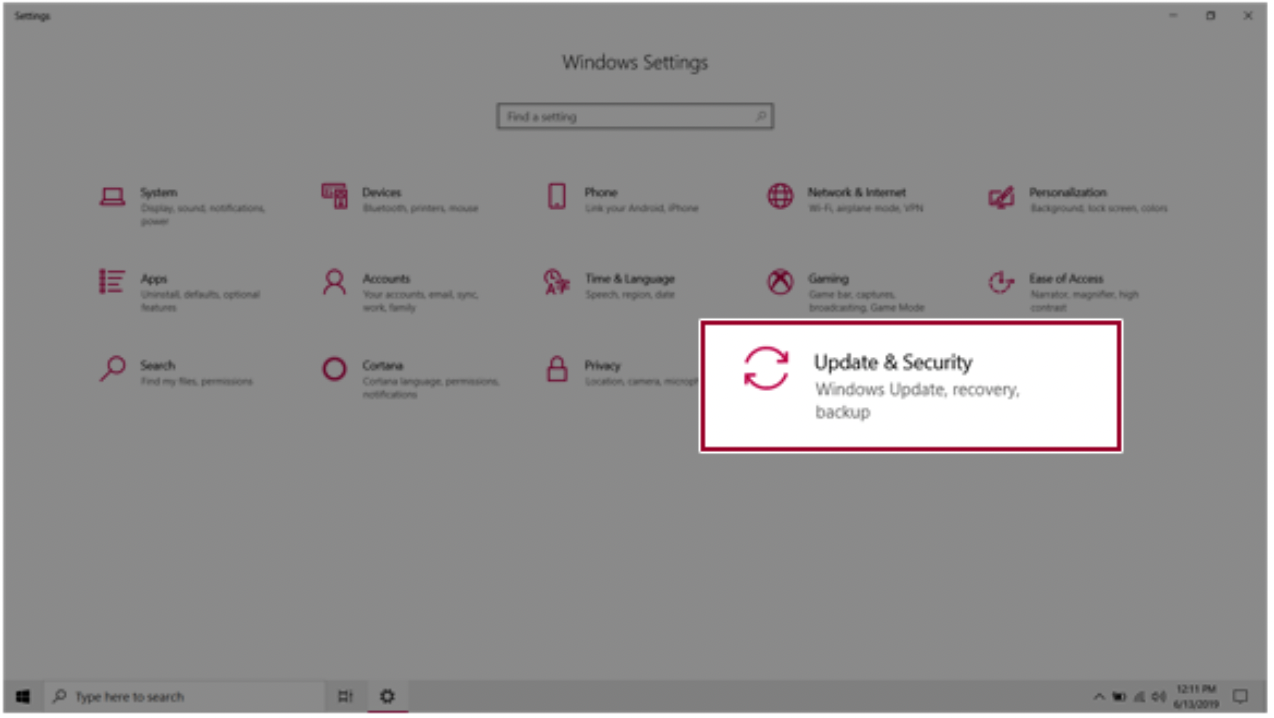
- When the [Settings] screen appears, select [Update & Security].
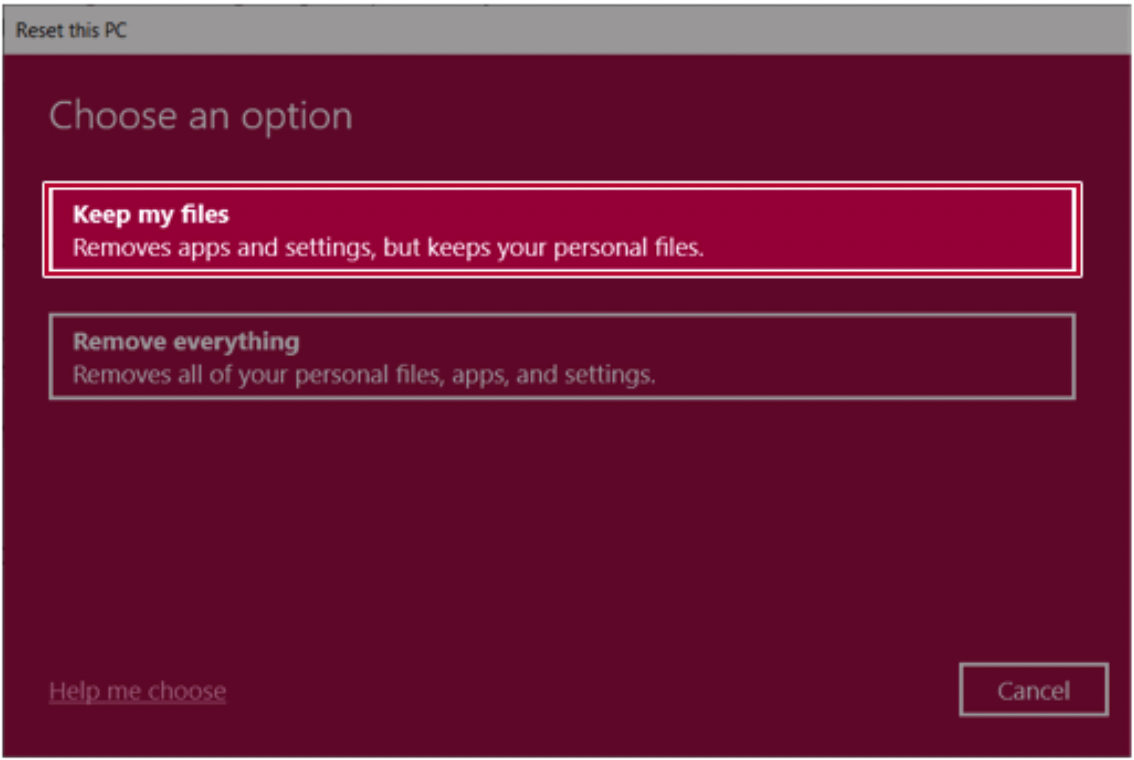
- Select the [Recovery] menu and press [Get started] in the Reset this PC menu.
- If the following option screen appears, select a desired option to proceed with recovery.
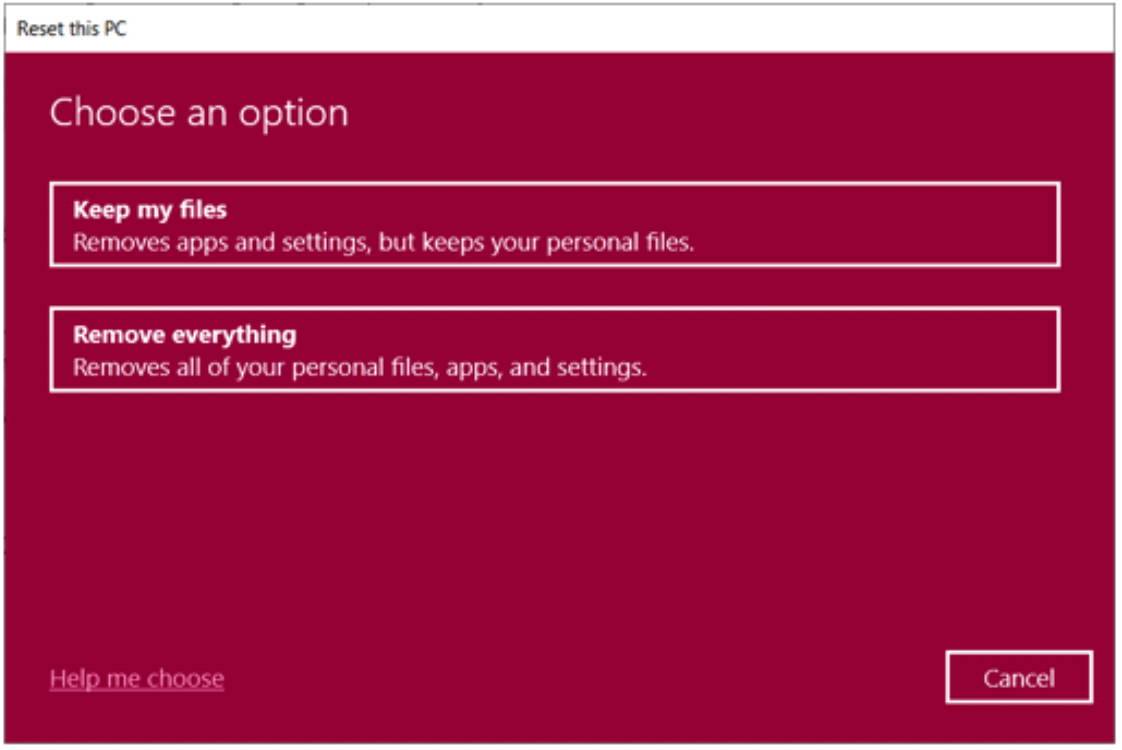
Keep My Files
It removes the apps and their settings without loss of personal files.
- Select [Keep my files].
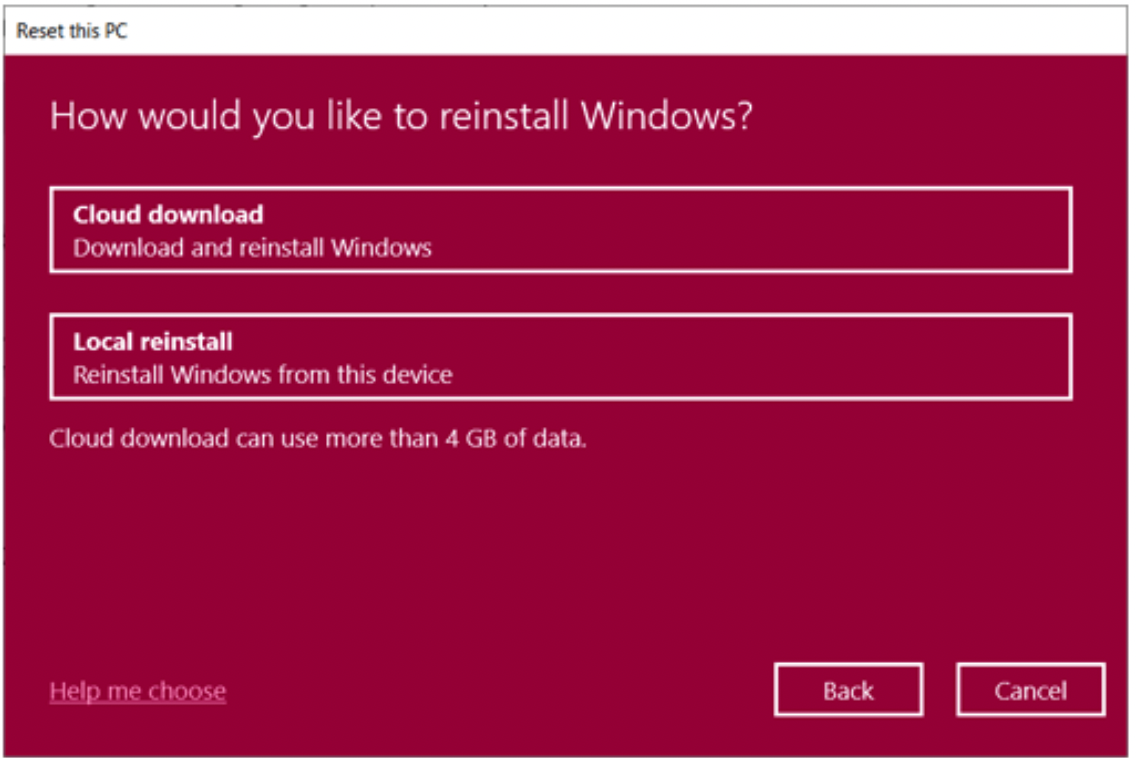
- Select How to Reinstall Windows.
TIP: If the PC is not connected to the Internet, the screen for selecting Windows installation method does not appear.
[Cloud download] is a menu for downloading Windows from Microsoft Cloud Server and reinstalling it.
The required time may vary depending on the Internet speed.

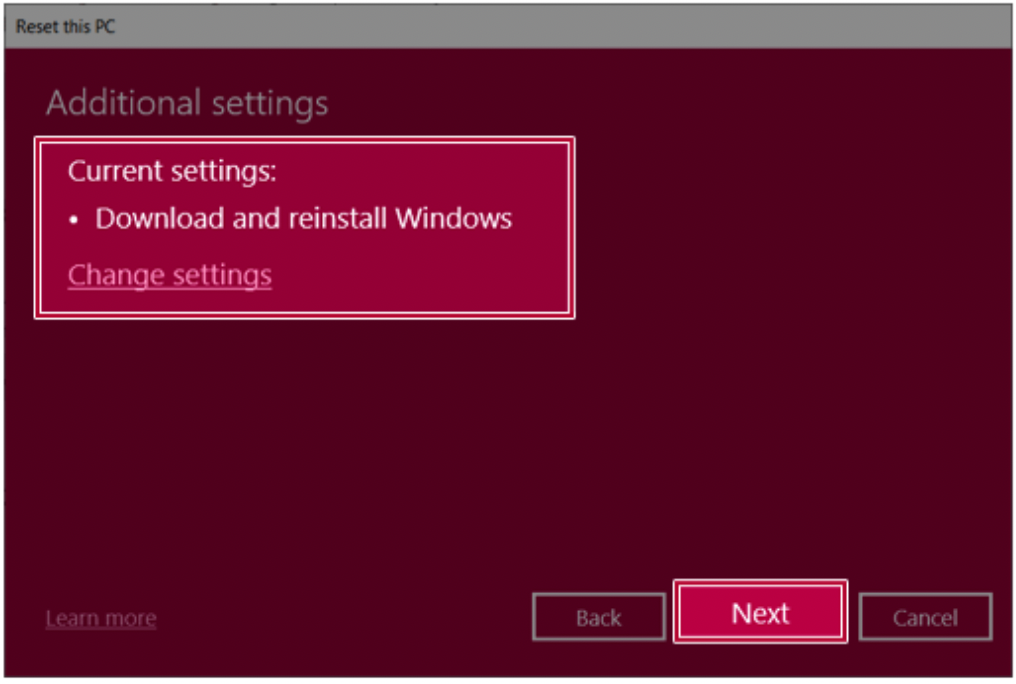
- Check the current settings and click [Next] to perform the recovery according to the instructions.
TIP: If you need to change the settings, click [Change settings] and change the settings.
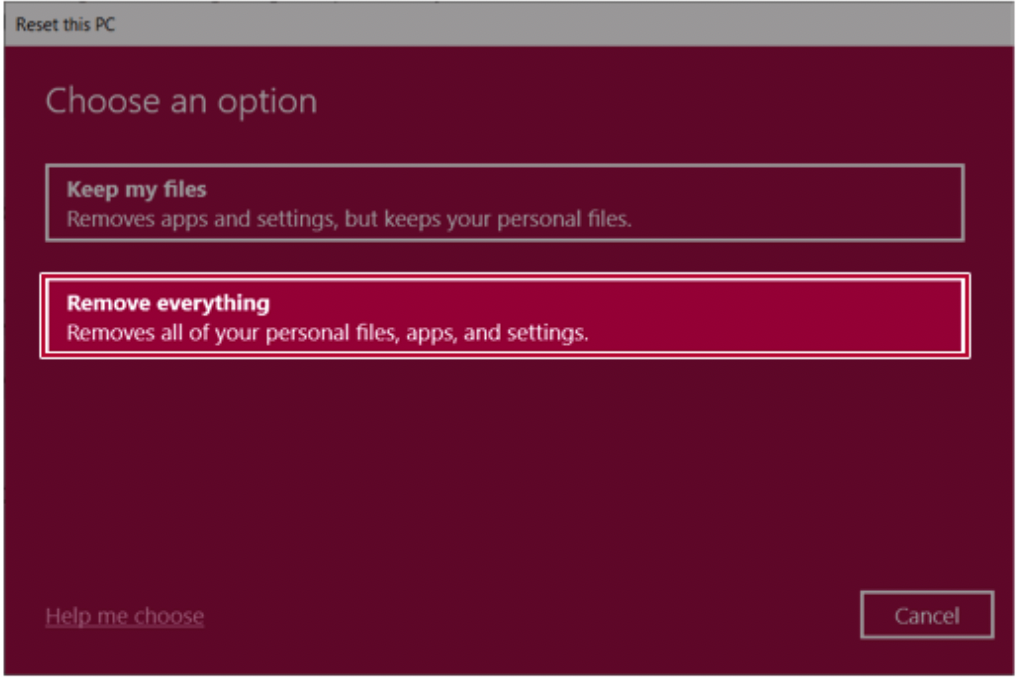
Remove everythings
Removes all items from the system and restores the system to its initial pre-purchase state.
CAUTION: All data is lost during the initialization, so you must backup all critical data in advance. It may take about 5 hours or longer depending on the system conditions.
- Select [Remove everything].
- Select How to Reinstall Windows.
TIP: If the PC is not connected to the Internet, the screen for selecting Windows installation method does not appear.
[Cloud download] is a menu for downloading Windows from Microsoft Cloud Server and reinstalling it.
The required time may vary depending on the Internet speed.
- Check the current settings and click [Next] to perform the recovery according to the instructions.
TIP: If you need to change the settings, click [Change settings] and change the settings.

Connecting to External Display
Connecting to the HDMI Port
HDMI is a multimedia interface that can integrate and transmit video and audio signals.
In some models, DTS Audio may not work when you use HDMI.
TIP: Ensure the monitor power is off before connecting the external monitor to the PC.
- Connect the HDMI cable to the PC and the external device (TV, monitor) that supports HDMI.
- HDMI port transfers both video and audio simultaneously. Hence, there is no need for a separate audio connection.
- On the PC, press [Fn] + [F7] to display monitor (projector) toggling screen. Select the desired screen output.
TIP: Everytime [ ] + [P] keys are pressed, the screen output option changes. Release the keys to display the selected screen output.
CAUTION
- If you do not set Speaker as the default value after disconnecting the HDMI cable, the system may not produce any sound.
- If a program was running already, you must exit and restart the program to produce sound.
Using a Wired/Wireless Router
A wireless / regular router connects several PCs and mobile devices to one internet line and enables the use of internet and the network.
A wireless / regular router has to be bought separately. Refer to the manual provided by the manufacturer for instructions.
Connecting a Wireless or Regular Router
If one internet line is used with a wired / wireless router and several devices are connected, this may result in a slower connection.
In case of a wireless LAN, it is recommended to change the network name and security settings for a more secure connection.
Network speed can differ according to operation environment and specifications.
- Connect the internet cable of the modem that was provided by your internet provider to the router's WAN port.
- Connect all devices (PC, IPTV, internet phone, etc.) with a LAN cable to LAN ports 1 to 4 of the router.
The number of LAN ports can vary for each router model.
- Please refer to the manual provided by the router manufacturer for setup of the network and internet.
Wireless LAN
The wireless network (Wireless LAN) is the network environment that connects a PC with the internet provider or company network through an Access Point (wireless or regular router).
Turning On/Off Airplane Mode
Prior to using the wireless LAN, press [Fn] + [F6] to turn off Airplane Mode.
Pressing [Fn] + [F6] keys will turn on or off the Airplane Mode. If you are not going to use the product for a while, keep the Airplane Mode turned on to reduce the battery power consumption.
Using the Wireless LAN
If an Access Point (wired or wireless router) is in the vicinity of the PC, the wireless LAN can easily be accessed.
During the search for a wireless network (Wireless LAN), various Access Points may be found according to the location where the PC is used.
In case there are no accessible wireless networks (Wireless LAN) near the PC, no Access Points may be found.
A password protected Access Point cannot be accessed without the correct password.
- Press the Action Center [ ] icon on the right side of the taskbar.
- Press the [Network] tile to search for a nearby Access Point.

TIP: If Wi-Fi is turned off, press the [Wi-Fi] tile.
- Select the Access Point you want to connect to and press [Connect].
- If a connection is established, [Connected] appears below the Access Point name.
- Click the Web Browser icon to check whether the Internet is operating normally.