www.philips.com/welcome
BDL4777XL
V2.00
User Manual (English)

BDL4777XL
ii
Safety Instructions
Safety precautions and maintenance
WARNING: Use of controls, adjustments or procedures other than those specied in this documentation may result in exposure to
shock, electrical hazards and/or mechanical hazards.
Read and follow these instructions when connecting and using your display:
Operation:
• Keepthedisplayoutofdirectsunlightandawayfromstovesoranyotherheatsources.
• Removeanyobjectthatcouldfallintoventilationholesorpreventpropercoolingofthedisplay’selectronics.
• Donotblocktheventilationholesonthecabinet.
• Whenpositioningthedisplay,makesurethepowerplugandoutletareeasilyaccessible.
• Whenturningoffthedisplaybydetachingthepowercord,wait6secondsbeforere-attachingthepowercordfornormaloperation.
• EnsuretheuseofanapprovedpowercordprovidedbyPhilipsatalltimes.Ifyourpowercordismissing,pleasecontactyourlocalservicecenter.
• Donotsubjectthedisplaytoseverevibrationorhighimpactconditionsduringoperation.
• Donotknockordropthedisplayduringoperationortransportation.
Maintenance:
• Toprotectyourdisplayfrompossibledamage,donotputexcessivepressureontheLCDpanel.Whenmovingyourdisplay,grasptheframetolift;do
notliftthedisplaybyplacingyourhandorngersontheLCDpanel.
• Unplugthedisplayifyouarenotgoingtouseitforanextensiveperiodoftime.
• Unplugthedisplayifyouneedtocleanitwithaslightlydampcloth.Thescreenmaybewipedwithadryclothwhenthepowerisoff.However,never
useorganicsolvent,suchas,alcohol,orammonia-basedliquidstocleanyourdisplay.
• Toavoidtheriskofshockorpermanentdamagetotheset,donotexposethedisplaytodust,rain,wateroranexcessivelymoistenvironment.
• Ifyourdisplaybecomeswet,wipeitwithdryclothassoonaspossible.
• Ifaforeignsubstanceorwatergetsinyourdisplay,turnthepoweroffimmediatelyanddisconnectthepowercord.Thenremovetheforeignsubstance
orwater,andsendtheunittothemaintenancecenter.
• Donotstoreorusethedisplayinlocationsexposedtoheat,directsunlightorextremecold.
• Inordertomaintainthebestperformanceofyourdisplayandensurealongerlifetime,westronglyrecommendusingthedisplayinalocationthatfalls
withinthefollowingtemperatureandhumidityranges.
- Temperature:0-40°C32-104°F
- Humidity:20-80%RH
IMPORTANT:Alwaysactivateamovingscreensaverprogramwhenyouleaveyourdisplayunattended.Alwaysactivateaperiodicscreenrefresh
applicationiftheunitwilldisplayunchangingstaticcontent.Uninterrupteddisplayofstillorstaticimagesoveranextendedperiodmaycause“burnin”,
alsoknownas“after-imaging”or“ghostimaging”,onyourscreen.Thisisawell-knownphenomenoninLCDpaneltechnology.Inmostcases,the“burned
in”or“after-imaging”or“ghostimaging”willdisappeargraduallyoveraperiodoftimeafterthepowerhasbeenswitchedoff.
WARNING:Severe“burn-in”or“after-image”or“ghostimage”symptomswillnotdisappearandcannotberepaired.Thisisalsonotcoveredunderthe
termsofyourwarranty.
Service:
• Thecasingcovershouldbeopenedonlybyqualiedservicepersonnel.
• Ifthereisanyneedforrepairorintegration,pleasecontactyourlocalservicecenter.
• Donotleaveyourdisplayunderdirectsunlight.
Ifyourdisplaydoesnotoperatenormally,havingfollowedtheinstructionssetoutinthisdocument,pleasecontactatechnicianoryour
localservicecenter.
BDL4777XL
iii
Read and follow these instructions when connecting and using your display:
• Unplugthedisplayifyouarenotgoingtouseitforanextensiveperiodoftime.
• Unplugthedisplayifyouneedtocleanitwithaslightlydampcloth.Thescreenmanybewipedwithadryclothwhenthepoweris
off.However,neverusealcohol,solventsorammonia-basedliquids.
• Consultaservicetechnicianifthedisplaydoesnotoperatenormallywhenyouhavefollowedtheinstructionsinthismanual.
• Thecasingcovershouldbeopenedonlybyqualiedservicepersonnel.
• Keepthedisplayoutofdirectsunlightandawayfromstovesoranyotherheatsources.
• Removeanyobjectthatcouldfallintotheventsorpreventpropercoolingofthedisplay’selectronics.
• Donotblocktheventilationholesonthecabinet.
• Keepthedisplaydry.Toavoidelectricshock,donotexposeittorainorexcessivemoisture.
• WhenturningoffthedisplaybydetachingthepowercableorDCpowercord,waitfor6secondsbeforere-attachingthepower
cableorDCpowercordfornormaloperation..
• Toavoidtheriskofshockorpermanentdamagetothesetdonotexposethedisplaytorainorexcessivemoisture.
• Whenpositioningthedisplay,makesurethepowerplugandoutletareeasilyaccessible.
• IMPORTANT:Alwaysactivateascreensaverprogramduringyourapplication.Ifastillimageinhighcontrastremainsonthe
screenforanextendedperiodoftime,itmayleavean‘after-image’or‘ghostimage’onthefrontofthescreen.Thisisawell-known
phenomenonthatiscausedbytheshortcomingsinherentinLCDtechnology.Inmostcasestheafterimagewilldisappeargradually
overaperiodoftimeafterthepowerhasbeenswitchedoff.Beawarethattheafter-imagesymptomcannotberepairedandisnot
coveredunderwarranty.
CE Declaration of Conformity
ThisdevicecomplieswiththerequirementssetoutintheCouncilDirectiveontheApproximationoftheLawsoftheMemberStatesrelatingto
ElectromagneticCompatibility(2014/30/EU),Low-voltageDirective(2014/35/EU),ErPDirective(2009/125/EC)andRoHSdirective(2011/65/EU).
ThisproducthasbeentestedandfoundtocomplywiththeharmonizedstandardsforInformationTechnologyEquipment,theseharmonizedstandards
publishedunderDirectivesofOfcialJournaloftheEuropeanUnion.
Federal Communications Commission (FCC) Notice (U.S. Only)
ThisequipmenthasbeentestedandfoundtocomplywiththelimitsforaClassBdigitaldevice,pursuanttopart15oftheFCCRules.
Theselimitsaredesignedtoprovidereasonableprotectionagainstharmfulinterferenceinaresidentialinstallation.Thisequipment
generates,usesandcanradiateradiofrequencyenergyand,ifnotinstalledandusedinaccordancewiththeinstructions,maycause
harmfulinterferencetoradiocommunications.However,thereisnoguaranteethatinterferencewillnotoccurinaparticularinstallation.
Ifthisequipmentdoescauseharmfulinterferencetoradioortelevisionreception,whichcanbedetermined
byturningtheequipmentoffandon,theuserisencouragedtotrytocorrecttheinterferencebyoneormoreofthefollowing
measures:
•
Reorientorrelocatethereceivingantenna.
• Increasetheseparationbetweentheequipmentandreceiver.
• Connecttheequipmentintoanoutletonacircuitdifferentfromthattowhichthereceiverisconnected.
• Consultthedealeroranexperiencedradio/TVtechnicianforhelp..
Changesormodicationsnotexpresslyapprovedbythepartyresponsibleforcompliancecouldvoidtheuser’sauthoritytooperatethe
equipment.
UseonlyanRFshieldedcablethatwassuppliedwiththedisplaywhenconnectingthisdisplaytoacomputerdevice.
Topreventdamagewhichmayresultinreorshockhazard,donotexposethisappliancetorainorexcessivemoisture.
THISCLASSBDIGITALAPPARATUSMEETSALLREQUIREMENTSOFTHECANADIANINTERFERENCE-CAUSINGEQUIPMENTREGULATIONS.
ThisdevicecomplieswithPart15oftheFCCRules.Operationissubjecttothefollowingtwoconditions:(1)thisdevicemaynot
causeharmfulinterference,and(2)thisdevicemustacceptanyinterferencereceived,includinginterferencethatmaycauseundesired
operation.
BDL4777XL
iv
Polish Center for Testing and Certication Notice
Theequipmentshoulddrawpowerfromasocketwithanattachedprotectioncircuit(athree-prongsocket).Allequipmentthatworkstogether(computer,
display,printer,andsoon)shouldhavethesamepowersupplysource.
Thephasingconductoroftheroom’selectricalinstallationshouldhaveareserveshort-circuitprotectiondeviceintheformofafusewithanominalvalue
nolargerthan16amperes(A).
Tocompletelyswitchofftheequipment,thepowersupplycablemustberemovedfromthepowersupplysocket,whichshouldbelocatednearthe
equipmentandeasilyaccessible.
Aprotectionmark“B”conrmsthattheequipmentisincompliancewiththeprotectionusagerequirementsofstandardsPN-93/T-42107andPN-89/
E-06251.
BDL4777XL
v
Electric, Magnetic and Electromagnetic Fields (“EMF”)
1. Wemanufactureandsellmanyproductstargetedatconsumers,which,likeanyelectronicapparatus,ingeneralhavetheabilitytoemitandreceive
electromagneticsignals.
2. OneofourleadingBusinessPrinciplesistotakeallnecessaryhealthandsafetymeasuresforourproducts,tocomplywithallapplicablelegal
requirementsandtostaywellwithintheEMFstandardsapplicableatthetimeofproducingtheproducts.
3. Wearecommittedtodevelop,produceandmarketproductsthatcausenoadversehealtheffects.
4. Weconrmthatifitsproductsarehandledproperlyfortheirintendeduse,theyaresafetouseaccordingtoscienticevidenceavailabletoday.
5. WeplayanactiveroleinthedevelopmentofinternationalEMFandsafetystandards,enablingustoanticipatefurtherdevelopmentsinstandardization
forearlyintegrationinitsproducts.
Information for U.K. only
(A)
(B)
WARNING - THIS APPLIANCE MUST BE EARTHED.
Important:
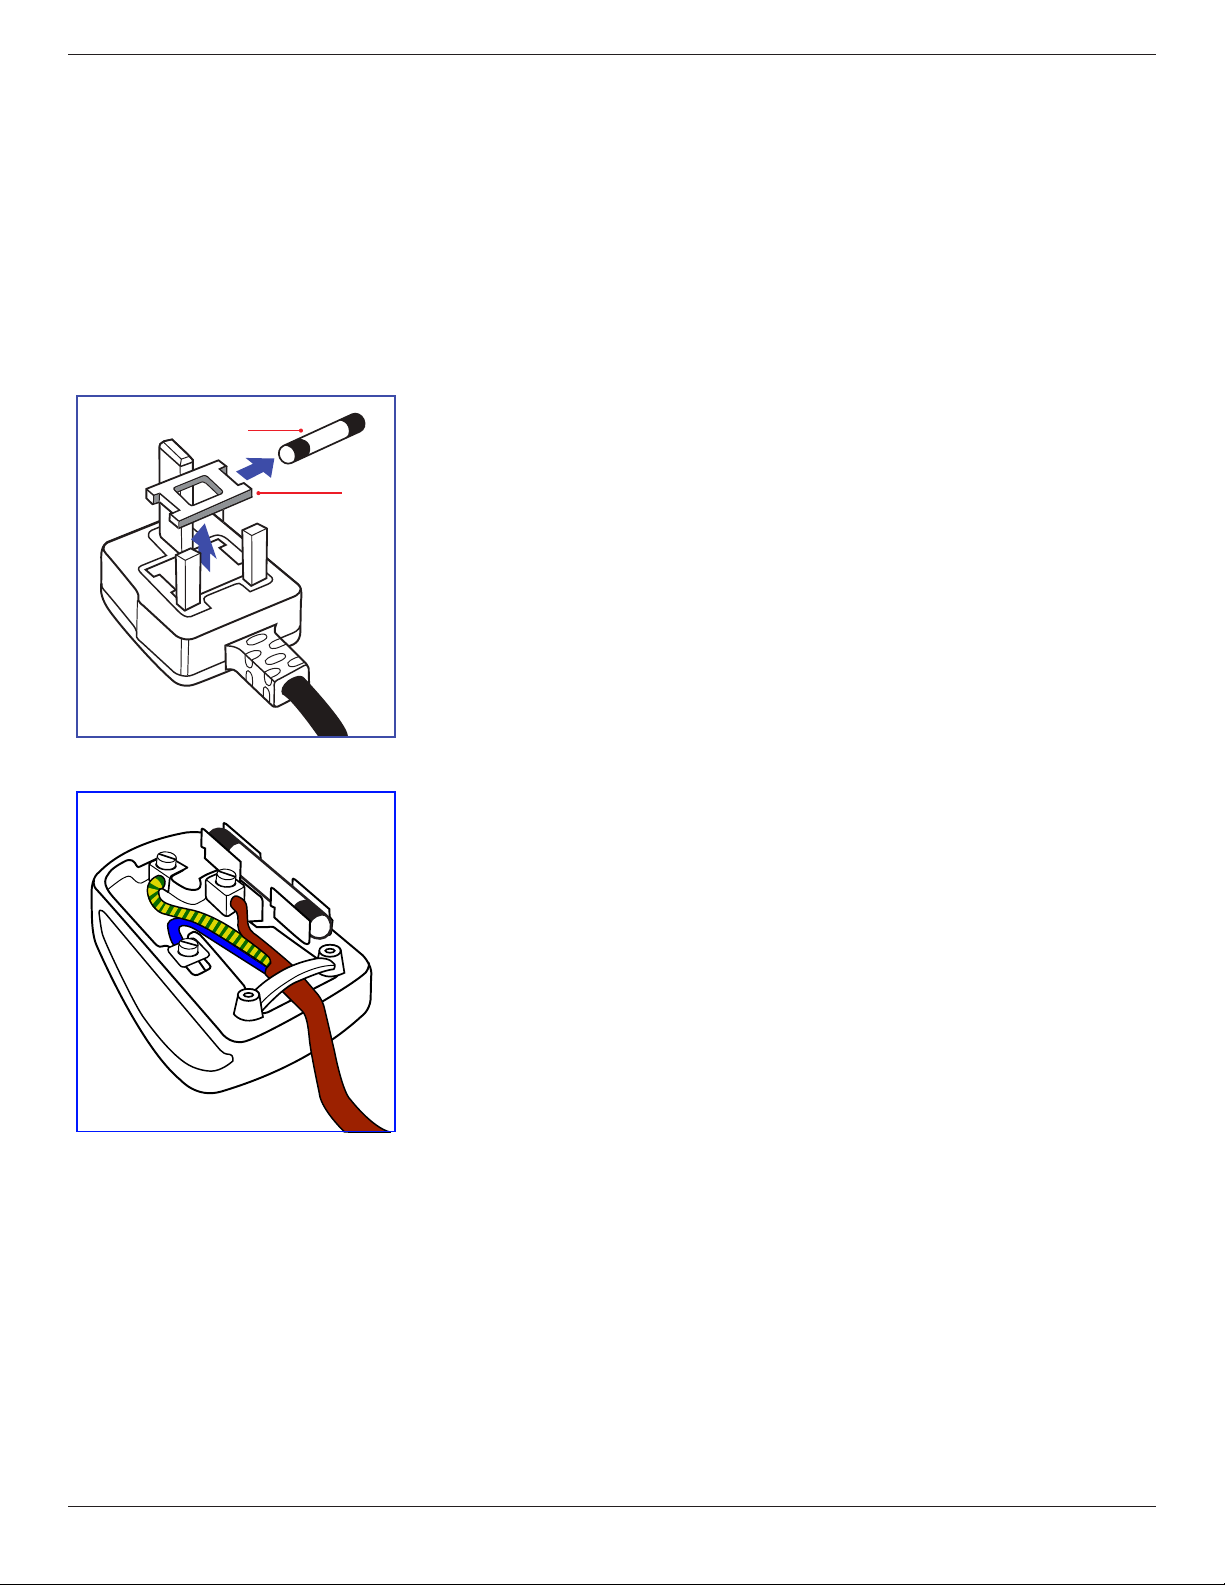
Thisapparatusissuppliedwithanapprovedmoulded13Aplug.Tochangeafuseinthistypeofplug
proceedasfollows:
1. Removefusecoverandfuse.
2. FitnewfusewhichshouldbeaBS13625A,A.S.T.A.orBSIapprovedtype.
3. Retthefusecover.
Ifthettedplugisnotsuitableforyoursocketoutlets,itshouldbecutoffandanappropriate3-pin
plugttedinitsplace.
Ifthemainsplugcontainsafuse,thisshouldhaveavalueof5A.Ifaplugwithoutafuseisused,thefuse
atthedistributionboardshouldnotbegreaterthan5A.
NOTE: Theseveredplugmustbedestroyedtoavoidapossibleshockhazardshoulditbeinserted
intoa13Asocketelsewhere.
How to connect a plug
Thewiresinthemainsleadarecolouredinaccordancewiththefollowingcode:
BLUE-“NEUTRAL”(“N”)
BROWN-“LIVE”(“L”)
GREEN&YELLOW-“EARTH”(“E”)
1. TheGREEN&YELLOWwiremustbeconnectedtotheterminalintheplugwhichismarkedwith
theletter“E”orbytheEarthsymbolorcolouredGREENorGREEN&YELLOW.
2. TheBLUEwiremustbeconnectedtotheterminalwhichismarkedwiththeletter“N”orcoloured
BLACK.
3.
TheBROWNwiremustbeconnectedtotheterminalwhichmarkedwiththeletter“L”or
colouredRED.
Beforereplacingtheplugcover,makecertainthatthecordgripisclampedoverthesheathofthelead
-notsimplyoverthethreewires.
BDL4777XL
vi
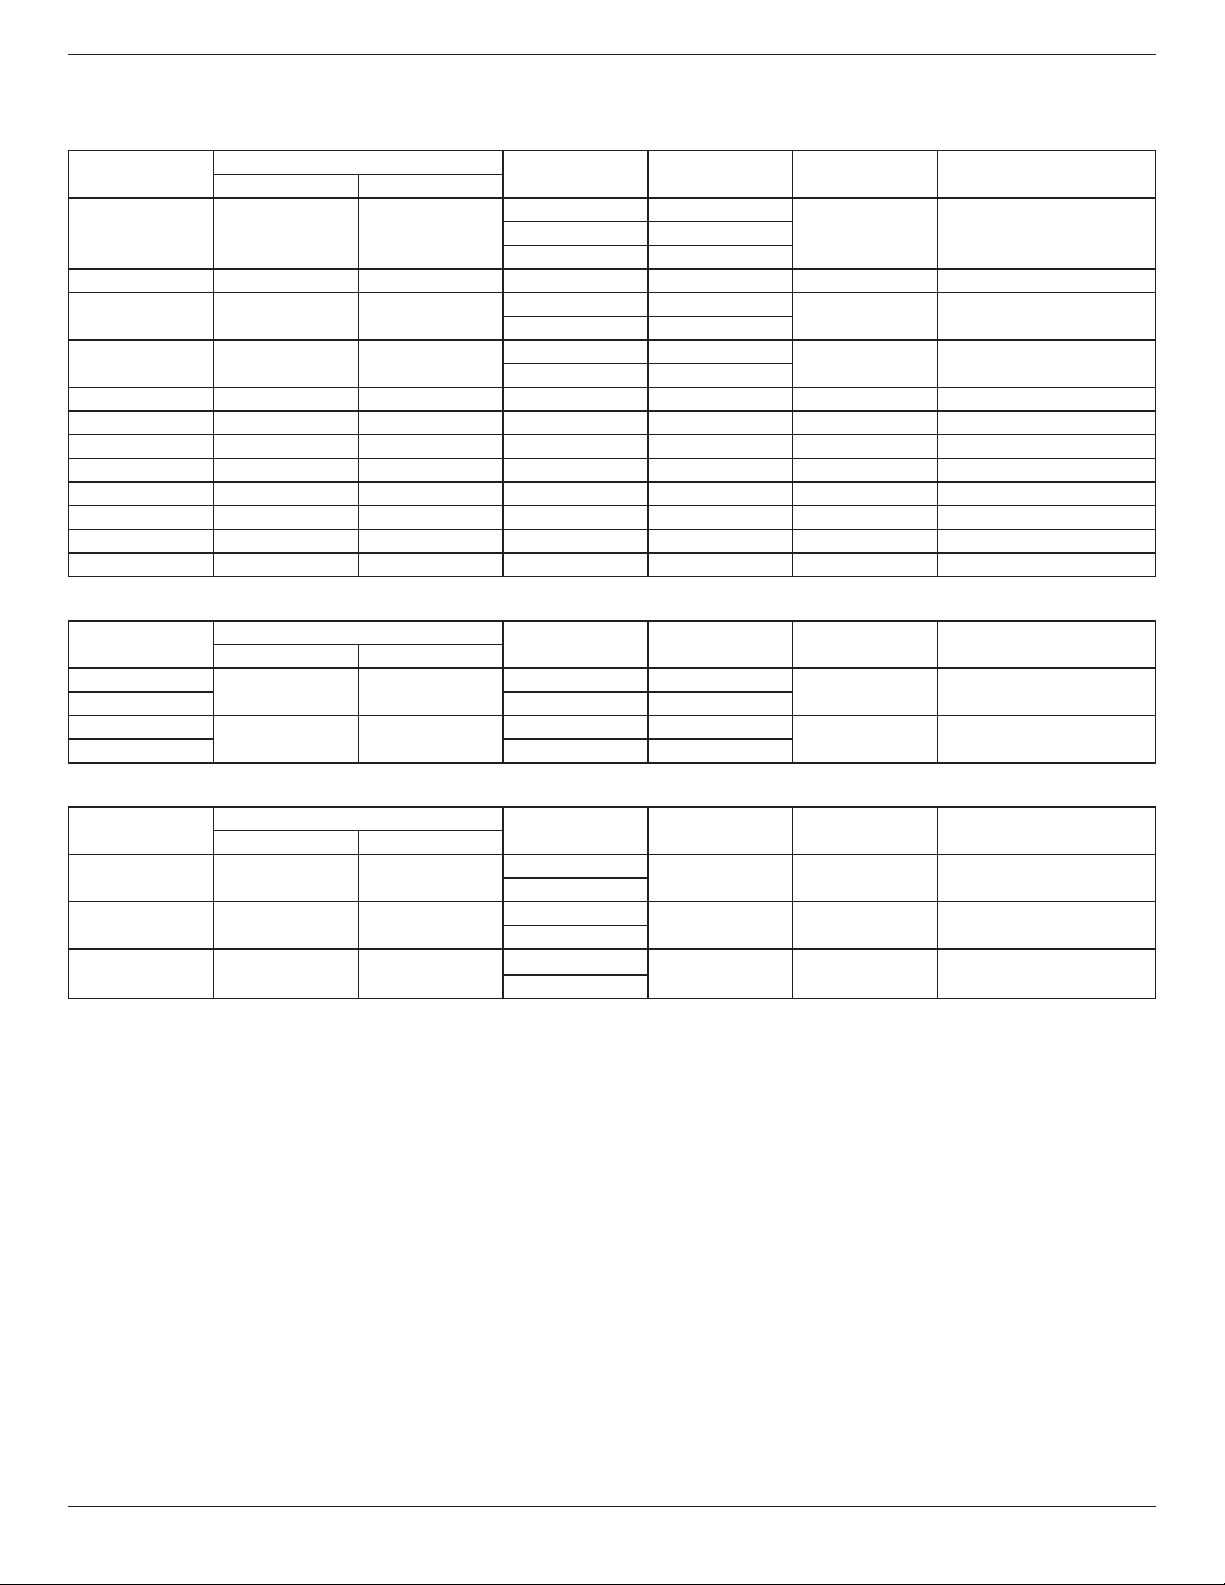
China RoHS
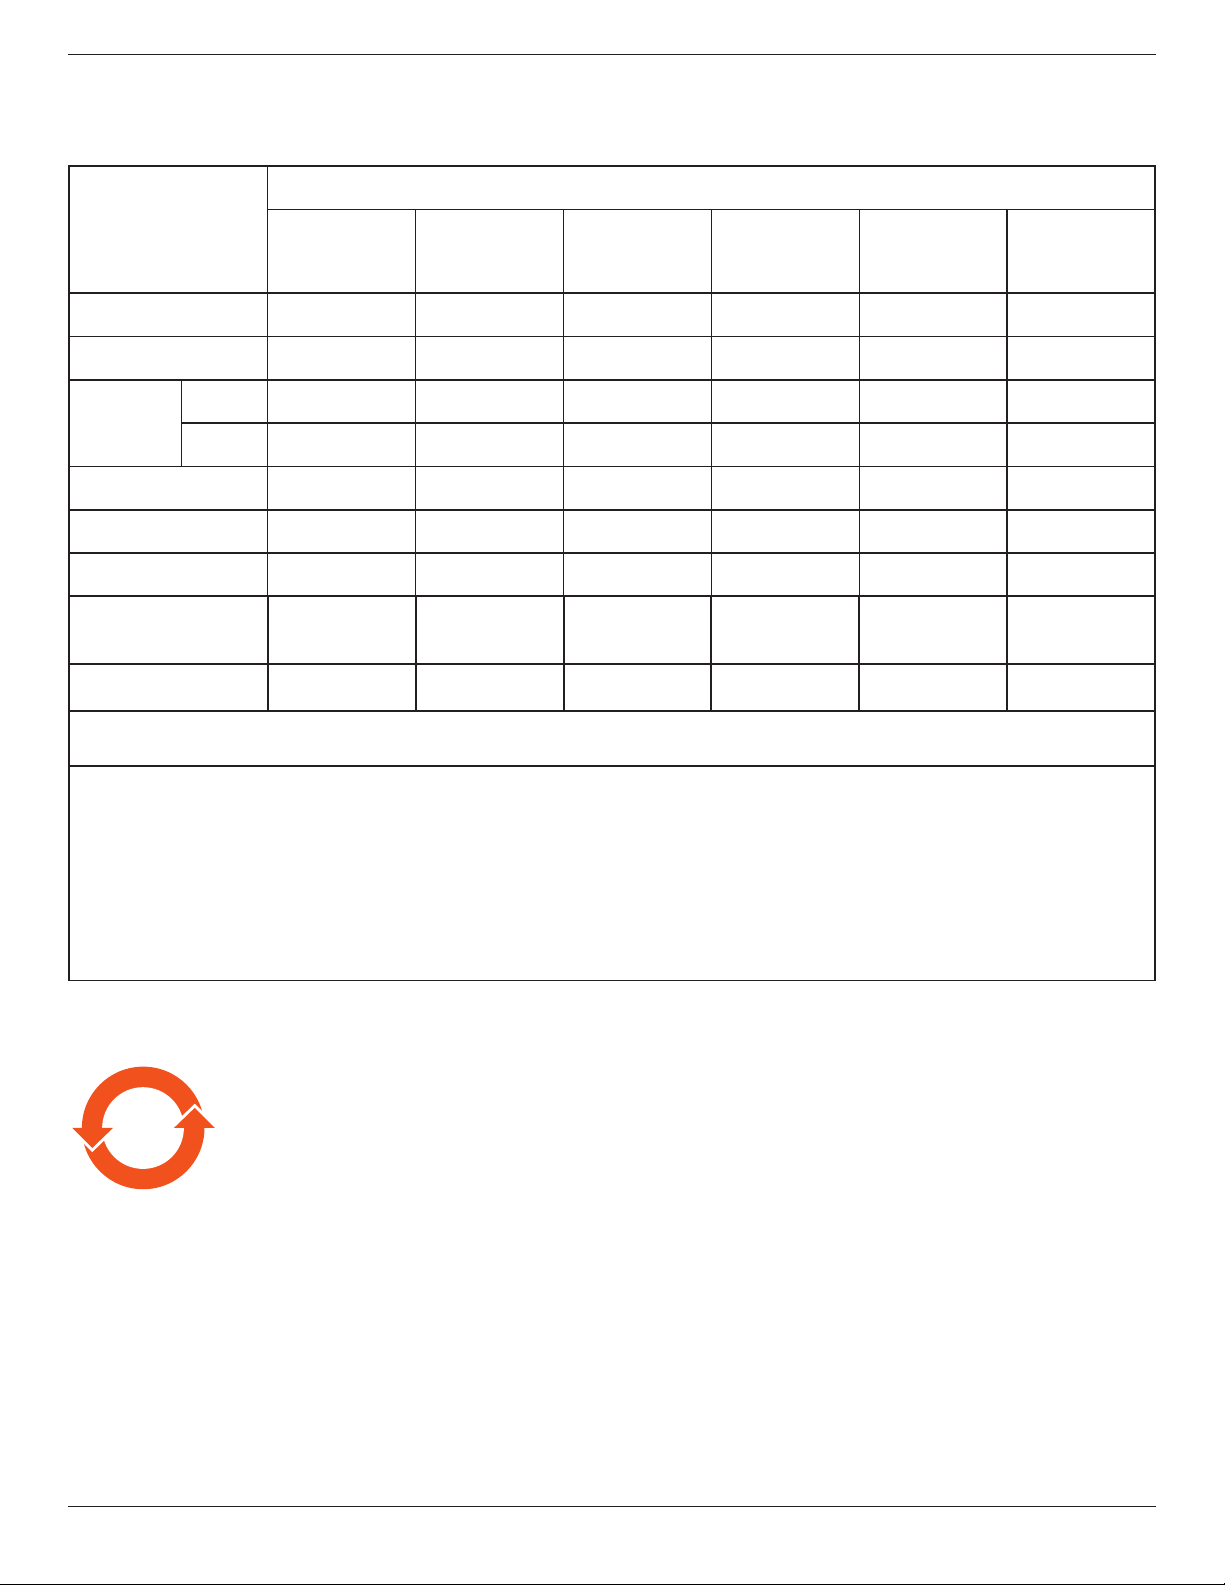
电子电气产品有害物质限制使用标识要求 (中国RoHS法规标识要求) 产品中有害物质的名称及含量。
零部件名称
有害物质
铅
(Pb)
汞
(Hg)
镉
(Cd)
六价铬
(Cr (VI))
多溴联苯
(PBB)
多溴二苯醚
(PBDE)
塑料外框 O O O O O O
后壳 O O O O O O
LCD
panel
CCFL X X O O O O
LED X O O O O O
电路板组件* X O O O O O
底座 O O O O O O
电源线 X O O O O O
其他线材 X O O O O O
遥控器 X O O O O O
*:电路板组件包括印刷电路板及其构成的零部件,如电阻、电容、集成电路、连接器等。
本表格依据SJ/T 11364的规定编制。
O: 表示该有害物质在该部件所有均质材料中的含量均在
GB/T 26572 标准规定的限量要求以下.
X: 表示该有害物质至少在该部件的某一均质材料中的含量超出
GB/T 26572 标准规定的限量要求.
上表中打“X”的部件中,应功能需要,部分有害物质含量超出GB/T 26572规定的限量要求,但是符
合欧盟RoHS法规要求(属于豁免部分)。
备注:上表仅做为范例,实际标示时应依照各产品的实际部件及所含有害物质进行标示。
10
環保使用期限
此標識指期限(十年),電子信息產品中含有的有害物質在正常使用的條件下不會發生外泄或突變,
電子信息產品用戶使用該電子信息產品不會對環境造成嚴重污染或對其人身、財產造成嚴重損害的期限。
BDL4777XL
vii
《废弃电器电子产品回收处理管理条例》提示性说明
为了更好地关爱及保护地球,当用户不再需要此产品或产品寿命终止时,请遵守国家废弃电器电子产品
回收处理相关法律法规,将其交给当地具有国家认可的回收处理资质的厂商进行回收处理。
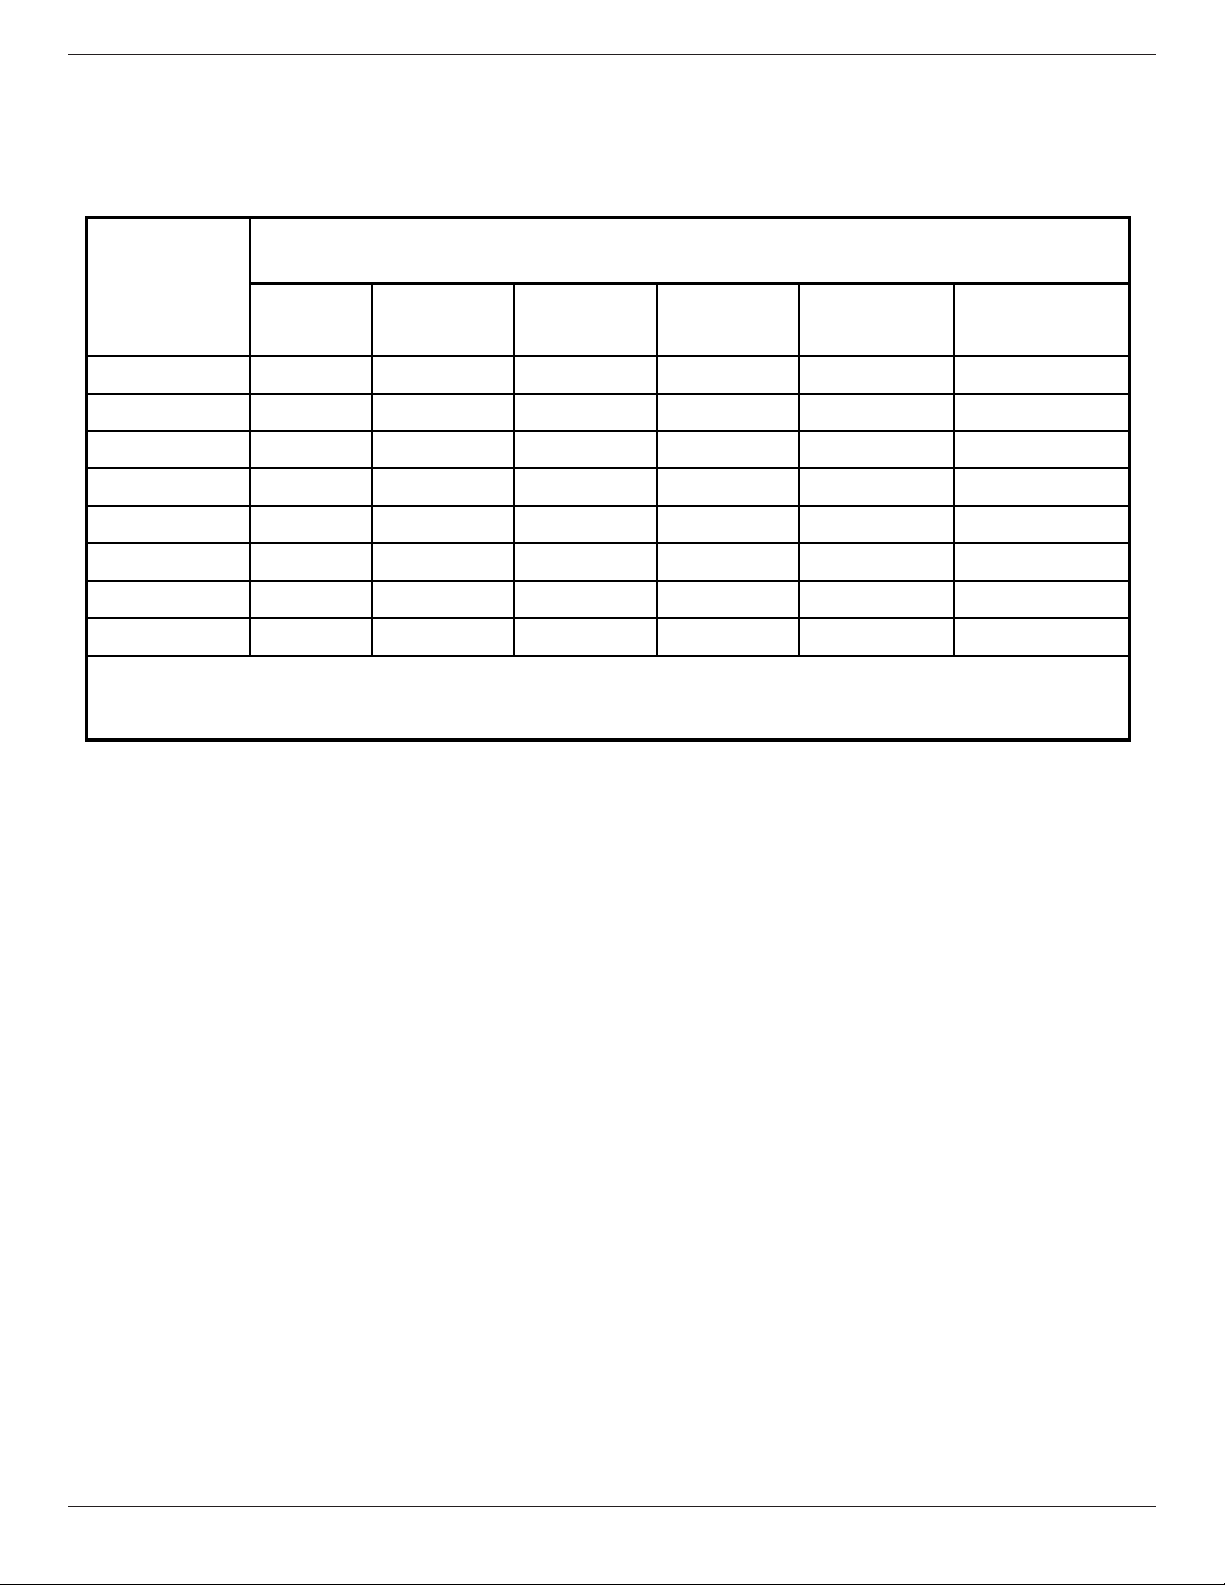
單元
限用物質及其化學符號
鉛
(Pb)
汞
(Hg)
鎘
(Cd)
六價鉻
(Cr
+6
)
多溴聯苯
(PBB)
多溴二苯醚
(PBDE)
塑料外框 ○ ○ ○ ○ ○ ○
後殼 ○ ○ ○ ○ ○ ○
- ○ ○ ○ ○ ○
電路板組件 - ○ ○ ○ ○ ○
底座 ○ ○ ○ ○ ○ ○
電源線 - ○ ○ ○ ○ ○
其他線材 - ○ ○ ○ ○ ○
遙控器 - ○ ○ ○ ○ ○
備考1.〝○〞係指該項限用物質之百分比含量未超出百分比含量基準值。
備考2.〝-〞係指該項限用物質為排除項目。
液晶面板
警語 : 使用過度恐傷害視力。
注意事項 :
(1) 使用30分鐘請休息10分鐘。
(2) 未滿2歲幼兒不看螢幕,2歲以上每天看螢幕不要超過1小時。
Turkey RoHS:
TürkiyeCumhuriyeti:EEEYönetmeliğineUygundur
Ukraine RoHS:
ОбладнаннявідповідаєвимогамТехнічногорегламентущодообмеженнявикористаннядеякихнебезпечнихречовинвелектричномута
електронномуобладнанні,затвердженогопостановоюКабінетуМіністрівУкраїнивід3грудня2008№1057
BDL4777XL
viii
North Europe (Nordic Countries) Information
Placering/Ventilation
VARNING:
FÖRSÄKRADIGOMATTHUVUDBRYTAREOCHUTTAGÄRLÄTÅTKOMLIGA,NÄRDUSTÄLLERDINUTRUSTNINGPÅPLATS.
Placering/Ventilation
ADVARSEL:
SØRGVEDPLACERINGENFOR,ATNETLEDNINGENSSTIKOGSTIKKONTAKTERNEMTTILGÆNGELIGE.
Paikka/Ilmankierto
VAROITUS:
SIJOITALAITESITEN,ETTÄVERKKOJOHTOVOIDAANTARVITTAESSAHELPOSTIIRROTTAAPISTORASIASTA.
Plassering/Ventilasjon
ADVARSEL:
NÅRDETTEUTSTYRETPLASSERES,MÅDUPASSEPÅATKONTAKTENEFORSTØMTILFØRSELERLETTEÅNÅ.
End-of-Life Disposal
YournewPublicInformationDisplaycontainsmaterialsthatcanberecycledandreused.Specializedcompaniescanrecycleyourproducttoincreasethe
amountofreusablematerialsandtominimizetheamounttobedisposedof.
PleasendoutaboutthelocalregulationsonhowtodisposeofyourolddisplayfromyourlocalPhilipsdealer.
(For customers in Canada and U.S.A.)
Thisproductmaycontainleadand/ormercury.Disposeofinaccordancetolocal-stateandfederalregulations.Foradditionalinformationonrecycling
contactwww.eia.org(ConsumerEducationInitiative)
Waste Electrical and Electronic Equipment-WEEE
Attention users in European Union private households
Thismarkingontheproductoronitspackagingillustratesthat,underEuropeanDirective2012/19/EUgoverningusedelectricaland
electronicappliances,thisproductmaynotbedisposedofwithnormalhouseholdwaste.Youareresponsiblefordisposalofthis
equipmentthroughadesignatedwasteelectricalandelectronicequipmentcollection.Todeterminethelocationsfordroppingoffsuch
wasteelectricalandelectronic,contactyourlocalgovernmentofce,thewastedisposalorganizationthatservesyourhouseholdorthe
storeatwhichyoupurchasedtheproduct.
Attention users in United States:
PleasedisposeofaccordingtoallLocal,StateandFederalLaws.Forthedisposalorrecyclinginformation,contact:www.mygreenelectronics.comorwww.
eiae.org.
End of Life Directives-Recycling
YournewPublicInformationDisplaycontainsseveralmaterialsthatcanberecycledfornewusers.
PleasedisposeofaccordingtoallLocal,State,andFederallaws.
AsanENERGYSTARPartner,wehavedeterminedthatthisproductmeetstheENERGYSTARguidelinesforenergyefciency.
BDL4777XL
ix
Restriction on Hazardous Substances statement (India)
Thisproductcomplieswiththe“E-Waste(Management)Rules,2016”CHAPTERV,rule16,sub-rule(1).WhereasNewElectricalandElectronic
EquipmentandtheircomponentsorconsumablesorpartsorsparesdonotcontainLead,Mercury,Cadmium,HexavalentChromium,polybrominated
biphenylsandpolybrominateddiphenylethersbeyondamaximumconcentrationvalueof0.1%byweightinhomogenousmaterialsforlead,mercury,
hexavalentchromium,polybrominatedbiphenylsandpolybrominateddiphenylethersandof0.01%byweightinhomogenousmaterialsforcadmium.
exceptofexemptionssetinSchedule2oftheRule.
E-Waste Declaration for India
Thissymbolontheproductoronitspackagingindicatesthatthisproductmustnotbedisposedofwithyourotherhouseholdwaste.
Insteaditisyourresponsibilitytodisposeofyourwasteequipmentbyhandingitovertoadesignatedcollectionpointfortherecycling
ofwasteelectricalandelectronicequipment.Theseparatecollectionandrecyclingofyourwasteequipmentatthetimeofdisposal
willhelptoconservenaturalresourcesandensurethatitisrecycledinamannerthatprotectshumanhealthandtheenvironment.
FormoreinformationaboutE-wastepleasevisithttp://www.india.philips.com/about/sustainability/recycling/index.pageandtoknow
whereyoucandropoffyourwasteequipmentforrecyclinginIndiapleasecontactonbelowgivencontactdetails.
Helplinenumber:1800-425-6396(MondaytoSaturday,9a.m.to5:30pm)
CentralizedE-wastecollectioncenter
Address:TPVTechnologyIndiaPrivateLimited,
59,MaheswariNagar,1stMainRoad,MahadevapuraPost,WhiteeldRoad
Bangalore,Karnataka,PIN:560048,Tel:080-3023-1000
E-mail:[email protected]
Batteries
For EU: The crossed-out wheeled bin implies that used batteries should not be put to the general household waste! There
is a separate collection system for used batteries, to allow proper treatment and recycling in accordance with legislation.
Please contact your local authority for details on the collection and recycling schemes.
For Switzerland: The used battery is to be returned to the selling point.
For other non-EU countries: Please contact your local authority for correct method of disposal of the used battery.
According to EU directive 2006/66/EC, the battery can’t be disposed improperly. The battery shall be separated
to collect by local service.
Após o uso, as pilhas
deverão ser entregues ao
estabelecimento comercial
ou
e/ou baterias
rede de assistência técnica
autorizada.
Information for EAC
Month and year of manufacturing please refer information in Rating label.
Name and location of manufacturer ООО “Профтехника”
Адрес: 3-й Проезд Марьиной рощи, 40/1 офис 1. Москва, 127018, Россия
Importer and information
Наименование организации: ООО “Профтехника”
Адрес: 3-й Проезд Марьиной рощи, 40/1 офис 1. Москва, 127018, Россия
Контактное лицо: Наталья Астафьева,
+7 495 640 20 20
nat@profdisplays.ru

BDL4777XL
x
Table Of Contents
1. Unpacking and Installation .......................................................1
1.1. Unpacking.........................................................................................1
1.2. PackageContents........................................................................1
1.3. InstallationNotes.........................................................................1
1.4. InstallingandRemovingTableStands(optional)........2
1.5. MountingonaWall....................................................................3
1.5.1. VESAGrid....................................................................3
1.6. MountinginPortraitPosition................................................4
1.7. OperatingInstructionsofEdgeAlignmentKit............5
1.7.1. InstallingEdgeAlignmentKit..............................5
1.8. UsingofEdgeFinishingKit(Optional).............................7
1.8.1. InstallingEdgeFinishingKit..................................7
2. Parts and Functions ...................................................................8
2.1. ControlPanel.................................................................................8
2.2. Input/OutputTerminals.............................................................9
2.3. RemoteControl........................................................................10
2.3.1. Generalfunctions..................................................10
2.3.2. IDRemoteControl..............................................11
2.3.3. Insertingthebatteriesintheremote
control..........................................................................12
2.3.4. Handlingtheremotecontrol..........................12
2.3.5. Operatingrangeoftheremotecontrol...12
3. Connecting External Equipment.......................................... 13
3.1. ConnectingExternalEquipment(DVD/VCR/
VCD)...............................................................................................13
3.1.1. UsingCOMPONENTvideoinput..............13
3.1.2. UsingVideoSourceinput..................................13
3.1.3. UsingHDMIvideoinput...................................14
3.2. ConnectingaPC.......................................................................14
3.2.1. UsingVGAinput.....................................................14
3.2.2. UsingDVIinput......................................................14
3.2.3. UsingHDMIinput.................................................15
3.2.4. UsingDisplayPortinput.....................................15
3.3. ConnectingAudioEquipment...........................................15
3.3.1. Connectingexternalspeakers........................15
3.3.2. Connectinganexternalaudiodevice........16
3.4. ConnectingMultipleDisplaysinaDaisy-chain
Conguration..............................................................................16
3.4.1. Displaycontrolconnection..............................16
3.4.2. Digitalvideoconnection....................................16
3.4.3. Analogvideoconnection..................................17
3.4.4. IRdaisy-chainConnection................................17
3.5. IRconnection..............................................................................18
3.6. IRPass-throughConnection...............................................18
4. OSD Menu ............................................................................... 19
4.1. NavigatingtheOSDMenu................................................19
4.1.1. NavigatingtheOSDmenuusingthe
remotecontrol........................................................19
4.1.2. NavigatingtheOSDmenuusingthe
display’scontrolbuttons....................................19
4.2. OSDMenuOverview...........................................................19
4.2.1. Picturemenu............................................................19
4.2.2. Screenmenu............................................................20
4.2.3. Audiomenu..............................................................21
4.2.4. PIPmenu....................................................................21
4.2.5. Conguration1menu..........................................22
4.2.6. Conguration2menu..........................................23
4.2.7. Advancedoptionmenu.....................................24
5. Input Mode ............................................................................... 28
6. Pixel Defect Policy .................................................................. 29
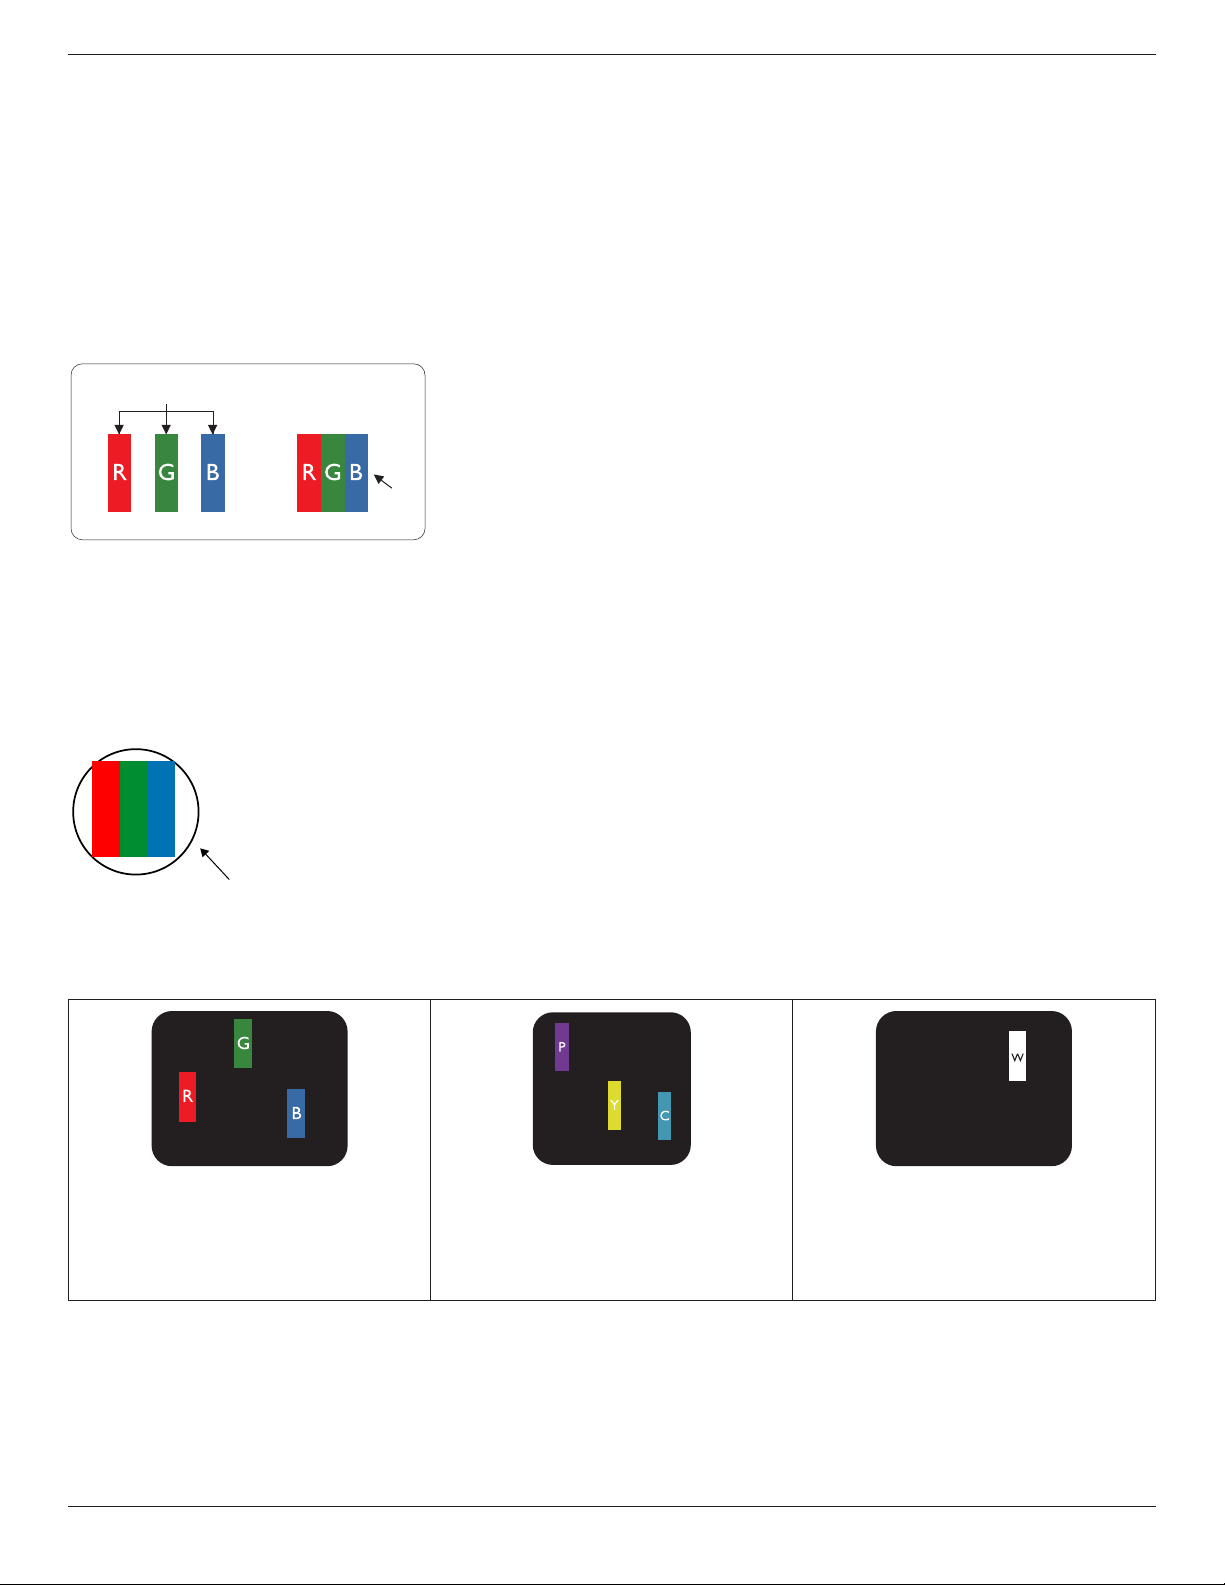
6.1. PixelsandSub-Pixels...............................................................29
6.2. TypesofPixelDefects+DotDenition....................29
6.3. BrightDotDefects...................................................................29
6.4. DarkDotDefects.....................................................................30
6.5. ProximityofPixelDefects...................................................30
6.6. PixelDefectTolerances.........................................................30
6.7. MURA.............................................................................................30
7. Cleaning and Troubleshooting .............................................. 31
7.1. Cleaning..........................................................................................31
7.2. Troubleshooting.........................................................................32
8. Technical Specications ......................................................... 34
BDL4777XL
1
1. Unpacking and Installation
1.1. Unpacking
• Thisproductispackedinacarton,togetherwiththestandardaccessories.
• Anyotheroptionalaccessorieswillbepackedseparately.
• Duetothesizeandweightofthisdisplayitisrecommendedfortwopeopletomoveit.
• Afteropeningthecarton,ensurethatthecontentsarecompleteandingoodcondition.
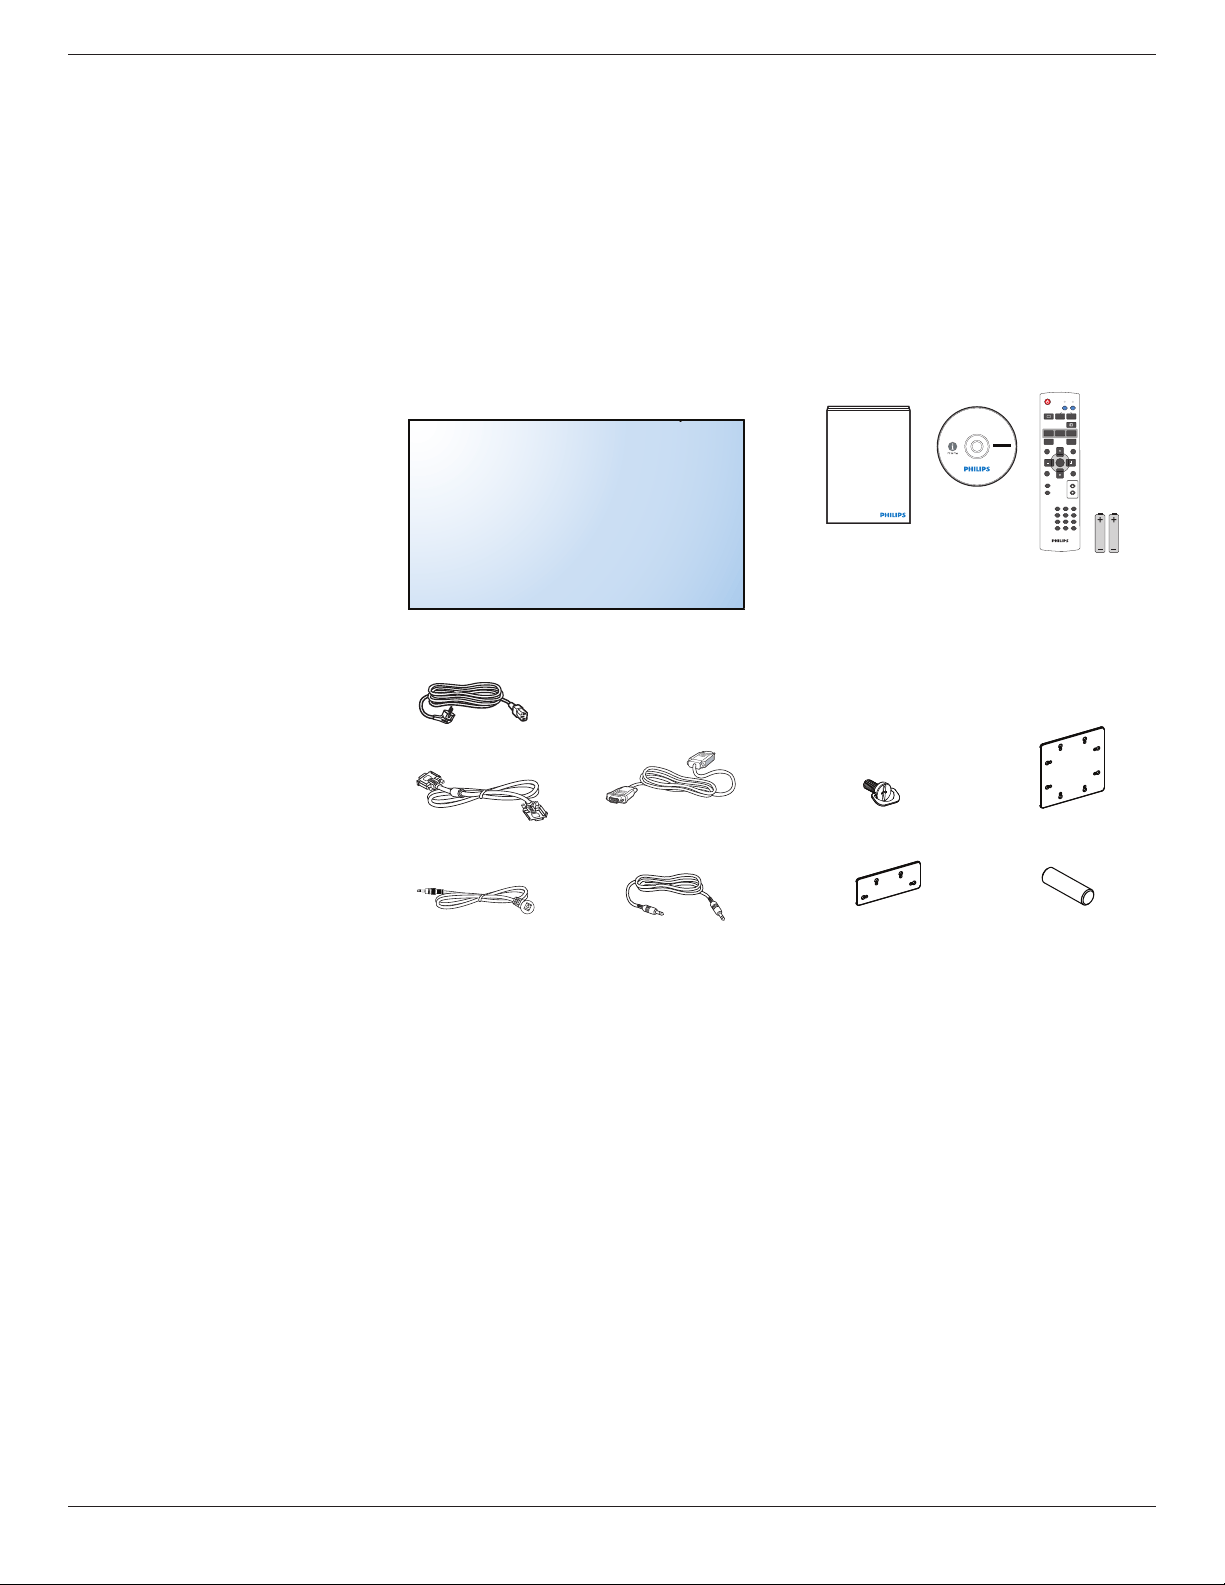
1.2. Package Contents
Pleaseverifythatyoureceivedthefollowingitemswithyourpackagecontent:
• LCDdisplay
• CDROM
• RemotecontrolwithAAAbatteries
• Powercord(1.8m)
• VGAcable(1.8m)
• RS232cable(3m)
• IRsensorcable(1.8m)
• 3.5mmJackIRcable(1.8m)
• Quickstartguide
• EdgeAlignmentKit-1:1PCS
• EdgeAlignmentKit-2:2PCS
• ThumbScrew:8PCS
• EdgeAlignmentPin:2PCS
* The supplied power cord varies depending on destination.
Remote Control
and AAA Batteries
CD ROM
Quick start guide
Edge Alignment Kit-1
Edge Alignment Kit-2
Edge Alignment Pin
Thumb Screw
Power Cord
Video Signal Cable
(D-SUB to D-SUB Cable)
RS232 Cable
IR Sensor Cable
IR Cable
POWER
SMART
VIDEO
PIP
INPUTON/OFF CHANGE
BRIGHTNESSCONTRAST
DISPLAY
AUTO
ADJUST
MUTE
VOL UP
VOL DOWN
EXIT
MENU
SET
AUDIO
USB MENU
SOURCE
NORMAL ID
1 2 3
6
9
0
7
4 5
8
ID SET ENTER
*Differencesaccordingtoregions
Displaydesignandaccessoriesmaydifferfromthoseillustratedabove.
NOTES:
• Forallotherregions,applyapowercordthatconformstotheACvoltageofthepowersocketandhasbeenapprovedbyandcomplieswiththe
safetyregulationsoftheparticularcountry.
• Youmightliketosavethepackageboxandpackingmaterialforshippingthedisplay.
1.3. Installation Notes
• Duetothehighpowerconsumption,alwaysusetheplugexclusivelydesignedforthisproduct.Ifanextendedlineisrequired,pleaseconsultyour
serviceagent.
• Theproductshouldbeinstalledonaatsurfacetoavoidtipping.Thedistancebetweenthebackoftheproductandthewallshouldbemaintained
forproperventilation.Avoidinstallingtheproductinthekitchen,bathroomoranyotherplaceswithhighhumiditysoasnottoshortentheservicelife
oftheelectroniccomponents.
• Theproductcannormallyoperateonlyunder3000minaltitude.Ininstallationsataltitudesabove3000m,someabnormalitiesmaybeexperienced.

BDL4777XL
2
1.4. Installing and Removing Table Stands (optional)
To install table stands:
1. Ensureyourdisplayispoweredoff.
2. Spreadaprotectivesheetonaatsurface.
3. Grabthecarryinghandlesandplacethedisplayface-downontheprotectivesheet.
4. Afterinsertingthestandintheguideblock,tightenthescrewsonbothsidesofthedisplay.
NOTE: Thelongersideofthestandshouldfacethefrontofthedisplay.
Carrying handle
Thumbscrews
Longer portions face the front
Table stand
To remove table stands:
1. Poweroffthedisplay.
2. Spreadaprotectivesheetonaatsurface.
3. Grabthecarryinghandlesandplacethedisplayface-downontheprotectivesheet.
4. Removescrewsusingascrewdriverandplacetheminasafeplaceforreuse.
BDL4777XL
3
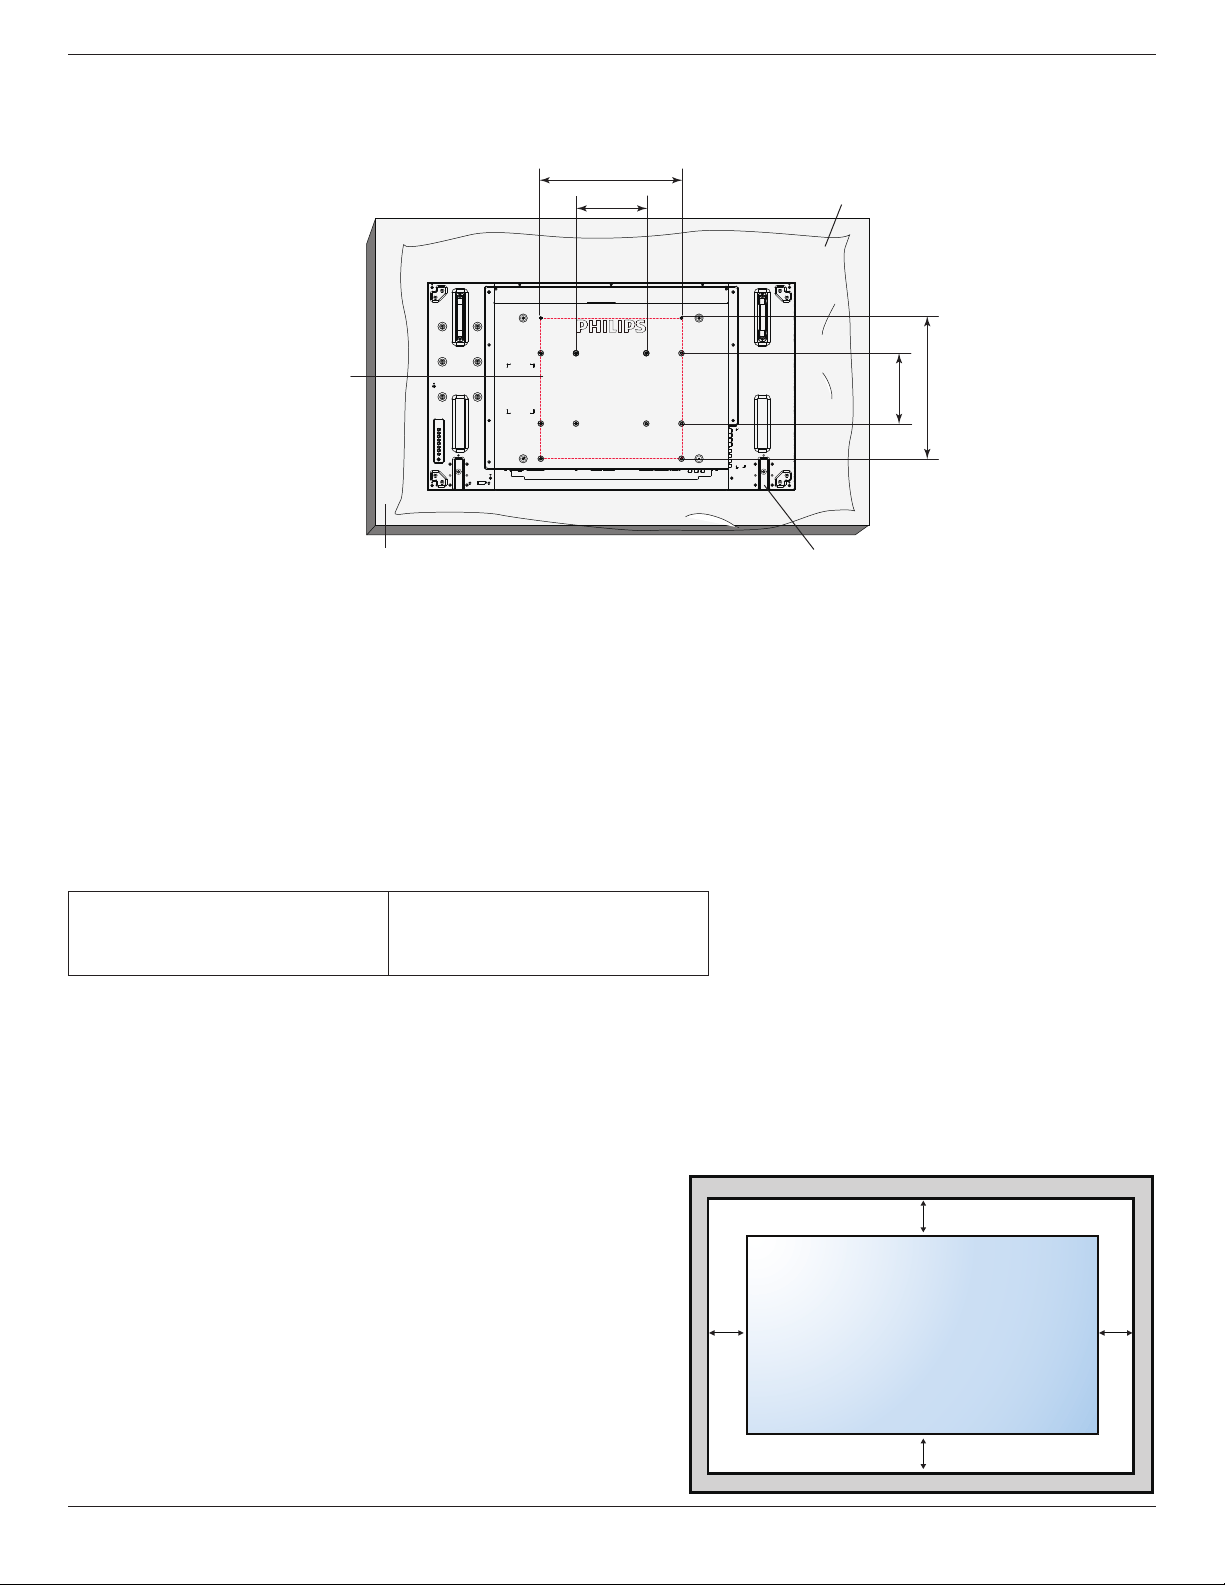
1.5. Mounting on a Wall
Tomountthisdisplaytoawall,youwillhavetoobtainastandardwall-mountingkit(commerciallyavailable).Werecommendusingamountinginterface
thatcomplieswithTUV-GSand/orUL1678standardinNorthAmerica.
400
200
400
200
Protective Sheet
VESA Grid
Tabletop standTable
1. Layaprotectivesheetonatable,whichwaswrappedaroundthedisplaywhenitwaspackaged,beneaththescreensurfacesoasnottoscratchthe
screenface.
2. Ensureyouhaveallaccessoriesformountingthisdisplay(wallmount,ceilingmount,tablestand,etc).
3. Followtheinstructionsthatcomewiththebasemountingkit.Failuretofollowcorrectmountingprocedurescouldresultindamagetotheequipment
orinjurytotheuserorinstaller.Productwarrantydoesnotcoverdamagecausedbyimproperinstallation.
4. Forthewall-mountingkit,useM6mountingscrews(havingalength10mmlongerthanthethicknessofthemountingbracket)andtightenthem
securely.
5. Unitwithoutbaseweight=24.6kg.Theequipmentanditsassociatedmountingmeansstillremainsecureduringthetest.ForuseonlywithULListed
WallMountBracketwithminimumweight/load:24.6kg.
1.5.1. VESA Grid
BDL4777XL
400(H)x400(V)mm
400(H)x200(V)mm
200(H)x200(V)mm
Caution:
Topreventthedisplayfromfalling:
• Forwallorceilinginstallation,werecommendinstallingthedisplaywithmetalbracketswhicharecommerciallyavailable.Fordetailedinstallation
instructions,refertotheguidereceivedwiththerespectivebracket.
• Tolessentheprobabilityofinjuryanddamageresultingfromfallofthedisplayincaseofearthquakeorothernaturaldisaster,besuretoconsultthe
bracketmanufacturerforinstallationlocation.
Ventilation Requirements for enclosure locating
Toallowheattodisperse,leavespacebetweensurroundingobjectsasshowninthe
diagrambelow.
100 mm 100 mm
100 mm
100 mm
BDL4777XL
4
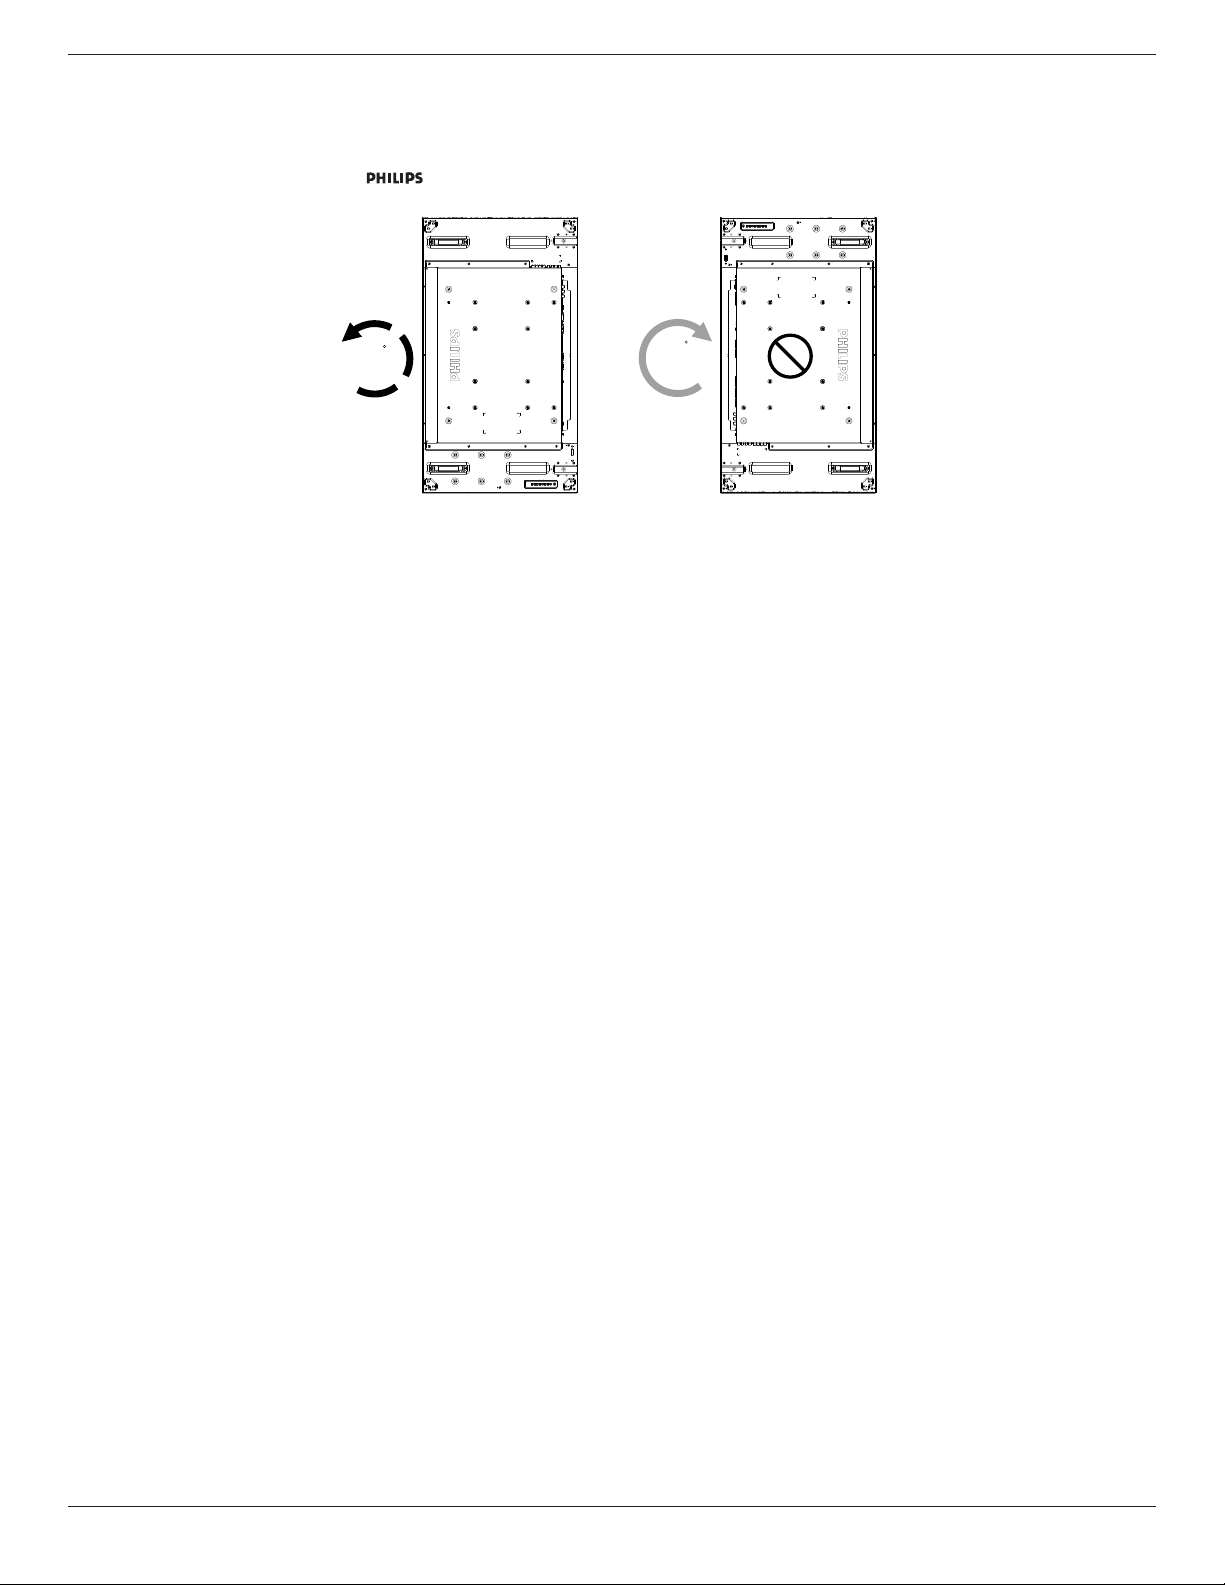
1.6. Mounting in Portrait Position
Thisdisplaycanbeinstalledinportraitposition.
1. Removethetablestand,ifattached.
2. Rotate90degreesanticlockwise.The“ ”logoshouldbebristlingwhenfacingthedisplayattheback.
90
90
BDL4777XL
5
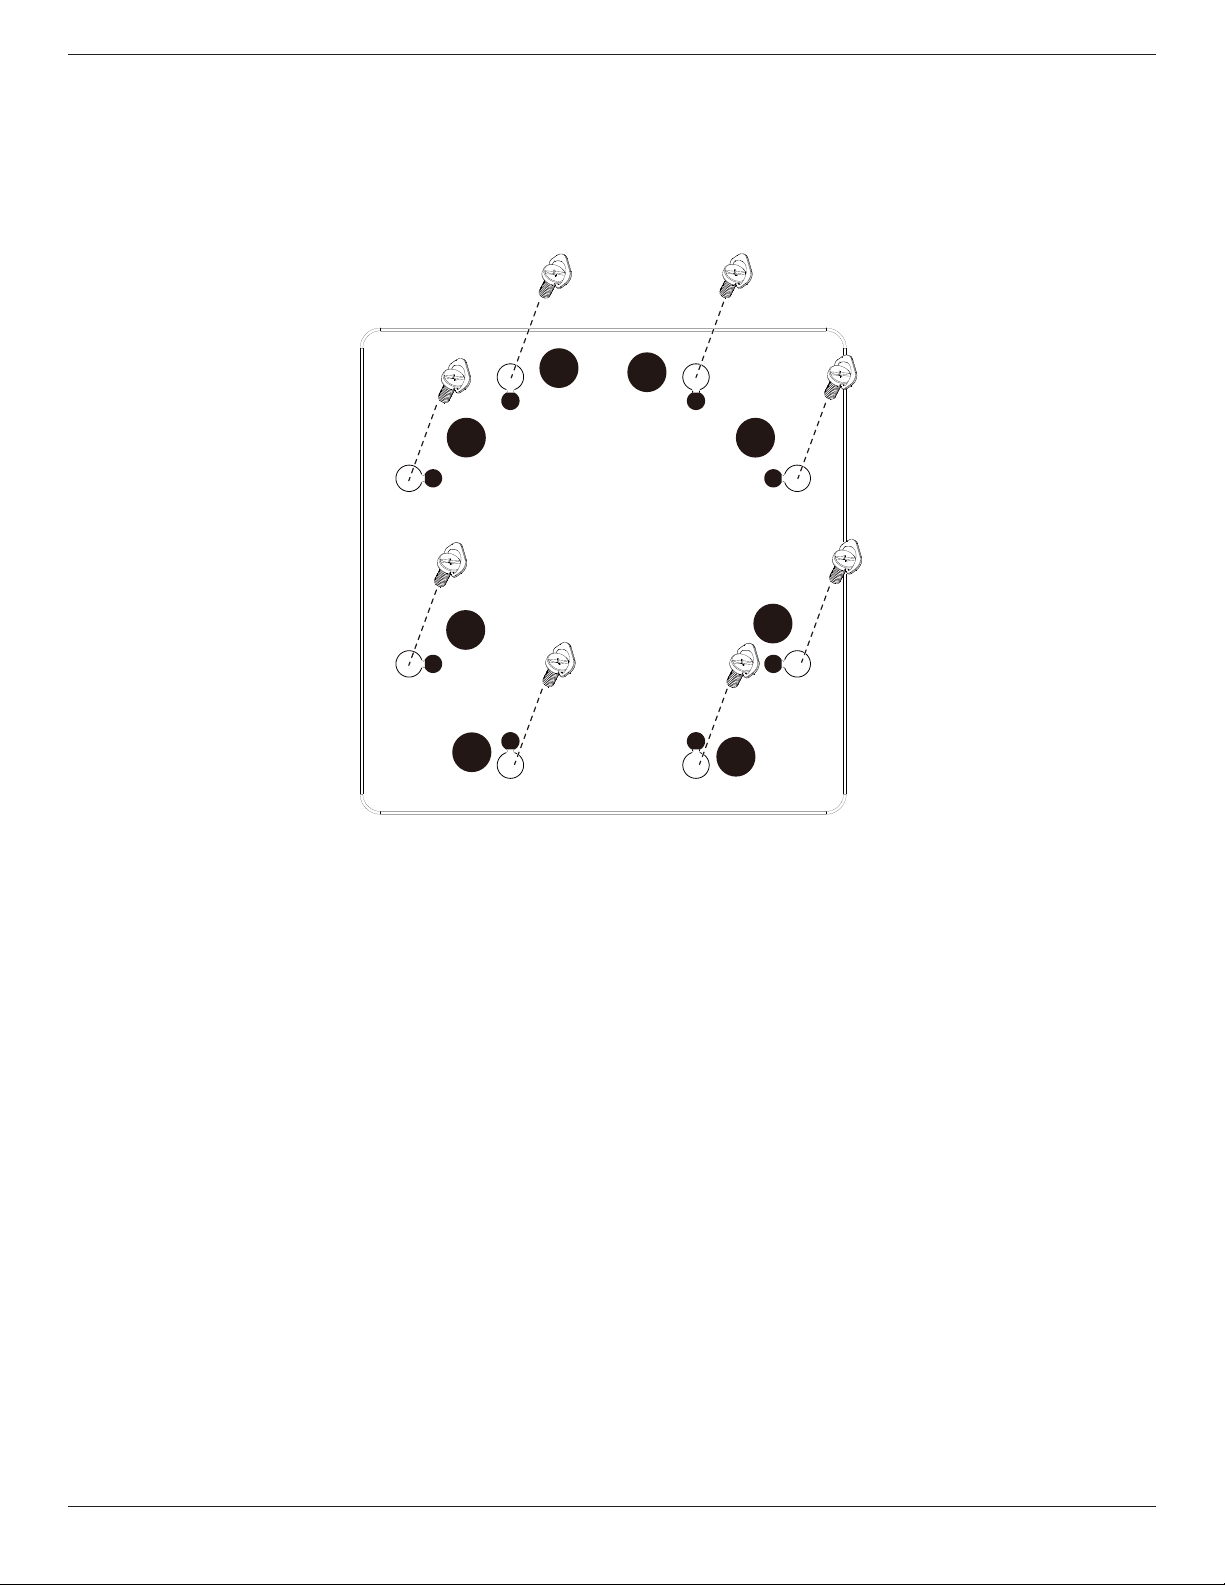
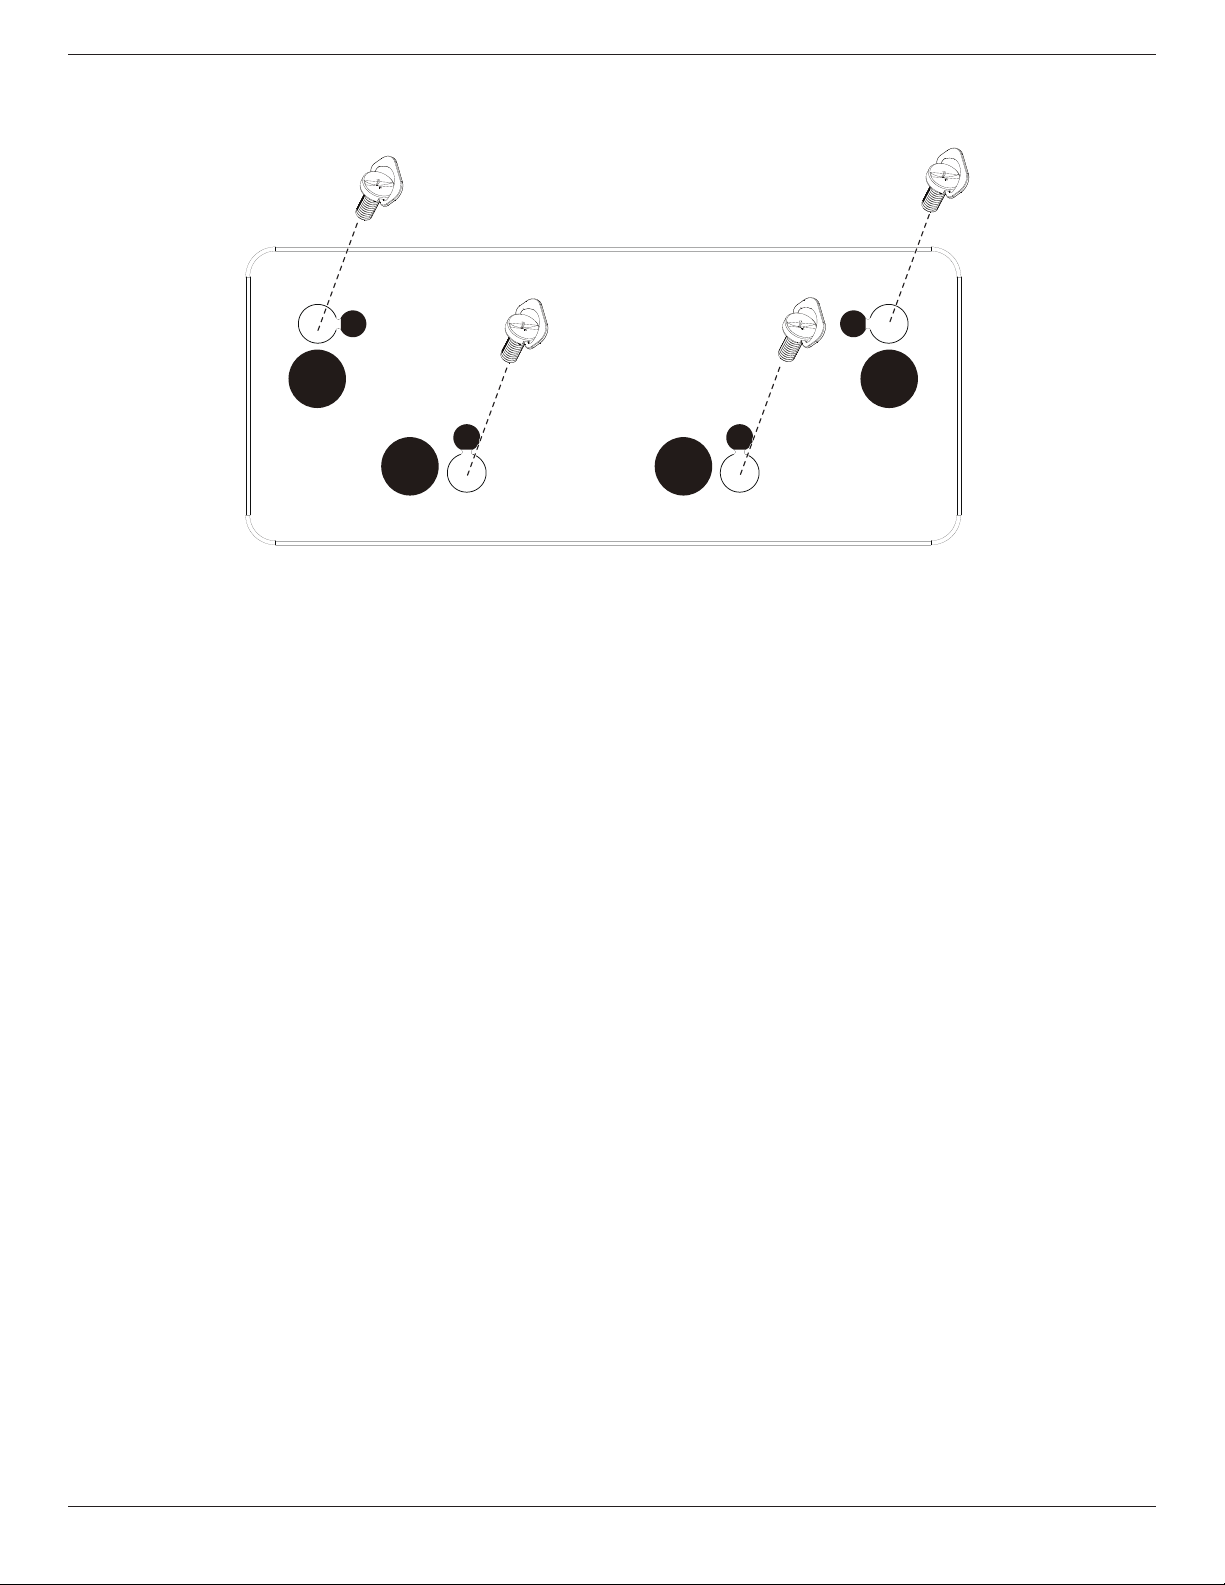
1.7. Operating Instructions of Edge Alignment Kit
1.7.1. Installing Edge Alignment Kit
• Beforeinstalledgealignmentkit,displaysmustbemountedtovideowallframecorrectly.
• Using“ThumbScrew”foreasyinstalling.
• Using“EdgeAlignmentKit-1”onadjacentfourdisplays.
2
3
4
5
6
7
8
1
BDL4777XL
6
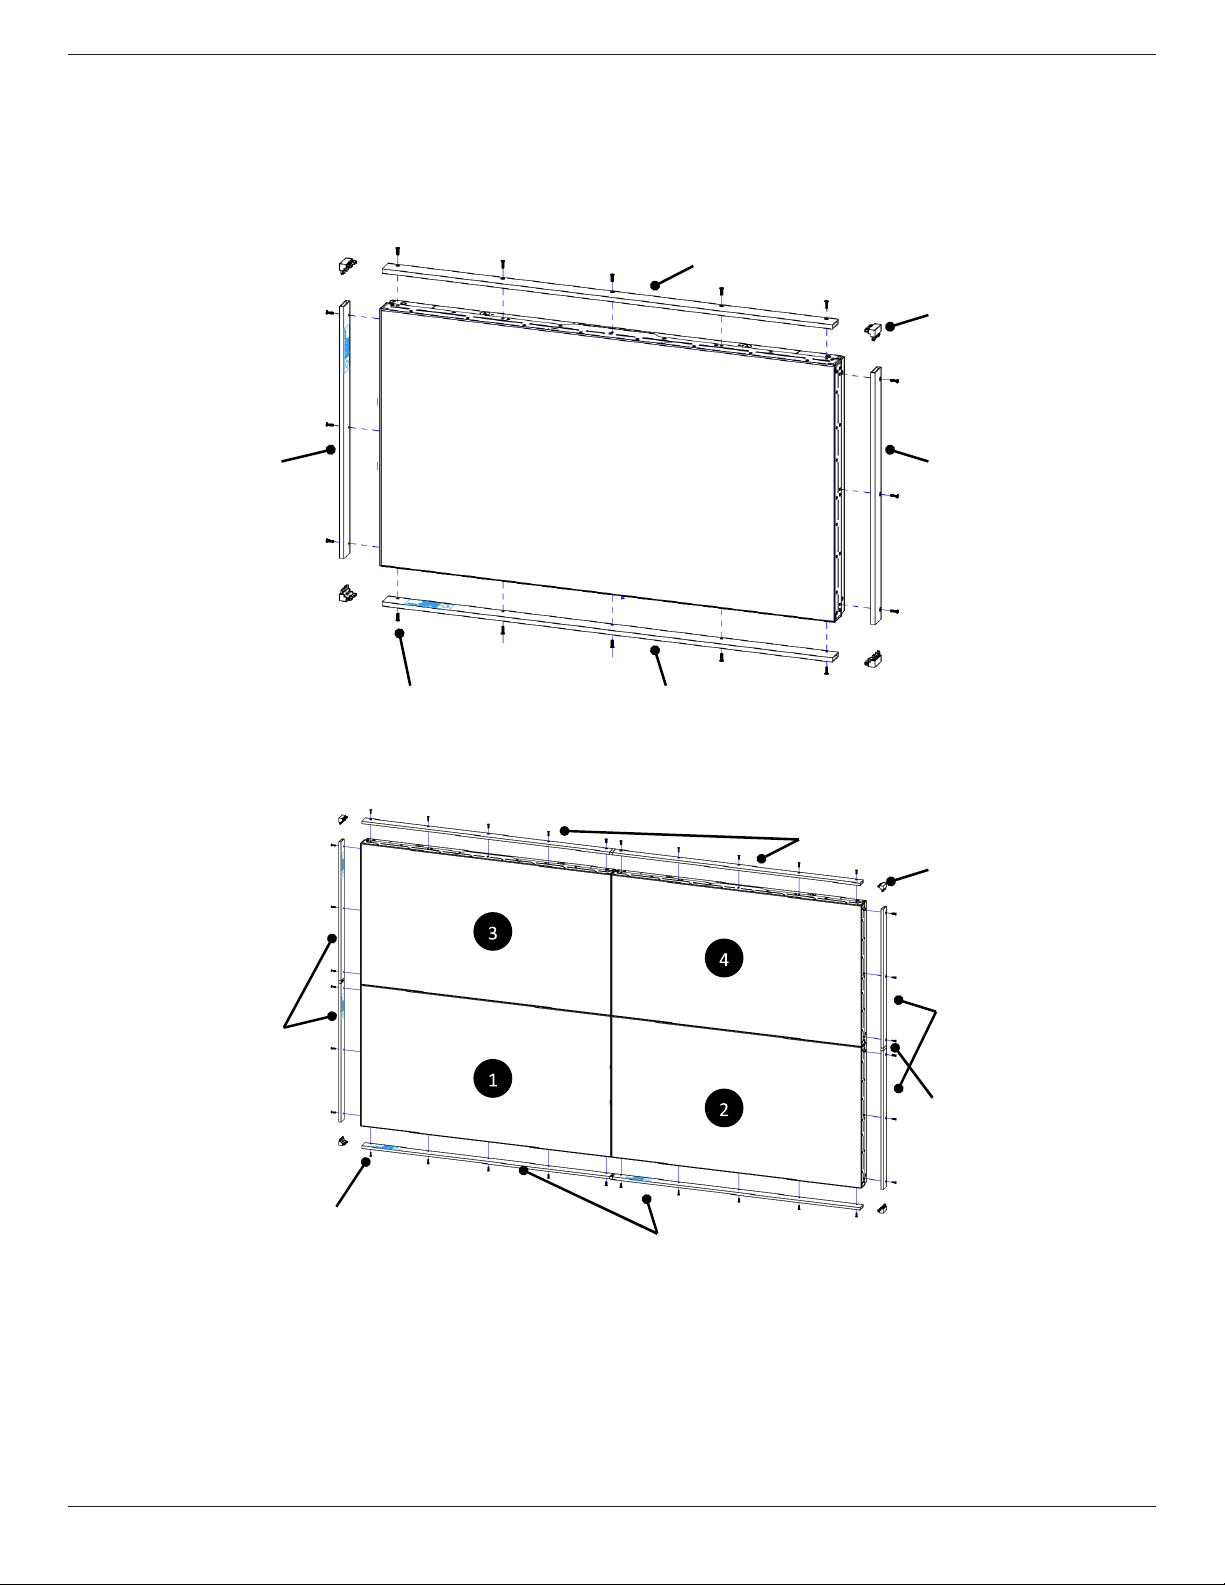
• Using“EdgeAlignmentKit-2”onadjacenttwodisplays.
• Installthe“EdgeAlignmentKit-2”with2PCSofM4screw.
1
2 3
4
NOTE: Wheninstallingtheedgealignmentkit,pleaseconsultaprofessionaltechnicianforproperinstallation.Weacceptnoliabilityforinstallationsnot
performedbyaprofessionaltechnician.
BDL4777XL
7
1.8. Using of Edge Finishing Kit (Optional)
Youcouldusetheedgenishingkittoprotectthedisplayandhaveabetterappearance.
1.8.1. Installing Edge Finishing Kit
InstallingEdgeFinishingKitfor1x1DisplayConguration
Edge Finishiing
Kit-Left(*1PCS)
Edge Finishiing Kit-Top
(*1PCS)
Edge Finishiing Kit-Bottom
(*1PCS)
Screw
(QTY is different depending
on models)
Edge Finishiing
Kit-Right(*1PCS)
Corner(*4PCS)
InstallingEdgeFinishingKitfor2x2DisplayConguration
Edge Finishiing Kit-Top
(*2PCS)
Edge Finishiing
Kit-Left(*1PCS)
Screw
(QTY is different depending
on models)
Edge Finishiing Kit-Bottom
(*2PCS)
Edge Finishiing
Kit-Right
(*2PCS)
Connector
(*4PCS)
Connector
(*4PCS)
*Formoredetailinformation,pleasechecktheinstructionguideinthepackageofkit.

BDL4777XL
8
2. Parts and Functions
2.1. Control Panel
1 2 3 4 5 6 7 8
MUTE INPUT
MENU
9
1
[ ] button
Usethisbuttontoturnthedisplayonorputthedisplaytostandby.
2
[MUTE] button
SwitchtheaudiomuteON/OFF.
3
[INPUT] button
Choosetheinputsource.
• Usedas[
SET
]buttonintheOn-Screen-Displaymenu.
4
[ ] button
IncreasetheadjustmentwhileOSDmenuison,orincreasethe
audiooutputlevelwhileOSDmenuisoff.
5
[ ] button
DecreasetheadjustmentwhileOSDmenuison,ordecreasethe
audiooutputlevelwhileOSDmenuisoff.
6
[ ] button
MovethehighlightbaruptoadjusttheselecteditemwhileOSD
menuison.
7
[ ] button
MovethehighlightbardowntoadjusttheselecteditemwhileOSD
menuison.
8
[MENU] button
ReturntopreviousmenuwhileOSDmenuison,ortoactivatethe
OSDmenuwhenOSDmenuisoff.
9
Remote control sensor and power status indicator
• Receivescommandsignalsfromtheremotecontrol.
• IndicatestheoperatingstatusofthedisplaywithoutOPS:
- Lightsgreenwhenthedisplayisturnedon
- Lightsredwhenthedisplayisinstandbymode
- LightsamberwhenthedisplayentersAPMmode
- When{SCHEDULE}isenabled,thelightblinksgreenandred
- Ifthelightblinksred,itindicatesthatafailurehasbeen
detected
- Lightsoffwhenthemainpowerofthedisplayisturnedoff
• IndicatestheoperatingstatusofthedisplaywithOPS:
- Lightsgreenwhenthedisplayison,buttheOPSisoff
- LightsbluewhenthedisplayandtheOPSareon
- Lightsredwhenthedisplayisinstandbymode
- LightsamberwhenthedisplayentersAPMmode
- When{SCHEDULE}isenabled,thelightblinksgreenandred
- Ifthelightblinksred,itindicatesthatafailurehasbeen
detected
- Lightsoffwhenthemainpowerofthedisplayisturnedoff

BDL4777XL
9
2.2. Input/Output Terminals
1
2
3
4
76 8
10
11
12 13
15
14
16
5
9
17
18
19
20
21
1
AC IN
ACpowerinputfromthewalloutlet.
2
MAIN POWER SWITCH
Switchthemainpoweron/off.
3
AC OUT
ACpowersupplytotheACINjackofamediaplayer.
4
/
5
IR IN / IR OUT
ReservedforthewiredconnectionoftheIRcontrol.
NOTE:IfanexternalIRreceiverisconnectedto[IRIN],thereisno
functiononthedisplay’sremotesensor.
6
RS232C OUT:
RS232Cnetworkoutputfortheloop-throughfunction.
7
RS232C IN
RS232Cnetworkinputfortheloop-throughfunction.
8
RJ-45
LANcontrolfunctionfortheuseofremotecontrolsignalfrom
controlcenter.
9
HDMI IN
HDMIvideo/audioinput.
10
DisplayPort
DisplayPortvideoinput.
11
DVI IN
DVI-Dvideoinput.
12
DVI OUT / VGA OUT
DVIorVGAvideooutput.
13
VGA IN (D-Sub)
VGAvideoinput.
14
VGA AUDIO IN
AudioinputforVGAsource(3.5mmstereophone).
15
COMPONENT IN (BNC)
ComponentYPbPrvideosourceinput.
16
Y/CVBS
Videosourceinput.
17
SPEAKER SWITCH
Internalspeakeron/offswitch.
18
AUDIO IN
AudioinputfromexternalAVdevice(RCA).
19
AUDIO OUT (RCA)
AudiooutputfromtheAUDIOINjacktoanexternalAVdevice.
20
SPEAKERS OUT
Externalspeakersoutput.
21
OPS SLOT
SlotforinstallingtheoptionalOPSmodule.
NOTES:WerecommendtouseAdvantechARK-DS220B-D6A1E
orWinmateOMIS-OPSmodules.We’llnotguaranteeotherOPS
modules.

BDL4777XL
10
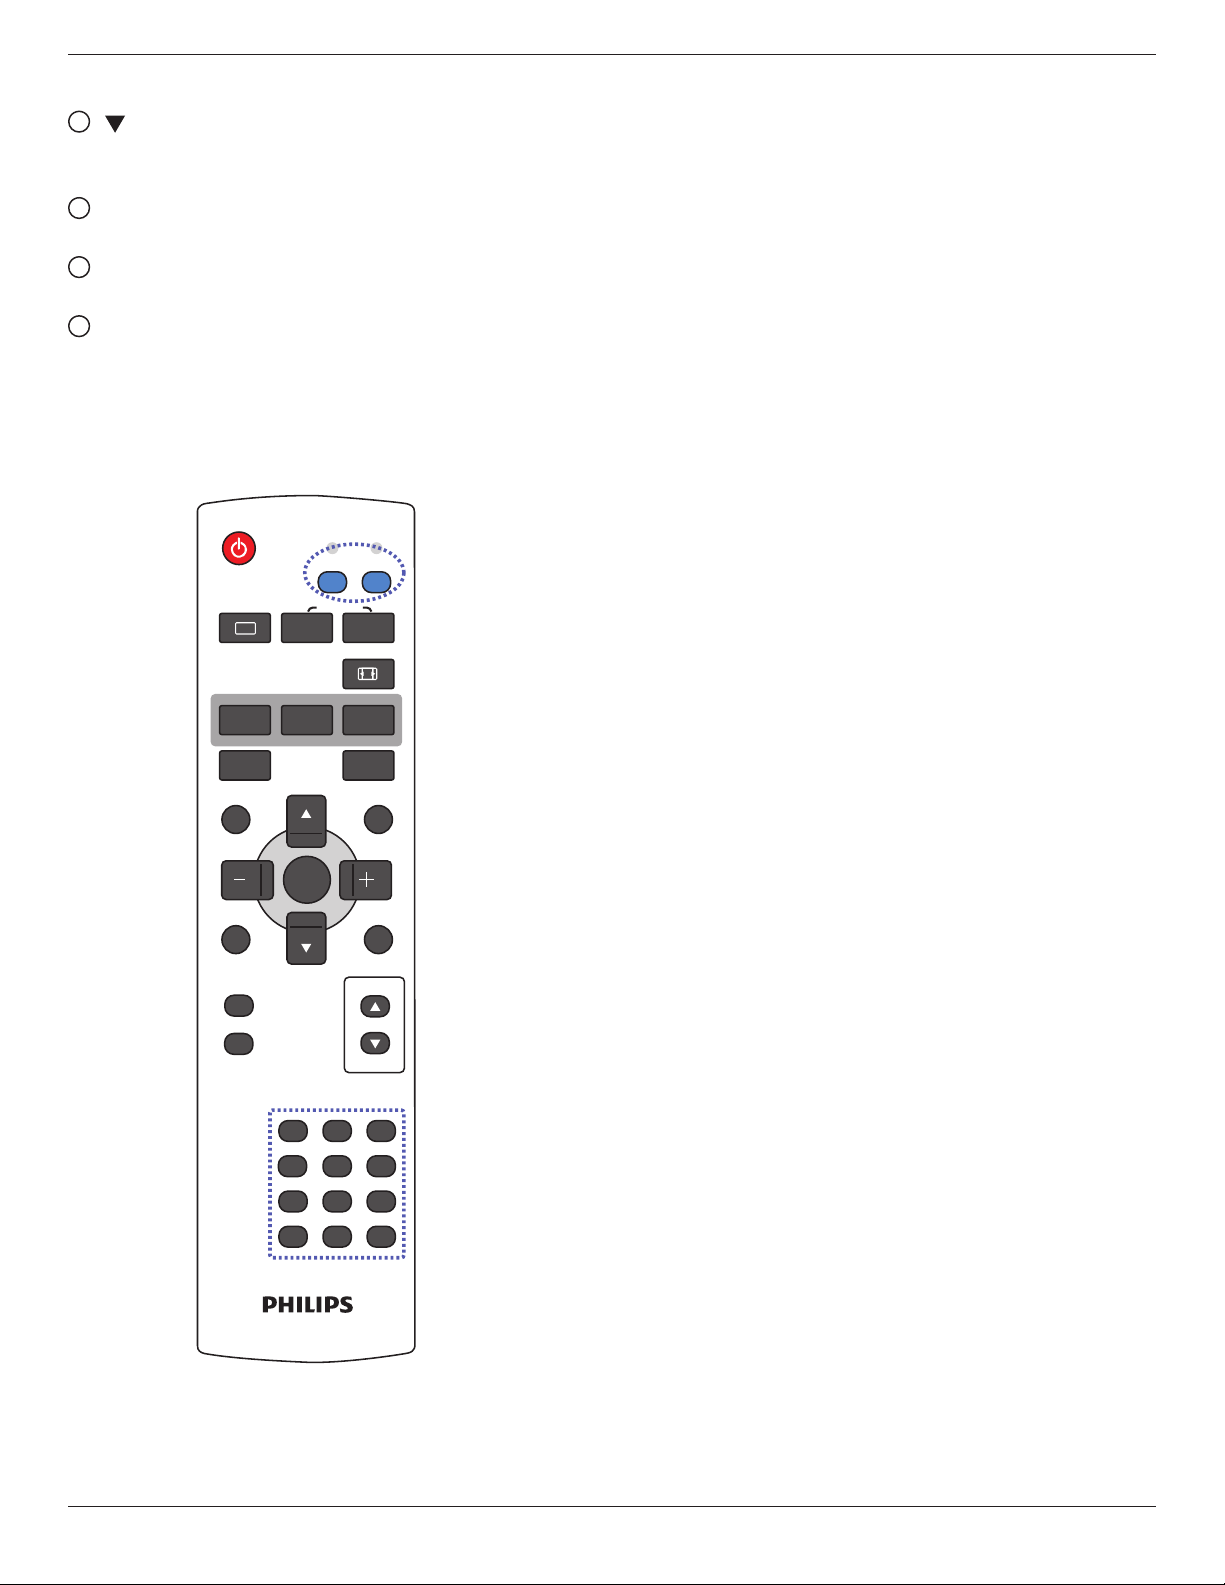
2.3. Remote Control
2.3.1. General functions
POWER
SMART
VIDEO
PIP
INPUTON/OFF CHANGE
BRIGHTNESSCONTRAST
DISPLAY
AUTO
ADJUST
MUTE
VOL UP
VOL DOWN
EXIT
MENU
SET
AUDIO
USB MENU
1
12
11
13
14
15
16
17
18
19
20
21
22
2
3
4
5
6
7
8
10
9
SOURCE
NORMAL ID
1 2 3
6
9
0
7
4 5
8
ID SET ENTER
1
[POWER] button
Presstoswitchonthedisplayfromstandbymode.Pressagainto
turnitoffandbackintostandbymode.
2
[SMART] button
PresstoactivateSmartMenu.Press[ ]or[ ]buttontoselect
menuoptions.Press[SET]buttontoconrmandexittheselection.
• Standard:Usedfornormalimages(factorysetting).
• Highbright:UsedformovingimagesuchasVideo.
• sRGB:Usedfortextbasedimages(onlyforPCmode).
• Cinema::Usedformovies(onlyforVideomode).
3
[PIP] (Picture In Picture) button
[ON/OFF]: TurnPIPmodeON/OFF.
[INPUT]: Selecttheinputsignalforthesub-picture.
[CHANGE]: Togglebetweenthemainpictureandsubpicture.
4
[CONTRAST] button
PresstoactivateContrastMenu.Press[ ]or[ ]buttontoadjust
thevalue.Press[MENU]buttontoconrmandexit.
5
[DISPLAY] button
Presstoturnon/offtheinformationOSDdisplayedontheupper
rightcornerofthescreen.
6
[ ] button
• PresstomovetheselectionleftinOSDmenu.
• PresstodecreasethevalueinOSDmenu.
• Presstomovethesub-pictureleftinPIPmode.
7
[SET] button
PresstoactivatethesettinginsidetheOSDmenu.
8
[AUTO ADJUST] button
PresstoruntheAutoAdjustfunction.
NOTE: ThisbuttonisfunctionalforVGAinputonly.
9
[USB MENU] button
UseformodelwithUSBmultimediafunction
(
notsupported
)
10
[MUTE] button
Presstoturnthemutefunctionon/off.
11
[NORMAL / ID] button
PresstosettheremotecontrolIDwhenyouwanttousethis
remotecontrolononeofseveraldifferentdisplays..
12
[VIDEO SOURCE] button
PresstotoggleVideoSourceMenu.Press[ ]or[ ]buttonto
selectoneofthevideosourcesamongDisplayport,DVI-D,
VGA,HDMI,Component,Video,orCard OPS.Press[SET]
buttontoconrmandexit.
[AUDIO SOURCE] button
PresstotoggleAudioSourceMenu.Press[ ]or[ ]button
toselectoneoftheaudiosourcesamongDisplayport,HDMI,
Audio1,Audio2,orCard OPS.Press[SET]buttontoconrm
andexit.
13
Picture Format button
Presstoswitchscreenaspectratio.
• ForPCsignal:FULL,NORMAL,CUSTOM,andREAL.
• ForVideosignal:FULL,NORMAL,DYNAMIC,CUSTOM,
REAL,and21:9.
14
[BRIGHTNESS] button
PresstotoggleBrightnessMenu.Press[ ]or[ ]buttontoadjust
thevalue.
15
[ ] button
• PresstomovetheselectionupinOSDmenu.
• Presstomovethesub-pictureupinPIPmode.
16
[MENU] button
PresstoturntheOSDmenuon/off.
17
[ ] button
• PresstomovetheselectionrightinOSDmenu.
• PresstoincreasethevalueinOSDmenu.
• Presstomovethesub-picturerightinPIPmode.
18
[EXIT] button
BDL4777XL
11
PresstoturnbacktothepreviousOSDmenu.
19
[ ] button
• PresstomovetheselectiondowninOSDmenu.
• Presstomovethesub-picturedowninPIPmode.
20
[VOL UP] button
Presstoincreasetheaudiooutputlevel.
21
[VOL DOWN] button
Presstodecreasetheaudiooutputlevel.
22
[Number / ID SET / ENTER] button
PresstosetthedisplayID.
2.3.2. ID Remote Control
YoucansettheremotecontrolIDwhenyouwanttousethisremote
controlononeofseveraldifferentdisplays.
POWER
SMART
VIDEO
PIP
INPUTON/OFF CHANGE
BRIGHTNESSCONTRAST
DISPLAY
AUTO
ADJUST
MUTE
VOL UP
VOL DOWN
EXIT
MENU
SET
AUDIO
USB MENU
SOURCE
NORMAL ID
1 2 3
6
9
0
7
4 5
8
ID SET ENTER
Press[ID]button.TheredLEDblinkstwice.
1. Press[IDSET]buttonformorethan1secondtoentertheIDMode.
TheredLEDlightsup.
Pressthe[IDSET]buttonagainwillexittheIDMode.TheredLED
lightsoff.
2. Pressthedigitnumbers[0]~[9]toselectthedisplayyouwantto
control.
Forexample:press[0]and[1]fordisplayNo.1,press[1]and[1]for
displayNo.11.
Thenumbersavailablearefrom[01]~[99].
3. Notpressinganybuttonwithin10secondswillexittheIDMode.
4. Ifanerrorpressingofbuttonsotherthanthedigitsoccured,wait
1secondaftertheredLEDlightsoffandthenlightsupagain,then
pressthecorrectdigitsagain.
5. Press[ENTER]buttontoconrm.TheredLEDblinkstwiceand
thenlightsoff.
NOTE:
• Press[NORMAL]button.ThegreenLEDblinkstwice,indicating
thedisplayisinnormaloperation.
• ItisnecessarytosetuptheIDnumberforeachdisplaybefore
selectingitsIDnumber.
BDL4777XL
12
2.3.3. Inserting the batteries in the remote control
Theremotecontrolispoweredbytwo1.5VAAAbatteries.
Toinstallorreplacebatteries:
1. Pressandthenslidethecovertoopenit.
2. Alignthebatteriesaccordingtothe(+)and(–)indicationsinsidethe
batterycompartment.
3. Replacethecover.
Caution:
Theincorrectuseofbatteriescanresultinleaksorbursting.Besuretofollowtheseinstructions:
• Place“AAA”batteriesmatchingthe(+)and(–)signsoneachbatterytothe(+)and(–)signsofthebatterycompartment.
• Donotmixbatterytypes.
• Donotcombinenewbatterieswithusedones.Itcausesshorterlifeorleakageofbatteries.
• Removethedeadbatteriesimmediatelytopreventthemfromliquidleakinginthebatterycompartment.Don’ttouchexposedbatteryacid,asitcan
damageyourskin.
NOTE: Ifyoudonotintendtousetheremotecontrolforalongperiod,removethebatteries.
2.3.4. Handling the remote control
• Donotsubjecttostrongshock.
• Donotallowwaterorotherliquidtosplashtheremotecontrol.Iftheremotecontrolgetswet,wipeitdryimmediately.
• Avoidexposuretoheatandsteam.
• Otherthantoinstallthebatteries,donotopentheremotecontrol.
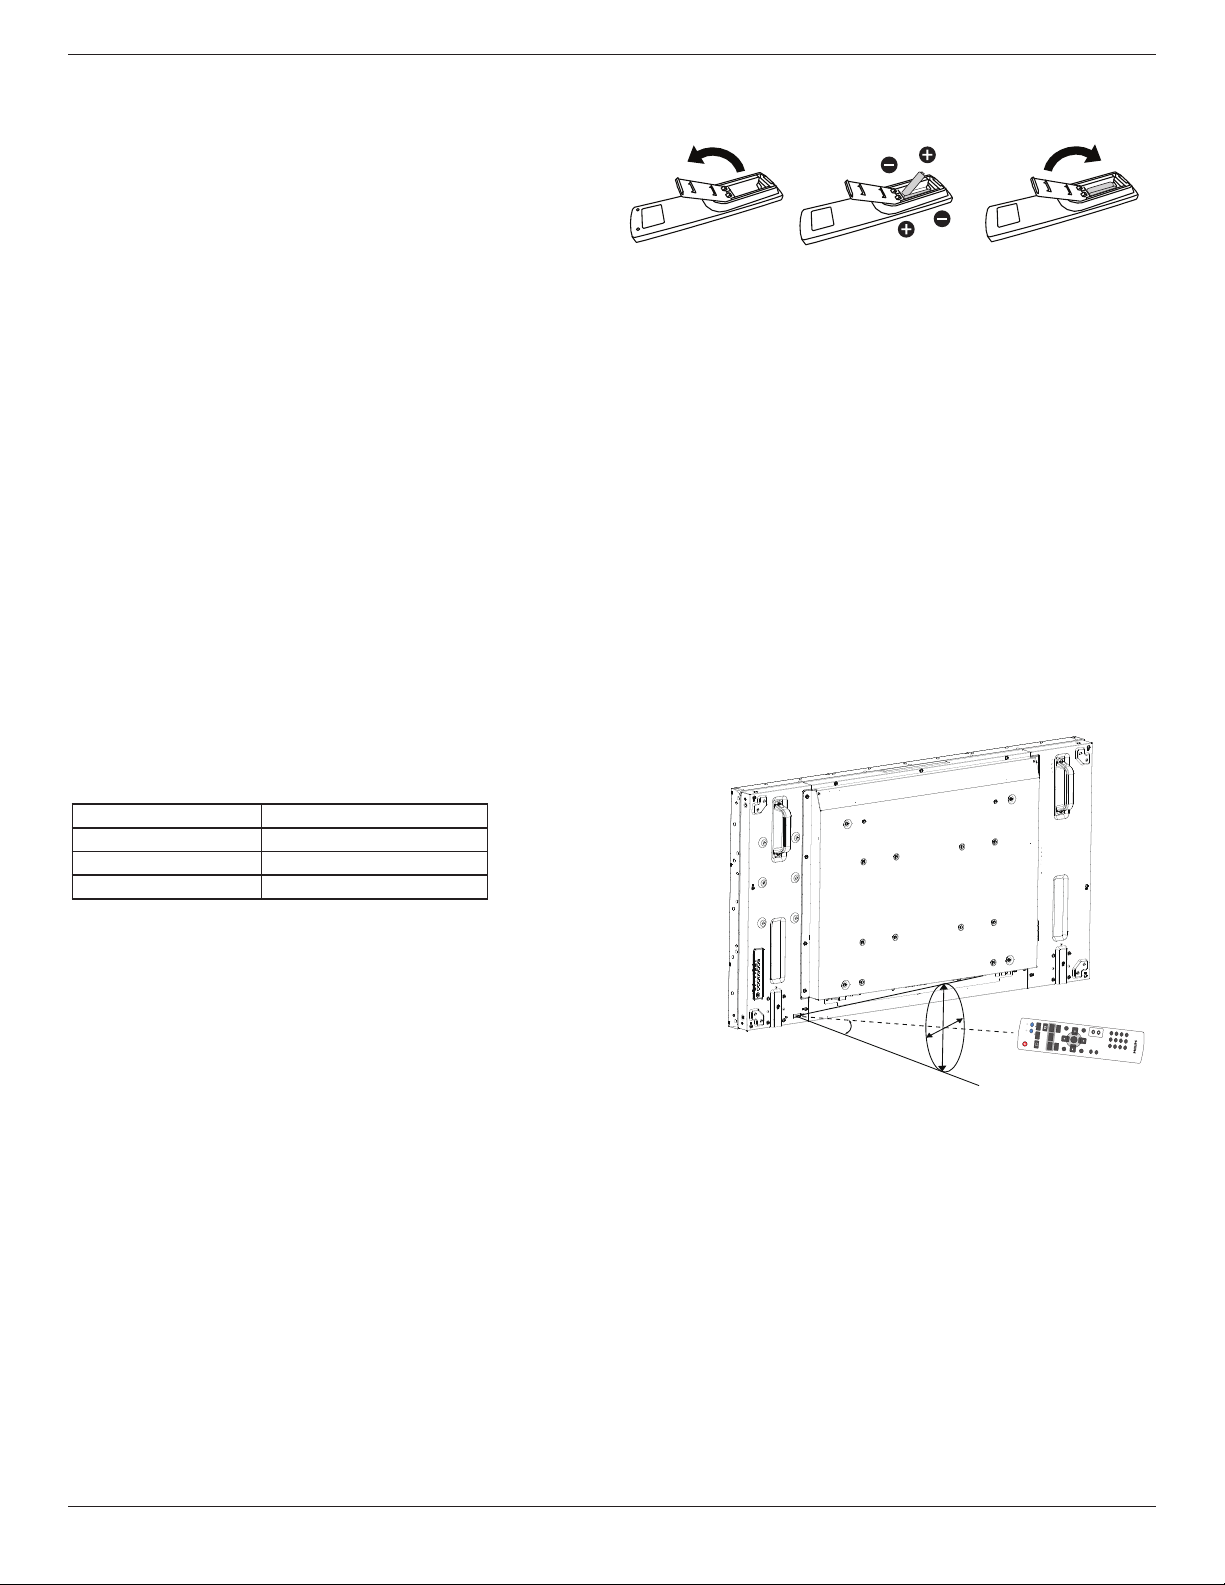
2.3.5. Operating range of the remote control
Pointthetopoftheremotecontroltowardthedisplay’sremotecontrolsensor(back
side)whenpressingabutton.
Usetheremotecontrolwithintherangewhichisshowninthefollowingtable.
Operation Angle RC operational distance
θ=0º(forH&V) ≥8m
θ=20º(forH&V) ≥5m
θ=45º(forHonly) ≥2m
NOTE: Theremotecontrolmaynotfunctionproperlywhentheremotecontrol
sensoronthedisplayisunderdirectsunlightorstrongillumination,orwhen
thereisanobstacleinthepathofsignaltransmission.
H
V
θ
POWER
SMART
VIDEO
PIP
INPUTON/OFF CHANGE
BRIGHTNESSCONTRAST
DISPLAY
AUTO
ADJUST
MUTE
VOL UP
VOL DOWN
EXIT
MENU
SET
AUDIO
USB MENU
SOURCE
NORMAL ID
1 2 3
6
9
0
7
4 5
8
ID SET ENTER
BDL4777XL
13
3. Connecting External Equipment
3.1. Connecting External Equipment (DVD/VCR/VCD)
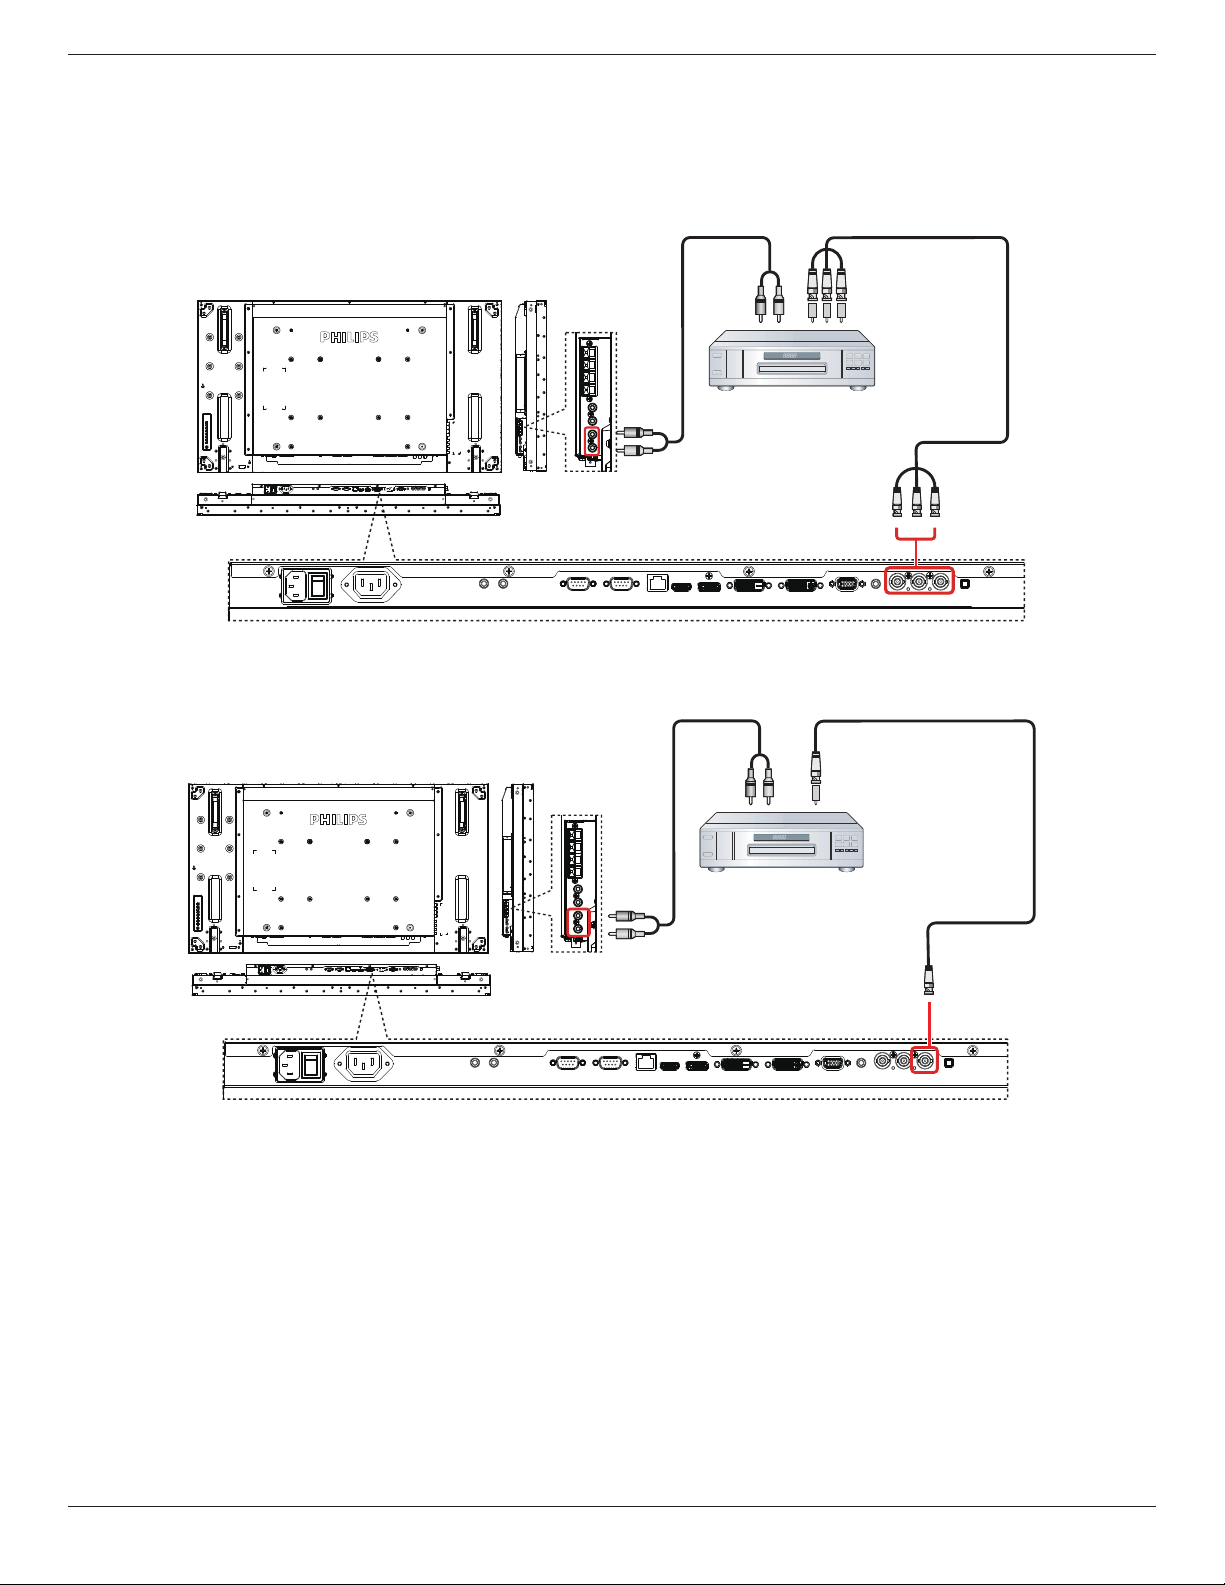
3.1.1. Using COMPONENT video input
DVD / VCR / VCD
[AUDIO IN]
[COMPONENT IN]
(YPbPr)
COMPONENT Out
(YPbPr)
Audio Out
[R]
[L]
3.1.2. Using Video Source input
[AUDIO IN]
[Y/CVBS IN]
Y/CVBS Out
[R]
[L]
DVD / VCR / VCD
BDL4777XL
14
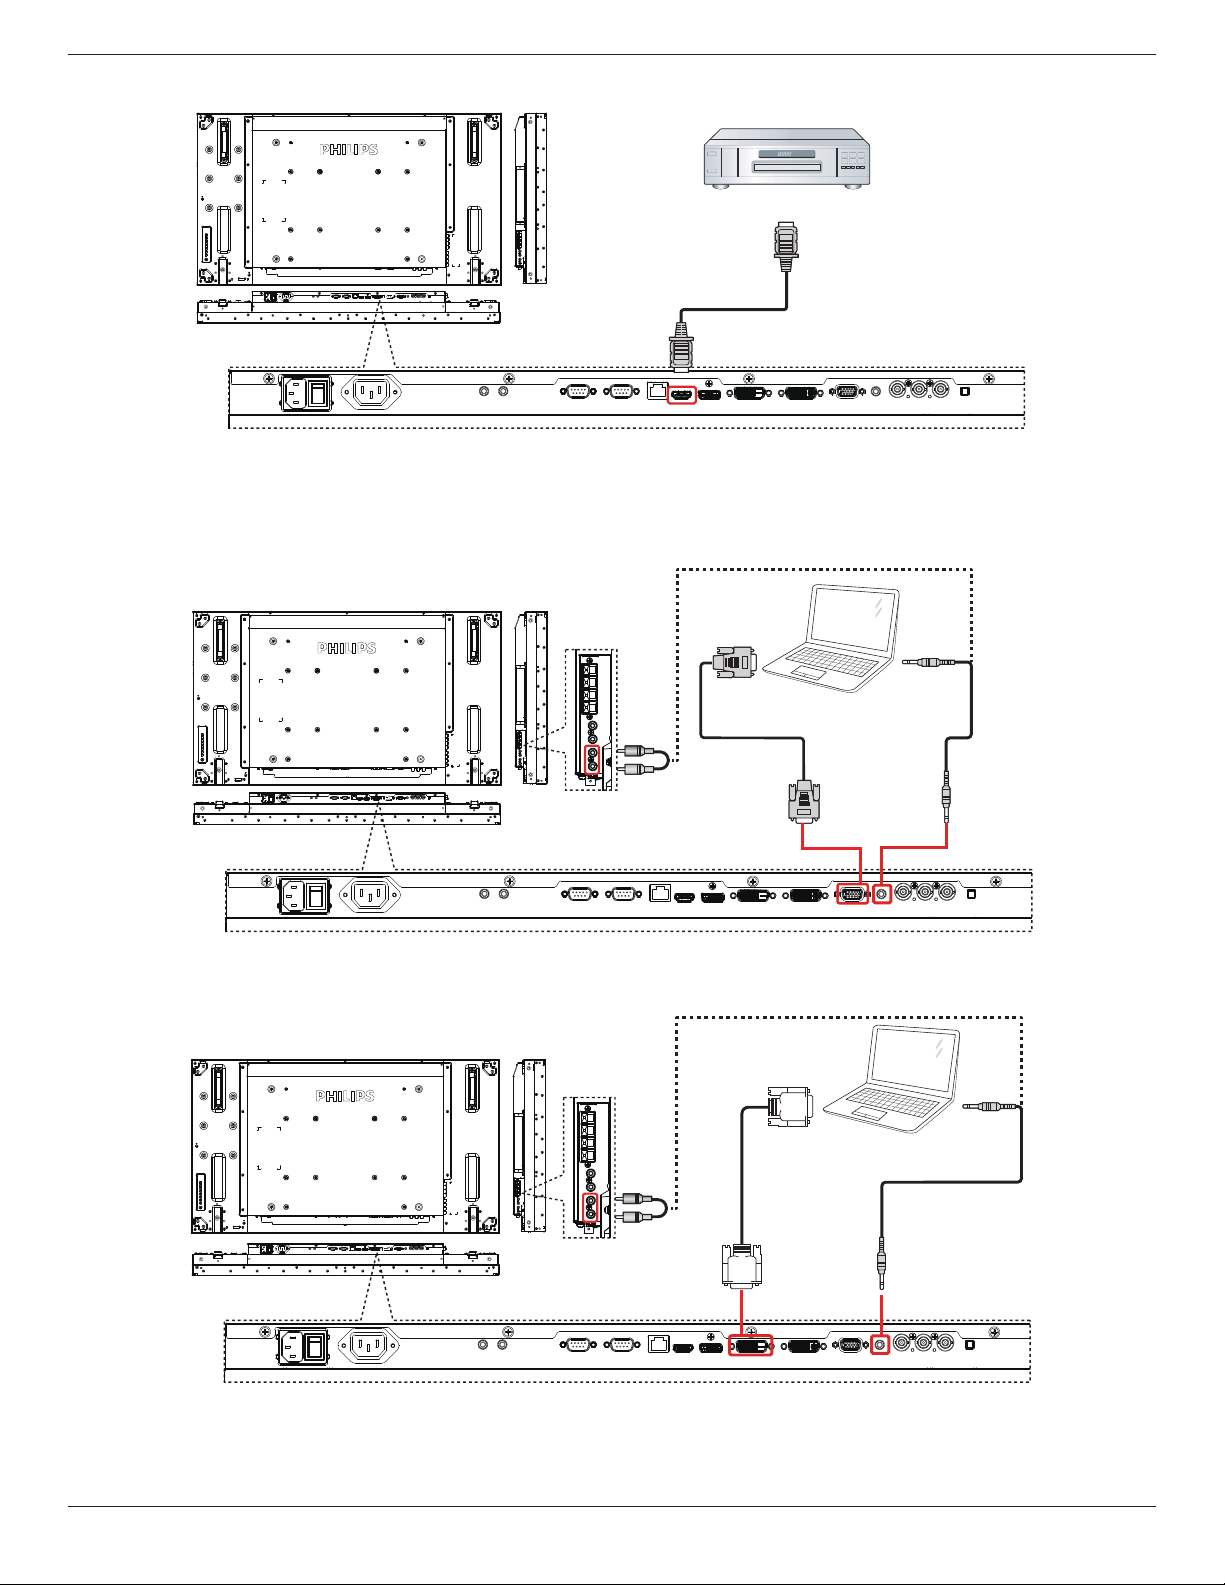
3.1.3. Using HDMI video input
DVD / VCR / VCD
HDMI Out
[HDMI IN]
3.2. Connecting a PC
3.2.1. Using VGA input
[R]
[L]
PC
[VGA IN]
[AUDIO IN]
[VGA AUDIO IN]
VGA Out
D-Sub 15 pin
Audio Out
3.2.2. Using DVI input
PC
[VGA AUDIO IN]
DVI Out
Audio Out
[DVI IN]
[R]
[L]
BDL4777XL
15
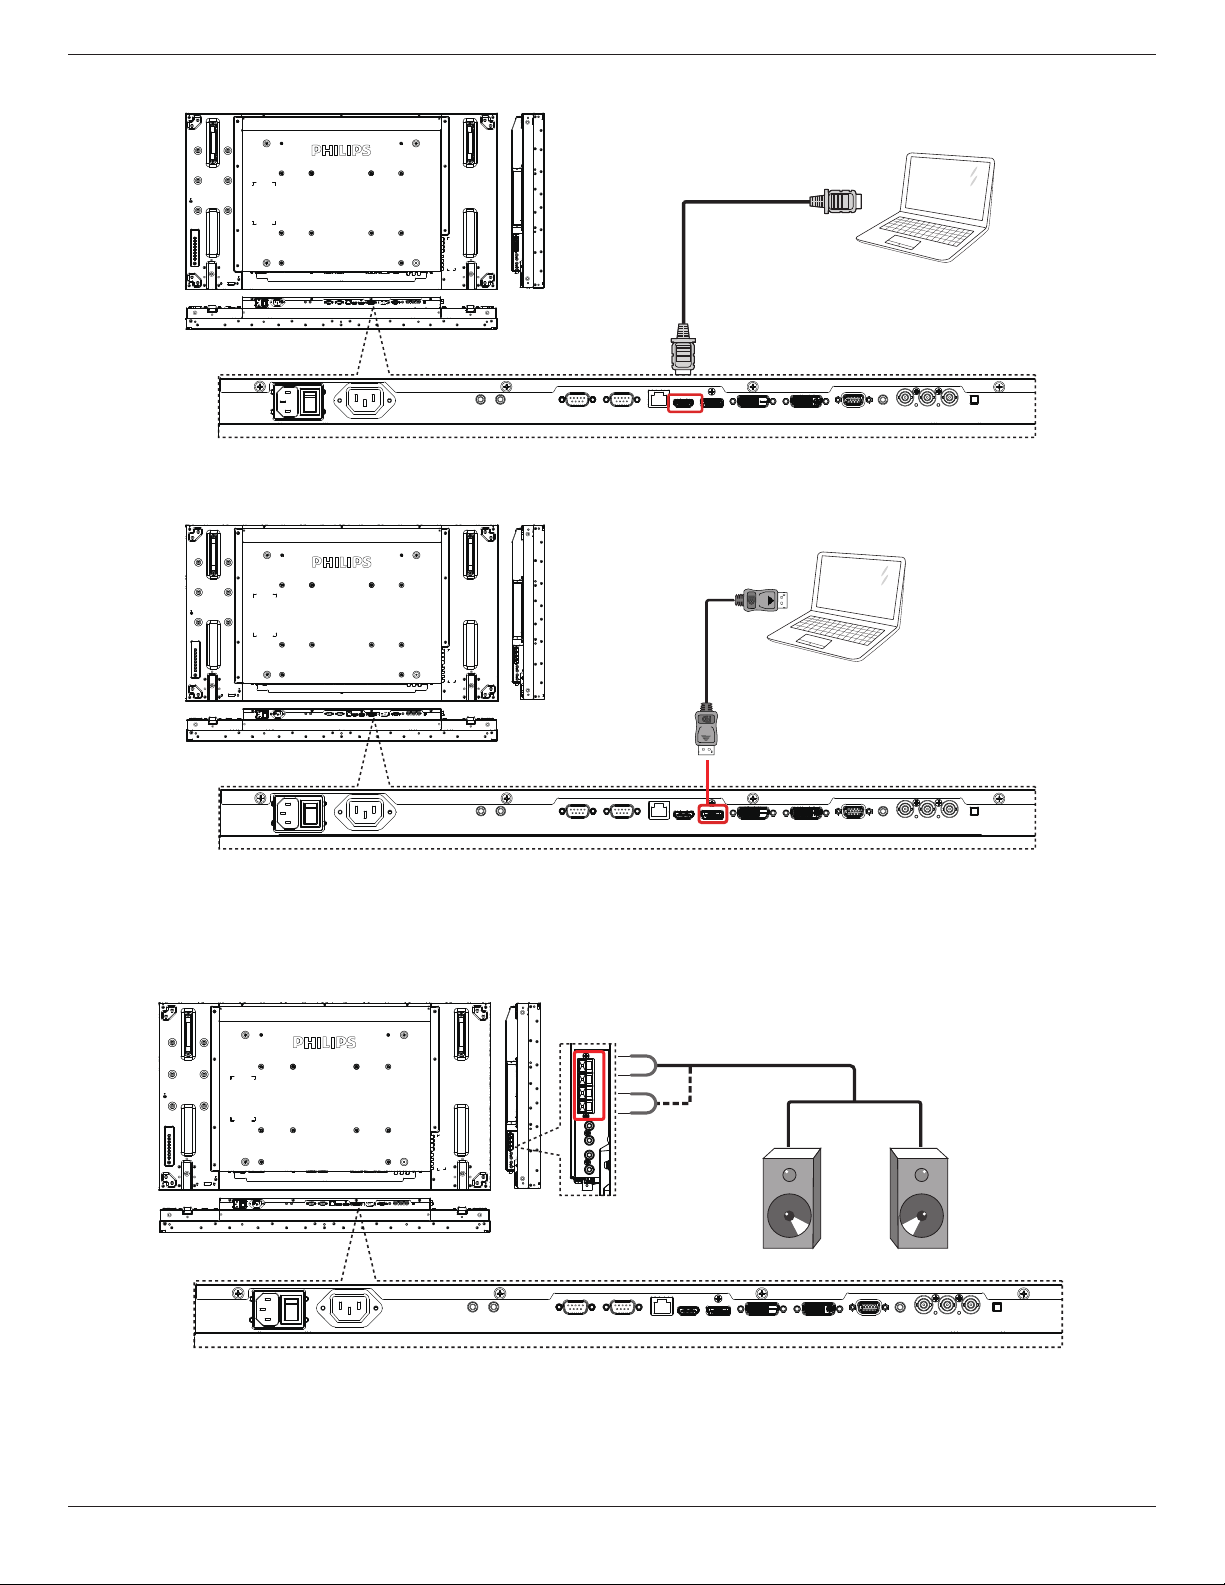
3.2.3. Using HDMI input
PC
HDMI Out
[HDMI IN]
3.2.4. Using DisplayPort input
PC
DisplayPort Out
[DisplayPort IN]
3.3. Connecting Audio Equipment
3.3.1. Connecting external speakers
External speakers
BDL4777XL
16
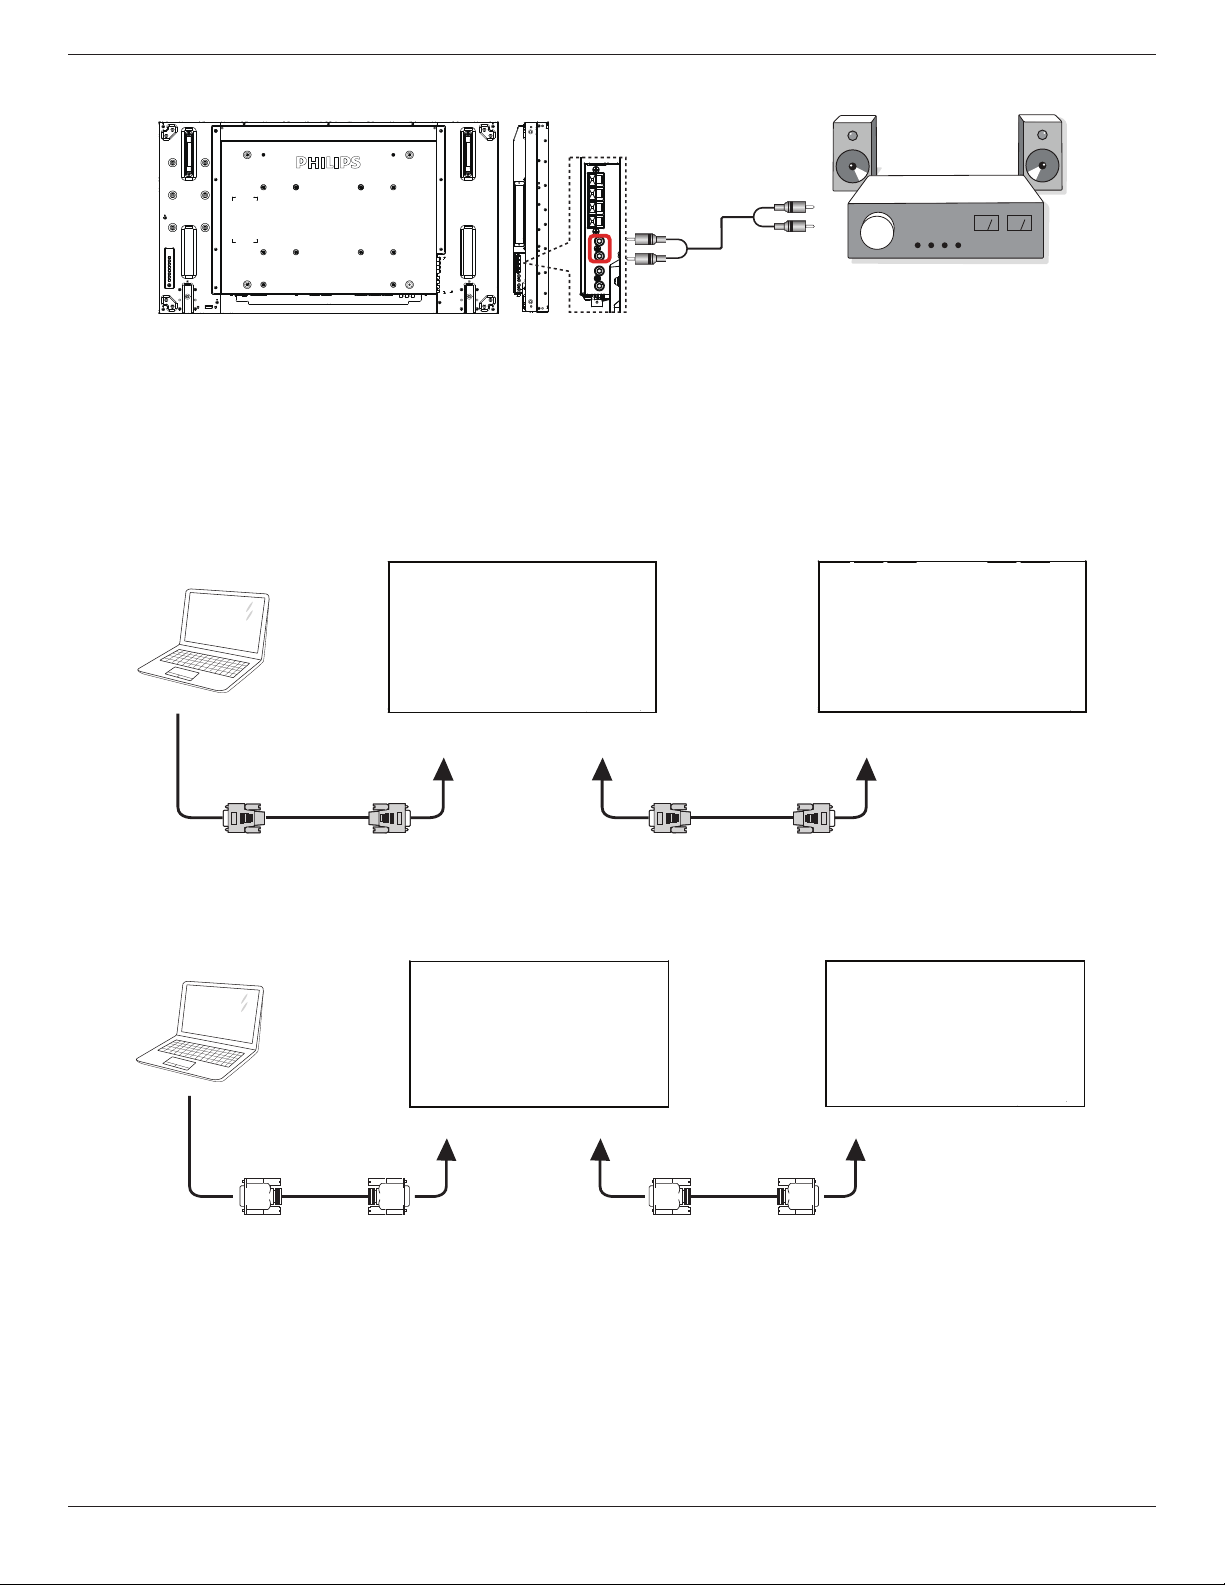
3.3.2. Connecting an external audio device
Stereo Amplifier
[AUDIO OUT]
Audio In
[R]
[L]
3.4. Connecting Multiple Displays in a Daisy-chain Configuration
Youcaninterconnectmultipledisplaystocreateadaisy-chaincongurationforapplicationssuchasavideowall.
3.4.1. Display control connection
Connectthe[RS232COUT]connectorofDISPLAY1tothe[RS232CIN]connectorofDISPLAY2.
DISPLAY 1
PC
DISPLAY 2
[RS-232C IN]
[RS-232C]
[RS-232C OUT] [RS-232C IN]
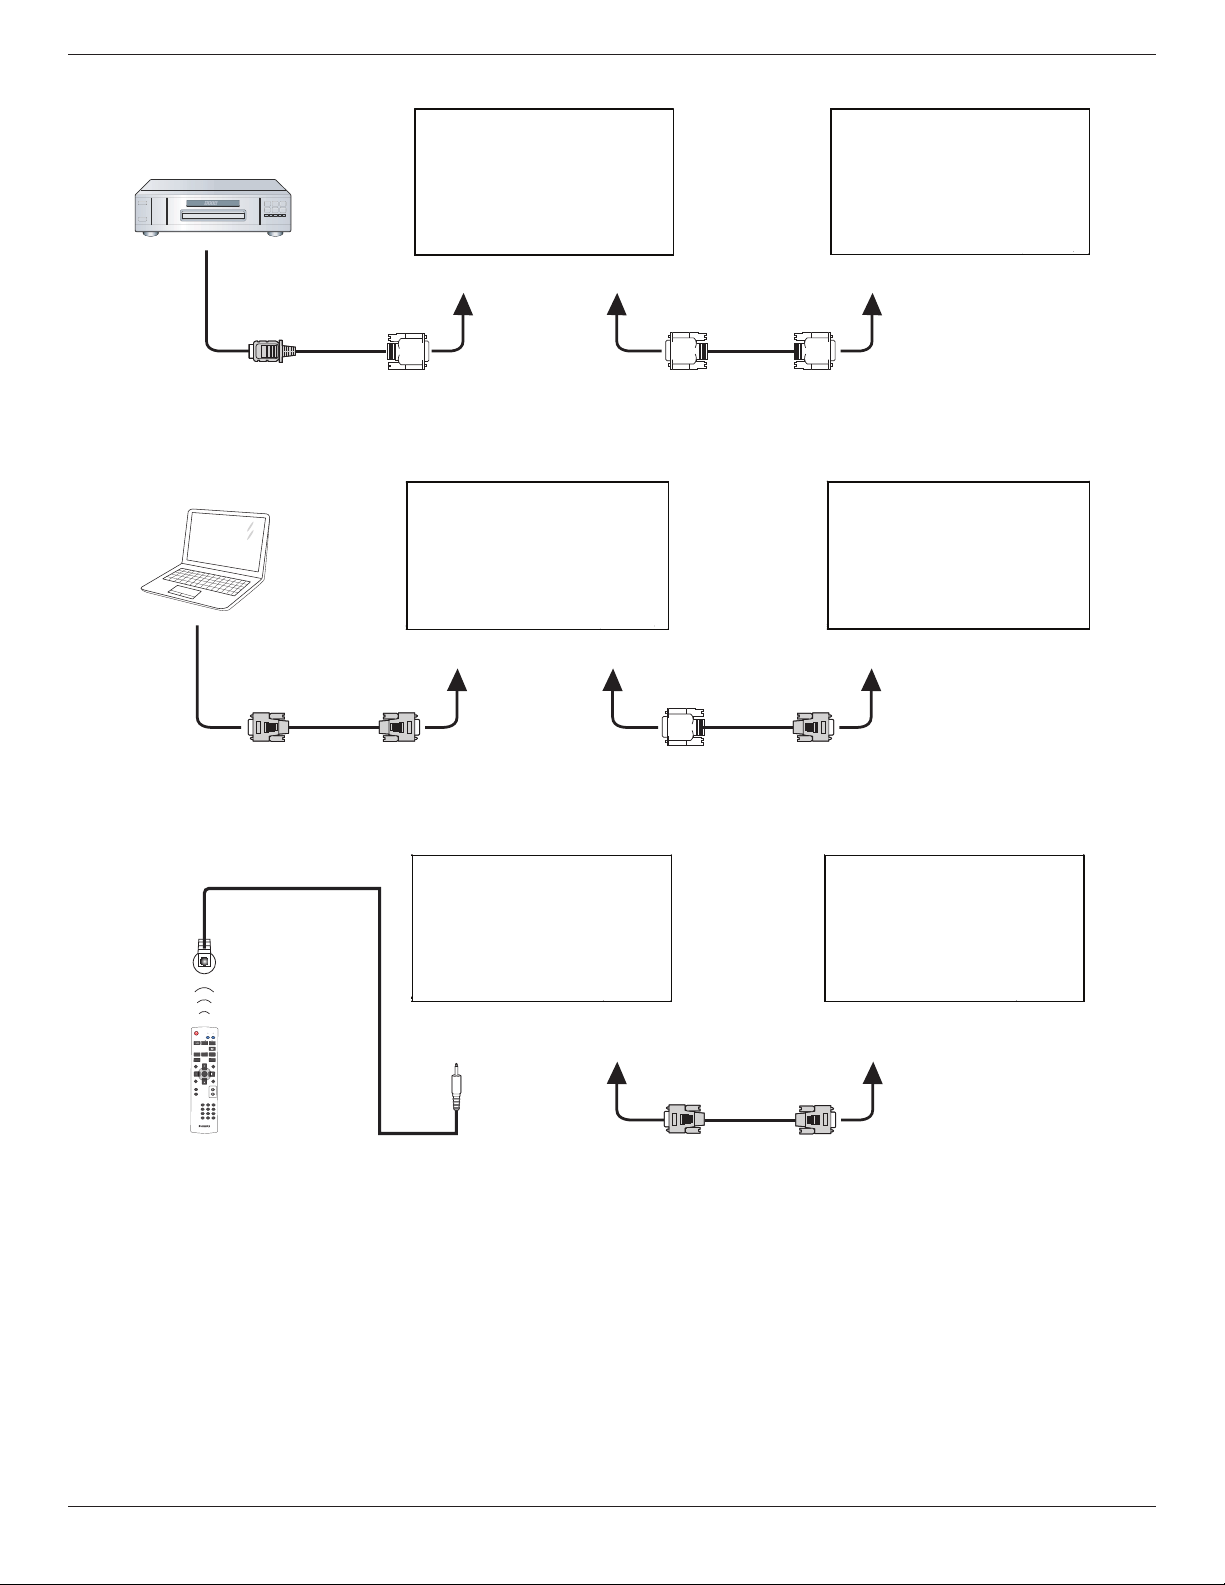
3.4.2. Digital video connection
Connectthe[DVIOUT/VGAOUT]connectorofDISPLAY1tothe[DVIIN]connectorofDISPLAY2.
PC
[DVI IN]
[DVI]
[DVI/VGA OUT] [DVI IN]
DISPLAY 1 DISPLAY 2
BDL4777XL
17
Connectthe[DVIOUT]connectorofDISPLAY1tothe[DVIIN]connectorofDISPLAY2.
DISPLAY 1 DISPLAY 2
[DVI IN]
[HDMI]
[DVI OUT] [DVI IN]
DVD / VCR / VCD
3.4.3. Analog video connection
Connectthe[DVIOUT/VGAOUT]connectorofDISPLAY1tothe[VGAIN]connectorofDISPLAY2.
PC
DISPLAY 1 DISPLAY 2
[VGA IN]
[VGA]
[DVI/VGA OUT] [VGA IN]
3.4.4. IR daisy-chain Connection
Connect[IRSensorCable]toDISPLAY1,andconnectthe[RS232COUT]connectorofDISPLAY1tothe[RS232CIN]connectorofDISPLAY2.
DISPLAY 2DISPLAY 1
[RS-232C OUT]
IR Sensor Cable
[RS-232C IN]
[IR IN]
POWER
SMART
VIDEO
PIP
INPUTON/OFF CHANGE
BRIGHTNESSCONTRAST
DISPLAY
AUTO
ADJUST
MUTE
VOL UP
VOL DOWN
EXIT
MENU
SET
AUDIO
USB MENU
SOURCE
NORMAL
ID
1 2
3
6
9
0
7
4 5
8
ID SET ENTER

BDL4777XL
18
3.5. IR connection
[IR IN]
External
IR Receiver
POWER
SMART
VIDEO
PIP
INPUTON/OFF CHANGE
BRIGHTNESSCONTRAST
DISPLAY
AUTO
ADJUST
MUTE
VOL UP
VOL DOWN
EXIT
MENU
SET
AUDIO
USB MENU
SOURCE
NORMAL
ID
1 2
3
6
9
0
7
4 5
8
ID SET ENTER
NOTE: Thisdisplay’sremotecontrolsensorwillstopworkingifthe[IR IN]isconnected.
3.6. IR Pass-through Connection
DVD / VCR / VCD
(DVD / VCR / VCD)
Remote Control
[IR OUT]
[IR IN]
POWER
SMART
VIDEO
PIP
INPUTON/OFF CHANGE
BRIGHTNESSCONTRAST
DISPLAY
AUTO
ADJUST
MUTE
VOL UP
VOL DOWN
EXIT
MENU
SET
AUDIO
USB MENU
SOURCE
NORMAL
ID
1 2
3
6
9
0
7
4 5
8
ID SET ENTER
BDL4777XL
19
4. OSD Menu
AnoverallviewoftheOn-ScreenDisplay(OSD)structureisshown
below.Youcanuseitasareferenceforfurtheradjustingyourdisplay.
4.1. Navigating the OSD Menu
4.1.1. Navigating the OSD menu using the
remote control
EXIT
MENU
SET
1. Press[MENU]buttonontheremotecontroltodisplaytheOSD
menu.
2. Press[ ]or[ ]buttontochoosetheitemyouwanttoadjust.
3. Press[SET]or[ ]buttontoenterthesubmenu.
4. Inthesubmenu,press[ ]or[ ]buttontotoggleamongitems,
press[ ]or[ ]buttontoadjustsettings.Ifthereisasubmenu,
press[SET]or[ ]buttontoenterthesubmenu.
5. Press[EXIT]buttontoreturntothepreviousmenu,orpress
[MENU]buttontoexittheOSDmenu.
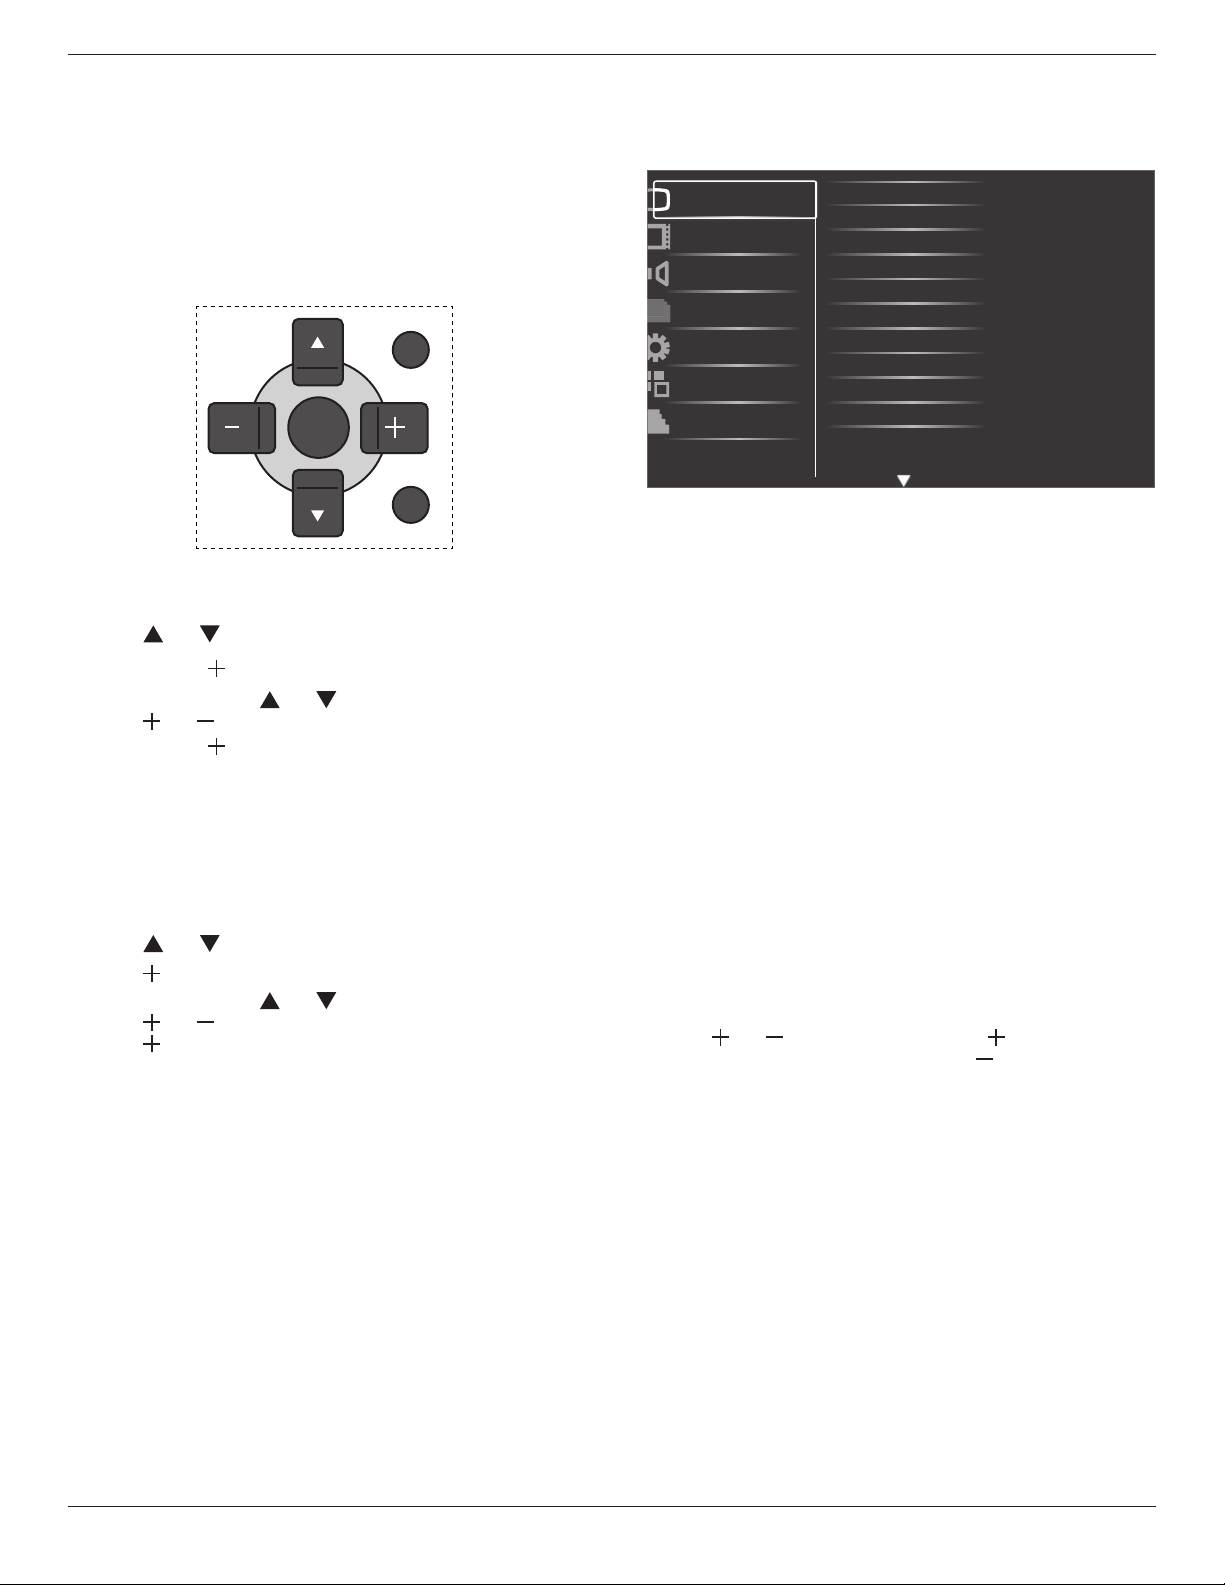
4.1.2. Navigating the OSD menu using the
display’s control buttons
1. Press[MENU]buttontodisplaytheOSDmenu.
2. Press[ ]or[ ]buttontochoosetheitemyouwanttoadjust.
3. Press[ ]buttontoenterthesubmenu.
4. Inthesubmenu,press[ ]or[ ]buttontotoggleamongitems,
press[ ]or[ ]buttontoadjustsettings.Ifthereisasubmenu,
press[ ]buttontoenterthesubmenu.
5. Press[MENU]buttontoreturntothepreviousmenu,orpress
[MENU]buttonseveraltimestoexittheOSDmenu.
4.2. OSD Menu Overview
4.2.1. Picture menu
Brightness
Contrast
Sharpness
Black level
Tint
Color
Color temperature
Color control
Smart contrast
Smart picture
Picture
Screen
Audio
PIP
Configuration1
Configuration2
Advanced option
Noise reduction
Brightness
AdjusttheoverallimagebrightnessbychangingtheintensityoftheLCD
panel’sbacklight.
Contrast
Adjusttosharpenthepicturequality.Theblackportionsofthepicture
becomericherindarknessandthewhitebecomebrighter.
Sharpness
Adjusttoimprovetheimagedetail.
Black level
Videoblacklevelisdenedasthelevelofbrightnessatthedarkest
(black)partofavisualimage.Adjusttochangetheimagebrightness.
Noise reduction
Adjusttoremovethenoiseintheimage.Youcanselectasuitablenoise
reductionlevel.
Choosefrom:{Off}/{Low}/{Medium}/{High}.
NOTE: ThisitemisfunctionalforHDMI(Videomode),Video,and
YPbPrinputsonly.
Tint
Adjusttochangethecolortintoftheimage.
Usethe[ ]or[ ]buttontoadjust.Pressthe[ ]buttonandthe
eshtonecolorturnsslightlygreen.Pressthe[ ]buttonandtheesh
tonecolorturnsslightlypurple.
NOTE: ThisitemisfunctionalforHDMI(Videomode),Video,and
YPbPrinputsonly.
Color
Adjusttoincreaseordecreasetheintensityofcolorsintheimage.
NOTE: ThisitemisfunctionalforHDMI(Videomode),Videoand
YPbPrinputsonly.
Color temperature
Selectacolortemperaturefortheimage.Alowercolortemperature
willhaveareddishtint,whilstahighercolortemperaturegivesoffa
morebluishtint.
Choosefrom:{3000K}/{4000K}/{5000K}/{6500K}/{7500K}/
{9300K}/{10000K}/{Native}/{User 1}/{User 2}.
Color control
Withthisfunctionyoucanadjustthecolortonesoftheimageprecisely
bychangingtheR(Red),G(Green)andB(Blue)settingsindependently.
BDL4777XL
20
NOTE: Thisitemisfunctionalonlywhen{Color temperature}isset
to{User 1}.
{User 2}
:
Adjustthe{Color temperature}by100Kper
stage
.
Theadjustingrangeisbetween2000Kto10000K.
Smart contrast
Whenturnedon,thisfunctionhelpsenhanceimagecontrastwhen
displayingdarkscenes.
Smart picture
Thefollowingsmartpicturemodesareavailablefor:
• PCmode:{Standard}/{Highbright} /{sRGB}.
• Videomode:{Standard}/{Highbright}/{Cinema}.
Video source
Selectthevideoinputsourceaccordingtothevideosignalsource
connectedtothevideoinputonthedisplay.
Picture reset
ResetallsettingsinthePicturemenu.
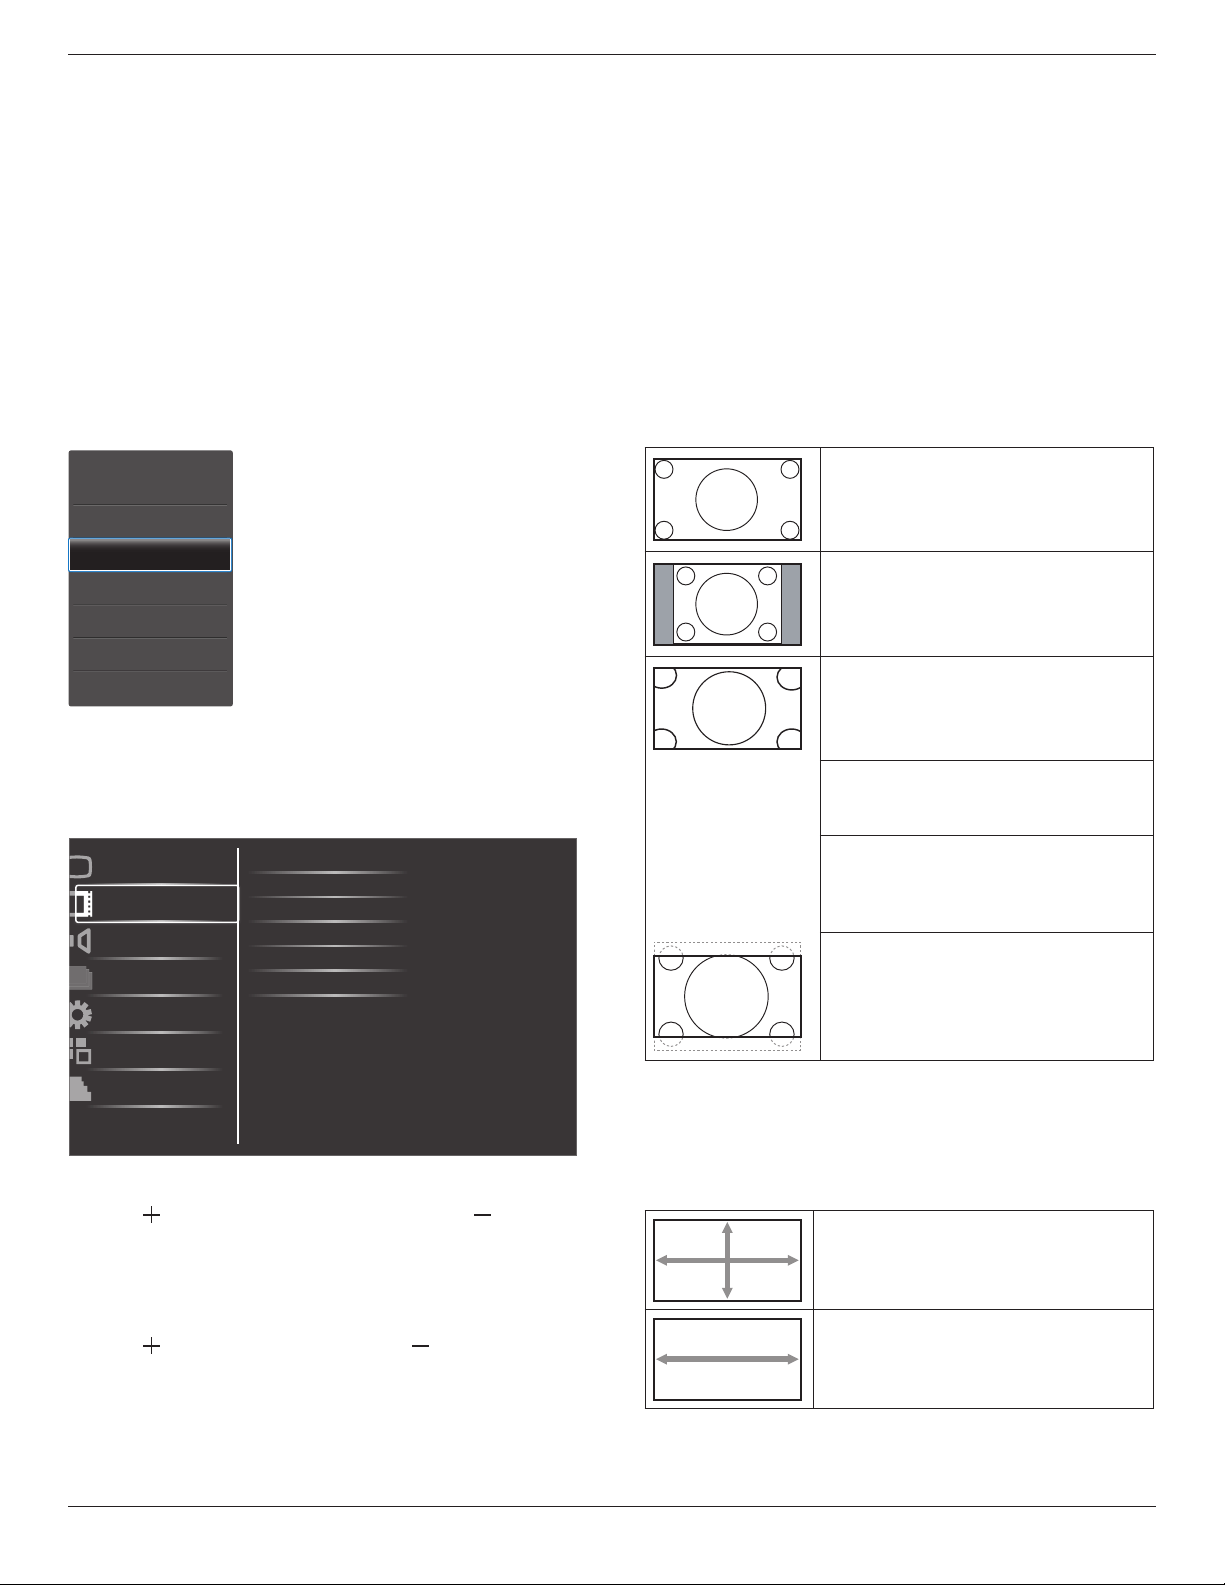
4.2.2. Screen menu
H position
V position
Clock
Clock phase
Custom zoom
Screen reset
Picture
Screen
Audio
PIP
Configuration1
Configuration2
Advanced option
Zoom mode
H position
Pressthe[ ]buttontomovetheimagetotheright,or[ ]tomove
theimagetotheleft.
NOTE: ThisitemisfunctionalforallinputsexceptHDMI,Card OPS,
andDisplayPortinvideomode.
V position
Pressthe[ ]buttontomovetheimageup,or[ ]tomovetheimage
down.
NOTE: ThisitemisfunctionalforallinputsexceptHDMI,Card OPS,
andDisplayPortinvideomode.
Clock
Adjustthewidthoftheimage.
NOTE: ThisitemisfunctionalforVGAinputonly.
Clock phase
Adjusttoimprovethefocus,clarityandstabilityoftheimage.
NOTE: ThisitemisfunctionalforVGAinputonly.
Zoom mode
Thepicturesyoureceivemaybetransmittedin16:9format(wide
screen)or4:3format(conventionalscreen).The16:9pictures
sometimeshaveablackbandatthetopandbottomofthescreen
(letterboxformat).
Thisfunctionallowsyoutooptimizethepicturedisplayonscreen.The
followingzoommodesareavailablefor:
• PCmode:{Full}/{Normal}/{Custom}/{Real}.
• Videomode:{Full}/{Normal}/{Dynamic}/{Custom}/{Real}/
{21:9}.
Full
Thismoderestoresthecorrectproportions
ofpicturestransmittedin16:9usingthefull
screendisplay.
Normal
Thepictureisreproducedin4:3formatand
ablackbandisdisplayedoneithersideofthe
picture.
Dynamic
Filltheentirescreenbystretching4:3pictures
non-proportionally.
Custom
Choosetoapplythecustomzoomsettingsin
theCustomZoomsubmenu.
Real
Thismodedisplaystheimagepixel-by-pixel
onscreenwithoutscalingtheoriginalimage
size.
21:9
Thepictureisenlargedto16:9format.This
modeisrecommendedwhendisplaying
picturesthathaveblackbandsatthetopand
bottom(letterboxformat).
Custom zoom
Youcanusethisfunctiontofurthercustomizethezoomsettingstosuit
theimageyouwanttodisplay.
NOTE: ThisitemisfunctionalonlywhentheZoom modesettingis
settoCustom.
Zoom
Expandsthehorizontalandverticalsizesofthe
imagesimultaneously.
H zoom
Expandsthehorizontalsizeoftheimageonly.
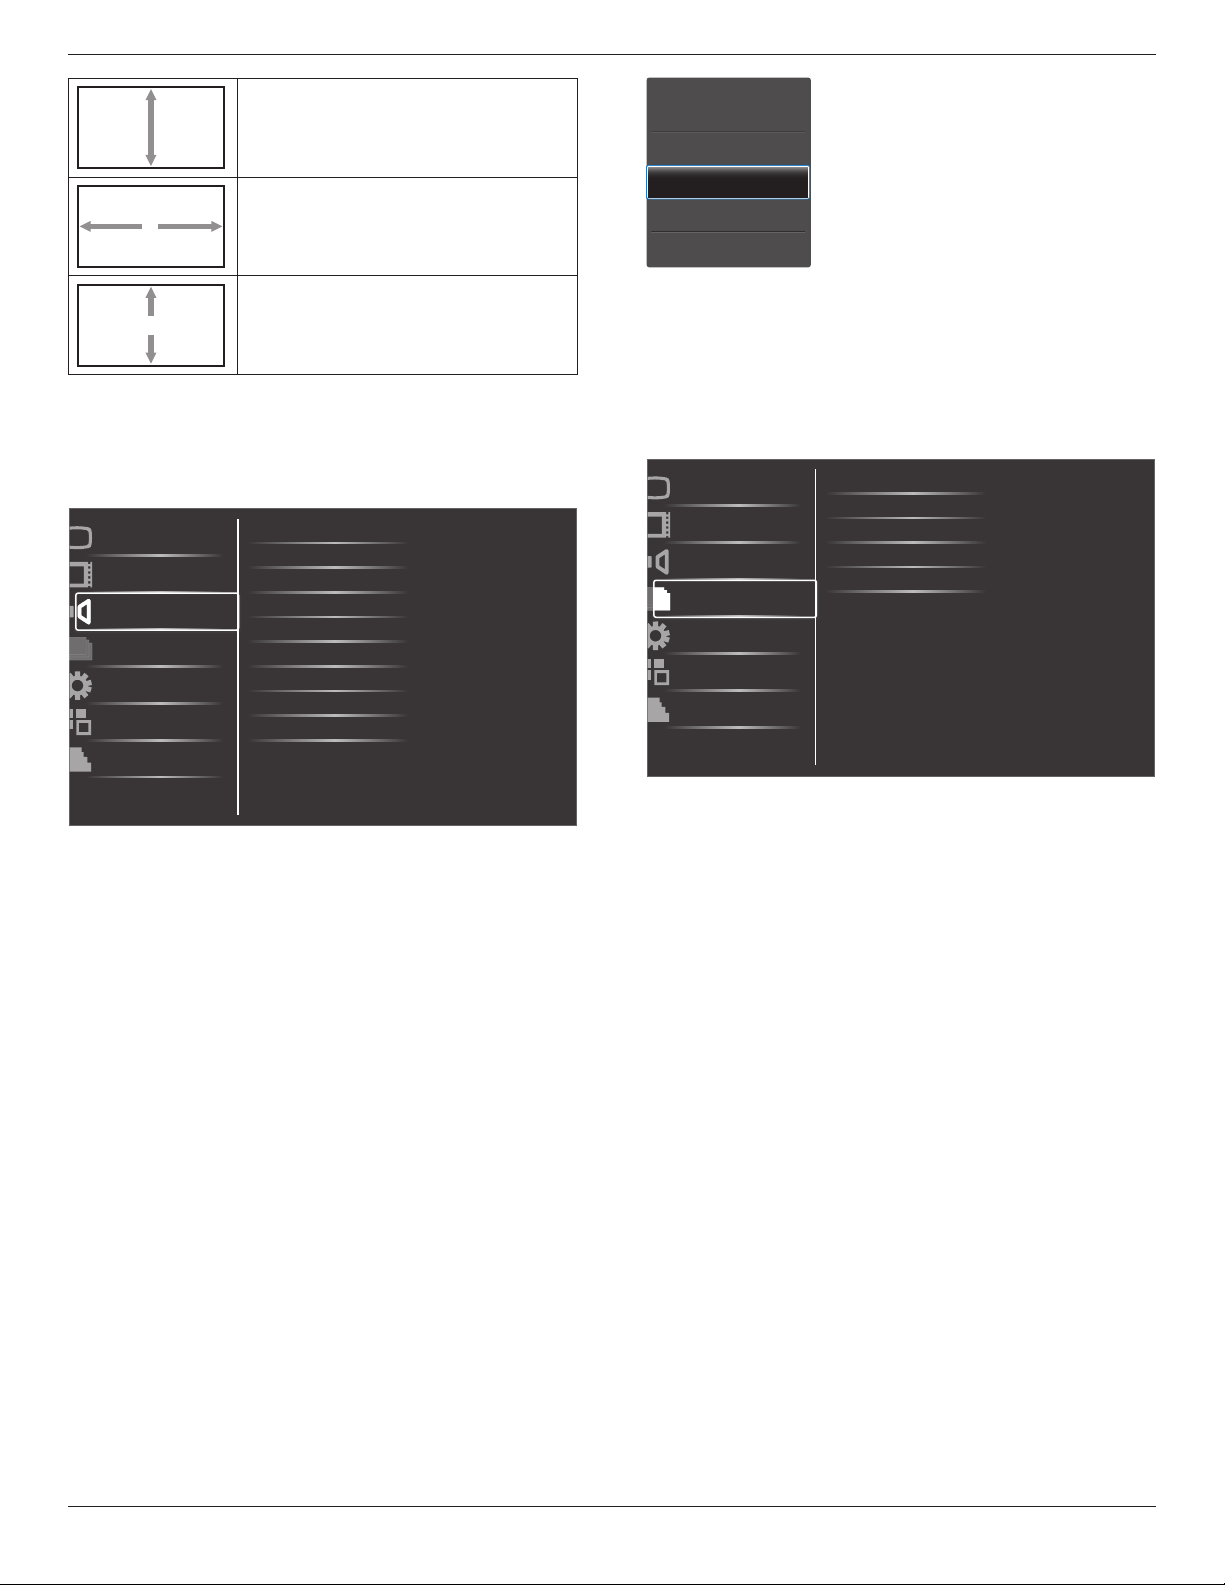
BDL4777XL
21
V zoom
Expandstheverticalsizeoftheimageonly.
H position
Movesthehorizontalpositionoftheimageleft
orright.
V position
Movestheverticalpositionoftheimageupor
down.
Screen reset
ResetallsettingsintheScreenmenutofactorypresetvalues.
4.2.3. Audio menu
Balance
Treble
Bass
Volume
Minimum volume
Picture
Screen
Audio
PIP
Configuration1
Configuration2
Advanced option
Maximum volume
Audio source
Mute
Audio reset
Card OPS audio
Balance
Adjusttoemphasizeleftorrightaudiooutputbalance.
Treble
Adjusttoincreaseordecreasehigher-pitchedsounds.
Bass
Adjusttoincreaseordecreaselower-pitchedsounds.
Volume
Adjusttoincreaseordecreasetheaudiooutputlevel.
Maximum volume
Adjustyourownlimitationforthemaximumvolumesetting.Thisstops
thevolumefrombeingplayingattooloudalevel.
Minimum volume
Adjustyourownlimitationfortheminimumvolumesetting.
Mute
Turnthemutefunctionon/off.
Audio source
Selecttheaudioinputsourceaccordingtotheaudiosignalsource
connectedtotheaudioinputandHDMIsocketsonthedisplay.
Audio reset
ResetallsettingsintheAudiomenutofactorypresetvalues.
Card OPS audio
SelecttheanalogordigitalaudiomodeforcardOPS.
4.2.4. PIP menu
PIP
PIP input
PIP change
PIP size
PIP reset
Picture
Screen
Audio
PIP
Configuration1
Configuration2
Advanced option
PIP audio
PIP
SelectthePIP(Picture-in-Picture)mode.
Choosefrom:{Off}/{PIP}/{POP}/{PBP aspect}/{PBP full}.
PIP input
Selecttheinputsignalforthesub-picture.
PIP change
Enlargesthesmallerpicturetobecomethemainpicture,andviceversa.
PIP size
SelectthesizeofthesubpictureinthePIP(Picture-in-Picture)mode.
Choosefrom:{Small}/{Medium}/{Large}.
PIP audio
SelecttheaudiosourceinthePIP(Picture-in-Picture)mode.
• {Main}–Selectaudiofromthemainpicture
• {Sub}–Selectaudiofromthesubpicture.
PIP reset
ResetallsettingsinthePIPmenutofactorypresetvalues.
NOTES:
• ThePIPfunctionisavailableonlyunderthefollowingcondition:
SetOSDoption{Conguration1}
{Panel saving}
{Pixel shift}
settingto{Off},andsetOSDoption{Advanced option}
{Tiling}
{Enable}settingto{No}.
• ThePIPfunctionisavailableonlyforcertainsignalsource
combinationsasshowninthetablebelow.
• TheavailabilityofthePIPfunctionwillalsodependontheresolution
oftheinputsignalbeingused.
BDL4777XL
22
MainPicture
SubPicture
Displayport HDMI DVI-D VGA YPbPr Video
Card
OPS
Displayport X X X O O O X
HDMI X X X O O O X
DVI-D X X X O O O X
VGA O O O X X X O
YPbPr O O O X X X O
Video O O O X X X O
CardOPS X X X O O O X
(O:PIPfunctionavailable,X:PIPfunctionunavailable)
Bypressingthe[PIP ON/OFF]buttonontheremotecontrol,youcan
changethemodeintheordershownbelow:
PIP POP
PBP aspect PBP full
Off
TheresolutionsinthePIPandPOPmodesareconguredasfollows:
PIPSIZE {Small} :320×240pixels
{Medium} :480×320pixels
{Large} :640×480pixels
POPSIZE:474×355pixels
NOTE: TheimagesdisplayedinthesubpicturealwaystthePIP
sizesshownaboveirrespectiveoftheaspectratiooftheinput
image.
4.2.5. Configuration1 menu
Switch on state
Auto adjust
Power save
Language
Color system
Picture
Screen
Audio
PIP
Configuration1
Configuration2
Advanced option
Panel saving
Network control port
Network settings
Configuration reset
Factory reset
Switch on state
Selectthedisplaystatususedforthenexttimeyouconnectthepower
cord.
• {Power off}–Thedisplaywillremainoffwhenthepowercordis
connectedtoawalloutlet.
• {Forced on}–Thedisplaywillturnonwhenthepowercordis
connectedtoawalloutlet.
• {Last status}–Thedisplaywillreturntothepreviouspowerstatus
(on/off/standby)whenremovingandreplacingthepowercord.
Auto adjust
UsethisfunctiontoautomaticallyoptimizethedisplayofVGAinput
image.
NOTE: ThisitemisfunctionalforVGAinputonly.
Power save
Usethissettingtoreducethepowerautomatically.
• {RGB}–Select{On}toletthedisplayenterAPMmodewhenno
signalisdetectedfromtheHDMIGraphicmode,HDMI,DVI-D,or
VGAinputsafterthreesuccessivecycles.
• {VIDEO}–Select{On}toenterpowersavingmodewhennosignal
isdetectedfromtheHDMIVideomodeorYPbPrinputsafterthree
successivecycles.
Language
SelectthelanguageusedintheOSDmenu.
Theoptionsare:{ }/{ }/{ }/{ }/
{ }/{ }/{ }/{ }/{ }/{ }/
{ }/{
日本語
}.
Panel saving
Choosetoenablethepanelsavingfunctionsandthusreducetheriskof
“image persistence”or“ghost-imaging”.
• {Cooling Fan}–Select{On}toturnonthecoolingfanallthe
time.Select{Auto}toturnon/offthecoolingfanaccordingtothe
display’stemperature.
NOTES:
• Thedefault{Auto}optionwillstartrunningthecoolingfanif
thetemperatureof60°C (140°F)isreached,andstoprunning
thecoolingfanifthetemperatureof58°C (136°F).
• Atemperature-warningmessagewillbeshownonthescreenif
thetemperaturereaches69°C(156°F).Allkeyfunctionsexcept
[Power]keywillthenbedisabled.
• Oncethetemperaturereaches70°C(158°F),thedisplaypower
willbeshutdownautomatically.
• {Brightness}–Select{On}andtheimagebrightnesswillbereduced
toanappropriatelevel.TheBrightnesssettinginthePicturemenu
willbeunavailablewhenselected.
• {Pixel shift}–Selectthetimeinterval({Auto}/{10~900}Seconds
/{Off})forthedisplaytoslightlyexpandtheimagesizeandshiftthe
positionofpixelsinfourdirections(up,down,left,orright).
Color system
SelectstheColorSystemdependingonyourinputvideoformat.
Theoptionsare:{Auto}/{NTSC}/{PAL}/{SECAM}/{4.43NTSC}/
{PAL-60}.
NOTE: ThisitemisfunctionalforVIDEOinputonly.
Network control port
Selectthenetworkcontrolport.
Choosefrom:{RS232}/{LAN(RJ45)}/{Card OPS RS232}.
NOTES:
• If{LAN(RJ45)}isselected,then{RS232}willnotbeactivated,even
ifacableisattached,andviceversa.
• Theoption{Card OPS RS232}isfunctionalafterconnectedwith
yourOPSdevice.
Network settings
Assign{IP address},{Subnet Mask},and{Default gateway}forthe
display.
BDL4777XL
23
Network settings
Network host name
DHCP
IP address
Subnet mask
Default gateway
Login user name
Login password
9
172
255
0
0
0
-
-
-
admin
0
[ SET ]
change [SET] in STORE
Z
Disable
16
255
0
0
L
-
-
-
0
0
0
0
1
0
0
-
-
-
• DHCP–ChoosetoenableordisabletheDHCPfunction.If
enabled,thedisplaywillbeassignedIPaddress,Subnetmaskand
Defaultgatewayautomatically.Ifdisabled,youwillbeprompted
toenterthefollowingvaluesmanually.Whennished,press[SET]
buttontostoreandsavethechosenvalues.
• IPaddress
• Subnetmask
• Defaultgateway
• Loginusername(Thedefaultusernameis{admin})
• Loginpassword(Thedefaultpasswordis{0000})
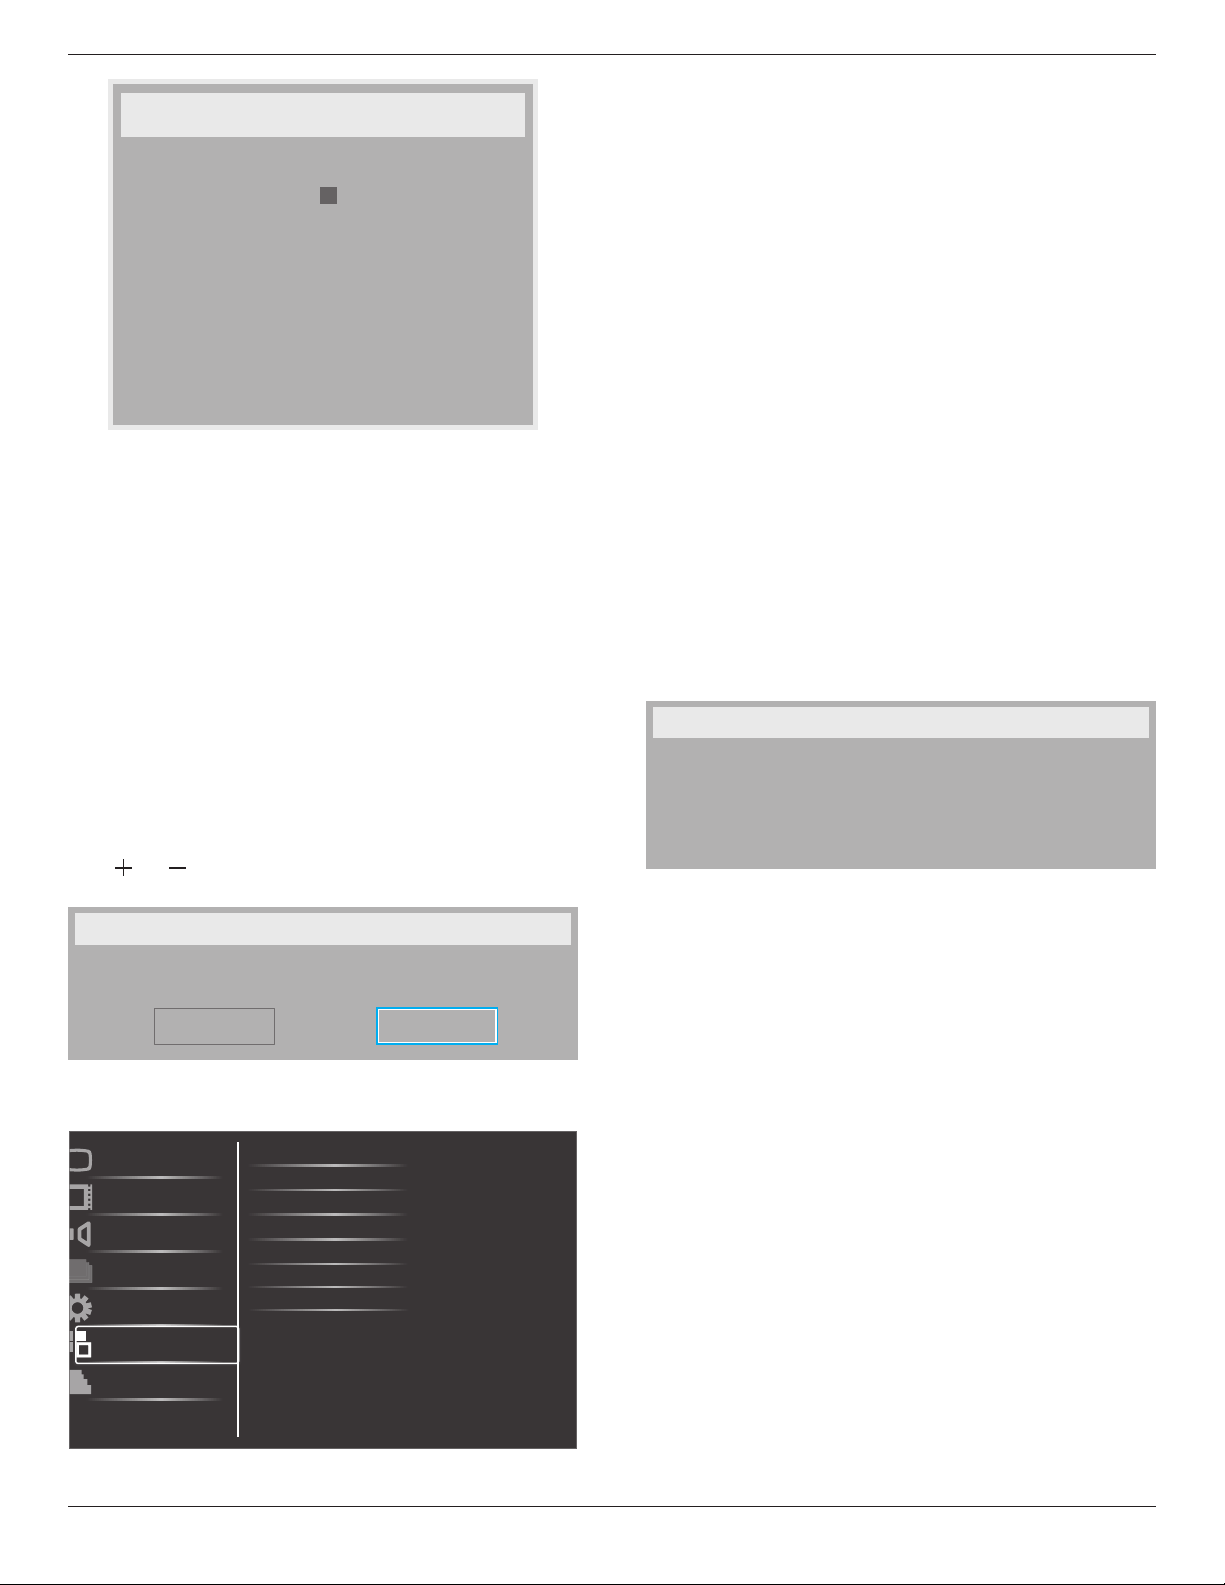
Conguration reset
ResetallsettingsinConguration1menutothefactorypresetvalues.
Factory reset
ResetallsettingsintheOSDmenusof{Picture},{Screen},{Audio},{PIP},
{Conguration1},{Conguration2},and{Advanced option}tothe
factorypresetvalues.
Press[ ]or[ ]buttontoselect[Reset],andthenpress[SET]button
todothereset.
Factory reset
Cancel
Reset
4.2.6. Configuration2 menu
OSD turn off
Information OSD
Off timer
OSD H-position
Monitor information
OSD rotation
Picture
Screen
Audio
PIP
Configuration1
Configuration2
Advanced option
OSD V-position
Logo
OSD turn off
SettheperiodoftimetheOSD(on-screendisplay)menustaysonthe
screen.
Theoptionsare:{5 ~ 120}seconds.
Information OSD
SettheperiodoftimetheinformationOSDisdisplayedontheupper
rightcornerofthescreen.TheinformationOSDwilldisplaywheninput
signalischanged.
TheinformationOSDwillremainonthescreenwith{Off}selection.
Theoptionsare:{1 ~ 60}seconds.
Off Timer
Setthedisplaytoturnitselfofftostandbymodewithinanamountof
timespecied.
Theoptionsare:{Off,1 ~ 24}hoursfromcurrrenttime.
NOTE: Whenthe“Offtimer”isactivated,the“Schedule”settingswill
bedisabled.
OSD H-position
AdjustthehorizontalpositionoftheOSDmenu.
OSD V-position
AdjusttheverticalpositionoftheOSDmenu.
Monitor information
Showsinformationaboutyourdisplay,includingmodelnumber,serial
number,operatinghoursandsoftwareversion.
Monitor information
Model name:
Serial no:
Operation hours:
SW Version:
BDL4777XL
VER 0.204
0 H 3M
OSD rotation
RotatetheOSDMenu.
Theoptionsare:
• {Landscape}(Default)
• {Portrait}
DVI color
Usage:TheusercansetthesuitablecolorformatviathisitemforDVI
input.
Option:Auto(default)/RGB/YCbCr444/YCbCr222
Logo
Choosetodisplaythelogowhenyouswitchon.
Theoptionsare:
• {On}(Default)
• {Off}

BDL4777XL
24
4.2.7. Advanced option menu
Input resolution
HDMI clock threshold
Black level expansion
Gamma selection
Scan mode
Film mode
IR control
Keyboard control
Tiling
Heat status
Picture
Screen
Audio
PIP
Configuration1
Configuration2
Advanced option
Scan conversion
Input resolution
SettheresolutionoftheVGAinput.Thisisonlyrequiredwhenthe
displayisunabletodetecttheVGAinputresolutioncorrectly.
NOTE: ThisitemisfunctionalforVGAinputonly.
Theoptionsare:
• {1024x768/1280x768/1360x768/1366x768}
• {1400x1050/1680x1050}
• {1600x1200/1920x1200}
• {Auto}:Determinestheresolutionautomatically.
Theselectedsettingswillbecomeeffectiveafterturningoffthepower
andturningitonagain.
HDMI clock threshold
AdjustHDMIlinkclock.
• {Min}–600KHz(Default)
• {Max}–5000KHz
Black level expansion
Thisfeatureoffersdeeperblacksforanevenbetterimagequality.
Theoptionsare:{Off}/{Low}/{Medium}/{High}.
NOTE: ThisitemisfunctionalforVideomodeinputonly.
Gamma selection
Gammaiswhatcontrolstheoverallbrightnessofanimage.Images
whicharenotcorrectedproperlycanappeartoowhiteortoodark,so
controllingthegammaproperlycanhaveahugeinuenceontheoverall
picturequalityofyourdisplay.
Theoptionsare:{Native}/{2.2}/{2.4}/{S gamma}/{D-image}.
Scan mode
Changethedisplayareaoftheimage.
• {Overscan}–Displayabout95%oftheoriginalsizeoftheimage.
Therestoftheareassurroundingtheimagewillbecutoff.
• {Underscan}–Displaytheimageinitsoriginalsize.
NOTE: ThisitemisfunctionalforVideomodeinputonly.
Scan conversion
ChoosetoenableordisabletheIP(InterlacetoProgressive)conversion
function.
• {Progressive}–EnabletheIPconversionfunction(recommended).
Onceenabled,theinterlaceinputsignalwillbeconvertedto
progressiveformatforbetterdisplayquality.
• {Interlace}–DisabletheIPfunction.Thismodeissuitablefor
displayingmotionpictures,butitincreasesthechanceofimage
retention.
Film mode
Choosetoturnonoroffthelmmodeframeconversionfunction.
• {Auto} –Enablethelmmodeframeconversionfunctionfor
moviesandmotionpictures.Thedisplayconvertsa24frames-per-
second(24fps)inputsignalformattoDVDvideosignalformat.
Oncethisfunctionisenabled,itisrecommendedthatyousetthe
{Scan conversion}functionto{Progressive}.
• {Off}– Disablethelmmodeframeconversionfunction.Thismode
issuitableforTVbroadcastingandVCRsignals.
IR control
Selecttheoperationmodeoftheremotecontrolwhenmultiple
displaysareconnectedviaanRS232Cconnection.
• {Normal} –Alldisplayscanbeoperatednormallybytheremote
controlunit.
• {Primary}–Designatethisdisplayastheprimarydisplayforremote
controloperation.Onlythisdisplaycanbeoperatedbytheremote
control.
• {Secondary}–Designatethisdisplayasthesecondarydisplay.This
displaycannotbeoperatedbytheremotecontrol,andwillonly
receivethecontrolsignalfromtheprimarydisplayviatheRS232C
connection.
• {Lock All}/{Lock all but Volume}/{Lock all but Power}–Lock
theremotecontrolfunctionofthisdisplay.Tounlock,pressandhold
the[DISPLAY]buttonontheremotecontrolfor5(ve)seconds..
Keyboard control
Choosetoenableordisablethedisplaykeyboard(controlbuttons)
function.
• {Unlock}–Enablethekeyboardfunction.
• {Lock All}/{Lock all but Volume}/{Lock all but Power}–Disable
thekeyboardfunction.
• “KeyboardControlLockMode”Thisfunctioncompletelydisables
theaccesstoallKeyboardControlfunctions.Toenableordisable
thekeyboardcontrollock,pressboth[ ]and[ ]buttonsand
holddowncontinuouslyformorethan3(three)seconds.
Tiling
Withthisfunctionyoucancreateasinglelarge-screenmatrix(video
wall)thatconsistsofupto150setsofthisdisplay(up to 10-sets on
the vertical and 15-sets on the horizontal sides).Thisfunctionrequires
adaisy-chainconnection.
Tiling
H monitors
V monitors
Position
Frame comp.
Enable
Switch on delay
1
1
1
No
No
Off
BDL4777XL
25
Example: 2 x 2 screen matrix (4 displays)
Hmonitors=2displays
Vmonitors=2displays
1 2
3 4
H monitors
V monitors
Position
Example: 5 x 5 screen matrix (25 displays)
Hmonitors=5displays
Vmonitors=5displays
1 2
6 7
3 4
8 9
5
10
11 12 13 14 15
16 17 18 19 20
21 22 23 24 25
H monitors
V monitors
Position
• H monitors-Selectthenumberofdisplaysonthehorizontalside.
• V monitors-Selectthenumberofdisplaysontheverticalside.
• Position-Selectthepositionofthisdisplayinthescreenmatrix.
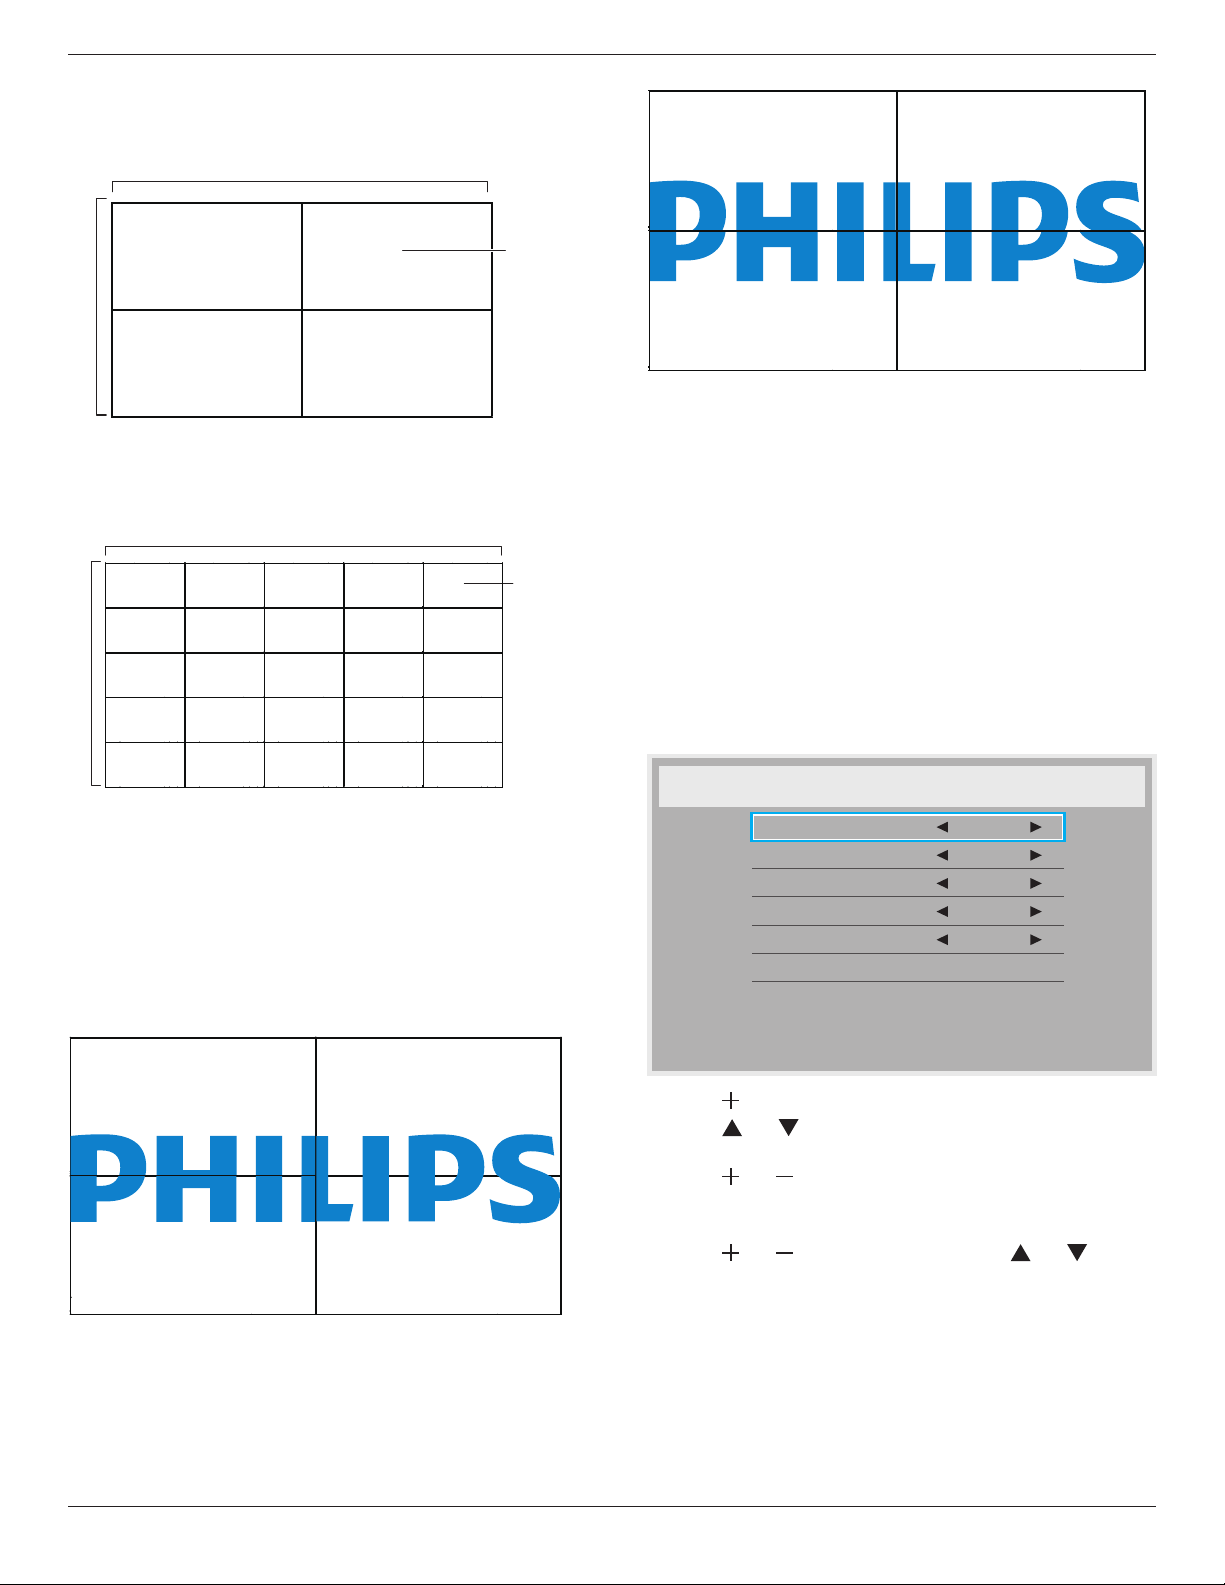
• Frame comp.-Choosetoturntheframecompensationfunction
onoroff.Ifselected{Ye s },thedisplaywilladjusttheimageto
compensateforthewidthofthedisplaybezelsinorderto
accuratelydisplaytheimage.
Frame comp. - Yes
Frame comp. - No
• Enable:ChoosetoenableordisabletheTilingfunction.Ifenabled,
thedisplaywillapplythesettingsin{H monitors},{V monitors},
{Position},and{Frame comp.}.
• Switch on delay:Setthepower-ondelayingtime(inseconds).The
defaultoption{Auto}allowsasequentialpowering-onforeach
displaybytheirIDnumberwhenmultipledisplaysareconnected.
Theoptionsare:{Off/Auto/2,4,6,8,10,20,30,40,50}
NOTE: ThePIPfunctionwillbedisabledwhenTilingfunctionis
enabled.
Heat status
Thisfunctionallowsyoutocheckthethermalstatusofthedisplayat
anytime.
Date and time
Adjustthecurrentdateandtimeforthedisplay’sinternalclock.
Date and time
Year
Month
Day
Hour
Minute
Daylight saving time
Current date time
2013 . 01 . 01 20 : 20 : 17
Press [SET] to set clock
2013
01
01
20
20
1. Press[ ]buttontoenterthesubmenu.
2. Press[ ]or[ ]buttontotogglebetween{Year},{Month},{Day},
{Hour},{Minute},and{Daylight saving time}.
3. Press[ ]or[ ]buttontoadjustallsettingsexcept{Daylight
saving time}.
4. Press[SET]buttontoenterthe{Daylight saving}submenu.
5. Press[ ]or[ ]buttontoselectitem,press[ ]or[ ]button
toadjust.
Schedule
Thisfunctionallowsyoutoprogramupto7(seven)differentscheduled
timeintervalsforthedisplaytoactivate.
Youcanselect:
• Thetimeforthedisplaytoturnonandturnoff.
• Thedaysinaweekforthedisplaytoactivate.
BDL4777XL
26
• Whichinputsourcethedisplaywilluseforeachscheduled
activationperiod.
NOTE: Werecommendyoutosetupcurrentdateandtimeinthe
{Date and time}menubeforeusingthisfunction.
1. Press[SET]or[ ]buttontoenterthesubmenu.
Schedule
Today
1
2
3
4
5
7
6
2013 . 01 . 01 TUE 20 : 19 : 55
On
_
:
_
_
:
_
_
Every day
Off Input
Wed
SAT
MON
THU
SUN
TUE
FRI
Every week
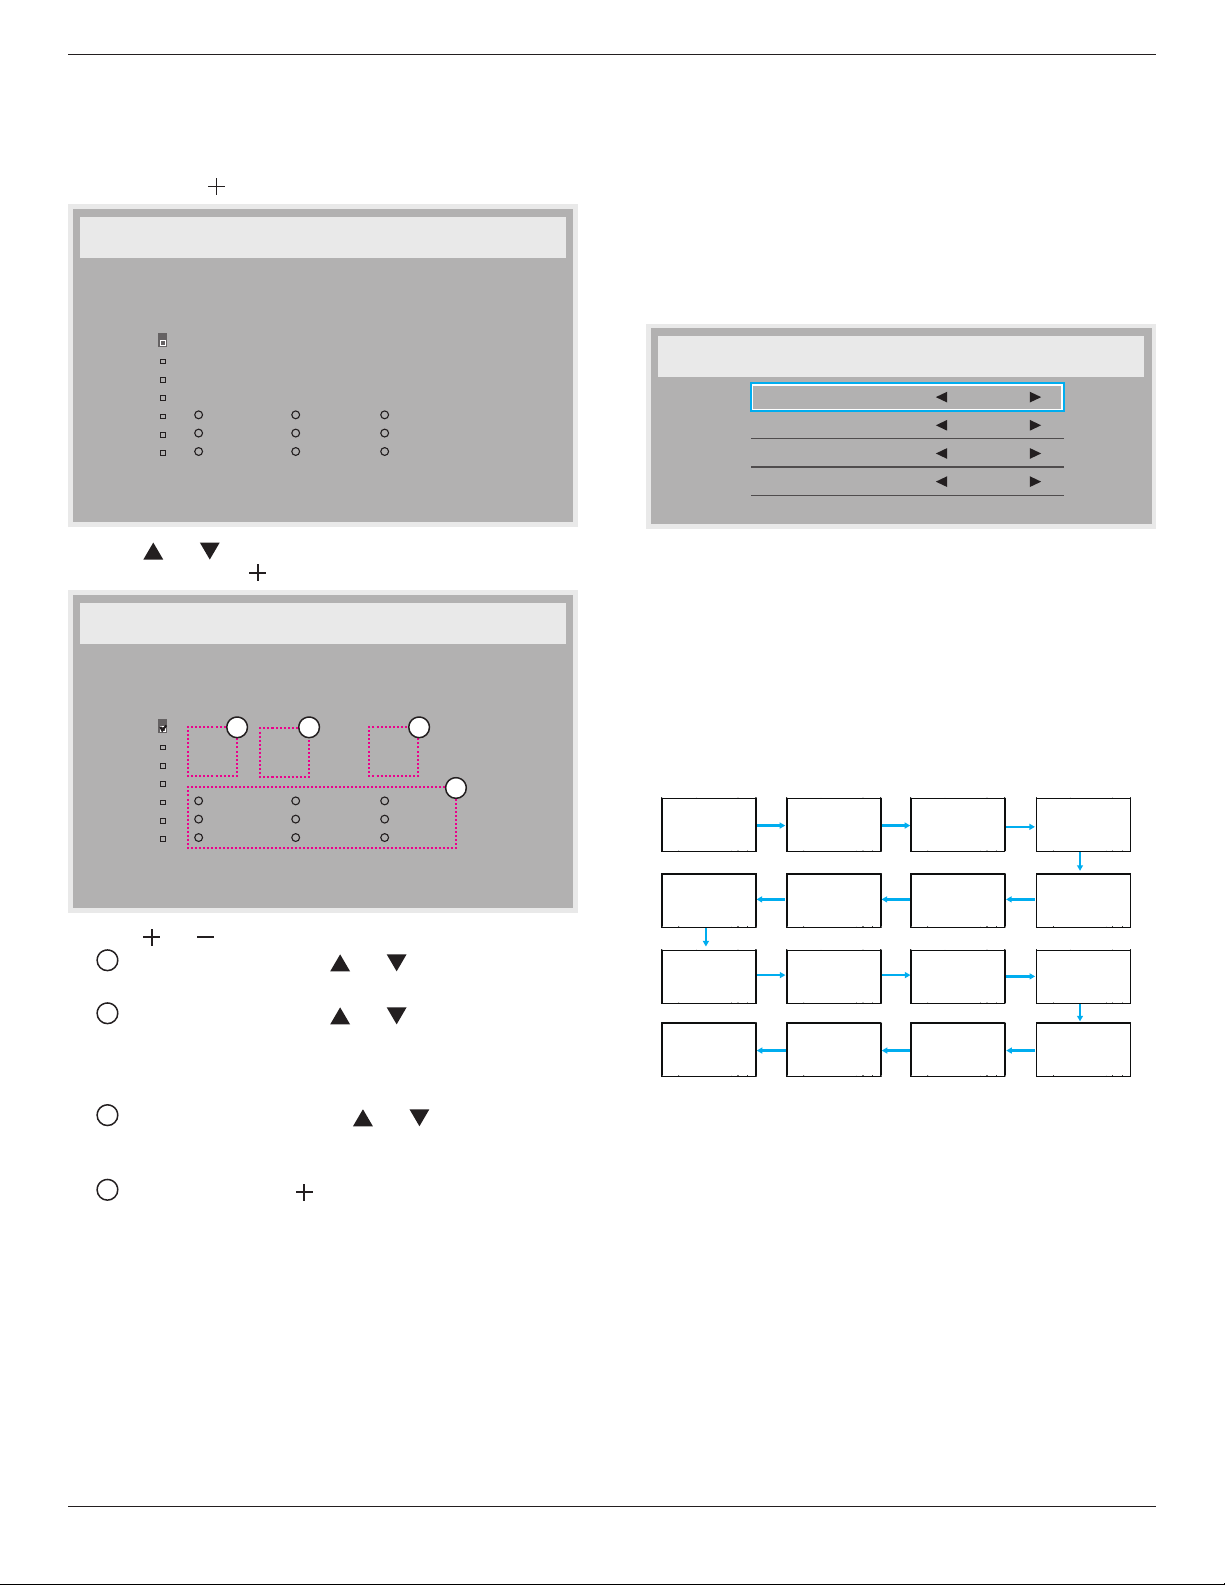
2. Press[ ]or[ ]buttontoselectascheduleitem(itemnumber1
~7),andthenpress[ ]buttontomarkittheitemnumber.
Schedule
Today
1
2
3
4
5
7
6
2013 . 01 . 01 TUE 20 : 19 : 55
On
_
:
_
_
:
_
_
Every day
Off Input
Wed
SAT
MON
THU
SUN
TUE
FRI
Every week
4
1 32
3. Press[ ]or[ ]buttontoselecttheschedule:
1
Power-onschedule:Press[ ]or[ ]buttontosetthehour
andminuteforthedisplaytoturnon.
2
Power-offschedule:Press[ ]or[ ]buttontosetthehour
andminuteforthedisplaytoturnoff.
Selectorleaveanempty“__”forboththehourandminuteslotif
youdonotwanttousethispower-onorpower-offschedule.
3
Input-sourceselection:Press[ ]or[ ]buttontoselectan
inputsource.Ifnoinputsourceisselected,theinputsource
willremainthesameaslastselected.
4
Dateschedule:Press[ ]buttontoselectwhichdayina
weekthisscheduleitemwillbetakeeffect,andthenpressthe
[SET]button.
4. Foradditionalschedulesettings,press[EXIT],thenrepeatthesteps
above.Acheckmarkintheboxnexttothenumberoftheschedule
itemindicatesthattheselectedscheduleisineffect.
NOTES:
• The{Every day}selectioninascheduleitemtakespriorityoverthe
otherweeklyschedules.
• Iftheschedulesoverlap,thescheduledpower-ontimetakespriority
overscheduledpower-offtime.
• Iftherearetwoscheduleitemsprogrammedforthesametime,the
highestnumberedscheduletakespriority.Forexample,ifschedule
items#1and#2bothsetthedisplaytopoweronat7:00AMand
offat5:00PM,thenonlyscheduleitem#1willtakeeffect.
Monitor ID
SettheIDnumberforcontrollingthedisplayviatheRS232C
connection.EachdisplaymusthaveauniqueIDnumberwhenmultiple
setsofthisdisplayareconnected.ThemonitorIDnumberrangeis
between1to255.
Theoptionare:{Monitor group}/{Tiling matrix}/{Auto ID}
Monitor ID
Monitor ID
Monitor group
Tiling matrix
Auto ID
1
1
1
End
• {Monitor group}
Theoptionare:{Off}/{1-254}
• {Off}–{Monitor group}arenotsupported.
• {1-254}–{Monitor group}aresupported.Thedefaultsetting
is1.
• {Tiling matrix}:
Tilingmatrixnumberrangeisbetween1to15.1isdefaultsetting.
The{Auto ID}setupfunctionenablessettingup{Monitor ID}of
connectedmachineaccordingto{Tiling matrix}settings.
Example:Tilingmatrixsetsas4
1 2
5 6
3 4
7 8
9 10 11 12
13 14 15 16
• {Auto ID}
Theoptionare:{Start}/{End}.Thedefaultis{End}.
• SwitchtoStartoptiontosetupIDsofmachinesbackward
fromcurrentone.
• Oncethesetupiscompleted,theoptionexitstoEnd
automatically.
• Tousethisfunction,serialconnectallmachineswithRS-232
cableandsettheirControlportstoRS-232too.
DDC/CI
ChoosetoturnonorofftheDDC/CIcommunicationfunction.Select
{On}fornormaluse.
DDC/CI(CommandInterface)speciesameansforacomputerto
sendcommandstothemonitor,aswellasreceivesensordatafromthe
monitor,overthebidirectionallinksuchasDDC2Ab/Bi/B+.
Speciccommandstocontrolmonitorsaredenedinaseparate
MonitorControlCommandSet(MCCS)standard.

BDL4777XL
27
DDC/CImonitorsaresometimessuppliedwithanexternalcolor
sensortoallowautomaticcalibrationofthemonitor’scolorbalance.
SometiltingDDC/CImonitorssupportanautopivotfunction,where
arotationsensorinthemonitorenablestheoperatingsystemtokeep
thedisplayuprightasthemonitorismovedbetweenitsportraitand
landscapepositions.
ThefollowingDDC/CIcommandsshouldbesupportedviacommand
line:
No. Commands
1 SetBrightness
2 setContrast
3 SetRedGain
4 SetGreenGain
5 SetBlueGain
6 GetBrightness
7 GetContrast
8 GetRedGain
9 GetGreenGain
10 GetBlueGain
HDMI with One Wire
SetthedisplaytofollowCECcontrol.
• {Off}–DisableCEC.(Default)
• {On}–EnableCEC.
Smart power
Setthedisplaytoreducethepowerconsumptionautomatically.
Theoptionsare:{Off}/{Medium}/{High}.
Auto signal detection
Choosetoletthedisplaydetectanddisplayfromavailablevideoinputs
automatically.
Thisfunctiontakesplaceonlywhenthereisnosignalconnectedatthe
inputportyoudesignateforauto-detection.
Theoptionsare:{Off}/{All}/{PC sources only}/{Video sources
only}/{Failover}
• {Off}–DisableAuto signal detection.
• {All}–Searchorder:Displayport
DVI-D
VGA
HDMI
Component
Composite
CardOPS(forsupportedOPS
models)
• {PC sources only}–Searchorder:Displayport
DVI-D
VGA
HDMI
CardOPS(forsupportedOPSmodels)
• {Video sources only}–Searchorder:HDMI
Component
Composite.
• {Failover}
- Failover1:User-denedsetting.Default:HDMI.
- Failover2:User-denedsetting.Default:HDMI.
- Failover3:User-denedsetting.Default:HDMI.
- Failover4:User-denedsetting.Default:HDMI.
- Failover5:User-denedsetting.Default:HDMI.
- Failover6:User-denedsetting.Default:HDMI.
- Failover7:User-denedsetting.Default:HDMI.
APM (Advanced Power Management)
Turnonorofftheautomaticpowermanagementsetting.
• {Off}–Shutdownpowerdirectlyifnosignaldetected.(Default)
• {On}–Enterpowersavingmodeifnosignaldetected.
OPS settings
SettheOPScongurationundereachpowercondition.
• {Auto}–Afterselecting{Card OPS}forvideosourceinput,the
OPSwillbesettooffwhenthedisplaypowerissettooff,orsetto
onwhenthedisplaypowerissettoon.Whensettoothervideo
sourceinputs,theOPSwillalwaysbesettoon.
• {Always off}–TheOPSwillalwaysbesettooff.
• {Always on}–TheOPSwillalwaysbesettoon.
Advanced option reset
Date and time
Schecule
Monitor
HDMI with One Wire Off
On
Action
Action
Action
Picture
Screen
Audio
PIP
Configuration1
Configuration2
Advanced option
DDC/CI
Smart power Off
Auto signal detection Action
APM Off
OPS settings
Action
Always on
Advanced option reset
ResetallsettingsintheAdvanced optionmenutofactorypresetvalues.
1. Press[SET]or[ ]buttontoenterthesubmenu.
2. Press[ ]or[ ]buttontoselect{Reset}andpressthe[SET]
buttontorestoresettingstofactorypresetvalues.
Pressthe[EXIT]buttonorselect{Cancel}andpressthe[SET]button
tocancelandthenreturntothepreviousmenu..
BDL4777XL
28
5. Input Mode
VGA Resolution:
Standard
Resolution
ActiveResolution
RefreshRate PixelRate AspectRatio StandforMode
HPixels VLines
VGA 640 480
60Hz 25.175MHz
4:3 VideoGraphicArray72Hz 31.5MHz
75Hz 31.5MHz
WVGA 720 400 70Hz 33.75MHz 16:9 WideVideoGraphicArray
SVGA 800 600
60Hz 40MHz
4:3 SuperVGA
75Hz 49.5MHz
XGA 1024 768
60Hz 65MHz
4:3 ExtendedGraphicArray
75Hz 78.75MHz
WXGA 1280 768 60Hz 79.5MHz 5:3 WideXGA
WXGA 1280 800 60Hz 79.5MHz 16:10 WideXGA
SXGA 1280 960 60Hz 108MHz 4:3 SuperXGA
SXGA 1280 1024 60Hz 108MHz 5:4 SuperXGA
WXGA 1360 768 60Hz 85.5MHz 16:9 WideXGA
WXGA 1366 768 60Hz 85.5MHz 16:9 WideXGA
UXGA 1600 1200 60Hz 162MHz 4:3 UltraXGA
HD1080 1920 1080 60Hz 148.5MHz 16:9 HD1080
SDTV Resolution:
Standard
Resolution
ActiveResolution
RefreshRate PixelRate AspectRatio StandforMode
HPixels VLines
480i
720 480
29.97Hz 13.5MHz
4:3 ModiedNTSCStandard
480p 59.94Hz 27MHz
576i
720 576
25Hz 13.5MHz
4:3 ModiedPALStandard
576p 50Hz 27MHz
HDTV Resolution:
Standard
Resolution
ActiveResolution
RefreshRate PixelRate AspectRatio StandforMode
HPixels VLines
720p 1280 720
50Hz
74.25MHz 16:9 NormallyDVBMode
60Hz
1080i 1920 1080
25Hz
74.25MHz 16:9 NormallyATSCMode
30Hz
1080p 1920 1080
50Hz
148.5MHz 16:9 NormallyATSCMode
60Hz
• ThePCtextqualityisoptimuminHD1080mode(1920x1080,60Hz).
• YourPCdisplayscreenmightappeardifferentdependingonthemanufacturer(andyourparticularversionofWindows).
• CheckyourPCinstructionbookforinformationaboutconnectingyourPCtoadisplay.
• Ifaverticalandhorizontalfrequency-selectmodeexists,select60Hz(vertical)and31.5KHz(horizontal).Insomecases,abnormalsignals(suchas
stripes)mightappearonthescreenwhenthePCpoweristurnedoff(orifthePCisdisconnected).Ifso,pressthe[INPUT]buttontoenterthe
videomode.Also,makesurethatthePCisconnected.
• WhenhorizontalsynchronoussignalsseemirregularinRGBmode,checkPCpowersavingmodeorcableconnections.
• ThedisplaysettingstablecompliestotheIBM/VESAstandards,andbasedontheanaloginput.
• TheDVIsupportmodeisregardedassametothePCsupportmode.
• Thebesttimingfortheverticalfrequencytoeachmodeis60Hz.
BDL4777XL
29
6. Pixel Defect Policy
Westrivetodeliverthehighestqualityproductsandusesomeoftheindustry’smostadvancedmanufacturingprocesseswhilstpracticingstringentquality
control.However,pixelorsub-pixeldefectsonthePDP/TFTpanelsusedinPlasma-&LCD-displaysaresometimesunavoidable.Nomanufacturercan
guaranteethatallpanelswillbefreefrompixeldefects,butPhilipsguaranteesthatanyPlasma-&LCD-displayswithanunacceptablenumberofdefects
willberepairedduringthewarrantyperiodinlinewithyourlocalguaranteeconditions.
ThisnoticeexplainsthedifferenttypesofpixeldefectsanddenestheacceptabledefectlevelfortheLCDscreen.Inordertoqualifyforrepairunder
warranty,thenumberofpixeldefectsmustexceedacertainlevelasshowninthereferencetable.IftheLCDscreeniswithinspecicationawarranty
exchange/claimbackwillberefused.Additionally,becausesometypesorcombinationsofpixeldefectsaremorenoticeablethanothers,Philipssetseven
higherqualitystandardsforthose.
6.1. Pixels and Sub-Pixels
subpixel
pixel
Apixel,orpictureelement,iscomposedofthreesub-pixelsintheprimarycolorsofred,greenand
blue.Manypixelstogetherformanimage.Whenallsub-pixelsofapixelarelit,thethreecolored
sub-pixelstogetherappearasasinglewhitepixel.Whenallaredark,thethreecoloredsub-pixels
togetherappearasasingleblackpixel.Othercombinationsoflitanddarksub-pixelsappearas
singlepixelsofothercolors.
6.2. Types of Pixel Defects + Dot Definition
Pixelandsub-pixeldefectsappearonthescreenindifferentways.Therearethreecategoriesofpixeldefectsandseveraltypesofsub-pixeldefectswithin
eachcategory.
Dot denition = What is a defective “Dot”? :
Oneormoredefective,adjacentsub-pixelaredenedasone“dot”.Theno.ofdefectivesub-pixelsarenotrelevanttodeneadefectivedot.Thismeans
thatadefectivedotcanconsistofone,twoorthreedefectivesub-pixelswhichcanbedarkorlit.
RR G B
Onedot=OnePixel;consistsofthreesub-pixelsofRed,Green,andBlue.
6.3. Bright Dot Defects
Brightdotdefectsappearaspixelsorsub-pixelsthatarealwayslitor“on”.Thesearetheexamplesofbrightdotdefects:
Onelitred,greenorbluesubpixel Twoadjacentlitsubpixels:
Red+Blue=Purple
Red+Green=Yellow
Green+Blue=Cyan(LightBlue)
Threeadjacentlitsubpixels(onewhitepixel)
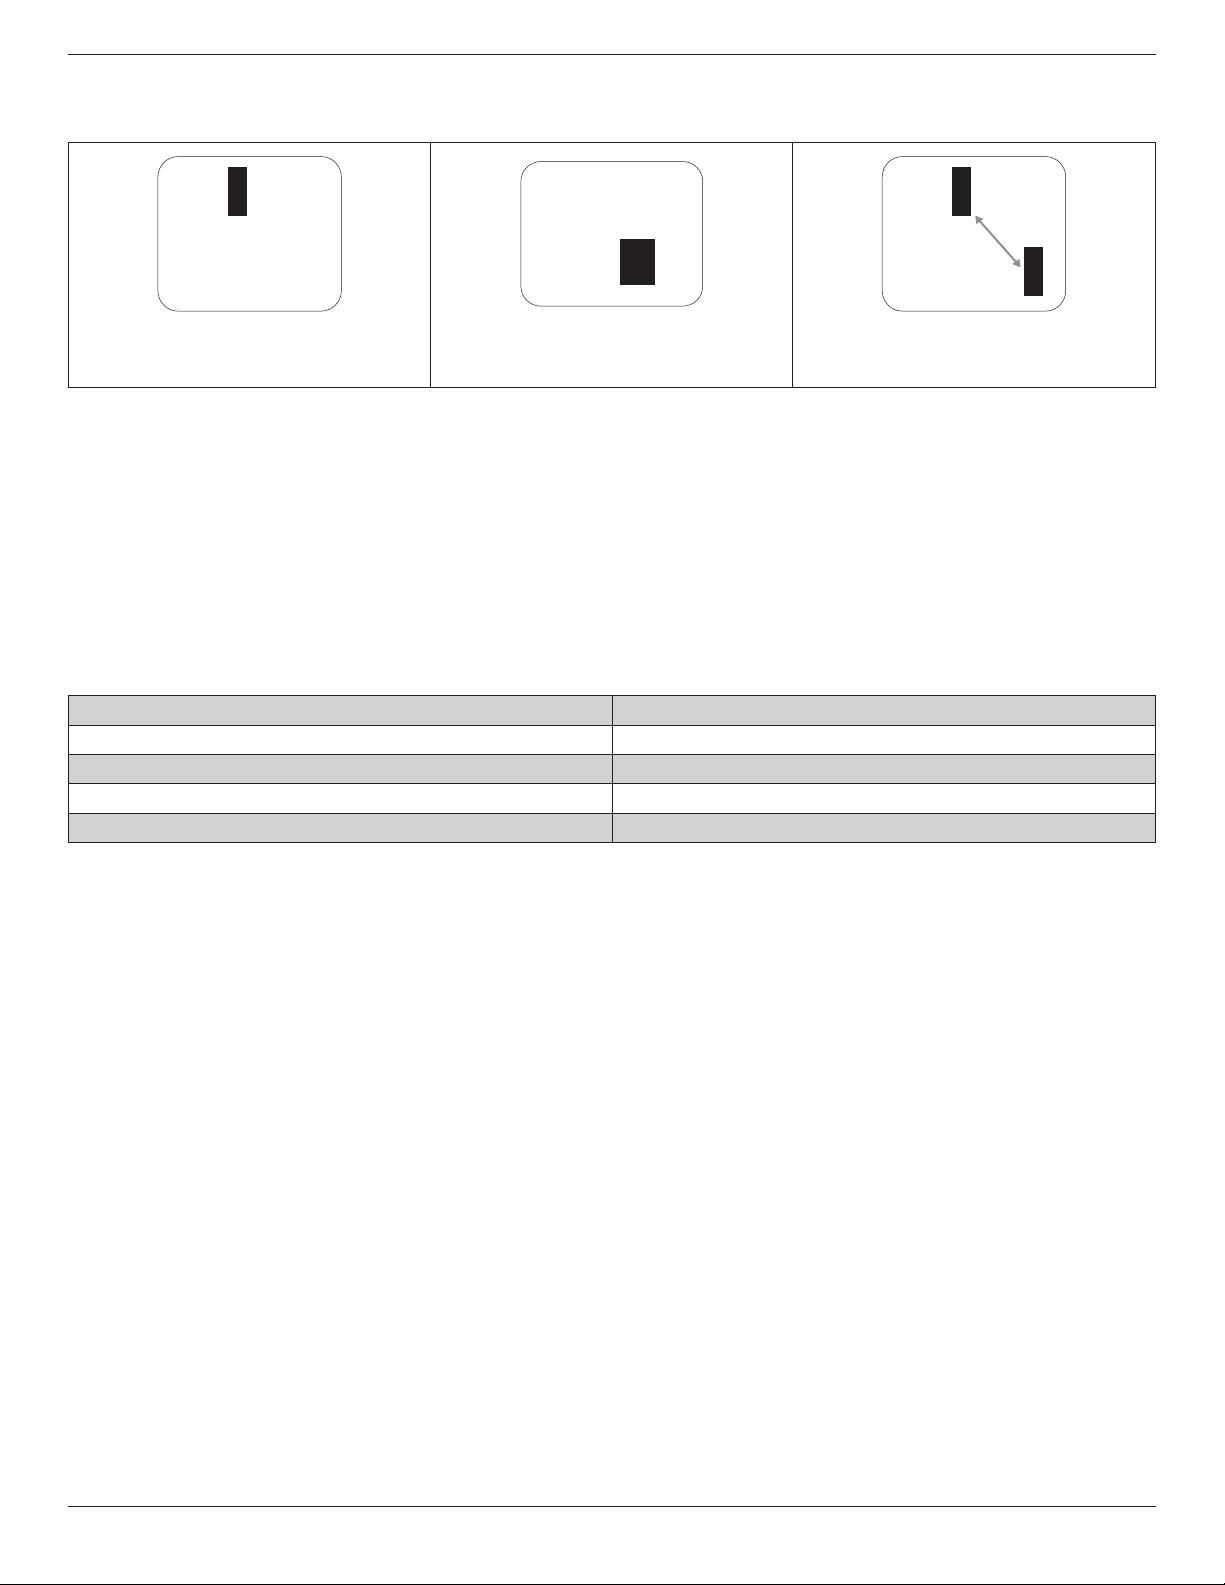
BDL4777XL
30
6.4. Dark Dot Defects
Blackdotdefectsappearaspixelsorsub-pixelsthatarealwaysdarkor“off”.Thesearetheexamplesofblackdotdefects:
Onedarkdot Twoadjacentdarkdots=1pairofdarkdots Twodarkdots,specicationsdenesthe
minimumdistancebetweendarkdots
6.5. Proximity of Pixel Defects
Becausepixelandsub-pixelsdefectsofthesametypethatarenearbyoneanothermaybemorenoticeable,Philipsalsospeciestolerancesfortheproximityof
pixeldefects.Inthetablebelowyoucanndspecicationsabout:
• Allowedamountofadjacentdarkdots=(adjacentdarkdots=1pairofdarkdots)
• Minimumdistancebetweendarkdots
• Totalno.ofalldefectivedots
6.6. Pixel Defect Tolerances
Inordertoqualifyforrepairduetopixeldefectsduringthewarrantyperiod,aPDP/TFTpanelinaPhilipsPlasma/LCD-displaymusthavepixelorsub-pixel
defectsexceedingthetoleranceslistedinthefollowingtable.
BRIGHTDOTEFFECT ACCEPTABLELEVEL
1litsubpixel 2
BLACKDOTEFFECT ACCEPTABLELEVEL
1darksubpixel 10
TOTALDOTDEFECTSOFALLTYPES 12
NOTE:*1or2adjacentsubpixeldefects=1dotdefect
6.7. MURA
Darkspotsorpatchesmayoccasionallyappearonsomeliquidcrystaldisplay(LCD)panels.ThisisknownwithintheindustryasMura,whichisaJapaneseterm
for“unevenness.”Itisusedtodescribeanirregularpatternorareainwhichunevenscreenuniformityappearsundercertainconditions.Muraisaresultofthe
deteriorationoftheliquidcrystalalignmentlayerandismostcommonlycausedbylong-termoperationunderhighambienttemperatures.Itisanindustry-wide
phenomenonandMuraisnotrepairable.Itisalsonotcoveredbyourwarrantyterms.
MurahasbeenaroundsincetheintroductionofLCDtechnologyandwithscreensgettingbiggerandinoperation24/7,manydisplaysarerunninginlowlight
conditions.ThisalladdstothepossibilityofMuraaffectingdisplays.
HOW TO SPOT MURA
TherearemanysymptomsofMuraandalsomultiplecauses.Severalofthesearelistedbelow:
• Impuritiesorforeignparticlesinthecrystalmatrix
• UnevendistributionofLCDmatrixduringmanufacturing
• Non-uniformluminancedistributionofthebacklight
• Panelassemblyinducedstress
• FlawswithintheLCDcells
• Thermalinducedstress-hightemperatureoperationoverlongperiodsoftime
HOW TO AVOID MURA
AlthoughwecannotguaranteethecompleteeradicationofMuraeverytime,ingeneraltheappearanceofMuracanbeminimizedbythesemethods:
• Lowerthebacklightbrightness
• Useascreensaver
• Reducetheambienttemperaturearoundtheunit

BDL4777XL
31
7. Cleaning and Troubleshooting
7.1. Cleaning
Caution When Using the Display
• Donotbringyourhands,faceorobjectsclosetotheventilationholesofthedisplay.Thetopofthedisplayisusuallyveryhotduetothehigh
temperatureofexhaustairbeingreleasedthroughtheventilationholes.Burnsorpersonalinjuriesmayoccurifanybodypartsarebroughttoo
close.Placinganyobjectnearthetopofthedisplaycouldalsoresultinheatrelateddamagetotheobjectaswellasthedisplayitself.
• Besuretodisconnectallcablesbeforemovingthedisplay.Movingthedisplaywithitscablesattachedmaydamagethecablesandthuscausere
orelectricshock.
• Disconnectthepowerplugfromthewalloutletasasafetyprecautionbeforecarryingoutanytypeofcleaningormaintenanceprocedure.
Front Panel Cleaning Instructions
• Thefrontofthedisplayhasbeenspeciallytreated.Wipethesurfacegentlyusingonlyacleaningclothorasoft,lint-freecloth.
• Ifthesurfacebecomesdirty,soakasoft,lint-freeclothinamilddetergentsolution.Wringtheclothtoremoveexcessliquid.Wipethesurfaceof
thedisplaytoremovedirt.Thenuseadryclothofthesametypetodry.
• Donotscratchorhitthesurfaceofthepanelwithngersorhardobjectsofanykind.
• Donotusevolatilesubstancessuchasinsertsprays,solventsandthinners.
Cabinet Cleaning Instructions
• Ifthecabinetbecomesdirty,wipethecabinetwithasoft,drycloth.
• Ifthecabinetisextremelydirty,soakalint-freeclothinamilddetergentsolution.Wringtheclothtoremoveasmuchmoistureaspossible.Wipe
thecabinet.Useanotherdryclothtowipeoveruntilthesurfaceisdry.
• Donotallowanywaterordetergenttocomeintocontactwiththesurfaceofthedisplay.Ifwaterormoisturegetsinsidetheunit,operating
problems,electricalandshockhazardsmayresult.
• Donotscratchorhitthecabinetwithngersorhardobjectsofanykind.
• Donotusevolatilesubstancessuchasinsertsprays,solventsandthinnersonthecabinet.
• DonotplaceanythingmadefromrubberorPVCnearthecabinetforanyextendedperiodsoftime.
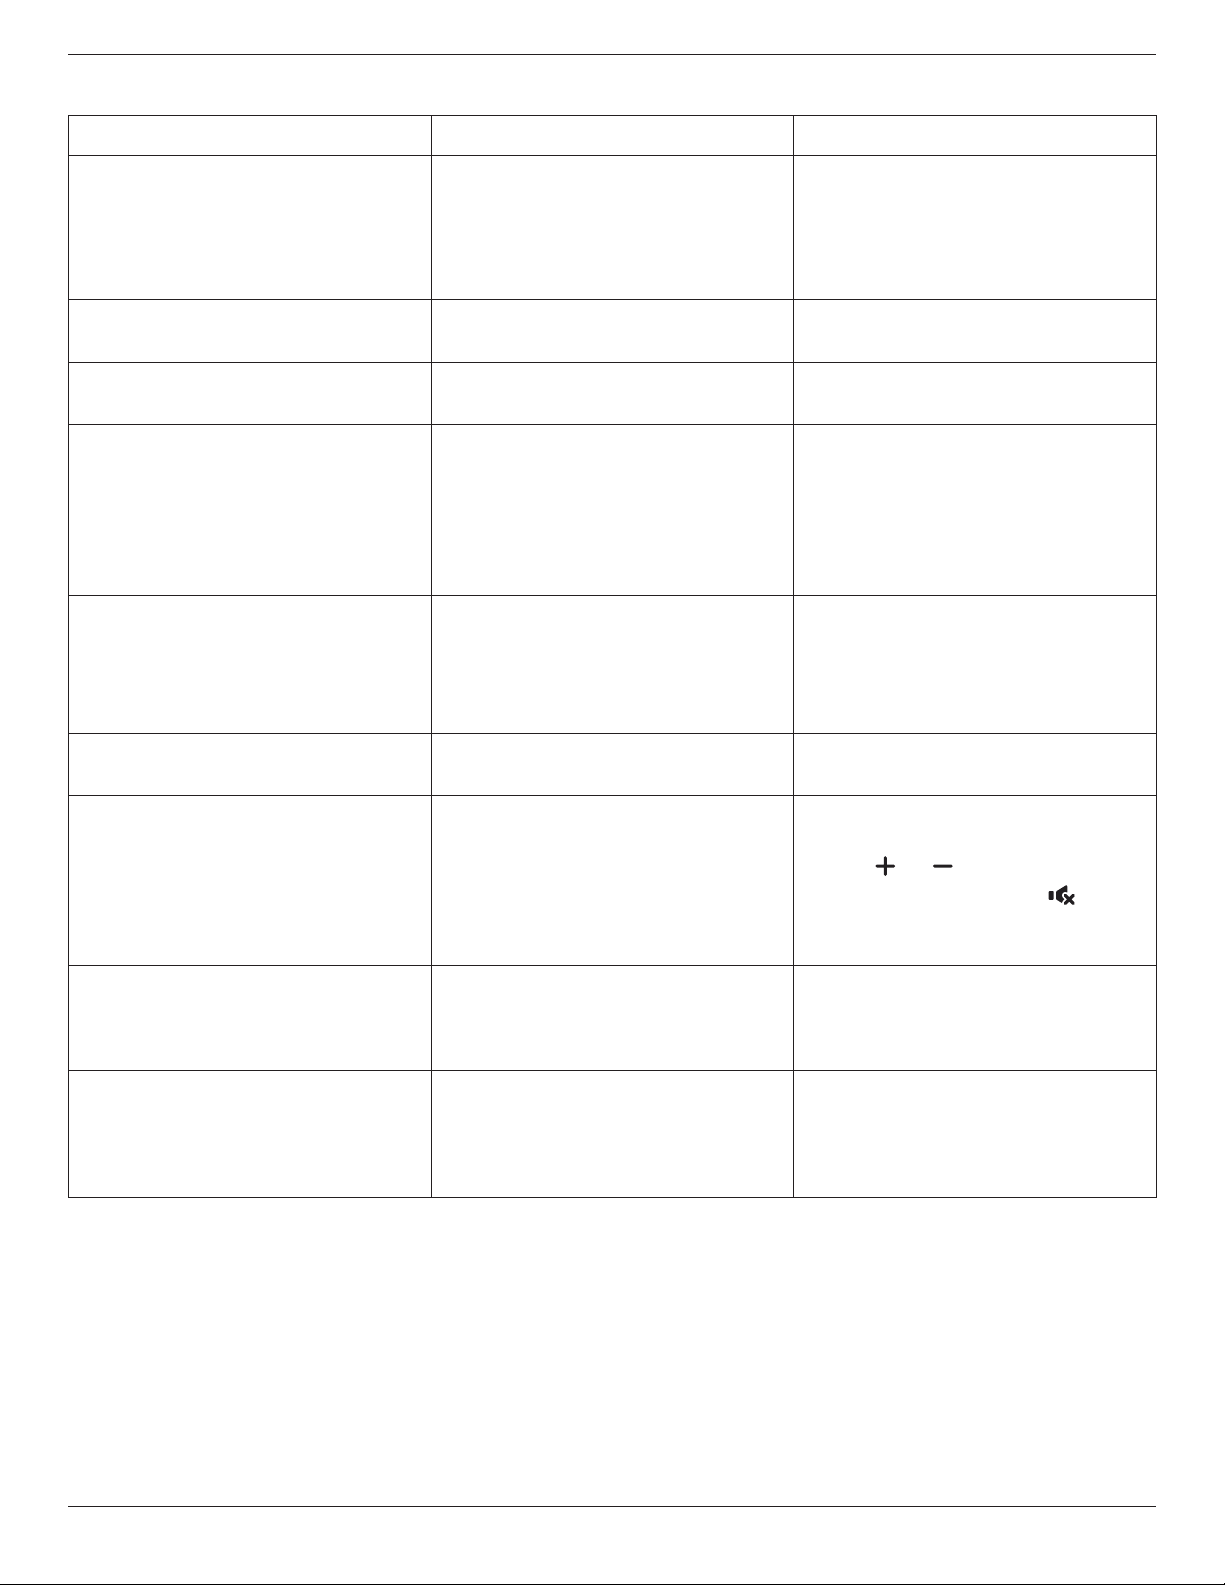
BDL4777XL
32
7.2. Troubleshooting
Symptom Possible Cause Remedy
No picture is displayed 1. Thepowercordisdisconnected.
2. Themainpowerswitchonthebackofthe
displayisnotswitchedon.
3. Theselectedinputhasnoconnection.
4. Thedisplayisinstandbymode.
1. Pluginthepowercord.
2. Makesurethepowerswitchisswitchedon.
3. Connectasignalconnectiontothedisplay.
Interference displayed on the display or audible
noise is heard
Causedbysurroundingelectricalappliancesor
uorescentlights.
Movethedisplaytoanotherlocationtoseeisthe
interferenceisreduced.
Color is abnormal Thesignalcableisnotconnectedproperly. Makesurethatthesignalcableisattachedrmly
tothebackofthedisplay.
Picture is distorted with abnormal patterns 1. Thesignalcableisnotconnectedproperly.
2. Theinputsignalisbeyondthecapabilitiesof
thedisplay.
1. Makesurethatthesignalcableisattached
rmly.
2. Checkthevideosignalsourcetoseeifit
isbeyondtherangeofthedisplay.Please
verifyitsspecicationswiththisdisplay’s
specicationsection.
Display image doesn’t ll up the full size of the
screen
1. Thezoommodeisnotsetcorrectly.
2. ScanModemaybesetincorrectlyto
underscan.
3. Iftheimageexceedsthescreensize,Scan
ModemayneedtobesettoUnderscan.
UsetheZoommodeorCustomzoomfunction
intheScreenmenutonetunedisplaygeometry
andtimefrequencyparameter.
Can hear sound, but no picture Improperlyconnectedsourcesignalcable. Makesurethatbothvideoinputsandsound
inputsarecorrectlyconnected.
Can see picture but no sound is heard 1. Improperlyconnectedsourcesignalcable.
2. Volumeisturnedallthewaydown.
3. {Mute}isturnedon.
4. Noexternalspeakerconnected.
1. Makesurethatbothvideoinputsandsound
inputsarecorrectlyconnected.
2. Press[ ]or[ ]buttontohearsound.
3. SwitchMUTEoffbyusingthe[ ]button.
4. Connectexternalspeakersandadjustthe
volumetoasuitablelevel.
Some picture elements do not light up Somepixelsofthedisplaymaynotturnon. Thisdisplayismanufacturedusinganextremely
highlevelofprecisiontechnology:however,
sometimessomepixelsofthedisplaymaynot
display.Thisisnotamalfunction.
After-Images can still be seen on the display
after the display is powered off. (Examples
of still pictures include logos, video games,
computer images, and images displayed in 4:3
normal mode)
Astillpictureisdisplayedforanoverextended
periodoftime
Donotallowastillimagetobedisplayedfor
anextendedperiodoftimeasthiscancausea
permanentafter-imagetoremainonthedisplay.

BDL4777XL
33
How to setup the settings in the menu to
control all the monitors at the same time and
individually via RC?
DaisychainedbyRS232andnoIRcable 1.Therstdisplaysetsas“Primary”onOSD
(Advancedoption/IRcontrolitem),otherssetas
“Secondary”.
2.ThesetupOSDwillshowonTop-Leftofdisplay.
(ToggleMENUwillshowagainifitdisappear)
3.Defaultsetting:IDNO:0,GPNO:0,thissetting
cancontrolalldisplaysbyIR.
The“+”,“-”canchange“IDNO”tocontrol
signaldisplayby“MonitorID”.
The“UP”,“DOWN”canchange“GPNO”to
controlmulti-displayby“GroupID”.
*TherstdisplayalwaysbecontrolledbyIR.
How is the RC working? Daisychain:noRS232connectedandIRcable Noneedsetting,justtoconnectwithIRcables
andcontrolbyIR.
*Thiswayhasout-of-synchronizmphenomenon.
SuggesttouseabovesettingwithRS-232cable.
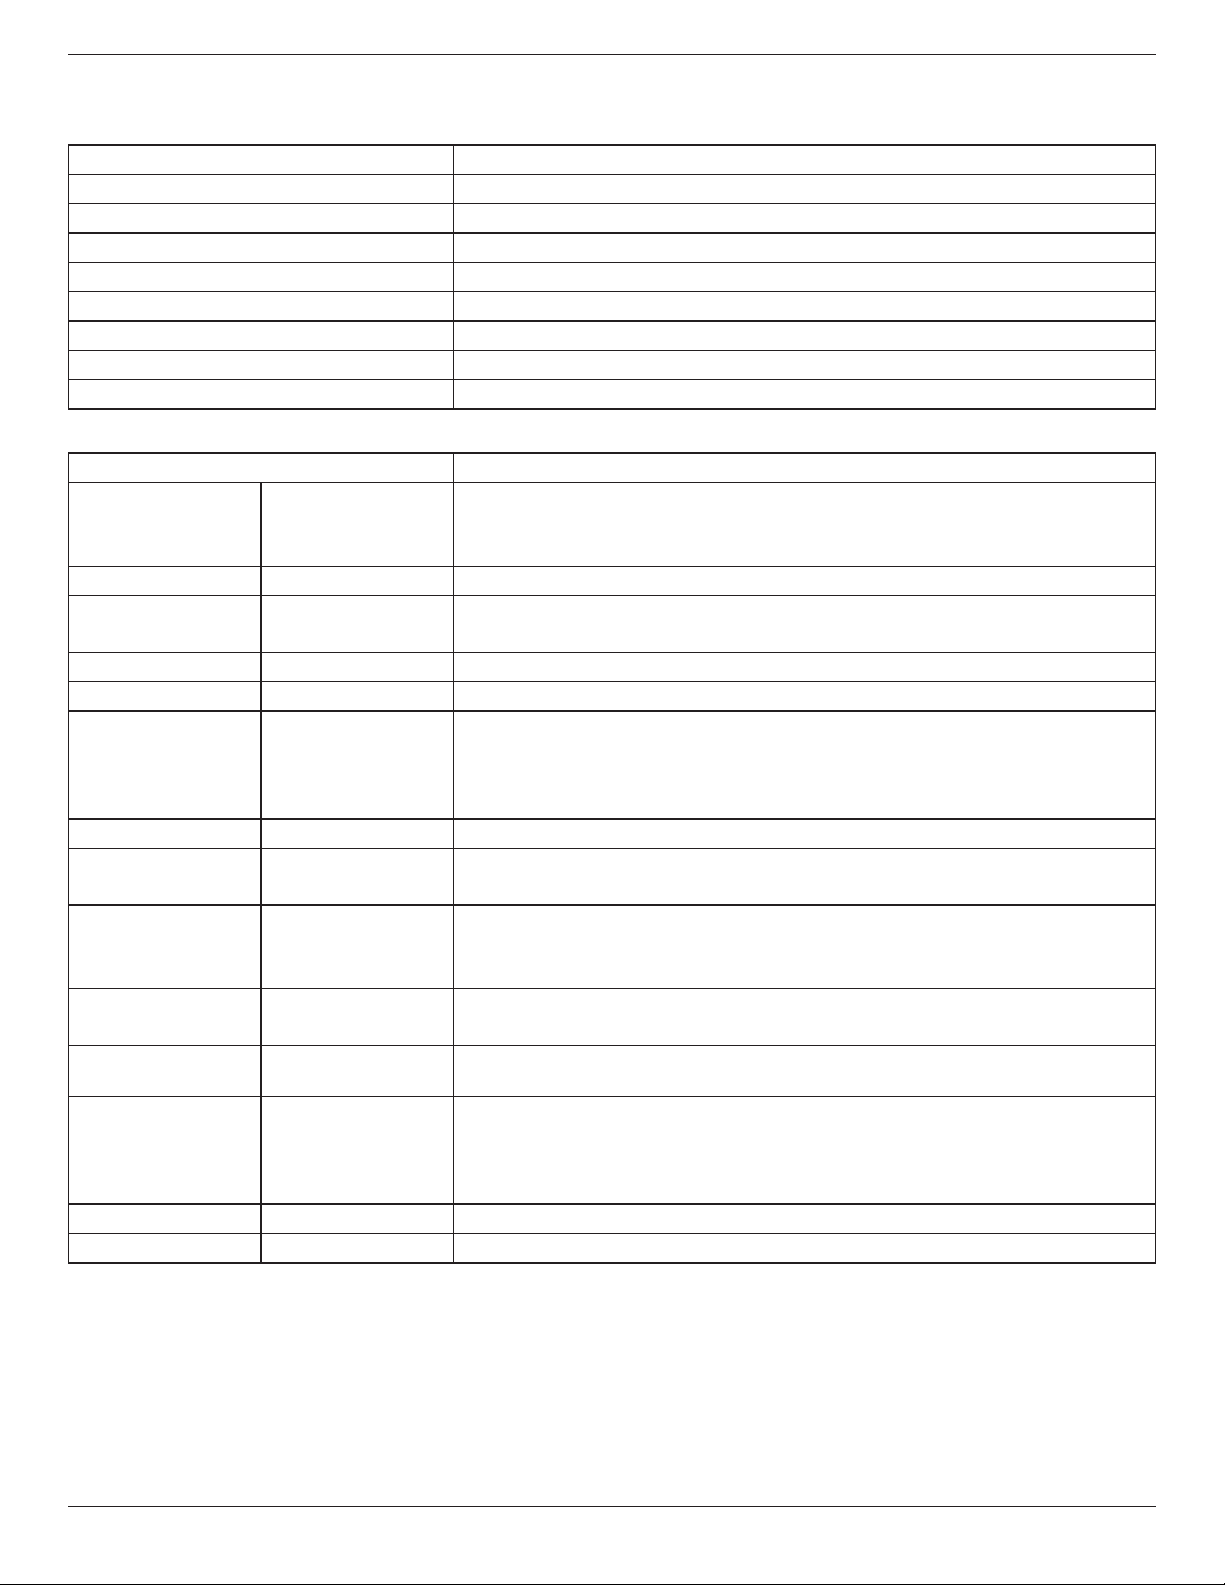
BDL4777XL
34
8. Technical Specifications
Display:
Item Specications
ScreenSize(ActiveArea) 47”(119.2cm)LCD
AspectRatio 16:9
Numberofpixels 1920(H)x1080(V)
Pixelpitch 0.54(H)x0.54(V)[mm]
Displayablecolors 1.06Bcolors
Brightness(typical) 500cd/m
2
Contrastratio(typical) 1400:1
Viewingangle 178degrees
In/Out Terminals:
Item Specications
SpeakerOutput InternalSpeakers
ExternalSpeakers
10W(L)+10W(R)[RMS]/8Ω
1Way1SpeakerSystem
82dB/W/M/160Hz~13KHz
AudioOutput
RCAJackx2 0.5V[rms](Normal)/2Channel(L+R)
AudioInput RCAJackx2
3.5mmStereox1
0.5V[rms](Normal)/2Channel(L+R)
RS232C D-SubJackx2(9pin) TXD+RXD(1:1)
RJ-45 RJ-45Jackx1(8pin)
10/100LANPort
HDMIInput HDMIJackx1
(TypeA)(18pin)
DigitalRGB:TMDS(Video+Audio)
MAX:
Video-720p,1080p,1920x1080/60Hz(WUXGA)
Audio-48KHz/2Channel(L+R)
SupportsLPCMonly
DVI-DInput DVI-Djack DigitalRGB:TMDS(Video)
VGAInput D-SubJackx1(15pin) AnalogRGB:0.7V[p-p](75Ω),H/CS/V:TTL(2.2kΩ),SOG:1V[p-p](75Ω)
MAX:720p,1080p,1920x1080/60Hz(WUXGA)
DVI-I(DVI-D&VGA)
Output
DVI-IJackx1(29pin) DigitalRGB:TMDS(Video)
AnalogRGB:0.7V[p-p](75Ω),H/CS/V:TTL(2.2kΩ),SOG:1V[p-p](75Ω)
MAX:720p,1080p,1920x1080/60Hz(WUXGA)
ComponentInput BNCJackx3 Y:1V[p-p](75Ω),Pb:0.7V[p-p](75Ω),Pr:0.7V[p-p](75Ω)
MAX:480i,576i,480p,576p,720p,1080i,1080p
VideoInput BNCx1(Sharewith
Component_Y)
Composite1V[p-p](75Ω)
DisplayportInput DisplayportJackx1
(20pin)
DigitalRGB:TMDS(Video+Audio)
MAX:
Video-720p,1080p,1920x1080/60Hz(WUXGA)
Audio-48KHz/2Channel(L+R)
SupportsLPCMonly
IRInput 3.5mmStereox1 ExternalIRinput
IROutput 3.5mmStereox1 ExternalIRoutput
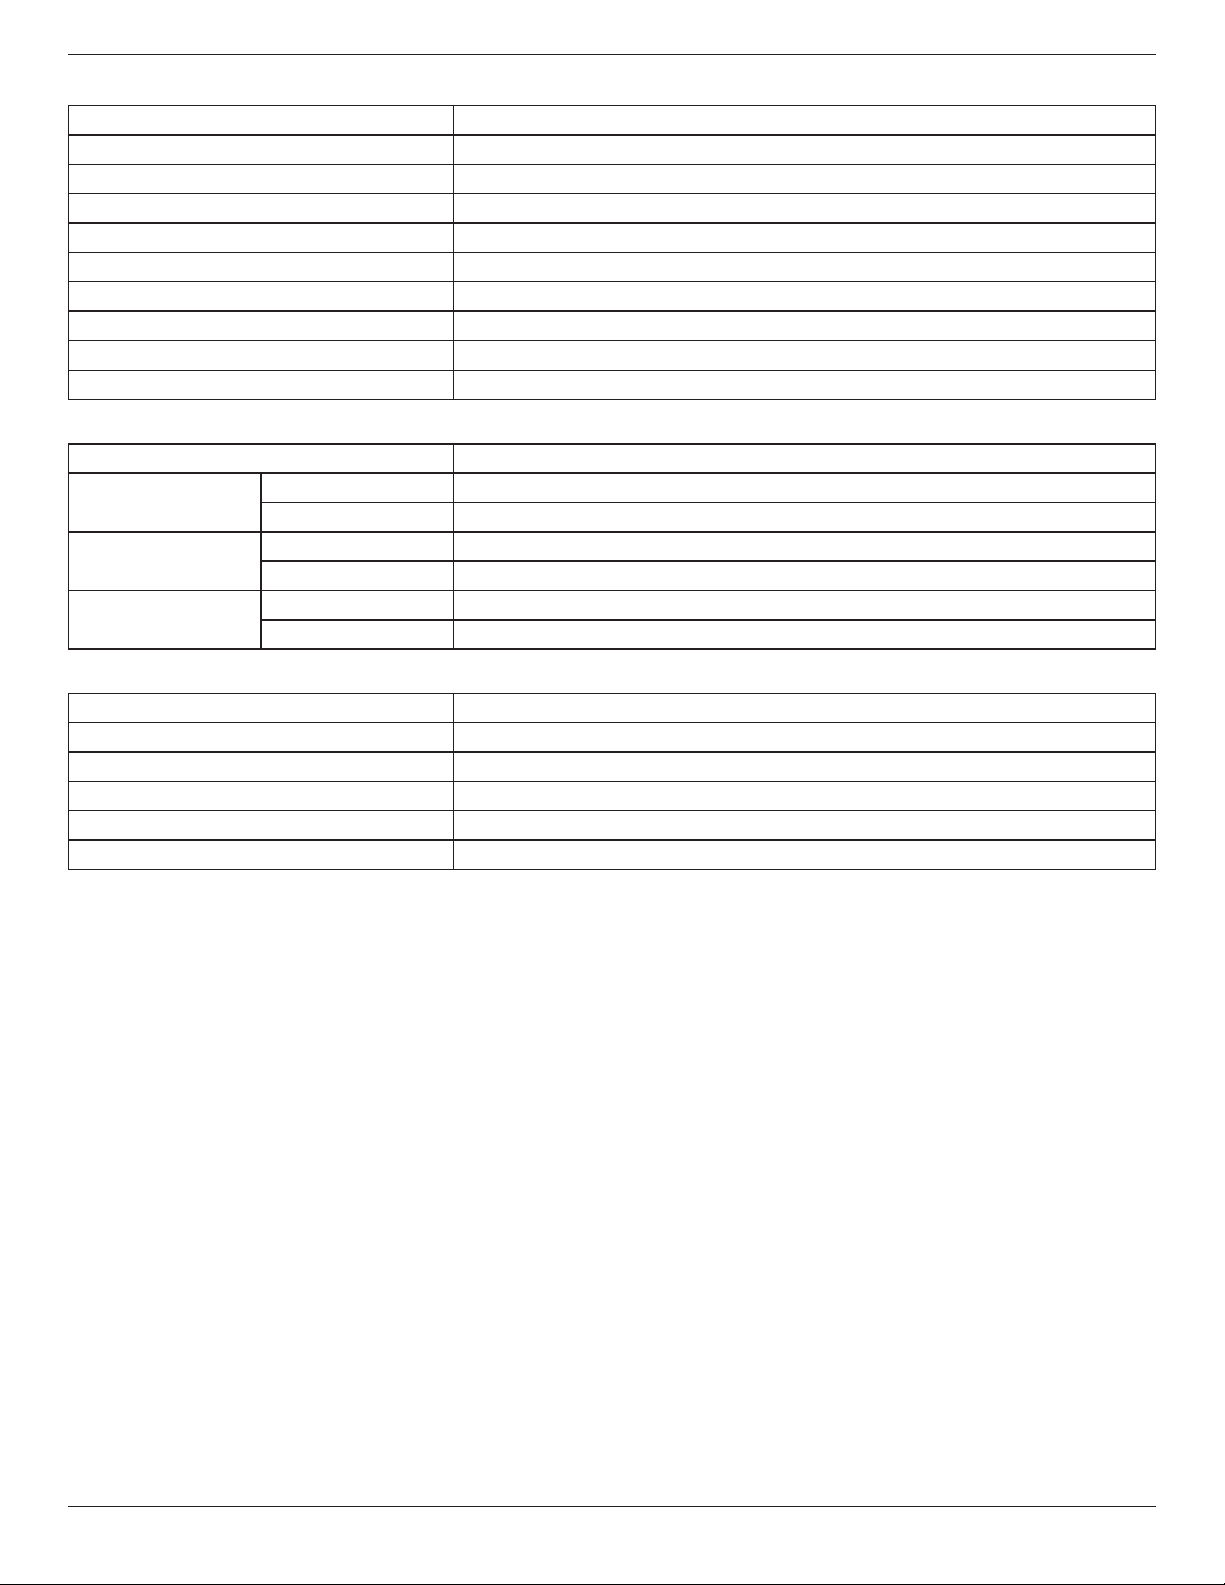
BDL4777XL
35
General:
Item Specications
PowerSupply AC100-240V,50-60Hz,5.5A
PowerConsumption(Max) 250W
PowerConsumption(typ.) 110W
PowerConsumption(Standby&Off) <0.5W(RS232inactive)
Dimensions(WithStand)[WxHxD] 1044.9mmx590.0mmx108.8mm
Dimensions(WithoutStand)[WxHxD] 1044.9mmx628.5mmx400.0mm
Weight(WithStand) 26.9Kg
Weight(WithoutStand) 24.6Kg
GrossWeight(WithoutStand) 36.7Kg
Environmental Condition:
Item Specications
Temperature Operational 0~40°C
Storage -20~60°C
Humidity Operational 20~80%RH(Nocondensation)
Storage 5~95%RH(Nocondensation)
Altitude Operational 0~3,000m
Storage/Shipment 0~9,000m
Internal Speaker:
Item Specications
Type 1Way1Speaker
Input 10W(RMS)
Impedance 8Ω
OutputSoundPressure 82dB/W/M
FrequencyResponse 160Hz~13KHz

2014 © Koninklijke Philips N.V. All rights reserved.
Philips and the Philips Shield Emblem are registered trademarks of
Koninklijke Philips N.V. and are used under license from
Koninklijke Philips N.V.
Specications are subject to change without notice.