
www.philips.com/welcome
BDL4677XH
User Manual (English)

BDL4677XH
ii
Safety Instructions
Safety precautions and maintenance
WARNING: Use of controls, adjustments or procedures other than those specied in this documentation may result in exposure to
shock, electrical hazards and/or mechanical hazards.
Read and follow these instructions when connecting and using your display:
Operation:
• Keepthedisplayoutofdirectsunlightandawayfromstovesoranyotherheatsources.
• Removeanyobjectthatcouldfallintoventilationholesorpreventpropercoolingofthedisplay’selectronics.
• Donotblocktheventilationholesonthecabinet.
• Whenpositioningthedisplay,makesurethepowerplugandoutletareeasilyaccessible.
• Whenturningoffthedisplaybydetachingthepowercord,wait6secondsbeforere-attachingthepowercordfornormaloperation.
• EnsuretheuseofanapprovedpowercordprovidedbyPhilipsatalltimes.Ifyourpowercordismissing,pleasecontactyourlocalservicecenter.
• Donotsubjectthedisplaytoseverevibrationorhighimpactconditionsduringoperation.
• Donotknockordropthedisplayduringoperationortransportation.
Maintenance:
• Toprotectyourdisplayfrompossibledamage,donotputexcessivepressureontheLCDpanel.Whenmovingyourdisplay,grasptheframetolift;do
notliftthedisplaybyplacingyourhandorngersontheLCDpanel.
• Unplugthedisplayifyouarenotgoingtouseitforanextensiveperiodoftime.
• Unplugthedisplayifyouneedtocleanitwithaslightlydampcloth.Thescreenmaybewipedwithadryclothwhenthepowerisoff.However,never
useorganicsolvent,suchas,alcohol,orammonia-basedliquidstocleanyourdisplay.
• Toavoidtheriskofshockorpermanentdamagetotheset,donotexposethedisplaytodust,rain,wateroranexcessivelymoistenvironment.
• Ifyourdisplaybecomeswet,wipeitwithdryclothassoonaspossible.
• Ifaforeignsubstanceorwatergetsinyourdisplay,turnthepoweroffimmediatelyanddisconnectthepowercord.Thenremovetheforeignsubstance
orwater,andsendtheunittothemaintenancecenter.
• Donotstoreorusethedisplayinlocationsexposedtoheat,directsunlightorextremecold.
• Inordertomaintainthebestperformanceofyourdisplayandensurealongerlifetime,westronglyrecommendusingthedisplayinalocationthatfalls
withinthefollowingtemperatureandhumidityranges.
- Temperature:0-40°C32-104°F
- Humidity:20-80%RH
IMPORTANT:Alwaysactivateamovingscreensaverprogramwhenyouleaveyourdisplayunattended.Alwaysactivateaperiodicscreenrefresh
applicationiftheunitwilldisplayunchangingstaticcontent.Uninterrupteddisplayofstillorstaticimagesoveranextendedperiodmaycause“burnin”,
alsoknownas“after-imaging”or“ghostimaging”,onyourscreen.Thisisawell-knownphenomenoninLCDpaneltechnology.Inmostcases,the“burned
in”or“after-imaging”or“ghostimaging”willdisappeargraduallyoveraperiodoftimeafterthepowerhasbeenswitchedoff.
WARNING:Severe“burn-in”or“after-image”or“ghostimage”symptomswillnotdisappearandcannotberepaired.Thisisalsonotcoveredunderthe
termsofyourwarranty.
Service:
• Thecasingcovershouldbeopenedonlybyqualiedservicepersonnel.
• Ifthereisanyneedforrepairorintegration,pleasecontactyourlocalservicecenter.
• Donotleaveyourdisplayunderdirectsunlight.
Ifyourdisplaydoesnotoperatenormally,havingfollowedtheinstructionssetoutinthisdocument,pleasecontactatechnicianoryour
localservicecenter..

BDL4677XH
iii
Read and follow these instructions when connecting and using your display:
• Unplugthedisplayifyouarenotgoingtouseitforanextensiveperiodoftime.
• Unplugthedisplayifyouneedtocleanitwithaslightlydampcloth.Thescreenmanybewipedwithadryclothwhenthepoweris
off.However,neverusealcohol,solventsorammonia-basedliquids.
• Consultaservicetechnicianifthedisplaydoesnotoperatenormallywhenyouhavefollowedtheinstructionsinthismanual.
• Thecasingcovershouldbeopenedonlybyqualiedservicepersonnel.
• Keepthedisplayoutofdirectsunlightandawayfromstovesoranyotherheatsources.
• Removeanyobjectthatcouldfallintotheventsorpreventpropercoolingofthedisplay’selectronics.
• Donotblocktheventilationholesonthecabinet.
• Keepthedisplaydry.Toavoidelectricshock,donotexposeittorainorexcessivemoisture.
• WhenturningoffthedisplaybydetachingthepowercableorDCpowercord,waitfor6secondsbeforere-attachingthepower
cableorDCpowercordfornormaloperation..
• Toavoidtheriskofshockorpermanentdamagetothesetdonotexposethedisplaytorainorexcessivemoisture.
• Whenpositioningthedisplay,makesurethepowerplugandoutletareeasilyaccessible.
• IMPORTANT:Alwaysactivateascreensaverprogramduringyourapplication.Ifastillimageinhighcontrastremainsonthe
screenforanextendedperiodoftime,itmayleavean‘after-image’or‘ghostimage’onthefrontofthescreen.Thisisawell-known
phenomenonthatiscausedbytheshortcomingsinherentinLCDtechnology.Inmostcasestheafterimagewilldisappeargradually
overaperiodoftimeafterthepowerhasbeenswitchedoff.Beawarethattheafter-imagesymptomcannotberepairedandisnot
coveredunderwarranty.
BDL4677XH
iv
Regulatory Information
CE Declaration of Conformity
Wedeclareunderourresponsibilitythattheproductisinconformitywiththefollowingstandards:
• EN60950-1:2006+A11:2009+A1:2010+A12:2011(SafetyrequirementofInformationTechnologyEquipment).
• EN55022:2010(RadioDisturbancerequirementofInformationTechnologyEquipment).
• EN55024:2010(ImmunityrequirementofInformationTechnologyEquipment).
• EN61000-3-2:2006+A1:2009+A2:2009(LimitsforHarmonicCurrentEmission).
• EN61000-3-3:2008(LimitationofVoltageFluctuationandFlicker)
• EN50581:2012(Technicaldocumentationfortheassessmentofelectricalandelectronicproductswithrespecttotherestrictionofhazardous
substances)
followingprovisionsofdirectivesapplicable.
• 2006/95/EC(LowVoltageDirective).
• 2004/108/EC(EMCDirective).
• 2009/125/EC(ErP,Energy-relatedProductDirective,ECNo.1275/2008and642/2009Implementing)
• 2011/65/EU(RoHSDirective)andisproducedbyamanufacturingorganizationonISO9000level.
Federal Communications Commission (FCC) Notice (U.S. Only)
ThisequipmenthasbeentestedandfoundtocomplywiththelimitsforaClassBdigitaldevice,pursuanttopart15oftheFCCRules.
Theselimitsaredesignedtoprovidereasonableprotectionagainstharmfulinterferenceinaresidentialinstallation.Thisequipment
generates,usesandcanradiateradiofrequencyenergyand,ifnotinstalledandusedinaccordancewiththeinstructions,maycause
harmfulinterferencetoradiocommunications.However,thereisnoguaranteethatinterferencewillnotoccurinaparticularinstallation.
Ifthisequipmentdoescauseharmfulinterferencetoradioortelevisionreception,whichcanbedetermined
byturningtheequipmentoffandon,theuserisencouragedtotrytocorrecttheinterferencebyoneormoreofthefollowing
measures:
• Reorientorrelocatethereceivingantenna.
• Increasetheseparationbetweentheequipmentandreceiver.
• Connecttheequipmentintoanoutletonacircuitdifferentfromthattowhichthereceiverisconnected.
• Consultthedealeroranexperiencedradio/TVtechnicianforhelp.
Changesormodicationsnotexpresslyapprovedbythepartyresponsibleforcompliancecouldvoidtheuser’sauthoritytooperatethe
equipment.
UseonlyanRFshieldedcablethatwassuppliedwiththedisplaywhenconnectingthisdisplaytoacomputerdevice.
Topreventdamagewhichmayresultinreorshockhazard,donotexposethisappliancetorainorexcessivemoisture.
THISCLASSBDIGITALAPPARATUSMEETSALLREQUIREMENTSOFTHECANADIANINTERFERENCE-CAUSINGEQUIPMENTREGULATIONS.
ThisdevicecomplieswithPart15oftheFCCRules.Operationissubjecttothefollowingtwoconditions:(1)thisdevicemaynot
causeharmfulinterference,and(2)thisdevicemustacceptanyinterferencereceived,includinginterferencethatmaycauseundesired
operation.
BDL4677XH
v
Polish Center for Testing and Certication Notice
Theequipmentshoulddrawpowerfromasocketwithanattachedprotectioncircuit(athree-prongsocket).Allequipmentthatworkstogether(computer,
display,printer,andsoon)shouldhavethesamepowersupplysource.
Thephasingconductoroftheroom’selectricalinstallationshouldhaveareserveshort-circuitprotectiondeviceintheformofafusewithanominalvalue
nolargerthan16amperes(A).
Tocompletelyswitchofftheequipment,thepowersupplycablemustberemovedfromthepowersupplysocket,whichshouldbelocatednearthe
equipmentandeasilyaccessible.
Aprotectionmark“B”conrmsthattheequipmentisincompliancewiththeprotectionusagerequirementsofstandardsPN-93/T-42107andPN-89/
E-06251.
Electric, Magnetic and Electronmagnetic Fields (“EMF”)
1. Wemanufactureandsellmanyproductstargetedatconsumers,which,likeanyelectronicapparatus,ingeneralhavetheabilitytoemitandreceive
electromagneticsignals.
2. OneofourleadingBusinessPrinciplesistotakeallnecessaryhealthandsafetymeasuresforourproducts,tocomplywithallapplicablelegal
requirementsandtostaywellwithintheEMFstandardsapplicableatthetimeofproducingtheproducts.
3. Wearecommittedtodevelop,produceandmarketproductsthatcausenoadversehealtheffects.
4. Weconrmthatifitsproductsarehandledproperlyfortheirintendeduse,theyaresafetouseaccordingtoscienticevidenceavailabletoday.
5. WeplayanactiveroleinthedevelopmentofinternationalEMFandsafetystandards,enablingustoanticipatefurtherdevelopmentsinstandardization
forearlyintegrationinitsproducts.
BDL4677XH
viii
North Europe (Nordic Countries) Information
Placering/Ventilation
VARNING:
FÖRSÄKRADIGOMATTHUVUDBRYTAREOCHUTTAGÄRLÄTÅTKOMLIGA,NÄRDUSTÄLLERDINUTRUSTNINGPÅPLATS.
Placering/Ventilation
ADVARSEL:
SØRGVEDPLACERINGENFOR,ATNETLEDNINGENSSTIKOGSTIKKONTAKTERNEMTTILGÆNGELIGE.
Paikka/Ilmankierto
VAROITUS:
SIJOITALAITESITEN,ETTÄVERKKOJOHTOVOIDAANTARVITTAESSAHELPOSTIIRROTTAAPISTORASIASTA.
Plassering/Ventilasjon
ADVARSEL:
NÅRDETTEUTSTYRETPLASSERES,MÅDUPASSEPÅATKONTAKTENEFORSTØMTILFØRSELERLETTEÅNÅ.
End-of-Life Disposal
YournewPublicInformationDisplaycontainsmaterialsthatcanberecycledandreused.Specializedcompaniescanrecycleyourproducttoincreasethe
amountofreusablematerialsandtominimizetheamounttobedisposedof.
PleasendoutaboutthelocalregulationsonhowtodisposeofyourolddisplayfromyourlocalPhilipsdealer.
(For customers in Canada and U.S.A.)
Thisproductmaycontainleadand/ormercury.Disposeofinaccordancetolocal-stateandfederalregulations.Foradditionalinformationonrecycling
contactwww.eia.org(ConsumerEducationInitiative)
Waste Electrical and Electronie Equipment-WEEE
Attention users in European Union private households
Thismarkingontheproductoronitspackagingillustratesthat,underEuropeanDirective2012/19/EUgoverningusedelectricaland
electronicappliances,thisproductmaynotbedisposedofwithnormalhouseholdwaste.Youareresponsiblefordisposalofthis
equipmentthroughadesignatedwasteelectricalandelectronicequipmentcollection.Todeterminethelocationsfordroppingoffsuch
wasteelectricalandelectronic,contactyourlocalgovernmentofce,thewastedisposalorganizationthatservesyourhouseholdorthe
storeatwhichyoupurchasedtheproduct.
Attention users in United States:
PleasedisposeofaccordingtoallLocal,StateandFederalLaws.Forthedisposalorrecyclinginformation,contact:www.mygreenelectronics.comorwww.
eiae.org.
End of Life Directives-Recycling
YournewPublicInformationDisplaycontainsseveralmaterialsthatcanberecycledfornewusers.
PleasedisposeofaccordingtoallLocal,State,andFederallaws.

BDL4677XH
ix
Table Of Contents
4.1.1. NavigatingtheOSDmenuusingthe
remotecontrol........................................16
4.1.2. NavigatingtheOSDmenuusingthe
display’scontrolbuttons....................16
4.2. OSDMenuOverview........................................16
4.2.1. Picturemenu............................................16
4.2.2. Screenmenu............................................17
4.2.3. Audiomenu..............................................18
4.2.4. PIPmenu....................................................18
4.2.5. Conguration1menu..........................19
4.2.6. Conguration2menu..........................20
4.2.7. Advancedoptionmenu.....................20
5. Input Mode ..............................................................25
6. Pixel Defect Policy .................................................26
6.1. PixelsandSub-Pixels............................................26
6.2. TypesofPixelDefects+DotDenition. 26
6.3. BrightDotDefects...............................................26
6.4. DarkDotDefects.................................................27
6.5. ProximityofPixelDefects................................27
6.6. PixelDefectTolerances......................................27
6.7. MURA..........................................................................27
7. Cleaning and Troubleshooting .............................28
7.1. Cleaning......................................................................28
7.2. Troubleshooting......................................................29
8. Technical Specications ........................................30
1. Unpacking and Installation ..................................... 1
1.1. Unpacking.....................................................................1
1.2. PackageContents.....................................................1
1.3. InstallationNotes......................................................1
1.4. InstallingandRemovingTableStands
(optional).......................................................................2
1.5. MountingonaWall.................................................3
1.5.1. VESAGrid....................................................3
1.6. MountinginPortraitPosition.............................4
1.7. OperatingInstructionsofEdgeAlignment
Kit/Pin...........................................................................4
1.7.1. InstallingEdgeAlignmentPin.............5
1.7.2. InstallingEdgeAlignmentKit..............5
1.8. InstallingOPSdevice...............................................7
2. Parts and Functions ................................................. 8
2.1. ControlPanel..............................................................8
2.2. Input/OutputTerminals.........................................9
2.3. RemoteControl.....................................................10
2.3.1. Generalfunctions..................................10
2.3.2. Insertingthebatteriesintheremote
control..........................................................11
2.3.3. Handlingtheremotecontrol..........11
2.3.4. Operatingrangeoftheremote
control..........................................................11
3. Connecting External Equipment ........................12
3.1. ConnectingExternalEquipment...................12
3.2. ConnectingRemoteControl..........................13
3.2.1. SingleDisplayControl.......................13
3.2.2. IRPassThroughControl..................13
3.3. ConnectingMultipleDisplaysinaDaisy-
chainConguration..............................................14
3.3.1. Displaycontrolconnection..............14
3.3.2. Digitalvideoconnection....................14
3.3.3. Analogvideoconnection..................14
3.3.4. IRdaisy-chainConnection................15
4. OSD Menu ..............................................................16
4.1. NavigatingtheOSDMenu.............................16
BDL4677XH
1
1. Unpacking and Installation
1.1. Unpacking
• Thisproductispackedinacarton,togetherwiththestandardaccessories.
• Anyotheroptionalaccessorieswillbepackedseparately.
• Duetothesizeandweightofthisdisplayitisrecommendedfortwopeopletomoveit.
• Afteropeningthecarton,ensurethatthecontentsarecompleteandingoodcondition.
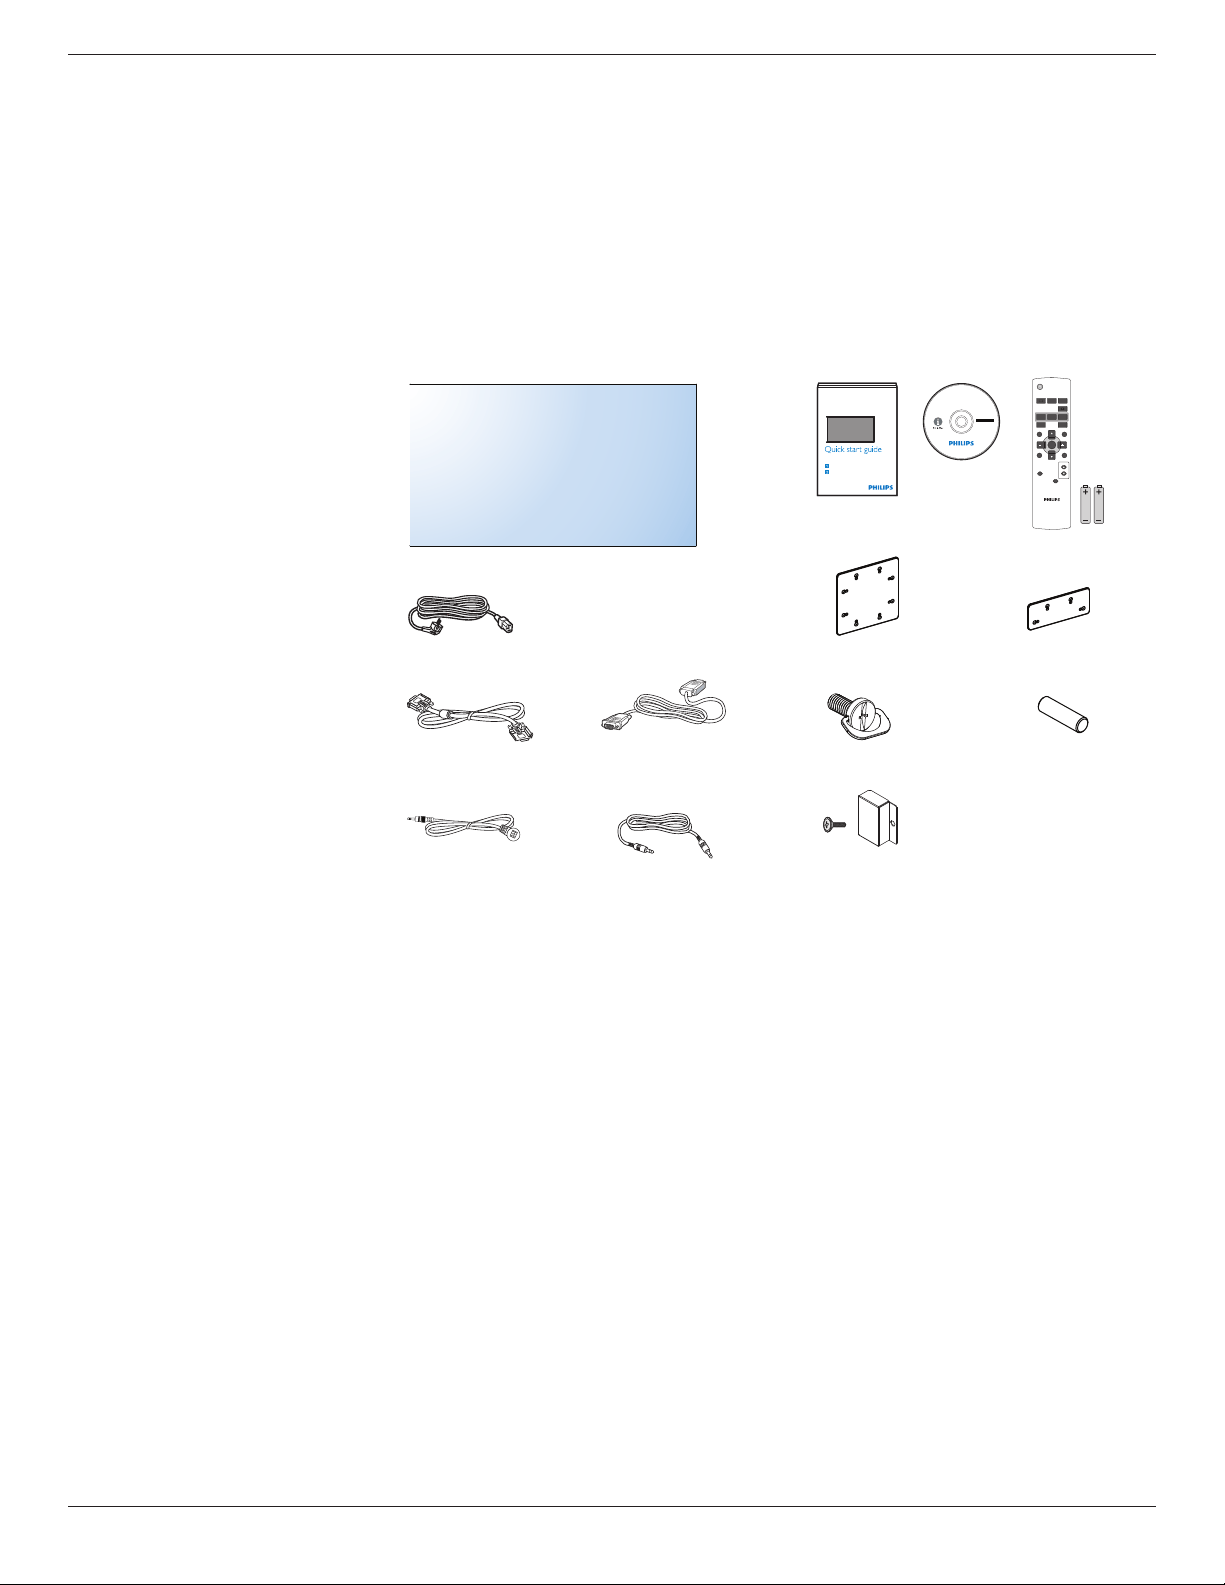
1.2. Package Contents
Pleaseverifythatyoureceivedthefollowingitemswithyourpackagecontent:
• LCDdisplay
• CDROM
• RemotecontrolwithAAAbatteries
• Powercord(1.8m)
• VGAcable(1.8m)
• RS232cable(3m)
• IRsensorcable(1.8m)
• 3.5mmJackIRcable(1.8m)
• Quickstartguide
• Powerswitchcover
• ScrewforPowerswitchcover(M3,
8mmx1)
• EdgeAlignmentKit-1:1PCS
• EdgeAlignmentKit-2:2PCS
• Screw:8PCS
• EdgeAlignmentPin:2PCS
* The supplied power cord varies depending on destination.
Power Cord
Video Signal Cable
(D-SUB to D-SUB Cable)
RS232 Cable
POWER
SMART
VIDEO
SOURCE
PIP
INPUTON/OFF CHANGE
BRIGHTNESSCONTRAST
DISPLAY
AUTO
ADJUST
MUTE
VOL UP
VOL DOWN
EXIT
MENU
SET
AUDIO
SOURCE
USB MENU
Remote Control
and AAA Batteries
CD ROM
Register your product and get support at
www.philips.com/welcome
LCD-Display / Pantalla LCD / Écran LCD / Display LCD
Wyświetlacz LCD / ЖК-монитор / LCD Ekran / 液晶显示器 /
液晶顯示器
Kurzanleitung / Guía rápida / Guide de démarrage rapide / Guida rapida /
Instrukcja szybkiego uruchomienia / Краткое руководство по запуску /
Hızlı bașlangiç kılavuzu / 快速入门指南 /
快速入門指南
Installation / Installation / Instalación / Installation / Installazione / Instalacja /
Установка / Kurulum / 安装 /
安裝
Connect / Verbindungsfähigkeit / Conectividad / Connectivité / Connettività /
Połączenia / Подключение / Bağlantı / 连接性 /
連接性
BDL4677XL
LCD Display
Quick start guide
IR Sensor Cable
IR Cable
Edge Alignment Kit-1
Edge Alignment Kit-2
Edge Alignment Pin
Screw
Power switch cover
and screw (M3x8) x1
NOTES:
• Forallotherregions,applyapowercordthatconformstotheACvoltageofthepowersocketandhasbeenapprovedbyandcomplieswiththe
safetyregulationsoftheparticularcountry.
• Youmightliketosavethepackageboxandpackingmaterialforshippingthedisplay.
1.3. Installation Notes
• Duetothehighpowerconsumption,alwaysusetheplugexclusivelydesignedforthisproduct.Ifanextendedlineisrequired,pleaseconsultyour
serviceagent.
• Theproductshouldbeinstalledonaatsurfacetoavoidtipping.Thedistancebetweenthebackoftheproductandthewallshouldbemaintained
forproperventilation.Avoidinstallingtheproductinthekitchen,bathroomoranyotherplaceswithhighhumiditysoasnottoshortentheservicelife
oftheelectroniccomponents.
• Theproductcannormallyoperateonlyunder3000minaltitude.Ininstallationsataltitudesabove3000m,someabnormalitiesmaybeexperienced.
BDL4677XH
5
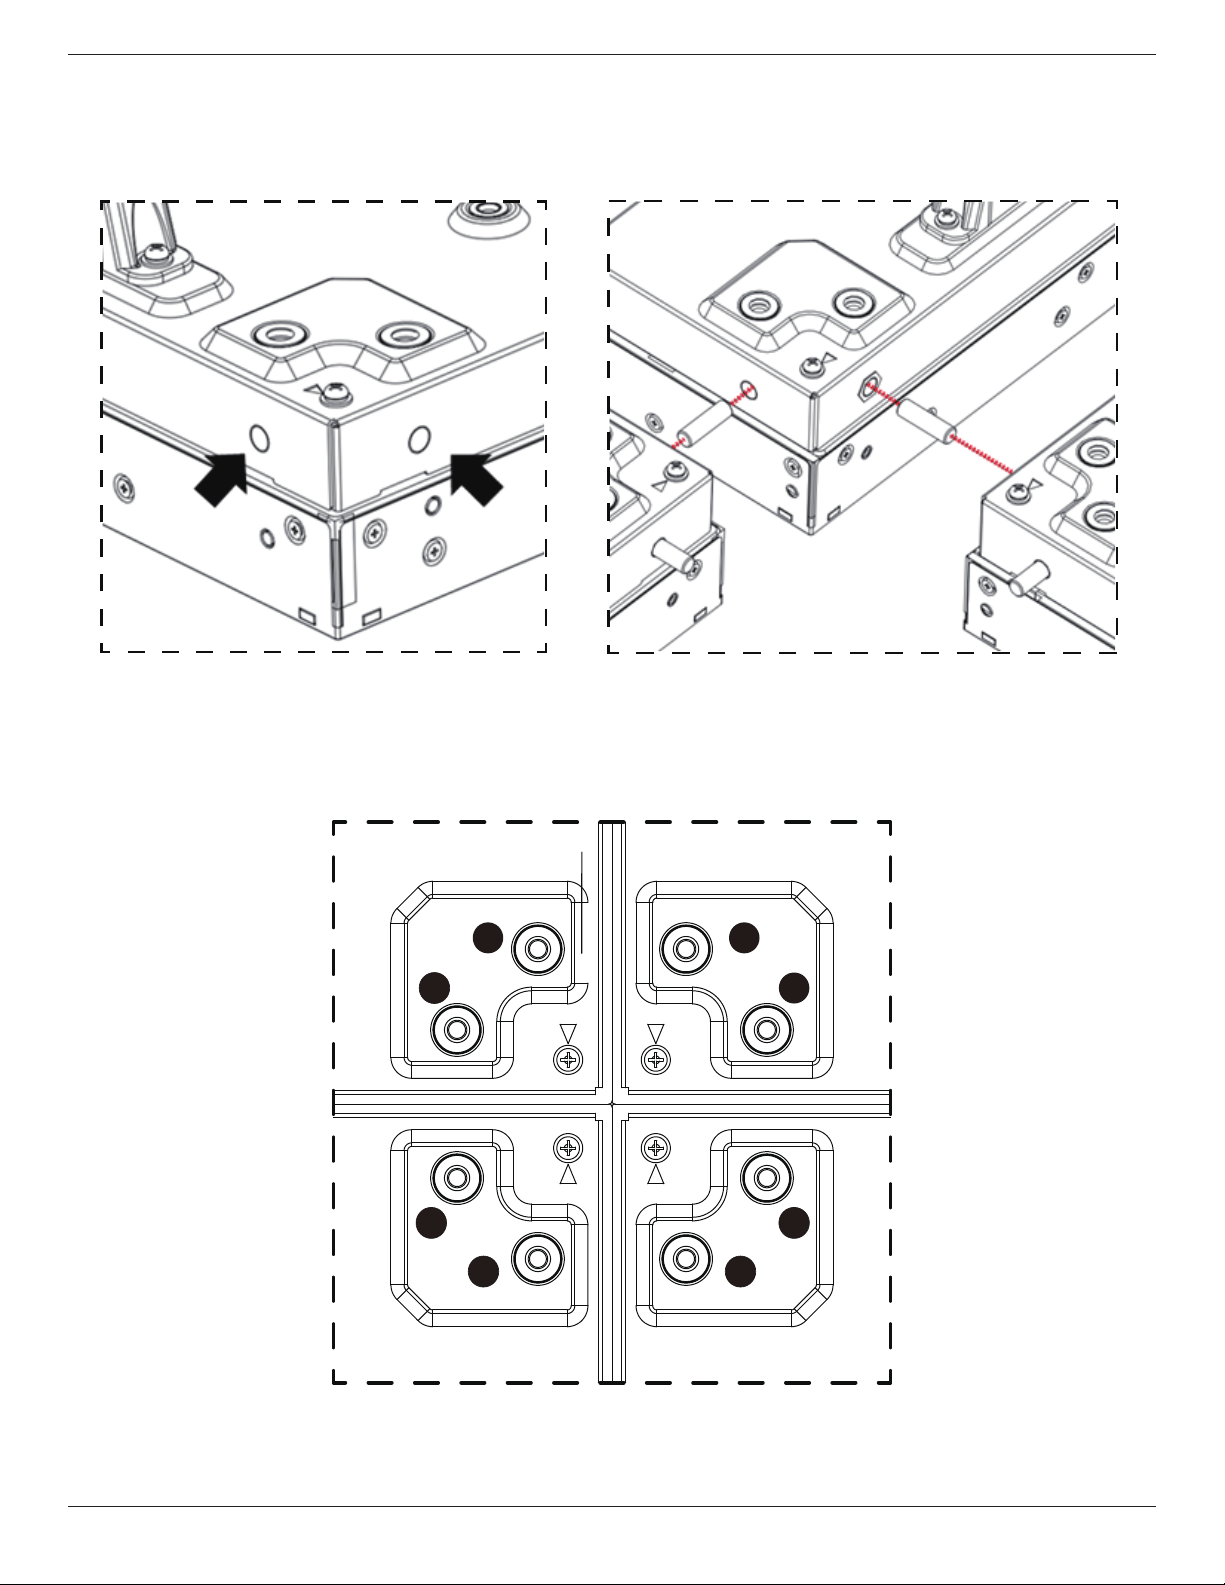
1.7.1. Installing Edge Alignment Pin
• Duringmountingdisplaystovideowallframe,using“EdgeAlignmentPin”tosecuretheatnessofadjacentdisplays.
• Don’tletedgealignmentpintotouchthesidesurfaceofpanel,panelwilldamageduetoincorrectinstallation.
• Using“EdgeAlignmentPin”onadjacentdisplays.
Thereare8holesonthefourcornersofdisplaysdesignedforplug-intheedgealignmentpin.
1.7.2. Installing Edge Alignment Kit
• Beforeinstalledgealignmentkit,displaysmustbemountedtovideowallframecorrectly.
• Using“EdgeAlignmentKit-1”onadjacentfourdisplays.
1
2
3
4
5
6
7
8

BDL4677XH
6
• Install“EdgeAlignmentKit-1”with8PCSofscrewonouter,biggerholes.
1
2
3
4
5
6
7
8
• Using“EdgeAlignmentKit-2”onadjacenttwodisplays.
1
2 3
4
• Install“EdgeAlignmentKit-2”with4PCSofscrewonouter,biggerholes.
1
2 3
4

BDL4677XH
7
1.8. Installing OPS device
ToinstallOPSdevicetodisplay:
1. Removethescrewsofhandle,thenremovethehandle.
2. RemovethescrewsofOPScover.
3. InstalltheOPSdevice.
4. FixtheOPSdevicebyscrews.
5. Fixthehandlebyscrews.
ScrewsforHandle
ScrewsforOPS
OPSCover
Handle
BDL4677XH
8
2. Parts and Functions
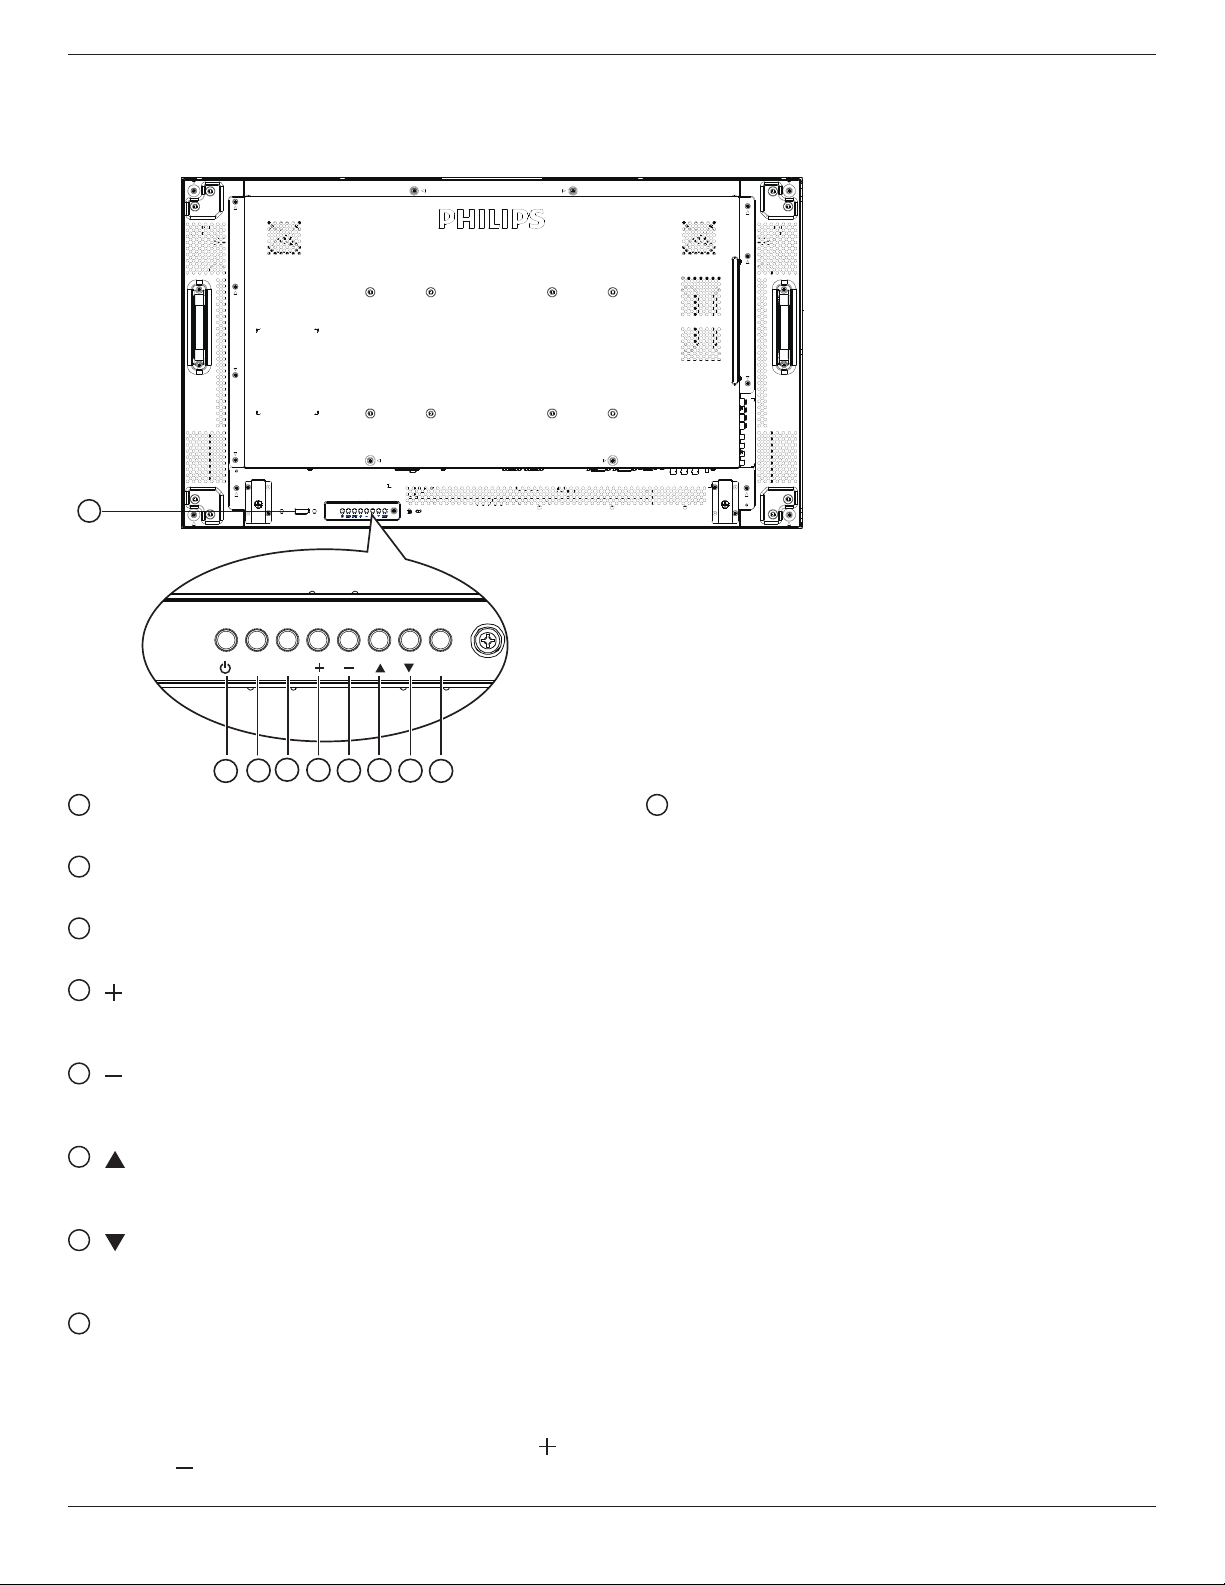
2.1. Control Panel
9
MUTE INPUT MENU
1
2
3
4
5
6
7
8
1
POWER button
Usethisbuttontoturnthedisplayonorputthedisplaytostandby.
2
MUTE button
SwitchtheaudiomuteON/OFF.
3
INPUT button
Usethisbuttontoselecttheinputsource.
4
[ ] button
IncreasetheadjustmentwhileOSDmenuison,orincreasethe
audiooutputlevelwhileOSDmenuisoff.
5
[ ] button
DecreasetheadjustmentwhileOSDmenuison,ordecreasethe
audiooutputlevelwhileOSDmenuisoff.
6
[ ] button
MovethehighlightbaruptoadjusttheselecteditemwhileOSD
menuison.
7
[ ] button
MovethehighlightbardowntoadjusttheselecteditemwhileOSD
menuison.
8
MENU button
ReturntopreviousmenuwhileOSDmenuison,ortoactivatethe
OSDmenuwhenOSDmenuisoff.
NOTE: “Keyboard Control Lock Mode”Thisfunctioncompletely
disablestheaccesstoallKeyboardControlfunctions.To
enableordisablethekeyboardcontrollock,pressboth[ ]
and[ ]buttonsandholddowncontinuouslyformorethan
3(three)seconds.
9
Remote control sensor and power status indicator
• Receivescommandsignalsfromtheremotecontrol.
• IndicatestheoperatingstatusofthedisplaywithoutOPS:
- Lightsgreenwhenthedisplayisturnedon
- Lightsredwhenthedisplayisinstandbymode
- LightsamberwhenthedisplayentersAPMmode
- When{SCHEDULE}isenabled,thelightblinksgreenandred
- Ifthelightblinksred,itindicatesthatafailurehasbeen
detected
- Lightsoffwhenthemainpowerofthedisplayisturnedoff
• IndicatestheoperatingstatusofthedisplaywithOPS:
- Lightsgreenwhenthedisplayison,buttheOPSisoff
- LightsbluewhenthedisplayandtheOPSareon
- Lightsredwhenthedisplayisinstandbymode
- LightsamberwhenthedisplayentersAPMmode
- When{SCHEDULE}isenabled,thelightblinksgreenandred
- Ifthelightblinksred,itindicatesthatafailurehasbeen
detected
- Lightsoffwhenthemainpowerofthedisplayisturnedoff
BDL4677XH
9
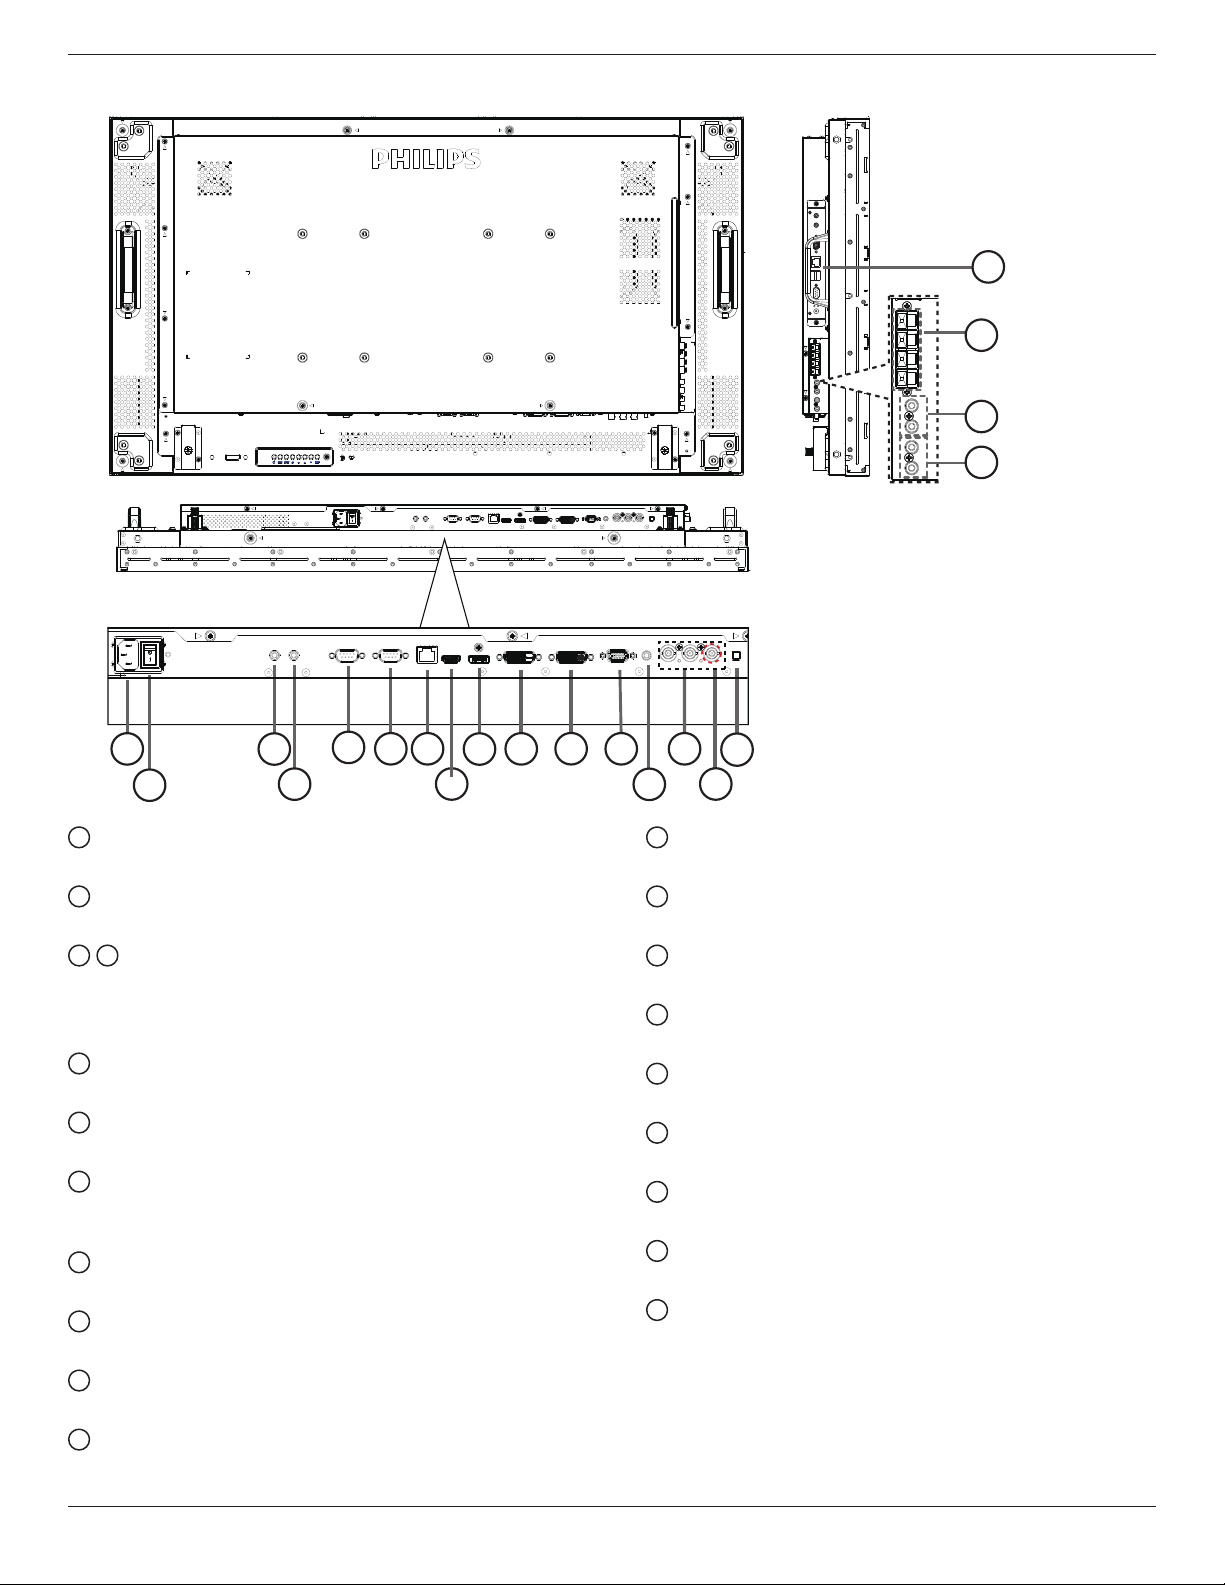
2.2. Input/Output Terminals
8
17
18
19
20
1
2
3
4
76
10
11
12 14
15
16
5
9
13
1
AC IN
ACpowerinputfromthewalloutlet.
2
MAIN POWER SWITCH
Switchthemainpoweron/off.
3
/
4
IR IN / IR OUT
ReservedforthewiredconnectionoftheIRcontrol.
NOTE:IfanexternalIRreceiverisconnectedto[IRIN],thereisno
functiononthedisplay’sremotesensor.
5
RS232C OUT:
RS232Cnetworkoutputfortheloop-throughfunction.
6
RS232C IN
RS232Cnetworkinputfortheloop-throughfunction.
7
RJ-45
LANcontrolfunctionfortheuseofremotecontrolsignalfrom
controlcenter.
8
HDMI IN
HDMIvideo/audioinput.
9
DisplayPort
DisplayPortvideoinput.
10
DVI IN
DVI-Dvideoinput.
11
DVI OUT / VGA OUT
DVIorVGAvideooutput.
12
VGA IN (D-Sub)
VGAvideoinput.
13
VGA AUDIO IN
AudioinputforVGAsource(3.5mmstereophone).
14
COMPONENT IN (BNC)
ComponentYPbPrvideosourceinput.
15
Y/CVBS
Videosourceinput.
16
SPEAKER SWITCH
Internalspeakeron/offswitch.
17
AUDIO IN
AudioinputfromexternalAVdevice(RCA).
18
AUDIO OUT (RCA)
AudiooutputfromtheAUDIOINjacktoanexternalAVdevice.
19
SPEAKERS OUT
Externalspeakersoutput.
20
OPS SLOT
SlotforinstallingtheoptionalOPSmodule.
BDL4677XH
10
2.3. Remote Control
2.3.1. General functions
POWER
SMART
VIDEO
SOURCE
PIP
INPUTON/OFF CHANGE
BRIGHTNESSCONTRAST
DISPLAY
AUTO
ADJUST
MUTE
VOL UP
VOL DOWN
EXIT
MENU
SET
AUDIO
SOURCE
USB MENU
1
10
11
12
13
14
15
16
17
18
19
20
2
3
4
5
6
7
8
9
21
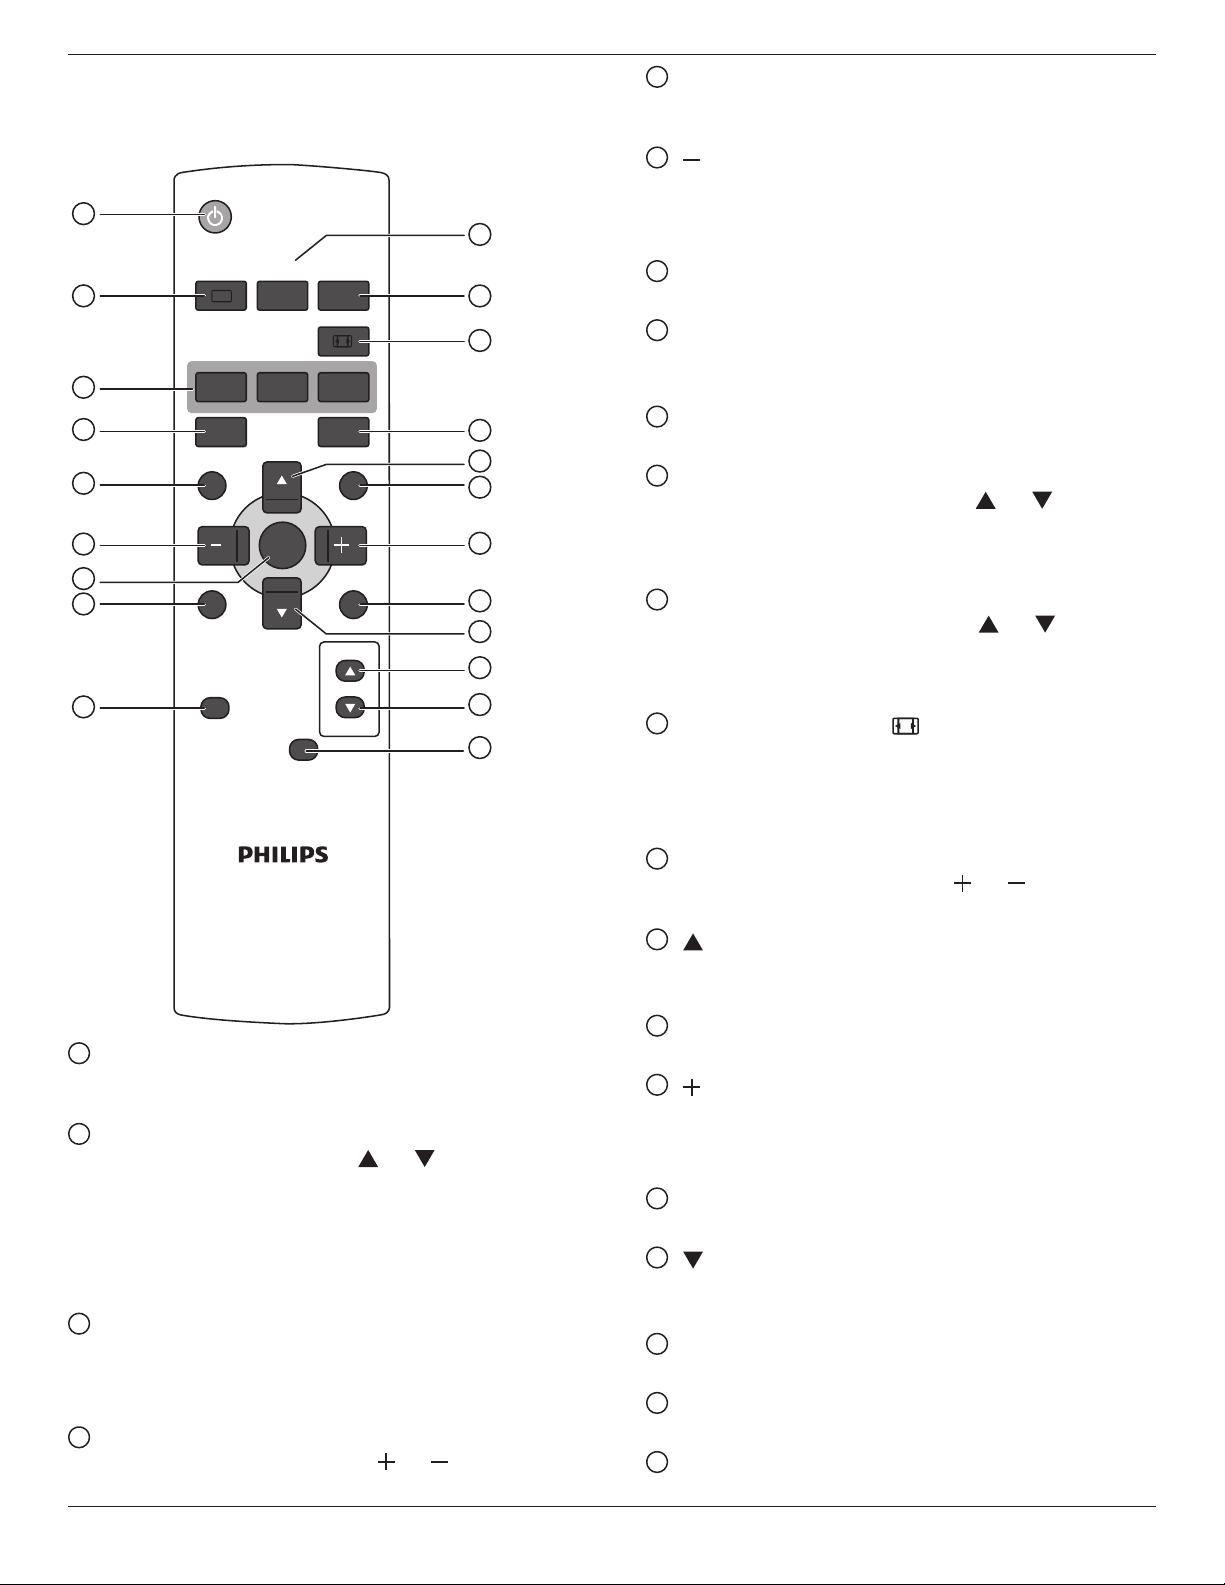
1
[POWER] button
Presstoswitchonthedisplayfromstandbymode.Pressagainto
turnitoffandbackintostandbymode.
2
[SMART] button
PresstoactivateSmartMenu.Press[ ]or[ ]buttontoselect
menuoptions.Press[SET]buttontoconrmandexittheselection.
• Standard:Usedfornormalimages(factorysetting)
• Highbright:UsedformovingimagesuchasVideo
• sRGB:Usedfortextbasedimages(onlyforPCmode)
• Cinema:Usedformovies(onlyforVideomode)
3
[PIP] (Picture In Picture) button
[ON/OFF]: TurnPIPmodeON/OFF.
[INPUT]: Selecttheinputsignalforthesub-picture.
[CHANGE]: Togglebetweenthemainpictureandsubpicture.
4
[CONTRAST] button
PresstoactivateContrastMenu.Press[ ]or[ ]buttontoadjust
thevalue.
5
[DISPLAY] button
Presstoturnon/offtheinformationOSDdisplayedontheupper
rightcornerofthescreen.
6
[ ] button
• PresstomovetheselectionleftinOSDmenu.
• PresstodecreasethevalueinOSDmenu.
• Presstomovethesub-pictureleftinPIPmode.
7
[SET] button
PresstoactivatethesettinginsidetheOSDmenu.
8
[AUTO ADJUST] button
PresstoruntheAutoAdjustfunction.
NOTE: ThisbuttonisfunctionalforVGAinputonly.
9
[MUTE] button
Presstoturnthemutefunctionon/off.
10
[VIDEO SOURCE] button
PresstotoggleVideoSourceMenu.Press[ ]or[ ]buttonto
selectoneofthevideosourcesamongDisplayport,DVI-D,
VGA,HDMI,Component,Video,Card OPS.Press[SET]
buttontoconrmandexit.
11
[AUDIO SOURCE] button
PresstotoggleAudioSourceMenu.Press[ ]or[ ]button
toselectoneoftheaudiosourcesamongDisplayport,HDMI,
Audio1,Audio2 orCard OPS.Press[SET]buttontoconrm
andexit.
12
Picture Format button
Presstoswitchscreenaspectratio.
• ForPCsignal:FULL,NORMAL,CUSTOM,andREAL.
• ForVideosignal:FULL,NORMAL,DYNAMIC,CUSTOM,
REAL,and21:9.
13
[BRIGHTNESS] button
PresstotoggleBrightnessMenu.Press[ ]or[ ]buttontoadjust
thevalue.
14
[ ] button
• PresstomovetheselectionupinOSDmenu.
• Presstomovethesub-pictureupinPIPmode.
15
[MENU] button
PresstoturntheOSDmenuon/off.
16
[ ] button
• PresstomovetheselectionrightinOSDmenu.
• PresstoincreasethevalueinOSDmenu.
• Presstomovethesub-picturerightinPIPmode.
17
[EXIT] button
PresstoturnbacktothepreviousOSDmenu.
18
[ ] button
• PresstomovetheselectiondowninOSDmenu.
• Presstomovethesub-picturedowninPIPmode.
19
[VOL UP] button
Presstoincreasetheaudiooutputlevel.
20
[VOL DOWN] button
Presstodecreasetheaudiooutputlevel.
21
[USB MENU] button
Thisfunctionisnotavailableonthisdisplay.
BDL4677XH
11
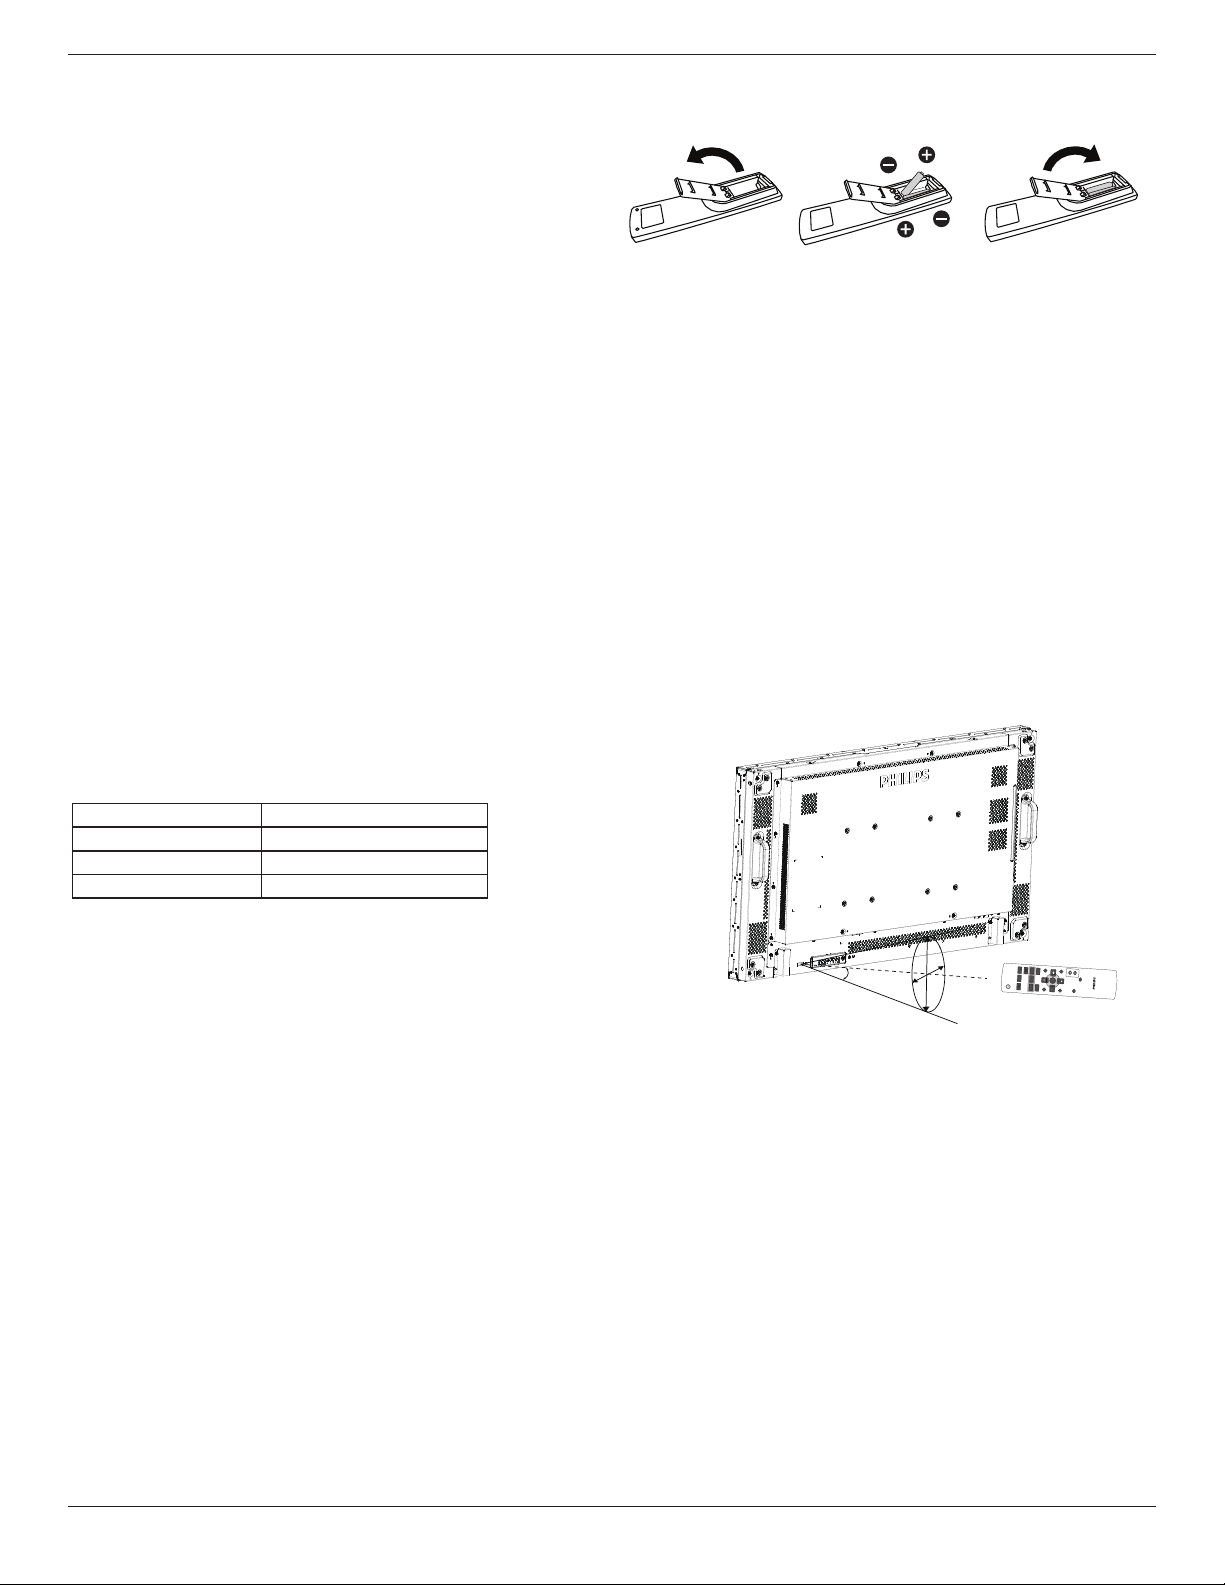
2.3.2. Inserting the batteries in the remote control
Theremotecontrolispoweredbytwo1.5VAAAbatteries.
Toinstallorreplacebatteries:
1. Pressandthenslidethecovertoopenit.
2. Alignthebatteriesaccordingtothe(+)and(–)indicationsinsidethe
batterycompartment.
3. Replacethecover.
Caution:
Theincorrectuseofbatteriescanresultinleaksorbursting.Besuretofollowtheseinstructions:
• Place“AAA”batteriesmatchingthe(+)and(–)signsoneachbatterytothe(+)and(–)signsofthebatterycompartment.
• Donotmixbatterytypes.
• Donotcombinenewbatterieswithusedones.Itcausesshorterlifeorleakageofbatteries.
• Removethedeadbatteriesimmediatelytopreventthemfromliquidleakinginthebatterycompartment.Don’ttouchexposedbatteryacid,asitcan
damageyourskin.
NOTE: Ifyoudonotintendtousetheremotecontrolforalongperiod,removethebatteries.
2.3.3. Handling the remote control
• Donotsubjecttostrongshock.
• Donotallowwaterorotherliquidtosplashtheremotecontrol.Iftheremotecontrolgetswet,wipeitdryimmediately.
• Avoidexposuretoheatandsteam.
• Otherthantoinstallthebatteries,donotopentheremotecontrol.
2.3.4. Operating range of the remote control
Pointthetopoftheremotecontroltowardthedisplay’sremotecontrolsensor(back
side)whenpressingabutton.
Usetheremotecontrolwithintherangewhichisshowninthefollowingtable.
Operation Angle RC operational distance
θ=0º(forH&V) ≥8m
θ=20º(forH&V) ≥5m
θ=45º(forHonly) ≥2m
NOTE: Theremotecontrolmaynotfunctionproperlywhentheremotecontrol
sensoronthedisplayisunderdirectsunlightorstrongillumination,orwhen
thereisanobstacleinthepathofsignaltransmission.
POWER
SMART
VIDEO
SOURCE
PIP
INPUTON/OFF CHANGE
BRIGHTNESSCONTRAST
DISPLAY
AUTO
ADJUST
MUTE
VOL UP
VOL DOWN
EXIT
MENU
SET
AUDIO
SOURCE
USB MENU
H
V
θ
BDL4677XH
12
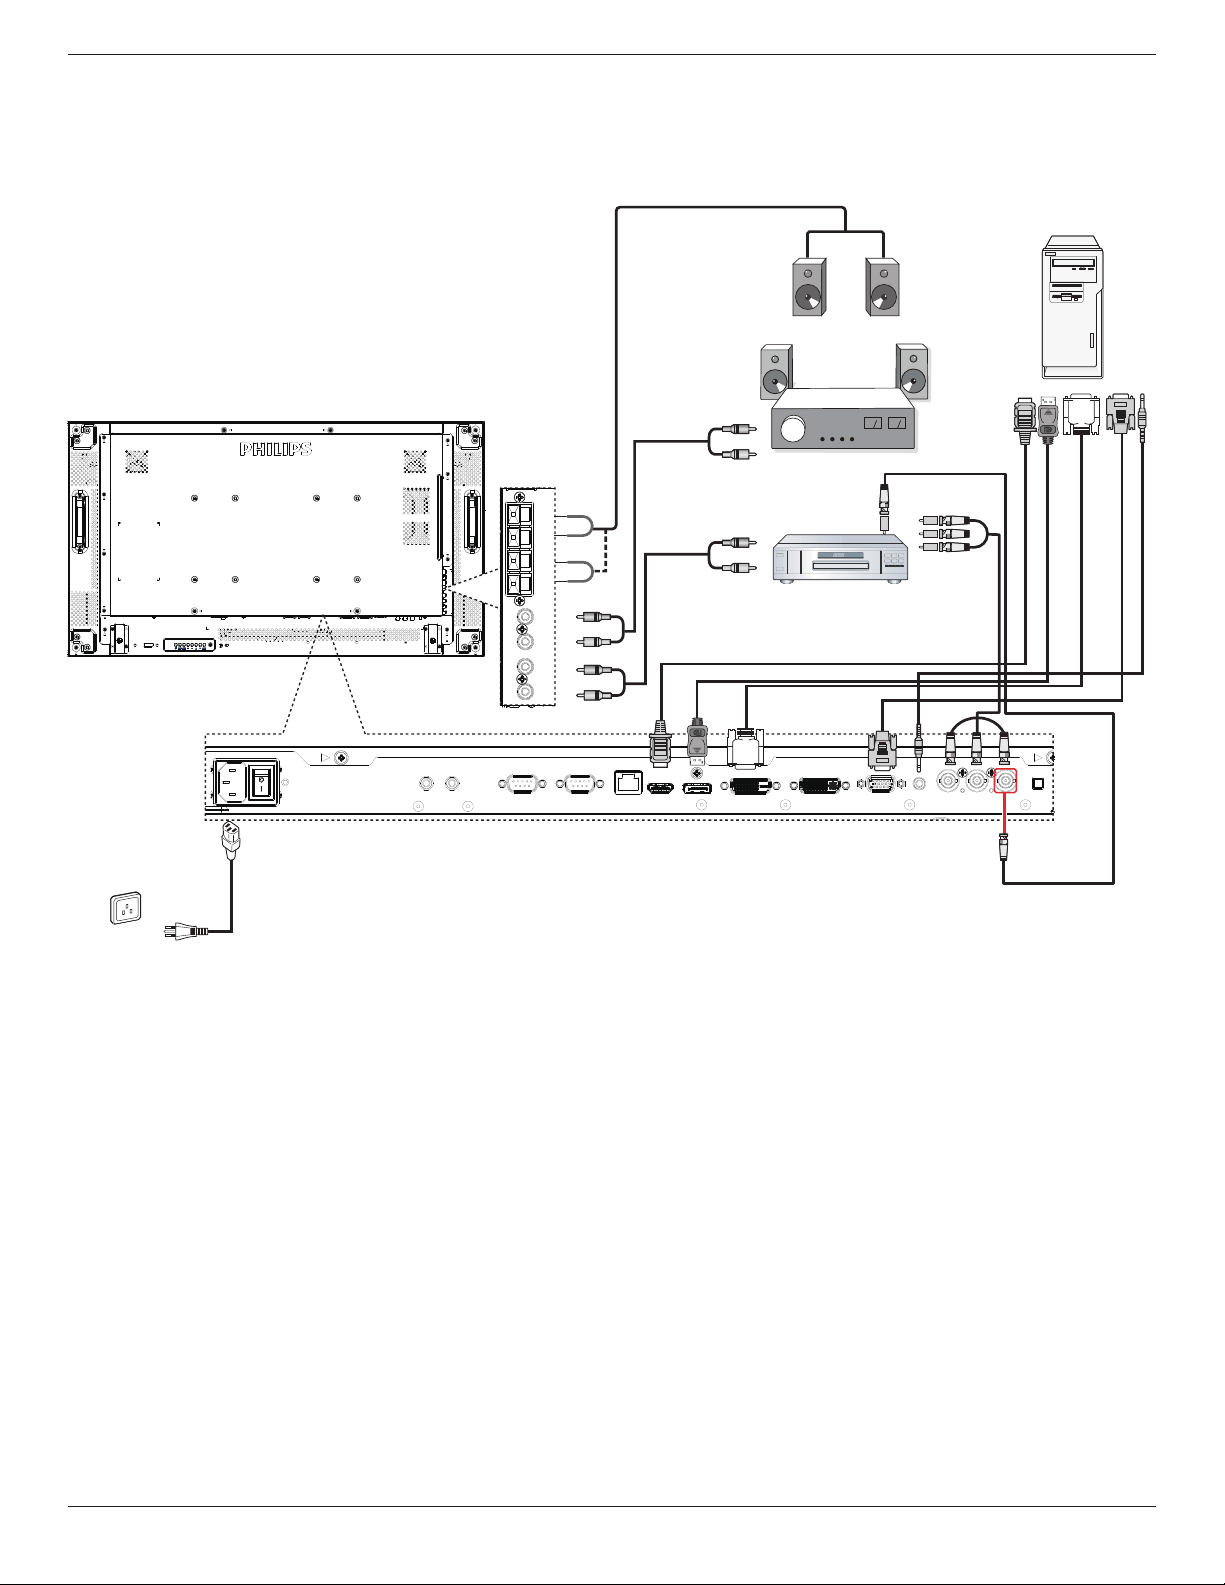
3. Connecting External Equipment
NOTE:Theperipheralsandcablesshownareforexamplepurposesonly.
3.1. Connecting External Equipment
DVD / VCR / VCD
PC
STEREO AMPLIFIER
DisplayPort IN
DisplayPort Out
AUDIO OUT
AUDIO IN
COMPONENT OUT
(YPbPr)
HDMI IN DVI IN VGA IN
COMPONENT IN
AUDIO OUT
DVI OUT
VGA OUT
AUDIO OUT
AUDIO IN
HDMI OUT
AC IN
R
L
R
L
AUDIO IN
Y/CVBS IN
Y/CVBS OUT
External speakers
BDL4677XH
13
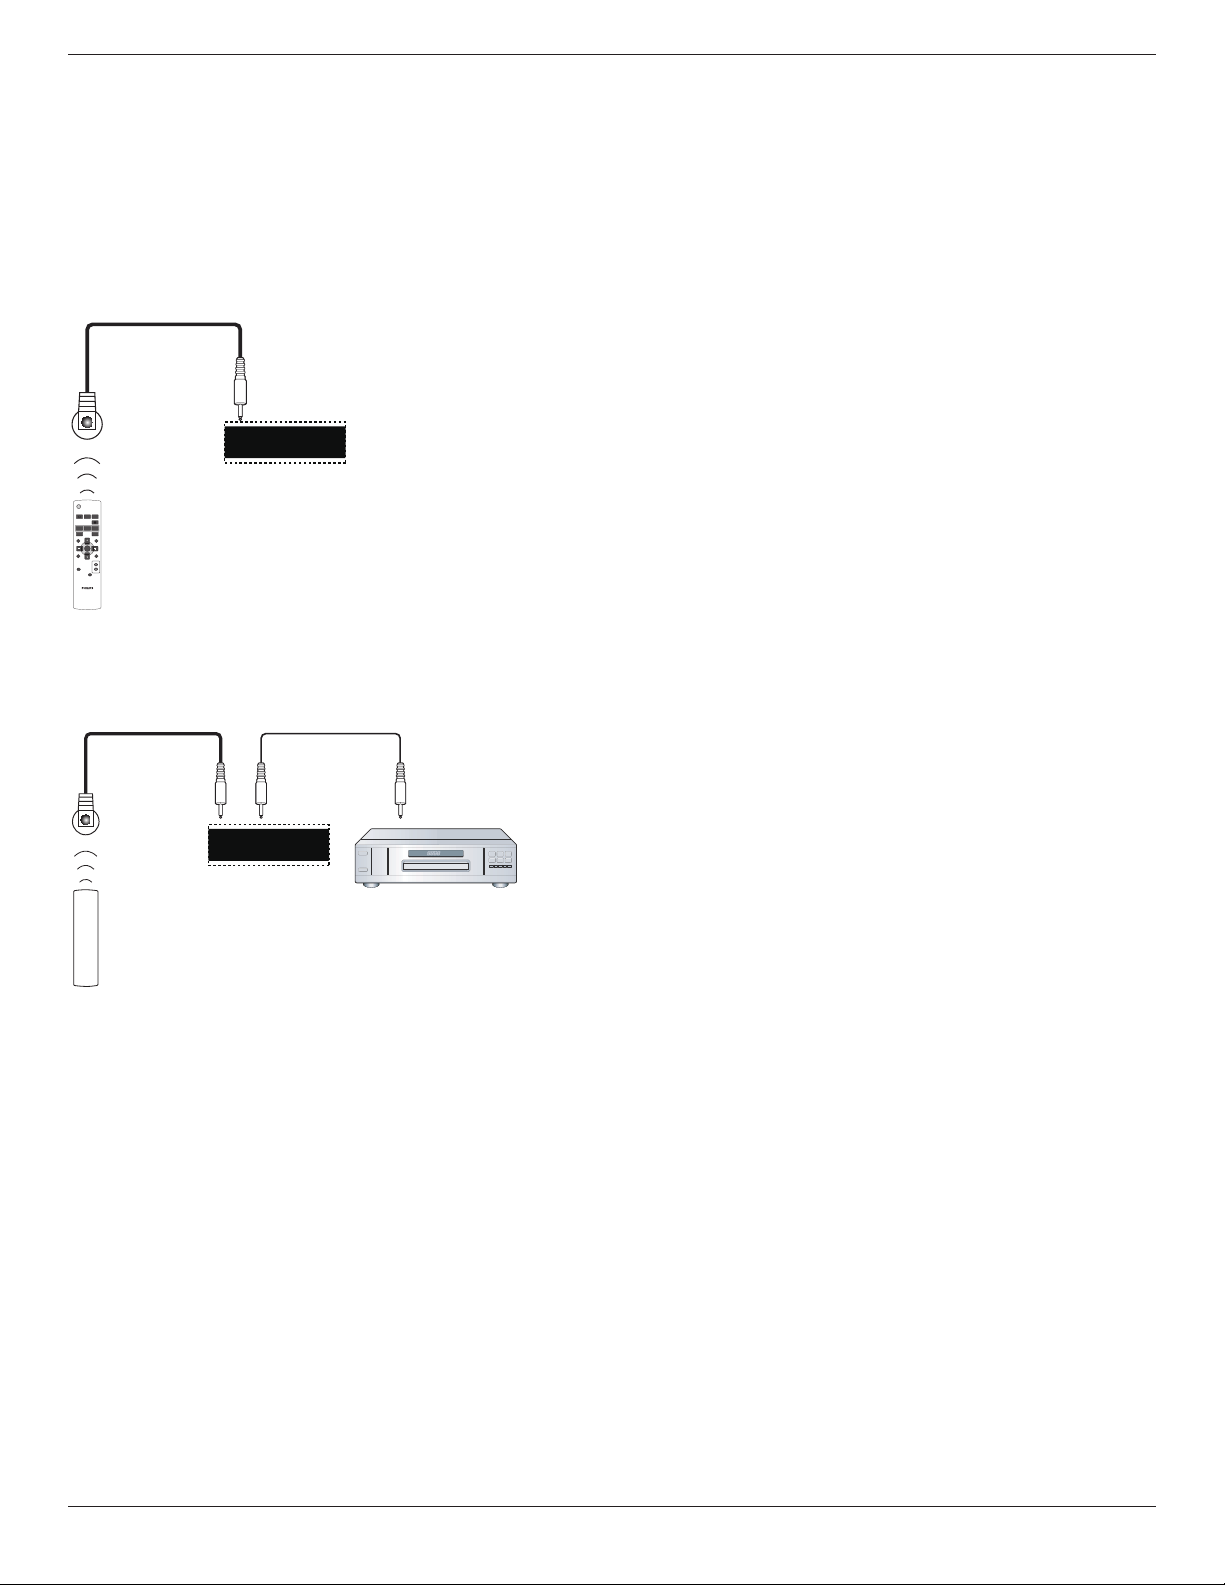
3.2. Connecting Remote Control
3.2.1. Single Display Control
Tocontrolonedisplay,connectthe“IRSensorCable”tothe[IRIN]
port.
Pointthetopoftheremotecontroltowardthe“IRSensorCable”when
pressingabutton.
NOTE: TheDisplay’sremotecontrolsensorwillstopworkingafter
connectedwiththe“IRSensorCable”.
IR Sensor Cable
POWER
SMART
VIDEO
SOURCE
PIP
INPUTON/OFF CHANGE
BRIGHTNESSCONTRAST
DISPLAY
AUTO
ADJUST
MUTE
VOL UP
VOL DOWN
EXIT
MENU
SET
AUDIO
SOURCE
USB MENU
IR IN IR OUT
3.2.2. IR Pass Through Control
TocontrolaVideo-Wallsetupbymultipledisplays,usethe”IRSensor
Cable”andthe”IRCable”toachievethefunction.
IR Sensor Cable
IR input port of the DVD player
Display
IR IN IR OUT
IR Cable
Remote control of DVD player
DVD Player
1. Connectthe“IRSensorCable”tothe[IRIN]portofthedisplay.
2. Connectwiththe”IRCable”fromthe[IROUT]portofthedisplay
totheIRinputportoftheDVDplayer.
3. IRsignalwillbepassedtoDVDplayerwhenpressingabutton.
NOTE: Theremotecontrolmaynotfunctionproperlyifthe“IR
SensorCable”isunderdirectsunlightorstrongillumination,orwhen
thereisobstacleinthepathofsignaltransmission.
BDL4677XH
14
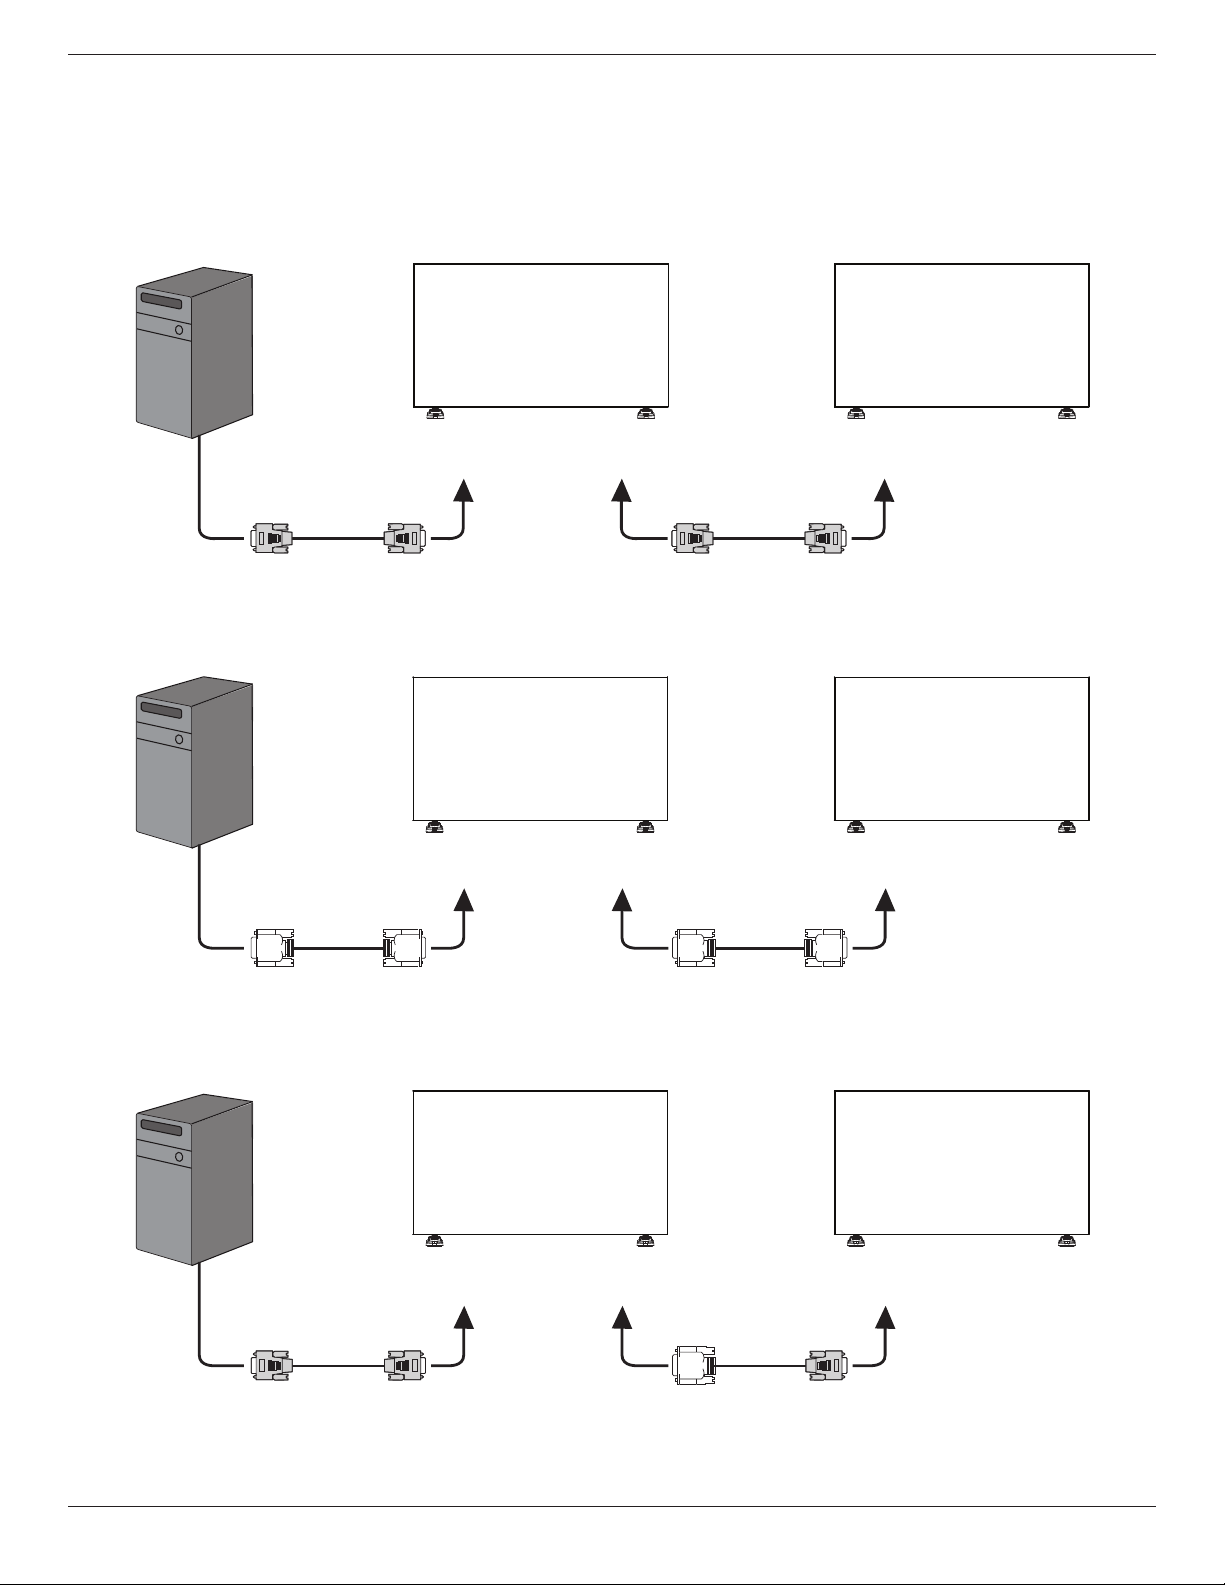
3.3. Connecting Multiple Displays in a Daisy-chain Configuration
Youcaninterconnectmultipledisplaystocreateadaisy-chaincongurationforapplicationssuchasavideowall.
NOTE: Maximum25displays(5x5)canbeusedinadaisy-chainconguration.
3.3.1. Display control connection
Connectthe[RS232COUT]connectorofDISPLAY1tothe[RS232CIN]connectorofDISPLAY2.
PC
DISPLAY 2DISPLAY 1
[RS-232C IN][RS-232C] [RS-232C OUT] [RS-232C IN]
3.3.2. Digital video connection
Connectthe[DVIOUT/VGAOUT]connectorofDISPLAY1tothe[DVIIN]connectorofDISPLAY2.
PC
[DVI IN][DVI] [DVI/VGA OUT] [DVI IN]
DISPLAY 2DISPLAY 1
3.3.3. Analog video connection
Connectthe[DVIOUT/VGAOUT]connectorofDISPLAY1tothe[VGAIN]connectorofDISPLAY2.
PC
DISPLAY 2DISPLAY 1
[VGA IN][VGA] [DVI/VGA OUT] [VGA IN]

BDL4677XH
15
3.3.4. IR daisy-chain Connection
Connect[IRSensorCable]toDISPLAY1,andconnectthe[RS232COUT]connectorofDISPLAY1tothe[RS232CIN]connectorofDISPLAY2.
DISPLAY 2DISPLAY 1
[RS-232C OUT]
IR Sensor Cable
POWER
SMART
VIDEO
SOURCE
PIP
INPUTON/OFF CHANGE
BRIGHTNESSCONTRAST
DISPLAY
AUTO
ADJUST
MUTE
VOL UP
VOL DOWN
EXIT
MENU
SET
AUDIO
SOURCE
USB MENU
[RS-232C IN]
[IR IN]
BDL4677XH
16
4. OSD Menu
AnoverallviewoftheOn-ScreenDisplay(OSD)structureisshown
below.Youcanuseitasareferenceforfurtheradjustingyourdisplay.
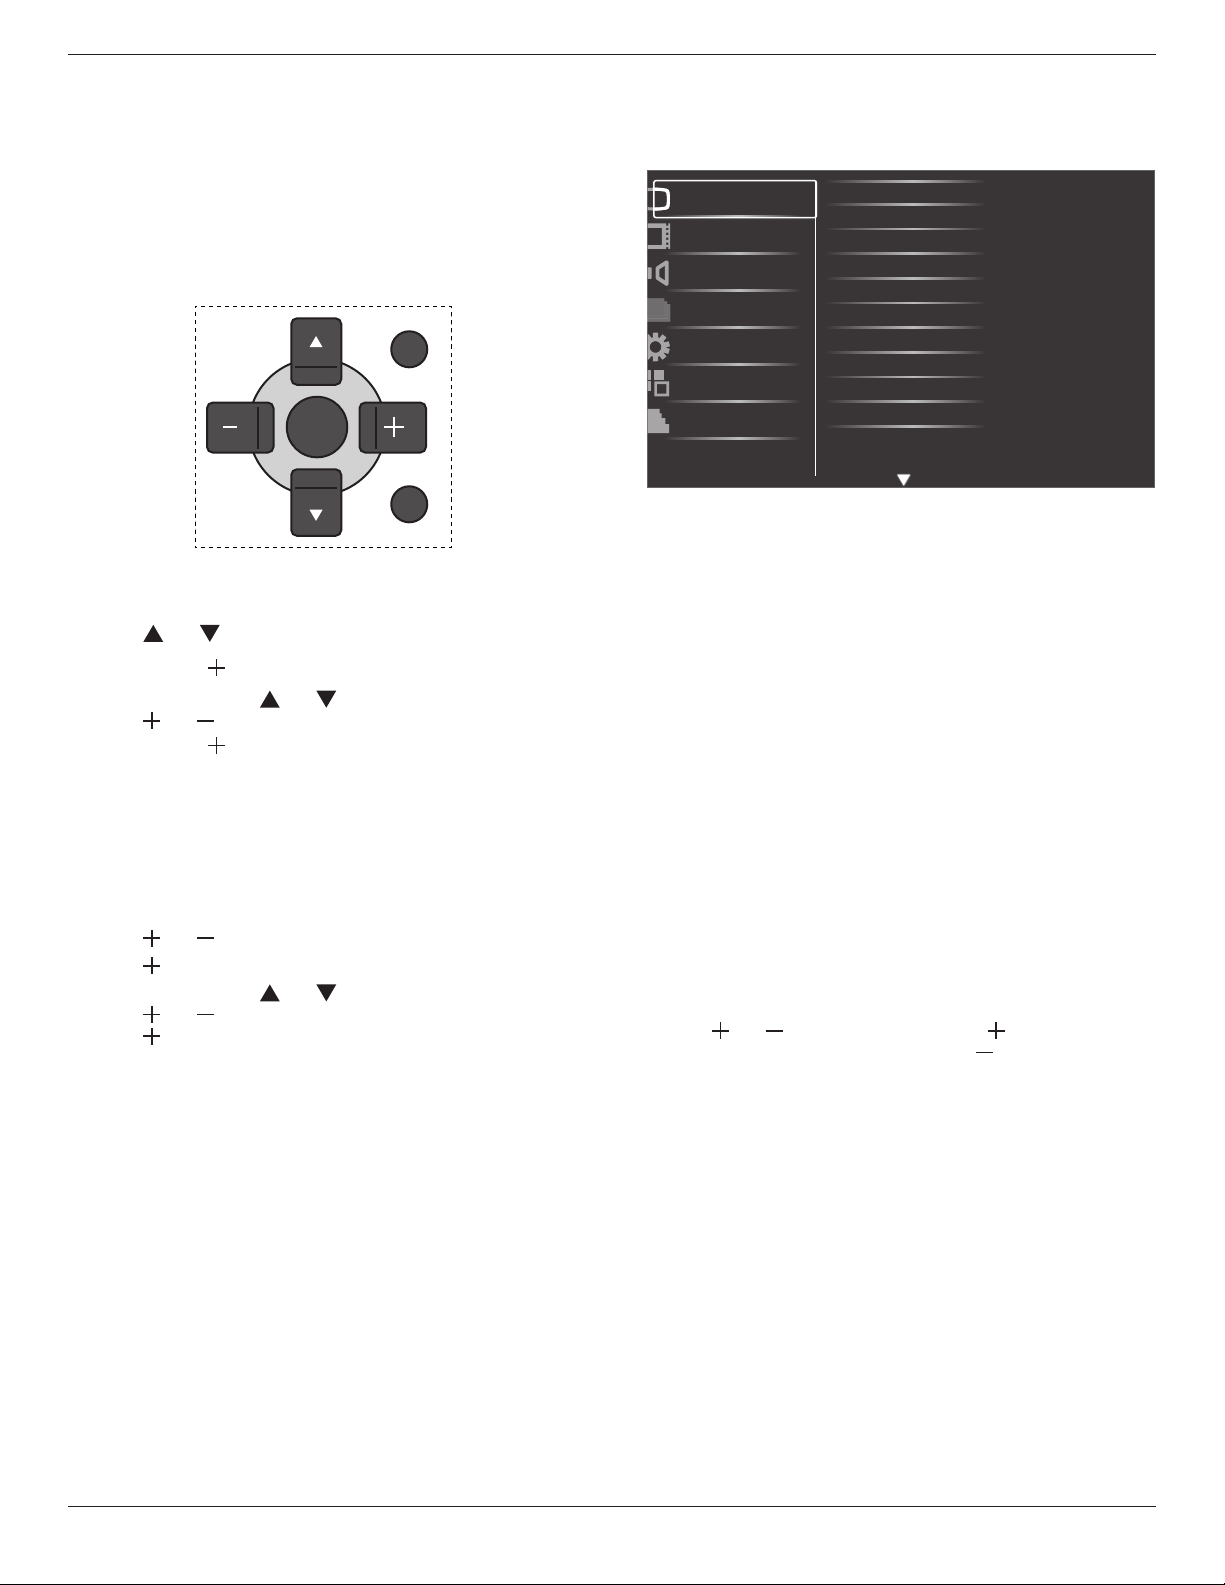
4.1. Navigating the OSD Menu
4.1.1. Navigating the OSD menu using the
remote control
EXIT
MENU
SET
1. Press[MENU]buttonontheremotecontroltodisplaytheOSD
menu.
2. Press[ ]or[ ]buttontochoosetheitemyouwanttoadjust.
3. Press[SET]or[ ]buttontoenterthesubmenu.
4. Inthesubmenu,press[ ]or[ ]buttontotoggleamongitems,
press[ ]or[ ]buttontoadjustsettings.Ifthereisasubmenu,
press[SET]or[ ]buttontoenterthesubmenu.
5. Press[EXIT]buttontoreturntothepreviousmenu,orpress
[MENU]buttontoexittheOSDmenu.
4.1.2. Navigating the OSD menu using the
display’s control buttons
1. Press[MENU]buttontodisplaytheOSDmenu.
2. Press[ ]or[ ]buttontochoosetheitemyouwanttoadjust.
3. Press[ ]buttontoenterthesubmenu.
4. Inthesubmenu,press[ ]or[ ]buttontotoggleamongitems,
press[ ]or[ ]buttontoadjustsettings.Ifthereisasubmenu,
press[ ]buttontoenterthesubmenu.
5. Press[MENU]buttontoreturntothepreviousmenu,orpress
[MENU]buttonseveraltimestoexittheOSDmenu.
4.2. OSD Menu Overview
4.2.1. Picture menu
Brightness
Contrast
Sharpness
Black level
Tint
Color
Color temperature
Color control
Smart contrast
Smart picture
Picture
Screen
Audio
PIP
Configuration1
Configuration2
Advanced option
Noise reduction
Brightness
AdjusttheoverallimagebrightnessbychangingtheintensityoftheLCD
panel’sbacklight.
Contrast
Adjusttosharpenthepicturequality.Theblackportionsofthepicture
becomericherindarknessandthewhitebecomebrighter.
Sharpness
Adjusttoimprovetheimagedetail.
Black level
Videoblacklevelisdenedasthelevelofbrightnessatthedarkest
(black)partofavisualimage.Adjusttochangetheimagebrightness.
Noise reduction
Adjusttoremovethenoiseintheimage.Youcanselectasuitablenoise
reductionlevel.
Choosefrom:{Off}/{Low}/{Medium}/{High}.
NOTE: ThisitemisfunctionalforHDMI(Videomode),Video,and
YPbPrinputsonly.
Tint
Adjusttochangethecolortintoftheimage.
Usethe[ ]or[ ]buttontoadjust.Pressthe[ ]buttonandthe
eshtonecolorturnsslightlygreen.Pressthe[ ]buttonandtheesh
tonecolorturnsslightlypurple.
NOTE: ThisitemisfunctionalforHDMI(Videomode),Video,and
YPbPrinputsonly.
Color
Adjusttoincreaseordecreasetheintensityofcolorsintheimage.
NOTE: ThisitemisfunctionalforHDMI(Videomode),Videoand
YPbPrinputsonly.
Color temperature
Selectacolortemperaturefortheimage.Alowercolortemperature
willhaveareddishtint,whilstahighercolortemperaturegivesoffa
morebluishtint.
Choosefrom:{3000K}/{4000K}/{5000K}/{6500K}/{7500K}/
{9300K}/{10000K}/{Native}/{User}.
Color control
Withthisfunctionyoucanadjustthecolortonesoftheimageprecisely
bychangingtheR(Red),G(Green)andB(Blue)settingsindependently.
BDL4677XH
17
NOTE: Thisitemisfunctionalonlywhen{Color temperature}isset
to{User}.
Smart contrast
Smartcontrastfunctionistoenhanceimagecontrastondarkerscenes
whenactivated.TheBrightnesssettinginthePicturemenuwillbe
disabledwhenSmartContrastisactivated.
Smart picture
Thefollowingsmartpicturemodesareavailablefor:
• PCmode:{Standard}/{Highbright} /{sRGB}.
• Videomode:{Standard}/{Highbright}/{Cinema}.
Video source
Selectavideoinputsource.
Picture reset
ResetallsettingsinthePicturemenu.
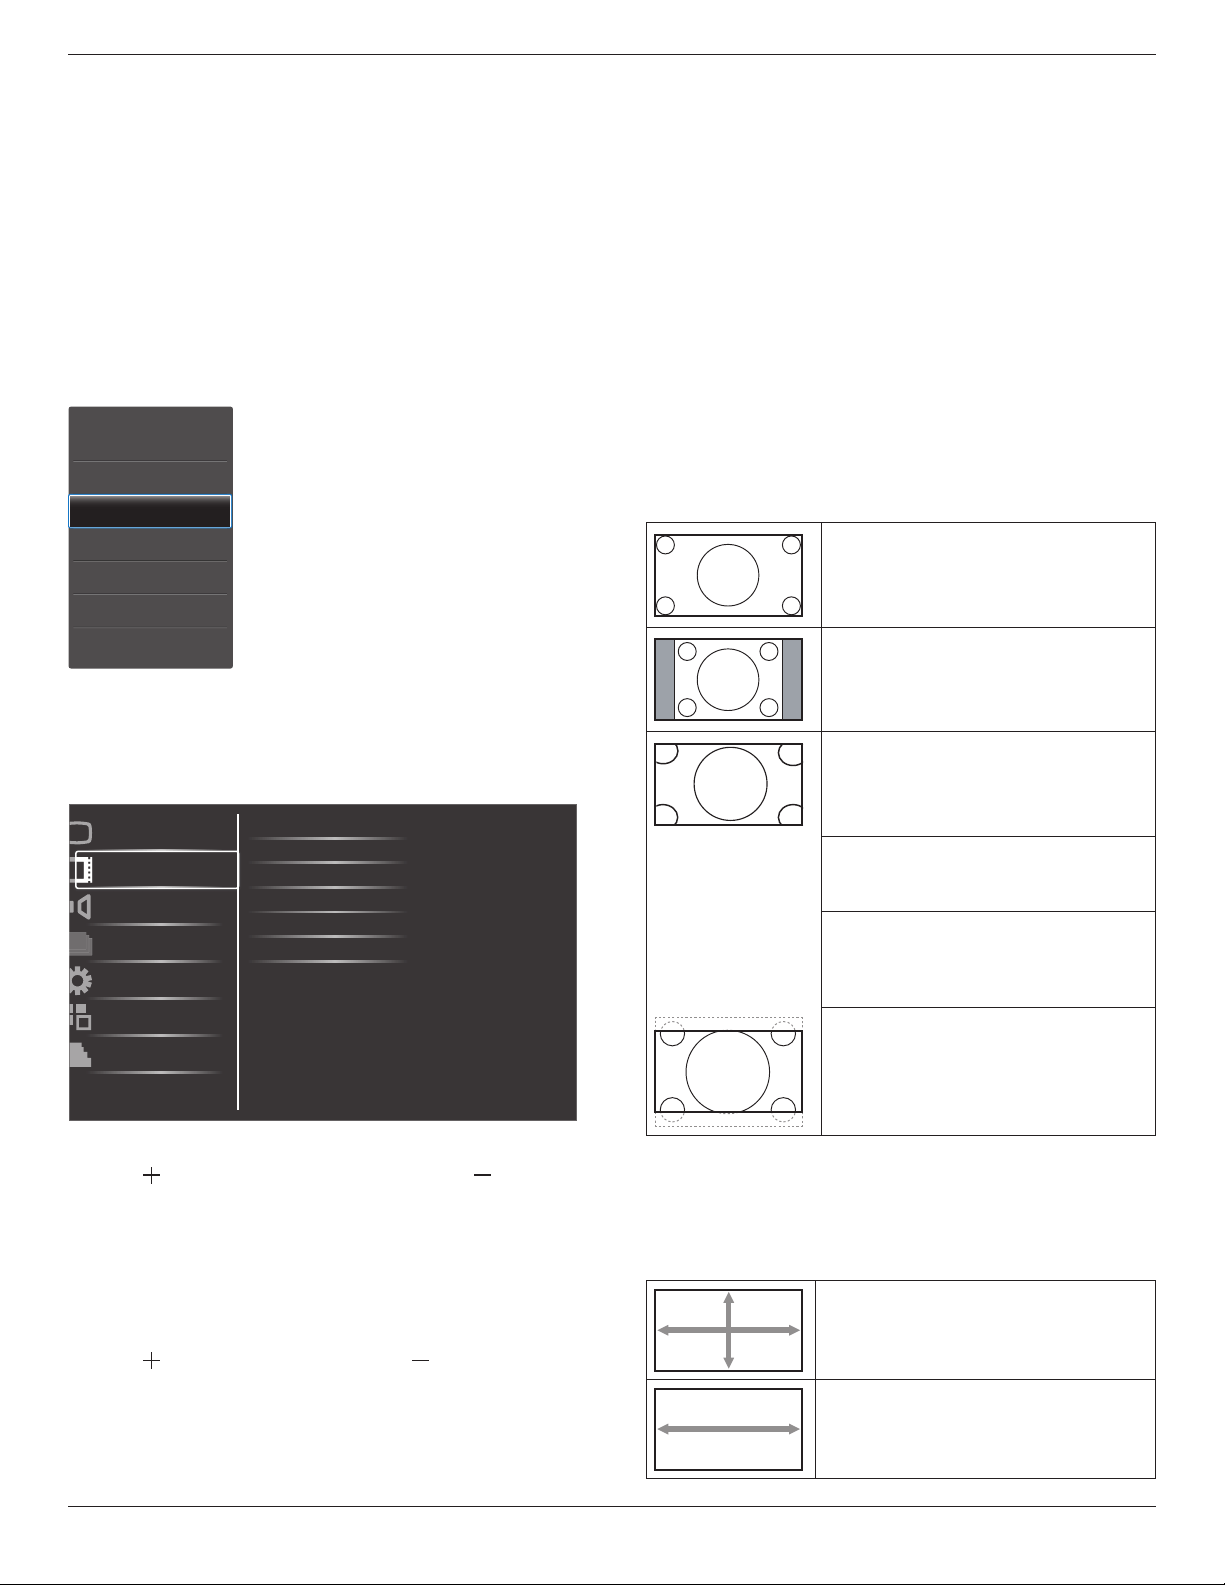
4.2.2. Screen menu
H position
V position
Clock
Clock phase
Custom zoom
Screen reset
Picture
Screen
Audio
PIP
Configuration1
Configuration2
Advanced option
Zoom mode
H position
Pressthe[ ]buttontomovetheimagetotheright,or[ ]tomove
theimagetotheleft.
NOTE:
• Hpositionadjustmentisfunctionalonallinputs,exceptHDMI,
CardOPS,andDisplayPortinvideomode.
• HpositioncannotbeadjustedwhenPixelShiftisactivated.
V position
Pressthe[ ]buttontomovetheimageup,or[ ]tomovetheimage
down.
NOTE:
• Vpositionadjustmentisfunctionalonallinputs,exceptHDMI,Card
OPS,andDisplayPortinvideomode.
• VpositioncannotbeadjustedwhenPixelShiftisactivated.
Clock
Adjustthewidthoftheimage.
NOTE: ThisitemisfunctionalforVGAinputonly.
Clock phase
Adjusttoimprovethefocus,clarityandstabilityoftheimage.
NOTE: ThisitemisfunctionalforVGAinputonly.
Zoom mode
Thepicturesyoureceivemaybetransmittedin16:9format(wide
screen)or4:3format(conventionalscreen).The16:9pictures
sometimeshaveablackbandatthetopandbottomofthescreen
(letterboxformat).ZoomModewillbedeactivatedwhenPixelShiftis
activatedorturnedon.
Thisfunctionallowsyoutooptimizethepicturedisplayonscreen.The
followingzoommodesareavailablefor:
• PCmode:{Full}/{Normal}/{Custom}/{Real}.
• Videomode:{Full}/{Normal}/{Dynamic}/{Custom}/{Real}/
{21:9}.
Full
Thismoderestoresthecorrectproportions
ofpicturestransmittedin16:9usingthefull
screendisplay.
Normal
Thepictureisreproducedin4:3formatand
ablackbandisdisplayedoneithersideofthe
picture.
Dynamic
Filltheentirescreenbystretching4:3pictures
non-proportionally.
Custom
Choosetoapplythecustomzoomsettingsin
theCustomZoomsubmenu.
Real
Thismodedisplaystheimagepixel-by-pixel
onscreenwithoutscalingtheoriginalimage
size.
21:9
Thepictureisenlargedto16:9format.This
modeisrecommendedwhendisplaying
picturesthathaveblackbandsatthetopand
bottom(letterboxformat).
Custom zoom
Youcanusethisfunctiontofurthercustomizethezoomsettingstosuit
theimageyouwanttodisplay.
NOTE: ThisitemisfunctionalonlywhentheZoom modesettingis
settoCustom.
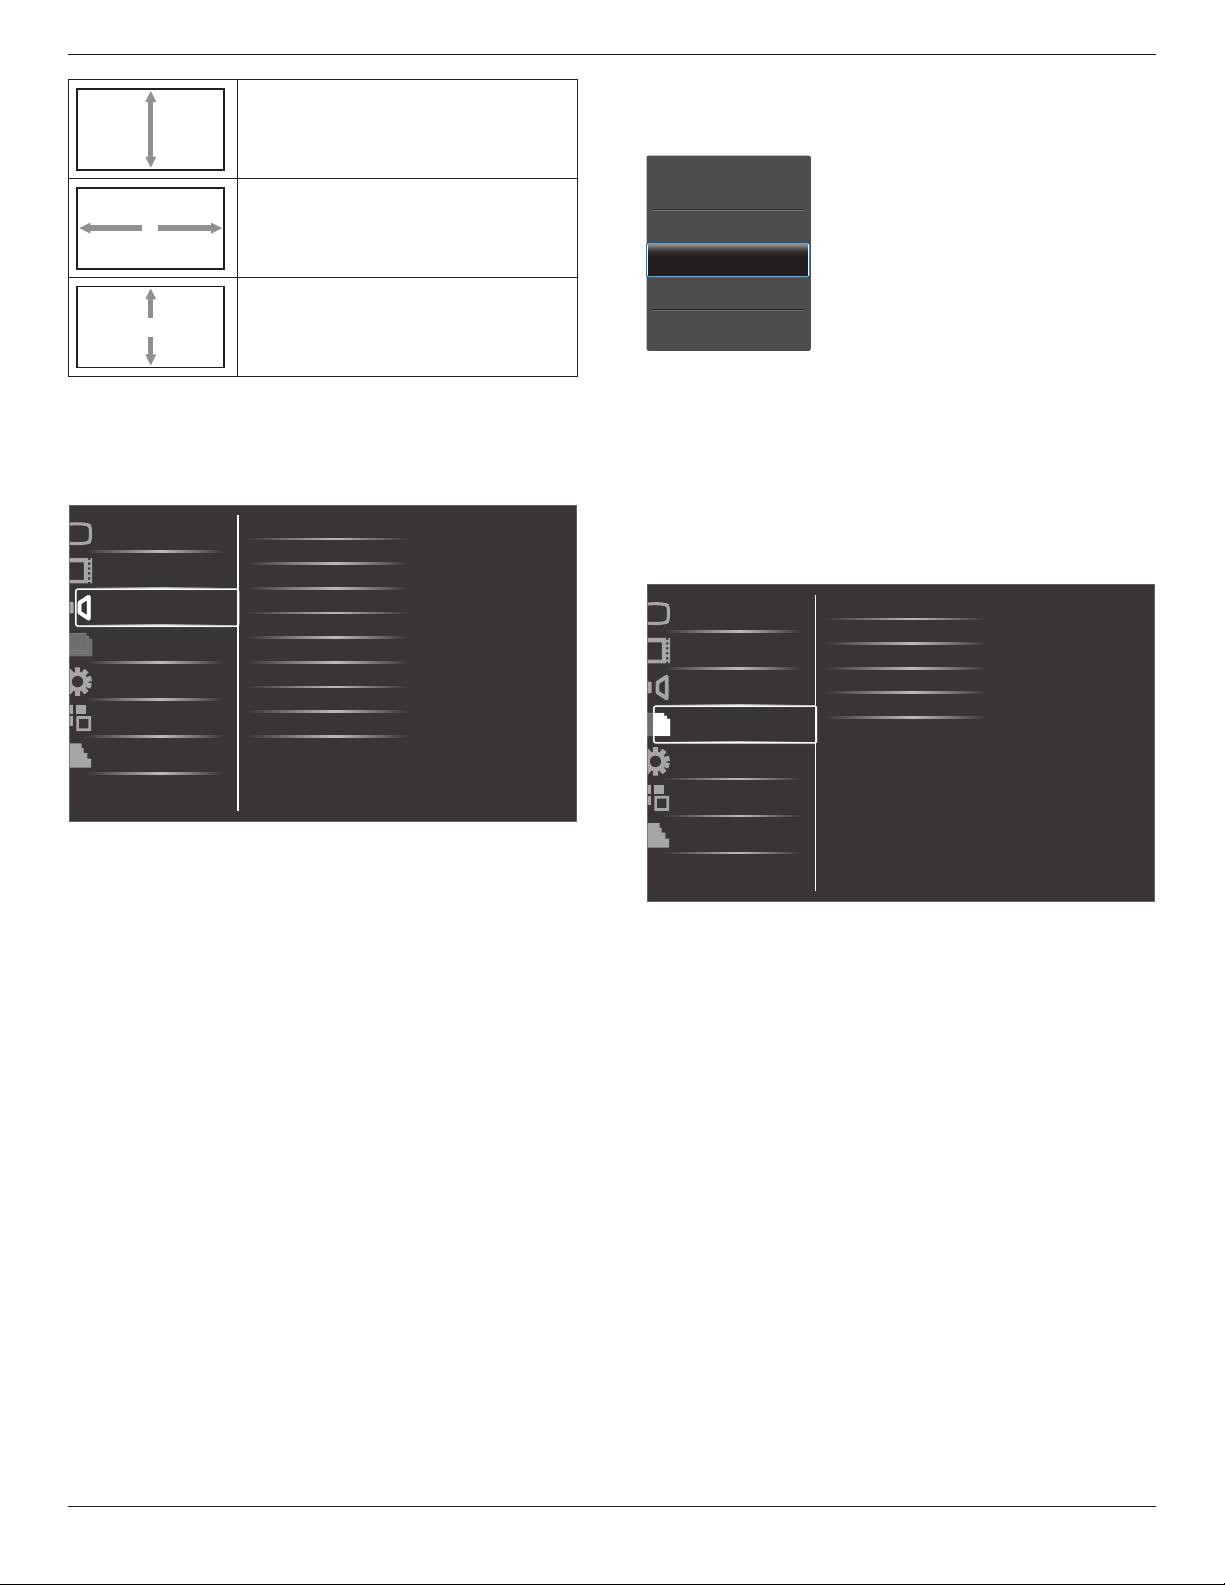
Zoom
Expandsthehorizontalandverticalsizesofthe
imagesimultaneously.
H zoom
Expandsthehorizontalsizeoftheimageonly.
BDL4677XH
18
V zoom
Expandstheverticalsizeoftheimageonly.
H position
Movesthehorizontalpositionoftheimageleft
orright.
V position
Movestheverticalpositionoftheimageupor
down.
Screen reset
ResetallsettingsintheScreenmenutofactorypresetvalues.
4.2.3. Audio menu
Balance
Treble
Bass
Volume
Minimum volume
Picture
Screen
Audio
PIP
Configuration1
Configuration2
Advanced option
Maximum volume
Audio source
Mute
Audio reset
Card OPS audio
Balance
Adjusttoemphasizeleftorrightaudiooutputbalance.
Treble
Adjusttoincreaseordecreasehigher-pitchedsounds.
Bass
Adjusttoincreaseordecreaselower-pitchedsounds.
Volume
Adjusttoincreaseordecreasetheaudiooutputlevel.
Maximum volume
Adjustyourownlimitationforthemaximumvolumesetting.Thisstops
thevolumefrombeingplayingattooloudalevel.
Minimum volume
Adjustyourownlimitationfortheminimumvolumesetting.
Mute
Turnthemutefunctionon/off.
Audio source
Selecttheaudioinputsourceaccordingtotheaudiosignalsource
connectedtotheaudioinputandHDMIsocketsonthedisplay.
Choosefrom:{Displayport}/{HDMI}/{Audio1}/{Audio2}/{Card
OPS}.
Audio reset
ResetallsettingsintheAudiomenutofactorypresetvalues.
Card OPS audio
SelecttheanalogordigitalaudiomodeforcardOPS.
4.2.4. PIP menu
PIP
PIP input
PIP change
PIP size
PIP reset
Picture
Screen
Audio
PIP
Configuration1
Configuration2
Advanced option
PIP audio
PIP
SelectthePIP(Picture-in-Picture)mode.
Choosefrom:{Off}/{PIP}/{POP}/{PBP aspect}/{PBP full}.
PIP input
Selecttheinputsignalforthesub-picture.
PIP change
Enlargesthesmallerpicturetobecomethemainpicture,andviceversa.
PIP size
SelectthesizeofthesubpictureinthePIP(Picture-in-Picture)mode.
Choosefrom:{Small}/{Medium}/{Large}.
PIP audio
SelecttheaudiosourceinthePIP(Picture-in-Picture)mode.
• {Main}-Selectaudiofromthemainpicture
• {Sub}-Selectaudiofromthesubpicture.
PIP reset
ResetallsettingsinthePIPmenutofactorypresetvalues.
NOTES:
• ThePIPfunctionisavailableonlyforthefollowingcondition:
{Conguration1}-{Panel saving}-{Pixel shift}settingto[Off]and
{Advanced option}-{Tiling}-{Enable}settingto[No].
BDL4677XH
21
NOTE: ThisitemisfunctionalforVGAinputonly.
Theoptionsare:
• {1024x768/1280x768/1360x768 / 1366x768}
• {1400x1050/1680x1050}
• {1600x1200/1920x1200}
• {Auto}:Determinestheresolutionautomatically.
Theselectedsettingswillbecomeeffectiveafterturningoffthepower
andturningitonagain.
HDMI clock threshold
AdjustHDMIlinkclock.
• {Min}-600KHz.(Default)
• {Max}-5000KHz.
NOTE: ThresholdclockisforHDMIsignalsonly.HDMIThreshold
clockappliestothedeviationofHDMIpixelclock.Attimes,HDMI
pixelclockfromsomedevicesmaynotbestable.Thedisplaymay
treattheunstablesignalasvideomodechangeandmutethevideo.
Thresholdclockallowsfortheadjustmentoftheclocktoleranceto
avoidvideomute.
Black level expansion
Thisfeatureoffersdeeperblacksforanevenbetterimagequality.
Theoptionsare:{Off}/{Low}/{Medium}/{High}.
NOTE: ThisitemisfunctionalforVideomodeinputonly.
Gamma selection
Gammaiswhatcontrolstheoverallbrightnessofanimage.Images
whicharenotcorrectedproperlycanappeartoowhiteortoodark,so
controllingthegammaproperlycanhaveahugeinuenceontheoverall
picturequalityofyourdisplay.
Theoptionsare:{Native}/{2.2}/{2.4}/{S gamma}.
Scan mode
Changethedisplayareaoftheimage.
• {Overscan}-Displayabout95%oftheoriginalsizeoftheimage.
Therestoftheareassurroundingtheimagewillbecutoff.
• {Underscan}-Displaytheimageinitsoriginalsize.
NOTE: ThisitemisfunctionalforVideomodeinputonly.
Scan conversion
ChoosetoenableordisabletheIP(InterlacetoProgressive)conversion
function.
• {Progressive}-EnabletheIPconversionfunction(recommended).
Onceenabled,theinterlaceinputsignalwillbeconvertedto
progressiveformatforbetterdisplayquality.
• {Interlace}-DisabletheIPfunction.Thismodeissuitablefor
displayingmotionpictures,butitincreasesthechanceofimage
retention.
Film mode
Choosetoturnonoroffthelmmodeframeconversionfunction.
• {Auto} -Enablethelmmodeframeconversionfunctionfor
moviesandmotionpictures.Thedisplayconvertsa24frames-per-
second(24fps)inputsignalformattoDVDvideosignalformat.
Oncethisfunctionisenabled,itisrecommendedthatyousetthe
{Scan conversion}functionto{Progressive}.
• {Off}- Disablethelmmodeframeconversionfunction.Thismode
issuitableforTVbroadcastingandVCRsignals.
IR control
Selecttheoperationmodeoftheremotecontrolwhenmultiple
displaysareconnectedviaanRS232Cconnection.
• {Normal} -Alldisplayscanbeoperatednormallybytheremote
controlunit.
• {Primary}-Designatethisdisplayastheprimarydisplayforremote
controloperation.Onlythisdisplaycanbeoperatedbytheremote
control.
• {Secondary}-Designatethisdisplayasthesecondarydisplay.This
displaycannotbeoperatedbytheremotecontrol,andwillonly
receivethecontrolsignalfromtheprimarydisplayviatheRS232C
connection.
• {Lock All}/{Lock all but Volume}/{Lock all but Power}-Lockthe
remotecontrolfunctionofthisdisplay.Tounlock,pressandholdthe
[DISPLAY]buttonontheremotecontrolfor5(ve)seconds..
Keyboard control
Choosetoenableordisablethedisplaykeyboard(controlbuttons)
function.
• {Unlock}-Enablethekeyboardfunction.
• {Lock All}/{Lock all but Volume}/{Lock all but Power}-Disable
thekeyboardfunction.
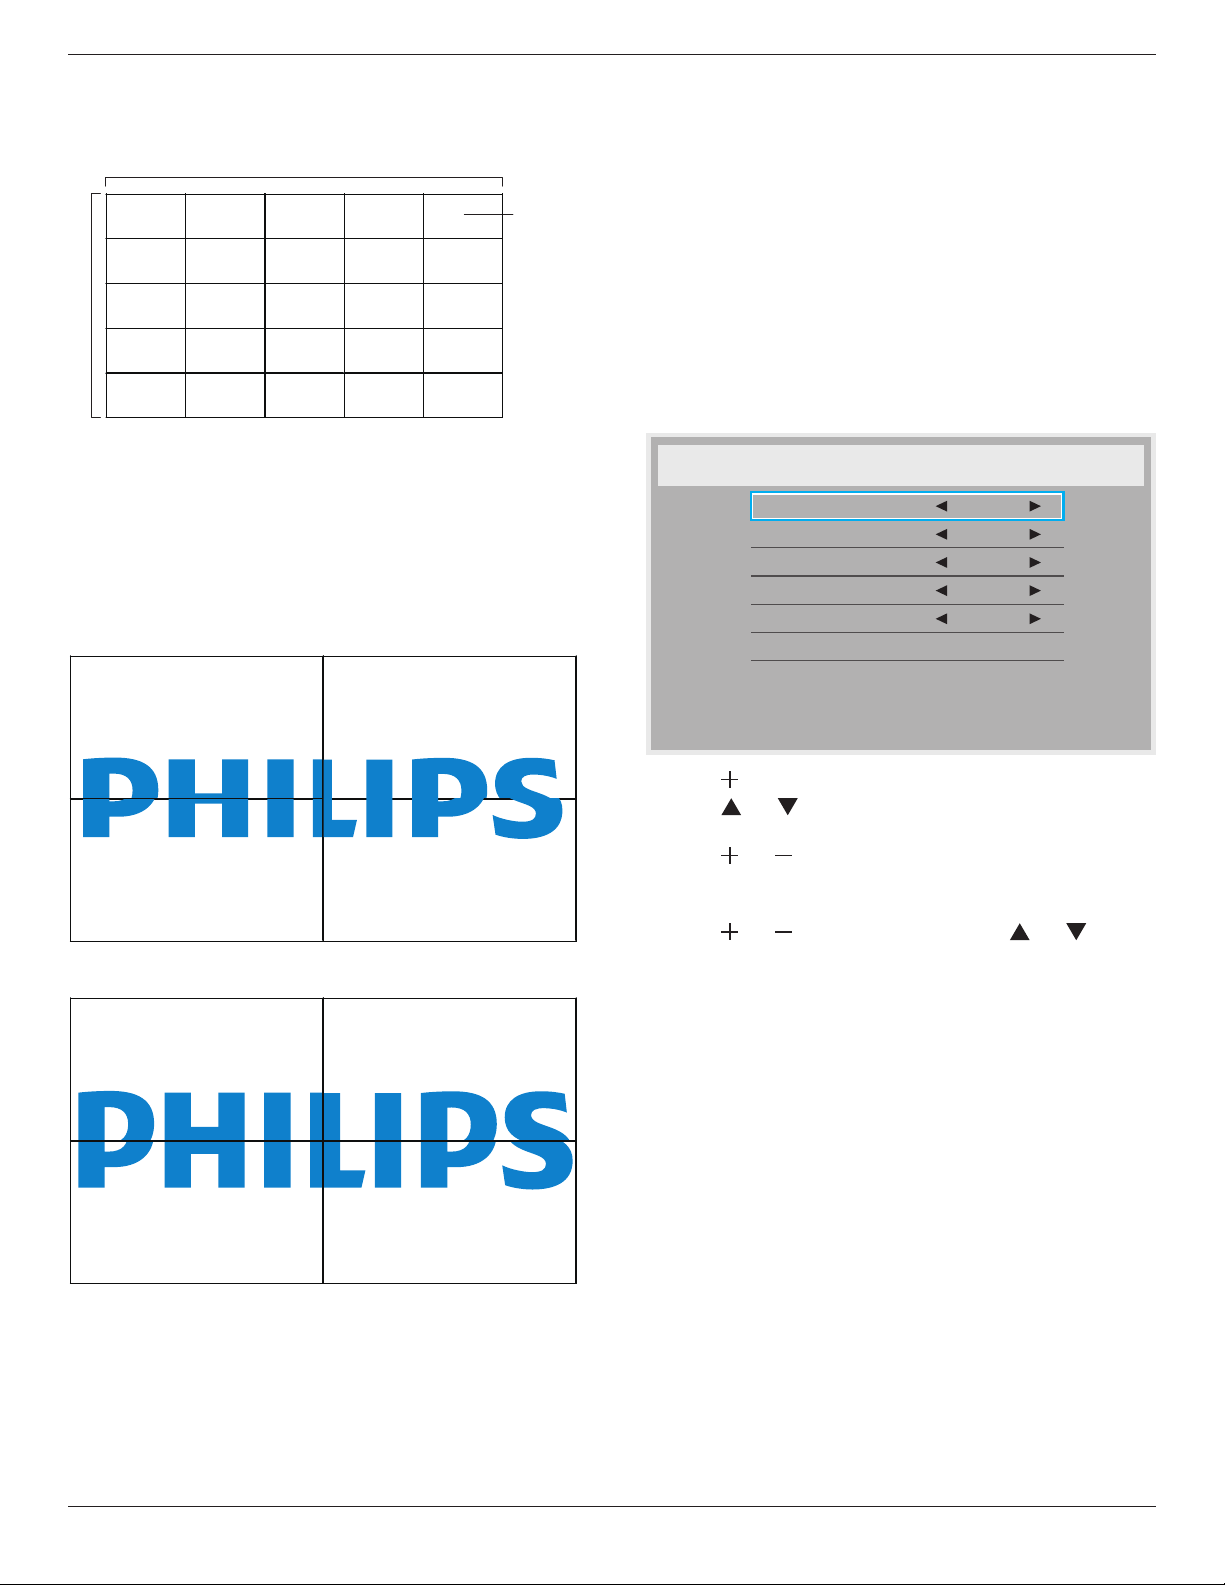
Tiling
Withthisfunctionyoucancreateasinglelarge-screenmatrix(video
wall)thatconsistsofupto150setsofthisdisplay(up to 10-sets on
the vertical and 15-sets on the horizontal sides).Thisfunctionrequires
adaisy-chainconnection.
Tiling
H monitors
V monitors
Position
Frame comp.
Enable
Switch on delay
1
1
1
No
No
Off
Example: 2 x 2 screen matrix (4 displays)
Hmonitors=2displays
Vmonitors=2displays
1 2
3 4
H monitors
V monitors
Position
BDL4677XH
22
Example: 5 x 5 screen matrix (25 displays)
Hmonitors=5displays
Vmonitors=5displays
1 2
6 7
3 4
8 9
5
10
11 12 13 14 15
16 17 18 19 20
21 22 23 24 25
H monitors
V monitors
Position
• H monitors-Selectthenumberofdisplaysonthehorizontalside.
• V monitors-Selectthenumberofdisplaysontheverticalside.
• Position-Selectthepositionofthisdisplayinthescreenmatrix.
• Frame comp.-Choosetoturntheframecompensationfunction
onoroff.Ifselected{Ye s },thedisplaywilladjusttheimageto
compensateforthewidthofthedisplaybezelsinorderto
accuratelydisplaytheimage.
Frame comp. - Yes
Frame comp. - No
• Enable:ChoosetoenableordisabletheTilingfunction.Ifenabled,
thedisplaywillapplythesettingsin{H monitors},{V monitors},
{Position},and{Frame comp.}.
• Switch on delay:Setthepower-ondelayingtime(inseconds).The
defaultoption{Auto}allowsasequentialpowering-onforeach
displaybytheirIDnumberwhenmultipledisplaysareconnected.
Theoptionsare:{Off/Auto/2,4,6,8,10,20,30,40,50}
NOTE: TheTilingfunctionwillbedisabledwhenthe[ON/OFF]
buttonforPIPispressed.
Heat status
Thisfunctionallowsyoutocheckthethermalstatusofthedisplayat
anytime.
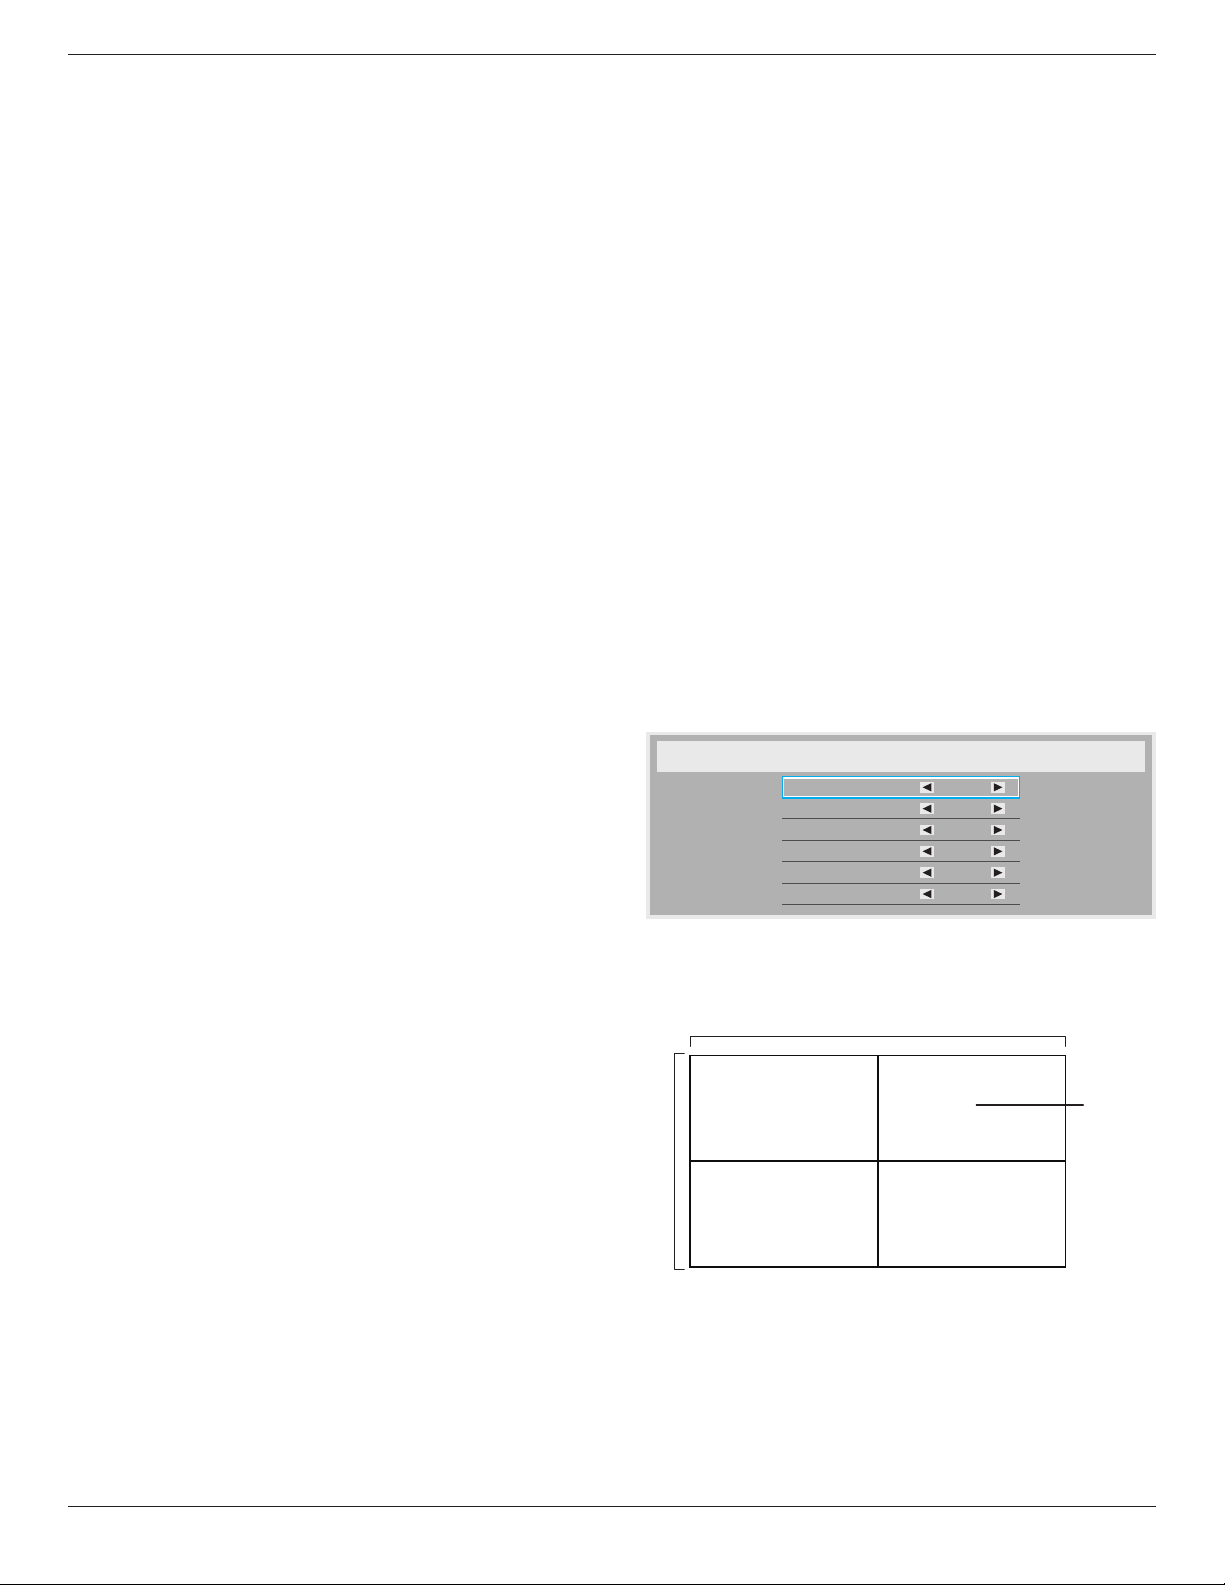
Date and time
Adjustthecurrentdateandtimeforthedisplay’sinternalclock.
Date and time
Year
Month
Day
Hour
Minute
Daylight saving time
Current date time
2012 . 08 . 04 20 : 20 : 17
Press [SET] to set clock
2012
08
04
20
20
1. Press[ ]buttontoenterthesubmenu.
2. Press[ ]or[ ]buttontotogglebetween{Year},{Month},{Day},
{Hour},{Minute},and{Daylight saving time}.
3. Press[ ]or[ ]buttontoadjustallsettingsexcept{Daylight
saving time}.
4. Press[SET]buttontoenterthe{Daylight saving}submenu.
5. Press[ ]or[ ]buttontoselectitem,press[ ]or[ ]button
toadjust.
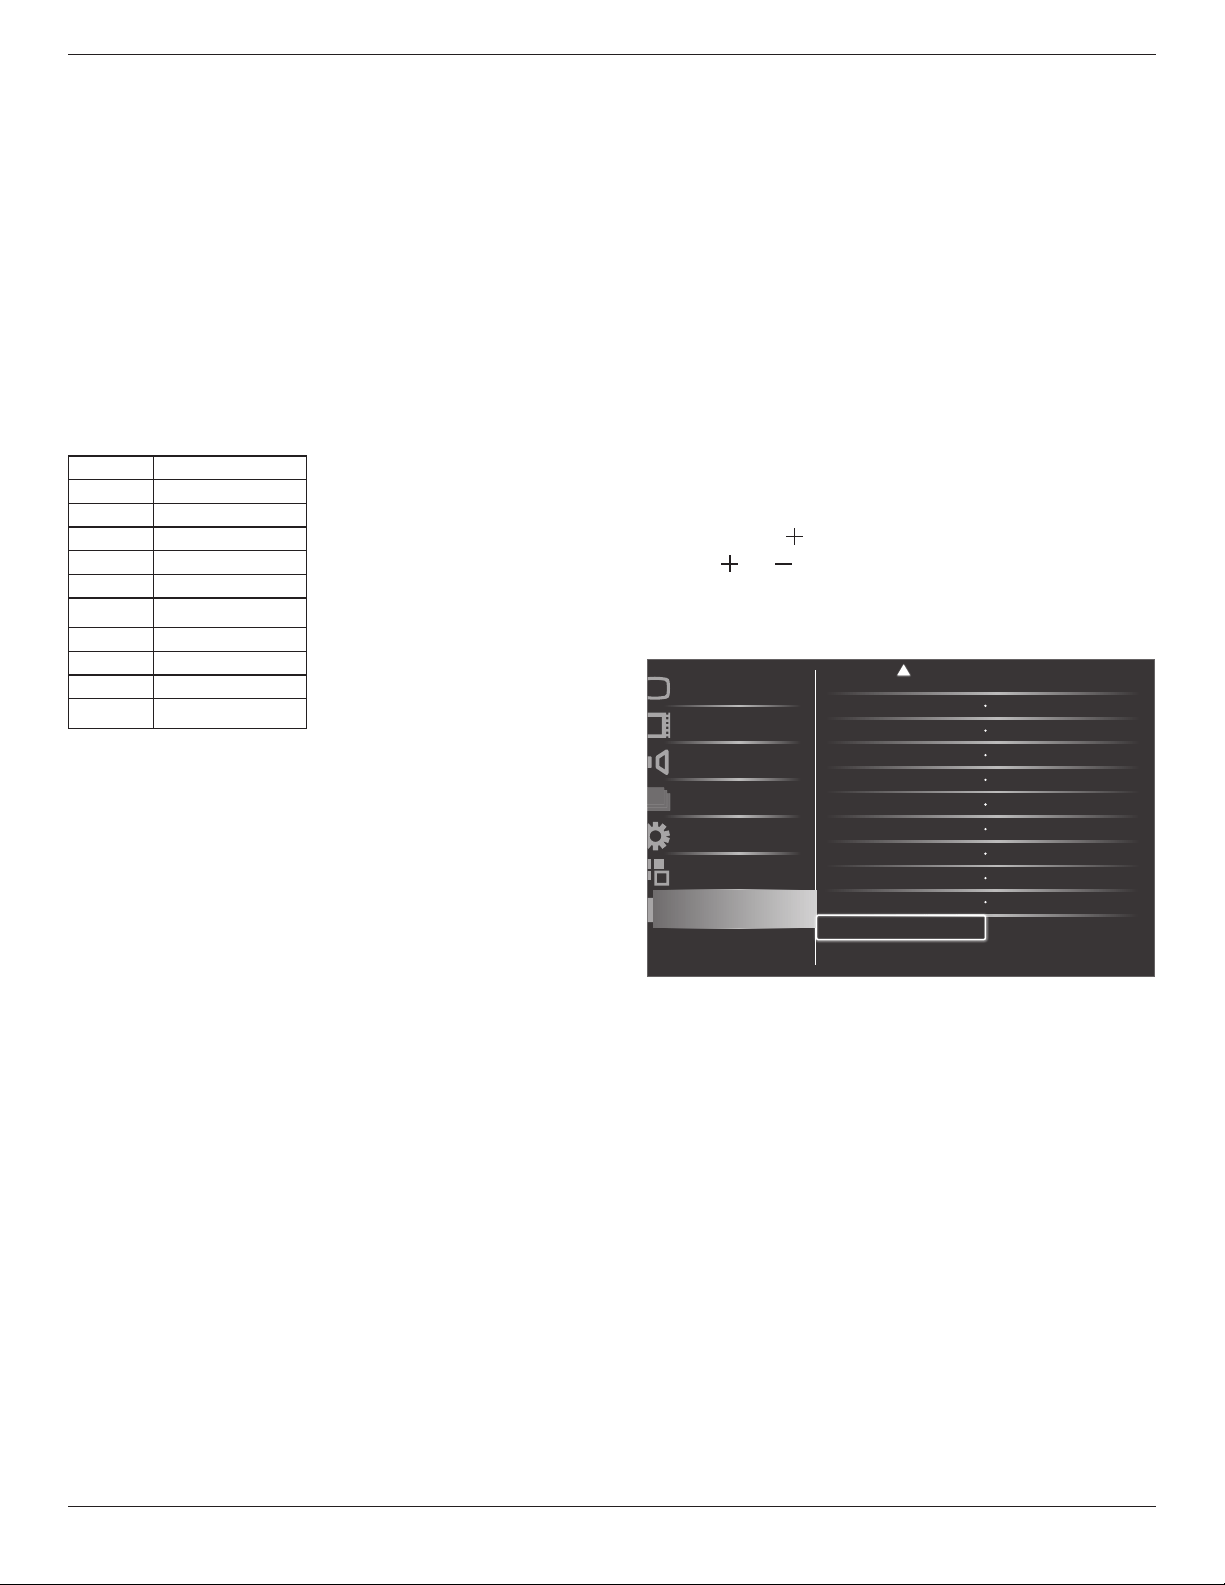
Schedule
Thisfunctionallowsyoutoprogramupto7(seven)differentscheduled
timeintervalsforthedisplaytoactivate.
Youcanselect:
• Thetimeforthedisplaytoturnonandturnoff.
• Thedaysinaweekforthedisplaytoactivate.
• Whichinputsourcethedisplaywilluseforeachscheduled
activationperiod.
NOTE: Werecommendyoutosetupcurrentdateandtimeinthe
{Date and time}menubeforeusingthisfunction.
BDL4677XH
24
DDC/CI
ChoosetoturnonorofftheDDC/CIcommunicationfunction.Select
{On}fornormaluse.
DDC/CI(CommandInterface)speciesameansforacomputerto
sendcommandstothemonitor,aswellasreceivesensordatafromthe
monitor,overthebidirectionallinksuchasDDC2Ab/Bi/B+.
Speciccommandstocontrolmonitorsaredenedinaseparate
MonitorControlCommandSet(MCCS)standard.
DDC/CImonitorsaresometimessuppliedwithanexternalcolor
sensortoallowautomaticcalibrationofthemonitor’scolorbalance.
SometiltingDDC/CImonitorssupportanautopivotfunction,where
arotationsensorinthemonitorenablestheoperatingsystemtokeep
thedisplayuprightasthemonitorismovedbetweenitsportraitand
landscapepositions.
ThefollowingDDC/CIcommandsshouldbesupportedviacommand
line:
No. Commands
1 SetBrightness
2 setContrast
3 SetRedGain
4 SetGreenGain
5 SetBlueGain
6 GetBrightness
7
GetContrast
8
GetRedGain
9 GetGreenGain
10 GetBlue
HDMI with One Wire
CECcontrol.
• {Off} -DisableCEC.(Default)
• {On}-EnableCEC.
Smart power
Setthedisplaytoreducethepowerconsumptionautomatically.
Theoptionsare:{Off}/{Medium}/{High}.
Auto signal detection
Choosetoletthedisplaydetectanddisplayavailablesignalsources
automatically.
• {Off}-Onceasignalisconnected,itcanonlybeselectedmanually.
Nosignal,setthedisplaytodisplaytheimageautomaticallyaccordingto
thesearchorderofeachoption.
Theoptionsare:{All} / {PC source only} / {Video source only} /
{Failover}
• {All}-Searchorder:DP->DVI->VGA->HDMI->Component->
Video->CardOPS
• {PC source only}-Searchorder:DP->DVI->VGA->HDMI->
CardOPS
• {Video source only}-Searchorder:HDMI->Component->
Video
• {Failover}
- Failover1:User-denedsetting.Default:HDMI.
- Failover2:User-denedsetting.Default:HDMI.
- Failover3:User-denedsetting.Default:HDMI.
- Failover4:User-denedsetting.Default:HDMI.
- Failover5:User-denedsetting.Default:HDMI.
- Failover6:User-denedsetting.Default:HDMI.
- Failover7:User-denedsetting.Default:HDMI.
APM (Advanced Power Management)
Powersavesetting.
• {Off}-Nosignal,directshutdown.(Default)
• {On} -Nosignal,enterintoPowerSavemode.
OPS settings
SettheOPScongurationundereachpowercondition.
• {Auto}-Afterselecting{Card OPS}forvideosourceinput,the
OPSwillbesettooffwhenthedisplaypowerissettooff,orsetto
onwhenthedisplaypowerissettoon.Whensettoothervideo
sourceinputs,theOPSwillalwaysbesettoon.
• {Always off}-TheOPSwillalwaysbesettooff.
• {Always on}-TheOPSwillalwaysbesettoon.
Advanced option reset
ResetallsettingsintheAdvanced optionmenutofactorypresetvalues.
1. Press[SET]or[ ]buttontoenterthesubmenu.
2. Press[ ]or[ ]buttontoselect{Reset}andpressthe[SET]
buttontorestoresettingstofactorypresetvalues.
3. Pressthe[EXIT]buttonorselect{Cancel}andpressthe[SET]
buttontocancelandthenreturntothepreviousmenu.
Schecule
Monitor ID
DDC/CI
Smart power Off
Off
On
Action
Action
Picture
Screen
Audio
PIP
Configuration1
Configuration2
Advanced option
HDMI with One Wire
Auto signal detection
Action
Action
Advanced option reset
OPS settings Always on
APM
Off
Date and time Action

BDL4677XH
25
5. Input Mode
VGA Resolution:
Standard
Resolution
ActiveResolution
RefreshRate PixelRate AspectRatio StandforMode
HPixels VLines
VGA 640
480 60Hz 25.175MHz
4:3 VideoGraphicArray72Hz 72Hz 31.5MHz
75Hz 75Hz 31.5MHz
WVGA 720 400 70Hz 33.75MHz 16:9 WideVideoGraphicArray
SVGA 800
600 60Hz 40MHz
4:3 SuperVGA
75Hz 75Hz 49.5MHz
XGA 1024
768 60Hz 65MHz
4:3 ExtendedGraphicArray
75Hz 75Hz 78.75MHz
WXGA 1280 768 60Hz 79.5MHz 5:3 WideXGA
WXGA 1280 800 60Hz 79.5MHz 16:10 WideXGA
SXGA 1280 960 60Hz 108MHz 4:3 SuperXGA
SXGA 1280 1024 60Hz 108MHz 5:4 SuperXGA
WXGA 1360 768 60Hz 85.5MHz 16:9 WideXGA
WXGA 1366 768 60Hz 85.5MHz 16:9 WideXGA
UXGA 1600 1200 60Hz 162MHz 4:3 UltraXGA
HD1080 1920 1080 60Hz 148.5MHz 16:9 HD1080
SDTV Resolution:
Standard
Resolution
ActiveResolution
RefreshRate PixelRate AspectRatio StandforMode
HPixels VLines
480i
720 480
29.97Hz 13.5MHz
4:3 ModiedNTSCStandard
480p 59.94Hz 27MHz
576i
720 480
25Hz 13.5MHz
4:3 ModiedPALStandard
576p 50Hz 27MHz
HDTV Resolution:
Standard
Resolution
ActiveResolution
RefreshRate PixelRate AspectRatio StandforMode
HPixels VLines
720p 1280 720
50Hz
74.25MHz 16:9 NormallyDVBMode
60Hz
1080i 1920 1080
25Hz
74.25MHz 16:9 NormallyATSCMode
30Hz
1080p 1920 1080
50Hz
148.5MHz 16:9 NormallyATSCMode
60Hz
• ThePCtextqualityisoptimuminHD1080mode(1920x1080,60Hz).
• YourPCdisplayscreenmightappeardifferentdependingonthemanufacturer(andyourparticularversionofWindows).
• CheckyourPCinstructionbookforinformationaboutconnectingyourPCtoadisplay.
• Ifaverticalandhorizontalfrequency-selectmodeexists,select60Hz(vertical)and31.5KHz(horizontal).Insomecases,abnormalsignals(suchas
stripes)mightappearonthescreenwhenthePCpoweristurnedoff(orifthePCisdisconnected).Ifso,pressthe[INPUT]buttontoenterthe
videomode.Also,makesurethatthePCisconnected.
• WhenhorizontalsynchronoussignalsseemirregularinRGBmode,checkPCpowersavingmodeorcableconnections.
• ThedisplaysettingstablecompliestotheIBM/VESAstandards,andbasedontheanaloginput.
• TheDVIsupportmodeisregardedassametothePCsupportmode.
• Thebesttimingfortheverticalfrequencytoeachmodeis60Hz.
BDL4677XH
26
6. Pixel Defect Policy
Westrivetodeliverthehighestqualityproductsandusesomeoftheindustry’smostadvancedmanufacturingprocesseswhilstpracticingstringentquality
control.However,pixelorsub-pixeldefectsonthePDP/TFTpanelsusedinPlasma-&LCD-displaysaresometimesunavoidable.Nomanufacturercan
guaranteethatallpanelswillbefreefrompixeldefects,butPhilipsguaranteesthatanyPlasma-&LCD-displayswithanunacceptablenumberofdefects
willberepairedduringthewarrantyperiodinlinewithyourlocalguaranteeconditions.
ThisnoticeexplainsthedifferenttypesofpixeldefectsanddenestheacceptabledefectlevelfortheLCDscreen.Inordertoqualifyforrepairunder
warranty,thenumberofpixeldefectsmustexceedacertainlevelasshowninthereferencetable.IftheLCDscreeniswithinspecicationawarranty
exchange/claimbackwillberefused.Additionally,becausesometypesorcombinationsofpixeldefectsaremorenoticeablethanothers,Philipssetseven
higherqualitystandardsforthose.
6.1. Pixels and Sub-Pixels
subpixel
pixel
Apixel,orpictureelement,iscomposedofthreesub-pixelsintheprimarycolorsofred,greenand
blue.Manypixelstogetherformanimage.Whenallsub-pixelsofapixelarelit,thethreecolored
sub-pixelstogetherappearasasinglewhitepixel.Whenallaredark,thethreecoloredsub-pixels
togetherappearasasingleblackpixel.Othercombinationsoflitanddarksub-pixelsappearas
singlepixelsofothercolors.
6.2. Types of Pixel Defects + Dot Definition
Pixelandsub-pixeldefectsappearonthescreenindifferentways.Therearethreecategoriesofpixeldefectsandseveraltypesofsub-pixeldefectswithin
eachcategory.
Dot denition = What is a defective “Dot”? :
Oneormoredefective,adjacentsub-pixelaredenedasone“dot”.Theno.ofdefectivesub-pixelsarenotrelevanttodeneadefectivedot.Thismeans
thatadefectivedotcanconsistofone,twoorthreedefectivesub-pixelswhichcanbedarkorlit.
RR G B
Onedot=OnePixel;consistsofthreesub-pixelsofRed,Green,andBlue.
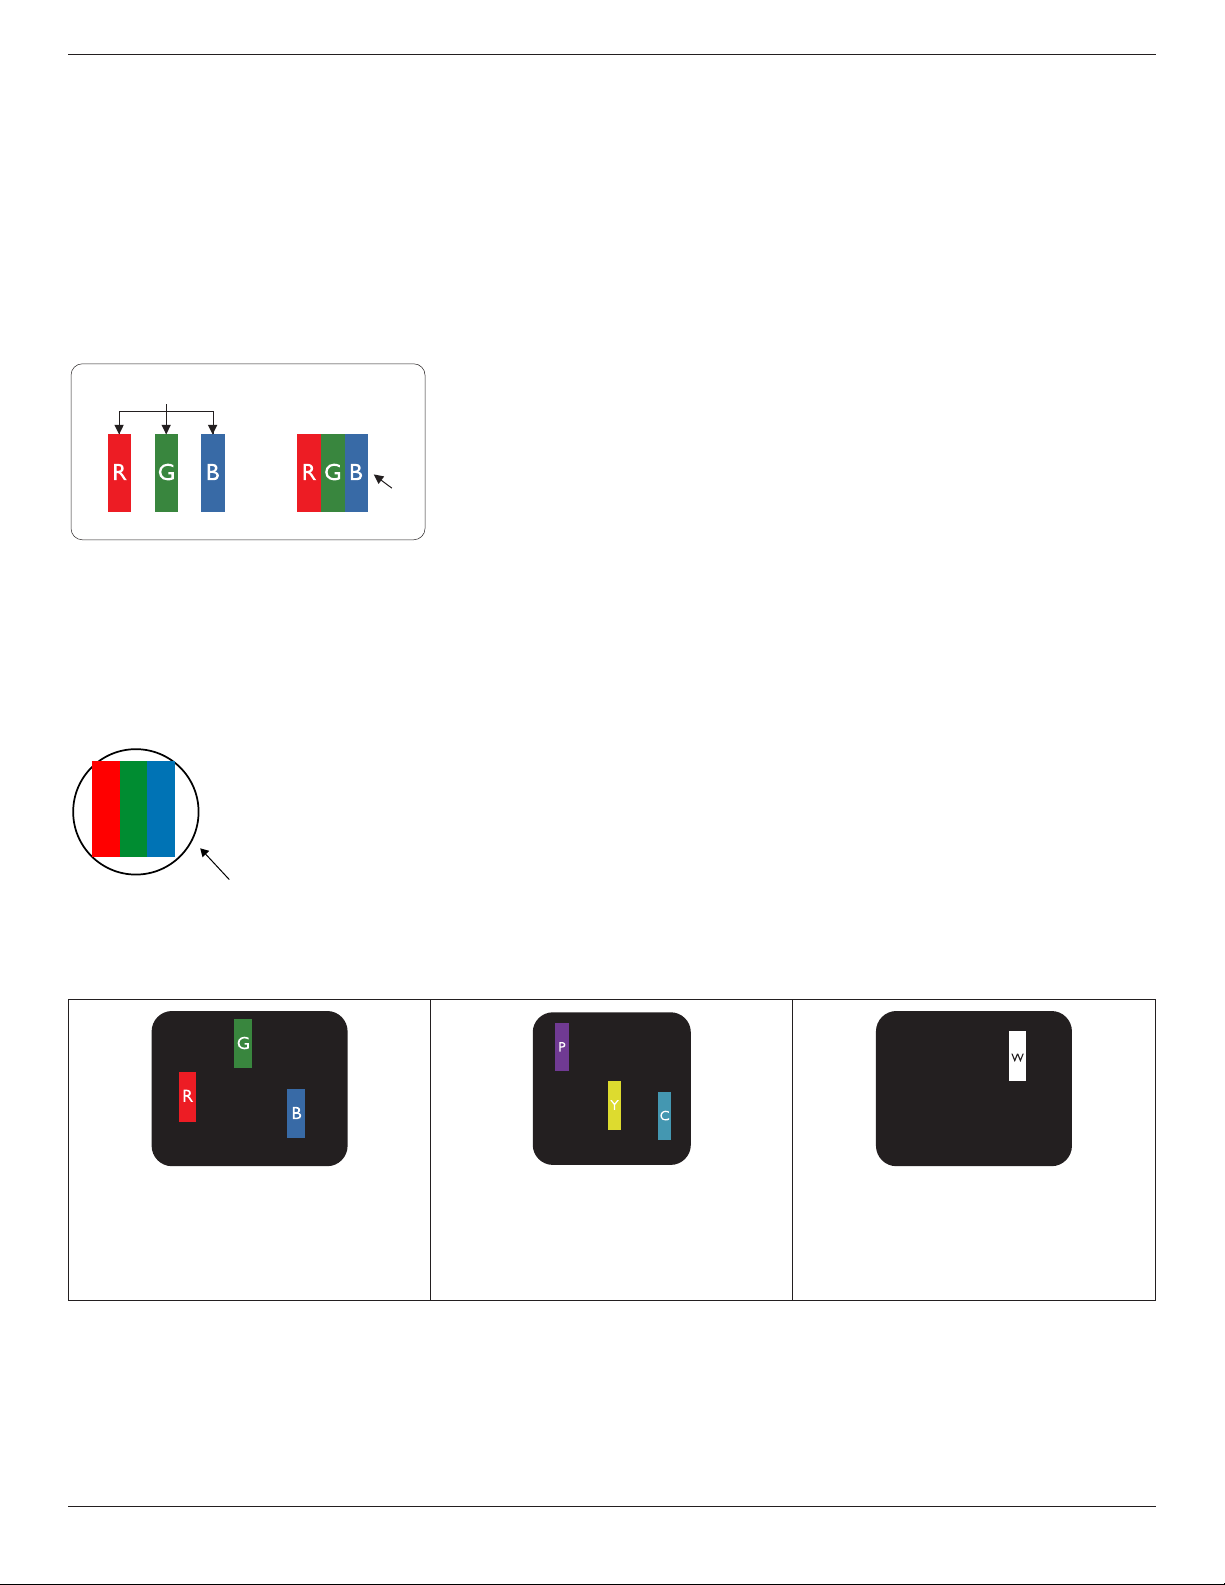
6.3. Bright Dot Defects
Brightdotdefectsappearaspixelsorsub-pixelsthatarealwayslitor“on”.Thesearetheexamplesofbrightdotdefects:
Onelitred,greenorbluesubpixel Twoadjacentlitsubpixels:
Red+Blue=Purple
Red+Green=Yellow
Green+Blue=Cyan(LightBlue)
Threeadjacentlitsubpixels(onewhitepixel)
BDL4677XH
27
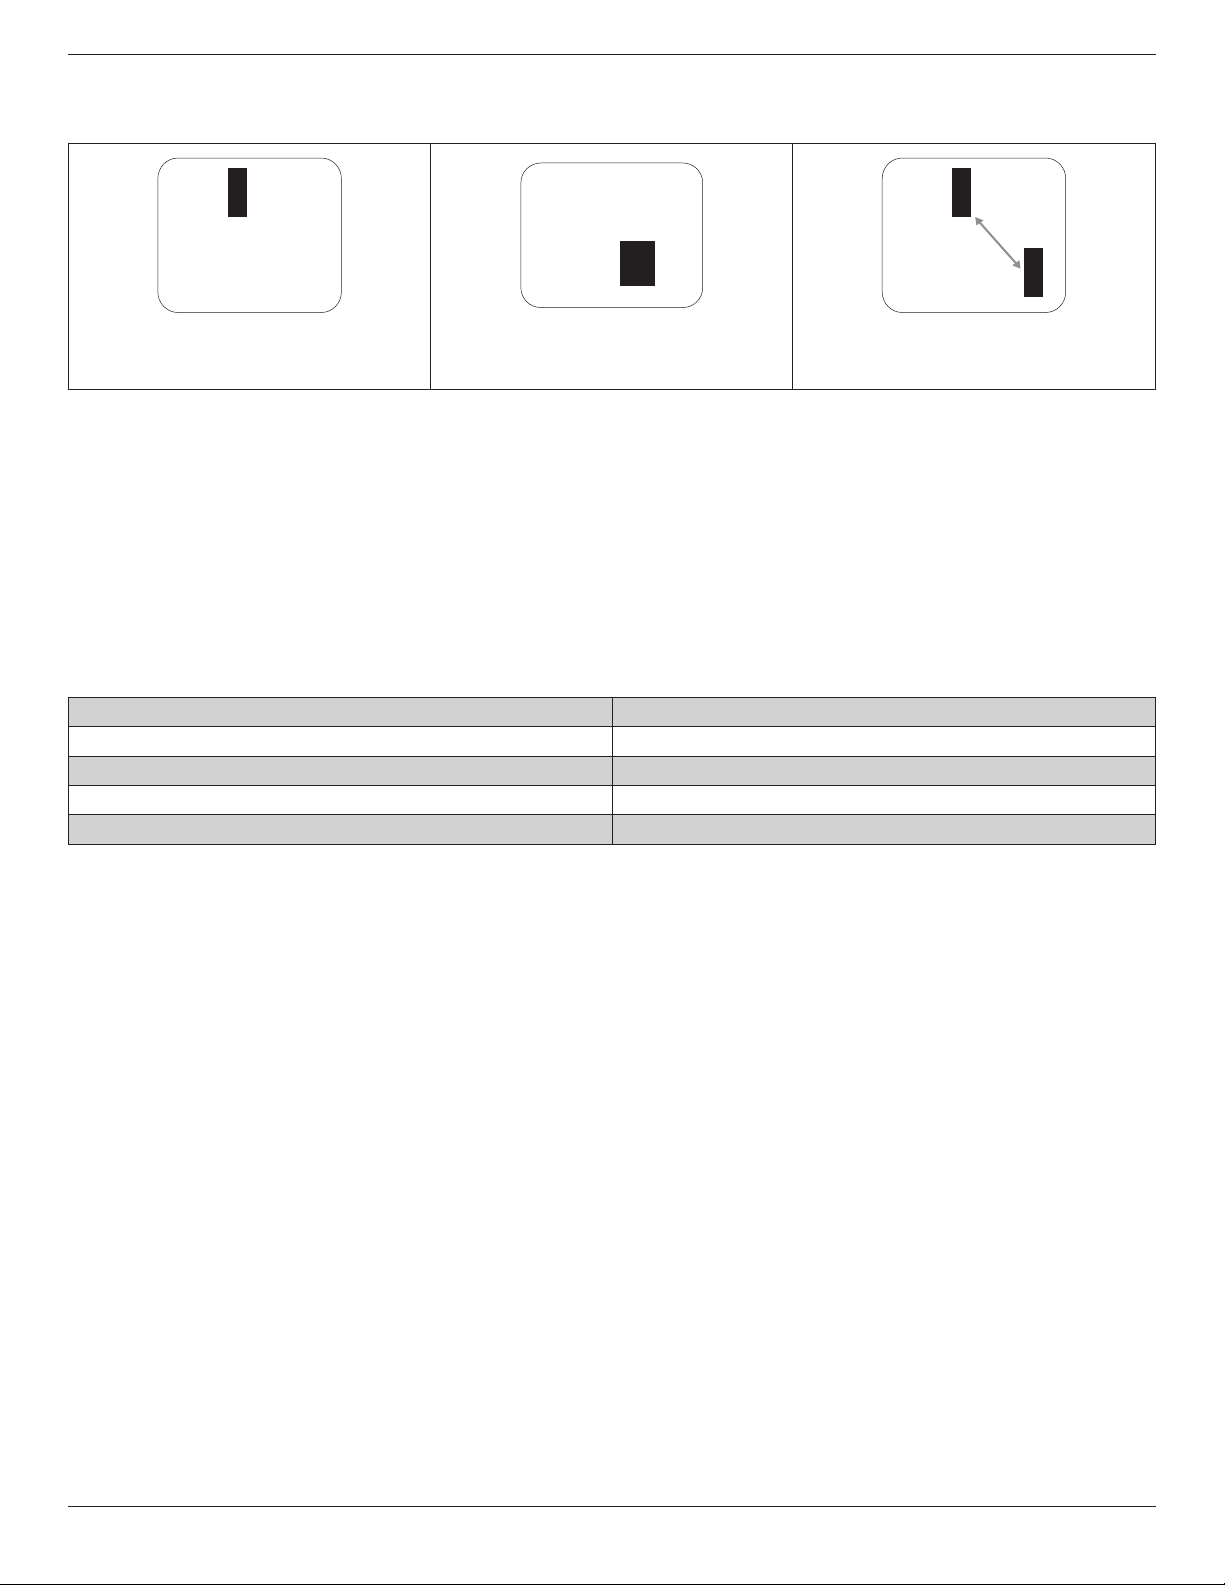
6.4. Dark Dot Defects
Blackdotdefectsappearaspixelsorsub-pixelsthatarealwaysdarkor“off”.Thesearetheexamplesofblackdotdefects:
Onedarkdot Twoadjacentdarkdots=1pairofdarkdots Twodarkdots,specicationsdenesthe
minimumdistancebetweendarkdots
6.5. Proximity of Pixel Defects
Becausepixelandsub-pixelsdefectsofthesametypethatarenearbyoneanothermaybemorenoticeable,Philipsalsospeciestolerancesforthe
proximityofpixeldefects.Inthetablebelowyoucanndspecicationsabout:
• Allowedamountofadjacentdarkdots=(adjacentdarkdots=1pairofdarkdots)
• Minimumdistancebetweendarkdots
• Totalno.ofalldefectivedots
6.6. Pixel Defect Tolerances
Inordertoqualifyforrepairduetopixeldefectsduringthewarrantyperiod,aPDP/TFTpanelinaPhilipsPlasma/LCD-displaymusthavepixelorsub-
pixeldefectsexceedingthetoleranceslistedinthefollowingtable.
BRIGHTDOTEFFECT ACCEPTABLELEVEL
1litsubpixel 2
BLACKDOTEFFECT ACCEPTABLELEVEL
1darksubpixel 10
TOTALDOTDEFECTSOFALLTYPES 12
NOTE:*1or2adjacentsubpixeldefects=1dotdefect
6.7. MURA
Darkspotsorpatchesmayoccasionallyappearonsomeliquidcrystaldisplay(LCD)panels.ThisisknownwithintheindustryasMura,whichisaJapanese
termfor“unevenness.”Itisusedtodescribeanirregularpatternorareainwhichunevenscreenuniformityappearsundercertainconditions.Muraisa
resultofthedeteriorationoftheliquidcrystalalignmentlayerandismostcommonlycausedbylong-termoperationunderhighambienttemperatures.It
isanindustry-widephenomenonandMuraisnotrepairable.Itisalsonotcoveredbyourwarrantyterms.
MurahasbeenaroundsincetheintroductionofLCDtechnologyandwithscreensgettingbiggerandinoperation24/7,manydisplaysarerunninginlow
lightconditions.ThisalladdstothepossibilityofMuraaffectingdisplays.
HOW TO SPOT MURA
TherearemanysymptomsofMuraandalsomultiplecauses.Severalofthesearelistedbelow:
• Impuritiesorforeignparticlesinthecrystalmatrix
• UnevendistributionofLCDmatrixduringmanufacturing
• Non-uniformluminancedistributionofthebacklight
• Panelassemblyinducedstress
• FlawswithintheLCDcells
• Thermalinducedstress-hightemperatureoperationoverlongperiodsoftime
HOW TO AVOID MURA
AlthoughwecannotguaranteethecompleteeradicationofMuraeverytime,ingeneraltheappearanceofMuracanbeminimizedbythesemethods:
• Lowerthebacklightbrightness
• Useascreensaver
• Reducetheambienttemperaturearoundtheunit

BDL4677XH
28
7. Cleaning and Troubleshooting
7.1. Cleaning
Caution When Using the Display
• Donotbringyourhands,faceorobjectsclosetotheventilationholesofthedisplay.Thetopofthedisplayisusuallyveryhotduetothehigh
temperatureofexhaustairbeingreleasedthroughtheventilationholes.Burnsorpersonalinjuriesmayoccurifanybodypartsarebroughttoo
close.Placinganyobjectnearthetopofthedisplaycouldalsoresultinheatrelateddamagetotheobjectaswellasthedisplayitself.
• Besuretodisconnectallcablesbeforemovingthedisplay.Movingthedisplaywithitscablesattachedmaydamagethecablesandthuscausere
orelectricshock.
• Disconnectthepowerplugfromthewalloutletasasafetyprecautionbeforecarryingoutanytypeofcleaningormaintenanceprocedure.
Front Panel Cleaning Instructions
• Thefrontofthedisplayhasbeenspeciallytreated.Wipethesurfacegentlyusingonlyacleaningclothorasoft,lint-freecloth.
• Ifthesurfacebecomesdirty,soakasoft,lint-freeclothinamilddetergentsolution.Wringtheclothtoremoveexcessliquid.Wipethesurfaceof
thedisplaytoremovedirt.Thenuseadryclothofthesametypetodry.
• Donotscratchorhitthesurfaceofthepanelwithngersorhardobjectsofanykind.
• Donotusevolatilesubstancessuchasinsertsprays,solventsandthinners.
Cabinet Cleaning Instructions
• Ifthecabinetbecomesdirty,wipethecabinetwithasoft,drycloth.
• Ifthecabinetisextremelydirty,soakalint-freeclothinamilddetergentsolution.Wringtheclothtoremoveasmuchmoistureaspossible.Wipe
thecabinet.Useanotherdryclothtowipeoveruntilthesurfaceisdry.
• Donotallowanywaterordetergenttocomeintocontactwiththesurfaceofthedisplay.Ifwaterormoisturegetsinsidetheunit,operating
problems,electricalandshockhazardsmayresult.
• Donotscratchorhitthecabinetwithngersorhardobjectsofanykind.
• Donotusevolatilesubstancessuchasinsertsprays,solventsandthinnersonthecabinet.
• DonotplaceanythingmadefromrubberorPVCnearthecabinetforanyextendedperiodsoftime.

BDL4677XH
29
7.2. Troubleshooting
Symptom Possible Cause Remedy
No picture is displayed 1. Thepowercordisdisconnected.
2. Themainpowerswitchonthebackofthe
displayisnotswitchedon.
3. Theselectedinputhasnoconnection.
4. Thedisplayisinstandbymode.
1. Pluginthepowercord.
2. Makesurethepowerswitchisswitchedon.
3. Connectasignalconnectiontothedisplay.
Interference displayed on the display or audible
noise is heard
Causedbysurroundingelectricalappliancesor
uorescentlights.
Movethedisplaytoanotherlocationtoseeisthe
interferenceisreduced.
Color is abnormal Thesignalcableisnotconnectedproperly. Makesurethatthesignalcableisattachedrmly
tothebackofthedisplay.
Picture is distorted with abnormal patterns 1. Thesignalcableisnotconnectedproperly.
2. Theinputsignalisbeyondthecapabilitiesof
thedisplay.
1. Makesurethatthesignalcableisattached
rmly.
2. Checkthevideosignalsourcetoseeifit
isbeyondtherangeofthedisplay.Please
verifyitsspecicationswiththisdisplay’s
specicationsection.
Display image doesn’t ll up the full size of the
screen
1. Thezoommodeisnotsetcorrectly.
2. ScanModemaybesetincorrectlyto
underscan.
3. Iftheimageexceedsthescreensize,Scan
ModemayneedtobesettoUnderscan.
UsetheZoommodeorCustomzoomfunction
intheScreenmenutonetunedisplaygeometry
andtimefrequencyparameter.
Can hear sound, but no picture Improperlyconnectedsourcesignalcable. Makesurethatbothvideoinputsandsound
inputsarecorrectlyconnected.
Can see picture but no sound is heard 1. Improperlyconnectedsourcesignalcable.
2. Volumeisturnedallthewaydown.
3. [MUTE]isturnedon.
4. Noexternalspeakerconnected.
1. Makesurethatbothvideoinputsandsound
inputsarecorrectlyconnected.
2. Press[VOL UP]or[VOL DOWN]buttonto
hearsound.
3. SwitchMUTEoffbyusingthe[MUTE]
button.
4. Connectexternalspeakersandadjustthe
volumetoasuitablelevel.
Some picture elements do not light up
Somepixelsofthedisplaymaynotturnon. Thisdisplayismanufacturedusinganextremely
highlevelofprecisiontechnology:however,
sometimessomepixelsofthedisplaymaynot
display.Thisisnotamalfunction.
After-Images can still be seen on the display
after the display is powered off. (Examples
of still pictures include logos, video games,
computer images, and images displayed in 4:3
normal mode)
Astillpictureisdisplayedforanoverextended
periodoftime
Donotallowastillimagetobedisplayedfor
anextendedperiodoftimeasthiscancausea
permanentafter-imagetoremainonthedisplay.
BDL4677XH
30
8. Technical Specifications
Display:
Item Specications
ScreenSize(ActiveArea) 46”(116.8cm)LCD
AspectRatio 16:9
Numberofpixels 1920(H)x1080(V)
Pixelpitch 0.53025(H)x0.53025(V)[mm]
Displayablecolors 16.7Mcolors
Brightness(typical) 700cd/m2
Contrastratio(typical) 3500:1
Viewingangle 178degrees
In/Out Terminals:
Item Specications
SpeakerOutput InternalSpeakers
ExternalSpeakers
10W(L)+10W(R)[RMS]/8Ω
1Way1SpeakerSystem
82dB/W/M/160Hz~13KHz
AudioOutput
RCAJackx2 0.5V[rms](Normal)/2Channel(L+R)
AudioInput RCAJackx2
3.5mmStereox1
0.5V[rms](Normal)/2Channel(L+R)
RS232C D-SubJackx2(9pin) TXD+RXD(1:1)
RJ-45 RJ-45Jackx1(8pin)
10/100LANPort
HDMIInput HDMIJackx1
(TypeA)(18pin)
DigitalRGB:TMDS(Video+Audio)
MAX:
Video-720p,1080p,1920x1080/60Hz(WUXGA)
Audio-48KHz/2Channel(L+R)
SupportsLPCMonly
DVI-DInput DVI-Djack DigitalRGB:TMDS(Video)
VGAInput D-SubJackx1(15pin) AnalogRGB:0.7V[p-p](75Ω),H/CS/V:TTL(2.2kΩ),SOG:1V[p-p](75Ω)
MAX:720p,1080p,1920x1080/60Hz(WUXGA)
DVI-I(DVI-D&VGA)
Output
DVI-IJackx1(29pin) DigitalRGB:TMDS(Video)
AnalogRGB:0.7V[p-p](75Ω),H/CS/V:TTL(2.2kΩ),SOG:1V[p-p](75Ω)
MAX:720p,1080p,1920x1080/60Hz(WUXGA)
ComponentInput BNCJackx3 Y:1V[p-p](75Ω),Pb:0.7V[p-p](75Ω),Pr:0.7V[p-p](75Ω)
MAX:480i,576i,480p,576p,720p,1080i,1080p
VideoInput BNCx1(Sharewith
Component_Y)
Composite1V[p-p](75Ω)
DisplayportInput DisplayportJackx1
(20pin)
DigitalRGB:TMDS(Video+Audio)
MAX:
Video-720p,1080p,1920x1080/60Hz(WUXGA)
Audio-48KHz/2Channel(L+R)
SupportsLPCMonly
IRInput 3.5mmStereox1 ExternalIRinput
IROutput 3.5mmStereox1 ExternalIRoutput
General:
Item Specications
PowerSupply AC100-240V,50-60Hz
PowerConsumption(Max) 260W
PowerConsumption(typ.) 130W
PowerConsumption(Standby&Off) <0.5W(RS232inactive)
Dimensions(WithStand)[WxHxD] 1023.98x629.41x400.0mm
BDL4677XH
31
Dimensions(WithoutStand)[WxHxD] 1023.98x578.57x108.1mm
Weight(WithStand) 25.6Kg
Weight(WithoutStand) 23.3Kg
GrossWeight(WithoutStand) 33.7Kg
Environmental Condition:
Item Specications
Temperature Operational 0~40°C
Storage -20~60°C
Humidity Operational 20~80%RH(Nocondensation)
Storage 5~95%RH(Nocondensation)
Altitude Operational 0~3,000m
Storage/Shipment 0~9,000m
Internal Speaker:
Item Specications
Type 1Way1Speaker
Input 10W(RMS)
Impedance 8Ω
OutputSoundPressure 82dB/W/M
FrequencyResponse 160Hz~13KHz