
1
20V CORDLESS PATIO WEEDER
Original Instructions
GB
LU C10
ASYWS0110020
www.yardforce.eu
+44(0)1904 727513
support@yardforce.co.uk

2
Read this manual carefully prior to assembling and
operating the Patio Weeder. It is dangerous to operate
this product without being familiar with these instructions.
Keep this manual in a safe place and have it ready for
future reference.
3
A
B
1
2 3
4
5
6
7
8
a
b
c
d
e
f
4
C
G
E
I
D
H
F
J
1
2
1
2
1
2
5
K
M
O
L

6
LU C10 Original Instructions
CONTENT
Intended use 07
General safety warnings 07
Symbols 20
Technical data 24
Description of product 25
Installation & Operation 26
Maintenance and storage 28
Troubleshooting 30
Warranty 31
CE declaration 32

7
INTENDED USE
The product is intended to clean the gap or edge of outdoor surfaces such as patio
stones, wood, or composite material.
For safety reasons it is essential to read the entire instruction manual before first
operation and to observe all the instructions therein.
This product is intended for private domestic use only, not for any commercial
trade use. It must not be used for any purposes other than those described.
GENERAL SAFETY WARNINGS
WARNING!
Read all safety warnings and all instructions.
Failure to follow the warnings and instructions may result
in electric shock, fire and/or serious injury.
Save all warnings and instructions for future reference.
1. Keep work area clean and well-lit. Cluttered, dark areas
invite accidents.
2. Replacement parts – When servicing this unit, use only
identical replacement parts. Replace or repair damaged
parts immediately.
3. Keep children, bystanders, and pets away. All
spectators, including pets, should be kept a safe distance
away from the work area.
4. Know your product – Know how to start and stop the
machine. Be thoroughly familiar with the controls.
5. Use the right tool – Do not use this machine for any
purpose other than for which it was intended.
6. Dress appropriately – Do not wear loose clothing or
jewellery as such accessories can become caught in
moving parts. Tie long hair back, to avoid injury. Wear
rubber gloves and non-slip footwear when working
outdoors. Wearing rubber gloves and substantial non-slip

8
footwear is recommended when working outdoors.
7. Avoid accidental starting – Do not carry the patio
weeder with your finger on the switch.
CAUTION! Moving parts will continue to run for several
seconds after turning off the machine.
8. Moving parts – Keep hands and feet away from moving
parts. Keep guards in place and in proper working order.
9. Do not force the tool – It will perform better with less
likelihood of personal or mechanical injury if it is used at
the rate for which it was designed.
10. Do not overreach – Keep proper footing and balance
at all times.
If the patio weeder strikes a foreign object, follow these
steps:
• Stop the cordless patio weeder.
• Inspect for damage.
• Repair any damage before restarting and operating the
tool.
11. Use safety glasses – Also use safety footwear, snug-
fitting clothing, protective gloves, hearing, and head
protection.
12. Remove the battery – Remove the battery from the
patio weeder when it is not in use, before servicing it,
when changing accessories and when performing any
other maintenance task.
13. Store indoors – When not in use, the patio weeder
should be stored indoors in a dry and safe place out of
the reach of children.
14. Maintain the patio weeder with care – Keep the
cutting edges sharp and clean for optimal performance
and to reduce the risk of injury. Keep the handles dry,
clean, and free from oil and grease. Follow the additional
GENERAL SAFETY WARNINGS

9
recommendations described in the maintenance section
of this manual.
15. Avoid dangerous environments – Do not use the
patio weeder in rain or in damp or wet locations. Do not
operate in gaseous or explosive atmospheres or use
near flammable or combustible liquids. Motors in these
tools normally spark, and the sparks might ignite fumes.
16. Do not operate the patio weeder when you are
tired or under the influence of drugs, alcohol, or other
medication.
17. Check for damaged parts – Before further use of
the tool, any part that is damaged should be carefully
checked to determine that it will operate properly and
perform its intended function. Check for alignment of
moving parts, binding of moving parts, breakage of parts,
mounting, and any other condition that may affect its
operation.
SAVE THESE INSTRUCTIONS
Training
• Read, understand, and follow all instructions on the
patio weeder and in the manual before operating this
machine. Thoroughly familiarize yourself with the controls
and the proper use of the equipment. Know how to stop
the unit and disengage the controls quickly.
• Children should never be allowed access to the
equipment. Adults should never operate the equipment
without carefully reading and understanding these
instructions.
• Keep the area of operation clear of all persons,
particularly small children or pets.
GENERAL SAFETY WARNINGS

10
GENERAL SAFETY WARNINGS
• Always observe the surface conditions in order to avoid
slipping, falling, and unexpected objects.
Preparation
• Always inspect the area where the patio weeder is to be
used. Remove all objects (i.e. stones, sticks, wires, and
other foreign materials) that could cause the operator to
trip.
• Always wear safety glasses or eye shields during
operation and while making an adjustment or repair.
• Always operate the patio weeder wearing adequate
garments. Do not wear jewellery or other loose clothing,
which could become entangled in moving parts. Wear
non-slip footwear to ensure proper footing.
• Inspect the weed patio weeder for worn, missing, or
damaged parts and safety labels. See maintenance
section for detailed instructions.
Operation
• Do not operate the machine while under the influence
of alcohol or drugs.
• Keep all safety devices in place and in proper working
order.
• Do not operate with missing or damaged components.
• Ensure the controls (start/stop) function properly before
starting.
• Hold onto the patio weeder with both hands during
operation. Ensure the grips are dry.
• Contact with rotating parts can cause severe injury to
hands and feet.
• Only operate the patio weeder when there is good
visibility or light and dry conditions. Always watch your

11
GENERAL SAFETY WARNINGS
footing and keep a firm hold on the grips. Walk; don't run!
• Do not operate the patio weeder on slippery surfaces.
Check your footing during use.
• Exercise caution when changing direction and
operating the tool on slopes. Always keep feet and legs
a safe distance away from the machine. Look for hidden
obstacles or hazards.
• If the patio weeder should start to vibrate abnormally,
stop the machine and inspect thoroughly for damage.
• Turn the machine OFF when moving to a new work
area. Allow the blades to completely stop rotating before
transporting the unit.
• Do not use in rain or wet conditions.
Stopping Work
• Always turn the machine OFF when you have finished
or when changing work areas. Never leave the machine
running when unattended. Remove the battery when your
task is finished.
• The motor housing remains hot for a short period after
the machine is turned OFF. Allow the motor housing
to cool completely before touching or storing near
combustible material.
Maintenance and Storage
• Maintain or replace safety and instruction labels.
• Disengage all controls, stop the engine, and wait until
the blades come to a complete stop before cleaning,
repairing, or inspecting the patio weeder.
• Regularly check the following:
i) Brushes are clear and can rotate freely – Accumulation

12
GENERAL SAFETY WARNINGS
of debris around the brush could impair performance or
damage the motor. Inspect and clean the area around the
brush before every use.
ii) Safety devices are operating properly – Do not tamper
with or adjust safety devices.
iii) Bolts and screws are properly tightened – Visually
inspect the machine for any damage and ensure that the
patio weeder is in safe working condition.
iv) Use only identical replacement parts – We recommend
to use the parts provided by the manufacturer.
Replacement parts that do not meet the original
equipment specifications may lead to improper
performance and compromise safety.
Battery and Charger instructions
We pay a great deal of attention to the design of every
battery pack to ensure that we supply you with batteries
that are safe, durable and have a high energy density.
The battery cells have a wide range of safety devices.
Each individual cell is initially formatted and its electrical
characteristic curves are recorded. This data is then used
exclusively to be able to assemble the best possible
battery packs.
Despite all the safety precautions, caution must always
be exercised when handling batteries. The following
points must be followed at all times to ensure safe use.
Safe use can only be guaranteed if undamaged cells are
used. Incorrect handling of the battery pack can cause
cell damage.

13
GENERAL SAFETY WARNINGS
IMPORTANT!
Analysis confirms that incorrect use and
poor care of high-performance batteries are the main
factors responsible for personal and/or product damage.
WARNING!
Use only approved replacement batteries;
other batteries may damage the cordless patio weeder
and cause it to malfunction, which can lead to serious
personal injury.
CAUTION!
To reduce the risk of injury, charge the 20V
lithium-ion battery pack only in its designated lithium-
ion charger. Other types of chargers present risk of fire,
personal injury and damage. Do not wire a battery pack
to a power supply plug or car cigarette lighter. Such
misuse will permanently disable or damage the battery
pack.
• Avoid dangerous environments – Do not charge the
battery pack in rain, snow or in damp or wet locations.
Do not use the battery pack or charger in the presence
of explosive atmospheres (gaseous fumes, dust or
flammable materials) because sparks may be generated
when inserting or removing the battery pack, which could
lead to a fire.
• Charge in a well-ventilated area. Do not block the
charger vents. Keep them clear to allow for proper
ventilation. Do not allow cigarettes or open flames near
a charging battery pack. Vented gases may explode.
NOTE: The safe temperature range for the battery is -4°F
(-20°C) to 113°F (45°C). Do not charge the battery outside
in freezing weather; charge it at room temperature.

14
GENERAL SAFETY WARNINGS
• Maintain charger cord – When unplugging the charger,
pull the plug, not the cord, from the receptacle to reduce
the risk of damage to the electrical plug and cord. Never
carry the charger by its cord or yank it by the cord to
disconnect it from the power source. Keep the cord
away from heat, oil and sharp edges. Make sure the
cord will not be stepped on, tripped over or subjected
to damage or stress when the charger is in use. Do not
use the charger with a damaged cord or plug. Replace a
damaged charger immediately.
• Do not use an extension cord unless it is absolutely
necessary – Using the wrong, damaged or improperly
wired extension cord poses a risk of fire and electric
shock.
If an extension cord must be used, plug the charger into
a properly wired 16 gauge or larger extension cord with
the female plug matching the male plug on the charger.
Make sure that the extension cord is in good electrical
condition.
• Charger is rated for 230-240 volt AC only – The charger
must be plugged into an appropriate receptacle.
• Use only recommended attachments – Use of an
attachment not recommended or sold by the battery
charger or battery pack manufacturer may result in risk of
fire, electric shock or personal injury.
• Unplug charger when not in use – Make sure to remove
battery packs from unplugged chargers.
WARNING!
To reduce the risk of electric shock, always
unplug the charger before performing any cleaning or
maintenance.

15
GENERAL SAFETY WARNINGS
• Do not burn or incinerate battery packs – Battery packs
may explode, causing personal injury or damage. Toxic
fumes and materials are created when battery packs are
burned.
• Do not crush, drop or damage battery packs – Do not
use the battery pack or charger if they have sustained
a sharp blow, been dropped, run over or have been
damaged in any way (i.e. pierced with a nail, hit with a
hammer, stepped on, etc.).
• Battery chemicals cause serious burns – Never let a
damaged battery pack contact the skin, eyes or mouth.
If a damaged battery pack leaks battery chemicals, use
rubber or neoprene gloves to safely dispose of it. If skin
is exposed to battery fluids, wash the affected area
with soap and water and rinse with vinegar. If eyes are
exposed to battery chemicals, immediately flush with
water for 20 minutes and seek medical attention. Remove
and dispose of contaminated clothing.
• Do not short circuit – A battery pack will short circuit if
a metal object makes a connection between the positive
and negative contacts on the battery pack. Do not place
a battery pack near anything that may cause a short
circuit, such as paper clips, coins, keys, screws, nails
and other metallic objects. A short-circuited battery pack
poses a risk of fire and severe personal injury.
• Store your battery pack and charger in a cool, dry
place – Do not store the battery pack or charger where
temperatures may exceed 104ºF (40ºC), such as in direct
sunlight or inside a vehicle or metal building during the
summer.

16
GENERAL SAFETY WARNINGS
Information about the battery
1. The battery pack supplied with your cordless patio
weeder is only partially charged. The battery pack has
to be charged completely before you use the tool for the
first time.
2. For optimum battery performance, avoid low discharge
cycles by charging the battery pack frequently.
3. Store the battery pack in a cool place, ideally at 59°F
(15°C) and charged to at least 40%.
4. Lithium-ion batteries are subject to a natural ageing
process. The battery pack must be replaced at the latest
when its capacity falls to just 20% of its capacity when
new. Weakened cells in an aged battery pack are no
longer capable of meeting the high power requirements
needed for the proper operation of your patio weeder,
and therefore pose a safety risk.
5. Do not throw battery packs into an open fire as this
poses a risk of explosion.
6. Do not ignite the battery pack or expose it to fire.
7. Do not exhaustively discharge batteries. Exhaustive
discharge will damage the battery cells. The most
common cause of exhaustive discharge is lengthy
storage or non-use of partially discharged batteries. Stop
working as soon as the performance of the battery falls
noticeably or the electronic protection system triggers.
Place the battery pack in storage only after it has been
fully charged.
8. Protect batteries and the tool from overloads.
Overloads will quickly result in overheating and
cell damage inside the battery housing even if this

17
GENERAL SAFETY WARNINGS
overheating is not apparent externally.
9. Avoid damage and shocks. Immediately replace
batteries that have been dropped from a height of more
than one meter or those that have been exposed to
violent shocks, even if the housing of the battery pack
appears to be undamaged. The battery cells inside the
battery may have suffered serious damage. In such
instances, please read the waste disposal information for
proper battery disposal.
10. If the battery pack suffers overloading and
overheating, the integrated protective cutoff will switch off
the equipment for safety reasons.
IMPORTANT!
Do not press the ON/OFF switch any more
if the protective cut-off has been activated. This may
damage the battery pack.
11. Use only original battery packs. The use of other
batteries poses a fire risk and may result in injuries or an
explosion.
Information about the charger and the charging
process
1. Please check the data marked on the rating plate of the
battery charger. Be sure to connect the battery charger
to a power supply with the voltage marked on the rating
plate. Never connect it to a different mains voltage.
2. Electrical plugs must match the outlet. Never modify
the plug in any way. Do not use any adapter plugs with
grounded appliances. Unmodified plugs and matching
outlets will reduce the risk of electric shock.

18
GENERAL SAFETY WARNINGS
3. Keep the battery charger, battery pack(s) and the
cordless tool out of the reach of children.
4. Do not use the supplied battery charger to charge
other cordless tools.
5. Do not overcharge batteries. Do not exceed the
maximum charging times. These charging times only
apply to discharged batteries. Frequent insertion of a
charged or partially charged battery pack will result in
overcharging and cell damage. Do not leave batteries in
the charger for days on end.
6. Do not use batteries that have been exposed to heat
during the charging process, as the battery cells may
have suffered dangerous damage.
7. Do not use batteries that have suffered curvature
or deformation during the charging process or those
that exhibit other atypical symptoms (gassing, hissing,
cracking, etc.).
8. Never fully discharge the battery pack (maximum
recommended depth of discharge is 80%). A complete
discharge of the battery pack will lead to premature
ageing of the battery cells.
Protection from environmental influences
1. Wear suitable work clothes. Wear safety goggles and
appropriate footwear.
2. Protect your cordless tool and the battery charger
from moisture and rain. Moisture and rain can cause
dangerous cell damage.
3. Do not use the cordless tool or the battery charger
near vapors and flammable liquids.
4. Use the battery charger and cordless tools only in dry
conditions and at an ambient temperature of 50-104°F

19
GENERAL SAFETY WARNINGS
(10-40°C).
5. Do not keep the battery charger in places where
the temperature is liable to reach over 104°F (40°C). In
particular, do not leave the battery charger in a car that is
parked in the sunshine.
6. Protect batteries from overheating. Overloads,
overcharging and exposure to direct sunlight will result
in overheating and cell damage. Never charge or work
with batteries that have been overheated – replace them
immediately, if possible.
7. Store the charger and your cordless tool only in dry
locations with an ambient temperature of 50-104°F (10-
40°C). Store your lithium-ion battery pack in a cool, dry
place at a temperature of 50-68°F (10-20°C). Protect the
battery pack, charger and cordless tool from humidity
and direct sunlight. Only place fully charged batteries in
storage (charged to at least 40%).
8. Prevent the lithium-ion battery pack from freezing.
Battery packs that were stored below 32°F (0°C) for more
than 60 minutes must be discarded.
9. When handling batteries, be wary of electrostatic
charge. Electrostatic discharges can damage the
electronic protection system and the battery cells. Avoid
electrostatic charging and never touch the battery poles.

20
SYMBOLS
Safety symbols
The purpose of safety symbols is to attract your attention
to possible dangers. The safety symbols and the
explanations with them require your careful attention
and full understanding. The symbol warnings do not, by
themselves, eliminate any danger. The instructions and
warnings they give are no substitutes for proper accident
prevention measures.
WARNING:
Be sure to read and understand all safety
instructions in this operator’s manual, including all safety
alert symbols such as “
DANGER
,” “
WARNING
,” and
“
CAUTION
” before using this tool. Failure to follow all
instructions listed below may result in electric shock, fire
and/or serious personal injury.
SAFETY ALERT SYMBOL
: Indicates
DANGER
,
WARNING
, or
CAUTION
. May be used in conjunction
with other symbols or pictographs.
Symbol meaning
This page depicts and describes safety symbols that
may appear on this product. Read, understand and
follow all instructions on the machine before attempting
to assemble and operate.
21
SYMBOLS
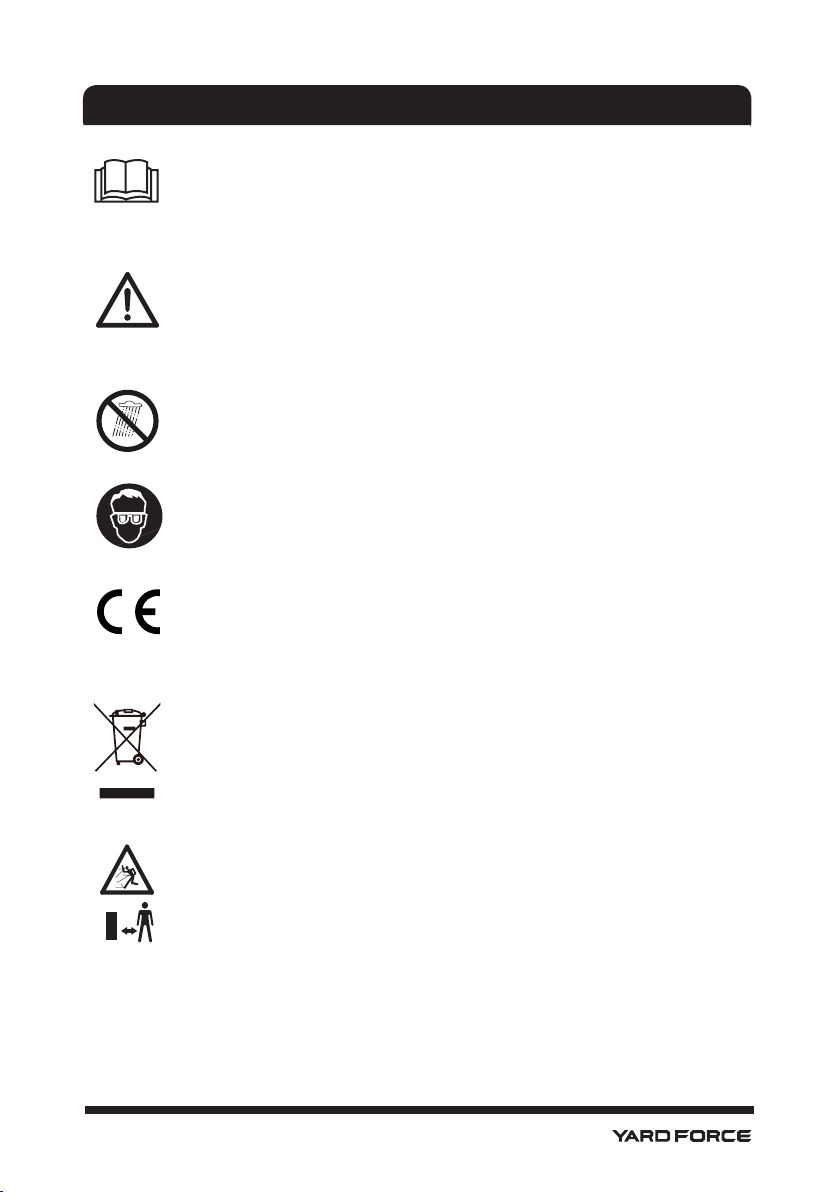
Please read all of the safety and operating
instructions carefully before using this machine.
Read the instruction manual before operating.
WARNING! Failure to follow the warnings and
instructions may result in electric shock, fire and/
or serious injury.
Do not use this tool in the rain. Avoid using it in
damp conditions.
This symbol indicates the requirement of wearing
eye protection when using the product.
The product complies with the applicable
European directives, and an evaluation method of
conformity for these directives was done.
Waste electrical products should not be disposed
of with household waste. Please recycle
where facilities exist. Check your Local Authority
or retailer for recycling advice.
Keep bystanders away. Objects thrown by the
product could hit the user or other bystanders.
Always ensure that other people and pets remain
at a safe distance from the product when it is in
operation.
22
SYMBOLS
To reduce the risk of injury, user must read
instruction manual carefully.
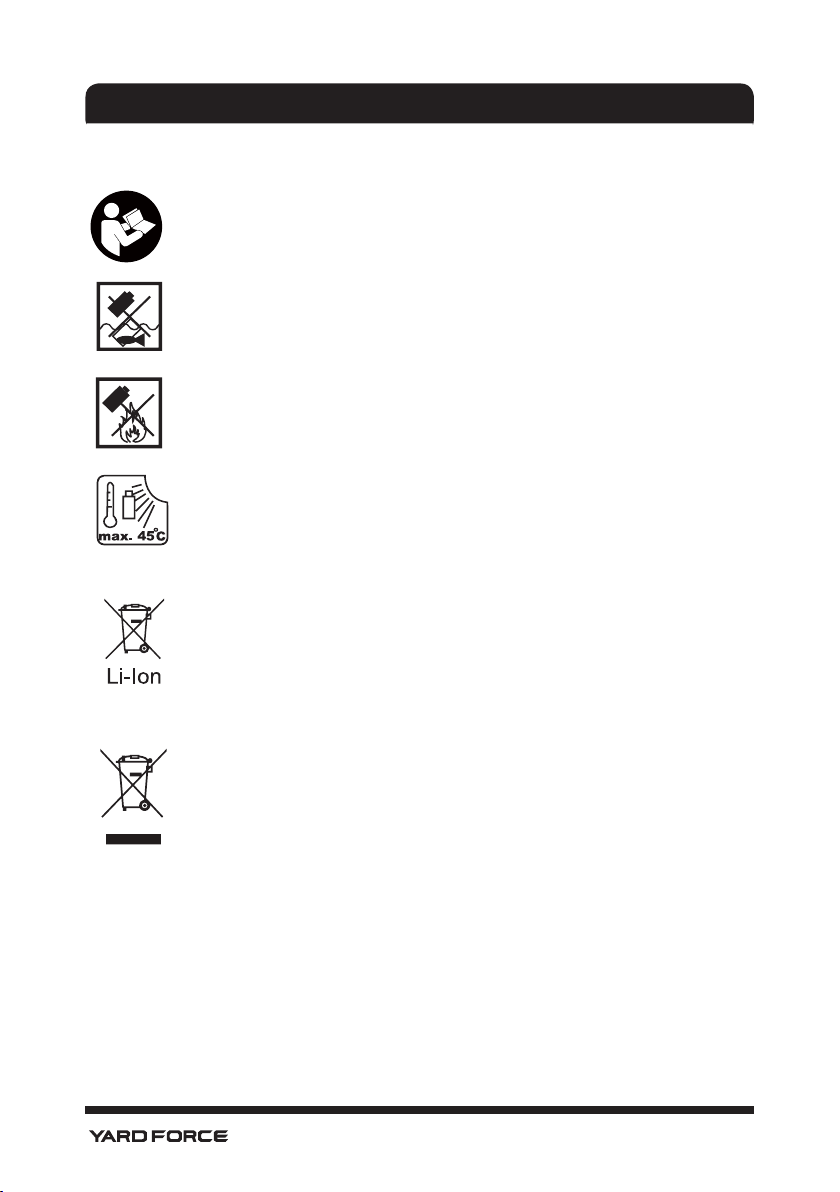
Do not throw into water.
Do not throw on fire.
Do not subject the battery to strong sunlight
over long periods of time. Do not leave on a
heater (max.45°C).
Batteries contain Li-ion. Do not dispose of
waste batteries in domestic waste. Contact
local authority to find out how to dispose of
batteries.
WEEE symbol. Waste electrical products should
not be disposed of with household waste.
Please recycle where facilities exist. Check with
your Local Authority or local store for recycling
advice.
Symbol On Battery Pack
23
SYMBOLS
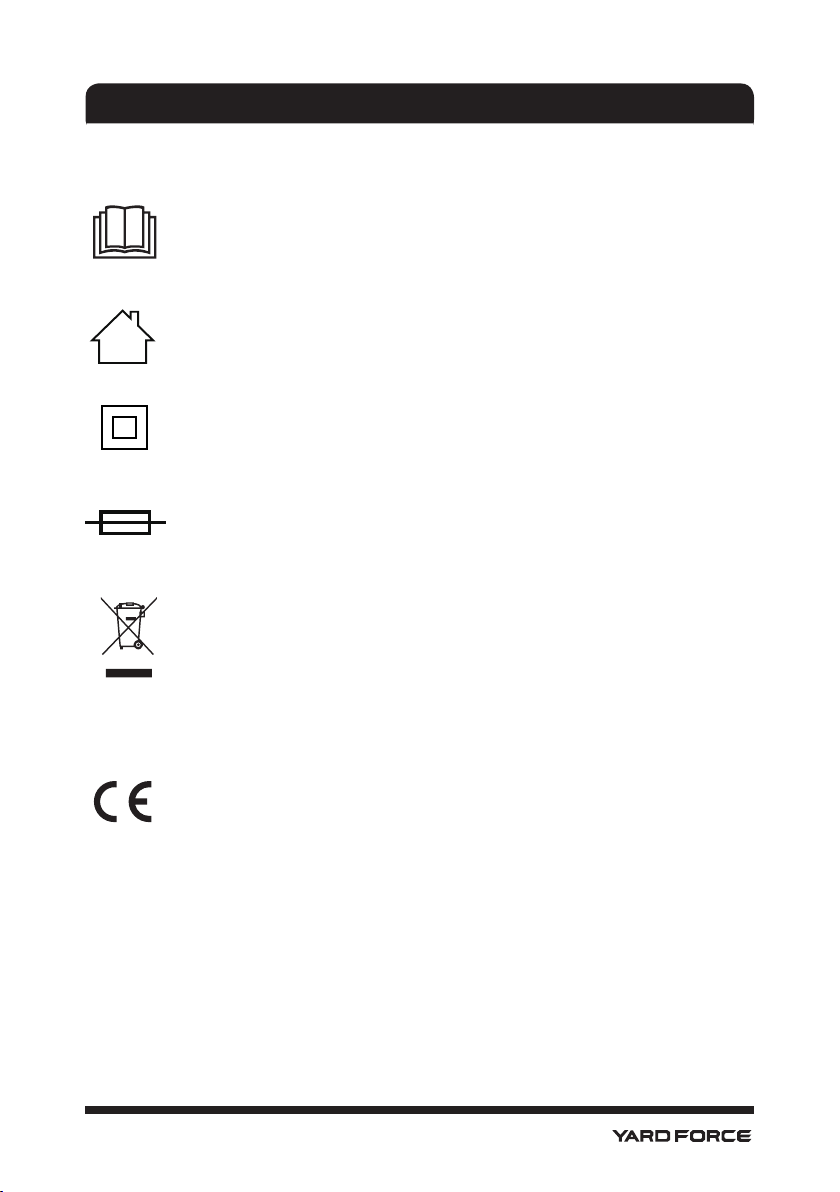
To reduce the risk of injury, user must read
instruction manual carefully.
The charger is for indoor use only.
Double insulation
Protective 3.15 A limited
WEEE symbol. Waste electrical products should
not be disposed of with household waste.
Please recycle where facilities exist. Check with
your Local Authority or local store for recycling
advice.
The product complies with the applicable
European directives and an evaluation method
of conformity for these directives was done.
Symbol On Battery Pack
T3.15A
24
TECHNICAL DATA
Model LU C10
Voltage 20V d.c.
Battery capacity 2.0 Ah
No load speed 1200 rpm
Brush size 100 mm
Measured sound pressure level(LpA) 70.4 dB(A) K=3.0 dB(A)
Measured sound power level(LwA) 82.1 dB(A) K=3.0 dB(A)
Net weight 2.2 kg
Vibrations 0.79 m/s² K=1.5 m/s²
The sound values have been determined according to noise test code given in
EN 60745-2-15, using the basic standards EN ISO 11094 and EN ISO 3744.
The noise figures quoted are emission levels and are not necessarily safe
working levels.
Factors that influence the actual level of exposure of work-force include the
characteristics of the work room, the other sources of noise, etc. i.e. the
number of machines and other adjacent processes, and the length of time for
which an operator is exposed to the noise.
Also the permissible exposure level can vary from country. This information,
however, will enable the user of the machine to make a better evaluation of the
hazard and risk.
Wear hearing protection! The sound intensity level for the operator may exceed
80 dB (A)
and ear protection measures are necessary!
The declared vibration value has been measured in accordance with a
standard test method (according to EN 60745-2-15) and may be used for
comparing one product with another. The declared vibration value may also be
used in a preliminary assessment of exposure.
This tool may cause hand-arm vibration syndrome if its use is not adequately
managed.
25
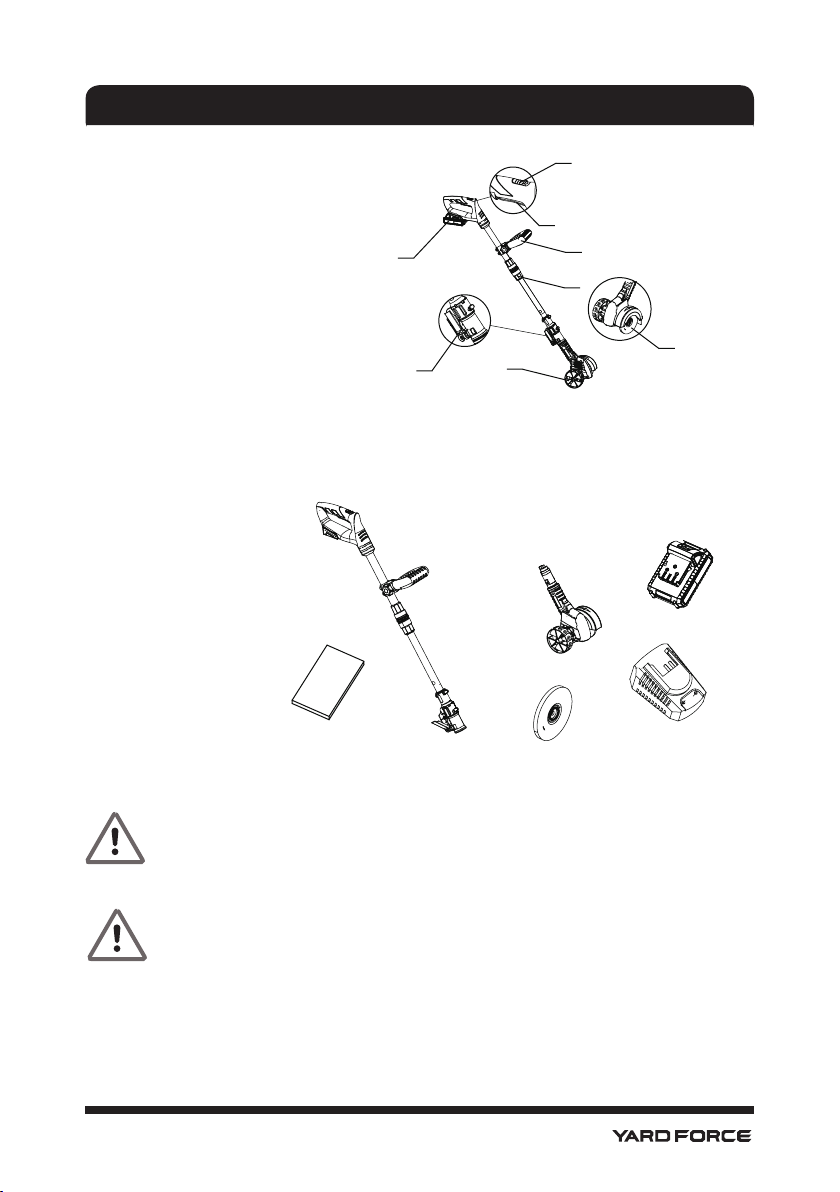
DESCRIPTION OF PRODUCT
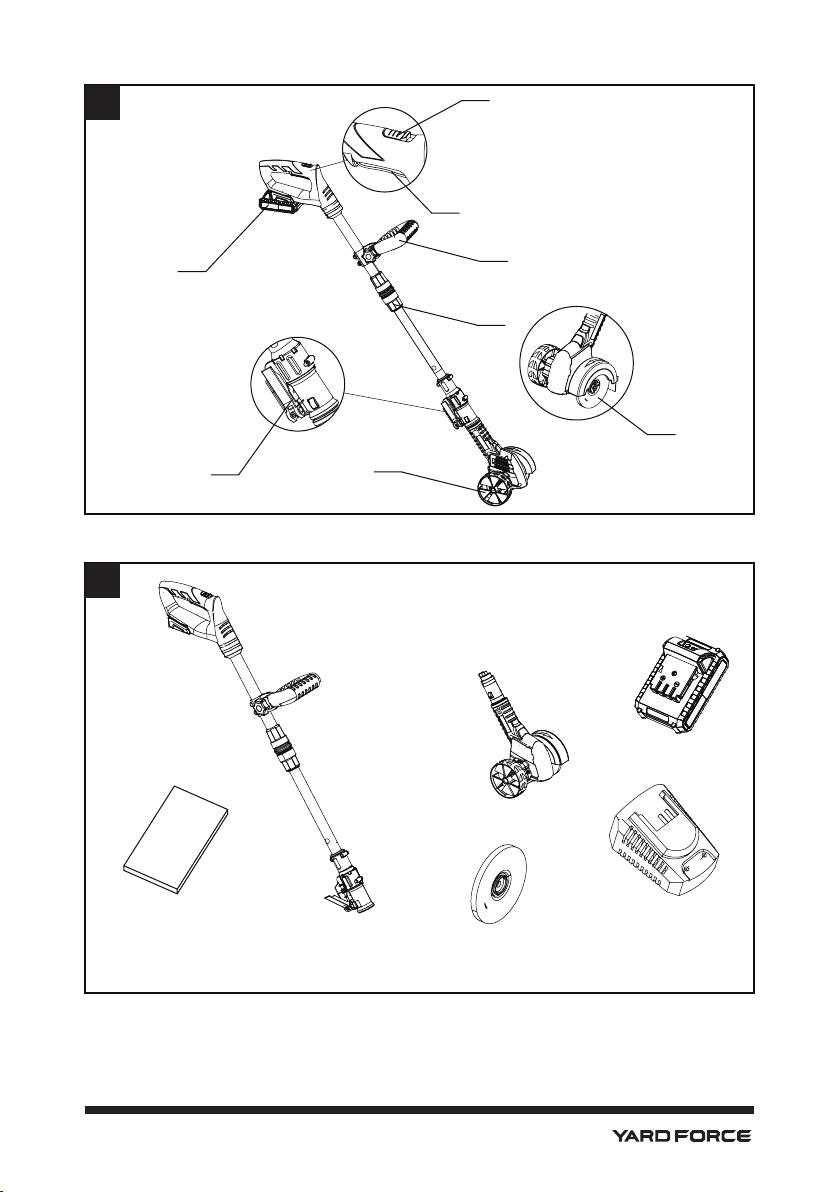
Parts description (Fig. A)
1. Battery pack
2. Spanner lever
3. Wheel
4. Brush wheel
5. Height adjusting knob
6. Auxiliary handle
7. Switch trigger
8. Safety button
Delivery contents (Fig. B)
Carefully unpack the appliance and check that it is complete. Dispose of the packaging
material correctly.
a. Telescopic shaft
b. Working head
c. Wire brush
d. Battery pack
e. Charger
f. Manual
WARNING:
If any parts are damaged or missing, do not operate this tool until these
parts are replaced. Failure to heed this warning could result in serious personal
injury.
NOTE:
Always recycle the packaging in accordance with local recycling guidelines.
1
2
3
4
5
6
7
8
a
b
c
d
e
f

26
INSTALLATION
OPERATION
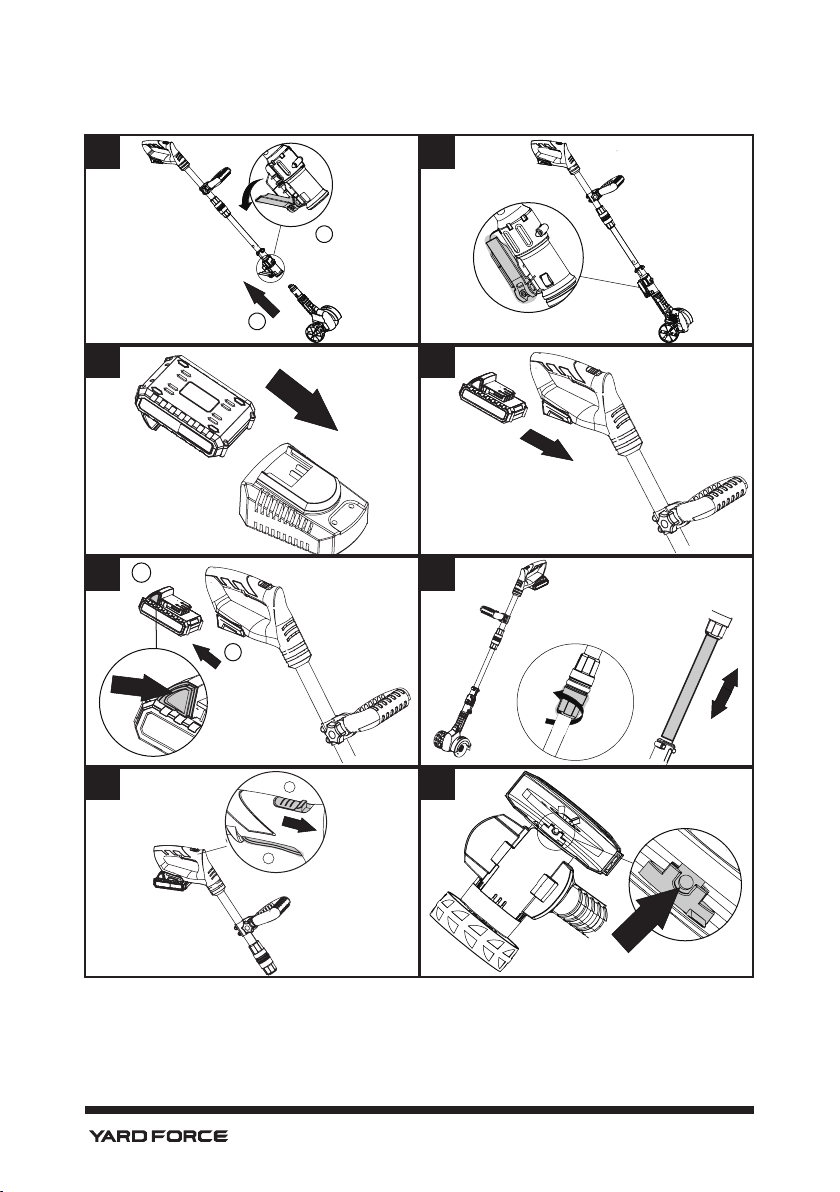
Connecting the patio weeder head with the shaft (Fig. C&D)
1. Unlock the spanner lever on the telescopic shaft.
2. Connect the working head with the telescopic shaft.
3. Lock the spanner lever.
Charging the battery pack (Fig. E)
NOTE:
Remove the battery pack from the charger after it has been fully charged.
NOTE:
Battery should be fully charged before first use.
NOTE:
Make sure the mains voltage is the same as rating label which is located on the
charger.
1. Connect the charger to a power supply. The green LED will light up.
2. To insert the battery pack into the charger, align the raised ribs of the battery pack with
the grooves of the charger then push it in.
3. The red LED light of the charger will light up during normal charging.
4. After charging is complete, the green LED will light up again.
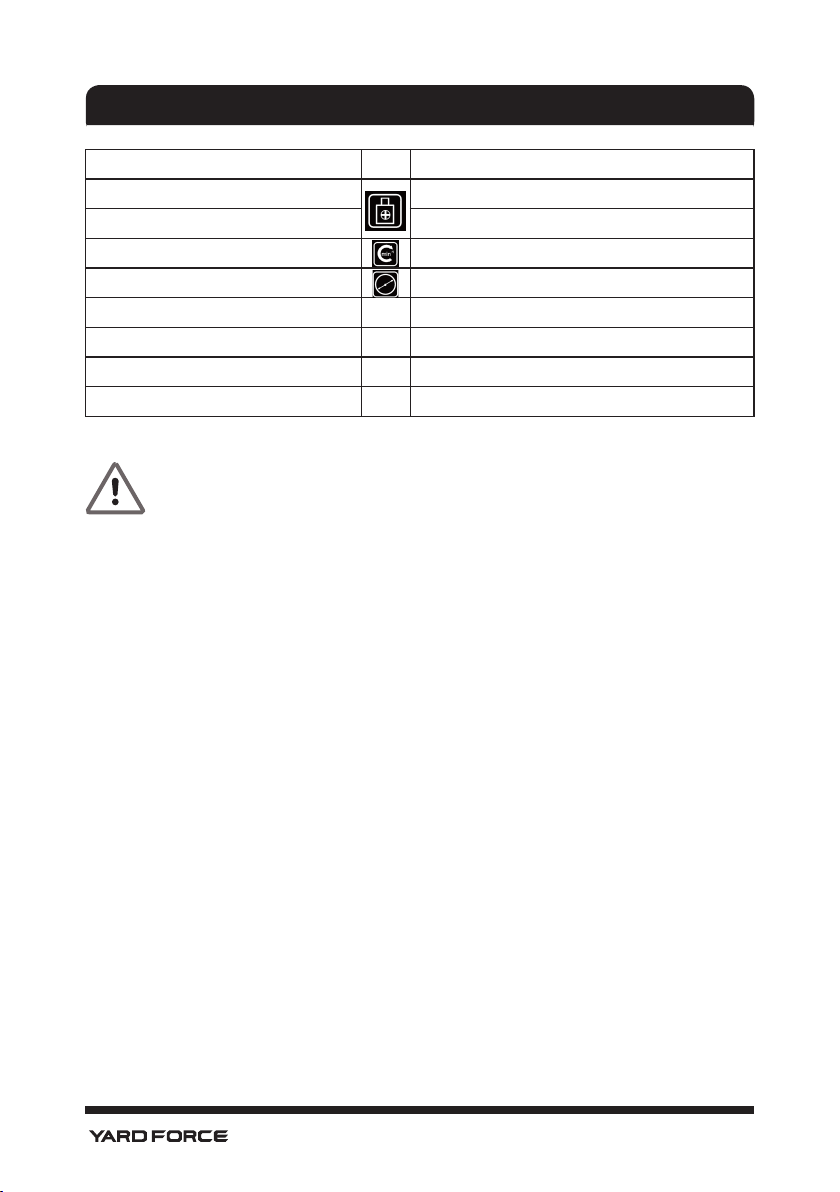
Power indicator
This Li-Ion battery pack is equipped with a power indicator which is used to show the battery
pack’s remaining charge. Press the power indicator button to check battery charge as below.
The LEDs will stay lit for approximately 4 seconds.
To obtain the best life from the battery
1. Never allow the battery to completely discharge before recharging. The battery pack
should be placed on the charger whenever the battery pack is noticeably running down
or the tool no longer performs a task it previously performed.
2. Avoid conducting short charges. Make sure that the battery is fully charged each time by
allowing the charger to complete its full charging cycle.
3. Avoid allowing loose items like screws or nails etc. to be stored with battery packs as
these or similar items can short battery packs and cause a fire or explosion.
4. Always unplug the charger when not in use and store in a dry and secure place.
5. Avoid charging or storing your battery in temperatures below 5°C and above 45°C.
6. After use, allow the battery to pack to cool down for approximately 30 minutes before
attempting to recharge.
Insert the battery pack to the tool (Fig. F)
Align the battery pack with its compartment of the tool. Push the battery pack in place until
you hear a click. This means the battery pack has been locked in position.
Removing the battery pack from the tool (Fig. G)
Pinch the battery pack release button, and then pull out the battery pack.
27
OPERATION
Adjust the height of the tool (Fig. H)
1. Loosen the lower half of the knob located in the middle of aluminum shaft by turning it anti-
clockwise.
2. Pull the lower shaft up or down to adjust the desired height.
3. Tighten the knob by turning counter clockwise.
Switching on and off
To switch on (Fig. I)
1. Hold the product firmly in both hands.
2. To switch on the product, Push the safety button forward with your thumb, and hold it
in place, then press the switch trigger.
To switch off
Release the switch trigger.
WARNING
: The tool runs on for several seconds after it has been switched off.
NOTE
: Always switch off before placing it down.
NOTE
: Do not carry the tool by the main switch.
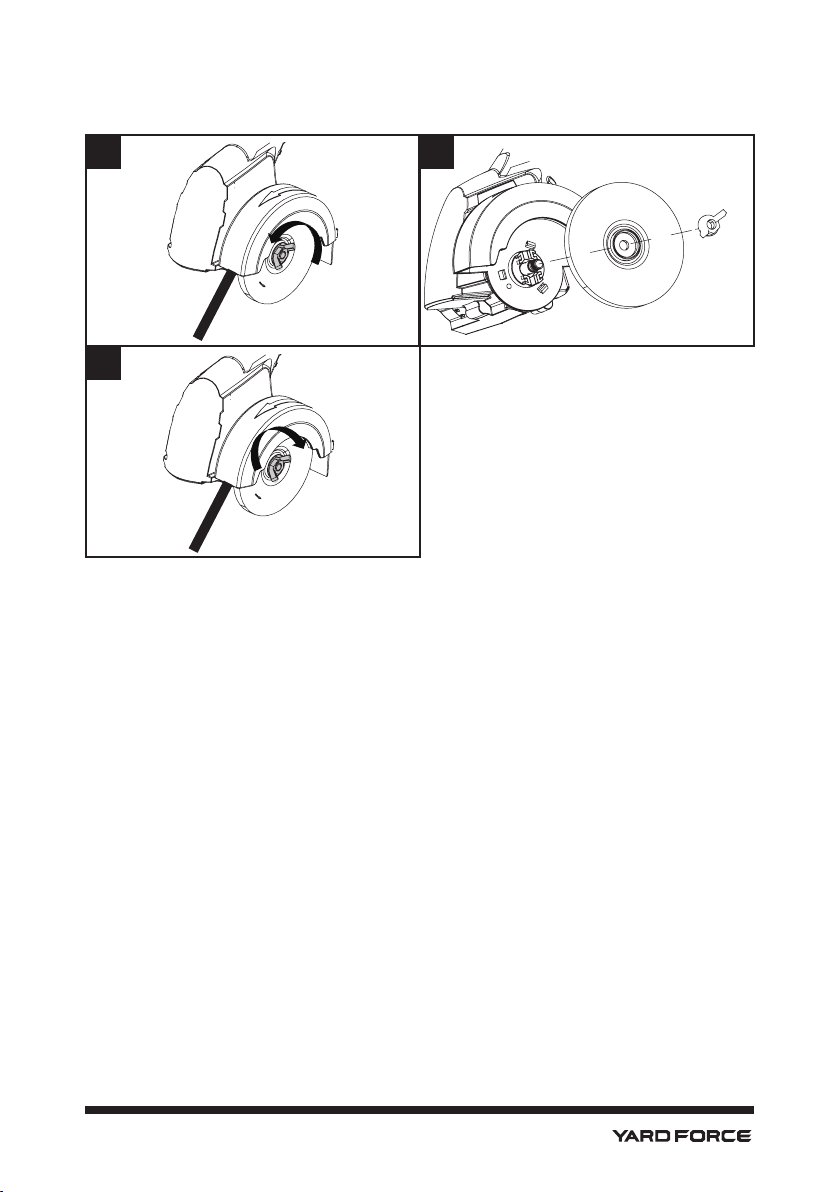
Install the wire brush
1. In order to uninstall the nylon brush. Insert a pin into the recess on the shaft and hold with
one hand. Loosen the nut by the other hand. (Fig. J&K)
2. Fit the wire brush onto the drive axle, pre-tighten the nut by hand. Make sure the brush fits
accurately into the mount. (Fig. L)
3. The shaft must be fixed in order to fasten the brush. Insert a pin into the recess on the
shaft and hold with one hand. Tighten the nut by the other hand. (Fig. M)

28
MAINTENANCE AND STORAGE
WARNING
: Before performing any repair work, always remove the battery pack .
Cleaning
1. Do not spray the unit with water. Water ingress may destroy the battery pack and
the electric motor.
2. Clean the unit with a cloth, hand brush, etc.
3. Keep all nuts, bolts and screws tight to be sure the equipment is in safe working
condition;
4. Replace worn or damaged parts for safety.
Cleaning the Working Tool
WARNING!
Wear safety gloves when working on or near the working tool. Use appropriate
tools (e.g a wooden stick) when necessary; never use your bare hands!
1. All nuts and bolts must be checked periodically for tightness before operation. After
prolonged use, especially in sandy soil conditions, the working tool will become worn and
lose some of its original shape. Weeding efficiency will be reduced and the working tool
should be replaced.
2. Have worn or damaged working parts replaced with new ones of the same type by a
qualified technician.
WARNING!
Unexpected blade movement may cause personal injury. Before servicing,
repairing, or inspecting the unit, turn the motor OFF and remove the battery. Wait for the
blades to completely stop rotating before conducting inspection, cleaning, or maintenance.
Before and after each use, check the product and accessories (or attachments) for wear and
damage. When necessary, only use identical replacement parts that are approved by the
manufacturer.
WARNING!
Contact with hot components (e.g. motor housing, gear box, etc.) on the machine
may cause burns.
Allow the machine to cool off before handling.
IMPORTANT!
• Wear protective gloves when cleaning or maintaining the machine.
• Do not use cleaning fluids or solvents or spray the machine down with water (especially
water under pressure) when cleaning the machine.
NOTE:
After each use, follow these steps to properly clean the unit:
1. Remove soil, dirt, and foliage stuck in the blades, drive shaft, tool surface, and vents with a
brush or dry cloth.
2. Clean soiled grips with a damp cloth.
Always inspect the machine for damaged and worn parts after each use. Check that safety
features (i.e. labels, guards, etc.) are in place. Check that nuts, bolts, and screws are tight.
29
MAINTENANCE AND STORAGE
Maintenance
1. Keep all nuts, bolts and screws tight to be sure that the machine is in safe working
condition.
2. Examine the machine and replace worn or damaged parts for safety
3. Check that the guards are undamaged and correctly fitted. Carry out necessary
maintenance or repairs before using.
4. Do not use the unit if the parts are blunt or worn. This will overstress the motor and
gearbox of the machine.
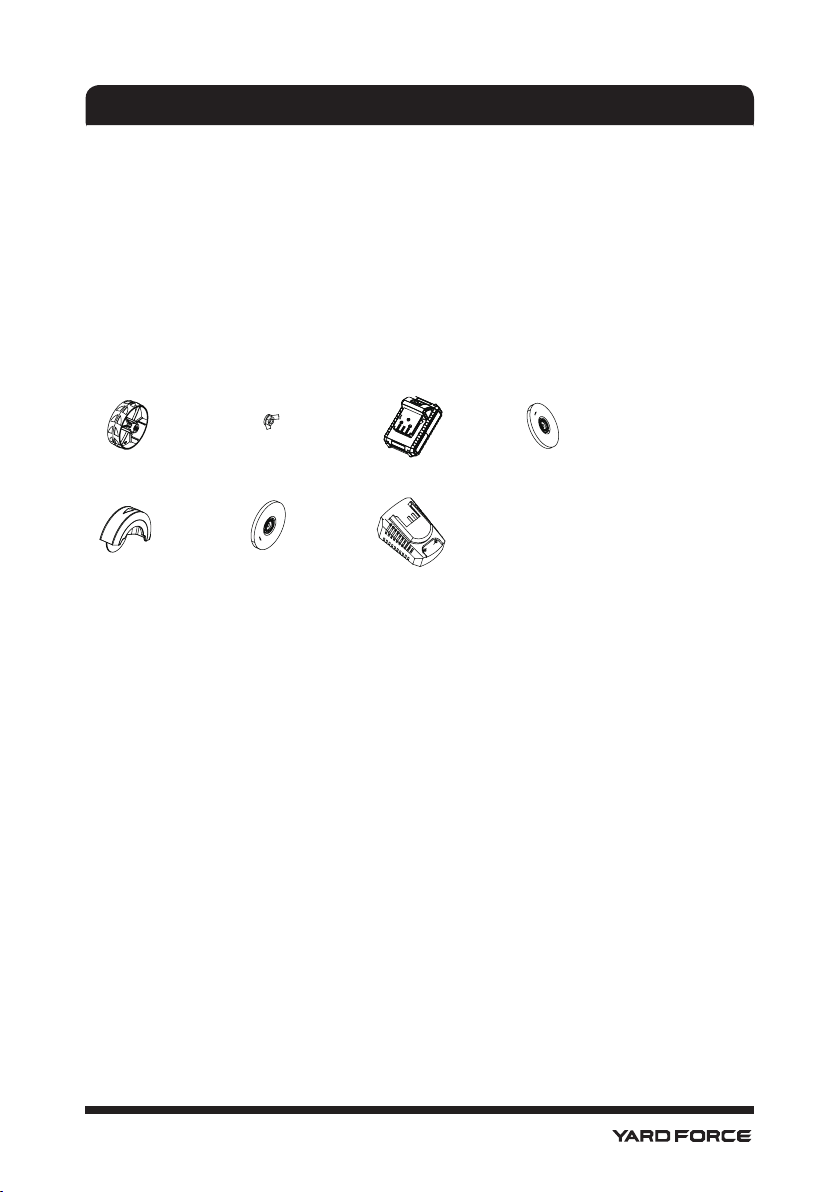
Spare Parts
Call the Customer support team on 01904 727513 or email support@yardforce.co.uk if you
want order following spare parts
Storage
Clean the exterior of the machine thoroughly using a soft brush and cloth, Do not use
water, solvents or polishes.
Store the machine in a dry place. Do not place other objects on top of the machine.
Transport
Use the original packaging to ship whenever possible.
Wheel
02014ZA001
Guard
02014ZA005
Locking nut
02014ZA002
Nylon brush
02014ZA006
Charger
02014ZA007
Battery pack
02014ZA003
wire brush
02014ZA004

30
TROUBLESHOOTING
WARNING!
Before performing any repair work, always remove the battery pack.
Improper repairs can result in the product functioning unsafely. This endangers
yourself and your environment.
Faults which cannot be rectified with the aid of following table may be rectified by
a specialist company only (customer service center).
Please be aware that any improper repairs will also invalidate the warranty and
additional costs may be incurred.
Use only genuine spare parts. These spare parts are designed and suitable for
the product.
Fault Possible cause Solution
Product is not
running.
Battery low? Charge the battery pack.
Battery pack does not sit its
place correctly
Install the battery pack once
again
Device defective?
Call our Customer Support Team
on 01904 727 513.
Product vibrates
heavily
Screws are loose
Locking nut are loose
Brush dish is unbalanced
Check screws
Check the locking nut
Replace brush

31
WARRANTY
Yard Force Warranty Statement.
All Yard Force products are covered by a standard two-year warranty which can
be extended to three years if the product is registered online within 28 days of purchase. If
you do not register your product within 28 days of purchase, the two-year warranty will apply.
Battery packs are guaranteed for 1 year.
If your product becomes faulty within the warranty period due to defective materials or
workmanship we will guarantee to
- Repair or replace all defective parts free of charge
- Repair product free of charge
- Replace the unit with a new or re-conditioned unit free of charge
Our 3 Year* warranty is subject to the following conditions:
- The machine has only been used for domestic tasks and has not be used in industrial
applications
- The tool has not been misused
- The tool has been subjected to fair wear and tear only and has not been tampered with or
modified in any way.
- Unauthorised repairs have not been attempted
Your warranty does not cover:
- Components that are subject to natural wear and tear cause by normal use of the machine
in line with the operating instructions, such as consumable parts and accessories
- Damage caused through negligence, abnormal working conditions or due to wilful actions
of the operator
- Damage caused by using non-recommended spare parts or accessories
- Tools to which unauthorised changes or additions have been made
- Battery packs which have not been properly maintained. (See instructions within this
manual).
*Standard 2 year warranty, plus additional 1 year warranty if product registered
on line at www.yardforce.eu, within 28 days of purchase, against a valid proof of
purchase receipt
WARRANTY
www.yardforce.eu
+44(0)1904 727513
support@yardforce.co.uk

32
CE DECLARATION
To the provisions of Council Directives
We
SUMEC UK
Unit A&B Escrick Business Park Escrick, York YO19 6 FD
Declare that the product:
Description: 20V Cordless Patio Weeder
Model No. LU C10/ ASYWS0110020
Function: Sweep the gap of wood or stone
Complies with the essential health and safety requirements of the
following directives:
Machinery Directive 2006/42/EC
Electromagnetic Compatibility Directive 2014/30/EU
EC Directive 2011/65/EU and its amendment Directive (EU) 2015/863 (RoHS)
Noise Emission in the Environment by Equipment for Use Outdoors Directive
2000/14/EC amended by 2005/88/EC
Measured Sound Power Level: 82.1 dB (A)
Standards and technical specification referred to:
EN 60335-1: 2012/A11:2014
EN ISO 12100: 2010
EN 1083-2: 1997
EN 62233: 2008
IEC 60335-1:2010
EN 55014-2: 2015
EN 55014-1: 2006+A2: 2011
EN 61000-3-2: 2014
EN 61000-3-3: 2013
EN 50581: 2012
Authorized Signatory
Date: 18.10.2019
Signature:________________________
Place: York
Name: Mariana Hall
General Manager
SUMEC UK Co.,Ltd.
Unit A&B Escrick Business Park
Escrick,York YO19 6 FD