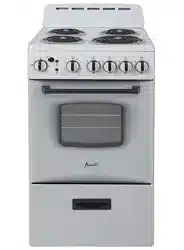
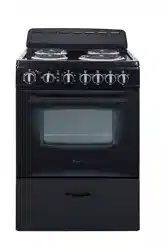
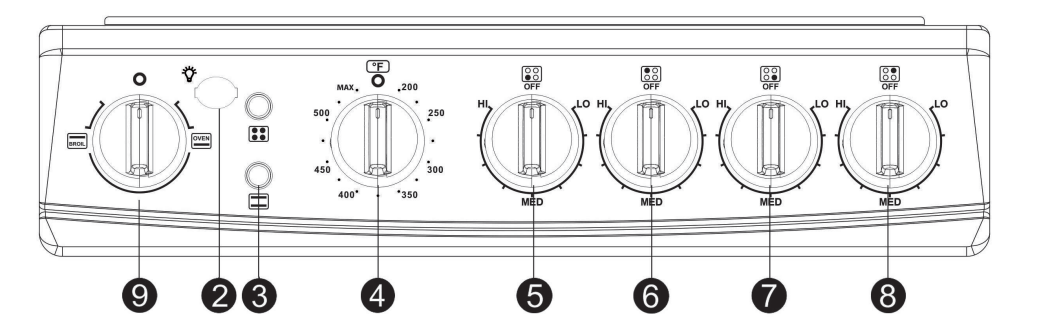
Kitchen Timer (Digital or Mechanical Knob depending on your specific model.)
Rear Left Burner Control Knob
Front Right Burner Control Knob
Oven Light Switch
Indicator Lights
Rear Right Burner Control Knob
Oven Temperature Knob
Front Left Burner ControlKnob
Oven Function (Broil/Oven) Control knob
USING THE TIMER
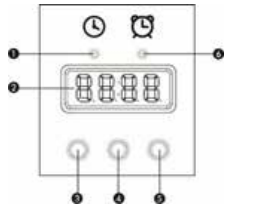
DIGITAL KITCHEN TIMER
Clock Time Indicator
Digital Display
Down Button
Up Button
Set/Quit Button
Cook Timer Indicator
When you first plug in the range or power has returned after 10 hours you will see 12:00 in the display and hear an alarm tone.
Clock:
To set the clock, press and hold the SET button for once, clock indicator will light, when the hour position flash adjust the hour by pressing the up or down button, press SET when done repeat the steps for the minutes and press SET to enter Cook Timer setting or just confirm by waiting for 5 seconds.
Cook Timer:
Press the SET button three times and the cook timer indicator will light. Press the up or down buttons to choose the except cooktime (1 – 99 minutes, default is 1 minute). After 5 seconds, the
Setting will be confirmed and the countdown will begin.
Once the selected time has elapsed, the indicator light will turn off and the alarm will sound 15 times or until a button is pressed.
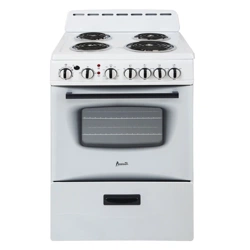
KITCHEN TIMER SELECTOR KNOB
You can set a reminder time up to 60 minutes. At the end of the time selected you will hear the sound of a bell. To set times less than 30 minutes, turn the knob to the 30 minute mark and then turn to the desired time.
OPERATING INDICATOR LIGHTS
The OVEN and BURNERS indicating lights will comeg separately when oven and top burners are in use.
OVEN LIGHT
The oven is equipped with a light that illuminates the oven to enable visually controlling the food that is cooking. By turning the switch on / off to light the oven cavity.
HOW TO USE THE OVEN
The oven is controlled by two separate knobs, the Broil / Oven Control Knob is used to select the mode of operation used for cooking and the Oven Temperature Knob which is used to set the desired cooking temperature.
When the Broil / Oven Control knob is in the or “standby” position, the heating elements will not operate.
You must first select the appropriate cooking mode (Broil or Oven/Bake) and then select the desired temperature as described in the instructions below.
USING THE OVEN (BAKE)
Turn the knob 9(Broil/Oven Control knob)to select
Turn the knob 4(Oven Temperature Knob)clockwise to select the desired temperature up to 500°F. To switch off the oven turn the thermostat control to the “standby” position.
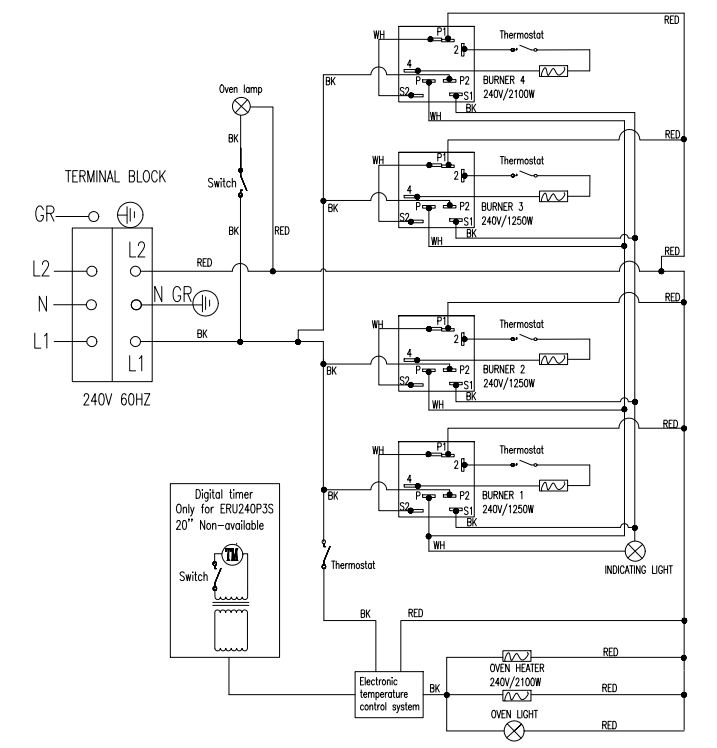
You can use your range for Bake and Broil. For that reason, the oven has two different heating elements which are:
Bake element 2100W (Lower heating element)
Broil element 2100W (Upper heating element)
CAUTION: The oven door becomes very hot during operation. Keep children well out of reach.
WARNING: The door is hot, use the handle
WARNING: After use, turn the Oven Function Control and Oven Temperature
Control knobs to the STANDBY position to turn the oven off.
OVEN THERMOSTAT
Rotate clockwise until the required temperature is reached
[From (Standby) to MAX (550ºF)].
USING THE BROILER
In this setting only the upper element is switched . Heat is distributed by radiation.
In order to broil, use the following steps:
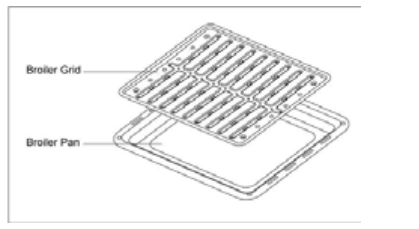
Place the meat on the broil grid in broiler pan. Always use the grid so that the fat drips into the broiler pan, otherwise the juices may catch on fire. Do not broil without using the broiler pan.
Position the broiler pan on the second level from the top.
Turn the knob Oven Broil/Oven Control Knob to
Turn the knob Oven Temperature Knob clockwise to select the desired temperature up to 550° F.
To switch off the oven turn the thermostat control and function control knobs to the “standby” position.
Always remember that when the oven is hot, outside surfaces of the range get hot.
IMPORTANT:
Always use suitable protective gloves when inserting/removing the broiler pan, shelves, pans and other cooking utensils from the oven.
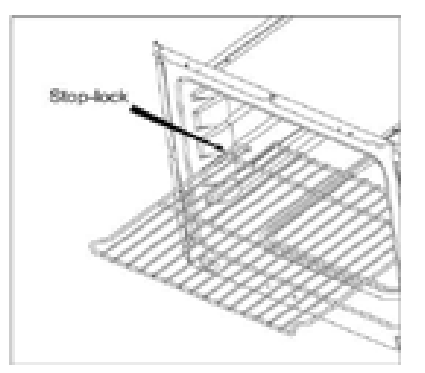
OVEN RACK
The rack is designed with stop-locks so that when placed correctly on the rack supporters, they will stop before coming completely out from the oven, and will not tilt when removing food from or placing food on them.
When placing cookware on the rack, pull the rack out to the bump on the rack support. Place the cookware on the rack, then slide the rack back into the oven.
To remove the rack from the oven, pull it towards you, tilt the front end upward and pull it out.
USING THE SURFACE UNITS
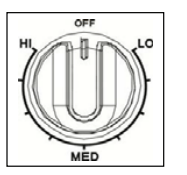
BURNER CONTROL KNOB
The range comes with four burners. To operate the burners simply push in and turn the knob to the desired position. These controls go from low to high power output, having a number of positions
To switch off the Burner, turn the burner control knob to the setting position.
Your range is equipped with four surface units with two different sizes. Three of them are and one of them is 8” in size. The surface controls are easily operated. Simply push in and turn the knob to the desired position.
When the element is energized, the indicator light will be lit regardless of the setting when one or more of the elements are turned on. The control has a variable of power output from LO to HI with a number of positions. The range of heat is increased by turning the knob to HI, decreased by turning the knob to LO.
The solid dot in the surface unit mark shows which surface unit is activated by that knob.
IMPORTANT: To switch on, always lightly press the control knob inwards then turn.
WARNING Make sure that the handles of cookware do not stick out over the edge of the range, to avoid them being knocked over by accident. This also makes it more difficult for children to reach the cooking pots/pans.
COOKWARE TIPS
The physical characteristics of pots and pans influence the performance of any cooking systems. Therefore, emphasis must be placed on the importance of using proper cookware.
Use cooking vessels with flat bottoms and tight fitting lids to conserve energy and shorten cooking times.
Only certain types of glass, glass/ceramic, ceramic, earthenware or other glazed utensils are suitable for cooktop. Manufacturers suggest using low to medium heat selections when using glass cookware.
Pan size should match the element size. A slightly larger pan covers the entire element and prevents spillovers from contacting the heat surface and burning in. Using a smaller pan than the element is a waste of energy.
To avoid spattering and to maximize efficiency, pan bottoms should be clean and dry before coming in contact with the elements.
Wipe spills off the elements with a damp cloth as soon as they cool to cut down on clean up time. Be sure the control is
If a surface unit stays red for a long time, the bottom of the pan is not flat enough or is too small for the surface unit. Prolonged usage of incorrect utensils could result in damage to the surface unit, cooktop, wiring and surrounding areas. To prevent damage use correct utensil, start cooking on position HI and turn control down to continue cooking.
Never leave an empty utensil, or one which has boiled dry, on a hot surface unit. The utensil could overheat and damage the utensils or surface unit.
Always be sure that all control knobs are turned tod and the indicator lights ared when you are not cooking.
CARE AND MAINTENANCE
GENERAL INFORMATION
CAUTION: Before any operation of cleaning and maintenance disconnect the appliance from the electrical supply.
It is advisable to clean when the appliance is cold and especially for cleaning the enameledparts.
Avoid leaving alkaline or acidic substances (lemon juice, vinegar, etc.) on the surfaces.
Avoid using cleaning products with a chlorine or acidic base.
The oven must always be cleaned after every use, using suitable products and keeping in mind that its operation for 30 minutes on the highest temperature eliminates most grime reducing it to ashes.
CLEANING YOUR RANGE
Disconnect the A/C from the main power box or designated circuit breaker, turn off the range, make sure all surface units are off and cool before removing anything, then remove all items including shelves and rack.
Wash the inside surfaces with a warm water and baking soda solution. The solution should be about 2 tablespoons of baking soda to a quart of water.
Wash the shelves and rack with a mild detergent solution.
The outside of the range should be cleaned with mild detergent and warm water.
Wring excess water out of the sponge or cloth when cleaning area of the controls, or any electrical parts.
Wash the outside cabinet with warm water and mild liquid detergent. Rinse well and wipe drywith a clean soft cloth.
Do not use steel wool or steel brush on the cook-top.
CLEANING SURFACE UNITS AND REFLECTOR BOWLS
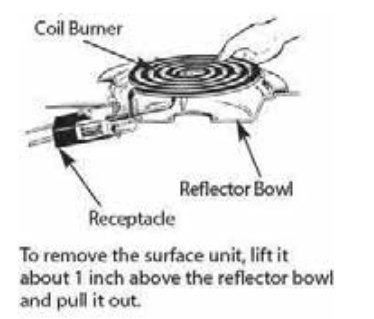
Disconnect the A/C from the main power box or designated circuit breaker and turn off the range to make sure that burners are off and cool before removing burners and reflector bowls.
Removing the burners and reflector bowls as following:
Lift the edge of the unit opposite from the receptacle, just enough to clear the reflector bowl.
Pull the surface unit gently out of the mounting receptacle.
After the unit has been removed, the reflector bowl can be lifted out of their mounting.
Clean the burners and reflector bowls with mild detergent and warm water. Wring excess water out of the sponge or cloth when cleaning them.
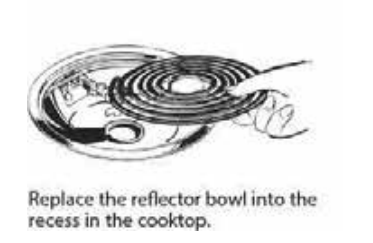
Replace the burners and reflector bowls as following:
Line up the opening of the reflector bowls with the burners receptacle, hold the surface unit as level as possible with the terminal just positioned into the receptacle, then push the surface units’ terminal into the receptacle.
When the terminal is pushed into the receptacles as far as it will go, push down the edge of the surface unit opposite the receptacle.
NOTE: Do not immerse burners in water or any other liquids.
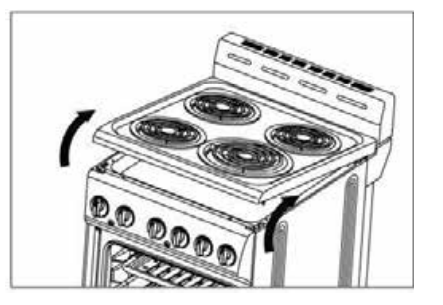
LIFT-UP COOKTOP
You can access the area beneath of the cooktop for cleaning purposes by lifting up the cooktop. In order to do:
Hold the cooktop from front left and right corners of cooktop and pull it up.
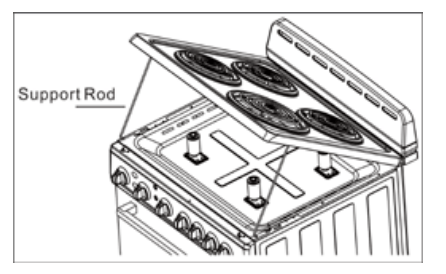
After lifting up the cooktop high enough, set the support rod into place as shown.
Leave the cooktop on the tip of support rod.
Wipe with warm soapy water. Use a soapy steelwool pad on heavily soiled areas.
To lower the cooktop, lift the cooktop holding from the front edge. Replace the support rod to its previous place. Lower the cooktop in its place.
During replacement of the cooktop, be sure that the front edge of cooktop covers the upper edge of control panel.
NOTE: Do not drop the cooktop. Personal injury or damage to the cooktop frame could result.
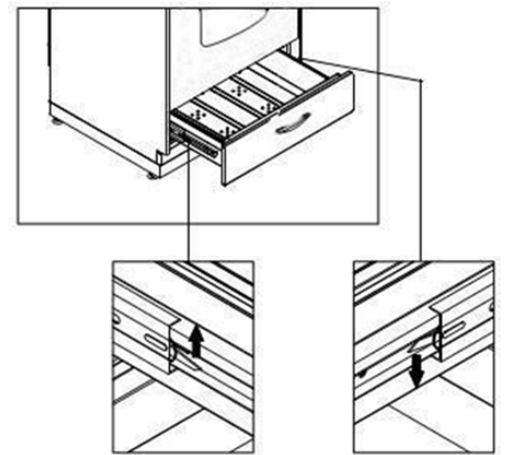
REMOVABLE STORAGE DRAWER
Do not store flammable material in the oven or in the bottom drawer.
Lift the left small hook upward, at the same time, push the right small hook downward. (See the picture)
REPLACING THE OVEN LIGHT
Before any maintenance is started involving electrical parts of the appliance, it must be disconnected from the power supply.
Let the oven cavity and broil burner cool down.
Switch off the electric supply.
Remove the protective cover.
Unscrew and replace the bulb with a new one suitable for high temperature (300°C ~ 570°C) having the same specifications: 240V 60Hz, 15W, E14.
Replace the protective cover.
NOTE: Oven bulb replacement is not covered by your guarantee.
PROBLEMS WITH YOUR ELECTRIC RANGE?
You can solve many common appliance problems easily, saving you the cost of a possible service call. Try the suggestions below to see if you can solve the problem before calling the servicer.
TROUBLESHOOTING GUIDE
PROBLEM
POSSIBLE CAUSE
Surface units will not maintain a rolling boil or frying rate is not fast enough
You must use pans that are absolutely flat.
Pan bottoms should closely match the diameter of the surface unit selected.
Foods cook slowly
Improper cookware being used.
Surface units do not operate
You have blown a household fuse or tripped a circuit breaker.
The surface units are not plugged in all the way.
You have not set the control knobs correctly.
Control knobs will not turn
If it is a surface unit control knob, you arenot pushing in before turning.
If it is oven control knob, you are tryingto turn the knob to wrong direction.
Oven light does not work
Light bulb is loose or defective.
Switch operating oven light is broken.
Oven does not work
You have blown a household fuse or tripped a circuit breaker.
You have not set the control knobs correctly.
Food does not broil properly
The oven control knob is not set at Broil.
Improper rack position being used.
Cookware is not suited for broiling.
Oven thermostat is defective.
Food does not bake properly
The oven control knob is not set properly.
Rack position is incorrect.
Incorrect cookware or cookware of improper size is being used.
Oven thermostat is defective.
SERVICE FOR YOUR APPLIANCE
We are proud of our customer service organization and the network of professional service technicians that provide service on your Avanti appliances. With the purchase of your Avanti appliance, you can have the confidence that if you ever need additional information or assistance, the Avanti Products Customer Service team will be here for you. Just call us toll-free.

 separately when oven and top burners are in use.


 setting position.