Loading ...
Loading ...
Loading ...
8 English English 8
English 9
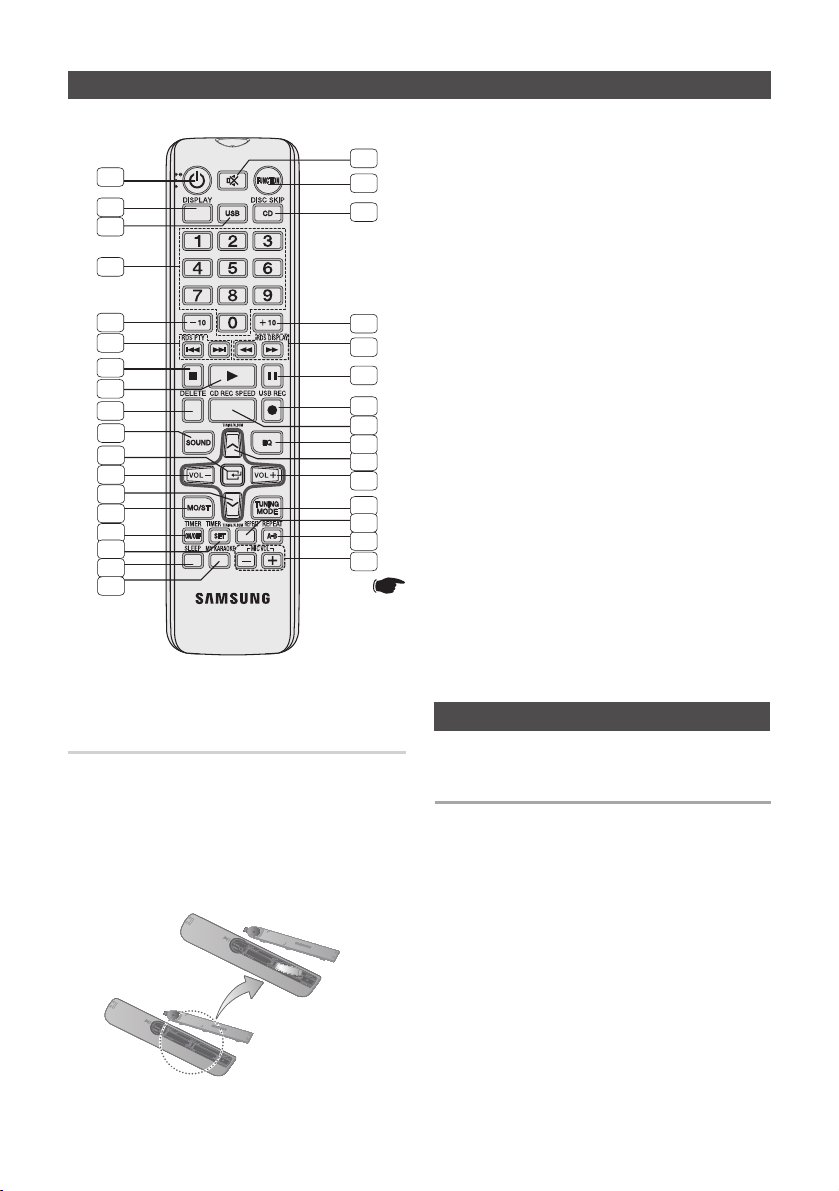
Remote Control
Installing batteries in the Remote
Control
Display function
1. POWER
2. DISPLAY
3. USB
4. Number(0~9) button
• Duringplayback,
pressthedesiredtrack
number.Theselected
trackisplayed.
5. -10
6. Skip, RDS PTY *
7. STOP
8. PLAY
9. DELETE
10. SOUND
11. ENTER
12. VOLUME -
13. TUNING/ALBUM
.
14. MO/ST
15. TIMER ON/OFF
16. TIMER SET
17. SLEEP
• Setasleeptimeto
shutofftheproduct.
18. MY KARAOKE
19. MIC VOLUME -, +
20. REPEAT A-B
21. REPEAT
22. TUNING MODE
23. VOLUME +
24.
TUNING/ALBUM
,
25. EQ
26. CD REC SPEED
27. USB REC
28. PAUSE
29. SEARCH,
RDS DISPLAY*
30. +10
31. CD DISC SKIP*
32. FUNCTION
33. MUTE
• Turnoffthesound
temporarily.
*
This product does not use the RDS PTY and RDS DIS-
PLAY function printed on the [,
)
button above.
*
This product does not use the DISC SKIP function
printed on the CD button above.
` Match the “+” and “–” ends of the batteries with the diagram
inside the battery compartment.
` Always replace both batteries at the same time.
` Do not expose the batteries to heat or a flame.
` The remote control can be used up to approximately 23 feet
(7 meters) in a straight line from the system.
Lets you view all functions available on the display
and adjust the brightness of the display.
Each time you press the DISPLAY button on the
remote control, the display mode will change as fol-
lows:
◆
The Demo function
All functions available on the system appear on the
front panel display.
◆
The Dimmer function
The Dimmer function is selected and the display
darkens.
◆
Display ON
The Display turns on.
◆
Clock ON
The Clock you set is displayed.
1
2
3
4
5
6
7
8
9
10
11
12
13
14
15
16
17
18
19
20
22
21
23
24
25
26
27
28
29
30
31
32
33
* Battery size: AAA
MX-E630CB-E650CB-ENG-XAA-0710.indd 8 2012-7-10 10:49:12
Loading ...
Loading ...
Loading ...