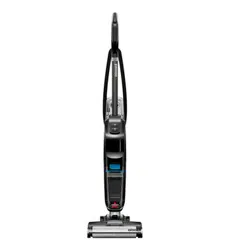
User Guide Vacuum Cleaner
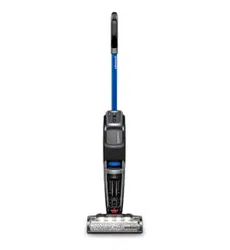
PRODUCT VIEW
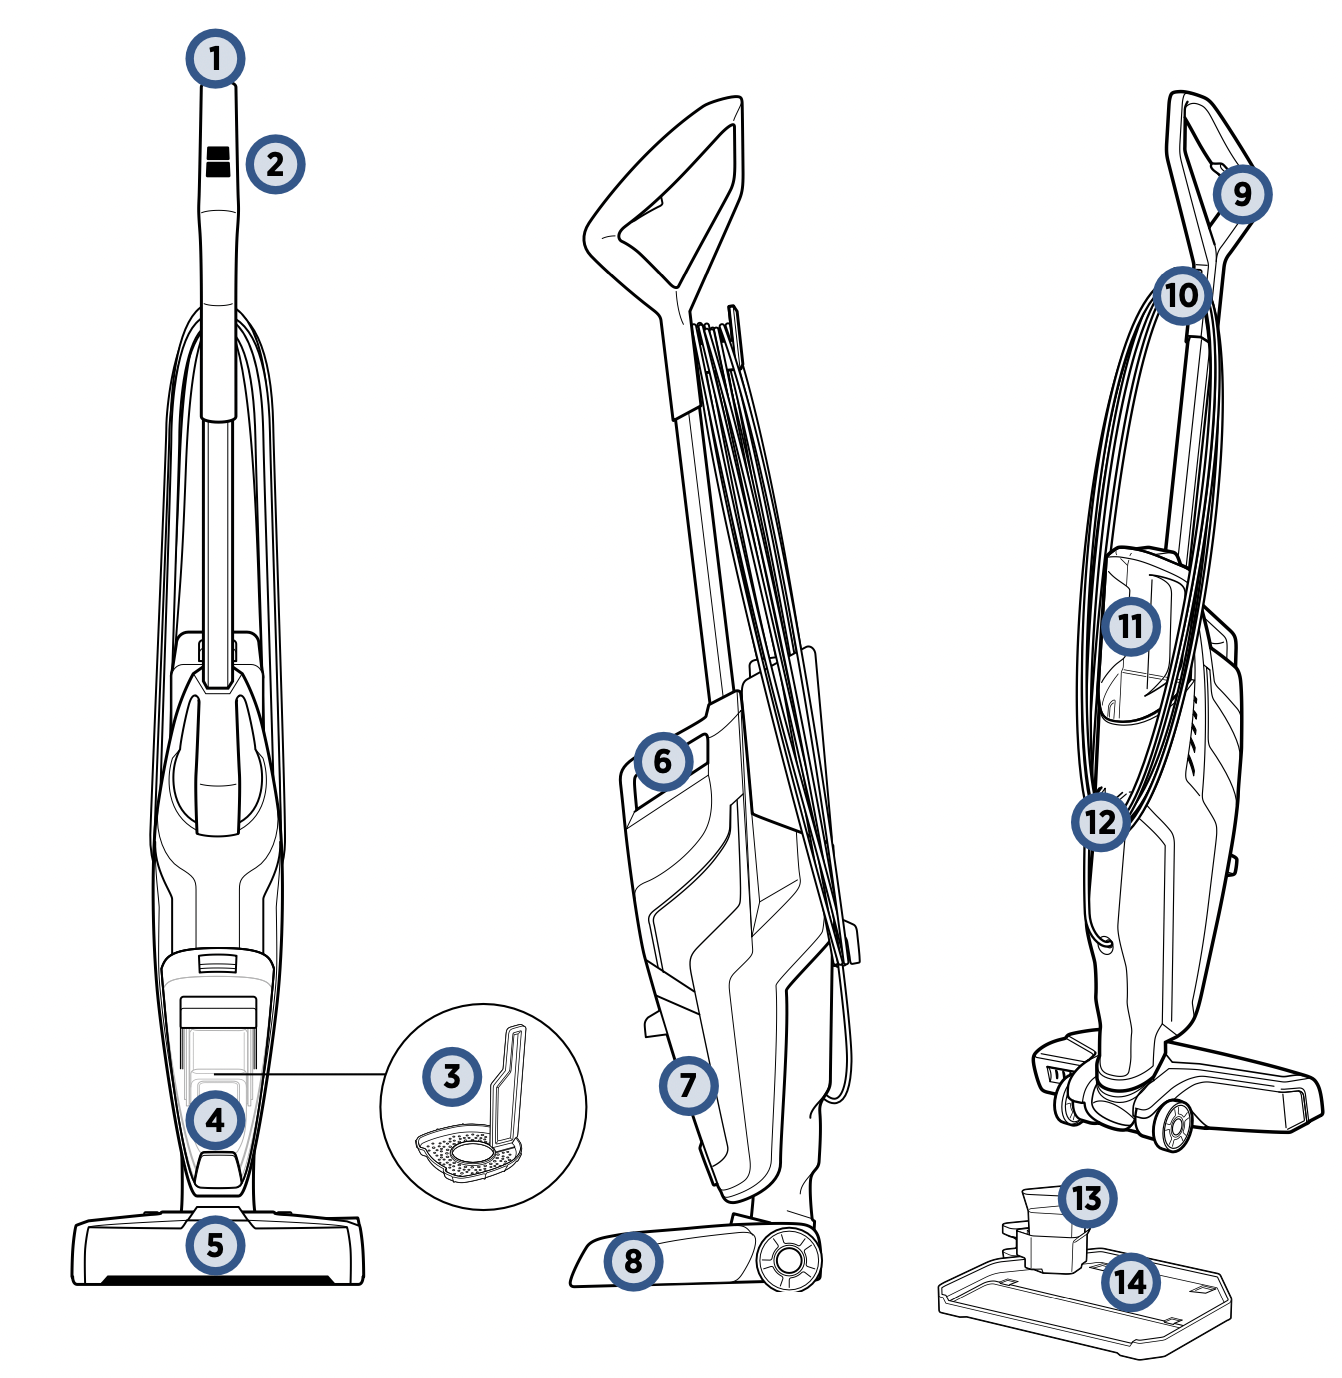
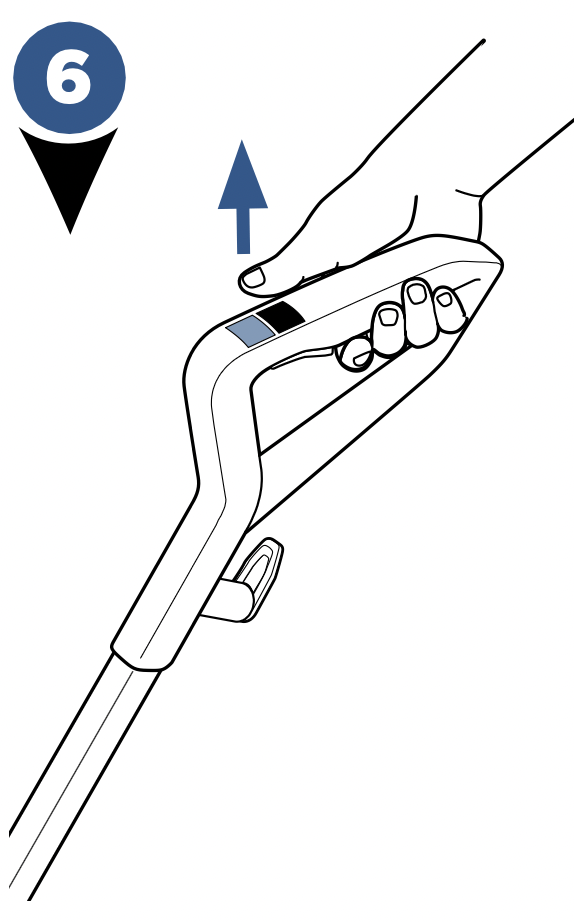
- Upper Handle
- SmartClean Fingertip Controls
- Strainer
- Float Stack
- Easy Remove Brush Window
- Integrated Carry Handle
- Dirty Water Tank
- Foot
- Solution Spray Trigger
- Quick Release Cord Wrap
- Clean Water Tank
- Lower Cord Wrap
- Rinse Cup
- Rinse and Storage Tray
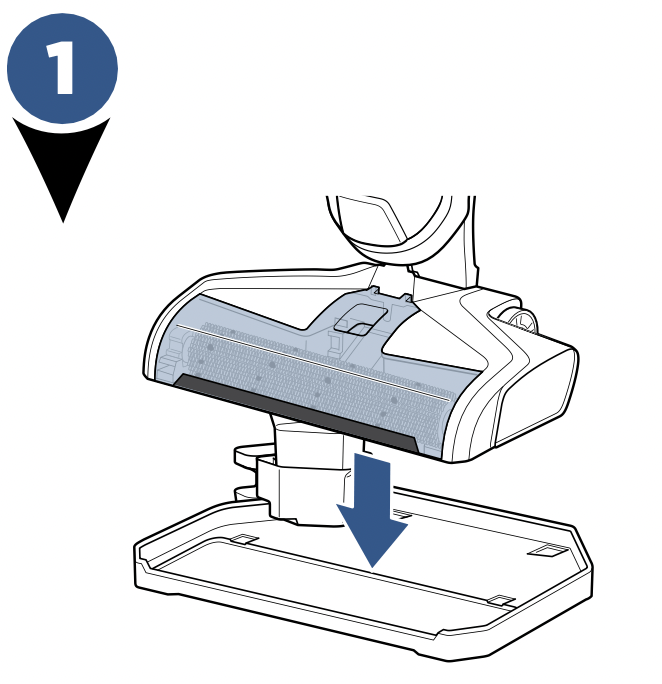
Your BISSELL CrossWave® Pet Pro machine comes in three easy to assemble components and does not require any tools to assemble. The unit also comes with a three-piece Rinse and Storage Tray.
- Handle
- Body
- Clean Water Tank
- Rinse and Storage Tray
- Brush Roll Drying Tray with Rinse Cup
ASSEMBLY
WARNING: Do not plug in your CrossWave Pet Pro until you are familiar with all instructions and operating procedures.
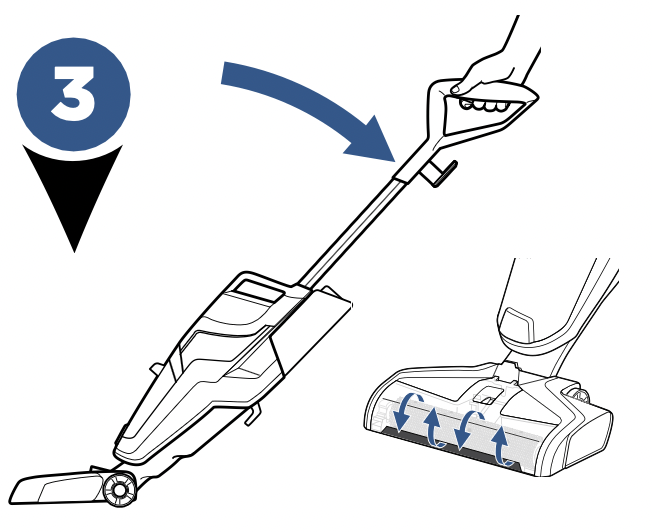
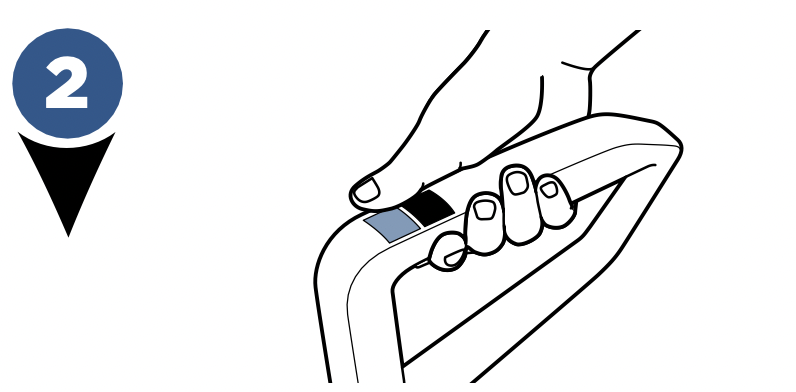
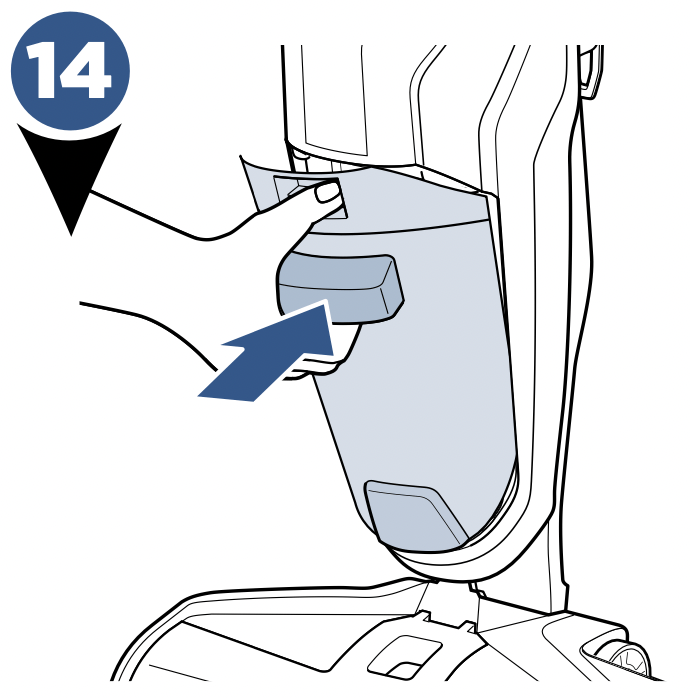
- Insert handle into body of unit until you hear a click.

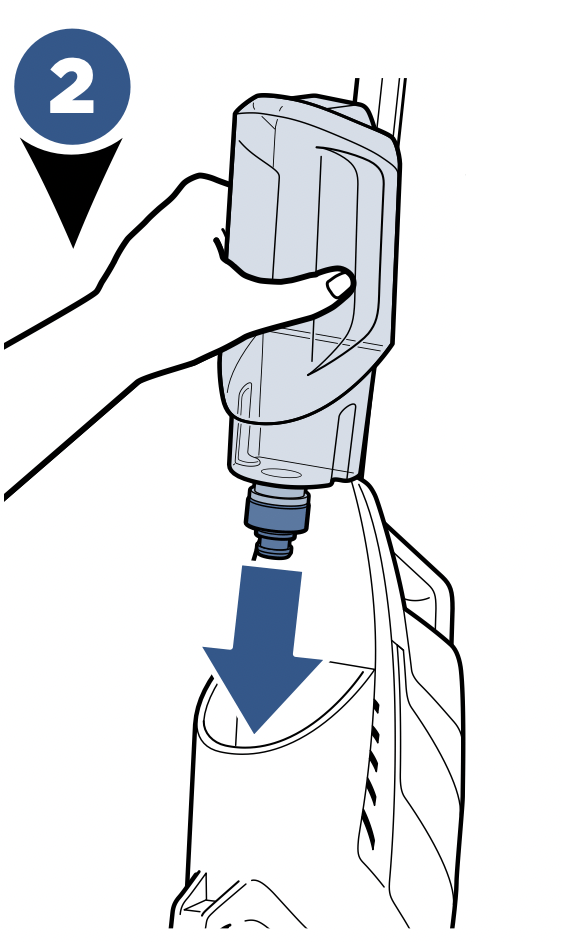
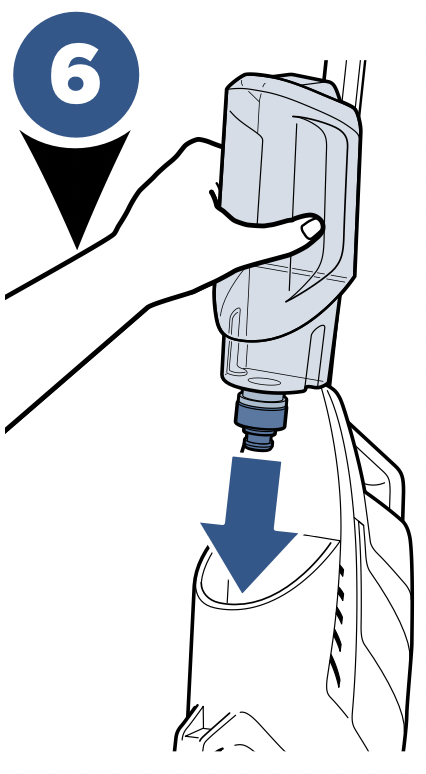
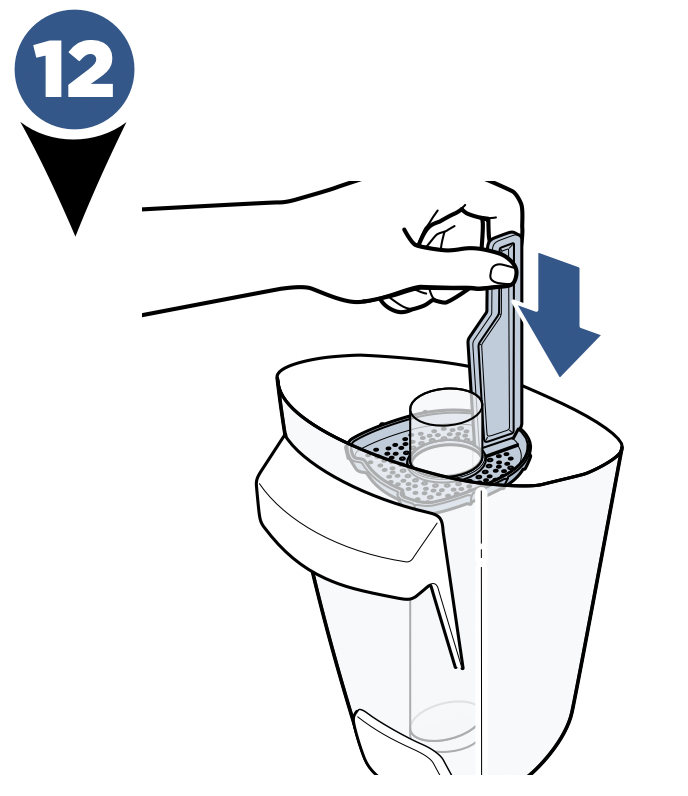
- Then, on the back of the machine, align clean water tank with the grooves and slide tank into place until you hear a click.
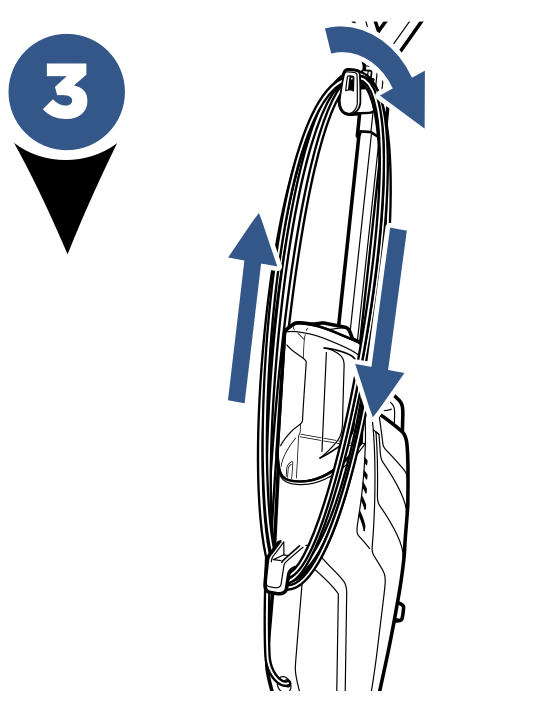
- Wrap the cord around the quick release cord wrap and the lower cord wrap.
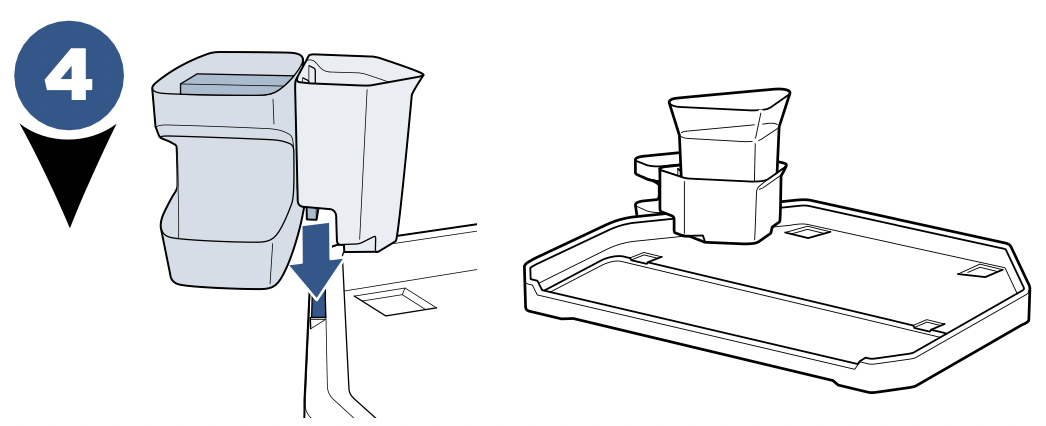
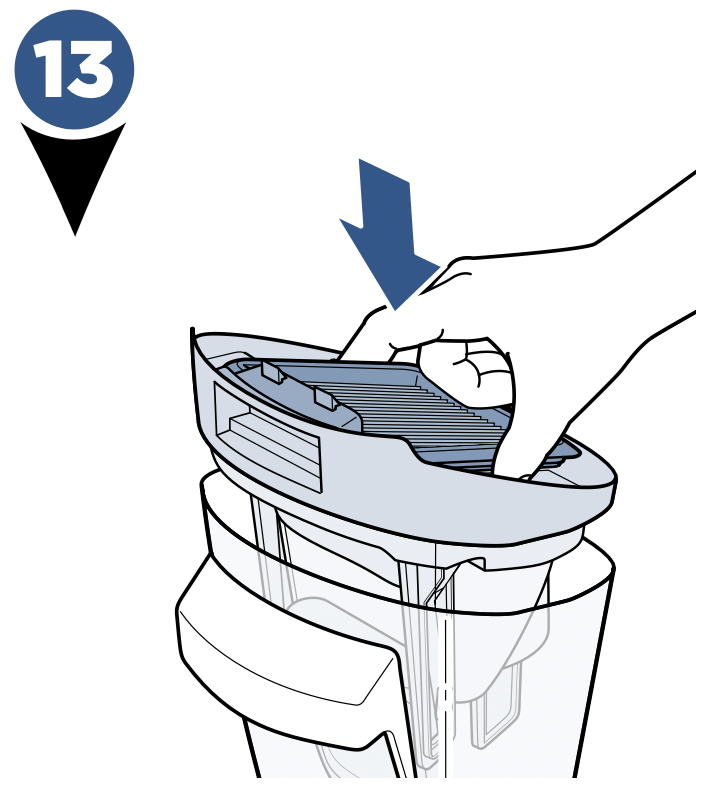
- The multi-functional Rinse and Storage Tray includes a machine storage tray, brush roll drying tray with rinse funnel, and rinse cup. To assemble, slide the over hang in the middle of the brush roll drying tray with rinse funnel down into the opening on the storage tray that is indicated with arrows. Then, place the Rinse Cup into the Rinse Funnel.
NOTE: To easily unwrap the cord for use, just turn the quick release cord wrap downward to remove the cord from the cord wrap.
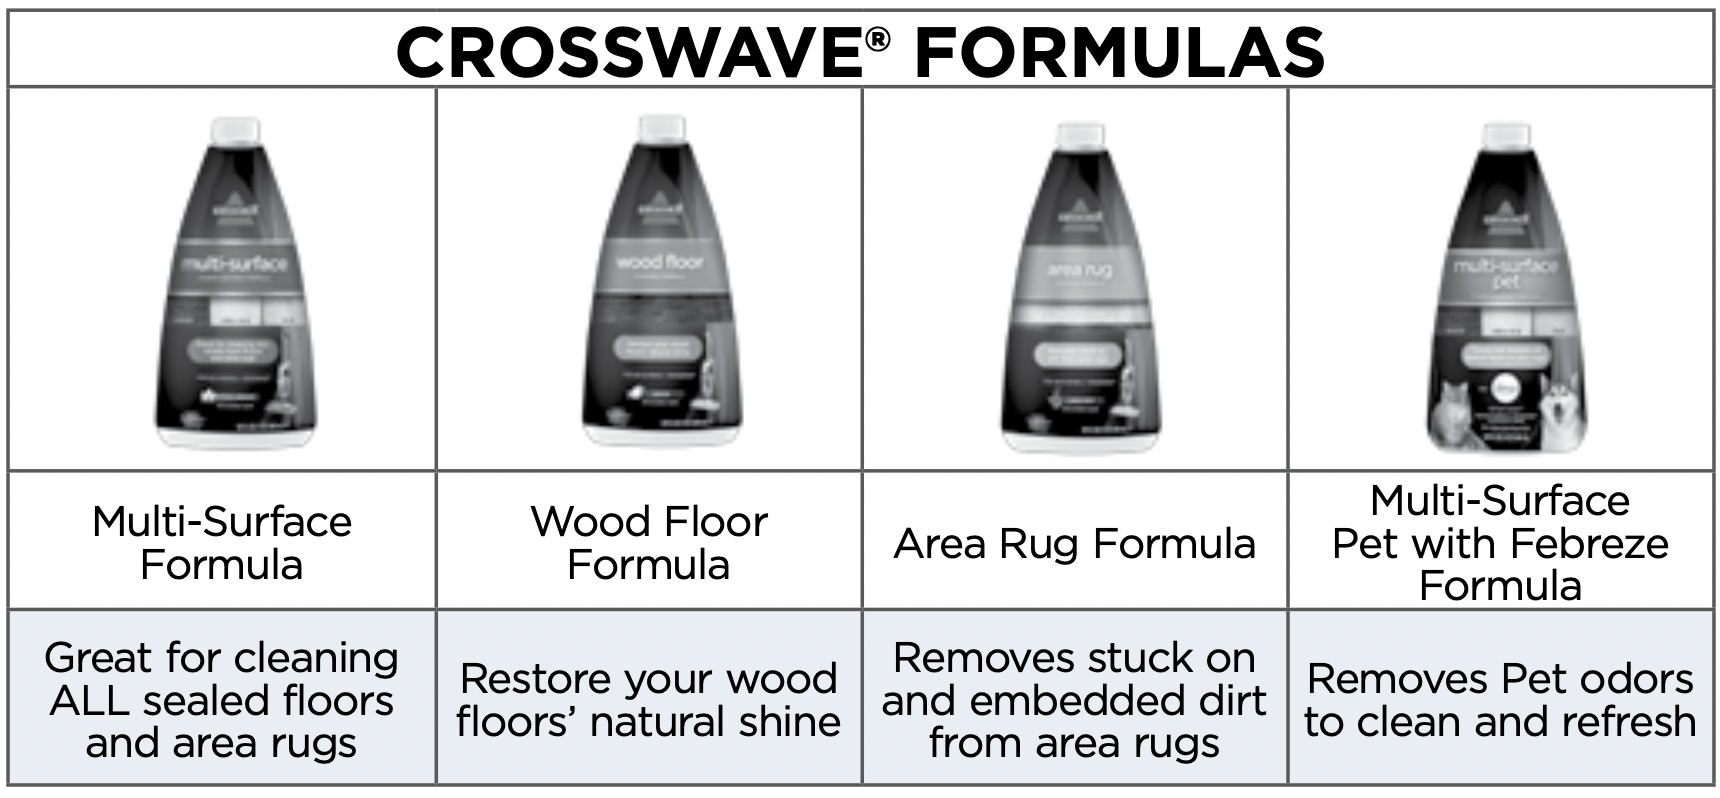
Cleaning Formulas
WARNING: To reduce the risk of fire and electric shock due to internal component damage, use only BISSELL cleaning fluids intended for use with the hard floor device.
Keep plenty of CrossWave® formulas on hand so you can clean your hard floors and area rugs whenever it fits your schedule.
Always use CrossWave® formulas in your machine. Other solutions may harm the machine and void the warranty.
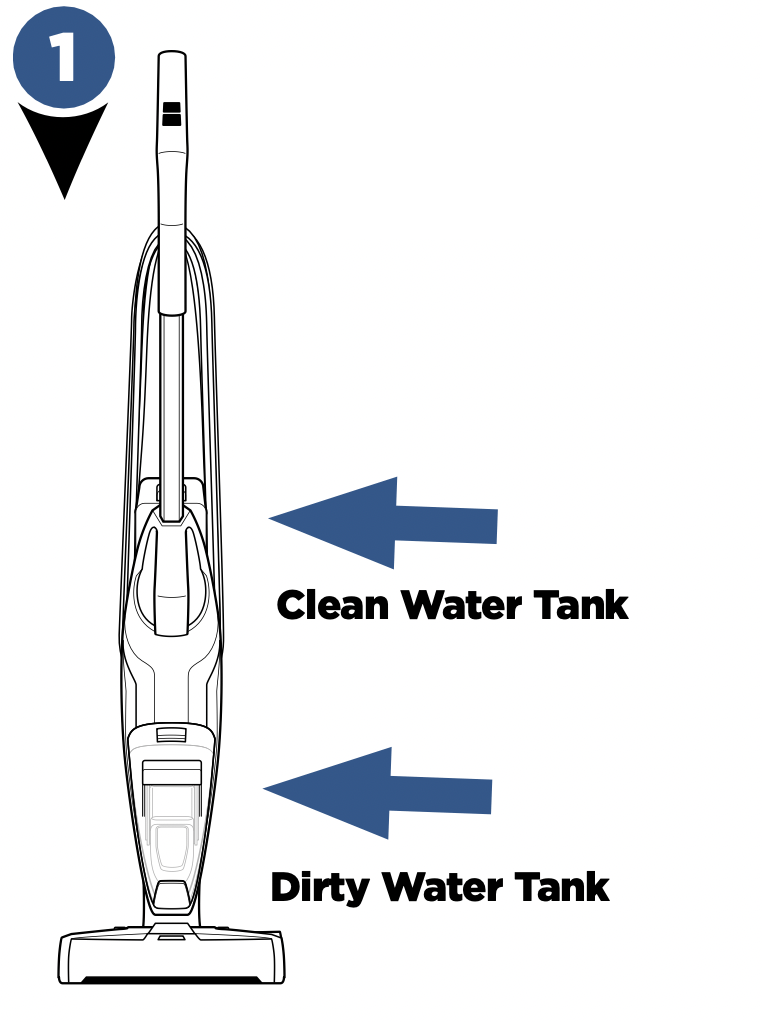
Filling Your Clean Water Tank
- The clean water tank is located on the back of the machine.
- Lift the clean water tank straight up to remove from the machine.
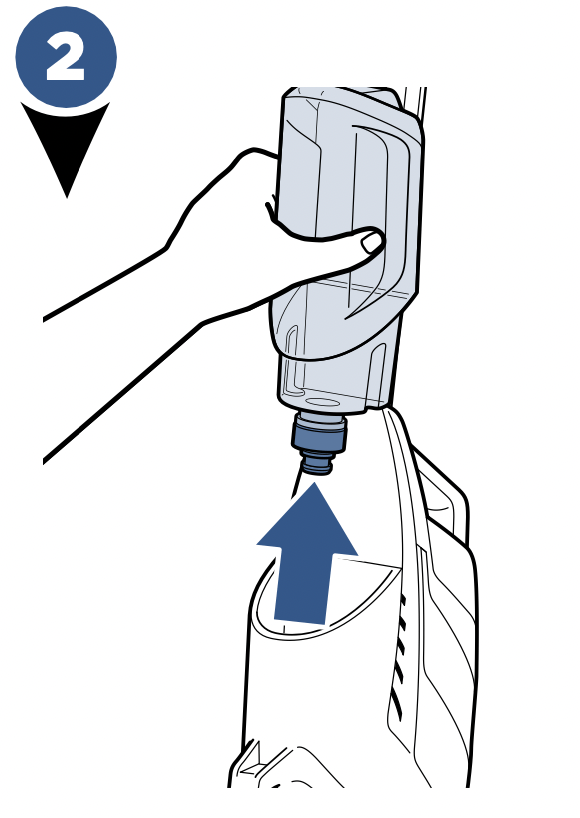
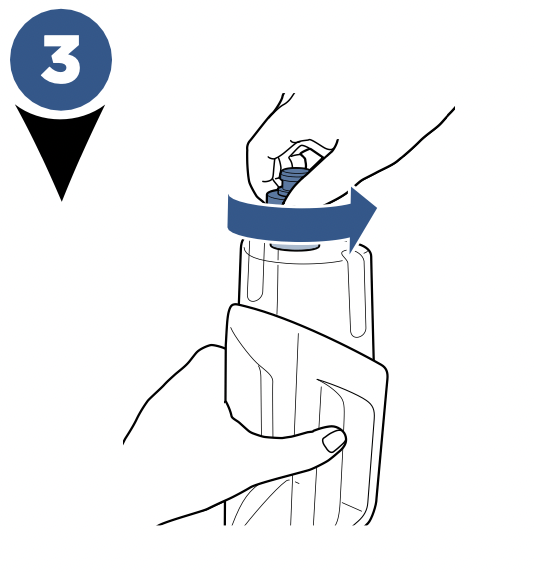
- Unscrew the cap from the clean water tank.
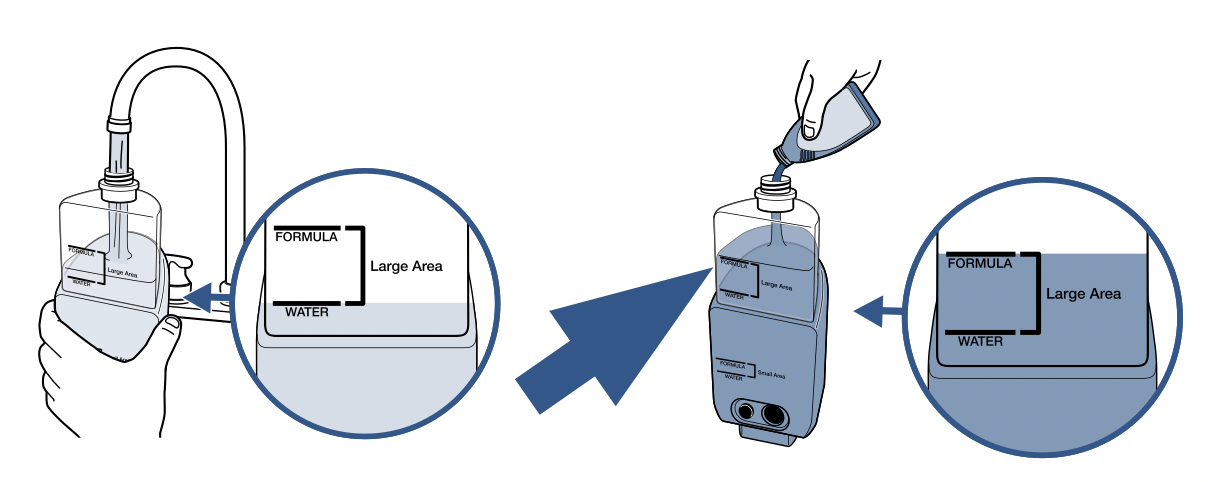
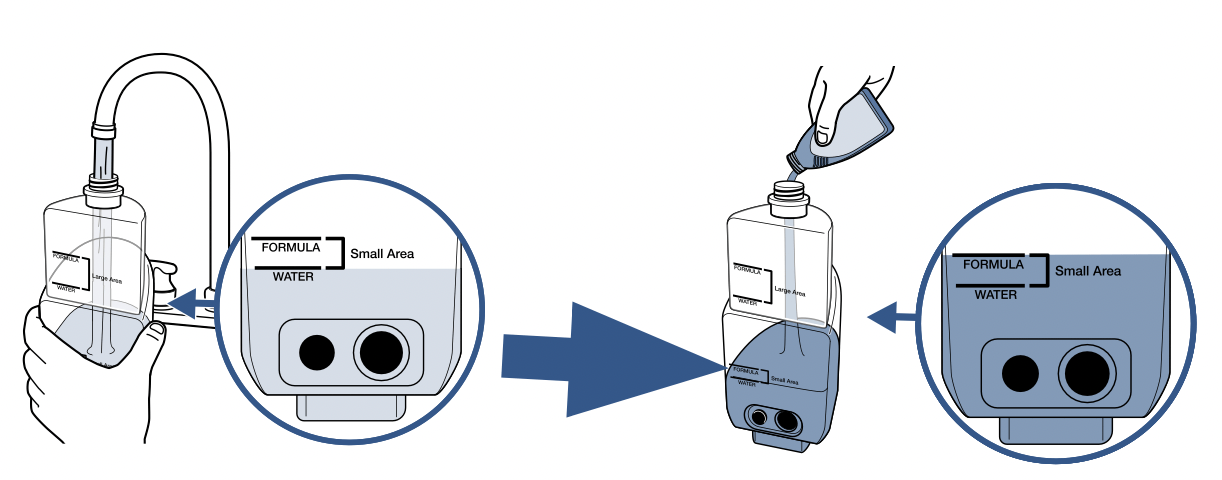
The clean water tank has two measuring volumes depending on the amount of space you would like to clean.
- For large area cleaning (up to 700 sq ft)
a. Fill formula tank with warm tap water to the second water fill line.
b. Then add formula to the second formula fill line.
For small area cleaning (<350 sq ft)
a. Fill formula tank with warm tap water to the first water fill line.
b. Then add formula to the first formula fill line.
- Screw the cap back onto the clean water tank.
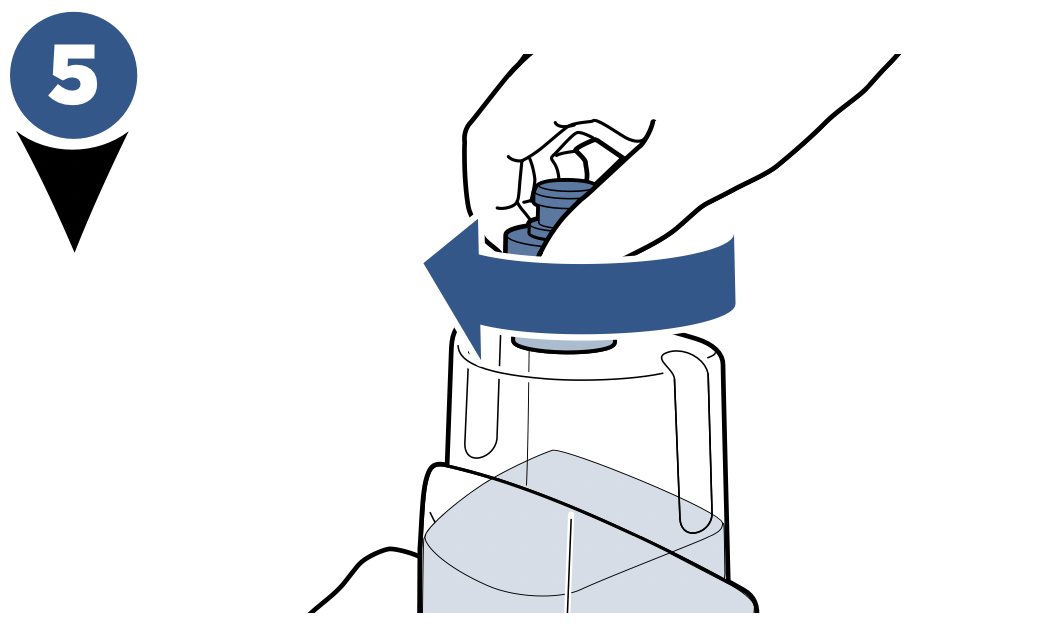
- On the back of the machine, align clean water tank with the grooves and slide tank into place until you hear a click.
A few notes about filling the clean water tank:
- Fill with warm (140°F/60°C MAX) tap water and add the appropriate BISSELL solution. DO NOT USE BOILING WATER. DO NOT HEAT WATER OR TANK IN MICROWAVE.
Cleaning Your Hard Floors
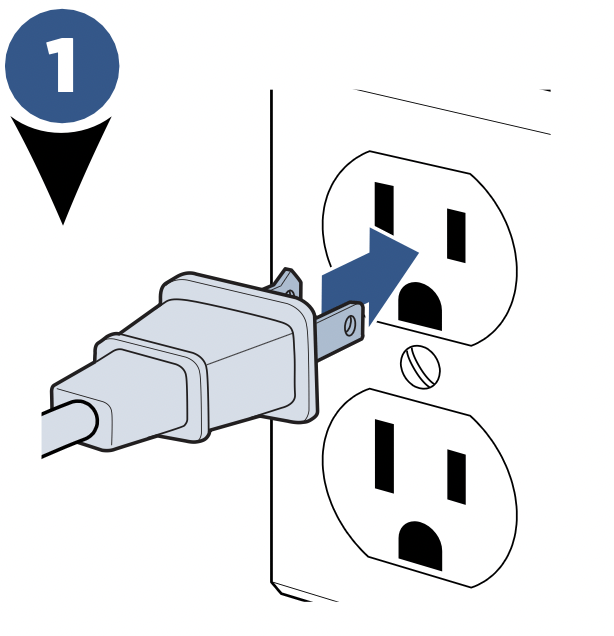
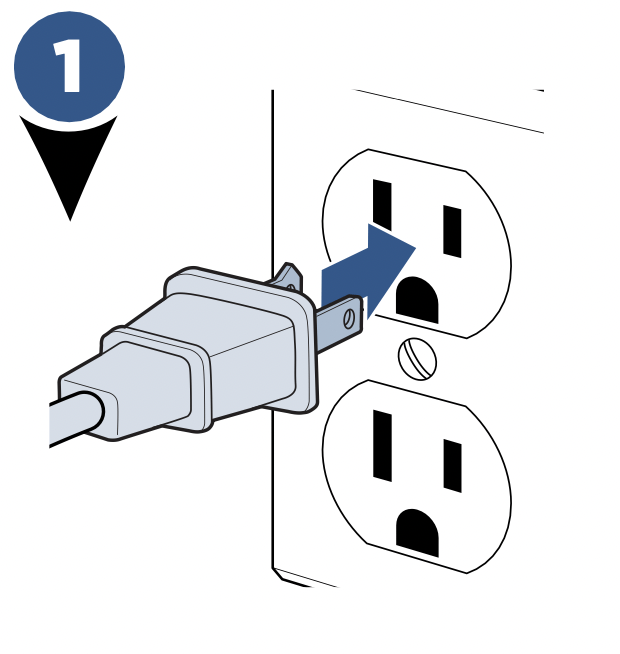
- Plug machine into a properly grounded outlet.
- Select cleaning mode:
To start cleaning your hard floors, turn the machine ON pressing the HARD FLOOR button. Once the setting is selected, the dry vacuum will turn on. To turn OFF, press the HARD FLOOR setting a second time.
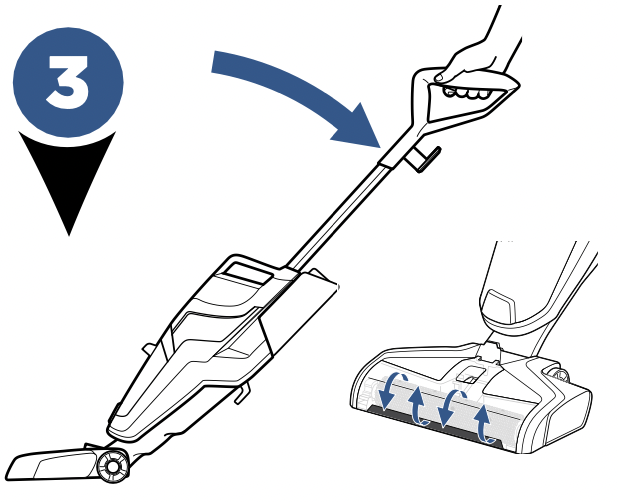
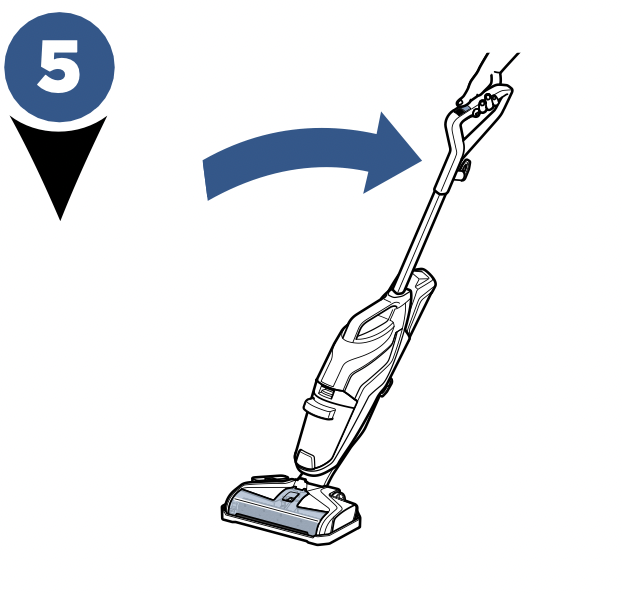
- Recline the body of the machine backward to start the brush roll spinning. To stop the brush roll spinning, you will need to stand the machine upright.
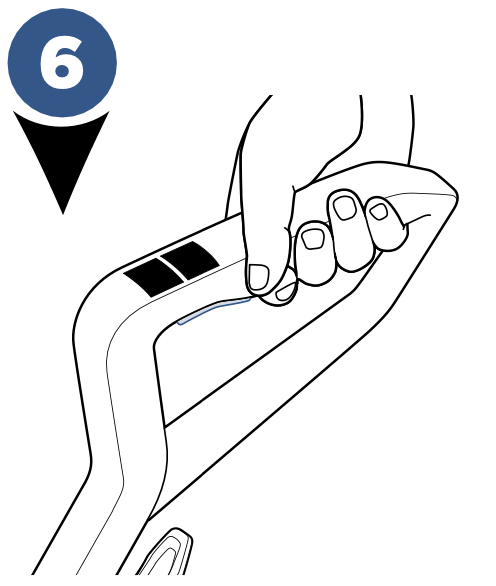
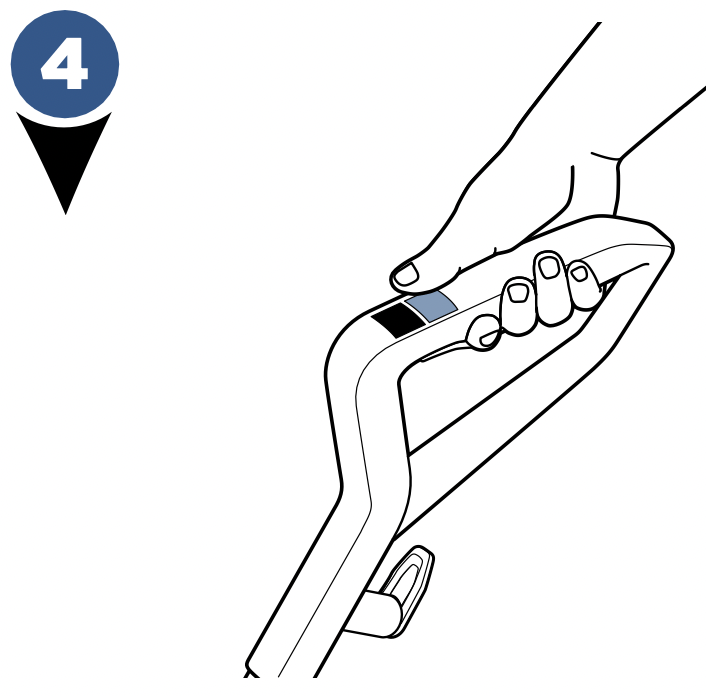
- Before each use, hold the solution spray trigger for 10 seconds to prime the system with cleaning solution. LED lights illuminate when holding the trigger.
NOTE: When solution is flowing, you will see bubbles forming at the edges of the brush roll window.
- To clean, hold the solution spray trigger to apply solution on both forward and backward passes.
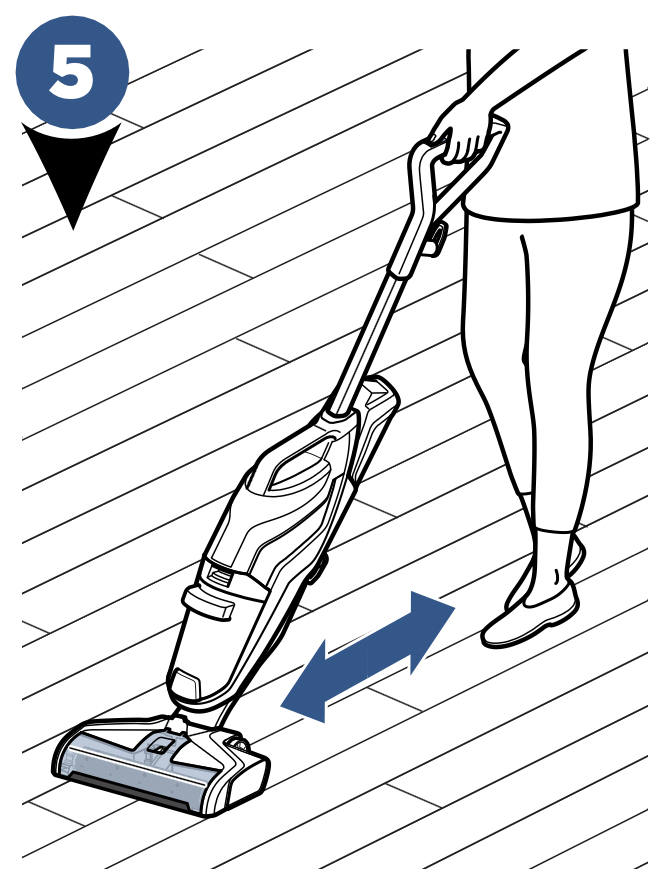
- To dry hard floors faster, release the trigger and clean a second pass without dispensing solution.
TIP:
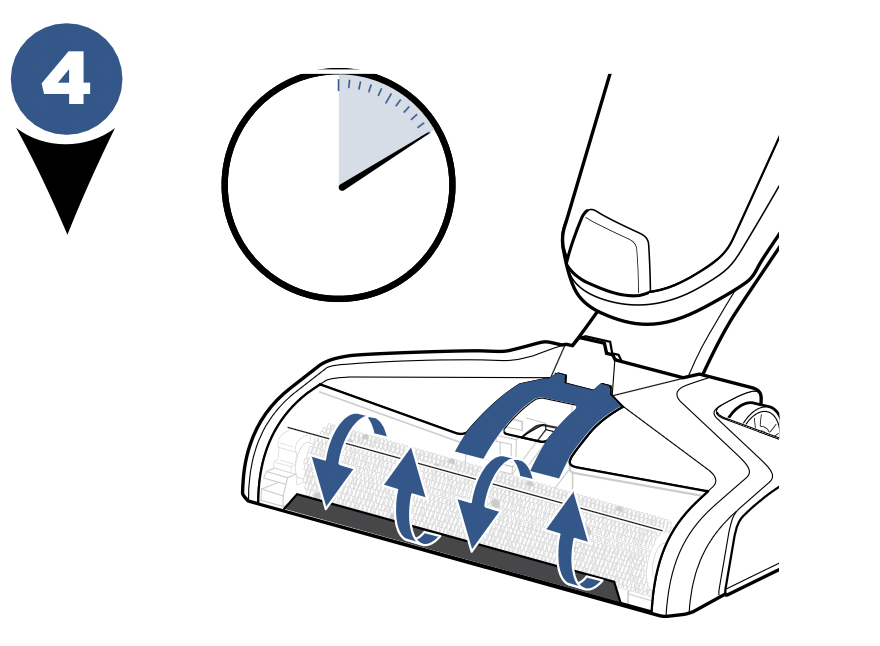
- When cleaning excessively dirty or muddy hard floors or if your brush roll looks dirty, use the Easy Clean Storage Tray to rinse your brush roll before cleaning your area rugs.
- For overly challenging and stuck-on messes on your hard floors, activate the RUG mode and hold your CrossWave Pet Pro over the mess. Using short passes while holding the trigger allows the multi-surface brush to go to work.
Cleaning Area Rugs
NOTE: Before cleaning area rugs, test an inconspicuous area of the rug for colorfastness. Also, please check manufacturer’s tag before cleaning area rugs for [any specialized cleaning instructions. Not for use on silk or delicate area rugs.
- Plug machine into a properly grounded outlet.
- Select cleaning mode:
To start cleaning your rugs, turn the machine ON pressing the RUG button. Once the setting is selected, the dry vacuum will turn on.
To turn OFF, press the RUG setting a second time.
- Recline the body of the machine backward to start the brush roll spinning. To stop the brush roll spinning, you will need to stand the machine upright.
- Before each use, hold the solution spray trigger for 10 seconds to prime the system with cleaning solution. LED lights illuminate when holding the trigger.
NOTE: When solution is flowing, you will see bubbles forming at the edges of the brush roll window.

- To clean, hold the solution spray trigger to apply solution on both forward and backward passes.
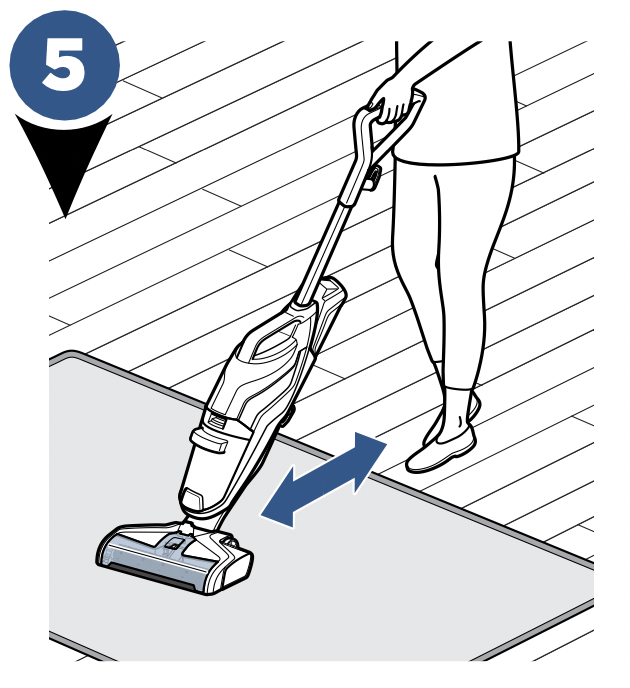
- To dry area rugs faster, release the trigger and clean a second pass without dispensing solution.
NOTE: The RUG button dispenses twice the solution of the HARD FLOOR button to help with area rug cleaning.
ATTENTION: Do not over wet carpet. Be careful not to run over loose objects or edges of area rugs. Stalling the brush may result in premature belt failure.
Maintenance
Rinse and Storage Tray
WARNING: To reduce the risk of fire, electric shock or injury, turn power OFF and disconnect plug from electrical outlet before performing maintenance or troubleshooting.
- Place unit on rinse and storage tray.
- Fill rinse cup with water.
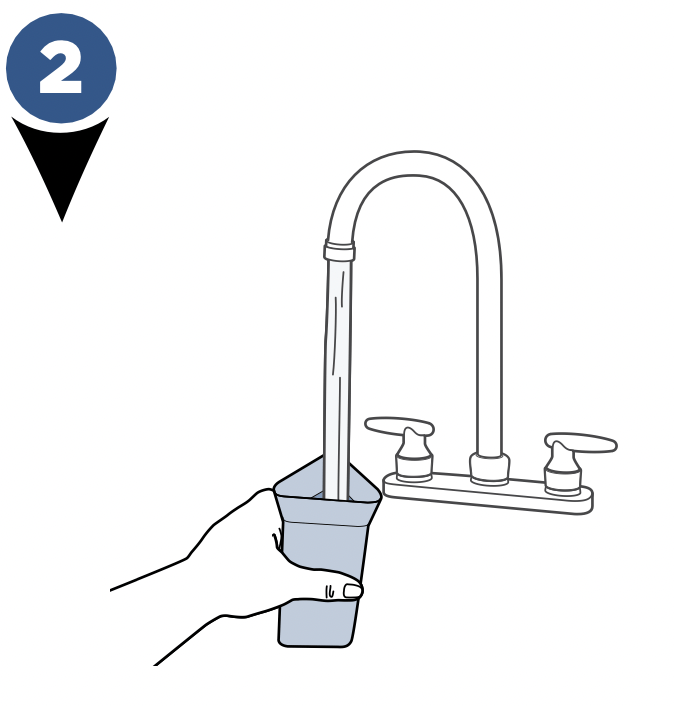
- Pour water into rinse funnel to fill the MAX line of the rinse and storage tray.
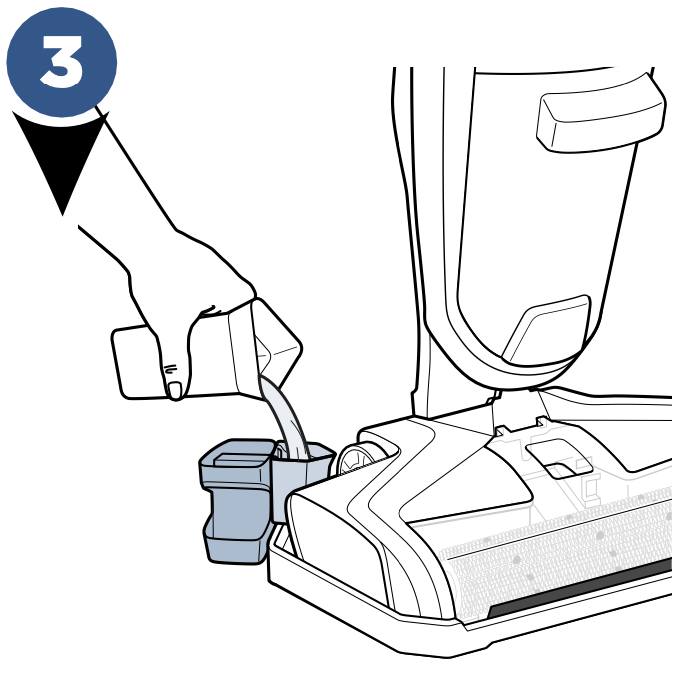
- Turn the machine ON by pressing the Hard Floor button.
- Recline the machine while in storage tray. Allow the machine to run for 10-15 seconds until all water is picked up. Repeat as needed.
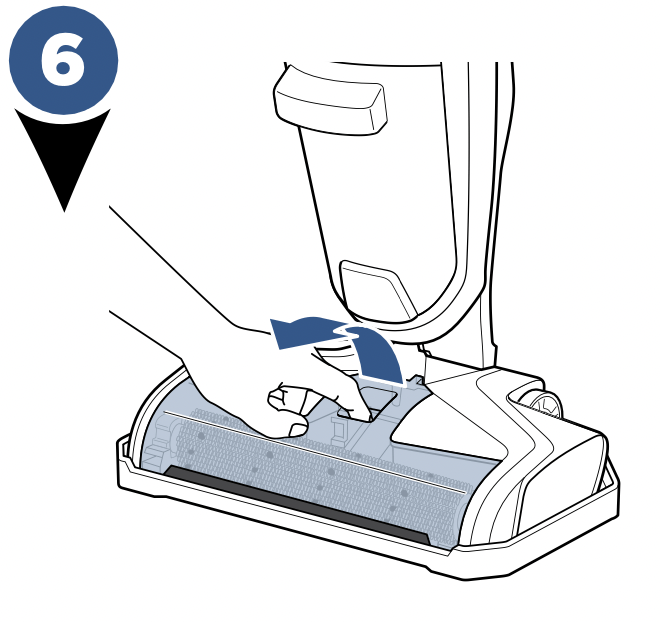
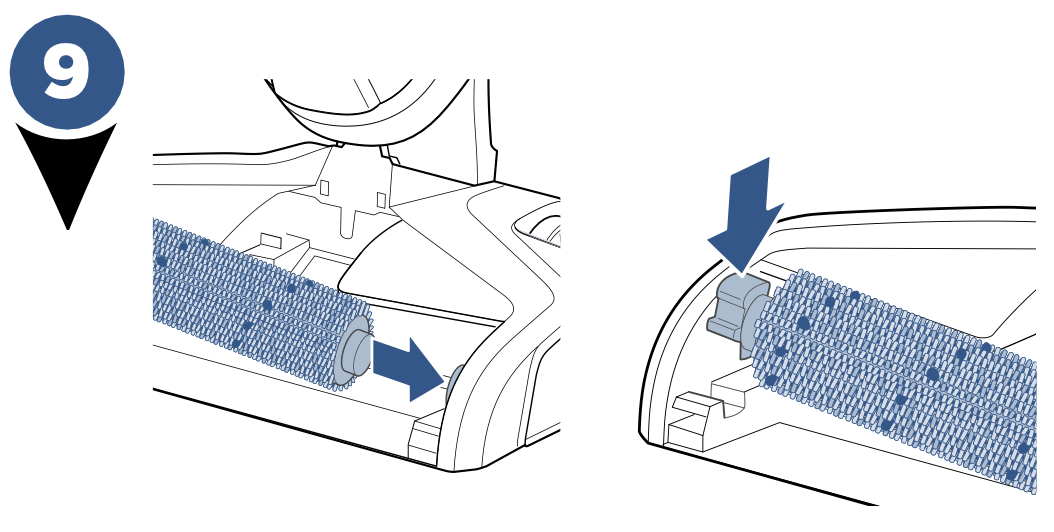
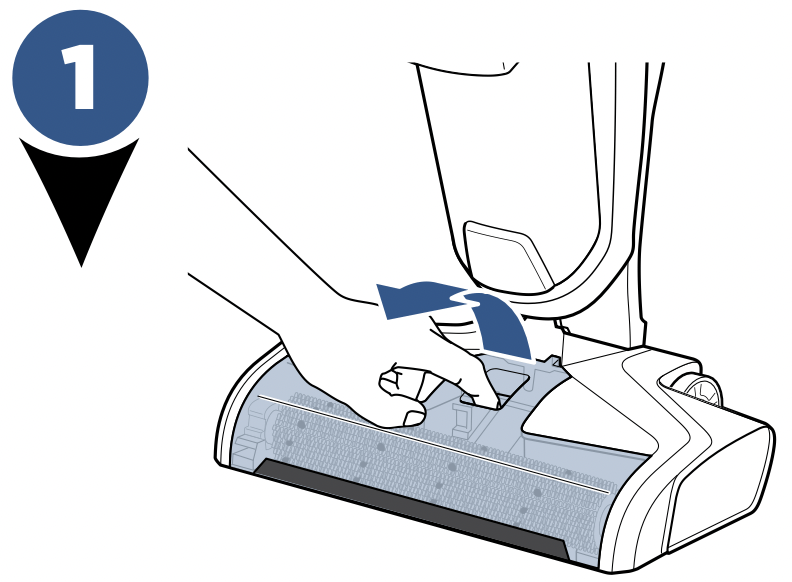
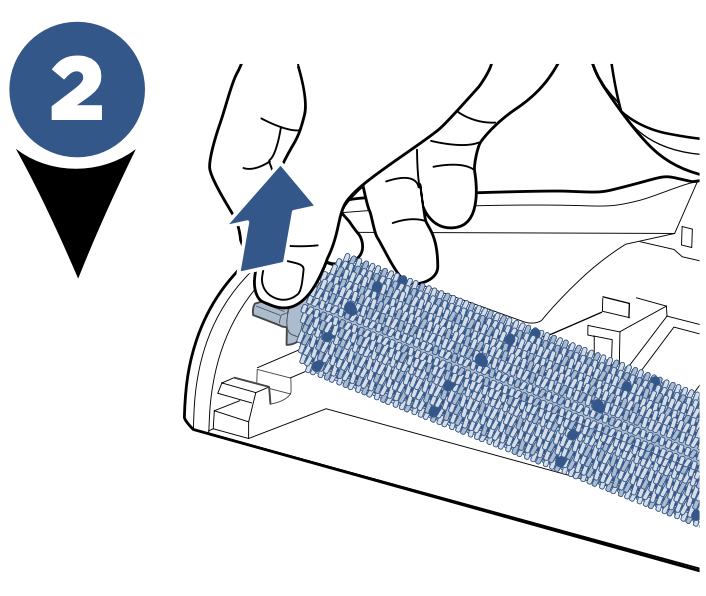
- Grasp brush roll window at the front of the window and pull upward to remove.
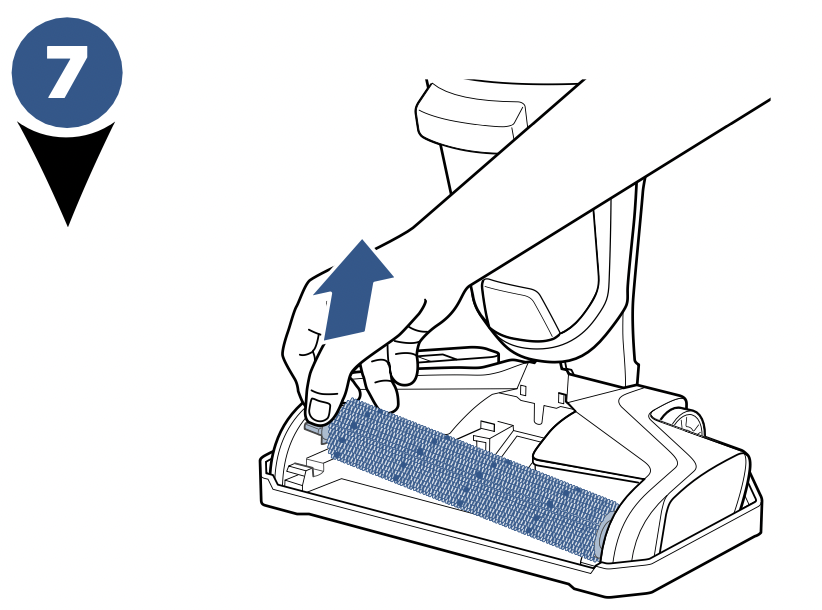
- Pull brush roll out by grabbing the brush roll tab and pulling upward.
- Place the brush roll upright in the Brush Roll Drying Tray to dry.
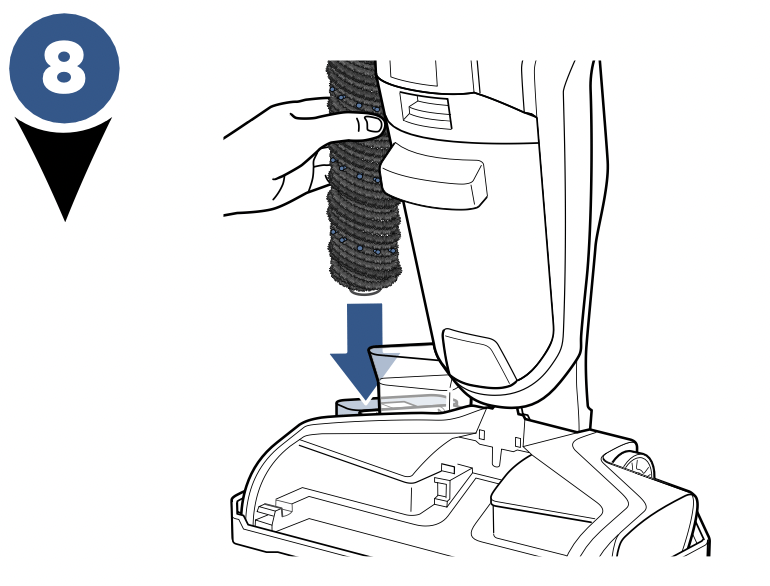
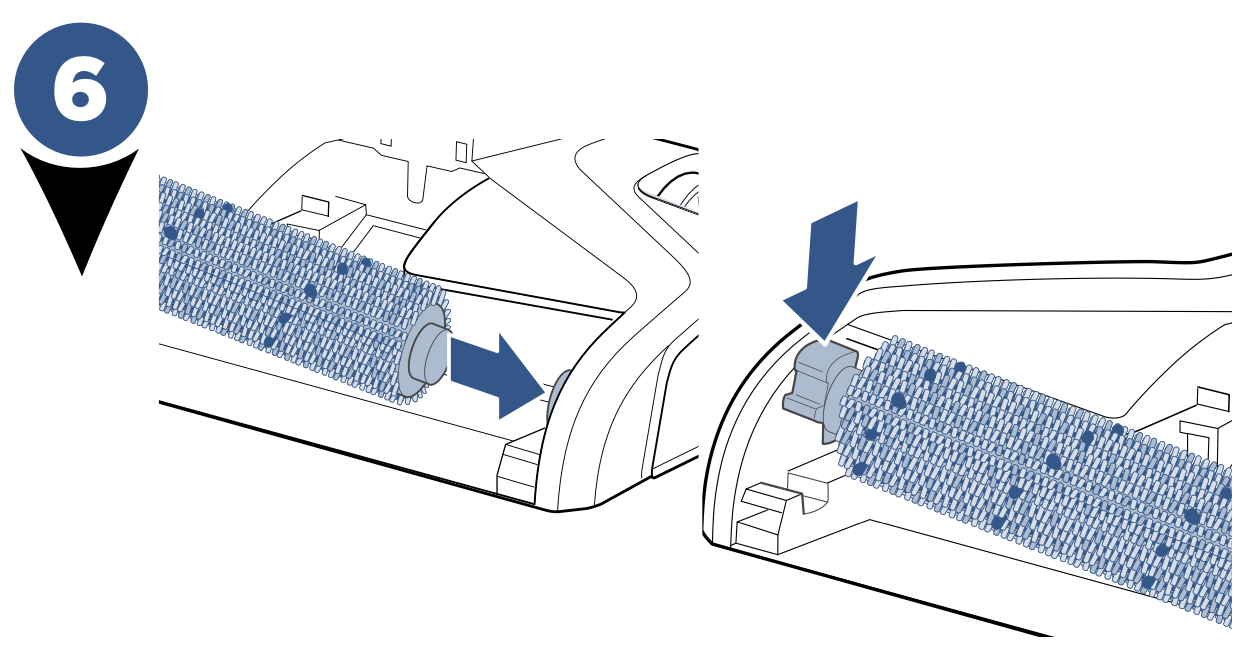
- Replace brush roll by inserting the brush roll end into the right side of the foot. Then lock the pull tab into place by pressing downward.
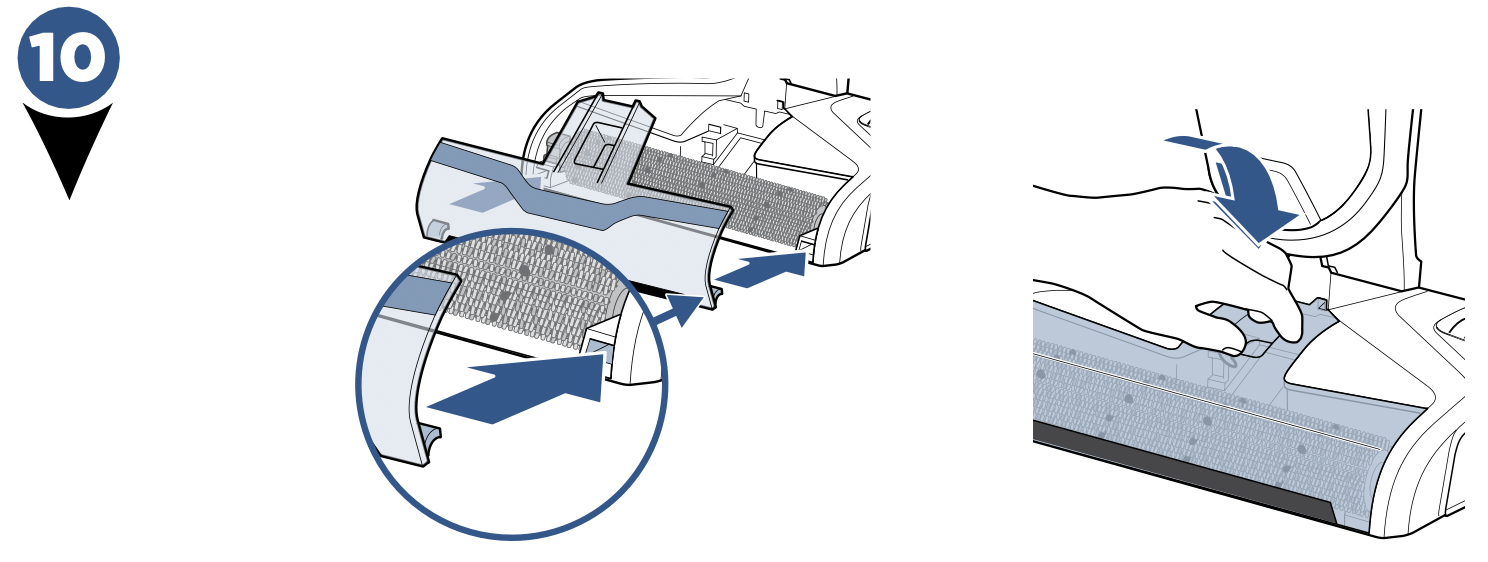
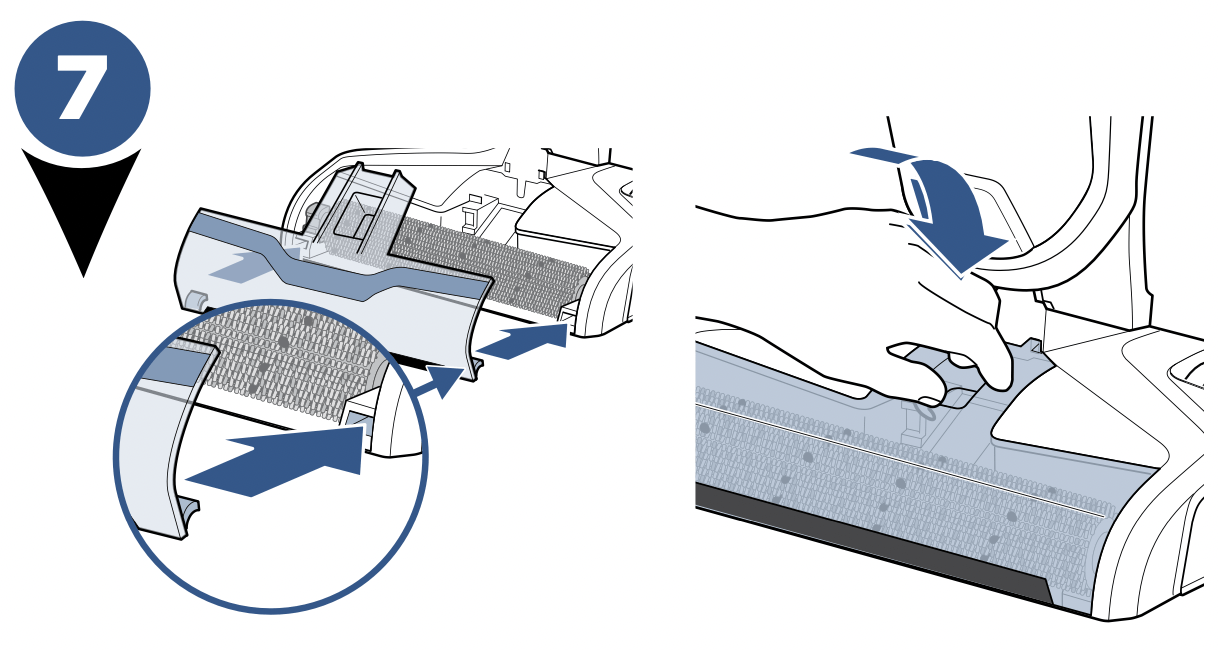
- Replace the brush roll window by first lining up the brush window tabs with the edges of the foot. Then press the window back into place until you hear a click.
Machine Storage: Put the unit away in a closet or basement until the next use. Store cleaner in a protected, dry area. Since this product uses water, it must not be stored where there is a danger of freezing. Freezing will damage internal components and may void the warranty.
NOTE: Any solution remaining in the clean water tank should be emptied prior to machine storage.
Dirty Water Tank
WARNING: To reduce the risk of fire, electric shock or injury, turn power OFF and disconnect plug from electrical outlet before performing maintenance or troubleshooting.
- To release dirty water tank, press down on recessed button on the top of the dirty tank.
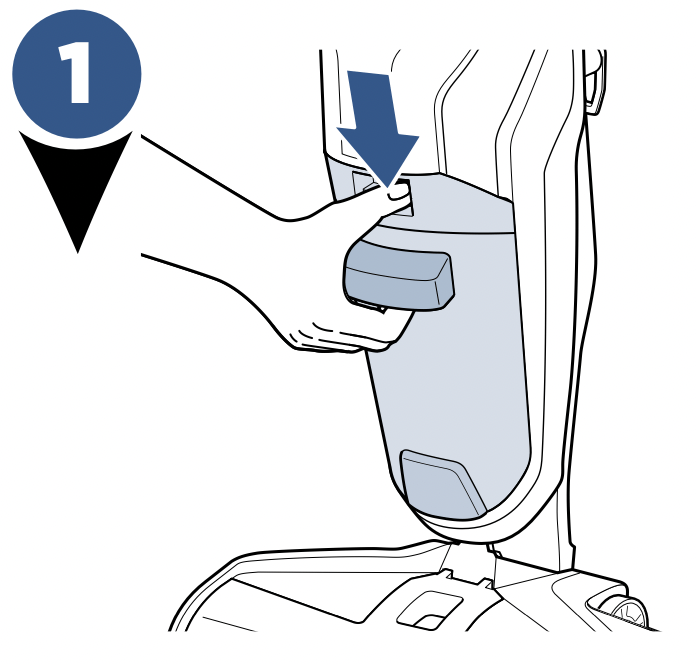
- Grab the front handle while pressing down on button and pull dirty water tank away from the unit.
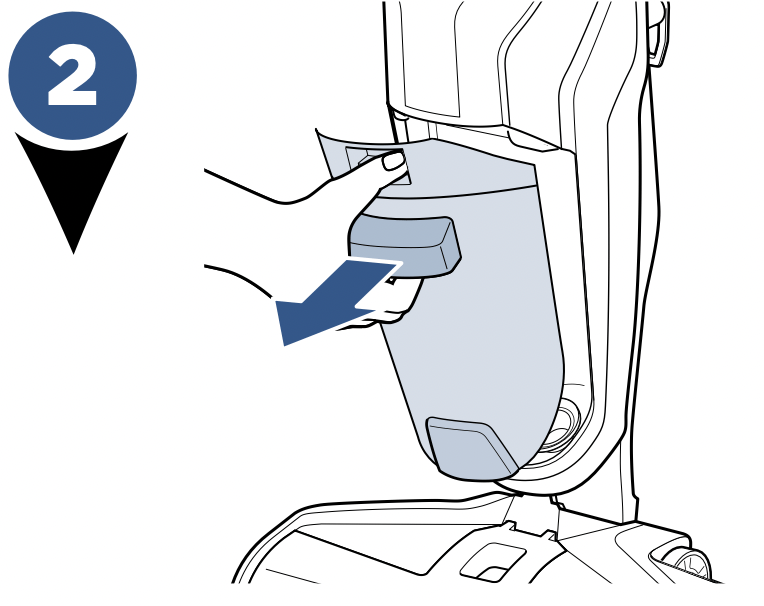
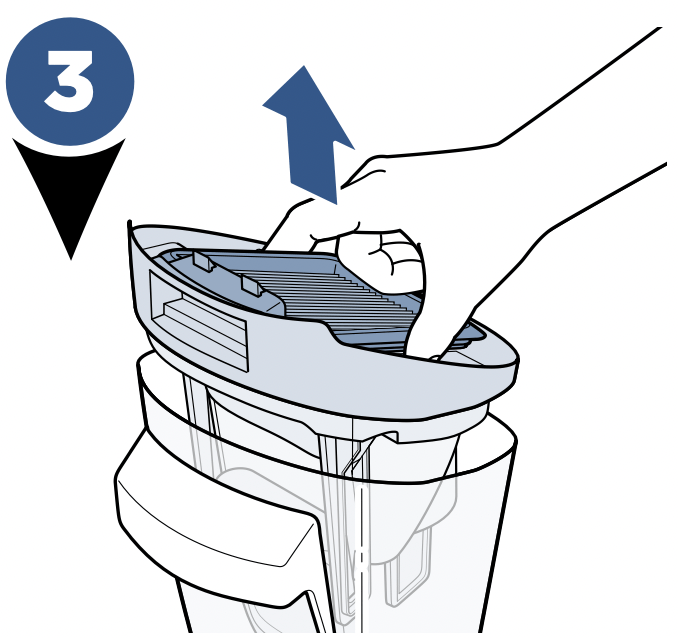
- Grasp top of dirty water tank in recessed areas on each side of the filter and pull upward to remove the top of the tank.
Did You Know?
The Float is what prevents your dirty tank from overflowing. When your dirty tank is full, the float will shut off your suction motor creating a high pitched sound indicating it is time to empty your dirty water tank.
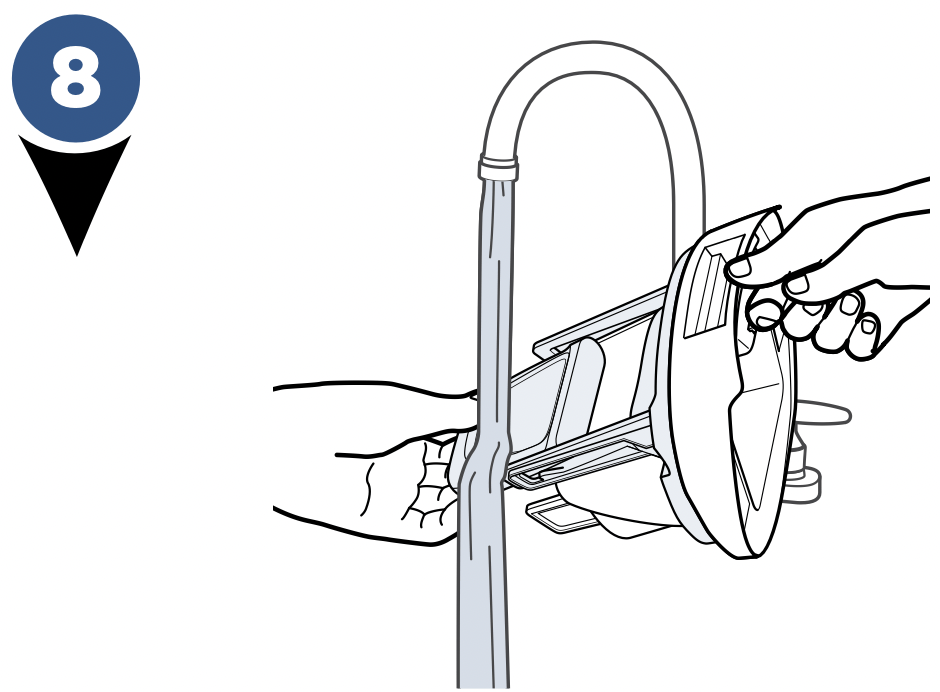
- Remove strainer from dirty tank then throw debris in trash.

- Pour dirty water out. Rinse the inside of the dirty water tank.
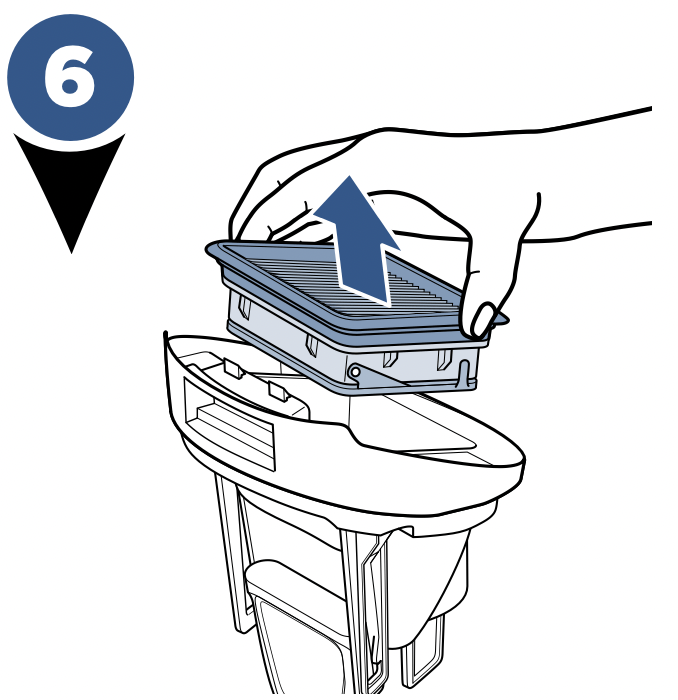
- Remove the filter from the top of the dirty water tank by pulling it up.
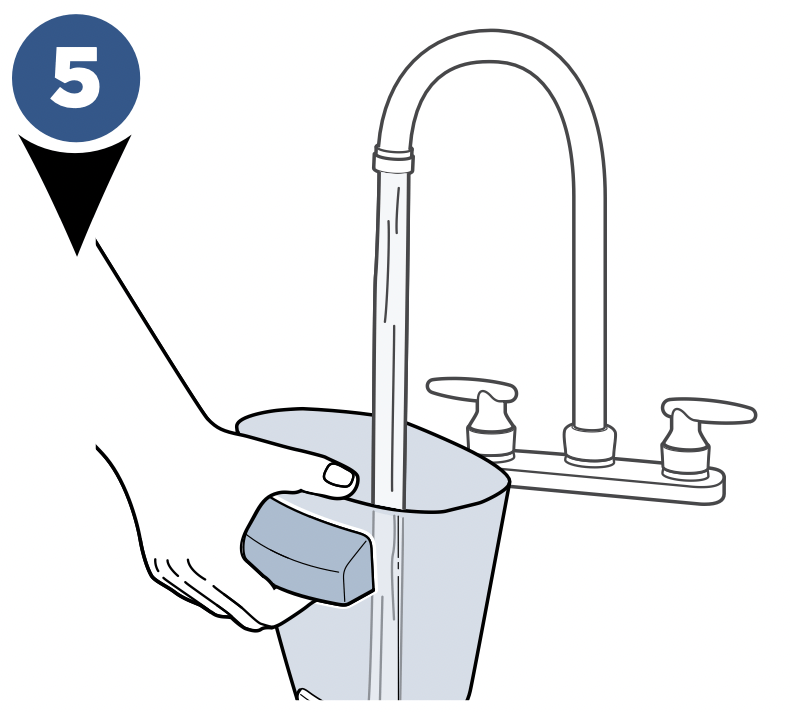
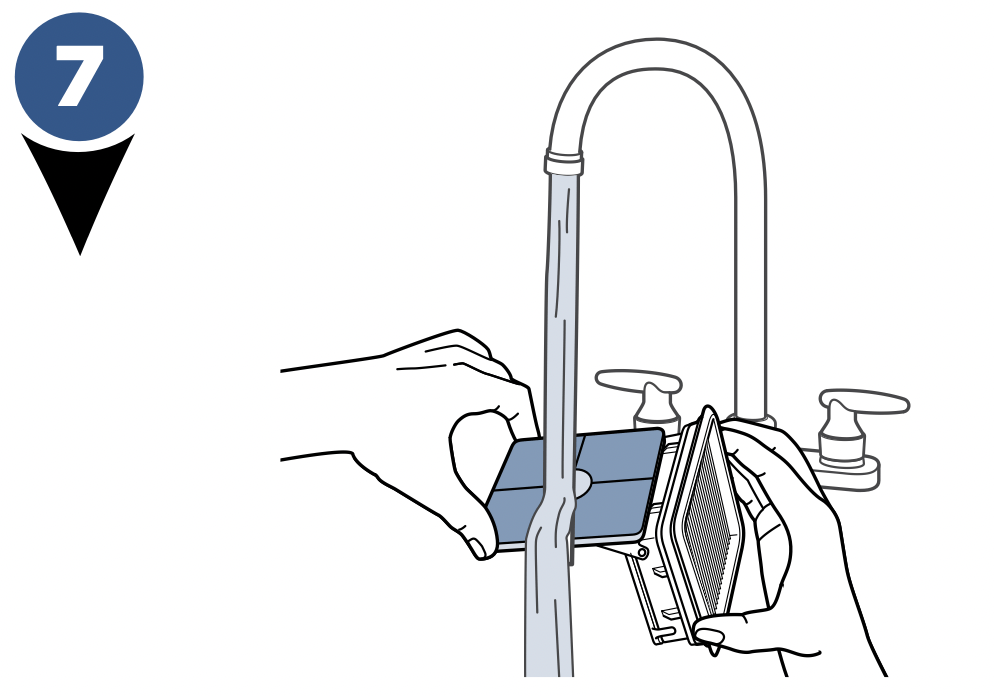
- Hand wash the vacuum filter and screen with warm water and mild detergent.
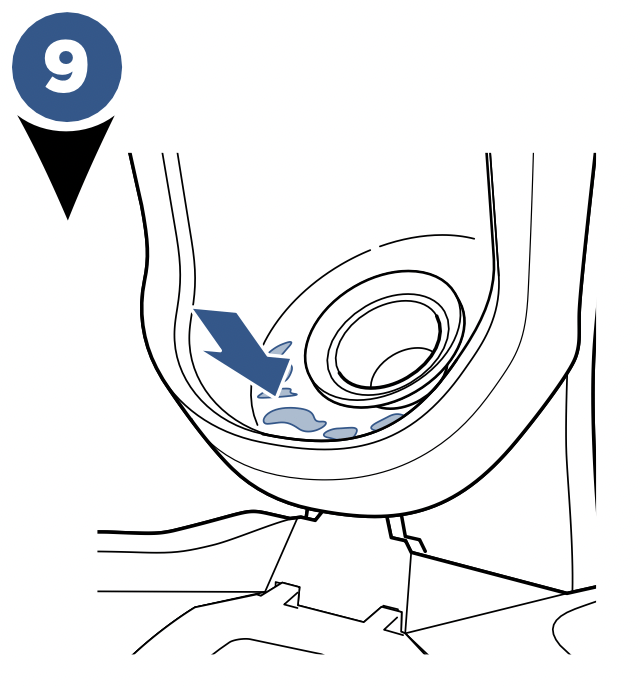
- Rinse the float located at the bottom of the top of the dirty water tank.
- If the inside area where the dirty water tank sits is dirty, wipe it clean with a rag or towel.
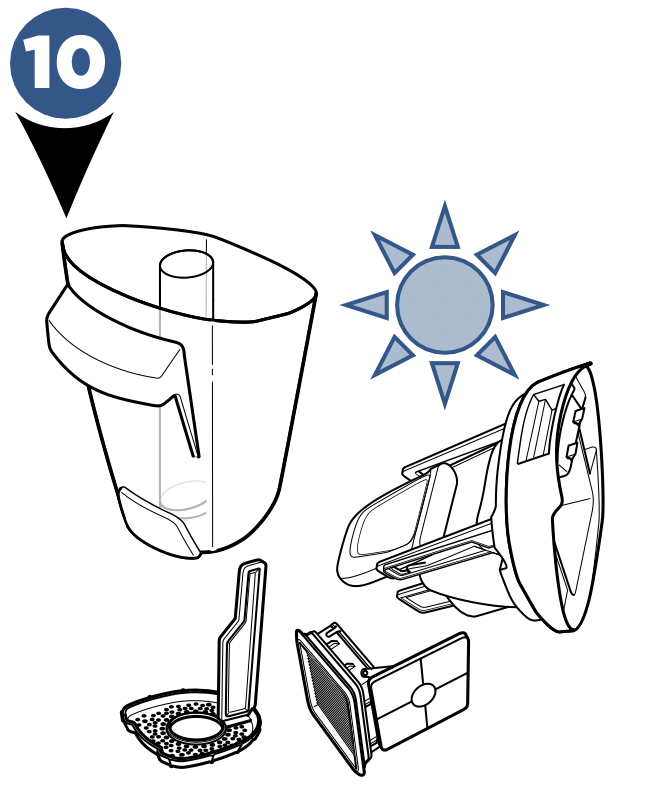
- Leave parts out to dry before reassembling.
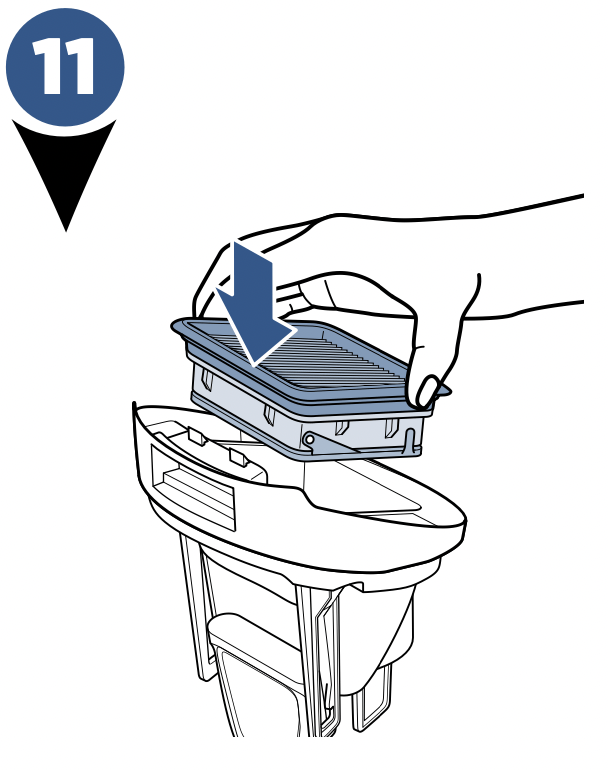
- Place vacuum filter back into the top of the dirty water tank.
NOTE: Make sure to clean your dirty tank and let all components dry out after each use to keep your product at its best.
- Place strainer back into dirty water tank.
- Once parts are dry, reassemble and replace the top of dirty water tank.
- Angle the dirt tank back into body of machine inserting bottom first. Then tilt the top of the dirt tank toward the machine and push into place until you hear a click.
Brush Roll and Chamber
WARNING: To reduce the risk of fire, electric shock or injury, turn power OFF and disconnect plug from electrical outlet before performing maintenance or troubleshooting.
- Grasp brush roll window at the front and pull upward to remove.
- Pull brush roll out by grabbing the brush roll tab and pulling upward.
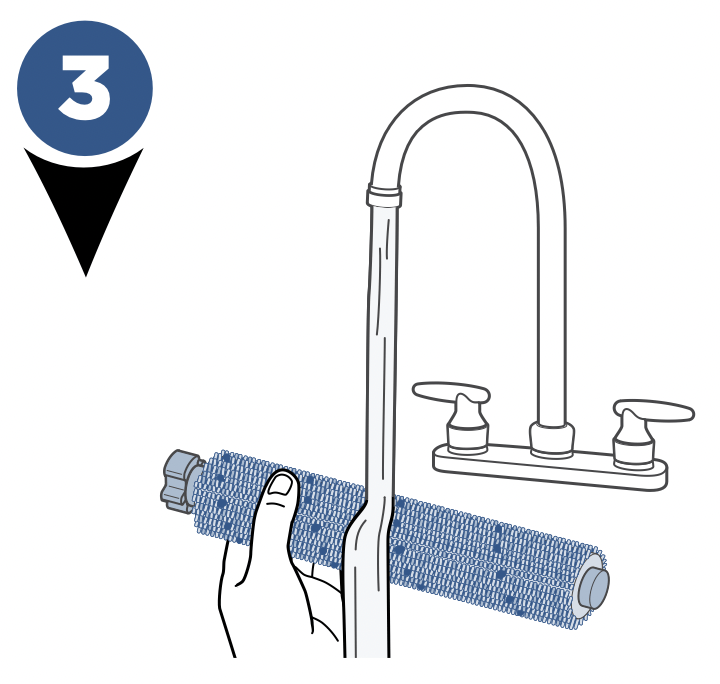
- With warm water, rinse your brush roll window and brush roll.
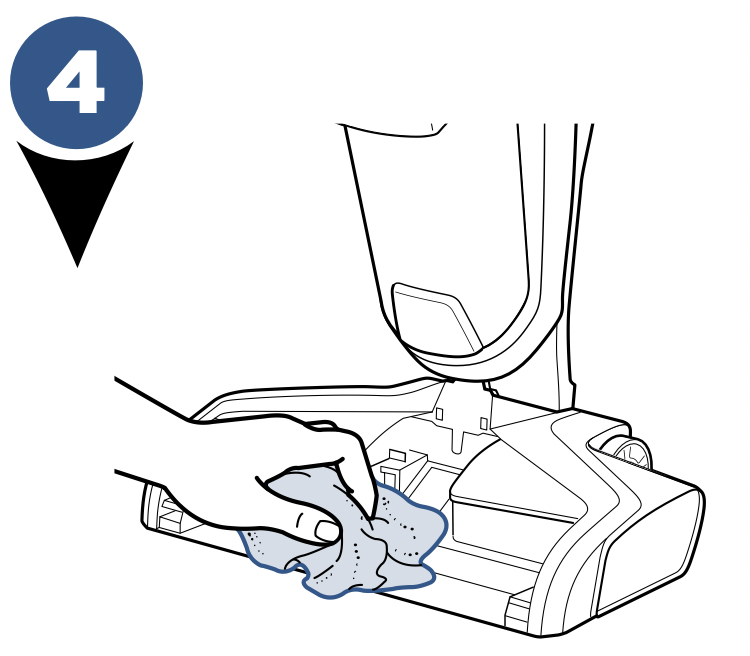
- If your brush roll chamber is dirty, clean with a rag or towel.
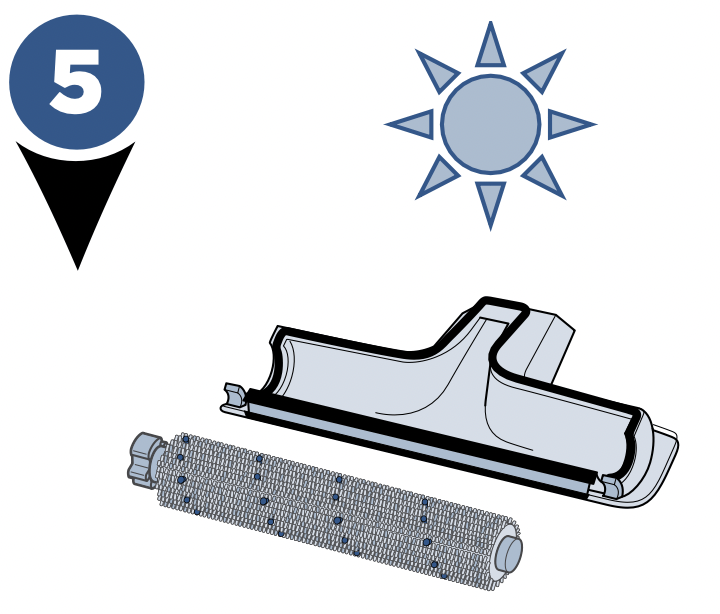
- Let your brush roll and brush roll window chamber dry before reassembling.
TIP: Running your machine with a wet brush roll will help the brush roll dry faster. The trigger should not be pressed.
NOTE: The brush roll is not dishwasher or automatic washing machine safe. Please follow cleaning instructions.
- Replace brush roll by inserting the brush roll end into the right side of the foot. Then lock the pull tab into place by pressing downward.
- Replace the brush roll window by first lining up both brush window tabs with the edges of the foot. Then press the window back into place until you hear a click.
TROUBLESHOOTING
WARNING: To reduce the risk of electric shock, turn power switch off and disconnect plug from electrical outlet before performing maintenance or troubleshooting checks.
| Problem |
Possible causes |
Remedies
|
| Reduced spray OR no spray |
Clean water tank may be empty |
Refill tank
|
| Clean water tank may not be seated completely |
Turn power OFF / Remove and reseat tank
|
| System isn’t completely primed |
Hold trigger for 10 to 15 seconds
|
| Brush window is not latched in place |
Turn power OFF / Unplug machine and re-install brush window
|
| Not holding trigger to spray solution |
Hold trigger continuously while using the machine
|
| Spray tips on foot clogged |
Use a pin to clean the spray tips located underneath the brush roll window
|
| Loss of suction power |
Tanks may not be seated properly
|
Turn Power OFF / Remove both tanks and reseat them so they fit properly |
|
Dirty tank has picked up maximum amount of dirty water and has reached full line
|
Empty dirty tank and make sure to make slow cleaning passes back and forth while cleaning |
|
Brush window is not latched in place
|
Turn Power OFF / Unplug machine and re-install brush window |
|
Debris channel in foot is clogged
|
Clean the channel with a paper towel |
|
Filter clogged by debris
|
Remove debris clogging the filter screen and clean the filter |
| Brush roll is not turning |
Brush roll is not installed properly
|
Turn Power OFF / Unplug machine and follow instructions on page 11 for replacing brush roll
|
|
Machine is standing upright
|
Recline machine to make brush roll turn on |
|
Obstruction has caused brush roll to stop
|
Turn Power OFF / Unplug machine and remove brush window and brush roll cleaning hair and string off of brush ends
|
| Machine won’t turn on |
Obstruction has caused brush roll to stop and shut down machine |
Unplug machine to reset the system. While the machine is unplugged, remove the brush window and brush roll cleaning hair and string off of brush ends
|
| Handle not inserted properly into body of machine |
Remove the handle and re-insert into the body of the machine making sure to push down until you hear a “click”
|
|
Machine is leaking
|
Cap of clean water tank is not closed properly |
Remove the clean water tank and re-apply the cap
|
| Machine is streaking |
Too much water applied |
Go over area without spraying down water
|
| Previous floor care products used |
Contact product manufacturer regarding how to remove
|