Loading ...
Loading ...
Loading ...
41
INSTALLATION CONTINUED
Optional Duct Cover Installation
1. Attach the full-width duct cover to the top of the range hood
with the screws provided. The duct cover must be attached
to the top of the range hood before mounting the range hood
to the wall.
A: Distance from center of mounting bracket to centerline:
30" hood: 13 15/32" / 36" hood: 16 15/32" /
42" hood: 19 15/32" / 48" hood: 22 15/32"
B: Mounting brackets
C: Top of hood
2. Install each bracket on the wall as shown. Make sure the
screws and brackets are securely fastened to the wall.
IMPORTANT: Install only the brackets. Do not install the
hood.
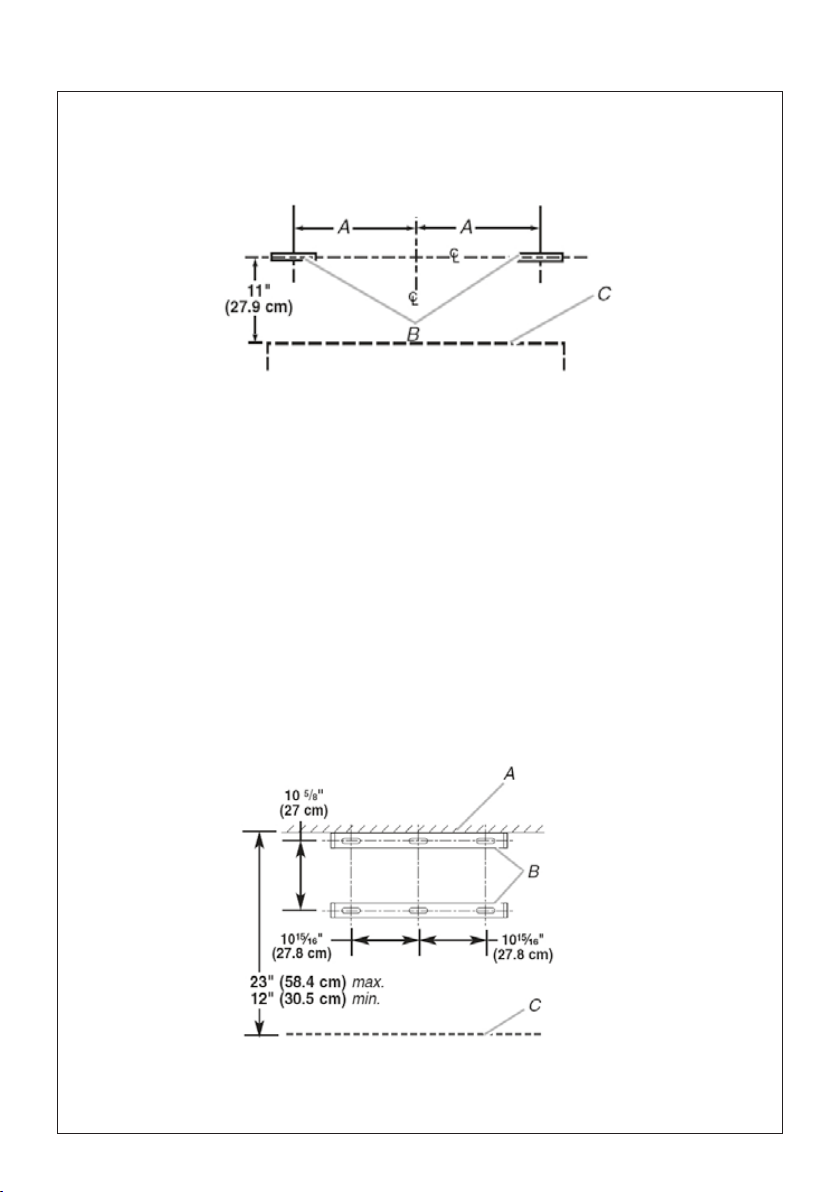
Optional Telescopic Chimney Extension Installation
1. If a chimney extension is used, attach the extension brackets
as shown. Make sure that the screws are securely fastened to
the wall.
A: Ceiling
B: Brackets
C. Top of hood
INSTALLATION(SUITE)
1. Fixez le recouvrement de canalisation pleine largeur sur le dessus de la hotte à l'aide des vis
fournies. Le recouvrement de canalisation doit être fixé sur le dessus de la hotte avant le montage
de la hotte au mur.
A : Distance entre le centre de la bride de montage et la ligne centrale :
Hotte 30" : 13 15/32"
Hotte 36" : 16 15/32"
Hotte 42" : 19 15/32"
Hotte 48" : 22 15/32"
B : Brides de montage
C : Haut de la hotte
2. Installez chaque bride sur le mur comme illustré. Assurez-vous que les vis et brides sont
solidement ancrées au mur. IMPORTANT : Installez les brides uniquement. N'installez pas la hotte.
Installation du recouvrement de canalisation en option
INSTALLATION CONTINUED
Optional Duct Cover Installation
1. Attach the full-width duct cover to the top of the range hood
with the screws provided. The duct cover must be attached
to the top of the range hood before mounting the range hood
to the wall.
A: Distance from center of mounting bracket to centerline:
30" hood: 13 15/32" / 36" hood: 16 15/32" /
42" hood: 19 15/32" / 48" hood: 22 15/32"
B: Mounting brackets
C: Top of hood
2. Install each bracket on the wall as shown. Make sure the
screws and brackets are securely fastened to the wall.
IMPORTANT: Install only the brackets. Do not install the
hood.
Optional Telescopic Chimney Extension Installation
1. If a chimney extension is used, attach the extension brackets
as shown. Make sure that the screws are securely fastened to
the wall.
A: Ceiling
B: Brackets
C. Top of hood
Installation du prolongement de cheminée télescopique en option
1. Si vous utilisez un prolongement de cheminée, fixez les brides du prolongement comme illustré.
Assurez-vous que les vis sont solidement ancrées au mur.
A : Plafond
B : Brides
C : Haut de la hotte
Loading ...
Loading ...
Loading ...