TT-AH025_V1.3 EU
Learn more about the EU Declaration of Conformity:
https://www.taotronics.com/downloads-TT-AH025-CE-Cert.html
www.taotronics.com
EUROPE
E-mail:
support.uk@taotronics.com(UK)
support.de@taotronics.com(DE)
support.fr@taotronics.com(FR)
support.es@taotronics.com(ES)
support.it@taotronics.com(IT)
EU Importer: ZBT International Trading GmbH
Address:Halstenbeker Weg 98C, 25462 Rellingen, Deutschland
NORTH AMERICA
E-mail : support@taotronics.com(US)
support.ca@taotronics.com(CA)
Tel : 1-888-456-8468 (Monday-Friday: 9:00 – 17:00 PST)
US Distributor: SUNVALLEYTEK INTERNATIONAL INC.
Address:46724 Lakeview Blvd, Fremont, CA 94538
Manufacturer: Shenzhen NearbyExpress Technology Development Co.,Ltd.
Address: 333 Bulong Road, Shenzhen, China, 518129
MANUFACTURER
ASIA PACIFIC
MODEL: TT-AH025
ULTRASONIC COOL MIST HUMIDIFIER
User Manual
Extend your warranty to 18 months by
registering your product on our website
taotronics.com/warranty
EN 1-16 DE 17-33 FR 34-50
ES 51-67 IT 68-84

STATEMENT
SAFETY INSTRUCTIONS
BEFORE USING THE HUMIDIFIER
WHEN USING THE HUMIDIFIER
AFTER USING THE HUMIDIFIER
PACKAGE CONTENTS
SPECIFICATIONS
PRODUCT DIAGRAM
OPERATIONS AND FUNCTIONS
Add Water
Power On / Off
Light Control
Low Water Protection: Auto Shut-off the Humidier
CLEANING AND MAINTENANCE
Caution
Daily Maintenance
Weekly Maintenance
Scale Removal Instructions
Disinfecting Instructions
Clean the Dustproof Sponge
End-Of-Season Care and Storage
TROUBLESHOOTING GUIDE
WARRANTY
TAOTRONICS CUSTOMER CARE
CONTENTS
01
01
05
05
07
13/15
06
16
16
02
03
04
07
08
09
09
09
09
10
11
12
12
08
08
EN

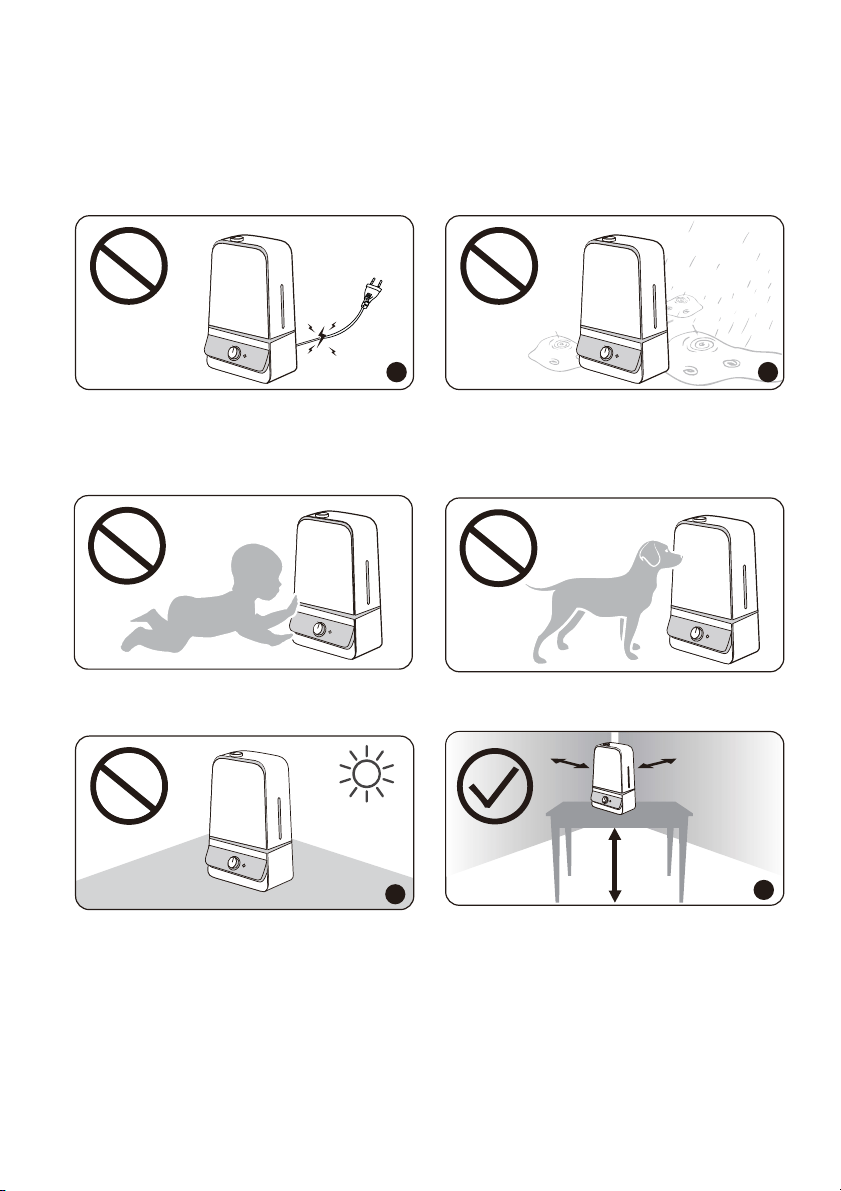
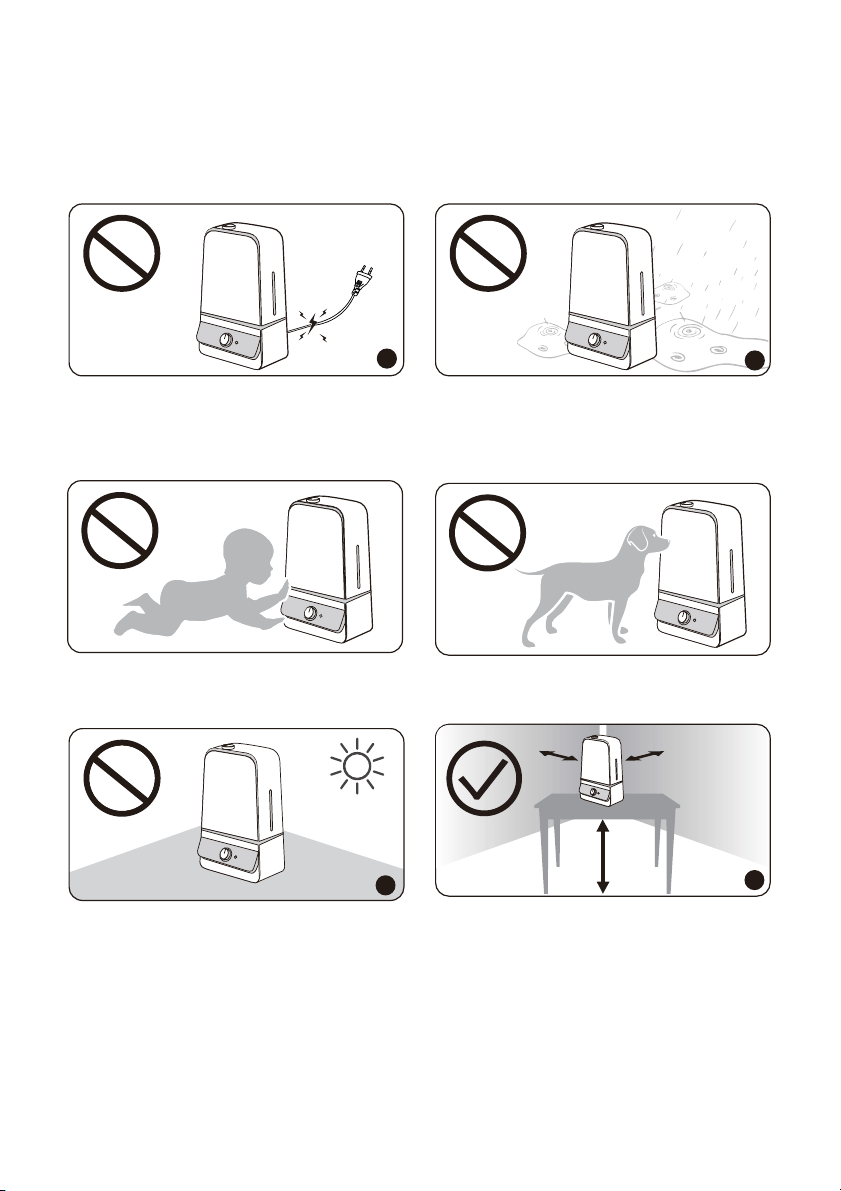
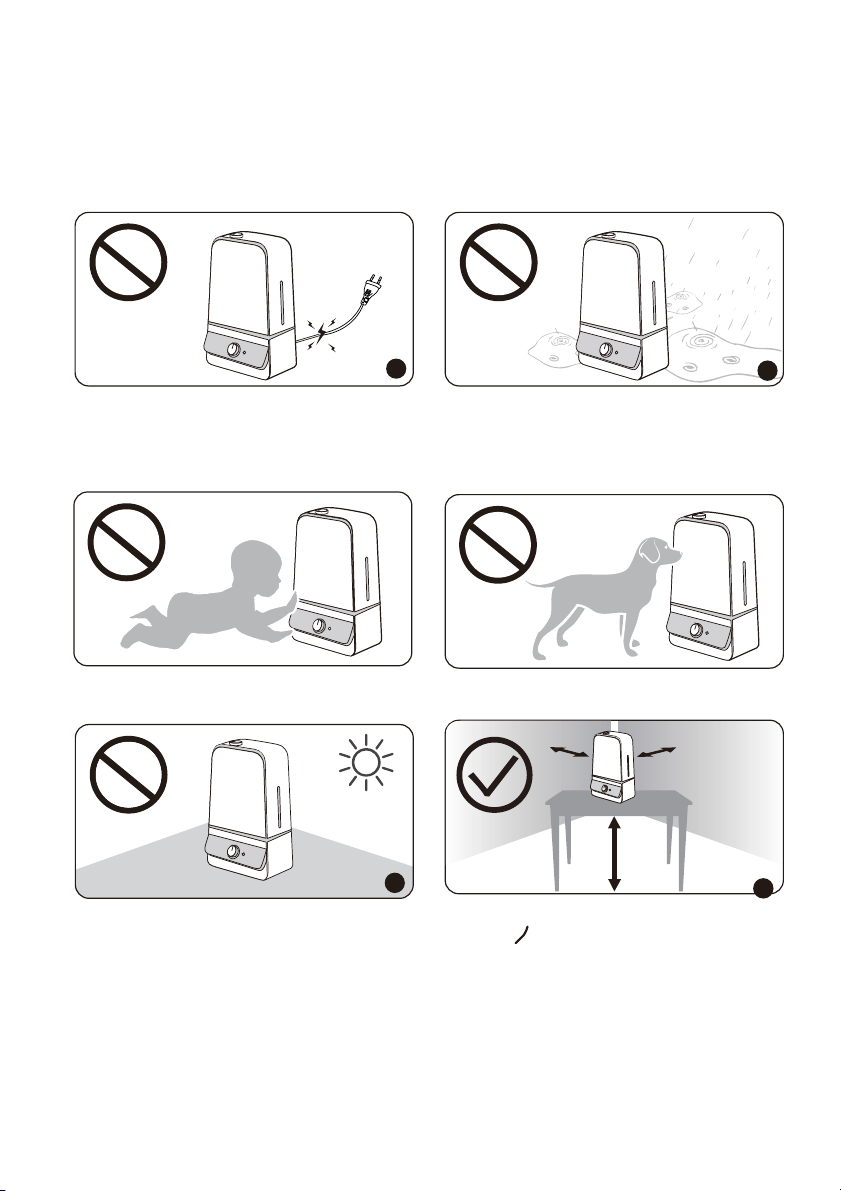
1. Please check the cord for any signs of damage.Do not use the humidier if the cord
has been damaged.
2. DO NOT place this humidier in wet environments.
Please always keep the humidier out of reach of patients & children & pet.
1. Please always place the unit on a smooth, at, lint-free, non-metallic, waterproof and level
surface and keep it away from direct sunlight.
2. Always place the unit 2 feet (60 cm) above the oor, 12 inches (30 cm) away from the wall,
other appliances or wooden furniture.
02
STATEMENT
Thank you for purchasing a TaoTronics product that has been tested to meet our stringent quality
standards. This product is covered with TaoTronics product and labor warranty for 12 months from the date
of its original purchase.
Please email us with your order ID and problem or issue via [email protected], we will respond within
24 hours.
Please read the User Manual thoroughly. Clean and maintain the product as instructed. If any
abnormalities occur, please refer to the Troubleshooting Guide rst.
This warranty is void if the defect is caused by accidental damage, misuse, abuse, neglect, improper
repair or alteration by unauthorized persons, or a failure to follow operating instructions provided with
the product including adding essential oils directly into the tank and base. This warranty does not
apply to normal wear and tear or commercial use.
In no event shall liability exceed the purchase price paid by the purchaser of the product. Under no
circumstances shall there be liability for any loss – direct, indirect or incidental – or consequential
damage arising out of, or in connection with the use of the product.
SAFETY INSTRUCTIONS
The humidier was made with safe and environmental protection materials, it has been certied
and complied with the requirement of sale regions’ related regulations or laws.
IMPORTANT: Please read and save this SAFETY INSTRUCTIONS before using the device. Basic
precautions should always be followed to reduce the risk of re, electrical shock, and injury to
persons or damage to the product.
01
BEFORE USING THE HUMIDIFIER
1 2
30 CM
60 CM
2
30 CM
1
1. Please check the cord for any signs of damage.Do not use the humidier if the cord
has been damaged.
2. DO NOT place this humidier in wet environments.
Please always keep the humidier out of reach of patients & children & pet.
1. Please always place the unit on a smooth, at, lint-free, non-metallic, waterproof and level
surface and keep it away from direct sunlight.
2. Always place the unit 2 feet (60 cm) above the oor, 12 inches (30 cm) away from the wall,
other appliances or wooden furniture.
02
STATEMENT
Thank you for purchasing a TaoTronics product that has been tested to meet our stringent quality
standards. This product is covered with TaoTronics product and labor warranty for 12 months from the date
of its original purchase.
Please email us with your order ID and problem or issue via support@taotronics.com, we will respond within
24 hours.
Please read the User Manual thoroughly. Clean and maintain the product as instructed. If any
abnormalities occur, please refer to the Troubleshooting Guide rst.
This warranty is void if the defect is caused by accidental damage, misuse, abuse, neglect, improper
repair or alteration by unauthorized persons, or a failure to follow operating instructions provided with
the product including adding essential oils directly into the tank and base. This warranty does not
apply to normal wear and tear or commercial use.
In no event shall liability exceed the purchase price paid by the purchaser of the product. Under no
circumstances shall there be liability for any loss – direct, indirect or incidental – or consequential
damage arising out of, or in connection with the use of the product.
SAFETY INSTRUCTIONS
The humidier was made with safe and environmental protection materials, it has been certied
and complied with the requirement of sale regions’ related regulations or laws.
IMPORTANT: Please read and save this SAFETY INSTRUCTIONS before using the device. Basic
precautions should always be followed to reduce the risk of re, electrical shock, and injury to
persons or damage to the product.
01
BEFORE USING THE HUMIDIFIER
1 2
30 CM
60 CM
2
30 CM
1
WHEN USING THE HUMIDIFIER
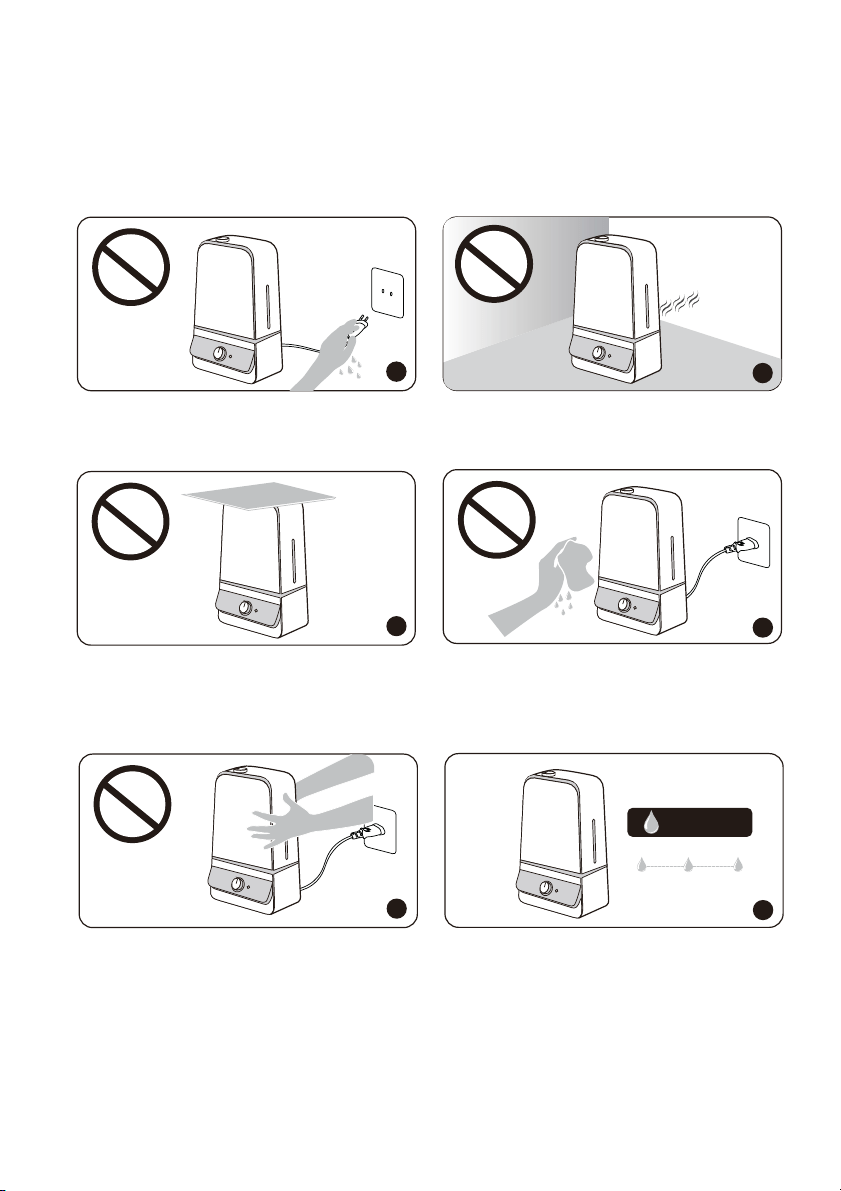
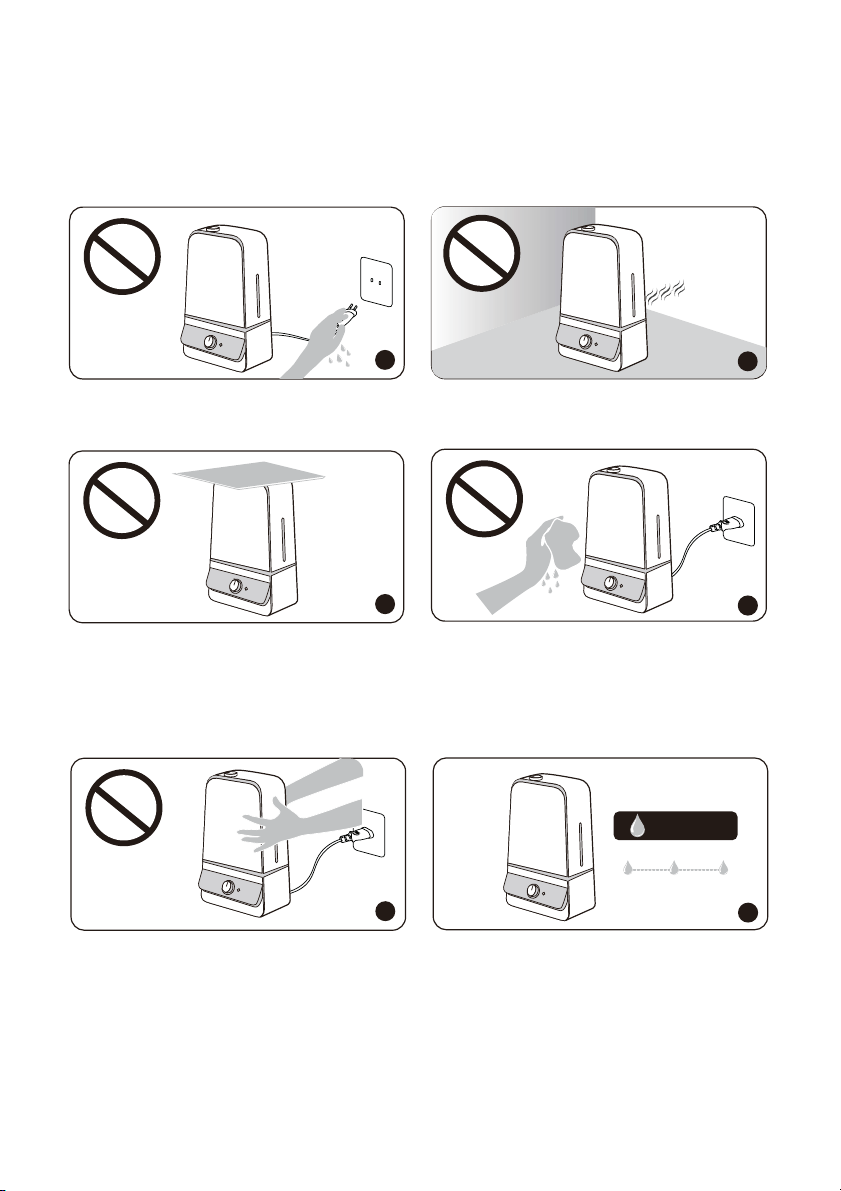
1. DO NOT plug the unit with wet hands.
2. DO NOT direct the mist nozzle against the wall.
1. DO NOT use your hand or any other object to cover the nozzle while the unit is on to avoid
damaging the product or causing injury.
2. DO NOT clean the unit while it is connected to a power source or while it is on.
1. DO NOT move or tilt the humidier while it is in operation.
2. The most comfortable environmental humidity is between 40%-60%. Please adjust the mist as
needed.
Humidity
1
2
04
03
1
2
1
2
40% 60%
AFTER USING THE HUMIDIFIER
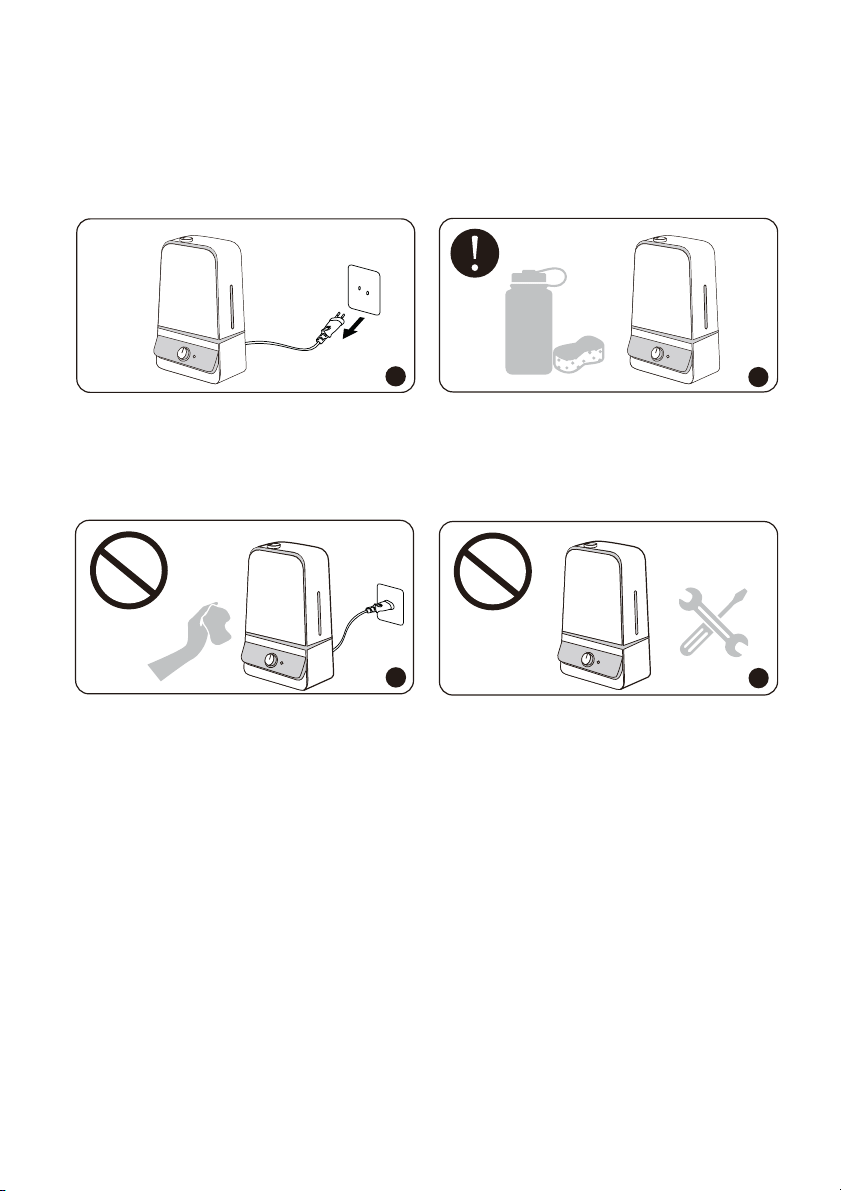
1. DO NOT clean the humidier right after turning it off if the humidier is warm to touch.
Allow the humidier to completely cool down before cleaning.
2. DO NOT attempt to repair or adjust any electrical or mechanical functions on this humidier.
Doing so will void your warranty.
1
2
1
2
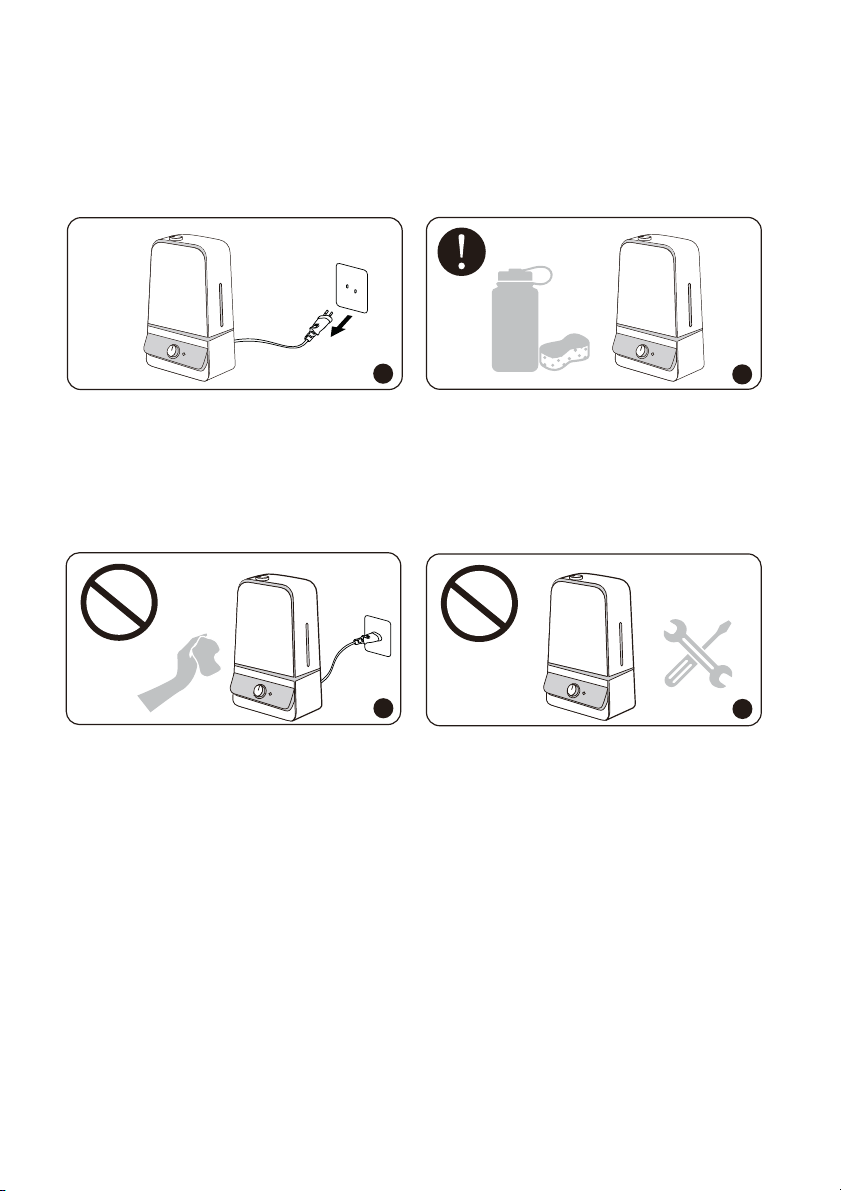
1. Always disconnect from a power source by pulling out the plug when not in use.
2. Humidier requires regular cleaning. Please refer to, and follow the Cleaning and
Maintenance instructions.
WHEN USING THE HUMIDIFIER
1. DO NOT plug the unit with wet hands.
2. DO NOT direct the mist nozzle against the wall.
1. DO NOT use your hand or any other object to cover the nozzle while the unit is on to avoid
damaging the product or causing injury.
2. DO NOT clean the unit while it is connected to a power source or while it is on.
1. DO NOT move or tilt the humidier while it is in operation.
2. The most comfortable environmental humidity is between 40%-60%. Please adjust the mist as
needed.
Humidity
1
2
04
03
1
2
1
2
40% 60%
AFTER USING THE HUMIDIFIER
1. DO NOT clean the humidier right after turning it off if the humidier is warm to touch.
Allow the humidier to completely cool down before cleaning.
2. DO NOT attempt to repair or adjust any electrical or mechanical functions on this humidier.
Doing so will void your warranty.
1
2
1
2
1. Always disconnect from a power source by pulling out the plug when not in use.
2. Humidier requires regular cleaning. Please refer to, and follow the Cleaning and
Maintenance instructions.

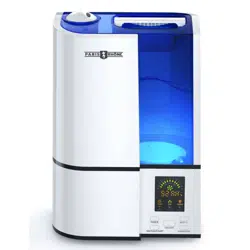
· 1 x TaoTronics Humidier (Model: TT-AH025)
· 1 x Cleaning Brush
· 1 x Dustproof Sponge
· 1 x Thank You Card
· 1 x User Manual
TT-AH025
AC 200-240V 50 / 60Hz
Min: 15W
Max: 25W
6.0L / 1.59Gal
Min: 60ml/h
Max: 300ml/h
20-60h
20-40m² / 215-430ft²
<27dB
251 x 167 x 412mm / 9.9 x 6.6 x 16.2in
1775g/62.6oz
Model
Operating Voltage
Rated Power
Water Tank Capacity
Mist Output
Working Time on a Full Tank
Recommended Room Size
Noise
Dimensions
Net Weight
PACKAGE CONTENTS
SPECIFICATIONS
0605
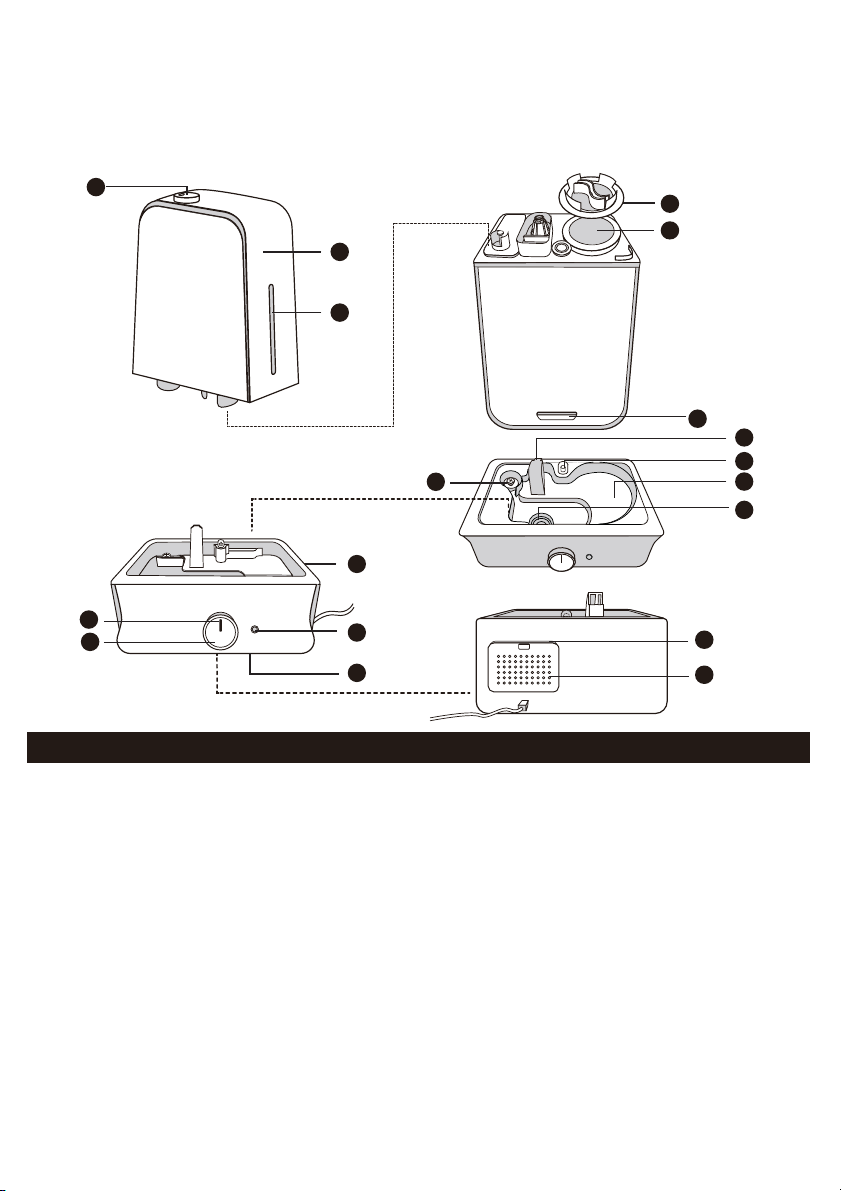
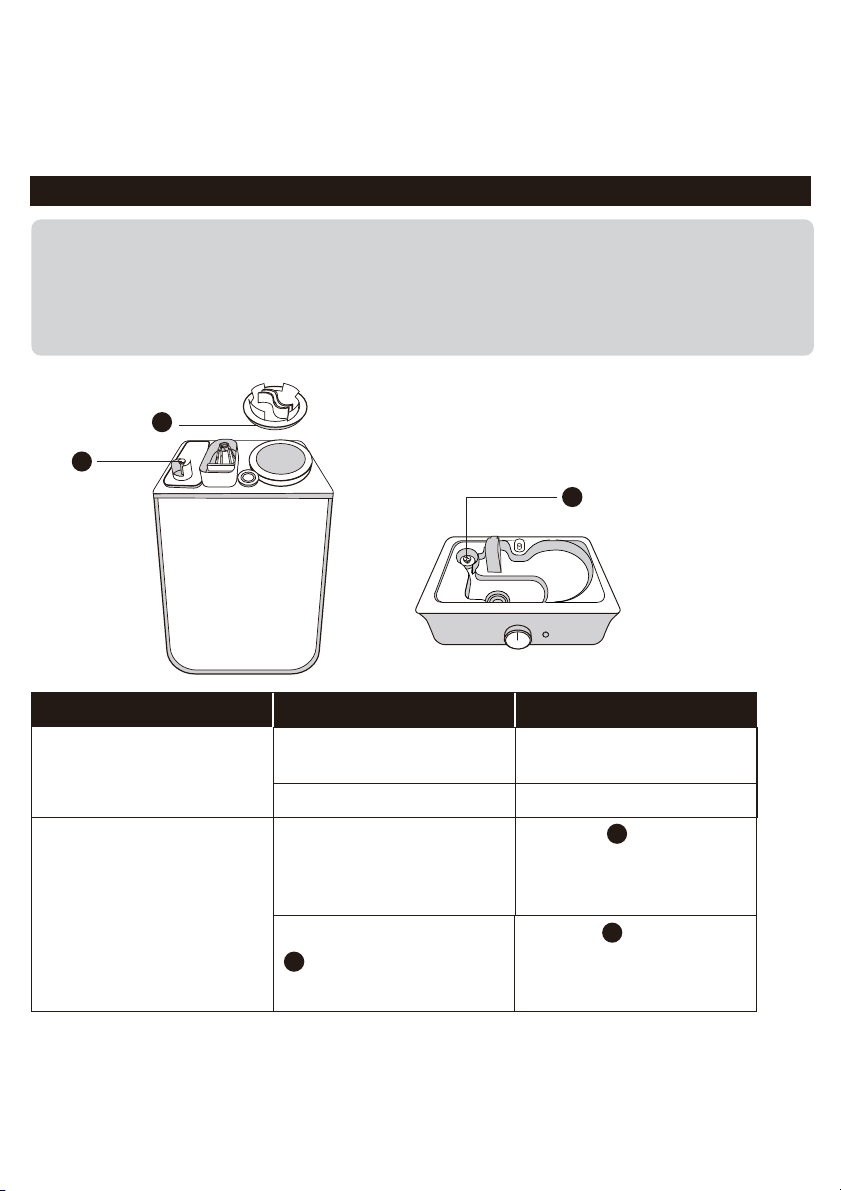
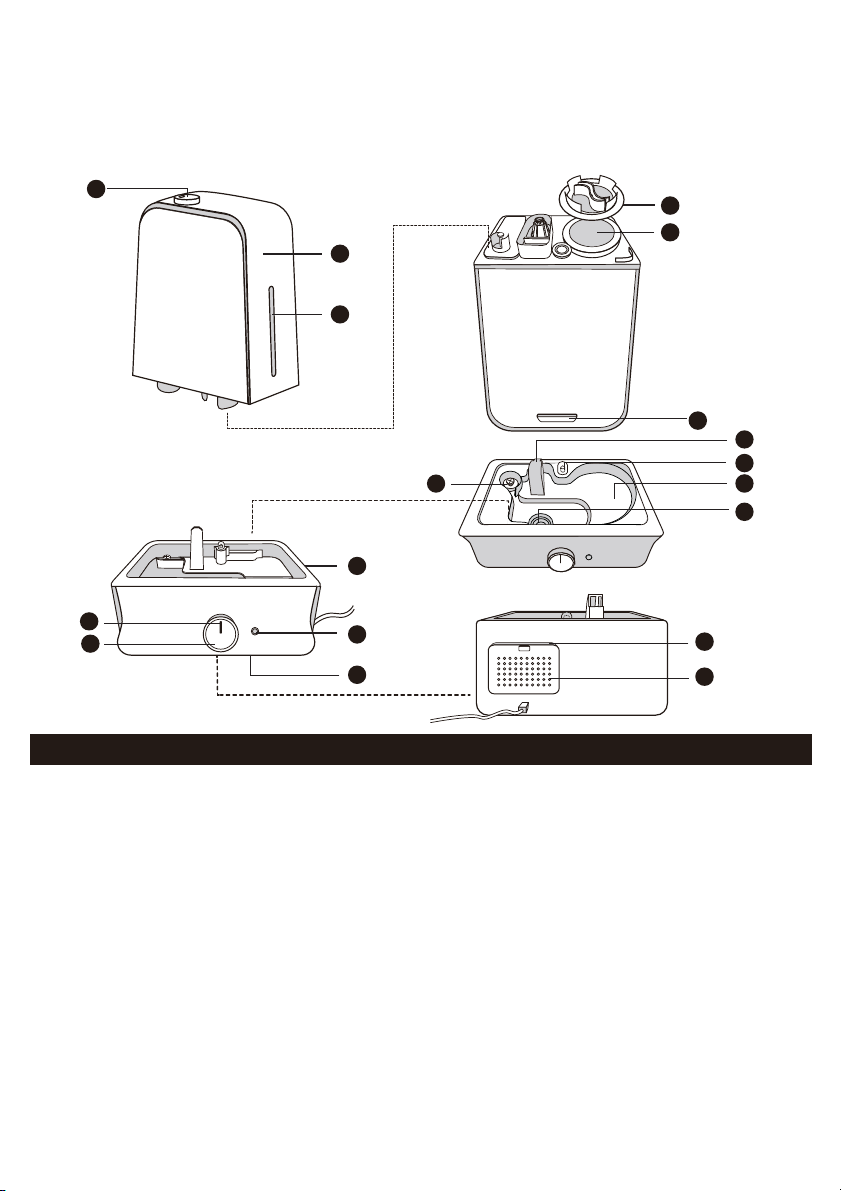
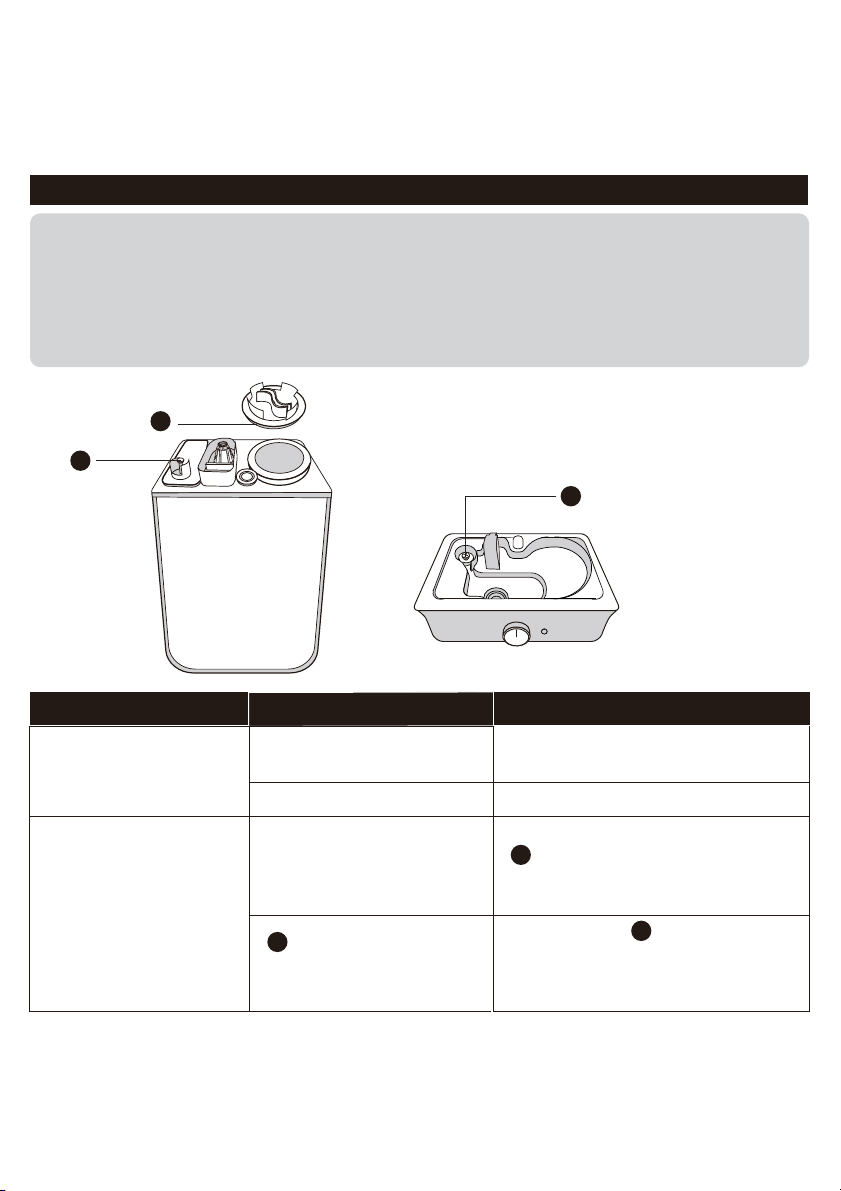
1. Nozzle
2. Water Tank
3. Water Level Window
4. Tank Cap
5. Water Inlet
6. Handle
7. LED Indicator
8. Control Knob
9. Base
10. Light Button
11. Night Light
12. Floater
13. Air Outlet
14. Tank Light
15. Water Reservoir
16. Atomizer
17. Dustproof Sponge
18. Air Inlet
PRODUCT DIAGRAM
1
3
5
15
16
12
4
9
11
10
18
13
14
8
17
2
7
push
6
· 1 x TaoTronics Humidier (Model: TT-AH025)
· 1 x Cleaning Brush
· 1 x Dustproof Sponge
· 1 x Thank You Card
· 1 x User Manual
TT-AH025
AC 200-240V 50 / 60Hz
Min: 15W
Max: 25W
6.0L / 1.59Gal
Min: 60ml/h
Max: 300ml/h
20-60h
20-40m² / 215-430ft²
<27dB
251 x 167 x 412mm / 9.9 x 6.6 x 16.2in
1775g/62.6oz
Model
Operating Voltage
Rated Power
Water Tank Capacity
Mist Output
Working Time on a Full Tank
Recommended Room Size
Noise
Dimensions
Net Weight
PACKAGE CONTENTS
SPECIFICATIONS
0605
1. Nozzle
2. Water Tank
3. Water Level Window
4. Tank Cap
5. Water Inlet
6. Handle
7. LED Indicator
8. Control Knob
9. Base
10. Light Button
11. Night Light
12. Floater
13. Air Outlet
14. Tank Light
15. Water Reservoir
16. Atomizer
17. Dustproof Sponge
18. Air Inlet
PRODUCT DIAGRAM
1
3
5
15
16
12
4
9
11
10
18
13
14
8
17
2
7
push
6
OPERATIONS AND FUNCTIONS
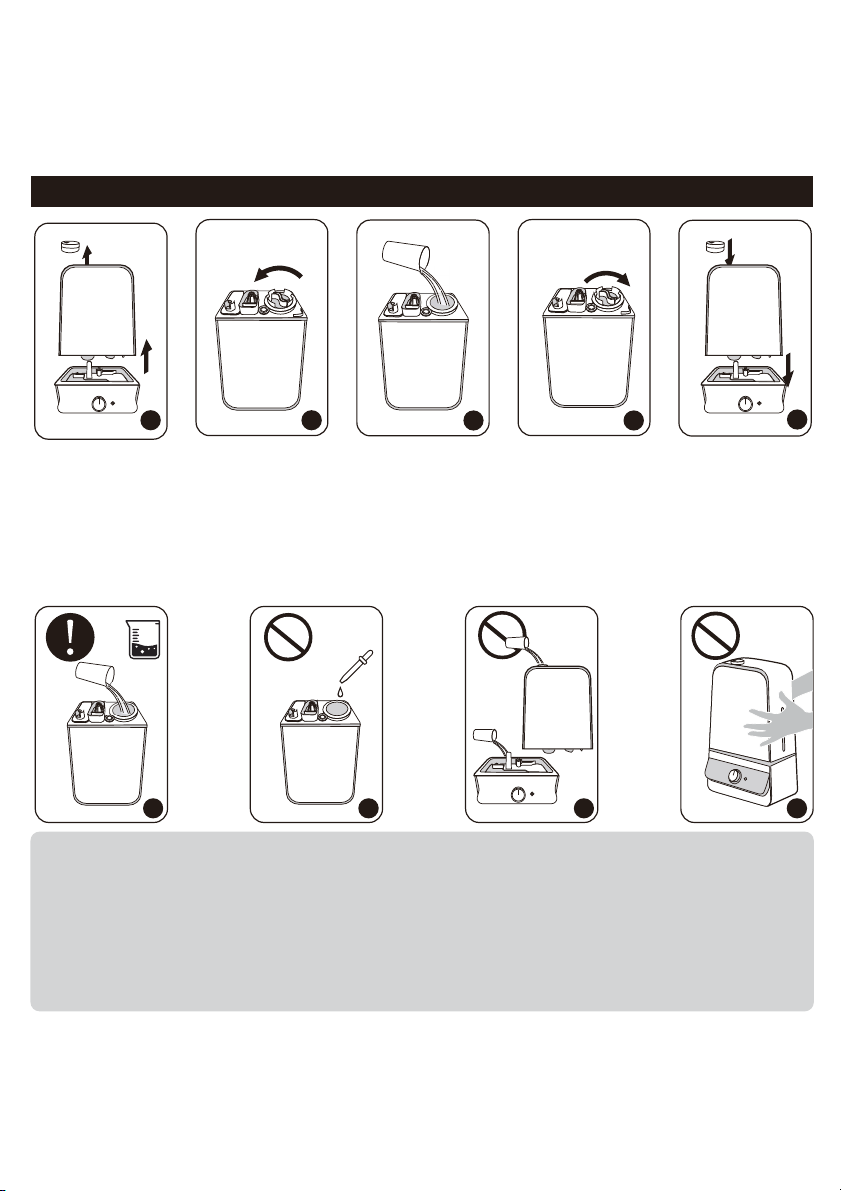
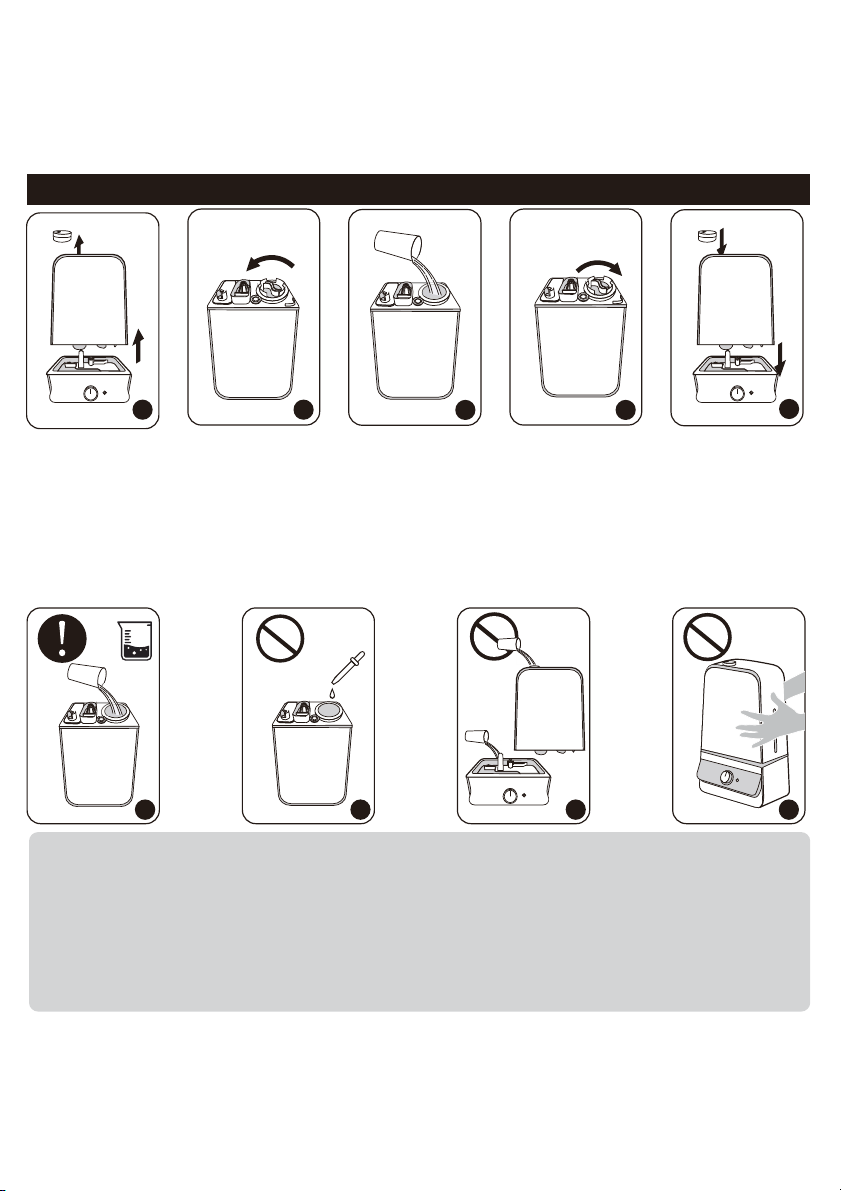
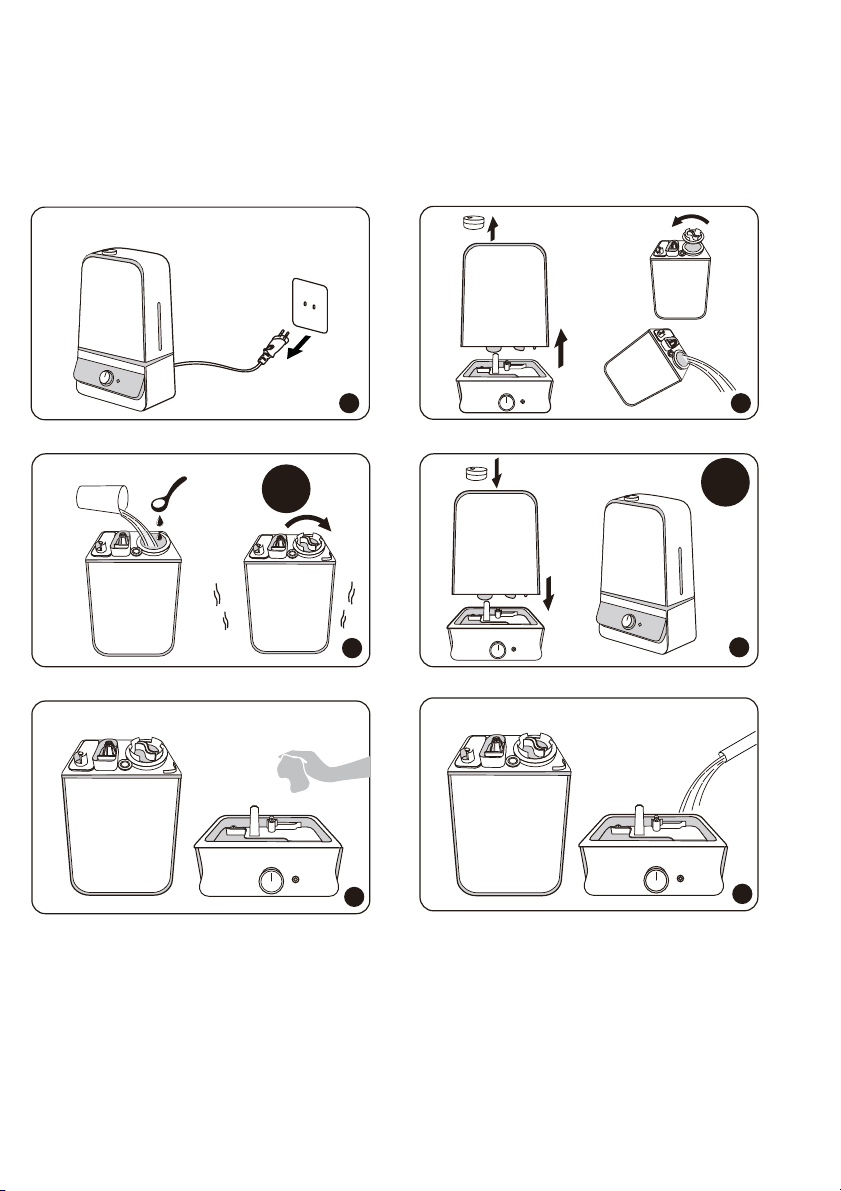
Add Water
1. Remove the nozzle and turn the water tank upside down.
2. Remove the tank cap and ll the tank with clean and cool water only.
3. Attach the tank cap and place the tank back onto the base. Make sure it ts together
securely so that water can go from the tank to the reservoir. Put the nozzle back on.
1. If tap water is too hard, it is recommended to use ltered or distilled water to avoid white
dust. DO NOT use hot water.
2. DO NOT add any essential oils or medicinal tablets into the water tank.
3. DO NOT add water into the base or through nozzle.
4. DO NOT move the humidier while the water tank is full of water to avoid leakage or base
overlling.
1
5
3
07
08
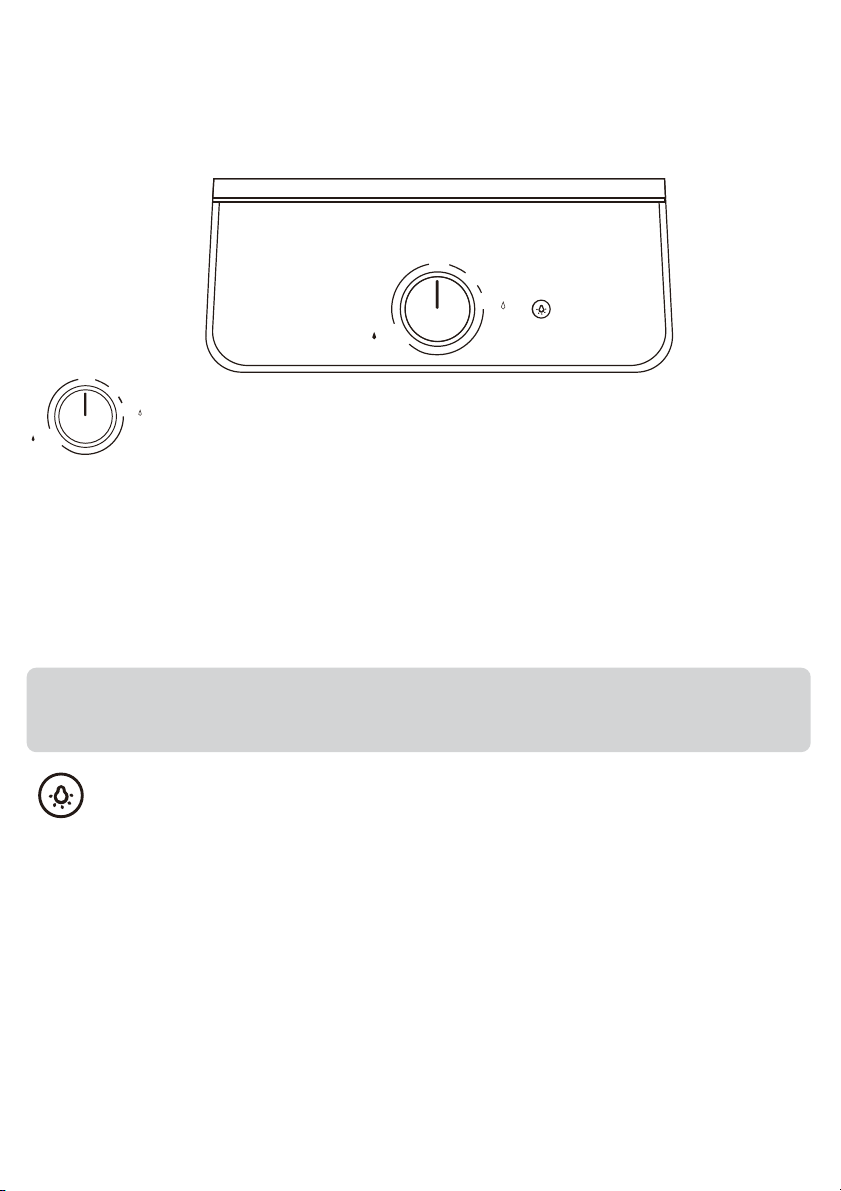
Plug the power cord into a wall socket. Now the humidier is ready for use.
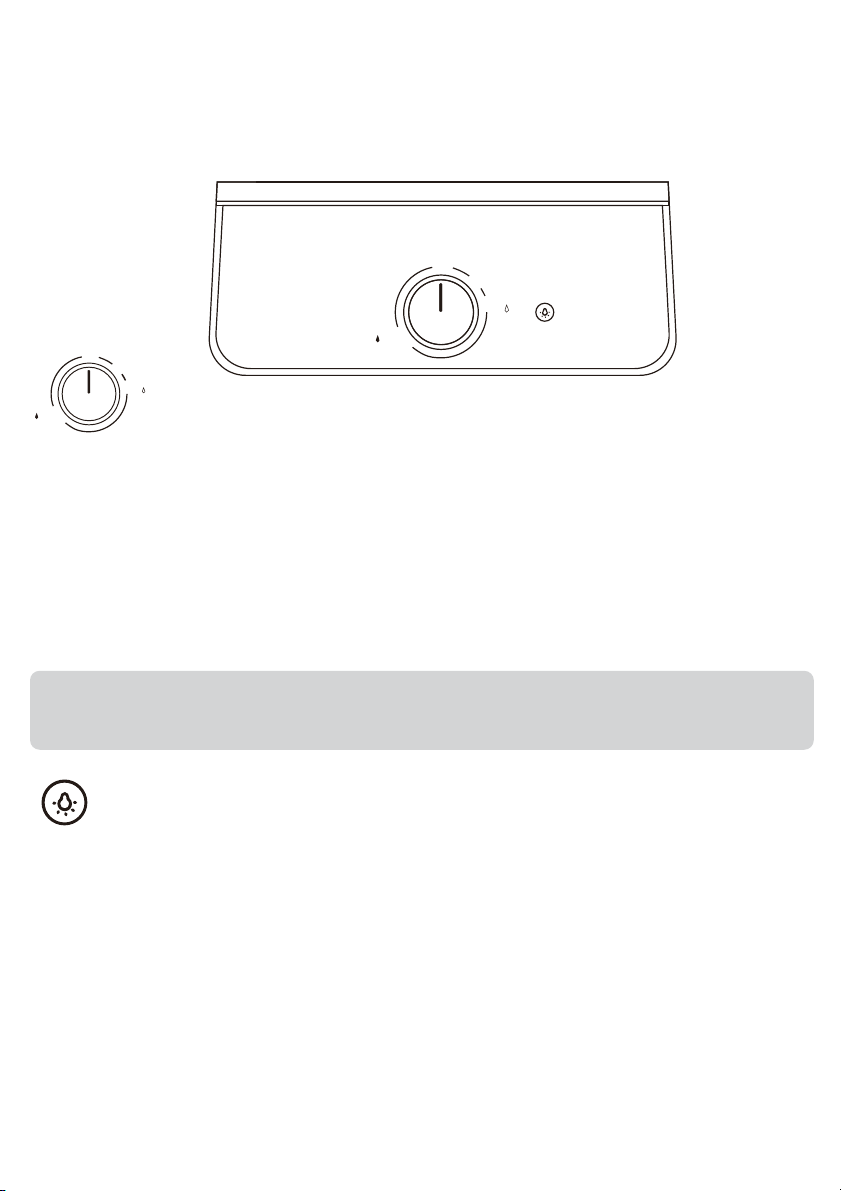
1. Rotate the control knob clockwise to the ON position. The blue LED indicator will light up
indicating that the humidier has been turned on .
2. Keep rotating the control knob clockwise to increase the mist level.
3. Rotate the control knob counterclockwise to decrease the mist level.
4. Rotate the control knob counterclockwise to the OFF position to turn off the humidier.
The LED indicator will turn off. The fan will work for another 3 minutes to dry the mist tube.
Power On / Off and Mist Adjustment
Light Control
Low Water Protection: Auto Shut-off the Humidier
1. Press the Light Button to turn on / off the night light.
2. Press and hold the Light Button for 1.5 seconds to turn on / off the tank light.
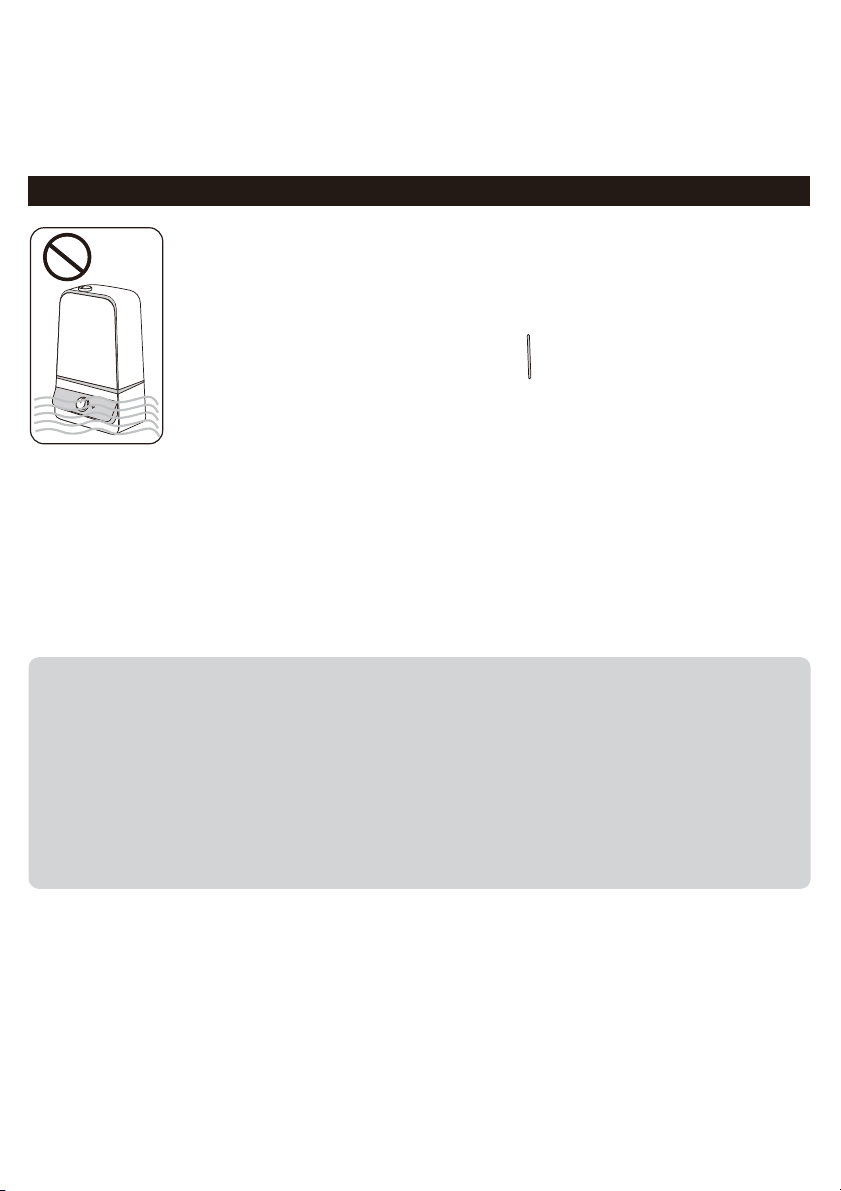
When there is not enough water inside the water reservoir, the humidier will stop misting and the LED
indicator will become red. It is designed for safety concern to prevent the humidier from possibly
overheating and damaging the atomizer.
Note:
The most comfortable environmental humidity is between 40%-60%.
Please adjust the mist output as needed.
OFF
ON
Max
Min
OFF
ON
Max
Min
2
3 4
21 4
OPERATIONS AND FUNCTIONS
Add Water
1. Remove the nozzle and turn the water tank upside down.
2. Remove the tank cap and ll the tank with clean and cool water only.
3. Attach the tank cap and place the tank back onto the base. Make sure it ts together
securely so that water can go from the tank to the reservoir. Put the nozzle back on.
1. If tap water is too hard, it is recommended to use ltered or distilled water to avoid white
dust. DO NOT use hot water.
2. DO NOT add any essential oils or medicinal tablets into the water tank.
3. DO NOT add water into the base or through nozzle.
4. DO NOT move the humidier while the water tank is full of water to avoid leakage or base
overlling.
1
5
3
07
08
Plug the power cord into a wall socket. Now the humidier is ready for use.
1. Rotate the control knob clockwise to the ON position. The blue LED indicator will light up
indicating that the humidier has been turned on .
2. Keep rotating the control knob clockwise to increase the mist level.
3. Rotate the control knob counterclockwise to decrease the mist level.
4. Rotate the control knob counterclockwise to the OFF position to turn off the humidier.
The LED indicator will turn off. The fan will work for another 3 minutes to dry the mist tube.
Power On / Off and Mist Adjustment
Light Control
Low Water Protection: Auto Shut-off the Humidier
1. Press the Light Button to turn on / off the night light.
2. Press and hold the Light Button for 1.5 seconds to turn on / off the tank light.
When there is not enough water inside the water reservoir, the humidier will stop misting and the LED
indicator will become red. It is designed for safety concern to prevent the humidier from possibly
overheating and damaging the atomizer.
Note:
The most comfortable environmental humidity is between 40%-60%.
Please adjust the mist output as needed.
OFF
ON
Max
Min
OFF
ON
Max
Min
2
3 4
21 4

09
CLEANING AND MAINTENANCE
Caution
1. DO NOT submerge the base in water.
2. Make sure water does not enter the base thro ugh the air outlet, air inlet,
or the control knob and light button.
3. DO NOT wash any part of this humidier in dish washer which will
damage the humidier and void the warranty.
Daily Maintenance
Turn off the humidier, unplug it from the power source. Drain water from the tank, reservoir
and base.
Weekly Maintenance
1. To properly clean your humidier, we recommend you to remove scale and disinfect the
humidier separately.
2. DO NOT mix vinegar and bleach solutions together. Do not use more than 1 tsp. of
bleach per gallon of water to avoid damaging your humidier.
3. Please make sure the rubber ring & rubber cap & spring on the tank cap is installed
properly after cleaning to avoid water leakage. Please refer to the diagram on page 6.
1 2
Scale Removal Instructions
10
15S
3
15-20
minutes
4
5
6

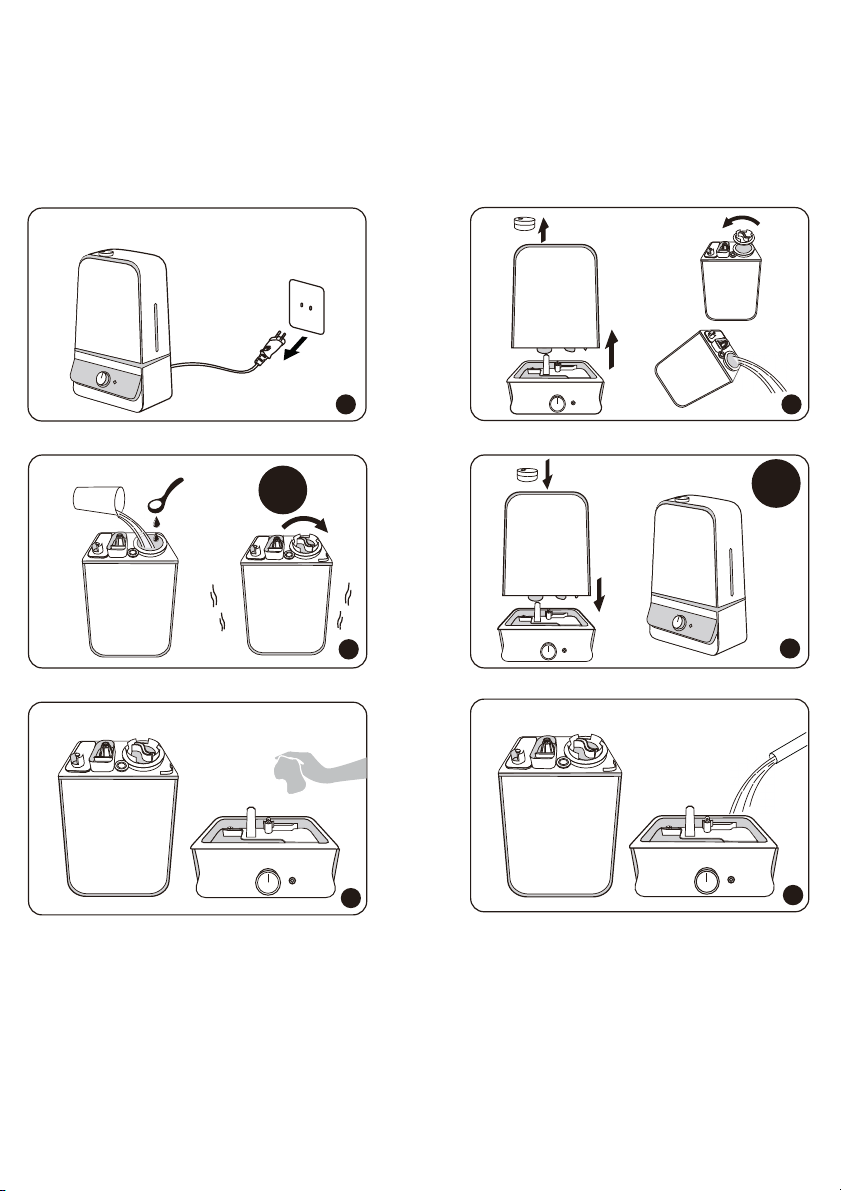
1. Turn off and unplug the humidier. Remove the nozzle.
2. Remove the water tank from the base. Remove the tank cap. Make sure that the white
sealing ring does not come off. Drain water from the water tank and base. Remove any
accessories and set them aside.
3. Fill the water tank half full. Add 1 teaspoon of undiluted distilled white vinegar. Attach the
tank cap and shake the tank for 15 seconds.
4. Place the tank onto the base. The vinegar solution will enter the water reservoir to loosen
mineral buildup (scale) on the atomizer, water oater and the bottom of the water tank.
Set it still for 15-20 minutes.
5. Uncap the tank cap and drain the solution. Wipe the atomizer and oater with a soft cloth
to remove loosened mineral deposits.
6. Rinse both the water reservoir and water tank until the smell of vinegar (for scale removal)
or bleach solution (for disinfecting, see below) is gone.
Disinfecting Instructions
1. Follow steps 1-2 of the previous section on scale removal.
2. Fill the water tank half full. Add ½ tsp of bleach. Place the tank cap back on. Swish the
solution around in tank. Place the tank on the base. The bleach solution will enter and
disinfect the water reservoir as well as the other components. Set it still for 15-20 minutes.
3. Follow steps 4-6 of the previous section on scale removal to complete disinfecting the
humidier.
1. Follow the cleaning instructions when the humidier will not be used for at least one week, or at the
end of the season. Remove any accessories used with the humidier and allow the humidier and
accessories to dry completely before storing.
2. DO NOT store with water inside the base, water reservoir, or tank.
3. Pack the unit safely and store in a cool, dry location.
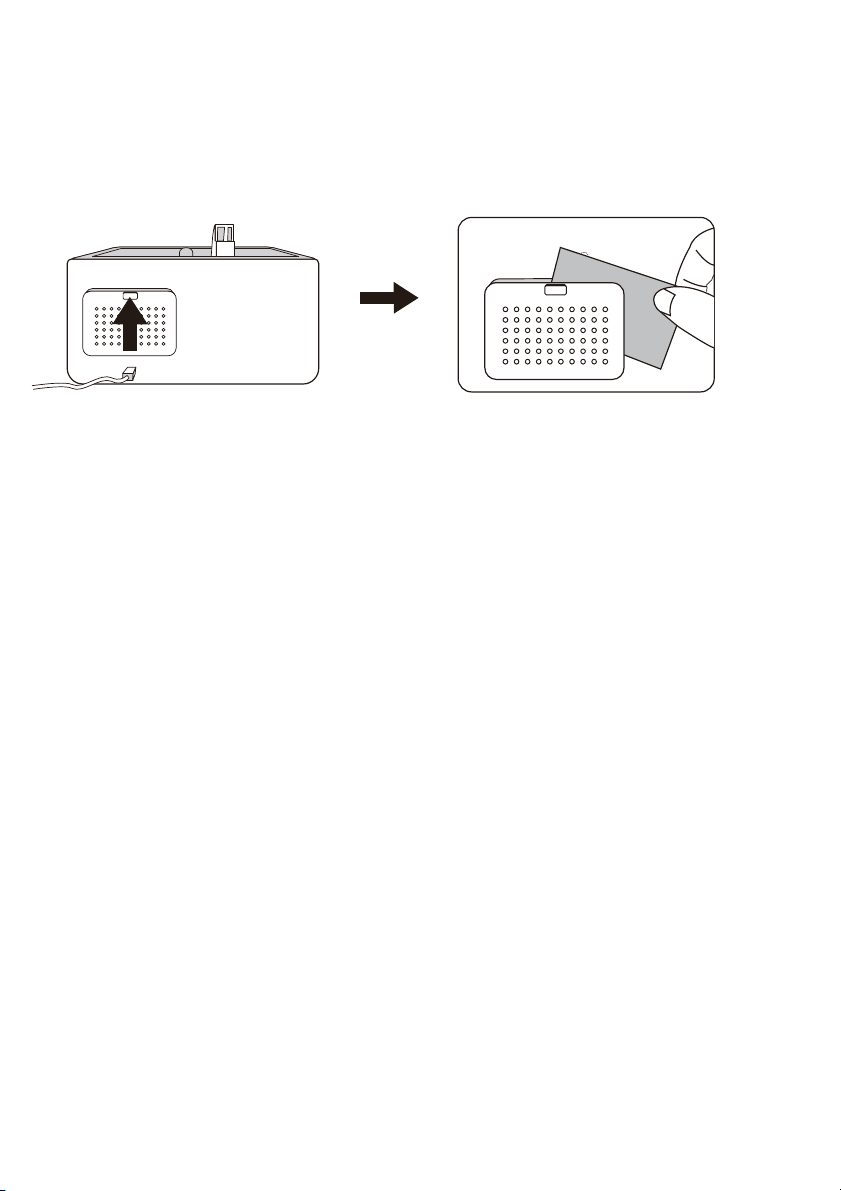
Clean the Dustproof Sponge
Clean the dustproof sponge (at the back of base) with water or detergent once a month. Put
it back in place after cleaning.
push
End-Of-Season Care and Storage
11
12
push

1. Turn off and unplug the humidier. Remove the nozzle.
2. Remove the water tank from the base. Remove the tank cap. Make sure that the white
sealing ring does not come off. Drain water from the water tank and base. Remove any
accessories and set them aside.
3. Fill the water tank half full. Add 1 teaspoon of undiluted distilled white vinegar. Attach the
tank cap and shake the tank for 15 seconds.
4. Place the tank onto the base. The vinegar solution will enter the water reservoir to loosen
mineral buildup (scale) on the atomizer, water oater and the bottom of the water tank.
Set it still for 15-20 minutes.
5. Uncap the tank cap and drain the solution. Wipe the atomizer and oater with a soft cloth
to remove loosened mineral deposits.
6. Rinse both the water reservoir and water tank until the smell of vinegar (for scale removal)
or bleach solution (for disinfecting, see below) is gone.
Disinfecting Instructions
1. Follow steps 1-2 of the previous section on scale removal.
2. Fill the water tank half full. Add ½ tsp of bleach. Place the tank cap back on. Swish the
solution around in tank. Place the tank on the base. The bleach solution will enter and
disinfect the water reservoir as well as the other components. Set it still for 15-20 minutes.
3. Follow steps 4-6 of the previous section on scale removal to complete disinfecting the
humidier.
1. Follow the cleaning instructions when the humidier will not be used for at least one week, or at the
end of the season. Remove any accessories used with the humidier and allow the humidier and
accessories to dry completely before storing.
2. DO NOT store with water inside the base, water reservoir, or tank.
3. Pack the unit safely and store in a cool, dry location.
Clean the Dustproof Sponge
Clean the dustproof sponge (at the back of base) with water or detergent once a month. Put
it back in place after cleaning.
push
End-Of-Season Care and Storage
11
12
push
Rell and reinstall the water tank.
Adjust to larger mist output.
Remove the tank, empty the base and
place back the lled tank on the empty
base.
Put your hand towards the nozzle and
feel if there is air coming out. If yes,
clean the water scale on the atomizer
as instructed(p10).
Check for possible cracks in the tank.
Ask for a replacement if it is damaged.
Tighten the tank cap.
Check the tank cap for rubber ring,
contact us if any is missing.
Ensure the spring is secured properly
to the tank allowing water to pass
through to the base.
1. Check if the room is too humid,adjust
to lower mist output.
2. Open door and windows, or change
to a larger room.
Humidier should be placed on a hard
at surface, 2 feet above the oor, 12
inches away from the wall. Point mist
outlet away from wall or window.
Raise the room temperature to 25°C/77°F.
Not enough water inside the
tank.
Mist level is set too low.
The base might be overlled.
Mineral buildup on atomizer.
Tank may be damaged.
Tank cap is not tightened
securely.
Rubber ring was not
installed on tank cap.
Spring get stuck.
Mist level is set too high for
the room size.
Air inlet is blocked.
Low indoor temperature
leads to liquefaction.
TROUBLESHOOTING GUIDE
1. If the information listed in the troubleshooting guide can’t solve your problem, please
email us for help.
2. Failure to keep this unit clean from mineral deposits may affect operation of this unit.
3. Customer failure to follow these instructions may void the warranty.
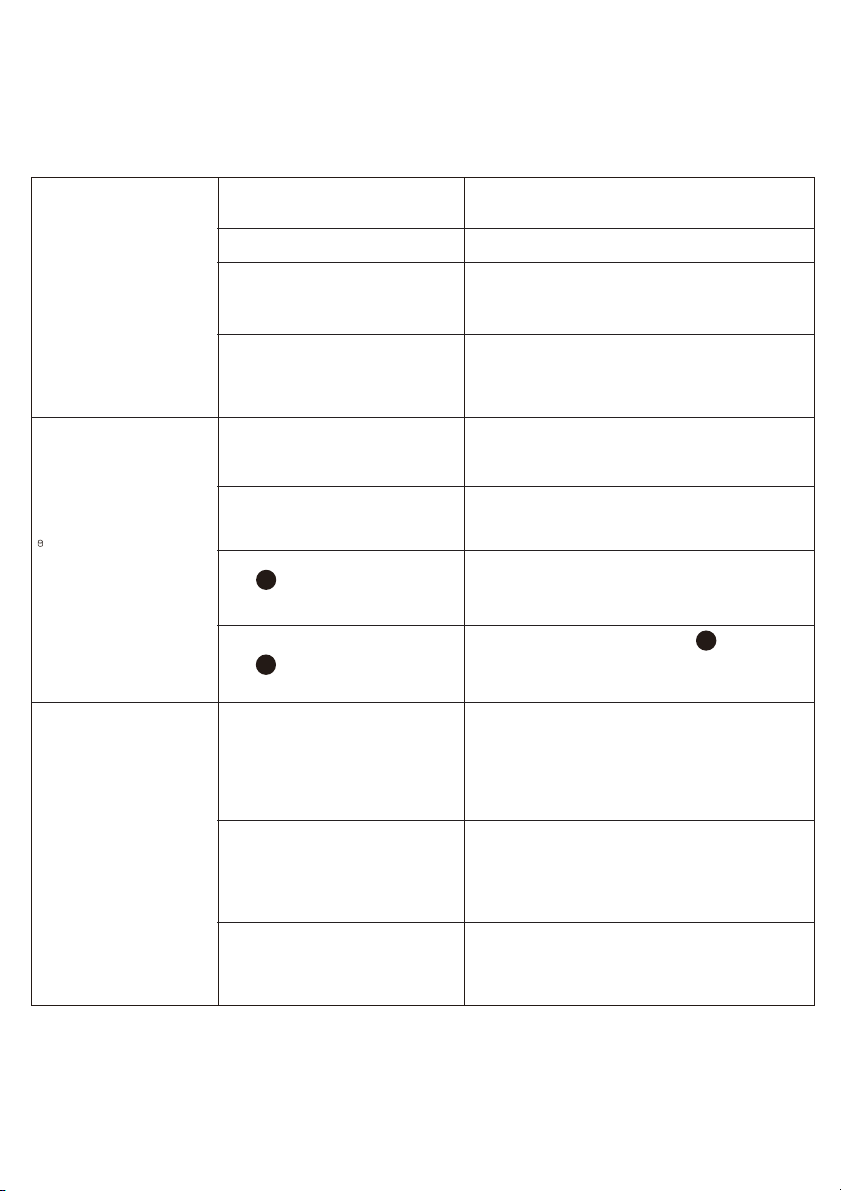
3
2
1. Spring
2. Rubber ring
3. Water oater
Problem Possible Cause Solution
Unit not plugged in.
No power from power outlet.
No water in the water
reservoir.
Ensure unit is properly
plugged in.
Try another power outlet.
Failed to turn on the unit.
Ensure the spring is
secured properly to the tank
allowing water to pass
through to the base.
1
Adjust the water oater to
a horizontal position and
make sure it can rise up with
water .
3
Water oater get stuck.
3
Waterless indicator is
constantly on.
The unit is on but
no mist or little
mist is produced.
Tank leakage.
1
2
1
Mist height is low,
damping surrounding
desk or oor.
Condensation
forms around
humidier or
on windows
and walls.
13 14
1
Rell and reinstall the water tank.
Adjust to larger mist output.
Remove the tank, empty the base and
place back the lled tank on the empty
base.
Put your hand towards the nozzle and
feel if there is air coming out. If yes,
clean the water scale on the atomizer
as instructed(p10).
Check for possible cracks in the tank.
Ask for a replacement if it is damaged.
Tighten the tank cap.
Check the tank cap for rubber ring,
contact us if any is missing.
Ensure the spring is secured properly
to the tank allowing water to pass
through to the base.
1. Check if the room is too humid,adjust
to lower mist output.
2. Open door and windows, or change
to a larger room.
Humidier should be placed on a hard
at surface, 2 feet above the oor, 12
inches away from the wall. Point mist
outlet away from wall or window.
Raise the room temperature to 25°C/77°F.
Not enough water inside the
tank.
Mist level is set too low.
The base might be overlled.
Mineral buildup on atomizer.
Tank may be damaged.
Tank cap is not tightened
securely.
Rubber ring was not
installed on tank cap.
Spring get stuck.
Mist level is set too high for
the room size.
Air inlet is blocked.
Low indoor temperature
leads to liquefaction.
TROUBLESHOOTING GUIDE
1. If the information listed in the troubleshooting guide can’t solve your problem, please
email us for help.
2. Failure to keep this unit clean from mineral deposits may affect operation of this unit.
3. Customer failure to follow these instructions may void the warranty.
3
2
1. Spring
2. Rubber ring
3. Water oater
Problem Possible Cause Solution
Unit not plugged in.
No power from power outlet.
No water in the water
reservoir.
Ensure unit is properly
plugged in.
Try another power outlet.
Failed to turn on the unit.
Ensure the spring is
secured properly to the tank
allowing water to pass
through to the base.
1
Adjust the water oater to
a horizontal position and
make sure it can rise up with
water .
3
Water oater get stuck.
3
Waterless indicator is
constantly on.
The unit is on but
no mist or little
mist is produced.
Tank leakage.
1
2
1
Mist height is low,
damping surrounding
desk or oor.
Condensation
forms around
humidier or
on windows
and walls.
13 14
1
Poor humidication.
Tap water may contain too
much minerals.
Replace with ltered or distilled
water or use with a TaoTronics
Demineralization Cartridge.
White dust appears / Black
coating in the base akes off.
Unit needs to be cleaned.Strange odor.
Water is going down to the
water reservoir.
This is normal while it is working.
Strange water noise.
Unit works long hours.
Power off and place in a
well-ventilated place for 10 minutes.
Humidier is getting too hot.
1-1. Adjust to maximum mist output.
1-2. Close door or windows to
reduce air ventilation, or
change to a smaller room.
Humidier should be placed on
a hard at surface, 2 feet above
the oor, 12 inches away from
the wall.
Raise the room temperature
to 25°C/77°F.
Mist level is set too low for the
room size.
Air inlet is blocked.
Low indoor temperature
leads to liquefaction.
Clean the humidier as instructed.
Leave the empty water tank open
in a cool place for 12 hours without
the water tank cap attached.
This product is covered with TaoTronics product and labor warranty for 12 months from the
date of its original purchase. You will be given a warranty extension of 18 months if the
product is registered on our website (www.taotronics.com).
Any defective part will be, at the discretion of SUNVALLEYTEK INTERNATIONAL INC. , repaired
or replaced at no charge if the appliance has not been tampered with and has been used
according to these printed directions.
PLEASE CONTACT US BEFORE RETURNING THIS PRODUCT TO THE STORE.
EMAIL TAOTRONICS CUSTOMER CARE FOR PROBLEMS AND QUESTIONS.
WE WILL RESPOND WITHIN 1 BUSINESS DAY.
WARRANTY
CONTACT / TAOTRONICS CUSTOMER CARE
Sunvalleytek USA, Inc.
Address: 46724 Lakeview Blvd, Fremont, CA 94538
E-mail: support@taotronics.com(US)
support.ca@taotronics.com(CA)
support.uk@taotronics.com(UK)
Tel: 1-888-456-8468 (Monday-Friday: 9:00 – 17:00 PST)
Website: www.taotronics.com
We can only provide after sales service for products that are sold by TaoTronics or TaoTronics
authorized retailers and distributors.If you have purchased your unit from a different place,
please contact your seller for return and warranty issues.
If any problems occur, please contact TaoTronics support (support@taotronics.com)
immediately to launch a warranty claim. Specify model number and your Amazon order
number. Our Consumer Service Representative will respond within 1 business day, advise you
how to correct the problem yourself, or instruct you on how to return the defective unit back
to us for repair or replacement.
15
16

Poor humidication.
Tap water may contain too
much minerals.
Replace with ltered or distilled
water or use with a TaoTronics
Demineralization Cartridge.
White dust appears / Black
coating in the base akes off.
Unit needs to be cleaned.Strange odor.
Water is going down to the
water reservoir.
This is normal while it is working.
Strange water noise.
Unit works long hours.
Power off and place in a
well-ventilated place for 10 minutes.
Humidier is getting too hot.
1-1. Adjust to maximum mist output.
1-2. Close door or windows to
reduce air ventilation, or
change to a smaller room.
Humidier should be placed on
a hard at surface, 2 feet above
the oor, 12 inches away from
the wall.
Raise the room temperature
to 25°C/77°F.
Mist level is set too low for the
room size.
Air inlet is blocked.
Low indoor temperature
leads to liquefaction.
Clean the humidier as instructed.
Leave the empty water tank open
in a cool place for 12 hours without
the water tank cap attached.
This product is covered with TaoTronics product and labor warranty for 12 months from the
date of its original purchase. You will be given a warranty extension of 18 months if the
product is registered on our website (www.taotronics.com).
Any defective part will be, at the discretion of SUNVALLEYTEK INTERNATIONAL INC. , repaired
or replaced at no charge if the appliance has not been tampered with and has been used
according to these printed directions.
PLEASE CONTACT US BEFORE RETURNING THIS PRODUCT TO THE STORE.
EMAIL TAOTRONICS CUSTOMER CARE FOR PROBLEMS AND QUESTIONS.
WE WILL RESPOND WITHIN 1 BUSINESS DAY.
WARRANTY
CONTACT / TAOTRONICS CUSTOMER CARE
Sunvalleytek USA, Inc.
Address: 46724 Lakeview Blvd, Fremont, CA 94538
E-mail: [email protected](US)
Tel: 1-888-456-8468 (Monday-Friday: 9:00 – 17:00 PST)
Website: www.taotronics.com
We can only provide after sales service for products that are sold by TaoTronics or TaoTronics
authorized retailers and distributors.If you have purchased your unit from a different place,
please contact your seller for return and warranty issues.
If any problems occur, please contact TaoTronics support ([email protected])
immediately to launch a warranty claim. Specify model number and your Amazon order
number. Our Consumer Service Representative will respond within 1 business day, advise you
how to correct the problem yourself, or instruct you on how to return the defective unit back
to us for repair or replacement.
15
16

17 18
ERKLÄRUNG
SICHERHEITSHINWEISE
BEVOR SIE DEN LUFTBEFEUCHTER BENUTZEN
WENN SIE DEN LUFTBEFEUCHTER BENUTZEN
NACHDEM SIE DEN LUFTBEFEUCHTER BENUTZT HABEN
IM LIEFERUMFANG ENTHALTEN
SPEZIFIKATIONEN
PRODUKTABBILDUNG
BEDIENUNG UND FUNKTIONEN
Wasser einfüllen
Ein- / Ausschalten
Beleuchtungssteuerung
Wassermangelsicherung: Abschaltautomatik des Luftbefeuchters.
REINIGUNG UND PFLEGE
Achtung
Tägliche Wartung
Wöchentliche Wartung
Hinweise zur Kesselsteinentfernung
Desinfektionshinweise
Reinigung des Staubschutz-Schwamms
Pflege zum Saisonende und Aufbewahrung
PROBLEMBEHANDLUNG
GARANTIE
KONTAKTIEREN DES TAOTRONICS KUNDENSERVICE
INHALT
18
18
22
22
24
30/32
23
33
33
19
21
20
24
25
26
26
26
26
27
28
29
29
25
25
DE
ERKLÄRUNG
Vielen Dank, dass Sie sich für ein TaoTronics Produkt entschieden haben, das gemäß unseren strengen
Qualitätsstandards geprüft wurde. Dieses Produkt beinhaltet eine TaoTronics Produkt- und Verarbeitungs-
garantie für 12 Monate ab Kaufdatum.
Bitte schreiben Sie uns eine E-Mail mit Ihrer Auftragsnummer und Ihrem Problem oder Anliegen an
support.de@taotronics.com. Wir antworten Ihnen innerhalb von 24 Stunden.
Bitte lesen Sie sich die Bedienungsanleitung sorgfältig durch. Reinigen und warten Sie das Produkt wie
beschrieben. Sollten Probleme auftreten, lesen Sie sich bitte zuerst die Problembehandlung durch.
Diese Garantie erlischt, wenn der Defekt von Unfallschäden, Fehlnutzung, unsachgemäßem Gebrauch,
Nachlässigkeit, fehlerhafter Reparatur oder Umbau durch unautorisiertes Personal oder dem Missachten der
Bedienhinweise, die dem Produkt beiliegen, einschließlich dem Hinzugeben von ätherischem Öl direkt in
Tank und Basis, herrührt. Diese Garantie findet bei normaler Abnutzung oder gewerblicher Nutzung keine
Anwendung.
Die Haftbarkeit darf in keinem Fall den Kaufpreis, der vom Käufer des Produkts gezahlt wurde, überschreit-
Unter keinen Umständen kann es zu Haftung für irgendwelchen Verlust - direkt, indirekt oder zufällig - oder
irgendwelche Folgeschäden, die aus der Nutzung resultieren oder in Verbindung mit der Nutzung des
Produkts stehen, kommen.
SICHERHEITSHINWEISE
Der Luftbefeuchter wurde aus sicheren und umweltschonenden Materialien gefertigt, zertifiziert und
entspricht den Regularien oder gesetzlichen Bestimmungen der jeweiligen Verkaufsregion.
WICHTIG: Bitte lesen Sie sich diese SICHERHEITSHINWEISE durch, bevor Sie das Gerät benutzen.
Grundlegende Vorsichtsmaßnahmen sollten stets eingehalten werden, um das Risiko für Brandgefahr,
Stromschlaggefahr und Personen- sowie Produktschaden zu minimieren.

17 18
ERKLÄRUNG
SICHERHEITSHINWEISE
BEVOR SIE DEN LUFTBEFEUCHTER BENUTZEN
WENN SIE DEN LUFTBEFEUCHTER BENUTZEN
NACHDEM SIE DEN LUFTBEFEUCHTER BENUTZT HABEN
IM LIEFERUMFANG ENTHALTEN
SPEZIFIKATIONEN
PRODUKTABBILDUNG
BEDIENUNG UND FUNKTIONEN
Wasser einfüllen
Ein- / Ausschalten
Beleuchtungssteuerung
Wassermangelsicherung: Abschaltautomatik des Luftbefeuchters.
REINIGUNG UND PFLEGE
Achtung
Tägliche Wartung
Wöchentliche Wartung
Hinweise zur Kesselsteinentfernung
Desinfektionshinweise
Reinigung des Staubschutz-Schwamms
Pflege zum Saisonende und Aufbewahrung
PROBLEMBEHANDLUNG
GARANTIE
KONTAKTIEREN DES TAOTRONICS KUNDENSERVICE
INHALT
18
18
22
22
24
30/32
23
33
33
19
21
20
24
25
26
26
26
26
27
28
29
29
25
25
DE
ERKLÄRUNG
Vielen Dank, dass Sie sich für ein TaoTronics Produkt entschieden haben, das gemäß unseren strengen
Qualitätsstandards geprüft wurde. Dieses Produkt beinhaltet eine TaoTronics Produkt- und Verarbeitungs-
garantie für 12 Monate ab Kaufdatum.
Bitte schreiben Sie uns eine E-Mail mit Ihrer Auftragsnummer und Ihrem Problem oder Anliegen an
[email protected]. Wir antworten Ihnen innerhalb von 24 Stunden.
Bitte lesen Sie sich die Bedienungsanleitung sorgfältig durch. Reinigen und warten Sie das Produkt wie
beschrieben. Sollten Probleme auftreten, lesen Sie sich bitte zuerst die Problembehandlung durch.
Diese Garantie erlischt, wenn der Defekt von Unfallschäden, Fehlnutzung, unsachgemäßem Gebrauch,
Nachlässigkeit, fehlerhafter Reparatur oder Umbau durch unautorisiertes Personal oder dem Missachten der
Bedienhinweise, die dem Produkt beiliegen, einschließlich dem Hinzugeben von ätherischem Öl direkt in
Tank und Basis, herrührt. Diese Garantie findet bei normaler Abnutzung oder gewerblicher Nutzung keine
Anwendung.
Die Haftbarkeit darf in keinem Fall den Kaufpreis, der vom Käufer des Produkts gezahlt wurde, überschreit-
Unter keinen Umständen kann es zu Haftung für irgendwelchen Verlust - direkt, indirekt oder zufällig - oder
irgendwelche Folgeschäden, die aus der Nutzung resultieren oder in Verbindung mit der Nutzung des
Produkts stehen, kommen.
SICHERHEITSHINWEISE
Der Luftbefeuchter wurde aus sicheren und umweltschonenden Materialien gefertigt, zertifiziert und
entspricht den Regularien oder gesetzlichen Bestimmungen der jeweiligen Verkaufsregion.
WICHTIG: Bitte lesen Sie sich diese SICHERHEITSHINWEISE durch, bevor Sie das Gerät benutzen.
Grundlegende Vorsichtsmaßnahmen sollten stets eingehalten werden, um das Risiko für Brandgefahr,
Stromschlaggefahr und Personen- sowie Produktschaden zu minimieren.
19
20
1. Bitte überprüfen Sie das Kabel auf jegliche Zeichen von Schäden. Verwenden Sie den
Luftbefeuchter nicht, wenn es beschädigt ist.
2. Stellen Sie diesen Luftbefeuchter NICHT an feuchte Orte.
Bitte bewahren Sie den Luftbefeuchter außerhalb der Reichweite von Patienten & Kindern &
Haustieren auf.
1. Bitte stellen Sie das Gerät auf eine glatte, fusselfreie, nicht metallische, wassergeschützte
und ebene Fläche und halten Sie es vor direkter Sonneneinstrahlung geschützt.
2. Stellen Sie das Gerät immer 60 cm (2 Fuß) über dem Boden, 30 cm (12 Zoll) von der Wand,
von anderen Geräten oder von Holzmöbeln entfernt auf.
BEVOR SIE DEN LUFTBEFEUCHTER BENUTZEN
1
2
30 CM
60 CM
30 CM
1
2
WENN SIE DEN LUFTBEFEUCHTER BENUTZEN
1. Stecken Sie den Stecker NICHT mit nassen Händen ein.
2. Richten Sie die Vernebelungsdüse NICHT auf die Wand.
1. Benutzen Sie WEDER Ihre Hand NOCH andere Gegenstände, um die Düse zu verdecken,
wenn das Gerät eingeschaltet ist, um Schäden am Produkt oder Verletzungen zu vermeiden.
2. Reinigen Sie das Gerät NICHT, solange es an einer Stromquelle angeschlossen oder
eingeschaltet ist.
1. Bewegen oder neigen Sie den Luftbefeuchter NICHT während des Betriebs.
2. Die angenehmste Luftfeuchtigkeit liegt zwischen 40% und 60%. Bitte stellen Sie den
Nebelausstoß wie gewünscht ein.
1
2
1
2
Humidity
1
2
40% 60%
21
NACHDEM SIE DEN LUFTBEFEUCHTER BENUTZT HABEN
1. Reinigen Sie den Luftbefeuchter NICHT direkt nach dem Ausschalten, falls das Gerät warm ist.
Lassen Sie den Luftbefeuchter vollkommen abkühlen, bevor Sie ihn reinigen.
2. Versuchen Sie NICHT, elektrische oder mechanische Funktionen dieses Luftbefeuchters
selbst zu reparieren oder zu justieren.Dies würde zum Verlust Ihrer Garantie führen.
1
2
1. Bitte trennen Sie das Gerät immer von der Stromquelle, indem Sie den Stecker ziehen,
wenn Sie es nicht benutzen.
2. Der Luftbefeuchter muss regelmäßig gereinigt werden. Bitte halten Sie sich an die Hinweise
zu Reinigung und Pflege.
1
2
· 1 x TaoTronics Luftbefeuchter (Modell: TT-AH025)
· 1 x Reinigungsbürste
· 1 x Staubschutz-Schwamm
· 1 x Dankeschön-Karte
· 1 x Bedienungsanleitung
TT-AH025
AC 200-240V 50 / 60Hz
Min: 15W
Max: 25W
6.0L / 1.59Gal
Min: 60ml/h
Max: 300ml/h
20-60h
20-40m² / 215-430ft²
<27dB
251 x 167 x 412mm / 9.9 x 6.6 x 16.2in
1775g/62.6oz
Model
Betriebsspannung
Nennleistung
Wassertank-Kapazität
Nebelausstoß
Betriebszeit mit einer Tankfüllung
Empfohlene Raumgröße
Geräuschpegel
Maße
Nettogewicht-
IM LIEFERUMFANG ENTHALTEN
SPEZIFIKATIONEN
22
24
23
1. Zerstäuberdüse
2. Wassertank
3. Wasserstandsfenster
4. Tankdeckel
5. Wasserzulauf
6. Griff
7. LED-Anzeige
8. Drehregler
9. Basis
10. Lichttaste
11. Nachtlicht
12. Schwimmer
13. Luftauslass
14. Tank-Beleuchtung
15. Wasserreservoir
16. Zerstäuber
17. Staubschutzschwamm
18. Luftzufuhr
PRODUKTABBILDUNG
1
3
5
15
16
12
4
9
11
10
18
13
14
8
17
2
7
push
6
BEDIENUNG UND FUNKTIONEN
Wasser einfüllen
1. Entnehmen Sie die Düse und drehen Sie den Tank auf den Kopf.
2. Nehmen Sie den Tankdeckel ab und befüllen Sie den Tank nur mit sauberem und kaltem Wasser.
3. Setzen Sie den Tankdeckel wieder auf, stellen Sie den Tank wieder in die Basis und setzen Sie die
Düse wieder ein. Stellen Sie bitte sicher, dass alle Teile richtig befestigt sind, damit das Wasser
vom Tank ins Reservoir laufen kann.
1. Sollte Ihr Leitungswasser zu hart sein, ist es empfehlenswert, gefiltertes oder destilliertes Wasser zu
verwenden, damit sich kein weißer Staub bildet. Verwenden Sie KEIN heißes Wasser.
2. Geben Sie KEINE ätherischen Öle oder medizinischen Tabletten in den Wassertank.
3. Füllen Sie KEIN Wasser in die Basis oder in die Düse.
4. Bewegen Sie den Luftbefeuchter NICHT, während der Wassertank voll ist, damit die Basis
nicht überläuft und kein Wasser ausläuft.
1
5
3
2
3 4
21 4
25
Schließen Sie das Stromkabel an einer Steckdose an. Der Luftbefeuchter ist jetzt einsatzbereit.
1. Drehen Sie den Drehregler im Uhrzeigersinn auf die AN-Position. Die blaue LED-Anzeige leuchtet
auf und signalisiert, dass der Luftbefeuchter auf minimalem Nebelausstoß eingeschaltet wurde.
2. Drehen Sie den Drehregler weiter im Uhrzeigersinn, um den Nebelausstoß zu erhöhen.
3. Drehen Sie den Drehregler gegen den Uhrzeigersinn, um den Nebelausstoß zu verringern.
4. Drehen Sie den Drehregler gegen den Uhrzeigersinn auf die AUS-Position, um den Luftbefeuchter
auszuschalten. Die LED-Anzeige geht dann aus. Die Belüftung läuft noch weitere 3 Minuten, um die
Wasserzulaufröhre zu trocknen.
Power Ein / Aus und Nebeljustierung
Beleuchtungssteuerung
Wassermangelsicherung: Abschaltautomatik des Luftbefeuchters.
1. Drücken Sie die Lichttaste, um das Nachtlicht ein- / auszuschalten.
2. Halten Sie die Lichttaste 1,5 Sekunden lang gedrückt, um die Tank-Beleuchtung ein- / auszuschalten.
Sobald nicht mehr genügend Wasser im Wassertank ist, stellt der Luftbefeuchter den Betrieb ein und die
LED-Anzeige leuchtet rot. Dies geschieht aus Sicherheitsgründen, damit der Luftbefeuchter nicht überhitzt
und der Zerstäuber nicht beschädigt wird.
Anmerkung:
Der angenehmste Luftfeuchtigkeitsgrad liegt zwischen 40%-60%.
Bitte stellen Sie den Nebelausstoß wie gewünscht ein.
OFF
ON
Max
Min
OFF
ON
Max
Min
26
REINIGUNG UND PFLEGE
Achtung
1. Tauchen Sie die Basis NICHT unter Wasser.
2. Stellen Sie sicher, dass kein Wasser durch Luftauslass, Lufteinlass oder
Drehregler und Nachtlichttaste.
3. Geben Sie KEINE Teile dieses Luftbefeuchters in die Spülmaschine, da
dies den Luftbefeuchter beschädigen kann und die Garantie hierdurch
erlischt.
Tägliche Wartung
Schalten Sie den Luftbefeuchter aus und trennen Sie ihn von der Stromquelle. Entleeren Sie das
Wasser aus Tank, Reservoir und Basis.
Wöchentliche Wartung
1. Um Ihren Luftbefeuchter richtig zu reinigen, empfehlen wir Ihnen, Ablagerungen zu entfernen
und den Luftbefeuchter separat zu desinfizieren.
2. Mischen Sie KEINE Essig- und Bleichmittel zusammen. Verwenden Sie nicht mehr als 1 TL
Bleiche auf 4 L Wasser, damit es nicht zu Schäden am Luftbefeuchter kommt.
3. Bitte stellen Sie sicher, dass Gummiring & Gummikappe & Feder (sehen Sie sich hierzu
das Diagramm auf Seite 30 an) auch nach der Reinigung richtig am Tankdeckel angebracht sind,
damit kein Wasser herausläuft.
1 2
Hinweise zur Kesselsteinentfernung
15S
3
15-20
minutes
4
5
6
27
1. Schalten Sie den Luftbefeuchter aus und ziehen Sie den Stecker. Entnehmen Sie dann die
Düse.
2. Nehmen Sie den Wassertank von der Basis. Nehmen Sie den Tankdeckel ab. Achten Sie
darauf, dass der weiße Dichtungsring an Ort und Stelle bleibt. Entleeren Sie das Wasser aus
Wassertank und Basis. Entfernen Sie alle Zubehörteile und stellen Sie das Ganze zur Seite.
3. Befüllen Sie den Tank zur Hälfte mit Wasser. Geben Sie 1 Teelöffel unverdünnten, destillierten
weißen Essig hinein. Schließen Sie den Tankdeckel und schütteln Sie das Ganze 15 Sekund
en lang.
4. Setzen Sie den Tank auf die Basis. Die Essiglösung läuft ins Wasserreservoir, um Mineralab
lagerungen (Kesselstein) auf dem Zerstäuber, Schwimmer und dem Boden des Wasser
tanks zu lösen. Lassen Sie das Ganze 15 - 20 Minuten ruhen.
5. Öffnen Sie den Tankdeckel und leeren Sie das Gemisch aus. Wischen Sie Zerstäuber und
Schwimmer mit einem weichen Tuch ab, um die gelösten Mineralablagerungen zu
entfernen.
6. Spülen Sie Wasserreservoir und Wassertank ab, bis der Geruch von Essig
(zur Kalkentfernung) oder von Bleiche (für Desinfektion, siehe unten) verschwunden ist.
28
Desinfektionshinweise
1. Befolgen Sie die Schritte 1 und 2 der Kesselsteinentfernung.
2. Befüllen Sie den Tank zur Hälfte mit Wasser. Geben Sie ½ TL Bleiche hinzu. Setzen Sie den Tankdeckel
wieder auf. Schwenken Sie die Lösung im Tank. Stellen Sie den Tank auf die Basis. Die Bleiche-Lösung
läuft ins Wasserreservoir und andere Teile und desinfiziert diese. Lassen Sie das Ganze 15 - 20 Minuten
ruhen.
3. Befolgen Sie Schritte 4-6 der Kalkentfernung, um die Desinfektion des Luftbefeuchters
abzuschließen.
1. Befolgen Sie die Reinigungshinweise, wenn der Luftbefeuchter mindestens eine Woche lang
nicht benutzt werden wird, oder am Saisonende. Entfernen Sie jegliches Zubehör, das mit
dem Luftbefeuchter verwendet wird, und lassen Sie den Luftbefeuchter und die
Zubehörteile vollständig trocknen, bevor Sie diese verstauen.
2. Lagern Sie das Gerät NICHT mit Wasser in der Basis, im Wasserreservoir oder im Tank.
3. Verpacken Sie das Gerät sicher und lagern Sie es an einem kühlen, trockenen Ort.
Reinigung des Staubschutz-Schwamms
Reinigen Sie den Staubschutz-Schwamm (an der Rückseite der Basis) einmal im Monat mit Wasser
oder Reinigungsmittel. Setzen Sie ihn nach der Reinigung wieder ein.
push
Pflege zum Saisonende und Aufbewahrung
push
PROBLEMBEHANDLUNG
1. Sollten Ihnen die in der Problemlösung aufgezeigten Informationen nicht helfen, schrei
ben Sie uns für weitere Hilfe bitte eine E-Mail.
2. Wenn das Gerät nicht regelmäßig von Mineralablagerungen befreit wird, kann dies den
Betrieb des Geräts beeinträchtigen.
3. Werden diese Hinweise vom Nutzer nicht eingehalten, kann hierdurch die Garantie erlöschen.
3
2
Problem Mögliche Ursache Lösung
Das Gerät ist nicht
angeschlossen.
Kein Strom von der Steckdose.
Kein Wasser im
Wasserreservoir.
Stellen Sie sicher, dass das
Gerät eingesteckt ist.
Testen Sie eine andere Steckdose.
Das Gerät konnte nicht
eingeschaltet werden.
1
3
Wasserschwimmer steckt
fest .
3
Die "Kein Wasser"-Anzeige
leuchtet konstant.
1
29
30
Vergewissern Sie sich, dass die
Feder richtig am Tank
befestigt ist, um Wasser durch
die Basis laufen zu lassen.
1. Feder
2. Gummiring
3. Wasserschwimmer
Bringen Sie den
Wasserschwimmer in eine horizontale
Lage und stellen Sie sicher, dass er mit
dem Wasserstand steigen kann.
Nicht genügend Wasser im
Tank.
Die Nebelstufe ist zu niedrig.
Die Basis könnte überfüllt sein.
Mineralablagerungen am
Zerstäuber.
Der Tank könnte
beschädigt sein.
Der Tankdeckel sitzt nicht fest
genug.
Der Gummiring ist nicht am
Tankdeckel angebracht.
Die Luftzufuhr ist blockiert.
Niedrige Innenraumtemperatur
führt zu Verflüssigung.
Die Feder klemmt.
Die Nebelstufe ist für die
Raumgröße zu hoch
eingestellt .
1. Stellen Sie die maximale Nebelstufe ein;
2. Schließen Sie Tür und Fenster, um die
Belüftung zu verringern,
oder wechseln Sie in einen kleineren
Raum.
31
32
Das Gerät ist
eingeschaltet,
es wird jedoch kein
oder nur wenig
Nebel erzeugt.
Tank-Lecks.
2
Befüllen Sie den Wassertank
und setzen Sie ihn wieder ein.
Stellen Sie die maximale Nebelstufe ein.
Nehmen Sie den Tank ab, leeren Sie die
Basis aus & setzen Sie den befüllten Tank
wieder auf die entleerte Basis.
Erfühlen Sie, ob Luft aus der Düse austritt.
Falls ja, befreien Sie den Zerstäuber wie
beschrieben von Ablagerungen.
Überprüfen Sie den Tank auf mögliche Risse
und ersetzen Sie ihn, falls nötig.
Befestigen Sie den
Tankdeckel.
Überprüfen Sie den Tankdeckel auf Gummiring.
Kontaktieren Sie uns, falls etwas fehlt.
1. Überprüfen Sie, ob der Raum zu feucht
ist. Regeln Sie den Nebelausstoß
herunter. 40%-60% Luftfeuchtigkeit
eignet sich am besten
2. Öffnen Sie Tür und Fenster oder
wechseln Sie in einen größeren Raum.
Der Luftbefeuchter sollte auf einem festen,
ebenen Untergrund etwa 60cm über dem
Boden und 30cm von der Wand entfernt
stehen. Richten Sie die Düse nicht auf Wände
oder Fenster.
Erhöhen Sie die
Raumtemperatur auf 25°C/77°F.
Geringe Befeuchtung.
Das Leitungswasser könnte zu
viele Mineralien enthalten.
Verwenden Sie gefiltertes oder
destilliertes Wasser oder
benutzen Sie eine TaoTronics
Demineralisationskartusche.
Es tritt weißer Staub auf /
schwarze Schicht auf der
Basis blättert ab.
Das Gerät muss gereinigt
werden.
Eigenartiger Geruch.
Wasser läuft ins Wasserreservoir.
Das ist im Betrieb ganz normal.
Eigenartige
Wassergeräusche.
Das Gerät ist zu lange
eingeschaltet.
Schalten Sie das Gerät aus und stellen
Sie es 10 Minuten lang an einen gut
belüfteten Ort.
Der Luftbefeuchter
wird zu heiß.
Der Luftbefeuchter sollte auf einem festen,
ebenen Untergrund etwa 60cm über
dem Boden und 30cm von der Wand
entfernt stehen.
Erhöhen Sie die
Raumtemperatur auf 25°C/77°F.
Die Nebelstufe ist für die
Raumgröße zu niedrig
eingestellt.
Air inlet is blocked.
Low indoor temperature
leads to liquefaction.
Reinigen Sie den Luftbefeuchter
wie beschrieben.
Lassen Sie den leeren Wassertank 12
Stunden lang ohne Tankdeckel an einem
kühlen Ort stehen.
1
1
Vergewissern Sie sich, dass die Feder
richtig am Tank befestigt ist, um Wasser
durch die Basis laufen zu lassen.
Die Nebelhöhe ist
zu niedrig, der
Untergrund in der
Umgebung wird
feucht.Um den
Luftbefeuchter oder
an Fenstern und
Wänden
bildet sich
Kondensation.

CONTENU
Dieses Produkt beinhaltet eine TaoTronics Produkt- und Verarbeitungsgarantie für 12 Monate ab
Kaufdatum. Wenn Sie das Produkt auf unserer Website (www.taotronics.com) registrieren, erhalten
Sie eine Garantieverlängerung von 18 Monaten.
Jedes kaputte Teil wird nach Ermessen von SUNVALLEYTEK INTERNATIONAL INC. kostenlos
repariert oder ausgetauscht, wenn das Gerät nicht manipuliert wurde und gemäß diesen festge-
legten Hinweise verwendet wurde.
Sollten Probleme auftreten, kontaktieren Sie bitte umgehend den TaoTronics Support
([email protected]), um den Garantieanspruch wahrzunehmen. Geben Sie Modellnummer
und Ihre Amazon Bestellnummer an. Unser Kundenservice-Mitarbeiter wird innerhalb von 1 Werktag
antworten und Ihnen dabei helfen, das Problem entweder selbst zu beheben, oder Sie anweisen, wie
Sie das defekte Gerät zu Reparatur- oder Tauschzwecken zu uns schicken können.
Wir können Kundenservice nur für Produkte anbieten, die von TaoTronics oder von durch TaoTronics
autorisierten Verkäufern und Händlern verkauft wurden. Sollten Sie Ihr Gerät anderweitig erworben
haben, kontaktieren Sie bezüglich Rücknahme- und Garantiefragen bitte Ihren Verkäufer.
BITTE KONTAKTIEREN SIE UNS, BEVOR SIE DIESES PRODUKT AN DEN LADEN ZURÜCKSCHICKEN.
SCHREIBEN SIE DEM TAOTRONICS KUNDENSERVICE BEI FRAGEN UND PROBLEMEN EINE E-MAIL.
WIR ANTWORTEN INNERHALB 1 WERKTAGS.
GARANTIE
KONTAKTIEREN DES TAOTRONICS KUNDENSERVICE
Sunvalleytek USA, Inc.
Address: 46724 Lakeview Blvd, Fremont, CA 94538
E-mail: [email protected]
Tel: 1-888-456-8468 (Monday-Friday: 9:00 – 17:00 PST)
Website: www.taotronics.com
FR
33
34
INTRODUCTION
CONSIGNES DE SÉCURITÉ
AVANT D’UTILISER L’HUMIDIFICATEUR
UTILISATION DE L’HUMIDIFICATEUR
APRÈS UTILISATION DE L’HUMIDIFICATEUR
CONTENU DE LA BOÎTE
SPÉCIFICATIONS
SCHÉMA PRODUIT
UTILISATION ET FONCTIONNALITÉS
Ajout d’eau
Marche / Arrêt et Réglage de Brumisation
Contrôle de la Lumière
Protection Manque d’Eau : Extinction Automatique de l’Humidificateur
NETTOYAGE ET ENTRETIEN
Mises en garde
Entretien quotidien
Entretien hebdomadaire
Instructions de nettoyage du calcaire
Instructions de désinfection
Nettoyage de l’éponge anti-poussière
Entretien de fin de saison et rangement
GUIDE DE RÉSOLUTION DES PROBLÈMES
GARANTIE
CONTACTER LE SERVICE CLIENT TAOTRONICS
35
35
39
39
40
47/49
50
50
36
37
38
41
41
42
43
43
43
43
44
45
46
46
42
42

CONTENU
Dieses Produkt beinhaltet eine TaoTronics Produkt- und Verarbeitungsgarantie für 12 Monate ab
Kaufdatum. Wenn Sie das Produkt auf unserer Website (www.taotronics.com) registrieren, erhalten
Sie eine Garantieverlängerung von 18 Monaten.
Jedes kaputte Teil wird nach Ermessen von SUNVALLEYTEK INTERNATIONAL INC. kostenlos
repariert oder ausgetauscht, wenn das Gerät nicht manipuliert wurde und gemäß diesen festge-
legten Hinweise verwendet wurde.
Sollten Probleme auftreten, kontaktieren Sie bitte umgehend den TaoTronics Support
(support.de@taotronics.com), um den Garantieanspruch wahrzunehmen. Geben Sie Modellnummer
und Ihre Amazon Bestellnummer an. Unser Kundenservice-Mitarbeiter wird innerhalb von 1 Werktag
antworten und Ihnen dabei helfen, das Problem entweder selbst zu beheben, oder Sie anweisen, wie
Sie das defekte Gerät zu Reparatur- oder Tauschzwecken zu uns schicken können.
Wir können Kundenservice nur für Produkte anbieten, die von TaoTronics oder von durch TaoTronics
autorisierten Verkäufern und Händlern verkauft wurden. Sollten Sie Ihr Gerät anderweitig erworben
haben, kontaktieren Sie bezüglich Rücknahme- und Garantiefragen bitte Ihren Verkäufer.
BITTE KONTAKTIEREN SIE UNS, BEVOR SIE DIESES PRODUKT AN DEN LADEN ZURÜCKSCHICKEN.
SCHREIBEN SIE DEM TAOTRONICS KUNDENSERVICE BEI FRAGEN UND PROBLEMEN EINE E-MAIL.
WIR ANTWORTEN INNERHALB 1 WERKTAGS.
GARANTIE
KONTAKTIEREN DES TAOTRONICS KUNDENSERVICE
Sunvalleytek USA, Inc.
Address: 46724 Lakeview Blvd, Fremont, CA 94538
E-mail: support.de@taotronics.com
Tel: 1-888-456-8468 (Monday-Friday: 9:00 – 17:00 PST)
Website: www.taotronics.com
FR
33
34
INTRODUCTION
CONSIGNES DE SÉCURITÉ
AVANT D’UTILISER L’HUMIDIFICATEUR
UTILISATION DE L’HUMIDIFICATEUR
APRÈS UTILISATION DE L’HUMIDIFICATEUR
CONTENU DE LA BOÎTE
SPÉCIFICATIONS
SCHÉMA PRODUIT
UTILISATION ET FONCTIONNALITÉS
Ajout d’eau
Marche / Arrêt et Réglage de Brumisation
Contrôle de la Lumière
Protection Manque d’Eau : Extinction Automatique de l’Humidificateur
NETTOYAGE ET ENTRETIEN
Mises en garde
Entretien quotidien
Entretien hebdomadaire
Instructions de nettoyage du calcaire
Instructions de désinfection
Nettoyage de l’éponge anti-poussière
Entretien de fin de saison et rangement
GUIDE DE RÉSOLUTION DES PROBLÈMES
GARANTIE
CONTACTER LE SERVICE CLIENT TAOTRONICS
35
35
39
39
40
47/49
50
50
36
37
38
41
41
42
43
43
43
43
44
45
46
46
42
42

1. Veuillez déplier le câble et vérifier l’absence de dommage. Ne pas utiliser l’humidificateur
si le câble est endommagé.
2. NE PAS placer cet humidificateur dans les environnements mouillés, humides.
Veuillez tenir l’humidificateur hors de portée des enfants & animaux.
1. Veuillez toujours placer l’appareil sur une surface lisse, plane, sans moquette, non-métallique,
imperméable et horizontale, et le tenir hors de portée des rayons du soleil directs.
2. Toujours placer l’appareil à 2 pieds (60 cm) au dessus du sol, 12 pouces (30 cm) du mur, des autres
appareils ou des meubles en bois.
36
INTRODUCTION
Merci d’avoir acheté un produit TaoTronics qui a été testé pour respecter nos standards de qualité
exigeants. Ce produit est couvert par la garantie 12 mois produit et main d’œuvre de TaoTronics à compter
de la date d’achat originelle.
Veuillez nous contacter par e-mail avec votre numéro de commande et votre problème ou souci à support.-
[email protected], nous vous répondrons sous 24 heures.
Veuillez lire le guide d’utilisation en détail. Nettoyez et entretenez le produit comme conseillé. Si des
problèmes surviennent, veuillez vous référer au guide de résolution de problèmes d’abord.
Cette garantie est annulée si le défaut est causé par un dommage accidentel, une utilisation incorrecte, une
négligence, une réparation inadéquate ou une altération par une personne non autorisée, ou un échec à
respecter les consignes d’utilisations fournies avec le produit, y compris l’ajout d’huiles essentielles directe-
ment dans le réservoir et la base. Cette garantie ne couvre par l’usure normale du produit ou l’utilisation
En aucun cas, la responsabilité à l’égard du produit ne peut dépasser le prix payé par l’acheteur du produit.
Sous aucune circonstance n’est engagée la responsabilité du fabricant pour toute perte – directe, indirecte
ou accidentelle – ou dommages conséquents dus à, ou liés à l’utilisation du produit.
CONSIGNES DE SÉCURITÉ
L’humidificateur est fabriqué à base de matériaux sûrs et respectueux de l’environnement, et a été certifié
en accord aux exigences des réglementations et lois des lieux de vente.
IMPORTANT: Veuillez lire et conserver ces CONSIGNES DE SÉCURITÉ avant d’utiliser l’appareil. Des
précautions de base doivent être respectées pour réduire le risque d’incendie, d’électrocution et de
blessure aux personnes ou de dommages au produit.
35
AVANT D’UTILISER L’HUMIDIFICATEUR
1
2
30 CM
60 CM
2
30 CM
1
1. Veuillez déplier le câble et vérifier l’absence de dommage. Ne pas utiliser l’humidificateur
si le câble est endommagé.
2. NE PAS placer cet humidificateur dans les environnements mouillés, humides.
Veuillez tenir l’humidificateur hors de portée des enfants & animaux.
1. Veuillez toujours placer l’appareil sur une surface lisse, plane, sans moquette, non-métallique,
imperméable et horizontale, et le tenir hors de portée des rayons du soleil directs.
2. Toujours placer l’appareil à 2 pieds (60 cm) au dessus du sol, 12 pouces (30 cm) du mur, des autres
appareils ou des meubles en bois.
36
INTRODUCTION
Merci d’avoir acheté un produit TaoTronics qui a été testé pour respecter nos standards de qualité
exigeants. Ce produit est couvert par la garantie 12 mois produit et main d’œuvre de TaoTronics à compter
de la date d’achat originelle.
Veuillez nous contacter par e-mail avec votre numéro de commande et votre problème ou souci à support.-
fr@taotronics.com, nous vous répondrons sous 24 heures.
Veuillez lire le guide d’utilisation en détail. Nettoyez et entretenez le produit comme conseillé. Si des
problèmes surviennent, veuillez vous référer au guide de résolution de problèmes d’abord.
Cette garantie est annulée si le défaut est causé par un dommage accidentel, une utilisation incorrecte, une
négligence, une réparation inadéquate ou une altération par une personne non autorisée, ou un échec à
respecter les consignes d’utilisations fournies avec le produit, y compris l’ajout d’huiles essentielles directe-
ment dans le réservoir et la base. Cette garantie ne couvre par l’usure normale du produit ou l’utilisation
En aucun cas, la responsabilité à l’égard du produit ne peut dépasser le prix payé par l’acheteur du produit.
Sous aucune circonstance n’est engagée la responsabilité du fabricant pour toute perte – directe, indirecte
ou accidentelle – ou dommages conséquents dus à, ou liés à l’utilisation du produit.
CONSIGNES DE SÉCURITÉ
L’humidificateur est fabriqué à base de matériaux sûrs et respectueux de l’environnement, et a été certifié
en accord aux exigences des réglementations et lois des lieux de vente.
IMPORTANT: Veuillez lire et conserver ces CONSIGNES DE SÉCURITÉ avant d’utiliser l’appareil. Des
précautions de base doivent être respectées pour réduire le risque d’incendie, d’électrocution et de
blessure aux personnes ou de dommages au produit.
35
AVANT D’UTILISER L’HUMIDIFICATEUR
1
2
30 CM
60 CM
2
30 CM
1

UTILISATION DE L’HUMIDIFICATEUR
1. NE PAS brancher l’appareil avec les mains mouillées.
2. NE PAS diriger la buse d’humidification vers le mur.
1. NE PAS utiliser vos mains ou tout objet pour couvrir la buse lorsque l’appareil est en marche
pour ne pas endommager l’appareil ou causer des blessures.
2. NE PAS nettoyer l’appareil lorsqu’il est branché à une source d’alimentation ou qu’il est en marche.
1. NE PAS déplacer ou pencher l’humidificateur lorsqu’il est en fonctionnement.
2. Le taux d’humidité ambiante le plus agréable est entre 40% et 60%. Veuillez régler
l’humidification selon votre besoin.
Humidity
1
2
38
37
1
2
1
2
40% 60%
APRÈS UTILISATION DE L’HUMIDIFICATEUR
1. NE PAS nettoyer l’humidificateur immédiatement après extinction si le diffuseur diffusait de
la brume tiède. Laissez l’humidificateur refroidir complètement avant nettoyage.
2. NE PAS essayer de réparer ou de modifier des fonctions électriques ou mécaniques sur cet
humidificateur. Ceci annulera votre garantie.
1
2
1
2
1. Toujours débrancher le câble de la prise d’alimentation lorsqu’il n’est pas en utilisation.
2. L’humidificateur nécessite un nettoyage régulier. Veuillez vous référer à, et suivre les
consignes de Nettoyage et Entretien.
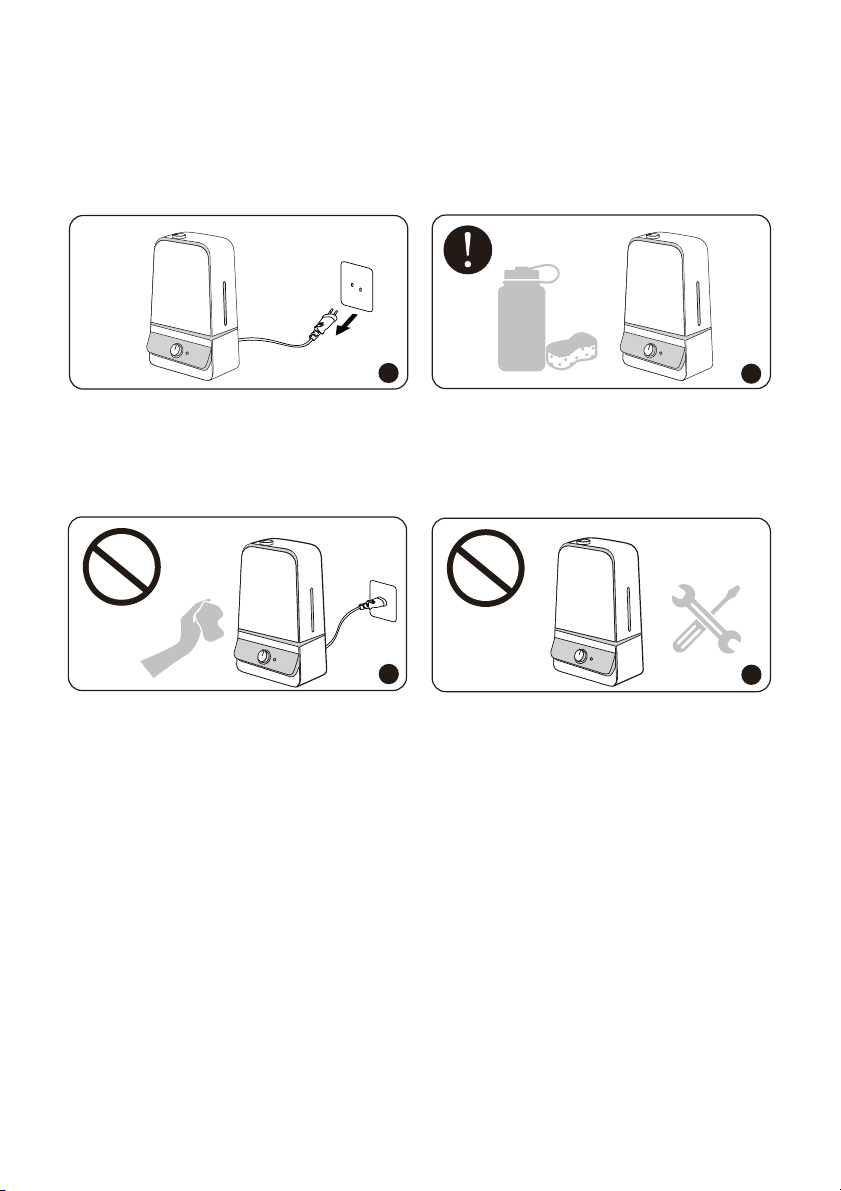
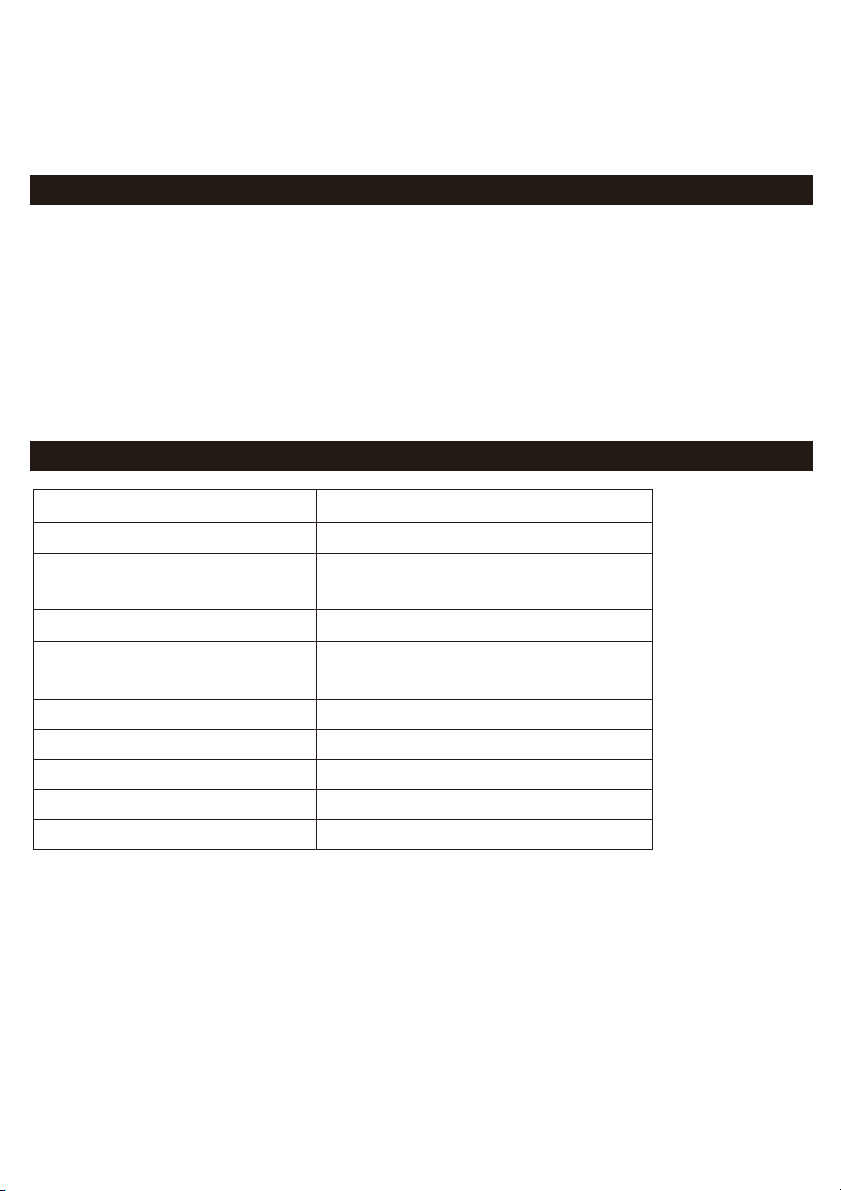
· 1 x TaoTronics Humidificateur (Modèle: TT-AH025)
· 1 x Brosse de nettoyage
· 1 x Éponge anti-poussière
· 1 x Carte de remerciement
· 1 x Guide utilisateur
TT-AH025
AC 200-240V 50 / 60Hz
Min: 15W
Max: 25W
6.0L
Min: 60ml/h
Max: 300ml/h
20-60h
20-40m²
<27dB
251 x 167 x 412mm
1775g/62.6oz
Modèle
Tension d’Alimentation
Puissance
Capacité du Réservoir d’Eau
Sortie de Brume
Autonomie avec un Réservoir Plein
Taille de Pièce Recommandée
Bruit
Dimensions
Poids Net
CONTENU DE LA BOÎTE
SPÉCIFICATIONS
4039
1. Buse
2. Réservoir d’Eau
3. Fenêtre de Niveau d’Eau
4. Bouchon du Réservoir
5. Entrée d’Eau
6. Poignée
7. Voyant à LED
8. Bouton de Contrôle
9. Base
10. Bouton Lumière
11. Night Light
12. Flotteur
13. Sortie d’Air
14. Lumière du Réservoir
15. Water Reservoir
16. Atomiseur
17. Filtre à Poussière
18. Entrée d’Air
SCHÉMA PRODUIT
1
3
5
15
16
12
4
9
11
10
18
13
14
8
17
2
7
push
6
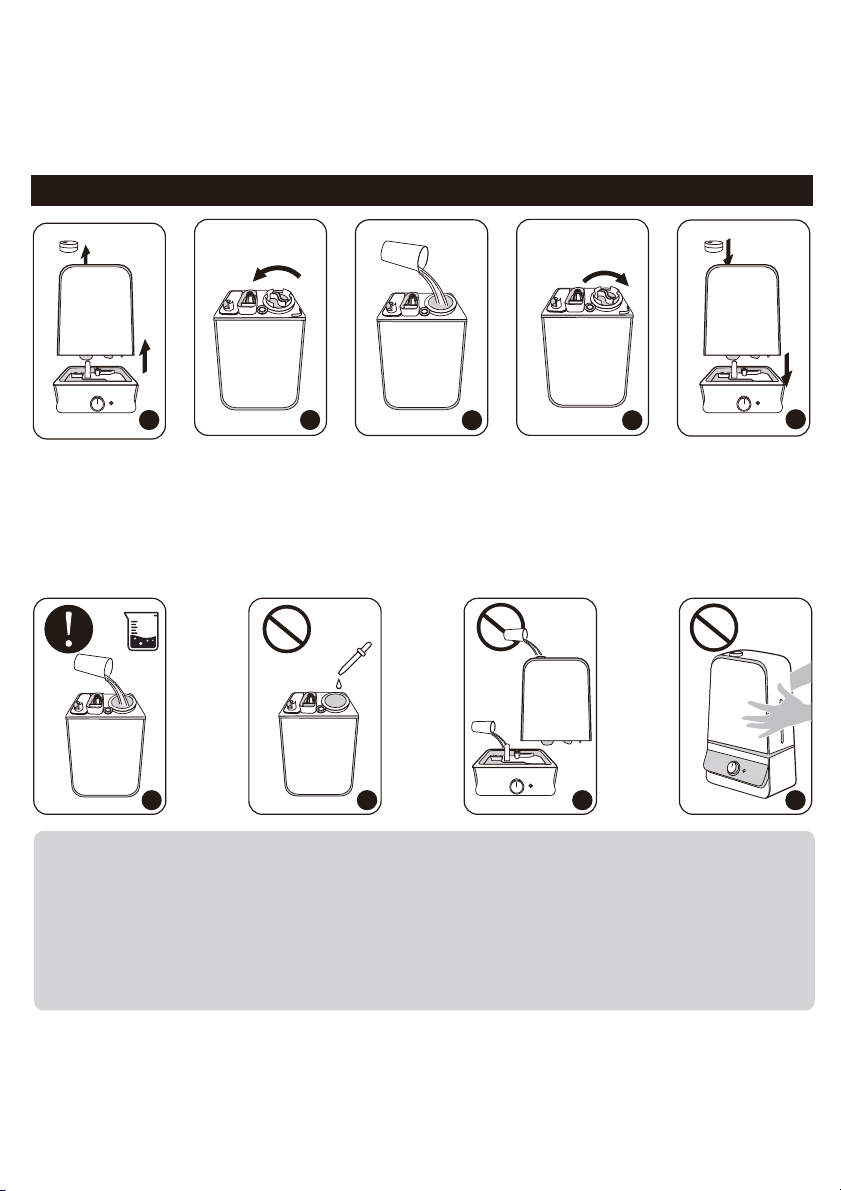
UTILISATION ET FONCTIONNALITÉS
Ajout d’eau
1. Retirez la buse et retournez le réservoir.
2. Retirez le couvercle du réservoir et remplissez le réservoir uniquement avec de l’eau propre et froide.
3. Refermez le réservoir, placez le réservoir sur la base et replacez la buse. Assurez-vous que
l’ensemble est bien assemblé pour que l’eau puisse aller du réservoir à la cuve.
1. Si l’eau du robinet est trop dure, il est recommandé d’utiliser de l’eau filtrée ou distillée pour
éviter le calcaire. NE PAS utiliser d’eau chaude.
2. NE PAS ajouter d’huile essentielle ou de comprimés médicinaux dans l’eau du réservoir.
3. NE PAS ajouter d’eau dans la base par la buse.
4. NE PAS déplacer l’humidificateur alors que le réservoir d’eau est rempli ou éviter les fuites
ou un débordement de la base.
42
Connecter le cordon secteur à une prise électrique. L’humidificateur est maintenant prêt à l’usage.
1. Tournez la molette de contrôle dans le sens horaire jusqu’à la position ON. Le voyant à LED bleu
s’allume pour indiquer que l’humidificateur a été allumé au niveau de brume minimal. .
2. Continuez à tourner la molette dans le sens horaire pour augmenter le niveau de brume.
3. Tournez la molette dans le sens anti-horaire pour baisser le niveau de brume.
4. Tournez la molette dans le sens anti-horaire jusqu’à la position OFF pour éteindre l’humidificateur.
Le voyant à LED s’éteindra. Le ventilateur continuera à tourner pendant 3 minutes pour sécher le
tube de brumisation.
Marche / Arrêt et Réglage de Brumisation
Contrôle de la Lumière
Protection Manque d’Eau : Extinction Automatique de l’Humidificateur
1. Appuyez sur le Bouton Lumière pour allumer / éteindre la veilleuse.
2. Maintenez appuyé le Bouton Lumière pendant 1.5 seconde pour allumer / éteindre la lumière du
réservoir.
S’il n’y a plus assez d’eau dans le réservoir, l’humidificateur s’arrêtera et le voyant à LED va clignoter rouge.
Cette sécurité est conçue pour empêcher l’humidificateur de surchauffer et endommager éventuellement le
brumisateur.
Nota :
Le taux d’hygrométrie le plus confortable est entre 40 et 60%.
Veuillez régler la brumisation selon le besoin.
OFF
ON
Max
Min
OFF
ON
Max
Min
41
1
5
3
2
3 4
21 4
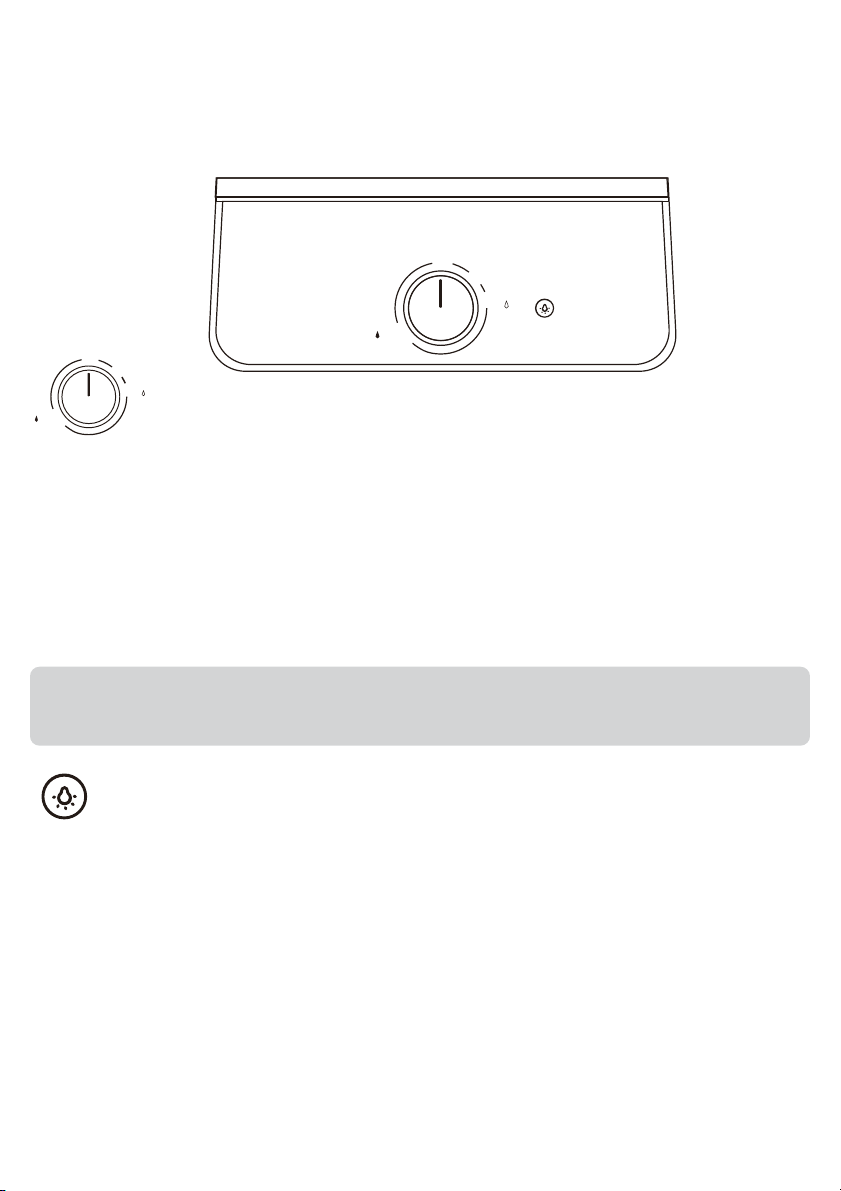
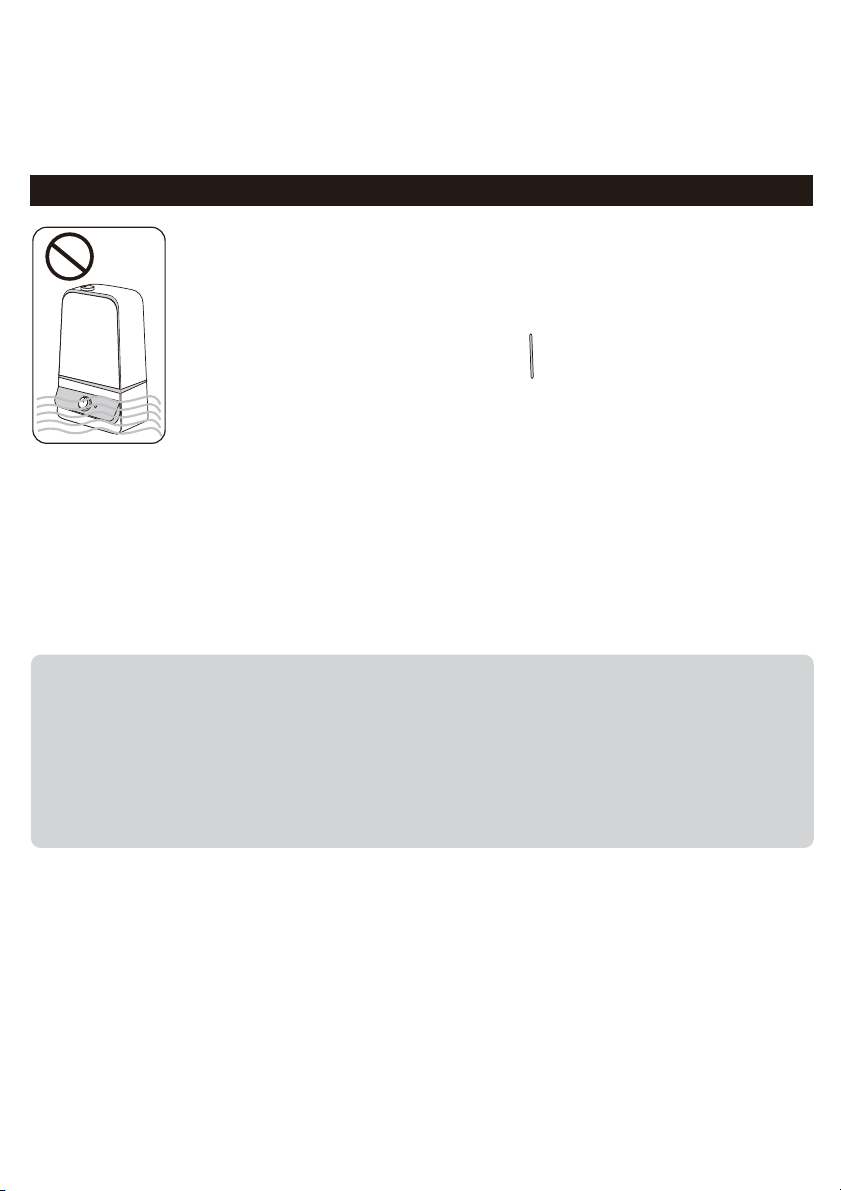
43
NETTOYAGE ET ENTRETIEN
Mises en garde
1. NE PAS submerger la base dans l’eau.
2. Assurez-vous que de l’eau n’entre pas dans la base via l’entrée d’air, la
sortie d’air, ou le bouton de contrôle et le bouton lumière.
3. NE PAS nettoyer toute partie de cet humidificateur dans le lave-vaisselle,
ce qui endommagera l’humidificateur et annulera la garantie.
Entretien quotidien
Éteignez l’humidificateur, débranchez-le de la prise d’alimentation. Videz l’eau du réservoir et de la
base.
Entretien hebdomadaire
1. Pour bien nettoyer votre humidificateur, nous recommandons de retirer le calcaire et
désinfecter l’humidificateur séparément.
2. NE PAS mélanger le vinaigre et l’eau de javel. Ne pas utiliser plus de 1 cuillère à thé d’eau de
javel par galon d’eau pour ne pas endommager l’humidificateur.
3. Veuillez vous assurer que le joint en caoutchouc & le couvercle & le ressort (se référer au
diagramme en page 40) sur le réservoir sont bien placés après nettoyage pour éviter les
fuites d’eau.
1 2
Instructions de nettoyage du calcaire
44
15S
3
15-20
minutes
4
5
6
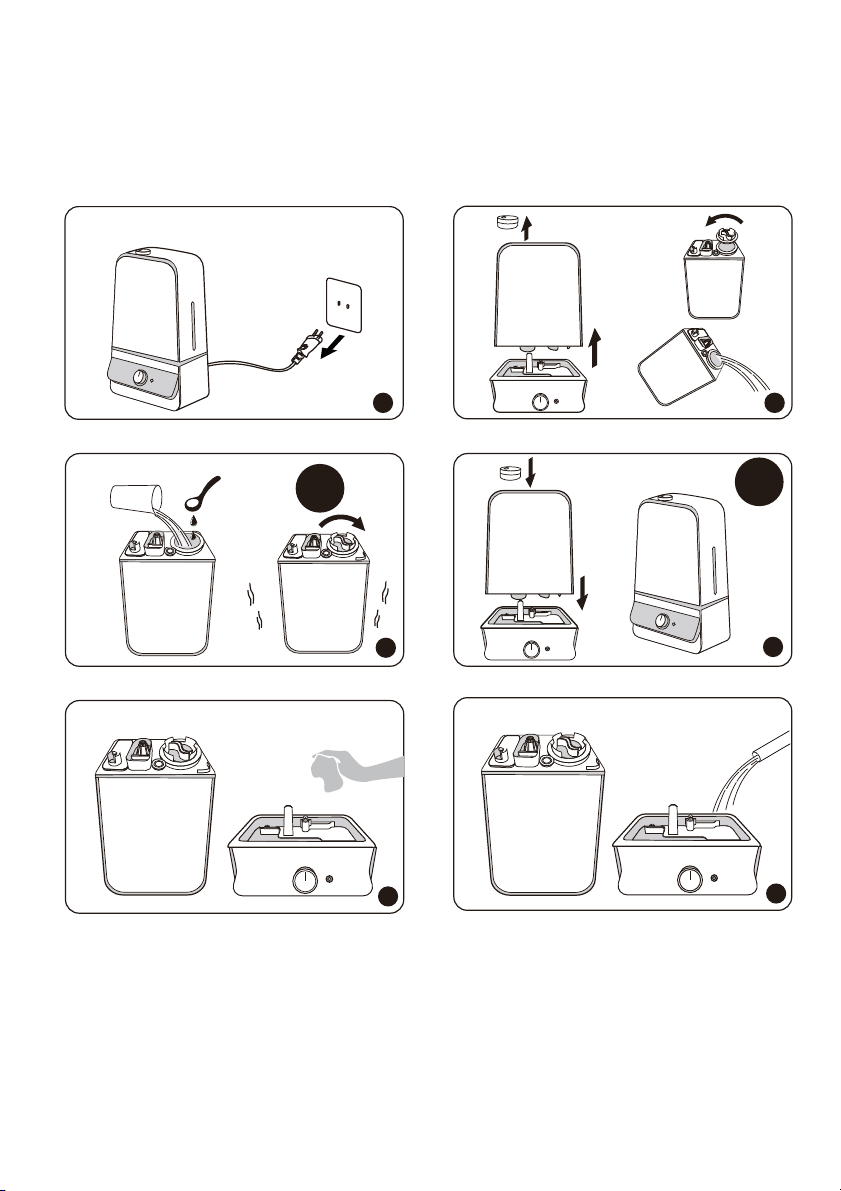

1. Éteignez et débranchez l’humidificateur, retirez la buse.
2. Retirez le réservoir d’eau de la base. Retirez le couvercle du réservoir. Assurez-vous que le
joint rond blanc ne s’enlève pas. Videz l’eau du réservoir d’eau et de la base. Retirez tout
accessoire et laissez les de côté.
3. Remplissez le réservoir d’eau à moitié. Ajoutez 1 cuillère à café de vinaigre blanc distillé
non dilué. Refermez le couvercle et secouez pendant 15 secondes.
4. Placez le réservoir sur la base. La solution vinaigrée entrera dans les circuits internes pour
éliminer les dépôts minéraux (calcaire) sur l’atomiseur, le flotteur et la base du réservoir.
Laissez reposer 15-20 minutes.
5. Retirez le couvercle du réservoir et videz la solution. Séchez l’atomiseur et le flotteur avec un
chiffon sec pour retirer les dépôts minéraux ramollis.
6. Rincez le réservoir d’eau jusqu’à ce que l’odeur de vinaigre (pour retirer le calcaire) ou la
solution javellisée (pour désinfection, voir ci-dessous) disparaisse.
Instructions de désinfection
1. Suivez les étapes 1-2 de la section précédente sur le nettoyage du calcaire.
2. Remplissez le réservoir d’eau à moitié. Ajoutez ½ cuillère à café d’eau de javel. Replacez le
couvercle. Remuez doucement la solution dans le réservoir. Placez le réservoir sur la base.
La solution javellisée entrera dans le circuit et désinfectera le réservoir d’eau mais aussi les
autres éléments. Laissez reposer 15-20 minutes.
3. Suivez les étapes 4-6 de la section précédente sur le nettoyage du calcaire pour complète
ment désinfecter l’humidificateur.
1. Suivez les consignes de nettoyage lorsque l’humidificateur ne sera plus utilisé pendant au
moins une semaine, ou en fin de saison. Retirez tout accessoire utilisé avec l’humidificateur
et laissez l’humidificateur et ses accessoires sécher complètement avant rangement.
2. NE PAS ranger avec de l’eau dans la base ou dans le réservoir d’eau.
3. Rangez l’appareil en sécurité dans un endroit sec et frais.
Nettoyage de l’éponge anti-poussière
Nettoyez l’éponge anti-poussière (en arrière de la base) avec de l’eau ou du détergent une fois par
mois. Remettre à sa place après nettoyage.
push
Entretien de fin de saison et rangement
45
46
push
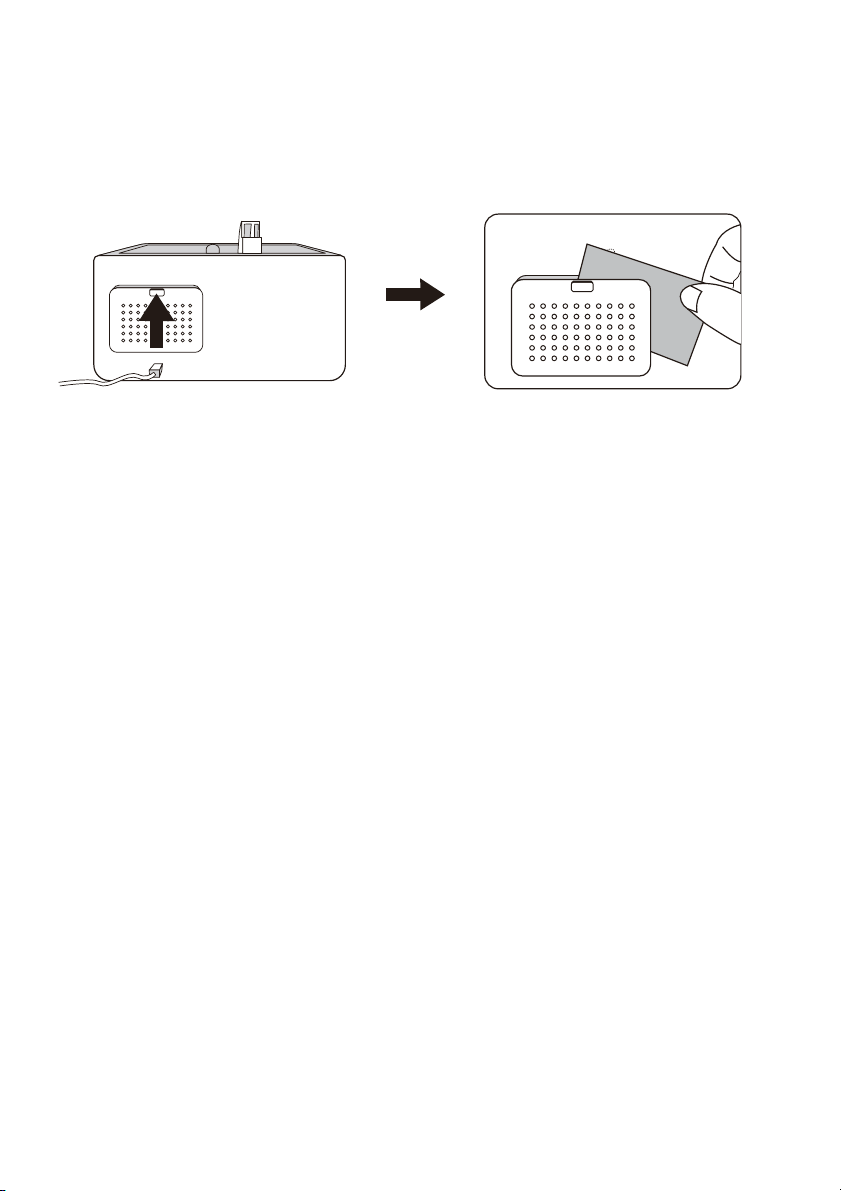
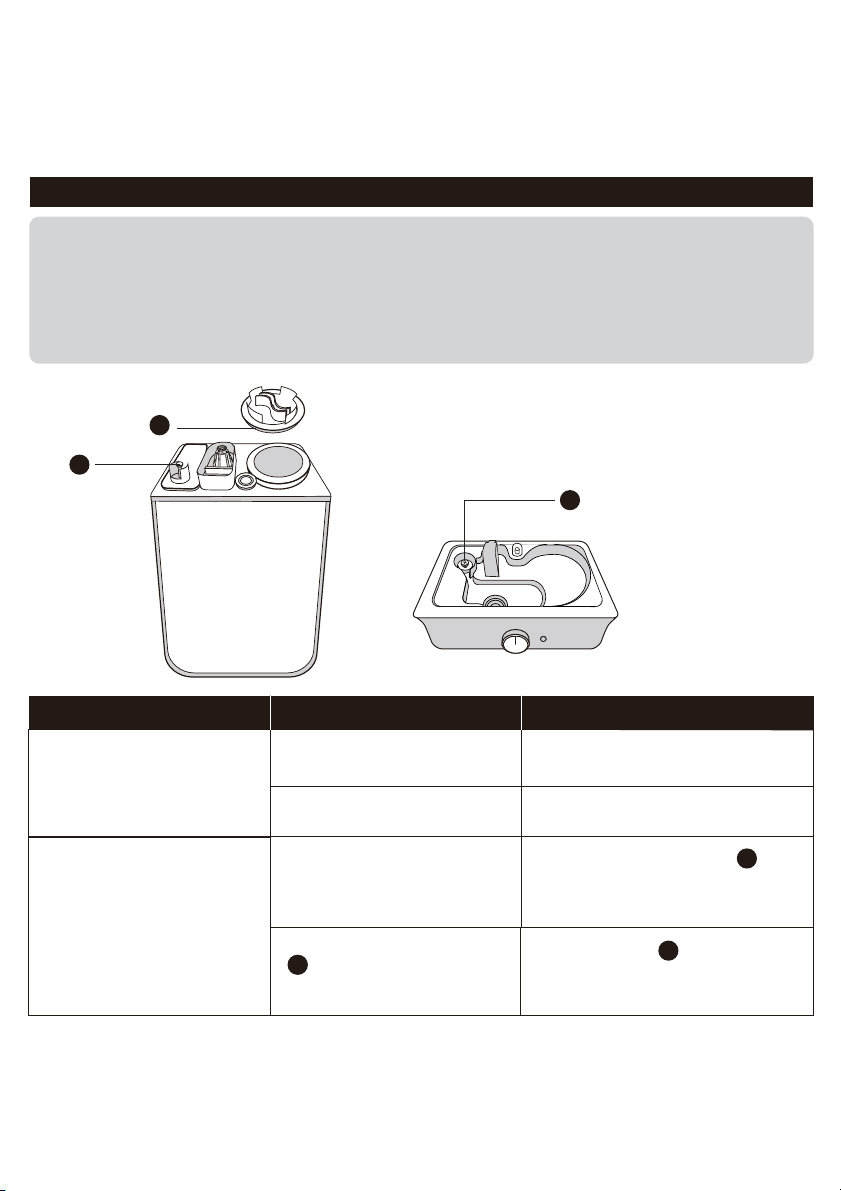
GUIDE DE RÉSOLUTION DES PROBLÈMES
1. Si les informations listées dans le guide de résolution des problèmes ne peut résoudre
votre problème, veuillez nous envoyer un e-mail pour vous aider.
2. Ne pas garder cet appareil propre de tout dépôt minéral peut affecter le fonctionne
ment de cet appareil.
3. Si l’utilisateur ne respecte pas ces consignes, la garantie peut être annulée.
3
2
1. Ressort
2. Joint caoutchouc
3. Flotteur
Problème Possible Cause Solution
Appareil non branché.
Pas d’alimentation de la prise
de courant.
Pas d’eau dans le réservoir
d’eau.
Assurez-vous que l’appareil
est bien branché.
Essayez une autre prise de courant.
Échouer à allumer l'appareil.
Assurez-vous que le ressort
est bien fixé au réservoir permettant
à l’eau de passer au travers de la base.
1
Placez le flotteur en position
horizontale et libre pour pouvoir se
déplacer avec l’eau .
3
Flotteur bloqué.
3
Le témoin de remplissage est
constamment allumé.
L'unité est allumée
mais l’humidication
est faible ou
inexistante.
Fuite du réservoir.
1
2
1
La hauteur de la brume
est faible, mouillant les
environs. De la
condensation se forme
autour de
l’humidificateur
ou sur les fenêtres
et murs.
Quantité d’eau dans le
réservoir insuffisante.
Re-remplir et replacer le réservoir d’eau.
Régler l’humidification au maximum.
Retirez le réservoir, videz la base & replacez
le réservoir rempli sur la base vide.
érifiez si de l’air sort de la buse, si oui,
nettoyez les dépôts sur l’atomiseur
comme indiqué.
Niveau d’humidification trop
faible.
La base peut être trop
remplie.
Dépôts minéraux dans
l’atomiseur.
Recherchez d’éventuelles failles dans le
réservoir, remplacez si nécessaire .
Serrez le couvercle du réservoir.
Vérifiez le couvercle de réservoir,
contactez-nous si un élément est manquant.
Assurez-vous que le ressort est bien
fixé au réservoir permettant le passage
de l’eau au travers de la base.
Le réservoir peut être
endommagé.
Le couvercle de réservoir n’est
pas bien fermé.
Le joint en caoutchouc
n’était pas installé sur le
couvercle.
Ressort bloqué.
1. Vérifiez si la pièce est trop humide,
abaissez le niveau à 40%-60% pour un
meilleur résultat
2. Ouvrez portes et fenêtres pour réduire la
circulation d’air, ou déplacez dans
une pièce plus grande.
L’humidificateur doit être placé sur une
surface plane, à 60 cm du sol et à 30 cm
du mur.
Élevez la température de la
pièce à 25°C/77°F
Le niveau d’humidification
est trop fort pour la taille de
la pièce.
L’entrée d’air est obstruée.
Une faible température
entraîne de la liquéfaction.
47
48
1
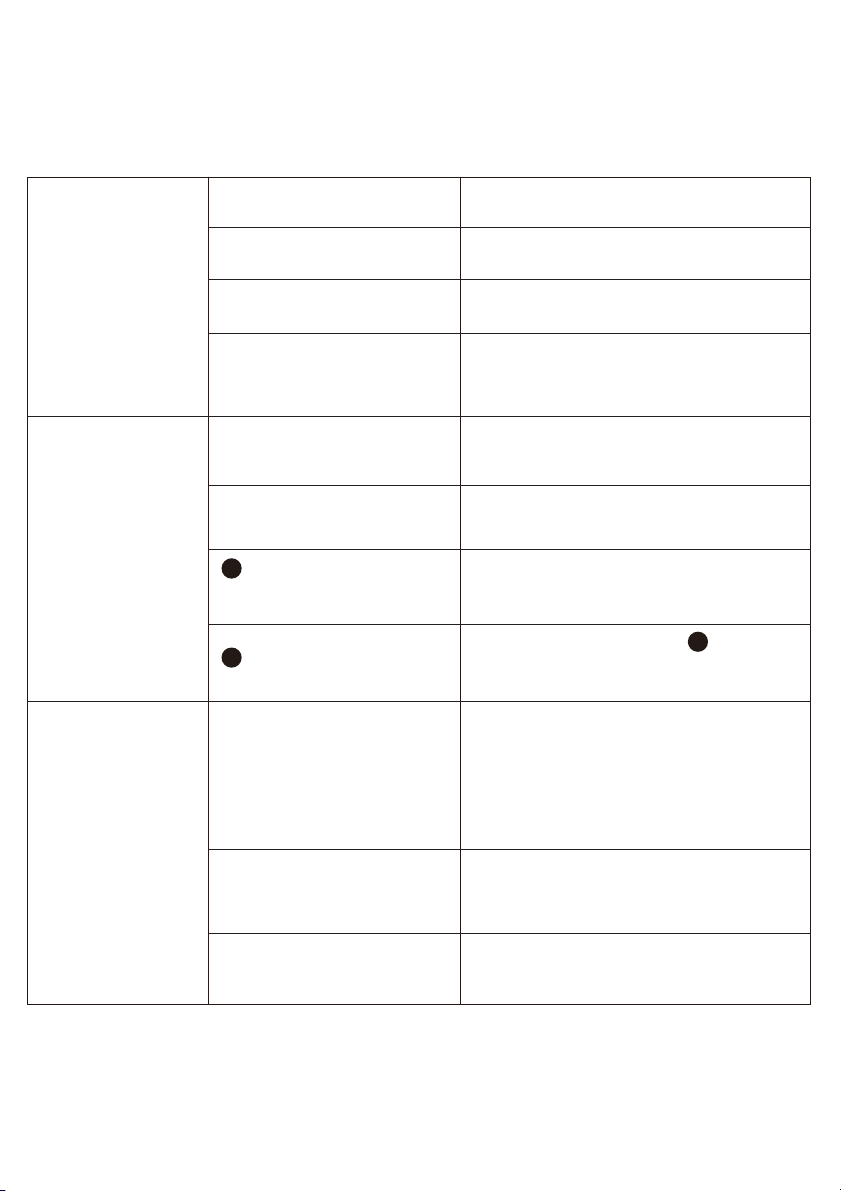
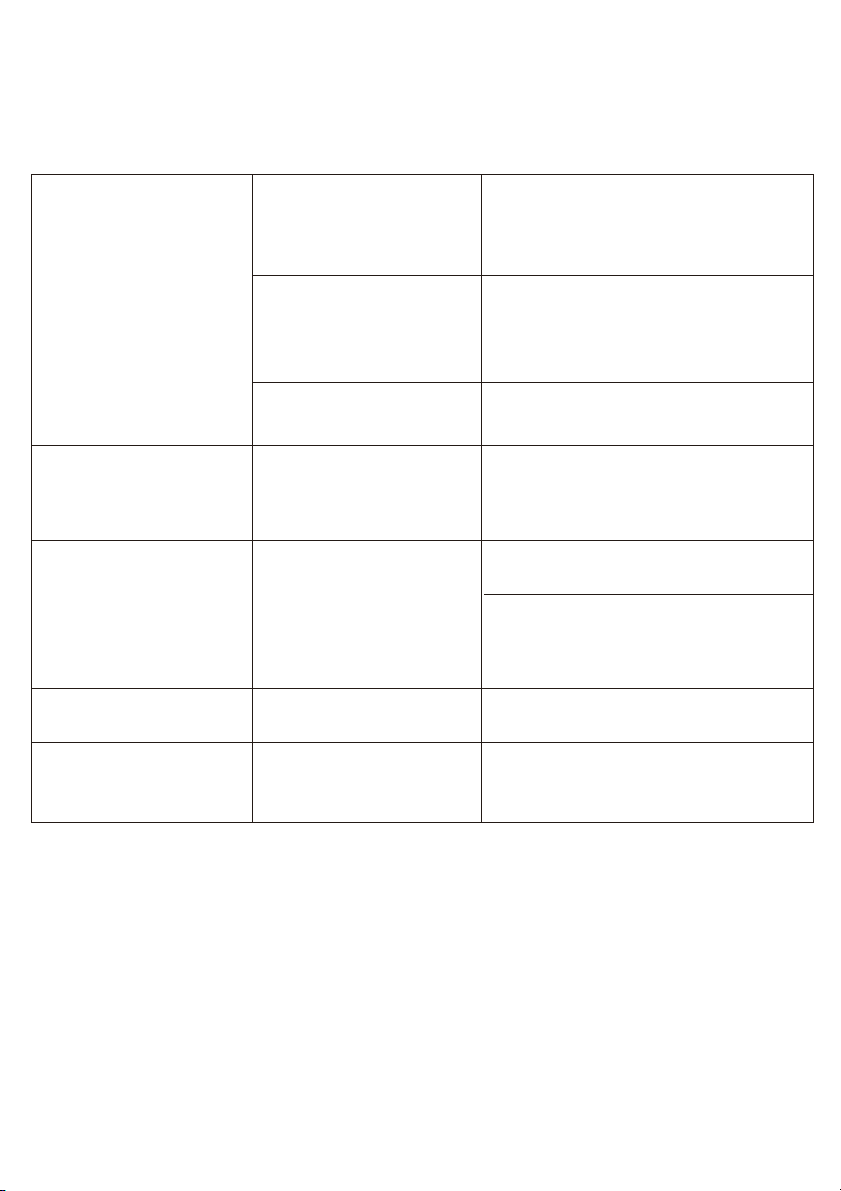
Faible humidification.
L’eau contient trop de
minéraux.
Remplacez par de l’eau filtrée ou distillée
ou utilisez une Cartouche de
Déminéralisation TaoTronics.
Apparition de poussière
blanche / le revêtement noir
de la base s’écaille.
L’appareil doit être nettoyé.
Odeur inhabituelle.
De l’eau retombe dans le
réservoir.
Ceci est normal en fonctionnement.
Bruit d’eau étrange.
L’appareil fonctionne depuis
trop longtemps.
Éteignez l’appareil et placez-le dans un
espace bien aéré pendant 10
minutes.
L’humidificateur chauffe trop.
1. Réglez l’humidification au niveau maximal;
2. Fermez portes et fenêtres pour réduire
la circulation d’air, ou déplacez dans
une pièce plus petite.
L’humidificateur doit être
placé sur une surface plane,
à 60 cm du sol et à 30 cm
du mur.
Élevez la température de la
pièce à 25°C/77°F.
Le niveau d’humidification
est trop faible pour la taille
de la pièce.
L’entrée d’air est obstruée.
Une faible température
entraîne de la liquéfaction.
Nettoyez l’humidificateur comme indiqué.
Laissez le réservoir d’eau vide et ouvert
dans un endroit frais pendant 12 heures
sans le couvercle.
Ce produit est couvert par la garantie 12 mois produit et main d’œuvre de TaoTronics à compter de
la date d’achat originelle. Vous recevrez une extension de garantie de 18 mois si le produit est
enregistré sur notre site web (www.taotronics.com).
Tout élément défectueux sera, à discrétion de SUNVALLEYTEK INTERNATIONAL INC., réparé ou
remplacé sans frais si l’appareil n’a pas été démonté et a été utilisé en respectant ces consignes
écrites.
VEUILLEZ NOUS CONTACTER AVANT DE RENVOYER LE PRODUIT AU MARCHAND.
ENVOYEZ UN E-MAIL AU SERVICE CLIENT TAOTRONICS POUR TOUS PROBLÈMES ET QUESTIONS.
NOUS RÉPONDRONS SOUS 1 JOUR OUVRÉ.
GARANTIE
CONTACTER LE SERVICE CLIENT TAOTRONICS
Sunvalleytek USA, Inc.
Address: 46724 Lakeview Blvd, Fremont, CA 94538
E-mail: support.fr@taotronics.com
Tel: 1-888-456-8468 (Monday-Friday: 9:00 – 17:00 PST)
Website: www.taotronics.com
Nous ne pouvons fournir de service après-vente que pour les produits vendus par TaoTronics ou les
distributeurs et revendeurs autorisés de TaoTronics. Si vous avez acheté cet appareil d’une autre source,
veuillez contacter votre vendeur pour les retours et garanties.
En cas de problème, veuillez contacter le service TaoTronics (support.fr@taotronics.com)
immédiatement pour lancer une réclamation de garantie. Spécifiez le modèle et le numéro de
commande Amazon. Notre Représentant de Service Client répondra sous 1 jour ouvré, vous
conseillant pour arranger le problème vous-même, ou vous indiquera la démarche à suivre pour nous
retourner l’appareil défectueux pour réparation ou remplacement.
49
50

Faible humidification.
L’eau contient trop de
minéraux.
Remplacez par de l’eau filtrée ou distillée
ou utilisez une Cartouche de
Déminéralisation TaoTronics.
Apparition de poussière
blanche / le revêtement noir
de la base s’écaille.
L’appareil doit être nettoyé.
Odeur inhabituelle.
De l’eau retombe dans le
réservoir.
Ceci est normal en fonctionnement.
Bruit d’eau étrange.
L’appareil fonctionne depuis
trop longtemps.
Éteignez l’appareil et placez-le dans un
espace bien aéré pendant 10
minutes.
L’humidificateur chauffe trop.
1. Réglez l’humidification au niveau maximal;
2. Fermez portes et fenêtres pour réduire
la circulation d’air, ou déplacez dans
une pièce plus petite.
L’humidificateur doit être
placé sur une surface plane,
à 60 cm du sol et à 30 cm
du mur.
Élevez la température de la
pièce à 25°C/77°F.
Le niveau d’humidification
est trop faible pour la taille
de la pièce.
L’entrée d’air est obstruée.
Une faible température
entraîne de la liquéfaction.
Nettoyez l’humidificateur comme indiqué.
Laissez le réservoir d’eau vide et ouvert
dans un endroit frais pendant 12 heures
sans le couvercle.
Ce produit est couvert par la garantie 12 mois produit et main d’œuvre de TaoTronics à compter de
la date d’achat originelle. Vous recevrez une extension de garantie de 18 mois si le produit est
enregistré sur notre site web (www.taotronics.com).
Tout élément défectueux sera, à discrétion de SUNVALLEYTEK INTERNATIONAL INC., réparé ou
remplacé sans frais si l’appareil n’a pas été démonté et a été utilisé en respectant ces consignes
écrites.
VEUILLEZ NOUS CONTACTER AVANT DE RENVOYER LE PRODUIT AU MARCHAND.
ENVOYEZ UN E-MAIL AU SERVICE CLIENT TAOTRONICS POUR TOUS PROBLÈMES ET QUESTIONS.
NOUS RÉPONDRONS SOUS 1 JOUR OUVRÉ.
GARANTIE
CONTACTER LE SERVICE CLIENT TAOTRONICS
Sunvalleytek USA, Inc.
Address: 46724 Lakeview Blvd, Fremont, CA 94538
E-mail: [email protected]
Tel: 1-888-456-8468 (Monday-Friday: 9:00 – 17:00 PST)
Website: www.taotronics.com
Nous ne pouvons fournir de service après-vente que pour les produits vendus par TaoTronics ou les
distributeurs et revendeurs autorisés de TaoTronics. Si vous avez acheté cet appareil d’une autre source,
veuillez contacter votre vendeur pour les retours et garanties.
En cas de problème, veuillez contacter le service TaoTronics ([email protected])
immédiatement pour lancer une réclamation de garantie. Spécifiez le modèle et le numéro de
commande Amazon. Notre Représentant de Service Client répondra sous 1 jour ouvré, vous
conseillant pour arranger le problème vous-même, ou vous indiquera la démarche à suivre pour nous
retourner l’appareil défectueux pour réparation ou remplacement.
49
50

51 52
CONTENIDO
DECLARACIÓN
INSTRUCCIONES DE SEGURIDAD
ANTES DE USAR EL HUMIDIFICADOR
AL UTILIZAR EL HUMIDIFICADOR
DESPUÉS DE USAR EL HUMIDIFICADOR
CONTENIDOS DEL PAQUETE
ESPECIFICACIONES TÉCNICAS
DIAGRAMA DE PRODUCTO
OPERACIONES Y FUNCIONES
Añadir Agua
Encender / Apagar y Ajuste de Neblina
Control de la Iluminación
Protección contra Bajo Nivel de Agua: Apagado Automático
LIMPIEZA Y MANTENIMIENTO
Precaución
Mantenimiento Diario
Mantenimiento Semanal
Instrucciones de Eliminación de Mugre
Instrucciones de Desinfección
Limpieza la Esponja a Prueba de Polvo
Cuidado y Almacenamiento de Fin de Temporada
GUÍA PARA SOLUCIONAR PROBLEMAS
GARANTÍA
CONTACTO TAOTRONICS ATENCIÓN AL CLIENTE
52
52
56
56
58
58
67
57
67
53
55
54
59
59
62
63
63
64/66
59
60
60
60
60
61
ES
DECLARACIÓN
Gracias por comprar un producto de TaoTronics. Nuestros productos han sido probados para cumplir
con nuestras más estrictas normas de calidad. Este producto está cubierto por TaoTronics y la
garantía de12 Meses a partir de la fecha de su compra original.
Envíenos un correo electrónico con su número de pedido y el problema a
support.es@taotronics.com, responderemos dentro de 24 horas.
Por favor, lea el manual del usuario a fondo. Limpie y mantenga el producto según las instrucciones.
Si se produce alguna anomalía, consulte la Guía de Resolución de Problemas primero.
Esta garantía es nula si el defecto es causado por un daño accidental, mal uso, abuso, negligencia,
reparación o alteración inadecuada por personas no autorizadas, o el incumplimiento de las instruc-
ciones de funcionamiento provisto con el producto, incluida la adición de aceites esenciales directa-
mente en el tanque y la base. Esta garantía no se aplica al desgaste normal o uso comercial.
En ningún caso la responsabilidad excederá el precio de compra pagado por el comprador del producto.
Bajo ninguna circunstancia habrá responsabilidad por cualquier pérdida, directa, indirecta o inciden-
tal, o daños consecuentes derivados de, o en relación con el uso del producto.
INSTRUCCIONES DE SEGURIDAD
El humidificador fue fabricado con materiales seguros y de protección ambiental, ha sido
certificado y cumplió con el requisito de las regulaciones o leyes relacionadas con las
regiones de venta.
IMPORTANTE:
Lea y guarde estas INSTRUCCIONES DE SEGURIDAD antes de usar el
dispositivo. Siempre deben seguirse las precauciones básicas para reducir el riesgo de
descarga eléctrica, y lesiones a personas o daños al producto.

51 52
CONTENIDO
DECLARACIÓN
INSTRUCCIONES DE SEGURIDAD
ANTES DE USAR EL HUMIDIFICADOR
AL UTILIZAR EL HUMIDIFICADOR
DESPUÉS DE USAR EL HUMIDIFICADOR
CONTENIDOS DEL PAQUETE
ESPECIFICACIONES TÉCNICAS
DIAGRAMA DE PRODUCTO
OPERACIONES Y FUNCIONES
Añadir Agua
Encender / Apagar y Ajuste de Neblina
Control de la Iluminación
Protección contra Bajo Nivel de Agua: Apagado Automático
LIMPIEZA Y MANTENIMIENTO
Precaución
Mantenimiento Diario
Mantenimiento Semanal
Instrucciones de Eliminación de Mugre
Instrucciones de Desinfección
Limpieza la Esponja a Prueba de Polvo
Cuidado y Almacenamiento de Fin de Temporada
GUÍA PARA SOLUCIONAR PROBLEMAS
GARANTÍA
CONTACTO TAOTRONICS ATENCIÓN AL CLIENTE
52
52
56
56
58
58
67
57
67
53
55
54
59
59
62
63
63
64/66
59
60
60
60
60
61
ES
DECLARACIÓN
Gracias por comprar un producto de TaoTronics. Nuestros productos han sido probados para cumplir
con nuestras más estrictas normas de calidad. Este producto está cubierto por TaoTronics y la
garantía de12 Meses a partir de la fecha de su compra original.
Envíenos un correo electrónico con su número de pedido y el problema a
[email protected], responderemos dentro de 24 horas.
Por favor, lea el manual del usuario a fondo. Limpie y mantenga el producto según las instrucciones.
Si se produce alguna anomalía, consulte la Guía de Resolución de Problemas primero.
Esta garantía es nula si el defecto es causado por un daño accidental, mal uso, abuso, negligencia,
reparación o alteración inadecuada por personas no autorizadas, o el incumplimiento de las instruc-
ciones de funcionamiento provisto con el producto, incluida la adición de aceites esenciales directa-
mente en el tanque y la base. Esta garantía no se aplica al desgaste normal o uso comercial.
En ningún caso la responsabilidad excederá el precio de compra pagado por el comprador del producto.
Bajo ninguna circunstancia habrá responsabilidad por cualquier pérdida, directa, indirecta o inciden-
tal, o daños consecuentes derivados de, o en relación con el uso del producto.
INSTRUCCIONES DE SEGURIDAD
El humidificador fue fabricado con materiales seguros y de protección ambiental, ha sido
certificado y cumplió con el requisito de las regulaciones o leyes relacionadas con las
regiones de venta.
IMPORTANTE:
Lea y guarde estas INSTRUCCIONES DE SEGURIDAD antes de usar el
dispositivo. Siempre deben seguirse las precauciones básicas para reducir el riesgo de
descarga eléctrica, y lesiones a personas o daños al producto.
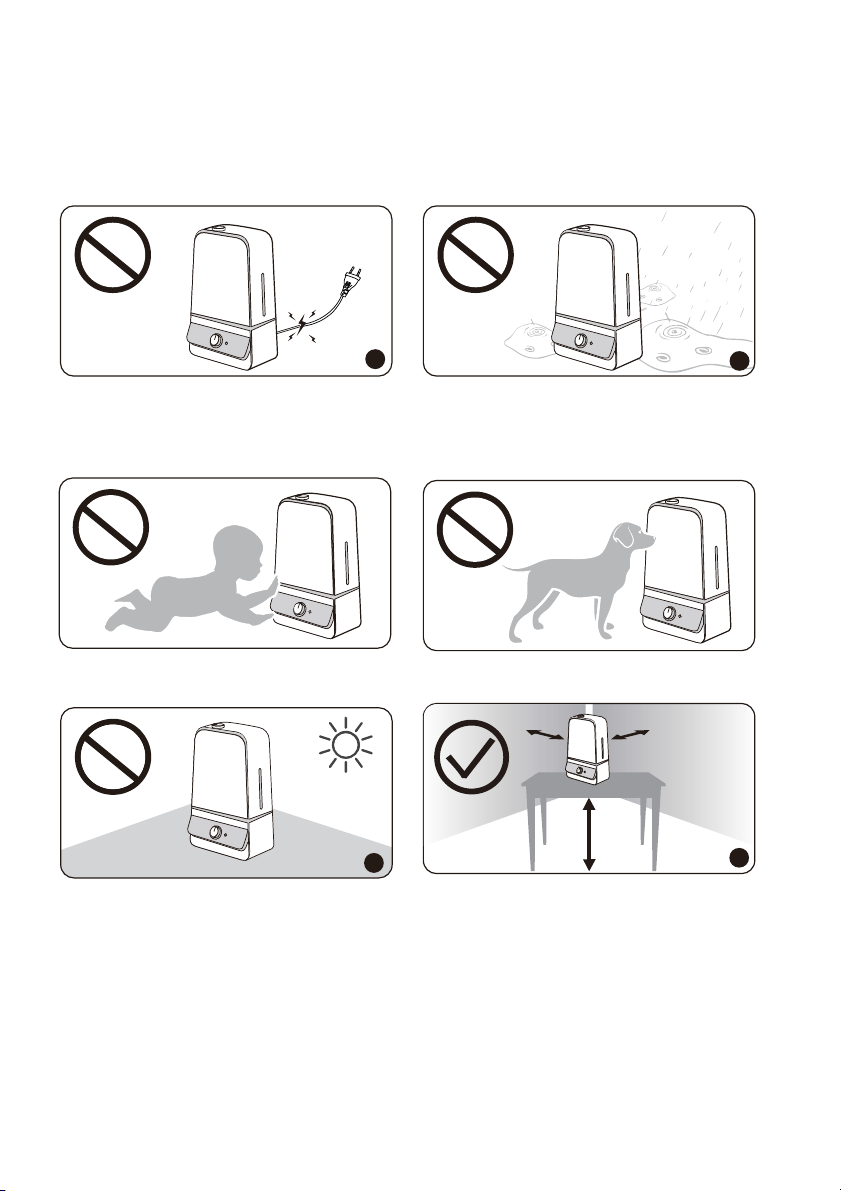
53 54
1. Por favor, extienda el cable y revise por cualquier señal de daño. No uses el humidificador
si el cable está dañado.
2. NO coloque el humidificador en ambientes húmedos.
Por favor mantenga el humidificador alejado de pacientes, infantes y mascotas.
1. Por favor, coloque siempre la unidad sobre una superficie plana, - que no suelte pelusa,
no sea metálica, sea impermeable y este al nivel de la superficie. Mantenga el
humidificador alejado de la luz solar directa.
2. Siempre coloque la unidad 2 pies (60 cm) por encima del piso, 12 pulgadas (30 cm) de
la pared y de otros electrodomésticos o muebles de madera.
ANTES DE USAR EL HUMIDIFICADOR
1
2
30 CM
60 CM
30 CM
1
2
AL UTILIZAR EL HUMIDIFICADOR
1. NO enchufe la unidad con las manos mojadas.
2. NO dirija la boquilla de neblina contra la pared.
1. NO use su mano ni ningún otro objeto para cubrir la boquilla mientras la unidad esté
encendida para evitar dañar el producto o causar lesiones.
2. NO limpie la unidad mientras esté conectada a una fuente de alimentación o mientras
esté encendida.
1. NO mueva ni incline el humidificador mientras está en funcionamiento.
2. La humedad ambiental óptima esta entre 40% -60%. Por favor, ajuste la neblina como sea
necesario.
1
2
1
2
Humidity
1
2
40% 60%
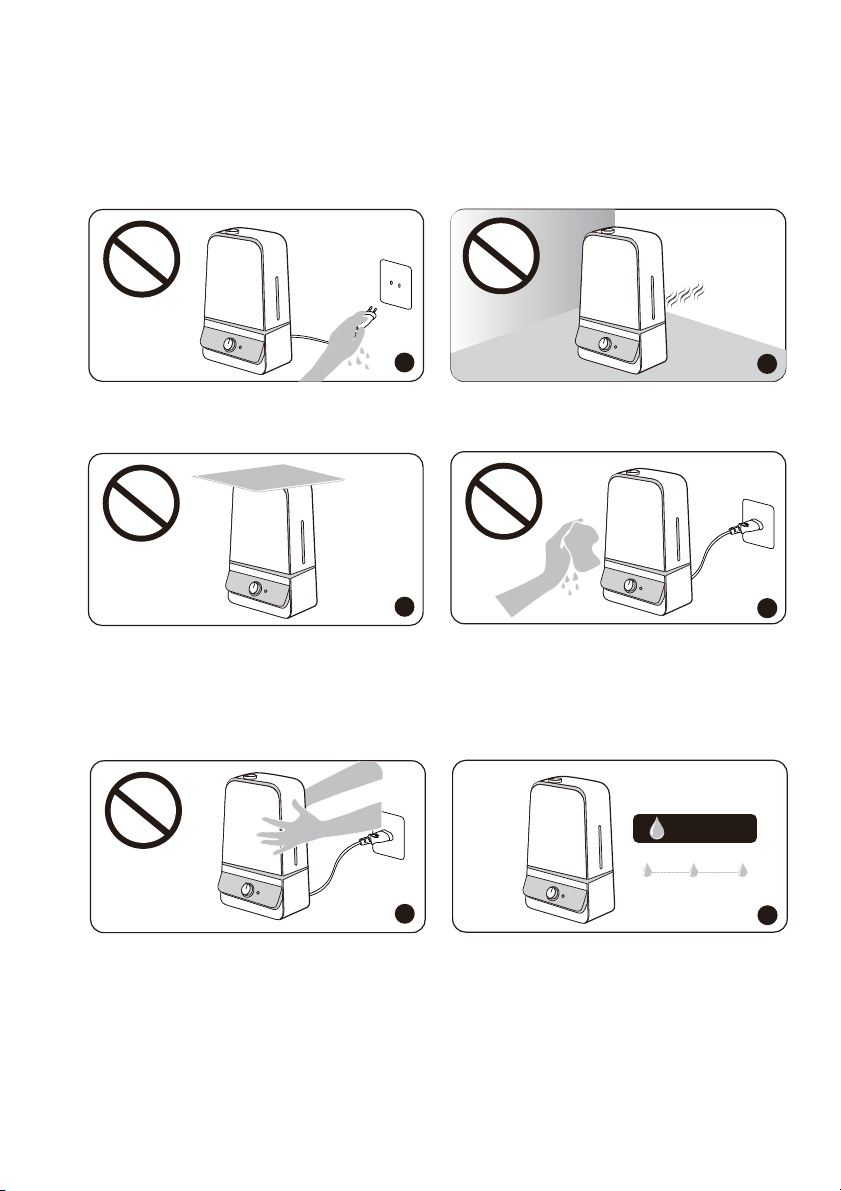
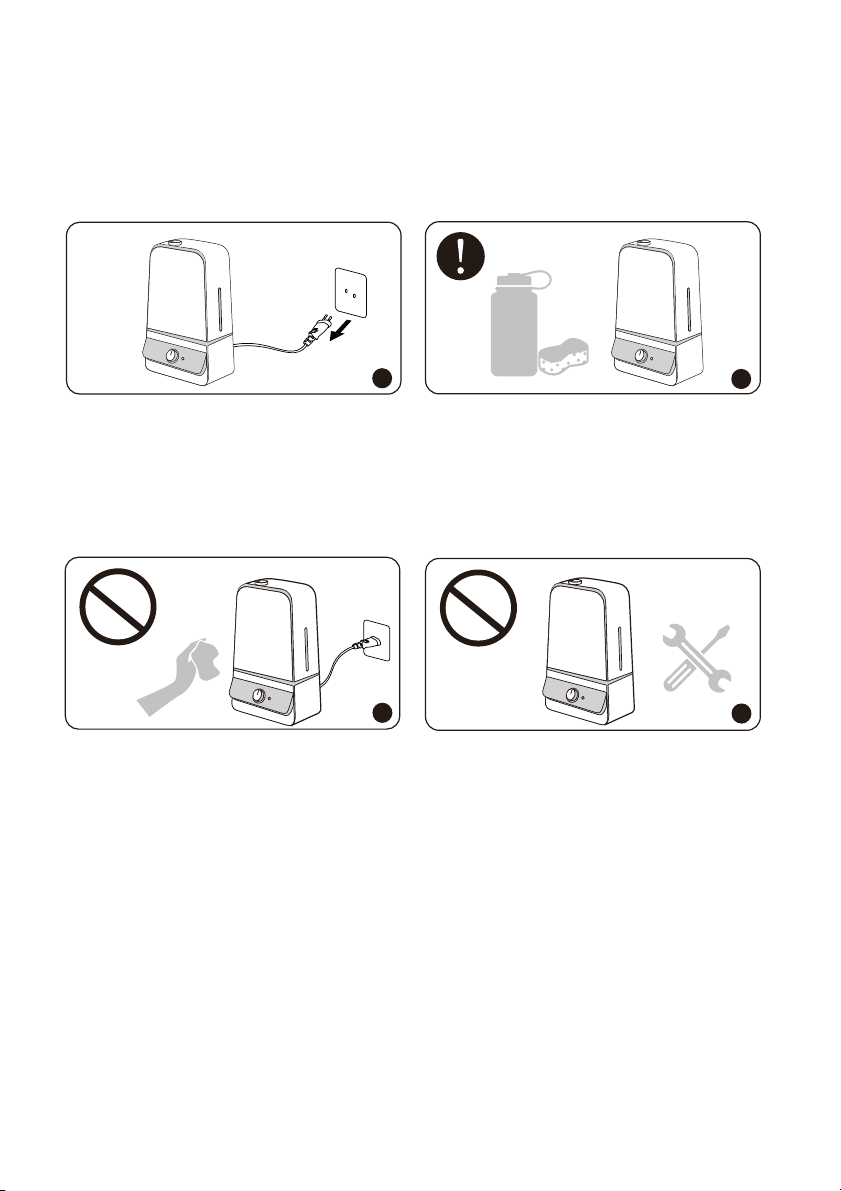
55
DESPUÉS DE USAR EL HUMIDIFICADOR
1. NO limpie el humidificador inmediatamente después de apagarlo si el humidificador ha
estado difundiendo calor. Deje que el humidificador se enfríe completamente antes de
limpiarlo.
2. NO intente reparar o ajustar ninguna función eléctrica o mecánica del humidificador.
Hacerlo anulará su garantía.
1
2
1. Desconecte siempre de la fuente de alimentación tirando del enchufe cuando no esté en uso.
2. El humidificador requiere limpieza regular. Por favor, consulte y siga las instrucciones de
limpieza y mantenimiento.
1
2
1 x Humidificador TaoTronics (Modelo: TT-AH025)
· 1 x Cepillo de Limpieza
· 1 x Esponja a Prueba de Polvo
· 1 x Tarjeta de Agradecimiento
· 1 x Manual de Usuario
TT-AH025
AC 200-240V 50 / 60Hz
Min: 15W
Max: 25W
6.0L / 1.59Gal
Min: 60ml / horas
Max: 300ml / horas
20-60h horas
20-40m² / 215-430ft²
<27dB
251 x 167 x 412mm / 9.9 x 6.6 x 16.2 pulgadas
1775g/62.6oz
Modelo
Voltaje de Operación
Potencia Nominal
Capacidad del Tanque de Agua
Salida de Neblina
Tiempo de Operación con un Tanque Lleno
Tamaño de Habitación Recomendado
Ruido
Dimensiones
Peso Neto
CONTENIDOS DEL PAQUETE
ESPECIFICACIONES TÉCNICAS
56
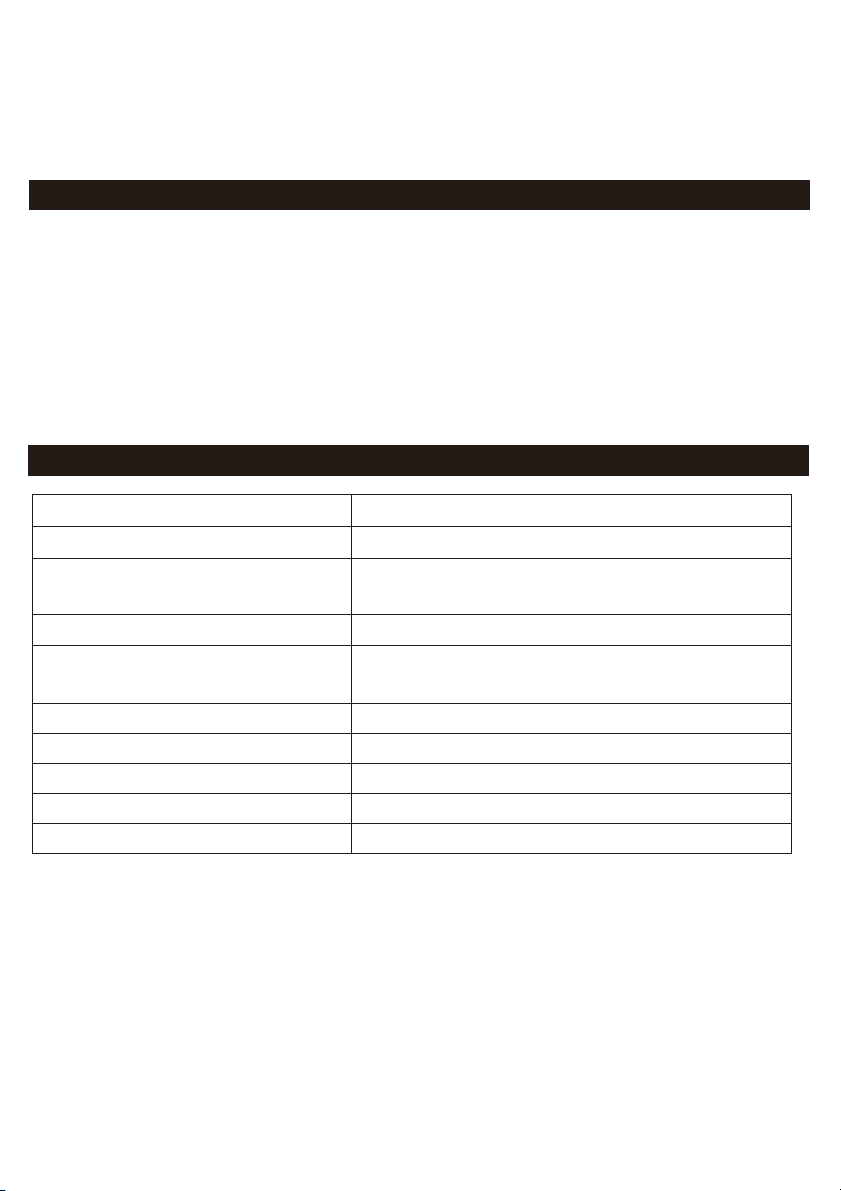
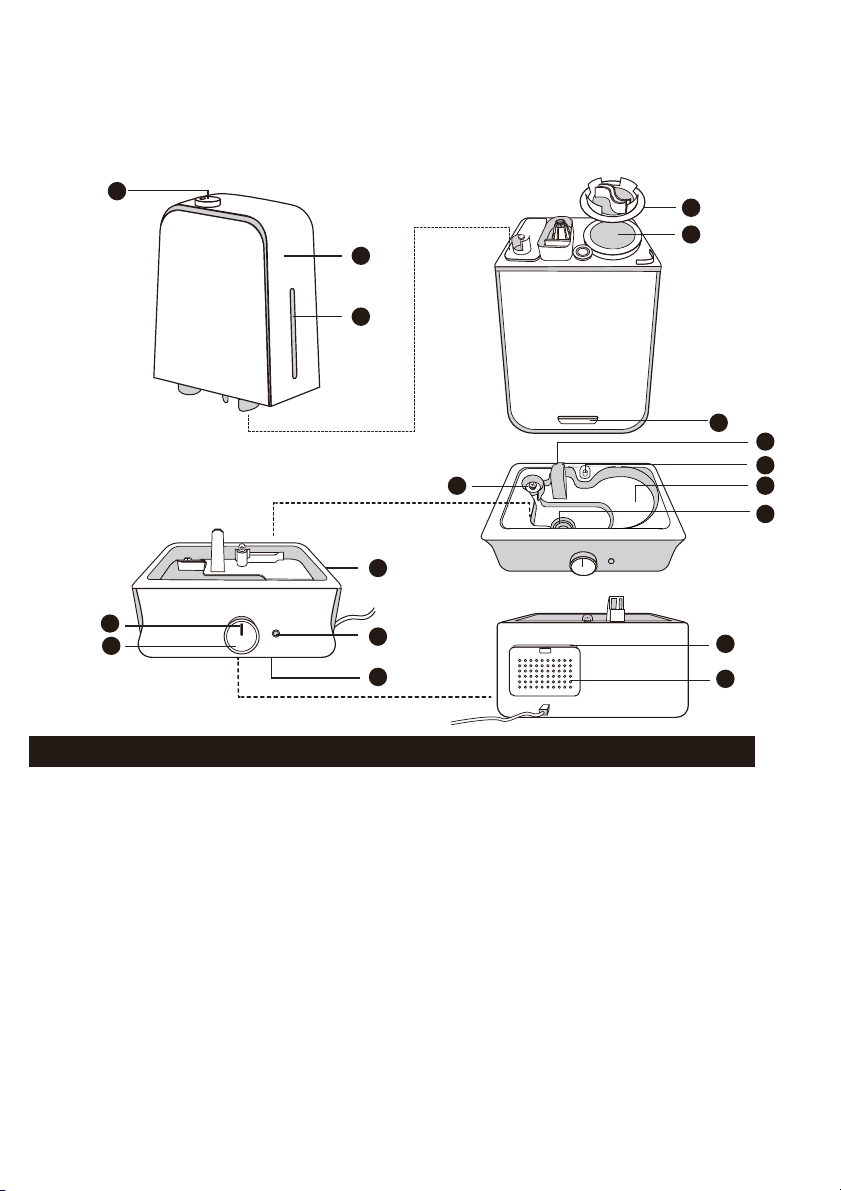
58
57
1. Boquilla
2. Tanque de Agua
3. Ventana del Nivel de Agua
4. Tapa del Tanque
5. Entrada de Agua
6. Manija
7. Indicador LED
8. Perilla de Control
9. Base
10. Botón de Iluminación
11. Luz de Noche
12. Flotador
13. Salida de Aire
14. Luz del Tanque
15. Reservorio de Agua
16. Atomizador
17. Esponja a Prueba de Polvo
18. Entrada de Aire
DIAGRAMA DE PRODUCTO
1
3
5
15
16
12
4
9
11
10
18
13
14
8
17
2
7
push
6
OPERACIONES Y FUNCIONES
Añadir Agua
1. Retire la boquilla y gire el tanque boca abajo.
2. Retire la tapa del tanque y llene el tanque solo con agua limpia y fría.
3. Coloque la tapa del tanque, coloque el tanque nuevamente en la base y vuelva a colocar
la boquilla. Asegúrese de que encaja de manera segura para que el agua pueda ir desde
el tanque hasta el depósito.
1. Si el agua del grifo es demasiado dura, se recomienda utilizar agua filtrada o destilada
para evitar el polvo blanco. NO use agua caliente.
2. NO agregue aceites esenciales o tabletas medicinales en el tanque de agua.
3. NO agregue agua en la base o a través de la boquilla.
4. NO mueva el humidificar mientras que el tanque de agua está lleno de agua para evitar
fugas o sobre llenado en la base.
1
5
3
2
3 4
21 4
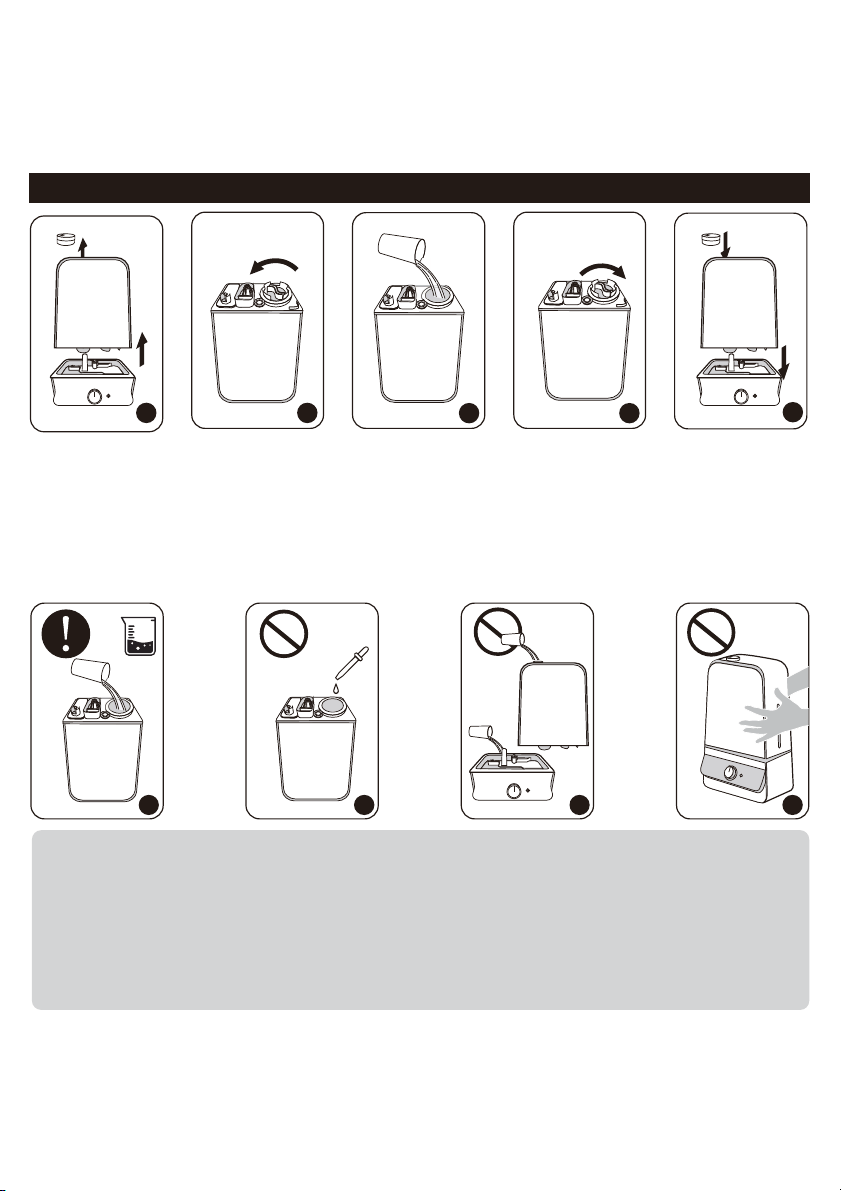

59
Enchufe el cable de alimentación a una toma de corriente. El humidicador está listo para ser usado.
1. Gire la perilla de control hacia la derecha hasta la posición ON. El indicador LED azul se iluminará,
indicando que el humidicador se está congurado en el nivel mínimo de neblina.
2. Siga girando la perilla de control hacia la derecha para aumentar el nivel de neblina.
3. Gire la perilla de control hacia la izquierda para disminuir el nivel de neblina.
4. Gire la perilla de control a la izquierda hasta la posición OFF para apagar el humidicador. El
indicador LED se apagará. El ventilador funcionará durante otros 3 minutos para secar el tubo
de neblina.
Encender / Apagar y Ajuste de Neblina
Control de la Iluminación
Protección contra Bajo Nivel de Agua: Apagado Automático
1. Presione el Botón de Iluminación para encender / apagar la luz nocturna.
2. Mantenga presionado el Botón de Iluminación durante 1.5 segundos para encender / apagar la
luz del tanque.
Cuando no hay suciente agua dentro del tanque, el humidicador dejará de producir neblina y el
indicador LED se iluminará rojo. Está diseñado de esta manera por motivos de seguridad para
prevenir que el humidicador se sobrecaliente o se dañe.
OFF
ON
Max
Min
Nota:
La humedad ambiental más confortable es entre 40% - 60%. Por favor ajuste la neblina
según sea necesario.
OFF
ON
Max
Min
60
LIMPIEZA Y MANTENIMIENTO
Precaución
1. NO sumerja la base en agua.
2. Asegúrese de que no entre agua en la base a través de la salida de
aire, entrada de aire, o la perilla de control y el botón de luz nocturna.
3. NO lave ninguna parte de este humidificador en el lavavajillas ya que
dañará el humidificador y se anulará la garantía.
Mantenimiento Diario
Apague el humidificador, desenchúfelo de la fuente de alimentación. Drene el agua del
tanque, depósito y base.
Mantenimiento Semanal
1. Limpie adecuadamente su humidificador, se recomienda remover la mugre y desinfec
tar por separado.
2. NO mezcle las soluciones de vinagre y cloro juntas. No use más de 1 cucharadita. de
cloro por galón de agua para evitar dañar su humidificador.
3. Asegúrese de que el anillo de goma, la tapa de goma y el resorte (consulte el diagrama
en la página 64) en la tapa del tanque estén instalados correctamente después de la
limpieza para evitar fugas de agua.
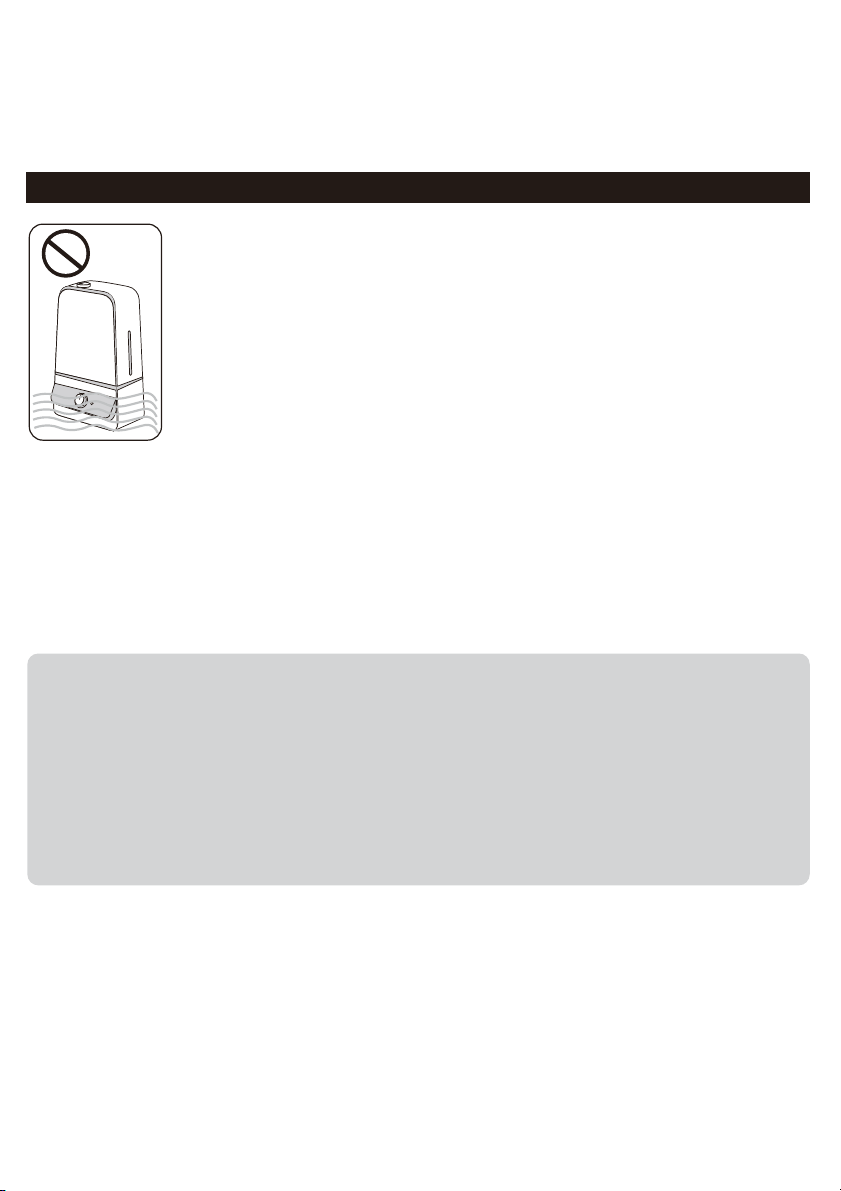
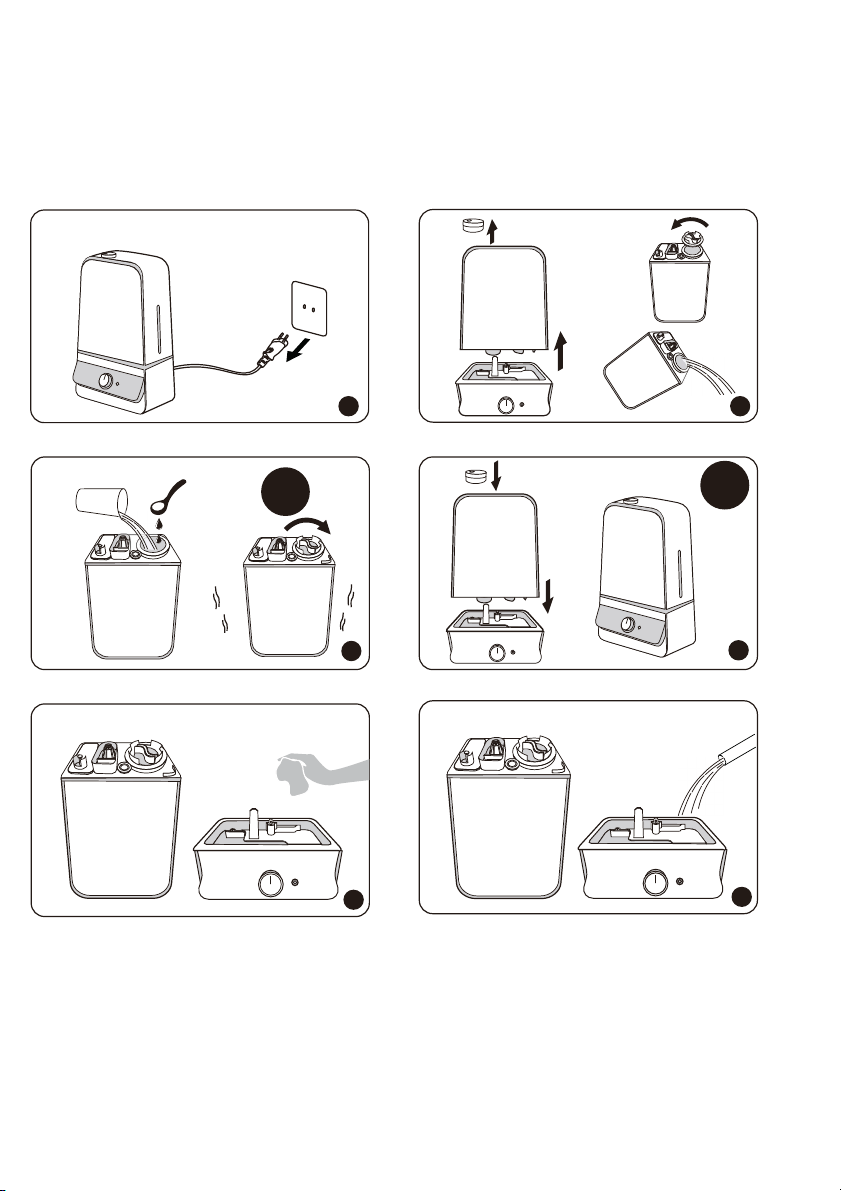
1 2
Instrucciones de Eliminación de Mugre
15S
3
15-20
minutes
4
5
6
61
1. Apague y desenchufe el humidificador, retire la boquilla.
2. Retire el tanque de agua de la base. Retire la tapa del tanque. Asegúrese de que el anillo
blanco de sellado no se desprenda. Drene el agua del tanque de agua y de la base.
Remueva cualquier accesorio y póngalos a un lado.
3. Llene el tanque de agua hasta la mitad. Añada en 1 cucharadita de vinagre blanco sin
diluir. Coloque la tapa del tanque y agite durante 15 segundos.
4. Coloque el tanque en la base. La solución de vinagre entrara en el depósito de agua para
aflojar la acumulación de minerales (mugre) en el atomizador, la base y tanque de agua.
Deje reposar por 15-20 minutos.
5. Destape el tanque y drene la solución. Limpie el atomizador con un paño suave. Para
eliminar los depósitos minerales sueltos.
6. Enjuague el depósito y el tanque de agua hasta que el olor a vinagre (para eliminar la
mugre) o a la solución de cloro (para desinfectar, vea más abajo) haya desaparecido.
62
Instrucciones de Desinfección
1. Siga los pasos 1-2 de la sección anterior sobre la eliminación de incrustaciones.
2. Llene el tanque de agua hasta la mitad. Añada una ½ cucharadita de cloro. Coloque la
tapa del tanque de nuevo. Agite la solución en el tanque. Coloque el tanque en la base.
La solución de cloro entrará y desinfectara el depósito de agua, así como en los otros
componentes. Deje reposar durante 15-20 minutos.
3. Siga los pasos 4-6 de la sección anterior sobre la eliminación de incrustaciones para
completar la desinfección del humidificador.
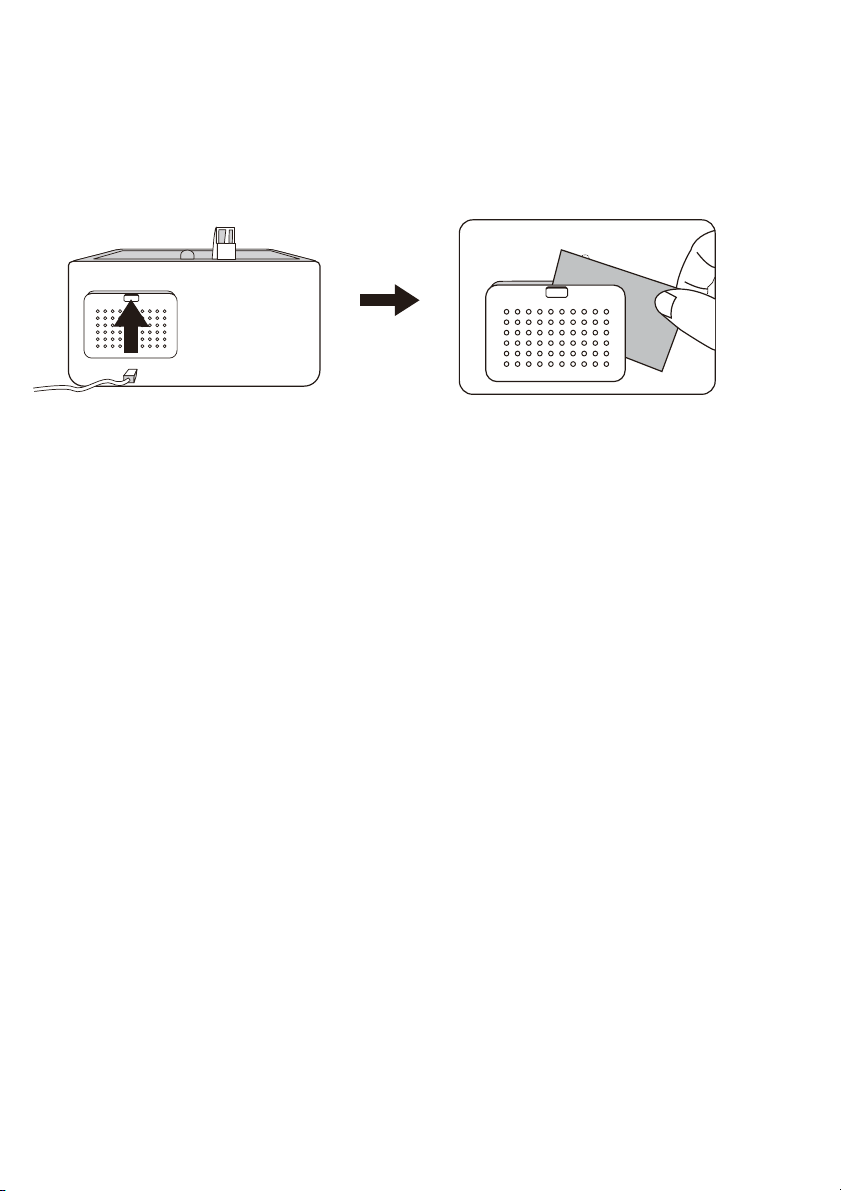
1. Siga las instrucciones de limpieza si el humidificador no será utilizado durante al menos
una semana o al final de la temporada. Retire todos los accesorios utilizados con el
humidificador y permita que el humidificador y los accesorios se sequen completamente
antes de guardarlos.
2. NO almacene con agua dentro de la base, el depósito o el tanque.
3. Almacene la unidad de forma segura y guárdela en un lugar fresco y seco.
Limpieza la Esponja a Prueba de Polvo
Limpie la esponja a prueba de polvo (en la parte posterior de la base) con agua o detergente
una vez al mes. Vuelva a colocarla en su lugar después de la limpieza.
push
Cuidado y Almacenamiento de Fin de Temporada
push
GUÍA PARA SOLUCIONAR PROBLEMAS
1. Si la información que aparece en la guía de solución de problemas no puede resolver
su problema, por favor envíenos un correo electrónico para obtener ayuda.
2. El hecho de no mantener limpia la unidad de depósitos minerales puede afectar el
funcionamiento del humidificador.
3. El incumplimiento por parte del cliente de estas instrucciones puede invalidar la garantía.
3
2
Problema Causa Posible Solución
Unidad no enchufada
No hay energía de la toma
de corriente .
No hay agua en el depósito
de agua.
Asegúrese de que la unidad
esté correctamente enchufada.
Prueba con otra toma de
corriente.
No se pudo encender
la unidad
1
3
El flotador de agua está
atascado .
3
El indicador de bajo nivel de
agua está constantemente
encendido.
1
63
64
Asegúrese de que el resorte está
asegurado apropiadamente al tanque
permitiendo que el agua pase a través
de la base.
1. Resorte
2. Anillo de Goma
3. Flotador de Agua
Ajuste el flotador de agua
a una posición horizontal y
asegúrese de que pueda
elevarse con agua .

1. Ajuste al nivel de neblina máxima.
2. Cierre las puertas y ventanas para
reducir la ventilación del aire, o
cámbiese a una habitación más pequeña
65
66
La unidad está
encendida pero no
se produce niebla
o produce poca
niebla.
Fuga del tanque.
No hay suficiente agua
dentro del tanque.
Rellene y reinstale el tanque
de agua.
Ajuste al nivel máximo de neblina.
Compruebe si la humedad actual es
mayor que la humedad preestablecida,
reinicie la humedad a un nivel más alto.
Sienta si sale aire por la
boquilla, si es así, limpie el
atomizador como se indica.
El nivel de neblina es
demasiado bajo.
La humedad predeterminada
es demasiado baja.
Acumulación de minerales
en atomizador.
Compruebe si hay posibles grietas en el
tanque, reemplácelo si es necesario.
Apriete la tapa del tanque.
Revise el anillo de goma
contáctenos si falta alguno.
El tanque puede estar
dañado.
La tapa del tanque no está
bien apretada.
1. Verifique si la habitación está demasiado
húmeda, ajuste para reducir la neblina
a , 40% -60% así deberá funciona mejor
2. Abra puertas y ventanas, o cambiase a
una habitación más grande
El humidificador debe colocarse sobre una
superficie dura y plana, a 2 pies sobre el
piso y a 12 pulgadas de la pared.
Eleve la temperatura
ambiental a 25°C / 77°F.
La entrada de aire está
bloqueada.
Baja temperatura interior
conduce a la licuefacción .
Humidificación Escasa .
El agua del grifo puede
contener demasiados
minerales.
Reemplácela con agua
filtrada o destilada o utilícelo
con un cartucho de
desmineralización TaoTronics.
Aparece polvo blanco /
Recubrimiento negro en
la base.
La unidad necesita ser
limpiada .
Olor Extraño .
El agua va hacia el depósito
de agua.
Esto es normal mientras está
funcionando.
Extraño ruido del agua .
La unidad funciona durante
demasiado tiempo.
Apague y coloque en un lugar bien
ventilado durante 10 minutos .
El humidificador se está
calentando demasiado .
El humidificador debe colocarse sobre
una superficie dura y plana, a 2 pies
sobre el piso y a 12 pulgadas de la pared.
Eleve la temperatura
ambiental a 25°C / 77°F.
El nivel de neblina está
demasiado bajo para el
tamaño de la habitación.
La entrada de aire está
bloqueada.
Baja temperatura interior
conduce a la licuefacción.
Limpie el humidificador según
las instrucciones.
Deje el tanque de agua vacío abierto en
un lugar fresco durante 12 horas sin la tapa
del tanque de agua colocada.
1
Resorte atascado.
1
Asegúrese de que el resorte está
apropiadamente asegurado al tanque
permitiendo que el agua pase a través de
la base.
Nivel de neblina es
demasiado alto para el
tamaño de la habitación .
La altura de la
neblina es
baja, humedeciendo
el escritorio o el
piso al circular. Se
forma condensación
alrededor del
humidificador o en
ventanas y paredes.
2
El anillo de goma no se
instaló en la tapa del
tanque.

CONTENTS
IT
67
68
DICHIARAZIONE
ISTRUZIONI DI SICUREZZA
PRIMA DI USARE L’UMIDIFICATORE
DURANTE L’USO DELL’UMIDIFICATORE
DOPO AVER USATO L’UMIDIFICATORE
CONTENUTO DELLA CONFEZIONE
SPECIFICHE
DIAGRAMA DE PRODUCTO
OPERAZIONI E FUNZIONAMENTO
Aggiungere Acqua
Accensione / Spegnimento e Regolazione del Vapore
Controllo della Luce
Protezione Acqua Bassa: Spegnimento Automatico dell’Umidicatore
PULIZIA E MANUTENZIONE
Avvertenze
Manutenzione Quotidiana
Manutenzione Settimanale
Istruzioni la Rimozione delle Incrostazioni
Instructions de désinfection
Pulizia della Spugna Antipolvere
Cosa Fare al Termine della Stagione e Come Riporre l’Umidicatore
GUIDA ALLA RISOLUZIONE DEI PROBLEMI
GARANZIA
CONTATTA IL SERVIZIO CLIENTI TAOTRONICS
69
69
73
73
74
81/83
84
84
70
71
72
75
75
76
76
76
77
77
77
77
78
79
80
80
Este producto está cubierto con la garantía de producto y mano de obra de TaoTronics
durante 12 meses a partir de La fecha de su compra original. Se le otorgará una prórroga
de garantía de 18 meses si el producto está registrado en nuestro sitio web (www.taotron-
ics.com).
Cualquier parte defectuosa será, a discreción de SUNVALLEYTEK INTERNATIONAL INC. ,
reparado o reemplazado sin cargo si el aparato no ha sido manipulado y ha sido usado de
acuerdo con estas instrucciones impresas.
Si ocurre algún problema, comuníquese con el soporte de TaoTronics a
([email protected]) inmediatamente para lanzar una reclamación de garantía.
Especique el número de modelo y su número de pedido de Amazon. Nuestro representante
de Servicio al Consumidor responderá dentro de 1 día hábil, le aconsejará cómo corregir el
problema usted mismo o le indicara cómo devolvernos la unidad defectuosa para su
reparación o reemplazo.
Solo podemos ofrecer un servicio postventa para los productos que se venden por TaoTron-
ics o los distribuidores autorizados. Si compro su unidad en un lugar diferente, por favor,
póngase en contacto con su vendedor para cuestiones de devolución y garantía.
PÓNGASE EN CONTACTO CON NOSOTROS ANTES DE DEVOLVER ESTE PRODUCTO A LA TIENDA.
MANDE UN CORREO ELECTRÓNICO A TAOTRONICS ATENCIÓN AL CLIENTE PARA PROBLEMAS Y
PREGUNTAS.
GARANTÍA
CONTACTO TAOTRONICS ATENCIÓN AL CLIENTE
Sunvalleytek USA, Inc.
Address: 46724 Lakeview Blvd, Fremont, CA 94538
E-mail: [email protected]
Tel: 1-888-456-8468 (Monday-Friday: 9:00 – 17:00 PST)
Website: www.taotronics.com

CONTENTS
IT
67
68
DICHIARAZIONE
ISTRUZIONI DI SICUREZZA
PRIMA DI USARE L’UMIDIFICATORE
DURANTE L’USO DELL’UMIDIFICATORE
DOPO AVER USATO L’UMIDIFICATORE
CONTENUTO DELLA CONFEZIONE
SPECIFICHE
DIAGRAMA DE PRODUCTO
OPERAZIONI E FUNZIONAMENTO
Aggiungere Acqua
Accensione / Spegnimento e Regolazione del Vapore
Controllo della Luce
Protezione Acqua Bassa: Spegnimento Automatico dell’Umidicatore
PULIZIA E MANUTENZIONE
Avvertenze
Manutenzione Quotidiana
Manutenzione Settimanale
Istruzioni la Rimozione delle Incrostazioni
Instructions de désinfection
Pulizia della Spugna Antipolvere
Cosa Fare al Termine della Stagione e Come Riporre l’Umidicatore
GUIDA ALLA RISOLUZIONE DEI PROBLEMI
GARANZIA
CONTATTA IL SERVIZIO CLIENTI TAOTRONICS
69
69
73
73
74
81/83
84
84
70
71
72
75
75
76
76
76
77
77
77
77
78
79
80
80
Este producto está cubierto con la garantía de producto y mano de obra de TaoTronics
durante 12 meses a partir de La fecha de su compra original. Se le otorgará una prórroga
de garantía de 18 meses si el producto está registrado en nuestro sitio web (www.taotron-
ics.com).
Cualquier parte defectuosa será, a discreción de SUNVALLEYTEK INTERNATIONAL INC. ,
reparado o reemplazado sin cargo si el aparato no ha sido manipulado y ha sido usado de
acuerdo con estas instrucciones impresas.
Si ocurre algún problema, comuníquese con el soporte de TaoTronics a
(support.es@taotronics.com) inmediatamente para lanzar una reclamación de garantía.
Especique el número de modelo y su número de pedido de Amazon. Nuestro representante
de Servicio al Consumidor responderá dentro de 1 día hábil, le aconsejará cómo corregir el
problema usted mismo o le indicara cómo devolvernos la unidad defectuosa para su
reparación o reemplazo.
Solo podemos ofrecer un servicio postventa para los productos que se venden por TaoTron-
ics o los distribuidores autorizados. Si compro su unidad en un lugar diferente, por favor,
póngase en contacto con su vendedor para cuestiones de devolución y garantía.
PÓNGASE EN CONTACTO CON NOSOTROS ANTES DE DEVOLVER ESTE PRODUCTO A LA TIENDA.
MANDE UN CORREO ELECTRÓNICO A TAOTRONICS ATENCIÓN AL CLIENTE PARA PROBLEMAS Y
PREGUNTAS.
GARANTÍA
CONTACTO TAOTRONICS ATENCIÓN AL CLIENTE
Sunvalleytek USA, Inc.
Address: 46724 Lakeview Blvd, Fremont, CA 94538
E-mail: support.es@taotronics.com
Tel: 1-888-456-8468 (Monday-Friday: 9:00 – 17:00 PST)
Website: www.taotronics.com

1. Si prega di svolgere completamente il cavo di alimentazione, vericando l’eventuale
presenza di danni. Non utilizzare l’umidicatore se il cavo è danneggiato.
2. NON collocare l’umidicatore in ambienti bagnati.
Tenere sempre l’umidicatore fuori dalla portata di malati, bambini e animali.
1. Si prega di collocare sempre il dispositivo su una superficie liscia, piana, senza tessuti,
senza metalli, impermeabile e livellata, avendo cura di tenerlo al riparo dalla luce diretta
del sole.
2. Collocare sempre il dispositivo a 60 cm da terra e a 30 cm dalle pareti, da altri dispositivi o
da mobili in legno.
70
DICHIARAZIONE
Grazie per aver acquistato un prodotto TaoTronics che è stato testato per rispondere ai nostri rigidi
standard qualitativi. Questo prodotto è coperto dalla garanzia TaoTronics sui difetti di fabbricazione
e di funzionamento per 12 mesi dalla data del suo acquisto originale.
Ti preghiamo di inviarci un’email all’indirizzo [email protected] con il tuo numero d’ordine e
una descrizione del problema o del malfunzionamento. Ti risponderemo entro 24 ore.
Si prega di leggere il Manuale nella sua interezza. Pulire e mantenere il prodotto seguendo le
istruzioni. In caso di anomalie, si prega innanzitutto di fare riferimento alla Guida alla Risoluzione dei
La presente garanzia è nulla se il difetto è causato da danno accidentale, uso errato o cattivo,
negligenza, riparazioni improprie o modiche apportate da persone non autorizzate, o qualora non
siano state seguite le istruzioni operative fornite col prodotto, ad esempio aggiungendo olii essenziali
direttamente nel serbatoio e nella base. La presente garanzia non vale per il normale deterioramen-
to dovuto all’uso o per utilizzi commerciali.
In nessun caso la responsabilità del produttore potrà superare il prezzo di acquisto pagato dall’ac-
quirente per il prodotto.
In nessuna circostanza il produttore potrà essere ritenuto responsabile per perdite – dirette, indirette
o accidentali – o danni indiretti derivanti da, o collegati all’uso del prodotto.
ISTRUZIONI DI SICUREZZA
69
PRIMA DI USARE L’UMIDIFICATORE
1 2
30 CM
60 CM
2
30 CM
1
L’umidicatore è stato realizzato con materiali sicuri e rispettosi dell’ambiente, è stato certicato e
risponde alle normative o alle leggi delle aree in cui viene venduto.
IMPORTANTE: Si prega di leggere e conservare queste ISTRUZIONI DI SICUREZZA prima dell’uso del
dispositivo. Dovranno essere sempre seguite le precauzioni di base per ridurre il rischio di incendio,
di shock elettrico e di danni alle persone o al prodotto stesso.
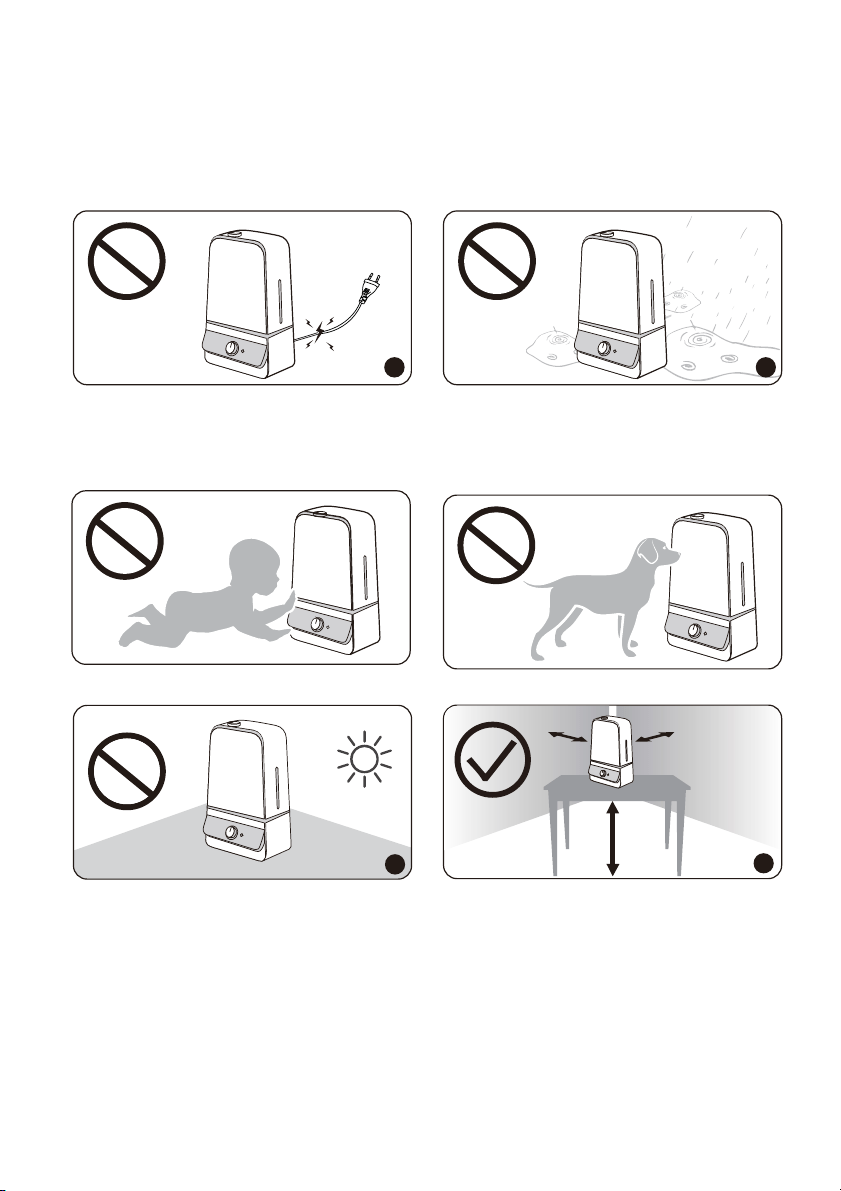
1. Si prega di svolgere completamente il cavo di alimentazione, vericando l’eventuale
presenza di danni. Non utilizzare l’umidicatore se il cavo è danneggiato.
2. NON collocare l’umidicatore in ambienti bagnati.
Tenere sempre l’umidicatore fuori dalla portata di malati, bambini e animali.
1. Si prega di collocare sempre il dispositivo su una superficie liscia, piana, senza tessuti,
senza metalli, impermeabile e livellata, avendo cura di tenerlo al riparo dalla luce diretta
del sole.
2. Collocare sempre il dispositivo a 60 cm da terra e a 30 cm dalle pareti, da altri dispositivi o
da mobili in legno.
70
DICHIARAZIONE
Grazie per aver acquistato un prodotto TaoTronics che è stato testato per rispondere ai nostri rigidi
standard qualitativi. Questo prodotto è coperto dalla garanzia TaoTronics sui difetti di fabbricazione
e di funzionamento per 12 mesi dalla data del suo acquisto originale.
Ti preghiamo di inviarci un’email all’indirizzo support.it@taotronics.com con il tuo numero d’ordine e
una descrizione del problema o del malfunzionamento. Ti risponderemo entro 24 ore.
Si prega di leggere il Manuale nella sua interezza. Pulire e mantenere il prodotto seguendo le
istruzioni. In caso di anomalie, si prega innanzitutto di fare riferimento alla Guida alla Risoluzione dei
La presente garanzia è nulla se il difetto è causato da danno accidentale, uso errato o cattivo,
negligenza, riparazioni improprie o modiche apportate da persone non autorizzate, o qualora non
siano state seguite le istruzioni operative fornite col prodotto, ad esempio aggiungendo olii essenziali
direttamente nel serbatoio e nella base. La presente garanzia non vale per il normale deterioramen-
to dovuto all’uso o per utilizzi commerciali.
In nessun caso la responsabilità del produttore potrà superare il prezzo di acquisto pagato dall’ac-
quirente per il prodotto.
In nessuna circostanza il produttore potrà essere ritenuto responsabile per perdite – dirette, indirette
o accidentali – o danni indiretti derivanti da, o collegati all’uso del prodotto.
ISTRUZIONI DI SICUREZZA
69
PRIMA DI USARE L’UMIDIFICATORE
1 2
30 CM
60 CM
2
30 CM
1
L’umidicatore è stato realizzato con materiali sicuri e rispettosi dell’ambiente, è stato certicato e
risponde alle normative o alle leggi delle aree in cui viene venduto.
IMPORTANTE: Si prega di leggere e conservare queste ISTRUZIONI DI SICUREZZA prima dell’uso del
dispositivo. Dovranno essere sempre seguite le precauzioni di base per ridurre il rischio di incendio,
di shock elettrico e di danni alle persone o al prodotto stesso.
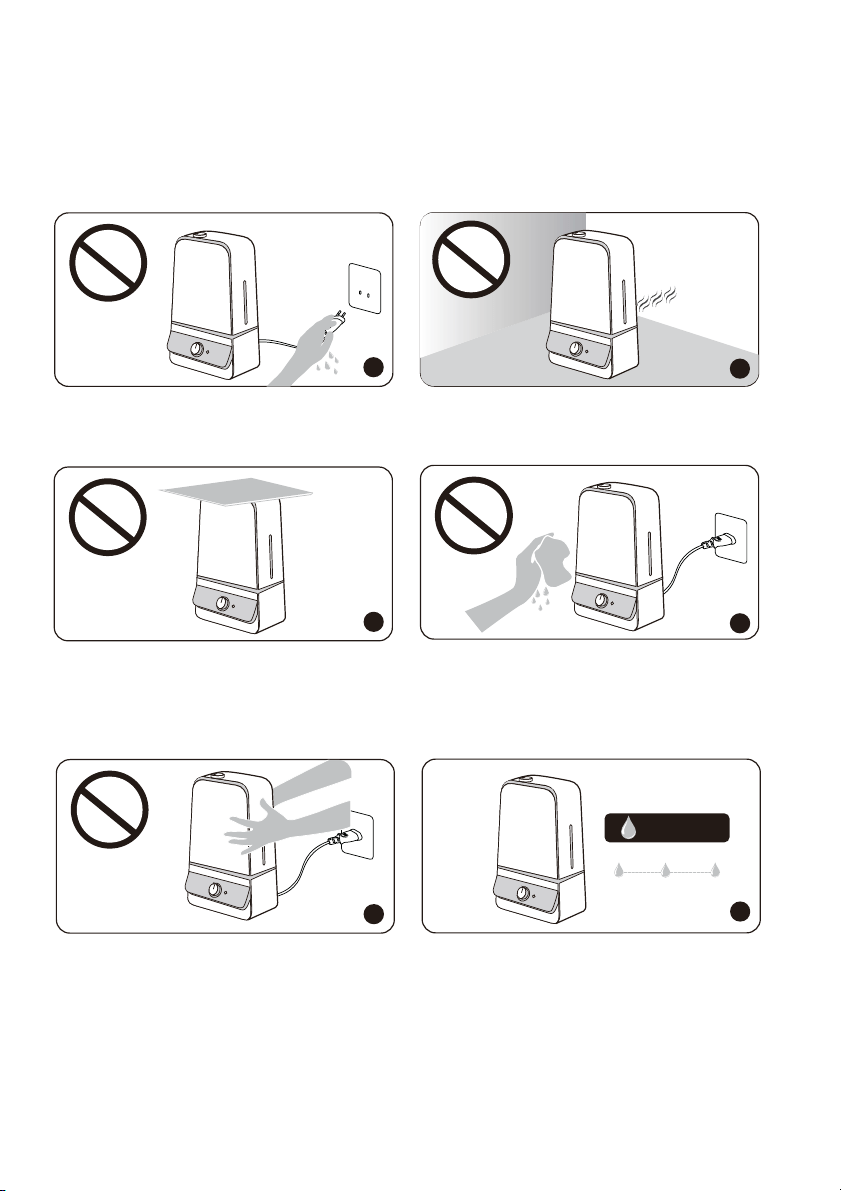
1. NON muovere o inclinare l’umidicatore mentre è in funzione.
2. Il livello più confortevole di umidità ambientale è compreso tra il 40% e il 60%. Si prega di
regolare il vapore secondo le necessità.
DURANTE L’USO DELL’UMIDIFICATORE
1. NON collegare il dispositivo ad una presa di corrente con le mani bagnate.
2. NON dirigere l’ugello del vapore verso le pareti.
1. NON utilizzare le mani o altri oggetti per coprire l’ugello mentre il dispositivo è acceso per
evitare danni al prodotto o infortuni.
2. NON pulire quando il dispositivo è ancora collegato ad una presa di corrente o mentre è
acceso.
Humidity
1
2
72
71
1
2
1
2
40% 60%
DOPO AVER USATO L’UMIDIFICATORE
1. NON pulire l’umidicatore subito dopo averlo spento se l’umidicatore stava diffondendo
vapore caldo. Lasciare raffreddare completamente l’umidicatore prima della pulizia.
2. NON tentare di riparare o sistemare nessun componente elettrico o meccanico su questo
umidicatore, altrimenti la garanzia verrà invalidata.
1
2
1
2
1. Scollegare sempre dall’alimentazione elettrica staccando la spina quando il dispositivo
non viene utilizzato.
2. L’umidicatore richiede una pulizia regolare. Si prega di fare riferimento e di seguire le
Istruzioni per la Pulizia e la Manutenzione.
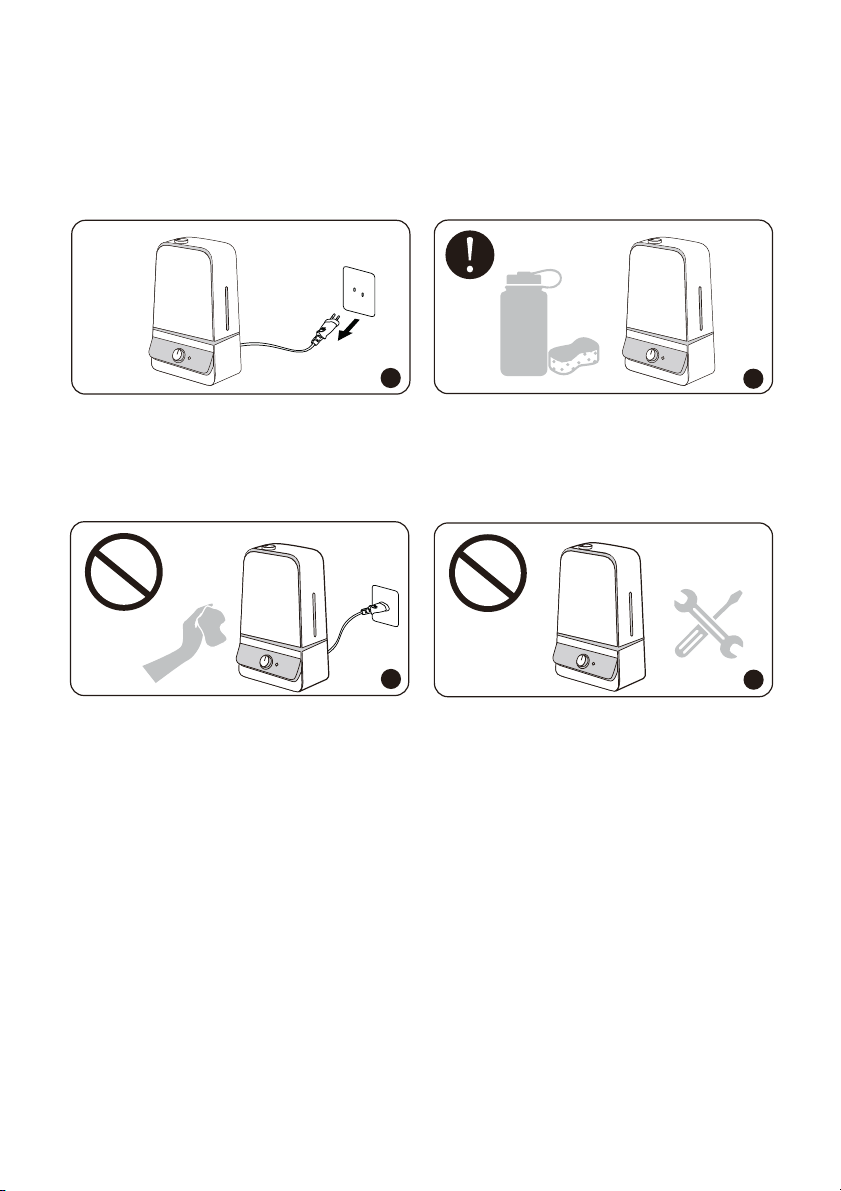
· 1 x Umidicatore TaoTronics (Modello: TT-AH025)
· 1 x Pennello per la Pulizia
· 1 x Spugna Antipolvere
· 1 x Biglietto di Ringraziamento
· 1 x Manuale Utente
TT-AH025
AC 200-240V 50 / 60Hz
Min: 15W
Max: 25W
6,0L / 1.59Gal
Min: 60ml/h
Max: 300ml/h
20-60h
20-40m² / 215-430ft²
<27dB
251 x 167 x 412mm / 9.9 x 6.6 x 16.2in
1775g/62.6oz
Modello
Tensione di Esercizio
Potenza Nominale
Capacità del Serbatoio dell’Acqua
Uscita Vapore
Tempo di Funzionamento a Serbatoio Pieno
Dimensione Consigliata della Stanza
Rumore
Dimensioni
Peso Netto
CONTENUTO DELLA CONFEZIONE
SPECIFICHE
7473
1. Ugello
2. Serbatoio dell’Acqua
3. Finestra del Livello dell’Acqua
4. Tappo del Serbatoio
5. Ingresso dell’Acqua
6. Maniglia
7. Indicatore LED
8. Manopola di Controllo
9. Base
10. Pulsante Luce
11. Luce Notturna
12. Galleggiante
13. Uscita dell’Aria
14. Luce del Serbatoio
15. Riserva dell’Acqua
16. Vaporizzatore
17. Filtro in Spugna Antipolvere
18. Ingresso Ariar
DIAGRAMA DE PRODUCTO
1
3
5
15
16
12
4
9
11
10
18
13
14
8
17
2
7
push
6
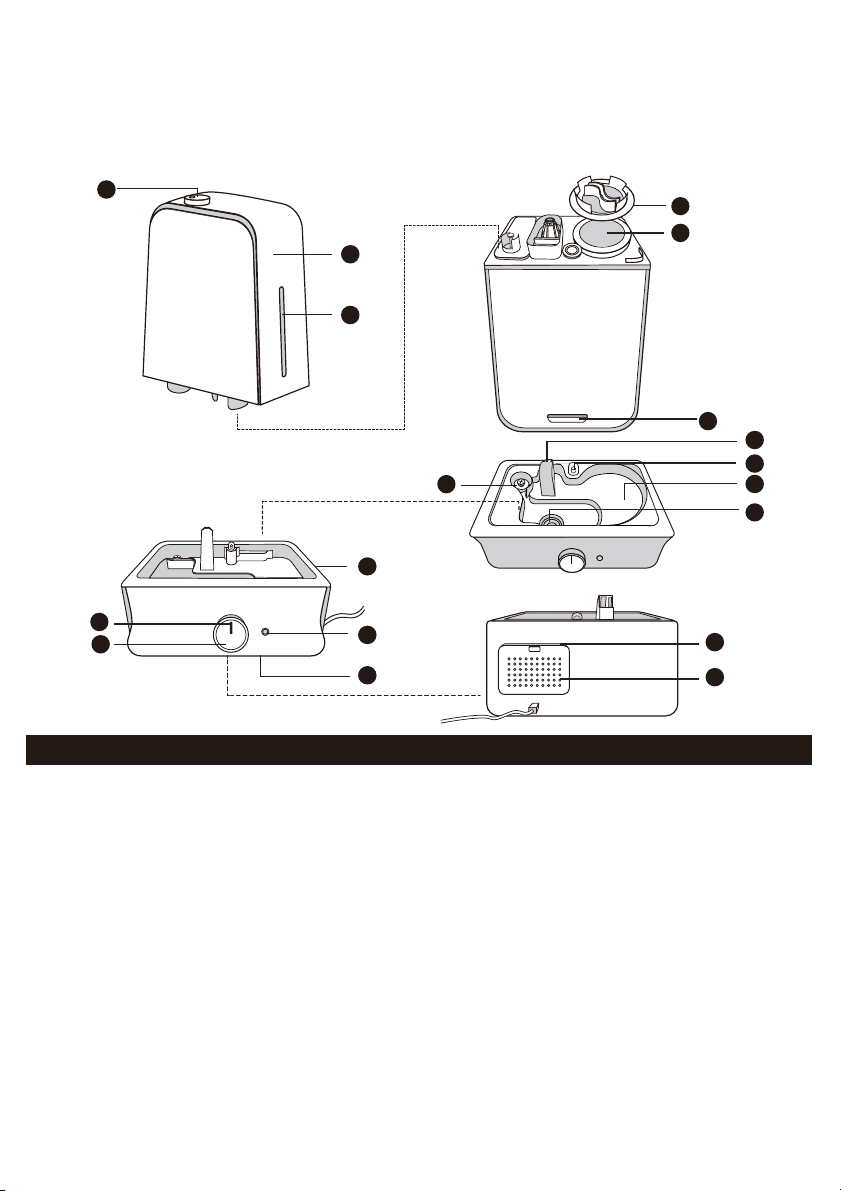
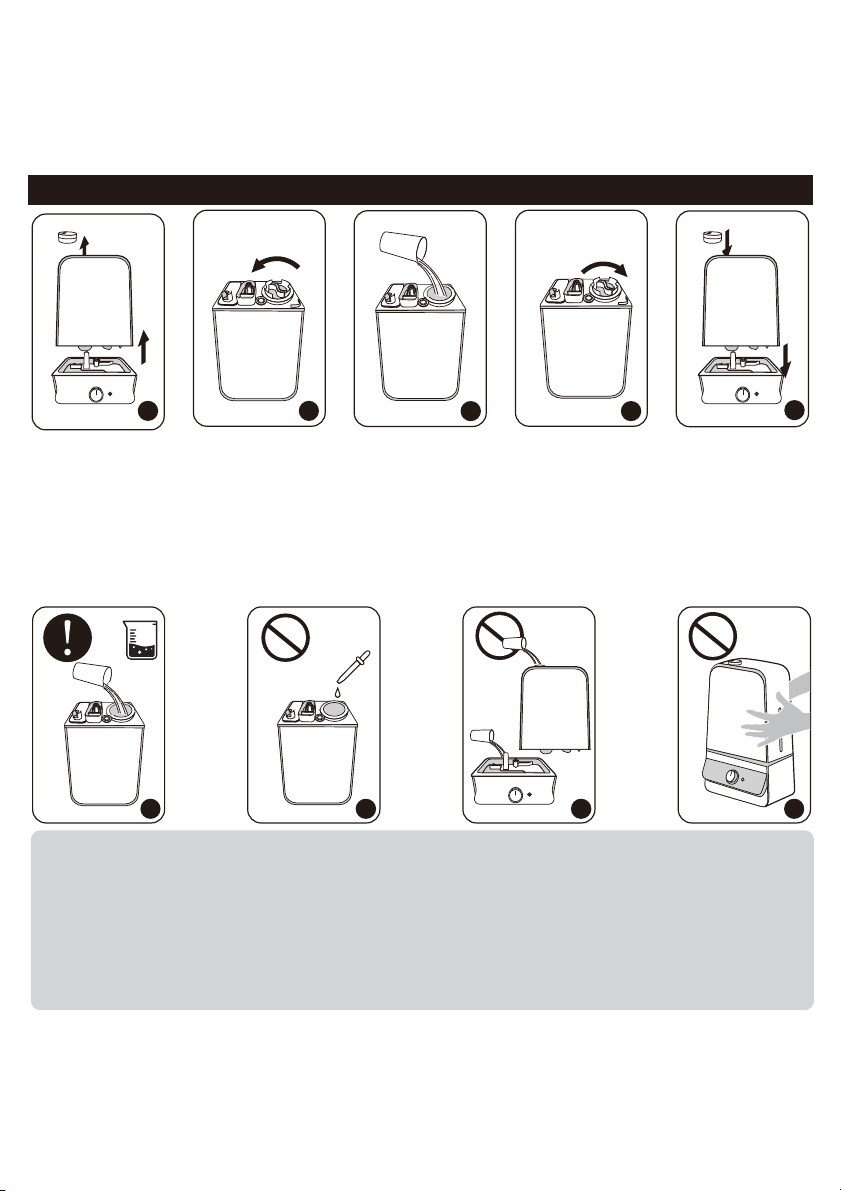
Quando non c’è più abbastanza acqua nella riserva dell’acqua, l’umidicatore smetterà di
emettere vapore, e l’indicatore LED diventerà rosso. Questa funzione è stata studiata per motivi di
sicurezza, per evitare che l’umidicatore si surriscaldi e danneggi il vaporizzatore.
OPERAZIONI E FUNZIONAMENTO
Aggiungere Acqua
1. Rimuovere l’ugello e girare il serbatoio al contrario.
2. Rimuovere il coperchio del serbatoio e riempire il serbatoio esclusivamente con acqupulita e fredda.
3. Rimettere il coperchio del serbatoio, sistemare nuovamente il serbatoio sulla base e
rimontare l’ugello. Assicurarsi che tutto sia ben ssato così che l’acqua possa andare dal
serbatoio alla riserva dell’acqua.
1. Se l’acqua del rubinetto è troppo dura, raccomandiamo l’utilizzo di acqua ltrata o
distillata per evitare il problema della polvere bianca. NON utilizzare acqua calda.
2. NON aggiungere olii essenziali o pastiglie medicinali nel serbatoio dell’acqua.
3. NON aggiungere acqua nella base o attraverso l’ugello.
4. NON spostare l’umidicatore mentre il serbatoio dell’acqua è pieno d’acqua per evitare
perdite o l’eccessivo riempimento della base.
76
Inserire il cavo di alimentazione in una presa di corrente. L’umidificatore è ora pronto per l’uso.
1. Ruotare la manopola di controllo in senso orario in posizione ON. L’indicatore LED blu si accenderà ad
indicare che l’umidificatore è stato acceso su un livello minimo di vapore.
2. Continuare a ruotare la manopola di controllo in senso orario per incrementare il livello di vapore.
3. Ruotare la manopola di controllo in senso antiorario per diminuire il livello del vapore.
4. Ruotare la manopola di controllo in senso antiorario in posizione OFF per spegnere l’umidificatore.
L’indicatore LED si spegnerà. La ventola resterà in funzione per altri 3 minuti per asciugare il condotto
del vapore.
Accensione / Spegnimento e Regolazione del Vapore
Controllo della Luce
Protezione Acqua Bassa: Spegnimento Automatico dell’Umidicatore
1. Premere il Pulsante Luce per accendere / spegnere la luce notturna.
2. Premere e tenere premuto il Pulsante Luce per 1,5 secondi per accendere / spegnere la luce
del serbatoio.
Nota :
Il più confortevole livello di umidità ambientale è compreso tra il 40% e il 60%. Si prega di
regolare il vapore a piacimento.
OFF
ON
Max
Min
OFF
ON
Max
Min
75
1
5
3
2
3 4
21 4
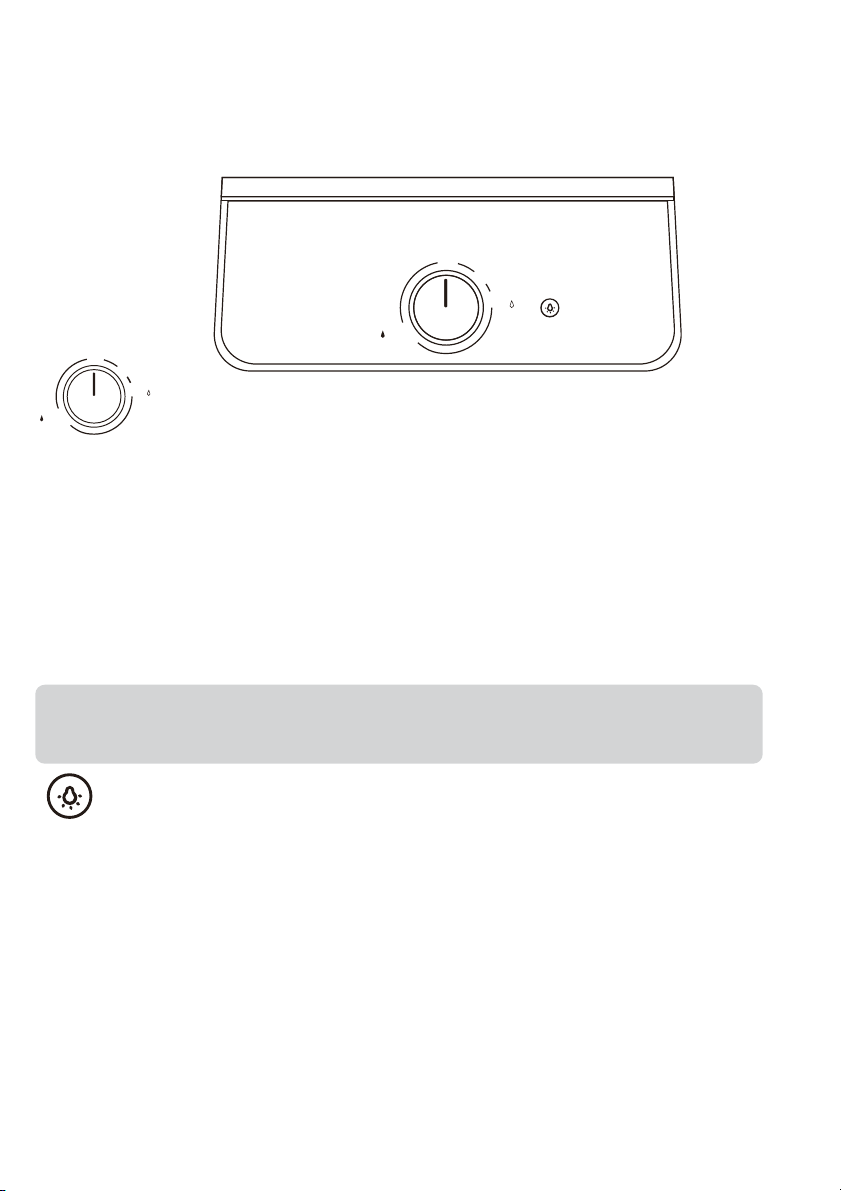
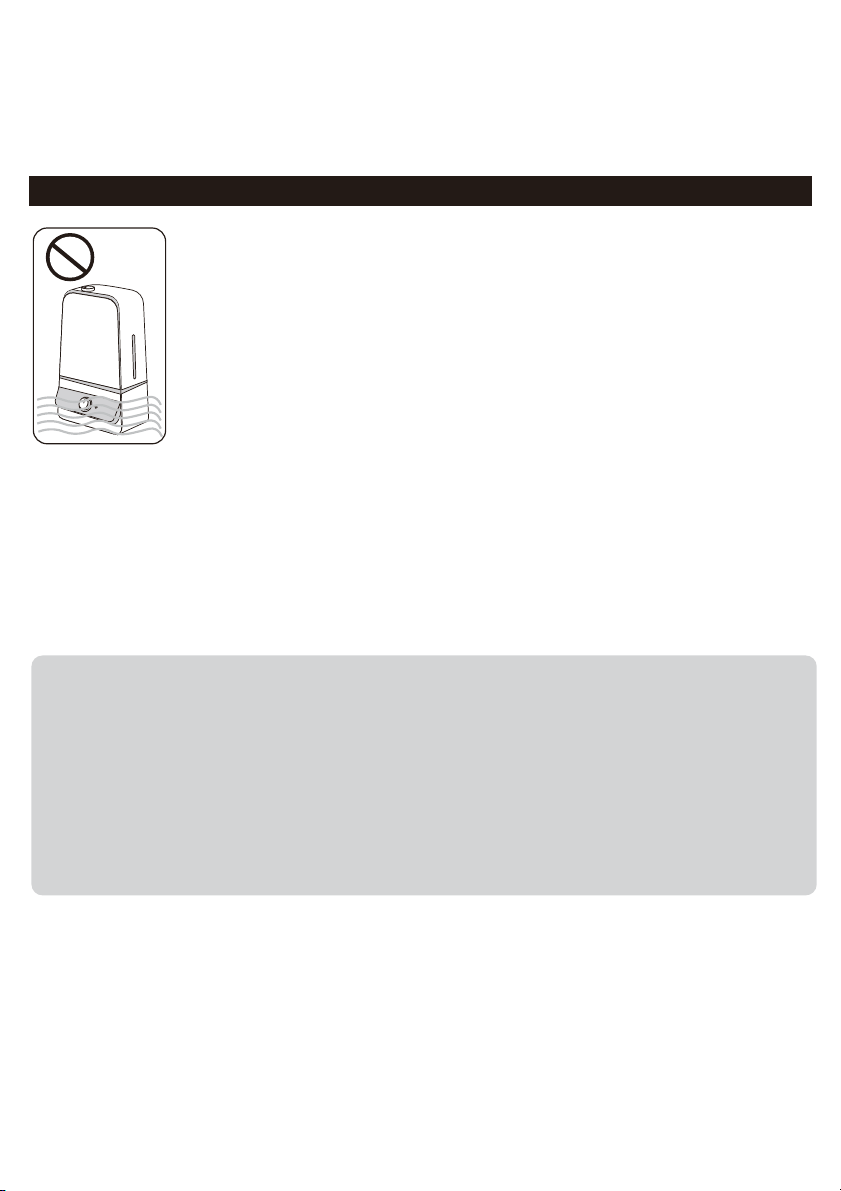
77
PULIZIA E MANUTENZIONE
Avvertenze
1. NON immergere la base in acqua.
2. Assicurarsi che l’acqua non entri nella base attraverso la presa dell’aria
in ingresso o in uscita, o attraverso manopola di controllo e pulsante Nightlight.
3. NON lavare nessun componente di questo umidicatore in
lavastoviglie, che potrebbe danneggiare l’umidicatore e invalidare la
garanzia.
Manutenzione Quotidiana
Spegnere l’umidicatore, disconnettendolo dall’alimentazione. Svuotare l’acqua dal serbato-
io, dalla riserva dell’acqua e dalla base.
Manutenzione Settimanale
1. Per pulire l’umidicatore, raccomandiamo di rimuovere le incrostazioni e di disinfettare
successivamente l’umidicatore.
2. NON mescolare soluzioni con aceto e candeggina. Non utilizzare più di un cucchiaino
di candeggina ogni 3,5 litri di acqua per evitare di danneggiare l’umidicatore.
3. Si prega di assicurarsi che l’anello in gomma, il coperchio in plastica e la molla (fare
riferimento al diagramma a pag 81) sul coperchio del serbatoio siano installati corretta
mente dopo la pulizia per evitare perdite d’acqua.
1 2
Istruzioni la Rimozione delle Incrostazioni
78
15S
3
15-20
minutes
4
5
6
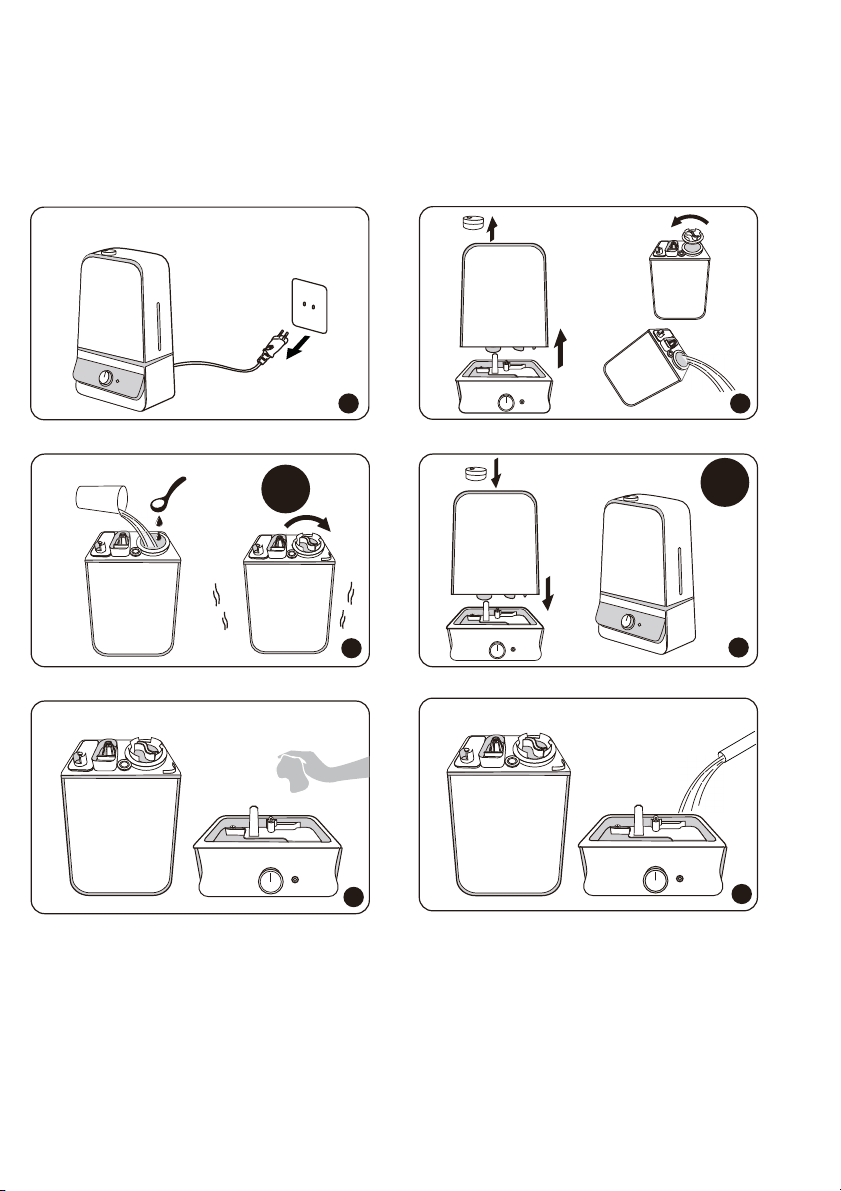

1. Spegnere e disconnettere l’umidicatore dalla presa di corrente. Rimuovere l’ugello.
2. Rimuovere il serbatoio dalla base. Rimuovere il coperchio del serbatoio. Assicurarsi che
l’anello di tenuta bianco non fuoriesca. Svuotare l’acqua dal serbatoio e dalla base.
Rimuovere qualsiasi altro accessorio e metterlo da parte.
3. Riempire per metà il serbatoio dell’acqua. Aggiungere 1 cucchiaino di aceto bianco non
diluito. Rimettere il coperchio al serbatoio e scuotere per 15 secondi.
4. Rimettere il serbatoio sulla base. La soluzione con aceto entrerà nella riserva dell’acqua e
scioglierà le incrostazioni calcaree sull’atomizzatore, sul galleggiante e sul fondo del
serbatoio. Lasciare riposare per 15-20 minuti.
5. Rimuovere il coperchio dal serbatoio e svuotare la soluzione. Asciugare l’atomizzatore e il
galleggiante con un panno morbido per rimuovere gli eventuali residui depositi di calcare.
6. Risciacquare sia la riserva dell’acqua che il serbatoio nché l’odore di aceto (per la
rimozione delle incrostazioni) o della soluzione con candeggina (per la disinfezione, vedi
sotto) sarà sparito.
Istruzioni per la Disinfezione
1. Seguire i passi 1-2 della sezione precedente per la rimozione delle incrostazioni.
2. Riempire per metà il serbatoio dell’acqua. Aggiungere ½ cucchiaino di candeggina.
Rimettere il coperchio. Scuotere la soluzione all’interno del serbatoio. Rimettere il serbatoio
sulla base. La soluzione con candeggina entrerà e disinfetterà la riserva dell’acqua e tutti
gli altri componenti. Lasciare riposare per 15-20 minuti.
3. Seguire i passi 4-6 della sezione precedente sulla rimozione delle incrostazioni per
completare la disinfezione dell’umidicatore.
1. Seguire le istruzioni per la pulizia quando si prevede di non utilizzare l’umidicatore per
almeno una settimana, o al termine della stagione. Rimuovere tutti gli accessori utilizzati
con l’umidicatore e far asciugare completamente l’umidicatore e tutti gli accessori prima
di riporli.
2. NON riporre il dispositivo con acqua all’interno della base, della riserva dell’acqua o del
serbatoio.
3. Imballare bene il dispositivo e riporlo in un luogo fresco e asciutto.
Pulizia della Spugna Antipolvere
Pulire la spugna antipolvere (sul retro della base) con acqua o detergente una volta al mese.
Dopo la pulizia riposizionare la spugna nella sua sede.
push
Cosa Fare al Termine della Stagione e Come Riporre l’Umidicatore
79
80
push
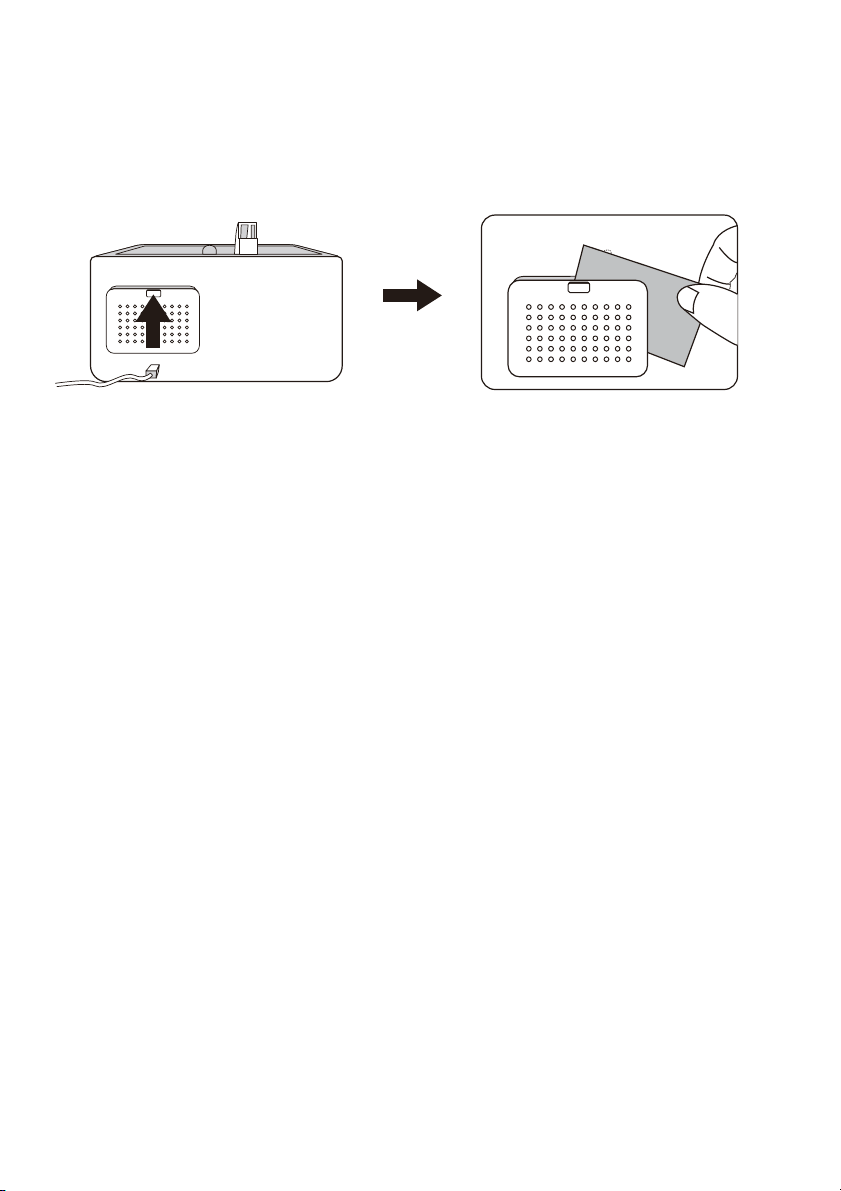
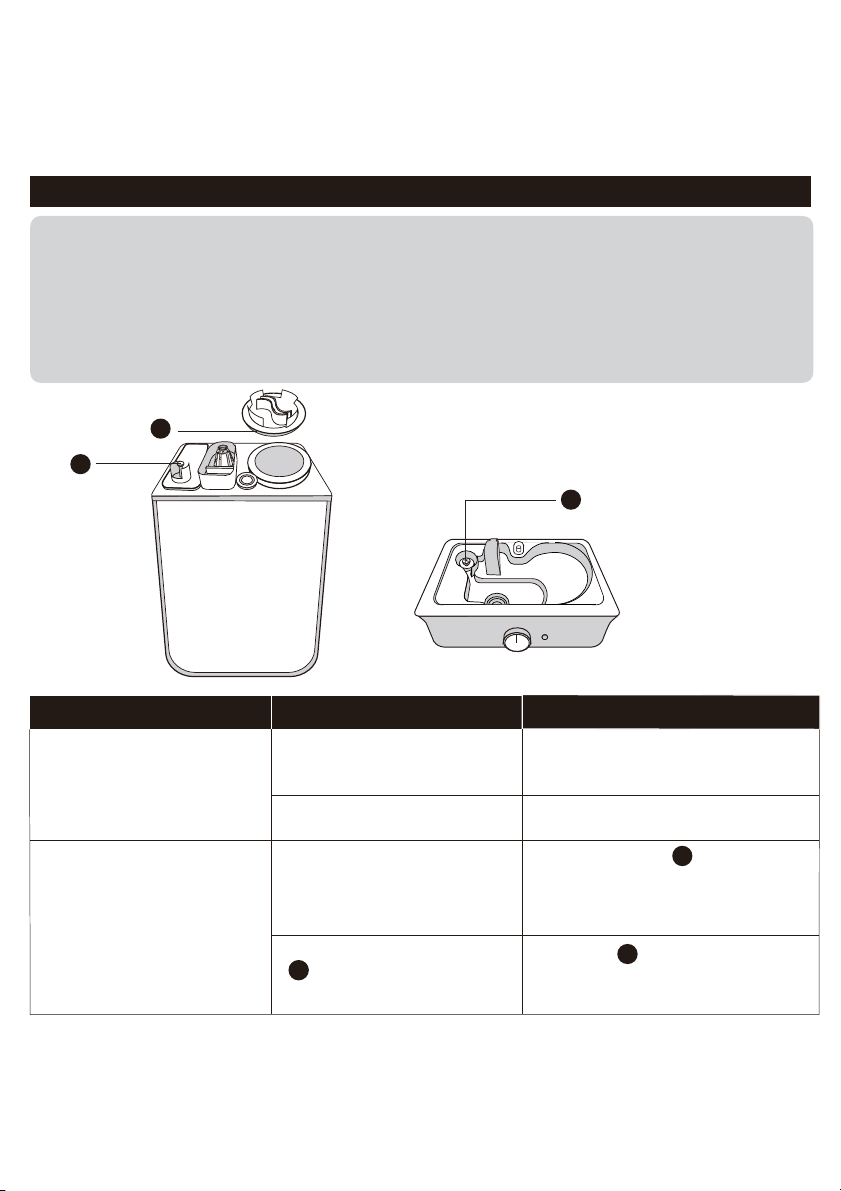
GUIDA ALLA RISOLUZIONE DEI PROBLEMI
1. Se le informazioni elencate nella guida alla risoluzione dei problemi non riescono a
risolvere il problema, si prega di contattarci via email.
2. La mancata pulizia del dispositivo dai depositi calcarei può inuenzare il buon funziona
mento del dispositivo stesso.
3. La mancata osservanza di queste istruzioni da parte del cliente potrebbe invalidare la
garanzia.
3
2
1. Molla
2. Anello in Gomma
3. Galleggiante
Problema Possible Cause Solution
Dispositivo non alimentato.
La presa di corrente non
fornisce alimentazione.
Non c’è acqua nel serbatoio.
Assicurarsi che il dispositivo sia
collegato correttamente alla
presa di corrente.
Provare un’altra presa di
corrente .
Impossibile accendere
l'unità .
Assicurarsi che la molla sia
assicurata adeguatamente al
serbatoio, e che lasci passare
l’acqua attraverso la base.
1
Regolare il galleggiante in
posizione orizzontale e assicurarsi
che riesca a sollevarsi con l’acqua .
3
Galleggiante bloccato.
3
L’indicatore di assenza
dell’acqua resta sempre
acceso.
L'unità è accesa
ma non viene
prodotta nebbia o
poca nebbia
Perdita dal serbatoio.
2
Il vapore non va
sufcientemente in
alto, bagnando il
piano o il pavimento
su cui è appoggiato
il dispositivo. Si forma
della condensa
attorno all’umidicat-
ore, o sulle nestre e
sulle pareti.
Non c’è abbastanza acqua
nel serbatoio.
Riempire e riposizionare il serbatoio
dell’acqua.
Regolare sull’impostazione di
vapore massimo.
Rimuovere il serbatoio, svuotare la base e
rimettere il serbatoio pieno sulla base vuota.
Sentire se esce aria dall’ugello. In caso di
risposta affermativa, pulire le incrostazioni o
l’atomizzatore secondo le istruzioni fornite.
Il livello di vapore è troppo
basso.
La base potrebbe essere
riempita troppo.
Accumulo di calcare
sull’atomizzatore.
Controllare la presenza di eventuali crepe
sul serbatoio e sostituirlo se necessario .
Serrare bene il coperchio del
serbatoio.
Controllare il coperchio del serbatoio
vericando la presenza di anello in gomma,
contattandocinel caso manchi qualcuno
di essi
Il serbatoio potrebbe essere
danneggiato.
Il coperchio del serbatoio non
è chiuso bene.
Non è stato installato
l’anello in plastica sul
coperchio del serbatoio.
1. Controllare se la stanza è troppo umida,
abbassando il vapore (l’ideale è tra il 40%
e il 60%).
2. Aprire porte e nestre, oppure spostare
l’apparecchio in una stanza più grande
L’umidicatore deve essere collocato su una
supercie rigida e piatta, a circa 60 cm
da terra e a 30 cm dalla
parete. Non indirizzare l’uscita del vapore
verso pareti o nestre
Innalzare la temperatura
ambientale no a 25°C/77°F
Il livello di vapore è troppo
alto per le dimensioni della
stanza.
La porta di ingresso dell’aria
è bloccata.
La temperatura dell’ambiente
è bassa, il che può causare
liquefazione.
81
82
1
1
Molla bloccata
1
Assicurarsi che la molla sia ssata
adeguatamente al serbatoio, e che lasci
passare l’acqua attraverso la base.
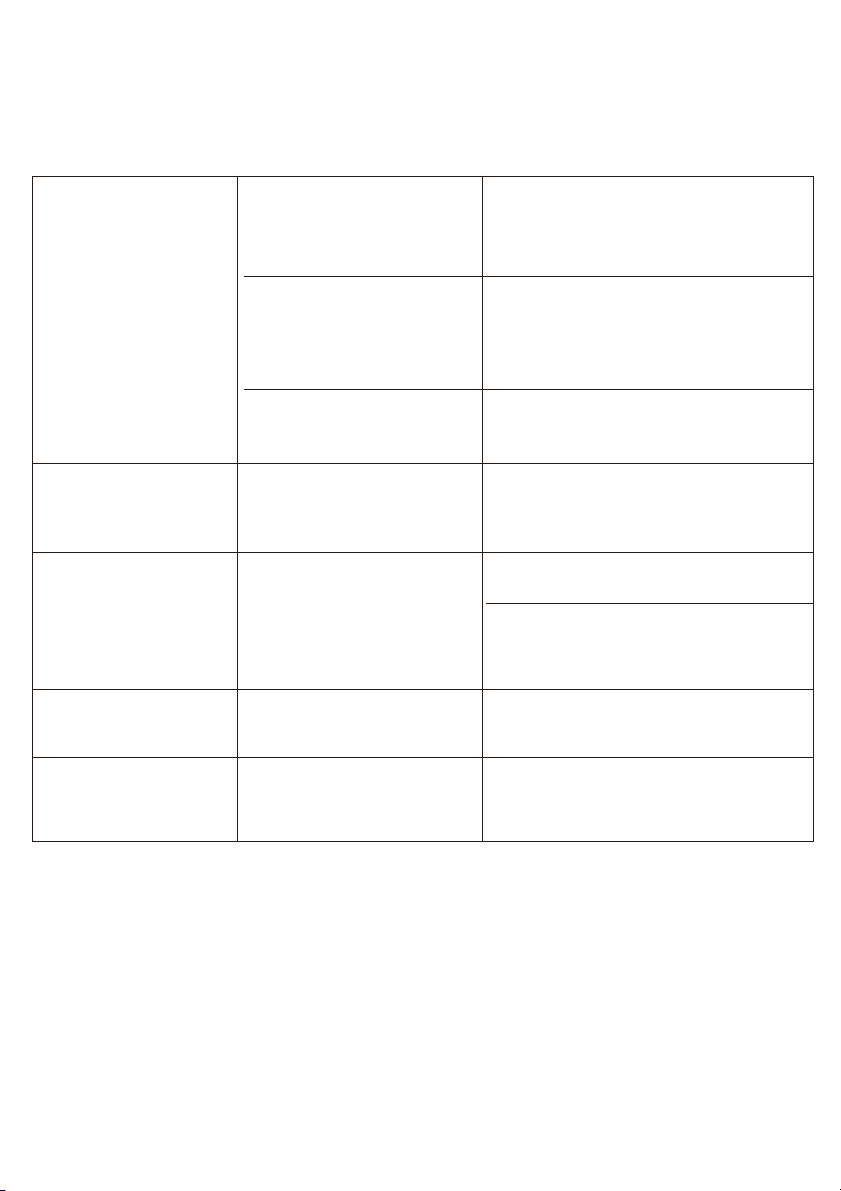
Scarsa umidicazione.
L’acqua del rubinetto può
contenere troppo calcare.
Sostituire con acqua ltrata o distillata
o utilizzare in combinazione con una
Cartuccia per la Demineralizzazione
TaoTronics.
Formazione di polvere
bianca / La verniciatura
nera alla base si sfalda.
Il dispositivo deve essere
pulito.
Formazione di cattivi
odori .
L’acqua sta scendendo nel
serbatoio di riserva sottostante.
Si tratta di un fenomeno del tutto
normale mentre il dispositivo è in
funzione.
Rumore strano
dell’acqua.
Il dispositivo è in funzione da
troppo tempo.
Spegnere e collocare in un
luogo ben ventilato per dieci
minuti.
L’umidicatore è troppo
caldo.
1. Regolare sul livello di vapore massimo
2. Chiudere porte e nestre per ridurre la
circolazione dell’aria, o spostare
l’apparecchio in una stanza più piccola.
L’umidicatore deve essere
collocato su una supercie
rigida e piatta, a circa 60 cm
da terra e a 30 cm dalla parete.
Innalzare la temperatura
ambientale no a 25°C/77°F.
Il livello di vapore è troppo
basso per le dimensioni della
stanza.
La porta di ingresso dell’aria
è bloccata.
La temperatura dell’ambiente
è bassa, il che può causare
liquefazione.
Pulire l’umidicatore
seguendo le istruzioni fornite.
Lasciare il serbatoio vuoto in
un luogo fresco per 12 ore
senza coperchio.
Questo prodotto è coperto dalla garanzia TaoTronics sui difetti di fabbricazione e di funziona-
mento per 12 mesi dalla data del suo acquisto originale. Verrà accordata un’estensione
della garanzia di 18 mesi se il prodotto viene registrato sul nostro sito web (www.taotron-
ics.com).
Ad esclusiva discrezione di SUNVALLEYTEK INTERNATIONAL INC., qualsiasi componente
difettoso sarà riparato o sostituito gratuitamente se il dispositivo non è stato manomesso ed è
stato utilizzato secondo le istruzioni qui riportate.
GARANZIA
CONTACTER LE SERVICE CLIENT TAOTRONICS
Sunvalleytek USA, Inc.
Address: 46724 Lakeview Blvd, Fremont, CA 94538
E-mail: support.fr@taotronics.com
Tel: 1-888-456-8468 (Monday-Friday: 9:00 – 17:00 PST)
Website: www.taotronics.com
Possiamo fornire un servizio post-vendita per prodotti venduti da TaoTronics o da rivenditori e
distributori autorizzati TaoTronics. Qualora il dispositivo sia stato acquistato altrove, sarà necessario
contattare il venditore per problematiche legate a resi e garanzia.
In caso di qualsiasi problema, si prega di contattare immediatamente il supporto clienti di
TaoTronics (support.it@taotronics.com) per aprire una richiesta di riparazione in garanzia,
specicando il numero di modello e il numero d’ordine di Amazon. Il Rappresentante del
nostro Servizio Clienti risponderà nel giro di una giornata lavorativa, consigliando su come
risolvere autonomamente il problema, o dando appropriate istruzioni per il reso del
dispositivo difettoso per la riparazione o la sostituzione.
83
84
TI PREGHIAMO DI CONTATTARCI PRIMA DI RIPORTARE QUESTO PRODOTTO IN NEGOZIO.
INVIA UN’EMAIL AL SERVIZIO CLIENTI DI TAOTRONICS PER PROBLEMI E DOMANDE.
RISPONDEREMO NEL GIRO DI UNA GIORNATA LAVORATIVA.

Scarsa umidicazione.
L’acqua del rubinetto può
contenere troppo calcare.
Sostituire con acqua ltrata o distillata
o utilizzare in combinazione con una
Cartuccia per la Demineralizzazione
TaoTronics.
Formazione di polvere
bianca / La verniciatura
nera alla base si sfalda.
Il dispositivo deve essere
pulito.
Formazione di cattivi
odori .
L’acqua sta scendendo nel
serbatoio di riserva sottostante.
Si tratta di un fenomeno del tutto
normale mentre il dispositivo è in
funzione.
Rumore strano
dell’acqua.
Il dispositivo è in funzione da
troppo tempo.
Spegnere e collocare in un
luogo ben ventilato per dieci
minuti.
L’umidicatore è troppo
caldo.
1. Regolare sul livello di vapore massimo
2. Chiudere porte e nestre per ridurre la
circolazione dell’aria, o spostare
l’apparecchio in una stanza più piccola.
L’umidicatore deve essere
collocato su una supercie
rigida e piatta, a circa 60 cm
da terra e a 30 cm dalla parete.
Innalzare la temperatura
ambientale no a 25°C/77°F.
Il livello di vapore è troppo
basso per le dimensioni della
stanza.
La porta di ingresso dell’aria
è bloccata.
La temperatura dell’ambiente
è bassa, il che può causare
liquefazione.
Pulire l’umidicatore
seguendo le istruzioni fornite.
Lasciare il serbatoio vuoto in
un luogo fresco per 12 ore
senza coperchio.
Questo prodotto è coperto dalla garanzia TaoTronics sui difetti di fabbricazione e di funziona-
mento per 12 mesi dalla data del suo acquisto originale. Verrà accordata un’estensione
della garanzia di 18 mesi se il prodotto viene registrato sul nostro sito web (www.taotron-
ics.com).
Ad esclusiva discrezione di SUNVALLEYTEK INTERNATIONAL INC., qualsiasi componente
difettoso sarà riparato o sostituito gratuitamente se il dispositivo non è stato manomesso ed è
stato utilizzato secondo le istruzioni qui riportate.
GARANZIA
CONTACTER LE SERVICE CLIENT TAOTRONICS
Sunvalleytek USA, Inc.
Address: 46724 Lakeview Blvd, Fremont, CA 94538
E-mail: [email protected]
Tel: 1-888-456-8468 (Monday-Friday: 9:00 – 17:00 PST)
Website: www.taotronics.com
Possiamo fornire un servizio post-vendita per prodotti venduti da TaoTronics o da rivenditori e
distributori autorizzati TaoTronics. Qualora il dispositivo sia stato acquistato altrove, sarà necessario
contattare il venditore per problematiche legate a resi e garanzia.
In caso di qualsiasi problema, si prega di contattare immediatamente il supporto clienti di
TaoTronics ([email protected]) per aprire una richiesta di riparazione in garanzia,
specicando il numero di modello e il numero d’ordine di Amazon. Il Rappresentante del
nostro Servizio Clienti risponderà nel giro di una giornata lavorativa, consigliando su come
risolvere autonomamente il problema, o dando appropriate istruzioni per il reso del
dispositivo difettoso per la riparazione o la sostituzione.
83
84
TI PREGHIAMO DI CONTATTARCI PRIMA DI RIPORTARE QUESTO PRODOTTO IN NEGOZIO.
INVIA UN’EMAIL AL SERVIZIO CLIENTI DI TAOTRONICS PER PROBLEMI E DOMANDE.
RISPONDEREMO NEL GIRO DI UNA GIORNATA LAVORATIVA.
TT-AH025_V1.3 EU
Learn more about the EU Declaration of Conformity:
https://www.taotronics.com/downloads-TT-AH025-CE-Cert.html
www.taotronics.com
EUROPE
E-mail:
support.uk@taotronics.com(UK)
support.de@taotronics.com(DE)
support.fr@taotronics.com(FR)
support[email protected](ES)
support[email protected](IT)
EU Importer: ZBT International Trading GmbH
Address:Halstenbeker Weg 98C, 25462 Rellingen, Deutschland
NORTH AMERICA
E-mail : support@taotronics.com(US)
support.ca@taotronics.com(CA)
Tel : 1-888-456-8468 (Monday-Friday: 9:00 – 17:00 PST)
US Distributor: SUNVALLEYTEK INTERNATIONAL INC.
Address:46724 Lakeview Blvd, Fremont, CA 94538
Manufacturer: Shenzhen NearbyExpress Technology Development Co.,Ltd.
Address: 333 Bulong Road, Shenzhen, China, 518129
MANUFACTURER
ASIA PACIFIC
MODEL: TT-AH025
ULTRASONIC COOL MIST HUMIDIFIER
User Manual
Extend your warranty to 18 months by
registering your product on our website
taotronics.com/warranty
EN 1-16 DE 17-33 FR 34-50
ES 51-67 IT 68-84