User Manual
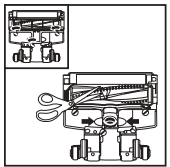
ASSEMBLY
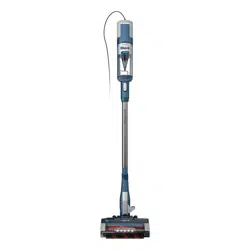
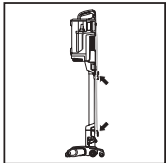
- Lift the Floor Nozzle Tube, pushing it firmly until it stands upright. The Retractable Wheels will extend so the vacuum can stand on its own.
- Insert the Wand into the floor nozzle tube.
- Attach the Lift-Away® Pod to the wand.
- Snap the Accessory Holder onto the wand, then place accessories in the holder.
Ensure all connections click securely into place

CLEANING MODES
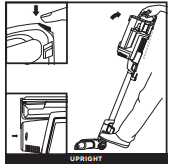
To vacuum in upright mode, plug in the power cord, then press the Power button on the back of the handle. Step on the footprint icon on the floor nozzle and tilt the handle back to activate the brushroll. The retractable wheels will automatically slide back for easy maneuverability while vacuuming.
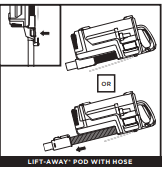
To clean with the Lift-Away pod, detach it by pressing the Pod Release button. Attach an accessory for more reach when cleaning above-floor areas like stairs and furniture. For added flexibility and reach, slide the cuff down to extend the hose.
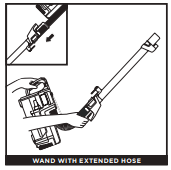
For even more reach and flexibility with the wand, slide the hose cuff down to extend the integrated hose.
NOTE: When finished with the hose, slide the hose cuff back into place while reattaching the wand to the pod
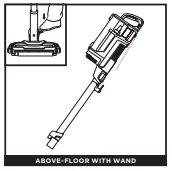
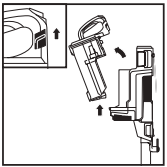
To clean above-floor areas with the wand, remove it from the floor nozzle and add an accessory. To detach the wand, stand the vacuum upright, then step on the release pedal and pull up the wand.
STORAGE
STABILITY
Return vacuum to upright position. The retractable wheels will extend to keep the vacuum in a standing position.
For easy maneuverability in storage mode, tilt the handle back and roll the vacuum on the retractable wheels. To take the vacuum out of storage mode, step on the footprint icon on the floor nozzle and tilt the handle back. The retractable wheels will slide back.
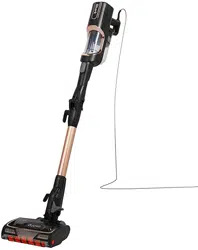
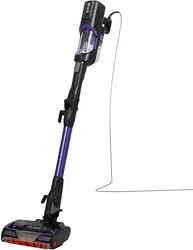
CORD
Wrap the cord around the two cord hooks for storage and to avoid damage.
AVAILABLE ACCESSORIES
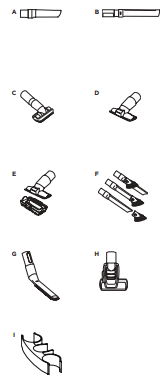
A 8" Crevice Tool
This slender 8" tool can access corners, baseboards, tight spaces, and ceilings.
B 12" Crevice Tool
Clean in tight spaces or reach baseboards and ceilings with this slim crevice tool.
C Dusting Brush
Dust shelves, baseboards, window and door frames, and much more. Turn the brush head to adjust the angle to fit the surface you’re cleaning.
D Pet/Upholstery Tool
Perfect for grabbing pet hair and lint from furniture and other upholstered surfaces.
E Pet Multi-Tool
A single convertible tool for cleaning tough pet messes two ways: first, a stiff bristle brush for cleaning stuck-on debris. Then take off the bristles to reveal an upholstery tool for removing stubborn pet hair.
F Duster Crevice Tool
Two cleaning tools in one. The crevice tool gives you extended reach to clean in tight spaces, while the soft brush lets you dust delicate surfaces.
G Anti-Allergen Dust Brush
Features nylon fiber bristles specifically designed for removing fine dust and allergen particles from the most delicate surfaces.
H Self-Cleaning Pet Power Brush
Tackles pet hair and ground-in dirt from above�floor areas like carpeted stairs and upholstery, while actively removing hair wrap as it cleans.
I Accessory Holder
Store accessories onboard the vacuum for ease and convenience.
MAINTENANCE
EMPTYING THE DUST CUP
 IMPORTANT: Unplug the power cord before performing any maintenance.
Keep the Lift-Away® pod attached to the wand while emptying the dust cup.
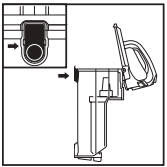
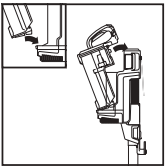
To remove the dust cup from the Lift-Away® pod, slide up both Dust Cup Release latches on the back of the handle at the same time and pull out the dust cup
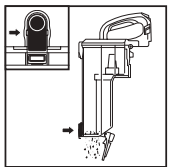
Press the button on the bottom of the dust cup to release debris into the trash.
To remove collected debris from Mesh Screen, press top release button and lift handle to open.
To reinstall, place bottom of dust cup into pod and then tilt it until it clicks into place
CLEANING FILTERS
Regularly clean and replace the filters to keep your vacuum's suction power optimal.
To clean filters, rinse with cold water only. Allow all filters to air-dry for at least 24 hours before reinstalling them to prevent liquid from being drawn into electric parts
IMPORTANT: DO NOT use soap when cleaning the filters
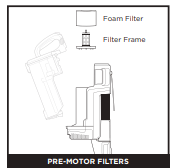
CLEAN PRE-MOTOR FILTERS ONCE A MONTH
Remove Dust Cup, then lift out the Filter Frame. Pull up the Foam Filter to remove it from the filter frame. The Felt Filter is built into the support frame.
To reinstall, insert the bottom of the dust cup into the pod and tilt it until it clicks into place
CLEAN HEPA FILTER EVERY YEAR
Press the Cover Latch above the Filter Cover, then pull off the cover. Push the tab on the front of the cover to detach the HEPA Filter.
To replace the HEPA filter, snap it back into the pod, then slide-on the cover until it clicks into place

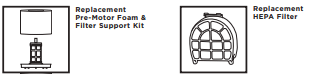
REPLACING FILTERS
The Pre-Motor Filters should be replaced every 2.5 years. The HEPA Filter should be replaced every 3 years
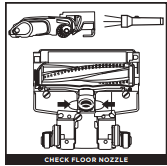
NOZZLE MAINTENANCE
If you notice any hair wrap, continue vacuuming and the Self-Cleaning Brushroll will automatically remove it. If some hair wrap remains after continued use, remove the brushroll cover from the bottom of the nozzle and use scissors to carefully cut away the hair.
To remove the cover, use a coin to turn the locks counterclockwise. Lift off the cover and remove any debris or hair wrap. Check the Debris Intake and clear away any dirt or blockages.
To close the cover, push down until it clicks into place, then turn the locks clockwise until closed
CLEANING THE SOFT ROLLER
- To remove the Soft Roller, slide the Eject Roller button on the floor nozzle.
- Tap loose debris off the Soft Roller. Use a dry towel to wipe it clean, and to remove any debris caught in the teeth behind the Soft Roller.
- Hand-wash the Soft Roller as needed. Use only water, and let it air-dry completely for at least 24 hours.
- Reinsert the Soft Roller and press it in until it clicks securely into place.
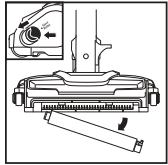
NOTE: For best performance, keep the Soft Roller clean with regular maintenance
CHECKING FOR BLOCKAGES
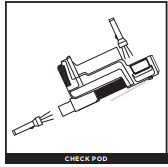
Remove the dust cup from the pod to check the intake opening inside. Then detach the pod from the wand to check the hose
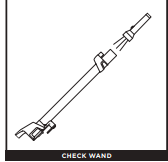
Detach the wand and check it for blockages.
Detach the wand, then remove the Soft Roller.
Tilt the floor nozzle tube back and check openings for blockages. Reinsert Soft Roller until it clicks securely into place.
Remove any blockages or debris from the floor nozzle debris intake (See Nozzle Maintenance section)
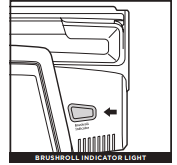
What does the Brushroll Indicator Light mean?
Solid Green: The brushrolls are spinning and working properly.
Solid Red: There is a jam in the brushroll area. Turn your vacuum off and remove any blockages in the nozzle.
Flashing Red: The motorized floor nozzle is overheating. Turn your vacuum off, unplug from the wall, and wait a minimum of 45 minutes for it to cool down.
TROUBLESHOOTING
Vacuum is not picking up debris. No suction or light suction.(Refer to Maintenance section for more information.)
- Empty the dust cup. Check filters to see if they need cleaning. Follow instructions for rinsing and completely air-drying the filters before reinstalling them.
- Check floor nozzle for blockages; clear blockages if required.
- Remove any string, carpet fibers, or hair that may be wrapped around the brushroll or Soft Roller.
- Ensure the brushroll cover is locked in place. First, turn the nozzle upside down. Using a coin, turn the three locks counterclockwise. Push down on both sides of the cover until it clicks securely into place, then turn locks clockwise to close.
Vacuum lifts area rugs.
- Suction is powerful. Take care when vacuuming area rugs or rugs with delicately sewn edges.
- Turn off the unit to disengage the brushrolls. To restart, press the power button on the handle.
NOTE: During above-floor cleaning, accessories are optimized for different types of debris (See Available Accessories section).
Brushrolls do not spin.
- If the brushroll indicator light turns solid red, immediately turn off and unplug the vacuum.
- Disconnect the wand from the floor nozzle and clear any blockages.
- Reconnect the wand, plug in the vacuum, and turn on the power.
- If the brushroll indicator light on the floor nozzle is green, the blockage has been successfully cleared. If the light is still red, please contact Customer Service at 1-800-798-7398.
Vacuum turns off on its own or if the indicator light flashes red.
This vacuum is equipped with a motor-protective thermostat that will shut off if it overheats. Should this occur, perform the following steps to restart the motor-protective thermostat:
- Turn vacuum off and unplug it.
- Empty dust cup and clean filters (see Emptying the Dust Cup section).
- Disassemble the entire vacuum.
- Check for blockages in hose, floor nozzle, inlet openings, and accessories.
- Reassemble the entire vacuum to ensure all parts click into place.
- Allow unit to cool for a minimum of 45 minutes.
- Plug in vacuum and turn it on.
Vacuum is making a loud noise.
If you run over a hard or sharp object or notice a noise change while vacuuming, check for blockages or objects caught behind the brushroll. (Refer to Maintenance section for more information.)
FIVE (5) YEAR LIMITED WARRANTY
The Five (5) Year Limited Warranty applies to purchases made from authorized retailers of SharkNinja Operating LLC. Warranty coverage applies to the original owner and to the original product only and is not transferable.
SharkNinja warrants that the unit shall be free from defects in material and workmanship for a period of five (5) years from the date of purchase when it is used under normal household conditions and maintained according to the requirements outlined in the Owner’s Guide, subject to the following conditions and exclusions:
What is covered by this warranty?
1. The original unit and/or non-wearable components deemed defective, in SharkNinja’s sole discretion, will be repaired or replaced up to five (5) years from the original purchase date.
2. In the event a replacement unit is issued, the warranty coverage ends six (6) months following the receipt date of the replacement unit or the remainder of the existing warranty, whichever is later. SharkNinja reserves the right to replace the unit with one of equal or greater value.
What is not covered by this warranty?
1. Normal wear and tear of wearable parts (such as foam filters, HEPA filters, pads, etc.), which require regular maintenance and/or replacement to ensure the proper functioning of your unit, are not covered by this warranty. Replacement parts are available for purchase at sharkaccessories.com.
2. Any unit that has been tampered with or used for commercial purposes.
3. Damage caused by misuse (e.g., vacuuming up water or other liquids), abuse, negligent handling, failure to perform required maintenance (e.g., not cleaning the filters), or damage due to mishandling in transit.
4. Consequential and incidental damages.
5. Defects caused by repair persons not authorized by SharkNinja. These defects include damages caused in the process of shipping, altering, or repairing the SharkNinja product (or any of its parts) when the repair is performed by a repair person not authorized by SharkNinja.
6. Products purchased, used, or operated outside North America.
How to get service
If your appliance fails to operate properly while in use under normal household conditions within the warranty period, visit sharkclean.com/support for product care and maintenance self-help. Our Customer Service Specialists are also available at 1-800-798-7398 to assist with product support and warranty service options, including the possibility of upgrading to our VIP warranty service options for select product categories. SharkNinja will cover the cost for the customer to send in the unit to us for repair or replacement. A fee of $24.95 (subject to change) will be charged when SharkNinja ships the repaired or replacement unit.
How to initiate a warranty claim
You must call 1-800-798-7398 to initiate a warranty claim. You will need the receipt as proof of purchase. A Customer Service Specialist will provide you with return and packing instruction information.
How state law applies
This warranty gives you specific legal rights, and you also may have other rights that vary from state to state. Some states do not permit the exclusion or limitation of incidental or consequential damages, so the above may not apply to you