DS-620
DS-720D
Version D
UK
User’s Guide DS-620 / DS-720D

i
Using the documentation
Thank you for buying a Brother machine! Reading the documentation will help you make the most of your
machine.
Symbols and conventions used in the documentation
The following symbols and conventions are used throughout the documentation.
IMPORTANT IMPORTANT indicates a potentially hazardous situation which, if not avoided,
may result in damage to property or loss of product functionality.
NOTE Notes tell you how you should respond to a situation that may arise or give tips
about how the operation works with other features.
Bold Bold style identifies keys on the machine or computer screen.
Italics Italicized style emphasizes an important point or refers you to a related topic.
NOTE
• For DSmobile 720D users: this guide uses DSmobile 620 screen images, unless otherwise indicated.
• If you are using a tablet running Windows
®
, you can make your selections either by tapping the screen
or by clicking with your mouse.

ii
Trademarks
The Brother logo, Brother and DSmobile are registered trademarks of Brother Industries, Ltd.
Apple, Macintosh, and Mac OS are trademarks of Apple Inc., registered in the United States and other
countries.
Windows and Windows Vista are either registered trademarks or trademarks of Microsoft Corporation
in the United States and / or other countries.
Nuance, the Nuance logo and PaperPort are trademarks or registered trademarks of Nuance Communications,
Inc. or its affiliates in the United States and / or other countries.
Any trade names and product names of companies appearing on Brother products, related documents
and any other materials are all trademarks or registered trademarks of those respective companies.

iii
Table of Contents
1 General Information 1
Scanner overview .....................................................................................................................................1
LED indications .........................................................................................................................................2
2 Installing the Scanner Driver and Scanning Software 3
For Windows
®
users ................................................................................................................................3
For Macintosh users .................................................................................................................................5
3 Document Specifications 6
Acceptable documents .............................................................................................................................6
Unacceptable documents .........................................................................................................................7
Documents recommended for use with the Carrier Sheet ........................................................................7
4 Scan Preparation 9
Loading a document .................................................................................................................................9
Loading the Carrier Sheet .......................................................................................................................10
Important Carrier Sheet tips .............................................................................................................11
5 Scanning Applications and Settings 12
Choosing your scanning software ...........................................................................................................12
Using DSmobileCapture (for Window
s
®
) ...............................................................................................13
Changing DSmobileCapture scan settings (for Window
s
®
) ...................................................................15
File settings ......................................................................................................................................15
Image settings ..................................................................................................................................16
Paper settings ...................................................................................................................................17
Preview settings ...............................................................................................................................19
Options settings ................................................................................................................................20
Imprinter settings ..............................................................................................................................21
Information ........................................................................................................................................22
Using DSmobileCapture (for Macintosh) ................................................................................................23
Changing DSmobileCapture scan settings (for Macintosh) ....................................................................24
Image settings ..................................................................................................................................24
File settings ......................................................................................................................................25
Paper settings ...................................................................................................................................26
Options settings ................................................................................................................................27
Information ........................................................................................................................................28
Using Button Manager V2 (for Window
s
®
) .............................................................................................29
Scanning methods ............................................................................................................................31
Scan buttons in the Button Manager V2 Button Panel (for Window
s
®
) .................................................32
Scan to an image ..............................................................................................................................32
Scan to an application ......................................................................................................................32
Scan to an email ...............................................................................................................................33
Scan to a printer ...............................................................................................................................33
Scan to shared folder .......................................................................................................................33
Scan to a FTP server ........................................................................................................................34

iv
6 Scanner Calibration 35
Calibration using software (for Windows
®
) ............................................................................................35
Calibration using software (for Macintosh) .............................................................................................38
7 Scanner Maintenance 40
Cleaning the outside of your scanner .....................................................................................................40
Cleaning the inside of your scanner .......................................................................................................40
8 Troubleshooting 42
Error and maintenance messages ..........................................................................................................42
Troubleshooting ......................................................................................................................................43
A Appendix A 48
Specifications ..........................................................................................................................................48
General .............................................................................................................................................48
Scanner ............................................................................................................................................49
Interfaces ..........................................................................................................................................50
Computer requirements ....................................................................................................................50
B Appendix B 52
Contacting Brother ..................................................................................................................................52
Register your product .......................................................................................................................52
Frequently asked questions (FAQs) .................................................................................................52
For customer service ........................................................................................................................53
Technical support (for PageManager and BizCard) ...............................................................................54
General Information
2
1
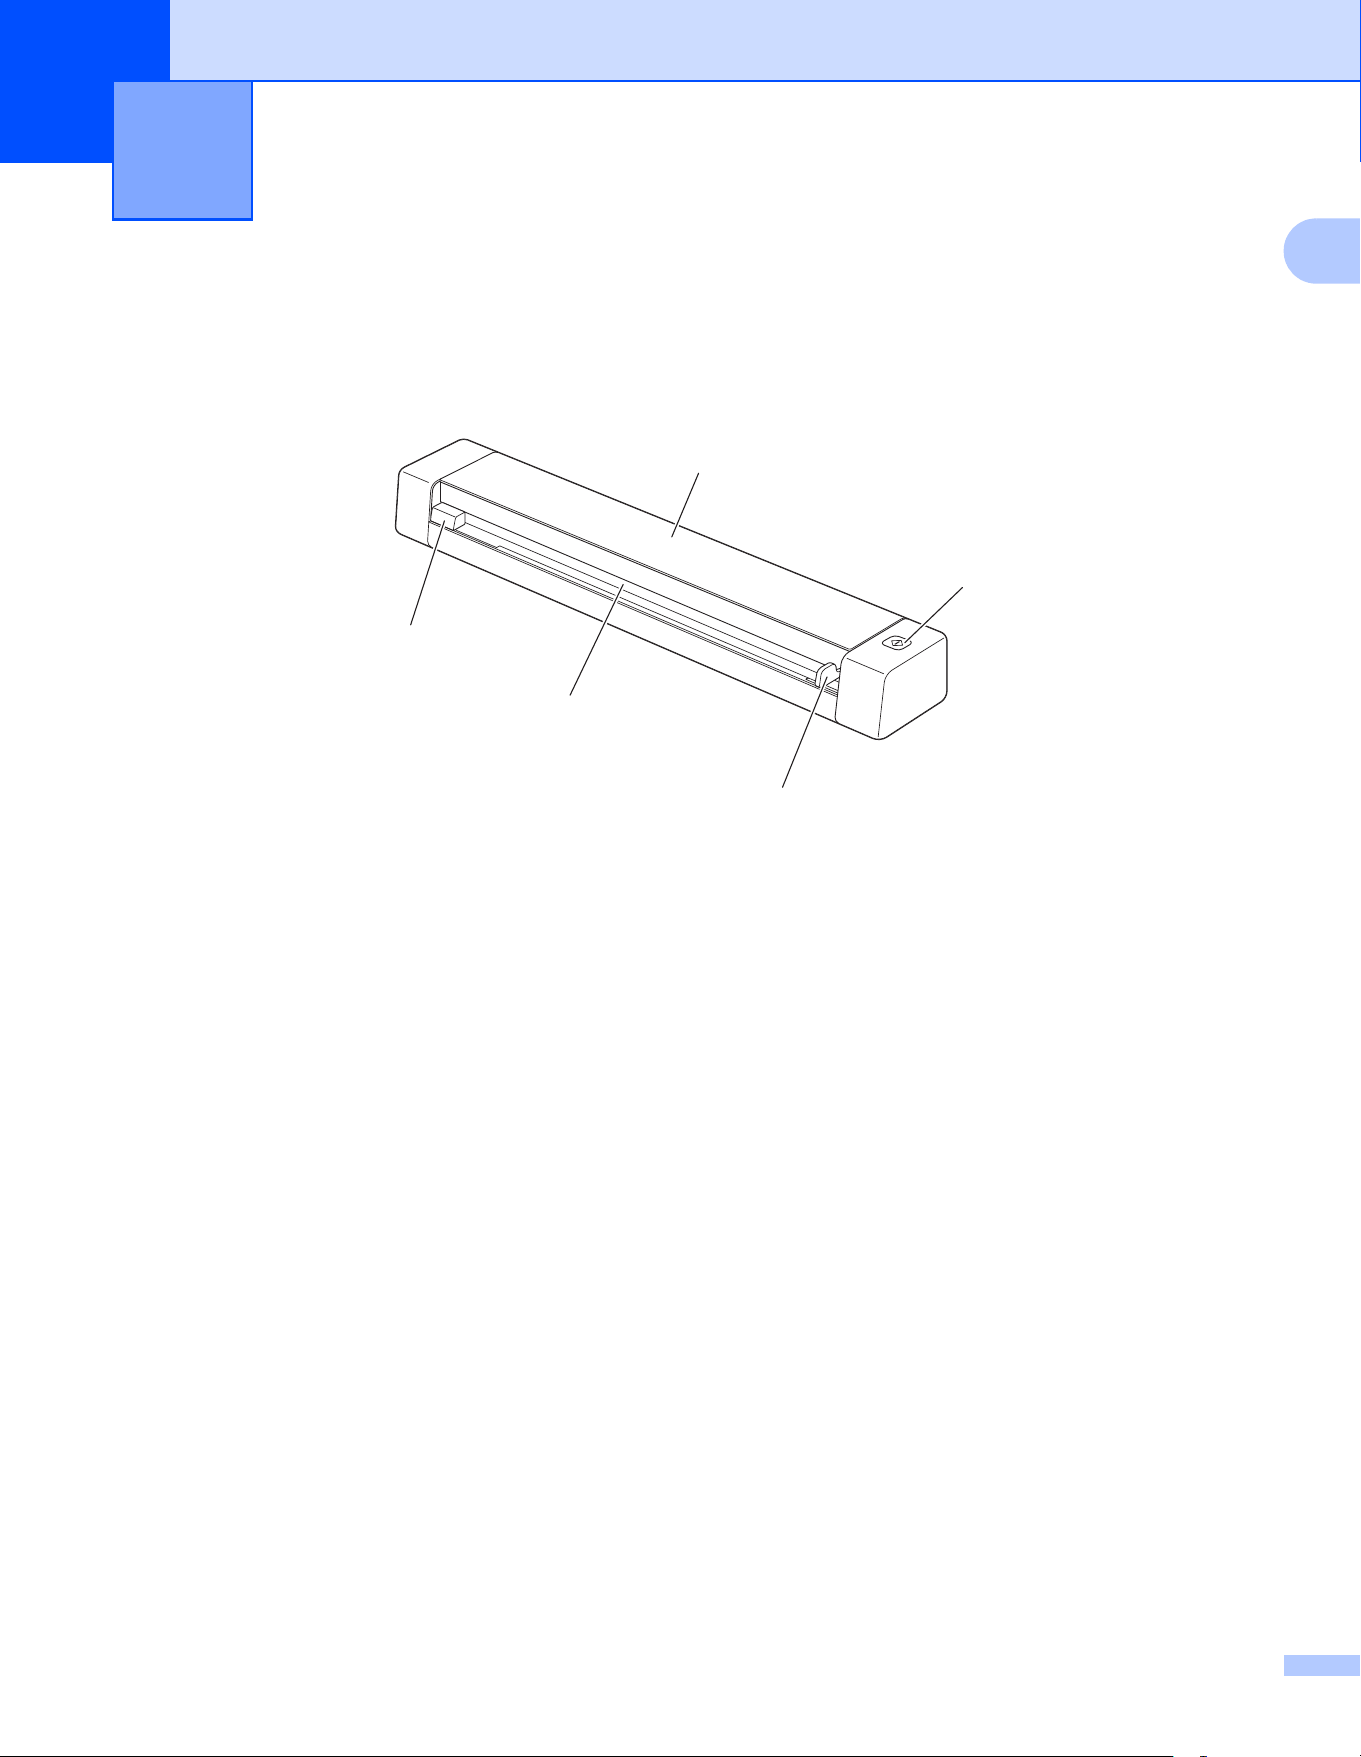
Rear
1 Micro USB port
2 Paper ejection slot
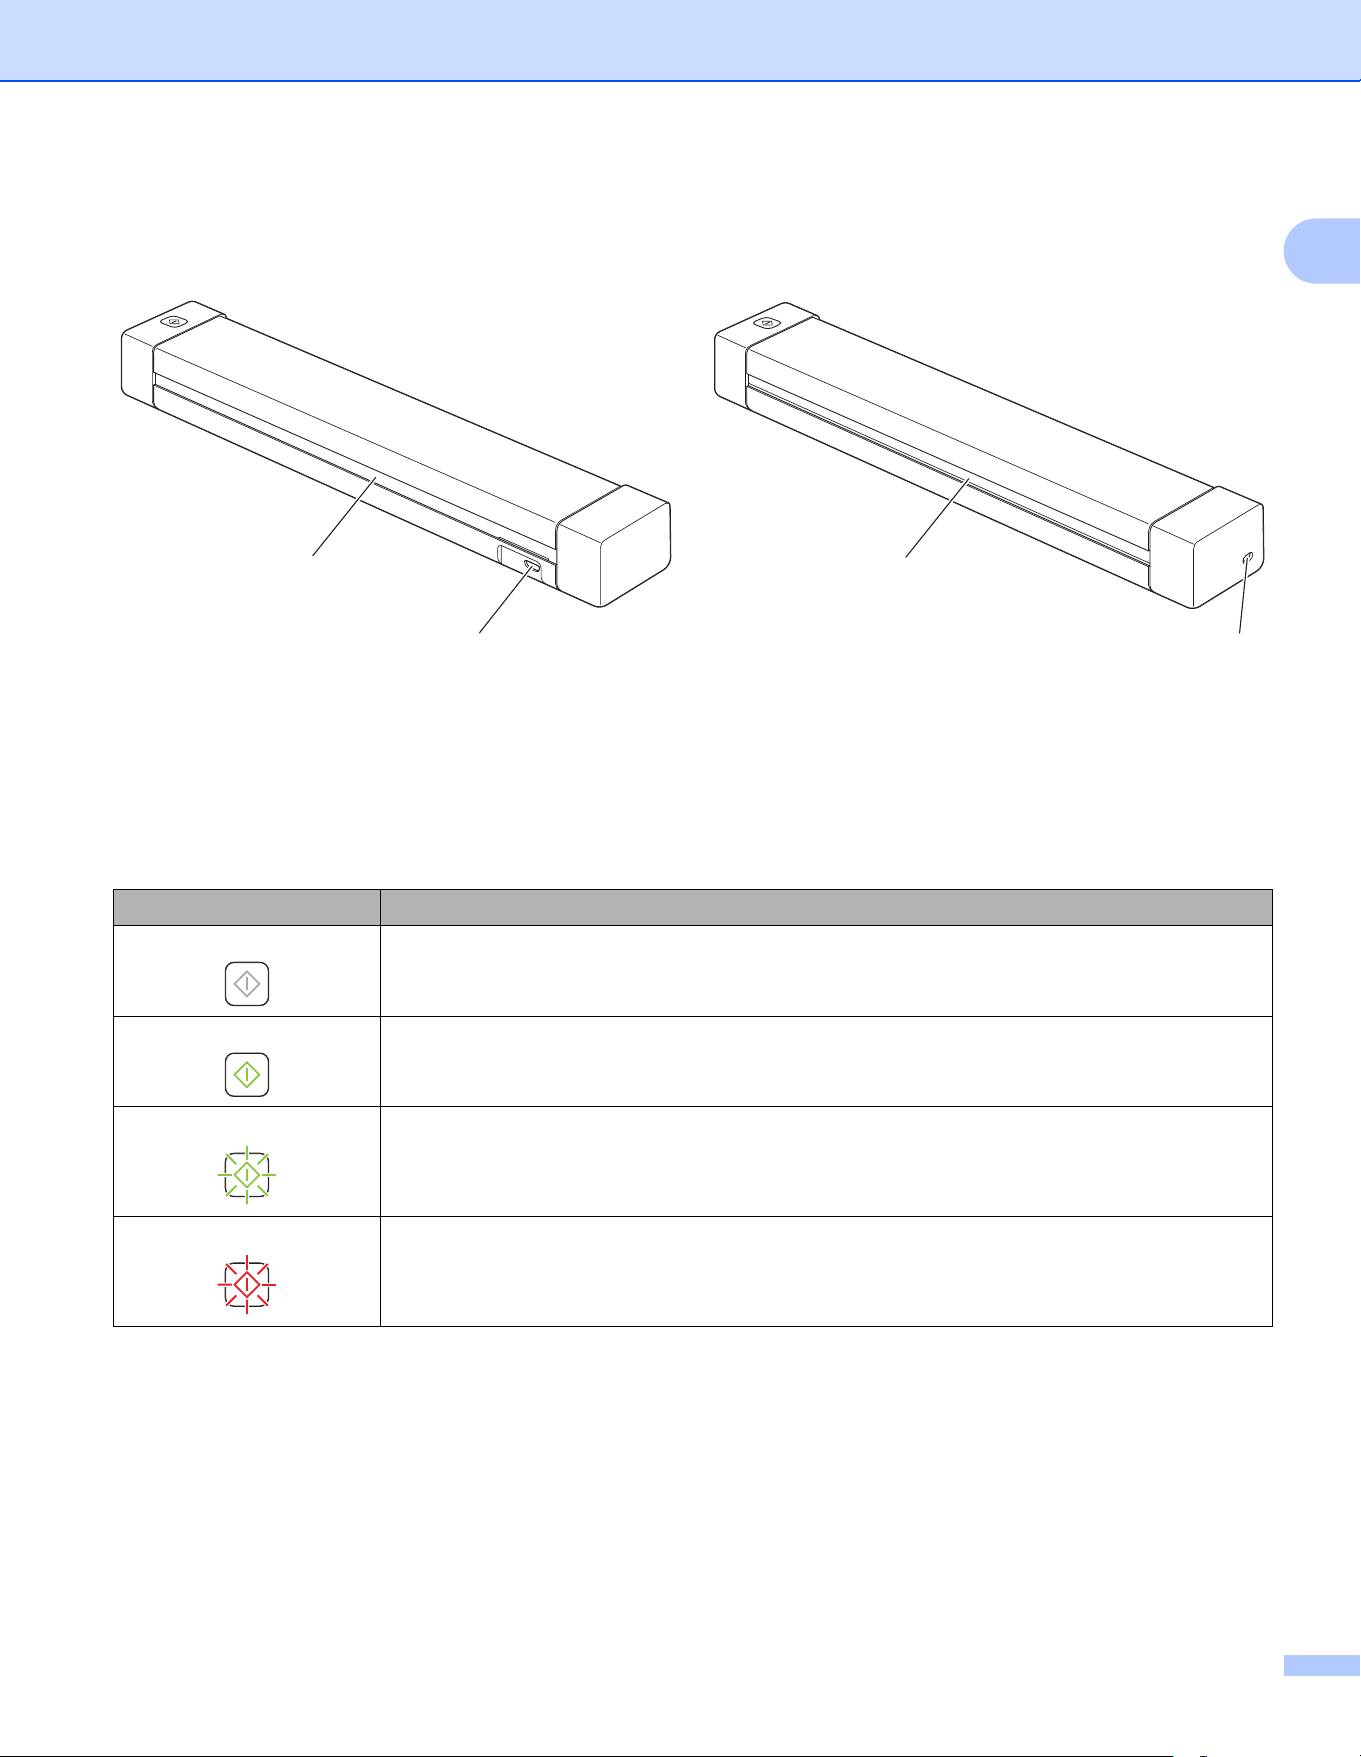
LED indications
LED indication Machine Status
No light The machine is not connected to your computer.
Green light The machine is ready to scan.
Blinking green The machine is scanning a document.
Rapidly blinking red An error occurred. The top cover is open, or a document is jammed.
2
1
2
1
DS-620 DS-720D
3
2
2
For Windows
®
users
NOTE
• Make sure that your computer is ON and you are logged on with Administrator rights.
• DO NOT connect the Micro USB Cable yet.
• If your computer does not have a DVD-ROM drive, the supplied DVD-ROM does not contain drivers
for your operating system, or you want to download manuals and utilities, visit your model page at
support.brother.com
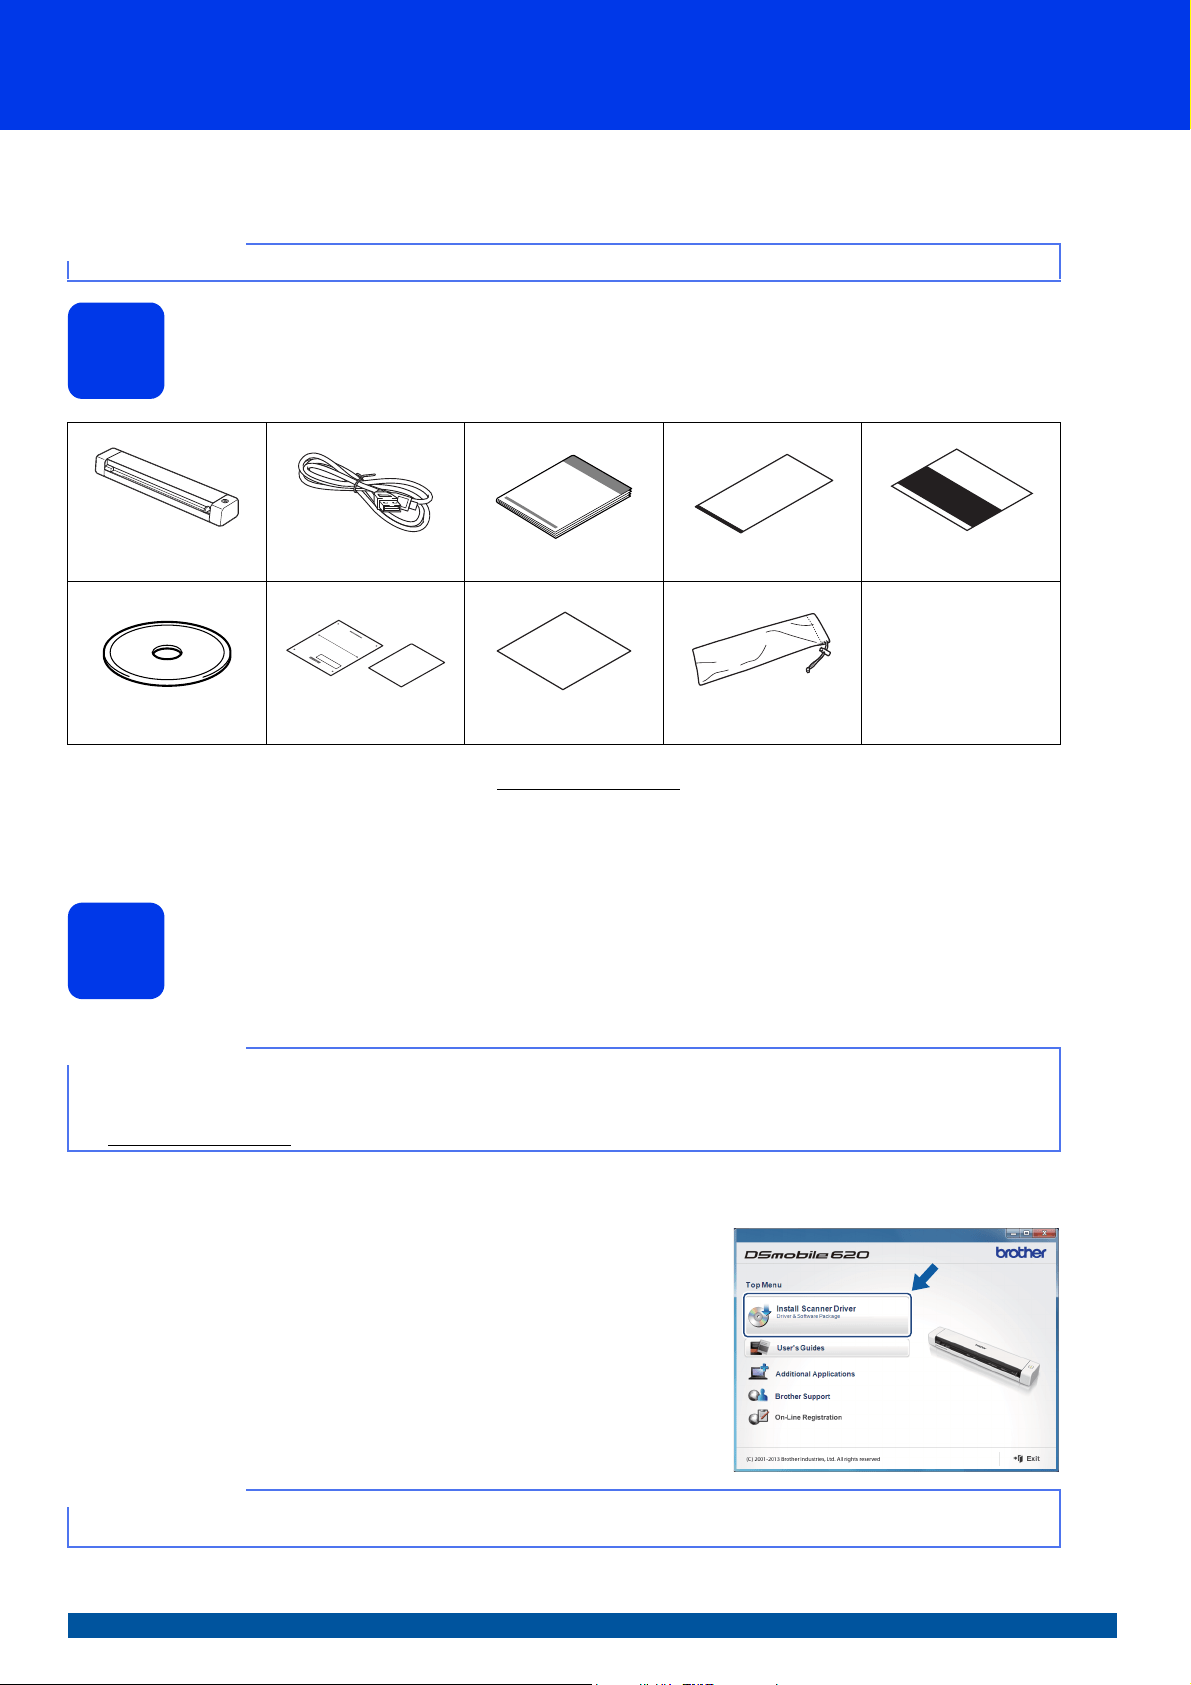
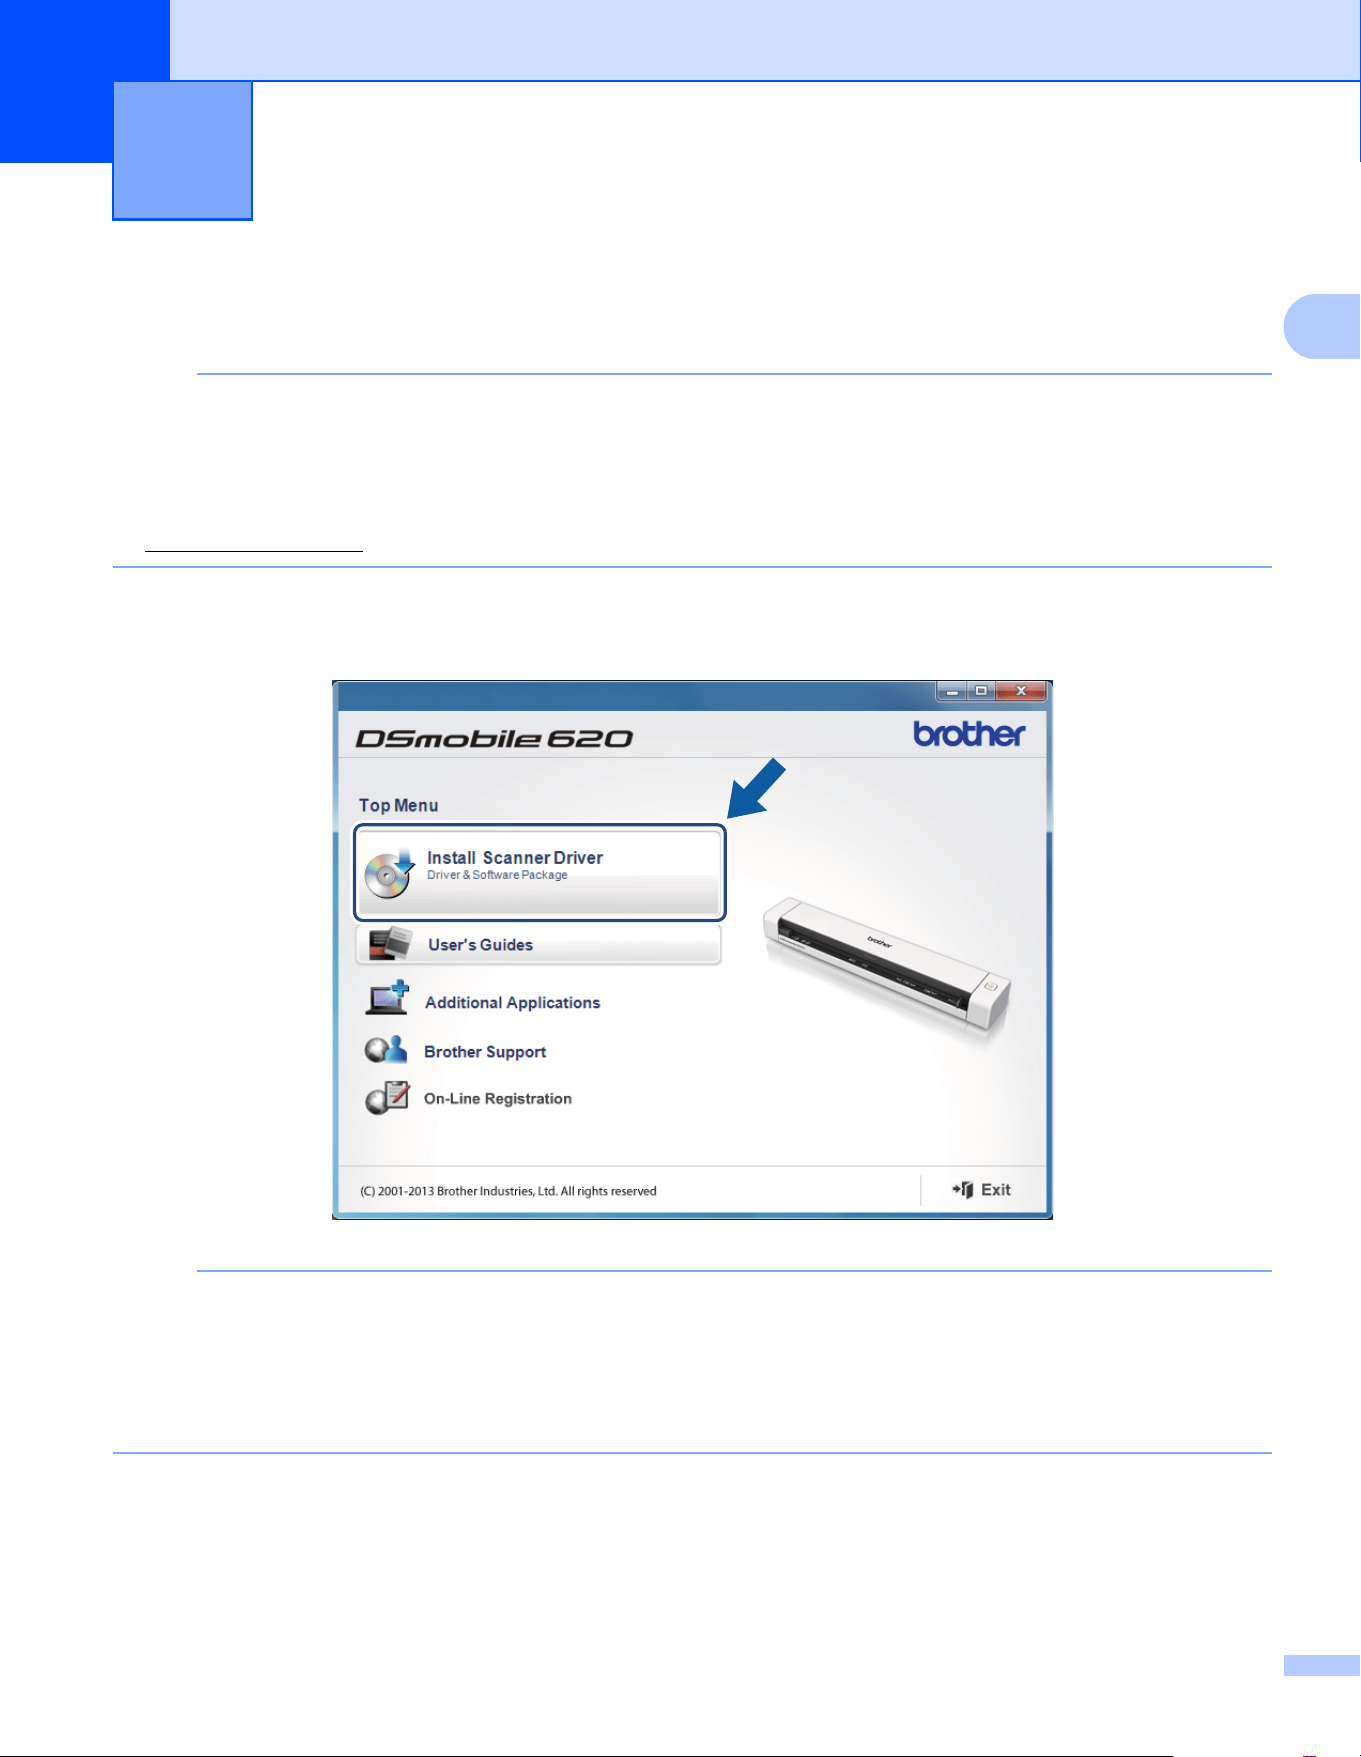
a Insert the DVD-ROM.
b When the Setup screen appears, click Install Scanner Driver and follow the on-screen instructions.
NOTE
• If the Brother screen does not appear automatically, go to My Computer (Computer), double-click the
CD-ROM icon, and then double-click AutoRun.exe.
• When you install the scanner driver, DSmobileCapture (a scanning application) will be installed at the
same time. For more information on using DSmobileCapture, see Using DSmobileCapture
(for Windows
®
) on page 13.
Installing the Scanner Driver
and Scanning Software
2
Installing the Scanner Driver and Scanning Software
4
2
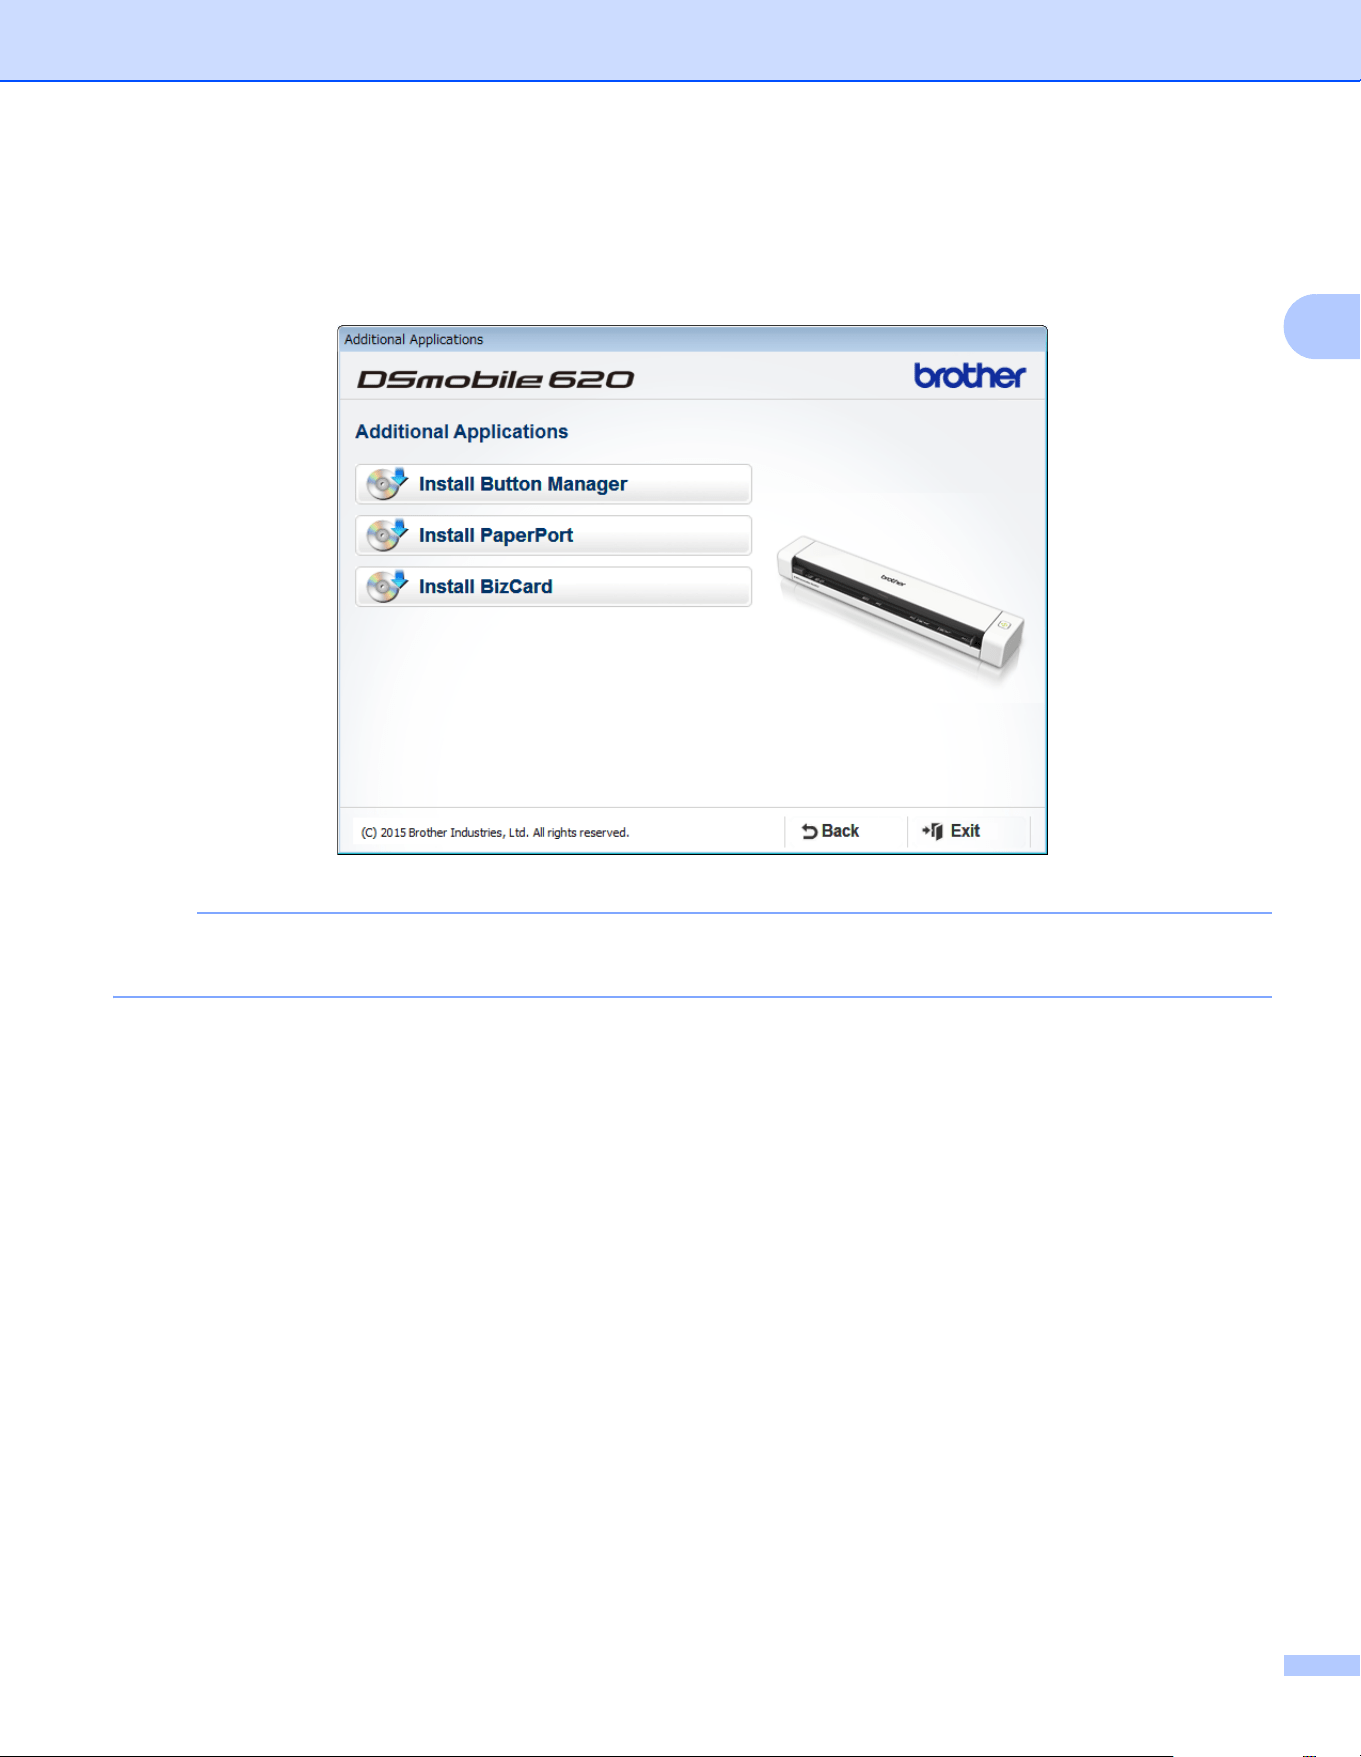
c Click Additional Applications to install any of these applications during setup.
• Button Manager V2: document scanning and storing (to specified destinations)
• PaperPort™ 12SE: document scanning, editing and management
• Presto! BizCard 6: business card scanning, editing and management
NOTE
For more information on which scanning application will work best for you, see Choosing your scanning
software on page 12.
Installing the Scanner Driver and Scanning Software
5
2
For Macintosh users
NOTE
• Make sure that your computer is ON and you are logged on with Administrator rights.
• DO NOT connect the Micro USB Cable yet.
• If your computer does not have a DVD-ROM drive, the supplied DVD-ROM does not contain drivers
for your operating system, or you want to download manuals and utilities, visit your model page at
support.brother.com
a Insert the DVD-ROM.
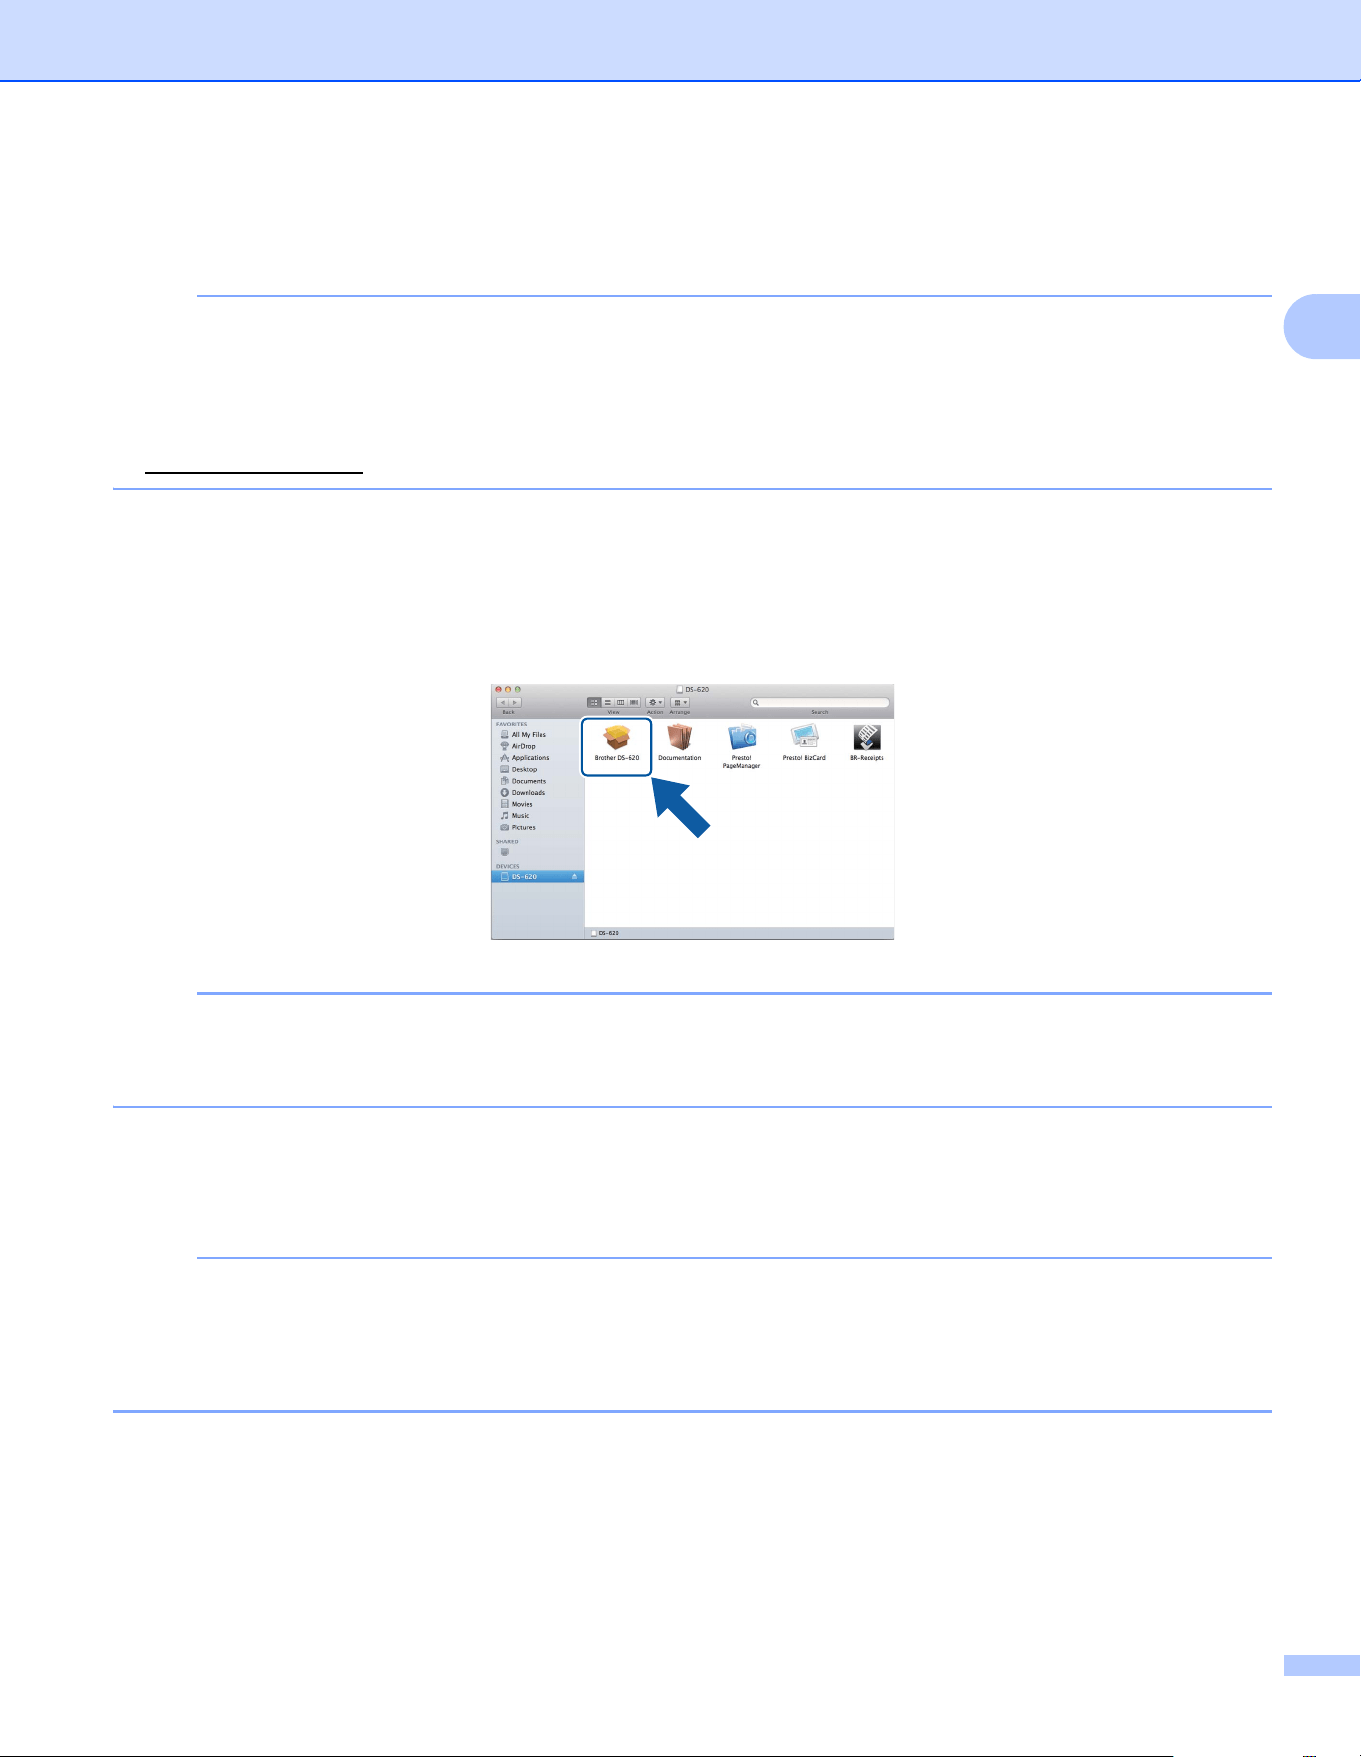
b Double-click on the DVD icon, and then double-click DS-620 (DS-720D).
c Double-click on Brother DS-620 (DS-720D) and follow the on-screen instructions to install the scanner
driver.
NOTE
When you install the scanner driver, DSmobileCapture (a scanning application) will be installed at the
same time. For more information on using DSmobileCapture, see Using DSmobileCapture (for Macintosh)
on page 23.
d Click one of these folders to install the application during setup.
• Presto! PageManager 9: document scanning, editing and management
• Presto! BizCard 6: business card scanning, editing and management
NOTE
•Clicking Presto! PageManager or Presto! BizCard will bring you to NewSoft Technology Corporation’s
website. Download the application from this website.
• For more information on which scanning application will work best for you, see Choosing your scanning
software on page 12.
6
3
3
Acceptable documents
Document Specifications 3
Standard Paper Length 1 sided scan
90 mm to 812.8 mm
2 sided scan (DS-720D only)
90 mm to 406.4 mm
Width 55mmto215.9mm
Weight 60 g/m
2
to 105 g/m
2
To scan thinner documents, use the Carrier Sheet (see Loading
the Carrier Sheet on page 10).
Maximum Number of Pages 1 page (1 sheet)
Standard Paper Size A4 210 × 297 mm
A5 148 × 210 mm
A6 105 × 148 mm
A7 74 × 105 mm
A8 52 × 74 mm
B5 182 × 257 mm
B6 128 × 182 mm
B7 91 × 128 mm
B8 64 × 91 mm
Legal 215.9 × 355.6 mm
Letter 215.9 × 279.4 mm
Plastic Cards
(DS-620:
non-embossed
cards only)
Length 40 mm to 86 mm
Width 40 mm to 86 mm
Standard Size (ISO) 85.6 × 54.0 × 0.76 mm
Material Plastic (PET)
Type Plastic card such as a driver’s license or an insurance card
Thickness Less than 0.8 mm
Maximum Number of Pages 1 page (1 sheet)
Receipts Length 1 sided scan
90 mm to 812.8 mm
2 sided scan (DS-720D only)
90 mm to 406.4 mm
Width 55 mm to 215.9 mm
Thickness More than 0.04 mm
Maximum Number of Pages 1 page (1 sheet)

Document Specifications
7
3
Unacceptable documents
Documents with paper clips or staples
Documents with wet ink
Fabrics, metallic sheets, overhead projector sheets
Glossy or mirrored media
Embossed plastic cards
Documents that exceed recommended thicknesses
Documents recommended for use with the Carrier Sheet
Use the supplied Carrier Sheet when you scan the following:
Documents with a carbon sheet attached on the back
Documents written in pencil
Documents narrower than 55 mm wide
Documents shorter than 90 mm long
Documents of uneven thickness, such as envelopes
Documents with large wrinkles or curls
Bent or damaged documents
Documents that use tracing paper
Documents that use coated paper
Photographs (photographic paper)
Documents printed on perforated paper
Documents printed on unusually-shaped paper (not square or rectangular)
Documents with photos, notes, or stickers affixed to them
Documents that use carbonless paper
Documents that use loose-leaf paper or any paper with holes in it
Photographic negatives
For more information about using the Carrier Sheet when scanning, see Loading the Carrier Sheet on page 10.
CAUTION
To avoid cutting yourself, do not slide or scrape your hand or fingers along the edges of the Carrier Sheet.

Document Specifications
8
3
IMPORTANT
• Do not place the Carrier Sheet in direct sunlight or in an area subject to high temperatures and high humidity,
or the Carrier Sheet may warp.
• Do not place large or heavy objects on the Carrier Sheet.
• Do not bend or pull the Carrier Sheet. If it becomes damaged, it may not be acceptable for scanning,
and should not be used.
9
4
4
Loading a document
IMPORTANT
• Insert only one page into the scanner at a time. Insert the next page only after the first one is completely
scanned. Inserting more than one page at a time may cause your scanner to malfunction.
• DO NOT pull on the document while it is feeding.
• DO NOT use paper that is curled, wrinkled, folded, ripped, stapled, paper clipped, pasted, or taped.
• DO NOT try to scan cardboard or fabric.
NOTE
• Make sure there is enough space behind the paper ejection slot. The scanned document will be ejected
from the rear of the scanner.
• Make sure documents that have ink or correction fluid on them are completely dry.
• Certain types of plastic cards may be scratched when scanned. To prevent damage to the card,
we recommended using the Carrier Sheet. For more information, see Loading the Carrier Sheet on page 10.
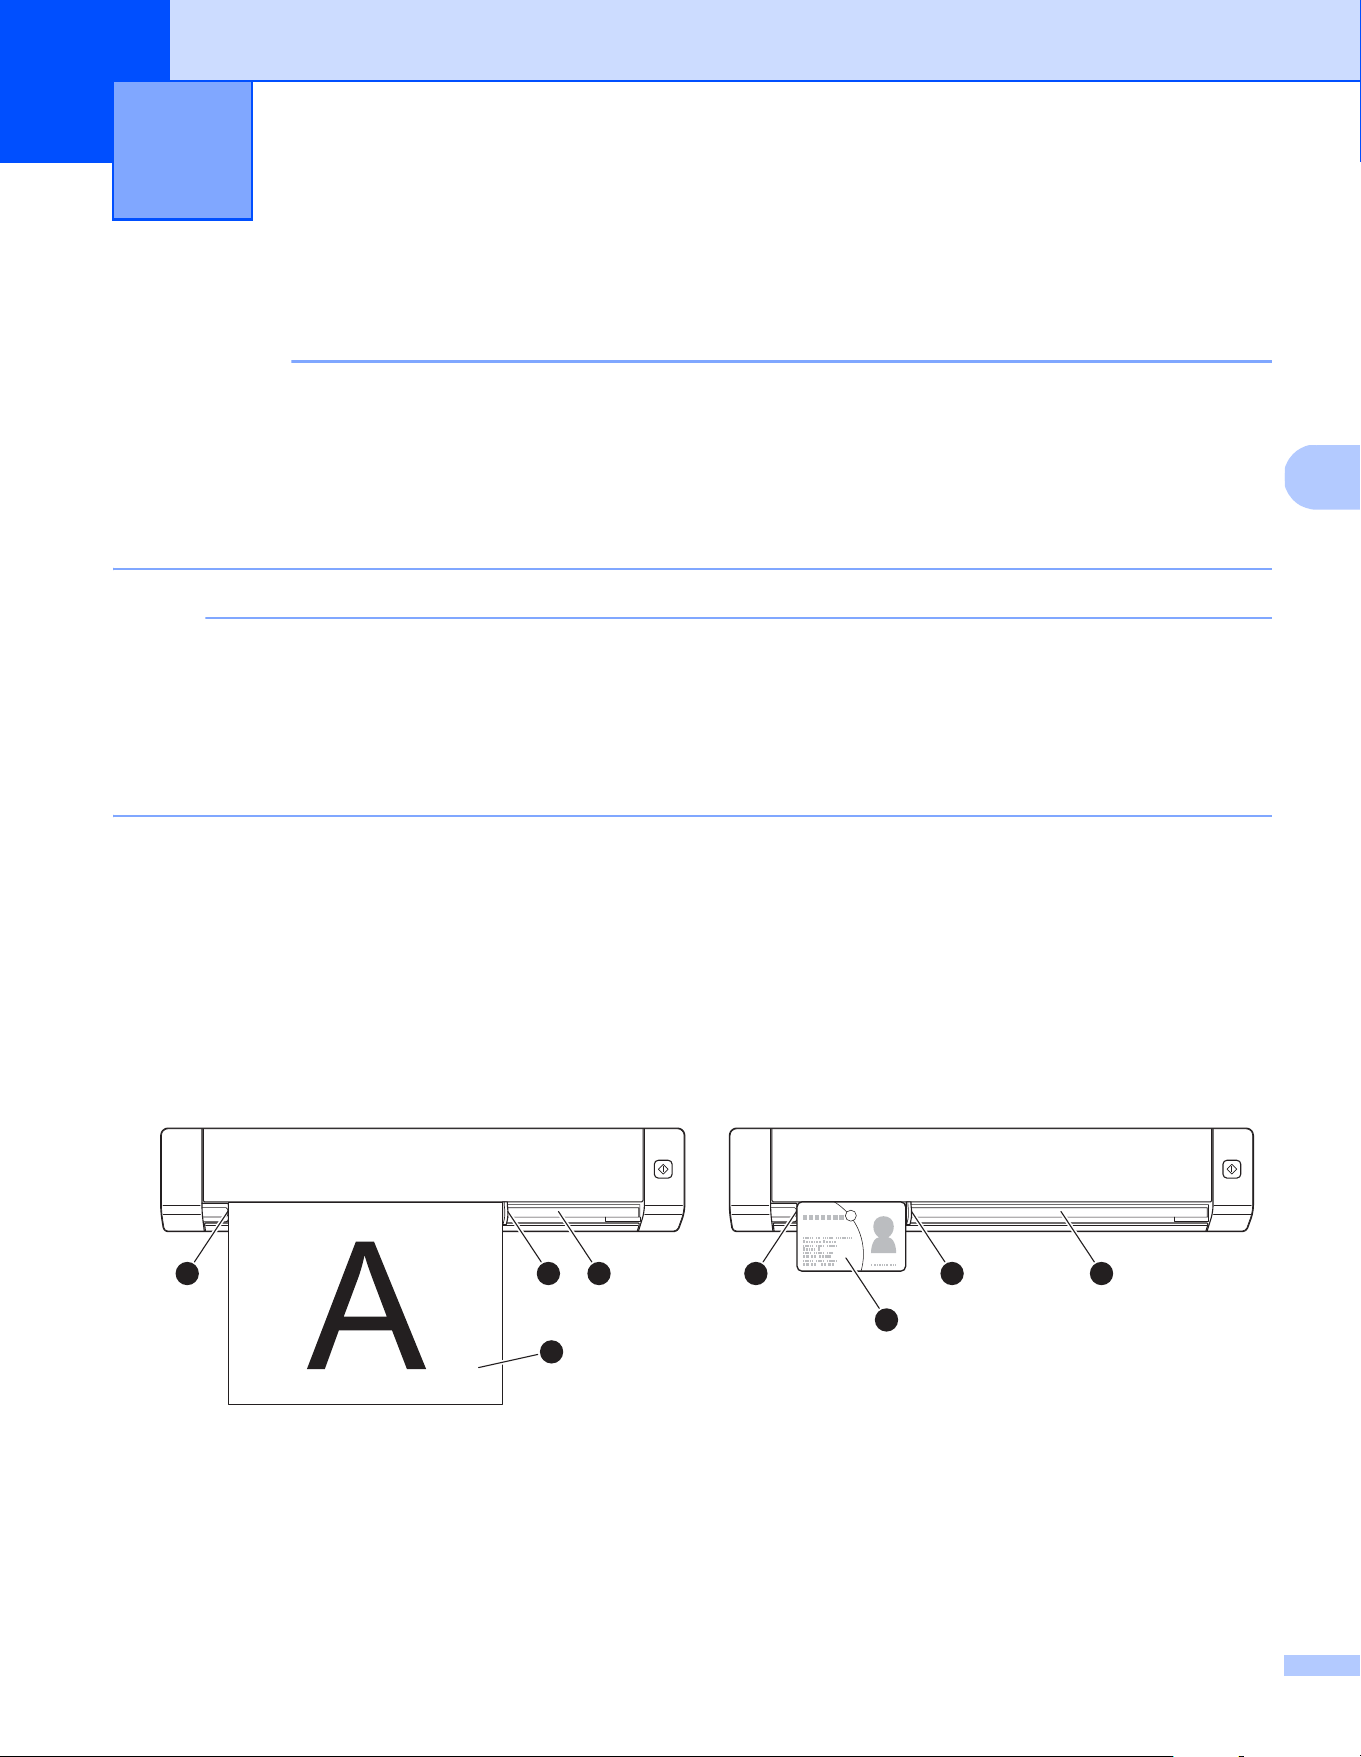
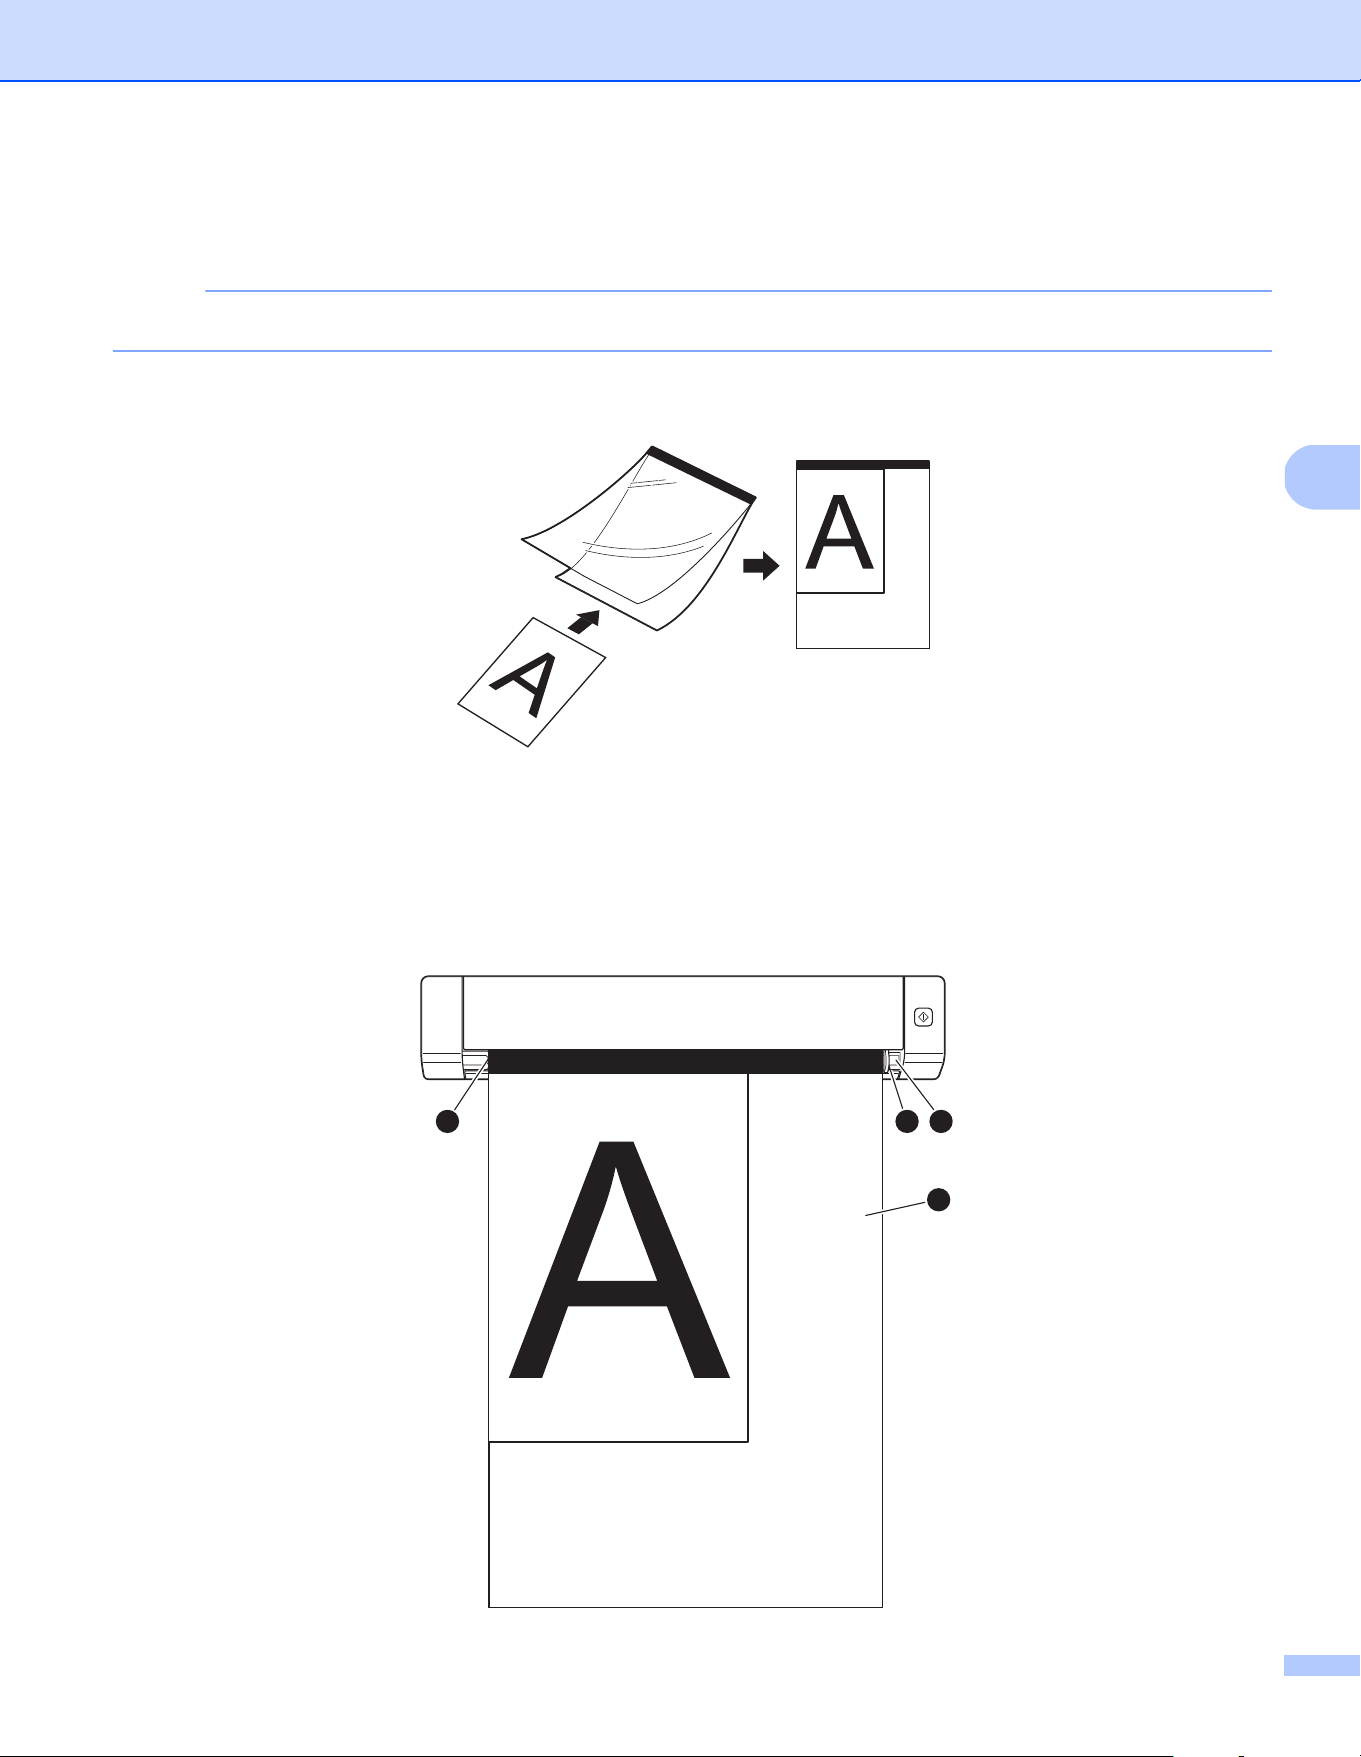
a Set your document a face up in the feeder slot b and align the left edge of the page with the left edge
of the feeder slot
c.
To scan a plastic card
a, set the card top edge first into the feeder slot b and align the left edge of the
card with the left edge of the feeder slot
c.
For DS-720D: When you perform duplex scanning, insert the first page face up into the feeder slot.
b Slide the document guide d until it touches the right side of the document.
c Gently insert the document until you feel its top edge touch the inside of the scanner.
Scan Preparation 4
1
2
43
2
4
1
3
Scan Preparation
10
4
Loading the Carrier Sheet
NOTE
Make sure documents that have ink or correction fluid on them are completely dry.
a Place the document you want to scan in the left corner of the Carrier Sheet and align the top of the
document with the top left corner of the Carrier Sheet.
b Set the Carrier Sheet a, document face up, with the black edge first in the feeder slot b and align
the left edge of the Carrier Sheet with the left edge of the feeder slot
c.
For DS-720D: When you perform duplex scanning, insert the first page face up into the feeder slot.
c Slide the document guide d against the right side of the Carrier Sheet.
d Gently insert the Carrier Sheet until you feel its top edge touch the inside of the scanner.
1
2
43

Scan Preparation
11
4
Important Carrier Sheet tips
To avoid document jams, do not load the Carrier Sheet upside down. For more information, see Loading
the Carrier Sheet on page 10.
To avoid document jams, do not put several small documents into the Carrier Sheet at the same time.
Insert only one document into the Carrier Sheet at a time.
Do not write on the Carrier Sheet, as the writing may be seen in scanned documents. If the Carrier Sheet
becomes dirty, wipe it with a dry cloth.
Do not leave documents in the Carrier Sheet for extended periods of time, as the printing on the documents
may bleed through onto the Carrier Sheet.

12
5
5
Choosing your scanning software
After downloading the scanner drivers, select a scanning software application for saving scanned images
to your computer. Brother has supplied several options for you on the DVD-ROM; use this table to help
determine which of the included scanning applications will work best for you:
NOTE
Clicking Presto! PageManager or Presto! BizCard will bring you to NewSoft Technology Corporation’s
website. Download the application from this website.
Scanning Applications and Settings 5
Software Function For more information
DSmobileCapture Document scanning, browsing
and filing
For Windows
®
: See Using DSmobileCapture
(for Windows
®
) on page 13.
For Macintosh: See Using DSmobileCapture
(for Macintosh) on page 23.
Button Manager V2
(Windows
®
only)
Document scanning and storing
(in specified destinations)
See the software’s user instructions or Using
Button Manager V2 (for Windows
®
) on page 29.
Nuance PaperPort
™
12SE
(Windows
®
only)
Document scanning, OCR scanning,
editing and management
See the software’s user instructions.
Presto! PageManager 9
(Macintosh only)
Document scanning, OCR scanning,
editing and management
See the software’s user instructions.
Presto! BizCard 6 Business card scanning, editing
and management
See the Presto! BizCard User’s Manual which
will be downloaded onto your computer when you
download the software.
Scanning Applications and Settings
13
5
Using DSmobileCapture (for Windows
®
)
a Connect the supplied Micro USB Cable to the Micro USB port on your scanner. Connect the cable
to your computer.
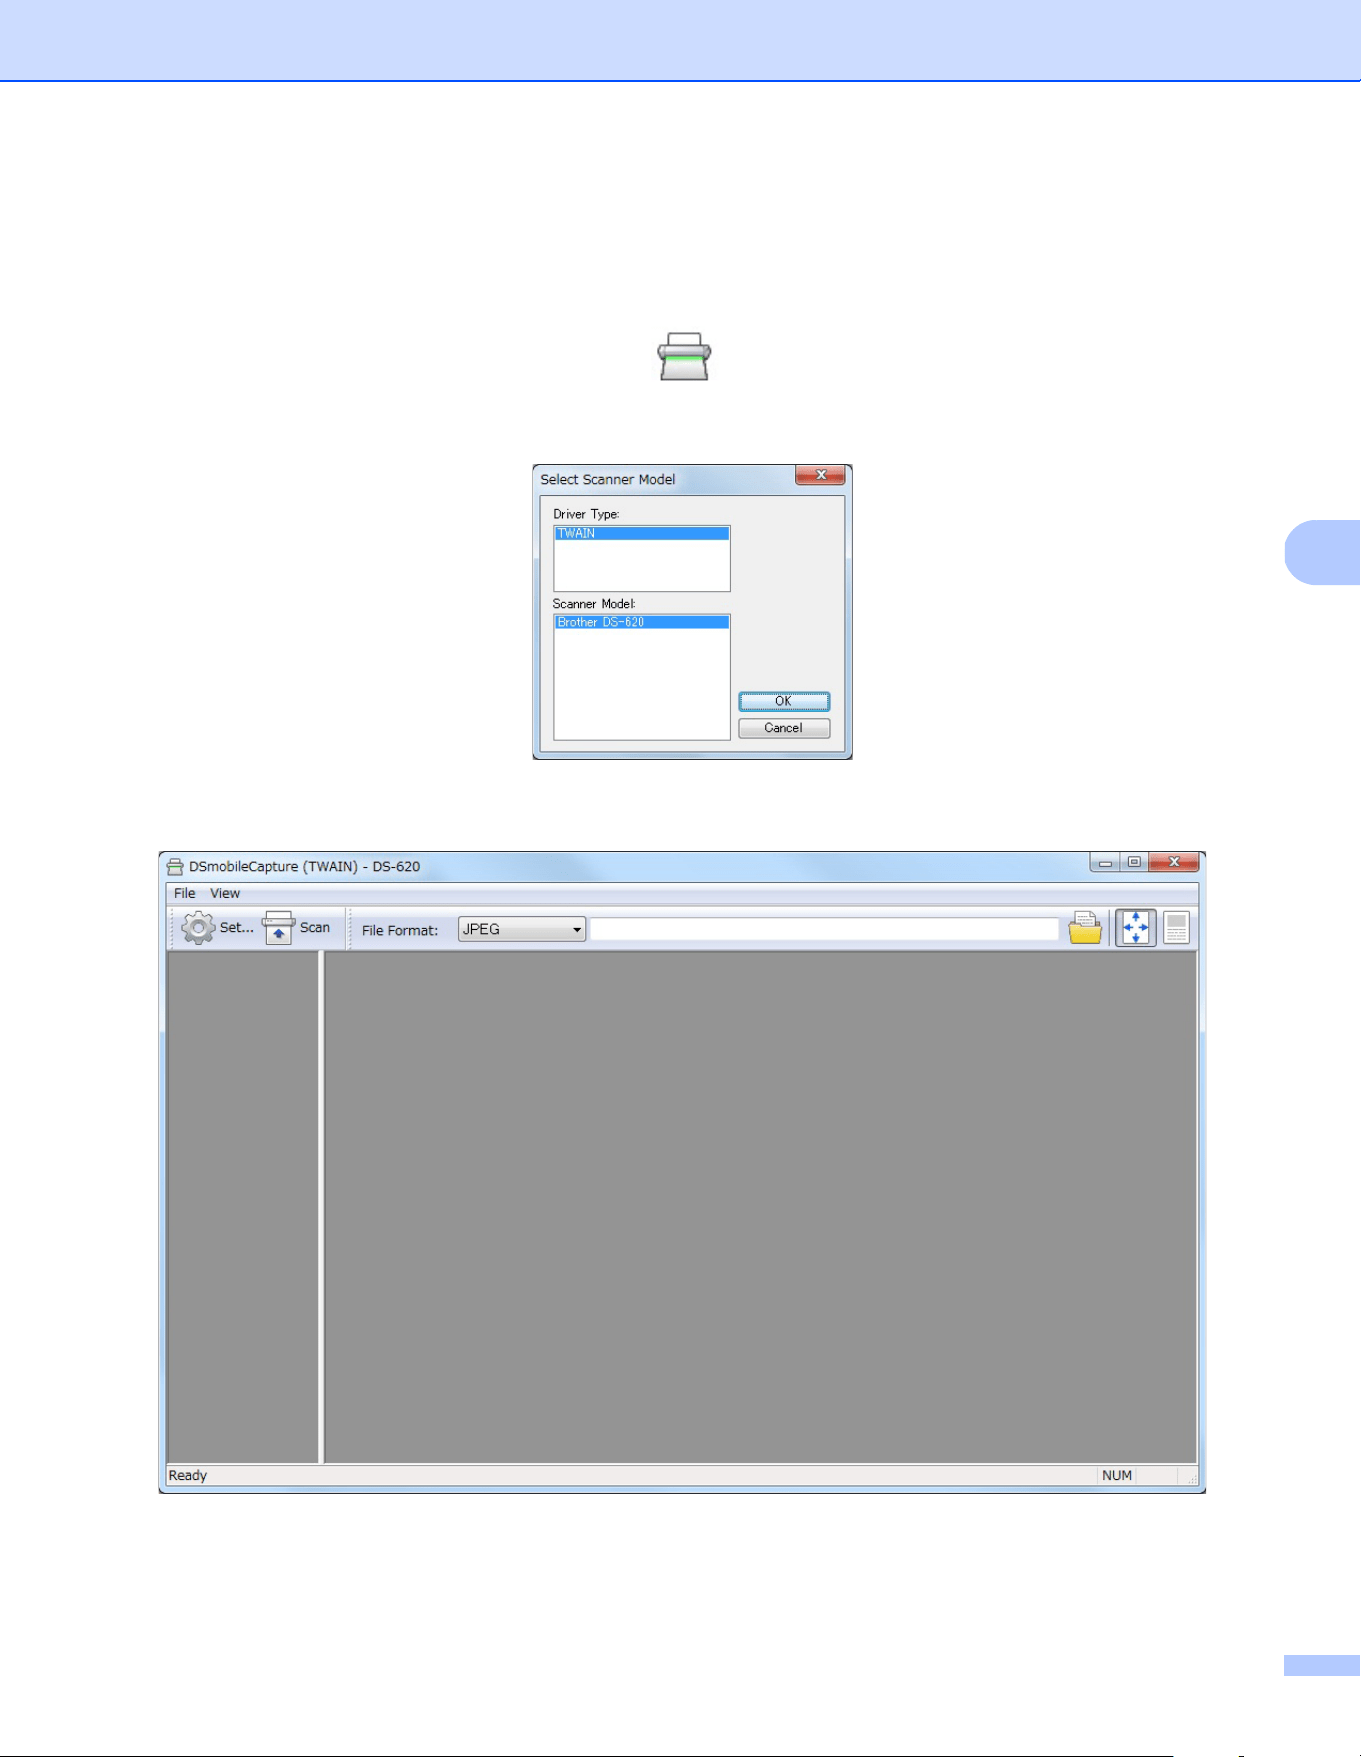
b Double-click the DSmobileCapture shortcut on your desktop.
c The Select Scanner Model dialog box appears. Select TWAIN under Driver Type, select
Brother DS-620 (DS-720D) under Scanner Model, and then click OK.
d DSmobileCapture launches.
e Change the scanning settings, if needed.
For more information on changing settings, see Changing DSmobileCapture scan settings (for Windows
®
)
on page 15.
Scanning Applications and Settings
14
5
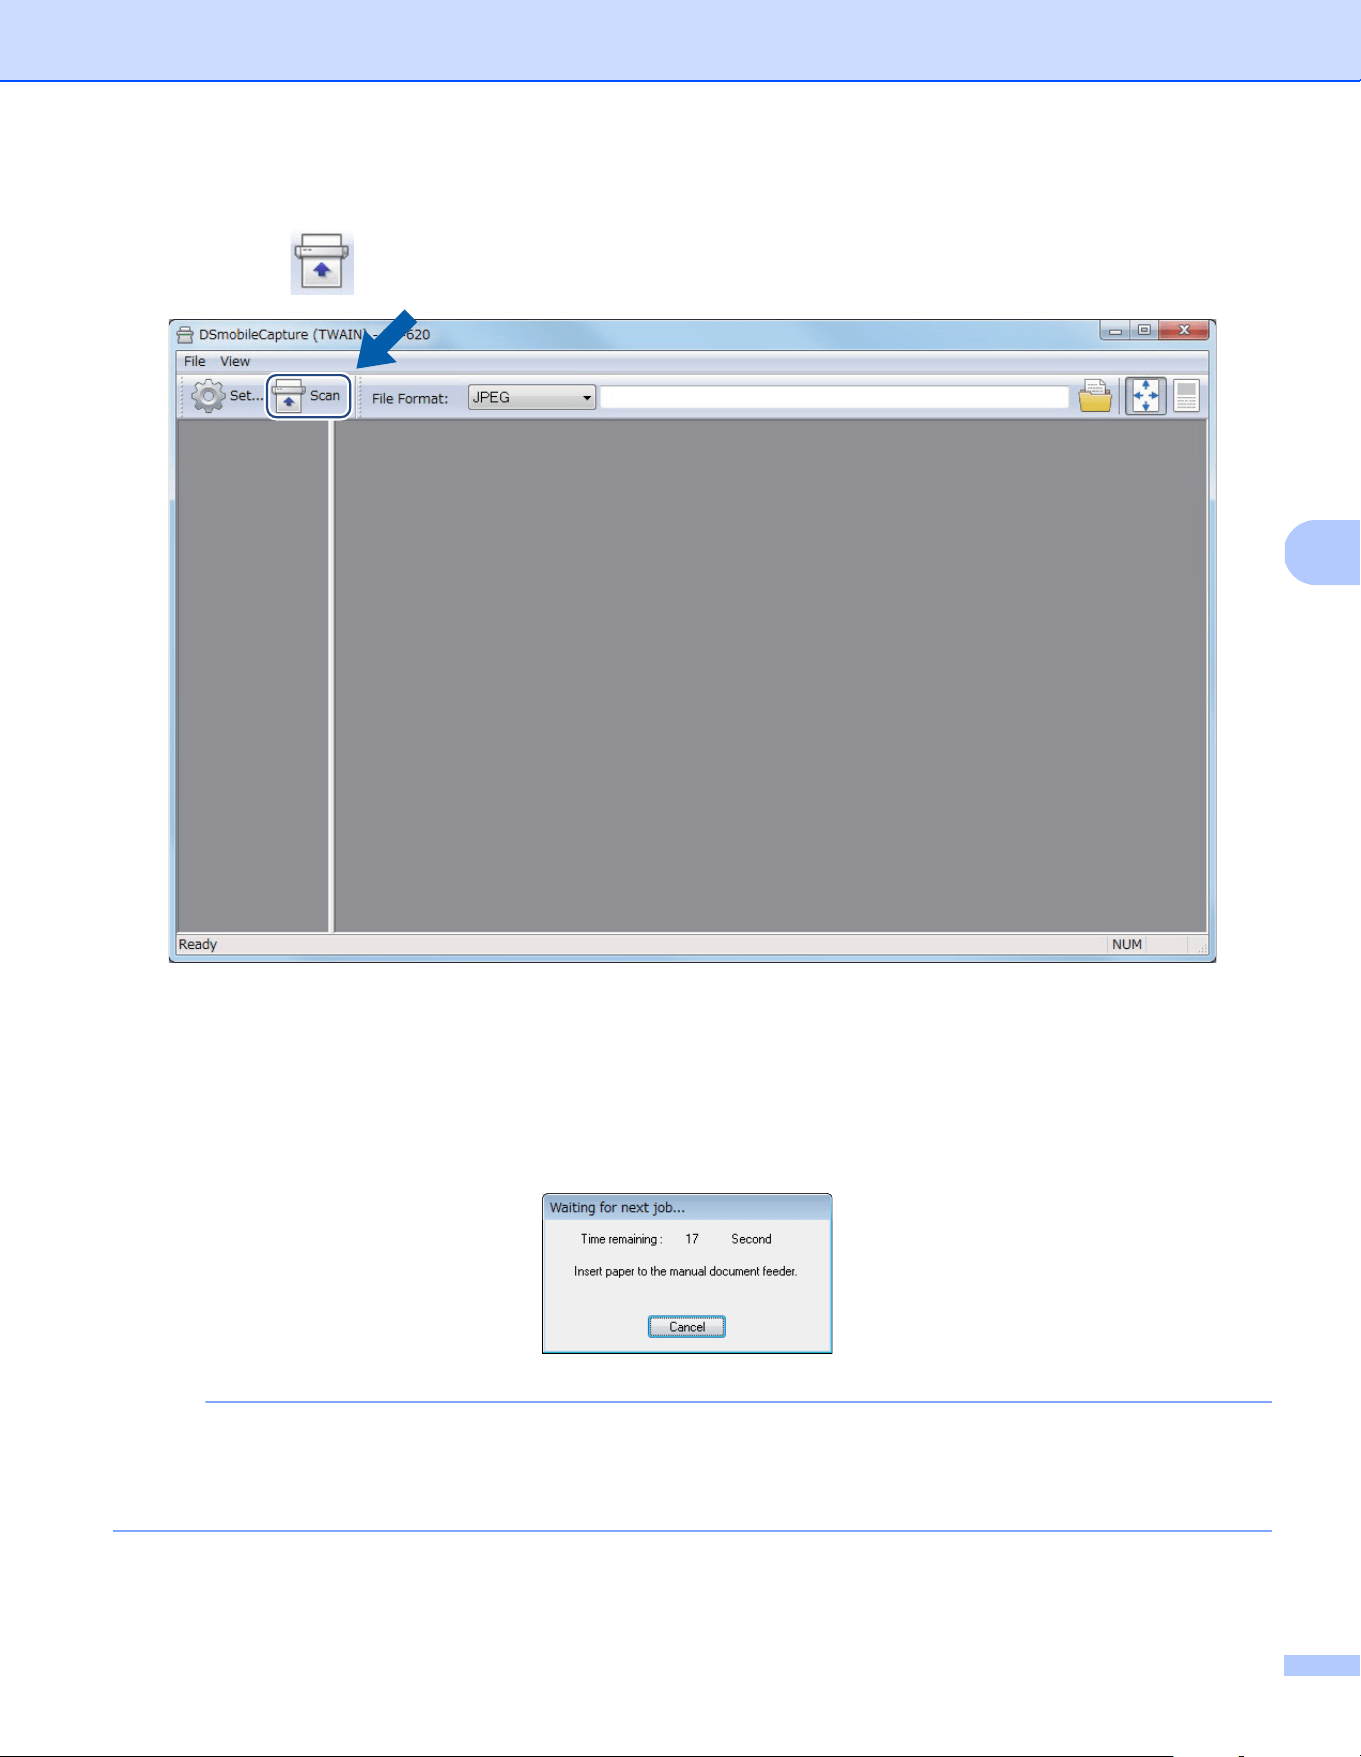
f Insert a document into your scanner.
g Click Scan . Your scanner starts scanning.
A thumbnail of the scanned image appears in the DSmobileCapture screen and the scanned image will
be saved in the directory you specified in step 5.
Check the scan result just in case.
h For continuous scanning, insert the next document into the scanner while Waiting for next job... screen
is displayed. When the document is ready, scanning will start automatically.
To stop the continuous scanning, click Cancel on Waiting for next job... screen.
NOTE
• To change the time delay when waiting for the next job, see Paper settings on page 17.
• To save multiple documents as one file, choose Multi-page PDF or Multi-page TIFF from the File Format
drop-down list.
Scanning Applications and Settings
15
5
Changing DSmobileCapture scan settings (for Windows
®
)
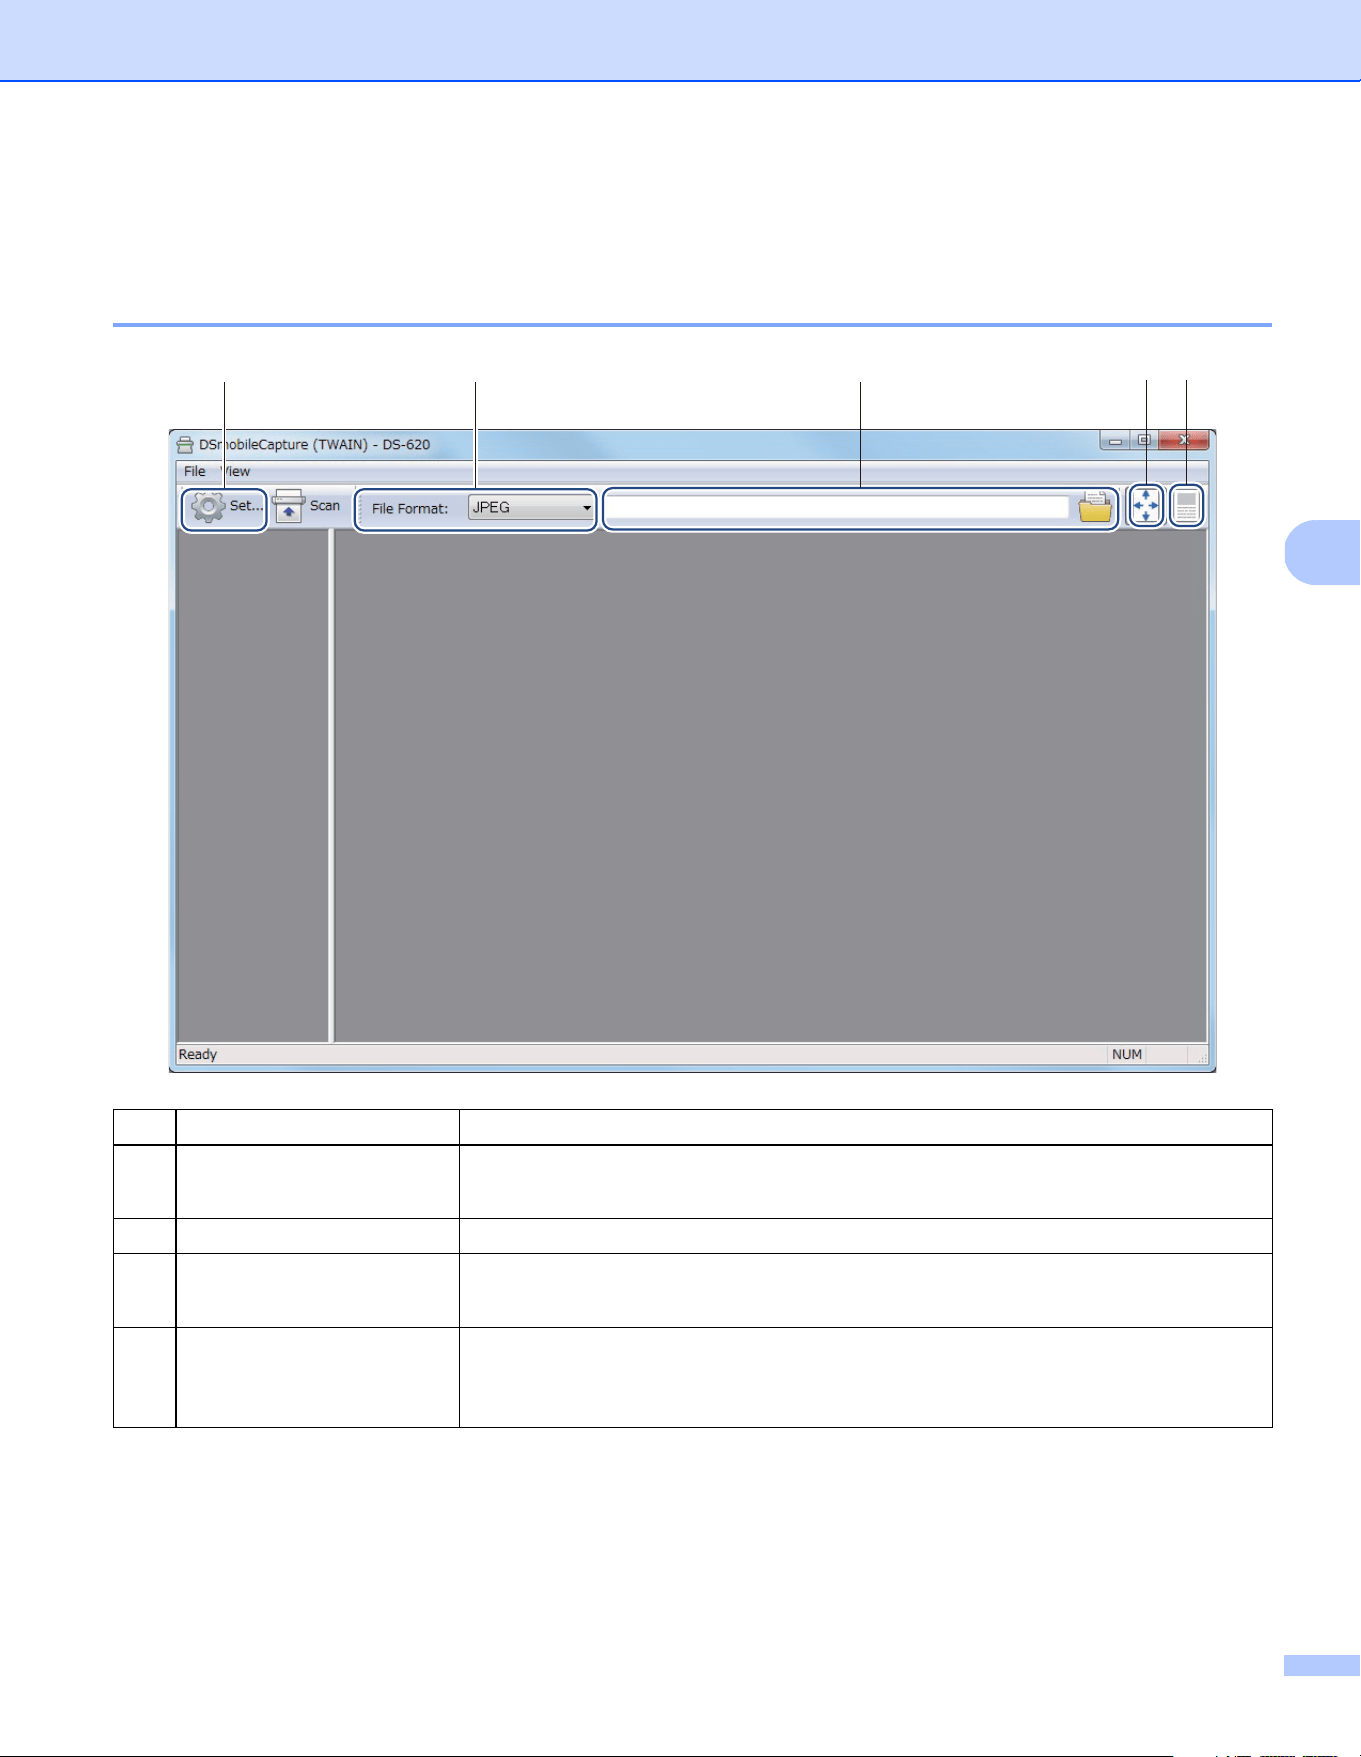
File settings
(1) Setup Change scanner properties.
(2) File Format Change the file format.
Select the format you want from the drop-down list.
(3) Path Specify the directory where you want to save scanned images.
(4) Fit Page You can view and size the scanned image.
You cannot use Fit Page when PDF or Multi-page PDF is chosen in File Format.
(5) Actual Size (100%) You can view the scanned image in Actual Size (100%).
You cannot use Actual Size (100%) when PDF or Multi-page PDF is chosen
in File Format.
(2)(1) (3) (4) (5)
Scanning Applications and Settings
16
5
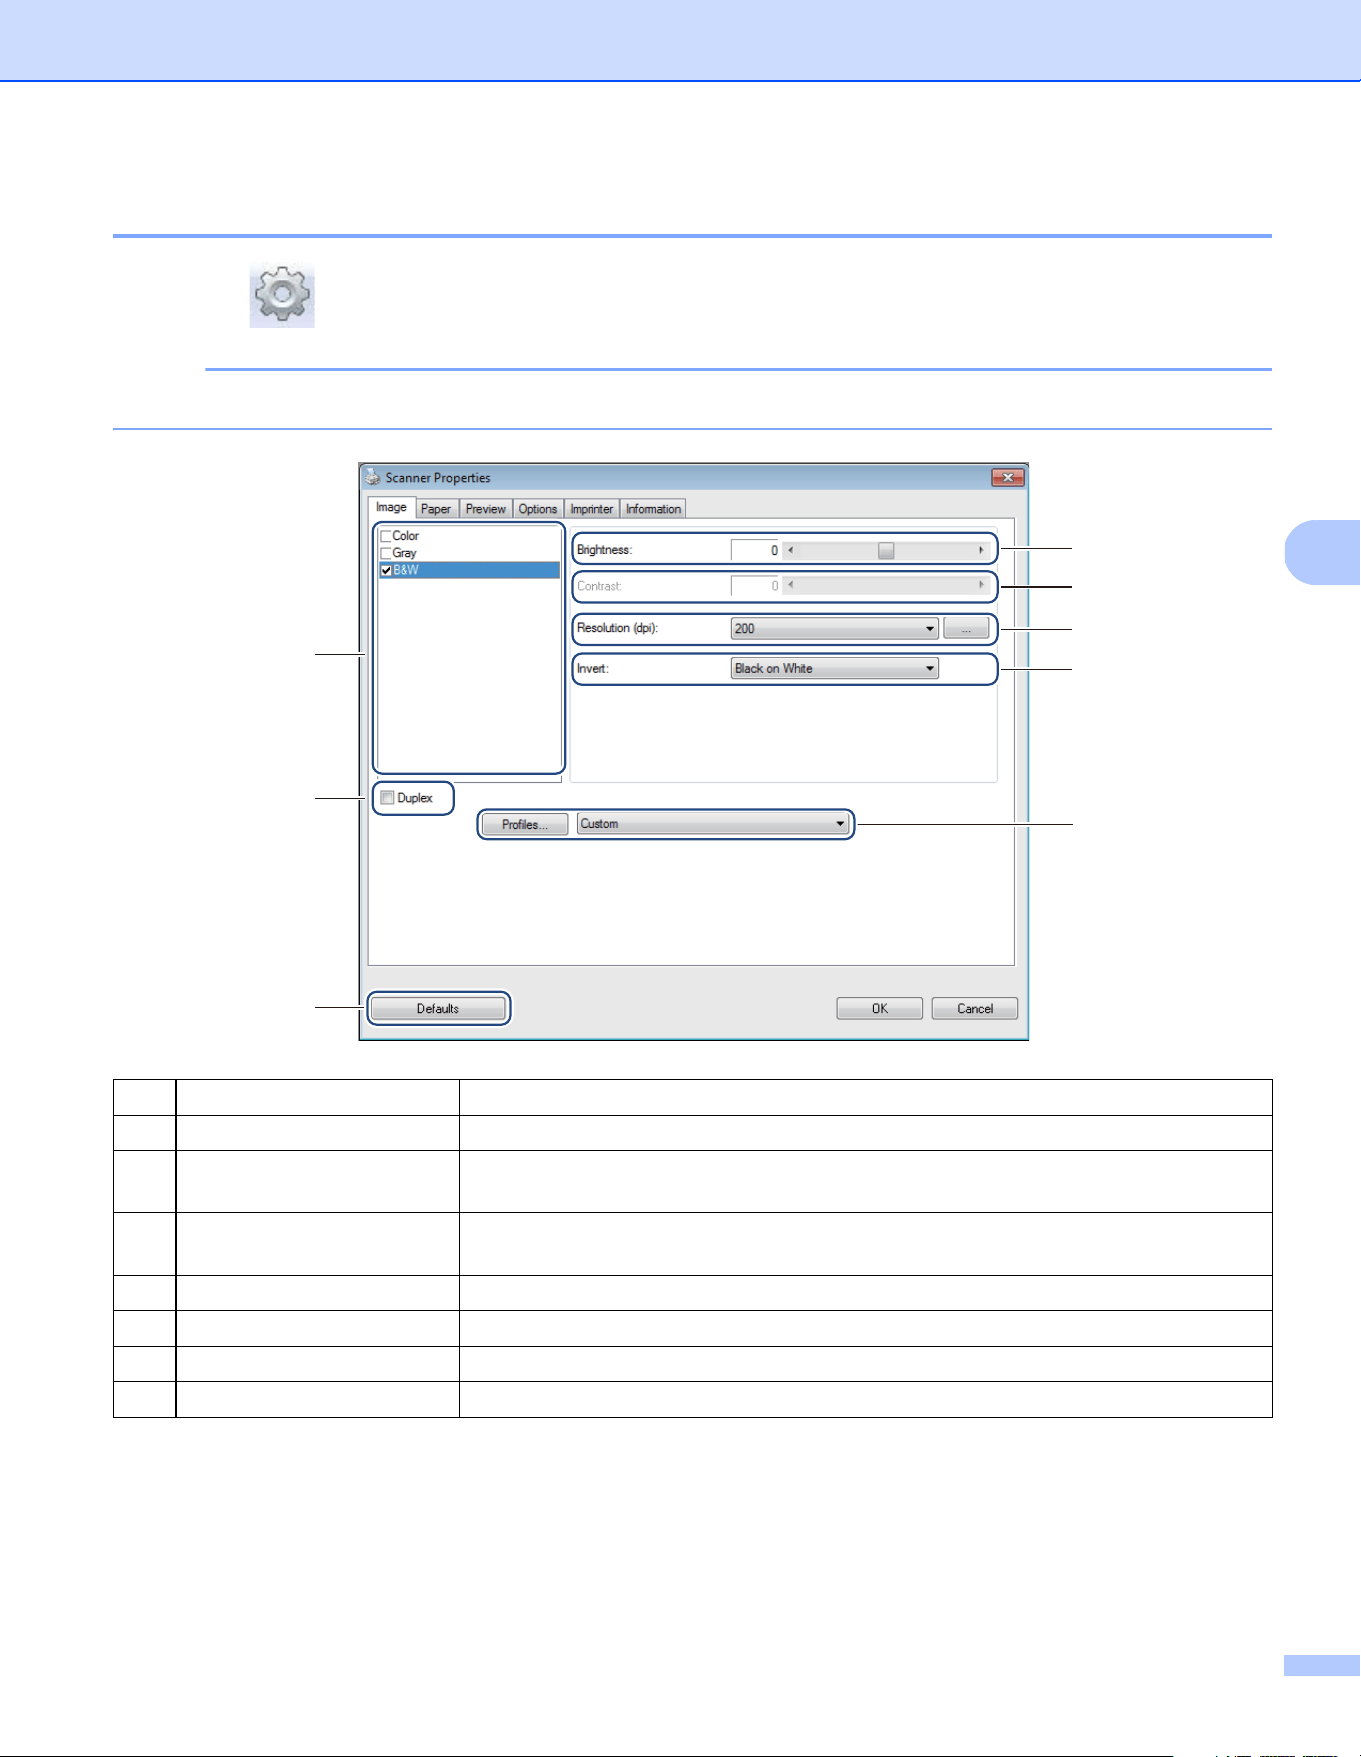
Image settings
Click Setup , and then click the Image tab to choose the image type and to set basic scan settings.
NOTE
This image is from the DS-720D.
(1) Image Selection Box Choose the type of document you want to scan.
(2) Duplex (DS-720D only) Select the Duplex check box to perform Duplex (2 side) scanning.
(3) Brightness Adjusts the lightness or darkness of an image. The range is from -100 to +100.
The factory default is 0.
(4) Contrast Adjusts the range between the darkest and the lightest shades in the image.
The range is from -100 to +100. The factory default is 0.
(5) Resolution Determine the quality of the scanned image. The factory default is 200 dpi.
(6) Invert Reverse the brightness and the colours in the image.
(7) Profiles Save or change the scan setting in the Scanner Properties dialog box.
(8) Defaults Reset values in this and all other Properties tabs to the original factory settings.
(1)
(6)
(3)
(4)
(5)
(8)
(2)
(7)
Scanning Applications and Settings
17
5
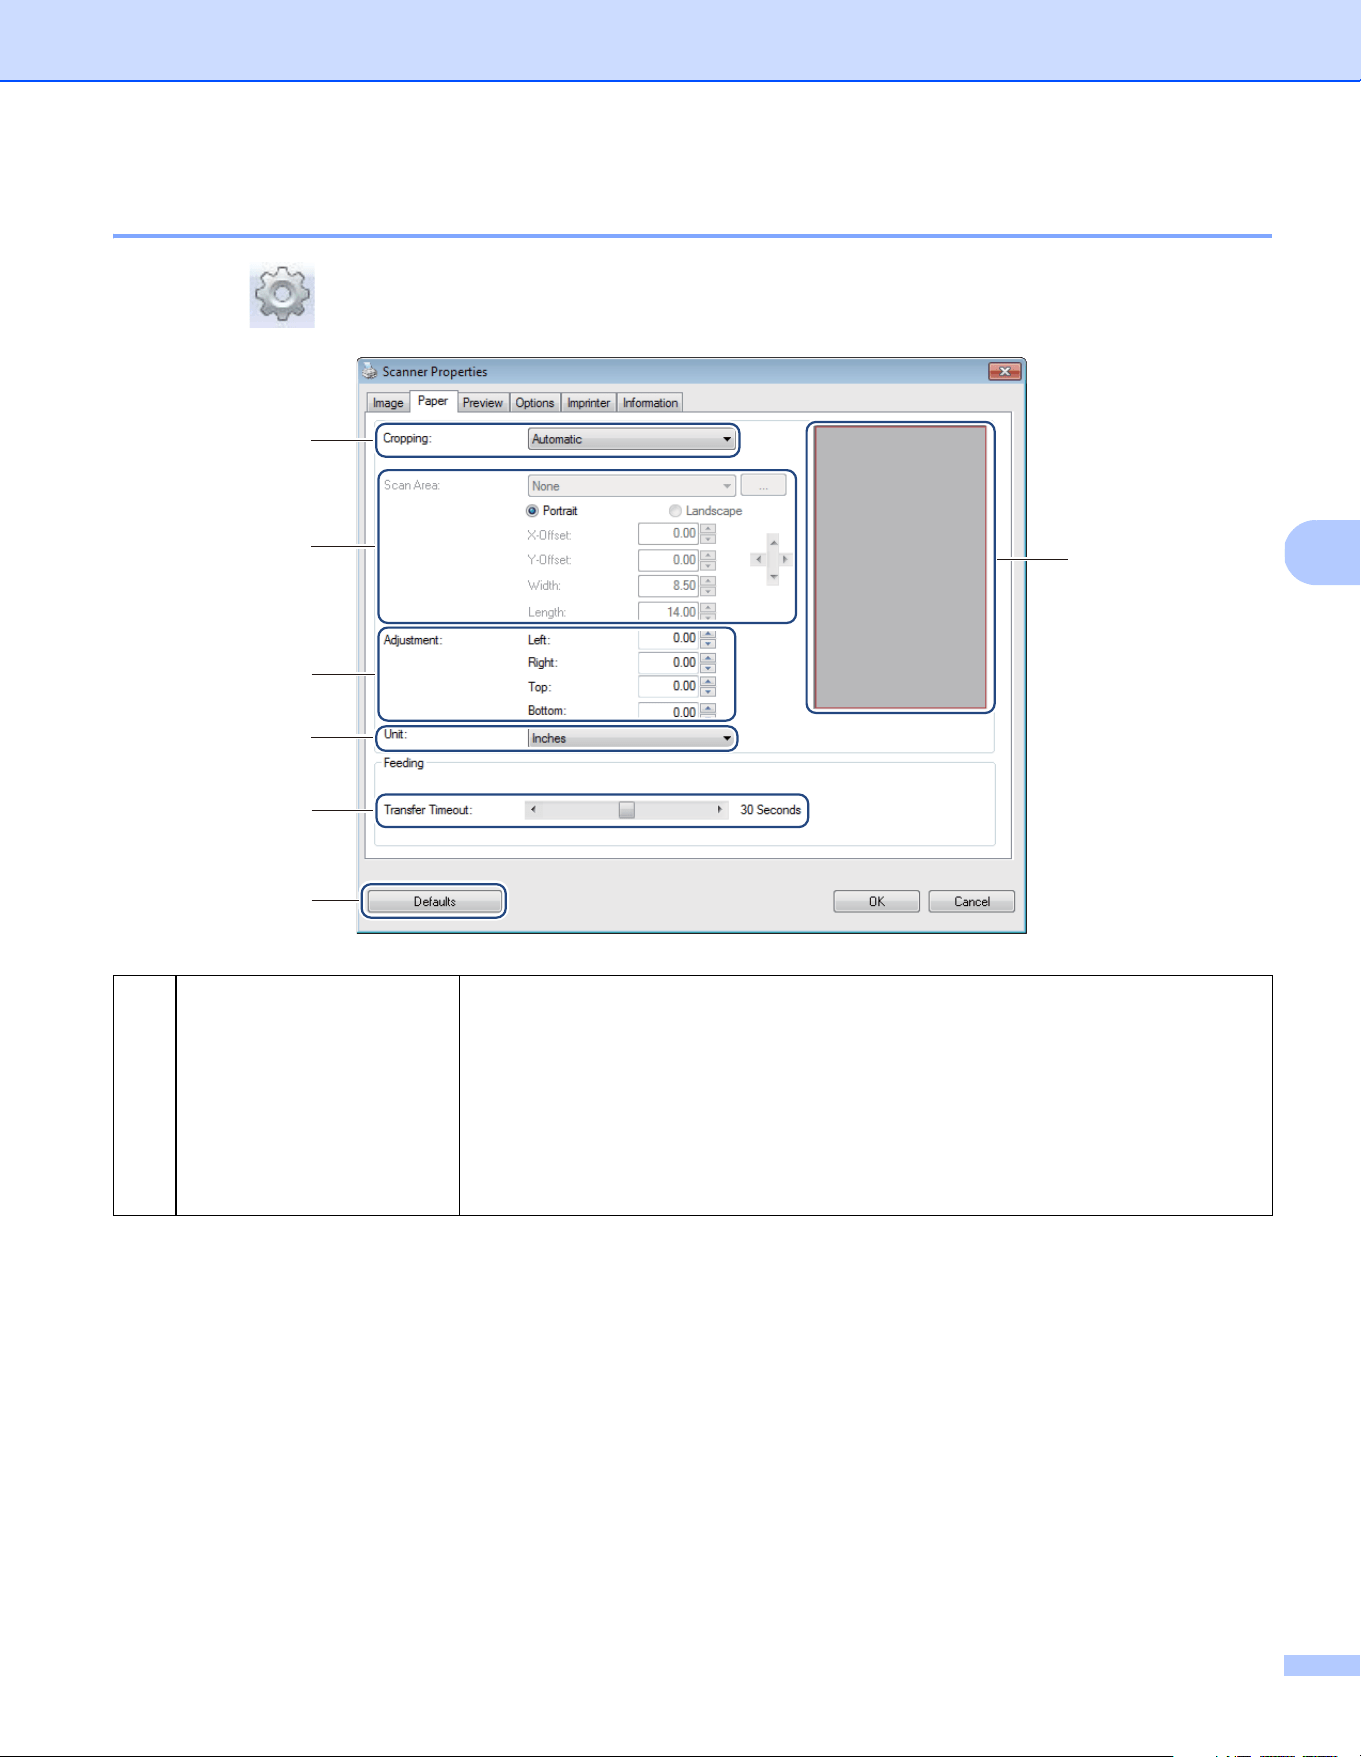
Paper settings
Click Setup , and then click the Paper tab to define values related to image output.
(1) Cropping Cropping allows you to capture a portion of the scanned document.
Automatic
Choose Automatic to allow the software to adjust the cropping window according
to the document size. Use this option for batches of mixed-sized documents.
Fix for Transfer
Choose Fix for Transfer if you want the ability to define the area or zone to be
imaged. Use for batches of same-sized documents.
(1)
(2)
(3)
(5)
(6)
(7)
(4)
Scanning Applications and Settings
18
5
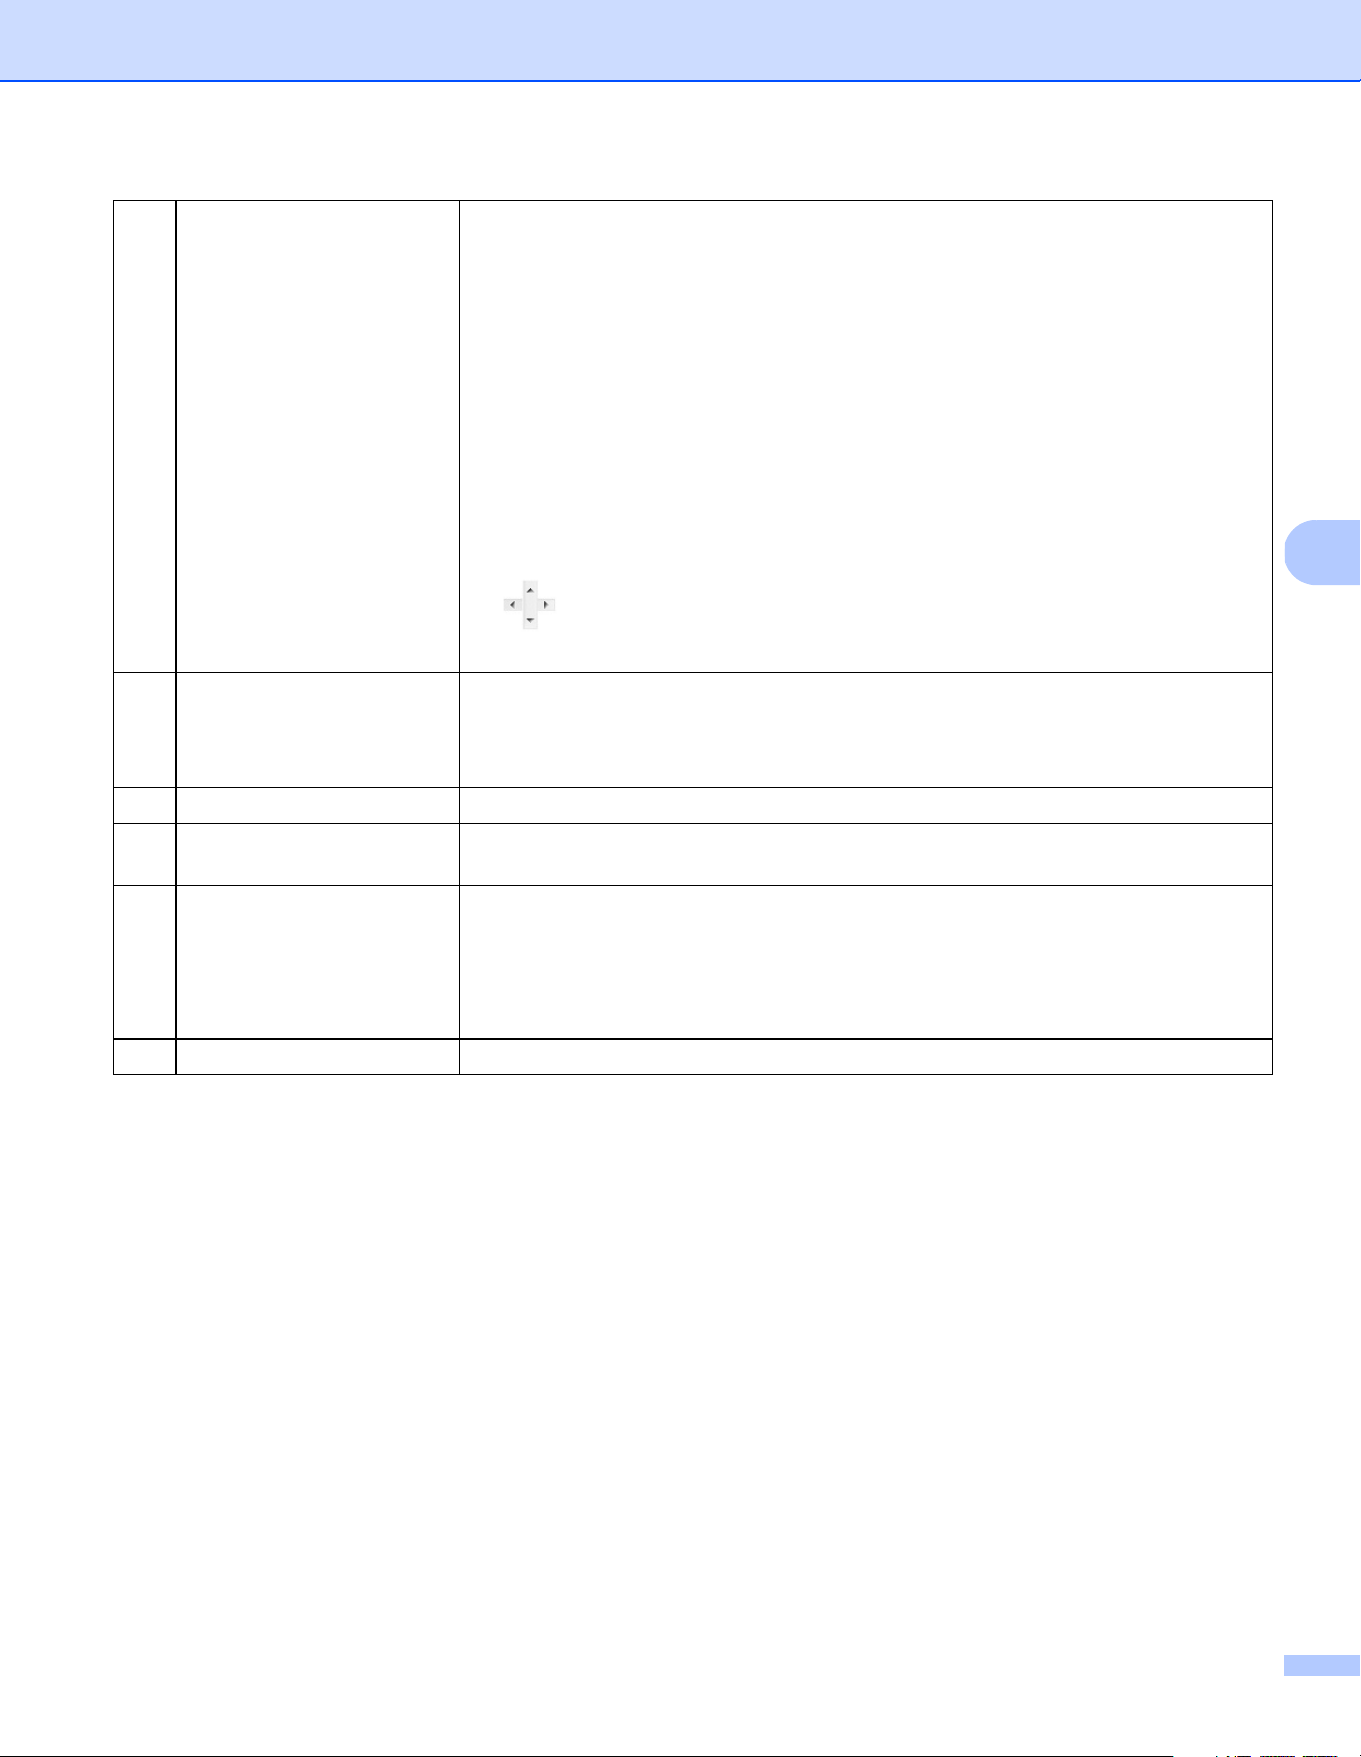
(2) Scan Area Choose your paper size from the drop-down list or create a custom paper size
by clicking Add in the drop-down list.
If you selected Fix for Transfer in Cropping (1), define the X-Offset and Y-Offset
or specify Width and Length to redefine the scan area. The Display Area (4)
in this screen displays image placement as you change the values.
• X-Offset - the distance from the left edge of the document to the left edge
of the scanned area.
• Y-Offset - the distance from the top edge of the document to the top edge
of the scanned area.
• Width - the width of the scanned area.
• Length - the length of the scanned area.
• Use these arrows (or your mouse) to move the scan area; you can view
the results in the Display Area of this screen.
(3) Adjustment Adjustment allows you to add a specific margin at the left, right, top and bottom
of your image. This may help to reduce possible corner clipping on any skewed
images. Select a value from 0 to +5 mm. The Adjustment result will not be shown
in the Display Area.
(4) Display Area Displays image placement as you change the values in Scan Area (2).
(5) Unit Unit allows you to define your preferred measurement system. Select Inches,
Millimeters, or Pixels from the drop-down list.
(6) Transfer Timeout Transfer Timeout allows you to set the amount of time (in seconds) the scanner
will wait before starting automatic scanning after the first scan job is completed.
When you have many separate documents that need to be scanned with the same
scan settings, this feature is especially useful. The default time is 30 seconds.
The value ranges from 0 to 60 seconds.
(7) Defaults Reset values in this and all other Properties tabs to the original factory settings.
Scanning Applications and Settings
19
5
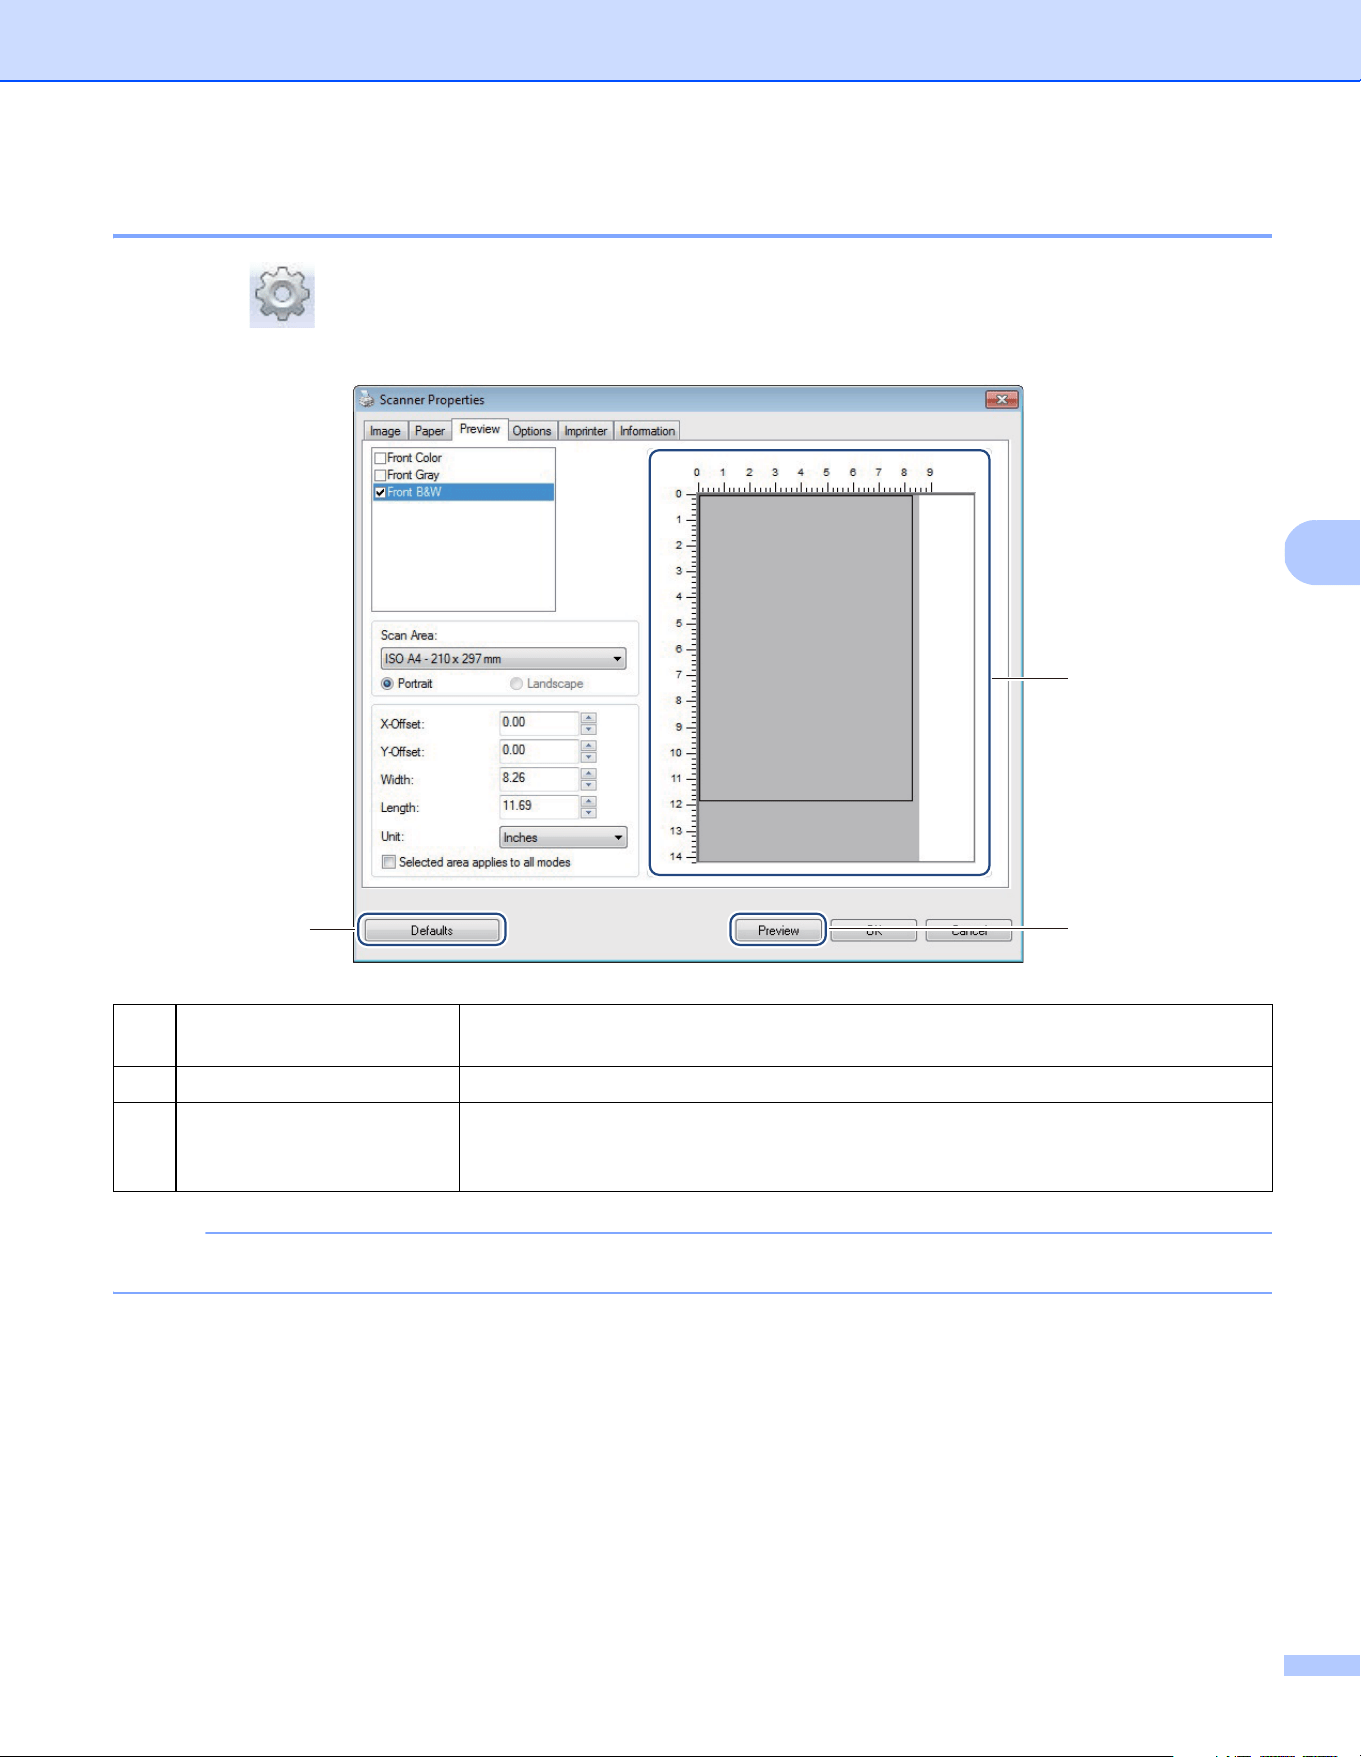
Preview settings
Click Setup , and then click the Preview tab to preview your image before scanning, to make sure
the scan area is set correctly.
NOTE
If you chose Automatic cropping, in the Paper tab screen, you cannot preview your scan on this screen.
(1) Preview Window When you click Preview (3), the scanned image will appear in this area.
This preview image lets you define your scan area.
(2) Defaults Reset values in this and all other Properties tabs to the original factory settings.
(3) Preview Click to start the preview scan. The scanned image will appear in the Preview
Window (1). Note that the scanned image is only for the preview and will not
be saved.
(3)
(1)
(2)
Scanning Applications and Settings
20
5
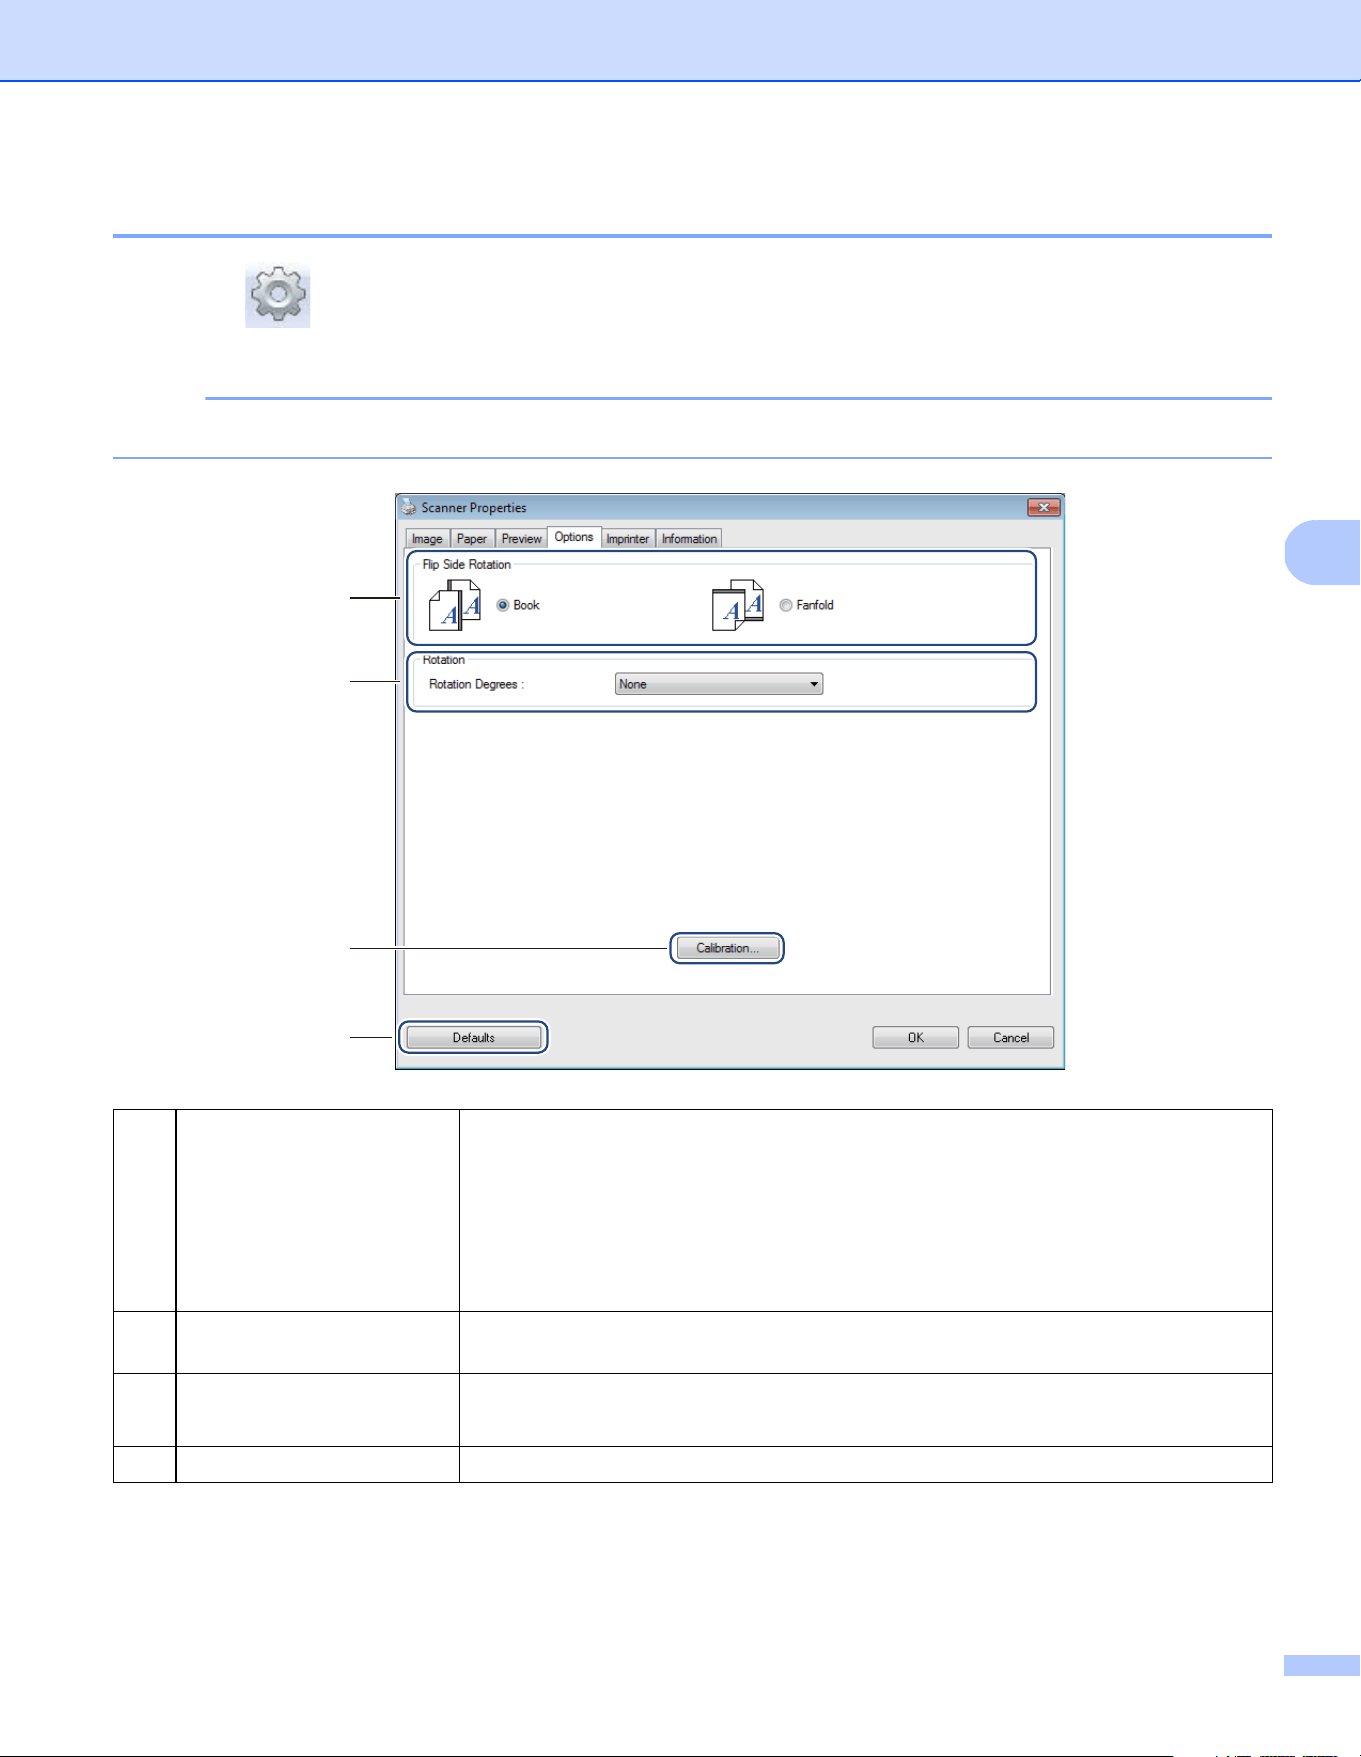
Options settings
Click Setup , and then click the Options tab to choose additional image processing settings or calibrate
your scanner.
NOTE
This image is from the DS-720D.
(1) Flip Side Rotation
(DS-720D only)
Book
Select Book to maintain the same image orientation on the reverse side
of the output page.
Fanfold
Select Fanfold to rotate the image orientation 180 degrees on the reverse side
of the output page.
(2) Rotation Choose the rotation angle from the drop-down list if you want to rotate your
scanned image.
(3) Calibration Calibrate the scanner.
For more information, see Calibration using software (for Windows
®
) on page 35.
(4) Defaults Reset values in this and all other Properties tabs to the original factory settings.
(2)
(3)
(4)
(1)
Scanning Applications and Settings
21
5
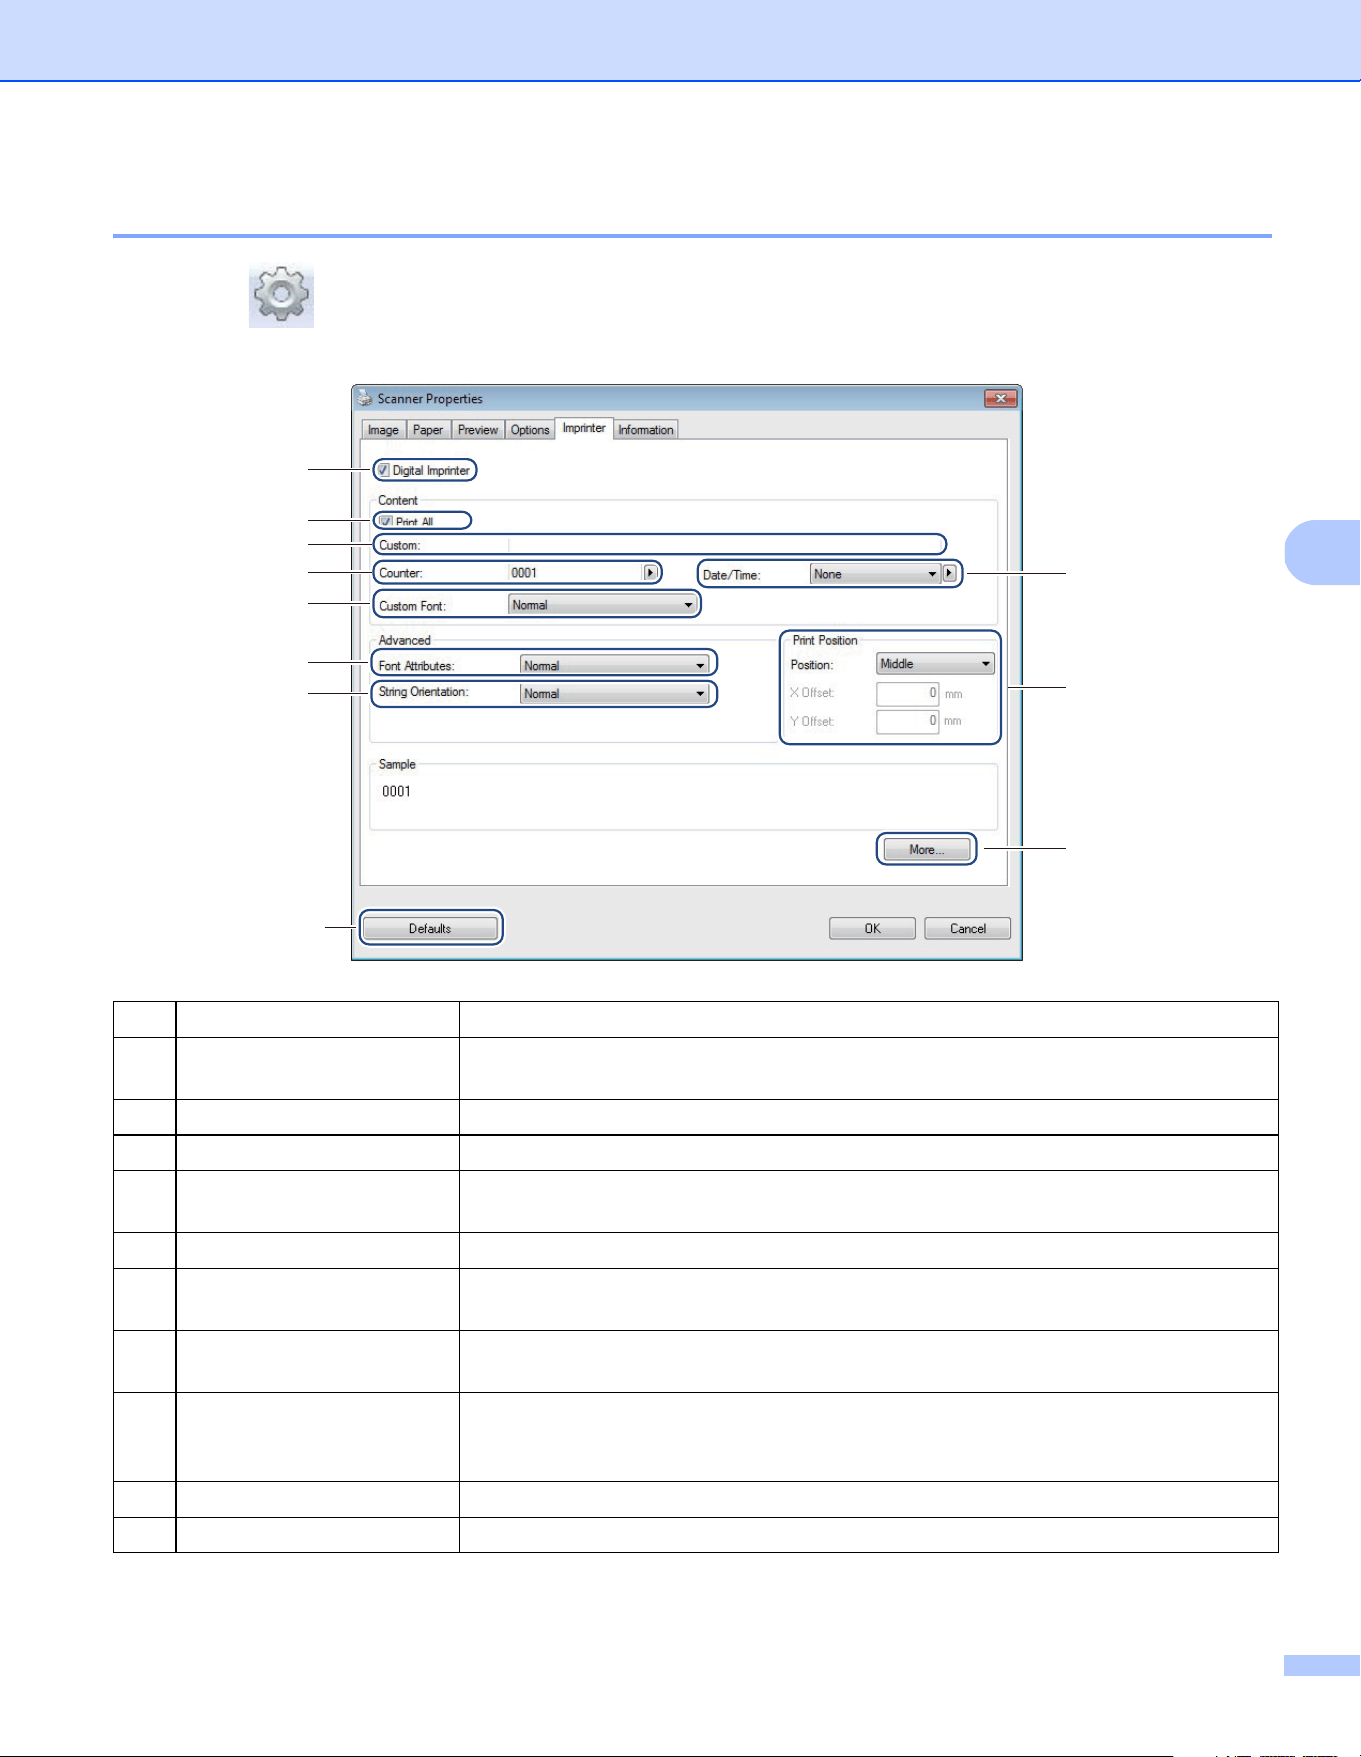
Imprinter settings
Click Setup , and then click the Imprinter tab to print alphanumeric characters, date, time, document
count and custom text on your scanned images.
1: Clockwise
2: Counter-clockwise
(1) Digital Imprinter Select Digital Imprinter to print the message on the front of your scanned image.
(2) Print All Select the Print All check box to print your chosen text content, on all pages of your
document. Clear the Print All check box to print the text on the first page only.
(3) Custom Type the text you want to print.
(4) Counter Displays the page count for the scan session.
(5) Date / Time Select a format from the drop-down list if you want to include the date and time
in your text.
(6) Custom Font Click the drop-down list to select a font for your text.
(7) Font Attributes Select a font attribute from the drop-down list. Options include Normal, Underline,
Double, or Bold.
(8) String Orientation Select a text orientation from the drop-down list. Options include Normal, Rotated,
Vertical, Vertical Inversion, 90 Degrees CW
1
or 90 Degrees CCW
2
.
(9) Print Position Select the position of your text from the drop-down list. Options include Top, Middle,
Bottom, or Custom. If you choose Custom, enter the X Offset and Y Offset values
to specify the text position.
(10) More Click More... to set Size, Density and Transparency for your text.
(11) Defaults Reset values in this and all other Properties tabs to the original factory settings.
(2)
(3)
(1)
(4)
(5)
(6)
(11)
(7)
(8)
(9)
(10)
Scanning Applications and Settings
22
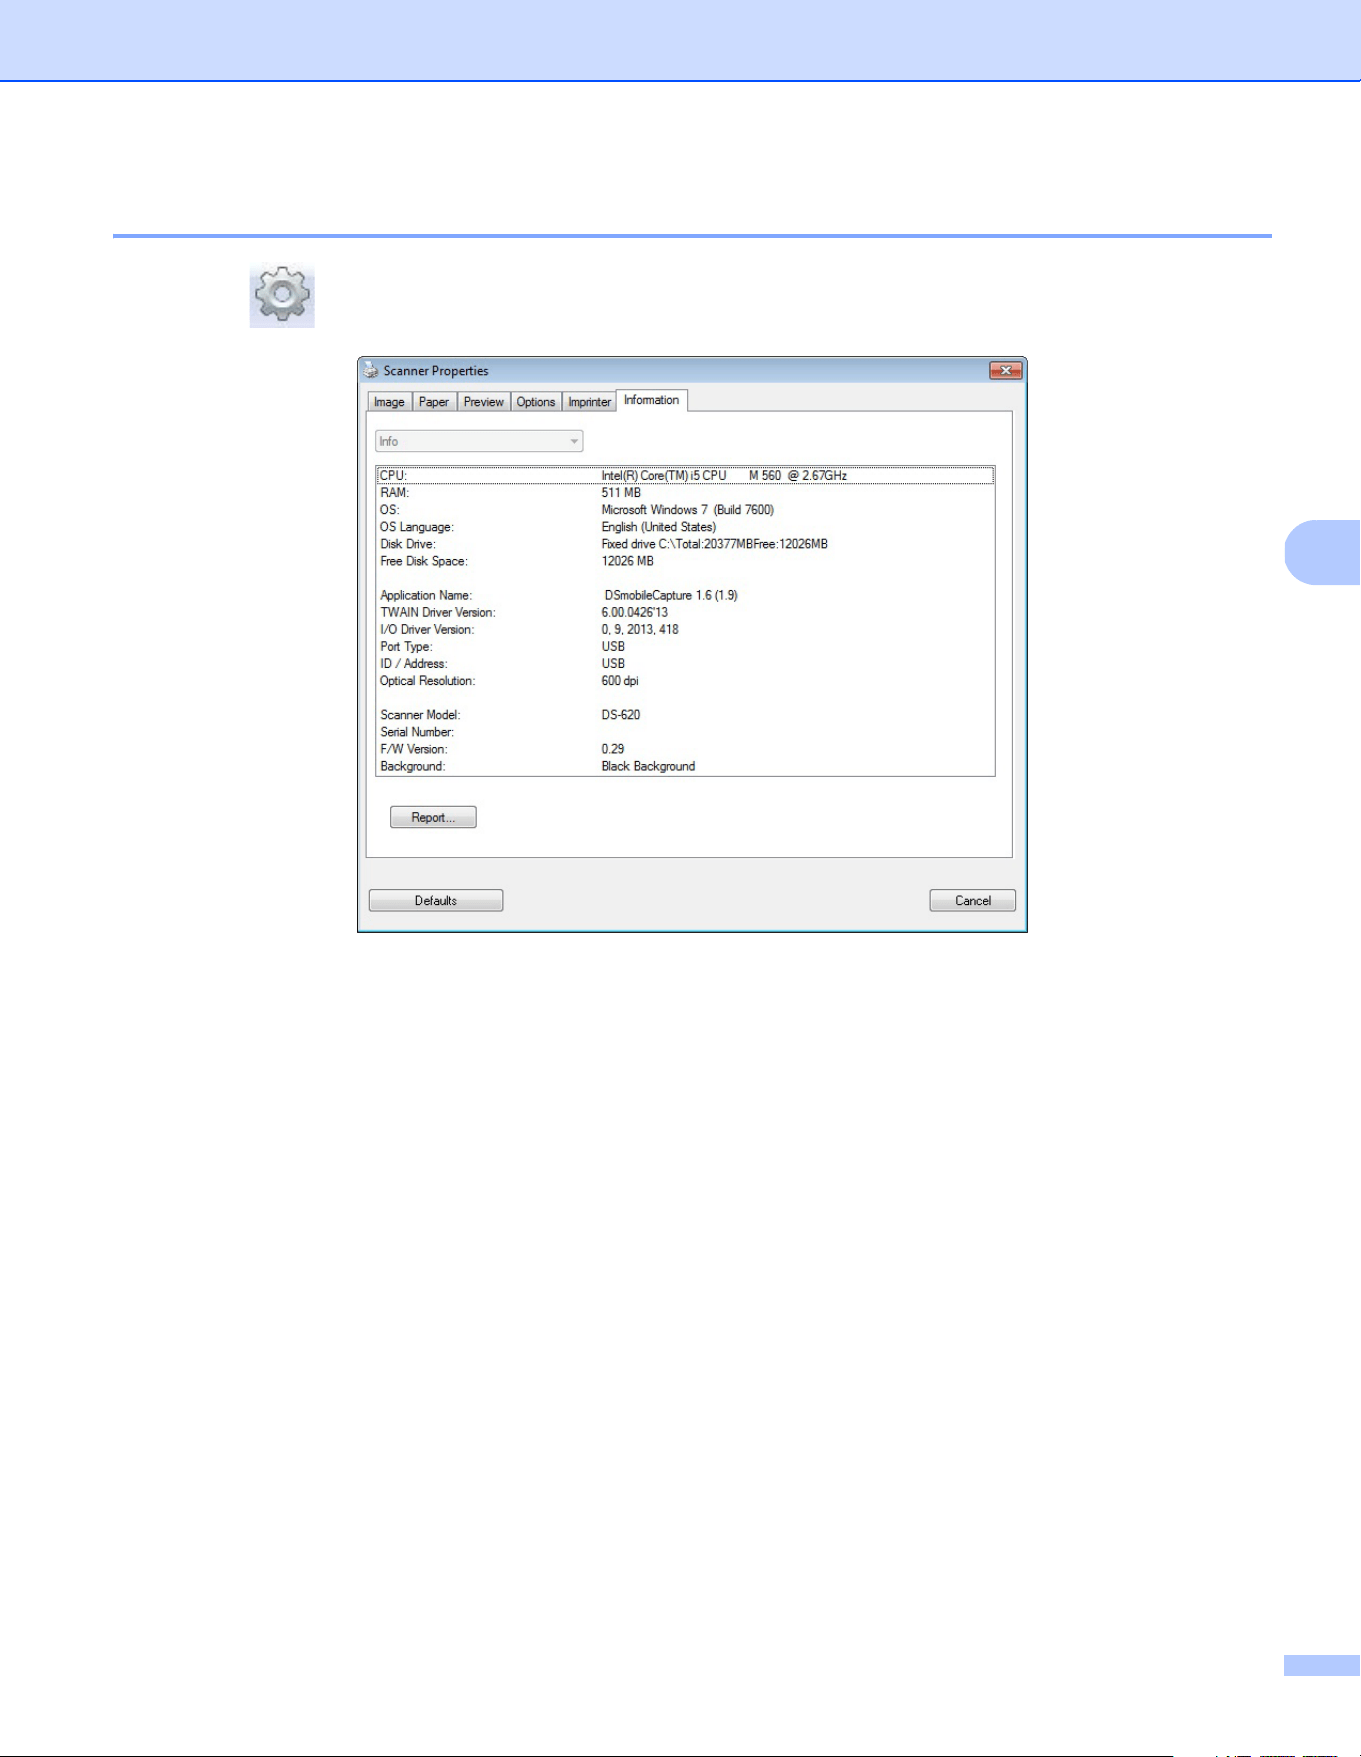
5
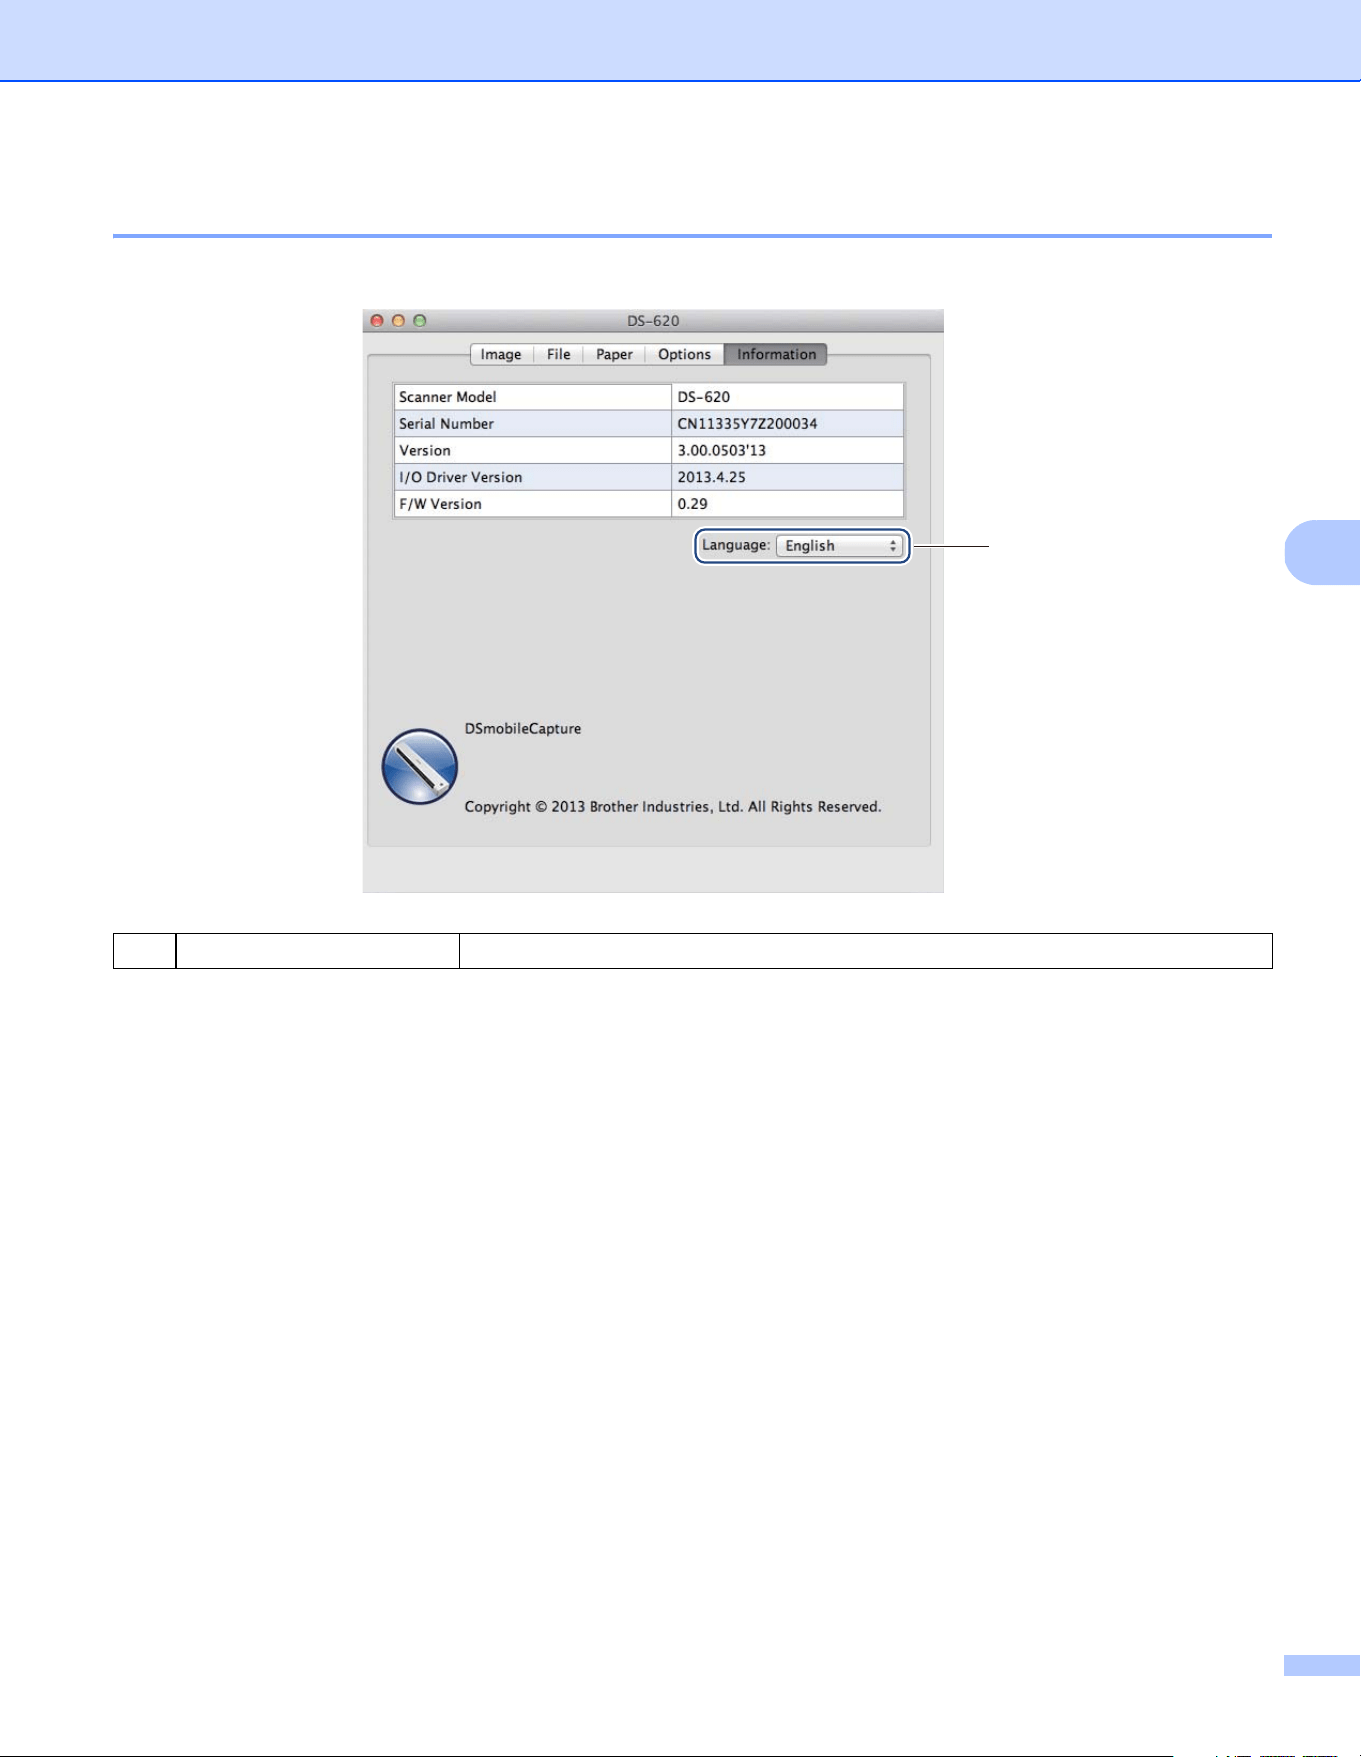
Information
Click Setup , and then click the Information tab to view system and scanner information.
Scanning Applications and Settings
23
5
Using DSmobileCapture (for Macintosh)
a Connect the supplied Micro USB Cable to the Micro USB port on your scanner. Connect the cable
to your computer.
b Double-click the DSmobileCapture shortcut on your desktop.
c DSmobileCapture launches.
d Change the scanning settings, if needed.
For more information on changing settings, see Changing DSmobileCapture scan settings (for Macintosh)
on page 24.
e Insert a document into your scanner.
f Click Scan in the DSmobileCapture screen.
Your scanner starts scanning. The scanned image will be saved in the directory you specified in step 4.
Check the scan result just in case.
Scanning Applications and Settings
24
5
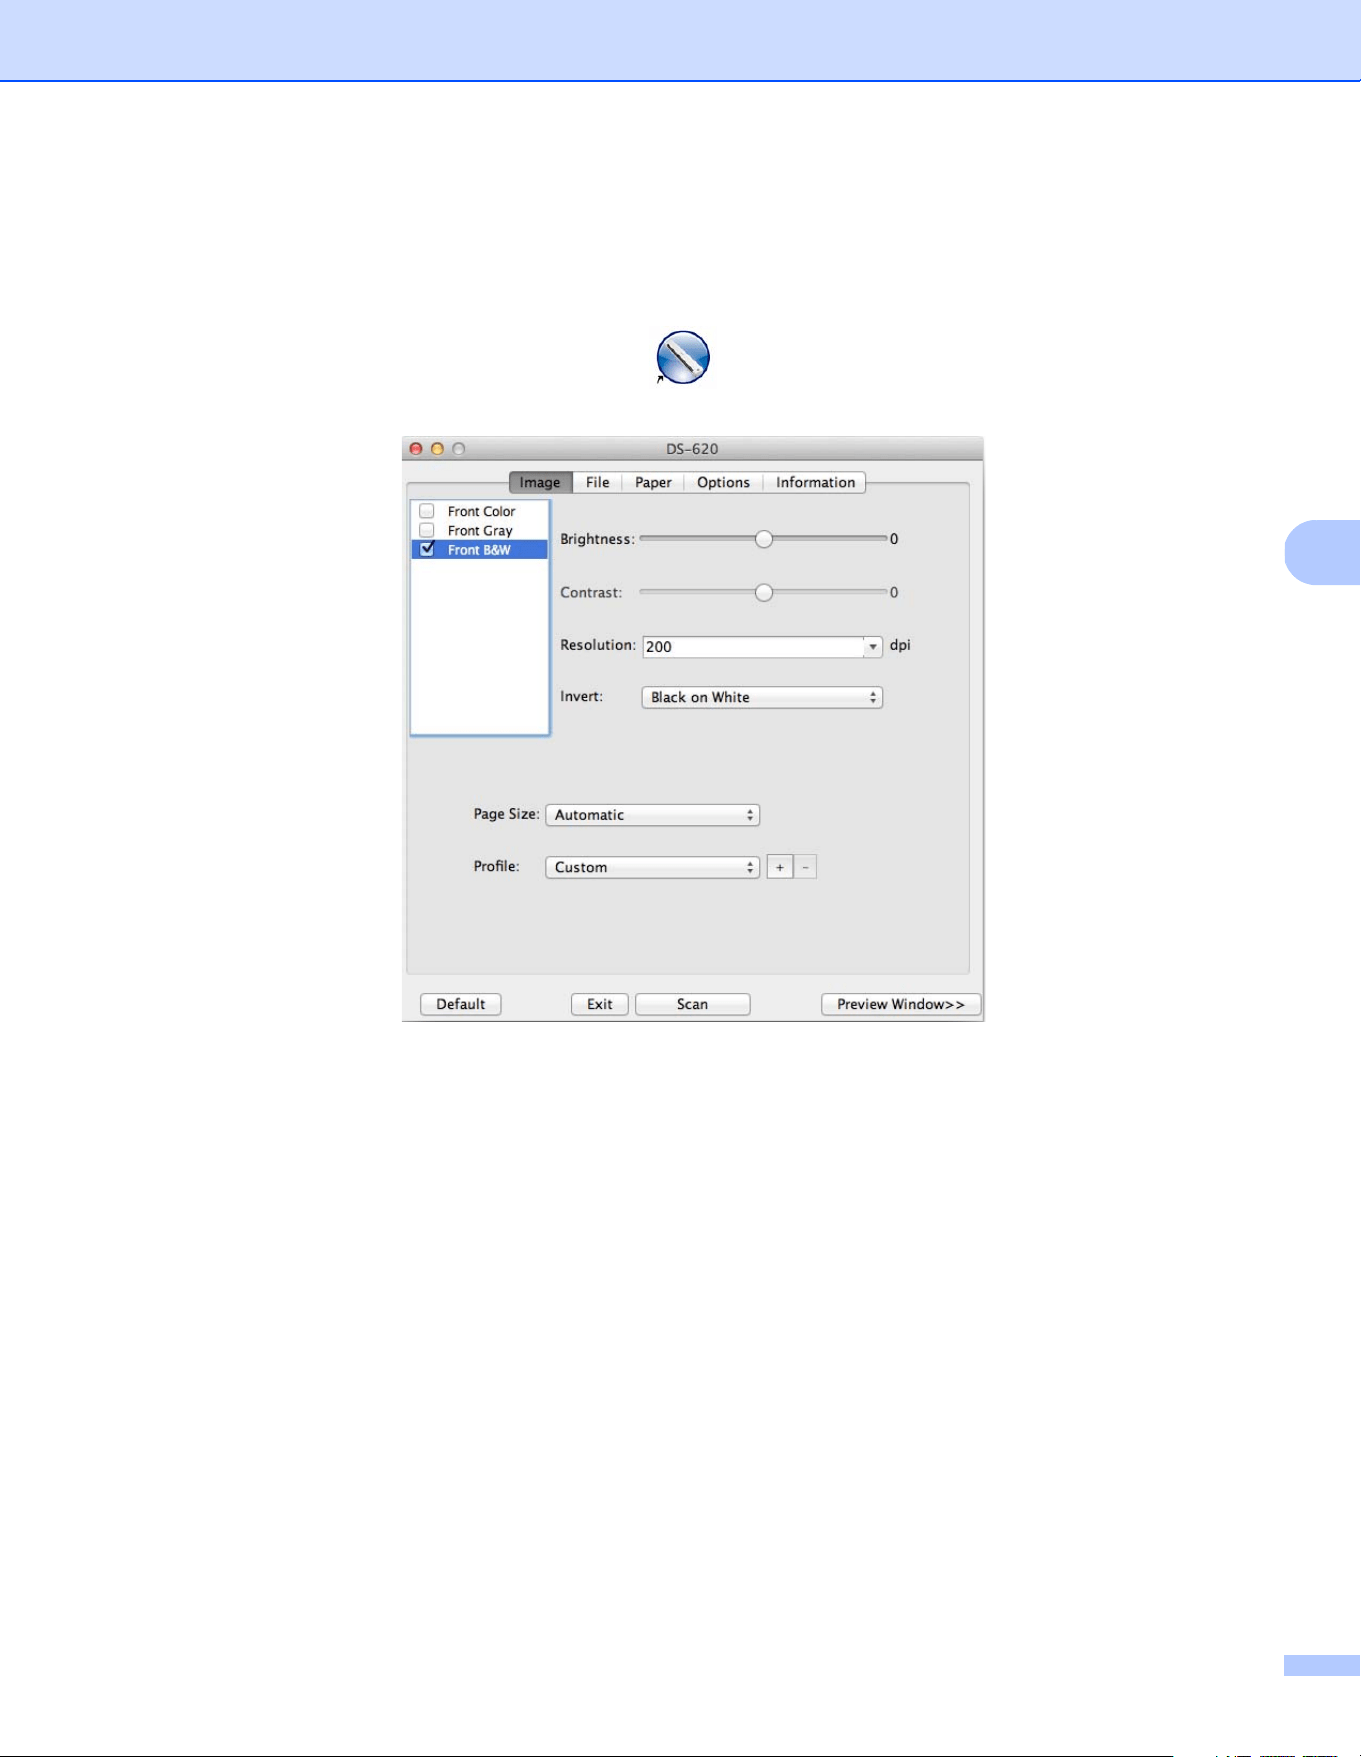
Changing DSmobileCapture scan settings (for Macintosh)
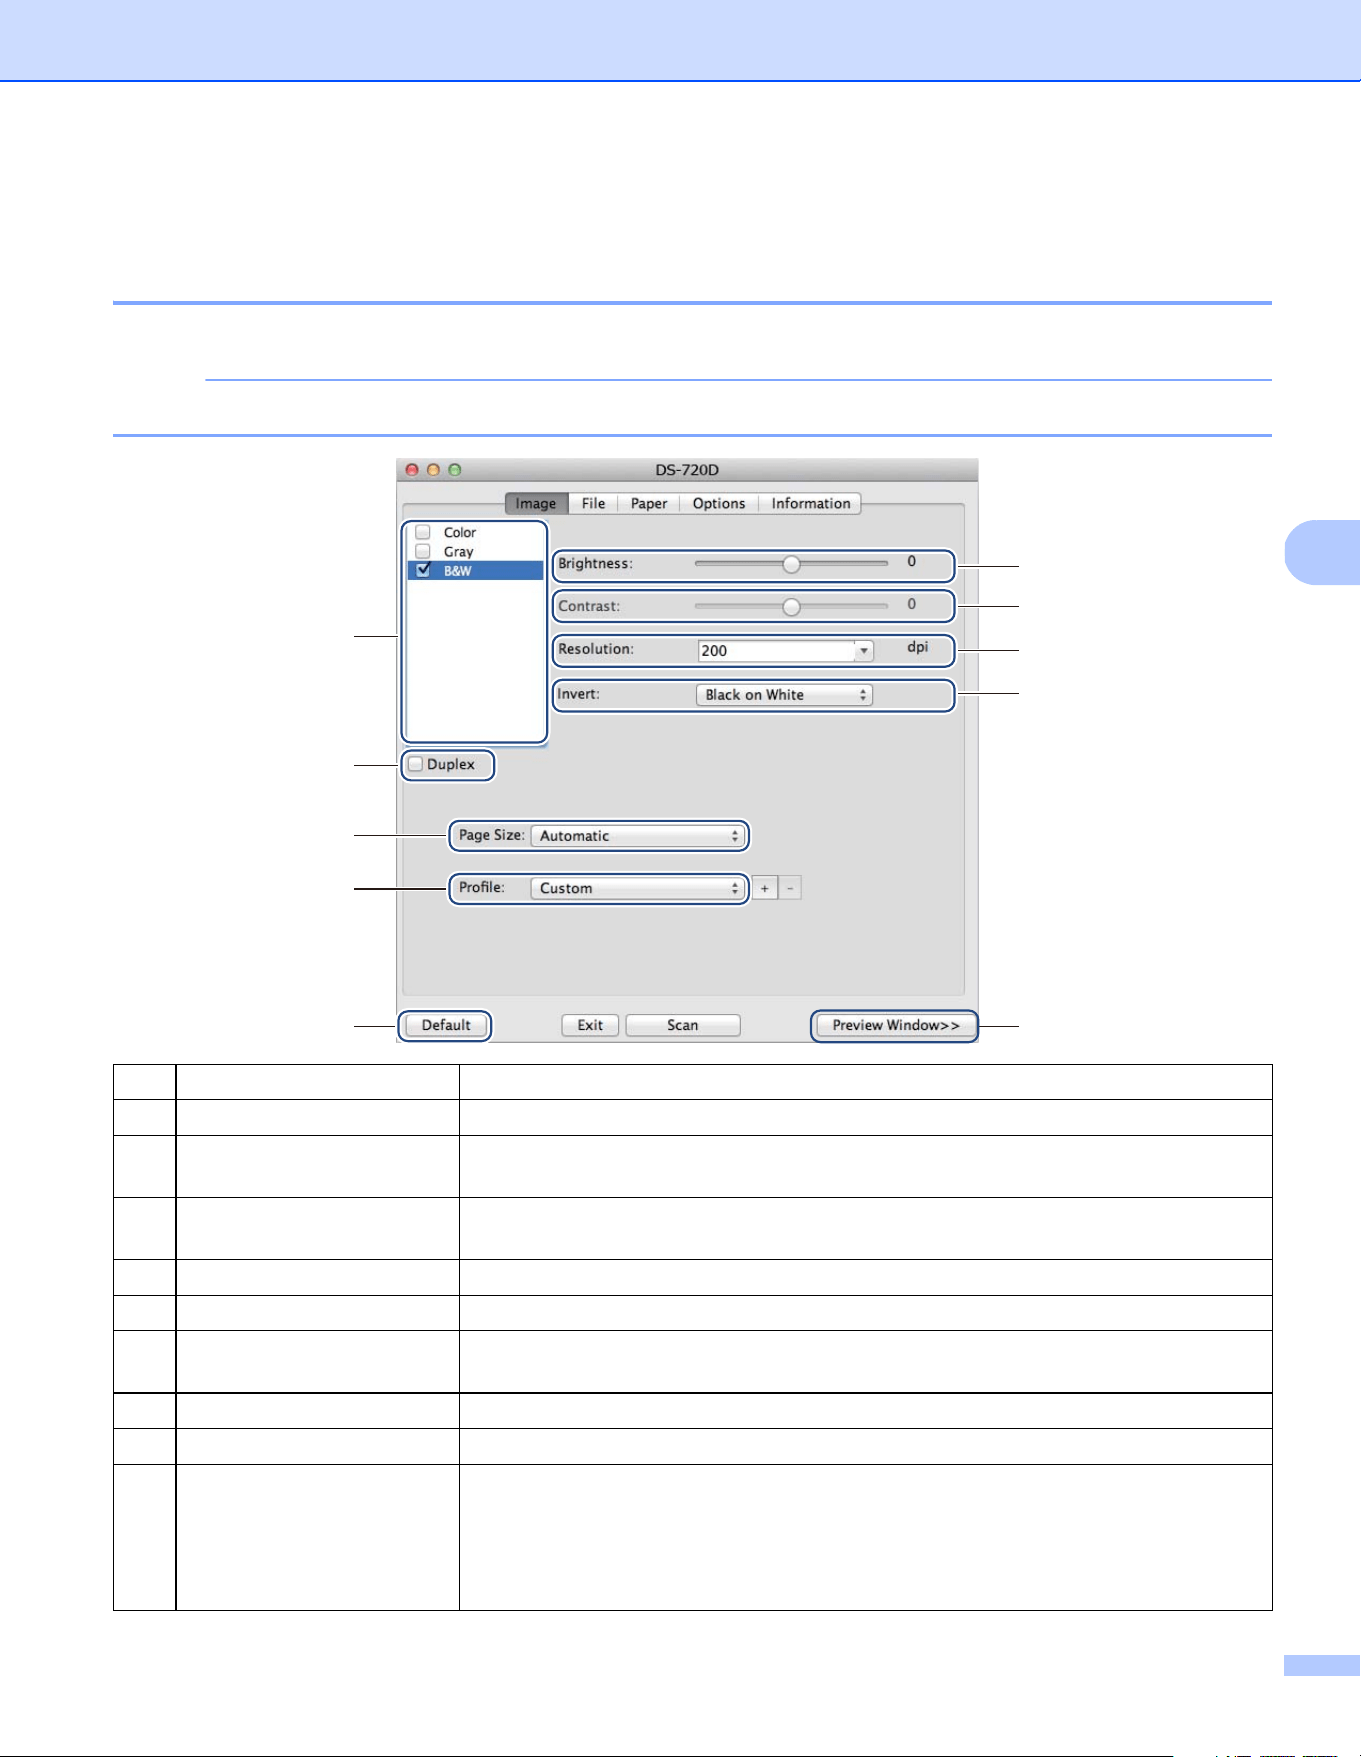
Image settings
Click the Image tab to choose image type and to set several basic scan settings.
NOTE
This image is from the DS-720D.
(1) Image Selection Box Choose the type of document you want to scan.
(2) Duplex (DS-720D only) Select the Duplex check box to perform Duplex (2 sided) scanning.
(3) Brightness Adjusts the lightness or darkness of an image. The range is from -100 to +100.
The factory default is 0.
(4) Contrast Adjusts the range between the darkest and the lightest shades in the image.
The range is from -100 to +100. The factory default is 0.
(5) Resolution Determine the quality of the scanned image. The factory default is 200 dpi.
(6) Invert Reverse the brightness and the colours in the image.
(7) Page Size Page Size allows you to capture a portion of the scanned document. Choose your
paper size from the Page Size pop-up list.
(8) Profiles Save or change the scanning setting in the dialog box of Scanner Properties.
(9) Default Reset values in this and all other Properties tabs to the original factory settings.
(10) Preview Window Click to preview your image before scanning. This preview image helps you define
your scan area.
When you click Preview, scanning for the preview starts and the scanned image
will appear in the Preview Window. Note that the scanned image is only for the
preview and will not be saved.
(1)
(7)
(8)
(3)
(4)
(5)
(6)
(10)
(9)
(2)
Scanning Applications and Settings
25
5
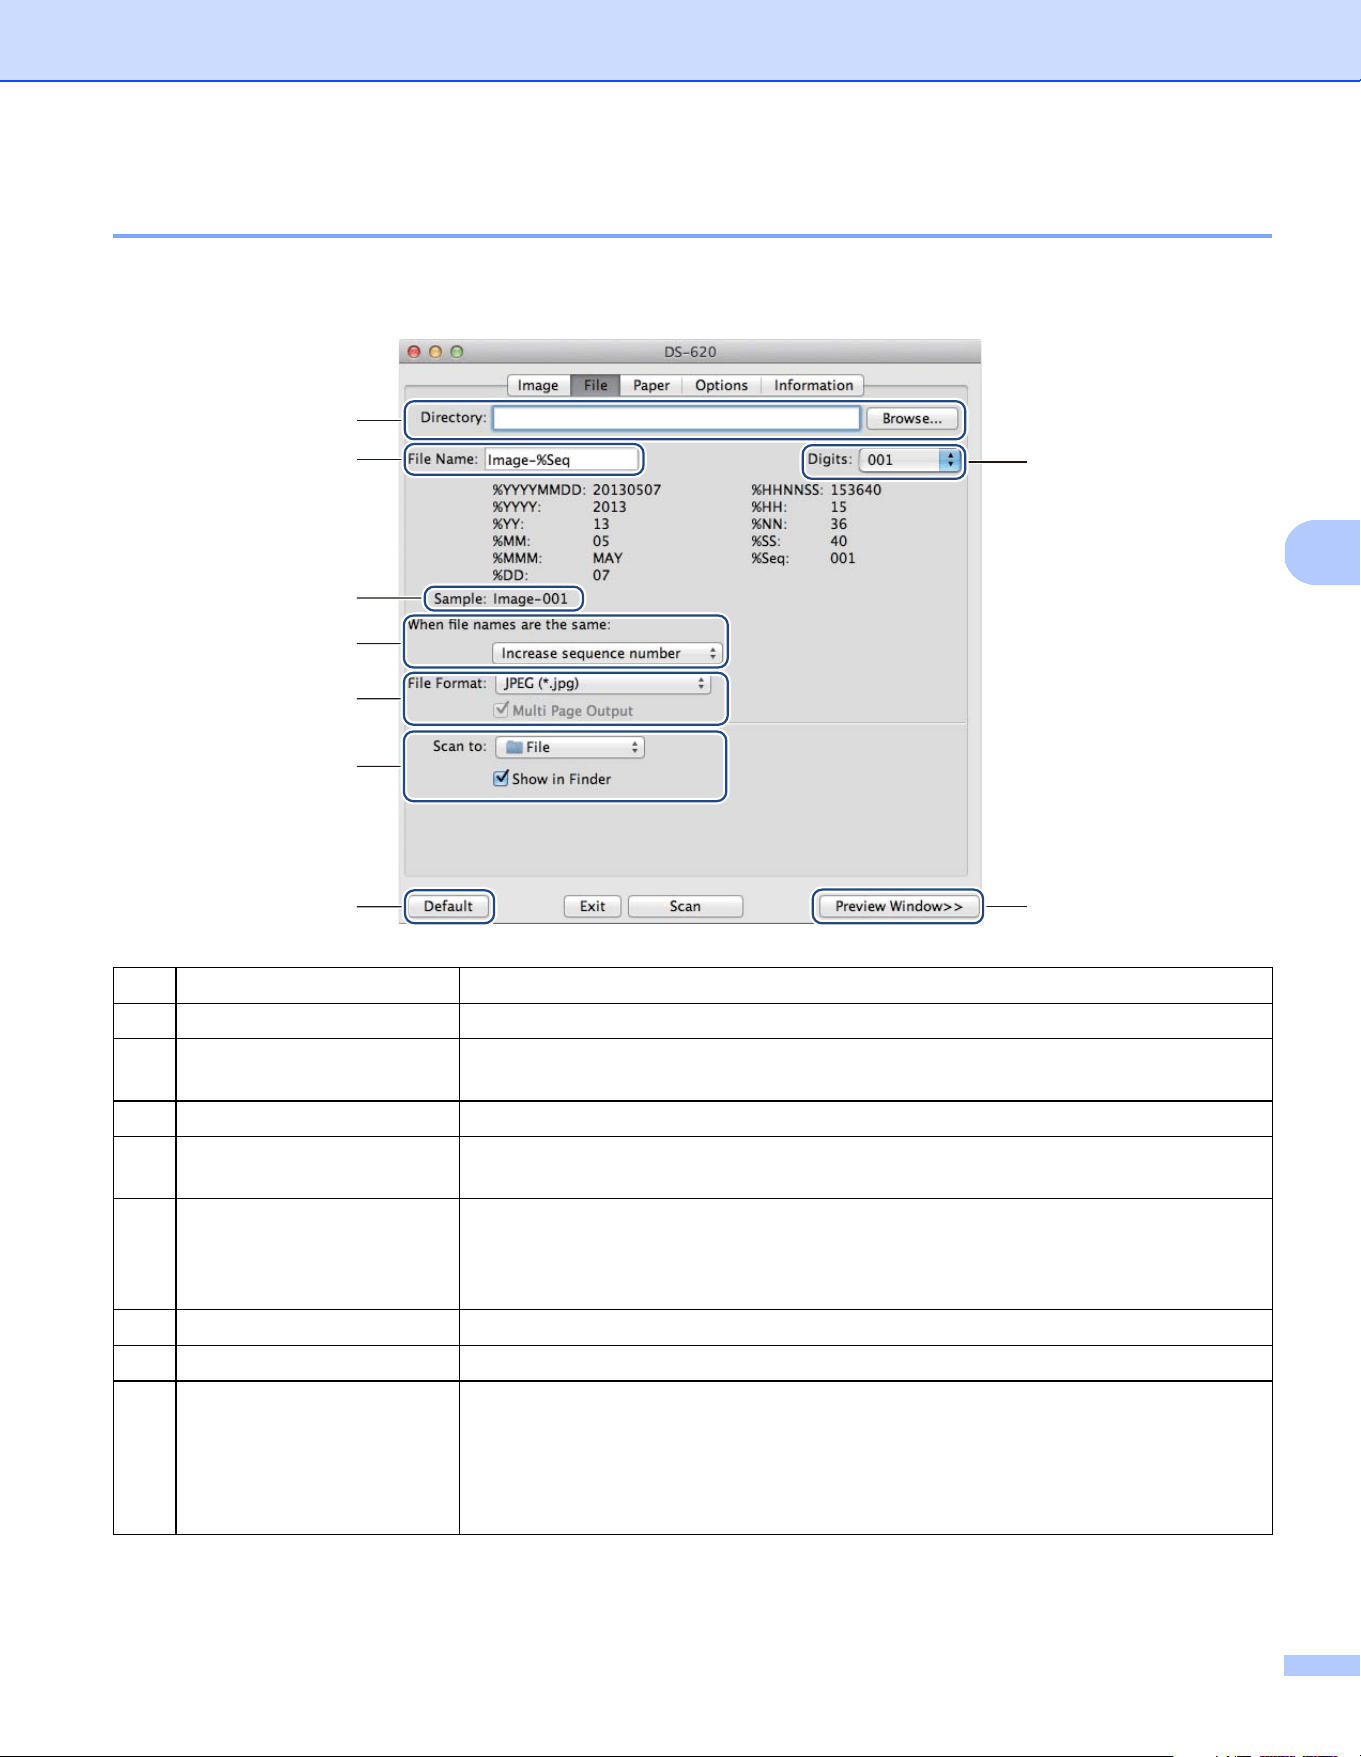
File settings
Click the File tab to configure the settings related to the file name and the directory where you want to save
the scanned image.
(1) Directory Specify the directory where you want to save scanned images.
(2) File Name Set the rule for the file name of the scanned image.
(3) Digits Determine the starting number of the sequence number that is included in the file
name.
(4) Sample Preview the file name that you set.
(5) When file names
are the same
Change the file name if the same name already exists in the directory you chose
in Directory.
(6) File Format Choose the file format for the scanned image.
When you choose TIFF or PDF, the Multi Page Output option is available.
You can continue to scan the next document after the first scan job is completed.
(7) Scan to Choose the destination to send the scanned image.
(8) Default Reset values in this and all other Properties tabs to the original factory settings.
(9) Preview Window Click to preview your image before scanning. This preview image helps you define
your scan area.
When you click Preview, scanning for the preview starts and the scanned image
will appear in the Preview Window. Note that the scanned image is only for the
preview and will not be saved.
(1)
(2)
(4)
(5)
(6)
(7)
(8)
(3)
(9)
Scanning Applications and Settings
26
5
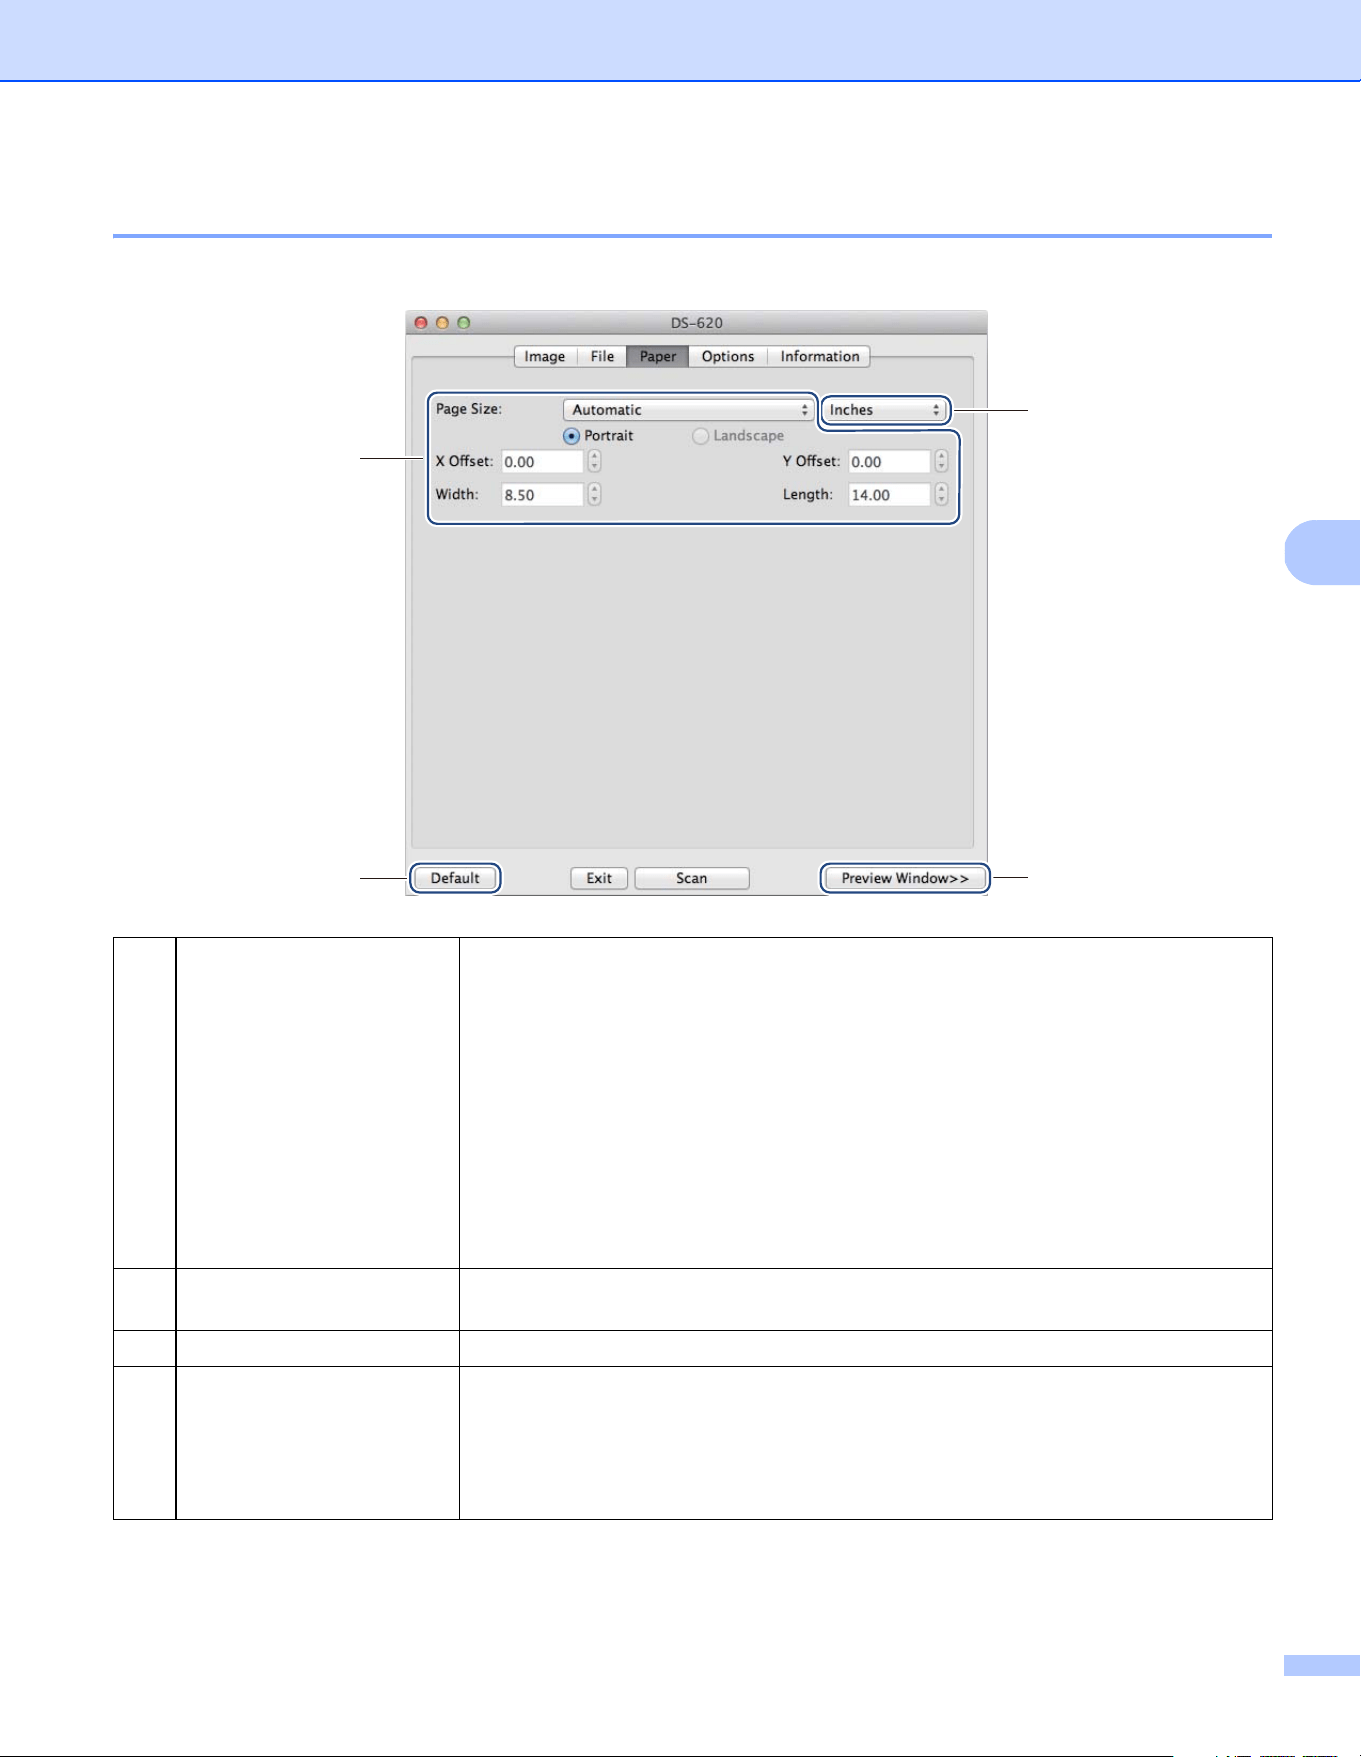
Paper settings
Click the Paper tab to define values related to image output.
(1) Page Size Page Size allows you to capture a portion of the scanned document.
Choose your paper size from the Page Size pop-up list, define the X Offset and
Y Offset values or specify Width and Length to define your scanned area. Click
Preview Window (4) to preview the image placement as you change the values.
• X Offset - the distance from the left edge of the document to the left edge
of the scanned area.
• Y Offset - the distance from the top edge of the document to the top edge
of the scanned area.
• Width - the width of the scanned area.
• Length - the length of the scanned area.
(2) Unit Unit allows you to define your preferred measurement system. Select Inches,
Millimeters, or Pixels from the pop-up list.
(3) Default Reset values in this and all other Properties tabs to the original factory settings.
(4) Preview Window Click to preview your image before scanning. This preview image helps you define
your scan area.
When you click Preview, scanning for the preview starts and the scanned image
will appear in the Preview Window. Note that the scanned image is only for the
preview and will not be saved.
(1)
(3)
(2)
(4)
Scanning Applications and Settings
27
5
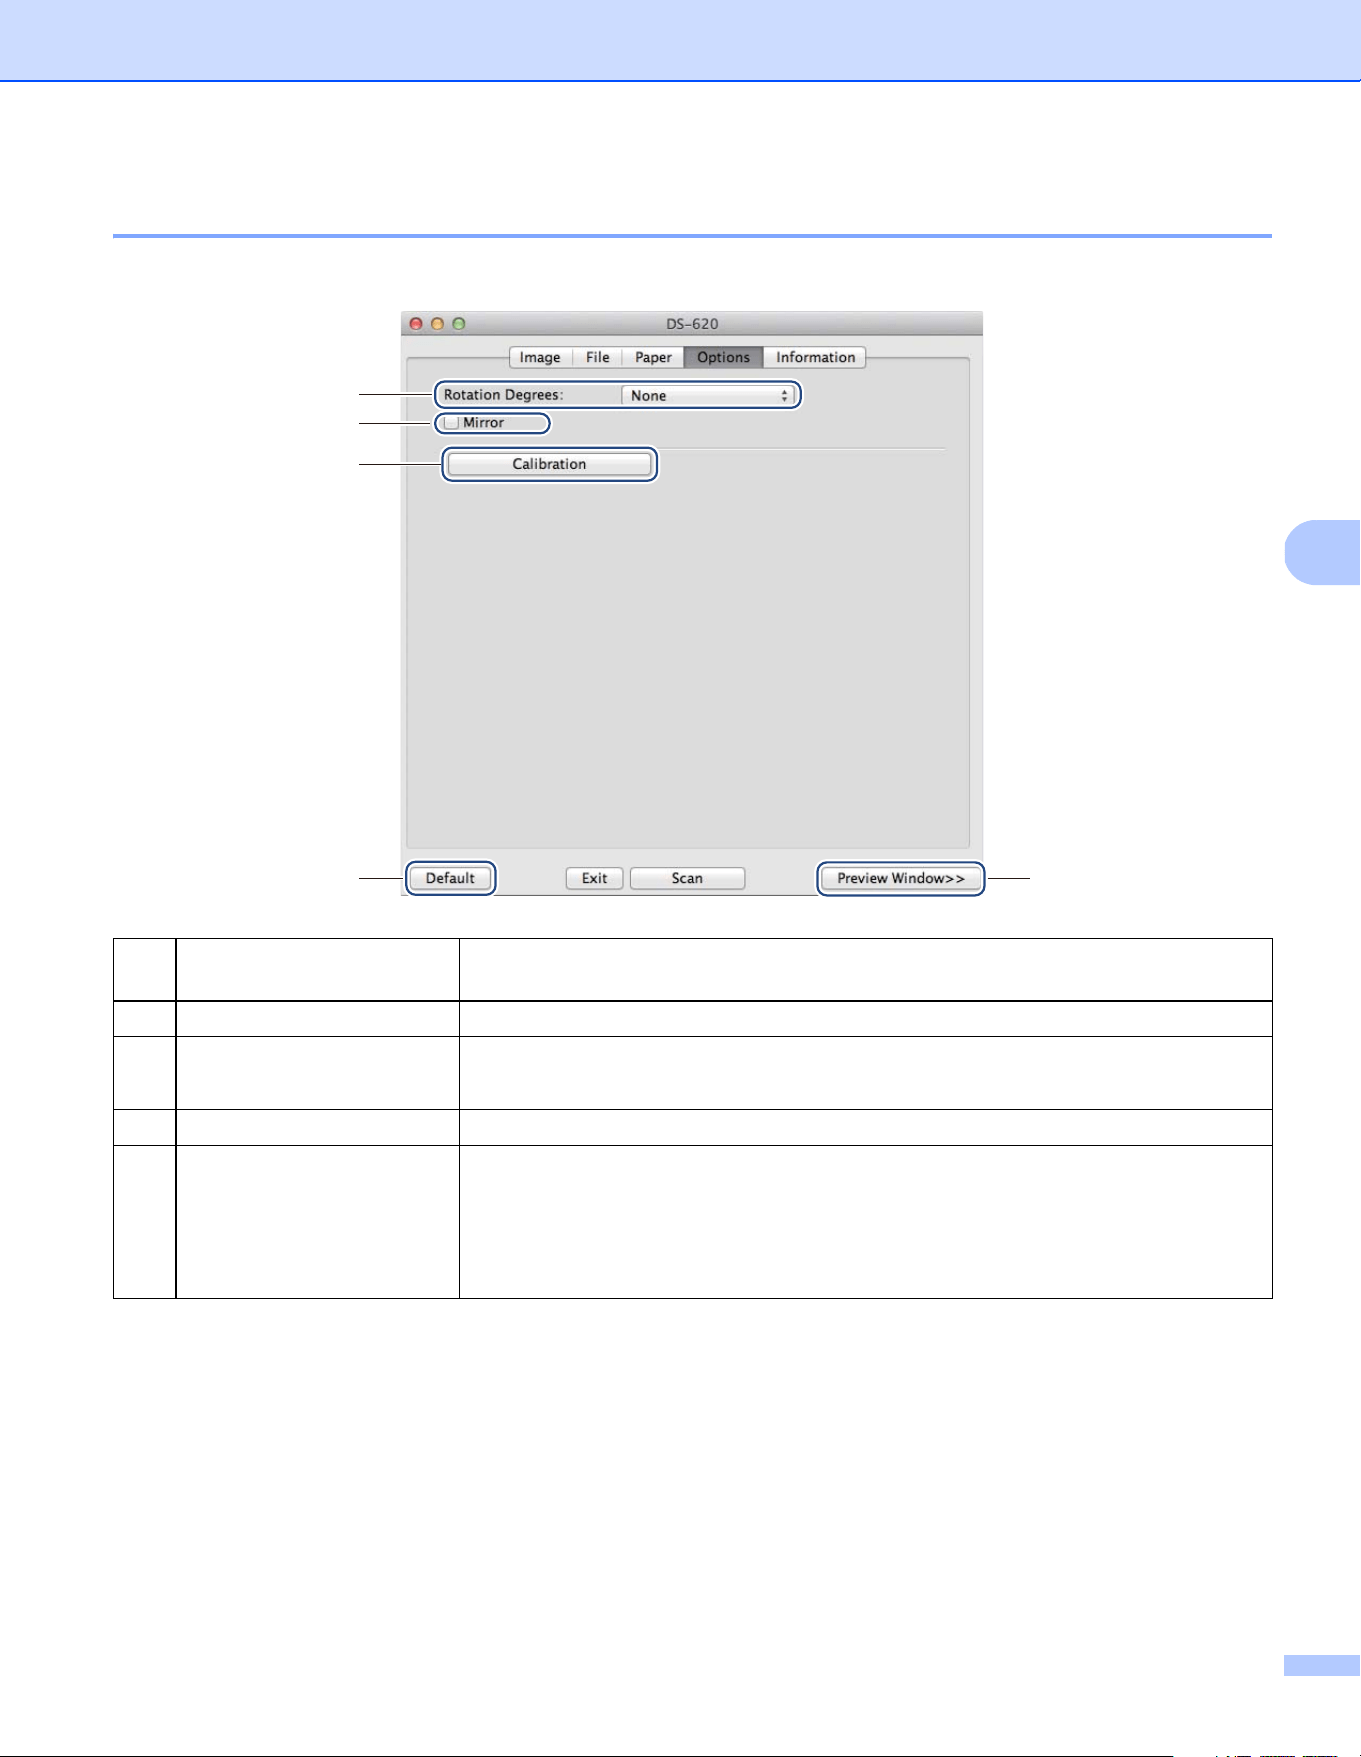
Options settings
Click the Options tab to set some additional image processing settings or calibrate your scanner.
(1) Rotation Degrees Choose the rotation angle from the pop-up list if you want to rotate your scanned
image.
(2) Mirror Select the Mirror check box to reverse your image.
(3) Calibration Calibrate the scanner.
For more information, see Calibration using software (for Macintosh) on page 38.
(4) Default Reset values in this and all other Properties tabs to the original factory settings.
(5) Preview Window Click to preview your image before scanning. This preview image helps you define
your scan area.
When you click Preview, scanning for the preview starts and the scanned image
will appear in the Preview Window. Note that the scanned image is only for the
preview and will not be saved.
(1)
(2)
(3)
(4)
(5)
Scanning Applications and Settings
28
5
Information
Click the Information tab to view system and scanner information.
(1) Language Choose the language you want to display from the pop-up list.
(1)
Scanning Applications and Settings
29
5
Using Button Manager V2 (for Windows
®
)
NOTE
• For more detailed instructions, see the Button Manager V2 User’s Guide from the application’s help menu.
• To see the help menu, right-click the Button Manager V2 icon on the system tray, and then click Help.
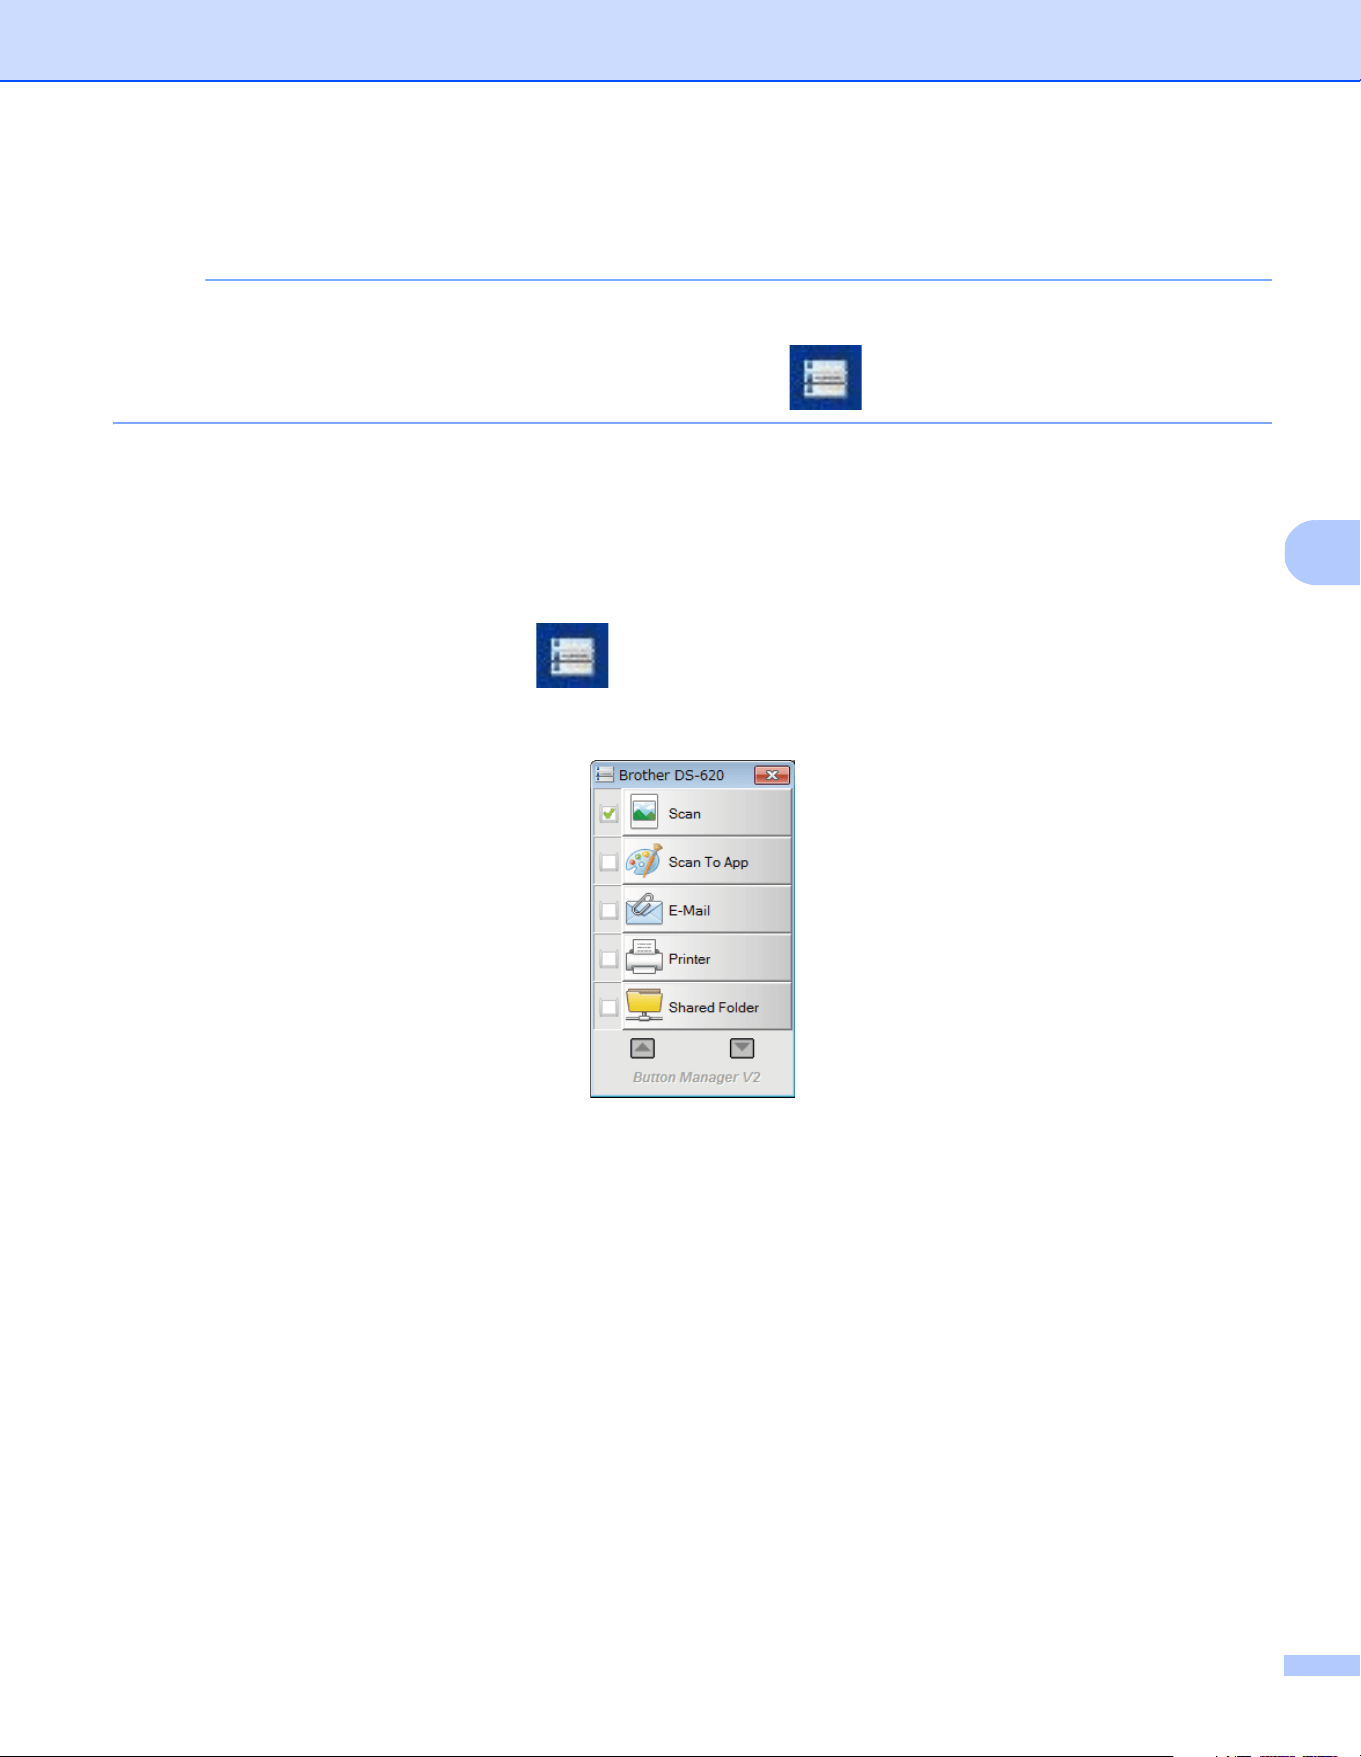
Use either one of these two methods to launch Button Manager V2.
To display the shortcut icon and launch Button Manager V2 from your system tray
a Connect the Micro USB Cable to the Micro USB port on your scanner. Connect the Micro USB Cable
to a USB port on your computer.
b Click the Button Manager V2 icon on the system tray at the bottom right corner of your computer
screen.
c Button Manager V2 launches.

Scanning Applications and Settings
30
5
To launch Button Manager V2 from the Windows
®
Start button
a Click Start > All Programs > Brother DS-620 (DS-720D) Scanner > Button Manager >
Button Manager V2.
b When the Select Scanner Model dialog box appears, select your scanner model from the list,
and then click OK.
c Button Manager V2 launches.

Scanning Applications and Settings
31
5
Scanning methods
There are two ways to scan using Button Manager V2. If necessary, check or change scan settings before
scanning.
To scan using the scan button on the Button Manager V2 Button Panel
a Insert a document into your scanner.
b Launch Button Manager V2.
c If necessary, right-click the desired scan button in the Button Manager V2 Button Panel to change
scan settings.
For more information, see the Button Manager V2 User’s Guide.
d Click the scan button you want to use in the Button Manager V2 Button Panel to start scanning.
To scan using the Start button on your scanner
a Insert a document into your scanner.
b Launch Button Manager V2.
c If necessary, right-click the desired scan button in the Button Manager V2 Button Panel to change
scan settings.
For more information, see the Button Manager V2 User’s Guide.
d Select the check box to the left of the scan button you want to use.
e Press the Start button on your scanner to start scanning.
Scanning Applications and Settings
32
5
Scan buttons in the Button Manager V2 Button Panel
(for Windows
®
)
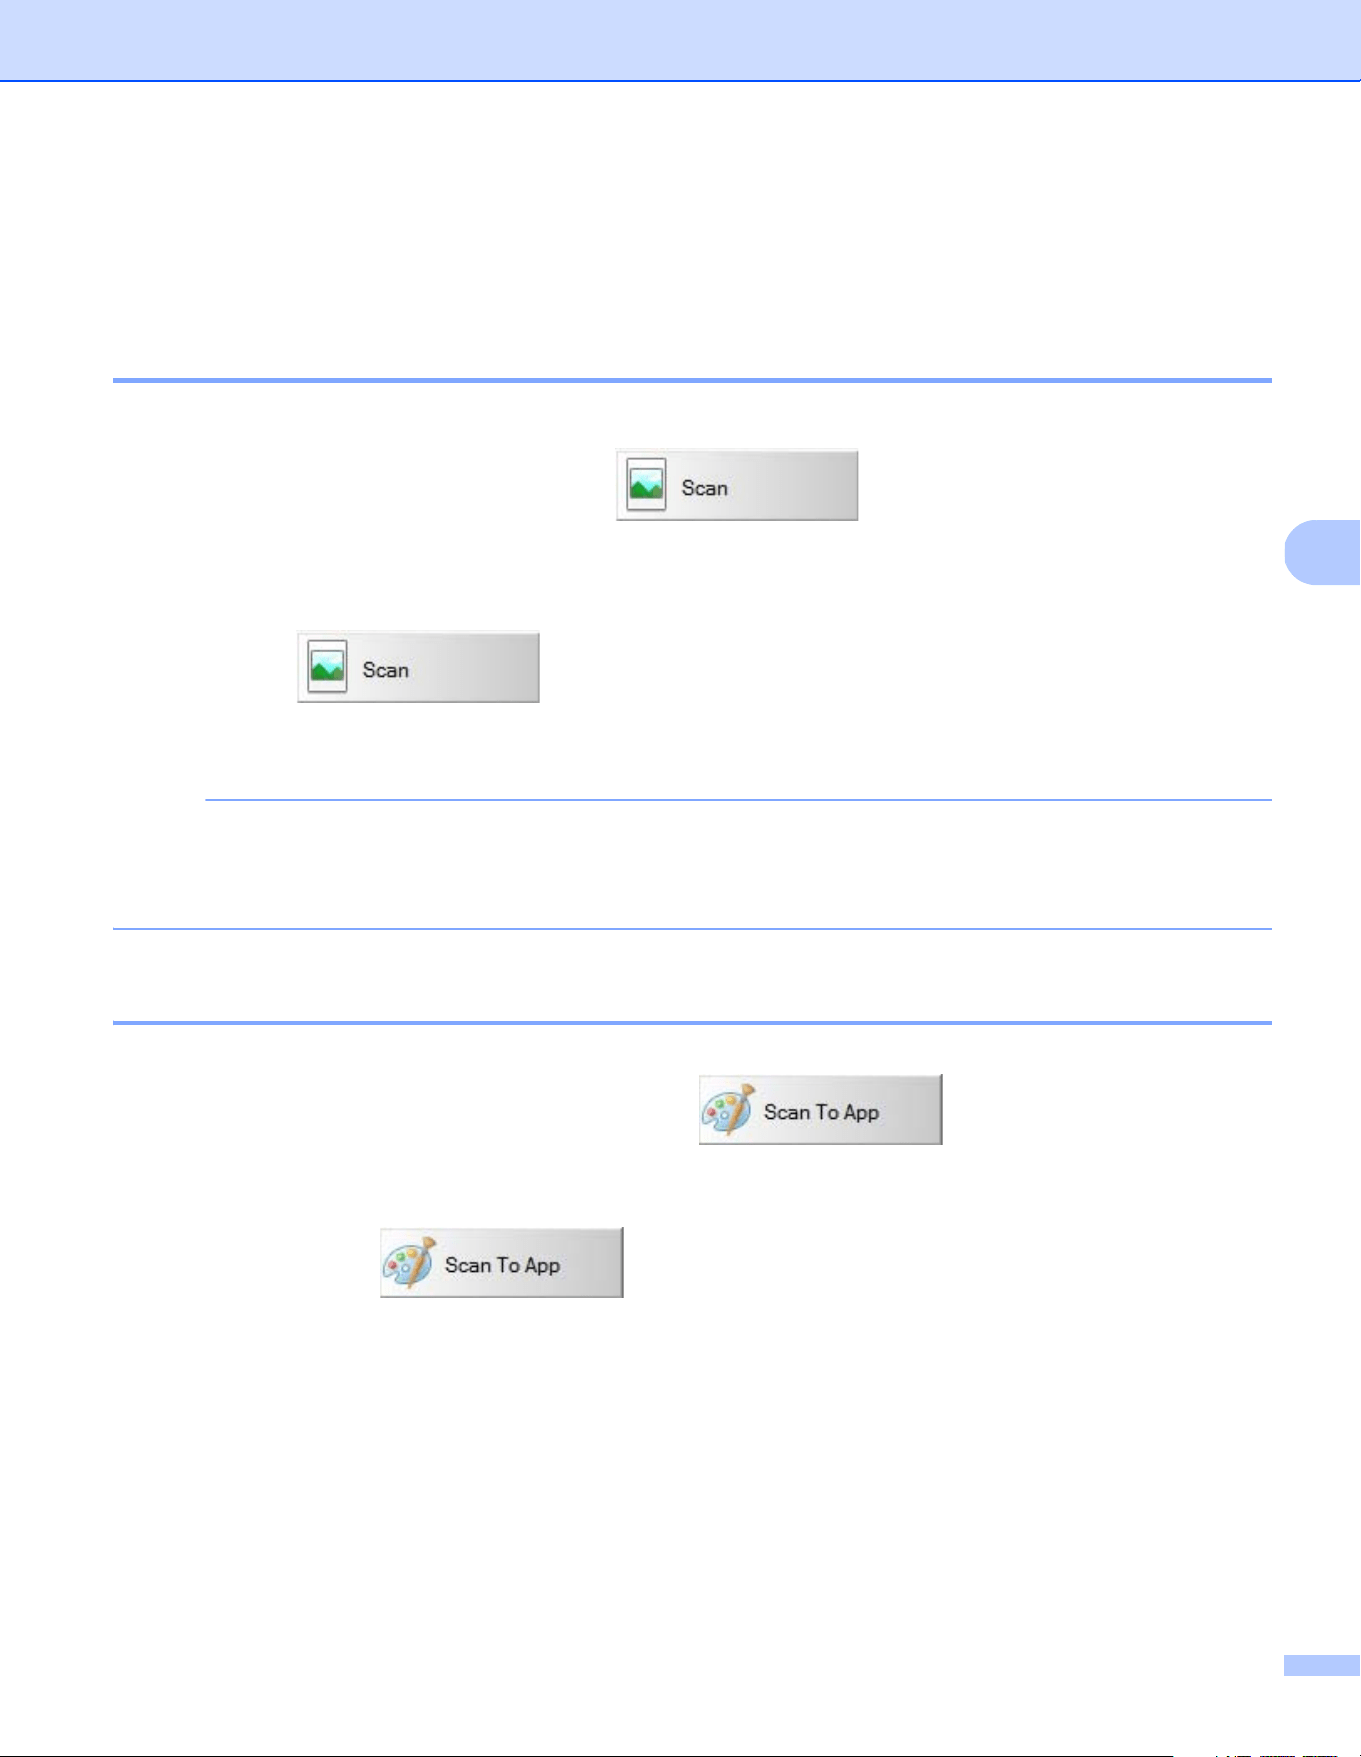
Scan to an image
Use this option to open the scanned image in a specific application. Note that the application must already
be open and running on your computer.
To change scan settings, right-click the Scan button (see the Button Manager V2
User’s Guide).
a Insert a document into your scanner.
b Launch Button Manager V2.
c Click Scan .
When scanning is complete, the scanned image will be inserted to your open and running application.
Check the scan result just in case.
NOTE
• If no application launches or the application is minimized, the scanned image will be saved in a predefined
folder (for more information about changing the folder path, see the Button Manager V2 User’s Guide).
• If two or more applications are open, the scanned image will appear in the active application.
Scan to an application
Use this option to open the scanned image in an application that you choose from a list.
To change scan settings, right-click the Scan to App button.
a Insert a document into your scanner.
b Launch Button Manager V2.
c Click Scan to App to start scanning.
When scanning is complete, the scanned image will be opened in an application you chose from
the displayed list.
Check the scan result just in case.
Scanning Applications and Settings
33
5
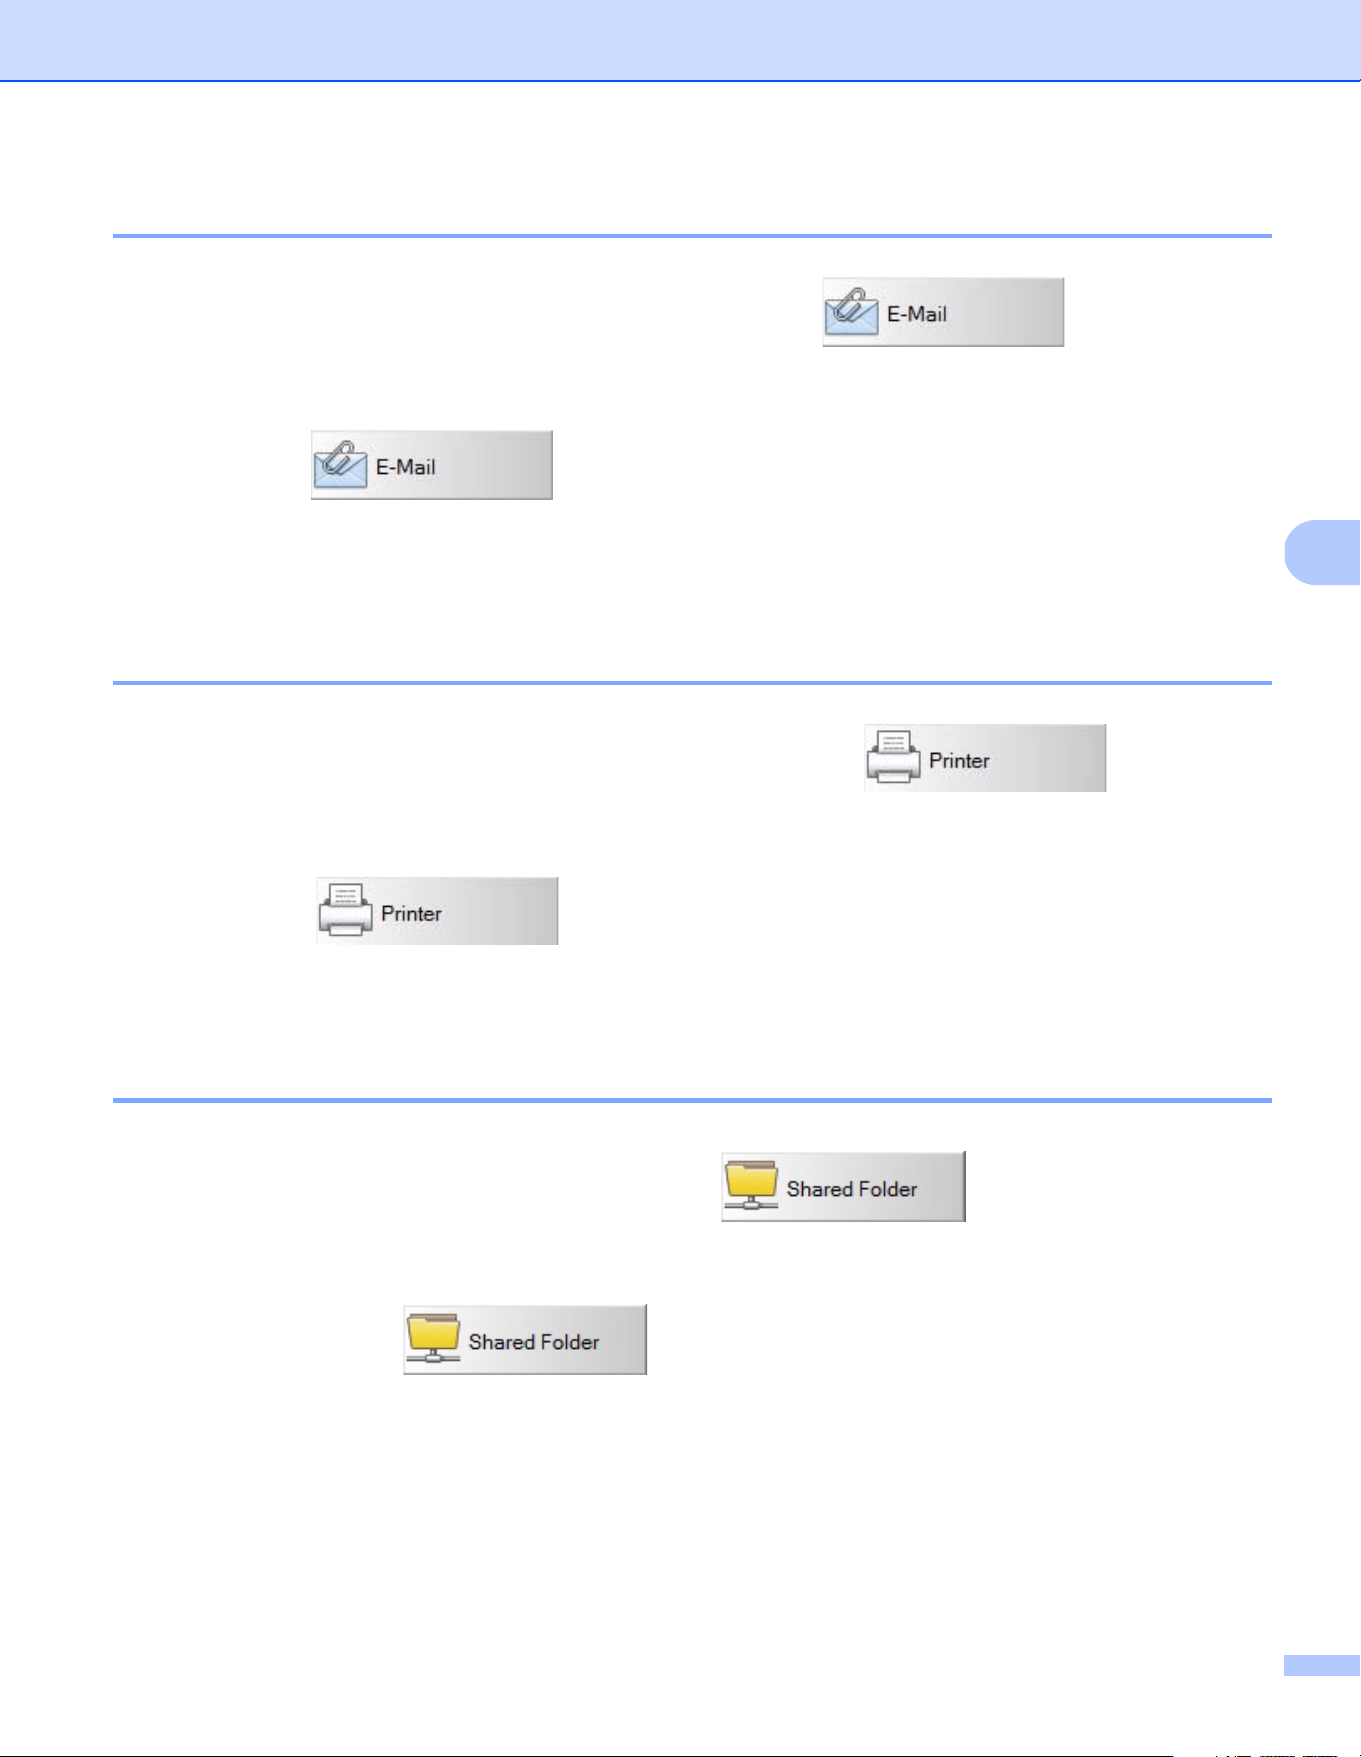
Scan to an email
Use this option to attach the scanned image to an email.
To change scan settings or email software, right-click the E-mail button.
a Insert a document into your scanner.
b Launch Button Manager V2.
c Click E-mail to start scanning.
When scanning is complete, your email software launches and the scanned image will be attached
to a blank email.
Check the scan result just in case.
Scan to a printer
Use this option to print the scanned image from your default printer.
To change scan settings or destination printer, right-click the Printer button.
a Insert a document into your scanner.
b Launch Button Manager V2.
c Click Printer to start scanning.
When scanning is complete, the scanned image will be printed from your default printer.
Check the scan result just in case.
Scan to shared folder
Use this option to save the scanned image in a shared folder on your network.
To change scan settings, right-click the Shared Folder button.
a Insert a document into your scanner.
b Launch Button Manager V2.
c Click Shared Folder to start scanning.
When scanning is complete, the scanned image will be sent directly to the shared folder.
Check the scan result just in case.

Scanning Applications and Settings
34
5
Scan to a FTP server
Use this option to save the scanned image in a folder on your FTP server.
To change scan settings, right-click the FTP button.
a Insert a document into your scanner.
b Launch Button Manager V2.
c Click FTP to start scanning.
When scanning is complete, the scanned image will be sent directly to the folder on your FTP server.
Check the scan result just in case.
35
6
6
Calibrate your scanner only if the scanned images start to look fuzzy, the colour looks abnormal (darker than
normal), after 8,000 scans, or if the scanner has been stored without being used for a long time.
You will need the Calibration Sheet that came with your scanner, to successfully perform calibration.
Calibration using software (for Windows
®
)
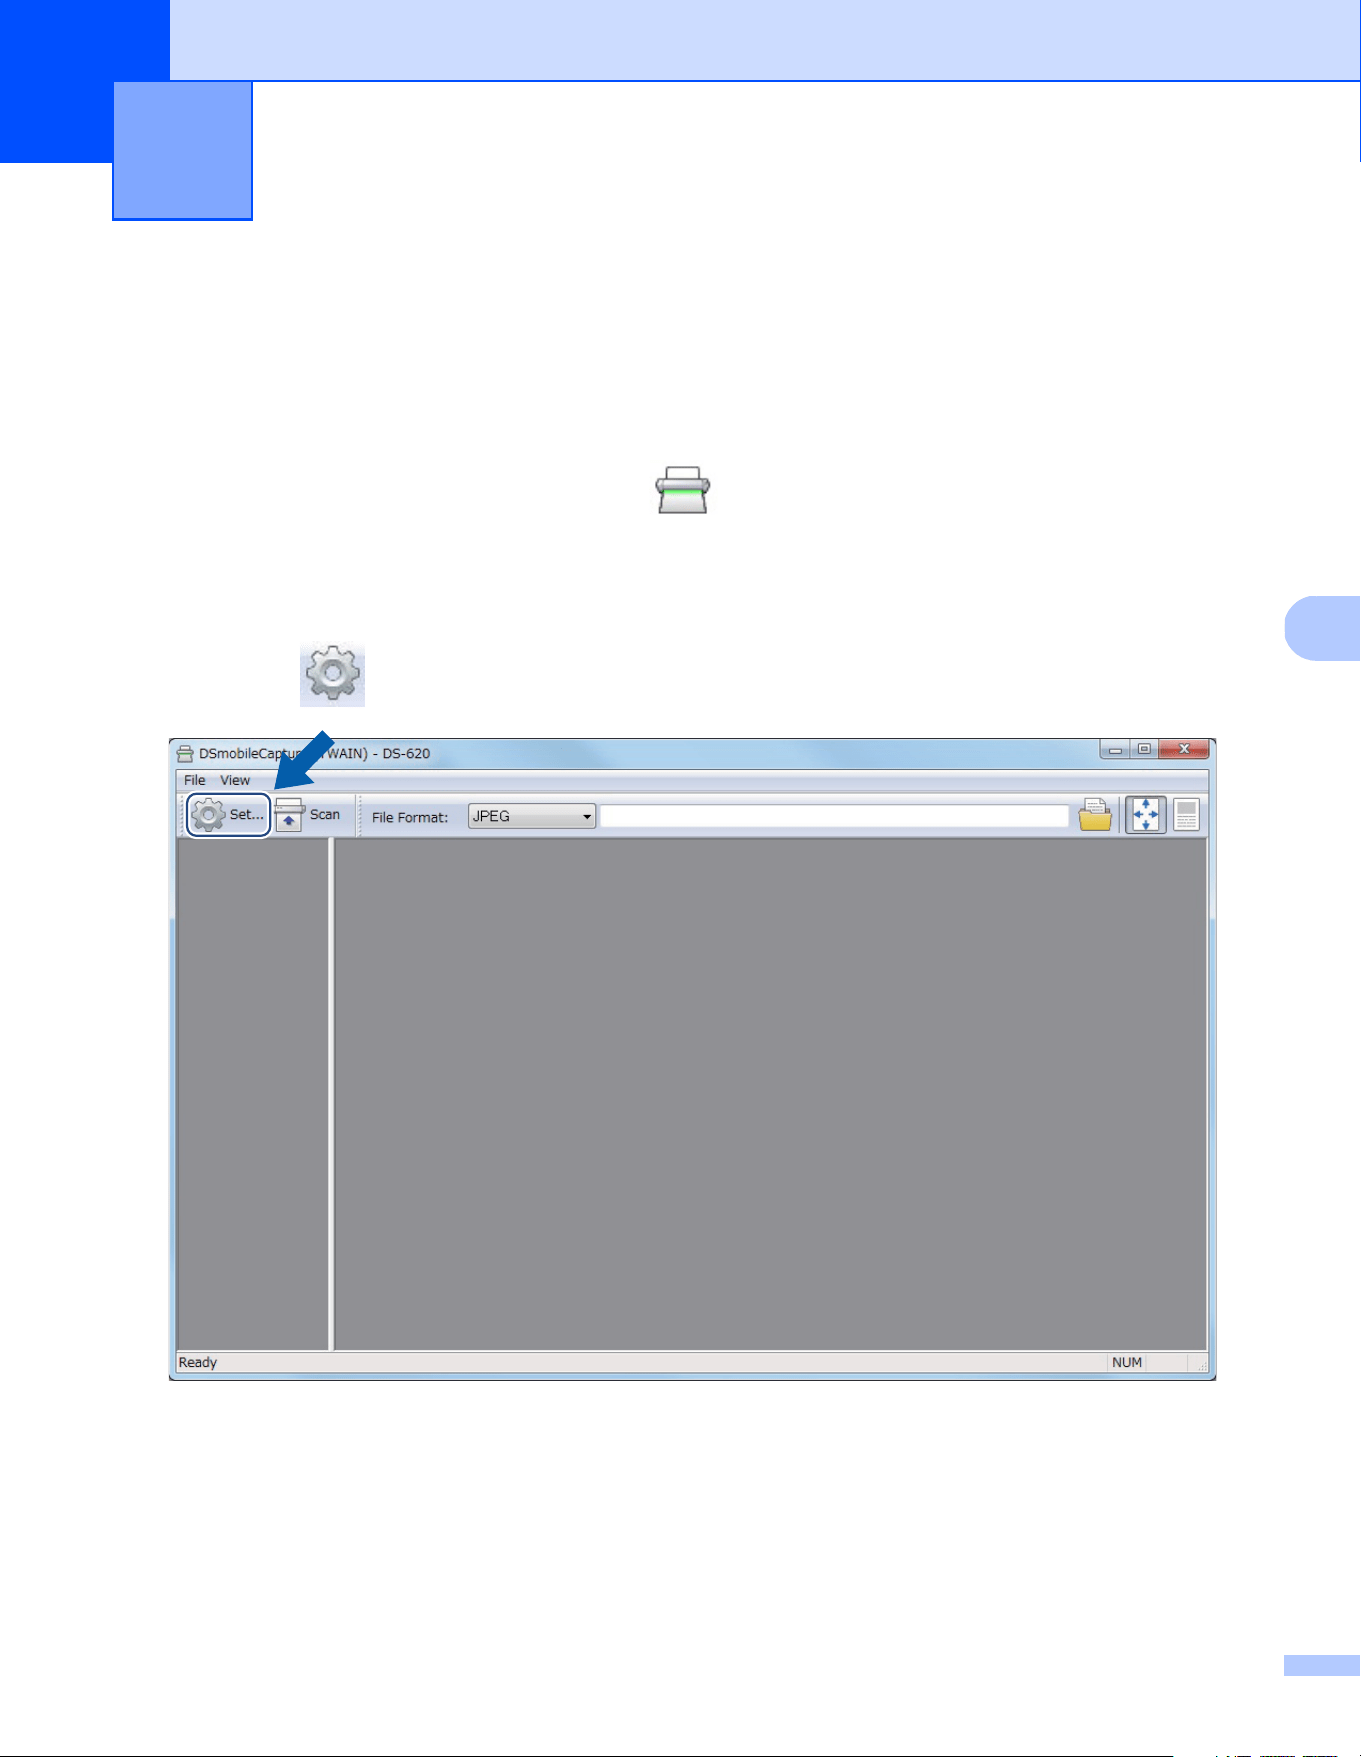
a Double-click the DSmobileCapture shortcut on your desktop.
b The Select Scanner Model dialog box appears. Select TWAIN under Driver Type, select
Brother DS-620 (DS-720D) under Scanner Model, and then click OK.
c DSmobileCapture launches.
d Click Setup .
Scanner Calibration 6
Scanner Calibration
36
6
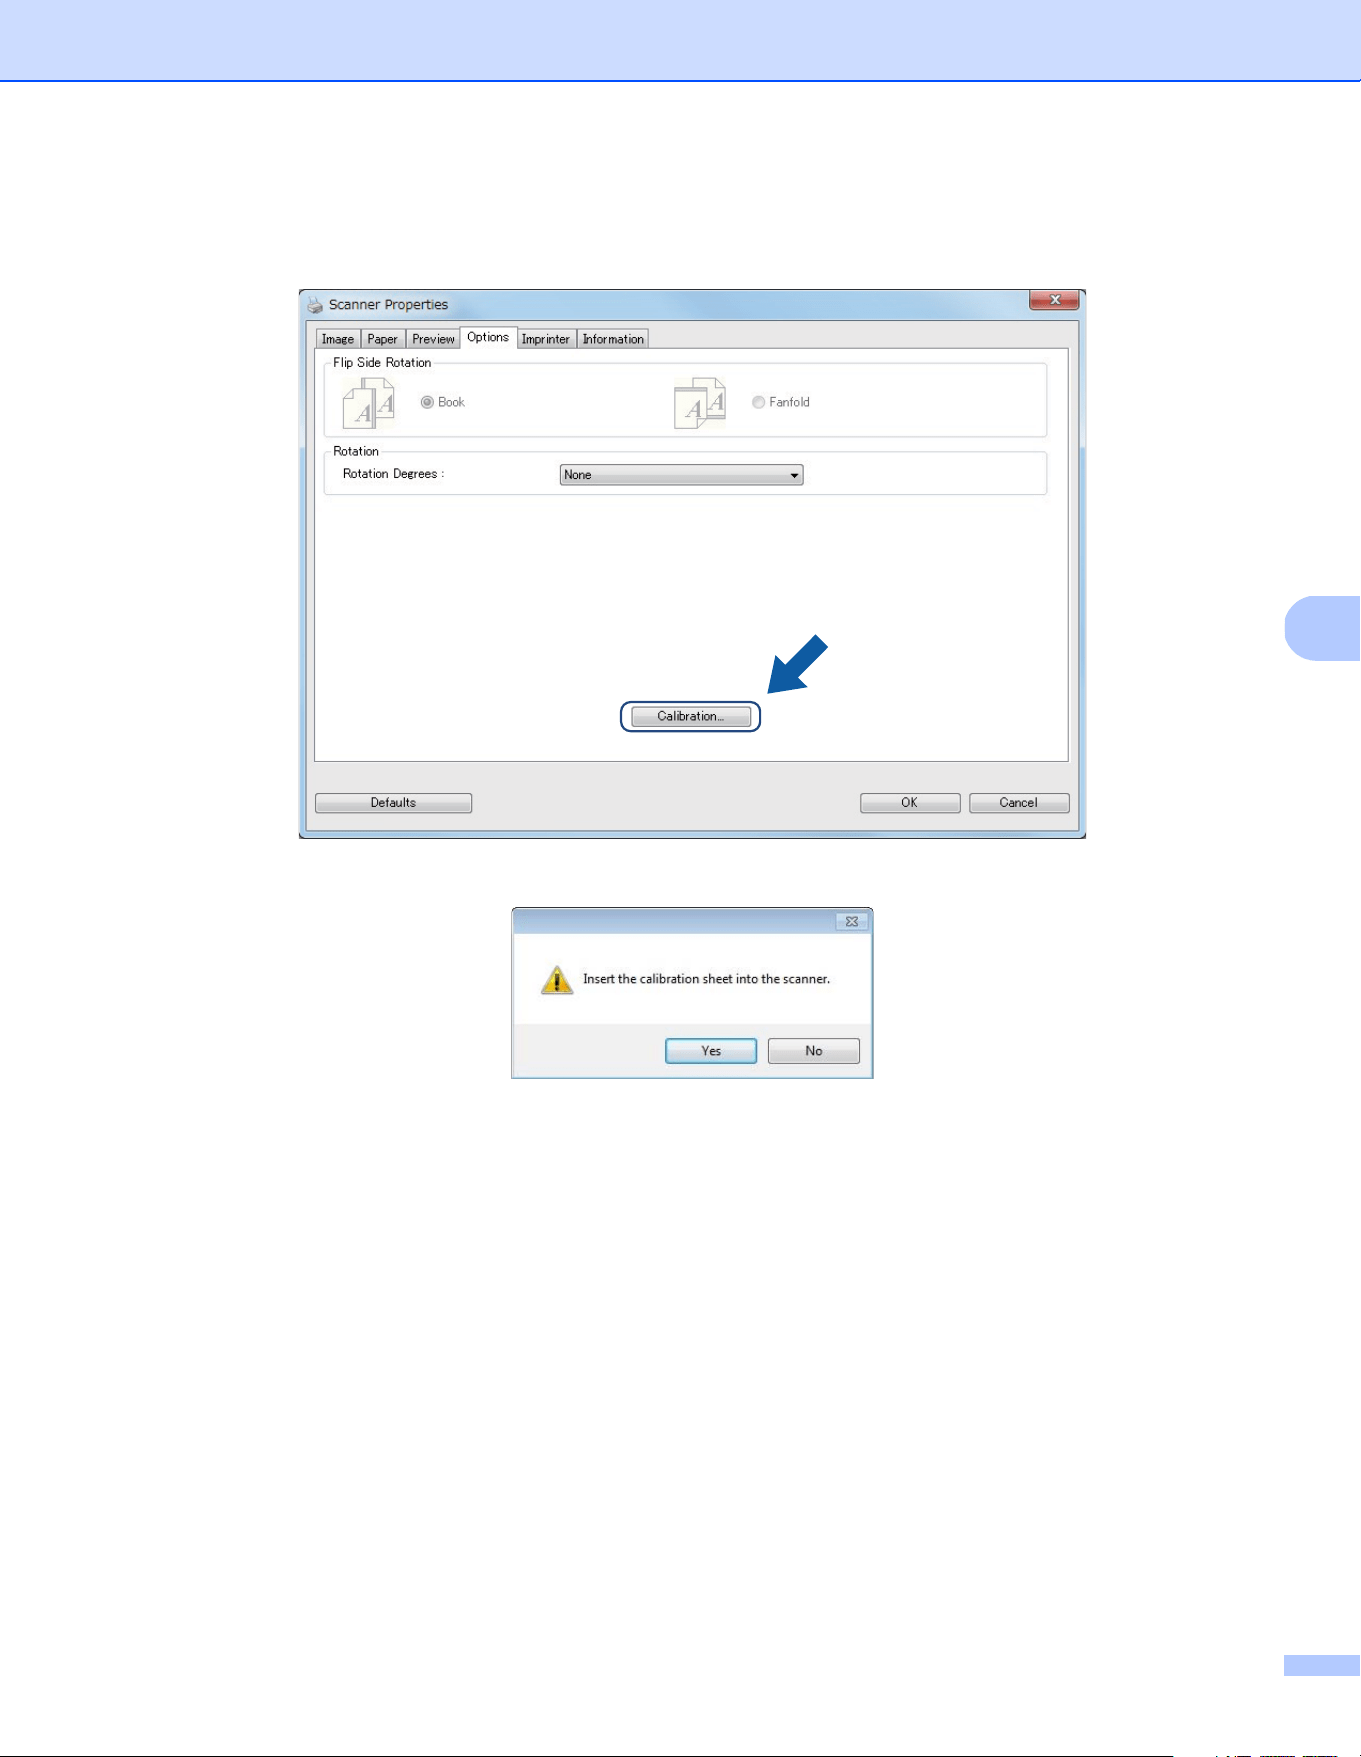
e Click the Options tab.
f Click Calibration to start calibrating the scanner.
g A message appears, prompting you to insert the Calibration Sheet.
Scanner Calibration
37
6
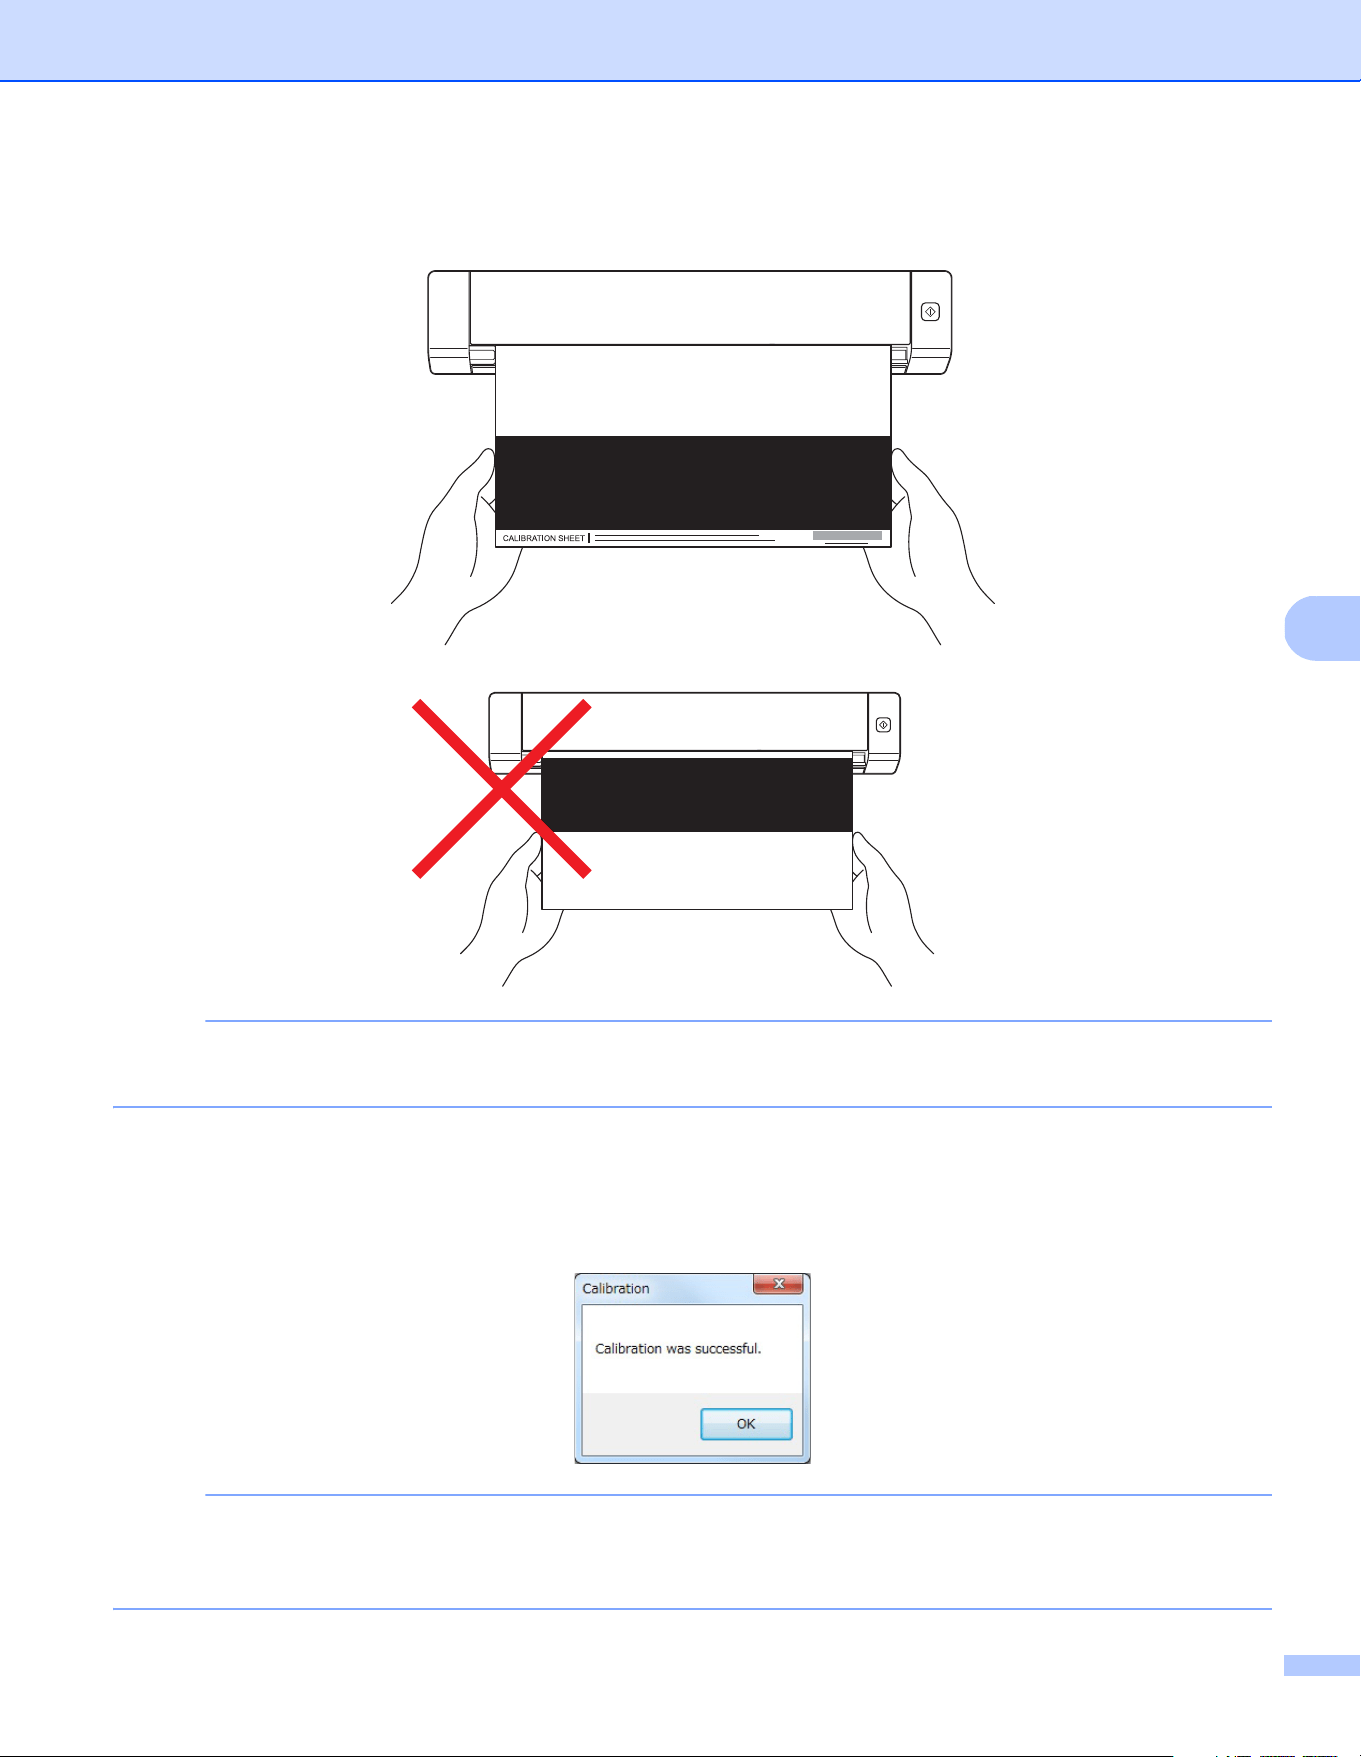
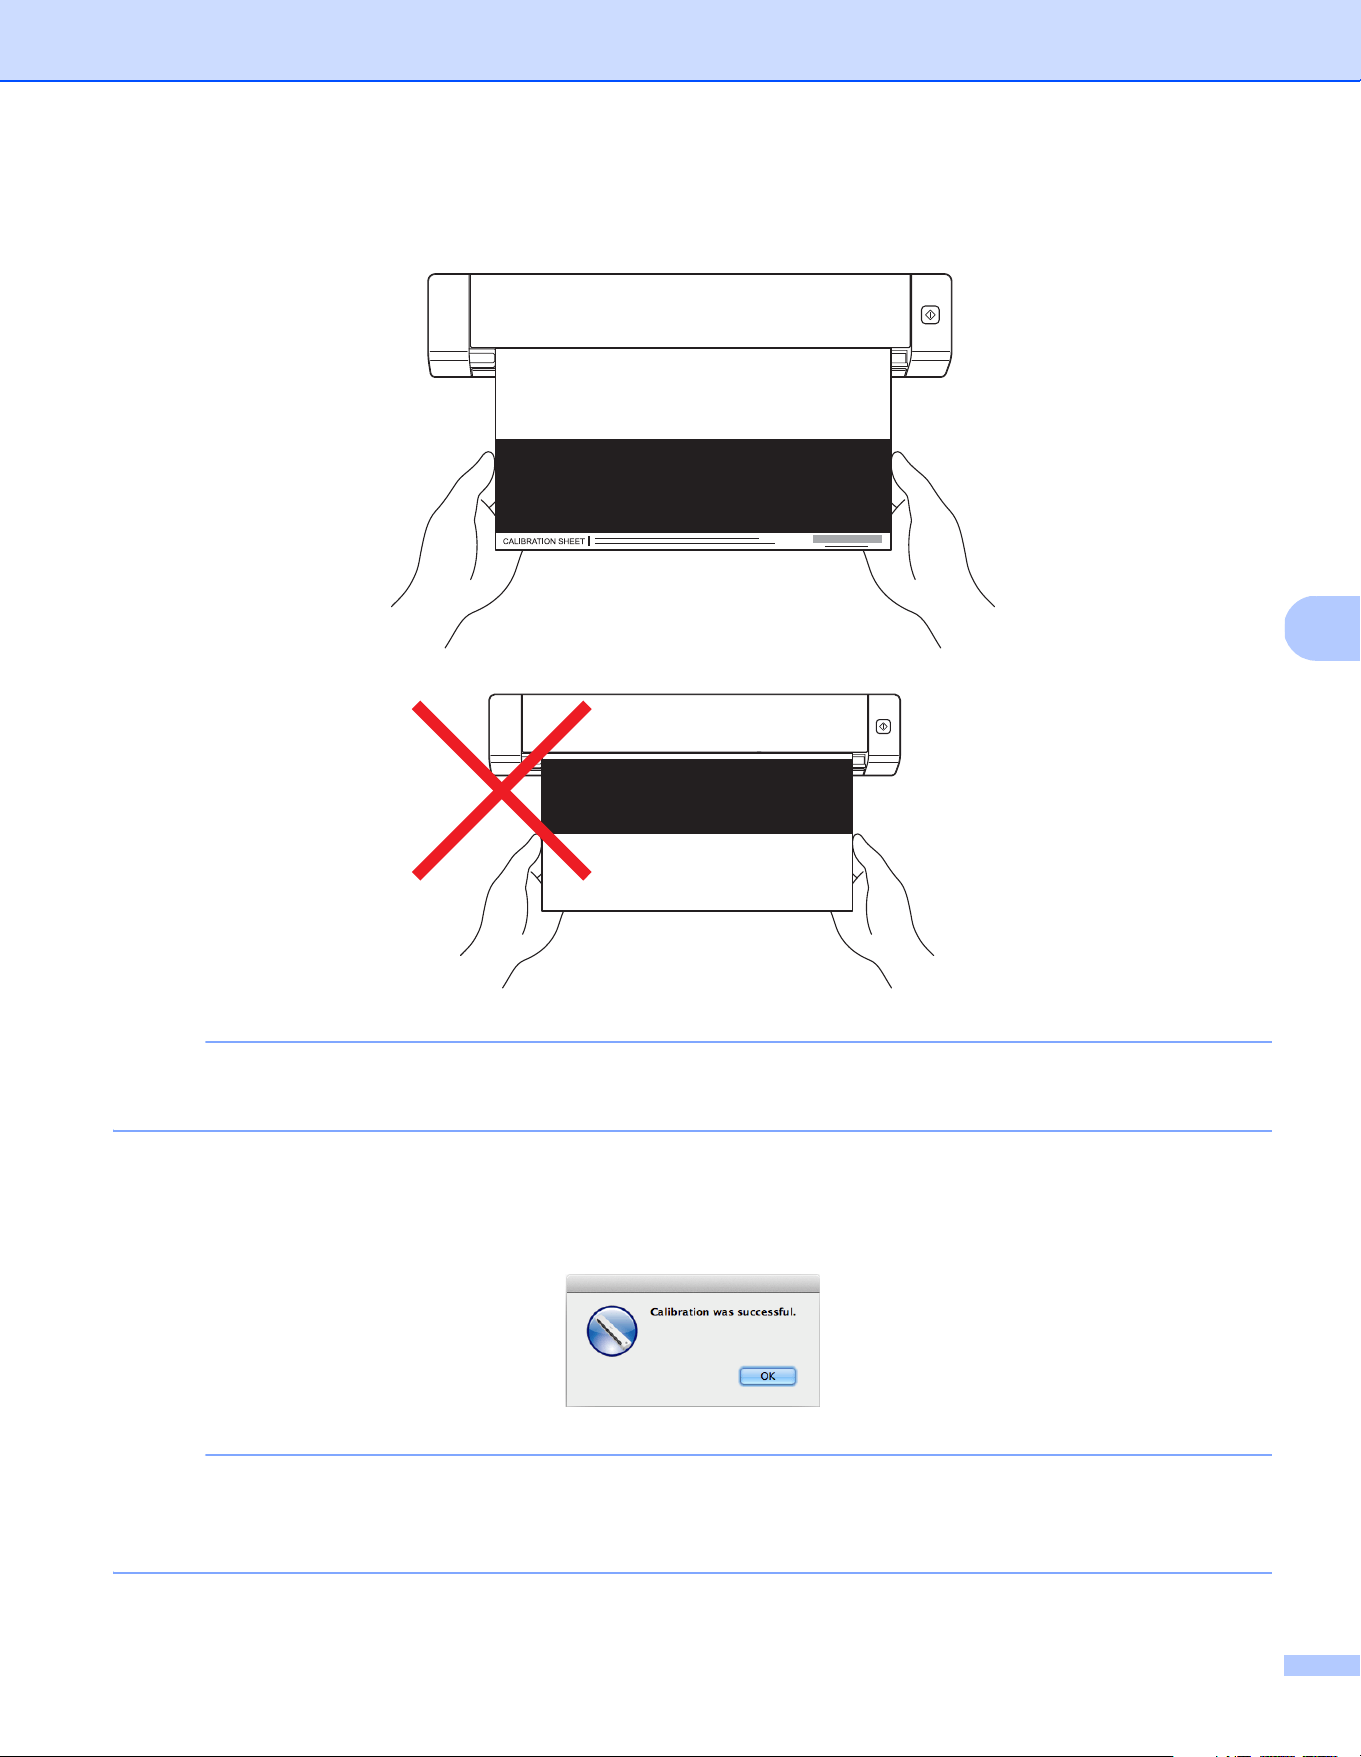
h Hold the edges of the Calibration Sheet and insert it into the feeder slot as shown below.
Click Yes.
NOTE
Hold only the edges of the Calibration Sheet and be careful not to touch the white or black area.
Leaving marks or fingerprints on this sheet can cause errors in calibration.
i Scanning starts automatically.
j After the Calibration Sheet is scanned, a Calibration was successful message appears on your
screen, indicating that calibration is finished. Click OK to end calibration, and then click OK to close
the Options screen.
NOTE
If a Calibration failed message appears on your screen, remove the Micro USB Cable from your computer.
Reconnect the Micro USB Cable to the computer and perform the calibration again. If calibration fails again,
check the scanner’s print head to ensure it is clean.
Scanner Calibration
38
6
Calibration using software (for Macintosh)
a Double-click the DSmobileCapture shortcut on your desktop.
b DSmobileCapture launches.
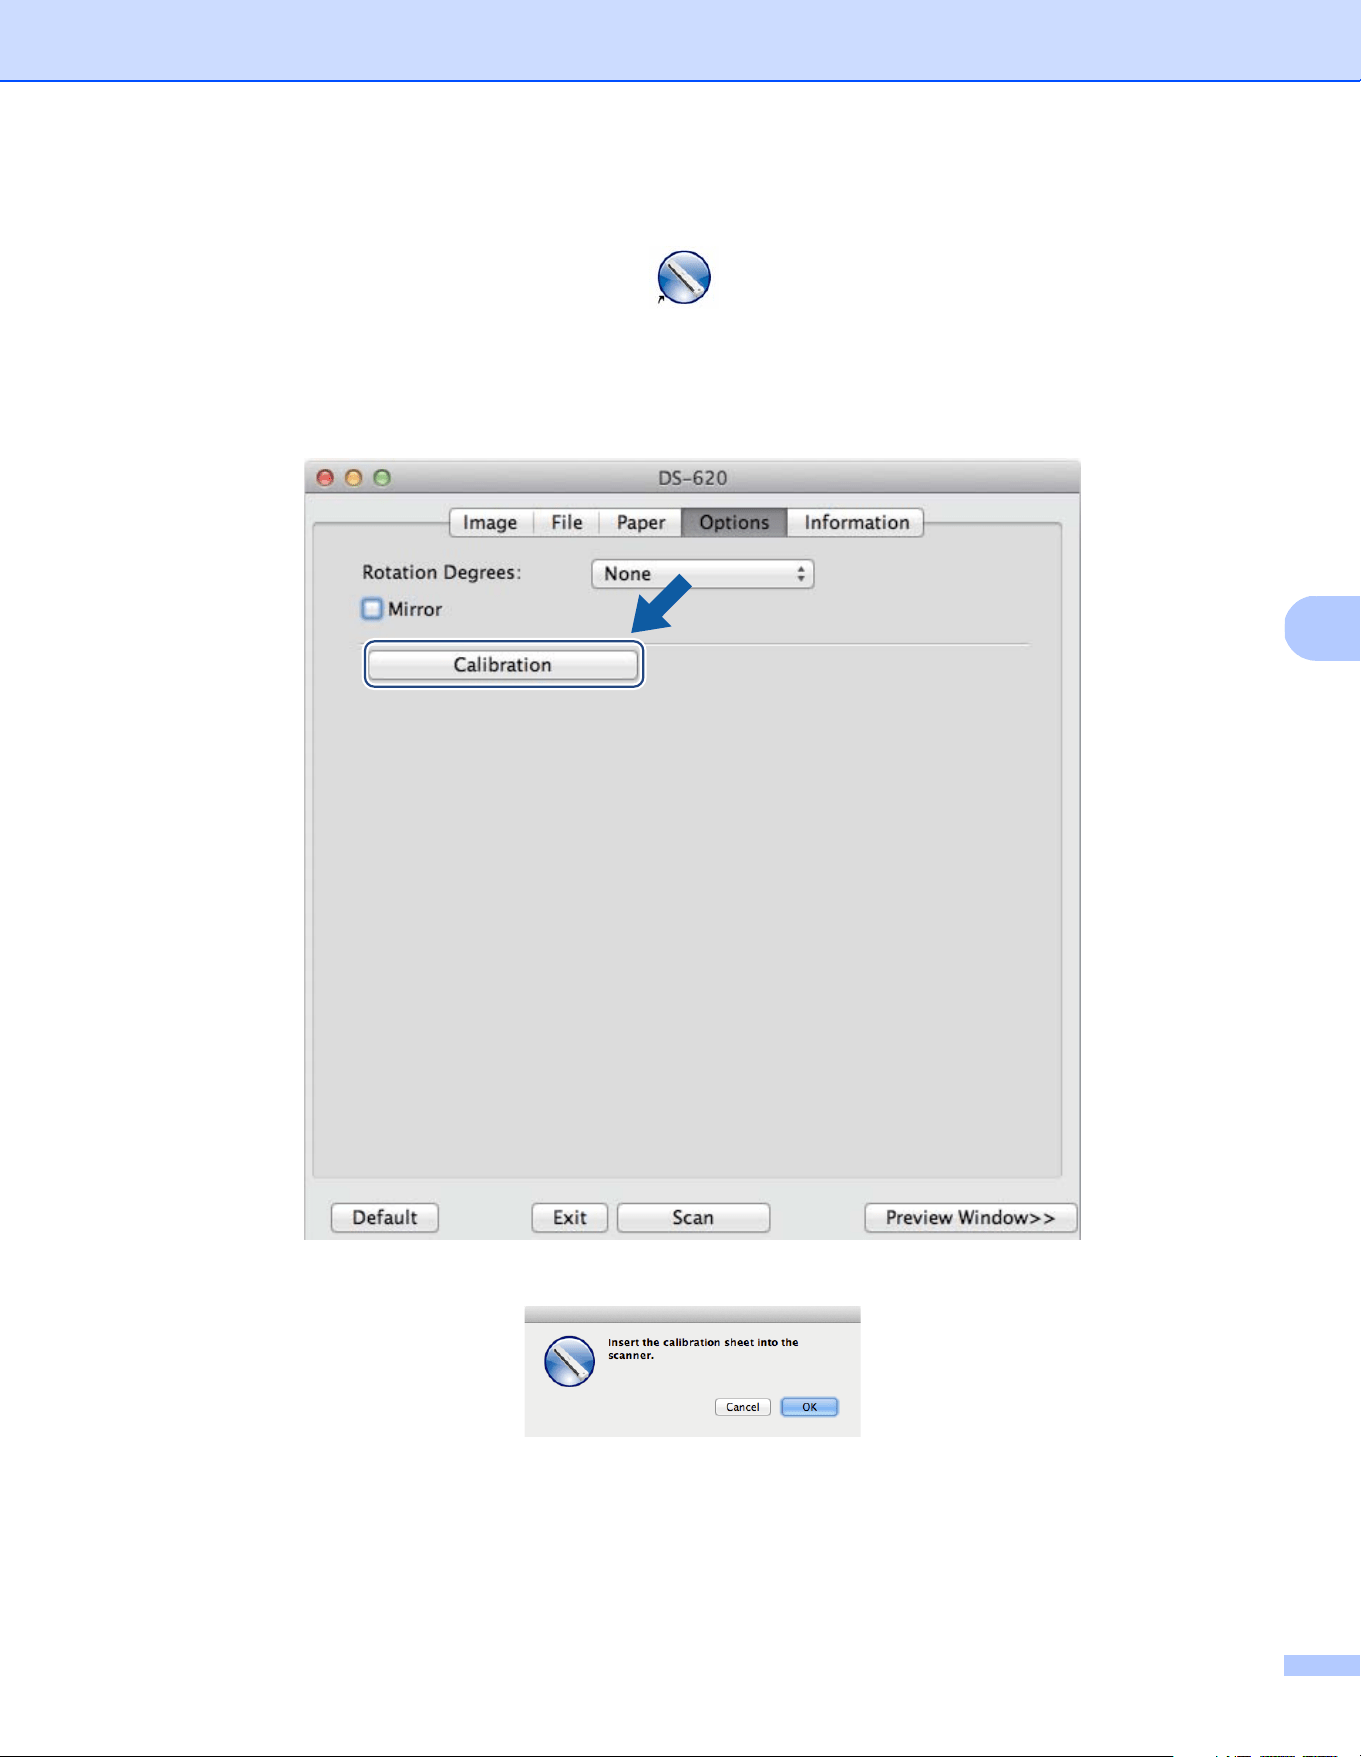
c Click the Options tab.
d Click Calibration to start calibrating the scanner.
e A message appears, prompting you to insert the Calibration Sheet.
Scanner Calibration
39
6
f Hold the edges of the Calibration Sheet and insert it into the feeder slot as shown below.
Click OK.
NOTE
Hold only the edges of the Calibration Sheet and be careful not to touch the white or black area.
Leaving marks or fingerprints on this sheet can cause errors in calibration.
g Scanning starts automatically.
h After the Calibration Sheet is scanned, a Calibration was successful message appears on your screen,
indicating that calibration finished successfully. Click OK to end calibration.
NOTE
If a Calibration failed message appears on your screen, remove the Micro USB Cable from your computer.
Reconnect the Micro USB Cable to the computer and perform the calibration again. If calibration fails again,
check the scanner’s print head to ensure it is clean.
40
7
7
IMPORTANT
Do not use any solvents or corrosive liquid, such as alcohol, kerosene, etc., to clean any part of the scanner,
or the plastic may be permanently damaged.
Cleaning the outside of your scanner
To prevent dust accumulation, we recommend cleaning the exterior of your scanner periodically.
a Remove the Micro USB Cable from both your scanner and your computer.
b Wipe the outside of the scanner with a dry, soft, lint-free cloth.
If necessary, wipe the exterior with a cloth lightly dampened with water or diluted detergent, and finish
with a dry cloth.
c Reconnect the Micro USB Cable to your scanner and your computer.
Cleaning the inside of your scanner
To maintain the scanned image quality, clean the interior of your scanner periodically. If vertical lines
or stripes appear on scanned images, this indicates that it is time to clean your scanner.
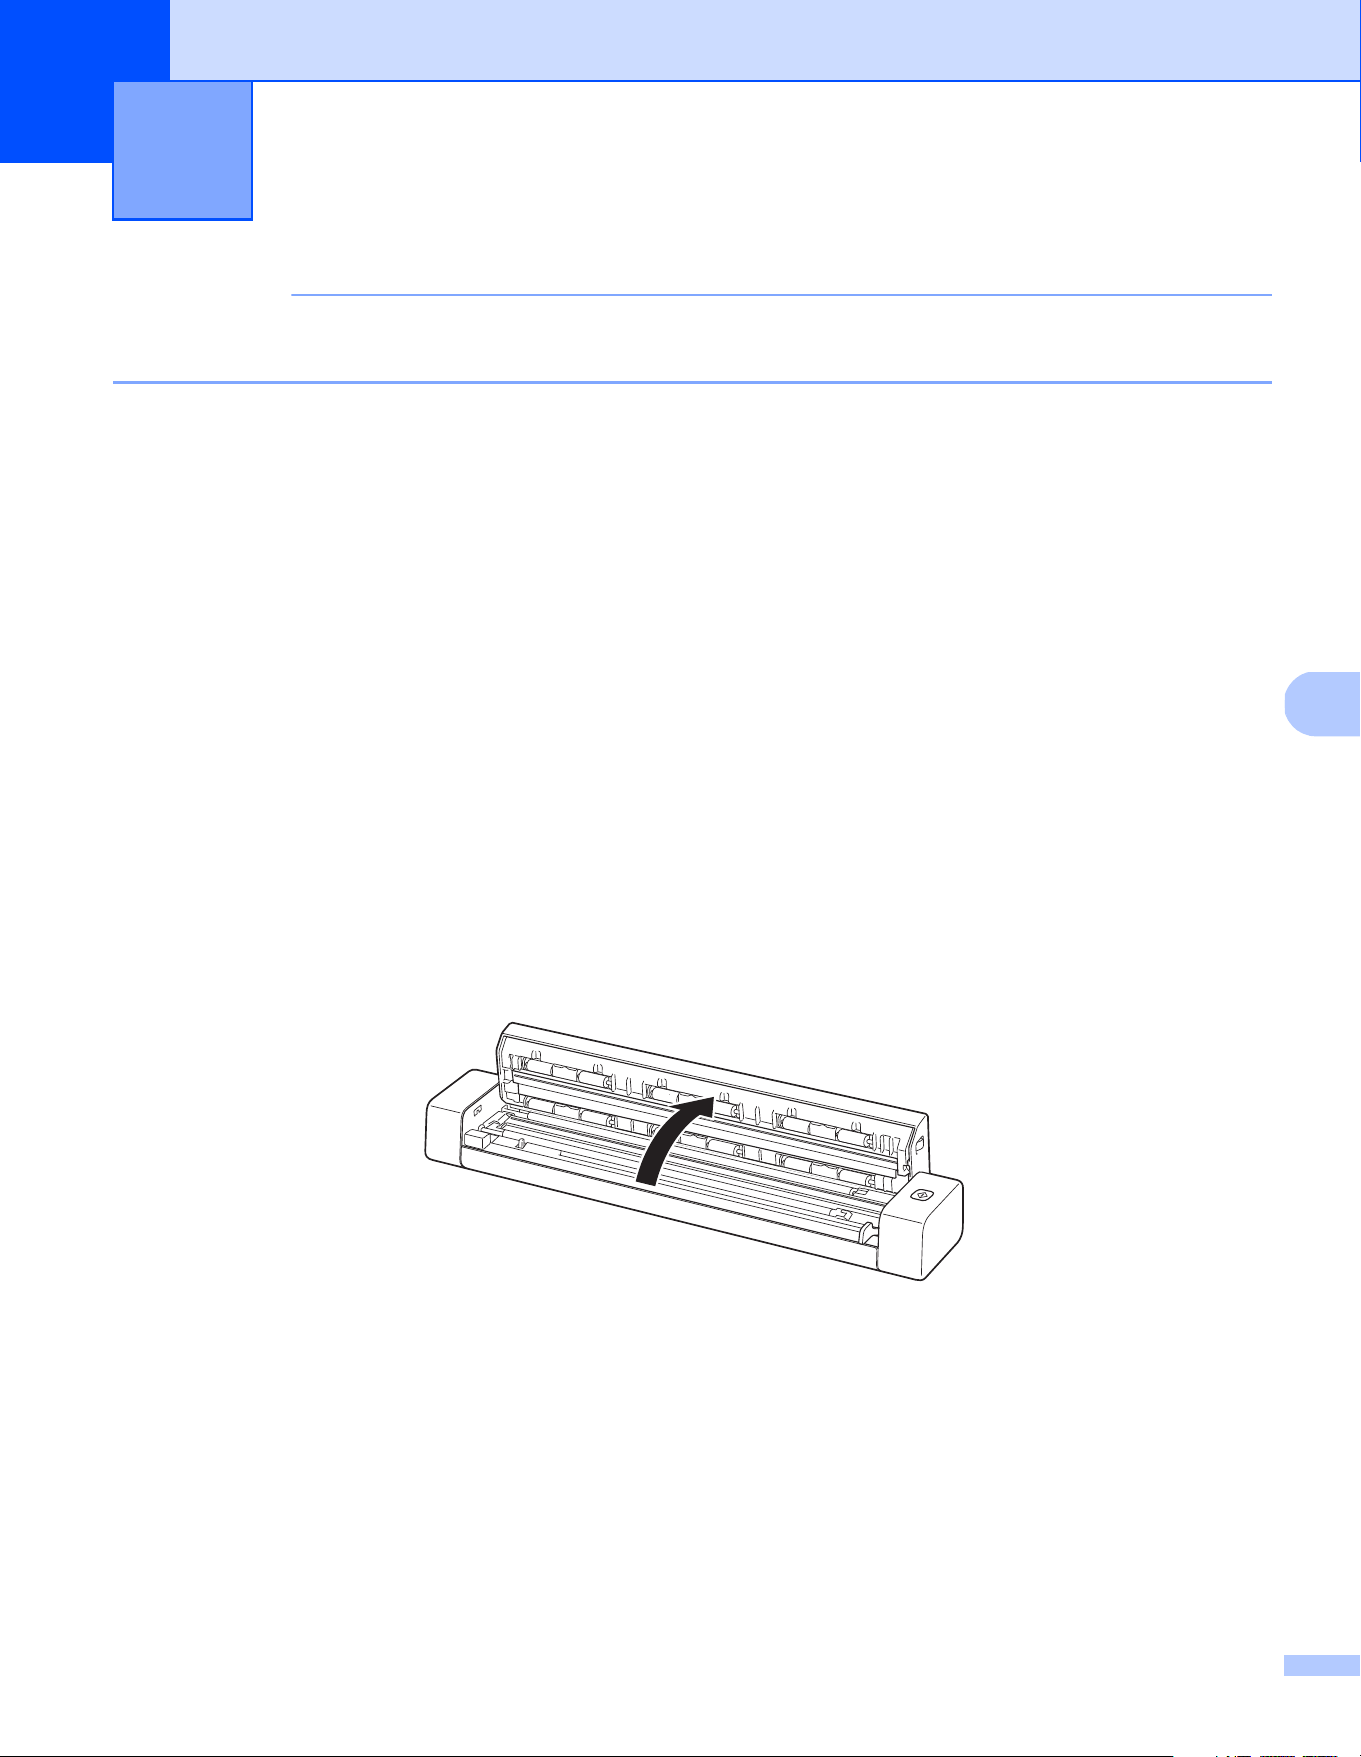
a Remove the Micro USB Cable from both your scanner and your computer.
b Open the scanner’s top cover.
Scanner Maintenance 7
Scanner Maintenance
41
7
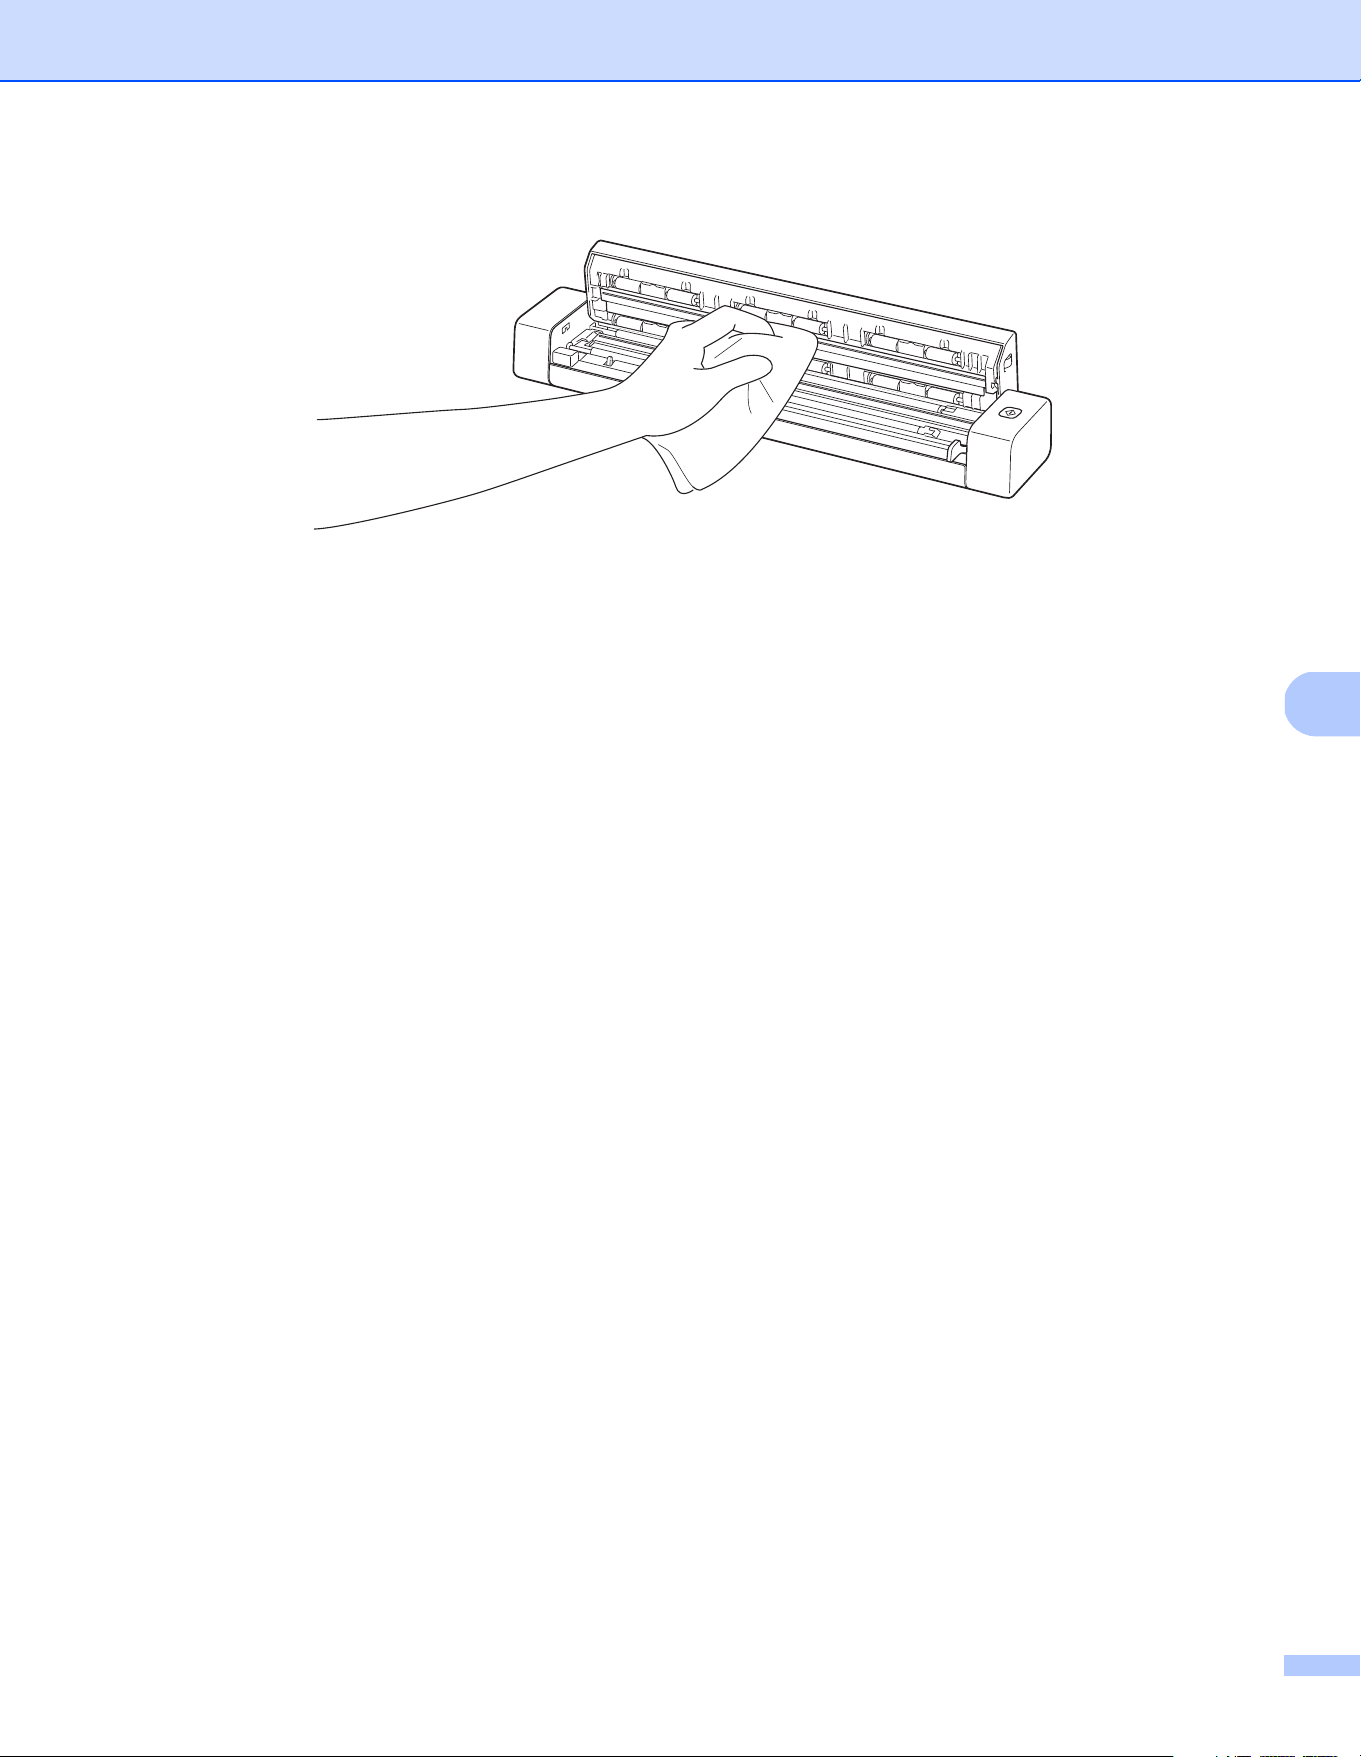
c Gently wipe the scanning glass strip and feed rollers with the supplied cleaning cloth.
d Close the top cover.
e Reconnect the Micro USB Cable to your scanner and your computer.
42
8
8
IMPORTANT
For technical help, you must contact the Customer Service center in the country where you bought the
scanner. For more information, see For customer service on page 53. Calls must be made from within
that country.
If you think there is a problem with your scanner, check the chart below and follow the suggestions.
Most problems can be easily resolved by yourself. If you need additional help, go to the Brother Solutions
Center at support.brother.com
for more FAQs and troubleshooting tips.
Using non-Brother supplies may affect scan quality, hardware performance and product reliability.
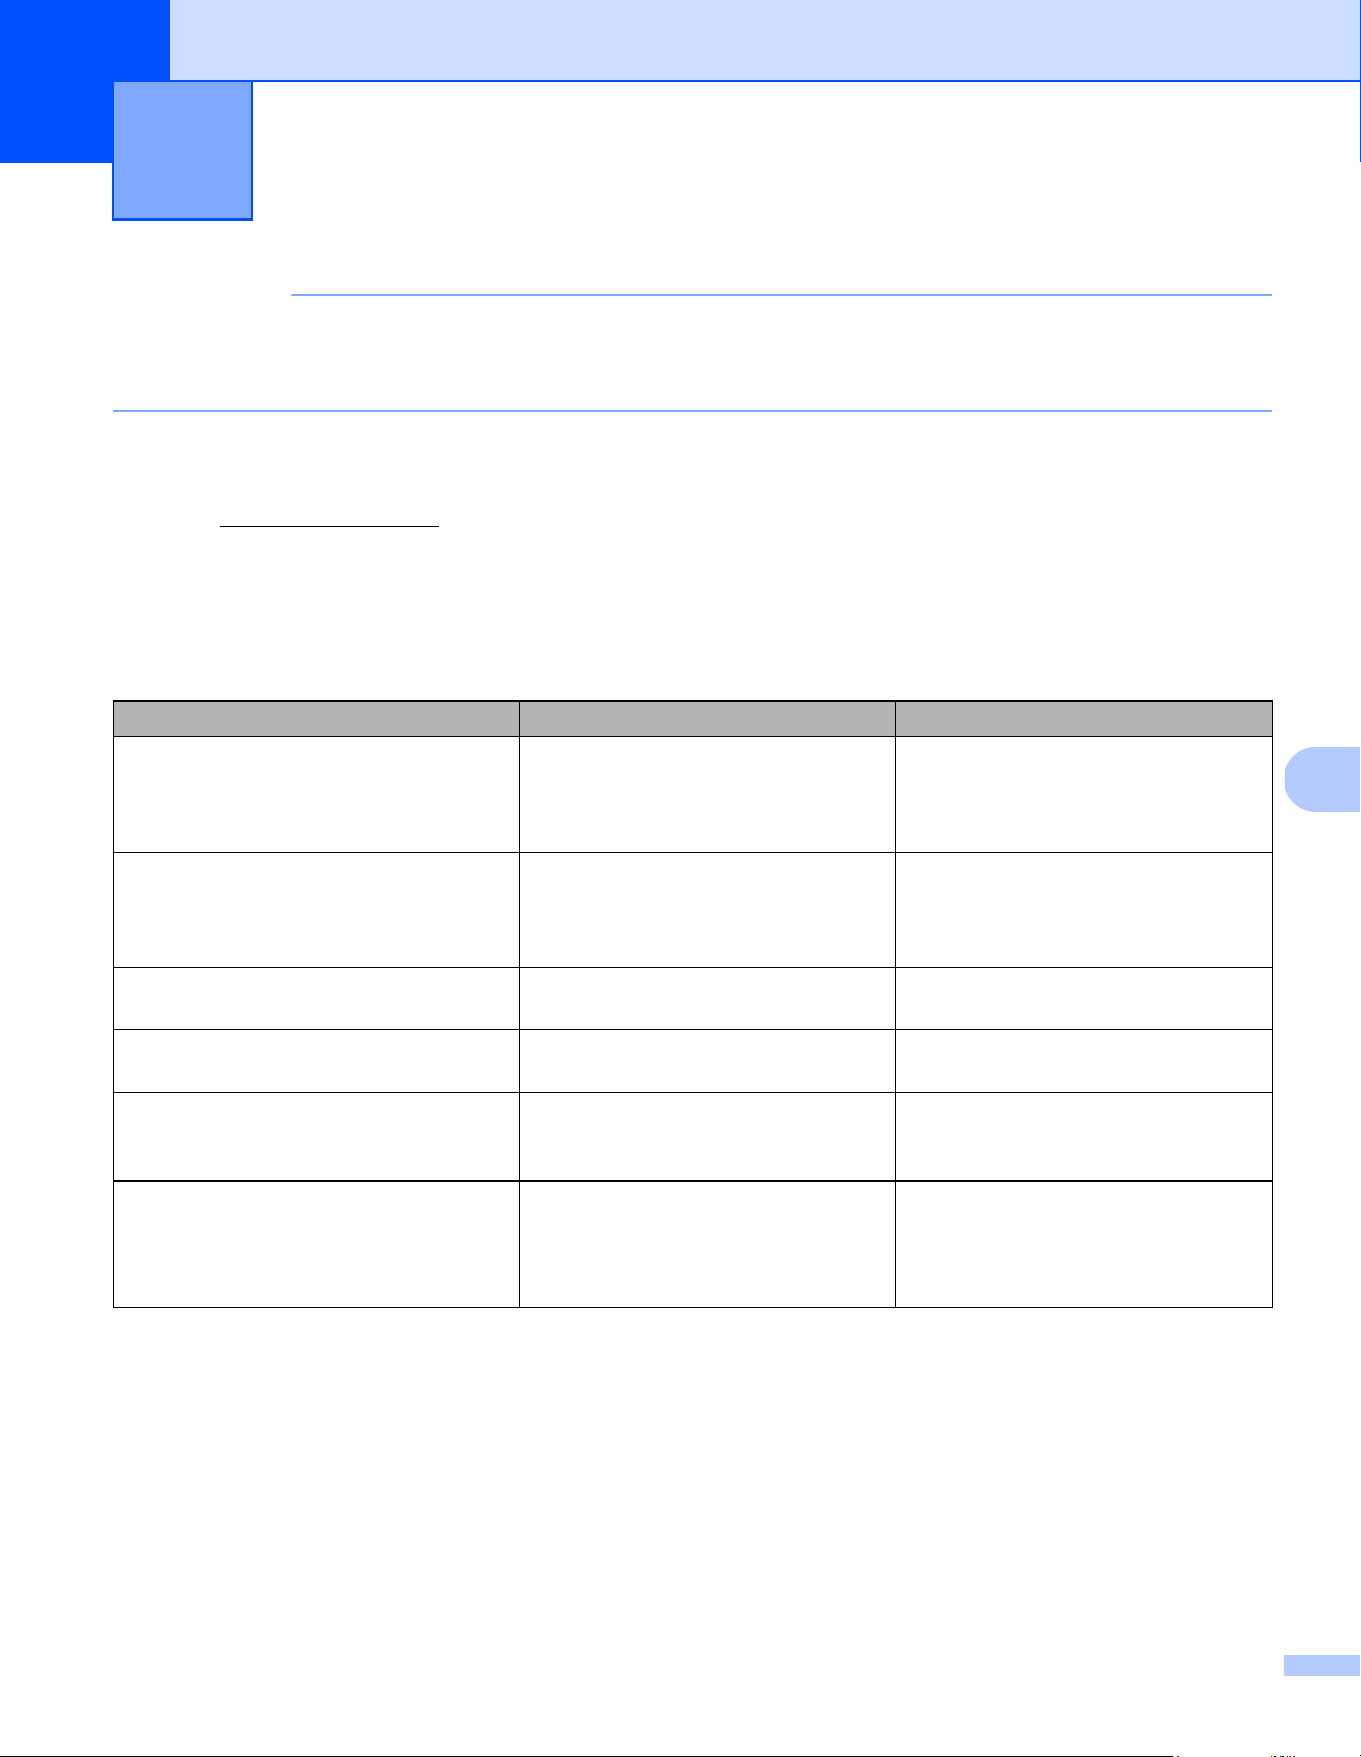
Error and maintenance messages
Troubleshooting 8
Error message Cause Action
Driver busy. The scanning application in use
crashed, or the scanner driver
is locked with administrator rights.
Remove the Micro USB Cable from
your computer. Reconnect the
Micro USB Cable to the computer,
and launch the application again.
A document is jammed. Please open
the top cover and remove the
jammed paper by pulling it forward,
then try again.
A document is jammed. Open the top cover and remove
the document by pulling it forward,
then close the top cover.
The cover of the manual document
feeder is open.
Your scanner’s top cover is open
when scanning starts.
Close the top cover and start scanning
again.
No paper in the manual document
feeder.
No document is set in the feeder slot. Place your document in the feeder
slot and start scanning again.
Cannot find the scanner. Your scanner is not connected
to your computer.
Confirm that the Micro USB Cable
connecting the scanner to the
computer is properly connected.
Operation system return error. Your Operating System cannot
recognize your scanner.
Confirm that the Micro USB Cable
connecting the scanner to the
computer is properly connected.
Restart the computer.

Troubleshooting
43
8
Troubleshooting
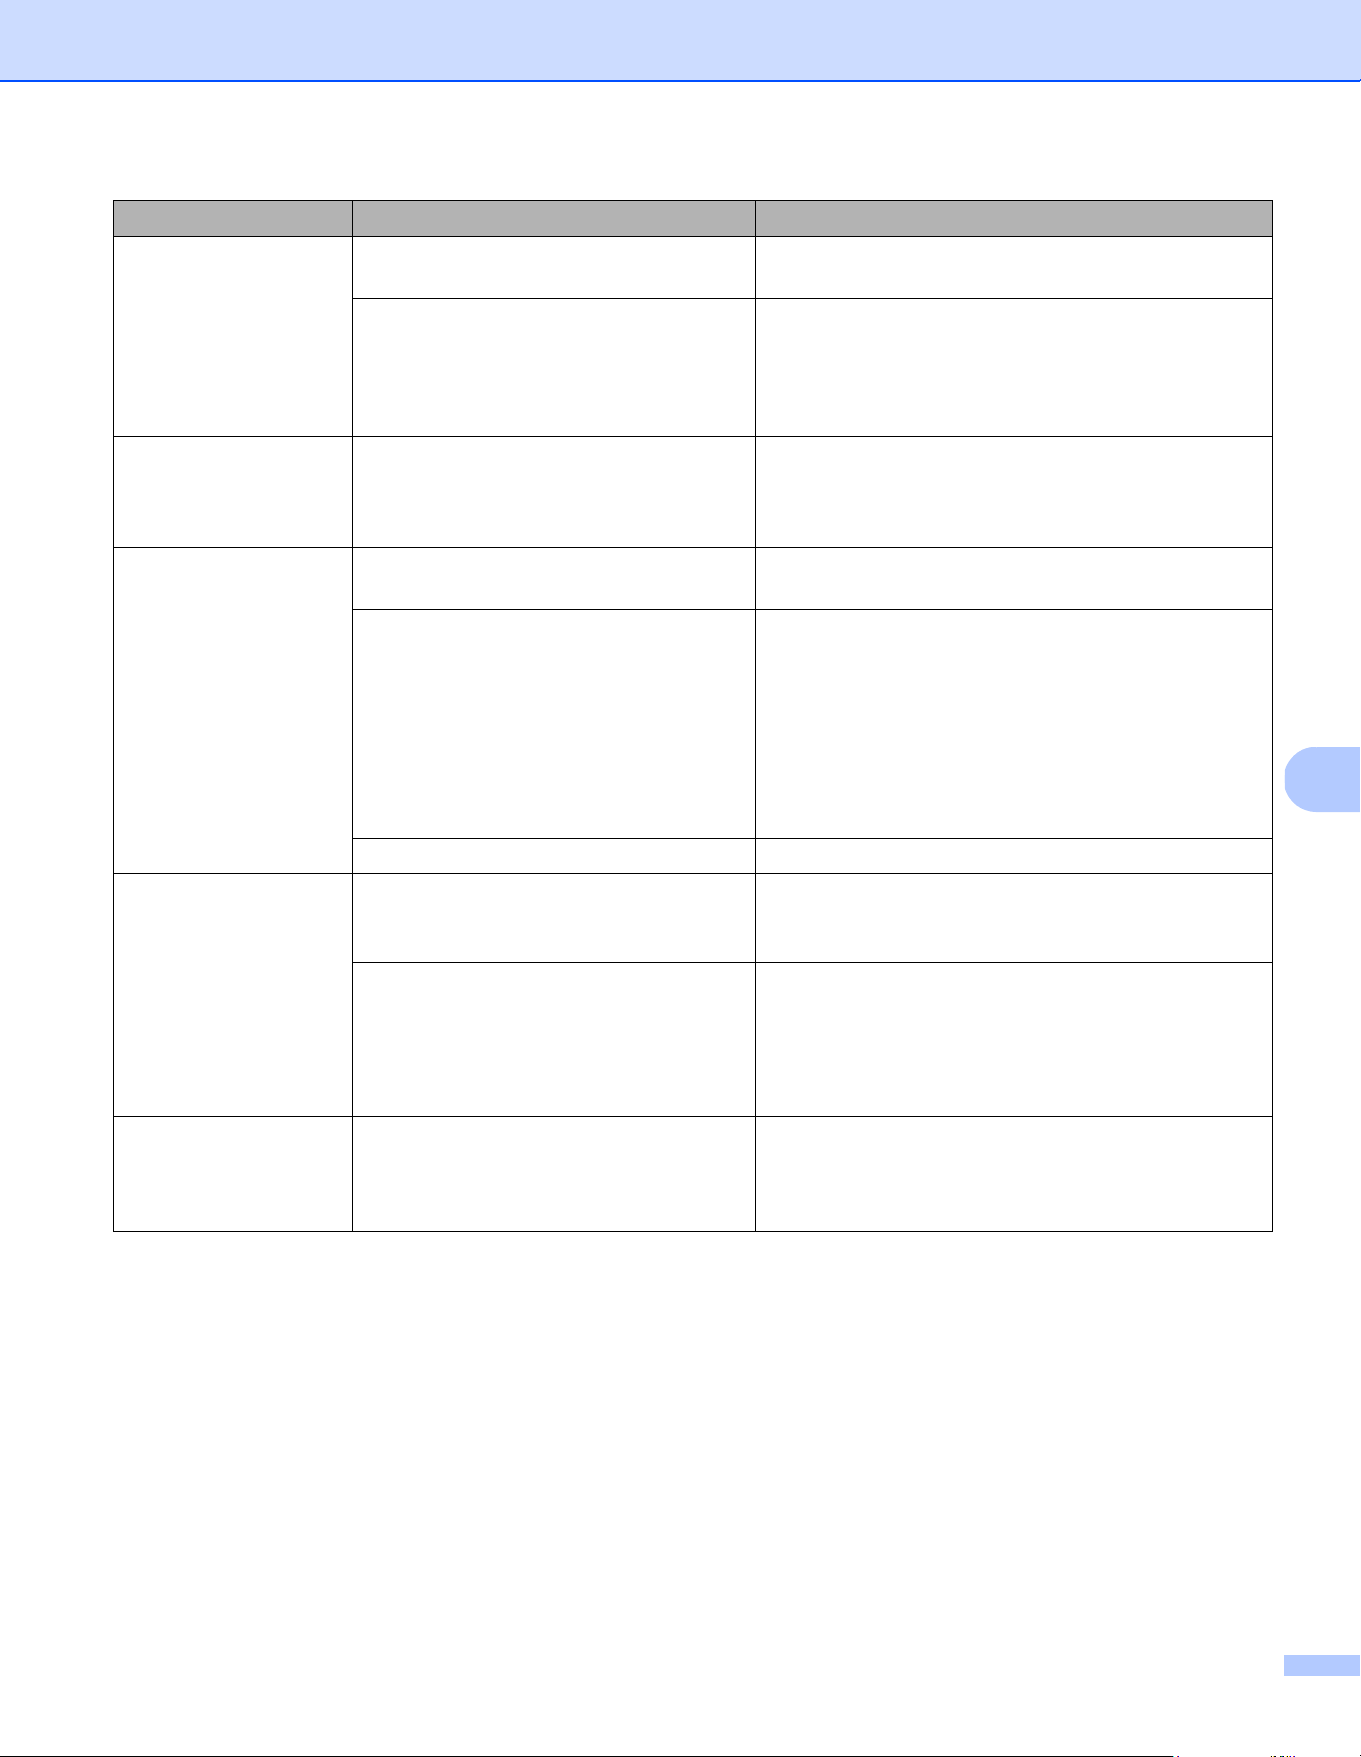
Scanning difficulties
Calibration failed. Please reboot
the machine.
An error caused the calibration to fail.
For example, the Calibration Sheet is
not inserted in the correct direction.
Remove the Micro USB Cable
from your computer. Reconnect
the Micro USB Cable to the
computer, and perform the
calibration again.
Insert the Calibration Sheet
in the correct direction.
• For Windows
®
: to perform
the calibration using software,
see Calibration using software
(for Windows
®
) on page 35.
• For Macintosh: to perform
the calibration using software,
see Calibration using software
(for Macintosh) on page 38.
Difficulty Cause Suggestions
My scanner does not
turn on.
The supplied Micro USB Cable is not
connected securely.
Make sure the Micro USB Cable is securely
connected to your scanner and computer.
My computer does not
recognize the scanner
when it is connected
via the Micro USB
Cable.
Causes may vary. Make sure the Micro USB Cable is securely
connected to your scanner and computer.
Remove the Micro USB Cable and reconnect the
Micro USB Cable to your scanner and computer.
My scanned images
have black lines
running through them,
blank spaces, or are of
overall bad quality.
This problem occurs if the scanner
is not calibrated correctly or if a foreign
object, such as a paper clip or ripped
paper, is stuck in the scanner.
1. Check the document feeder slot and make sure
that the slot is clear. If foreign objects are found,
remove them from your scanner.
2. Calibrate your scanner (see Scanner Calibration
on page 35).
If scan quality is not improved after you calibrate
your scanner:
1. Clean the scanner (see Scanner Maintenance
on page 40).
2. Calibrate your scanner again.
Error message Cause Action
Troubleshooting
44
8
My document did not
scan correctly.
The Document Guides are not adjusted
to fit the width of the document.
Adjust the Document Guide to fit the width of the
document.
The settings are not suitable for
your document. For example,
a A4 document was fed when A5
was selected as document size.
Make sure the document size settings are suitable
for your document.
For Windows
®
: see Paper settings on page 17.
For Macintosh: see Paper settings on page 26.
The scan speed is too
slow.
The resolution is not suitable for your
document.
Decrease the scanner resolution.
For Windows
®
: see Image settings on page 16.
For Macintosh: see Image settings on page 24.
My scanner is
connected but it will
not feed my document
or do anything else.
Your document is not set correctly. Insert your document until you feel the top edge
of the document touch the inside of your scanner.
Your document is too thin or too thick. Check that your document is acceptable
(see Document Specifications on page 6).
If your document is not the problem:
1. Confirm that the Micro USB Cable connecting
your scanner to your computer is securely
connected.
2. Re-install the scanner driver from the DVD-ROM.
The scanner’s top cover is open. Close the top cover and start scanning again.
The document
is jammed.
Causes may vary. Open the scanner’s top cover and gently pull out
the document. Make sure that no piece of paper
remains inside the scanner.
Your document is not acceptable for
the machine (for example, if the paper
is too long).
Make sure your document is acceptable for
the machine (see Document Specifications
on page 6).
Use the supplied Carrier Sheet (see Loading
the Carrier Sheet on page 10).
My scanner gets
warm.
It is normal for your scanner to emit
a small amount of heat after prolonged
use.
If there is a strange smell coming from the scanner
or the scanner feels a little bit hot to the touch,
immediately remove the Micro USB Cable from
your scanner and computer.
Difficulty Cause Suggestions

Troubleshooting
45
8
The scan quality
is poor.
Paper dust has accumulated inside
your scanner.
Clean your scanner (see Scanner Maintenance
on page 40).
Calibration needs to be performed. Perform the calibration.
• For Windows
®
: to perform the calibration using
software, see Calibration using software
(for Windows
®
) on page 35.
• For Macintosh: to perform the calibration using
software, see Calibration using software
(for Macintosh) on page 38.
The scanner resolution is too low. Increase the scanner resolution.
For Windows
®
: see Image settings on page 16.
For Macintosh: see Image settings on page 24.
Colours in the
scanned image
are dark.
The settings are not appropriate for
the type of document being scanned.
Adjust the scanning settings.
For Windows
®
: see Image settings on page 16.
For Macintosh: see Image settings on page 24.
Calibration needs to be performed. Perform the calibration.
• For Windows
®
: to perform the calibration using
software, see Calibration using software
(for Windows
®
) on page 35.
• For Macintosh: to perform the calibration using
software, see Calibration using software
(for Macintosh) on page 38.
OCR feature does not
work.
The scanner resolution is too low. Increase the scanner resolution.
For Windows
®
: use PaperPort™ 12SE to increase
the resolution.
For Macintosh: use Presto! PageManager 9
to increase the resolution.
(Windows
®
users)
Nuance PaperPort™ 12SE has not
been installed on your computer.
Make sure you have installed
Nuance PaperPort™ 12SE from
thesuppliedDVD-ROM.
(Macintosh users)
Presto! PageManager has not been
installed on your computer.
Make sure you have installed Presto! PageManager
from the supplied DVD-ROM.
The scanned image
is skewed (slanted).
The scanner’s Document Guide are not
adjusted to fit the width of the document.
Adjust the Document Guide to fit the width of the
document.
Difficulty Cause Suggestions
Troubleshooting
46
8
Software difficulties
White vertical lines
or white stripes appear
on the scanned image.
The scanner is in direct sunlight. • Move the scanner indoors, or out of direct
sunlight.
A light source is near the scanner. • Move the scanner away from the light source.
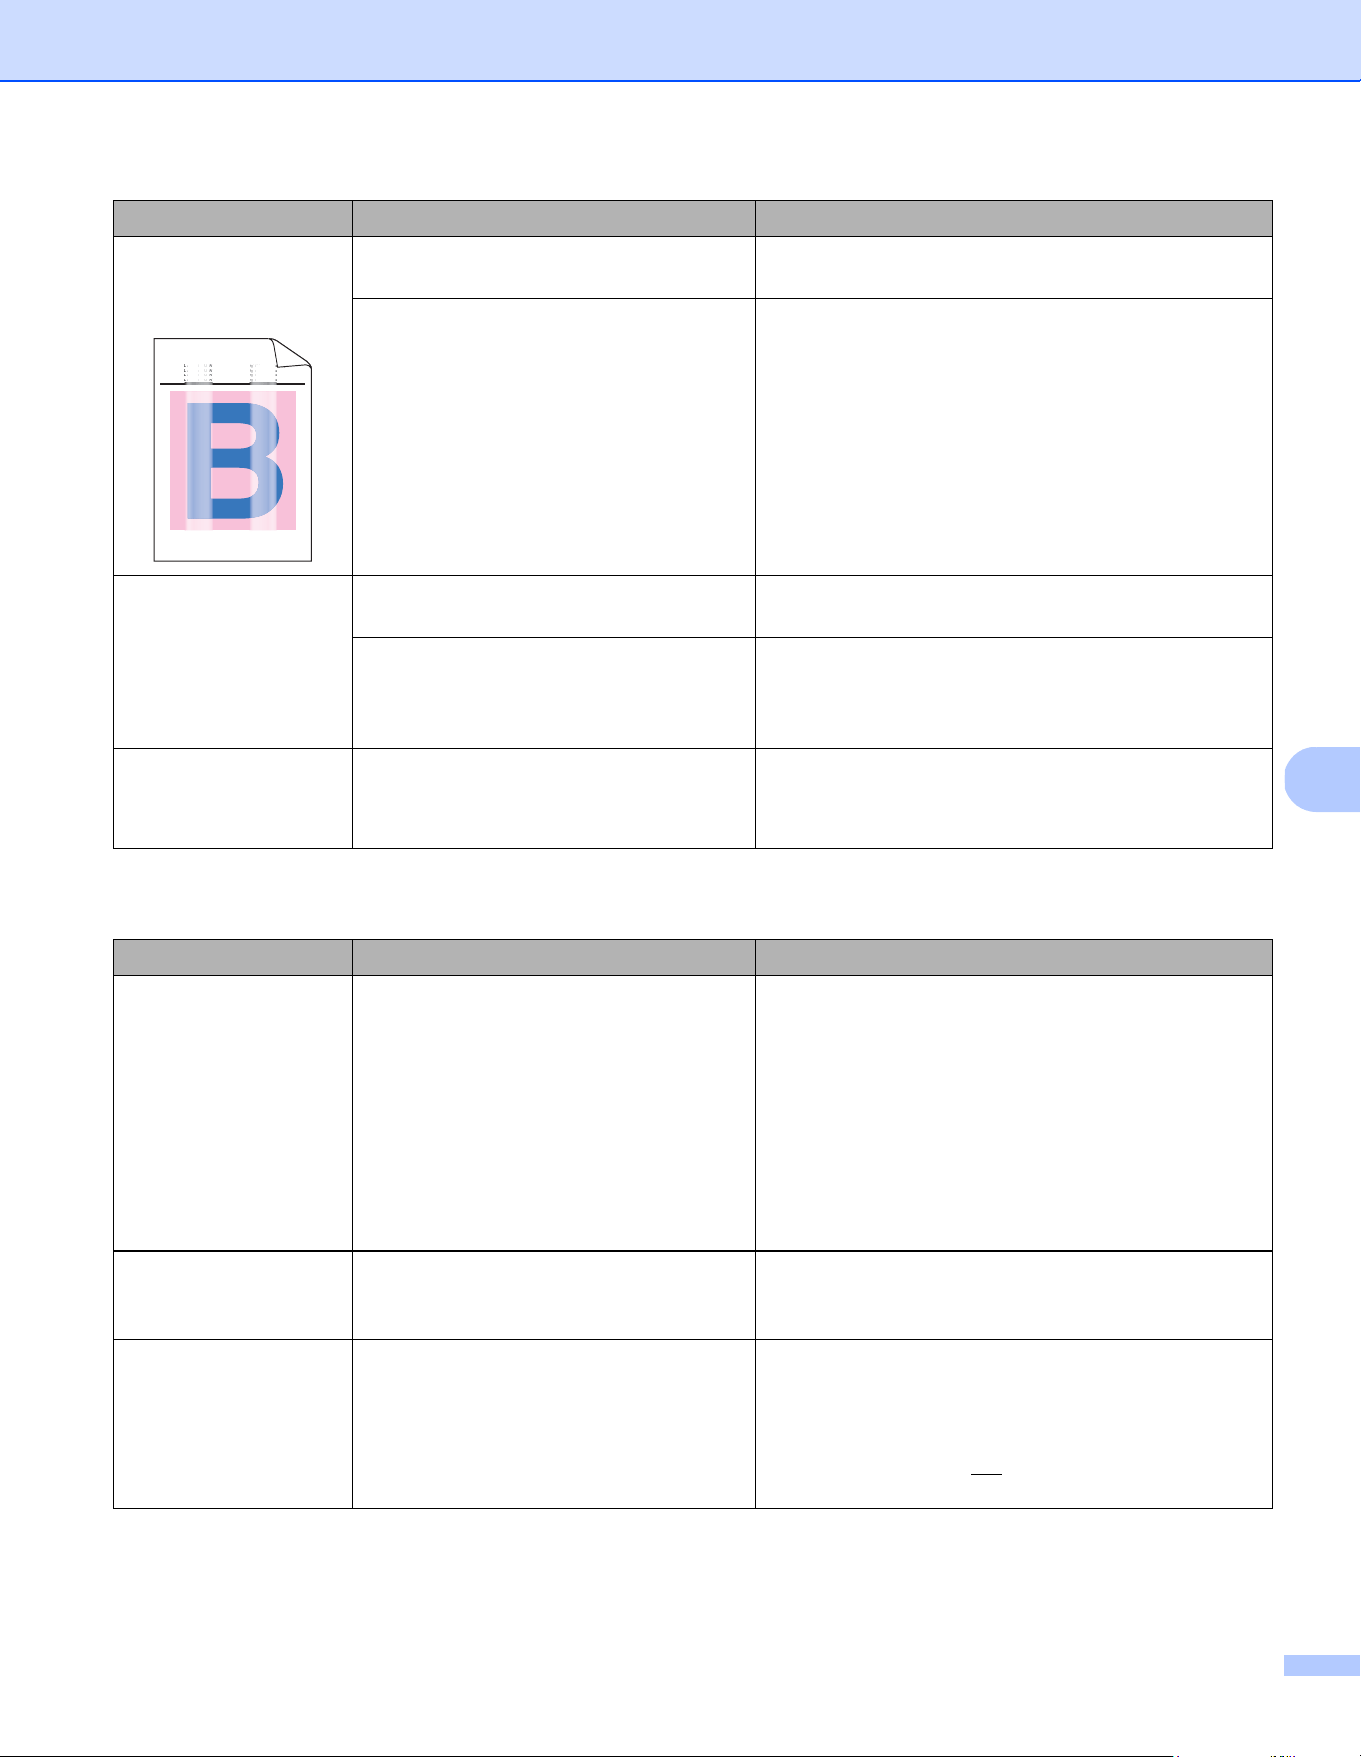
Bleed-through is seen
in the scanned image.
Your document is too thin. Check that your document is acceptable
(see Document Specifications on page 6).
The contrast setting is improper. Increase the contrast level.
For Windows
®
: see Image settings on page 16.
For Macintosh: see Image settings on page 24.
(DS-720D only)
Duplex scanning
cannot be performed.
The duplex scanning settings are not
configured in DSmobileCapture.
Select the Duplex check box of the Image tab
in DSmobileCapture.
Difficulty Cause Suggestions
When I press Scan in
my scanning software,
an error message
appears: Please
install scanner
or The scan was
aborted because
the scanner is not
powered on or not
connected properly.
This error message appears if your
scanner isn’t recognized by your
computer.
1. Make sure your scanner is connected properly.
2. Confirm that the Micro USB Cable is working and
that it is not frayed or damaged in any way.
If the error still appears after verifying that the
Micro USB Cable is connected properly, reinstall
the scanner driver from the DVD-ROM.
I cannot install the
scanner drivers.
(Windows
®
)
You may not have been given
administrator privileges.
Log into Windows
®
with administrator rights.
I cannot install the
scanner drivers.
(Macintosh)
You may not have been given
administrator privileges.
From Apple menu, select System Preferences >
System > Users & Groups. The left pane of the
window will list the current accounts, one of which
should be your name with the word “Admin”
underneath. If this is not
the case, contact your
system administrator.
Difficulty Cause Suggestions
ABCDEFGHIJKLMNOPQRSTUVWXYZ. 0123456789. abcdefghi jklmn opqrst uvwxyz.
ABCDEFGHIJKLMNOPQRSTUVWXYZ. 0123456789. abcdefghi jklmn opqrst uvwxyz.
ABCDEFGHIJKLMNOPQRSTUVWXYZ. 0123456789. abcdefghi jklmn opqrst uvwxyz.
ABCDEFGHIJKLMNOPQRSTUVWXYZ. 0123456789. abcdefghi jklmn opqrst uvwxyz.
KL
KL
L
LM
MN
MN
MN
OPQRSTUVW
OP
QRSTUV
TU
W
W
W
W
WX
KL
KL
L
LM
MN
MN
MN
OPQRSTUVW
OP
QRSTUV
TU
W
W
W
W
WX
KL
KL
L
LM
MN
MN
MN
OPQRSTUVW
OP
QRSTUV
TU
W
W
W
W
WX
KL
KL
L
LM
MN
MN
MN
OPQRSTUVW
OP
QRSTUV
TU
W
W
W
W
WX
ef
f
fg
g
ghijklmnop
ghijklmno
hijklmn
ijk
qrst
qrs
r
t
u
u
u
ef
f
fg
g
ghijklmnop
ghijklmno
hijklmn
ijk
qrst
qrs
r
t
u
u
u
ef
f
fg
g
ghijklmnop
ghijklmno
hijklmn
ijk
qrst
qrs
r
t
u
u
u
ef
f
fg
g
ghijklmnop
ghijklmno
hijklmn
ijk
qrst
qrs
r
t
u
u
u

Troubleshooting
47
8
Other difficulties
The file size is too
large.
The size of the file will depend upon
many factors. The physical size of the
document and the amount of text /
graphics on each page are factors that
will affect the resulting file size. These
factors cannot be changed.
To produce the smallest scan file for a given
document, use the lowest resolution and Black and
White mode, and scan the smallest area possible.
Using the opposite settings (scanned in the highest
resolution, in the Colour mode, and scanning the
largest area possible) will produce the largest-sized
file.
For Windows
®
: see Changing DSmobileCapture
scan settings (for Windows
®
) on page 15).
For Macintosh: see Changing DSmobileCapture
scan settings (for Macintosh) on page 24).
Difficulty Cause Suggestions
I do not have or lost
the Calibration Sheet.
Causes may vary. The special glossy calibration sheet that came
with your scanner will give you the best calibration
results. To order a new Calibration Sheet, contact
information for your local Brother office
at www.brother.com
I want to use a USB
hub.
Causes may vary. A USB hub may not be able to supply enough
power to the scanner.
Difficulty Cause Suggestions

48
A
A
Specifications
NOTE
This chapter provides a summary of the scanner’s specifications. For additional specifications, go to your
scanner’s product page at www.brother.com
and click the Specifications tab.
General
Appendix A A
DS-620 DS-720D
Power Source USB bus-power 5V DC
Power consumption Scanning 2.5 W 500 mA or less
Ready 1.0 W 200 mA or less
Dimensions Width 290.5 mm
Height 36.7 mm 40.7 mm
Depth 52.5 mm 66.9 mm
Weight Approx. 400 g Approx. 500 g
Temperature Operating 5 °C to 35 °C
Humidity Operating 15 to 85 %
Storage 10 to 90 %
Document Size Single Sheet Width 55 mm to 215.9 mm
Length 1 side scan
90 mm to 812.8 mm
- 2 side scan
(DS-720D only)
90 mm to 406.4 mm

Appendix A
49
A
Scanner
1
Windows
®
XP in this User’s Guide includes Windows
®
XP Home Edition and Windows
®
XP Professional.
2
For the latest driver updates for the version of Mac OS X you are using, visit us at support.brother.com
DS-620 DS-720D
Colour / Black Yes / Yes
Duplex Scan No Yes
TWAIN Compliant Windows
®
Windows
®
XP
1
/ Windows Vista
®
/ Windows
®
7 / Windows
®
8 /
Windows
®
8.1 / Windows
®
10
Macintosh Mac OS X 10.6.x, 10.7.x, 10.8.x, 10.9.x, 10.10.x, 10.11.x
2
Colour Depth Input 48 bit colour processing
Output 24 bit colour processing
Resolution Optical Up to 600 × 600 dpi
Interpolated 1200 dpi
Scanning Width Up to 216 mm
Greyscale Input 16 bit
Output 8 bit
Scanning Max. Speed Mono 8.0 ppm (7.5 seconds (Letter) up to 300 dpi)
7.5 ppm (8 seconds (A4) up to 300 dpi)
4.3 ppm (14.1 seconds (Letter) above 400 dpi)
4 ppm (15 seconds (A4) above 400 dpi)
Colour 8.0 ppm (7.5 seconds (Letter) up to 300 dpi)
7.5 ppm (8 seconds (A4) up to 300 dpi)
4.3 ppm (14.1 seconds (Letter) above 400 dpi)
4 ppm (15 seconds (A4) above 400 dpi)
Duplex Scanning Max. Speed - Mono 5.3 ppm (11.3 seconds
(Letter) up to 300 dpi)
5 ppm (12 seconds
(A4) up to 300 dpi)
3 ppm (19.8 seconds
(Letter) above 400 dpi)
2.9 ppm (21 seconds
(A4) above 400 dpi)
Color 5.3 ppm (11.3 seconds
(Letter) up to 300 dpi)
5 ppm (12 seconds
(A4) up to 300 dpi)
3 ppm (19.8 seconds
(Letter) above 400 dpi)
2.9 ppm (21 seconds
(A4) above 400 dpi)
Appendix A
50
A
Interfaces
1
Your scanner has a Hi-Speed USB 2.0 interface. The scanner can also be connected to a computer that has a USB 1.1 interface.
2
Third party USB ports are not supported.
Computer requirements
USB Hi-Speed USB 2.0
1, 2
Use a USB 2.0 cable (Type A / B) that is no more than 1.2 metres long.
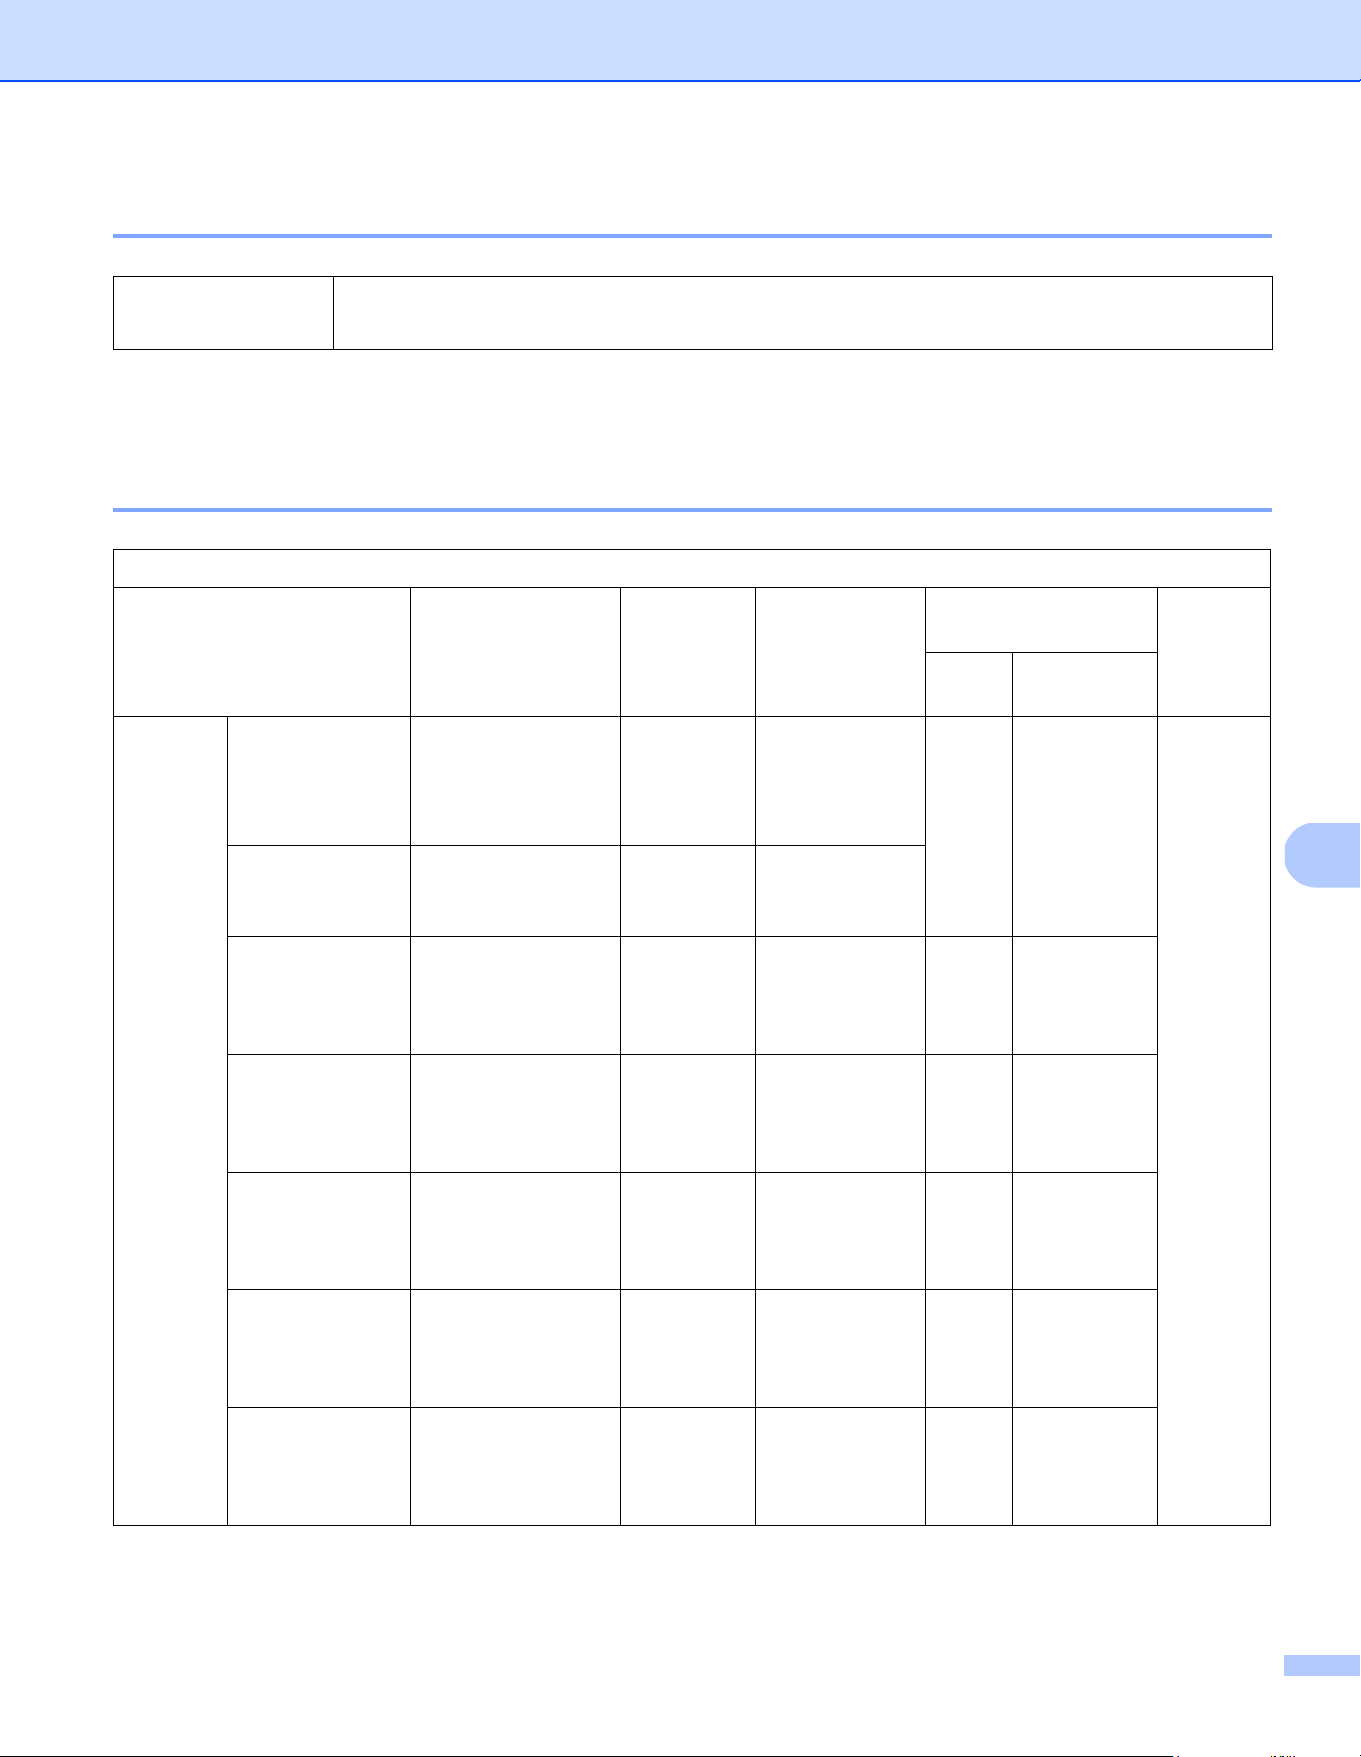
SUPPORTED OPERATING SYSTEMS AND SOFTWARE FUNCTIONS
Computer Platform &
Operating System Version
Processor
Minimum Speed
Minimum
RAM
Recommended
RAM
Hard Disk Space
to install
Support-
ed PC
Interface
For
Drivers
For
Applications
Windows
®
Operating
System
Windows
®
XP
Home
Windows
®
XP
Professional
Intel
®
Core™ 2 Duo
or equivalent
1 GB 2 GB 80 MB 1.2 GB USB
Windows
®
XP
Professional x64
Edition
64-bit
(Intel
®
64 or AMD64)
supported CPU
1 GB 2 GB
Windows Vista
®
Intel
®
Core™ 2 Duo
or equivalent 64-bit
(Intel
®
64 or AMD64)
supported CPU
1 GB 2 GB 80 MB 1.2 GB
Windows
®
7Intel
®
Core™ 2 Duo
or equivalent 64-bit
(Intel
®
64 or AMD64)
supported CPU
1 GB (32-bit)
2 GB (64-bit)
2 GB (32-bit)
4 GB (64-bit)
80 MB 1.2 GB
Windows
®
8Intel
®
Core™ i3 or
equivalent 64-bit
(Intel
®
64 or AMD64)
supported CPU
1 GB (32-bit)
2 GB (64-bit)
2 GB (32-bit)
4 GB (64-bit)
80 MB 1.2 GB
Windows
®
8.1 Intel
®
Core™ i3 or
equivalent 64-bit
(Intel
®
64 or AMD64)
supported CPU
1 GB (32-bit)
2 GB (64-bit)
2 GB (32-bit)
4 GB (64-bit)
80 MB 1.2 GB
Windows
®
10 Intel
®
Core™ i3 or
equivalent 64-bit
(Intel
®
64 or AMD64)
supported CPU
1 GB (32-bit)
2 GB (64-bit)
2 GB (32-bit)
4 GB (64-bit)
80 MB 1.2 GB

Appendix A
51
A
For the latest driver updates, visit support.brother.com
All trademarks, brand and product names are property of their respective companies.
Macintosh
Operating
System
Mac OS X 10.6.x Intel
®
Processor 1 GB 2 GB 80 MB 400 MB USB
Mac OS X 10.7.x Intel
®
Processor 1 GB 2 GB
Mac OS X 10.8.x Intel
®
Processor 2 GB 4 GB
Mac OS X 10.9.x Intel
®
Processor 2 GB 4 GB
Mac OS X 10.10.x Intel
®
Processor 2 GB 4 GB
Mac OS X 10.11.x Intel
®
Processor 2 GB 4 GB

52
B
B
Contacting Brother
IMPORTANT
For technical help, contact the Customer Service center in the country where you bought the scanner.
For more information, see For customer service on page 53. Calls must be made from within that country.
Register your product
By registering your product with Brother International Corporation, you will be recorded as the original owner
of the product. Your registration with Brother:
may serve as confirmation of the purchase date of your product should you lose your receipt
may support an insurance claim by you in the event of product loss covered by insurance
will help us notify you of enhancements to your product and special offers
Complete and fax the Brother Warranty Registration And Test Sheet or, for your convenience and most
efficient way to register your new product, register online at
www.brother.com/registration
Frequently asked questions (FAQs)
The Brother Solutions Center is our one-stop resource for all your Brother machine needs. You can download
the latest software documents and utilities, read FAQs and troubleshooting tips, and learn how to get the most
from your Brother product.
support.brother.com
You can check the Brother Solutions Center for Brother driver updates.
To keep your machine performance up to date, check the Brother Solutions Center for the latest firmware
upgrade.
Appendix B B


Appendix B
54
B
Technical support (for PageManager and BizCard)
NOTE
For all other issues, see For customer service on page 53.
E-mail Address: [email protected]