Clean the housing and control panel with a mild cleaning agent or soap and water and dry both with a soft cloth.
The drum can be cleaned using a suitable stainless steel cleaning agent following the manufacturer’s instructions on the packaging.
Cleaning the detergent dispensing drawer
Washing at low temperatures and the use of liquid detergent can lead to a build-up of bacteria in the detergent dispenser drawer.
For hygiene reasons, clean the entire drawer at regular intervals.
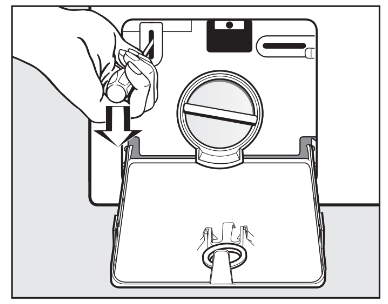
Removing the detergent dispenser drawer
Pull out the detergent dispenser drawer until a resistance is felt. Press down the release button and at the same time pull the drawer right out of the machine.
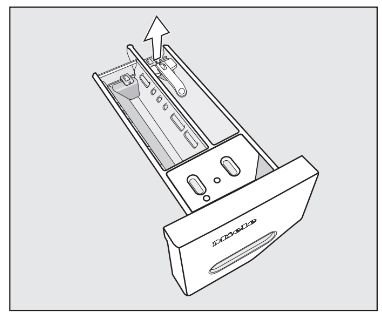
Removing and cleaning the insert for liquid detergents
An insert for liquid detergents is located in the compartment of the detergent dispenser drawer.
Remove the insert. Clean the insert thoroughly with warm water.
Cleaning the compartment
Compartment 1 has a siphon for better dispensing of the chlorine bleach.
Remove the release catch.
Remove and clean the siphon.
Clean the and compartments with warm water.
Cleaning the siphon and thecompartment channel
Liquid starch results in clogging. The siphon in the compartment no longer works and the compartment can overflow.
Clean the siphon particularly thoroughly after using liquid starch a few times.
Remove the siphon from the compartment and clean under warm running water. Clean the siphon tube in the same way.
Refit the siphon.
Clean the fabric softener channel with a brush and warm water.
Cleaning the detergent dispenser drawer housing
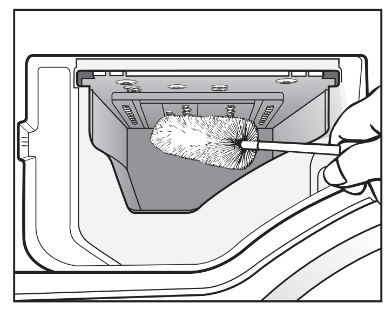
Use a bottle brush to remove detergent residues and limescale from the jets inside the detergent dispenser drawer housing.
Replace the detergent dispenser drawer.
Tip: Leave the detergent dispenser drawer slightly open to allow it to dry.
Sanitize info (Cleaning the drum)
Washing at low temperatures and/or using liquid detergent can cause bacteria and unpleasant odors to build up in the washing machine. Use the
Sanitize program to clean the washing machine. Clean the drum no later than the point at which the indicator light and light up on the time display.
Cleaning the water-inlet filter
The washing machine has 2 filters to protect the inlet valve. Check these filters every 6 months or so. Check the filters more often if there are frequent interruptions to the external water supply.
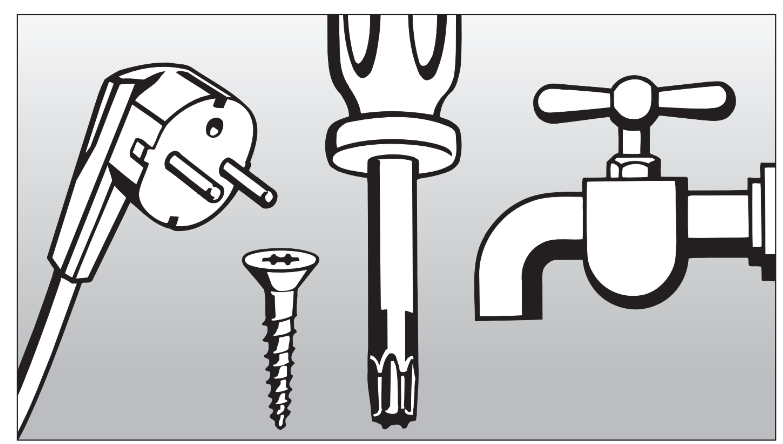
Cleaning the filter in the inlet hose
First turn off the faucet.
Unscrew the inlet hose from the faucet.
Remove the rubber seal 1 from the connector.
Using needle nose pliers, take hold of the plastic filter bar 2 and remove the plastic filter.
Clean the filter.
Reassemble in reverse order.
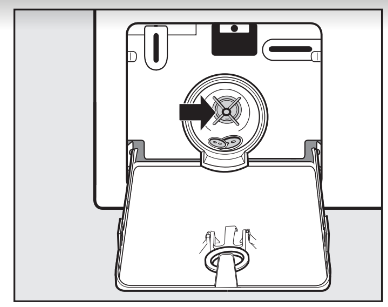
Cleaning the filter in the inlet valve
Using pliers, carefully loosen the ribbed plastic nut on the inlet valve and unscrew.
Use needle nose pliers to withdraw the filter by the bar.
Clean the filter.
Reassemble in reverse order.
The filters must be put back in place after cleaning.
Screw the screw thread securely back onto the faucet.
Turn on the water-supply faucet.
Make sure there is no water leaking from the screw thread.
Tighten the screw thread.
Frequently Asked Questions
With the help of the following guide minor faults in the performance of the machine, some of which may result from incorrect operation, can be remedied without contacting the Service Department.
This guide may help you to find the reason for the fault, and how to correct it.
A wash program cannot be started
Problem
Possible cause and solution
The control field re- mains dark.
There is no power to the machine.
Check whether the plug is plugged in.
Check whether the fuse has tripped.
The washing machine has switched off automatically to save energy.
Switch the washing machine on again by turning the program selector.
and appear alter- nately on the time dis- play.
The door is not closed properly. The door lock could not engage.
Close the door again.
Start the program again.
If the fault message appears again, contact Service.
After the appliance is switched on, ap- pears in the time dis- play.
An update is available for the washing machine. See “Programmable functions RemoteUpdate” for more information.
The program is canceled and a fault indicator light lights up on the control field
Problem
Possible cause and solution
The fault indicator light lights up, and ap- pear alternately on the time display, and the buzzer sounds.
The drain is blocked or restricted. The drain hose has been fixed too high.
Clean the filter and the pump.
The maximum drain height is 39 3⁄8" (1 m).
The fault indicator light lights up, and ap- pear alternately on the time display, and the buzzer sounds.
The water intake is blocked or restricted.
Check whether the water supply is turned on properly.
Check whether the intake hose is kinked.
Check whether there is sufficient water pressure.
The filter in the water intake is blocked.
Clean the filter.
The fault indicator light lights up, and appear alternately on the time display, and the buzzer sounds.
The water protection system has reacted.
Close the water supply.
Contact Service.
and alternate on the time display and the buzzer sounds.
There is a fault.
Disconnect the washing machine from the power supply. Unplug the appliance or switch off the breaker.
Wait at least 2 minutes before reconnecting the washing machine to the power supply.
Then switch the washing machine on again.
Restart the program.
If the fault message appears again, contact Miele Customer Service.
During the program, a symbol appears on the time display
Message
Possible cause and solution
is lit up on the time display.
The program selector was moved to a different position after the program had started.
Turn the program selector back to the original position.
At the end of the program, an indicator light lights up on the control field
Problem
Possible cause and solution
The indicator light lights up.
Excessive foam has built up during washing.
Use less detergent next time and follow the manufacturer’s instructions on dosage given on the packaging.
The indicator light lights up and appears on the time display.
When washing, a wash program using a temperature of Hot+ has not been run for a long time.
Run the Sanitize program using a universal powder detergent.
The washing machine is cleaned which prevents bacteria and odor buildup.
and alternate on the time display
The SoftSteam extra option which runs at the end of the program could not be carried out properly.
Check whether the washing machine is aligned correctly (see “Installation – Leveling the machine”).
Check whether the maximum drain height of 3' 3" (1 m) has been exceeded.
If the fault message appears again, contact Miele Customer Service. The washing machine can still be used, but without the SoftSteam extra option.
General problems with the washer
Problem
Possible cause and solution
The washing machine is emitting an odor.
The indicator light lighting up and appearing on the time display was ignored. When washing, a wash program using a temperature of Hot+ has not been run for a long time.
In order to prevent bacteria and unpleasant odors building up in the washing machine, run the Sanitize program using a universal powder detergent.
The door and detergent dispenser drawer were closed after washing.
Leave the door and the detergent dispenser drawer slightly open to allow them to dry.
The washer shakes dur- ing the spin cycle.
The four feet are not resting evenly on the floor.
Level the machine (see “Leveling the washer”).
The laundry has not been spun properly and the laundry is still wet.
The machine detected an imbalance during the final spin and reduced the spin speed automatically.
Wash large and small items together in order to achieve a more even load distribution.
There are unusual sounds coming from the drain pump.
There is no fault! Lapping sounds at the beginning and end of the drain process are normal.
General problems with the washing machine
Problem
Possible cause and solution
Large amounts of deter- gent residue remain in the detergent dispens- ing drawer.
The water pressure is too low.
Clean the filter in the water intake.
Please note that the water pressure must be at least 14.5 psi (100 kPa).
Powder detergent used in conjunction with water softeners tends to become sticky.
Clean the detergent dispenser drawer and in future, add detergent first and then the water softener.
The fabric softener is not completely dis- pensed or too much water remains in the compartment.
The siphon tube is either positioned incorrectly or clogged.
Clean the siphon tube, see “Cleaning and care - Cleaning the detergent drawer”.
At the end of the pro- gram there is still liquid in the capsule.
The small pipe in the detergent dispenser drawer onto which the capsule is placed is blocked.
Clean the small pipe.
Not a fault. For technical reasons, a small amount of water will remain in the capsule.
There is water next to the capsule in the fabric softener compartment
The sensor button was not activated.
Make sure that you remember to activate the sensor button the next time you insert a capsule.
An empty capsule was not removed at the end of the last wash program.
Remove and then dispose of the empty capsule at the end of each wash cycle.
The small pipe in the detergent dispenser drawer onto which the capsule is placed is blocked.
Clean the small pipe.
Poor wash results
Problem
Possible cause and solution
Liquid detergent is not achieving the required results.
Liquid detergents do not usually contain bleaching agents. Consequently, fruit, coffee, and tea stains cannot always be removed.
Use powder detergent containing a bleaching agent.
Use the appropriate capsule or add stain removers to the compartment.
Never put stain removers and liquid detergent together in the detergent dispenser drawer.
Gray, greasy particles cling to washed laundry.
Insufficient amounts of detergent were used. The laundry was heavily soiled with grease (oils, ointments).
Use more detergent or use liquid detergent with this type of soiled laundry.
Before washing the next load, run a Normal program with liquid detergent but without a load.
White residues which look like powder deter- gent are seen on dark textiles after washing.
The detergent contained compounds (zeolites) to aid water softening which are not soluble in water. These have ended up on the laundry.
Try and brush off the residues with a soft brush once the laundry is dry.
In the future, wash dark textiles using a detergent which contains no zeolites. Liquid detergents do not usually contain zeolites.
Use the Darks/Denim program to wash the textiles.
The drum door cannot be opened
Problem
Possible cause and solution
The door cannot be pulled open during a program.
The drum is locked during a program.
Follow the description in “5. Starting a program – Adding or removing laundry”.
After the program is canceled, flashing bars appear on the time display.
To protect the user against scalding, the door cannot be opened if the suds temperature is higher than 130°F (55°C).
Wait until the temperature in the drum has decreased and the bars have stopped flashing on the time display.
and appear alter- nately on the time dis- play.
The door lock has jammed.
Contact Service.
Opening the door in the event of a blocked drain outlet and/ or power outage
Turn off the washing machine.
Open the drain pump flap.
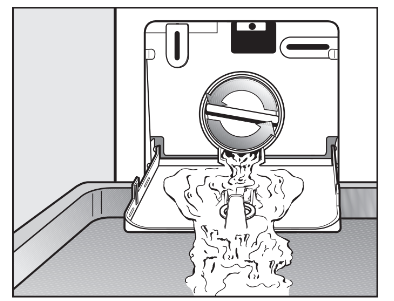
Blocked drain outlet
If the drain outlet is blocked, a larger quantity of water can remain in the washing machine.
Risk of scalding due to hot suds.
Escaping suds will be hot if laundry has been washed at high temperatures.
Carefully allow all suds to drain off.
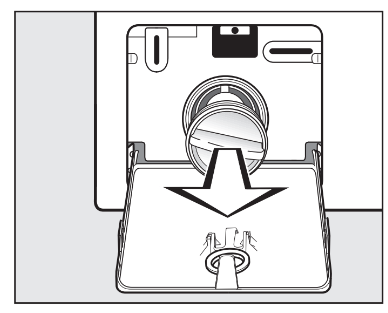
Draining the washing machine
Remove the drain filter, though not completely.
Place a suitable container under the flap, e.g., a bowl or dish.
Slowly unscrew the drain filter to let the water out.
Tighten the drain filter back up again if you need to interrupt the flow of water.
Once the flow of water stops:
Remove the drain filter completely.
Clean the drain filter thoroughly.
Remove any foreign objects (e.g., buttons, coins, etc.) and clean the interior. Turn the impellers by hand to check that they rotate freely.
Replace the drain filter correctly and tighten it securely.
Close the drain pump flap.
Risk of water damage
Make sure the drain filter is securely tightened. Otherwise there is a risk of water leakage during use.
Replace the drain filter correctly and tighten it securely.
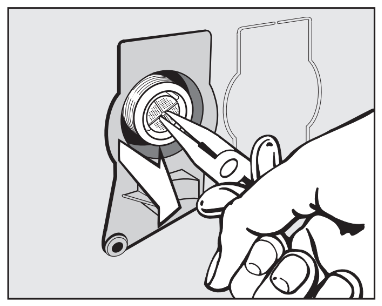
Opening the door
Danger of injury due to rotating drum.
Reaching into a rotating drum is extremely dangerous and may result in injury.
Always make sure that the drum is stationary before reaching in to remove laundry.
Use a screwdriver to unlock the door.
Pull open the door.
Installation instructions
Alteration rights reserved. Visit our website for all the current product specifications, technical appliance information, and warranty information. To avoid accidents or damage to the appliance, please read these instructions before installing and/or using it.
Installation
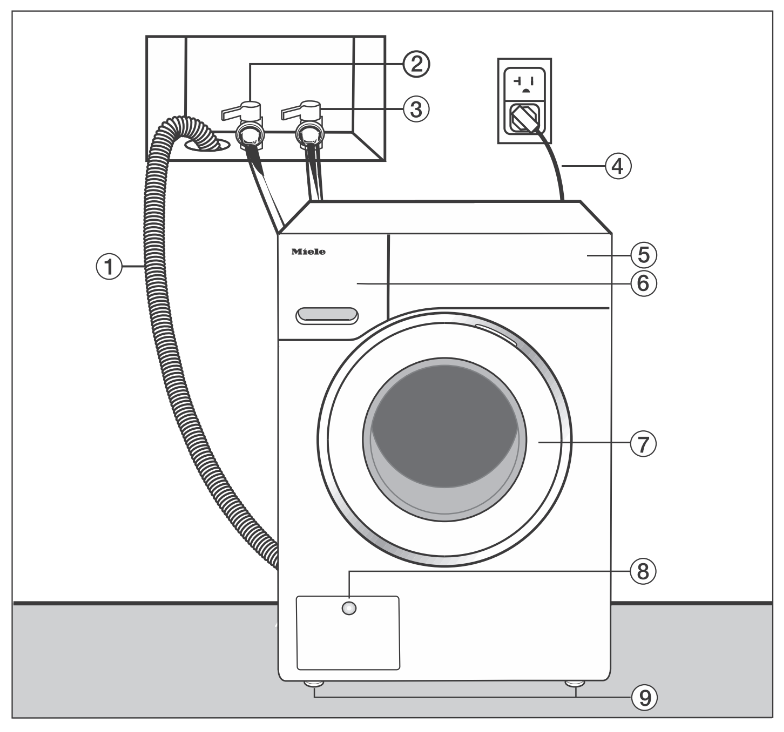
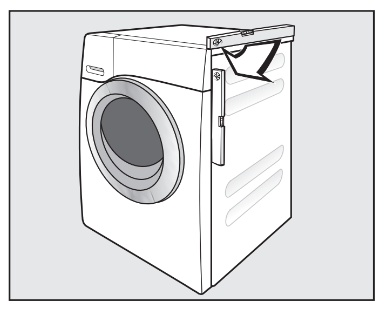
Front view
Drain hose
Hot-water inlet hose (pressure-proof to 870 psi/6,000 kPa)
Cold-water inlet hose (pressure- proof to 870 psi/6,000 kPa)
Electrical connection
Control panel
Detergent dispenser drawer
Door
Flap for drain filters, drain pump, and emergency release
Flap for TwinDos cartridges
Four height-adjustable feet
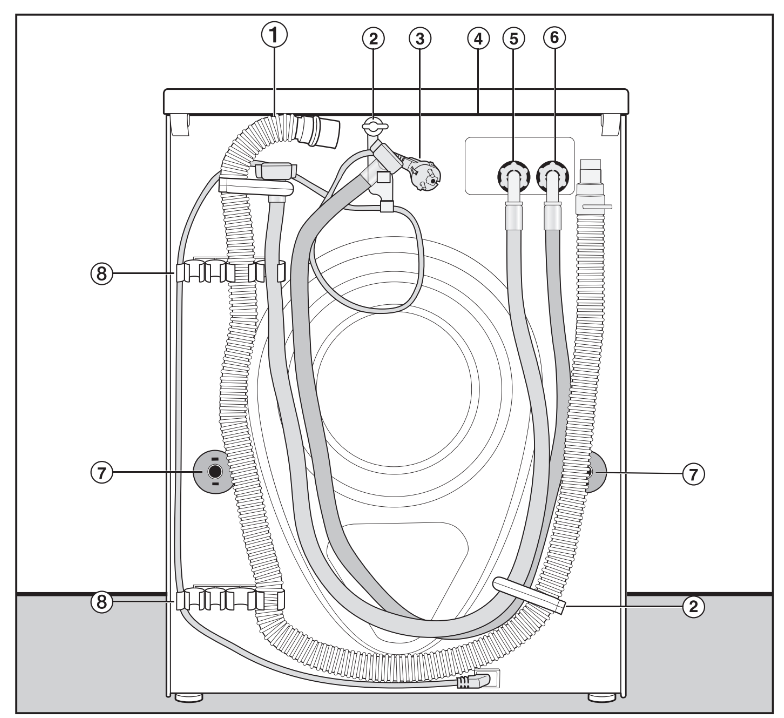
Rear view
Drain hose
Transport clips for inlet and drain hoses and power cord
Electrical connection
Protruding lid for holding when moving the machine
Cold-water inlet hose (pressure- proof to 870 psi/6,000 kPa)
Hot-water inlet hose (pressure-proof to 870 psi/6,000 kPa)
Safety caps for shipping struts
Transport clips for inlet and drain hoses and for storing shipping struts when not in use
Installation surface
A concrete floor is the most suitable installation surface for this machine. It is far less prone to vibration during the spin cycle than wooden floorboards or a carpeted surface.
Please note:
The machine must be level and securely positioned.
To avoid vibrations during spinning, the machine should not be installed on soft floor coverings.
If installing on a wooden joist floor:
Install the unit on a 2 ft. x 2 ft. x 1 3/16 ( 61X 61 x 3 cm) plywood base. Ideally the base should be large enough to span several joists and should be anchored to the joists and not just the floor boards.
Tip: If possible, install the machine in a corner. This is usually the most stable part of the floor.
Injury can occur if the washing machine has not been adequately secured.
During installation, the washing machine must be secured on a raised plinth to be made available on site (concrete or brick), in order to ensure it cannot fall or slip.
Secure the washing machine using a clamp/fastening bracket (MTS floor mounting kit – available from your Miele dealer or Miele Service).
Transporting the washing machine to its installation site
Danger of injury due to unsecure lid.
The fixings at the back of the lid may become brittle due to external circumstances. There is a danger of the lid being pulled off when carrying the appliance.
Before carrying the appliance, check that the lid is secure where it protrudes at the back of the appliance.
Carry the washing machine by the front feet and by the lid where it protrudes at the back of the appliance.
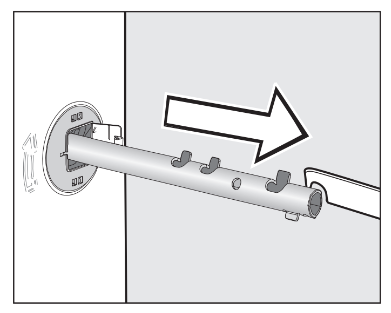
Removing the shipping struts
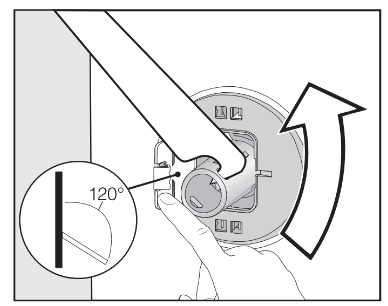
Removing the left-hand shipping strut
Open the cover and use the wrench supplied with the washing machine to turn the shipping strut 90°.
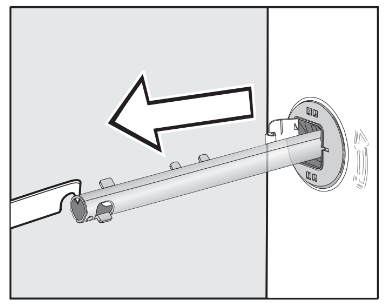
Pull out the shipping strut.
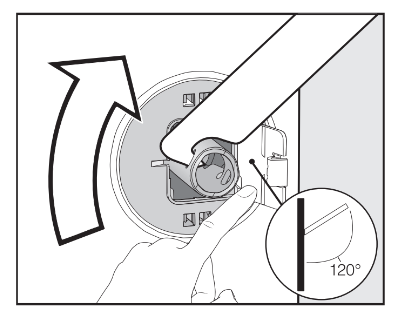
Removing the right-hand shipping strut
Open the cover and use the wrench supplied with the washing machine to turn the shipping strut 90°.
Pull out the shipping strut.
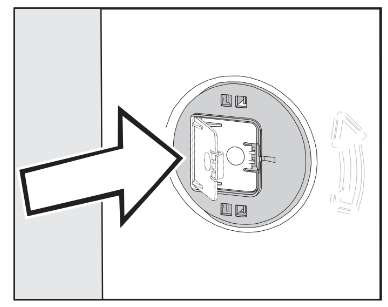
Covering the holes
Risk of injury from sharp edges.
There is a risk of injury from reaching into holes that are not covered.
Cover the holes for the shipping struts after they have been removed.
Press the covers firmly shut until they click into place.
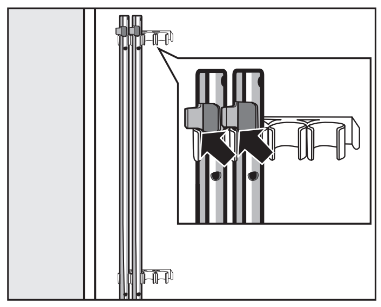
Securing the shipping struts
Secure the shipping struts to the back of the washing machine. Make sure that the top catch is located above the holder.
Risk of damage from incorrect transport.
The washing machine may become damaged if moved without the shipping struts in place.
Keep the struts in a safe place.
Install them again if the washing machine is to be moved (e.g., when moving to a new house).
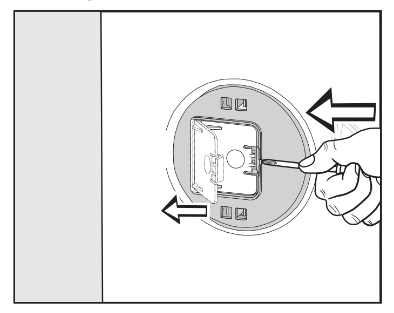
Installing the shipping struts
Opening the covers
Press against the catch with a thin object (a narrow screwdriver, for example).
The cover opens.
Installing the shipping struts
Install the shipping struts by following the instructions for their removal in reverse order.
Tip: The struts will slide in more easily if you lift the drum slightly.
Leveling the machine
The washing machine must stand perfectly level on all four feet to ensure safe and proper operation.
Incorrect installation may increase electric and water consumption and may cause the machine to move about.
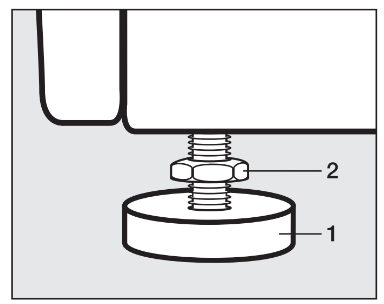
Unscrewing and adjusting the feet
The four adjustable screw feet are used to level the washing machine. All four feet are screwed in when the machine is delivered.
Using the wrench supplied, turn counter nut 2 in a clockwise direction. Then turn counter nut 2 together with foot 1 to unscrew.
Use a spirit level to check that the washing machine is standing level.
Hold foot 1 securely with a pipe wrench. Turn counter nut 2 again using the wrench supplied until it sits firmly up against the housing.
Risk of damage due to incorrectly aligned washing machine.
There is a danger of the washing machine moving about if the feet are not secured.
Turn all four counter nuts for the feet until they sit firmly up against the housing. Please also check this for the feet which did not need adjustment.
Installing under a countertop
Risk of electric shock due to exposed cables
There is a risk of coming into contact with live parts while the lid is removed.
Do not remove the washing machine lid.
This washing machine (with lid intact) can be pushed under a countertop if there is space to do so.
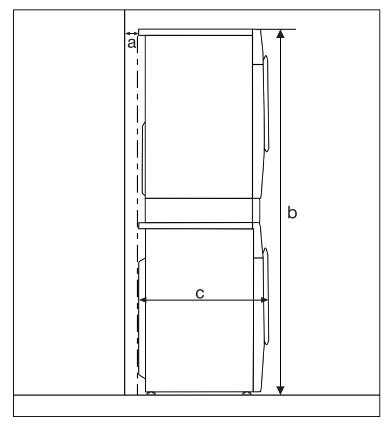
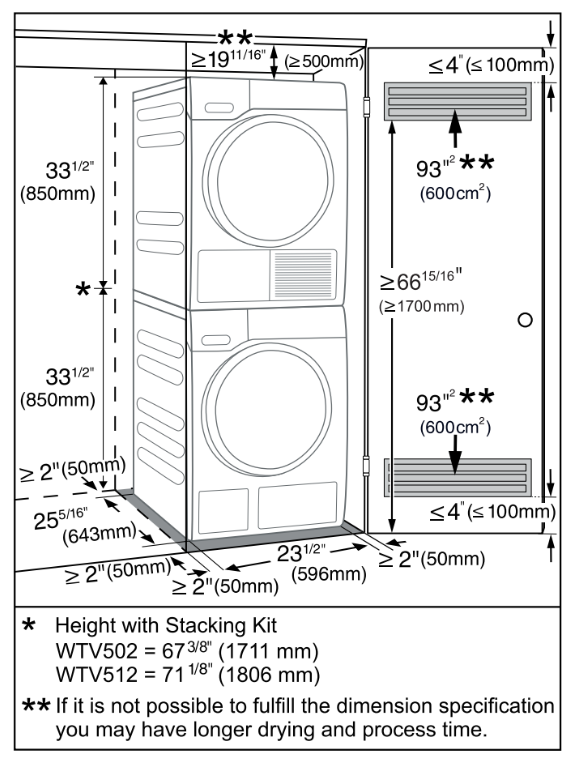
Washer-dryer stack
The washing machine can be installed as a washer-dryer stack together with a Miele Tumble Dryer. A WTV stacking kit* is required for this.
Parts marked with * are available from your Miele dealer or Miele Customer Service.
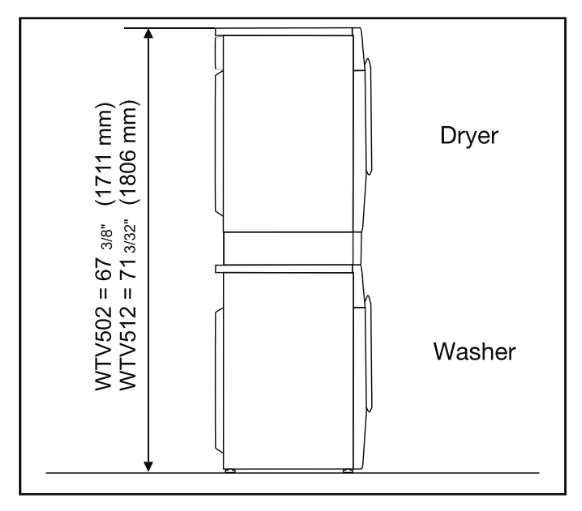
Please note:
a = at least 3⁄4" (2 cm)
b = WTV without drawer: 67 11⁄16" cm)
WTV with drawer: 71 1⁄4" (181 cm)
c = 25 9⁄16" (65 cm)
Additional installation requirements
The washing machine must be installed in accordance with the relevant local regulations.
Damage resulting from failure to remove the shipping struts.
Failure to remove the shipping struts can result in damage to the washing machine and to adjacent cabinetry or appliances.
Remove the shipping struts as described in “Installation and connection”.
Installing under a countertop
Risk of electric shock due to exposed cables
There is a risk of coming into contact with live parts while the lid is removed.
Do not remove the washing machine lid.
This washing machine (with lid intact) can be pushed under a countertop if there is space to do so.
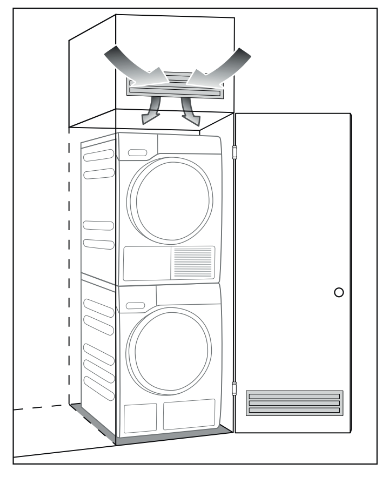
Setting up the cabinet
For closets at room height
You can also insert a ventilation opening at the top of the closet. In addition, you must provide an opening on the bottom side of the door.
Risk of damage due to overheating of the washing machine.
The air supply must not be hindered by an additional closet or shelf.
Please ensure that air is able to circulate freely at the top of the closet.
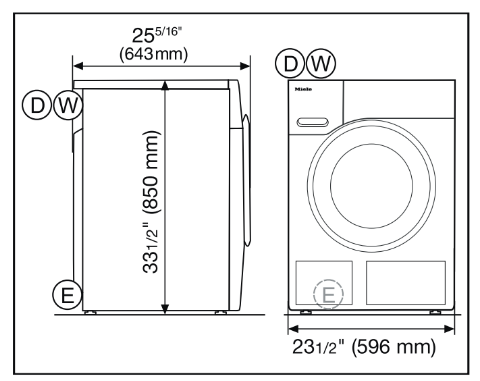
Product Dimensions
Dimensions
D= 4.9ft (1.50 m) drain hose with connection to the top left on the rear
E= 6.5 ft (2.00 m) electrical cord with plug for 120 V, 15 A (NEMA configuration) to the top left on the rear
W= 5.2 ft (1.60 m) warm and cold- water intake hoses to the top left on the rear
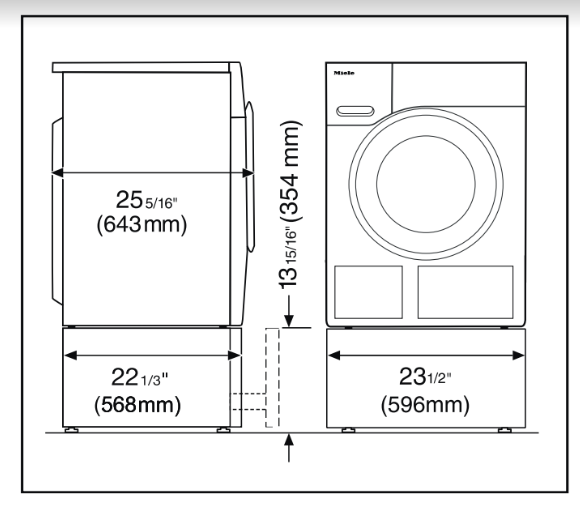
Installation on a plinth
- WTS 510 (only available in white)
Washer-dryer stack
- WTV 512 and WTV 502 washer-dryer stacking kit
The water protection system
The Miele water protection system protects all parts of the washing machine and its surroundings from water damage.
The system consists of the following main components:
the inlet hose
the electronic module and drainage and overflow protection
the drain hose
Inlet hoses
- Protection against the hoses bursting
The inlet hose can withstand pressure of more than 1,015 psi (7,000kPa).
Electronic module and washing machine housing
- Sump: Any leaking water is collected in a sump in the base of the machine. A float switches off the water inlet valves, preventing any more water from flowing into the machine and water in the suds container is pumped away.
- Overflow protection: This prevents the washing machine taking in too much water. If the water level exceeds a certain level, the drain pump switches on and pumps the excess water away in a controlled way.
Water intake
Health risk and risk of damage due to contaminated incoming water.
The quality of the incoming water must comply with the requirements for drinking water in the country in which the washing machine is being operated.
Always connect the washing machine to the drinking water supply.
The washing machine can be connected to a portable water supply. A non-return valve is not needed unless required by building code.
The washing machine has 1⁄2“ (13 mm) pressure hoses with 3⁄4” (19 mm) female hose thread connections. If there is no water hookup, contact a plumber to install a connection. Make sure that the sealing ring is seated properly on the hose connector.
Replace the hose only with a genuine Miele hose, or with a hose able to withstand up to 145 psi (1,000 kPa) pressure. The water valve connector must also be able to withstand 145 psi kPa).
The bolted connection is under water pressure. Open the water supply slowly to check for leaks. Adjust the rubber seal and the bolted connection if necessary.
Maintenance
Only use a genuine Miele hose that has been tested to withstand pressure of at least 870 psi (6,000 kPa) should you ever need a replacement.
A filter is located in the open end of the inlet hose and another in the intake point to protect the inlet valve.
Neither filter may be removed.
Water drainage
The suds are drained through a drain pump with a 3.2 ft (1 m) delivery head.
For the water to drain freely, the hose must be installed free of kinks.
If required, the hose can be extended to a length of up to 16.4 ft (5 m).
Accessories are available from your Miele dealer or Miele Customer Service.
For a delivery head of more than 3.2 ft m) (up to a max. of 5.9 ft (1.8 m)) a replacement drain pump will need to be installed. Please contact Miele Customer Service for advice.
For a delivery head of 5.9 ft (1.8 m) the hose can be extended to a length of up to 8.2 ft (2.5 m). Accessories are available from your Miele dealer or Miele Customer Service.
Drainage options:
1. Direct into a sink or basin:
Please note:
Hook the hose over the edge and secure!
If the water is pumped into a sink, be sure that it can drain away quickly enough. Otherwise there is a risk of water overflowing or of some of the drained water being sucked back into the machine.
2. Connected securely to a plastic drain pipe with a rubber nipple (there is no need to use a non-return valve).
3. Connected securely to a floor drain.
4. Connected securely to a sink with a plastic nipple.
Electrical connection
GROUNDING INSTRUCTIONS
This appliance must be grounded. In the event of a malfunction or breakdown, grounding will reduce the risk of electric shock by providing a path of least resistance for electric current. This appliance is equipped with a cord having an equipment-grounding conductor and a grounding plug. The plug must be plugged into an appropriate outlet that is properly installed and grounded in accordance with all local codes and ordinances.
WARNING – Improper connection of the equipment-grounding conductor can result in a risk of electric shock.
Check with a qualified electrician or service representative if you are in doubt as to whether the appliance is properly grounded.
Do not modify the plug provided with the appliance; if it will not fit the outlet, have a proper outlet installed by a qualified electrician.
ELECTRICAL INSTRUCTIONS
This installation should be performed by an experienced and qualified technician, in accordance with local codes and regulations.
The washing machine is supplied with a m) long, 3 wire cord, ending in a NEMA 5-15P plug, ready for connection to a 120 V, 15 A, 60 Hz, AC power supply.
The manufacturer recommends operating the appliance on a dedicated circuit to avoid overloading the electrical circuit.
The proper outlet can be purchased from an electrical supply dealer.
Guide to the washer
1.Control field
The control field consists of a time display and various sensor buttons. The individual sensor buttons are explained in the following sections.
2. Temperature sensor buttons for selecting the temperature.
3. Spin speed sensor buttons for selecting the final spin speed.
4. Sensor buttons for extra options
You can supplement the wash programs with extra options.
If a wash program has been selected, the sensor buttons for the possible extras light up dimly.
5. Indicator lights
Lights up if there are faults affecting the water intake and drainage.
Lights up if excess detergent was used.
Lights up together with in the time display as a reminder about hygiene information.
The Add laundry function cannot be selected.
6. CapDosing sensor buttons
CapDosing of fabric-care products (e.g., fabric softener, proofing agent)
CapDosing of additives (e.g., detergent enhancers)
CapDosing of detergent (for the main wash only)
7. Time display After the program has started, the program duration will appear on the display in hours and minutes. When Delay Start is being used, the program duration will appear after the delay-stat period has elapsed.
8. sensor buttons
The delay-start period selected will appear on the time display. After the program has started, the delay-start period will begin to count down. Once the delay-start period has elapsed, the program begins and the estimated program duration appears on the time display.
After touching the sensor button, a later start time for the program (Delay Start) can be selected. Once selected, lights up brightly.
The duration of the delay-start period is increased by touching the sensor button. The duration of the delay-start period is reduced by touching the sensor button.
9. Start/Add laundry sensor button
A. The program can be started as soon as the sensor button is flashing on and off. Touching the Start/Add laundry sensor button starts the selected program. The sensor button lights up constantly. B. Once the program has been started, the Start/Add laundry sensor button allows you to add laundry.
10. Optical interface This is used by the Service department as a transmission point. 11. Program selector for selecting programs and for switching the machine off. The washing machine is switched on when you select a program, and switched off by turning the program selector to the position.
How the control field works
The 2 , 3, 4, 6, 8,and 9 sensor buttons react to fingertip contact.
Selection is possible as long as the respective sensor button is lit.
If a sensor button is brightly lit, this means it is currently selected
If a sensor button is dimly lit, this means it can be selected
Before using for the first time
Removing the protective film and stickers
Remove:
any protective film from the door
any stickers from the front and from the lid
Please do not remove any labels (e.g., the data plate) which are visible when you open the door.
Remove the drain hose elbow from the drum
An elbow piece for the drain hose is stored in the drum.
Pull open the door.
Remove the elbow piece.
Shut the door.
This washing machine has undergone a complete functional test at the factory and some residual water will therefore remain in the drum from this process.
1. Removing the shipping struts
Damage resulting from failure to remove the shipping struts.
Failure to remove the shipping struts can result in damage to the washing machine and to adjacent cabinetry or appliances.
Remove the shipping struts as described in “Installation and connection”.
2.Setting up Miele@home
There are 2 ways of connecting:
via the Miele app (default)
via WPS
To do so, you will need a WPS- compatible router.
Logging in via the Miele app
Turn the program selector to the MobileStart program.
appears on the time display and the timeout starts to count down from 10 minutes. The Miele app will guide you through the remaining steps.
When you have successfully connected, will appear on the time display.
Logging in via WPS
Turn the program selector to the MobileStart program.
Touch the sensor button until appears on the time display and a short keypad tone sounds.
The timeout then starts to count down from 2 minutes on the time display.
Activate the WPS function on your router within 2 minutes.
When you have successfully connected, will appear on the time display.
Tip: If the connection has not been set up when the timeout has finished counting down, repeat the process.
3. Starting the calibration program
For optimum water and energy consumption and excellent wash results, it is important to calibrate the washing machine.
To do this, the Normal program must be run without laundry and without detergent.
Turn on the faucet.
Turn the program selector to the Normal position.
The washing machine is now switched on and the temperature Warm+ and spin speed Max light up.
Touch the Start/Add laundry sensor button.
The wash program will start.
After 15 minutes, the indicators dim.
Opening the door at the end of the program
The door remains locked during the Anti-crease phase. The control field lights up for the first 10 minutes. The control field then goes out and the Start/Add laundry sensor button flashes.
Turn the program selector to the position.
appears on the time display and the indicator light goes out.
The door will be unlocked.
Tip: After the Anti-crease phase, the washing machine will have switched off and the door unlocked automatically.
The control field is completely dark.
Take hold of the door and pull it open.
Tip: Leave the door slightly open to allow the drum to dry.

 compartment of the detergent dispenser drawer.
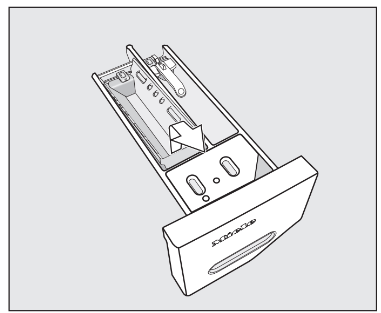
 compartment
 and
and  compartments with warm water.
 compartment channel
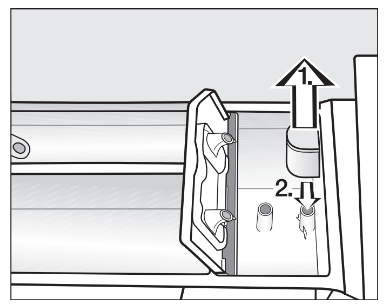
 compartment and clean under warm running water. Clean the siphon tube in the same way.
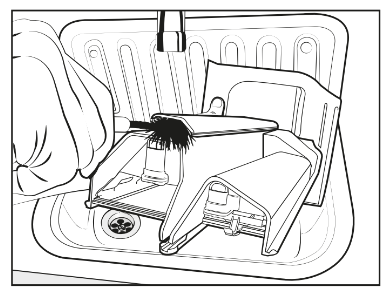
 indicator light and
  light up on the time display.
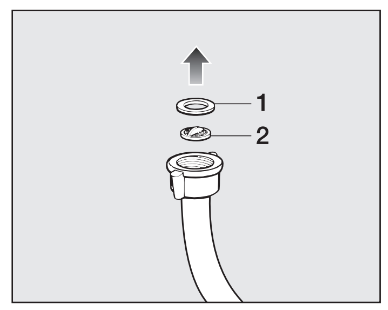
 and
and  appear alter- nately on the time dis- play.
 ap- pears in the time dis- play.
 RemoteUpdate” for more information.
 lights up,
  and
and  ap- pear alternately on the time display, and the buzzer sounds.
 lights up,
  and
and  ap- pear alternately on the time display, and the buzzer sounds.
 appear alternately on the time display, and the buzzer sounds.
 alternate on the time display and the buzzer sounds.
 is lit up on the time display.
 indicator light lights up.
 alternate on the time display
 sensor button was not activated.
 sensor button the next time you insert a capsule.
 compartment.
 appear on the time display.
 appear alter- nately on the time dis- play.
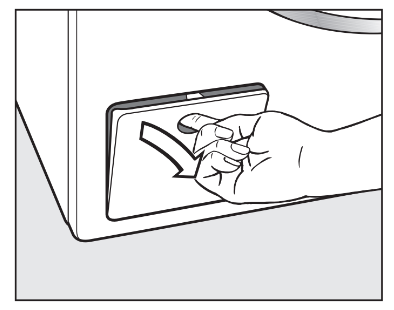

 Lights up if there are faults affecting the water intake and drainage.
 Lights up if excess detergent was used.
 Lights up together with
  in the time display as a reminder about hygiene information.
 The Add laundry function cannot be selected.
 CapDosing of fabric-care products (e.g., fabric softener, proofing agent)
 CapDosing of additives (e.g., detergent enhancers)
 CapDosing of detergent (for the main wash only)
 sensor buttons
 After touching the
  sensor button, a later start time for the program (Delay Start) can be selected. Once selected,
  The duration of the delay-start period is increased by touching the
  The duration of the delay-start period is reduced by touching the
  position.


 program.
 appears on the time display and the timeout starts to count down from 10 minutes. The Miele app will guide you through the remaining steps.
 will appear on the time display.
 sensor button until
  appears on the time display and a short keypad tone sounds.
 position.
 appears on the time display and the
  indicator light goes out.