User Manual RefrigeratorInstallation
Before installing. follow these important first steps.
Location
Position the appliance away from sources of heat such as stoves. radiators. direct sunlight etc.
Maximum performance and safety are guaranteed by maintaining the correct indoor temperature for the class of unit concerned. as specified on the rating plate. This appliance performs well from 12.8 to 43.3°C (55~110°F). The appliance may not work properly if it is left for a longer period at a temperature above or below the indicated range.
IMPORTANT
There is a need of good ventilation around the fridge for easy dissipation of heat. high efficiency of refrigeration and low power consumption. For this
purpose. sufficient clear space should be available around the fridge. It is advisable for there to be 75 mm (3 in) separating the back of the fridge to the wall. at least 100 mm (4 in) of space at its two sides. and aminimum of 100 mm (4 in) from its top and a clear space upfront to allow the doors to open 160°.
Appliances must not be exposed to rain. Sufficient air must be allowed to circulate in the lower rear section of appliance. as poor air circulation can affect performance.
Cleaning
- Wash any removable parts of the refrigerator interior. nd exterior with mild detergent and warm water. Wipe dry. Do not use harsh cleaners on these surfaces.
- Donot use razor blades or other sharp instruments. which can scratch the appliance surface when removing adhesive labels. Any glue left from the tape can be removed with a mixture of warm water and mild detergent. or touch the residue with the sticky side of tape already removed. Do not remove the serial plate.
Caution: flammable refrigerant used! When handing. moving and use of the refrigerator. make sure to avoid either damaging the refrigerant tubing. or increasing the risk of a leak.
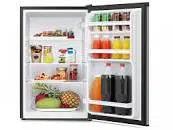
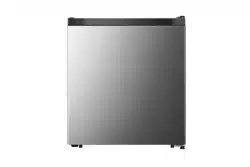
Appliance Description
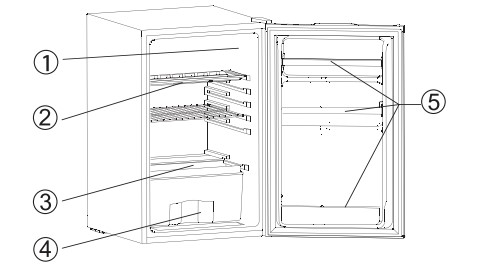
- Temperature Regulator and (LED inside)
- Storage Shelf
- Crisper Cover
- Crisper
- Door Shelf
Note: Due to constant modification of our products. your refrigerator may be slightly different from this instruction manual. but its functions and usage methods remain the same.
Note: Prior to frist use or after moving. the product must remain in the intended use position(upright) for 24 hours at minimum prior to being turned on.
Important: For ease of use. the user is advised to put the frist can at the bottom of the beverage housing retainer. and additional cans from the upper position.
Reversing the Door
The side at which the door opens can be changed from the right side (as supplied) to the left side. if the installation site requires.
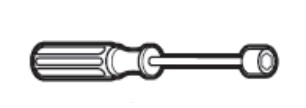
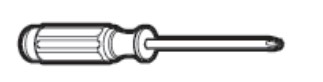
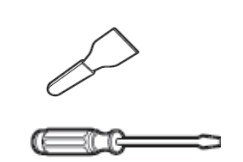
Tools you will need:
- 8mm(0.315 inch) socket driver
- Cross-shaped screwdriver
- Putty knife or thin-blade screwdriver
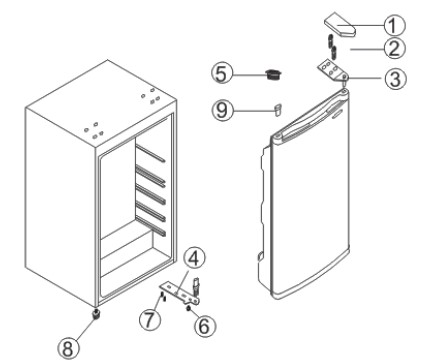
- Remove the upper hinge cap(1).
- Using a sharp object. pry out the plug buttons(5)
Remove the two Phillips screws(2) that connect the upper hinge(3) on the right side of the cabinet top.
Carefully lift the door and place it on a padded surface to prevent it from scratching.
Remove the plug(9) and transfer it to the uncovered hole at the right side. Be sure to press the button firmly into the hole. Remove the two bolts(7) that hold the lower hinge(4) on the right side.
Remove the screw-type leveling front leg(8) and transfer it to the right side as shown in the figure below.
Set the door into its new place making sure the pin enters the bushing at the lower frame section (hole).
Secure the upper hinge(3) previously removed in step 3 on the left side. make sure the pin enters the bushing at the upper frame section(hole).
Loosely secure the lower left hinge (4) and do not tighten the bolts until the door is in the closed position and leveled.
Insert the plug buttons(5) on the uncovered holes(right side).
Replace the upper hinge cap(1)
Temperature Control
Insert the plug of the connection lead into an outlet with protective earth contact.
The temperature selector knob is located on the side of the refrigerator compartment.
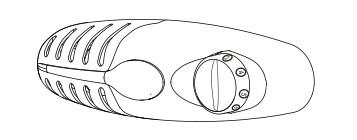
Setting 0 means:
Turning the temperature control to "0" position stops the cooling cycle. but does not shut off the power to the refrigerator.
Turn the knob clockwise to turn the refrigerating uint on. Coldest setting is all the way to highest number. The unit operates automatically at the set position. If the unit is unplugged. power lost. or turned off. you must wait 3 to 5 minutes before restarting the unit. If you attempt to restart before this time delay. the refrigerator will not start.
Setting 1 means:
Highest temperature, warmest setting.
Setting 7 (end-stop) means:
Lowest temperature. coldest setting.
IMPORTANT
Normally we advise you to select setting of 3 or 4. If you want the temperature warmer or colder. please turn the knob to lower or higher setting accordingly.
Though the unit is energy efficient. it is more efficient at lower position settings.
IMPORTANT
High ambient temperatures (e.g. on hot summer days) and a cold setting on the temperature regulator (position 6 to 7) can cause the compressor to run continuously or even non-stop!
Vacation Tips: If the appliance will not be used for several months:
- Remove all food.
- Unplug the power cord.
- Clean and dry thoroughly.
- Leave the door open slightly to prevent odour and mould growth.
Cleaning and Care
For hygienic reasons the appliance interior. including interior accessories. should be cleaned regularly. The fridge should be cleaned and maintained at least every two months.
Warning! Danger of electrical shock!
The appliance may not be connected to the outlet during cleaning! Before cleaning switch the appliance off and remove the plug from the mains. or switch off the circuit breaker or fuse.
Remove the food from the appliance before cleaning. Store food in a cool place and keep well covered.
Never clean the appliance with a steam cleaner. Moisture could accumulate in electrical components.
Hot vapours can lead to the damage of plastic parts.
The appliance must be dry before it is placed back into service.
IMPORTANT
Ethereal oils and organic solvents can attact plastic parts, e.g. lemon juice or the juice from orange pell, butyric acid. and cleansers that contain acetic acid. Do not allow such substances to come into contact with appliance parts.
Do not use any abrasive cleaners.
Clean the appliance and the interior accessories with a cloth and lukewarm water. Commercially available dishwashing detergents may also be used.
After cleaning. wipe with fresh water and a clean dishcloth.
Accumulation of dust at the condenser increases energy consumption. For this reason, carefully clean the condenser at the back of the appliance once a year with a soft brush or a vacuum cleaner.
Check the water drain hole on the rear wall of the refrigerator compartment.
Clear a blocked drain hole with the aid of something like a soft peg. Be careful not to create any damage to the cabinet by sharp objects.
After everything is dry. place appliance back into service.
Defrosting Your Refrigerator
- To defrost the refrigerator. remove all food and objects from the refrigerator. Ensure the drip pan is in place under the freezer compartment. Unplug the unit and ensure the cord is in safe dry location. The defrost process may take a few hours. To speed up the defrost time. keep the door open and place a bowl of warm water in the refrigerator. Never use sharp objects to remove the frost.
- During the defrost cycle. water will accumulate in the drip tray. The drip tray may need to be emptied during the defrost cycle. Do not leave unattended.
- After defrosting is complete. empty and wipe down the drip tray. as well as the interior of the refrigerator. You may now reset the refrigerator to the desired temperature and put the food back in.
Energy Saving Tips
- Do not place warm foods into the appliance. Allow warm foods to cool first. Do not install the appliance near cookers. radiators or other sources of warmth. High ambient temperatures cause longer. more frequent operation of the compressor
- In order to make the cooling system work efficiently. please make sure the side plates and back plates of the product are some distance from the wall. It is strongly recommended that the fridge be 75 mm (3 in) away from the wall. that the sides are at least 100 mm (4 in) away each. the top is at least 100 mm (4 in) from the ceiling.
- When the product works. please do not open the door too often or leave the door open any longer than necessary.
- Do not set temperature any colder than necessary.
- The direct cooling refrigerator (with a freezer) needs to be defrosted when necessary. This will improve the cold transfer and reduce energy consumption.
- The sketch map shows the right combination of the shelves which can lead to more energy efficiency. If users adjust the combination. it may result in more energy-consumption.
- Store food logically. Do not exceed the storage period specified.
Trouble Shooting
Correcting Malfunctions
A malfunction may be caused by only a minor fault that you can rectify yourself using the following instructions. Do not perform any other work on the appliance if the following information does not provide assistance in your specific case.
- Appliance does not work.
- Appliance is not switched on.
- Main plug is not plugged in or is loose.
- Fuse has blown or is defective.
- Check fuse. replace if necessary.
- Socket is defective.
- Electrical malfunctions are to be corrected by an electrician.
- Appliance cools too much.
- Temperature is set too cold.
- Turn the temperature regulator to a warmer setting temporarily.
- The food is too warm.
- Temperature is not properly adjusted.
- Door was open for an extended period.
- Open the door only as long
- Please lookin the _. temperature control section. as necessary.
- Alarge quantity of warm food was placed in the appliance within the last 24 hours.
- Turn the temperature regulation to a colder setting temporarily.
- The appliance is near a heat source.
- Please look in the “installation” section.
- Heavy build-up of frost. possibly also on the door seal.
- Door seal is not air-tight (possibly after reversing the door).
- Carefully warm the leaking sections of the door seal with a hair dryer (on a cool setting). At the same time shape the warmed door seal by hand such that it sits correctly.
- Unusual noises.
- Appliance is not level.
- The appliance is touching A component other objects.
- Move the appliance slightly.
- A component. e.g. a pipe. on the| rear of the appliance is touching another part of the appliance or the wall.
- If necessary. carefully bend the component out of the way.
- The compressor does not start immediately after changing the temperature setting.
- This is normal. no error has occurred.
- The compressor starts after a period of time.
- Water on the floor or storage shelves.
- Check that the drip tray is housed properly. Drip tray is full of water.
- See the “cleaning and care” section.
Disposal of the appliance
It is prohibite d to dispose of this appliance as household waste.
Packaging materials:
Packaging materials with the recycle symbol are recyclable. Dispose of the packaging into as uitable waste collection container to recycle it.
Before disposal of the appliance:
- Pull out the main plug from the main socket.
- Cut off the power cord and discard with the main plug.