User Manual for Cell phone
Getting Started

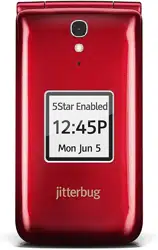
Your Jitterbug Flip

• Camera – Take clear pictures.
• Flash / Flashlight – Automatically turns on when taking pictures in low light and can be manually activated using the Flashlight Button.
• Headset Jack – Connect a headset for hands-free calling.
• Indicator Light – Lights up for incoming calls or when the phone is fully charged.
• Outside Display – View the current time, the current date and notifications about charging status, incoming calls or messages.
• USB Connector – Charge your phone and download photos onto your computer.
• Dock Connector – Charge your phone using the supplied Charging Dock.

- Earpiece Speaker – Lets you hear the caller loud and clear.
- Inside Display – The main screen you will use to interact with your phone.
- Up/Down Button – For navigating within the screens you see.
- Speakerphone Button – Turns Speakerphone on and off.
- On/Off Button – Turns your Jitterbug on and off.
- YES Button – Allows you to answer “YES” to questions or commands.
- NO Button – Allows you to answer “NO” to questions or commands.
- Keypad – Used for dialing numbers to make a call.
- Star Button – Allows you to get help in any emergency.
- Microphone – Picks up your voice loud and clear.

- External Speaker – Delivers loud and clear sound when the Speakerphone feature is enabled.
- Flashlight Button – Press and hold this button while your Jitterbug is open to help you see in low light conditions.
- Volume Button – Allows you to adjust the ringer, Earpiece Speaker and External Speaker volume.
- Battery Cover – Protects the rechargeable battery and the back of your phone.
- Battery Cover Release – Allows you to remove the Battery Cover
Activating Your Jitterbug
Depending where your Jitterbug was purchased, your phone may already be activated. The following three easy steps will guide you in powering on your phone for the first time.
IMPORTANT! Please do not turn on your phone until instructed to do so. If you turn it on prior to setting up your account, the device may fail to activate. If the device fails to activate, power off and start with STEP 1.
STEP 1 Determine where your phone was purchased.
• If you purchased your Jitterbug from GreatCall or firstSTREET, your phone is already activated and you may skip to STEP 3.

• If you purchased your Jitterbug from Amazon, Best Buy, Fry’s Electronics, Rite-Aid, Sears, or Walmart, your phone is not yet activated and you will need to continue to STEP 2.

STEP 2 Go online or call to activate your account.
• If you are new to GreatCall, go online at GreatCall/Activate to activate your account. You will be asked to enter in your Jitterbug Serial Number which can be found on the included Activation Card or on the side of the retail box. If you do not have Internet access, you can call our Activation Line at (888) 900-1367.
OR
• If your Jitterbug is already activated and you have questions about your phone or service, please call our customer service agents at (866) 482-1424.
STEP 3 Turn on your Jitterbug to complete set up.

Press the On/Off Button ( ) and your phone will automatically complete the set up process.
This process may take a few minutes and you may notice the phone restart a few times. Once complete, you will see a screen “Phone was set up successfully!”
You’re now ready to enjoy the benefits of your easy-to-use Jitterbug phone.
Charging the Battery
We’ve included a Charging Dock to make it easy for you to always have your Jitterbug fully charged and ready to go.
Charging Using the Charging Dock
- Plug the smaller end of the USB Cable into the back of the Charging Dock.
- Plug the larger end of the USB Cable into the Wall Charger.
- Plug the Wall Charger into a standard wall outlet (110/220 VAC).
- Place the Jitterbug into the Charging Dock as illustrated.
Your Jitterbug is fully charged when you see “Charging Complete” on the Outside Display.

IMPORTANT! It is recommended to fully charge your Jitterbug after activating it for the first time. Your phone may turn off sooner than expected if using it before fully charging.
Charging Without the Charging Dock
It’s also possible to charge your Jitterbug without the Charging Dock by using the included USB Cable.
- Plug the larger end of the USB Cable into the Wall Charger.
- Plug the Wall Charger into a standard wall outlet (110/220 VAC).
- Plug the smaller end of the USB Cable into the USB Connector on the side of your Jitterbug.
Battery Level Indicator
Your Jitterbug will remind you to charge the battery. Reminders appear on the Inside Display and Outside Display with the following messages:
- Battery Low – This will appear when your battery is beginning to get low.
- Battery Critical – This will appear when your battery has about 20% charge remaining.
IMPORTANT!
Only use batteries designed specifically for your Jitterbug phone. Using other batteries could damage your phone and may void your warranty. Extra batteries are available online at GreatCall/Accessories
Powering Your Jitterbug On and Off
Turning Your Jitterbug On
- Open your Jitterbug.
- Press and hold the On/Off Button () until the Inside Display turns on.
- When you hear a dial tone, your Jitterbug has service and is ready to use. If a connection is not possible, a “No Service” message will appear on the Outside Display and a dial tone will not be heard.
IMPORTANT!
If you receive an error message to call Customer Care after turning your Jitterbug on, it may be possible that your phone has not yet been activated. Please refer to “Activating Your Jitterbug” on page 10 for more information on how to activate your phone.
Turning Your Jitterbug Off
- Press and hold the On/Off Button () until the GreatCall logo appears on the Inside Display.
- Your Jitterbug will then turn off.
INFO
We recommend keeping your Jitterbug on at all times and charging it at night so you can always stay connected.
How to Read the Inside Display
Throughout this guide, the screen on the inside of your Jitterbug is referred to as the Inside Display. The following diagram explains the areas of the Inside Display and how to use them. Below is an example of the Phone Book screen.

- Feature Area – Identifies the feature you are using. For example, when you are in the Phone Book, you will see “PHONE BOOK” in this area.
- Detail Area – Details of the feature you are using will appear here. For example, information such as detailed entries from your Phone Book, will appear in this area.
- Action Line – Questions or commands displayed here can be responded to using the YES Button (
 ) or the NO Button (
 ).
).
- Additional Information Exists – Small arrows at the top and bottom indicate when more information is available to view using the Up/Down Button.
INFO If you are unsure about what to do, simply press the YES Button () or NO Button ( ) to answer the question in the Action Line at the bottom of the Inside Display
Using the Main Screen
When you open your Jitterbug while it is powered on, you will see the Main Screen as shown in the image below.

INFO The Main Screen will display your Jitterbug phone number at the top of the screen as shown above as “My # 800-650-5703”.
The Main Screen is where you access the features on your Jitterbug. Your Jitterbug is designed with the following six features installed
- Phone Book – Store up to 200 of the names and numbers that you call most often. Our Personal Operators can even set up your Phone Book for you. See “Personal Operator” on page 51 for more information on what GreatCall’s Personal Operators can do for you.
- Call History – An easy way to review your last ten incoming, outgoing and missed calls, listed with the most recent first. See “Call History” on page for more information.
- Phone Info – Gives you the following important points of information about your Jitterbug: your phone number, battery life, signal strength and approximate minutes used per month.
- Settings – The following items can be changed from within the Settings feature: colors, jingle on/off, ring tones and Bluetooth. See “Phone Settings” on page 101 for more information.
- Camera – This is where you will take photos that will be automatically stored in My Photos. See “Section 3: Camera” on page 57 for more information.
- My Photos – An easy way to view, delete or send photos. See “Section 3: Camera” on page 57 for more information.
INFO Approximate minutes used per month shows your estimated minute usage each month. This time resets at the beginning of your monthly billing cycle. Your Main Screen may contain additional features depending on your plan
Navigating the Main Screen with the Keypad
You can easily access all of your features within the Main Screen using three simple buttons located at the top of the Keypad.

- When the feature you want to select is highlighted in the middle of the Inside Display, press the YES Button ( ) to select that feature.
- Use the Up/Down Buttons (
 ) to scroll through the features of the Main Screen.
- The NO Button ( ) enables you to answer “NO” to questions in the Action Line and return to the previous screen. If you make a mistake while dialing a number or typing a Text Message, you can always press the NO Button ( ) to back up and delete what you entered.
INFO
By default, your phone always displays the Main Screen when opening your Jitterbug after it has been closed. If you find it easier to have your Jitterbug start directly in your Phone Book each time you open your phone, you can dial “0” on your Jitterbug to reach a Personal Operator to enable this feature.
The 5Star Button
If you have a Health & Safety Package, press the red 5Star Button in an uncertain or unsafe situation to be connected to a highly-trained 5Star Agent. The Agent will assess your situation, confirm your location using GPS and connect you to emergency services if you need it. See “GreatCall Health & Safety Services” on page 86 for more information.


IMPORTANT! If you do not have a Health & Safety Package, you will be asked if you would like to be connected directly to 9-1-1 services when the 5Star Button is pressed. Press the YES Button ( ) if you would like to call 9-1-1 or the NO Button ( ) if you would like to hang up.

Phone Calls
Making and Answering Phone Calls
Making a Phone Call
You can dial a phone number directly from almost every screen on your Jitterbug.
1. When you open your Jitterbug, you will hear a dial tone indicating that service is available. If service is not available, there will be no dial tone and you will see “No Service” on the Inside Display.
2. Dial the full ten-digit phone number using the Keypad. You may be required to dial the number “1” first before placing a call in some areas.
3. Press the YES Button ( ) to place the call.
INFO If you make a mistake while dialing, press the NO Button ( ) to back up and delete the last number.
Incoming Phone Calls
Your Jitterbug rings or vibrates to indicate when you have an incoming call. Additionally, there are other indications that you have an incoming call:
- The Indicator Light on the outside of your Jitterbug flashes.
- The name or phone number of the person calling will appear on the Outside Display.
- If the caller’s number is saved in your Phone Book, then the name and number will appear on the Inside Display.
- If the caller cannot be identified, you may see the phone number only or you may see “Unavailable” or “Restricted”.
Answering a Call When Your Jitterbug is Closed
- Open your Jitterbug when you hear it ring. The ring tone will stop when the phone is opened.
- A “Connected” message will appear on the Inside Display and the caller’s voice can be heard through the Earpiece Speaker.
- To end the call, press the NO Button ( ) or close your Jitterbug.
Answering a Call When Your Jitterbug is Open
- When the “ANSWER?” question appears in the Action Line at the bottom of the Inside Display, press the YES Button ( ) to connect.
- A “Connected” message will appear on the Inside Display and the caller’s voice can be heard through the Earpiece Speaker.
- To end the call, press the NO Button ( ) or close your Jitterbug.
Ignoring Incoming Calls
When you receive an incoming call while your Jitterbug is closed you can press the Volume Button on the side of your phone to mute the ringer. If you receive an incoming call while your phone is open, you can press the NO Button to ignore the call.
Ignored calls will be sent to your Voicemail. If your Voicemail is not active or set up, callers will get an automated message that you are not available. See "Voicemail” on page 46 for more information.
INFO
Talk time over your monthly Minutes plan allowance is $0.35 per minute.
Speakerphone
The Speakerphone provides you the convenience to make a call without holding the phone to your ear. The Speakerphone can be activated at any time while you are on a call.
To turn Speakerphone on, press the Speakerphone Button while on a call. You will hear the caller’s voice coming from the External Speaker on the back of your Jitterbug. Press the Speakerphone Button again if you would like to switch audio back to the Earpiece Speaker.
INFO
Turning Speakerphone off during a call will not end your conversation, but instead will switch audio back to the Earpiece Speaker. If you close your Jitterbug while using Speakerphone, the call will end.
Adjusting the Volume
Adjusting the Earpiece or Speakerphone Volume
While on a call, press the Volume Button up or down until the sound reaches a comfortable level. Your Jitterbug has three volume options for the Earpiece Speaker and External Speaker: High, Medium and Low.
Adjusting the Ringer Volume
While not actively on a call, press the Volume Button up or down until the ringer volume is at the desired level. Your Jitterbug has five volume options for the ringer: Max, High, Medium, Low and Vibrate
Call History
Your Jitterbug keeps a list of your 10 most recent outgoing, incoming and missed calls.
Reviewing Your Call History
- From the Main Screen, use the Up/Down Buttons ( ) until Call History appears highlighted and press the YES Button ( ) to view your Call History. The first number you will see in your Call History will be your most recent phone call.
- Using the Up/Down Buttons ( ), scroll down to view your Call History in sequence according to the time of occurrence.
- As you scroll through your Call History you will see the following type of call events:
- Missed – You missed a call from this phone number.
- Incoming – You received and answered a call from this phone number
- Outgoing – You placed a call to this phone number.
Making Calls from Your Call History
With Call History you can quickly return missed calls, as well as redial both incoming and outgoing calls. While in Call History, use the Up/Down Buttonsto find the Missed, Incoming or Outgoing phone number you would like to call. Once highlighted, simply press the YES Button ( ) to automatically dial the number.
Personal Operator
GreatCall’s Personal Operators are able to manage your Phone Book, look up phone numbers, connect you to any number in the U.S. or Canada, and place calls to anyone in your Phone Book. To call a Personal Operator:
- Dial “0” on your Keypad.
- Press the YES Button ( ) and a “Calling...” message will appear on the Inside Display, followed by the message “Connected to Operator”.
- When the Personal Operator answers, let them know which of the above services you need assistance with.
- To end the call, press the NO Button ( ) or close your Jitterbug.
INFO Ultimate Health & Safety Package customers get unlimited access to Personal Operator, 24/7, for no additional cost. For all other packages and plans, the Personal Operator service costs $0.99 per call. Standard airtime rates apply on all plans for the duration of a Personal Operator call. For more information on Health & Safety Packages call us at 1-800-733-6632 or visit us online at GreatCall.
Emergency 9-1-1 Services
To make an emergency call:
- Open your Jitterbug and make sure it’s on and connected (you should hear a dial tone).
- Dial 9-1-1 using the Keypad.
- Press the YES Button () when you see “CALL?” at the bottom of the Inside Display
Camera
Taking a Photo
- From the Main Screen, use the Up/Down Buttons ( ) until Camera appears highlighted and press the YES Button ( ).
- Aim your phone until you are satisfied with what you see on the Inside Display and press the YES Button ( ) to capture the image.
- A preview of your photo will appear on the Inside Display. Press the YES Button ( ) to keep this photo or the NO Button ( ) to delete this photo.
- When you are finished with using the Camera, press the NO Button ( ) until you see the Main Screen or close your Jitterbug.
INFO
Any photo saved on your Jitterbug will be stored in a photo gallery called "My Photos”.

Viewing a Photo
- From the Main Screen, use the Up/Down Buttons ( ) until My Photos appears highlighted and press the YES Button ( ).
- Use the Up/Down Buttons ( ) to scroll through your photos.
- When finished viewing your photos, press the NO Button ( ) to return to the Main Screen or close your Jitterbug.
Sending a Photo
- From the Main Screen, use the Up/Down Buttons ( ) until My Photos appears highlighted and press the YES Button ( ).
- Use the Up/Down Buttons ( ) to scroll to the photo that you would like to send and press the YES Button ( ) to select it.
- Use the Up/Down Buttons ( ) until you see “Forward” highlighted and press the YES Button ( ).
- Use the Up/Down Buttons ( ) to scroll to the contact you would like to send your photo and press the YES Button ( ).
When your photo has been sent you will see the words “Photo Successfully Sent” on the Inside Display.
INFO
If the contact you would like to send the photo to is not listed in your Phone Book, use the Up/Down Buttons ( ) and scroll until “Enter Recipient” appears. There you can enter a phone number using your keypad.
Photos sent from your Jitterbug use your monthly text message allowance (one photo = one text message). Photos sent over your monthly text message allowance will incur a charge of $0.10 per photo.
Deleting a Photo
- From the Main Screen, use the Up/Down Buttons ( ) until My Photos appears highlighted and press the YES Button ( ).
- Use the Up/Down Buttons ( ) to scroll to the photo you would like to delete and press the YES Button ( ).
- Use the Up/Down Buttons ( ) until you see “Delete” highlighted and press the YES Button ( ).
- Press the YES Button ( ) again to confirm that you want to delete this photo permanently.
IMPORTANT!
Once a photo has been deleted, there is no way to recover it.
Receiving a Photo
Your friends and family can send photos to your Jitterbug by using your phone number. If you receive a photo from them a notification on the Outside Display will read “New Photo”. This message will remain on the Outside Display until you open your Jitterbug.
If you see this notification, you can open your Jitterbug and press the YES Button ( ) to view the photo that was just sent to you. i INFO
There is a $0.10 charge for each photo you send or receive.
Downloading Photos to Your Computer
You can download photos from your Jitterbug to your personal computer using the included USB Cable.
- Insert the smaller end of the USB Cable into the USB Connector on the side of your Jitterbug.
- Insert the larger end of the USB Cable into the USB Connector on your personal computer.
Use “Windows Explorer” on Windows computers or “Finder” on Mac computers to browse through your Jitterbug’s photos.
INFO
This feature is only compatible with Windows XP or greater, and Mac OS X (Mountain Lion”) or greater.
Sharing Photos on Facebook
You can share photos you have captured on your Jitterbug to your Facebook account. Before you can share photos on Facebook you will need to enable it on your MyGreatCall account. If you don’t have a MyGreatCall account yet, registration is easy at MyGreatCall.
Enabling Facebook Photo Sharing
- Log into your MyGreatCall account at MyGreatCall.com from any computer.
- Click on “My Photos” in the navigation bar.
- Click “Login or Sign Up”. You will need your login information for your Facebook account handy.
Sharing a Photo on Facebook
Once Facebook photo sharing has been enabled on your MyGreatCall account, you will be able to use it when choosing to share your photos on your Jitterbug.
- From the Main Screen, use the Up/Down Buttons ( ) until My Photos appears highlighted and press the YES Button ( ).
- Use the Up/Down Buttons ( ) to scroll to the photo you would like to share and press the YES Button ( ).
- Use the Up/Down Buttons ( ) until “Facebook” is highlighted and press the YES Button ( ).
Text Messages
Text Message Notifications
Text Messages are a quick and easy way to communicate with other cell phone users using short messages. When you receive a new Text Message, you will be notified in three ways:
- Indicator Light – the light above the Outside Display will flash every 15 seconds until you open your phone.
- Outside Display – the words “New Text Message” will appear on the display found on the outside of your Jitterbug until you open your phone.
- External Speaker – an audible alert will play every five minutes until you open your phone or 30 minutes have elapsed.
Reading Text Messages
Reading Text Messages After Receiving a Notification
After receiving a notification that you have a new Text Message, follow these steps to read the message:
- Open your Jitterbug. You will see the words “You have a new text message” on the Inside Display and the word“ VIEW?” in the Action Line at the bottom. Press the YES Button ( ) to continue.
- A preview of your most recent Text Message will appear. Press the YES Button ( ) to view this Text Message.
- Use the Up/Down Buttons ( ) to read the entire Text Message.

Reading Text Messages from the Main Screen
You can view any of your saved Text Messages at any time from the Main Screen. Follow these steps to view your saved Text Messages:
- From the Main Screen, use the Up/Down Buttons ( ) until Text Messages appears highlighted and press the YES Button ( ).
- Use the Up/Down Buttons ( ) until you see “Read” highlighted and press the YES Button ( ).
- Use the Up/Down Buttons ( ) until you see the Text Message you want to view and press the YES Button ( ).
When done reading the Text Message, you can close your Jitterbug or press the NO Button ( ) until you see the Main Screen.
Replying to Text Messages
Once you have read a Text Message, you have the option to reply to it.
- When viewing a Text Message, you will see the word “REPLY?” in the Action Line. Press the YES Button ( ) to reply.
- You have two options when replying to a Text Message. Use the Up/Down Buttons ( ) to scroll to the desired reply option and press the YES Button
- Library – Reply using a pre-defined Text Message.
- Customize – Reply using a custom Text Message that you enter. See
3. Entering Text with the Keypad” on page 78 for more information on how to enter text using the numeric keypad). Press the YES Button ( ) to send your Text Message.
INFO Your Jitterbug automatically saves the last 50 incoming and outgoing Text Messages. You cannot reply to outgoing Text Messages that you sent. It is recommended to have a monthly Text Message plan if you use this feature frequently. Text Messages sent or received over your monthly Text Message plan allowance are $0.10 per Text Message.
Deleting Text Messages
Once you have read a Text Message, you have the option to delete it.
- When reading a Text Message, you will see the word “REPLY?” in the Action Line. Press the NO Button ( ) to delete.
- The Action Line will now say “DELETE?” Press YES Button ( ) to continue deleting this Text Message.
- A message will appear to confirm delete. Press the YES Button ( ) to confirm.
INFO Once a Text Message has been deleted, it cannot be recovered.
Sending Text Messages
- From the Main Screen, use the Up/Down Buttons ( ) until Text Messages appears highlighted and press the YES Button ( ).
- Use the Up/Down Buttons ( ) until you see “Send” highlighted and press the YES Button ( ).
- You have two options when sending a Text Message. Use the Up/Down Buttons ( ) to scroll to the desired send option and press the YES Button
- Library – Send using a pre-defined Text Message.
- Customize – Send using a custom Text Message that you enter. See "Entering Text with the Keypad” on page 78 for more information on how to enter text using the numeric keypad)
4. After selecting a pre-defined message or entering a customized message press the YES Button ( ) to continue.
5. Your Phone Book contacts will now be visible. Use the Up/Down Buttons ( ) until the contact you wish to send a Text Message to is highlighted and press the YES Button ( )
INFO
If you do not have the contact in your Phone Book, use the Up/Down Buttons ( ) until “Enter Number” is highlighted, press the YES Button and then enter the phone number using the Keypad.
It is recommended to have a monthly Text Message plan if you use this feature frequently. Text Messages sent or received over your monthly Text Message plan allowance are $0.10 per Text Message.
Bluetooth
For your convenience, your Jitterbug is equipped to utilize Bluetooth wireless headsets, hands-free speakers, and other Bluetooth compatible devices.
There are many benefits to using Bluetooth devices. Along with improved ease-of-use and safety by eliminating wires, Bluetooth also offers you plenty of other advantages, such as having the ability to talk hands-free while your Jitterbug is in your pocket or purse.
Turning Bluetooth On and Off
The following procedure is applicable to all Bluetooth compatible devices. You must have your Jitterbug set to “Bluetooth ON” to use any Bluetooth device.
- From the Main Screen, use the Up/Down Buttons ( ) until “Settings” appears highlighted and press the YES Button ( ).
- Use the Up/Down Buttons ( ) until you see “Bluetooth” highlighted and press the YES Button ( ).
- Use the Up/Down Buttons ( ) until you see “Bluetooth OFF” highlighted and press the YES Button ( ).
When your Jitterbug is set to “Bluetooth ON,” you will see the Bluetooth symbol in the top-right corner of the Main Screen. Pressing the YES Button ( ) again on “Bluetooth ON” will switch Bluetooth off.
Please ensure you turn off Bluetooth if you wish to receive calls from your Jitterbug handset and not your Bluetooth headset. You are unable to turn off your Bluetooth while on a call.
When your Bluetooth is on and available for your use, you will notice a white Bluetooth icon, similar to the one on the right, appear at the top right corner of your Main Screen.
INFO The battery life of your Jitterbug is shortened when Bluetooth is on. As such, turn off the Bluetooth feature or accessory when not in use to maximize battery life.
Pairing a Bluetooth Headset to Your Jitterbug
Pairing” is typically a one-time set up process that allows the headset and your Jitterbug to automatically connect every time Bluetooth is turned on. The following will guide you on pairing a Bluetooth headset to your Jitterbug phone.
- Refer to your Bluetooth headset manufacturer’s instructions on enabling pairing” mode on the headset device. Once in pairing mode, please proceed to Step 2.
- Starting from the Main Screen of your Jitterbug, use the Up/Down Buttons until “Settings” appears highlighted and press the YES Button ( ).
- Use the Up/Down Buttons ( ) until you see “Bluetooth” highlighted and press the YES Button ( ).
- Use the Up/Down Buttons ( ) until you see “Pair” highlighted and press the YES Button ( ).
- A prompt will appear remind you to ensure that your Bluetooth headset is in pairing mode. Press the YES Button ( ) to continue if your headset is already in pairing mode.
- After a few seconds your Jitterbug should find your Bluetooth headset, and potentially additional Bluetooth devices within proximity. Use the Up/Down Buttons ( ) until you see the name of your Bluetooth headset highlighted and press the YES Button ( ).
Bluetooth Status Indicator
You will notice different Bluetooth icons on your Jitterbug Main Screen that indicate when your Bluetooth is available to use:
|
• Gray – Bluetooth is on, but not paired to your Bluetooth headset

|
|
• White – Bluetooth is on, paired with your Bluetooth headset and available for you to use.

|
Answering a Call When Paired with a Bluetooth Headset
Press the “Talk” button on the Bluetooth headset.
Ending a Call When Paired with a Bluetooth Headset
Press the “Talk” button on the Bluetooth headset or press the NO Button on your Jitterbug if the phone is open.
Phone Settings
The “Settings” feature of your Jitterbug allows you to make minor customizations to your phone based on your personal preference.
Under Settings you can:
- Colors – Adjust the color scheme
- Jingle – Turn the power up sound effect on or off
- Ring Tones – Change the sound your phone makes when you receive a call
- Bluetooth – Turn the Bluetooth feature on or off
Accessing Phone Settings
From the Main Screen, use the Up/Down Buttons ( ) until “Settings” appears highlighted and press the YES Button ( ).
Installing and Removing the Battery
IMPORTANT!
The battery has been pre-installed into your Jitterbug phone for your convenience.
Removing the Battery
- If your Jitterbug is on, turn it off by holding down the On/Off Button ( ).
- With the back of the Jitterbug facing up, find the Battery Cover Release at the bottom-left corner.
- Using your fingernail, gently lift the Battery Cover up using the Battery Cover Release.
- To remove the Battery, use your fingernail in the groove at the top of the Battery, and gently pull the Battery out.
Installing the Battery
- Align the gold metal contacts at the bottom of the Battery with the gold metal pins in the back of your Jitterbug.
- Insert the Battery so that the gold metal contacts and pins touch first, and then push the rest of Battery into place until it sits flush inside the phone.
- Align the Battery Cover with the back of the phone and push it into place. You will hear it click into place on several corners of the Battery Cover. Push along all edges of the Battery Cover to ensure there are no gaps between the Battery Cover and the Jitterbug