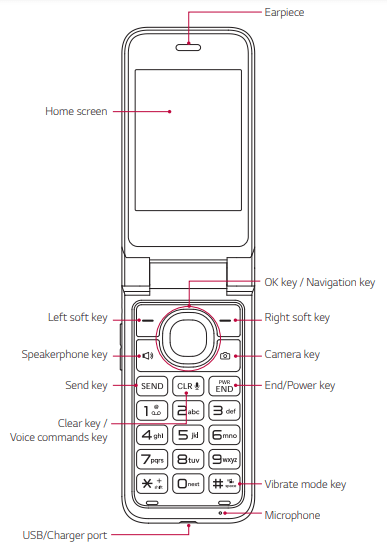
Displays messages, indicator icons and active functions.
Left soft key
Allows you to select the command at the lower left area of the display screen.
Headset jack
Allows you to plug in an optional 3.5mm headset for convenient, hands-free conversations, or other compatible listening devices.
Speakerphone key
Allows you to enable or disable the speakerphone mode (Speakerphone available when you are on call or listening to FM radio).
Send key
Allows you to make and answer calls. Press from standby mode to access your call history (All calls, Missed calls, Dialed calls and Received calls).
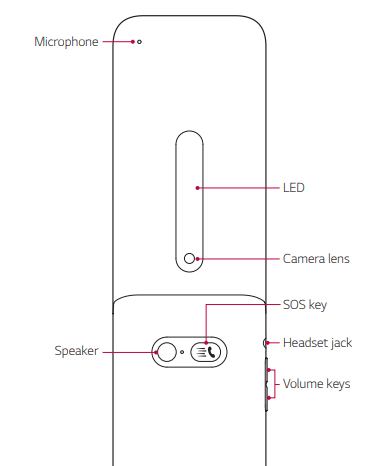
Microphone
Allows you to transmit your voice to a caller or for voice-activated functions (e.g., Voice commands).
Clear key / Voice commands key
•Deletes single spaces or characters with a quick press, or press and hold to delete entire words in text entry screens. Press to back out of menus, one level at a time.
•Press for quick access to Voice Commands from standby mode.
•Press and hold to open the Voice recorder app.
USB/Charger port
Connects the phone to the charger adapter or other compatible accessories.
Earpiece
Lets you hear the caller and automated prompts.
OK key / Navigation key
Use OK key to select options and menus. Use Navigation key to scroll through menu items and highlight a specific field or object, then press OK key to select it.
Right soft key
Allows you to select the command at the lower right area of the display screen.
End/Power key
Allows you to turn the power on/off and to end a call. Also exits menus and returns to standby mode (the Home screen).
Vibrate mode key
Allows you to set Vibrate mode from standby mode (the Home screen), press and hold for about 3 seconds.
LED
Indicates incoming calls, new notifications, charging status, etc.
Camera lens
Allows you to take pictures. Keep it clean for optimal performance.
Camera key
Allows you to access the Camera app. In the camera mode, press once the Camera key to take a picture, and press and hold to switch to the video mode.
Speaker
Use to listen to the audio from the selected function (e.g., music, videos, sound clips, etc.).
SOS key
Click 3 times to call the registered phone number.
Volume keys
Use to adjust the volume in standby mode.
Quick access to convenient features
Vibrate mode
You can set the phone to vibrate instead of ringing ( is displayed). To set Vibrate Mode, with the flip open, press and hold Vibrate mode key . To return to Normal Mode, press and hold Vibrate mode key again.
Sounds off
Quickly deactivate your phone’s sounds when you’re in a place where phone sounds would be disruptive. From standby mode with the flip open, press and hold Volume down key . To return to normal sounds mode, press and hold Volume up key .
Quick volume adjustment
Quickly adjust ringer and earpiece volumes by pressing Volume key on the left side of the phone. Press Volume up key to increase the volume and Volume down key to decrease the volume.
Note
The earpiece volume can only be adjusted during a call and keypad sound can only be adjusted through the Sound & notifications menu.
Capturing a screenshot
Press and hold Volume down key and End/Power key at the same time for 2 seconds to capture a screenshot of the current screen.
To view the captured image, press OK key [Menu], then press 3 key [Gallery].
Recent apps
Quickly reopen apps using the Recent apps screen. From the Home screen, press Down Navigation key to open the Recent apps screen which lists all of the apps you’ve opened. From this screen, use Navigation key to highlight an app.
• Press OK key [Open] to reopen the app.
• Press Left soft key [Remove] to remove the app from the list.
• Press Right soft key [Options], then press 1 key [Clear all] to remove all apps from the list.
Note
• To use this feature, Recent apps needs to be designated as one of your shortcuts (the Key shortcuts setting in the Phone settings menu). Set it as Up, Down, Left or Right Navigation key or designate it as one of the choices in your Shortcut menu.
Call waiting
During a call, one beep indicates another incoming call. Press Send key to answer it and put the first call on hold. Press Send key again to return to the first call.
Conference call
You can talk with up to six people at the same time in a conference call on your wireless phone. Airtime and other charges, which may include toll or long distance charges, will apply for all simultaneous calls until you end one call.
While on the first call, press Right soft key [Options], select New call and then Dialer and dial the 10-digit number of the second person.
Press Send key . The first person is automatically put on hold while the call is made.
When the second person answers, press Right soft key [Options], then press 2 key [Merge calls] to create a conference call.
To end both conversations completely, press End/Power key .
Caller ID
Caller ID displays the number and/or name and picture (if applicable) of the person calling when your phone rings.
Voice commands
Voice Commands allow you to do things by verbal command (e.g., make calls, check Voice mail, etc.). From the Home screen, press Clear key / Voice commands key on the keypad .
Call Say “Call” and then call someone simply by saying the name or phone number.
Send message Say “Send message” and the command will prompt you for the type of message.
Redial Say “Redial” and the phone will redial the last phone number.
Open App Say “Open” and then the name of the app you want to launch.
Play music Say “Play music” to listen to music on your phone.
Check This allows you to check out a wide range of items such as Status, Voicemail, Messages, Missed Calls, Time, Signal Strength, Network, Battery, My Phone Number and Volume.
Note
• Voice Commands can also be started with the designated key on your Bluetooth® device. Please check the user manual of the Bluetooth® device for further instructions.
Sound & notifications
From the Home screen, press OK key [Menu].
Press 9 key [Settings ].
Press 3 key [Sound & notifications].
Volume
From the Sound & notifications menu screen, press 1 key [Volume].
Select a Volume setting and set the level to your preference using Navigation key , then press OK key [OK]. • 1 key [Alert sounds] Allows you to set the default volume level for alerts. • 2 key [Media] Allows you to set the default volume level for media.
Sound with vibration
From the Sound & notifications menu screen, press 2 key [Sound with vibration].
Use Navigation key to highlight On or Off, then press OK key [OK] to select it.
Press Clear key / Voice commands key to exit.
Ringtones
From the Sound & notifications menu screen, press 3 key [Ringtones] to set the ringtone for calls.
Use Navigation key to highlight a desired ringtone, then press OK key [OK] to select it. • Press Left soft key [Play] to listen to a highlighted ringtone. • Press Right soft key [Options] to add or delete ringtones.
Press Clear key / Voice commands key to exit.
Notification sounds
From the Sound & notifications menu screen, press 4 key [Notification sounds] to set the sound played for new notifications.
Use Navigation key to highlight a desired sound, then press OK key [OK] to select it. • Press Left soft key [Play] to listen to a highlighted sound. • Press Right soft key [Options] to add or delete sound files.
Press Clear key / Voice commands key to exit.
Keypad sound
From the Sound & notifications menu screen, press 5 key [Keypad sound].
Use Navigation key to highlight On or Off, then press OK key [OK] to select it.
Press Clear key / Voice commands key to exit.
Emergency tone
Allows you to view emergency alerts and customize your emergency alerts settings.
From the Sound & notifications menu screen, press 6 key [Emergency tone].
• Alert: Allows you to set an alert tone same as the volume level on your phone.
• Vibrate: Enable this option to emit the vibration instead of providing an alert tone.
• Off: Allows you to disable the alert related with emergency dialing.
Phone settings
The Phone settings menu allows you to designate specific settings to customize how you use your phone.
From the Home screen, press OK key [Menu].
Press 9 key [Settings ].
Press 5 key [Phone settings].
Language
From the Phone settings menu screen, press 1 key [Language] to set the language for your phone's software.
Use Navigation key to highlight your choice, then press OK key [OK] to select it.
Press Clear key / Voice commands key to exit.
Key shortcuts
Shortcuts are available from the Home screen. Simply press Navigation key up, down, right or left to open one. You can change the shortcut for each key and also change the shortcuts provided from the Shortcut menu (the Right Navigation key by default).
Setting Navigation key shortcuts
From the Phone settings menu screen, press 2 key [Key shortcuts].
Use Navigation key to highlight a shortcut key you want to set.
Press Left soft key [Set] to display the available shortcuts. Use Navigation key to highlight one, then press OK key [OK].
Press OK key [Save].
Setting the shortcut menu shortcuts
From the Phone settings menu screen, press 2 key [Key shortcuts].
Use Navigation key to highlight the key field set as Shortcut menu, then press Left soft key [Set].
Use Navigation key to highlight Shortcut 1, Shortcut 2, Shortcut 3 or Shortcut 4, then press Left soft key [Set].
Use Navigation key to highlight an item, then press OK key [OK] to set the shortcut.
Press OK key [Save] to save the settings you changed.
To reset shortcuts to their default settings, press Right soft key [Reset]
SOS mode
During an emergency, press the SOS mode key 3 times to automatically send a message and call an emergency number. If you activate the mode by mistake, you can cancel it within 5 seconds with your phone.
From the Phone settings menu screen, press 3 key [SOS mode].
Select the security option you want to activate. • 1 key [Mode] Allows you to enable or disable the SOS mode. • 2 key [Emergency number] Allows you to set the emergency number. • 3 key [Legal info] Allows you to read the legal documents for SOS mode.
Storage
From the Phone settings menu screen, press 4 key [Storage] to view your phone's storage memory information (in text and on a bar graph).
Press 1 key [Phone] to view information for used memory, total memory, available memory and the amount of memory used by specific apps. When a microSD card is inserted in the phone, the Storage menu displays additional options. • SD card Allows you to view data saved in your external memory. From the Storage menu screen, press Right soft key [Options]. • Eject SD card Allows you to unmount your microSD card for safe removal from your phone. • Mount SD card Allows you to mount an inserted microSD card.
USB connection
You can connect your phone to your PC to charge it and transfer items to the PC from the phone (and vice versa).
Transferring music, photos, and videos
From the Phone settings menu screen, press 5 key [USB connection].
Use Navigation key to highlight File transfer, Photo transfer, or MIDI device, then press OK key [OK].
Connect your phone to a PC using the USB cable included with your phone.
You can now view the mass storage content on your PC and transfer files.
After transferring files, return to the Phone settings menu, press 5 key [USB connection] and change the setting back to Charging before disconnecting the USB cable.
Location
From the Phone settings menu screen, press 6 key [Location] to set the GPS (Global Positioning System: Satellite assisted information system) mode.
Use Navigation key to highlight On or Off, then press OK key [OK].
Note
GPS satellite signals are not always received by the phone, especially under bad atmospheric and environmental conditions, indoors, etc.
When in Airplane Mode, services supporting the location functionality will be suspended.
Security
From the Phone settings menu screen, press 7 key [Security] to allow you to secure your phone electronically by PIN, encryption or SIM card lock.
Select the security option you want to activate. • 1 key [Screen lock] Allows you to set a PIN to secure your phone from unintentional and/or unauthorized use. • 2 key [Encrypt phone] Allows you to encrypt or decrypt your phone data (accounts, settings, media files and other files). • 3 key [Encrypt SD card] Allows you to encrypt or decrypt external microSD card data. Encrypted data is not accessible on other devices. • 4 key [SIM card lock] Allows you to lock your SIM card. • 5 key [Certificate management] Allows you to manage your secure certificates. - Trusted credentials Shows system root CA certificates and user added CA certificates. - Install from storage Allows you to install a secure certificate from storage. - Clear credentials Allows you to delete user added secure certificates and related credentials.
Accounts
From the Phone settings menu screen, press 8 key [Accounts].
Press Right soft key [Options] to access Add account or Auto-sync data.
Email
From the Phone settings menu screen, press 8 key [Accounts].
Press 1 key [Email].
Use Navigation key to highlight an account, press OK key [Select], then set the Sync settings to On or Off.
Press Right soft key [Options] to access Sync now or Remove account.
Reset
From the Phone settings menu screen, press 9 key [Reset].
Select the type of reset you want to perform.
Press 1 key [Factory data reset] Allows you to erase all of the data on the phone, an inserted MicroSD card, or both the phone and the card.
Date & time
From the Phone settings menu screen, press 0 key [Date & time].
Select the date and time options and set them as desired.
Note By default the Auto-date & time and Auto-time zone options are enabled. To activate the manual setting option(s), turn off the Auto option(s), then select Set date, Set time and/or Select time zone.
Turn on the Auto-date & time option to use the date/time provided by the network, or select Set date and/or Set time to manually set them.
Turn on the Auto-time zone option to use the time zone provided by the network, or select Select time zone to set it manually.
Time format: Select the 24-hour option to display the time using the 24-hour format (e.g., 13:00 instead of 1:00 PM).
Home screen
The Home screen is your starting point to access all of the features on your phone using simple key presses.
Customizing the Home screen
You can customize your Home screen wallpaper and clock format using the Settings app. From the Home screen, press OK key [Menu], press 9 key [Settings], then press 4 key [Display].
•Wallpaper: Press 3 key [Wallpaper] to select a background image from pre-loaded images or your own pictures.
•Clock Format: Press 8 key [Clock] to set the clock format.
Phone’s status icons
The Status Bar appears at the top of every screen. It displays icons indicating that you’ve received notifications (on the left) and icons indicating the phone’s status (on the right), along with the current time.
The following icons may appear in the Status Bar.
Call icons
Sound icons
Network icons
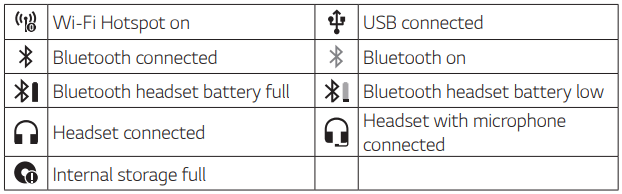
Connectivity icons
Email and Messaging icons
Alarm and Calendar icons
Battery icons
Other icons
Call logs icons
Getting started with your phone
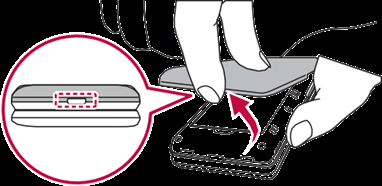
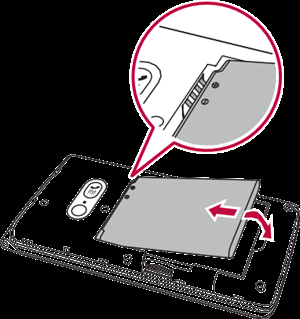
Step 1. Remove the back cover
With the phone facing down, insert your fingernail into the cutout located on the bottom of the back cover and gently lift the cover.
Step 2. Insert the battery
Insert the battery, making sure the gold contacts line up. Press down gently to secure.
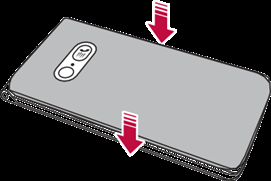
Step 3. Replace the back cover
Place the back cover over the back of the phone and then press down along the edges to secure.
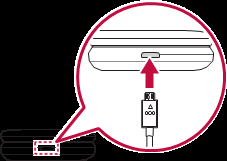
Step 4. Charge the phone
Before turning on your phone, charge it fully.
Insert the small end of the USB cable into the phone. Insert the larger end into the charger and plug the charger into an outlet.
Removing the battery
Turn the phone off.
With the phone facing down, insert your fingernail into the cutout located on the bottom of the back cover and gently lift the cover.
Use the fingertip opening near the bottom of the battery compartment to lift the battery out.
Charging with USB
You can use your computer to charge your phone. To be able to charge with the USB cable, you may need to have the necessary USB Driver installed on your PC first. Connect one end of the USB cable to the Accessory/Charger Port on your phone and the other end to the USB port on your PC.
Powering your phone on/off
Making calls
Open the flip and enter the phone number using the keypad.
Correcting dialing mistakes
While entering a phone number, press Clear key / Voice commands key once to erase the last digit entered.
Redialing calls
With the flip open, press Send key twice to redial the latest number recorded in the call log.
Wireless & networks
The Wireless & networks menu allows you to configure and manage your device’s wireless radio communications.
From the Home screen, press OK key [Menu].
Press 9 key [Settings ].
Press 1 key [Wireless & networks]
Airplane mode
1 From the Wireless & networks menu screen, press 1 key [Airplane mode].
2 Use Navigation key to highlight On or Off, then press OK key [OK].
3 Press Clear key / Voice commands key to exit
Wi-Fi
1. From the Wireless & networks menu screen, press 2 key [Wi-Fi].
2. Use Navigation key to highlight a Wi-Fi network, then press OK key [Connect] to connect to it.
3. Press Right soft key [Options] to access the following Options to manage your Wi-Fi connections.
• 1 key [Search] Searches for nearby Wi-Fi networks.
• 2 key [Forget Wi-Fi] Allows you to remove specific Wi-Fi network information.
• 3 key [Modify Wi-Fi] Allows you to modify specific Wi-Fi network information.
• 4 key [Add Wi-Fi] Allows you to manually add a Wi-Fi network by entering its name (SSID), security, and password.
• 5 key [Saved Wi-Fi] Displays your saved Wi-Fi networks allowing you to manage them. This menu will be shown after a Wi-Fi network is added.
- 1 key [Wi-Fi notification] Enable this option to be notified if Wi-Fi networks are available nearby.
- 2 key [Keep Wi-Fi on during sleep] Allows you to set the Wi-Fi status when the screen is off.
- 3 key [Connect by WPS button] Provides information to connect to a secured Wi-Fi network with a WPS button.
- 4 key [Connect by WPS PIN] Provides the WPS PIN to connect to a secured Wi-Fi network.
- 5 key [Install certificates] Allows you to install certificates from storage.
Display
From the Home screen, press OK key [Menu].
Press 9 key [Settings ].
Press 4 key [Display].
Menu layout
From the Display menu screen, press 1 key [Menu layout] to display your Menu screen in a grid or list.
Use Navigation key to highlight Grid or List, then press OK key [OK] to select it.
Brightness
1. From the Display menu screen, press 2 key [Brightness].
2. Use Navigation key to adjust it, then press OK key [OK]
Wallpaper
1. From the Display menu screen, press 3 key [Wallpaper].
2. Select a Wallpaper type and highlight your preference using Navigation key , then press OK key [Select] (crop and save the image, if necessary).
• 1 key [Wallpaper gallery] Allows you to set your Home screen background. Select one of the available wallpaper images.
• 2 key [Gallery] Allows you to set your Home screen background. Select an image from your Gallery.
Display backlight
1. From the Display menu screen, press 4 key [Display backlight] to set the amount of time before the screen times out due to inactivity to conserve your battery power
2. Use Navigation key to highlight your choice, then press OK key [OK].
Key backlight
1. From the Display menu screen, press 5 key [Key backlight] to set how long the keypad remains lit.
2. Use Navigation key to highlight your choice, then press OK key [OK]
Font type
1. From the Display menu screen, press 6 key [Font type] to set the font used for the phone.
2. Use Navigation key to highlight your choice, then press OK key [OK].
Clock
1. From the Display menu screen, press 8 key [Clock] to set the kind of clock displayed on the Home screen.
2. Use Navigation key to highlight your choice, then press OK key [OK].
• Press Left soft key [Preview] to see it first before applying the change.
Appendix
Q&A
Please check to see if any problems you have encountered with the phone are described in this section before taking the phone in for a service or calling customer service.
QIHvioew dthoe list of outgoing calls, incoming calls, and missed calls?
A Press Send key .
Q Why won’t the LCD turn on?
A Rmove the battery, and place it back. Then turn on the power. If there is no change, fully charge the battery and try again.
Q Wishthe connection inconsistent or not audible in certain areas?
A Wquheennctyheenfvrironment is unstable in a certain area, connection may be inconsistent and inaudible. Relocate to another area and try again.
Q Why does the phone heat up?
A The phone may get hot when there is a very long call duration, when games are played, or even when surfing the Internet for
a long time. This has no effect
upon the life of the product or performance.
Q Wishthe connection inconsistent or abruptly disconnects even when established?
A When frequency is unstable or weak, or if there are too many users, a connection may be cut off even after it was established. Please try again later or attempt again after relocating to other areas.
Q Wdohes the battery run out so quickly during normal use?
A Tbheisdmuae to the user environment, a large number of calls, or a weak signal.
Q Wishno number dialed when an contact list entry is recalled?
A Check that the number has been stored correctly by using the contact list Search feature. Re- store them, if necessary.
Anti-Theft Guide
You can set up your device to prevent other people from using it if it's been reset to factory settings without your permission. For example, if your device is lost, stolen, or wiped, only someone with your Google account or screen lock information can use the device.
All you need to make sure your device is protected is:
•Set a screen lock: If your device is lost or stolen but you have a screen lock set, the device can't be erased using the Settings menu unless your screen is unlocked.
•Add your Google account on your device: If your device is wiped but you have your Google account on it, the device can't finish the setup process until your Google account information is entered again.
After your device is protected, you'll need to either unlock your screen or enter your Google account password if you need to do a factory reset. This ensures that you or someone you trust is doing the reset.
•Do not forget your Google account and password you had added to your device prior to performing a factory reset. If you can't provide the account information during the setup process, you won't be able to use the device at all after performing the factory reset.
More information
Open Source Software Notice Information
To obtain the source code under GPL, LGPL, MPL, and other open source licenses, that is contained in this product, please visit http:// opensource.lge.com.
In addition to the source code, all referred license terms, warranty disclaimers and copyright notices are available for download.
LG Electronics will also provide open source code to you on CD-ROM for a charge covering the cost of performing such distribution (such as the cost of media, shipping, and handling).
This offer is valid for a period of three years after our last shipment of this product. This offer is valid to anyone in receipt of this information.
Remove the battery, and place it back. Then turn on the power. If there is no change, fully charge the battery and try again.
#2 Why is the connection inconsistent or abruptly disconnects even when established?
When frequency is unstable or weak, or if there are too many users, a connection may be cut off even after it was established. Please try again later or attempt again after relocating to other areas.
#3 Why is the connection inconsistent or not audible in certain areas?
When the frequency environment is unstable in a certain area, connection may be inconsistent and inaudible. Relocate to another area and try again.
The phone may get hot when there is a very long call duration, when games are played, or even when surfing the Internet for a long time. This has no effect upon the life of the product or performance.
 to select options and menus. Use Navigation key
  to scroll through menu items and highlight a specific field or object, then press OK key
  is displayed). To set Vibrate Mode, with the flip open, press and hold Vibrate mode key
  . To return to Normal Mode, press and hold Vibrate mode key
  . To return to normal sounds mode, press and hold Volume up key
  .
. on the left side of the phone. Press Volume up key
  at the same time for 2 seconds to capture a screenshot of the current screen.
 [Remove] to remove the app from the list.
 to answer it and put the first call on hold. Press Send key


 [Security] to allow you to secure your phone electronically by PIN, encryption or SIM card lock.
 [Date & time].
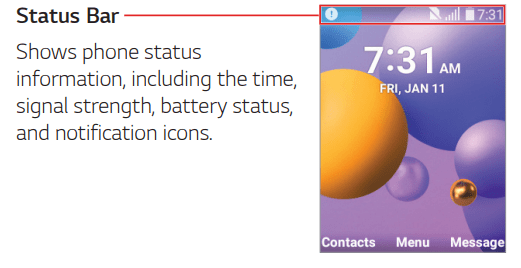


 twice to redial the latest number recorded in the call log.
 [Options] to access the following Options to manage your Wi-Fi connections.