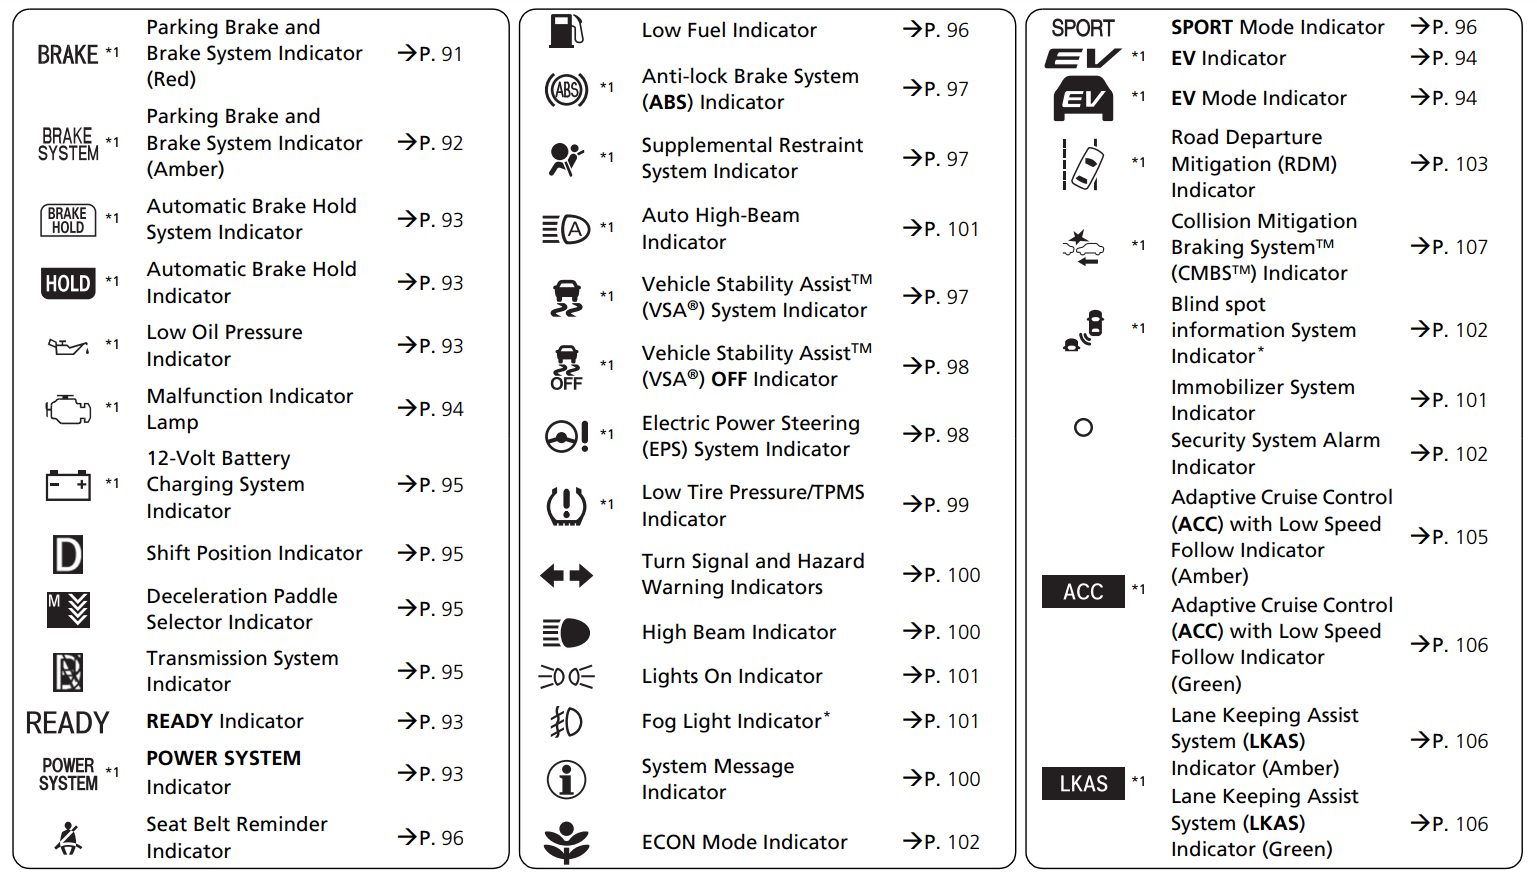
*1: When you set the power mode to ON, these indicators come on to indicate that system checks are being performed. They go off a few seconds later or after the power system has started. If an indicator does not come on or turn off, there may be a malfunction in the corresponding system. To resolve the issue, follow the instructions in the owner's manual.
* Not available on all models
Driver Information Interface Warning and Information Messages
The following messages appear only on the driver information interface. Press the (display/information) button to see the message again with the system message indicator on.
Controls
Clock
Adjusting the Clock
Models with Display Audio- The clock is automatically updated through the audio system.
All models-You can adjust the time manually in the audio/information screen, with the power mode is in ON.
Adjusting the Time
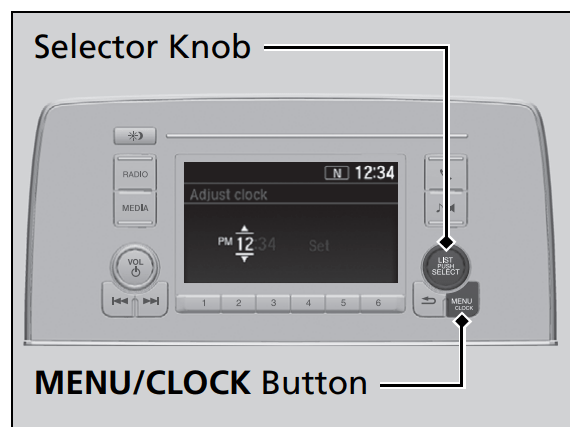
Models with color audio system
Using the MENU/CLOCK button
Press and hold the MENU/CLOCK button. Adjust Clock is selected.
Rotate to change hour, then press .
Rotate to change minute, then press .
To enter the selection, rotate and select Set, then press .
Using the MENU/CLOCK button
These indications are used to show how to operate the selector knob.
Rotate to select.
Press to enter.
You can customize the clock display to show the 12 hour clock or 24 hour clock. →Customized Features P. 361
Models with Display Audio
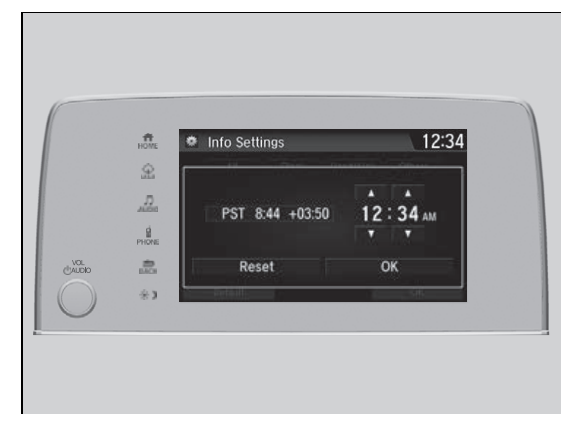
Using the Settings menu on the audio/ information screen
Select Settings.
Select Clock.
Select Clock Adjustment.
Select or to change hour.
Select or to change minute, then select OK.
Using the Settings menu on the audio/information screen
You can customize the clock display to show the 12 hour clock or 24 hour clock and turn the clock display on and off. →Customized Features P. 368
You can also adjust the clock by touching the clock displayed on the upper right corner of the display.
Touch the clock on the display for a few seconds.
Select Settings.
Select Clock.
Select Clock Adjustment.
Select or to change hour.
Select or to change minute, then select OK.
You cannot adjust the time while the vehicle is moving.
Locking and Unlocking the Doors
Key
This vehicle comes with the following keys:
Use the keys to turn on and off the power system, and to lock and unlock the doors and tailgate.
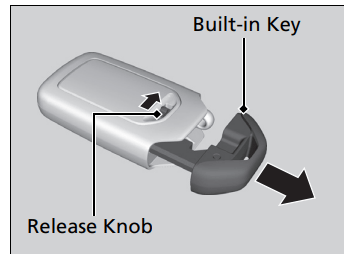
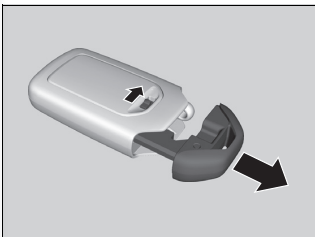
Built-in Key
The built-in key can be used to lock/unlock the doors when the smart entry remote battery becomes weak and the power door lock/ unlock operation is disabled.
To remove the built-in key, slide the release knob and then pull out the key. To reinstall the built-in key, push the built-in key into the smart entry remote until it clicks.
All the keys have an immobilizer system. The immobilizer system helps protect against vehicle theft. →Immobilizer System P. 177
Follow the advice below to prevent damage to the keys:
Do not leave the keys in direct sunlight, or in locations with high temperature or high humidity.
Do not drop the keys or set heavy objects on them.
Keep the keys away from liquids.
Do not take the keys apart except for replacing the battery.
If the circuits in the keys are damaged, the power system may not activate, and the remote transmitter may not work.
If the keys do not work properly, have them inspected by a dealer.
You can remotely turn the power system on using the remote engine start. →Remote Engine Start P. 469
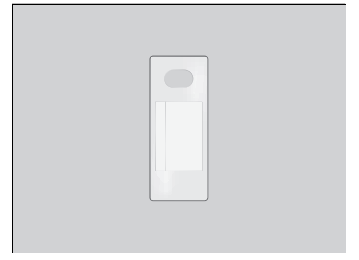
Key Number Tag
Contains a number that you will need if you purchase a replacement key.
Keep the key number tag separate from the key in a safe place outside of your vehicle. If you wish to purchase an additional key, contact a dealer. If you lose your key and you cannot activate the power system, contact a dealer.
Low Smart Entry Remote Signal Strength
The vehicle transmits radio waves to locate the smart entry remote when locking/ unlocking the doors, opening the tailgate, or to activate the power system.
In the following cases, locking/unlocking the doors, opening the tailgate, or activating the power system may be inhibited or operation may be unstable:
Strong radio waves are being transmitted by nearby equipment.
You are carrying the smart entry remote together with telecommunications equipment, laptop computers, cell phones, or wireless devices.
A metallic object is touching or covering the smart entry remote.
Communication between the smart entry remote and the vehicle consumes the smart entry remote’s battery.
Battery life is about two years, but this varies depending on regularity of use.
The battery is consumed whenever the smart entry remote is receiving strong radio waves. Avoid placing it near electrical appliances such as televisions and personal computers.
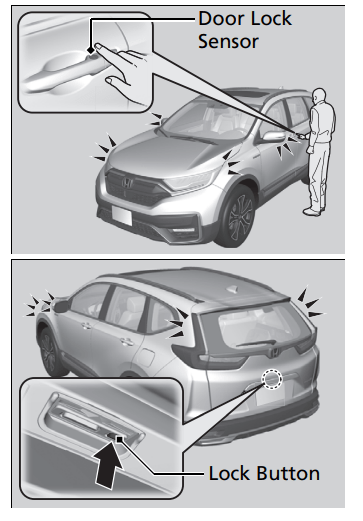
Locking/Unlocking the Doors from the Outside
Using the Smart Entry with Push Button Start System
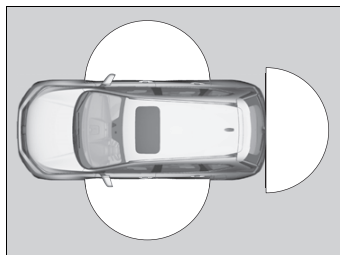
When you carry the smart entry remote, you can lock/unlock the doors and open the tailgate. You can lock/unlock the doors within a radius of about 32 inches (80 cm) of the outside door handle or tailgate outer handle.
If the interior light switch is in the door activated position, the interior light comes on when you unlock the doors and tailgate. No doors opened: The light fades out after 30 seconds. Doors and tailgate relocked: The light goes off immediately. → Interior Lights P. 217
Locking the doors and tailgate
* Not available on all models
Touch the door lock sensor on the front door or press the lock button on the tailgate.
Some exterior lights flash; the beeper sounds; all the doors and tailgate lock; and the security system* sets.
If you do not open a door or the tailgate within 30 seconds of unlocking the vehicle with the smart entry system, the doors and tailgate will automatically relock.
You can lock or unlock doors using the smart entry system only when the power mode is in VEHICLE OFF.
Do not leave the smart entry remote in the vehicle when you get out. Carry it with you.
Even if you are not carrying the smart entry remote, you can lock/unlock the doors and tailgate while someone else with the remote is within range.
The door may be locked or unlocked if the door handle is covered with water in heavy rain or in a car wash if the smart entry remote is within range.
If you grip a front door handle or touch a door lock sensor wearing gloves, the door sensor may be slow to respond or may not respond by locking or unlocking the doors.
Unlocking the doors and tailgate
Grab the driver’s door handle:
The driver’s door unlocks.
Some exterior lights flash twice and the beeper sounds twice.
Grab the front passenger’s door handle:
All the doors and tailgate unlock.
Some exterior lights flash twice and the beeper sounds twice.
Press the tailgate outer handle:
The tailgate unlocks.
Some exterior lights flash twice and the beeper sounds twice.
→Opening/Closing the Tailgate P. 167
After locking the door, you have up to 2 seconds during which you can pull the door handle to confirm whether the door is locked. If you need to unlock the door immediately after locking it, wait at least 2 seconds before gripping the handle, otherwise the door will not unlock.
The door might not open if you pull it immediately after gripping the door handle. Grip the handle again and confirm that the door is unlocked before pulling the handle.
Even within the 32 inches (80 cm) radius, you may not be able to lock/unlock the doors and the tailgate with the smart entry remote if it is above or below the outside handle.
The smart entry remote may not operate if it is too close to the door and door glass
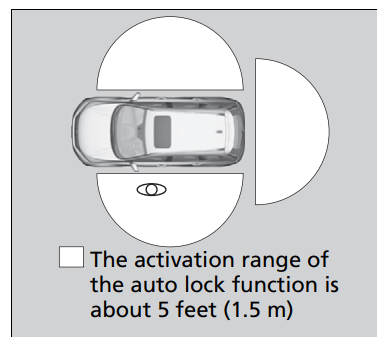
Locking the doors and tailgate (Walk away auto lock®)
When you walk away from the vehicle with all doors and tailgate closed while carrying the smart entry remote, the doors and tailgate will automatically lock.
The auto lock function activates when all doors and tailgate are closed, and the smart entry remote is within about 5 feet (1.5 m) radius of the outside door handle.
Exit vehicle while carrying smart entry remote and close door(s) and tailgate.
While within about 5 feet (1.5 m) radius of the vehicle.
The beeper sounds; the auto lock function will be activated.
Carry the smart entry remote beyond about 5 feet (1.5 m) from the vehicle and remain outside this range for 2 or more seconds.
Some exterior lights flash; the beeper sounds; all doors and tailgate will then lock.
The auto lock function is set to OFF as the factory default setting. The auto lock function can be set to ON using the driver information interface* or audio/ information screen*.
If you set the auto lock function to ON using the driver information interface* or audio/information screen*, only the smart entry remote that was used to unlock the driver's door prior to the setting change can activate auto lock.
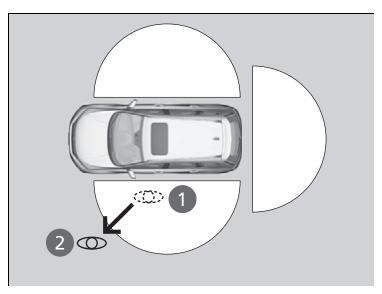
After the auto lock function has been activated, when you stay within the locking/unlocking operation range, the indicator on the smart entry remote will continue to flash until the doors and tailgate are locked.
When you stay beside the vehicle within the operation range, the doors and tailgate will automatically lock approximately 30 seconds after the auto lock function activating beeper sounds.
When you open a door or tailgate after the auto lock function activating beeper sounds, the auto lock function will be canceled.
To temporarily deactivate the function:
Set the power mode to OFF.
Open the driver’s door.
Using the master door lock switch, operate the lock as follows: Lock →Unlock→ Lock →Unlock.
The beeper sounds and the function is deactivated.
To restore the function:
Set the power mode to ON.
Lock the vehicle without using the auto lock function.
With the smart entry remote on you, move out of the auto lock function operation range.
Open any door.
Under the following circumstances, the auto lock function will not activate:
The remote is inside the vehicle.
The beeper will not sound
The remote is taken out of its operational range before all doors and tailgate are closed.
The beeper will sound.
Models with power tailgate
If equipped, the user must wait until the power tailgate fully closes before the auto lock function will be activated.
The auto lock function does not operate when any of the following conditions are met.
The smart entry remote is inside the vehicle.
A door, tailgate or the hood is not closed.
The power mode is set to any mode other than OFF.
The smart entry remote is not located within a radius of about 5 feet (1.5 m) from the vehicle when you get out of the vehicle and close the doors and tailgate.
Auto lock function operation stop beeper
After the auto lock function has been activated, the auto lock operation stop beeper sounds for approximately two seconds in the following cases.
The smart entry remote is put inside the vehicle through a window.
You are located too close to the vehicle.
The smart entry remote is put inside the tailgate.
If the warning beeper sounds, check that you are carrying the smart entry remote. Then, open/close a door and confirm the auto lock activation beeper sounds once.
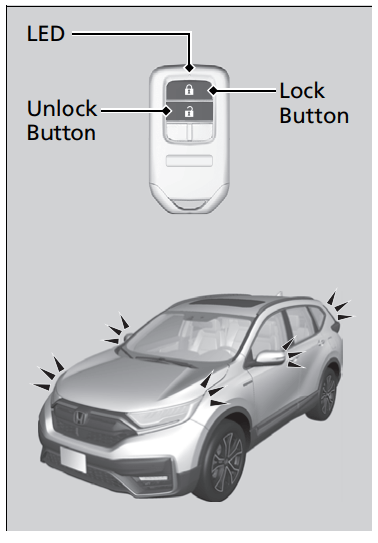
Using the Remote Transmitter
Locking the doors and tailgate
Press the lock button.
Once:
Some exterior lights flash, all the doors and tailgate lock, and the security system* sets.
Twice (within five seconds after the first push):
The beeper sounds and verifies the security system* is set.
Unlocking the doors and tailgate
Press the unlock button.
Once:
Some exterior lights flash twice, and the driver's door unlocks.
Twice:
The remaining doors and tailgate unlock.
If you do not open a door or the tailgate within 30 seconds of unlocking the vehicle with the remote transmitter, the doors and tailgate will automatically relock.
You can lock or unlock doors using the remote transmitter only when the power mode is in VEHICLE OFF.
The remote transmitter uses low-power signals, so the operating range may vary depending on the surroundings.
The remote will not lock the vehicle when a door is open.
If the distance at which the remote transmitter works varies, the battery is probably low.
If the LED does not come on when you press a button, the battery is dead.→Replacing the Button Battery P. 615
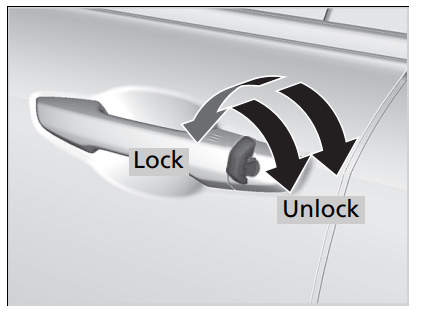
Locking/Unlocking the Doors Using a Key
If the lock or unlock button of the remote transmitter does not work, use the key instead.
Fully insert the key and turn it.
When you lock the driver’s door with a key, all the other doors and tailgate lock at the same time. When unlocking, the driver’s door unlocks first. Turn the key a second time within a few seconds to unlock the remaining doors and the tailgate.
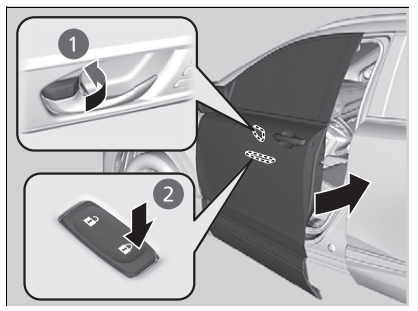
Locking a Door Without Using a Key
If you do not have the key on you, or if for some reason you cannot lock a door using the key, you can lock the door without it.
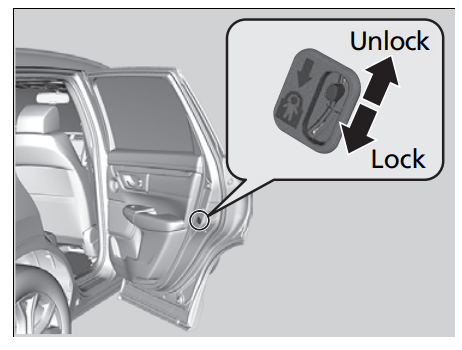
Locking the driver’s door
Push the lock tab forward 1or push the master door lock switch in the lock direction 2, and close the door.
Locking the passenger’s doors
Push the lock tab forward and close the door.
Lockout prevention system
The doors and tailgate cannot be locked when the smart entry remote is inside the vehicle.
When you lock the driver’s door, all the other doors and tailgate lock at the same time. Before locking a door, make sure that the key is not inside the vehicle.
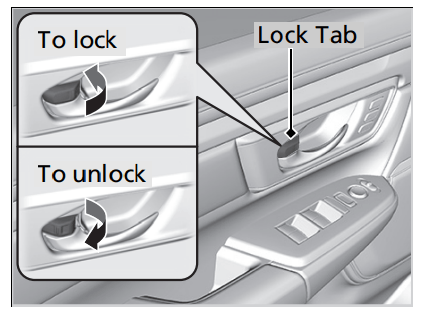
Locking/Unlocking the Doors from the Inside
Using the Lock Tab
Locking a door
Push the lock tab forward.
Unlocking a door
Pull the lock tab rearward.
When you lock the door using the lock tab on the driver’s door, all of the other doors and tailgate lock at the same time. When you unlock the door using the lock tab on the driver’s door, only the driver’s door will unlock.
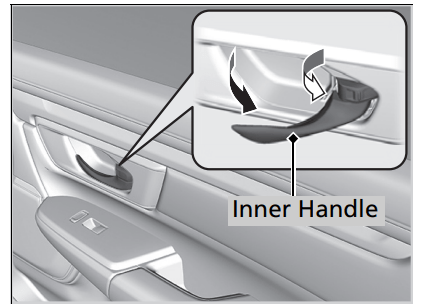
Unlocking Using the Front Door Inner Handle
Pull the front door inner handle.
The door unlocks and opens in one motion.
Unlocking and opening the driver’s door from the inner handle unlocks all the other doors.
To avoid all the doors to be unlocked, use the lock tab on the driver’s door to unlock, then lock again before opening the door.
This setting works for one time only. If you do not want all the doors to be unlocked all the time, customize the Auto Door Unlock setting to OFF*1/Off*2 using the driver information interface* or audio/information screen*.
The front door inner handles are designed to allow front seat occupants to open the door in one motion. However, this feature requires that front seat occupants never pull a front door inner handle while the vehicle is in motion. Children should always ride in a rear seat where childproof door locks are provided. →Childproof Door Locks P. 164
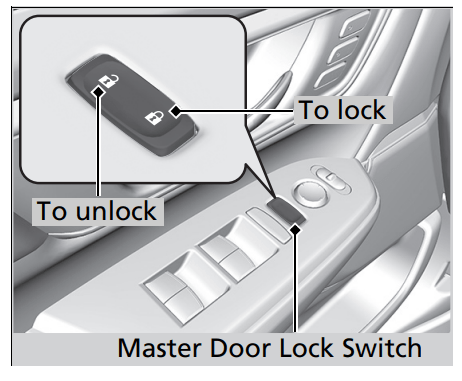
Using the Master Door Lock Switch
Press the master door lock switch in as shown to lock or unlock all doors and the tailgate.
When you lock/unlock either front door using the master door lock switch, all the other doors and the tailgate lock/unlock at the same time.
Childproof Door Locks
The childproof door locks prevent the rear doors from being opened from the inside regardless of the position of the lock tab.
Setting the Childproof Door Locks
Slide the lever in the rear door to the lock position, and close the door.
When opening the door
Open the door using the outside door handle.
To open the door from the inside when the childproof door lock is on, put the lock tab in the unlock position, lower the rear window, put your hand out of the window, and pull the outside door handle.
Auto Door Locking/Unlocking
Your vehicle locks or unlocks all doors automatically when a certain condition is met.
Auto Door Locking
Drive lock mode
All doors and tailgate lock when the vehicle's speed reaches about 10 mph (15 km/h).
Auto Door Unlocking
Driver's door open mode
All doors unlock when the driver's door is opened.
You can turn off or change to another auto door locking/unlocking setting using the driver information interface* or audio/information screen*.
Before Driving
Driving Preparation
Check the following items before you start driving.
Exterior Checks
Make sure there are no obstructions on the windows, door mirrors, exterior lights, or other parts of the vehicle.
Remove any frost, snow, or ice.
Remove any snow on the roof, as this can slip down and obstruct your field of vision while driving. If frozen solid, remove ice once it has softened.
When removing ice from around the wheels, be sure not to damage the wheel or wheel components.
Make sure the hood is securely closed.
If the hood opens while driving, your front view will be blocked.
Make sure the tires are in good condition.
Check air pressures, and check for damage and excessive wear. →Checking and Maintaining Tires P. 604
Make sure there are no people or objects behind or around the vehicle.
There are blind spots from the inside.
NOTICE
When doors are frozen shut, use warm water around the door edges to melt any ice. Do not try to force them open, as this can damage the rubber trim around the doors. When done, wipe dry to avoid further freezing.
Do not pour warm water into the key cylinder. You will be unable to insert the key if the water freezes in the hole.
Heat from the engine and exhaust can ignite flammable materials left under the hood, causing a fire. If you've parked your vehicle for an extended period, inspect and remove any debris that may have collected, such as dried grass and leaves that have fallen or have been carried in for use as a nest by a small animal. Also check under the hood for leftover flammable materials after you or someone else has performed maintenance on your vehicle.
Interior Checks
Store or secure all items on board properly.
Carrying too much cargo, or improperly storing it, can affect your vehicle's handling, stability, stopping distance, and tires, and make it unsafe.→ Maximum Load Limit P. 461
Do not pile items higher than the seat height.
They can block your view and may be thrown forward in the event of sudden braking.
Do not place anything in the front seat footwells. Make sure to secure the floor mat.
An object or unsecured floor mat can interfere with your brake and accelerator pedal operation while driving.
If you have any animals on board, do not let them move around in the vehicle.
They may interfere with driving and a crash could occur.
Securely close and lock all doors and the tailgate.
→ Locking/Unlocking the Doors from the Inside P. 162
Adjust your seating position properly.
Adjust the head restraint, too.→ Seats P. 207 → Adjusting the Front Head Restraints P.214
Adjust the mirrors and steering wheel properly for your driving.
Adjust them while sitting in the proper driving position.→ Adjusting the Steering Wheel P. 204 → Mirrors P. 205
The headlight aim is set by the factory, and does not need to be adjusted. However, if you regularly carry heavy items in the cargo area, have the aiming readjusted at a dealer or by a qualified technician.
Be sure items placed on the floor behind the front seats cannot roll under the seats.
They can interfere with the driver's ability to operate the pedals, the operation of the seats, or the operation of the sensors under the seats.
Everyone in the vehicle must fasten their seat belt.
→ Fastening a Seat Belt P. 51
Make sure that the indicators in the instrument panel come on when you start the vehicle, and go off soon after.
Always have a dealer check the vehicle if a problem is indicated. → Indicators P. 90
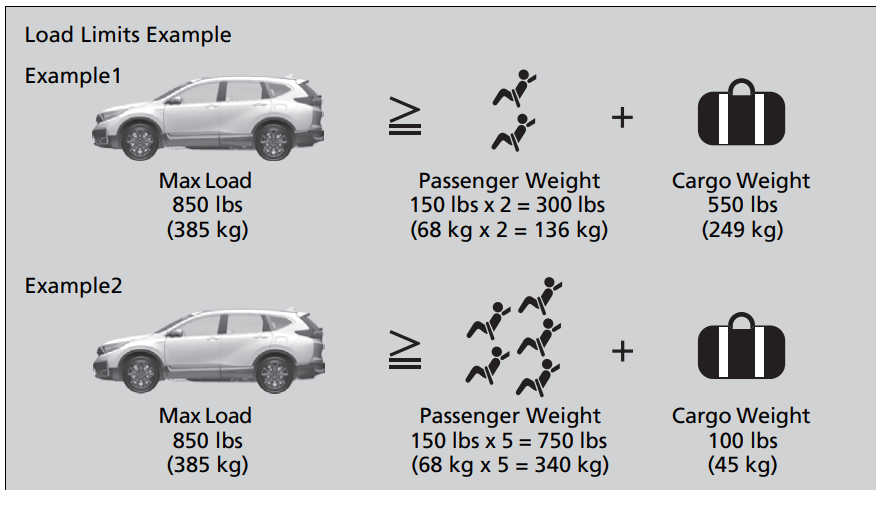
Maximum Load Limit
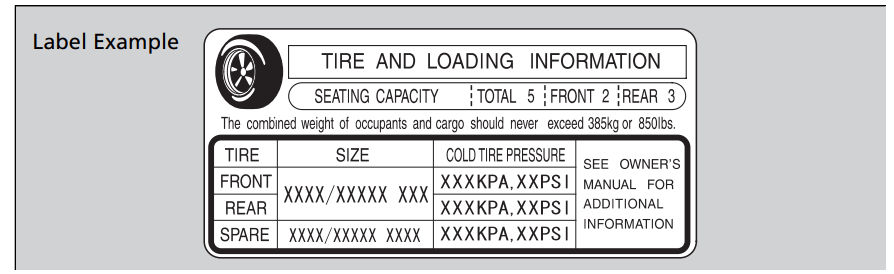
The maximum load for your vehicle is 850 lbs (385 kg). See the Tire and Loading Information label attached to the driver’s doorjamb.
This figure includes the total weight of all occupants, cargo, and accessories, and the tongue load if you are towing a trailer.
Steps for Determining Correct Load Limit -
Locate the statement “The combined weight of occupants and cargo should never exceed XXX kg or XXX lbs.” on your vehicle’s placard.
Determine the combined weight of the driver and passengers that will be riding in your vehicle.
Subtract the combined weight of the driver and passengers from XXX kg or XXX lbs.
The resulting figure equals the available amount of cargo and luggage load capacity. For example, if the “XXX” amount equals 1,400 lbs. and there will be five 150 lb. passengers in your vehicle, the amount of available cargo and luggage load capacity is 650 lbs. (1,400 - 750 (5 x 150) = 650 lbs.)
Determine the combined weight of luggage and cargo being loaded on the vehicle. That weight may not safely exceed the available cargo and luggage load capacity calculated in step 4.
If your vehicle will be towing a trailer, load from your trailer will be transferred to your vehicle. Consult this manual to determine how this reduces the available cargo and luggage load capacity of your vehicle.
In addition, the total weight of the vehicle, all occupants, accessories, cargo, and trailer tongue load must not exceed the Gross Vehicle Weight Rating (GVWR) or the Gross Axle Weight Rating (GAWR). Both are on a label on the driver’s doorjamb
Maintenance
Before Performing Maintenance
Inspection and Maintenance
For your safety, perform all listed inspections and maintenance to keep your vehicle in good condition. If you become aware of any abnormality (noise, smell, insufficient brake fluid, oil residue on the ground, etc.), have your vehicle inspected by a dealer. (Note, however, that service at a dealer is not mandatory to keep your warranties in effect.)
Safety When Performing Maintenance
Some of the most important safety precautions are given here. However, we cannot warn you of every conceivable hazard that can arise in performing maintenance. Only you can decide whether you should perform a given task
Maintenance Minder™
Select the Maintenance Minder to see maintenance items that are due soon and to see the percentage of life remaining in the engine oil. When the engine oil life is less than 15%, a Maintenance Minder message will appear every time you set the power mode to ON, reminding you to bring your vehicle to a dealer for service.
To Use Maintenance Minder™
Displaying the Maintenance Minder Information
Maintenance items, which should be serviced at the same time that you replace the engine oil, appear on the driver information interface. You can view them on the Maintenance Minder screen at any time
Set the power mode to ON.
Press the button several times until is displayed.
Press ENTER to go to the Maintenance Minder screen. The engine oil life appears on the driver information interface along with maintenance items due soon.
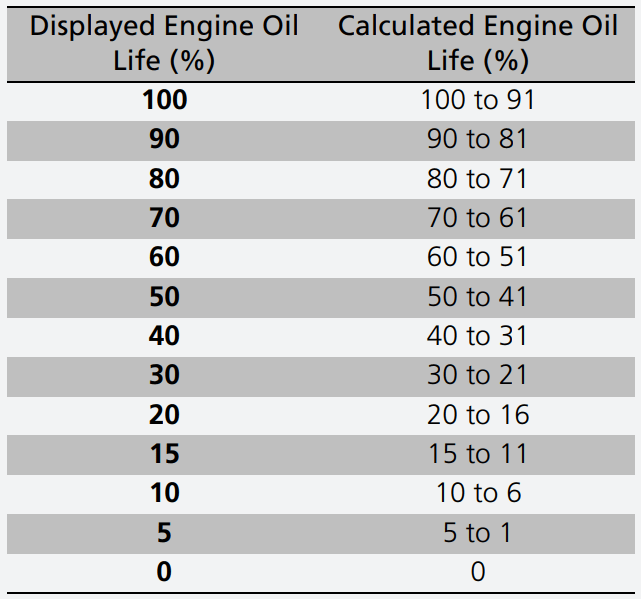
Based on the engine operating conditions, the remaining engine oil life is calculated and displayed as a percentage.
There is a list of maintenance main and sub items you can view on the driver information interface.
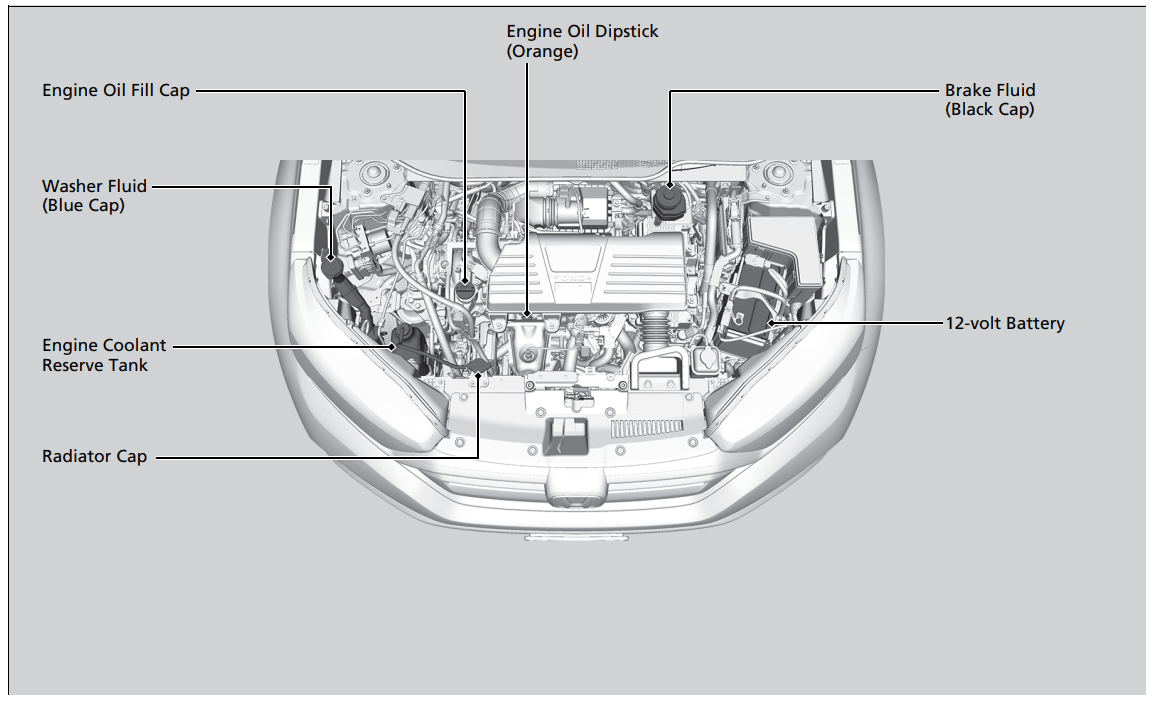
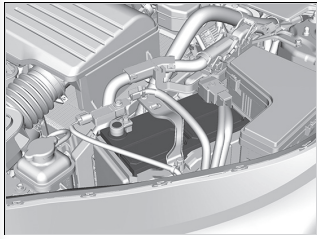
Maintenance Under the Hood
Maintenance Items Under the Hood
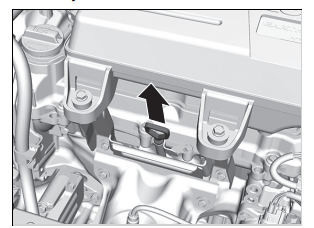
Oil Check
We recommend that you check the engine oil level every time you refuel. Park the vehicle on level ground. Turn off the power system. You can check the oil level without the engine having run beforehand. If the engine has been running, wait approximately three minutes before you check the oil.
Remove the dipstick (orange).
Wipe the dipstick with a clean cloth or paper towel.
Insert the dipstick back all the way into its hole.
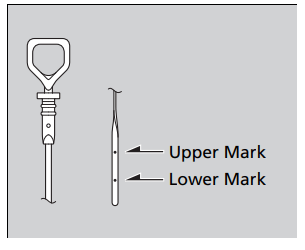
Remove the dipstick again, and check the level. It should be between the upper and lower marks. Add oil if necessary
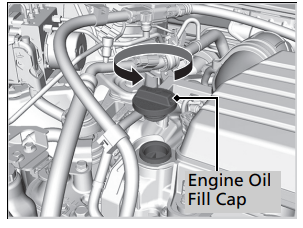
Adding Engine Oil
Unscrew and remove the engine oil fill cap.
Add oil slowly.
Reinstall the engine oil fill cap, and tighten it securely.
Wait for three minutes and recheck the engine oil dipstick.
Replacing Light Bulbs
Headlights
Headlights are LED type. Have an authorized Honda dealer inspect and replace the light assembly.
Fog Lights*
Fog lights are LED type. Have an authorized Honda dealer inspect and replace the light assembly.
Parking/Daytime Running Lights
Parking/daytime running lights are LED type. Have an authorized Honda dealer inspect and replace the light assembly.
Front Turn Signal/Front Side Marker Lights
Front turn signal lights/front side marker lights are LED type. Have an authorized
Honda dealer inspect and replace the light assembly.
Side Turn Signal/Emergency Indicator Lights*
Door mirror side turn signal lights are LED type. Have an authorized Honda dealer inspect and replace the light assembly.
Brake/Taillights, Rear Turn Signal Lights and Rear Side Marker Lights
Brake/taillights, rear turn signal lights and rear side marker lights are LED type. Have an authorized Honda dealer inspect and replace the light assembly.
Taillights and Back-Up Light Bulbs
When replacing, use the following bulbs.
Taillight: LED
Back-Up Light: 16W
Remove the cover by prying on the edge using a flat-tip screwdriver. u Wrap the flat-tip screwdriver with a cloth to prevent scratches.
Turn the socket counter-clockwise and remove it. Remove the old bulb.
Insert a new bulb.
Rear License Plate Light
Rear license plate light is LED type. Have an authorized Honda dealer inspect and replace the light assembly.
High-Mount Brake Light
High-mount brake light is LED type. Have an authorized Honda dealer inspect and replace the light assembly
Checking and Maintaining Wiper Blades
Checking Wiper Blades
If the wiper blade rubber has deteriorated, it will leave streaks, become noisy, and the hard surfaces of the blade may scratch the window glass.
Changing the Front Wiper Blade Rubber
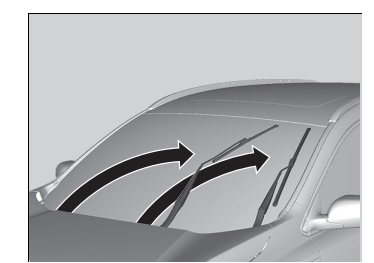
Set the power mode to VEHICLE OFF.
While holding the wiper switch in the MIST position, set the power mode to ON, then to VEHICLE OFF.
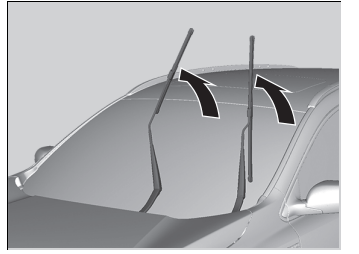
Both wiper arms are set to the maintenance position as shown in the image.
Lift the driver side wiper arm first, then the passenger side.
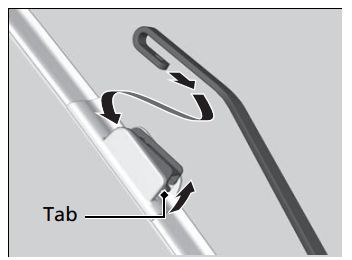
Press up on and hold the tab, then slide the holder off the wiper arm.
Pull the end of the wiper blade in the direction of the arrow in the image until it is out of the holder’s end cap.
Pull the wiper blade in the opposite direction to slide it out of the holder.
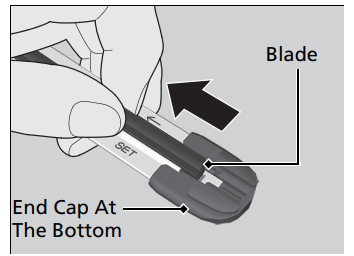
Slide the new wiper blade onto the holder from the bottom end.
The tab on the holder should fit in the indent of the wiper blade.
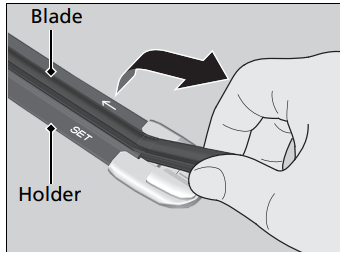
Slide the holder onto the wiper arm, then push down the lock tab.
Lower the passenger side wiper arm first, then the driver side.
Set the power mode to ON and hold the wiper switch in the MIST position until both wiper arms return to the standard position
Checking and Maintaining Tires
Checking Tires
To safely operate your vehicle, your tires must be of the proper type and size, in good condition with adequate tread, and properly inflated.
Inflation guidelines
Properly inflated tires provide the best combination of handling, tread life, and comfort. Refer to the driver’s doorjamb label or specifications page for the specified pressure. Underinflated tires wear unevenly, adversely affect handling and fuel economy, and are more likely to fail from overheating. Overinflated tires make your vehicle ride harshly, are more prone to road hazards, and wear unevenly. Every day before you drive, look at each of the tires. If one looks lower than the others, check the pressure with a tire gauge. At least once a month or before long trips, use a gauge to measure the pressure in all tires. Even tires in good condition can lose 1–2 psi (10–20 kPa, 0.1–0.2 kgf/cm2) per month.
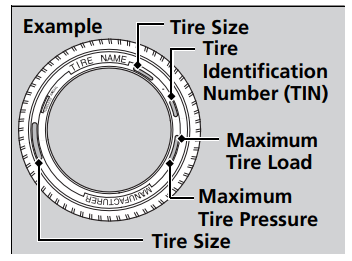
Tire Labeling
The tires that came on your vehicle have a number of markings. Those you should be aware of are described as shown.
Tire and Wheel Replacement
Replace your tires with radials of the same size, load range, speed rating, and maximum cold tire pressure rating (as shown on the tire‘s sidewall). Using tires of a different size or construction can cause certain vehicle systems such as the ABS and Vehicle Stability AssistTM (VSA®) system to work incorrectly.
It is best to replace all four tires at the same time. If that isn’t possible, replace the front or rear tires in pairs.
Make sure that the wheel’s specifications match those of the original wheels.
12-volt Battery
Checking the 12-volt Battery
The condition of the battery is monitored by a sensor located on the negative terminal of the battery. If there is a problem with this sensor, the driver information interface will display a warning message. If this happens, have your vehicle inspected by a dealer.
Check the battery terminals for corrosion monthly.
Charging the 12-volt Battery
Disconnect both battery cables to prevent damaging your vehicle's electrical system. Always disconnect the negative (–) cable first, and reconnect it last.
Remote Transmitter Care
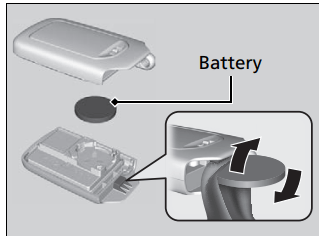
Replacing the Button Battery
If the indicator does not come on when the button is pressed, replace the battery.
Battery type: CR2032
Remove the built-in key.
Remove the upper half of the cover by carefully prying on the edge with a coin.
Wrap a coin with a cloth to prevent scratching the smart entry remote.
Remove carefully to avoid losing the buttons.
Make sure to replace the battery with the correct polarity
Climate Control System Maintenance
Air Conditioning
To ensure proper and safe operation, the Society of Automotive Engineers (SAE J2845) recommends that the refrigerant system only be serviced by trained and certified technicians. Never repair or replace the air conditioning evaporator (cooling coil) with one removed from a used or salvaged vehicle. New replacement mobile air conditioning evaporators must be certified (and labeled) as meeting SAE Standard J2842.
Dust and Pollen Filter
The climate control system is equipped with a dust and pollen filter that collects pollen, dust, and other debris in the air. The Maintenance MinderTM messages will let you know when to replace the filter. We recommend that you replace the dust and pollen filter sooner when using your vehicle in areas with high concentrations of dust.
Cleaning
Interior Care
Use a damp cloth with a mixture of mild detergent and warm water to remove dirt. Use a clean cloth to remove detergent residue.
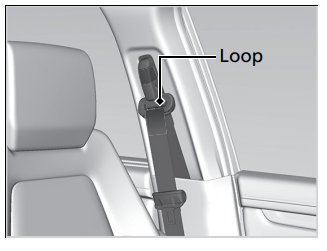
Cleaning Seat Belts
Use a soft brush with a mixture of mild soap and warm water to clean the seat belts. Let the belts air dry. Wipe the loops of the seat belt anchors using a clean cloth.
Cleaning the Window -Wipe using a glass cleaner.
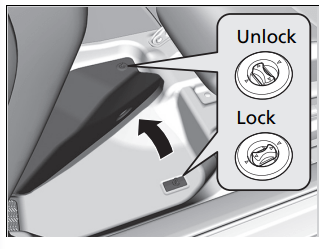
Floor Mats
The driver's floor mat hooks over floor anchors, which keep them from sliding forward. To remove a mat for cleaning, turn the anchor knobs to the unlock position. When reinstalling the mat after cleaning, turn the knobs to the lock position. Do not put additional floor mats on top of the anchored mat.
Maintaining Genuine Leather*
To properly clean leather:
Use a vacuum or soft dry cloth first to remove any dirt or dust.
Clean the leather with a soft cloth dampened with a solution comprised of 90% water and 10% neutral soap.
Wipe away any soap residue with a clean damp cloth.
Wipe away residual water and allow leather to air dry in the shade.
Exterior Care
Dust off the vehicle body after you drive. Regularly inspect your vehicle for scratches on painted surfaces. A scratch on a painted surface can result in body rust. If you find a scratch, promptly repair it.
Washing the Vehicle
Wash the vehicle regularly. Wash more frequently when driving in the following conditions:
If driving on roads with road salt.
If driving in coastal areas.
If tar, soot, bird droppings, insects, or tree sap are stuck to painted surfaces.
Using an Automated Car Wash
Make sure to follow the instructions indicated on the automated car wash.
Fold in the door mirrors.
For models equipped with automatic intermittent wipers, turn the wipers off
Using High Pressure Cleaners
Keep sufficient distance between the cleaning nozzle and the vehicle body.
Take particular care around the windows. Standing too close may cause water to enter the vehicle interior.
Do not spray high pressure water directly into the engine compartment. Instead, use low pressure water and a mild detergent.
Maintaining Aluminum Wheels
Aluminum is susceptible to deterioration caused by salt and other road contaminants. When necessary, as early as possible use a sponge and mild detergent to wipe away these contaminants. Do not use a stiff brush or harsh chemicals (including some commercial wheel cleaners). These can damage the protective finish on aluminum alloy wheels, resulting in corrosion. Depending on the type of finish, the wheels also may lose their luster or appear burnished. To avoid water stains, wipe the wheels dry with a cloth while they are still wet.
Fogged Exterior Light Lenses
The inside lenses of exterior lights (headlights, brake lights, etc.) may fog temporarily if you have driven in the rain, or after the vehicle has been run through a car wash. Dew condensation also may build up inside the lenses when there is a significant enough difference between the ambient and inside lens temperatures (similar to vehicle windows fogging up in rainy conditions). These conditions are natural processes, not structural design problems in the exterior lights. Lens design characteristics may result in moisture developing on the light lens frame surfaces. This also is not a malfunction. However, if you see large amounts of water accumulation, or large water drops building up inside the lenses, have your vehicle inspected by a dealer.
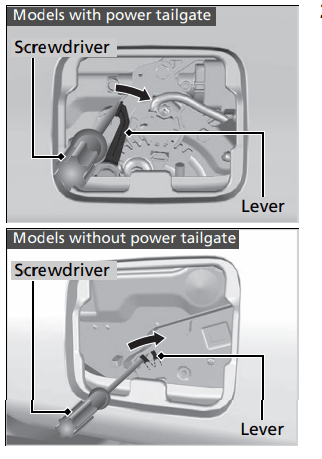
If You Cannot Open the Tailgate
What to Do If Unable to Open the Tailgate
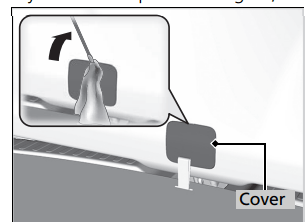
If you cannot open the tailgate, use the following procedure.
Use a flat-tip screwdriver and remove the cover on the inside of the tailgate.
Wrap the flat-tip screwdriver with a cloth to prevent scratches.
To open the tailgate, push the tailgate while pushing the lever to the right with the flat-tip screwdriver.
Following up:
After taking these steps, contact a dealer to have the vehicle checked.
When you open the tailgate from inside, make sure there is enough space around the tailgate, and it does not hit anyone or any object.
Refueling
Refueling From a Portable Fuel Container
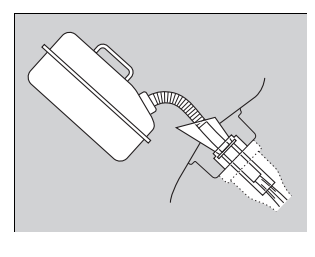
If you have run out of fuel and need to refuel your vehicle from a portable fuel container, use the funnel provided with your vehicle.
Turn off the power system.
Pull on the fuel fill door release handle under the lower left corner of the dashboard.
The fuel fill door opens.
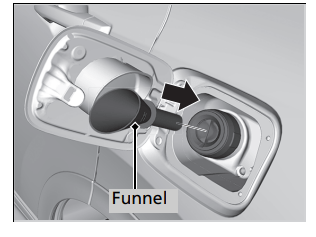
Take the funnel out of the tool case in the cargo area. →Types of Tools P. 626
Place the end of the funnel on the lower part of filler opening, then insert it slowly and fully.
Make sure that the end of the funnel goes down along with the filler pipe.
Fill the tank with fuel from the portable fuel container.
Pour fuel carefully so you do not spill any.
Remove the funnel from the filler neck.
Wipe up any fuel from the funnel before storing it.
Shut the fuel fill door by hand.
Overview—Functions at a Glance
HOME Screen
The system displays various functions from the HOME screen. Press the (Home) icon at any time to return to the main HOME screen.
Navigation Top Screen
Display the map screen and operate the navigation features. From the HOME screen, press the (Map) icon and then press the (Back) icon. The navigation top screen is displayed.
Touchscreen Operation
You can operate the system using your finger on the touchscreen.
The touchscreen can be operated if you are wearing thin gloves, but it may be more difficult for the system to respond.
Tap
Touch the screen lightly with your finger to select an option on the screen.
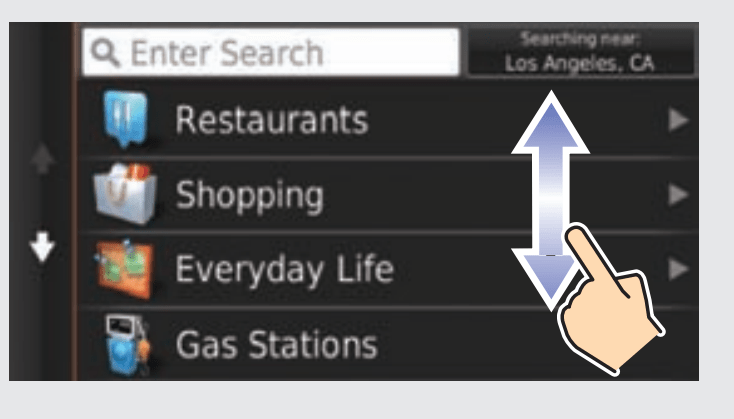
Swipe
Lightly sweep your finger side to side or up and down to scroll a list or map.
You can change the touchscreen sensitivity setting.
Refer to the Owners Manual.
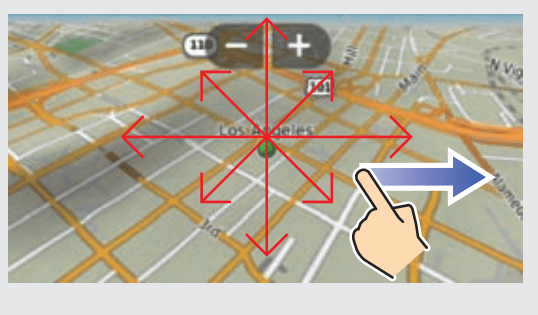
Slide
Move your finger slowly across the screen to scroll the map.
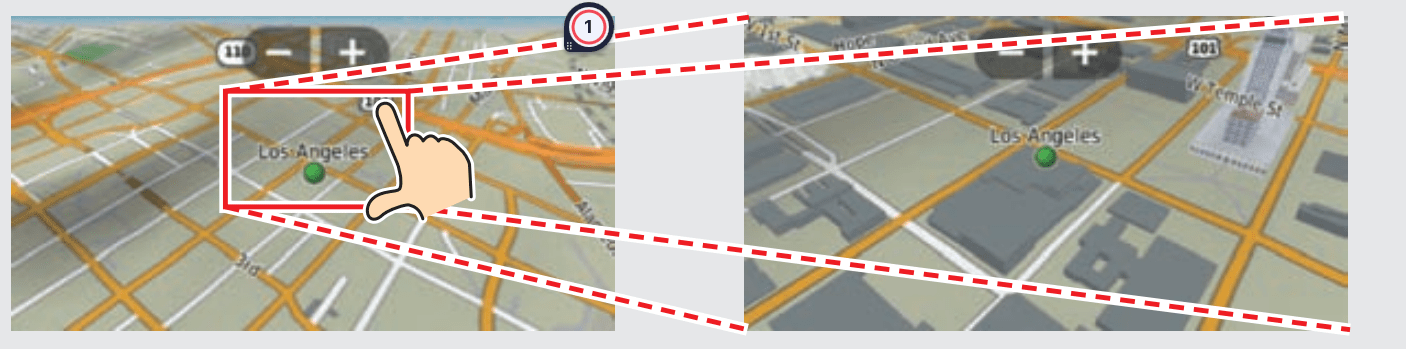
Pinch In/Out
Open or close your fingers on the screen in a pinching motion to zoom in or out of the map.
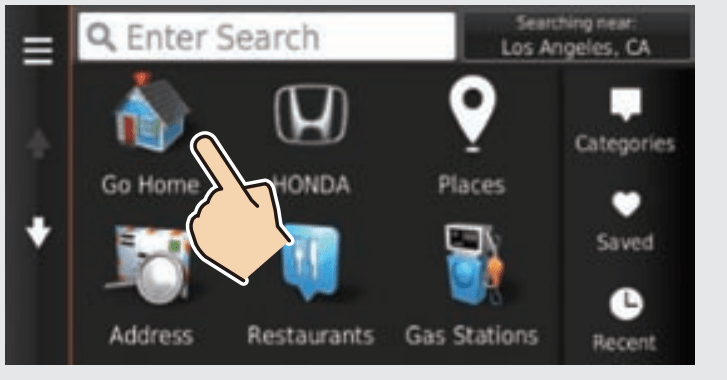
How to Enter Information
You can enter information (e.g., city names, street names, numbers.
Using Voice Commands
When you see in this manual, voice commands are available for that feature.
The system recognizes only certain commands.
Available navigation commands→ p.136
Press the (Talk) button, and say the letter, number, or symbol (e.g., say "1").
If a voice command is not recognized, a list is displayed with possible options.
On list screens:
Say the number of the list item (e.g., say "Three" to select item 3).
Say "Main menu" to return to the voice command menu screen.
Say"Back" to return to the previous screen.
Say"Page Up" to scroll up one page.
Say"Page Down" to scroll down one page.
Say"Exit" to end the voice command function.
Using the Touchscreen
Select a character or icon on the screen to select it.
Select to remove the last entered character.
Select to remove all entered characters.
Select to display upper/lower case characters.
Select to enter a space character.
Select to display other types of characters.
Select to change the keypad language.
On input search screens, the suggested search terms are displayed. Select to display a list of possible entries.
Map Screen Legend
The color of the map is different depending on the selected Map Theme.
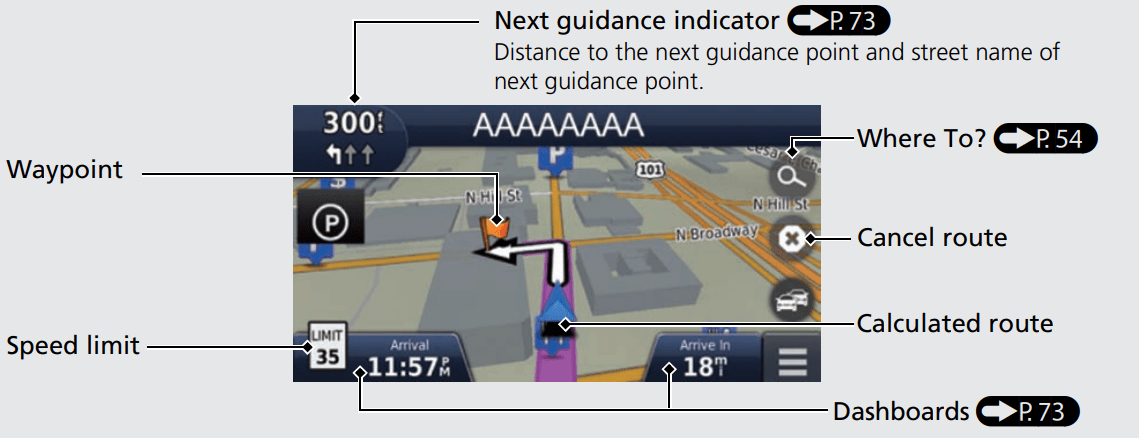
During Route Guidance
During route guidance, route information is displayed on the map screen. You can see the detailed information on the turn information screen.
Map Screen
Guidance Screen
Day or Night Mode
Press the (Display Mode) icon to manually switch between Day and Night modes.
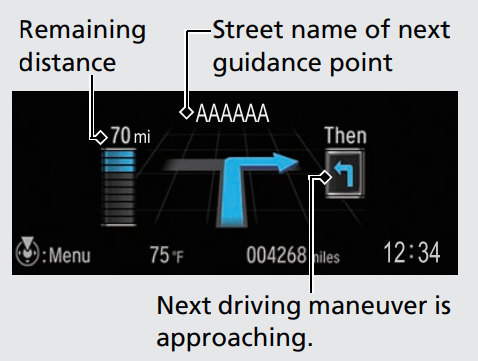
Turn-by-Turn Directions
The next guidance point appears on the Driver Information Interface.
Navigation—Home Addresses and Going Home
The “Home” feature automatically routes you to your home address from any location simply by selecting Go Home.
You can store one home address. (P18)
The order of the steps may change depending on the map data loaded on your system
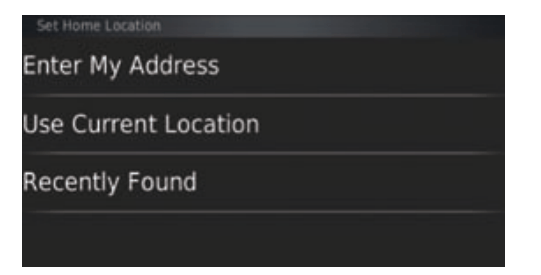
Storing Your Home Address
Press the (Map) icon.
Select .
Select and then select Set Home Location.
Select Enter My Address.
Enter a house number and then select Done.
Enter a street and then select Next.
Select an address from the list.
Select Select.
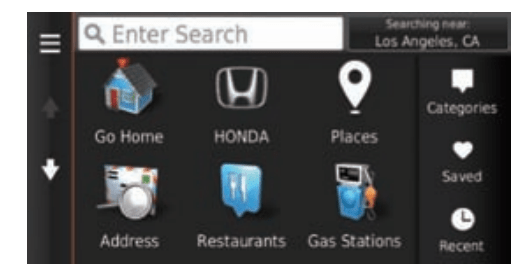
Going Home
Press the(Map) icon.
Select .
Select Go Home.
Alternatively, you can say “Navigation” and then “Go Home” from any screen.
Troubleshooting
Why does the vehicle position icon on the map appear slightly off my actual position, especially at intersections?
This is normal. The navigation system is unaware of the width of intersections. Large differences in vehicle position can indicate a temporary loss of the GPS signal.
Why does the “Arrival time” display sometimes increase even though I am getting closer to my destination?
The “Arrival time” is based on the speed limit on each road. Depending on the traffic conditions, the “Arrival time” may be calculated to be earlier or later.
Why does my clock frequently change the time forward and backward by one hour?
The clock setting is automatically updated based on your GPS location. If you are driving near a time zone border, the automatic update is the likely reason.
How do I turn on the navigation system voice guidance?
Press the (Map) icon and then press the (Back) icon. Select Settings > Navigation and enable Voice Prompts.
Press the (Home) icon. Select Settings > System > Sound/Beep tab. Turn up Guidance Volume, if guidance volume is low. For more details, see the Owner’s Manual.
How do I specify a destination when an entered city or street could not be found?
Try selecting the destination directly from the map
Troubleshooting
Map, Voice, Entering Destinations
Problem
Problem
Problem
Problem
Problem
Solution
My clock frequently changes forward and backward by one hour.
The clock setting is automatically updated based on your GPS location. If you are driving near a time zone border, the automatic update is the likely reason
How do I change the interface language?
Press the (Home) icon and then select Settings > System > Others tab > Language.

 (display/information) button to see the message again with the system message indicator on.
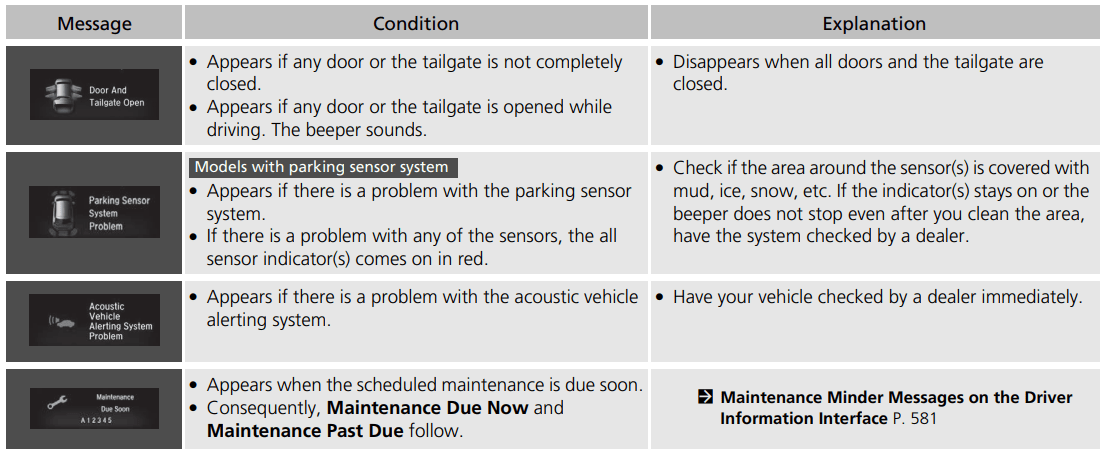
 Adjust Clock is selected.
 to change hour, then press
  .
.
 or
or  to change hour.
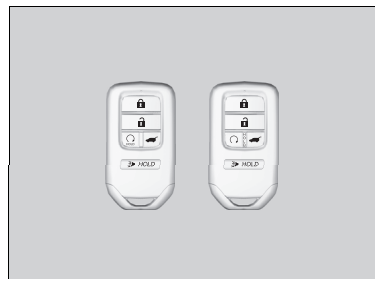
 button several times until
  is displayed.
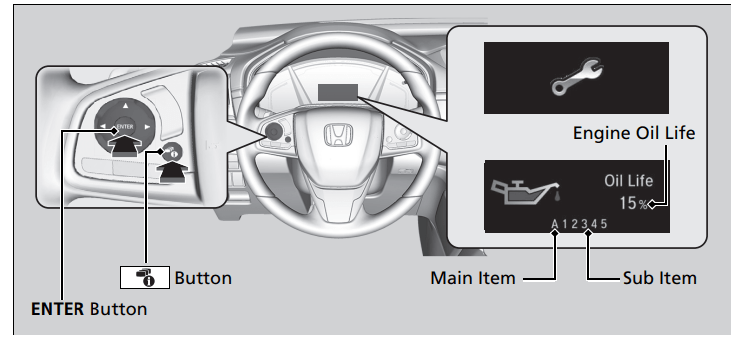


 (Home) icon at any time to return to the main HOME screen.
 (Map) icon and then press the (Back) icon. The navigation top screen is displayed.
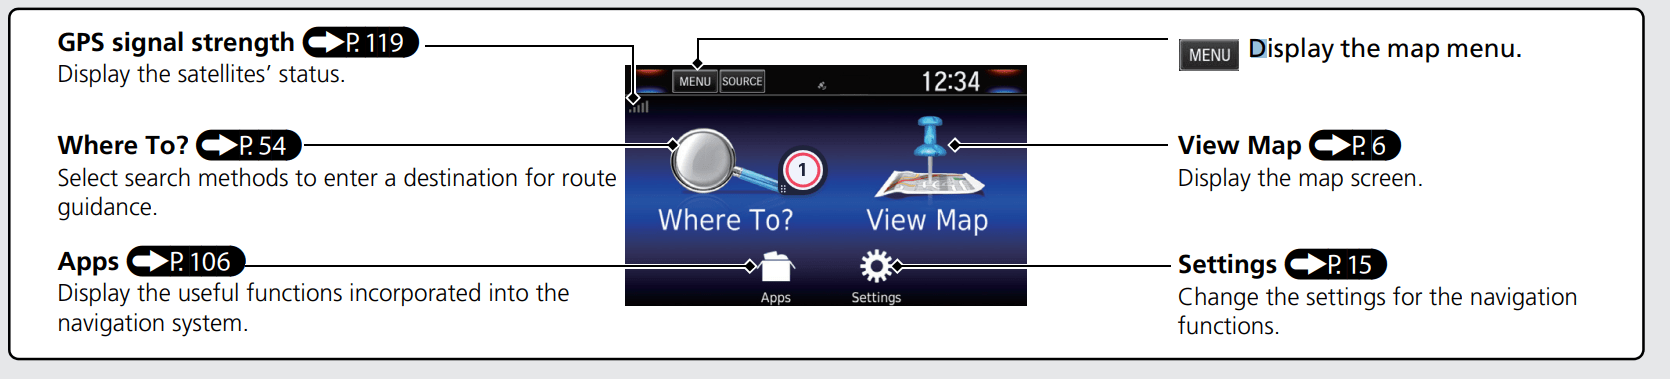
 in this manual, voice commands are available for that feature.
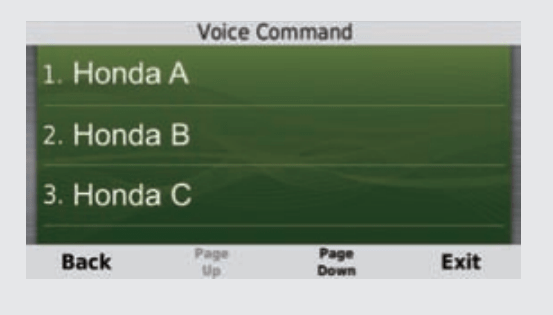
 to remove the last entered character.
 to remove all entered characters.
 to display upper/lower case characters.
 to enter a space character.
 to display other types of characters.
 to change the keypad language.
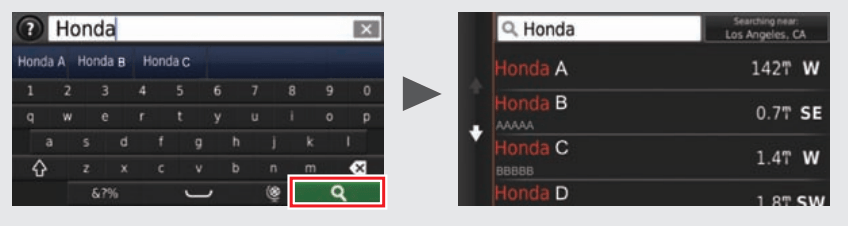
 to display a list of possible entries.
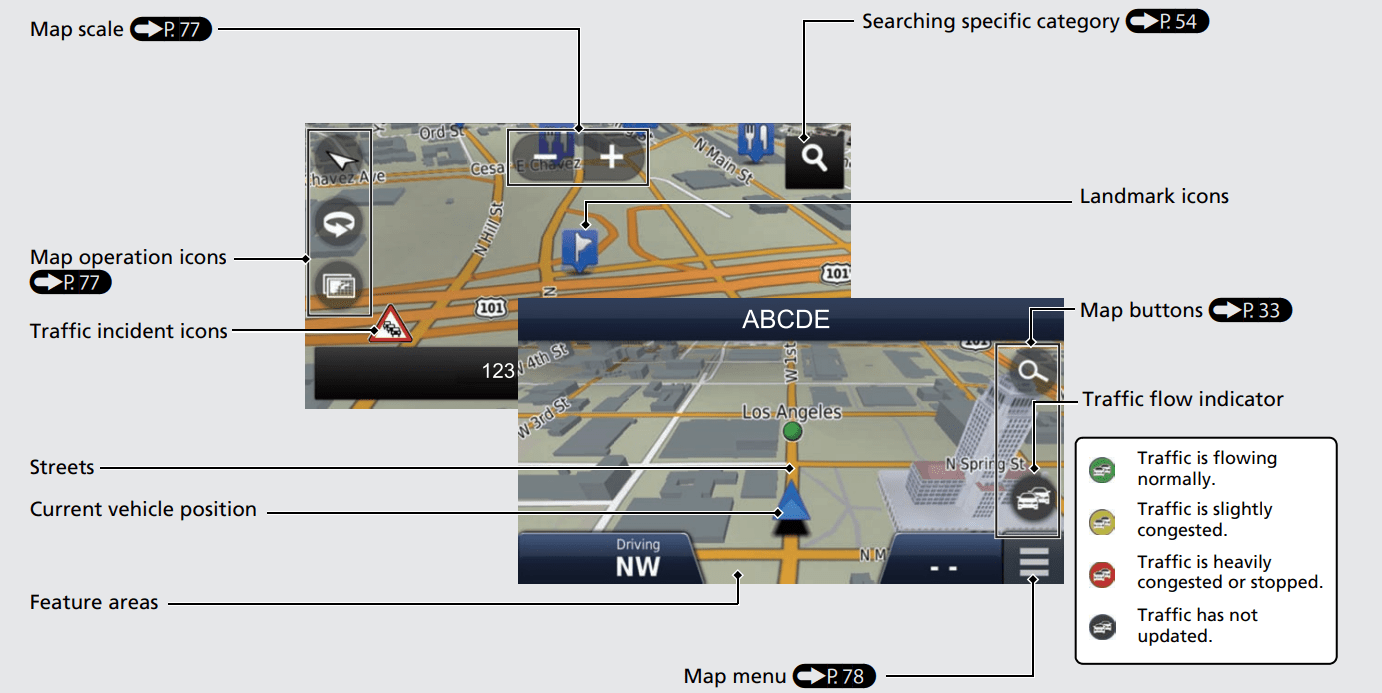

 (Display Mode) icon to manually switch between Day and Night modes.
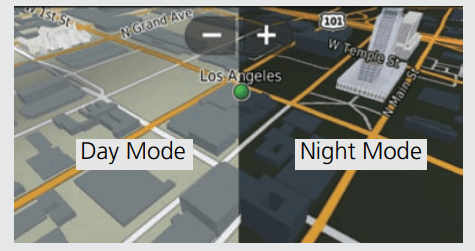
 (Map) icon.
 .
.
 (Map) icon and then press the
  (Back) icon. Select Settings > Navigation and enable Voice Prompts.
 (Home) icon.