NordicTrack NTL10421.0 EXP 7i Treadmil

Product's Documents

Below are documents related to this product, you can read online or download:
NTL10421.0 photo

User manual Treadmil for NordicTrack NTL10421.0

ASSEMBLY

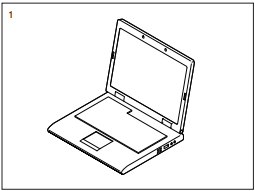
1. Go to my.nordictrack.com on your computer and register your product.

  • documents your ownership
  • activates your warranty
  • ensures priority customer support if assistance is ever needed

Note: If you do not have internet access, call Customer Care (see the front cover of this manual) and register your product.

2. Make sure that the power cord is unplugged.

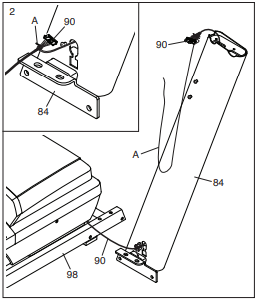
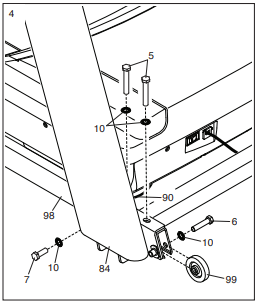
Remove the tie securing the Upright Wire (90) to the front of the Base (98).

Next, identify the Right Upright (84). Have a second person hold the Right Upright near the Base (98).

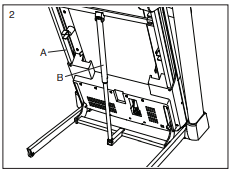
See the inset drawing. Tie the wire tie (A) in the Right Upright (84) securely around the end of the Upright Wire (90). Then, insert the Upright Wire into the lower end of the Right Upright, and pull the other end of the wire tie until the Upright Wire is routed through the Right Upright.

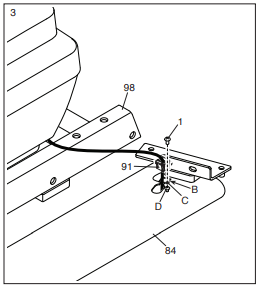
3. Lay the Right Upright (84) near the Base (98). Press the Upright Grommet (91) into the square hole (B) in the Right Upright. Make sure not to pinch the ground wire (C).

If there is a screw (D) pre-attached to the Right Upright (84), remove and discard it.

Then, attach the ground wire (C) to the Right Upright (84) with an M4 x 13mm Screw (1).

4. Hold the Right Upright (84) against the Base (98). Make sure not to pinch the Upright Wire (90).

Attach the Right Upright (84) and a Wheel (99) with two 3/8" x 2 3/8" Screws (5), a 3/8" x 1 1/4" Screw (7), a 3/8" x 1 3/4" Screw (6), and four 3/8" Star Washers (10) as shown; do not fully tighten the Screws yet.

Attach the Left Upright (not shown) and the other Wheel (not shown) in the same way. Note: There are no wires on the left side.

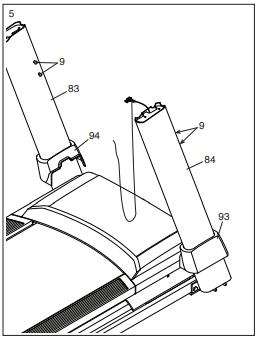
5. Remove and save the four 5/16" x 3/4" Screws (9).

Identify the Left and Right Base Covers (94, 93). Slide the Left Base Cover onto the Left Upright (83), and slide the Right Base Cover onto the Right Upright (84); do not press the Base Covers into place yet.

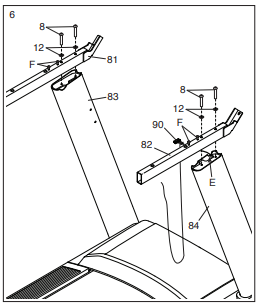
6. Attach the Left and Right Handrails (81, 82) to the Left and Right Uprights (83, 84) with four 5/16" x 2 1/2" Screws (8) and four 5/16" Star Washers (12); do not fully tighten the Screws yet. Be careful not to pinch the Upright Wire (90) on the right side. Position the Upright Wire in the notch (E) as shown.

Then, remove and discard the four indicated screws (F).

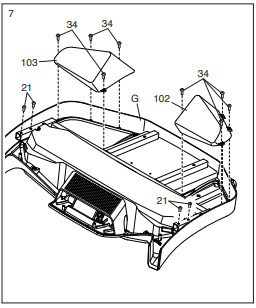
7. Set the console assembly (G) face down on a soft surface to avoid scratching the console assembly. Remove and save the four 1/4" x 1/2" Screws (21).

Next, identify the Left and Right Trays (102, 103). Attach the Trays to the console assembly (G) with eight #8 x 3/8" Screws (34); do not overtighten the Screws.

8. IMPORTANT: To avoid damaging the Crossbar (87), do not use power tools, and do not overtighten the #10 x 3/4" Screws (4).

Orient the Crossbar (87) as shown. Attach the Crossbar to the Handrails (81, 82) with four #10 x 3/4" Screws (4) and four #10 Star Washers (11); start all four Screws, and then tighten them.

Then, tighten the four 5/16" x 2 1/2" Screws (8).

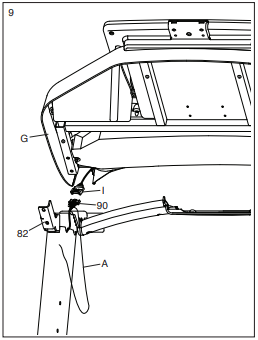
9. With the help of a second person, hold the console assembly (G) near the Right Handrail (82).

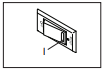
Connect the Upright Wire (90) to the console wire (I). The connectors should slide together easily and snap into place. If they do not, turn one connector and try again.

Then, remove the wire tie (A) from the Upright Wire (90).

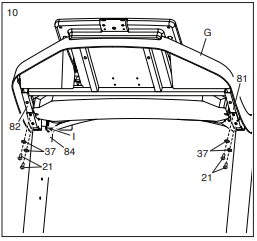
10. Attach the console assembly (G) to the Handrails (81, 82) with four 1/4" x 1/2" Screws (21) that you removed in step 7 and four 1/4" Star Washers (37); start all four Screws, and then tighten them. Be careful not to pinch the wires (I).

Insert any excess wire (I) into the top of the Right Upright (84).

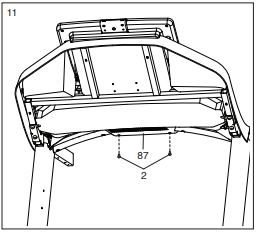
11. Start two #8 x 1/2" Screws (2) into the Crossbar (87), and then tighten them; do not overtighten the Screws.

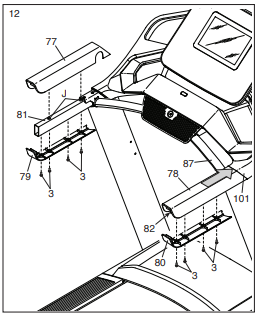
12. Align the Right Top Handrail Cover (78) with the Crossbar (87) and with the holes (J) in the Right Handrail (82). Then, press the Right Top Handrail Cover downward onto the Right Handrail. The front of the Right Top Handrail Cover should flex around the Console Base (101) and snap into place around the Crossbar. Next, start four #8 x 3/4" Screws (3) into the Right Bottom Handrail Cover (80), the Right Handrail (82), and the Right Top Handrail Cover (78).

Next, slide the Right Top and Bottom Handrail Covers forward against the Console Base (101) as shown. Then, tighten the four Screws.

Attach the Left Top and Bottom Handrail Covers (77, 79) to the Left Handrail (81) as described above.

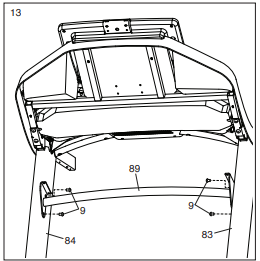
13. Carefully slide the Upright Crossbar (89) between the Right and Left Uprights (84, 83). Attach the Upright Crossbar with the four 5/16" x 3/4" Screws (9) that you removed in step 5; start all four Screws, and then tighten them.

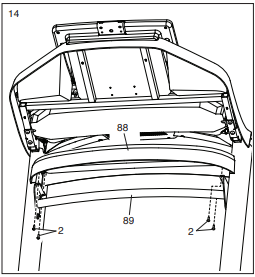
14. Attach the Tray (88) to the Upright Crossbar (89) with four #8 x 1/2" Screws (2); start all four Screws, and then tighten them. Do not overtighten the Screws.

15. Note: If the treadmill is assembled on a smooth surface, it may roll forward in this step.

Remove the two 5/16" x 3/4" Screws (9) from the Latch Crossbar (55).

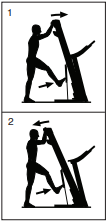
Raise the Frame (59) to the upright position. Have a second person hold the Frame until step 17 is completed.

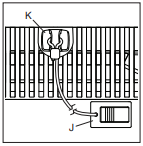
Orient the Latch Crossbar (55) as shown. Make sure that the “This side toward belt” sticker (K) is facing the treadmill. Attach the Latch Crossbar to the brackets (L) on the Frame (59) with the two 5/16" x 3/4" Screws (9) that you just removed and two 5/16" Star Washers (12).

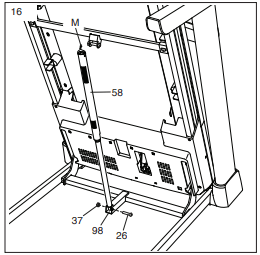
16. Remove the 5/16" Nut (36) and the 5/16" x 1 3/4" Bolt (26) from the bracket on the Base (98).

Next, orient the Storage Latch (58) as shown.

Attach the lower end of the Storage Latch (58) to the bracket on the Base (98) with the 5/16" x 1 3/4" Bolt (26) and the 5/16" Nut (36) as shown.

Then, raise the Storage Latch (58) to a vertical position, and remove the tie (M).

17. Remove the 5/16" Nut (36) and the 5/16" x 2 1/4" Bolt (27) from the bracket on the Latch Crossbar (55).

Align the upper end of the Storage Latch (58) with the bracket on the Latch Crossbar (55), and insert the 5/16" x 2 1/4" Bolt (27) through the bracket and the Storage Latch. This will push a spacer (N) out of the Storage Latch; discard the spacer.

Next, tighten the 5/16" Nut (36) onto the 5/16" x 2 1/4" Bolt (27); do not overtighten the Nut; the Storage Latch (58) must be able to pivot.

Then, lower the Frame (59) (see HOW TO LOWER THE TREADMILL FOR USE on page 30).

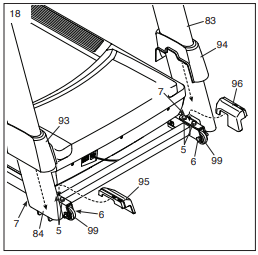
18. Firmly tighten the four 3/8" x 2 3/8" Screws (5) and the two 3/8" x 1 1/4" Screws (7).

Next, tighten the two 3/8" x 1 3/4" Screws (6); make sure that the Wheels (99) turn freely.

Next, set the Left Inner Base Cover (96) onto the lower end of the Left Upright (83). Slide the Left Base Cover (94) downward and press it onto the Left Inner Base Cover.

Then, set the Right Inner Base Cover (95) onto the lower end of the Right Upright (84). Slide the Right Base Cover (93) downward and press it onto the Right Inner Base Cover.

19. Make sure that all parts are properly tightened before you use the treadmill. If there are sheets of plastic on the treadmill decals, remove the plastic. To protect the fl oor or carpet, place a mat under the treadmill. To avoid damage to the console, keep the treadmill out of direct sunlight. Keep the included hex keys in a secure place; one of the hex keys is used to adjust the walking belt (see pages 32 and 33). Note: Extra parts may be included.

HOW TO USE THE TREADMILL

HOW TO CONNECT THE POWER CORD

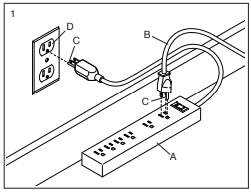
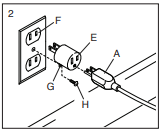
Use a Surge Suppressor

  • Your treadmill, like other electronic equipment, can be damaged by sudden voltage changes in your home’s power. Voltage surges, spikes, and noise interference can result from weather conditions or from other appliances being turned on or off. To decrease the risk of damaging the treadmill, always use a surge suppressor (A) with the treadmill. To purchase a surge suppressor, see precaution 14 on page 3.
  • Use only a surge suppressor (A) that is UL 1449 listed as a transient voltage surge suppressor (TVSS). The surge suppressor must have a UL suppressed voltage rating of 400 volts or less and a minimum surge dissipation of 450 joules. The surge suppressor must also be electrically rated for 120 volts AC and 15 amps. There must be a monitoring light on the surge suppressor to indicate whether it is functioning properly. Failure to use a properly functioning surge suppressor could result in damage to the control system of the treadmill and serious injury to users.

Plug in the Power Cord

  • The treadmill must be grounded. If it should malfunction or break down, grounding provides a path of least resistance for electric current to reduce the risk of electric shock. The treadmill power cord (B) has a plug with a grounding pin (C) (see drawing 1 on this page).
  • Plug the power cord (B) into a surge suppressor (A), and plug the surge suppressor into an appropriate outlet (D) that is properly installed and grounded in accordance with all local codes and ordinances. The outlet must be on a nominal 120-volt circuit capable of carrying 15 or more amps. To avoid overloading the circuit, do not plug other electrical devices, except for low-power devices such as cell phone chargers, into the surge suppressor or into an outlet on the same circuit. IMPORTANT: If the treadmill is connected to an AFCI-equipped outlet and your circuit breaker trips repeatedly when the treadmill is used, see the front cover of this manual to purchase an arc filter.

  • A temporary adapter (E) may be used to connect the surge suppressor (A) to a 2-pole receptacle (F) if a properly grounded outlet is not available.

  • The lug (G) or wire extending from the adapter must be connected with a metal screw (H) to a permanent ground such as a properly grounded outlet box cover. Some 2-pole receptacle outlet box covers are not grounded. Before using an adapter, contact a qualified electrician to determine whether the outlet box cover is grounded. The temporary adapter should be used only until a properly grounded outlet can be installed by a qualified electrician.

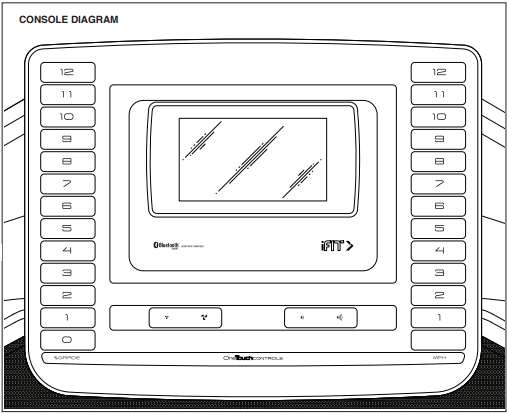
FEATURES OF THE CONSOLE

  • The advanced treadmill console offers a selection of features designed to make your workouts more effective and enjoyable.
  • The console features wireless technology that enables the console to connect to iFit. With iFit, you can access a large and varied workout library, create your own workouts, track your workout results, and access many other features.
  • When you use the manual mode, you can change the speed and incline of the treadmill with the touch of a button. As you exercise, the console will display instant exercise feedback. You can even measure your heart rate using a compatible heart rate monitor. See page 29 for information about purchasing an optional heart rate monitor.
  • You can also listen to your favorite workout music or audio books with the console’s sound system while you exercise.
  • To turn on the power, see page 20. To learn how to use the touch screen, see page 20. To set up the console, see page 21.

HOW TO TURN ON THE POWER

  • IMPORTANT: If the treadmill has been exposed to cold temperatures, allow it to warm to room temperature before you turn on the power. If you do not do this, you may damage the console displays or other electrical components.
  • Plug in the power cord (see page 18). Next, locate the power switch on the treadmill frame near the power cord. Press the power switch into the reset position (I).

  • Next, stand on the foot rails of the treadmill. Locate the clip (J) attached to the key (K), and slide the clip securely onto the waistband of your clothes. Then, insert the key into the console. Note: It may take some time for the console to be ready for use. IMPORTANT: In an emergency, the key can be pulled from the console, causing the walking belt to slow to a stop. Test the clip by carefully taking a few steps backward; if the key is not pulled from the console, adjust the position of the clip.

  • Note: The console can display speed and distance in either miles or kilometers. To find which unit of measurement is selected, see HOW TO CHANGE CONSOLE SETTINGS on page 26. For simplicity, all instructions in this section refer to miles.

HOW TO USE THE TOUCH SCREEN

The console features a tablet with a full-color touch screen. The following information will help you become familiar with the tablet’s advanced technology:

  • The console functions similarly to other tablets. You can slide or flick your finger against the screen to move certain images on the screen, such as the displays in a workout (see step 5 on page 22). However, you cannot zoom in and out by sliding your fingers on the screen.
  • The screen is not pressure sensitive. You do not need to press hard on the screen.
  • To type information into a text box, touch the text box to view the keyboard. To use numbers or other characters on the keyboard, touch the ?123 button. To view more characters, touch the ~[< button. Touch the ?123 button again to return to the number keyboard. To return to the letter keyboard, touch the ABC button. To use a capital character, touch the button with an upward-facing arrow. To use multiple capital characters, touch and hold the arrow button. To return to the lowercase keyboard, touch the arrow button again. To clear the last character, touch the button with a backward-facing arrow and an X.

HOW TO SET UP THE CONSOLE

Before using the treadmill for the first time, set up the console.

Connect to your wireless network.

  • To access the internet, download iFit workouts, and use several other features of the console, you must be connected to a wireless network. Follow the prompts on the screen to connect the console to your wireless network.

Customize settings.

  • Fill in the form on the screen to set the console to display the desired unit of measurement and your time zone. Note: If you need to change these settings later, see HOW TO CHANGE CONSOLE SETTINGS on page 26.

Log into or create an iFit account.

  • Provide your email address, and follow the prompts on the screen to sign up for or log into your iFit account.

Tour the console.

  • The first time you turn on the treadmill, dialogue boxes on the screen will guide you through the features of the console.

Check for firmware updates.

  • First, touch your name or Hello on the screen, and then touch Settings. Next, select the maintenance section. Then, touch Update to check for firmware updates using your wireless network. See step 5 on page 26 for more information.

Calibrate the incline system.

  • First, touch your name or Hello on the screen. Next, select the settings main menu. Then, select the maintenance section, touch Calibrate Incline, and then touch Begin to calibrate the incline system. See step 6 on page 26 for more information.

The console is now ready for you to begin working out. The following pages explain the various workouts and other features that the console offers.

To use the manual mode, see page 22. To use a map workout, see page 23. To use a draw your own map workout, see page 24. To use a distance or time workout, see page 25.

To view or change console settings, see page 26. To connect to a wireless network, see page 27. To use the sound system, see page 28. To adjust the cushions, see page 28.

IMPORTANT: If there are sheets of plastic on the console, remove the plastic. To prevent damage to the walking platform, wear clean athletic shoes while using the treadmill. The first time you use the treadmill, observe the alignment of the walking belt, and center the walking belt if necessary (see page 32).

HOW TO USE THE MANUAL MODE

Insert the key into the console.

  • See HOW TO TURN ON THE POWER on page 20. Note: It may take some time for the console to be ready for use.

Select the main menu.

  • When you turn on the power, the main menu will appear after the console boots up. If you are in a workout or the settings menu, touch the back arrow or the x on the screen to return to the main menu.
  • Note: If you plan to use a heart rate monitor with the console while you exercise (see page 29), you must put on the heart rate monitor before you start the walking belt. The console will automatically search for the heart rate monitor for 30 seconds when you start the walking belt at the beginning of each workout.

Start the walking belt and adjust the speed.

  • Touch Manual Start on the screen or press the Start button on the console to start the walking belt. The walking belt will begin to move at a low speed. As you exercise, change the speed of the walking belt as desired by pressing the speed increase and decrease buttons. Each time you press one of the buttons, the speed setting will change by 0.1 mph; if you hold down the button, the speed setting will change in increments of 0.5 mph.
  • If you press one of the numbered speed buttons, the walking belt will gradually change speed until it reaches the selected speed setting.
  • To stop the walking belt, press the Stop button or tap the middle of the screen. To restart the walking belt, press the Start button.

Change the incline of the treadmill as desired.

  • To change the incline of the treadmill, press the Incline increase and decrease buttons or one of the numbered incline buttons. Each time you press one of the buttons, the incline will gradually change until it reaches the selected incline setting.
  • IMPORTANT: The first time you use the treadmill, you must calibrate the incline system (see step 6 on page 26).

Monitor your progress with the display modes.

While you walk or run on the treadmill, a selection of workout information will be displayed:

  • The incline level of the treadmill
  • The elapsed time
  • The approximate number of calories you have burned
  • The distance that you have walked or run
  • The speed of the walking belt

Additional information is also available. To view or browse additional statistics and charts, swipe down from the top of the screen. You can also touch the + button on the screen to view stats or charts. Note: To record heart rate information, a compatible heart rate monitor must be in use (see page 29).

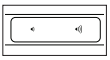
If desired, adjust the volume by pressing the volume buttons on the console.

To pause the workout, tap the screen or press the Stop button on the console. To continue the workout, touch the play icon on the screen or press the Start button.

Turn on the fan if desired.

  • The fan features several speed settings. Press the fan buttons repeatedly to select a fan speed or to turn on or turn off the fan.

When you are finished exercising, remove the key from the console.

  • Step onto the foot rails and press the Stop button on the console or tap on the screen. Then, touch the stop icon on the screen or press the Stop button again. A workout summary will appear on the screen. If you wish to save your workout for future use, you can add it as a favorite by touching the heart icon on the screen. You may also be able to either save or publish your results using one of the options on the screen. Touch Finish to exit to the main menu. Then, remove the key from the console and put it in a secure place.
  • When you are finished using the treadmill, press the power switch into the off position and unplug the power cord. IMPORTANT: If you do not do this, the treadmill’s electrical components may wear prematurely.

HOW TO USE A MAP WORKOUT

Note: To use a map workout, the console must be connected to a wireless network (see HOW TO CONNECT TO A WIRELESS NETWORK on page 27).

Insert the key into the console.

  • See HOW TO TURN ON THE POWER on page 20.

Select the main menu or the workout library.

  • Touch Home or Browse on the screen to select either the main menu or the workout library

Select a map workout.

  • To select a map workout, touch the desired option on the screen. Note: The featured map workouts on your console will change periodically. If you wish to save one of the featured workouts for future use, you can add it as a favorite by touching the heart icon on the screen. To draw your own map workout, see page 24.
  • The screen will show the duration and distance of the workout, and the approximate number of calories you will burn during the workout.

Start the workout.

  • Touch Start to start the workout. A moment after you touch the button, the walking belt will begin to move. Hold the handrails and begin walking.
  • During the workout, a map on the screen will show your progress.
  • When you reach the end of the workout, the walking belt will slow to a stop, and a workout summary will appear on the screen. After you view the workout summary, touch Finish to return to the main menu. You may also be able to either save or publish your results using one of the options on the screen.

Monitor your progress with the display modes.

  • See step 5 on page 22.

Turn on the fan if desired.

  • See step 6 at the left.

When you are finished exercising, remove the key from the console.

  • See step 7 at the left.

HOW TO USE A DRAW YOUR OWN MAP WORKOUT

Note: To use a draw your own map workout, the console must be connected to a wireless network (see HOW TO CONNECT TO A WIRELESS NETWORK on page 27).

Insert the key into the console.

  • See HOW TO TURN ON THE POWER on page 20.

Select a draw your own map workout.

  • To select a draw your own map workout, touch Create on the screen.

Draw your map.

  • Navigate to the area on the map where you want to draw your workout by sliding your fingers on the screen. Tap the screen to add the start point for your workout. Then, tap the screen to add the end point for your workout. Note: If you want to start and end the workout at the same point, use the Loop or Out & Back options. You can also select whether you want your workout to snap to the road.
  • If you make a mistake, you can touch Undo.
  • The screen will display the elevation and distance stats for your workout. If desired, you can change the default speed.

Save your workout.

  • Touch Save New Workout on the screen. If desired, change the title of the workout or add a description, and then press the > symbol on the screen.

Start the workout.

  • Touch Start on the screen to start the workout. A moment after you touch the button, the walking belt will begin to move. Hold the handrails and begin walking. See step 4 on page 23 for more information.

Monitor your progress with the display modes.

  • See step 5 on page 22.

Turn on the fan if desired.

  • See step 6 on page 23.

When you are finished exercising, remove the key from the console.

  • See step 7 on page 23.

HOW TO USE A DISTANCE OR TIME WORKOUT

Note: To use a distance or time workout, the console must be connected to a wireless network (see HOW TO CONNECT TO A WIRELESS NETWORK on page 27). An iFit account is also required.

Add workouts to your schedule on iFit.com.

  • On your computer, smartphone, tablet, or other device, open an internet browser, go to iFit.com, and sign in to your iFit account.
  • Next, navigate to Menu > Library on the website. Browse the workout programs in the library and join the desired workouts.
  • Then, navigate to Menu > Schedule to view your schedule. All of the workouts that you have joined will appear on your schedule; you can arrange or delete the workouts on your schedule as desired.
  • Take time to explore the iFit.com website before you log out.

Insert the key into the console.

  • See HOW TO TURN ON THE POWER on page 20.

Select the main menu.

  • See step 2 on page 22.

Log in to your iFit account.

  • If you have not already done so, touch Login to log in to your iFit account. The screen will ask for your iFit.com username and password. Enter them and touch Submit. Touch Cancel to exit the login screen.

Select a distance or time workout that you have previously added to your schedule on iFit.com.

  • Touch the calendar icon to download a distance or time workout from your schedule.
  • Note: Before workouts will download, you must add them to your schedule on iFit.com.
  • When you select a distance or time workout, the screen will show the name, the estimated duration, and the distance of the workout.

Start the workout.

  • See step 4 on page 23. Note: During a distance or time workout, the display will not show a map.

Monitor your progress with the display modes.

  • See step 5 on page 21. The screen will show the elapsed distance or time, and the remaining distance or time.

Turn on the fan if desired.

  • See step 6 on page 23.

When you are finished exercising, remove the key from the console.

  • See step 7 on page 23.

HOW TO CHANGE CONSOLE SETTINGS

IMPORTANT: Some of the settings and features described may not be enabled. Occasionally, a firmware update may cause your console to function slightly differently.

Select the settings main menu.

  • First, turn on the power and insert the key into the console (see HOW TO TURN ON THE POWER on page 20). Note: It may take a few moments for the console to be ready for use.
  • Next, select the main menu. When you turn on the console, the main menu will appear on the screen after the console boots up. If you are in a workout, touch the screen, touch Pause, touch End, and then touch Finish to return to the main menu.
  • Next, touch your name or Hello on the screen, and then touch Settings. The settings menu will appear on the screen.

Navigate the settings menus and change settings as desired.

  • Slide or flick the screen to scroll upward or downward if necessary. To view a settings menu, simply touch the menu name. To exit a menu, touch the back button (arrow symbol). You may be able to view and change settings in the following settings menus:

Account

  • My Profi le
  • In Workout
  • Manage Accounts

Equipment

  • Equipment Info
  • Equipment Settings
  • Maintenance
  • Wi-Fi

About

  • Legal

Customize the unit of measurement and other settings.

  • To customize the unit of measurement, the time zone, or other settings, touch Equipment Settings, and then touch the desired settings.
  • The console can display speed and distance in either standard or metric units of measurement.

View machine information.

  • Touch Equipment Info, and then touch Machine Info to view information about your treadmill.

Update the console firmware.

  • For the best results, regularly check for firmware updates. Touch Maintenance, and then touch Update to check for firmware updates using your wireless network. The update will begin automatically. IMPORTANT: To avoid damaging the console, do not turn off or unplug the treadmill while the firmware is being updated.
  • The screen will show the progress of the update. When the update is complete, the treadmill will turn off and then turn back on. If it does not, use the power switch (see HOW TO TURN ON THE POWER on page 20) to turn the treadmill off, wait for a few seconds, and then turn it back on again. Note: It may take a few minutes for the console to be ready for use.
  • Note: Occasionally, a firmware update may cause the console to function slightly differently. These updates are always designed to improve your exercise experience.

Calibrate the incline system of the treadmill.

  • Touch Calibrate Incline, and then touch Begin to calibrate the incline system. The treadmill will automatically rise to the maximum incline level, and then return to the starting position. This will calibrate the incline system. Touch Cancel to return to the Maintenance section. When the incline system is calibrated, touch Finish.
  • IMPORTANT: Keep pets, feet, and other objects away from the treadmill while the incline system is calibrating. In an emergency, pull the key from the console to stop the incline calibration.

Exit the settings main menu.

  • If you are in a settings menu, touch the back arrow. Then, touch the close button (x symbol) to exit the settings main menu.

HOW TO CONNECT TO A WIRELESS NETWORK

The console is Wi-Fi enabled, allowing you to set up a wireless network connection.

Select the main menu.

  • See step 2 on page 22.

Select the wireless network menu.

  • Touch your name or Hello on the screen, and then touch the Wi-Fi® symbol to enter the wireless network menu.

Enable Wi-Fi.

  • Make sure that Wi-Fi is enabled. If it is not, touch the Wi-Fi toggle to enable a wireless connection.

Set up and manage a wireless network connection.

  • When Wi-Fi is enabled, the screen will show a list of available networks. Note: It may take several seconds for the list of wireless networks to appear.
  • Note: You must have your own wireless network and an 802.11b/g/n router with SSID broadcast enabled (hidden networks are not supported).
  • When a list of networks appears, touch the desired network. Note: You will need to know your network name (SSID). If your network has a password, you will also need to know the password.
  • An information box will ask if you want to connect to the wireless network. Touch Connect to connect to the network or touch Cancel to return to the list of networks. If the network has a password, touch the password entry box. A keyboard will appear on the screen. To view the password as you type it, touch the Show Password checkbox.
  • To use the keyboard, see HOW TO USE THE TOUCH SCREEN on page 20.
  • When the console is connected to your wireless network, a checkmark will appear next to the wireless network name. Then, touch the back arrow on the screen to return to the wireless network menu.
  • To disconnect from a wireless network, touch and hold the name of the wireless network and then touch Forget Network.
  • If you are having problems connecting to an encrypted network, make sure that your password is correct. Note: Passwords are case-sensitive.
  • Note: The console supports unsecured and secured (WEP, WPA™, and WPA2™) encryption. A broadband connection is recommended; performance depends on connection speed.
  • Note: If you have questions after following these instructions, go to support.iFit.com for assistance.

Exit the wireless network menu.

  • To exit the wireless network menu, touch the back arrow on the screen.

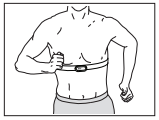
THE OPTIONAL HEART RATE MONITOR

  • Whether your goal is to burn fat or to strengthen your cardiovascular system, the key to achieving the best results is to maintain the proper heart rate during your workouts. The optional heart rate monitor will enable you to continuously monitor your heart rate while you exercise, helping you to reach your personal fi tness goals. To purchase a heart rate monitor, please see the front cover of this manual.
  • Note: The console is compatible with all Bluetooth Smart heart rate monitors.

HOW TO FOLD AND MOVE THE TREADMILL

HOW TO FOLD THE TREADMILL

To avoid damaging the treadmill, adjust the incline to zero before you fold the treadmill. Then, remove the key and unplug the power cord. CAUTION: You must be able to safely lift 45 lbs. (20 kg) to raise, lower, or move the treadmill.

  • Hold the metal frame (A) fi rmly in the location shown by the arrow below. CAUTION: Do not hold the frame by the plastic foot rails. Bend your legs and keep your back straight.

  • Raise the frame (A) until the storage latch (B) locks in the storage position. CAUTION: Make sure that the storage latch locks.

  • To protect the fl oor or carpet, place a mat under the treadmill. Keep the treadmill out of direct sunlight. Do not leave the treadmill in the storage position in temperatures above 85°F (30°C).

HOW TO MOVE THE TREADMILL

  • Before moving the treadmill, fold it as described at the left. CAUTION: Make sure that the storage latch is in the locked position. Moving the treadmill may require two people.
  • Hold the handrails (C) with both hands and carefully push the treadmill to the desired location. CAUTION: Do not pull on the frame, and do not move the treadmill over an uneven surface.

HOW TO LOWER THE TREADMILL FOR USE

  1. Push the upper end of the frame forward, and gently press the footprint decal on the storage latch with your foot at the same time.
  2. While pressing the storage latch with your foot, pull the upper end of the frame toward yourself.
  3. Step back and let the frame lower to the floor.

MAINTENANCE AND TROUBLESHOOTING

MAINTENANCE

  • Regular maintenance is important for optimal performance and to reduce wear. Inspect and properly tighten all parts each time the treadmill is used. Replace any worn parts immediately.
  • Regularly clean the treadmill and keep the walking belt clean and dry. First, press the power switch into the off position and unplug the power cord. Wipe exterior parts of the treadmill with a damp cloth and a small amount of mild soap. IMPORTANT: Do not spray liquids directly onto the treadmill. To avoid damage to the console, keep liquids away from the console. Then, thoroughly dry the treadmill with a soft towel.

TROUBLESHOOTING

Most treadmill problems can be solved by following the simple steps below. Find the symptom that applies, and follow the steps listed. If further assistance is needed, see the front cover of this manual.

SYMPTOM: The power does not turn on

a. Make sure that the power cord is plugged into a surge suppressor, and that the surge suppressor is plugged into a properly grounded outlet (see page 18). Use only a surge suppressor that meets all of the specifi cations described on page 18. IMPORTANT: If the treadmill is connected to an AFCI-equipped outlet and your circuit breaker trips repeatedly when the treadmill is used, see the front cover of this manual to purchase an arc fi lter.

b. After the power cord has been plugged in, make sure that the key is inserted into the console.

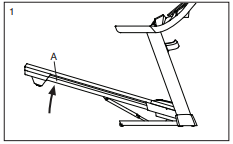
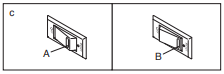
c. Check the power switch located on the treadmill frame near the power cord. If the switch protrudes as shown (A), the switch has tripped. To reset the power switch, wait for fi ve minutes and then press the switch back in (B).

SYMPTOM: The power turns off during use

a. Check the power switch (see the drawing above). If the switch has tripped, wait for fi ve minutes and then press the switch back in.

b. Make sure that the power cord is plugged in. If the power cord is plugged in, unplug it, wait for fi ve minutes, and then plug it back in.

c. Remove the key from the console, and then reinsert it.

d. If the treadmill still will not run, please see the front cover of this manual.

SYMPTOM: The incline of the treadmill does not change correctly

a. Calibrate the incline system (see step 6 on page 26).

SYMPTOM: The treadmill will not connect to the wireless network

a. Make sure that the wireless settings on the console are correct (see page 27).

b. Make sure that the settings for your wireless network are correct.

c. If you still have questions, see the front cover of this manual.

SYMPTOM: The displays of the console do not function properly

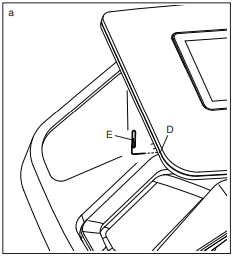
a. If the console does not boot up properly, or if the console freezes and does not respond, reset the console to the factory default settings. IMPORTANT: Doing this will erase all the custom settings you have made to the console. Resetting the console requires two people. First, press the power switch into the off position. Next, locate the small reset opening (D) on the back edge of the console. Using a bent paper clip (E), press and hold the reset button inside the opening, and have a second person press the power switch into the on (reset) position. Continue holding the reset button (D) until the console turns on. When the reset operation is complete, the console will turn off and then turn back on. If it does not, use the power switch to turn the treadmill off and then on again. Once the console turns on, check for fi rmware updates (see step 5 on page 26). Note: It may take a few minutes for the console to be ready for use.

EXERCISE GUIDELINES

These guidelines will help you to plan your exercise program. For detailed exercise information, obtain a reputable book or consult your physician. Remember, proper nutrition and adequate rest are essential for successful results.

EXERCISE INTENSITY

Whether your goal is to burn fat or to strengthen your cardiovascular system, exercising at the proper intensity is the key to achieving results. You can use your heart rate as a guide to find the proper intensity level. The chart below shows recommended heart rates for fat burning and aerobic exercise.

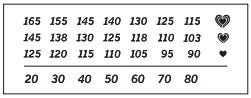
To find the proper intensity level, find your age at the bottom of the chart (ages are rounded off to the nearest ten years). The three numbers listed above your age define your “training zone.” The lowest number is the heart rate for fat burning, the middle number is the heart rate for maximum fat burning, and the highest number is the heart rate for aerobic exercise.

Burning Fat—To burn fat effectively, you must exercise at a low intensity level for a sustained period of time. During the first few minutes of exercise, your body uses carbohydrate calories for energy. Only after the first few minutes of exercise does your body begin to use stored fat calories for energy. If your goal is to burn fat, adjust the intensity of your exercise until your heart rate is near the lowest number in your training zone. For maximum fat burning, exercise with your heart rate near the middle number in your training zone.

Aerobic Exercise—If your goal is to strengthen your cardiovascular system, you must perform aerobic exercise, which is activity that requires large amounts of oxygen for prolonged periods of time. For aerobic exercise, adjust the intensity of your exercise until your heart rate is near the highest number in your training zone.

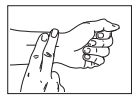
HOW TO MEASURE YOUR HEART RATE

To measure your heart rate, exercise for at least four minutes. Then, stop exercising and place two fingers on your wrist as shown. Take a six-second heartbeat count, and multiply the result by 10 to find your heart rate. For example, if your six-second heartbeat count is 14, your heart rate is 140 beats per minute.

WORKOUT GUIDELINES

Warming Up—Start with 5 to 10 minutes of stretching and light exercise. A warm-up increases your body temperature, heart rate, and circulation in preparation for exercise.

Training Zone Exercise—Exercise for 20 to 30 minutes with your heart rate in your training zone. (During the first few weeks of your exercise program, do not keep your heart rate in your training zone for longer than 20 minutes.) Breathe regularly and deeply as you exercise; never hold your breath.

Cooling Down—Finish with 5 to 10 minutes of stretching. Stretching increases the flexibility of your muscles and helps to prevent post-exercise problems.

SUGGESTED STRETCHES

The correct form for several basic stretches is shown at the right. Move slowly as you stretch —never bounce.

1. Toe Touch Stretch

Stand with your knees bent slightly and slowly bend forward from your hips. Allow your back and shoulders to relax as you reach down toward your toes as far as possible. Hold for 15 counts, then relax. Repeat 3 times. Stretches: Hamstrings, back of knees and back.

2. Hamstring Stretch

Sit with one leg extended. Bring the sole of the opposite foot toward you and rest it against the inner thigh of your extended leg. Reach toward your toes as far as possible. Hold for 15 counts, then relax. Repeat 3 times for each leg. Stretches: Hamstrings, lower back and groin.

3. Calf/Achilles Stretch

With one leg in front of the other, reach forward and place your hands against a wall. Keep your back leg straight and your back foot flat on the floor. Bend your front leg, lean forward and move your hips toward the wall. Hold for 15 counts, then relax. Repeat 3 times for each leg. To cause further stretching of the achilles tendons, bend your back leg as well. Stretches: Calves, achilles tendons and ankles.

4. Quadriceps Stretch

With one hand against a wall for balance, reach back and grasp one foot with your other hand. Bring your heel as close to your buttocks as possible. Hold for 15 counts, then relax. Repeat 3 times for each leg. Stretches: Quadriceps and hip muscles.

5. Inner Thigh Stretch

Sit with the soles of your feet together and your knees outward. Pull your feet toward your groin area as far as possible. Hold for 15 counts, then relax. Repeat 3 times. Stretches: Quadriceps and hip muscles.

Reference file: NordicTrack NTL10421.0 EXP 7i Treadmil

Specifications

Indexed Terms: Treadmill, Folding

Nordictrack NTL10421.0 Questions and Answers

Questions and Answers

Related Products