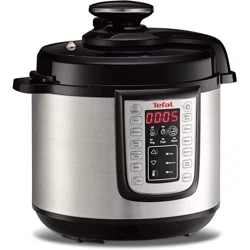
The 20 features are respectively: «Keep Warm/Cancel», «Rice», «Oatmeal», «Baby food», «Pressure cook», «Bake», «DIY», «Reheat», «Slow Cook», «Simmer», «Brown», «Steam», «Stew/Soup», , «Delayed Start», «Timer», «Menu», , , «Temperature».
25 types of cooking are proposed.
For «Steam», «Stew/Soup» and «Simmer», you can choose the type of food: «vegetables», «fish», «meat/bean».
BEFORE FIRST USE
Remove packaging
Take your appliance out of its packaging. Please keep your warranty card and remember to read the operating instructions before using the appliance for the first time.
Place your appliance on a flat surface. Remove all packaging materials from the inside of the appliance: plastic bags, accessories (trivet, rice ladle, measuring cup & condensation collector) as well as the plug - fig. 4.
Remove the promotional sticker on the appliance before using your appliance for the first time.
Opening the lid
To open the lid, take hold of the handle, turn anti-clockwise, lift and pull the lid to the right - fig. 1-2-3.
Cleaning
Be aware: only the accessories are dishwasher safe.
Rinse the cooking pot, the condensation collector, the trivet, the sealing gasket.
Using your appliance for the first time
Fully unwind the power cord; connect it to the appliance and then plug it into the mains - fig. 8.
INSTRUCTIONS FOR USE
Put the condensation collector into place. - fig. 7.
Take the cooking pot out and add the ingredients
Remove the cooking pot.
Put ingredients in the cooking pot.
Please note that the level of foods and liquids should never exceed the max level marking on the cooking pot - fig. 9.
Place the cooking pot in the appliance
Ensure the bottom of the cooking pot is clean and dry, and remove any food residue from the heating plate. Then place the cooking pot into the appliance - fig. 10-11.
Do not use your appliance without the cooking pot.
Close and lock the lid
Check that the sealing gasket is securely placed on the sealing gasket supporting cover.
Close the lid on the appliance and turn it fully clockwise - fig. 12-13-14.
Fit the pressure limit valve
Position the pressure limit valve and ensure that it is on. Please note that the valve does not click into place and that it will remain somewhat loose. Check that the pressure limit valve is down before you start pressure cooking (please see appliance description).
FUNCTIONS ILLUSTRATION
1. Switching on the appliance (standby mode)
Connect to the power supply, the system starts to self check, a buzzer makes a «BEEP» sound. The digital screen and all the indicator lights come on. After 1 second, the screen displays «----», the appliance is in the standby mode.
2. Working mode
1. Each function has a default time and temperature and requires a specific lid position as shown below:
Press the corresponding key of the desired function, the screen displays the default cooking time.
Then press and set the desired time by pressing or keys.
Then press . The appliance enters into cooking preheat and the screen displays a rotating red circle « ».
When the temperature for cooking is reached, the appliance switches automatically to counting down signifying the cooking phase has started.
At the end of the count down the appliance will beep to announce the end of cooking.
Stew/Soup, Steam, Simmer functions
Press the corresponding key of the desired function, the screen displays the default cooking time, the indicator for the type of food lights up as the default and the corresponding pressure level indicator lights comes on too.
If needed you can change the time and type of food.
To change cooking time, press and set the desired time by pressing or keys.
To change the type of food, press Menu key several times until the indicator of the desired type of food lights up. The specified food will have a red light indicator light underneath.
Then press . The appliance enters into cooking preheat and the screen displays « ».
When the temperature for cooking is reached, the appliance switches automatically to cooking phase, and the time previously set starts counting down.
At the end of the count down the appliance will beep to announce the end of cooking.
The appliance enters into keep warm mode (see Keep Warm chapter).
Browning function
You can add oil first and then the ingredients, or add oil and ingredients at the same time.
Press the Browning key, the screen displays the default temperature.
If needed you can change the temperature by pressing or keys
Then if you want to change the browning time press and set the desired time by pressing or keys.
You are able to change the temperature by pressing the temperature key ( ) and or key.
Then press . The appliance enters into cooking preheat and the screen displays « ».
When the temperature for cooking is reached, the appliance switches automatically to cooking phase, and the time previously set starts counting down.
At the end of the count down the appliance will beep to announce the end of cooking.
Note:
The lid must remain open during browning.
To avoid the oil overheating do not use the browning function for more than 30 minutes.
Pressure cooking function
Press the Pressure cook key, the pressure level is indicated by a light on the control panel (High, Medium or Low) and on the display by «HI-P», «P», or «LO-P».
You can change the pressure level by pressing or keys.
If needed you can also change the cooking time, by pressing and set the desired time by pressing or keys.
Then press . The appliance enters into cooking preheat and the screen displays « ».
The appliance switches automatically to cooking phase (indicated by a single beep sound), and the time previously set starts counting down. Another beep sound during cooking (double beep sound) informs that the operational pressure is achieved.
At the end of the count down the appliance will beep to announce the end of cooking.
The electric pressure cooker enters into keep warm mode (see Keep Warm chapter).
Note: The lid must remain closed and locked during pressure cooking.
DIY Chef function
Thanks to this function, you are free to choose the cooking time and temperature/pressure.
Set your DIY cooking level from 1 to 6 depending on the cooking you want to do, by pressing or keys. If you want to cook with pressure in DIY mode : the lid must be locked, there must be enough liquid in thecooking pot, and you have to choose between the three levels : 4 (LOW pressure 20kPa), 5 (MEDIUM pressure 38kPa) or 6 (HIGH pressure 60kPa).
If needed you can also change the cooking time, by pressing and set the desired time by pressing or keys.
Then press . The appliance enters into cooking preheat and the screen displays « ».
When the temperature for cooking is reached, the appliance switches automatically to cooking phase, and the time previously set starts counting down.
At the end of the count down the appliance will beep to announce the end of cooking.
Keep Warm
In keep warm mode, when the cooking countdown reaches 0, the appliance “will beep”, then it automatically goes into the keep warm setting, (except for DIY functions), the digital screen indicates «00:00».
If pressing during standby mode, it goes to keeping warm function, the digital screen indicates «00:00» and counts up.
After 24 consecutive hours, this function will be cancelled automatically and it returns to the standby state.
During Keep Warm, take care that the lid is closed.
Delayed start setting
When choosing a function, before the appliance has started cooking, you can press to set a delayed time. By pressing and keys, you can adjust the time, in intervals of 10 minutes.
The delayed time setting range (2-24 hours) contains the cooking time; when you press the Delayed start/timer function key, it indicates «02:00», press the key to increase and the key to decrease.
After setting the delayed start the corresponding function indicator will light up.
Note: «Delayed start» is not available for the «Browning» and «DIY» functions.
Cancel/Stop setting
In the following setting: preset, cooking, pressure cooking, keeping warm, only «keep warm/cancel» key is available. Press the «keep warm/cancel» key for one second to cancel and return to the standby mode.
You have the possibility to switch off the product by pressing the key more than 2 seconds.
Opening the lid after pressure cooking
After cooking under pressure is completed, steam will be released by pressing on the button on the handle “one-touch steam release”- fig. 21, it will take only a few seconds to 10 minutes depending on the of liquid inside.
To open the lid, take hold of the handle, turn it clockwise, lift and pull the lid to the right - fig. 22-23-24.
Unplug the power cord - fig. 25.
Note: Be careful of the hot steam coming out from the bowl. Keep your face and hands away from the steam flow.
GENERAL INFORMATION FOR COOKING UNDER PRESSURE
Once pressure has built up in the appliance:
− The pressure limit valve will rise. The safety lock in the lid is then activated and the lid will not be able to be opened during cooking. Never attempt to open the lid during pressure cooking.
− The led Low, Medium, or High will light on to indicate that there is pressure in the appliance.
When using the pressure cooker for the first few times, you may notice slight leaking from the pressure limit valve and the sealing gasket. This is normal and will occur when pressure builds up.
Your favourite traditional recipes can be easily adapted to PRESSURE COOK setting.
− Low (Low Pressure): to cook delicate food such as fish, shellfish and some vegetables
− Medium (Moderate Pressure): to cook vegetables
− High (High Pressure): to cook meat and frozen food
It is normal for a small amount of steam to escape during cooking (as the valve is a safety valve). 18
Don’t use the pressure cooking without a minimum amount of water of 10cl.
For cooking with pressure, the starting of the cooking is indicated by a single beep sound. The operational pressure is achieved after a double beep sound.
CLEANING AND MAINTENANCE
Once your food is cooked, unplug the appliance and let it cool for at least 2 hours before cleaning - fig. 25-26. Clean your appliance after each use.
Clean the housing and the inside of the lid with a damp cloth - fig. 32-33.
Do not immerse the appliance in water or pour water into it without the inner bowl - fig. 27.
Remove the condensation collector and clean it thoroughly under water. Place it back in its original position - fig. 35.
Rinse the sealing gasket. Dry it off thoroughly before placing it back.
To clean the float valve, remove the lid - fig. 36 then remove the valve gently from the lid - fig. 37 and rinse it under water. Dry it off thoroughly. Take care that the duct is properly cleaned before placing the float valve back in its original position.
Press on the internal part of the safety valve spring to check that it is not clogged - fig. 37,38.
Clean the cooking pot and the accessories. Only the accessories are dishwasher safe - fig. 29. Do not use a scourer or abrasive cleaners to clean the pot as this can damage the non stick coating in the pot.
Remove the pressure limit valve from the pipe and clean both valve and pipe with water. Once dry, take care that duct of the pipe is properly cleaned before to plug the valve back on it - fig. 31.
Do not immerse the appliance. Always use the cooking pot provided. Do not pour water or food directly into the appliance - fig. 27.
If you inadvertently immerse your appliance in water or spill water directly on the heating element (when the pot is not in place), do not use the appliance and take it to your service centre for repair.
Clean your appliance after each use.
Change the sealing gasket every 2 years. Use only the gasket reference 22CM CYSB50YC8.
TROUBLESHOOTING
Problem
Possible reasons
Solutions
Unable to open lid.
Unable to open because of pressure in the inner pot.
a.Wait for the pressure in the pot to release completely.
b. Press and hold the pressure release button
Pressure in the pot is fully released but the float valve is stuck because it is too dirty, and therefore unable to move down.
a. Be sure the pressure is totally released by leaving to completely cool down for 2 hours minimum (not under water).
b. Please use a skewer to poke the float valve, to make it fall down. Be careful, keep your face away from the lid and the handle as hot steam/food may be released.
c. Before next use, please clean and wipe the float valve.
Unable to close lid.
Sealing gasket is not properly installed
Install the sealing gasket properly.
The float valve is stuck because it is too dirty, and therefore unable to move down.
a. Please use a skewer to poke the float valve, to make it fall down.
b. Before next use, please clean and wipe the float valve
Direction which lid was closed is incorrect.
Close the lid in the correct direction according to the instruction manual.
Intense release of pressure from pressure limit valve.
Faulty pressure control resulted in release of pressure.
Send to repair and maintenance department.
Pressure limit valve is in an incorrect in position.
Gentling press the pressure limit valve to make it fall into place.
Food is uncooked
Rice/water ratio is incorrect.
Use the required rice/water ratio
Be sure the releasing valve is not dirty and creating leakage during cooking.
No electricity from the power supply.
Check the home electric circuit.
E0 displayed on digital screen.
Lid temperature sensor is faulty.
Send to repair and maintenance department.
E1 displayed on digital screen.
The bottom sensor open circuit or short circuit.
Send to repair and maintenance department
E2 displayed on digital screen.
lid is not locked
Check if the program selected requires the lid totally closed .
If yes, completely lock the lid.
If no, send to repair and maintenance department
E5 displayed on digital screen.
Abnormal low pressure.
Check that gasket is properly installed and cleaned.Check that pressure limit valve falls down into place and is cleaned.Check that lid fixing nut is well tightened.
Steam leaking from lid.
The sealing gasket was not properly installed.
Remove the gasket, clean it and reinstall the sealing gasket properly, in correct position


 , «Delayed Start», «Timer», «Menu»,
  ,
,  , «Temperature».


 and set the desired time by pressing
  or
or  keys.
keys. . The appliance enters into cooking preheat and the screen displays a rotating red circle «
  ».
».  as the default and the corresponding pressure level indicator lights comes on too.
  ) and
) and  during standby mode, it goes to keeping warm function, the digital screen indicates «00:00» and counts up.
  to set a delayed time. By pressing