EN
www.tefal.com
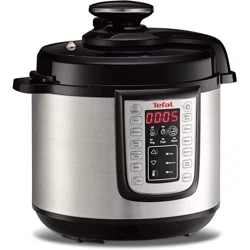
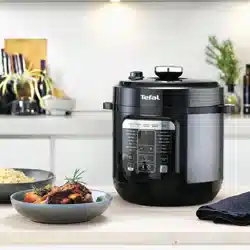
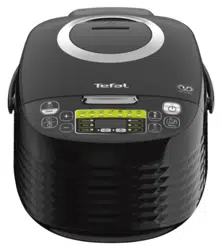
SPHERICOOK Multicooker
Model RK745840
1 5 6
7
12
9
2
3
4
10
13
8
14&15
11
1 5 6
7
12
9
2
3
4
10
13
8
14&15
11
Fig.1 Fig.2 Fig.3a Fig.3b
Fig.4 Fig.5 Fig.6 Fig.7
Fig.12 Fig.13 Fig.14 Fig.15
Fig.16 Fig.18 Fig.19
Fig.8 Fig.9 Fig.10 Fig.11
Fig.17
MAX.
10cups
10
cups
MAX.
a
b
a
b
4
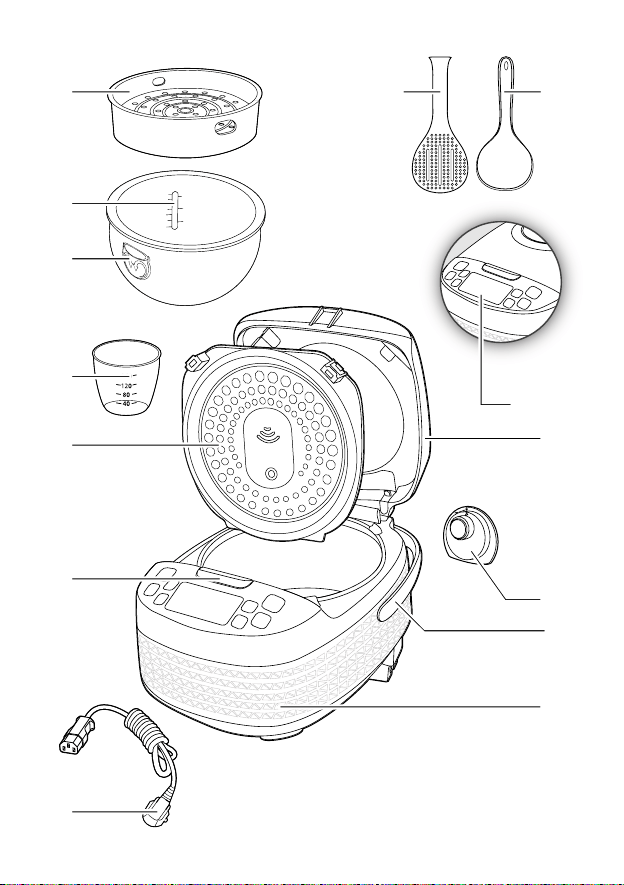
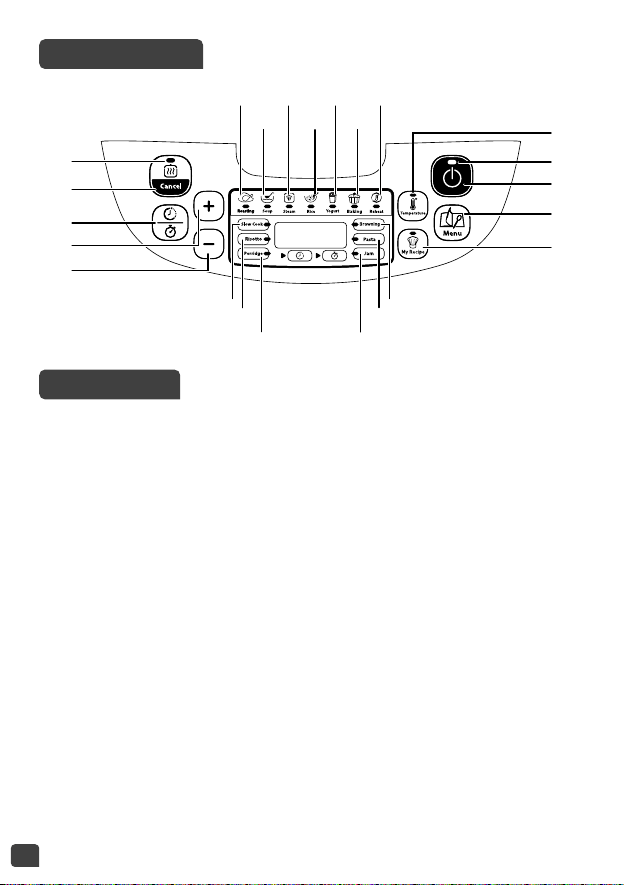
CONTROL PANEL
DESCRIPTION
1 Steam basket
2 Water Level markings for
cooking rice
3 Removable bowl
4 Measuring cup
5 Rice spoon
6 Soup spoon
7 Lid
8 Removable inner lid
9 Micro pressure valve
10 Lid opening button
11 Handle
12 Housing
13 Power cord
14 Control Panel
a “Keep warm status indicator”
b “Keep warm / Cancel” key
c “Delayed start/Timer key”
d “+” key for time and
temperature adjustment
e “-” key for time and
temperature adjustment
f “Cooking status” indicator
g “Start” key
h “Menu selection” key
i “Temperature” key
j “My recipe” key
15 Function indicators
a Roasting function
b Soup function
c Steam function
d Rice function
e Yogurt function
f Baking function
g Reheat function
h Slow Cook function
i Risotto function
j Porridge function
k Browning function
l Pasta function
m Jam function
14a
14b
14c
14d
14e
15b 15d 15f
15a 15c
15h
15i
15j
15e 15g
14f
14g
14h
14j
14i
15k
15l
15m

5
EN
IMPORTANT SAFEGUARDS
SAFETY INSTRUCTIONS
IMPORTANT: Before using this product please
ensure that you read the safety instructions first.
Keep the instructions safe.
• This appliance is not intended to be operated by
means of an external timer or a separate remote-
control system.
• This appliance can be used by children aged
from 8 years and above if they have been
given supervision or instruction concerning
use of the appliance in a safe way and if they
understand the hazards involved. Cleaning and
user maintenance shall not be made by children
unless they are older than 8 years and supervised.
Keep the appliance and its cord out of reach of
children aged less than 8years.
• Appliances can be used by persons with reduced
physical, sensory or mental capabilities or lack
of experience and knowledge if they have been
given supervision or instruction concerning use of
the appliance in a safe way and understand the
hazards involved.
• Children shall not play with the appliance.
• This appliance is not intended for use by persons

6
(including children) with reduced physical, sensory
or mental capabilities, or lack of experience
and knowledge, unless they have been given
supervision or instruction concerning use of the
appliance by a person responsible for their safety.
• Children should be supervised to ensure that they
do not play with the appliance.
• As this appliance is for household use only, it is
not intended for use in the following applications
and the guarantee will not apply for:
– Staff kitchen areas in shops, offices and other
working environments
– Farm houses
– By clients in hotels, motels and other residential
type environments
– Bed and breakfast type environments
• If your appliance is fitted with a removable
power cord: if the power cord is damaged, it must
be replaced by a special cord or unit available
from a authorised service centre.
• If your appliance is fitted with fixed power cord:
if the power supply cord is damage, it must be
replacedby themanufacturer,themanufacturer’s
after-sales service department or similarly
qualified person in order to avoid any danger.

7
EN
• The appliance must not be immersed in water or
any other liquid.
• Use a damp cloth or sponge with diswashing
liquid to clean the accessories and parts in
contact with foodstuff. Rinse with a damp cloth
or sponge. Dry accessories and parts in contact
with food with a dry cloth.
• If the symbol is marked on the appliance, this
symbol means “Caution: surfaces may become
hot during use”.
• Caution: the surface of heating element is subject
to residual heat after use.
• Caution: risk of injury due to improper use of the
appliance.
• Caution: if your appliance has a removable power
cord, do not spill liquid on the connector.
• Always unplug the appliance:
– immediately after use
– when moving it
– prior to any cleaning or maintenance
– if it fails to function correctly
• Burns can occur by touching the hot surface of
the appliance, the hot water, steam or the food.
• During cooking, the appliance gives out heat and
steam. Keep face and hands away.

8
• Do not get face and hands close to the steam
outlet. Do not obstruct the steam outlet.
• For any problems or queries please contact our
Customer Relations Team or consult our web site.
• The appliance can be used up to an altitude of
4000m.
• For your safety, this appliance complies with the safety regulations and
directives in effect at the time of manufacture (Low-voltage Directive,
Electromagnetic Compatibility, Food Contact Materials Regulations,
Environment…).
• Check that the power supply voltage corresponds to that shown on the
appliance (alternating current).
• Given the diverse standards in effect, if the appliance is used in a country
other than that in which it is purchased, have it checked by an approved
service centre.
CONNECTING TO THE POWER SUPPLY
• Do not use the appliance if:
– the appliance or the cord is damaged
– the appliance has fallen or shows visible damage or does not work
properly
– In the event of the above, the appliance must be sent to an approved
Service Centre. Do not take the appliance apart yourself.
• Do not leave the cord hanging
• Always plug the appliance into an earthed socket.
• Do not use an extension lead. If you accept liability for doing so, only
use an extension lead which is in good condition, has an earthed plug
and is suited to the power of the appliance.
• Do not unplug the appliance by pulling on the cord.
• Do not carry the appliance while in use or just after cooking.
USING THE APPLIANCE
• Use on a flat, stable, heat-resistant work surface away from any water
splashes.
• Do not allow the base of the appliance to come into contact with water

9
EN
PROTECT THE ENVIRONMENT
• Your appliance has been designed to run for many years. However,
when you decide to replace it, remember to think about how you can
contribute to protecting the environment.
• Before discarding your appliance you should remove the battery from
the timer and dispose of it at a local civic waste collection centre
(according to model).
Environment protection first!
Your appliance contains valuable materials which can be
recovered or recycled.
Leave it at a local civic waste collection point.
• Never try to operate the appliance when the bowl is empty or without
the bowl.
• Do not remove the bowl while the appliance is working.
• Do not put the appliance directly onto a hot surface, or any other source
of heat or flame, as it will cause a failure or danger.
• The bowl and the heating plate should be in direct contact. Any object
or food inserted between these two parts would prevent the correct
operation.
• Do not place the appliance near a heat source or in a hot oven, as
serious damage could result.
• Do not put any food or water into the appliance until the bowl is in
place.
• Respect the quantities indicated in the recipes.
• Should any part of your appliance catch fire, do not attempt to put it
out with water. Smother flames using a damp tea towel.
• Do not touch the heating element when the product is plugged in or
after cooking. Do not carry the product in use or just after cooking.
• Any maintenance should only be made by a service centre with original
spare parts.

10
BEFORE THE FIRST USE
Unpack the appliance
• Remove the appliance from the packaging and unpack all the accessories
and printed documents. Remove all stickers on the outside.
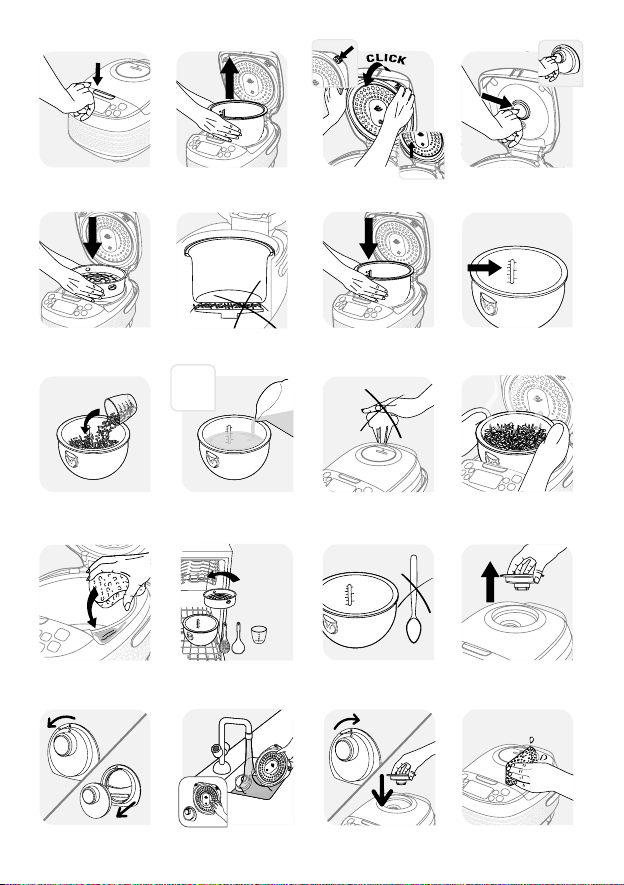
• Open the lid by pushing the opening button on the housing –
fig.1.
Read the Instructions and follow them carefully.
Clean the appliance
• Remove the bowl – fig.2, the inner lid and the pressure valve – fig.3a
and 3b.
• Clean the bowl, the valve and the inner lid with a sponge and washing
up liquid.
• Wipe the outside of the appliance and the lid with a damp cloth.
• Dry off carefully.
• Put all the elements back in their original position. Install the inner lid
in the right position on the top lid of machine. Then, put the inner lid
behind the 2 ribs and push it on the top until it’s fixed. Fit the detachable
cord into the socket on the cooker base.
FOR THE APPLIANCE AND ALL FUNCTIONS
• Carefully wipe the outside of the bowl (especially the bottom). Make
sure that there are no foreign residues or liquid underneath the bowl
and on the heating element –
fig.5.
• Place the bowl into the appliance, making sure that it is correctly
positioned –
fig.6.
• Make sure that the inner lid is correctly in position.
• Close the lid in place so you hear a “click”.
• Fit the power cord into the socket of the cooker base and then plug into
the power outlet. The appliance will ring a long sound «Beep», all the
indicators on the control box will light up for an instant. Then the
screen display will show «----», and all the indicators will switch off. The
appliance enters into standby mode, you can select the menu functions
as you wish.
• This appliance is only intended for indoor use.
Never place your hand on the steam vent during cooking, as there is a
danger of burns – fig.10.
11
EN
After starting the cooking program, if you wish to change the selected
cooking program because of an error, press «KEEP WARM/CANCEL»
key and re-choose the program you want.
Only use the inner bowl provided with the appliance.
Do not pour water or put ingredients in the appliance without the
bowl inside.
The maximum quantity of water + ingredient should not exceed the
highest mark inside the bowl - fig.7.
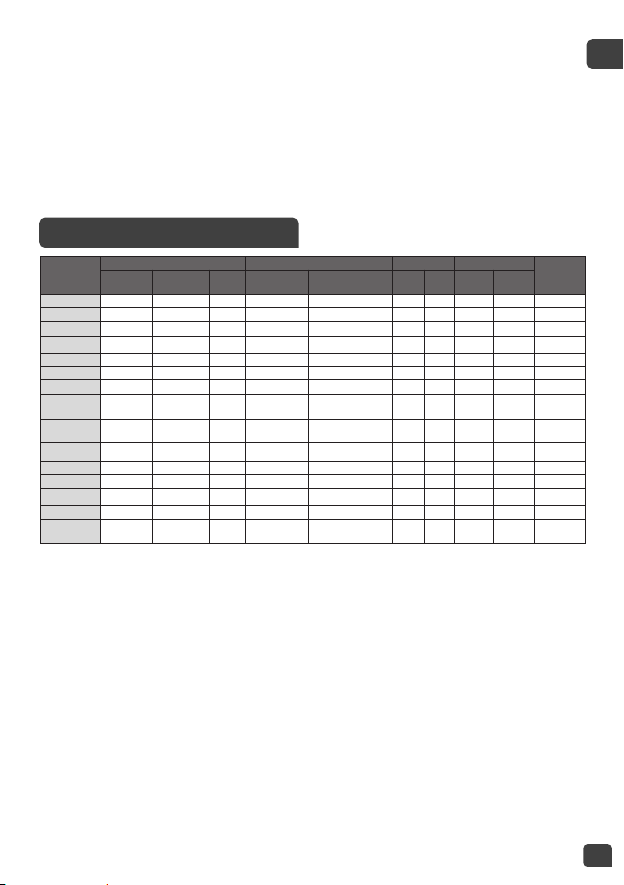
COOKING PROGRAM TABLE
COOKING
Programs
COOKINGTIME COOKINGTEMPERATURE LID POSITION DELAYED START*
AUTOMATIC
KEEP WARM
Default Range
Setting
interval
Default Range (°C) Closed Open Range Adjustable
Roasting 45 min 5min - 4h 5 min 160°C 120/140/160
.
up to 24h 5 min
.
Soup 1h 5min - 3h 5 min Automatic -
.
up to 24h 5 min
.
Steam 30 min 5min - 3h 5 min 100°C -
.
up to 24h 5 min
.
Rice Automatic Automatic N/A Automatic -
.
up to 24h 5 min
.
Yogurt 8h 1h - 12h 15 min 40°C -
.
N/A N/A No
Baking 45 min 5min - 2h 5 min 130C 100/130/160
.
up to 24h 5 min
No
Reheat 25 min 5m - 1h 5 min 100°C -
.
N/A N/A
.
Slow Cook
(Stew)
4h 20min - 9h 5 min 100°C 80 / 100 /120
.
up to 24h 5 min
.
Risotto Automatic Automatic N/A Automatic -
.
up to 24h 5 min
.
Porridge 25 min 5min - 2h 5 min Automatic -
.
up to 24h 5 min
.
Browning 20 min 5min -1h30m 1 min 160°C 120/130/140/150/160
..
N/A N/A
.
Pasta 10 min 3min - 3h 1 min 100°C -
..
up to 24h 5 min
No
Jam 1h 5min- 3h 5 min 105°C -
..
up to 24h 5 min No
Keep Warm Automatic Automatic N/A 75°C -
.
N/A N/A
My Recipe 30 min 5min - 9h 5 min 100°C
40-160
°C
(10
°C
increments)
.
up to 24h 5 min
No
* Delayed Start time displayed includes the cookingtime of the cooking programme pre-selected.

12
CONTROL PANEL
1. START KEY
• Press to start the cooking process.
2. MENU KEY
• Under standby status, press the <Menu> key to cycle through the
following functions: Roasting Soup Steam Rice Yogurt
Baking Reheat Slow Cook Risotto Porridge
Browning Pasta Jam.
• The screen displays the default cooking time of each function (except
Rice, Risotto). “Start” button light flashes and the linked function lights up.
Note:
To cancel the “beep” sound, hold down the “Menu” key for 5 seconds until
the long beep sounds. If you want to start the “beep” sound again, hold
down the “Menu” button a second time for 5 seconds.
3. “DELAYED START/TIMER” KEY
• Timer: You can adjust the cooking time (except Rice, Risotto), when
you select a cooking mode, the default cooking time will be shown
on the digital display. Press the “Delayed Start/Timer” key once (the
timer indicator will turn on), and then use the +/- buttons to adjust the
cooking time.
• Delayed start: The preset time corresponds to the time for the end of
cooking, (except Browning, Yogurt, Reheat) and is used for delaying the
start of cooking. After selecting the desired cooking mode, press the
“Delayed start/Timer” key button twice (the preset indicator will turn
on), and then use the +/- button to set the timer for the length of time
you want to delay the start of cooking. Cooking will begin after the
preset time has elapsed.
• When you have chosen the required preset time, press the “Start” key
to enter cooking status, the “start” indicator will light up the screen will
display the desired cooking time and the preset pictogram will light up.
• When the Multicooker begins the cooking mode, the preset pictogram
light will turn off and the timer pictogram will light up.
• The maximum start delay is 24 hours. If the delayed start time is shorter
than the cooking time, cooking will start immediately.

13
EN
4. “+/-” KEYS
• Use these buttons to adjust the cooking time (+/- 1, 5 or 15 mins) and
delayed start time (+/- 5 mins). You cannot adjust the cooking time in
“Rice, Risotto” mode and cannot set a delayed start time in “Browning,
Yogurt, Reheat” mode.
5. “KEEP WARM/CANCEL” KEY
• In standby mode, press the Keep warm/Cancel key to keep your food
warm.
• Press the Keep warm/Cancel key to stop the cooking process or cancel all
settings. The Multicooker will return to standby mode.
• See details in KEEP WARM/CANCEL function description.
6. “TEMPERATURE” KEY
• To use the Temperature function, choose a cooking program and cooking
time first (only available for Baking, Browning, Slow Cook, Baking and My
Recipe). Then, press the “Temperature” key and select the temperature.
The default cooking temperature will change depending on the selected
cooking program. Each press of “+” and “-” key can increase or decrease
the temperature.
• When you have chosen the required temperature, press the “Start” key
to start the cooking process, the “Start” indicator will remain on.
• You can modify the temperature during the cooking by pressing the
“Temperature” key. After selecting the choose temperature and without
action during 5 seconds, the multicooker will resume the cooking with
the new setting.
PORRIDGE FUNCTION
• Press “Menu” key to select function “Porridge”. The screen displays the
default cooking time, the “Start” light will flash red.
• You can change the cooking time by pressing “Delayed start/Timer” key
first and then press “+” and “−” keys.
• Press “Start” key. The mulitcooker will start the “Porridge” cooking
program and the “Start” light will come on. The screen will display the
remaining cooking time.
• At the end of cooking, the multicooker will “beep” three times and begin the
keep warm program, the “Keep Warm” indicator will come on and the screen
will display the time for which the keep warm function has been active.

14
STEAM FUNCTION
• Press “Menu” key to select function “Steam”. The screen displays the
default cooking time, the “Start” light will flash red.
• You can change the cooking time by pressing “Delayed start/Timer” key
first and then press “+” and “−” keys.
• Press “Start” key. The mulitcooker will start the “Steam” cooking program
and the “Start” light will come on. The screen will display the remaining
cooking time.
• At the end of cooking, the multicooker will “beep” three times and begin
the keep warm program, the “Keep Warm” indicator will come on and
the screen will display the time for which the keep warm function has
been active.
Recommendations for steam cooking:
• Pour water into the bowl. The quantity of water must always be lower
than the steam basket. Do not exceed the 7 cup mark (2.15 litres) on the
inside of the bowl to avoid overflows during use.
• Add the ingredients to the steam basket.
• Place the steam basket, filled with food, into the bowl. Close the lid.
SOUP FUNCTION
• Press “Menu” key to select function “Soup”. The screen displays the
default cooking time, the “Start” light will flash red.
• You can change the cooking time by pressing “Delayed start/Timer” key
first and then press “+” and “−” keys.
• Press “Start” key. The mulitcooker will start the “Soup” cooking program
and the “Start” light will come on. The screen will display the remaining
cooking time.
• At the end of cooking, the multicooker will “beep” three times and begin
the keep warm program, the “Keep Warm” indicator will come on and
the screen will display the time for which the keep warm function has
been active.
• For best results serve the porridge immediately after it is cooked.
Although it can be left on the keep warm setting for a short time, it will
soon begin to thicken and you may need to stir in some additional hot
liquid.
• Do not exceed the maximum quantity of ingredients stated in the
recipe book.

15
EN
ROASTING FUNCTION
JAM FUNCTION
• Press <Menu> key to select function <Roasting>. The screen displays the
default cooking time, the “Start” light will flash red.
• You can change the cooking time by pressing “Preset/Timer” key first
and then press “+” and “-” keys. Press “Temperature” key to select the
temperature.
• Press “Start” key. The mulitcooker will start the “Roasting” cooking
program and the “Start” light will come on. The screen will display the
remaining cooking time.
• At the end of cooking, the multicooker will “beep” three times and begin
the keep warm program, the “Keep Warm” indicator will come on and
the screen will display the time for which the keep warm function has
been active.
• Press <Menu> key to select function <Jam>. The screen displays the
default cooking time, the “Start” light will flash red.
• You can change the cooking time by pressing “Delayed start/Timer” key
first and then press “+” and “-” keys.
• Press “Start” key. The mulitcooker will start the “Jam” cooking program
and the “Start” light will come on. The screen will display the remaining
cooking time.
• The lid must remain open when using the jam function.
• At the end of cooking, the multicooker will “beep” three times.
Note: No keep warm function for this function
RECOMMENDATIONS WHEN JAM MAKING
• Follow the quantities stated in the recipe book when making jam to
avoid boil overs.
• We recommend making soft set jam with a reduced sugar quantity.
Traditional firm set jam has a higher sugar content and it can risk boiling
over in the Spheri Cook.
• Keep reduced sugar jam in the refrigerator and use within 3-4 weeks.
• Do not alter the quantities of sugar or fruit in the recipe book, as it may
cause the jam to scorch or boil over.
• Use fresh ripe fruit. Over or under ripe fruit may not set firmly.
• Never close the lid when jam making.

16
YOGURT FUNCTION
BROWNING FUNCTION
SLOW COOK FUNCTION
• Press <Menu> key to select function <Browning>. The screen displays
the default cooking time, the “Start” light will flash red.
• You can change the cooking time by pressing “Delayed start/Timer” key
first and then press “+” and “-” keys. Press “Temperature” key to select
the temperature.
• Press “Start” key. The mulitcooker will start the “Browning” cooking
program and the “Start” light will come on. The screen will display the
remaining cooking time.
• Leave the lid open or closed when using the Browning function, as
instructed in the recipe book.
• At the end of cooking, the multicooker will “beep” three times and begin
the keep warm program, the “Keep Warm” indicator will come on and
the screen will display the time for which the keep warm function has
been active.
Note: Always use this function with oil and food. With oil only, it may
cause a failure or danger.
• Press <Menu> key to select function <Slow Cook>. The screen displays
the default cooking time, the “Start” light will flash red.
• You can change the cooking time by pressing “Delayed start/Timer” key
first and then press “+” and “-” keys. Press “Temperature” key to select
the temperature.
• Press “Start” key. The mulitcooker will start the “Slow Cook” cooking
program and the “Start” light will come on. The screen will display the
remaining cooking time.
• At the end of cooking, the multicooker will “beep” three times and begin
the keep warm program, the “Keep Warm” indicator will come on and
the screen will display the time for which the keep warm function has
been active.
• Press <Menu> key to select function <Yogurt>. The screen displays the
default cooking time, the “Start” light will flash red.
• You can change the cooking time by pressing “Delayed start/Timer” key
first and then press “+” and “-” keys.

17
EN
• Press “Start” key. The mulitcooker will start the “Yogurt” cooking program
and the “Start” light will come on. The screen will display the remaining
cooking time.
• At the end of cooking, the multicooker will “beep” three times.
Note: There is no Keep Warm function at the end of the “Yogurt” program.
The preset function to delay the start of cooking cannot be used with the
“Yogurt” program.
CHOICE OF MILK FOR YOGURT
What milk should you use?
All our recipes (unless otherwise stipulated) are prepared using cow’s
milk. You can use plant milk such as soya milk for example as well as
sheep or goat’s milk but, in this case, the firmness of the yogurt may vary
depending on the milk used. Raw milk or long-life milks and all the milks
described below are suitable for your appliance:
• Long-life sterilised milk: UHT whole milk results in firmer yogurt. Using
semi-skimmed milk will result in less firm yogurt. However, you can use
semi-skimmed milk and add 3-5 tablespoons of dried skimmed milk
powder to 1 litre of milk
• Pasteurised fresh milk: this milk gives a more creamy yogurt with a
little bit of skin on the top. The milk must be boiled first, then left to cool
and strained through a sieve to remove the skin.
• Raw milk (farm milk): this must be boiled. It is also recommended to
let it boil for a long time. It would be unsafe to use this milk without
boiling it. You must then leave it to cool before using it in your appliance.
Culturing using yogurt prepared with raw milk is not recommended.
• Dried skimmed milk powder: using powdered milk will result in very
creamy yogurt. Reconstitute the powder as directed on the packet.
Choose a whole milk, preferably long-life UHT.
Raw (fresh) or pasteurised fresh milk must be boiled then cooled and
needs the skin removing.
TIPS FOR MAKING YOGURT
• You can either make a large batch of natural yogurt directly in the bowl
(maximum quantity of 1 litre of milk), in a deep sided oven-proof dish or
in individual oven-proof glass containers. The bowl fits about four yogurt
containers, depending on their size. Wash the bowl, dish or containers in
warm water and washing up liquid, then rinse and dry them thoroughly.

18
• All the equipment used in the yogurt making process should be sterilised
using Milton sterilizing solution or cleaned in a dishwasher. Sterilising is
important to prevent the introduction of undesirable airborne organisms
which could interfere with the incubation of the culture, and results in
runny yogurt which will not set.
• Prepare the yogurt mixture as instructed in the recipe book supplied
with your appliance. Also see the section “Choice of milk”.
• You can sweeten natural yogurt either when you eat them or when you
make them. After the yogurt is cooked, simply add one or two teaspoons
of sugar or honey per individual pot. Alternatively, when preparing the
yogurt mixture dissolve the sugar after boiling the milk or dissolve in the
cold UHT milk. Use no more than 80 g sugar for 1 litre milk.
• The “Yogurt Function” has a default cooking time of 8 hours. The
cooking time is adjustable from a minimum of 1 hour to a maximum
of 12 hours. A longer cooking time of 12 hour gives a more acidic and
firmer yogurt. A shorter cooking time of 6 hours gives a sweeter, more
fluid yogurt.
• After cooking label up the yogurt with the date it needs to be used by,
as stated in the recipe.
• When the yogurt cooking process has finished, the yogurt should be
cooled completely, covered with a lid or cling film. Chill the yogurt in
the refrigerator for at least 4 hours, preferably overnight, before serving.
This helps the yogurt to thicken slightly.
• Natural yogurts will keep for a maximum of 7 days in the refrigerator,
depending on the freshness of the milk. Yogurts with jam or additional
ingredients added will keep for up to 3 days.
• Homemade yogurts do not contain the thickeners and stabilisers
contained in commercially produced yogurt and are often thinner in
consistency. Sometimes homemade yogurt has nutritious clear whey on
top which can be stirred back in. Alternatively, you can pour it off.
• Homemade natural yogurt can be flavoured with fresh fruit or cold
cooked stewed fruit after preparation and chilling. If the fruit is added
before fermentation the fruit acids interfere with the setting process
and the yoghurts will be very runny. Some very acidic fruits, such as fresh
pineapple, can cause the yogurt to curdle or separate. Acidic fruit is best
served in a separate bowl.

19
EN
BAKING FUNCTION
RICE FUNCTION
• Press <Menu> key to select function “Baking” the screen displays the
default cooking time, the “Start” light will flash red.
• You can change the cooking time by pressing “Delayed start/Timer” key
first and then press “+” and “-” keys. Press “Temperature” key to select the
temperature.
• Press “Start” key. The mulitcooker will start the “Baking” cooking program
and the “Start” light will come on. The screen will display the remaining
cooking time.
• At the end of cooking, the multicooker will “beep” three times.
Note: There is no Keep Warm function at the end of the “Baking” program.
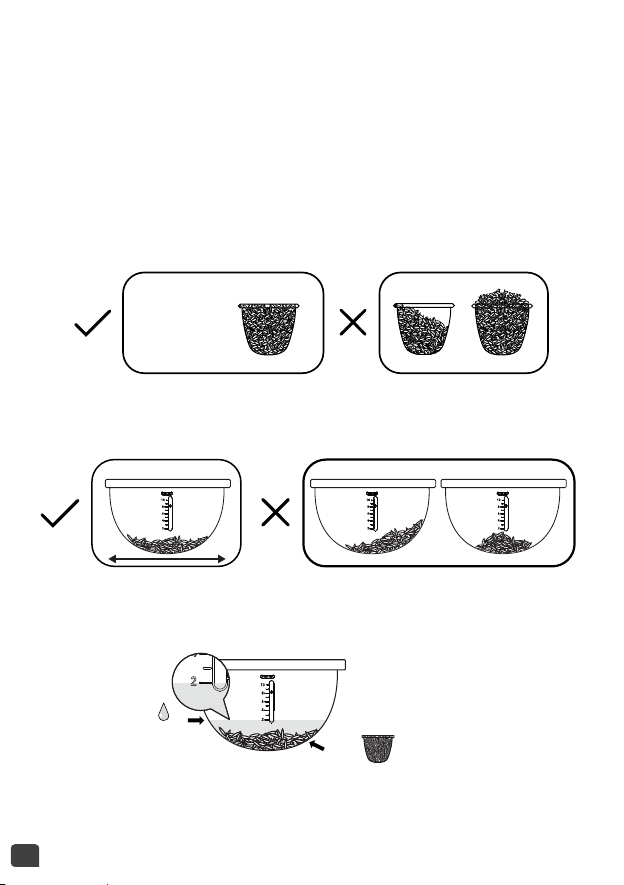
• Pour the required quantity of well washed rice into the bowl using the
measuring cup provided – fig.4. Then fill with cold water up to the
corresponding «CUP» mark printed inside the bowl – fig.2.
• Close the lid.
Note: Always add the rice first otherwise you will have too much water.
•Press «Menu» key to select function «Rice». The screen displays «
»,
the “Start” light will flash, then press «Start» key. The mulitcooker will
start the “rice” cooking program and the “Start” light will come on.
The screen will flash« -- ». The cooking time is not displayed on the
multicooker as the Rice function works automatically. The cooking time
can vary depending on the quantity of rice and type of rice.
• At the end of cooking, the multicooker will “beep” three times and begin
the keep warm program, the “Keep Warm” indicator will come on and
the screen will display the time for which the keep warm function has
been active.
RISOTTO FUNCTION
• Press «Menu» key to select function «Risotto». The screen displays «
», the “Start” light will flash, then press «Start» key. The mulitcooker
will start the “Risotto” cooking program and the “Start” light will come
on. The screen will flash « -- ». The cooking time is not displayed on the
multicooker as the Risotto function works automatically. The cooking
time can vary depending on the quantity of rice and type of rice.
20
• At the end of cooking, the multicooker will “beep” three times and begin
the keep warm program, the “Keep Warm” indicator will come on and
the screen will display the time for which the keep warm function has
been active.
TIPS FOR COOKING PERFECT RICE.
Recommendations for rice cooking (Rice & Risotto
functions)
• Before cooking, measure out the rice using the measuring cup provided
and rinse the rice (do not rinse if making risotto).
1 Cup =
150 g = 1 cup raw white rice
• If you are cooking two cups of rice, for example, after washing the rice
and distributing it evenly in the bowl, add water up to the level 2 mark.
• Distribute the rinsed rice evenly over the surface of the bowl.
• When the rice is cooked and the “Keep Warm” indicator (fig. 14a)
comes on, stir the rice and leave it in the multicooker for several
minutes—this will result in perfectly cooked rice with seperated grains.
2 x =
2
21
EN
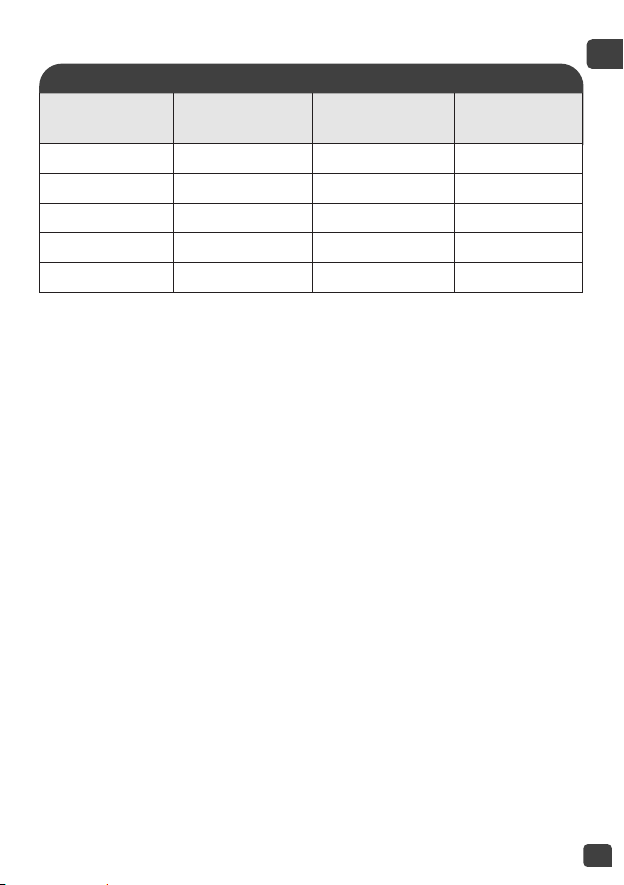
This table below gives a guide to cooking white rice:
COOKING GUIDE FOR WHITE RICE*
Measuring cups Weight of rice*
Water level in
the bowl (+ rice)
Serves
2 300 g 2 cup mark 3 – 4
4 600 g 4 cup mark 5 – 6
6 900 g 6 cup mark 8 – 10
8 1200 g 8 cup mark 13 – 14
10 1500 g 10 cup mark 16 – 18
* For white basmati, white long grain, paella, short grain and white basmati
& wild rice mix. For whole grain brown rice and other types of white rice
(risotto, sushi rice, jasmine rice, round white Italian rice), prepare as listed
in the table above using the same quantity of rice measured in cups, not
grams. These types of rice weigh slightly heavier than other types of rice.
For sticky rice, reduce the quantity of water when cooking. Use 6 cups of
sticky rice and fill to the 5 cup water level mark. For 10 cups of sticky rice
fill to the 9 cup water level mark.
We recommend using the “Rice” function for cooking plain risotto rice
with water only and no additional ingredients. For recipes using stock and
additional ingredients we recommend using the “Risotto” function.
The time and temperature are automatic for rice cooking.
Please note that there are 7 steps:
Preheat => Water absorb => Temperature quick rise => Keep boiling =>
Water evaporation => Braise rice => Keep warm.
The cooking time depends on the quantity and type of rice.

22
PASTA FUNCTION
• To cook pasta it is IMPORTANT to wait until the water reaches the right
temperature before adding pasta.
• Fill the bowl with boiling water from a kettle to the required level.
Do not add the pasta. Close the lid.
Note: You can use cold water instead of boiling water but this will
lengthen the water heating time considerably.
• Press <Menu> key to select function <Pasta>. The screen displays the
default cooking time, the “Start” light will flash red.
• You can change the cooking time by pressing “Delayed start/Timer” key
first and then press “+” and “-” keys.
• Press “Start” key. The mulitcooker will start the “Pasta” cooking program
and the “Start” light will come on. The screen will display the remaining
cooking time.
• The multicooker will beep when the water is at the ideal temperature.
Put the pasta into the water and press the start key again to begin the
cooking process. During pasta cooking, the lid should be closed.
• At the end of cooking, the multicooker will “beep” three times. Remove
the pasta and drain off the water.
• Note: There is no “Keep Warm” function after the pasta program.
RECOMMENDATIONS FOR COOKING PASTA
• For 400 g dried pasta (penne, fusilli, spaghetti, conchiglie, etc) fill to the
6 cup water level inside the bowl. Close the lid.
• Press the “Start” key again and set the cooking time. We recommend
setting the cooking time for 15 minutes and checking the pasta before
the end of the cooking time.
• When the appliance beeps, add 400 g dried pasta and stir.
• During pasta cooking, the lid must be closed.
• Four minutes before the end of the cooking time, open the lid and check
if the pasta is cooked to your liking.If not cook a minute or two longer.
• When the pasta is ready, switch off the appliance, remove the bowl and
drain.

23
EN
• This function is intended to reheat cooked food only. Do not use for raw
food or reheating frozen food. Do not use for reheating frozen food.
• Press <Menu> key to select function <Reheat>. The screen displays the
default cooking time, the “Start” light will flash red.
• You can change the cooking time by pressing “Delayed start/Timer” key
first and then press “+” and “-” keys.
• Press “Start” key. The mulitcooker will start the “reheat” cooking program
and the “Start” light will come on. The screen will display the remaining
cooking time.
• At the end of cooking, multicooker will “beep” three times and begin
the keep warm program, the “Keep Warm” indicator will come on and
the screen will display the time for which the keep warm function has
been active.
CAUTION:
The cold food should not exceed ½ of the cooker’s volume. Too much
food cannot be thoroughly heated. Repeated use of “Reheat” or too little
food will lead to burnt food and a hard layer at the bottom.
It is recommend not to reheat thick porridge, or it may become pasty.
Do not reheat food that has been stored for a long time to avoid
unpleasant smells. Only reheat fresh, cold cooked food. Do not reheat
frozen food.
REHEAT FUNCTION
• Press the “Keep Warm / Cancel key when the multicooker is in standby
mode to begin the keep warm program. The “Keep Warm / Cancel” light
will flash and the screen will display the time for which the keep warm
function has been active.
• The remaining heating time will be indicated on the display and the
keep warm indicator will turn on.
• Press the “Keep warm / Cancel” key when the multicooker is in a program
to reset the settings and go back to Standby mode.
• You can remove the automatic keep warm function for the next cooking
program by pressing the “Keep warm / Cancel” key for 5 seconds and the
KEEP WARM / CANCEL FUNCTION

24
MY RECIPE FUNCTION
• “My Recipe” function is to memorise your favourite cooking choices.
• Press “My Recipe” key when the multicooker is in standby mode to start
the My Recipe setting. The screen will display the default cooking time,
and the “Start” light will flash.
• If you want to choose a temperature and time for your program, press
“Delayed start/Timer” and “Temperature” key to defined your setting.
• At the end of cooking, the multicooker will beep three times.
Note:
The multicooker stores the most recent temperature and cooking time
settings for the next time it is used.
• Open the lid –
fig.1.
• Oven gloves must be used when handling the cooking bowl and steam
basket – fig.11.
• Serve the food using the spoon provided with your appliance and reclose
the lid.
• Press “Keep warm / Cancel“ to stop the keep warm status.
• Unplug the appliance.
ON COMPLETION OF COOKING
CLEANING AND MAINTENANCE
“Keep warm / Cancel” light will go off. To set the automatic keep warm
function again, press the “Keep warm / Cancel” key again for 5 seconds.
• The maximum keep warm time is 24 hours.
Recommendation: to keep the food in the best condition limit the
“Keep Warm” time to the shortest time possible.
• Ensure that the mutlicooker is unplugged and completely cooled down
before cleaning and maintenance.
• It is strongly advised to clean the appliance after each use with a
sponge –
fig.12.
• The bowl, steam basket, measuring cup, rice spoon and soup ladle are
all dishwasher safe –
fig.13.

25
EN
Bowl, steam basket
• Scouring powders and metal sponges are not recommended.
• If food has stuck to the bottom of the removable bowl, you may put
water in the bowl to soak for a while before washing.
• Dry the bowl carefully.
Taking care of the bowl
For the bowl, carefully follow the instructions below:
• To ensure the maintenance of bowl quality, it is recommended not to
cut food in it.
• Make sure you put the bowl back into the multicooker.
• Use the plastic spoon provided or a wooden spoon and not a metal
‘utensil’ so as to avoid damaging the bowl surface – fig.14.
• To avoid any risk of corrosion, do not pour vinegar into the bowl.
• The colour of the bowl surface may change after using for the first time or
after longer use. This change in colour is due to the action of steam and
water and does not have any effect on the use of the multicooker, nor is it
dangerous for your health. It is perfectly safe to continue using it.
Cleaning the micro pressure valve
• When clean the micro-pressure valve, please remove it from the lid –
fig.15 and open it by rotating in the direction of “open” – fig.16a and
16b. After cleaning it, please wipe it dry and align the two triangles in
the two parts together and rotate it in the direction of “close”, then put
it back into the lid of the multicooker – fig.18a and 18b.
Cleaning the inner lid
• Clean the inner lid after each use to avoid the smell of strong foods
lingering in the appliance.
• Remove the inner lid by pushing outwards with both hands. Clean it with
a sponge and washing up liquid (fig.17). Then wipe dry and put it back
behind the 2 ribs and push it on the top until it’s fixed.
Cleaning and care of the other parts of the appliance
• Clean the outside of the multicooker – fig.19, the inside of the lid and
the cord with a damp cloth and wipe dry. Do not use abrasive products.
• Do not use water to clean the interior of the appliance body as it could
damage the heat sensor.

26
Problem Causes Solutions
Control panel
lights off and no
heating.
Appliance not
plugged in.
Check the appliance is
plugged in at the socket,
and is switched on.
Control panel
lights off and
heating.
Problem with the
connection of the
indicator light or
indicator light is
damaged.
Send to authorised
service center for repair.
Steam leakage
during use
Lid is badly closed.
Open and close the lid
again.
Micro pressure valve
not well positioned or
assembled incorrectly.
Stop the cooking (unplug
the appliance) and check
the valve is correctly
assembled (2parts
locked together) and well
positioned.
Lid or micro pressure
valve gasket is
damaged.
Send to authorised
service center for repair.
Rice
undercooked or
overcooked.
Too much or not
enough water
compared to rice
quantity.
Refer to rice cooking
table for water quantity.
Always add rice to the
cooking bowl first, then
add water to the water
level mark on the inside
of the bowl.
TECHNICAL TROUBLESHOOTING GUIDE

27
EN
Problem
Causes
Solutions
Rice undercooked
or overcooked.
Insufficiently
simmered.
Refer to the rice cooking
table for the water
quantity.
Always add rice to the
cooking bowl first, then
add water to the water
level mark on the inside of
the bowl.
Automatic keep
warm function
fails (appliance
stays on cooking
programe or
does not heat
on keep warm).
The keep warm
function has been
cancelled by user
during the setting.
See keep warm
function paragraph.
The “Keep Warm”
function does not
operate after the
Baking, Yogurt, Jam,
Pasta and My Recipe
programs.
Send to the authorised
service center for repair.
E0
Temperature sensor in
the lid is damaged.
E1
Temperature sensor
under the bowl is
damaged.
Unplug the appliance and
leave for a few seconds
and restart the program.
Ifthe problem continues,
please send to the
authorised service centre
for repair.
E3
High temperature
detected.
Note: If inner bowl is deformed, do not use it anymore and get a
replacement from the authorised service center for repair.

EN p. 4 – 28
EN
3203000109
EN