
Register your
new device on
MyBosch now and
get free benefits
:
bosch-
ho
me.com/
welcome
BGL3 GB
[en]
Instruction manual 4
[zf]
18

2
Safety information . . . . . . . . . . . . . . . . . . . . . . . . . . . . . . . . . . . . . . . . . . . . . . . . . . .4
Your vacuum cleaner . . . . . . . . . . . . . . . . . . . . . . . . . . . . . . . . . . . . . . . . . . . . . . . . .6
Replacement parts and special accessories . . . . . . . . . . . . . . . . . . . . . . . . . . . . . . .7
Before using your appliance for the first time . . . . . . . . . . . . . . . . . . . . . . . . . . . . .8
Initial use . . . . . . . . . . . . . . . . . . . . . . . . . . . . . . . . . . . . . . . . . . . . . . . . . . . . . . . . . .8
Vacuuming . . . . . . . . . . . . . . . . . . . . . . . . . . . . . . . . . . . . . . . . . . . . . . . . . . . . . . . .10
When the work is done . . . . . . . . . . . . . . . . . . . . . . . . . . . . . . . . . . . . . . . . . . . . . .12
Changing the filter . . . . . . . . . . . . . . . . . . . . . . . . . . . . . . . . . . . . . . . . . . . . . . . . . .12
Replacing the exhaust filter . . . . . . . . . . . . . . . . . . . . . . . . . . . . . . . . . . . . . . . . . .15
Care . . . . . . . . . . . . . . . . . . . . . . . . . . . . . . . . . . . . . . . . . . . . . . . . . . . . . . . . . . . . .16
Costumer service . . . . . . . . . . . . . . . . . . . . . . . . . . . . . . . . . . . . . . . . . . . . . . . . . . .17
Disposal information . . . . . . . . . . . . . . . . . . . . . . . . . . . . . . . . . . . . . . . . . . . . . . . .17
Conditions of guarantee . . . . . . . . . . . . . . . . . . . . . . . . . . . . . . . . . . . . . . . . . . . . .17
en

3
ǃ
ǃƥħ
. . . . . . . . . . . . . . . . . . . . . . . . . . . . . . . . . . . . . . . . . . . . . . . . . . . . . . . . . .18
Ȫɒɐɑɀ
. . . . . . . . . . . . . . . . . . . . . . . . . . . . . . . . . . . . . . . . . . . . . . . . . . . . . . . . .19
ȠǦéȲɇLjƂȏȲ
. . . . . . . . . . . . . . . . . . . . . . . . . . . . . . . . . . . . . . . . . . . . . . . . . .20
§GɈɎɍɋƅ
. . . . . . . . . . . . . . . . . . . . . . . . . . . . . . . . . . . . . . . . . . . . . . . . . . . . .21
ɧGɈɎ
. . . . . . . . . . . . . . . . . . . . . . . . . . . . . . . . . . . . . . . . . . . . . . . . . . . . . . . . . .21
ɐɑ
. . . . . . . . . . . . . . . . . . . . . . . . . . . . . . . . . . . . . . . . . . . . . . . . . . . . . . . . . . . . . .23
ɈɎȧ
. . . . . . . . . . . . . . . . . . . . . . . . . . . . . . . . . . . . . . . . . . . . . . . . . . . . . . . . . . . .25
ȠǦɉɊ
. . . . . . . . . . . . . . . . . . . . . . . . . . . . . . . . . . . . . . . . . . . . . . . . . . . . . . . . . .25
ȠǦƳȆɉɊ
. . . . . . . . . . . . . . . . . . . . . . . . . . . . . . . . . . . . . . . . . . . . . . . . . . . . . . .28
Ȟȁ
. . . . . . . . . . . . . . . . . . . . . . . . . . . . . . . . . . . . . . . . . . . . . . . . . . . . . . . . . . . . . .29
ģɤøğ
. . . . . . . . . . . . . . . . . . . . . . . . . . . . . . . . . . . . . . . . . . . . . . . . . . . . . . . . . .30
Njȗþ¾
. . . . . . . . . . . . . . . . . . . . . . . . . . . . . . . . . . . . . . . . . . . . . . . . . . . . . . . . . .31
ȹŜɟ
. . . . . . . . . . . . . . . . . . . . . . . . . . . . . . . . . . . . . . . . . . . . . . . . . . . . . . . . . . . .31
zf

4
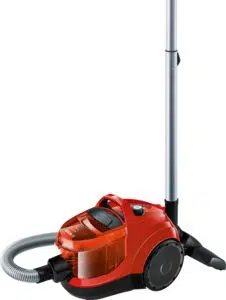
Congratulations on your purchase of the Bosch GL30
vacuum cleaner.
This instruction manual describes various GL30 models,
which means that some of the equipment features and
functions described may not apply to your model. You
should only use original Bosch accessories, which have
been specially developed for your vacuum cleaner, in
order to achieve the best possible vacuuming results.
Please keep this instruction manual. When passing the
vacuum cleaner on to a third party, please also pass on
this instruction manual.
Intended use
This appliance is intended for domestic use only. This
appliance is intended for use up to a maximum height of
2000 metres above sea level. Only use this vacuum
cleaner in accordance with the instructions in this
instruction manual.
In order to prevent injuries and damage, the vacuum
cleaner must not be used for:
Vacuum-cleaning persons or animals
Vacuuming up:
- hazardous, sharp-edged, hot or glowing substances.
- damp or liquid substances.
- highly flammable or explosive substances and gases.
- ash, soot from tiled stoves and central heating sys-
tems.
- toner dust from printers and copiers.
Spare parts, accessories, dust bags
Our original spare parts, original (special) accessories
and original dust bags are designed to work with the
features and requirements of our vacuum cleaners. We
therefore recommend that you only use our original
spare parts, original (special) accessories and original
dust bags. This will ensure that your vacuum cleaner has
a long service life and that the quality of its cleaning per-
formance will remain consistently high throughout.
! Please note:
Using unsuitable or inferior-quality spare parts, (spe-
cial) accessories and dust bags can damage your
vacuum cleaner. Damage caused by the use of such
products is not covered by our guarantee.
Safety information
This vacuum cleaner complies with the
recognised rules of technology and the rel-
evant safety regulations.
The appliance may be used by children
over the age of 8 years and by persons
with reduced physical, sensory or mental
capacity or by persons with a lack of expe-
rience or knowledge if they are supervised
or have been instructed on the safe use of
the appliance and the have understood
the potential dangers of using the appli-
ance.
Children must never play with the appli-
ance.
Cleaning and user maintenance must
never be carried out by children without
supervision.
Plastic bags and films must be kept out of
the reach of children before disposal.
=> Risk of suffocation.
Proper use
Only connect and use the vacuum cleaner in accor-
dance with the specifications on the rating plate.
Never vacuum without the dust bag or dust container,
motor protection or exhaust filter.
=> This may damage the vacuum cleaner.
Always keep the vacuum cleaner away from your head
when using nozzles and tubes.
=> This could cause injury!
When vacuuming stairs, the appliance must always be
positioned below the user.
Do not use the power cord or the hose to carry or
transport the vacuum cleaner.
For safety reasons, if this appliance's mains power
cable becomes damaged, it must be replaced by the
manufacturer, their after-sales service department or a
similarlyqualified person.
If using the appliance for longer than 30 minutes, pull
out the power cord completely.
When disconnecting the appliance from the mains, pull
on the plug itself to remove it; do not pull on the power
cord.
Do not pull the power cord over sharp edges or allow
it to become trapped.
When the cable is being automatically rewound, ensure
that the mains plug is not thrown towards persons,
body parts, animals or objects.
=> Use the mains plug to guide the power cord.
Pull out the mains plug before carrying out any work on
the vacuum cleaner.
Safety information

5
Do not operate the vacuum cleaner if it is damaged.
Unplug the appliance from the mains if a fault is detect-
ed.
For safety reasons, only authorised after-sales service
personnel are permitted to carry out repairs and fit
replacement parts to the vacuum cleaner.
Protect the vacuum cleaner from the weather, mois-
ture and sources of heat.
Do not pour flammable substances or substances con-
taining alcohol onto the filters (dust bag, motor pro-
tection filter, exhaust filter, etc.).
The vacuum cleaner is not suitable for use on con-
struction sites.
=> Vacuuming up building rubble could damage the
appliance.
When not in use, switch off the appliance and pull out
the mains plug.
At the end of its life, the appliance should immediately
be rendered unusable, then disposed of in an appro-
priate manner.
! Please note
The mains socket must be protected by at least a 16
amp circuit breaker.
If a circuit breaker is tripped when you switch on the
vacuum cleaner, this may be because other electrical
appliances which have a high current draw are con-
nected to the same power circuit.
To prevent the circuit breaker from tripping, select
the lowest power setting before switching the appli-
ance on, and increase the power only once it is run-
ning.
General information
Accessories
Your accessories (nozzle, suction pipe, etc.) may look
different from but work in the same way as those
depicted in the illustrations in this instruction manual.
Safety information
6
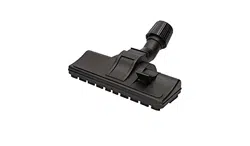
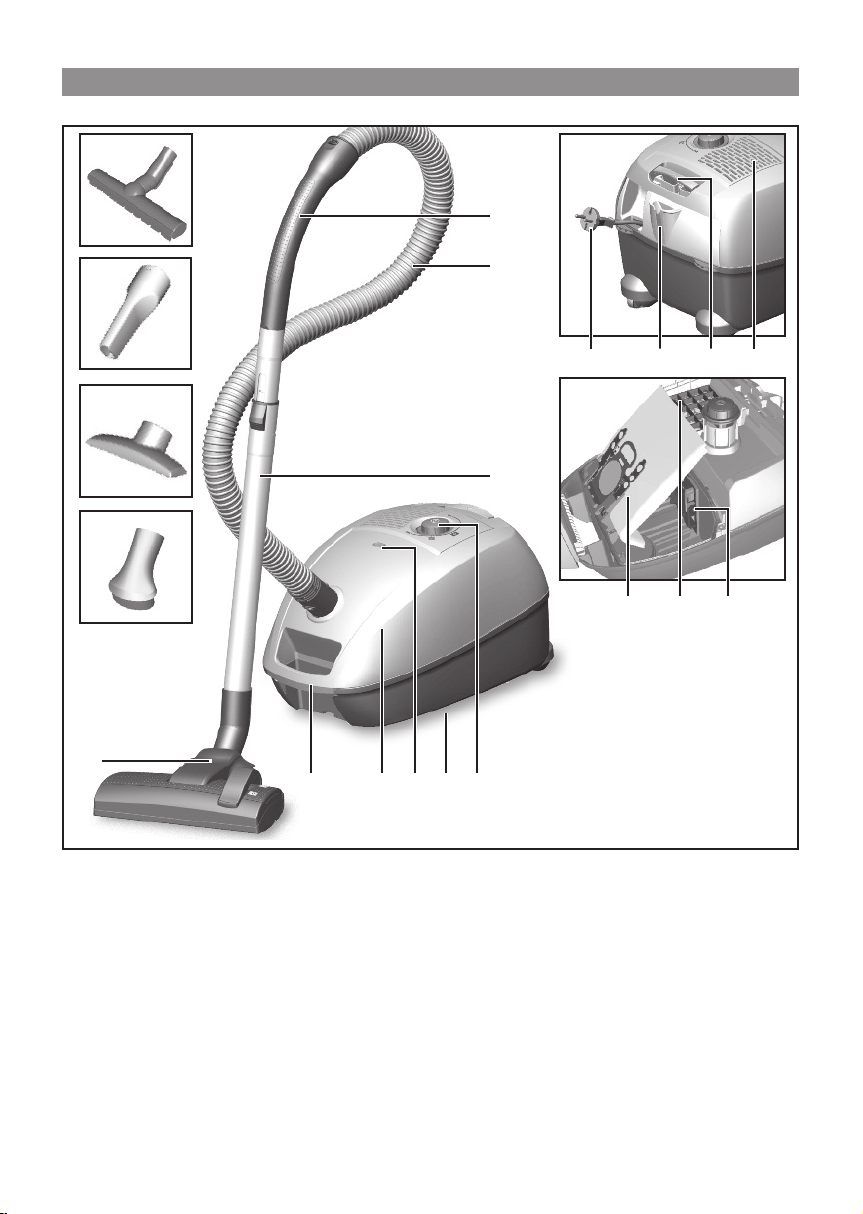
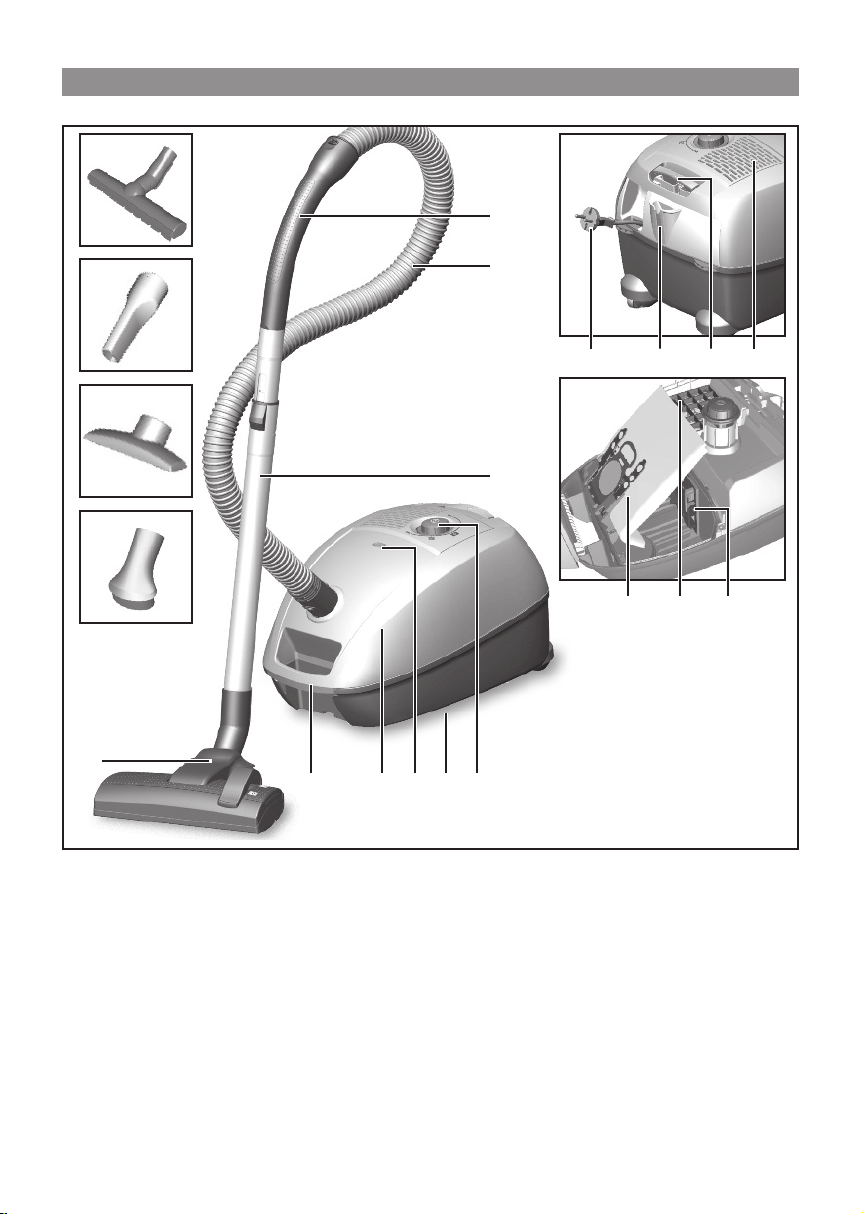
1 Adjustable floor tool
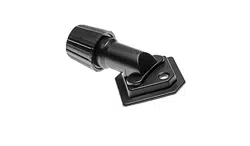
2 Hard-floor brush
3 Hose hand grip
4 Flexible hose
5 Telescopic tube with adjusting sleeve
6 Power cord
7 Parking aid
8 Locking lever
9 Exhaust grille
10 Dust bag
11 Exhaust filter*
12 Motor protection filter, washable
13 Carrying handle
14 Dust bag compartment lid
15 Dust bag change indicator
16 Storage aid (on underside of appliance)
17 On/off button and power controller
18 Crevice nozzle
19 Upholstery nozzle
20 Hard furnishing brush
Your vacuum cleaner
2
1
9
7
6
1613
5
3
4
8
14
18
19
1110 12
15 17
20
7
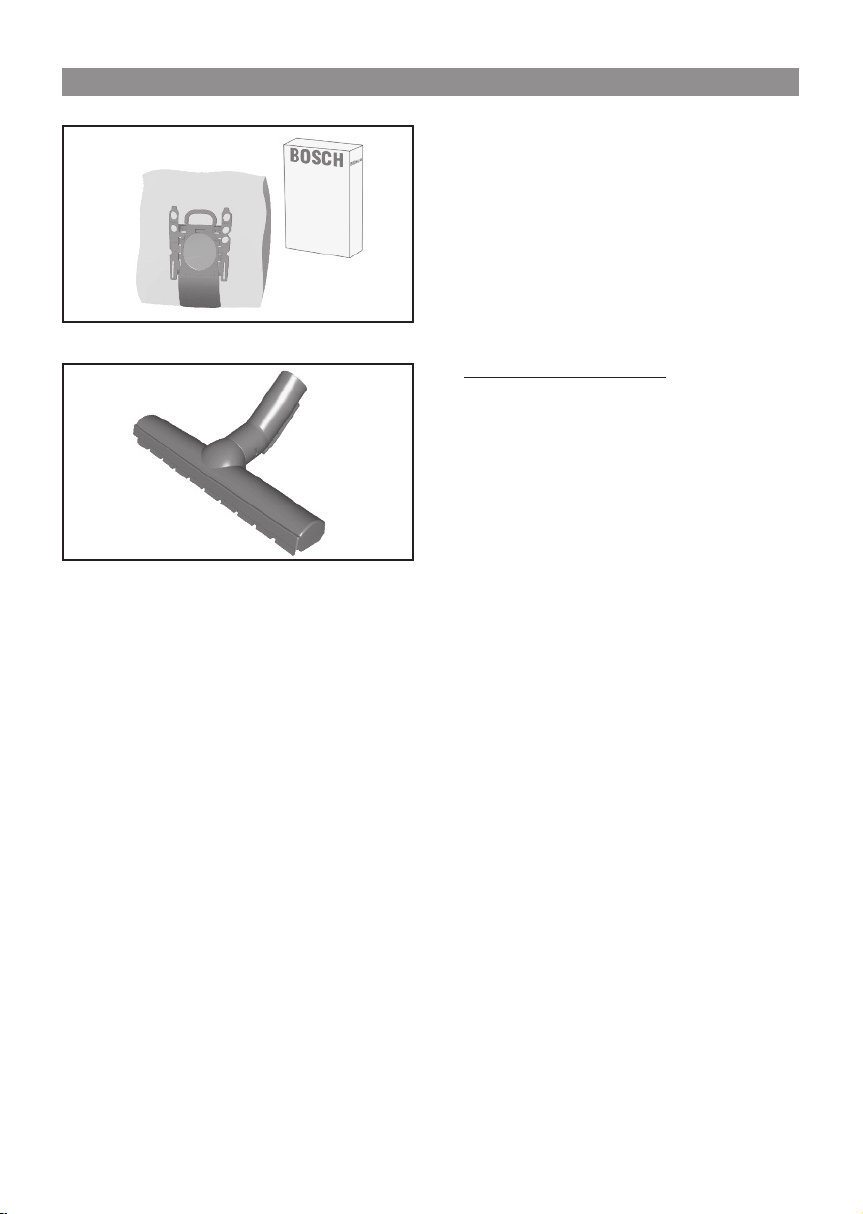
Replacement parts and special accessories
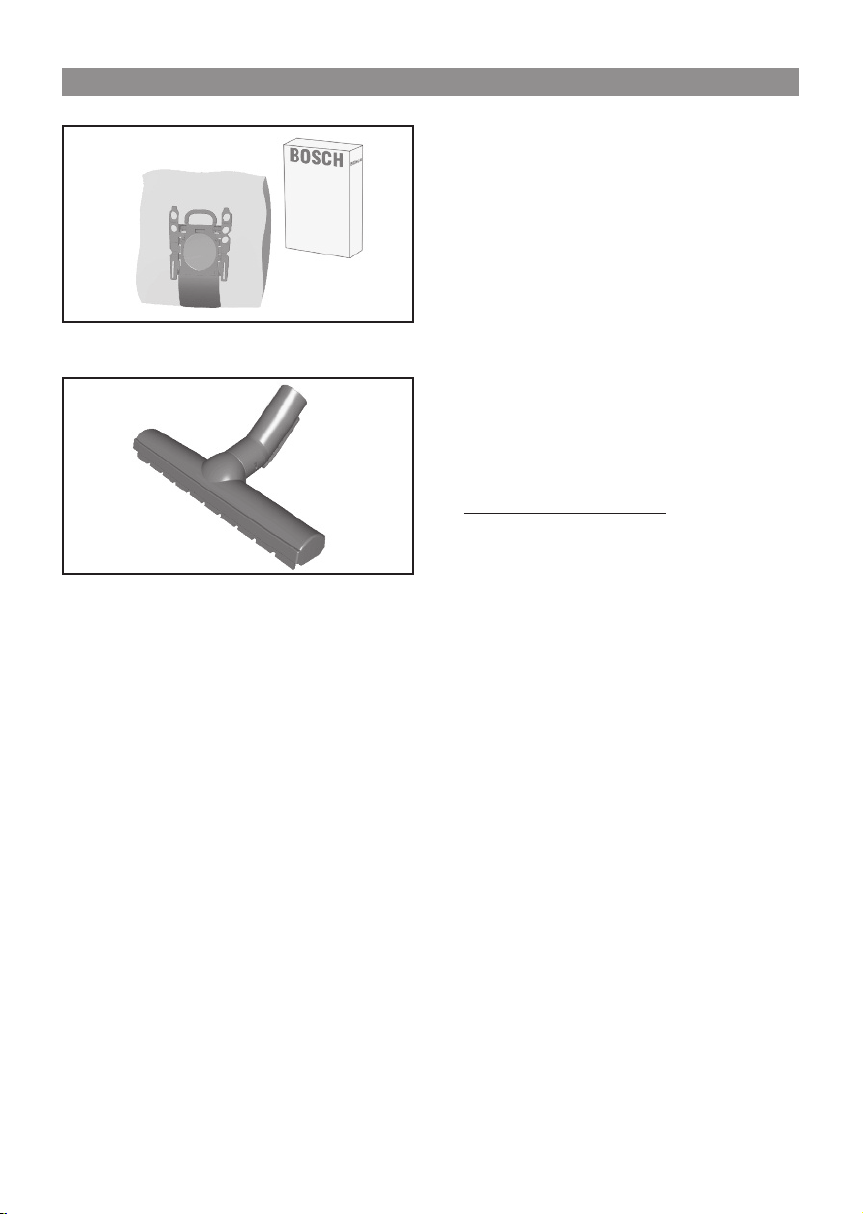
A Dust bag
To get the most out of your appliance, we recommend
using G ALL genuine replacement bags.
Contents:
- 4 dust bags with fasteners
!
PLEASE NOTE
Your appliance is a highly efficient vacuum cleaner
that can only achieve its best cleaning results using
genuine dust bags.
Only if high-quality dust bags are used, such as
genuine Bosch dust bags, can the figures specified
on the EU energy label pertaining to energy efficiency
class, suction and dust retention capacity be
achieved.
Additionally, using inferior quality dust bags (e.g.
paper bags) can have a significant impact on the
service life and performance of your appliance.
Warranty claims can only be made if genuine Bosch
dust bags are used.
For more information and to order genuine Bosch
dust bags, go to
www.bosch-home.com/dust-bag
B Hard floor brush BBZ123HD
For vacuuming hard floors
(parquet, tiles, terracotta, etc.)
A
B
4
3
8
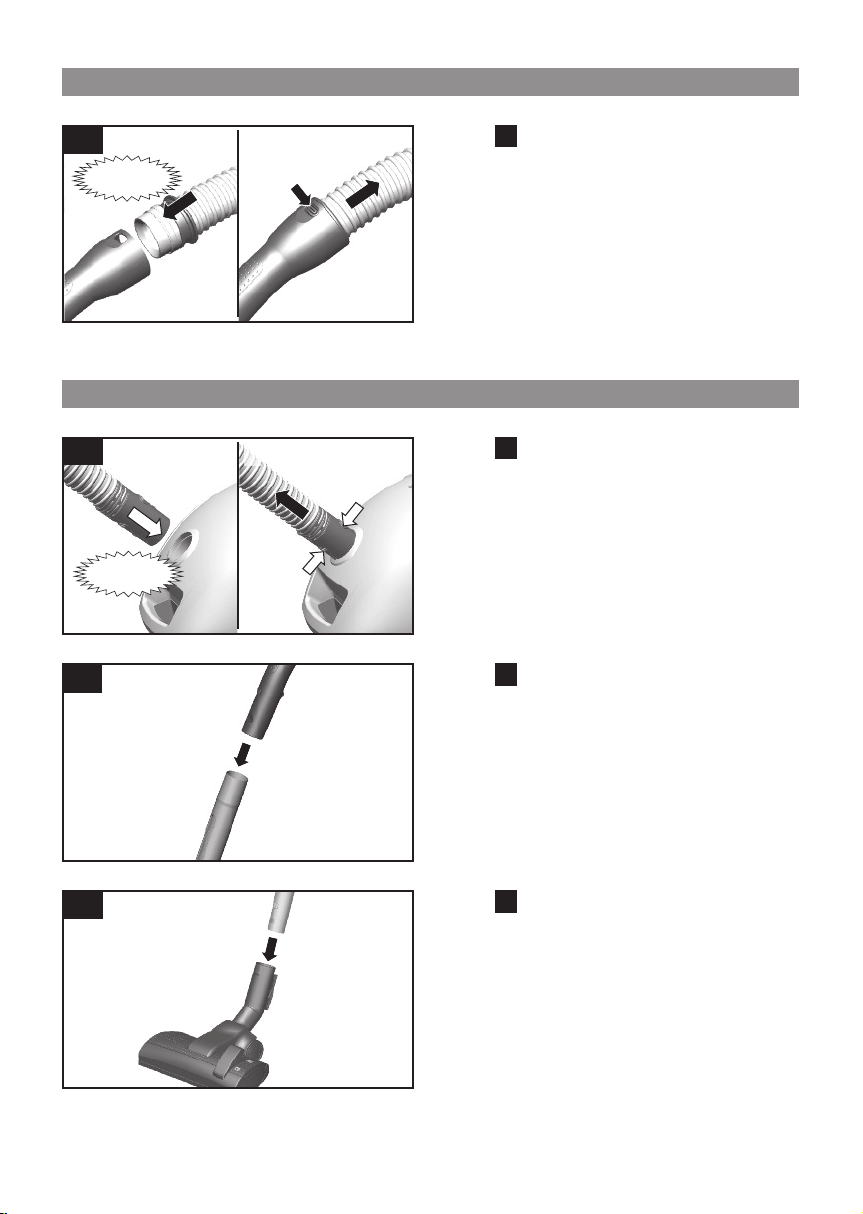
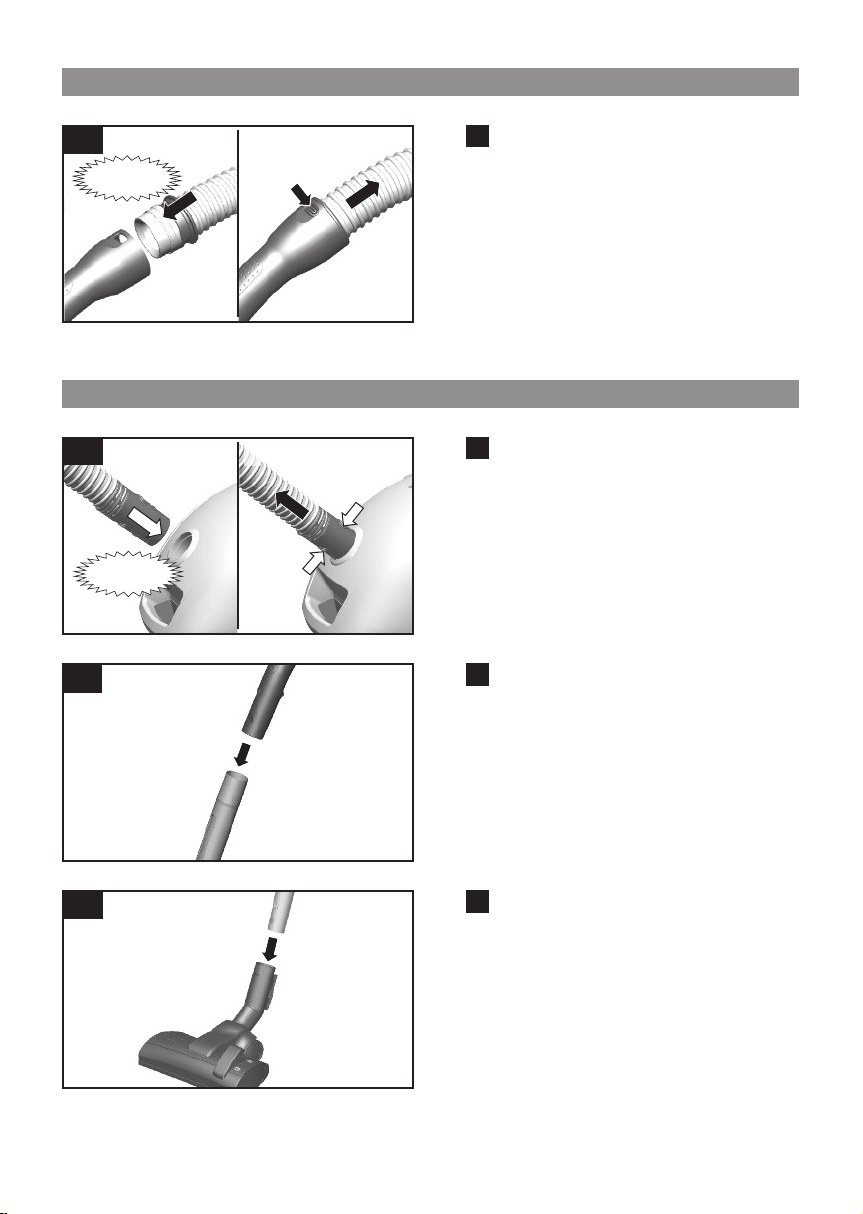
Figure
● Push the hand grip onto the flexible hose and lock it in
place.
● To remove the hand grip, press the two catches
together and pull out the flexible hose.
1
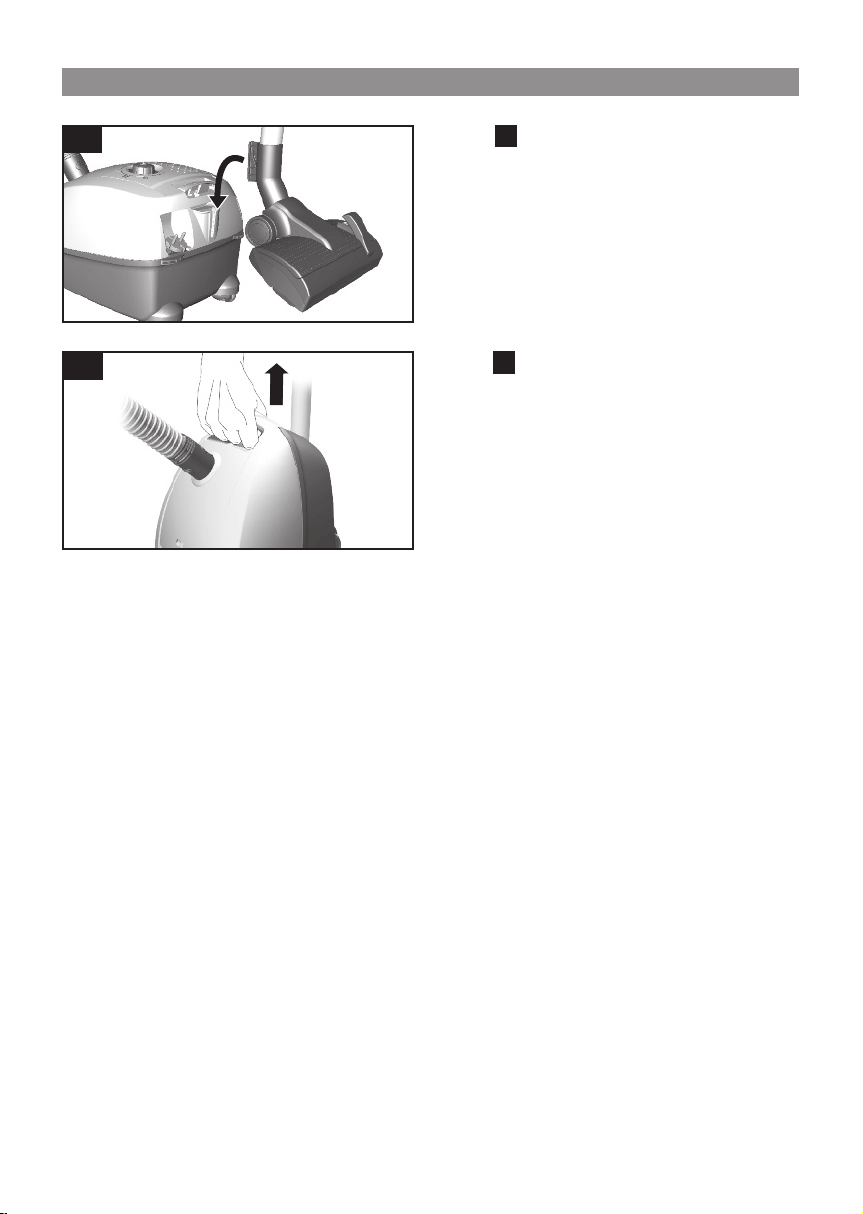
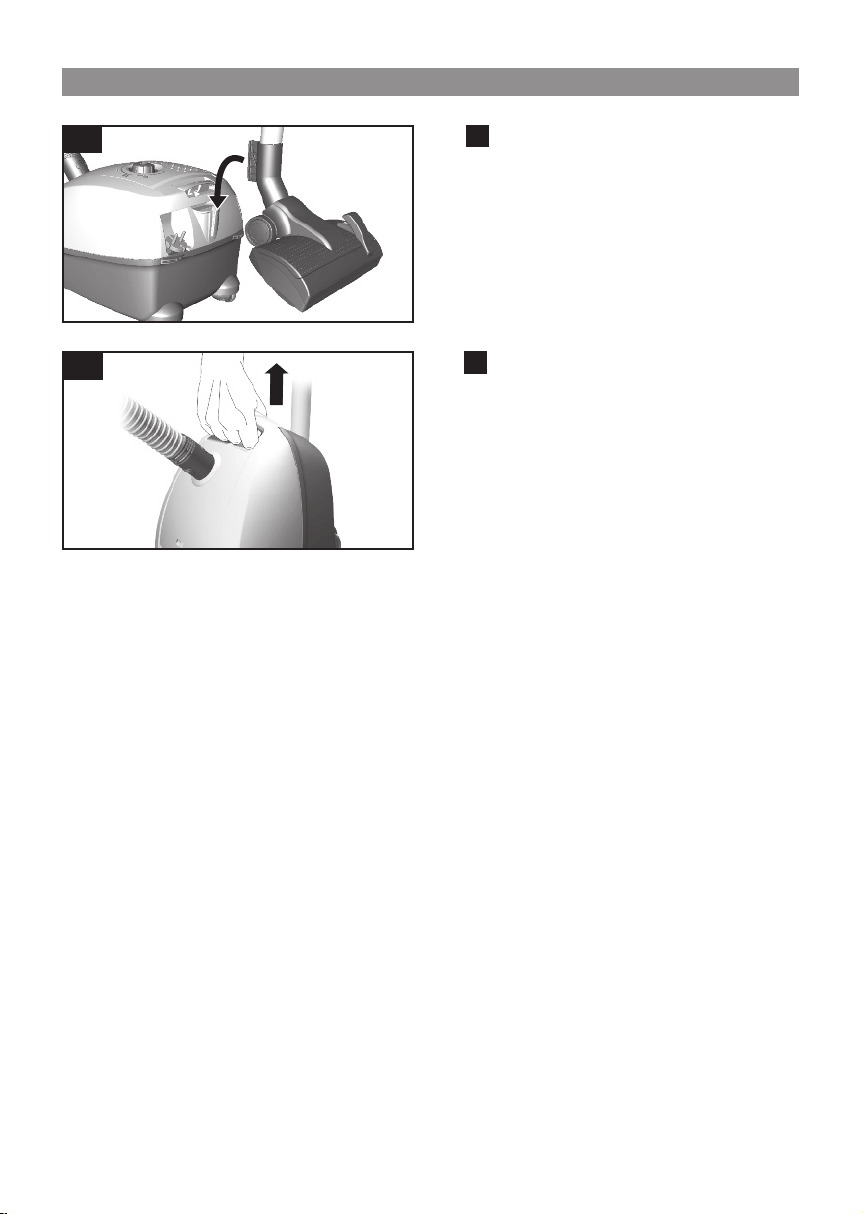
Figure
a)Push the flexible hose adapter into the air intake
opening in the vacuum cleaner lid until it locks in
place.
b)To remove the flexible hose, press the two catches
together and pull out the hose.
2
Figure
● Push the hand grip into the telescopic tube. To remove it,
turn the hand grip slightly and pull it out of the tube.
3
11
Click!
a b
2
Before using your appliance for the first time
Figure
● Insert the telescopic tube into the connecting piece of
the floor tool. To release the connection, turn the tube
slightly and pull it out of the floor tool.
4
Initial use
Click!
9
Initial use
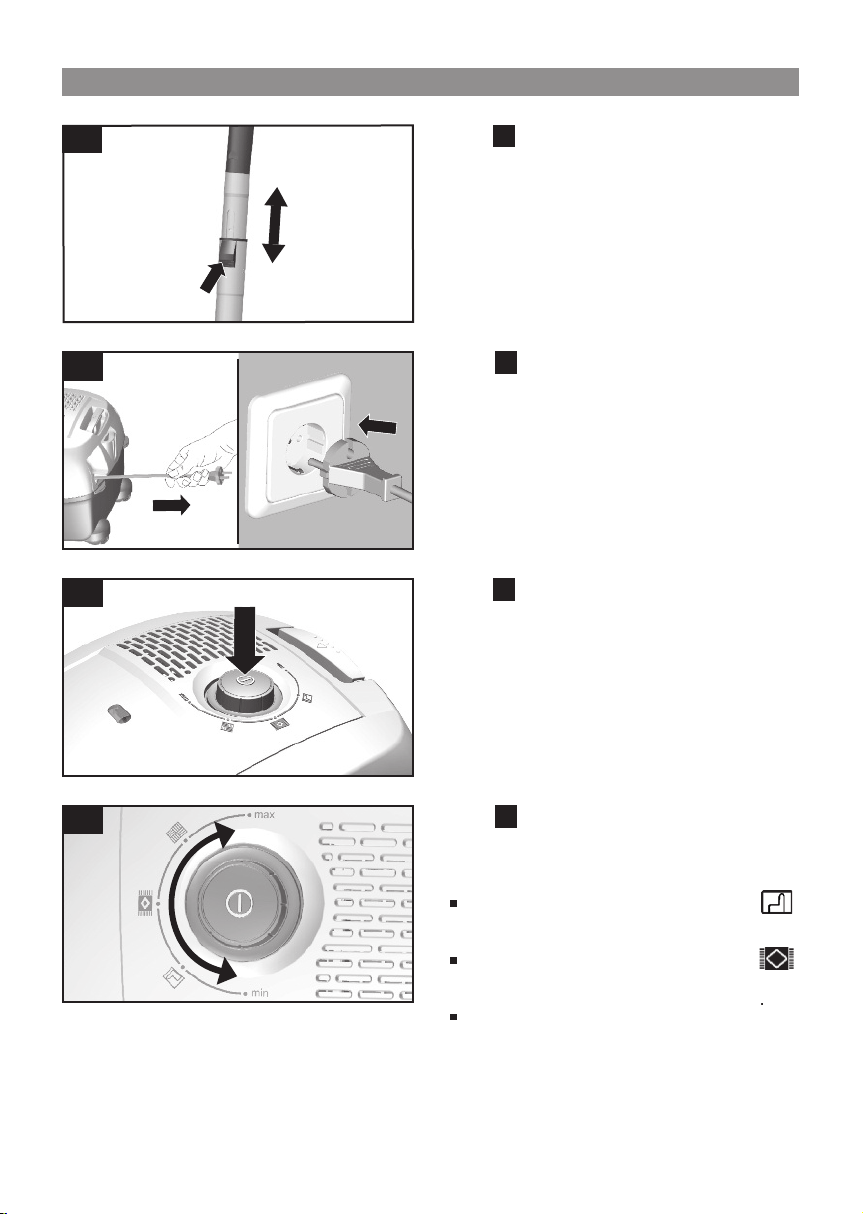
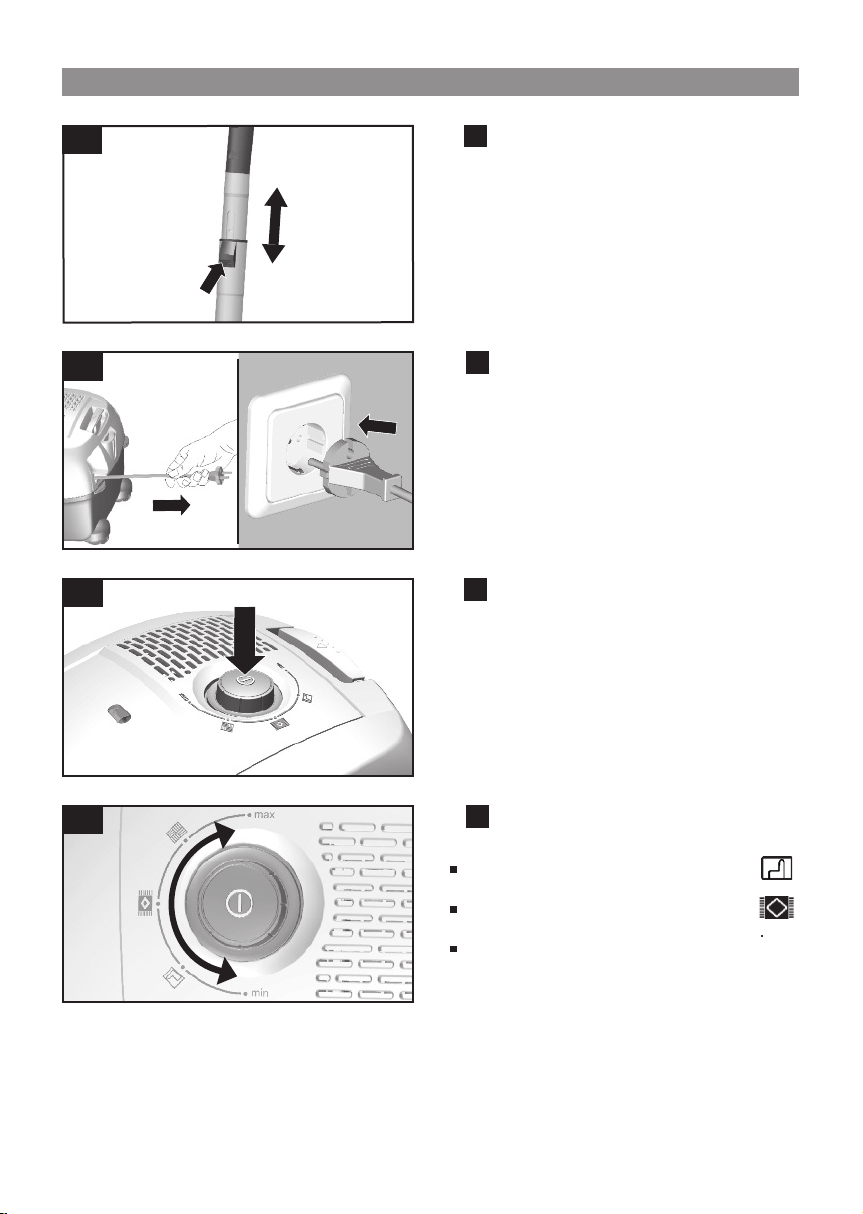
Figure
● Move the adjusting sleeve / slider button in the direction
of the arrow to unlock the telescopic tube and adjust it to
the length required.
5
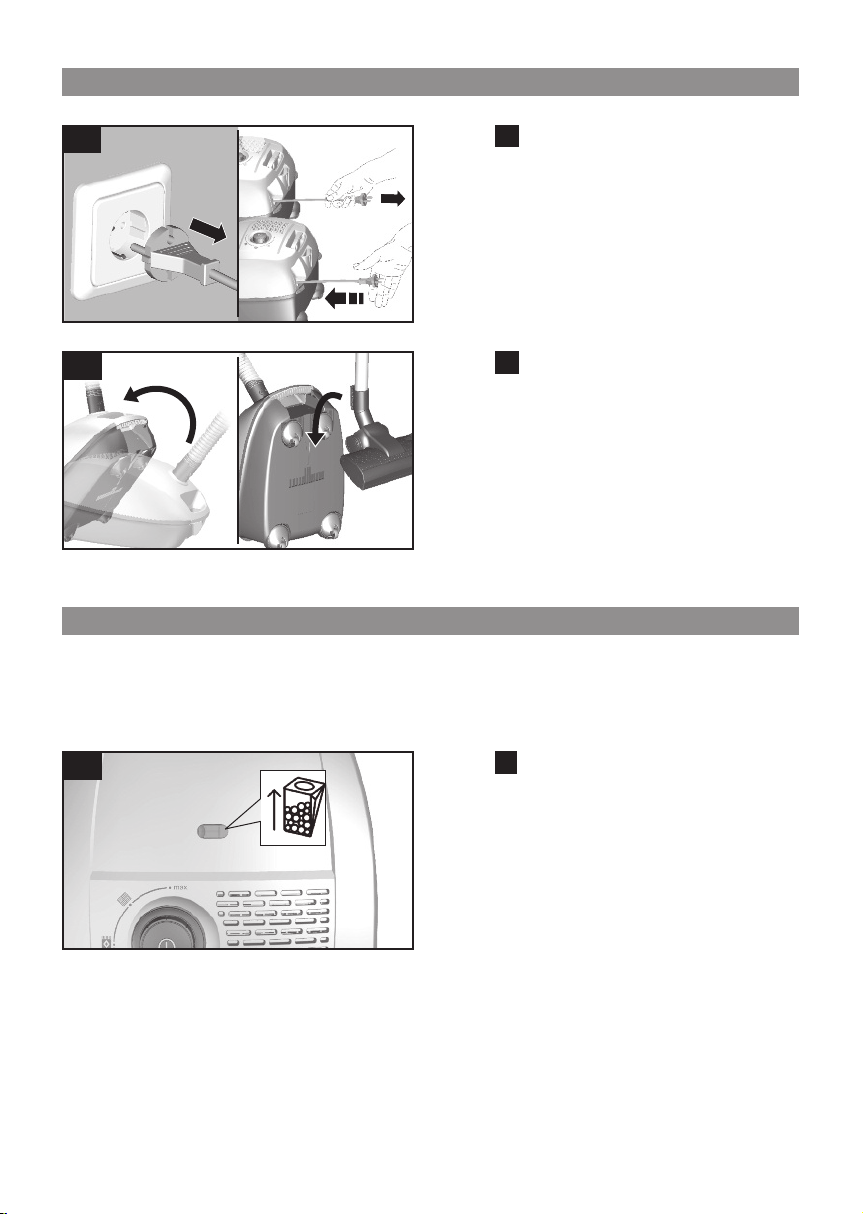
Figure
● Holding the power cord by the plug, pull out to the
required length and insert the plug into the mains
socket.
6
Figure Switching on and off
● Press the ON/OFF button in the direction of the arrow
to switch your vacuum cleaner on.
7
5
6
7
Figure Controlling the suction level
The suction level can be infinitely adjusted to the level
required by turning the control knob in the direction
of the arrow.
Low power range =>
For vacuuming delicate materials, e.g.
upholstery, curtains, etc.
Medium power range =>
For the daily vacuuming of light dirt
deposits.
High power range =>
For vacuuming durable floor coverings,
hard floors and heavily soiled surfaces.
8
8
9
10
!
Caution:
Floor tools are subject to a certain amount of wear,
depending on the type of hard floor you have (e.g.
rough, rustic tiles). Therefore, you must check the
underside of the floor tool at regular intervals. Worn
undersides of floor tools may have sharp edges that
can damage sensitive hard floors, such as parquet or
linoleum. The manufacturer does not accept any
responsibility for damage caused by worn floor tools.
Vacuuming
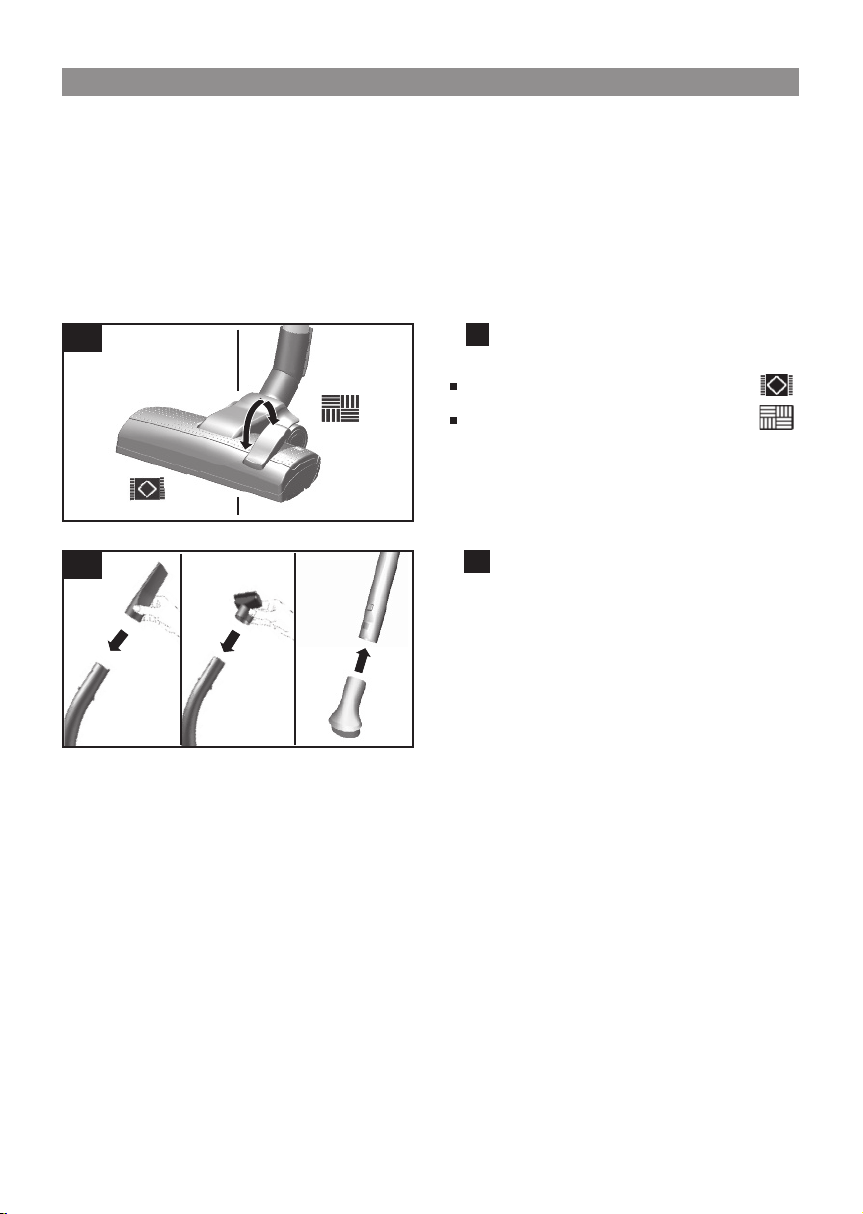
Figure Vacuuming with accessories
Attach the nozzles to the suction pipe or hand grip as
required:
a)Crevice nozzle for vacuuming crevices and corners,
etc.
b)Upholstery nozzle for vacuuming upholstered
furniture, curtains, etc.
c)Hard furnishing brush
10
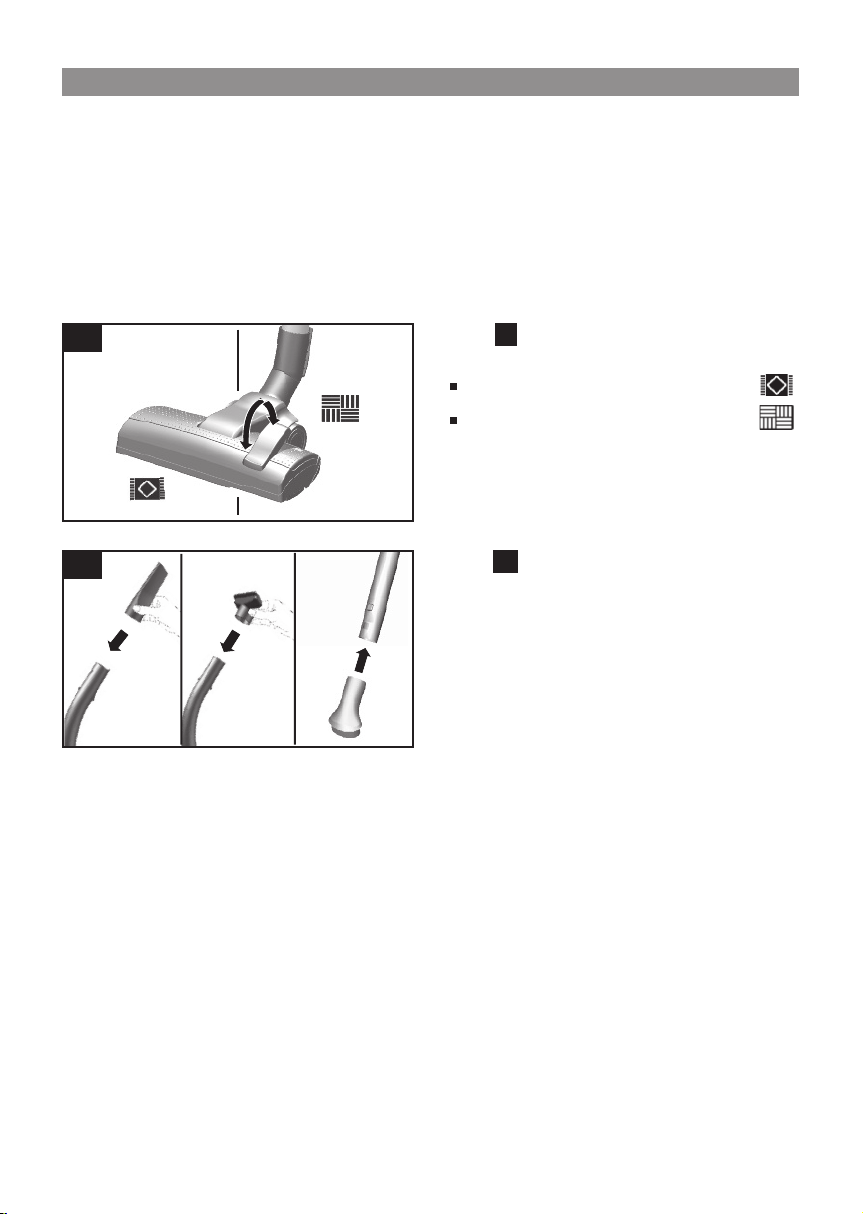
Figure
Set the adjustable floor nozzle:
Rugs and carpets =>
Hard floors =>
If you are vacuuming up relatively large particles, make
sure that you vacuum them up successively and carefully
to ensure that the vacuum channel of the floor tool does
not become blocked. If necessary, you should raise the
nozzle in order to better vacuum up the dirt particles.
9
10
a
b
c
11
Vacuuming
Figure
You can use the parking aid on the back of the vacuum
cleaner if you wish to stop vacuuming for a short time.
● Once you have switched off the appliance, slide the
hook on the floor tool into the recess on the rear of the
appliance.
11
Figure
To overcome obstacles, e.g. steps, the appliance can
also be carried by the handle on the appliance body.
12
11
12
12
15
!
Caution: Always switch off the appliance before
changing the filter.
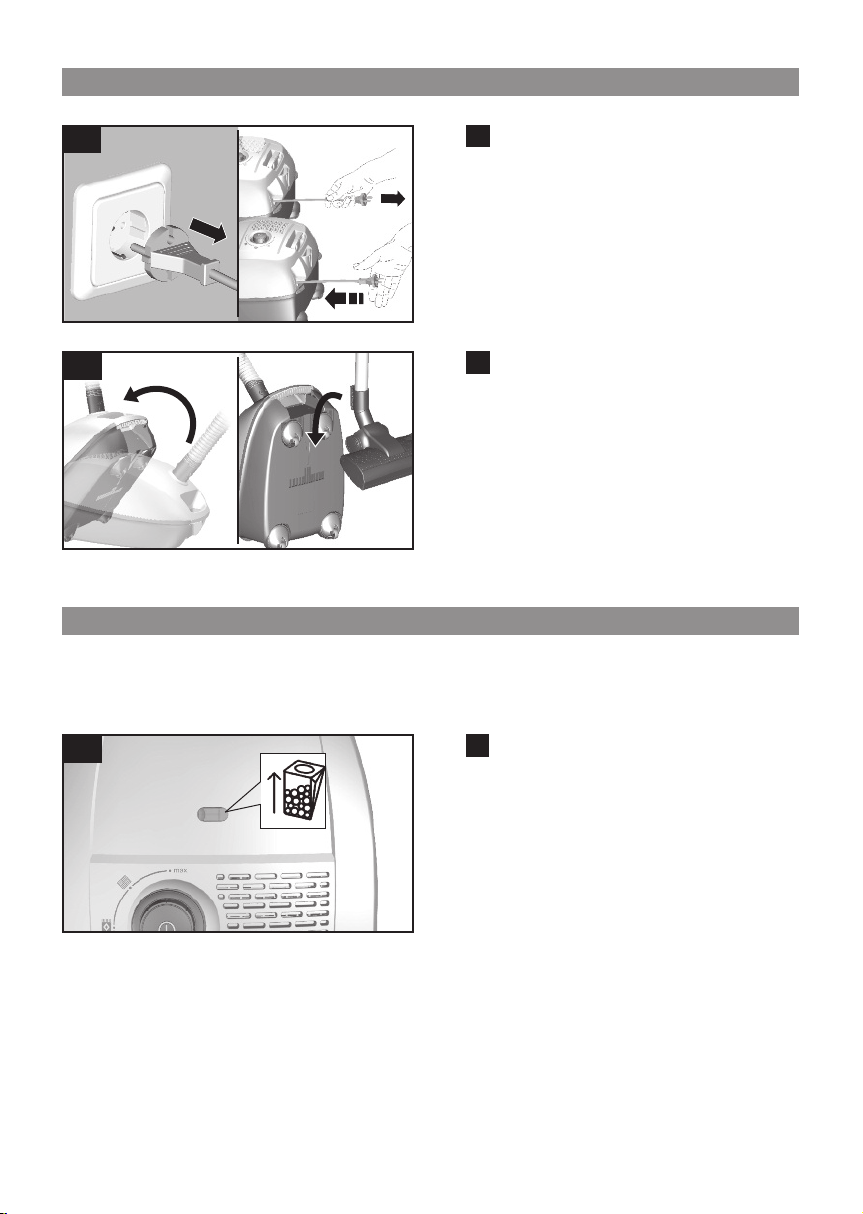
Replacing the dust bag
Figure
● If the dust bag change indicator in the lid is filled
completely when the floor tool is lifted from the floor
with the highest suction level selected, the dust bag
must be changed, even though it may not yet be full.
Even if the dust bag is not full, it may still need
changing, due to the type of dust which has been
vacuumed. First check that the nozzle, suction pipe
and flexible hose are not blocked, as this would also
lead to the dust bag change indicator being triggered.
● The hand grip can easily be detached from the hose to
remove blockages.
15
a
b
14
When the work is done
a
13
Figure
a)Pull out the mains plug.
b)Briefly pull on the power cord and then release it (the
power cord retracts automatically).
13
Figure
To store/transport the appliance, you can use the
storage aid on the underside of the appliance.
a)Stand the appliance upright on its end.
b)Slide the hook on the floor tool into the recess on the
underside of the appliance.
14
b
Changing the filter
13
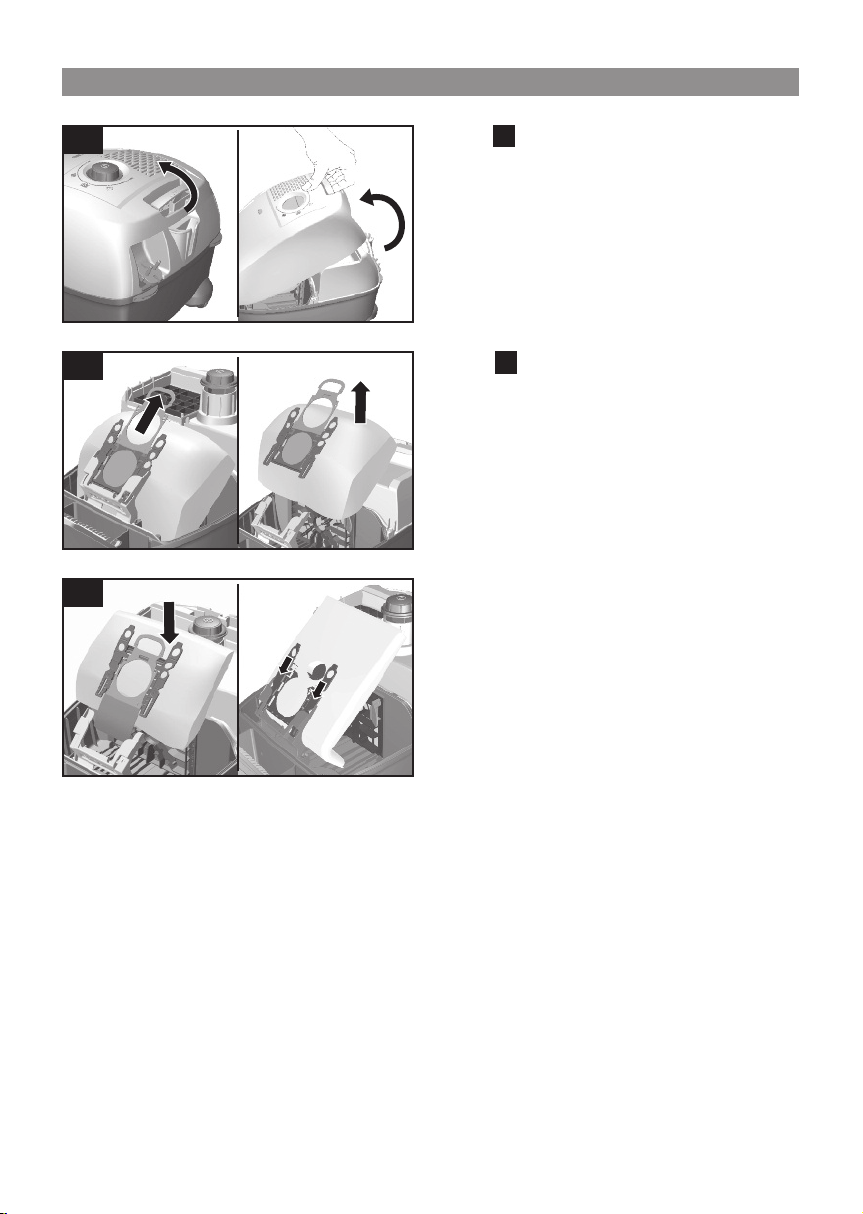
Figure
a)Close the dust bag by pulling on the locking tab.
b)Take out the dust bag.
17
Changing the filter
a b
16
17
17 ab
cd
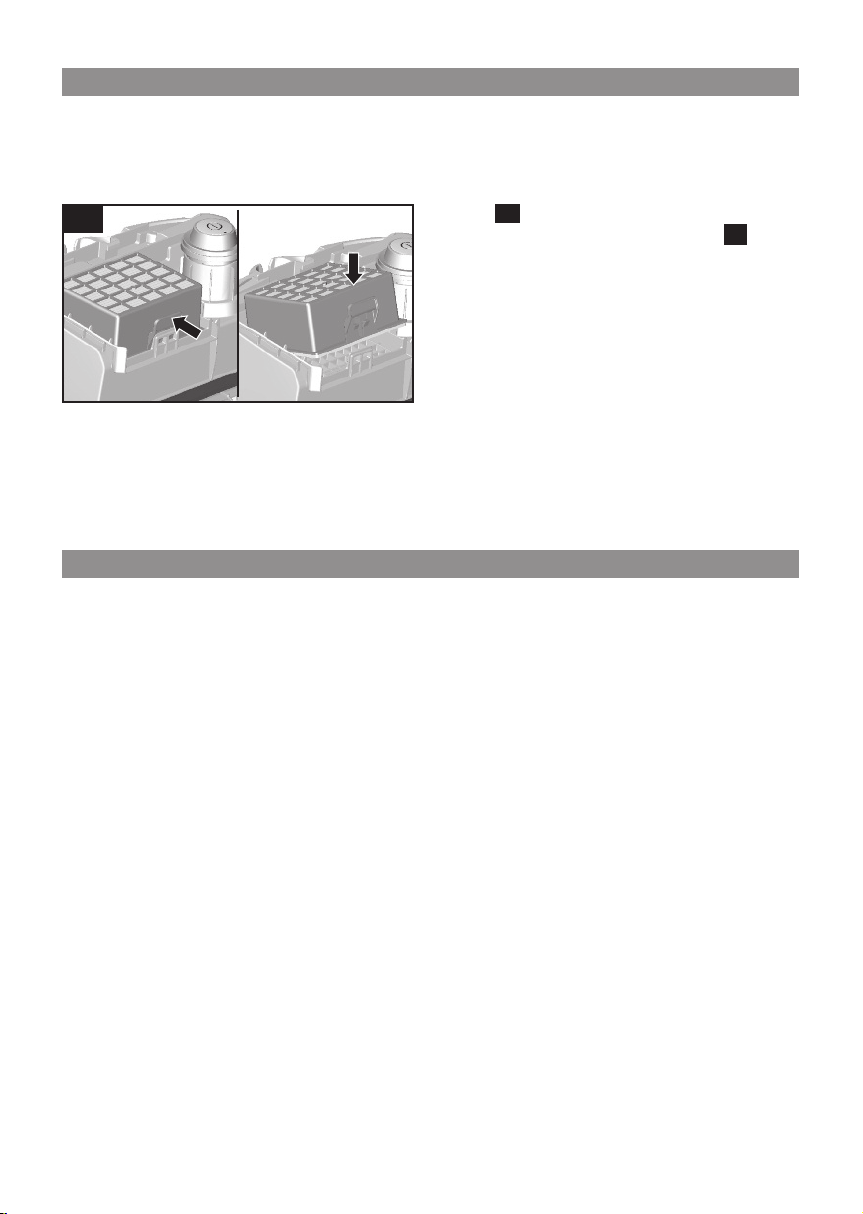
c)Insert a new dust bag.
d)Push the dust bag fully into the holder.
!
Please note: the lid will only close if a dust bag has
been inserted.
Figure Opening the lid
a)Unlock the lid by pulling on the locking lever in the
direction of the arrow.
b)Open the lid in the direction of the arrow.
16
14
Changing the filter
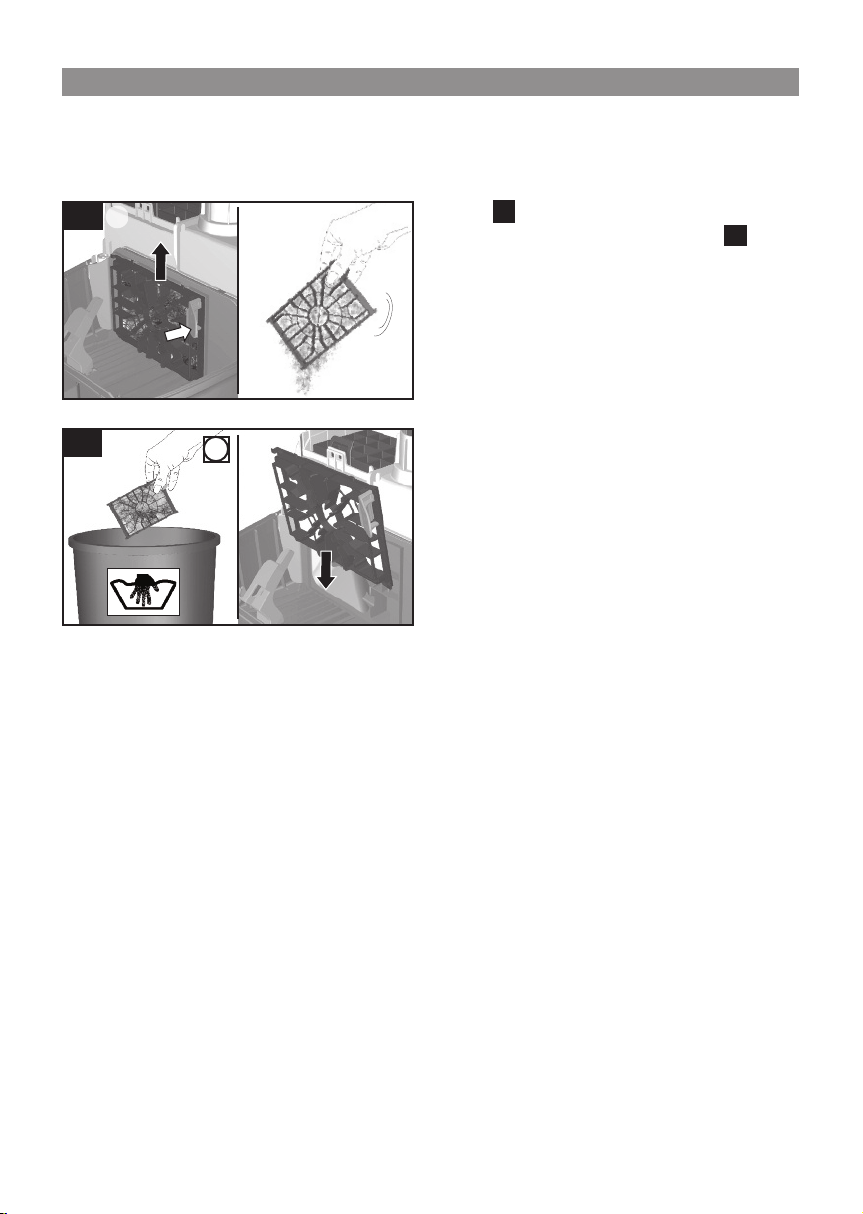
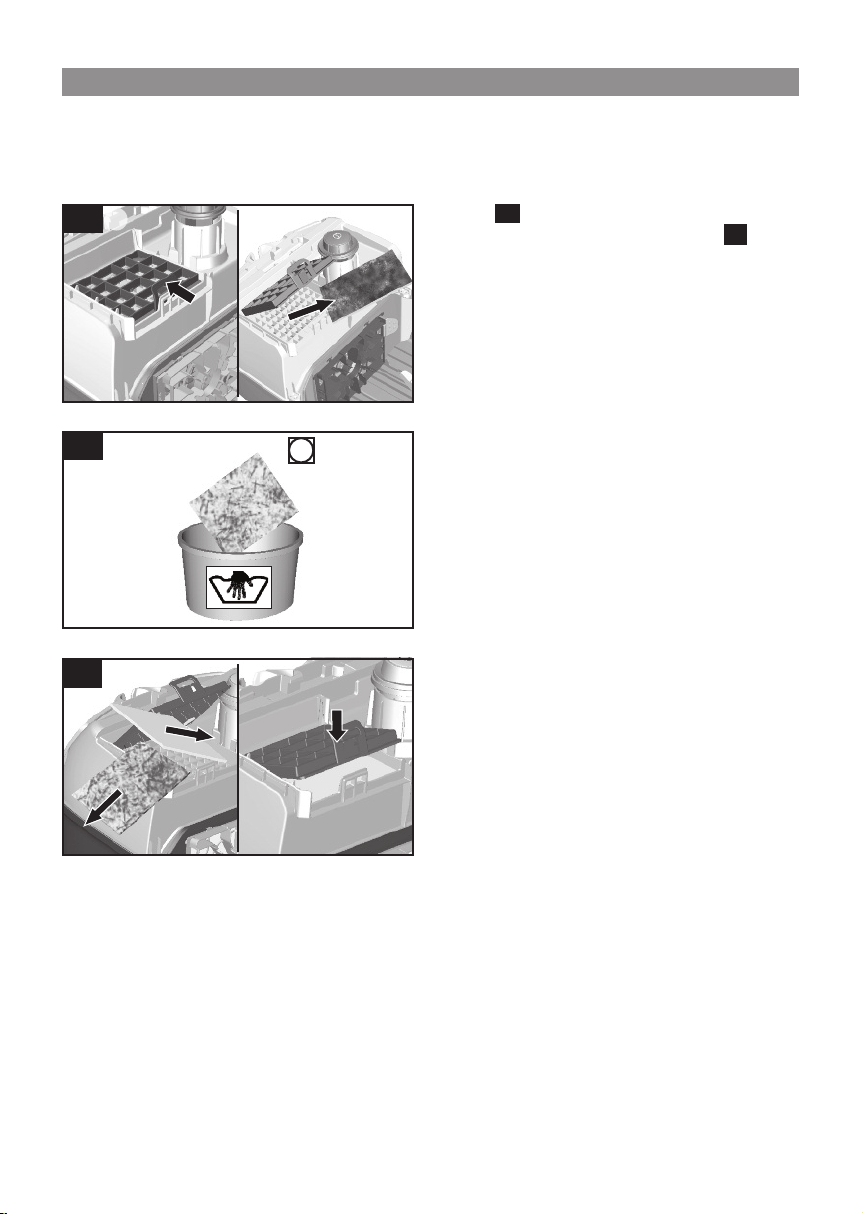
Cleaning the motor protection filter
The motor protection filter should be cleaned regularly
by knocking out the dirt and rinsing.
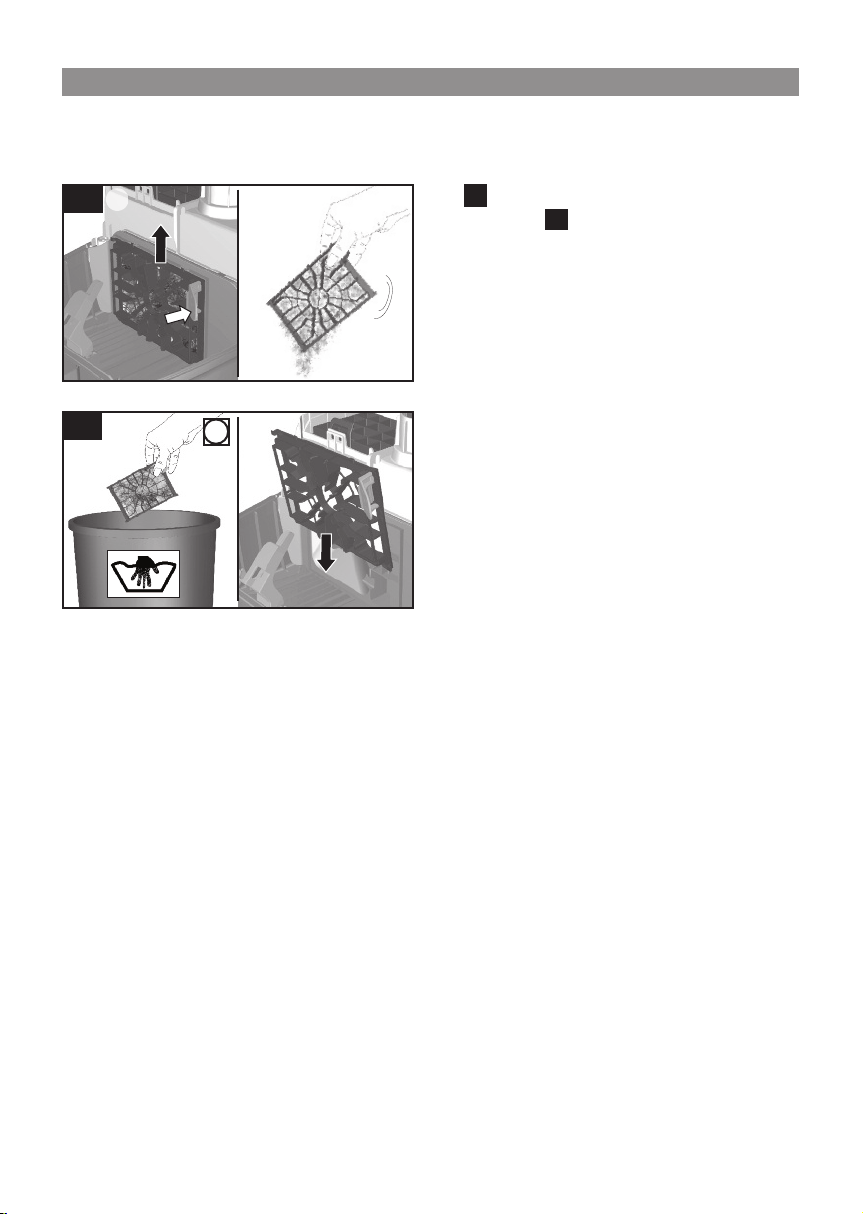
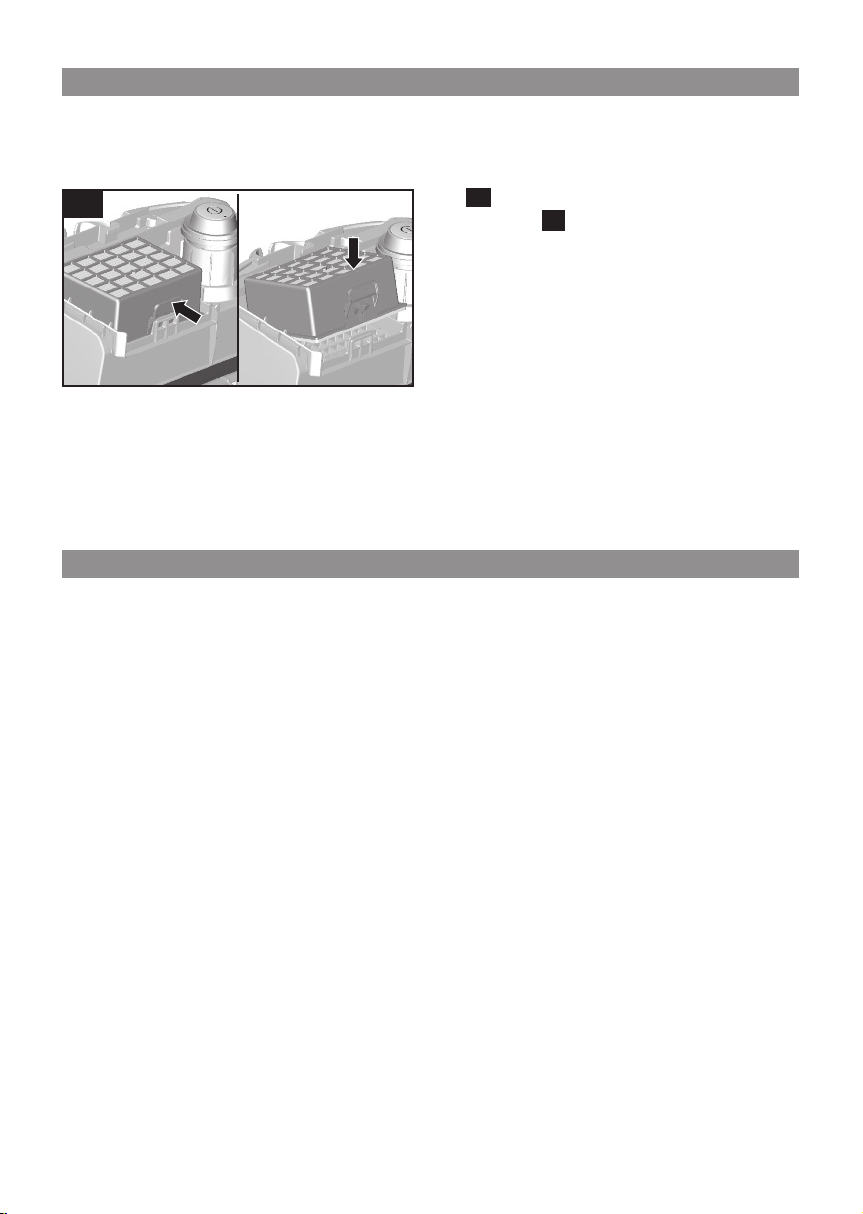
Figure
Open the dust bag compartment lid. Figure
a)Release the motor protection filter from the catch by
pulling it sideways, and pull it out in the direction of
the arrow.
b)Clean the motor protection filter by tapping out the dirt.
16
18
24h
18
b
a
18 c
d
c)If it is very dirty, the motor protection filter should be
rinsed.
● The filter must then be left to dry for at least 24 hours.
d)After cleaning, refit the motor protection filter into the
appliance, lock it in place and close the dust bag
compartment lid.
Replacing the exhaust filter
Vacuum cleaner with micro-hygiene filter
This should be replaced with every replacement filter
pack.
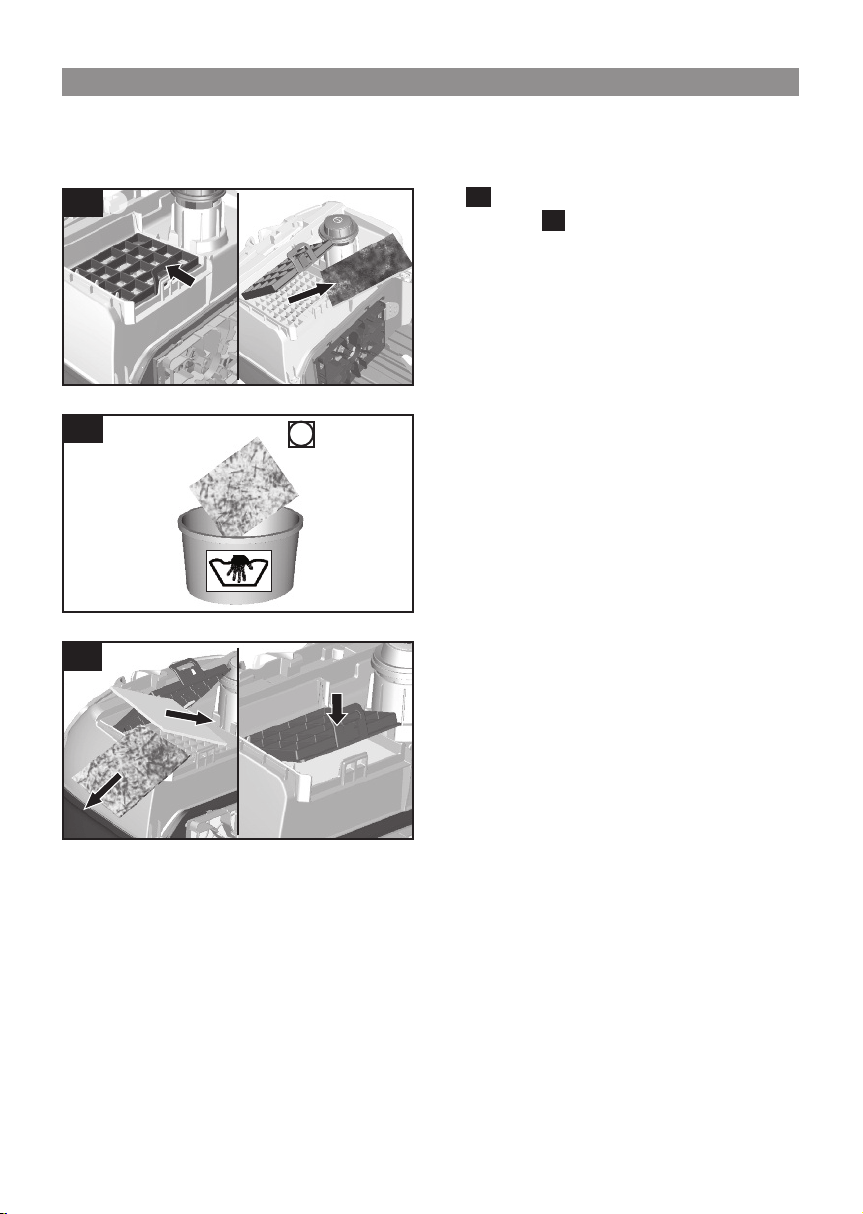
Figure
Open the dust bag compartment lid. Figure
a)Release the filter holder by moving the locking lever in
the direction of the arrow.
b)Remove the micro-hygiene filter.
19
16
15
19
24h
b
a
19 c
d
c)The micro-hygiene filter can be rinsed out.
● The filter must then be left to dry for at least 24 hours.
19
d)Remove the micro-hygiene filter. Insert the new micro-
hygiene filter into the appliance.
e)Insert the filter holder into the appliance and lock it in
place.
e
16
Care
Always switch off the vacuum cleaner and disconnect it from the mains before cleaning the vacuum cleaner. The
vacuum cleaner and plastic accessories can be cleaned with ordinary plastic cleaner.
!
Do not use abrasive materials, glass-cleaning agents or all-purpose cleaning products. Never immerse the
vacuum cleaner in water.
If required, the dust compartment can be vacuumed out with a second vacuum cleaner or simply with a dry duster/
dusting brush.
Subject to technical modifications.
20
b
Vacuum cleaner with HEPA filter
If your vacuum cleaner is equipped with a HEPA filter,
this must be replaced once a year.
Figure
Open the dust bag compartment lid. Figure
a)Unlock the HEPA filter by moving the locking lever in
the direction of the arrow and remove the filter from
the appliance.
b)Insert the new HEPA filter and lock it in place.
After vacuuming fine dust particles, clean the motor
protection filter and, if necessary, replace the
microhygiene filter or HEPA filter.
20
16
Replacing the exhaust filter
a
17
Customer Service
GB Great Britain
BSH Home Appliances Ltd.
Grand Union House
Old Wolverton Road
Wolverton
Milton Keynes MK12 5PT
To arrange an engineer visit, to order spare parts and
accessories or for product advice please visit
www.bosch-home.co.uk
or call
Tel.: 0844 892 8979*
*Calls from a BT landline will be charged at up to
3 pence per minute. A call set-up fee of up to 6 pence
may apply.
HK Hong Kong,
ɢ
ɢɡ
BSH Home Appliances Limited
Unit 1 & 2, 3rd Floor
North Block, Skyway House
3 Sham Mong Road
Tai Kok Tsui, Kowloon
Hong Kong
Tel.: 2565 6151
Fax: 2565 6681
mailto:[email protected]
www.bosch-home.cn
SG Singapore,
Ɯɣɠ
BSH Home Appliances Pte. Ltd.
TECHPLACE I and
Mo Kio Avenue 10
Block 4012 #01-01
569628 Singapore
Tel.: 6751 5000
Fax: 6751 5005
mailto:[email protected]
www.bosch-home.com.sg
Packaging
The packaging is designed to protect the vacuum cleaner from being damaged during transportation. It is made of
environmentally friendly materials and can therefore be recycled. Dispose of packaging that is no longer required at
an appropriate recycling point.
Old appliance
Old appliances still contain many valuable materials. Therefore, please take appliances that have reached the end
of their service life to your retailer or recycling centre so that they can be recycled. For current disposal methods,
please enquire at a retailer or your local council.
Disposal of filters and dust bags
Filters and dust bags are manufactured from environmentally friendly materials. Provided they do not contain
substances that are not permitted in household waste, you can dispose of them with your normal household
waste.
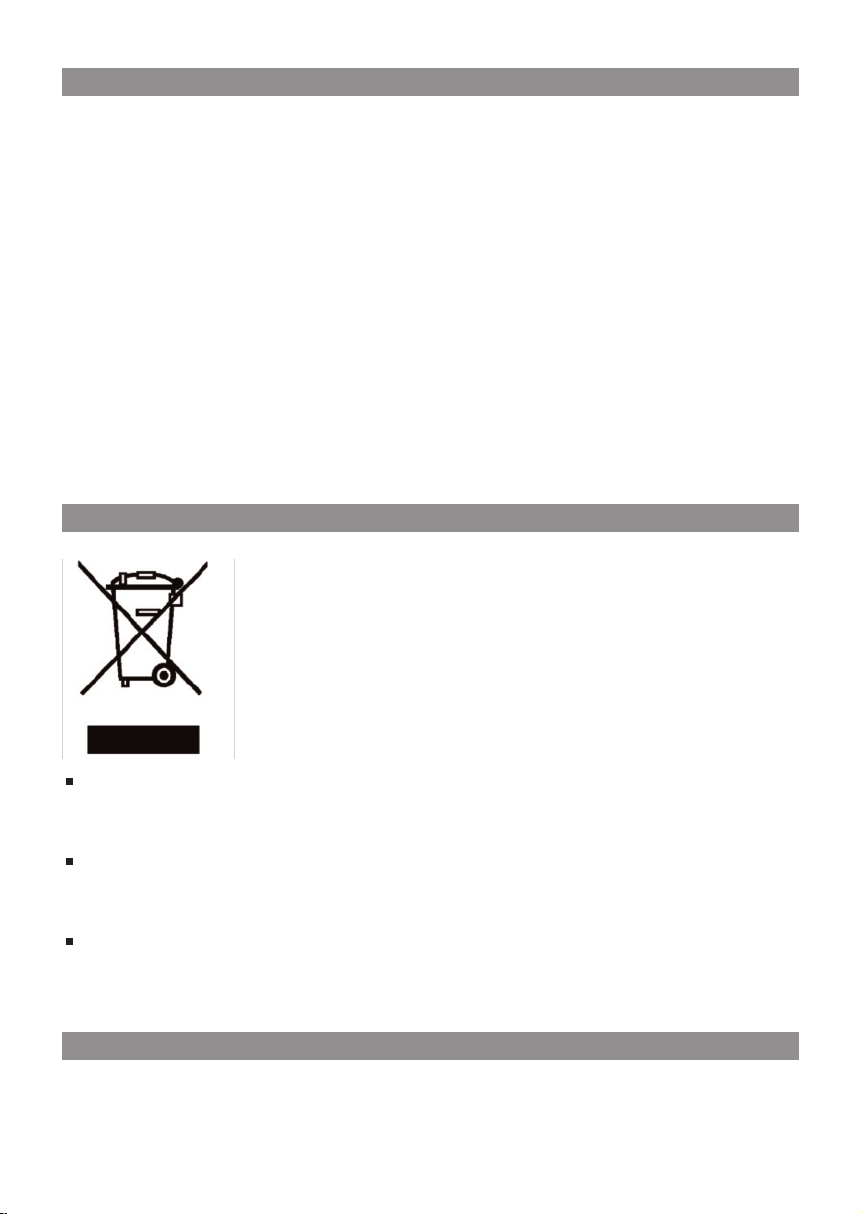
Disposal information
This appliance is labelled in accordance with European
Directive 2012/19/EU concerning used electrical and
electronic appliances (waste electrical and electronic
equipment - WEEE). The guideline determines the
framework for the return and recycling of used
appliances as applicable throughout the EU.
Conditions of guarantee
For this appliance the guarantee conditions as set out by our representatives in the country of sale apply. Details
regarding same may be obtained from the dealer from whom the appliance was purchased. For claims under
guarantee the sales receipt must be produced.

18
ǃ
ǃƥħ
ĭæȪÿåƌƬGL30ɐɑɀɔ
ȖǏǔƲƩGL301ÝŚɎɓQ¶ťȼŪȏǵɁɅǫɎȚȪɒ
IJÊɔɂğȊɈɎȦɐɑɀƪɎɒƌƬșțȏȲɓȿǑǾǚ
ƫɐɑƾǒɔ
ɂ@%ȹŴɈɎǏǔƲɔȺ
Ƀɐɑɋñų«ȳȮɓɂǛdzɈɎǏǔƲȐų¼ɔ
ǙČȸɈɎ
ȖɀƝ°ȚǂŐȌƇǀLDž8ȓɈɎɔȖɀǫǙȥxǭ
ǚǶȺ£ƚƚƚȺŠȿȒɈɎɔȺ
ƝɏȢȍɈɎǏǔƲȯɒǷǓɈɎȖɐɑɋɔ
ƩǁĂĿǂǪŪɀɋȔǧɓɅɏɃȖɐɑɋɎȥɞ
ǂŻɇȀȶɔ
ɐȫĞ
- ȰȾƧĉȾǶžɁlžɒȶȱɔ
- qāɁwrɒȶȱɔ
- ĦĶDZĈɁekɒȶȱɇȆƛɔ
- jǮȾcȉɇȓ>[ȆnjǵɒiǮɔ
- ġƻɀɇÇġɀɒ6ɑɔ
ǵȲȾȏȲȾȬɑɌ
ȭdzȖŠĪɒșțȬɑɌɓľŝɒșțǵȲȾșțȏȲɇLj
ƂȏȲLjâȢȍɐɑɋɒLjŷȝAǖnjŤɔǻȦɓŗđȪ
ĨɈɎșțǵȲȾșțȏȲɇLjƂȏȲɇȖŠĪɒșțȬɑ
ɌɔŸɏŒȹȪɐɑɋȼRȰŲ÷ɈɎĢĬɇE±ɒǶȽȱ
ȴȋŷȼɔ
!
{pɝɜ
Ğ
ɈɎƇůuǙɁŬȽȱɒǵȲȾȏȲưLjƂȏȲɇȬɑ
ɌɏȼȡǹȪɐɑɋɒȔǧɓȭǻɈɎȯĐȟȽǖœÑȔ
ǧɓƱĄźvƗȥȹǽć+ǝɔ
ǃƥħ
ȦɐɑɀǙĀɏɒĩėČćɇüȤɒǃƥ
Ʊɔ
ȥǪŔóɓɁłŦǷœȭĥǃƥɈɎɓȌȁ
ƈɈɎȦȟȽɒsȥƺǿȒɓȦȟȽɏ8F
ȿȯƤƆɓȌǎȀɅƙȾĭÅɁ\ǣÈɓ
ȌÙ³(¦ɁÜɒǂɈɎɔ
ƤƆƕɅɏɃȦȟȽƠƼaȉɔ
ȥ~ȰŔón|ȒɓƤƆƕɅɏȿȴȋȌõ
ŜȦȟȽɔ
ŰƸɌɇËÓȥŦNjȗƅȊǩǠȗȚ¬Ƥ
Ɔɒŭȗɔ
=>Ȱħɒƺǿɔ
ɛŒɈɎ
ƝɏȢȍbþƸǛƖɐɑɋɇɈɎɔȺ
òǃǨȬɑɌɁȬɑȾôǑƢȞɇƳȆƴɉɊȮɓƕɅ
ɏƽǎɐɑɔ
=>ɏȼƣȡǹȟȽȔǧĻȺ
ƽǎɐɑȮɓƕɅɏɃɐɆɇɐȆȷȗȚɆǥĘɔȺ
=>ȦÏɏȼȡǹǪƺǿĻȺ
ȚKèȯɐɑȮɓȊǩɃȖȟȽȗȚɈɎØɒȒȳɔ
ɅhȿɍȻȕɇȄȷTưŏȀɐɑɋɔȭȖȟȽɒɍȻ
ȕȔǧɓƱȊǩƴƋȡǀɁšģøȓŹɓɁŻǙOɒ
ǂ!ƽǎȠǦɓȿƢęíëƺǿɔ
ȭɈɎƴȺ¤ƚȺ޸ɓɂōƥǭǜɍȻȕɔȺ
ɅɏȈūĽɍȕǭǜɍȻ
ȟȽɓǖİȈūȨɆɔ
ɅɏɃɍȻȕȈf»ňɒ&ȑīɅɏS:ɔ
ȥÒȀƭȕȮɓɂ{pɅɏěɍȻȨɆǾǂȾÔƛȾ
ȀȶɁȶƛȯɔȺ
ňɎɍȻȨɆœȫɍȻȕɔ
ƽǎǸȰɐɑɋɒņƼƅɓɂşȈȜɍȻȕɔ
ɅɏņƼȔǧɒɐɑɋɔȜ XçȮɓɂǭǜɍȻȨɆɔ
ƩĂĿíëƺǿɓƝɏƟHIɒģøȓŹƽǎɐɑɋɒõ
ŜɇǵȲȠǦɔ
ɂȹȞɐɑɋɅǪȆȾāǗɇžȻɒļìɔȺ
ɅɏɃɏĈŷɁƄůɒȶȽǠȗȥɉɊŀȬɑɌȾôǑ
ƢȞɉɊȾƳȆɉɊȂŅȯɔ
ȖɐɑɋɅǫɎȚŗ;3Ǹɔ
=> ,2A$H!9RPOCS
ɅɐɑȮɓɂȤǜȣȤȑǭǜɍȻȕɔȺ
ŎƔ2LJɅƶɈɎɒȟȽɓǢȧǃƳǫƠɒLJNjŧȁɔȺȺ
!
ɂ{p
ɍȻȨĸȊǩƎƨǩƟȺ¢¥ɕȺɒȹǿŮƢȞɔ
ǯȦȹǿŮȥȣɀȮýȣɓƱdzȐǕɍǝɏȼdzȮǛƖ
ǁšıɒǶ×ɍɍdžǨȗɔȺ
ȭȪȥȣɀȮɃťŘǼǾǚŬɓǢȧƶǼǶɓɏĂĿȹǿ
Ůýȣɔ
ȐŨħ
©Ƚ
ȪɒĘȲŀ'ȎɓɐȷȂŅɏȼŪȖǏǔƊáȓɒȨ,ȓ
MĐɒüdzɓDzƼȳƃɅdzɔ
19
1 ɏǼƃɄȵDzȉ
2 ǰȱɄȵƯɆ
3 ȄȷƹǍ
4 ȃȅȄȷ
5 ȃȅȷƄǼƦŃą
6 ɍȻȕ
7 ƞƉƘƓ
8 ǬȸŵƁ
9 ƳȆP
10 ɑɌ
11 ƳȆɉɊ*
12 ǤȘȹȞɉɊɓɏȴlj
13 Ɗĵ
14 ɑɌǞ
15 ɑɌȠǦǷǓɋ
16 ŴǠƞƉnjŤ(ȥɍɋơǥ)
17 ȣȤǘƐŪťŘĤţɋ
18 ƧɆɐȎ
19 ŌǝɐȎ
20 ǰȱŞśƯɆ
Ȫ
Ȫɒɐɑɀ
2
1
9
7
6
1613
5
3
4
8
14
18
19
1110 12
15 17
20
20
Ƞ
ȠǦéȲɇLjƂȏȲ
A
ɑɌ
ƩǁǑǾǚƫȬɑƾǒɓľŝŗđȪɈɎȺG ALL șțȬɑ
Ɍ
ǝĦ:
- 4 ǕɑɌɓƄżȲ
!
ɂ{p
ɈɎșțɑɌɓȪɒɐɑɀŸȼǑǾǚƫɒȴȋƾǒɔ
ĨȰɈɎǶȽȱɒșțƌƬɑɌɓŸȼǑǾƀŕȼȻĜ9
ǸĜǓɒ?ȼƾŘŢ*ȾɐǣɇȬɑȼǣɔ
ȭǒɈɎȽȱɅƫɒɑɌ(řȭ.Ɍ)ɓɃƣʼnļìɍɋ
ɈɎĢĬɇƾȼɔ
òɈɎșțƌƬɑɌɁƣœÑȹ¨ɖƾɔ
ȤȚ¿ÿșțƌƬɑɌɒþ¾,ɂmÃ
www.bosch-home.com/dust-bag
B
ǰȱɄȵƯɆ
BBZ123HD
ǰȱɄȵɐɑƪɎ
(VȱɄȵȾĚĝȾ/-Ȃ)
A
B
21
,
,
● ɃƹǍƷȫȃȅȄȷȑǬƎȸŭɔ
● ǯȩƒȒƹǍɓɂdzȮǘȒŁǕǽȸżɓǢȧȈȜȃȅȄ
ȷɔ
1
§GɈɎɍɋƅ
,
a)ɃȃȅȄȷƷȫɐɑɀƗɒȫȆȣÐɓǾǬȸƩęɔ
b)ǯȩƒȒȃȅȄȷɓɂdzȮǘȒŁǕǽȸżɓǢȧȈȜȄ
ȷɔ
2
,
● ǛƖƊǍȌȃȅȷɔ
3
ɧGɈɎ
,
●
ǛƖƯɆɇȃȅȷɔ
4
4
3
11
Click!
a b
2
Click!
22
ɧ
ɧGɈɎ
,
● ȢȍǺɆȳǴŏȀǼƦŃąưtȀǘƐȿƈǬȃȅȷȑǼ
ƦǸȝŲǗɔ
5
,
● ūȨɆɓƵDŽǸȝŲǗȈȜɍȻȕɓǢȧɃȨɆȨȫɍ
ȻȨĸȓɔ
6
, ȣ$ɇȤĔ
● ȢȍǺɆȳǴǘȒȣȤǘƐɓȿ$Ȁɐɑɀɔ
7
, Ĥţɐǣ
ǯȩǼúǸȝɐǣɓɂȢȍǺɆȳǴķñĤţķƐɔ
Ŭɐǣ =>
ȴȁÚȶȽɓřȭűĒŻȾĆċȂɔ
ȓȂɐǣ =>
]ŖȴȁƨǮɑɔ
Ƕɐǣ =>
ȴȁƮɒɄȵÆƗȶȾǰȱɄȵɇƇŖöùɒƻ
NJɔ
8
5
7
8
6
23
!
{
{p
:
ɄȵDzȉƣǪǾȐȸčǗɒƮȔɓƵDŽɄȵɒǰǗǖȸ(ř
ȭƻNJ54ɒĚĝ)ɔǻȦɓē®ȐBȮ´ȊǩJêɄȵDz
ȉɒơǥɔɄȵDzȉơǥǻƮȔǸȡǹɒƧĉƻNJɁƣȡ
ǹDÎɁ·¡ɄȵȂů#ɒǰȱɄȵƻNJǪȔɔǻƮȔɒ
ɄȵDzȉǸȡǹɒȔǧɓƋȡǀɃɅÞįĥàįɔ
ɐɑ
,
njȸɏǼƃɄȵɐȎ:
ɄűɁɄĒ =>
ǰȱɄȵ =>
ǯȩɐDZúʼnɒȶȲɓɂŒĀȶȲłǛÛɄɐDZɓǖīȑòĖ
ƏɐɑŚɔȪɏȿƵDŽȝȩĴDZɐȎɓȠĶȚɐȫǮɑɔ
9
9
, ɈɎȏȲɐɑ
ƵDŽȝȩɓȥɐɑȷɁƹǍȯǃǨɐȎ:
a)ǫǙȴȁ"ɇÂÌȂɒƧɆɐȎ
b)ǫǙȄűŞśȾĆċȂɒŌǝɐȎ
c)ǰȱŞśƯɆƪɎɒŌǝɐȎ
10
10
a
b
c
24
ɐ
ɐɑ
,
ǯȪoZɐɑɓɏȿɈɎɐɑɀȧȳɒƞƉƘƓɔ
● ȤĔɍɋȧɓɃɄȵDzȉȯɒƘƓƷȫɍɋȧȳɒńðɔ
11
,
ɍɋȯȰȐǕƊĵɓȳƙƴ¯èȂçȶɔ
12
12
11
25
Ɉ
ɈɎȧ
,
a)ɂǭǜɍȻȨɆɔ
b)=7IKJG@(KJGB 0))ɔ
13
,
ǯȩǠȗưăĊɍɋɓȪɏȿɈɎɍɋơǥɒŴǠƞƉnjŤɔ
a)ɃɍɋŎDZɔ
b)ɃɄȵDzȉȯɒƘƓƷȫɍɋȧȳɒńðɔ
14
ȠǦɉɊ
!
{p
:
ȠǦɉɊƅȊǩɃɍɋȤǜɔ
ȠǦɑɌ
,
● dCǁǚǶɐȇƑɐȇzºɄNJĴDZ_ɓȭǒdž
ȯɒȬȇɌȠƍǷǓɋōƥĽŶɓ²ɓƔƙȬȇɌɏȼ
ĎȰĕŶɓĹȊªȠƍȬȇɌɔƟµŚɐȫɒǮ
ȇ7IJɅȐɓƔƙȬȇɌĎȰĕŶɓĹɏȼȝȩȠƍɔ
§şNêɐȎȾɐȇȷɇyÄȷ`ÖijƏɓȭȰijƏß
ɏȼÀÍȬȇɌȠƍǷǓɋɔ
● şɃƹǍƒſɓƔɏǟȜĖƏȶƛɔ
15
a
b
14
a
13
b
15

26
,
,
a)ȈDZɑɌɒäȜǥŢȿȤȯɑɌɔ
b)ǟȜɑɌɔ
17
ȠǦɉɊ
c)ǠȫƜɑɌɔ
d)ɃɑɌƷƿǽȸŧɔ
!
ɂ{p
:
ȭǒòǠȫɑɌɓƗdžɃĄźȤȯɔ
, ȘȣƗdž
a)ȢǺɆȳǴȈDZǬȸŵƁɔ
b)ȢǺɆȳǴȘȣƗdžɔ
16
a b
16
17
17 ab
cd
27
ȴ
ȴȋǤȘȹȞɉɊ
İȸ÷ȴȋǤȘȹȞɉɊȯȳɒǮɑɓȑɎƑŽljɔ
,
ȘȣɑɌǞɔ
,Ⱥ
a)ɂȢȍǺɆȳǴɓɃǤȘȹȞɉɊƟNJƈſǽȸȑǟȜɔ
b)ȴȁǤȘȹȞɉɊȯɒǮɑɔ
16
18
c)ȭǒǤȘȹȞɉɊƇŖöùɓɂȿƑŽljɔ
● ɉɊȝȩƎƨ24ŋȮûőɔ
d)ȴljōǹȧɓɃǤȘȹȞɉɊƜǨƿȑǬȸɓǢȧȤȯ
ɑɌǞɔ
ȠǦɉɊ
24h
18
b
a
18 c
d
28
Ƞ
ȠǦƳȆɉɊ
ƄǡǐɉɊɒɐɑɀ
ɂȢȍɉɊYǦĠɒǷǓȠǦ
,
ȘȣɑɌǞɔ
,
a)ȢȍǺɆȳǴƒȒɉɊǽȸɋɔ
b)ǟȜǡǐɉɊɔ
19
16
c)ȪɏȿɎƑŽljǡǐǡɊɔ
● ɉɊȝȩƎƨ24ŋȮûőɔ
d)ǟȜǡǐɉɊɔɃƜɒǡǐɉɊǨȫɍɋȓɔ
e)ȨȫɉɊǽȸɋȑǽȸɔ
19
24h
b
a
19 c
d
19 e
29
Ȟ
Ȟȁ
ȴȋɐɑɀƅɓɂğȊȤĔɐɑɀɍȻȑǭȒȨɆɔȪɏȿɈɎȐŨŰïȴȋÁȹ¨ɐɑɀɇŰïȏȲɔ
!
ɥɦɈɎƄəƮƾǒɒȶȽȾɘɗȴȋÁɁšıȴȋȟȽɔɥɦɃɐɑɀɚȥƑȓɔ
ȭȰȝȩɓɏȿɈɎšıɐɑɀȴȋɑɌǞɓɁɎőưɑƯȴȋɔ
ȖǏǔƲɏȼǻĩėãȠǖŜUɔ
Ƅ
HEPA
ɉɊɒɐɑɀ
ɐɑɀǯȏǵHEPAɉɊɓƱȊǩēȠǦȐGɉɊɔ
,
ȘȣɑɌǞɔ
,
a)ȢȍǺɆȳǴŏȀǬȸŵƁȿƈȣHEPAɉɊɓǢȧǟȜɉ
Ɋɔ
b)ɃƜɒHEPAɉɊǨȫȸŭɔ
ȴȁǐǡǮɑȧɓɂȴȋǤȘȹȞɉɊɓȑƵDŽȝȩȠǦǡǐ
ɉɊɁHEPAɉɊɔ
20
16
ȠǦƳȆɉɊ
20
b
a

30
GB Great Britain
BSH Home Appliances Ltd.
Grand Union House
Old Wolverton Road
Wolverton
Milton Keynes MK12 5PT
To arrange an engineer visit, to order spare parts and
accessories or for product advice please visit
www.bosch-home.co.uk
or call
Tel.: 0844 892 8979*
*Calls from a BT landline will be charged at up to
3 pence per minute. A call set-up fee of up to 6 pence
may apply.
HK Hong Kong,
ɢ
ɢɡ
BSH Home Appliances Limited
Unit 1 & 2, 3rd Floor
North Block, Skyway House
3 Sham Mong Road
Tai Kok Tsui, Kowloon
Hong Kong
Tel.: 2565 6151
Fax: 2565 6681
mailto:[email protected]
www.bosch-home.cn
SG Singapore,
Ɯɣɠ
BSH Home Appliances Pte. Ltd.
TECHPLACE I and
Mo Kio Avenue 10
Block 4012 #01-01
569628 Singapore
Tel.: 6751 5000
Fax: 6751 5005
mailto:[email protected]
www.bosch-home.com.sg
ģɤøğ

31
Nj
Njȗþ¾
ȦɐɑɀǪƀŕ2012/19/EUȰȤũɍɋȌɍdžȟȽ(LJNjɍ
ɋɇɍdžnjǵ– WEEE)ǷĺŔȷɓ½ǷĺŒŎǁǫɎȚƦǕ
ƀŕɒũɍɋƿƭɇƶȡɒČţǗɔ
ĠǨ
ȟȽĠǨ^ȥȹȞɐɑɀȚăƴčȓɅǪȔǧɓȿDžȹîƸƋǹɓǻȦɏŦŇDžƶȡɓɅƶȝȩ}ƪďɒƿƭNjȗɔ
ũɍɋ
ũɍɋɹȰg=ɏɎɒȶƸɔǻȦɓɂɃĄźɈɎɒɍɋĊųéĮǀɁƿƭȓŹɓěŝɏŇDžɍȡɔ
ȰȤƅɒNjȗȳźɓɂÕ)éĮǀɁƠɄȰȤWǥďɔ
NjȗɉɊȌɑɌ
ɉɊȌɑɌȿDžȹîƸƋȡɔſǁƄȰɅȼȿŐŊLJȶNjȗɒȶȱ<ɓɉɊȌɑɌ0ɏƠƼȐŨŐŊLJȶŧȁ
RPOR1.MN'&85QL(FS;H-MNRPOQ"*#%SE46:?IMN
D>L3/Q<QF+S
ȹŜɟ

Robert Bosch Hausgeräte GmbH
Carl-Wery-Straße 34
81739 München
GERMANY
www.bosch-home.com
Register your new device on MyBosch now and profit directly from:
-*#$&&#%&$%"$+"'$##!
-$$!&+*&!%"!"#&"!%
-%"'!&%"$%%"$%%#$#$&%
-& !'!##!&&!
-%+%%&""%" ##!%$(
Free and easy registration – also on mobile phones:
)))"%" " )"
Expert advice for your Bosch home appliances, need help with problems
or a repair from Bosch experts.
Find out everything about the many ways Bosch can support you:
)))"%" " %$(
"!&&&""'!&$%$%&!&&&%$($&"$+
!+"'"$'+!
"%" ##!
""!"$#
"'.,!&$
8001155403
990403