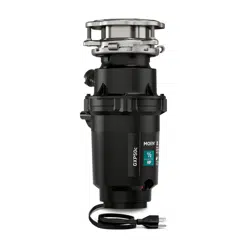
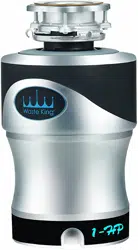
User manual Garbage Disposal
REMOVAL OF OLD DISPOSAL
TYPICAL INSTRUCTIONS, YOUR MODEL MAY VARY. If there is no disposal, skip to page 5
Turn off power if hard wired or unplug if cord is used.
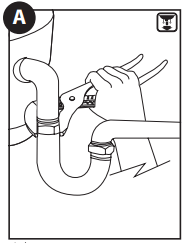
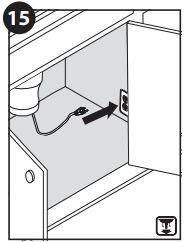
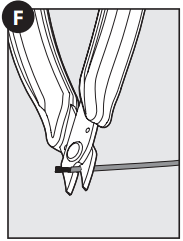
Unplug the disposal or if disposal is hardwired, turn off the electrical power at the circuit breaker or fuse box. Use a wrench to disconnect the drain line where it attaches to the disposal discharge tube.
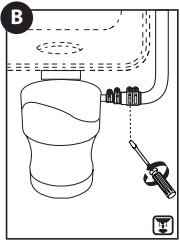
If a dishwasher is installed, make sure the dishwasher is not running. We recommend unplugging the dishwasher or turning off the electrical power at the circuit breaker or fuse box. Remove the dishwasher drain hose from the disposal.
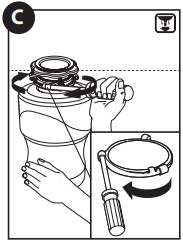
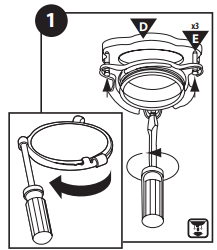
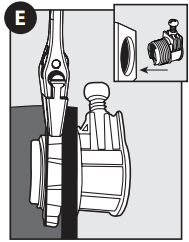
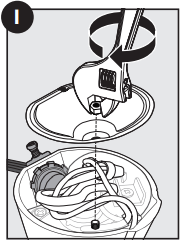
Caution: Be sure to support the disposal while performing this step or it may fall when the lower mounting ring is disconnected from the mounting assembly. Remove disposal from sink flange by turning lower mount ring to the left. If you are unable to turn the mount ring, tap on one of the extensions from the ring with a hammer. Some mounting systems have tubular extensions. Inserting a screwdriver into one tube will provide additional leverage for turning the mount ring. Some disposals may require the removal of a clamp. If your disposal is hard wired (metal shielded cable not utilizing a wall plug), complete step D. If you utilize a plug in cord, go on to step E.
TYPICAL INSTRUCTIONS, YOUR MODEL MAY VARY. Disclaimer: If there is no disposal, skip to page 5.
HARDWIRE REMOVAL
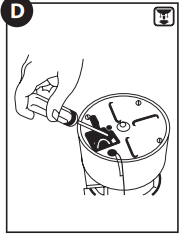
Turn off power at circuit breaker or fuse box. When the old disposal is removed from sink flange, disconnect any hardwired connections or unplug unit. Disclaimer: If you are not familiar with electrical power and procedures, call a qualified electrician.
A. Connect the disposal cord to 110-120 volt, 60 Hz AC current only.
B. This waste disposal is equipped with a factory installed plug-in cord with a three prong grounding plug. If a 110-120 volt, 60 Hz AC grounding outlet is not available, have a proper outlet installed by a qualified electrician, or see section on optional hardwiring in HARDWIRE INSTALLATION section.
C. This waste disposal requires that a dedicated switch with a marked “Off“ position. The switch shall be installed within sight of the sink opening or the disposal.
HELPFUL HINT: Unless you have a new home, this is a good time to clean out the trap and drain lines by running a drain auger or plumber’s snake before installing your new disposal.
Inspect current mounting ring seals, your new diposal may be compatible with the existing mounting ring and could be reused. If the existing sink flange is to be reused, go to page 6. If unable to be used, remove the old sink flange from the sink. Clean the sink thoroughly.
Parts List
A.Stopper
A1. Removable Splash Guard
B.Sink Flange
C.Fiber Gasket
D.Backup Flange
E.Screws (x3)
F. Mounting Ring
G.Snap Ring
H.Cushion Mount
I.Lower Mounting Ring
J.Disposal
K.Drain Elbow
L. Rubber Gasket
M.Screws
N.Powercord
INSTALLATION OF MOUNTING ASSEMBLY READ COMPLETELY BEFORE STARTING
NOTE: Pay close attention to the order of the mounting assembly parts, as they have been correctly assembled by the factory
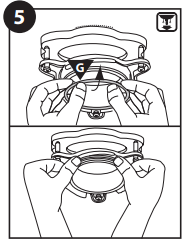
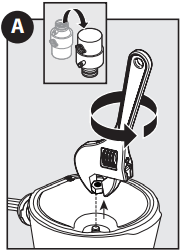
Disassemble the mounting assembly from the disposal by turning the lower mount ring until it disengages from the ramps on the mounting ring and the sink flange assembly can be removed. Loosen the 3-mount screws until the mounting ring can be moved up to the backup flange.
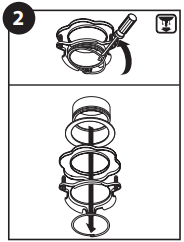
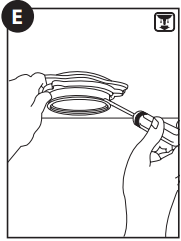
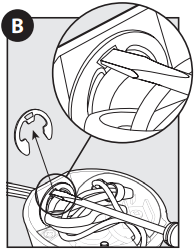
Use a flat blade screwdriver under one end of the snap ring to remove it from the sink flange. Remove the mounting ring, backup flange and fiber gasket from the sink flange. Note the sequence of these parts as they are stacked in the correct re-assembly sequence. Keep these parts together and set aside. Note: Mounting assembly can accommodate sink thickness up to 1/2".
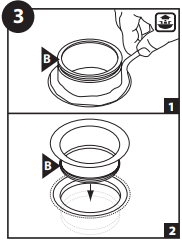
1) Clean the area around the sink drain where the disposal is to be mounted. (Evenly apply ½" thick rope of plumber’s sealant around Sink Flange (B).)
2) Position the Sink Flange (B) in the center of the sink drain opening. Push the sink flange down firmly to make a good seal.
Note: Excess sealant will be squeezed out during the installation and should not be cleaned up until installation is complete. DO NOT move or rotate the sink flange once seated or the seal may be broken. Note: Some sink manufacturers may recommend “Non- Staining” plumber’s sealant, check your sink care instructions. Using a towel in the sink to prevent scratching, place a weight on the sink flange to hold it in place until the sink flange assembly is secured from the underside of the sink.
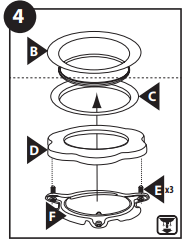
Re-assemble the Fiber Gasket (C), Backup Flange (D) and Mounting Ring (F) and Screws (E). From underneath the sink, place the fiber gasket, backup flange and then the mounting ring onto the flange in this order.
Holding all 3 parts up against the sink, pull the Snap Ring (G) open and press firmly into the groove on the sink flange until it snaps into place. Ensure Snap Ring (G) is locked into place. Failure to properly seat Snap Ring (G) in groove will prevent proper installation.
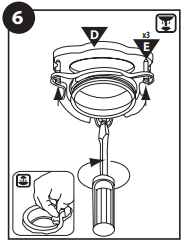
Tighten all three 1½" Screws (E) evenly and firmly against the Backup Flange (D). DO NOT OVERTIGHTEN! Trim off excess sealant in the sink.
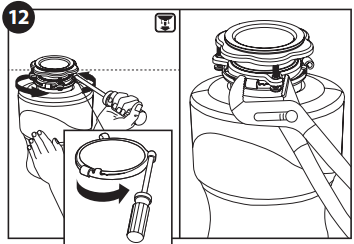
ATTACHING DISCHARGE ELBOW/ CONNECTING DISPOSAL TO MOUNT ASSEMBLY
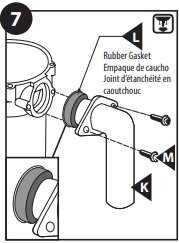
Install the provided pre-assembled discharge elbow/gasket assembly and flange. Install and tighten two screws evenly with a screw driver. DO NOT RE-USE THE EXISTING DISCHARGE ELBOW AND GASKET AS THE GASKET MAY NOT SEAL PROPERLY. USE ONLY THE NEW ELBOW, GASKET, FLANGE AND SCREWS PROVIDED. DO NOT OVER TIGHTEN!
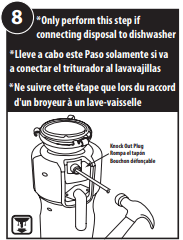
Using a blunt instrument (steel punch or wooden dowel), knock out the entire plug in the dishwasher inlet. Do not use a screwdriver or sharp instrument. IMPORTANT: Do not remove the gasket and place it on the disposal between the elbow and disposal. It must stay on the elbow to make a proper seal. When the plug has been knocked into the disposal, it should be removed using a pair of kitchen tongs and thrown away.
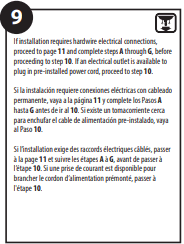
If installation requires hardwire electrical connections, proceed to page 11 and complete steps A through G, before proceeding to step 10. If an electrical outlet is available to plug in pre-installed power cord, proceed to step 10.
CONNECTING DISPOSAL TO MOUNT ASSEMBLY
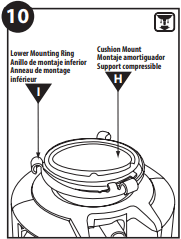
Before connecting the disposal to the mounting assembly under the sink, check that the Lower Mounting Ring (I) is in place and the Cushioning Mount (H) is engaged securely around the top lip of the disposal.
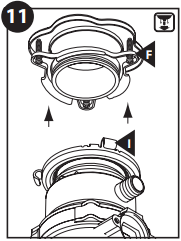
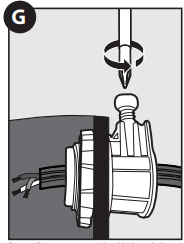
Align the discharge elbow with the drain connection and hang the disposal by aligning the 3 mounting tabs on the lower mounting ring with the slide-up ramps on the mounting ring.
Turn the lower mounting ring until all 3 mounting tabs lock over the ribs at the top of the ramps. If you are unable to turn the mount ring by hand, insert a screw driver through one of the tubes on the lower mounting ring to provide extra leverage to turn the mount ring. Use adjustable pliers for final tightening.

Reconnect the discharge elbow to the drain line. (the reversal of page 3, step A) Use a wrench to secure the drain line where it attaches to disposal discharge tube. DO NOT OVERTIGHTEN. If you are connecting to a dishwasher, go to Step 13. If not, remove any tools, packaging or materials used for installation from the sink. Make sure all plumbing connections are tight and in accordance with all plumbing codes and ordinances (If in doubt, contact a qualified plumber). Run water and check for leaks. Then got to page 11 for the electrical connection.

If you are utilizing a dishwasher, complete the following procedure. Connect the dishwasher hose using a hose clamp. A 7/8" inside diameter hose will fit the disposal. If the hose size is different, a Dishwasher Connector Kit should be used.
Plug into grounded receptacle, if available. If not available, proceed to page 13 and complete steps H and I to finalize hardwire connecting.
OPTIONAL STEPS FOR HARDWIRE INSTALLATION
(Complete Steps A through I prior to mounting disposal on sink.)
With power supply turned off, remove metal plate on the bottom of the disposal.
Remove clip with needle nose pliers or flathead screwdriver from the strain relief piece of the cord, and remove cord.
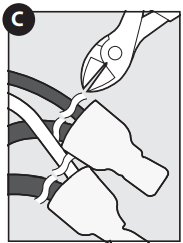
Cut white and black wires off close to the connectors.

Pull cord out of housing. Cut green ground wire close to the cord strain relief.
Insert cable connector (not included) into the access hole and secure by tightening the nut.
Strip the black, white and green wire coating from last 1/2" of each wire.
From wall, insert power supply cable through the connector and tighten connector.
Connect internal disposal wire leads to coordinating wire lead from electrical source. Connect white to white, black to black or red, and green ground wire to the ground lead with wire nuts (not included).
Push wires into the disposal and replace the metal bottom plate (do not displace plastic shield with label).
OPERATING INSTRUCTIONS
(NOTE: Reference IMPORTANT SAFETY INSTRUCTIONS during operation of the disposal)
The Anti-Jam Swivel Impellers make a clicking sound as they swing into place. This indicates normal operation.
A. Remove the sink stopper. Turn on a medium flow of cold water.
B. Turn the switch to the “ON” position; your motor is turning at full speed and ready to use.
C. Scrape garbage into the disposal. Down the drain go table scraps, peelings, rinds, seeds, pits, small bones and coffee grounds. To speed up garbage disposal, cut or break up large bones, rinds and cobs. Large bones and fibrous husks require considerable grinding time and are more easily thrown away with other trash.
Important: Do not be alarmed that the disposal slows down while grinding. The disposal is actually increasing torque (grinding power) and is operating under normal conditions.
D. Before turning the disposal off, let the water and the disposal run for approximately 15 seconds after shredding stops. This assures that all waste is thoroughly flushed through the trap and drain.
E. Run cold water during the disposal operation. This will keep waste and fats solid so the disposal can properly flush away the particles. It is not recommended to use hot water while running the disposal.
TIPS FOR SUCCESSFUL OPERATION
A. Be sure the disposal is empty before using your dishwasher so it can drain properly.
B. You may want to leave the stopper in the drain when not in use to prevent utensils and foreign objects falling into the disposal.
C. Your disposal is ruggedly built to give you many years of trouble free service. It will handle all normal garbages, but it will NOT grind or dispose of such items as plastic, tin cans, bottle caps, glass, china, leather, cloth, rubber, string, clam and oyster shells, aluminum foil or feathers. These items may cause damage to the disposal and the plumbing system
CLEANING AND MAINTENANCE
DO NOT ATTEMPT TO LUBRICATE YOUR DISPOSAL! The motor is permanently lubricated. The disposal is self-cleaning and scours its internal parts with each use. NEVER put lye or chemical drain cleaners into the disposal, as they cause serious corrosion of metal parts. If used, resulting damage can be easily detected and all warranties are void. Mineral deposits from your water can form on the stainless steel turntable, giving the appearance of rust. DO NOT BE ALARMED, the stainless steel turntables used will not corrode or rust.
TROUBLESHOOTING
Before seeking repair or replacement, we recommend that you review the following:
NOISES:
- (Other than those during grinding of small bones and fruit pits): These are usually caused by accidental entry of a spoon, bottle cap, dishwasher knockout plug (page 8, step 8) or other foreign object.
- To correct this, turn off the electrical switch and the water. After the disposal has stopped running, remove the object from the disposal. WARNING: Never put your hands or fingers inside disposal.
- A humming noise with no grinding could be that the turn table is not rotating (see below).
UNIT DOES NOT START:
- Unplug the power cord or turn either the wall switch or breaker box switch to the “OFF” position, depending on your model and wiring configuration.
- Remove the stopper.
- Check to see if the turntable will rotate freely, in either direction, using a wooden spoon.
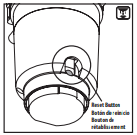
- If the turntable rotates freely, check the re-set button to see if it has been tripped.
- The re-set button is red and located opposite the discharge elbow, near the bottom. Push the button in until it clicks and remains depressed.
- If the re-set button has not been tripped, check for shorted or broken wires connecting to the disposal.
- Check the electrical power switch, fuse box or circuit breaker.
- If wiring and electrical components are intact, the unit may have an internal problem that requires service or replacement.
- NOTE: if you are not familiar with electrical power and procedures, call a qualified electrician.
IF THE TURNTABLE DOES NOT ROTATE FREELY:
- Turn off the disposal and the water, then power off.
- After the disposal has stopped running, check for any foreign object(s) lodged between the turntable and grind ring.
- Dislodge any object(s) by rotating the turntable, in either direction, with a wooden spoon and remove the object(s). Unjamming wrench service kit available for order on moen.com part number 1037.
- If no foreign object is present, there may be an internal problem that requires service or replacement.
- After turning the power back on, press the red reset button before resumming use.
LEAKS:
If the unit leaks at the top, it may be due to:
- Improper seating of the sink flange (gasket centering, sealant or tightening). – Re-check the installation.
- Mount Screws not tightened properly. – Re-check the installation.
- Defective or improperly installed Hush Cushion. – Re-check the installation.
If the unit leaks at the waste elbow or from bottom of unit, it may be due to:
- Improper installation of the discharge elbow and gasket. – Re-check the discharge elbow & gasket installation. (see page 8, step 7)
- Improper tightening of elbow flange screws. – Re-check the discharge elbow and flange installation. (see page 8, step 7)
If unit leaks at dishwasher hose connection:
- Check the hose and clamp connection.
If the unit leaks from elsewhere, there may be an internal problem that requires service or replacement.