Part Number: 50011-4
Upright Bike
Recumbent Bike
90 Series Owner’s Manual
Important Safety Instructions
2
Important Safety Instructions
Read all instructions before using the bike. Be sure you understand
operation of the bike before use. SAVE THESE INSTRUCTIONS.
Veuillez lire toutes les instructions avant d'utiliser le tapis roulant.
VEUILLEZ CONSERVER CES INSTRUCTIONS.
WARNING
Keep Children under the age of 13 away
from machine.
AVERTISSEMENT
Garder les enfants de moins de 13 ans loin
de la machine.
WARNING
Heart rate monitoring systems may be
inaccurate. Over exercising may result in
serious injury or death. If you feel faint stop
exercising immediately.
AVERTISSEMENT
Les systèmes de surveillance de la
fréquence cardiaque peuvent être inexacts.
L'exercice excessif peut entraîner des
blessures graves ou la mort. Si vous sentez
faible, arrêtez de vous entraîner
immédiatement.
WARNING
This product contains chemicals known to the
state of California to cause cancer and birth
defects or other reproductive harm.
AVERTISSEMENT
Ce produit contient des produits chimiques
reconnus par l’état de Californie comme pouvant
causer le cancer, des anomalies congénitales ou
d’autres troubles de la reproduction.

Important Safety Instructions
3
WARNING
To reduce the risk of injury to persons:
• Do not use this product without consulting your doctor
first if you are suffering from any illness, condition or
disability which affects your ability to exercise.
• Do not use this product without supervision present if
you are suffering from any illness, condition or
disability. Failure to do so can result in serious injury.
• Close supervision is necessary when this unit is used
by or near children or disabled persons.
• Keep the area around the bike clear of any
obstructions, including walls and furniture. Be sure no
objects that can impede or entangle the pedals are
near or underneath the pedals when you are using the
bike.
• Allow a minimum clearance of at least 3 feet on
each side of the bike.
• Allow a minimum clearance of at least 18 inches to
the front and rear of the bike.
• Do not allow other people to interfere with the bike or
the user when the bike is in use. Do not tip the bike
when in use.
• Always wear shoes with rubber or high-traction soles.
Do not operate bike with bare feet, slippers, high heels,
leather soles or spikes.
• Use the bike only for its intended use as described in
this manual. Do not use attachments not recommended
by Landice.
• Do not drop or insert objects into any opening on the
bike. Be sure no objects are near or beneath the bike
while you are using it.
• Use caution when stepping onto or off the bike. Never
sit facing backward while using the bike. Always face
forward during your workout.

Important Safety Instructions
4
AVERTISSEMENT
Pour réduire le risque de blessure corporelle :
• N'utilisez pas ce produit avant d'avoir consulté votre
médecin si vous souffrez de tout problème de santé,
maladie ou handicap pouvant affecter votre capacité
à courir, marcher ou faire de l'exercice.
• N'utilisez pas ce produit sans surveillance si vous
souffrez de tout problème de santé, maladie ou
handicap pouvant affecter votre capacité à courir,
marcher ou faire de l'exercice. Le non-respect de ces
recommandations peut entraîner des blessures
graves si vous chutez lorsque le tapis roulant est en
mouvement.
• Une surveillance étroite est nécessaire lorsque le
tapis roulant est utilisé par des enfants, des
personnes invalides ou handicapées ou à leur
proximité.
• Gardez la zone autour du vélo dégagée de toute
obstruction, y compris des murs et des meubles.
Assurez-vous qu'aucun objet pouvant gêner ou
emmêler les pédales ne se trouve à proximité ou sous
les pédales lorsque vous utilisez le vélo.
• Gardez au moins 1M de dégagement de
chaque côté du vélo.
• Gardez au moins 46 cm de dégagement à
l'avant et à l'arrière du vélo.
• Ne laissez personne interférer avec le vélo ou avec
l'utilisateur lorsque le vélo est en cours d'utilisation.
Ne pas renverser le vélo lors de son utilisation.
• Portez toujours des chaussures à semelles en
caoutchouc ou à forte traction. Ne conduisez pas de
vélo pieds nus, pantoufles, talons hauts, semelles en
cuir ou pointes.
• N'utilisez de vélo que dans le cadre prévu et décrit
dans ce manuel. N'utilisez aucune pièce
supplémentaire non recommandée par Landice.
• Ne laissez pas de peluches, cheveux, poussières ou
débris bloquer les ouvertures d'aération.
• Faites preuve de prudence lorsque vous montez ou
descendez du vélo. Ne vous assoyez jamais à
l’arrière lorsque vous utilisez le vélo. Toujours faire
face à l'avant pendant votre séance d'entraînement.
Important Safety Instructions
5
WARNING
Failure to observe the following warning
statements can result in serious injury!
• Do not operate bike where aerosol (spray) products are being used or where
oxygen is being administered.
• Do not operate outdoors, by a swimming pool or in areas of high humidity.
• Never operate the bike with the air openings blocked. Keep the air openings free
of lint, hair and dust.
• Never place containers filled with liquid on the bike, except in the bottle holder.
Containers should be securely covered.
• Never operate bike if it is not working properly or is damaged. Call your selling
dealer immediately for examination and repair.
• To prevent entanglement and injury, never attempt to operate the pedals by
hand. Never let the pedals support your full weight. Always ride sitting down, do
not stand up on the bike at any time. Doing so could result in personal injury and
damage to the bike.
AVERTISSEMENT
Le non-respect des avertissements qui
suivent peut entraîner de graves blessures !
• N'utilisez pas le vélo d'appartement lorsque des produits aérosols (sprays) sont
utilisés ou lorsque de l'oxygène est administré.
• N'utilisez pas le vélo d'appartement en extérieur.
• Ne faites jamais fonctionner le vélo avec les ouvertures d’air obstruées. Gardez
les ouvertures d’air exemptes de peluches, de cheveux et de poussière.
• Ne placez jamais de bidons remplis de liquide sur le vélo, sauf dans le porte-
bouteille. Les conteneurs doivent être bien couverts.
• N'utilisez jamais le vélo s'il ne fonctionne pas correctement ou s'il est
endommagé. Appelez immédiatement votre revendeur pour un examen et une
réparation.
• Pour éviter tout enchevêtrement et toute blessure, n'essayez jamais d'actionner
les pédales à la main. Ne laissez jamais les pédales supporter tout votre poids.
Roulez toujours assis, ne vous tenez jamais debout sur le vélo. Cela pourrait
entraîner des blessures et endommager le vélo.
Quick Start Guide
6
Quick Start Guide
Using the Control Panel
Note: Landice bikes are self-powered and require users to pedal
at all times to keep the display on. If you stop pedaling the
display will turn off and all statistics will be lost.
This manual covers the Landice Recumbent and Upright Bikes. For
detailed instructions, see “Cardio Bike Operation” on page 35 or
“Operation: Landice Achieve Control Panel” on page 51.
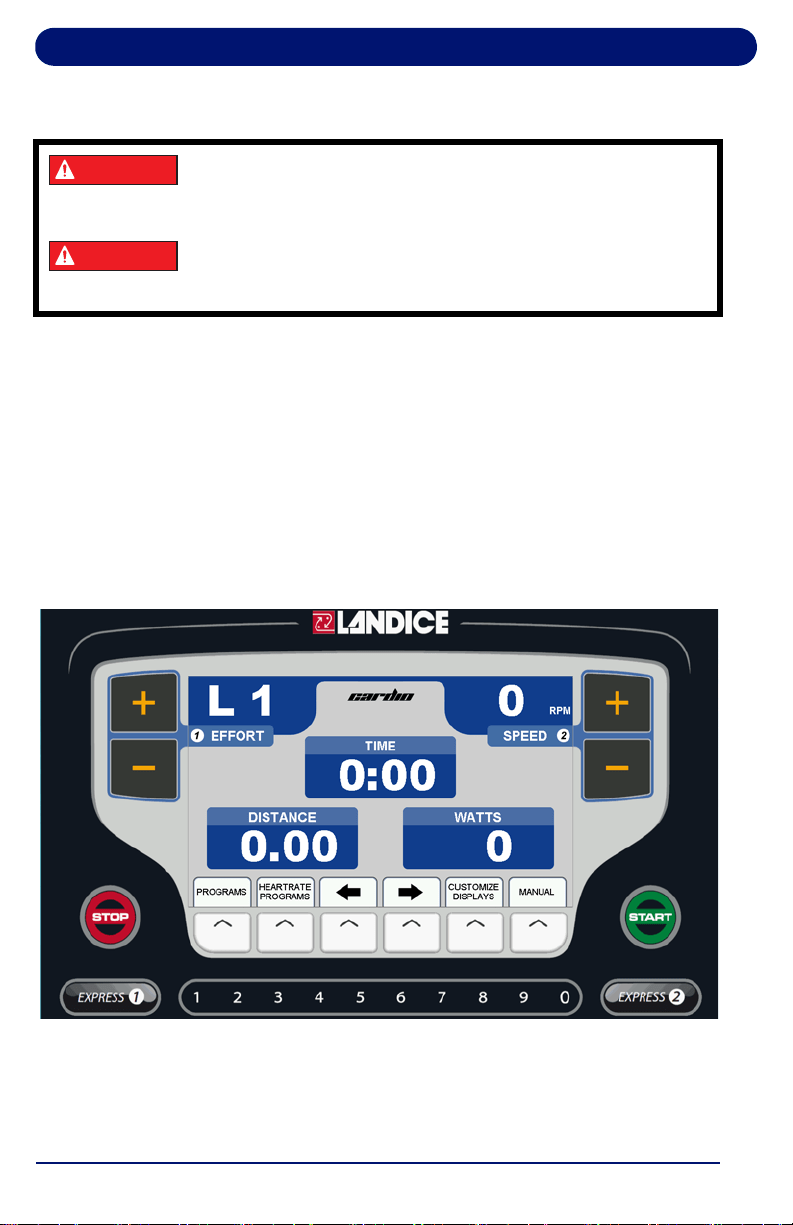
Cardio Bike Console
DANGER
Be aware of loose clothing, shoe laces and any
other item of clothing that may become entangled
in the pedals.
DANGER
Faites attention aux vêtements amples, aux lacets
de chaussures et à tout autre vêtement qui
pourrait se prendre dans les pédales.
Quick Start Guide
7
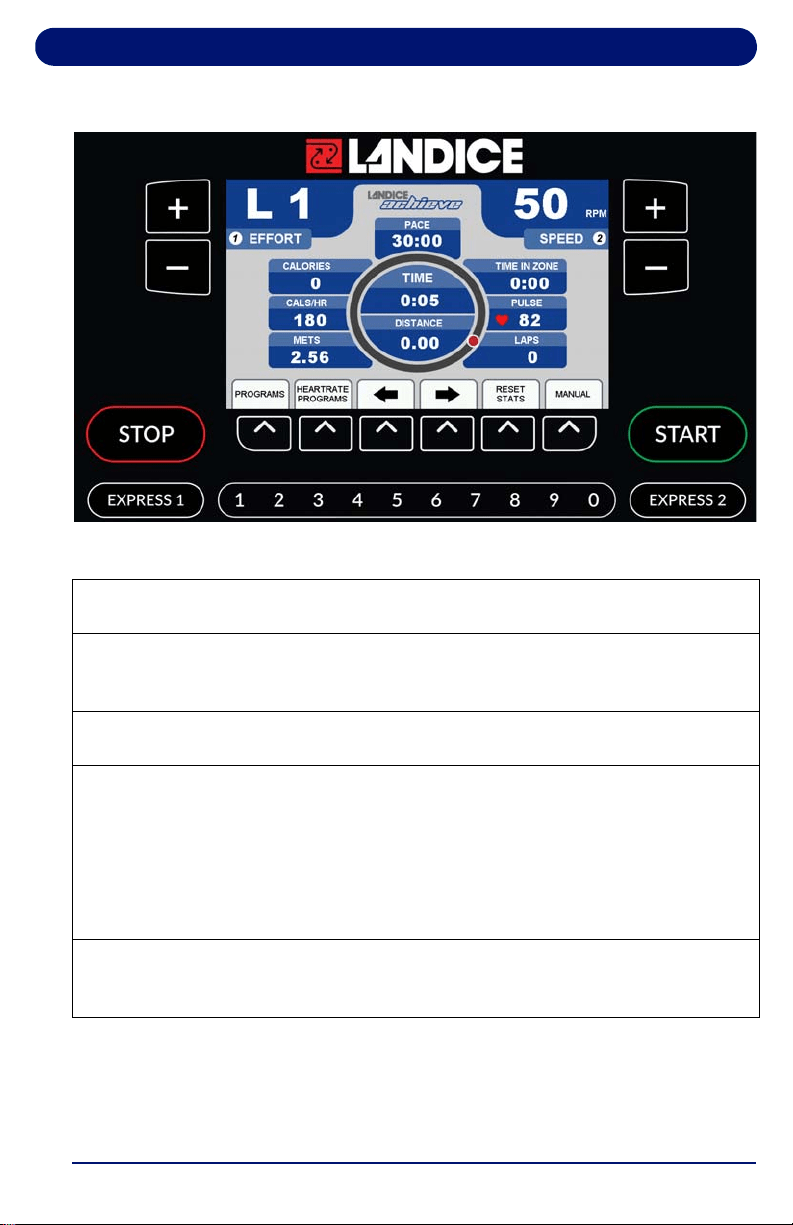
Landice Achieve Bike Console
Bike Controls: Quick Start Guide
To start the bike: Begin pedaling and after a few seconds the display will
light. The starting effort level is set to Level 1.
To turn off the bike: Press STOP once to pause the bike. Press STOP twice
to power down the bike. The display console will shut off and all current
statistical information will be cleared.
To view your speed in different units: Press the SPEED (+ / -) to select
MPH, Km/hr, or Revolutions per Minute.
To change effort level:
Press and hold EFFORT (+) key to increase effort. Pressing for more than
2 seconds raises effort faster. Release key when desired effort is shown on
EFFORT display.
Press and hold EFFORT (–) key to reduce effort. Pressing for more than
2 seconds reduces effort faster. Release key when desired effort is shown in
the EFFORT display.
To view different screens during workout:
Use the arrow keys at any time to choose the display screen that best suits
your workout.

Quick Start Guide
8
Switching English/Metric Display Units
The display shows English units (mph for speed, lb for weight) by
default.
To change to metric units (kilometers per hour for speed and kilograms
for weight):
• Cardio: press and hold 3, 9 and START simultaneously while the unit is
off, then begin pedeling. Use the + or - keys to move up and down the list
and select Toggle Units. Then press the START button to select setting.
Press STOP to save and exit.
• Landice Achieve: begin pedaling, then hold 3 and 9 simultaneously
during the boot-up screen, then release all. Use the + or - keys to move
up and down the list and select Toggle Units. Then press START to select
the setting.
Press STOP to save and exit.
Repeat the same steps to return the display to English units if desired.

Contents
9
Contents
Important Safety Instructions ................................................................2
Quick Start Guide....................................................................................6
1. Introduction ..........................................................................................11
1.1. Before You Begin ......................................................................... 11
1.2. Heart Rate Monitoring .................................................................. 15
1.2.1. What is exercise intensity?.............................................. 15
1.2.2. What is maximum heart rate? ......................................... 15
1.2.3. Why should I monitor exercise intensity? ........................ 16
1.2.4. How do I determine my Target Heart Rate Zone? .......... 17
1.3. Heart Rate Monitors ..................................................................... 17
1.3.1. Wireless Chest Strap Monitoring System ........................ 18
1.3.2. Contact Heart Rate Monitoring System........................... 18
1.4. Program Capabilities .................................................................... 19
2. Recumbent Bike Assembly .................................................................21
2.1. Tools Needed ............................................................................... 21
2.2. Unpacking .................................................................................... 21
2.3. Assembly...................................................................................... 22
3. Upright Bike Assembly ........................................................................29
3.1. Tools Needed ............................................................................... 29
3.2. Unpacking .................................................................................... 29
3.3. Assembly...................................................................................... 30
4. Cardio Bike Operation .........................................................................35
4.1. Cardio Control Panel .................................................................... 35
4.2. Display Features .......................................................................... 37
4.3. Using the Cardio Bike................................................................... 39
4.4. Using the Built-in Programs.......................................................... 40
4.4.1. Description ...................................................................... 40
4.4.2. Running a Built-In Program ............................................. 41
4.5. Cardio User Programs.................................................................. 42
4.5.1. Learn Mode ..................................................................... 44
4.6. Specific Goal Programs................................................................ 45
4.7. Heart Rate Control Programs....................................................... 46
4.7.1. Built-in HRC Programs .................................................... 47
4.7.2. User-Defined Heart Rate Programs ................................ 48

Contents
10
5. Operation: Landice Achieve Control Panel ....................................... 51
5.1. Landice Achieve Control Panel.................................................... 51
5.2. Display Features.......................................................................... 53
5.3. Using the Landice Achieve Bike .................................................. 55
5.4. Using the Built-in Programs ......................................................... 56
5.4.1. Description ...................................................................... 56
5.4.2. Running a Built-In Program ............................................ 58
5.5. Landice Achieve User Programs ................................................. 59
5.5.1. Learn Mode..................................................................... 60
5.6. Specific Goal Programs ............................................................... 61
5.7. Heart Rate Control Programs ...................................................... 62
5.7.1. Built-in HRC Programs ................................................... 63
5.7.2. User-Defined Heart Rate Programs................................ 64
6. Maintenance and Troubleshooting .................................................... 67
6.1. Cleaning....................................................................................... 67
6.2. Maintenance ................................................................................ 68
6.2.1. Pedals............................................................................. 68
6.2.2. Moving the Bike .............................................................. 68
6.3. Self-Diagnostics........................................................................... 68
6.4. Hidden Menus.............................................................................. 69

11
1. Introduction
Landice has placed over 100,000 treadmills, ellipticals and
bikes in the harshest commercial environments around the
world, where our fitness equipment has proven its strength and
durability. Landice products are designed by a world-class
development team whose innovation defines the leading edge
of high-end fitness.
This manual covers upright and recumbent bikes. Be sure you
understand how to operate your bike’s control panel before
using the bike.
1.1. Before You Begin
Please do the following before you start to exercise on your
bike:
•
Register your bike. Landice backs your bike with a strong
warranty. For the factory to respond if your bike has a
problem, we need your warranty information on file. Register
online at the link below.
http://www.landice.com/support/product-registration
• Select the proper location. The bike should be installed in a
climate-controlled room.
• See “Recumbent Bike Assembly” on page 21.
• See “Upright Bike Assembly” on page 29.
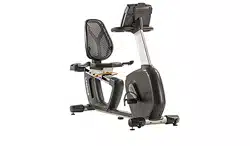
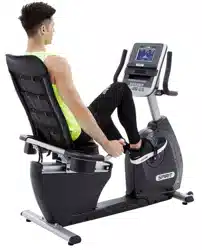
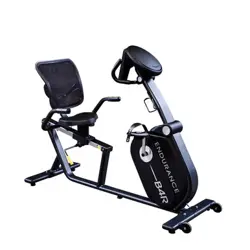
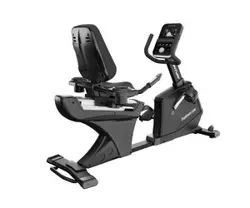
• Familiarize yourself with the features of the bike, shown in the
following figures.
Introduction
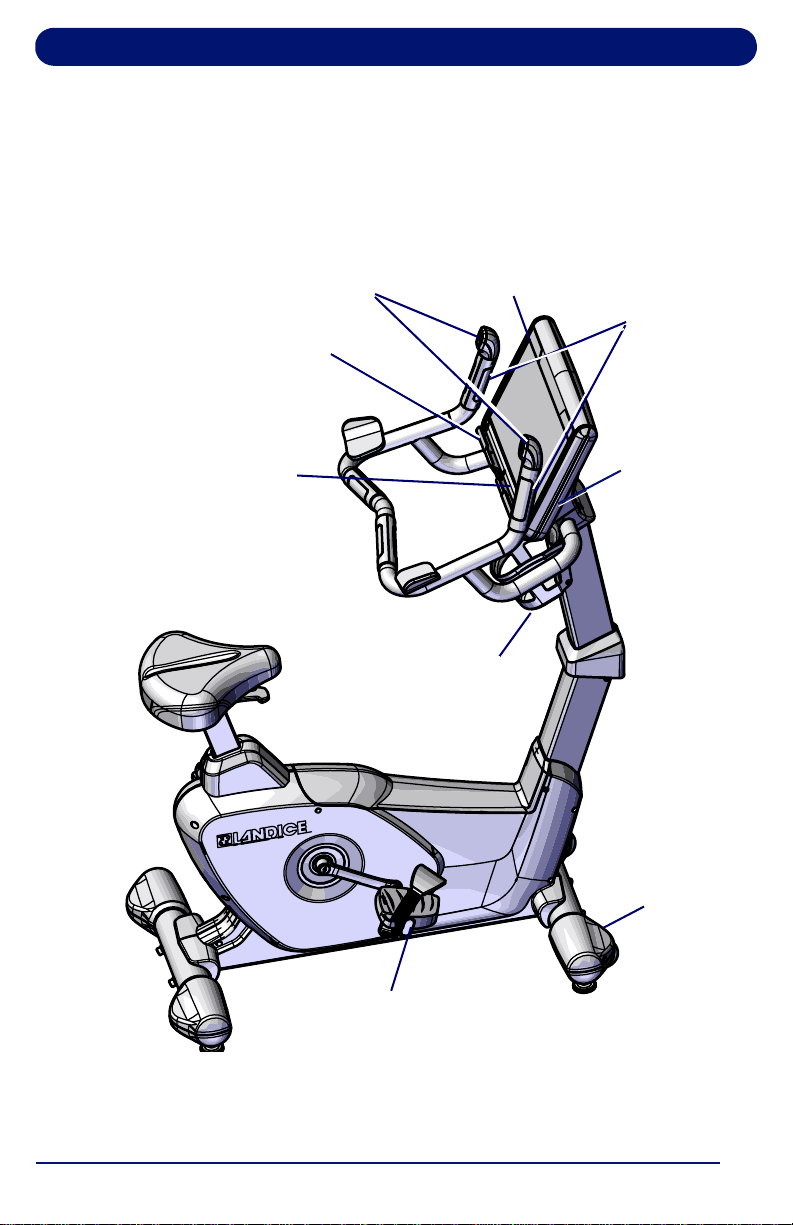
12
Figure 1-1. Upright Bike Features and Controls
Wheels
USB Port
(Cardio)
Control Panel
Reading Rack
(Cardio only)
Bottle Holder
Rapid Buttons
Pedal
Pulse
Grips
USB Port
(Landice
Achieve)
Introduction
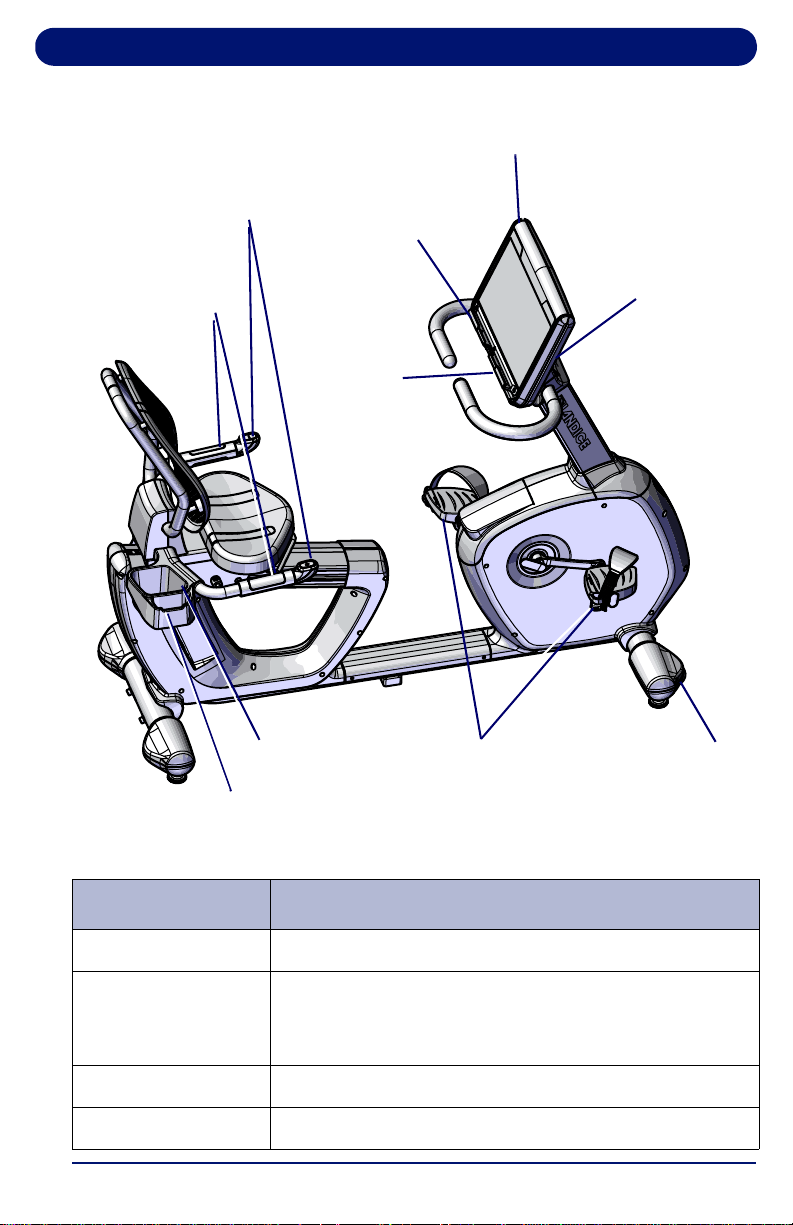
13
Figure 1-2. Recumbent Bike Features and Controls
Wheel
Pulse
Grips
USB Port
(Cardio)
Control Panel
Reading Rack
(Cardio only)
Bottle Holder
Rapid Buttons
Pedals
Accessory Tray
USB Port
(Landice
Achieve)
Table 1-1 Bike Features and Controls
Item Description
Control Panel Provides workout displays and controls.
USB Port Provides a charging port for most devices up to
600mA. Service use only: allows software
updates.
Reading Rack Holds reading material (Cardio only).
Accessory Tray Provides accessory storage.
Introduction
14
Pulse Grips (2) Detects pulse when hands are placed on the
grips, allowing bike to calculate and display heart
rate.
Rapid Resistance
Buttons (2)
Allow you to easily change the resistance without
releasing the Pulse Grips.
• Recumbent bikes: located on the handles
next to the seat.
• Upright bikes: located by the console at the
top of the handles.
Bottle Holder Holds bottles/cups.
CAUTION
To help avoid injury, do not sit on the seat while
making adjustments. Make sure the seat is
secure before beginning your workout.
ATTENTION
Pour éviter les blessures, ne vous asseyez pas
sur le siège faire des ajustements. Assurez-vous
que le siège est sécurisé avant de commencer
votre séance d'entraînement.
Seat Adjustment Located beneath the seat to accommodate users
of all heights.
•
Recumbent bike: pull up the adjustment handle
and slide seat forward or backward along
inclined path to desired position. The seat
remains level for maximum comfort.
•
Upright bike: pull up the adjustment handle and
move seat up or down to desired height.
Table 1-1 Bike Features and Controls (Continued)
Item Description

Introduction
15
1.2. Heart Rate Monitoring
This section provides basic concepts of heart rate monitoring
so you can better understand how to use it to reach the fitness
level you desire.
1.2.1. What is exercise intensity?
Exercise intensity is simply a measure of how hard you are
working at a given time during exercise. The ACSM, the world’s
leading medical and scientific authority on sports medicine and
fitness, recommends that every individual involved in an
exercise program know how hard his/her body is working
during exercise.
Your heart provides key information for determining how
intensely you are working during exercise. Your heart rate (how
many times your heart beats per minute) is really an efficiency
rating for your entire body. The number of times your heart
beats during each minute of exercise is a measurement of the
intensity of the exercise. If your heart rate is low, exercise
intensity is low; if your heart rate is high, your exercise intensity
is high.
1.2.2. What is maximum heart rate?
Maximum Heart Rate (MHR) is the maximum attainable heart
rate your body can reach before total exhaustion. True
maximum heart rate is measured during a fatigue or “stress”
test. This test must be done in a clinical setting and is not
practical or accessible for most people.
WARNING
The use of this formula assumes no
underlying heart or respiratory disease or
other condition, which could be adversely
affected by exercise. Consult your doctor
before using this equipment!
AVERTISSEMENT
L'utilisation de cet équipement
impliquel'absence de maladie cardiaque ou
respiratoire ou autre problème de santé
susceptible d'être affecté par l'exercice
physique. Consultez votre médecin avant
d'utiliser cet équipement !

Introduction
16
Your maximum heart rate can be established with a high
degree of accuracy using the following simple formula:
Estimated Maximum Heart Rate = 220 minus your age.
If John is 35 years old, what is his estimated maximum heart
rate?
John’s estimated maximum heart rate is: 220 - 35 = 185
185 beats per minute is the estimated maximum number of
times John’s heart can beat before his body would fatigue or
“max out.” This number is extremely helpful because it
indicates the absolute highest exercise intensity John can
handle before his body wears out. The ACSM says that during
exercise, John should keep his heart rate below his maximum
so that he will not become exhausted and have to quit. In fact,
the ACSM gives John a specific percentage range of his
maximum heart rate to exercise in, known as his Target Heart
Rate Zone.(THRZ).
1.2.3. Why should I monitor exercise intensity?
Your heart is the most important muscle in your body and, like
all muscles, must be exercised regularly to remain strong and
efficient. According to fitness experts, exercise is more effective
when you work out in a specific heart rate range or zone. This
is referred to as your Target Heart Rate Zone (THRZ) and is
reflected by the number of heart beats per minute. This zone
can vary greatly depending on your age, fitness level and
various other factors. If your heart rate is too low during
exercise, your body reaps little or no benefit. This means you’re
not likely to see the results you want, like weight loss or
increased endurance. If your heart rate is too high during
exercise, you may tire too quickly, become fatigued or even run
the risk of injury.
Monitoring exercise intensity helps you to stay at a level of
exercise that allows you to accomplish your goals. In fact, the
ACSM recommends that, in order to get the most benefit from
your cardiovascular exercise, you should work within your
THRZ for at least 20 to 60 minutes per workout, 3 to 5 times per
week. Knowing your exercise intensity (THRZ) will allow you to
work at the right level of exercise to accomplish this.

Introduction
17
1.2.4. How do I determine my Target Heart Rate Zone?
Your THRZ represents the minimum and maximum number of
times your heart should beat in one minute of exercise. The
ACSM recommends that all individuals should work within a
Target Heart Rate Zone of 60% to 85% of Maximum Heart
Rate. This means that your heart rate during exercise should
not fall below 60% or rise above 85% of your maximum heart
rate. Let’s look at John from our earlier example. John is 35
years old, so his estimated maximum heart rate is 220 minus
35, or 185 beats per minute (bpm). The ACSM
recommendation is that John should exercise between 60%
and 85% of 185 beats per minute to stay in his THRZ. Let’s
determine John’s THRZ:
• John’s estimated maximum heart rate: 185 bpm
• Lower target limit: 185 (MHR) X 0.6 = 111 bpm
• Upper target limit: 185 (MHR) X 0.85 = 157 bpm
• John’s target heart rate zone: 111-157 bpm
111-157 beats per minute is the range or zone for John’s heart
rate during exercise in order to achieve his goals. If John is a
beginning exerciser, he’ll want to stay at the low end of his
THRZ. If John is a more advanced exerciser, he may want to
work at the higher end of his THRZ to challenge himself more.
The following list shows the different intensity levels within a
target heart rate zone:
• Beginner: 60% of MHR
• Weight Loss: 75% of MHR
• Aerobic: 85% of MHR
1.3. Heart Rate Monitors
Heart rate monitors are built into the bike’s pulse grips, and a
wireless chest strap monitor is available as an option.
Exercising too hard can put you at a risk for injury. A heart rate
monitor reminds you of the safe and effective heart rate
intensity at which you should exercise and warns you if your
workouts go too far.
Introduction
18
If you want to reach your exercise goals, it’s important to stay in
your THRZ during workouts. A heart rate monitor provides a
reminder of the intensity and quality of each workout session.
Landice heart rate monitors are used to monitor your level of
exercise intensity during workouts. Pulse meters have a high
margin for error. Manual pulse measurements during exercise
can result in errors as high as ±15 beats per minute, with the
risk of potential error increasing as heart rate increases.
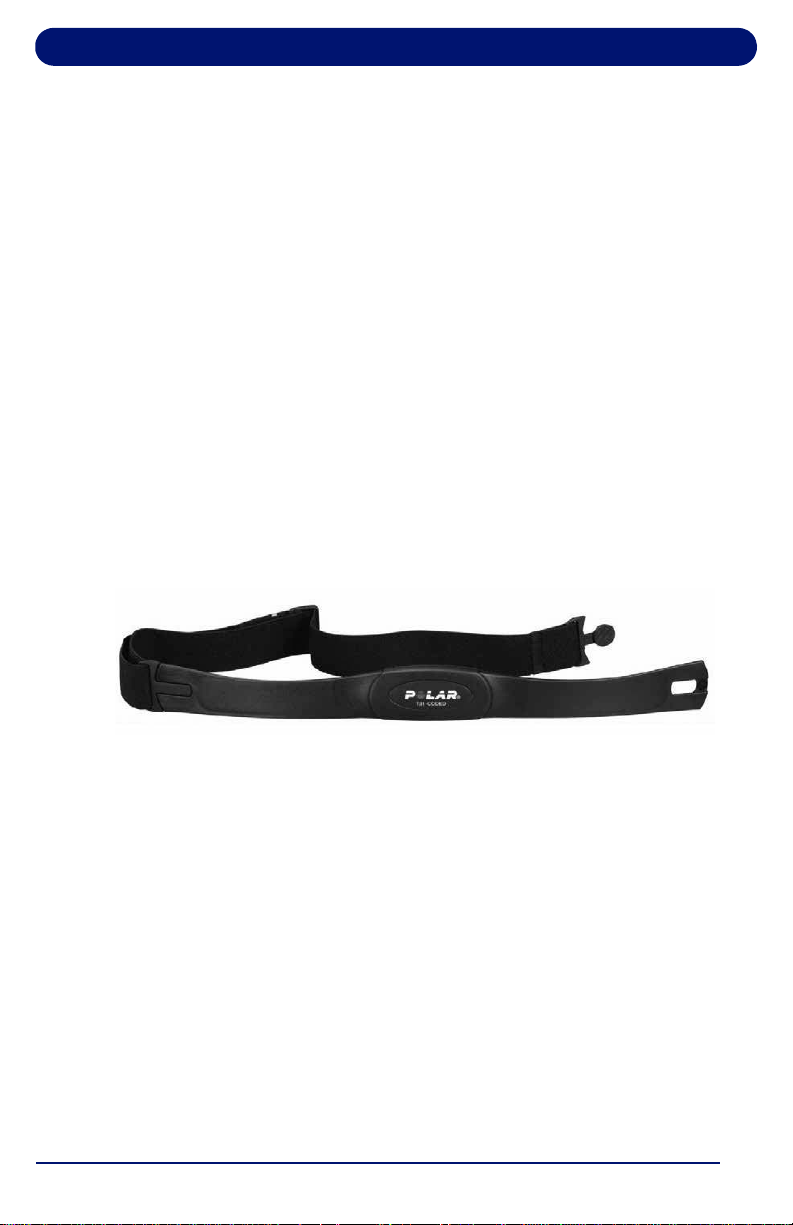
1.3.1. Wireless Chest Strap Monitoring System
Note: The wireless chest strap is optional.
The Wireless Chest Strap transmitter works best against bare
skin. Because sweat (salt water) is an electrical conductor, the
transmitter will work over a T-shirt if the shirt is wet with sweat.
If you are having trouble getting an accurate pulse reading, try
wearing the belt against bare skin.
Figure 1-3. Wireless Chest Strap Transmitter
Center the transmitter on the chest as high under the pectoral
muscles (breasts) as possible. Tighten the strap so that the belt
is as tight as possible without being uncomfortable.
1.3.2. Contact Heart Rate Monitoring System
The Contact Heart Rate Monitoring System can be used in
place of the wireless chest strap to perform any of the following
functions:
• Monitor your Time in Zone
• Heart Rate Control (HRC) program adjustment
• Help you maintain your Target Pulse

Introduction
19
To use the Contact Heart Rate Monitoring System:
1. Switch to any screen that shows Pulse.
2. Grab the pulse grips. When you place your hands on the
grips the display flashes. The pulse will “beat” briefly and
then display your heart rate. Your heart rate will be
continuously monitored while your hands remain on the
grips.
The HRC programs make speed and effort adjustments to
maintain your target heart rate while your hands remain on the
grips. If you remove your hands the HRC programs will not
change speed or effort until you place your hands on the grips.
Note: If you are wearing the wireless chest strap, the heart rate
from the pulse grips overrides the wireless signal from the
chest strap while your hands are on the pulse grips. When
you release the grips, the bike uses the wireless chest
strap signal for pulse calculation.
1.4. Program Capabilities
The bike has the following program capabilities:
• Built-in Programs: You enter the program’s maximum time
and effort.
• Cardio: see page 40.
• Landice Achieve: see page 56.
• User-Defined Programs: A User-Defined Program looks
and runs exactly like a Built-In Program. The primary
difference between Built-In and User-Defined Programs is
customization. User-Defined Programs allow you to manually
edit individual segments.
• Cardio: see page 42.
• Landice Achieve: see page 59.
• Specific Goal Programs: The numeric keypad is used to
enter Time, Calorie and Distance.
• Cardio: see page 45.
• Landice Achieve: see page 61.


21
2. Recumbent Bike Assembly
2.1. Tools Needed
The Landice recumbent bike is shipped with tools and
hardware necessary for assembly and installation. A sharp
utility knife and/or diagonal cutters will aid in removing plastic
strapping.
• 13-16 mm open end combination wrench
• Cross head #2 (Phillips) screwdriver
• #8 Hex key wrench
• #6 Hex key wrench
• #5 Hex key wrench
• #4 Hex key wrench
• Optional: 5/8 inch open end or adjustable wrench for leveling
bike if necessary (not included)
2.2. Unpacking
Unpacking and installation of the bike should be done by a
qualified technician. The packaged bike is heavy and weighs
290 lb (132 kg).
WARNING
To avoid injury, use caution when moving
and lifting the bike during unpacking and
assembly. Two people are recommended
when removing bike base from shipping
pallet.
AVERTISSEMENT
Pour éviter toute blessure, faites attention
lors du déplacement et du levage du vélo
lors du déballage et de l'assemblage. Deux
personnes sont recommandé lors du retrait
socle de vélo de la palette d'expédition.
CAUTION
Be careful! Straps are under tension.
ATTENTION
Faites attention! Les sangles sont sous
tension.

Recumbent Bike Assembly
22
Note: Move the shipping crate/pallet to location of final
assembly. Allow 3-5 feet working space to safely remove
box and pallet. If assembly space is limited, you may lift
the rear of the assembled upright bike and roll it to its final
location.
1. Remove strapping from box and pallet. Use caution, straps
may be under tension.
2. Lift and remove outer box, set aside for disposal.
3. Carefully remove protective shrink wrap from bike base and
component boxes.
4. Cut and remove four plastic straps holding bike base to
pallet.
5. Remove upright tube/handle bar assembly, console and
accessory boxes from recumbent bike base, set aside for
assembly.
6. Remove protective plastic bag and contact HR grip covers.
7. Carefully team lift the recumbent bike base off of shipping
pallet onto a solid level surface for assembly.
8. Locate the plastic bag that contains the Owner's Manual
and the Hardware Kit.
2.3. Assembly
1. Position the base where the bike is to be located:
• Allow a minimum clearance of 3 feet (92 cm) on each
side of the bike.
• Allow a minimum clearance of 18 inches (41 cm) at the
front and rear of the bike.
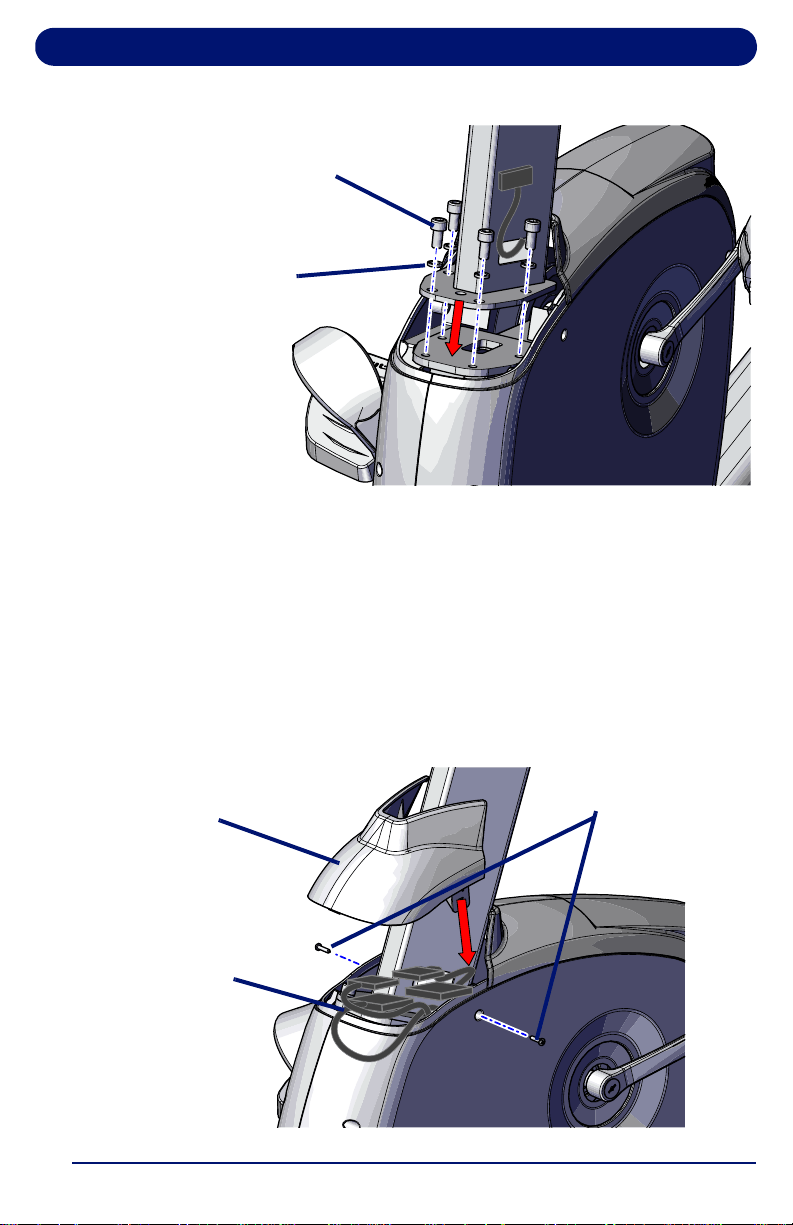
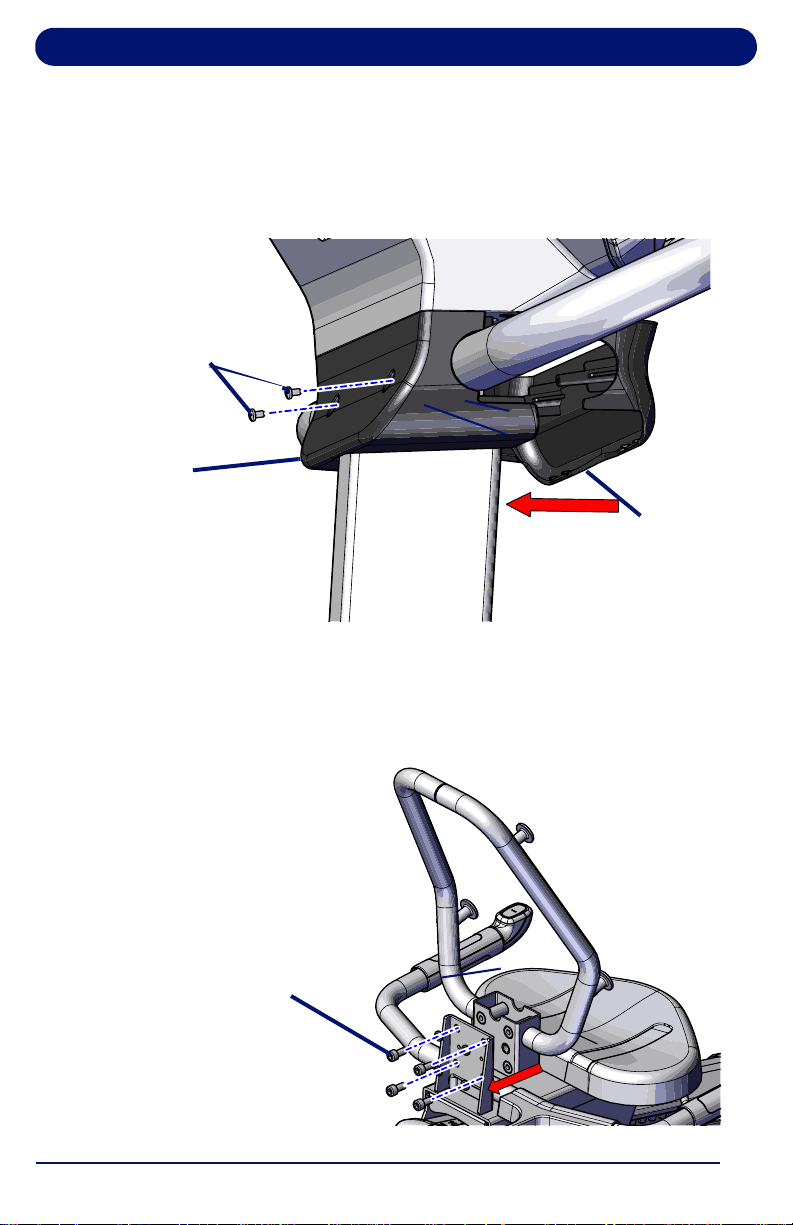
2. With the recumbent bike base position on a solid, level
surface, install the upright tube onto recumbent bike base
(Figure 2-1) using (4) M10x20 socket head cap screws, #22
and (4) M10 split lockwashers #21 from the hardware kit.
Fully tighten hardware.
Recumbent Bike Assembly
23
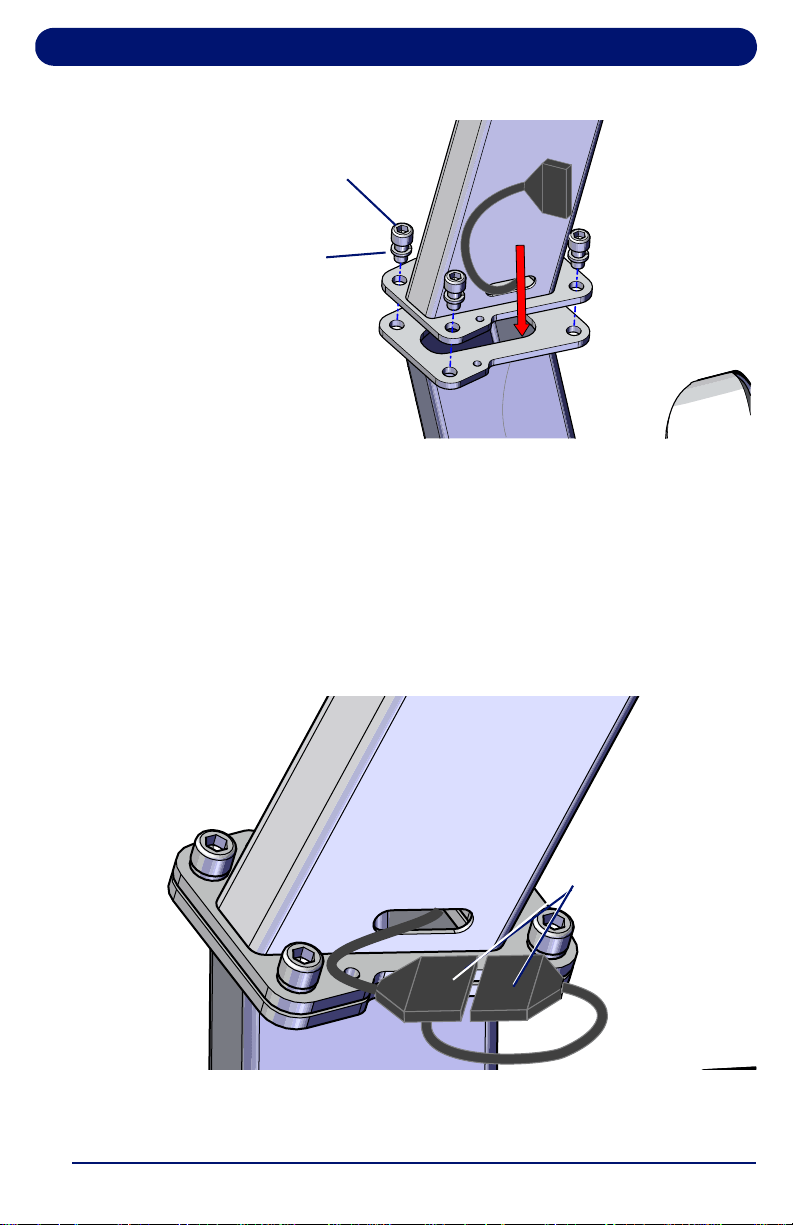
Figure 2-1. Upright Tube Installation
3. Connect both cables from recumbent bike base to
intermediate harnesses located inside the upright tube.
Connectors are keyed, do not force connectors together or
damage may result (Figure 2-2).
4. Carefully tuck wiring inside of plastic shroud and install
finishing cover located inside the accessory box with (2)
#25 cross head screws as shown.
Figure 2-2. Harness Connection and Finishing Cover
M10x20 socket
head cap screws
(4x)
M10 split
lockwashers
(4x)
Cross head
screw (2x)
Finishing
Cover
Cables
Recumbent Bike Assembly
24
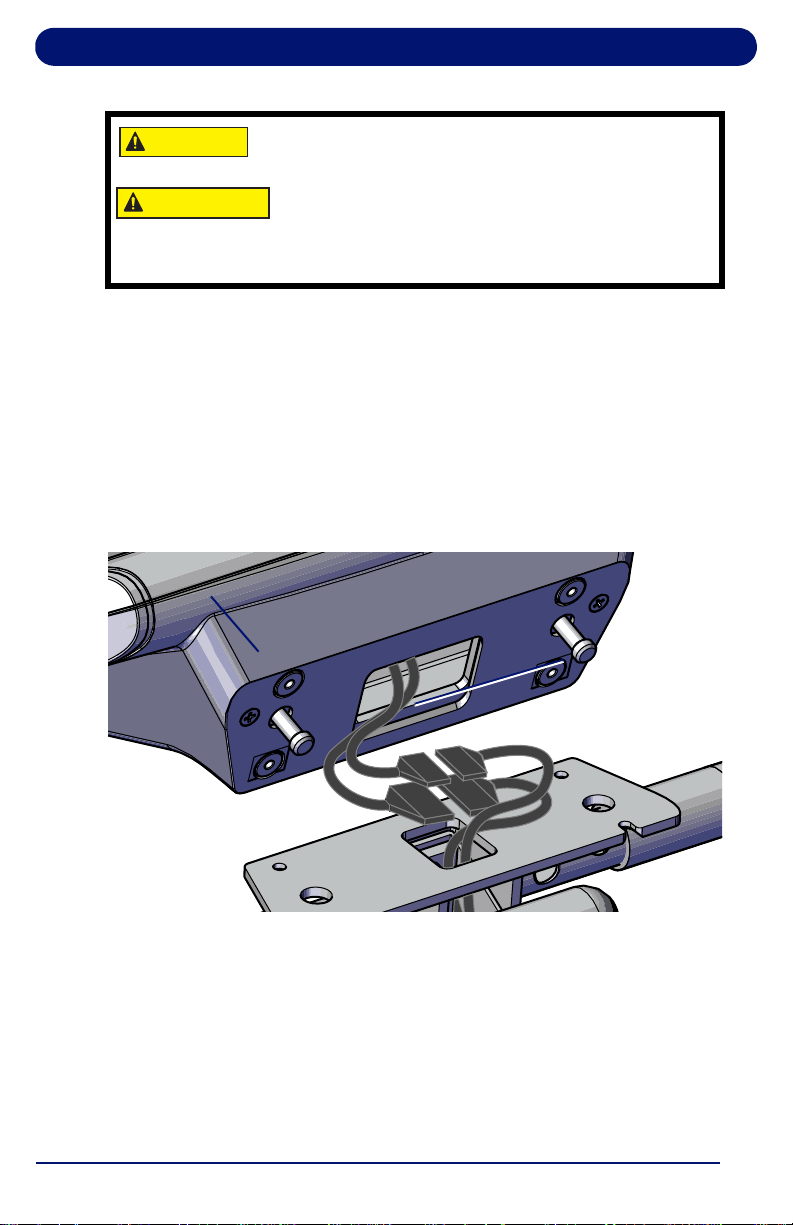
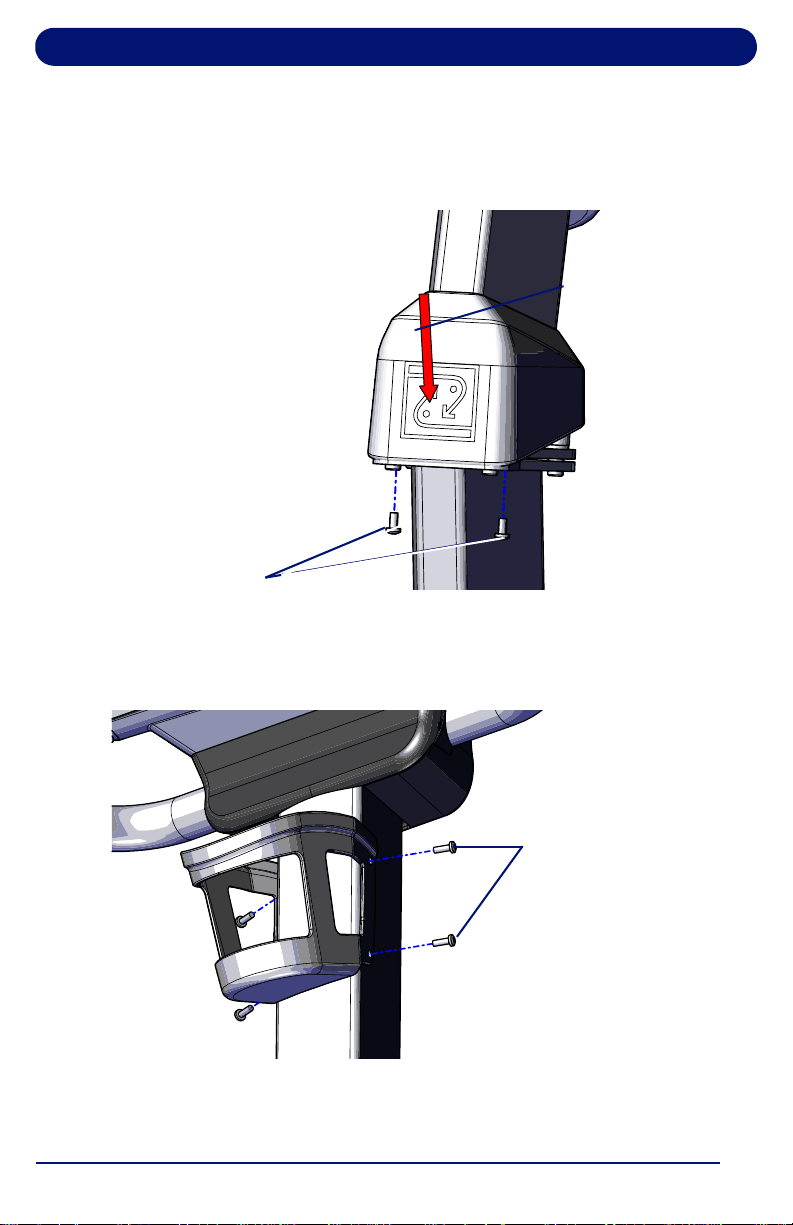
5. Carefully remove the display console from its box.
6. Connect both power harnesses within the upright tube to
the matching harnesses located at the bottom of the display
console (Figure 2-3).
Note: Connectors are keyed, do not force connectors together or
damage may result.
Figure 2-3. Console Harness Connectors
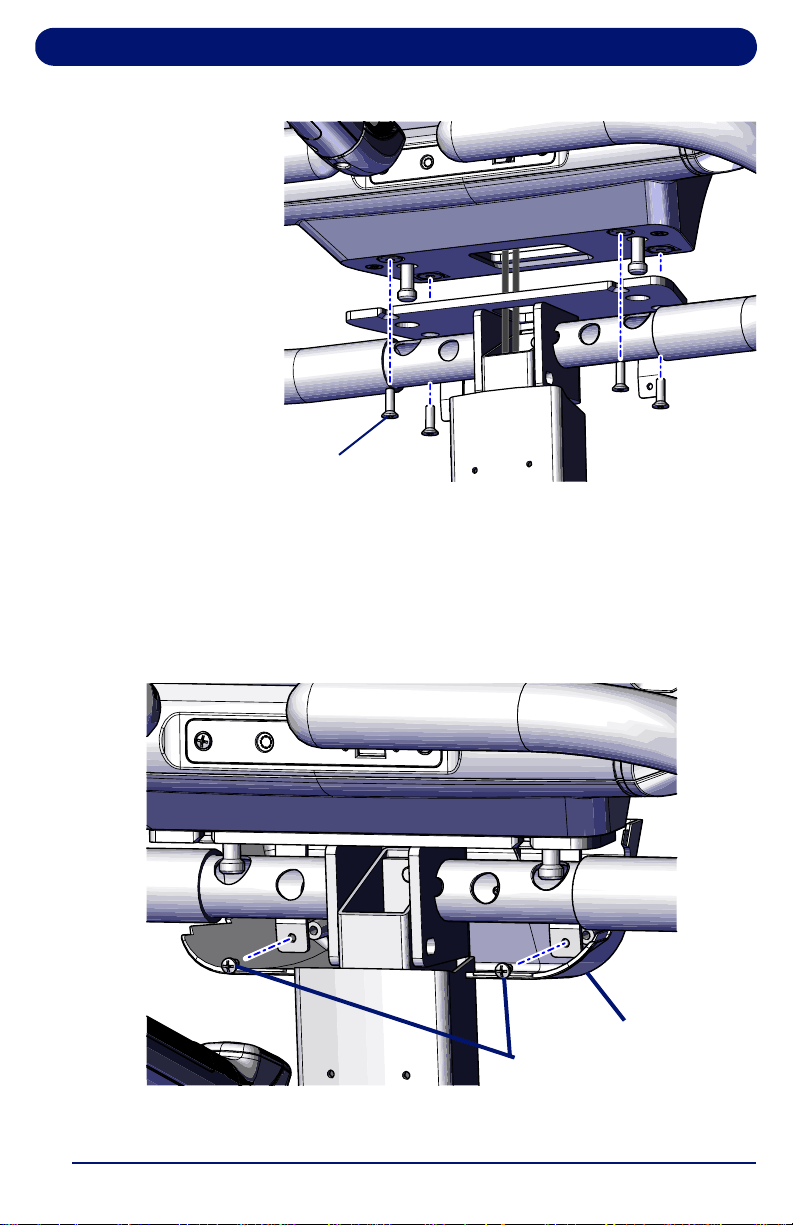
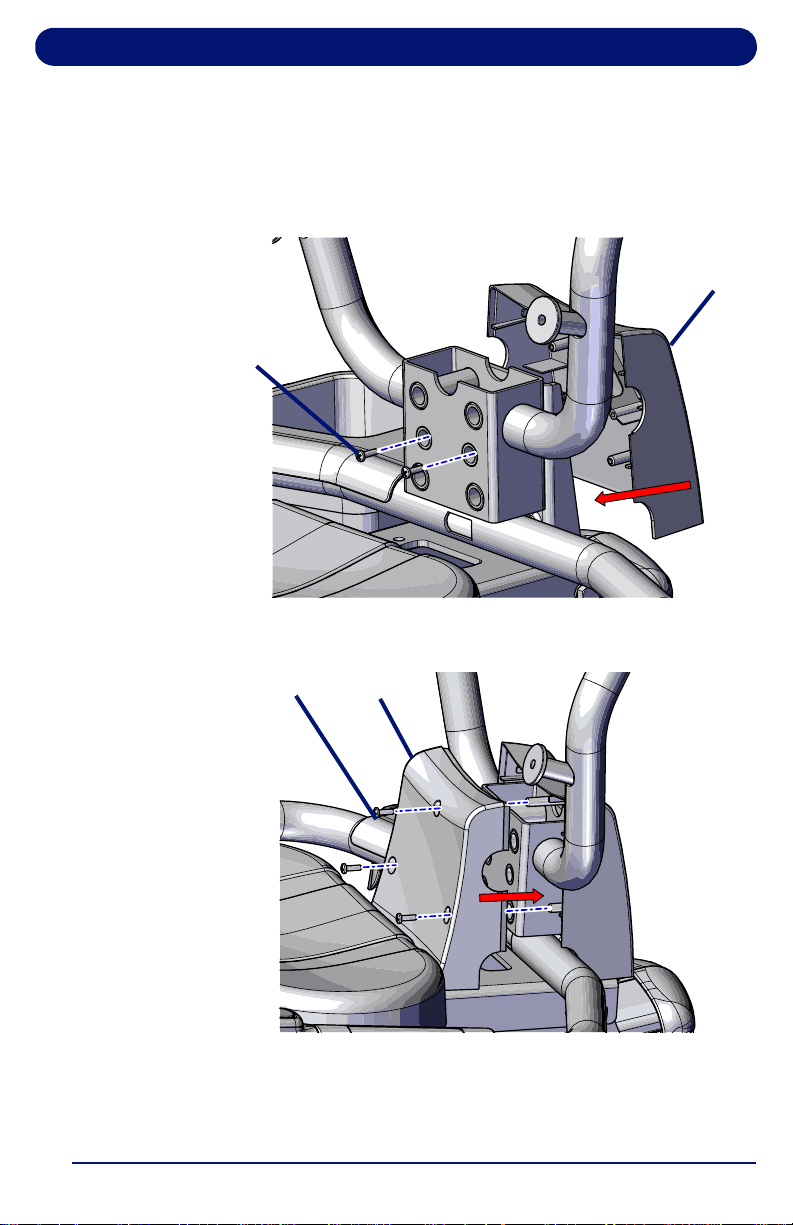
7. Rotate console upward, while carefully routing wire
connections into base tube and/or console (Figure 2-4).
Align pins with holes in flange, then secure console using
(4) #27 M6x20 flat head cap screws.
CAUTION
Use care if using a knife to open console
box to prevent damage to console.
ATTENTION
Faites attention si vous utilisez un
couteau pour ouvrir le boîtier de la
console afin d'éviter d'endommager la
console.
Recumbent Bike Assembly
25
Figure 2-4. Console Mounting
8. Locate front and rear console/upright tube finishing covers
in the accessory box.
9. Install rear console cover first. Secure to upright tube
mounting plate with (2) #25 crosshead screws. (Figure 2-5).
Figure 2-5. Console Rear Finishing Cover Installation
M6x20 flat head
cap screws (4x)
Cross head
screws (2x)
Rear Cover
Recumbent Bike Assembly
26
10. With rear cover in place, position front cover so both plastic
mounting inserts go through the cross bar access holes.
Secure with (2) #25 cross head screws. Do not over tighten
or plastic components may be damaged (Figure 2-6).
Figure 2-6. Console Front Finishing Cover Installation
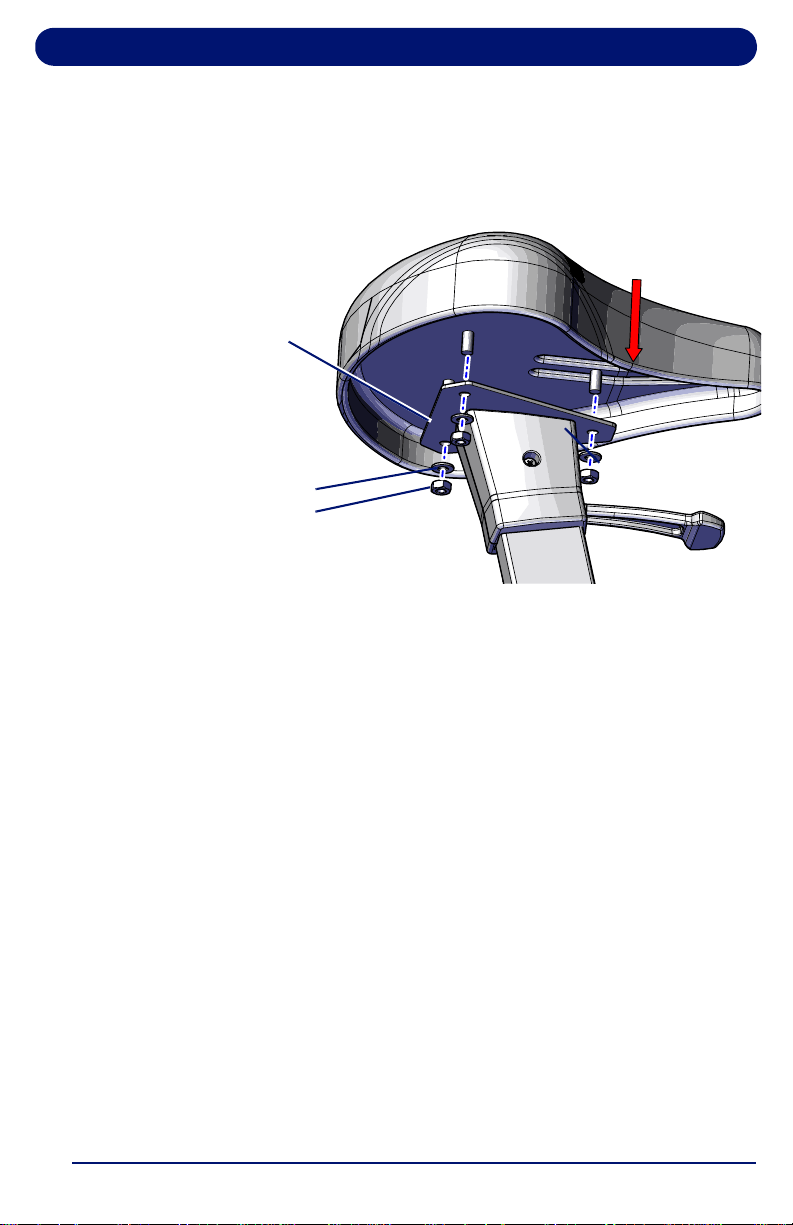
11. Locate the metal tube seatback frame in the accessory box.
Attach to base using (4) #26 M10 x 25 hex head bolts and
(4) #21 spring washers (Figure 2-7). Fully tighten hardware.
Figure 2-7. Seat Back Installation
cross head
screws
(2x)
Rear
Cover
Front
Cover
M10 x 25 hex
head bolts and
spring washers
(4x)
Recumbent Bike Assembly
27
12. Install front (Figure 2-8) and rear (Figure 2-9) seat back
finishing covers using (2) #25 cross head screws for front
cover and (3) screws for back cover. Do not over tighten or
plastic components may be damaged.
Figure 2-8. Front Seat Back Cover Installation
Figure 2-9. Rear Seat Back Cover Installation
Cross Head
Screws (2x)
Cover
Cross Head
Screws (3x)
Cover
Recumbent Bike Assembly
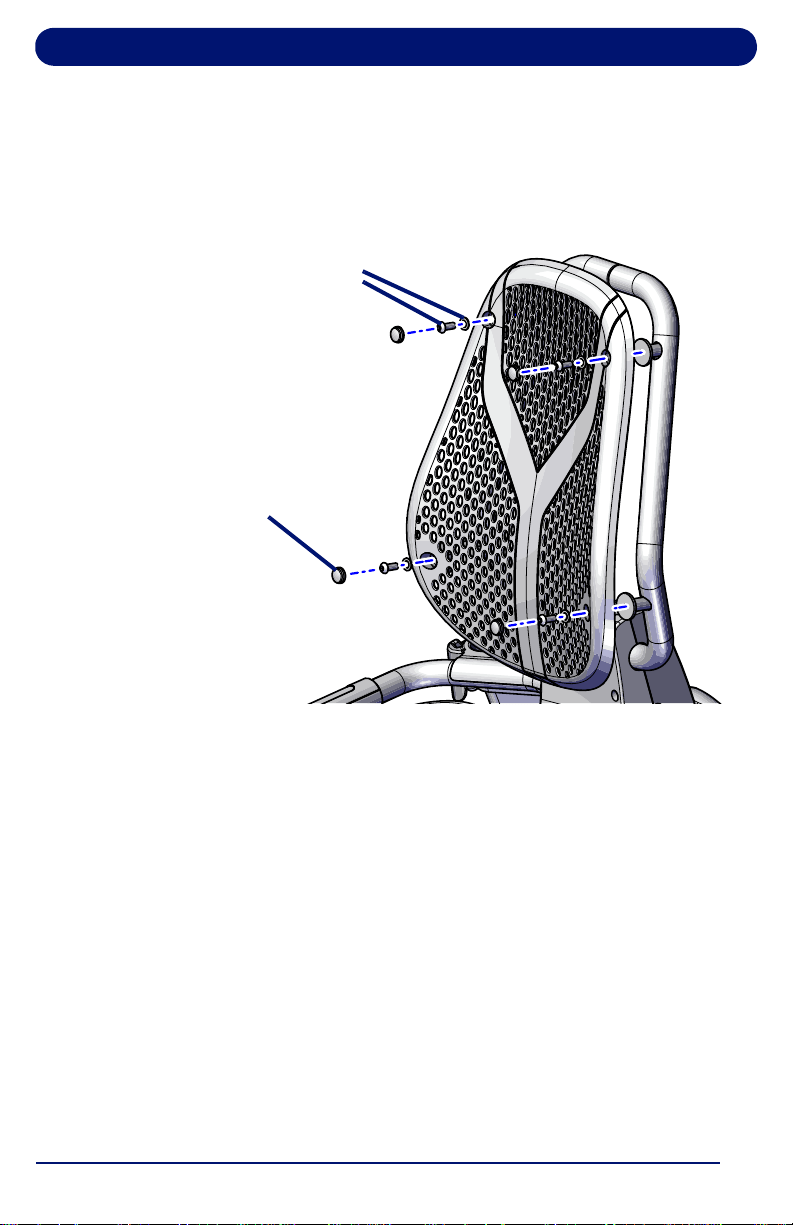
28
13. Locate the vented seatback pad from the accessory box,
secure to seatback frame with (4) M8 x 20 button head bolt
#28 and (4) flat washers #29. When secured, insert back
pad finishing covers #30 as shown (Figure 2-10).
Figure 2-10. Seat Back Pad Installation
14. Prior to use, verify there is no remaining hardware within
the hardware kit and all hardware is properly tightened.
15. If the bike is positioned on an unlevel surface, adjust each
foot pedestal using a 5/8 inch open end or adjustable
wrench (not provided).
16. Your bike is now ready for use.
M8 x 20 button head bolt
and washer (4 places)
Finishing Covers
(4 places)
29
3. Upright Bike Assembly
3.1. Tools Needed
The Landice upright bike is shipped with tools and hardware
necessary for assembly and installation. A sharp utility knife
and/or diagonal cutters will aid in removing plastic strapping.
The following tools are needed for assembly:
• 13-16 mm open end combination wrench
• Cross head #2 (Phillips) Screw Driver
• #8 Hex Key Wrench
• #6 Hex Key Wrench
• #5 Hex Key Wrench
• #4 Hex Key Wrench
• Optional: 5/8 inch open end or adjustable wrench for leveling
bike if necessary (not included)
3.2. Unpacking
Unpacking and installation of the bike should be done by a
qualified technician. The packaged bike is heavy and weighs
235 lb (107 kg).
WARNING
To avoid injury, use caution when moving
and lifting the bike during unpacking and
assembly. Two people are recommended
when removing bike base from shipping
pallet.
AVERTISSEMENT
Pour éviter toute blessure, faites attention
lors du déplacement et du levage du vélo
lors du déballage et de l'assemblage. Deux
personnes sont recommandé lors du retrait
socle de vélo de la palette d'expédition.
CAUTION
Be careful! Straps are under tension.
ATTENTION
Faites attention! Les sangles sont sous
tension.

Upright Bike Assembly
30
Note: Move the shipping crate/pallet to location of final
assembly. Allow 3-5 feet working space to safely remove
box and pallet. If assembly space is limited, you may lift
the rear of the assembled upright bike and roll it to its final
location.
1. Remove strapping from box and pallet. Use caution, straps
may be under tension.
2. Lift and remove outer box, set aside for disposal.
3. Carefully remove protective shrink wrap from bike base and
component boxes.
4. Cut and remove four plastic straps holding bike base to
pallet.
5. Remove upright tube / handle bar assembly, console, and
accessory boxes from upright bike base, set aside for
assembly.
6. Remove protective plastic bag from bike base.
7. Carefully team lift the upright bike base off of shipping pallet
onto a solid level surface for assembly.
8. Locate the plastic bag that contains the Owner's Manual
and the Hardware Kit.
3.3. Assembly
1. Position the base on a solid, level surface at or near where
the bike is to be located:
• Allow a minimum clearance of 3 feet (92 cm) on each
side of the bike.
• Allow a minimum clearance of 18 inches (41 cm) at the
front and rear of the bike.
2. Install the upright tube onto upright bike base using (4)
M10x20 socket head cap screws #24 and (4) spring
washers #22 in the hardware kit (Figure 3-1). Use supplied
#8 Hex Key Wrench and fully tighten hardware.
Upright Bike Assembly
31
Figure 3-1. Upright Tube Installation
3. Connect main power harness from upright bike base to
intermediate harness located inside the upright tube
(Figure 3-2).
Note: Connectors are keyed, do not force connectors together or
damage may result.
4. After connecting, carefully tuck wiring back into neck tube.
Figure 3-2. Main Power Harness Connection
M10x20 socket head
cap screws (4x)
Spring washers
(4x)
#21 screw (2x)
Finishing Cover
Power Harness
Connectors
Upright Bike Assembly
32
5. Lower plastic tube finishing cover, attached to upright tube,
into place (Figure 3-3). Secure with (2) #21 Phillip cross
head screws. Do not over tighten.
Figure 3-3. Upright Tube Finishing Cover Installation
6. Install Bottle Holder onto upright tube. Secure with (4) #21
M5x15 cross head screws (Figure 3-4).
Figure 3-4. Bottle Holder Installation
7. Locate seat cushion in accessory box. Remove (3) #13
nylock nuts and (3) #13 flat washers from seat cushion.
cross head
screws (2x)
M5x15 Screws,
both sides (4x)
Upright Bike Assembly
33
8. Position seat cushion onto seat flange, then re-install
hardware (Figure 3-5) using a 13mm open end wrench
from the hardware kit. Fully tighten hardware.
Figure 3-5. Seat Bottom Installation
9. Prior to use, verify there is no remaining hardware in the
hardware kit and that all hardware is properly tightened.
10. If the bike is positioned on an unlevel surface, adjust each
foot pedestal using a 5/8 inch open end or adjustable
wrench (not provided).
11. Your upright bike is now ready for use.
Seat Flange
#13 flat washer
#13 Nylock nut
(3x)

Upright Bike Assembly
34
35
4. Cardio Bike Operation
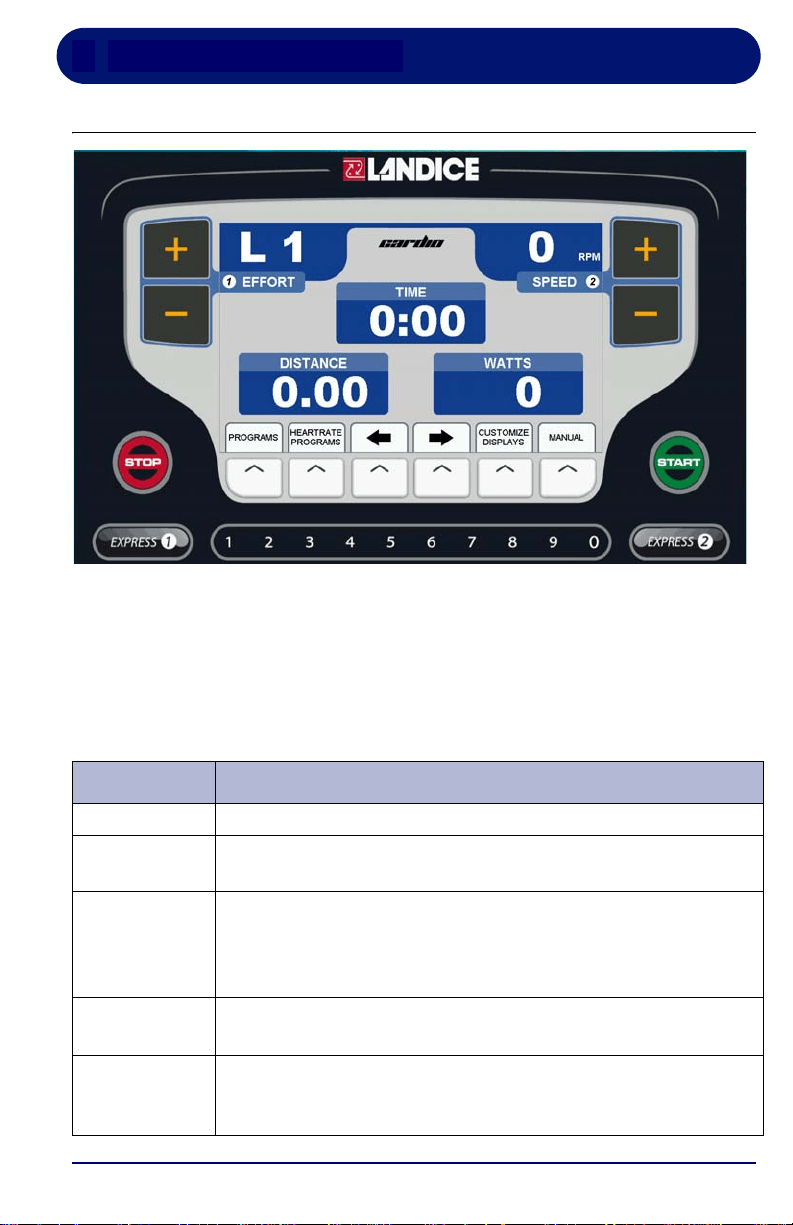
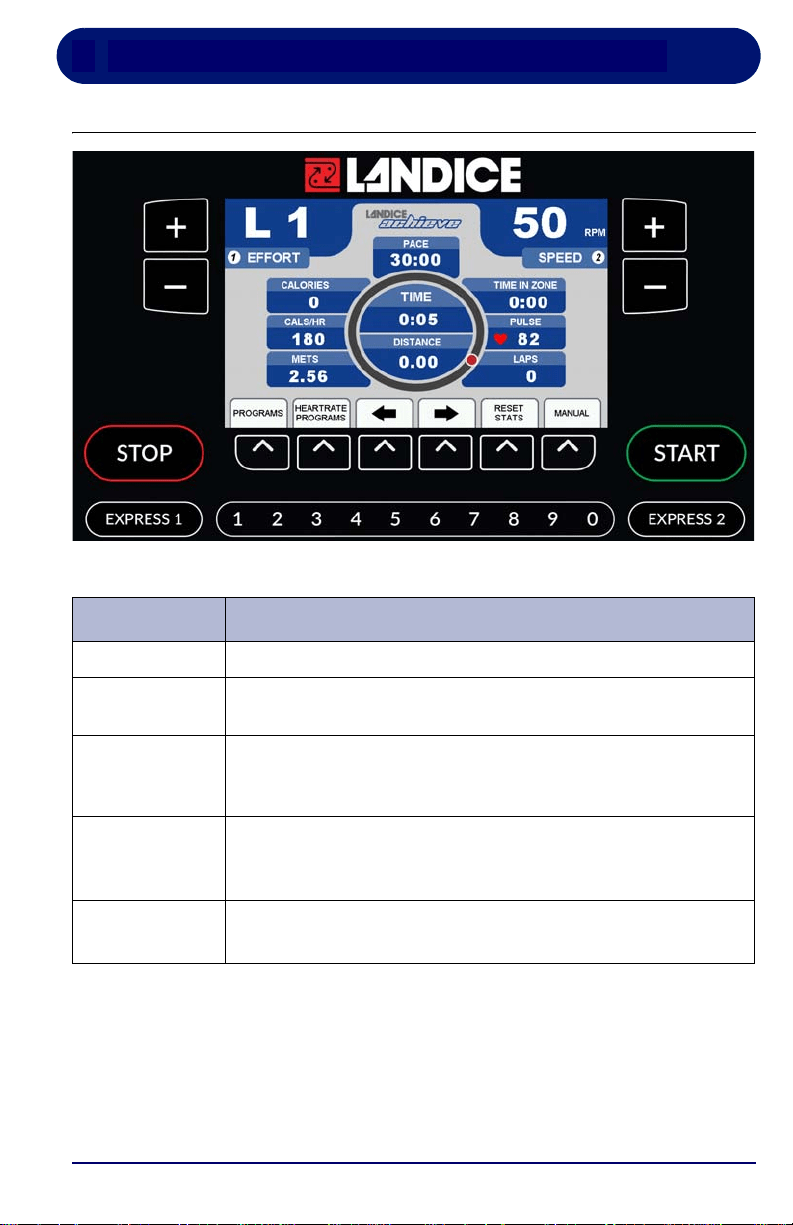
4.1. Cardio Control Panel
Note: Landice bikes are self-powered and require users to pedal
at all times to keep the display on. If you stop pedaling the
display will turn off and all statistics will be lost.
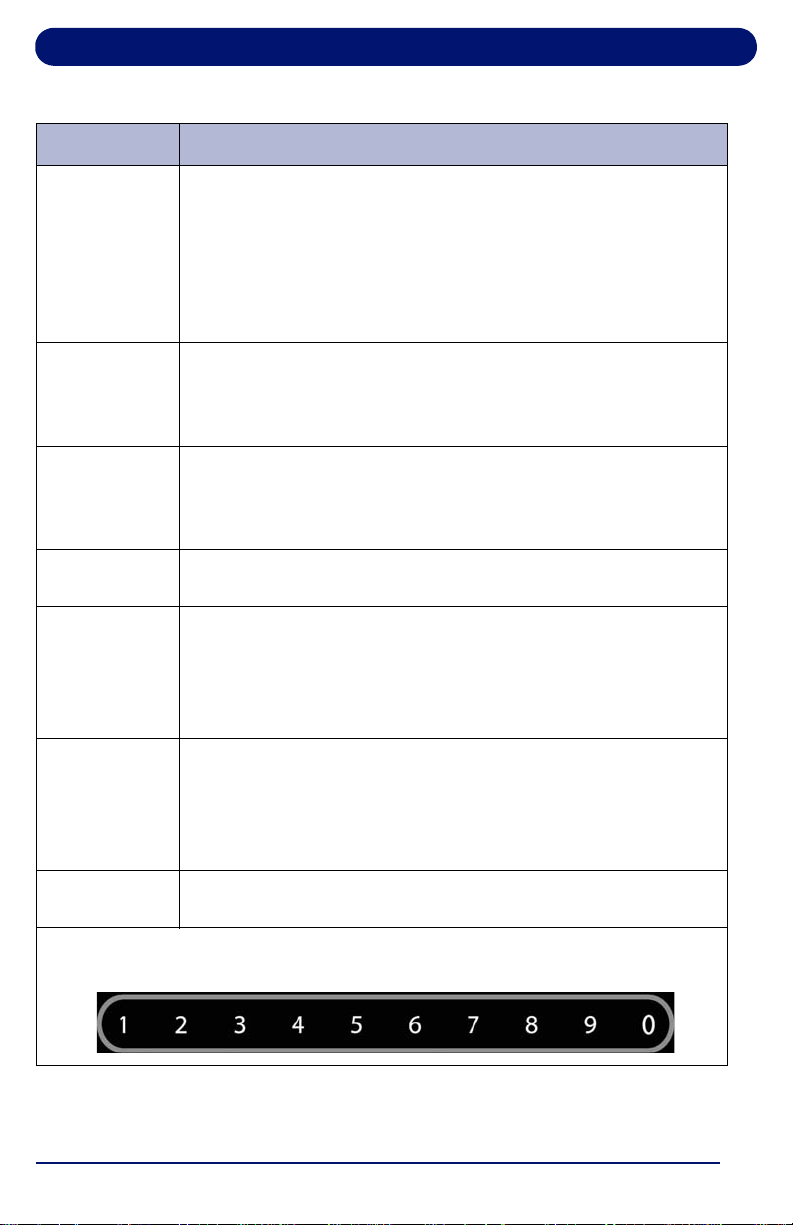
Table 4-1 Control Panel Functions
Function Description
EFFORT Displays the effort setting of the bike.
SPEED To view your speed in different units: Press SPEED +/– to
select MPH, Km/hr, or Revolutions per Minute.
START When you begin pedaling, after a few seconds the display
will light, with the starting effort level set to Level 1. The
START button is used to quickly start the bike in manual
mode and allows you to skip Client and Weight entry.
STOP
Press
STOP once to pause the bike or twice to turn it off.
Statistical information is cleared when the bike is turned off.
MANUAL The Manual Mode has no limits or parameters to enter.
Changes in effort level will only happen by pressing the +/–
buttons.
Cardio Bike Operation
36
PROGRAMS To use the built-in and user-defined workout programs:
Press PROGRAMS at any time to display the programs
selection screen. Use arrow to scroll through the program.
Press ENTER to select the desired program. When
prompted, enter the program’s specific parameters (Effort,
Time) using the arrow keys. Press START to begin the
program.
PLUS KEY Press and hold to increase effort or to switch between units
of measurement. Pressing for longer than 2 seconds causes
the effort to increase at a faster rate. Release the key when
the display shows desired effort.
MINUS KEY Press and hold to decrease effort or to switch between units
of measurement. Pressing for longer than 2 seconds causes
the effort to decrease at a faster rate. Release the key when
the display indicates desired effort.
ARROW
KEYS
The left and right arrows are used to set values, select
programs or display screens.
HEART
RATE
PROGRAMS
To use the Heart Rate Controlled programs, press HEART
RATE PROGRAMS
at any time. Choose either a built-in or
user-defined heart rate program. Heart Rate Control
programs automatically adjust the effort in order to maintain
a heart rate.
EXPRESS 1
This key, in conjunction with the numeric keypad, allow you
to directly enter a target effort without using the +/– keys.
Press
EXPRESS 1, then enter the desired value using the
numeric keypad. Then press
ENTER or wait 3 seconds for
the bike to adjust to the new settings.
EXPRESS 2
Select MPH, Km/hr, or Revolutions per Minute by pressing
EXPRESS 2.
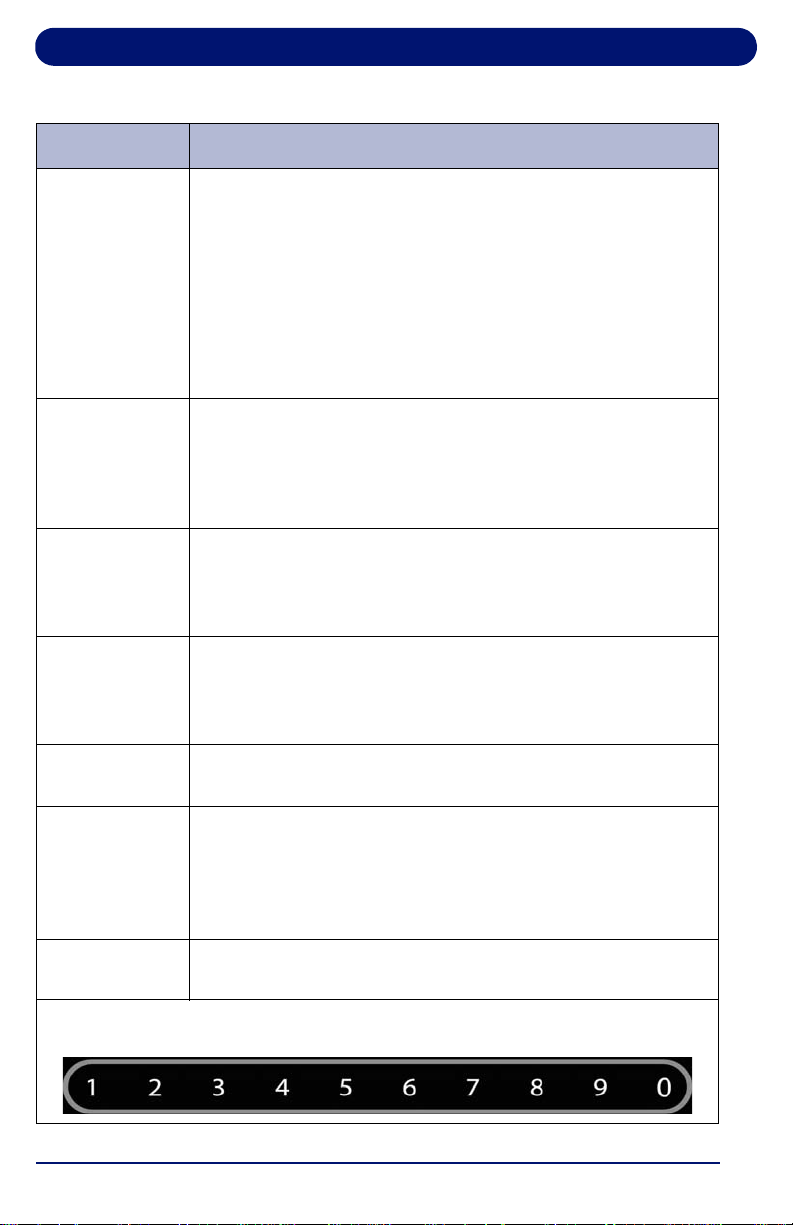
The numeric keypad is used to change effort with the
EXPRESS 1 input
key, enter user settings, and configure programs.
Table 4-1 Control Panel Functions (Continued)
Function Description
Cardio Bike Operation
37
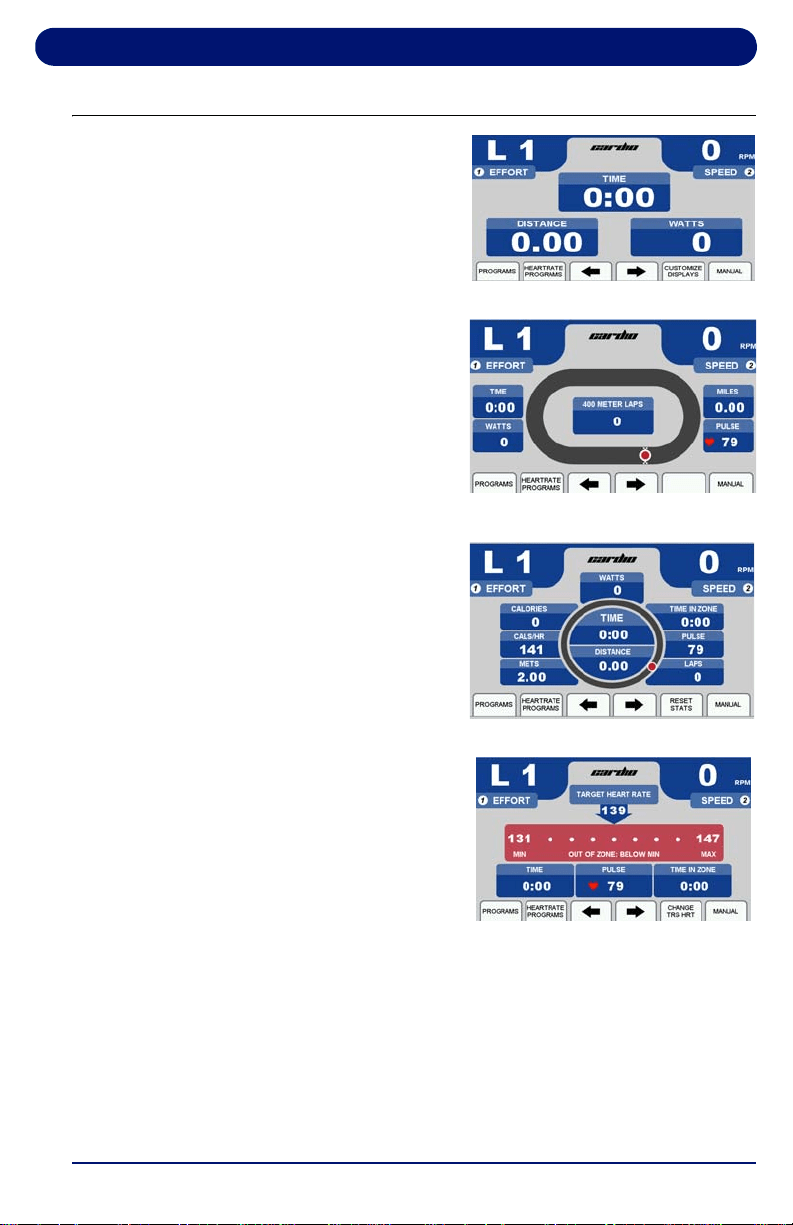
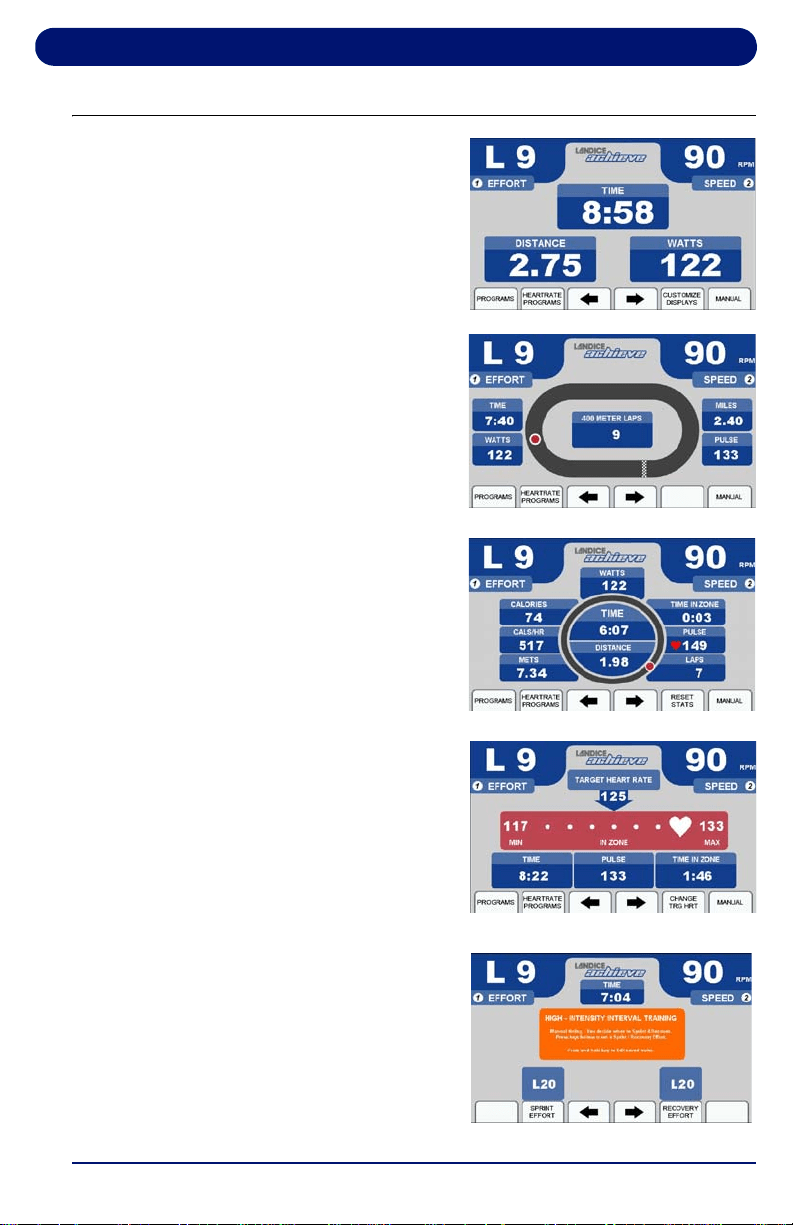
4.2. Display Features
The screens at right are the
options available for displaying
workout information. Table 4-2
provides information about the
available options.
To toggle between these
screens during your workout,
use the arrow keys.
To customize the information
displayed on the Personalized
Stats screen, select “Customize
Display” to edit the screen. Use
the arrows to toggle through the
options and press ENTER to
confirm your selections.
Note: The custom Personalized Statistic Screen layouts are
permanently stored for each Client. Guest Mode resets to
Time, Distance and Pace each time you turn on the bike.
Personalized Stats
Statistics Screen
Track Screen
Heart Rate Screen

Cardio Bike Operation
38
T
Table 4-2 Display Features
Feature Description
TIME Time logged on bike, displayed as Minutes:Seconds
DISTANCE
Miles logged on bike (kilometers when in metric)
WATTS
A measurement of power you produce based on user’s
weight, effort level and RPM.
CALORIES
Total calories burned, based on entered user weight
CALS/HR
Approximate calories used per hour, based on user weight
LAP
(Progress)
1/4-mile (400 meter in metric) track and Lap Indicator
LAP
(Counter)
Number of laps completed
PULSE Current heart rate
TIME IN ZONE Time spent in zone. The zone is ± 8 beats from target heart
rate.
IN ZONE
User’s heart rate is within 8 beats of the target heart rate
OUT OF
ZONE
User’s heart rate is outside zone (more than 8 beats above
or below target heart rate)
ABOVE MAX User’s heart rate is above the maximum desirable heart rate
MAX Maximum allowable heart rate to remain in zone
TARGET HR Target heart rate (user-defined in Heart Rate Status screen)
MIN Minimum allowable heart rate to remain in zone
BELOW MIN User is below minimum allowable heart rate in zone
TOTAL TIME
The total time of the user’s workout
METS*
Current MET level, based on user weight and effort
*One MET is the energy consumed at rest by the average adult.
Cardio Bike Operation
39
4.3. Using the Cardio Bike
Note: Client Profiles are available on residential bikes only.
The bike can be used immediately as the Guest user or as a
default Client. The bike’s CLIENT LOGIN feature allows 4
different users to separately log cumulative statistics from
workout to workout. On residential models, client statistics
(total miles, hours, calories, weight, laps, and average HR,
Mets, pace, lap time, miles per hour and calories per hour) are
stored.
Personalized Statistic are permanently stored for each client. If
you are logged in as a Guest, screens reset to default values.
1. Make sure you have read and understand this owner’s
manual before beginning.
2. Sit on the bike - adjust the seat if needed.
3. Place your feet on the pedals. Begin pedaling and after a
few seconds the screen will power up.
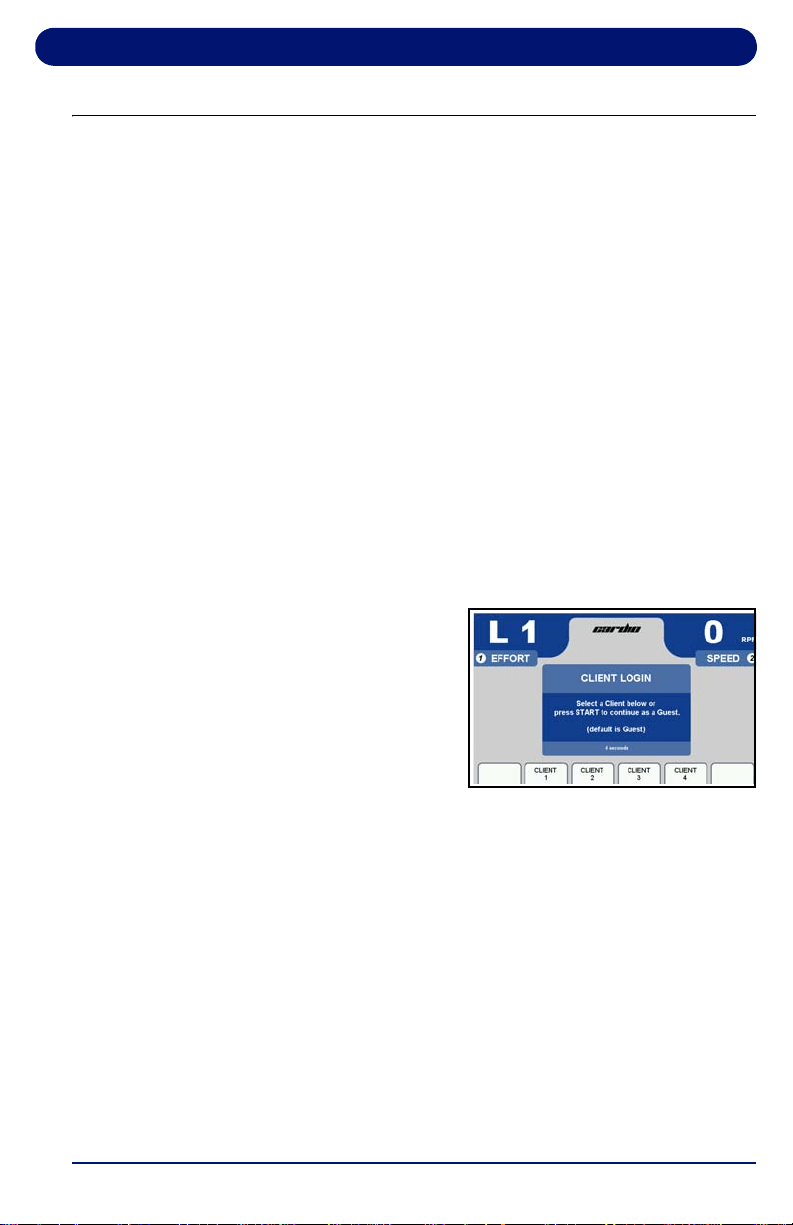
4. After 3 seconds the CLIENT
LOGIN screen is displayed.
Client login is only available
on residential models.
5. Use the designated button
below to select a Client. If a
Client is not selected the
user will then be registered as a GUEST.
6. To reset client totals if desired: From the Client Statistics
screen, enter Client Weight or select the Reset Client
Statistics button. Use the numeric keypad to change the
weight.
7. Enter your weight using the numeric keypad or arrows.
Press ENTER or wait 3 seconds to advance to the first of
the motivational screens.
8. The bike is now ready to use. You can vary effort if desired
by using the EFFORT (+/–) keys or EXPRESS 1 key.
Cardio Bike Operation
40
4.4. Using the Built-in Programs
4.4.1. Description
The Built-in Programs differ in effort. Each lets you select a
maximum effort and time (10 to 99 minutes). (Intervals Program
requires a minimum effort.) The bike will not go above the
maximum number unless manually overridden. Each program
has 20 segments of equal time, beginning with 3 warm-up
segments and ending with 2 cool-down segments. For
example, a 40-minute program contains 20 2-minute segments.
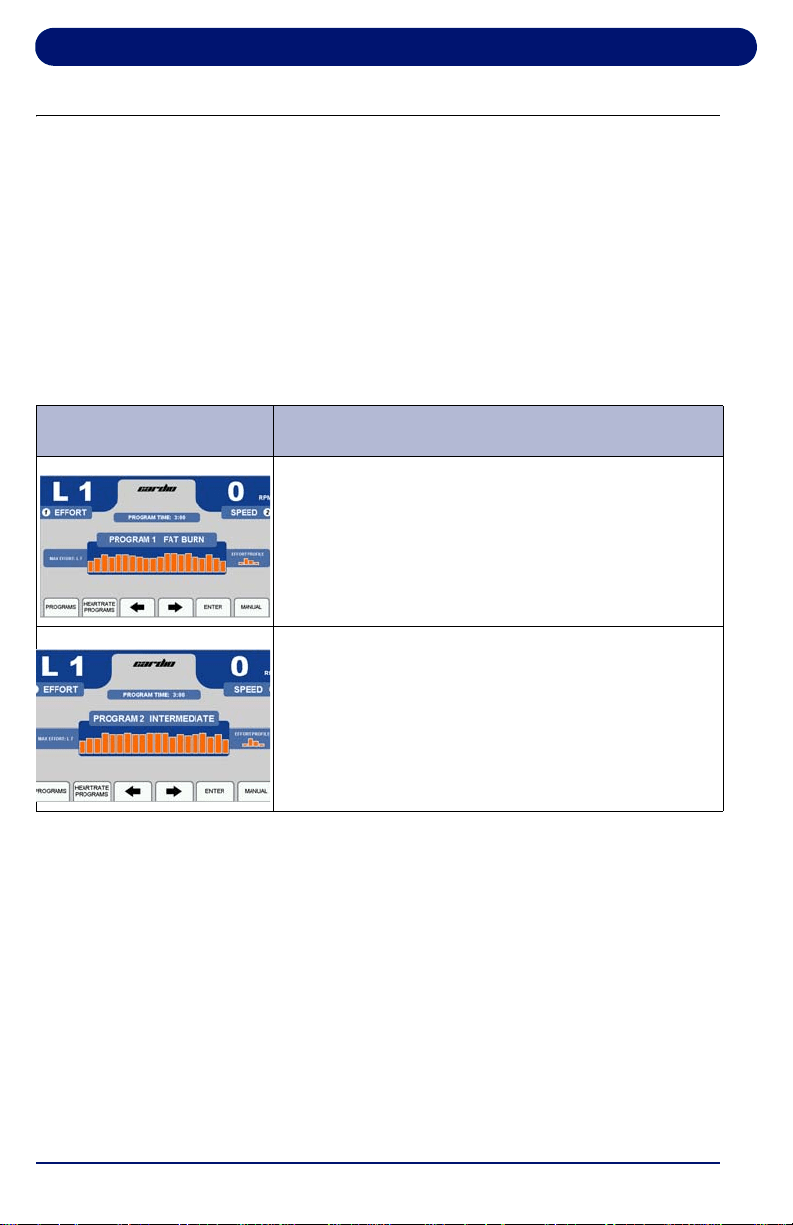
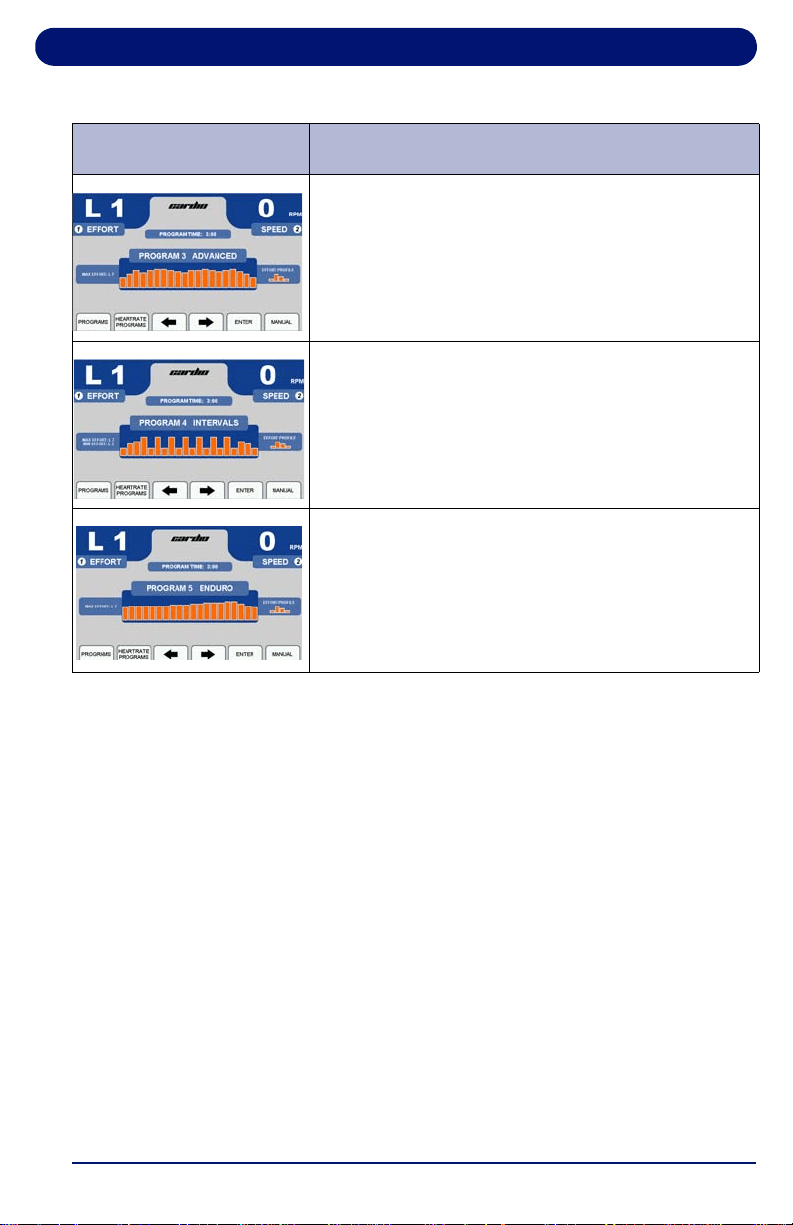
Table 4-3 Built-In Programs
Screen Program Description
FAT BURN: This program features two peaks
along with gradual changes in effort. The overall
goal is to raise heart rate, maintain the raised
heart rate for most of the workout, then gradually
bring heart rate down during the last 2 cool down
segments.
INTERMEDIATE: This program features 5 peaks
that reach maximum effort. The overall goal is to
vary heart rate by elevating and lowering it
several times, providing a challenging
cardiovascular workout.
Cardio Bike Operation
41
4.4.2. Running a Built-In Program
1. Start a workout as outlined in “Using the Cardio Bike” on
page 39.
2. Press PROGRAMS to display the Programs selection
screen.
3. Select a built-in program by using the arrow to scroll
through the list, then press ENTER. You are prompted to
enter the following program parameters:
• Maximum Effort:
This scales the effort curve to the
maximum effort entered.
• Program Time: Sets the total length of time you want the
program to run.
• Minimum Effort: INTERVALS programs only.
ADVANCED: This program focuses on high
resistance. The overall goal is to raise heart rate
using effort for an advanced cardiovascular
workout.
INTERVALS: This program alternates high efforts
with low efforts. The overall goal is to vary your
workout, taking you from peak level to recovery
8 times throughout the workout.
ENDURO: This program features your maximum
effort. The overall goal is to raise heart rate for the
ultimate cardiovascular workout.
Table 4-3 Built-In Programs (Continued)
Screen Program Description

Cardio Bike Operation
42
4. Enter the Maximum Effort using the numeric keypad or the
arrow to select a value, then press ENTER or wait 3
seconds.
5. Enter Program Time using the numeric keypad or the arrow
keys, then press ENTER or wait 3 seconds. The time
should be at least 10 minutes and not more than 99
minutes.
6. Press START to begin your workout. The Program
Progress Detail screen displays your current segment,
effort, and remaining time.
7. To view other segments, select the “View Other Segments”
button. Use the arrow keys to move left or right. To exit,
press DONE.
8. Press the buttons below the arrow keys at any time to view
any of the other motivational screens during your program,
including the Program Profile screen to see a program
overview. When viewing a motivational screen other than
the Program Progress Detail screen during a segment
change, the display temporarily shows the Program
Progress Detail screen then returns to the original screen.
During a segment change, the effort will flash if there is a
change.
4.5. Cardio User Programs
The bike can store individual, modifiable user-defined program
profiles.
A user-defined program looks and runs exactly like a built-in
program, but it can be customized to suit the user. Unlike the
built-in programs, user-defined programs allow editing of
individual segments as well as the number of segments.
1. Press the button below PROGRAMS to display the
Programs selection screen.
2. Scroll through the program options by pressing
PROGRAMS or use the arrow keys. When USER
PROGRAM PREVIEW is shown, press ENTER.
Cardio Bike Operation
43
3. Press ENTER or wait 3 seconds. The screen displays
PRESS START TO BEGIN OR EDIT TO SET UP.
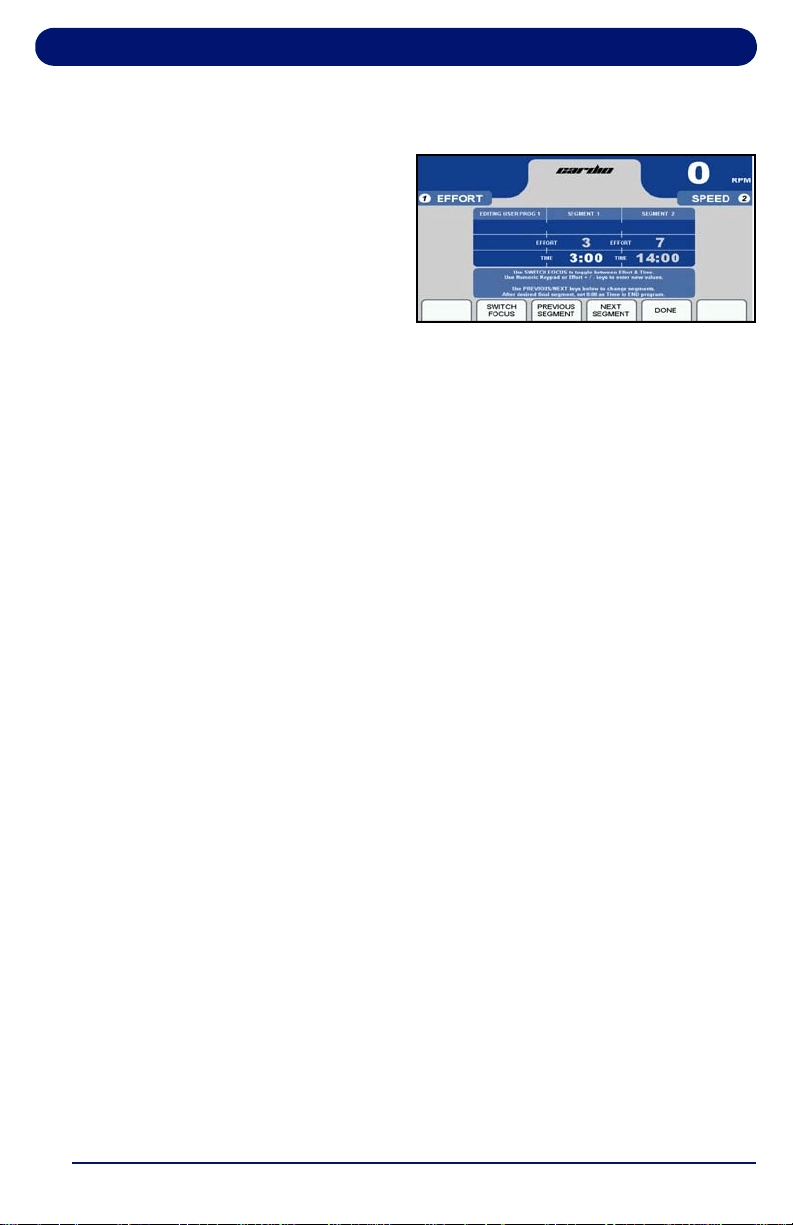
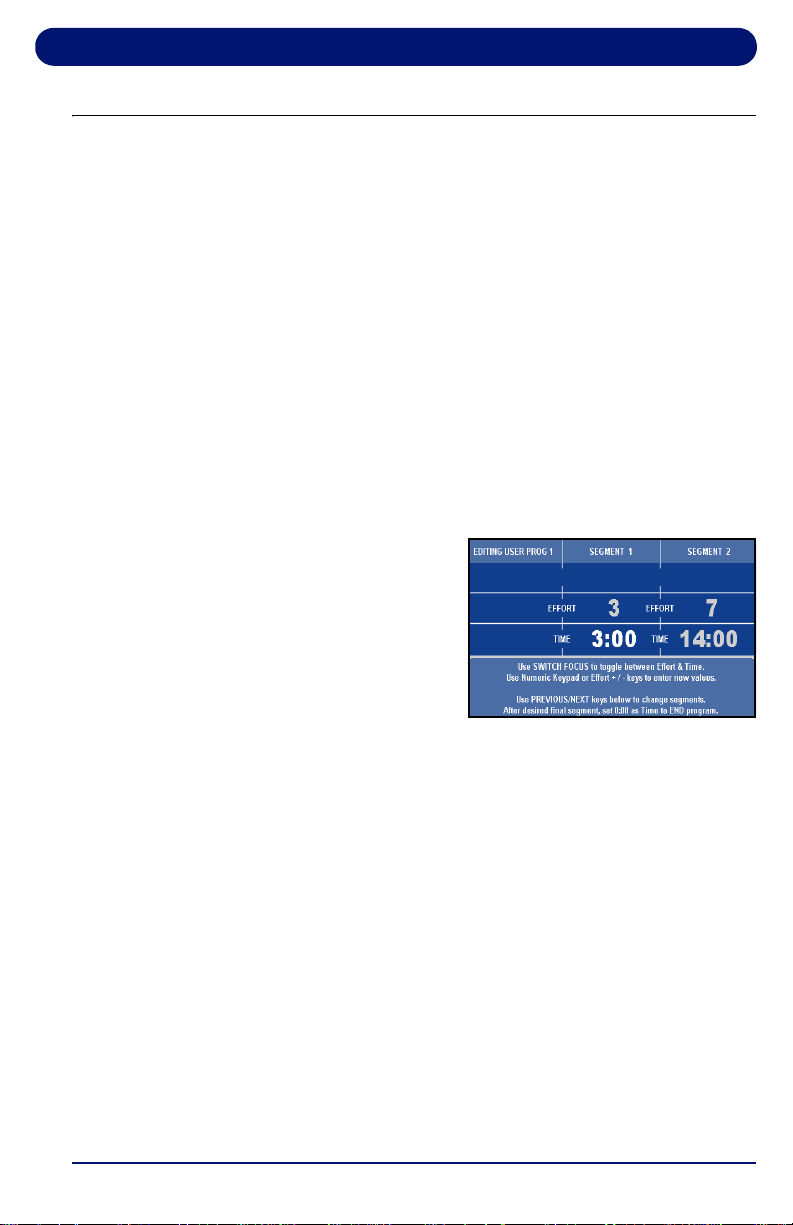
4. Press EDIT. EDIT
MODE requires a time
for segment 1 (area in
bold).
Note: Press SWITCH FOCUS to toggle between effort and time
values for the current segment. To change segments,
press NEXT SEGMENT or PREVIOUS SEGMENT. You can
change segments in either the forward or reverse
direction.
5. Use the numeric keypad to change the value and press
SWITCH FOCUS. Continue to another segment by
pressing the next or previous segment keys.
6. If you want a program to have less than 20 segments,
create the last segment with 0 in the time field. The time
reads END. The program ends when it reaches this
segment.
7. When you finish editing your User-Defined Program, you
can begin your program by pressing START or DONE.
Note: If you attempt to advance the cursor past the 20th
segment, you are prompted with PRESS START TO BEGIN
OR EDIT TO SET UP. You can also exit Edit Mode by
pressing MANUAL MODE or PROGRAMS at any time.

Cardio Bike Operation
44
4.5.1. Learn Mode
When you run a User-Defined Program and the effort is
adjusted, the bike saves the last change to the current
segment.
Note: Learn Mode allows you to adjust existing segments in your
user program, but you cannot add segments to it in Learn
Mode.
1. Start a workout, then press PROGRAMS to display the
Programs selection screen.
2. Scroll through the program options by pressing
PROGRAMS or use the arrow keys. When the USER
PROGRAM PREVIEW you desire is shown, press ENTER.
3. Press START to begin your program. When you begin, the
Program Progress Detail screen is displayed. The effort of
your current segment is displayed in the center. To change
the effort of your current segment, press the EFFORT (+/–)
keys. The modified segment is stored with these new
settings for the next time you run this program.
Cardio Bike Operation
45
4.6. Specific Goal Programs
The bike provides Specific Goal programs. Whether you want
to go for a 3-mile ride, burn 1,000 calories, or simply exercise
for 15 minutes, the Goal Progress screen accurately assesses
your progress with a variety of statistics. During these
programs you retain full manual control.
1. Start a workout as outlined in “Using the Cardio Bike” on
page 39.
2. Press the arrow button under Programs to display the
Programs selection screen and select the goal program
that you want to run:
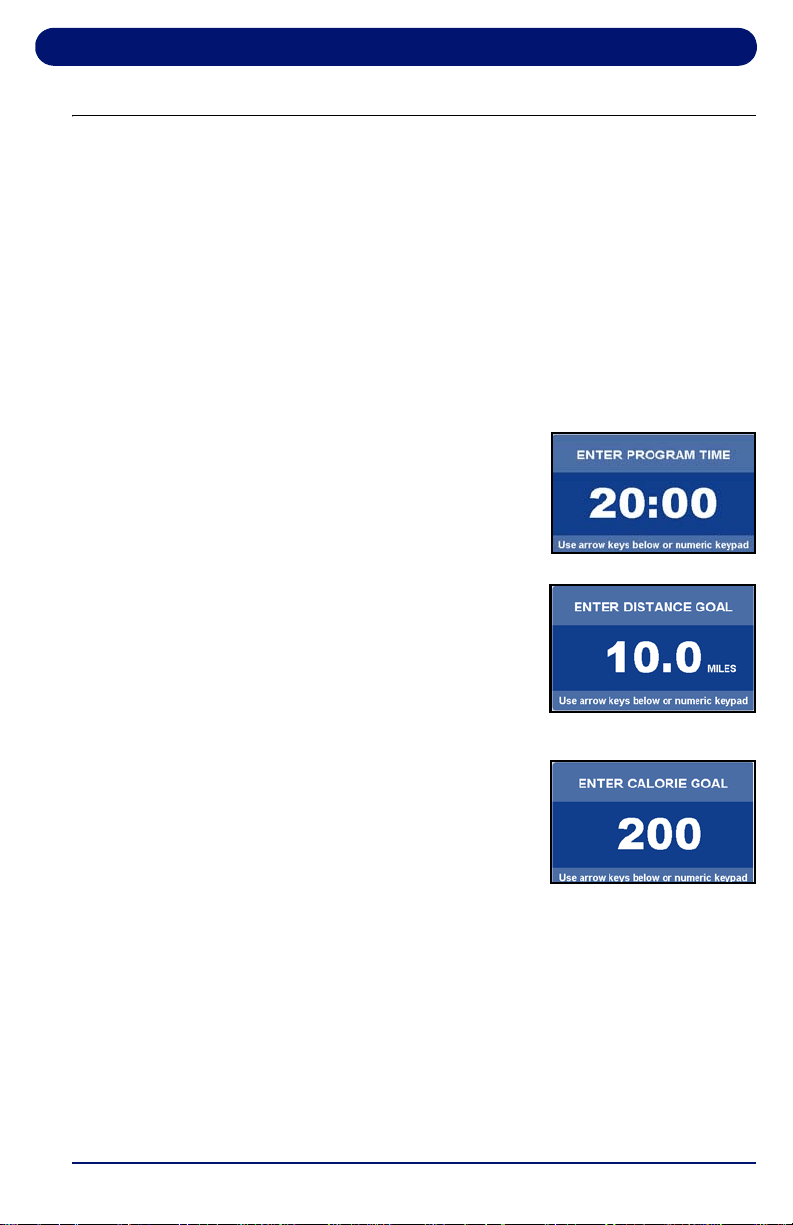
• For TIME GOAL PROGRAM, set
a Program Time Goal using the
numeric keypad or the arrow
keys. Enter a time from 10 to 99
minutes, then press ENTER or
wait 3 seconds.
• For DISTANCE GOAL
PROGRAM, set a Program
Distance Goal using the numeric
keypad or arrow keys. Enter a
distance from 0.1 to 99.9 miles
(km in metric), then press
ENTER or wait 3 seconds.
• For CALORIE GOAL
PROGRAM, set a Program
Calorie Goal using the numeric
keypad or arrow keys. Enter a
calorie goal from 10 to 9,999
calories, then press ENTER or
wait 3 seconds.
3. Press START to begin.
The Goal Progress screen shows your Specific Goal (Time,
Distance or Calorie), counting down (noted by a negative
sign).
4. Press the arrows at any time to view any of the other
screens during your program.
Cardio Bike Operation
46
4.7. Heart Rate Control Programs
Landice Cardio bikes offer Heart Rate Control (HRC) programs
that display your heart rate and automatically vary bike effort.
HRC training allows you to maximize your workout
performance while minimizing your workout time.
You must use the Pulse Grips or the Wireless Chest Strap
(optional) to detect your heart rate during the HRC programs.
There are 2 different 20-segment HRC programs:
• HRC varies bike effort to keep your heart rate near the target
heart rate for the entire workout.
• Interval HRC targets different heart rates. It alternates
between the target and 80% of the target.
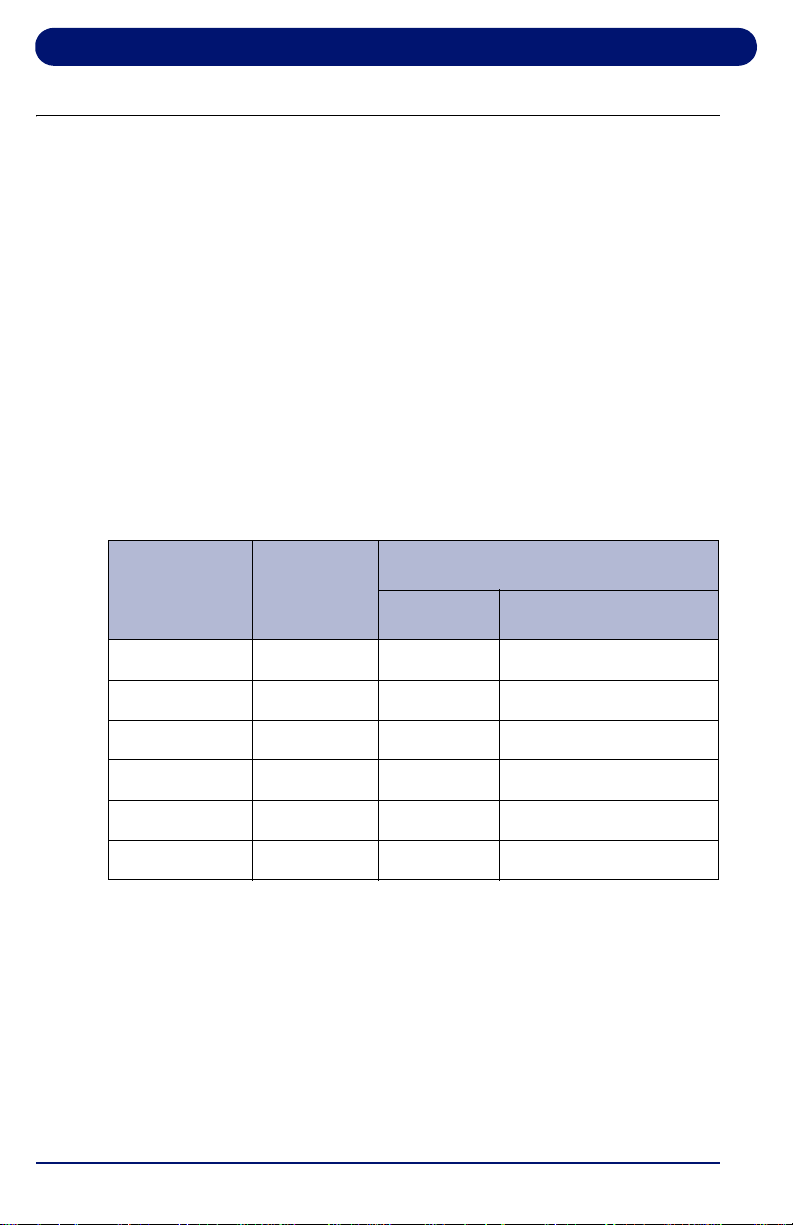
Table 4-4 Heart Rate Control Programs
Segment Stage
% of Target Heart Rate
HRC Interval HRC
1 Warm Up 70 70
2 Warm Up 80 80
3 Warm Up 90 90
4-18 Training 100 Alternating 80 & 100
19 Cool Down 90 90
20 Cool Down 80 80
Cardio Bike Operation
47
4.7.1. Built-in HRC Programs
1. Press the HEARTRATE PROGRAMS key. Press ENTER
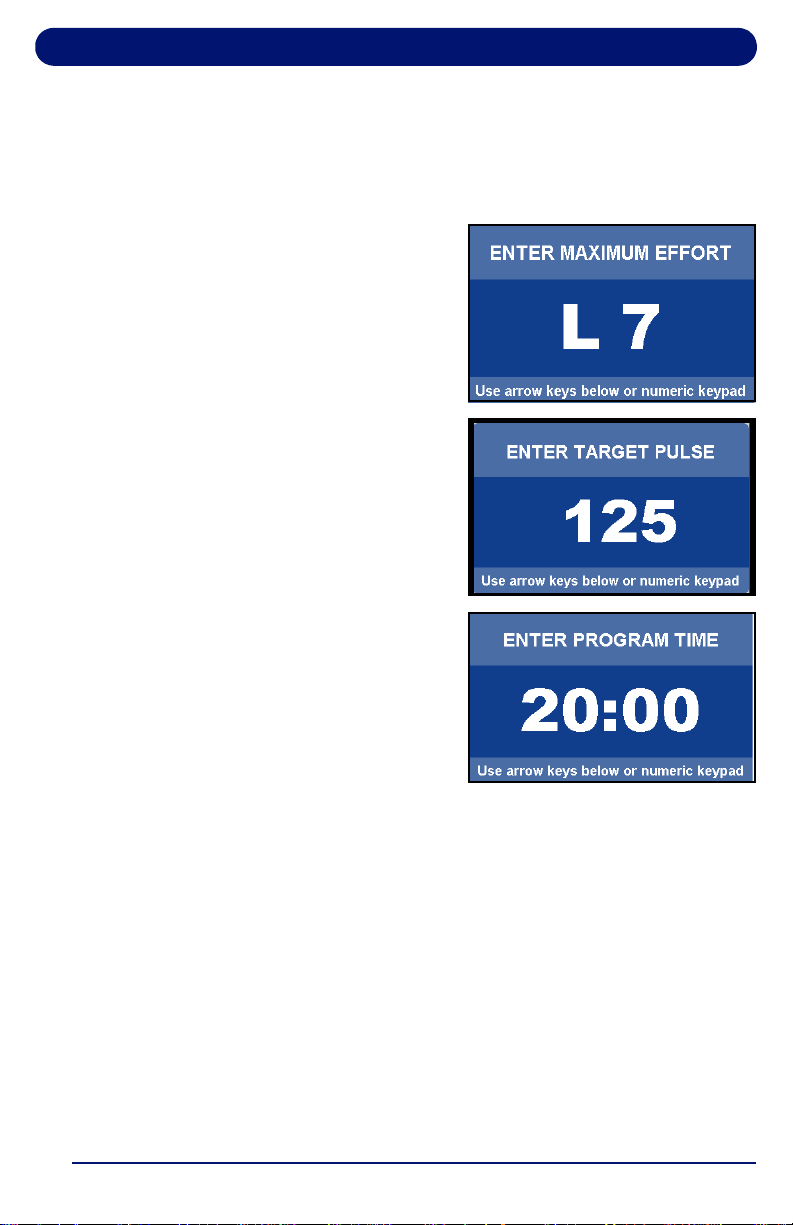
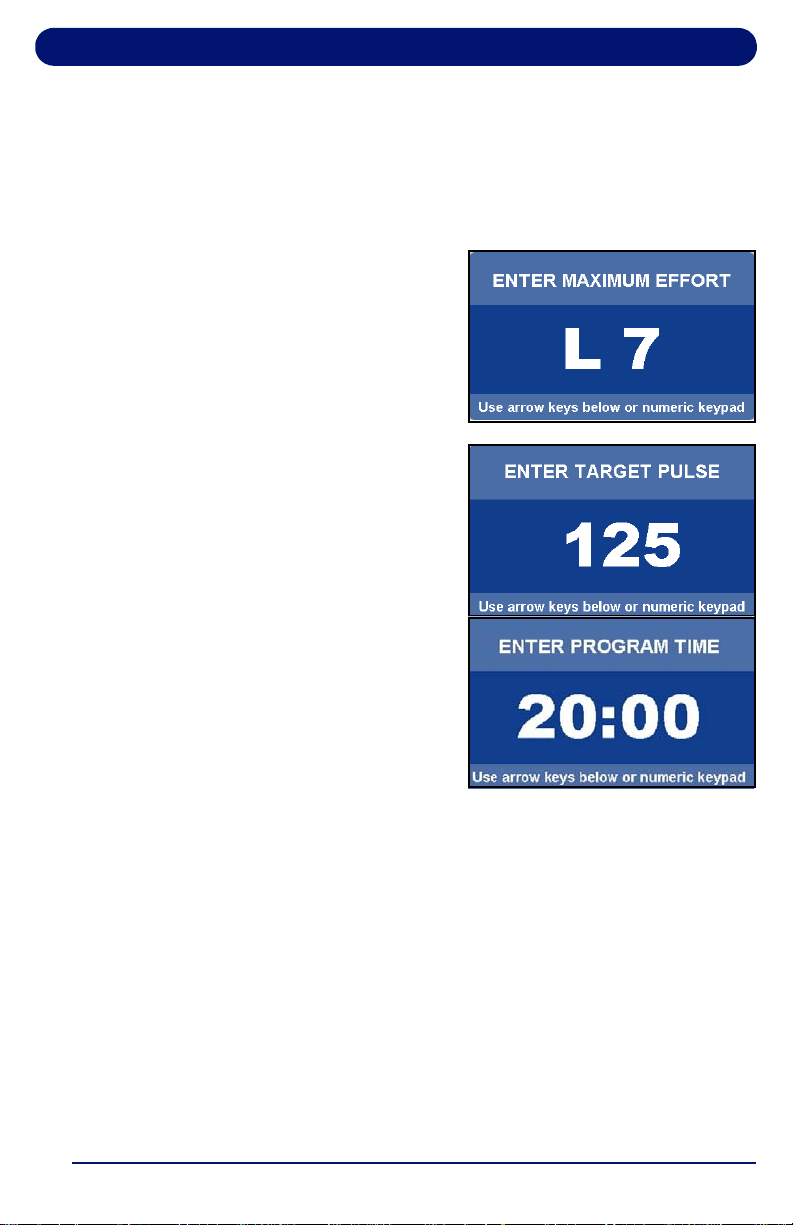
while the HR Control program is displayed.
2. Use the numeric keypad or
arrow keys to select your
maximum effort. Press
ENTER or wait 3 seconds.
3. Use the numeric keypad or
arrow keys to enter your
target pulse. The bike will
vary the effort to make sure
you reach this heart rate.
Press ENTER or wait 3
seconds.
4. The display prompts you to
set a Program Time using
the numeric keypad or
center arrow. For HRC,
enter a time between 20-99
minutes. This will scale the
20 segments of the program
equally throughout your
selected time. Press ENTER or wait 3 seconds.
5. Press START to begin.
Cardio Bike Operation
48
4.7.2. User-Defined Heart Rate Programs
The User-Defined Heart Rate Monitoring (HRC) programs are
designed to allow you to set the target heart rate for up to 20
program segments.
To customize a User-Defined HRC Program during your
workout, adjust your Target Heart Rate in the Heart Rate Status
screen by selecting Change TRG HRT button. Any Target
Heart Rate changes you make during your workout will be
saved in that User-Defined HRC Program.
If you want to edit your User-Defined HRC Program before your
workout, follow these steps:
1. To select an HR program to edit, press HEARTRATE
PROGRAMS. To scroll through the programs, either
continue pressing HEARTRATE PROGRAMS or use the
arrow keys. Select a User-Defined HRC Program to edit by
pressing ENTER.
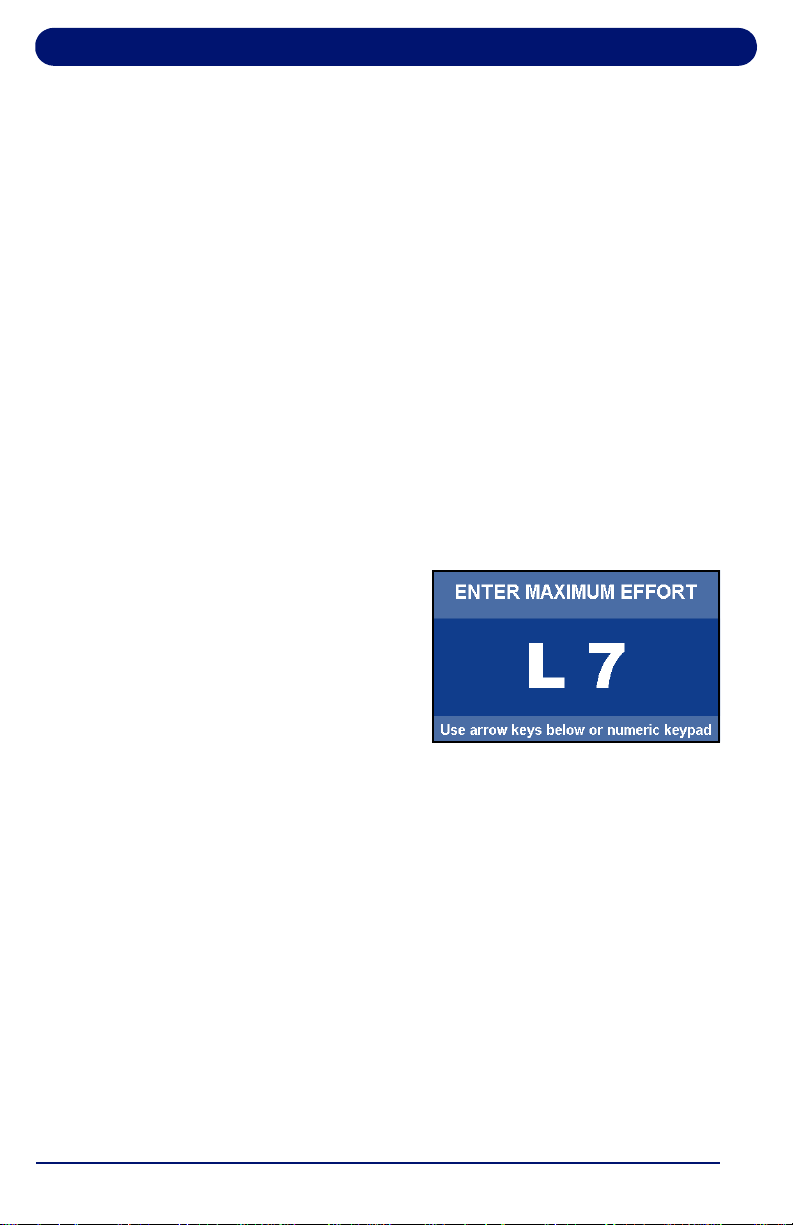
2. Enter the maximum effort
using the numeric keypad or
arrow keys. Press ENTER
or wait 3 seconds.
3. The display prompts
PRESS START TO BEGIN
OR EDIT TO SET UP. Press
START to run the program or press EDIT to enter editing
mode and make changes if desired.
4. To change segments, press PREVIOUS or NEXT
SEGMENT buttons. You can change segments in either the
forward or reverse direction.
5. The first display in EDIT MODE requires you to change the
time for segment 1 (area in bold). Use the keypad to
change the segment time length and press SWITCH
FOCUS to change the target heart rate.
6. If you want a program to have fewer than 20 segments,
create the last segment with 0 in the time field and press
DONE. The time reads END. The program ends when it
reaches this segment.

Cardio Bike Operation
49
7. Use the SWITCH FOCUS button to toggle between Target
Heart Rate and Time values within a segment. Continue to
program subsequent segments by using the Previous and
Next Segment buttons to move from segment to segment.
8. When you finish editing your User-Defined HRC Program,
do one of the following:
•Press DONE to save the program or START to begin.
• Exit Edit Mode by pressing MANUAL, HRC, or
PROGRAMS at any time. Any edits you made in Edit
Mode are permanently saved in that User-Defined HRC
Program.
9. If you attempt to advance the cursor past the 20th segment,
you are prompted with PRESS START TO BEGIN OR EDIT
TO SET UP.
Note: To adjust the program’s target heart rate during your
workout, from the Heart Rate Status screen, select the
CHANGE TRG HRT button.

Cardio Bike Operation
50
51
5. Operation: Landice Achieve Control Panel
5.1. Landice Achieve Control Panel
Table 5-1 Landice Achieve Control Panel Functions
Function Description
EFFORT
Displays the effort setting of the bike.
SPEED
To view your speed in different units: Press SPEED +/–
to select MPH, Km/hr, or Revolutions per Minute.
START
Start pedaling to power up the bike. All displays light and
the starting effort level is set to Level 1. The START button
will also take the bike out of pause mode.
STOP Press STOP once to pause the bike or twice to turn it off.
The statistical information is cleared when the bike is
turned off.
MANUAL
MODE
To manually control the effort of the bike, press the button
below the word
MANUAL.
Operation: Landice Achieve Control Panel
52
PROGRAMS
To use the built-in and user-defined workout programs:
Press the button below the word PROGRAMS at any time
to display the programs selection screen. Use arrow to
scroll through the built-in and user-defined program
previews and select the desired program by pressing
ENTER. You are then prompted to enter the program’s
specific parameters (Maximum Effort, Time, etc.). Use the
numeric keypad or the arrow to select the desired values.
Press
START to begin the program.
HEARTRATE
PROGRAMS
To use the Heart Rate Controlled programs:
Press the button below HEARTRATE PROGRAMS at any
time. Choose either a built-in or user-defined heart rate
program. Heart Rate Control programs automatically
adjust effort in order to maintain a constant heart rate.
PLUS KEY Press and hold the (+) to increase effort or change the
speed readout. Pressing for longer than 2 seconds causes
the effort to increase at a faster rate. Release the key
when the display shows desired effort or speed readout.
MINUS KEY Press and hold to the (–) to decrease effort or change the
speed readout. Pressing for longer than 2 seconds causes
the effort to decrease at a faster rate. Release the key
when the display indicates desired effort or speed readout.
ARROW
KEYS
The buttons below the left and right arrows move between
display sections or to set values.
EXPRESS 1
This key, in conjunction with the numeric keypad, allow you
to directly enter a target effort without using the +/– keys.
Press
EXPRESS 1, then enter the desired value using
the numeric keypad. Then press
ENTER or wait 3
seconds for the bike to adjust to the new settings.
EXPRESS 2
Select MPH, Km/hr, or Revolutions per Minute by pressing
EXPRESS 2.
The numeric keypad is used to change effort with the
EXPRESS 1 input
key, enter user settings, and configure programs.
Table 5-1 Landice Achieve Control Panel Functions (Continued)
Function Description
Operation: Landice Achieve Control Panel
53
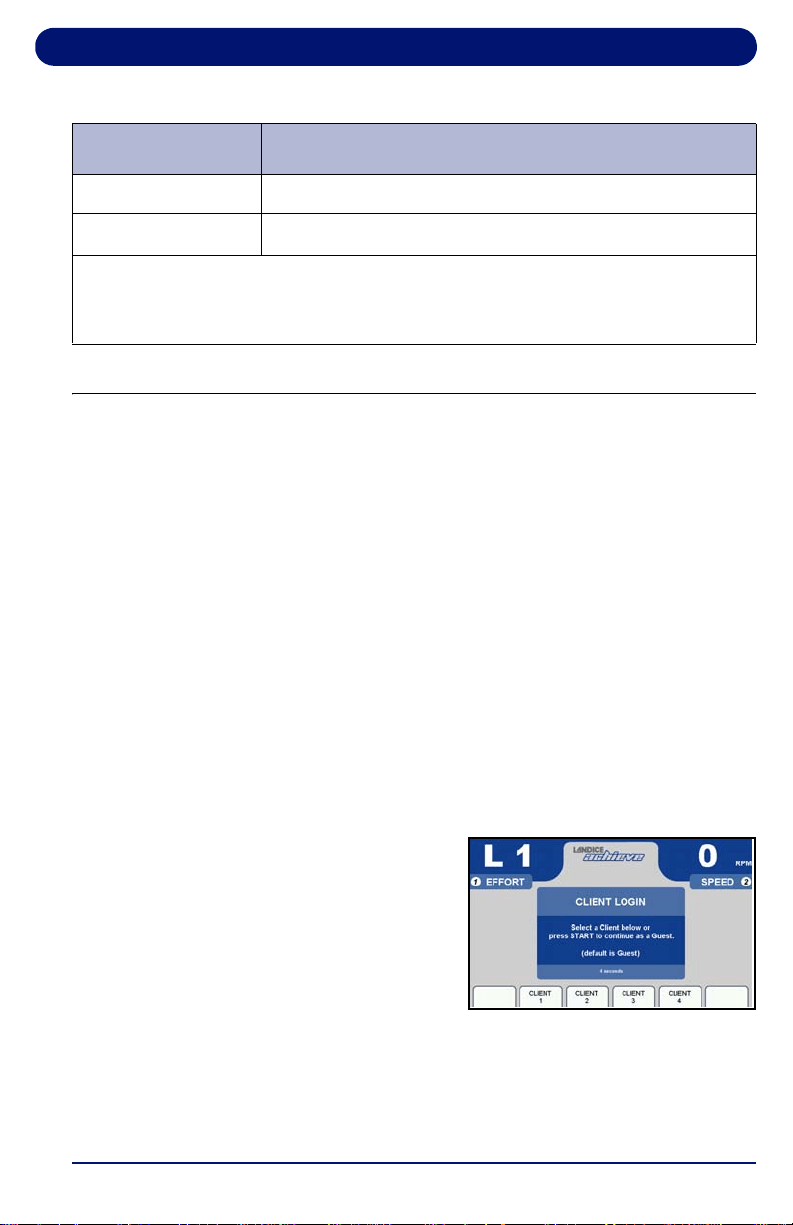
5.2. Display Features
The screens on the right are the
options available for displaying
workout information. Table 5-2
provides information about the
available options.
To toggle between these
screens during your workout,
press the arrow keys.
To customize the information
displayed on the Personalized
Stats screen, press the button
under CUSTOMIZE DISPLAY
to edit. Use the arrows to toggle
through the options and press
ENTER to confirm your
selections.
To modify the HIIT sprint and
recovery effort values on the
HIIT Screen, press and hold the
button below the item you would
like to edit for 5 seconds. A pop-
up window will appear. Use the
arrow keys or numeric keypad
to select your desired number.
Note: The custom
Personalized Statistic
and HIIT Screen
layouts are
permanently stored for
each client. Guest
Mode resets to Time,
Distance and Pace
each time you start the
bike.
Personalized Stats
Statistics Screen
Track Screen
Heart Rate Screen
HIIT Screen

Operation: Landice Achieve Control Panel
54
Table 5-2 Display Features
FEATURE DESCRIPTION
EFFORT
20 levels, select using EFFORT +/– keys
SPEED*
Displayed in MPH, Km/Hr or Revolutions per Minute,
select using
SPEED +/– keys.
TIME
Time logged on bike displayed as “Minutes: Seconds”
DISTANCE*
Miles logged on bike (kilometers when in metric)
CALORIES
Total calories burned based on user weight
CAL/HR
Rate in calories/hour based on user weight
PACE*
Time to complete 1 mile (1 kilometer when in metric)
METS
Current MET level, based on user weight / effort level/
speed. One MET is defined as the energy consumed
at rest by the average adult.
LAP
(PROGRESS)
A 1/4 mile (400 meter in metric) lap counter.
LAP (COUNTER)
Number of laps completed.
PULSE
Displays current heart rate.
TIME IN ZONE Time spent in target zone. The zone is ± 8 beats from
target heart rate.
IN ZONE
User’s heart rate is within 8 beats of the target heart
rate.
OUT OF ZONE
User’s heart rate is outside zone (more than 8 beats
above or below target heart rate).
ABOVE MAX User’s heart rate is above the maximum desirable
heart rate.
MAX Maximum allowable heart rate to remain in zone
TARGET HR Target heart rate (user-defined in Heart Rate Status
screen)
MIN Minimum allowable heart rate to remain in zone
Operation: Landice Achieve Control Panel
55
5.3. Using the Landice Achieve Bike
Note: Client Profiles are available on residential bikes only.
The bike can be used immediately as the Guest user or as a
default Client. The bike’s CLIENT LOGIN feature allows 4
different users to separately log cumulative statistics from
workout to workout. On residential models, client statistics
(total miles, hours, calories, weight, laps, and average HR,
Mets, pace, lap time, miles per hour and calories per hour) are
stored.
Personalized Statistic and HIIT screens are permanently stored
for each client. If you are logged in as a Guest, screens reset to
default values.
1. Make sure you have read and understand this owner’s
manual before beginning.
2. Press START. The power-up screen is displayed.
3. The CLIENT LOGIN screen
is displayed. Client login is
only available on residential
models.
4. Use the designated button
below the arrows to select a
Client. If a Client is not
selected the user will then be registered as a GUEST.
5. To enter client weight or reset totals: From Client
Statistics screen, enter weight by using the numeric keypad
BELOW MIN User is below minimum allowable heart rate in zone
TIME
The total time of the user’s workout
* Speed and distance are calculated using an advanced metabolic running
equivalent algorithm. Your pedal speed and effort level will yield a “running”
speed with the equivalent energy consuming intensity.
Table 5-2 Display Features (Continued)
FEATURE DESCRIPTION

Operation: Landice Achieve Control Panel
56
or select the Reset Client Statistics button to zero out your
information.
6. Enter your weight using the numeric keypad or arrows.
Press ENTER or wait 3 seconds to advance to the first of
the motivational screens.
7. The bike is now ready to use. You can vary the speed
readout or effort, if desired, by using the SPEED (+/–) and
effort (+/–) keys or EXPRESS 1 and EXPRESS 2 keys.
5.4. Using the Built-in Programs
5.4.1. Description
The Built-in Programs differ in effort. Each lets you select a
maximum effort and time (10 to 99 minutes). (Intervals Program
requires a minimum speed and effort and the HIIT programs
have a fixed time.) The bike will not go above the maximum
number unless manually overridden. Each program has 20
segments of equal time, beginning with 3 warm-up segments
and ending with 2 cool-down segments. For example, a 40-
minute program contains 20 2-minute segments.
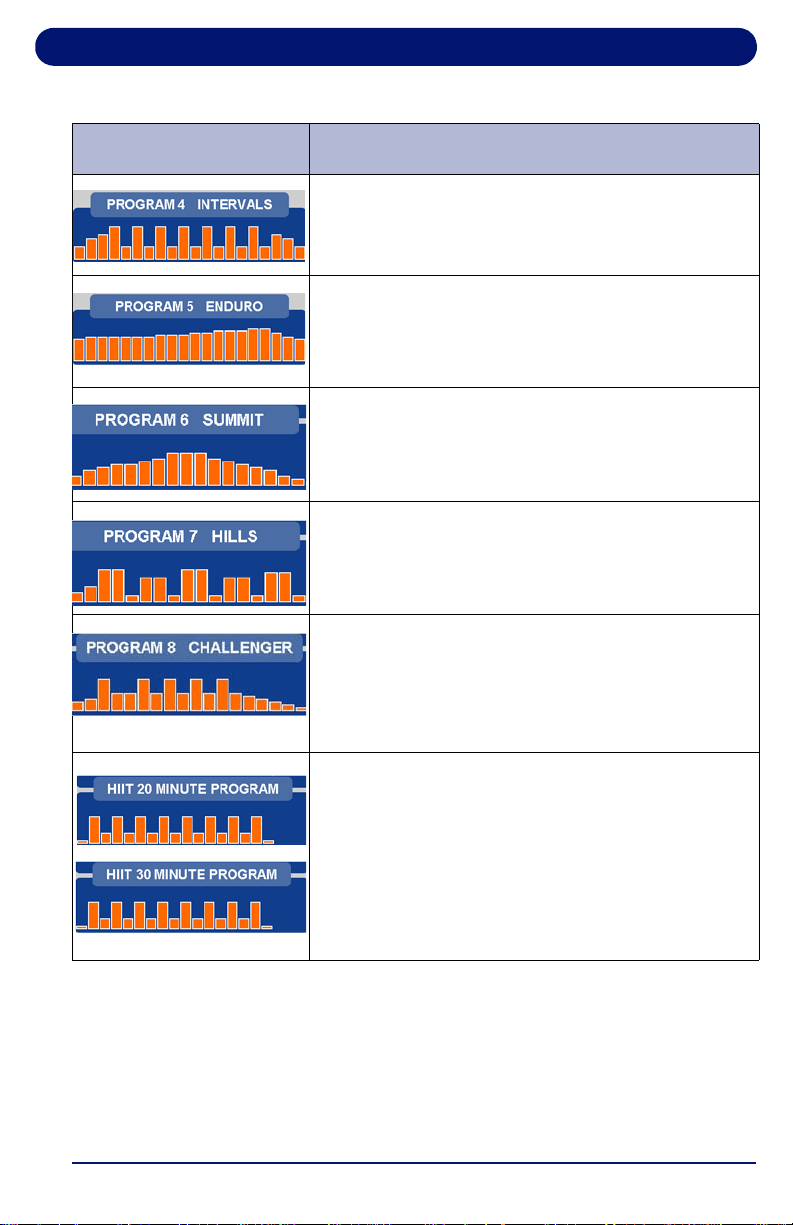
Table 5-3 Landice Achieve Built-In Programs
Screen Program Description
FAT BURN: This program features two peaks
along with gradual changes in effort. The overall
goal is to raise heart rate, maintain the raised
heart rate for most of the workout, then gradually
bring heart rate down during the last 3 cool down
segments.
INTERMEDIATE: The overall goal of this
program is to vary your heart rate by increasing
and lowering the effort several times, providing
you with a challenging cardiovascular workout.
ADVANCED: The overall goal of this program is
to raise your heart rate with high effort levels for
an advanced cardiovascular workout.
Operation: Landice Achieve Control Panel
57
INTERVALS: The overall goal is to vary your
workout load, taking you from peak level to
recovery 8 times throughout the workout.
ENDURO: This program features a maximum
effort. The overall goal is to increase intensity
toward a peak without recovery until the
cooldown.
SUMMIT: This program allows the user to input
their maximum effort. The goal is to gradually
work your way up to maximum effort with a steady
decline.
HILLS: This program features a maximum effort
with four series of hills. The goal is to increase
your cardiovascular while using effort.
CHALLENGER:
This program is designed to
increase your cardiovascular by reaching maximum
effort several times throughout the program.
Maximum effort is set by the user during program
set-up
.
HIIT20 and HIIT30: These programs feature
8 sprint phases alternated with 7 recovery
segments. Please note the maximum effort for the
sprint phases will differ between the two
programs due to the length of the sprint segment.
The overall goal of these programs is to provide a
combination of very high-intensity bursts of cardio
exercise followed by longer periods of recovery.
Table 5-3 Landice Achieve Built-In Programs (Continued)
Screen Program Description

Operation: Landice Achieve Control Panel
58
5.4.2. Running a Built-In Program
1. Start a workout as outlined in “Using the Landice Achieve
Bike” on page 55.
2. Press PROGRAMS to display the Programs selection
screen.
3. Select a built-in program by using the arrow buttons to
scroll through the list, then press ENTER. You are
prompted to enter the following program parameters:
• Maximum Effort:
This scales the effort curve to the
maximum effort entered.
• Program Time: Sets the total length of time you want the
program to run. HIIT Programs have a fixed time.
• Minimum Effort: INTERVALS and HIIT programs only.
4. Enter the Maximum Effort using the numeric keypad or the
arrows to select a value, then press ENTER or wait 3
seconds.
5. Enter Program Time using the numeric keypad or the arrow
keys, then press ENTER or wait 3 seconds. The time
should be at least 10 minutes and not more than 99
minutes.
6. Press START to begin your workout. The Program
Progress Detail screen displays your current segment effort
and remaining time.
7. To view other segments, select the “View Other Segments”
button. Use the “look back and/or look forward” keys to
move left or right. To exit, press DONE.
8. Press the buttons below the arrow keys at any time to view
any of the other motivational screens during your program,
including the Program Profile screen to see a program
overview. When viewing a motivational screen other than
the Program Progress Detail screen during a segment
change, the display temporarily shows the Program
Progress Detail screen then returns to the original screen.
During a segment change, the effort will flash if there is a
change in either.
Operation: Landice Achieve Control Panel
59
5.5. Landice Achieve User Programs
Landice Achieve bikes can store up to 6 individual, modifiable
user-defined program profiles.
A user-defined program looks and runs exactly like a built-in
program, but it can be customized to suit the user. Unlike the
built-in programs, user-defined programs allow editing of
individual segments as well as the number of segments.
1. Press the button below PROGRAMS to display the
Programs selection screen.
2. Scroll through the program options by pressing
PROGRAMS or use the arrow keys. When USER
PROGRAM PREVIEW is shown, press ENTER.
3. Press ENTER or wait 3 seconds. The screen displays
PRESS START TO BEGIN OR EDIT TO SET UP.
4. Press EDIT. EDIT MODE
requires a time for segment
1 (area in bold).
Note: Press SWITCH FOCUS to toggle between effort and time
values for the current segment. To change segments,
press NEXT SEGMENT or PREVIOUS SEGMENT. You can
change segments in either the forward or reverse
direction.
5. Use the numeric keypad to change the value and press
SWITCH FOCUS. Continue to another segment by
pressing the next or previous segment keys.
6. If you want a program to have less than 20 segments,
create the last segment with 0 in the time field. The time
reads END. The program ends when it reaches this
segment.
7. When you finish editing your User-Defined Program, you
can begin your program by pressing START or DONE.

Operation: Landice Achieve Control Panel
60
Note: If you attempt to advance the cursor past the 20th
segment, you are prompted with PRESS START TO BEGIN
OR EDIT TO SET UP.
5.5.1. Learn Mode
When you run a User-Defined Program and the effort is
adjusted, the bike saves the last change to the current
segment.
Note: Learn Mode allows you to adjust existing segments in your
user program, but you cannot add segments to it in Learn
Mode.
1. Start a workout, then press PROGRAMS to display the
Programs selection screen.
2. Scroll through the program options by pressing
PROGRAMS or use the arrow keys. When the USER
PROGRAM PREVIEW you desire is shown, press ENTER.
3. Press START to begin your program. When you begin, the
Program Progress Detail screen is displayed. The effort
values of your current segment are displayed in the center.
To change the effort of your current segment, press the
EFFORT (+/–) keys. The modified segment is stored with
these new settings for the next time you run this program.

Operation: Landice Achieve Control Panel
61
5.6. Specific Goal Programs
The Landice Achieve Bike provides Specific Goal programs.
Whether you want to go for a 3-mile run, burn 1,000 calories, or
simply exercise for 15 minutes, the Goal Progress screen
accurately assesses your progress with a variety of statistics.
During these programs you retain full manual control.
1. Start a workout as outlined in “Using the Landice Achieve
Bike” on page 55.
2. Press the arrow button under Programs to display the
Programs selection screen and select the goal program
that you want to run:
• For TIME GOAL PROGRAM,
set a Program Time Goal
using the numeric keypad or
the arrow keys. Enter a time
from 10 to 99 minutes, then
press ENTER or wait 3 seconds.
• For DISTANCE GOAL
PROGRAM, set a Program
Distance Goal using the
numeric keypad or arrow
keys. Enter a distance from
0.1 to 99.9 miles (km in metric), then press ENTER or
wait 3 seconds.
• For CALORIE GOAL
PROGRAM, set a Program
Calorie Goal using the
numeric keypad or arrow
keys. Enter a calorie goal
from 10 to 9,999 calories, then press ENTER or wait 3
seconds.
3. Press START to begin.
The Goal Progress screen shows your Specific Goal (Time,
Distance or Calorie), counting down (noted by a negative
sign).
4. Press the arrows at any time to view any of the other
screens during your program.

Operation: Landice Achieve Control Panel
62
5.7. Heart Rate Control Programs
Landice Achieve bikes offer Heart Rate Control (HRC)
programs that display your heart rate and automatically vary
bike effort. HRC training allows you to maximize your workout
performance while minimizing your workout time.
You must use the Pulse Grips or the Wireless Chest Strap
(optional) to detect your heart rate during the HRC programs.
There are 2 different 20-segment HRC programs:
• HRC varies bike effort to keep your heart rate near the target
heart rate for the entire workout.
• Interval HRC targets different heart rates. It alternates
between the target and 80% of the target.
Table 5-4 Heart Rate Control Programs
Segment Stage
% of Target Heart Rate
HRC Interval HRC
1 Warm Up 70 70
2 Warm Up 80 80
3 Warm Up 90 90
4-18 Training 100 Alternating 80 & 100
19 Cool Down 90 90
20 Cool Down 80 80
Operation: Landice Achieve Control Panel
63
5.7.1. Built-in HRC Programs
1. If using a Landice Achieve bike, press the button under
HEART RATE PROGRAMS. Press ENTER while the HR
Control program is displayed.
2. Use the numeric keypad or
arrow keys to select your
maximum effort. Press
ENTER or wait 3 seconds.
3. Use the numeric keypad or
arrow keys to enter your
target pulse. The bike will
vary the effort to help you
reach this heart rate. Press
ENTER or wait 3 seconds.
4. The display prompts you to
set a Program Time using
the numeric keypad or
center arrow. For HRC,
enter a time between 20-99
minutes. This will scale the
20 segments of the program
equally throughout your
selected time. Press ENTER or wait 3 seconds.
5. Press START to begin.
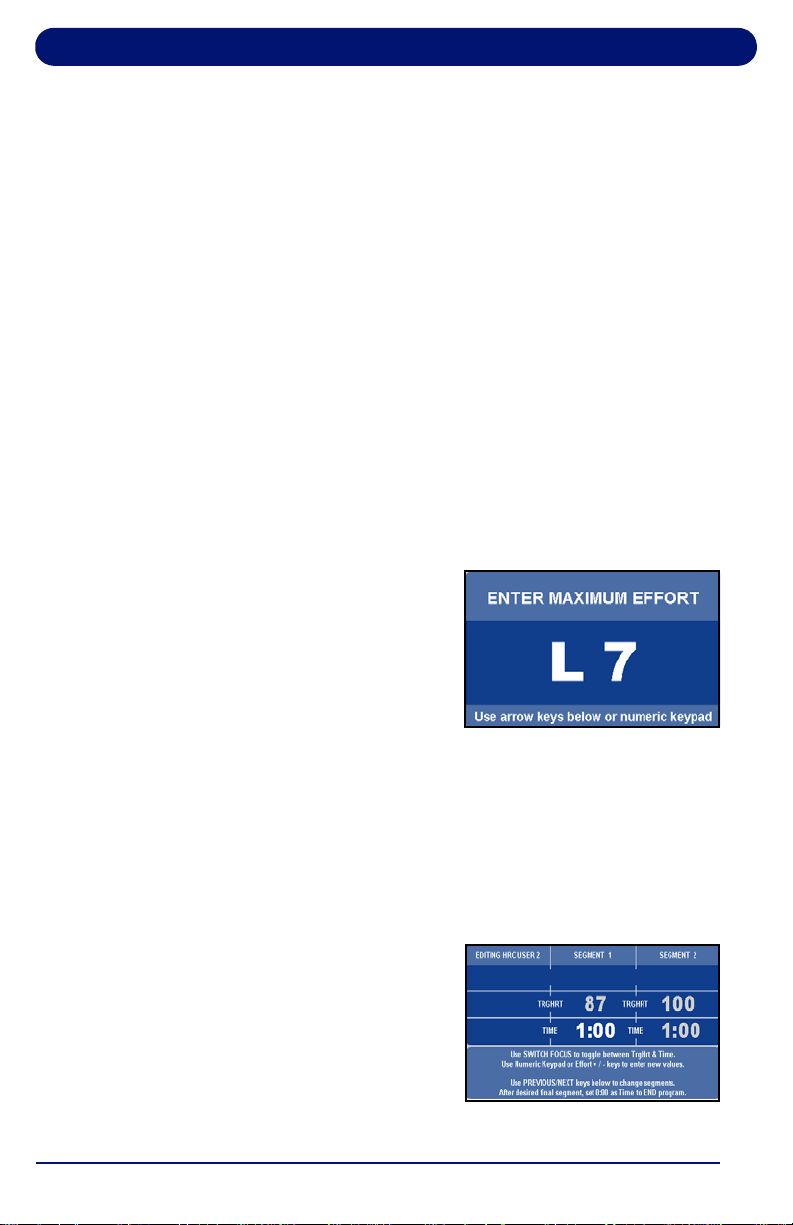
Operation: Landice Achieve Control Panel
64
5.7.2. User-Defined Heart Rate Programs
The User-Defined Heart Rate Monitoring (HRC) programs are
designed to allow you to set the target heart rate for up to 20
program segments.
To customize a User-Defined HRC Program during your
workout, adjust your Target Heart Rate in the Heart Rate Status
screen by selecting Change TRG HRT button. Any Target
Heart Rate changes you make during your workout will be
saved in that User-Defined HRC Program.
If you want to edit your User-Defined HRC Program before your
workout, follow these steps:
1. To select a user HRC program to edit, press the button
under HEART RATE PROGRAMS. To scroll through the
programs, either continue pressing HEART RATE
PROGRAMS or use the arrow keys. Select a User-Defined
HEART RATE Program to edit by pressing ENTER.
2. Select your maximum effort
using the numeric keypad or
arrow keys and press ENTER,
or wait 3 seconds.
3. The display prompts PRESS START TO BEGIN OR EDIT
TO SET UP. Press START to run the program or press
EDIT to enter editing mode and make changes if desired.
4. To change segments, press PREVIOUS or NEXT
SEGMENT buttons. You can change segments in either the
forward or reverse direction.
5. The first display in EDIT MODE
requires you to change the time
for segment 1 (area in bold).
Use the keypad to change the
segment time length and press
SWITCH FOCUS to change the
target heart rate.

Operation: Landice Achieve Control Panel
65
6. If you want a program to have
fewer than 20 segments, create
the last segment with 0 in the
time field and press DONE. The
time reads END. The program
ends when it reaches this
segment.
7. Use the SWITCH FOCUS button to toggle between Target
Heart Rate and Time values within a segment. Continue to
program subsequent segments by using the Previous and
Next Segment buttons to move from segment to segment.
8. When you finish editing your User-Defined HRC Program,
press DONE to save the program or START to begin.
9. If you attempt to advance the cursor past the 20th segment,
you are prompted with PRESS START TO BEGIN OR EDIT
TO SET UP.
Note: To adjust the program’s target heart rate during your
workout, from the Heart Rate Status screen, select the
CHANGE TRG HRT button.

Operation: Landice Achieve Control Panel
66

67
6. Maintenance and Troubleshooting
6.1. Cleaning
It is recommended to clean the console and screen after each
workout.
General: Vacuum around and under the bike at least once a
month. Wipe any sweat from the bike after each workout.
Console and Display Screen: Wipe exposed console
surfaces with a microfiber cloth, dampened with a mixture of
30 parts water to 1 part Simple Green
®
cleaner.
www.simplegreen.com
Touch Screen Cleaning:
1. Turn your fitness equipment off.
2. Spray/dampen a microfiber cloth with the cleaner and be
sure to wring out any excess liquid prior to cleaning the
screen.
3. Wipe the surface of the monitor gently in small circles, and
then allow it to dry.
Wireless Chest Strap (Optional): The transmitter activates
when the belt is moist. To conserve battery life, wipe the
electrodes dry after each use. Clean monthly with mild soap
and water and wipe dry.
IMPORTANT Avoid getting any cleaning liquids in the console
or other parts.
CAUTION
To avoid damaging the electrodes, do not use
abrasives to clean the chest strap. Do not bend
or stretch the electrode strips, especially when
storing the chest strap.
ATTENTION
Pour éviter d'endommager les électrodes,
n'utilisez pas d'abrasifs pour nettoyer la ceinture
thoracique. Ne pliez pas et n'étirez pas les
bandes d'électrodes, en particulier lors du
rangement de la ceinture pectorale.
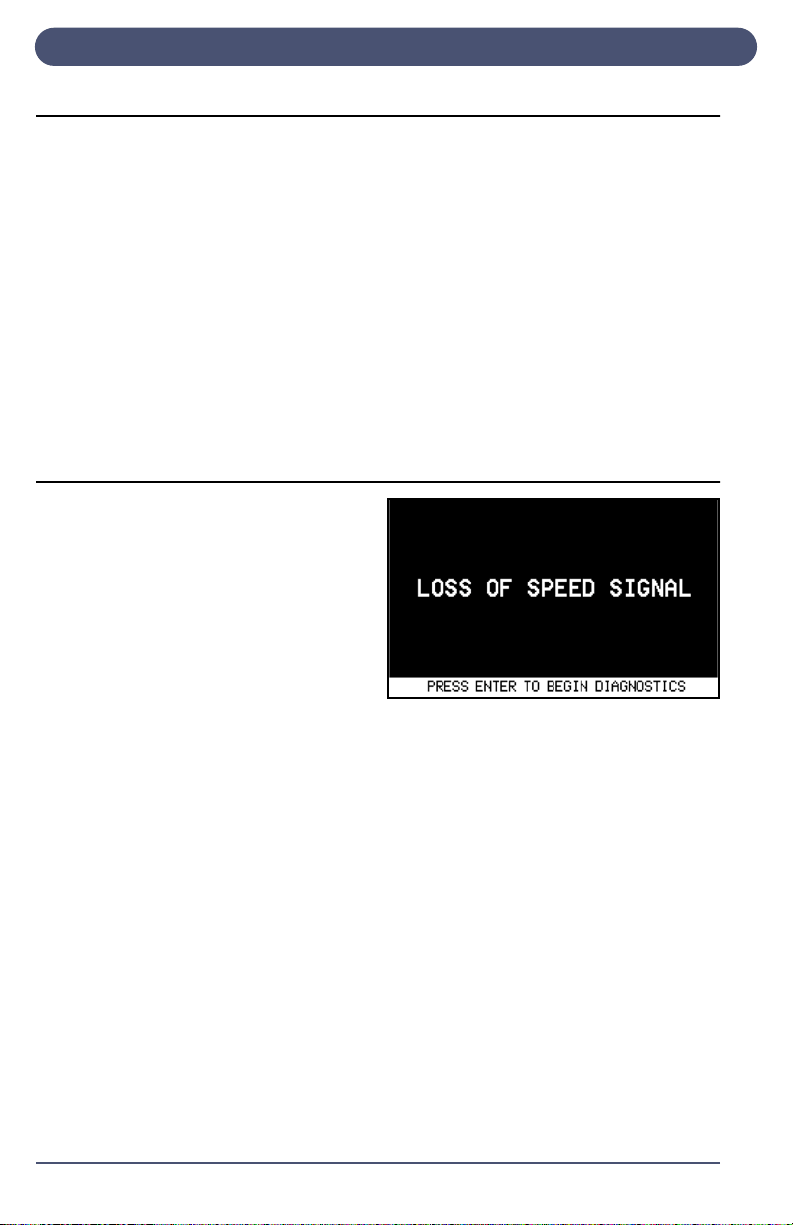
Maintenance and Troubleshooting
68
6.2. Maintenance
6.2.1. Pedals
The pedals may become loose after workouts. Check the
pedals before each workout and tighten them if necessary to
avoid injury. Turn the right pedal clockwise and the left pedal
counterclockwise to tighten. Check all bolts and screws
frequently to avoid injury.
6.2.2. Moving the Bike
The bike has two small wheels at the front to assist with moving
it if needed. To move the bike, lift it at the rear, then roll on front
wheels to desired location. See page 12 and page 13 for the
location of the small wheels
6.3. Self-Diagnostics
The bike is equipped with
on-board self-diagnostics.
If the bike experiences any
errors during operation, an
error message is displayed.
You can run self-
diagnostics to get further
information on the error by
pressing ENTER.
When you choose the option to enter diagnostics you will be
prompted with a warning screen. After reading it, take your feet
off the pedals and press ENTER.
The bike will systematically test individual components. During
some of the tests, you will be prompted with simple “Yes or No”
questions to assist with the diagnosis. Answer the questions
when prompted.
When the Self-Diagnostics has completed all of the tests, it will
display one of the two messages along the bottom: “No Errors
Detected”, or “Error Detected, Contact Service Provider”.
Contact your Dealer or go to www.landice.com and click on
Service Locator to find a provider in your area.
The self-diagnostics mode can be accessed manually by
selecting the Self-Diagnostics option from the Hidden Menus
(see page 69).

Maintenance and Troubleshooting
69
6.4. Hidden Menus
The Hidden Menus provide access to control the settings listed
below.To view the Hidden Menus:
Cardio: press and hold 3, 9 and START simultaneously while
the unit is off, then begin pedaling. Use the + or – keys to move
up and down the list. Then press the START button to select
setting. Press STOP to save and exit.
Landice Achieve: begin pedaling, then hold 3 and 9
simultaneously during the boot-up screen, then release all. Use
the + or – keys to move up and down the list. Then press
START to select the setting. Press STOP to save and exit.
• Error Logs: Records the number of times a specific error
code occurs.
• NV Init - Boot: Manufacturer's use ONLY
• Diagnostics: Provide technicians the ability to test buttons
and calibrate. Press and hold STOP to exit diagnostic mode.
• Reprogram Firmware: Manufacturer's use ONLY
• Self-Diagnostics: Runs an automatic test of specific
components to assist service technicians with diagnostics.
• Effort Level Scaling: Provides the ability to rescale the effort
level to make the resistance easier or harder.
• Toggle Client Mode: On residential models, provides the
ability to show two Clients and a guest on the home screen.
• Toggle Lockout Mode: Enables or disables use of a code to
operate the bike. When Lockout Mode is enabled it provides
the ability to set a personalized four-digit code to use the
bike. If the code is forgotten, 9010 will grant access.
• Toggle Units: Allows the measurement of units to switch
between English and Metric.
• Toggle Beeper: Enables or disables the ability to control the
beeping sound.

111 Canfield Avenue, Suite A-1, Randolph, NJ 07869
Tel. 973-927-9010 · Fax 973-927-0630
www.landice.com