The owner’s manual in PDF file format is supplied on the enclosed CD. Install the Adobe Acrobat Reader to view the owner’s manual on your PC.
Insert the supplied CD. The web page appears automatically.
Click Owner’s Manual on the web page.
View the owner’s manual.
NOTE If the web page does not appear automatically, access My computer and then click LG and index. html to view the owner’s manual.
Setting up the TV
You can mount your TV to a wall or attach the stand if you wish to place the TV on an entertainment center or other furniture.
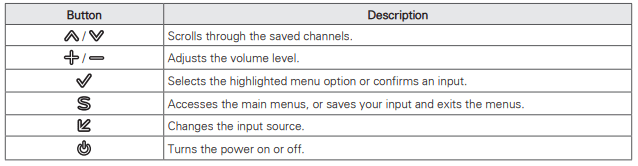
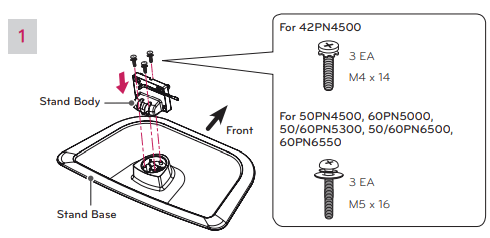
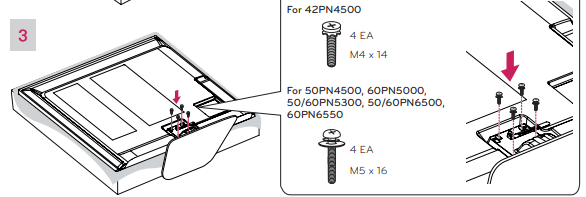
Attaching the stand
If you are not mounting the TV to a wall, use the following instructions to attach the stand.
Caution
When attaching the stand to the TV set, place the screen facing down on a cushioned table or flat surface to protect the screen from scratches.
Make sure that the screws are fastened completely. (If they are not fastened securely enough, the TV may tilt forward after being installed.)
Do not fasten the screws with too much force; otherwise they may be worn out and get loosened.
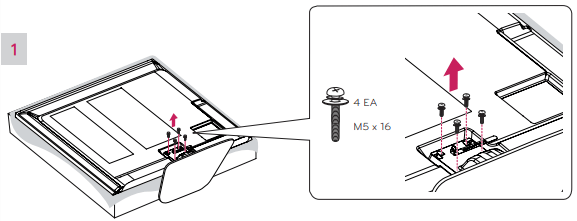
To detach the stand,
For 50PN4500, 50PN5300, 50PN6500
Note
Remove the stand before installing the TV on a wall mount by performing the stand attachment in reverse.
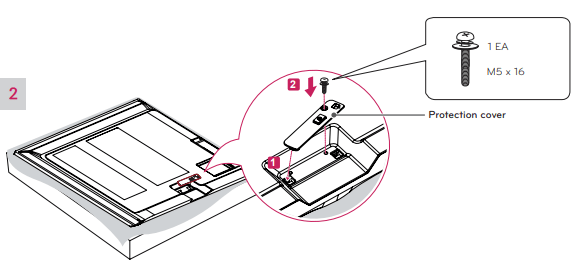
When installing the wall mounting bracket, use the Protection cover. This will protect the opening from accumulating dust and dirt.
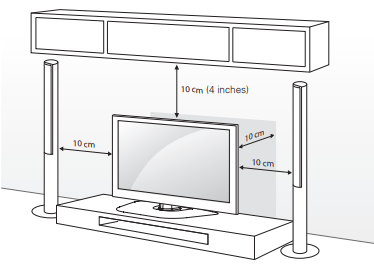
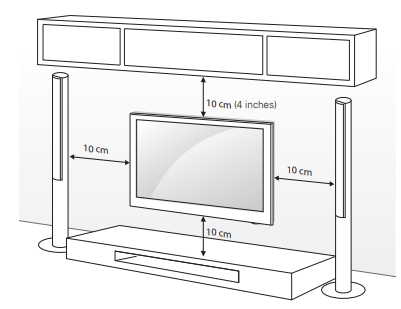
Mounting on a table
1. Lift and tilt the TV into its upright position on a table.
- Leave a 10 cm (4 inches) (minimum) space from the wall for proper ventilation.
2. Connect the power cord to a wall outlet.
Caution Do not place the TV near or on sources of heat, as this may result in fire or other damage.
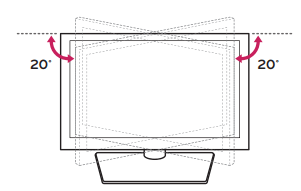
Adjusting the angle of the TV to suit view
Swivel 20 degrees to the left or right and adjust the angle of the TV to suit your view.
Caution When adjusting the angle of the TV, watch out for your fingers.
- Personal injury may occur if hands or fingers are pinched. If the product is tilted too much, it may fall, causing damage or injury.
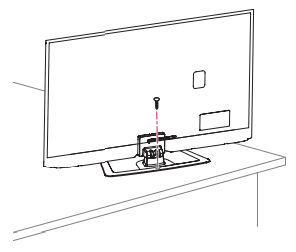
Securing the TV to a table
(For 42PN4500)
Fix the TV to a table to prevent from tilting forward, damage, and potential injury.
Mount the TV on a table, and then insert and tighten the supplied screw on the rear of the stand.
WARNING To prevent TV from falling over, the TV should be securely attached to the floor/wall per installation instructions. Tipping, shaking, or rocking the TV may cause injury.
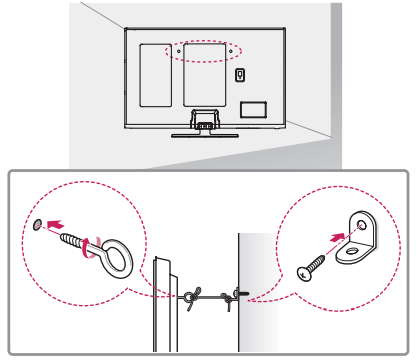
Securing the TV to a wall (optional)
(Depending on model)
1. Insert and tighten the eye-bolts, or TV brackets and bolts on the back of the TV.
- If there are bolts inserted at the eye-bolts position, remove the bolts first.
2. Mount the wall brackets with the bolts to the wall. Match the location of the wall bracket and the eyebolts on the rear of the TV.
3. Connect the eye-bolts and wall brackets tightly with a sturdy rope. Make sure to keep the rope horizontal with the flat surface.
Caution Make sure that children do not climb on or hang on the TV.
NOTE
Use a platform or cabinet that is strong and large enough to support the TV securely.
Brackets, bolts and ropes are optional. You can obtain additional accessories from your local dealer.
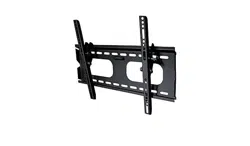
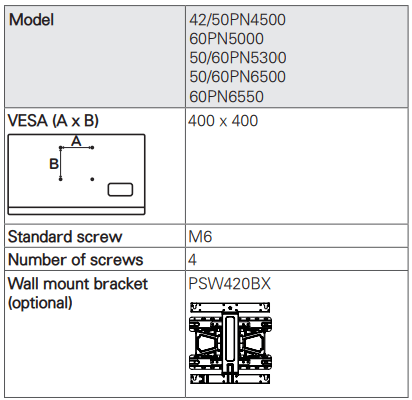
Mounting on a wall
An optional wall mount can be used with your LG Television. Consult with your local dealer for a wall mount that supports the VESA standard used by your TV model. Carefully attach the wall mount bracket at the rear of the TV. Install the wall mount bracket on a solid wall perpendicular to the floor. If you are attaching the TV to other building materials, please contact qualified personnel to install the wall mount. Detailed instructions will be included with the wall mount. We recommend that you use an LG brand wall mount.
Make sure to use screws and wall mounts that meet the VESA standard. Standard dimensions for the wall mount kits are described in the following table.
Caution
Disconnect the power before moving or installing the TV. Otherwise electric shock may occur.
If you install the TV on a ceiling or slanted wall, it may fall and result in severe injury. Use an authorized LG wall mount and contact the local dealer or qualified personnel.
Do not over tighten the screws as this may cause damage to the TV and void your warranty.
Use only screws and wall mounts that meet the VESA standard. Any damages or injuries by misuse or using an improper accessory are not covered by the warranty.
Note
Use only screws that are listed on the VESA standard screw specifications.
The wall mount kit includes an installation manual and necessary parts.
The wall mount bracket is optional. You can obtain additional accessories from your local dealer.
The length of screws may differ depending on the wall mount. Make sure to use the proper length.
For more information, refer to the manual supplied with the wall mount.
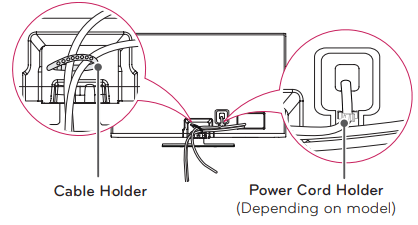
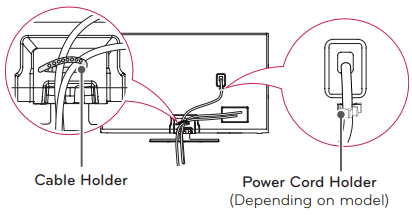
Tidying cables
1. Install the power cord holder and power cord. It will help prevent the power cable from being removed by accident.
2. Gather and bind the cables with the cable holder.
Caution Do not move the TV by holding the cable holder and power cord holder, as the cable holders may break, and injuries and damage to the TV may occur.
Note If you install the TV on a Wall, detach the cable holder from stand body and attach it to the protection cover or to the back cover to help keep the cables organize.
MAKING CONNECTIONS
You can connect various external devices to the TV. Supported external devices are: HD receivers, DVD players, VCRs, audio systems, USB storage devices, PC, gaming devices, and other external devices. For more information on external device’s connection, refer to the manual provided with each device.
NOTE
If you record a TV program on a DVD recorder or VCR, make sure to connect the TV signal input cable to the TV through a DVD recorder or VCR. For more information on recording, refer to the manual provided with the connected device.
The external device connections shown may differ slightly from illustrations in this manual.
Connect external devices to the TV regardless of the order of the TV port.
If you connect a gaming device to the TV, use the cable supplied with the gaming device.
Refer to the external equipment’s manual for operating instructions.
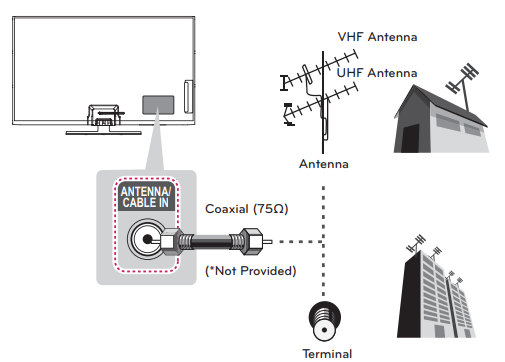
Connecting to an antenna or cable
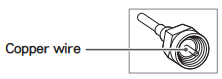
Connect an antenna, cable, or cable box to watch TV while referring to the following. The illustrations may differ from the actual items and a RF cable is optional.
Caution
Make sure not to bend the copper wire of the RF cable.
Complete all connections between devices, and then connect the power cord to the power outlet to prevent damage to your TV.
NOTE
Use a signal splitter to use more than 2 TVs.
DTV Audio Supported Codec: MPEG, Dolby Digital
Connecting to a HD receiver, DVD Player or VCR
Connect a HD receiver, DVD Player or VCR to the TV and select an appropriate input mode.
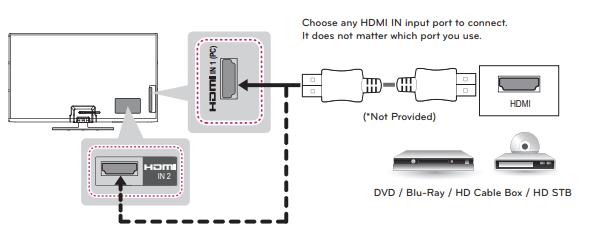
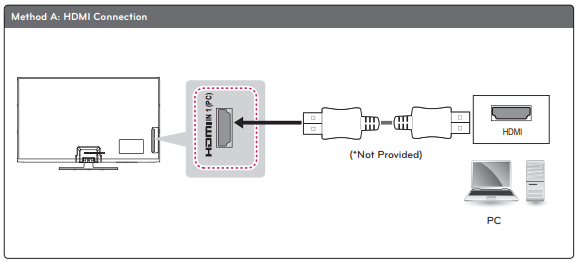
HDMI Connection
HDMI is the best way to connect a device.
Transmits digital video and audio signals from an external device to the TV. Connect the external device and the TV with the HDMI cable as shown in the following illustration.
NOTE
Use the latest High Speed HDMI™ Cable that supports CEC (Customer Electronics Control) function.
High Speed HDMI™ Cables are tested to carry an HD signal up to 1080p and higher.
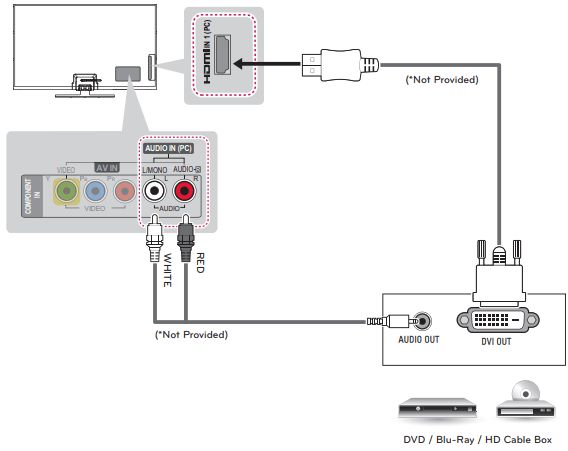
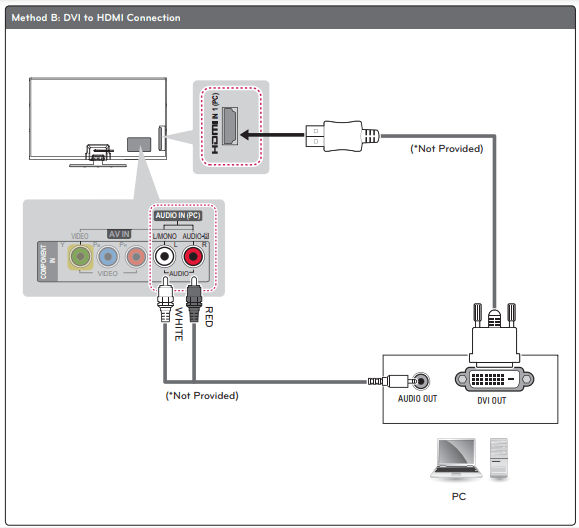
Transmits the digital video signal from an external device to the TV. Connect the external device and the TV with the DVI-HDMI cable as shown in the following illustration. To transmit an audio signal, connect an audio cable.
NOTE When using the HDMI/DVI cable, Single link is only supported.
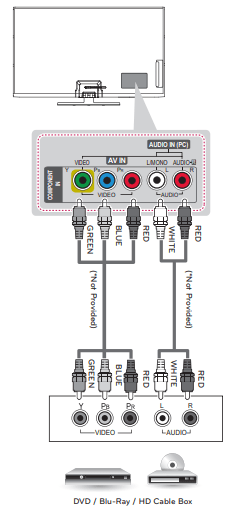
Component Connection
Transmits the analog video and audio signals from an external device to the TV. Connect the external device and the TV with the component cable as shown in the following illustration.
NOTE
If cables are installed incorrectly, it could cause the image to display in black and white or with distorted color.
Check to ensure each cable is matched with the corresponding color connection.
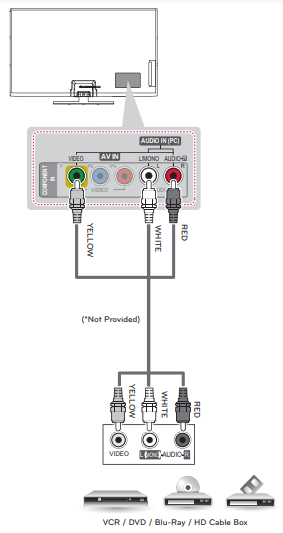
Composite Connection
Transmits the analog video and audio signals from an external device to the TV. Connect the external device and the TV with the composite cable as shown in the following illustration.
NOTE If you have a mono VCR, connect the audio cable from the VCR to the AUDIO L/MONO jack of the TV.
Connecting to a PC
NOTE
It is recommended to use an HDMI connection for the best image quality.
Depending on the graphics card, DOS mode may not work if a HDMI to DVI Cable is in use.
In PC mode, there may be noise associated with the resolution, vertical pattern, contrast or brightness. If noise is present, change the PC output to another resolution, change the refresh rate to another rate or adjust the brightness and contrast on the PICTURE menu until the picture is clear.
The synchronization input form for Horizontal and Vertical frequencies is separate.
Depending on the graphics card, some resolution settings may not allow the image to be positioned on the screen properly.
When using the HDMI/DVI cable, Single link is only supported.
HDMI Connection or DVI to HDMI Connection
Choose method A or B to make connection.
Connecting to an Audio System
You can use an optional external audio system instead of the built-in speaker.
NOTE If you use an optional external audio device instead of the built-in speaker, set the TV speaker feature to off.
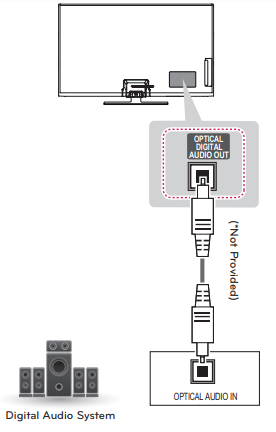
Digital Optical Audio Connection
Transmits the digital audio signal from the TV to an external device. Connect the external device and the TV with the optical audio cable as shown in the following illustration.
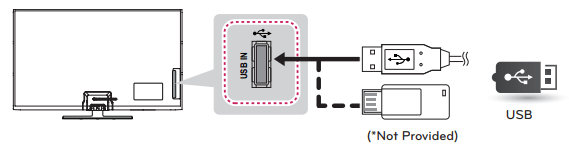
Connecting a USB Device
Connect a USB storage device such as a USB flash memory, external hard drive, or a USB memory card reader to the TV and access the USB menu to use various multimedia files.
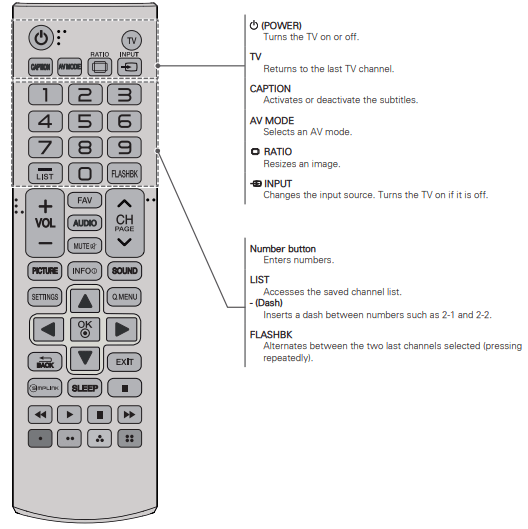
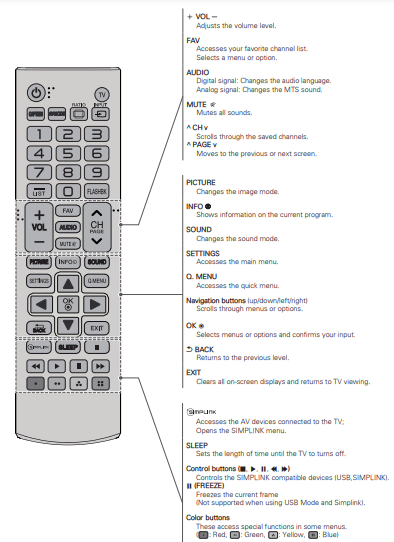
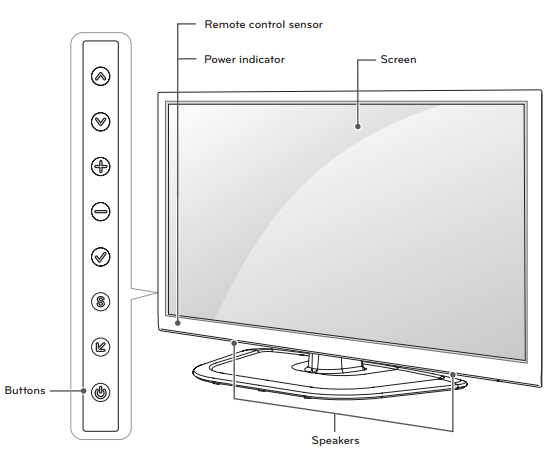
REMOTE CONTROL
The descriptions in this manual are based on the buttons on the remote control. Please read this manual carefully and use the TV correctly.
To install batteries, open the battery cover, replace batteries (1.5 V AAA) matching the and ends to the label inside the compartment, and close the battery cover. To remove the batteries, perform the installation actions in reverse.
Caution Do not mix old and new batteries, as this may damage the remote control.
This remote uses infrared light. When in use, it should be pointed in the direction of the TV’s remote sensor.
WATCHING TV
Turning the TV on for the first time
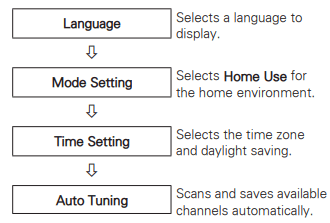
When you turn the TV on for the first time, the Initial setting screen appears. Select a language and customize the basic settings.
1. Connect the power cord to a power outlet.
2. In Standby mode, press the power button on the remote control to turn the TV on. The Initial setting screen appears when you turn the TV on for the first time.
NOTE You can also access Initial Setting by accessing OPTION in the main menu.
3. Follow the on-screen instructions to customize your TV settings according to your preferences.
NOTE
To display images in the best quality for your home environment, select Home Use.
Store Demo is suitable for the retail environment.
If you select Store Demo, any customized settings will switch back to the default settings of Store Demo in 5 minutes.
4. When the basic settings are complete, press OK.
NOTE
If you do not complete the Initial setting, it will appear whenever the TV turns on.
Disconnect the power cord from the power outlet when you do not use the TV for a long period of time.
5. To turn the TV off, press the power button on the remote control.
TROUBLESHOOTING
General
Problem
Solution
Cannot control the TV with the remote control.
Check the remote control sensor on the product and try again.
Check if there is any obstacle between the product and the remote control.
Check if the batteries are still working and properly installed ( to , to ).
No image display and no sound is produced.
Check if the product is turned on.
Check if the power cord is connected to a wall outlet.
Check if there is a problem in the wall outlet by connecting other products
Image appears slowly when the TV turns on.
The image is muted during the product startup process. This is normal. If the image does not appear in a few minutes, unplug the TV for 30 seconds and try again. If the image still does not appear, contact the authorized service center in your local area.
Cannot connect external devices.
Refer to the "Connection Overview" and connect an external device.
The TV turns off suddenly
Check the power control settings. The power supply may be interrupted.
Check if the Auto sleep feature is activated in the Time settings. Refer to the "Sleep Timer".
If there is no signal while the TV is on, the TV will turn off automatically after 15 minutes of inactivity.
Audio
Problem
Solution
No sound is produced while images are displaying.
Press VOL + or - button.
Check if the sound is muted by pressing MUTE.
Scroll to other channels. There may a problem with the broadcast.
Check if the audio cables are connected properly.
Check if the TV Speaker feature is activated in the menu option.
No output from one of the speakers
Adjust Balance in the menu option.
Unusual sound from inside the TV is produced.
A change in ambient humidity or temperature may result in an unusual noise when the product turns on or off. There is no problem with your product.
Video
Problem
Solution
An image displays in black and white or the color quality is poor.
Adjust the color setting in the menu option.
Keep a sufficient distance between this product and other electronic products.
Scroll to other channels. There may a problem with the broadcast.
Horizontal or vertical bars appears or images blur.
Check if there are local interferences such as an electrical appliance or power tool.
Lines or streaks appear on images
Check the antenna or aim the antenna to the proper direction.
Afterimages (ghosts) appear when the product turns off
Pixels may have been damaged from a fixed image displayed for a long time (image burn). Use a screen saver to prevent the pixel damage on the screen.
The power is on but the screen appears extremely dark.
Adjust the brightness and contrast in the menu option.
“No Signal” appears on the screen.
Check if the signal cable is connected between the TV and products properly.
Check the selected input source by pressing INPUT
Black spots appear on the screen.
Several pixels in red, green, white, or black may appear on the screen that can attribute to the characteristics of the panel.
This is normal.
The display offset is wrong.
Adjust the position setting in the Picture menu.
Check if the video card resolution and frequency are supported by the product. If the frequency is out of range, set to the recommended resolution using the display settings on the external device.
Thin lines appear in the background of the screen.
Check the video cable connections.
The reception on some channels is poor
Scroll to other channels. There may a problem with the broadcast.
The station signal may be weak. Aim the antenna to the proper direction.
Check if there is local interferences such as an electrical appliance or power tool.
 and
and  ends to the label inside the compartment, and close the battery cover. To remove the batteries, perform the installation actions in reverse.