
www.krups.com
DEFRITEN
2
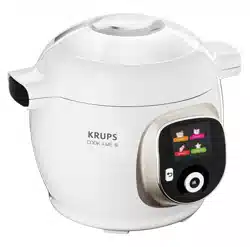
DESCRIPTION
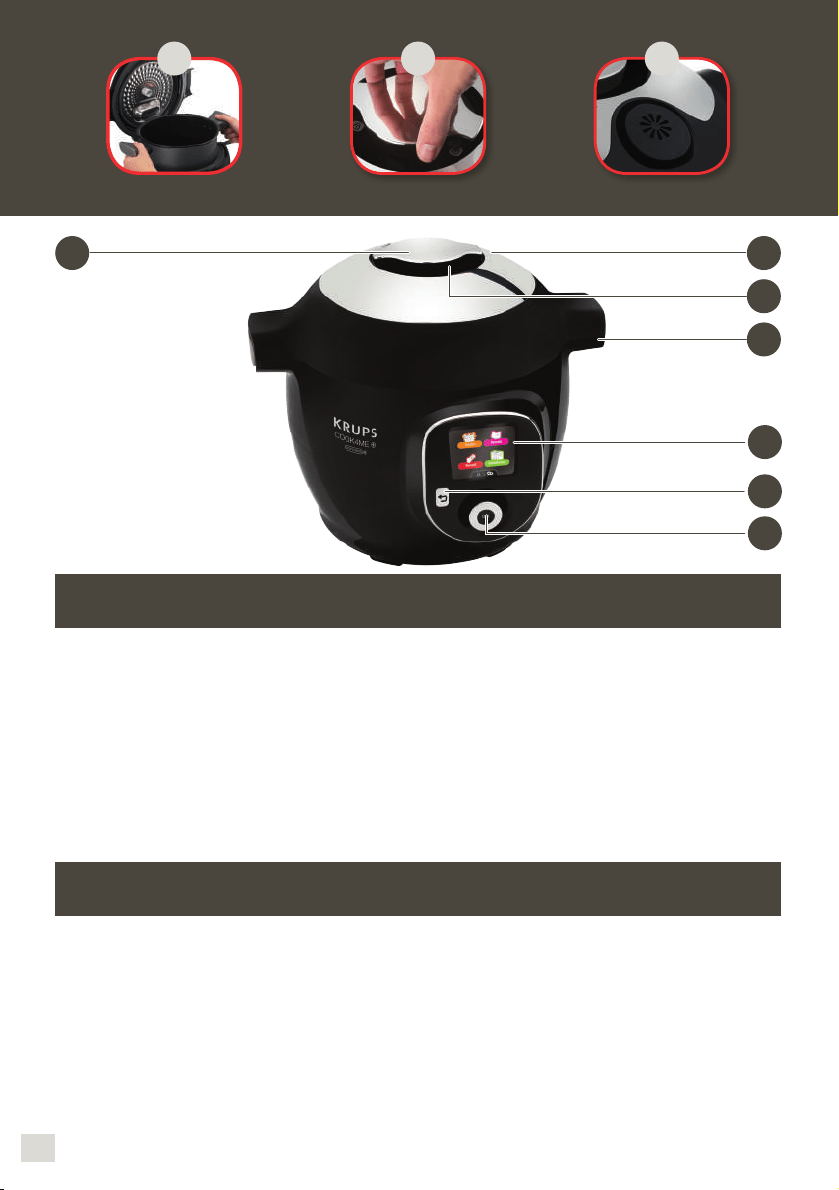
1 Lid open / close handle
2 Control panel
3 Cancel button
4 Main operation button
5 Cooking pot
6 Open / closed marking
7 Silencing valve
SERIE EPC09
Low pressure 40kPa (109°c) / High pressure: 70kPa (115°c)
Product capacity: 6L / Useful capacity: 4L
Frequency: 2.40 GHz. Maximum transmitted power: 7.7 dBm
Built-in heating
The operational pressure is achieved 10 minutes after the beep.
BESCHREIBUNG
1 Griff zum Öffnen/Schließen des Deckels
2 Display / Menüführung
3 Knopf „Abbrechen“
4 Hauptnavigationsknopf
5 Kochbehälter
6 Kennzeichnung Offen / Geschlossen
7 Dampfventil
SERIE EPC09
Geringer Druck: 40 kPa (109 °C) / Hoher Druck: 70 kPa (115 °C)
Produktvolumen: 6 l / Nutzvolumen: 4 l
Frequenz: 2,40 GHz. Maximale übertragene Leistung: 7,7 dBm
Integriertes Heizelement
Der Betriebsdruck wird 10 Minuten nach dem akustischen Signal erreicht
5 6 7
5
7
2
3
1
4
6

3
DESCRIZIONE
1 Impugnatura di apertura/chiusura del
coperchio
2 Pannello di controllo
3 Pulsante Annulla
4 Pulsante di funzionamento principale
5 Pentola di cottura
6 Simbolo di apertura/chiusura
7 Valvola silenziatrice
SERIE EPC09
Bassa pressione: 40 kPa (109°C) / Alta pressione: 70 kPa (115°C)
Capacità totale: 6 L / Capacità utile: 4 L
Frequenza: 2,40 GHz. Potenza di trasmissione massima: 7,7 dBm
Riscaldamento integrato
La pressione di regolazione viene raggiunta 10 minuti dopo il segnale acustico.
DESCRIPTION
1 Poignée ouverture/fermeture du
couvercle
2 Panneau de commande
3 Bouton annuler
4 Bouton d’utilisation principal
5 Cuve de cuisson
6 Repère visuel d’indication d’ouverture /
fermeture
7 Valve silencieuse
SERIE EPC09
Basse pression 40kPa (109°C) / Haute pression : 70kPa (115°C)
CAPACITÉ PRODUIT : 6L / CAPACITÉ UTILE : 4L
Fréquence : 2,40 GHz. Puissance maximale transmise : 7,7 dBm
Chauffage intégré
La pression de régulation est atteinte 10 minutes après le bip sonore.

4
SICHERHEITSHINWEISE
Bitte lesen Sie die folgenden Anweisungen aufmerksam durch.
Verwenden Sie das Gerät nur in Innenräumen.
Zur Reinigung des Geräts beachten Sie bitte die Hinweise
in der Gebrauchsanleitung. Sie können den Garbehälter und
den Dampfkorbeinsatz mit warmer Seifenlauge oder in der
Geschirrspülmaschine reinigen. Reinigen Sie den Sockel mit
einem feuchten Tuch.
Dieses Gerät darf nicht ins Wasser getaucht werden.
Bei unsachgemäßem Gebrauch des Geräts und des
Zubehörs kann das Gerät beschädigt werden und es besteht
Verletzungsgefahr.
Kommen Sie nicht mit heißen Geräteteilen in Berührung! Nach
dem Gebrauch gibt das Heizelement noch Restwärme ab.
Für Ihre Sicherheit entspricht dieses Produkt allen gängigen
Standards (Niederspannungsrichtlinie, elektromagnetische
Verträglichkeit, Lebensmittelverordnung, Umweltschutz,...).
Das Gerät darf nicht von Kindern verwendet werden. Stellen
Sie das Gerät mitsamt Kabel außerhalb der Reichweite von
Kindern ab.
Das Gerät darf nur dann von Personen mit eingeschränkten
körperlichen, sensorischen oder geistigen Fähigkeiten oder
durch Personen mit mangelnder Erfahrung bzw. mangelnden
Kenntnissen verwendet werden, wenn sie beaufsichtigt
werden oder Anweisungen zur sicheren Bedienung des
Geräts erhalten haben und die damit verbundenen Gefahren
verstehen.
Kinder dürfen das Gerät nicht als Spielzeug verwenden.
Wenn die Anschlussleitung dieses Gerätes beschädigt wird,
muss sie durch den Hersteller oder seinen Kundendienst
oder eine ähnlich qualizierte Person ersetzt werden, um
Gefährdungen zu vermeiden. Das mitgelieferte Netzkabel
darf nicht durch ein anderes Kabel ersetzt werden.
Dieses Gerät ist dazu bestimmt, im Haushalt verwendet zu

5
DEUTSCH
werden. Bei Verwendung des Gerätes in Umgebungen wie
beispielsweise
– in Küchen für Mitarbeiter in Läden, Büros und anderen
gewerblichen Bereichen
– in landwirtschaftlichen Anwesen
– von Kunden in Hotels, Motels und anderen Wohneinrichtungen
– in Frühstückspensionen
erlischt die Garantie.
Das Gerät darf nicht von Kindern verwendet werden. Stellen
Sie das Gerät mitsamt Kabel außerhalb der Reichweite von
Kindern ab.
Das Gerät darf nur dann von Personen mit eingeschränkten
körperlichen, sensorischen oder geistigen Fähigkeiten oder
durch Personen mit mangelnder Erfahrung bzw. mangelnden
Kenntnissen verwendet werden, wenn sie beaufsichtigt
werden oder Anweisungen zur sicheren Bedienung des
Geräts erhalten haben und die damit verbundenen Gefahren
verstehen.
Kinder dürfen das Gerät nicht als Spielzeug verwenden.
Füllen Sie den Garbehälter maximal bis zur MAX-Markierung.
Wenn Sie Lebensmittel zubereiten, die beim Garen aufquellen
(z.B. Reis oder Trockengemüse), darf der Garbehälter
maximal bis zur Hälfte gefüllt werden. Reduzieren Sie die
Wassermenge, um das Überlaufen zu vermeiden.
Halten Sie sich an die empfohlenen Mengen für Lebensmittel
und Wasser, um ein Überlaufen zu vermeiden, welches
Schäden am Gerät sowie körperliche Schäden verursachen
könnte.
Stellen Sie vor jedem Gebrauch sicher, dass der Schwimmer
für das Druckablasssystem und das Sicherheitsventil sauber
sind (siehe Abschnitt zur Reinigung und Pege).
Achten Sie darauf, dass keine Fremdkörper in das
Druckablasssystem geraten. Der Schwimmer darf nicht
ausgetauscht werden.
Beim Öffnen halten Sie den Deckel immer am vorgesehenen

6
Griff. Halten Sie die Arme in Verlängerung zu den seitlichen
Tragegriffen. Durch die eventuelle Ansammlung von kochend
heißem Wasser zwischen der Auage für den Dichtungsring
und dem Deckel könnte Verbrennungsgefahr bestehen.
Achten Sie auch darauf, sich beim Öffnen nicht am heißen
Dampf zu verbrennen. Öffnen Sie den Deckel zunächst nur
einen Spalt, um den Dampf langsam entweichen zu lassen.
Versuchen Sie niemals, den Deckel mit Gewalt zu öffnen.
Öffnen Sie den Deckel nicht, solange das Gerät unter Druck
steht (siehe Bedienungsanleitung).
Angesichts der unterschiedlichen gültigen Vorschriften sollten Sie sich bei einer
autorisierten Kundendienststelle diesbezüglich vergewissern, wenn das Gerät in einem
Land verwendet werden soll, in dem es nicht gekauft wurde.
Verwenden Sie nur für Ihr Gerätemodell geeignete Ersatzteile. Dies gilt insbesondere für
den Dichtungsring, Garbehälter und Metalldeckel.
Achten Sie darauf, den Dichtungsring nicht zu beschädigen. Falls der Dichtungsring
beschädigt sein sollte, muss er in einem zugelassenen Kundendienstcenter ausgetauscht
werden.
Die Wärmequelle für den Garvorgang ist bereits im Gerät integriert.
Stellen Sie das Gerät niemals in einen heißen Ofen oder auf ein heißes Kochfeld. Stellen
Sie das Gerät niemals in die Nähe einer offenen Flamme oder hitzeempndlicher/
feuergefährlicher Gegenstände.
Erhitzen Sie den Garbehälter ausschließlich mithilfe der zugehörigen Heizplatte, und
ersetzen Sie ihn nicht durch einen anderen Topf. Verwenden Sie den Garbehälter nicht
mit anderen Geräten.
Solange der Garbehälter unter Druck steht, darf er nur vorsichtig bewegt werden.
Achten Sie darauf, nicht mit heißen Geräteteilen in Berührung zu kommen. Fassen Sie
den Garbehälter ausschließlich an den vorgesehenen Griffen an, und verwenden Sie bei
Bedarf Topappen. Heben Sie das Gerät niemals am Deckelgriff an.
Nutzen Sie das Gerät ausschließlich für die vorgesehenen Zwecke.
Dieser Gerät ist kein Sterilisiergerät. Verwenden Sie das Gerät nicht, um Einweckgläser
zu sterilisieren.
Das Gerät ermöglicht das Druckgaren von Lebensmitteln in zwei verschiedenen Modi.
Bei unsachgemäßer Verwendung besteht Verbrühungsgefahr durch heißen Dampf.
Stellen Sie sicher, dass das Gerät ordnungsgemäß verschlossen ist, bevor Sie das
Druckgaren einleiten (siehe Bedienungsanleitung).
Verwenden Sie das Gerät niemals leer, d.h., ohne Garbehälter oder üssigen Inhalt.
Gravierende Schäden an Ihrem Gerät könnten die Folge sein.
Fleisch mit dicker Haut (z.B. Rinderzunge) dürfen Sie nach dem Garen nicht einstechen,
da Verbrühungsgefahr besteht. Stechen Sie das Fleisch bereits vor dem Garen ein.
Beim Garen von Lebensmitteln mit dicküssiger oder zäher Konsistenz (Kichererbsen,
Rhabarber, kandierte Früchte etc.) sollten Sie das Gerät vor dem Öffnen leicht rütteln, um
zu vermeiden, dass die Lebensmittel bzw. Garsäfte überschwappen.
Verwenden Sie das Gerät nicht zum Frittieren. Lebensmittel dürfen nur angebraten/
geröstet werden.
Wenn Sie Lebensmittel anbraten, achten Sie darauf, sich beim Hinzufügen von Zutaten in

7
DEUTSCH
den heißen Garbehälter nicht zu verbrennen.
Beim Garen und beim automatischen Druckablass nach dem Garen gibt das Gerät Hitze
und Dampf ab. Halten Sie zu diesem Zeitpunkt Gesicht und Hände vom Gerät fern, um
sich nicht zu verbrühen. Fassen Sie den Deckel während des Garens nicht an.
Der Deckel darf nicht mit einem Geschirrtuch oder sonstigen Objekten offen gehalten
werden, weil dadurch der Dichtungsring dauerhaft verformt werden könnte.
Berühren Sie die Sicherheitssysteme nur zum Zweck der Reinigung und Pege. Beachten
Sie dabei die entsprechenden Hinweise.
Achten Sie darauf, dass der Boden des Garbehälters und das Heizelement immer sauber
sind. Das zentrale Element der Heizplatte muss frei beweglich bleiben.
Das Gerät darf nur gefüllt werden, wenn zuvor der Garbehälter eingesetzt wurde.
Verwenden Sie einen Plastik- oder Holzlöffel, um die Antihaftbeschichtung des
Garbehälters nicht zu beschädigen. Schneiden Sie niemals Lebensmittel direkt im
Garbehälter.
Sollte am Deckelrand eine große Menge Dampf austreten, ziehen Sie sofort den
Netzstecker, und überprüfen Sie, ob das Gerät sauber ist. Falls notwendig, übergeben
Sie das Gerät einem zugelassenen Kundendienstcenter zur Reparatur.
Tragen Sie das Gerät nicht an den Griffen des entnehmbaren Behälters. Halten Sie
das Gerät immer an den beiden seitlichen Griffen an der Außenseite. Verwenden Sie
Topappen, wenn das Gerät heiß ist. Bevor Sie das Gerät bewegen, stellen Sie sicher,
dass der Deckel richtig verschlossen ist.
Falls beim Druckgaren kontinuierlich (länger als 1 Minute) Dampf über das Dampfventil
freigegeben wird, lassen Sie das Gerät in einem zugelassenen Kundendienstcenter
reparieren.
Wenn Ihr Gerät beschädigt sein sollte, dürfen Sie es nicht verwenden. Lassen Sie es in
einem zugelassenen Kundendienstcenter reparieren.
BEWAHREN SIE DIESE ANWEISUNGEN GUT AUF.
Verwenden Sie nur Ersatzteile aus einem zugelassenen Kundendienstcenter.
Die Garantie gilt nicht für abnormalen Verschleiß des Garbehälters.
Lesen Sie die Bedienungsanleitung aufmerksam, bevor Sie Ihr Gerät das erste Mal in
Gebrauch nehmen. Bei Nichteinhaltung dieser Anweisungen übernimmt der Hersteller
weder Haftung noch Garantie.
Gemäß der geltenden Vorschriften ist jedes ausgediente Gerät vor seiner Entsorgung
unbrauchbar zu machen. Hierfür ziehen Sie zunächst den Netzstecker und durchtrennen
anschließend das Netzkabel.
Denken Sie an den Schutz der Umwelt !
Ihr Gerät enthält wertvolle Rohstoffe, die wiederverwertet werden können.
Geben Sie Ihr Gerät deshalb bitte bei einer Sammelstelle Ihrer Stadt oder
Gemeinde ab.
88
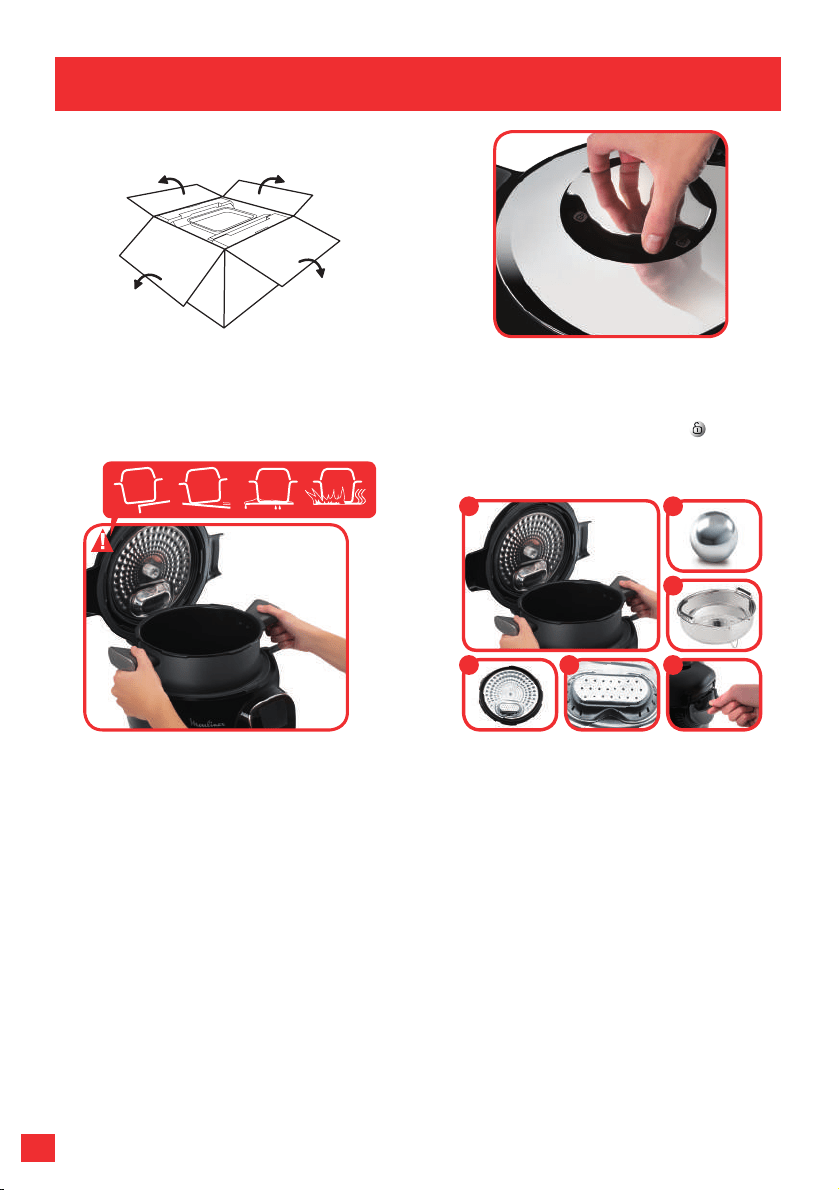
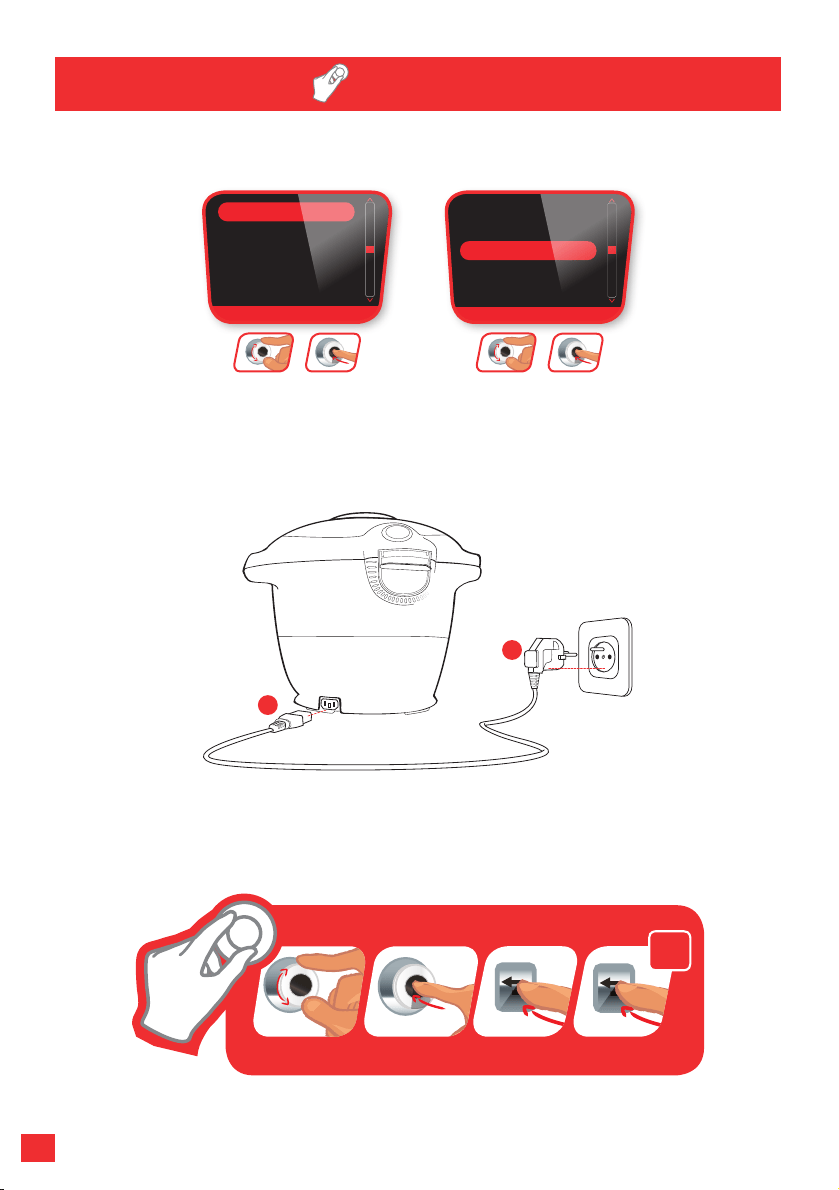
Entfernen Sie vor der ersten Benutzung
des Produkts die Verpackung vom
Gerät und lesen Sie aufmerksam die
Bedienungsanleitung.
Stellen Sie das Gerät auf einer
ebenen, trockenen und kühlen
Oberäche auf. Entfernen Sie sämtliche
Verpackungsmaterialien, Aufkleber und
Zubehör an den Außen- und Innenseiten
des Geräts.
Um das Produkt zu öffnen, drehen Sie den
Öffnen/Schließen-Griff an der Unterseite
des Deckels so, dass ein geöffnetes
Vorhängeschloss zu sehen ist:
REINIGUNG DER VERSCHIEDENEN
BESTANDTEILE
1. Kochbehälter
2. Metalldeckel
3. Ventilabdeckung
4. Kondenswasserschale
5. Dampfeinsatz
6. Dekompressionskugel
VORBEREITUNG
1 6
5
432
9
DEUTSCH
9
DECKEL AUSEINANDERNEHMEN UND ZUSAMMENBAUEN
METALLDECKEL ABNEHMEN:
Halten Sie die Deckel-Unterbaugruppe an
der Dichtung fest und schrauben Sie die
zentrale Mutter durch Drehung entgegen
dem Uhrzeigersinn ab. Nehmen Sie erst
die Mutter und dann den Deckel ab.
METALLDECKEL-UNTERBAUGRUPPE
WIEDER EINSETZEN:
Halten Sie die Deckel-Unterbaugruppe wie
abgebildet an der Dichtung fest. Richten
Sie den Deckel an der mittleren Achse
aus und drücken Sie ihn ach gegen die
Unterbaugruppe. Setzen Sie die Mutter wieder
auf und drehen Sie sie im Uhrzeigersinn.
Ziehen Sie sie bis zum Anschlag fest.
VENTILABDECKUNG ABNEHMEN:
Drücken Sie die Ventilabdeckung an ihrer
mittleren Partie ein (siehe Abbildung). Drehen
Sie sie dann leicht, um die Verbindung zu
lösen. Reinigen Sie die Ventilabdeckung und
beachten Sie dabei besonders die Innenseite
(es dürfen sich keine Speiserückstände an
der Innenseite benden).
VENTILABDECKUNG WIEDER AUFSETZEN:
Halten Sie die Ventilabdeckung wie in der
Abbildung gezeigt (Drücken der mittleren
Partie). Richten Sie die innen liegende
Kreisform an den drei Haken aus und drücken
Sie sie dann so, dass die Ventilabdeckung
einklickt (es sollte ein „Klick“-Geräusch zu
hören sein). Die Ventilabdeckung muss korrekt
an der Innenseite des Deckels anliegen.
DIE DEKOMPRESSIONSKUGEL REINIGEN:
Drehen Sie Kugelabdeckung entgegen dem Uhrzeigersinn, sodass die MarkierungI auf der
Position steht. Nehmen Sie die Abdeckung ab. Nehmen Sie die Kugel ab und reinigen
Sie sie sowie ihre Befestigung vorsichtig mit Wasser und etwas Spülmittel. Trocknen Sie die
Kugel mit einem weichen Tuch ab und legen Sie sie wieder auf ihre Befestigung auf. Setzen
Sie die Kugelabdeckung wieder mit der MarkierungI auf die Position . Verschließen Sie die
Kugelabdeckung so, dass die Markierung dem Piktogramm „geschlossen“ gegenüber steht.
1
4 5
2
3
1010
Beim ersten Anschalten öffnet sich
das Menü Einstellungen:
ok
ok
STEUERUNG DER BEDIENOBERFLÄCHE
AUSWAHL BESTÄTIGUNG
ZURÜCK
NEUSTART
3 s
BETRIEB
1
2
Wählen Sie Ihre
Sprache aus
Wählen Sie Ihr Land
aus
SPRACHEN
Deutsch
English
Espanol
Français
Nederlands
LÄNDER
UNIT
Deutschland
cups / oz gr / ml
UNIT
cups / oz gr / ml
SPRACHEN
Deutsch
English
Espanol
Français
Nederlands
LÄNDER
UNIT
Deutschland
cups / oz gr / ml
UNIT
cups / oz gr / ml
ok
ok
+
ok
ok
+
11
DEUTSCH
11
DECKEL ÖFFNEN:
Drehen Sie zum Öffnen des Produkts
den Griff zum Öffnen/Schließen, sodass
die Kennzeichnung mit dem geöffneten
Schloss auf einer Linie liegt. Öffnen Sie den
Deckel nicht mit Gewalt, wenn er klemmt.
Setzen Sie dann den Behälter durch
Positionierung der Behältergriffe in den
Halterungen in das Gerät ein.
DIE HALTERUNG UNTER DEM
DAMPFEINSATZ EINSETZEN:
Drücken Sie die Halterung mit Daumen
und Zeigenger ein, um sie unter dem
Dampfeinsatz einzusetzen.
Verwenden Sie das Gerät niemals ohne den Kochbehälter.
Bei der ersten Benutzung des Geräts kann der Behälter einen schwachen Geruch
absondern. Dies ist normal.
VERWENDUNG
KONDENSWASSERSCHALE EINSETZEN:
Prüfen Sie, dass die Kondenswasserschale
leer ist. Setzen Sie sie dann an der
Rückseite des Geräts ein.
DEN BEHÄLTER IM GERÄT
POSITIONIEREN:
Wischen Sie die Unterseite des Kochbehälters
ab. Prüfen Sie, dass sich keine Speisereste
oder Flüssigkeiten unter dem Behälter oder
auf der Heizplatte benden.
1212
MENÜEIN-STELLUNGEN
Hinweis: Auch wenn der Ton ausgeschaltet ist, bleiben die Alarmtöne aktiviert.
Wählen Sie «Rezepte»
Bibliotheken
rezeptezutaten
Manuell
LAND
Germany
Spain
France
Italy
Netherlands
SPRACHE
deutsch
spanish
french
italian
nederlands
Display
Töne
HELLIGKEIT
Demo-Modus
helligkeit
DEMO-MODUS
OFF ON
DEMO-MODUS
3424
REZEPT 2
Möchten Sie dieses
Rezept löschen?
JA NEIN
Bitte wählen Sie das Rezept
das Sie löschen möchten
rezept 1
TÖNE
OFF ON
sprache/land
Rezepte löschen
Display/Töne
Connect
rezept 2
OFF ON
Connect
sprache/land
Rezepte löschen
Display/Töne
Connect
sprache/land
Rezepte löschen
Display/Töne
Connect
rezepte
bibliotheken
rezepte
bibliotheken
Bitte wählen Sie die Bibliothek
die Sie löschen möchten
bibliothek 1
bibliothek 2
BIBLIOTHEK 2
Möchten Sie diese
Bibliothek löschen?
JA NEIN
Demo-Modus
helligkeit
Display
Töne
sprache/land
Rezepte löschen
Display/Töne
Connect
ok
ok
+
Möchten Sie diese Bibliothek
wirklich löschen?
Bibliotheken
rezeptezutaten
Manuell
LAND
Germany
Spain
France
Italy
Netherlands
SPRACHE
deutsch
spanish
french
italian
nederlands
Display
Töne
HELLIGKEIT
Demo-Modus
helligkeit
DEMO-MODUS
OFF ON
DEMO-MODUS
3424
REZEPT 2
Möchten Sie dieses
Rezept löschen?
JA NEIN
Bitte wählen Sie das Rezept
das Sie löschen möchten
rezept 1
TÖNE
OFF ON
sprache/land
Rezepte löschen
Display/Töne
Connect
rezept 2
OFF ON
Connect
sprache/land
Rezepte löschen
Display/Töne
Connect
sprache/land
Rezepte löschen
Display/Töne
Connect
rezepte
bibliotheken
rezepte
bibliotheken
Bitte wählen Sie die Bibliothek
die Sie löschen möchten
bibliothek 1
bibliothek 2
BIBLIOTHEK 2
Möchten Sie diese
Bibliothek löschen?
JA NEIN
Demo-Modus
helligkeit
Display
Töne
sprache/land
Rezepte löschen
Display/Töne
Connect
ok
ok
+
Wählen Sie
«Rezepte 2»
Bibliotheken
rezeptezutaten
Manuell
LAND
Germany
Spain
France
Italy
Netherlands
SPRACHE
deutsch
spanish
french
italian
nederlands
Display
Töne
HELLIGKEIT
Demo-Modus
helligkeit
DEMO-MODUS
OFF ON
DEMO-MODUS
3424
REZEPT 2
Möchten Sie dieses
Rezept löschen?
JA NEIN
Bitte wählen Sie das Rezept
das Sie löschen möchten
rezept 1
TÖNE
OFF ON
sprache/land
Rezepte löschen
Display/Töne
Connect
rezept 2
OFF ON
Connect
sprache/land
Rezepte löschen
Display/Töne
Connect
sprache/land
Rezepte löschen
Display/Töne
Connect
rezepte
bibliotheken
rezepte
bibliotheken
Bitte wählen Sie die Bibliothek
die Sie löschen möchten
bibliothek 1
bibliothek 2
BIBLIOTHEK 2
Möchten Sie diese
Bibliothek löschen?
JA NEIN
Demo-Modus
helligkeit
Display
Töne
sprache/land
Rezepte löschen
Display/Töne
Connect
ok
ok
+
Bibliotheken
rezeptezutaten
Manuell
LAND
Germany
Spain
France
Italy
Netherlands
SPRACHE
deutsch
spanish
french
italian
nederlands
Display
Töne
HELLIGKEIT
Demo-Modus
helligkeit
DEMO-MODUS
OFF ON
DEMO-MODUS
3424
REZEPT 2
Möchten Sie dieses
Rezept löschen?
JA NEIN
Bitte wählen Sie das Rezept
das Sie löschen möchten
rezept 1
TÖNE
OFF ON
sprache/land
Rezepte löschen
Display/Töne
Connect
rezept 2
OFF ON
Connect
sprache/land
Rezepte löschen
Display/Töne
Connect
sprache/land
Rezepte löschen
Display/Töne
Connect
rezepte
bibliotheken
rezepte
bibliotheken
Bitte wählen Sie die Bibliothek
die Sie löschen möchten
bibliothek 1
bibliothek 2
BIBLIOTHEK 2
Möchten Sie diese
Bibliothek löschen?
JA NEIN
Demo-Modus
helligkeit
Display
Töne
sprache/land
Rezepte löschen
Display/Töne
Connect
Wählen Sie
«Land/Sprache» aus
Bibliotheken
rezeptezutaten
Manuell
LAND
Germany
Spain
France
Italy
Netherlands
SPRACHE
deutsch
spanish
french
italian
nederlands
Display
Töne
HELLIGKEIT
Demo-Modus
helligkeit
DEMO-MODUS
OFF ON
DEMO-MODUS
3424
REZEPT 2
Möchten Sie dieses
Rezept löschen?
JA NEIN
Bitte wählen Sie das Rezept
das Sie löschen möchten
rezept 1
TÖNE
OFF ON
sprache/land
Rezepte löschen
Display/Töne
Connect
rezept 2
OFF ON
Connect
sprache/land
Rezepte löschen
Display/Töne
Connect
sprache/land
Rezepte löschen
Display/Töne
Connect
rezepte
bibliotheken
rezepte
bibliotheken
Bitte wählen Sie die Bibliothek
die Sie löschen möchten
bibliothek 1
bibliothek 2
BIBLIOTHEK 2
Möchten Sie diese
Bibliothek löschen?
JA NEIN
Demo-Modus
helligkeit
Display
Töne
sprache/land
Rezepte löschen
Display/Töne
Connect
ok
ok
+
Wählen Sie Ihre
Sprache aus
Bibliotheken
rezeptezutaten
Manuell
LAND
Germany
Spain
France
Italy
Netherlands
SPRACHE
deutsch
spanish
french
italian
nederlands
Display
Töne
HELLIGKEIT
Demo-Modus
helligkeit
DEMO-MODUS
OFF ON
DEMO-MODUS
3424
REZEPT 2
Möchten Sie dieses
Rezept löschen?
JA NEIN
Bitte wählen Sie das Rezept
das Sie löschen möchten
rezept 1
TÖNE
OFF ON
sprache/land
Rezepte löschen
Display/Töne
Connect
rezept 2
OFF ON
Connect
sprache/land
Rezepte löschen
Display/Töne
Connect
sprache/land
Rezepte löschen
Display/Töne
Connect
rezepte
bibliotheken
rezepte
bibliotheken
Bitte wählen Sie die Bibliothek
die Sie löschen möchten
bibliothek 1
bibliothek 2
BIBLIOTHEK 2
Möchten Sie diese
Bibliothek löschen?
JA NEIN
Demo-Modus
helligkeit
Display
Töne
sprache/land
Rezepte löschen
Display/Töne
Connect
ok
ok
+
Wählen Sie Ihr
Land aus
Bibliotheken
rezeptezutaten
Manuell
LAND
Germany
Spain
France
Italy
Netherlands
SPRACHE
deutsch
spanish
french
italian
nederlands
Display
Töne
HELLIGKEIT
Demo-Modus
helligkeit
DEMO-MODUS
OFF ON
DEMO-MODUS
3424
REZEPT 2
Möchten Sie dieses
Rezept löschen?
JA NEIN
Bitte wählen Sie das Rezept
das Sie löschen möchten
rezept 1
TÖNE
OFF ON
sprache/land
Rezepte löschen
Display/Töne
Connect
rezept 2
OFF ON
Connect
sprache/land
Rezepte löschen
Display/Töne
Connect
sprache/land
Rezepte löschen
Display/Töne
Connect
rezepte
bibliotheken
rezepte
bibliotheken
Bitte wählen Sie die Bibliothek
die Sie löschen möchten
bibliothek 1
bibliothek 2
BIBLIOTHEK 2
Möchten Sie diese
Bibliothek löschen?
JA NEIN
Demo-Modus
helligkeit
Display
Töne
sprache/land
Rezepte löschen
Display/Töne
Connect
ok
ok
+
Wählen Sie
«Rezepte löschen»
Bibliotheken
rezeptezutaten
Manuell
LAND
Germany
Spain
France
Italy
Netherlands
SPRACHE
deutsch
spanish
french
italian
nederlands
Display
Töne
HELLIGKEIT
Demo-Modus
helligkeit
DEMO-MODUS
OFF ON
DEMO-MODUS
3424
REZEPT 2
Möchten Sie dieses
Rezept löschen?
JA NEIN
Bitte wählen Sie das Rezept
das Sie löschen möchten
rezept 1
TÖNE
OFF ON
sprache/land
Rezepte löschen
Display/Töne
Connect
rezept 2
OFF ON
Connect
sprache/land
Rezepte löschen
Display/Töne
Connect
sprache/land
Rezepte löschen
Display/Töne
Connect
rezepte
bibliotheken
rezepte
bibliotheken
Bitte wählen Sie die Bibliothek
die Sie löschen möchten
bibliothek 1
bibliothek 2
BIBLIOTHEK 2
Möchten Sie diese
Bibliothek löschen?
JA NEIN
Demo-Modus
helligkeit
Display
Töne
sprache/land
Rezepte löschen
Display/Töne
Connect
ok
ok
+
Wählen Sie
«Bibliotheken löschen»
Bibliotheken
rezeptezutaten
Manuell
LAND
Germany
Spain
France
Italy
Netherlands
SPRACHE
deutsch
spanish
french
italian
nederlands
Display
Töne
HELLIGKEIT
Demo-Modus
helligkeit
DEMO-MODUS
OFF ON
DEMO-MODUS
3424
REZEPT 2
Möchten Sie dieses
Rezept löschen?
JA NEIN
Bitte wählen Sie das Rezept
das Sie löschen möchten
rezept 1
TÖNE
OFF ON
sprache/land
Rezepte löschen
Display/Töne
Connect
rezept 2
OFF ON
Connect
sprache/land
Rezepte löschen
Display/Töne
Connect
sprache/land
Rezepte löschen
Display/Töne
Connect
rezepte
bibliotheken
rezepte
bibliotheken
Bitte wählen Sie die Bibliothek
die Sie löschen möchten
bibliothek 1
bibliothek 2
BIBLIOTHEK 2
Möchten Sie diese
Bibliothek löschen?
JA NEIN
Demo-Modus
helligkeit
Display
Töne
sprache/land
Rezepte löschen
Display/Töne
Connect
ok
ok
+
Wählen Sie
«Bibliothek 2»
Bibliotheken
rezeptezutaten
Manuell
LAND
Germany
Spain
France
Italy
Netherlands
SPRACHE
deutsch
spanish
french
italian
nederlands
Display
Töne
HELLIGKEIT
Demo-Modus
helligkeit
DEMO-MODUS
OFF ON
DEMO-MODUS
3424
REZEPT 2
Möchten Sie dieses
Rezept löschen?
JA NEIN
Bitte wählen Sie das Rezept
das Sie löschen möchten
rezept 1
TÖNE
OFF ON
sprache/land
Rezepte löschen
Display/Töne
Connect
rezept 2
OFF ON
Connect
sprache/land
Rezepte löschen
Display/Töne
Connect
sprache/land
Rezepte löschen
Display/Töne
Connect
rezepte
bibliotheken
rezepte
bibliotheken
Bitte wählen Sie die Bibliothek
die Sie löschen möchten
bibliothek 1
bibliothek 2
BIBLIOTHEK 2
Möchten Sie diese
Bibliothek löschen?
JA NEIN
Demo-Modus
helligkeit
Display
Töne
sprache/land
Rezepte löschen
Display/Töne
Connect
ok
ok
+
13
DEUTSCH
13
Anm.: Im Demo-Modus kann das Produkt ohne Erhitzen oder Druckaufbau in Betrieb
genommen werden.
Möchten Sie diese Rezepte
wirklich löschen?
Bibliotheken
rezeptezutaten
Manuell
LAND
Germany
Spain
France
Italy
Netherlands
SPRACHE
deutsch
spanish
french
italian
nederlands
Display
Töne
HELLIGKEIT
Demo-Modus
helligkeit
DEMO-MODUS
OFF ON
DEMO-MODUS
3424
REZEPT 2
Möchten Sie dieses
Rezept löschen?
JA NEIN
Bitte wählen Sie das Rezept
das Sie löschen möchten
rezept 1
TÖNE
OFF ON
sprache/land
Rezepte löschen
Display/Töne
Connect
rezept 2
OFF ON
Connect
sprache/land
Rezepte löschen
Display/Töne
Connect
sprache/land
Rezepte löschen
Display/Töne
Connect
rezepte
bibliotheken
rezepte
bibliotheken
Bitte wählen Sie die Bibliothek
die Sie löschen möchten
bibliothek 1
bibliothek 2
BIBLIOTHEK 2
Möchten Sie diese
Bibliothek löschen?
JA NEIN
Demo-Modus
helligkeit
Display
Töne
sprache/land
Rezepte löschen
Display/Töne
Connect
ok
ok
+
Zum Aktivieren oder Deaktivieren des Demo-Modus
müssen Sie einen Code eingeben: 3424
«Anzeige»
auswählen
Wählen Sie «Helligkeit»
Wählen Sie «Demo-
Modus»
Stellen Sie die
Helligkeit ein
Lautstärke einstellen
Aktivieren oder
Deaktivieren des
Connect-Modus
Wählen Sie die
Einstellung «Anzeige/Ton»
«Ton» auswählen
Wählen Sie «Connect»
Bibliotheken
rezeptezutaten
Manuell
LAND
Germany
Spain
France
Italy
Netherlands
SPRACHE
deutsch
spanish
french
italian
nederlands
Display
Töne
HELLIGKEIT
Demo-Modus
helligkeit
DEMO-MODUS
OFF ON
DEMO-MODUS
3424
REZEPT 2
Möchten Sie dieses
Rezept löschen?
JA NEIN
Bitte wählen Sie das Rezept
das Sie löschen möchten
rezept 1
TÖNE
OFF ON
sprache/land
Rezepte löschen
Display/Töne
Connect
rezept 2
OFF ON
Connect
sprache/land
Rezepte löschen
Display/Töne
Connect
sprache/land
Rezepte löschen
Display/Töne
Connect
rezepte
bibliotheken
rezepte
bibliotheken
Bitte wählen Sie die Bibliothek
die Sie löschen möchten
bibliothek 1
bibliothek 2
BIBLIOTHEK 2
Möchten Sie diese
Bibliothek löschen?
JA NEIN
Demo-Modus
helligkeit
Display
Töne
sprache/land
Rezepte löschen
Display/Töne
Connect
ok
ok
+
ok
ok
+
ok
ok
+
ok
ok
+
ok
ok
+
ok
ok
+
ok
ok
+
ok
ok
+
ok
ok
ok
+
ok
ok
+

1414
MENÜ AN/AUS
Durch Drücken auf „JA/NEIN“ können Sie das Gerät
ausschalten
Bibliotheken
Möchten Sie das Gerät
ausschalten?
JA NEIN
RezepteZutaten
Manuell
JA NEIN
Möchten Sie das Gerät
ausschalten?
Bibliotheken
Möchten Sie das Gerät
ausschalten?
JA NEIN
RezepteZutaten
Manuell
JA NEIN
Möchten Sie das Gerät
ausschalten?
Wählen Sie
Entsprechendes aus
und bestätigen Sie
Bibliotheken
Möchten Sie das Gerät
ausschalten?
JA NEIN
RezepteZutaten
Manuell
JA NEIN
Möchten Sie das Gerät
ausschalten?
ok
ok
+
ok
ok
+
ok
ok
+

15
DEUTSCH
15
Ihr COOK4ME CONNECT ist betriebsbereit, Sie können es bereits für 150 vorprogrammierte
Rezepte einsetzen, auch ohne die App.
Wenn Sie Ihr COOK4ME CONNECT, anschalten, blinkt die blaue Kontrolllampe (während
die Verbindung hergestellt wird), es sei denn Sie haben manuell die Verbindungs-Funktion
deaktiviert (siehe Kapitel Einstellungen).
Verbinden Sie das Gerät beim ersten Gebrauch mit Ihrem Tablet, indem Sie den Anweisungen
auf den Displays folgen.
Wenn die Verbindung
hergestellt ist, leuchtet
die blaue Kontrolllampe
konstant.
Bestätigen Sie die
Verbindung idem
Sie OK drüken
OK
Sie nden die App
Cook4me im App Store zum
Download von Ihrem Tablet
oder Smartphone aus.
CONNEXION
Verbindungsproblem:
Wenn die Verbindung fehlgeschlagen ist, wird eine Fehlermeldung angezeigt.
Folgen Sie den Anweisungen auf Ihren Displays, um einen erneuten Verbindungsversuch
zu starten.
Achtung: Es ist jeweils nur eine Verbindung möglich.
Zur Kontoerstellung:
Folgen Sie den Hinweisen in
der App.
Suchleiste:
Geben Sie Ihre Schlüsselwörter
in die Suchleiste ein, um eine
Suche mit Filter durchzuführen.
1616
Bitte beachten Sie: Wenn Sie Ihr COOK4ME CONNECT 30 Minuten lang nicht benutzen,
wird es in den Schlafmodus versetzt und die Verbindung bricht ab. Beim Verlassen des
Schlafmodus wird die Verbindung automatisch wiederhergestellt.
Bitte beachten Sie: Sie können den Garvorgang nur von Ihrem COOK4ME CONNECT
aus starten, indem Sie auf die Taste OK drücken (wie in der App dargestellt).
Ein Verbindungsabbruch hat keine Auswirkung auf den Garvorgang. COOK4ME CONNECT
funktioniert stets eigenständig.
Browser:
Sie können auch über die
App navigieren, indem Sie
das Menü aufrufen:
• Inspiration
• Suche
• Meine Welt
• Einkaufen
Mit der App können Sie:
• die Schritt-für-Schritt-Anleitung
ansehen
• das Rezept Schritt für
Schritt zusammen mit Ihrem
COOK4ME CONNECT
umsetzen
Favoriten
Bibliotheken
17
DEUTSCH
17
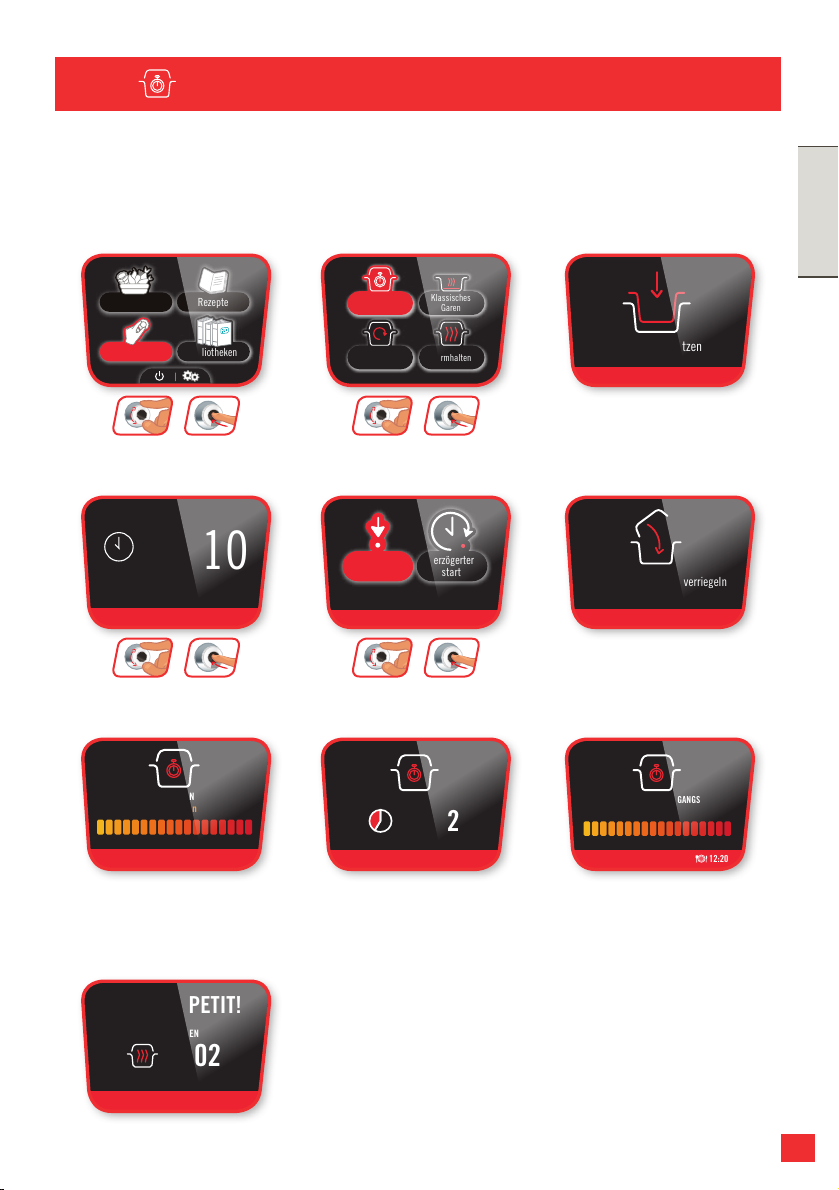
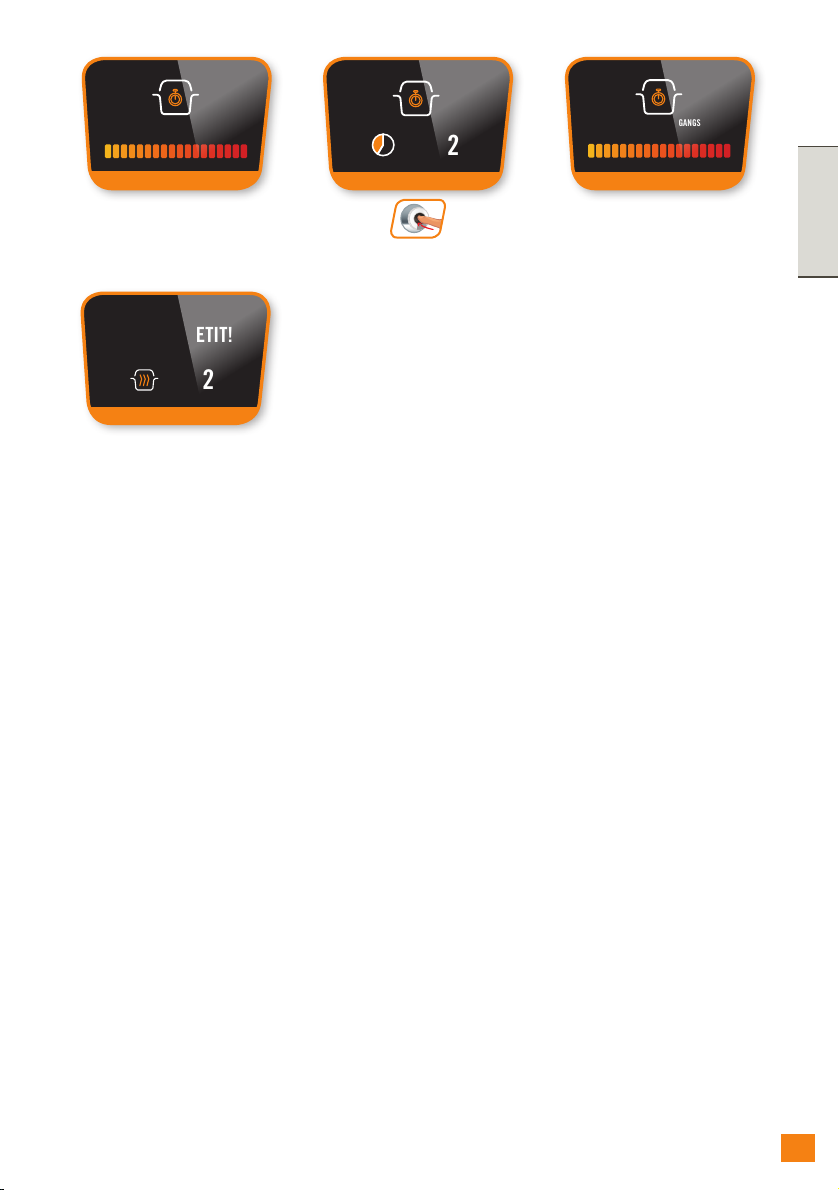
DAMPFDRUCKGAREN
MENÜ MANUELL:
Wählen Sie den Garmodus: Dampfdruckgaren, normales Garen (schonendes Garen,
Köcheln, Anbraten), Aufwärmen oder Warmhalten.
MENÜ MANUELL (MODUS KOCHEN)
Fertig!
ACHTUNG
GAREN UNTER DRUCK
GAREN UNTER DRUCK
GAREN UNTER DRUCK
Behälter einsetzen
00:10
GAREN
Sofortiger
start
Verzögerter
start
WARNHINWEIS
Deckel schließen und verriegeln
AUFHEIZEN
Bitte warten
GAREN UNTER DRUCK
GAREN UNTER DRUCK
GAREN UNTER DRUCK
GAREN
00:02
ENDE DES GARVORGANGS
Bitte warten
12:20
GUTEN APPETIT!
WARMHALTEN
00:02
Garen unter Druck
Aufwärmen
Klassisches
Garen
Warmhalten
RezepteZutaten
Manuell
Bibliotheken
Setzen Sie den
Kochbehälter ein und
geben Sie dann die
Zutaten hinein
ACHTUNG
GAREN UNTER DRUCK
GAREN UNTER DRUCK
GAREN UNTER DRUCK
Behälter einsetzen
00:10
GAREN
Sofortiger
start
Verzögerter
start
WARNHINWEIS
Deckel schließen und verriegeln
AUFHEIZEN
Bitte warten
GAREN UNTER DRUCK
GAREN UNTER DRUCK
GAREN UNTER DRUCK
GAREN
00:02
ENDE DES GARVORGANGS
Bitte warten
12:20
GUTEN APPETIT!
WARMHALTEN
00:02
Garen unter Druck
Aufwärmen
Klassisches
Garen
Warmhalten
RezepteZutaten
Manuell
Bibliotheken
Wählen Sie den Modus
„Garen unter Druck“
Der Kochvorgang läuft
ACHTUNG
GAREN UNTER DRUCK
GAREN UNTER DRUCK
GAREN UNTER DRUCK
Behälter einsetzen
00:10
GAREN
Sofortiger
start
Verzögerter
start
WARNHINWEIS
Deckel schließen und verriegeln
AUFHEIZEN
Bitte warten
GAREN UNTER DRUCK
GAREN UNTER DRUCK
GAREN UNTER DRUCK
GAREN
00:02
ENDE DES GARVORGANGS
Bitte warten
12:20
GUTEN APPETIT!
WARMHALTEN
00:02
Garen unter Druck
Aufwärmen
Klassisches
Garen
Warmhalten
RezepteZutaten
Manuell
Bibliotheken
Der Kochvorgang ist
abgeschlossen
ACHTUNG
GAREN UNTER DRUCK
GAREN UNTER DRUCK
GAREN UNTER DRUCK
Behälter einsetzen
00:10
GAREN
Sofortiger
start
Verzögerter
start
WARNHINWEIS
Deckel schließen und verriegeln
AUFHEIZEN
Bitte warten
GAREN UNTER DRUCK
GAREN UNTER DRUCK
GAREN UNTER DRUCK
GAREN
00:02
ENDE DES GARVORGANGS
Bitte warten
12:20
GUTEN APPETIT!
WARMHALTEN
00:02
Garen unter Druck
Aufwärmen
Klassisches
Garen
Warmhalten
RezepteZutaten
Manuell
Bibliotheken
Der Vorwärmvorgang
läuft
ACHTUNG
GAREN UNTER DRUCK
GAREN UNTER DRUCK
GAREN UNTER DRUCK
Behälter einsetzen
00:10
GAREN
Sofortiger
start
Verzögerter
start
WARNHINWEIS
Deckel schließen und verriegeln
AUFHEIZEN
Bitte warten
GAREN UNTER DRUCK
GAREN UNTER DRUCK
GAREN UNTER DRUCK
GAREN
00:02
ENDE DES GARVORGANGS
Bitte warten
12:20
GUTEN APPETIT!
WARMHALTEN
00:02
Garen unter Druck
Aufwärmen
Klassisches
Garen
Warmhalten
RezepteZutaten
Manuell
Bibliotheken
Schließen und
verriegeln Sie den
Deckel des Gerätes
ACHTUNG
GAREN UNTER DRUCK
GAREN UNTER DRUCK
GAREN UNTER DRUCK
Behälter einsetzen
00:10
GAREN
Sofortiger
start
Verzögerter
start
WARNHINWEIS
Deckel schließen und verriegeln
AUFHEIZEN
Bitte warten
GAREN UNTER DRUCK
GAREN UNTER DRUCK
GAREN UNTER DRUCK
GAREN
00:02
ENDE DES GARVORGANGS
Bitte warten
12:20
GUTEN APPETIT!
WARMHALTEN
00:02
Garen unter Druck
Aufwärmen
Klassisches
Garen
Warmhalten
RezepteZutaten
Manuell
Bibliotheken
Wählen Sie das Menü
„Manuell“
ok
ok
+
ACHTUNG
GAREN UNTER DRUCK
GAREN UNTER DRUCK
GAREN UNTER DRUCK
Behälter einsetzen
00:10
GAREN
Sofortiger
start
Verzögerter
start
WARNHINWEIS
Deckel schließen und verriegeln
AUFHEIZEN
Bitte warten
GAREN UNTER DRUCK
GAREN UNTER DRUCK
GAREN UNTER DRUCK
GAREN
00:02
ENDE DES GARVORGANGS
Bitte warten
12:20
GUTEN APPETIT!
WARMHALTEN
00:02
Garen unter Druck
Aufwärmen
Klassisches
Garen
Warmhalten
RezepteZutaten
Manuell
Bibliotheken
Stellen Sie die
Gardauer ein
ok
ok
+
ok
ok
+
ACHTUNG
GAREN UNTER DRUCK
GAREN UNTER DRUCK
GAREN UNTER DRUCK
Behälter einsetzen
00:10
GAREN
Sofortiger
start
Verzögerter
start
WARNHINWEIS
Deckel schließen und verriegeln
AUFHEIZEN
Bitte warten
GAREN UNTER DRUCK
GAREN UNTER DRUCK
GAREN UNTER DRUCK
GAREN
00:02
ENDE DES GARVORGANGS
Bitte warten
12:20
GUTEN APPETIT!
WARMHALTEN
00:02
Garen unter Druck
Aufwärmen
Klassisches
Garen
Warmhalten
RezepteZutaten
Manuell
Bibliotheken
Wählen Sie sofortiger Start oder
verzögerten Start (S.18)
ok
ok
+

1818
KLASSISCHES GAREN
Mit dem Modus „Klassisches Garen“ können Sie je nach gewünschtem Ergebnis:
SLOW COOKING
SCHMOREN
BRATEN
Bei diesen Kochvorgängen bleibt der Deckel geöffnet.
MENÜ MANUELL (MODUS KOCHEN)
Anmerkung: Der Vorgang ist der gleiche, nur die Temperaturen sind unterschiedlich.
Drücken Sie zum Abbrechen des Bräunungsvorgangs den Knopf Zurück und wählen
Sie entweder Stopp oder „Dampfdruckgaren“
ACHTUNG
ACHTUNG
Behälter einsetzen
SLOW COOKING
Deckel öffnen
AUFHEIZEN
Bitte warten
SLOW COOKING
Zutaten hinzufügen
OK
00:02
SLOW COOKING
OK
Möchten Sie den Garvorgang
stoppen?
JA NEIN
stop
pressure
cooking
SLOW COOKING
Garen unter Druck
Aufwärmen
Klassisches
Garen
Warmhalten
RezepteZutaten
Manuell
SLOW COOKING
SLOW COOKING
Bibliotheken
ACHTUNG
ACHTUNG
Behälter einsetzen
SLOW COOKING
Deckel öffnen
AUFHEIZEN
Bitte warten
SLOW COOKING
Zutaten hinzufügen
OK
00:02
SLOW COOKING
OK
Möchten Sie den Garvorgang
stoppen?
JA NEIN
stop
pressure
cooking
SLOW COOKING
Garen unter Druck
Aufwärmen
Klassisches
Garen
Warmhalten
RezepteZutaten
Manuell
SLOW COOKING
SLOW COOKING
Bibliotheken
+
Wählen Sie das Menü
„Manuell“
ACHTUNG
ACHTUNG
Behälter einsetzen
SLOW COOKING
Deckel öffnen
AUFHEIZEN
Bitte warten
SLOW COOKING
Zutaten hinzufügen
OK
00:02
SLOW COOKING
OK
Möchten Sie den Garvorgang
stoppen?
JA NEIN
stop
pressure
cooking
SLOW COOKING
Garen unter Druck
Aufwärmen
Klassisches
Garen
Warmhalten
RezepteZutaten
Manuell
SLOW COOKING
SLOW COOKING
Bibliotheken
ok
ok
+
Wählen Sie die Funktion
„Klassisches Garen“
ACHTUNG
ACHTUNG
Behälter einsetzen
SLOW COOKING
Deckel öffnen
AUFHEIZEN
Bitte warten
SLOW COOKING
Zutaten hinzufügen
OK
00:02
SLOW COOKING
OK
Möchten Sie den Garvorgang
stoppen?
JA NEIN
stop
pressure
cooking
SLOW COOKING
Garen unter Druck
Aufwärmen
Klassisches
Garen
Warmhalten
RezepteZutaten
Manuell
SLOW COOKING
SLOW COOKING
Bibliotheken
ok
ok
+
Wählen Sie die
gewünschte Funktion
ACHTUNG
ACHTUNG
Behälter einsetzen
SLOW COOKING
Deckel öffnen
AUFHEIZEN
Bitte warten
SLOW COOKING
Zutaten hinzufügen
OK
00:02
SLOW COOKING
OK
Möchten Sie den Garvorgang
stoppen?
JA NEIN
stop
pressure
cooking
SLOW COOKING
Garen unter Druck
Aufwärmen
Klassisches
Garen
Warmhalten
RezepteZutaten
Manuell
SLOW COOKING
SLOW COOKING
Bibliotheken
ok
ok
+
Öffnen Sie den Deckel
ACHTUNG
ACHTUNG
Behälter einsetzen
SLOW COOKING
Deckel öffnen
AUFHEIZEN
Bitte warten
SLOW COOKING
Zutaten hinzufügen
OK
00:02
SLOW COOKING
OK
Möchten Sie den Garvorgang
stoppen?
JA NEIN
stop
pressure
cooking
SLOW COOKING
Garen unter Druck
Aufwärmen
Klassisches
Garen
Warmhalten
RezepteZutaten
Manuell
SLOW COOKING
SLOW COOKING
Bibliotheken
Setzen Sie den
Behälter ein
ACHTUNG
ACHTUNG
Behälter einsetzen
SLOW COOKING
Deckel öffnen
AUFHEIZEN
Bitte warten
SLOW COOKING
Zutaten hinzufügen
OK
00:02
SLOW COOKING
OK
Möchten Sie den Garvorgang
stoppen?
JA NEIN
stop
pressure
cooking
SLOW COOKING
Garen unter Druck
Aufwärmen
Klassisches
Garen
Warmhalten
RezepteZutaten
Manuell
SLOW COOKING
SLOW COOKING
Bibliotheken
Der Vorwärmvorgang
läuft
ACHTUNG
ACHTUNG
Behälter einsetzen
SLOW COOKING
Deckel öffnen
AUFHEIZEN
Bitte warten
SLOW COOKING
Zutaten hinzufügen
OK
00:02
SLOW COOKING
OK
Möchten Sie den Garvorgang
stoppen?
JA NEIN
stop
pressure
cooking
SLOW COOKING
Garen unter Druck
Aufwärmen
Klassisches
Garen
Warmhalten
RezepteZutaten
Manuell
SLOW COOKING
SLOW COOKING
Bibliotheken
ok
ok
ok
+
ok
ok
+
ok
19
DEUTSCH
19
AUFWÄRMEN
Anmerkung: Der Aufwärmvorgang beginnt und die Zeit läuft.
MENÜ MANUELL (MODUS KOCHEN)
Fertig!
ACHTUNG
Behälter einsetzen
Möchten Sie das Aufwärmen
stoppen?
JA NEIN
ACHTUNG
Deckel schließen und verriegeln
00:02
AUFWÄRMEN
GUTEN APPETIT!
WARMHALTEN
00:02
Dampfdruckgaren
Aufwärmen
Klassisches
Garen
Warmhalten
RezepteZutaten
Manuell
AUFWÄRMEN
AUFWÄRMEN
AUFWÄRMEN
Bibliotheken
Setzen Sie den
Behälter ein
ACHTUNG
Behälter einsetzen
Möchten Sie das Aufwärmen
stoppen?
JA NEIN
ACHTUNG
Deckel schließen und verriegeln
00:02
AUFWÄRMEN
GUTEN APPETIT!
WARMHALTEN
00:02
Dampfdruckgaren
Aufwärmen
Klassisches
Garen
Warmhalten
RezepteZutaten
Manuell
AUFWÄRMEN
AUFWÄRMEN
AUFWÄRMEN
Bibliotheken
ACHTUNG
Behälter einsetzen
Möchten Sie das Aufwärmen
stoppen?
JA NEIN
ACHTUNG
Deckel schließen und verriegeln
00:02
AUFWÄRMEN
GUTEN APPETIT!
WARMHALTEN
00:02
Dampfdruckgaren
Aufwärmen
Klassisches
Garen
Warmhalten
RezepteZutaten
Manuell
AUFWÄRMEN
AUFWÄRMEN
AUFWÄRMEN
Bibliotheken
Wählen Sie das Menü
„Manuell“
ok
ok
+
ACHTUNG
Behälter einsetzen
Möchten Sie das Aufwärmen
stoppen?
JA NEIN
ACHTUNG
Deckel schließen und verriegeln
00:02
AUFWÄRMEN
GUTEN APPETIT!
WARMHALTEN
00:02
Dampfdruckgaren
Aufwärmen
Klassisches
Garen
Warmhalten
RezepteZutaten
Manuell
AUFWÄRMEN
AUFWÄRMEN
AUFWÄRMEN
Bibliotheken
Wählen Sie den Modus
„Aufwärmen“
ok
ok
+
Schließen und
verriegeln Sie den
Deckel
ACHTUNG
Behälter einsetzen
Möchten Sie das Aufwärmen
stoppen?
JA NEIN
ACHTUNG
Deckel schließen und verriegeln
00:02
AUFWÄRMEN
GUTEN APPETIT!
WARMHALTEN
00:02
Dampfdruckgaren
Aufwärmen
Klassisches
Garen
Warmhalten
RezepteZutaten
Manuell
AUFWÄRMEN
AUFWÄRMEN
AUFWÄRMEN
Bibliotheken
Drücken Sie zum
Abbrechen des
Aufwärmvorgangs den
Knopf „Zurück“ und
wählen Sie „Ja“
ACHTUNG
Behälter einsetzen
Möchten Sie das Aufwärmen
stoppen?
JA NEIN
ACHTUNG
Deckel schließen und verriegeln
00:02
AUFWÄRMEN
GUTEN APPETIT!
WARMHALTEN
00:02
Dampfdruckgaren
Aufwärmen
Klassisches
Garen
Warmhalten
RezepteZutaten
Manuell
AUFWÄRMEN
AUFWÄRMEN
AUFWÄRMEN
Bibliotheken
ok
ok
+
Der Aufwärmvorgang läuft
Zum Unterbrechen
ACHTUNG
Behälter einsetzen
Möchten Sie das Aufwärmen
stoppen?
JA NEIN
ACHTUNG
Deckel schließen und verriegeln
00:02
AUFWÄRMEN
GUTEN APPETIT!
WARMHALTEN
00:02
Dampfdruckgaren
Aufwärmen
Klassisches
Garen
Warmhalten
RezepteZutaten
Manuell
AUFWÄRMEN
AUFWÄRMEN
AUFWÄRMEN
Bibliotheken
ok

2020
MENÜ MANUELL (MODUS KOCHEN)
WARMHALTEN
Setzen Sie den
Behälter ein
ACHTUNG
Behälter einsetzen
Möchten Sie die
Warmhaltefunktion stoppen?
JA NEIN
WARMHALTEN
AUFHEIZEN
Bitte warten
WARMHALTEN
00:02
Dampfdruckgaren
Aufwärmen
Klassisches
Garen
Warmhalten
RezepteZutaten
Manuell
WARMHALTEN
WARMHALTEN
Bibliotheken
ACHTUNG
Behälter einsetzen
Möchten Sie die
Warmhaltefunktion stoppen?
JA NEIN
WARMHALTEN
AUFHEIZEN
Bitte warten
WARMHALTEN
00:02
Dampfdruckgaren
Aufwärmen
Klassisches
Garen
Warmhalten
RezepteZutaten
Manuell
WARMHALTEN
WARMHALTEN
Bibliotheken
Wählen Sie das Menü
„Manuell“
ok
ok
+
ACHTUNG
Behälter einsetzen
Möchten Sie die
Warmhaltefunktion stoppen?
JA NEIN
WARMHALTEN
AUFHEIZEN
Bitte warten
WARMHALTEN
00:02
Dampfdruckgaren
Aufwärmen
Klassisches
Garen
Warmhalten
RezepteZutaten
Manuell
WARMHALTEN
WARMHALTEN
Bibliotheken
Wählen Sie die
Funktion „Warmhalten“
ok
ok
+
Der Vorwärmvorgang
läuft
ACHTUNG
Behälter einsetzen
Möchten Sie die
Warmhaltefunktion stoppen?
JA NEIN
WARMHALTEN
AUFHEIZEN
Bitte warten
WARMHALTEN
00:02
Dampfdruckgaren
Aufwärmen
Klassisches
Garen
Warmhalten
RezepteZutaten
Manuell
WARMHALTEN
WARMHALTEN
Bibliotheken
Die Warmhaltefunktion
läuft
ACHTUNG
Behälter einsetzen
Möchten Sie die
Warmhaltefunktion stoppen?
JA NEIN
WARMHALTEN
AUFHEIZEN
Bitte warten
WARMHALTEN
00:02
Dampfdruckgaren
Aufwärmen
Klassisches
Garen
Warmhalten
RezepteZutaten
Manuell
WARMHALTEN
WARMHALTEN
Bibliotheken
Drücken Sie zum
Abbrechen des
Warmhaltevorgangs
den Knopf „Zurück“
und wählen Sie „Ja“
ACHTUNG
Behälter einsetzen
Möchten Sie die
Warmhaltefunktion stoppen?
JA NEIN
WARMHALTEN
AUFHEIZEN
Bitte warten
WARMHALTEN
00:02
Dampfdruckgaren
Aufwärmen
Klassisches
Garen
Warmhalten
RezepteZutaten
Manuell
WARMHALTEN
WARMHALTEN
Bibliotheken
+
ok
21
DEUTSCH
21
MENÜ MANUELL (MODUS KOCHEN)
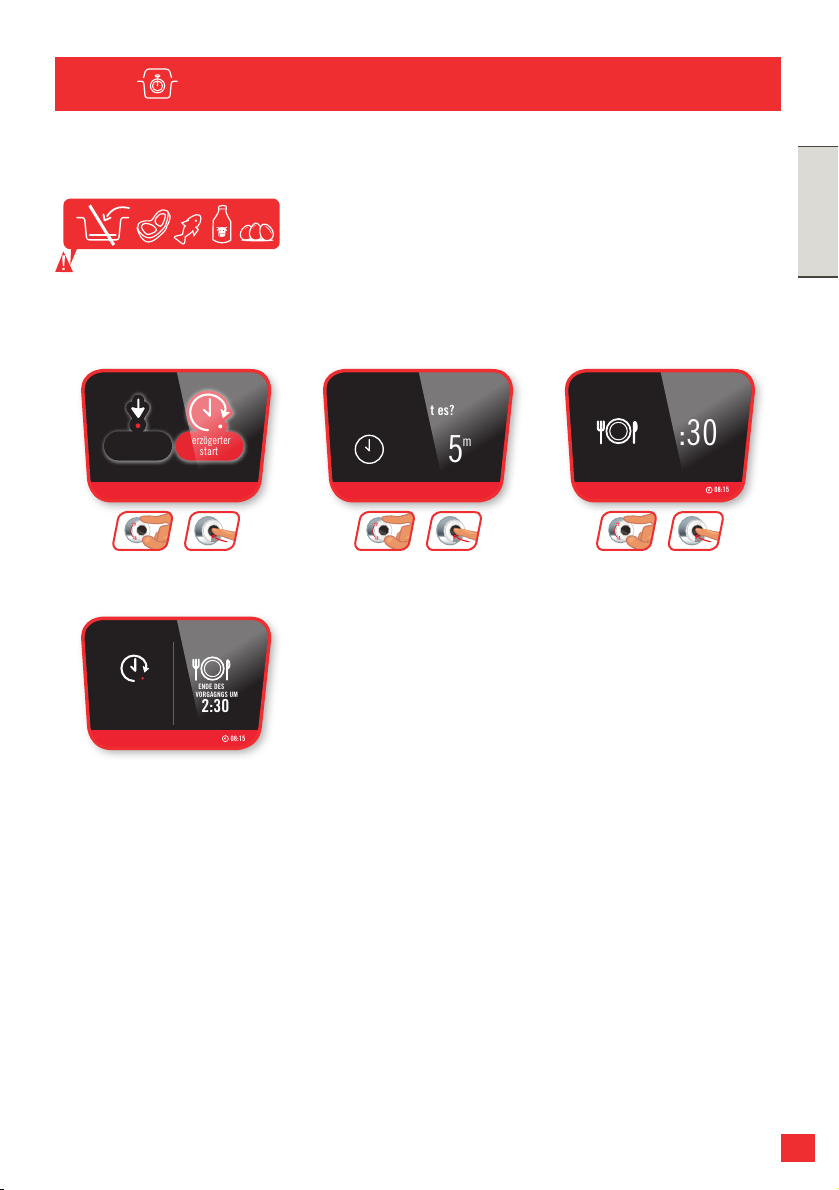
VERZÖGERTER START
(GAREN UNTER DRUCK)
Einige Speisen (z.B. Fleisch, Fisch, Milch usw.) können nicht im Modus „Verzögerter Start“
zubereitet werden.
Der Endzeitpunkt des Garvorgangs kann je nach Inhalt des Behälters abweichen.
Der verzögerte Start ist
programmiert
GAREN UNTER DRUCK
h m
Wie spät ist es?
ENDE DES
GARVORGANGS
12:30
08:15
08:15
01:00
VERZÖGERTER
START
12:30
08:15
Sofortiger
start
Verzögerter
start
ENDE DES
GARVORGAGNGS UM
GAREN UNTER DRUCK
GAREN UNTER DRUCK
GAREN UNTER DRUCK
Wählen Sie
„Verzögerter Start“
GAREN UNTER DRUCK
h m
Wie spät ist es?
ENDE DES
GARVORGANGS
12:30
08:15
08:15
01:00
VERZÖGERTER
START
12:30
08:15
Sofortiger
start
Verzögerter
start
ENDE DES
GARVORGAGNGS UM
GAREN UNTER DRUCK
GAREN UNTER DRUCK
GAREN UNTER DRUCK
ok
ok
+
Stellen Sie die aktuelle
Zeit ein
GAREN UNTER DRUCK
h m
Wie spät ist es?
ENDE DES
GARVORGANGS
12:30
08:15
08:15
01:00
VERZÖGERTER
START
12:30
08:15
Sofortiger
start
Verzögerter
start
ENDE DES
GARVORGAGNGS UM
GAREN UNTER DRUCK
GAREN UNTER DRUCK
GAREN UNTER DRUCK
ok
ok
+
Wählen Sie den
Endzeitpunkt des
Garvorgangs
GAREN UNTER DRUCK
h m
Wie spät ist es?
ENDE DES
GARVORGANGS
12:30
08:15
08:15
01:00
VERZÖGERTER
START
12:30
08:15
Sofortiger
start
Verzögerter
start
ENDE DES
GARVORGAGNGS UM
GAREN UNTER DRUCK
GAREN UNTER DRUCK
GAREN UNTER DRUCK
ok
ok
+
2222
MENÜ ZUTATEN
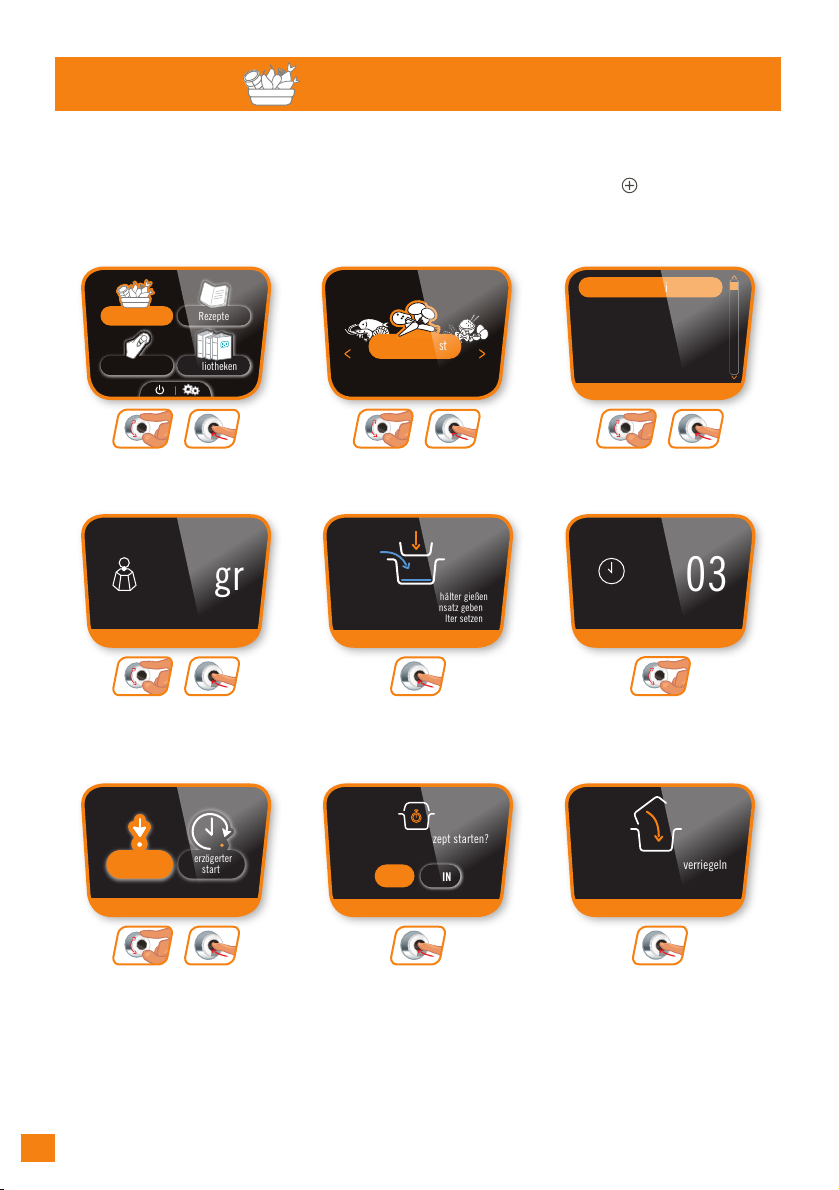
MENÜ ZUTATEN:
Mit dem Menü „Zutaten“ können Sie Ihre Speisen alleine kochen lassen, ohne dass Sie sich
über Kochmodus und -dauer Gedanken machen müssen: COOK4ME CONNECT bietet
Ihnen Hinweise für alle Gewichtsmengen und Zutaten: Fleisch, Fisch, Gemüse, Obst und
sogar Getreide.
Wählen Sie das Menü
„Zutaten“
EMPFOHLENE ZEIT: 3 MIN
AUFHEIZEN
Bitte warten
GEMÜSE & OBST
BROCCOLI
BROCCOLI
Broccoli
Chicorée
Erbsen
Fenchel
Gartenkürbis
Möchten Sie das Rezept starten?
GAREN
BROCCOLI
JA NEIN
- 200 ml Wasser in den Behälter gießen
- Zutaten in den Dampfeinsatz geben
Dampfeinsatz in den Behälter setzen
00:03
BROCCOLI
BROCCOLI
BROCCOLI
ENDE DES GARVORGANGS
Bitte warten
BROCCOLI
BROCCOLI
Sofortiger
Start
Verzögerter
start
GAREN
00:02
GUTEN APPETIT!
WARMHALTEN
00:02
300 gr
Deckel schließen und verriegeln
Gemüse & Obst
RezepteZutaten
Manuell
BROCCOLI
Bibliotheken
Wählen Sie
„Broccoli“
EMPFOHLENE ZEIT: 3 MIN
AUFHEIZEN
Bitte warten
GEMÜSE & OBST
BROCCOLI
BROCCOLI
Broccoli
Chicorée
Erbsen
Fenchel
Gartenkürbis
Möchten Sie das Rezept starten?
GAREN
BROCCOLI
JA NEIN
- 200 ml Wasser in den Behälter gießen
- Zutaten in den Dampfeinsatz geben
Dampfeinsatz in den Behälter setzen
00:03
BROCCOLI
BROCCOLI
BROCCOLI
ENDE DES GARVORGANGS
Bitte warten
BROCCOLI
BROCCOLI
Sofortiger
Start
Verzögerter
start
GAREN
00:02
GUTEN APPETIT!
WARMHALTEN
00:02
300 gr
Deckel schließen und verriegeln
Gemüse & Obst
RezepteZutaten
Manuell
BROCCOLI
Bibliotheken
Wählen Sie
„Gemüse & Obst“
EMPFOHLENE ZEIT: 3 MIN
AUFHEIZEN
Bitte warten
GEMÜSE & OBST
BROCCOLI
BROCCOLI
Broccoli
Chicorée
Erbsen
Fenchel
Gartenkürbis
Möchten Sie das Rezept starten?
GAREN
BROCCOLI
JA NEIN
- 200 ml Wasser in den Behälter gießen
- Zutaten in den Dampfeinsatz geben
Dampfeinsatz in den Behälter setzen
00:03
BROCCOLI
BROCCOLI
BROCCOLI
ENDE DES GARVORGANGS
Bitte warten
BROCCOLI
BROCCOLI
Sofortiger
Start
Verzögerter
start
GAREN
00:02
GUTEN APPETIT!
WARMHALTEN
00:02
300 gr
Deckel schließen und verriegeln
Gemüse & Obst
RezepteZutaten
Manuell
BROCCOLI
Bibliotheken
Befolgen Sie die
Anweisungen
EMPFOHLENE ZEIT: 3 MIN
AUFHEIZEN
Bitte warten
GEMÜSE & OBST
BROCCOLI
BROCCOLI
Broccoli
Chicorée
Erbsen
Fenchel
Gartenkürbis
Möchten Sie das Rezept starten?
GAREN
BROCCOLI
JA NEIN
- 200 ml Wasser in den Behälter gießen
- Zutaten in den Dampfeinsatz geben
Dampfeinsatz in den Behälter setzen
00:03
BROCCOLI
BROCCOLI
BROCCOLI
ENDE DES GARVORGANGS
Bitte warten
BROCCOLI
BROCCOLI
Sofortiger
Start
Verzögerter
start
GAREN
00:02
GUTEN APPETIT!
WARMHALTEN
00:02
300 gr
Deckel schließen und verriegeln
Gemüse & Obst
RezepteZutaten
Manuell
BROCCOLI
Bibliotheken
Wählen Sie
„Sofortiger Start“
EMPFOHLENE ZEIT: 3 MIN
AUFHEIZEN
Bitte warten
GEMÜSE & OBST
BROCCOLI
BROCCOLI
Broccoli
Chicorée
Erbsen
Fenchel
Gartenkürbis
Möchten Sie das Rezept starten?
GAREN
BROCCOLI
JA NEIN
- 200 ml Wasser in den Behälter gießen
- Zutaten in den Dampfeinsatz geben
Dampfeinsatz in den Behälter setzen
00:03
BROCCOLI
BROCCOLI
BROCCOLI
ENDE DES GARVORGANGS
Bitte warten
BROCCOLI
BROCCOLI
Sofortiger
Start
Verzögerter
start
GAREN
00:02
GUTEN APPETIT!
WARMHALTEN
00:02
300 gr
Deckel schließen und verriegeln
Gemüse & Obst
RezepteZutaten
Manuell
BROCCOLI
Bibliotheken
ok
ok
+
ok
ok
+
ok
ok
+
Befolgen Sie die
Anweisungen
EMPFOHLENE ZEIT: 3 MIN
AUFHEIZEN
Bitte warten
GEMÜSE & OBST
BROCCOLI
BROCCOLI
Broccoli
Chicorée
Erbsen
Fenchel
Gartenkürbis
Möchten Sie das Rezept starten?
GAREN
BROCCOLI
JA NEIN
- 200 ml Wasser in den Behälter gießen
- Zutaten in den Dampfeinsatz geben
Dampfeinsatz in den Behälter setzen
00:03
BROCCOLI
BROCCOLI
BROCCOLI
ENDE DES GARVORGANGS
Bitte warten
BROCCOLI
BROCCOLI
Sofortiger
Start
Verzögerter
start
GAREN
00:02
GUTEN APPETIT!
WARMHALTEN
00:02
300 gr
Deckel schließen und verriegeln
Gemüse & Obst
RezepteZutaten
Manuell
BROCCOLI
Bibliotheken
ok
Starten Sie das Rezept
EMPFOHLENE ZEIT: 3 MIN
AUFHEIZEN
Bitte warten
GEMÜSE & OBST
BROCCOLI
BROCCOLI
Broccoli
Chicorée
Erbsen
Fenchel
Gartenkürbis
Möchten Sie das Rezept starten?
GAREN
BROCCOLI
JA NEIN
- 200 ml Wasser in den Behälter gießen
- Zutaten in den Dampfeinsatz geben
Dampfeinsatz in den Behälter setzen
00:03
BROCCOLI
BROCCOLI
BROCCOLI
ENDE DES GARVORGANGS
Bitte warten
BROCCOLI
BROCCOLI
Sofortiger
Start
Verzögerter
start
GAREN
00:02
GUTEN APPETIT!
WARMHALTEN
00:02
300 gr
Deckel schließen und verriegeln
Gemüse & Obst
RezepteZutaten
Manuell
BROCCOLI
Bibliotheken
ok
Wählen Sie die
erforderliche Menge
Broccoli (mind. 300g)
EMPFOHLENE ZEIT: 3 MIN
AUFHEIZEN
Bitte warten
GEMÜSE & OBST
BROCCOLI
BROCCOLI
Broccoli
Chicorée
Erbsen
Fenchel
Gartenkürbis
Möchten Sie das Rezept starten?
GAREN
BROCCOLI
JA NEIN
- 200 ml Wasser in den Behälter gießen
- Zutaten in den Dampfeinsatz geben
Dampfeinsatz in den Behälter setzen
00:03
BROCCOLI
BROCCOLI
BROCCOLI
ENDE DES GARVORGANGS
Bitte warten
BROCCOLI
BROCCOLI
Sofortiger
Start
Verzögerter
start
GAREN
00:02
GUTEN APPETIT!
WARMHALTEN
00:02
300 gr
Deckel schließen und verriegeln
Gemüse & Obst
RezepteZutaten
Manuell
BROCCOLI
Bibliotheken
ok
ok
+
ok
Die empfohlene Gardauer
wird angezeigt
EMPFOHLENE ZEIT: 3 MIN
AUFHEIZEN
Bitte warten
GEMÜSE & OBST
BROCCOLI
BROCCOLI
Broccoli
Chicorée
Erbsen
Fenchel
Gartenkürbis
Möchten Sie das Rezept starten?
GAREN
BROCCOLI
JA NEIN
- 200 ml Wasser in den Behälter gießen
- Zutaten in den Dampfeinsatz geben
Dampfeinsatz in den Behälter setzen
00:03
BROCCOLI
BROCCOLI
BROCCOLI
ENDE DES GARVORGANGS
Bitte warten
BROCCOLI
BROCCOLI
Sofortiger
Start
Verzögerter
start
GAREN
00:02
GUTEN APPETIT!
WARMHALTEN
00:02
300 gr
Deckel schließen und verriegeln
Gemüse & Obst
RezepteZutaten
Manuell
BROCCOLI
Bibliotheken
ok
ok
ok
+
23
DEUTSCH
23
Vorwärmen
EMPFOHLENE ZEIT: 3 MIN
AUFHEIZEN
Bitte warten
GEMÜSE & OBST
BROCCOLI
BROCCOLI
Broccoli
Chicorée
Erbsen
Fenchel
Gartenkürbis
Möchten Sie das Rezept starten?
GAREN
BROCCOLI
JA NEIN
- 200 ml Wasser in den Behälter gießen
- Zutaten in den Dampfeinsatz geben
Dampfeinsatz in den Behälter setzen
00:03
BROCCOLI
BROCCOLI
BROCCOLI
ENDE DES GARVORGANGS
Bitte warten
BROCCOLI
BROCCOLI
Sofortiger
Start
Verzögerter
start
GAREN
00:02
GUTEN APPETIT!
WARMHALTEN
00:02
300 gr
Deckel schließen und verriegeln
Gemüse & Obst
RezepteZutaten
Manuell
BROCCOLI
Bibliotheken
Ende des
Kochvorgangs
EMPFOHLENE ZEIT: 3 MIN
AUFHEIZEN
Bitte warten
GEMÜSE & OBST
BROCCOLI
BROCCOLI
Broccoli
Chicorée
Erbsen
Fenchel
Gartenkürbis
Möchten Sie das Rezept starten?
GAREN
BROCCOLI
JA NEIN
- 200 ml Wasser in den Behälter gießen
- Zutaten in den Dampfeinsatz geben
Dampfeinsatz in den Behälter setzen
00:03
BROCCOLI
BROCCOLI
BROCCOLI
ENDE DES GARVORGANGS
Bitte warten
BROCCOLI
BROCCOLI
Sofortiger
Start
Verzögerter
start
GAREN
00:02
GUTEN APPETIT!
WARMHALTEN
00:02
300 gr
Deckel schließen und verriegeln
Gemüse & Obst
RezepteZutaten
Manuell
BROCCOLI
Bibliotheken
Fertig!
EMPFOHLENE ZEIT: 3 MIN
AUFHEIZEN
Bitte warten
GEMÜSE & OBST
BROCCOLI
BROCCOLI
Broccoli
Chicorée
Erbsen
Fenchel
Gartenkürbis
Möchten Sie das Rezept starten?
GAREN
BROCCOLI
JA NEIN
- 200 ml Wasser in den Behälter gießen
- Zutaten in den Dampfeinsatz geben
Dampfeinsatz in den Behälter setzen
00:03
BROCCOLI
BROCCOLI
BROCCOLI
ENDE DES GARVORGANGS
Bitte warten
BROCCOLI
BROCCOLI
Sofortiger
Start
Verzögerter
start
GAREN
00:02
GUTEN APPETIT!
WARMHALTEN
00:02
300 gr
Deckel schließen und verriegeln
Gemüse & Obst
RezepteZutaten
Manuell
BROCCOLI
Bibliotheken
Start des
Kochvorgangs
EMPFOHLENE ZEIT: 3 MIN
AUFHEIZEN
Bitte warten
GEMÜSE & OBST
BROCCOLI
BROCCOLI
Broccoli
Chicorée
Erbsen
Fenchel
Gartenkürbis
Möchten Sie das Rezept starten?
GAREN
BROCCOLI
JA NEIN
- 200 ml Wasser in den Behälter gießen
- Zutaten in den Dampfeinsatz geben
Dampfeinsatz in den Behälter setzen
00:03
BROCCOLI
BROCCOLI
BROCCOLI
ENDE DES GARVORGANGS
Bitte warten
BROCCOLI
BROCCOLI
Sofortiger
Start
Verzögerter
start
GAREN
00:02
GUTEN APPETIT!
WARMHALTEN
00:02
300 gr
Deckel schließen und verriegeln
Gemüse & Obst
RezepteZutaten
Manuell
BROCCOLI
Bibliotheken
ok
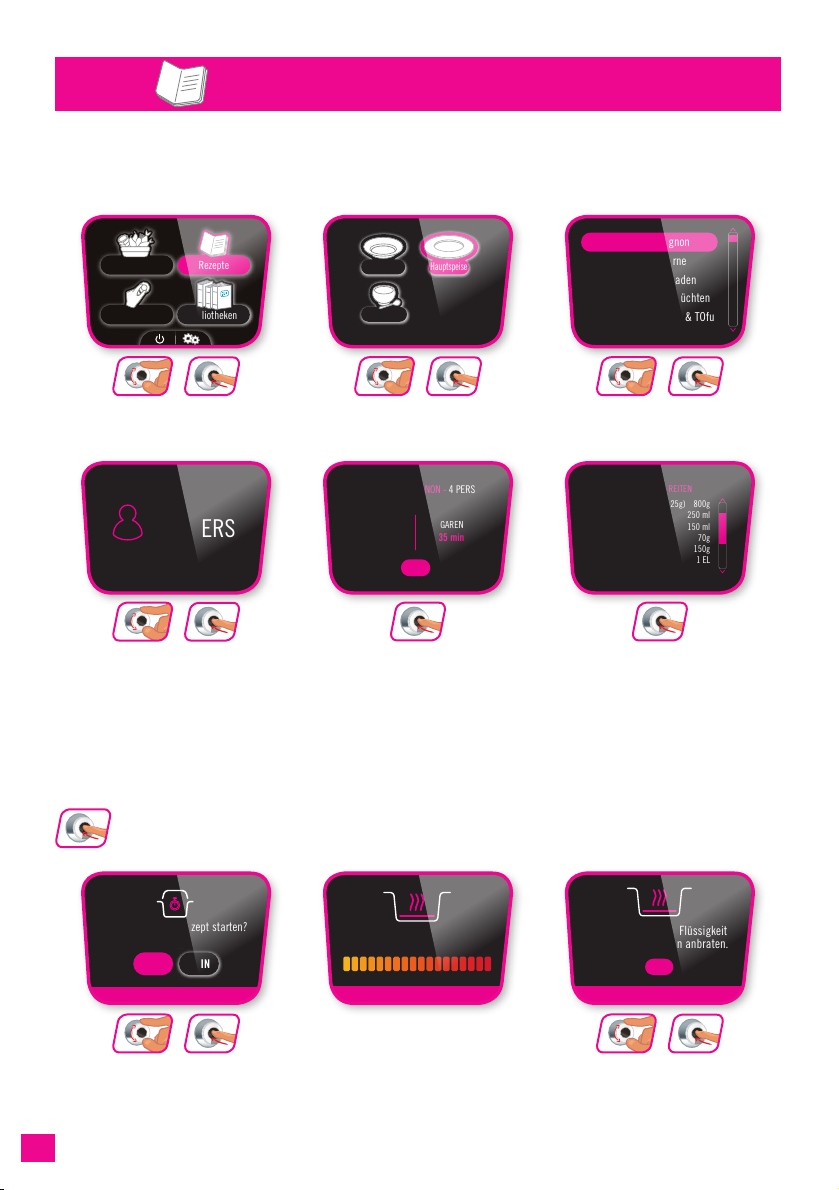
2424
REZEPT BOEUF BOURGUIGNON
MENÜ REZEPTE:
Im Menü Rezepte können Sie zwischen herzhaften und süßen Rezepten aus drei Kategorien
wählen: Vorspeise / Hauptspeise / Dessert.
Rezeptanzeige
BOEUF BOURGUIGNON
Boeuf Bourguignon
Chilloc con Carne
Chinesische Rouladen
Coucous mit Meeresfrüchten
Curryreis, Kichererbsen & TOfu
BOEUF BOURGUIGNON - 4 PERS
ZUBEREITUNG
10 min 35 min
GAREN
BOEUF BOURGUIGNON
BOEUF BOURGUIGNON
BOEUF BOURGUIGNON
BOEUF BOURGUIGNON
BOEUF BOURGUIGNON
BOEUF BOURGUIGNON
BOEUF BOURGUIGNON
GUTEN APPETIT!
WARMHALTEN
00:10
00:35
04
PERS
OK
OK
Rindfleisch, gewürfelt (25g)
Rotwein (Burgunder)
Kalbs-Fond
Speck, gewürfelt
Zwiebeln, gehackt
Pflanzenöl
800g
250 ml
150 ml
70g
150g
1 EL
ZUTATEN VORBEREITEN
Möchten Sie das Rezept starten?
Alle Zutaten, außer Flüssigkeit
und Kräuter, 10 min anbraten.
JA NEIN
AUFHEIZEN
Bitte warten
ENDE DES GARVORGANGS
Bitte warten
Möchten Sie das Braten stoppen?
JA NEIN
Möchten Sie den Garvorgang starten?
JA NEIN
Flüssigkeit und Kräuter dazugeben.
OK
GAREN
BOEUF BOURGUIGNON
Hauptspeise
Vorspeise
Dessert
RezepteZutaten
Manuell
Bibliotheken
Bereiten Sie die
Zutaten vor
BOEUF BOURGUIGNON
Boeuf Bourguignon
Chilloc con Carne
Chinesische Rouladen
Coucous mit Meeresfrüchten
Curryreis, Kichererbsen & TOfu
BOEUF BOURGUIGNON - 4 PERS
ZUBEREITUNG
10 min 35 min
GAREN
BOEUF BOURGUIGNON
BOEUF BOURGUIGNON
BOEUF BOURGUIGNON
BOEUF BOURGUIGNON
BOEUF BOURGUIGNON
BOEUF BOURGUIGNON
BOEUF BOURGUIGNON
GUTEN APPETIT!
WARMHALTEN
00:10
00:35
04
PERS
OK
OK
Rindfleisch, gewürfelt (25g)
Rotwein (Burgunder)
Kalbs-Fond
Speck, gewürfelt
Zwiebeln, gehackt
Pflanzenöl
800g
250 ml
150 ml
70g
150g
1 EL
ZUTATEN VORBEREITEN
Möchten Sie das Rezept starten?
Alle Zutaten, außer Flüssigkeit
und Kräuter, 10 min anbraten.
JA NEIN
AUFHEIZEN
Bitte warten
ENDE DES GARVORGANGS
Bitte warten
Möchten Sie das Braten stoppen?
JA NEIN
Möchten Sie den Garvorgang starten?
JA NEIN
Flüssigkeit und Kräuter dazugeben.
OK
GAREN
BOEUF BOURGUIGNON
Hauptspeise
Vorspeise
Dessert
RezepteZutaten
Manuell
Bibliotheken
Wählen Sie die Anzahl
der Personen
BOEUF BOURGUIGNON
Boeuf Bourguignon
Chilloc con Carne
Chinesische Rouladen
Coucous mit Meeresfrüchten
Curryreis, Kichererbsen & TOfu
BOEUF BOURGUIGNON - 4 PERS
ZUBEREITUNG
10 min 35 min
GAREN
BOEUF BOURGUIGNON
BOEUF BOURGUIGNON
BOEUF BOURGUIGNON
BOEUF BOURGUIGNON
BOEUF BOURGUIGNON
BOEUF BOURGUIGNON
BOEUF BOURGUIGNON
GUTEN APPETIT!
WARMHALTEN
00:10
00:35
04
PERS
OK
OK
Rindfleisch, gewürfelt (25g)
Rotwein (Burgunder)
Kalbs-Fond
Speck, gewürfelt
Zwiebeln, gehackt
Pflanzenöl
800g
250 ml
150 ml
70g
150g
1 EL
ZUTATEN VORBEREITEN
Möchten Sie das Rezept starten?
Alle Zutaten, außer Flüssigkeit
und Kräuter, 10 min anbraten.
JA NEIN
AUFHEIZEN
Bitte warten
ENDE DES GARVORGANGS
Bitte warten
Möchten Sie das Braten stoppen?
JA NEIN
Möchten Sie den Garvorgang starten?
JA NEIN
Flüssigkeit und Kräuter dazugeben.
OK
GAREN
BOEUF BOURGUIGNON
Hauptspeise
Vorspeise
Dessert
RezepteZutaten
Manuell
Bibliotheken
Wählen Sie das
Menü „Rezepte“
BOEUF BOURGUIGNON
Boeuf Bourguignon
Chilloc con Carne
Chinesische Rouladen
Coucous mit Meeresfrüchten
Curryreis, Kichererbsen & TOfu
BOEUF BOURGUIGNON - 4 PERS
ZUBEREITUNG
10 min 35 min
GAREN
BOEUF BOURGUIGNON
BOEUF BOURGUIGNON
BOEUF BOURGUIGNON
BOEUF BOURGUIGNON
BOEUF BOURGUIGNON
BOEUF BOURGUIGNON
BOEUF BOURGUIGNON
GUTEN APPETIT!
WARMHALTEN
00:10
00:35
04
PERS
OK
OK
Rindfleisch, gewürfelt (25g)
Rotwein (Burgunder)
Kalbs-Fond
Speck, gewürfelt
Zwiebeln, gehackt
Pflanzenöl
800g
250 ml
150 ml
70g
150g
1 EL
ZUTATEN VORBEREITEN
Möchten Sie das Rezept starten?
Alle Zutaten, außer Flüssigkeit
und Kräuter, 10 min anbraten.
JA NEIN
AUFHEIZEN
Bitte warten
ENDE DES GARVORGANGS
Bitte warten
Möchten Sie das Braten stoppen?
JA NEIN
Möchten Sie den Garvorgang starten?
JA NEIN
Flüssigkeit und Kräuter dazugeben.
OK
GAREN
BOEUF BOURGUIGNON
Hauptspeise
Vorspeise
Dessert
RezepteZutaten
Manuell
Bibliotheken
ok
ok
+
Wählen Sie die
Rezeptkategorie
BOEUF BOURGUIGNON
Boeuf Bourguignon
Chilloc con Carne
Chinesische Rouladen
Coucous mit Meeresfrüchten
Curryreis, Kichererbsen & TOfu
BOEUF BOURGUIGNON - 4 PERS
ZUBEREITUNG
10 min 35 min
GAREN
BOEUF BOURGUIGNON
BOEUF BOURGUIGNON
BOEUF BOURGUIGNON
BOEUF BOURGUIGNON
BOEUF BOURGUIGNON
BOEUF BOURGUIGNON
BOEUF BOURGUIGNON
GUTEN APPETIT!
WARMHALTEN
00:10
00:35
04
PERS
OK
OK
Rindfleisch, gewürfelt (25g)
Rotwein (Burgunder)
Kalbs-Fond
Speck, gewürfelt
Zwiebeln, gehackt
Pflanzenöl
800g
250 ml
150 ml
70g
150g
1 EL
ZUTATEN VORBEREITEN
Möchten Sie das Rezept starten?
Alle Zutaten, außer Flüssigkeit
und Kräuter, 10 min anbraten.
JA NEIN
AUFHEIZEN
Bitte warten
ENDE DES GARVORGANGS
Bitte warten
Möchten Sie das Braten stoppen?
JA NEIN
Möchten Sie den Garvorgang starten?
JA NEIN
Flüssigkeit und Kräuter dazugeben.
OK
GAREN
BOEUF BOURGUIGNON
Hauptspeise
Vorspeise
Dessert
RezepteZutaten
Manuell
Bibliotheken
ok
ok
+
Wählen Sie ein Rezept
BOEUF BOURGUIGNON
Boeuf Bourguignon
Chilloc con Carne
Chinesische Rouladen
Coucous mit Meeresfrüchten
Curryreis, Kichererbsen & TOfu
BOEUF BOURGUIGNON - 4 PERS
ZUBEREITUNG
10 min 35 min
GAREN
BOEUF BOURGUIGNON
BOEUF BOURGUIGNON
BOEUF BOURGUIGNON
BOEUF BOURGUIGNON
BOEUF BOURGUIGNON
BOEUF BOURGUIGNON
BOEUF BOURGUIGNON
GUTEN APPETIT!
WARMHALTEN
00:10
00:35
04
PERS
OK
OK
Rindfleisch, gewürfelt (25g)
Rotwein (Burgunder)
Kalbs-Fond
Speck, gewürfelt
Zwiebeln, gehackt
Pflanzenöl
800g
250 ml
150 ml
70g
150g
1 EL
ZUTATEN VORBEREITEN
Möchten Sie das Rezept starten?
Alle Zutaten, außer Flüssigkeit
und Kräuter, 10 min anbraten.
JA NEIN
AUFHEIZEN
Bitte warten
ENDE DES GARVORGANGS
Bitte warten
Möchten Sie das Braten stoppen?
JA NEIN
Möchten Sie den Garvorgang starten?
JA NEIN
Flüssigkeit und Kräuter dazugeben.
OK
GAREN
BOEUF BOURGUIGNON
Hauptspeise
Vorspeise
Dessert
RezepteZutaten
Manuell
Bibliotheken
ok
ok
+
ok
ok
+
ok
ok
Sie können zum vorherigen Menü zurückkehren, indem Sie den Knopf „Zurück“ 30Sekunden
lang gedrückt halten.
ok
Vorwärmvorgang läuft
BOEUF BOURGUIGNON
Boeuf Bourguignon
Chilloc con Carne
Chinesische Rouladen
Coucous mit Meeresfrüchten
Curryreis, Kichererbsen & TOfu
BOEUF BOURGUIGNON - 4 PERS
ZUBEREITUNG
10 min 35 min
GAREN
BOEUF BOURGUIGNON
BOEUF BOURGUIGNON
BOEUF BOURGUIGNON
BOEUF BOURGUIGNON
BOEUF BOURGUIGNON
BOEUF BOURGUIGNON
BOEUF BOURGUIGNON
GUTEN APPETIT!
WARMHALTEN
00:10
00:35
04
PERS
OK
OK
Rindfleisch, gewürfelt (25g)
Rotwein (Burgunder)
Kalbs-Fond
Speck, gewürfelt
Zwiebeln, gehackt
Pflanzenöl
800g
250 ml
150 ml
70g
150g
1 EL
ZUTATEN VORBEREITEN
Möchten Sie das Rezept starten?
Alle Zutaten, außer Flüssigkeit
und Kräuter, 10 min anbraten.
JA NEIN
AUFHEIZEN
Bitte warten
ENDE DES GARVORGANGS
Bitte warten
Möchten Sie das Braten stoppen?
JA NEIN
Möchten Sie den Garvorgang starten?
JA NEIN
Flüssigkeit und Kräuter dazugeben.
OK
GAREN
BOEUF BOURGUIGNON
Hauptspeise
Vorspeise
Dessert
RezepteZutaten
Manuell
Bibliotheken
Starten Sie das Rezept
BOEUF BOURGUIGNON
Boeuf Bourguignon
Chilloc con Carne
Chinesische Rouladen
Coucous mit Meeresfrüchten
Curryreis, Kichererbsen & TOfu
BOEUF BOURGUIGNON - 4 PERS
ZUBEREITUNG
10 min 35 min
GAREN
BOEUF BOURGUIGNON
BOEUF BOURGUIGNON
BOEUF BOURGUIGNON
BOEUF BOURGUIGNON
BOEUF BOURGUIGNON
BOEUF BOURGUIGNON
BOEUF BOURGUIGNON
GUTEN APPETIT!
WARMHALTEN
00:10
00:35
04
PERS
OK
OK
Rindfleisch, gewürfelt (25g)
Rotwein (Burgunder)
Kalbs-Fond
Speck, gewürfelt
Zwiebeln, gehackt
Pflanzenöl
800g
250 ml
150 ml
70g
150g
1 EL
ZUTATEN VORBEREITEN
Möchten Sie das Rezept starten?
Alle Zutaten, außer Flüssigkeit
und Kräuter, 10 min anbraten.
JA NEIN
AUFHEIZEN
Bitte warten
ENDE DES GARVORGANGS
Bitte warten
Möchten Sie das Braten stoppen?
JA NEIN
Möchten Sie den Garvorgang starten?
JA NEIN
Flüssigkeit und Kräuter dazugeben.
OK
GAREN
BOEUF BOURGUIGNON
Hauptspeise
Vorspeise
Dessert
RezepteZutaten
Manuell
Bibliotheken
ok
ok
+
Befolgen Sie die
Anweisungen
BOEUF BOURGUIGNON
Boeuf Bourguignon
Chilloc con Carne
Chinesische Rouladen
Coucous mit Meeresfrüchten
Curryreis, Kichererbsen & TOfu
BOEUF BOURGUIGNON - 4 PERS
ZUBEREITUNG
10 min 35 min
GAREN
BOEUF BOURGUIGNON
BOEUF BOURGUIGNON
BOEUF BOURGUIGNON
BOEUF BOURGUIGNON
BOEUF BOURGUIGNON
BOEUF BOURGUIGNON
BOEUF BOURGUIGNON
GUTEN APPETIT!
WARMHALTEN
00:10
00:35
04
PERS
OK
OK
Rindfleisch, gewürfelt (25g)
Rotwein (Burgunder)
Kalbs-Fond
Speck, gewürfelt
Zwiebeln, gehackt
Pflanzenöl
800g
250 ml
150 ml
70g
150g
1 EL
ZUTATEN VORBEREITEN
Möchten Sie das Rezept starten?
Alle Zutaten, außer Flüssigkeit
und Kräuter, 10 min anbraten.
JA NEIN
AUFHEIZEN
Bitte warten
ENDE DES GARVORGANGS
Bitte warten
Möchten Sie das Braten stoppen?
JA NEIN
Möchten Sie den Garvorgang starten?
JA NEIN
Flüssigkeit und Kräuter dazugeben.
OK
GAREN
BOEUF BOURGUIGNON
Hauptspeise
Vorspeise
Dessert
RezepteZutaten
Manuell
Bibliotheken
ok
ok
+
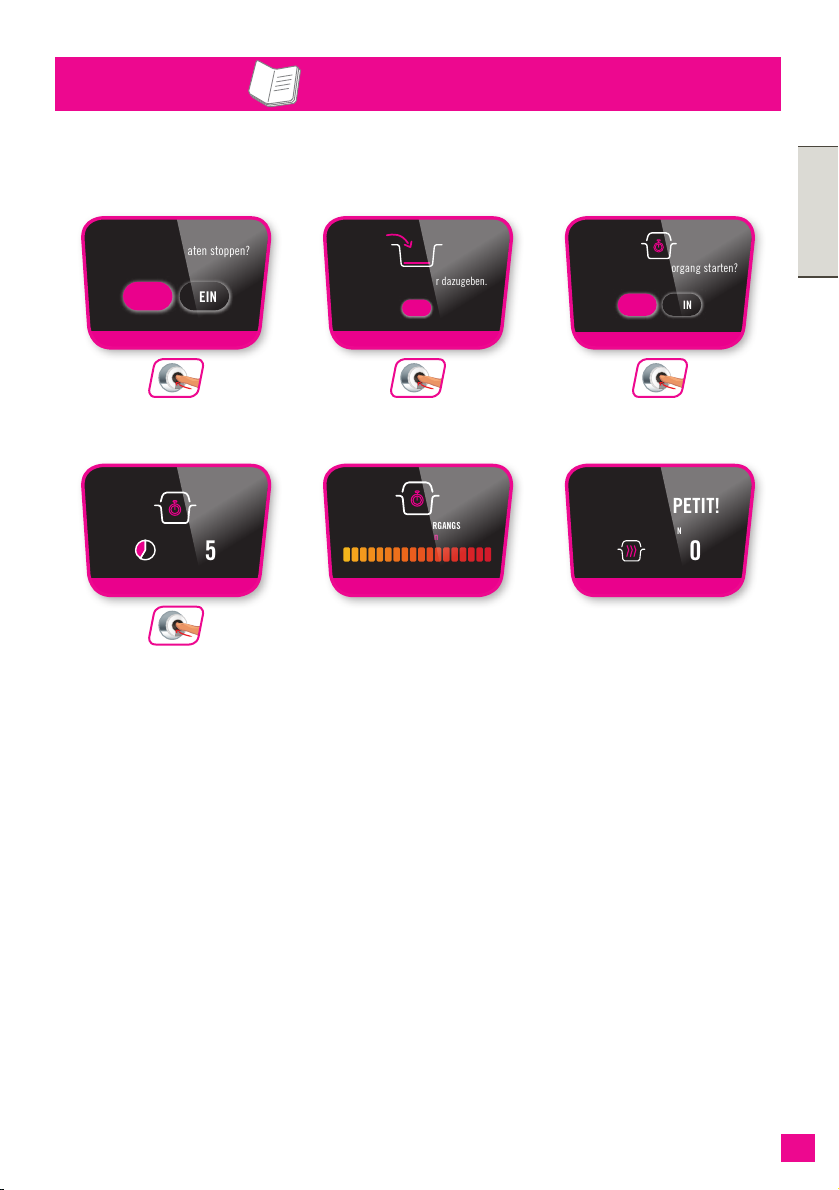
25
DEUTSCH
25
MENÜ REZEPTE
MENÜ REZEPTE: (FORTSETZUNG)
Garvorgang ist beendet
BOEUF BOURGUIGNON
Boeuf Bourguignon
Chilloc con Carne
Chinesische Rouladen
Coucous mit Meeresfrüchten
Curryreis, Kichererbsen & TOfu
BOEUF BOURGUIGNON - 4 PERS
ZUBEREITUNG
10 min 35 min
GAREN
BOEUF BOURGUIGNON
BOEUF BOURGUIGNON
BOEUF BOURGUIGNON
BOEUF BOURGUIGNON
BOEUF BOURGUIGNON
BOEUF BOURGUIGNON
BOEUF BOURGUIGNON
GUTEN APPETIT!
WARMHALTEN
00:10
00:35
04
PERS
OK
OK
Rindfleisch, gewürfelt (25g)
Rotwein (Burgunder)
Kalbs-Fond
Speck, gewürfelt
Zwiebeln, gehackt
Pflanzenöl
800g
250 ml
150 ml
70g
150g
1 EL
ZUTATEN VORBEREITEN
Möchten Sie das Rezept starten?
Alle Zutaten, außer Flüssigkeit
und Kräuter, 10 min anbraten.
JA NEIN
AUFHEIZEN
Bitte warten
ENDE DES GARVORGANGS
Bitte warten
Möchten Sie das Braten stoppen?
JA NEIN
Möchten Sie den Garvorgang starten?
JA NEIN
Flüssigkeit und Kräuter dazugeben.
OK
GAREN
BOEUF BOURGUIGNON
Hauptspeise
Vorspeise
Dessert
RezepteZutaten
Manuell
Bibliotheken
Fertig!
BOEUF BOURGUIGNON
Boeuf Bourguignon
Chilloc con Carne
Chinesische Rouladen
Coucous mit Meeresfrüchten
Curryreis, Kichererbsen & TOfu
BOEUF BOURGUIGNON - 4 PERS
ZUBEREITUNG
10 min 35 min
GAREN
BOEUF BOURGUIGNON
BOEUF BOURGUIGNON
BOEUF BOURGUIGNON
BOEUF BOURGUIGNON
BOEUF BOURGUIGNON
BOEUF BOURGUIGNON
BOEUF BOURGUIGNON
GUTEN APPETIT!
WARMHALTEN
00:10
00:35
04
PERS
OK
OK
Rindfleisch, gewürfelt (25g)
Rotwein (Burgunder)
Kalbs-Fond
Speck, gewürfelt
Zwiebeln, gehackt
Pflanzenöl
800g
250 ml
150 ml
70g
150g
1 EL
ZUTATEN VORBEREITEN
Möchten Sie das Rezept starten?
Alle Zutaten, außer Flüssigkeit
und Kräuter, 10 min anbraten.
JA NEIN
AUFHEIZEN
Bitte warten
ENDE DES GARVORGANGS
Bitte warten
Möchten Sie das Braten stoppen?
JA NEIN
Möchten Sie den Garvorgang starten?
JA NEIN
Flüssigkeit und Kräuter dazugeben.
OK
GAREN
BOEUF BOURGUIGNON
Hauptspeise
Vorspeise
Dessert
RezepteZutaten
Manuell
Bibliotheken
Start des
Kochvorgangs
BOEUF BOURGUIGNON
Boeuf Bourguignon
Chilloc con Carne
Chinesische Rouladen
Coucous mit Meeresfrüchten
Curryreis, Kichererbsen & TOfu
BOEUF BOURGUIGNON - 4 PERS
ZUBEREITUNG
10 min 35 min
GAREN
BOEUF BOURGUIGNON
BOEUF BOURGUIGNON
BOEUF BOURGUIGNON
BOEUF BOURGUIGNON
BOEUF BOURGUIGNON
BOEUF BOURGUIGNON
BOEUF BOURGUIGNON
GUTEN APPETIT!
WARMHALTEN
00:10
00:35
04
PERS
OK
OK
Rindfleisch, gewürfelt (25g)
Rotwein (Burgunder)
Kalbs-Fond
Speck, gewürfelt
Zwiebeln, gehackt
Pflanzenöl
800g
250 ml
150 ml
70g
150g
1 EL
ZUTATEN VORBEREITEN
Möchten Sie das Rezept starten?
Alle Zutaten, außer Flüssigkeit
und Kräuter, 10 min anbraten.
JA NEIN
AUFHEIZEN
Bitte warten
ENDE DES GARVORGANGS
Bitte warten
Möchten Sie das Braten stoppen?
JA NEIN
Möchten Sie den Garvorgang starten?
JA NEIN
Flüssigkeit und Kräuter dazugeben.
OK
GAREN
BOEUF BOURGUIGNON
Hauptspeise
Vorspeise
Dessert
RezepteZutaten
Manuell
Bibliotheken
ok
Befolgen Sie die
Anweisungen
BOEUF BOURGUIGNON
Boeuf Bourguignon
Chilloc con Carne
Chinesische Rouladen
Coucous mit Meeresfrüchten
Curryreis, Kichererbsen & TOfu
BOEUF BOURGUIGNON - 4 PERS
ZUBEREITUNG
10 min 35 min
GAREN
BOEUF BOURGUIGNON
BOEUF BOURGUIGNON
BOEUF BOURGUIGNON
BOEUF BOURGUIGNON
BOEUF BOURGUIGNON
BOEUF BOURGUIGNON
BOEUF BOURGUIGNON
GUTEN APPETIT!
WARMHALTEN
00:10
00:35
04
PERS
OK
OK
Rindfleisch, gewürfelt (25g)
Rotwein (Burgunder)
Kalbs-Fond
Speck, gewürfelt
Zwiebeln, gehackt
Pflanzenöl
800g
250 ml
150 ml
70g
150g
1 EL
ZUTATEN VORBEREITEN
Möchten Sie das Rezept starten?
Alle Zutaten, außer Flüssigkeit
und Kräuter, 10 min anbraten.
JA NEIN
AUFHEIZEN
Bitte warten
ENDE DES GARVORGANGS
Bitte warten
Möchten Sie das Braten stoppen?
JA NEIN
Möchten Sie den Garvorgang starten?
JA NEIN
Flüssigkeit und Kräuter dazugeben.
OK
GAREN
BOEUF BOURGUIGNON
Hauptspeise
Vorspeise
Dessert
RezepteZutaten
Manuell
Bibliotheken
ok
Braten stoppen
BOEUF BOURGUIGNON
Boeuf Bourguignon
Chilloc con Carne
Chinesische Rouladen
Coucous mit Meeresfrüchten
Curryreis, Kichererbsen & TOfu
BOEUF BOURGUIGNON - 4 PERS
ZUBEREITUNG
10 min 35 min
GAREN
BOEUF BOURGUIGNON
BOEUF BOURGUIGNON
BOEUF BOURGUIGNON
BOEUF BOURGUIGNON
BOEUF BOURGUIGNON
BOEUF BOURGUIGNON
BOEUF BOURGUIGNON
GUTEN APPETIT!
WARMHALTEN
00:10
00:35
04
PERS
OK
OK
Rindfleisch, gewürfelt (25g)
Rotwein (Burgunder)
Kalbs-Fond
Speck, gewürfelt
Zwiebeln, gehackt
Pflanzenöl
800g
250 ml
150 ml
70g
150g
1 EL
ZUTATEN VORBEREITEN
Möchten Sie das Rezept starten?
Alle Zutaten, außer Flüssigkeit
und Kräuter, 10 min anbraten.
JA NEIN
AUFHEIZEN
Bitte warten
ENDE DES GARVORGANGS
Bitte warten
Möchten Sie das Braten stoppen?
JA NEIN
Möchten Sie den Garvorgang starten?
JA NEIN
Flüssigkeit und Kräuter dazugeben.
OK
GAREN
BOEUF BOURGUIGNON
Hauptspeise
Vorspeise
Dessert
RezepteZutaten
Manuell
Bibliotheken
ok
Garzeit
BOEUF BOURGUIGNON
Boeuf Bourguignon
Chilloc con Carne
Chinesische Rouladen
Coucous mit Meeresfrüchten
Curryreis, Kichererbsen & TOfu
BOEUF BOURGUIGNON - 4 PERS
ZUBEREITUNG
10 min 35 min
GAREN
BOEUF BOURGUIGNON
BOEUF BOURGUIGNON
BOEUF BOURGUIGNON
BOEUF BOURGUIGNON
BOEUF BOURGUIGNON
BOEUF BOURGUIGNON
BOEUF BOURGUIGNON
GUTEN APPETIT!
WARMHALTEN
00:10
00:35
04
PERS
OK
OK
Rindfleisch, gewürfelt (25g)
Rotwein (Burgunder)
Kalbs-Fond
Speck, gewürfelt
Zwiebeln, gehackt
Pflanzenöl
800g
250 ml
150 ml
70g
150g
1 EL
ZUTATEN VORBEREITEN
Möchten Sie das Rezept starten?
Alle Zutaten, außer Flüssigkeit
und Kräuter, 10 min anbraten.
JA NEIN
AUFHEIZEN
Bitte warten
ENDE DES GARVORGANGS
Bitte warten
Möchten Sie das Braten stoppen?
JA NEIN
Möchten Sie den Garvorgang starten?
JA NEIN
Flüssigkeit und Kräuter dazugeben.
OK
GAREN
BOEUF BOURGUIGNON
Hauptspeise
Vorspeise
Dessert
RezepteZutaten
Manuell
Bibliotheken
ok
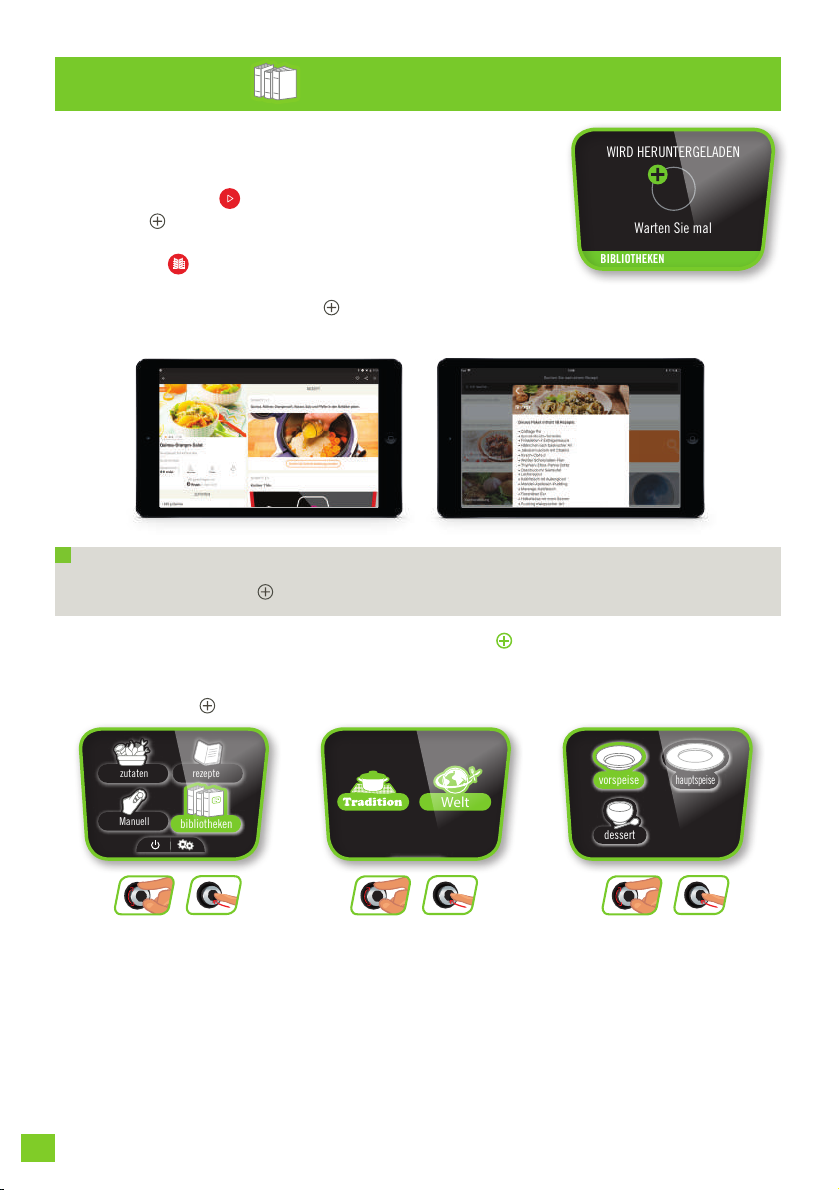
2626
BIBLIOTHEKEN
Zugang zur Rezeptsammlung auf Ihrem COOK4ME CONNECT:
Sie können Ihre heruntergeladenen Rezeptpakete ganz einfach wiedernden. Gehen Sie
zu Ihrer gespeicherten Rezeptsammlung und starten Sie die Zubereitung Ihrer Gerichte auf
Ihrem COOK4ME CONNECT.
HERUNTERLADENREZEPT UND PAKETE:
Sobald Ihre App mit Ihrem Cook4me verbunden ist.
Sie können auf klicken, um Ihr Rezept an Ihr
COOK4ME CONNECT zu senden; es wird in der „Rezepte“
Liste Ihres Gerätes gespeichert. Wenn ein Pack verfügbar ist,
sehen Sie ein Symbol auf dem Rezept. Sie können auf den
entsprechenden Text klicken, um das Pack herunterzuladen.
Es wird dann in Ihrer COOK4ME CONNECT „Bibliotheken“
zu sehen sein.
Das Rezeptpaket wird
heruntergeladen
Warten Sie mal
WIRD HERUNTERGELADEN
BIBLIOTHEKEN
rezepte
Manuell
zutaten
bibliotheken
hauptspeise
vorspeise
dessert
hauptspeise
vorspeise
dessert
bibliothek
Welt
Wählen Sie das
Untermenü
«Bibliothek»
rezepte
Manuell
zutaten
bibliotheken
hauptspeise
vorspeise
dessert
hauptspeise
vorspeise
dessert
bibliothek
Welt
ok
ok
+
Wählen Sie das gewünschte
Thema oder Express-Rezepte
ok
ok
+
Wählen Sie «Vorspeise»,
«Hauptspeise» oder
«Dessert» und wählen
Sie Ihr Rezept
ok
ok
+
rezepte
Manuell
zutaten
bibliotheken
hauptspeise
vorspeise
dessert
hauptspeise
vorspeise
dessert
bibliothek
Welt
Hinweis: Sie können den Downloadvorgang jederzeit abbrechen, indem Sie die Zurück-
Taste Ihres COOK4ME CONNECT drücken.

27
DEUTSCH
27
ZUTATEN
Geügel
Kalbeisch
Kaninchen
Lammeisch
Rindeisch
Schweineeisch
Dorsch
Fisch (alle Arten)
Garnelen
Jakobsmuscheln
Miesmuscheln
Buchweizen
Bulgur
Gerste
Hirse
Quinoa
Weißer Reis
Weizen
Wildreis
Apfel
Artischocke
Aubergine
Birne
Blumenkohl
Broccoli
Chicorée
Erbsen
Fenchel
Gartenkürbis
Grüne Bohnen
Grünkohl
Karotte
Kartoffeln
Kohl
Lauch
Linsen
Mangold
Paprika
Pilze
Rosenkohl
Rote Bete
Rübe
Sellerie
Spargel
Speisekürbis
Spinat
Süßkartoffeln
Zucchini
Reis und Cerealien
Fisch
Fleisch
Gemüse & Obst
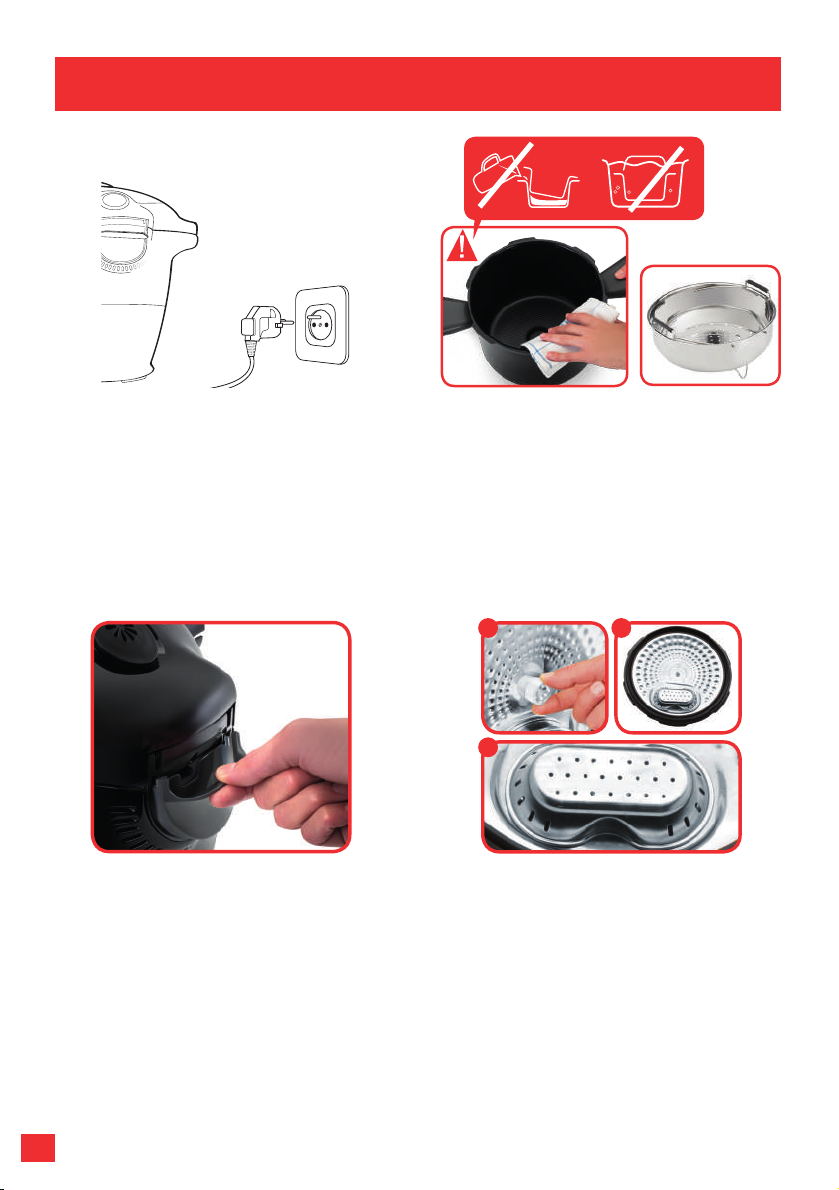
2828
REINIGUNG UND INSTANDHALTUNG
Trennen Sie das Gerät vom Netzstrom,
wenn Sie mit dem Kochen fertig sind.
Reinigen Sie das Gerät nach jeder
Benutzung.
Sie können den Kochbehälter und den
Dampfeinsatz in heißem Seifenwasser
oder im Geschirrspüler reinigen. Reinigen
Sie das Gehäuse des Geräts mit einem
feuchten Tuch.
Nach einigen Reinigungsvorgängen im
Geschirrspüler kann die Außenseite des
Behälters ihre Farbe verlieren. Reinigen Sie
sie mit einem Haushaltsschwamm.
Entfernen Sie nach jeder Benutzung die
Kondenswasserschale und reinigen Sie
sie vorsichtig mit klarem Wasser oder im
Geschirrspüler. Achten Sie darauf, sie gut
abzutrocknen. Bringen Sie sie wieder in
ihrer Position an.
Zur Reinigung des Metalldeckels von
Hand oder im Geschirrspüler muss die
Ventilabdeckung entfernt werden.
1. Lösen Sie die Schraube in der Mitte des
Metalldeckels
2. Nehmen Sie den Metalldeckel ab
3. Nehmen Sie die Ventilabdeckung ab
1 2
3

29
DEUTSCH
29
MANUELLE REINIGUNG:
Sie können den Metalldeckel mit heißem
Seifenwasser reinigen. Entfernen Sie
zuerst die Kugel und führen Sie dann die
komplette Reinigung durch. Trocknen Sie
die Kugel und ihre Befestigung vorsichtig
mit einem weichen Tuch ab.
REINIGUNG IM GESCHIRRSPÜLER:
Sie können den Metalldeckel in den
Geschirrspüler geben, ohne die Ventile zu
entfernen. Entfernen Sie nach der Reinigung
im Geschirrspüler die Kugel und pusten Sie in
die Öffnung, um zu prüfen, dass diese nicht
verstopft ist. Trocknen Sie die Kugel und ihre
Befestigung mit einem weichen Tuch ab.
Prüfen Sie vor dem Wiedereinsetzen der
Kugel, dass die Öffnung nicht verstopft ist,
indem Sie hinein pusten.
Drücken Sie auf den Innenteil der
Sicherheitsventilfeder, um zu prüfen, dass
diese nicht verstopft ist.
Reinigen Sie den oberen Teil des Kochbehälters, bevor Sie den inneren Deckel abnehmen.
Reinigen Sie die Innenseite des Metalldeckels des Geräts mit einem feuchten Schwamm.
Prüfen Sie, dass die Manometernadel richtig positioniert ist, damit sie nicht blockiert.
Spülen Sie sie mit Wasser ab und überprüfen Sie den Bewegungsspielraum der Sicherheitsnadel.
Ersetzen Sie die wasserundurchlässige
Dichtung mindestens alle drei Jahre.
Diese Arbeit wird in einem zugelassenen
Servicecenter vorgenommen.
Verstauen Sie das Gerät nicht mit
geschlossenem Deckel. Lassen Sie ihn offen
oder halb offen stehen. So verhindern Sie die
Entstehung unangenehmer Gerüche.
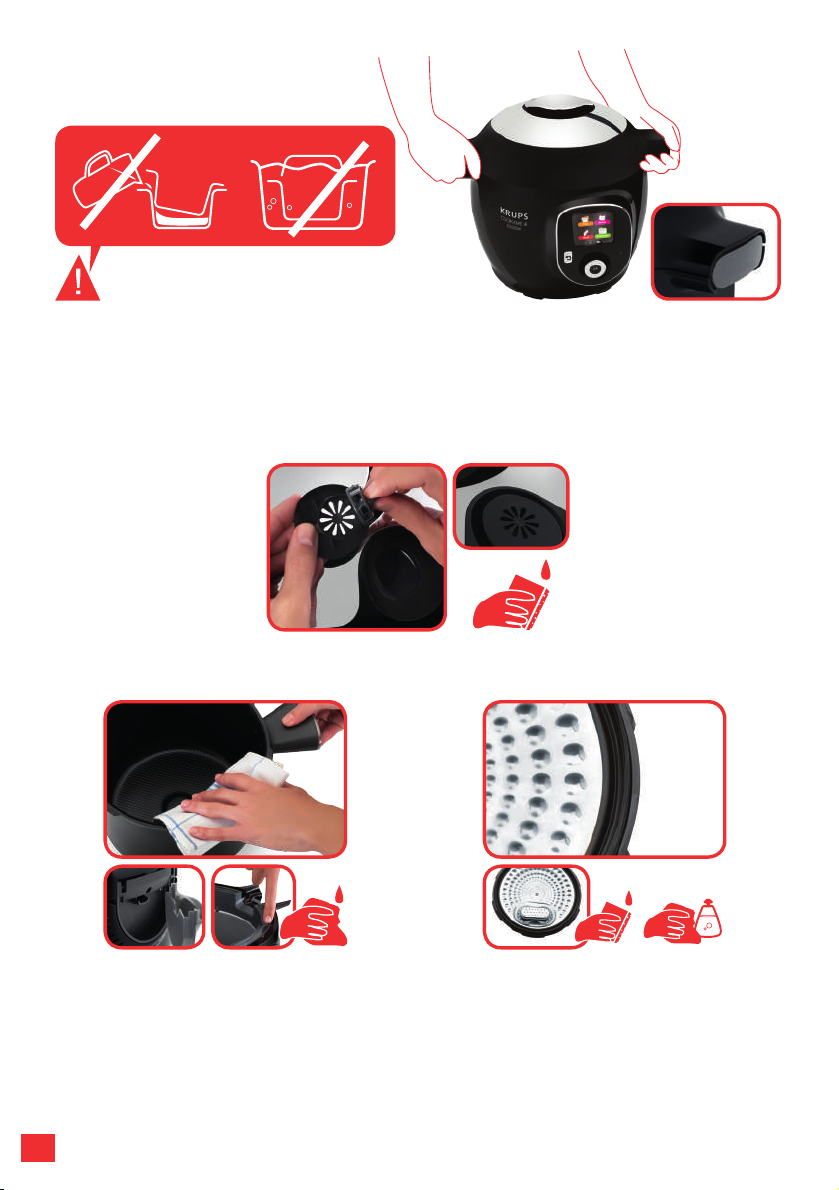
3030
Transportieren Sie das Gerät an den
Griffen an beiden Seiten. Überprüfen Sie
zur größeren Sicherheit, dass der Griff
auf der geschlossenen Stellung steht.
Überprüfen Sie zur größeren Sicherheit,
dass der Deckel verriegelt ist.
Im Falle, dass das Gerät versehentlich
eingetaucht wird oder Wasser direkt auf
das Heizelement läuft, wenn der Behälter
nicht eingesetzt ist, bringen Sie das Gerät
bitte zu einem zugelassenen Servicecenter.
Reinigen Sie das Gehäuse des Gerätedeckels mit einem feuchten Schwamm. Reinigen Sie
das Dampfventil an der Rückseite des Deckels.
Reinigen Sie den oberen Teil des
Kochbehälters mit einem feuchten Tuch.
Reinigen Sie die Kondenswasserschale
mit einem feuchten Tuch. Spülen Sie sie
mit Wasser ab und prüfen Sie, dass die
Manometernadel beweglich ist.
Reinigen Sie die Dichtung am Metalldeckel
mit einem feuchten Tuch und spülen Sie
sie dann gründlich ab. Verwenden Sie
keine scharfen Objekte.

31
DEUTSCH
Ihr Dampfkochtopf ist mit mehreren Sicherheitsfunktionen versehen:
Verriegelungsschutz:
- Wenn Ihr Dampfkochtopf unter Druck steht, bendet sich der Druckstab in der oberen
Position und verriegelt den Deckel. Versuchen Sie niemals Ihren Dampfkochtopf mit
Gewalt zu öffnen.
- Manipulieren Sie insbesondere nicht den Druckstab.
- Vergewissern Sie sich, ob der Druck im Topf wieder abgefallen ist (mehr Dampf
entweicht durch das Regelventil), bevor Sie versuchen den Deckel zu öffnen.
Zwei Überdruck-Sicherheitsmechanismen:
- Erster Mechanismus: Das Überdruckventil mindert den Druck – siehe Kapitel
Reinigung und Instandhaltung auf Seite 28 - 30.
- Zweiter Mechanismus: Die Dichtung lässt an der Hinterseite des Deckels Dampf
entweichen.
Wenn einer der Überdruck-Sicherheitsmechanismen ausgelöst wird:
Schalten Sie Ihr Gerät aus.
Lassen Sie Ihren Dampfkochtopf abkühlen.
Öffnen Sie den Deckel.
Prüfen und reinigen Sie das Überdruckventil, die Druckentlastungskugel und die
Dichtung. Siehe Kapitel Reinigung und Instandhaltung.
Wenn nach diesen Prüfungen und der Reinigung Ihr Produkt undichte Stellen
aufweist oder nicht mehr funktioniert, bringen Sie es zu einem zugelassenen SEB-
Vertragskundendienst.
Regulierung Ihres Gerätes:
Die Druckregelung erfolgt durch das Aktivieren oder Deaktivieren des Heizelementes.
Um die Wirkung der Wärmeträgheit zu begrenzen und die Regelgenauigkeit zu
optimieren, kann die Dekompressionskugel automatisch aktiviert werden, um hin und
wieder kurz etwas Dampf abzulassen.
SICHERHEITSFUNKTIONEN
32
PROBLEME MÖGLICHE URSACHEN LÖSUNG
Deckel lässt sich
nicht schließen
Es benden sich Fremdkörper
zwischen dem Behälter und
der Heizplatte
Entnehmen Sie den Behälter
und prüfen Sie, dass Heizplatte,
Hauptelement und Unterseite des
Behälters sauber sind. Prüfen Sie
auch, dass das Hauptelement
beweglich ist
Der Griff zum Öffnen des Deckels
ist nicht richtig positioniert
Prüfen Sie, dass der Griff zum
Öffnen vollständig geöffnet ist
Der Metalldeckel und/oder die
Befestigungsschraube sind
nicht richtig eingesetzt oder
festgeschraubt
Prüfen Sie, dass Sie alle Bauteile
des Metalldeckels richtig
positioniert haben und dass die
Schraube fest sitzt
Das Produkt baut
den Druck nicht
ab
Die Kugelabdeckung ist nicht
an ihrem Platz
Lassen Sie das Produkt vollständig
auskühlen, entfernen Sie dann den
Metalldeckel und positionieren Sie
die Kugelabdeckung richtig (sodass
sie in der verriegelten Stellung fest
sitzt)
Nach dem
Dampfablassen
öffnet sich der
Deckel nicht
Die Manometernadel bendet
sich noch in der oberen
Position
Wenn Sie sicher sind, dass kein
Dampf mehr austritt und dass
das Produkt vollständig abgekühlt
ist, führen Sie einen Zahnstocher
in das Loch zwischen dem
Öffnungsgriff und dem Dampfventil
ein. Seien Sie vorsichtig mit dem
Dampf, der austritt, wenn der
Zahnstocher eingesteckt ist.
Wenn kein Dampf mehr austritt,
versuchen Sie das Gerät zu öffnen
Das Gerät baut
keinen Druck auf
Prüfen Sie, dass Dichtung,
Sicherheitsventil und
Manometernadel sauber sind
Reinigen Sie das Gerät
entsprechend der Anweisungen
der Bedienungsanleitung
Überprüfen Sie, dass
der Deckel verriegelt und
die Markierung richtig
am verriegelten Schloss
ausgerichtet ist. Prüfen Sie,
dass die Manometernadel
beweglich ist und ob sie
gereinigt werden muss
Prüfen Sie, dass die
Manometernadel beweglich ist
und ob sie gereinigt werden muss
Die Dekompressionskugel ist
nicht richtig positioniert oder
verunreinigt
Prüfen Sie, dass die Kugel richtig
positioniert ist und dass die
Abdeckung sich in der verriegelten
Stellung bendet. Reinigen Sie die
Kugel und ihre Befestigung und
trocknen Sie beides ab.
33
DEUTSCH
PROBLEME MÖGLICHE URSACHEN LÖSUNG
FEHLERCODES Code 24: Beim Dampfgaren
sinkt der Druck ab
Code 21 und 26: Druck steigt
nicht an
Fügen Sie Ihrem Rezept jeweils
50– 100ml Flüssigkeit (Wasser,
Brühe oder Saucenüssigkeit)
hinzu und starten Sie das Rezept
erneut
Beim Kochen
tritt an den
Deckelseiten
Dampf aus
(Undichtigkeit)
Die Dichtung des
Metalldeckels und/oder die
Ränder des Behälters sind
verunreinigt
Reinigen Sie die Wände vom
Behälter und die Dichtung mit
einem feuchten Tuch. Verwenden
Sie keine scharfen Objekte
Abnutzung, Kerben und
Deformationen an der
Dichtung
Die Dichtung muss mindestens
alle drei Jahre gewechselt
werden. Bringen Sie Ihr
Gerät zu einem zugelassenen
Servicecenter
Behälterränder sind
beschädigt
Bringen Sie Ihr Gerät zu einem
zugelassenen Servicecenter
Die Mutter am Metalldeckel
war nicht fest genug
angezogen
Ziehen Sie die Mutter in der Mitte
des Metalldeckels richtig fest
Wasser rinnt an
der Rückseite des
Geräts
Die Kondenswasserschale ist
nicht eingesetzt oder läuft über
Überprüfen Sie, dass die
Kondenswasserschale richtig an der
Rückseite des Geräts positioniert ist
und dass das Durchussröhrchen
nicht verstopft ist
Die Sicherheitsventile und/oder
Öffnungen sind verstopft
Prüfen Sie, dass der Behälter
nicht zu voll ist und dass
er keine Speisen enthält,
die sich ausdehnen (siehe
Sicherheitshinweisheft)
Die Anzeige blinkt
nicht oder schaltet
sich nicht an
Die LED funktioniert nicht
mehr oder der Deckel ist nicht
vollständig verriegelt
Prüfen Sie, dass das Produkt
vollständig verriegelt ist.
Bringen Sie Ihr Gerät zu einem
zugelassenen Servicecenter,
wenn das Problem fortbesteht
Die
Bedienungseinheit
schaltet sich nicht
an
Das Gerät ist nicht mit dem
Netzstrom verbunden oder
bendet sich im Ruhemodus
Prüfen Sie, dass die Stromleitung
sowohl mit dem Gerät als auch
mit der Steckdose verbunden ist.
Prüfen Sie, dass sich das Gerät
nicht im Ruhemodus bendet,
indem Sie auf den Knopf „OK“
drücken
Das Gerät ist beschädigt Bringen Sie Ihr Gerät zu einem
zugelassenen Servicecenter

34
PROBLEME MÖGLICHE URSACHEN LÖSUNG
An der
Anzeige tritt
Kondenswasser
auf
Am Deckel ist Kondenswasser Lassen Sie das Gerät für einige
Stunden an der frischen Luft
trocknen
Der Metalldeckel
kann nicht
abgenommen
werden, er ist
blockiert
Die Metalldeckel-
Kugelabdeckung war nicht
richtig positioniert
Lösen Sie die Mutter in der Mitte
des Metalldeckels und drücken
Sie dann den Stempel in die Mitte
der Mutter ein. So wird der Deckel
gelöst und die Kugelabdeckung
ist für Sie zugänglich. Überprüfen
Sie, dass er richtig mit der Kugel
wieder eingesetzt wird
PROBLEME MÖGLICHE URSACHEN LÖSUNG
Stick wird nicht
anerkannt
Ein anderer Stick als der
Moulinex-Stick
Verwenden Sie nur Moulinex-
USB-Sticks
Aktive Sprache weicht von der
Sprache des Sticks ab
Gehen Sie zurück zu den
Einstellungen Ihres Geräts:
Wählen Sie die Sprache des
Sticks
Bibliotheksspeicher voll Löschen Sie eine Bibliothek
Nichts passiert Sie benden sich nicht im
richtigen Menü
Gehen Sie zurück zum
Hauptmenü
Stick oder Port beschädigt Wenden Sie sich an den
Kundendienst
PROBLEMBEHANDLUNGSTIPPS FÜR USB-MODELLE

35
DEUTSCH
KRUPS INTERNATIONALE GARANTIE
: www.krups.com
Dieses Produkt wird von KRUPS innerhalb und nach der Garantiezeit repariert.
Zubehör, Verbrauchsmaterialien und durch den Endverbraucher austauschbare Ersatzteile
können, mit Ausnahme der Schweiz, auf der KRUPS Internetseite www.accessories.
home-and-cook.com erworben werden. Für Bestellungen aus der Schweiz verwenden Sie
bitte die Internetseite www.krups.com
Garantie
KRUPS (Firmenanschrift und Details nden Sie in der Länderliste der internationalen
KRUPS Garantie) gewährt für dieses Produkt eine Garantie auf Material- oder
Herstellungsfehler innerhalb der Garantiezeit von 2 Jahren, beginnend mit dem Datum des
Kaufes, in den Ländern, die in der beigefügten Länderliste aufgeführt sind.
Die internationale KRUPS Herstellergarantie ist ein zusätzlicher Vorteil, der die
gesetzlichen Verbraucherrechte nicht beeinträchtigt.
Die internationale Herstellergarantie deckt alle Kosten, die zur Wiederherstellung der
ursprünglichen Eigenschaften eines defekten Produktes dienen, durch Reparatur oder
Austausch eines defekten Teiles und der dazu erforderlichen Arbeit. KRUPS behält sich
vor, ein Ersatzgerät anstelle einer Reparatur des defekten Gerätes zu liefern. KRUPS
einzige und ausschließliche Verpichtung im Rahmen dieser Garantie beschränkt sich auf
die Reparatur oder den Ersatz.
Bedingungen & Ausschluss
Die internationale KRUPS Garantie ndet nur Anwendung innerhalb der Garantiezeit in
den Ländern, die in der beigefügten Länderliste aufgeführt sind und gilt nur bei Vorlage
eines Kaufbeleges. Das defekte Gerät kann persönlich bei einer autorisierten KRUPS
Servicestelle abgegeben oder gut verpackt an eine autorisierte Servicestelle eingesandt
werden. Die Anschriften der autorisierten Servicestellen eines Landes nden Sie auf
den KRUPS Webseiten (www.krups.com) oder rufen Sie unter der entsprechenden
Telefonnummer in der Länderliste an, um die Postanschrift zu erfragen.
KRUPS ist nicht verpichtet, ein Produkt zu reparieren oder zu ersetzen, wenn diesem
kein gültiger Kaufbeleg beiliegt oder das Produkt gewerblich genutzt wurde.
Diese Garantie deckt keine Schäden ab, die auftreten können als Folge von Missbrauch,
Fahrlässigkeit, Nichtbeachtung der KRUPS
Bedienungsanleitungen, anderer Spannung oder Frequenz als auf dem Typenschild des
Produktes angegeben, sowie einer Veränderung oder nicht autorisierten Reparatur des
Produktes. Darüber hinaus erstreckt sie sich nicht auf normalen Verschleiß, fehlende
Wartung oder ausgetauschte Ersatzteile und die folgenden Fälle:
–Verwendung von ungeeigneten Flüssigkeiten oder Zubehörteilen
–Verkalkung (jede Entkalkung muss gemäß der Bedienungsanleitung durchgeführt
werden)
–Mechanische Schäden, Überbeanspruchung
–Unglücksfälle wie Feuer, Wasser, etc.
–Bruch von Glas- oder Porzellanbestandteilen des Produktes
–Eindringen von Wasser, Staub oder Insekten in das Produkt (ausgenommen
Insektenfallen)
–Schäden oder ungenügende Ergebnisse wegen falscher Spannung oder Frequenz
–Professionelle oder gewerbliche Nutzung
Um Ihnen einen bestmöglichen Kundendienst zu bieten und eine kontinuierlichen
Verbesserung der Kundenzufriedenheit zu gewährleisten, behält sich KRUPS das Recht
vor, Ihnen nach einer bei einem autorisierten Servicepartner durchgeführten Reparatur
einen Fragebogen zuzusenden.

36
Diese Garantie ndet keine Anwendung auf Produkte, die verändert wurden oder auf
Schäden, die durch unsachgemäße Benutzung oder Pege, mangelhafte Verpackung oder
falsche Handhabung des Transportdienstleisters aufgetreten sind.
Die internationale KRUPS Garantie ndet nur Anwendung auf Produkte, die in den
aufgeführten Ländern erworben und in einem dieser Länder nur für den Hausgebrauch
genutzt werden. Wird ein Produkt in einem der aufgeführten Länder gekauft und in einem
anderen genutzt, gilt:
a) Die internationale KRUPS Garantie ndet keine Anwendung, falls das Produkt nicht
den örtlichen Standards entspricht, wie Spannung, Frequenz, Steckern oder anderen
lokalen, technischen Vorschriften.
b) Die Reparatur eines im Ausland gekauften Produktes kann länger dauern, wenn dieses
nicht in Ihrem Land von KRUPS vertrieben wird.
c) Wenn das Produkt in Ihrem Land nicht repariert werden kann, beschränkt sich die
internationale KRUPS Garantie auf den Austausch in ein ähnliches Produkt oder, wenn
möglich, ein anderes Produkt zum gleichen Preis.
Gesetzliche Rechte des Verbrauchers
Diese internationale KRUPS Garantie beeinträchtigt weder die gesetzlichen Rechte des
Verbrauchers, noch können diese ausgeschlossen oder eingeschränkt werden. Dies gilt
auch für Rechte gegen den Händler, bei dem der Verbraucher das Produkt erworben hat.
Diese Garantie gibt dem Verbraucher besondere Rechte. Zusätzlich hat der Verbraucher
andere gesetzliche Rechte, die von Staat zu Staat oder von Land zu Land variieren.
Der Verbraucher kann diese Rechte nach eigenem Ermessen geltend machen.
Bitte bewahren Sie dieses Dokument zusammen mit den Unterlagen dieses Gerätes auf.
GROUPE SEB DEUTSCHLAND GmbH
Theodor-Stern-Kai 1
60596 Frankfurt am Main

37
FRANÇAIS
CONSIGNES DE SÉCURITÉ
Prenez le temps de lire attentivement toutes les instructions
suivantes.
Utilisez uniquement votre appareil en intérieur.
Pour le nettoyage de votre appareil, reportez vous aux
consignes données dans la notice. Vous pouvez nettoyer la
cuve de cuisson et le panier vapeur à l’eau chaude savonneuse
ou bien au lave-vaisselle. Nettoyez le corps de l’appareil à
l’aide d’un chiffon humide.
Ne pas immerger l’appareil dans l’eau.
Une mauvaise utilisation de votre appareil et de ses
accessoires peut endommager l’appareil et provoquer des
blessures.
Ne touchez jamais les parties chaudes de l’appareil. Après
utilisation l’élément chauffant présente une chaleur résiduelle.
Pour votre sécurité, cet appareil est conforme aux normes
et réglementations applicables (Directives Basse Tension,
Compatibilité Electromagnétique, Matériaux en contact des
aliments, Environnement, …).
Cet appareil n’est pas prévu pour être utilisé par des personnes
(y compris les enfants) dont les capacités physiques,
sensorielles ou mentales sont réduites, ou des personnes
dénuées d’expérience ou de connaissance, sauf si elles ont pu
bénécier, par l’intermédiaire d’une personne responsable de
leur sécurité, d’une surveillance ou d’instructions préalables
concernant l’utilisation de l’appareil.
Il convient de surveiller les enfants pour s’assurer qu’ils ne
jouent pas avec l’appareil.
Si le câble est endommagé, il doit être remplacé par le
fabricant, son service après vente ou des personnes de
qualication similaire an d’éviter un danger. Ne remplacez
pas le cordon d’alimentation fourni par un autre cordon.
Votre appareil a été conçu pour un usage domestique

38
seulement. Il n’a pas été conçu pour être utilisé dans les cas
suivants qui ne sont pas couverts par la garantie :
– dans des coins de cuisines réservés au personnel
dans des magasins, bureaux et autres environnements
professionnels,
– dans des fermes,
– par les clients des hôtels, motels et autres environnements
à caractère résidentiel,
– dans des environnements de type chambres d’hôtes.
L’appareil ne doit pas être utilisé par des enfants. Tenir
l’appareil et son cordon hors de la portée des enfants.
Cet appareil peut être utilisé par des personnes dont les
capacités physiques, sensorielles ou mentales sont réduites
ou dont l’expérience ou les connaissances ne sont pas
sufsantes, à condition qu’ils bénécient d’une surveillance
ou qu’ils aient reçu des instructions quant à l’utilisation
de l’appareil en toute sécurité et en comprennent bien les
dangers potentiels.
Les enfants ne doivent pas utiliser l’appareil comme un jouet.
Ne remplissez pas votre appareil au-delà du marquage MAX
de la cuve. Ne pas remplir au-delà de la moitié de la cuve
pour les aliments qui se dilatent pendant la cuisson, tels que
le riz ou les légumes déshydratés, réduisez le volume d’eau
pour éviter les risques de débordement.
Veillez à respecter les recommandations relatives au volume
d’aliments et d’eau pour éviter tout débordement qui
pourrait endommager l’appareil et provoquer des blessures
corporelles.
Vériez avant chaque utilisation que la bille de décompression
et la soupape de sécurité soient propres et pas obstruées
avant d’utiliser l’appareil (voir section Nettoyage et entretien).
Ne placez aucun objet ou corps étranger dans le système de
décompression. Ne remplacez pas la bille.
Lorsque vous ouvrez le couvercle, tenez-le toujours par la

39
FRANÇAIS
poignée d’ouverture/fermeture. Positionnez vos bras dans
l’alignement des poignées latérales de transport. En effet,
il est possible que de l’eau bouillante reste piégée entre le
support du joint d’étanchéité et le couvercle et vous risqueriez
de vous brûler.
Attention également au risque de brûlures avec la vapeur qui
va sortir du produit au moment de l’ouverture.
Entrouvrez d’abord le couvercle pour laisser s’échapper
doucement la vapeur.
N’essayez jamais de forcer l’ouverture du couvercle.
N’ouvrez pas le couvercle tant que le produit est sous pression.
Pour ce faire, référez-vous aux Instructions d’utilisation.
Compte tenu de la diversité des normes en vigueur, si l’appareil est utilisé dans un autre
pays que celui de l’achat, le faire vérier par une station service agrée.
Utilisez uniquement des pièces de rechange adaptées à votre modèle. Ceci est tout
particulièrement important pour le joint d’étanchéité, la cuve de cuisson et le couvercle
métallique.
Faites attention à ne pas endommager le joint d’étanchéité. S’il est endommagé, faites-le
remplacer dans un Centre de Service Agréé.
La source de chaleur pour la cuisson est incluse dans l’appareil.
Ne placez jamais l’appareil dans un four chauffé ou sur une plaque chaude. Ne placez
pas l’appareil à proximité d’une amme nue ou d’un objet inammable.
Ne chauffez pas la cuve de cuisson à l’aide d’une source de chaleur autre que la plaque
chauffante de l’appareil et n’utilisez jamais une autre cuve. N’utilisez pas non plus la cuve
de cuisson avec d’autres appareils.
Lorsque l’appareil est sous pression, déplacez-le avec précautions. Pour le déplacer,
utilisez les poignées prévues à cet effet et portez des gants anti-chaleur si nécessaire.
N’utilisez jamais la poignée du couvercle pour soulever l’appareil.
N’utilisez jamais votre appareil dans des applications autres que celles pour lesquelles il
a été conçu.
Cet appareil n’est pas un stérilisateur. Ne l’utilisez pas pour stériliser des bocaux.
L’appareil cuit les aliments sous pression. Une utilisation incorrecte peut entraîner des
risques de brûlure dûs à la vapeur.
Assurez-vous que l’appareil est correctement fermé avant de le faire monter en pression
(voir Instructions d’utilisation).
N’utilisez jamais l’appareil à vide, sans sa cuve ni liquide à l’intérieur de cette dernière.
Ceci pourrait gravement endommager l’appareil.
Lors de la cuisson d’une viande à peau épaisse (par exemple de la langue de boeuf), ne
percez pas la peau si celle-ci paraît gonée, une fois la cuisson terminée, vous risqueriez
de vous brûler. Pensez à la percer avant la cuisson.
Lors de la cuisson d’aliments à texture épaisse (pois chiches, rhubarbe, fruits conts, etc.)
secouez doucement l’appareil avant de l’ouvrir, pour éviter que les aliments ne jaillissent
ou que des sucs de cuisson ne giclent à l’ouverture.
N’utilisez pas l’appareil pour frire des aliments dans l’huile. Seul le dorage/rissolage est
autorisé.

40
En mode dorage, attention aux risques de brûlures dûs aux projections lorsque vous
ajoutez des aliments ou ingrédients dans la cuve chaude.
Lors de la cuisson et de la libération automatique de la pression en n de cuisson,
l’appareil dégage de la chaleur et de la vapeur. Éloignez bien le visage et les mains de
l’appareil à ce moment-là, pour ne pas vous brûler. Ne touchez pas le couvercle durant
la cuisson.
Ne placez aucun élément (torchon ou autre) entre le couvercle et le corps de l’appareil,
dans le but de garder le couvercle ouvert, cela pourrait entraîner une déformation
permanente du joint d’étanchéité.
Ne touchez jamais aux dispositifs de sécurité, excepté lors du nettoyage et de l’entretien
de l’appareil, effectués conformément aux instructions fournies.
Veillez à ce que le dessous de la cuve de cuisson et l’élément chauffant soient toujours
propres. Veillez à ce que l’élément central du plateau chauffant soit mobile.
Ne remplissez pas votre appareil sans avoir installé sa cuve de cuisson.
Servez-vous d’une cuillère en plastique ou en bois pour ne pas endommager le
revêtement antiadhésif de la cuve. Ne coupez jamais les aliments directement dans la
cuve de cuisson.
Si une quantité importante de vapeur est dégagée en bordure du couvercle, débranchez
immédiatement le cordon d’alimentation et vériez la propreté de l’appareil. Si nécessaire
envoyez l’appareil dans un Centre de Service Agréé pour réparation.
Ne portez pas l’appareil en le tenant par les poignées de la cuve amovible. Utilisez
toujours les deux poignées latérales situées sur le corps de l’appareil en utilisant des
gants anti-chaleur si l’appareil est chaud. Pour plus de sécurité, assurez-vous que le
couvercle est verrouillé avant tout transport.
Si la pression est libérée en continu par la valve silencieuse de l’appareil (pendant plus
de 1 minute), durant une cuisson sous pression, renvoyez l’appareil dans un centre de
services agréé, pour réparation.
N’utilisez pas un appareil endommagé, ramenez le dans votre centre de services agréé.
CONSERVEZ SOIGNEUSEMENT CES INSTRUCTIONS.
N’utilisez que des pièces de rechange que vous trouverez dans un Centre de Service
Agréé.
La garantie ne concerne pas l’usure anormale de la cuve de cuisson.
Lisez attentivement les instructions d’utilisation avant de vous servir de votre appareil pour
la première fois. Toute utilisation non conforme aux instructions entraînera l’annulation de
la responsabilité et de la garantie constructeur.
Conformément aux réglementations en vigueur, vous devez préparer l’appareil et le
rendre inutilisable (en le débranchant et en coupant le cordon d’alimentation) avant toute
mise au rebut.
Participons à la protection de l’environnement !
Votre appareil contient de nombreux matériaux valorisables ou recyclables.
Conez celui-ci dans un point de collecte pour que son traitement soit effectué.
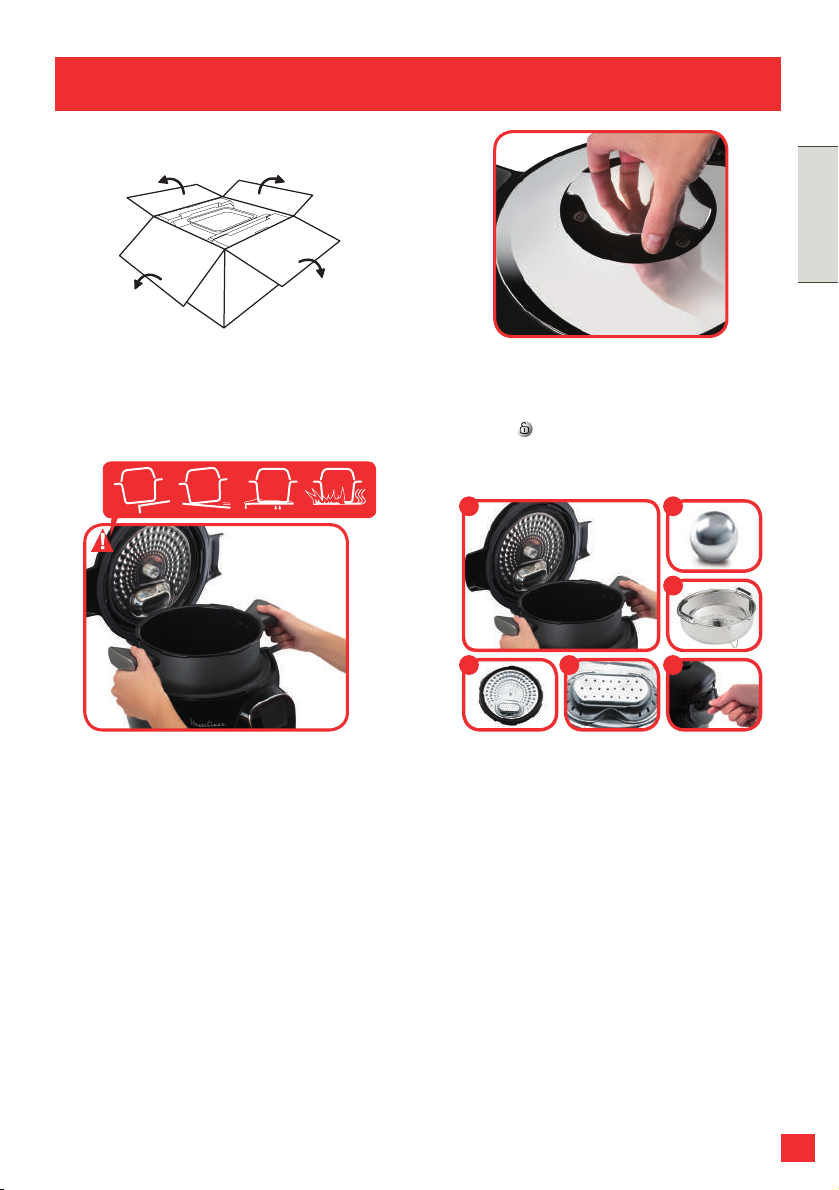
41
FRANÇAIS
41
Sortez l’appareil de son emballage et
lisez attentivement les instructions de
fonctionnement et les consignes de sécurité
avant d’utiliser le produit pour la première fois.
Installez l’appareil sur une surface
plane, sèche et froide. Enlevez tous les
emballages, autocollants ou accessoires
divers à l’intérieur comme à l’extérieur de
l’appareil.
Pour ouvrir le produit, tournez la poignée
d’ouverture/fermeture sur le dessus du
couvercle de manière à voir les cadenas
ouverts :
NETTOYEZ LES DIFFÉRENTS
ÉLÉMENTS
1. La cuve de cuisson
2. Le couvercle métallique
3. Le cache valve
4. Le récupérateur de condensation
5. Le panier vapeur
6. La bille de décompression
AVANT UTILISATION
1 6
5
432
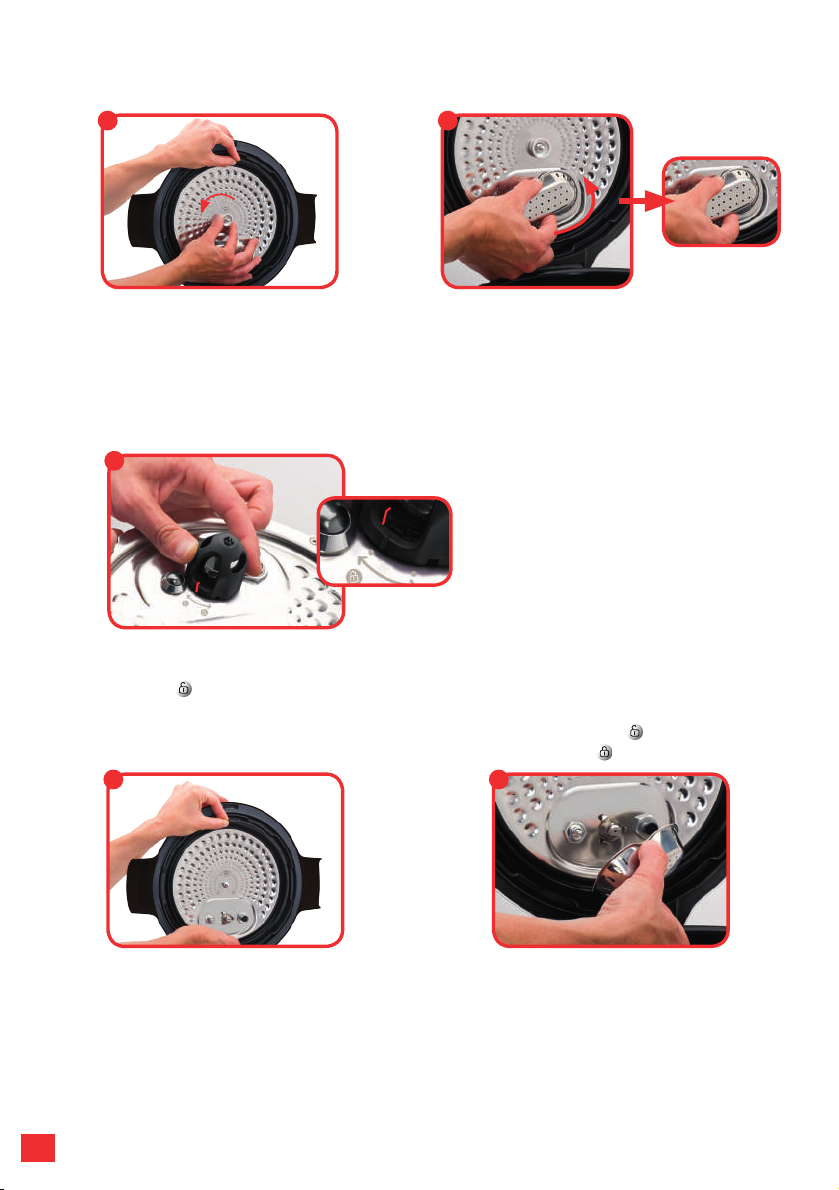
4242
PRÉCISIONS SUR LE DÉMONTAGE ET LE REMONTAGE DU
COUVERCLE
DÉMONTAGE DU COUVERCLE
MÉTALLIQUE :
Saisissez le sous-ensemble couvercle en
le tenant par le joint, et dévissez l’écrou
central dans le sens inverse des aiguilles
d’une montre.
Retirez l’écrou puis le couvercle.
REMONTAGE DU SOUS-ENSEMBLE
COUVERCLE MÉTALLIQUE :
Saisissez le sous-ensemble couvercle par le
joint comme indiqué sur la photo.
Centrez le couvercle sur l’axe central et
plaquez-le à plat.
Remettez en place l’écrou et vissez-le à fond,
dans le sens des aiguilles d’une montre.
DÉMONTAGE DU CACHE VALVE :
Saisissez le cache valve par la partie
centrale (comme indiqué) ; puis tournez-le
légèrement an de le déclipser.
Nettoyez le cache valve, en insistant sur la
partie intérieure (vériez qu’il n’y ait plus de
résidus d’aliments).
REMONTAGE DU CACHE VALVE :
Prenez le cache valve comme indiqué sur la
photo (saisissez-le par la zone centrale).
Centrez la forme intérieure circulaire sur les
trois crochets, puis poussez an de clipser le
cache valve (on doit entendre un “clip”).
Le cache valve doit être parfaitement en
contact avec la face intérieure du couvercle.
ACCÈS À LA BILLE DE DÉCOMPRESSION :
Tournez le cache bille, dans le sens inverse des aiguilles d’une montre, an d’amener le repère
I sur la position . Soulevez le cache. Retirez la bille, nettoyez-la délicatement avec de l’eau et
du liquide vaisselle, ainsi que son siège. Séchez la bille à l’aide d’un chiffon doux, puis remettez-
la sur son siège. Remettez en place le cache bille, le repère I en position . Verrouillez-le, en
tournant le cache bille pour amener le repère en face du picto “fermé” .
1
4 5
2
3

43
FRANÇAIS
43
Pour la première mise sous tension, vous accédez au
menu réglage :
ok
ok
COMMANDES DE L’INTERFACE
SÉLECTIONNEZ VALIDEZ
RÉINITIALISEZ
RETOUR
3 s
MISE EN FONCTIONNEMENT
1
2
Choisissez votre pays Choisissez votre langue
LANGUE
Italiano
English
Français
Deutsch
Español
PAYS
UNITÉ
Italia
United Kingdom
France
Deutschland
España
cups / oz gr / ml
UNITÉ
cups / oz gr / ml
LANGUE
Italiano
English
Français
Deutsch
Español
PAYS
UNITÉ
Italia
United Kingdom
France
Deutschland
España
cups / oz gr / ml
UNITÉ
cups / oz gr / ml
ok
ok
+
ok
ok
+
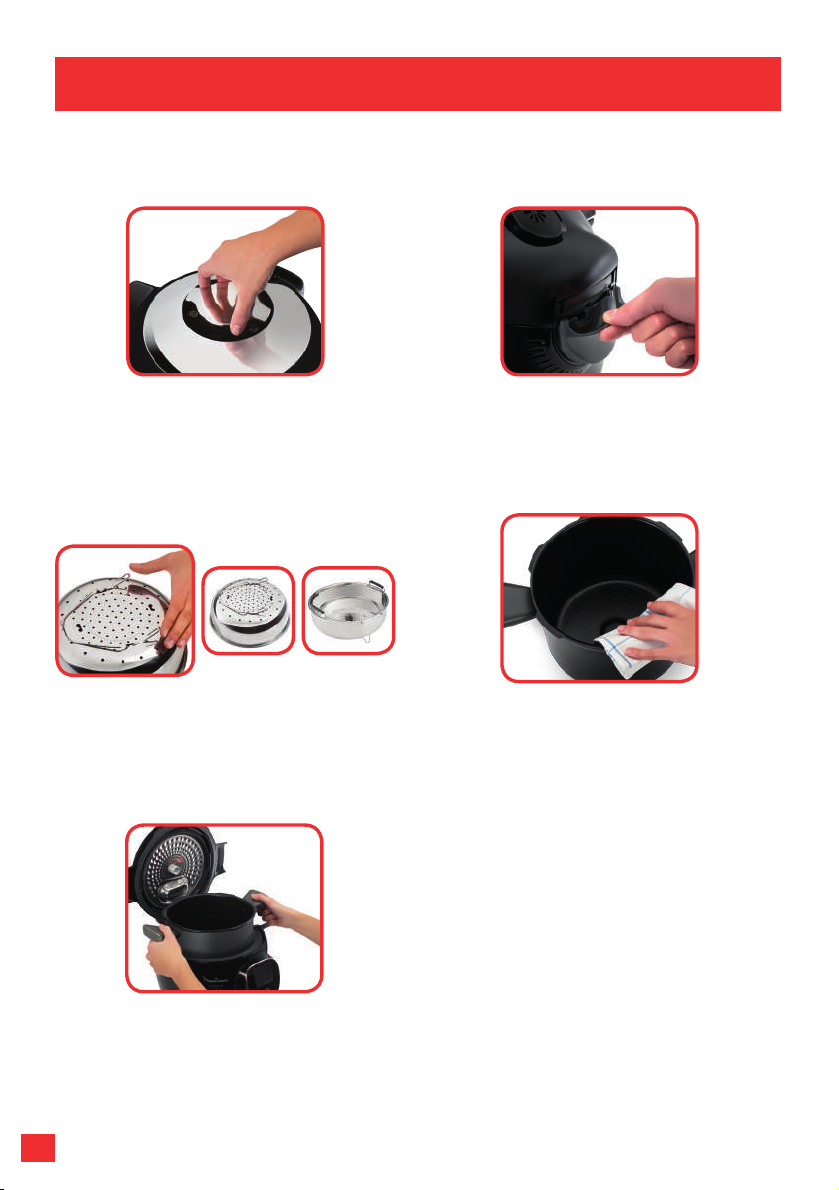
4444
OUVERTURE DU COUVERCLE :
Pour ouvrir le produit, tournez la poignée
d’ouverture / fermeture de manière à voir
les cadenas ouverts . Ne jamais tenter de
forcer l’ouverture du couvercle s’il résiste.
Installez ensuite la cuve dans l’appareil en
positionnant bien les poignées de la cuve
dans les encoches.
MISE EN PLACE DU TRÉPIED SOUS LE
PANIER VAPEUR :
Pincez entre le pouce et l’index le trépied
an de l’installer sous le panier vapeur.
N’utilisez jamais l’appareil sans la cuve de cuisson.
Lors de la première utilisation de votre appareil, la cuve peut dégager une légère
odeur. Ceci est normal.
UTILISATION
INSTALLATION DU RÉCUPÉRATEUR DE
CONDENSATION :
vériez que le récupérateur de
condensation soit vide puis installez-le à
l’arrière de l’appareil.
POSITIONNEMENT DE LA CUVE DANS
L’APPAREIL :
Essuyez le fond de la cuve de cuisson.
Assurez-vous qu’il n’y a aucun résidu de
nourriture ou de liquide sous le bol ni sur le
plateau chauffant.
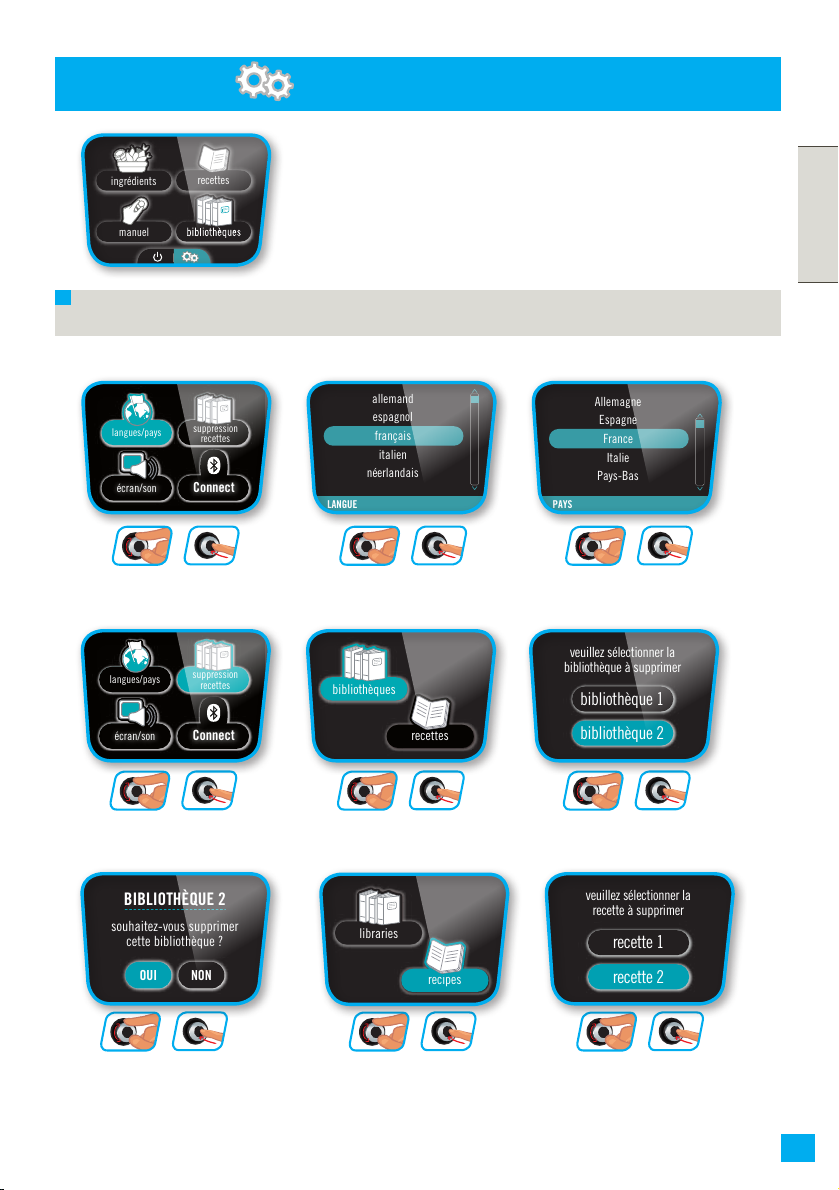
45
FRANÇAIS
45
MENU RÉGLAGES
N.B. : Même si le son est désactivé, les sons d’alerte demeurent actifs.
ok
ok
+
ok
ok
+
ok
ok
+
Choisissez
votre pays
Choisissez
votre langue
Choisissez
« langues/pays »
recettes
manuel
ingrédients
PAYS
Allemagne
Espagne
France
Italie
Pays-Bas
LANGUE
allemand
espagnol
français
italien
néerlandais
écran
son
son
LUMINOSITÉ
mode démo
luminosité
mode démo
luminosité
MODE DÉMO
OFF ON
MODE DÉMO
3424
RECETTE 2
souhaitez-vous supprimer
cette recette ?
OUI NON
veuillez sélectionner la
recette à supprimer
recette 1
BIBLIOTHÈQUE 2
souhaitez-vous supprimer
cette bibliothèque ?
OUI NON
veuillez sélectionner la
bibliothèque à supprimer
bibliothèque 1
bibliothèque 2
SON
OFF ON
écran
langues/pays
suppression
recettes
écran/son
Connect
langues/pays
suppression
recettes
écran/son
Connect
langues/pays
suppression
recettes
écran/son
Connect
langues/pays
suppression
recettes
écran/son
Connect
bibliothèques
recettes
recette 2
OFF ON
Connect
recettes
manuel
ingrédients
PAYS
Allemagne
Espagne
France
Italie
Pays-Bas
LANGUE
allemand
espagnol
français
italien
néerlandais
écran
son
son
LUMINOSITÉ
mode démo
luminosité
mode démo
luminosité
MODE DÉMO
OFF ON
MODE DÉMO
3424
RECETTE 2
souhaitez-vous supprimer
cette recette ?
OUI NON
veuillez sélectionner la
recette à supprimer
recette 1
BIBLIOTHÈQUE 2
souhaitez-vous supprimer
cette bibliothèque ?
OUI NON
veuillez sélectionner la
bibliothèque à supprimer
bibliothèque 1
bibliothèque 2
SON
OFF ON
écran
langues/pays
suppression
recettes
écran/son
Connect
langues/pays
suppression
recettes
écran/son
Connect
langues/pays
suppression
recettes
écran/son
Connect
langues/pays
suppression
recettes
écran/son
Connect
bibliothèques
recettes
recette 2
OFF ON
Connect
Choisissez
« suppression recettes »
Choisissez « bibliothèques » Sélectionnez
« bibliothèque 2 »
ok
ok
+
ok
ok
+
ok
ok
+
recettes
manuel
ingrédients
PAYS
Allemagne
Espagne
France
Italie
Pays-Bas
LANGUE
allemand
espagnol
français
italien
néerlandais
écran
son
son
LUMINOSITÉ
mode démo
luminosité
mode démo
luminosité
MODE DÉMO
OFF ON
MODE DÉMO
3424
RECETTE 2
souhaitez-vous supprimer
cette recette ?
OUI NON
veuillez sélectionner la
recette à supprimer
recette 1
BIBLIOTHÈQUE 2
souhaitez-vous supprimer
cette bibliothèque ?
OUI NON
veuillez sélectionner la
bibliothèque à supprimer
bibliothèque 1
bibliothèque 2
SON
OFF ON
écran
langues/pays
suppression
recettes
écran/son
Connect
langues/pays
suppression
recettes
écran/son
Connect
langues/pays
suppression
recettes
écran/son
Connect
langues/pays
suppression
recettes
écran/son
Connect
bibliothèques
recettes
recette 2
OFF ON
Connect
recettes
manuel
ingrédients
PAYS
Allemagne
Espagne
France
Italie
Pays-Bas
LANGUE
allemand
espagnol
français
italien
néerlandais
écran
son
son
LUMINOSITÉ
mode démo
luminosité
mode démo
luminosité
MODE DÉMO
OFF ON
MODE DÉMO
3424
RECETTE 2
souhaitez-vous supprimer
cette recette ?
OUI NON
veuillez sélectionner la
recette à supprimer
recette 1
BIBLIOTHÈQUE 2
souhaitez-vous supprimer
cette bibliothèque ?
OUI NON
veuillez sélectionner la
bibliothèque à supprimer
bibliothèque 1
bibliothèque 2
SON
OFF ON
écran
langues/pays
suppression
recettes
écran/son
Connect
langues/pays
suppression
recettes
écran/son
Connect
langues/pays
suppression
recettes
écran/son
Connect
langues/pays
suppression
recettes
écran/son
Connect
bibliothèques
recettes
recette 2
OFF ON
Connect
Choisissez « recettes »
Sélectionnez
« recette 2 »
Souhaitez-vous supprimer
cette bibliothèque ?
ok
ok
+
ok
ok
+
ok
ok
+
recettes
manuel
ingrédients
PAYS
Allemagne
Espagne
France
Italie
Pays-Bas
LANGUE
allemand
espagnol
français
italien
néerlandais
écran
son
son
LUMINOSITÉ
mode démo
luminosité
mode démo
luminosité
MODE DÉMO
OFF ON
MODE DÉMO
3424
RECETTE 2
souhaitez-vous supprimer
cette recette ?
OUI NON
veuillez sélectionner la
recette à supprimer
recette 1
BIBLIOTHÈQUE 2
souhaitez-vous supprimer
cette bibliothèque ?
OUI NON
veuillez sélectionner la
bibliothèque à supprimer
bibliothèque 1
bibliothèque 2
SON
OFF ON
écran
langues/pays
suppression
recettes
écran/son
Connect
langues/pays
suppression
recettes
écran/son
Connect
langues/pays
suppression
recettes
écran/son
Connect
langues/pays
suppression
recettes
écran/son
Connect
bibliothèques
recettes
recette 2
OFF ON
Connect
recettes
manuel
ingrédients
PAYS
Allemagne
Espagne
France
Italie
Pays-Bas
LANGUE
allemand
espagnol
français
italien
néerlandais
écran
son
son
LUMINOSITÉ
mode démo
luminosité
mode démo
luminosité
MODE DÉMO
OFF ON
MODE DÉMO
3424
RECETTE 2
souhaitez-vous supprimer
cette recette ?
OUI NON
veuillez sélectionner la
recette à supprimer
recette 1
BIBLIOTHÈQUE 2
souhaitez-vous supprimer
cette bibliothèque ?
OUI NON
veuillez sélectionner la
bibliothèque à supprimer
bibliothèque 1
bibliothèque 2
SON
OFF ON
écran
langues/pays
suppression
recettes
écran/son
Connect
langues/pays
suppression
recettes
écran/son
Connect
langues/pays
suppression
recettes
écran/son
Connect
langues/pays
suppression
recettes
écran/son
Connect
bibliothèques
recettes
libraries
recipes
recette 2
recettes
manuel
ingrédients
PAYS
Allemagne
Espagne
France
Italie
Pays-Bas
LANGUE
allemand
espagnol
français
italien
néerlandais
écran
son
son
LUMINOSITÉ
mode démo
luminosité
mode démo
luminosité
MODE DÉMO
OFF ON
MODE DÉMO
3424
RECETTE 2
souhaitez-vous supprimer
cette recette ?
OUI NON
veuillez sélectionner la
recette à supprimer
recette 1
BIBLIOTHÈQUE 2
souhaitez-vous supprimer
cette bibliothèque ?
OUI NON
veuillez sélectionner la
bibliothèque à supprimer
bibliothèque 1
bibliothèque 2
SON
OFF ON
écran
langues/pays
suppression
recettes
écran/son
Connect
langues/pays
suppression
recettes
écran/son
Connect
langues/pays
suppression
recettes
écran/son
Connect
langues/pays
suppression
recettes
écran/son
Connect
bibliothèques
recettes
recette 2
OFF ON
Connect
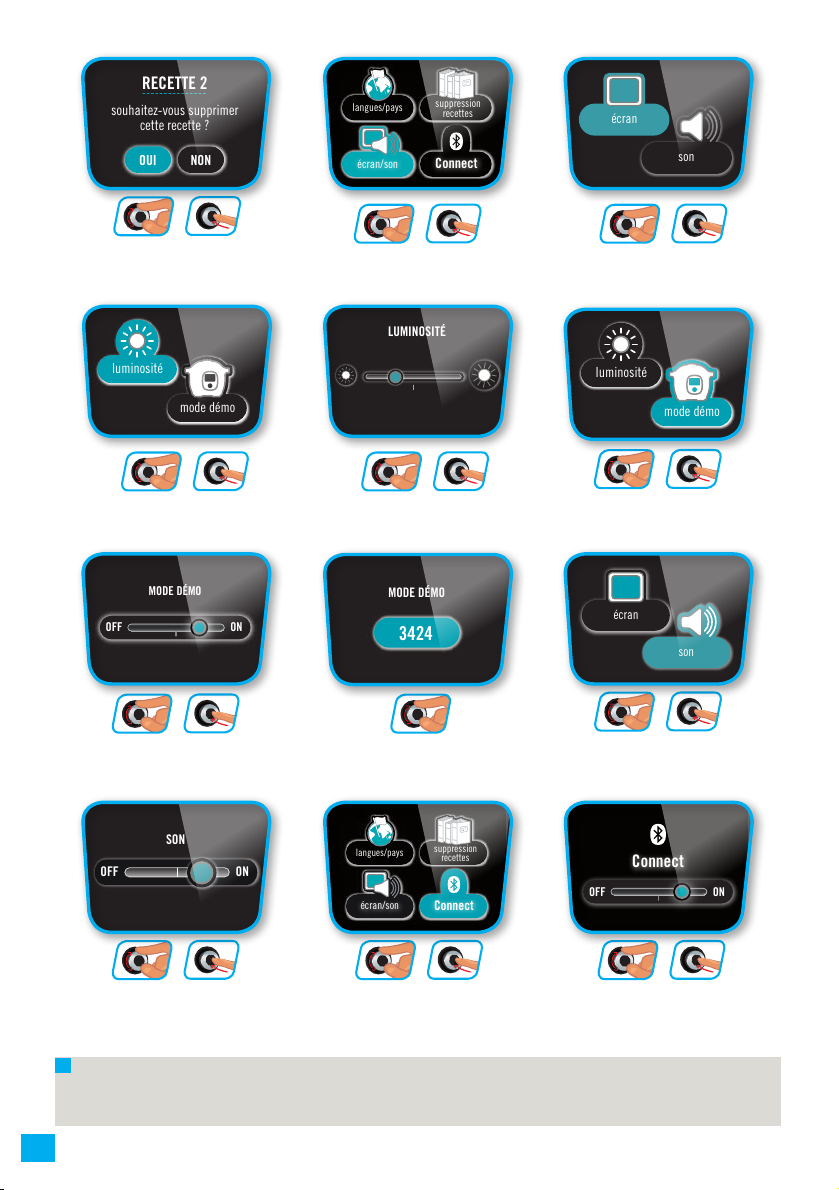
4646
N.B. : Le mode DéMO permet de faire fonctionner le produit sans qu’il ne chauffe ou
monte en pression.
Souhaitez-vous supprimer
cette recette ?
ok
ok
+
recettes
manuel
ingrédients
PAYS
Allemagne
Espagne
France
Italie
Pays-Bas
LANGUE
allemand
espagnol
français
italien
néerlandais
écran
son
son
LUMINOSITÉ
mode démo
luminosité
mode démo
luminosité
MODE DÉMO
OFF ON
MODE DÉMO
3424
RECETTE 2
souhaitez-vous supprimer
cette recette ?
OUI NON
veuillez sélectionner la
recette à supprimer
recette 1
BIBLIOTHÈQUE 2
souhaitez-vous supprimer
cette bibliothèque ?
OUI NON
veuillez sélectionner la
bibliothèque à supprimer
bibliothèque 1
bibliothèque 2
SON
OFF ON
écran
langues/pays
suppression
recettes
écran/son
Connect
langues/pays
suppression
recettes
écran/son
Connect
langues/pays
suppression
recettes
écran/son
Connect
langues/pays
suppression
recettes
écran/son
Connect
bibliothèques
recettes
recette 2
OFF ON
Connect
ok
ok
+
Choisissez
« écran / son »
recettes
manuel
ingrédients
PAYS
Allemagne
Espagne
France
Italie
Pays-Bas
LANGUE
allemand
espagnol
français
italien
néerlandais
écran
son
son
LUMINOSITÉ
mode démo
luminosité
mode démo
luminosité
MODE DÉMO
OFF ON
MODE DÉMO
3424
RECETTE 2
souhaitez-vous supprimer
cette recette ?
OUI NON
veuillez sélectionner la
recette à supprimer
recette 1
BIBLIOTHÈQUE 2
souhaitez-vous supprimer
cette bibliothèque ?
OUI NON
veuillez sélectionner la
bibliothèque à supprimer
bibliothèque 1
bibliothèque 2
SON
OFF ON
écran
langues/pays
suppression
recettes
écran/son
Connect
langues/pays
suppression
recettes
écran/son
Connect
langues/pays
suppression
recettes
écran/son
Connect
langues/pays
suppression
recettes
écran/son
Connect
bibliothèques
recettes
recette 2
OFF ON
Connect
ok
ok
+
Choisissez « écran »
recettes
manuel
ingrédients
PAYS
Allemagne
Espagne
France
Italie
Pays-Bas
LANGUE
allemand
espagnol
français
italien
néerlandais
écran
son
son
LUMINOSITÉ
mode démo
luminosité
mode démo
luminosité
MODE DÉMO
OFF ON
MODE DÉMO
3424
RECETTE 2
souhaitez-vous supprimer
cette recette ?
OUI NON
veuillez sélectionner la
recette à supprimer
recette 1
BIBLIOTHÈQUE 2
souhaitez-vous supprimer
cette bibliothèque ?
OUI NON
veuillez sélectionner la
bibliothèque à supprimer
bibliothèque 1
bibliothèque 2
SON
OFF ON
écran
langues/pays
suppression
recettes
écran/son
Connect
langues/pays
suppression
recettes
écran/son
Connect
langues/pays
suppression
recettes
écran/son
Connect
langues/pays
suppression
recettes
écran/son
Connect
bibliothèques
recettes
recette 2
OFF ON
Connect
ok
ok
+
Choisissez « luminosité »
recettes
manuel
ingrédients
PAYS
Allemagne
Espagne
France
Italie
Pays-Bas
LANGUE
allemand
espagnol
français
italien
néerlandais
écran
son
son
LUMINOSITÉ
mode démo
luminosité
mode démo
luminosité
MODE DÉMO
OFF ON
MODE DÉMO
3424
RECETTE 2
souhaitez-vous supprimer
cette recette ?
OUI NON
veuillez sélectionner la
recette à supprimer
recette 1
BIBLIOTHÈQUE 2
souhaitez-vous supprimer
cette bibliothèque ?
OUI NON
veuillez sélectionner la
bibliothèque à supprimer
bibliothèque 1
bibliothèque 2
SON
OFF ON
écran
langues/pays
suppression
recettes
écran/son
Connect
langues/pays
suppression
recettes
écran/son
Connect
langues/pays
suppression
recettes
écran/son
Connect
langues/pays
suppression
recettes
écran/son
Connect
bibliothèques
recettes
recette 2
OFF ON
Connect
ok
ok
+
Réglez la luminosité
recettes
manuel
ingrédients
PAYS
Allemagne
Espagne
France
Italie
Pays-Bas
LANGUE
allemand
espagnol
français
italien
néerlandais
écran
son
son
LUMINOSITÉ
mode démo
luminosité
mode démo
luminosité
MODE DÉMO
OFF ON
MODE DÉMO
3424
RECETTE 2
souhaitez-vous supprimer
cette recette ?
OUI NON
veuillez sélectionner la
recette à supprimer
recette 1
BIBLIOTHÈQUE 2
souhaitez-vous supprimer
cette bibliothèque ?
OUI NON
veuillez sélectionner la
bibliothèque à supprimer
bibliothèque 1
bibliothèque 2
SON
OFF ON
écran
langues/pays
suppression
recettes
écran/son
Connect
langues/pays
suppression
recettes
écran/son
Connect
langues/pays
suppression
recettes
écran/son
Connect
langues/pays
suppression
recettes
écran/son
Connect
bibliothèques
recettes
recette 2
OFF ON
Connect
ok
ok
+
Choisissez « mode démo »
recettes
manuel
ingrédients
PAYS
Allemagne
Espagne
France
Italie
Pays-Bas
LANGUE
allemand
espagnol
français
italien
néerlandais
écran
son
son
LUMINOSITÉ
mode démo
luminosité
mode démo
luminosité
MODE DÉMO
OFF ON
MODE DÉMO
3424
RECETTE 2
souhaitez-vous supprimer
cette recette ?
OUI NON
veuillez sélectionner la
recette à supprimer
recette 1
BIBLIOTHÈQUE 2
souhaitez-vous supprimer
cette bibliothèque ?
OUI NON
veuillez sélectionner la
bibliothèque à supprimer
bibliothèque 1
bibliothèque 2
SON
OFF ON
écran
langues/pays
suppression
recettes
écran/son
Connect
langues/pays
suppression
recettes
écran/son
Connect
langues/pays
suppression
recettes
écran/son
Connect
langues/pays
suppression
recettes
écran/son
Connect
bibliothèques
recettes
recette 2
OFF ON
Connect
ok
ok
+
Pour activer ou désactiver le mode démo,
vous devrez entrer un code : 3424
recettes
manuel
ingrédients
PAYS
Allemagne
Espagne
France
Italie
Pays-Bas
LANGUE
allemand
espagnol
français
italien
néerlandais
écran
son
son
LUMINOSITÉ
mode démo
luminosité
mode démo
luminosité
MODE DÉMO
OFF ON
MODE DÉMO
3424
RECETTE 2
souhaitez-vous supprimer
cette recette ?
OUI NON
veuillez sélectionner la
recette à supprimer
recette 1
BIBLIOTHÈQUE 2
souhaitez-vous supprimer
cette bibliothèque ?
OUI NON
veuillez sélectionner la
bibliothèque à supprimer
bibliothèque 1
bibliothèque 2
SON
OFF ON
écran
langues/pays
suppression
recettes
écran/son
Connect
langues/pays
suppression
recettes
écran/son
Connect
langues/pays
suppression
recettes
écran/son
Connect
langues/pays
suppression
recettes
écran/son
Connect
bibliothèques
recettes
recette 2
OFF ON
Connect
ok
recettes
manuel
ingrédients
PAYS
Allemagne
Espagne
France
Italie
Pays-Bas
LANGUE
allemand
espagnol
français
italien
néerlandais
écran
son
son
LUMINOSITÉ
mode démo
luminosité
mode démo
luminosité
MODE DÉMO
OFF ON
MODE DÉMO
3424
RECETTE 2
souhaitez-vous supprimer
cette recette ?
OUI NON
veuillez sélectionner la
recette à supprimer
recette 1
BIBLIOTHÈQUE 2
souhaitez-vous supprimer
cette bibliothèque ?
OUI NON
veuillez sélectionner la
bibliothèque à supprimer
bibliothèque 1
bibliothèque 2
SON
OFF ON
écran
langues/pays
suppression
recettes
écran/son
Connect
langues/pays
suppression
recettes
écran/son
Connect
langues/pays
suppression
recettes
écran/son
Connect
langues/pays
suppression
recettes
écran/son
Connect
bibliothèques
recettes
recette 2
OFF ON
Connect
ok
ok
+
Choisissez « son »
recettes
manuel
ingrédients
PAYS
Allemagne
Espagne
France
Italie
Pays-Bas
LANGUE
allemand
espagnol
français
italien
néerlandais
écran
son
son
LUMINOSITÉ
mode démo
luminosité
mode démo
luminosité
MODE DÉMO
OFF ON
MODE DÉMO
3424
RECETTE 2
souhaitez-vous supprimer
cette recette ?
OUI NON
veuillez sélectionner la
recette à supprimer
recette 1
BIBLIOTHÈQUE 2
souhaitez-vous supprimer
cette bibliothèque ?
OUI NON
veuillez sélectionner la
bibliothèque à supprimer
bibliothèque 1
bibliothèque 2
SON
OFF ON
écran
langues/pays
suppression
recettes
écran/son
Connect
langues/pays
suppression
recettes
écran/son
Connect
langues/pays
suppression
recettes
écran/son
Connect
langues/pays
suppression
recettes
écran/son
Connect
bibliothèques
recettes
recette 2
OFF ON
Connect
ok
ok
+
Réglez le son
recettes
manuel
ingrédients
PAYS
Allemagne
Espagne
France
Italie
Pays-Bas
LANGUE
allemand
espagnol
français
italien
néerlandais
écran
son
son
LUMINOSITÉ
mode démo
luminosité
mode démo
luminosité
MODE DÉMO
OFF ON
MODE DÉMO
3424
RECETTE 2
souhaitez-vous supprimer
cette recette ?
OUI NON
veuillez sélectionner la
recette à supprimer
recette 1
BIBLIOTHÈQUE 2
souhaitez-vous supprimer
cette bibliothèque ?
OUI NON
veuillez sélectionner la
bibliothèque à supprimer
bibliothèque 1
bibliothèque 2
SON
OFF ON
écran
langues/pays
suppression
recettes
écran/son
Connect
langues/pays
suppression
recettes
écran/son
Connect
langues/pays
suppression
recettes
écran/son
Connect
langues/pays
suppression
recettes
écran/son
Connect
bibliothèques
recettes
recette 2
OFF ON
Connect
ok
ok
+
Choisissez « connect »
recettes
manuel
ingrédients
PAYS
Allemagne
Espagne
France
Italie
Pays-Bas
LANGUE
allemand
espagnol
français
italien
néerlandais
écran
son
son
LUMINOSITÉ
mode démo
luminosité
mode démo
luminosité
MODE DÉMO
OFF ON
MODE DÉMO
3424
RECETTE 2
souhaitez-vous supprimer
cette recette ?
OUI NON
veuillez sélectionner la
recette à supprimer
recette 1
BIBLIOTHÈQUE 2
souhaitez-vous supprimer
cette bibliothèque ?
OUI NON
veuillez sélectionner la
bibliothèque à supprimer
bibliothèque 1
bibliothèque 2
SON
OFF ON
écran
langues/pays
suppression
recettes
écran/son
Connect
langues/pays
suppression
recettes
écran/son
Connect
langues/pays
suppression
recettes
écran/son
Connect
langues/pays
suppression
recettes
écran/son
Connect
bibliothèques
recettes
recette 2
OFF ON
Connect
ok
ok
+
Activer ou désactiver
le mode connect
recettes
manuel
ingrédients
PAYS
Allemagne
Espagne
France
Italie
Pays-Bas
LANGUE
allemand
espagnol
français
italien
néerlandais
écran
son
son
LUMINOSITÉ
mode démo
luminosité
mode démo
luminosité
MODE DÉMO
OFF ON
MODE DÉMO
3424
RECETTE 2
souhaitez-vous supprimer
cette recette ?
OUI NON
veuillez sélectionner la
recette à supprimer
recette 1
BIBLIOTHÈQUE 2
souhaitez-vous supprimer
cette bibliothèque ?
OUI NON
veuillez sélectionner la
bibliothèque à supprimer
bibliothèque 1
bibliothèque 2
SON
OFF ON
écran
langues/pays
suppression
recettes
écran/son
Connect
langues/pays
suppression
recettes
écran/son
Connect
langues/pays
suppression
recettes
écran/son
Connect
langues/pays
suppression
recettes
écran/son
Connect
bibliothèques
recettes
recette 2
OFF ON
Connect

47
FRANÇAIS
47
MENU ON /OFF
Une entrée ON/OFF vous permet d’éteindre votre
appareil.
Sélectionnez et validez
recettes
manuel
ingrédients
souhaitez-vous éteindre
votre appareil ?
OUI NON
souhaitez-vous éteindre
votre appareil ?
OUI NON
recettes
manuel
ingrédients
souhaitez-vous éteindre
votre appareil ?
OUI NON
souhaitez-vous éteindre
votre appareil ?
OUI NON
recettes
manuel
ingrédients
souhaitez-vous éteindre
votre appareil ?
OUI NON
souhaitez-vous éteindre
votre appareil ?
OUI NON
ok
ok
+
ok
ok
+
ok
ok
+
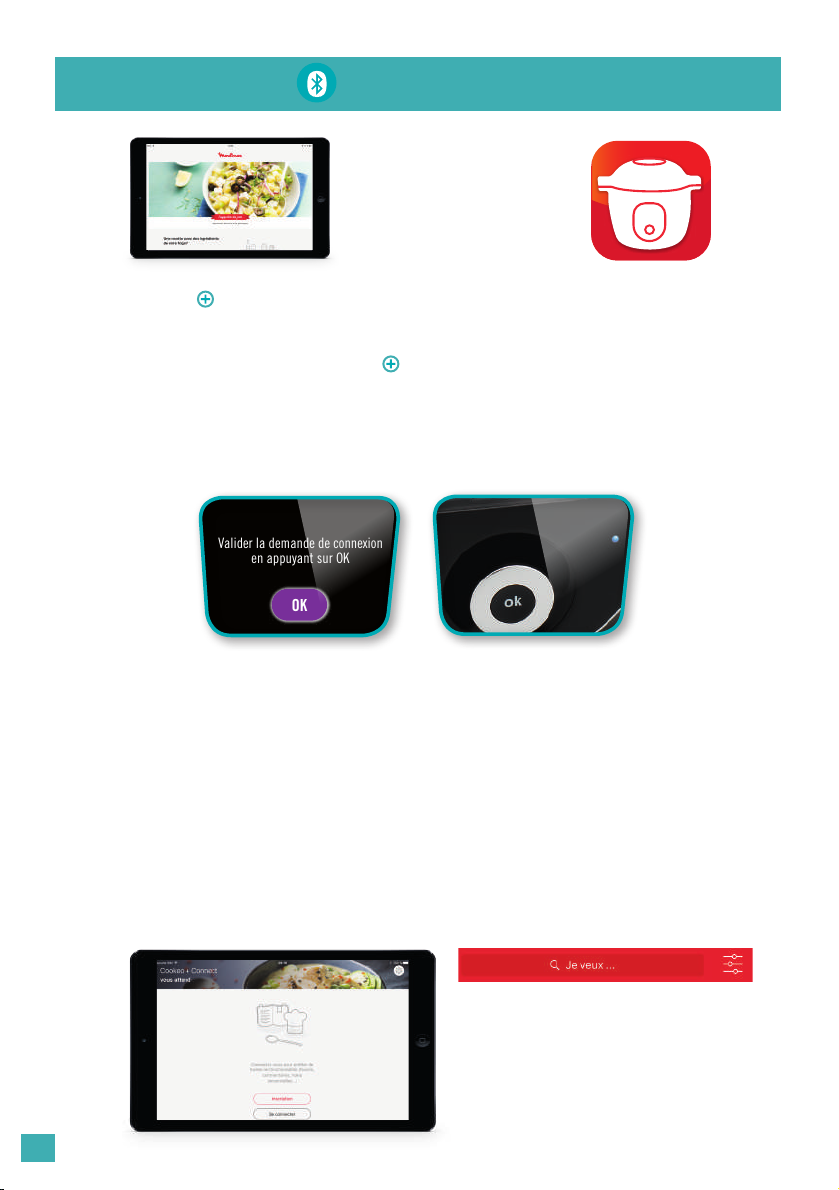
4848
Votre COOK4ME CONNECT est fonctionnel, vous pouvez déjà utiliser votre produit avec
les 150 recettes pré-programmées même sans l’application.
Lorsque vous allumez votre COOK4ME CONNECT, le voyant bleu clignote (en attente
de connexion) sauf si vous avez désactivé manuellement la fonction connect (voir chapitre
Réglages).
À la première utilisation, jumelez votre produit à votre tablette en suivant les instructions
sur vos écrans.
Téléchargez l’application
Cookeo en vous rendant
sur l’App Store depuis votre
tablette ou smartphone.
CONNEXION
Problème de connexion :
Si la connexion a échoué, vous verrez un message d’erreur. Vous devez suivre les instructions
sur vos écrans pour une nouvelle tentative de connexion.
Attention : une seule connexion possible à la fois.
Créer son compte :
Suivez les indications
sur l’application.
Barre de recherche :
Tapez vos mots clés dans la
barre de recherche et accédez
à la recherche par ltre
Si La connexion est
réussie, le voyant bleu
devient xe.
Valider la demande de connexion
en appuyant sur OK
OK
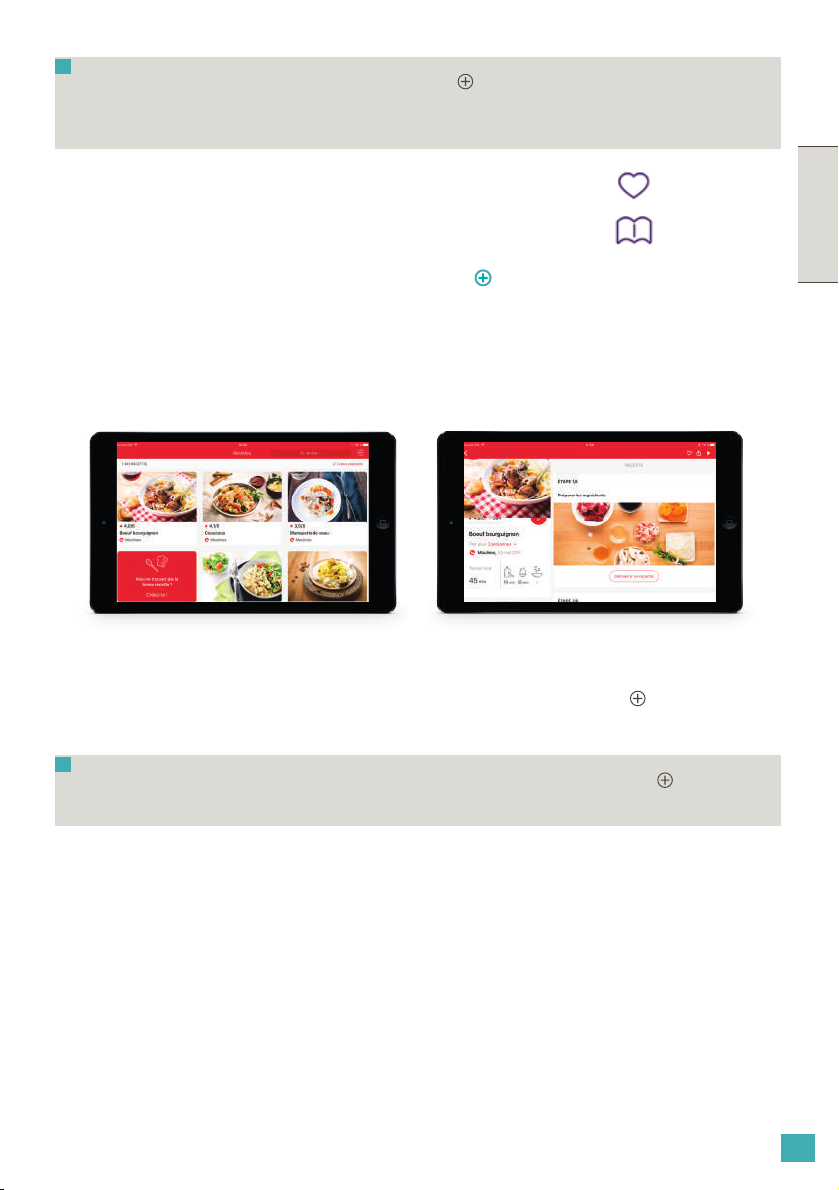
49
FRANÇAIS
49
N.B. : si vous n’utilisez pas votre COOK4ME CONNECT pendant 30 minutes, il
passera en mise en veille et la connexion sera perdue. A la sortie de la mise en veille, la
reconnexion se fera automatiquement.
N.B. : vous ne pouvez démarrer la cuisson qu’à partir de votre COOK4ME CONNECT
en appuyant sur lebouton OK (comme indiqué sur l’application).
Aucune incidence sur la cuisson si il y a perte de connexion. COOK4ME CONNECT reste
dans tous les cas autonome.
Navigation :
Vous pouvez également
naviguer à travers
l’application en accédant
au Menu :
• Inspiration
• Recherche
• Mon univers
• Courses
Depuis l’application vous
pouvez soit :
• voir le pas à pas
• lancer la recette en pas
à pas en intéraction avec
votre COOK4ME CONNECT
Favoris
Bibliothèques
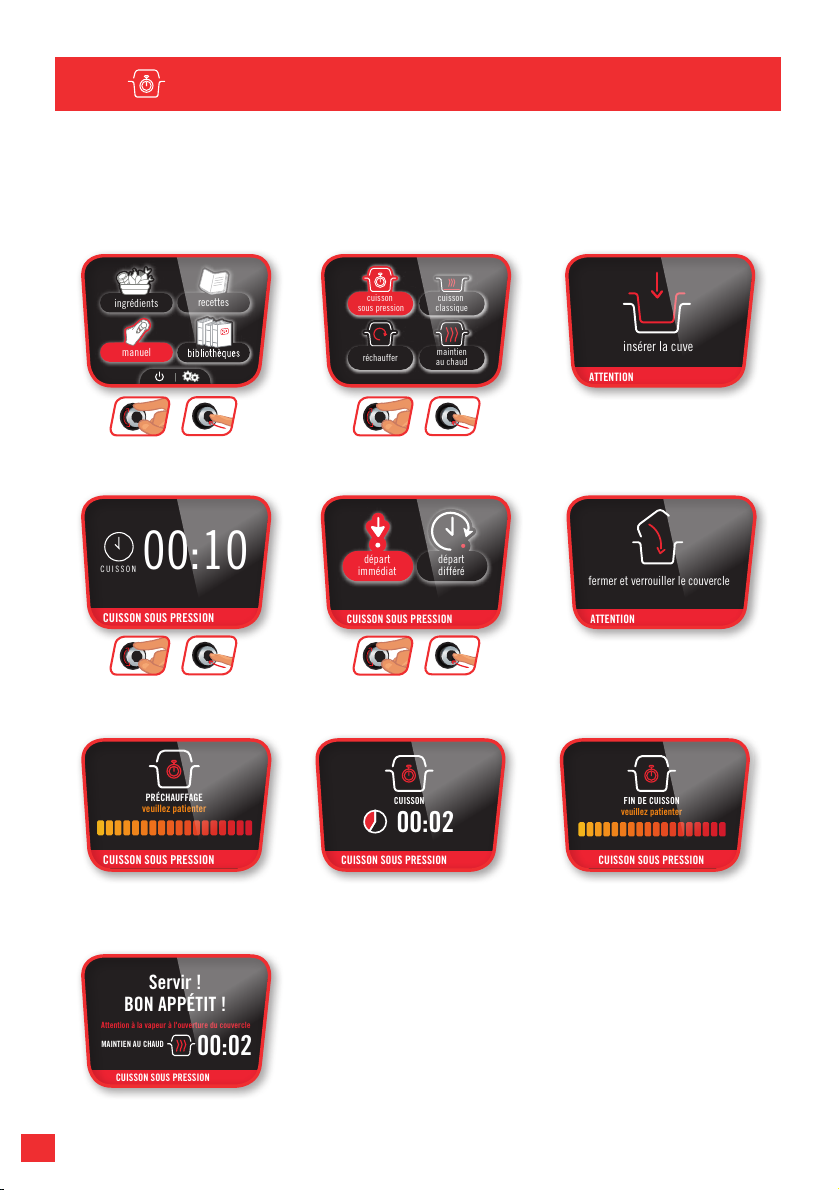
5050
SOUS PRESSION
MENU MANUEL :
Avec le menu manuel, c’est vous qui pilotez la cuisson. Choisissez vous-même le temps et
le mode de cuisson : cuisson sous pression, cuisson classique (cuisson douce, mijoter,
dorer), réchauffage ou maintien au chaud.
MENU MANUEL (MODE DE CUISSON )
L’appareil préchauffe
recettes
manuel
ingrédients
ATTENTION
CUISSON SOUS PRESSION
CUISSON SOUS PRESSION
CUISSON SOUS PRESSION
insérer la cuve
00:10
CUISSON
départ
immédiat
départ
différé
ATTENTION
fermer et verrouiller le couvercle
PRÉCHAUFFAGE
veuillez patienter
CUISSON SOUS PRESSION
CUISSON SOUS PRESSION
CUISSON SOUS PRESSION
CUISSON
00:02
FIN DE CUISSON
veuillez patienter
maintien
au chaud
cuisson
sous pression
réchauffer
cuisson
classique
00:02
BON APPÉTIT !
Servir !
MAINTIEN AU CHAUD
Attention à la vapeur à l'ouverture du couvercle
La cuisson démarre
recettes
manuel
ingrédients
ATTENTION
CUISSON SOUS PRESSION
CUISSON SOUS PRESSION
CUISSON SOUS PRESSION
insérer la cuve
00:10
CUISSON
départ
immédiat
départ
différé
ATTENTION
fermer et verrouiller le couvercle
PRÉCHAUFFAGE
veuillez patienter
CUISSON SOUS PRESSION
CUISSON SOUS PRESSION
CUISSON SOUS PRESSION
CUISSON
00:02
FIN DE CUISSON
veuillez patienter
maintien
au chaud
cuisson
sous pression
réchauffer
cuisson
classique
00:02
BON APPÉTIT !
Servir !
MAINTIEN AU CHAUD
Attention à la vapeur à l'ouverture du couvercle
La cuisson se termine
recettes
manuel
ingrédients
ATTENTION
CUISSON SOUS PRESSION
CUISSON SOUS PRESSION
CUISSON SOUS PRESSION
insérer la cuve
00:10
CUISSON
départ
immédiat
départ
différé
ATTENTION
fermer et verrouiller le couvercle
PRÉCHAUFFAGE
veuillez patienter
CUISSON SOUS PRESSION
CUISSON SOUS PRESSION
CUISSON SOUS PRESSION
CUISSON
00:02
FIN DE CUISSON
veuillez patienter
maintien
au chaud
cuisson
sous pression
réchauffer
cuisson
classique
00:02
BON APPÉTIT !
Servir !
MAINTIEN AU CHAUD
Attention à la vapeur à l'ouverture du couvercle
Vous pouvez déguster !
recettes
manuel
ingrédients
ATTENTION
CUISSON SOUS PRESSION
CUISSON SOUS PRESSION
CUISSON SOUS PRESSION
insérer la cuve
00:10
CUISSON
départ
immédiat
départ
différé
ATTENTION
fermer et verrouiller le couvercle
PRÉCHAUFFAGE
veuillez patienter
CUISSON SOUS PRESSION
CUISSON SOUS PRESSION
CUISSON SOUS PRESSION
CUISSON
00:02
FIN DE CUISSON
veuillez patienter
maintien
au chaud
cuisson
sous pression
réchauffer
cuisson
classique
00:02
BON APPÉTIT !
Servir !
MAINTIEN AU CHAUD
Attention à la vapeur à l'ouverture du couvercle
Sélectionnez le menu
« manuel »
recettes
manuel
ingrédients
ATTENTION
CUISSON SOUS PRESSION
CUISSON SOUS PRESSION
CUISSON SOUS PRESSION
insérer la cuve
00:10
CUISSON
départ
immédiat
départ
différé
ATTENTION
fermer et verrouiller le couvercle
PRÉCHAUFFAGE
veuillez patienter
CUISSON SOUS PRESSION
CUISSON SOUS PRESSION
CUISSON SOUS PRESSION
CUISSON
00:02
FIN DE CUISSON
veuillez patienter
maintien
au chaud
cuisson
sous pression
réchauffer
cuisson
classique
00:02
BON APPÉTIT !
Servir !
MAINTIEN AU CHAUD
Attention à la vapeur à l'ouverture du couvercle
Insérez la cuve puis
ajoutez les ingrédients
ok
ok
+
recettes
manuel
ingrédients
ATTENTION
CUISSON SOUS PRESSION
CUISSON SOUS PRESSION
CUISSON SOUS PRESSION
insérer la cuve
00:10
CUISSON
départ
immédiat
départ
différé
ATTENTION
fermer et verrouiller le couvercle
PRÉCHAUFFAGE
veuillez patienter
CUISSON SOUS PRESSION
CUISSON SOUS PRESSION
CUISSON SOUS PRESSION
CUISSON
00:02
FIN DE CUISSON
veuillez patienter
maintien
au chaud
cuisson
sous pression
réchauffer
cuisson
classique
00:02
BON APPÉTIT !
Servir !
MAINTIEN AU CHAUD
Attention à la vapeur à l'ouverture du couvercle
Choisissez le mode
« sous pression »
ok
ok
+
recettes
manuel
ingrédients
ATTENTION
CUISSON SOUS PRESSION
CUISSON SOUS PRESSION
CUISSON SOUS PRESSION
insérer la cuve
00:10
CUISSON
départ
immédiat
départ
différé
ATTENTION
fermer et verrouiller le couvercle
PRÉCHAUFFAGE
veuillez patienter
CUISSON SOUS PRESSION
CUISSON SOUS PRESSION
CUISSON SOUS PRESSION
CUISSON
00:02
FIN DE CUISSON
veuillez patienter
maintien
au chaud
cuisson
sous pression
réchauffer
cuisson
classique
00:02
BON APPÉTIT !
Servir !
MAINTIEN AU CHAUD
Attention à la vapeur à l'ouverture du couvercle
Fermez et verrouillez
Réglez le temps
de cuisson
ok
ok
+
recettes
manuel
ingrédients
ATTENTION
CUISSON SOUS PRESSION
CUISSON SOUS PRESSION
CUISSON SOUS PRESSION
insérer la cuve
00:10
CUISSON
départ
immédiat
départ
différé
ATTENTION
fermer et verrouiller le couvercle
PRÉCHAUFFAGE
veuillez patienter
CUISSON SOUS PRESSION
CUISSON SOUS PRESSION
CUISSON SOUS PRESSION
CUISSON
00:02
FIN DE CUISSON
veuillez patienter
maintien
au chaud
cuisson
sous pression
réchauffer
cuisson
classique
00:02
BON APPÉTIT !
Servir !
MAINTIEN AU CHAUD
Attention à la vapeur à l'ouverture du couvercle
Choisissez départ immédiat
ou différé
ok
ok
+

51
FRANÇAIS
51
CLASSIQUE
Avec le mode de cuisson classique, vous pouvez :
CUIRE DOUCEMENT
MIJOTER
DORER
selon le résultat souhaité.
Le couvercle reste ouvert pour ces types de cuisson.
MENU MANUEL MODE DE CUISSON
N.B. : Le fonctionnement est identique, seule la température diffère.
Pour arrêter la cuisson, appuyez sur la èche retour, vous avez la possibilité d’arrêter
complètement la cuisson ou de procéder à une cuisson sous pression.
Sélectionnez le menu
« manuel »
L’appareil préchauffe
Choisissez la fonction
« classique »
Choisissez la fonction
désirée
Insérez la cuve
Ouvrez le couvercle
ATTENTION
ATTENTION
insérer la cuve
CUISSON DOUCE
ouvrir le couvercle
CUISSON DOUCE
PRÉCHAUFFAGE
veuillez patienter
ajouter les ingrédients
OK
00:02
CUISSON DOUCE
OK
souhaitez-vous arrêter
la cuisson douce ?
OUI NON
arrêt
cuisson
sous pression
maintien
au chaud
cuisson
sous pression
réchauffer
cuisson
classique
CUISSON DOUCE
recettes
manuel
ingrédients
CUISSON DOUCE
ATTENTION
ATTENTION
insérer la cuve
CUISSON DOUCE
ouvrir le couvercle
CUISSON DOUCE
PRÉCHAUFFAGE
veuillez patienter
ajouter les ingrédients
OK
00:02
CUISSON DOUCE
OK
souhaitez-vous arrêter
la cuisson douce ?
OUI NON
arrêt
cuisson
sous pression
maintien
au chaud
cuisson
sous pression
réchauffer
cuisson
classique
CUISSON DOUCE
recettes
manuel
ingrédients
CUISSON DOUCE
ok
ok
+
ok
+
ok
ok
+
ok
ok
+
ok
ok
+
ok
ok
+
ok
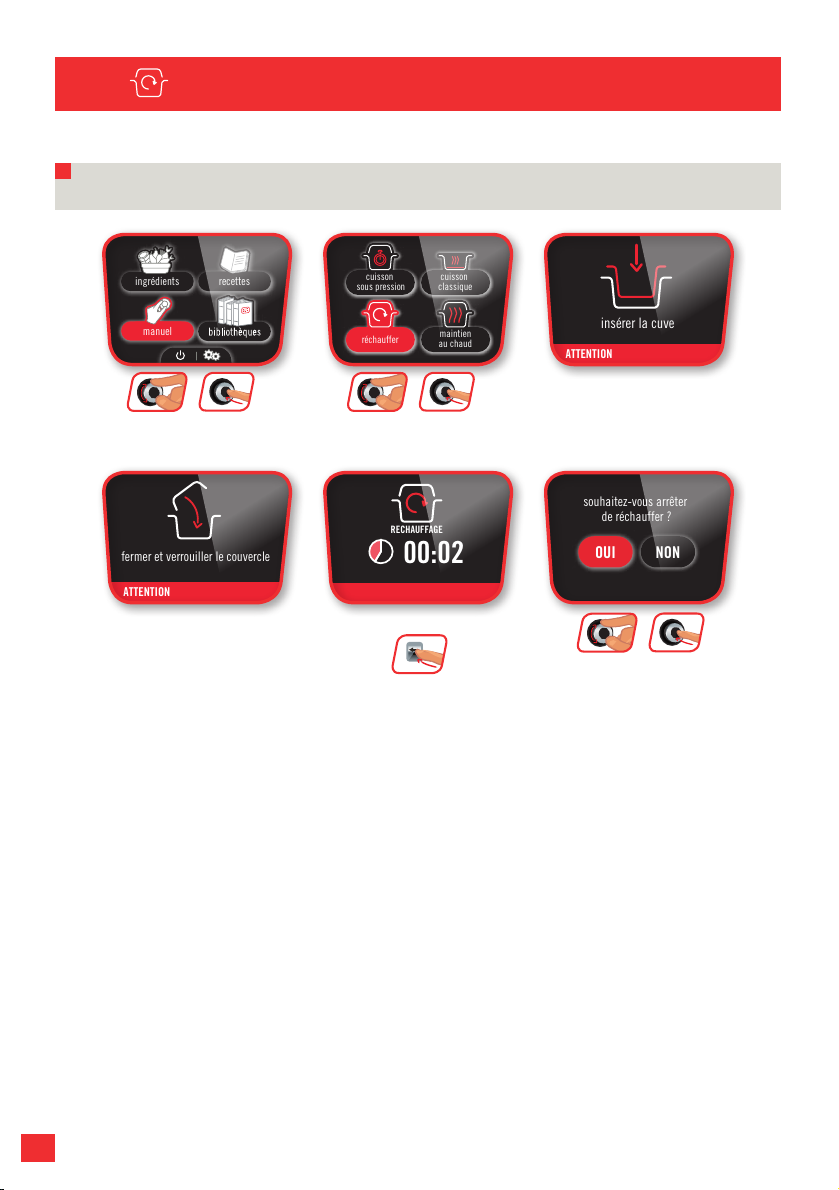
5252
RÉCHAUFFER
N.B. : Le réchauffage commence et le temps augmente.
MENU MANUEL (MODE DE CUISSON)
ATTENTION
insérer la cuve
souhaitez-vous arrêter
de réchauffer ?
OUI NON
ATTENTION
fermer et verrouiller le couvercle
00:02
RECHAUFFAGE
BON APPÉTIT !
MAINTIEN AU CHAUD
00:02
maintien
au chaud
cuisson
sous pression
réchauffer
cuisson
classique
recettes
manuel
ingrédients
ATTENTION
insérer la cuve
souhaitez-vous arrêter
de réchauffer ?
OUI NON
ATTENTION
fermer et verrouiller le couvercle
00:02
RECHAUFFAGE
BON APPÉTIT !
MAINTIEN AU CHAUD
00:02
maintien
au chaud
cuisson
sous pression
réchauffer
cuisson
classique
recettes
manuel
ingrédients
Sélectionnez le menu
« manuel »
Choisissez le mode
« réchauffer »
Le réchauffer commence.
pour
l’interrompre
Souhaitez-vous arrêter
de réchauffer ?
Insérez la cuve
Fermez et verrouillez
le couvercle
ATTENTION
insérer la cuve
souhaitez-vous arrêter
de réchauffer ?
OUI NON
ATTENTION
fermer et verrouiller le couvercle
00:02
RECHAUFFAGE
BON APPÉTIT !
MAINTIEN AU CHAUD
00:02
maintien
au chaud
cuisson
sous pression
réchauffer
cuisson
classique
recettes
manuel
ingrédients
ATTENTION
insérer la cuve
souhaitez-vous arrêter
de réchauffer ?
OUI NON
ATTENTION
fermer et verrouiller le couvercle
00:02
RECHAUFFAGE
BON APPÉTIT !
MAINTIEN AU CHAUD
00:02
maintien
au chaud
cuisson
sous pression
réchauffer
cuisson
classique
recettes
manuel
ingrédients
ATTENTION
insérer la cuve
souhaitez-vous arrêter
de réchauffer ?
OUI NON
ATTENTION
fermer et verrouiller le couvercle
00:02
RECHAUFFAGE
BON APPÉTIT !
MAINTIEN AU CHAUD
00:02
maintien
au chaud
cuisson
sous pression
réchauffer
cuisson
classique
recettes
manuel
ingrédients
ATTENTION
insérer la cuve
souhaitez-vous arrêter
de réchauffer ?
OUI NON
ATTENTION
fermer et verrouiller le couvercle
00:02
RECHAUFFAGE
BON APPÉTIT !
MAINTIEN AU CHAUD
00:02
maintien
au chaud
cuisson
sous pression
réchauffer
cuisson
classique
recettes
manuel
ingrédients
ok
ok
+
ok
ok
+
ok
ok
+
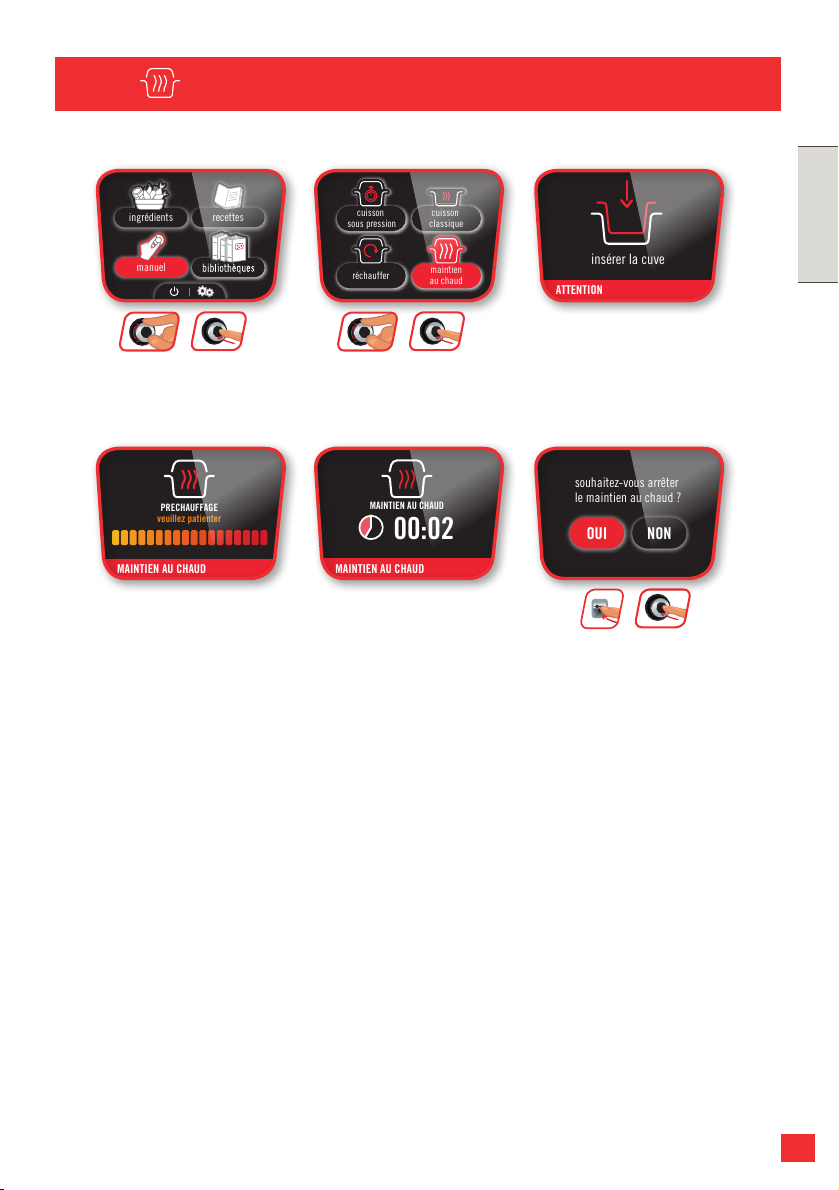
53
FRANÇAIS
53
MENU MANUEL (MODE DE CUISSON)
MAINTIEN AU CHAUD
ATTENTION
insérer la cuve
souhaitez-vous arrêter
le maintien au chaud ?
OUI NON
MAINTIEN AU CHAUD
MAINTIEN AU CHAUD
PRECHAUFFAGE
veuillez patienter
MAINTIEN AU CHAUD
00:02
maintien
au chaud
cuisson
sous pression
réchauffer
cuisson
classique
recettes
manuel
ingrédients
ATTENTION
insérer la cuve
souhaitez-vous arrêter
le maintien au chaud ?
OUI NON
MAINTIEN AU CHAUD
MAINTIEN AU CHAUD
PRECHAUFFAGE
veuillez patienter
MAINTIEN AU CHAUD
00:02
maintien
au chaud
cuisson
sous pression
réchauffer
cuisson
classique
recettes
manuel
ingrédients
Sélectionnez le menu
« manuel »
Insérez la cuve
L’appareil préchauffe Le maintien au chaud
commence
Pour arrêter le maintien
au chaud, appuyez sur
la èche « retour » et
sélectionnez « oui »
Choisissez la fonction
« maintien au chaud »
ok
+
ATTENTION
insérer la cuve
souhaitez-vous arrêter
le maintien au chaud ?
OUI NON
MAINTIEN AU CHAUD
MAINTIEN AU CHAUD
PRECHAUFFAGE
veuillez patienter
MAINTIEN AU CHAUD
00:02
maintien
au chaud
cuisson
sous pression
réchauffer
cuisson
classique
recettes
manuel
ingrédients
ATTENTION
insérer la cuve
souhaitez-vous arrêter
le maintien au chaud ?
OUI NON
MAINTIEN AU CHAUD
MAINTIEN AU CHAUD
PRECHAUFFAGE
veuillez patienter
MAINTIEN AU CHAUD
00:02
maintien
au chaud
cuisson
sous pression
réchauffer
cuisson
classique
recettes
manuel
ingrédients
ATTENTION
insérer la cuve
souhaitez-vous arrêter
le maintien au chaud ?
OUI NON
MAINTIEN AU CHAUD
MAINTIEN AU CHAUD
PRECHAUFFAGE
veuillez patienter
MAINTIEN AU CHAUD
00:02
maintien
au chaud
cuisson
sous pression
réchauffer
cuisson
classique
recettes
manuel
ingrédients
ATTENTION
insérer la cuve
souhaitez-vous arrêter
le maintien au chaud ?
OUI NON
MAINTIEN AU CHAUD
MAINTIEN AU CHAUD
PRECHAUFFAGE
veuillez patienter
MAINTIEN AU CHAUD
00:02
maintien
au chaud
cuisson
sous pression
réchauffer
cuisson
classique
recettes
manuel
ingrédients
ok
ok
+
ok
ok
+
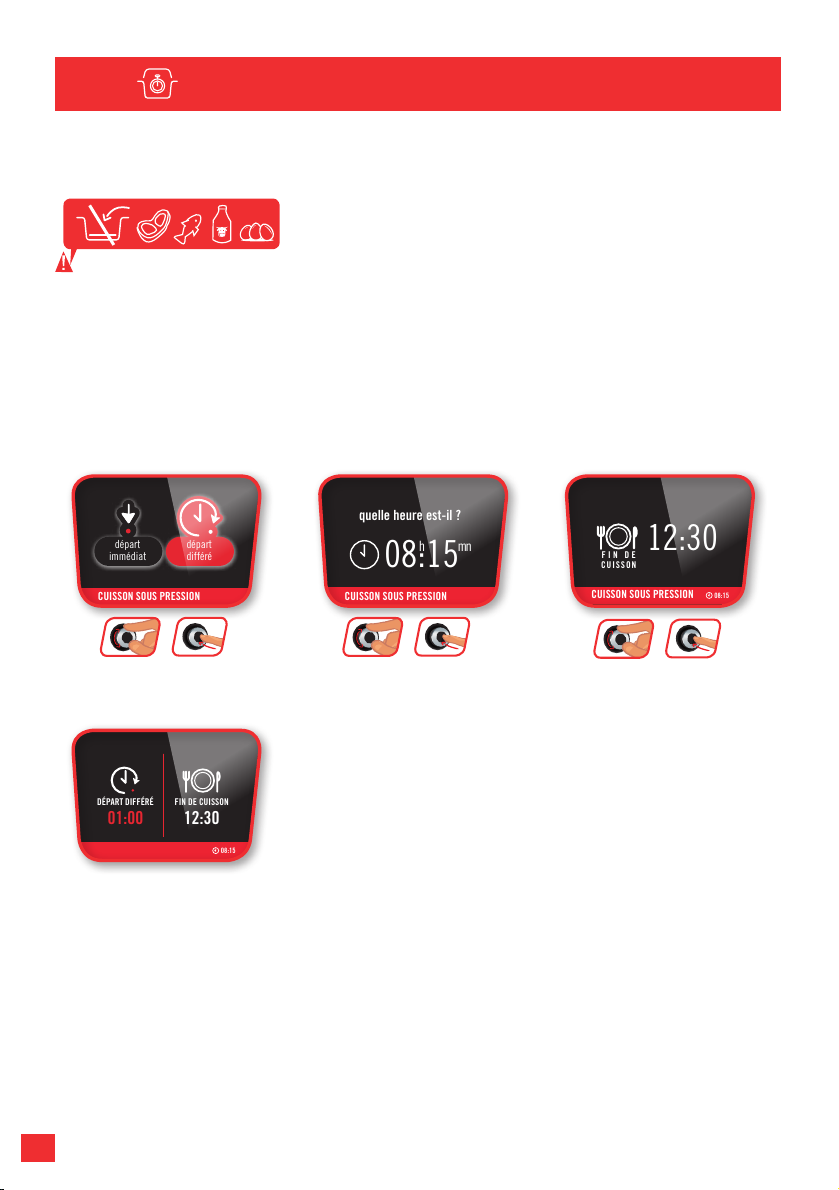
5454
MENU MANUEL (MODE DE CUISSON)
DÉPART DIFFÉRÉ
(MODE CUISSON SOUS PRESSION)
Certains aliments ne permettent pas d’utiliser la fonction départ différé (ex : viande, poisson,
lait ...).
L’heure de n de cuisson peut varier suivant le volume contenu dans le produit.
NB : Le départ différé est égale ment possible dans le menu Ingré dients (selon le type
d’ingrédients).
Sélectionnez
« départ différé »
CUISSON SOUS PRESSION
CUISSON SOUS PRESSION
CUISSON SOUS PRESSION
h mn
quelle heure est-il ?
FIN DE
CUISSON
12:30
08:15
08:15
01:00
DÉPART DIFFÉRÉ FIN DE CUISSON
12:30
08:15
départ
immédiat
départ
différé
ok
ok
+
Sélectionnez
la n de cuisson
CUISSON SOUS PRESSION
CUISSON SOUS PRESSION
CUISSON SOUS PRESSION
h mn
quelle heure est-il ?
FIN DE
CUISSON
12:30
08:15
08:15
01:00
DÉPART DIFFÉRÉ FIN DE CUISSON
12:30
08:15
départ
immédiat
départ
différé
ok
ok
+
Sélectionnez
l’heure actuelle
CUISSON SOUS PRESSION
CUISSON SOUS PRESSION
CUISSON SOUS PRESSION
h mn
quelle heure est-il ?
FIN DE
CUISSON
12:30
08:15
08:15
01:00
DÉPART DIFFÉRÉ FIN DE CUISSON
12:30
08:15
départ
immédiat
départ
différé
ok
ok
+
Le départ différé
est programmé
CUISSON SOUS PRESSION
CUISSON SOUS PRESSION
CUISSON SOUS PRESSION
h mn
quelle heure est-il ?
FIN DE
CUISSON
12:30
08:15
08:15
01:00
DÉPART DIFFÉRÉ FIN DE CUISSON
12:30
08:15
départ
immédiat
départ
différé
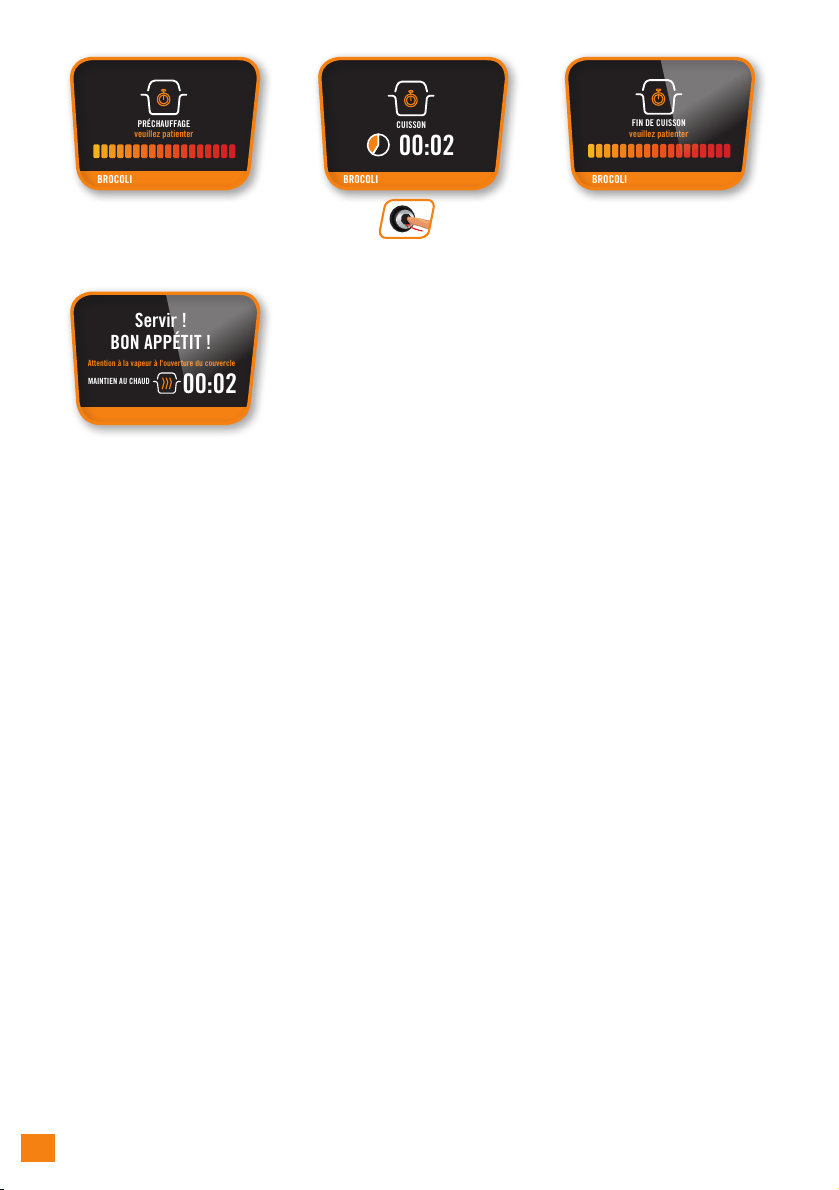
5656
Préchauffage
TEMPS CONSEILLÉ : 10MIN
PRÉCHAUFFAGE
veuillez patienter
recettesingrédients
manuel
LEGUMES / FRUITS
BROCOLI
BROCOLI
artichaut
asperge
aubergine
betterave
brocoli
souhaitez-vous démarrer
la recette ?
CUISSON
légumes / fruits
BROCOLI
OUI NON
- verser 200ml d'eau dans le faitout.
- déposer les ingrédients dans le panier.
- placer le panier vapeur dans le faitout.
00:10
BROCOLI
ATTENTION
BROCOLI
FIN DE CUISSON
veuillez patienter
BROCOLI
BROCOLI
départ
immédiat
départ
différé
CUISSON
00:02
00:02
300 gr
fermer et verrouiller
le couvercle
BON APPÉTIT !
Servir !
MAINTIEN AU CHAUD
Attention à la vapeur à l'ouverture du couvercle
Fin de cuisson
TEMPS CONSEILLÉ : 10MIN
PRÉCHAUFFAGE
veuillez patienter
recettesingrédients
manuel
LEGUMES / FRUITS
BROCOLI
BROCOLI
artichaut
asperge
aubergine
betterave
brocoli
souhaitez-vous démarrer
la recette ?
CUISSON
légumes / fruits
BROCOLI
OUI NON
- verser 200ml d'eau dans le faitout.
- déposer les ingrédients dans le panier.
- placer le panier vapeur dans le faitout.
00:10
BROCOLI
ATTENTION
BROCOLI
FIN DE CUISSON
veuillez patienter
BROCOLI
BROCOLI
départ
immédiat
départ
différé
CUISSON
00:02
00:02
300 gr
fermer et verrouiller
le couvercle
BON APPÉTIT !
Servir !
MAINTIEN AU CHAUD
Attention à la vapeur à l'ouverture du couvercle
Démarrez la cuisson
TEMPS CONSEILLÉ : 10MIN
PRÉCHAUFFAGE
veuillez patienter
recettesingrédients
manuel
LEGUMES / FRUITS
BROCOLI
BROCOLI
artichaut
asperge
aubergine
betterave
brocoli
souhaitez-vous démarrer
la recette ?
CUISSON
légumes / fruits
BROCOLI
OUI NON
- verser 200ml d'eau dans le faitout.
- déposer les ingrédients dans le panier.
- placer le panier vapeur dans le faitout.
00:10
BROCOLI
ATTENTION
BROCOLI
FIN DE CUISSON
veuillez patienter
BROCOLI
BROCOLI
départ
immédiat
départ
différé
CUISSON
00:02
00:02
300 gr
fermer et verrouiller
le couvercle
BON APPÉTIT !
Servir !
MAINTIEN AU CHAUD
Attention à la vapeur à l'ouverture du couvercle
ok
Vous pouvez déguster
TEMPS CONSEILLÉ : 10MIN
PRÉCHAUFFAGE
veuillez patienter
recettesingrédients
manuel
LEGUMES / FRUITS
BROCOLI
BROCOLI
artichaut
asperge
aubergine
betterave
brocoli
souhaitez-vous démarrer
la recette ?
CUISSON
légumes / fruits
BROCOLI
OUI NON
- verser 200ml d'eau dans le faitout.
- déposer les ingrédients dans le panier.
- placer le panier vapeur dans le faitout.
00:10
BROCOLI
ATTENTION
BROCOLI
FIN DE CUISSON
veuillez patienter
BROCOLI
BROCOLI
départ
immédiat
départ
différé
CUISSON
00:02
00:02
300 gr
fermer et verrouiller
le couvercle
BON APPÉTIT !
Servir !
MAINTIEN AU CHAUD
Attention à la vapeur à l'ouverture du couvercle
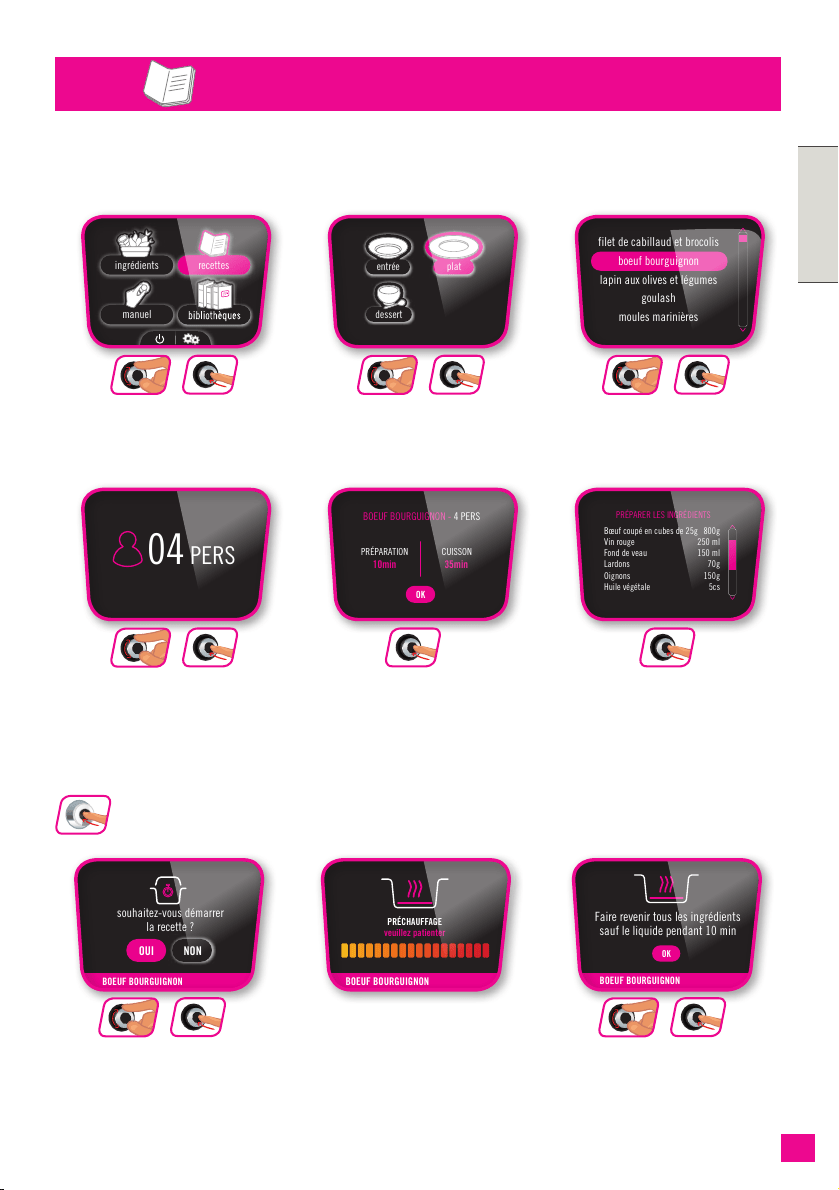
57
FRANÇAIS
57
RECETTE BOEUF BOURGUIGNON
MENU RECETTES :
Avec le menu recettes, choisissez parmi 150 recettes salées et sucrées réparties en trois
catégories : entrées / plats / desserts
Sélectionnez
le menu recettes
BOEUF BOURGUIGNON
recettesingrédients
manuel
filet de cabillaud et brocolis
boeuf bourguignon
lapin aux olives et légumes
goulash
moules marinières
BOEUF BOURGUIGNON - 4 PERS
PRÉPARATION
10min 35min
CUISSON
BOEUF BOURGUIGNON
BOEUF BOURGUIGNON
BOEUF BOURGUIGNON
BOEUF BOURGUIGNON
BOEUF BOURGUIGNON
BOEUF BOURGUIGNON
BOEUF BOURGUIGNON
00:10
00:35
04
PERS
OK
OK
Bœuf coupé en cubes de 25g
Vin rouge
Fond de veau
Lardons
Oignons
Huile végétale
800g
250 ml
150 ml
70g
150g
5cs
PRÉPARER LES INGRÉDIENTS
souhaitez-vous démarrer
la recette ?
Faire revenir tous les ingrédients
sauf le liquide pendant 10 min
OUI NON
PRÉCHAUFFAGE
veuillez patienter
FIN DE CUISSON
veuillez patienter
souhaitez-vous arrêter
de dorer ?
OUI NON
souhaitez-vous démarrer
la cuisson ?
OUI NON
ajouter le reste des ingrédients
OK
CUISSON
BOEUF BOURGUIGNON
platentrée
dessert
BON APPÉTIT !
Servir !
MAINTIEN AU CHAUD
Attention à la vapeur à l'ouverture du couvercle
ok
ok
+
Sélectionnez le
nombre de personnes
BOEUF BOURGUIGNON
recettesingrédients
manuel
filet de cabillaud et brocolis
boeuf bourguignon
lapin aux olives et légumes
goulash
moules marinières
BOEUF BOURGUIGNON - 4 PERS
PRÉPARATION
10min 35min
CUISSON
BOEUF BOURGUIGNON
BOEUF BOURGUIGNON
BOEUF BOURGUIGNON
BOEUF BOURGUIGNON
BOEUF BOURGUIGNON
BOEUF BOURGUIGNON
BOEUF BOURGUIGNON
00:10
00:35
04
PERS
OK
OK
Bœuf coupé en cubes de 25g
Vin rouge
Fond de veau
Lardons
Oignons
Huile végétale
800g
250 ml
150 ml
70g
150g
5cs
PRÉPARER LES INGRÉDIENTS
souhaitez-vous démarrer
la recette ?
Faire revenir tous les ingrédients
sauf le liquide pendant 10 min
OUI NON
PRÉCHAUFFAGE
veuillez patienter
FIN DE CUISSON
veuillez patienter
souhaitez-vous arrêter
de dorer ?
OUI NON
souhaitez-vous démarrer
la cuisson ?
OUI NON
ajouter le reste des ingrédients
OK
CUISSON
BOEUF BOURGUIGNON
platentrée
dessert
BON APPÉTIT !
Servir !
MAINTIEN AU CHAUD
Attention à la vapeur à l'ouverture du couvercle
ok
ok
+
Présentation
de la recette
BOEUF BOURGUIGNON
recettesingrédients
manuel
filet de cabillaud et brocolis
boeuf bourguignon
lapin aux olives et légumes
goulash
moules marinières
BOEUF BOURGUIGNON - 4 PERS
PRÉPARATION
10min 35min
CUISSON
BOEUF BOURGUIGNON
BOEUF BOURGUIGNON
BOEUF BOURGUIGNON
BOEUF BOURGUIGNON
BOEUF BOURGUIGNON
BOEUF BOURGUIGNON
BOEUF BOURGUIGNON
00:10
00:35
04
PERS
OK
OK
Bœuf coupé en cubes de 25g
Vin rouge
Fond de veau
Lardons
Oignons
Huile végétale
800g
250 ml
150 ml
70g
150g
5cs
PRÉPARER LES INGRÉDIENTS
souhaitez-vous démarrer
la recette ?
Faire revenir tous les ingrédients
sauf le liquide pendant 10 min
OUI NON
PRÉCHAUFFAGE
veuillez patienter
FIN DE CUISSON
veuillez patienter
souhaitez-vous arrêter
de dorer ?
OUI NON
souhaitez-vous démarrer
la cuisson ?
OUI NON
ajouter le reste des ingrédients
OK
CUISSON
BOEUF BOURGUIGNON
platentrée
dessert
BON APPÉTIT !
Servir !
MAINTIEN AU CHAUD
Attention à la vapeur à l'ouverture du couvercle
ok
Préparez les
ingrédients
BOEUF BOURGUIGNON
recettesingrédients
manuel
filet de cabillaud et brocolis
boeuf bourguignon
lapin aux olives et légumes
goulash
moules marinières
BOEUF BOURGUIGNON - 4 PERS
PRÉPARATION
10min 35min
CUISSON
BOEUF BOURGUIGNON
BOEUF BOURGUIGNON
BOEUF BOURGUIGNON
BOEUF BOURGUIGNON
BOEUF BOURGUIGNON
BOEUF BOURGUIGNON
BOEUF BOURGUIGNON
00:10
00:35
04
PERS
OK
OK
Bœuf coupé en cubes de 25g
Vin rouge
Fond de veau
Lardons
Oignons
Huile végétale
800g
250 ml
150 ml
70g
150g
5cs
PRÉPARER LES INGRÉDIENTS
souhaitez-vous démarrer
la recette ?
Faire revenir tous les ingrédients
sauf le liquide pendant 10 min
OUI NON
PRÉCHAUFFAGE
veuillez patienter
FIN DE CUISSON
veuillez patienter
souhaitez-vous arrêter
de dorer ?
OUI NON
souhaitez-vous démarrer
la cuisson ?
OUI NON
ajouter le reste des ingrédients
OK
CUISSON
BOEUF BOURGUIGNON
platentrée
dessert
BON APPÉTIT !
Servir !
MAINTIEN AU CHAUD
Attention à la vapeur à l'ouverture du couvercle
ok
Choisissez le type
de recette
BOEUF BOURGUIGNON
recettesingrédients
manuel
filet de cabillaud et brocolis
boeuf bourguignon
lapin aux olives et légumes
goulash
moules marinières
BOEUF BOURGUIGNON - 4 PERS
PRÉPARATION
10min 35min
CUISSON
BOEUF BOURGUIGNON
BOEUF BOURGUIGNON
BOEUF BOURGUIGNON
BOEUF BOURGUIGNON
BOEUF BOURGUIGNON
BOEUF BOURGUIGNON
BOEUF BOURGUIGNON
00:10
00:35
04
PERS
OK
OK
Bœuf coupé en cubes de 25g
Vin rouge
Fond de veau
Lardons
Oignons
Huile végétale
800g
250 ml
150 ml
70g
150g
5cs
PRÉPARER LES INGRÉDIENTS
souhaitez-vous démarrer
la recette ?
Faire revenir tous les ingrédients
sauf le liquide pendant 10 min
OUI NON
PRÉCHAUFFAGE
veuillez patienter
FIN DE CUISSON
veuillez patienter
souhaitez-vous arrêter
de dorer ?
OUI NON
souhaitez-vous démarrer
la cuisson ?
OUI NON
ajouter le reste des ingrédients
OK
CUISSON
BOEUF BOURGUIGNON
platentrée
dessert
BON APPÉTIT !
Servir !
MAINTIEN AU CHAUD
Attention à la vapeur à l'ouverture du couvercle
ok
ok
+
Sélectionnez
une recette
BOEUF BOURGUIGNON
recettesingrédients
manuel
filet de cabillaud et brocolis
boeuf bourguignon
lapin aux olives et légumes
goulash
moules marinières
BOEUF BOURGUIGNON - 4 PERS
PRÉPARATION
10min 35min
CUISSON
BOEUF BOURGUIGNON
BOEUF BOURGUIGNON
BOEUF BOURGUIGNON
BOEUF BOURGUIGNON
BOEUF BOURGUIGNON
BOEUF BOURGUIGNON
BOEUF BOURGUIGNON
00:10
00:35
04
PERS
OK
OK
Bœuf coupé en cubes de 25g
Vin rouge
Fond de veau
Lardons
Oignons
Huile végétale
800g
250 ml
150 ml
70g
150g
5cs
PRÉPARER LES INGRÉDIENTS
souhaitez-vous démarrer
la recette ?
Faire revenir tous les ingrédients
sauf le liquide pendant 10 min
OUI NON
PRÉCHAUFFAGE
veuillez patienter
FIN DE CUISSON
veuillez patienter
souhaitez-vous arrêter
de dorer ?
OUI NON
souhaitez-vous démarrer
la cuisson ?
OUI NON
ajouter le reste des ingrédients
OK
CUISSON
BOEUF BOURGUIGNON
platentrée
dessert
BON APPÉTIT !
Servir !
MAINTIEN AU CHAUD
Attention à la vapeur à l'ouverture du couvercle
ok
ok
+
Vous pouvez revenir au menu initial en appuyant 3 secondes sur la touche retour.
ok
Préchauffage
BOEUF BOURGUIGNON
recettesingrédients
manuel
filet de cabillaud et brocolis
boeuf bourguignon
lapin aux olives et légumes
goulash
moules marinières
BOEUF BOURGUIGNON - 4 PERS
PRÉPARATION
10min 35min
CUISSON
BOEUF BOURGUIGNON
BOEUF BOURGUIGNON
BOEUF BOURGUIGNON
BOEUF BOURGUIGNON
BOEUF BOURGUIGNON
BOEUF BOURGUIGNON
BOEUF BOURGUIGNON
00:10
00:35
04
PERS
OK
OK
Bœuf coupé en cubes de 25g
Vin rouge
Fond de veau
Lardons
Oignons
Huile végétale
800g
250 ml
150 ml
70g
150g
5cs
PRÉPARER LES INGRÉDIENTS
souhaitez-vous démarrer
la recette ?
Faire revenir tous les ingrédients
sauf le liquide pendant 10 min
OUI NON
PRÉCHAUFFAGE
veuillez patienter
FIN DE CUISSON
veuillez patienter
souhaitez-vous arrêter
de dorer ?
OUI NON
souhaitez-vous démarrer
la cuisson ?
OUI NON
ajouter le reste des ingrédients
OK
CUISSON
BOEUF BOURGUIGNON
platentrée
dessert
BON APPÉTIT !
Servir !
MAINTIEN AU CHAUD
Attention à la vapeur à l'ouverture du couvercle
Démarrez la recette
BOEUF BOURGUIGNON
recettesingrédients
manuel
filet de cabillaud et brocolis
boeuf bourguignon
lapin aux olives et légumes
goulash
moules marinières
BOEUF BOURGUIGNON - 4 PERS
PRÉPARATION
10min 35min
CUISSON
BOEUF BOURGUIGNON
BOEUF BOURGUIGNON
BOEUF BOURGUIGNON
BOEUF BOURGUIGNON
BOEUF BOURGUIGNON
BOEUF BOURGUIGNON
BOEUF BOURGUIGNON
00:10
00:35
04
PERS
OK
OK
Bœuf coupé en cubes de 25g
Vin rouge
Fond de veau
Lardons
Oignons
Huile végétale
800g
250 ml
150 ml
70g
150g
5cs
PRÉPARER LES INGRÉDIENTS
souhaitez-vous démarrer
la recette ?
Faire revenir tous les ingrédients
sauf le liquide pendant 10 min
OUI NON
PRÉCHAUFFAGE
veuillez patienter
FIN DE CUISSON
veuillez patienter
souhaitez-vous arrêter
de dorer ?
OUI NON
souhaitez-vous démarrer
la cuisson ?
OUI NON
ajouter le reste des ingrédients
OK
CUISSON
BOEUF BOURGUIGNON
platentrée
dessert
BON APPÉTIT !
Servir !
MAINTIEN AU CHAUD
Attention à la vapeur à l'ouverture du couvercle
ok
ok
+
Suivez les instructions
BOEUF BOURGUIGNON
recettesingrédients
manuel
filet de cabillaud et brocolis
boeuf bourguignon
lapin aux olives et légumes
goulash
moules marinières
BOEUF BOURGUIGNON - 4 PERS
PRÉPARATION
10min 35min
CUISSON
BOEUF BOURGUIGNON
BOEUF BOURGUIGNON
BOEUF BOURGUIGNON
BOEUF BOURGUIGNON
BOEUF BOURGUIGNON
BOEUF BOURGUIGNON
BOEUF BOURGUIGNON
00:10
00:35
04
PERS
OK
OK
Bœuf coupé en cubes de 25g
Vin rouge
Fond de veau
Lardons
Oignons
Huile végétale
800g
250 ml
150 ml
70g
150g
5cs
PRÉPARER LES INGRÉDIENTS
souhaitez-vous démarrer
la recette ?
Faire revenir tous les ingrédients
sauf le liquide pendant 10 min
OUI NON
PRÉCHAUFFAGE
veuillez patienter
FIN DE CUISSON
veuillez patienter
souhaitez-vous arrêter
de dorer ?
OUI NON
souhaitez-vous démarrer
la cuisson ?
OUI NON
ajouter le reste des ingrédients
OK
CUISSON
BOEUF BOURGUIGNON
platentrée
dessert
BON APPÉTIT !
Servir !
MAINTIEN AU CHAUD
Attention à la vapeur à l'ouverture du couvercle
ok
ok
+
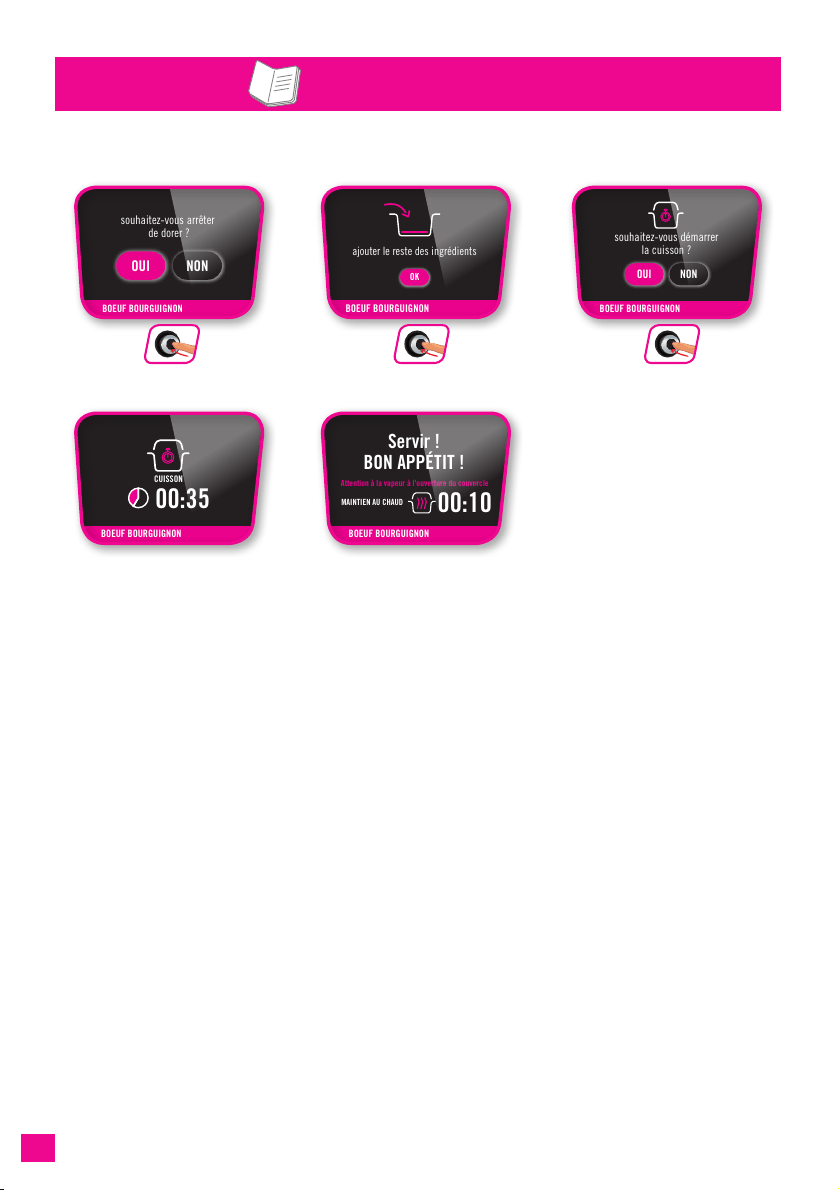
5858
MENU RECETTES
MENU RECETTES : (SUITE)
Cuisson
BOEUF BOURGUIGNON
recettesingrédients
manuel
filet de cabillaud et brocolis
boeuf bourguignon
lapin aux olives et légumes
goulash
moules marinières
BOEUF BOURGUIGNON - 4 PERS
PRÉPARATION
10min 35min
CUISSON
BOEUF BOURGUIGNON
BOEUF BOURGUIGNON
BOEUF BOURGUIGNON
BOEUF BOURGUIGNON
BOEUF BOURGUIGNON
BOEUF BOURGUIGNON
BOEUF BOURGUIGNON
00:10
00:35
04
PERS
OK
OK
Bœuf coupé en cubes de 25g
Vin rouge
Fond de veau
Lardons
Oignons
Huile végétale
800g
250 ml
150 ml
70g
150g
5cs
PRÉPARER LES INGRÉDIENTS
souhaitez-vous démarrer
la recette ?
Faire revenir tous les ingrédients
sauf le liquide pendant 10 min
OUI NON
PRÉCHAUFFAGE
veuillez patienter
FIN DE CUISSON
veuillez patienter
souhaitez-vous arrêter
de dorer ?
OUI NON
souhaitez-vous démarrer
la cuisson ?
OUI NON
ajouter le reste des ingrédients
OK
CUISSON
BOEUF BOURGUIGNON
platentrée
dessert
BON APPÉTIT !
Servir !
MAINTIEN AU CHAUD
Attention à la vapeur à l'ouverture du couvercle
Vous pouvez déguster
BOEUF BOURGUIGNON
recettesingrédients
manuel
filet de cabillaud et brocolis
boeuf bourguignon
lapin aux olives et légumes
goulash
moules marinières
BOEUF BOURGUIGNON - 4 PERS
PRÉPARATION
10min 35min
CUISSON
BOEUF BOURGUIGNON
BOEUF BOURGUIGNON
BOEUF BOURGUIGNON
BOEUF BOURGUIGNON
BOEUF BOURGUIGNON
BOEUF BOURGUIGNON
BOEUF BOURGUIGNON
00:10
00:35
04
PERS
OK
OK
Bœuf coupé en cubes de 25g
Vin rouge
Fond de veau
Lardons
Oignons
Huile végétale
800g
250 ml
150 ml
70g
150g
5cs
PRÉPARER LES INGRÉDIENTS
souhaitez-vous démarrer
la recette ?
Faire revenir tous les ingrédients
sauf le liquide pendant 10 min
OUI NON
PRÉCHAUFFAGE
veuillez patienter
FIN DE CUISSON
veuillez patienter
souhaitez-vous arrêter
de dorer ?
OUI NON
souhaitez-vous démarrer
la cuisson ?
OUI NON
ajouter le reste des ingrédients
OK
CUISSON
BOEUF BOURGUIGNON
platentrée
dessert
BON APPÉTIT !
Servir !
MAINTIEN AU CHAUD
Attention à la vapeur à l'ouverture du couvercle
Arrêtez le dorage
BOEUF BOURGUIGNON
recettesingrédients
manuel
filet de cabillaud et brocolis
boeuf bourguignon
lapin aux olives et légumes
goulash
moules marinières
BOEUF BOURGUIGNON - 4 PERS
PRÉPARATION
10min 35min
CUISSON
BOEUF BOURGUIGNON
BOEUF BOURGUIGNON
BOEUF BOURGUIGNON
BOEUF BOURGUIGNON
BOEUF BOURGUIGNON
BOEUF BOURGUIGNON
BOEUF BOURGUIGNON
00:10
00:35
04
PERS
OK
OK
Bœuf coupé en cubes de 25g
Vin rouge
Fond de veau
Lardons
Oignons
Huile végétale
800g
250 ml
150 ml
70g
150g
5cs
PRÉPARER LES INGRÉDIENTS
souhaitez-vous démarrer
la recette ?
Faire revenir tous les ingrédients
sauf le liquide pendant 10 min
OUI NON
PRÉCHAUFFAGE
veuillez patienter
FIN DE CUISSON
veuillez patienter
souhaitez-vous arrêter
de dorer ?
OUI NON
souhaitez-vous démarrer
la cuisson ?
OUI NON
ajouter le reste des ingrédients
OK
CUISSON
BOEUF BOURGUIGNON
platentrée
dessert
BON APPÉTIT !
Servir !
MAINTIEN AU CHAUD
Attention à la vapeur à l'ouverture du couvercle
ok
Suivez les instructions
BOEUF BOURGUIGNON
recettesingrédients
manuel
filet de cabillaud et brocolis
boeuf bourguignon
lapin aux olives et légumes
goulash
moules marinières
BOEUF BOURGUIGNON - 4 PERS
PRÉPARATION
10min 35min
CUISSON
BOEUF BOURGUIGNON
BOEUF BOURGUIGNON
BOEUF BOURGUIGNON
BOEUF BOURGUIGNON
BOEUF BOURGUIGNON
BOEUF BOURGUIGNON
BOEUF BOURGUIGNON
00:10
00:35
04
PERS
OK
OK
Bœuf coupé en cubes de 25g
Vin rouge
Fond de veau
Lardons
Oignons
Huile végétale
800g
250 ml
150 ml
70g
150g
5cs
PRÉPARER LES INGRÉDIENTS
souhaitez-vous démarrer
la recette ?
Faire revenir tous les ingrédients
sauf le liquide pendant 10 min
OUI NON
PRÉCHAUFFAGE
veuillez patienter
FIN DE CUISSON
veuillez patienter
souhaitez-vous arrêter
de dorer ?
OUI NON
souhaitez-vous démarrer
la cuisson ?
OUI NON
ajouter le reste des ingrédients
OK
CUISSON
BOEUF BOURGUIGNON
platentrée
dessert
BON APPÉTIT !
Servir !
MAINTIEN AU CHAUD
Attention à la vapeur à l'ouverture du couvercle
ok
Démarrez la cuisson
BOEUF BOURGUIGNON
recettesingrédients
manuel
filet de cabillaud et brocolis
boeuf bourguignon
lapin aux olives et légumes
goulash
moules marinières
BOEUF BOURGUIGNON - 4 PERS
PRÉPARATION
10min 35min
CUISSON
BOEUF BOURGUIGNON
BOEUF BOURGUIGNON
BOEUF BOURGUIGNON
BOEUF BOURGUIGNON
BOEUF BOURGUIGNON
BOEUF BOURGUIGNON
BOEUF BOURGUIGNON
00:10
00:35
04
PERS
OK
OK
Bœuf coupé en cubes de 25g
Vin rouge
Fond de veau
Lardons
Oignons
Huile végétale
800g
250 ml
150 ml
70g
150g
5cs
PRÉPARER LES INGRÉDIENTS
souhaitez-vous démarrer
la recette ?
Faire revenir tous les ingrédients
sauf le liquide pendant 10 min
OUI NON
PRÉCHAUFFAGE
veuillez patienter
FIN DE CUISSON
veuillez patienter
souhaitez-vous arrêter
de dorer ?
OUI NON
souhaitez-vous démarrer
la cuisson ?
OUI NON
ajouter le reste des ingrédients
OK
CUISSON
BOEUF BOURGUIGNON
platentrée
dessert
BON APPÉTIT !
Servir !
MAINTIEN AU CHAUD
Attention à la vapeur à l'ouverture du couvercle
ok
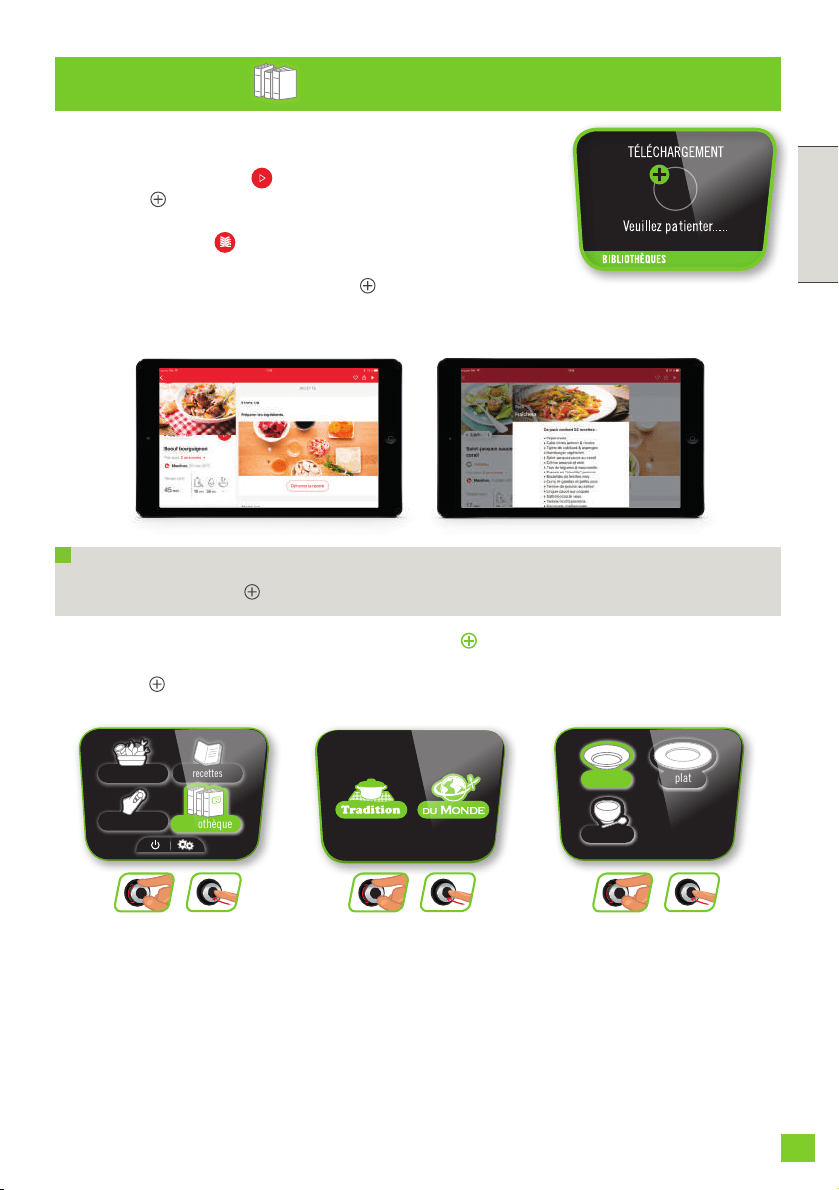
59
FRANÇAIS
59
BIBLIOTHÈQUES
Accéder aux bibliothèques de votre COOK4ME CONNECT:
Vous pouvez retrouver vos packs téléchargés. Lancez vos recettes depuis votre
COOK4ME CONNECT en accédant à votre Bibliothèque.
TELECHARGER DES RECETTES ET DES PACKS:
Vous pouvez cliquer sur pour envoyer une recette sur votre
COOK4ME CONNECT, elle ira directement dans la liste de
«recettes» de votre appareil. Lorsqu’un pack est disponible
pour verrez un logo cliquez sur le texte correspondant pour
télécharger le pack. Celui-ci sera ensuite visible dans l’onglet
«bibliothèques» de votre COOK4ME CONNECT.
N.B. : Vous pouvez à tout moment arrêter le téléchargement en appuyant sur la touche
retour du COOK4ME CONNECT.
Le téléchargement
est en cours
Sélectionnez le sous-
menu «bibliothèque»
platentrée
dessert
bibliothèque
platentrée
dessert
recettes
manuel
ingrédients
bibliothèque
ok
ok
+
Sélectionnez le pack
de recettes désiré
platentrée
dessert
bibliothèque
platentrée
dessert
recettes
manuel
ingrédients
bibliothèque
ok
ok
+
Sélectionnez «entrée»,
«plat» ou «dessert»
et choisissez votre recette
platentrée
dessert
bibliothèque
platentrée
dessert
recettes
manuel
ingrédients
bibliothèque
ok
ok
+

6060
INGRÉDIENTS
agneau
bœuf
lapin
porc
veau
volaille
crevettes / gambas
moules
poisson
saint-jacques
blé
boulgour
orge
quinoa
riz blanc
riz complet / sauvage
sarrasin
artichauts
asperges
aubergines
betteraves
brocolis
carottes
céleris raves
choux
choux de Bruxelles
choux eurs / choux
romanesco
choux vert frisé
côtes de bettes /
blettes
courgettes
endives
épinards
fenouils
haricots verts
lentilles
navets
patates douces
poires
poireaux
poivrons
pommes
pommes de terre
riz & céréales
poissons, coquillages
& crustacé
viandes
légumes / fruits
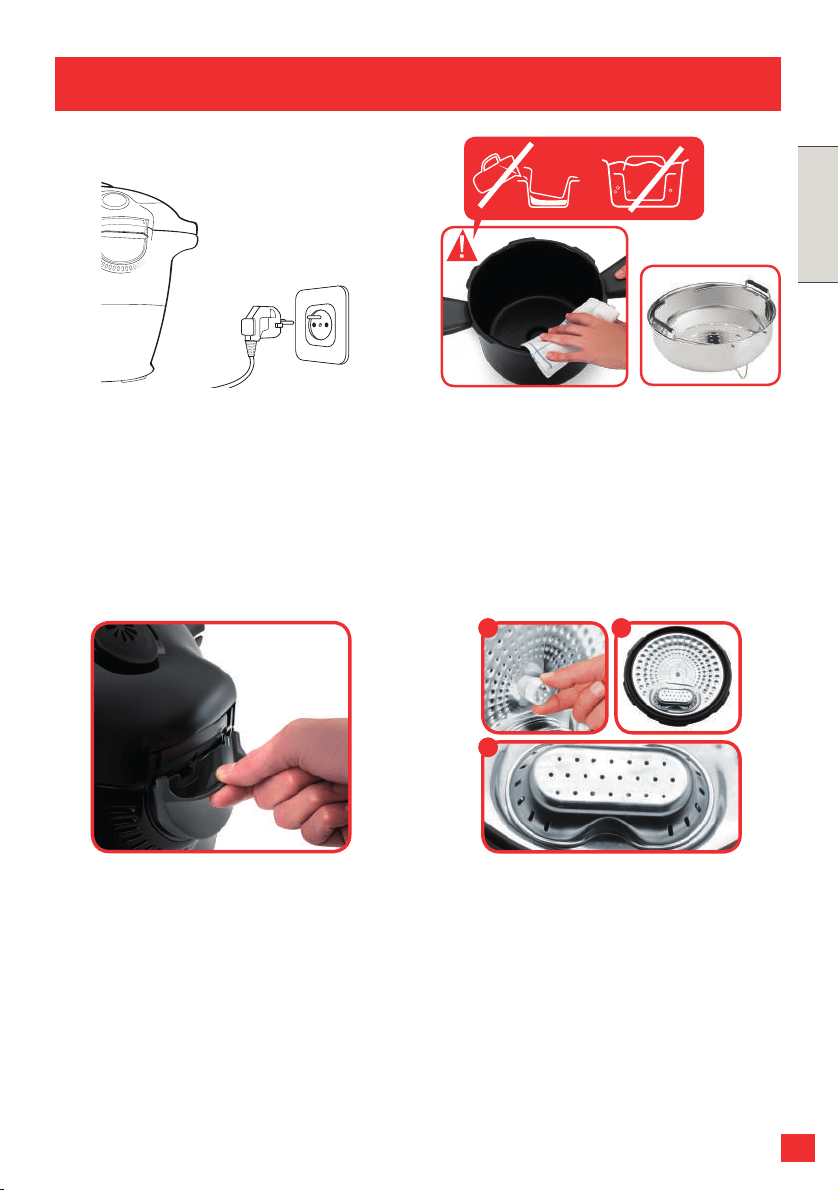
61
FRANÇAIS
61
NETTOYAGE ENTRETIEN
Une fois la cuisson de votre plat terminée,
débranchez l’appareil pour le nettoyer.
Nettoyez l’appareil après chaque
utilisation.
Vous pouvez nettoyer la cuve de cuisson
et le panier vapeur à l’eau chaude
savonneuse ou bien au lave-vaisselle.
Nettoyez le corps de l’appareil à l’aide
d’un chiffon humide.
Après plusieurs passages au lave vaisselle,
l’extérieur de la cuve peut devenir
blanchâtre. Vous pouvez le nettoyer avec
le grattoir de votre éponge.
Après chaque utilisation, sortez le
récupérateur de condensation et nettoyez-
le soigneusement à l’eau claire ou au lave-
vaisselle. Prenez soin de bien le sécher.
Remettez-le ensuite en place, à sa position
initiale.
Pour nettoyer le couvercle métallique, à la
main ou au lave-vaisselle, vous devez le
démonter ainsi que le cache-valve.
1. Dévissez l’écrou au centre du couvercle
métallique
2. Ôtez le couvercle métallique
3. Démontez le cache valve
1 2
3
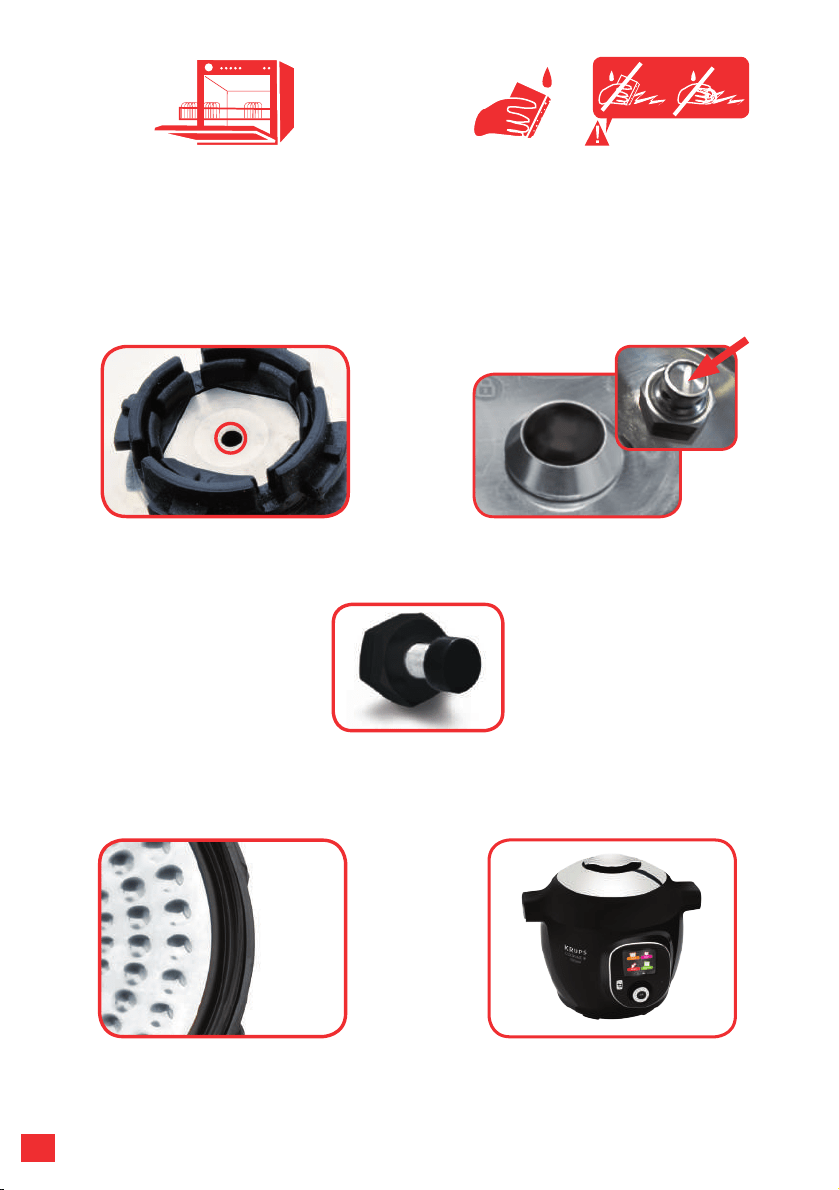
6262
NETTOYAGE À LA MAIN :
Vous pouvez nettoyer le couvercle
métallique à l’eau chaude savonneuse.
Tout d’abord, démontez la bille puis
nettoyez le tout. Essuyez la bille et son
siège avec un chiffon doux.
NETTOYAGE AU LAVE-VAISSELLE :
Vous pouvez mettre le couvercle métallique
tel quel au lave-vaisselle, sans démonter les
valves. Après le passage au lave-vaisselle,
démontez la bille et soufez dans le conduit
an de vérier qu’il ne soit pas obstrué.
Essuyez la bille et son siège soigneusement
avec un chiffon doux.
Avant de remonter la bille, vériez que
le conduit n’est pas obstrué en soufant
dedans.
Appuyez sur la partie interne de la soupape
de sécurité à ressort an de vérier qu’elle
n’est pas colmatée.
Avant de remonter le couvercle intérieur. Nettoyez la partie supérieure de la cuve de cuisson.
Nettoyez l’intérieur du couvercle métallique de l’appareil avec une éponge humide et vériez le
logement du doigt d’aroma an d’être sûr qu’il n’est pas obstrué. Rincez sous l’eau, et vériez la
mobilité du doigt d’aroma.
Remplacez le joint d’étanchéité au
minimum tous les 3 ans. Cette opération
se fera dans un Centre de Services Agréé.
Ne stockez pas l’appareil couvercle
fermé. Laissez-le en position ouverte ou
entr-ouverte ; cela évitera l’apparition de
mauvaises odeurs.

63
FRANÇAIS
63
Transportez l’appareil en vous servant
des deux poignées latérales. Pour plus de
sécurité, veillez à ce que la poignée soit
en position fermée. Pour plus de sécurité,
veillez à ce que le couvercle soit verrouillé.
En cas d’immersion accidentelle de
l’appareil ou si de l’eau a été versée
directement sur l’élément chauffant en
l’absence de la cuve, emmenez l’appareil
dans un Centre de Service Agréé.
Nettoyez l’extérieur du couvercle de l’appareil à l’aide d’une éponge humide. Nettoyez
également la valve silencieuse à l’arrière du couvercle
Nettoyez la partie supérieure de la
cuve de cuisson à l’aide d’un chiffon
humide. Nettoyez également le canal de
récupération à condensation avec un
chiffon humide.
Nettoyez le joint du couvercle métallique
à l’aide d’une éponge humide, puis rincez
abondamment. N’utilisez pas d’objets
coupants.

64
Votre autocuiseur est équipé de plusieurs dispositifs de sécurité :
Sécurité à l’ouverture :
- Si votre appareil est sous pression, le doigt d’aroma est en position haute vérouillant
alors l’ouverture du couvercle. N’essayez jamais d’ouvrir votre appareil en force.
- N’agissez surtout pas sur le doigt d’aroma.
- Assurez-vous que la pression intérieure est retombée (plus d’échappement vapeur
par la valve silencieuse) avant de tenter d’ouvrir le couvercle.
Deux sécurités à la surpression :
- Premier dispositif : la soupape de sécurité libère la pression – voir chapitre Nettoyage
et Entretien.
- Second dispositif : Le joint laisse échapper la vapeur sur l’arrière du couvercle.
Si l’un des systèmes de sécurité à la surpression se déclenche :
Arrêtez votre appareil.
Laissez refroidir complètement votre appareil.
Ouvrez.
Vériez et nettoyez la soupape de sécurité, la bille de décompression et le joint. Voir
chapitre Nettoyage et entretien.
Si après ces vérications et nettoyages, votre produit fuit ou ne fonctionne plus,
ramenez-le dans un Centre de Service agréé SEB.
Régulation de votre appareil :
La régulation de la pression se fait en alimentant ou en coupant l’élément chauffant.
Pour limiter les effets de l’inertie thermique et améliorer la précision de la régulation,
la bille de décompression peut être actionnée automatiquement pour relâcher
brièvement de la vapeur de temps en temps.
SECURITES

65
FRANÇAIS
PROBLÈMES CAUSES POSSIBLES SOLUTION
Le couvercle ne se
ferme pas
Il reste des corps
étrangers entre la cuve et
le plateau chauffant
Enlevez la cuve, vériez la propreté du
plateau chauffant, de l’élément central
et du dessous de cuve. Vériez aussi la
bonne mobilité de l’élément central
La poignée d'ouverture du
couvercle n'est pas sur la
bonne position
Assurez-vous que la poignée
d'ouverture soit en position ouverte et
complète
Le couvercle métallique
et/ou l'écrou de serrage
ne sont pas correctement
remontés ou vissés
complètement
Vériez que vous avez remis tous les
éléments du couvercle métallique en
place, et que l'écrou est serré
Le produit ne
décompresse pas
Le cache bille n’est pas
bien positionné
Laisser le produit refroidir
complètement puis démonter le
couvercle métallique et positionner
correctement le cache bille (repère en
position vérouillage)
Le couvercle ne
s'ouvre pas après
libération de la
vapeur
Le doigt d'aroma reste en
position haute
Après s’être assuré qu’il n’y a plus
d’échappement de vapeur, et que
le produit est totalement froid,
insérez une pique dans le trou situé
entre la poignée d’ouverture et la
valve silencieuse. Prenez garde à
l’échappement de vapeur qui risque
de subvenir après que la tige ait été
enfoncée. Quand il n’y aura plus de
vapeur, essayez d’ouvrir votre appareil
L'appareil ne
monte pas en
pression
Vériez la propreté du
joint, de la soupape de
sécurité violette et du
doigt d’aroma
Nettoyez votre appareil en suivant les
instructions fournies dans la notice
d'utilisation
Vériez que le couvercle
est verrouillé et le repère
soit bien en face du
cadenas fermé. Vériez la
mobilité du doigt d’aroma,
et si besoin le nettoyer
Vériez la mobilité du doigt d’aroma, et
si besoin le nettoyer
La bille de décompression
est mal positionnée ou
sale
Vériez que la bille est bien mise en
place, et que son cache est en position
verrouillée. Nettoyez et essuyez la bille
et son siège
CODES ERREUR Code 24 : la pression
décroit en cuisson sous
pression
Code 21 et 26 : l’appareil
ne monte pas en pression
Veuillez ajouter dans votre recette du
liquide (eau ou sauce liquide)

66
De la vapeur
s’échappe des
bords du couvercle
pendant la cuisson
(fuites)
Le joint du couvercle
métallique et/ou les bords
de cuve sont sales
Nettoyez le joint et le bord de cuve à
l’aide d’un chiffon humide. Veillez à ne
pas utiliser d’instrument coupant
Usure, coupures et
déformations du joint
Le joint doit être changé tous les trois
ans au maximum. Emmenez votre
appareil dans un centre de services
agréé
Bord de cuve abîmé Emmenez votre appareil dans un
centre de services agréé
L’écrou du couvercle
métallique n’a pas été
sufsamment revissé
Revisser l’écrou au centre du couvercle
métallique convenablement
De l'eau coule
derrière l'appareil
Le récupérateur de
condensation n'est pas en
place ou déborde
Assurez-vous que le récupérateur
de condensation est bien en place à
l'arrière de l'appareil et que le conduit
d’écoulement ne soit pas bouché
Les sécurités et/ou orices
sont obstrués
Vérier que le remplissage n’est
pas excessif et qu’il ne s’agit pas
d’aliments qui se dilatent (voir livret de
consignes de sécurité)
Le panneau de
commande ne
s'allume pas
L’appareil n’est pas
branché ou est en veille
Assurez-vous que le cable
d'alimentation est branché à la fois sur
votre appareil et sur le secteur. Vériez
que l’appareil n’est pas en veille en
appuyant sur le bouton « OK »
L'appareil est endommagé Emmenez votre appareil dans un
centre de services agréé
On ne peut pas
retirer le couvercle
métallique, il est
bloqué
Le cache-bille du
couvercle métallique n’a
pas été bien remis en
place
Dévissez l’écrou au centre du
couvercle métallique, puis appuyez
sur la sonde au centre de l’écrou. Cela
débloque le couvercle, et vous pourrez
accéder au cache-bille. Assurez-vous
qu’il soit bien remis en place, ainsi que
la bille

67
FRANÇAIS
KRUPS GARANTIE INTERNATIONALE
: www.krups.com
Ce produit est réparable par KRUPS, pendant et après la période de garantie.
Les accessoires, consommables, et autres pièces remplaçables directement par
l'utilisateur, peuvent être commandés, s’ils sont disponibles localement, sur le site internet
www.krups.com
La Garantie :
Ce produit est garanti par KRUPS (adresse et contacts dans la liste des pays de la
Garantie Internationale KRUPS) contre tout défaut de fabrication ou de matière ou de
main d’oeuvre, pendant 2 ans à partir de la date d'achat initiale ou la date de livraison.
Cette Garantie Internationale du fabricant KRUPS vient en complément des droits des
consommateurs.
La Garantie Internationale du fabricant couvre tous les coûts de remise en état d'un
produit reconnu défectueux pour redevenir conforme à ses spécications d'origine, par
la réparation, la main-d'œuvre, et le remplacement éventuel de pièces défectueuses. Au
choix de KRUPS, un produit de remplacement équivalent ou supérieur peut être proposé
à la place de la réparation du produit défectueux. Les obligations de KRUPS dans le cadre
de cette garantie se limitent exclusivement à cette réparation ou ce remplacement.
Conditions & Exclusions :
Cette garantie ne couvre pas les dommages qui seraient le résultat d'une mauvaise
utilisation, d'une négligence, du non respect des instructions d'utilisation et de
maintenance, de l'utilisation avec une alimentation électrique non conforme à celle
spéciée sur la plaque signalétique, ou d'une modication ou d'une réparation non
autorisée du produit. Elle n'inclut également pas l'usure normale du produit, ni la
maintenance ou le remplacement de pièces consommables, ni les cas suivants :
–dommage résultant de la foudre ou surtension électrique
–utilisation d'une eau ou d’un consommable non adapté
–entrée d'eau, de poussière, d'insectes dans le produit (hors appareils aux caractéristiques
spécialement conçues pour les insectes)
–entartrage (tout détartrage doit être réalisé conformément aux instructions dans le
mode d'emploi)
–dommages mécaniques, surcharge
–dommages ou dysfonctionnements dus à l'utilisation avec un voltage ou une fréquence
électrique non conformes
–tout accident lié à un feu, une inondation, etc
–usage professionnel ou sur un lieu de travail
–verre ou céramique endommagé
Cette garantie ne s'applique pas aux produits traqués, ou aux dommages résultant
d'une utilisation impropre ou sans entretien, aux problèmes d'emballage ou de transport
pendant l'expédition du produit par son propriétaire.
An d’offrir le meilleur service après-vente possible et d’améliorer constamment la
satisfaction de ses clients, KRUPS pourra envoyer une enquête de satisfaction à tous ses
clients dont le produit aura été réparé ou échangé par l’un des partenaires service agréés
de KRUPS.
La Garantie Internationale de KRUPS couvre exclusivement les produits achetés dans un
des pays listés, et utilisés à des ns domestiques également dans un des pays listés dans
la Liste des Pays. En cas d'utilisation dans un pays différent du pays d'achat :
a) La Garantie Internationale de KRUPS ne s'applique qu'en cas d'adéquation du produit
avec les standards et normes locales, tels que le voltage, la fréquence électrique,
le type de prise électrique, ou toute autre exigence locale légale ou toute autre

68
spécication technique locale.
b) Le processus de réparation pour des produits achetés en dehors du pays d'utilisation
peut exiger un temps de réparation plus long si le produit n'est pas localement vendu
par KRUPS.
c) Au cas où le produit ne serait pas réparable dans le pays d'emploi, la Garantie
Internationale de KRUPS est limitée au remplacement par un produit équivalent ou un
produit alternatif de même valeur, si c'est possible.
Droits des Consommateurs :
Cette Garantie Internationale de KRUPS n'affecte ni les droits légaux dont bénécie tout
consommateur localement, qui ne sauraient être exclus ou limités, ni les droits légaux
envers un distributeur auprès de qui aurait été acheté un produit. Cette Garantie donne au
consommateur des droits spéciques, et le consommateur peut par ailleurs bénécier des
droits particuliers en fonction du Pays, de l’Etat ou de la Province. Le consommateur peut
faire usage de ces droits de son seul fait.
***Veuillez conserver ce document qui vous sera utile en cas de réclamation sous garantie.
Pour la France uniquement :
Article L 217-4 du Code de la consommation : « Le vendeur est tenu de livrer un bien
conforme au contrat et répond des défauts de conformité existant lors de la délivrance.
Il répond également des défauts de conformité résultant de l'emballage, des instructions
de montage ou de l'installation lorsque celle-ci a été mise à sa charge par le contrat ou a
été réalisée sous sa responsabilité. »
Article L 217-5 du Code de la consommation: « Pour être conforme au contrat, le bien
doit :
1° Etre propre à l'usage habituellement attendu d'un bien semblable et, le cas échéant :
- correspondre à la description donnée par le vendeur et posséder les qualités que celui-
ci a présentées à l'acheteur sous forme d'échantillon ou de modèle ;
- présenter les qualités qu'un acheteur peut légitimement attendre eu égard aux
déclarations publiques faites par le vendeur, par le producteur ou par son représentant,
notamment dans la publicité ou l'étiquetage ;
2° Ou présenter les caractéristiques dénies d'un commun accord par les parties ou être
propre à tout usage spécial recherché par l'acheteur, porté à la connaissance du vendeur
et que ce dernier a accepté. »
Article L 217-12 du Code de la consommation : « L'action résultant du défaut de
conformité se prescrit par deux ans à compter de la délivrance du bien. »
Article L 217-16 du Code de la consommation : « Lorsque l'acheteur demande au
vendeur, pendant le cours de la garantie commerciale qui lui a été consentie lors de
l'acquisition ou de la réparation d'un bien meuble, une remise en état couverte par la
garantie, toute période d'immobilisation d'au moins sept jours vient s'ajouter à la durée de
la garantie qui restait à courir. Cette période court à compter de la demande d'intervention
de l'acheteur ou de la mise à disposition pour réparation du bien en cause, si cette mise à
disposition est postérieure à la demande d'intervention. »
Article 1641 du Code civil : « Le vendeur est tenu de la garantie à raison des défauts
cachés de la chose vendue qui la rendent impropre à l'usage auquel on la destine, ou qui
diminuent tellement cet usage que l'acheteur ne l'aurait pas acquise, ou n'en aurait donné
qu'un moindre prix, s'il les avait connus. »
Article 1648, al.1er du Code civil : « L'action résultant des vices rédhibitoires doit être
intentée par l'acquéreur dans un délai de deux ans à compter de la découverte du vice. »

69
ITALIANO
CONSIGLI DI SICUREZZA
Leggere attentamente le seguenti istruzioni.
Utilizzare l’apparecchio esclusivamente in luogo chiuso.
Per la pulizia dell’apparecchio, fare riferimento alle indicazioni
fornite nelle istruzioni d’uso. Il recipiente di cottura e il cestello
vapore possono essere lavati con acqua calda e detersivo
per piatti o in lavastoviglie. Pulire il corpo dell’apparecchio
con un panno umido.
Non immergere mai in acqua l’apparecchio.
Un uso scorretto dell’apparecchio e dei suoi accessori può
danneggiare l’apparecchio e provocare lesioni.
Non toccare mai le superci calde dell’apparecchio. Dopo
l’utilizzo la resistenza rimane ancora calda.
Per la vostra sicurezza, questo prodotto è conforme alle
norme in vigore (Direttiva Basso Voltaggio, Compatibilità
elettromagnetica, Materiali compatibili con il cibo,
Ambiente,...).
Questo apparecchio non dovrebbe essere utilizzato da
persone (compresi i bambini) le cui capacità siche, sensoriali
o mentali sono ridotte, o da persone prive di esperienza o
di informazioni riguardo al prodotto, tranne se hanno potuto
beneciare, tramite una persona responsabile della loro
sicurezza, di una supervisione o di istruzioni preliminari
relative all’utilizzo dell’apparecchio.
È opportuno sorvegliare i bambini per assicurarsi che non
giochino con l’apparecchio.
Se il cavo di alimentazione e’ danneggiato, esso deve essere
sostituito dal costruttore o dal suo servizio assistenza tecnica
o comunque da una persona con qualica similare, in modo da
prevenire ogni rischio. Non sostituire il cavo d’alimentazione
in dotazione con un altro cavo.
Questo apparecchio è stato concepito per uso unicamente
domestico. Non è stato ideato per essere utilizzato nei

70
seguenti casi, che restano esclusi dalla garanzia:
– in angoli cottura riservati al personale nei negozi, negli ufci
e in altri ambienti professionali,
– nelle fabbriche,
– dai clienti di alberghi, motel e altre strutture ricettive
residenziali,
– in ambienti tipo camere per vacanze.
L’apparecchio non deve essere utilizzato da bambini. Tenere
l’apparecchio e il cavo fuori dalla portata dei bambini.
Questo apparecchio può essere utilizzato da persone le
cui capacità siche, sensoriali o mentali sono ridotte o
le cui conoscenze non sono sufcienti, a condizione che
benecino di una sorveglianza o che abbiano ricevuto
istruzioni circa l’utilizzo dell’apparecchio in tutta sicurezza e
che comprendano bene i pericoli potenziali.
I bambini non devono giocare con l’apparecchio.
Non riempire l’apparecchio oltre il livello MAX indicato sul
recipiente di cottura. Non superare la metà del recipiente di
cottura con alimenti che aumentano di volume durante la
cottura, come il riso o le verdure disidratate; ridurre il volume
di acqua per evitare il rischio di fuoriuscita.
Rispettare le raccomandazioni relative al volume di alimenti e
di acqua per evitare fuoriuscite che potrebbero danneggiare
l’apparecchio e causare ferite.
Prima di ogni utilizzo vericare che la sfera di decompressione
e la valvola di sicurezza siano pulite (vedere paragrafo Pulizia
e manutenzione).
Non inserire oggetti o corpi estranei nel sistema di
decompressione. Non sostituire la sfera.
Quando si apre il coperchio, tenerlo sempre dalla maniglia
di apertura/chiusura. Per spostarlo, allineare le braccia alle
maniglie laterali per evitare di scottarsi: è infatti possibile che
dell’acqua bollente rimanga tra il supporto della guarnizione
a tenuta stagna e il coperchio.

71
ITALIANO
Inoltre, prestare attenzione a non scottarsi con il vapore che
esce dall’apparecchio al momento dell’apertura: all’inizio
lasciare il coperchio socchiuso per far fuoriuscire lentamente
il vapore.
Non cercare mai di forzare l’apertura del coperchio.
Non aprire il coperchio nché l’apparecchio è sotto pressione.
Per questo, fare riferimento alle istruzioni d’uso.
Alla luce della disparità delle norme vigenti, se l’apparecchio viene utilizzato in un paese
diverso da quello in cui è stato acquistato, farlo controllare da un centro assistenza
autorizzato.
Utilizzare esclusivamente componenti di ricambio adatti al modello, in particolare la
guarnizione a tenuta stagna, il recipiente di cottura e il coperchio metallico.
Fare attenzione a non danneggiare la guarnizione a tenuta stagna. Se è danneggiata, farla
sostituire presso un centro assistenza autorizzato.
La fonte di calore per la cottura è inclusa nell’apparecchio.
Non mettere mai l’apparecchio in un forno o su una piastra caldi. Non posizionare
l’apparecchio vicino a una amma libera o a un oggetto inammabile.
Non riscaldare il recipiente di cottura utilizzando una fonte di calore diversa dalla piastra
riscaldante dell’apparecchio e non utilizzare mai un altro recipiente. Non utilizzare il
recipiente di cottura con altri apparecchi.
Quando l’apparecchio è sotto pressione, spostarlo con cautela. Non toccare mai le
superci calde dell’apparecchio. Per spostarlo, utilizzare le apposite maniglie e, se
necessario, indossare guanti da cucina. Non utilizzare mai l’impugnatura del coperchio
per sollevare l’apparecchio.
Non utilizzare mai l’apparecchio per funzioni diverse da quelle per le quali è stato
progettato.
Questo prodotto non è uno sterilizzatore. Non utilizzarlo per sterilizzare vasetti.
L’apparecchio cuoce alimenti sotto pressione. Un utilizzo scorretto può esporre al rischio
di scottature dovute al vapore.
Assicurarsi che l’apparecchio sia chiuso correttamente prima di metterlo sotto pressione
(vedere le Istruzioni d’uso).
Non utilizzare l’apparecchio a vuoto, senza recipiente di cottura né liquido all’interno:
potrebbe danneggiarsi gravemente.
Terminata la cottura di un taglio di carne con pelle spessa (ad esempio lingua di bue), non
forare la pelle se si è gonata per evitare di scottarsi. Forarla avant della cottura.
• Terminata la cottura di alimenti dalla consistenza spessa (ceci, rabarbaro, frutta candita,
ecc.) scuotere leggermente l’apparecchio prima di aprirlo per evitare che dagli alimenti
fuoriesca acqua o che il succo di cottura schizzi al momento dell’apertura.
Non utilizzare l’apparecchio per friggere degli alimenti in olio. È invece possibile farli
dorare o rosolare.
Quando, in modalità doratura, si aggiungono alimenti o ingredienti nel recipiente di cottura
caldo, prestare attenzione al rischio di bruciature dovute agli schizzi di olio.
Durante la cottura e nel momento in cui scarica automaticamente la pressione a ne cottura,
l’apparecchio genera calore e vapore. Tenere il viso e le mani lontani dall’apparecchio per
evitare scottature. Non toccare il coperchio durante la cottura.
Non posizionare elementi (canovacci o altro) tra il corpo dell’apparecchio e il coperchio
per tenerlo aperto: potrebbe vericarsi una deformazione permanente della guarnizione

72
a tenuta stagna.
Non toccare mai i dispositivi di sicurezza, se non durante le operazioni di pulizia e di
manutenzione dell’apparecchio che vanno effettuate seguendo le istruzioni.
Assicurarsi che la parte inferiore del recipiente di cottura e la resistenza siano sempre
puliti. Assicurarsi che l’elemento centrale della piastra riscaldante sia mobile.
Non riempire l’apparecchio senza prima aver inserito il suo recipiente di cottura.
Per evitare di danneggiare il rivestimento antiaderente del recipiente di cottura, utilizzare
un cucchiaio di plastica o di legno. Non tagliare mai gli ingredienti direttamente nel
recipiente di cottura.
Se si verica una signicativa fuoriuscita di vapore dal bordo del coperchio, scollegare
immediatamente il cavo d’alimentazione e vericare la pulizia dell’apparecchio. Se
necessario portare l’apparecchio presso un centro assistenza autorizzato per la
riparazione.
Non sollevare l’apparecchio utilizzando le maniglie del recipiente di cottura estraibile.
Utilizzare sempre le due maniglie laterali situate sul corpo dell’apparecchio, indossando
guanti da cucina se l’apparecchio è caldo. Per una maggiore sicurezza, assicurarsi anche
che il coperchio sia ben chiuso prima di spostarlo.
Se durante la cottura sotto pressione la valvola silenziosa dell’apparecchio libera
continuativamente e per più di 1 minuto la pressione, portare l’apparecchio presso un
centro assistenza autorizzato per la riparazione.
Non utilizzare un apparecchio danneggiato, rivolgersi al centro assistenza autorizzato.
LEGGETE ATTENTAMENTE LE SEGUENTI INDICAZIONI.
Non utilizzare componenti di ricambio diversi da quelli forniti presso un centro assistenza
autorizzato.
La garanzia non copre l’usura anomala del recipiente di cottura.
Leggere attentamente le Istruzioni d’uso prima di utilizzare l’apparecchio per la prima
volta. Qualsiasi utilizzo non conforme alle istruzioni comporterà l’annullamento della
responsabilità e della garanzia del produttore.
Conformemente alle normative in vigore, è necessario preparare l’apparecchio e renderlo
inutilizzabile (scollegandolo e tagliando il cavo d’alimentazione) prima di smaltirlo.
Partecipiamo alla protezione dell’ambiente !
Il vostro apparecchio è composto da diversi materiali che possono essere riciclati.
Lasciatelo in un punto di raccolta o presso un Centro Assistenza Autorizzato.
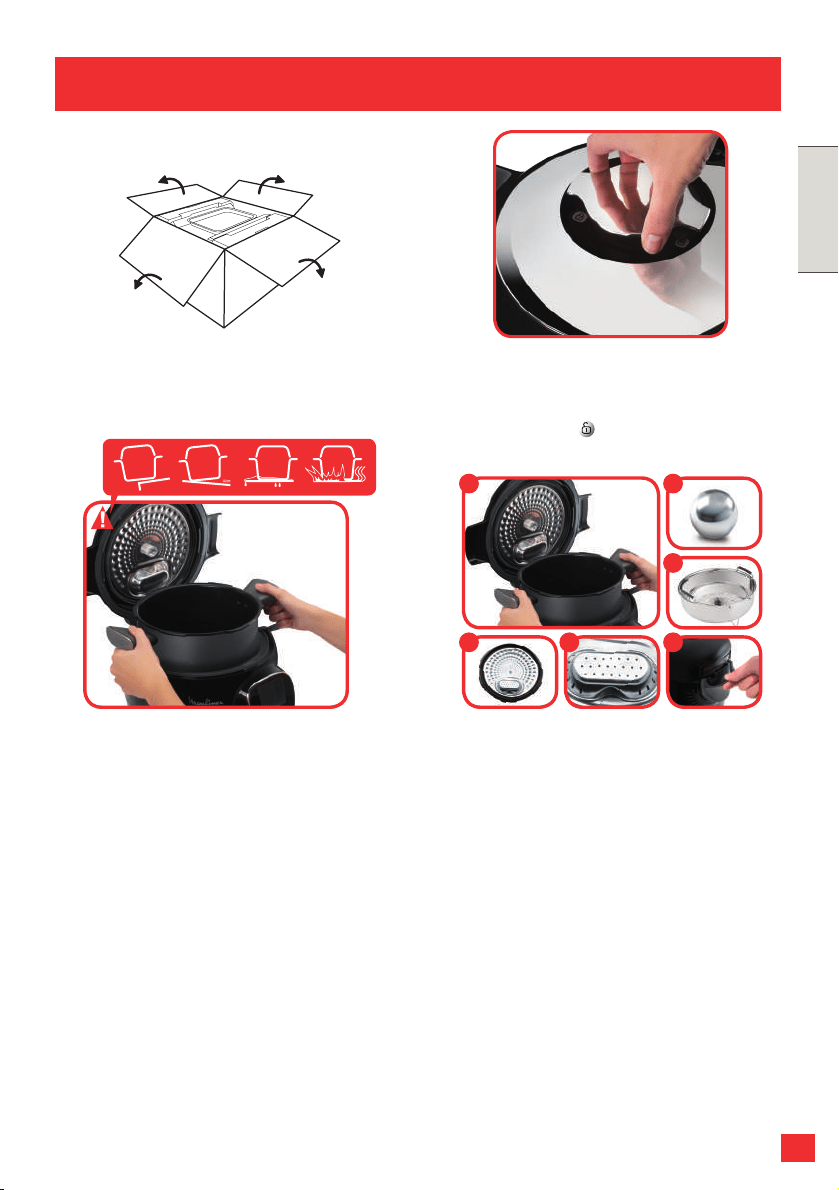
73
ITALIANO
73
Estrarre l’apparecchio dalla confezione e
leggere attentamente le istruzioni prima di
usare il pro dotto per la prima volta.
Installare l’apparecchio su una supercie
piana, asciutta e fredda. Rimuovere tutti
i materiali di imballaggio, gli adesivi e
i vari accessori all’interno e all’esterno
dell’apparecchio.
Per aprire il prodotto, ruotare la manopola
di apertura/chiusura sulla parte superiore
del coperchio in modo da vedere il
lucchetto aperto
PULIRE TUTTI I COMPONENTI
1. Pentola di cottura
2. Coperchio in metallo
3. Coperchio della valvola
4. Raccogli-condensa
5. Cestello vapore
6. Sfera di decompressione
PRIMA DELL’USO
1 6
5
432
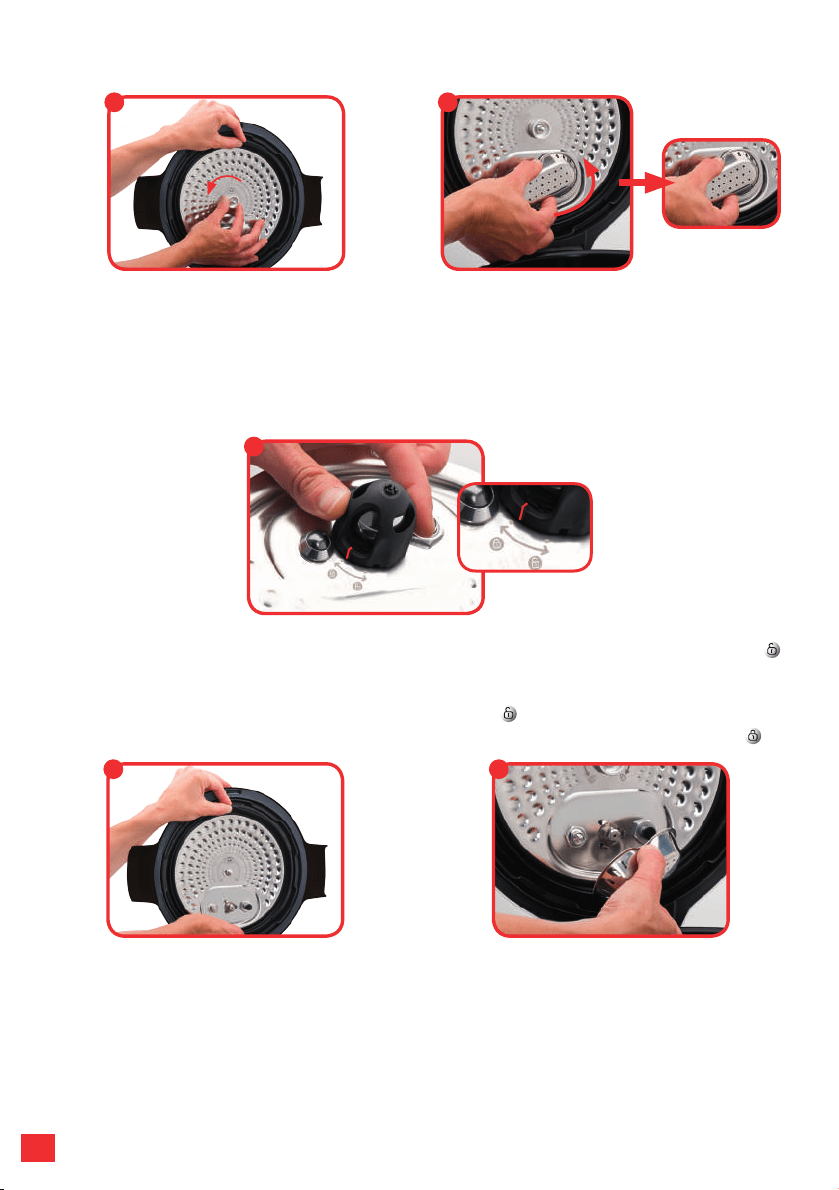
7474
COME DISASSEMBLARE E RIASSEMBLARE IL COPERCHIO
COME DISASSEMBLARE IL COPERCHIO
IN METALLO
Afferrare il sottogruppo del coperchio
tenendolo per la guarnizione e svitare
il dado centrale in senso antiorario.
Rimuovere il dado, quindi il coperchio.
RIPOSIZIONARE IL SOTTOGRUPPO
DEL COPERCHIO
Afferrare il sottogruppo sulla guarnizione
come illustrato in gura. Allineare il
coperchio con l’asse centrale e premerlo
contro il sottogruppo. Riposizionare il
dado e ruotarlo in senso orario, serrandolo
il più possibile.
COME RIMUOVERE IL COPERCHIO
DELLA VALVOLA
Afferrare il coperchio della valvola sulla
parte centrale (come illustrato); quindi
ruotarlo leggermente per sbloccarlo.
Pulire il coperchio della valvola, prestando
particolare attenzione all’interno (vericare
l’assenza di residui alimentari).
IPOSIZIONARE IL COPERCHIO DELLA
VALVOLA
Afferrare il coperchio della valvola come
indicato in gura (afferrando la parte
centrale). Allineare la forma circolare
interna con le tre sporgenze, quindi
spingere il coperchio della valvola no a
udire un “clic”. Il coperchio della valvola
deve aderire perfettamente all’interno del
coperchio.
ACCEDERE ALLA SFERA DI DECOMPRESSIONE
Ruotare il coperchio della sfera in senso antiorario no a portare la linea in posizione
. Sollevare il coperchio. Rimuovere la sfera e pulirla delicatamente insieme al coperchio,
con acqua e detersivo. Asciugare la sfera con un panno morbido, quindi riposizionarla.
Riposizionare la sfera e riportare la linea in posizione . Fissare il coperchio della sfera
ruotandolo nché la linea non si trova nella posizione indicata dal simbolo di chiusura .
1
4 5
2
3

75
ITALIANO
75
Alla prima accensione, apparirà il menu Impostazioni:
FUNZIONAMENTO
1
2
ok
ok
CONTROLLI INTERFACCIA
SELEZIONA CONFERMA
RIAVVIA
RIAVVIA
3 s
Selezionare il paese
LANGUAGE
Italian
English
French
Deutsch
Spanish
COUNTRY
UNIT
Italy
United Kingdom
France
Germany
Spain
cups / oz gr / ml
UNIT
cups / oz gr / ml
ok
ok
+
Selezionare la lingua
LANGUAGE
Italian
English
French
Deutsch
Spanish
COUNTRY
UNIT
Italy
United Kingdom
France
Germany
Spain
cups / oz gr / ml
UNIT
cups / oz gr / ml
ok
ok
+
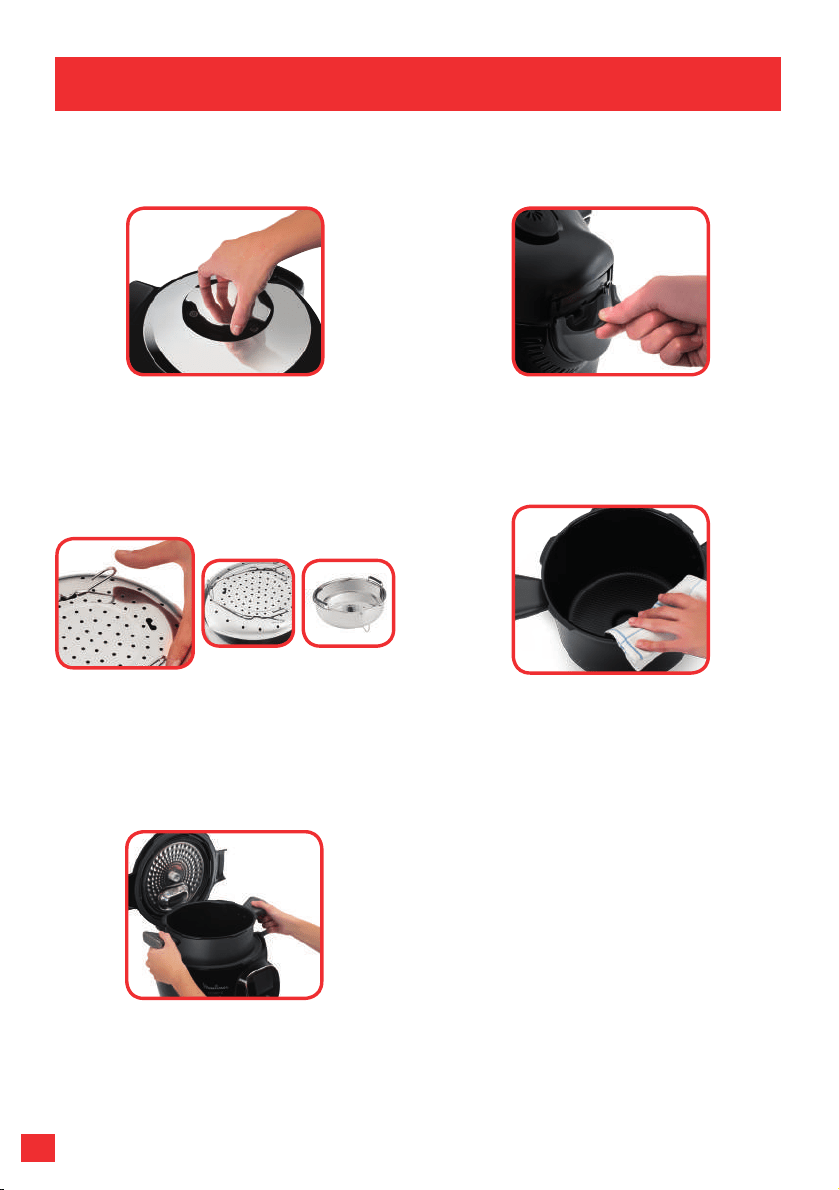
7676
APRIRE IL COPERCHIO
Per aprire il prodotto, ruotare la manopola
di apertura/chiusura in modo da vedere
il lucchetto aperto . Non cercare mai di
forzare l’apertura del coperchio.
INSTALLARE IL RACCOGLI-CONDENSA
Vericare che il raccogli-condensa
sia vuoto, quindi installarlo sul retro
dell’apparecchio.
Posizionare quindi il recipiente
nell’apparecchio, inserendo correttamente
le impugnature nelle tacche.
INSERIRE LA PENTOLA
NELL’APPARECCHIO
Pulire la parte inferiore della pentola di
cottura. Vericare che la parte inferiore
della pentola e la piastra riscaldante siano
prive di residui alimentari o liquidi.
INSTALLARE IL SUPPORTO SOTTO IL
CESTELLO VAPORE
Prendere il supporto tra pollice e indice per
installarlo sotto il cestello vapore.
Non usare mai l’apparecchio senza la pentola di cottura.
Al primo utilizzo dell’apparecchio, la pentola potrebbe emettere un leggero odore. È
un fenomeno normale.
USO
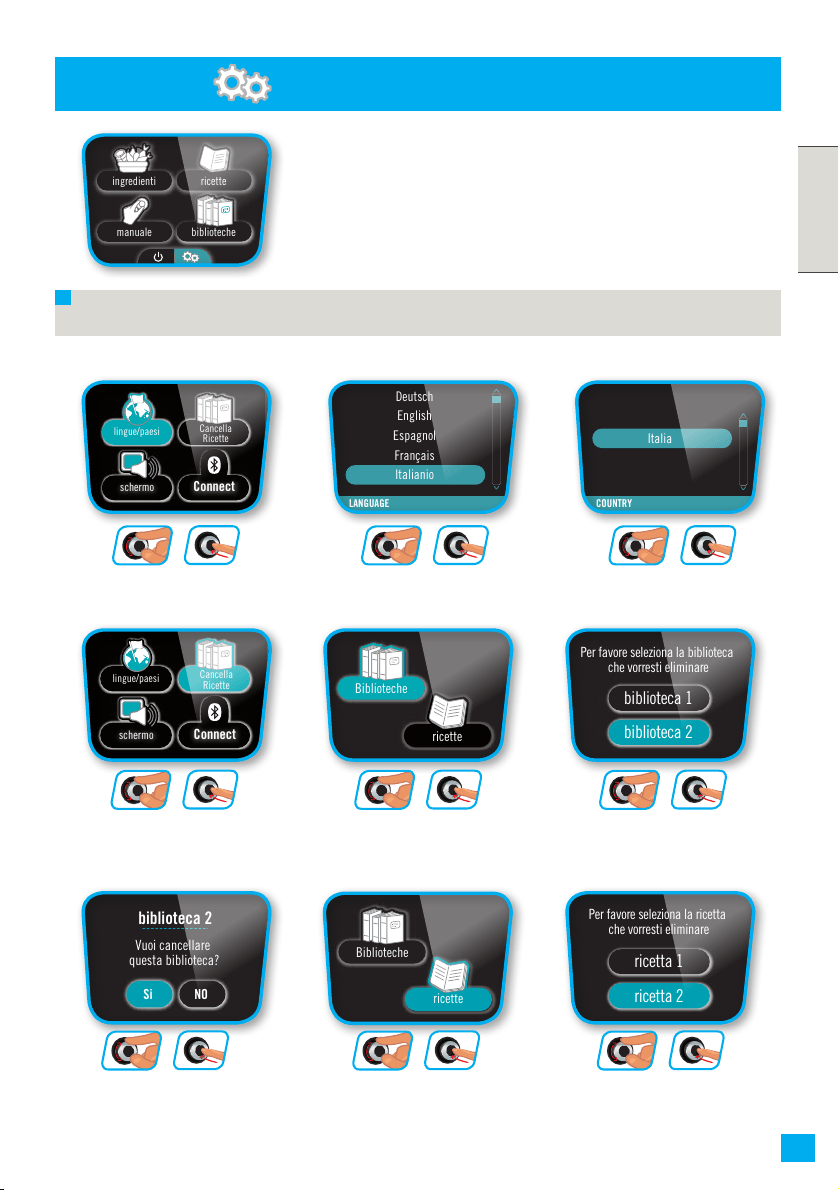
77
ITALIANO
77
MENU IMPOSTAZIONI
Nota: anche se i suoni sono disattivati, gli avvisi acustici rimangono attivi.
Selezionare
“lingua/paese”
biblioteche
ricetteingredienti
manuale
COUNTRY
Italia
LANGUAGE
Deutsch
English
Espagnol
Français
Italianio
schermo
segnali acustici
luminosità
modalità demo
luminosità
modalità demo
OFF ON
modalità demo
3424
RICETTA 2
Vuoi cancellare
questa ricetta?
Si NO
Per favore seleziona la ricetta
che vorresti eliminare
ricetta 1
segnali acustici
OFF ON
lingue/paesi
Cancella
Ricette
schermo
Connect
ricetta 2
OFF ON
Connect
lingue/paesi
Cancella
Ricette
schermo
Connect
lingue/paesi
Cancella
Ricette
schermo
Connect
ricette
Biblioteche
Per favore seleziona la biblioteca
che vorresti eliminare
biblioteca 1
biblioteca 2
biblioteca 2
Vuoi cancellare
questa biblioteca?
Si NO
modalità demo
luminosità
schermo
segnali acustici
lingue/paesi
Cancella
Ricette
schermo
Connect
ok
ok
+
Selezionate “Eliminare
ricette”
biblioteche
ricetteingredienti
manuale
COUNTRY
Italia
LANGUAGE
Deutsch
English
Espagnol
Français
Italianio
schermo
segnali acustici
luminosità
modalità demo
luminosità
modalità demo
OFF ON
modalità demo
3424
RICETTA 2
Vuoi cancellare
questa ricetta?
Si NO
Per favore seleziona la ricetta
che vorresti eliminare
ricetta 1
segnali acustici
OFF ON
lingue/paesi
Cancella
Ricette
schermo
Connect
ricetta 2
OFF ON
Connect
lingue/paesi
Cancella
Ricette
schermo
Connect
lingue/paesi
Cancella
Ricette
schermo
Connect
ricette
Biblioteche
Per favore seleziona la biblioteca
che vorresti eliminare
biblioteca 1
biblioteca 2
biblioteca 2
Vuoi cancellare
questa biblioteca?
Si NO
modalità demo
luminosità
schermo
segnali acustici
lingue/paesi
Cancella
Ricette
schermo
Connect
ok
ok
+
Selezionate “ricette”
recettes
manuel
ingrédients
PAYS
Allemagne
Espagne
France
Italie
Pays-Bas
LANGUE
allemand
espagnol
français
italien
néerlandais
écran
son
son
LUMINOSITÉ
mode démo
luminosité
mode démo
luminosité
MODE DÉMO
OFF ON
MODE DÉMO
3424
RECETTE 2
souhaitez-vous supprimer
cette recette ?
OUI NON
veuillez sélectionner la
recette à supprimer
recette 1
BIBLIOTHÈQUE 2
souhaitez-vous supprimer
cette bibliothèque ?
OUI NON
veuillez sélectionner la
bibliothèque à supprimer
bibliothèque 1
bibliothèque 2
SON
OFF ON
écran
langues/pays
suppression
recettes
écran/son
Connect
langues/pays
suppression
recettes
écran/son
Connect
langues/pays
suppression
recettes
écran/son
Connect
langues/pays
suppression
recettes
écran/son
Connect
bibliothèques
recettes
Biblioteche
ricette
recette 2
ok
ok
+
Desiderate eliminare
questa biblioteca?
biblioteche
ricetteingredienti
manuale
COUNTRY
Italia
LANGUAGE
Deutsch
English
Espagnol
Français
Italianio
schermo
segnali acustici
luminosità
modalità demo
luminosità
modalità demo
OFF ON
modalità demo
3424
RICETTA 2
Vuoi cancellare
questa ricetta?
Si NO
Per favore seleziona la ricetta
che vorresti eliminare
ricetta 1
segnali acustici
OFF ON
lingue/paesi
Cancella
Ricette
schermo
Connect
ricetta 2
OFF ON
Connect
lingue/paesi
Cancella
Ricette
schermo
Connect
lingue/paesi
Cancella
Ricette
schermo
Connect
ricette
Biblioteche
Per favore seleziona la biblioteca
che vorresti eliminare
biblioteca 1
biblioteca 2
biblioteca 2
Vuoi cancellare
questa biblioteca?
Si NO
modalità demo
luminosità
schermo
segnali acustici
lingue/paesi
Cancella
Ricette
schermo
Connect
ok
ok
+
Selezionare la lingua
biblioteche
ricetteingredienti
manuale
COUNTRY
Italia
LANGUAGE
Deutsch
English
Espagnol
Français
Italianio
schermo
segnali acustici
luminosità
modalità demo
luminosità
modalità demo
OFF ON
modalità demo
3424
RICETTA 2
Vuoi cancellare
questa ricetta?
Si NO
Per favore seleziona la ricetta
che vorresti eliminare
ricetta 1
segnali acustici
OFF ON
lingue/paesi
Cancella
Ricette
schermo
Connect
ricetta 2
OFF ON
Connect
lingue/paesi
Cancella
Ricette
schermo
Connect
lingue/paesi
Cancella
Ricette
schermo
Connect
ricette
Biblioteche
Per favore seleziona la biblioteca
che vorresti eliminare
biblioteca 1
biblioteca 2
biblioteca 2
Vuoi cancellare
questa biblioteca?
Si NO
modalità demo
luminosità
schermo
segnali acustici
lingue/paesi
Cancella
Ricette
schermo
Connect
ok
ok
+
Selezionate “biblioteche”
biblioteche
ricetteingredienti
manuale
COUNTRY
Italia
LANGUAGE
Deutsch
English
Espagnol
Français
Italianio
schermo
segnali acustici
luminosità
modalità demo
luminosità
modalità demo
OFF ON
modalità demo
3424
RICETTA 2
Vuoi cancellare
questa ricetta?
Si NO
Per favore seleziona la ricetta
che vorresti eliminare
ricetta 1
segnali acustici
OFF ON
lingue/paesi
Cancella
Ricette
schermo
Connect
ricetta 2
OFF ON
Connect
lingue/paesi
Cancella
Ricette
schermo
Connect
lingue/paesi
Cancella
Ricette
schermo
Connect
ricette
Biblioteche
Per favore seleziona la biblioteca
che vorresti eliminare
biblioteca 1
biblioteca 2
biblioteca 2
Vuoi cancellare
questa biblioteca?
Si NO
modalità demo
luminosità
schermo
segnali acustici
lingue/paesi
Cancella
Ricette
schermo
Connect
ok
ok
+
Selezionate “ricetta 2”
biblioteche
ricetteingredienti
manuale
COUNTRY
Italia
LANGUAGE
Deutsch
English
Espagnol
Français
Italianio
schermo
segnali acustici
luminosità
modalità demo
luminosità
modalità demo
OFF ON
modalità demo
3424
RICETTA 2
Vuoi cancellare
questa ricetta?
Si NO
Per favore seleziona la ricetta
che vorresti eliminare
ricetta 1
segnali acustici
OFF ON
lingue/paesi
Cancella
Ricette
schermo
Connect
ricetta 2
OFF ON
Connect
lingue/paesi
Cancella
Ricette
schermo
Connect
lingue/paesi
Cancella
Ricette
schermo
Connect
ricette
Biblioteche
Per favore seleziona la biblioteca
che vorresti eliminare
biblioteca 1
biblioteca 2
biblioteca 2
Vuoi cancellare
questa biblioteca?
Si NO
modalità demo
luminosità
schermo
segnali acustici
lingue/paesi
Cancella
Ricette
schermo
Connect
ok
ok
+
Selezionare il paese
biblioteche
ricetteingredienti
manuale
COUNTRY
Italia
LANGUAGE
Deutsch
English
Espagnol
Français
Italianio
schermo
segnali acustici
luminosità
modalità demo
luminosità
modalità demo
OFF ON
modalità demo
3424
RICETTA 2
Vuoi cancellare
questa ricetta?
Si NO
Per favore seleziona la ricetta
che vorresti eliminare
ricetta 1
segnali acustici
OFF ON
lingue/paesi
Cancella
Ricette
schermo
Connect
ricetta 2
OFF ON
Connect
lingue/paesi
Cancella
Ricette
schermo
Connect
lingue/paesi
Cancella
Ricette
schermo
Connect
ricette
Biblioteche
Per favore seleziona la biblioteca
che vorresti eliminare
biblioteca 1
biblioteca 2
biblioteca 2
Vuoi cancellare
questa biblioteca?
Si NO
modalità demo
luminosità
schermo
segnali acustici
lingue/paesi
Cancella
Ricette
schermo
Connect
ok
ok
+
Selezionate
“biblioteca 2”
biblioteche
ricetteingredienti
manuale
COUNTRY
Italia
LANGUAGE
Deutsch
English
Espagnol
Français
Italianio
schermo
segnali acustici
luminosità
modalità demo
luminosità
modalità demo
OFF ON
modalità demo
3424
RICETTA 2
Vuoi cancellare
questa ricetta?
Si NO
Per favore seleziona la ricetta
che vorresti eliminare
ricetta 1
segnali acustici
OFF ON
lingue/paesi
Cancella
Ricette
schermo
Connect
ricetta 2
OFF ON
Connect
lingue/paesi
Cancella
Ricette
schermo
Connect
lingue/paesi
Cancella
Ricette
schermo
Connect
ricette
Biblioteche
Per favore seleziona la biblioteca
che vorresti eliminare
biblioteca 1
biblioteca 2
biblioteca 2
Vuoi cancellare
questa biblioteca?
Si NO
modalità demo
luminosità
schermo
segnali acustici
lingue/paesi
Cancella
Ricette
schermo
Connect
ok
ok
+
biblioteche
ricetteingredienti
manuale
COUNTRY
Italia
LANGUAGE
Deutsch
English
Espagnol
Français
Italianio
schermo
segnali acustici
luminosità
modalità demo
luminosità
modalità demo
OFF ON
modalità demo
3424
RICETTA 2
Vuoi cancellare
questa ricetta?
Si NO
Per favore seleziona la ricetta
che vorresti eliminare
ricetta 1
segnali acustici
OFF ON
lingue/paesi
Cancella
Ricette
schermo
Connect
ricetta 2
OFF ON
Connect
lingue/paesi
Cancella
Ricette
schermo
Connect
lingue/paesi
Cancella
Ricette
schermo
Connect
ricette
Biblioteche
Per favore seleziona la biblioteca
che vorresti eliminare
biblioteca 1
biblioteca 2
biblioteca 2
Vuoi cancellare
questa biblioteca?
Si NO
modalità demo
luminosità
schermo
segnali acustici
lingue/paesi
Cancella
Ricette
schermo
Connect
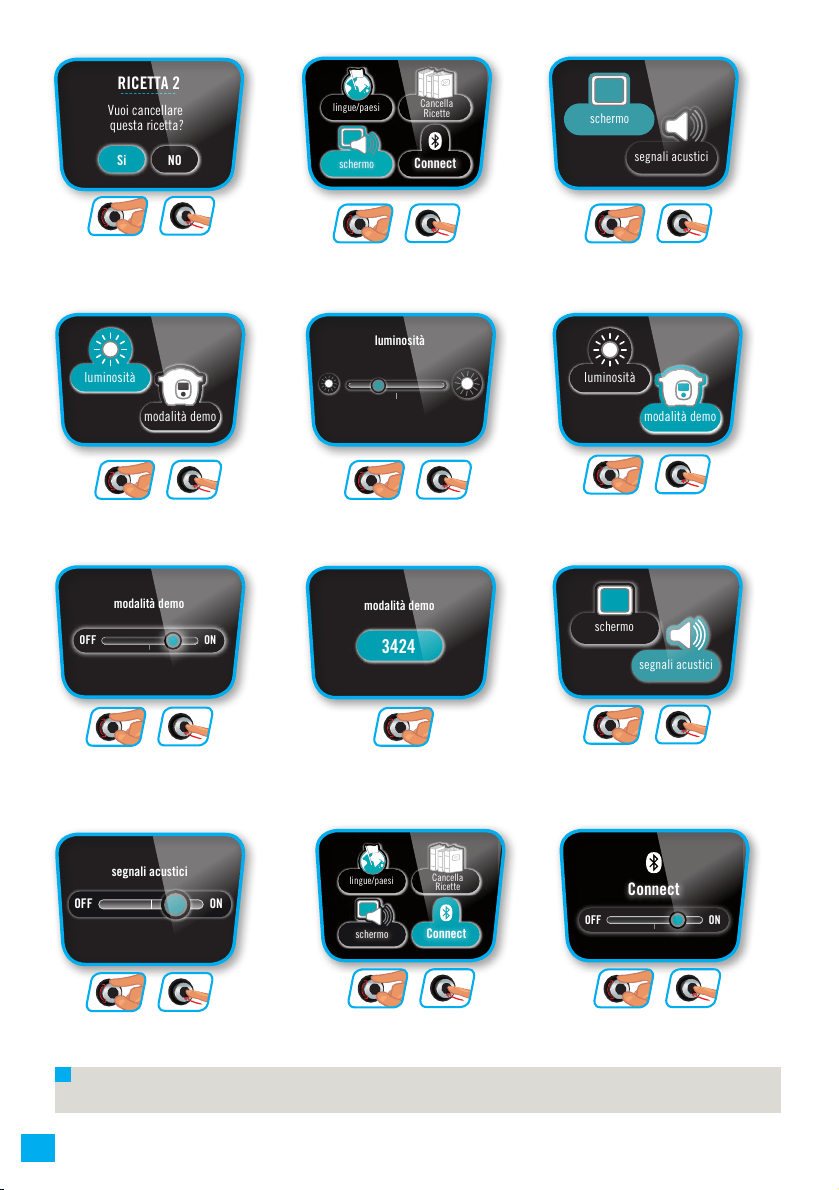
7878
Nota: la modalità DEMO permette di usare il prodotto senza riscaldarlo o pressurizzarlo.
Desiderate eliminare
questa ricetta?
biblioteche
ricetteingredienti
manuale
COUNTRY
Italia
LANGUAGE
Deutsch
English
Espagnol
Français
Italianio
schermo
segnali acustici
luminosità
modalità demo
luminosità
modalità demo
OFF ON
modalità demo
3424
RICETTA 2
Vuoi cancellare
questa ricetta?
Si NO
Per favore seleziona la ricetta
che vorresti eliminare
ricetta 1
segnali acustici
OFF ON
lingue/paesi
Cancella
Ricette
schermo
Connect
ricetta 2
OFF ON
Connect
lingue/paesi
Cancella
Ricette
schermo
Connect
lingue/paesi
Cancella
Ricette
schermo
Connect
ricette
Biblioteche
Per favore seleziona la biblioteca
che vorresti eliminare
biblioteca 1
biblioteca 2
biblioteca 2
Vuoi cancellare
questa biblioteca?
Si NO
modalità demo
luminosità
schermo
segnali acustici
lingue/paesi
Cancella
Ricette
schermo
Connect
ok
ok
+
Selezionare
“display/suoni”
biblioteche
ricetteingredienti
manuale
COUNTRY
Italia
LANGUAGE
Deutsch
English
Espagnol
Français
Italianio
schermo
segnali acustici
luminosità
modalità demo
luminosità
modalità demo
OFF ON
modalità demo
3424
RICETTA 2
Vuoi cancellare
questa ricetta?
Si NO
Per favore seleziona la ricetta
che vorresti eliminare
ricetta 1
segnali acustici
OFF ON
lingue/paesi
Cancella
Ricette
schermo
Connect
ricetta 2
OFF ON
Connect
lingue/paesi
Cancella
Ricette
schermo
Connect
lingue/paesi
Cancella
Ricette
schermo
Connect
ricette
Biblioteche
Per favore seleziona la biblioteca
che vorresti eliminare
biblioteca 1
biblioteca 2
biblioteca 2
Vuoi cancellare
questa biblioteca?
Si NO
modalità demo
luminosità
schermo
segnali acustici
lingue/paesi
Cancella
Ricette
schermo
Connect
ok
ok
+
Selezionare “modalità
demo”
biblioteche
ricetteingredienti
manuale
COUNTRY
Italia
LANGUAGE
Deutsch
English
Espagnol
Français
Italianio
schermo
segnali acustici
luminosità
modalità demo
luminosità
modalità demo
OFF ON
modalità demo
3424
RICETTA 2
Vuoi cancellare
questa ricetta?
Si NO
Per favore seleziona la ricetta
che vorresti eliminare
ricetta 1
segnali acustici
OFF ON
lingue/paesi
Cancella
Ricette
schermo
Connect
ricetta 2
OFF ON
Connect
lingue/paesi
Cancella
Ricette
schermo
Connect
lingue/paesi
Cancella
Ricette
schermo
Connect
ricette
Biblioteche
Per favore seleziona la biblioteca
che vorresti eliminare
biblioteca 1
biblioteca 2
biblioteca 2
Vuoi cancellare
questa biblioteca?
Si NO
modalità demo
luminosità
schermo
segnali acustici
lingue/paesi
Cancella
Ricette
schermo
Connect
ok
ok
+
Selezionare “suoni”
biblioteche
ricetteingredienti
manuale
COUNTRY
Italia
LANGUAGE
Deutsch
English
Espagnol
Français
Italianio
schermo
segnali acustici
luminosità
modalità demo
luminosità
modalità demo
OFF ON
modalità demo
3424
RICETTA 2
Vuoi cancellare
questa ricetta?
Si NO
Per favore seleziona la ricetta
che vorresti eliminare
ricetta 1
segnali acustici
OFF ON
lingue/paesi
Cancella
Ricette
schermo
Connect
ricetta 2
OFF ON
Connect
lingue/paesi
Cancella
Ricette
schermo
Connect
lingue/paesi
Cancella
Ricette
schermo
Connect
ricette
Biblioteche
Per favore seleziona la biblioteca
che vorresti eliminare
biblioteca 1
biblioteca 2
biblioteca 2
Vuoi cancellare
questa biblioteca?
Si NO
modalità demo
luminosità
schermo
segnali acustici
lingue/paesi
Cancella
Ricette
schermo
Connect
ok
ok
+
Selezionare
“display”
biblioteche
ricetteingredienti
manuale
COUNTRY
Italia
LANGUAGE
Deutsch
English
Espagnol
Français
Italianio
schermo
segnali acustici
luminosità
modalità demo
luminosità
modalità demo
OFF ON
modalità demo
3424
RICETTA 2
Vuoi cancellare
questa ricetta?
Si NO
Per favore seleziona la ricetta
che vorresti eliminare
ricetta 1
segnali acustici
OFF ON
lingue/paesi
Cancella
Ricette
schermo
Connect
ricetta 2
OFF ON
Connect
lingue/paesi
Cancella
Ricette
schermo
Connect
lingue/paesi
Cancella
Ricette
schermo
Connect
ricette
Biblioteche
Per favore seleziona la biblioteca
che vorresti eliminare
biblioteca 1
biblioteca 2
biblioteca 2
Vuoi cancellare
questa biblioteca?
Si NO
modalità demo
luminosità
schermo
segnali acustici
lingue/paesi
Cancella
Ricette
schermo
Connect
ok
ok
+
Regolare il volume
biblioteche
ricetteingredienti
manuale
COUNTRY
Italia
LANGUAGE
Deutsch
English
Espagnol
Français
Italianio
schermo
segnali acustici
luminosità
modalità demo
luminosità
modalità demo
OFF ON
modalità demo
3424
RICETTA 2
Vuoi cancellare
questa ricetta?
Si NO
Per favore seleziona la ricetta
che vorresti eliminare
ricetta 1
segnali acustici
OFF ON
lingue/paesi
Cancella
Ricette
schermo
Connect
ricetta 2
OFF ON
Connect
lingue/paesi
Cancella
Ricette
schermo
Connect
lingue/paesi
Cancella
Ricette
schermo
Connect
ricette
Biblioteche
Per favore seleziona la biblioteca
che vorresti eliminare
biblioteca 1
biblioteca 2
biblioteca 2
Vuoi cancellare
questa biblioteca?
Si NO
modalità demo
luminosità
schermo
segnali acustici
lingue/paesi
Cancella
Ricette
schermo
Connect
ok
ok
+
Selezionare “luminosità”
biblioteche
ricetteingredienti
manuale
COUNTRY
Italia
LANGUAGE
Deutsch
English
Espagnol
Français
Italianio
schermo
segnali acustici
luminosità
modalità demo
luminosità
modalità demo
OFF ON
modalità demo
3424
RICETTA 2
Vuoi cancellare
questa ricetta?
Si NO
Per favore seleziona la ricetta
che vorresti eliminare
ricetta 1
segnali acustici
OFF ON
lingue/paesi
Cancella
Ricette
schermo
Connect
ricetta 2
OFF ON
Connect
lingue/paesi
Cancella
Ricette
schermo
Connect
lingue/paesi
Cancella
Ricette
schermo
Connect
ricette
Biblioteche
Per favore seleziona la biblioteca
che vorresti eliminare
biblioteca 1
biblioteca 2
biblioteca 2
Vuoi cancellare
questa biblioteca?
Si NO
modalità demo
luminosità
schermo
segnali acustici
lingue/paesi
Cancella
Ricette
schermo
Connect
ok
ok
+
Regolare la
luminosità
biblioteche
ricetteingredienti
manuale
COUNTRY
Italia
LANGUAGE
Deutsch
English
Espagnol
Français
Italianio
schermo
segnali acustici
luminosità
modalità demo
luminosità
modalità demo
OFF ON
modalità demo
3424
RICETTA 2
Vuoi cancellare
questa ricetta?
Si NO
Per favore seleziona la ricetta
che vorresti eliminare
ricetta 1
segnali acustici
OFF ON
lingue/paesi
Cancella
Ricette
schermo
Connect
ricetta 2
OFF ON
Connect
lingue/paesi
Cancella
Ricette
schermo
Connect
lingue/paesi
Cancella
Ricette
schermo
Connect
ricette
Biblioteche
Per favore seleziona la biblioteca
che vorresti eliminare
biblioteca 1
biblioteca 2
biblioteca 2
Vuoi cancellare
questa biblioteca?
Si NO
modalità demo
luminosità
schermo
segnali acustici
lingue/paesi
Cancella
Ricette
schermo
Connect
ok
ok
+
Per attivare o disattivare la modalità Demo,
inserire il codice: 3424
biblioteche
ricetteingredienti
manuale
COUNTRY
Italia
LANGUAGE
Deutsch
English
Espagnol
Français
Italianio
schermo
segnali acustici
luminosità
modalità demo
luminosità
modalità demo
OFF ON
modalità demo
3424
RICETTA 2
Vuoi cancellare
questa ricetta?
Si NO
Per favore seleziona la ricetta
che vorresti eliminare
ricetta 1
segnali acustici
OFF ON
lingue/paesi
Cancella
Ricette
schermo
Connect
ricetta 2
OFF ON
Connect
lingue/paesi
Cancella
Ricette
schermo
Connect
lingue/paesi
Cancella
Ricette
schermo
Connect
ricette
Biblioteche
Per favore seleziona la biblioteca
che vorresti eliminare
biblioteca 1
biblioteca 2
biblioteca 2
Vuoi cancellare
questa biblioteca?
Si NO
modalità demo
luminosità
schermo
segnali acustici
lingue/paesi
Cancella
Ricette
schermo
Connect
ok
ok
+
biblioteche
ricetteingredienti
manuale
COUNTRY
Italia
LANGUAGE
Deutsch
English
Espagnol
Français
Italianio
schermo
segnali acustici
luminosità
modalità demo
luminosità
modalità demo
OFF ON
modalità demo
3424
RICETTA 2
Vuoi cancellare
questa ricetta?
Si NO
Per favore seleziona la ricetta
che vorresti eliminare
ricetta 1
segnali acustici
OFF ON
lingue/paesi
Cancella
Ricette
schermo
Connect
ricetta 2
OFF ON
Connect
lingue/paesi
Cancella
Ricette
schermo
Connect
lingue/paesi
Cancella
Ricette
schermo
Connect
ricette
Biblioteche
Per favore seleziona la biblioteca
che vorresti eliminare
biblioteca 1
biblioteca 2
biblioteca 2
Vuoi cancellare
questa biblioteca?
Si NO
modalità demo
luminosità
schermo
segnali acustici
lingue/paesi
Cancella
Ricette
schermo
Connect
ok
Selezionate “connetti”
biblioteche
ricetteingredienti
manuale
COUNTRY
Italia
LANGUAGE
Deutsch
English
Espagnol
Français
Italianio
schermo
segnali acustici
luminosità
modalità demo
luminosità
modalità demo
OFF ON
modalità demo
3424
RICETTA 2
Vuoi cancellare
questa ricetta?
Si NO
Per favore seleziona la ricetta
che vorresti eliminare
ricetta 1
segnali acustici
OFF ON
lingue/paesi
Cancella
Ricette
schermo
Connect
ricetta 2
OFF ON
Connect
lingue/paesi
Cancella
Ricette
schermo
Connect
lingue/paesi
Cancella
Ricette
schermo
Connect
ricette
Biblioteche
Per favore seleziona la biblioteca
che vorresti eliminare
biblioteca 1
biblioteca 2
biblioteca 2
Vuoi cancellare
questa biblioteca?
Si NO
modalità demo
luminosità
schermo
segnali acustici
lingue/paesi
Cancella
Ricette
schermo
Connect
ok
ok
+
Attivate o disattivate la
modalità “Connect”
biblioteche
ricetteingredienti
manuale
COUNTRY
Italia
LANGUAGE
Deutsch
English
Espagnol
Français
Italianio
schermo
segnali acustici
luminosità
modalità demo
luminosità
modalità demo
OFF ON
modalità demo
3424
RICETTA 2
Vuoi cancellare
questa ricetta?
Si NO
Per favore seleziona la ricetta
che vorresti eliminare
ricetta 1
segnali acustici
OFF ON
lingue/paesi
Cancella
Ricette
schermo
Connect
ricetta 2
OFF ON
Connect
lingue/paesi
Cancella
Ricette
schermo
Connect
lingue/paesi
Cancella
Ricette
schermo
Connect
ricette
Biblioteche
Per favore seleziona la biblioteca
che vorresti eliminare
biblioteca 1
biblioteca 2
biblioteca 2
Vuoi cancellare
questa biblioteca?
Si NO
modalità demo
luminosità
schermo
segnali acustici
lingue/paesi
Cancella
Ricette
schermo
Connect
ok
ok
+

79
ITALIANO
79
MENU ON /OFF
Premere ON/OFF per spegnere l’apparecchio Selezionare e
confermare
spegnere l'apparecchio?
SÌ NO
ricetteingredienti
manuale
SÌ NO
spegnere l'apparecchio?
biblioteche
spegnere l'apparecchio?
SÌ NO
ricetteingredienti
manuale
SÌ NO
spegnere l'apparecchio?
biblioteche
spegnere l'apparecchio?
SÌ NO
ricetteingredienti
manuale
SÌ NO
spegnere l'apparecchio?
biblioteche
ok
ok
+
ok
ok
+
ok
ok
+
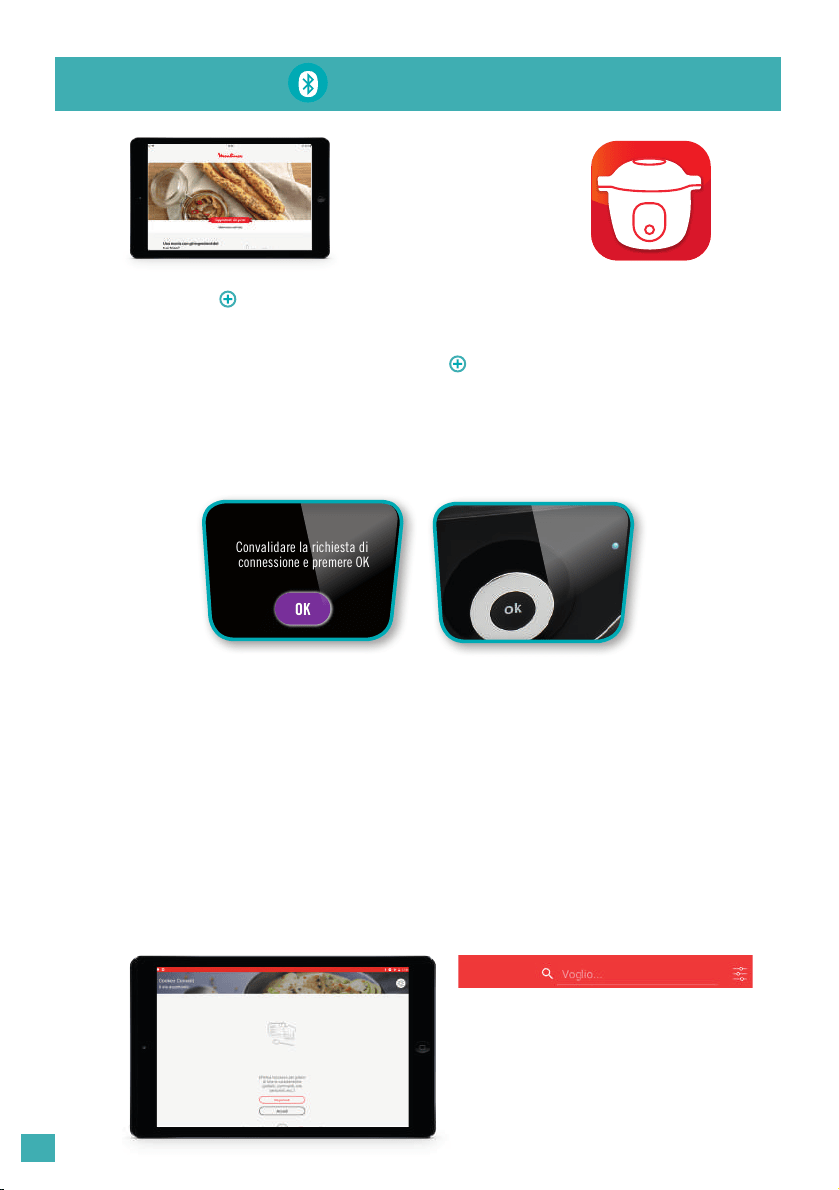
8080
Il vostro COOK4ME CONNECT è funzionante, potete già utilizzare il vostro prodotto con
le 150 ricette pre-programmate anche senza l’applicazione.
Ogni volta che accendete il vostro COOK4ME CONNECT, la spia blu lampeggia (in
attesa della connessione), tranne nel caso in cui abbiate disattivato manualmente la
funzione connetti (vedere il capitolo Regolazione).
In occasione del primo utilizzo, collegate il vostro prodotto al tablet seguendo le istruzioni
sul vostro schermo.
Se la connessione è
riuscita, la spia blu
diventa ssa.
Scaricate l’applicazione Il
Cookeo andando sull’App
Store dal vostro tablet o
smartphone.
CONNESSIONE
Problema di connessione:
Se la connessione non è riuscita, visualizzerete un messaggio di errore. Dovrete seguire le
istruzioni sul vostro schermo per effettuare un nuovo tentativo di connessione.
Attenzione: è possibile connettere un solo dispositivo per volta.
Per creare un account:
seguite le indicazioni
sull’applicazione.
Barra di ricerca:
Inserite le vostre parole chiave
nella barra di ricerca e accedete
alla ricerca per ltro
Convalidare la richiesta di
connessione e premere OK
OK
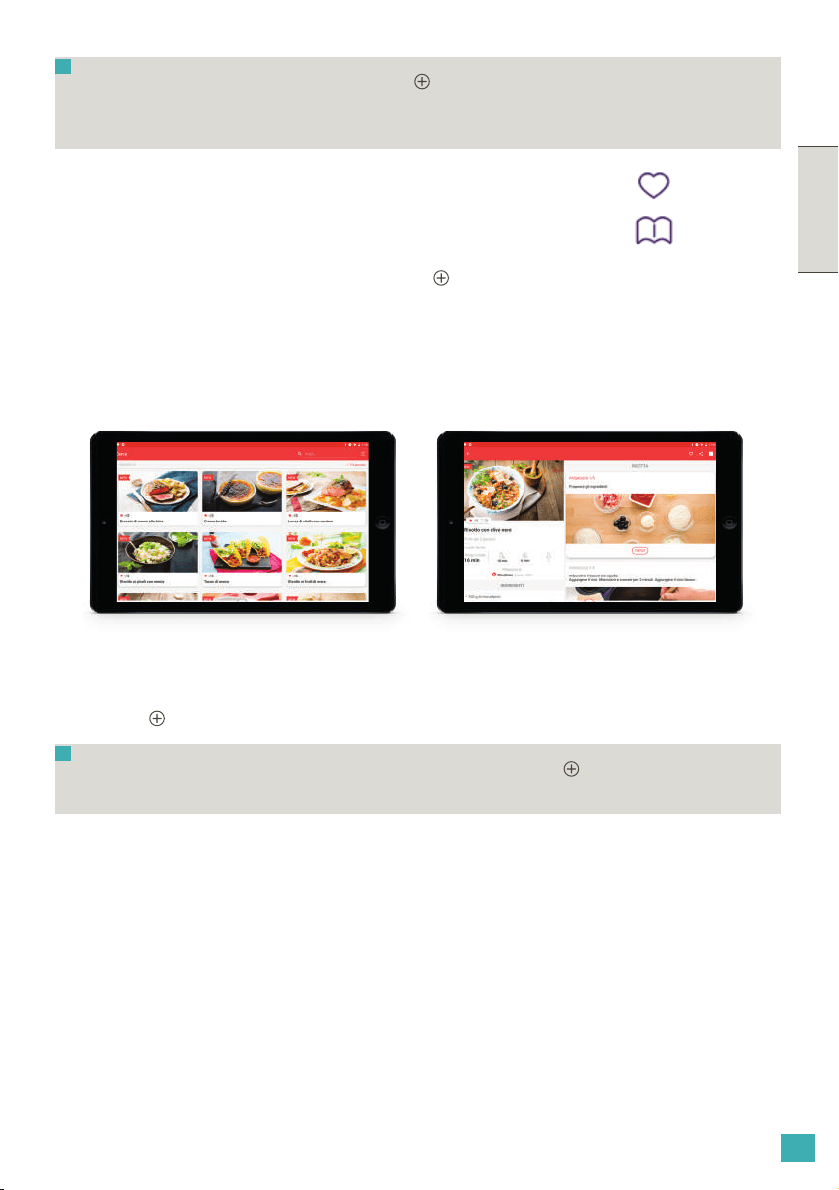
81
ITALIANO
81
N.B.: se non utilizzate il vostro COOK4ME CONNECT per 30 minuti, questo si porrà
in modalità stand-by e la connessione scadrà. Al termine dello stand-by la connessione
si ripristinerà automaticamente.
N.B. Potete avviare la cottura soltanto dal vostro COOK4ME CONNECT, premendo
il tasto OK (come indicato sull’applicazione).
Eventuali perdite di connessione non incidono assolutamente sulla cottura.
COOK4ME CONNECT rimane in ogni caso autonomo.
Navigazione:
potete anche navigare
tramite l’applicazione
accedendo al menu:
• Inspirazione
• Cerca
• Il mio universo
• Acquisti
Dall’applicazione potete:
• vedere il procedimento step
by step
• lanciare la ricetta step by step
in interazione con il vostro
COOK4ME CONNECT
Preferiti
Biblioteche
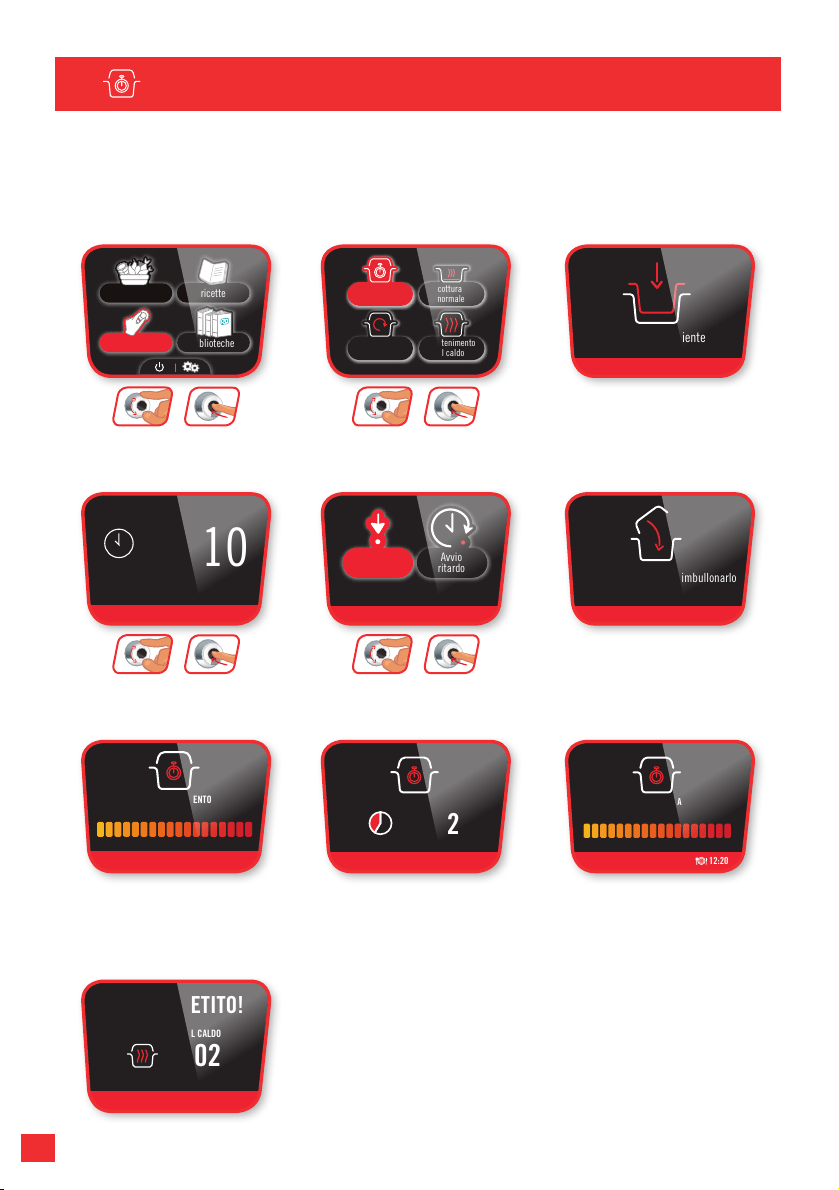
8282
PRESSIONE
MENU MANUALE
Con il menu Manuale, la cottura è guidata manualmente. Selezionare la modalità di
cottura: cottura a pressione, cottura normale (lenta, bollitura, rosolatura), riscaldare o
mantenere caldo.
MENU MANUALE MODALITÀ DI COTTURA
ok
ok
+
ok
ok
+
ok
ok
+
ok
ok
+
L’apparecchio è in
preriscaldamento
AVVERTENZA
COTTURA A PRESSIONE
COTTURA A PRESSIONE
COTTURA A PRESSIONE
Inserire il recipiente
00:10
cottura
Avvio
immediato
Avvio
ritardo
AVVERTENZA
Chiudere il coperchio e imbullonarlo
PRERISCALDAMENTO
Attendere
COTTURA A PRESSIONE
COTTURA A PRESSIONE
COTTURA A PRESSIONE
COTTURA
00:02
FINE COTTURA
Attendere
12:20
BUON APPETITO!
MANTENIMENTO AL CALDO
00:02
cottura
a pressione
riscaldamento
cottura
normale
mantenimento
al caldo
ricetteingredienti
manuale
biblioteche
La cottura è iniziata
AVVERTENZA
COTTURA A PRESSIONE
COTTURA A PRESSIONE
COTTURA A PRESSIONE
Inserire il recipiente
00:10
cottura
Avvio
immediato
Avvio
ritardo
AVVERTENZA
Chiudere il coperchio e imbullonarlo
PRERISCALDAMENTO
Attendere
COTTURA A PRESSIONE
COTTURA A PRESSIONE
COTTURA A PRESSIONE
COTTURA
00:02
FINE COTTURA
Attendere
12:20
BUON APPETITO!
MANTENIMENTO AL CALDO
00:02
cottura
a pressione
riscaldamento
cottura
normale
mantenimento
al caldo
ricetteingredienti
manuale
biblioteche
La cottura è terminata
AVVERTENZA
COTTURA A PRESSIONE
COTTURA A PRESSIONE
COTTURA A PRESSIONE
Inserire il recipiente
00:10
cottura
Avvio
immediato
Avvio
ritardo
AVVERTENZA
Chiudere il coperchio e imbullonarlo
PRERISCALDAMENTO
Attendere
COTTURA A PRESSIONE
COTTURA A PRESSIONE
COTTURA A PRESSIONE
COTTURA
00:02
FINE COTTURA
Attendere
12:20
BUON APPETITO!
MANTENIMENTO AL CALDO
00:02
cottura
a pressione
riscaldamento
cottura
normale
mantenimento
al caldo
ricetteingredienti
manuale
biblioteche
È pronto!
AVVERTENZA
COTTURA A PRESSIONE
COTTURA A PRESSIONE
COTTURA A PRESSIONE
Inserire il recipiente
00:10
cottura
Avvio
immediato
Avvio
ritardo
AVVERTENZA
Chiudere il coperchio e imbullonarlo
PRERISCALDAMENTO
Attendere
COTTURA A PRESSIONE
COTTURA A PRESSIONE
COTTURA A PRESSIONE
COTTURA
00:02
FINE COTTURA
Attendere
12:20
BUON APPETITO!
MANTENIMENTO AL CALDO
00:02
cottura
a pressione
riscaldamento
cottura
normale
mantenimento
al caldo
ricetteingredienti
manuale
biblioteche
AVVERTENZA
COTTURA A PRESSIONE
COTTURA A PRESSIONE
COTTURA A PRESSIONE
Inserire il recipiente
00:10
cottura
Avvio
immediato
Avvio
ritardo
AVVERTENZA
Chiudere il coperchio e imbullonarlo
PRERISCALDAMENTO
Attendere
COTTURA A PRESSIONE
COTTURA A PRESSIONE
COTTURA A PRESSIONE
COTTURA
00:02
FINE COTTURA
Attendere
12:20
BUON APPETITO!
MANTENIMENTO AL CALDO
00:02
cottura
a pressione
riscaldamento
cottura
normale
mantenimento
al caldo
ricetteingredienti
manuale
biblioteche
Inserire la pentola,
quindi aggiungere gli
ingredienti
AVVERTENZA
COTTURA A PRESSIONE
COTTURA A PRESSIONE
COTTURA A PRESSIONE
Inserire il recipiente
00:10
cottura
Avvio
immediato
Avvio
ritardo
AVVERTENZA
Chiudere il coperchio e imbullonarlo
PRERISCALDAMENTO
Attendere
COTTURA A PRESSIONE
COTTURA A PRESSIONE
COTTURA A PRESSIONE
COTTURA
00:02
FINE COTTURA
Attendere
12:20
BUON APPETITO!
MANTENIMENTO AL CALDO
00:02
cottura
a pressione
riscaldamento
cottura
normale
mantenimento
al caldo
ricetteingredienti
manuale
biblioteche
Selezionare il
menu “manuale”
AVVERTENZA
COTTURA A PRESSIONE
COTTURA A PRESSIONE
COTTURA A PRESSIONE
Inserire il recipiente
00:10
cottura
Avvio
immediato
Avvio
ritardo
AVVERTENZA
Chiudere il coperchio e imbullonarlo
PRERISCALDAMENTO
Attendere
COTTURA A PRESSIONE
COTTURA A PRESSIONE
COTTURA A PRESSIONE
COTTURA
00:02
FINE COTTURA
Attendere
12:20
BUON APPETITO!
MANTENIMENTO AL CALDO
00:02
cottura
a pressione
riscaldamento
cottura
normale
mantenimento
al caldo
ricetteingredienti
manuale
biblioteche
Selezionare la modalità
“pressione”
AVVERTENZA
COTTURA A PRESSIONE
COTTURA A PRESSIONE
COTTURA A PRESSIONE
Inserire il recipiente
00:10
cottura
Avvio
immediato
Avvio
ritardo
AVVERTENZA
Chiudere il coperchio e imbullonarlo
PRERISCALDAMENTO
Attendere
COTTURA A PRESSIONE
COTTURA A PRESSIONE
COTTURA A PRESSIONE
COTTURA
00:02
FINE COTTURA
Attendere
12:20
BUON APPETITO!
MANTENIMENTO AL CALDO
00:02
cottura
a pressione
riscaldamento
cottura
normale
mantenimento
al caldo
ricetteingredienti
manuale
biblioteche
Chiudere e bloccare
AVVERTENZA
COTTURA A PRESSIONE
COTTURA A PRESSIONE
COTTURA A PRESSIONE
Inserire il recipiente
00:10
cottura
Avvio
immediato
Avvio
ritardo
AVVERTENZA
Chiudere il coperchio e imbullonarlo
PRERISCALDAMENTO
Attendere
COTTURA A PRESSIONE
COTTURA A PRESSIONE
COTTURA A PRESSIONE
COTTURA
00:02
FINE COTTURA
Attendere
12:20
BUON APPETITO!
MANTENIMENTO AL CALDO
00:02
cottura
a pressione
riscaldamento
cottura
normale
mantenimento
al caldo
ricetteingredienti
manuale
biblioteche
Impostare il tempo di
cottura
AVVERTENZA
COTTURA A PRESSIONE
COTTURA A PRESSIONE
COTTURA A PRESSIONE
Inserire il recipiente
00:10
cottura
Avvio
immediato
Avvio
ritardo
AVVERTENZA
Chiudere il coperchio e imbullonarlo
PRERISCALDAMENTO
Attendere
COTTURA A PRESSIONE
COTTURA A PRESSIONE
COTTURA A PRESSIONE
COTTURA
00:02
FINE COTTURA
Attendere
12:20
BUON APPETITO!
MANTENIMENTO AL CALDO
00:02
cottura
a pressione
riscaldamento
cottura
normale
mantenimento
al caldo
ricetteingredienti
manuale
biblioteche
Selezionare l’avvio immediato o
ritardato
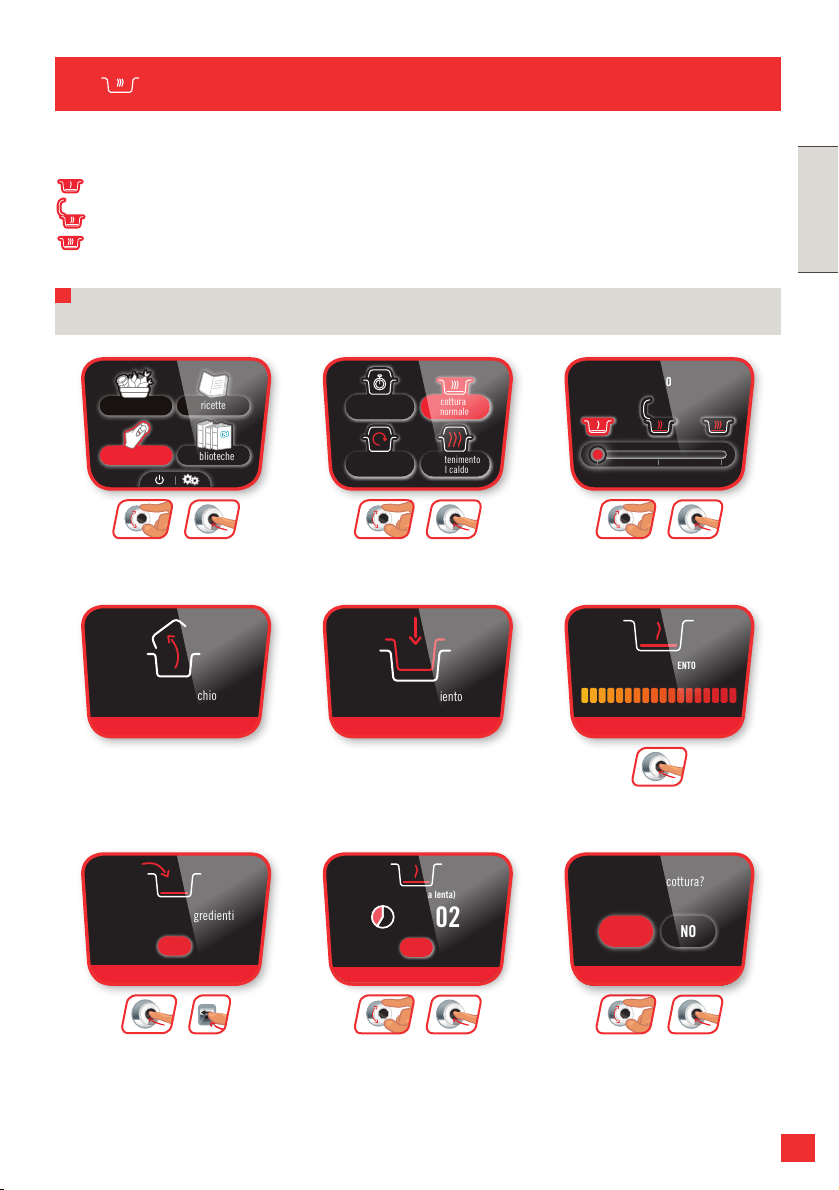
83
ITALIANO
83
MENU MANUALE MODALITÀ DI COTTURA
ok
ok
+
ok
ok
+
ok
ok
+
ok
ok
ok
+
ok
ok
++
ok
NORMALE
Con la modalità di cottura normale è possibile:
BASSO
MEDIO
ELEVATO
a seconda del risultato desiderato. In queste modalità di cottura il coperchio rimane aperto.
Nota: il processo è identico, solo la temperatura è diversa
Selezionare il
menu “manuale”
AVVERTENZA
AVVERTENZA
inserire il recipiento
CALORE BASSO
Aprire il coperchio
CALORE BASSO
PRERISCALDAMENTO
Attendere
aggiungere gli ingredienti
OK
00:02
BASSO (cottura lenta)
OK
Arrestare la cottura?
SÌ NO
stop
pressure
cooking
BASSO
cottura
a pressione
riscaldamento
cottura
normale
mantenimento
al caldo
ricetteingredienti
manuale
CALORE BASSO
CALORE BASSO
biblioteche
Selezionare la modalità
“normale”
AVVERTENZA
AVVERTENZA
inserire il recipiento
CALORE BASSO
Aprire il coperchio
CALORE BASSO
PRERISCALDAMENTO
Attendere
aggiungere gli ingredienti
OK
00:02
BASSO (cottura lenta)
OK
Arrestare la cottura?
SÌ NO
stop
pressure
cooking
BASSO
cottura
a pressione
riscaldamento
cottura
normale
mantenimento
al caldo
ricetteingredienti
manuale
CALORE BASSO
CALORE BASSO
biblioteche
Selezionare la funzione
desiderata
AVVERTENZA
AVVERTENZA
inserire il recipiento
CALORE BASSO
Aprire il coperchio
CALORE BASSO
PRERISCALDAMENTO
Attendere
aggiungere gli ingredienti
OK
00:02
BASSO (cottura lenta)
OK
Arrestare la cottura?
SÌ NO
stop
pressure
cooking
BASSO
cottura
a pressione
riscaldamento
cottura
normale
mantenimento
al caldo
ricetteingredienti
manuale
CALORE BASSO
CALORE BASSO
biblioteche
Per arrestare la cottura, premere la freccia indietro: è possibile arrestare completamente
la cottura o precedere alla cottura a pressione
AVVERTENZA
AVVERTENZA
inserire il recipiento
CALORE BASSO
Aprire il coperchio
CALORE BASSO
PRERISCALDAMENTO
Attendere
aggiungere gli ingredienti
OK
00:02
BASSO (cottura lenta)
OK
Arrestare la cottura?
SÌ NO
stop
pressure
cooking
BASSO
cottura
a pressione
riscaldamento
cottura
normale
mantenimento
al caldo
ricetteingredienti
manuale
CALORE BASSO
CALORE BASSO
biblioteche
AVVERTENZA
AVVERTENZA
inserire il recipiento
CALORE BASSO
Aprire il coperchio
CALORE BASSO
PRERISCALDAMENTO
Attendere
aggiungere gli ingredienti
OK
00:02
BASSO (cottura lenta)
OK
Arrestare la cottura?
SÌ NO
stop
pressure
cooking
BASSO
cottura
a pressione
riscaldamento
cottura
normale
mantenimento
al caldo
ricetteingredienti
manuale
CALORE BASSO
CALORE BASSO
biblioteche
Aprire il coperchio
AVVERTENZA
AVVERTENZA
inserire il recipiento
CALORE BASSO
Aprire il coperchio
CALORE BASSO
PRERISCALDAMENTO
Attendere
aggiungere gli ingredienti
OK
00:02
BASSO (cottura lenta)
OK
Arrestare la cottura?
SÌ NO
stop
pressure
cooking
BASSO
cottura
a pressione
riscaldamento
cottura
normale
mantenimento
al caldo
ricetteingredienti
manuale
CALORE BASSO
CALORE BASSO
biblioteche
Inserire la pentola
AVVERTENZA
AVVERTENZA
inserire il recipiento
CALORE BASSO
Aprire il coperchio
CALORE BASSO
PRERISCALDAMENTO
Attendere
aggiungere gli ingredienti
OK
00:02
BASSO (cottura lenta)
OK
Arrestare la cottura?
SÌ NO
stop
pressure
cooking
BASSO
cottura
a pressione
riscaldamento
cottura
normale
mantenimento
al caldo
ricetteingredienti
manuale
CALORE BASSO
CALORE BASSO
biblioteche
AVVERTENZA
AVVERTENZA
inserire il recipiento
CALORE BASSO
Aprire il coperchio
CALORE BASSO
PRERISCALDAMENTO
Attendere
aggiungere gli ingredienti
OK
00:02
BASSO (cottura lenta)
OK
Arrestare la cottura?
SÌ NO
stop
pressure
cooking
BASSO
cottura
a pressione
riscaldamento
cottura
normale
mantenimento
al caldo
ricetteingredienti
manuale
CALORE BASSO
CALORE BASSO
biblioteche
L’apparecchio è in
preriscaldamento
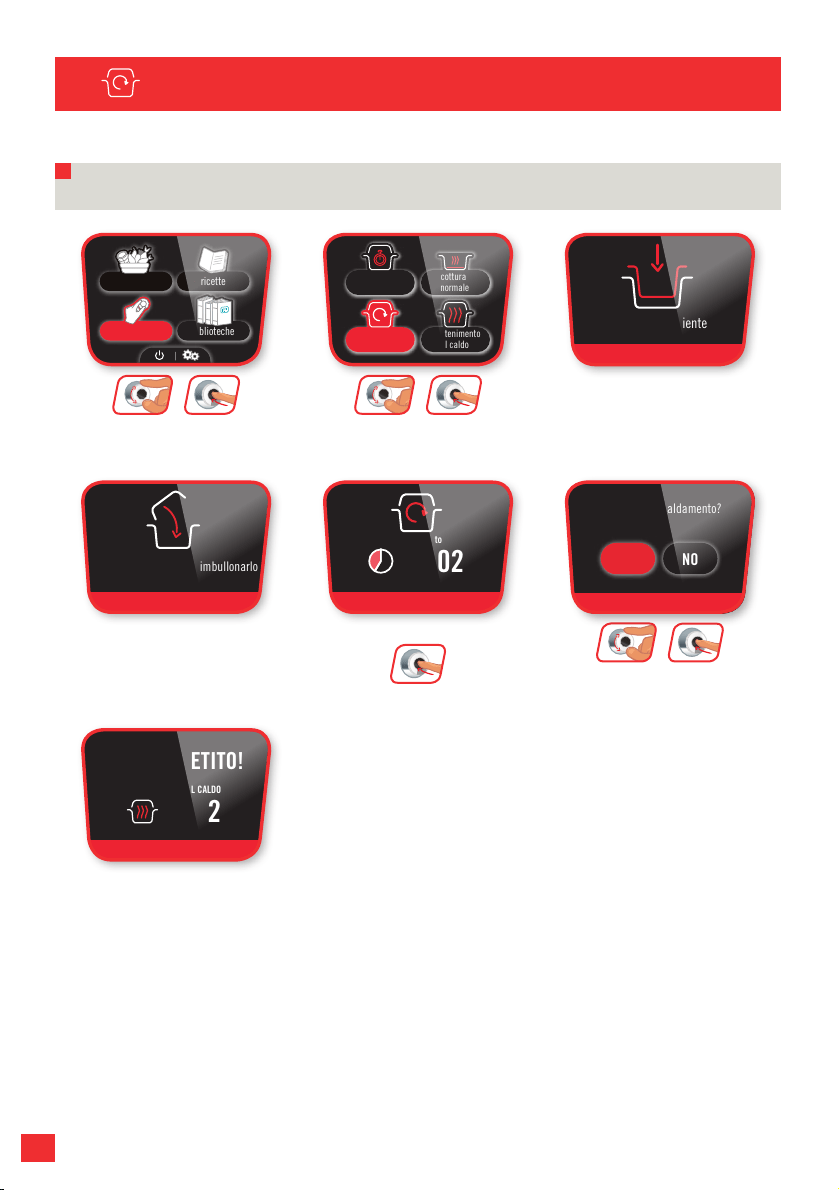
8484
MENU MANUALE MODALITÀ DI COTTURA
ok
ok
+
ok
ok
+
ok
ok
+
ok
RISCALDAMENTO
Nota: il riscaldamento inizia e il tempo aumenta.
È pronto!
AVVERTENZA
Inserire il recipiente
Arrestare il riscaldamento?
SÌ NO
AVVERTENZA
Chiudere il coperchio e imbullonarlo
00:02
riscaldamento
BUON APPETITO!
MANTENIMENTO AL CALDO
00:02
cottura
a pressione
riscaldamento
cottura
normale
mantenimento
al caldo
ricetteingredienti
manuale
riscaldamento
riscaldamento
riscaldamento
biblioteche
Inserire la pentola
AVVERTENZA
Inserire il recipiente
Arrestare il riscaldamento?
SÌ NO
AVVERTENZA
Chiudere il coperchio e imbullonarlo
00:02
riscaldamento
BUON APPETITO!
MANTENIMENTO AL CALDO
00:02
cottura
a pressione
riscaldamento
cottura
normale
mantenimento
al caldo
ricetteingredienti
manuale
riscaldamento
riscaldamento
riscaldamento
biblioteche
AVVERTENZA
Inserire il recipiente
Arrestare il riscaldamento?
SÌ NO
AVVERTENZA
Chiudere il coperchio e imbullonarlo
00:02
riscaldamento
BUON APPETITO!
MANTENIMENTO AL CALDO
00:02
cottura
a pressione
riscaldamento
cottura
normale
mantenimento
al caldo
ricetteingredienti
manuale
riscaldamento
riscaldamento
riscaldamento
biblioteche
Selezionare il
menu “manuale”
AVVERTENZA
Inserire il recipiente
Arrestare il riscaldamento?
SÌ NO
AVVERTENZA
Chiudere il coperchio e imbullonarlo
00:02
riscaldamento
BUON APPETITO!
MANTENIMENTO AL CALDO
00:02
cottura
a pressione
riscaldamento
cottura
normale
mantenimento
al caldo
ricetteingredienti
manuale
riscaldamento
riscaldamento
riscaldamento
biblioteche
Selezionare la modalità
“riscaldamento”
Chiudere e bloccare il
coperchio
AVVERTENZA
Inserire il recipiente
Arrestare il riscaldamento?
SÌ NO
AVVERTENZA
Chiudere il coperchio e imbullonarlo
00:02
riscaldamento
BUON APPETITO!
MANTENIMENTO AL CALDO
00:02
cottura
a pressione
riscaldamento
cottura
normale
mantenimento
al caldo
ricetteingredienti
manuale
riscaldamento
riscaldamento
riscaldamento
biblioteche
Interrompere il
riscaldamento?
AVVERTENZA
Inserire il recipiente
Arrestare il riscaldamento?
SÌ NO
AVVERTENZA
Chiudere il coperchio e imbullonarlo
00:02
riscaldamento
BUON APPETITO!
MANTENIMENTO AL CALDO
00:02
cottura
a pressione
riscaldamento
cottura
normale
mantenimento
al caldo
ricetteingredienti
manuale
riscaldamento
riscaldamento
riscaldamento
biblioteche
Inizia il riscaldamento.
Per interrompere
AVVERTENZA
Inserire il recipiente
Arrestare il riscaldamento?
SÌ NO
AVVERTENZA
Chiudere il coperchio e imbullonarlo
00:02
riscaldamento
BUON APPETITO!
MANTENIMENTO AL CALDO
00:02
cottura
a pressione
riscaldamento
cottura
normale
mantenimento
al caldo
ricetteingredienti
manuale
riscaldamento
riscaldamento
riscaldamento
biblioteche

85
ITALIANO
85
MANTENIMENTO AL CALDO
MENU MANUALE MODALITÀ DI COTTURA
Inserire la pentola
AVVERTENZA
Inserire il recipiente
Arrestare la funzione di
mantenimento al caldo?
SÌ NO
MANTENIMENTO AL CALDO
PRERISCALDAMENTO
Attendere
MANTENIMENTO AL CALDO
00:02
cottura
a pressione
riscaldamento
cottura
normale
mantenimento
al caldo
ricetteingredienti
manuale
MANTENIMENTO AL CALDO
MANTENIMENTO AL CALDO
biblioteche
ok
ok
+
AVVERTENZA
Inserire il recipiente
Arrestare la funzione di
mantenimento al caldo?
SÌ NO
MANTENIMENTO AL CALDO
PRERISCALDAMENTO
Attendere
MANTENIMENTO AL CALDO
00:02
cottura
a pressione
riscaldamento
cottura
normale
mantenimento
al caldo
ricetteingredienti
manuale
MANTENIMENTO AL CALDO
MANTENIMENTO AL CALDO
biblioteche
Selezionare il
menu “manuale”
ok
ok
+
AVVERTENZA
Inserire il recipiente
Arrestare la funzione di
mantenimento al caldo?
SÌ NO
MANTENIMENTO AL CALDO
PRERISCALDAMENTO
Attendere
MANTENIMENTO AL CALDO
00:02
cottura
a pressione
riscaldamento
cottura
normale
mantenimento
al caldo
ricetteingredienti
manuale
MANTENIMENTO AL CALDO
MANTENIMENTO AL CALDO
biblioteche
Selezionare la modalità
“mantenimento al caldo”
L’apparecchio è in
preriscaldamento
AVVERTENZA
Inserire il recipiente
Arrestare la funzione di
mantenimento al caldo?
SÌ NO
MANTENIMENTO AL CALDO
PRERISCALDAMENTO
Attendere
MANTENIMENTO AL CALDO
00:02
cottura
a pressione
riscaldamento
cottura
normale
mantenimento
al caldo
ricetteingredienti
manuale
MANTENIMENTO AL CALDO
MANTENIMENTO AL CALDO
biblioteche
La modalità mantenimento
al caldo è iniziata
AVVERTENZA
Inserire il recipiente
Arrestare la funzione di
mantenimento al caldo?
SÌ NO
MANTENIMENTO AL CALDO
PRERISCALDAMENTO
Attendere
MANTENIMENTO AL CALDO
00:02
cottura
a pressione
riscaldamento
cottura
normale
mantenimento
al caldo
ricetteingredienti
manuale
MANTENIMENTO AL CALDO
MANTENIMENTO AL CALDO
biblioteche
+
ok
Per interrompere la
modalità mantenimento
al caldo, premere il
pulsante Indietro e
selezionare “sì”
AVVERTENZA
Inserire il recipiente
Arrestare la funzione di
mantenimento al caldo?
SÌ NO
MANTENIMENTO AL CALDO
PRERISCALDAMENTO
Attendere
MANTENIMENTO AL CALDO
00:02
cottura
a pressione
riscaldamento
cottura
normale
mantenimento
al caldo
ricetteingredienti
manuale
MANTENIMENTO AL CALDO
MANTENIMENTO AL CALDO
biblioteche
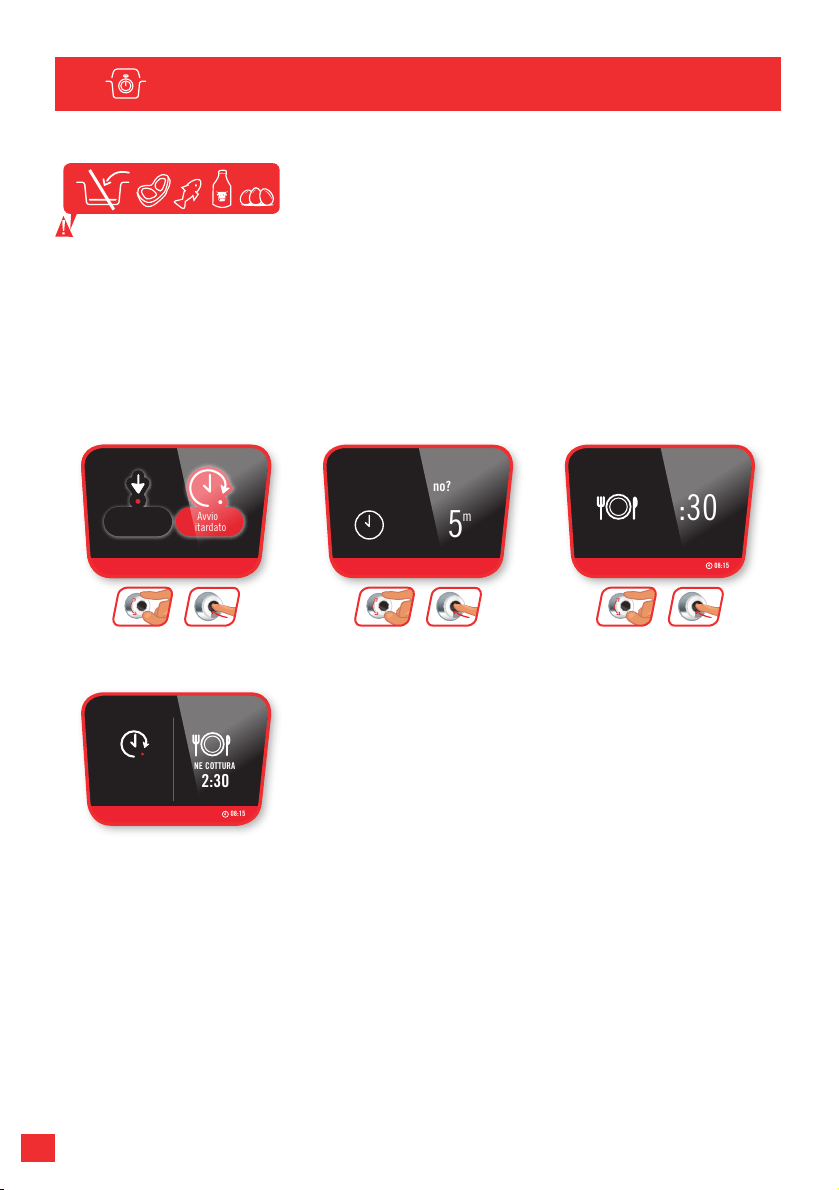
8686
MENU MANUALE MODALITÀ DI COTTURA
AVVIO RITARDATO (MODALITÀ COTTURA A PRESSIONE
Alcuni alimenti non possono essere cotti in modalità Avvio ritardato (carne, pesce, latte,
ecc.).
Il tempo di cottura può variare a seconda del volume all’interno del prodotto.
Nota: l’avvio ritardato è possibile anche nel menu Ingredienti (a seconda del tipo di
ingredienti).
L’avvio ritardato è
programmato
COTTURA A PRESSIONE
h m
Che ore sono?
FINE
COTTURA
12:30
08:15
08:15
01:00
AVVIO RITARDATO TRA FINE COTTURA
12:30
08:15
Avvio
immediato
Avvio
ritardato
COTTURA A PRESSIONE
COTTURA A PRESSIONE
COTTURA A PRESSIONE
ok
ok
+
Selezionare l’ora
corrente
COTTURA A PRESSIONE
h m
Che ore sono?
FINE
COTTURA
12:30
08:15
08:15
01:00
AVVIO RITARDATO TRA FINE COTTURA
12:30
08:15
Avvio
immediato
Avvio
ritardato
COTTURA A PRESSIONE
COTTURA A PRESSIONE
COTTURA A PRESSIONE
ok
ok
+
Selezionare l’ora di
termine della cottura
COTTURA A PRESSIONE
h m
Che ore sono?
FINE
COTTURA
12:30
08:15
08:15
01:00
AVVIO RITARDATO TRA FINE COTTURA
12:30
08:15
Avvio
immediato
Avvio
ritardato
COTTURA A PRESSIONE
COTTURA A PRESSIONE
COTTURA A PRESSIONE
ok
ok
+
Selezionare
“avvio ritardato”
COTTURA A PRESSIONE
h m
Che ore sono?
FINE
COTTURA
12:30
08:15
08:15
01:00
AVVIO RITARDATO TRA FINE COTTURA
12:30
08:15
Avvio
immediato
Avvio
ritardato
COTTURA A PRESSIONE
COTTURA A PRESSIONE
COTTURA A PRESSIONE
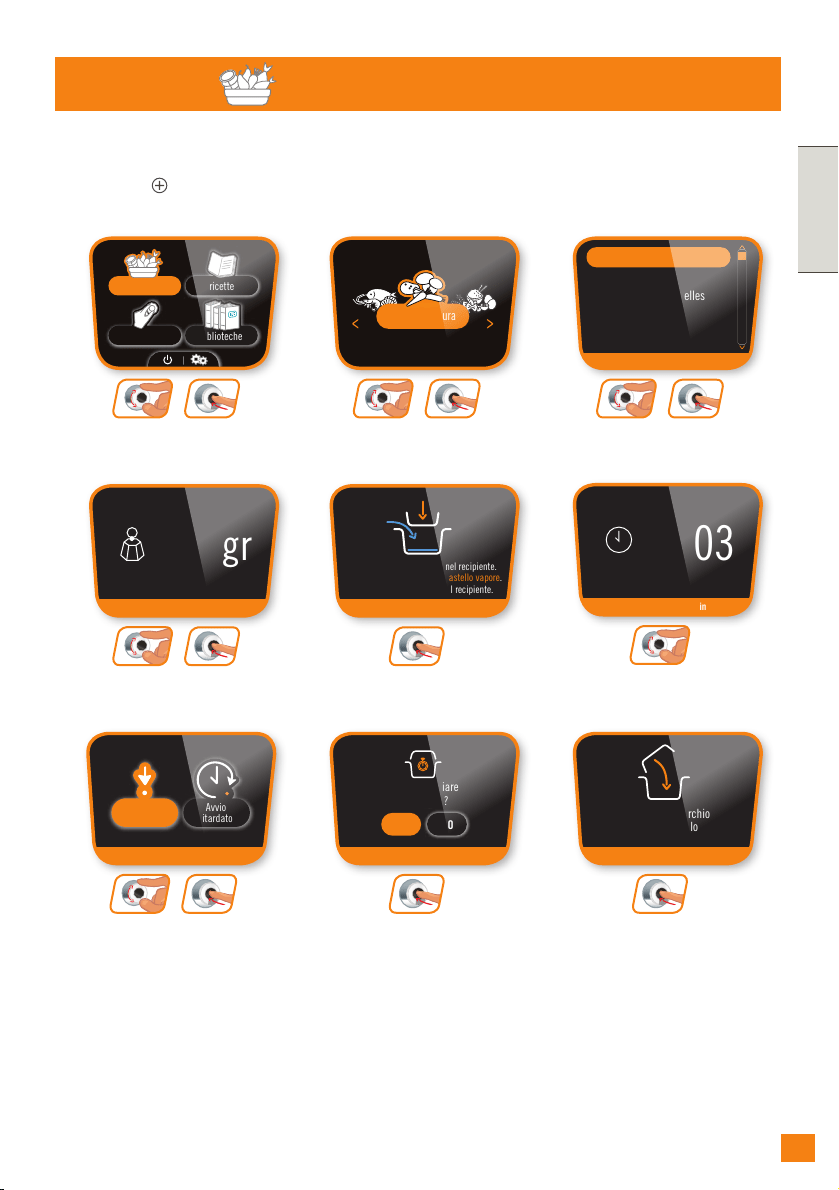
87
ITALIANO
87
MENU INGREDIENTI
Con il menu Ingredienti non è necessario inserire la modalità o il tempo di cottura:
COOK4ME CONNECT fornisce tutte le istruzioni per ogni tipo e peso di ingrediente:
carne, pesce, verdura, frutta e cereali.
MENU INGREDIENTI
ok
ok
+
ok
ok
+
ok
ok
+
ok
ok
+
Selezionare il
menu “ingredienti”
TEMPO CONSIGLIOATO: 3 min
PRERISCALDAMENTO
Attendere
Frutta e verdura
BROCCOLI
BROCCOLI
broccoli
carote
cavoletti di Bruxelles
cavolfiore
cavolo
Desideri avviare
la cottura ?
COOKING
BROCCOLI
SÌ NO
- Versare 200 ml di acqua nel recipiente.
- Mettere gli ingredienti nel castello vapore.
- Porre il cestello vapore nel recipiente.
00:03
BROCCOLI
AVVERTENZA
BROCCOLI
FINE COTTURA
Attendere
BROCCOLI
BROCCOLI
Avvio
immediato
Avvio
ritardato
COTTURA
00:02
BUON APPETITO!
MANTENIMENTO AL CALDO
00:02
300 gr
Chuidere il coperchio
e umbullonarlo
Frutta e verdura
ricetteingredienti
manuale
BROCCOLI
biblioteche
Selezionare “broccoli”
TEMPO CONSIGLIOATO: 3 min
PRERISCALDAMENTO
Attendere
Frutta e verdura
BROCCOLI
BROCCOLI
broccoli
carote
cavoletti di Bruxelles
cavolfiore
cavolo
Desideri avviare
la cottura ?
COOKING
BROCCOLI
SÌ NO
- Versare 200 ml di acqua nel recipiente.
- Mettere gli ingredienti nel castello vapore.
- Porre il cestello vapore nel recipiente.
00:03
BROCCOLI
AVVERTENZA
BROCCOLI
FINE COTTURA
Attendere
BROCCOLI
BROCCOLI
Avvio
immediato
Avvio
ritardato
COTTURA
00:02
BUON APPETITO!
MANTENIMENTO AL CALDO
00:02
300 gr
Chuidere il coperchio
e umbullonarlo
Frutta e verdura
ricetteingredienti
manuale
BROCCOLI
biblioteche
Selezionare Frutta e
verdura
TEMPO CONSIGLIOATO: 3 min
PRERISCALDAMENTO
Attendere
Frutta e verdura
BROCCOLI
BROCCOLI
broccoli
carote
cavoletti di Bruxelles
cavolfiore
cavolo
Desideri avviare
la cottura ?
COOKING
BROCCOLI
SÌ NO
- Versare 200 ml di acqua nel recipiente.
- Mettere gli ingredienti nel castello vapore.
- Porre il cestello vapore nel recipiente.
00:03
BROCCOLI
AVVERTENZA
BROCCOLI
FINE COTTURA
Attendere
BROCCOLI
BROCCOLI
Avvio
immediato
Avvio
ritardato
COTTURA
00:02
BUON APPETITO!
MANTENIMENTO AL CALDO
00:02
300 gr
Chuidere il coperchio
e umbullonarlo
Frutta e verdura
ricetteingredienti
manuale
BROCCOLI
biblioteche
Selezionare la quantità di
broccoli (min 300 g).
TEMPO CONSIGLIOATO: 3 min
PRERISCALDAMENTO
Attendere
Frutta e verdura
BROCCOLI
BROCCOLI
broccoli
carote
cavoletti di Bruxelles
cavolfiore
cavolo
Desideri avviare
la cottura ?
COOKING
BROCCOLI
SÌ NO
- Versare 200 ml di acqua nel recipiente.
- Mettere gli ingredienti nel castello vapore.
- Porre il cestello vapore nel recipiente.
00:03
BROCCOLI
AVVERTENZA
BROCCOLI
FINE COTTURA
Attendere
BROCCOLI
BROCCOLI
Avvio
immediato
Avvio
ritardato
COTTURA
00:02
BUON APPETITO!
MANTENIMENTO AL CALDO
00:02
300 gr
Chuidere il coperchio
e umbullonarlo
Frutta e verdura
ricetteingredienti
manuale
BROCCOLI
biblioteche
ok
Avviare la ricetta
TEMPO CONSIGLIOATO: 3 min
PRERISCALDAMENTO
Attendere
Frutta e verdura
BROCCOLI
BROCCOLI
broccoli
carote
cavoletti di Bruxelles
cavolfiore
cavolo
Desideri avviare
la cottura ?
COOKING
BROCCOLI
SÌ NO
- Versare 200 ml di acqua nel recipiente.
- Mettere gli ingredienti nel castello vapore.
- Porre il cestello vapore nel recipiente.
00:03
BROCCOLI
AVVERTENZA
BROCCOLI
FINE COTTURA
Attendere
BROCCOLI
BROCCOLI
Avvio
immediato
Avvio
ritardato
COTTURA
00:02
BUON APPETITO!
MANTENIMENTO AL CALDO
00:02
300 gr
Chuidere il coperchio
e umbullonarlo
Frutta e verdura
ricetteingredienti
manuale
BROCCOLI
biblioteche
ok
Seguire le istruzioni
TEMPO CONSIGLIOATO: 3 min
PRERISCALDAMENTO
Attendere
Frutta e verdura
BROCCOLI
BROCCOLI
broccoli
carote
cavoletti di Bruxelles
cavolfiore
cavolo
Desideri avviare
la cottura ?
COOKING
BROCCOLI
SÌ NO
- Versare 200 ml di acqua nel recipiente.
- Mettere gli ingredienti nel castello vapore.
- Porre il cestello vapore nel recipiente.
00:03
BROCCOLI
AVVERTENZA
BROCCOLI
FINE COTTURA
Attendere
BROCCOLI
BROCCOLI
Avvio
immediato
Avvio
ritardato
COTTURA
00:02
BUON APPETITO!
MANTENIMENTO AL CALDO
00:02
300 gr
Chuidere il coperchio
e umbullonarlo
Frutta e verdura
ricetteingredienti
manuale
BROCCOLI
biblioteche
ok
ok
+
Selezionare
“avvio immediato”
TEMPO CONSIGLIOATO: 3 min
PRERISCALDAMENTO
Attendere
Frutta e verdura
BROCCOLI
BROCCOLI
broccoli
carote
cavoletti di Bruxelles
cavolfiore
cavolo
Desideri avviare
la cottura ?
COOKING
BROCCOLI
SÌ NO
- Versare 200 ml di acqua nel recipiente.
- Mettere gli ingredienti nel castello vapore.
- Porre il cestello vapore nel recipiente.
00:03
BROCCOLI
AVVERTENZA
BROCCOLI
FINE COTTURA
Attendere
BROCCOLI
BROCCOLI
Avvio
immediato
Avvio
ritardato
COTTURA
00:02
BUON APPETITO!
MANTENIMENTO AL CALDO
00:02
300 gr
Chuidere il coperchio
e umbullonarlo
Frutta e verdura
ricetteingredienti
manuale
BROCCOLI
biblioteche
ok
Apparirà il tempo di cottura
raccomandato
TEMPO CONSIGLIOATO: 3 min
PRERISCALDAMENTO
Attendere
Frutta e verdura
BROCCOLI
BROCCOLI
broccoli
carote
cavoletti di Bruxelles
cavolfiore
cavolo
Desideri avviare
la cottura ?
COOKING
BROCCOLI
SÌ NO
- Versare 200 ml di acqua nel recipiente.
- Mettere gli ingredienti nel castello vapore.
- Porre il cestello vapore nel recipiente.
00:03
BROCCOLI
AVVERTENZA
BROCCOLI
FINE COTTURA
Attendere
BROCCOLI
BROCCOLI
Avvio
immediato
Avvio
ritardato
COTTURA
00:02
BUON APPETITO!
MANTENIMENTO AL CALDO
00:02
300 gr
Chuidere il coperchio
e umbullonarlo
Frutta e verdura
ricetteingredienti
manuale
BROCCOLI
biblioteche
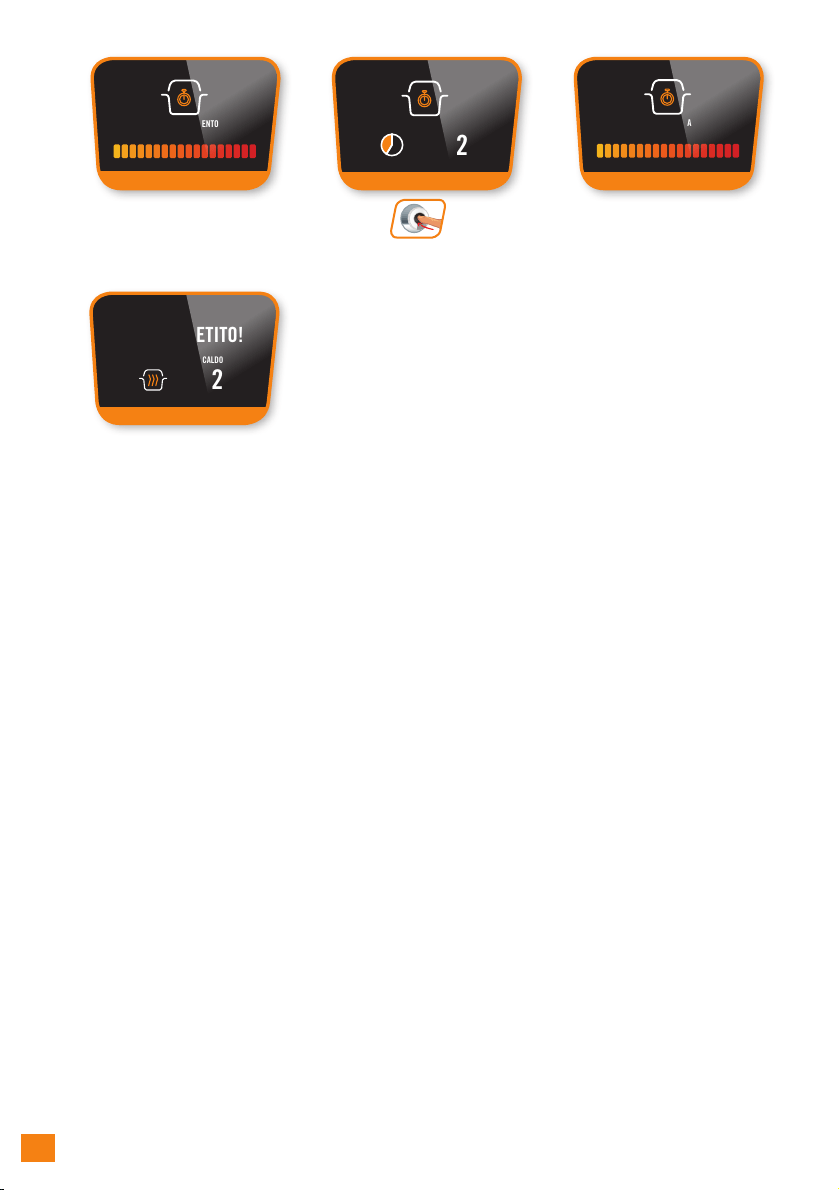
8888
ok
Preriscaldamento
TEMPO CONSIGLIOATO: 3 min
PRERISCALDAMENTO
Attendere
Frutta e verdura
BROCCOLI
BROCCOLI
broccoli
carote
cavoletti di Bruxelles
cavolfiore
cavolo
Desideri avviare
la cottura ?
COOKING
BROCCOLI
SÌ NO
- Versare 200 ml di acqua nel recipiente.
- Mettere gli ingredienti nel castello vapore.
- Porre il cestello vapore nel recipiente.
00:03
BROCCOLI
AVVERTENZA
BROCCOLI
FINE COTTURA
Attendere
BROCCOLI
BROCCOLI
Avvio
immediato
Avvio
ritardato
COTTURA
00:02
BUON APPETITO!
MANTENIMENTO AL CALDO
00:02
300 gr
Chuidere il coperchio
e umbullonarlo
Frutta e verdura
ricetteingredienti
manuale
BROCCOLI
biblioteche
Termine della cottura
TEMPO CONSIGLIOATO: 3 min
PRERISCALDAMENTO
Attendere
Frutta e verdura
BROCCOLI
BROCCOLI
broccoli
carote
cavoletti di Bruxelles
cavolfiore
cavolo
Desideri avviare
la cottura ?
COOKING
BROCCOLI
SÌ NO
- Versare 200 ml di acqua nel recipiente.
- Mettere gli ingredienti nel castello vapore.
- Porre il cestello vapore nel recipiente.
00:03
BROCCOLI
AVVERTENZA
BROCCOLI
FINE COTTURA
Attendere
BROCCOLI
BROCCOLI
Avvio
immediato
Avvio
ritardato
COTTURA
00:02
BUON APPETITO!
MANTENIMENTO AL CALDO
00:02
300 gr
Chuidere il coperchio
e umbullonarlo
Frutta e verdura
ricetteingredienti
manuale
BROCCOLI
biblioteche
È pronto!
TEMPO CONSIGLIOATO: 3 min
PRERISCALDAMENTO
Attendere
Frutta e verdura
BROCCOLI
BROCCOLI
broccoli
carote
cavoletti di Bruxelles
cavolfiore
cavolo
Desideri avviare
la cottura ?
COOKING
BROCCOLI
SÌ NO
- Versare 200 ml di acqua nel recipiente.
- Mettere gli ingredienti nel castello vapore.
- Porre il cestello vapore nel recipiente.
00:03
BROCCOLI
AVVERTENZA
BROCCOLI
FINE COTTURA
Attendere
BROCCOLI
BROCCOLI
Avvio
immediato
Avvio
ritardato
COTTURA
00:02
BUON APPETITO!
MANTENIMENTO AL CALDO
00:02
300 gr
Chuidere il coperchio
e umbullonarlo
Frutta e verdura
ricetteingredienti
manuale
BROCCOLI
biblioteche
Avviare la cottura
TEMPO CONSIGLIOATO: 3 min
PRERISCALDAMENTO
Attendere
Frutta e verdura
BROCCOLI
BROCCOLI
broccoli
carote
cavoletti di Bruxelles
cavolfiore
cavolo
Desideri avviare
la cottura ?
COOKING
BROCCOLI
SÌ NO
- Versare 200 ml di acqua nel recipiente.
- Mettere gli ingredienti nel castello vapore.
- Porre il cestello vapore nel recipiente.
00:03
BROCCOLI
AVVERTENZA
BROCCOLI
FINE COTTURA
Attendere
BROCCOLI
BROCCOLI
Avvio
immediato
Avvio
ritardato
COTTURA
00:02
BUON APPETITO!
MANTENIMENTO AL CALDO
00:02
300 gr
Chuidere il coperchio
e umbullonarlo
Frutta e verdura
ricetteingredienti
manuale
BROCCOLI
biblioteche

89
ITALIANO
89
RICETTA MANZO ALLA BOURGUIGNON
ok
ok
+
ok
ok
+
ok
ok
+
ok
ok
+
ok
ok
MENU RICETTE
Con il menu ricette, scegliete tra 150 ricette salate e dolci suddivise in quattro categorie:
Antipasti/ Primi Piatti/ Secondo Piatti/ Dolci.
Visualizzare la ricetta
MANZO ALLA BOURGUIGNON
Involtini di tacchino
Lonza di vitello con verdure
Manzo alla Bourguignon
Manzo alla Stroganoff
Ossobuco all'uva
MANZO ALLA BOURGUIGNON - 4 PERS
PREPARAZIONE
10min 35min
COTTURA
MANZO ALLA BOURGUIGNON
MANZO ALLA BOURGUIGNON
MANZO ALLA BOURGUIGNON
MANZO ALLA BOURGUIGNON
MANZO ALLA BOURGUIGNON
MANZO ALLA BOURGUIGNON
MANZO ALLA BOURGUIGNON
BUON APPETITO!
Fare attenzione al vapore durante
l'apertura del coperchio
00:10
00:35
04
PERS
OK
OK
Manzo tagliato a striscioline
Vino rosso
Brodo di vitello
Bacon a striscioline
Cipolle
Olio vegetale
800 g
250 ml
150 ml
70 g
150 g
1Cc
PREPARARE GLI INGREDIENTI
Desideri avviare la ricetta ?
Saltare tutti gli ingredienti esclusi i
liquidi per 10 minuti.
SI NO
PRERISCALDAMENTO
Attendere
FINE COTTURA
Attendere
ARRESTARE LA ROSOLATURA
SI NO
ARRESTARE LA ROSOLATURA
SI NO
Aggiungere i liquidi.
OK
COTTURA
MANZO ALLA BOURGUIGNON
Primi Piatti
Antipasti
Dolci
library
Secondi Piatti
ricetteingredienti
manuale
Biblioteche
Preparare gli ingredienti
MANZO ALLA BOURGUIGNON
Involtini di tacchino
Lonza di vitello con verdure
Manzo alla Bourguignon
Manzo alla Stroganoff
Ossobuco all'uva
MANZO ALLA BOURGUIGNON - 4 PERS
PREPARAZIONE
10min 35min
COTTURA
MANZO ALLA BOURGUIGNON
MANZO ALLA BOURGUIGNON
MANZO ALLA BOURGUIGNON
MANZO ALLA BOURGUIGNON
MANZO ALLA BOURGUIGNON
MANZO ALLA BOURGUIGNON
MANZO ALLA BOURGUIGNON
BUON APPETITO!
Fare attenzione al vapore durante
l'apertura del coperchio
00:10
00:35
04
PERS
OK
OK
Manzo tagliato a striscioline
Vino rosso
Brodo di vitello
Bacon a striscioline
Cipolle
Olio vegetale
800 g
250 ml
150 ml
70 g
150 g
1Cc
PREPARARE GLI INGREDIENTI
Desideri avviare la ricetta ?
Saltare tutti gli ingredienti esclusi i
liquidi per 10 minuti.
SI NO
PRERISCALDAMENTO
Attendere
FINE COTTURA
Attendere
ARRESTARE LA ROSOLATURA
SI NO
ARRESTARE LA ROSOLATURA
SI NO
Aggiungere i liquidi.
OK
COTTURA
MANZO ALLA BOURGUIGNON
Primi Piatti
Antipasti
Dolci
library
Secondi Piatti
ricetteingredienti
manuale
Biblioteche
Selezionare il menu
“ricette”
MANZO ALLA BOURGUIGNON
Involtini di tacchino
Lonza di vitello con verdure
Manzo alla Bourguignon
Manzo alla Stroganoff
Ossobuco all'uva
MANZO ALLA BOURGUIGNON - 4 PERS
PREPARAZIONE
10min 35min
COTTURA
MANZO ALLA BOURGUIGNON
MANZO ALLA BOURGUIGNON
MANZO ALLA BOURGUIGNON
MANZO ALLA BOURGUIGNON
MANZO ALLA BOURGUIGNON
MANZO ALLA BOURGUIGNON
MANZO ALLA BOURGUIGNON
BUON APPETITO!
Fare attenzione al vapore durante
l'apertura del coperchio
00:10
00:35
04
PERS
OK
OK
Manzo tagliato a striscioline
Vino rosso
Brodo di vitello
Bacon a striscioline
Cipolle
Olio vegetale
800 g
250 ml
150 ml
70 g
150 g
1Cc
PREPARARE GLI INGREDIENTI
Desideri avviare la ricetta ?
Saltare tutti gli ingredienti esclusi i
liquidi per 10 minuti.
SI NO
PRERISCALDAMENTO
Attendere
FINE COTTURA
Attendere
ARRESTARE LA ROSOLATURA
SI NO
ARRESTARE LA ROSOLATURA
SI NO
Aggiungere i liquidi.
OK
COTTURA
MANZO ALLA BOURGUIGNON
Primi Piatti
Antipasti
Dolci
library
Secondi Piatti
ricetteingredienti
manuale
Biblioteche
Selezionare il tipo di
ricetta
MANZO ALLA BOURGUIGNON
Involtini di tacchino
Lonza di vitello con verdure
Manzo alla Bourguignon
Manzo alla Stroganoff
Ossobuco all'uva
MANZO ALLA BOURGUIGNON - 4 PERS
PREPARAZIONE
10min 35min
COTTURA
MANZO ALLA BOURGUIGNON
MANZO ALLA BOURGUIGNON
MANZO ALLA BOURGUIGNON
MANZO ALLA BOURGUIGNON
MANZO ALLA BOURGUIGNON
MANZO ALLA BOURGUIGNON
MANZO ALLA BOURGUIGNON
BUON APPETITO!
Fare attenzione al vapore durante
l'apertura del coperchio
00:10
00:35
04
PERS
OK
OK
Manzo tagliato a striscioline
Vino rosso
Brodo di vitello
Bacon a striscioline
Cipolle
Olio vegetale
800 g
250 ml
150 ml
70 g
150 g
1Cc
PREPARARE GLI INGREDIENTI
Desideri avviare la ricetta ?
Saltare tutti gli ingredienti esclusi i
liquidi per 10 minuti.
SI NO
PRERISCALDAMENTO
Attendere
FINE COTTURA
Attendere
ARRESTARE LA ROSOLATURA
SI NO
ARRESTARE LA ROSOLATURA
SI NO
Aggiungere i liquidi.
OK
COTTURA
MANZO ALLA BOURGUIGNON
Primi Piatti
Antipasti
Dolci
library
Secondi Piatti
ricetteingredienti
manuale
Biblioteche
Selezionare una ricetta
MANZO ALLA BOURGUIGNON
Involtini di tacchino
Lonza di vitello con verdure
Manzo alla Bourguignon
Manzo alla Stroganoff
Ossobuco all'uva
MANZO ALLA BOURGUIGNON - 4 PERS
PREPARAZIONE
10min 35min
COTTURA
MANZO ALLA BOURGUIGNON
MANZO ALLA BOURGUIGNON
MANZO ALLA BOURGUIGNON
MANZO ALLA BOURGUIGNON
MANZO ALLA BOURGUIGNON
MANZO ALLA BOURGUIGNON
MANZO ALLA BOURGUIGNON
BUON APPETITO!
Fare attenzione al vapore durante
l'apertura del coperchio
00:10
00:35
04
PERS
OK
OK
Manzo tagliato a striscioline
Vino rosso
Brodo di vitello
Bacon a striscioline
Cipolle
Olio vegetale
800 g
250 ml
150 ml
70 g
150 g
1Cc
PREPARARE GLI INGREDIENTI
Desideri avviare la ricetta ?
Saltare tutti gli ingredienti esclusi i
liquidi per 10 minuti.
SI NO
PRERISCALDAMENTO
Attendere
FINE COTTURA
Attendere
ARRESTARE LA ROSOLATURA
SI NO
ARRESTARE LA ROSOLATURA
SI NO
Aggiungere i liquidi.
OK
COTTURA
MANZO ALLA BOURGUIGNON
Primi Piatti
Antipasti
Dolci
library
Secondi Piatti
ricetteingredienti
manuale
Biblioteche
Selezionare il numero
di persone
MANZO ALLA BOURGUIGNON
Involtini di tacchino
Lonza di vitello con verdure
Manzo alla Bourguignon
Manzo alla Stroganoff
Ossobuco all'uva
MANZO ALLA BOURGUIGNON - 4 PERS
PREPARAZIONE
10min 35min
COTTURA
MANZO ALLA BOURGUIGNON
MANZO ALLA BOURGUIGNON
MANZO ALLA BOURGUIGNON
MANZO ALLA BOURGUIGNON
MANZO ALLA BOURGUIGNON
MANZO ALLA BOURGUIGNON
MANZO ALLA BOURGUIGNON
BUON APPETITO!
Fare attenzione al vapore durante
l'apertura del coperchio
00:10
00:35
04
PERS
OK
OK
Manzo tagliato a striscioline
Vino rosso
Brodo di vitello
Bacon a striscioline
Cipolle
Olio vegetale
800 g
250 ml
150 ml
70 g
150 g
1Cc
PREPARARE GLI INGREDIENTI
Desideri avviare la ricetta ?
Saltare tutti gli ingredienti esclusi i
liquidi per 10 minuti.
SI NO
PRERISCALDAMENTO
Attendere
FINE COTTURA
Attendere
ARRESTARE LA ROSOLATURA
SI NO
ARRESTARE LA ROSOLATURA
SI NO
Aggiungere i liquidi.
OK
COTTURA
MANZO ALLA BOURGUIGNON
Primi Piatti
Antipasti
Dolci
library
Secondi Piatti
ricetteingredienti
manuale
Biblioteche
È possibile tornare al menu iniziale tenendo premuto il pulsante Indietro per 3 secondi.
ok
ok
+
ok
ok
+
ok
Preriscaldamento
MANZO ALLA BOURGUIGNON
Involtini di tacchino
Lonza di vitello con verdure
Manzo alla Bourguignon
Manzo alla Stroganoff
Ossobuco all'uva
MANZO ALLA BOURGUIGNON - 4 PERS
PREPARAZIONE
10min 35min
COTTURA
MANZO ALLA BOURGUIGNON
MANZO ALLA BOURGUIGNON
MANZO ALLA BOURGUIGNON
MANZO ALLA BOURGUIGNON
MANZO ALLA BOURGUIGNON
MANZO ALLA BOURGUIGNON
MANZO ALLA BOURGUIGNON
BUON APPETITO!
Fare attenzione al vapore durante
l'apertura del coperchio
00:10
00:35
04
PERS
OK
OK
Manzo tagliato a striscioline
Vino rosso
Brodo di vitello
Bacon a striscioline
Cipolle
Olio vegetale
800 g
250 ml
150 ml
70 g
150 g
1Cc
PREPARARE GLI INGREDIENTI
Desideri avviare la ricetta ?
Saltare tutti gli ingredienti esclusi i
liquidi per 10 minuti.
SI NO
PRERISCALDAMENTO
Attendere
FINE COTTURA
Attendere
ARRESTARE LA ROSOLATURA
SI NO
ARRESTARE LA ROSOLATURA
SI NO
Aggiungere i liquidi.
OK
COTTURA
MANZO ALLA BOURGUIGNON
Primi Piatti
Antipasti
Dolci
library
Secondi Piatti
ricetteingredienti
manuale
Biblioteche
Avviare la ricetta
MANZO ALLA BOURGUIGNON
Involtini di tacchino
Lonza di vitello con verdure
Manzo alla Bourguignon
Manzo alla Stroganoff
Ossobuco all'uva
MANZO ALLA BOURGUIGNON - 4 PERS
PREPARAZIONE
10min 35min
COTTURA
MANZO ALLA BOURGUIGNON
MANZO ALLA BOURGUIGNON
MANZO ALLA BOURGUIGNON
MANZO ALLA BOURGUIGNON
MANZO ALLA BOURGUIGNON
MANZO ALLA BOURGUIGNON
MANZO ALLA BOURGUIGNON
BUON APPETITO!
Fare attenzione al vapore durante
l'apertura del coperchio
00:10
00:35
04
PERS
OK
OK
Manzo tagliato a striscioline
Vino rosso
Brodo di vitello
Bacon a striscioline
Cipolle
Olio vegetale
800 g
250 ml
150 ml
70 g
150 g
1Cc
PREPARARE GLI INGREDIENTI
Desideri avviare la ricetta ?
Saltare tutti gli ingredienti esclusi i
liquidi per 10 minuti.
SI NO
PRERISCALDAMENTO
Attendere
FINE COTTURA
Attendere
ARRESTARE LA ROSOLATURA
SI NO
ARRESTARE LA ROSOLATURA
SI NO
Aggiungere i liquidi.
OK
COTTURA
MANZO ALLA BOURGUIGNON
Primi Piatti
Antipasti
Dolci
library
Secondi Piatti
ricetteingredienti
manuale
Biblioteche
Seguire le istruzioni
MANZO ALLA BOURGUIGNON
Involtini di tacchino
Lonza di vitello con verdure
Manzo alla Bourguignon
Manzo alla Stroganoff
Ossobuco all'uva
MANZO ALLA BOURGUIGNON - 4 PERS
PREPARAZIONE
10min 35min
COTTURA
MANZO ALLA BOURGUIGNON
MANZO ALLA BOURGUIGNON
MANZO ALLA BOURGUIGNON
MANZO ALLA BOURGUIGNON
MANZO ALLA BOURGUIGNON
MANZO ALLA BOURGUIGNON
MANZO ALLA BOURGUIGNON
BUON APPETITO!
Fare attenzione al vapore durante
l'apertura del coperchio
00:10
00:35
04
PERS
OK
OK
Manzo tagliato a striscioline
Vino rosso
Brodo di vitello
Bacon a striscioline
Cipolle
Olio vegetale
800 g
250 ml
150 ml
70 g
150 g
1Cc
PREPARARE GLI INGREDIENTI
Desideri avviare la ricetta ?
Saltare tutti gli ingredienti esclusi i
liquidi per 10 minuti.
SI NO
PRERISCALDAMENTO
Attendere
FINE COTTURA
Attendere
ARRESTARE LA ROSOLATURA
SI NO
ARRESTARE LA ROSOLATURA
SI NO
Aggiungere i liquidi.
OK
COTTURA
MANZO ALLA BOURGUIGNON
Primi Piatti
Antipasti
Dolci
library
Secondi Piatti
ricetteingredienti
manuale
Biblioteche
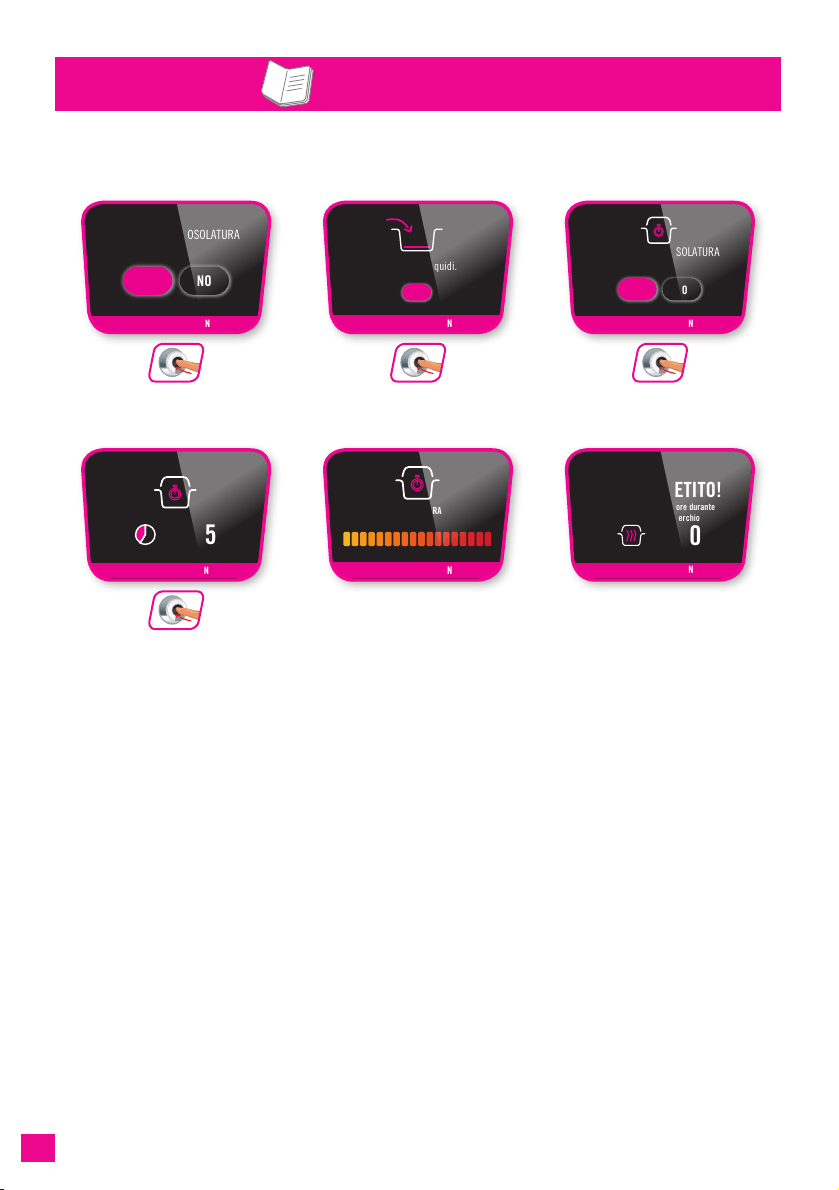
9090
MENU RICETTE (CONTINUA)
MENU RICETTE
ok
ok
ok
ok
Termine della cottura
MANZO ALLA BOURGUIGNON
Involtini di tacchino
Lonza di vitello con verdure
Manzo alla Bourguignon
Manzo alla Stroganoff
Ossobuco all'uva
MANZO ALLA BOURGUIGNON - 4 PERS
PREPARAZIONE
10min 35min
COTTURA
MANZO ALLA BOURGUIGNON
MANZO ALLA BOURGUIGNON
MANZO ALLA BOURGUIGNON
MANZO ALLA BOURGUIGNON
MANZO ALLA BOURGUIGNON
MANZO ALLA BOURGUIGNON
MANZO ALLA BOURGUIGNON
BUON APPETITO!
Fare attenzione al vapore durante
l'apertura del coperchio
00:10
00:35
04
PERS
OK
OK
Manzo tagliato a striscioline
Vino rosso
Brodo di vitello
Bacon a striscioline
Cipolle
Olio vegetale
800 g
250 ml
150 ml
70 g
150 g
1Cc
PREPARARE GLI INGREDIENTI
Desideri avviare la ricetta ?
Saltare tutti gli ingredienti esclusi i
liquidi per 10 minuti.
SI NO
PRERISCALDAMENTO
Attendere
FINE COTTURA
Attendere
ARRESTARE LA ROSOLATURA
SI NO
ARRESTARE LA ROSOLATURA
SI NO
Aggiungere i liquidi.
OK
COTTURA
MANZO ALLA BOURGUIGNON
Primi Piatti
Antipasti
Dolci
library
Secondi Piatti
ricetteingredienti
manuale
Biblioteche
È pronto!
MANZO ALLA BOURGUIGNON
Involtini di tacchino
Lonza di vitello con verdure
Manzo alla Bourguignon
Manzo alla Stroganoff
Ossobuco all'uva
MANZO ALLA BOURGUIGNON - 4 PERS
PREPARAZIONE
10min 35min
COTTURA
MANZO ALLA BOURGUIGNON
MANZO ALLA BOURGUIGNON
MANZO ALLA BOURGUIGNON
MANZO ALLA BOURGUIGNON
MANZO ALLA BOURGUIGNON
MANZO ALLA BOURGUIGNON
MANZO ALLA BOURGUIGNON
BUON APPETITO!
Fare attenzione al vapore durante
l'apertura del coperchio
00:10
00:35
04
PERS
OK
OK
Manzo tagliato a striscioline
Vino rosso
Brodo di vitello
Bacon a striscioline
Cipolle
Olio vegetale
800 g
250 ml
150 ml
70 g
150 g
1Cc
PREPARARE GLI INGREDIENTI
Desideri avviare la ricetta ?
Saltare tutti gli ingredienti esclusi i
liquidi per 10 minuti.
SI NO
PRERISCALDAMENTO
Attendere
FINE COTTURA
Attendere
ARRESTARE LA ROSOLATURA
SI NO
ARRESTARE LA ROSOLATURA
SI NO
Aggiungere i liquidi.
OK
COTTURA
MANZO ALLA BOURGUIGNON
Primi Piatti
Antipasti
Dolci
library
Secondi Piatti
ricetteingredienti
manuale
Biblioteche
Interrompere la
rosolatura
MANZO ALLA BOURGUIGNON
Involtini di tacchino
Lonza di vitello con verdure
Manzo alla Bourguignon
Manzo alla Stroganoff
Ossobuco all'uva
MANZO ALLA BOURGUIGNON - 4 PERS
PREPARAZIONE
10min 35min
COTTURA
MANZO ALLA BOURGUIGNON
MANZO ALLA BOURGUIGNON
MANZO ALLA BOURGUIGNON
MANZO ALLA BOURGUIGNON
MANZO ALLA BOURGUIGNON
MANZO ALLA BOURGUIGNON
MANZO ALLA BOURGUIGNON
BUON APPETITO!
Fare attenzione al vapore durante
l'apertura del coperchio
00:10
00:35
04
PERS
OK
OK
Manzo tagliato a striscioline
Vino rosso
Brodo di vitello
Bacon a striscioline
Cipolle
Olio vegetale
800 g
250 ml
150 ml
70 g
150 g
1Cc
PREPARARE GLI INGREDIENTI
Desideri avviare la ricetta ?
Saltare tutti gli ingredienti esclusi i
liquidi per 10 minuti.
SI NO
PRERISCALDAMENTO
Attendere
FINE COTTURA
Attendere
ARRESTARE LA ROSOLATURA
SI NO
ARRESTARE LA ROSOLATURA
SI NO
Aggiungere i liquidi.
OK
COTTURA
MANZO ALLA BOURGUIGNON
Primi Piatti
Antipasti
Dolci
library
Secondi Piatti
ricetteingredienti
manuale
Biblioteche
Seguire le istruzioni
MANZO ALLA BOURGUIGNON
Involtini di tacchino
Lonza di vitello con verdure
Manzo alla Bourguignon
Manzo alla Stroganoff
Ossobuco all'uva
MANZO ALLA BOURGUIGNON - 4 PERS
PREPARAZIONE
10min 35min
COTTURA
MANZO ALLA BOURGUIGNON
MANZO ALLA BOURGUIGNON
MANZO ALLA BOURGUIGNON
MANZO ALLA BOURGUIGNON
MANZO ALLA BOURGUIGNON
MANZO ALLA BOURGUIGNON
MANZO ALLA BOURGUIGNON
BUON APPETITO!
Fare attenzione al vapore durante
l'apertura del coperchio
00:10
00:35
04
PERS
OK
OK
Manzo tagliato a striscioline
Vino rosso
Brodo di vitello
Bacon a striscioline
Cipolle
Olio vegetale
800 g
250 ml
150 ml
70 g
150 g
1Cc
PREPARARE GLI INGREDIENTI
Desideri avviare la ricetta ?
Saltare tutti gli ingredienti esclusi i
liquidi per 10 minuti.
SI NO
PRERISCALDAMENTO
Attendere
FINE COTTURA
Attendere
ARRESTARE LA ROSOLATURA
SI NO
ARRESTARE LA ROSOLATURA
SI NO
Aggiungere i liquidi.
OK
COTTURA
MANZO ALLA BOURGUIGNON
Primi Piatti
Antipasti
Dolci
library
Secondi Piatti
ricetteingredienti
manuale
Biblioteche
Avviare la cottura
MANZO ALLA BOURGUIGNON
Involtini di tacchino
Lonza di vitello con verdure
Manzo alla Bourguignon
Manzo alla Stroganoff
Ossobuco all'uva
MANZO ALLA BOURGUIGNON - 4 PERS
PREPARAZIONE
10min 35min
COTTURA
MANZO ALLA BOURGUIGNON
MANZO ALLA BOURGUIGNON
MANZO ALLA BOURGUIGNON
MANZO ALLA BOURGUIGNON
MANZO ALLA BOURGUIGNON
MANZO ALLA BOURGUIGNON
MANZO ALLA BOURGUIGNON
BUON APPETITO!
Fare attenzione al vapore durante
l'apertura del coperchio
00:10
00:35
04
PERS
OK
OK
Manzo tagliato a striscioline
Vino rosso
Brodo di vitello
Bacon a striscioline
Cipolle
Olio vegetale
800 g
250 ml
150 ml
70 g
150 g
1Cc
PREPARARE GLI INGREDIENTI
Desideri avviare la ricetta ?
Saltare tutti gli ingredienti esclusi i
liquidi per 10 minuti.
SI NO
PRERISCALDAMENTO
Attendere
FINE COTTURA
Attendere
ARRESTARE LA ROSOLATURA
SI NO
ARRESTARE LA ROSOLATURA
SI NO
Aggiungere i liquidi.
OK
COTTURA
MANZO ALLA BOURGUIGNON
Primi Piatti
Antipasti
Dolci
library
Secondi Piatti
ricetteingredienti
manuale
Biblioteche
Tempo di cottura
MANZO ALLA BOURGUIGNON
Involtini di tacchino
Lonza di vitello con verdure
Manzo alla Bourguignon
Manzo alla Stroganoff
Ossobuco all'uva
MANZO ALLA BOURGUIGNON - 4 PERS
PREPARAZIONE
10min 35min
COTTURA
MANZO ALLA BOURGUIGNON
MANZO ALLA BOURGUIGNON
MANZO ALLA BOURGUIGNON
MANZO ALLA BOURGUIGNON
MANZO ALLA BOURGUIGNON
MANZO ALLA BOURGUIGNON
MANZO ALLA BOURGUIGNON
BUON APPETITO!
Fare attenzione al vapore durante
l'apertura del coperchio
00:10
00:35
04
PERS
OK
OK
Manzo tagliato a striscioline
Vino rosso
Brodo di vitello
Bacon a striscioline
Cipolle
Olio vegetale
800 g
250 ml
150 ml
70 g
150 g
1Cc
PREPARARE GLI INGREDIENTI
Desideri avviare la ricetta ?
Saltare tutti gli ingredienti esclusi i
liquidi per 10 minuti.
SI NO
PRERISCALDAMENTO
Attendere
FINE COTTURA
Attendere
ARRESTARE LA ROSOLATURA
SI NO
ARRESTARE LA ROSOLATURA
SI NO
Aggiungere i liquidi.
OK
COTTURA
MANZO ALLA BOURGUIGNON
Primi Piatti
Antipasti
Dolci
library
Secondi Piatti
ricetteingredienti
manuale
Biblioteche
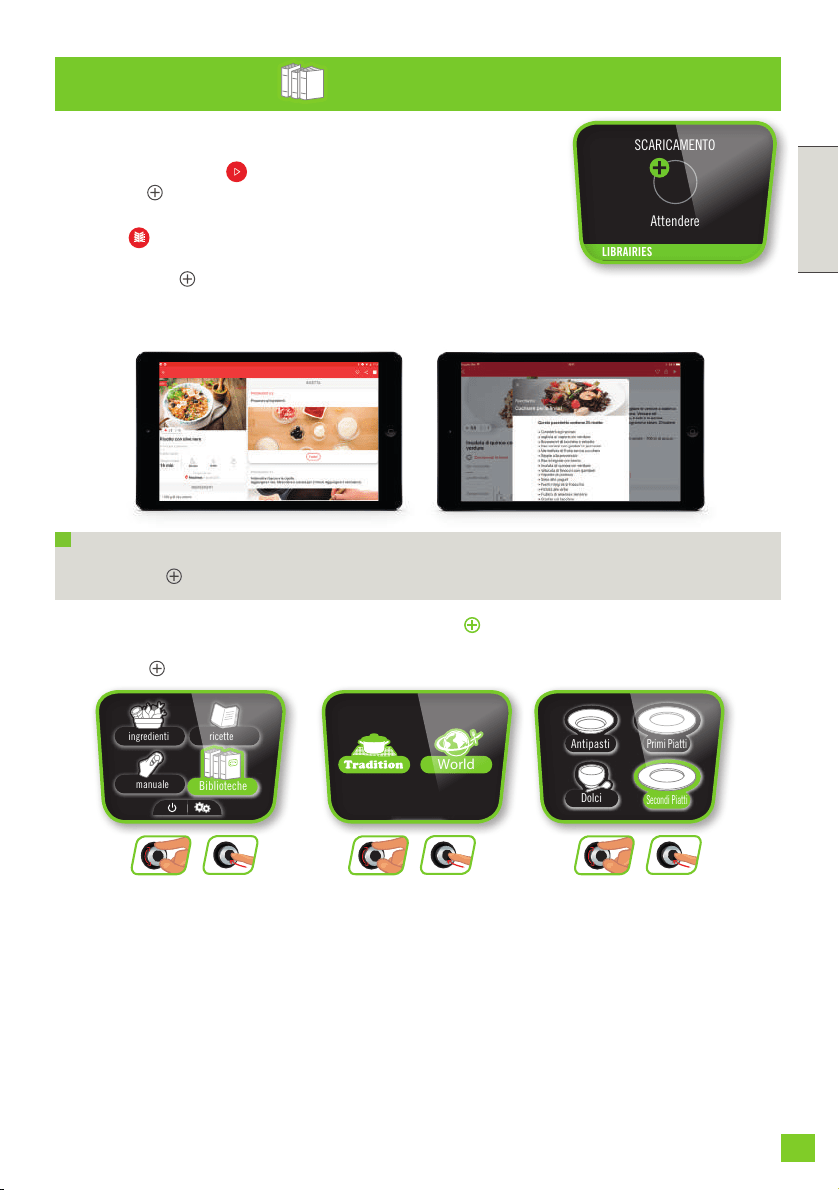
91
ITALIANO
91
BIBLIOTECHE
Accedere alle biblioteche del vostro COOK4ME CONNECT:
potete ritrovare i pacchetti che avete scaricato. Lanciate le ricette dal vostro
COOK4ME CONNECT accedendo alla vostra biblioteca.
N.B.: Potete arrestare in ogni momento lo scaricamento premendo il tasto “indietro” del
COOK4ME CONNECT.
SCARICARE RICETTE E PACCHETTI:
Puoi cliccare su per inviare una ricetta al tuo
COOK4ME CONNECT, andrà direttamente nella lista "ricette"
del tuo dispositivo. Quando un pacco è disponibile per vedere
un logo clicca sul testo corrispondente per scaricare il
pacchetto. Sarà quindi visibile nella scheda «biblioteche" della
tua COOK4ME CONNECT.
Attendere
SCARICAMENTO
LIBRAIRIES
Scaricamento in corso
Selezionatele
dal sotto-menu
“biblioteca”
Selezionate il pacchetto
di ricette desiderato
Selezionate Antipasti, Primi
Piatti, Secondo piatti or
Dolci, e scegliete la vostra
ricetta
ricette
manuale
ingredienti
Biblioteche
Primi Piatti
Secondi Piatti
Antipasti
Dolci
mainstarter
dessert
library
World
ricette
manuale
ingredienti
Biblioteche
Primi Piatti
Secondi Piatti
Antipasti
Dolci
mainstarter
dessert
library
World
ricette
manuale
ingredienti
Biblioteche
Primi Piatti
Secondi Piatti
Antipasti
Dolci
mainstarter
dessert
library
World
ok
ok
+
ok
ok
+
ok
ok
+
9292
INGREDIENTI
agnello
coniglio
maiale
manzo
pollame
vitello
capesante
cozze
pesce
scampi
bulgur
frumento
grano saraceno
orzo
quinoa
riso ne
riso integrale
asparagi
barbabietole
broccoli
carote
cavoletti di Bruxelles
cavolore
cavolo
cavolo verde
fagiolini verdi
nocchi
funghi
lenticchie
mela
melanzane
patate
patate dolci
pare
peperoni
piselli
porro
rape
sedano
spinaci
zucchine
riso e cereali
pesci pesce
Carne
frutta/verdura
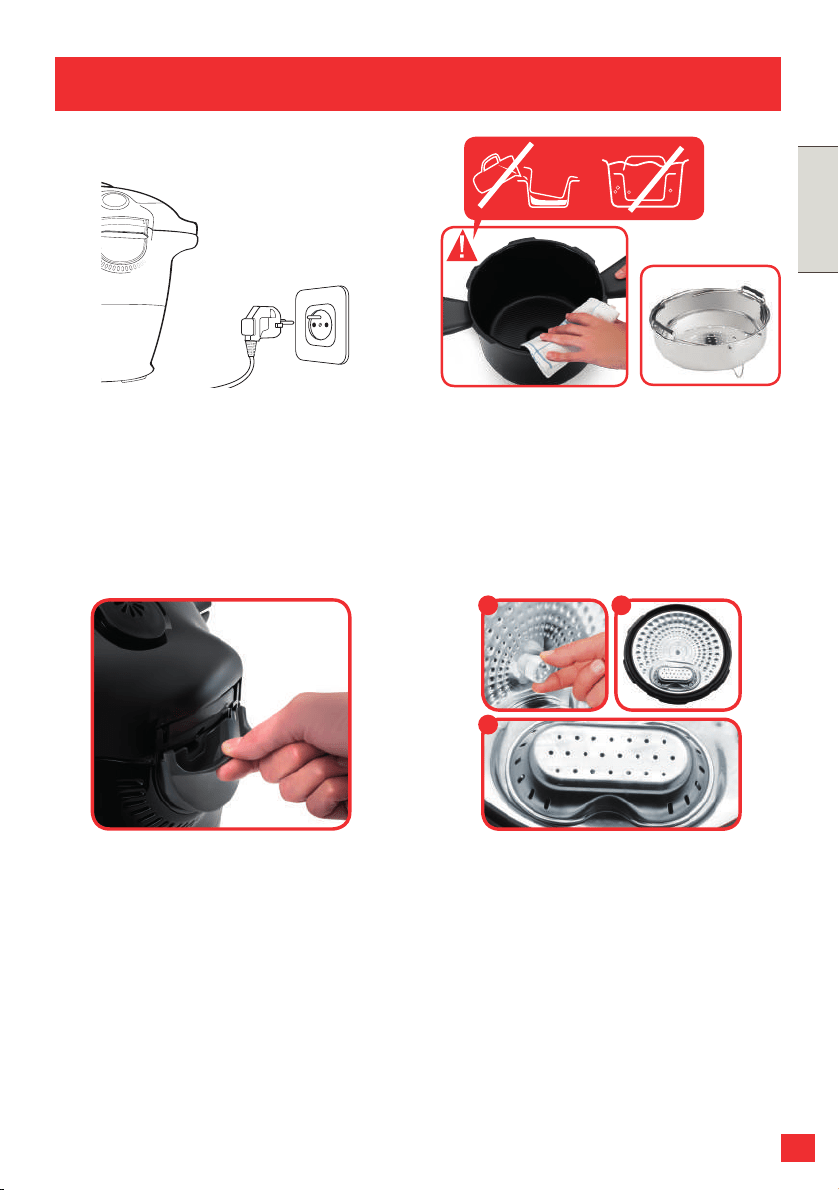
93
ITALIANO
93
PULIZIA E MANUTENZIONE
Dopo l’uso, scollegare l’apparecchio
dalla presa di corrente per pulirlo. Pulire
l’apparecchio dopo ogni utilizzo.
È possibile lavare la pentola di cottura e il
cestello vapore con acqua calda saponata
o in lavastoviglie. Il corpo centrale
dell’apparecchio deve essere pulito con
un panno umido.
Dopo diversi lavaggi in lavastoviglie,
l’esterno della pentola potrebbe scolorirsi.
È possibile pulirlo con la parte ruvida di
una spugna.
Dopo ogni utilizzo, rimuovere il raccogli-
condensa e lavarlo accuratamente con
acqua pulita o in lavastoviglie. Asciugarlo
accuratamente. Riportarlo nella posizione
originale.
lavastoviglie, è necessario rimuovere il
coperchio della valvola.
1. Svitare il dado al centro del coperchio
in metallo
2. Rimuovere il coperchio in metallo
3. Rimuovere il coperchio della valvola
1 2
3

9494
LAVAGGIO A MANO
È possibile lavare il coperchio in metallo
con acqua calda saponata. Rimuovere la
sfera e pulirla accuratamente. Asciugare
la sfera e il suo coperchio con un panno
morbido.
LAVAGGIO IN LAVASTOVIGLIE
È possibile lavare il coperchio in metallo in
lavastoviglie, senza rimuovere le valvole.
Dopo il lavaggio, rimuovere la sfera e
sofare nel tubo per vericare che non
sia bloccato. Asciugare accuratamente
la sfera e il suo coperchio con un panno
morbido.
Prima di reinserire la sfera, sofare nel tubo
per vericare che non sia ostruito.
Premere la parte interna della molla della
valvola di sicurezza per vericare che non
sia ostruita
Prima di rimuovere il coperchio interno, pulire la parte superiore della pentola di cottura.
Pulire l’interno del coperchio in metallo dell’apparecchio con una spugna umida e vericare
che l’asta manometrica sia posizionata correttamente e non sia ostruita.
Risciacquare con acqua corrente e vericare la mobilità del perno di sicurezza.
Sostituire la guarnizione impermeabile
almeno ogni tre anni. Questa operazione
può essere effettuata in un centro di
assistenza autorizzato
Non riporre l’apparecchio con il coperchio
chiuso; lasciarlo aperto o socchiuso per
evitare la formazione di odori sgradevoli.

95
ITALIANO
95
Trasportare l’apparecchio usando le
due maniglie laterali. Per una maggiore
sicurezza, vericare che l’impugnatura sia
in posizione di chiusura. Per una maggiore
sicurezza, vericare che il coperchio sia
chiuso.
In caso di immersione accidentale
dell’apparecchio in acqua o se l’elemento
riscaldante entra a contatto con acqua
quando la pentola non è in posizione,
portare l’apparecchio presso un centro di
assistenza autorizzato.
Pulire le superci esterne del coperchio dell’apparecchio con una spugna umida. Pulire la
valvola silenziatrice situata sul retro del coperchio.
Pulire la parte superiore della pentola
di cottura con un panno umido. Pulire il
raccogli-condensa con un panno umido.
Risciacquare con acqua corrente e
vericare la mobilità dell’asta di sicurezza.
Pulire la guarnizione sul coperchio di
metallo con un panno umido, quindi
risciacquarla accuratamente. Non usare
oggetti appuntiti.

96
La pentola a pressione è dotata di diversi dispositivi di sicurezza.
Sicurezza all’apertura
- Se l’apparecchio è sotto pressione, l’asta manometrica è in posizione sollevata,
bloccando l’apertura del coperchio. Non tentare mai di forzare l’apertura
dell’apparecchio.
- In particolare, non intervenire sull’asta manometrica.
- Assicurarsi che la pressione interna sia diminuita (dalla valvola silenziatrice non esce
più vapore) prima di tentare di aprire il coperchio.
Due dispositivi contro la sovrappressione
- Primo dispositivo: la valvola di sicurezza libera la pressione – consultare la sezione
Pulizia e manutenzione a pagina 190.
- Secondo dispositivo: la guarnizione permette la fuoriuscita del vapore sul retro del
coperchio.
Se uno dei dispositivi contro la sovrappressione si attiva:
Arrestare l’apparecchio.
Attendere che l’apparecchio si raffreddi completamente.
Aprirla.
Ispezionare e pulire la valvola di sicurezza, la sfera di decompressione e la guarnizione.
Consultare la sezione Pulizia e manutenzione.
Se dopo l’ispezione e la pulizia il prodotto perde o non funziona più, portarlo presso
un centro di assistenza autorizzato.
Regolazione della pressione
L’apparecchio regola la pressione attivando o disattivando l’elemento riscaldante.
Per limitare gli effetti dell’inerzia termica e migliorare la precisione della regolazione,
occasionalmente la sfera di decompressione può attivarsi automaticamente per
rilasciare brevemente del vapore.
DISPOSITIVI DI SICUREZZA

97
ITALIANO
PROBLEMA POSSIBILE CAUSA SOLUZIONE
Il coperchio non
si chiude.
Tra la pentola e la piastra
riscaldante sono presenti
corpi estranei.
Rimuovere la pentola e vericare che la
piastra riscaldante, l'elemento centrale e
la parte inferiore della pentola siano puliti.
Vericare inoltre la mobilità dell'elemento
centrale.
L'impugnatura di apertura
del coperchio non è
posizionata correttamente.
Vericare che l'impugnatura del
coperchio sia completamente aperta.
Il coperchio in metallo
e/o il dado di serraggio
non sono installati
correttamente o avvitati
completamente.
Vericare di aver posizionato tutti gli
elementi del coperchio in metallo e che il
dado sia serrato.
L'apparecchio
non si
decomprime.
Il coperchio della sfera
non è posizionato
correttamente.
Lasciare che l'apparecchio si raffreddi
completamente, quindi rimuovere il
coperchio in metallo e posizionare
correttamente il coperchio della sfera
(ssarlo in posizione di chiusura).
Il coperchio non
si apre dopo la
fuoriuscita del
vapore
L'asta manometrica
è ancora in posizione
sollevata.
Dopo aver vericato che non fuoriesca
altro vapore e che la pentola sia
completamente fredda, inserire
uno stecchino nel foro situato tra
l'impugnatura di apertura e la valvola
silenziatrice. Fare attenzione al vapore
rilasciato dopo aver inserito lo stecchino.
Quando non fuoriesce più vapore,
provare ad aprire l'apparecchio.
L'apparecchio
non si
pressurizza.
Vericare che la
guarnizione, la valvola di
sicurezza viola e l'asta
manometrica siano pulite.
Pulire l'apparecchio seguendo le
istruzioni fornite nel manuale.
Vericare che il coperchio
sia bloccato e che la linea
sia allineata correttamente
con il lucchetto chiuso.
Vericare che l'asta
manometrica sia libera di
muoversi e che sia pulita.
Vericare che l'asta manometrica sia
libera di muoversi e che sia pulita.
La sfera di
decompressione non è
posizionata correttamente
o è sporca.
Vericare che la sfera sia posizionata
correttamente e che il coperchio sia in
posizione di chiusura. Pulire e asciugare
la sfera e il suo coperchio.
98
PROBLEMA POSSIBILE CAUSA SOLUZIONE
CODICI ERRORE Codice 24: la pressione
diminuisce durante la
cottura a pressione.
Codici 21 e 26: la
pressione non aumenta.
Aggiungere del liquido nella pentola
(acqua, brodo o salsa), 50-100 ml alla
volta, e riavviare la ricetta.
Durante la
cottura fuoriesce
del vapore dai
lati del coperchio
(perdite).
La guarnizione del
coperchio in metallo e/o i
bordi della pentola sono
sporchi.
Pulire i lati della pentola e la guarnizione
con un panno umido. Non usare oggetti
appuntiti.
La guarnizione è usurata,
danneggiata o deformata.
La guarnizione deve essere sostituita
almeno ogni tre anni. Portare
l'apparecchio presso un centro di
assistenza autorizzato.
I bordi della pentola sono
danneggiati.
Portare l'apparecchio presso un centro di
assistenza autorizzato.
Il dado del coperchio in
metallo non è abbastanza
serrato.
Serrare il dado al centro del coperchio in
metallo.
Fuoriesce
dell'acqua
dal retro
dell'apparecchio.
Il raccogli-condensa non
è in posizione o è troppo
pieno.
Vericare che il raccogli-condensa sia
posizionato correttamente sul retro
dell'apparecchio e che il tubo di usso
non sia ostruito.
Le valvole di sicurezza e/o
le aperture sono ostruite.
Vericare che il raccogli-condensa
non sia troppo pieno e che non siano
presenti alimenti soggetti a espansione
(consultare le istruzioni di sicurezza).
La spia non
lampeggia o non
si accende.
La spia non funziona
o il coperchio non è
completamente bloccato.
Vericare che l'apparecchio sia
completamente bloccato. Portare
l'apparecchio presso un centro di
assistenza autorizzato se il problema
persiste.
Il pannello di
controllo non si
accende.
L'apparecchio non è
collegato alla presa di
corrente o è in modalità di
standby.
Vericare che il cavo di alimentazione
sia collegato sia all'apparecchio che
a una presa di corrente. Vericare
che l'apparecchio non sia in standby
premendo il pulsante OK.
L'apparecchio è
danneggiato.
Portare l'apparecchio presso un centro di
assistenza autorizzato.

99
ITALIANO
PROBLEMA POSSIBILE CAUSA SOLUZIONE
Il coperchio in
metallo non può
essere rimosso, è
bloccato.
Il coperchio della sfera sul
coperchio in metallo non è
posizionato correttamente.
Svitare il dado al centro del coperchio
in metallo e premere il perno al centro
del dado per rilasciare il coperchio
e accedere al coperchio della sfera.
Posizionare accuratamente sia la sfera
che il coperchio in metallo.

100
KRUPS GARANZIA INTERNAZIONALE
: www.krups.com
Questo prodotto è riparabile da KRUPS, durante e dopo il periodo di garanzia
Accessori, materiali di consumo ed altre parti possono essere sostituiti direttamente
dall'utente oppure essere acquistati, se sono disponibili a livello locale, come descritto sul
sito www.accessories.home-and-cook.com
La Garanzia
Questo prodotto è garantito da KRUPS (Indirizzi e dati sono inclusi nell’elenco dei paesi
del presente manuale) contro qualsiasi difetto di fabbricazione dei materiali durante 2
anni dalla data di acquisto o di consegna.
La garanzia del produttore KRUPS è un ulteriore vantaggio che non pregiudica i diritti del
consumatore.
La garanzia internazionale del produttore copre tutti i costi di ripristino di un prodotto
difettoso secondo le sue speciche originali per la riparazione, il lavoro e l’eventuale
sostituzione delle parti difettose E’ facoltà di KRUPSproporre un prodotto sostitutivo
equivalente o superiore invece di riparare il prodotto difettoso.
L’unico obbligo di KRUPS nella presente garanzia è limitato esclusivamente alla
riparazione o sostituzione.
Termini ed Esclusioni
La Garanzia Internazionale si applica solo durante il periodo denito per i paesi elencati
nella lista allegata ed è valida solo su presentazione della prova di acquisto. Il prodotto
può essere restituito al rivenditore o ad un centro di assistenza autorizzato oppure può
essere inviato per posta raccomandata dopo essere stato imballato nel modo corretto.
L'elenco completo dei riparatori autorizzati in ogni paese, con dati completi, è disponibile
sul sito KRUPS (www.krups.com), o chiamando il Servizio Consumatori specicato nella
lista dei Paesi.
KRUPS non ha l'obbligo di riparare o sostituire un prodotto che non sia accompagnato
dalla prova di acquisto. Questa garanzia non copre i danni derivanti da uso improprio quali :
negligenza, mancata osservanza delle istruzioni d'uso e manutenzione, utilizzo di un voltaggio
o frequenza irregolare rispetto a quanto specicato sulla targhetta segnaletica, o alterazione
o riparazione non autorizzata del prodotto. Inoltre non comprende la normale usura o
manutenzione o sostituzione di parti di consumo, o nei seguenti casi:
–Utilizzo d’acqua non adatta o parti di consumo non adatte
–Calcare (la decalcicazione deve essere fatta secondo le istruzioni riportate nel manuale)
–Entrata d’acqua, polvere e insetti nel prodotto (esclusi gli impianti specicamente
destinati a intrappolare insetti
–Danni causati da urti o sovraccarichi
–Incidenti dovuti a incendi, inondazioni, ecc ...
–Uso professionale o commerciale
–Danni causati per l’errato utilizzo di un voltaggio o frequenza come indicato sulla
targhetta segnaletica o qualsiasi altra specica locale
–Danni a parti in vetro o ceramica nel prodotto
–Danni causati da sovratensione elettrica
Questa garanzia non si applica ai prodotti con danni derivanti dall'uso improprio o esente
da manutenzione, per problemi di confezionamento o di spedizione del prodotto da parte
del suo proprietario.
Al ne di offrire il miglior servizio post vendita e migliorare costantemente la soddisfazione
del cliente, KRUPS potrebbe spedire un questionario di gradimento a tutti i clienti
che hanno fatto riparare/cambiare un prodotto in uno dei centri di assitenza KRUPS
autorizzati.

101
ITALIANO
La garanzia internazionale copre solo i prodotti KRUPS acquistati e utilizzati a ni
domestici nei paesi elencati. Quando viene utilizzato in un paese diverso dal paese di
acquisto:
a) La garanzia internazionale KRUPS si applica solo se il prodotto è adatto a tutte le
norme e gli standard locali, come la tensione, frequenza elettrica, il tipo di presa
elettrica, non conformità con altri requisiti locali legali o qualsiasi altra specica locale.
b) La riparazione potrebbe richiedere più tempo se il prodotto non è commercializzato
nel paese in cui deve essere effettuata la riparazione.
c) Se il prodotto non può essere riparato nel paese di residenza, la garanzia internazionale
KRUPS è limitata alla sostituzione con un prodotto equivalente o un prodotto
alternativo di pari valore, se possibile.
Diritti del Consumatore
Questa garanzia internazionale KRUPS non pregiudica nè i diritti legali di cui godono tutti i
consumatori a livello locale, che non possono essere esclusi o limitati, nè i diritti legali nei
confronti del rivenditore presso il quale è stato acquistato il prodotto. Questa garanzia dà
specici diritti legali e il consumatore può anche beneciare di diritti speciali a seconda
del Paese. Il consumatore può avvalersi di tali diritti a sua discrezione.
Questo documento vale come riferimento per qualsiasi reclamo che rientri nelle condizioni
di garanzia indicate

102
SAFETY INSTRUCTIONS
Take the time to read all the following instructions carefully.
Indoor use only.
For cleaning your appliance, please refer instructions for
use. You can wash the cooking bowl and steam basket in
soapy hot water or in the dishwasher. Clean the body of the
appliance using a damp cloth.
Do not immerse the appliance in water.
Improper use of the appliance and its accessories may
damage the appliance and cause injury.
Do not touch hot parts of the appliance. After use, heating
element surface is subject to residual heat after use.
For your safety, this product conforms to all applicable
standards and regulations (Low Voltage Directive,
Electromagnetic Compatibility, Food Compliant Materials,
Environment, ...).
This appliance is not intended for use by persons (including
children) with reduced physical, sensory or mental capabilities,
or lack of experience and knowledge, unless they have
been given supervision or instruction concerning use of the
appliance by a person responsible for their safety.
Children should be supervised to ensure that they do not play
with the appliance.
If the supply cord is damaged, it must be replaced by the
manufacturer, its service agent or similar qualied persons
in order to avoid a hazard. Do not replace the power cord
supplied with other cords.
This appliance is intended for domestic household use only.
It is not intended to be used in the following applications, and
the guarantee will not apply for:
– staff kitchen areas in shops, ofces and other working
environments;
– farm houses;

103
ENGLISH
– by clients in hotels, motels and other residential type
environments;
– bed and breakfast type environments.
This appliance shall not be used by children. Keep the
appliance and its cord out of reach of children.
Appliances can be used by persons with reduced physical,
sensory or mental capabilities or lack of experience and
knowledge if they have been given supervision or instruction
concerning use of the appliance in a safe way and if they
understand the hazards involved.
Children shall not play with the appliance.
Do not ll your appliance more than the MAX mark on the pot.
Do not ll it more than half full for food that expands during
cooking, such as rice, dehydrated vegetables.
Reduce the volume of water to avoid the risk of boiling over.
Please follow the recommendations on the volume of food
and water to avoid the risk of boiling over which can damage
your appliance and cause injury.
Before using your appliance, check that the oat valve and
the pressure limit valve are clean (see section Cleaning and
maintenance).
Do not place any foreign objects in the pressure relief system.
Do not replace the valve.
When you open the lid, always hold it by the lid handle. Position
your arms in alignment with the side carrying handles. Boiling
water could remain trapped between the gasket support and
the lid and could cause burns.
Be careful also about the risk of scalding from the steam
coming out of the appliance when you open the lid. First open
the lid very slightly to allow the steam to escape gently.
Never force the appliance open. Make sure that the inside
pressure has returned to normal. Do not open the lid when
the product is under pressure. To do so, see the Instructions
for use.

104
Use only the appropriate spare parts for your model. This is particularly important for the
sealing gasket, the cooking pot and the metal lid.
Do not damage the sealing gasket. If it is damaged, have it replaced in an Approved
Service Centre.
The heat source necessary for cooking is included in the appliance.
Do not place the appliance in a heated oven or on a hot hob. Do not place the appliance
close to an open ame or a ammable object.
Do not heat the cooking pot with any other heat source than the heating plate of the
appliance and do not use any other pot. Do not use the cooking pot with other appliances.
Move the appliance with great care when it is under pressure. Do not touch the hot
surfaces. Use the carrying handles when moving it and wear oven mitts, if necessary. Do
not use the lid handle to lift the appliance.
Do not use appliance for other than the intended purpose.
This appliance is not a steriliser. Do not use it to sterilise jars.
The appliance cooks food under pressure. Incorrect use may cause risks of burns due
to steam.
Make sure that the appliance is properly closed before bringing it up to pressure (see
Instructions for use).
Do not use the appliance empty, without its pot or without liquid inside the pot. This could
cause serious damage to the appliance.
After cooking meat which has an outer layer of skin (such as ox tongue), which could
swell due to the effects of pressure, do not pierce the skin after cooking if it appears
swollen: you could get burnt. Pierce it before cooking.
When cooking food with a thick texture (chick peas, rhubarb, compotes, etc.), shake the
appliance slightly before opening it to ensure that the food or cooking juices do not spurt
out.
Do not use the appliance to fry food in oil. Only browning is allowed.
In browning mode, be careful of risks of burns caused by spattering when you add food
or ingredients into the hot pot.
During cooking and automatic steam release at the end of cooking, the appliance releases
heat and steam. Keep your face and hands away from the appliance to avoid scalding. Do
not touch the lid during cooking.
Do not use a cloth or anything else between the lid and the housing to leave the lid ajar.
This can permanently damage the gasket.
Do not touch the safety devices, except while cleaning and maintaining the appliance in
accordance with the instructions given.
Make sure that the bottom of the cooking pot and the heating element are always clean.
Make sure that the central part of the heating plate is mobile.
Do not fill up your appliance without its cooking pot.
Use a plastic or wooden spoon to prevent any damage to the non-stick coating of the pot.
Do not cut food directly in the cooking pot.
If a great deal of steam is released from the rim of the lid, unplug the power cord at
once and check whether the appliance is clean. If necessary, send the appliance to an
Approved Service Centre for repair.
Do not carry the appliance by holding it by the handles of the removable pot. Always use
the two side handles on the housing of the appliance. Wear oven mitts if the appliance is
hot. For more safety, make sure that the lid is locked before transporting the appliance.
If pressure is released continuously through the valve of the appliance (for more than 1
minute) while pressure cooking, send the appliance to a service centre for repair.
Do not use a damaged appliance. Take it to your approved service centre.

105
ENGLISH
SAVE THESE INSTRUCTIONS CAREFULLY.
Use only spare parts sold in an approved service centre.
The warranty does not cover the abnormal wear and tear of the cooking pot.
Read these instructions for use carefully before using your appliance for the rst time. Any
use which does not conform to these instructions will absolve the manufacturer from any
liability and void the warranty.
In accordance with current regulations, before disposing of an appliance no longer
needed, the appliance must be rendered inoperative (by unplugging it and cutting off the
supply cord).
Environment protection first!
Your appliance contains valuable materials which can be recovered.
Leave it at a local civic waste collection point.
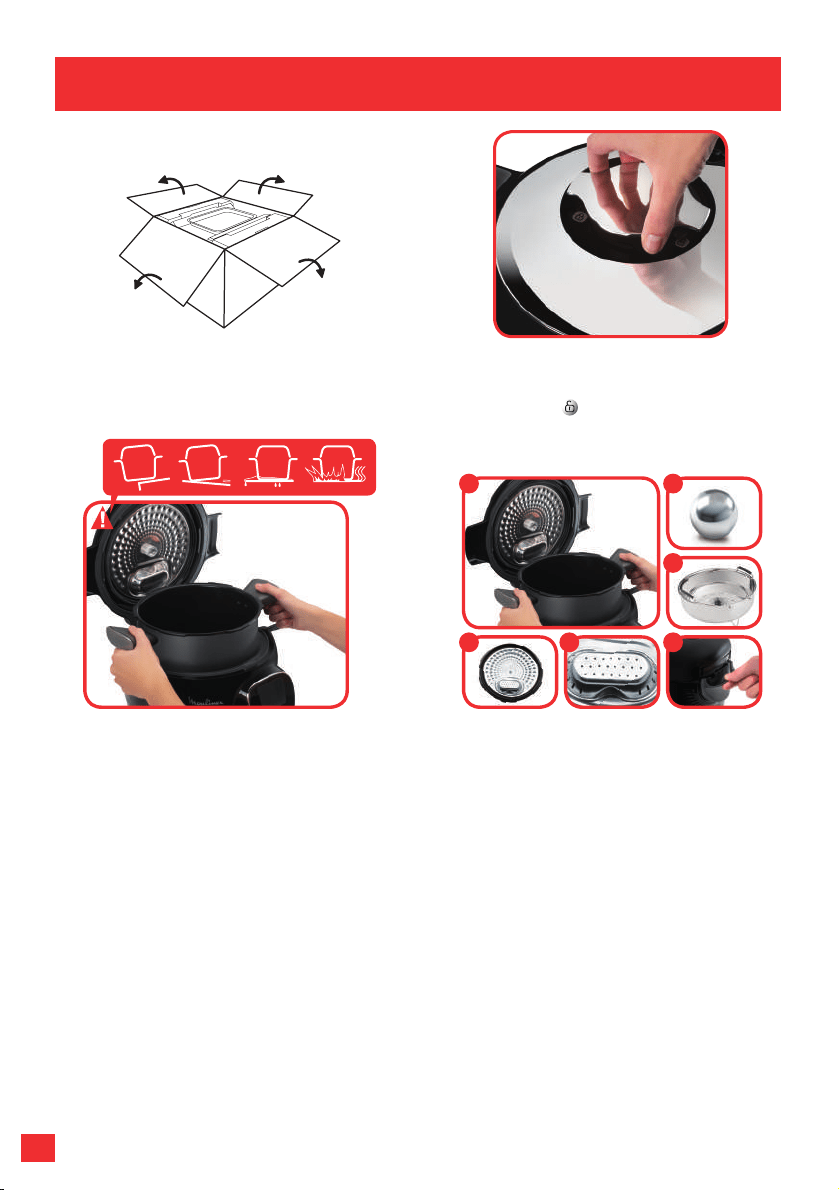
106106
Remove the appliance from its packaging
and read the instructions carefully before
using the product for the rst time.
Install the appliance on a at, dry and
cold surface. Remove all the packaging,
stickers or different accessories inside and
outside the appliance.
To open the product, turn the open/close
handle on the bottom of the lid to show an
open padlock:
CLEAN THE DIFFERENT COMPONENTS
1. Cooking pot
2. Metal lid
3. Valve cover
4. Condensation trap
5. Steam basket
6. Decompression ball
BEFORE USE
1 6
5
432
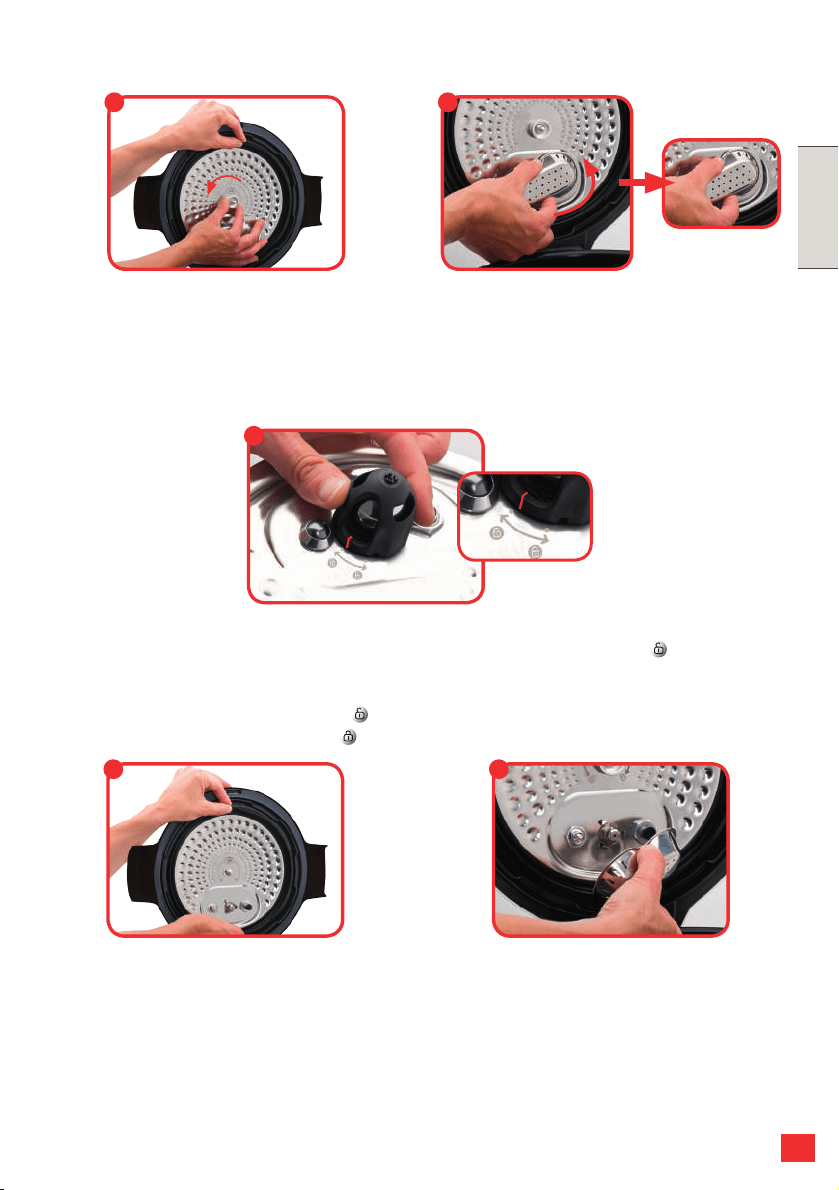
107
ENGLISHENGLISH
107
HOW TO DISASSEMBLE AND REASSEMBLE THE LID
HOW TO DISASSEMBLE THE METAL LID:
Grip the lid sub-assembly holding it by
the seal, and unscrew the central nut in an
anticlockwise direction. Remove the nut
then the lid.
PUTTING THE METAL LID SUB-
ASSEMBLY BACK IN TO PLACE:
Grip the lid sub-assembly by the seal as
shown in the picture. Line up the lid with
the central axis and press it at against the
sub-assembly. Put the nut back on and
turn it clockwise, tightening it as far as it
will go.
HOW TO TAKE THE VALVE COVER OFF:
Clasp the valve cover by its middle part
(as shown); then turn it slightly to unclip
it. Clean the valve cover, paying special
attention to the inside (check that there is
no left over food).
PUTTING THE VALVE COVER BACK:
Take the valve cover as shown in the
picture (gripping the middle). Line up the
interior circular shape with the three hooks
and then push so that the valve cover clips
on (you should hear a “clip” sound). The
valve cover must be right up against the
inside of the lid.
ACCESSING THE DECOMPRESSION BALL:
Turn the ball cover, anti-clockwise, so as to bring the I marker into position . Lift the cover
up. Remove the ball, and gently clean it, along with its seat, with water and some washing-
up liquid. Dry the ball using a soft cloth, then put it back in position. Put the ball cover back
in place, and the marker I in position . Lock it by turning the ball cover so that the marker
is opposite the pictogram “closed” .
1
4 5
2
3

108108
When turning on for the rst time,
you will access the settings menu:
OPERATION
1
2
ok
ok
INTERFACE CONTROLS
SELECT CONFIRM
BACK
RESTART
3 s
Select your language
LANGUAGE
Italian
English
French
Deutsch
Spanish
COUNTRY
UNIT
Italy
United Kingdom
France
Germany
Spain
cups / oz gr / ml
UNIT
cups / oz gr / ml
ok
ok
+
Select your country
LANGUAGE
Italian
English
French
Deutsch
Spanish
COUNTRY
UNIT
Italy
United Kingdom
France
Germany
Spain
cups / oz gr / ml
UNIT
cups / oz gr / ml
ok
ok
+

109
ENGLISHENGLISH
109
OPENING THE LID:
To open the product, turn the open/close
handle so that the marking is in line with
the open padlock. Never try to force the lid
to open if it is stuck.
INSTALLING THE CONDENSATION TRAP:
Check that the condensation tank is empty
then install it behind the appliance.
Then install the pot in the appliance by
positioning the bowl handles into the slots.
POSITIONING THE POT IN THE
APPLIANCE:
Wipe the bottom of the cooking pot. Make
sure there are no food remains or liquid
under the bowl or on the heating plate.
INSTALLING THE STAND UNDER THE
STEAM BASKET:
Nip the stand between your thumb and index
nger to install under the steam basket.
Never use the appliance without the cooking pot.
When using your appliance for the first time, the pot can release a slight odour. This
is normal.
USE
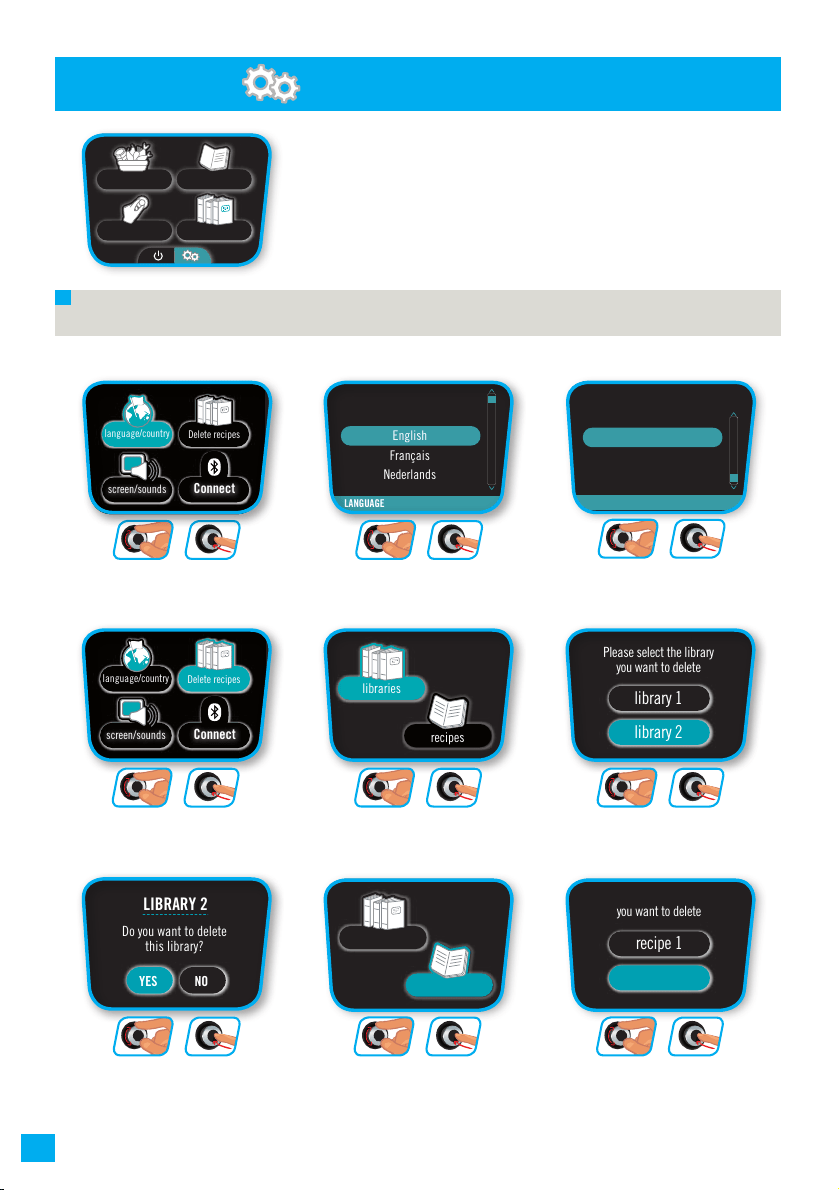
110110
SETTINGS MENU
N.B.: even if the sound is deactivated, the alert sounds remain active.
ok
ok
+
Select “language/
country”
libraries
recipesingredients
manual
COUNTRY
Australia
France
United-Kingdom
LANGUAGE
English
Français
Nederlands
screen
sounds
BRIGHTNESS
demo mode
brightness
DEMO MODE
OFF ON
DEMO MODE
3424
RECIPE 2
Do you want to delete
this recipe?
YES NO
Please select the recipe
you want to delete
recipe 1
SOUNDS
OFF ON
language/country
Delete recipes
screen/sounds
Connect
recipe 2
OFF ON
Connect
language/country
Delete recipes
screen/sounds
Connect
language/country
delete libraries
screen/sounds
Connect
recipes
libraries
Please select the library
you want to delete
library 1
library 2
LIBRARY 2
Do you want to delete
this library?
YES NO
demo mode
brightness
screen
sounds
language/country
delete libraries
screen/sounds
Connect
Select your language
libraries
recipesingredients
manual
COUNTRY
Australia
France
United-Kingdom
LANGUAGE
English
Français
Nederlands
screen
sounds
BRIGHTNESS
demo mode
brightness
DEMO MODE
OFF ON
DEMO MODE
3424
RECIPE 2
Do you want to delete
this recipe?
YES NO
Please select the recipe
you want to delete
recipe 1
SOUNDS
OFF ON
language/country
Delete recipes
screen/sounds
Connect
recipe 2
OFF ON
Connect
language/country
Delete recipes
screen/sounds
Connect
language/country
delete libraries
screen/sounds
Connect
recipes
libraries
Please select the library
you want to delete
library 1
library 2
LIBRARY 2
Do you want to delete
this library?
YES NO
demo mode
brightness
screen
sounds
language/country
delete libraries
screen/sounds
Connect
ok
ok
+
Select “delete libraries”
libraries
recipesingredients
manual
COUNTRY
Australia
France
United-Kingdom
LANGUAGE
English
Français
Nederlands
screen
sounds
BRIGHTNESS
demo mode
brightness
DEMO MODE
OFF ON
DEMO MODE
3424
RECIPE 2
Do you want to delete
this recipe?
YES NO
Please select the recipe
you want to delete
recipe 1
SOUNDS
OFF ON
language/country
Delete recipes
screen/sounds
Connect
recipe 2
OFF ON
Connect
language/country
Delete recipes
screen/sounds
Connect
language/country
delete libraries
screen/sounds
Connect
recipes
libraries
Please select the library
you want to delete
library 1
library 2
LIBRARY 2
Do you want to delete
this library?
YES NO
demo mode
brightness
screen
sounds
language/country
delete libraries
screen/sounds
Connect
ok
ok
+
Select “libraries”
libraries
recipesingredients
manual
COUNTRY
Australia
France
United-Kingdom
LANGUAGE
English
Français
Nederlands
screen
sounds
BRIGHTNESS
demo mode
brightness
DEMO MODE
OFF ON
DEMO MODE
3424
RECIPE 2
Do you want to delete
this recipe?
YES NO
Please select the recipe
you want to delete
recipe 1
SOUNDS
OFF ON
language/country
Delete recipes
screen/sounds
Connect
recipe 2
OFF ON
Connect
language/country
Delete recipes
screen/sounds
Connect
language/country
delete libraries
screen/sounds
Connect
recipes
libraries
Please select the library
you want to delete
library 1
library 2
LIBRARY 2
Do you want to delete
this library?
YES NO
demo mode
brightness
screen
sounds
language/country
delete libraries
screen/sounds
Connect
ok
ok
+
Select “library 2”
libraries
recipesingredients
manual
COUNTRY
Australia
France
United-Kingdom
LANGUAGE
English
Français
Nederlands
screen
sounds
BRIGHTNESS
demo mode
brightness
DEMO MODE
OFF ON
DEMO MODE
3424
RECIPE 2
Do you want to delete
this recipe?
YES NO
Please select the recipe
you want to delete
recipe 1
SOUNDS
OFF ON
language/country
Delete recipes
screen/sounds
Connect
recipe 2
OFF ON
Connect
language/country
Delete recipes
screen/sounds
Connect
language/country
delete libraries
screen/sounds
Connect
recipes
libraries
Please select the library
you want to delete
library 1
library 2
LIBRARY 2
Do you want to delete
this library?
YES NO
demo mode
brightness
screen
sounds
language/country
delete libraries
screen/sounds
Connect
ok
ok
+
Do you want to delete
this library?
libraries
recipesingredients
manual
COUNTRY
Australia
France
United-Kingdom
LANGUAGE
English
Français
Nederlands
screen
sounds
BRIGHTNESS
demo mode
brightness
DEMO MODE
OFF ON
DEMO MODE
3424
RECIPE 2
Do you want to delete
this recipe?
YES NO
Please select the recipe
you want to delete
recipe 1
SOUNDS
OFF ON
language/country
Delete recipes
screen/sounds
Connect
recipe 2
OFF ON
Connect
language/country
Delete recipes
screen/sounds
Connect
language/country
delete libraries
screen/sounds
Connect
recipes
libraries
Please select the library
you want to delete
library 1
library 2
LIBRARY 2
Do you want to delete
this library?
YES NO
demo mode
brightness
screen
sounds
language/country
delete libraries
screen/sounds
Connect
ok
ok
+
libraries
recipesingredients
manual
COUNTRY
Australia
France
United-Kingdom
LANGUAGE
English
Français
Nederlands
screen
sounds
BRIGHTNESS
demo mode
brightness
DEMO MODE
OFF ON
DEMO MODE
3424
RECIPE 2
Do you want to delete
this recipe?
YES NO
Please select the recipe
you want to delete
recipe 1
SOUNDS
OFF ON
language/country
Delete recipes
screen/sounds
Connect
recipe 2
OFF ON
Connect
language/country
Delete recipes
screen/sounds
Connect
language/country
delete libraries
screen/sounds
Connect
recipes
libraries
Please select the library
you want to delete
library 1
library 2
LIBRARY 2
Do you want to delete
this library?
YES NO
demo mode
brightness
screen
sounds
language/country
delete libraries
screen/sounds
Connect
Select your country
libraries
recipesingredients
manual
COUNTRY
Australia
France
United-Kingdom
LANGUAGE
English
Français
Nederlands
screen
sounds
BRIGHTNESS
demo mode
brightness
DEMO MODE
OFF ON
DEMO MODE
3424
RECIPE 2
Do you want to delete
this recipe?
YES NO
Please select the recipe
you want to delete
recipe 1
SOUNDS
OFF ON
language/country
Delete recipes
screen/sounds
Connect
recipe 2
OFF ON
Connect
language/country
Delete recipes
screen/sounds
Connect
language/country
delete libraries
screen/sounds
Connect
recipes
libraries
Please select the library
you want to delete
library 1
library 2
LIBRARY 2
Do you want to delete
this library?
YES NO
demo mode
brightness
screen
sounds
language/country
delete libraries
screen/sounds
Connect
ok
ok
+
Select “recipes”
recettes
manuel
ingrédients
PAYS
Allemagne
Espagne
France
Italie
Pays-Bas
LANGUE
allemand
espagnol
français
italien
néerlandais
écran
son
son
LUMINOSITÉ
mode démo
luminosité
mode démo
luminosité
MODE DÉMO
OFF ON
MODE DÉMO
3424
RECETTE 2
souhaitez-vous supprimer
cette recette ?
OUI NON
veuillez sélectionner la
recette à supprimer
recette 1
BIBLIOTHÈQUE 2
souhaitez-vous supprimer
cette bibliothèque ?
OUI NON
veuillez sélectionner la
bibliothèque à supprimer
bibliothèque 1
bibliothèque 2
SON
OFF ON
écran
langues/pays
suppression
recettes
écran/son
Connect
langues/pays
suppression
recettes
écran/son
Connect
langues/pays
suppression
recettes
écran/son
Connect
langues/pays
suppression
recettes
écran/son
Connect
bibliothèques
recettes
libraries
recipes
recette 2
ok
ok
+
Select “recipe 2”
libraries
recipesingredients
manual
COUNTRY
Australia
France
United-Kingdom
LANGUAGE
English
Français
Nederlands
screen
sounds
BRIGHTNESS
demo mode
brightness
DEMO MODE
OFF ON
DEMO MODE
3424
RECIPE 2
Do you want to delete
this recipe?
YES NO
Please select the recipe
you want to delete
recipe 1
SOUNDS
OFF ON
language/country
Delete recipes
screen/sounds
Connect
recipe 2
OFF ON
Connect
language/country
Delete recipes
screen/sounds
Connect
language/country
delete libraries
screen/sounds
Connect
recipes
libraries
Please select the library
you want to delete
library 1
library 2
LIBRARY 2
Do you want to delete
this library?
YES NO
demo mode
brightness
screen
sounds
language/country
delete libraries
screen/sounds
Connect
ok
ok
+
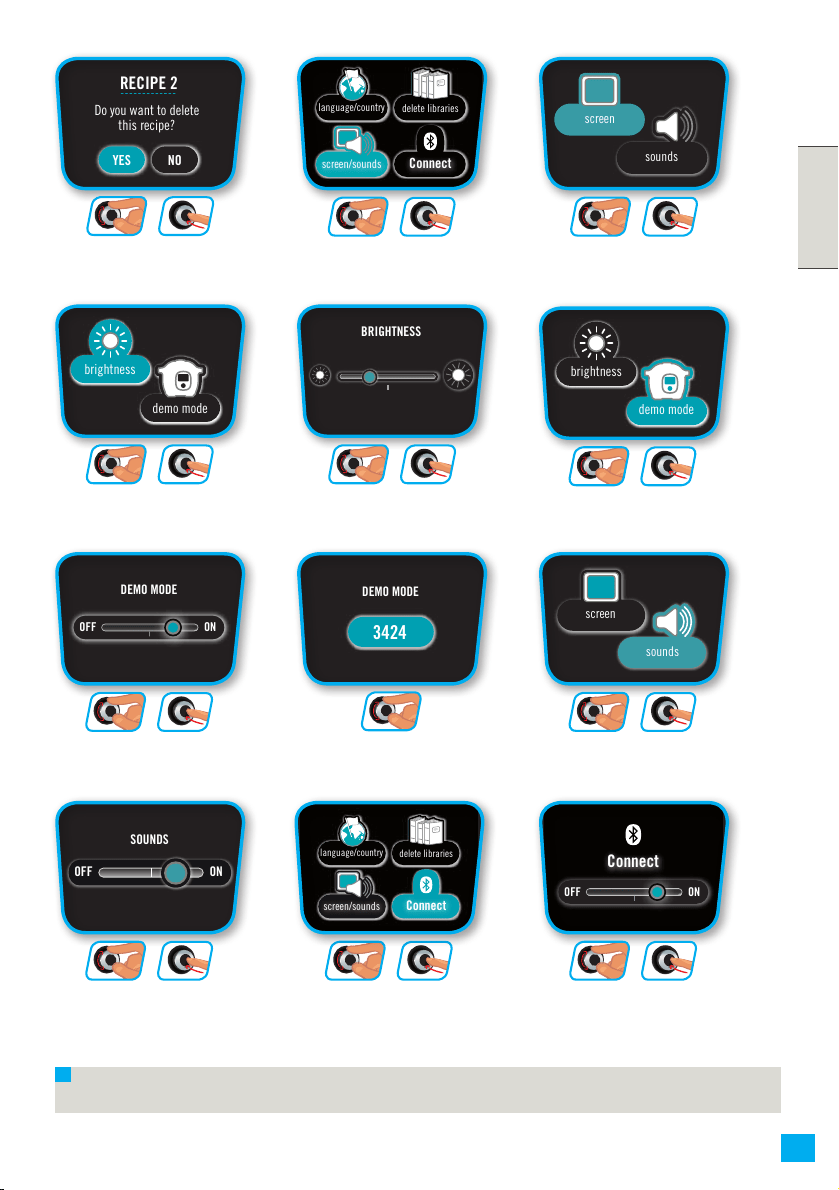
111
ENGLISHENGLISH
111
N.B.: DEMO mode allows you to operate the appliance without heating or pressurising it.
Do you want to delete
this recipe?
libraries
recipesingredients
manual
COUNTRY
Australia
France
United-Kingdom
LANGUAGE
English
Français
Nederlands
screen
sounds
BRIGHTNESS
demo mode
brightness
DEMO MODE
OFF ON
DEMO MODE
3424
RECIPE 2
Do you want to delete
this recipe?
YES NO
Please select the recipe
you want to delete
recipe 1
SOUNDS
OFF ON
language/country
Delete recipes
screen/sounds
Connect
recipe 2
OFF ON
Connect
language/country
Delete recipes
screen/sounds
Connect
language/country
delete libraries
screen/sounds
Connect
recipes
libraries
Please select the library
you want to delete
library 1
library 2
LIBRARY 2
Do you want to delete
this library?
YES NO
demo mode
brightness
screen
sounds
language/country
delete libraries
screen/sounds
Connect
ok
ok
+
Select “brightness”
libraries
recipesingredients
manual
COUNTRY
Australia
France
United-Kingdom
LANGUAGE
English
Français
Nederlands
screen
sounds
BRIGHTNESS
demo mode
brightness
DEMO MODE
OFF ON
DEMO MODE
3424
RECIPE 2
Do you want to delete
this recipe?
YES NO
Please select the recipe
you want to delete
recipe 1
SOUNDS
OFF ON
language/country
Delete recipes
screen/sounds
Connect
recipe 2
OFF ON
Connect
language/country
Delete recipes
screen/sounds
Connect
language/country
delete libraries
screen/sounds
Connect
recipes
libraries
Please select the library
you want to delete
library 1
library 2
LIBRARY 2
Do you want to delete
this library?
YES NO
demo mode
brightness
screen
sounds
language/country
delete libraries
screen/sounds
Connect
Adjust the light
libraries
recipesingredients
manual
COUNTRY
Australia
France
United-Kingdom
LANGUAGE
English
Français
Nederlands
screen
sounds
BRIGHTNESS
demo mode
brightness
DEMO MODE
OFF ON
DEMO MODE
3424
RECIPE 2
Do you want to delete
this recipe?
YES NO
Please select the recipe
you want to delete
recipe 1
SOUNDS
OFF ON
language/country
Delete recipes
screen/sounds
Connect
recipe 2
OFF ON
Connect
language/country
Delete recipes
screen/sounds
Connect
language/country
delete libraries
screen/sounds
Connect
recipes
libraries
Please select the library
you want to delete
library 1
library 2
LIBRARY 2
Do you want to delete
this library?
YES NO
demo mode
brightness
screen
sounds
language/country
delete libraries
screen/sounds
Connect
Select “demo mode”
libraries
recipesingredients
manual
COUNTRY
Australia
France
United-Kingdom
LANGUAGE
English
Français
Nederlands
screen
sounds
BRIGHTNESS
demo mode
brightness
DEMO MODE
OFF ON
DEMO MODE
3424
RECIPE 2
Do you want to delete
this recipe?
YES NO
Please select the recipe
you want to delete
recipe 1
SOUNDS
OFF ON
language/country
Delete recipes
screen/sounds
Connect
recipe 2
OFF ON
Connect
language/country
Delete recipes
screen/sounds
Connect
language/country
delete libraries
screen/sounds
Connect
recipes
libraries
Please select the library
you want to delete
library 1
library 2
LIBRARY 2
Do you want to delete
this library?
YES NO
demo mode
brightness
screen
sounds
language/country
delete libraries
screen/sounds
Connect
To activate or deactivate the demo mode,
please enter the code: 3424
libraries
recipesingredients
manual
COUNTRY
Australia
France
United-Kingdom
LANGUAGE
English
Français
Nederlands
screen
sounds
BRIGHTNESS
demo mode
brightness
DEMO MODE
OFF ON
DEMO MODE
3424
RECIPE 2
Do you want to delete
this recipe?
YES NO
Please select the recipe
you want to delete
recipe 1
SOUNDS
OFF ON
language/country
Delete recipes
screen/sounds
Connect
recipe 2
OFF ON
Connect
language/country
Delete recipes
screen/sounds
Connect
language/country
delete libraries
screen/sounds
Connect
recipes
libraries
Please select the library
you want to delete
library 1
library 2
LIBRARY 2
Do you want to delete
this library?
YES NO
demo mode
brightness
screen
sounds
language/country
delete libraries
screen/sounds
Connect
libraries
recipesingredients
manual
COUNTRY
Australia
France
United-Kingdom
LANGUAGE
English
Français
Nederlands
screen
sounds
BRIGHTNESS
demo mode
brightness
DEMO MODE
OFF ON
DEMO MODE
3424
RECIPE 2
Do you want to delete
this recipe?
YES NO
Please select the recipe
you want to delete
recipe 1
SOUNDS
OFF ON
language/country
Delete recipes
screen/sounds
Connect
recipe 2
OFF ON
Connect
language/country
Delete recipes
screen/sounds
Connect
language/country
delete libraries
screen/sounds
Connect
recipes
libraries
Please select the library
you want to delete
library 1
library 2
LIBRARY 2
Do you want to delete
this library?
YES NO
demo mode
brightness
screen
sounds
language/country
delete libraries
screen/sounds
Connect
Select “sounds”
libraries
recipesingredients
manual
COUNTRY
Australia
France
United-Kingdom
LANGUAGE
English
Français
Nederlands
screen
sounds
BRIGHTNESS
demo mode
brightness
DEMO MODE
OFF ON
DEMO MODE
3424
RECIPE 2
Do you want to delete
this recipe?
YES NO
Please select the recipe
you want to delete
recipe 1
SOUNDS
OFF ON
language/country
Delete recipes
screen/sounds
Connect
recipe 2
OFF ON
Connect
language/country
Delete recipes
screen/sounds
Connect
language/country
delete libraries
screen/sounds
Connect
recipes
libraries
Please select the library
you want to delete
library 1
library 2
LIBRARY 2
Do you want to delete
this library?
YES NO
demo mode
brightness
screen
sounds
language/country
delete libraries
screen/sounds
Connect
Adjust the volume
libraries
recipesingredients
manual
COUNTRY
Australia
France
United-Kingdom
LANGUAGE
English
Français
Nederlands
screen
sounds
BRIGHTNESS
demo mode
brightness
DEMO MODE
OFF ON
DEMO MODE
3424
RECIPE 2
Do you want to delete
this recipe?
YES NO
Please select the recipe
you want to delete
recipe 1
SOUNDS
OFF ON
language/country
Delete recipes
screen/sounds
Connect
recipe 2
OFF ON
Connect
language/country
Delete recipes
screen/sounds
Connect
language/country
delete libraries
screen/sounds
Connect
recipes
libraries
Please select the library
you want to delete
library 1
library 2
LIBRARY 2
Do you want to delete
this library?
YES NO
demo mode
brightness
screen
sounds
language/country
delete libraries
screen/sounds
Connect
Select “Connect”
libraries
recipesingredients
manual
COUNTRY
Australia
France
United-Kingdom
LANGUAGE
English
Français
Nederlands
screen
sounds
BRIGHTNESS
demo mode
brightness
DEMO MODE
OFF ON
DEMO MODE
3424
RECIPE 2
Do you want to delete
this recipe?
YES NO
Please select the recipe
you want to delete
recipe 1
SOUNDS
OFF ON
language/country
Delete recipes
screen/sounds
Connect
recipe 2
OFF ON
Connect
language/country
Delete recipes
screen/sounds
Connect
language/country
delete libraries
screen/sounds
Connect
recipes
libraries
Please select the library
you want to delete
library 1
library 2
LIBRARY 2
Do you want to delete
this library?
YES NO
demo mode
brightness
screen
sounds
language/country
delete libraries
screen/sounds
Connect
Activate or deactivate
the connect mode
(Bluetooth, BLE)
libraries
recipesingredients
manual
COUNTRY
Australia
France
United-Kingdom
LANGUAGE
English
Français
Nederlands
screen
sounds
BRIGHTNESS
demo mode
brightness
DEMO MODE
OFF ON
DEMO MODE
3424
RECIPE 2
Do you want to delete
this recipe?
YES NO
Please select the recipe
you want to delete
recipe 1
SOUNDS
OFF ON
language/country
Delete recipes
screen/sounds
Connect
recipe 2
OFF ON
Connect
language/country
Delete recipes
screen/sounds
Connect
language/country
delete libraries
screen/sounds
Connect
recipes
libraries
Please select the library
you want to delete
library 1
library 2
LIBRARY 2
Do you want to delete
this library?
YES NO
demo mode
brightness
screen
sounds
language/country
delete libraries
screen/sounds
Connect
Select “screen/sounds”
libraries
recipesingredients
manual
COUNTRY
Australia
France
United-Kingdom
LANGUAGE
English
Français
Nederlands
screen
sounds
BRIGHTNESS
demo mode
brightness
DEMO MODE
OFF ON
DEMO MODE
3424
RECIPE 2
Do you want to delete
this recipe?
YES NO
Please select the recipe
you want to delete
recipe 1
SOUNDS
OFF ON
language/country
Delete recipes
screen/sounds
Connect
recipe 2
OFF ON
Connect
language/country
Delete recipes
screen/sounds
Connect
language/country
delete libraries
screen/sounds
Connect
recipes
libraries
Please select the library
you want to delete
library 1
library 2
LIBRARY 2
Do you want to delete
this library?
YES NO
demo mode
brightness
screen
sounds
language/country
delete libraries
screen/sounds
Connect
ok
ok
+
Select “screen”
libraries
recipesingredients
manual
COUNTRY
Australia
France
United-Kingdom
LANGUAGE
English
Français
Nederlands
screen
sounds
BRIGHTNESS
demo mode
brightness
DEMO MODE
OFF ON
DEMO MODE
3424
RECIPE 2
Do you want to delete
this recipe?
YES NO
Please select the recipe
you want to delete
recipe 1
SOUNDS
OFF ON
language/country
Delete recipes
screen/sounds
Connect
recipe 2
OFF ON
Connect
language/country
Delete recipes
screen/sounds
Connect
language/country
delete libraries
screen/sounds
Connect
recipes
libraries
Please select the library
you want to delete
library 1
library 2
LIBRARY 2
Do you want to delete
this library?
YES NO
demo mode
brightness
screen
sounds
language/country
delete libraries
screen/sounds
Connect
ok
ok
+
ok
ok
+
ok
ok
+
ok
ok
+
ok
ok
+
ok
ok
+
ok
ok
+
ok
ok
+
ok
ok
+
ok

112112
MENU ON /OFF
ok
ok
+
ok
ok
+
ok
ok
+
Press YES/NO to turn the appliance on/off.Select and conrm
do you want to switch off
the appliance?
YES NO
recipesingredients
manual
YES NO
do you want to switch off
the appliance?
libraries
do you want to switch off
the appliance?
YES NO
recipesingredients
manual
YES NO
do you want to switch off
the appliance?
libraries
do you want to switch off
the appliance?
YES NO
recipesingredients
manual
YES NO
do you want to switch off
the appliance?
libraries
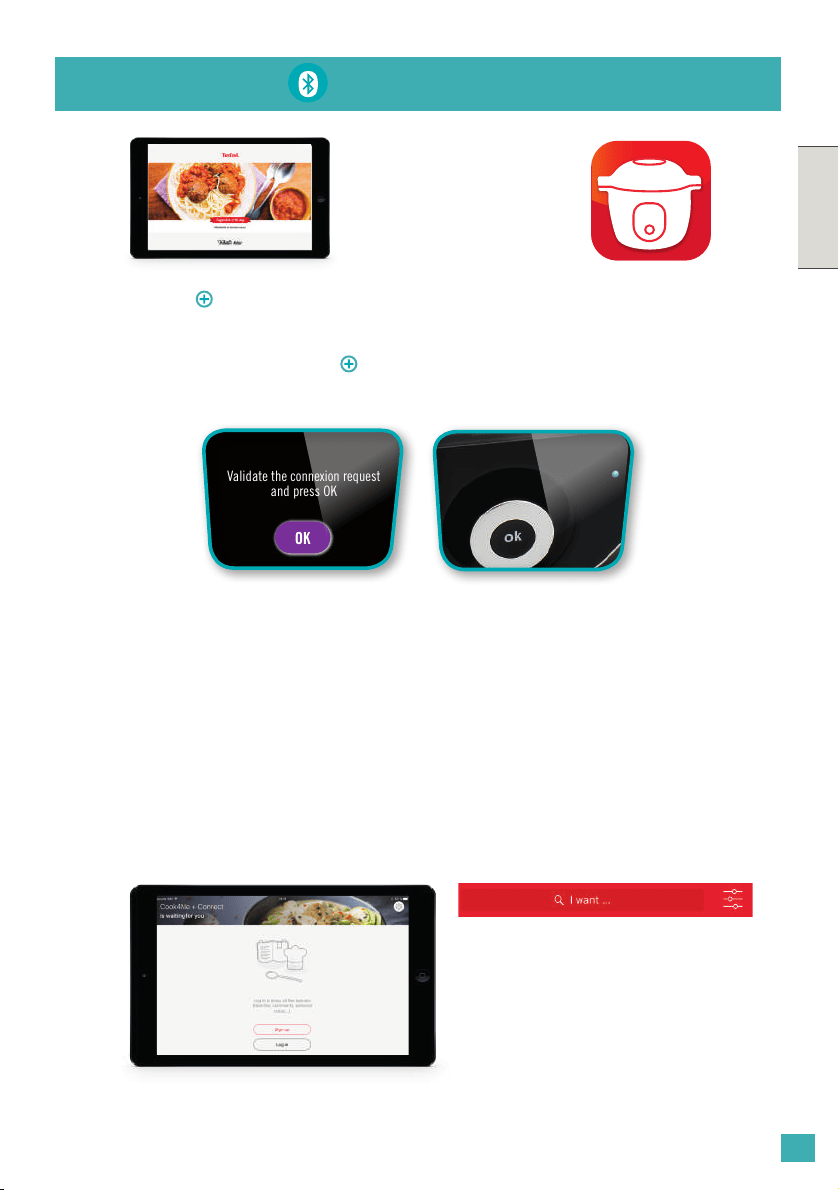
113
ENGLISH
113
Your COOK4ME CONNECT is operational, you can now use your applicance with the
150 pre-programmed recipes even without the app.
When you turn on your COOK4ME CONNECT, the blue light will start ashing (awaiting
connection), unless you manually deactivate the co connect function (See "Settings"
chapter).
If the connection is
successful, the light will
stay blue.
Validate the connexion request
and press OK
OK
Download the Cookeo app
(on the App Store and on
Google Play) via your tablet
or mobile.
CONNECTION
Connectiong problem:
If the connection failed, you will see an error message. Follow the instructions on your
screens to establish a new connection.
Creating an account:
Follow the instructions on
the app.
Search bar:
Type the key words in the search
bar and access the search lter.
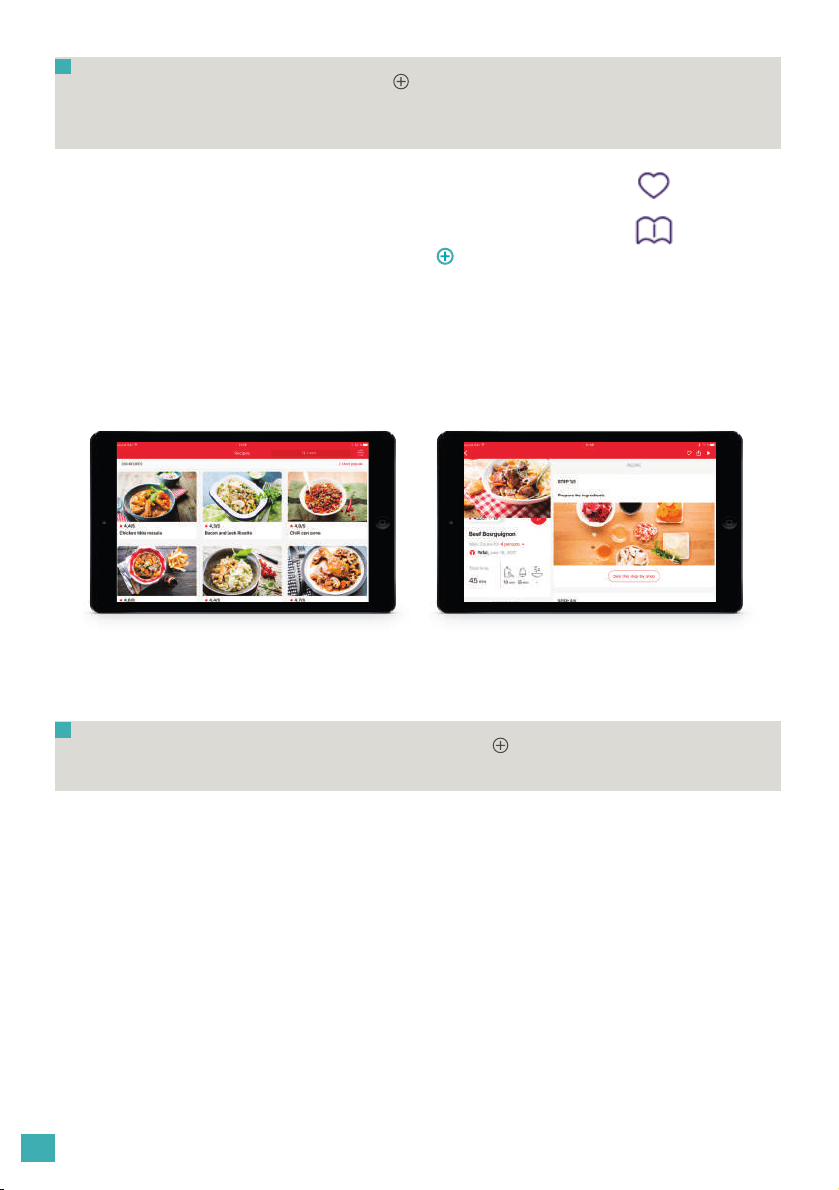
114114
N.B.: if you don’t use your COOK4ME CONNECT for 30 minutes, it will switch to
stand-by mode and the connection will be lost. When exiting stand-by mode, it will
automatically re-connect.
N.B.: you can start the cooking from your COOK4ME CONNECT connect by pressing
the OK button (as instructed on the app).
The cooking continues even if you do not have connection.
Browsing:
You can also browse via
the app by accessing the
Menu:
• Inspiration
• Search
• My universe
• Shopping
From the app, you can either:
• view the step by step
• launch the recipe step by
step in interaction with your
COOK4ME CONNECT
Favourites
Libraries
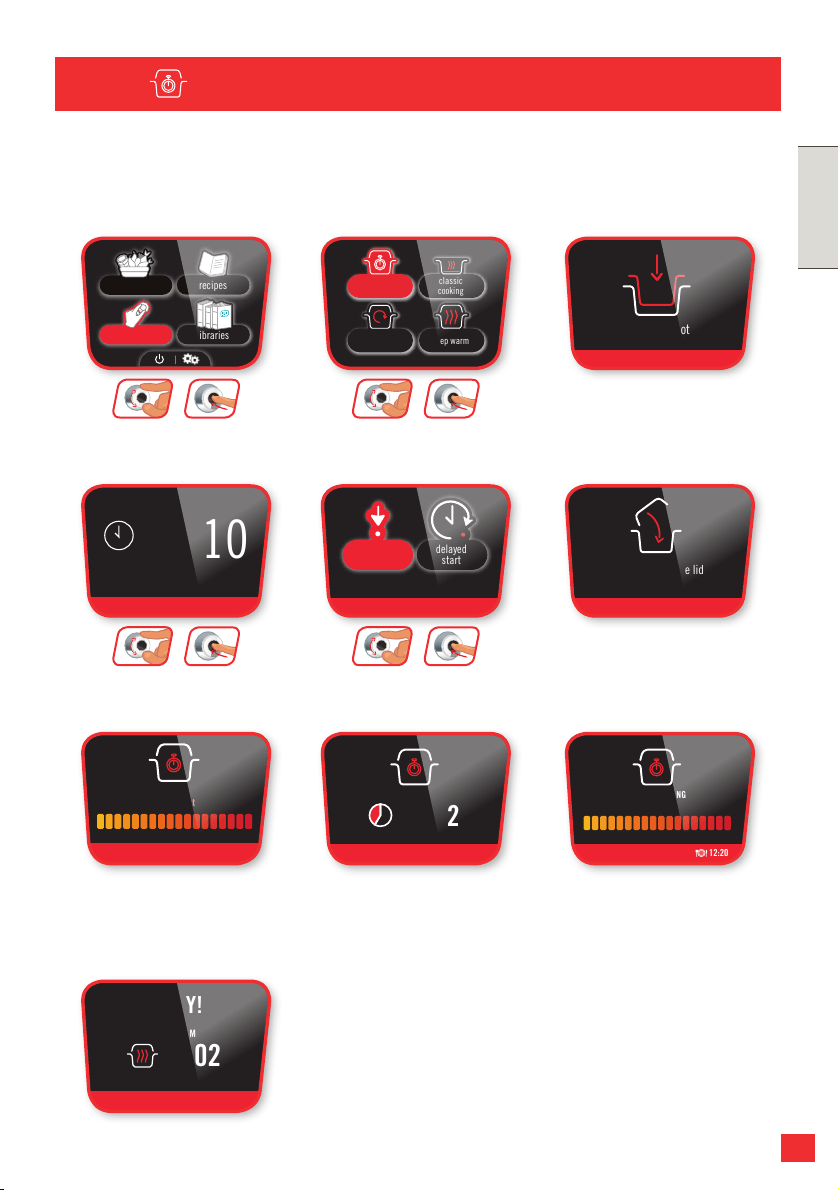
115
ENGLISHENGLISH
115
PRESSURE
MANUAL MENU:
With the manual menu, it is you that guides the cooking. Select the cooking mode: pressure
cooking regular cooking (gentle cooking, simmer, brown), reheat or keep warm.
MANUAL MENU (COOKING MODE)
ok
ok
+
ok
ok
+
ok
ok
+
ok
ok
+
The appliance is
preheating
WARNING
PRESSURE COOKING
PRESSURE COOKING
PRESSURE COOKING
insert the pot
00:10
COOKING
immediate
start
delayed
start
WARNING
close and lock the lid
PREHEAT
please wait
PRESSURE COOKING
PRESSURE COOKING
PRESSURE COOKING
COOKING
00:02
END OF COOKING
please wait
12:20
ENJOY!
KEEP WARM
00:02
pressure
cooking
reheat
classic
cooking
keep warm
recipesingredients
manual
libraries
Cooking has started
WARNING
PRESSURE COOKING
PRESSURE COOKING
PRESSURE COOKING
insert the pot
00:10
COOKING
immediate
start
delayed
start
WARNING
close and lock the lid
PREHEAT
please wait
PRESSURE COOKING
PRESSURE COOKING
PRESSURE COOKING
COOKING
00:02
END OF COOKING
please wait
12:20
ENJOY!
KEEP WARM
00:02
pressure
cooking
reheat
classic
cooking
keep warm
recipesingredients
manual
libraries
Cooking has nished
WARNING
PRESSURE COOKING
PRESSURE COOKING
PRESSURE COOKING
insert the pot
00:10
COOKING
immediate
start
delayed
start
WARNING
close and lock the lid
PREHEAT
please wait
PRESSURE COOKING
PRESSURE COOKING
PRESSURE COOKING
COOKING
00:02
END OF COOKING
please wait
12:20
ENJOY!
KEEP WARM
00:02
pressure
cooking
reheat
classic
cooking
keep warm
recipesingredients
manual
libraries
It’s ready to try!
WARNING
PRESSURE COOKING
PRESSURE COOKING
PRESSURE COOKING
insert the pot
00:10
COOKING
immediate
start
delayed
start
WARNING
close and lock the lid
PREHEAT
please wait
PRESSURE COOKING
PRESSURE COOKING
PRESSURE COOKING
COOKING
00:02
END OF COOKING
please wait
12:20
ENJOY!
KEEP WARM
00:02
pressure
cooking
reheat
classic
cooking
keep warm
recipesingredients
manual
libraries
WARNING
PRESSURE COOKING
PRESSURE COOKING
PRESSURE COOKING
insert the pot
00:10
COOKING
immediate
start
delayed
start
WARNING
close and lock the lid
PREHEAT
please wait
PRESSURE COOKING
PRESSURE COOKING
PRESSURE COOKING
COOKING
00:02
END OF COOKING
please wait
12:20
ENJOY!
KEEP WARM
00:02
pressure
cooking
reheat
classic
cooking
keep warm
recipesingredients
manual
libraries
Insert the pot then
add the ingredients
WARNING
PRESSURE COOKING
PRESSURE COOKING
PRESSURE COOKING
insert the pot
00:10
COOKING
immediate
start
delayed
start
WARNING
close and lock the lid
PREHEAT
please wait
PRESSURE COOKING
PRESSURE COOKING
PRESSURE COOKING
COOKING
00:02
END OF COOKING
please wait
12:20
ENJOY!
KEEP WARM
00:02
pressure
cooking
reheat
classic
cooking
keep warm
recipesingredients
manual
libraries
Select the
“manual” menu
WARNING
PRESSURE COOKING
PRESSURE COOKING
PRESSURE COOKING
insert the pot
00:10
COOKING
immediate
start
delayed
start
WARNING
close and lock the lid
PREHEAT
please wait
PRESSURE COOKING
PRESSURE COOKING
PRESSURE COOKING
COOKING
00:02
END OF COOKING
please wait
12:20
ENJOY!
KEEP WARM
00:02
pressure
cooking
reheat
classic
cooking
keep warm
recipesingredients
manual
libraries
Select the
“Pressure Cooking” mode
WARNING
PRESSURE COOKING
PRESSURE COOKING
PRESSURE COOKING
insert the pot
00:10
COOKING
immediate
start
delayed
start
WARNING
close and lock the lid
PREHEAT
please wait
PRESSURE COOKING
PRESSURE COOKING
PRESSURE COOKING
COOKING
00:02
END OF COOKING
please wait
12:20
ENJOY!
KEEP WARM
00:02
pressure
cooking
reheat
classic
cooking
keep warm
recipesingredients
manual
libraries
Close and lock
WARNING
PRESSURE COOKING
PRESSURE COOKING
PRESSURE COOKING
insert the pot
00:10
COOKING
immediate
start
delayed
start
WARNING
close and lock the lid
PREHEAT
please wait
PRESSURE COOKING
PRESSURE COOKING
PRESSURE COOKING
COOKING
00:02
END OF COOKING
please wait
12:20
ENJOY!
KEEP WARM
00:02
pressure
cooking
reheat
classic
cooking
keep warm
recipesingredients
manual
libraries
Set the cooking time
WARNING
PRESSURE COOKING
PRESSURE COOKING
PRESSURE COOKING
insert the pot
00:10
COOKING
immediate
start
delayed
start
WARNING
close and lock the lid
PREHEAT
please wait
PRESSURE COOKING
PRESSURE COOKING
PRESSURE COOKING
COOKING
00:02
END OF COOKING
please wait
12:20
ENJOY!
KEEP WARM
00:02
pressure
cooking
reheat
classic
cooking
keep warm
recipesingredients
manual
libraries
Select immediate or
delayed start
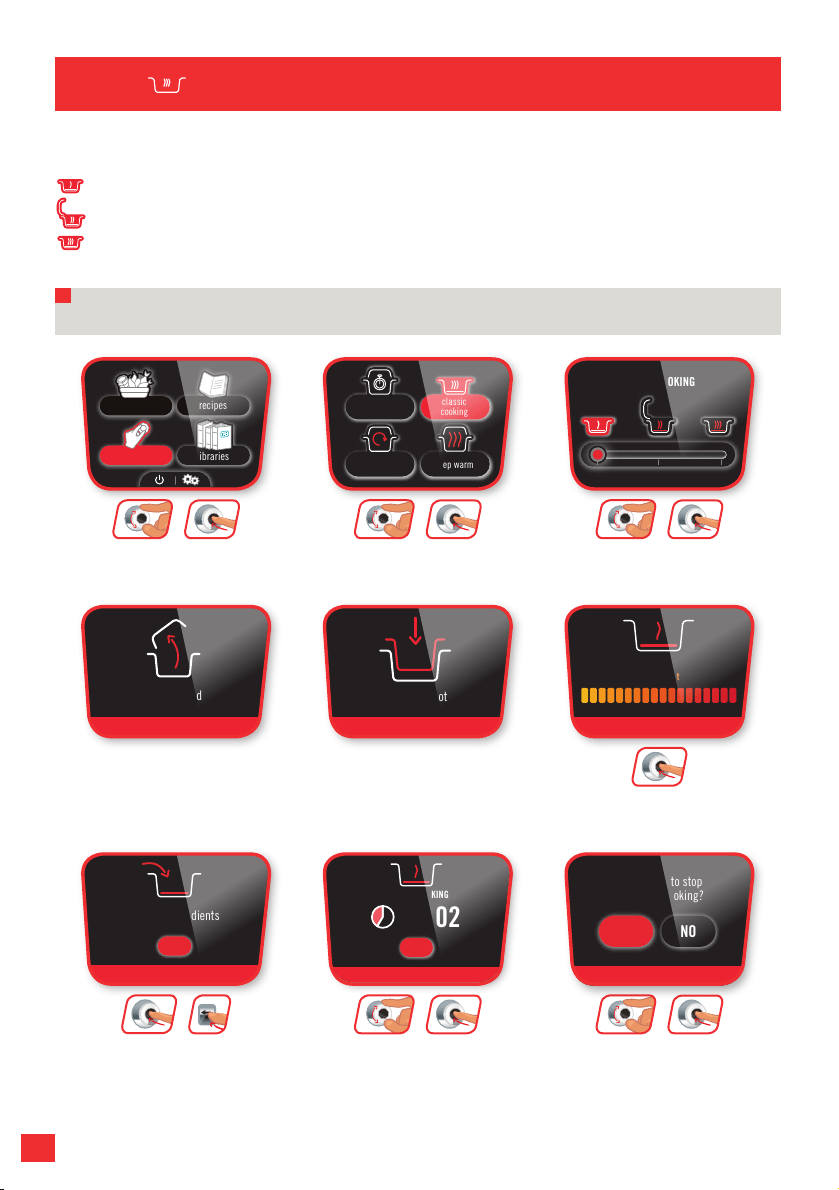
116116
MANUAL MENU (COOKING MODE)
ok
ok
+
ok
ok
+
ok
ok
+
ok
ok
ok
+
ok
ok
++
ok
REGULAR
When using the “Classic Cooking” mode, you can further select the desired option:
Gentle cooking
Simmering
Browning
depending on the desired result. The lid remains open for these types of cooking.
N.B.: The operation is the same, only the temperature is different.
Select the
“manual” menu
WARNING
WARNING
insert the pot
GENTLE COOKING
open the lid
GENTLE COOKING
PREHEAT
please wait
add the ingredients
OK
00:02
CLASSIC COOKING
OK
Do you want to stop
the classic cooking?
YES NO
stop
pressure
cooking
GENTLE COOKING
pressure
cooking
reheat
classic
cooking
keep warm
recipesingredients
manual
GENTLE COOKING
GENTLE COOKING
libraries
Select the
“classic cooking” function
WARNING
WARNING
insert the pot
GENTLE COOKING
open the lid
GENTLE COOKING
PREHEAT
please wait
add the ingredients
OK
00:02
CLASSIC COOKING
OK
Do you want to stop
the classic cooking?
YES NO
stop
pressure
cooking
GENTLE COOKING
pressure
cooking
reheat
classic
cooking
keep warm
recipesingredients
manual
GENTLE COOKING
GENTLE COOKING
libraries
Select the
desired function
WARNING
WARNING
insert the pot
GENTLE COOKING
open the lid
GENTLE COOKING
PREHEAT
please wait
add the ingredients
OK
00:02
CLASSIC COOKING
OK
Do you want to stop
the classic cooking?
YES NO
stop
pressure
cooking
GENTLE COOKING
pressure
cooking
reheat
classic
cooking
keep warm
recipesingredients
manual
GENTLE COOKING
GENTLE COOKING
libraries
To abort the browning process, press the Back button and select either stop or
“Pressure Cooking”
WARNING
WARNING
insert the pot
GENTLE COOKING
open the lid
GENTLE COOKING
PREHEAT
please wait
add the ingredients
OK
00:02
CLASSIC COOKING
OK
Do you want to stop
the classic cooking?
YES NO
stop
pressure
cooking
GENTLE COOKING
pressure
cooking
reheat
classic
cooking
keep warm
recipesingredients
manual
GENTLE COOKING
GENTLE COOKING
libraries
WARNING
WARNING
insert the pot
GENTLE COOKING
open the lid
GENTLE COOKING
PREHEAT
please wait
add the ingredients
OK
00:02
CLASSIC COOKING
OK
Do you want to stop
the classic cooking?
YES NO
stop
pressure
cooking
GENTLE COOKING
pressure
cooking
reheat
classic
cooking
keep warm
recipesingredients
manual
GENTLE COOKING
GENTLE COOKING
libraries
Open the lid
WARNING
WARNING
insert the pot
GENTLE COOKING
open the lid
GENTLE COOKING
PREHEAT
please wait
add the ingredients
OK
00:02
CLASSIC COOKING
OK
Do you want to stop
the classic cooking?
YES NO
stop
pressure
cooking
GENTLE COOKING
pressure
cooking
reheat
classic
cooking
keep warm
recipesingredients
manual
GENTLE COOKING
GENTLE COOKING
libraries
Insert the pot
WARNING
WARNING
insert the pot
GENTLE COOKING
open the lid
GENTLE COOKING
PREHEAT
please wait
add the ingredients
OK
00:02
CLASSIC COOKING
OK
Do you want to stop
the classic cooking?
YES NO
stop
pressure
cooking
GENTLE COOKING
pressure
cooking
reheat
classic
cooking
keep warm
recipesingredients
manual
GENTLE COOKING
GENTLE COOKING
libraries
WARNING
WARNING
insert the pot
GENTLE COOKING
open the lid
GENTLE COOKING
PREHEAT
please wait
add the ingredients
OK
00:02
CLASSIC COOKING
OK
Do you want to stop
the classic cooking?
YES NO
stop
pressure
cooking
GENTLE COOKING
pressure
cooking
reheat
classic
cooking
keep warm
recipesingredients
manual
GENTLE COOKING
GENTLE COOKING
libraries
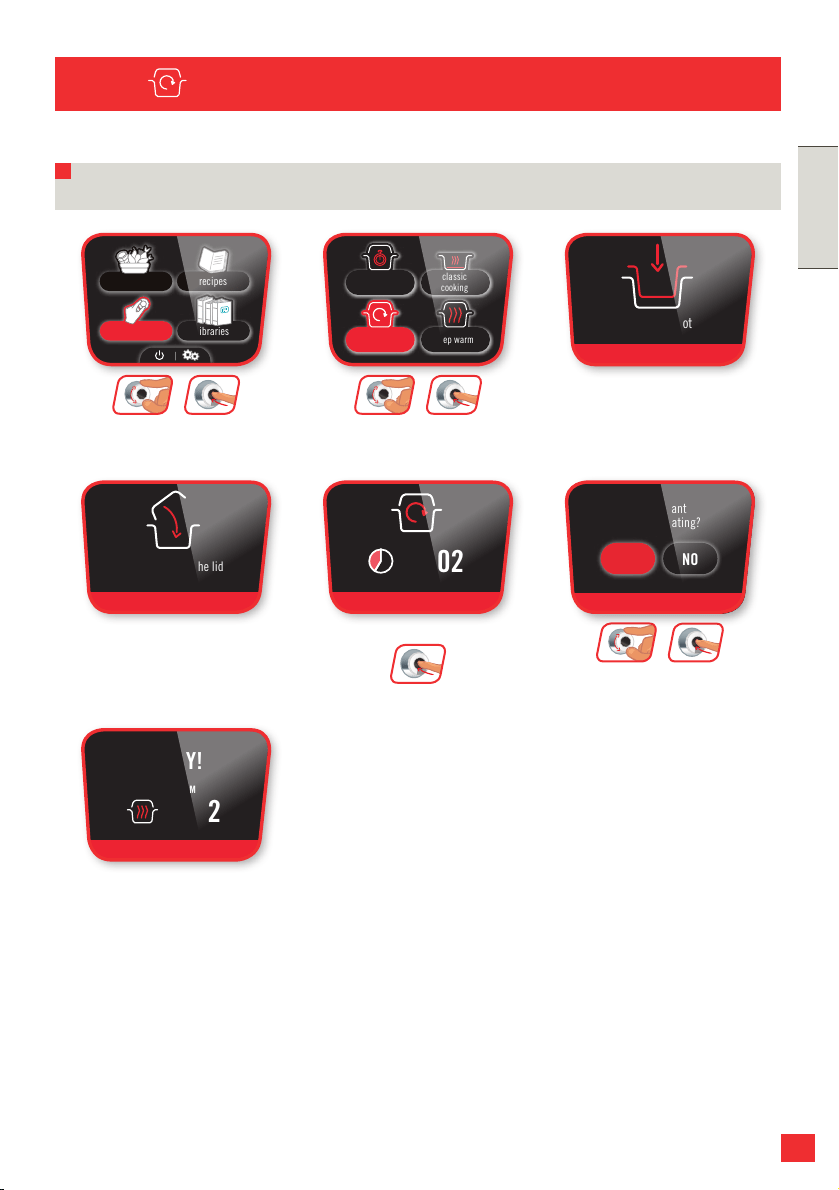
117
ENGLISHENGLISH
117
MANUAL MENU (COOKING MODE)
ok
ok
+
ok
ok
+
ok
ok
+
ok
REHEAT
N.B.: Reheating starts and the time increases.
It’s ready to try!
WARNING
insert the pot
do you want
to stop reheating?
YES NO
WARNING
close and lock the lid
00:02
REHEAT
ENJOY!
KEEP WARM
00:02
pressure
cooking
reheat
classic
cooking
keep warm
recipesingredients
manual
REHEAT
REHEAT
REHEAT
libraries
Insert the pot
WARNING
insert the pot
do you want
to stop reheating?
YES NO
WARNING
close and lock the lid
00:02
REHEAT
ENJOY!
KEEP WARM
00:02
pressure
cooking
reheat
classic
cooking
keep warm
recipesingredients
manual
REHEAT
REHEAT
REHEAT
libraries
WARNING
insert the pot
do you want
to stop reheating?
YES NO
WARNING
close and lock the lid
00:02
REHEAT
ENJOY!
KEEP WARM
00:02
pressure
cooking
reheat
classic
cooking
keep warm
recipesingredients
manual
REHEAT
REHEAT
REHEAT
libraries
Select the
“manual” menu
WARNING
insert the pot
do you want
to stop reheating?
YES NO
WARNING
close and lock the lid
00:02
REHEAT
ENJOY!
KEEP WARM
00:02
pressure
cooking
reheat
classic
cooking
keep warm
recipesingredients
manual
REHEAT
REHEAT
REHEAT
libraries
Select the
“reheat” mode
Close and lock the lid
WARNING
insert the pot
do you want
to stop reheating?
YES NO
WARNING
close and lock the lid
00:02
REHEAT
ENJOY!
KEEP WARM
00:02
pressure
cooking
reheat
classic
cooking
keep warm
recipesingredients
manual
REHEAT
REHEAT
REHEAT
libraries
Do you want to stop
reheating?
WARNING
insert the pot
do you want
to stop reheating?
YES NO
WARNING
close and lock the lid
00:02
REHEAT
ENJOY!
KEEP WARM
00:02
pressure
cooking
reheat
classic
cooking
keep warm
recipesingredients
manual
REHEAT
REHEAT
REHEAT
libraries
Reheating has started
to interrupt
WARNING
insert the pot
do you want
to stop reheating?
YES NO
WARNING
close and lock the lid
00:02
REHEAT
ENJOY!
KEEP WARM
00:02
pressure
cooking
reheat
classic
cooking
keep warm
recipesingredients
manual
REHEAT
REHEAT
REHEAT
libraries

118118
KEEP WARM
MANUAL MENU (COOKING MODE)
Insert the pot
WARNING
insert the pot
do you want to stop
the keep warm function?
YES NO
KEEP WARM
PREHEAT
please wait
KEEP WARM
00:02
pressure
cooking
reheat
classic
cooking
keep warm
recipesingredients
manual
KEEP WARM
KEEP WARM
libraries
ok
ok
+
WARNING
insert the pot
do you want to stop
the keep warm function?
YES NO
KEEP WARM
PREHEAT
please wait
KEEP WARM
00:02
pressure
cooking
reheat
classic
cooking
keep warm
recipesingredients
manual
KEEP WARM
KEEP WARM
libraries
Select the
“manual” menu
ok
ok
+
WARNING
insert the pot
do you want to stop
the keep warm function?
YES NO
KEEP WARM
PREHEAT
please wait
KEEP WARM
00:02
pressure
cooking
reheat
classic
cooking
keep warm
recipesingredients
manual
KEEP WARM
KEEP WARM
libraries
Select the
“keep warm” function
The appliance is
preheating
WARNING
insert the pot
do you want to stop
the keep warm function?
YES NO
KEEP WARM
PREHEAT
please wait
KEEP WARM
00:02
pressure
cooking
reheat
classic
cooking
keep warm
recipesingredients
manual
KEEP WARM
KEEP WARM
libraries
The keeping warm
function has started
WARNING
insert the pot
do you want to stop
the keep warm function?
YES NO
KEEP WARM
PREHEAT
please wait
KEEP WARM
00:02
pressure
cooking
reheat
classic
cooking
keep warm
recipesingredients
manual
KEEP WARM
KEEP WARM
libraries
+
ok
To abort the Keep
Warm process, press
the “Back” button and
select “Yes”
WARNING
insert the pot
do you want to stop
the keep warm function?
YES NO
KEEP WARM
PREHEAT
please wait
KEEP WARM
00:02
pressure
cooking
reheat
classic
cooking
keep warm
recipesingredients
manual
KEEP WARM
KEEP WARM
libraries

119
ENGLISHENGLISH
119
MANUAL MENU (COOKING MODE)
DELAYED START (PRESSURE COOKING)
Some foods cannot be cooked in Delayed start mode (e.g. meat, sh, milk, etc.).
The cooking end time may vary according to the volume contained in the product.
Delayed start is
programmed
PRESSURE COOKING
h m
what time is it?
END OF
COOKING
12:30
08:15
08:15
01:00
DELAYED STARTING END OF COOKING AT
12:30
08:15
immediate
start
delayed
start
PRESSURE COOKING
PRESSURE COOKING
PRESSURE COOKING
ok
ok
+
Select the current time
PRESSURE COOKING
h m
what time is it?
END OF
COOKING
12:30
08:15
08:15
01:00
DELAYED STARTING END OF COOKING AT
12:30
08:15
immediate
start
delayed
start
PRESSURE COOKING
PRESSURE COOKING
PRESSURE COOKING
ok
ok
+
Select the end of
cooking
PRESSURE COOKING
h m
what time is it?
END OF
COOKING
12:30
08:15
08:15
01:00
DELAYED STARTING END OF COOKING AT
12:30
08:15
immediate
start
delayed
start
PRESSURE COOKING
PRESSURE COOKING
PRESSURE COOKING
ok
ok
+
Select “delayed start”
PRESSURE COOKING
h m
what time is it?
END OF
COOKING
12:30
08:15
08:15
01:00
DELAYED STARTING END OF COOKING AT
12:30
08:15
immediate
start
delayed
start
PRESSURE COOKING
PRESSURE COOKING
PRESSURE COOKING
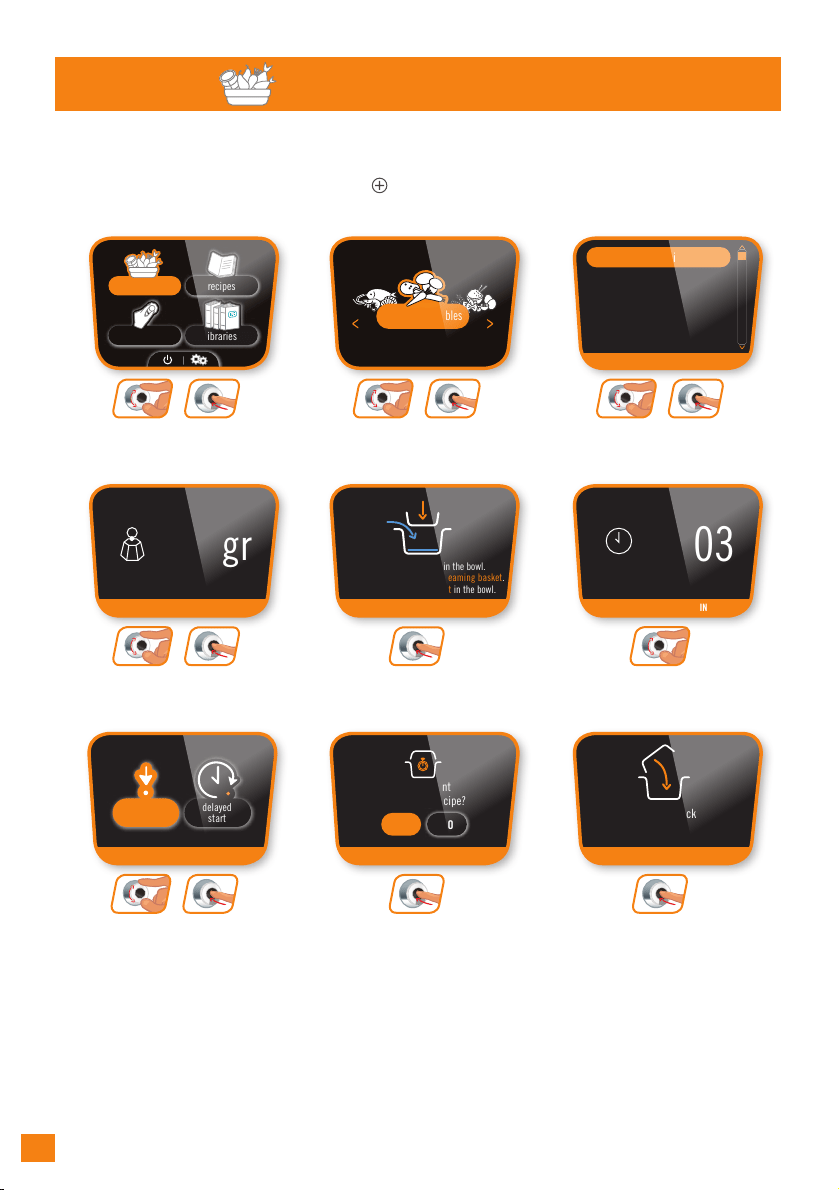
120120
INGREDIENTS MENU:
With the ingredients menu, cook your ingredients alone without you having to worry about
the cooking mode or time: COOK4ME CONNECT provides you with instructions for all
weights and types of ingredients: meat, sh, vegetables, fruit and nally cereals.
INGREDIENTS MENU
ok
ok
+
ok
ok
+
ok
ok
+
ok
ok
+
ok
ok
ok
+
ok
Select the
“ingredients” menu
RECOMMENDED TIME: 10 MIN
PREHEAT
please wait
VEGETABLES
BROCCOLI
BROCCOLI
Broccoli
Chicorée
Erbsen
Fenchel
Gartenkürbis
do you want
to start the recipe?
COOKING
BROCCOLI
YES NO
- Pour 200 ml of water in the bowl.
- Put the ingredients in the steaming basket.
- Place the steaming basket in the bowl.
00:03
BROCCOLI
WARNING
BROCCOLI
END OF COOKING
please wait
BROCCOLI
BROCCOLI
immediate
start
delayed
start
COOKING
00:02
ENJOY!
KEEP WARM
00:02
300 gr
close and lock
the lid
fruits & vegetables
recipesingredients
manual
BROCCOLI
libraries
Select broccoli
RECOMMENDED TIME: 10 MIN
PREHEAT
please wait
VEGETABLES
BROCCOLI
BROCCOLI
Broccoli
Chicorée
Erbsen
Fenchel
Gartenkürbis
do you want
to start the recipe?
COOKING
BROCCOLI
YES NO
- Pour 200 ml of water in the bowl.
- Put the ingredients in the steaming basket.
- Place the steaming basket in the bowl.
00:03
BROCCOLI
WARNING
BROCCOLI
END OF COOKING
please wait
BROCCOLI
BROCCOLI
immediate
start
delayed
start
COOKING
00:02
ENJOY!
KEEP WARM
00:02
300 gr
close and lock
the lid
fruits & vegetables
recipesingredients
manual
BROCCOLI
libraries
Select
fruit & vegetables
RECOMMENDED TIME: 10 MIN
PREHEAT
please wait
VEGETABLES
BROCCOLI
BROCCOLI
Broccoli
Chicorée
Erbsen
Fenchel
Gartenkürbis
do you want
to start the recipe?
COOKING
BROCCOLI
YES NO
- Pour 200 ml of water in the bowl.
- Put the ingredients in the steaming basket.
- Place the steaming basket in the bowl.
00:03
BROCCOLI
WARNING
BROCCOLI
END OF COOKING
please wait
BROCCOLI
BROCCOLI
immediate
start
delayed
start
COOKING
00:02
ENJOY!
KEEP WARM
00:02
300 gr
close and lock
the lid
fruits & vegetables
recipesingredients
manual
BROCCOLI
libraries
Select the required quantity
of broccoli (min 300 g)
RECOMMENDED TIME: 10 MIN
PREHEAT
please wait
VEGETABLES
BROCCOLI
BROCCOLI
Broccoli
Chicorée
Erbsen
Fenchel
Gartenkürbis
do you want
to start the recipe?
COOKING
BROCCOLI
YES NO
- Pour 200 ml of water in the bowl.
- Put the ingredients in the steaming basket.
- Place the steaming basket in the bowl.
00:03
BROCCOLI
WARNING
BROCCOLI
END OF COOKING
please wait
BROCCOLI
BROCCOLI
immediate
start
delayed
start
COOKING
00:02
ENJOY!
KEEP WARM
00:02
300 gr
close and lock
the lid
fruits & vegetables
recipesingredients
manual
BROCCOLI
libraries
ok
Start the recipe
RECOMMENDED TIME: 10 MIN
PREHEAT
please wait
VEGETABLES
BROCCOLI
BROCCOLI
Broccoli
Chicorée
Erbsen
Fenchel
Gartenkürbis
do you want
to start the recipe?
COOKING
BROCCOLI
YES NO
- Pour 200 ml of water in the bowl.
- Put the ingredients in the steaming basket.
- Place the steaming basket in the bowl.
00:03
BROCCOLI
WARNING
BROCCOLI
END OF COOKING
please wait
BROCCOLI
BROCCOLI
immediate
start
delayed
start
COOKING
00:02
ENJOY!
KEEP WARM
00:02
300 gr
close and lock
the lid
fruits & vegetables
recipesingredients
manual
BROCCOLI
libraries
ok
Follow the instructions
RECOMMENDED TIME: 10 MIN
PREHEAT
please wait
VEGETABLES
BROCCOLI
BROCCOLI
Broccoli
Chicorée
Erbsen
Fenchel
Gartenkürbis
do you want
to start the recipe?
COOKING
BROCCOLI
YES NO
- Pour 200 ml of water in the bowl.
- Put the ingredients in the steaming basket.
- Place the steaming basket in the bowl.
00:03
BROCCOLI
WARNING
BROCCOLI
END OF COOKING
please wait
BROCCOLI
BROCCOLI
immediate
start
delayed
start
COOKING
00:02
ENJOY!
KEEP WARM
00:02
300 gr
close and lock
the lid
fruits & vegetables
recipesingredients
manual
BROCCOLI
libraries
Select
“immediate start”
RECOMMENDED TIME: 10 MIN
PREHEAT
please wait
VEGETABLES
BROCCOLI
BROCCOLI
Broccoli
Chicorée
Erbsen
Fenchel
Gartenkürbis
do you want
to start the recipe?
COOKING
BROCCOLI
YES NO
- Pour 200 ml of water in the bowl.
- Put the ingredients in the steaming basket.
- Place the steaming basket in the bowl.
00:03
BROCCOLI
WARNING
BROCCOLI
END OF COOKING
please wait
BROCCOLI
BROCCOLI
immediate
start
delayed
start
COOKING
00:02
ENJOY!
KEEP WARM
00:02
300 gr
close and lock
the lid
fruits & vegetables
recipesingredients
manual
BROCCOLI
libraries
The recommended cooking
time is displayed
RECOMMENDED TIME: 10 MIN
PREHEAT
please wait
VEGETABLES
BROCCOLI
BROCCOLI
Broccoli
Chicorée
Erbsen
Fenchel
Gartenkürbis
do you want
to start the recipe?
COOKING
BROCCOLI
YES NO
- Pour 200 ml of water in the bowl.
- Put the ingredients in the steaming basket.
- Place the steaming basket in the bowl.
00:03
BROCCOLI
WARNING
BROCCOLI
END OF COOKING
please wait
BROCCOLI
BROCCOLI
immediate
start
delayed
start
COOKING
00:02
ENJOY!
KEEP WARM
00:02
300 gr
close and lock
the lid
fruits & vegetables
recipesingredients
manual
BROCCOLI
libraries
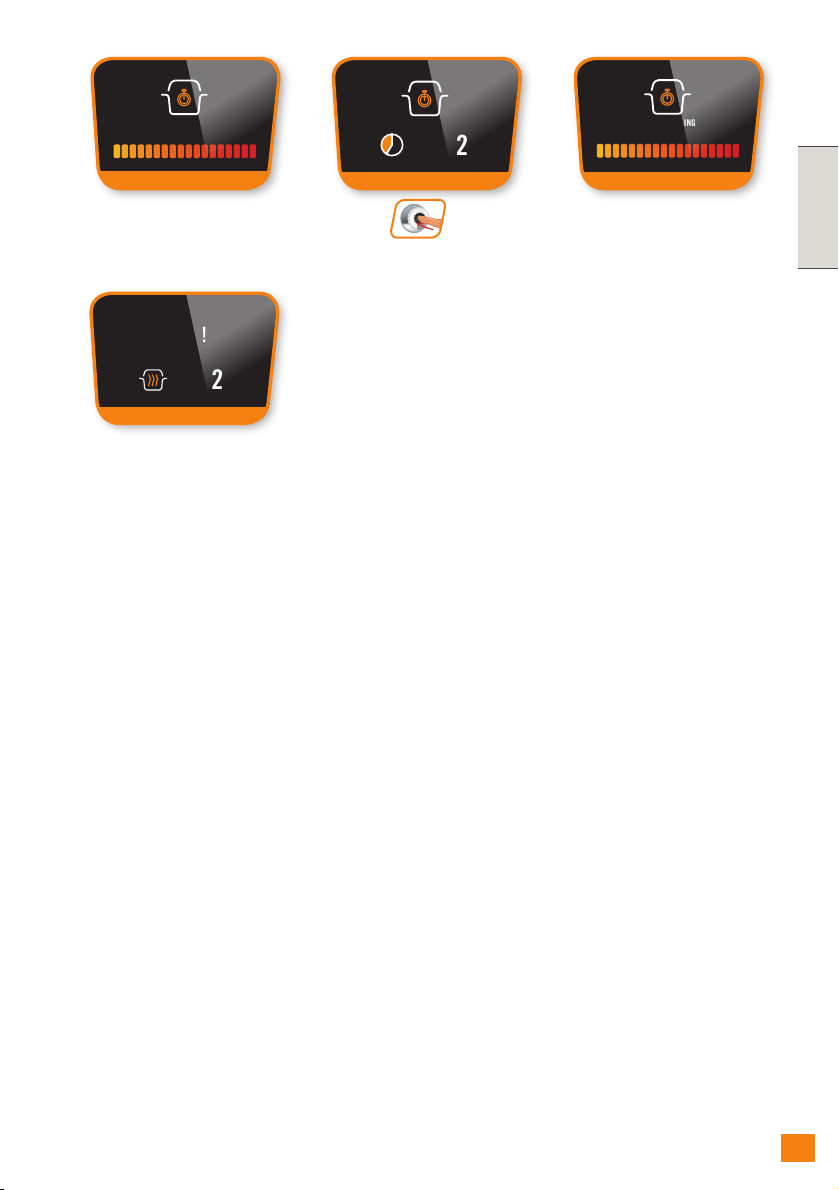
121
ENGLISHENGLISH
121
ok
Preheat
RECOMMENDED TIME: 10 MIN
PREHEAT
please wait
VEGETABLES
BROCCOLI
BROCCOLI
Broccoli
Chicorée
Erbsen
Fenchel
Gartenkürbis
do you want
to start the recipe?
COOKING
BROCCOLI
YES NO
- Pour 200 ml of water in the bowl.
- Put the ingredients in the steaming basket.
- Place the steaming basket in the bowl.
00:03
BROCCOLI
WARNING
BROCCOLI
END OF COOKING
please wait
BROCCOLI
BROCCOLI
immediate
start
delayed
start
COOKING
00:02
ENJOY!
KEEP WARM
00:02
300 gr
close and lock
the lid
fruits & vegetables
recipesingredients
manual
BROCCOLI
libraries
End of cooking
RECOMMENDED TIME: 10 MIN
PREHEAT
please wait
VEGETABLES
BROCCOLI
BROCCOLI
Broccoli
Chicorée
Erbsen
Fenchel
Gartenkürbis
do you want
to start the recipe?
COOKING
BROCCOLI
YES NO
- Pour 200 ml of water in the bowl.
- Put the ingredients in the steaming basket.
- Place the steaming basket in the bowl.
00:03
BROCCOLI
WARNING
BROCCOLI
END OF COOKING
please wait
BROCCOLI
BROCCOLI
immediate
start
delayed
start
COOKING
00:02
ENJOY!
KEEP WARM
00:02
300 gr
close and lock
the lid
fruits & vegetables
recipesingredients
manual
BROCCOLI
libraries
It’s ready to try!
RECOMMENDED TIME: 10 MIN
PREHEAT
please wait
VEGETABLES
BROCCOLI
BROCCOLI
Broccoli
Chicorée
Erbsen
Fenchel
Gartenkürbis
do you want
to start the recipe?
COOKING
BROCCOLI
YES NO
- Pour 200 ml of water in the bowl.
- Put the ingredients in the steaming basket.
- Place the steaming basket in the bowl.
00:03
BROCCOLI
WARNING
BROCCOLI
END OF COOKING
please wait
BROCCOLI
BROCCOLI
immediate
start
delayed
start
COOKING
00:02
ENJOY!
KEEP WARM
00:02
300 gr
close and lock
the lid
fruits & vegetables
recipesingredients
manual
BROCCOLI
libraries
Start cooking
RECOMMENDED TIME: 10 MIN
PREHEAT
please wait
VEGETABLES
BROCCOLI
BROCCOLI
Broccoli
Chicorée
Erbsen
Fenchel
Gartenkürbis
do you want
to start the recipe?
COOKING
BROCCOLI
YES NO
- Pour 200 ml of water in the bowl.
- Put the ingredients in the steaming basket.
- Place the steaming basket in the bowl.
00:03
BROCCOLI
WARNING
BROCCOLI
END OF COOKING
please wait
BROCCOLI
BROCCOLI
immediate
start
delayed
start
COOKING
00:02
ENJOY!
KEEP WARM
00:02
300 gr
close and lock
the lid
fruits & vegetables
recipesingredients
manual
BROCCOLI
libraries
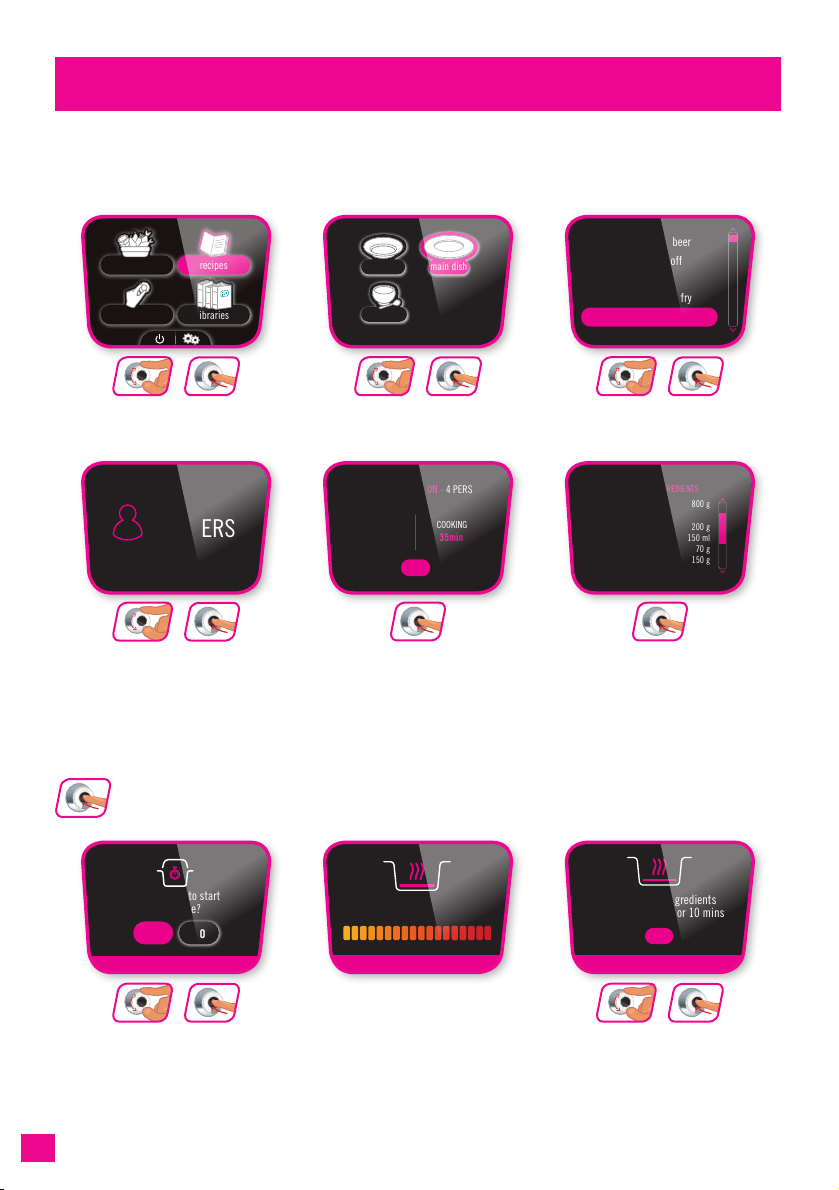
122122
You can return to the initial menu by pressing the Back button for 30 seconds.
ok
ok
+
ok
ok
+
ok
Preheating
BEEF BOURGUIGNON
Beef stew with beer
Beef Stroganoff
Beef tacos
Beef teriyaki stir-fry
Beef bourguignon
BEEF BOURGUIGNON - 4 PERS
PREPARATION
10min 35min
COOKING
BEEF BOURGUIGNON
BEEF BOURGUIGNON
BEEF BOURGUIGNON
BEEF BOURGUIGNON
BEEF BOURGUIGNON
BEEF BOURGUIGNON
BEEF BOURGUIGNON
ENJOY!
KEEP WARM
00:10
00:35
04
PERS
OK
OK
Diced beef pieces
rolled in flour
Mushrooms
Beef consomme
Diced bacon
Diced onion
800 g
200 g
150 ml
70 g
150 g
PREPARE THE INGREDIENTS
do you want to start
the recipe?
brown all the ingredients
except the liquid for 10 mins
YES NO
PREHEAT
please wait
END OF COOKING
please wait
do you want
to stop browning?
YES NO
do you want
to start the cooking?
YES NO
add the rest of the ingredients
OK
COOK
BEEF BOURGUIGNON
main dishstarter
dessert
library
recipesingredients
manual
libraries
Start the recipe
BEEF BOURGUIGNON
Beef stew with beer
Beef Stroganoff
Beef tacos
Beef teriyaki stir-fry
Beef bourguignon
BEEF BOURGUIGNON - 4 PERS
PREPARATION
10min 35min
COOKING
BEEF BOURGUIGNON
BEEF BOURGUIGNON
BEEF BOURGUIGNON
BEEF BOURGUIGNON
BEEF BOURGUIGNON
BEEF BOURGUIGNON
BEEF BOURGUIGNON
ENJOY!
KEEP WARM
00:10
00:35
04
PERS
OK
OK
Diced beef pieces
rolled in flour
Mushrooms
Beef consomme
Diced bacon
Diced onion
800 g
200 g
150 ml
70 g
150 g
PREPARE THE INGREDIENTS
do you want to start
the recipe?
brown all the ingredients
except the liquid for 10 mins
YES NO
PREHEAT
please wait
END OF COOKING
please wait
do you want
to stop browning?
YES NO
do you want
to start the cooking?
YES NO
add the rest of the ingredients
OK
COOK
BEEF BOURGUIGNON
main dishstarter
dessert
library
recipesingredients
manual
libraries
Follow the instructions
BEEF BOURGUIGNON
Beef stew with beer
Beef Stroganoff
Beef tacos
Beef teriyaki stir-fry
Beef bourguignon
BEEF BOURGUIGNON - 4 PERS
PREPARATION
10min 35min
COOKING
BEEF BOURGUIGNON
BEEF BOURGUIGNON
BEEF BOURGUIGNON
BEEF BOURGUIGNON
BEEF BOURGUIGNON
BEEF BOURGUIGNON
BEEF BOURGUIGNON
ENJOY!
KEEP WARM
00:10
00:35
04
PERS
OK
OK
Diced beef pieces
rolled in flour
Mushrooms
Beef consomme
Diced bacon
Diced onion
800 g
200 g
150 ml
70 g
150 g
PREPARE THE INGREDIENTS
do you want to start
the recipe?
brown all the ingredients
except the liquid for 10 mins
YES NO
PREHEAT
please wait
END OF COOKING
please wait
do you want
to stop browning?
YES NO
do you want
to start the cooking?
YES NO
add the rest of the ingredients
OK
COOK
BEEF BOURGUIGNON
main dishstarter
dessert
library
recipesingredients
manual
libraries
BEEF BOURGUIGNON RECIPE
ok
ok
+
ok
ok
+
ok
ok
+
ok
ok
+
ok
ok
RECIPE MENU:
In the Recipe Menu, you can choose between savoury and sweet recipes from three
categories: Starter/ Main Course / Dessert
Show recipe
BEEF BOURGUIGNON
Beef stew with beer
Beef Stroganoff
Beef tacos
Beef teriyaki stir-fry
Beef bourguignon
BEEF BOURGUIGNON - 4 PERS
PREPARATION
10min 35min
COOKING
BEEF BOURGUIGNON
BEEF BOURGUIGNON
BEEF BOURGUIGNON
BEEF BOURGUIGNON
BEEF BOURGUIGNON
BEEF BOURGUIGNON
BEEF BOURGUIGNON
ENJOY!
KEEP WARM
00:10
00:35
04
PERS
OK
OK
Diced beef pieces
rolled in flour
Mushrooms
Beef consomme
Diced bacon
Diced onion
800 g
200 g
150 ml
70 g
150 g
PREPARE THE INGREDIENTS
do you want to start
the recipe?
brown all the ingredients
except the liquid for 10 mins
YES NO
PREHEAT
please wait
END OF COOKING
please wait
do you want
to stop browning?
YES NO
do you want
to start the cooking?
YES NO
add the rest of the ingredients
OK
COOK
BEEF BOURGUIGNON
main dishstarter
dessert
library
recipesingredients
manual
libraries
Prepare the ingredients
BEEF BOURGUIGNON
Beef stew with beer
Beef Stroganoff
Beef tacos
Beef teriyaki stir-fry
Beef bourguignon
BEEF BOURGUIGNON - 4 PERS
PREPARATION
10min 35min
COOKING
BEEF BOURGUIGNON
BEEF BOURGUIGNON
BEEF BOURGUIGNON
BEEF BOURGUIGNON
BEEF BOURGUIGNON
BEEF BOURGUIGNON
BEEF BOURGUIGNON
ENJOY!
KEEP WARM
00:10
00:35
04
PERS
OK
OK
Diced beef pieces
rolled in flour
Mushrooms
Beef consomme
Diced bacon
Diced onion
800 g
200 g
150 ml
70 g
150 g
PREPARE THE INGREDIENTS
do you want to start
the recipe?
brown all the ingredients
except the liquid for 10 mins
YES NO
PREHEAT
please wait
END OF COOKING
please wait
do you want
to stop browning?
YES NO
do you want
to start the cooking?
YES NO
add the rest of the ingredients
OK
COOK
BEEF BOURGUIGNON
main dishstarter
dessert
library
recipesingredients
manual
libraries
Select the recipe menu
BEEF BOURGUIGNON
Beef stew with beer
Beef Stroganoff
Beef tacos
Beef teriyaki stir-fry
Beef bourguignon
BEEF BOURGUIGNON - 4 PERS
PREPARATION
10min 35min
COOKING
BEEF BOURGUIGNON
BEEF BOURGUIGNON
BEEF BOURGUIGNON
BEEF BOURGUIGNON
BEEF BOURGUIGNON
BEEF BOURGUIGNON
BEEF BOURGUIGNON
ENJOY!
KEEP WARM
00:10
00:35
04
PERS
OK
OK
Diced beef pieces
rolled in flour
Mushrooms
Beef consomme
Diced bacon
Diced onion
800 g
200 g
150 ml
70 g
150 g
PREPARE THE INGREDIENTS
do you want to start
the recipe?
brown all the ingredients
except the liquid for 10 mins
YES NO
PREHEAT
please wait
END OF COOKING
please wait
do you want
to stop browning?
YES NO
do you want
to start the cooking?
YES NO
add the rest of the ingredients
OK
COOK
BEEF BOURGUIGNON
main dishstarter
dessert
library
recipesingredients
manual
libraries
Select the
type of recipe
BEEF BOURGUIGNON
Beef stew with beer
Beef Stroganoff
Beef tacos
Beef teriyaki stir-fry
Beef bourguignon
BEEF BOURGUIGNON - 4 PERS
PREPARATION
10min 35min
COOKING
BEEF BOURGUIGNON
BEEF BOURGUIGNON
BEEF BOURGUIGNON
BEEF BOURGUIGNON
BEEF BOURGUIGNON
BEEF BOURGUIGNON
BEEF BOURGUIGNON
ENJOY!
KEEP WARM
00:10
00:35
04
PERS
OK
OK
Diced beef pieces
rolled in flour
Mushrooms
Beef consomme
Diced bacon
Diced onion
800 g
200 g
150 ml
70 g
150 g
PREPARE THE INGREDIENTS
do you want to start
the recipe?
brown all the ingredients
except the liquid for 10 mins
YES NO
PREHEAT
please wait
END OF COOKING
please wait
do you want
to stop browning?
YES NO
do you want
to start the cooking?
YES NO
add the rest of the ingredients
OK
COOK
BEEF BOURGUIGNON
main dishstarter
dessert
library
recipesingredients
manual
libraries
Select a recipe
BEEF BOURGUIGNON
Beef stew with beer
Beef Stroganoff
Beef tacos
Beef teriyaki stir-fry
Beef bourguignon
BEEF BOURGUIGNON - 4 PERS
PREPARATION
10min 35min
COOKING
BEEF BOURGUIGNON
BEEF BOURGUIGNON
BEEF BOURGUIGNON
BEEF BOURGUIGNON
BEEF BOURGUIGNON
BEEF BOURGUIGNON
BEEF BOURGUIGNON
ENJOY!
KEEP WARM
00:10
00:35
04
PERS
OK
OK
Diced beef pieces
rolled in flour
Mushrooms
Beef consomme
Diced bacon
Diced onion
800 g
200 g
150 ml
70 g
150 g
PREPARE THE INGREDIENTS
do you want to start
the recipe?
brown all the ingredients
except the liquid for 10 mins
YES NO
PREHEAT
please wait
END OF COOKING
please wait
do you want
to stop browning?
YES NO
do you want
to start the cooking?
YES NO
add the rest of the ingredients
OK
COOK
BEEF BOURGUIGNON
main dishstarter
dessert
library
recipesingredients
manual
libraries
Select the number of
people
BEEF BOURGUIGNON
Beef stew with beer
Beef Stroganoff
Beef tacos
Beef teriyaki stir-fry
Beef bourguignon
BEEF BOURGUIGNON - 4 PERS
PREPARATION
10min 35min
COOKING
BEEF BOURGUIGNON
BEEF BOURGUIGNON
BEEF BOURGUIGNON
BEEF BOURGUIGNON
BEEF BOURGUIGNON
BEEF BOURGUIGNON
BEEF BOURGUIGNON
ENJOY!
KEEP WARM
00:10
00:35
04
PERS
OK
OK
Diced beef pieces
rolled in flour
Mushrooms
Beef consomme
Diced bacon
Diced onion
800 g
200 g
150 ml
70 g
150 g
PREPARE THE INGREDIENTS
do you want to start
the recipe?
brown all the ingredients
except the liquid for 10 mins
YES NO
PREHEAT
please wait
END OF COOKING
please wait
do you want
to stop browning?
YES NO
do you want
to start the cooking?
YES NO
add the rest of the ingredients
OK
COOK
BEEF BOURGUIGNON
main dishstarter
dessert
library
recipesingredients
manual
libraries
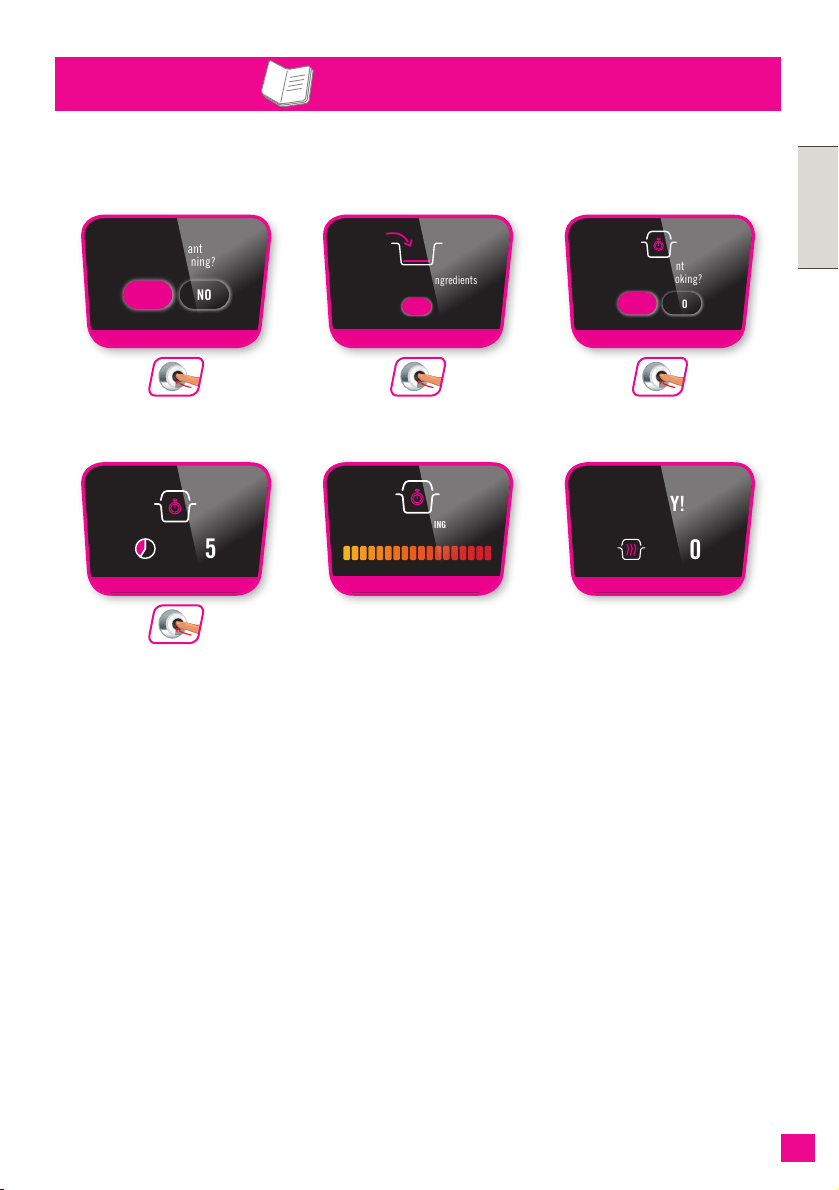
123
ENGLISHENGLISH
123
RECIPE MENU: (CONTINUATION)
RECIPE MENU
ok
ok
ok
ok
Cooking has nished
BEEF BOURGUIGNON
Beef stew with beer
Beef Stroganoff
Beef tacos
Beef teriyaki stir-fry
Beef bourguignon
BEEF BOURGUIGNON - 4 PERS
PREPARATION
10min 35min
COOKING
BEEF BOURGUIGNON
BEEF BOURGUIGNON
BEEF BOURGUIGNON
BEEF BOURGUIGNON
BEEF BOURGUIGNON
BEEF BOURGUIGNON
BEEF BOURGUIGNON
ENJOY!
KEEP WARM
00:10
00:35
04
PERS
OK
OK
Diced beef pieces
rolled in flour
Mushrooms
Beef consomme
Diced bacon
Diced onion
800 g
200 g
150 ml
70 g
150 g
PREPARE THE INGREDIENTS
do you want to start
the recipe?
brown all the ingredients
except the liquid for 10 mins
YES NO
PREHEAT
please wait
END OF COOKING
please wait
do you want
to stop browning?
YES NO
do you want
to start the cooking?
YES NO
add the rest of the ingredients
OK
COOK
BEEF BOURGUIGNON
main dishstarter
dessert
library
recipesingredients
manual
libraries
It’s ready to try!
BEEF BOURGUIGNON
Beef stew with beer
Beef Stroganoff
Beef tacos
Beef teriyaki stir-fry
Beef bourguignon
BEEF BOURGUIGNON - 4 PERS
PREPARATION
10min 35min
COOKING
BEEF BOURGUIGNON
BEEF BOURGUIGNON
BEEF BOURGUIGNON
BEEF BOURGUIGNON
BEEF BOURGUIGNON
BEEF BOURGUIGNON
BEEF BOURGUIGNON
ENJOY!
KEEP WARM
00:10
00:35
04
PERS
OK
OK
Diced beef pieces
rolled in flour
Mushrooms
Beef consomme
Diced bacon
Diced onion
800 g
200 g
150 ml
70 g
150 g
PREPARE THE INGREDIENTS
do you want to start
the recipe?
brown all the ingredients
except the liquid for 10 mins
YES NO
PREHEAT
please wait
END OF COOKING
please wait
do you want
to stop browning?
YES NO
do you want
to start the cooking?
YES NO
add the rest of the ingredients
OK
COOK
BEEF BOURGUIGNON
main dishstarter
dessert
library
recipesingredients
manual
libraries
Stop browning
BEEF BOURGUIGNON
Beef stew with beer
Beef Stroganoff
Beef tacos
Beef teriyaki stir-fry
Beef bourguignon
BEEF BOURGUIGNON - 4 PERS
PREPARATION
10min 35min
COOKING
BEEF BOURGUIGNON
BEEF BOURGUIGNON
BEEF BOURGUIGNON
BEEF BOURGUIGNON
BEEF BOURGUIGNON
BEEF BOURGUIGNON
BEEF BOURGUIGNON
ENJOY!
KEEP WARM
00:10
00:35
04
PERS
OK
OK
Diced beef pieces
rolled in flour
Mushrooms
Beef consomme
Diced bacon
Diced onion
800 g
200 g
150 ml
70 g
150 g
PREPARE THE INGREDIENTS
do you want to start
the recipe?
brown all the ingredients
except the liquid for 10 mins
YES NO
PREHEAT
please wait
END OF COOKING
please wait
do you want
to stop browning?
YES NO
do you want
to start the cooking?
YES NO
add the rest of the ingredients
OK
COOK
BEEF BOURGUIGNON
main dishstarter
dessert
library
recipesingredients
manual
libraries
Follow the instructions
BEEF BOURGUIGNON
Beef stew with beer
Beef Stroganoff
Beef tacos
Beef teriyaki stir-fry
Beef bourguignon
BEEF BOURGUIGNON - 4 PERS
PREPARATION
10min 35min
COOKING
BEEF BOURGUIGNON
BEEF BOURGUIGNON
BEEF BOURGUIGNON
BEEF BOURGUIGNON
BEEF BOURGUIGNON
BEEF BOURGUIGNON
BEEF BOURGUIGNON
ENJOY!
KEEP WARM
00:10
00:35
04
PERS
OK
OK
Diced beef pieces
rolled in flour
Mushrooms
Beef consomme
Diced bacon
Diced onion
800 g
200 g
150 ml
70 g
150 g
PREPARE THE INGREDIENTS
do you want to start
the recipe?
brown all the ingredients
except the liquid for 10 mins
YES NO
PREHEAT
please wait
END OF COOKING
please wait
do you want
to stop browning?
YES NO
do you want
to start the cooking?
YES NO
add the rest of the ingredients
OK
COOK
BEEF BOURGUIGNON
main dishstarter
dessert
library
recipesingredients
manual
libraries
Start the cooking
BEEF BOURGUIGNON
Beef stew with beer
Beef Stroganoff
Beef tacos
Beef teriyaki stir-fry
Beef bourguignon
BEEF BOURGUIGNON - 4 PERS
PREPARATION
10min 35min
COOKING
BEEF BOURGUIGNON
BEEF BOURGUIGNON
BEEF BOURGUIGNON
BEEF BOURGUIGNON
BEEF BOURGUIGNON
BEEF BOURGUIGNON
BEEF BOURGUIGNON
ENJOY!
KEEP WARM
00:10
00:35
04
PERS
OK
OK
Diced beef pieces
rolled in flour
Mushrooms
Beef consomme
Diced bacon
Diced onion
800 g
200 g
150 ml
70 g
150 g
PREPARE THE INGREDIENTS
do you want to start
the recipe?
brown all the ingredients
except the liquid for 10 mins
YES NO
PREHEAT
please wait
END OF COOKING
please wait
do you want
to stop browning?
YES NO
do you want
to start the cooking?
YES NO
add the rest of the ingredients
OK
COOK
BEEF BOURGUIGNON
main dishstarter
dessert
library
recipesingredients
manual
libraries
Cooking time
BEEF BOURGUIGNON
Beef stew with beer
Beef Stroganoff
Beef tacos
Beef teriyaki stir-fry
Beef bourguignon
BEEF BOURGUIGNON - 4 PERS
PREPARATION
10min 35min
COOKING
BEEF BOURGUIGNON
BEEF BOURGUIGNON
BEEF BOURGUIGNON
BEEF BOURGUIGNON
BEEF BOURGUIGNON
BEEF BOURGUIGNON
BEEF BOURGUIGNON
ENJOY!
KEEP WARM
00:10
00:35
04
PERS
OK
OK
Diced beef pieces
rolled in flour
Mushrooms
Beef consomme
Diced bacon
Diced onion
800 g
200 g
150 ml
70 g
150 g
PREPARE THE INGREDIENTS
do you want to start
the recipe?
brown all the ingredients
except the liquid for 10 mins
YES NO
PREHEAT
please wait
END OF COOKING
please wait
do you want
to stop browning?
YES NO
do you want
to start the cooking?
YES NO
add the rest of the ingredients
OK
COOK
BEEF BOURGUIGNON
main dishstarter
dessert
library
recipesingredients
manual
libraries
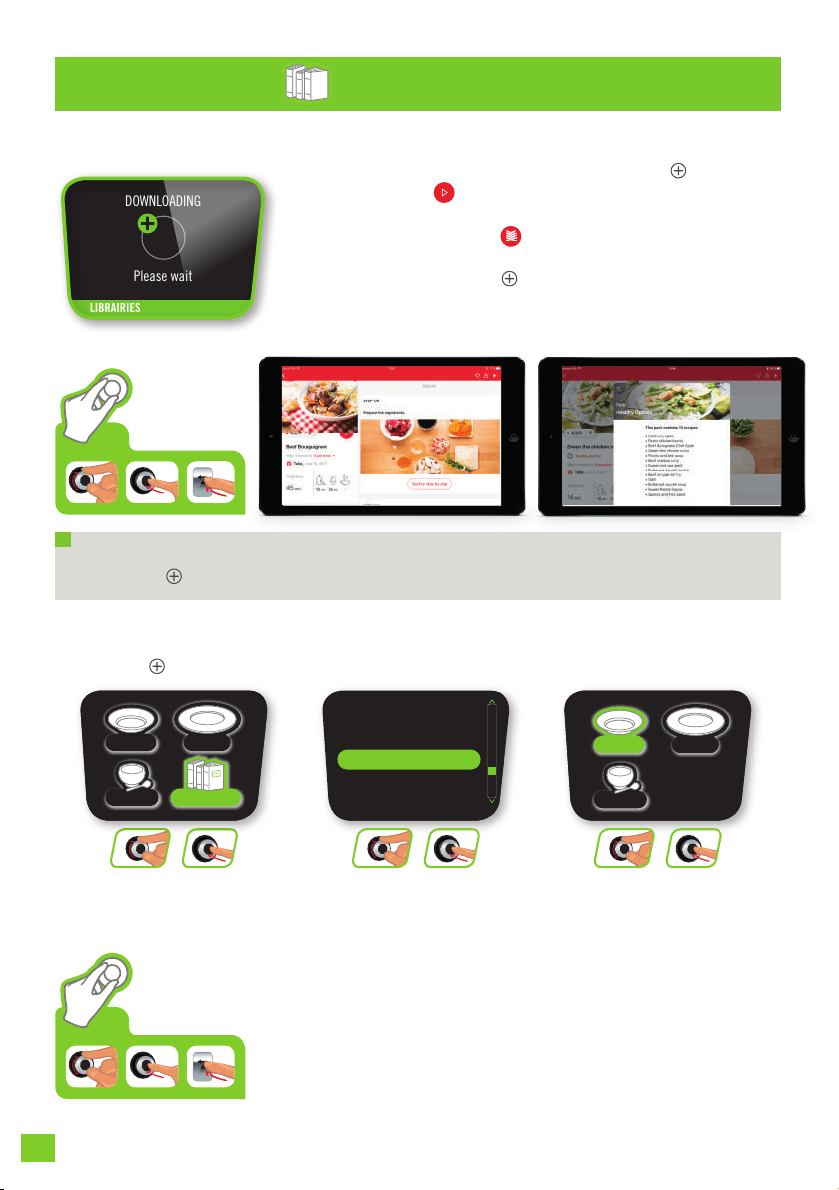
124124
ok
ok
ok
ok
ok
ok
ok
ok
+
Select the
“libraries” sub-menu
mainstarter
dessert
mainstarter
dessert
libraries
Asian recipes
Bistro recipes
Mediterranean recipes
Soup recipes
Select the desired
theme
mainstarter
dessert
mainstarter
dessert
libraries
Asian recipes
Bistro recipes
Mediterranean recipes
Soup recipes
ok
ok
+
Select “starter”, “main”
or “dessert” and
choose your recipe
mainstarter
dessert
mainstarter
dessert
libraries
Asian recipes
Bistro recipes
Mediterranean recipes
Soup recipes
ok
ok
+
LIBRARIES
ACCESS THE LIBRARIES:
You can nd your downloaded packs. Launch your recipes from your
COOK4ME CONNECT by accessing your library.
DOWNLOADING
RECIPE AND PACK:
Download in progress
Please wait
DOWNLOADING
LIBRAIRIES
N.B.: You can stop the transfer at any time by pressing the return button on
COOK4ME CONNECT.
Once your app is connected to your COOK4ME CONNECT,
you can click on to send a recipe on your appliance, then
you will be able to nd it in the list of "recipes". When a pack
is available you will see a logo on the recipe, you can click
on the corresponding text to download the pack. It will be
visible in you COOK4ME CONNECT «libraries»

125
ENGLISHENGLISH
125
INGREDIENTS
beef
chicken
lamb
pork
cod
sh
king prawns (raw)
mussels
scallops
brown rice - Basmati
bulgar wheat
quinoa
white rice - Basmati
white rice - long grain
apples
aspargus
aubergines
beetroot
broccoli (orets)
Brussels sprouts
butternut squash
cabbage (green)
cabbage (red)
carrots
cauliower (orets)
celery
courgettes
green beans (whole)
green lentils
leeks
mushrooms
parsnips
pears
peas (frozen)
pepper (any colour)
potatoes (new)
potatoes (old)
runner beans
spinach
swede
sweet potatoes
turnips
rice & cereals
sh & shellsh
meat and chiken
vegetables / fruits
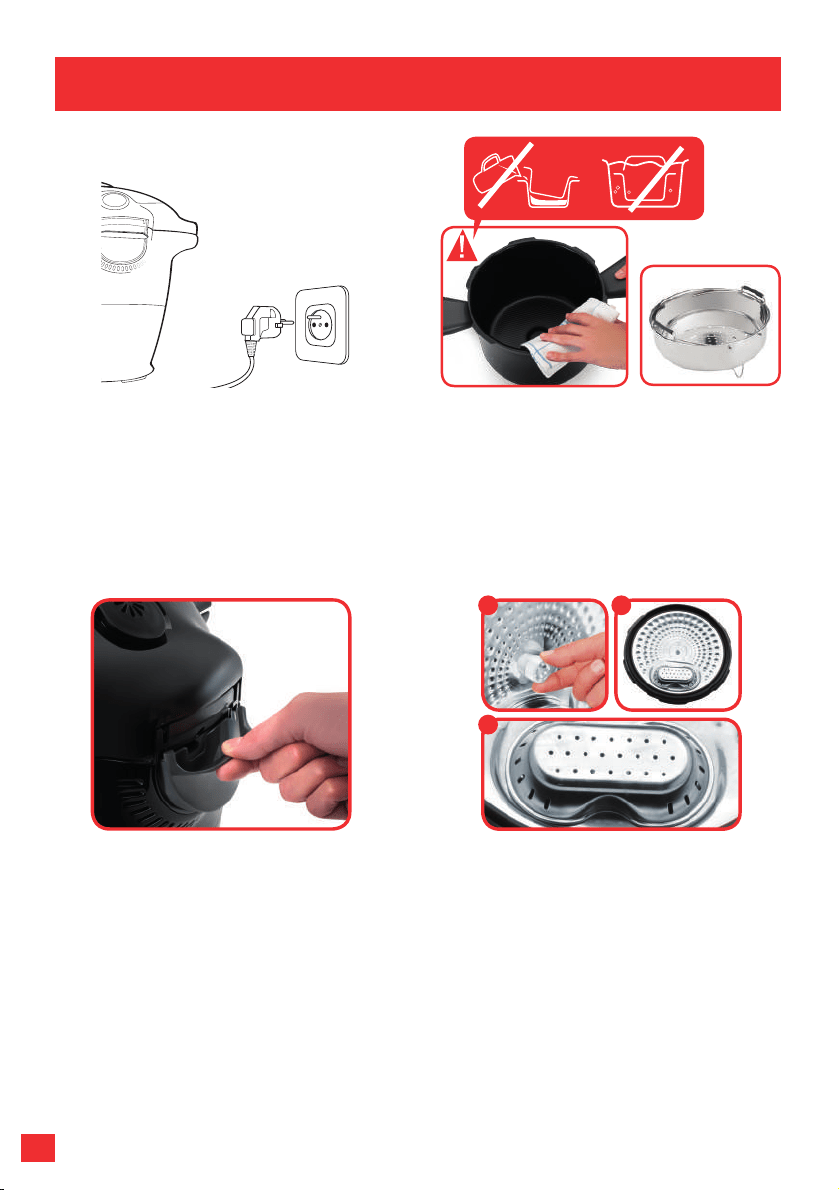
126126
CLEANING MAINTENANCE
Once you have nished cooking your dish,
disconnect the appliance to clean. Clean
the appliance after each use.
You can wash the cooking pot and
steam basket in soapy hot water or in
the dishwasher. Clean the body of the
appliance using a damp cloth.
After several times in the dishwasher,
the exterior of the tank may become
discoloured. You may clean it using a
scraper sponge.
After each use, remove the condensation
trap and wash carefully in clear water or
in the dishwasher. Take care to dry well.
Return to its original position.
To clean the metal lid, by hand or in the
dishwasher, you need to remove the valve
cover.
1. Unscrew the screw at the centre of the
metal lid
2. Take off the metal lid
3. Remove the valve cover
1 2
3
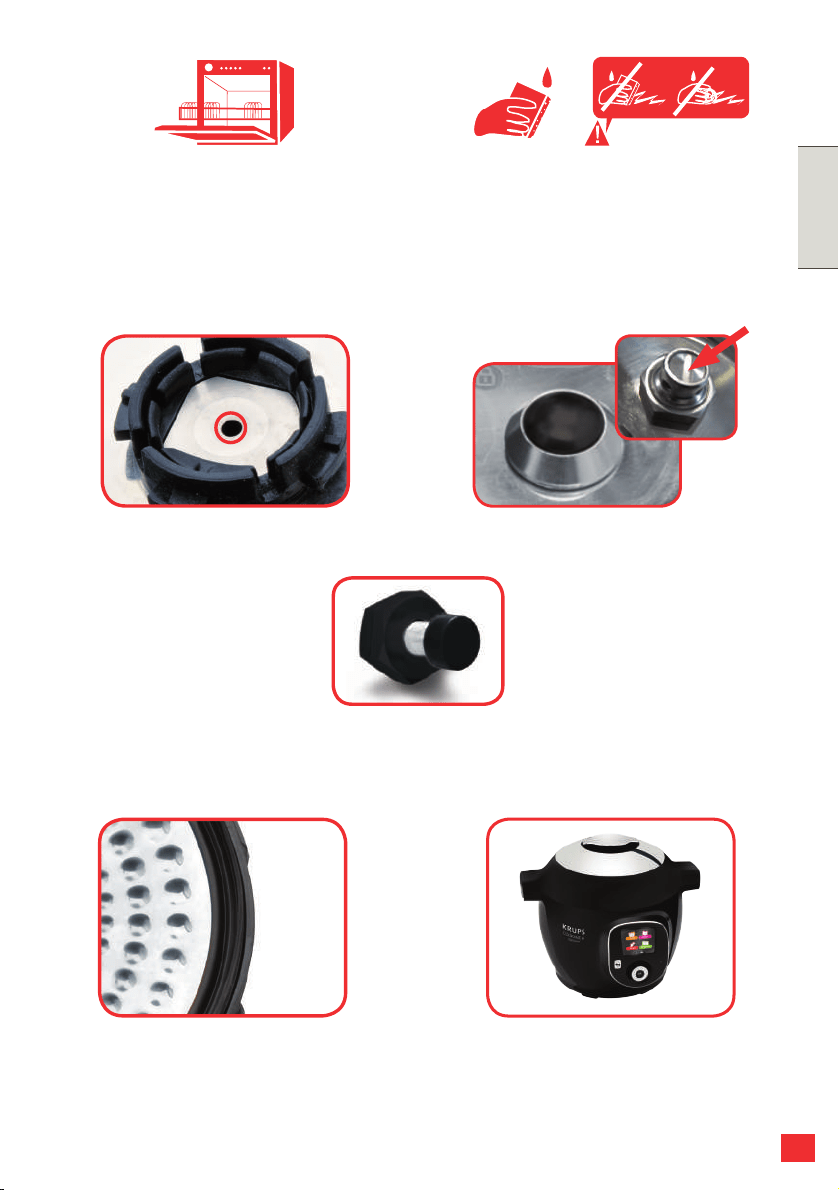
127
ENGLISHENGLISH
127
CLEANING BY HAND:
you can clean the metal lid using soapy hot
water. Firstly, remove the ball then clean
completely. Dry the ball and its support
using a soft cloth.
CLEANING IN THE DISHWASHER:
you can place the metal lid in the
dishwasher, without removing the valves.
After placing in the dishwasher, remove the
ball and blow in the pipe to check that it is
not blocked. Dry the ball and its support
carefully using a soft cloth.
Before reinstalling the ball, check that the
pipe is not blocked by blowing into it.
Press on the internal part of the safety
valve spring to check that it is not clogged.
Before removing the internal lid, clean the upper part of the cooking pot. Clean the inside
of the appliance’s metal lid using a damp sponge and check that the manometric rod is
properly positioned to ensure that it is not blocked.
Rinse under water and check the mobility of the safety pin.
Replace the watertight seal at least
every three years. This operation will be
performed in an Approved Service Centre.
Do not store the appliance with the lid
closed. Leave open or half open; this will
prevent unpleasant odours.

128128
Transport the appliance using the two side
handles. For greater safety, check that the
handle is in the closed position. For greater
safety, check that the lid is locked.
In the event of accidental immersion of
the appliance or if water is spilt directly
on the heating element when the pot is
not in position, take the appliance to an
Approved Service Centre.
Clean the outside of the appliance’s lid using a damp sponge. Clean the silencing valve at
the back of the lid.
Clean the upper part of the cooking pot
using a damp cloth. Clean the condensation
trap using a damp cloth. Rinse under water
and check that the manometric rod can
move around.
Clean the seal on the metal lid using a
damp cloth then rinse thoroughly. Do not
use sharp objects.

129
ENGLISH
Your pressure cooker contains several safety features:
Safety When Opening:
- If your pressure cooker is under pressure, the manometric rod is in the upper locking
position, which prevents the cover from opening. Never try to force open your
pressure cooker.
- It is especially important not to apply pressure to the manometric rod.
- Ensure that the internal pressure has fallen (additional steam escaping from the
safety valve) prior to trying to open the cover.
Two Overpressure Safety Features:
- First device: the safety valve releases the pressure – see chapter on Cleaning and
Maintenance, page 60 - 62.
- Second device : the joint let off steam on the back of the cover
If one of the overpressure safety features is triggered:
Turn off your appliance.
Let your pressure cooker completely cool down.
Open it.
Check and clean the safety valve, decompression ball and gasket. See chapter on
Cleaning and Maintenance.
If your product leaks or is no longer operational after having performed these checks
and cleaning, return it to a SEB authorised Service Centre.
Regulating your appliance:
The pressure can be regulated by switching the heating element on or off.
To minimise the effects of thermal inertia and improve regulation accuracy, the
decompression ball can be automatically triggered to briey release steam from time
to time.
SAFETYFEATURES

130
PROBLEMS POSSIBLE CAUSES SOLUTION
The lid does not close There are foreign bodies
between the pot and the
heating plate
Remove the pot, check that
the heating plate, central
element and under the pot
are clean. Also check that
the central element can
move around
The lid open handle is not
correctly positioned
Check that the open handle
is completely open
The metal lid and/or the
tightening screw are not
properly installed or fully
screwed
Check that you have
positioned all of the
elements of the metal lid
and that the screw is tight
The product does not
decompress
The ball cover is not in
place
Let the product cool
completely and then
remove the metal lid and
position correctly the ball
cover (xed in the lock
position)
The lid does not open once
the steam is released
The manometric rod is still
in the high position
After ensuring that no more
steam is released and that
the product is completely
cold, insert a pick into
the hole located between
the open handle and the
silencing valve. Be careful
of steam being released
once the stick is pushed
in. When no more steam
is released, try to open the
appliance
The appliance does not
become pressurised
Check that the seal, safety
valve and manometric rod
are clean
Clean your appliance by
following the instructions
provided in the instructions
Check that the lid is locked
and the marking is properly
aligned with the closed
padlock. Check that the
manometric rod can move
around and if it needs
cleaning
Check that the manometric
rod can move around and if
it needs cleaning
The decompression ball is
not positioned correctly or
dirty
Check that the ball is
correctly positioned and
that the cover is in the
locked position. Clean and
dry the ball and its support

131
ENGLISH
PROBLEMS POSSIBLE CAUSES SOLUTION
ERROR CODES Code 24: the pressure
decreases while pressure
cooking
Code 21 and 26: pressure
fails to raise
Add liquid to your recipe
(water, stock or a liquid
sauce) 50-100ml at a time
and re-start the recipe
Steam is released from
the sides of the lid during
cooking (leaks)
The seal of the metal lid
and/or the edges of the pot
are dirty
Clean the sides of the pot
and seal using a damp
cloth. Do not use any sharp
instruments
Wear, cuts and deformation
of the seal
The seal must be changed
every three years at most.
Take your appliance to an
Approved Service Centre
Pot edges damaged Take your appliance to an
approved service centre
The metal lid nut was not
screwed enough
Tighten the nut to the metal
lid center correctly
Water ows behind the
appliance
The condensation trap
is not in position or is
overowing
Make sure that the
condensation tank is
properly positioned behind
the appliance and that the
ow pipe is not blocked
The safety valves and/or
openings are obstructed
Verify that the tank is not
too full and that there are
no food that expand (see
Safety Instructions booklet)
The indicator is not ashing
or does not come on
The LED is no longer
working or the lid is not
completely locked
Check that the product
is completely locked.
Take your appliance to an
Approved Service Centre if
the problem continues
The control panel does not
light up
The appliance is not
connected or is on standby
Check that the power lead
is connected both to the
appliance and the mains.
Check that the appliance is
not on standby by pressing
the “OK” button
The appliance is damaged Take your appliance to an
Approved Service Centre
Condensation appears on
the indicator
There is condensation on
the lid
Let the appliance dry in
fresh air for a few hours

132
PROBLEMS POSSIBLE CAUSES SOLUTION
The metal lid can not be
removed, it is blocked
The metal lid ball cover was
not well positioned
Unscrew the nut in the
metal lid center, and then
press the prob into the
center of the nut. This
releases the lid and you can
access the ball cover. Make
sure it is well put back as
the ball
PROBLEMS POSSIBLE CAUSES SOLUTION
Key not recognised Key other than KRUPS Use only KRUPS USB keys
Active language different
from that of the key
Go back to the settings of
your appliance: select the
language of the key
Library memory full Delete a library
Nothing happens You are not in the right
menu
Go back to the main menu
Key or port damaged Contact customer service
TROUBLESHOOTING TIPS FOR USB MODELS

133
ENGLISH
KRUPS INTERNATIONAL LIMITED GUARANTEE
: www.krups.com
This product is repairable by KRUPS during and after the guarantee period.
Accessories, consumables and end-user replaceable parts can be purchased, if locally
available, as described on the KRUPS internet site www.krups.com
The Guarantee:
This product is guaranteed by KRUPS (company address and details included in the
country list of the KRUPS International Guarantee) against any manufacturing defect in
materials or workmanship for a period of 2 years starting from the initial date of purchase
or delivery date. The international manufacturer’s guarantee by KRUPS is an extra benet
which does not affect consumer’s Statutory Rights. The international manufacturer’s
guarantee covers all costs related to restoring the proven defective product so that it
conforms to its original specications, through the repair or replacement of any defective
part and the necessary labour. At KRUPS’s choice, a replacement product may be
provided instead of repairing a defective product. KRUPS’s sole obligation and your
exclusive resolution under this guarantee are limited to such repair or replacement.
Conditions & Exclusions:
The international KRUPS guarantee only applies within the guarantee period and for those
countries listed in the country list attached and is valid only on presentation of a proof of
purchase. The product can be taken directly in person to an authorised service centre or
must be adequately packaged and returned, by recorded delivery (or equivalent method
of postage), to a KRUPS authorised service centre. Full address details for each country’s
authorised service centres are listed on KRUPS website (www.krups.com) or by calling
the appropriate telephone number as set out in the country list to request the appropriate
postal address. KRUPS shall not be obliged to repair or replace any product which is not
accompanied by a valid proof of purchase.
This guarantee will not cover any damage which occurs as a result of misuse, negligence,
failure to follow KRUPS instructions, use on current or voltage other than as stamped on
the product, or a modication or unauthorised repair of the product. It also does not cover
normal wear and tear, maintenance or replacement of consumable parts, or the following:
–using the wrong type of water or consumable
–damage as a result of lightning or power surges
–scaling (any de-scaling must be carried out according to the instructions for use)
–damages or poor results due to wrong voltage or frequency professional or commercial
use
–ingress of water, dust or insects into the product (excluding appliances with features
specically designed for insects)
–mechanical damages, overloading
–accidents including re, ood, thunderbolt, etc
–damage to any glass or porcelain ware in the product
This guarantee does not apply to any product that has been tampered with, or to
damages incurred through improper use and care, faulty packaging by the owner or
mishandling by any carrier.
In order to offer the best possible after-sales service and constantly improve customer
satisfaction, KRUPS may send a satisfaction survey to all customers who have had their
product repaired or exchanged in a KRUPS authorised service centre.
The international KRUPS guarantee applies only for products purchased in one of the
countries listed, and used for domestic purposes only in one of the countries listed on the
Country List. Where a product purchased in one listed country and then used in another
listed country:

134
a) The international KRUPS guarantee does not apply in case of non conformity of the
purchased product with the local standards, such as voltage, frequency, power plugs,
or other local technical specications
b) The repair process for products purchased outside the country of use may require a
longer time if the product is not locally sold by KRUPS
c) In cases where the product is not repairable in the new country, the international
KRUPS guarantee is limited to a replacement by a similar product or an alternative
product at similar cost, where possible.
Consumer Statutory Rights:
This international KRUPS guarantee does not affect the statutory rights a consumer may
have or those rights that cannot be excluded or limited, nor rights against the retailer from
which the consumer purchased the product. This guarantee gives a consumer specic
legal rights, and the consumer may also have other legal rights which vary from State
to State or Country to Country. The consumer may assert any such rights at his sole
discretion.
For Australia only: Our goods come with guarantees that cannot be excluded under the
Australian Consumer Law. You are entitled to a replacement or refund for a major failure
and compensation for any other reasonably foreseeable loss or damage. You are also
entitled to have the goods repaired or replaced if the goods fail to be of acceptable quality
and the failure does not amount to a major failure.
*** Please keep this document for your reference should you wish to make a claim under
the guarantee

NC00154249
DE ................. P. 4 – 36
FR ................. P. 37 – 68
IT ................... P. 69 – 101
EN ................. P. 102 – 134