User Manual
Carton Contents:
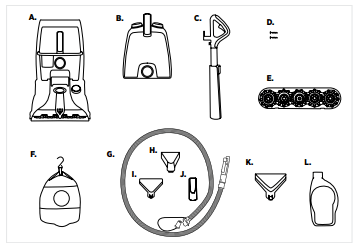
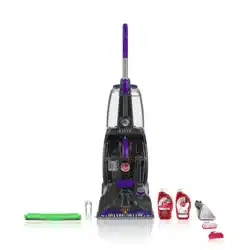
CARTON CONTENTS
A. Carpet Cleaner
B. Water/Solution Tank
C. Upper Handle
D. Handle Screws
E. SpinScrub® Brush
Assembly
F. Mesh Tool Storage Bag
G. Accessory Hose
H. Upholstery Tool*
I. Stair Tool*
J. Crevice Tool*
K. 2-in-1 Antimicrobial Tool*
L. Sample Bottle of Cleaning Solution
* Tools vary per model.
Accessories not included with your model may be purchased separately by visiting Hoover.com
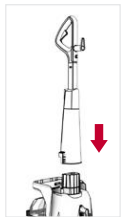
How to assemble your Power Scrub Elite™:
1 Insert the handle into the base.
2 Insert both screws and tighten with a screwdriver.
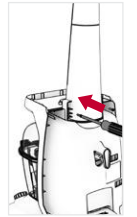
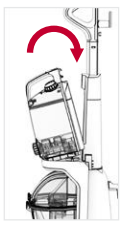
3 Angle the Solution/Clean Water tank above the Dirty Water Recovery Tank and click it into place.
4 Wrap the power cord around the cord hooks for convenient storage.
Features:
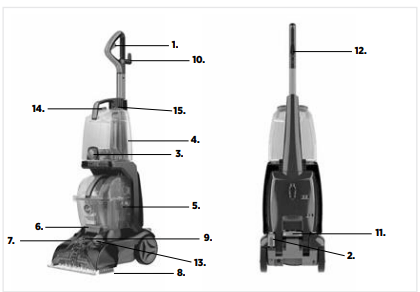
- Water & Solution Trigger:
- Press to release
- ON/OFF Pedal
- Wash/Rinse Mode Selector
- Clean Water/Solution Tank
- Dirty Water Recovery Tank Latch
- Solution Connection Port for Hose
- Nozzle
- Hose Connection Port
- Cord Storage Hook
- Handle Release Pedal
- Cord Clip
- Cleaning Mode Dial
- Clean Water Fill Port
- Solution Fill Port
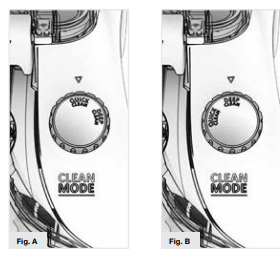
Cleaning Modes:
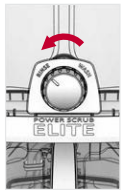
1. Turn the cleaning mode selection dial on the base of the unit to choose your preferred cleaning mode. Align arrow to preferred mode.
a. Quick Clean Mode: Best for a quick, surface clean because carpets dry in less than 1 hour.
b. Deep Clean Mode: Best overall results for a thorough, deep clean.
Before You Begin Cleaning
Vacuum carpet and upholstery thoroughly with a Hoover vacuum before use.
Don’t use the carpet cleaner as a traditonal vacuum cleaner.
Use your Hoover carpet cleaner only if upholstery fabric is marked with a “W” (for “wet” clean) or “S/W” (for “solvent/dry” or “wet” clean). Don’t clean fabric marked “S” (“solvent/dry” clean only).
Test for colorfastness in a small, hidden area. Gently rub surface with a dampened white cloth. Wait ten minutes and check for color removal or bleed with a white paper towel.
Move furniture out of area to be cleaned. Place aluminum foil or wax paper under legs of furniture too heavy to move to prevent wood finishes from staining carpet. Pin up furniture skirts and draperies.
Pretreat spots and heavy traffic areas with a Hoover® Cleaning Solution*. See the “Cleaning Solutions” section.
*Available at additional cost if not included with your model.
Pretreating:
For best results, pretreat stains with a Hoover spot treatment (see Hoover Cleaning Solution Guide, pg. 18) to help loosen and remove even the most stubborn stains.
NOTE: To prevent staining, use plastic or aluminum foil to protect wood or metal surfaces from possible water spray.
NOTE: To avoid damage to wood floors underneath area rugs or carpet, place waterproof material (ex: plastic) underneath them before cleaning
Getting started your Power Scrub Elite™:
1 Press down on top latch of clean water tank and pull to remove.
2 Twist off the clean water cap on the top of the clean water tank. Add warm water to fill line and replace cap.– DO NOT BOIL OR MICROWAVE WATER (Do not fill with water above 140˚ F (60˚ C)
3 Twist off the solution cap on the top of the clean water tank and pour cleaning solution into tank. Replace cap.
4 Angle the Solution/ Clean Water tank back on the base and click it into place.
Cord:
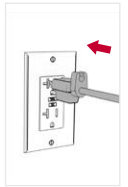
Unwrap the power cord and plug unit in an electrical outlet
How to empty:
1 Turn the cleaner off and unplug from electrical outlet.
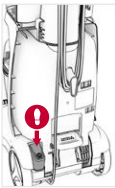
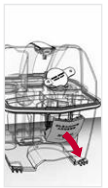
2 Release Dirty Water Tank Latch
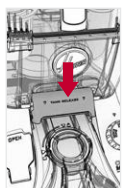
3 Grab the Dirty Water Tank handle and remove from carpet cleaner base.
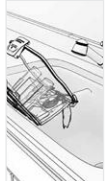
4 Place on a flat surface and unlatch Dirty Water Tank lid located below the Quick Spout Pour cap.
5 Empty tank, rinse and allow to air dry.
Using your Power Scrub Elite™:
1 Choose cleaning mode by turning the dial on the base to “Quick Clean” or “Deep Clean” mode.

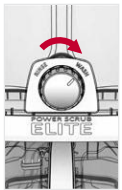
2 Ensure Wash/Rinse dial on the Clean Water Tank is turned to “Wash”
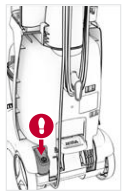
3 Plug into electrical outlet. Step on the Power Pedal to turn ON.
4 Step on the Handle Release Pedal to recline the unit for cleaning position.
5 Squeeze trigger to apply water and cleaning solution. Slowly push forward then backwards while squeezing the trigger.
6 Release the trigger and slowly push forward. Then slowly pull back toward you without squeezing the trigger. Continue pushing forward and back without squeezing the trigger until little water is visible passing through the nozzle.
7 For Best Results, Hoover recommends rinsing the carpet with clean water only. This will remove residual carpet cleaning solution from your carpets. To Rinse with clean water only, set the wash/ rinse dial to Rinse and then repeat steps 5 and 6.
How to Attach Hose:
1 Attach hose to the unit by opening the Hose Connection Port on the nozzle. Insert hose end, aligning the indicator with the unlock arrows.
2 Rotate clockwise to lock position.
3 Hold open the Hose Solution Port door.
4 Plug the Hose Solution Tube connector firmly into the Hose Solution Port.
How to Remove Hose:
1 Disconnect Hose Solution Tube from Hose Solution Port by pulling up firmly. Do not pull on tube, this may cause damage. Port door will automatically close.
2 Rotate hose end counterclockwise from the locked position to the unlocked position and remove by pulling out.
3 Snap the Hose Port Door on the Nozzle back into place. Make sure to snap it firmly back into place to ensure proper suction.
How to Attach Tools:
1 To ensure maximum performance and to protect your carpet, be sure to place the handle in the upright position while using the hose. Placing the handle in the upright position shuts off the SpinScrub® brushes.
2 Connect tool to hose by sliding it onto the connector until it securely locks into place.
3 Using your thumb, push forward and up on the latch to remove tool.
After Using Tools:
1 Drain hose by removing the solution tank and turning the cleaner ON. Aim hose in a downward angle and press trigger to remove excess water.
2 Turn OFF cleaner. Disconnect the hose and solution tube from cleaner.
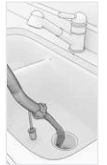
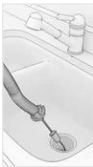
3 Drain solution tube by placing the round end in the sink and placing the tool in sink. Press the trigger to release air and fluid.
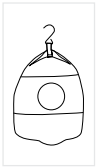
4 Replace hose and tools in the Mesh Tool Storage Bag.
Cleaning Carpeted Stairs
1. Read “Before you Begin Cleaning” instruction
2. Attached hose and solution tube as instructed
3. Place handle in upright position. SpinScrub® brushes will not rotate while handle is in upright position.
4. Fill Clean Water Tank according to instructions.
5. Fill Solution Tank with HOOVER solution according to instructions.
6. Attach tool to end of hose.
7. Dry hands and plug cleaner into a properly grounded outlet.
8. Set Wash/Rinse Selection to WASH. Turn cleaner ON.
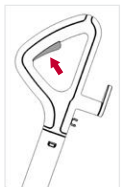
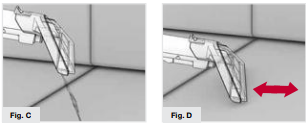
9. Pre-spray the carpeted stair by holding the tool about one inch above the carpet and push it forward while pressing the trigger (Fig. C).
10. Position tool against the riser and slightly press it into carpet pile. Press the trigger and pull the tool slowly over the carpet. Release trigger at end of stroke.
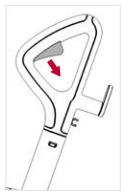
11. Lift tool, and position it against riser. Pull tool slowly over carpet without pressing trigger (Fig. D).
12. Overlap strokes by 1/2 inch to help prevent streaking.
13. It is best to alternate wet and dry strokes as described in steps 9-12. End with more dry strokes to aid in faster drying of carpet.
14. To avoid saturating carpet, do not use more than 4 wet strokes over any one area. Always end with dry strokes.
15. If additional cleaning is necessary, wait until the carpet is completely dry before using the tool again.
16. Empty Dirty Water Tank when the motor sound becomes higher pitched and there is a loss in suction. You will also see the float rise and shut off suction at the same time.
17. When finished cleaning, follow “After Cleaning” and “After Using Tool” instructions.
Maintenance:
NOZZLE: HOW TO CLEAN AND STOR
- To prevent possible leaking, remove and empty Clean Water Tank and Dirty Water Tank.
- With handle in upright position, tilt carpet cleaner back so that handle rests on the floor.
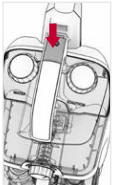
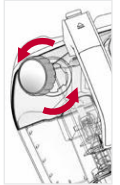
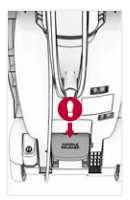
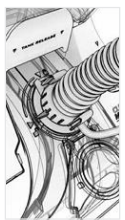
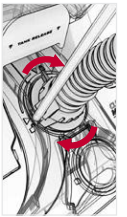
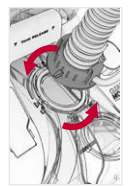
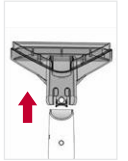
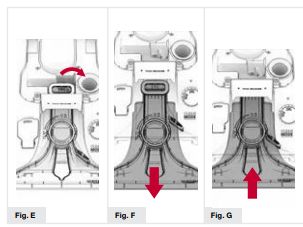
- Rotate Nozzle latch to unlock position (Fig. E).
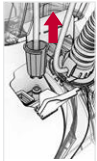
- Pull up on Nozzle slightly to unsnap Nozzle from foot of carpet cleaner.
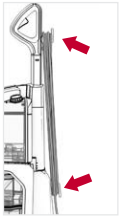
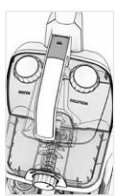
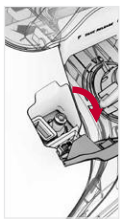
- Pull Nozzle forward to remove from carpet cleaner. Be sure the Nozzle does not get caught on Recovery Tank Latch (Fig. F).
- Rinse debris from Nozzle.
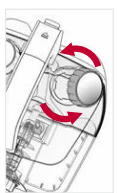
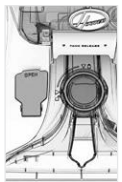
- Position Nozzle onto foot, making sure to align the tabs at the bottom of the Nozzle with the notches on the foot (Fig. G).
- Snap Nozzle to foot.
- Rotate Nozzle latch to lock position.
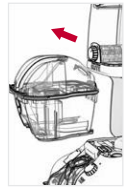
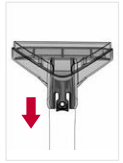
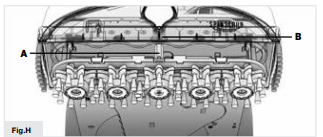
BRUSHES: HOW TO CHANGE AND CLEAN
How to Remove
- To prevent possible leaking, remove Clean Water Tank and Dirty Water Tank.
- With handle in upright position, tilt cleaner back until handle rests on the floor.
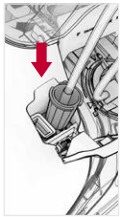
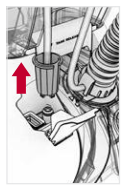
- Grab brush assembly and pull firmly (Fig. H).
- The brushes can be cleaned under running water.
How to Replace
- Align black posts on both ends of brush assembly with the slots on the bottom of the cleaner.
- Make sure that the hexagonal post (A) also aligns with the hexagonal hole (B). Turn brushes slightly until post fits easily into hole.
- Press brush assembly firmly to snap into place.
Storage
Before storing: Empty Clean Water Tank and let air dry. Replace on cleaner. Empty Dirty Water Tank, rinse tank and lid thoroughly with clean water and let air dry.
Allow brushes and underside of carpet cleaner to air dry thoroughly before storing carpet cleaner on a carpeted or wood surface.
Lubrication
The motor is equipped with bearings that contain sufficient lubrication for the life of the motor.
The addition of lubricant could cause damage. Therefore, do not add lubricant to motor bearings.
Hoover® Cleaning Solution Guide
Use only Hoover cleaning solutions to prevent potential harm to your carpet cleaner and keep your warranty.
For best results, use your Carpet Cleaner + Spot Treatment + Solutions.
Hoover has a full line of Detergents and Spot Treatments to complement your Hoover carpet cleaner and the specific condition of your carpet. To prevent project interruption, keep Detergent on hand and store with your carpet cleaner. Spot Treatment may be used as a pretreatment immediately before you clean your carpets, or as an independent treatment between cleaning your carpets.
EXPERT CARPET SOLUTIONS: PROFESSIONAL GRADE
EXPERT CLEAN™ CARPET WASHER DETERGENT - Powerful, professional strength cleaner lifts dirt and removes allergens for our deepest, extreme clean

EXPERT CLEAN™ SPOT TREATMENT GEL - Professional grade targeted gel removes tough stains like ground-in dirt, allergens, chocolate and wine.

EXPERT PET™ CARPET WASHER DETERGENT - Powerful, professional strength enzymes break down biological stains, dirt and odor for a truly deep clean

EXPERT PET™ SPOT TREATMENT SPRAY - Professional grade targeted enzyme spray removes tough stains like dirt, oils, urine and residual odor.

PLUS CARPET SOLUTIONS
CLEAN PLUS™ CARPET WASHER DETERGENT - Powerful cleaner for everyday dirt and grime.

CLEAN PLUS™ SPOT SPRAY - Powerful spot spray for everyday dirt and grime.

PET PLUS™ CARPET WASHER DETERGENT - Powerful cleaner enhanced with enzymes to tackle pet messes and eliminate odor.

PET PLUS™ SPOT SPRAY - Powerful spot spray enhanced with enzymes to tackle pet messes and eliminate odor

PRO PLUS™ CARPET WASHER DETERGENT - Professional strength carpet & upholstery solution removes stubborn stains and odors

HARD FLOOR SOLUTIONS
MULTI-FLOOR PLUS™ HARD FLOOR SOLUTION - Powerful hard floor cleaning solution removes everyday dirt and grime.

TILE & GROUT PLUS™ HARD FLOOR SOLUTION - Powerful hard floor cleaning solution cleans and revitalizes tile and grout surfaces

STEAM PLUS™ HARD FLOOR SOLUTION - Powerful hard floor cleaning solution combines with steam to safely wash hard floors.

Troubleshooting:
Any other servicing should be done by an authorized service representative.
USE TROUBLESHOOTING GUIDE AS A FIRST STEP TO RESOLVE ANY PROBLEMS YOU MAY BE EXPERIENCING.
If appliance is not working as it should, has been dropped, damaged, left outdoors, or dropped into water, call Customer Service at 1-800-944-9200 for further instruction before continuing use
Cleaner won’t run
1. Not firmly plugged in
2. No voltage in wall plug
- Check fuse or breaker in home.
3. Blown fuse or tripped breaker
- Replace fuse or reset breaker in home.
4. Fuse in cleaner blown
5. On/Off pedal not depressed
Low suction
1. Dirty Water Tank full/automatic shut off engaged
- Remove and empty Dirty Water Tank. See "How to Empty"
2. Blockage in tool on end of hose
- Remove tool and clear blockage.
3. Dirty Water Lid not on correctly
- Make sure lid is on securely. See “How to Clean”
4. Dirty Water Tank Debris Filter clogged
5. Blockage in nozzle
6. Recovery Tank not properly secured
- Replace Recovery Tank and secure recovery tank latch.
Hose Nozzle stops spraying liquid during use
1. Clean Water Tank or Detergent Container is empty
- Turn off Cleaner and fill Clean Water tank & Detergent Container.
2. Loose connection to solution port on foot of cleaner
- Check for secure connection to solution port on foot of Cleaner.
Hose nozzle will not spray after filling the Clean Water Tank or Detergent Container
1. Air is trapped in the hose & pump
- Turn on the Cleaner. If hose does not spray, prime the pump by lowering the hose down to the floor and hold the trigger for up to one minute.
2. Hold trigger to floor and squeeze trigger
- Aim downward & squeeze trigger.
Hose willl not spray after priming pump
1. Pump is defective
- Call for service: 1-800-944-9200.
2. Not connected properly
Clean water won’t dispense
1. Clean Water Tank or Solution Tank not firmly in place
- Make sure tank is securely locked in position.
2. Clean Water Tank or Solution Tank empty
- Refill container according to cleaning instructions.
Solution won’t dispense
1. Unit is not moving in forward direction
- Ensure unit is moving in forward direction.
Brushes won’t rotate during floor cleaning
1. Please check the screen on the front of the unit behind the nozzle, the filter may be dirty
- Shut off unit and clean filter in upright position. SpinScrub® will not rotate in upright position