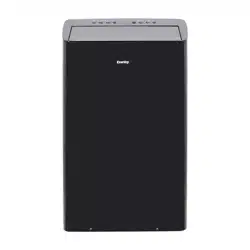
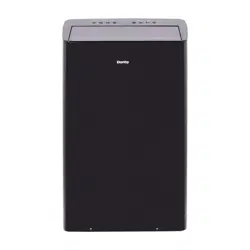
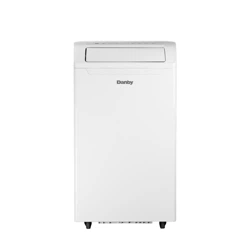
INSTALLATION INSTRUCTIONS
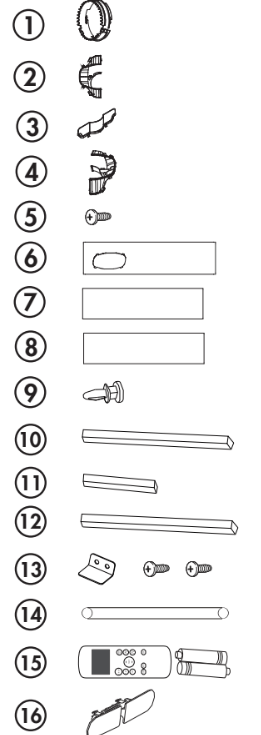
ACCESSORIES
- Air outlet adapter
- Exhaust adapter module A
- Exhaust adapter module B
- Exhaust adapter module C
- Exhaust adapter screw
- Window slider A
- Window slider B
- Window slider C
- Window slider bolts (x4)
- Foam seal A (adhesive) (x2)
- Foam seal B (adhesive) (x2)
- Foam seal C (non-adhesive) (x2)
- Security bracket and 2 screws
- Drain hose
- Remote control and batteries
- Power cord buckle
REQUIRED TOOLS
- Medium sized Phillips screwdriver
- Tape measure or ruler
- Knife or scissors
- Saw (in the event that the window sliders need to be cut to size)
IMPORTANT WARNING: Do not leave this appliance unattended in a space where people or animals who cannot react to a malfunction are located. A malfunction such as the exhaust hose becoming dislocated, can cause extreme overheating or death in an enclosed, unattended space.
WINDOW KIT ASSEMBLY
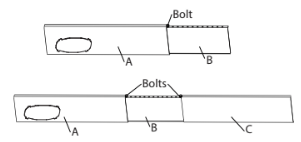
Step one: prepare the window sliders
- Measure the window opening where the window kit will be installed.
- Assemble as many sliders as necessary to fi t the window. If the window opening is less than the minimum length of a single slider, use the slider that has the hole in it and cut it to the correct length. Make sure not to cut the end that has the hole as this is necessary to attach the exhaust hose adapter.
- Use the window slider bolts to secure the window sliders at the correct length.
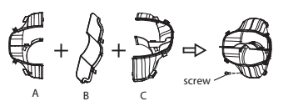
Step two: prepare the exhaust adapter (for optional sliding window applications)
Assemble the exhaust adapter module for sliding windows using the exhaust adapter screw as shown. The window slider is eccentric so the exhaust adapter must be installed away from the wall.
EXHAUST HOSE
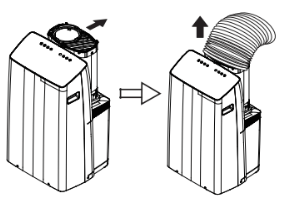
Pull out the hose
- Rotate the exhaust hose gently backwards.
- Pull out the exhaust hose.
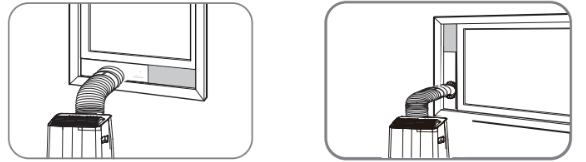
INSTALLING THE WINDOW KIT
The instructions below can be used for a hung window application (shown on the left) or an optional sliding window application (shown on the right).
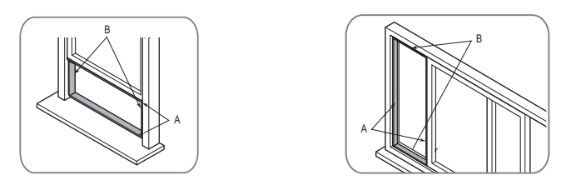
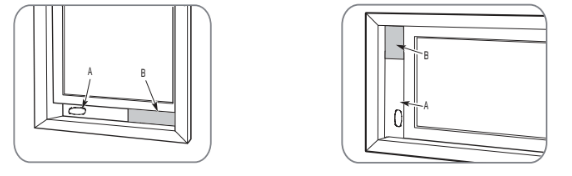
1. Cut adhesive foam seals A and B to the correct lengths and attach them to the window frame as shown.
2. Insert the window slider kit into the window opening and close the window the secure it in place.
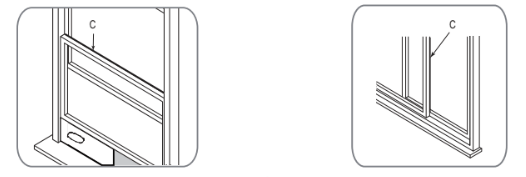
3. Cut the non-adhesive foam seal C to match the width or height of the window and insert it between the panes of glass as shown to prevent outside air from entering the window.
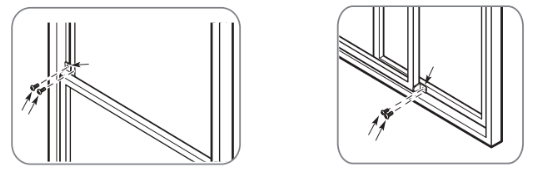
4. If desired, install the security bracket with 2 screws as shown.
5. For a hung window, attach the air outlet adapter onto the exhaust hose and rotate it 90° to secure it in place. For a sliding window, attach the exhaust adapter onto the exhaust hose.
6. For a hung window, attach the air outlet adapter onto the window slider kit. For a sliding window, attach the exhaust adapter onto the window slider kit.
OPERATING INSTRUCTIONS
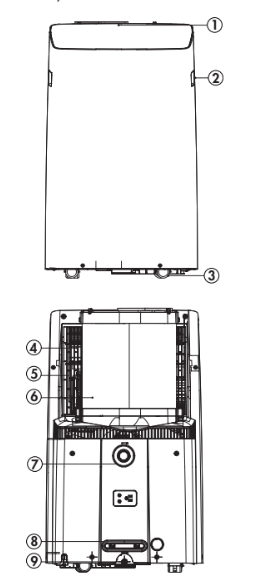
FEATURES
- Control panel
- Handle (both sides)
- Casters
- Upper air fi lter
- Upper air intake
- Exhaust hose
- Continuous drain
- Power cord storage band
- Bottom tray drain
LOCATION
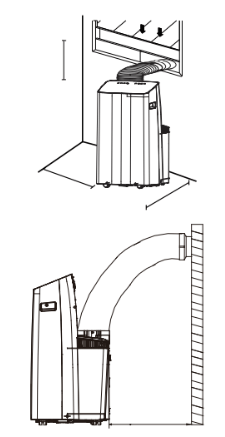
Place the air conditioner on a smooth, level fl oor that is strong enough to support it and all included accessories.
Make sure the appliance is level to minimize noise and vibration.
The appliance must be installed near a grounded receptacle and the overfl ow drain outlet on the rear of the appliance must be accessible.
Do not cover air inlets or outlets or the remote control receiver on the control panel.
The appliance requires 25 cm (10 inches) of space from the nearest wall and the back for proper operation. The louver blade should be 50 cm (20 inches) away from obstacles.
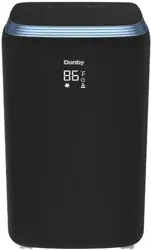
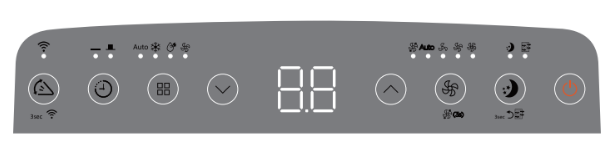
CONTROL PANEL
1. Swing and wireless connect button:
- Press to start the auto swing feature.
- Press and hold for three seconds to start using the wireless connect feature.
2. Timer button: Press to set the automatic timer. Light will indicate whether a timer is set.
3. Mode button: Press to select the desired mode. Light will indicate current mode.
4. Temperature control buttons:
- Press to modify the set temperature in 1° increments in a range of 16 - 30°C (60 - 86°F).
- Press to modify the timer setting in 0.5 hour increments up to 10 hours and then in 1 hour increments up to 24 hours.
- Press and hold both temperature control buttons for three seconds to change the temperature display from °C to °F.
5. LED display:
- Shows the set temperature in °C or °F.
- Shows the timer settings.
- Shows error codes.
- When on fan mode, shows the room temperature.
8. Fan button:
- Press to select fan speed. Light will indicate current speed.
- Press and hold for 3 seconds to turn the continuous fan on or off.
7. Sleep and filter button:
- Press to start the sleep feature.
- The filter light will illuminate after 250 hours of use as a reminder to clean the fi lter; to reset the fi lter after cleaning, press and hold the sleep button for three seconds.
8. Power button: Press to turn the appliance on or off.
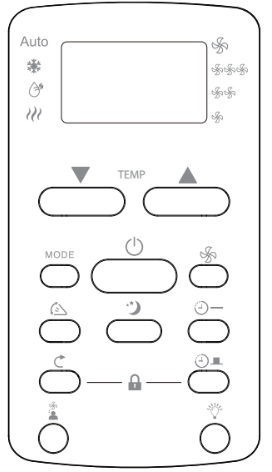
REMOTE CONTROL
1. Power button: Press to turn the appliance on or off.
2. Mode button: Press to select the desired mode.
3. Fan button: Press to select fan speed.
4. Sleep button: Press to start the sleep feature.
5. Swing button: Press to start the auto swing feature. When auto swing is activated, press again to stop the louver at the desired angle.
6. Follow me button: Press to activate the follow me feature.
7. LED button: Press to turn the LED display on or off.
8. Timer off button: Press to set the automatic off timer.
9. Timer on button: Press to set the automatic on timer.
10. Shortcut button: Press to set and activate the short cut function.
11. Temperature control buttons:
- Used to set the temperature.
- Press and hold both temperature control buttons for 3 seconds to change the temperature display from °C to °F.
12. LED display:
- Shows the set temperature in °C or °F or the auto-timer settings.
- Shows whether the follow me function is active.
SHORTCUT FUNCTION
The shortcut function can be used to save a favorite setting.
To set a favorite, set the appliance to the desired temperature and fan speed. Press and hold the shortcut button for 2 seconds. Press the shortcut button at any point in future to return to the favorite setting.
If no favorite is set, pressing the shortcut button will cause the appliance to run in auto mode at 29°C (79°F), with fan speed set to auto.
The shortcut function is only available on the remote control.
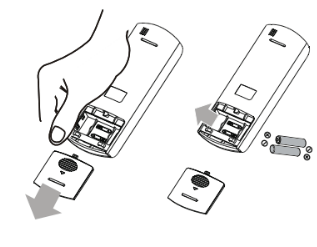
REPLACING THE REMOTE BATTERIES
This air conditioner comes with two AAA batteries. Place the batteries in the remote control before use.
- Slide the back cover from the remote downward to expose the battery compartment.
- Insert the batteries, ensure to match the (+) and symbols on the ends of the batteries with the symbols inside the battery compartment.
- Slide the battery cover back into place.
Notes:
- The air conditioner will not respond if curtains, doors or other materials block the signal from the remote control to the unit.
- Prevent any liquid from contact with the remote control. Do not expose the remote control to direct sunlight or heat.
- If the infrared signal receiver on the indoor unit is exposed to direct sunlight, the air conditioner may not function properly. Use curtains to prevent the sunlight from falling on the receiver.
- Do not mix old and new batteries or batteries of different types.
- Do not leave the batteries in the remote control if it is not going to be used for more than 2 months.
This equipment has been tested and found to comply with the limits for a Class B digital device, pursuant to Part 15 of the FCC Rules. These limits are designed to provide reasonable protection against harmful interference in a residential installation. This equipment generates, uses and can radiate radio frequency energy and, if not installed and used in accordance with the instructions, may cause harmful interference to radio communications. However, there is no guarantee that interference will not occur in a particular installation.
If this equipment does cause harmful interference to radio or television reception, which can be determined by turning the equipment off and on, the user is encouraged to try to correct the interference by one or more of the following measures:
- Reorient or relocate the receiving antenna
- Increase the separation between the equipment and receiver
- Connect the equipment into an outlet on a circuit different from that to which the receiver is connected
- Consult the dealer or an experienced radio/TV technician for help
Changes or modifications not approved by the party responsible for FCC compliance could void the user’s authority to operate the equipment. This appliance complies with Part 15 of the FCC Rules.
Operation is subject to the following conditions:
- This device may not cause harmful interference.
- This device must accept any interference received, including interference that may cause undesired operation.
This device complies with Canadian CAN ICES-3 (B) / NMB-3 (B)
IMPORTANT: Do not dispose of batteries as unsorted municipal waste. Refer to local laws for proper disposal of batteries.
OPERATING MODES
Cool Mode
Choose cool mode to set the cooling function.
- Use the temperature control buttons to choose the desired temperature.
- Use the fan button to choose the desired fan speed.
- The temperature can be set within a range of 16 - 30°C (60 - 86°F).
- The exhaust hose should be installed.
Dry Mode
Choose dry mode to remove excess moisture from the air. Water will condense inside the appliance and drain out the back.
- The humidity level and fan speed will be automatically set and cannot be modifi ed in dry mode.
- The exhaust hose does not need to be connected to the window kit.
- It may be necessary to install the continuous drain hose during dry mode to remove excess water.
OPERATING MODES
Fan Mode
Fan mode can be used to run the fan without engaging the cooling or dehumidifying functions.
- Use the fan button to choose the desired fan speed.
- The exhaust hose does not need to be connected to the window kit.
- In cooling or dry mode, press and hold the fan button for 3 seconds to set the fan to run continuously. Press and hold the fan button for 3 seconds to disengage the continuous fan. During normal operation the fan will turn on and off with the compressor.
Auto Mode
Auto mode is a pre-set factory program that automatically defi nes the mode and fan speed based on the set temperature and the ambient temperature. The exhaust hose should be installed during auto mode.
TIMER
Auto Off
- When the air conditioner is turned on, press the timer button to activate the auto off timer.
- Press the temperature control buttons to change the set time in 0.5 hour increments up to 10 hours and then in 1 hour increments up to 24 hours.
Auto On
- When the air conditioner is turned off, press the timer button to activate the auto on timer.
- Press the temperature control buttons to change the set time in 0.5 hour increments up to 10 hours and then in 1 hour increments up to 24 hours.
The timer will not cycle the air conditioner on and off indefi nitely. The auto on and auto off timers will function one time and then the air conditioner will return to regular functioning.
When setting the timer, the display will revert back to showing the temperature if there is no input within 5 seconds.
Turn the air conditioner off, set the timer to 0 or press and hold the timer button for 3 seconds to turn off the timer.
SLEEP
The sleep feature can be used to conserve energy during sleeping hours. This feature can be used during cool and heat mode. It is not available in dry or fan mode.
The temperature will increase by 1 degree every minutes for 1 hour. The unit will hold the new temperature for 7 hours.
The sleep feature can be canceled at any time by pressing the sleep button.
FOLLOW ME
There is a temperature sensor built into the remote control that will continuously collect the current room temperature. Keep the remote control with you and the appliance will automatically adjust the set temperature based on the current temperature where you are located to reach the most comfortable condition and temperature.
Press the follow me button to activate the follow me function. The remote will send a signal to the air conditioner every 3 minutes, so long as you remain within range of the appliance.
If the appliance does not receive a signal from the remote during any 7 minute interval, it will beep to indicate that the follow me mode has ended.
The maximum distance for the follow me feature is 8 meters (26 feet). This feature is available in cool and auto modes.
AUTO RESTART
If the unit loses power unexpectedly, it will resume the previous settings once power is restored.
When the unit has been turned off, it cannot be restarted for 3 minutes to protect the internal components.
LOUVER ADJUSTMENT
When the unit is turned on, the louver opens fully.
Press the swing button to being the louver movement. The louver will swing up and down automatically. Press the swing button again to stop the automatic louver swing.
Please do not adjust the louver manually.
WIRELESS CONNECTION
This appliance can be controlled with a wireless application on your wireless device.
Visit web danby support apps to download the application and learn about its operation.
WATER DRAINAGE
When the internal drain pan becomes full the appliance will beep 8 times and the digital display will show error code P1. The air conditioning or dehumidifying action will stop but the fan may continue to operate.
Ensure that the appliance is turned off and unplugged and that it is close to a fl oor drain before setting up any drain option.
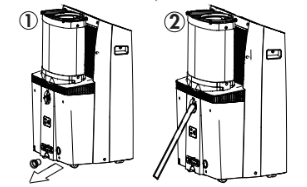
1. Drain Plug
Remove the drain plug and allow the water to completely drain. Replace the bottom drain plug, pressing fi rmly to ensure a tight fi t and no leaks.
2. Continuous Drain
During dry mode, install continuous drain option so that the appliance will automatically drain collected water.
Remove the upper drain plug and attach the drain hose that was provided with the appliance. Place the open end of the drain hose over the receptacle that the appliance will drain into; this could be a basement fl oor drain, a sink or similar.
Ensure that there are no kinks or bends in the drain hose and that it goes straight down toward the floor. The continuous drain is activated by gravity only. If the hose is not positioned directly downwards, water will not drain correctly.
CARE & MAINTENANCE
CLEANING
- Unplug the appliance before cleaning or servicing.
- Clean the cabinet with a lukewarm damp cloth and neutral detergent. Dry the cabinet with a lint-free dry cloth.
- Do not use gasoline, paint thinner or other chemicals to clean the appliance.
- Do not wash the appliance directly under a tap or using a hose. It may cause electrical damage.
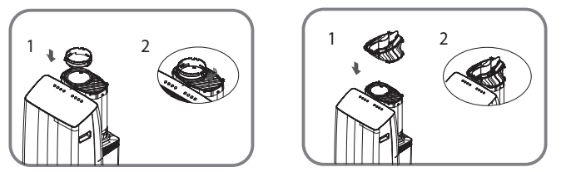
AIR FILTERS
The air fi lter should be cleaned every two weeks to ensure effi cient performance. In households with animals, the air fi lters may need to be cleaned more often and the external grills may need to be wiped to prevent blocked air fl ow.
To access the filter:
- Hold the exhaust hose, push it backward slightly and then lift it up.
- Remove the filter.

LONG-TERM STORAGE
- Drain all water from the appliance.
- Run the appliance on Fan mode for half a day in a warm room to dry the inside of the appliance and prevent mold formation.
- Turn off the appliance and unplug it, wrap the cord and bundle it with tape.
- Remove the batteries from the remote control.
- Clean the air fi lters and reinstall them.
- Store the appliance in a cool, dark place. Prolonged exposure to direct sunlight or extreme heat can shorten the lifespan of the appliance.
DISPOSAL
This appliance should not be treated as regular household waste. Check for local regulatory compliance regarding the approved and safe disposal of this appliance.
ERROR CODES
P1 - water tray is full - attach drain hose and drain excess water
If any other error code appears on the display, unplug the air conditioner and allow it to sit undisturbed for 5 minutes. If the error code persists when the unit is plugged back in, please contact consumer service.
FREQUENTLY ASKED QUESTIONS
Can I leave my AC in place through the winter?
This is not recommended.
What are the standard wattage and amps used?
Information pertaining to watts and amps can be found on the rating plate located on the side of the unit.
When should I use the exhaust hose?
The exhaust hose should be used in cool and auto modes. It is not required in fan and dry modes.
Can I use an extension cord?
No, an extension cord may not be used.
Can I extend the length of the exhaust hose?
No. The unit was designed with the length of the hose in mind and has only been tested under those conditions. Instead use an additional fan to blow the cool air to other locations.
When should I use the drain hose?
The drain hose should be used in dry mode or if using the continuous drain.
Where do I drain water from?
The water drains from the drainage port. If you are not using the continuous drain, the internal pan drains from the bottom outlet.
Odors
Odor is caused by the formation of mold or mildew on internal surfaces. This can happen when there is poor air circulation, a dirty filter or the air conditioner was not used for a period of time.
- Ensure the filter is clean.
- Run the unit on fan mode to remove any internal moisture.
- Check for any blockages in the drain lines and ensure there are no obstructions.
Please give your unit a hard reboot. Unplug it and plug it back in after 15-20 minutes. This allows the unit to warm and drain if there is any frost stopping draining and go back to factory settings For odor in a unit, we suggest using an algaecide tablet. You first need to turn the unit off, remove the lower grill and filter from the grill at the base of the unit, and then place the tablet in base.
TROUBLESHOOTING
Appliance will not operate
- Plug is not fully inserted into the wall outlet
- Blown fuse or circuit breaker
Insufficient cooling
- Air filter is dirty
- Blocked air flow
- Appliance size is too small for application
Noise
- The ground is not level
- The air fi lter is dirty or blocked
- Gurgling sounds are normal, this is coolant moving inside the appliance
Odors
- Formation of mold or mildew on internal wet surfaces
- Place an algaecide tablet in the base pan; ensure the appliance is unplugged, remove the upper grille and filter, place the tablet in the middle water tray and replace the grille and fi lter