
SAVE THIS MANUAL FOR REFERENCE
Our Customer Service staff is ready to provide assistance.
In the case of a damaged or missing part, most replacement parts ship from our
facility.
For immediate help with assembly, or for additional product information, visit
www.YardForceUSA.com or email [email protected]
You will need this manual for safety
instructions, operating procedures, and Warranty.
The original sales receipt is required for warranty service.
YF22-HWT
GAS-POWERED WALK-BEHIND
TRIMMER
OPERATOR’S MANUAL

2
Hotline: 1-866-902-9690
YF22-HWT Original Instructions
TABLE OF CONTENTS
Safety instructions ............................................................................................................................................ 3
Parts list ........................................................................................................................................................... 6
Intended use .................................................................................................................................................... 7
Technical specications ................................................................................................................................... 8
Assembly ......................................................................................................................................................... 8
Operation ....................................................................................................................................................... 13
Maintenance and storage ............................................................................................................................... 16
Trouble shooting ............................................................................................................................................. 21
Warranty ........................................................................................................................................................ 22

3
Hotline: 1-866-902-9690
SAFETY INSTRUCTIONS
IMPORTANT
Please read these instructions fully before assembling and operating.
DESCRIPTION OF SYMBOLS
Symbols are used in this manual to attract your attention to possible risks. The safety symbols and the
explanations which accompany them must be perfectly understood. The warnings themselves do not
prevent the risks and cannot be a substitute for proper methods of avoiding accidents.
WARNING SYMBOLS ON THE MACHINE
Indicates WARNING, DANGER, or CAUTION.
Read operator’s manual before operating this machine. Failure to follow directions could result
in serious injury.
Thrown objects. Keep bystanders at least 50 ft (15 m) away. Do not use if children are present.
Remove all objects which could be thrown by machine. Read operator’s manual before
operatingthis machine.
Do NOT trim up and down slopes. Trim across slopes.
Rotating parts can cause serious injury. Keep away from rotating parts. Stop engine
anddisconnect spark plug wire before making adjustments.
Wear eye protection complying with ANSI Z87.1 and hearing protection.
Disconnect spark plug wire before servicing unit.
Direction of rotating line.
Engine emits carbon monoxide. Do NOT run indoors or in enclosed area.
Do NOT touch hot muffler or cylinder. These parts are extremely hot from operation and
mayremain hot for a short time after operation.
To reduce risk of fire, clean spilled gas and oil and keep unit free from debris. Gasoline is
extremely flammmable. Allow machine to cool before refueling.

4
Hotline: 1-866-902-9690
SAFETY INSTRUCTIONS
TRAINING
1. Read the instructions carefully. Be familiar with the controls and the proper use of the equipment.
2. Never allow children or people unfamiliar with these instructions to use the trimmer. Local regulations
can restrict the age of the operator.
3. Never mow while people, especially children, or pets are nearby.
4. Keep in mind that the operator or user is responsible for accidents or hazards occurring to other people
or their property.
5. Do not operate the machine while under the influence of alcohol or drugs.
6. Follow the manufacturer’s recommendation for wheel weights or counterweights.
7. Stop the machine and attachment(s) if anyone enters the area.
PREPARATION
1. While trimming, always wear substantial footwear and long trousers. Do not operate the equipment
when barefoot or wearing open sandals.
2. Thoroughly inspect the area where the equipment is to be used and remove all objects which can be
thrown by the machine.
3. Warning - gas is highly flammable.
- Store fuel in containers specifically designed for this purpose.
- Refuel outdoors only and do not smoke while refueling.
- Add fuel before starting the engine. Never remove the cap of the fuel tank or add gas while the
engine is running or when the engine is hot.
- If gas is spilled, do not attempt to start the engine but move the machine away from the area of
spillage and avoid creating any source of ignition until gas vapours have dissipated.
- Replace all fuel tank and container caps securely.
4. Replace faulty mufflers.
5. Before using, always visually inspect to see that bolts and cutter assembly are not worn or damaged.
Replace worn or damaged bolts in sets to preserve balance.
OPERATION
1. Do not operate the engine in a confined space where dangerous carbon monoxide fumes can collect.
2. Mow only in daylight or in good artificial light.
3. Avoid operating the equipment in wet grass, where feasible.
4. Always be sure of your footing on slopes.
5. Walk, never run.
6. For wheeled rotary machines, mow across the face of slopes, never up and down.
7. Exercise extreme caution when changing direction on slopes.
8. Do not mow excessively steep slopes.
9. Use extreme caution when reversing or pulling the trimmer towards you.
10. Stop the trimmer line if the trimmer has to be tilted for transportation when crossing surfaces other than
grass, and when transporting the trimmer to and from the area to be mowed.
11. Never operate the trimmer with defective guards, or without safety devices.
12. Do not change the engine governor settings or over speed the engine.
13. Start the engine or switch on the motor carefully according to instructions and with feet well away from
the trimmer line.
14. Do not tilt the trimmer when starting the engine or switching on the motor, except if the trimmer has
to be tilted for starting. In this case, do not tilt it more than absolutely necessary and lift only the part
which is away from the operator.
15. Do not put hands or feet near or under rotating parts.
16. Never pick up or carry a trimmer while the engine is running.
17. Stop the engine and disconnect the spark plug wire, making sure that all moving parts have come to a
complete stop.
18. Reduce the throttle setting during engine shut down and, if the engine is provided with a shut-off valve,
turn the fuel off at the conclusion of mowing.
SAFETY INSTRUCTIONS

5
Hotline: 1-866-902-9690
SAFETY INSTRUCTIONS
19. Go slow when using a trailing seat.
20. Avoid holes, ruts, bumps, rocks, or other hidden hazards.
21. Do not direct discharge material toward anyone. Avoid discharging material against a wall or
obstruction. Material may ricochet back toward the operator. Stop the line when crossing gravel
surfaces.
22. Do not leave a running machine unattended. Always park on level ground, disengage the attachment,set
parking brake, and stop engine.
23. Do not trim in reverse unless absolutely necessary.
24. Tragic accidents can occur if the operator is not alert to the presence of children. Children are often
attracted to the machine and the trimming activity. Never assume that children will remain where you
last saw them.
25. Keep children out of the operating area and under the watchful care of a responsible adult other than
the operator.
26. Travel in the manufacturer recommended direction on slopes. Use caution while operating near drop-
offs.
27. Poor footing could cause a slip and fall accident.
28. Do not operate machine under any condition where traction, steering, or stability is in question. Tires
could slide even if the wheels are stopped.
29. Always keep the machine in gear when going down slopes. Do not coast downhill.
30. Extinguish all cigarettes, cigars, pipes and other sources of ignition.
31. Do not store the machine or fuelcontainer, or refuel, where there is an open flame, spark, or pilot light
such as on a water heater or other appliance.
32. Use full width ramps for loading and unloading a machine for transport.
MAINTENANCE AND STORAGE
1. Keep all nuts, bolts and screws tight to be sure the equipment is in safe working condition.
2. Never store the equipment with gas in the tank inside a building where fumes can reach an open flame
or spark.
3. Allow the engine to cool before storing in any enclosure.
4. To reduce the fire hazard, keep the engine, muffler, battery compartment and gas storage area free of
grass, leaves, or excessive grease.
5. Check the grass catcher frequently for wear or deterioration.
6. If the fuel tank has to be drained, this should be done outdoors.
SLOPE OPERATION
Slopes are a major factor related to slip and fall accidents, which can result in severe injury. Operation on
slopes requires extra caution. If you feel uneasy on a slope, do not trim on it. For your safety, use the slope
gauge included as part of this manual to measure slopes before operating this machine on a sloped or
hilly area. If the slope is greater than 15 degrees, do not trim on it.
1. Trim across the face of slopes; never up and down. Exercise extreme caution when changing direction
on slopes.
2. Watch for holes, ruts, rocks, hidden objects, or bumps which can cause you to slip or trip. Tall grass
can hide obstacles.
3. Always be sure of your footing. A slip and fall can cause serious personal injury. If you feel you are
losing your balance, release the control lever immediately and the spindle will stop rotating within three (3)
seconds.
4. Do not trim near drop-offs, ditches or embankments, you could lose your footing or balance.
5. Do not trim on wet grass. Unstable footing could cause slipping.

6
Hotline: 1-866-902-9690
SAFETY INSTRUCTIONS
CHILDREN
Tragic accidents can occur if the operator is not alert to the presence of children. Children are often
attracted to the trimmer and the trimming activity. Never assume that children will remain where you last
saw them.
Keep children out of the trimming area and under the watchful care of a responsible adult.
Be alert and turn trimmer off if children enter the area.
Before and while trimming backwards, look behind and down for small children.
Never allow children to operate the trimmer.
Use extra care when approaching blind corners, shrubs, trees, or other objects that may obscure vision.

7
Hotline: 1-866-902-9690
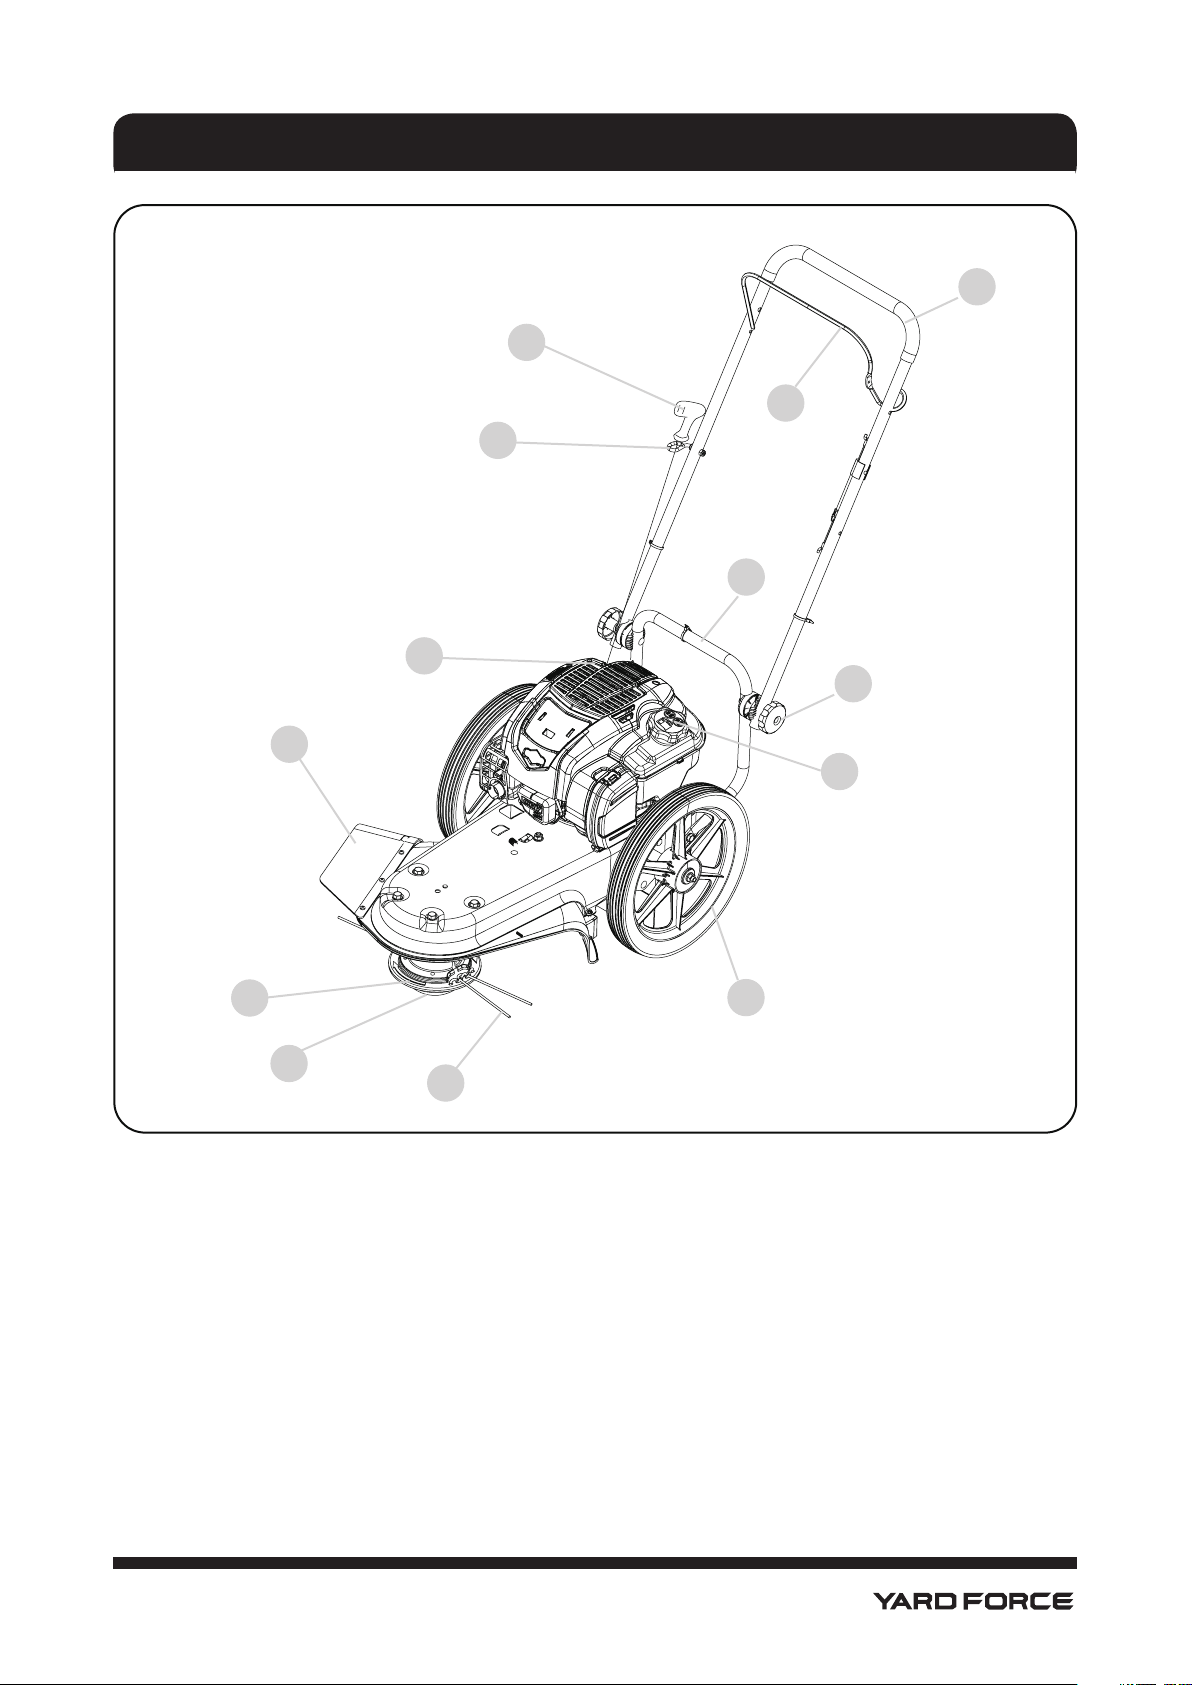
PARTS LIST
Fig. 1
1
12
10
9
7
6
4
3
2
1. Engine on/off control bar
2. Upper handle
3. Lower handle
4. Handle adjustment knob
5. Gas ller cap
6. Wheel
7. Trimmer line
8. Trimmer guide
9. Trimmer head
10. Shield edge guard
11. Oil fller dipstick
12. Rope guide
13. Recoil starter handle
5
13
11
8
8
Hotline: 1-866-902-9690
PARTS LIST
This gas-powered walk-behind trimmer has been designed for cutting residential lawn areas.
The machine is to be used only for its prescribed purpose. Any other use is deemed to be a case of misuse.
The user/operator and not the manufacturer will be liable for any damage or injuries of any kind caused as a
result of this.
Please note that our equipment has not been designed for use in commercial, trade or industrial applica-
tions. Our warranty will be voided if the machine is used in commercial, trade or industrial businesses or for
equivalent purposes.
INTENDED USE
PARTS LIST
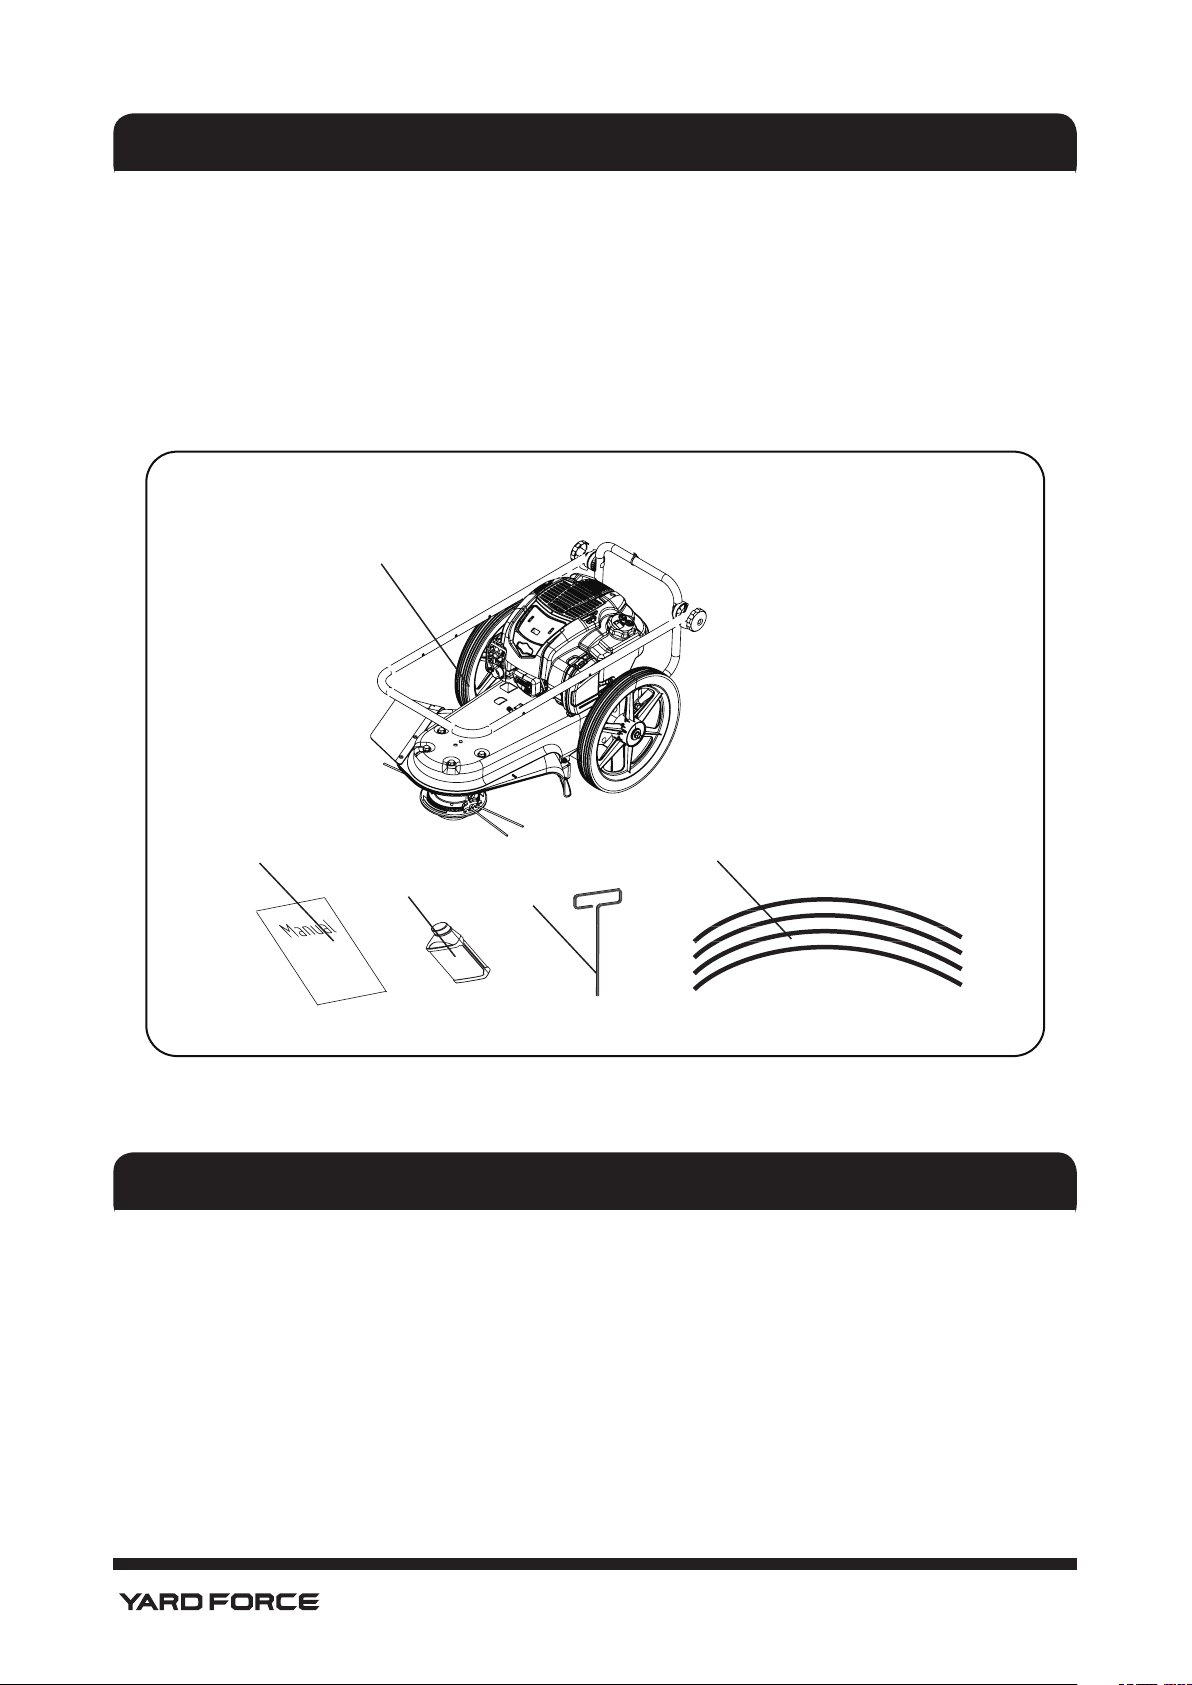
Carefully remove the trimmer from its packaging and check that the following parts are included:
A Main trimmer with handles 1pc
B Manual 1pc
C Engine oil(SAE30 15oz) 1pc
D T-handle wrench 1pc
E Trimmer line 4pcs
Fig. 2
A
B
C
D
E

9
Hotline: 1-866-902-9690
TECHNICAL SPECIFICATIONS
Engine type Single cylinder 4-stroke
Engine displacement 163cc
Engine speed 3100±100RPM
Cutting path 22"(56cm)
Cutting height 1.5"-3"(38-76mm)
Trimmer Line 0.155"(4 mm)
Wheel diameter 14"
TECHNICAL SPECIFICATIONS
ASSEMBLY
Read and follow the assembly and adjustment instructions. Do not discard any parts or materials unit the
unit is as assembled.
NOTE: Torque is measured in foot-pounds (metric unit is Nm).The measurement describes how
tight a nut or bolt must be .The torque is measured with torque wrench.
WARNING Always wear ANSI compliant safety glasses or eye shields while assembling the
trimmer.
WARNING
Before doing any assembly or maintenance to the unit , remove the wire from the spark plug.
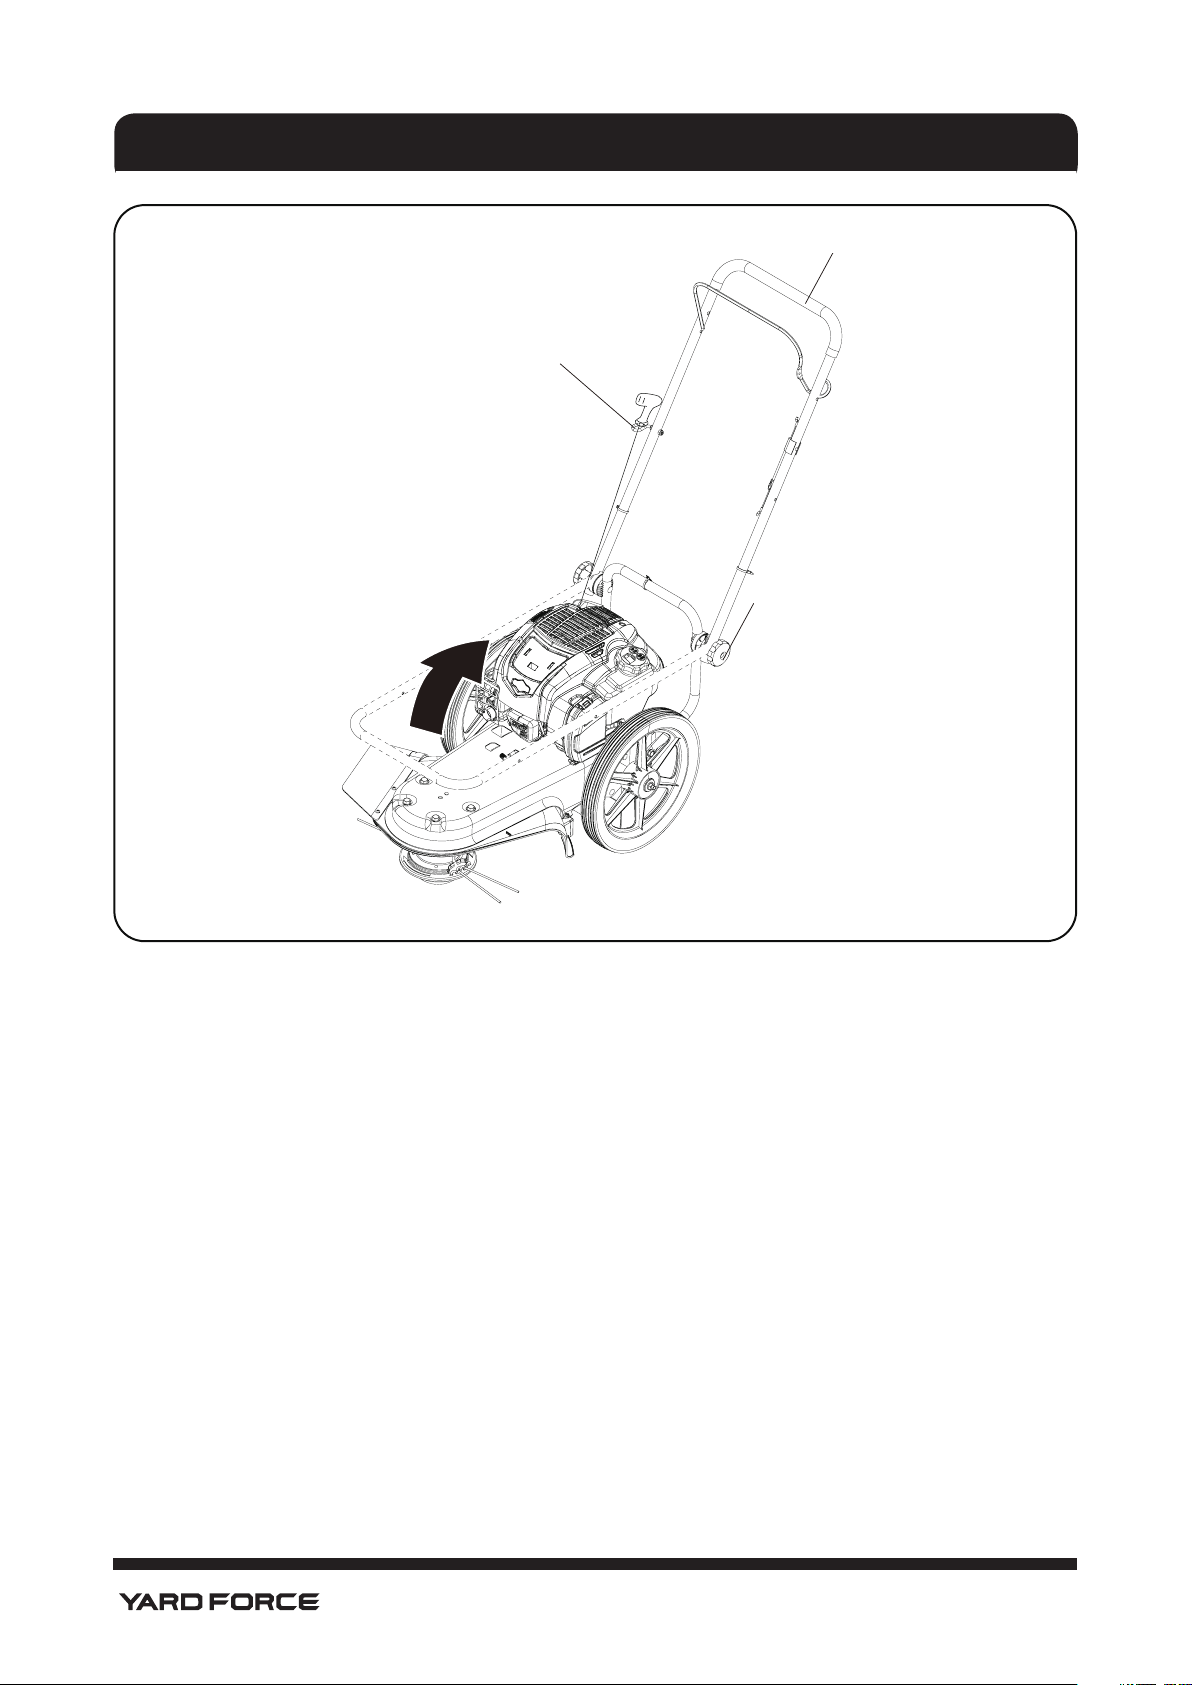
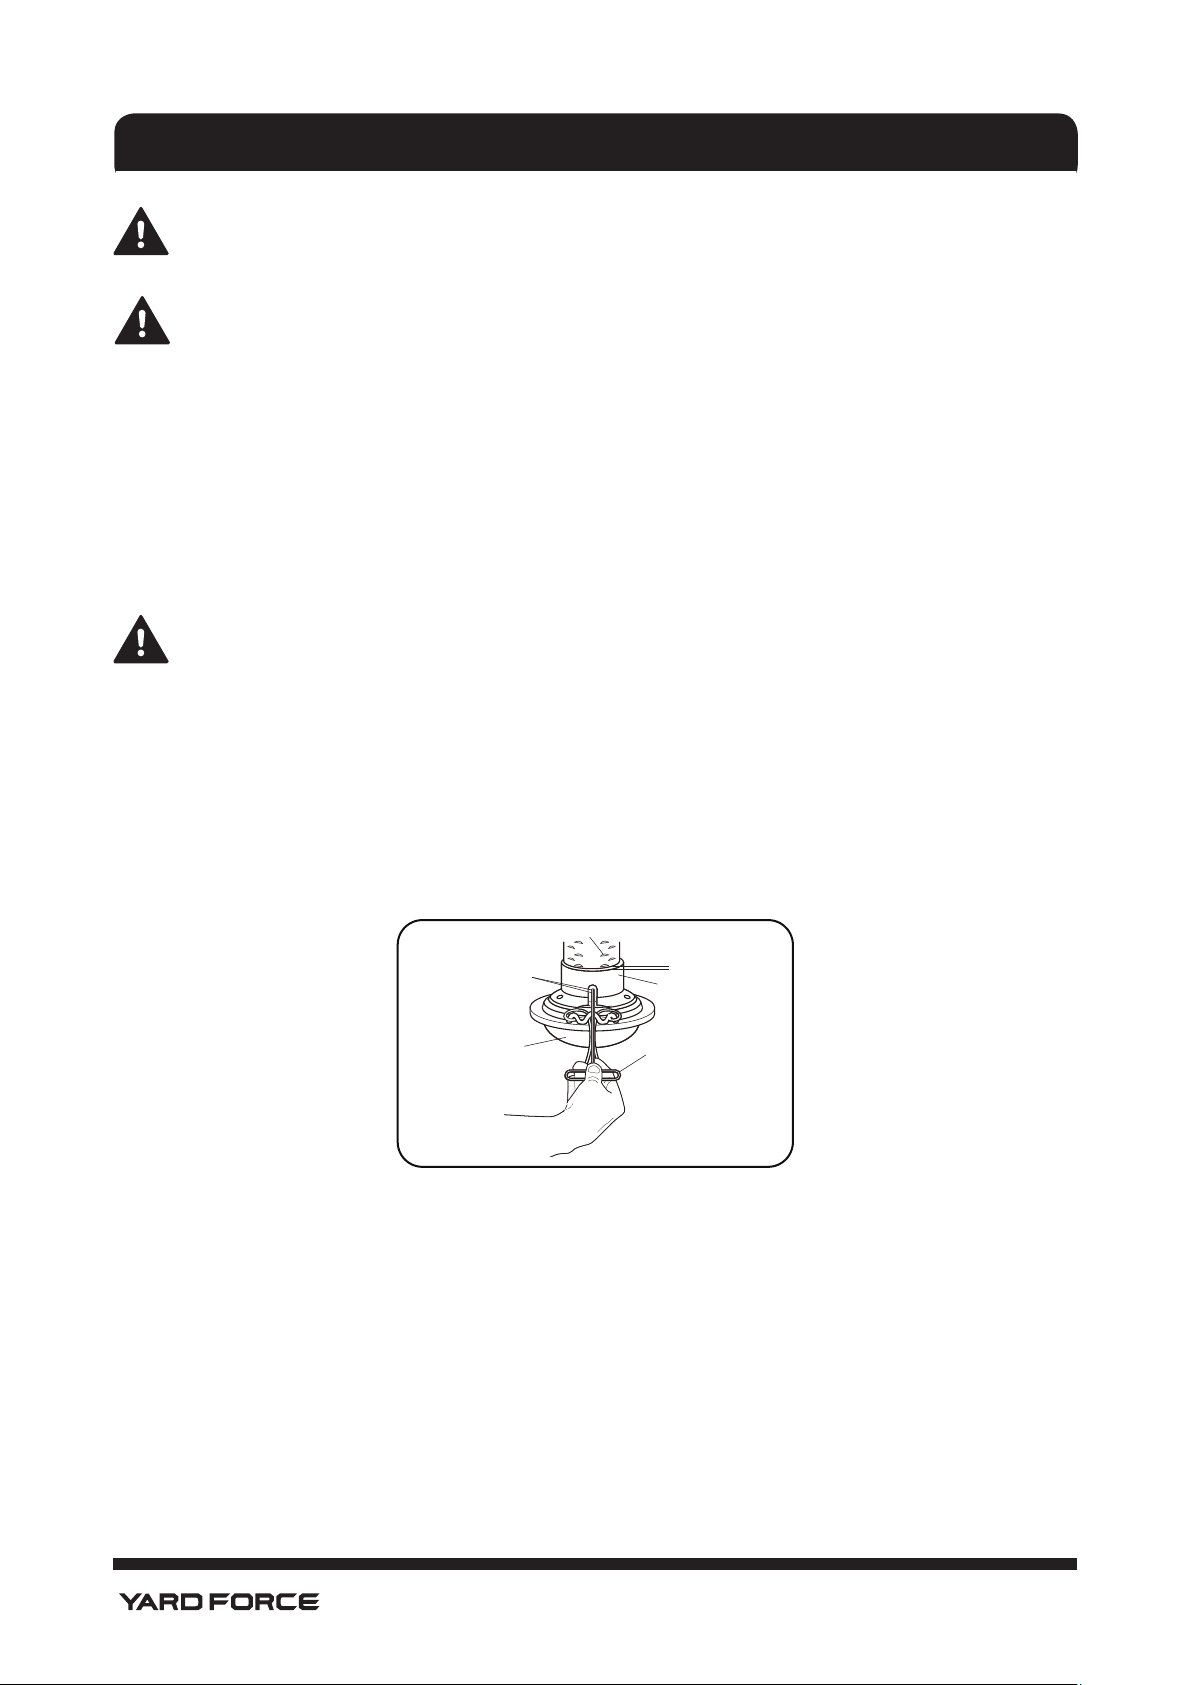
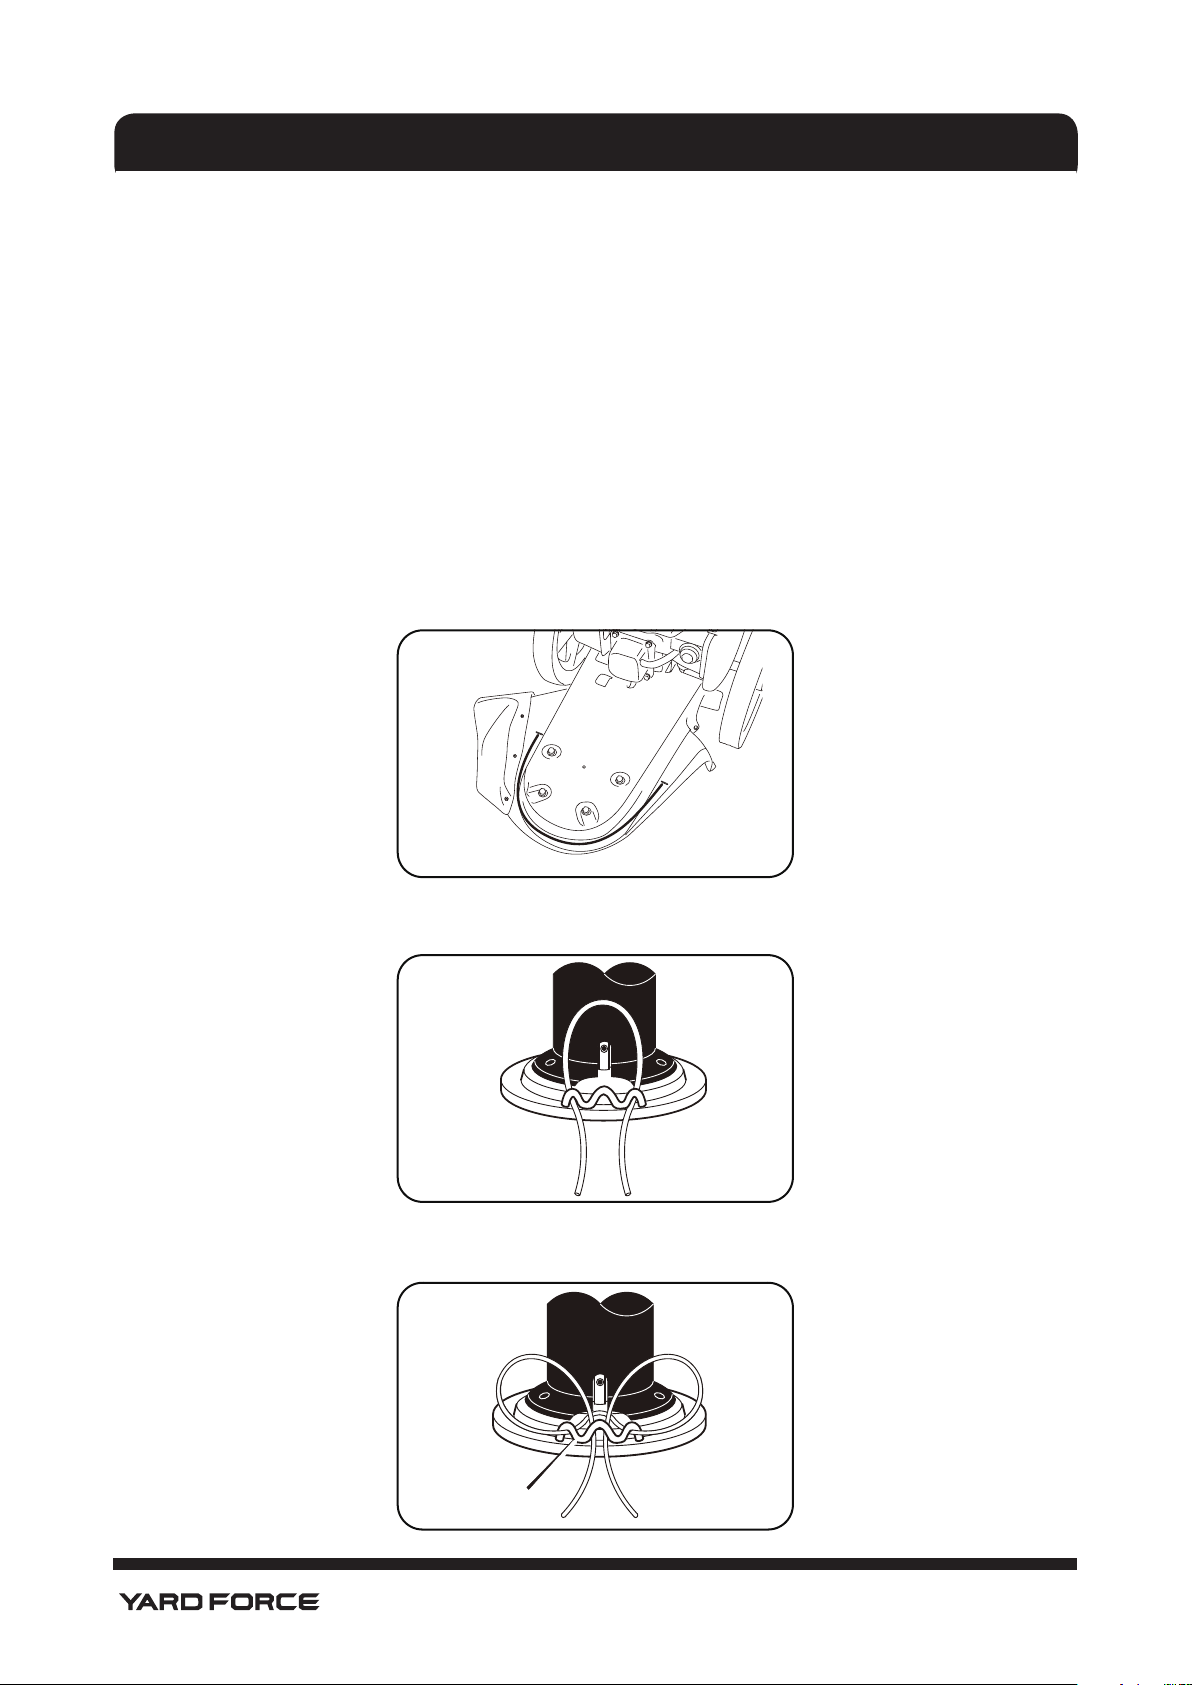
ADJUST THE HANDLE
1. Adjust knobs until the ratchet teeth are disengaged .Do not remove the handle adjustment knobs(See
Fig. 3).
2. Pull sides of handle apart and rotate the handle to the desired position behind the trimmer.
3. Stand in the operator’s position behind the trimmer to make sure handle is adjusted to a comfortable
position.
4. Tighten the handle adjustment knobs.
5. To attach the recoil start handle to rope guide, twist the rope through the rope guide mounted on the
right side of the handle.

10
Hotline: 1-866-902-9690
ASSEMBLY
Fig. 3

11
Hotline: 1-866-902-9690
ASSEMBLY
ENGINE PREPARATION
ENGINE DOES NOT CONTAIN OIL OR GASOLINE WHEN SHIPPED See the engine manufacturer’s
instructions for the type of gasoline and oil to use. Before you use the unit, read the information on safety,
operation, maintenance, and storage.
This trimmer was shipped with a 15 oz container of SAE30 engine oil. This oil is to be added to the engine
before operating. Follow the following procedure to fill the crankcase with oil.
Never use additives with recommended oil.
This engine is "Check & add" and never needs the oil to be replaced.
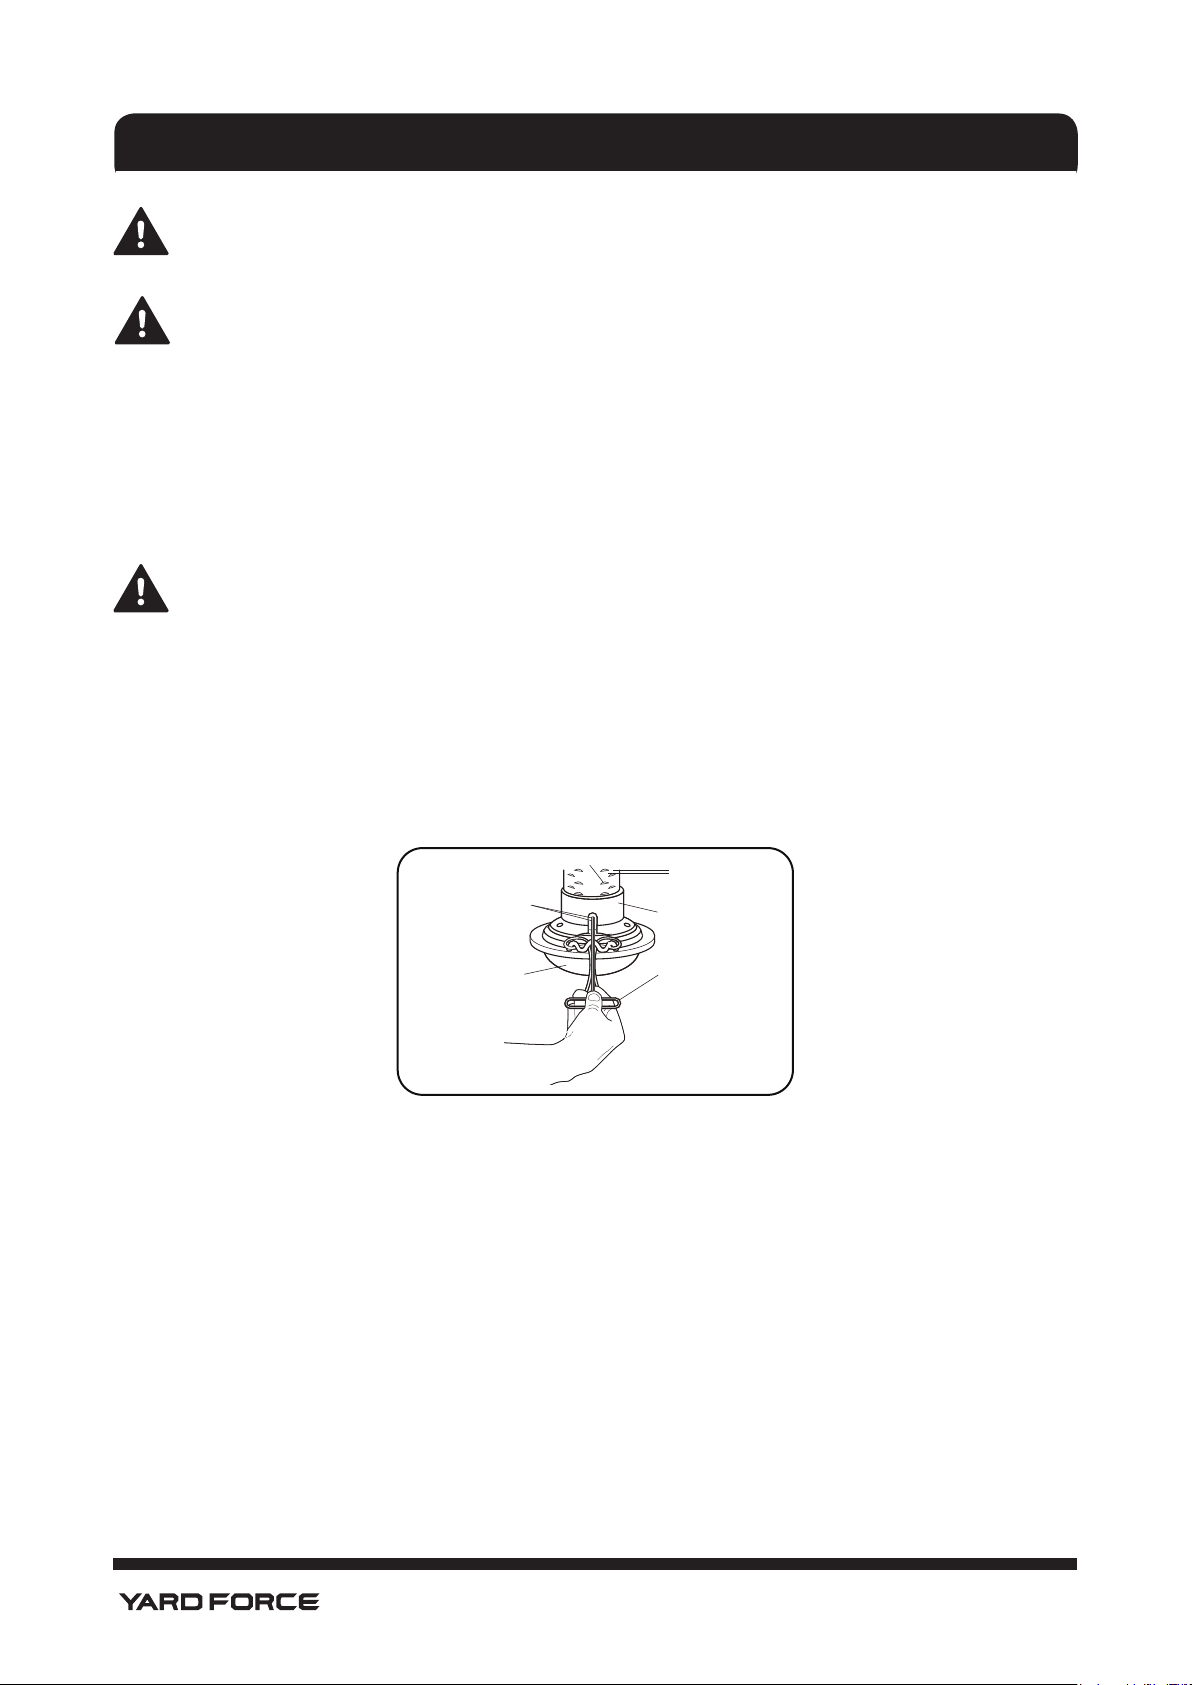
TO CHECK THE OIL LEVEL AND FILL TO PROPER LEVEL
1. Place the trimmer on a level surface.
2. Remove the oil fill cap/dipstick and wipe clean with cloth.
3. Replace dipstick and do NOT screw it. Remove and check oil level.
4. When oil level is full, the oil will be at upper limit on dipstick. (See Fig. 4)
5. If the oil level is near or below the lower limit mark on the dipstick (See Fig. 4), add SAE 30 oil (or
equivalent) slowly and recheck until oil level reaches upper limit of dipstick. DO NOT OVER FILL.
6. Replace and tighten dipstick.
7. Clean up any spilled oil.
NOTE: When adding oil, frequently insert the oil filler dipstick and check the amount of oil in the
engine.DO NOT OVERFILL. (See Fig. 5)
Gas filler cap
Oil filler
dipstick
FILLING TANK
CAUTION! Always use clean, fresh unleaded gas. Purchase fuel in quantities that can be used
within 30 days. Never mix oil with gas.
CAUTION! Do not fill into the base of neck to allow for fuel expansion. Do not overfill the fuel tank.
CAUTION! WARNING! Gas is highly flammable and extreme caution must be taken when handling
or working with it. Keep out of reach of children.
CAUTION! To prevent engine damage the engine is shipped without oil or gas. The engine must be
filled with the correct grade of oil and gas before starting the engine.
WARNING Follow the engine manufacturer’s instructions for the type of gasoline and oil to use.
Always use a safety gasoline container. Do not smoke when adding gasoline to the engine. When
inside an enclosure, do not fill with gasoline. Before you add gasoline, stop the engine. Let the
engine cool for several minutes.
Fig. 4 Fig. 5
12
Hotline: 1-866-902-9690
WARNING! Refuel in a well-ventilated area with the engine stopped. Do not smoke or allow flame
or sparks in the area where the engine is refueled or where gas is stored. Avoid repeated or
prolonged contact with skin or inhalation of vapour.
WARNING! Gasoline with up to 10% ethanol (gasohol) is acceptable.
Do not use unapproved gasoline, such as E15 and E85.
1. Clean surface around gas filler cap to prevent contamination.
2. Loosen gas filler cap slowly. (see Fig.5)
3. Carefully pour fuel into the tank. Avoid spillage.
4. Prior to replacing the gas filler cap, clean and inspect the gasket.
5. Immediately replace gas filler cap and hand tighten. Wipe up any spillage.
NOTE: It is normal for smoke to be emitted from a new engine after the first use.
TO SET THE HEIGHT OF CUT
CAUTION Before you set the height of cut, stop the engine. Wait for all moving parts to stop. Allow
engine to cool and disconnect the spark plug wire.
The height of cut can be set from 11⁄2 to 3 in. [38-76 mm]. Recommended cutting height for the average
yard is 2 in.[51 mm].
1. Use the T-Wrench, found in a parts bag, to loosen the (2) set screws. (See Fig. 6)
NOTE: The (2) set screws are only on one side of the trimmer head. If you don’t see the set screws,
check the opposite side. Both set screws need to be loosened to change the height of the cut.
2. Slide the trimmer head up or down for desired height of cut.From position 1 to position 7, the cutting
heights range from 1.5" to 3" (38-76mm), 0.25” between each position.
3. Tighten both set screws to 2.6 - 3.7 foot-pounds (3.5-5 Nm).
Height of Cut Positions
Set Screws
T-Handle Wrench
ASSEMBLY
Fig. 6
0.25"
Trimmer Guide
Trimmer Head
13
Hotline: 1-866-902-9690
START AND STOP THE ENGINE
WARNING: the trimmer line begins to rotate as soon as the engine is started.
NOTE: Do not operate the trimmer in enclosed or poorly-ventilated areas as the exhaust
gas contains toxic substances.
Keep hands, feet, hair and clothing away from the moving parts of the machine. The exhaust and
other parts of the machine will become hot during use.
Make sure that the blade is securely fastened before starting the engine.
NOTE: to start the engine, make sure that the spark plug cover is connected to the plug and the
machine is filled with sufficient oil and gas.
TO START THE ENGINE
NOTE: Due to protective coatings on the engine, a small amount of smoke may be present during
the initial use of the trimmer This is normal.
NOTE: Your engine is equipped with an automatic choke system. No priming or choking is required
before starting.
CAUTION Never leave the trimmer unattended while the engine is running. Wait for the trimmer
lines to stop rotation.
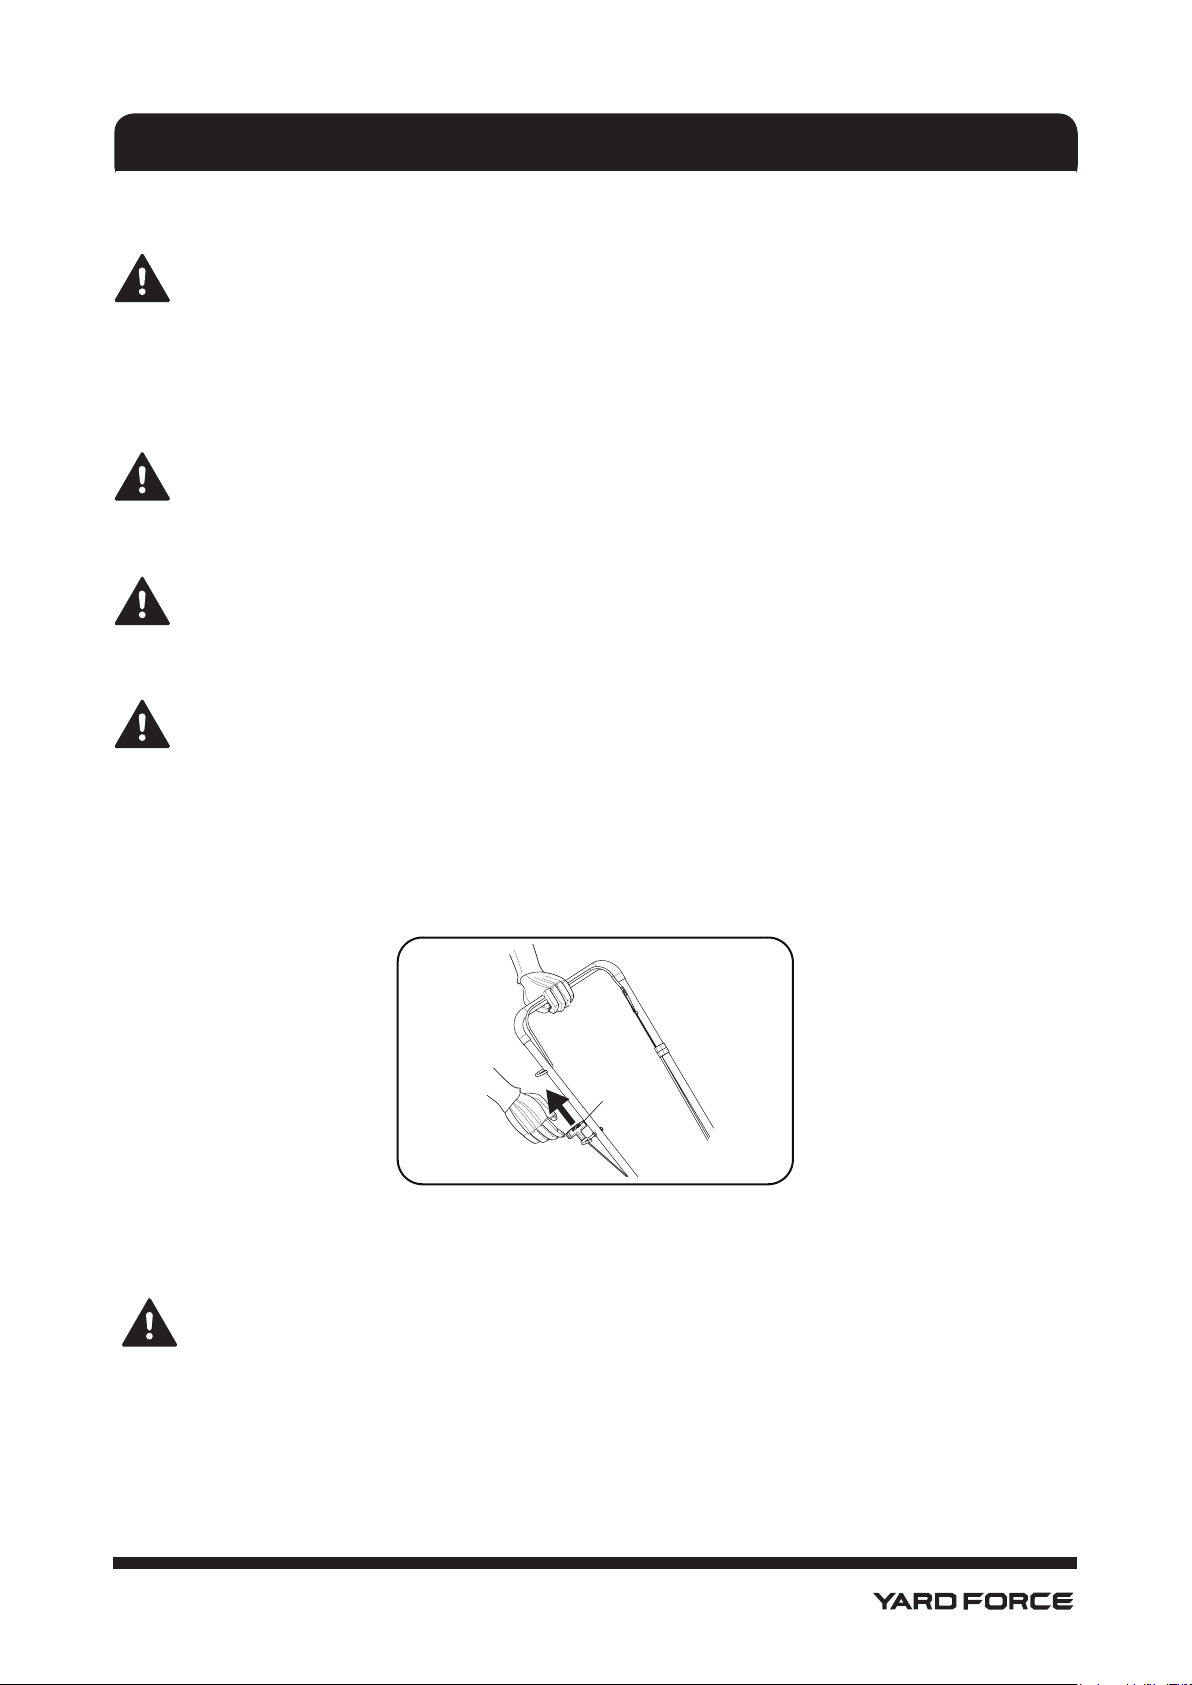
1. The engine equipped with an automatic choke system. No priming or choking is required before starting.
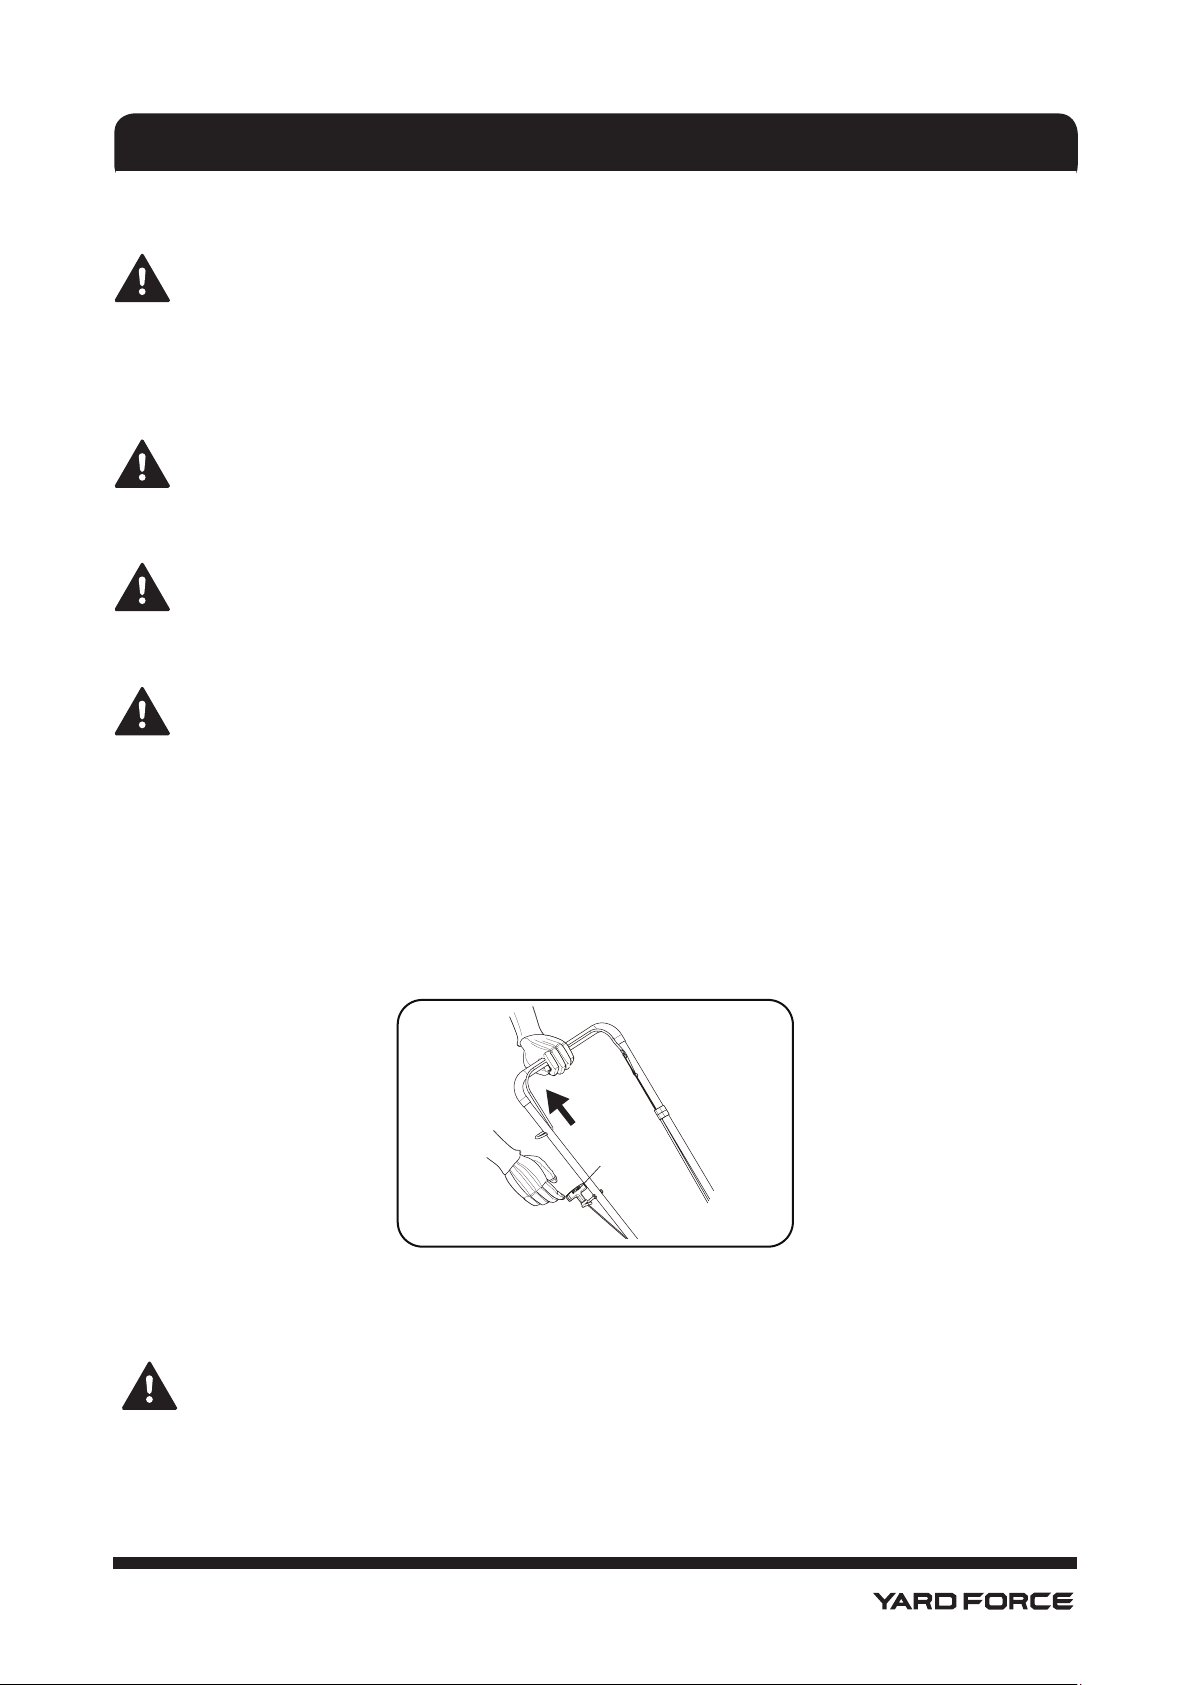
2. Stand behind the trimmer Pull the Engine On/Off Control Bar toward upper handle with one hand and
place the other hand on the Recoil Start Handle (see Fig.7).
3. Pull the starter handle out approximately 4" to 6" until you feel a resistance and then start the engine
with a sharp pull.DO NOT allow the starter rope to snap back.
NOTE: If the engine fails to start after three pulls, repeat the process.
4. Once the engine is running, put the starter rope into the rope guide.
Recoil Starter
Handle
TO STOP THE ENGINE
Release the Engine On/Off Control Bar. It will return to its initial position and the engine will automatically
switch off.
CAUTION The trimmer head will continue to rotate for several seconds after the engine has
stopped.
Fig. 7
OPERATION

14
Hotline: 1-866-902-9690
USING YOUR TRIMMER
Be sure trimming area is clear of stones, sticks, wire, or other objects which could damage the trimmer or
engine. Such objects could accidently thrown by the trimmer in any direction and cause serious personal
injury to the operator and others.
WARNING: The operation of any trimmer can result in foreign objects being thrown into the eyes,
which can damage your eyes severely. Always wear safety glasses while operating the trimmer, or
while performing any adjustments or repairs on it.
The trimmer is designed with trimmer head offset to the left side, allowing the operator to trim along a fence,
landscaping, or a house to his or her right side without having to make any adjustments to the machine.
Use two hands hold the upper handle firmly and push the trimmer forward, keep the trimmer guide gliding
on the ground to trim.
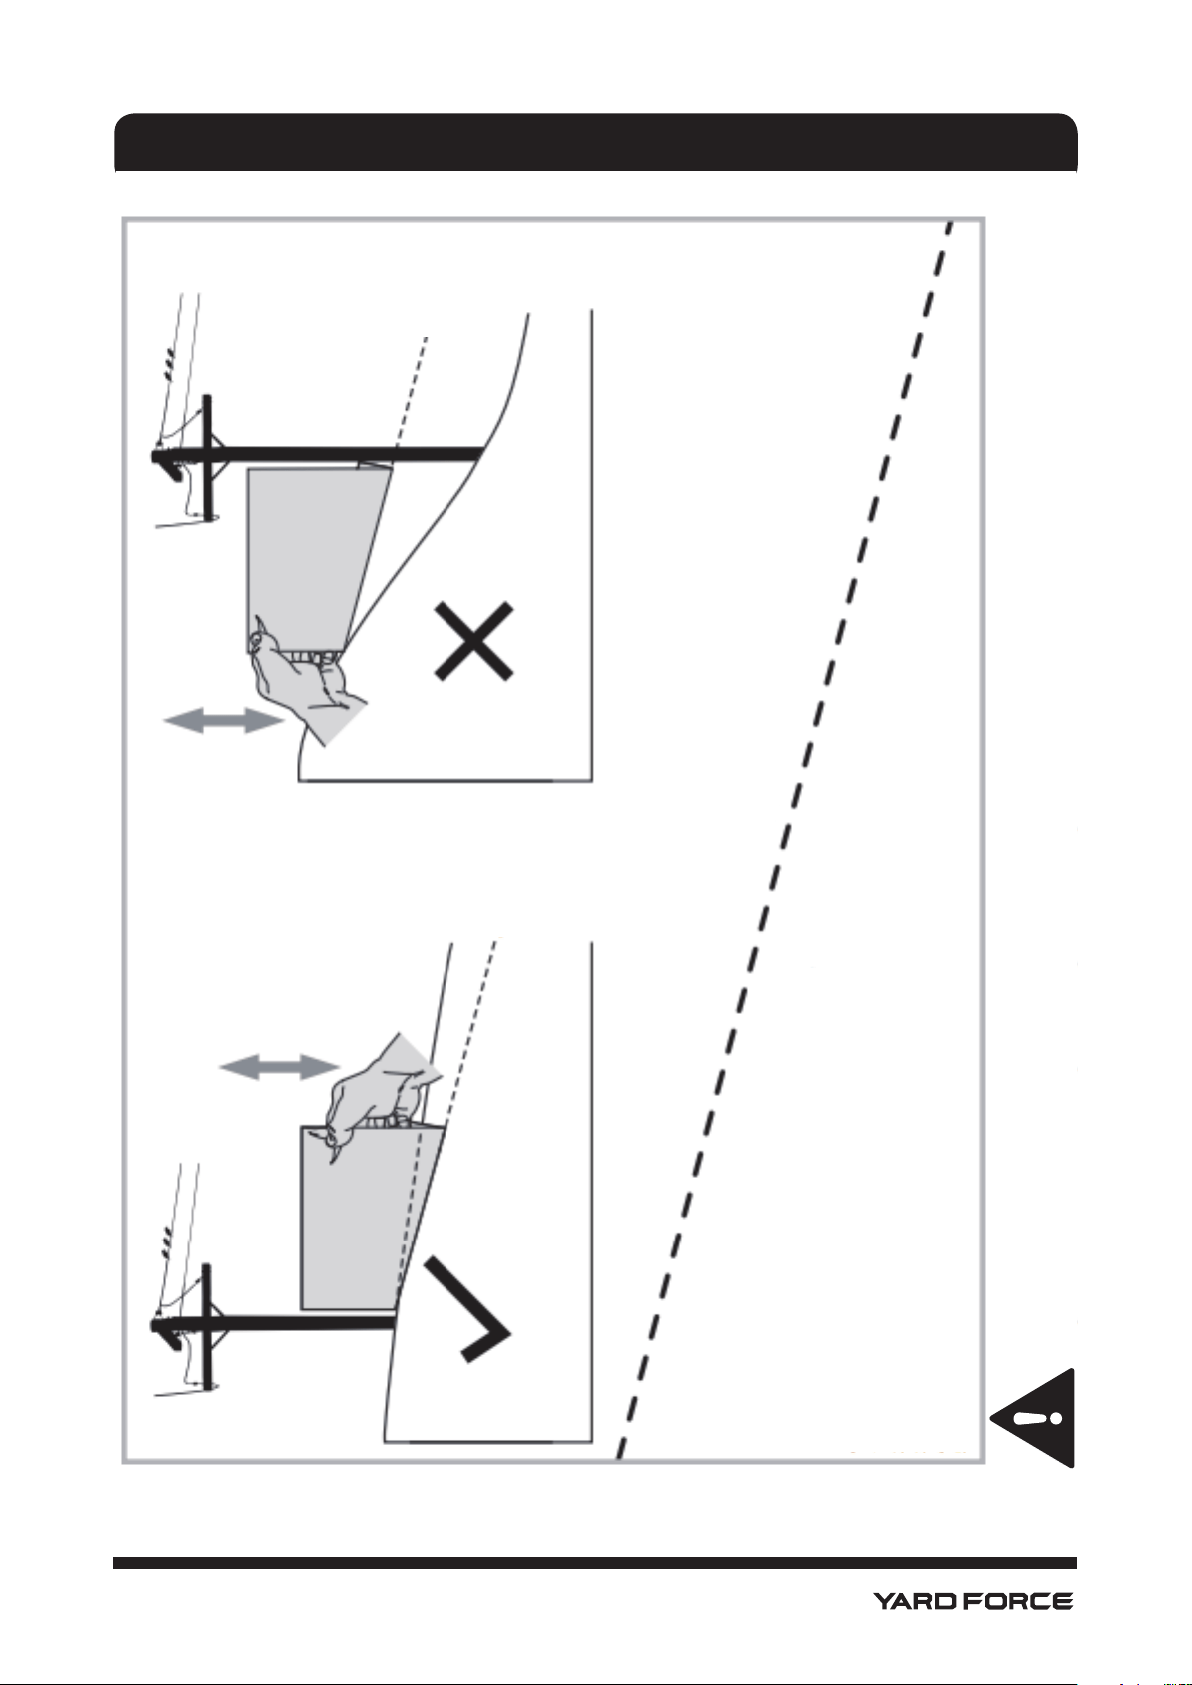
Do not trim on excessively steep slopes. Use the slope gauge to determin if a slope is too steep for safe
operation. If a slope is difficult to stand on, do not trim. Do not trim on slopes when the ground is slippery or
wet. Trim across the face of a slope, not up and down.
CAUTION: While operating the trimmer, do not allow the trimmer guide to contact a concrete, asphalt, or
gravel surface. Doing so will result in premature wear.
TRIMMING TIPS
WARNING Debris such as sticks, gravel, and rocks can be thrown with sufficient force to cause
personal injury or property damage.
1. Frequently clean the trimmer to remove any grass buildup. See the Maintenance section for details.
2. For best results and longer lasting line, use the ends of the line to do the cutting. This is easily done by
moving slowly through very thick or heavy weeds.
3. If the trimmer lines become too short, it will take longer to complete this job. If the trimmer lines are
worn to less than half their original length, change to a new trimmer line. See “Replace the Trimmer
Line” in the Maintenance section.
OPERATION

15
Hotline: 1-866-902-9690
OPERATION
Slope Gauge
(TOO STEEP)
15
O
Slope
15
O
Slope
(OK)
Fig. 8
Fig. 9
15
o
dashed line
USE THIS SLOPE GAUGE TO DETERMINE
IF A SLOPE IS TOO STEEP FOR SAFE OPERATION!
To check the slop, proceed as follows:
1. Remove this page and fold along the dashed line.
2. Locate a vertical object on or behind the slope (e.g. a pole, building, fence, tree, etc.)
3. Align either side of the slope gauge with the object (See Fig 8 and Fig 9).
4. Adjust gauge up or down until the left corner touches the slope(See Fig 8 and Fig 9).
5. If there is a gap below the gauge, the slope is too steep for safe operation(See Fig 9 above).
WARNING: Slope are a major factor related to slip and fall accidents which can result in severe injury or death. Do not operate machine
on slops in excess of 15 degrees. All slopes require extra caution.
Always trim across the face of slops, never up and down slopes.

16
Hotline: 1-866-902-9690
MAINTENANCE AND STORAGE
PERIODIC MAINTENANCE SCHEDULE TABLE
Service records-
fill in dates as
you complete
regular service
Before
each use
Every 5
hours
Every 25
hours
Every 100
hours
See note Before
storage
Service
dates
Check engine oil
level
Y
Check trimmer
lines
Y 1
Check
trimmer head
engagement
Y
Engine/machine
cleaning
Y 2
Check nuts and
bolts
Y
Check spark
plug
Y
Change engine
oil
Y
Service air filter Y 3
Lubricate
jackshaft
assembly
Y
Lubricate wheel
bearings
Y
Note 1 When old line is half the original length, replace with new line.
Note 2 Clean daily if used in extremely dusty or dirty conditions. Clean grass and debris build up off of the
debris screen.
Note 3 Change more often if used in extremely dusty or dirty conditions.
GENERAL RECOMMENDATIONS
The warranty on this trimmer does not cover items that have been subjected to operator abuse or
negligence. To receive full value from the warranty, the operator must maintain the trimmer as instructed in this
manual. Some adjustments must be made periodically to properly maintain your trimmer. All adjustments in
the Maintenance section of this manual must be checked at least once each season.
17
Hotline: 1-866-902-9690
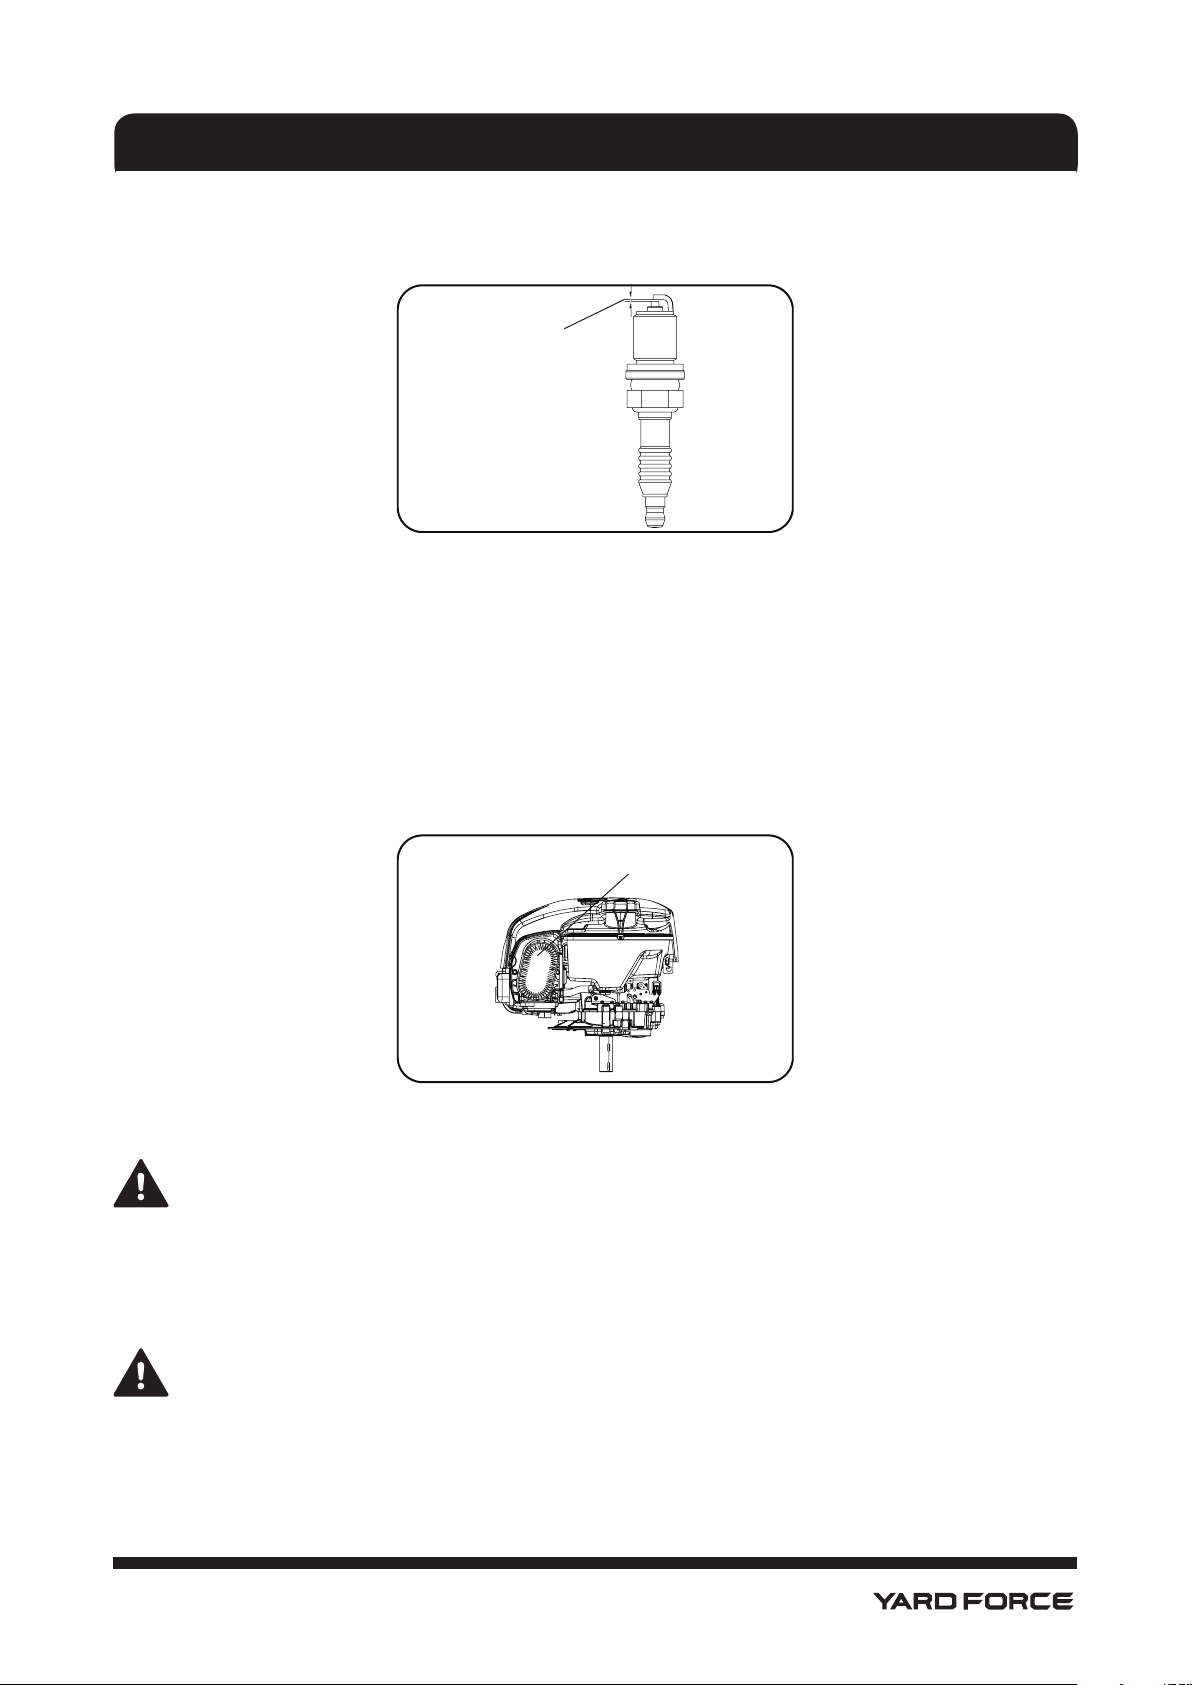
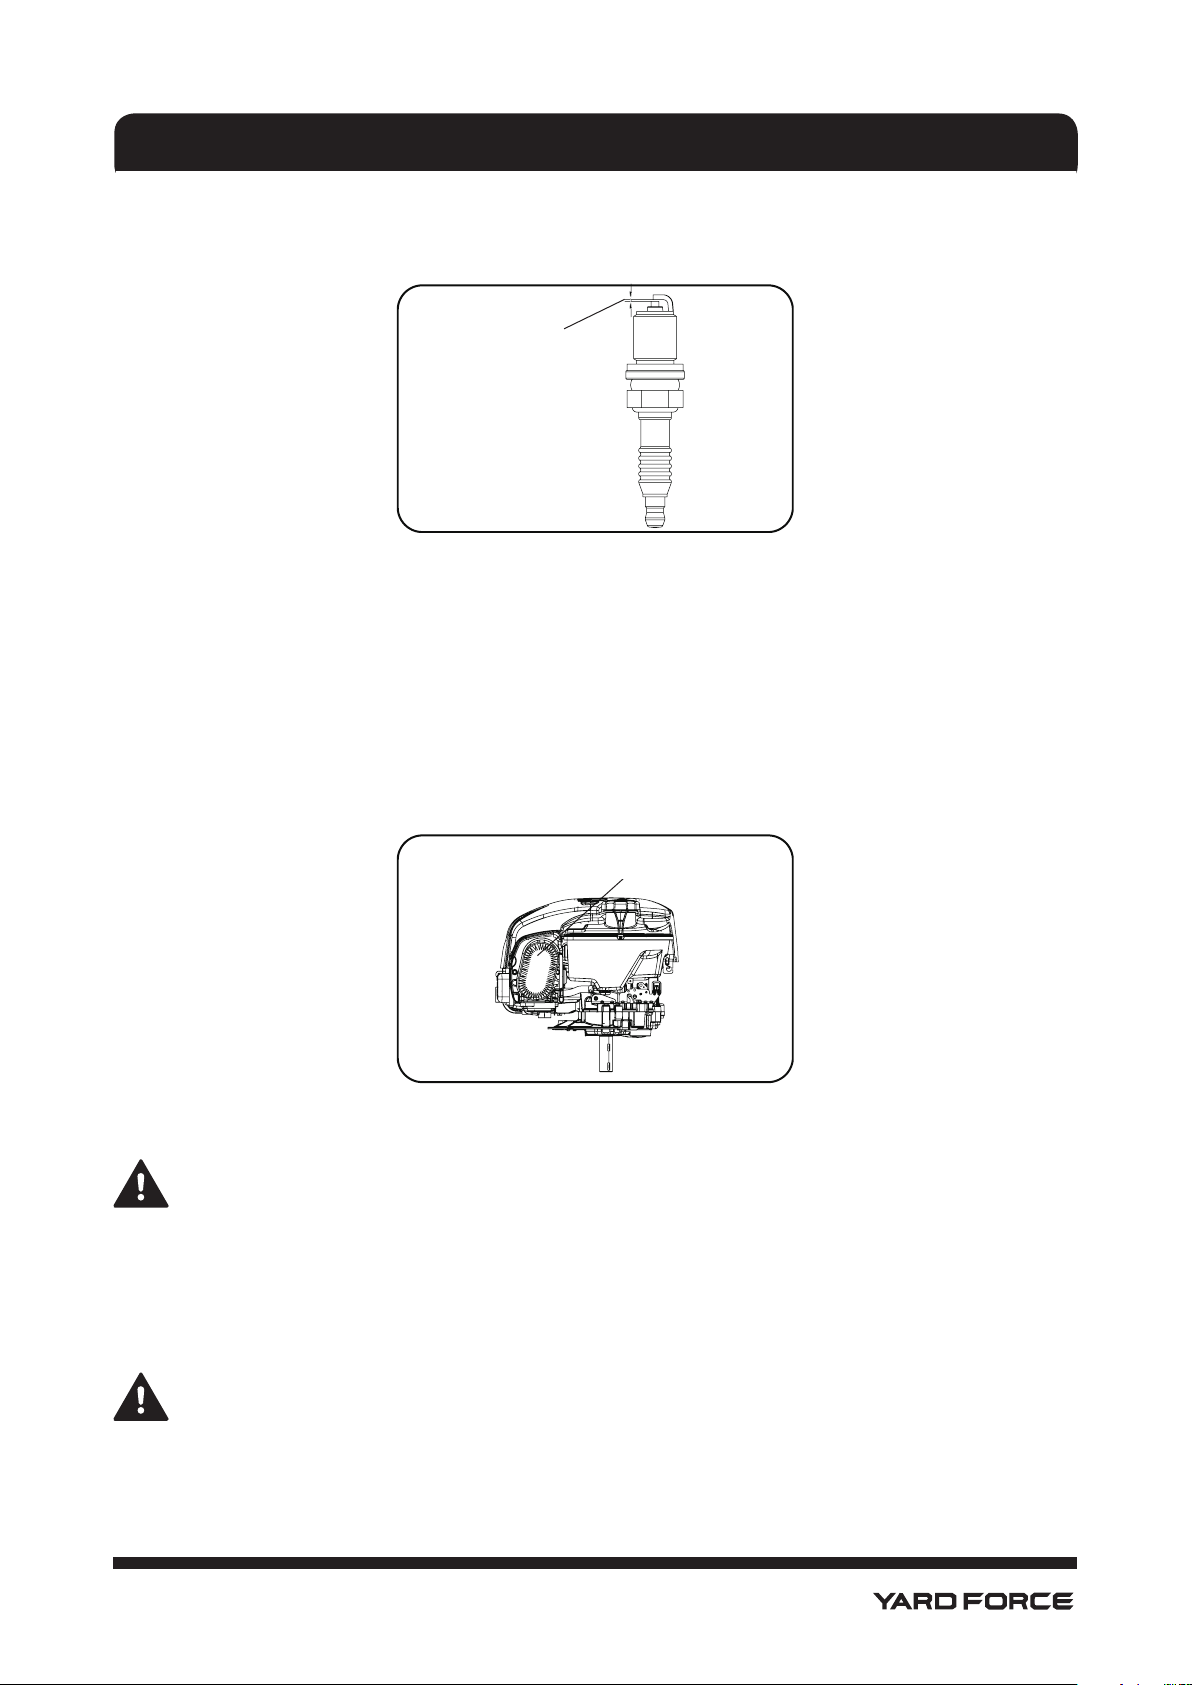
MAINTENANCE OF THE SPARK PLUG
As shown in Fig. 10
0.027"- 0.033"
Fig. 10
1. Once the engine has cooled, pull off the spark cover with a twist.
2. Remove the spark plug using a spark plug wrench (not supplied).
3. Clean the spark plug with a wire brush (not supplied).
4. Using a feeler gauge, set the gap to 0.027"- 0.033" (0.686- 0.838 mm).
5. Install the spark plug carefully by hand to avoid cross-threading.
6. After the spark plug is seated, tighten with the spark plug wrench to compress the washer.
MAINTENANCE OF THE AIR FILTER
As shown in Fig. 11
Filter cartridge
Fig. 11
Soiled air filters reduce the engine output by restricting air to the carburetor. If the air contains a lot of dust,
the air filter should be checked more frequently.
WARNING! Never run the engine without the air filter element installed.
1. Press tabs at the top of the air filter cover and tilt away from the engine to remove the cover.
2. Remove the filter cartridge.
3. To loosen debris, gently tap the filter cartridge on a hard surface. If the filter cartridge is excessively dirty,
replace with a new one.
Note: Never clean the air filter cartridge with gas or inflammable solvents.
Clean the air filter cartridge only with compressed air or by tapping it.
4. Install the filter cartridge.
5. Close the cover and secure it properly by snapping tabs back into the correct slots at the top.
MAINTENANCE AND STORAGE
18
Hotline: 1-866-902-9690
MAINTENANCE AND STORAGE
CHECK AND ADD THE ENGINE OIL
The Briggs & Stratton 675EXi engine on this lawn mower is made with a special feature Check & Add(TM).
The oil never needs to be changed. Before each use check the oil level and add additional oil if the level is
not within the Min - Max levels.
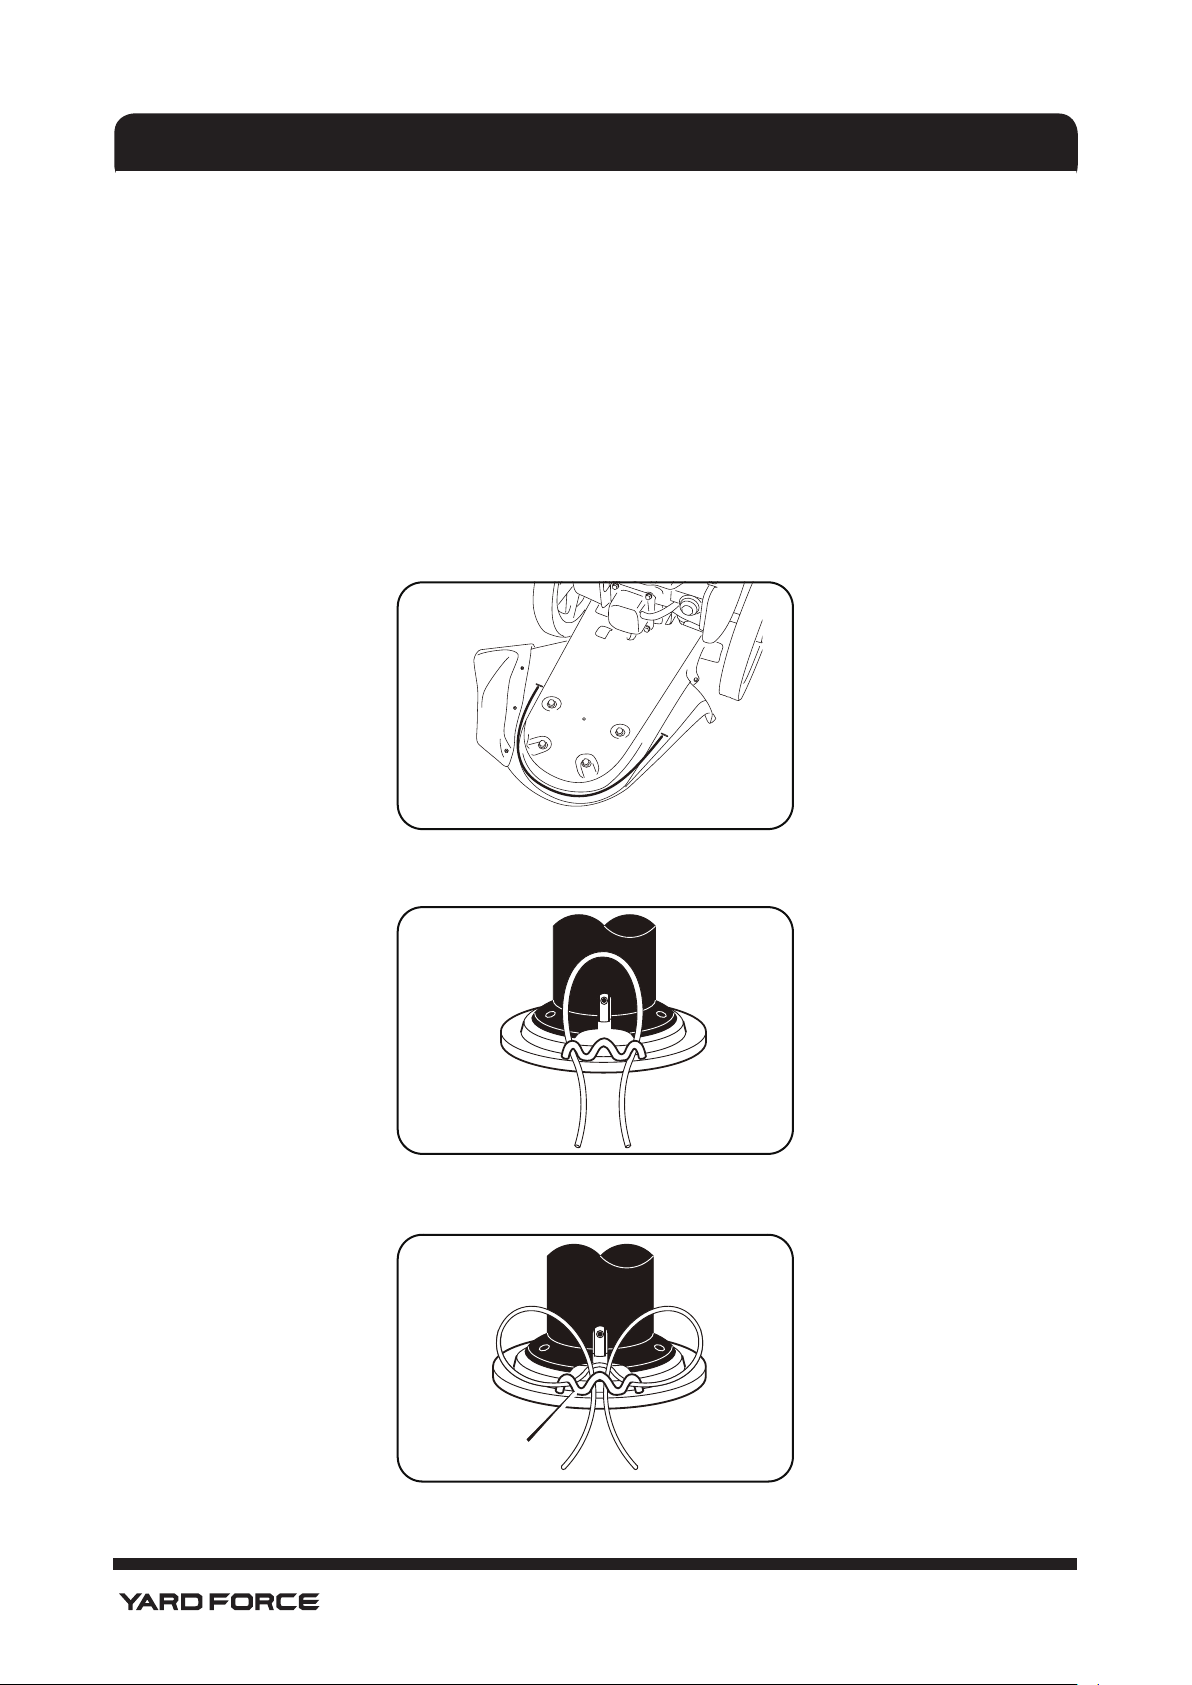
REPLACING THE TRIMMER LINE
When the trimmer line becomes worn to half the original length, replace the trimmer line. For the best
performance, use a heavy gauge 0.155 in. [4 mm] trimmer line.
1. Stop the engine. Wait for all moving parts to stop. Disconnect the wire from the spark plug.
2. Remove the worn trimmer line from line retainer.
3. Cut the length of the trimmer line to 21.5 in. [546 mm]. Use the length guide; located on the shield to
make sure the trimmer line is the correct length. (See Fig. 12)Do not allow the length of the lines to vary
more than one inch. Make sure the trimmer head is balanced and does not vibrate.
4. Thread the ends of the new trimmer line through the out side loops. (See Fig
.
13)
5. Take the ends of the line, cross over the line retainer, and thread the ends through the center hole. (See
Fig. 14)
Fig. 12
Fig. 13
Fig. 14
19
Hotline: 1-866-902-9690
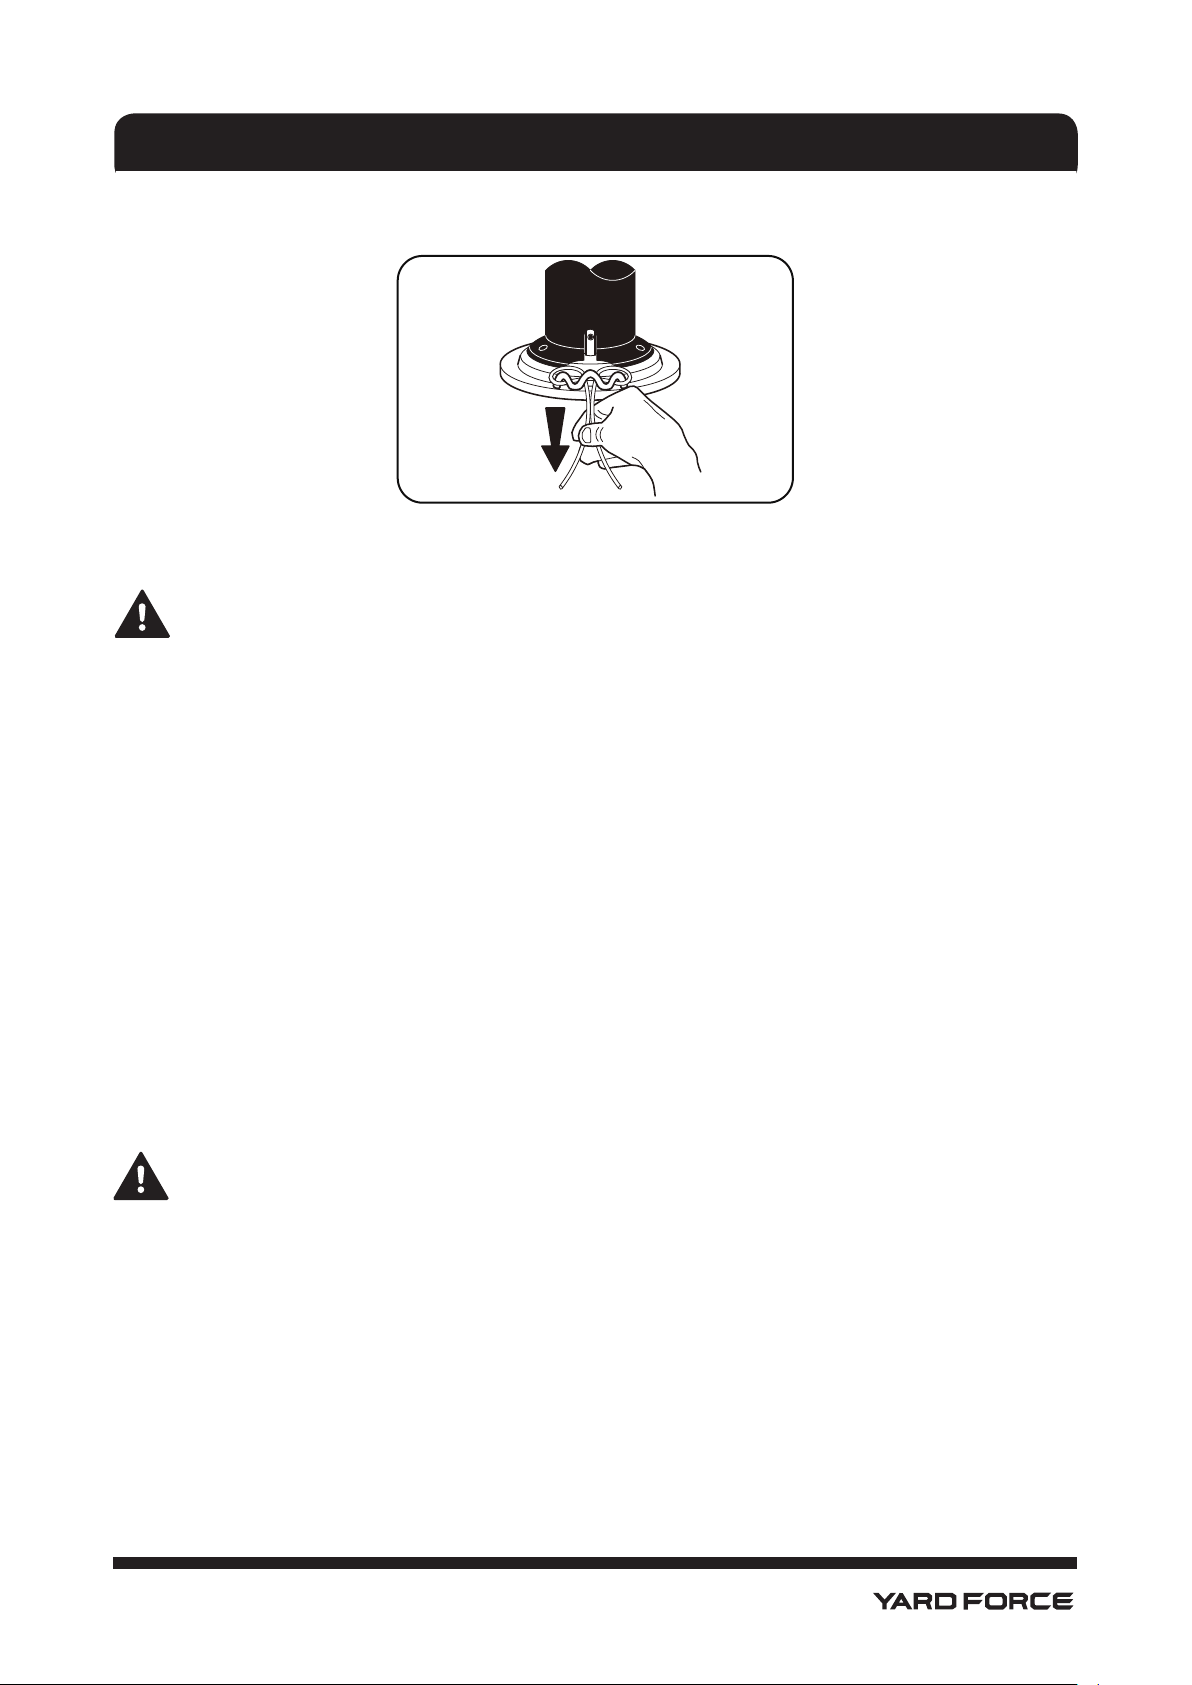
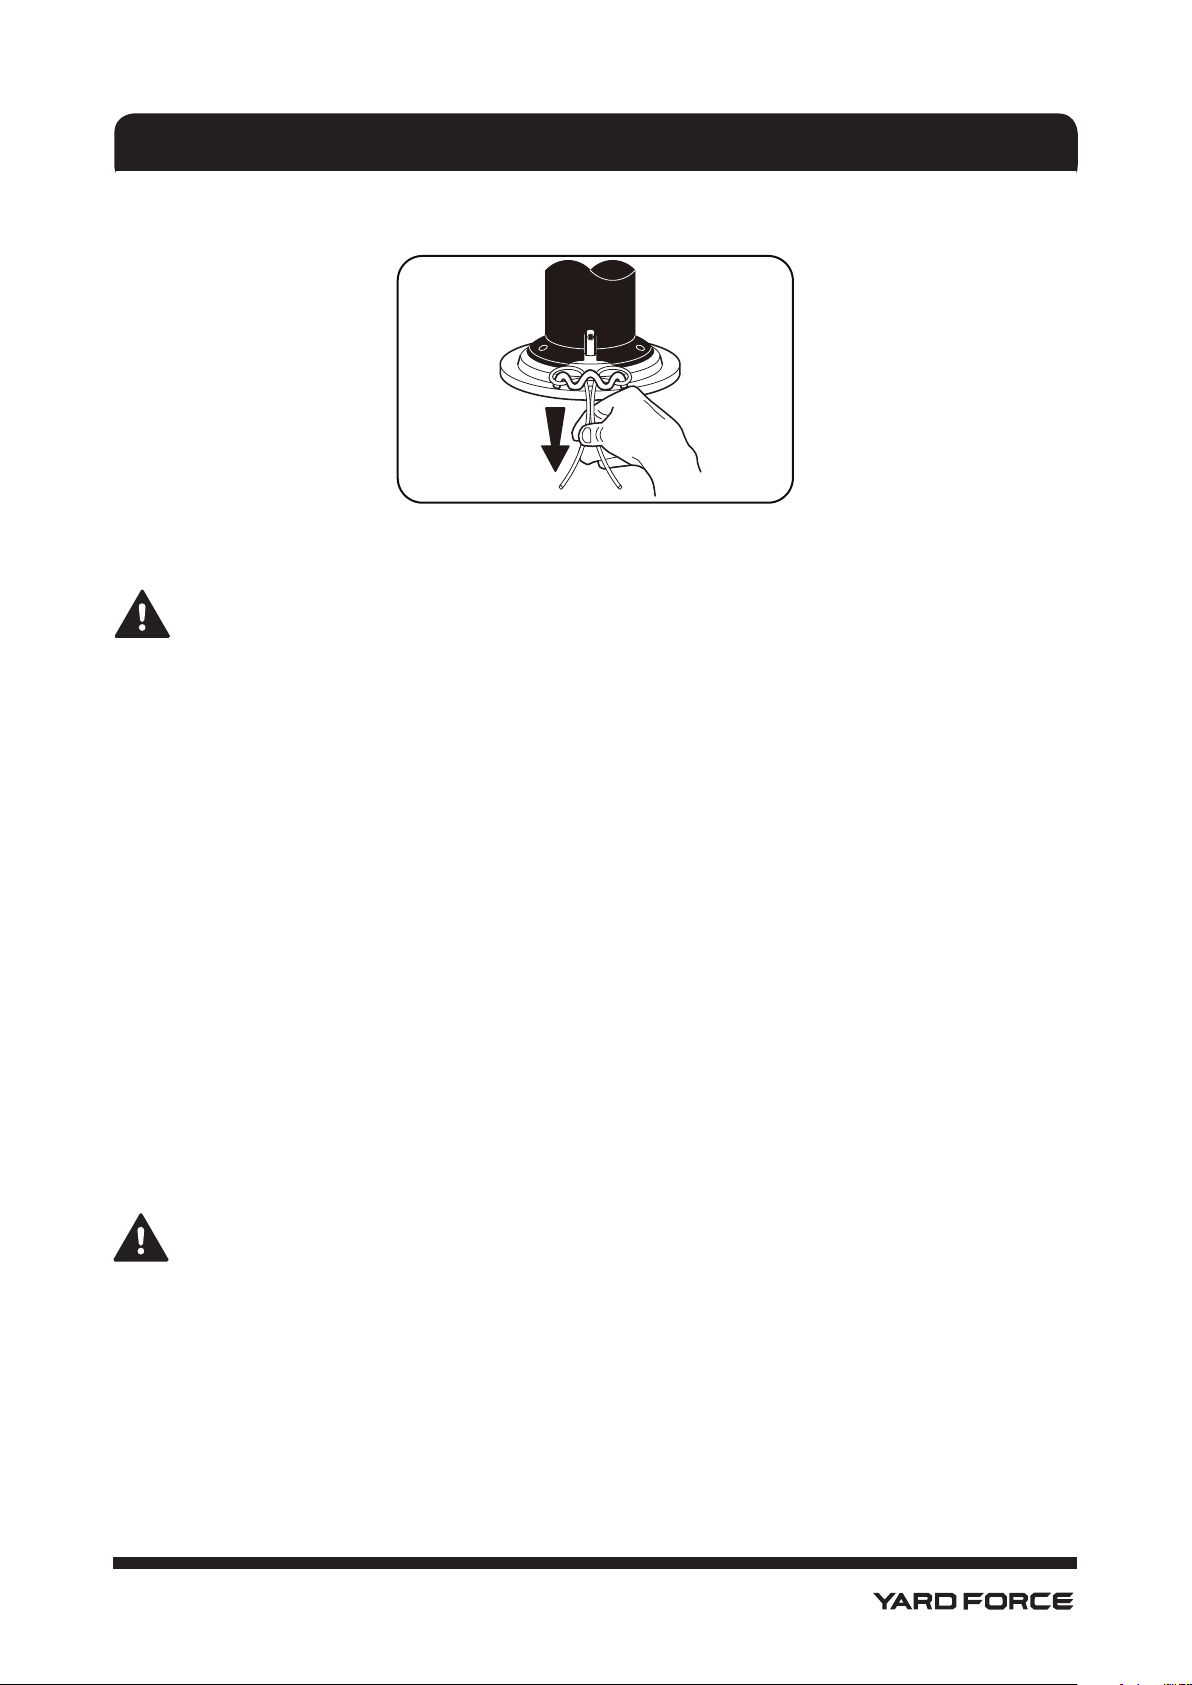
6. Then, check to make sure that the ends of the line are even. (See Fig. 15)
7. Follow same steps for line on alternate side.
IMPORTANT: To extend the life of the trimmer line, keep the trimmer line moist. If not kept moist,
the nylon trimmer line will become dry and brittle. Keep extra trimmer line in a can of water. The line
will then stay flexible and easy to change. A flexible line will also last much longer.
STORING THE TRIMMER FOR SHORT PERIODS
The trimmer can be stored for short periods of time (less than 15 days) without performing any storage
maintenance. Before placing the trimmer into storage always do the following:
1. Allow the engine to fully cool.
2. Ensure the grass bag is empty.
3. Clean all debris from under the cutting deck.
4. Store the trimmer on a flat and level surface with the trimmer upright.
5. Store in a safe place which is not accessible by children or people who are not familiar with the trimmer's
operation.
STORING THE TRIMMER FOR EXTENDED PERIODS
If the trimmer is to be placed into storage for more than 15 days, storage maintenance must be performed
on the trimmer. If the following steps are not carried out, when you next operate the trimmer it may not start
correctly and may need to be serviced.
CAUTION! Do not empty the gas tank in enclosed areas, near fire or when smoking. Gas fumes can
cause explosions and fire.
1. Empty the gas tank with a gas suction pump if available.
2. Start the engine and let it run until any remaining gas has been used up.
3. Clean the cooling fins of the cylinder and the housing.
4. Be sure to clean the entire machine to protect the paint.
5. Store the machine in a well-ventilated place.
MAINTENANCE AND STORAGE
Fig. 15

20
Hotline: 1-866-902-9690
MAINTENANCE SCHEDULE
Performing routine maintenance correctly on your trimmer will ensure you get years of trouble-free use.
Please keep this manual safe for future reference.
It is recommended that the following maintenance schedule is adhered to. This will ensure the trimmer
operates correctly and is safe to use.
12 hours of use 24 hours of use 36 hours of use
Air filter Clean Clean Clean
Spark plug Check Clean Clean
Engine oil Check Check and Add Check and Add
TRANSPORTING THE TRIMMER
Empty the gas tank. Always let the engine run until it has used up the remainder of gas in the tank.
Empty the engine oil from the warm engine. Remove the spark plug cover from the spark plug. Clean the
cooling fins of the cylinder and the housing. Use the original packaging to ship whenever possible.
MAINTENANCE AND STORAGE

21
Hotline: 1-866-902-9690
TROUBLE SHOOTING
Fault/malfunction Cause Remedy
Engine does not start
Engine on/off control bar pressed.
Spark plug is defective.
Cutting blade is worn or damaged.
Fuel tank is empty.
Engine may be flooded.
Press engine on/off control bar.
Replace spark plug.
Replace it through the customer
service centre.
Refill with fuel.
Remove plug and dry.
Engine runs unsteadily.
Air filter is soiled.
Spark plug is soiled.
Clean the air filter.
Clean the spark plug.
Trimmer vibrates
Set screws for trimmer head is
loose
Trimmer line lengths are
substantially different
Loose nuts or bolts
Broken trimmer head
Tighten set screw with T-handle
wrench.
Adjust trimmer line to
approximately equal lengths.
Check all bolts and nuts, including
engine bolts.
Replace broken part.
Trimmer head does not retain line
Trimmer line not properly attached
Broken line retainer
Trimmer line not correct size
Follow instructions on decal or in
the Service section of the owner’s
manual.
Replace the trimmer head
assembly.
Use a 0.155 in. (4 mm) trimmer line.

22
Hotline: 1-866-902-9690
WARRANTY
YARD FORCE TWO YEAR LIMITED WARRANTY
Product Warranty
Please keep your original purchase receipt in a safe place as proof of purchase. Warranty coverage for
this product must be veried by the original purchase receipt. The warranty period begins on the day
that the product was purchased from an authorized retailer of Yard Force products. Warranty coverage
only applies to the original purchaser and is not transferable. Warranty coverage is only provided on
products purchased and used in the USA and Puerto Rico from authorized Yard Force retailers. Products
purchased or used outside of the USA and Puerto Rico are not covered by this warranty.
(2) Two-Year Warranty – Engine
The YF22-HWT has a 2-Year Limited Warranty from the date of purchase against manufacturer defects
for residential use only. Commercial use voids the warranty. This warranty does not cover accidental
damage, unreasonable use, normal wear and tear, neglect or non-compliance with the Operating, Safety
and Maintenance Instructions. All service, outside of normal maintenance as described in this manual,
must be done by an authorized service technician. Any unauthorized service or changes to the original
con guration of this product will void the warranty. All parts and accessories used on and with this prod-
uct must be manufacturer/or and authorized by Merotec Inc.
(90) Ninety-Day Warranty – Accessories
The accessories included with the YF22-HWT; like the blade, and other similar parts are warranted
against manufacturer defects for residential use only for a period of 90 days from date of purchase.
Warranty does not cover loss of use or other consequential damages arising from any of the above, nor
does it cover repairs made or attempted by unauthorized persons. This warranty is void if the product
is used for commercial, rental or industrial purposes. Certain parts, attachments and accessories are
subject to normal wear and tear and are excluded from the warranty.
Service and Warranty Claims Process
Contact the Yard Force Support Center toll-free at (866) 902-9690 Monday-Friday between 8:30 AM
and 5:00 PM Eastern Time for service and warranty support.
Yard Force USA Service Support agents can help you troubleshoot problems over the phone to get
you back up and running as quickly as possible. In the situation where service or warranty inspection is
needed, please follow these steps:
1. Contact Yard Force USA at (866) 902-9690 or support@merotecusa.com Monday-Friday between
8:30 AM and 5:00 PM Eastern Time.
2. Send in proof-of-purchase and serial number (if applicable) to conrm warranty coverage.
3. If service or a warranty evaluation is requested, Yard Force USA will provide an RGA number that
should be used in all communications with Yard Force USA and if necessary a list of local authorized
service centers to bring your trimmer to for evaluation and repair.
4. All shipments to Yard Force USA must have an RGA number. Any shipment received that does not have
an RGA number clearly marked on the outside of the box will be refused.
5. All shipments must be sent pre-paid, Yard Force USA does not pay for any shipping costs for service
or warranty evaluation. Yard Force USA is not responsible for any packages that are lost by carrier. We
recommend that shipments are made by a carrier that provides tracking and delivery con rmation.
For more information or to ask questions, please call toll-free (866) 902-9690 or support@merotecusa.
com Monday-Friday between 8:30 AM and 5:00 PM Eastern Time.
SAVE THESE INSTRUCTIONS

Merotec Inc.
3655 Kennesaw North Industrial Parkway
Kennesaw, GA 30144
Copyright © 2019 Merotec Inc.
Made in China at a SUMEC manufacturing
facility.
www.YardForceUSA.com
www.YardForceUSA.com

YF22-HWT
CORTABORDES DE EMPUJE A GASOLINA
MANUAL DEL USUARIO
El personal de nuestro servicio de atención al cliente está preparado para proporcionar
asistencia.
En caso de que alguna pieza falte o esté dañada, la mayoría de las piezas de recambio
se envían desde nuestras instalaciones.
Si necesita ayuda inmediata para el montaje, o si desea más información sobre el
producto, visite la página www.YardForceUSA.com o envíe un mensaje de correo
electrónico a [email protected]
Necesitará este manual para leer las instrucciones de seguridad, el modo de
empleo y la garantía.
Para reclamar el servicio de garantía es necesario el justicante de compra
original.
CONSERVE ESTE MANUAL PARA CONSULTARLO

2
Hotline: 1-866-902-9690
YF22-HWT Instrucciones originales
ÍNDICE
Instrucciones de seguridad............................................................................................................................ 3
Lista de piezas................................................................................................................................................. 6
Uso previsto .................................................................................................................................................... 7
Especicaciones técnicas.............................................................................................................................. 8
Montaje ......................................................................................................................................................... 8
Modo de empleo............................................................................................................................................ 13
Mantenimiento y almacenamiento................................................................................................................. 16
Solución de problemas................................................................................................................................. 21
Garantía ........................................................................................................................................................ 22

3
Hotline: 1-866-902-9690
INSTRUCCIONES DE SEGURIDAD
IMPORTANTE
Lea completamente estas instrucciones antes de montar la herramienta y de utilizarla.
DESCRIPCIÓN DE LOS SÍMBOLOS
La finalidad de los símbolos que se usan en este manual es atraer su atención hacia los posibles riesgos.
Los símbolos de seguridad y las explicaciones que los acompañan deben comprenderse perfectamente.
Las advertencias no evitan los riesgos por sí mismas, y no sustituyen a la adopción de medidas adecuadas
para evitar accidentes.
SÍMBOLOS DE ADVERTENCIA EN EL APARATO
Indica ADVERTENCIA, PELIGRO o PRECAUCIÓN.
Lea el manual de instrucciones completo antes de utilizar esta herramienta. Si no se siguen
las instrucciones, pueden producirse lesiones graves.
Objetos lanzados. Las demás personas deben mantenerse a una distancia mínima de 50 pies
(15 m). No utilice el aparato en presencia de niños. Retire todos los objetos que podrían ser
lanzados por el aparato. Lea el manual de instrucciones antes de utilizar esta herramienta.
NO corte subiendo y bajando pendientes. Corte en las pendientes de manera transversal.
Las piezas giratorias podrían causar lesiones graves. Manténgase alejado de las piezas
giratorias. Pare el motor y desconecte el cable de la bujía antes de hacer ajustes.
Utilice protección ocular que cumpla la norma ANSI Z87.1, así como protección auditiva.
Desconecte el cable de la bujía antes de realizar trabajos de servicio técnico en el aparato.
Dirección de giro del hilo.
El motor emite monóxido de carbono. NO lo ponga en marcha en interiores ni en áreas
cerradas.
NO toque el silenciador ni el cilindro calientes. Estas piezas se calientan extremadamente
durante el funcionamiento, y pueden seguir estando calientes durante poco tiempo después
del uso.
Para reducir el riesgo de incendio, limpie la gasolina derramada y mantenga el aparato libre
de residuos. La gasolina es extremadamente inflamable. Espere a que el aparato se enfríe
antes de repostar.

4
Hotline: 1-866-902-9690
INSTRUCCIONES DE SEGURIDAD
FORMACIÓN
1. Lea atentamente las instrucciones. Familiarícese con los controles y el uso correcto del equipo.
2. Nunca permita que utilicen el producto los niños o las personas que no estén familiarizadas con estas
instrucciones de uso del cortabordes. Las regulaciones locales pueden restringir la edad del usuario.
3. Nunca utilice el cortabordes cuando haya cerca otras personas, especialmente niños, o mascotas.
4. Tenga en cuenta que el operario o usuario es responsable de los accidentes o riesgos que ocurran a
otras personas o a su propiedad.
5. No utilice el aparato si se encuentra bajo la influencia de alcohol o drogas.
6. Siga las instrucciones del fabricante en relación con los pesos o contrapesos de las ruedas.
7. Pare el aparato y los accesorios si alguien entra en el área en la que los está utilizando.
PREPARACIÓN
1. Lleve siempre calzado robusto y pantalones largos cuando corte el césped. No use el aparato cuando
vaya descalzo o lleve puestas sandalias abiertas.
2. Examine minuciosamente la zona donde vaya a utilizarse el aparato y elimine todos los objetos que
puedan ser lanzados por la máquina.
3. Advertencia: la gasolina es muy inflamable.
- Guarde el combustible en recipientes diseñados específicamente para ello.
- Reposte combustible solo en exteriores y no fume mientras lo hace.
- Añada gasolina antes de arrancar el motor. No quite nunca el tapón del depósito de combustible ni
añada gasolina cuando el motor esté en marcha ni cuando esté caliente.
- Si se derrama gasolina, no intente arrancar el motor. Aleje el aparato del área donde se ha
derramado el combustible y evite crear cualquier fuente de ignición hasta que se hayan disipado
los vapores de gasolina.
- Vuelva a cerrar bien los tapones del depósito de combustible y del recipiente.
4. Cambie los silenciadores si están defectuosos.
5. Antes de utilizar la herramienta, examine siempre los tornillos y el conjunto del sistema de corte para
comprobar que no están desgastados ni dañados. Sustituya simultáneamente los tornillos dañados o
desgastados para mantener el equilibrado del conjunto.
MODO DE EMPLEO
1. No ponga en marcha el motor en lugares en los que puedan acumularse gases de monóxido de
carbono peligrosos.
2. Utilice el cortacésped solo a plena luz del día o cuando se cuente con iluminación artificial adecuada.
3. Siempre que sea posible, evite utilizar el aparato para cortar hierba húmeda.
4. Asegúrese siempre de tener los pies firmemente apoyados sobre el suelo cuando utilice la herramienta
en pendientes.
5. Desplácese caminando, sin correr nunca.
6. En el caso de aparatos rotativos con ruedas, corte la hierba desplazándose perpendicularmente a la
pendiente, nunca cuesta arriba o cuesta abajo.
7. Extreme la precaución al cambiar de dirección mientras utiliza la herramienta en pendientes.
8. No corte el césped en pendientes excesivamente pronunciadas.
9. Extreme la precaución al retroceder o al tirar hacia usted del cortabordes.
10. Pare el hilo de corte en caso de que sea necesario volcar el aparato para transportarlo, así como al
atravesar superficies que no sean de hierba y al transportarlo hasta y desde su lugar de uso.
11. No utilice nunca el cortabordes si las protecciones están defectuosas o si no están instalados los
dispositivos de seguridad.
12. No cambie los ajustes de regulación del motor ni ponga el motor a una velocidad excesiva.
13. Arranque o encienda el motor con cuidado, teniendo en cuenta las instrucciones y con los pies bien
alejados del hilo de corte.
14. No incline el aparato mientras arranca el motor o lo enciende, a menos que sea necesario inclinarlo
para poder ponerlo en marcha. En ese caso, no incline el producto más de lo absolutamente necesario
y eleve únicamente la parte que queda más alejada del usuario.
INSTRUCCIONES DE SEGURIDAD

5
Hotline: 1-866-902-9690
INSTRUCCIONES DE SEGURIDAD
15. No ponga las manos ni los pies cerca o debajo de los elementos que giran.
16. Nunca levante ni transporte un cortabordes con el motor en marcha.
17. Pare el motor y desconecte el cable de la bujía, y asegúrese de que todas las piezas móviles se hayan
parado completamente.
18. Reduzca el ajuste del estrangulador durante el apagado del motor y, si el motor está equipado con una
válvula de cierre, cierre el combustible cuando termine de cortar el césped.
19. Vaya despacio cuando utilice un asiento colgante.
20. Evite los agujeros, surcos, baches, rocas u otros peligros ocultos.
21. No dirija el material de descarga hacia ninguna persona. Evite descargar material contra una pared
o una obstrucción. El material puede rebotar hacia el usuario. Pare el hilo de corte cuando atraviese
superficies de grava.
22. No deje una herramienta en macha sin vigilancia. Déjela siempre en una superficie nivelada, desmonte
el accesorio, ponga el freno de estacionamiento y pare el motor.
23. No corte marcha atrás, a menos que sea absolutamente necesario.
24. Pueden producirse accidentes trágicos si el usuario no está atento a la presencia de niños. Con
frecuencia, a los niños les atrae la herramienta y la actividad de recortar la hierba. No suponga nunca
que los niños permanecerán donde los ha visto por última vez.
25. Mantenga a los niños fuera del área de funcionamiento de la herramienta y bajo la supervisión de un
adulto responsable que no sea el usuario.
26. Desplácese por las pendientes siguiendo la dirección recomendada por el fabricante. Tenga cuidado
cuando utilice la herramienta cerca de simas.
27. Si apoya mal los pies, podría resbalar y sufrir una caída.
28. No utilice el aparato en ningún caso si hay problemas de tracción, control o estabilidad. Los
neumáticos pueden resbalar incluso si las ruedas están paradas.
29. Mantenga siempre la herramienta engranada cuando descienda por una pendiente. No la deje
descender en punto muerto.
30. Apague todos los cigarrillos, cigarros, pipas u otras fuentes de ignición.
31. No almacene la herramienta ni el recipiente de combustible, ni reposte combustible, en un lugar en el
que haya una llama abierta, chispas o una luz piloto, como un calentador de agua u otros aparatos.
32. Cuando cargue o descargue la herramienta para transportarla, utilice rampas lo bastante anchas.
MANTENIMIENTO Y ALMACENAMIENTO
1. Mantenga todas las tuercas, los pernos y los tornillos apretados para garantizar unas condiciones de
trabajo seguras.
2. No guarde nunca el aparato con gasolina dentro del depósito en un edificio en el que los vapores
puedan alcanzar una llama abierta o una chispa.
3. Espere a que el motor se haya enfriado antes de guardarlo en algún espacio cerrado.
4. Para reducir el riesgo de incendio, mantenga el motor, el silenciador, el compartimento de la batería y el
área de almacenamiento de la gasolina libres de grasa, hojas, o exceso de grasa.
5. Compruebe frecuentemente que el recogedor de hierba no está desgastado ni deteriorado.
6. Cuando haya que vaciar el depósito de combustible, deberá hacerse en exteriores.
USO EN PENDIENTES
Las pendientes son un factor importante en relación con los accidentes por resbalamiento o caída, que
pueden provocar lesiones graves. Hay que extremar las precauciones en las pendientes. Si no se siente
seguro en una pendiente, no corte ahí la hierba. Por su seguridad, antes de usar este aparato en una
pendiente o una colina, utilice el medidor de pendientes que se incluye en este manual. No corte la hierba
en una pendiente que tenga más de 15 grados.
1. Recorte la hierba desplazándose perpendicularmente a la pendiente y nunca cuesta arriba o cuesta
abajo. Extreme la precaución al cambiar de dirección mientras utiliza la herramienta en pendientes.
2. Tenga cuidado con los agujeros, surcos, rocas, objetos ocultos o baches, que podrían hacerle resbalar
o tropezar. La hierba alta puede ocultar obstáculos.
3. Asegúrese siempre de tener los pies firmemente apoyados sobre el suelo. Un resbalón y una caída
pueden provocar lesiones graves. Si nota que está perdiendo el equilibrio, suelte inmediatamente la
palanca de control para que el husillo deje de girar en el transcurso de tres (3) segundos.

6
Hotline: 1-866-902-9690
4. No corte la hierba cerca de precipicios, zanjas o terraplenes, ya que podría perder el equilibrio o el
apoyo de los pies.
5. No corte hierba mojada. Un apoyo inestable de los pies puede hacerle resbalar.
NIÑOS
Pueden producirse accidentes trágicos si el usuario no está atento a la presencia de niños. Con frecuencia,
a los niños les atrae el cortabordes y la actividad de recortar la hierba. No suponga nunca que los niños
permanecerán donde los ha visto por última vez.
Mantenga a los niños fuera del área de corte y bajo la supervisión de un adulto responsable.
Permanezca alerta y apague el cortabordes si algún niño entra en la zona.
Antes de cortar marcha atrás y mientras lo haga, mire hacia atrás y hacia abajo por si hubiera niños
pequeños.
Nunca permita que los niños utilicen el cortabordes.
Tenga mucho cuidado cuando se acerque a esquinas sin visibilidad, arbustos, árboles u otros objetos que
puedan entorpecer la visión.
INSTRUCCIONES DE SEGURIDAD
7
Hotline: 1-866-902-9690
LISTA DE PIEZAS
Fig. 1
1
12
10
9
7
6
4
3
2
1. Barra de control de encendido/apagado del motor
2. Mango superior
3. Mango inferior
4. Tornillo de ajuste del mango
5. Tapón de llenado de gasolina
6. Rueda
7. Hilo de corte
8. Guía de corte
9. Cabezal de corte
10. Protección del borde
11. Varilla del nivel de aceite
12. Guía de la cuerda
13. Tirador del cordón de arranque
5
13
11
8

8
Hotline: 1-866-902-9690
LISTA DE PIEZAS
Este cortabordes de empuje a gasolina ha sido diseñado para cortar el césped en zonas residenciales.
La herramienta solo debe utilizarse para el uso previsto. Cualquier otro uso se considerará un uso indebido.
El usuario, y no el fabricante, será responsable de cualquier tipo de daños o lesiones que pudieran deri-
varse de ello.
Tenga en cuenta que este equipo no ha sido diseñado para uso comercial o aplicaciones industriales.
Nuestra garantía se anulará si se utiliza la herramienta en negocios comerciales o industriales, o para nes
equivalentes.
USO PREVISTO
LISTA DE PIEZAS
Con cuidado, saque el cortabordes del embalaje y compruebe que las piezas siguientes están incluidas:
A. Unidad principal del cortabordes con mangos 1 ud.
B. Manual 1 ud.
C. Aceite de motor (SAE30 15 oz.) 1 ud.
D. Llave con mango en T 1 ud.
E. Hilo de corte 4 ud.
Fig. 2
A
B
C
D
E

9
Hotline: 1-866-902-9690
ESPECIFICACIONES TÉCNICAS
Tipo de motor De un cilindro y de 4 tiempos
Cilindrada 163 cc
Velocidad del motor 3100±100 rpm
Trayectoria de corte 22" (56 cm)
Altura de corte 1.5"-3" (38-76 mm)
Hilo de corte 0.155" (4 mm)
Diámetro de las ruedas 14"
ESPECIFICACIONES TÉCNICAS
MONTAJE
Lea las instrucciones de montaje y ajuste, y sígalas. No elimine ninguna pieza ni material hasta que esté
montado el aparato.
NOTA: El par se mide en pies-libra (la unidad métrica es Nm). La medición describe lo apretada
que debe estar una tuerca o un tornillo. El par se mide con una llave dinamométrica.
ADVERTENCIA Para montar el cortabordes, utilice siempre gafas de seguridad o protección ocular
que cumplan las normas ANSI.
ADVERTENCIA
Antes de realizar trabajos de montaje o mantenimiento en el aparato, quite el cable de la bujía.
AJUSTE DEL MANGO
1. Ajuste los tornillos hasta que se desengranen los dientes de la rueda dentada. No quite los tornillos de
ajuste del mango (ver fig. 3).
2. Separe los laterales del mango y gire el mango hasta la posición que desee detrás del cortabordes.
3. Colóquese en la posición del usuario detrás del cortabordes, para asegurarse de que el mango esté
ajustado a una posición cómoda.
4. Apriete los tornillos de ajuste del mango.
5. Para colocar el tirador del cordón de arranque en la guía de la cuerda, enganche la cuerda a través de
la guía de la cuerda montada en el lado derecho del mango.
10
Hotline: 1-866-902-9690
MONTAJE
Fig. 3
Guía de la cuerda
Mango
Tornillo de ajuste del mango

11
Hotline: 1-866-902-9690
MONTAJE
PREPARACIÓN DEL MOTOR
EL MOTOR NO CONTIENE ACEITE NI GASOLINA CUANDO SE ENVÍA Consulte en las instrucciones
del fabricante del motor el tipo de gasolina y aceite que debe utilizar. Antes de utilizar el aparato, lea la
información relativa a la seguridad, el funcionamiento, el mantenimiento y el almacenamiento.
Este cortabordes se suministra con un recipiente de 15 oz. de aceite de motor SAE30. Debe añadir este
aceite al motor antes de ponerlo en marcha. Siga el procedimiento que se indica a continuación para llenar
con aceite el cárter.
No use nunca aditivos con el aceite recomendado.
El motor es del tipo «Comprobar y añadir», y no hay que cambiar nunca el aceite.
COMPROBAR EL NIVEL DE ACEITE Y LLENAR HASTA EL NIVEL ADECUADO
1. Coloque el cortabordes sobre una superficie nivelada.
2. Quite la varilla del nivel de aceite y limpie el aceite con un paño.
3. Vuelva a introducir la varilla y NO la enrosque. Saque la varilla y compruebe el nivel de aceite
4. Si el deposito de aceite está lleno, el aceite llegará hasta la marca de límite superior de la varilla. (Ver
fig. 4).
5. Si el nivel está cerca o por debajo del límite inferior de la varilla (ver fig. 4), añada aceite SAE30 (o
equivalente) lentamente y vuelva a comprobar, hasta que el nivel alcance la marca de límite superior de
la varilla. NO LO LLENE DEMASIADO.
6. Vuelva a poner la varilla y apriétela.
7. Limpie el aceite que se haya derramado.
NOTA: Cuando añada aceite, introduzca con frecuencia la varilla de nivel de aceite y compruebe la
cantidad de aceite que hay en el motor. NO LO LLENE DEMASIADO. (Ver fig. 5)
Gas filler cap
LLENAR EL DEPÓSITO
¡PRECAUCIÓN! Use siempre gasolina limpia, fresca y sin plomo. Compre combustible en
cantidades que se puedan usar dentro de un plazo de 30 días. No mezcle nunca aceite y gasolina.
¡PRECAUCIÓN! No llene hasta la base de la boca de llenado, para permitir la expansión del
combustible. No llene demasiado el depósito de combustible.
¡PRECAUCIÓN! ¡ADVERTENCIA! La gasolina es muy inflamable, por lo que deben extremarse las
precauciones cuando se la manipule y se trabaje con ella. Mantener fuera del alcance de los niños.
¡PRECAUCIÓN! El motor se envía sin aceite y sin gasolina para evitar que se dañe. El motor debe
llenarse con gasolina y aceite del grado correcto antes de arrancarlo.
ADVERTENCIA Consulte en las instrucciones del fabricante del motor el tipo de gasolina y aceite
que debe utilizar. Utilice siempre un recipiente de gasolina de seguridad. No fume cuando esté
repostando gasolina en el motor. No reposte gasolina en un espacio cerrado. Pare el motor antes
de añadir gasolina. Deje que el motor se enfríe durante varios minutos.
Fig. 4 Fig. 5
AÑADIR
LLENO
Tapón del ltro
de gasolina
Varilla del
nivel de
aceite
12
Hotline: 1-866-902-9690
¡ADVERTENCIA! Llene el depósito de combustible en una zona bien ventilada y con el motor
parado. No fume y no permita que haya llamas o chispas en el área en la que se reposta o donde
se guarda la gasolina. Evite el contacto repetido o prolongado con la piel y la inhalación de vapor.
¡ADVERTENCIA! Es admisible la gasolina que tenga hasta un 10 % de etanol (gasohol).
No use gasolina no autorizada, como E15 y E85.
1. Limpie la superficie alrededor del tapón de llenado de gasolina para evitar que se contamine.
2. Abra lentamente el tapón de llenado de gasolina. (Ver fig. 5)
3. Vierta gasolina en el depósito con cuidado. Evite que se derrame.
4. Antes e volver a poner el tapón de llenado de gasolina, limpie la junta y examínela.
5. Vuelva a colocar enseguida el tapón de llenado de gasolina y apriételo a mano. Limpie la gasolina que
se haya derramado.
NOTA: Es normal que un motor nuevo emita humo después del primer uso.
AJUSTAR LA ALTURA DE CORTE
PRECAUCIÓN Antes de ajustar la altura de corte, pare el motor. Espere hasta que todas las piezas
móviles se hayan detenido. Deje que el motor se enfríe y desconecte el cable de la bujía.
La altura de corte se puede ajustar desde 1,5 a 3 pulgadas [38-76 mm]. La altura de corte recomendada
para un jardín medio es 2 pulgadas [51 mm].
1. Use la llave en T que encontrará en la bolsa de piezas para aflojar los 2 tornillos de ajuste. (Ver fig. 6)
NOTA: Los 2 tornillos de ajuste están solo en un lado del cabezal de corte. Si no encuentra los tornillos
de ajuste, busque en el lado contrario. Es necesario aflojar los dos tornillos para cambiar la altura de
corte.
2. Deslice el cabezal de corte hacia arriba o hacia abajo, hasta la altura que desee. Desde la position 1 a la
posición 7, la altura de corte varía de 1,5" a 3" (38-76 mm), a intervalos de 0,25” entre dos posiciones.
3. Apriete los dos tornillos de ajuste 2,6-3,7 pies-libra (3,5-5 Nm).
MONTAJE
Fig. 6
0.25"
Guía de corte
Cabezal de corte
Llave con mango en
forma de T
Tornillos de ajuste
Posiciones de la altura de corte
13
Hotline: 1-866-902-9690
ARRANCAR Y PARAR EL MOTORE
ADVERTENCIA: El hilo de corte empieza a girar en cuanto se arranca el motor.
NOTA: No utilice el cortabordes en áreas cerradas o mal ventiladas, ya que el gas de escape
contiene sustancias tóxicas.
Mantenga las manos, los pies, el pelo y la ropa alejados de las piezas móviles de la máquina. El
gas de escape y otras piezas de la máquina se calientan mucho durante el uso.
Asegúrese de que la cuchilla esté instalada de forma segura antes de arrancar el motor.
NOTA: Para arrancar el motor, asegúrese de que el tapón de la bujía esté conectado a la bujía y de
que la máquina esté llena con suficiente aceite y gasolina.
ARRANCAR EL MOTOR
NOTA: Debido al recubrimiento protector del motor, puede producirse una pequeña cantidad de
humo cuando se utiliza el cortabordes por primera vez. Esto es normal.
NOTA: El motor está equipado con un sistema de estárter automático. No es necesario cebarlo
antes de arrancar.
PRECAUCIÓN No deje nunca el cortabordes sin vigilancia cuando el motor esté en marcha.
Espere hasta que los hilos de corte paren de girar.
1. Este motor está equipado con un sistema de estárter automático. No es necesario cebarlo antes de
arrancar.
2. Colóquese detrás del cortabordes. Tire de la barra de control de encendido/apagado del motor hacia el
mango superior con una mano, y coloque la otra mano sobre el tirador del cordón de arranque (ver fig. 7).
3. Tire del mango de arranque aproximadamente de 4" a 6" (de 10 a 15 cm) hasta que note una resistencia
y, a continuación, arranque el motor con un tirón fuerte. NO deje que el cordón de arranque salte hacia
atrás.
NOTA: Si el motor no arranca después de tirar tres veces, repita el proceso.
4. Cuando el motor ya esté en marcha, coloque el cordón de arranque en la guía de la cuerda.
PARAR EL MOTOR
Suelte la barra de control de encendido/apagado del motor. Regresará a la posición inicial y el motor se
apagará automáticamente.
PRECAUCIÓN El cabezal de corte seguirá girando durante varios segundos después de que se
haya parado el motor.
Fig. 7
MODO DE EMPLEO
Tirador del cordón
de arranque

14
Hotline: 1-866-902-9690
USO DEL CORTABORDES
Asegúrese de que el área de corte esté despejada de piedras, palos, alambres u otros objetos que pudieran
dañar el cortabordes o el motor. Esos objetos podrían ser lanzados accidentalmente por el cortabordes en
cualquier dirección, y provocar lesiones graves al usuario o a otras personas.
ADVERTENCIA: Cuando se utiliza un cortabordes, es posible que salgan despedidos objetos
que podrían golpear los ojos y causar lesiones oculares graves. Lleve siempre gafas de seguridad
cuando utilice el cortabordes, o cuando haga ajustes o reparaciones en el aparato.
El cortabordes has sido diseñado con una función de desplazamiento del cabezal de corte hacia la
izquierda, que permite al usuario cortar a lo largo de una valla, un jardín o una casa a su derecha, sin tener
que hacer ajustes en el aparato.
Sujete firmemente el mango superior con las dos manos y empuje el cortabordes hacia delante,
manteniendo la guía de corte deslizándose sobre el suelo para cortar.
No corte la hierba en pendientes excesivamente pronunciadas. Utilice el medidor de pendientes para
determinar si una pendiente es demasiado pronunciada para usar el aparato con seguridad. No corte en
una pendiente en la que sea difícil estar de pie. No corte en pendientes en las que el suelo esté mojado o
resbaladizo. Corte la hierba desplazándose perpendicularmente a la pendiente y no cuesta arriba o cuesta
abajo.
PRECAUCIÓN: Mientras utilice el cortabordes, no deje que la guía de corte entre en contacto con
superficies de hormigón, asfalto o grava. De lo contrario, se producirá un desgaste prematuro.
CONSEJOS DE CORTE
ADVERTENCIA Los residuos, como palos, grava y piedras, pueden salir despedidos con suficiente
fuerza para causar lesiones o daños materiales.
1. Limpie el cortabordes con frecuencia para eliminar la hierba acumulada. Consulte los detalles en el
apartado «Mantenimiento».
2. Para obtener un resultado óptimo y una mayor duración del hilo de corte, utilice los extremos del hilo
para hacer el corte. Esto resulta fácil si se mueve lentamente a través de las hierbas muy gruesas o
pesadas.
3. Si el hilo se acorta demasiado, requerirá más tiempo para realizar esta tarea. Si los hilos de corte se han
desgastado hasta que quede menos de la mitad de la longitud original, cámbielos por un hilo nuevo.
Consulte el punto «Cambiar el hilo de corte» en el apartado «Mantenimiento».
MODO DE EMPLEO
15
Hotline: 1-866-902-9690
MODO DE EMPLEO
Medidor de
pendientes
(DEMASIADO
PRONUNCIADA)
15
O
pendiente
15
O
pendiente
(CORRECTO)
Fig. 8
Fig. 9
15
o
línea discontinua
¡UTILICE ESTE MEDIDOR DE PENDIENTES PARA DETERMI-
NAR SI UNA PENDIENTE ES DEMASIADO PRONUNCIADA
PARA USAR EL APARATO CON SEGURIDAD!
Proceda del modo siguiente para comprobar una pendiente:
1. Saque esta página y dóblela por la línea discontinua.
2. Ubique un objeto vertical sobre la pendiente o detrás de la misma (por ejemplo, un poste, un
edicio, una valla, un árbol, etc.)
3. Alinee con el objeto un lado del medidor de pendientes (ver g. 8 y g. 9).
4. Ajuste el medidor hacia arriba o hacia abajo hasta que la esquina izquierda toque la pendiente
(ver g. 8 y g. 9).
5. Si hay un hueco debajo del medidor, la pendiente es demasiado pronunciada para usar el
aparato con seguridad (ver la g. 9 arriba).
ADVERTENCIA Las pendientes son un factor importante en relación con los accidentes por resbalamiento o caída, que pueden provocar
lesiones graves o mortales. No utilice el aparato en pendientes con una inclinación mayor que 15 grados. Debe extremar las precauciones
en todas las pendientes.
Corte siempre el césped desplazándose perpendicularmente a las pendientes, y nunca cuesta arriba o cuesta abajo.

16
Hotline: 1-866-902-9690
MANTENIMIENTO Y ALMACENAMIENTO
TABLA CON EL PROGRAMA DE MANTENIMIENTO PERIÓDICO
Registro de
servicio: rellene
las fechas
cuando finalice
el mantenimiento
regular
ANTES DE
CADA USO
Cada 5
horas
Cada 25
horas
Cada 100
horas
Ver nota Antes del
almacenamiento
Fechas de
mantenimiento
Comprobar el
nivel de aceite
del motor
Y
Comprobar los
hilos de corte
Y 1
Comprobar la
sujeción del
cabezal de corte
Y
Limpiar el motor/
la máquina
Y 2
Comprobar
tuercas y
tornillos
Y
Comprobar la
bujía
Y
Cambiar el
aceite del motor
Y
Mantenimiento
del filtro de aire
Y 3
Lubricar el
conjunto del eje
de unión
Y
Lubricar los
cojinetes de las
ruedas
Y
Nota 1 Cuando el hilo viejo tenga a la mitad de su longitud original, cámbielo por uno nuevo.
Nota 2 Limpiar a diario si se usa en condiciones de extrema suciedad o polvo. Limpie las acumulaciones
de hierba o residuos de la pantalla de residuos.
Nota 3 Limpiar con más frecuencia si se usa en condiciones de extrema suciedad o polvo.
RECOMENDACIONES GENERALES
La garantía de este cortabordes no cubre los objetos que hayan sido sometidos a un uso indebido o
negligente por parte del usuario. Para obtener el pleno valor de la garantía, el usuario debe realizar el
mantenimiento del cortabordes siguiendo las instrucciones que se indican en este manual. Algunos ajustes
deben llevarse a cabo de forma periódica para mantener el cortabordes correctamente. Todos los ajustes
del apartado «Mantenimiento» deben comprobarse al menos una vez cada temporada.
17
Hotline: 1-866-902-9690
MANTENIMIENTO DE LA BUJÍA
Como se muestra en la fig. 10
0.027"- 0.033"
Fig. 10
1. Una vez que el motor se ha enfriado, tire del tapón de la bujía con un giro.
2. Quite la bujía utilizando una llave de bujías (no incluida).
3. Limpie la bujía con un cepillo de alambre (no incluido).
4. Utilice una galga para ajustar el hueco de 0,027" a 0,033" (de 0,686 a 0,838 mm).
5. Instale la bujía con cuidado a mano, para evitar que se dañe la rosca.
6. Una vez colocada la bujía, apriete con la llave de bujías para comprimir la arandela.
MANTENIMIENTO DEL FILTRO DE AIRE
Como se muestra en la Fig. 11
Filter cartridge
Fig. 11
Si el filtro de aire está sucio, se reduce el rendimiento del motor debido a la restricción del aire al
carburador. Si el aire contiene mucho polvo, será necesario comprobar con más frecuencia el filtro de aire.
¡ADVERTENCIA! No ponga nunca en marcha el motor sin el elemento del filtro de aire instalado.
1. Presione las pestañas en la parte superior de la cubierta del filtro de aire, e incline la cubierta hacia fuera
del motor para quitarla.
2. Saque el cartucho del filtro.
3. Para soltar los residuos, golpee con cuidado el cartucho del filtro contra una superficie dura. Si el
cartucho del filtro está excesivamente sucio, cámbielo por uno nuevo.
Nota: No limpie nunca el cartucho del filtro de aire con gasolina ni con disolventes inflamables.
Limpie el cartucho del filtro solo con aire comprimido o golpeándolo.
4. Instale el cartucho del filtro.
5. Cierre la cubierta y sujétela correctamente enganchando las pestañas de nuevo en las ranuras
correspondientes de la parte superior.
MANTENIMIENTO Y ALMACENAMIENTO
Cartucho del ltro
18
Hotline: 1-866-902-9690
COMPROBAR Y AÑADIR ACEITE DE MOTOR
El motor Briggs & Stratton 675EXi de este cortacésped ha sido realizado con la función especial «Check &
Add»(TM) (Comprobar y añadir). No es necesario cambiar nunca el aceite. Antes de cada uso, compruebe
el nivel de aceite y añada más aceite en caso de que el nivel no esté entre las marcas «Min» y «Max».
SUSTITUIR EL HILO DE CORTE
Cambie el hilo de corte cuando se haya desgastado hasta la mitad de su longitud original. Para obtener un
rendimiento óptimo, use un hilo de corte de calibre grueso de 0,155 pulgadas [4 mm].
1. Pare el motor. Espere hasta que todas las piezas móviles se hayan detenido. Desconecte el cable de la
bujía.
2. Quite el hilo de corte gastado del cartucho de hilo.
3. Corte el hilo a una longitud de 21,5 pulgadas [546 mm]. Use la guía de longitud que se encuentra en la
cubierta para asegurarse de que el hilo de corte tiene la longitud adecuada (ver fig. 12). No deje que la
longitud de los hilos varíe más de una pulgada. Asegúrese de que el cabezal de corte esté equilibrado y
no vibre.
4. Pase los extremos del nuevo hilo de corte a través de los bucles exteriores. (Ver fig. 13).
5. Tome los extremos del hilo, crúcelos por encima del cartucho del hilo, y pase los extremos a través del
orificio central. (Ver fig. 14)
Fig. 12
Fig. 13
Fig. 14
MANTENIMIENTO Y ALMACENAMIENTO
19
Hotline: 1-866-902-9690
6. A continuación, asegúrese de que los extremos del hilo sean igual de largos. (Ver fig. 15)
7. Siga los mismos pasos en el otro lado.
IMPORTANTE: Para aumentar la duración del hilo de corte, manténgalo húmedo. Si no lo mantiene
húmedo, el hilo de corte de nailon se secará y se quebrará. Guarde el resto de hilo de corte en un
bote con agua. De este modo, el hilo se mantendrá flexible y será fácil de cambiar. Un hilo flexible
también durará mucho más tiempo.
ALMACENAMIENTO DEL CORTABORDES DURANTE PERIODOS CORTOS
El cortabordes se puede guardar durante periodos cortos (menos de 15 días) sin necesidad de hacer
ningún mantenimiento de almacenamiento. Antes de colocar el cortabordes en el lugar de almacenamiento,
haga siempre lo siguiente:
1. Deje que el motor se enfríe completamente.
2. Compruebe que la bolsa colectora de hierba está vacía.
3. Limpie todos los residuos que haya debajo de la cubierta del cortabordes.
4. Guarde el cortabordes en una superficie plana y nivelada, con el aparato en vertical.
5. Guárdelo en un lugar seguro al que no puedan acceder los niños o las personas que no estén
familiarizadas con el manejo del cortabordes.
ALMACENAMIENTO DEL CORTABORDES DURANTE PERIODOS LARGOS
Si se va a almacenar el cortabordes durante más de 15 días, hay que hacer el mantenimiento de
almacenamiento. Si no se realizan los pasos siguientes, es posible que el cortabordes no arranque
correctamente la próxima vez que lo utilice y que tenga que repararlo.
¡PRECAUCIÓN! No vacíe el depósito de gasolina en áreas cerradas, cerca de fuego o cuando esté
fumando. Los vapores de la gasolina pueden provocar explosiones e incendios.
1. Vacíe el depósito de gasolina con una bomba de aspiración, si dispone de ella.
2. Arranque el motor y déjelo en marcha hasta que se haya consumido toda la gasolina restante.
3. Limpie las aletas de refrigeración del cilindro y la carcasa.
4. Asegúrese de limpiar la máquina completa para proteger la pintura.
5. Guarde la máquina en un lugar bien ventilado.
Fig. 15
MANTENIMIENTO Y ALMACENAMIENTO

20
Hotline: 1-866-902-9690
PROGRAMA DE MANTENIMIENTO
Realice correctamente la rutina de mantenimiento en el cortabordes para poder usarlo sin incidentes
durante años. Guarde bien este manual para poder consultarlo en el futuro.
Se recomienda cumplir el siguiente programa de mantenimiento. De este modo se asegurará el
funcionamiento correcto y seguro del cortabordes.
12 horas de uso 24 horas de uso 36 horas de uso
Filtro de aire Limpiar Limpiar Limpiar
Bujía Comprobar Limpiar Limpiar
Aceite de motor Comprobar Comprobar y añadir Comprobar y añadir
TRANSPORTAR EL CORTABORDES
Vacíe el depósito de gasolina. Deje siempre el motor en marcha hasta que se haya consumido la gasolina
que quede en el depósito.
Vacíe el aceite del motor caliente. Quite el tapón de la bujía. Limpie las aletas de refrigeración del cilindro y
la carcasa. Siempre que sea posible, use el embalaje original para el transporte.
MANTENIMIENTO Y ALMACENAMIENTO

21
Hotline: 1-866-902-9690
SOLUCIÓN DE PROBLEMAS
Fallo/avería Causa Solución
El motor no arranca
No se ha presionado la barra de
control de encendido/apagado del
motor. La bujía está defectuosa.
La cuchilla está desgastada
o dañada. El depósito de
combustible está vacío.
El motor podría estar ahogado.
Presione la barra de control de
encendido/apagado del motor.
Cambie la bujía.
Deberá cambiarla el centro de
servicio postventa.
Reposte combustible.
Quite la bujía y séquela.
El motor marcha de forma
inestable.
El filtro de aire está sucio.
La bujía está sucia.
Limpie el filtro de aire.
Limpie la bujía.
El cortabordes vibra.
Los tornillos de ajuste del cabezal
de corte están flojos.
Las longitudes del hilo de corte
son muy diferentes.
Tuercas o tornillos flojos.
Cabezal de corte roto.
Apriete los tornillos de ajuste con
la herramienta de mango en T.
Ajuste el hilo de corte a longitudes
aproximadamente iguales.
Compruebe todos los tornillos y las
tuercas, incluyendo los tornillos del
motor.
Sustituya la pieza rota.
El cabezal de corte no retiene el
hilo.
El hilo de corte no se ha instalado
correctamente.
El cartucho de hilo está roto.
El hilo de corte no es del tamaño
adecuado.
Siga las instrucciones de la etiqueta
o del apartado «Mantenimiento»
del manual de funcionamiento.
Sustituya el conjunto del cabezal
de corte.
Use un hilo de corte de 0,155
pulgadas (4 mm).

22
Hotline: 1-866-902-9690
GARANTÍA
GARANTÍA DE YARD FORCE LIMITADA A DOS AÑOS
Garantía del producto
Guarde en un lugar seguro el recibo de compra original como justicante de compra. La cobertura de
la garantía para este producto debe vericarse con el recibo de compra original. El periodo de garantía
comienza el día en que se compró el producto a un distribuidor autorizado de productos Yard Force.
La cobertura de la garantía solo se aplica al comprador original y no es transferible. La cobertura de la
garantía se ofrece solo a productos comprados y utilizados en los EE.UU. y Puerto Rico a distribuidores
Yard Force autorizados. Los productos comprados y utilizados fuera de los EE.UU. y Puerto Rico no
están cubiertos por esta garantía.
Garantía de dos (2) años - Motor
El YF22-HWT tiene una garantía limitada de 2 años a partir de la fecha de compra contra defectos de
fabricación, solo en caso de uso doméstico. El uso comercial anula la garantía. Esta garantía no cubre
daños accidentales, uso indebido, desgaste normal, negligencia o incumplimiento de las instrucciones
de funcionamiento, seguridad y mantenimiento. Todos los trabajos de servicio técnico que no estén
incluidos en el mantenimiento normal descrito en este manual deberá realizarlos un técnico autorizado.
Todo servicio técnico no autorizado o los cambios de la conguración original de este producto anularán
la garantía. Todas las piezas y accesorios utilizados con este producto deben estar fabricados y/o autor-
izados por Merotec Inc.
Garantía de noventa (90) días - Accesorioss
Los accesorios incluidos con el YF22-HWT, como la cuchilla y otras piezas similares, están garantizados
contra defectos de fabricación en caso de uso doméstico, solo durante un periodo de 90 días a partir
de la fecha de compra. La garantía no cubre la pérdida de uso ni otros daños derivados de lo anterior, ni
tampoco cubre las reparaciones que realicen o intenten realizar personas no autorizadas. Esta garantía
se anula en caso de que el producto se utilice para nes comerciales, de alquiler o industriales. Algu-
nas piezas, accesorios y complementos están sometidos a un desgaste normal y están excluidos de la
garantía.
Proceso de reclamación de garantía y servicio técnico
Póngase en contacto con el centro de soporte técnico de Yard Force a través del número gratuito (866)
902-9690, de lunes a viernes, de 8:30 AM a 5:00 PM de la zona horaria del Este, para solicitar servi-
cio técnico y garantía.
Los agentes de servicio técnico de Yard Force USA pueden ayudarle a resolver problemas por teléfono,
para que recupere la operatividad lo antes posible. En los casos en que sea necesaria una inspección
de garantía o servicio técnico, procesa del modo siguiente:
1. Póngase en contacto con Yard Force USA a través del número (866) 902-9690 o la dirección sup-
[email protected] de lunes a viernes, de 8:30 AM a 5:00 PM de la zona horaria del Este.
2. Envíe el justicante de compra y el número de serie (si procede) para conrmar la cobertura de la ga-
rantía.
3. En caso de que se solicite una evaluación de garantía o servicio técnico, Yard Force USA le proporcio-
nará un número RGA que deberá utilizar en todas las comunicaciones con Yard Force USA y, en caso
necesario, una lista de centros de servicio técnico autorizados a los que puede llevar el cortacésped
para su evaluación y reparación.
4. Todos los envíos a Yard Force USA deben llevar un número RGA. Todos los envíos recibidos que no
lleven marcado claramente un número RGA en el exterior de la caja serán rechazados.
5. Todos los envíos deben realizarse a portes pagados. Yard Force USA no pagará gastos de envío para
la evaluación de garantía o servicio técnico. Yard Force USA no es responsable de ningún paquete
perdido por el transportista. Recomendamos realizar los envíos con un transportista que proporcione
seguimiento y conrmación de entrega.
Para obtener más información o si desea plantear alguna pregunta, llame al teléfono gratuito (866) 902-
9690 o escriba a [email protected], de lunes a viernes de 8:30 AM a 5:00 PM del horario del
Este.
GUARDE ESTAS INSTRUCCIONES

Merotec Inc.
3655 Kennesaw North Industrial Parkway
Kennesaw, GA 30144
Copyright © 2019 Merotec Inc.
Hecho en China en instalaciones manufacture-
ras de SUMEC
www.YardForceUSA.com
¿Necesita ayuda?
Por favor, todavía no devuelva el producto al lugar donde lo
compró. Estamos aquí para ayudarle y atender todas sus
necesidades.
Póngase en contacto con el departa-
mento de servicio al cliente para ayuda
con:
• Montaje o uso del producto
• Piezas faltantes o dañadas
• Resolución de problemas
También puede visitar nuestro sitio web para ver las preguntas
frecuentes, los pasos de resolución de problemas descarga
abrir y vídeos tutoriales. Las piezas de recambio y los acceso-
rios se pueden comprar en www.YardForceUSA.com, o llame
sin costo a nuestra línea gratuita: 1-866-902-9690 L-V 8:30am
- 5:00pm ET
www.YardForceUSA.com