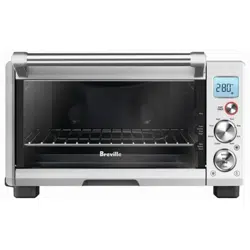

the Smart Oven
®
Air
Instruction Book - Suits all BOV900 models
BOV900_USC_IB_A16.indd 1 25/05/2016 11:47 am

2
BREVILLE
RECOMMENDS
SAFETY FIRST
At Breville we are very safety
conscious. We design and
manufacture consumer
products with the safety of you,
our valued customer, foremost
in mind. In addition we ask
that you exercise a degree of
care when using any electrical
appliance and adhere to the
following precautions.
IMPORTANT
SAFEGUARDS
READ ALL INSTRUCTIONS
BEFORE USE AND SAVE
FOR FUTURE REFERENCE
When using electrical
appliances, basic safety
precautions should always be
followed including:
• Remove and safely discard
any packing materials and
promotional labels before
using the oven for the first time.
• To avoid choking hazard for
young children, remove and
safely dispose the protective
cover fitted on the power plug.
2 Breville recommends safety first
7 Components
9 Before first use
12 Functions
– OPERATING YOUR
BREVILLE OVEN 12
– DOOR SENSOR 13
– AUTO EJECT RACK 13
– BUZZER VOLUME 13
– ROTATE REMIND 13
– TOAST 14
– BAGEL 15
– BROIL 16
– BAKE 16
– ROAST 18
– WARM 19
– PIZZA 20
– PROOF 21
– AIRFRY 22
– REHEAT 23
– COOKIES 24
– SLOW COOK 25
– DEHYDRATE 26
– PHASE COOK 27
– REPLACING THE
OVEN LIGHT 28
29 Care & Cleaning
31 Troubleshooting
33 French
Contents
BOV900_USC_IB_A16.indd 2 25/05/2016 11:47 am

3
• Do not use the appliance near
the edge of a countertop or
table. Ensure the surface is
stable, level, heat-resistant and
clean.
• Do not use on a cloth-covered
surface, near curtains or other
flammable materials.
• A fire may occur if the oven is
covered or touches flammable
material, including curtains,
draperies, walls, and the like,
when in operation.
• Do not use the appliance on (or
close to) a hot gas or electric
burner, or where it could touch
a heated oven or surface.
• Do not let the power cord hang
over the edge of a table or
counter, or touch hot surfaces.
• To avoid electric shock, do
not immerse the cord, plug or
motor base in water (or other
liquids).
• When operating the oven,
keep a minimum distance of
4" (10cm) of space on both
sides of the appliance and
6" (15cm) above.
• Do not touch hot surfaces.
To avoid burns, use extreme
caution when removing pans,
dishes and accessories such as
the included broiling rack and
roasting pan, that contain hot
oil or other hot liquids.
• Do not lay cooking utensils,
roasting pans or dishes on the
glass door.
• Do not leave the door standing
open for extended periods of
time.
• Do not store any item on top
of the oven when in operation
except those described on
page 28 of this book.
• Do not place cardboard, plastic,
paper, or other flammable
materials in the oven.
• Do not cover crumb tray or any
part of the oven with metal foil.
This will cause overheating of
the oven.
• Caution should be exercised
when using pans and dishes
constructed of materials other
than metal. Ensure pans and
dishes are oven safe before
using in the oven.
• Caution should be exercised
when using lids in the oven, as
pressure build up in a covered
pan or dish may cause hot
ingredients to expel or the dish
to crack. Do not place sealed or
airtight containers in the oven.
• Oversized foods and metal
utensils must not be inserted in
the oven as they may create fire
or risk of electric shock.
BOV900_USC_IB_A16.indd 3 25/05/2016 11:47 am
4
• The use of accessories and
attachments not recommended
or supplied with this oven may
cause injuries.
• Do not store any materials,
other than manufacturers
recommended accessories, in
this oven when not in use.
• This appliance is for household
use only. Do not use in any
type of moving vehicles. Do
not use the appliance outdoors,
or for anything other than its
intended use. Misuse can cause
injury.
• If the appliance is to be:
cleaned, moved, assembled or
stored, always switch the unit
off and unplug the cord from
the power outlet and allow to
cool completely.
• Do not clean with metal
scouring pads. Pieces can break
off the pad and touch electrical
parts, creating a risk of electric
shock.
• Close supervision is necessary
when the appliance is used by
or near children.
• Longer detachable power-
supply cords or extension cords
are available and may be used
if care is exercised in their use.
• It is recommended to regularly
inspect the appliance and
power cord. Do not use the
appliance if there is damage to
the power cord or plug, or after
the appliance malfunctions or
has been damaged in any way.
Immediately stop use and call
Breville Consumer Support.
• Servicing should be performed
by an authorized service
representative.
WARNING
To prevent electric shock,
unplug before cleaning.
BOV900_USC_IB_A16.indd 4 25/05/2016 11:47 am

5
SPECIFIC
INSTRUCTIONS
FOR BOV900
• We recommend operating
the oven on a dedicated
circuit separated from other
appliances. Consult a licensed
and qualified electrician if you
are unsure.
• The oven is in standby mode
when the LCD screen backlight
turns off. Interacting with any
of the controls will take the
oven out of standby mode.
• Regularly clean the crumb tray.
To clean the crumb tray please
see page 29.
WARNING
To reduce the risk of FIRE,
ELECTRIC SHOCK,
EXPOSURE TO EXCESSIVE
UV RADIATION, OR INJURY
TO PERSONS:
• Always unplug the oven and
let all parts (including the
bulb housing, glass cover and
enclosure) cool completely
before replacing bulb.
• Only use a 25W maximum,
120V, Type G9 oven bulb with
UV filter.
• Always use a soft cloth when
handling the bulb and do not
directly touch the surface as
oil from your skin can damage
the bulb.
• Do not look directly at a
glowing bulb.
• Do not remain in the light if
skin feels warm.
• Keep bulb away from materials
that may burn.
• The bulb gets hot quickly. Only
ever use the light button to turn
on the light.
• Do not operate the light if the
bulb housing, glass cover, UV
filter or enclosure are missing
or damaged.
BOV900_USC_IB_A16.indd 5 25/05/2016 11:47 am

6
FOR HOUSEHOLD USE ONLY
SAVE THESE INSTRUCTIONS
SHORT CORD
INSTRUCTIONS
Your Breville appliance is fitted
with a short power supply cord
to reduce personal injury or
property damage resulting from
pulling, tripping or becoming
entangled with a longer cord.
If an extension cord is used, (1)
the marked electrical rating of
the cord set or extension cord
should be at least as great as the
electrical rating of the appliance,
(2) the cord should be arranged
so that it will not drape over the
countertop or table-top where
it can be pulled on by children
or tripped over unintentionally
and (3) the extension cord must
include a 3-prong grounding
plug.
BREVILLE ASSIST
®
PLUG
Your Breville appliance comes
with a unique Assist
®
Plug,
conveniently designed with a
finger hole to ease removal from
the power outlet.
CALIFORNIA
PROPOSITION 65:
(Applicable to California
residents only).
This product contains chemicals
known to the State of California
to cause cancer, birth defects or
other reproductive harm.
BOV900_USC_IB_A16.indd 6 25/05/2016 11:47 am

7
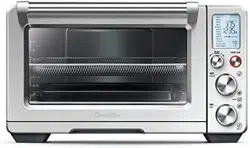
Components
A. 13" non-stick pizza pan
B. Wire rack (x 2)
Reversible for 8 different rack positions.
C. 9" x 13" broiling rack
D. 9" x 13" enamel roasting pan
E. Air fry/dehydrate basket
F. Oven light
G. Door handle
H. Ventilation slots
I. Crumb tray
J. Breville Assist
‰
Plug
F
I
J
G H
B
A
C
D
E
BOV900_USC_IB_A16.indd 7 25/05/2016 11:47 am
8
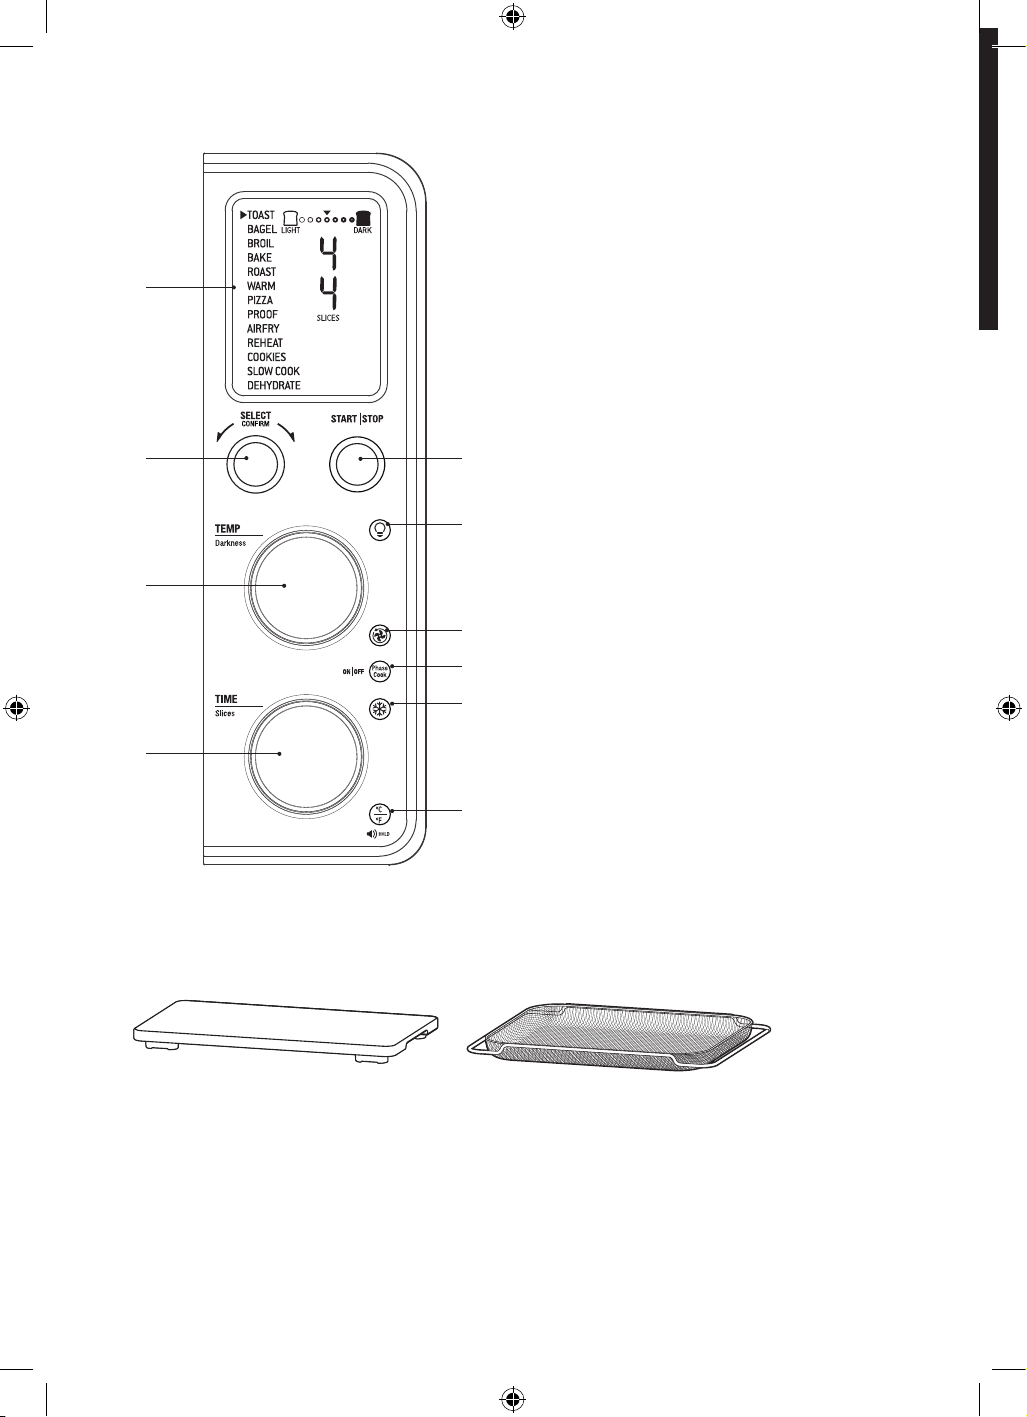
K. LCD screen
L. SELECT/CONFIRM dial and ROTATE
REMIND button
M. TEMPERATURE dial/toast and bagel
darkness control
N. TIME dial/toast and bagel slice selection
O. START/STOP button
P. OVEN LIGHT button
Q. CONVECTION button
R. PHASE COOK button
S. FROZEN FOODS button
T. TEMPERATURE CONVERSION button
and volume adjustment button
Accessories sold separately:
R
S
T
L
K
O
P
Q
M
N
Bamboo Cutting Board
Part No: BOV900CB
Air fry/dehydrate basket
Part No: BOV900AB
BOV900_USC_IB_A16.indd 8 25/05/2016 11:47 am
9
Before first use
This guide is designed for first time use.
For safety and more information, refer to the rest of the Instruction Book.
PREPARING THE OVEN
In order to remove any protective substances
on the heating elements, it is necessary to run
the oven empty for 20 minutes. Ensure the area
is well ventilated as the oven may emit vapors.
These vapors are safe and are not detrimental
to the performance of the oven.
1. Remove and safely discard any packing
material, promotional labels and tape from
the oven.
2. Remove the crumb tray, wire racks, broiling
rack, roasting pan, air fry/dehydrate basket
and pizza pan from the polyfoam packaging.
Wash them with a soft sponge in warm,
soapy water then rinse and dry thoroughly.
3. Wipe the interior of the oven with
a soft, damp sponge. Dry thoroughly.
4. Place the oven on a flat, dry surface. Ensure
there is a minimum distance of 4" (10cm) of
space on both sides of the appliance and 6"
(15cm) above.
5. Insert the crumb tray into the oven.
6. Unwind the power cord completely
and insert the power plug into a
grounded power outlet.
7. The oven alert will sound and the LCD
screen will illuminate. The function options
will appear with an indicator on the
TOAST setting.
8. Turn the SELECT/CONFIRM dial to the
right until the indicator reaches the PIZZA
function.
ROTATE
SELECT
CONFIRM
9. Press the START/STOP button. The button
backlight will illuminate red, the LCD screen
will illuminate orange and the oven alert
will sound.
10. The LCD screen will indicate a blinking
‘PREHEATING’. Once the oven has
completed the preheating cycle, an alert
will sound.
11. The timer will be displayed and
automatically begin to count down.
12. At the end of the cooking cycle, the oven
alert will sound, the START/STOP button
backlight will go out and the LCD screen
will illuminate white.
13. The oven is now ready to use.
ELEMENT IQ
‰
The Breville Smart Oven
‰
Air features Element
IQ
‰
, a cooking technology that adjusts the
power of the heating elements to cook food
more evenly and quickly. Each of the oven’s
functions is preset with our recommended
setting, however we suggest experimenting
with these depending on the recipe, amount of
food and your personal taste.
Your customized setting will remain in the
memory of the oven until changed or you
reset the oven to the factory defaults, even if
the power cord is unplugged. To do this, press
and hold the FROZEN and TEMPERATURE
CONVERSION buttons together for 5 seconds.
BOV900_USC_IB_A16.indd 9 25/05/2016 11:47 am

10
OVEN FUNCTIONS OVERVIEW
FUNCTION SUGGESTED
RACK
POSITION
OPTIONAL
SETTINGS
PRESETS PREHEAT RANGE
TOAST
4 FROZEN FOODS Darkness 4
Slices 4
No Darkness 1–7
Slices 1–9
BAGEL
4 FROZEN FOODS Darkness 4
Slices 4
No Darkness 1–7
Slices 1–10
BROIL
1 – 2 HIGH No LOW, MED, HIGH
Up to 20 MIN
BAKE
6 CONVECTION
TEMPERATURE
CONVERSION
ROTATE
REMINDER
325°F
30 MIN
CONVECTION
Yes >390°F up to 4 hours
300°F – 390°F up to 8 hours
210°F – 300°F up to 12 hours
<210°F up to 72 hours
ROAST
6 CONVECTION
TEMPERATURE
CONVERSION
ROTATE
REMINDER
400°F
1:00 HR
CONVECTION
Yes >390°F up to 4 hours
300°F – 390°F up to 8 hours
210°F – 300°F up to 12 hours
<210°F up to 72 hours
WARM
Various CONVECTION
TEMPERATURE
CONVERSION
ROTATE
REMINDER
160°F
1:00 HR
CONVECTION
No >390°F up to 4 hours
300°F – 390°F up to 8 hours
210°F – 300°F up to 12 hours
<210°F up to 72 hours
PIZZA
7 CONVECTION
TEMPERATURE
CONVERSION
FROZEN FOODS
ROTATE
REMINDER
375°F
20 MIN
CONVECTION
FROZEN FOODS
Yes 120°F – 480°F
Up to 1:00 HR
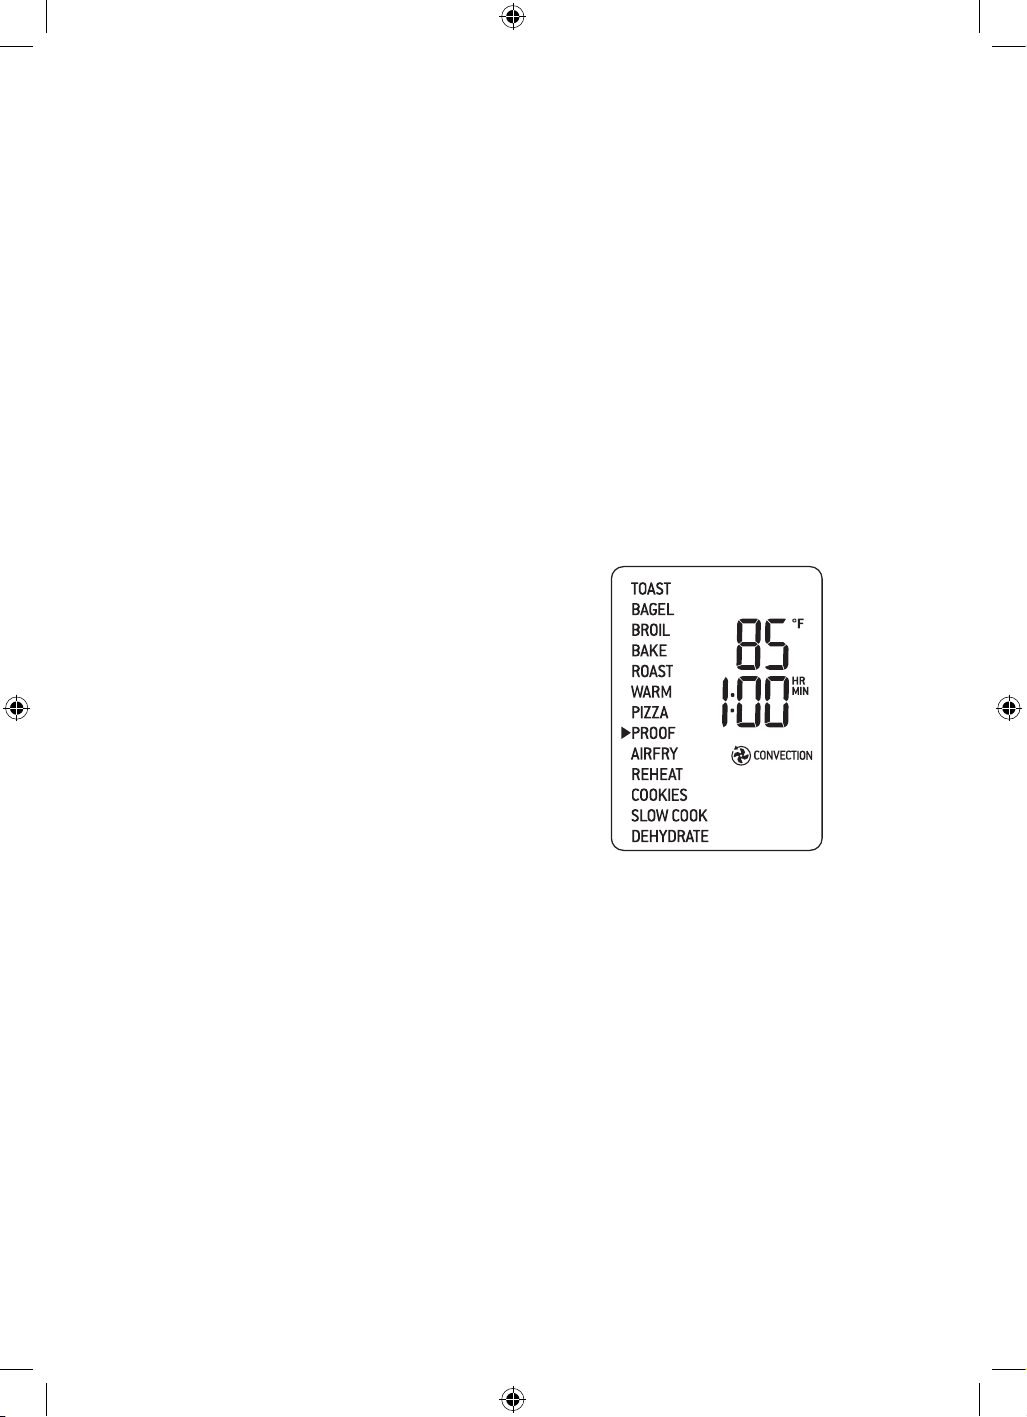
PROOF
7 CONVECTION
TEMPERATURE
CONVERSION
ROTATE
REMINDER
85°F
1:00 HR
CONVECTION
No 80°F – 100°F
Up to 2:00 HR
BOV900_USC_IB_A16.indd 10 25/05/2016 11:47 am

11
FUNCTION SUGGESTED
RACK
POSITION
OPTIONAL
SETTINGS
PRESETS PREHEAT RANGE
AIRFRY
3 CONVECTION
TEMPERATURE
CONVERSION
FROZEN FOODS
ROTATE
REMINDER
400°F
18 MIN
SUPER CONVECTION
FROZEN FOODS
Yes 120°F – 480°F
Up to 1:00 HR
REHEAT
Various CONVECTION
TEMPERATURE
CONVERSION
FROZEN FOODS
ROTATE
REMINDER
325°F
15 MIN
CONVECTION
No 120°F – 480°F
Up to 2:00HR
COOKIES
5 CONVECTION
TEMPERATURE
CONVERSION
FROZEN FOODS
ROTATE
REMINDER
325°F
11 MIN
CONVECTION
Yes 120°F – 480°F
Up to 1:00 HR
SLOW
COOK
8 CONVECTION HIGH
4:00 HR
CONVECTION
Yes HI, 2:00 – 12:00 HR
LO, 4:00 – 72:00 HR
Automatic KEEP WARM for
2:00 HR
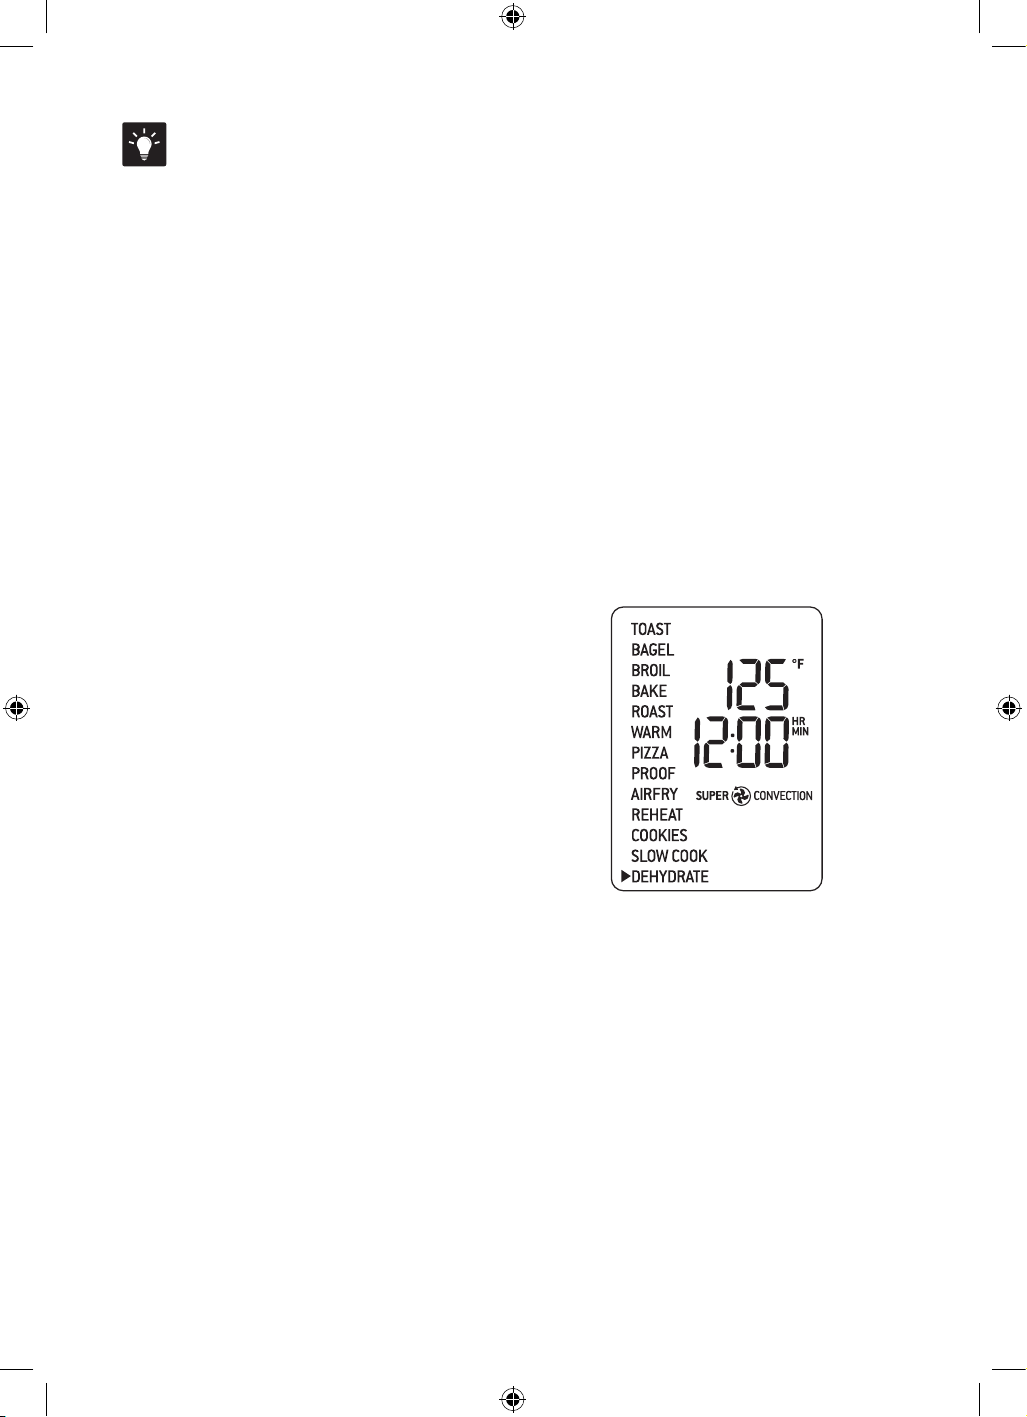
DEHYDRATE
3 CONVECTION
TEMPERATURE
CONVERSION
ROTATE
REMINDER
125°F
12:00 HR
SUPER CONVECTION
No 86°F – 176°F
Up to 72:00 HR
BOV900_USC_IB_A16.indd 11 25/05/2016 11:47 am
12
Functions
OPERATING YOUR BREVILLE OVEN
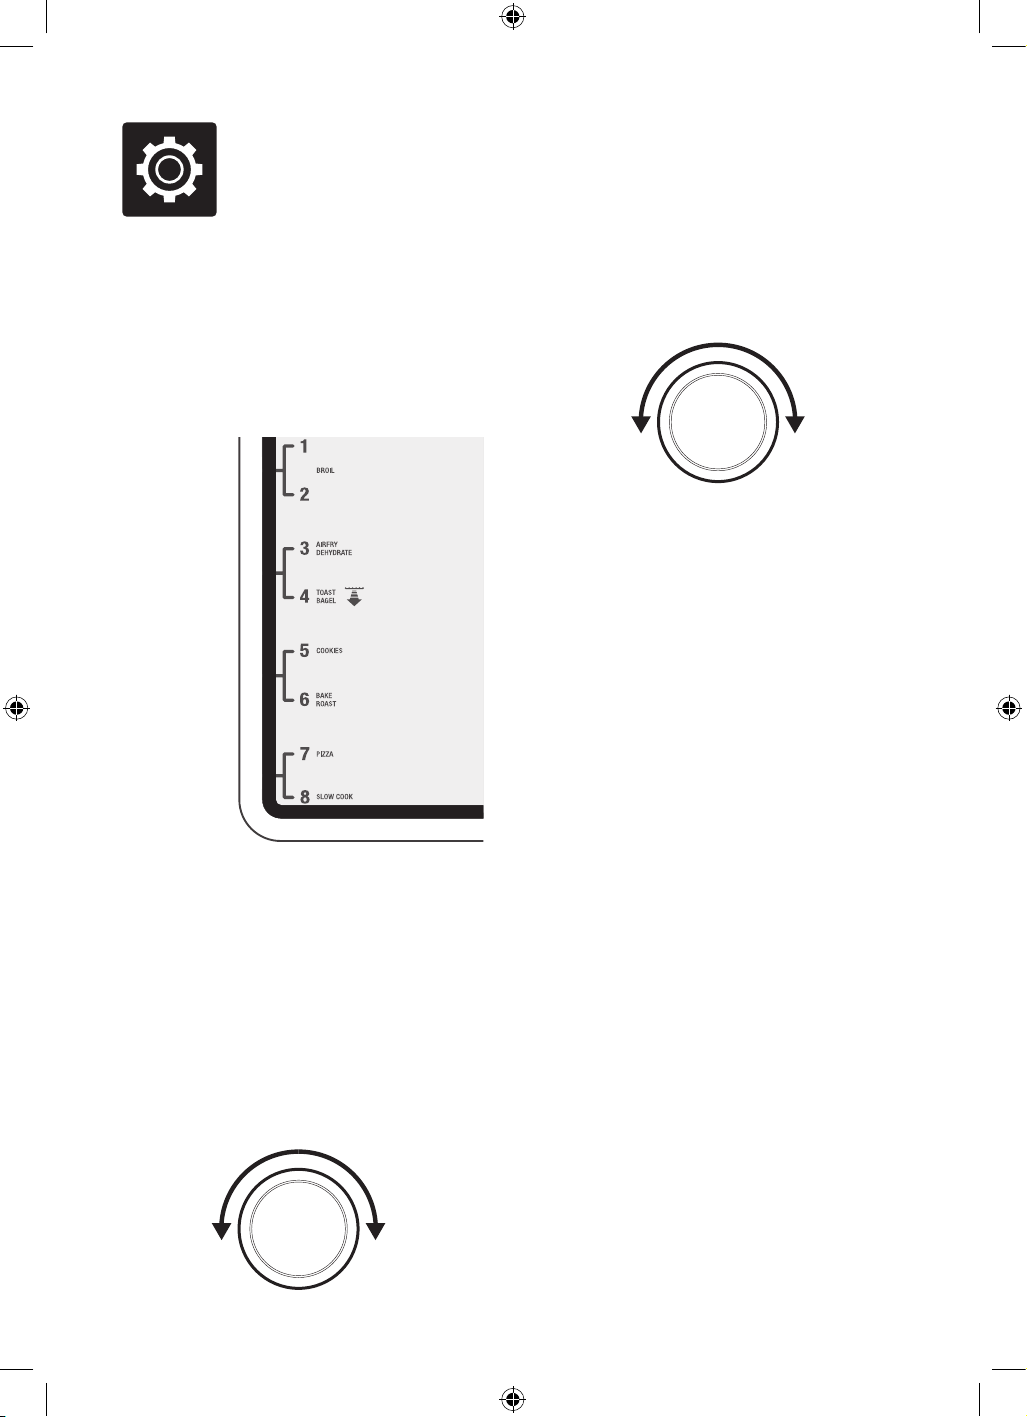
1. Insert the wire rack into the desired
rack position. The rack positions are
conveniently printed on the left-hand side
of the oven door window. There are four
groove positions. The rack can be inserted
either facing upwards or downwards to
allow two rack positions for each groove.
2. Turn the SELECT/CONFIRM dial until the
indicator on the LCD screen reaches the
desired setting.
3. The top figure on the LCD screen indicates
the preset cooking temperature for the
selected setting. For the TOAST and
BAGEL settings it indicates the darkness
level. Turn the TEMPERATURE dial to the
left to reduce the temperature or to the right
to increase the temperature.
REDUCE
TEMPERATURE
INCREASE
TEMPERATURE
ROTATE
TEMPERATURE
DIAL
4. The bottom figure on the LCD screen
indicates the preset cooking time for
the selected setting. For the TOAST and
BAGEL settings it indicates the number
of slices. Turn the TIME dial to the left to
reduce the cooking time or to the right to
increase the cooking time.
REDUCE
TIME
INCREASE
TIME
ROTATE
TIME
DIAL
5. For settings without a preheat cycle
(TOAST, BAGEL, BROIL, WARM, PROOF,
REHEAT, DEHYDRATE), place the food
directly on the wire rack or on the included
air fry/dehydrate basket, pizza pan, broiling
rack and/or roasting pan. Ensure the food
is centered in the oven for the most even
cooking.
a) Close the oven door.
b) Press the START/STOP button. The button
backlight will illuminate red, the oven
alert will sound, and the LCD screen will
illuminate orange.
c) The timer will be displayed and begin to
count down. The cooking temperature
and time can be adjusted during the
cooking cycle.
6. For settings that feature a preheat
cycle (BAKE, ROAST, PIZZA, AIRFRY,
COOKIES, SLOW COOK), press the
START/STOP button before placing
food in the oven (with the exception of
SLOW COOK. Place the food before the
preheat cycle for SLOW COOK). The
button backlight will illuminate red, the
oven alert will sound and the LCD screen
will indicate a blinking ‘PREHEATING’
while the oven is heating up.
BOV900_USC_IB_A16.indd 12 25/05/2016 11:47 am

13
a) When the oven is ready for use, the blinking
‘PREHEATING’ will go out, the oven alert
will sound and the timer will start counting
down. Place the food directly on the wire
rack, or on the included air fry/dehydrate
basket, pizza pan, broiling rack and/or
roasting pan. Ensure the food is centered in
the oven for the most even cooking.
b) Close the oven door.
c) The timer will continue to count down.
The cooking temperature and time can be
adjusted during the cooking cycle.
7. At the end of the cooking cycle, the oven
alert will sound, the START/STOP button
backlight will go out and the LCD screen
will illuminate white.
NOTE
The cooking cycle can be stopped at any time
by pressing the START/STOP button. This will
cancel the cycle and the button backlight will
illuminate white.
NOTE
Press the CONVECTION button to choose
between no convection, convection and super
convection. Convection and super convection
may adjust the temperature to compensate.
Super convection will deliver crispier food
result.
DOOR SENSOR
If the door is opened during cooking, the timer
will pause and the light will turn on.
When the door is closed, the timer will resume
counting down and the light will stay on for
30 seconds before turning off. If the door
is open for longer than 10 minutes during
cooking the heaters will turn off.
MAGNETIC AUTO-EJECT RACK
When the wire rack is inserted into rack
position 3 or 4, it will automatically eject
halfway out of the oven when the door is
opened so you can easily remove your food.
Always open the door slowly when the wire
rack is in this position to prevent the rack from
ejecting too quickly.
BUZZER VOLUME
Press and hold the TEMPERATURE
CONVERSION button for 3 seconds to enter
the buzzer volume control mode.
Press the TEMPERATURE CONVERSION
button to select the desired volume. To confirm
press any button.
ROTATE REMIND
When cooking food on multiple racks at
one time, use the Rotate Remind feature to
remind you to switch the position of food in
the oven for the most even, consistent results.
Rotate Remind is available for the following
functions: BAKE, ROAST, WARM, PROOF,
PIZZA, AIRFRY, REHEAT, COOKIES and
DEHYDRATE.
1. Turn the SELECT/CONFIRM dial until the
indicator on the LCD screen reaches your
desired function.
2. Press the SELECT/CONFIRM dial. ‘Rotate
Remind’ will display on the LCD screen.
3. Follow the steps for the function you
selected and begin cooking your food.
4. When it is time to switch rack positions,
the Rotate Remind alert will sound and
‘Rotate Remind’ will flash on the screen.
The Rotate Remind alert will continue to
sound every 30 seconds until the door is
opened or the SELECT/CONFIRM dial is
pressed to disable the feature.
BOV900_USC_IB_A16.indd 13 25/05/2016 11:47 am
14
a) The darkness setting is indicated by the
row of circles at the top of the LCD screen.
Turn the TEMPERATURE dial to the left to
reduce the darkness setting, or to the right
to increase it. The triangle above the circles
will move according to the selected setting.
As general guide:
Desired toast color Setting
Light 1 or 2
Medium 3, 4 or 5
Dark 6 or 7
b) The number of slices is displayed as the
bottom figure on the LCD screen. Turn the
TIME dial to the left to reduce the number
of slices, or to the right to increase it. The
number of slices ranges from ‘1’ to ‘9’.
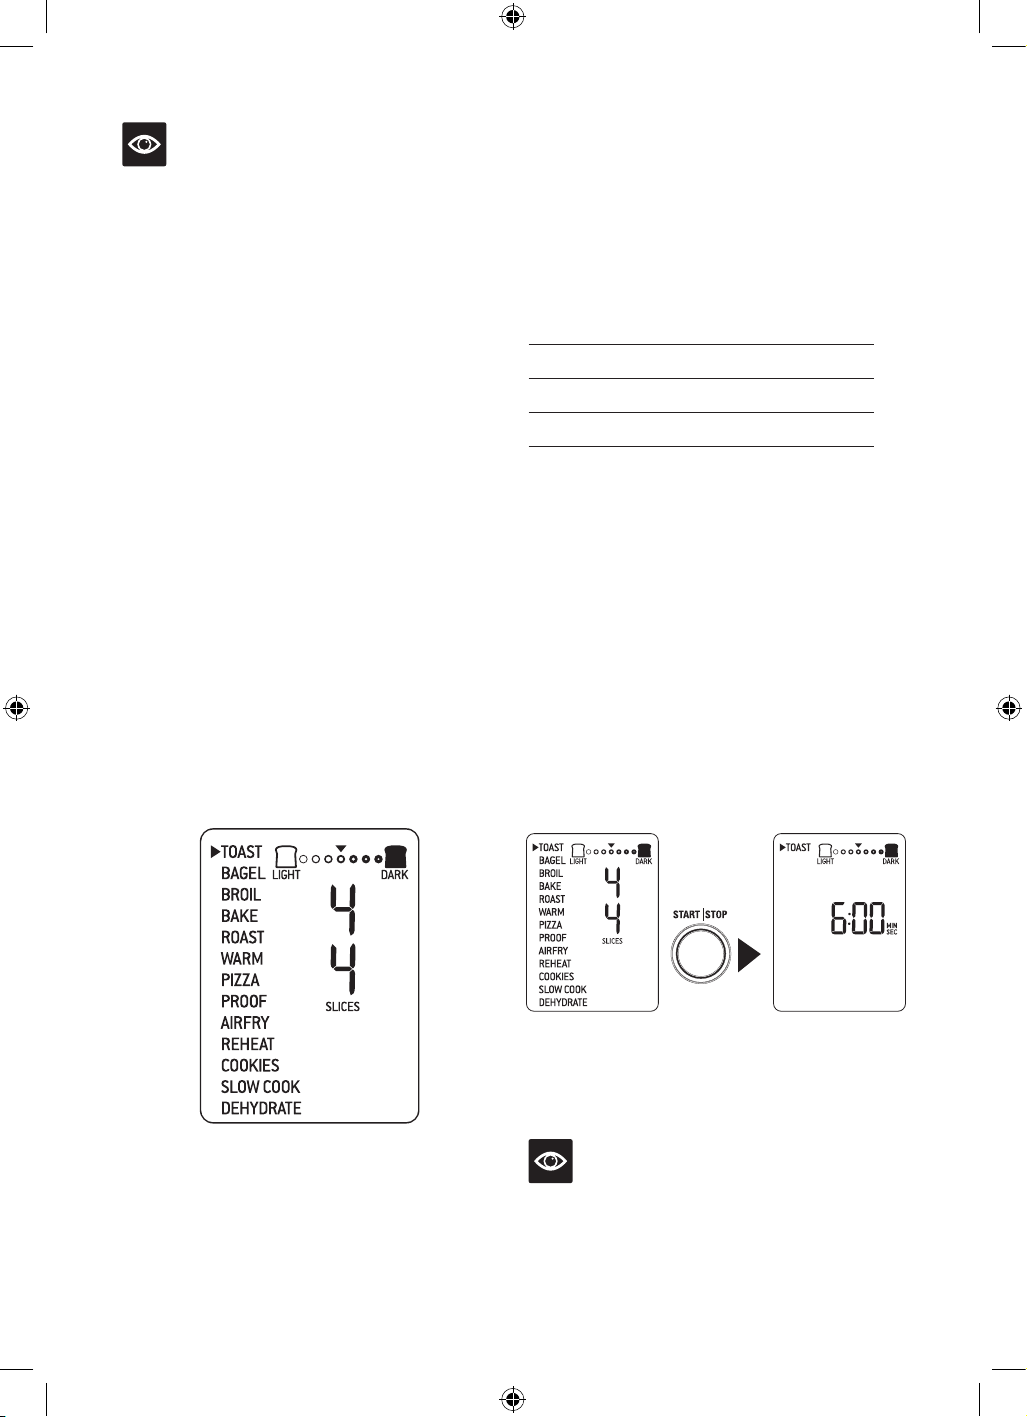
6. Press the START/STOP button to start the
TOAST function. The button backlight will
illuminate red, the oven alert will sound, and
the LCD screen will illuminate orange.
7. The timer will be displayed and
automatically begin to count down.
The time can be adjusted during the
toasting cycle by turning the TIME dial.
The cycle can be stopped at any time by
pressing the START/STOP button.
PRESS
8. At the end of the TOAST cycle, the oven
alert will sound. The START/STOP button
backlight will go out and the LCD screen
will illuminate white.
NOTE
The cooking time is dependent on a number
of variables including the temperature in the
oven, so the time may vary, even with the same
color and slices settings. This is in order to
achieve consistent results.
NOTE
When cooking food on baking pans or other
cooking vessels on multiple wire racks, it is
suggested to leave sufficient room between
racks and avoid using the top rack position
due to proximity to the heating elements.
In most cases, rack positions 3 and 7 or 4 and
8 will give the best results. When using air fry/
dehydrate baskets it is not necessary to leave
space between rack positions.
TOAST FUNCTION
The TOAST function browns and crisps the
outside of your bread while keeping the inside
soft and moist. This function is also ideal for
English muffins and frozen waffles.
1. Insert the wire rack into rack position 4.
2. Position bread slices as close to the center
of the wire rack as possible for optimum
toasting results.
3. Close the oven door.
4. Turn the SELECT/CONFIRM dial until
the indicator on the LCD screen reaches
the TOAST function. The top figure on the
LCD screen indicates the preset darkness
setting ‘4’, while the bottom figure indicates
the preset number of slices ‘4’.
5. The darkness setting and number of
slices can be adjusted before or during the
toasting cycle.
BOV900_USC_IB_A16.indd 14 25/05/2016 11:47 am
15
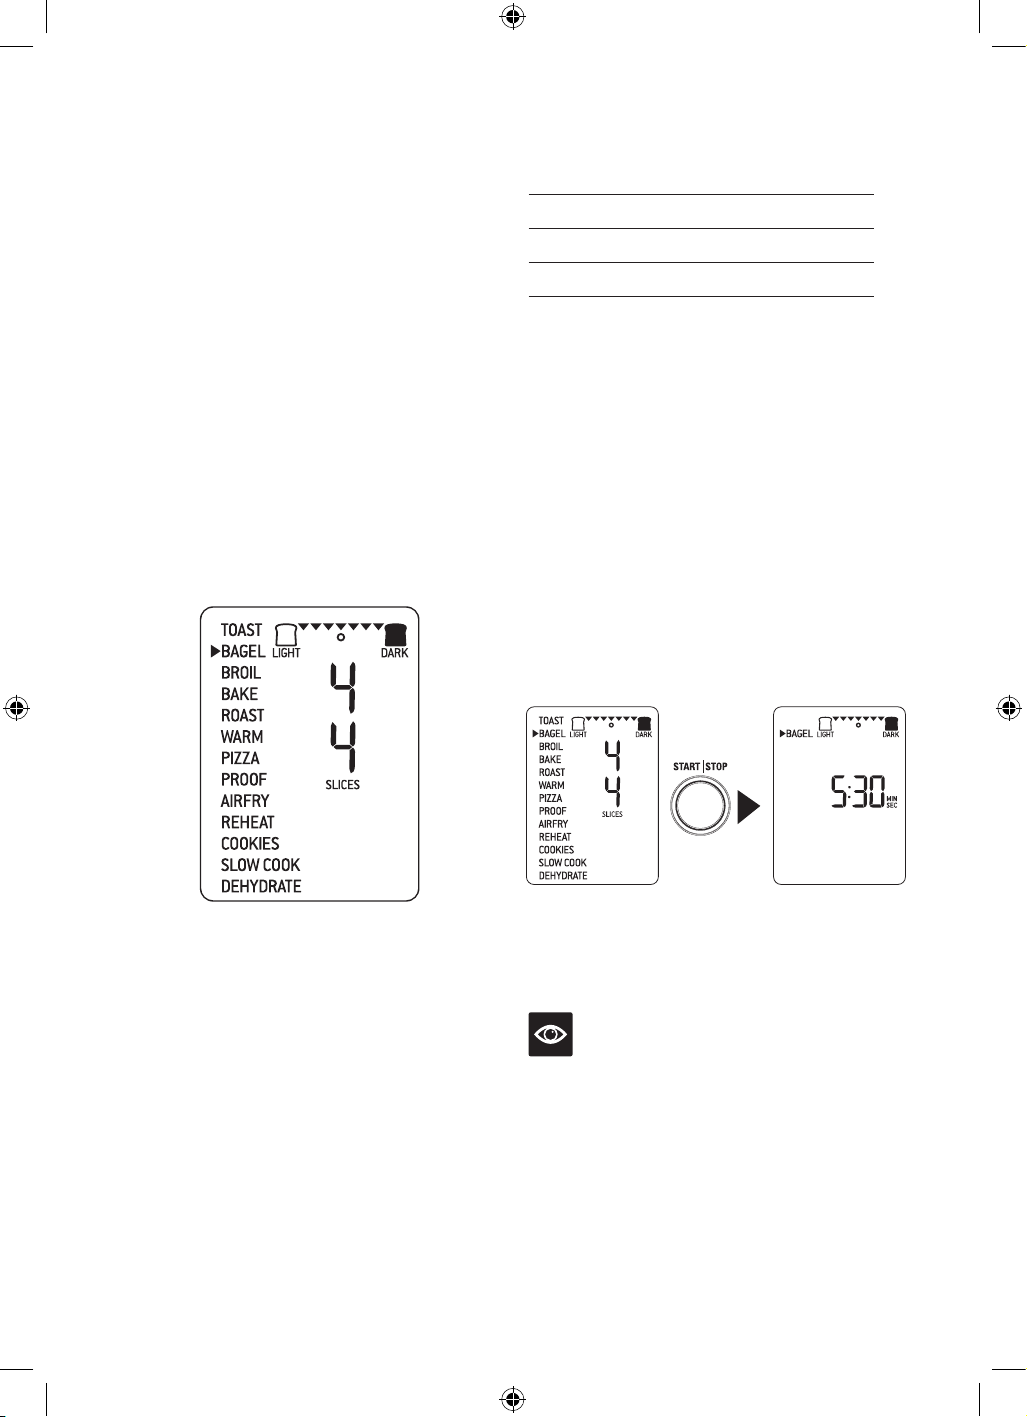
BAGEL FUNCTION
The BAGEL function crisps the insides of
your cut bagel while only lightly toasting the
outside. This function is also ideal for toasting
crumpets or thick sliced specialty breads
which require one side to be toasted more than
the other.
1. Insert the wire rack into rack position 4.
2. Position bagel halves with cut side facing
upwards as close to the center of the wire
rack as possible for optimum toasting
results.
3. Close the oven door.
4. Turn the SELECT/CONFIRM dial until the
indicator on the LCD screen reaches the
BAGEL function. The top figure on the LCD
screen indicates the preset darkness setting
‘4’, while the bottom figure indicates the
preset number of bagel halves ‘4’.
5. The darkness setting and number of bagel
halves can be adjusted before or during the
toasting cycle.
a) The darkness setting is indicated by the row
of triangles at the top of the LCD screen.
Turn the TEMPERATURE dial to the left to
reduce the darkness setting, or to the right
to increase it. The circle below the triangles
will move according to the selected setting.
As general guide:
Desired bagel color Setting
Light 1 or 2
Medium 3, 4 or 5
Dark 6 or 7
b) The number of bagel halves is displayed
as the bottom figure on the LCD screen.
Turn the TIME dial to the left to reduce
the number of bagel halves, or to the right
to increase it. The number of bagel halves
ranges from ‘1’ to ‘10’.
6. Press the START/STOP button to start the
BAGEL function. The button backlight will
illuminate red, the oven alert will sound, and
the LCD screen will illuminate orange.
7. The timer will be displayed and
automatically begin to count down.
The time can be adjusted during the bagel
cycle by turning the TIME dial. The cycle
can be stopped at any time by pressing the
START/STOP button.
PRESS
8. At the end of the BAGEL cycle, the oven
alert will sound. The START/STOP button
backlight will go out and the LCD screen
will illuminate white.
NOTE
The inside (cut side) of the bagel must always
face upwards towards the top heating elements.
This allows the cut side to get crisp while the
crust is only lightly toasted.
If you like your bagel halves equally crisp on
both the top and bottom, we recommend using
the TOAST function to toast your cut bagel.
BOV900_USC_IB_A16.indd 15 25/05/2016 11:47 am
16
7. The timer will be displayed and
automatically begin to count down. The
power level and time can be adjusted
during the broiling cycle by turning the
corresponding TEMPERATURE and TIME
dial. The cycle can be stopped at any time
by pressing the START/STOP button.
8. At the end of the BROIL cycle, the oven
alert will sound. The START/STOP button
backlight will go out and the LCD screen
will illuminate white.
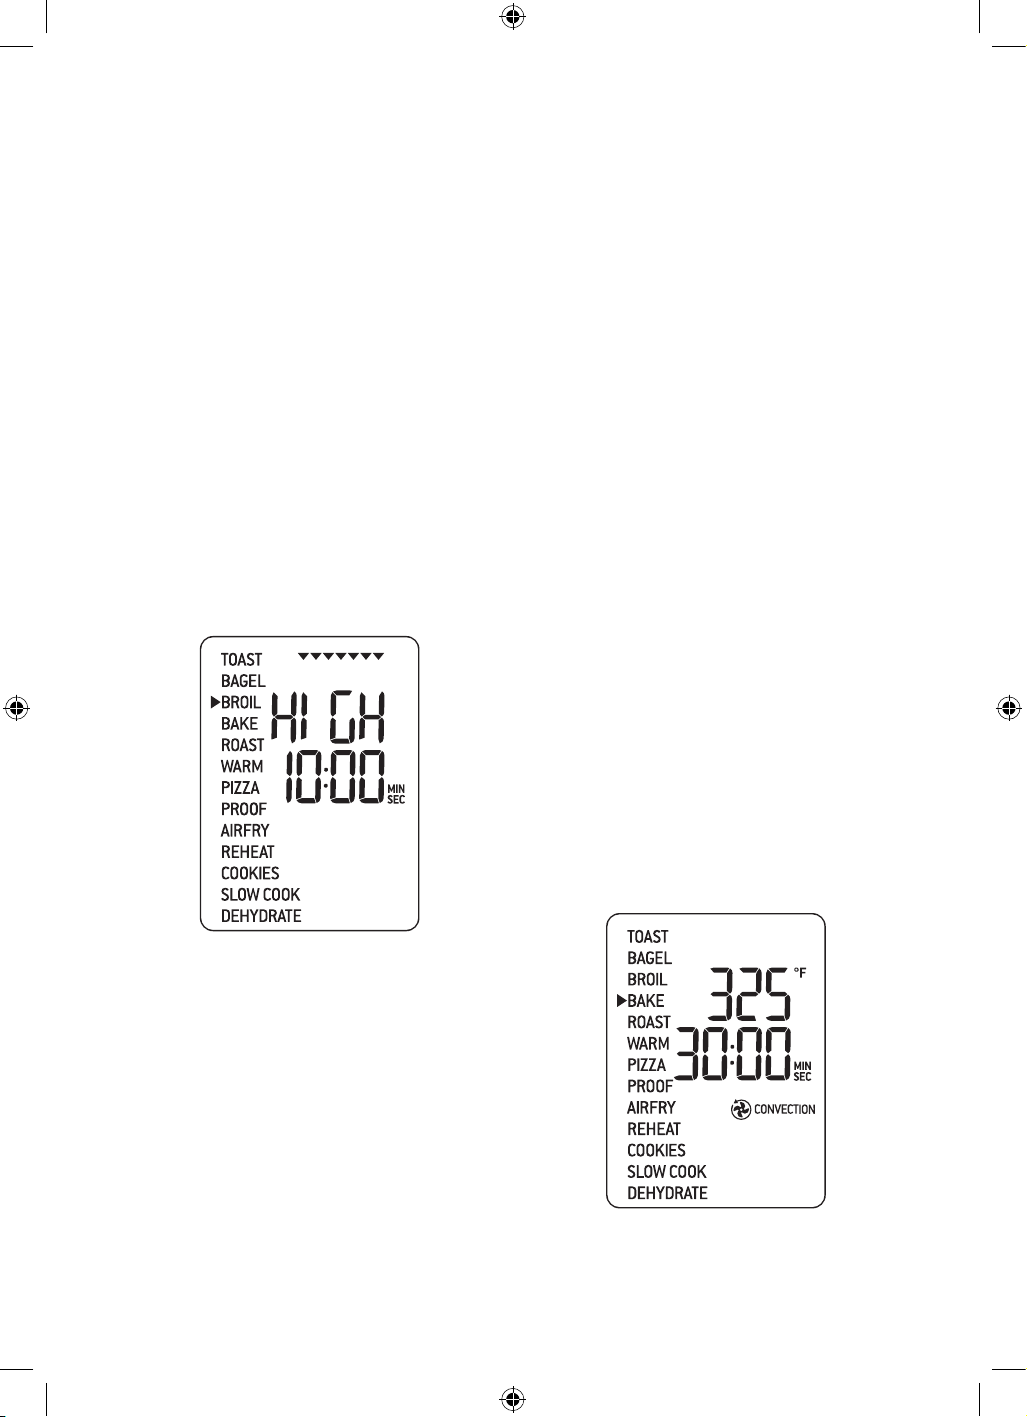
BAKE FUNCTION
The BAKE function cooks food evenly
throughout. This function is ideal for baking
cakes, muffins, brownies and pastries. The
BAKE function is also ideal for cooking
prepackaged frozen meals such as lasagna
and pot pies.
1. Insert the wire rack into rack position 6.
Note that some baked goods, such as
brownies or pastries, may be more suited to
rack position 5.
2. Close the oven door.
3. Turn the SELECT/CONFIRM dial until
the indicator on the LCD screen reaches
the BAKE function. The top figure on the
LCD screen indicates the preset BAKE
temperature of ‘325°F’, while the bottom
figure indicates the preset time of ‘30:00
MIN/SEC’. The preset CONVECTION
setting will also be displayed.
BROIL FUNCTION
The BROIL function is ideal for cooking
open-faced sandwiches, thin cuts of meat,
poultry and fish, sausages and vegetables.
Broiling can also be used to brown the tops of
casseroles, gratins and desserts.
1. Insert the wire rack into either rack position
1 or 2.
2. Insert the included broiling rack into the
roasting pan. Place food on the assembled
broiling rack or in an oven-proof dish, then
place on the center of the wire rack so air
flows around the sides of the food.
3. Close the oven door.
4. Turn the SELECT/CONFIRM dial until
the indicator on the LCD screen reaches
the BROIL function. The top figure on the
LCD screen indicates the preset power level
‘HIGH’, while the bottom figure indicates
the preset time of ‘10:00 MIN/SEC’.
5. The broiling power level and time can be
adjusted before or during the broiling cycle.
a) The broiling power level is displayed as
the top figure on the LCD screen. Turn the
TEMPERATURE dial to adjust broiling to
one of three power levels: ‘HIGH’, 'MED'
and ‘LOW’ broil.
b) The broiling time is displayed as the bottom
figure on the LCD screen. Turn the TIME
dial to adjust the time up to 20 minutes.
6. Press the START/STOP button to activate
the BROIL function. The button backlight
will illuminate red, the oven alert will sound
and the LCD screen will illuminate orange.
BOV900_USC_IB_A16.indd 16 25/05/2016 11:47 am

17
4. The baking temperature, time and
convection settings can be adjusted before
or during the baking cycle.
a) The baking temperature is displayed as
the top figure on the LCD screen. Turn
the TEMPERATURE dial to adjust the
baking temperature from 120°F/50°C to a
maximum of 480°F/250°C.
b) Turn the TIME dial to select the cooking
time. Maximum cooking times can be set
as follows:
>390°F/200°C up to 4 hours
300°F/150°C – 390°F/200°C up to 8 hours
210°F/100°C – 300°F/150°C up to 12 hours
<210°F/100°C up to 72 hours
5. Press the START/STOP button to activate
the BAKE function. The button backlight
will illuminate red, the oven alert will sound
and the LCD screen will illuminate orange.
The LCD screen will indicate a blinking
‘PREHEATING’.
6. Once the oven has finished preheating, an
alert will sound and food can be inserted
into the oven.
7. Place food, positioned on the included
roasting pan or other oven-proof dish, on
the center of the wire rack so air will flow
around all sides of the food. Close the
oven door.
8. After the PREHEATING alert has sounded,
the timer will automatically begin to count
down. The temperature and time can be
adjusted during the baking cycle by turning
the corresponding TEMPERATURE and
TIME dial. The cycle can be stopped at any
time by pressing the START/STOP button.
PRESS
WHEN AT
TEMPERATURE
9. At the end of the BAKE cycle, the oven
alert will sound. The START/STOP button
backlight will go out and the LCD screen
will illuminate white.
BOV900_USC_IB_A16.indd 17 25/05/2016 11:47 am

18
ROAST FUNCTION
The ROAST function is ideal for cooking a
variety of meats and poultry. Food will be
tender and juicy on the inside and roasted to
perfection on the outside.
1. Insert the wire rack into rack position 6.
2. Close the oven door.
3. Turn the SELECT/CONFIRM dial until
the indicator on the LCD screen reaches
the ROAST function. The top figure on the
LCD screen indicates the preset ROAST
temperature of ‘400°F’, while the bottom
figure indicates the preset time of ‘1:00HR/
MIN’. The preset CONVECTION setting
will also be displayed.
4. The roasting temperature, time and
convection settings can be adjusted before
or during the roasting cycle.
a) The roasting temperature is displayed as
the top figure on the LCD screen. Turn
the TEMPERATURE dial to adjust the
roasting temperature from 120°F/50°C to a
maximum of 480°F/250°C.
b) Turn the TIME dial to select the cooking
time. Maximum cooking times can be set
as follows:
>390°F/200°C up to 4 hours
300°F/150°C – 390°F/200°C up to 8 hours
210°F/100°C – 300°F/150°C up to 12 hours
<210°F/100°C up to 72 hours
5. Press the START/STOP button to activate
the ROAST function. The button backlight
will illuminate red, the oven alert will sound
and the LCD screen will illuminate orange.
The LCD screen will indicate a blinking
‘PREHEATING’.
6. Once the oven has finished preheating, an
alert will sound and food can be inserted
into the oven.
7. Place food, positioned on the included
roasting pan or other oven-proof dish, on
the center of the wire rack so air will flow
around all sides of the food. Close the
oven door.
8. After the PREHEATING alert has sounded,
the timer will automatically begin to count
down. The temperature and time can be
adjusted during the roasting cycle by
turning the corresponding TEMPERATURE
and TIME dial. The cycle can be stopped
at any time by pressing the START/STOP
button.
PRESS
WHEN AT
TEMPERATURE
9. At the end of the ROAST cycle, the oven
alert will sound. The START/STOP button
backlight will go out and the LCD screen
will illuminate white.
BOV900_USC_IB_A16.indd 18 25/05/2016 11:47 am
19
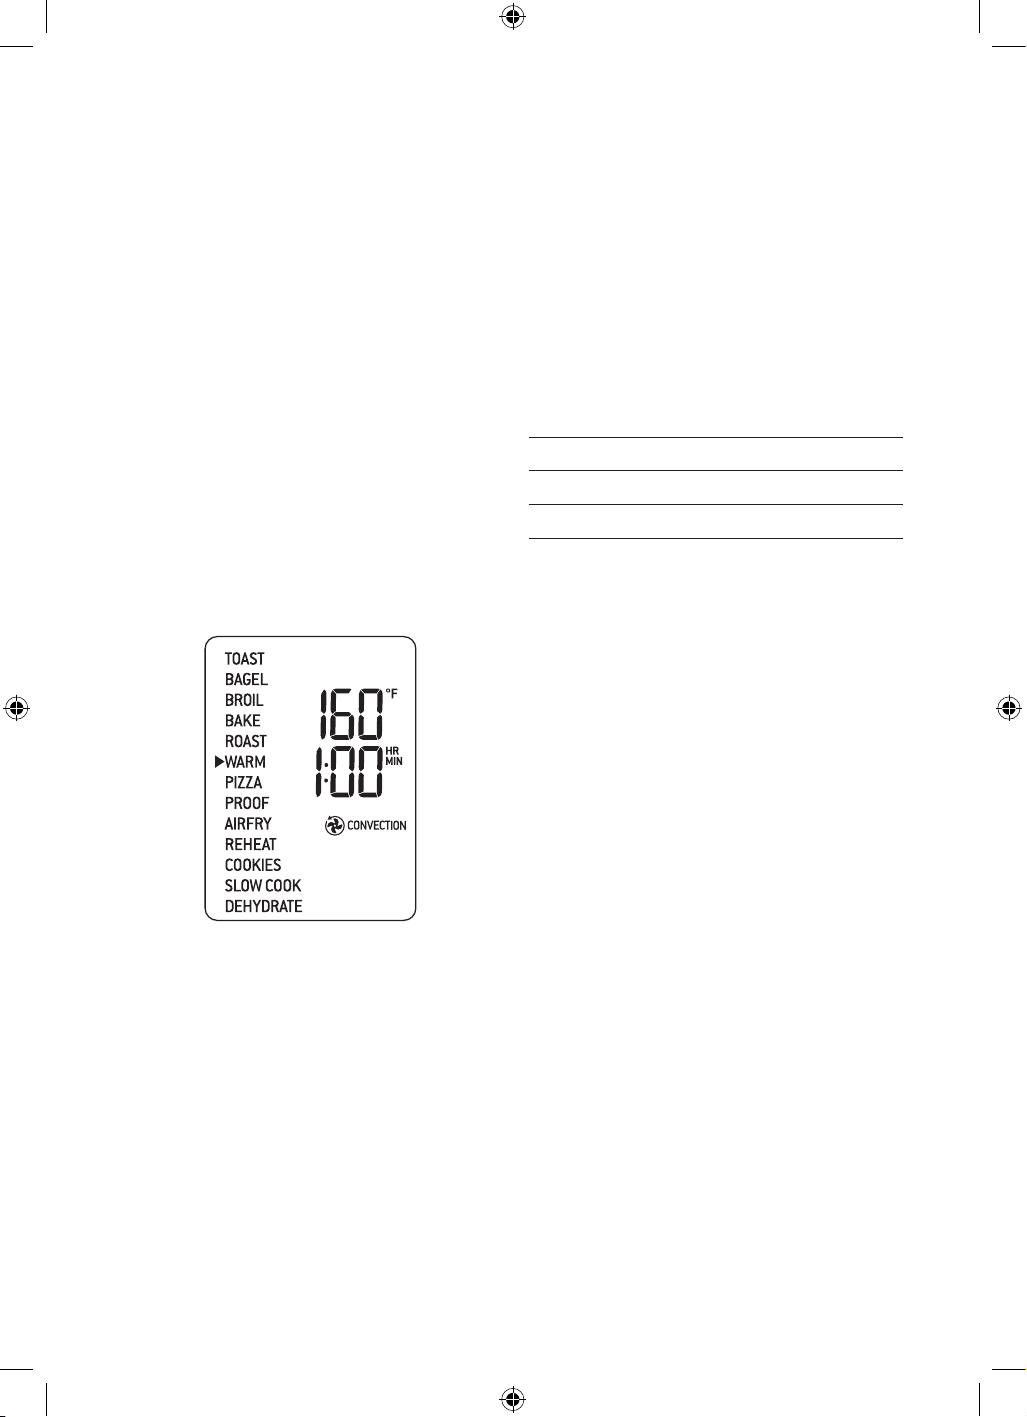
WARM FUNCTION
The WARM function maintains hot foods at
the recommended temperature to prevent
bacterial growth, 160°F/70°C or above.
1. Insert the wire rack into a rack position
that best suits the type of food you are
keeping warm.
2. Place food, positioned on the included
roasting pan, pizza pan or other oven-proof
dish, on the center of the wire rack so air will
flow around all sides of the food.
3. Close the oven door.
4. Turn the SELECT/CONFIRM dial until the
indicator on the LCD screen reaches the
WARM function. The top figure on the LCD
screen indicates the preset temperature of
‘160°F’, while the bottom figure indicates
the preset time of ‘1:00 HR/MIN’. The
preset CONVECTION setting will also be
displayed.
5. The temperature, time and convection
settings can be adjusted before or during
the warming cycle.
a) The warming temperature is displayed
as the top figure on the LCD screen.
Turn the TEMPERATURE dial to adjust
the temperature from 120°F/50°C to a
maximum of 480°F/250°C.
b) Turn the TIME dial to select the cooking
time. Maximum cooking times can be set
as follows:
>390°F/200°C up to 4 hours
300°F/150°C – 390°F/200°C up to 8 hours
210°F/100°C – 300°F/150°C up to 12 hours
<210°F/100°C up to 72 hours
6. Press the START/STOP button to activate
the WARM function. The button backlight
will illuminate red, the oven alert will sound
and the LCD screen will illuminate orange.
7. The timer will be displayed and
automatically begin to count down. The
temperature and time can be adjusted
during the warming cycle by turning the
corresponding TEMPERATURE and TIME
dial. The cycle can be stopped at any time
by pressing the START/STOP button.
8. At the end of the WARM cycle, the oven
alert will sound. The START/STOP button
backlight will go out and the LCD screen
will illuminate white.
BOV900_USC_IB_A16.indd 19 25/05/2016 11:47 am
20
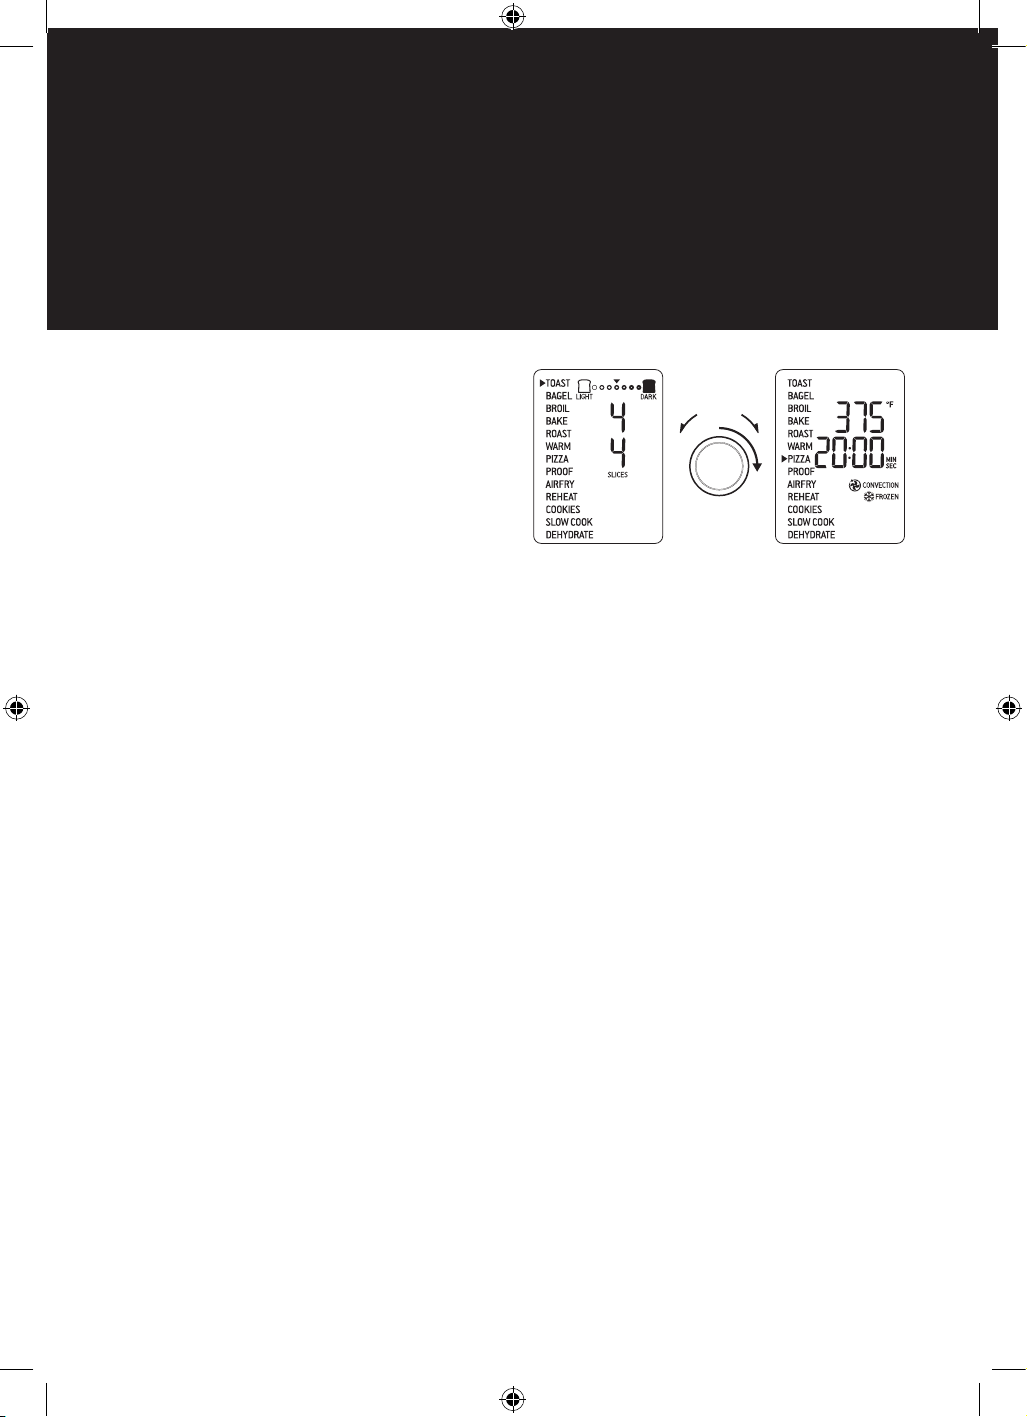
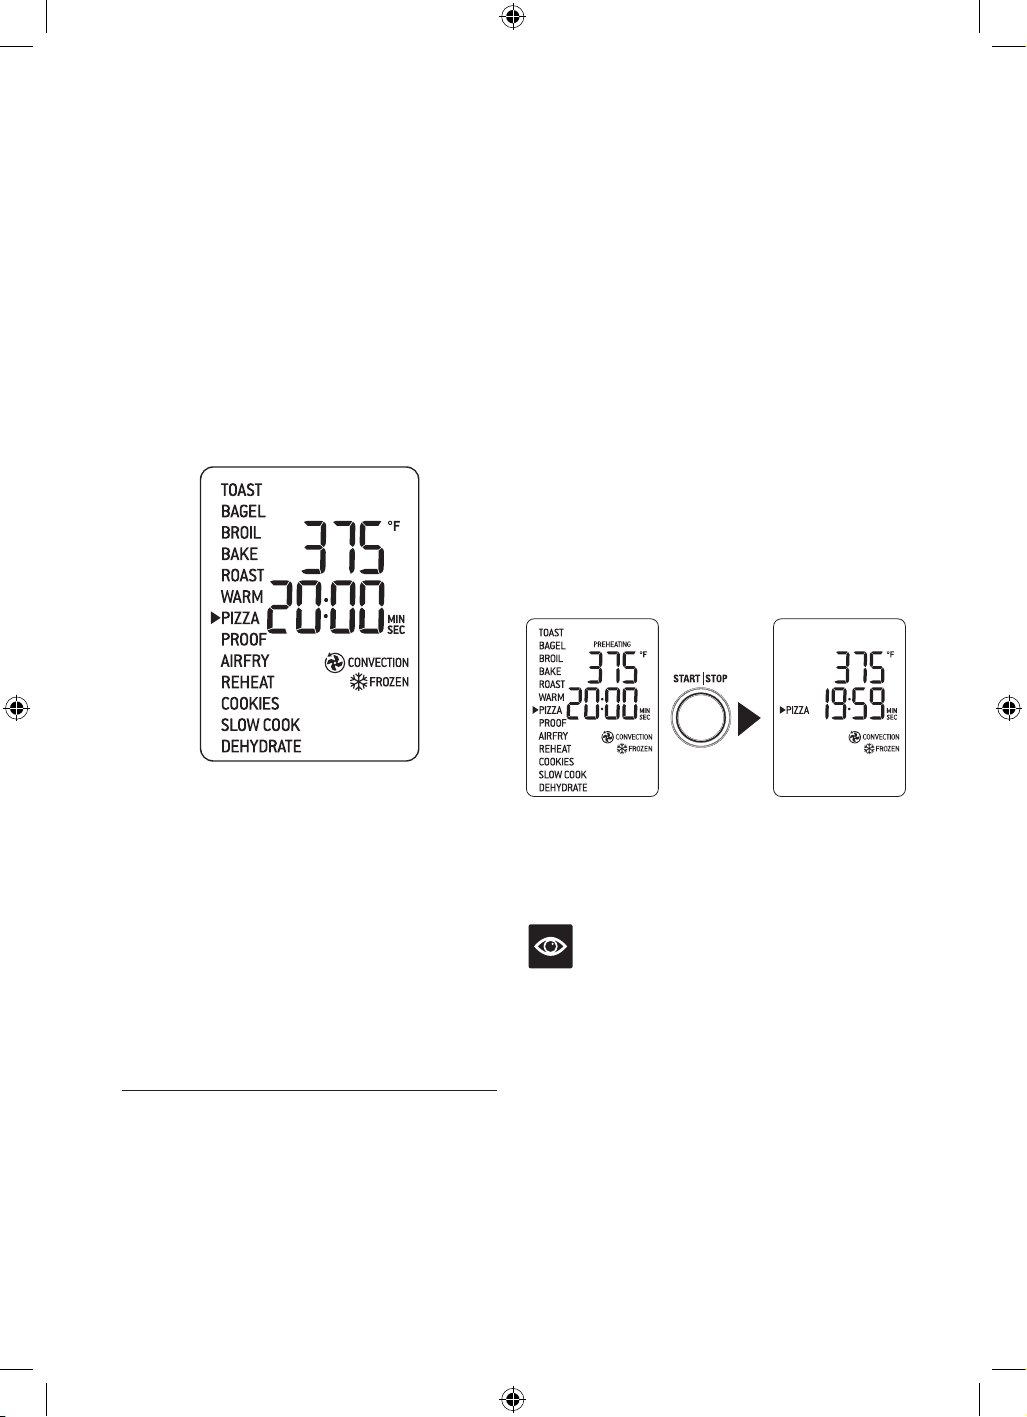
PIZZA FUNCTION
The PIZZA function melts and browns cheese
and toppings, while crisping up the pizza crust.
1. Insert the wire rack into rack position 7.
2. Close the oven door.
3. Turn the SELECT/CONFIRM dial until
the indicator on the LCD screen reaches
the PIZZA function. The top figure on the
LCD screen indicates the preset PIZZA
temperature of ‘375°F’, while the bottom
figure indicates the preset time of ‘20:00
MIN/SEC’. The preset CONVECTION and
FROZEN settings will also be displayed.
4. The pizza temperature, time, convection,
and frozen settings can be adjusted before
or during the cycle.
a) The pizza temperature is displayed as
the top figure on the LCD screen. Turn
the TEMPERATURE dial to adjust the
temperature from 120°F/50°C to a
maximum of 480°F/250°C.
b) Turn the TIME dial to select the cooking
time. Maximum cooking times can be set
as follows:
120°F/50°C – 480°F/250°C up to 1:00 HR
5. Press the START/STOP button to activate
the PIZZA function. The button backlight
will illuminate red, the oven alert will sound
and the LCD screen will illuminate orange.
The LCD screen will indicate a blinking
‘PREHEATING’.
6. Once the oven has reached the set
temperature, the temperature alert will
sound.
7. Place food, positioned on the included pizza
pan if using, on the center of the wire rack
so air will flow around all sides of the food.
Close the oven door.
8. After the PREHEATING alert has sounded,
the timer will automatically begin to count
down. The temperature and time can be
adjusted during the PIZZA cycle by turning
the corresponding TEMPERATURE and
TIME dial. The cycle can be stopped at any
time by pressing the START/STOP button.
PRESS
9. At the end of the PIZZA cycle, the oven
alert will sound. The START/STOP button
backlight will go out and the LCD screen
will illuminate white.
NOTE
If using the included pizza pan, place it in
the oven during the preheating cycle for
the best result. Carefully place pizza on the
heated pizza pan.
BOV900_USC_IB_A16.indd 20 25/05/2016 11:47 am
21
A note on pizza stones
When using a pizza stone, it is necessary to
preheat the stone, without a pizza, for optimum
results.
1. Insert the wire rack into rack position 7.
2. Place pizza stone on the center of the wire
rack so air will flow around all sides of
the stone.
3. Close the door.
4. Turn the SELECT/CONFIRM dial until
the indicator on the LCD screen reaches
the PIZZA function. The top figure on the
LCD screen indicates the preset PIZZA
temperature of ‘375°F’, while the bottom
figure indicates the preset time of
‘20:00 MIN/SEC’. The preset
CONVECTION and FROZEN settings will
also be displayed.
5. Turn the TIME dial to the set the time to
15:00 MIN/SEC.
6. Press the START/STOP button to activate
the PIZZA function. The button backlight
will illuminate red, the oven alert will sound
and the LCD screen will illuminate orange.
The LCD screen will indicate a blinking
‘PREHEATING’.
7. Once the oven has finished preheating,
an alert will sound.
8. After the PREHEATING alert has sounded,
the timer will automatically begin to
count down.
9. At the end of the cycle, the oven alert will
sound. The START/STOP button backlight
will go out and the LCD screen will
illuminate white.
10. Open the oven door and carefully place
pizza on the heated pizza stone.
11. Select desired PIZZA temperature, time,
convection, and fresh/frozen settings and
press the START/STOP button to restart
the PIZZA cycle.
PROOF FUNCTION
The PROOF function is designed to precisely
hold low temperatures, providing an ideal
environment for proofing bread, rolls, pizza and
other doughs.
1. Insert the wire rack into rack position 8.
2. Place dough in an oven-proof vessel, cover
and place on center of wire rack.
3. Close the oven door.
4. Turn the SELECT/CONFIRM dial until
the indicator on the LCD screen reaches
the PROOF function. The top figure on the
LCD screen indicates the preset PROOF
setting of ‘85°F’,while the bottom figure
indicates the preset time of ‘1:00HR/MIN’.
The preset CONVECTION setting will
also be displayed.
5. The proofing temperature, time and
convection settingss can be adjusted before
or during the proof cycle.
a) The proofing temperature is displayed as
the top figure on the LCD screen. Turn the
TEMPERATURE dial to adjust the proofing
temperature from 80°F/27°C to a max of
100°F/38°C.
b) The proofing time is displayed as the
bottom figure on the LCD screen. Turn
the TIME dial to adjust the time up to
2:00 HR/MIN.
6. Press the START/STOP button to activate
the PROOF function. The button backlight
will illuminate red, the oven alert will sound
and the LCD screen will illuminate orange.
BOV900_USC_IB_A16.indd 21 25/05/2016 11:47 am
22
7. The timer will be displayed and begin to
count down. The temperature and time
can be adjusted during the proofing
cycle by turning the corresponding
TEMPERATURE and TIME dial. The cycle
can be stopped at any time by pressing the
START/STOP button
8. At the end of the PROOF cycle, the oven
alert will sound. The START/STOP button
backlight will go out and the LCD screen
will illuminate white.
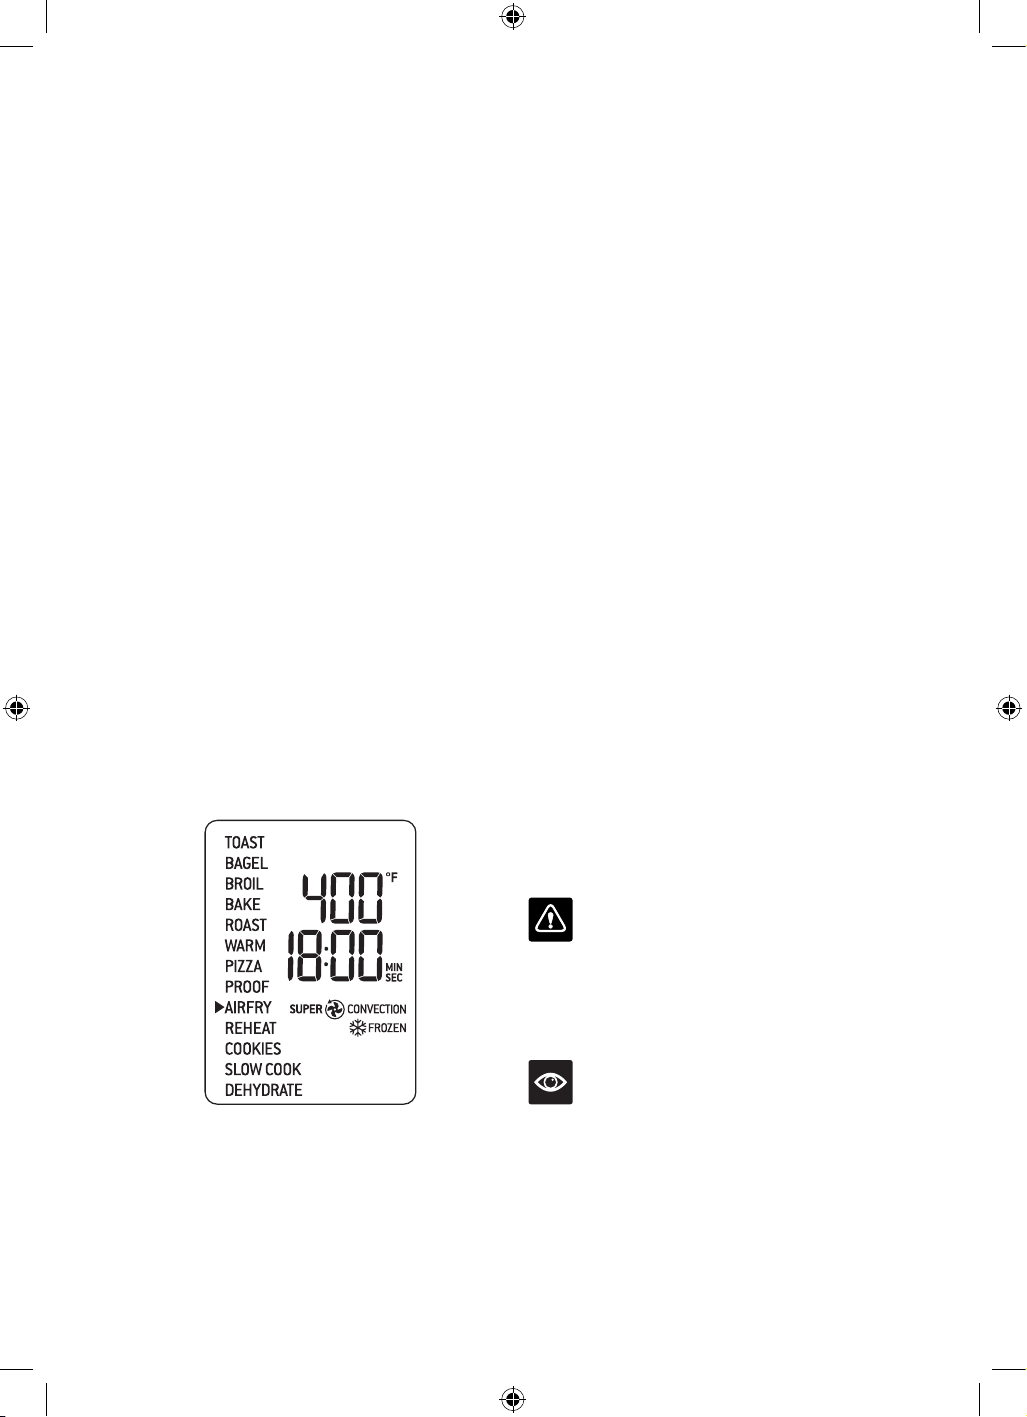
AIR FRY FUNCTION
The AIRFRY function combines intense heat
and maximized airflow to cook foods crispy
and brown.
1. Ensure rack position 3, or other desired
position for the air fry/dehydrate basket,
is empty.
2. Close the oven door.
3. Turn the SELECT/CONFIRM dial until
the indicator on the LCD screen reaches
the AIRFRY function. The top figure on the
LCD screen indicates the preset AIRFRY
setting of ‘400°F’, while the bottom figure
indicates the preset time of '18:00 MIN/
SEC’. The preset SUPER CONVECTION
setting will also be displayed.
4. The AIRFRY temperature, time, convection
and frozen settings can be adjusted before
or during the AIRFRY cycle.
a) The AIRFRY temperature is displayed as
the top figure on the LCD screen. Turn the
TEMPERATURE dial to adjust the AIRFRY
temperature from 120°F/50°C to a max of
480°F/250°C.
b) The AIRFRY time is displayed as the
bottom figure on the LCD screen. Turn
the TIME dial to adjust the time up to a
maximum of 1 hour.
5. Press the START/STOP button to activate
the AIRFRY function. The button backlight
will illuminate red, the oven alert will sound
and the LCD screen will illuminate orange.
The LCD screen will indicate a blinking
‘PREHEATING’.
6. Once the oven has finished preheating, an
alert will sound and food can be inserted
into the oven.
7. Arrange food evenly on the included
air fry/ dehydrate basket. For best results,
place food in a single layer and leave space
between pieces. Insert the air fry/dehydrate
basket into rack position Close the
oven door.
8. After the PREHEATING alert has sounded,
the timer will automatically begin to
count down. The temperature and time
can be adjusted during the AIRFRY
cycle by turning the corresponding
TEMPERATURE and TIME dial. The cycle
can be stopped at any time by pressing the
START/STOP button.
9. At the end of the AIRFRY cycle, the oven
alert will sound. The START/STOP button
backlight will go out and the LCD screen
will illuminate white.
IMPORTANT
When cooking fatty foods (e.g. chicken wings)
use roasting pan instead of air fry/dehydrate
basket to prevent the oil dripping. Discard
excess oil in between the batches.
NOTE
You can fit a total of 4 air frying/dehydrating
baskets in this oven. Visit www.breville.com
for more information on purchasing additional
air fry/dehydrate baskets.
BOV900_USC_IB_A16.indd 22 25/05/2016 11:47 am

23
REHEAT FUNCTION
The REHEAT function is ideal for gently
reheating leftovers without browning or drying
them out.
1. Insert the wire rack into a rack position that
best suits the type of food you are reheating.
2. Place food, positioned on the included
roasting pan, pizza pan or other oven-proof
dish, on the center of the wire rack so air will
flow around all sides of the food.
3. Close the oven door.
4. Turn the SELECT/CONFIRM dial until the
indicator on the LCD screen reaches the
REHEAT function. The top figure on the
LCD screen indicates the preset REHEAT
temperature of ‘325°F’, while the bottom
figure indicates the preset time of
‘15:00 MIN/SEC’. The preset
CONVECTION setting will also be
displayed.
5. The reheating temperature, time,
convection and frozen settings can
be adjusted before or during the
reheating cycle.
a) The reheating temperature is displayed
as the top figure on the LCD screen.
Turn the TEMPERATURE dial to adjust
the temperature from 120°F/50°C to a
maximum of 480°F/250°C.
The reheating time is displayed as the
bottom figure on the LCD screen. Turn
the TIME dial to adjust the time up to
2 hours for temperatures 120°F/50°C –
480°F/250°C.
6. Press the START/STOP button to activate
the REHEAT function. The button backlight
will illuminate red, the oven alert will sound
and the LCD screen will illuminate orange.
7. The timer will be displayed and begin to
count down. The temperature and time
can be adjusted during the reheating
cycle by turning the corresponding
TEMPERATURE and TIME dial. The cycle
can be stopped at any time by pressing the
START/STOP button.
8. At the end of the REHEAT cycle, the oven
alert will sound. The START/STOP button
backlight will go out and the LCD screen
will illuminate white.
BOV900_USC_IB_A16.indd 23 25/05/2016 11:47 am
24
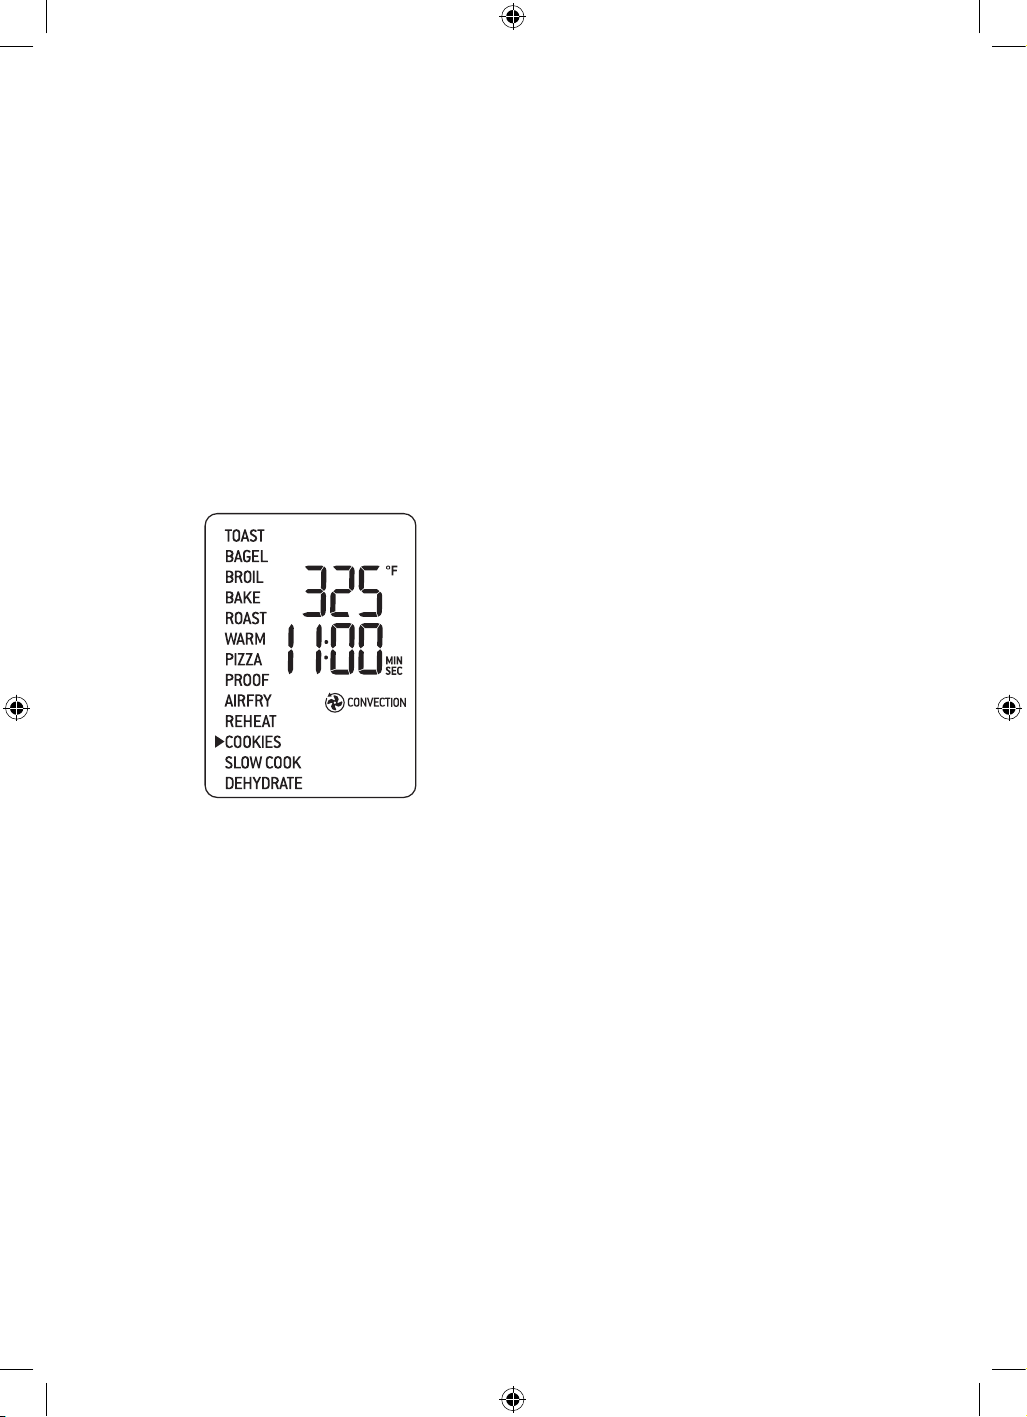
COOKIES FUNCTION
The COOKIES function is ideal for baking
homemade or commercially prepared cookies
and other baked treats.
1. Insert the wire rack into rack position 6.
2. Close the oven door.
3. Turn the SELECT/CONFIRM dial until the
indicator on the LCD screen reaches the
COOKIES function. The top figure on the
LCD screen indicates the preset COOKIES
temperature of ‘325°F’, while the bottom
figure indicates the preset time of
‘11:00 MIN/SEC’. The preset
CONVECTION setting will also be
displayed.
4. The COOKIES temperature, time,
convection and frozen settings can be
adjusted before or during the cookie cycle.
a) The COOKIES temperature is displayed
as the top figure on the LCD screen. Turn
the TEMPERATURE dial to adjust the
baking temperature from 120°F/50°C to a
maximum of 480°F/250°C.
b) The COOKIES time is displayed as the
bottom figure on the LCD screen. Turn the
TIME dial to adjust the time up to 1 hour for
temperatures 120°F/50°C - 480°F/250°C.
5. Press the START/STOP button to activate
the COOKIES function. The button
backlight will illuminate red, the oven
alert will sound and the LCD screen will
illuminate orange. The LCD screen will
indicate a blinking ‘PREHEATING’.
6. Once the oven has finished preheating,
an alert will sound and food can be inserted
into the oven.
7. Place food, positioned on the included
roasting pan, pizza pan or other oven-proof
dish, on the center of the wire rack so air will
flow around all sides of the food. Close the
oven door.
8. After the PREHEATING alert has sounded,
the timer will automatically begin to
count down. The temperature and time
can be adjusted during the COOKIES
cycle by turning the corresponding
TEMPERATURE and TIME dial. The cycle
can be stopped at any time by pressing the
START/STOP button.
9. At the end of the COOKIES cycle, the oven
alert will sound. The START/STOP button
backlight will go out and the LCD screen
will illuminate white.
BOV900_USC_IB_A16.indd 24 25/05/2016 11:47 am
25
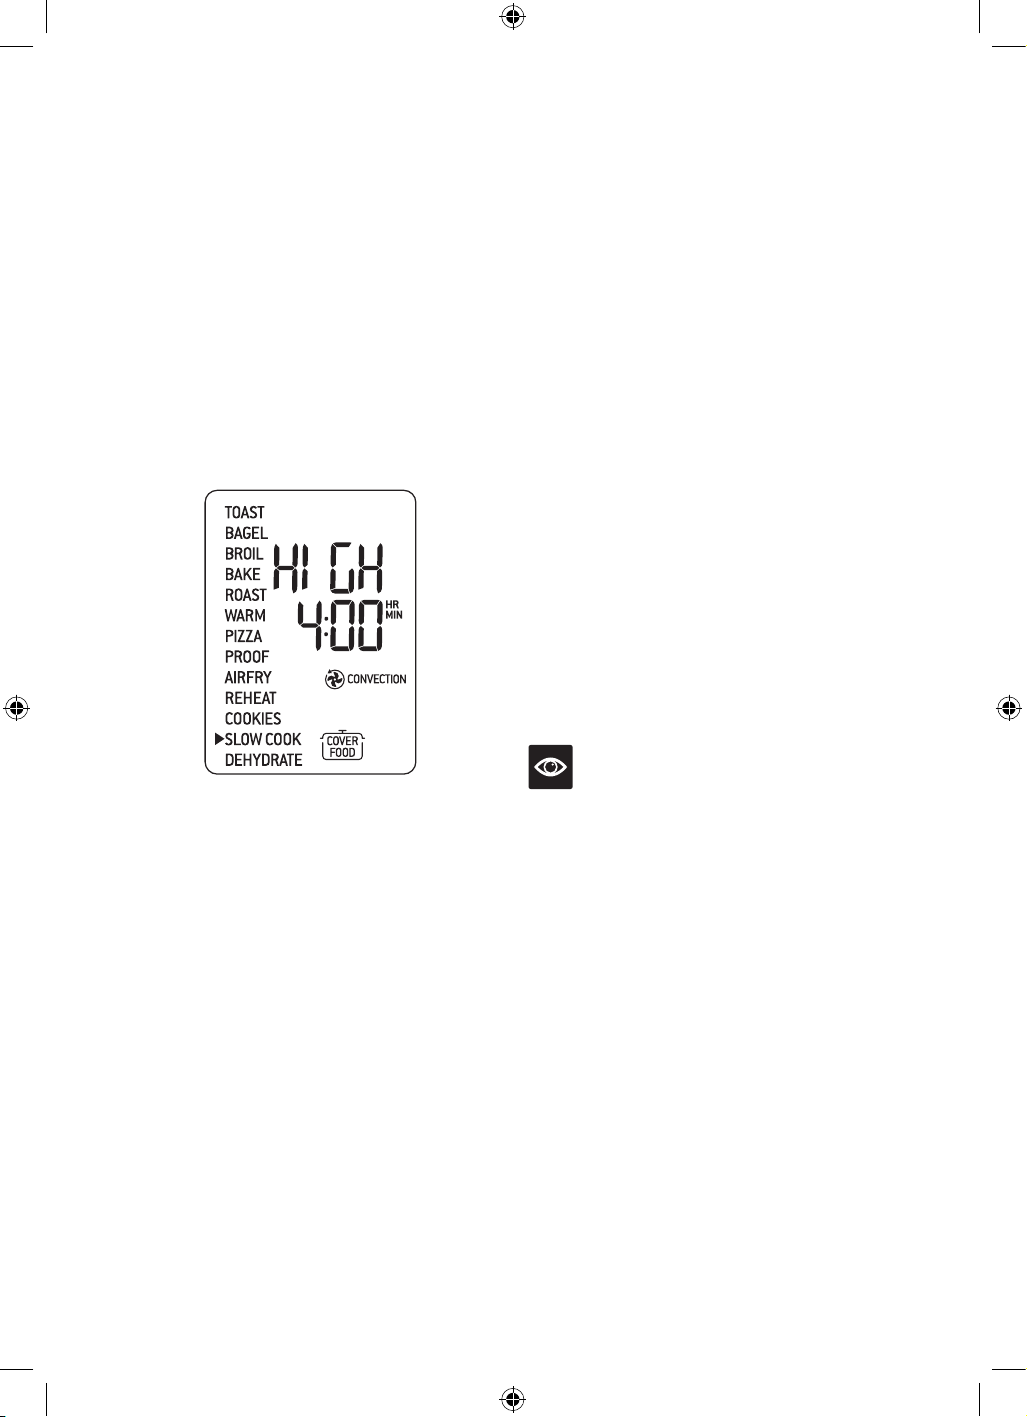
SLOW COOK FUNCTION
The SLOW COOK function has cooking
profiles designed for long cook times at
low temperatures.
1. Insert the wire rack into rack position 8.
2. Close the oven door.
3. Turn the SELECT/CONFIRM dial until the
indicator on the LCD screen reaches the
SLOW COOK function. The top figure on
the LCD screen indicates the preset SLOW
COOK temperature of ‘HIGH’, while the
bottom figure indicates the preset time of
‘4:00HR/MIN’. The preset CONVECTION
setting will also be displayed.
4. The slow cook temperature, time and
convection settings can be adjusted before
or during the slow cook cycle.
a) The temperature is displayed as the
top figure on the LCD screen. Turn the
TEMPERATURE dial to adjust slow
cooking to one of two preset temperatures:
‘LOW’ or ‘HIGH’.
b) The time is displayed as the bottom figure
on the LCD screen. Turn the TIME dial to
adjust the time between 4 and 72 hours
for ‘LOW’ and between 2 and 12 hours for
‘HIGH’.
5. Place food, inside covered oven-proof
cookware, on the center of the wire rack
so air will flow around all sides of the food.
Close the oven door.
6. Press the START/STOP button to activate
the SLOW COOK function. The button
backlight will illuminate red, the oven
alert will sound and the LCD screen will
illuminate orange. The LCD screen will
indicate a blinking ‘PREHEATING’.
7. After the PREHEATING alert has sounded,
the timer will automatically begin to count
down. The temperature and time can be
adjusted during the cycle by turning the
corresponding TEMPERATURE and TIME
dial. The cycle can be stopped at any time
by pressing the START/CANCEL button.
8. At the end of the SLOW COOK cycle,
the oven will automatically switch to the
WARM function. The LCD screen will
display ‘WARM’ and a keep warm time of
‘2:00 HR/MIN’ will automatically count
down. The keep warm cycle can be
stopped at any time by pressing the
START/STOP button.
NOTE
Do not pull the wire rack further than halfway
out when inserting or removing cookware from
the oven.
Do not allow heavy cookware to rest on the
glass when the door is open.
BOV900_USC_IB_A16.indd 25 25/05/2016 11:47 am
26
TIPS
TIPS FOR SLOW COOKING
1. Ensure cookware is oven-proof and does not
exceed 13 pounds when empty.
2. Fill cookware to a minimum of ½ and
maximum of ¾ full to avoid over or
under-cooking. To prevent spillover,
do not fill cookware more than ¾ full.
3. Always slow cook with the lid on to prevent
food from drying out. Cover cookware with
a layer of aluminum foil before covering
with lid to keep even more moisture in.
4. Follow cooking temperatures and times
prescribed in traditional slow cooker
recipes. One hour on ‘HIGH’ is equivalent
to approximately one-and-a-half to two
hours on ‘LOW’.
5. Cold food will take longer to cook than food
that has been pre-seared or heated so adjust
cooking times as appropriate. Do not slow
cook frozen foods.
6. Cut large pieces of meat in half to allow heat
to penetrate more evenly.
DEHYDRATE FUNCTION
The DEHYDRATE function combines low and
stable heat with maximized airflow to evenly
dry out foods without cooking or overheating.
1. Arrange food evenly on the included
air fry/dehydrate basket. For best results,
place food in a single layer and leave space
between pieces. Insert air fry/dehydrate
basket into rack position 3.
2. Close the oven door.
3. Turn the SELECT/CONFIRM dial until
the indicator on the LCD screen reaches
the DEHYDRATE function. The top figure
on the LCD screen indicates the preset
DEHYDRATE temperature of ‘125°F’,
while the bottom figure indicates the
preset time of ‘12:00HR/MIN’. The preset
SUPER CONVECTION setting will also
be displayed.
4. The dehydrating temperature, time and
convection settings can be adjusted before
or during the dehydrate cycle.
a) The dehydrating temperature is displayed
as the top figure on the LCD screen.
Turn the TEMPERATURE dial to adjust the
dehydrating temperature from ‘86°F/30°C
to a maximum of 176°F/80°C’.
b) The time is displayed as the bottom figure
on the LCD screen. Turn the TIME dial to
adjust the time up to 72 hours.
5. Press the START/STOP button to activate
the DEHYDRATE function. The button
backlight will illuminate red, the oven
alert will sound and the LCD screen will
illuminate orange.
BOV900_USC_IB_A16.indd 26 25/05/2016 11:47 am

27
3. The arrow will now blink above the ‘2’,
indicating you are programming the second
phase of cooking.
a) Turn the SELECT/CONFIRM dial until the
indicator on the LCD screen reaches your
desired function.
b) Turn the TEMPERATURE dial to adjust the
cooking temperature. Turn the TIME dial to
adjust the cooking time.
c) Press the SELECT/CONFIRM dial to
confirm the second cooking phase.
4. Press the START|STOP button to activate
the first function. The button backlight will
illuminate red, the oven alert will sound and
the LCD screen will illuminate orange.
The functions for both phases will display
on the LCD screen with an arrow next to the
first phase.
5. When the first cooking phase completes,
the second one will automatically start. At
the end of the second cooking phase, the
oven alert will sound. The START|STOP
button backlight will go out and the LCD
screen will illuminate white.
6. The timer will be displayed and begin to
count down. The temperature and time
can be adjusted during the dehydrating
cycle by turning the corresponding
TEMPERATURE and TIME dial. The cycle
can be stopped at any time by pressing the
START/STOP button
7. At the end of the DEHYDRATE cycle, the
oven alert will sound. The START/STOP
button backlight will go out and the LCD
screen will illuminate white.
TIPS
• Use baking paper on top of the air fry/
dehydrate basket when dehydrating foods
with strong color to prevent staining.
• When dehydrating foods that may drip,
such as marinated jerky, use the included
roasting pan to catch any dripping liquid.
Insert a wire rack into rack position 8 and
center the roasting pan on the wire rack.
PHASE COOK
Use the PHASE COOK button to program 2
back to back cooking functions. The functions
available for Phase Cook are BROIL, BAKE,
ROAST, WARM and PIZZA.
1. Press the PHASE COOK button. ‘PHASE
COOK’ will appear on the LCD screen,
along with the available functions.
2. An arrow will blink above the ‘1’, indicating
you are programming the first phase of
cooking.
a) Turn the SELECT/CONFIRM dial until the
indicator on the LCD screen reaches your
desired function.
b) Turn the TEMPERATURE dial to adjust the
cooking temperature. Turn the TIME dial to
adjust the cooking time.
c) Press the SELECT/CONFIRM or
START/STOP dial to confirm the first
cooking phase.
BOV900_USC_IB_A16.indd 27 25/05/2016 11:47 am
28
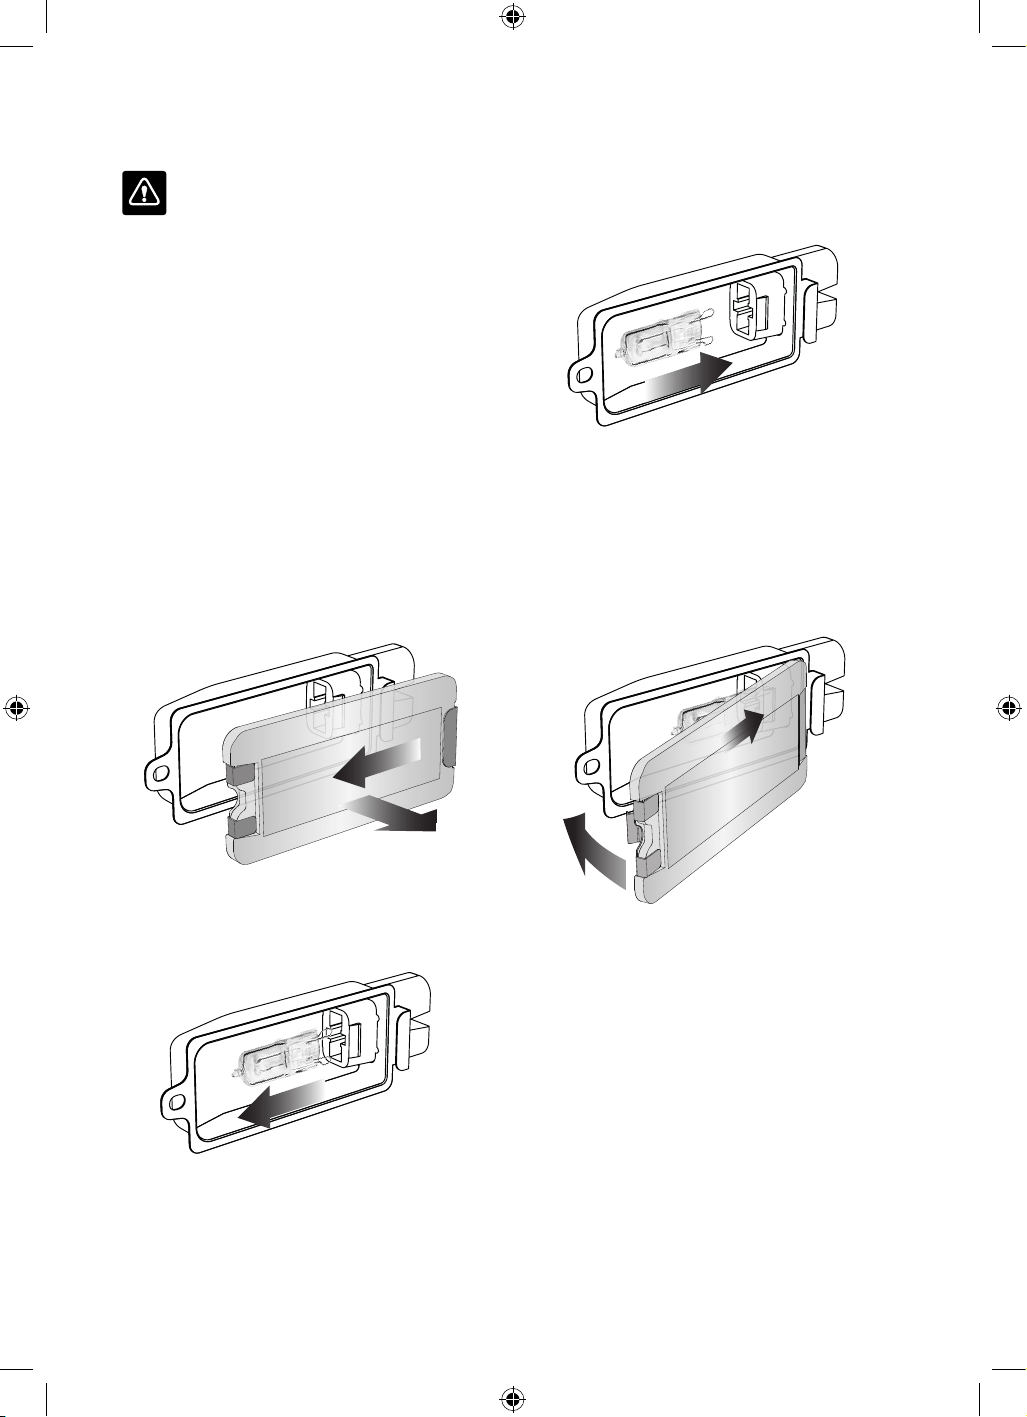
REPLACING THE OVEN LIGHT
WARNING
Always unplug oven and let cool before
replacing bulb. Only use a 25 Watt, 120V, G9
type oven bulb.
1. Remove the wire rack from the oven before
replacing the light.
2. The light is positioned on the lefthand side
of the oven cavity. Position your fingers on
the outside of the light housing and gently
pull the glass cover away from the oven wall
to remove it. If you are unable to pull the
cover off, slide a spoon into the left side of
the light housing and gently lever the glass
cover off. Always hold the glass cover with
the other hand to prevent the cover from
falling and breaking.
3. Remove the used bulb by pulling it directly
out of its holder.
4. Use a soft cloth to insert the new bulb. Do
not directly touch the surface of the bulb
with your fingers as oil from your skin can
damage the bulb.
5. To reattach the glass cover, align the metal
hook with the left side of the light housing.
Slide the opposite end of the glass cover
into the metal bracket on the right side of
the housing, then push the metal hook into
the left side of the housing until it snaps
securely into position.
USING THE WARMING TRAY
The top of the oven is very hot during and after
operation. As a result, storing items on top of
the oven is not recommended.
The only exception is the optional Breville
Bamboo Cutting Board and Serving Tray that
fits in the ribbed section on top of the oven.
Visit www.breville.com for more information.
BOV900_USC_IB_A16.indd 28 25/05/2016 11:47 am
29
Care & Cleaning
Before cleaning, ensure the oven is turned
off by removing the power plug from the
power outlet.
Allow the oven and all accessories to cool
completely before disassembling and cleaning.
Cleaning the outer body and door
1. Wipe the outer body with a soft, damp
sponge. A non-abrasive liquid cleanser or
mild spray solution may be used to avoid
build-up of stains. Apply the cleanser to
the sponge, not the oven surface, before
cleaning.
2. To clean the glass door, use a glass cleaner
or mild detergent and a soft, damp sponge
or soft plastic scouring pad. Do not use an
abrasive cleanser or metal scouring pad as
these will scratch the oven surface.
3. Wipe the LCD screen with a soft damp
cloth. Apply cleanser to the cloth and not
the LCD surface. Cleaning with dry cloth or
abrasive cleaners may scratch the surface.
4. Let all surfaces dry thoroughly prior to
inserting the power plug into a power outlet
and turning the oven on.
WARNING
Do not immerse the body, power cord or power
plug in water or any other liquid as this may
cause electrocution.
Cleaning the interior
The walls on the inside of the oven feature a
non-stick coating for easy cleaning. To clean
any splattering that may occur while cooking,
wipe the walls with a soft, damp sponge. A non-
abrasive liquid cleanser or mild spray solution
may be used to avoid build-up of stains. Apply
the cleanser to the sponge, not the oven
surface, before cleaning. Avoid touching the
quartz heating elements.
WARNING
Use extreme caution when cleaning the
quartz heating elements. Allow the oven to
cool completely, then gently rub a soft, damp
sponge or cloth along the length of the heating
element. Do not use any type of cleanser or
cleaning agent. Let all surfaces dry thoroughly
prior to inserting the power plug into a power
outlet and turning the oven on.
Cleaning the crumb tray
1. After each use, slide out the crumb tray
and discard crumbs. Wipe the tray with a
soft, damp sponge. A non-abrasive liquid
cleanser may be used to avoid build-up of
stains. Apply the cleanser to the sponge, not
the tray, before cleaning. Dry thoroughly.
2. To remove baked-on grease, soak the tray
in warm soapy water then wash with a soft
sponge or soft plastic scouring pad. Rinse
and dry thoroughly.
3. Always reinsert the crumb tray into the
oven after cleaning and prior to inserting
the power plug into a power outlet and
turning the oven on.
BOV900_USC_IB_A16.indd 29 25/05/2016 11:47 am

30
Cleaning the wire rack, broiling rack,
roasting pan and pizza pan
1. Wash all accessories in warm soapy water
with a soft sponge or soft plastic scouring
pad. Rinse and dry thoroughly. Do not use
abrasive cleansers, metal scouring pads
or metal utensils to clean any of
the accessories as they may damage
the surfaces.
2. To extend the life of your accessories,
we do not recommend that these be placed
in the dishwasher.
Storage
1. Ensure the oven is turned off by removing
the power plug from the power outlet.
2. Allow the oven and all accessories to
cool completely before disassembling
and cleaning.
3. Ensure the oven and all accessories are
clean and dry.
4. Ensure the crumb tray is inserted into the
oven; the broiling rack is inserted into the
roasting pan and resting on the wire rack in
the middle rack height position.
5. Ensure the door is closed.
6. Store the appliance in an upright position
standing level on its support legs. Do not
store anything on top. The only exception is
the optional Breville Bamboo Cutting Board
and Serving Tray.
BOV900_USC_IB_A16.indd 30 25/05/2016 11:47 am

31
Troubleshooting
POSSIBLE PROBLEM EASY SOLUTION
Oven will not switch "ON"
•
Check that the power plug is securely inserted into the outlet.
•
Insert the power plug into an independent outlet.
•
Insert the power plug into a different outlet.
•
Reset the circuit breaker if necessary.
I would like to have the
default LCD settings back
•
The oven will remember the last setting used for each function even if you
remove the plug from the power outlet.
•
To restore the oven’s default settings for each function, press and hold the
TEMPERATURE CONVERSION and FROZEN buttons at the same time
for 5 seconds.
The LCD display
light has gone out
•
The oven goes into standby mode if not used for 10 minutes. When in
standby mode, the LCD screen will cease to illuminate, however all function
options will still be visible.
•
To re-activate the oven out of standby mode, press the START/STOP
button on the control panel, or turn any dial. The LCD screen will
re-illuminate.
The pizza does not
cook evenly
•
Some large pizzas may brown unevenly in compact ovens. Open the oven
door half way through the cooking time and turn the pizza 180 degrees for
more even darkness. Try using ROTATE REMIND.
The Magnetic Auto-Rack
Eject comes out too far
when I open the door
•
Always open the door slowly and in a controlled manner when the wire rack
is inserted into rack position 3 or 4 to prevent the wire rack from ejecting
too quickly.
I cannot select the
FROZEN FOODS button
•
The FROZEN FOODS button is only selectable for the following functions:
TOAST, BAGEL, PIZZA, AIRFY, REHEAT and COOKIES.
Steam is coming out
from the oven door
•
This is normal. The door is vented to release steam created from high
moisture content foods such as frozen breads.
The heating elements
appear to be pulsing
•
Element IQ
‰
accurately controls the heat inside the oven by pulsing the
power and adjusting the power level in the heating elements in short bursts
to give accurate temperature control. This is normal.
Water is dripping onto
counter from under door
•
This is normal. The condensation created from high moisture content foods
such as frozen breads will run down the inside of the door and can drip onto
the counter.
The temperature reading
on the LCD screen doesn't
match the temperature
measured inside the oven
•
To ensure the measurements are standardized, the oven temperatures
have been calibrated in the TOAST position (center of the middle rack
with no tray in place). Re-check the temperature in this position, ensuring
not to open the oven door for 30 minutes as heat will escape each time
the door is opened. Note that the ‘preheat’ alert sounds at 75% of the target
temperature.
BOV900_USC_IB_A16.indd 31 25/05/2016 11:47 am

32
POSSIBLE PROBLEM EASY SOLUTION
The ‘preheat’ alert sounds
at a lower temperature
than what is displayed
on the LCD screen
•
The ‘preheat’ alert sounds at 75% of the target temperature. This provides
the fastest, combined preheating and cooking time.
•
This is because when the ‘preheating’ alert sounds, signaling the user to
open the oven door and insert food, there is dramatic temperature loss
inside the oven. If the alert sounded at 100% of the target temperature,
opening the door would mean a lot of this waiting time is "wasted". We
have calculated that by sounding the alert at 75% of the target temperature,
followed by the oven door being opened to place food inside the oven, that
we still recover to the target temperature up to 2 minutes faster. This is why
the temperature on the LCD screen does not match the target temperature
at the ‘preheat’ alert. Depending on the set temperature, it can take the oven
approximately 8–10 minutes from start-up, including opening the oven
door when the ‘preheat’ alert sounds, to reach the target temperature.
The LCD screen
displays 'E01'
•
The LCD screen will display 'E01' when there is a non-resettable issue with
the appliance. Should this occur, immediately remove the power cord from
the power outlet and call Breville Consumer Support.
The LCD screen
displays 'E02'
•
The LCD screen will display 'E02' when there is a non-resettable issue with
the appliance. Should this occur, immediately remove the power cord from
the power outlet and call Breville Consumer Support.
The LCD screen
displays 'E03'
•
The LCD screen will display 'E03' if the oven temperature is above the set
maximum limit. Remove the plug from the power outlet, allow the oven to
cool for 15 minutes, then plug back in.
•
Call Breville Consumer Support if the 'E03' message continues.
The LCD screen
displays 'E06'
•
The LCD screen will display 'E06' when there is a non-resettable issue with
the appliance. Should this occur, immediately remove the power cord from
the power outlet and call Breville Consumer Support.
Temperature are changing
when convection
button is pressed
•
This is normal. The temperature is calibrated to compensate for the
convection fan increasing cooking rates.
Noise from control panel
•
When the oven is over 302°F/150°C the electronics cooling fan is turned
ON. Below 302°F/150°C the fan is OFF.
BOV900_USC_IB_A16.indd 32 25/05/2016 11:47 am
the Smart Oven
®
Air
Manuel d'instructions - Convient à tous les modèles BOV900
BOV900_USC_IB_A16.indd 33 25/05/2016 11:47 am

34
BREVILLE VOUS
RECOMMANDE
LA SÉCURITÉ
AVANT TOUT
Chez Breville, la sécurité
occupe une place de choix.
Nous concevons et fabriquons
des produits destinés aux
consommateurs sans jamais
perdre de vue la sécurité de
notre précieuse clientèle. De
plus, nous vous demandons
d’être très vigilant lorsque
vous utilisez un appareil
électroménager et de respecter
les mesures de sécurité
suivantes:
IMPORTANTES
MESURES DE
SÉCURITÉ
LISEZ TOUTES LES
INSTRUCTIONS AVANT
USAGE ET CONSERVEZ-
LES À TITRE DE
RÉFÉRENCE
Lorsque vous utilisez un
appareil électrique, des
précautions élémentaires
s'imposent, incluant:
34 Breville recommande la
sécurité avant tout
39 Composants
41 Avant la première utilisation
44 Fonctions
–
FONCTIONNEMENT DE
VOTRE FOUR BREVILLE 44
– CAPTEUR DE LA PORTE 45
– GRILLE AUTO-ÉJECTABLE 45
– VOLUME DE L'AVERTISSEUR 45
– ROTATION 46
– TOAST 46
– BAGEL 47
– GRILLER 48
– CUIRE 49
– RÔTIR 50
– GARDER CHAUD 51
– PIZZA 52
– LEVER 54
– FRIRE À AIR CHAUD 55
– RÉCHAUFFER 56
– BISCUITS 57
– MIJOTER 58
– DÉSHYDRATER 59
– PHASES DE CUISSON 60
– REMPLACER LA LAMPE
DE FOUR
61
62 Entretien & nettoyage
64 Guide de dépannage
Tables des
matières
BOV900_USC_IB_A16.indd 34 25/05/2016 11:47 am

35
• Retirez et jetez en lieu sûr
tout matériel d'emballage et
promotionnel avant d'utiliser le
four pour la première fois.
• Afin d'éviter tout risque de
suffocation chez les jeunes
enfants, retirez et jetez en lieu
sûr l'enveloppe protectrice
recouvrant la fiche de l'appareil.
• N'utilisez pas l'appareil sur le
bord d'un comptoir ou d'une
table. Assurez-vous que le plan
de travail est stable, de niveau,
résistant à la chaleur et propre.
• N'utilisez pas l'appareil sur une
surface recouverte de tissu,
près des rideaux ou de tout
autre matériau inflammable.
• Un risque d'incendie peut
survenir si le four est recouvert
ou touche à du matériel
inflammable, incluant rideaux,
draperies, murs ou autre
lorsqu'il est en marche.
• N'utilisez pas l'appareil sur (ou
près de) un brûleur à gaz ou
électrique ou là où il pourrait
toucher un four chaud ou une
surface chaude.
• Ne laissez pas le cordon
d'alimentation pendre d'une
table ou d'un comptoir ni
toucher des surfaces chaudes.
• Pour éviter tout risque
d'électrocution, n'immergez pas
le cordon, la fiche ou la base
motorisée dans l'eau (ou tout
autre liquide).
• Lorsque l'appareil est en
marche, gardez une distance
minimale de 10 cm (4 po) de
chaque côté de l'appareil et
15 cm (6 po) au-dessus.
• Ne touchez pas les surfaces
chaudes de l'appareil. Pour
éviter de vous brûler, soyez
extrêmement prudent lorsque
vous retirez les casseroles,
plats, accessoires, grilloir et
lèchefrite qui contiennent de
l'huile ou des liquides chauds.
• Ne déposez aucun d'ustensile
de cuisine, lèchefrite ou plat sur
la porte en verre.
• Ne laissez pas la porte ouverte
durant une période de temps
prolongée.
• Ne déposez aucun objet sur le
dessus du four lorsqu'il est en
marche, sauf les articles décrits
en page 61 de ce manuel.
• Ne mettez aucun objet en
carton, plastique, papier ou
autre matériau inflammable
dans le four.
BOV900_USC_IB_A16.indd 35 25/05/2016 11:47 am

36
• Ne recouvrez pas le plateau
ramasse-miettes ou toute
autre partie du four de papier
métallique, car cela entraînera
une surchauffe du four.
• Faites preuve de prudence
lorsque vous utilisez des
casseroles ou plats faits
de matériaux autres que le
métal. Assurez-vous que les
casseroles et plats résistent au
four avant de les utiliser.
• Soyez prudent lorsque vous
utilisez des couvercles dans le
four, car la pression accumulée
dans le plat peut faire expulser
des ingrédients ou fissurer
le plat. Ne placez pas de
contenants scellés ou étanches
dans le four.
• Les aliments surdimensionnés
et les ustensiles métalliques
ne doivent pas être insérés
dans le four, car ils peuvent
entraîner un risque d'incendie
ou d'électrocution.
• L'utilisation d'accessoires
non recommandés ou fournis
avec ce four peut causer des
blessures.
• Ne rangez aucun objet dans le
four autre que les accessoires
recommandés par le fabricant
lorsqu'il n'est pas utilisé.
• Cet appareil est conçu pour un
usage domestique seulement.
Ne l'utilisez dans aucun type
de véhicule en mouvement ni à
l'extérieur ou à d'autres fins que
son usage prévu. Une mauvaise
utilisation peut causer des
blessures.
• Si l'appareil doit être : nettoyé,
déplacé, assemblé ou rangé,
éteignez-le toujours au
préalable et débranchez-le de la
prise électrique, puis laissez-le
refroidir complètement.
• Ne nettoyez pas le four
avec un tampon à récurer
métallique, car des particules
peuvent briser et s'en détacher,
provoquant un risque
d'électrocution.
• Une surveillance étroite est
requise lorsque l'appareil est
utilisé par ou à approximé des
enfants.
• L'utilisation de cordons
d'alimentation plus longs ou de
rallonges est permise, mais doit
être effectuée avec précaution.
BOV900_USC_IB_A16.indd 36 25/05/2016 11:47 am
37
• Il est recommandé de vérifier
régulièrement l'appareil et
le cordon d'alimentation.
N'utilisez pas l'appareil
si le cordon ou la fiche
d'alimentation ont été
endommagés, si l'appareil
présente des défauts de
fonctionnement ou a été
endommagé de quelque façon.
Cessez immédiatement l'usage
et contactez le Soutien aux
consommateurs de Breville.
• L'entretien doit être effectué
par un représentant de service
autorisé. .
AVERTISSEMENT
Pour prévenir le risque
d'électrocution, débranchez
l'appareil avant de le nettoyer.
INSTRUCTIONS
SPÉCIFIQUES
POUR LE BOV900
• Nous recommandons de
brancher le four sur un circuit
dédié séparé des autres
appareils. Consultez un
électricien agréé si un doute
persiste quant à l'installation.
• Le four est en mode veille
lorsque le rétroéclairage de
l'écran ACL est éteint. Toute
interaction avec l'une des
commandes désactivera le
mode veille.
• Nettoyez régulièrement le
ramasse-miettes. Pour ce faire,
consultez la page 62.
AVERTISSEMENT
Pour réduire le risque
D'INCENDIE,
D'ÉLECTROCUTION,
D'EXPOSITION EXCESSIVE
AUX RAYONS UV OU DE
BLESSURES :
• Débranchez toujours le four
et laissez les pièces (incluant
le boîtier de l'ampoule,
son enveloppe de verre
et son contenu) refroidir
complètement avant de
remplacer l'ampoule.
• Utilisez uniquement une
ampoule de 25W maximum,
120V, de type G9 avec filtre UV.
• Utilisez toujours un chiffon
doux lorsque vous manipulez
l'ampoule et n'y touchez pas
directement, car l'huile de votre
peau peut l'endommager.
• Ne regardez pas directement
une ampoule allumée.
• Éloignez-vous de la lumière si
vous sentez une chaleur.
BOV900_USC_IB_A16.indd 37 25/05/2016 11:47 am

38
• Ne mettez pas de matériaux
inflammables près de
l'ampoule.
• L'ampoule devient chaude
rapidement. Utilisez
uniquement le bouton
d'éclairage pour allumer la
lampe.
• Ne faites pas fonctionner la
lampe de four si le boîtier de
l'ampoule, l'enveloppe de verre,
le filtre UV ou le contenu sont
manquants ou endommagés.
COURT CORDON
D'ALIMENTATION
Votre appareil Breville est muni
d'un court cordon d'alimentation
très sécuritaire qui réduit les
risques de blessures ou de
dommages pouvant résulter
du fait de tirer, trébucher ou
s'enchevêtrer dans un cordon
plus long. Si une rallonge
est utilisée : (1) la puissance
nominale inscrite sur la corde
doit être au moins équivalente
à celle de l'appareil; (2) la
rallonge ne doit pas pendre
d'un comptoir ou d'une table
où des enfants pourraient
involontairement s'y suspendre
ou trébucher; (3) la rallonge
doit être munie d'une fiche à
3 broches reliée à la terre.
FICHE ASSIST
®
DE
BREVILLE
Votre appareil Breville est
équipé d'une fiche exclusive
Assist
®
conçue spécialement
avec anneau pour laisser passer
un doigt et faciliter le retrait de
la prise électrique.
PROPOSITION 65 DE LA
CALIFORNIE :
(Applicable uniquement aux
résidents de la Californie).
Cet appareil contient des
produits chimiques connus de
l'État de la Californie comme
pouvant causer le cancer, des
malformations congénitales
ou autres problèmes de
reproduction.
USAGE
DOMESTIQUE
SEULEMENT
CONSERVEZ CES
INSTRUCTIONS
BOV900_USC_IB_A16.indd 38 25/05/2016 11:47 am
39
Composants
A. Plaque à pizza antiadhésive de 33 cm
B. Grilles métalliques (x2)
Réversibles pour 8 différentes positions.
C. Grilloir de 23 x 33 cm
D. Lèchefrite en émail de 23 x 33 cm
E. Panier pour frire à air chaud/déshydrater
F. Lampe de four
G. Poignée de la porte
H. Évents
I. Ramasse-miettes
J. Fiche Assist
‰
de Breville
F
I
J
G H
B
A
C
D
E
BOV900_USC_IB_A16.indd 39 25/05/2016 11:47 am

40
K. Écran ACL
L. Cadran SÉLECTION/CONFIRMER et
bouton RAPPEL ROTATION
M. Cadran de TEMPÉRATURE/coloration de
toast & bagel
N. Cadran de TEMPS/nombre de tranches de
toast & bagel
O. Bouton MARCHE/ARRÊT
P. Bouton pour LAMPE DE FOUR
Q. Bouton de CONVECTION
R. Bouton de PHASES DE CUISSON
S. Bouton pour ALIMENTS CONGELÉS
T. Bouton de CONVERSION DE
TEMPÉRATURE et bouton de réglage de
volume
Accessoires vendus séparément:
R
S
T
L
K
O
P
Q
M
N
Planche à découper en bambou
Pièce n° BOV900CB
Panier pour frire à air chaud/déshydrater
Pièce n° BOV900AB
BOV900_USC_IB_A16.indd 40 25/05/2016 11:47 am

41
Avant la première utilisation
Ce guide est conçu pour la première utilisation.
Pour plus d'information et de sécurité, consultez le reste du manuel d'instructions.
PRÉPARER LE FOUR
Afin d'éliminer toutes les substances
protectrices sur les éléments chauffants, il
est nécessaire de faire fonctionner le four à
vide durant 20 minutes. Assurez-vous que
l'espace environnant est bien aéré, car le
four peut émettre des vapeurs. Ces vapeurs
sont sécuritaires et ne sont pas nuisibles au
rendement du four.
1. Retirez et jetez en lieu sûr tout matériel
d'emballage, étiquettes promotionnelles et
collants du four.
2. Retirez le plateau ramasse-miettes, le
grilloir, la lèchefrite, le panier pour frire à air
chaud/déshydrater et la plaque à pizza de
leur emballage en polymousse. Lavez-les à
l'eau chaude savonneuse avec une éponge
douce, puis rincez et séchez soigneusement.
3. Essuyez l'intérieur du four avec une éponge
douce et humide. Séchez soigneusement.
4. Placez le four sur une surface plane et sèche.
Assurez-vous de laisser une distance d'au
moins 10 cm (4 po) de chaque côté du four
et de 15 cm (6 po) au-dessus.
5. Insérez le ramasse-miettes dans le four.
6. Déroulez complètement le cordon
d'alimentation et branchez-le dans une prise
électrique reliée à la terre.
7. Le signal sonore se fera entendre et l'écran
ACL s'illuminera. Le menu de fonctions
apparaîtra avec une flèche indiquant le
réglage TOAST.
8. Tournez le cadran SÉLECTION/
CONFIRMER vers la droite jusqu'à ce que
la flèche indique la fonction PIZZA.
TOURNER
SÉLECTION
CONFIRMER
9. Appuyez sur le bouton MARCHE/ARRÊT
qui deviendra rétroéclairé en rouge, l'écran
ACL s'illuminera en orange et le signal
sonore se fera entendre.
10. Le message 'PREHEATING' (préchauffage)
clignotera sur l'écran ACL. Dès que le cycle
de préchauffage sera terminé, un signal
sonore se fera entendre.
11. La minuterie s'affichera et le compte à
rebours débutera automatiquement.
12. À la fin du cycle de cuisson, le signal sonore
se fera entendre, le bouton MARCHE/
ARRÊT ne sera plus rétroéclairé et l'écran
ACL s'illuminera en blanc.
13. Le four est maintenant prêt à être utilisé.
ELEMENT IQ
‰
Le Smart Oven
®
Air de Breville dispose de
la technologie ELEMENT IQ
®
qui ajuste la
puissance des éléments chauffants et assure
une cuisson uniforme et rapide des aliments.
Chacune des fonctions du four est préréglée
selon nos recommandations. Cependant, nous
vous suggérons d'en faire l'expérience en
fonction des recettes, de la quantité d'aliments
et de vos goûts personnels.
Le four gardera en mémoire votre réglage
personnalisé jusqu'à ce qu'il soit changé ou
que vous réinitialisiez le four aux réglages par
défaut, et ce même si le four est débranché.
Pour ce faire, appuyez et maintenez
simultanément les boutons ALIMENTS
CONGELÉS et CONVERSION DE
TEMPÉRATURE durant 5 secondes.
BOV900_USC_IB_A16.indd 41 25/05/2016 11:47 am

42
SURVOL DES FONCTIONS DU FOUR
FONCTION POSITION
DE GRILLE
SUGGÉRÉE
RÉGLAGES
OPTIONNELS
PRÉRÉGLAGES PRÉ-
CHAUFFAGE
ÉCHELLE
TOAST
4 FROZEN
(CONGELÉS)
Coloration 4
Tranches 4
Non Coloration 1-7
Tranches 1-9
BAGEL
4 FROZEN
(CONGELÉS)
Coloration 4
Tranches 4
Non Coloration 1-7
Tranches 1-10
BROIL
(GRILLER)
1 – 2 HIGH (HAUT) Non BAS, MED, HAUT
Jusqu'à 20 MIN
BAKE (CUIRE)
6 CONVECTION
TEMPÉRATURE
CONVERSION
ROTATE
(ROTATION)
325°F (160°C)
30 MIN
CONVECTION
Oui >390°F/200°C jusqu'à
4 heures
300°F/150°C –
390°F/200°C jusqu'à
8 heures
210°F/100°C –
300°F/150°C jusqu'à
12 heures
<210°F/100°C jusqu'à
72 heures
ROAST (RÔTIR)
6 CONVECTION
TEMPÉRATURE
CONVERSION
ROTATE
(ROTATION)
400°F (205°C)
1:00 HR
CONVECTION
Oui >390°F/200°C jusqu'à
4 heures
300°F/150°C –
390°F/200°C jusqu'à
8 heures
210°F/100°C –
300°F/150°C jusqu'à
12 heures
<210°F/100°C jusqu'à
72 heures
WARM
(CHAUD)
Variée CONVECTION
TEMPÉRATURE
CONVERSION
ROTATE
(ROTATION)
160°F (70°C)
1:00 HR
CONVECTION
Non >390°F/200°C jusqu'à
4 heures
300°F/150°C –
390°F/200°C jusqu'à
8 heures
210°F/100°C –
300°F/150°C jusqu'à
12 heures
<210°F/100°C jusqu'à
72 heures
PIZZA
7 CONVECTION
TEMPÉRATURE
CONVERSION
FROZEN
(CONGELÉS)
ROTATE
(ROTATION)
375°F (190°C)
20 MIN
CONVECTION
FROZEN
(CONGELÉS)
Oui 120°F/50°C -
480°F/250°C jusqu'à
1:00 HR
BOV900_USC_IB_A16.indd 42 25/05/2016 11:47 am

43
FONCTION POSITION
DE GRILLE
SUGGÉRÉE
RÉGLAGES
OPTIONNELS
PRÉRÉGLAGES PRÉ-
CHAUFFAGE
ÉCHELLE
PROOF (LEVER)
7 CONVECTION
TEMPÉRATURE
CONVERSION
ROTATE
(ROTATION)
85°F (30°C)
1:00 HR
CONVECTION
Non 80°F/27°C -
100°F/38°C
Jusqu'à 2:00 HR
AIRFRY (FRIRE
À AIR CHAUD)
3 CONVECTION
TEMPÉRATURE
CONVERSION
FROZEN
(CONGELÉS)
ROTATE
(ROTATION)
400°F (205°C)
18 MIN
SUPER
CONVECTION
ALIMENTS
CONGELÉS
Oui 120°F/50°C -
480°F/250°C
Jusqu'à 1:00 HR
REHEAT
(RÉCHAUFFER)
Variée CONVECTION
TEMPÉRATURE
CONVERSION
FROZEN
(CONGELÉS)
ROTATE
(ROTATION)
325°F (160°C)
15 IN
CONVECTION
Non 120°F/50°C -
480°F/250°C
Jusqu'à 2:00 HR
COOKIES
(BISCUITS)
5 CONVECTION
TEMPÉRATURE
CONVERSION
FROZEN
(CONGELÉS)
ROTATE
(ROTATION)
325°F (160°C)
11 MIN
CONVECTION
Oui 120°F/50°C -
480°F/250°C
Jusqu'à 1:00 HR
SLOW COOK
(MIJOTER)
8 CONVECTION HIGH (haut)
4:00 HR
CONVECTION
Oui HI, 2:00 - 12:00 HR
LO, 4:00 - 72:00 HR
WARM (CHAUD)
automatique
Jusqu'à 2:00 HR
DEHYDRATE
(DÉSHYDRATER)
3 CONVECTION
TEMPÉRATURE
CONVERSION
ROTATE
(ROTATION)
125°F (52°C)
12:00 HR
SUPER
CONVECTION
Non 86°F/30°C -
176°F/80°C
Jusqu'à 72:00 HR
BOV900_USC_IB_A16.indd 43 25/05/2016 11:47 am
44
Fonctions
FONCTIONNEMENT DE
VOTRE FOUR BREVILLE
1. Insérez la grille à la position désirée. Les
positions de la grille sont imprimées sur le
côté gauche de la porte vitrée. La grille peut
être insérée dans l'une ou l'autre des quatre
rainures, à l'endroit ou à l'envers, doublant
ainsi le nombre de positions disponibles.
2. Tournez le cadran SÉLECTION/
CONFIRMER jusqu'à ce que la flèche
indique le réglage désiré sur l'écran ACL.
3. Le chiffre du haut apparaissant sur l'écran
ACL indique la température de cuisson
préréglée pour le réglage sélectionné. Pour
les réglages TOAST et BAGEL, il indique
le niveau de coloration. Tournez le cadran
de TEMPÉRATURE vers la gauche pour
réduire la température ou vers la droite pour
l'augmenter.
RÉDUIRE LA
TEMPÉRATURE
TOURNER
CADRAN DE
TEMPÉRATURE
AUGMENTER LA
TEMPÉRATURE
4. Le chiffre du bas apparaissant sur l'écran
ACL indique le temps préréglé pour le
réglage sélectionné. Pour les réglages
TOAST et BAGEL, il indique le nombre de
tranches. Tournez le cadran de TEMPS vers
la gauche pour réduire le temps de cuisson
ou vers la droite pour l'augmenter.
TOURNER
CADRAN
DE TEMPS
RÉDUIRE
LE TEMPS
AUGMENTER
LE TEMPS
5. Pour les réglages sans cycle de
préchauffage (TOAST, BAGEL,
GRILLER, GARDER CHAUD, LEVER,
RÉCHAUFFER, DÉSHYDRATER), déposez
les aliments directement sur la grille ou
dans le panier pour frire à air chaud/
déshydrater, sur la plaque à pizza, le grilloir
et/ou la lèchefrite. Assurez-vous de bien
centrer les aliments dans le four pour
obtenir une cuisson uniforme.
a) Fermez la porte du four.
b) Appuyez sur le bouton MARCHE/ARRÊT.
Le bouton sera rétroéclairé en rouge, le
signal sonore se fera entendre et l'écran
ACL s'illuminera en orange.
c) La minuterie s'affichera et le compte à
rebours débutera. La température et le
temps de cuisson peuvent être ajustés
durant le cycle de cuisson.
6. Pour les réglages avec cycle de
préchauffage (CUIRE, RÔTIR, PIZZA,
FRIRE À AIR CHAUD, BISCUITS,
MIJOTER), appuyez sur le bouton
MARCHE/ARRÊT avant d'insérer les
aliments dans le four (à l'exception de
MIJOTER - pour cette fonction, insérez les
aliments avant le cycle de préchauffage).
Le bouton sera rétroéclairé en rouge, le
signal sonore se fera entendre et le message
'PREHEATING' (PRÉCHAUFFAGE)
clignotera sur l'écran ACL pendant que le
four se réchauffe.
BOV900_USC_IB_A16.indd 44 25/05/2016 11:48 am
45
a) Lorsque le four sera prêt à être
utilisé, le message 'PREHEATING'
(PRÉCHAUFFAGE) disparaîtra, le signal
sonore se fera entendre et le compte à
rebours débutera. Déposez les aliments
directement sur la grille ou dans le panier
pour frire à air chaud/déshydrater, sur la
plaque à pizza, le grilloir et/ou la lèchefrite.
Assurez-vous de bien centrer les aliments
dans le four pour obtenir une cuisson
uniforme.
b) Fermez la porte du four.
c) Le compte à rebours se poursuivra. La
température et le temps de cuisson peuvent
être ajustés durant le cycle de cuisson.
7. À la fin du cycle de cuisson, le signal sonore
se fera entendre, le bouton MARCHE/
ARRÊT ne sera plus rétroéclairé et l'écran
ACL s'illuminera en blanc.
NOTE
Le cycle de cuisson peut être arrêté en tout
temps en appuyant sur le bouton MARCHE/
ARRÊT. Le cycle s'annulera et le bouton sera
rétroéclairé en blanc.
NOTE
Appuyez sur le bouton CONVECTION.
Trois choix s'offrent à vous: aucune
convection, convection ou super convection.
Convection et super convection peuvent
ajuster la température pour compenser.
Super convection donnera des résultats plus
croustillants.
CAPTEUR DE LA PORTE
Si la porte est ouverte durant la cuisson, la
minuterie fera une pause et la lampe de four
s'allumera.
Une fois la porte fermée, le compte à rebours
reprendra et la lampe de four restera allumée
30 secondes avant de s'éteindre. Si la porte
reste ouverte plus de 10 minutes durant la
cuisson, les éléments chauffants s'éteindront.
GRILLE MAGNÉTIQUE
AUTO-ÉJECTABLE
Lorsque la grille est insérée en position 3 ou 4
et que vous ouvrez la porte, la grille s'éjectera
automatiquement à moitié hors du four pour
permettre le retrait facile des aliments.
Ouvrez toujours la porte lentement lorsqu'elle
est dans une telle position pour empêcher la
grille d'être éjectée trop rapidement.
VOLUME DE L'AVERTISSEUR
Appuyez et maintenez le bouton de
CONVERSION DE TEMPÉRATURE durant
3 secondes pour activer le mode de contrôle
de l'avertisseur.
Appuyez sur le bouton CONVERSION DE
TEMPÉRATURE pour choisir le volume désiré.
Pour confirmer, appuyez sur n'importe quel
bouton.
BOV900_USC_IB_A16.indd 45 25/05/2016 11:48 am
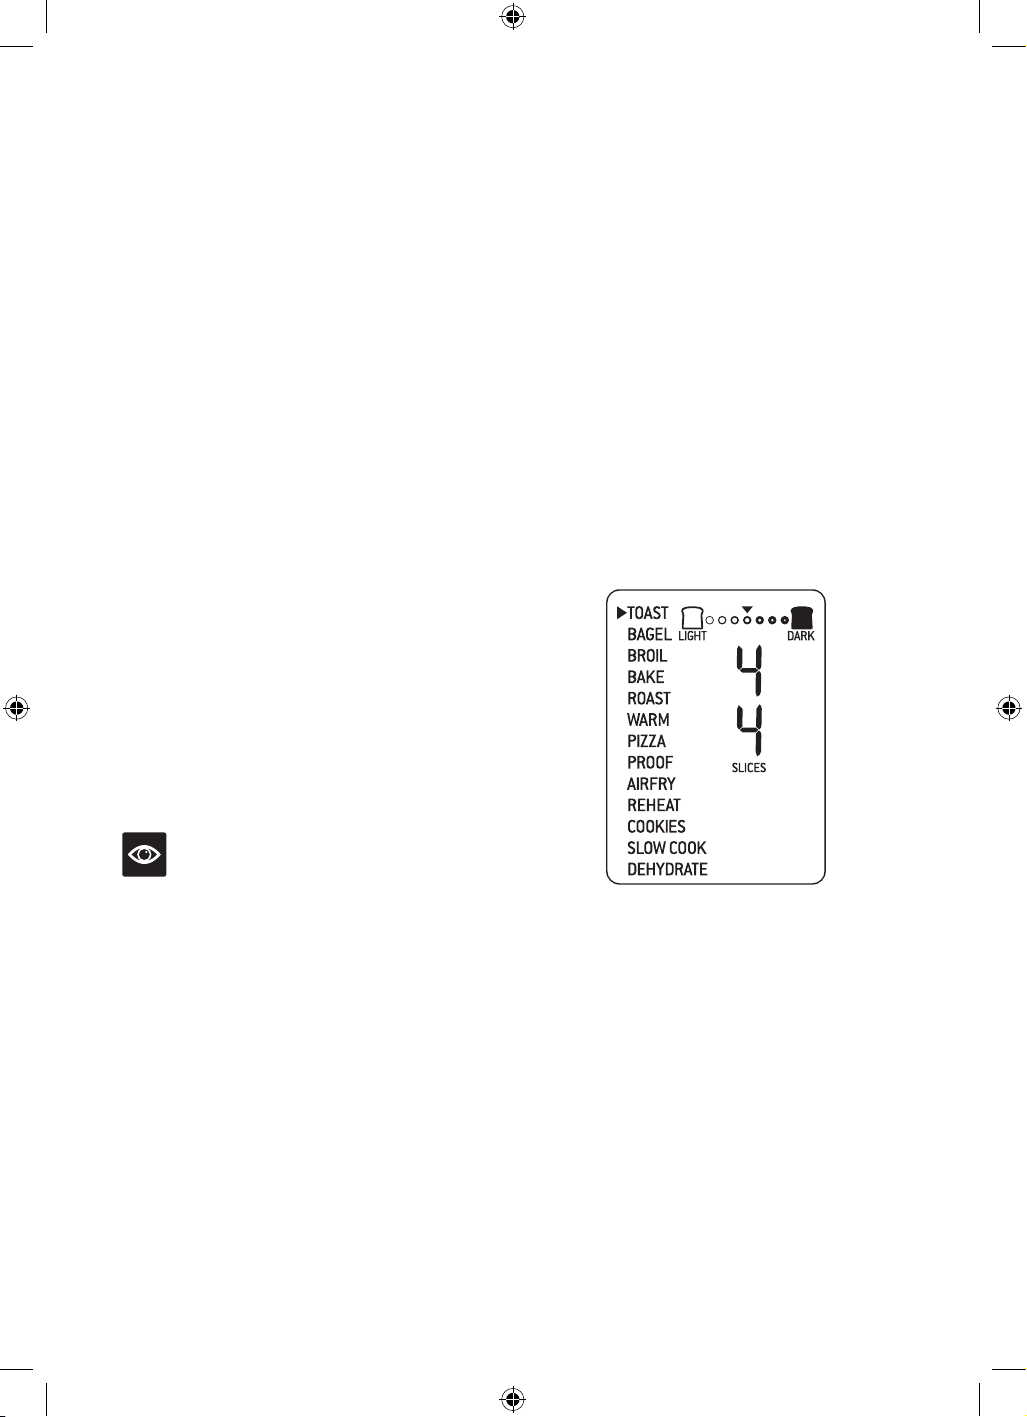
46
FONCTION TOAST
La fonction TOAST colore et rend la croûte de
votre pain croustillante pendant que l'intérieur
est tendre et moelleux. Cette fonction convient
parfaitement aux muffins anglais et gaufres
congelées .
1. Insérez la grille en position 4.
2. Déposez les tranches de pain aussi près que
possible du centre de la grille afin d'assurer
un grillage optimal.
3. Fermez la porte du four.
4. Tournez le cadran SÉLECTION/
CONFIRMER jusqu'à ce que la flèche
indique la fonction TOAST sur l'écran
ACL. Le chiffre du haut apparaissant sur
l'écran ACL indique le réglage de coloration
'4', tandis que le chiffre du bas indique le
nombre de tranches préréglé de '4'.
5. Le réglage de coloration et le nombre de
tranches peuvent être modifiés avant ou
durant le cycle de grillage.
a) Le réglage de coloration est indiqué par
une série de cercles apparaissant au
haut de l'écran ACL. Tournez le cadran
de TEMPÉRATURE vers la gauche pour
réduire la coloration, ou vers la droite pour
l'augmenter. Le triangle au-dessus des
cercles se déplacera en fonction du réglage
choisi.
ROTATE REMIND (ROTATION)
Lorsque vous faites cuire des aliments sur
plusieurs grilles à la fois, utilisez la fonction
Rotate Remind (Rotation) pour vous rappeler
de changer la position des aliments dans le
four afin d'obtenir des résultats uniformes et
constants. Rotate Remind (Rotation) convient
aux fonctions suivantes : CUIRE, RÔTIR,
GARDER CHAUD, LEVER, PIZZA, FRIRE À
AIR CHAUD, RÉCHAUFFER, BISCUITS et
DÉSHYDRATER.
1. Tournez le cadran SÉLECTION/
CONFIRMER jusqu'à ce que la flèche
indique la fonction désirée sur l'écran ACL.
2. Appuyez sur le cadran SÉLECTION/
CONFIRMER. Le message 'Rotate Remind'
(Rotation) apparaîtra sur l'écran ACL.
3. Suivez les étapes de la fonction sélectionnée
et commencez la cuisson.
4. Lorsqu'il sera temps d'interchanger la
position des grilles, le signal sonore se fera
entendre et le message 'Rotate Remind'
(Rotation) clignotera sur l'écran ACL.
Le signal sonore se fera entendre toutes
les 30 secondes jusqu'à ce que la porte
soit fermée ou que vous appuyiez sur le
cadran SÉLECTION/CONFIRMER pour
désactiver la fonction.
NOTE
Lorsque vous faites cuire des aliments dans
des plats de cuisson sur plusieurs grilles, il
est suggéré de laisser assez d'espace entre
les grilles et d'éviter d'utiliser la position
supérieure, due à la proximité des éléments
chauffants.
Dans la plupart des cas, les positions 3 et 7
ou 4 et 8 donneront les meilleurs résultats. Si
vous utilisez les paniers pour frire à air chaud/
déshydrater, il ne sera pas nécessaire de laisser
de l'espace entre les grilles.
BOV900_USC_IB_A16.indd 46 25/05/2016 11:48 am
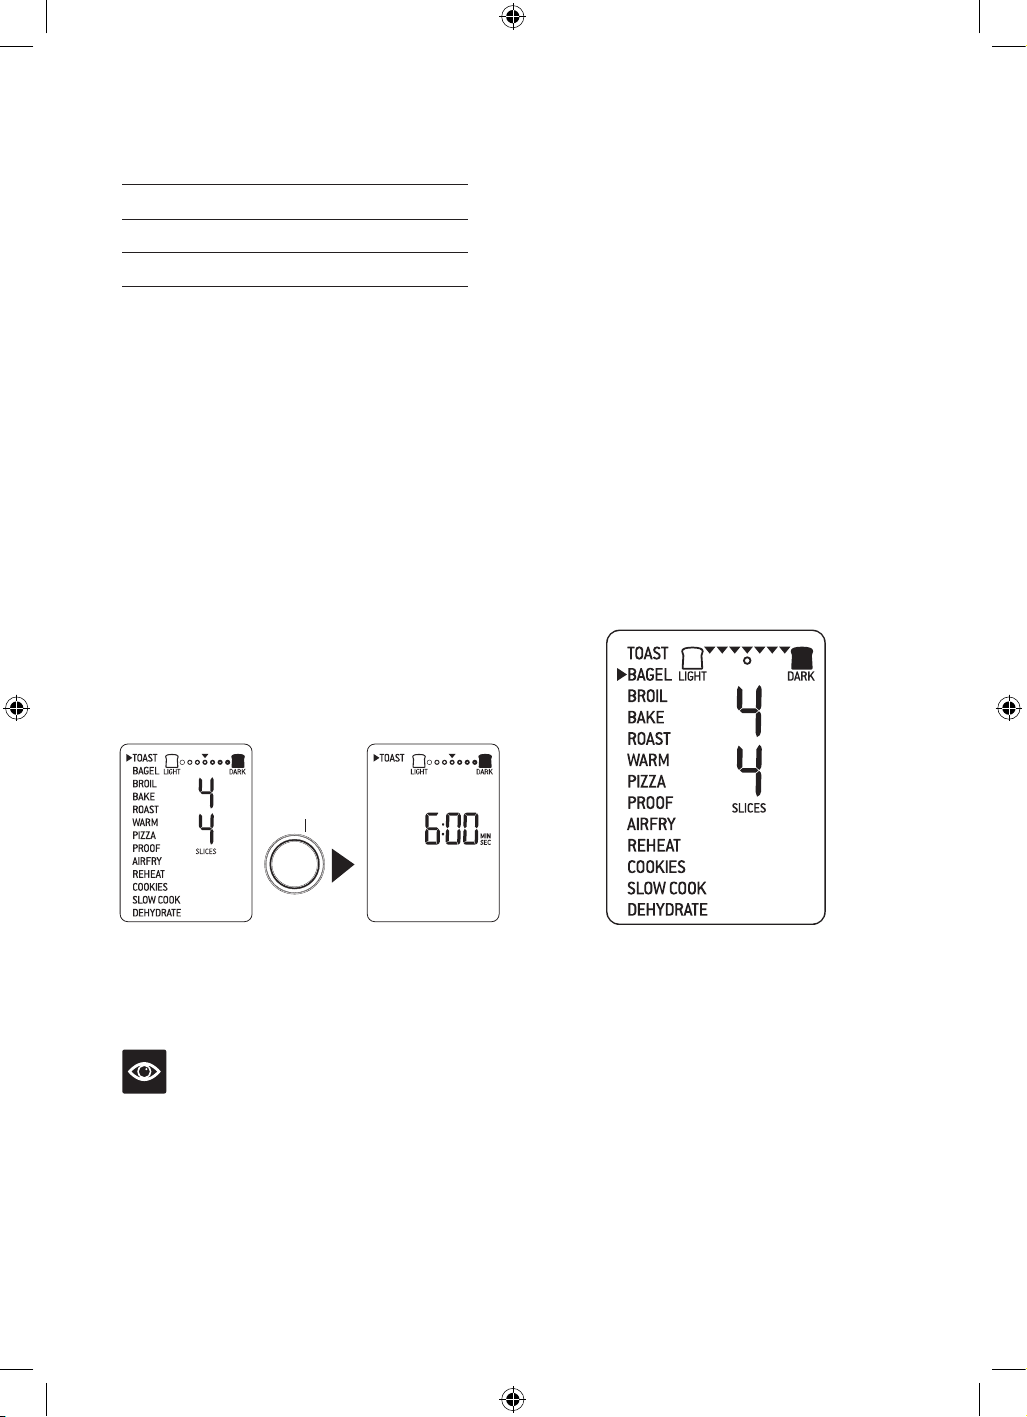
47
À titre indicatif :
Coloration désirée Réglage
Pâle 1 ou 2
Moyenne 3, 4 ou 5
Foncée 6 ou 7
b) Le nombre de tranches est indiqué par le
chiffre du bas sur l'écran ACL. Tournez
le cadran de TEMPS vers la gauche pour
réduire le nombre de tranches, ou vers la
droite pour l'augmenter. Le nombre de
tranches varie de '1' à '9'.
6. Appuyez sur le bouton MARCHE/ARRÊT
pour activer la fonction TOAST. Le bouton
sera rétroéclairé en rouge, le signal sonore
se fera entendre et l'écran ACL s'illuminera
en orange.
7. La minuterie s'affichera et le compte à
rebours débutera automatiquement. Le
temps peut être ajusté durant le cycle de
grillage en tournant le cadran de TEMPS.
Le cycle peut être interrompu en tout
temps en appuyant sur le bouton
MARCHE/ARRÊT.
APPUYER
MARCHE ARRÊT
8. À la fin du cycle TOAST, le signal sonore se
fera entendre, le bouton MARCHE/ARRÊT
s'éteindra et l'écran ACL sera illuminé en
blanc.
NOTE
Le temps de cuisson dépend d'un certain
nombre de facteurs, incluant la température
dans le four. Le temps peut alors varier, même
si les réglages de coloration et de nombre de
tranches sont les mêmes, et ce dans le but
d'obtenir des résultats cohérents.
FONCTION BAGEL
La fonction BAGEL rend l'intérieur (côté
coupé) du bagel croustillant tout en grillant
légèrement la croûte. Cette fonction est idéale
pour griller les crumpets ou tranches épaisses
de pain de spécialité qui requièrent plus de
coloration d'un côté que de l'autre.
1. Insérez la grille en position 4.
2. Déposez les moitiés de bagel, côté coupé
orienté vers le haut, aussi près que possible
du centre de la grille afin d'assurer un
grillage optimal.
3. Fermez la porte du four.
4. Tournez le cadran SÉLECTION/
CONFIRMER jusqu'à ce que la flèche
indique BAGEL sur l'écran ACL. Le chiffre
du haut apparaissant sur l'écran ACL
indique le réglage de coloration préréglé
'4', tandis que le chiffre du bas indique le
nombre préréglé de moitiés de bagel '4'.
5. Les réglages de coloration et de nombre de
moitiés de bagel peuvent être ajustés avant
ou durant le cycle de grillage.
a) Le réglage de coloration est indiqué par la
série de triangles au haut de l'écran ACL.
Tournez le cadran de TEMPÉRATURE vers
le gauche pour réduire la coloration, ou vers
la droite pour l'augmenter. Le cercle sous
les triangles se déplacera en fonction du
réglage choisi.
BOV900_USC_IB_A16.indd 47 25/05/2016 11:48 am
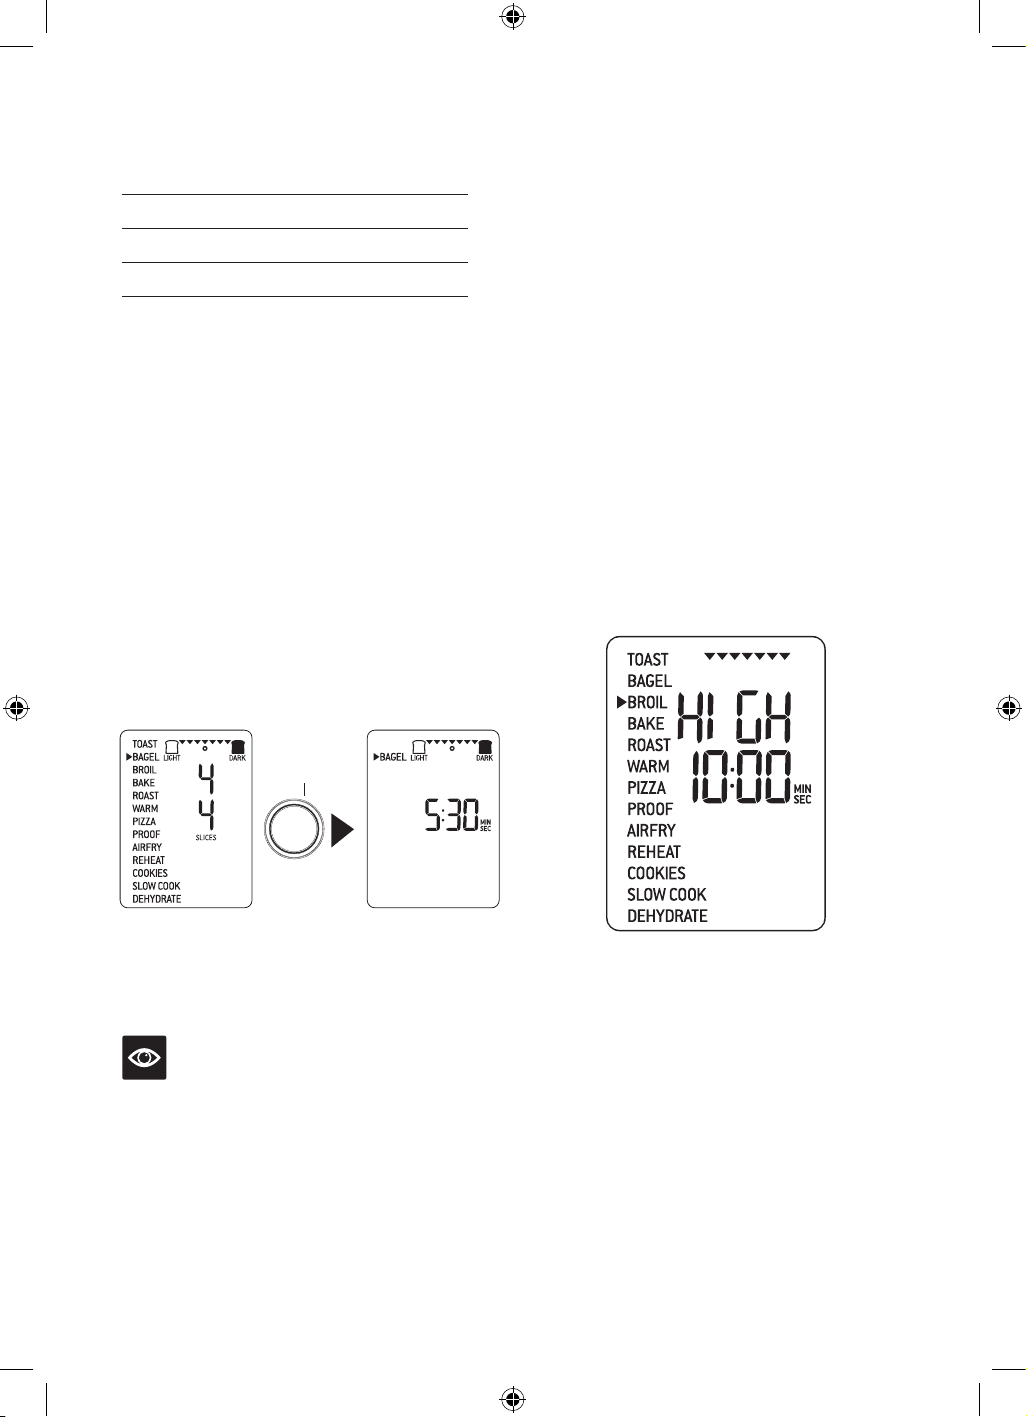
48
FONCTION BROIL (GRILER)
La fonction BROIL (GRILLER) est idéale
pour cuire les sandwichs ouverts, les coupes
de viande minces, le poulet, le poisson, les
saucisses et les légumes. Elle peut aussi servir
à gratiner les plats en cocotte ou les desserts.
1. Insérez la grille en position 1 ou 2.
2. Insérez le grilloir fourni dans la lèchefrite.
Déposez les aliments sur le grilloir (ou dans
un plat allant au four) et placez-le au centre
de la grille pour faciliter la circulation d'air
tout autour des aliments.
3. Fermez la porte du four.
4. Tournez le cadran SÉLECTION/
CONFIRMER jusqu'à ce que la flèche
indique BROIL (GRILLER) sur l'écran
ACL. Le chiffre du haut sur l'écran ACL
indique le niveau de puissance préréglé
'HIGH' (HAUT), tandis que le chiffre du bas
indique le temps préréglé '10:00 MIN/SEC'.
À titre indicatif :
Coloration désirée Réglage
Pâle 1 ou 2
Moyenne 3, 4 ou 5
Foncée 6 ou 7
b) Le chiffre du bas sur l'écran ACL indique
le nombre de moitiés de bagel. Tournez
le cadran de TEMPS vers la gauche pour
réduire le nombre de moitiés de bagels, et
vers la droite pour l'augmenter. Le nombre
de bagels varie de '1' à '10'.
6. Appuyez sur le bouton MARCHE/ARRÊT
pour activer la fonction BAGEL. Le bouton
sera rétroéclairé en rouge, le signal sonore
se fera entendre et l'écran ACL s'illuminera
en orange.
7. La minuterie s'affichera et le compte à
rebours débutera automatiquement. Le
temps peut être ajusté durant le cycle de
bagel en tournant le cadran de TEMPS. Le
cycle peut être interrompu en tout temps en
appuyant sur le bouton MARCHE/ARRÊT.
APPUYER
MARCHE ARRÊT
8. À la fin du cycle de BAGEL, le signal sonore
se fera entendre. Le bouton MARCHE/
ARRÊT s'éteindra et l'écran ACL sera
illuminé en blanc.
NOTE
L'intérieur (côté coupé) du bagel doit toujours
être orienté vers le haut en direction des
éléments chauffants. Cela permet d'obtenir
un côté coupé croustillant et une croûte
légèrement grillée.
Si vous préférez vos moitiés de bagel
croustillantes des deux côtés, nous vous
recommandons d’utiliser la fonction TOAST.
BOV900_USC_IB_A16.indd 48 25/05/2016 11:48 am
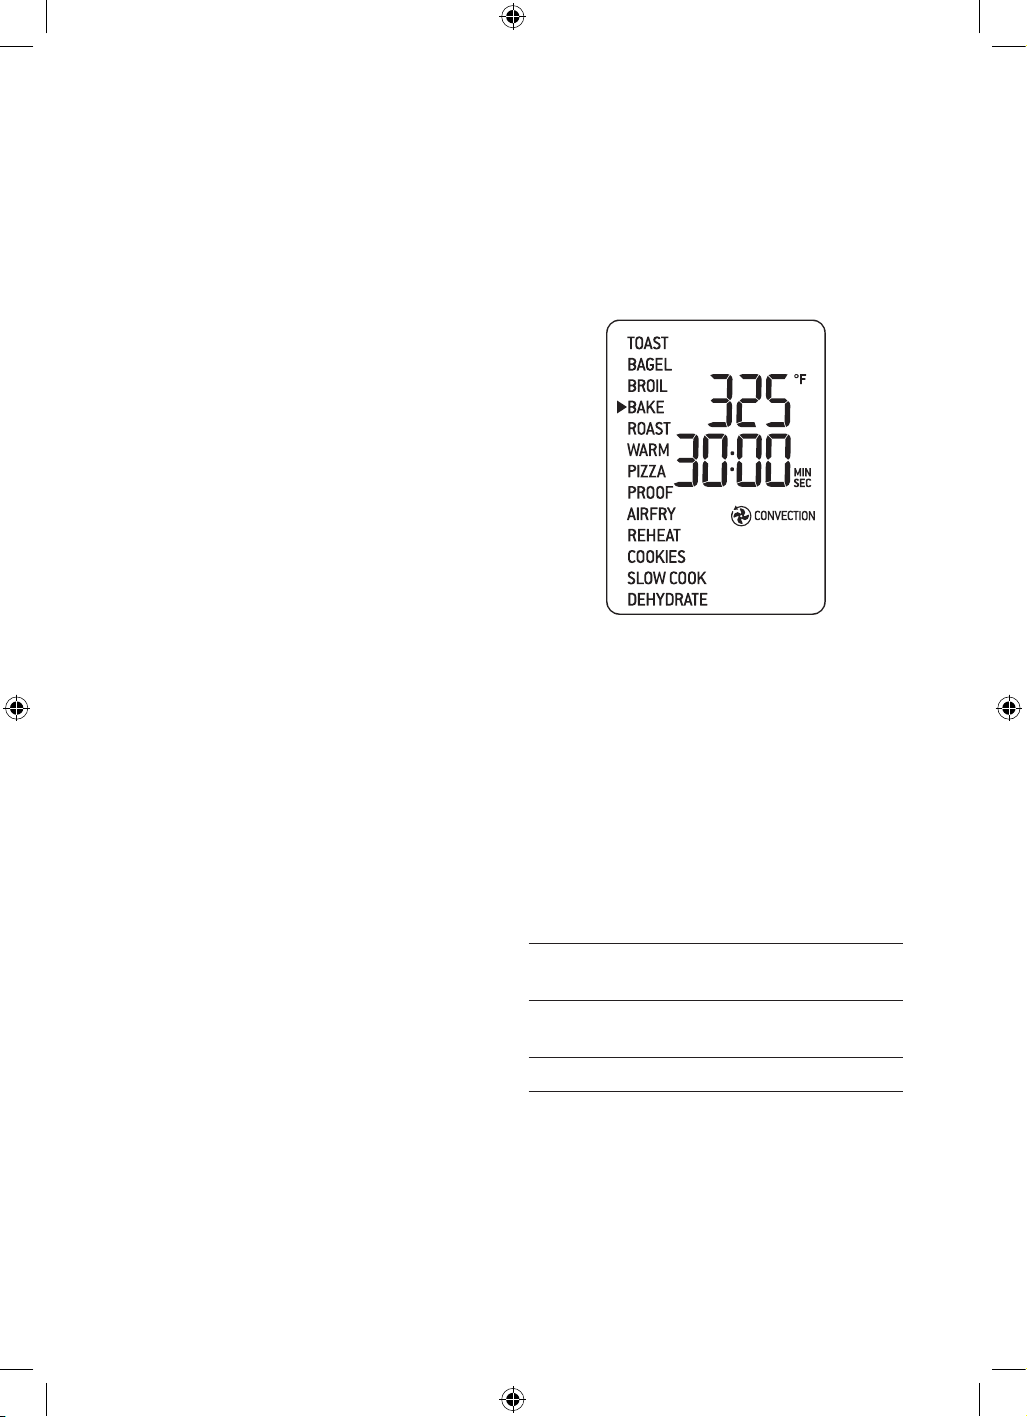
49
5. Les réglages de puissance et de temps
peuvent être ajustés avant ou durant le
cycle de grillage.
a) Le chiffre du haut sur l'écran ACL indique
le niveau de puissance de grillage. Tournez
le cadran de TEMPÉRATURE pour choisir
le niveau entre 'HIGH', 'MED' ou 'LOW'
(HAUT, MOYEN OU BAS).
b) Le chiffre du bas sur l'écran ACL indique
le temps de grillage. Tournez le cadran de
TEMPS pour ajuster le temps jusqu'à 20
minutes.
6. Appuyez sur le bouton MARCHE/ARRÊT
pour activer la fonction BROIL (GRILLER).
Le bouton sera rétroéclairé en rouge, le
signal sonore se fera entendre et l'écran
ACL s'illuminera en orange.
7. La minuterie s'affichera et le compte à
rebours débutera automatiquement. Le
niveau de puissance et le temps peuvent
être ajustés durant le cycle de grillage
en tournant les cadrans respectifs de
TEMPÉRATURE et de TEMPS. Le cycle
peut être interrompu en tout temps en
appuyant sur le bouton MARCHE/ARRÊT.
8. À la fin du cycle de grillage, le signal sonore
se fera entendre, le bouton MARCHE/
ARRÊT s'éteindra et l'écran ACL sera
illuminé en blanc.
FONCTION BAKE (CUIRE)
La fonction BAKE (CUIRE) cuit uniformément
les aliments. Elle est idéale pour cuire les
gâteaux, muffins, brownies et pâtisseries,
de même que les mets surgelés comme les
lasagnes et les pâtés.
1. Insérez la grille en position 6. Notez que
certains aliments, comme les brownies
ou les pâtés, peuvent mieux convenir à la
position 5.
2. Fermez la porte du four.
3. Tournez le cadran SÉLECTION/
CONFIRMER jusqu'à ce que la flèche
indique BAKE (CUIRE) sur l'écran ACL. Le
chiffre du haut sur l'écran ACL indique la
température de cuisson préréglée de '325°F',
tandis que le chiffre du bas indique le temps
préréglé '30:00 MIN/SEC'. Le préréglage
CONVECTION apparaîtra également.
4. Les réglages de température, de temps et
de convection peuvent être ajustés avant ou
durant le cycle de cuisson.
a) Le chiffre du haut sur l'écran ACL indique
le niveau de température. Tournez le
cadran de TEMPÉRATURE pour choisir la
température de 120°F/50°C à un maximum
de 480°F/250°C
b) Tournez le cadran de TEMPS pour choisir
le temps de cuisson. Le temps maximal peut
être réglé comme suit :
>390°F/200°C jusqu'à 4 heures
300°F/150°C –
390°F/200°C
jusqu'à 8 heures
210°F/100°C –
300°F/150°C
jusqu'à 12 heures
<210°F/100°C jusqu'à 72 heures
5. Appuyez sur le bouton MARCHE/ARRÊT
pour activer la fonction BAKE (CUIRE).
Le bouton sera rétroéclairé en rouge, le
signal sonore se fera entendre et l'écran
ACL s'illuminera en orange. Le message
'PREHEATING' (PRÉCHAUFFAGE)
clignotera sur l'écran ACL.
BOV900_USC_IB_A16.indd 49 25/05/2016 11:48 am
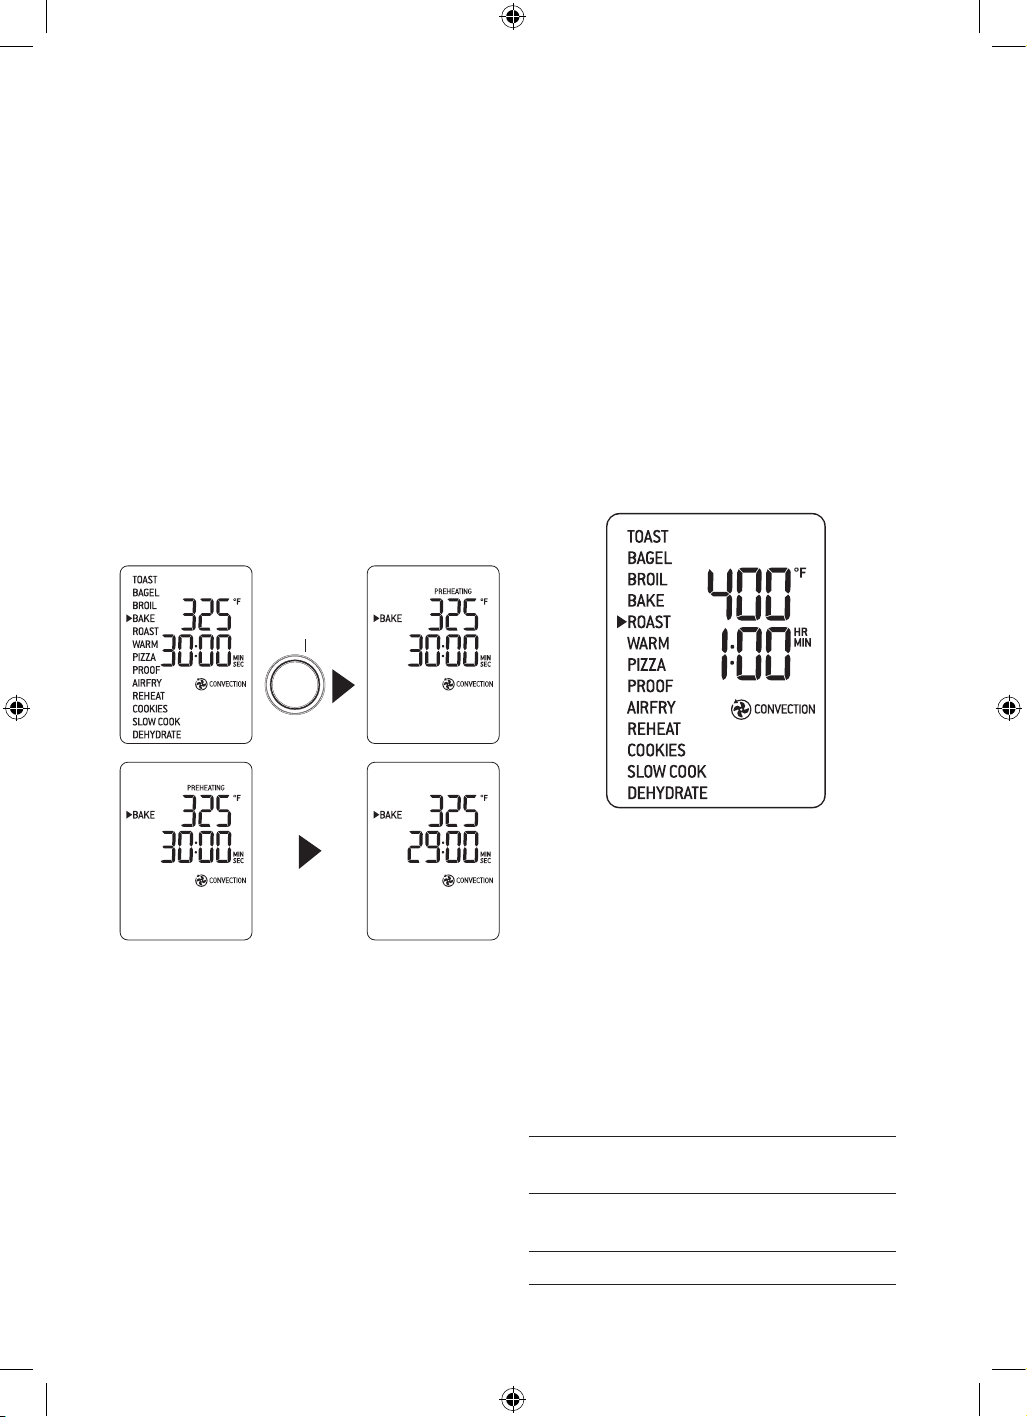
50
6. Une fois le préchauffage terminé, un signal
sonore se fera entendre, signifiant que les
aliments peuvent être insérés dans le four.
7. Déposez les aliments dans la lèchefrite (ou
tout autre plat allant au four) et placez-la au
centre de la grille pour faciliter une bonne
circulation d'air autour des aliments. Fermez
la porte du four.
8. Après que le signal sonore de
PRÉCHAUFFAGE se sera fait
entendre, le compte à rebours débutera
automatiquement. La température et
le temps peuvent être ajustés durant le
cycle de cuisson en tournant les cadrans
respectifs de TEMPÉRATURE et de
TEMPS. Le cycle peut être interrompu
en tout temps en appuyant sur le bouton
MARCHE/ARRÊT.
APPUYER
MARCHE ARRÊT
TEMPÉRATURE
ATTEINTE
9. À la fin du cycle de cuisson (BAKE), le
signal sonore se fera entendre, le bouton
MARCHE/ARRÊT s'éteindra et l'écran ACL
sera illuminé en blanc.
FONCTION ROAST (RÔTIR)
La fonction ROAST (RÔTIR) est idéale pour
cuire une variété de viande ou de poulet. Les
aliments seront tendres et juteux à l'intérieur et
rôtis à la perfection à l'extérieur.
1. Insérez la grille en position 6.
2. Fermez la porte du four.
3. Tournez le cadran SÉLECTION/
CONFIRMER jusqu'à ce que la flèche
indique ROAST (RÔTIR) sur l'écran ACL.
Le chiffre du haut sur l'écran ACL indique
la température préréglée de '400°F', tandis
que le chiffre du bas indique le temps
préréglé de '1:00 HR/MIN'. Le préréglage
CONVECTION s'affichera également.
4. Les réglages de puissance, de temps et de
convection peuvent être ajustés avant ou
durant le cycle de rôtissage.
a) Le chiffre du haut sur l'écran ACL indique
la température de rôtissage. Tournez le
cadran de TEMPÉRATURE pour ajuster la
température de 120°F/50°C à un maximum
de 480°F/250°C.
b) Tournez le cadran de TEMPS pour choisir
le temps de cuisson. Le temps maximal peut
être réglé comme suit :
>390°F/200°C jusqu'à 4 heures
300°F/150°C –
390°F/200°C
jusqu'à 8 heures
210°F/100°C –
300°F/150°C
jusqu'à 12 heures
<210°F/100°C jusqu'à 72 heures
BOV900_USC_IB_A16.indd 50 25/05/2016 11:48 am
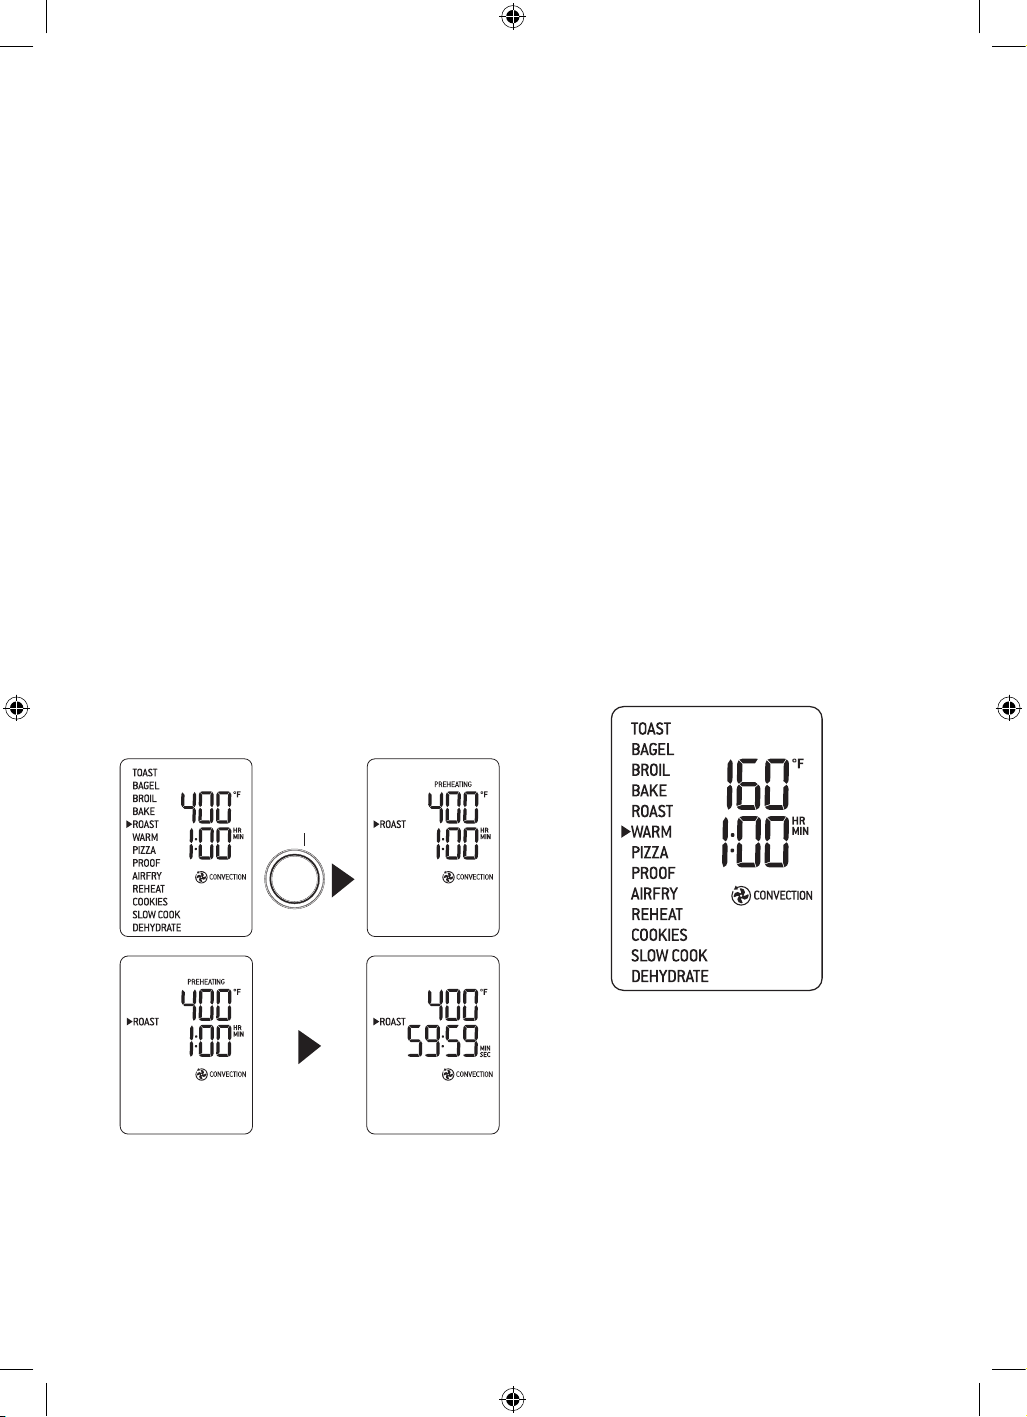
51
5. Appuyez sur le bouton MARCHE/ARRÊT
pour activer la fonction ROAST (RÔTIR).
Le bouton sera rétroéclairé en rouge, le
signal sonore se fera entendre et l'écran
ACL s'illuminera en orange. Le message
'PREHEATING' (PRÉCHAUFFAGE)
clignotera sur l'écran ACL.
6. Une fois le cycle de préchauffage terminé,
un signal sonore se fera entendre, signifiant
que les aliments peuvent être insérés dans
le four.
7. Disposez les aliments dans la lèchefrite (ou
tout autre plat allant au four) et placez-la au
centre de la grille pour faciliter une bonne
circulation d'air autour des aliments. Fermez
la porte du four.
8. Après que le signal sonore de
PRÉCHAUFFAGE se sera fait
entendre, le compte à rebours débutera
automatiquement. La température et
le temps peuvent être ajustés durant le
cycle de rôtissage en tournant les cadrans
respectifs de TEMPÉRATURE et de
TEMPS. Le cycle peut être interrompu
en tout temps en appuyant sur le bouton
MARCHE/ARRÊT.
APPUYER
MARCHE ARRÊT
TEMPÉRATURE
ATTEINTE
9. À la fin du cycle de rôtissage (ROAST), le
signal sonore se fera entendre, le bouton
MARCHE/ARRÊT s'éteindra et l'écran ACL
sera illuminé en blanc.
FONCTION WARM (GARDER CHAUD)
La fonction WARM (GARDER CHAUD)
maintient les aliments à la température
recommandée pour prévenir la croissance
bactérienne, soit 160°F/70°C ou plus.
1. Insérez la grille à la position adéquate selon
le type d'aliments que vous désirez garder
chauds.
2. Déposez les aliments dans la lèchefrite
incluse ou sur la plaque à pizza (ou tout
autre plat allant au four) et et placez-la au
centre de la grille pour faciliter une bonne
circulation d'air tout autour.
3. Fermez la porte du four.
4. Tournez le cadran SÉLECTION/
CONFIRMER jusqu'à ce que la flèche
indique WARM (GARDER CHAUD) sur
l'écran ACL. Le chiffre du haut sur l'écran
ACL indique la température préréglée de
160°F, tandis que le chiffre du bas indique
le temps préréglé de '1:00 HR/MIN'. Le
préréglage CONVECTION apparaîtra
également.
BOV900_USC_IB_A16.indd 51 25/05/2016 11:48 am
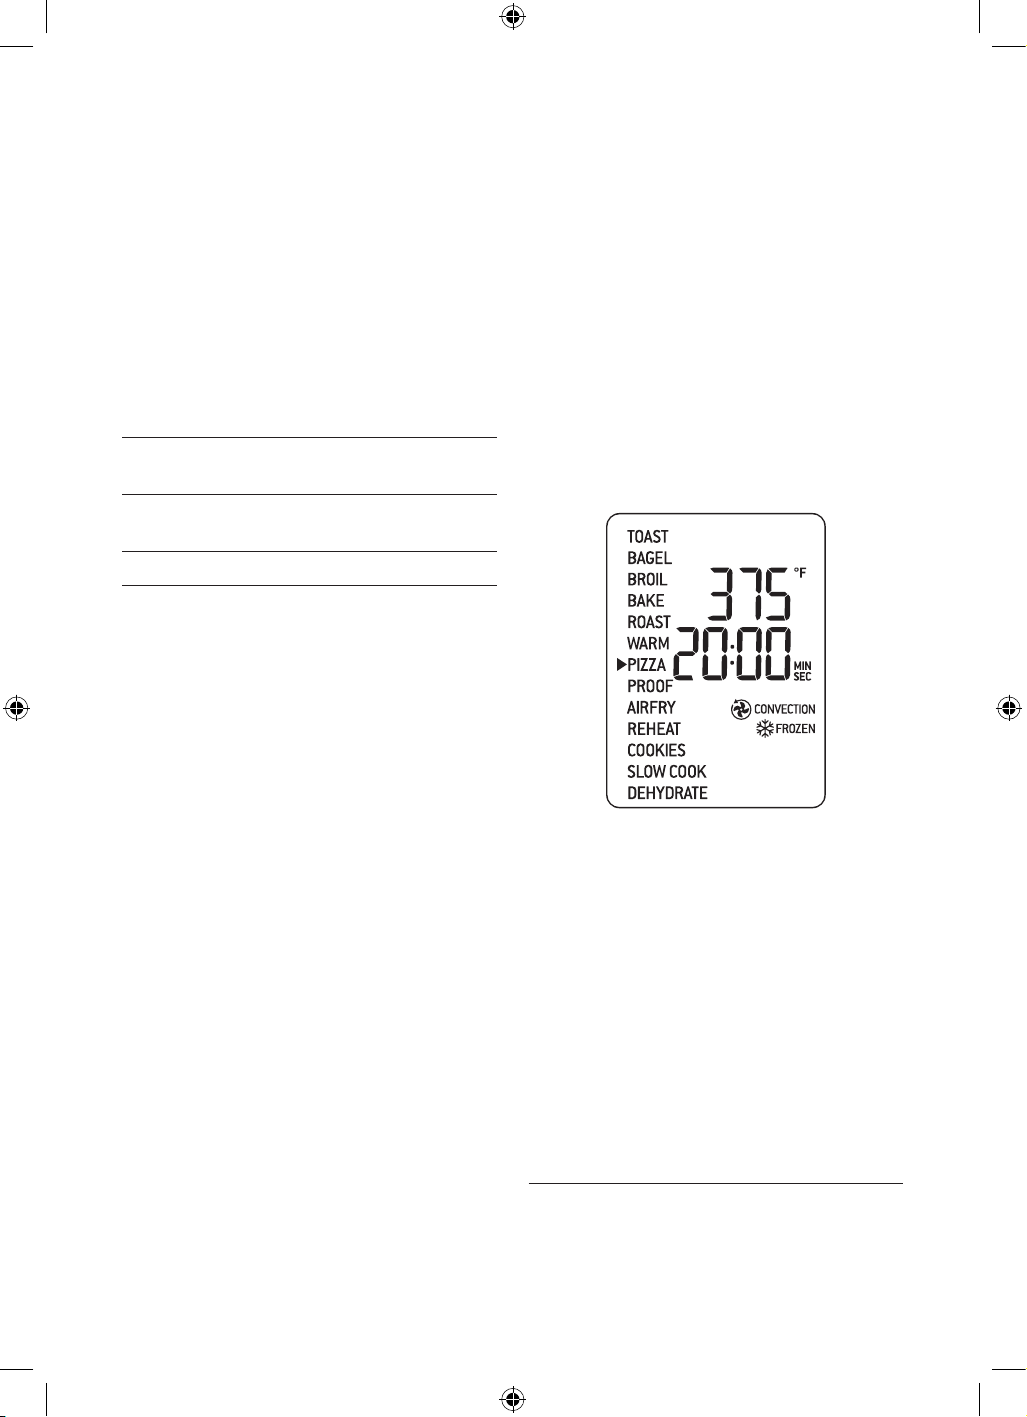
52
5. Les réglages de température, de temps et
de convection peuvent être ajustés avant
ou durant le cycle de maintien au chaud.
a) Le chiffre du haut sur l'écran ACL indique
la température de maintien au chaud.
Tournez le cadran de TEMPÉRATURE pour
ajuster la température de 120°F/50°C à un
maximum de 480°F/250°C.
b) Tournez le cadran de TEMPS pour choisir
le temps de cuisson. Le temps maximal peut
être réglé comme suit :
>390°F/200°C jusqu'à 4 heures
300°F/150°C –
390°F/200°C
jusqu'à 8 heures
210°F/100°C –
300°F/150°C
jusqu'à 12 heures
<210°F/100°C jusqu'à 72 heures
6. Appuyez sur le bouton MARCHE/ARRÊT
pour activer la fonction WARM (GARDER
CHAUD). Le bouton sera rétroéclairé en
rouge, le signal sonore se fera entendre et
l'écran ACL s'illuminera en orange.
7. La minuterie s'affichera et le compte à
rebours débutera automatiquement. La
température et le temps peuvent être
ajustés durant le cycle de maintien au
chaud en tournant les cadrans respectifs
de TEMPÉRATURE et de TEMPS. Le cycle
peut être interrompu en tout temps en
appuyant sur le bouton MARCHE/ARRÊT.
8. À la fin du cycle GARDER CHAUD, le
signal sonore se fera entendre, le bouton
MARCHE/ARRÊT s'éteindra et l'écran ACL
sera illuminé en blanc.
FONCTION PIZZA
La fonction PIZZA faire fondre et brunit le
fromage et les garnitures et fait simultanément
croustiller la croûte de la pizza.
1. Insérez la grille en position 7.
2. Fermez la porte du four.
3. Tournez le cadran SÉLECTION/
CONFIRMER jusqu'à ce que la flèche
indique PIZZA sur l'écran ACL. Le
chiffre du haut sur l'écran ACL indique la
température préréglée de '375°F' tandis que
le chiffre du bas indique le temps préréglé
de '20:00 MIN/SEC'. Les préréglages
CONVECTION et FROZEN (CONGELÉS)
seront également affichés.
4. Les réglages de température, de temps,
de convection et pour aliments congelés
peuvent être ajustés avant ou durant le
cycle de PIZZA.
a) Le chiffre du haut sur l'écran ACL indique
la température de pizza. Tournez le cadran
de TEMPÉRATURE pour ajuster la
température de 120°F/50°C à un maximum
de 480°F/250°C.
b) Tournez le cadran de TEMPS pour
sélectionner le temps de cuisson. Le temps
maximal peut être réglé comme suit :
120°F/50°C –
480°F/250°C
jusqu'à 1:00 HR
BOV900_USC_IB_A16.indd 52 25/05/2016 11:48 am
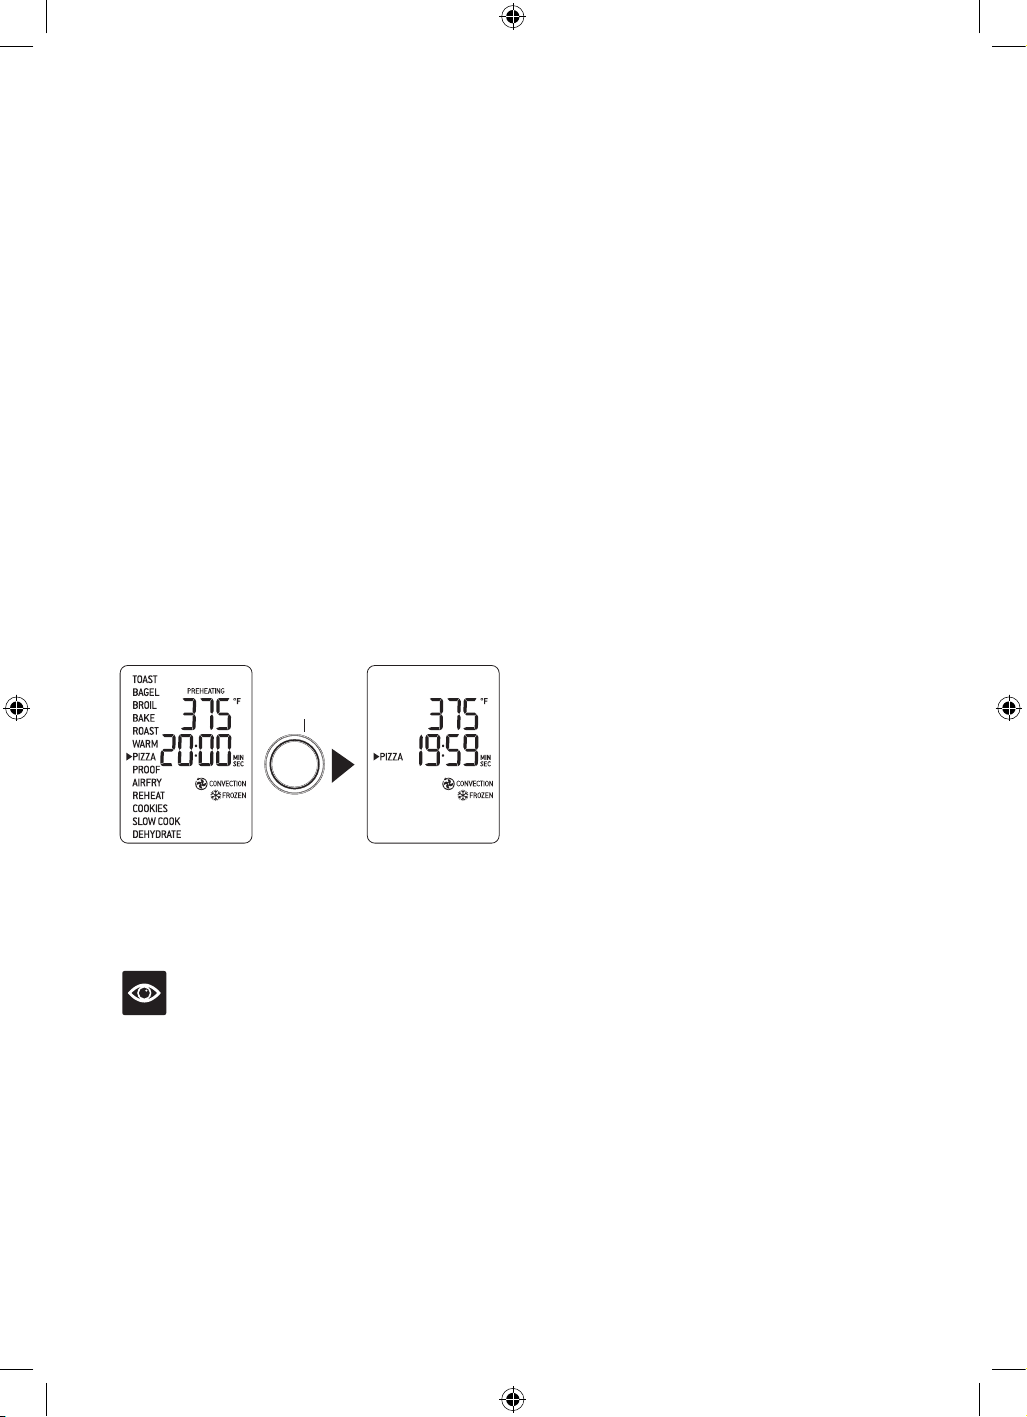
53
5. Appuyez sur le bouton MARCHE/ARRÊT
pour activer la fonction PIZZA. Le bouton
sera rétroéclairé en rouge, le signal sonore
se fera entendre et l'écran ACL s'illuminera
en orange. Le message 'PREHEATING'
(PRÉCHAUFFAGE) clignotera sur
l'écran ACL.
6. Une fois la température atteinte, le signal
sonore se fera entendre.
7. Déposez la pizza sur la plaque à pizza
fournie et placez-la au centre de la grille
pour faciliter une bonne circulation d'air
tout autour. Fermez la porte.
8. Après que le signal sonore de
PRÉCHAUFFAGE se sera fait
entendre, le compte à rebours débutera
automatiquement. La température et le
temps peuvent être ajustés durant le cycle
de PIZZA en tournant les cadrans respectifs
de TEMPÉRATURE et de TEMPS. Le cycle
peut être interrompu en tout temps en
appuyant sur le bouton MARCHE/ARRÊT.
APPUYER
MARCHE ARRÊT
9. À la fin du cycle de PIZZA, le signal sonore
se fera entendre, le bouton MARCHE/
ARRÊT s'éteindra et l'écran ACL sera
illuminé en blanc.
NOTE
Si vous utilisez la plaque à pizza incluse,
insérez-la dans le four durant le cycle de
préchauffage pour obtenir de meilleurs
résultats. Soyez prudent lorsque vous déposez
la pizza sur la plaque chaude.
Une note sur les pierres à pizza
Lorsque vous utilisez une pierre à pizza, il est
nécessaire de la préchauffer, sans pizza, pour
obtenir de meilleurs résultats.
1. Insérez la grille en position 7.
2. Déposez la pierre à pizza au centre de la
grille pour faciliter une bonne circulation
d'air tout autour.
3. Fermez la porte du four.
4. Tournez le cadran SÉLECTION/
CONFIRMER jusqu'à ce que la flèche
indique PIZZA sur l'écran ACL. Le
chiffre du haut sur l'écran ACL indique la
température préréglée de '375°F', tandis que
le chiffre du bas indique le temps préréglé
de '20:00 MIN/SEC'. Les préréglages
CONVECTION et FROZEN (CONGELÉS)
s'afficheront également.
5. Tournez le cadran de TEMPS pour régler le
temps à 15:00 MIN/SEC.
6. Appuyez sur le bouton MARCHE/ARRÊT
pour activer la fonction PIZZA. Le bouton
sera rétroéclairé en rouge, le signal sonore
se fera entendre et l'écran ACL s'illuminera
en orange. Le message 'PREHEATING'
(PRÉCHAUFFAGE) clignotera sur
l'écran ACL.
7. À la fin du cycle de préchauffage, un signal
sonore se fera entendre.
8. Après que le signal de PRÉCHAUFFAGE
se sera fait entendre, le compte à rebours
débutera automatiquement.
9. À la fin du cycle, le signal sonore se fera
entendre. Le bouton MARCHE/ARRÊT
s'éteindra et l'écran ACL s'illuminera
en blanc.
10. Ouvrez la porte du four et déposez
délicatement la pizza sur la pierre à pizza.
11. Choisissez les réglages de température,
de temps, de convection et pour aliments
frais/congelés et appuyez sur le bouton
MARCHE/ARRÊT pour débuter le cycle de
PIZZA.
BOV900_USC_IB_A16.indd 53 25/05/2016 11:48 am
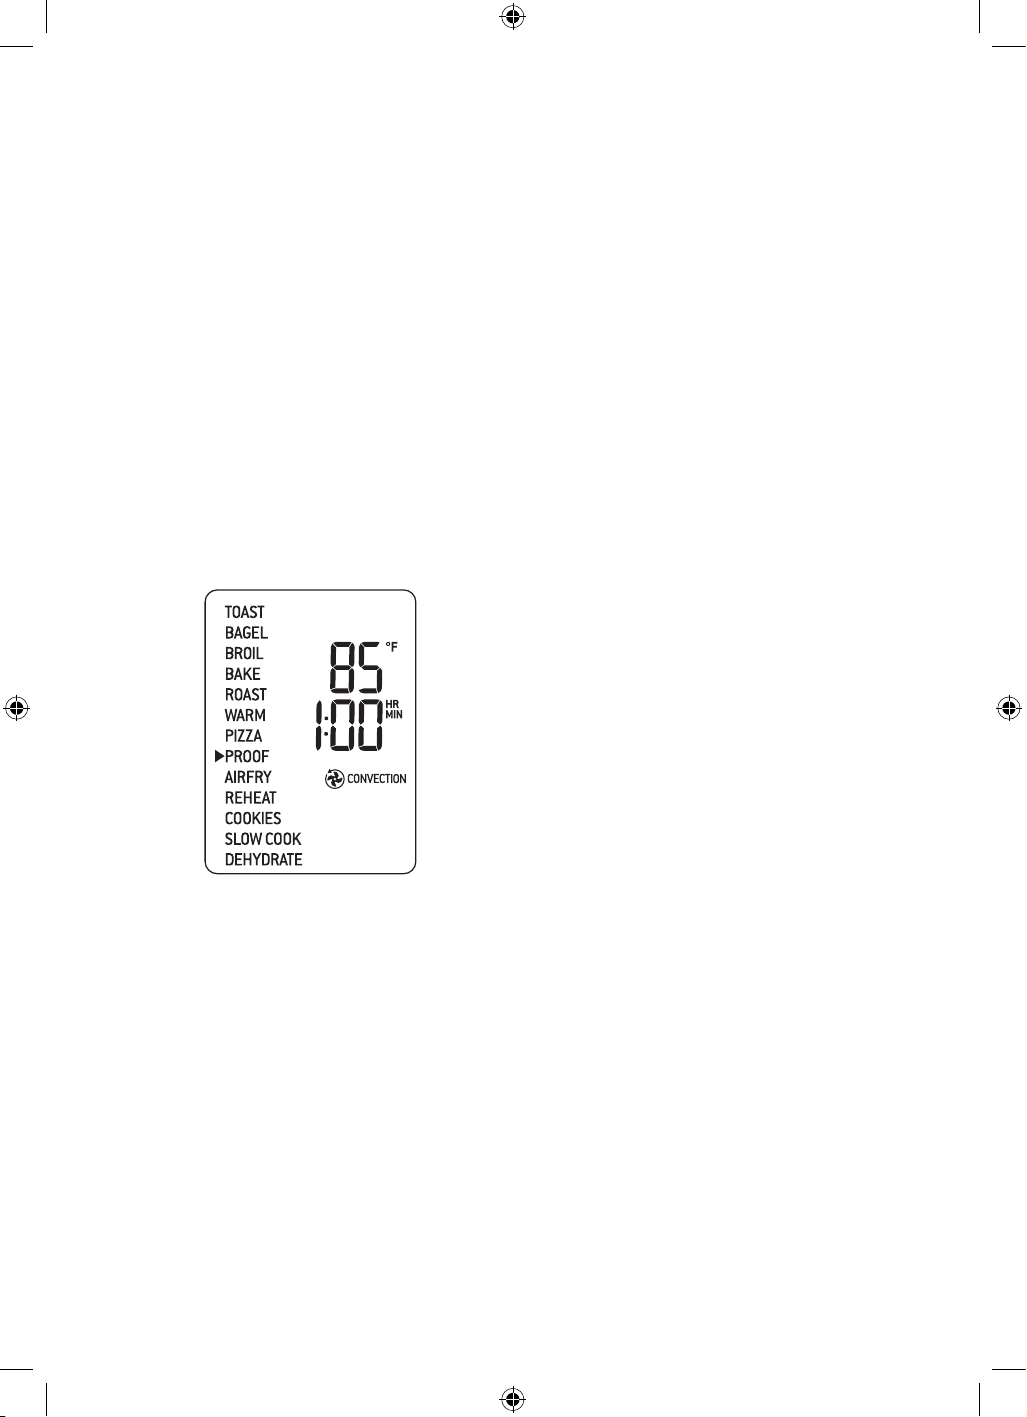
54
FONCTION PROOF (LEVER)
La fonction PROOF (LEVER) est conçue
précisément pour maintenir des températures
basses, créant un environnement idéal pour
faire lever le pain, les petits pains, la pâte à
pizza et autres pâtes.
1. Insérez la grille en position 8.
2. Déposez la pâte dans un plat allant au four,
couvrez et placez au centre de la grille.
3. Fermez la porte du four.
4. Tournez le cadran SÉLECTION/
CONFIRMER jusqu'à ce que la flèche
indique PROOF (LEVER) sur l'écran ACL.
Le chiffre du haut sur l'écran ACL indique
la température préréglée de '85°F, tandis
que le chiffre du bas indique le temps
préréglé de '1:00 HR/MIN'. Le préréglage
CONVECTION apparaîtra également.
5. Les réglages de température, de temps et
de convection peuvent être ajustés avant ou
durant le cycle de lever.
a) Le chiffre du haut sur l'écran ACL indique
la température de levée. Tournez le cadran
de TEMPÉRATURE pour l'ajuster de
80°F/278°C à un maximum de 100°F/38°C.
b) Le chiffre du bas sur l'écran ACL indique
le temps de levée. Tournez le cadran de
TEMPS pour ajuster le temps jusqu'à 2:00
HR/MIN.
6. Appuyez sur le bouton MARCHE/ARRÊT
pour activer la fonction PROOF (LEVER).
Le bouton sera rétroéclairé en rouge, le
signal sonore se fera entendre et l'écran
ACL s'illuminera en orange.
7. La minuterie s'affichera et le compte à
rebours débutera. La température et le
temps peuvent être ajustés durant le cycle
de levée en tournant les cadrans respectifs
de TEMPÉRATURE et de TEMPS. Le cycle
peut être interrompu en tout temps en
appuyant sur le bouton MARCHE/ARRÊT.
8. À la fin du cycle LEVER, le signal sonore se
fera entendre. Le bouton MARCHE/ARRÊT
s'éteindra et l'écran ACL sera illuminé en
blanc.
BOV900_USC_IB_A16.indd 54 25/05/2016 11:48 am
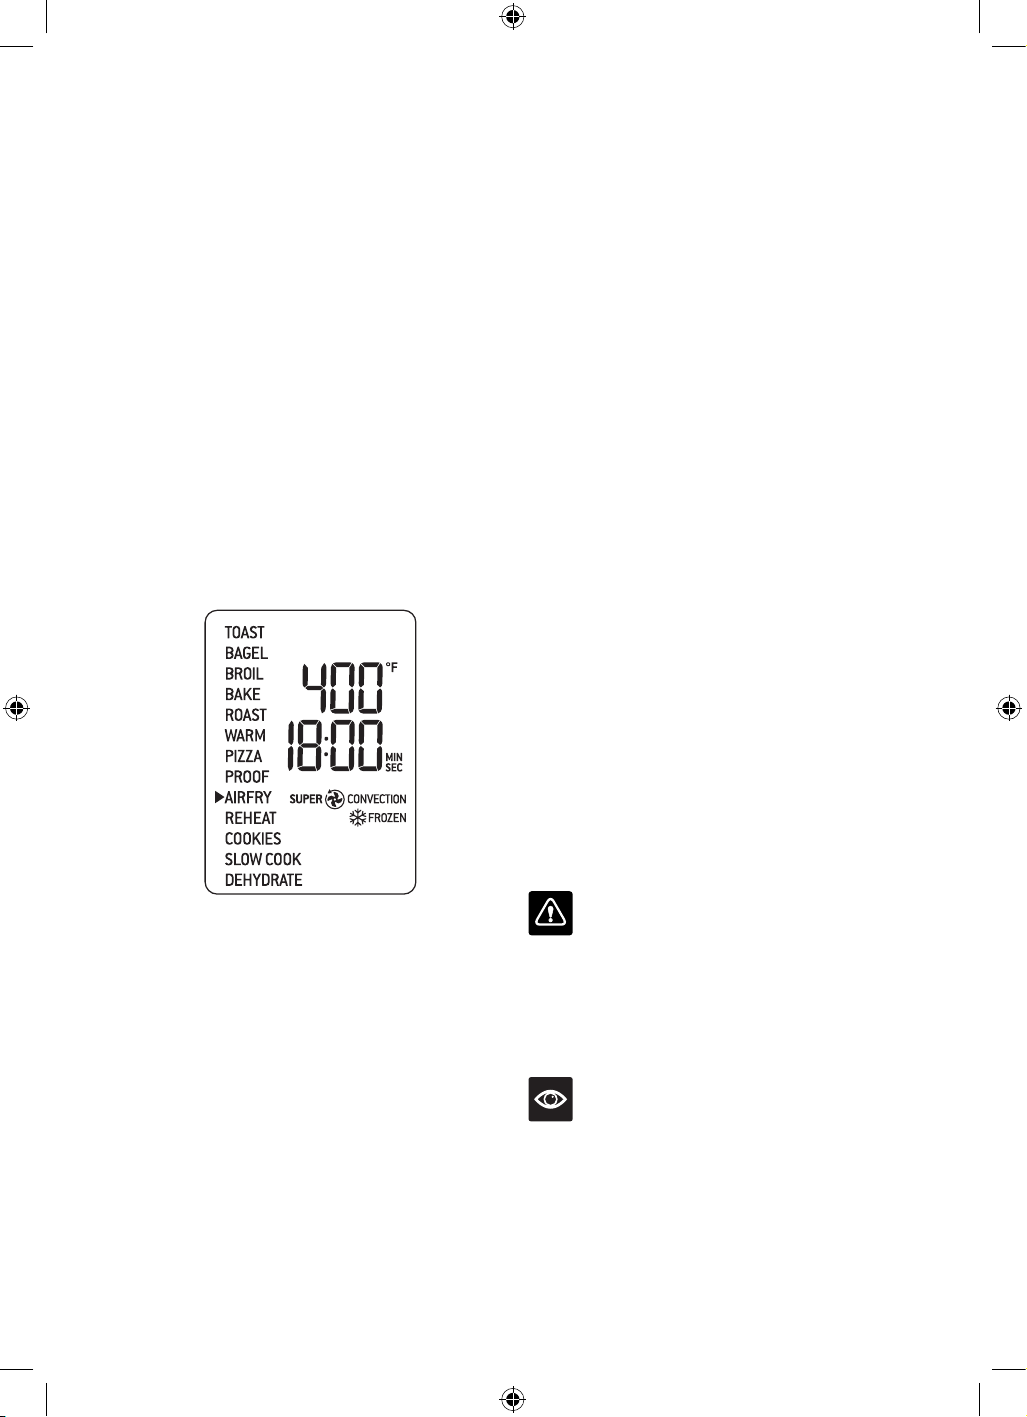
55
FONCTON AIR FRY (FRIRE
À AIR CHAUD)
La fonction AIR FRY (FRITE À AIR CHAUD)
combine une chaleur intense et une circulation
d'air maximale, idéal pour faire croustiller et
brunir les aliments.
1. Assurez-vous que la position 3, ou toute
autre position convenant au panier pour
frire à air chaud/déshydrater, est libre.
2. Fermez la porte du four.
3. Tournez le cadran SÉLECTION/
CONFIRMER jusqu'à ce que la flèche
indique AIRFRY (FRIRE À AIR CHAUD)
sur l'écran ACL. Le chiffre du haut sur
l'écran ACL indique la température
préréglée de '400°F', tandis que le chiffre
du bas indique le temps préréglé de
'18:00 MIN/SEC'. Le préréglage SUPER
CONVECTION apparaîtra sur l'écran ACL.
4. Les réglages de température, de temps,
de convection et pour aliments congelés
peuvent être ajustés avant ou durant le
cycle AIRFRY (FRIRE À AIR CHAUD).
a) Le chiffre du haut sur l'écran ACL indique
la température pour FRIRE À AIR CHAUD.
Tournez le cadran de TEMPÉATURE pour
l'ajuster de 120°F/50°C à un maximum de
480°F/250°C.
b) Le chiffre du bas sur l'écran ACL indique
le temps de FRITURE À AIR CHAUD.
Tournez le cadran de TEMPS pour ajuster le
temps jusqu'à un maximum d'une heure.
5. Appuyez sur le bouton MARCHE/
ARRÊT pour activer la fonction AIRFRY
(FRIRE À AIR CHAUD). Le bouton sera
rétroéclairé en rouge, le signal sonore se
fera entendre et l'écran ACL s'illuminera
en orange. Le message, PREHEATING
(PRÉCHAUFFAGE) clignotera sur
l'écran ACL.
6. Une fois le préchauffage terminé, un signal
sonore se fera entendre, signifiant que les
aliments peuvent être insérés dans le four.
7. Déposez les aliments uniformément dans
le panier pour frire à air chaud/déshydrater.
Pour de meilleurs résultats, placez les
aliments en une seule couche en laissant un
peu d'espace entre chaque morceau. Insérez
le panier à friture dans la position adéquate
de la grille et fermez la porte du four.
8. Après que le signal sonore de
PRÉCHAUFFAGE se sera fait
entendre, le compte à rebours débutera
automatiquement. La température et le
temps peuvent être ajustés durant le cycle
AIRFRY en tournant les cadrans respectifs
de TEMPÉRATURE et de TEMPS. Le cycle
peut être interrompu en tout temps en
appuyant sur le bouton MARCHE/ARRÊT.
9. À la fin du cycle FRIRE À AIR CHAUD, le
signal sonore se fera entendre, le bouton
MARCHE/ARRÊT s'éteindra et l'écran ACL
sera illuminé en blanc.
IMPORTANT
Lorsque vous faites cuire des aliments
gras (comme les ailes de poulet), utilisez la
lèchefrite au lieu du panier à friture pour
empêcher le gras de dégouliner. Jetez l'excès
de gras entre chaque portion.
NOTE
Vous pouvez utiliser jusqu'à 4 paniers pour
frire à air chaud/déshydrater dans ce four.
Si vous désirez vous procurer des paniers
supplémentaires, visitez www.breville.com
pour plus d'informations.
BOV900_USC_IB_A16.indd 55 25/05/2016 11:48 am
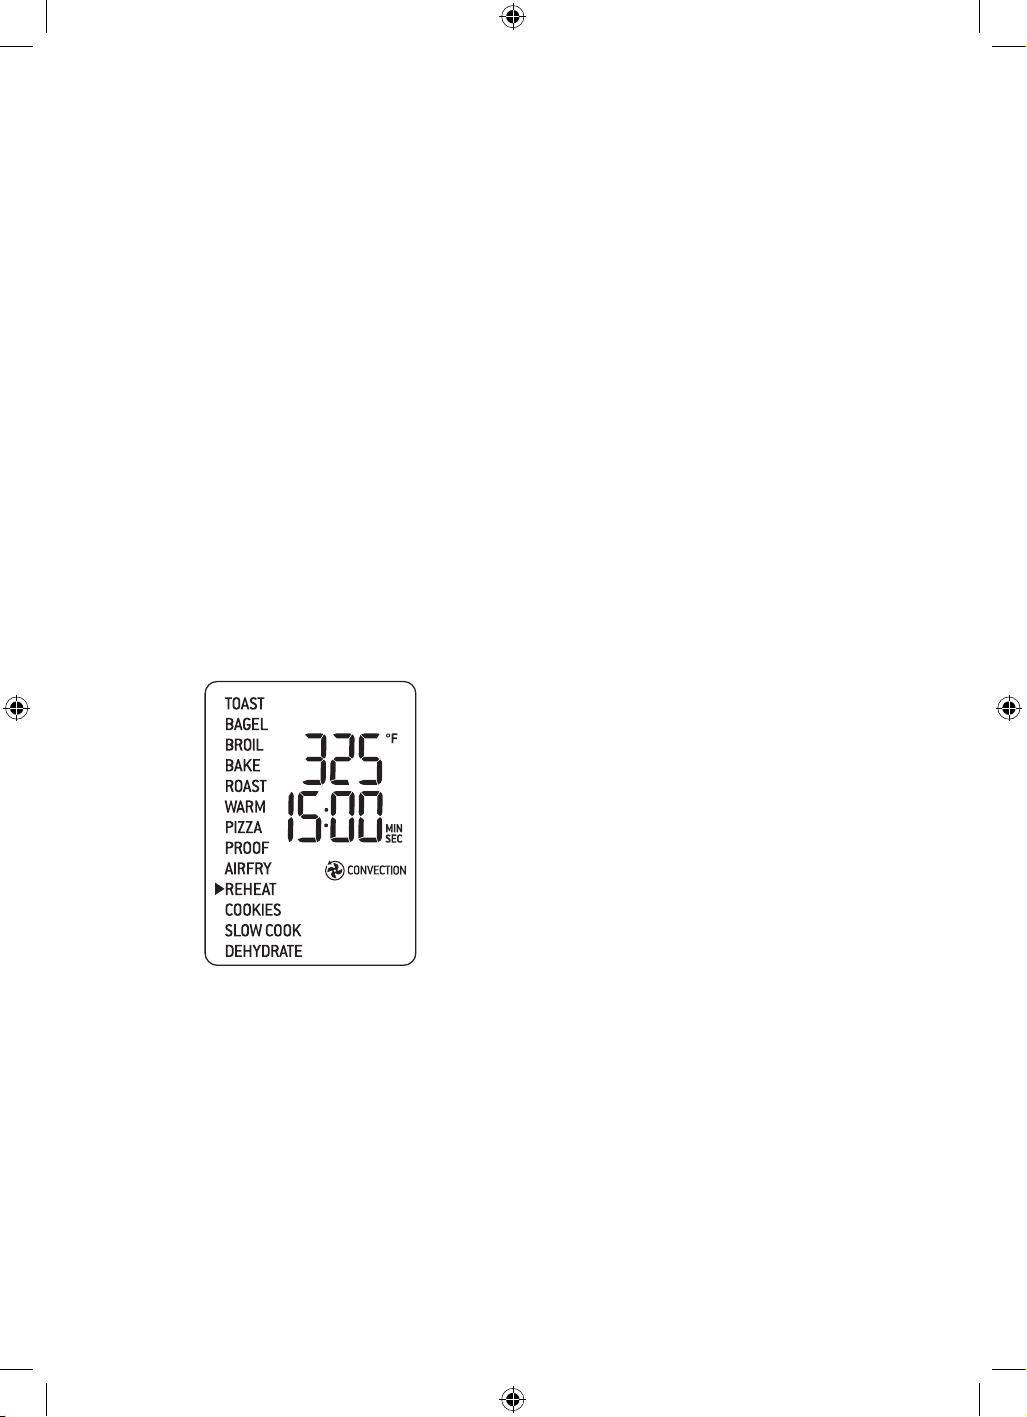
56
FONCTION REHEAT (RÉCHAUFFER)
La fonction REHEAT (RÉCHAUFFER) est
idéale pour réchauffer lentement les restes
d'aliments sans les brunir ni les dessécher.
1. Insérez la grille à la position qui convient le
mieux au type d'aliment que vous désirez
réchauffer.
2. Déposez les aliments dans la lèchefrite
fournie, la plaque à pizza (ou un plat allant
au four) et placez-la au centre de la grille
pour faciliter une bonne circulation d'air
tout autour.
3. Fermez la porte du four.
4. Tournez le cadran SÉLECTION/
CONFIRMER jusqu'à ce que la flèche
indique REHEAT (RÉCHAUFFER) sur
l'écran ACL. Le chiffre du haut sur l'écran
ACL indique la température préréglée de
'325°F', tandis que le chiffre du bas indique
le temps préréglé de '15:00 MIN/SEC'. Le
préréglage CONVECTION apparaîtra
également.
5. Les réglages de température, de temps,
de convection et pour aliments congelés
peuvent être ajustés avant ou durant le
cycle de réchauffage.
a) Le chiffre du haut sur l'écran ACL indique
la température de réchauffage. Tournez le
cadran de TEMPÉATURE pour ajuster la
température de 120°F/50°C à un maximum
de 480°F/250°C.
b) Le chiffre du bas sur l'écran ACL indique
le temps de réchauffage. Tournez le cadran
de TEMPS pour ajuster le temps jusqu'à un
maximum de 2 heures à des températures
de 120°F/50°C - 480°F/250°C.
6. Appuyez sur le bouton MARCHE/
ARRÊT pour activer la fonction REHEAT
(RÉCHAUFFAGE). Le bouton sera
rétroéclairé en rouge, le signal sonore se
fera entendre et l'écran ACL s'illuminera en
orange.
7. La minuterie s'affichera et le compte à
rebours débutera. La température et le
temps peuvent être ajustés durant le cycle
de réchauffage en tournant les cadrans
respectifs de TEMPÉRATURE et de
TEMPS. Le cycle peut être interrompu
en tout temps en appuyant sur le bouton
MARCHE/ARRÊT.
8. À à fin du cycle de RÉCHAUFFAGE, le
signal sonore se fera entendre, le bouton
MARCHE/ARRÊT s'éteindra et l'écran ACL
sera illuminé en blanc.
BOV900_USC_IB_A16.indd 56 25/05/2016 11:48 am

57
FONCTION COOKIES (BISCUITS)
La fonction COOKIES (BISCUITS) est idéale
pour cuire les biscuits maison ou achetés, ou
autres pâtisseries.
1. Insérez la grille en position 6.
2. Fermez la porte du four.
3. Tournez le cadran SÉLECTION/
CONFIRMER jusqu'à ce que la flèche
indique COOKIES sur l'écran ACL. Le
chiffre du haut sur l'écran ACL indique la
température préréglée de '325°F', tandis
que le chiffre du bas indique le temps
préréglé de '11:00 MIN/SEC'. Le préréglage
CONVECTION sera aussi affiché.
4. Les réglages de température, de temps,
de convection et pour aliments congelés
peuvent être ajustés avant ou durant le
cycle COOKIES (BISCUITS).
a) Le chiffre du haut sur l'écran ACL indique
la température de cuisson. Tournez le
cadran de TEMPÉRATURE pour l'ajuster
de 120°F/50°C à un maximum de
480°F/250°C.
b) Le chiffre du bas sur l'écran ACL indique
le temps de cuisson. Tournez le cadran de
TEMPS pour ajuster le temps jusqu'à une
heure à des températures de 120°F/50°C -
480°F/250°C.
5. Appuyez sur le bouton MARCHE/
ARRÊT pour activer la fonction
COOKIES (BISCUITS). Le bouton sera
rétroéclairé en rouge, le signal sonore se
fera entendre et l'écran ACL s’illuminera
en orange. Le message 'PREHEATING'
(PRÉCHAUFFAGE) clignotera sur
l'écran ACL.
6. Une fois le préchauffage terminé, un signal
sonore se fera entendre, signifiant que les
aliments peuvent être insérés dans le four.
7. Déposez les aliments dans la lèchefrite
fournie, la plaque à pizza (ou tout autre plat
allant au four) et placez-la au centre de la
grille pour faciliter une bonne circulation
d'air autour des aliments. Fermez la porte
du four.
8. Après que le signal sonore de
PRÉCHAUFFAGE se sera fait
entendre, le compte à rebours débutera
automatiquement. La température et le
temps peuvent être ajustés durant le cycle
COOKIES (BISCUITS) en tournant les
cadrans respectifs de TEMPÉRATURE et
de TEMPS. Le cycle peut être interrompu
en tout temps en appuyant sur le bouton
MARCHE/ARRÊT.
9. À la fin du cycle BISCUITS, le signal sonore
se fera entendre, le bouton MARCHE/
ARRÊT s'éteindra et l'écran ACL sera
illuminé en blanc.
BOV900_USC_IB_A16.indd 57 25/05/2016 11:48 am
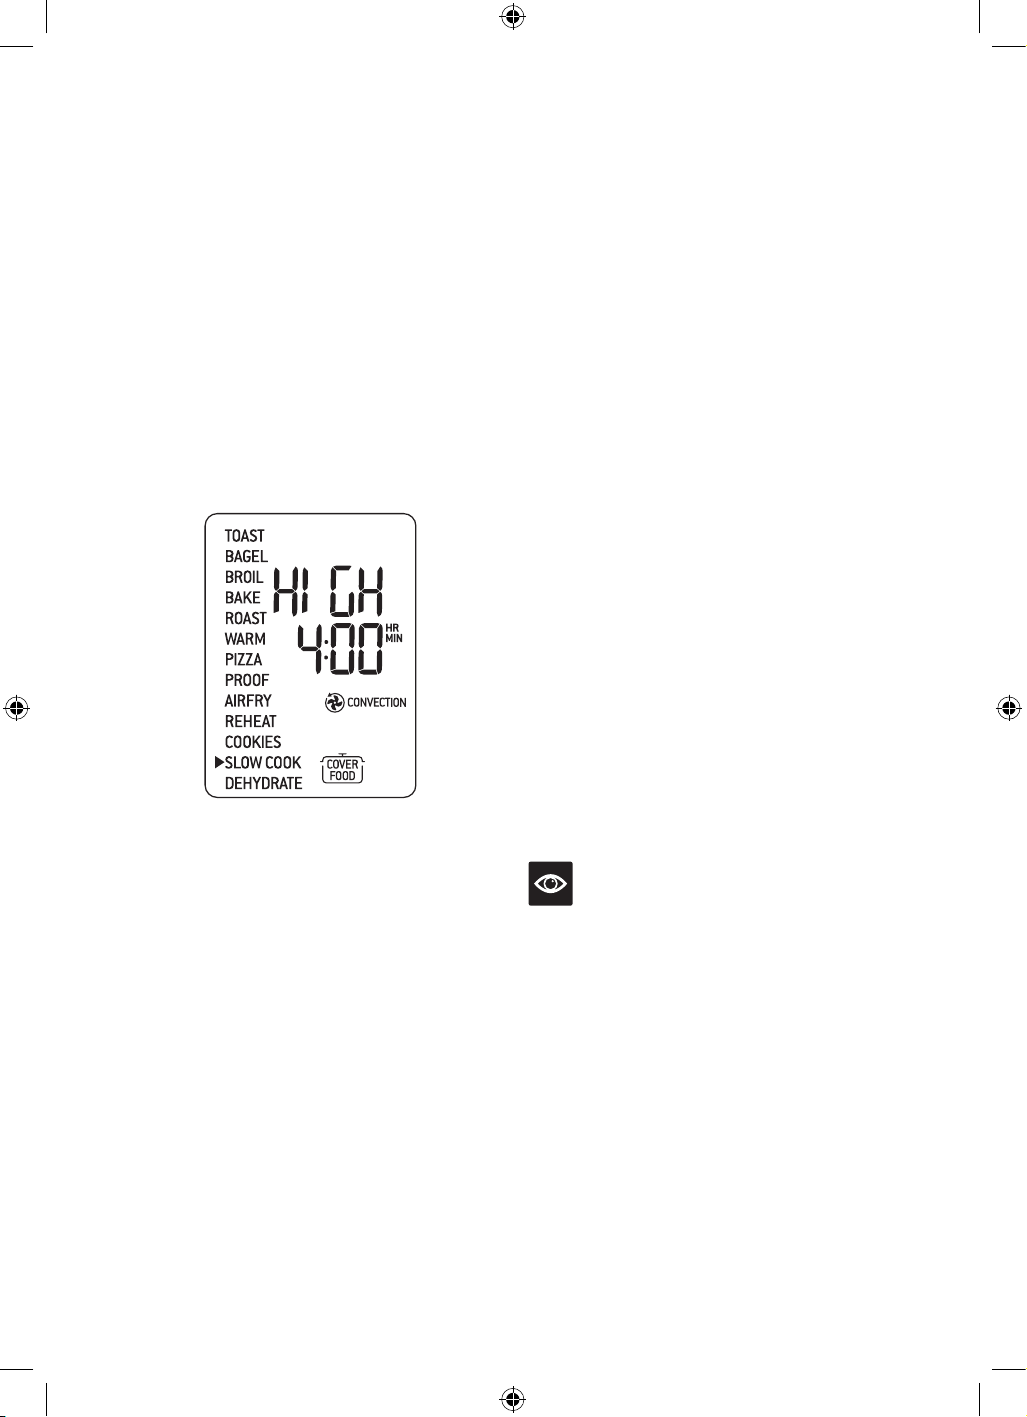
58
FONCTION SLOW COOK (MIJOTER)
La fonction SLOW COOK (MIJOTER) dispose
de profils conçus pour cuire à long terme à
basse température.
1. Insérez la grille en position 8.
2. Fermez la porte du four.
3. Tournez le cadran SÉLECTION/
CONFIRMER jusqu'à ce que la flèche
indique SLOW COOK (MIJOTER) sur
l'écran ACL. Le chiffre du haut sur l'écran
ACL indique la température préréglée de
'HIGH' (HAUT), tandis que le chiffre du bas
indique le temps préréglé de '4:00 MIN/
SEC'. Le préréglage CONVECTION sera
aussi affiché.
4. Les réglages de température, de temps et
de convection peuvent être ajustés avant ou
durant le cycle de mijotage.
a) Le chiffre du haut sur l'écran ACL indique
la température de mijotage. Tournez le
cadran de TEMPÉRATURE pour ajuster la
température à l'un des deux préréglages :
'LOW' (BAS) ou 'HIGH' (HAUT).
b) Le chiffre du bas sur l'écran ACL indique
le temps de mijotage. Tournez le cadran de
TEMPS pour l'ajuster entre 4 et 72 heures
pour le réglage BAS et entre 2 et 12 heures
pour le réglage HAUT.
5. Déposez les aliments dans un plat de
cuisson couvert allant au four, et placez-
le au centre de la grille pour faciliter une
bonne circulation d'air autour des aliments.
Fermez la porte du four.
6. Appuyez sur le bouton MARCHE/
ARRÊT pour activer la fonction SLOW
COOK (MIJOTER). Le bouton sera
rétroéclairé en rouge, le signal sonore se
fera entendre et l'écran ACL s’illuminera
en orange. Le message 'PREHEATING'
(PRÉCHAUFFAGE) clignotera sur l'écran
ACL.
7. Après que le signal sonore de
PRÉCHAUFFAGE se sera fait
entendre, le compte à rebours débutera
automatiquement. La température et
le temps peuvent être ajustés durant le
cycle de mijotage en tournant les cadrans
respectifs de TEMPÉRATURE et de
TEMPS. Le cycle peut être interrompu
en tout temps en appuyant sur le bouton
MARCHE/ARRÊT.
8. À la fin du cycle de mijotage, le four passera
automatiquement à la fonction 'WARM'
(GARDER CHAUD) et le restera jusqu'à la
fin du compte à rebours de '2:00 HR/MIN'.
Le cycle de maintien au chaud peut être
interrompu en tout temps en appuyant sur
le bouton MARCHE/ARRÊT.
NOTE
Ne retirez pas plus de la moitié de la grille
lorsque vous insérez ou retirez le plat de
cuisson du four.
Ne déposez aucun plat de cuisson lourd sur la
vitre de la porte lorsqu'elle est ouverte.
BOV900_USC_IB_A16.indd 58 25/05/2016 11:48 am
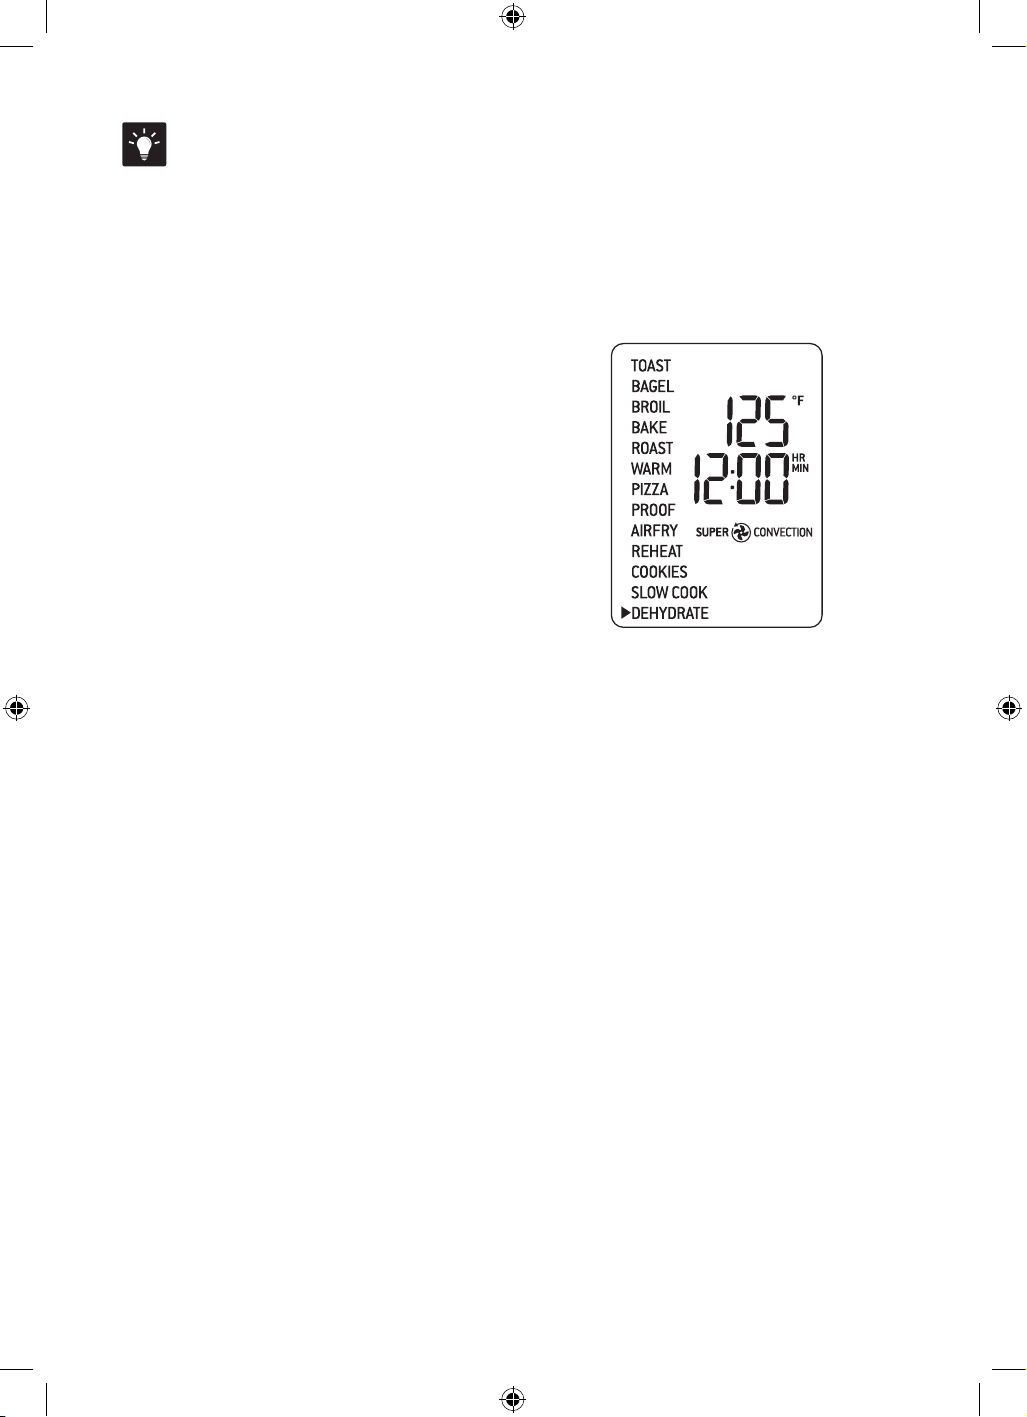
59
3. Tournez le cadran SÉLECTION/
CONFIRMER jusqu'à ce que la flèche
indique DEHYDRATE (DÉSHYDRATER)
sur l'écran ACL. Le chiffre du haut sur
l'écran ACL indique la température
préréglée de '125°F', tandis que le chiffre
du bas indique le temps préréglé de
'12:00 MIN/SEC'. Le préréglage SUPER
CONVECTION sera aussi affiché.
4. Les réglages de température, de temps et
de convection peuvent être ajustés avant ou
durant le cycle de déshydratation.
a) Le chiffre du haut sur l'écran ACL indique la
température de déshydratation. Tournez le
cadran de TEMPÉRATURE pour ajuster la
température de '86°F/30°C à un maximum
de 176°F/80°C.
b) Le chiffre du bas sur l'écran ACL indique le
temps de déshydratation. Tournez le cadran
de TEMPS pour ajuster le temps jusqu'à
72 heures.
5. Appuyez sur le bouton MARCHE/ARRÊT
pour activer la fonction DEHYDRATE
(DÉSHYDRATER). Le bouton sera
rétroéclairé en rouge, le signal sonore se
fera entendre et l'écran ACL s’illuminera
en orange.
6. La minuterie s'affichera et le compte à
rebours débutera. La température et le
temps peuvent être ajustés durant le
cycle de déshydratation en tournant les
cadrans respectifs de TEMPÉRATURE et
de TEMPS. Le cycle peut être interrompu
en tout temps en appuyant sur le bouton
MARCHE/ARRÊT.
TRUCS
TRUCS DE MIJOTAGE
1. Assurez-vous que votre plat résiste au four
et ne pèse pas plus de 6 kg/13 lb lorsque
vide.
2. Remplissez le plat à un minimum de ½
et un maximum de ¾ pour éviter une
surcuisson ou une cuisson insuffisante.
Pour prévenir le dégoulinage, ne remplissez
pas le plat au-delà des ¾.
3. Laissez toujours mijoter les aliments avec
couvercle pour éviter qu'ils ne dessèchent.
Couvrez-les d'une feuille de papier
métallique avant de mettre le couvercle, cela
contribuera à maintenir l'humidité.
4. Respectez les températures et temps
suggérés dans les recettes traditionnelles
de mijoteuse. Une heure à 'HAUT' équivaut
à environ une heure et demie à deux heures
à 'BAS'.
5. Les aliments froids prendront plus de temps
à cuire que ceux saisis ou réchauffés au
préalable; il faudra donc ajuster le temps
de cuisson en conséquence. Ne faites pas
mijoter de produits congelés.
6. Coupez les gros morceaux de viande
en deux pour laisser la chaleur pénétrer
uniformément.
FONCTION DEHYDRATE
(DÉSHYDRATER)
La fonction DEHYDRATE (DÉSHYDRATER)
combine une chaleur basse et stable à une
circulation d'air maximale pour déshydrater les
aliments sans les cuire ni les surchauffer.
1. Déposez les aliments uniformément dans
le panier pour frire à air chaud/déshydrater.
Pour de meilleurs résultats, placez les
aliments en une seule couche et laissez un
peu d'espace entre chaque morceau. Insérez
le panier pour frire à air chaud/déshydrater
à la position de grille 3.
2. Fermez la porte du four.
BOV900_USC_IB_A16.indd 59 25/05/2016 11:48 am

60
7. À la fin du cycle de déshydratation, le
signal sonore se fera entendre, le bouton
MARCHE/ARRÊT s'éteindra et l'écran ACL
sera illuminé en blanc.
TRUCS
• Afin de prévenir la décoloration du
panier à friture, recouvrez-le de papier
parchemin lorsque vous déshydratez
des aliments très colorés.
• Lorsque vous faites déshydrater des
aliments qui peuvent dégouliner, comme
le jerky mariné, utilisez la lèchefrite
fournie pour récupérer les gras de cuisson.
Insérer la grille en position 8 et déposez
la lèchefrite au centre de la grille.
PHASES DE CUISSON
Utilisez le bouton PHASE COOK (PHASES
DE CUISSON) pour programmer deux
fonctions de cuisson, l'une après l'autre. Les
fonctions qui conviennent à ce réglage sont:
BROIL, BAKE, ROAST, WARM et PIZZA
(GRILLER, CUIRE, RÔTIR, GARDER CHAUD
et PIZZA).
1. Appuyez sur le bouton PHASE COOK
(PHASES DE CUISSON). 'PHASE COOK'
apparaîtra sur l'écran ACL, de même que les
fonctions disponibles.
2. Une flèche clignotera au-dessus du '1',
indiquant que vous programmez la
première phase de cuisson.
a) Tournez le cadran SÉLECTION/
CONFIRMER jusqu'à ce que la flèche
indique votre fonction désirée sur l'écran
ACL.
b) Pour ajuster la température et le temps de
cuisson, tournez les cadrans respectifs de
TEMPÉRATURE et de TEMPS.
c) Appuyez sur le cadran SÉLECTION/
CONFIRMER ou MARCHE/ARRÊT pour
confirmer votre première phase.
3. La flèche clignotera alors au-dessus du '2',
indiquant que vous programmez la seconde
phase de cuisson.
a) Tournez le cadran SÉLECTION/
CONFIRMER jusqu'à ce que la flèche
indique votre fonction désirée sur l'écran
ACL.
b) Pour ajuster la température et le temps de
cuisson, tournez les cadrans respectifs de
TEMPÉRATURE et de TEMPS.
c) Appuyez sur le cadran SÉLECTION/
CONFIRMER pour confirmer votre
première phase.
4. Appuyez sur le bouton MARCHE/ARRÊT
pour activer la première fonction. Le bouton
sera rétroéclairé en rouge, le signal sonore
se fera entendre et l'écran ACL s'illuminera
en orange. Les deux phases s'afficheront
sur l'écran ACL avec une flèche pointant sur
la première phase.
5. Lorsque la première phase sera complétée,
la seconde débutera automatiquement. À la
fin de la seconde phase, le signal sonore se
fera entendre, le bouton MARCHE/ARRÊT
s'éteindra et l'écran ACL sera illuminé en
blanc.
BOV900_USC_IB_A16.indd 60 25/05/2016 11:48 am
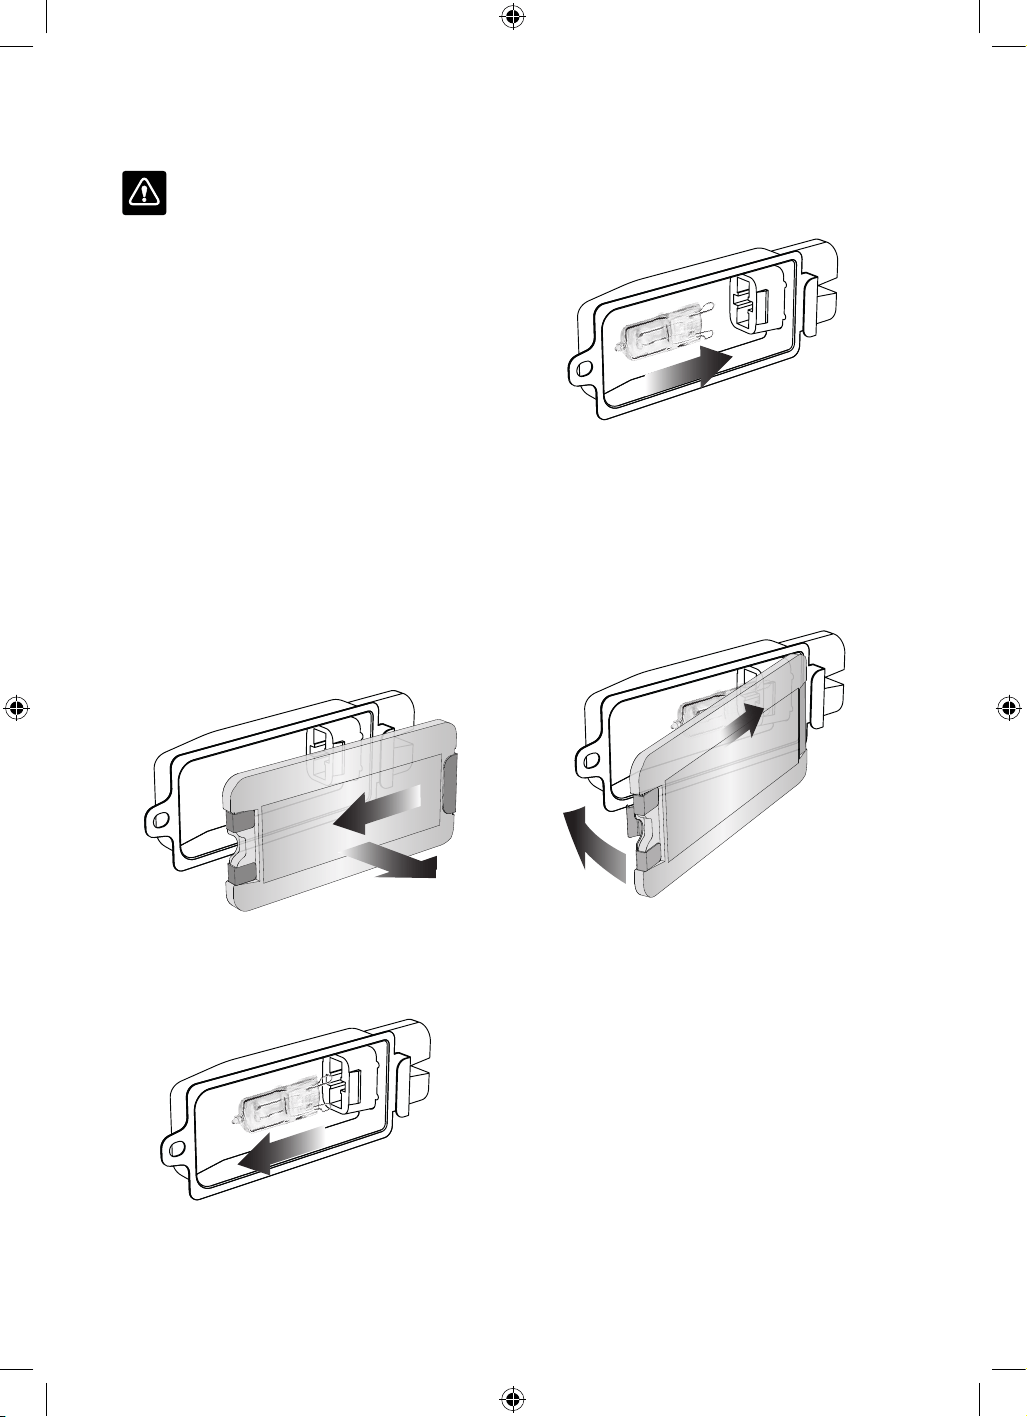
61
REMPLACER LA LAMPE DE FOUR
AVERTISSEMENT
Débranchez toujours le four et laissez-le
refroidir avant de remplacer l'ampoule. Utilisez
uniquement une ampoule de four de 25W,
120V, de type G9.
1. Retirez la grille du four avant de remplacer
l'ampoule.
2. La lampe de four est placée sur le côté
gauche de la cavité du four. Agrippez
l'extérieur du boîtier de la lampe avec vos
doigts et tirez doucement le couvercle en
verre hors du four. Si vous êtes incapable
d'enlever le couvercle, faites glisser une
cuillère dans le côté gauche du boîtier
et soulevez délicatement le couvercle de
verre. Maintenez toujours de couvercle en
verre avec l'autre main pour l'empêcher de
tomber et de se briser.
3. Retirez l'ampoule usagée en la tirant
directement hors de son support.
4. Utilisez un chiffon doux pour insérer
la nouvelle ampoule. Ne touchez pas à
l'ampoule, car l'huile de vos doigts pourrait
l'endommager.
5. Pour replacer le couvercle en verre, alignez
le crochet métallique avec le côté gauche
du boîtier. Faites glisser le côté opposé du
couvercle en verre dans le support en métal
sur le côté droit du boîtier, puis poussez le
crochet métallique sur le côté gauche du
boîtier jusqu'à ce qu'il s'enclenche en place.
UTILISER LE RÉCHAUD
Le dessus du four devient très chaud durant et
après l'utilisation. En conséquence, il n'est pas
recommandé d'y ranger des objets.
La seule exception est la planche à découper/
plateau de service en bambou de Breville
conçue pour reposer parfaitement dans la
partie nervurée sur le dessus du four. Visitez
www.breville.com pour plus d'informations.
BOV900_USC_IB_A16.indd 61 25/05/2016 11:48 am
62
Entretien &
nettoyage
Avant de nettoyer le four, assurez-vous qu'il est
éteint en le débranchant de la prise électrique.
Laissez le four et les accessoires refroidir
complètement avant le retrait des pièces et le
nettoyage.
Nettoyer le boîtier et la porte
1. Essuyez l'extérieur du four avec une éponge
douce et humide. Vous pouvez utiliser
un nettoyant liquide non abrasif ou une
solution douce en pulvérisateur pour
éliminer les taches tenaces. Appliquez le
nettoyant sur l'éponge, et non sur la surface
du four, avant le nettoyage.
2. Pour nettoyer la porte en verre, utilisez
un nettoyant à vitre ou un détergent très
doux et une éponge douce et humide, ou
encore un tampon à récurer en plastique
souple. N'utilisez pas de nettoyant abrasif
ou de tampon à récurer métallique, car ils
égratigneront la surface en verre.
3. Essuyez l'écran ACL avec un chiffon doux et
humide. Appliquez le nettoyant directement
sur le chiffon et non sur la surface de l'écran.
N'utilisez pas de chiffon sec ou de nettoyant
abrasif qui pourraient égratigner la surface
de l'écran.
4. Laissez toutes les surfaces sécher
soigneusement avant de brancher le
cordon d'alimentation et mettre le four
sous tension.
AVERTISSEMENT
N'immergez pas le boîtier, le cordon ou la
fiche d'alimentation dans l'eau ou tout autre
liquide, car cela pourrait entraîner un risque
d'électrocution.
Nettoyer l'intérieur
Les parois internes du four sont recouvertes
d'un matériau antiadhésif qui facilite le
nettoyage. Pour nettoyer les éclaboussures qui
peuvent survenir durant la cuisson, essuyez
les parois avec une éponge douce et humide.
Un liquide non abrasif ou une solution de
pulvérisation légère peuvent être utilisés pour
éviter l'accumulation de taches. Appliquez le
nettoyant sur l'éponge et non sur les parois
avant de les nettoyer. Évitez de toucher les
éléments chauffants à quartz.
AVERTISSEMENT
Soyez extrêmement prudent lorsque vous
nettoyez les éléments chauffants à quartz.
Laissez le four refroidir complètement, puis
frottez doucement les éléments sur la longueur
à l'aide d'une éponge ou d'un chiffon doux et
humide. N'utilisez aucun type de nettoyant
ou d'agent de nettoyage. Laissez toutes les
surfaces sécher complètement avant de
brancher le cordon d'alimentation dans la prise
électrique et de mettre l'appareil sous tension.
Nettoyer le ramasse-miettes
1. Avant chaque usage, retirez le ramasse-
miettes en le glissant hors du four. Essuyez-
le avec une éponge douce et humide. Un
nettoyant liquide non abrasif peut être
utilisé pour éviter l'accumulation de taches.
Appliquez le nettoyant sur l'éponge, et non
sur le plateau, avant de le nettoyer. Sécher
correctement.
2. Pour enlever les résidus graisseux de
cuisson, faites tremper le ramasse-miettes
dans l'eau chaude savonneuse, puis lavez-le
avec une éponge douce ou un tampon
à récurer en plastique souple. Rincez et
séchez complètement.
3. Réinsérez toujours le ramasse-miettes dans
le four après le nettoyage, mais avant de
brancher l'appareil dans la prise électrique
et le faire fonctionner.
BOV900_USC_IB_A16.indd 62 25/05/2016 11:48 am

63
Nettoyer la grille, le grilloir, la
lèchefrite et la plaque à pizza
1. Lavez tous les accessoires à l'eau chaude
savonneuse à l'aide d'une éponge douce
ou d'un tampon à récurer en plastique
souple. Rincez et séchez complètement.
Ne nettoyez aucun des accessoires avec
un nettoyant abrasif, un tampon à récurer
métallique et des ustensiles en métal qui
pourraient endommager la surface.
2. Pour prolonger la durée de vie des
accessoires, nous ne recommandons pas
qu'ils soient nettoyés dans le lave-vaisselle
Rangement
1. Assurez-vous que le four est éteint en le
débranchant de la prise électrique.
2. Laissez le four et tous les accessoires
refroidir complètement avant de démonter
et de nettoyer l'appareil.
3. Assurez-vous que le four et tous les
accessoires sont propres et secs.
4. Assurez-vous que le ramasse-miettes est
inséré dans le four et que le grilloir est
inséré dans la lèchefrite et placé sur la grille
placée en position centrale.
5. Assurez-vous que la porte est bien fermée.
6. Assurez-vous que l'appareil est en position
verticale, de niveau et reposant sur ses
pieds. Ne rangez aucun objet sur le dessus
du four, la seule exception étant la planche
à découper/plateau de service en bambou
de Breville.
BOV900_USC_IB_A16.indd 63 25/05/2016 11:48 am
64
Guide de dépannage
PROBLÈME POSSIBLE SOLUTION FACILE
Le four ne se met
pas sous tension
•
Vérifiez si la fiche d'alimentation est bien insérée dans la prie électrique.
•
Branchez le cordon d'alimentation dans une prise indépendante.
•
Branchez le cordon d'alimentation dans une autre prise.
•
Réinitialisez le disjoncteur, si nécessaire.
J'aimerais restaurer
les réglages par défaut
de l'écran ACL
•
Le four mémorisera le dernier réglage utilisé pour chacune des fonctions,
même si vous le débranchez de la prise électrique.
•
Pour restaurer les réglages par défaut pour chaque fonction, appuyez
et maintenez simultanément les boutons de CONVERSION DE
TEMPÉRATURE et ALIMENTS CONGELÉS durant 5 secondes.
L'éclairage de l'écran
ACL a disparu
•
Le four passe en mode veille s'il n'est pas utilisé pendant 10 minutes.
Durant le mode veille, l'écran ACL cessera d'être illuminé, bien que toutes
les options de fonctions restent visibles.
•
Pour réactiver le four hors du mode veille, appuyez sur le bouton
MARCHE/ARRÊT ou tournez n'importe quel cadran. L'écran ACL
s'illuminera à nouveau.
La pizza ne cuit pas
uniformément
•
Certaines pizzas de grand format ne colorent pas uniformément dans
un four de comptoir. Ouvrez la porte du four à mi-temps de la cuisson et
retournez la pizza sur 180 degrés pour qu'elle colore plus également. Faites
l'essai de la fonction ROTATE REMIND (ROTATION).
La grille magnétique
auto-éjectable sort trop
loin quand j'ouvre la porte
•
Ouvrez toujours la porte lentement et avec précaution lorsque la grille
est insérée en position 3 ou 4, pour empêcher qu'elle ne s'éjecte trop
rapidement.
Je ne peux sélectionner
le bouton ALIMENTS
CONGELÉS
•
Le bouton pour ALIMENTS CONGELÉS ne peut être sélectionné que pour
les fonctions suivantes: GRILLER, BAGEL, PIZZA, FRIRE À AIR CHAUD,
RÉCHAUFFER et BISCUITS.
De la vapeur s'échappe
de la porte du four
•
Cela est normal. La porte est munie d'évents pour laisser échapper la
vapeur générée par certains aliments à forte teneur en humidité, comme le
pain congelé.
Les éléments chauffants
semblent clignoter
•
Element IQ
®
contrôle avec précision la chaleur à l'intérieur du four en
pulsant la puissance par courts jets et ajustant le niveau de puissance des
éléments chauffants pour fournir un contrôle précis de la température. Cela
est normal.
De l'eau coule sous
la porte coule et
sur le comptoir
•
Cela est normal. La condensation créée par la forte teneur en humidité
de certains aliments comme le pain congelé s'écoulera le long des parois
internes du four et pourrait dégoutter sur le comptoir.
BOV900_USC_IB_A16.indd 64 25/05/2016 11:48 am

65
PROBLÈME POSSIBLE SOLUTION FACILE
La température
apparaissant sur l'écran
ACL ne correspond pas à
la température mesurée
à l'intérieur du four
•
Pour s'assurer que les mesures sont standardisées, les températures du
four ont été calibrées à la position TOAST (au centre de la grille centrale et
sans plateau en place). Vérifiez à nouveau la température à cette position,
en vous assurant de ne pas ouvrir la porte du four durant 30 minutes, car
la chaleur s'échappera chaque fois que vous ouvrirez la porte. Notez que
le signal sonore de 'préchauffage' se fait entendre à 75% de la température
cible.
Le signal sonore de
'préchauffage' se
fait entendre à une
température plus basse
que celle affichée
sur l'écran ACL
•
Le signal sonore de 'préchauffage' se fait entendre à 75% de la température
cible. Cela assure un combinaison rapide de préchauffage et de temps de
cuisson.
•
Cela s'explique par le fait que, lorsque le signal de 'préchauffage' se fait
entendre pour signaler à l'utilisateur d'ouvrir la porte et insérer les aliments,
une perte dramatique de chaleur survient à l'intérieur du four. Si le signal
se faisait entendre à 100% de la température cible, le fait d'ouvrir la porte
signifierait que tout ce temps d'attente serait 'gaspillé'. Nous avons calculé
que, lorsque le signal se fait entendre à 75% de la température cible et
qu'on insère immédiatement les aliments dans le four en ouvrant la porte,
la température cible est atteinte jusqu'à 2 minutes plus rapidement. Cela
explique pourquoi la température sur l'écran ACL ne correspond pas à la
température cible lorsque l'alerte de 'préchauffage' se fait entendre. Selon
la température réglée, le four peut prendre environ 8-10 minutes à partir
du réglage initial, incluant l'ouverture de la porte lorsque le signal de
'préchauffage' se fait entendre, pour atteindre la température cible.
L'écran ACL affiche 'EO1'
•
L'écran ACL affiche 'EO1' si l'appareil ne peut être réinitialisé. Si cela se
produit, débranchez immédiatement le cordon d'alimentation de la prise
électrique et appelez le Soutien aux consommateurs de Breville.
L'écran ACL affiche 'EO2'
•
L'écran ACL affiche 'EO2' si l'appareil ne peut être réinitialisé. Si cela se
produit, débranchez immédiatement le cordon d'alimentation de la prise
électrique et appelez le Soutien aux consommateurs de Breville.
L'écran ACL affiche 'EO3'
•
L'écran ACL affiche 'EO3' si la température excède la limite maximale
réglée. Débranchez le cordon d'alimentation de la prise électrique, laissez le
four refroidir 15 minutes, puis rebranchez-le.
•
Appelez le Soutien aux consommateurs de Breville si le message 'EO3'
persiste.
L'écran ACL affiche 'EO6'
•
L'écran ACL affiche 'EO6' si l'appareil ne peut être réinitialisé. Si cela se
produit, débranchez immédiatement le cordon d'alimentation de la prise
électrique et appelez le Soutien aux consommateurs de Breville.
La température change
quand le bouton de
conversion est enfoncé
•
Cela est normal. La température est calibrée pour compenser pour la
vitesse de cuisson majorée par le ventilateur à convection.
Du bruit émane du
panneau de commande
•
Lorsque la température du four excède 302°F/150°C, le ventilateur de
refroidissement électronique s'active. Sous 302°F/150°C, le ventilateur
est éteint.
BOV900_USC_IB_A16.indd 65 25/05/2016 11:48 am

66
Notes
BOV900_USC_IB_A16.indd 66 25/05/2016 11:48 am

BOV900_USC_IB_A16.indd 67 25/05/2016 11:48 am

Web: www.breville.caWeb: www.brevilleusa.com
Breville is a registered trademark of Breville Pty. Ltd. A.B.N. 98 000 092 928.
Copyright Breville Pty. Ltd. 2016.
Due to continued product improvement, the products illustrated/photographed
in this booklet may vary slightly from the actual product.
BOV900 USC A16
USA
Mail: Breville USA
19400 S. Western Ave
Torrance CA
90501-1119
Phone: 1-866-273-8455
1-866-BREVILLE
Email:
Canada
Mail: Breville Canada
3595 boulevard Côte-Vertu,
Saint-Laurent, Québec
H4R 1R2
Phone:
1-855-683-3535
Email:
Breville Consumer Support
BOV900_USC_IB_A16.indd 68 25/05/2016 11:48 am