Loading ...
Loading ...
Loading ...
ENGLISH
11
• If the beer has too much foam, turn the Regulator Knob to the OFF position,
pull the Pressure Relief Valve on the 5L Growler Keg, then slowly turn the
Regulator Dial counterclockwise to increase the CO2 pressure within the keg.
• PRO TIP:
When the regulator is open, CO2 will continue owing into the keg. This may
result in a surplus of pressure owing into the keg, and may be a cause of foamy beer.
If you experience foamy beer, simply ll the keg with CO2, then turn the Regulator
Knob to the OFF position. As more beer is dispensed, add small amounts of CO2 into
the keg to displace the dispensed beer, then turn the Regulator Knob back to OFF.
5L PRESSURIZED KEGS (HEINEKEN™)
1. Chill the keg for 10-12 hours in the refrigerator, or for 4-6 hours in an ice bath.
2. Find a stable, waterproof surface near an electrical outlet to set the
unit. Make sure the cord is away from any water source.
3. Check that the Drain Tab is in the closed position (up position),
and there are no extra objects in the Cooling Cavity.
4. Add 3 cups (800 ml) of water into the Cooling Cavity. Be sure water levels do not exceed
the MAX line found inside the Cooling Cavity. The water helps to keep the keg cool.
5. Set the LED Temperature Display to your desired temperature by pressing the "-" and "+"
buttons.
NOTE: It may take several hours to reach your desired temperature.
This is why it is important to chill your keg beforehand.
6. Turn the Power Switch to ON (I).
7. Carefully place the Pressurized Keg into the Cooling Cavity.
NOTE: When moving the keg, take care not to shake or jostle the keg as it may cause your
beer to pour with too much foam.
NOTE: Make sure the Suction Cup is securely fashioned to the bottom of
the Cooling Cavity. The Suction Cup ensures the keg will not oat.
8. Use a at head screwdriver to remove the
plastic plug from the top of the keg.
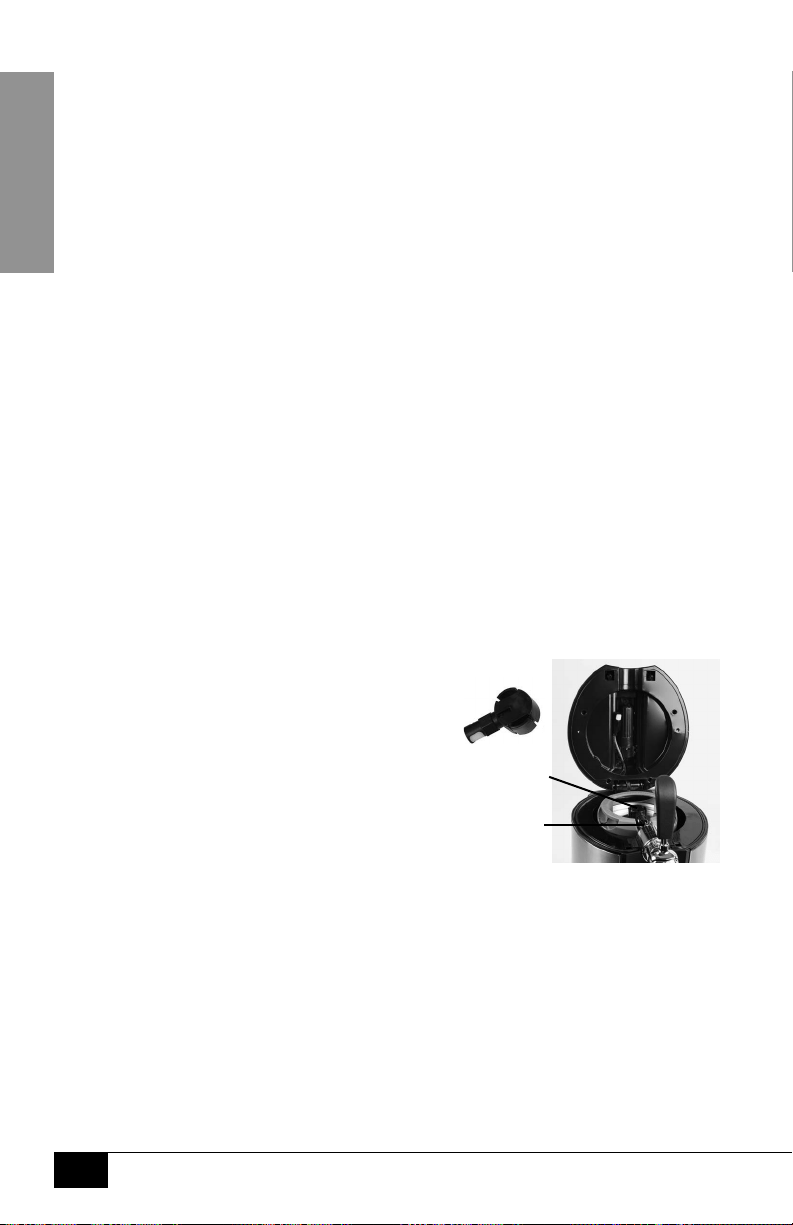
9. Connect the Pressurized Keg
Adapter to the Beer Line.
10. Insert the Pressurized Keg Adapter into
the top of the Pressurized Keg.
11. Pour yourself a beer!
NOTE: Pressurized kegs come pre-charged with
CO2. These kegs do not require the use of this unit's
external CO2 system, so there is no need to install
a CO2 cartridge. The Regulator Knob on the Top Cover does not work with these kegs.
12. When the keg is empty, remove the Pressurized Keg Adapter from
the keg by pressing inward on both sides of the adapter.
Beer Line
Pressurized
Keg Adapter
Loading ...
Loading ...
Loading ...