
SAVE THIS MANUAL FOR REFERENCE
You will need this manual for safety
instructions, operating procedures, and Warranty.
The original sales receipt is required for warranty service.
YF22ESSPV
GAS LAWN MOWER
OPERATOR’S MANUAL
Our Customer Service staff is ready to provide assistance.
In the case of a damaged or missing part, most replacement parts ship directly from
Merotec USA in Atlanta or from one of our service partners in the US.
For immediate help with assembly, or for additional product information, email support@
MerotecUSA.com or call 866-902-9690 M-F 8:30am – 5:00pm ET. More information can be
found on www.YardForceUSA.com.


2
Original Instructions
TABLE OF CONTENTS
CONGRATULATIONS
.............................................................................................................................. 3
Symbols
........................................................................................................................................................4
Safety
.............................................................................................................................................................6
Setup
.............................................................................................................................................................10
Technical Data
.........................................................................................................................................15
Know Your Lawn Mower
......................................................................................................................16
Operation
....................................................................................................................................................18
Operating Tips
..........................................................................................................................................23
Maintenance
............................................................................................................................................. 24
Warranty
.....................................................................................................................................................29

3
CONGRATULATIONS
Congratulations on your purchase of a new lawn mower. It has been designed, engineered and
manufactured to give you the best possible dependability and performance.
Should you experience any problem you cannot easily resolve, please contact your nearest authorized
service center or email [email protected] or call 866-902-9690 M-F 8:30am – 5:00pm ET.
PLEASE READ AND RETAIN THIS INSTRUCTION MANUAL. These instructions will enable you to assemble
and maintain your lawn mower properly. ALWAYS observe the “SAFETY RULES”.
The instruction manual was designed to conveniently help you get your purchase ready to use so there’s
less risk of damaging it and to provide you with enough information
for you to get familiar with your product’s controls and features to operate it safely. This manual however,
is NOT a replacement for you reading your complete owner’s manual and all the details it covers, such as
mower maintenance, adjustments and storage.
THE OPERATOR’S MANUAL FOR YOUR PARTICULAR PRODUCT IS AVAILABLE BY CALLING 1-(866)
902-9690.
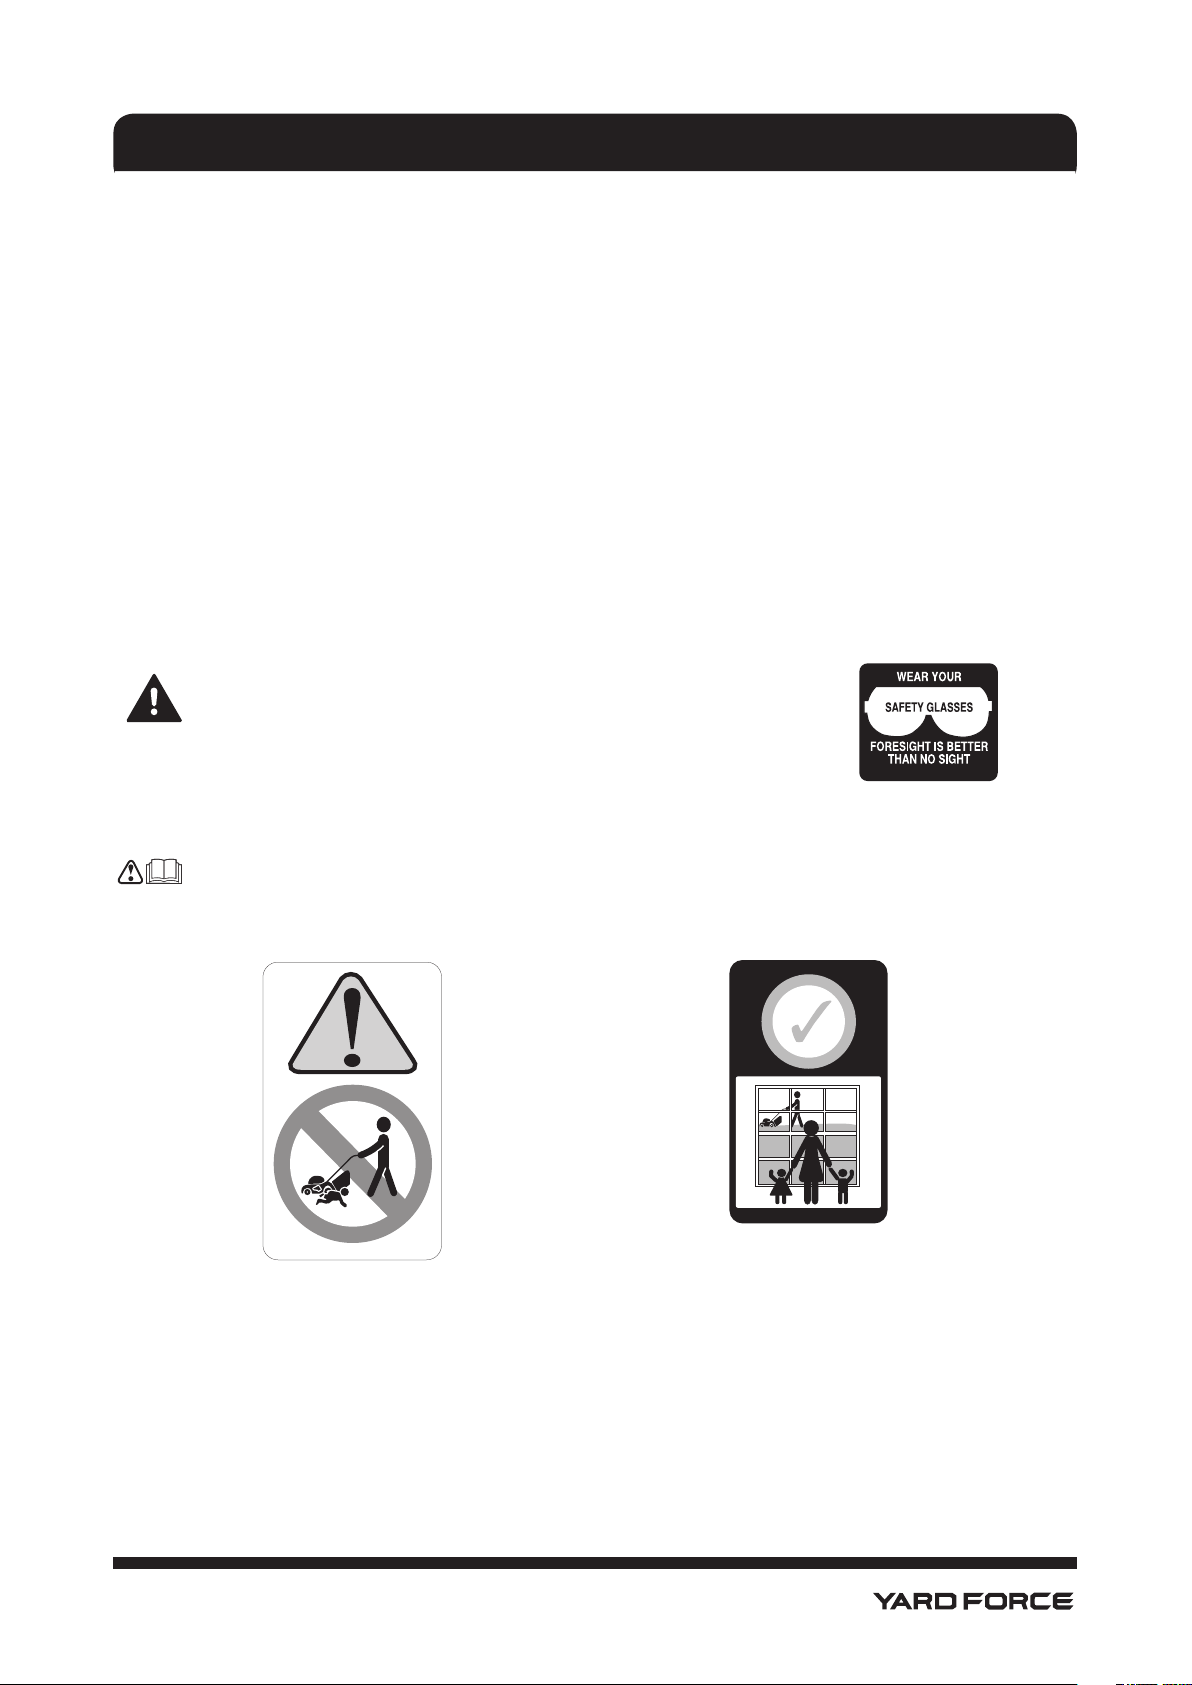
CAUTION: The operation of any lawn mower can result in
foreign objects thrown into the eyes, which can result in
severe eye damage. ALWAYS wear safety glasses or eye
shields while operating your lawn mower or performing any
adjustments or repairs. We recommend standard safety
glasses or a wide vision safety mask worn over spectacles.
Please read this manual carefully and make sure you understand the instructions before using the
machine.
KIDS AND MOWERS DON’T MIX!
Tragic accidents can happen. You can
SEVERELY INJURE or KILL a child with a
lawn mower.
Please leave children indoors and
supervised!

4
Oil
Fuel
Choke
Slow
Engine Off
Engine On
Fast
SYMBOLS

5
SYMBOLS
SAFETY
DANGER: KEEP HANDS AND FEET AWAY (See SAFETY section, page 5)
*These symbols may appear on your lawn mower or in the literature supplied with the
product. Learn and understand their meaning.
HAZARD ALERT
The hazard alert symbol informs the user of potential hazards.
READ THE OPERATOR’S MANUAL(S)
Read, understand, and follow all instructions in the manual(s) before attempting to assemble
and operate.
Wear hearing protection.
Wear eye protection.
DANGER — ROTATING BLADES
To reduce the risk of injury, keep hands and feet away. Do not operate unless discharge
cover or grass catcher is in its proper place. If damaged, replace immediately.
DANGER — BYSTANDERS
Do not mow when children or others are around.
Look down and behind before and while backing.
DANGER — ROTATING BLADES
Never operate the machine without proper guards, plates, or other safety protective devices
in place.
DANGER — HAND/ FOOT CUT
Keep hands and feet away from rotating parts.
DANGER — THROWN DEBRIS
Remove objects that can be thrown by the blade in any direction. Wear safety glasses.
DANGER — SLOPES
Use extra caution on slopes. Do not mow slopes greater than 15°.
WARNING—GASOLINE IS FLAMMABLE
Allow the engine to cool at least two minutes before refueling.
WARNING— CARBON MONOXIDE
Never run an engine indoors or in a poorly ventilated area. Engine exhaust contains carbon
monoxide, an odourless and deadly gas.

6
SYMBOLS
WARNING— HOT SURFACE
Engine parts, especially the mufer, become extremely hot during operation. Allow engine
and mufer to cool before touching.
GLOSSARY OF SAFETY SYMBOLS
Failure to follow instructions could result in serious injury or death. The safety alert symbol is used to identify
safety information about hazards which can result in death, serious injury and/or property damage.
DANGER indicates a hazard which, if not avoided, WILL result in death or serious injury.
WARNING indicates a hazard which, if not avoided, COULD result in death or serious injury.
CAUTION indicates a hazard which, if not avoided, COULD result in minor or moderate
injury.
CAUTION when used without the alert symbol, indicates a situation that could result in
damage to the lawn mower and/or engine.
HOT SURFACES indicates a hazard which, if not avoided, could result in death, serious
injury and/or property damage.
FIRE indicates a hazard which, if not avoided, could result in death, serious injury and/or
property damage.
SAFE OPERATION PRACTICES FOR PEDESTRIAN CONTROLLED LAWN MOWERS
DANGER: THIS CUTTING MACHINE IS CAPABLE OF AMPUTATING HANDS AND FEET AND
THROWING OBJECTS. FAILURE TO OBSERVE THE FOLLOWING SAFETY INSTRUCTIONS
COULD RESULT IN SERIOUS INJURY OR DEATH.
WARNING: This mower is equipped with an internal combustion engine and should NOT be used
on or near any unimproved forest-covered, brush-covered, or grass- covered land unless the
engine’s exhaust system is equipped with a spark arrester meeting applicable local or provincial
laws (if any). If a spark arrester is used, it should be maintained in effective working order by the
operator. A spark arrester for the mufer is available through your nearest authorized service
centre/department.
SAFETY

7
SAFETY
CAUTION: Mufer and other engine parts become extremely hot during operation and remain hot
after engine has stopped. To avoid severe burns on contact, stay away from these areas.
WARNING:
a) Do not operate machine under any condition where traction, steering, or stability is in question.
Tires could slide even if the wheels are stopped.
b) Always keep the machine in gear when going down slopes. Do not coast downhill.c)Avoid
starting and stopping on slopes. Avoid making sudden changes in speed or direction. Make turns
slowly and gradually.
I. CHILDREN
WARNING: CHILDREN CAN BE SERIOUSLY INJURED OR KILLED BY THIS EQUIPMENT.
Carefully read and follow all of the safety instructions below.
Tragic accidents can occur if the operator is not alert to the presence of children. Children are often
attracted to the machine and the mowing activity. NEVER assume that children will remain where you last
saw them.
• Keep children out of the mowing area and in the watchful care of a responsible adult other than the
operator.
• Be alert and turn machine off if a child enters the area.
• Before and while backing, look behind and down for small children.
• Children should be a minimum of 12 years of age before operating a pedestrian-controlled lawn mower
and a minimum of 16 years of age before operating a riding lawn mower.
• Use extra care when approaching blind corners, shrubs, trees or other objects that may block your view
of a child.
• NEVER OPERATE THE MOWER WHEN CHILDREN ARE PRESENT.
II. SLOPE OPERATION
Slopes are a major factor related to slip and fall accidents which can result in severe injury. All slopes require
extra caution. If you feel uneasy on a slope, do not mow it.
• Mow across the face of slopes: NEVER up and down. Exercise extreme caution when changing direction
on slopes.
• Watch for holes, ruts, bumps, rocks or other hidden objects. Uneven terrain could cause a slip and fall
accident. Tall grass can hide obstacles.
• DO NOT mow near drop-offs, ditches, or embankments. You could lose footing or balance.
• DO NOT mow on wet grass or excessively steep slopes. Poor footing could cause a slip and fall
accident.
III. GENERAL OPERATION
• Read, understand, and follow all instructions on the machine and in the instruction manual before
starting.
• DO NOT put hands or feet near rotating parts or under the machine. Keep clear of the discharge opening
at all times.
• Allow only responsible adults familiar with the instructions to operate the machine.
• Clear the area of objects such as rocks, toys, wire, etc., which could be picked up and thrown by the
blades. Stay behind the handles while the engine is running.
• Be sure the area is clear of bystanders before operating. Stop machine if anyone enters the area.

8
SAFETY
• DO NOT operate the mower when barefoot or while wearing sandals. ALWAYS wear substantial footwear.
• DO NOT pull mower backwards unless absolutely necessary. ALWAYS look down and behind before and
while moving backwards.
• NEVER direct discharged material toward anyone.
Avoid discharging material against a wall or obstruction. Material may ricochet back toward the operator.
Stop the blades when crossing gravel surfaces.
• DO NOT operate machine without the entire grass catcher, discharge chute or other safety devices in
place and working.
• See manufacturer’s instructions for proper operation and installation of accessories. Only use
accessories approved by the manufacturer.
• NEVER leave a running machine unattended.
• Stop the engine (motor) and wait until the blade comes to a complete stop before cleaning the mower,
removing the grass catcher, or unclogging the discharge guard.
• Operate machine only in daylight or good articial light.
• DO NOT operate the machine while under the inuence of alcohol or drugs.
• NEVER operate machine in wet grass. ALWAYS be sure of your footing; keep a rm hold on the handle
and walk; NEVER run.
• Disengage the drive system on mowers so equipped before starting the engine (motor).
• If the equipment should start to vibrate abnormally, stop the engine (motor) and check for the cause
immediately. Vibration is generally a warning of trouble.
• ALWAYS wear eye protection when operating machine.
IV. SERVICE
SAFE HANDLING OF GASOLINE
• To avoid personal injury or property damage, use extreme care in handling gasoline. Gasoline is
extremely ammable and the vapours are explosive.
• Extinguish all cigarettes, cigars, pipes and other sources of ignition.
• Use only an approved gasoline container.
• NEVER remove gas cap or add fuel with the engine running. Allow engine to cool before refueling.
• NEVER fuel the machine indoors.
• NEVER store the machine or fuel container where there is an open ame, spark or pilot light such as on
a water heater or other appliances.
• NEVER ll containers inside a vehicle or on a truck or trailer bed with plastic liner. ALWAYS place
containers on the ground away from your vehicle when lling.
• Remove gas-powered equipment from the truck or trailer and refuel it on the ground. If this is not
possible, then refuel such equipment with a portable container, rather than from a gasoline dispenser
nozzle.
• Keep the nozzle in contact with the rim of the fuel tank or container opening at all times until fueling is
complete.
DO NOT use a nozzle lock-open device.
• If fuel is spilled on clothing, change clothing immediately.
• NEVER overll fuel tank. Replace gas cap and tighten securely.
GENERAL SERVICE
• NEVER operate machine in a closed area.
• Keep all nuts and bolts tight to ensure the equipment is in safe working condition.
• NEVER remove or tamper with any safety devices. Check their proper operation regularly. NEVER do
anything to interfere with the function of a safety device or to reduce the protection offered by the safety
device.
• Keep machine free of grass, leaves, or other debris buildup. Clean oil or fuel spillage and remove any
fuel- soaked debris. Allow machine to cool before storing.
• If you strike a foreign object, stop and inspect the machine. Repair, if necessary, before restarting.

9
SAFETY
PREPARING THE ENGINE
• IMPORTANT: This lawn mower is shipped WITHOUT OIL OR GASOLINE in the engine.
• NOTE: Gasoline containing up to 10% ethanol (E10) is acceptable for use in this machine. The use of any
gasoline exceeding 10% ethanol (E10) will void the product warranty.
V. CUSTOMER RESPONSIBILITIES
• Read and observe the safety rules.
• Follow a regular schedule in maintaining, caring for and using your lawn mower.
• Wear proper personal protective equipment (PPE) while operating this machine, including (at a minimum)
sturdy footwear, eye protection and hearing protection. DO NOT mow in shorts and/or open-toed
footwear.
• NEVER attempt to make any adjustments or repairs while the engine (motor) is running. Disconnect the
spark plug wire and ground against the engine to prevent unintended starting.
• Check grass catcher components and the discharge chute frequently, and replace with manufacturer’s
recommended parts when necessary.
• Mower blade is sharp. Wrap the blade or wear gloves and use extra caution when servicing it.
• DO NOT change the engine governor setting or over speed the engine.
• Maintain or replace safety and instruction labels as necessary.
• ALWAYS let someone know you are outside mowing.
• NEVER allow children in the vicinity of any operating mower, even if the blades are off. Children should
be under the supervision of a responsible adult other than the operator for the duration of the mowing
operation.
• Follow the instructions under “Maintenance” section of the operator’s manual.
CAUTION: An Operator Presence Control is installed on this lawn mower in order to minimize
the risk of blade contact injury.
DO NOT under any circumstances attempt to defeat the function of the operator control. The
blade turns when the engine is running.
10
ASSEMBLY/ PRE-OPERATION
CAUTION: Read complete INSTRUCTION MANUAL before operating this machine.
IMPORTANT: THIS LAWN MOWER IS SHIPPED WITHOUT OIL OR GASOLINE IN THE ENGINE.
Your new lawn mower has been assembled at the factory with the exception of those parts left
disassembled for shipping purposes. All parts such as nuts, washers, bolts, etc., necessary to complete the
assembly have been placed in the parts bag. To ensure safe and proper operation of your lawn mower, all
parts and hardware you assemble must be tightened securely. Use the correct tools as necessary to ensure
proper tightness.
SETUP
TO REMOVE LAWN MOWER FROM CARTON
1. Remove loose parts included with mower.
2. Cut down two end corners of carton and lay end panel down at.
3. Remove all packing materials except padding between upper and lower handle and padding holding
operator presence control bar to upper handle.
4. Roll lawn mower out of carton and check carton thoroughly for additional loose parts.
HOW TO SET UP YOUR LAWN MOWER
IMPORTANT: Get out the handle carefully to avoid pinching or damaging the control cables.
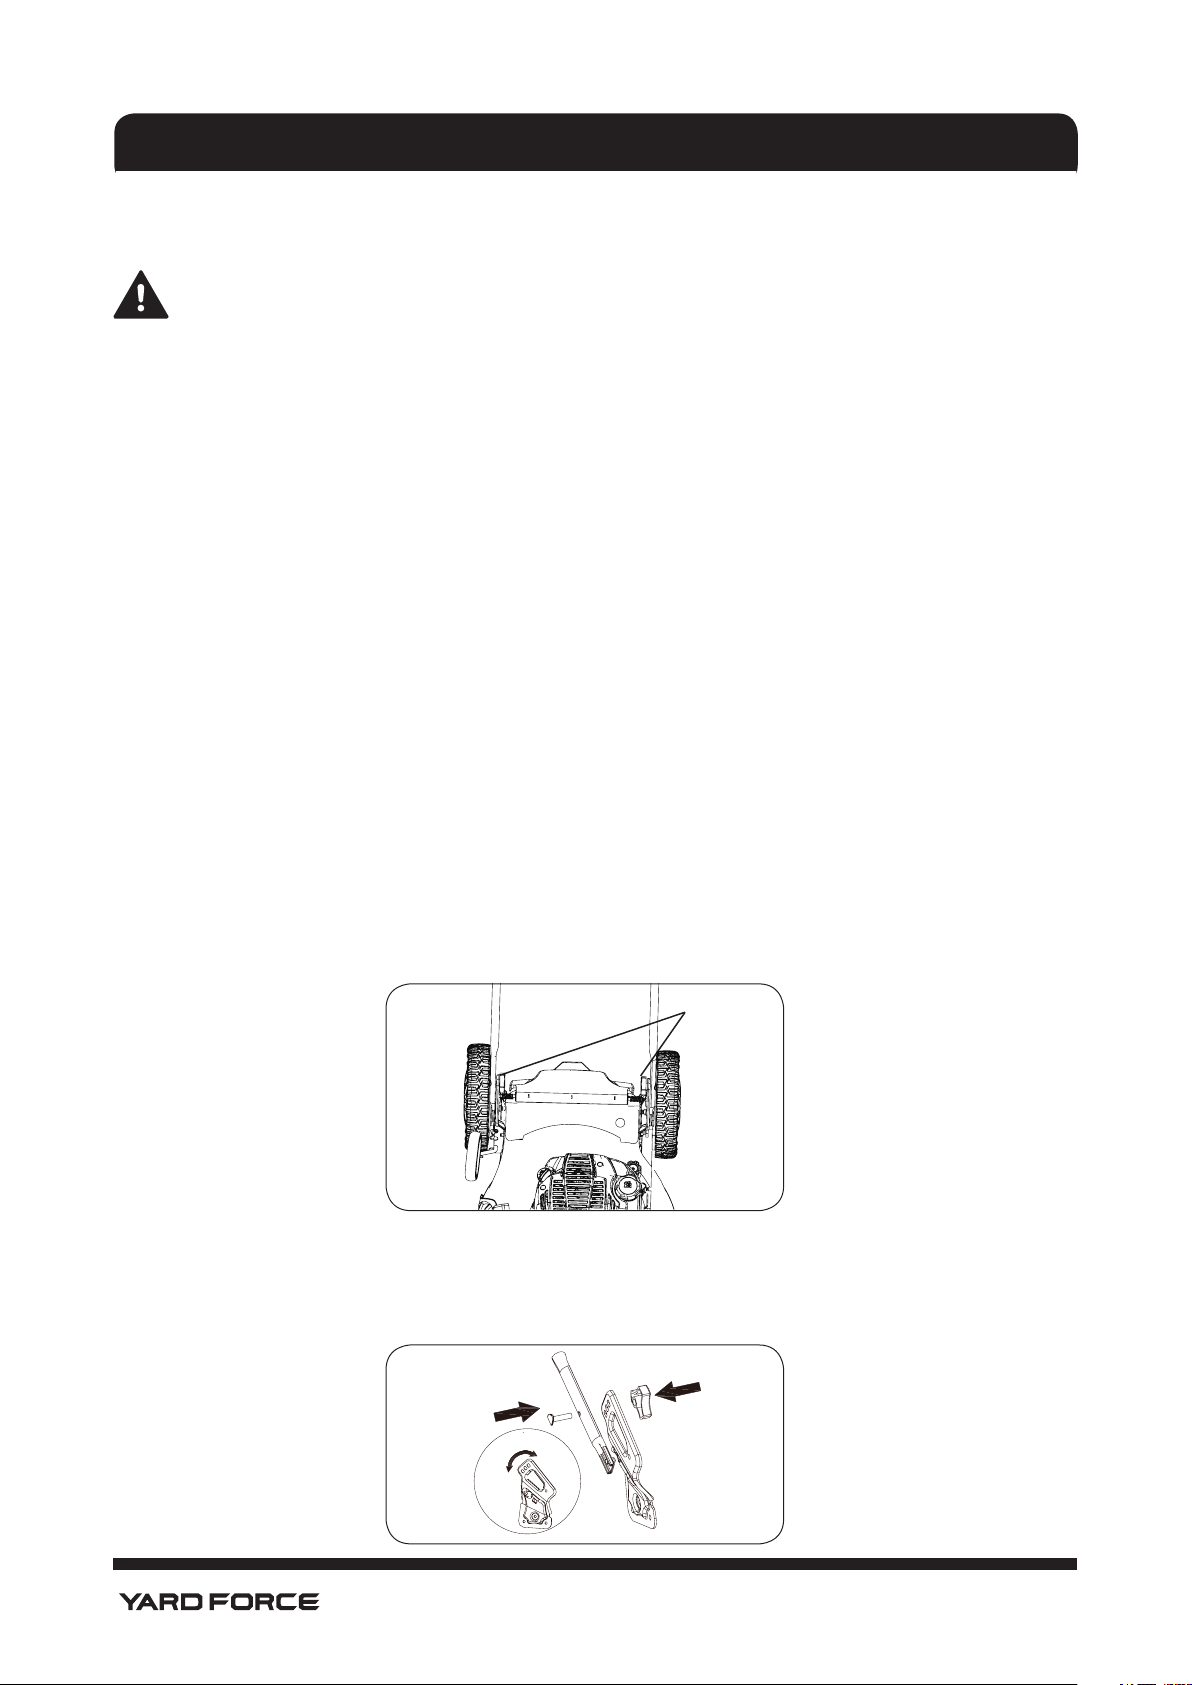
1. Insert the lower handle to the two side brackets on the mower deck. Use corresponding holes on the
brackets when attaching lower handle pin for a suitable handle height desired. Fasten the lower handle
to the lawn mower by using handle bolts, install and tighten knobs to secure the handle. (Fig. 1 & 2)
NOTE: The washer should be pressed against the inner face of the bracket.
2. Attach the upper handle into place and attach it to lower handle by using handle bolts.
SETUP
fixing knob
Fig. 1
Fig. 2
raise
lower
11
SETUP
3. Install and tighten knobs to secure the handle. (Fig.3)
NOTE: Your lawn mower handle can be adjusted for your mowing comfort. Refer to the “TO ADJUST
HANDLE” section of the operator’s manual.
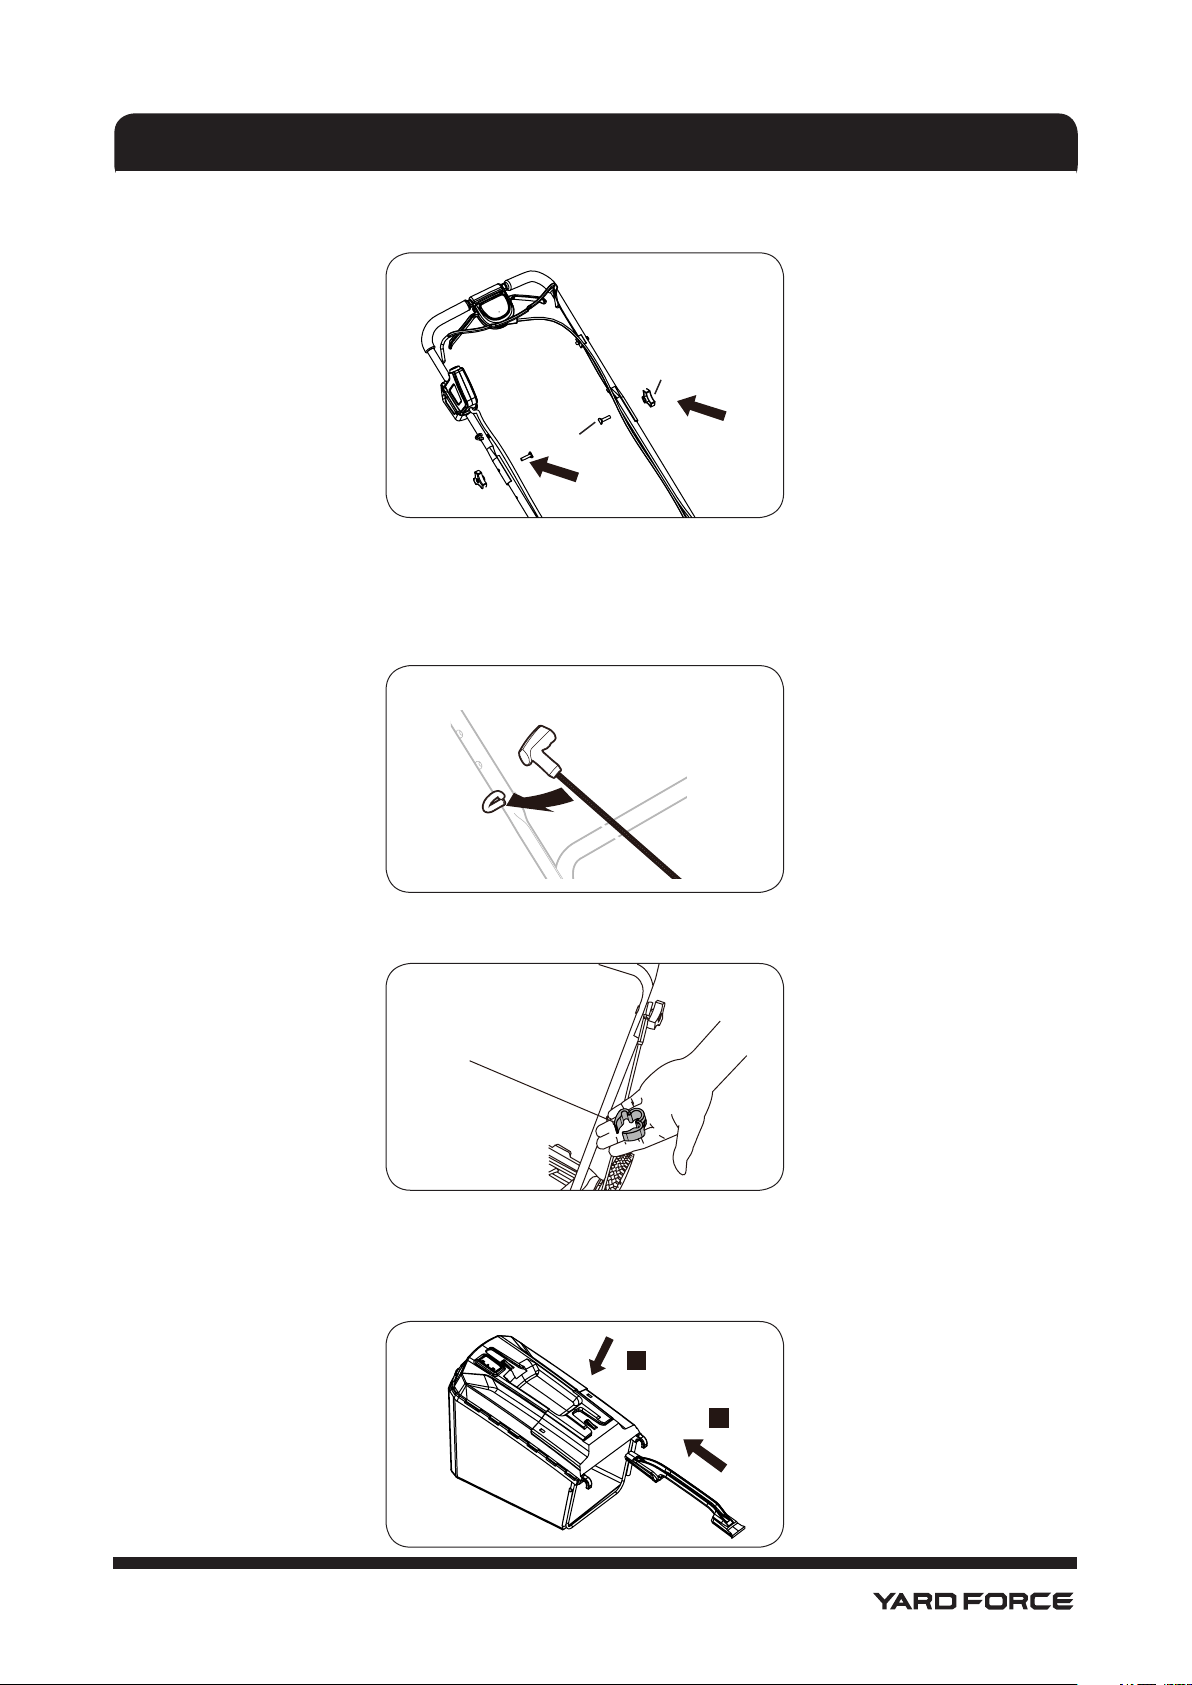
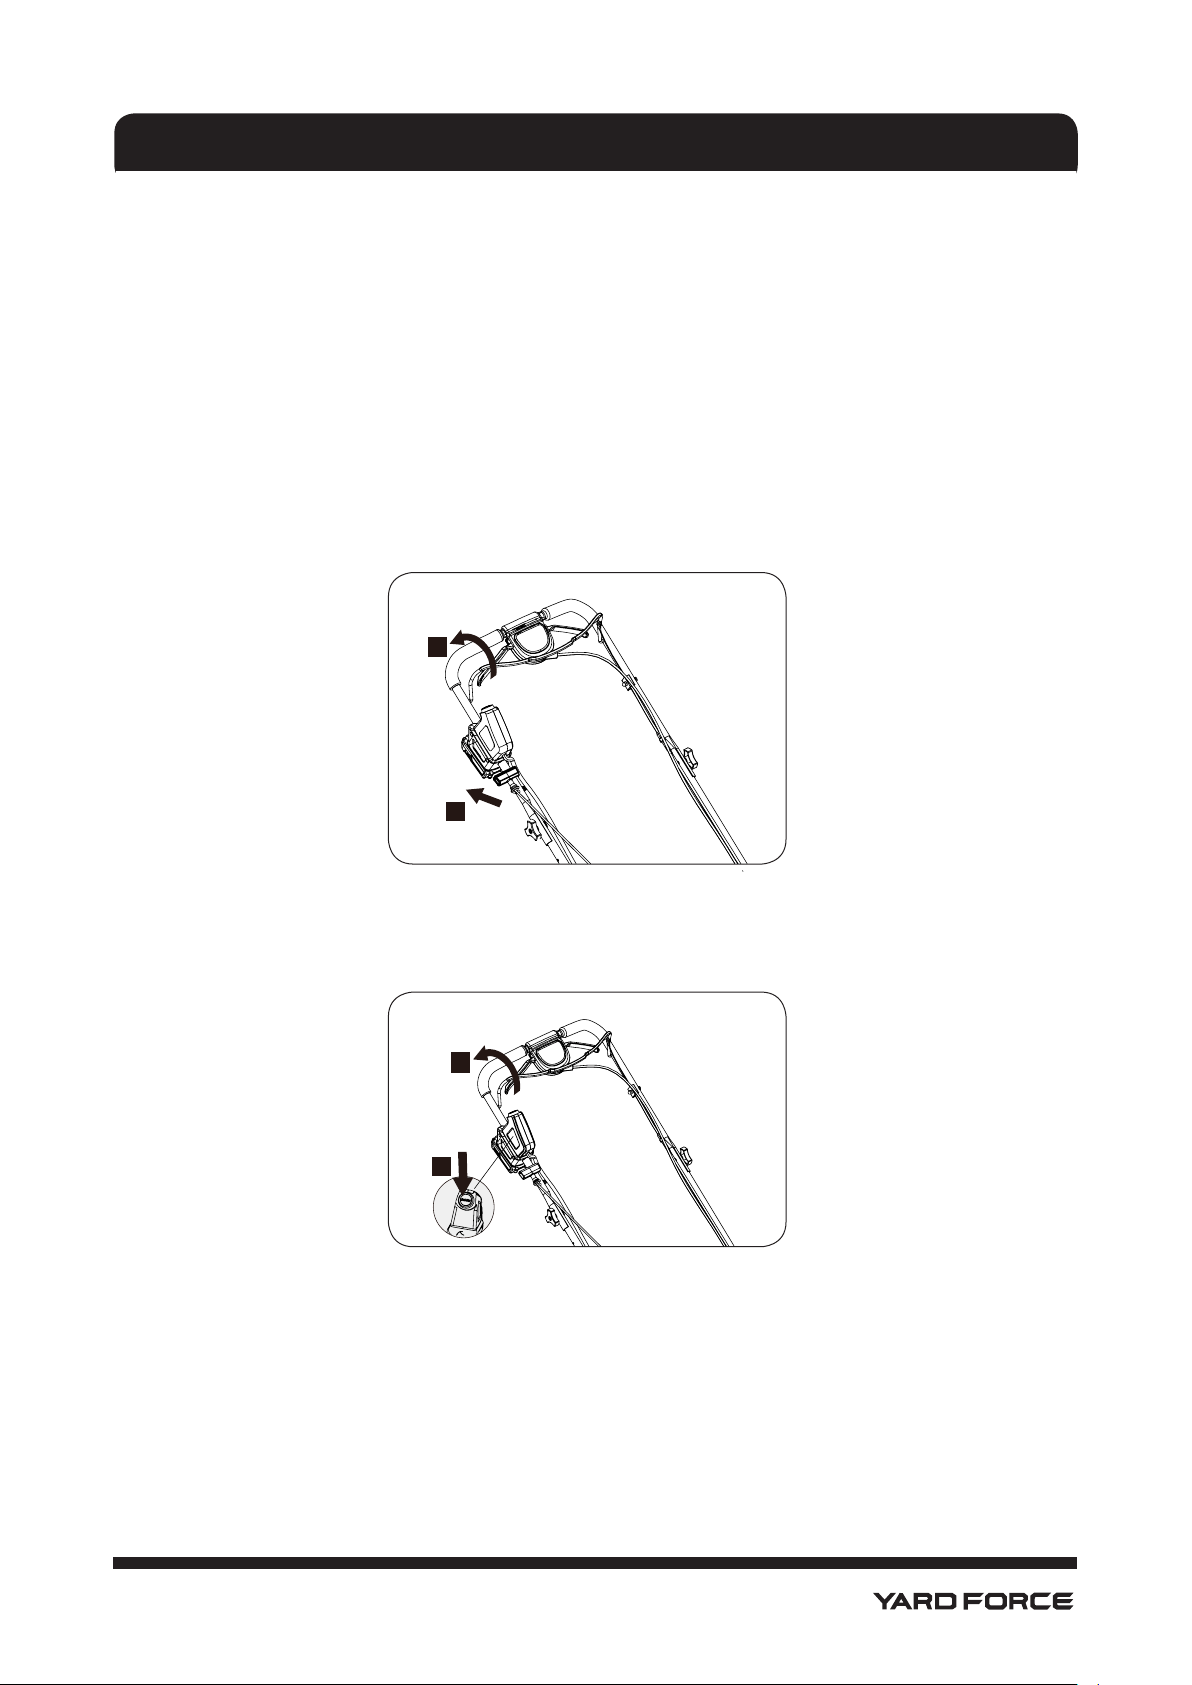
5. Slip starter rope into loop on upper handle. (Fig.4)
6. Attach the bowden cable and electric start cable to the handle with the cord clip (supplied). (Fig. 5)
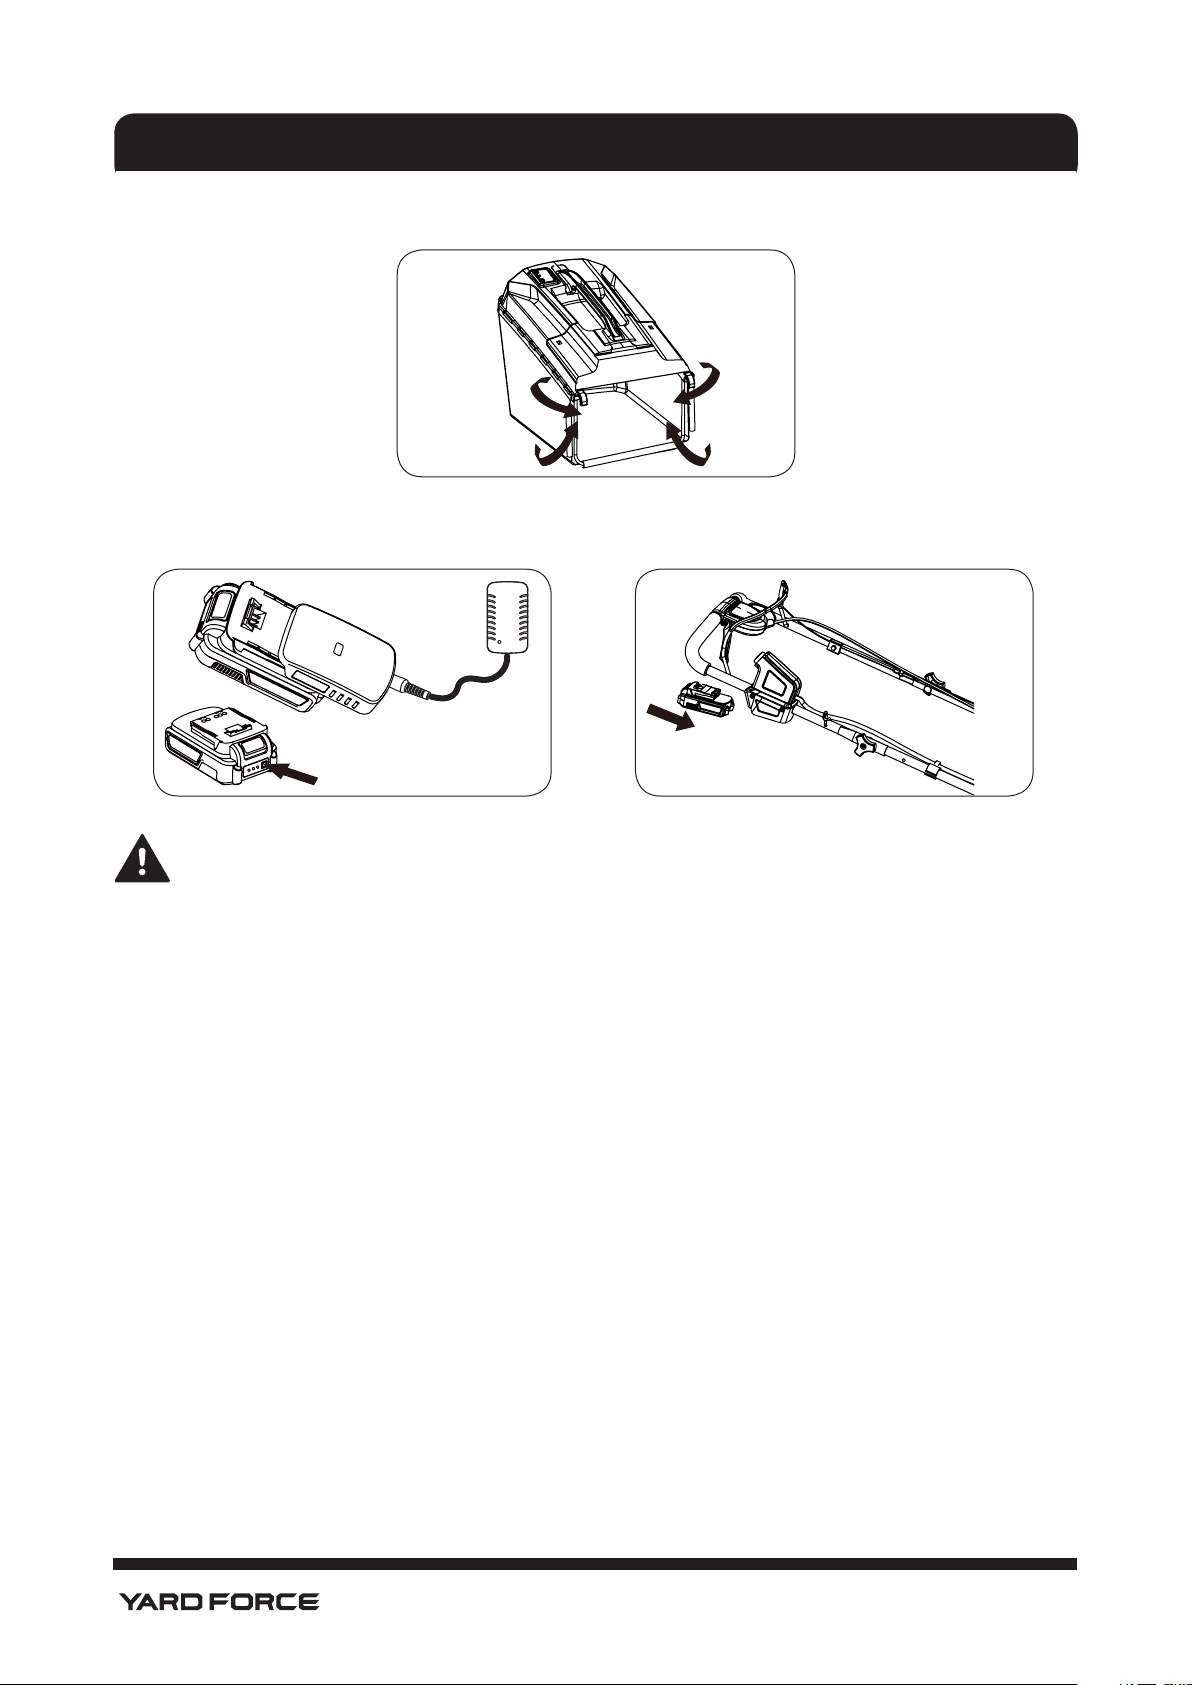
TO ASSEMBLE THE GRASS CATCHER
1. Attach the lift handle to the plastic top cover of the grass catcher , insert two ends in to the groove on
the top cover, push the handle until it lockes with an audible "click", verify it is securely attached.(Fig.6)
Fig. 3
bolt
fixing knob
Fig. 4
Fig. 5
Fig. 6
1
2
Clip
12
SETUP
2. Slip the vinyl clip bindings over the frame. (Fig. 7)
TO PREPARE BATTERY.
CAUTION: 1. Improper use of battery pack and charger can result in electric shock and re.
2. Keep battery charger and pack dry. Avoid exposing battery pack and charger to rain or wet
conditions.
3. To reduce the risk of electric shock, do not allow water to ow into AC plug.
4. Do not short circuit. Never place any object into the battery pack terminals.
NOTE:Your battery must be charged before you can start your lawn mower using the electric start.
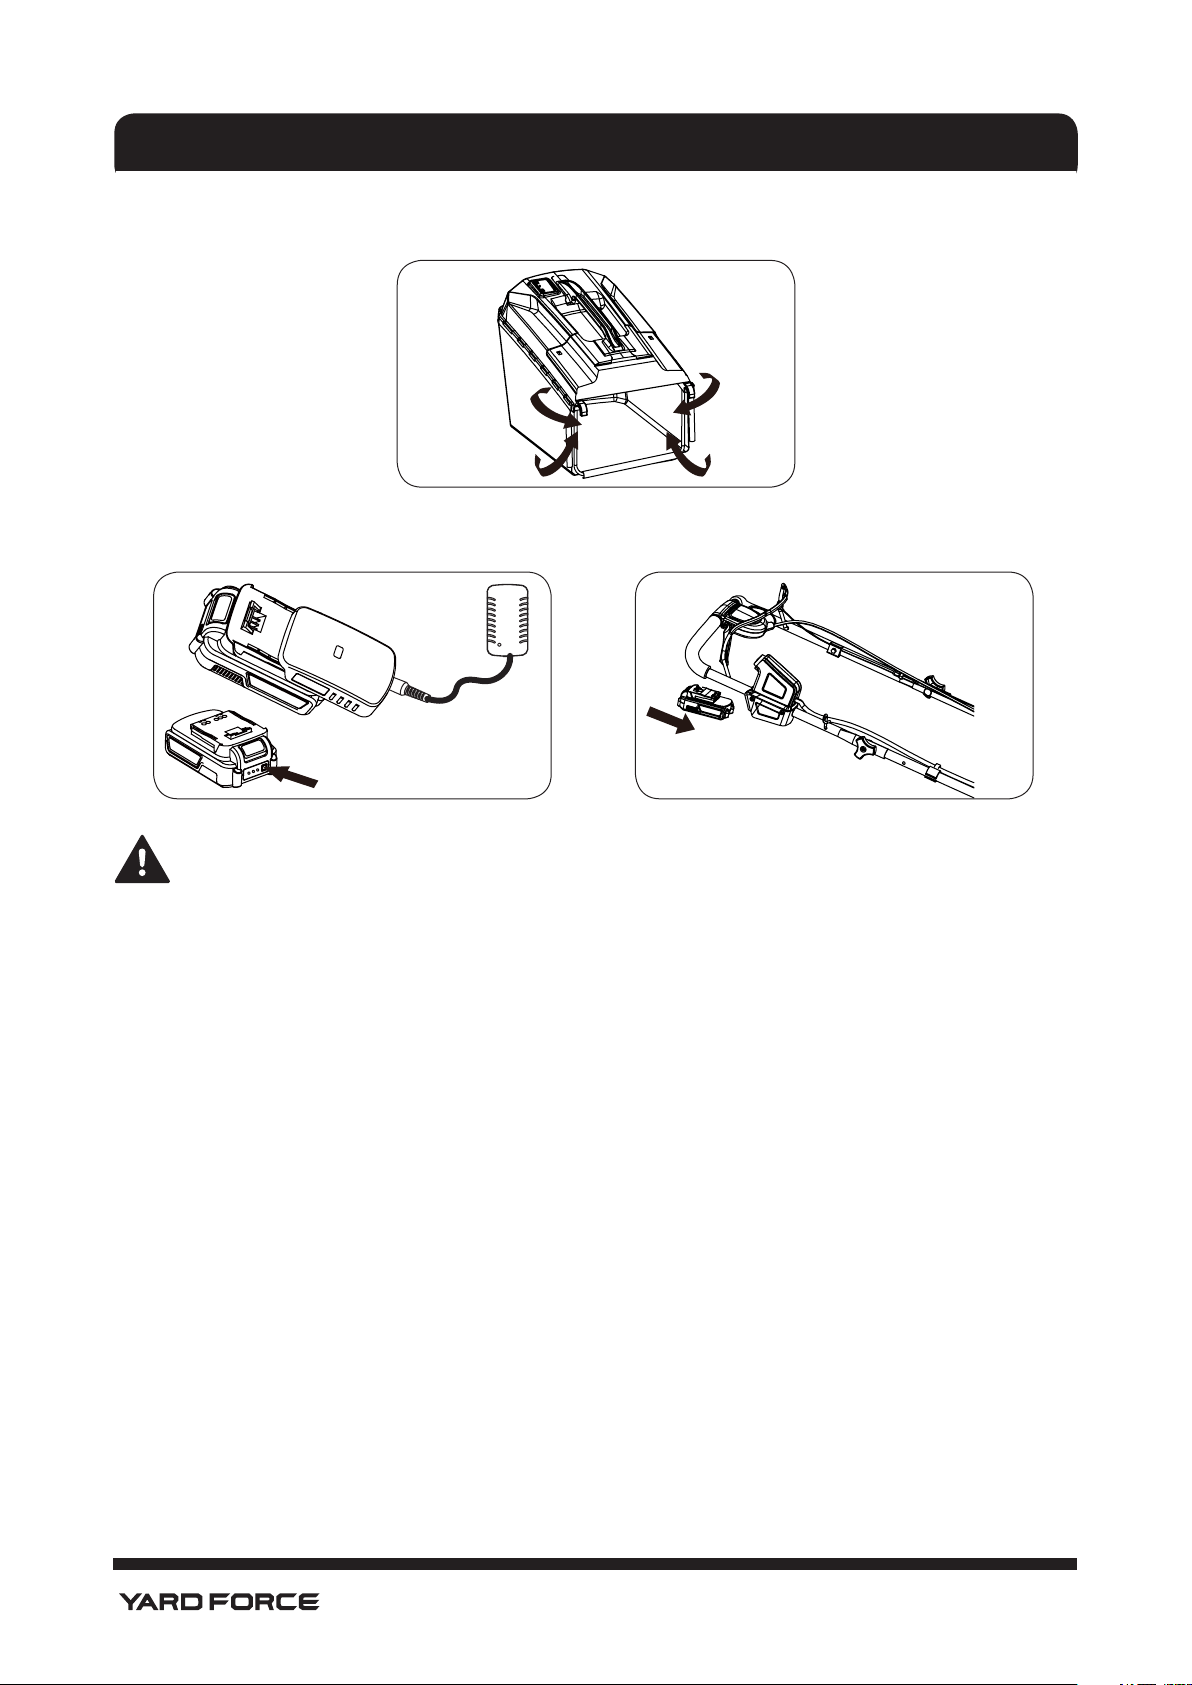
CHARGING BATTERY PACK(Fig. 8)
NOTICE:
- The battery pack is supplied partially charged. To ensure the best performance, charge the battery
completely before rst use.
- Make sure the main voltage is the same as rating label which is located on the charger.
- Remove the battery pack from the charger after it has been fully charged.
1. Connect the charger to a power supply. The red LED light on the charger will illuminate.
2. To insert the battery pack into the charger, align the grooves on the battery pack with the raised ribs in
the opening of the charger.
3. Once the battery pack is correctly located in the charger, the green LED light of the charger will ash
continuously during normal charging.
4. When charging is complete, the green LED lights of the charger will illuminate.
This 20V Li-Ion battery pack is equipped with a power indicator which is used to show the battery pack’s
remaining charge. Press the power indicator button to check battery charge as shown above.
Fig. 8 Fig. 9
Fig. 7
13
SETUP
INSTALL BATTERY PACK(Fig. 9)
1. Make sure the operator presence control bar is released.
2. The battery bay is located on the top handle of the lawn mower. Slide in the battery pack until it locks
with an audible "click". Verify it is securely installed.
3. To check the battery charge level, rst remove it from the battery bay by pressing the release button.
When pressing the indicate button, the display will show the current charge level. Three lights, battery
power above 78 %, up to 150 start cycles; one light, power above 10%, up to 5 start cycles. If the light
is ashing, power lower than 10%, possibly insufcient for a single start cycle.
IMPORTANT: THE ENGINE WILL NOT RECHARGE YOUR BATTERY. The battery will need to be recharged
periodically.
CAUTION: ALWAYS disconnect the battery pack to prevent accidental starting when transporting
or storing your lawn mower after the season.
At the end of the mowing season, the battery should be charged fully to protect the battery during winter
storage.
ADD OIL(Fig. 10)
IMPORTANT: Check oil level before each use. Add oil if needed. Fill to “Full” line on dipstick.
1. Be sure lawnmower is level.
2. Remove oil dipstick from oil ll spout.
3. Use the recommended engine oil.
4. Pour oil slowly. DO NOT overll. Wait one minute to allow oil to settle. Insert and tighten dipstick, then
remove it to check oil level.
5. Before using for the rst time, add maximum 15.9 Ounces of oil (SAE 30).
ADD GASOLINE
Fill fuel tank to bottom of tank ller neck. DO NOT overll. Use fresh, clean, regular unleaded gasoline with
a minimum of 87 octane.
DO NOT mix oil with gasoline. Purchase fuel in quantities that can be used within 30 days to assure fuel
freshness.
CAUTION: Wipe off any spilled oil or fuel. DO NOT store, spill or use gasoline near an open ame.
Alcohol-blended fuels (called gasohol or using ethanol or methanol) can attract moisture which leads to
separation and formation of acids during storage. Acidic gas can damage the fuel system of an engine while
in storage.
To avoid engine problems, the fuel system should be emptied before storage of 30 days or longer. Empty
the gas tank, start the engine and let it run until the fuel lines and carburetor are empty. Use fresh fuel next
season. NEVER use engine or carburetor cleaner products or permanent damage may occur.
Fig. 10

14
SETUP
ENGINE KEY SPECIFICATIONS
Gasoline Type: Unleaded Regular (Maximum 10% ethanol)
Oil Type (API: SG-SL) SAE 30 or SAE 10W30
Oil Capacity Max. 15.9 o.z.
Spark Plug See engine manual.
IMPORTANT NOTE: Gasoline containing up to 10% ethanol (E10) is acceptable for use in this machine.
The use of ANY gasoline exceeding 10% ethanol (E10) violates federal law and will void the product
warranty.
START-UP CHECKLIST
Before you start up your new mower, we wish to ensure that you receive the best performance and
satisfaction from this quality product.
PLEASE REVIEW THE FOLLOWING CHECKLIST:
• All assembly instructions have been completed.
• No remaining loose parts in the carton.
• The battery is properly prepared and charged.
• Before starting to mow, make sure the area is clear of debris or objects that may be thrown by the
blades.
• Check the engine oil level before starting the machine.
• Ensure a responsible adult, other than the operator, is supervising children in a safe location AWAY
FROM THE MOWING AREA before starting the mower.
• Be sure the Operator Presence Control (OPC) is working properly. See Page 16.

15
TECHNICAL DATA
Model number YF22ESSPV
Engine
Briggs & Stratton 675Exi
Engine Displacement 163 cc
Start Type Recoil & Electric Start
Cutting Width 21 inch
Cutting Height 1.25 -3.75 inch
Battery Pack (B0P-SP07-20-G)
20 V d.c., 1.5 Ah, Lithium-ion
Charger (HY1302100500UL) Output 21 V d.c., 0.5 A
Wheel Size 8”/ 12”
Variable Speed Up to 2.5 MPH
Grass Catcher Capacitity 2 Bushel
16
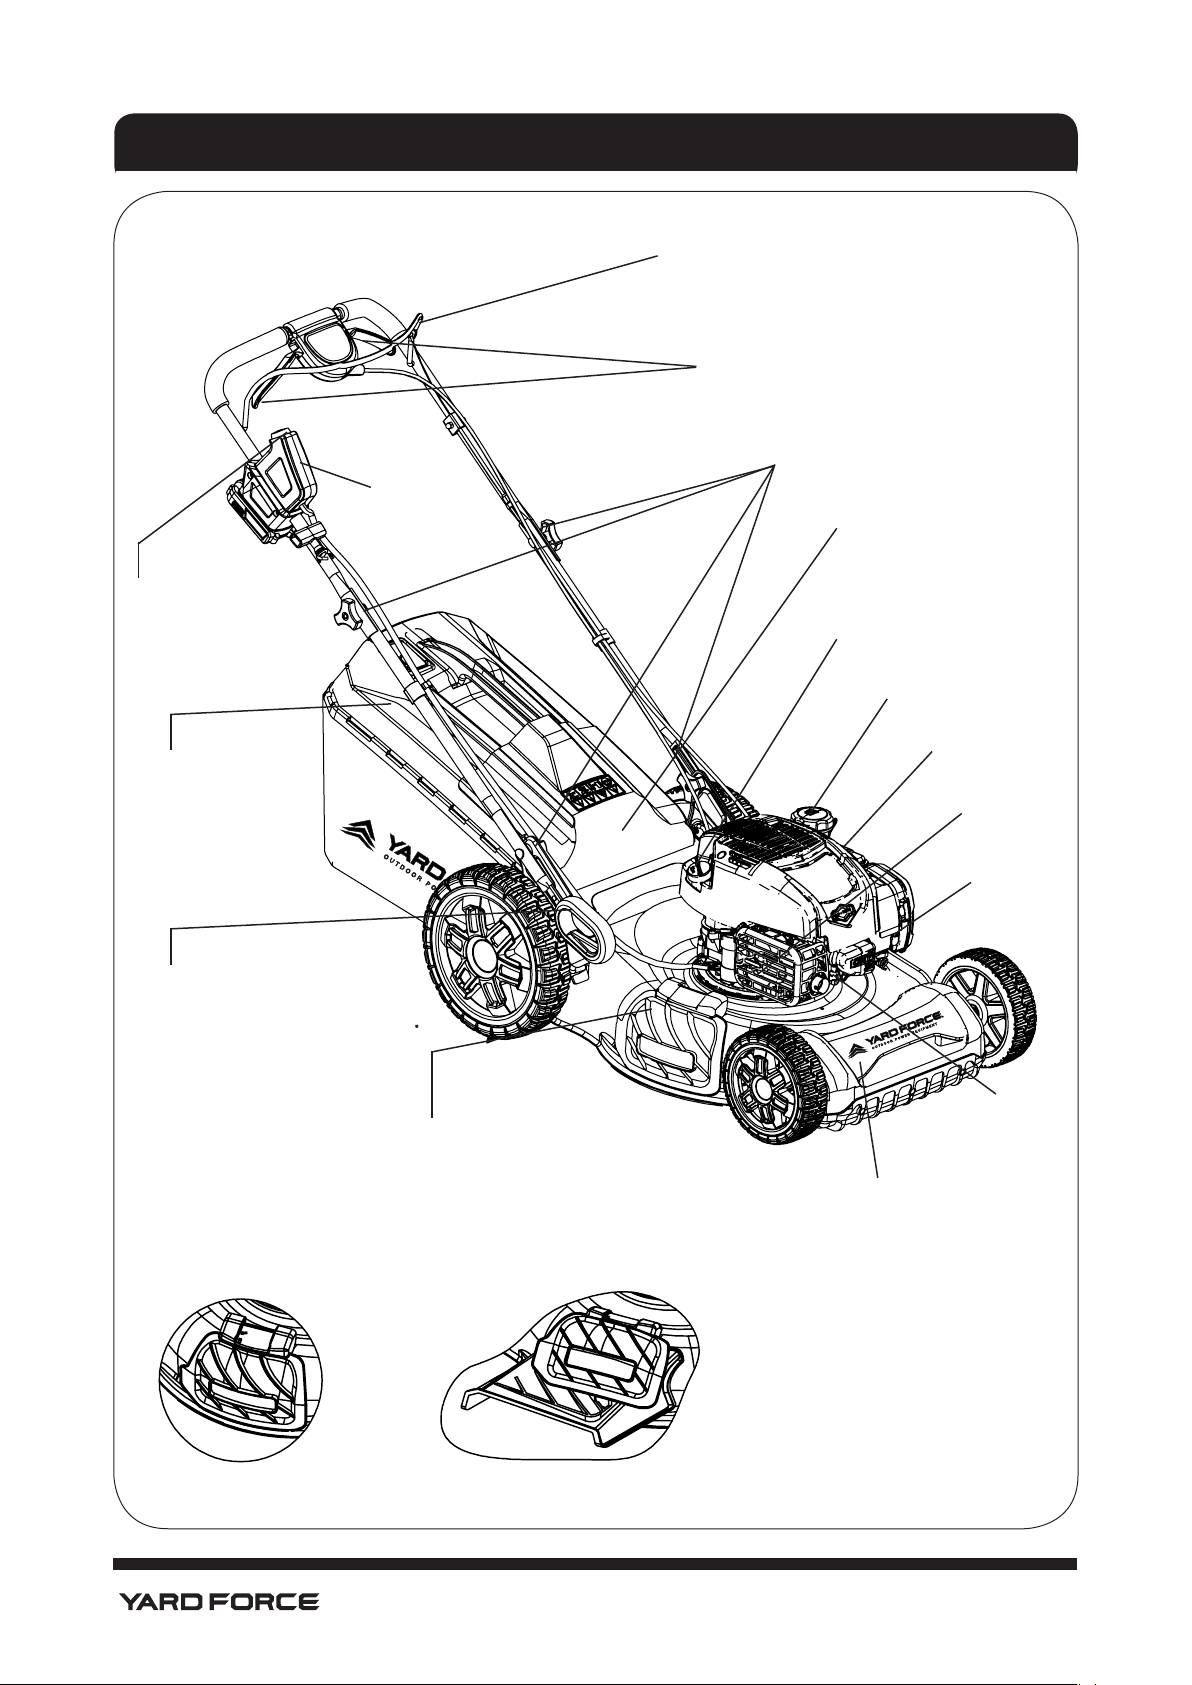
KNOW YOUR LAWN MOWER
Mulch Door Side Discharge Deector
Operator Presence Control Bar
Must be held down to the handle to start the
engine or engage the blades. Release the
bar to stop the blade/engine.
Drive Control Lever
Used to engage self-propelled rear
motion of the lawn mower.
Knobs
Battery Bay
Start Button
Used to start the engine.
Grass Catcher
With full indicator
Height Adjuster
Used to adjust cutting height
of the lawn mower.
Housing
Front bumper handle can
be used to lift mower
during transport.
Spark Plug
Rear Door
Rear door must be
present and closed if bag
is not attached.
Engine Oil Cap with
Dipstick
Gasoline Filler Cap
Muffler
Mulch Door
Allows conversion to discharge or
bagging operations.
NOTE: To convert to side discharge,
install deflector.
Air Filter
Fig. 11
Washing Port

17
TO START THE ENGINE
NOTE: Due to protective coatings on the engine, a small amount of smoke may be present during the initial
use of the lawn mower. This is normal.
NOTE: Your engine is equipped with an automatic choke system. No priming or choking is required before
starting for these models.
TO START THE ENGINE USING STARTER ROPE(Fig. 12)
1. To start the engine using the starter rope, hold the operator presence control bar down to the upper
handle.
2. Pull the starter handle (at the end of the starter rope) quickly. DO NOT allow the starter rope to snap
back.
TO START THE ENGINE USING THE START BUTTON(Fig.13)
1. To start the engine, hold the operator presence control bar down to the handle.
2. Press the start button to start the engine.
IMPORTANT NOTE: DO NOT CRANK THE ENGINE CONTINUOUSLY FOR MORE THAN FIVE SECONDS
EACH TIME YOU TRY TO START. WAIT FIVE TO TEN SECONDS BETWEEN EACH ATTEMPT TO START.
TO STOP THE ENGINE AND BLADE(Fig. 14)
To stop the engine, release the operator presence control bar.
OPERATION
2
1
2
1
Fig. 12
Fig. 13

18
OPERATION
TO SET THE MOWER CUTTING HEIGHT
IMPORTANT NOTE: MAKE SURE ENGINE AND BLADE ARE STOPPED.
Adjust the cutting height to suit your requirements. The middle position is suitable for most lawns. Raise the
mower for high cut and lower the mower for low cut.
NOTE: For shipping purposes the height adjustment position may not be adjusted to the cutting position.
Before operating the mower adjust cutting height to the normal cutting position.
SINGLE POINT HEIGHT ADJUSTMENT(Fig. 15)
All four wheels are adjusted by a single lever.
1. Pull height adjuster toward wheel.
2. To raise the mower, move the lever backward to desired height position. To lower the mower, move the
lever toward the front.
DRIVE CONTROL(Fig. 16)
1. Self-propelling is controlled by holding the operator presence control bar down to the handle and
pulling the drive control lever(s) rearward to the handle. This machine is equipped with variable speed
system. The further toward the handle the lever is pulled, the faster the machine will travel.
2. To stop forward motion without stopping the engine, release the drive control lever(s) only. Hold the
operator presence control bar down against the handle to continue mowing without self-propelling.
Fig. 14
Fig. 15

19
OPERATION
Drive Adjustment( Fig. 17)
Note: The drive system consists of pulleys, a belt, and a bowden cable linking the
transmission to the drive handle. As these components wear, adjustment may be needed.
To adjust the drive linkage perform the following:
• Loosen the locking nut with a wrench (not supplied).
• Hold the upper bolt and turn the lower bolt clockwise to shorten the bowden cable,
counterclockwise to lengthen the bowden cable.
• Start the mower to test the function of the drive control lever and tighten the locking
nut once self-propel can engage.
Note: The bowden cable must be loose with the self-propel drive contol lever in the
released position; otherwise, the machine may creep when the drive control lever is
disengaged.
Note: Self-propelled speed can change on slopes.
NOTE: After releasing the drive control lever, if the mower will not roll backwards, push the mower forward
slightly to disengage the drive wheels.
TO CONVERT MOWER
Your lawn mower may have been shipped ready to be used as a mulcher. Convert to bagging or discharge
modes by changing the installed accessories.
NOTE: This lawn mower has three functions. Change functions by changing the installed accessories as
shown in the following chart.
Fig. 16
locking nut
Lower bolt
upper bolt
Fig. 17
20
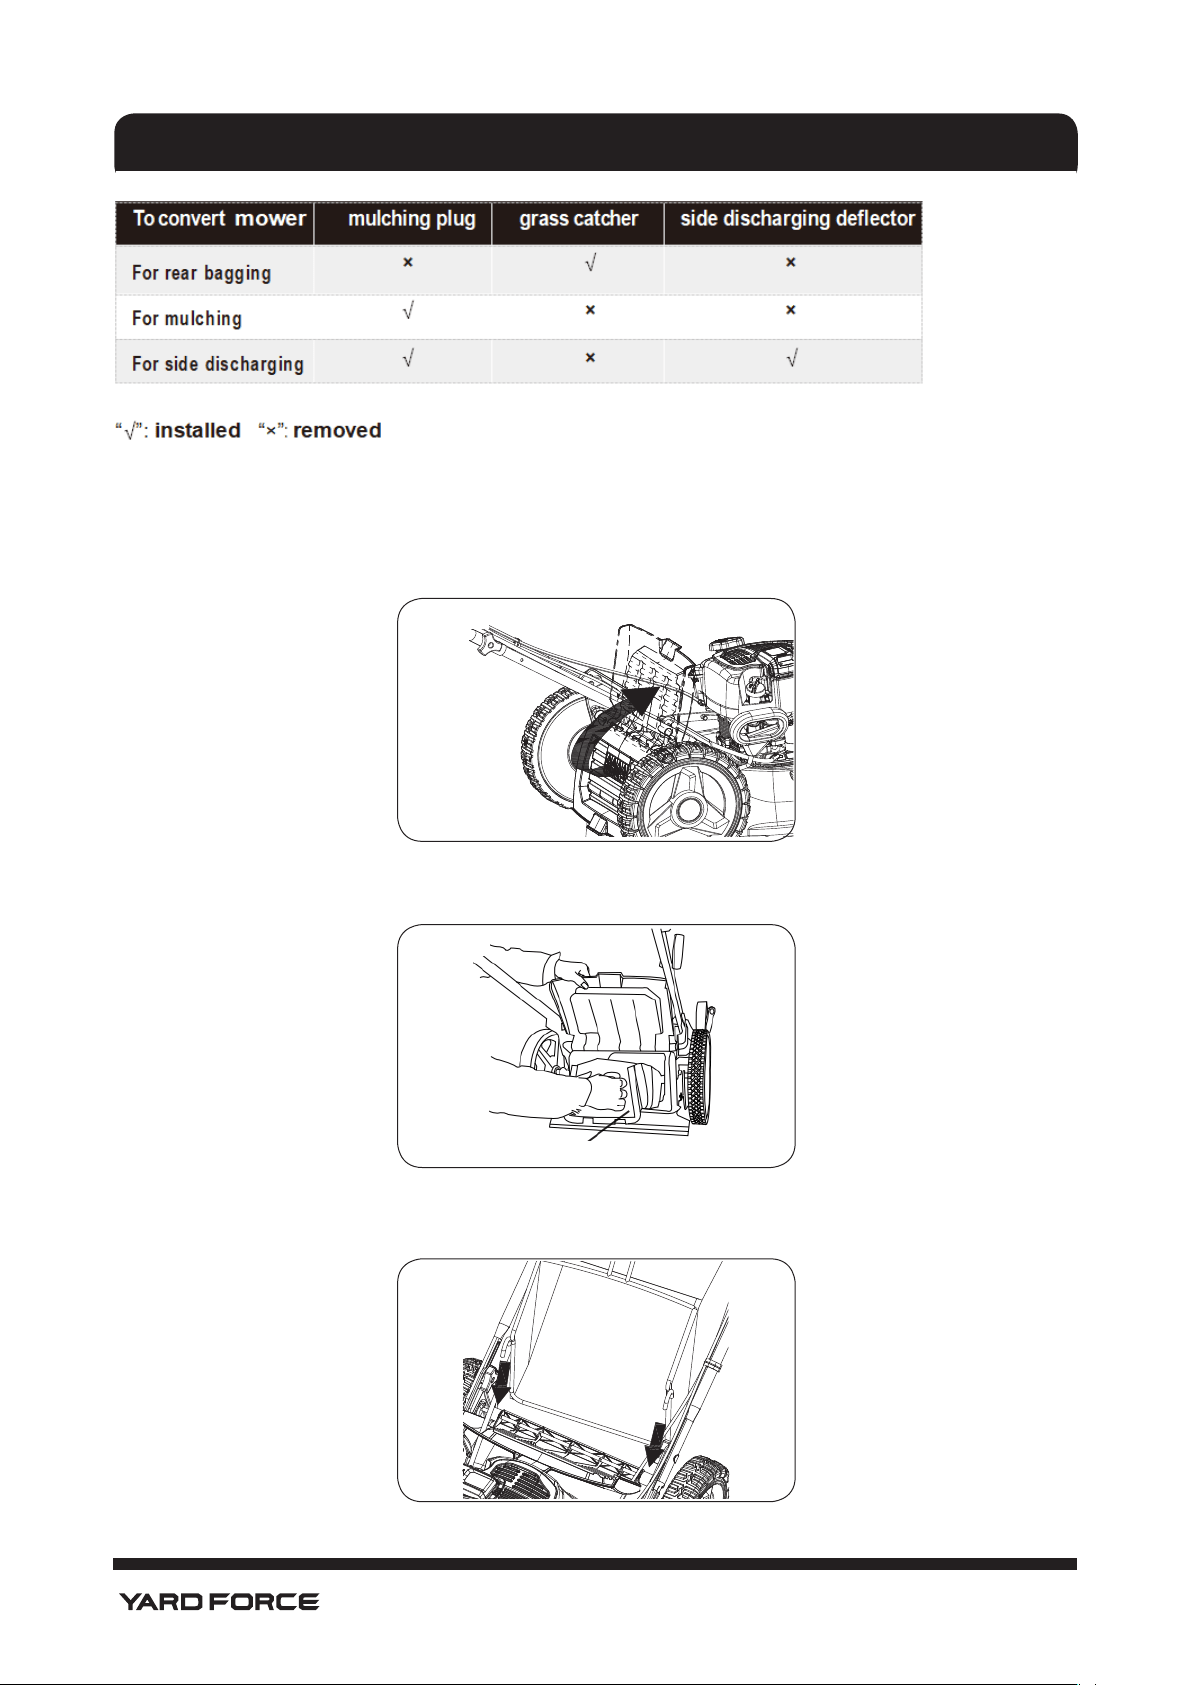
REAR BAGGING
1. Lift rear door of the lawn mower.(Fig. 18)
2. Remove the mulching plug when you set your lawn mower for rear bagging.(Fig. 19)
3. Place the grass catcher frame hooks onto the grass bag brackets. (Fig. 20)
OPERATION
Mulching plug
Fig. 18
Fig. 19
Fig. 20

21
side discharge deflector
mulch door
OPERATION
4. Close the rear door and ensure that rear door covers any gap between mower deck and bagging unit.
5. Empety the grass catcher if the full indicator on the top cover closed.
NOTE: To convert to mulching or discharging operation, remove grass catcher, assemble the mulching
plug and close the rear door.
SIDE DISCHARGING(Fig. 21)
IMPORTANT: THE REAR DOOR MUST BE CLOSED.
1. Assemble the mulch plug.
2. Open the mulch door.
3. Install the discharge deector under the door as shown. The mower is now ready for discharging
operation.
NOTE: To convert to mulching or bagging operation, side mulch door must be closed.
MULCHING(Fig. 22)
1. Open the mulch door.
2. Remove the discharge deector.
3. Assemble the mulching plug as shown. The mower is now ready for mulching operation.
SIMPLE STEPS TO REMEMBER WHEN CONVERTING YOUR LAWN MOWER
FOR MULCHING
• The rear door is closed.
• The mulch door is closed, and the mulching plug must be assembled.
Mulching plug
Fig. 21
Fig. 22

22
OPERATION
FOR REAR BAGGING
• Remove the mulching plug.
• The grass catcher is installed.
• The mulch door is closed.
FOR SIDE DISCHARGING
• The rear door is closed.
• Assemble the mulching plug.
• The discharge deector is installed.
CAUTION: DO NOT run your lawn mower without the rear door closed or an approved grass
catcher properly installed. NEVER attempt to operate the mower with the rear door removed
or propped open. Serious injury may result from operating the mower with the rear discharge
open.
MOWING TIPS
CAUTION: DO NOT use dethatcher blade attachments on your mower. Such attachments are
hazardous, will damage your mower, and could void your warranty.
• Under certain conditions, such as very tall grass, it may be necessary to raise the height of cut to reduce
pushing effort and to keep from overloading the engine and leaving clumps of grass clippings. It may
also be necessary to reduce ground speed and/or run the lawn mower over the area a second time.
• For extremely heavy cutting, reduce the width of cut by overlapping previously cut path and mow slowly.
• Pores in cloth grass catchers can become lled with dirt and dust with use and catchers will collect less
grass. To prevent this, regularly hose catcher off with water and let dry before using.
• Keep top of engine around starter clear and clean of grass clippings and chaff. This will help engine
airow and extend engine life.
MULCHING MOWING TIPS
IMPORTANT: For best performance, keep mower housing free of built-up grass and trash. See “Cleaning”
in the Maintenance section of the operator’s manual.
• The special mulching blade will re-cut the grass clippings many times and reduce them in size so that
as they fall onto the lawn they will disperse into the grass and not be noticed. Also, the mulched grass
will biodegrade quickly to provide nutrients for the lawn. ALWAYS mulch with your highest engine (blade)
speed as this will provide the best re-cutting action of the blades.
• Avoid cutting your lawn when it is wet. Wet grass tends to form clumps and interferes with the mulching
action. The best time to mow your lawn in the early afternoon. At this time the grass has dried, yet the
newly-cut area will not be exposed to direct sunlight.
OPERATING TIPS

23
OPERATING TIPS
• For best results, adjust the lawn mower cutting height so that the lawn mower cuts off only the top one-
third of the grass blades (Fig. 23). If the lawn is overgrown it will be necessary to raise the height of cut to
reduce pushing effort and to keep from overloading the engine and leaving clumps of mulched grass. For
extremely heavy mulching, reduce your width of cut by overlapping previously cut path and mow slowly.
• Certain types of grass and grass conditions may require that an area be mulched a second time to
completely hide the clippings. When doing a second cut, mow across (perpendicular) to the rst cut
path.
• Change your cutting pattern from week to week. Mow north to south one week, then east to west the
next week. This will help prevent matting and graining of the lawn.
MAX 1/3
FIGURE A
Fig. 23

24
MAINTENANCE
THE OPERATOR’S MANUAL FOR YOUR PARTICULAR PRODUCT IS AVAILABLE BY CALLING 1-(866) 902-
9690.
Before
Each
Use
After
Each
Use
Every
10
Hours
Every
25
Hours
Or
Season
Every
100
Hours
Before
Storage
Check for loose fasteners × ×
Clean/inspect grass catcher × × ×
Check tires ×
Clean drive wheels ×
Clean lawn mower × ×
Clean under drive cover ×
Check drive belt/pulleys ×
Check/sharpen/replace blade ×
Lubrication ×
Clean and recharge battery × ×
Check engine oil level ×
Change engine oil ×
Clean air lter ×
Inspect mufer ×
Replace spark plug ×
Replace air lter paper cartridge ×
Empty fuel system or add stabilizer ×
NOTES: (1) Change more often when operating under a heavy load or in high ambient temperatures. (2)
Service more often when operating in dirty or dusty conditions. (3) Replace blades more often when mowing
in sandy soil.
25
MAINTENANCE
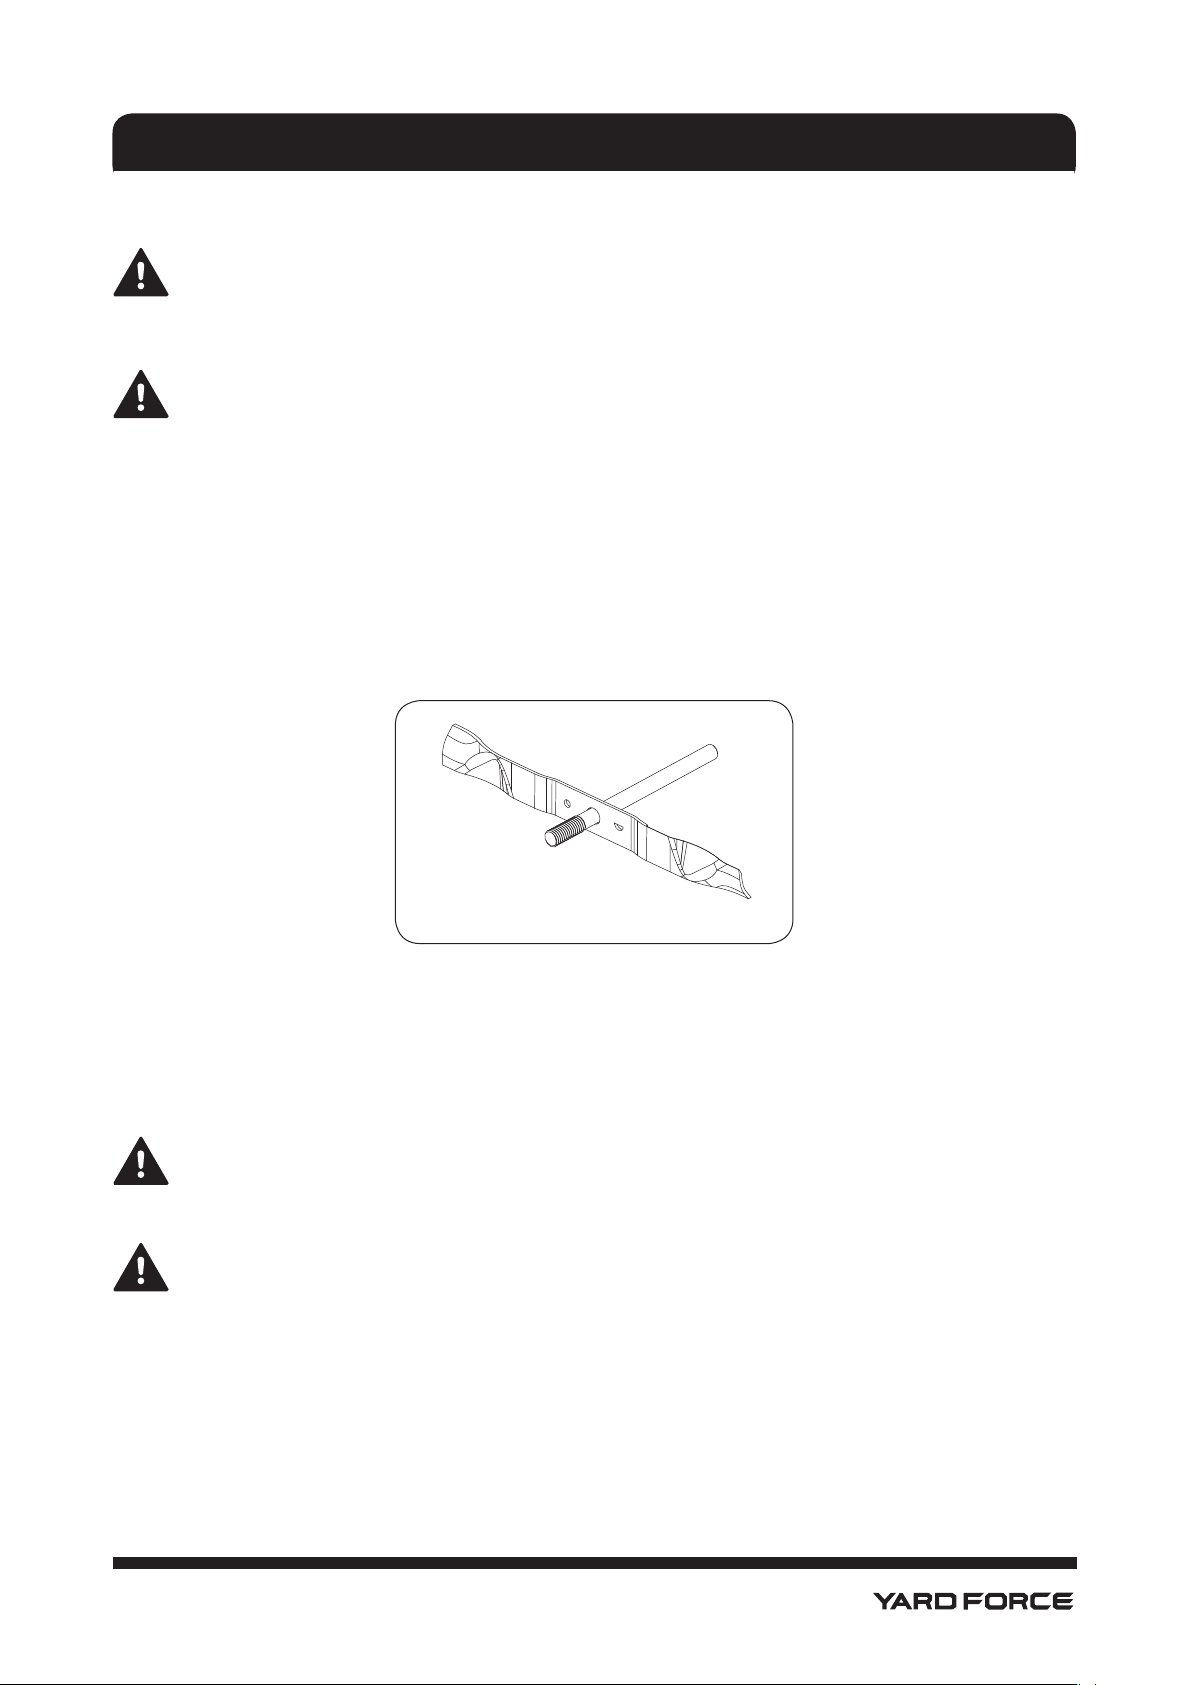
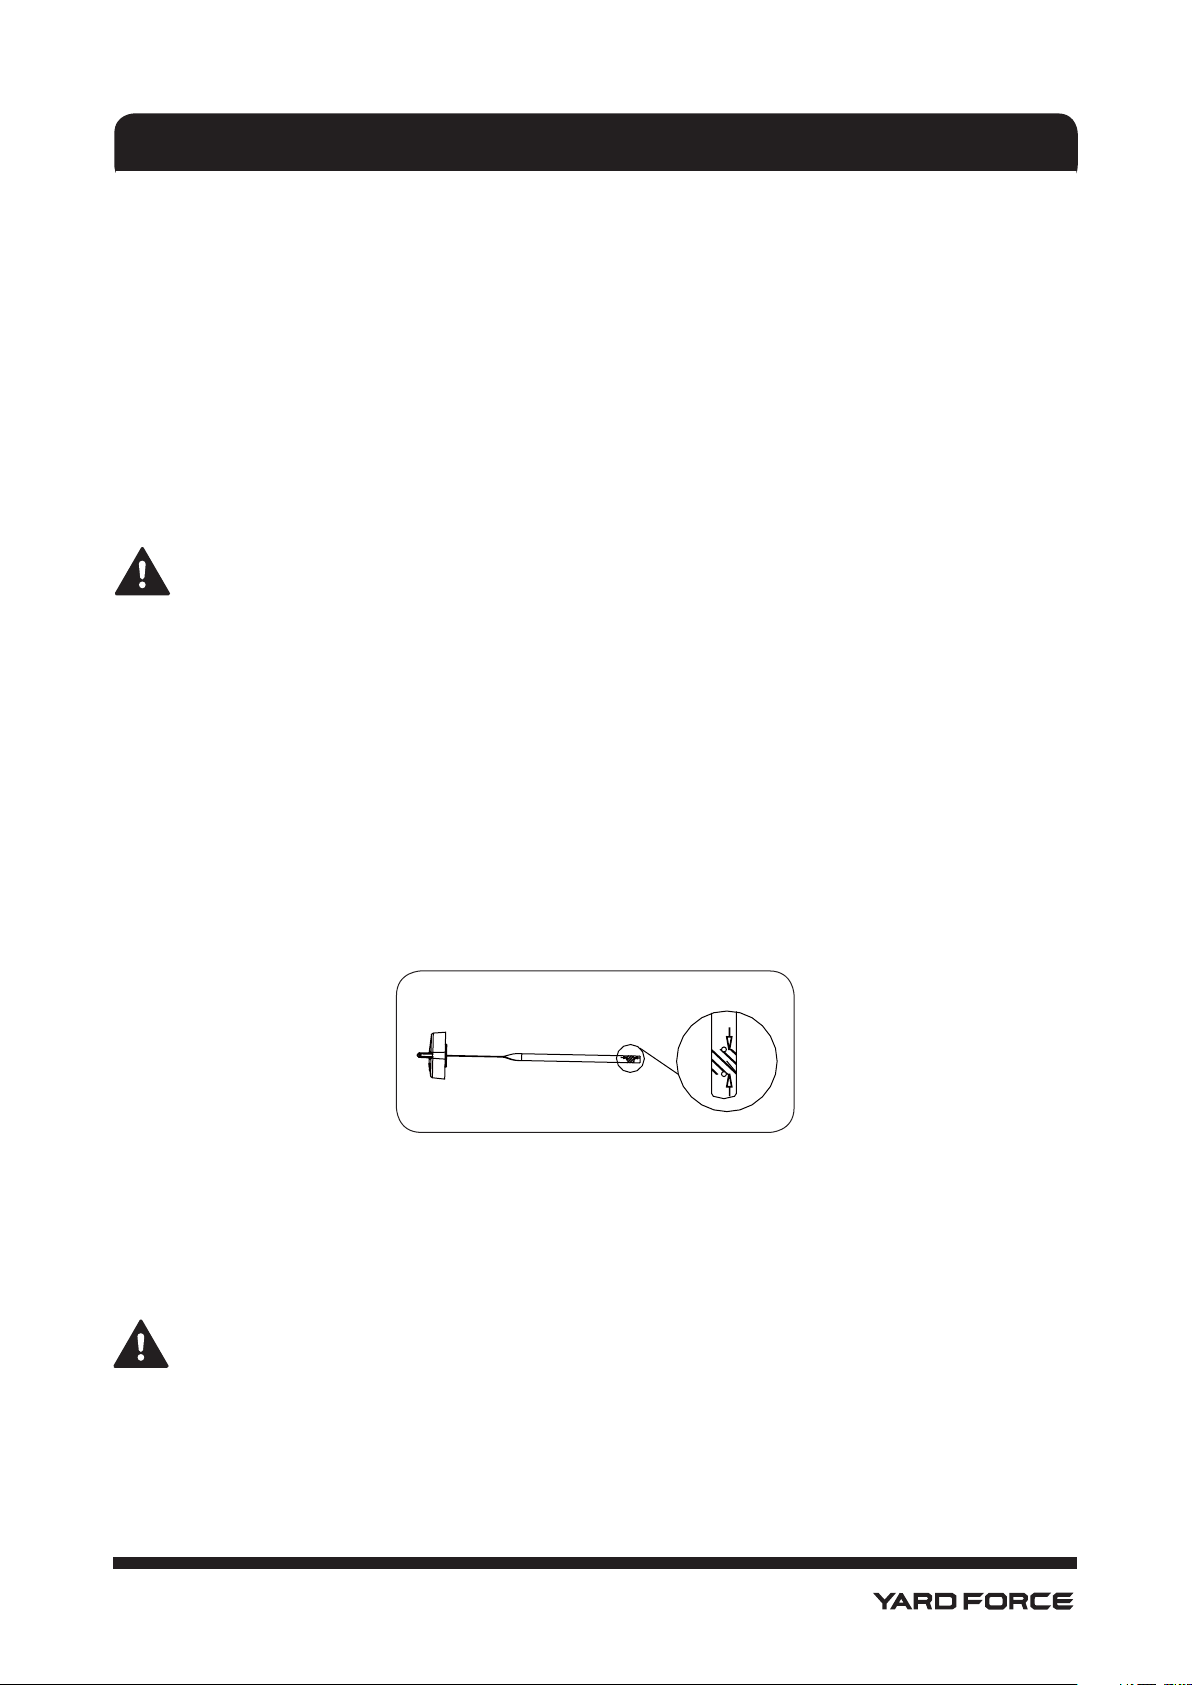
TO EXAMINE THE BLADE(Fig. 24)
WARNING: ALWAYS stop the engine before you do work on the blade. The blade continues
to rotate after the throttle has been released. Make sure that the blade is fully stopped and
disconnect the spark plug cap before you start work.
CAUTION: For best results, keep the blade sharpened. Replace damaged blades immediately.
DO NOT use a mower with damaged blade.
• Examine the blade for cracks and other damage. A damaged blade must always be replaced.
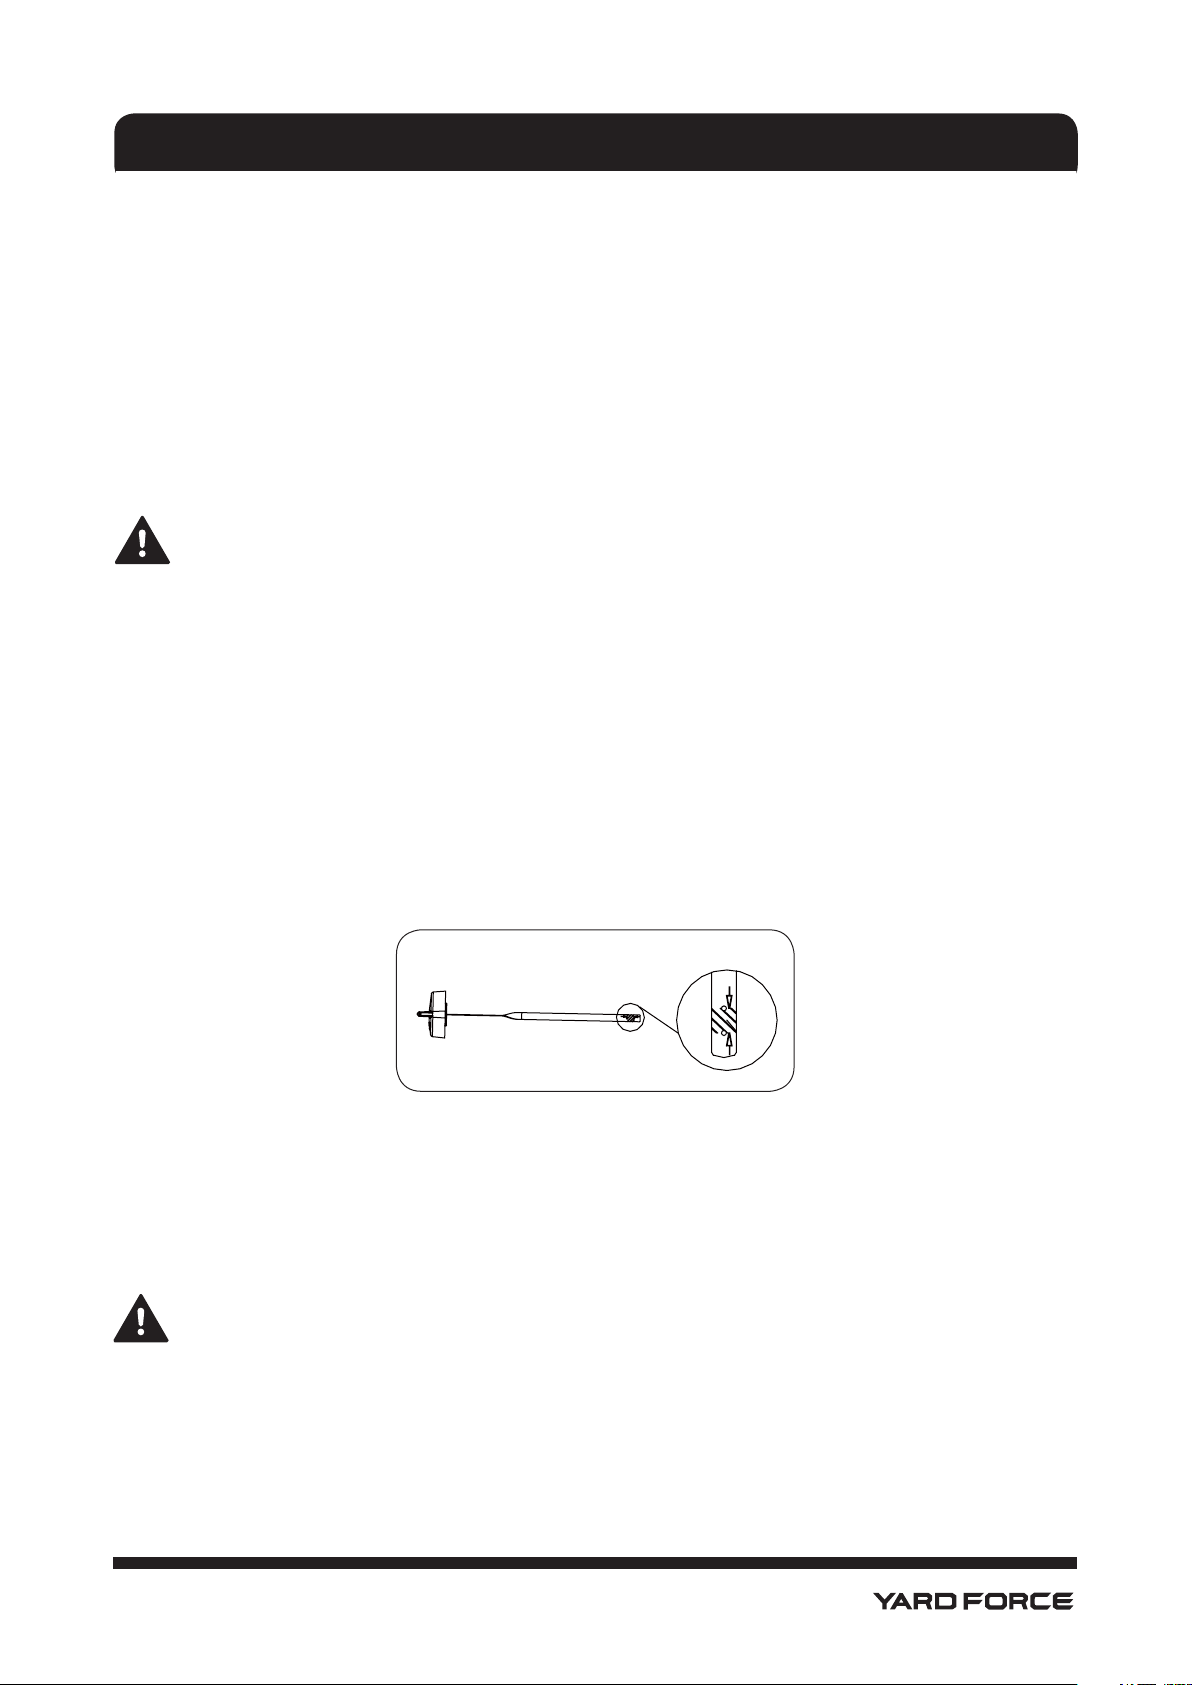
• Always make sure that the blade is correctly ground and balanced. To examine blade balance, use a 7/8"
(22 mm) diameter steel bolt, pin or a cone balancer. Obey the instructions included with the balancer.
• DO NOT use a nail to balance the blade. The lobes of the centre hole are not centred.
• Move the blade onto an unthreaded part of the steel bolt or pin, and hold the bolt or pin parallel to the
ground. If the blade is balanced, it stays in the horizontal position.
If one of the two ends of the blade moves down, sharpen the heavy end until the blade is correctly
balanced.
NOTE: The blades must be balanced after sharpening. DO NOT sharpen or balance the blade on your own.
Speak to an approved service workshop.
TO REPLACE THE BLADE
WARNING: Use gloves and/or wind the blade with a heavy cloth to prevent injury to your
hands.
CAUTION: Only use a replacement blade from an approved manufacturer. Using
a blade not approved by the manufacturer is dangerous and can cause damage to the product
and void the warranty.
1. Always disconnect the spark plug before you do maintenance.
2. Always empty the fuel tank before you put the product on its side. Empty the fuel tank by operating the
machine until the tank is empty.
3. Turn the product on its side. When the product is tilted, make sure that the air lter is always put in the
highest position. (Fig. 25)
Fig. 24
26
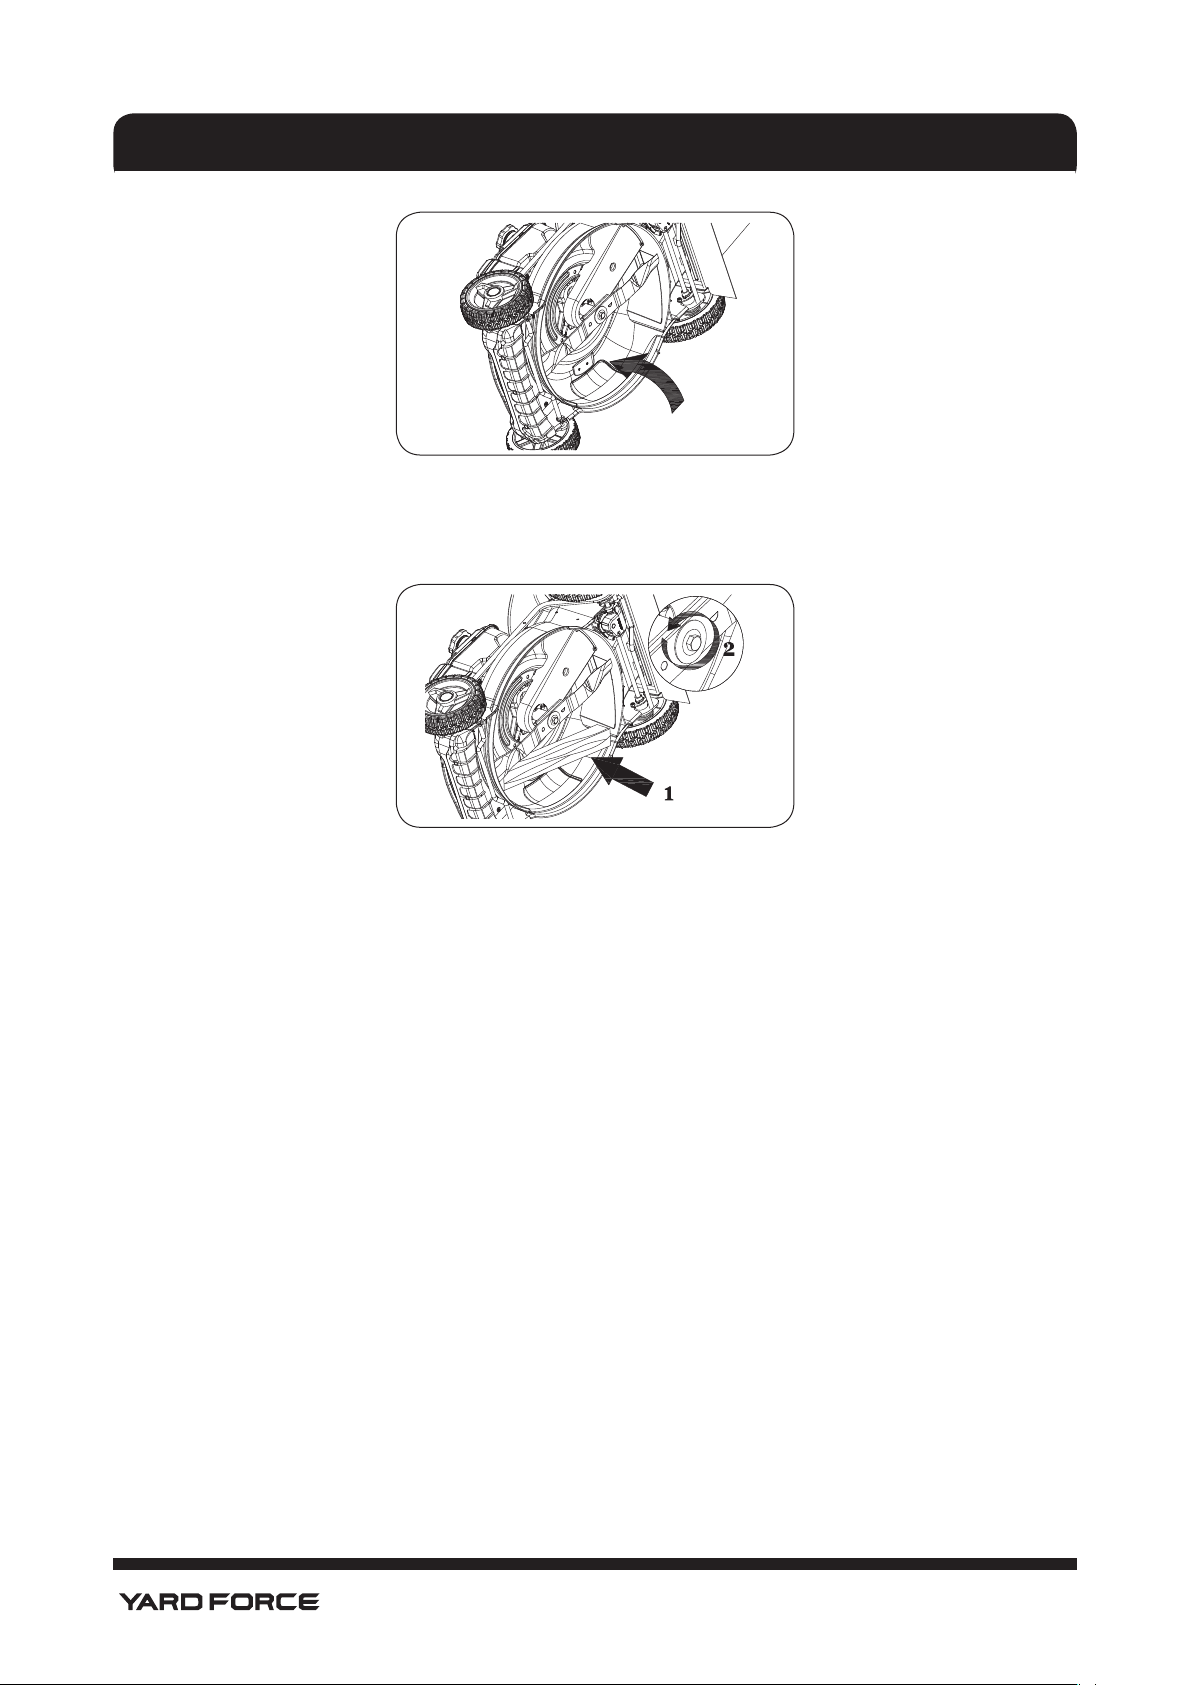
4. Use a wood block between the blade and the mower housing to prevent the blade from turning when
removing the blade bolt. (Fig. 26)
5. Remove the blade bolt by turning the bolt counter-clockwise.
6. Remove the blade.
NOTE: Make sure that the blade adaptor is not damaged. Examine the blade bolt for damage and make
sure the engine shaft is not bent.
TO ASSEMBLE THE BLADE
1. Put the blade adaptor on the engine crankshaft. Make sure the key in the adaptor and crankshaft keyway
are aligned.
MAINTENANCE
Fig. 25
Fig. 26
27
0.467–0.61 mm
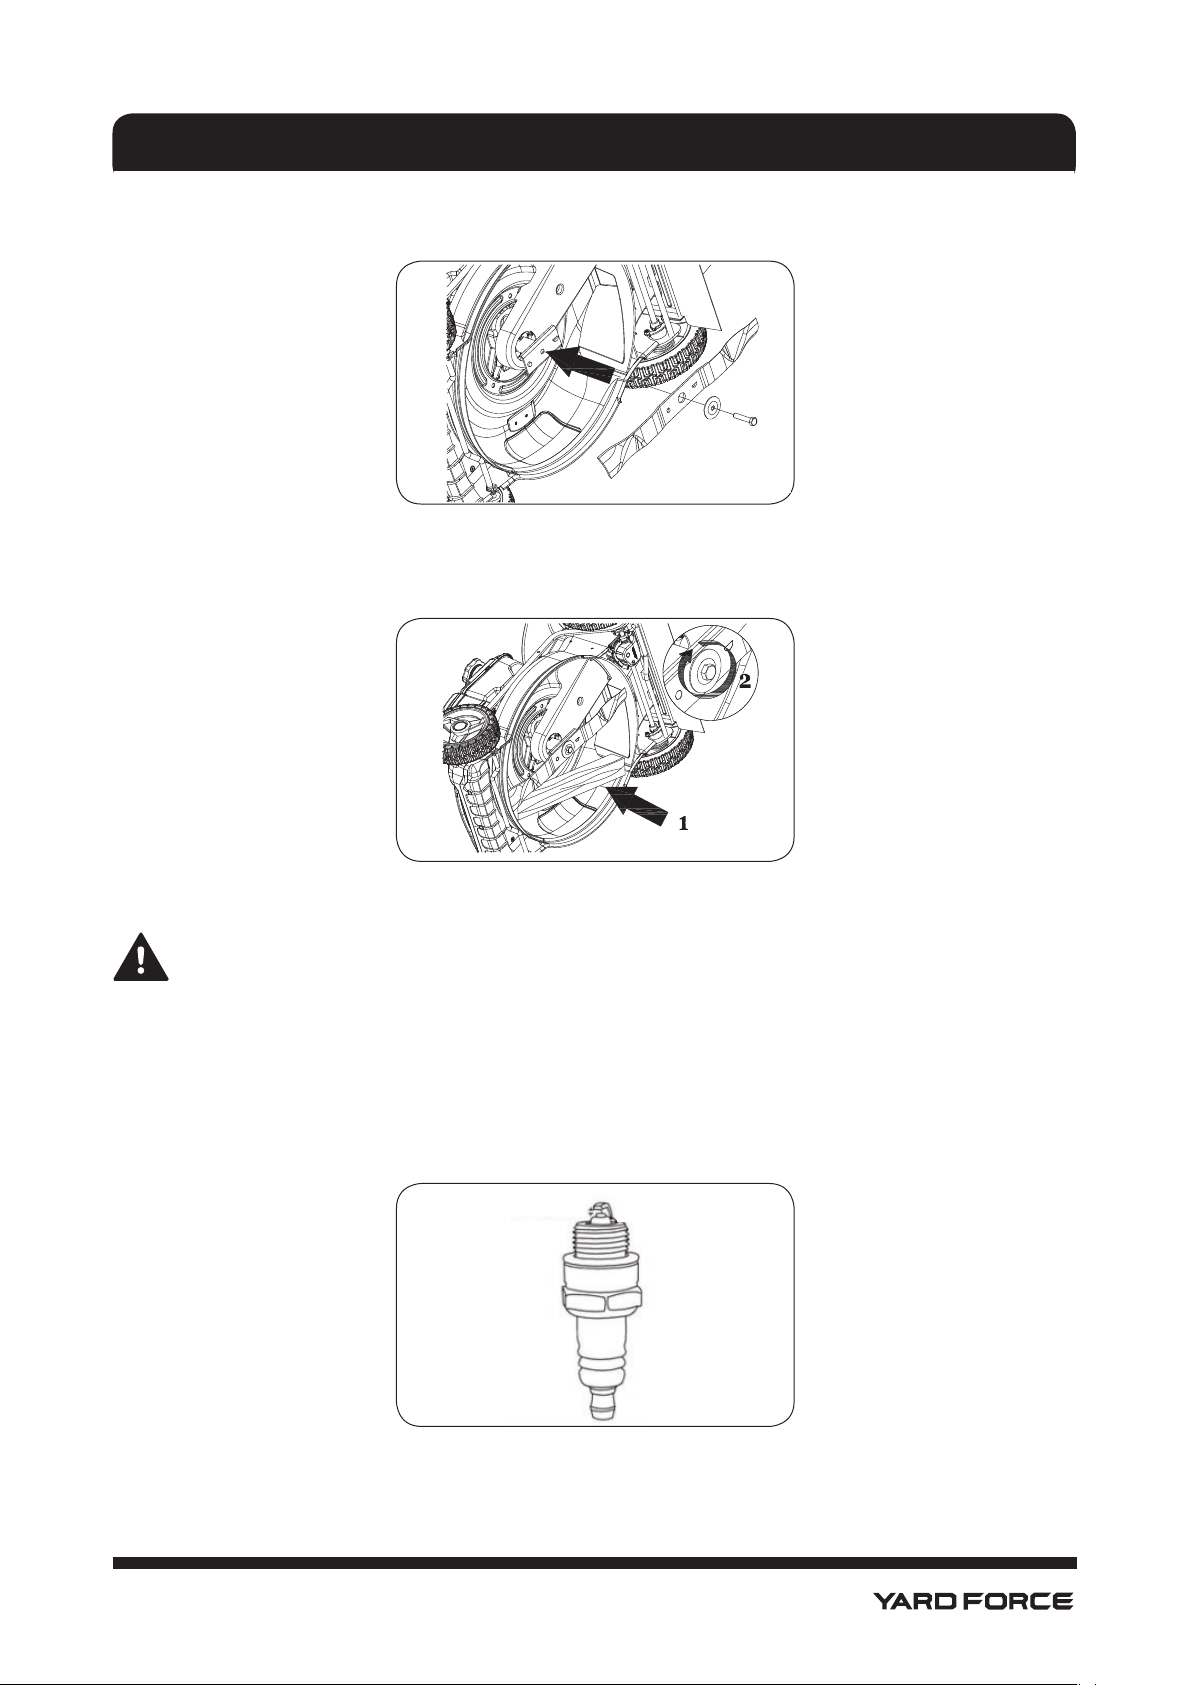
2. Always attach the blade with the angled ends pointing up in the direction of the engine. (Fig. 27)
3. Use a block of wood between the blade and product housing. Tighten the blade bolt and turn it
clockwise. (Fig. 28)
4. Always tighten the bolt with a torque of 33–40 ft-lb (45–55 Nm).
5. Make sure the spark plug cable is disconnected from the engine.
CAUTION: To prevent accidental start, always disconnect the spark plug cable and put the wire
where it cannot touch the spark plug.
6. Pull the blade around by hand and make sure it rotates freely.
TO MAINTAIN THE SPARK PLUG(Fig. 29)
1. Once the engine has cooled, pull off the spark cover with a twist.
2. Remove the spark plug using a spark plug wrench (not supplied).
3. Clean the spark plug with a wire brush (not supplied).
4. Using a feeler gauge, set the gap to 0.018"-0.024" (0.467–0.61 mm).
5. Install the spark plug carefully by hand to avoid cross-threading.
6. After the spark plug is seated, tighten with the spark plug wrench to compress the washer.
MAINTENANCE
Fig. 27
Fig. 28
Fig. 29
0.018"-0.024"

28
filter cartridge
TO MAINTAIN THE AIR FILTER(Fig. 30)
Soiled air lters reduce the engine output by supplying too little air to the carburetor. If the air contains a lot
of dust, the air lter should be checked more frequently.
CAUTION! Never run the engine without the air lter element installed.
1. Remove the air lter cover.
2. Remove the lter cartridge.
3. To loosen debris, gently tap the lter cartridge on a hard surface. If the lter cartridge is excessively dirty,
replace with a new one.
CAUTION! Never clean the air lter cartridge with gas or ammable solvents.
Clean the air lter cartridge only with compressed air or by tapping it.
4. Install the lter cartridge.
5. Close the cover with an audible "click".
Washing The Mower Deck
The washing port allows you to connect a typical garden hose to the mower deck to remove grass and
debris from the underside.
CAUTION! Contact with the mower blade, or with objects thrown by the mower blade, could result
in death or serious injury.
• Before running the mower, make sure the hose is properly connected and does not come into
contact with the blade.
• When the mower is running, the person cleaning the mower deck must be in the operator position,
with no bystanders in the area.
1. Place the unit on a smooth level surface.
2. Place the mower in the highest cutting position. See Single Point Height Adjustment.
3. Attach a garden hose to the washing port(Fig. 31) on the mower deck.
4. Run water to remove grass and debris from the underside of the mower deck.
5. Turn the mower on.
6. Turn the mower off.
7. Remove the garden hose from the washing port when completed.
MAINTENANCE
Fig. 30
Washing Port
Fig. 31

29
WARRANTY
YARD FORCE TWO YEAR LIMITED WARRANTY
Product Warranty
Please keep your original purchase receipt in a safe place as proof of purchase. Warranty coverage for
this product must be veried by the original purchase receipt. The warranty period begins on the day
that the product was purchased from an authorized retailer of Yard Force products. Warranty coverage
only applies to the original purchaser and is not transferable. Warranty coverage is only provided on
products purchased and used in the USA and Puerto Rico from authorized Yard Force retailers. Products
purchased or used outside of the USA and Puerto Rico are not covered by this warranty.
(2) Two-Year Warranty – Engine
The Yard Force lawn mower has a Two-Year Limited Warranty from the date of purchase against man-
ufacturer defects for residential use only. Commercial use voids the warranty. This warranty does not
cover accidental damage, unreasonable use, normal wear and tear, neglect or non-compliance with the
Operating, Safety and Maintenance Instructions. All service, outside of normal maintenance as de-
scribed in this manual, must be done by an authorized service technician. Any unauthorized service or
changes to the original con guration of this product will void the warranty. All parts and accessories used
on and with this product must be manufacturer/or and authorized by Merotec Inc.
(90) Ninety-Day Warranty – Accessories
The accessories included with the lawn mower; like the blade, and other similar parts are warranted
against manufacturer defects for residential use only for a period of 90 days from date of purchase.
Warranty does not cover loss of use or other consequential damages arising from any of the above, nor
does it cover repairs made or attempted by unauthorized persons. This warranty is void if the product
is used for commercial, rental or industrial purposes. Certain parts, attachments and accessories are
subject to normal wear and tear and are excluded from the warranty.
Service and Warranty Claims Process
Contact the Yard Force Support Center toll-free at (866) 902-9690 Monday-Friday between 8:30 AM
and 5:00 PM Eastern Time for service and warranty support.
Yard Force USA Service Support agents can help you troubleshoot problems over the phone to get
you back up and running as quickly as possible. In the situation where service or warranty inspection is
needed, please follow these steps:
1. Contact Yard Force USA at (866) 902-9690 or support@merotecusa.com Monday-Friday between
8:30 AM and 5:00 PM Eastern Time.
2. Send in proof-of-purchase and serial number (if applicable) to conrm warranty coverage.
3. If service or a warranty evaluation is requested, Yard Force USA will provide an RGA number that
should be used in all communications with Yard Force USA and if necessary a list of local authorized
service centers to bring your lawn mower to for evaluation and repair.
4. All shipments to Yard Force USA must have an RGA number. Any shipment received that does not have
an RGA number clearly marked on the outside of the box will be refused.
5. All shipments must be sent pre-paid, Yard Force USA does not pay for any shipping costs for service
or warranty evaluation. Yard Force USA is not responsible for any packages that are lost by carrier. We
recommend that shipments are made by a carrier that provides tracking and delivery con rmation.
For more information or to ask questions, please call toll-free (866) 902-9690 or support@merotecusa.
com Monday-Friday between 8:30 AM and 5:00 PM Eastern Time.
SAVE THESE INSTRUCTIONS!

SAVE THIS MANUAL FOR REFERENCE
YF22ESSPV
PODADORA DE MOTOR A GASOLINA
MANUAL OPERATIVO
Nuestro personal de atención al cliente está a su disposición para ayudarle.
En caso de que una pieza se haya extraviado o esté dañada, la mayoría de las piezas de repuesto se
envían directamente desde Merotec USA en Atlanta o desde uno de nuestros socios de servicio en
los EE.UU.
Para ayuda inmediata con el montaje, o para información adicional sobre el producto, envíe un e-mail
a [email protected] o llame al 866-902-9690 L-V 8:30 a.m. - 5:00 p.m. hora del este. Más
información en www.YardForceUSA.com.
Necesitará este manual para consultar las instrucciones de seguridad, procedimientos
operativos y la garantía.
Es necesario tener a la mano el recibo de compra original para el servicio de garantía.
GUARDE ESTE MANUAL PARA CONSULTARLO POSTERIORMENTE

2
Instrucciones originales
ÍNDICE
FELICIDADES
.................................................................................................................................................. 3
Símbolos
..........................................................................................................................................................4
Seguridad
.....................................................................................................................................................6
Ajuste
...........................................................................................................................................................10
Datos técnicos
.........................................................................................................................................15
Conozca su podadora
...........................................................................................................................16
Operación
...................................................................................................................................................18
Consejos de trabajo
...............................................................................................................................23
Mantenimiento
......................................................................................................................................... 24
Garantía
..........................................................................................................................................................29
3
FELICIDADES
Felicidades por la compra de su nueva podadora de pasto. Fue diseñada, pensada y fabricada para ofrecer
lo mejor en abilidad y desempeño.
Si llegara a experimentar cualquier problema que no lograra resolver fácilmente, contacte a su centro de
servicio autorizado más cercano o envíe un correo a [email protected] o llame al 866-902-9690 L-V
8:30 a.m. - 5:00 p.m. hora del este.
LEA Y CONSERVE ESTE MANUAL INSTRUCTIVO. Estas instrucciones le permitirán ensamblar y conservar
su podadora de manera adecuada. Siga SIEMPRE las «REGLAS DE SEGURIDAD».
El manual instructivo se diseñó para ayudarle a tener su compra lista para usarse y que haya menos riesgo
de dañarla. Está pensado para darle la información necesaria para que se familiarice con los controles
y características del producto a n de operarlo de manera segura. Este manual NO sustituye la lectura
del manual completo del usuario y todos los detalles que cubre, como el mantenimiento, los ajustes y el
almacenamiento.
EL MANUAL DEL USUARIO PARA SU PRODUCTO EN PARTICULAR ESTÁ DISPONIBLE LLAMANDO
AL 1-(866) 902-9690.
PRECAUCIÓN: La operación de cualquier podadora puede
resultar en que objetos vuelen hacia sus ojos, causando daño
ocular severo. SIEMPRE use lentes de seguridad o protectores
oculares cuando opere su podadora o cuando realice ajustes
o reparaciones. Le recomendamos que use unos lentes de
seguridad estándar o una mascarilla de seguridad con amplia
visibilidad.
Lea este manual atentamente y asegúrese de comprender las instrucciones antes de usar el
aparato.
¡NIÑOS Y PODADORAS SON UNA MALA
COMBINACIÓN!
Pueden ocurrir accidentes trágicos. Usted
puede LESIONAR GRAVEMENTE o incluso
MATAR a un niño con una podadora.
Resguarde a los niños en casa y déjelos
bajo supervisión.
USE SUS LENTES DE SEGURIDAD
PREVER ES MEJOR QUE CURAR

4
Aceite
Combustible
Obturador
Lento
Motor apagado
Motor encendido
Rápido
SÍMBOLOS

5
SÍMBOLOS
SEGURIDAD
PELIGRO:
MANTENGA MANOS Y PIES ALEJADOS (consulte la sección de SEGURIDAD, página 5)
*Estos símbolos pueden aparecer en su podadora o en los contenidos escritos que se
entregan con el producto. Aprenda y comprenda su signicado.
ALERTA DE PELIGRO
El símbolo de alerta de peligro informa al usuario sobre peligros potenciales.
LEA EL MANUAL OPERATIVO
Lea, comprenda y siga todas las instrucciones del manual antes de montar y operar el
aparato.
Use protección en sus oídos.
Use protección en sus ojos.
PELIGRO: CUCHILLAS ROTATIVAS
Para reducir el riesgo de lesión, mantenga pies y manos alejados. No opere a menos que el
conducto de descarga o toda la bolsa recogepasto estén colocados en su lugar. En caso de
que esté dañadas, cámbielas de inmediato.
PELIGRO: PERSONAS ALREDEDOR
No pode si hay niños u otras personas alrededor.
Mire hacia abajo y hacia atrás, y siempre que se mueva hacia atrás.
PELIGRO: CUCHILLAS ROTATIVAS
Nunca opere el aparato sin que las guardas, los platillos u otros dispositivos protectores
estén colocados en su lugar.
PELIGRO: CORTE DE MANOS Y PIES
Mantenga manos y pies alejados de las piezas rotativas.
PELIGRO: RESTOS ARROJADOS
Retire los objetos que puedan ser arrojados por la cuchilla en cualquier dirección. Use
lentes de seguridad.
PELIGRO: PENDIENTES
Extreme precauciones cuando esté en pendientes. No pode pendientes mayores a 15°.
ADVERTENCIA: LA GASOLINA ES INFLAMABLE
Deje que el motor se enfríe al menos durante dos minutos antes de volver a cargarlo con
gasolina.
ADVERTENCIA: MONÓXIDO DE CARBONO
Nunca encienda un motor en interiores o una área con poca ventilación. El escape del
motor contiene monóxido de carbono, un gas inodoro y mortal.

6
SÍMBOLOS
ADVERTENCIA: SUPERFICIE CALIENTE
Las piezas del motor, especialmente el moe, se calientan en extremo durante el
funcionamiento. Deje que el motor y el moe se enfríen antes de tocarlos.
GLOSARIO DE SÍMBOLOS DE SEGURIDAD
No seguir las instrucciones puede resultar en lesiones graves o en la muerte. El símbolo de alerta de
seguridad se usa para identicar información de seguridad relacionada con peligros que pueden resultar en
muerte, lesiones graves y/o daños a la propiedad.
PELIGRO indica un peligro que, de no evitarse, RESULTARÁ en muerte o lesiones graves.
ADVERTENCIA indica un peligro que, de no evitarse, PODRÍA RESULTAR en muerte o
lesiones graves.
PRECAUCIÓN indica un peligro que, de no evitarse, PODRÍA RESULTAR en lesiones
menores o moderadas.
PRECAUCIÓN cuando se use sin el símbolo de alerta, indica una situación que podría
resultar en daños a la podadora y/o al motor.
SUPERFICIES CALIENTES indica un peligro que, de no evitarse, PODRÍA RESULTAR en
muerte, lesiones graves y/o daños a la propiedad.
FUEGO indica un peligro que, de no evitarse, PODRÍA RESULTAR en muerte, lesiones graves
y/o daños a la propiedad.
PRÁCTICAS DE OPERACIÓN SEGURAS PARA PODADORAS CONTROLADAS POR
PEATONES
PELIGRO: ESTA MÁQUINA CORTADORA PUEDE AMPUTAR MANOS Y PIERNAS ASÍ COMO
ARROJAR OBJETOS. NO OBSERVAR LAS SIGUIENTES INSTRUCCIONES DE SEGURIDAD
PUEDE RESULTAR EN MUERTE O LESIONES GRAVES.
ADVERTENCIA: Esta podadora está equipada con un motor interno de combustión y NO debe
usarse sobre o cerca de ningún terreno forestal cubierto de maleza o pasto, a menos que el
sistema de escape del motor esté equipado con un parachispas que cumpla con las leyes locales
y provinciales (de haberlas). En caso de usar el parachispas, el operador deberá conservarlo
en condiciones de trabajo efectivas. Hay parachispas para el moe disponibles en su centro/
departamento de servicio autorizado más cercano.
SEGURIDAD

7
SEGURIDAD
PRECAUCIÓN: El moe y otras piezas del motor se calientan en extremo durante el funcionamiento
y permanecen calientes después de que el motor se apaga. Para evitar quemaduras graves por
contacto, manténgase alejado de estas áreas.
ADVERTENCIA:
a) No opere la máquina bajo ninguna condición donde esté en cuestión la tracción, la dirección o la
estabilidad. Las llantas podrían derrapar si las ruedas se detienen.
b) Mantenga siempre la máquina en marcha cuando baje por pendientes. No deje que la máquina
se impulse sola en pendientes hacia abajo.
c) Evite encender y apagar en pendientes. Evite hacer cambios repentinos de velocidad y de
dirección. Dé los giros lenta y gradualmente.
I. NIÑOS
ADVERTENCIA: ESTE EQUIPO PUEDE LESIONAR GRAVEMENTE O INCLUSO MATAR A LOS
NIÑOS. Lea cuidadosamente y siga todas las instrucciones de seguridad a continuación.
Pueden ocurrir accidentes trágicos si el operador no está alerta a la presencia de niños. Los niños suelen
sentirse atraídos a la máquina y la actividad de poda. NUNCA suponga que los niños se quedarán donde
los vio por última vez.
• Mantenga a los niños alejados de la zona de operación y bajo estricta supervisión por parte de un adulto
responsable que no sea quien esté podando.
• Permanezca alerta y apague la máquina si un niño entra en el área.
• Antes de poner la reversa y mientras esté manejando en reversa, mire hacia atrás y por abajo para
asegurarse de que no haya ningún niño pequeño.
• Los niños deberán tener una edad mínima de 12 años antes de operar una podadora conducida a pie y
como mínimo 16 años de edad antes de operar una podadora con conductor.
• Tenga mucho más cuidado cuando se acerque a puntos ciegos, arbustos, árboles u otros objetos que
puedan bloquear la visión de donde están los niños.
• JAMÁS OPERE LA PODADORA EN PRESENCIA DE NIÑOS.
II. OPERACIÓN EN PENDIENTES
Las pendientes son factores de extrema importancia cuando se habla de resbalones y caídas que pueden
resultar en lesiones graves. Todas las pendientes requieren de cuidados extra. Si no se siente cómodo en
una pendiente, no la pode.
• Pode atravesando las pendientes: NUNCA hacia arriba ni hacia abajo. Tenga precaución extrema al
cambiar de dirección en las pendientes.
• Evite hoyos, ranuras, baches, rocas u otros objetos ocultos. El terreno desigual podría causar que se
resbalara y se cayera. El pasto crecido puede ocultar obstáculos.
• NO pode cerca de precipicios, zanjas o terraplenes. Podría perder la rmeza de la postura o el equilibrio.
• NO pode en pasto húmedo ni en las pendientes excesivamente pronunciadas. Un mal paso podría
causar que se resbalara y se cayera.
III. OPERACIÓN GENERAL
• Lea atentamente y siga todas las instrucciones de la podadora y de este manual antes de empezar.
• NO ponga las manos ni los pies cerca o debajo de las partes rotativas. En todo momento manténgase
alejado de la abertura de descarga.
• Solo los adultos responsables familiarizados con las instrucciones pueden operar el aparato.
• Limpie el área y retire los objetos como piedras, juguetes, cables, etc., que podrían agarrarse en las
cuchillas y ser aventados. Quédese tras el manubrio mientras el motor esté en funcionamiento.
• Asegúrese de que no haya personas en el área antes de operar el aparato. Detenga la máquina si
alguien entra en la zona.

8
SEGURIDAD
• NO opere el equipo con los pies descalzos o con sandalias abiertas. Al podar, use SIEMPRE calzado
robusto.
• NO pode en reversa a menos que sea absolutamente necesario. Primero mire SIEMPRE hacia abajo y
hacia atrás, y siempre que se mueva hacia atrás.
• NO dirija el material de descarga hacia nadie. Evite descargar el material contra una pared u obstrucción.
El material podría rebotarle al operador. Detenga las cuchillas antes de cruzar por supercies de grava.
• NO opere el aparto sin el recogepasto completo, el conducto de descarga u otros dispositivos de
seguridad colocados y en pleno funcionamiento.
• Vea las instrucciones del fabricante donde se explican la operación y la instalación correctas de los
accesorios. Solo use accesorios aprobados por el fabricante.
• NUNCA deje desatendida la máquina encendida.
• Detenga el motor y espere hasta que las cuchillas se detengan por completo antes de limpiar la
podadora, retirar el recogepasto o destapar el guarda de descarga.
• Pode solo a la luz del día o con buena luz articial.
• NO opere la máquina si está bajo la inuencia de alcohol o drogas.
• NUNCA opere la máquina en pasto mojado. Pise SIEMPRE con seguridad, mantenga un agarre rme del
manubrio y camine, no corra NUNCA.
• Desconecte el sistema de manejo de la podadora antes de encender el motor.
• Si el equipo empezara a vibrar de forma anormal, detenga el motor y verique la causa de inmediato. La
vibración suele ser un aviso de que algo anda mal.
• SIEMPRE use protección ocular al operar la máquina.
IV. SERVICIO
MANEJO SEGURO DE LA GASOLINA
• Para evitar lesiones personales o daños a la propiedad, tenga cuidados extremos en el manejo de la
gasolina. La gasolina es extremadamente inamable y los vapores son explosivos.
• Apague todos los cigarrillos, puros, pipas y otras fuentes de ignición.
• Use solo un contenedor de gasolina aprobado.
• NUNCA retire la tapa de la gasolina ni agregue combustible cuando el motor esté encendido. Deje que
el motor se enfríe antes de recargar combustible.
• NUNCA recargue combustible en un espacio cerrado.
• NO almacene la máquina ni el contenedor de combustible donde haya llama abierta, chispas o una llama
piloto como la del calentador de agua u otro aparato.
• NUNCA llene los contenedores dentro de un vehículo o un camión o remolque de tráiler con
revestimiento plástico. SIEMPRE coloque los contenedores en el piso alejados de su vehículo cuando
los llene.
• Retire el equipo que funciona con gasolina del camión o tráiler y recargue el combustible sobre el
piso. De no ser posible, recargue combustible con un contenedor portátil, en vez de una boquilla
dispensadora de gasolina.
• Mantenga la boquilla en contacto con el borde del tanque de combustible o la abertura del contenedor
en todo momento hasta que haya terminado de recargar combustible. NO use un dispositivo para
mantener abierta la boquilla.
• Si el combustible se derrama sobre la ropa, cámbiese de inmediato.
• NUNCA llene el tanque de combustible en exceso. Vuelva a colocar la tapa de la gasolina y ciérrela bien.
SAFETY

9
SEGURIDAD
SERVICIO GENERAL
• NUNCA opere la máquina en un espacio cerrado.
• Mantenga todas las tuercas y pernos bien apretados para asegurarse de que el equipo esté funcionando
en buenas condiciones.
• NUNCA retire ni falsique ningún dispositivo de seguridad. Verique su operación adecuada con
frecuencia. NUNCA haga nada que interera con la función de un dispositivo de seguridad o para reducir
la protección ofrecida por el dispositivo de seguridad.
• Mantenga la máquina libre de pasto, hojas o acumulación de otros restos. Limpie lo que se haya
derramado de gasolina o aceite, y retire cualquier resto que se haya podido mojar de combustible. Deje
que la máquina se enfríe antes de guardarla.
• Si impacta un objeto extraño, deténgase e inspeccione la máquina. En caso necesario, repárela antes de
volver a empezar.
PREPARAR EL MOTOR
• IMPORTANTE: ESTA PODADORA SE ENTREGA SIN ACEITE NI GASOLINA EN EL MOTOR.
• NOTA: La gasolina que contenga hasta 10% de etanol (E10) es aceptable para este tipo de máquina. El
uso de cualquier gasolina que exceda 10% de etanol (E10) invalidará la garantía del producto.
V. RESPONSIBILIDADES DEL CLIENTE
• Lea y siga las reglas de seguridad.
• Siga un programa regular de mantenimiento, cuidados y uso de su podadora.
• Use equipo de protección personal adecuado al operar esta máquina, incluido (como mínimo) calzado
robusto, protección ocular y protección auditiva. NO pode en shorts o con calzado abierto.
• NUNCA trate de hacer ninguno de estos ajustes mientras el motor esté encendido. Desconecte el cable
de la bujía y póngalo en el piso para evitar que el motor se encienda sin querer.
• Verique los componentes del recogepasto y el conducto de descarga frecuentemente, y cambie las
piezas recomendadas por el fabricante cuando sea necesario.
• La podadora es alada. Envuelva la cuchilla o use guantes y tenga precaución extrema al darle
mantenimiento.
• NO cambie los ajustes del motor ni opere el motor con exceso de velocidad.
• Mantenga o remplace las etiquetas de seguridad y de instrucciones siempre que sea necesario.
• SIEMPRE avise a alguien que va a estar afuera podando.
• NUNCA permita que los niños estén cerca de ninguna podadora operativa, incluso si las cuchillas están
apagadas. Los niños deben estar bajo supervisión de un adulto responsable que no sea quien está
podando durante toda la operación de poda.
• Siga las instrucciones de la sección «Mantenimiento» del manual del operadors.
PRECAUCIÓN: Un control de presencia del operador está instalado en esta podadora a n de
minimizar el riesgo de lesiones por contacto de las cuchillas.
NO trate bajo ninguna circunstancia de rechazar la función de control del operador. La
cuchilla gira cuando el motor está encendido.

10
MONTAJE/ PREOPERACIÓN
PRECAUCIÓN: Lea el MANUAL INSTRUCTIVO completo antes de operar esta máquina.
IMPORTANTE: ESTA PODADORA SE ENTREGA SIN ACEITE NI GASOLINA EN EL MOTOR.
Su nueva podadora se ensambló en la fábrica con la excepción de las piezas que se dejaron desarmadas
para nes del envío. Todas las piezas, como tuercas, arandelas, pernos, etc., necesarias para terminar
el montaje están en la bolsa de las piezas. Con el n de asegurar una operación segura y adecuada de
su podadora, todas las piezas y el hardware que usted monte deben apretarse correctamente. Use las
herramientas correctas según sea necesario para asegurar que todo quede apretado de forma adecuada.
AJUSTE
PARA RETIRAR LA PODADORA DEL CARTÓN
1. Retire las piezas sueltas que se incluyen con la podadora.
2. Corte los dos extremos del cartón y coloque el panel nal en el piso en plano.
3. Retire todos los materiales del embalaje, excepto el relleno entre el manubrio superior y el manubrio
inferior, y el relleno entre la barra de control de presencia del operador y el manubrio superior.
4. Saque la podadora del cartón y verique que no queden piezas sueltas adicionales en el cartón.
CÓMO CONFIGURAR SU PODADORA
IMPORTANTE: Saque el manubrio con cuidado para evitar pellizcar o dañar los cables de control.
1. Inserte el manubrio inferior en los dos soportes laterales de la plataforma de poda. Use los agujeros
correspondientes en los soportes al acoplar el pin del manubrio inferior para lograr la altura deseada
del manubrio. Apriete el manubrio inferior a la podadora usando los pernos del manubrio, instalando y
apretando las perillas para asegurar el manubrio. (Fig. 1 & 2)
NOTA: La arandela debería estar presionada contra la cara interior del soporte.
2. Desdoble el manubrio superior y adjúntelo al manubrio inferior usando pernos de manubrio.
AJUSTE
Perilla fijadora
Fig. 2
raise
lower
levantar
bajar
Fig. 1

11
AJUSTE
3. Instale y apriete los pernos para sujetar el manubrio. (Fig.3)
NOTA: El manubrio de su podadora se puede ajustar para que la poda sea confortable. Consulte la sección
«AJUSTAR EL MANUBRIO» en el manual del operador.
5. Deslice la cuerda del cebador en la anilla del manubrio superior. (Fig.4)
6. Acople el cable Bowden y el cable de inicio eléctrico al manubrio con la abrazadera de cordón (que
viene con el aparato). (Fig. 5)
PARA MONTAR EL RECOGEPASTO
1. Adjunte el asa para levantar a la cubierta superior de plástico del recogepasto, inserte los dos extremos
en la ranura de la cubierta superior, empuje el asa hasta que se escuche el «clic», verique que quede
bien ensamblada. (Fig. 6)
Fig. 3
perno
Perilla fijadora
Fig. 4
Fig. 5
Clip
Fig. 6
1
2
12
AJUSTE
2. Deslice las ataduras en forma de clip de vinilo por encima del marco. (Fig.7)
PARA PREPARAR LA BATERÍA.
PRECAUCIÓN: 1. El uso inadecuado del paquete de la batería y el cargador pueden resultar en
shock eléctrico e incendio.
2. Mantenga el cargador y el paquete de la batería secos. Evite exponer el paquete de la batería y
el cargador a lluvia y condiciones de humedad.
3. Para reducir el riesgo de shock eléctrico, no permita que el agua uya haya el enchufe AC.
4. No provoque cortocircuitos. Nunca coloque ningún objeto en las terminales del paquete de la
batería.
NOTA:Su batería debe cargarse antes de que encienda la podadora con el encendido eléctrico.
CARGA DEL PAQUETE DE LA BATERÍA (Fig. 8)
AVISO:
- El paquete de la batería se entrega parcialmente cargado. Para asegurar el mejor desempeño, cargue la
batería por completo antes del primer uso.
- Asegúrese de que el voltaje principal sea el mismo que el de la etiqueta ubicada en el cargador.
- Retire el paquete de la batería del cargador cuando se haya cargado por completo.
1. Conecte el cargador en una toma eléctrica. La luz LED roja del cargador se encenderá.
2. Para insertar el paquete de la batería en el cargador, alinee las ranuras del paquete de batería con las
ranuras de la abertura del cargador.
3. Cuando el paquete de la batería esté correctamente colocado en el cargador, la luz LED verde del
cargador parpadeará continuamente durante la carga normal.
4. Cuando se haya completado la carga, las luces LED verdes del cargador se encenderán.
Este paquete de batería de iones de litio de 20 v está equipado con un indicador de encendido que se usa
para mostrar la carga restante del paquete de batería. Pulse el botón indicador de encendido para vericar
la carga de batería, como se muestra arriba.
Fig. 8 Fig. 9
Fig. 7
13
AJUSTE
INSTALAR EL PAQUETE DE BATERÍA (Fig. 9)
1. Asegúrese de que la barra de control de presencia del operador esté liberada.
2. El compartimiento de la batería está ubicado en el manubrio superior de la podadora. Deslice el paquete
de la batería hasta que se je y escuche un «clic». Verique que esté bien instalado.
3. Para vericar el nivel de carga de la batería, primero retírela del compartimiento de batería pulsando el
botón para liberarla. Cuando pulse el botón indicativo, la pantalla mostrará el nivel actual de carga. Tres
luces, energía de batería hasta 78%, hasta 150 ciclos de inicio; una luz, energía por encima de 10%,
hasta 5 ciclos de inicio. Si la luz parpadea, la energía es menor a 10%, posiblemente no sea suciente
para un único ciclo de inicio.
IMPORTANTE: EL MOTOR NO RECARGA LA BATERÍA. La batería deberá recargarse
periódicamente.
PRECAUCIÓN: SIEMPRE desconecte el paquete de la batería para evitar que se encienda
accidentalmente cuando transporte o guarde la podadora al nalizar la temporada.
Al nal de la temporada de poda, la batería debería recargarse por completo para protegerla durante el
almacenamiento de invierno.
AGREGAR ACEITE (Fig. 10)
IMPORTANTE: Verique el nivel de aceite antes de cada uso. Agregue aceite si es necesario. Llene hasta la
línea «Lleno» marcada en la varilla.
1. Asegúrese de que la podadora esté nivelada.
2. Retire la varilla de aceite del surtidor para llenado de aceite.
3. Use el aceite de motor recomendado.
4. Vierta el aceite lentamente. NO lo llene en exceso. Espere un minuto para que el aceite se estabilice.
Inserte y apriete la varilla, luego retírela para vericar el nivel de aceite.
5. Antes del primer uso, agregue un máximo de 15.9 onzas de aceite (SAE 30).
AGREGAR GASOLINA
Llene el tanque de combustible hasta la parte inferior del cuello de llenado del tanque. NO lo llene en
exceso. Use gasolina nueva, limpia, sin plomo con un mínimo de 87 octanos.
NO mezcle el aceite y la gasolina. Compre la gasolina en cantidades que pueda usar en un plazo de 30 días
para asegurarse de que el combustible esté fresco.
PRECAUCIÓN: Limpie cualquier derrame de aceite o combustible. NO almacene, derrame ni use
gasolina cerca de una llama abierta.
Los combustibles con mezcla de alcohol (llamados gasohol o que contengan etanol o metanol) pueden
atraer humedad que crea una separación y formación de ácidos durante el tiempo de almacenamiento. La
gasolina ácida puede dañar el sistema de combustible de un motor durante su tiempo de almacenamiento.
Para evitar problemas con el motor, el sistema de combustible debería vaciarse antes de un
almacenamiento de 30 días o más. Vacíe el tanque de gasolina, inicie el motor y déjelo funcionar hasta que
las líneas de combustibles y el carburador estén vacíos. Use combustible nuevo en la próxima temporada.
NUNCA use productos para limpiar el motor o el carburador ya que de hacerlo, puede dañarlos.
Fig. 10

14
AJUSTE
ESPECIFICACIONES TÉCNICAS DEL MOTOR
Tipo de gasolina: Sin plomo regular (máximo 10% de etanol)
Tipo de aceite (API: SG-SL)
SAE 30 o SAE 10W30
Capacidad de aceite Máx. 15.9 o.z.
Bujía Consulte el manual del motor.
NOTA IMPORTANTE: La gasolina que contenga hasta 10% de etanol (E10) es aceptable para este tipo de
máquina. El uso de cualquier gasolina que exceda 10% de etanol (E10) constituye una violación a la ley
federal e invalidará la garantía del producto.
LISTA DE VERIFICACIÓN DE ARRANQUE
Antes de que arranque su nueva podadora, queremos asegurar que reciba el mejor rendimiento y
satisfacción de este producto de calidad.
REPASE LA SIGUIENTE LISTA DE VERIFICACIÓN:
• Se concluyeron todas las instrucciones de montaje.
• No quedan piezas sueltas en el cartón.
• La batería está correctamente lista y cargada.
• Antes de arrancar la podadora, asegúrese de que la zona esté libre de restos u objetos que podrían ser
arrojados por las cuchillas.
• Verique el nivel del aceite de motor antes de encender la máquina.
• Asegúrese de que un adulto responsable, que no sea el operador, esté supervisando a los niños en un
lugar seguro ALEJADO DE LA ZONA DE PODA antes de encender la podadora.
• Asegúrese de que el Control de Presencia del Operador (OPC) funcione correctamente. Consulte la
página 16.

15
DATOS TÉCNICOS
Número de modelo YF22ESSPV
Motor
Briggs & Stratton 675Exi
Desplazamiento del motor 163 cc
Tipo de arranque Arranque de retroceso y eléctrico
Ancho del corte 21 pulgadas
Altura de corte 1.25 -3.75 pulgadas
Paquete de batería (B0P-SP07-20-G)
20 V d.c., 1.5 Ah, ion de litio
Cargador (HY1302100500UL) Salida 21 V d.c., 0.5 A
Tamaño de la llanta 8”/ 12”
Velocidad variable Hasta 2.5 MPH
Capacidad del recogepasto 2 hectolitros

16
CONOZCA SU PODADORA
Puerta de la trituradora Deector de descarga lateral
Barra de control de presencia del operador
Debe sostenerse apretada con el manubrio para
arrancar el motor o hacer funcionar las cuchillas.
Suelte la barra para detener las cuchillas/motor.
Palanca de control
Se usa para el movimiento trasero
autopropulsado de la podadora.
Perillas
Compartimiento
de la batería
Botón de encendido
Se usa para
encender el motor.
Recogedor de pasto
Con indicador de
capacidad máxima
Ajuste de altura
Se usa para ajustar la altura
de corte de la podadora.
Carcasa
El asa del parachoques
delantero se puede usar
para levantar la podadora
al transportarla.
Bujía
Puerta trasera
La puerta trasera debe
estar presente y cerrada
si no se adjunta ninguna
bolsa.
Tapa del aceite de motor
con varilla
Tapa del tanque
de gasolina
Moe
Puerta de la trituradora
Permite conversión a descarga u
operaciones de embolsado.
NOTA: Para convertir a descarga lateral,
instale el deector.
Filtro de aire
Fig. 11
Puerto
de lavado
17
PARA ENCENDER EL MOTOR
NOTA: Debido a los recubrimientos protectores del motor, puede observarse una pequeña cantidad de
humo al iniciar el uso de la podadora. Esto debe considerarse como normal.
NOTA: Su motor está equipado con un sistema cebador automático. No es necesario cebar ni asxiar el
motor antes de encender estos modelos.
PARA ENCENDER EL MOTOR USANDO LA CUERDA DEL CEBADOR (Fig. 12)
1. Para encender el motor usando la cuerda del cebador, sostenga la barra de control de presencia del
operador junto con el manubrio superior.
2. Jale el asa del cebador (que está en el extremo de la cuerda del cebador) rápidamente. NO deje que la
cuerda del cebador se regrese.
ENCENDER EL MOTOR USANDO EL BOTÓN DE ENCENDIDO (Fig.13)
1.
Para encender el motor, sostenga la barra de control de presencia del operador junto con el manubrio.
2. Pulse el
botón de encendido
para encender el motor.
NOTA IMPORTANTE: NO ARRANQUE EL MOTOR DE FORMA CONTINUA POR MÁS DE 5 SEGUNDOS
CADA VEZ QUE TRATE DE ENCENDERLO. ESPERE ENTRE CINCO Y DIEZ SEGUNDOS ENTRE CADA
INTENTO DE ARRANQUE.
APAGAR EL MOTOR Y LA CUCHILLA (Fig. 14)
Para detener el motor, suelte la
barra de control de presencia del operador
.
OPERACIÓN
2
1
2
1
Fig. 12
Fig. 13

18
OPERACIÓN
AJUSTAR LA ALTURA DE CORTE DE LA PODADORA
NOTA IMPORTANTE: ASEGÚRESE DE QUE EL MOTOR Y LAS CUCHILLAS SE HAYA DETENIDO.
Ajuste la altura de corte para que se apegue a sus necesidades. La posición media es adecuada para la
mayoría de podadoras. Levante la podadora para corte alto y bájela para corte bajo.
NOTA: Para nes de envío, la posición de ajuste de altura podría no estar ajustada a la posición de corte.
Antes de operar la podadora, ajuste la altura de corte a la posición normal de corte.
AJUSTE DE ALTURA DE PUNTO ÚNICO (Fig. 15)
Las cuatro llantas se ajustan con una única palanca.
1. Jale el
ajustador de altura
hacia la llanta.
2. Para levantar la podadora, mueva la palanca hacia atrás a la posición de altura deseada. Para bajar la
podadora, mueva la palanca hacia el frente.
CONTROL DEL MECANISMO (Fig. 16)
1. El autopropulsado se controla sosteniendo la
barra de control de presencia del operador
junto con
el manubrio y se empuja la
palanca de control
hacia el manubrio. Este aparato está equipado con un
sistema de velocidad variable. Mientras más se jale la palanca hacia el manubrio, más rápido se mueve
el aparato.
2. Para detener el movimiento sin parar el motor, solo libere la palanca de control. Sostenga la barra de
control de presencia del operador con el manubrio para seguir podando sin autopropulsión.
Fig. 14
Fig. 15
levantar
bajar

19
OPERACIÓN
Ajuste de manejo (Fig. 17)
Nota: El sistema de funcionamiento consiste de poleas, un cinturón y un cable Bowden
que liga la transmisión al manubrio. Con el desgaste de estos componentes es necesario
ir haciendo ajustes. Para ajustar la vinculación, haga lo siguiente:
•
Suelte la tuerca de seguridad con una llave inglesa (no suministrada).
• Sostenga el perno superior y gire el perno inferior en dirección de las manecillas del reloj para
recortar el cable Bowden, y en contra de la manecillas del reloj para alargar el cable Bowden.
• Encienda la podadora para probar la función de la palanca de control y apriete la tuerca de
seguridad una vez que el autopropulsado pueda iniciar.
Nota: El cable Bowden deberá estar suelto con la palanca de control de autopropulsado
en la posición liberada; de lo contrario, la máquina podría avanzar si la palanca de control
está desconectada.
Nota: La velocidad de autopropulsión puede cambiar en las pendientes.
NOTA: Tras soltar la barra de control, si la podadora no se mueve hacia atrás, empuje la podadora
ligeramente hacia adelante para soltar las ruedas.
PARA CONVERTIR LA PODADORA
Su podadora podría haberse enviado lista para usarse como trituradora. Convierta a los modos de
embolsado o descarga cambiando los accesorios instalados.
NOTA: Esta podadora tiene tres funciones. Modique las funciones cambiando los accesorios instalados
como se muestra en la siguiente tabla.
Fig. 16
Fig. 17
tuerca de seguridad
perno superior
perno inferior
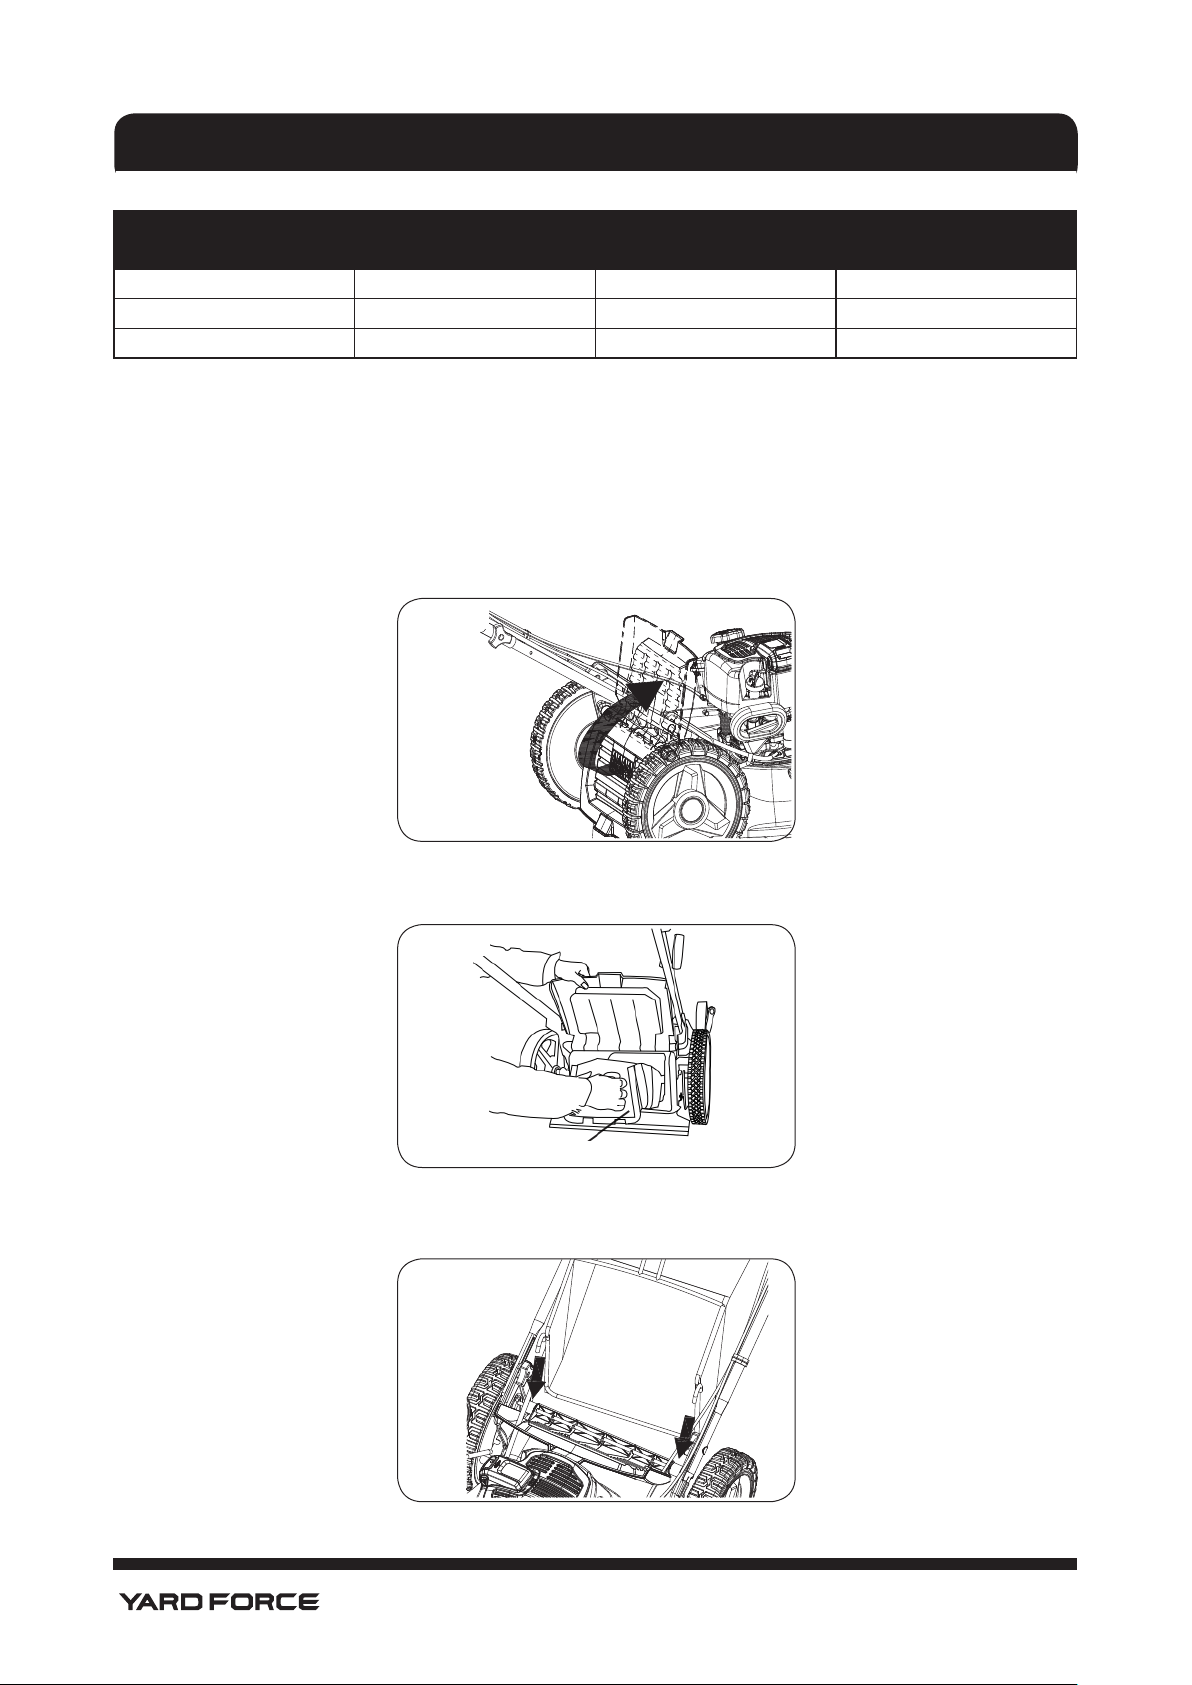
20
OPERACIÓN
Para convertir la podadora
tapón de la trituradora recogepasto
deector para descarga
lateral
Para embolsado trasero X √ X
Para triturar √ X X
Para descarga lateral √ X √
“√”: instalado “x”: retirado
EMBOLSADO TRASERO
1. Levante la
puerta trasera
de la podadora. (Fig. 18)
2. Retire el tapón de la trituradora cuando ajuste su podadora para embolsado trasero. (Fig. 19)
3. Coloque los ganchos del marco del recogepasto en los soportes de la bolsa de pasto. (Fig. 20)
Tapón de la trituradora
Fig. 18
Fig. 19
Fig. 20
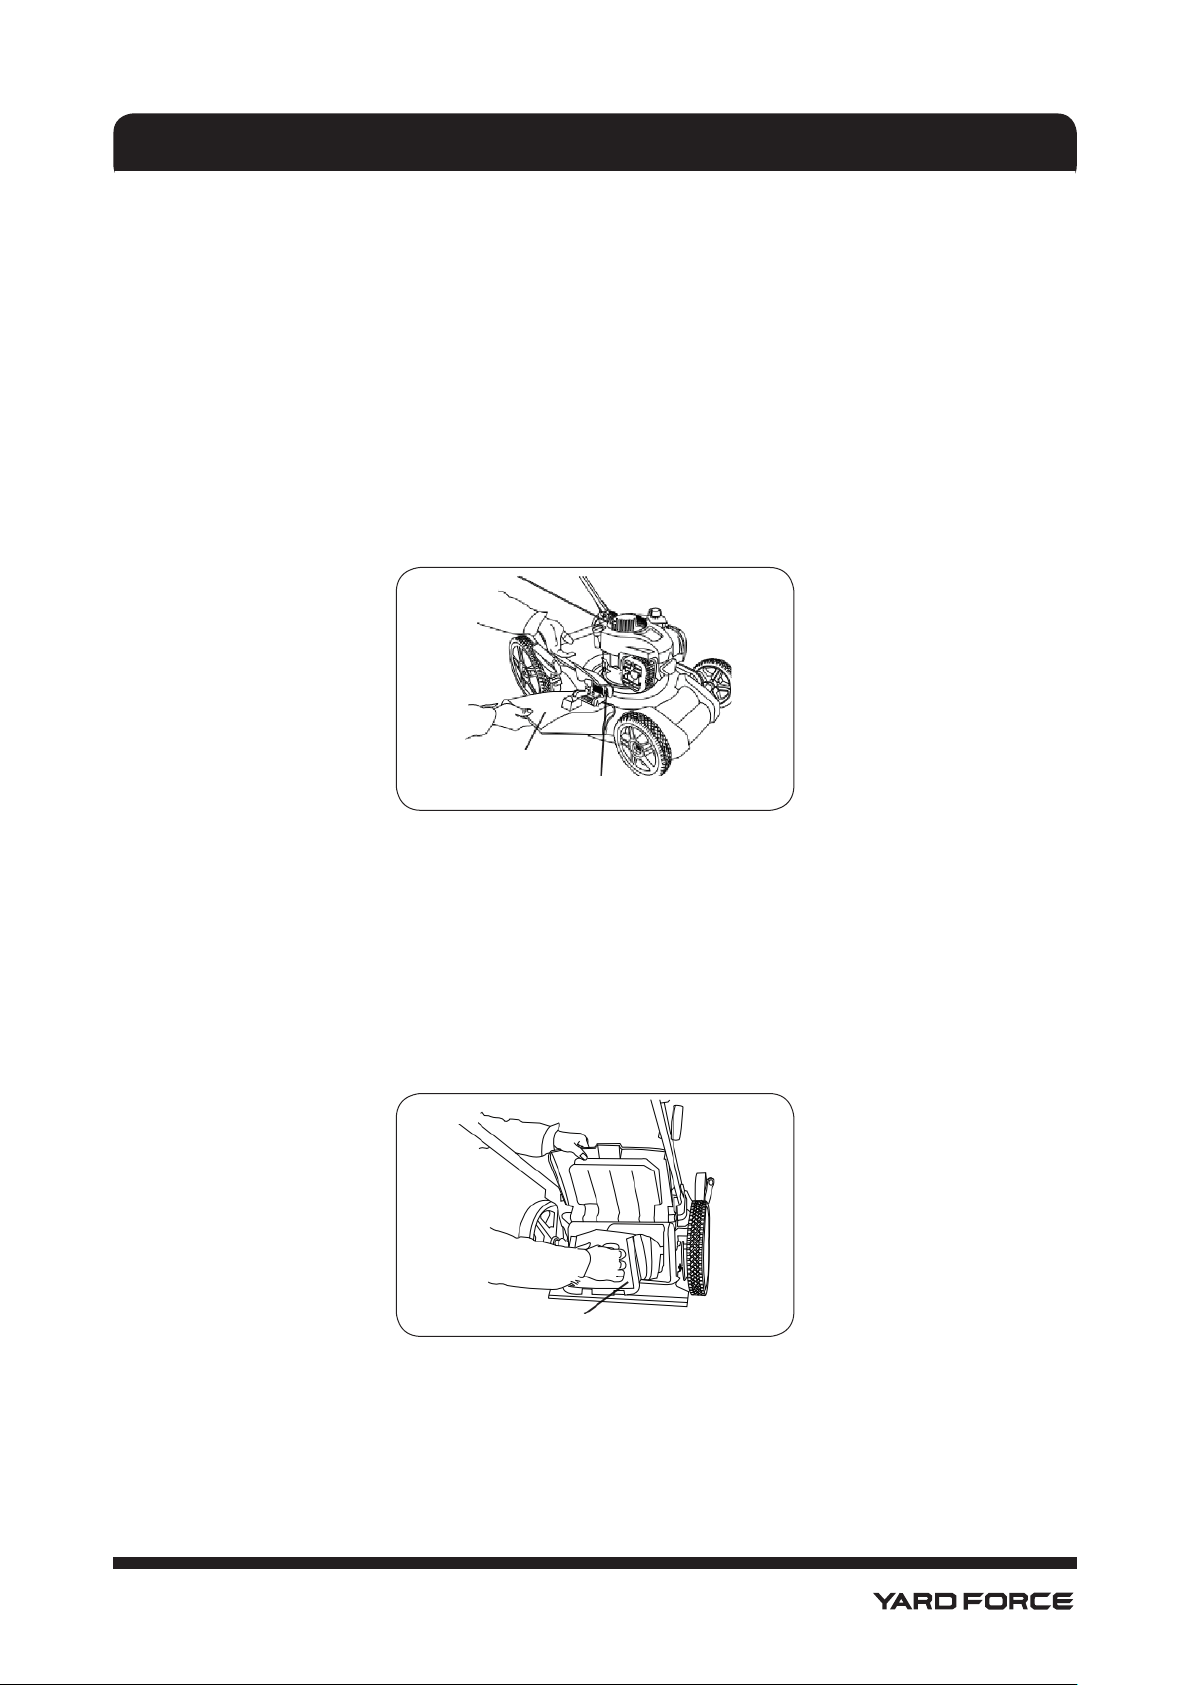
21
side discharge deflector
mulch door
OPERACIÓN
4. Cierre la puerta trasera y asegúrese de que tape cualquier espacio entre la plataforma de poda y la
unidad de embolsado.
5. Vacíe el recogepasto si el indicador de llenado en la cubierta superior está cerrado.
NOTA: Para convertir a operación de triturado o de descarga, retire el recogepasto, monte el tapón de la
trituradora y cierre la puerta trasera.
DESCARGA LATERAL (Fig. 21)
IMPORTANTE: LA PUERTA TRASERA DEBE ESTAR CERRADA.
1. Monte el tapón de la trituradora.
2. Abra la puerta de la trituradora.
3. Instale el deector de descarga debajo de la puerta como se muestra. La podadora ya está lista para la
operación de descarga.
NOTA:
Para convertir a operación trituradora o de embolsado, la puerta lateral de la trituradora debe estar cerrada.
TRITURADO (Fig. 22)
1. Abra la puerta de la trituradora.
2. Retire el deector de descarga.
3. Instale el tapón de la trituradora como se muestra. La podadora ya está lista
para la operación de triturado.
PASOS SENCILLO PARA RECORDAR CUÁNDO CONVERTIR SU PODADORA
PARA TRITURAR
• La puerta trasera está cerrada.
• La puerta para triturado está cerrada y el tapón de la trituradora debe estar montado.
Tapón de la trituradora
Fig. 21
Fig. 22
Deflector de descarga lateral
Puerta de la trituradora
Para convertir la podadora
tapón de la trituradora recogepasto
deector para descarga
lateral
Para embolsado trasero X √ X
Para triturar √ X X
Para descarga lateral √ X √
“√”: instalado “x”: retirado
EMBOLSADO TRASERO
1. Levante la
puerta trasera
de la podadora. (Fig. 18)
2. Retire el tapón de la trituradora cuando ajuste su podadora para embolsado trasero. (Fig. 19)
3. Coloque los ganchos del marco del recogepasto en los soportes de la bolsa de pasto. (Fig. 20)

22
OPERACIÓN
PARA EMBOLSADO TRASERO
• Retire el tapón de la trituradora.
• El recogepasto está instalado.
• La puerta de la trituradora está cerrada.
PARA DESCARGA LATERAL
• La puerta trasera está cerrada.
• Instale el tapón de la trituradora.
• El deector de descarga está instalado.
PRECAUCIÓN: NO haga funcionar su podadora sin que la puerta trasera esté cerrada y un
recogepasto aprobado esté correctamente instalado. NUNCA trate de operar la podadora sin
puerta trasera o abierta. Podrían causarse lesiones graves al operar la podadora con la puerta
de descarga trasera abierta.
CONSEJOS DE PODA
PRECAUCIÓN: NO use accesorios de cuchilla aireadora en su podadora. Accesorios de este
tipo son peligrosos, dañan la podadora y podrían invalidar la garantía.
•
Bajo ciertas condiciones, como pasto muy alto, podría ser necesario incrementar la altura de corte para reducir
el esfuerzo de empuje y evitar sobrecargar el motor y dejar acumulaciones de cortes de pasto. También podría
ser necesario reducir la velocidad del suelo o pasar la podadora sobre la misma zona una segunda vez.
• Para corte extremadamente pesado, reduzca el ancho de corte solapando el camino de corte anterior y
podando lentamente.
• Los poros del recogepasto de tela pueden llenarse de tierra y polvo tras el uso y el recogepasto recogerá
menos pasto. Para evitar esto, use regularmente una manguera para limpiar el recogepasto y déjelo secar
antes de usar.
• Mantenga la parte superior del motor alrededor de encendido limpia y sin pedazos de pasto ni paja. Esto ayuda
a que uya el aire por el motor y conserva la vida útil de este último
.
CONSEJOS DE PODA DE TRITURADO
IMPORTANTE: Para un mejor desempeño, mantenga la carcasa de la podadora libre de acumulación de
pasto y basura. Consulte «Limpieza» en la sección de mantenimiento del manual del operador.
• La cuchilla especial de trituradora recorta los restos de pasto muchas veces y reduce su tamaño para
que cuando caigan en el campo se dispersen en el pasto y no se vean. El pasto triturado se biodegrada
rápidamente aportando nutrientes al césped. SIEMPRE triture con la velocidad de motor (cuchillas) más
alta ya que así tendrá la mejor acción recortadora en las cuchillas.
• Evite cortar el pasto cuando esté mojado. En el pasto mojado tienden a formarse grumos, lo cual
interere con la acción de triturado. La mejor hora para podar es en la tarde. A esa hora el pasto ya se
CONSEJOS DE TRABAJO

23
CONSEJOS DE TRABAJO
secó y la zona recién podada no se expone a luz solar directa.
• Para mejores resultados, ajuste la altura de poda de la podadora para que corte solo la tercera parte
superior del pasto (Fig. 23). Si el pasto está muy crecido, será necesario incrementar la altura de corte
para reducir el esfuerzo de empuje y evitar sobrecargar el motor y dejar acumulaciones de cortes de
pasto. Para triturado extremadamente pesado, reduzca el ancho de corte solapando el camino de corte
anterior y podando lentamente.
• Ciertos tipos de pasto y condiciones de pasto podría requerir que un segundo triturado para ocultar por
completo los cortes. Al hacer un segundo corte, pode en perpendicular al trazo del primer corte.
• Cambie el patrón de corte entre una semana y otra. Pode de norte a sur una semana y de este a oeste la
otra semana. De esta manera, evitará texturizar y vetear el pasto.
MÁX 1/3
FIGURE A
Fig. 23

24
MANTENIMIENTO
EL MANUAL DEL OPERADOR PARA SU PRODUCTO EN PARTICULAR ESTÁ DISPONIBLE LLAMANDO AL
1-(866) 9029690.
Antes
de cada
uso
Después
de cada
uso
Cada 10
horas
Cada 25 horas
o temporada
Cada
100
horas
Antes de
almacenar
Vericar sujetadores sueltos × ×
Limpiar/inspeccionar el guardapasto × × ×
Vericar llantas ×
Limpiar las llantas directivas ×
Limpiar la podadora × ×
Limpiar debajo de la cubierta ×
Limpiar las correas y poleas ×
Vericar/alar/cambiar las cuchillas ×
Lubricación ×
Limpiar y recargar la batería × ×
Vericar el nivel de aceite de motor ×
Cambiar el aceite de motor ×
Limpiar el ltro de aire ×
Inspeccionar el moe ×
Cambiar la bujía ×
Cambiar el cartucho de papel de ltro de
aire
×
Vaciar el sistema de combustible y agregar
estabilizante
×
NOTAS: (1) Cambiar más a menudo cuando se opera bajo una carga pesada o en temperaturas ambiente
muy altas (2) Dar mantenimiento con más frecuencia al operar en condiciones sucias o polvorosas. (3)
Cambiar las cuchillas con más frecuencia al podar en terrenos arenosos.

25
MANTENIMIENTO
EXAMINAR LA CUCHILLA (Fig. 24)
ADVERTENCIA: SIEMPRE detenga el motor antes de trabajar sobre las cuchillas. La cuchilla
sigue rotando después de soltar el acelerador. Asegúrese de que la cuchilla se haya detenido
por completo y desconecte el tapón de la bujía antes de que inicie los trabajos.
PRECAUCIÓN: Para mejores resultados, mantenga la cuchilla alada. Cambie las cuchillas
dañadas de inmediato. NO use una podadora con cuchillas dañadas.
• Examine la cuchilla para ver si no presenta grietas u otros daños. Las cuchillas dañadas deben
cambiarse siempre.
• Asegúrese siempre de que la cuchilla esté correctamente puesta y equilibrada. Para examinar el balance
de la cuchilla, use un perno de acero de 7/8" (22 mm) de diámetro, un pin o un amortiguador de cono.
Siga todas las instrucciones que se incluyen con el amortiguador.
• NO use un clavo para equilibrar la cuchilla. Los lóbulos del agujero central no están centrados.
• Mueva la cuchilla a una parte no enroscada del perno de acero o pin, sostenga el perno o pin paralelos
al piso. Si la cuchilla está equilibrada, se mantiene en posición horizontal.
Si uno de los dos extremos de la cuchilla se mueve hacia abajo, ale el extremo pesado de la cuchilla
que está correctamente equilibrada.
NOTA: Las cuchillas deben equilibrarse después del alado. NO ale ni equilibre la cuchilla usted solo.
Hágalo con un taller de servicio autorizado.
CAMBIAR LA CUCHILLA
ADVERTENCIA: Use guantes y/o gire la cuchilla con un paño grueso para evitar lesionarse
las manos.
PRECAUCIÓN: Use solo una cuchilla de recambio de un fabricante autorizado. Usar una
cuchilla no autorizada por el fabricante es peligroso y puede dañar el producto e invalidar la
garantía.
1. Desconecte siempre la bujía antes de dar mantenimiento al aparato.
2. Vacíe siempre el tanque de combustible antes de ladear el producto. Vacíe el tanque de combustible
operando la máquina hasta que el tanque esté vacío.
3. Gire el producto sobre el costado. Cuando el producto esté volteado, asegúrese de que el ltro de aire
esté puesto en la posición más alta. (Fig. 25)s
Fig. 24

26
4. Use un bloque de madera entre la cuchilla y la carcasa de la podadora para evitar que la cuchilla gire al
retirar el perno de la cuchilla. (Fig. 26)
5. Retire el perno de la cuchilla girándola en contra de las manecillas del reloj.
6. Retire la cuchilla.
NOTA: Asegúrese de que el adaptador de la cuchilla no esté dañado. Examine el perno de la cuchilla y
asegúrese de que el eje del motor no esté doblado.
MONTAR LA CUCHILLA
1. Ponga el adaptador de la cuchilla en el cigüeñal del motor. Asegúrese de que llave del adaptador y la
ranura del cigüeñal estén alineados.
MANTENIMIENTO
Fig. 25
Fig. 26

27
0.467–0.61 mm
2. Siempre adjunte la cuchilla con los extremos angulados apuntando hacia el motor. (Fig. 27)
3. Use un bloque de madera entre la cuchilla y la carcasa del producto. Apriete el perno de la cuchilla y gire
en sentido del reloj. (Fig. 28)
4. Siempre apriete el perno con par de torsión de 33-40 ft-lb (45-55 Nm).
5. Asegúrese de que el cable de la bujía esté desconectado del motor.
PRECAUCIÓN: Para evitar que se encienda por accidente, desconecte siempre el cable de la bujía
y ponga el cable donde no pueda tocar la bujía.
6. Mueva la cuchilla a mano y asegúrese de que rote libremente.
MANTENER LA BUJÍA (Fig. 29)
1. Cuando el motor se haya enfriado, jale la cubierta de la bujía con un giro.
2. Retire la bujía con la ayuda de una llave tubular (no incluida).
3. Limpie la bujía con un cepillo metálico (no incluido).
4. Usando un calibrador de espesor, ajuste la distancia a 0.467-0.61" (0.686- 0.838 mm).
5. Instale la bujía con cuidado a mano para evitar dañar la rosca.
6. Cuando la bujía esté instalada, apriétela con la llave tubular para bujía para comprimir la arandela.
MANTENIMIENTO
Fig. 27
Fig. 28
Fig. 29
0.018"-0.024"
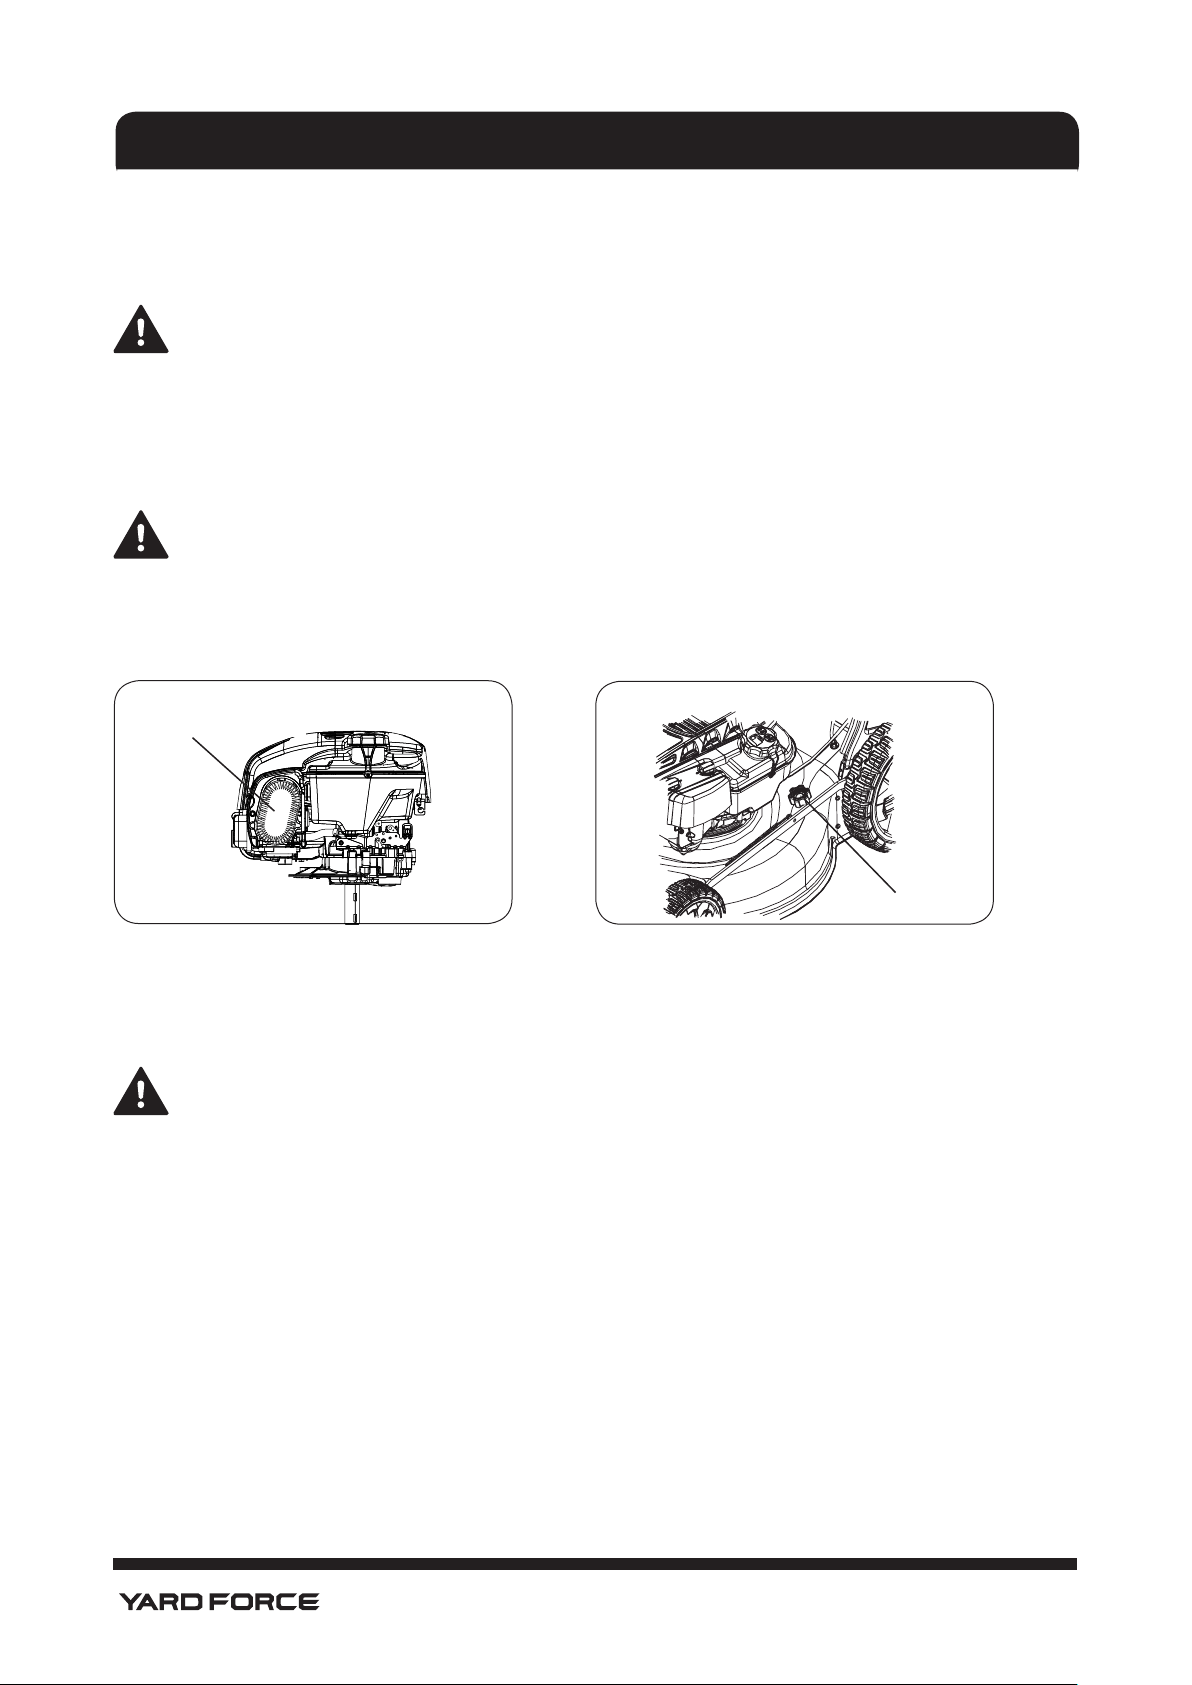
28
filter cartridge
DAR MANTENIMIENTO AL FILTRO DE AIRE (Fig. 30)
Los ltros de aire sucios reducen la salida del motor restringiendo la cantidad de aire al carburador. Si el
aire contiene mucho polvo, el ltro de aire debe checarse con más frecuencia.
PRECAUCIÓN Nunca haga funcionar el motor sin que el elemento del ltro de aire esté instalado.
1. Limpie la tapa del ltro de aire.
2. Retire el cartucho del ltro.
3. Para soltar los restos, dele suaves golpes al cartucho del ltro sobre una supercie dura. Si el cartucho
del ltro está excesivamente sucio, cámbielo por uno nuevo.
PRECAUCIÓN Nunca limpie el cartucho de aire con gasolina o solventes inamables. Limpie
el cartucho del ltro de aire solo con aire comprimido o dándole golpecitos.
4. Instale el cartucho del ltro.
5. Cierre la tapa y asegúrese de que suene el clic.
Lavar la plataforma de poda
El puerto de lavado le permite conectar una manguera de jardín normal a la plataforma de poda para retirar
el pasto y los restos que quedan abajo.
PRECAUCIÓN! El contacto con la cuchilla de poda o con objetos que la cuchilla aviente, puede
resultar en muerte o lesiones graves.
• Antes de operar la podadora, asegúrese de que la manguera esté bien conectada y no entre en
contacto con la cuchilla.
• Cuando la podadora esté funcionando, la persona que limpie la podadora debe estar en el lugar
del operador, sin que haya gente alrededor.
1. Coloque la unidad sobre una supercie lisa.
2. Coloque la podadora en la posición de corte más alta. Consulte Ajuste de altura de punto único.
3. Acople una manguera de jardín al puerto de lavado (Fig. 31.) sobre la plataforma de poda.
4. Haga correr el agua para retirar el pasto y los restos de la parte de abajo de la podadora.
5. Encienda la podadora.
6. Apague la podadora.
7. Retire la manguera del puerto de lavado cuando haya terminado.
MANTENIMIENTO
Fig. 30
Puerto de lavado
Cartucho de filtro
Fig. 31

29
GARANTÍA
GARANTÍA LIMITADA DE DOS AÑOS DE YARD FORCE
Garantía de producto
Guarde su recibo de venta original en un lugar seguro como prueba de compra. La cobertura de la
garantía de este producto deberá vericarse con el recibo original de la compra. El periodo de garantía
comienza el día en que se compró el producto con un distribuidor autorizado de productos Yard Force.
La cobertura de la garantía aplica únicamente para el comprador original y no es transferible. La cober-
tura de la garantía se proporciona únicamente para los productos comprados y usados en los Estados
Unidos y en Puerto Rico de distribuidores autorizados de Yard Force. Los productos comprados o usa-
dos fuera de los Estados Unidos y Puerto Rico no están cubiertos por esta garantía.
Dos (2) años de garantía - Motor
La podadora Yard Force tiene una garantía limitada de dos años a partir de la fecha de compra que
cubre defectos de fabricación para uso residencial únicamente. El uso comercial invalida la garantía.
Esta garantía no cubre daño accidental, uso no razonable, desgaste por uso normal, negligencia o no
cumplimiento de las instrucciones de operación, seguridad y mantenimiento. Todo servicio, fuera del
mantenimiento normal descrito en este manual, deberá realizarse por un técnico de servicio autorizado.
Cualquier servicio no autorizado o cambios a la conguración original de este producto invalidarán la
garantía. Todas las piezas y accesorios usados en y con este producto deberán ser fabricados y autor-
izados por Merotec Inc.
Garantía de noventa (90) días - accesorios
Los accesorios incluidos con la podadora, como la cuchilla y otras piezas similares tienen garantía por
defectos de fabricación, para uso residencial únicamente, por un periodo de 90 días a partir de la fecha
de compra. La garantía no cubre la pérdida de uso u otros daños consecuentes de nada de lo anterior,
y tampoco cubre reparaciones hechas o tentativas de reparación realizadas por personas no autoriza-
das. Esta garantía se anula si el producto se usa para nes comerciales, de renta o industriales. Ciertas
piezas y accesorios están sujetos al desgaste normal y se excluyen de esta garantía.
Proceso de servicio y reclamos de garantía
Para servicio y soporte con la garantía, póngase en contacto con el centro de soporte de Yard Force
llamando a la línea gratuita al (866) 902-9690 de lunes a viernes de 8:30 AM a 5:00 PM hora del este.
Los agentes de soporte de servicio de Yard Force USA pueden ayudarle a resolver los problemas por
teléfono para que pueda volver a usar su producto tan rápidamente como sea posible. En situaciones en
donde sea necesario reparación o inspección de la garantía, por favor siga de los siguientes pasos:
1. Contacte Yard Force USA al (866) 902-9690 o support@merotecusa.com de lunes a viernes de 8:30
AM a 5:00 PM hora del este.
2. Envíe su prueba de compra y el número de serie (si aplica) para conrmar la cobertura de la garantía.
3. Si se solicita un servicio o una evaluación de la garantía, Yard Force USA le proporcionará un número
RGA que deberá usar en todas las comunicaciones con Yard Force USA y, de ser necesario, una lista de
los centros de servicio autorizados locales donde podrá llevar su podadora para que la evalúen y reparen.
4. Todos los envíos Yard Force USA deberán tener un número RGA. Cualquier envío recibido que no lleve
el número RGA marcado en la parte exterior de la caja será rechazado.
5. Todos los envíos deben ir prepagados, Yard Force USA no paga los costos de envío para servicio o
evaluación de garantía. Yard Force USA no se hace responsable de ningún paquete perdido por el ser-
vicio de paquetería. Recomendamos que los envíos se hagan por un servicio de paquetería que propor-
cionen guía de seguimiento y conrmación de entrega.
Para más información o si tiene alguna pregunta, llame sin costo al (866) 902-9690 o escriba a support@
merotecusa.com de lunes a viernes de 8:30 a.m. a 5:00 p.m. hora del este.
GUARDE ESTAS INSTRUCCIONES!


Merotec Inc.
3655 Kennesaw North Industrial Parkway Kennesaw, GA 30144
Copyright © 2019 Merotec Inc.
Hecho en China en instalaciones manufactureras de SUMEC
www.YardForceUSA.com
¿Necesita ayuda?
Por favor, todavía no devuelva el producto al lugar donde lo
compró. Estamos aquí para ayudarle y atender todas sus
necesidades.
Póngase en contacto con el departa-
mento de servicio al cliente para ayuda
con:
• Montaje o uso del producto
• Piezas faltantes o dañadas
• Resolución de problemas
También puede visitar nuestro sitio web para ver las preguntas
frecuentes, los pasos de resolución de problemas descarga
abrir y vídeos tutoriales. Las piezas de recambio y los acceso-
rios se pueden comprar en www.YardForceUSA.com, o llame
sin costo a nuestra línea gratuita: 1-866-902-9690 L-V 8:30am
- 5:00pm ET
www.YardForceUSA.com