
Operation Manual
ADVANCED MULTIMEDIA NAVIGATION SYST EM
AVIC-F500BT
Notice to all users:
Be sure to read “Important Information for the user” first!
“Important Information for the user” includes the
important information that you must understand before
using this navigation system.
This software requires that the navigation system is
properly connected to your vehicle’s parking brake and
depending on your vehicle, additional installation may
be required. For more information, please contact your
Authorized Pioneer Electronics retailer or call us at
(800) 421-1404.
English

Thank you for buying this Pioneer product.
Please read through these operating instructions so you will know how to operate
your model properly. After you have finished reading the instructions, keep this man-
ual in a safe place for future reference.
Important
The screens shown in the examples may differ
from the actual screens.
The actual screens may be changed without
notice for performance and function improve-
ments.
Introduction
Manual overview 6
– How to read this manual 6
– Terminology 6
– About the definition of terminology 6
Features 7
Map coverage 8
Protecting the LCD panel and screen 8
Viewing the LCD comfortably 8
Notes for internal memory 9
– Before detaching the battery pack 9
– Resetting the navigation system 9
Basic operation
Checking part names and functions 10
Inserting and ejecting an SD memory
card 12
– Inserting an SD memory card 12
– Ejecting an SD memory card 12
Plugging and unplugging a USB storage
device 13
– Plugging in a USB storage device 13
– Unplugging a USB storage device 13
Connecting and disconnecting iPod 14
– Connecting your iPod 14
– Disconnecting your iPod 14
Flow from startup to termination 14
On first-time startup 15
Regular startup 15
How to use the navigation menu
screens 16
– Screen switching overview 16
– What you can do on each menu 17
– Displaying the rear camera image 17
– Listening to the combined car stereo
sounds 17
How to use the map 18
– How to read the map screen 18
– Switching the map between 2D and
3D 20
– Changing the scale of the map 20
– Scrolling the map to the position you
want to see 21
– Changing the tilt and rotation angle of
the map 21
The basic flow of creating your route 22
The operations of a list screen (e.g. city
list) 22
The operation of the on-screen keyboard 22
Searching for and selecting a location
Searching for a location by address 24
Searching for the vicinity Points of Interest
(POI) 26
– Searching for POIs around the
cursor 26
– Searching for a nearby POI 27
– Searching for POIs along the current
route 27
– Searching for POIs around the
destination 27
– Using “Saved Criteria” 28
Searching for POIs by using the data on
external storage devices (USB, SD) 30
Searching for a location by coordinates 31
Selecting a location you searched for
recently 32
– Deleting an entry in “History” 32
Selecting a location stored in “Favorites” 32
– Deleting an entry in “Favorites” 33
Setting up a route to your home 33
Setting a route by recalling a saved route 33
Searching for a location by scrolling the
map 34
Contents
En
2

After the location is decided (Map
Confirmation Screen)
What you can do with the “Map Confirmation
Screen” 36
Route... 36
Save as... 37
Setting the location as a new destination 37
Setting the location as a waypoint 37
Replacing the location as the new final
destination 37
Setting the location as the start point 37
Viewing the information of a specified
location 38
Placing a map pin on the location 38
– Removing a map pin 39
Registering the location as a customized
POI 39
Storing the location in “Favorites” 40
Deleting an entry in “Favorites” 40
Checking the current route
Checking the current route conditions 41
– Playing simulated travel at high
speed 42
– Checking the entire route overview on
the map 42
Checking the current itinerary 42
Editing waypoints and the destination
Editing waypoints 44
– Adding a waypoint 44
– Sorting waypoints 44
– Deleting a waypoint 44
Storing the current route 44
– Deleting the entry in “Saved
Routes” 45
Deleting the current route 45
Browsing information on MSN Direct
Activating the service 46
– Checking your product key 46
– Subscribing to the MSN Direct
service 47
– Activating the MSN Direct
function 47
Browsing gas prices 47
Browsing movie times 48
– Searching for a theater by selecting a
movie title 48
– Searching for a movie title by selecting
a theater 49
Browsing weather information 50
– Checking the local weather
information 50
– Checking worldwide weather
conditions 50
Using traffic information 50
– Viewing the traffic list 50
– How to read traffic information on the
map 51
– Setting the traffic information 51
Using hands-free phoning
Hands-free phoning overview 52
Preparing communication devices 52
Displaying the Phone Menu 52
Registering your cellular phone 52
– Searching for nearby phones 53
– Searching for a specified phone 53
– Pairing from your mobile phone 54
Connecting a registered cellular phone 55
– Disconnecting a cellular phone 55
– Deleting a registered phone 55
Receiving a phone call 56
– Answering an incoming call 56
– Rejecting an incoming call 56
Making a phone call 56
– Direct dialing 57
– Dialing from the histor y 57
– Calling a number in the “Contacts”
screen 58
– Dialing a phone number on the “Map
Confirmation Screen” 58
En
3
Contents

– Making a call home easily 58
– Dialing GOOG-411 59
Announcing incoming short mails 59
Transferring the phone book 59
Clearing memory 60
Setting the phone 61
– Setting the phone volume 61
– Stopping Bluetooth wave
transmission 61
– Answering a call automatically 61
– Setting the automatic rejection
function 62
– Echo canceling and noise
reduction 62
– Setting the automatic connection 62
– Editing the device name 62
Notes for hands-free phoning 63
Updating the Bluetooth wireless technology
software 64
Playing the music file (USB, SD)
Starting procedures 65
Reading the screen 65
Using the touch panel keys (Music) 66
– Selecting a track from the list 67
– Browsing embedded text
information 67
Using the “Function” menu 67
Playing the movie file (USB, SD)
Starting procedures 69
Reading the screen 69
Using the touch panel keys (Video) 70
– Searching for a desired scene and
starting playback from a specified
time 70
Using the “Function” menu 71
Using the iPod® (iPod)
Starting procedures 72
Reading the screen 72
Using the touch panel keys (Music) 73
– Browsing for a song 73
Starting the video playback 74
Using the touch panel keys (Video) 75
– Browsing for a video 76
Using the “Function” menu 76
Using the AV input
Starting procedures (AV) 78
Using the touch panel keys 78
Customizing preferences
The options in the “Navi Settings” menu 79
– Basic operations in the “Navi Settings”
menu 79
– GPS & Time Settings 79
– Time Settings 80
– 3D Settings 81
– Map Settings 81
– Displayed Info 82
– Smart Zoom 82
– Overview Mode 83
– Manage POI 83
– Manage Track Logs 83
– Route 83
– Warnings 85
– Regional Settings 85
– Restore Factory Settings 85
– Set Home 86
– Demo Mode 86
– Sound settings 86
– About 86
– Setting the POI appearance 87
– Creating new categories 87
– Editing your customized POI 88
– Recording your travel history 89
– Setting your home position 90
The options on the “System Settings”
menu 91
– Displaying the “System Settings”
menu 91
– Selecting the language 91
– Changing the splash screen 92
Contents
En
4

– Setting the rear view camera 92
– Adjusting the response positions of the
touch panels (touch panel
calibration) 93
– Adjusting the screen brightness 94
– Setting the power-saving function 94
– Monitoring the battery status 94
– Checking the version information 95
– Turning off the screen 95
The options on the “AV Settings” menu 95
– Displaying the “AV Settings” menu 95
– Setting video input (AV) 95
– Switching the sound muting/
attenuation 96
– Changing the wide screen mode 96
– Setting the audio output 96
– Acquiring/Cataloging iPod music
information 97
Operating Your Navigation System with
Voice
To Ensure Safe Driving 98
Basics of Voice Operation 98
– Flow of voice operation 98
– Starting voice operation 99
Operating iPod by voice 99
Calling the entry on “Contacts” 99
Available Basic Voice Commands 100
– Basic commands 100
– Voice operation for the iPod 100
– Voice operation for AV source (other
than iPod) 101
– Voice commands related to hands-free
phoning 102
Tips for Voice Operation 103
Other functions
Returning the navigation system to the
default or factory settings 104
– Setting items to be deleted 105
Appendix
Troubleshooting 106
Messages and how to react to them 109
Messages for Audio Functions 110
Positioning technology 111
– Positioning by GPS 111
– Map matching 111
Handling large errors 111
– When positioning by GPS is
impossible 112
– Conditions likely to cause noticeable
positioning errors 112
Route setting information 114
– Route search specifications 114
Detailed information for playable media 115
– Compatibility 115
– Media compatibility chart 117
About Bluetooth 120
About SD and SDHC logo 120
About WMA 120
About AAC 120
Detailed information regarding connectable
iPods 120
Using the LCD screen correctly 121
– Handling the LCD screen 121
– Liquid crystal display (LCD)
screen 121
– Maintaining the LCD screen 121
– LED (light-emitting diode)
backlight 121
Display information 122
– Destination Menu 122
– Phone Menu 122
– Settings Menu 123
– Shortcut menu 125
Glossary 126
Specifications 128
En
5
Contents

Manual overview
Before using this product, be sure to read “Im-
portant Information for the user” (a separate
manual) which contains warnings, cautions,
and other important information that you
should note.
This manual provides important information
you need to make full use of your new naviga-
tion system.
The beginning chapters outline this navigation
system. The later chapters describe the details
of the navigation functions.
Chapter 8 describes the operations related to
hands-free phoning by using a cellular phone
featuring Bluetooth
®
technology.
Chapter 9 to Chapter 12 describe how to con-
trol the AV sources. Please read these chap-
ters when you use the various functions in the
built-in audio and visual source or operate the
audio equipment connected to the navigation
system.
Chapter 13 describes how to change the set-
tings so as to suit your tastes. The behavior of
your navigation system depends the settings
for navigation and audio-visual functions.
How to read this manual
Finding the operation procedure from
what you want to do
When you have decided what you want to do,
you can find the page you need from the
“Contents”.
Finding the operation procedure from
a menu name
If you want to check the meaning of each item
displayed on the screen, you will find the ne-
cessary page from the “Display information” at
the end of the manual.
Glossary
See the glossary to find the meaning of a
term.
Terminology
Before moving on, take a few minutes to read
the following information about the conven-
tions used in this manual. Familiarity with
these conventions will help you greatly as you
learn how to use your new equipment.
! Buttons on your navigation system are de-
scribed in ALL CAPITAL, BOLD lettering:
e.g.)
MENU button, MAP button.
! Items in different menus, screen titles, and
functional components are described in
bold with double quotation marks “”:
e.g.)
“Destination Menu” screen or “AV
Source” screen
! Touch panel keys that are available on the
screen are described in bold in brackets [ ]:
e.g.)
[Destination], [Settings].
! Extra information, alternatives and other
notes are presented in the following for-
mat:
e.g.)
p If the home location has not been stored
yet, set the location first.
! References are indicated like this:
e.g.)
= For details, refer to Setting your home
position on page 90.
About the definition of
terminology
“Video image”
“Video image” in this manual indicates the
moving images of iPod, and any equipment
that is connected to this system with an RCA
cable, such as general-purpose AV equipment.
Introduction
En
6
Chapter
01

“External storage device (USB, SD)”
The SD memory card, SDHC memory card,
USB memory device and USB portable audio
player are collectively referred to as the “exter-
nal storage device (USB, SD)”. If it indicates
the USB memory and USB portable audio
player only, they are referred to as the “USB
storage device”.
Features
Touch panel key operation
It is possible to operate the navigation and
audio functions by using the touch panel key.
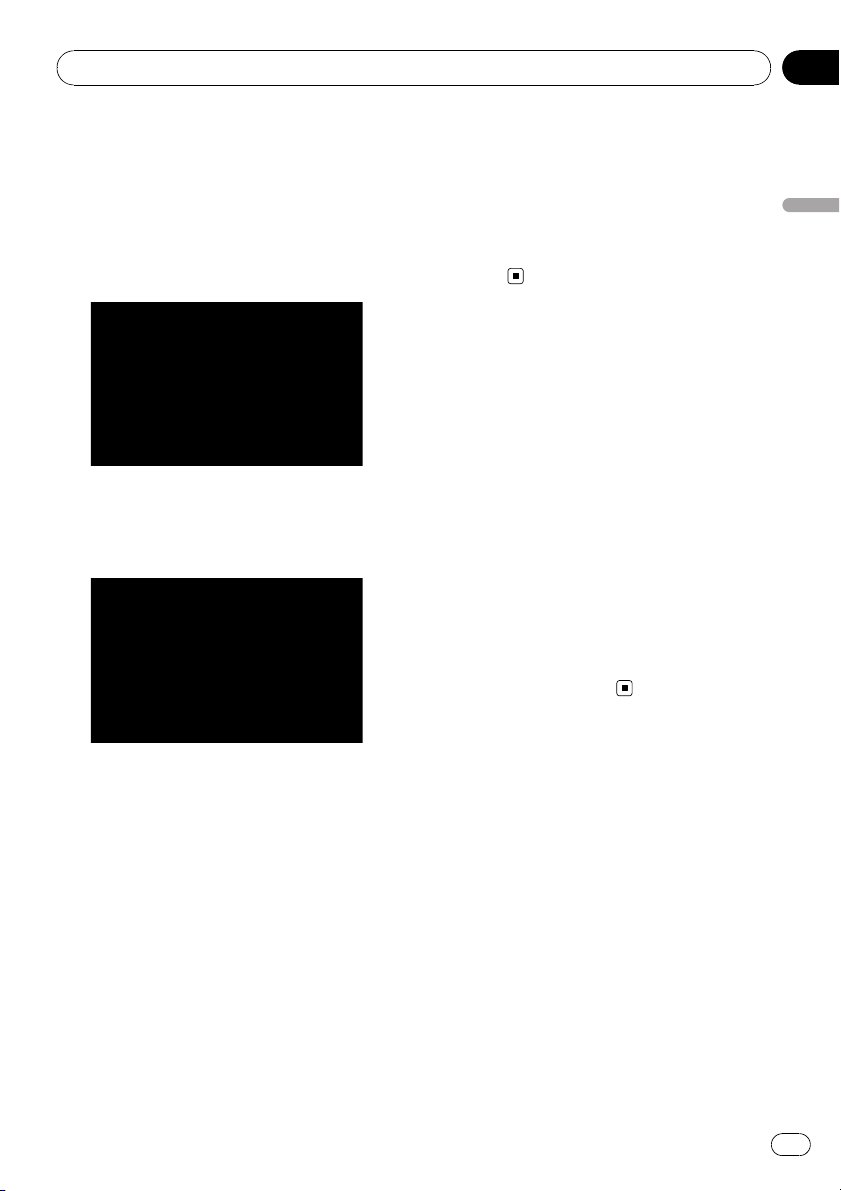
2D and 3D map view modes
Various types of screen displays can be se-
lected for navigation guidance.
2D map screen
3D map screen
A wide variety of Points of Interest
(POI) information
More than 100 types of POI categories are in-
cluded in the database. You can also create
your own customized POIs and categories.
Auto reroute function
If you deviate from the set route, the system
will re-calculate the route from that point so
that you remain on track to the destination.
p This function may not work under certain
conditions.
Assign your original image as a splash
screen
You can store your own pictures on an external
storage device (USB, SD) in JPEG or BMP for-
mat and import an original splash screen to
this navigation system. These imported
images can be set up as customized splash
screens.
p Imported original images will be stored in
the built-in memory, but the ability to save
these images cannot be guaranteed com-
pletely. If your original image data is de-
leted, set the external storage device (USB,
SD) again and re-import the original image.
A wide variety of playable file formats
! Following file types is playable on the exter-
nal storage device (USB, SD).
MP3, WMA, AAC, WAV, MPEG-4, AVI
— Notice regarding video viewing
Remember that use of this system for com-
mercial or public viewing purposes may
constitute an infringement on the author’s
rights as protected by the Copyright Law.
— Notice regarding MP3 file usage
Supply of this navigation system conveys
only a license for private, non-commercial
use and does not convey a license nor
imply any right to use this product in any
commercial (i.e. revenue-generating), real
time broadcasting (terrestrial, satellite,
cable and/or any other media), broadcast-
ing/streaming via internet, intranets and/or
other networks or in other electronic con-
tent distribution systems, such as pay-
audio or audio-on-demand applications. An
independent license for such use is re-
quired. For details, please visit
http://www.mp3licensing.com.
Introduction
En
7
Chapter
01
Introduction

Auto file name listing
The track name will be automatically listed
when this function is available. This system
provides easy-to-operate audio functions that
allow playback simply by selecting an item
from the list.
iPod
®
compatibility
This product supports only the following iPod
models and iPod software versions. Others
may not be work correctly.
! iPod nano first generation; Ver. 1.3.1
! iPod nano second generation; Ver. 1.1.3
! iPod nano third generation; Ver. 1.1
! iPod fifth generation; Ver. 1.3
! iPod classic; Ver. 1.1.1
! iPod touch; Ver. 1.1.4
p When you use this navigation system with
a Pioneer USB interface cable for iPod (CD-
IU200VM) (sold separately), you can control
an iPod compatible with this navigation
system.
p To obtain maximum performance, we re-
commend that you use the latest software
for the iPod.
p Operations may vary depending on the
iPod models and the software version of
iPod.
p For more details about iPod compatibility
with this navigation system, refer to the in-
formation on our website.
p iPod is a trademark of Apple Inc., regis-
tered in the U.S. and other countries.
Hands-free phoning
A cellular phone featuring Bluetooth
®
technol-
ogy can be connected wirelessly.
— The cellular phone used must be compati-
ble with the profile of this navigation sys-
tem.
— When using Bluetooth wireless technology,
this navigation system may not be able to
operate all of the functions on the cellular
phone.
Rear view camera ready
You can display what is behind the vehicle if
connected to a rear view camera (e.g. ND-
BC2) (sold separately).
Map coverage
For more details about the map coverage of
this navigation system, refer to the information
on our website.
Protecting the LCD panel
and screen
p Do not allow direct sunlight to fall on the
LCD screen when this product is not being
used. Extended exposure to direct sunlight
can result in LCD screen malfunction due
to the resulting high temperatures.
p When using a cellular phone, keep the an-
tenna of the cellular phone away from the
LCD screen to prevent disruption of the
video in the form of spots, colored stripes,
etc.
p To protect the LCD screen from damage, be
sure to touch the touch panel keys only
with your fingers. (Keep the use of other in-
struments at a minimum, and only in cases
in which the touch panel calibration is
necessary.)
Viewing the LCD comfortably
Due to its construction, the viewing angle of
the LCD screen is limited. However, “Bright-
ness” may be used to adjust the black density
of the video. When using the screen for the
first time, the adjustment of the black density
for clear viewing is recommended.
Introduction
En
8
Chapter
01
Notes for internal memory
Before detaching the battery pack
If the internal battery is detached or dis-
charged, the memory will be erased and must
be reprogrammed.
p Some data remains. Read Returning the na-
vigation system to the default or factory set-
tings before you operate this function.
= For more detailed information about the
items to be deleted, refer to Returning
the navigation system to the default or
factory settings on page 104.
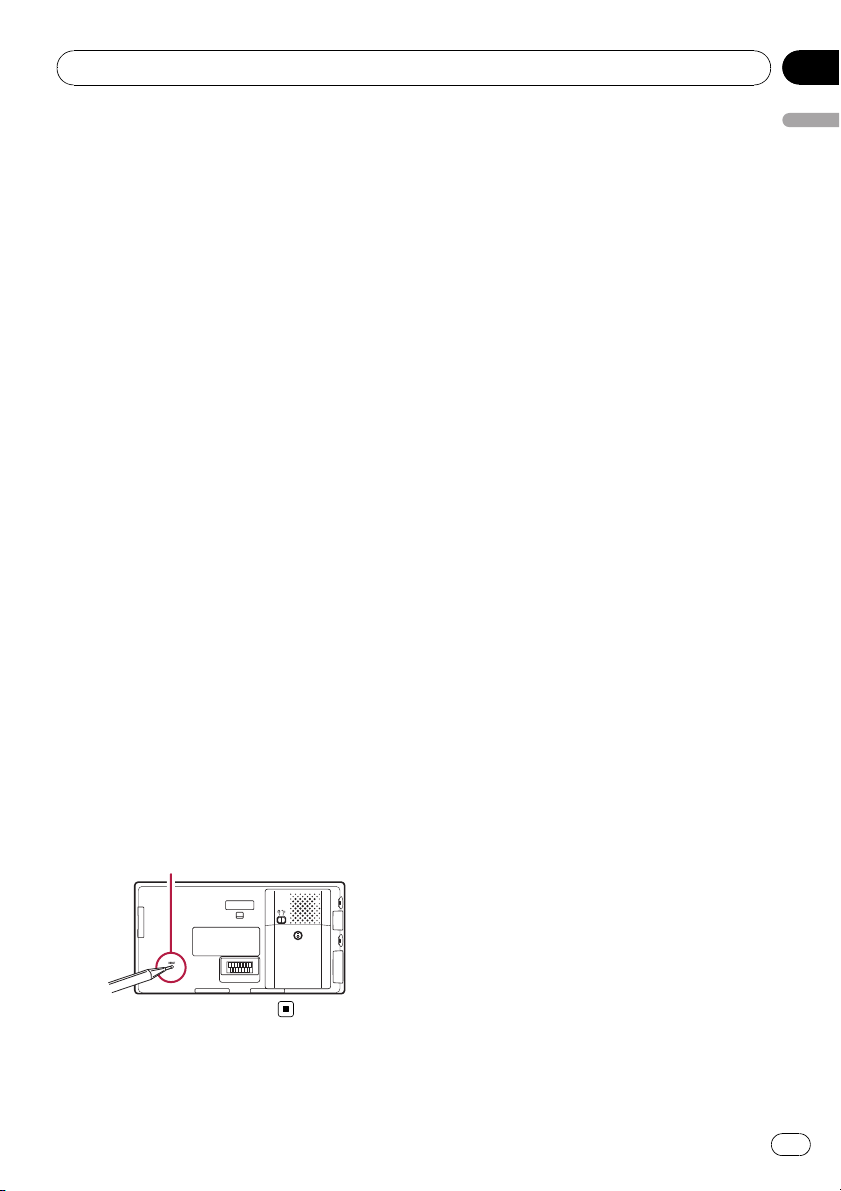
Resetting the navig ation system
Press RESET button only under the following
conditions:
! Prior to using this product for the first time.
! If the product fails to operate properly.
! If there appear to be problems with the op-
eration of the system.
! When adding/removing additional pro-
ducts that connect to the navigation sys-
tem.
! If your vehicle position shown on the map
with a significant positioning error.
1 Turn the ignition switch OFF.
2 Detach the navigation unit from the
cradle.
3 Press RESET button with a pen tip or
other pointed instrument.
RESET button
Introduction
En
9
Chapter
01
Introduction
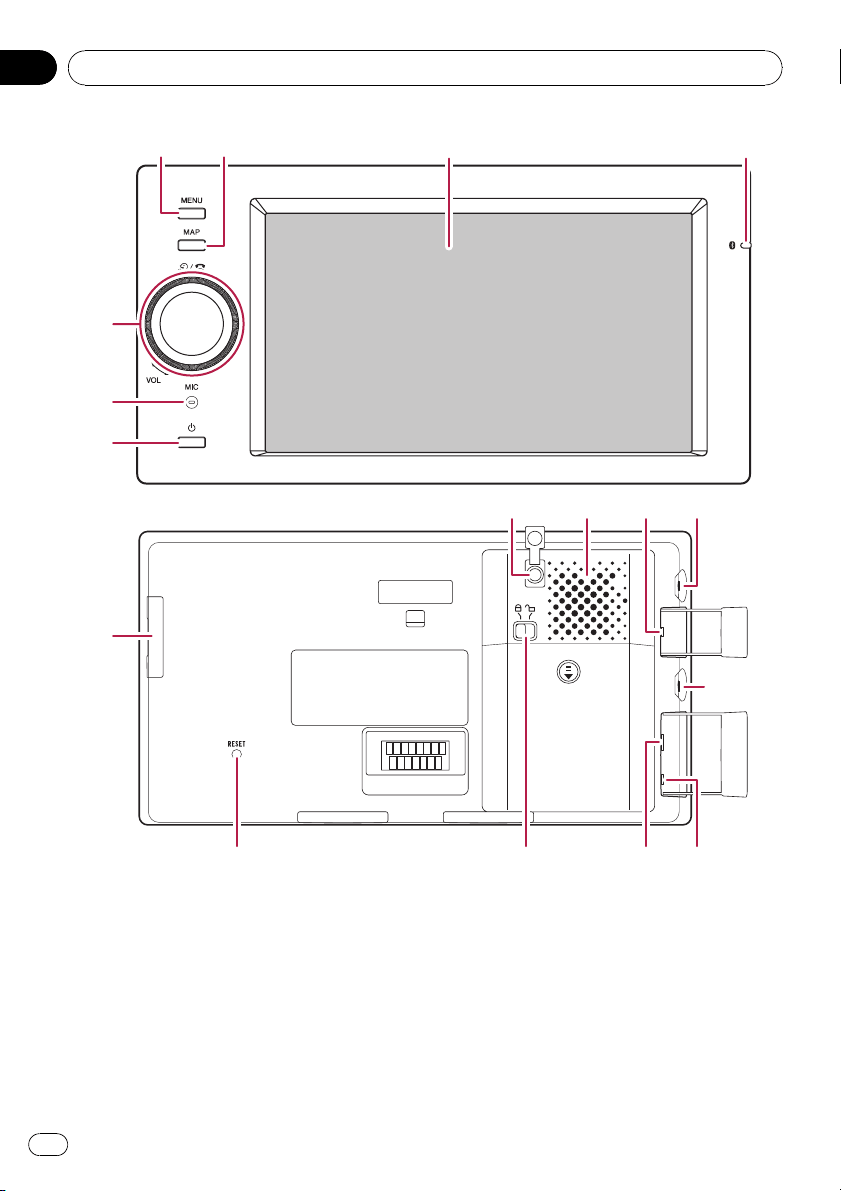
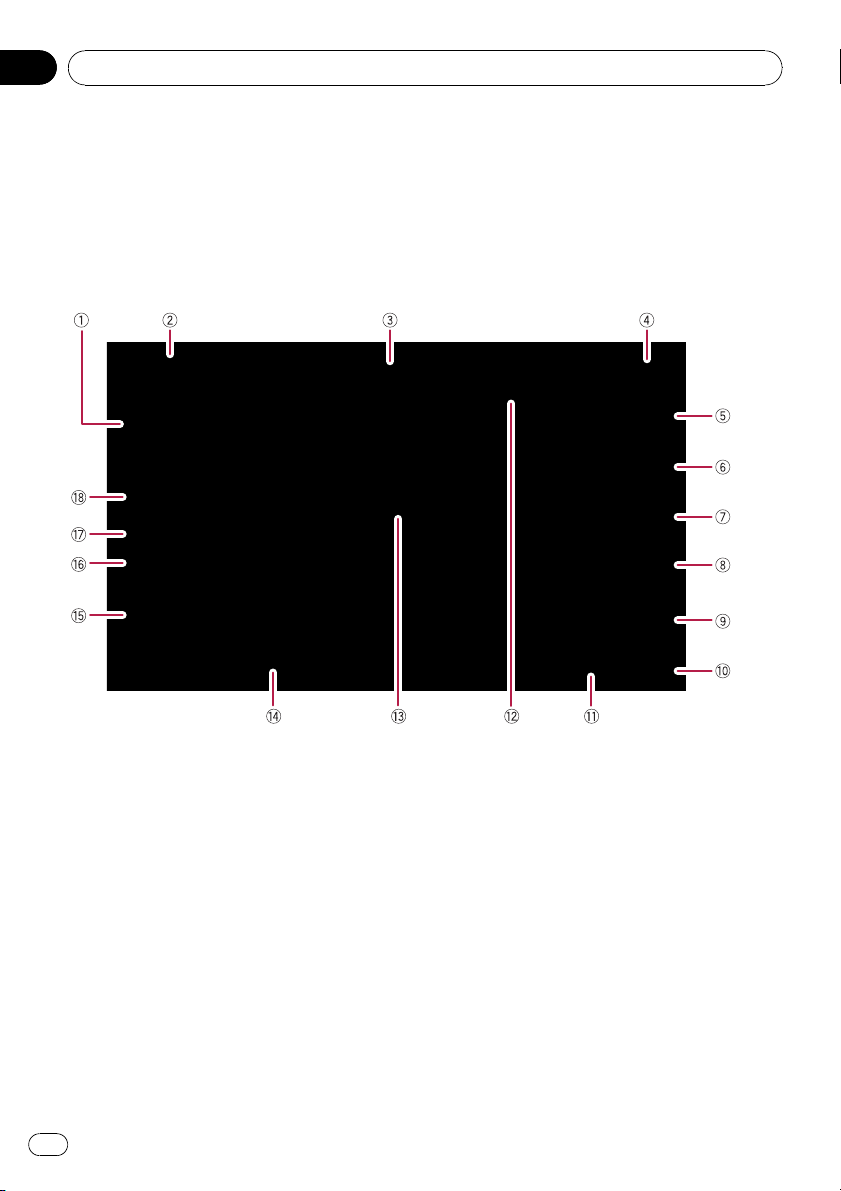
Checking part names and functions
This chapter gives information about the
names of the parts and the main features
using the buttons.
1 MENU button
Press MENU button to display the “Top
Menu”.
Press and hold to display the “Screen Cali-
bration” screen.
= For details concerning operations, refer
to Adjusting the response positions of the
touch panels (touch panel calibration) on
page 93.
321
5
6
7
d efg
4
c
8b
h
a9
Basic operation
En
10
Chapter
02

2 MAP button
Press to view the map screen.
Press and hold to display the “Picture Ad-
justment” screen.
= For details concerning operations, refer
to Adjusting the screen brightness on
page 94.
3 LCD screen
4 Bluetooth connection status indicator
Lights up when your phone is paired to the
navigation system by Bluetooth wireless
technology.
During charging via the DC power jack, the
indicator lights even if the system is pow-
ered off. The indicator will go off after full
charge.
5 MULTI-CONTROL
Rotating;
Adjusts the AV (Audio and Video) source vo -
lume.
Moving upward or downward once;
Changes the map scale one step at a time.
Keep moving upward or downward;
Changes the map scale continuously.
p This operation is available only while the
map screen is displayed.
Moving MULTI-CONTROL to the left or
right;
Allows you to change the frequency one
step at a time; operates track search con-
trols.
Keep moving MULTI-CONTROL to the
left or right;
Allows you to perform manual seek tuning,
fast forward or reverse.
Pressing the center of MULTI-CONTROL;
Enables you to start the voice operation
when “English” is selected in “Program lan-
guage:”. (When a language other than
“English” is selected, pressing the center al-
lows you to hear the previous route gui-
dance.)
p When your phone is paired to the naviga-
tion system, pressing its center allows
you to answer an incoming call or end
the phone call.
6 Built-in microphone
Microphone for hands-free operation.
Also this microphone can be used on the
voice operation.
7 Power button
When the system is powered off, press and
hold the key to turn the power on.
When the system is powered on, press the
key to go into the power-saving mode, and
press and hold the key to turn the power off
completely. When in power-saving mode,
pressing returns the system to the normal
mode.
8 Optional GPS antenna jack
Use this jack only when optional GPS anten-
na connection is necessary.
9 Built-in speaker
When the sounds are not output in the fol-
lowing conditions;
— The setting on “Audio Out Selection” is
“Preout”
— Headphone being connected
a Optional microphone jack
Use this jack only when optional micro-
phone connection is necessary.
b Headphone jack
c SD card slot
= For more detailed information, refer to In-
serting and ejecting an SD memory card
on the next page.
d RESET button
= For details concerning operations, refer
to Resetting the navigation system on
page 9.
e Battery lock knob
To remove the batteries, move this knob to
unlock position.
Basic operation
En
11
Chapter
02
Basic operation
= Be sure to keep this knob to lock position
in regular use. Otherwise, the navigation
system cannot boot up.
f USB connector (Mini-USB)
Use this port to connect an USB storage de-
vice with using the supplied USB cable.
Also you can connect an iPod (cable sold
separately, CD-IU200VM).
= For details, refer to Plugging and unplug-
ging a USB storage device on the next
page.
= For details, refer to Connecting your iPod
on page 14.
g AV input jack
To connect your iPod using a USB interface
cable for iPod (CD-IU200VM), connect it to
both this input jack and USB connector.
= Use the CD-RM10 (sold separately) to
connect the external video component.
h DC power jack
Use this jack only to connect with the AC
adapter.
Inserting and ejecting an
SD memory card
CAUTION
! To prevent data loss and damage to the sto-
rage device, never remove it from this naviga-
tion system while data is being transferred.
! If data loss or corruption occurs on the sto-
rage device for any reason, it is usually not
possible to recover the data. Pioneer accepts
no liability for damages, costs or expenses
arising from data loss or corruption.
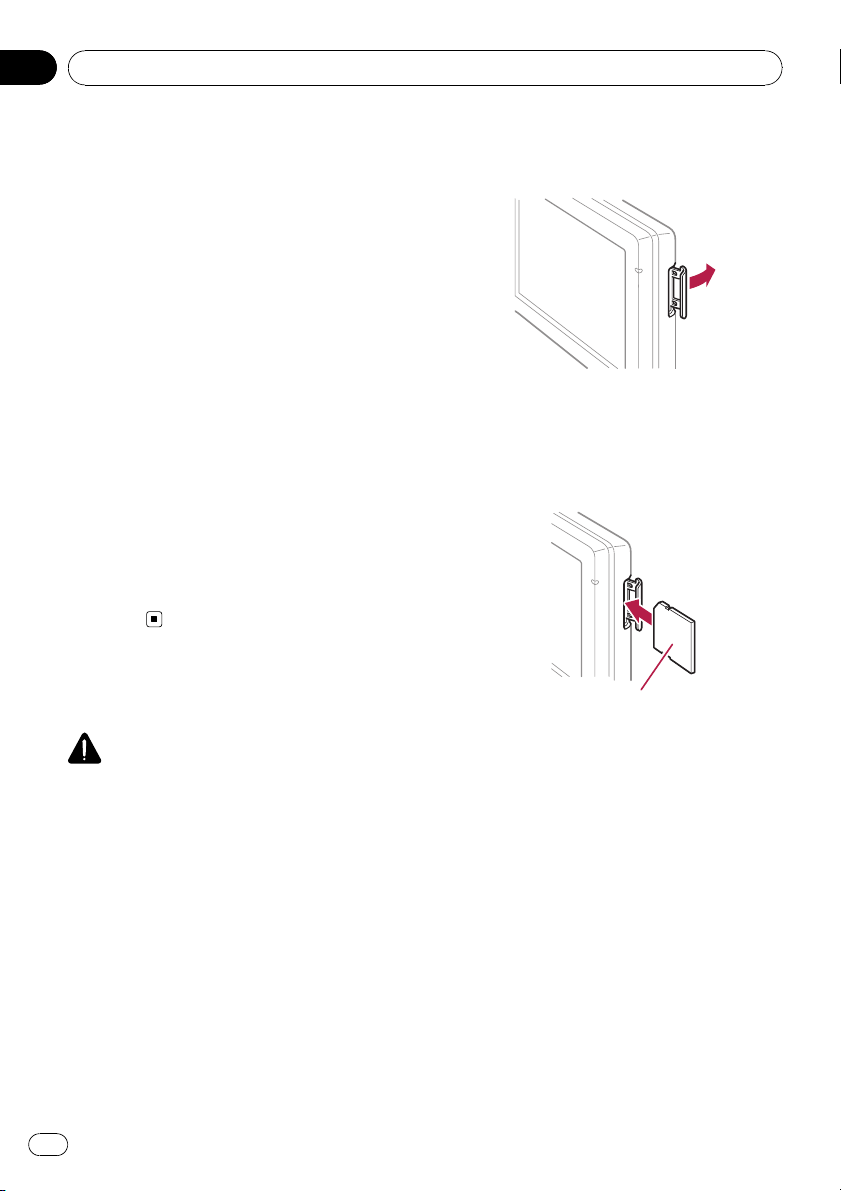
Inserting an SD memory card
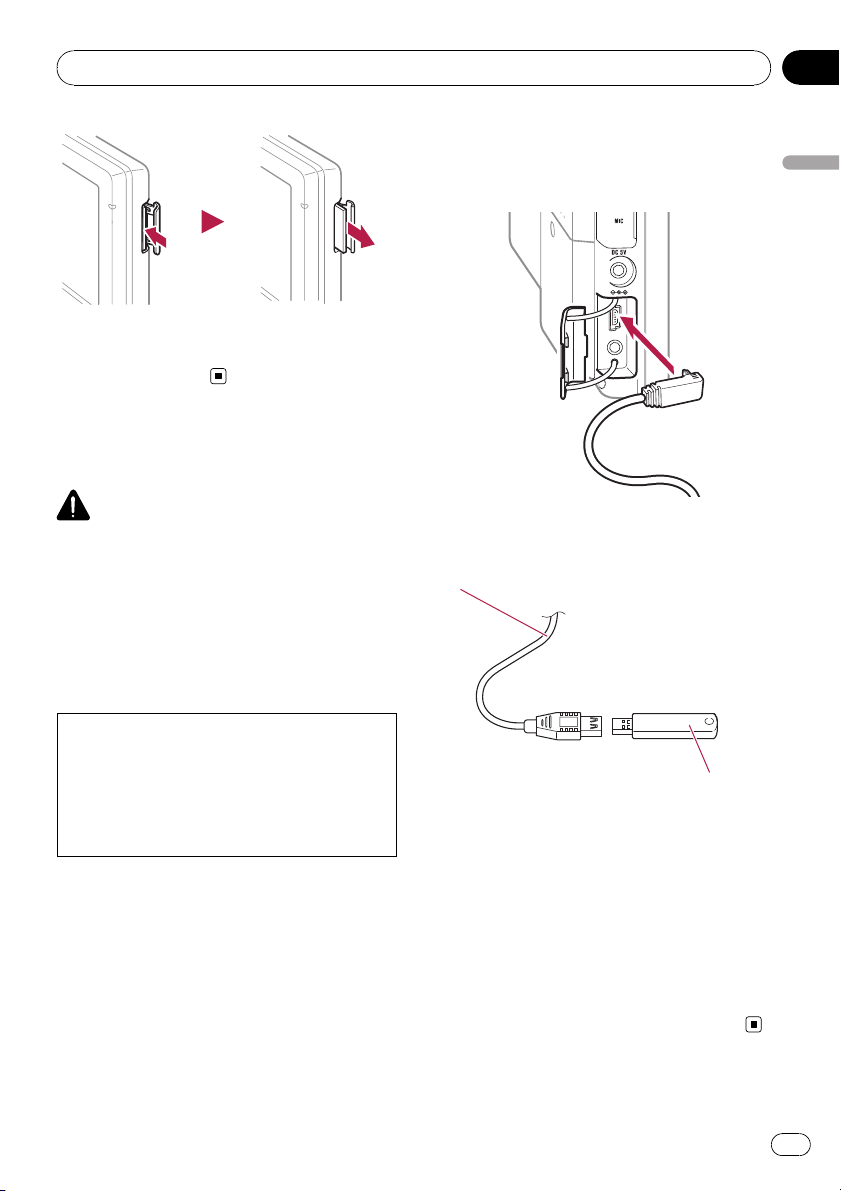
1 Open the cover.
2 Insert an SD memory card into the SD
card slot.
Insert it with the label facing in the same di-
rection as the LCD screen and press the card
until it clicks and completely locks.
Label side
3 Close the cover.
p There is no compatibility for Multi Media
Card (MMC).
p Compatibility with all SD memory card is
not guaranteed.
p Optimum performance of this unit may not
be obtained depending on the SD memory
card.
p Do not insert anything other than SD mem-
ory cards or dummy SD cards into the SD
card slot.
Ejecting an SD memory card
1 Open the cover.
2 Press the SD memory card until it clicks.
The SD memory card is ejected.
Basic operation
En
12
Chapter
02
3 Pull out the SD memory card.
4 Close the cover.
Plugging and unplugging a
USB storage device
CAUTION
! To prevent data loss and damage to the sto-
rage device, never remove it from this naviga-
tion system while data is being transferred.
! If data loss or corruption occurs on the sto-
rage device for any reason, it is usually not
possible to recover the data. Pioneer accepts
no liability for damages, costs or expenses
arising from data loss or corruption.
When you run this navigation system on power
from the built-in batter y alone, you cannot use
an iPod and a USB memor y device. To use
them, supply power through this product by
another method, such as connecting an AC
adapter or vehicle power charger.
Plugging in a USB storage devic e
1 Connect the supplied USB cable to USB
connector.
2 Plug a USB storage device into the USB
connector.
USB cable (supplied)
USB storage device
p Compatibility with all USB storage device is
not guaranteed.
Optimum performance of this navigation
system may not be obtained depending on
the USB storage device that is connected.
p Connection via USB hub is not available.
Unplugging a USB storage device
% Pull out the USB storage device after
checking that no data is being accessed.
Basic operation
En
13
Chapter
02
Basic operation
Connecting and
disconnecting iPod
CAUTION
! To prevent data loss and damage to the sto-
rage device, never remove it from this naviga-
tion system while data is being transferred.
! If data loss or corruption occurs on the sto-
rage device for any reason, it is usually not
possible to recover the data. Pioneer accepts
no liability for damages, costs or expenses
arising from data loss or corruption.
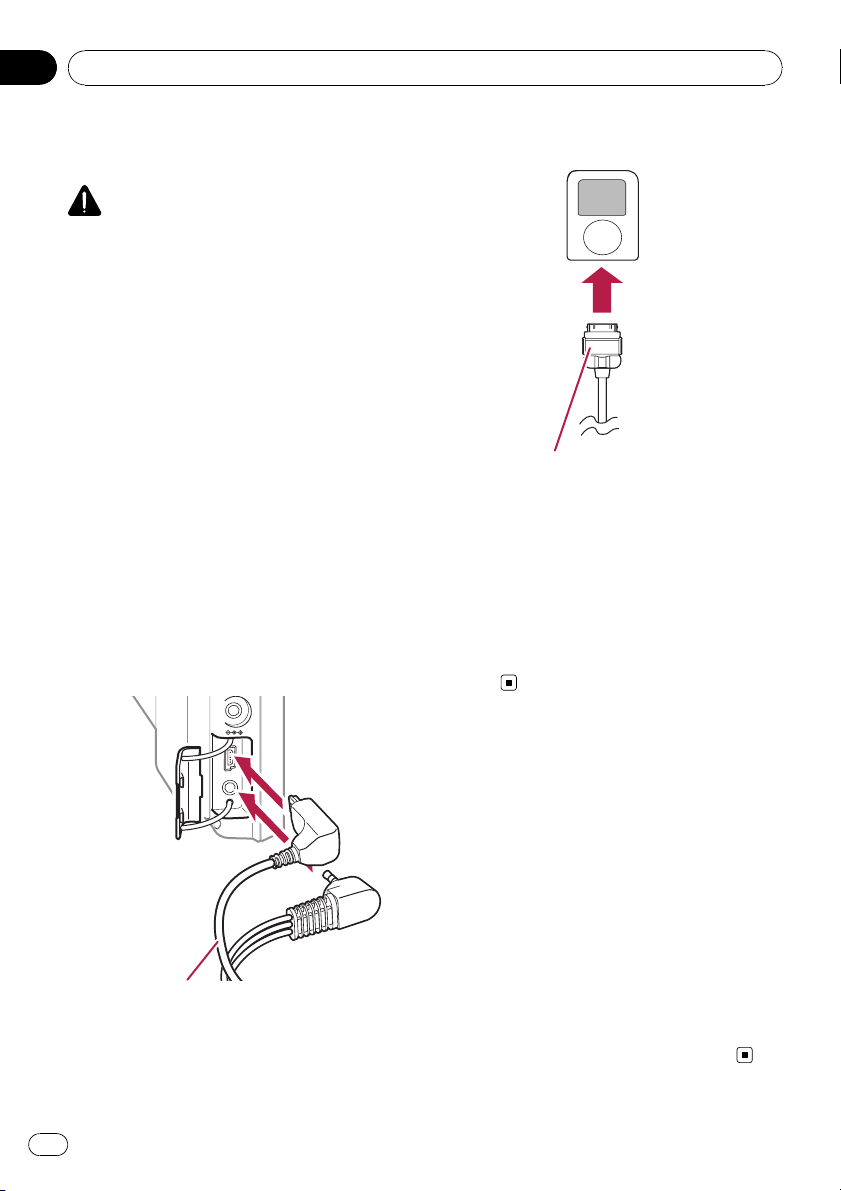
Connecting your iPod
Using the USB interface cable for iPod en-
ables you to connect your iPod to the naviga-
tion system.
p For connection, USB interface cable for
iPod (CD-IU200VM) (sold separately) is re-
quired.
1 Detach the supplied USB cable after
checking that no data is being accessed.
2 Connect the USB interface cable for
iPod to both USB connector and AV input.
USB interface cable for iPod
3 Connect your iPod.
USB interface cable for iPod
p For more details about iPod compatibility
with this navigation system, refer to the in-
formation on our website.
p Connection via USB hub is not available.
Disconnecting your iPod
% Pull out the USB interface cable for iPod
after checking that no data is being ac-
cessed.
Flow from startup to
termination
1 Start the engine to boot up the system.
After a short pause, the navigation splash
screen comes on for a few seconds.
p To protect the LCD screen from damage, be
sure to touch the touch panel keys only
with your fingers. (Keep the use of other in-
struments at a minimum, and only in cases
in which the touch panel calibration is ne-
cessary.)
2 Turn off the vehicle engine to termi-
nate the system.
The navigation system is also turned off.
Basic operation
En
14
Chapter
02
On first-time startup
CAUTION
The rear view camera function is not available for
safety reasons until the navigation system boots
up completely.
When you use the navigation system for the
first time, select the language that you want to
use.
1 Start the engine to boot up the system.
After a short pause, the navigation splash
screen comes on for a few seconds.
2 Touch the language that you want to
use on the screen.
3 Touch the language that you want to
use for the voice guidance.
The navigation system will now restart.
4 Read the disclaimer carefully, checking
its details, and then touch [OK] if you
agree to the conditions.
The “Top Menu” appears.
Regular startup
CAUTION
The rear view camera function is not available for
safety reasons until the navigation system boots
up completely.
% Start the engine to boot up the system.
After a short pause, the navigation splash
screen comes on for a few seconds.
p The screen shown will differ depending on
the previous conditions.
p If the navigation screen was shown pre-
viously, the disclaimer appears.
Read the disclaimer carefully, checking its
details, and then touch [OK] if you agree to
the conditions.
p If other screens were shown previously, the
disclaimer screen will be skipped.
Basic operation
En
15
Chapter
02
Basic operation
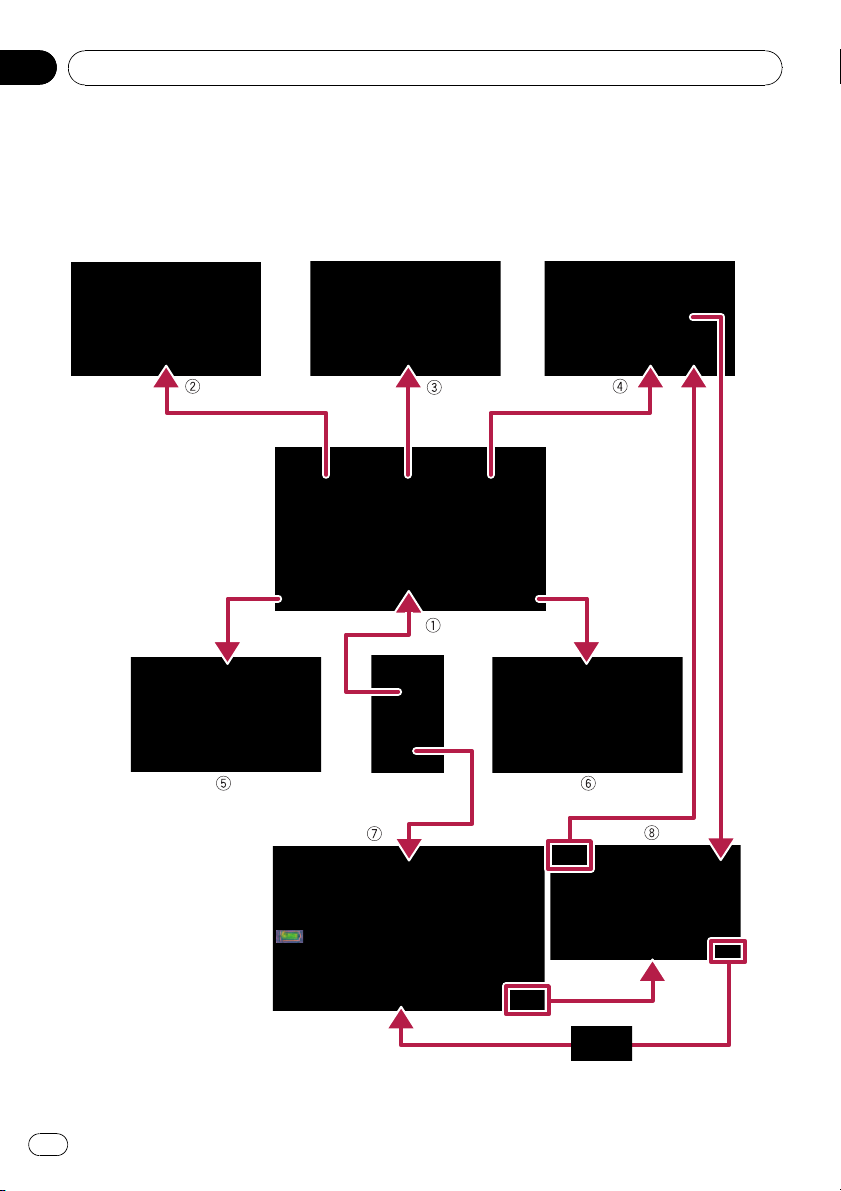
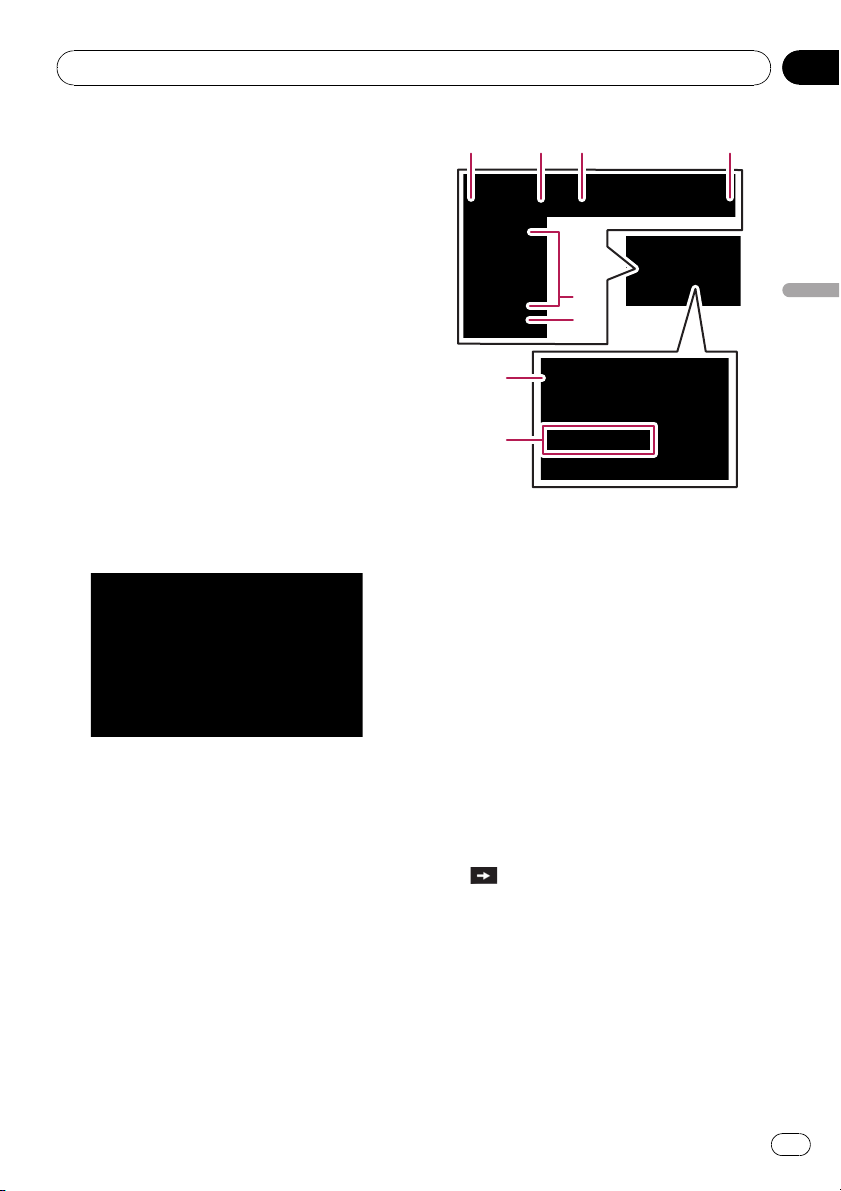
How to use the navigation menu screens
The “Top Menu” appears when you boot up the navigation system for the first time.
Screen switching overview
Basic operation
En
16
Chapter
02
What you can do on each menu
1 Top Menu
Press MENU button to display the “Top
Menu”.
This is the starting menu to access the desired
screens and operate the various functions.
2 Destination Menu
You can search for your destination on this
menu. You can also check or cancel your set
route from this menu.
3 Contacts screen
You can access the list of contacts to call up
an entry.
4 AV Source menu
You can access the screen for selecting the
audio and visual source to play.
5 Phone Menu
You can access the screen that is related to
hands-free phoning to see call histories and
change the settings on the Bluetooth wireless
technology connection.
6 Settings Menu
You can access the screen to customize set-
tings.
7 Map screen
Press MAP button to display the navigation
map screen.
8 AV operation screen
When you play the AV source, this screen ap-
pears regularly. Touching the icon on the top
left corner displays the “AV Source” menu.
p To return to the previous screen, touch
.
Displaying the rear camera image
[RearView] can be displayed the full-screen
rear camera image. [RearView] is useful if
you want to monitor an attached trailer, etc.
= For details, refer to Setting the rear view
camera on page 92.
1 Press MENU button to display the “Top
Menu”, and then touch [Settings].
2 Touch [System Settings] and then touch
[Back Camera].
3 Touch [On] next to “Camera” to acti-
vate the camera setting.
4 Press MENU button to display the “Top
Menu” and then touch [AV Source].
5 Touch [RearView] on the “AV Source”
menu.
Listening to the combined car
stereo sounds
When the navigation system is combined with
ND-G500 (sold separately), you can listen to
the sound output from the connected car
stereo.
1 Select “Preout” on [Audio Out Selec-
tion].
= For details, refer to Setting the audio output
on page 96.
2 Press MENU button to display the “Top
Menu” and then touch [AV Source].
3 Touch [OFF] on the “AV Source” menu.
4 Turn the car stereo on.
5 Adjust the volume level with the com-
bined car stereo.
p When ND-G500 is connected with this sys-
tem, the following cases always mute the
sound output from the connected car
stereo:
— While you use a mobile phone con-
nected with Bluetooth technology (dial-
ling, talking, incoming call).
— While you perform the voice operation.
— When the navigation guidance voice is
output.
Basic operation
En
17
Chapter
02
Basic operation
How to use the map
Most of the information provided by your navigation system can be seen on the map. You need to be-
come familiar with how the information appears on the map.
How to read the map screen
This example shows an example of a 2D map screen.
p Information with the mark (*) appears only
when the route is set.
p Depending on the conditions and settings,
some items may not be displayed.
1 Next direction of travel*
When you approach a guidance point, this ap-
pears green. Touching this item enables you
to hear the previous guidance again.
p For more information about the direc-
tion symbol, refer to Supplemental infor-
mation about dir ections on page 115.
2 Distance to the guidance point*
Shows the distance to the next guidance
point.
3 Name of the street to be used (or next gui-
dance point)*
4 Current time
5 Compass
The red arrow indicates north.
6 Map mode selector
= For details, refer to Switching the map
between 2D and 3D on page 20.
7 Shortcut to the “Map Confirmation
Screen”
Touching this shortcut enables the screen to
switch to the “Map Confirmation Screen” di-
rectly with the current position or the cursor
position centered.
= For details, refer to What you can do with
the “Map Confirmation Screen” on page
36.
8 Stop key for the dummy run
Basic operation
En
18
Chapter
02

This key will be displayed while you activate
the dummy run (“Fly over” or “Demo
Mode”). Touching the key to cancel the
dummy run.
= For details, refer to Demo Mode on
page 86.
= For details, refer to Playing simulated tra-
vel at high speed on page 42.
9 Album artwork on iPod
If you connect your iPod to this navigation sys-
tem, the album artwork that is playing ap-
pears.
a Shortcut to the AV operation screen
The AV Source currently selected is shown.
Touching the indicator displays the AV opera-
tion screen of the current source directly.
b Extension tab for the AV information bar
Touching this tab opens the AV information
bar and enables you to briefly view the current
status on the AV source. Touching it again re-
tracts the bar.
c Current route*
The route currently set is highlighted in bright
color on the map. If a waypoint is set on the
route, the route after the next waypoint is
highlighted in other color.
d Current position
Indicates the current location of your vehicle.
The apex of the triangular mark indicates your
orientation and the display moves automati-
cally as you drive.
p The apex of the triangular mark is the
proper current position.
e Street name (or city name) that your vehi-
cle is traveling along
f Multi-Info window
Shows the value on the items selected on
“Displayed Info”. Touching this area allows
you to display the “Route Information”
screen.
= For details, refer to Displayed Info on
page 82.
= For details, refer to Checking the current
route conditions on page 41.
p This item is not shown when “Full
Screen Cockpit” is set to “On”.
= For details, refer to Map Settings on
page 81.
p The estimated time of arrival is an ideal
value that the navigation system com-
putes internally as the route is calcu-
lated. The estimated time of arrival
should be read just as a reference value,
and does not guarantee arrival at the
time indicated.
g Map scale
The scale of the map is indicated by distance.
h Battery status indicator
Shows the battery power if “Battery Power
Indication” is [On].
= For details, refer to Displaying the bat-
tery power on page 94.
i Second Maneuver Arrow*
Shows the turning direction after next and the
distance to there.
p This item is not shown when “Full
Screen Cockpit” is set to “On”.
= For details, refer to Map Settings on
page 81.
Meaning of guidance flags
: Destination
The checkered flag indicates your
destination.
: Waypoint
The yellow flags indicate your way-
points.
: Start point
The bright green flag indicates
your start point.
Basic operation
En
19
Chapter
02
Basic operation

When you drive on a multi-lane road
Appears where multi-lane roads exist when
you are driving on your route. The highlighted
lane indicates the recommended lane.
p This information is based on the map data-
base. Thus, the information may be differ-
ent from what actual condition exists. Use
it as just a directional reference for your
driving.
Note regarding the route highlighted
in purple
p A route highlighted in purple on the map
indicates that your route includes a road
not matching your preference on the fol-
lowing settings in “Route”; “Unpaved
Roads”, “Highways”, “Ferries”, “U-turns”,
“Permit Needed”, “Toll Roads”.
For your safety, please review and obey all
local traffic rules along the highlighted
route.
Switching the map between 2D
and 3D
2D map screen
3D map screen
1 Press MAP button to display the navi-
gation map screen.
2 Touch
or to switch the map
mode.
Changing the scale of the map
1 Press MAP button to display the navi-
gation map screen.
2 Move MULTI-CONTROL down or up to
zoom in or out.
Moving MULTI-CONTROL upward or down-
ward once allows you to change the map
scale one step at a time. Holding MULTI-CON-
TROL while moving it up or down allows you
to change the scale sequentially.
Basic operation
En
20
Chapter
02
p Zooming out will reduce the size of the icon
and further zooming out will hide it. How-
ever, the pin-shaped icon is not resized and
keeps displayed.
p Further zooming out hides the lines of traf-
fic information.
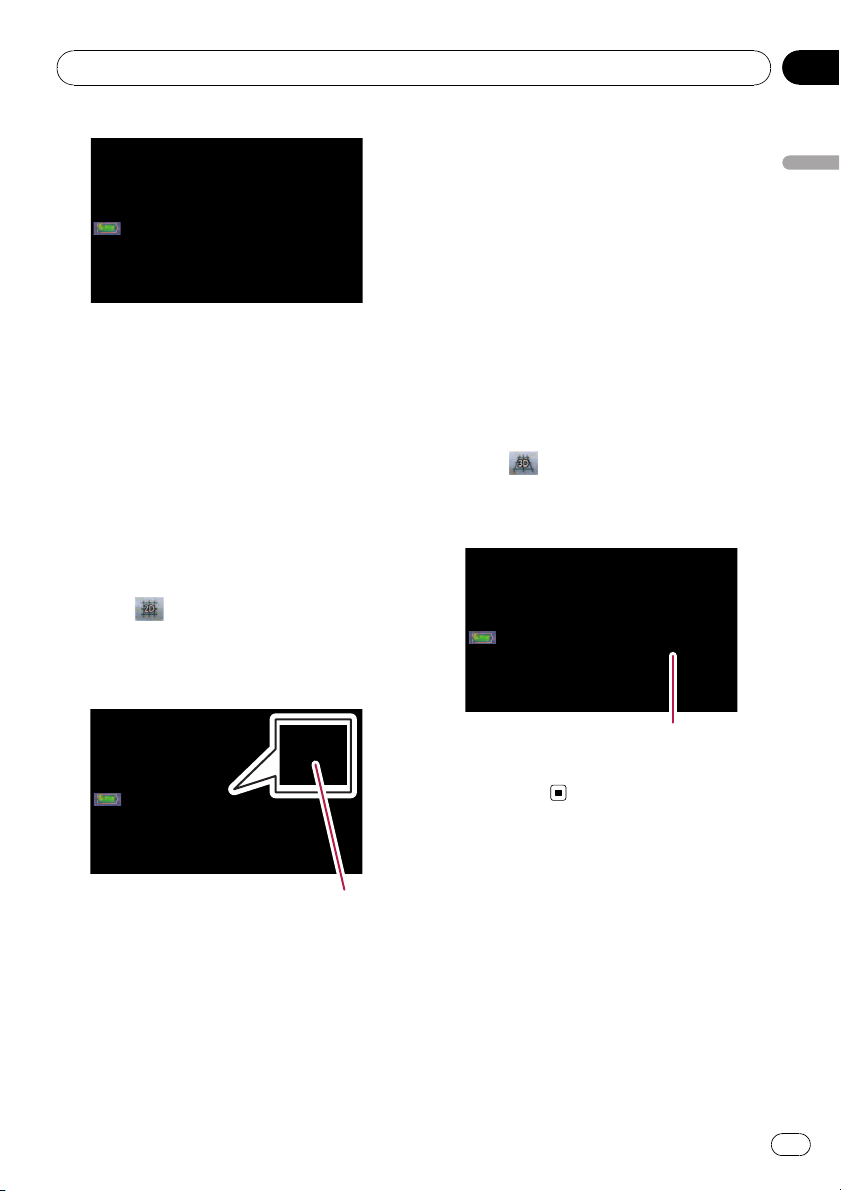
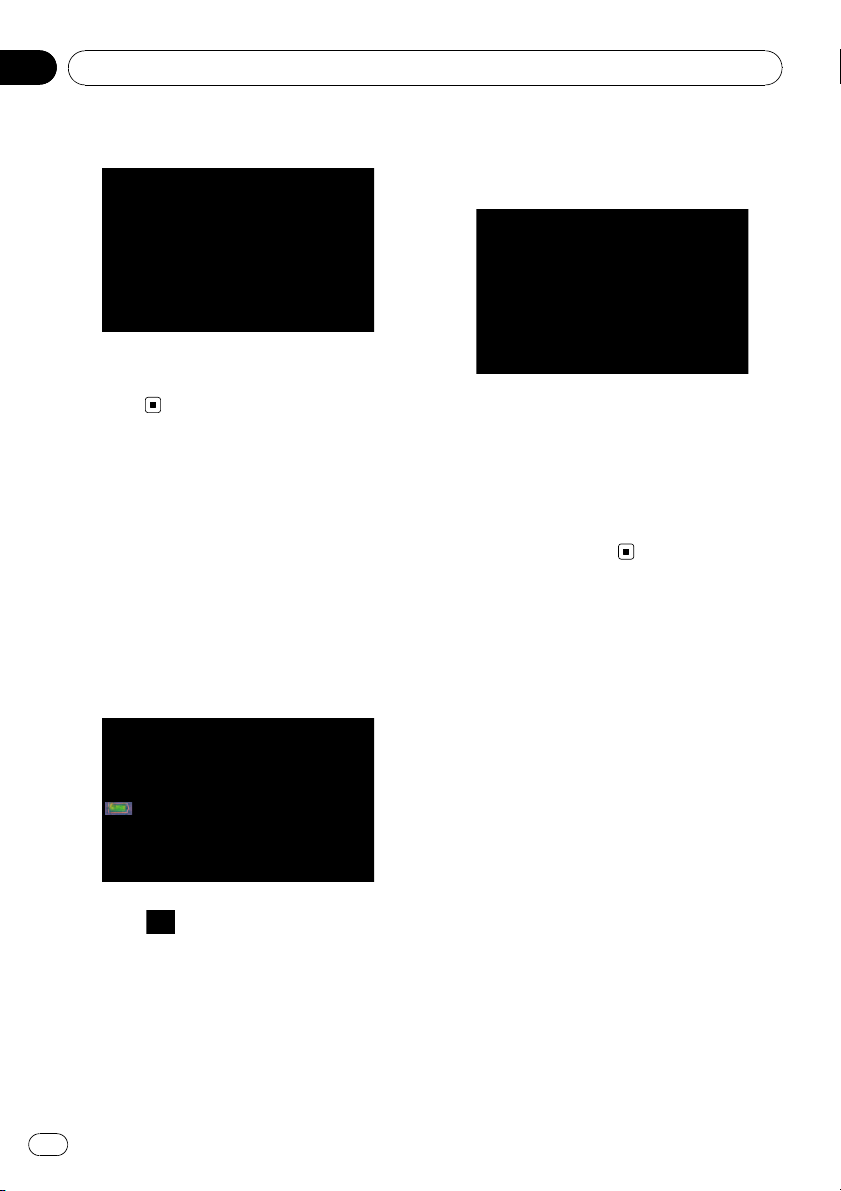
Scrolling the map to the
position you want to see
1 Press MAP button to display the navi-
gation map screen.
2 Touch
to switch the 2D map mode.
3 Touch the map briefly.
Briefly touching the position on the map that
you want to see positions the cursor there.
Cursor
Positioning the cursor to the desired location
results in a brief informational overview about
the location being displayed at the bottom of
screen, with street name and other informa-
tion for this location being shown. (The infor-
mation shown varies depending on the
position.)
4 Touch and drag the map in the desired
direction to scroll.
Dragging the map scrolls it. The scrolling in-
crement depends on your dragging length.
p Pressing MAP button returns the map to
the current position.
Changing the tilt and rotation
angle of the map
On the 3D map screen, briefly touching the
map shows the tilt controls and rotation angle.
1 Press MAP button to display the navi-
gation map screen.
2 Touch
to switch the 3D map mode.
3 Touch anywhere on the map briefly to
show the tilt controls and rotation angle.
Controls for tilt and rotation angle
4 Touch the controls to adjust the tilt and
rotation angle.
Basic operation
En
21
Chapter
02
Basic operation
The basic flow of creating
your route
1 Park your vehicle in a safe place, and apply
the parking brake.
j
2 Display the “Destination Menu”.
j
3 Select the method of searching for your
destination.
j
4 Enter the information for the destination
and narrow down candidates to one.
j
5 Touch [Go Here Now] on the “Map Confir-
mation Screen”.
j
6 The navigation system calculates the route
to your destination, and then shows the
route on the map.
j
7 After releasing the parking brake, drive in
accordance with navigation guidance.
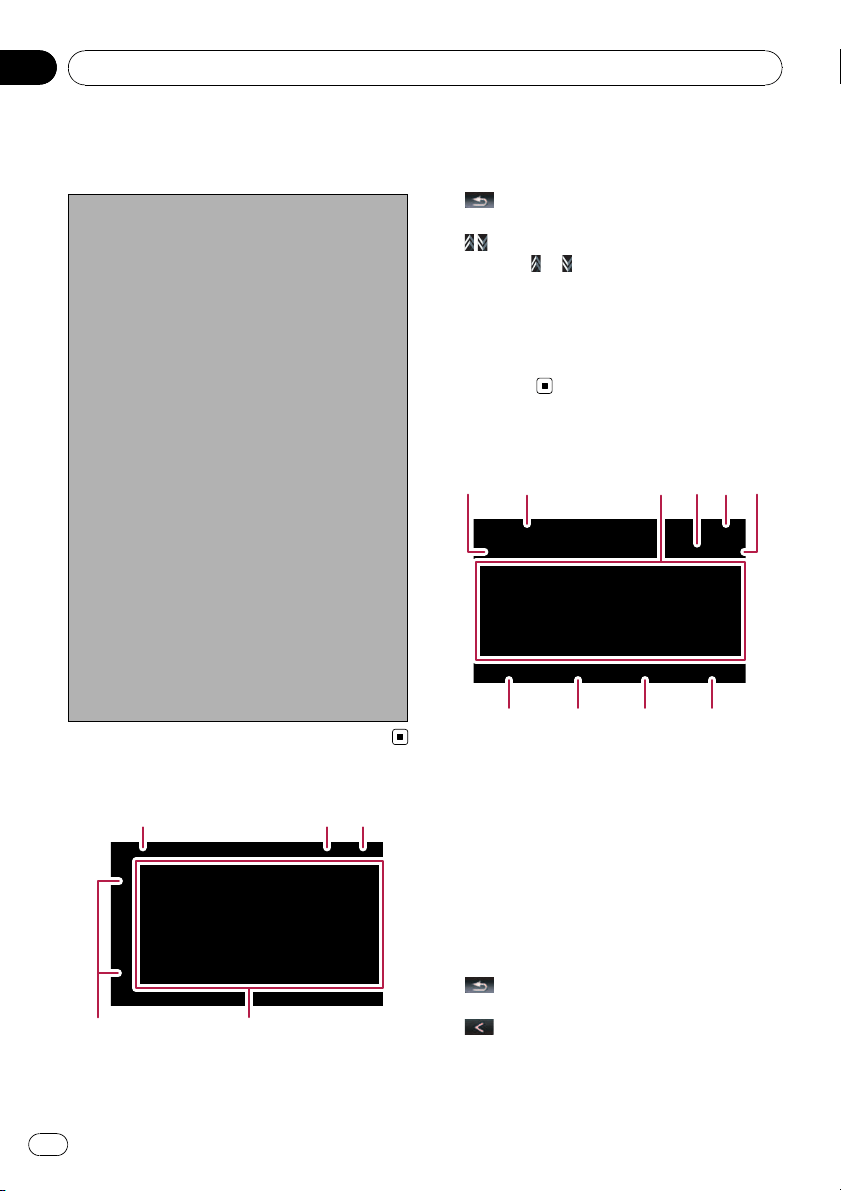
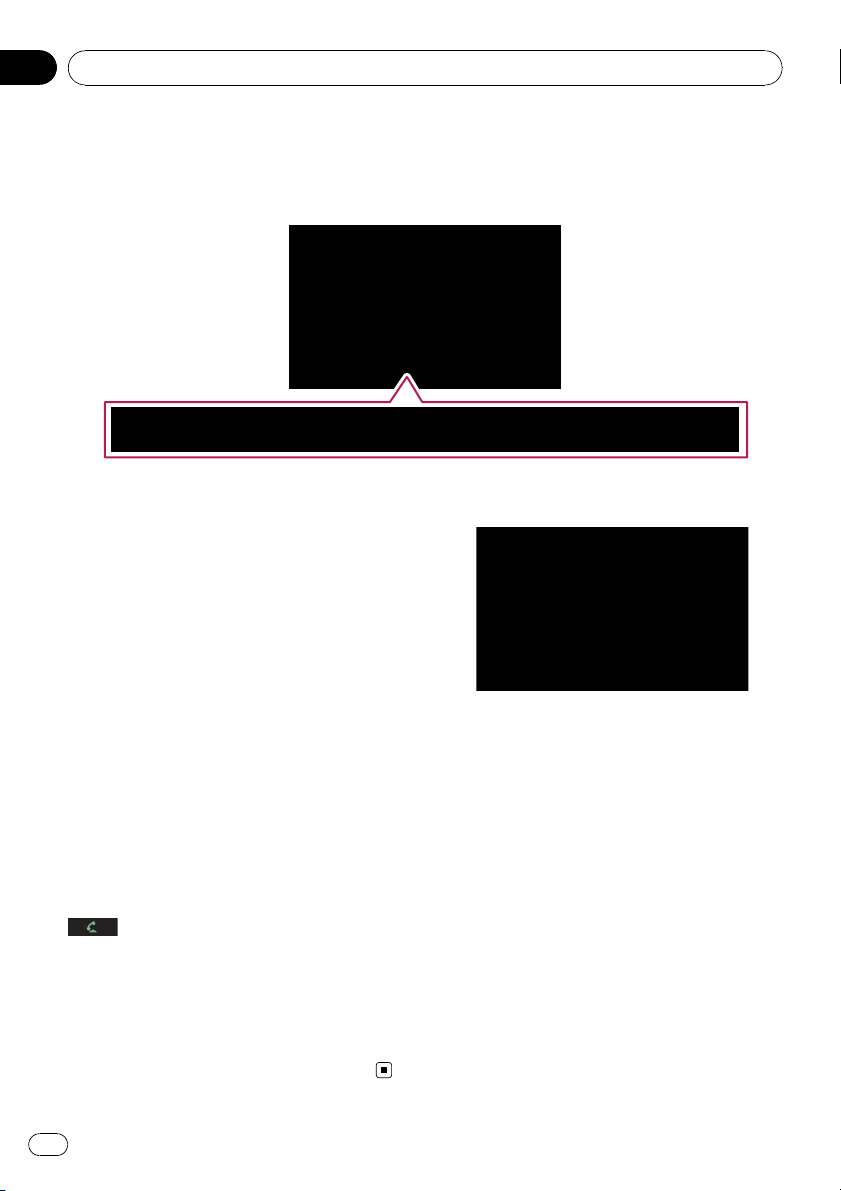
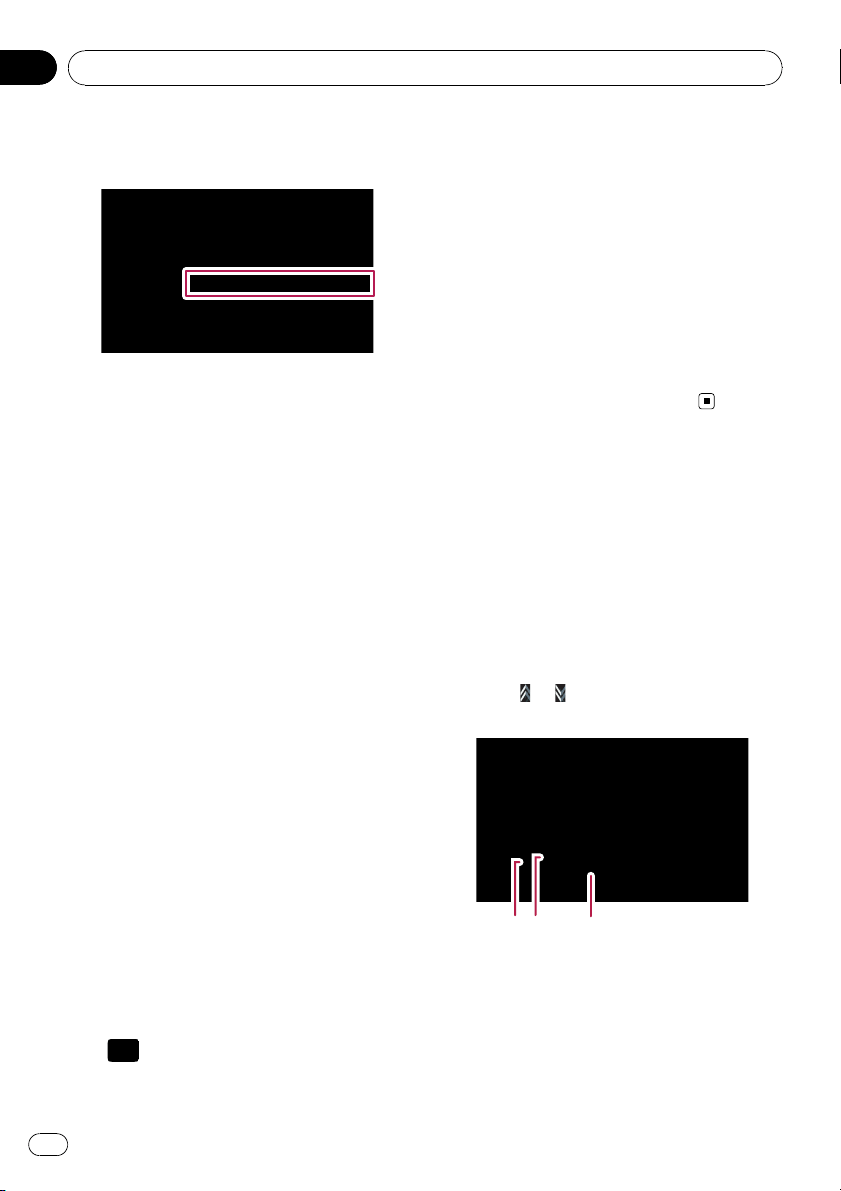
The operations of a list
screen (e.g. city list)
1
2
45
3
1 Screen title
This description will provide you with a refer-
ence for the next operation.
2 Current page/total pages
3
:
Returns the previous screen.
4
:
Touching
or on the scroll bar scrolls
through the list and allows you to view the re-
maining items.
5 Listed items:
Touching an item on the list allows you to nar-
row down the options and proceed to the next
operation.
The operation of the on-
screen keyboard
12 3456
789a
1 Text box:
Displays the characters that are entered. If
there is no text in the box, an informative
guide with text appears.
2 Screen title
This description will provide you with a refer-
ence for the next operation.
3 Keyboard:
Touching the keys enables you to enter the
characters.
4 Number of possible choices
5
:
Returns the previous screen.
6
:
Deletes the input text one letter at a time, be-
ginning at the end of the text. Continuing to
touch the button deletes all of the text.
Basic operation
En
22
Chapter
02
7 Caps lock control
Switches the keyboard between lowercase let-
ters and uppercase letters.
Each touch of [aA] changes the settings as
follows:
— enables you to capitalize the first
letter of a word.
— enables you to enter letters in
lower-case. (When a space is entered, it
switches
automatically.)
— enables you to enter letters with
capitals (caps) lock.
8 [@/!]:
Displays the key to enter special characters,
such as [!].
p The appearance of this key and typeable
characters change according to the cur-
rent keyboard layout.
9 [Keys]:
Switches the on-screen keyboard layout.
a [Done]:
Confirms the entry and allows you to proceeds
to the next step.
Basic operation
En
23
Chapter
02
Basic operation

CAUTION
For safety reasons, these route-setting functions
are not available while your vehicle is in motion.
To enable these functions, you must stop in a
safe place and put on the parking brake before
setting your route.
p Some information regarding traffic regula-
tions depends on the time when the route
calculation is performed. Thus, the infor-
mation may not correspond with a certain
traffic regulation when your vehicle actually
passes through the location in question.
Also, the information on the traffic regula-
tions provided will be for a passenger vehi-
cle, and not for a truck or other delivery
vehicles. Always follow the actual traffic
regulations when driving.
Searching for a location by
address
The most frequently used function is [Ad-
dress], in which the address is specified and
the destination is searched.
1 Touch [Destination] on the “Top Menu”.
2 Touch [Address].
3 Touch the key next to “Country:” to dis-
play the country list.
4 Touch one of the items on the list to set
the country as search area.
The screen returns to the previous screen.
Searching for and selecting a location
En
24
Chapter
03

5 Touch the key next to “State:” and
touch the desired state, province, or terri-
tory on the list.
The screen returns to the previous screen.
6 Touch the key next to “City:” to enter
the city name.
7 Enter the city name or Zip code.
! When the options are narrowed down to six
or less, those are automatically listed.
! If you want to list the options matching to
the current information entered, touch
[Done].
! Touching [History] displays the list of cities
that you selected before.
8 Touch the desired city name.
! When a city is already set, touching [City
Center] allows you to select the representa-
tive location of the city and proceed to the
“Map Confirmation Screen”.
9 Enter the street name and touch the de-
sired one from the list.
! When a street is already set, touching
[Street Center] allows you to select the re-
presentative point of the street and proceed
to the “Map Confirmation Screen”.
! When a street is already set, touching [In-
tersection] allows you to search for an in-
tersection. After entering the second street
name and selecting the desired intersec-
tion, the “Map Confirmation Screen” ap-
pears. This is useful when you don’t know
the house number or cannot input the
house number of the selected street.
10 Enter the house number and then
touch [Done].
! If the house number you have entered is
not found, a message appears. In that case,
touch [OK] and try entering the existing
house number.
Searching for and selecting a location
En
25
Chapter
03
Searching for and selecting a location
11 Touch on of the options at the bottom
of the “Map Confirmation Screen” to select
the next operation.
Touching [Route...] and [Go Here Now] se-
quentially enables you to set your selected po-
sition as your destination and calculate the
route up that point.
= For details concerning other operations on
the “Map Confirmation Screen”, refer to
What you can do with the “Map Confirmation
Screen” on page 36.
If only one option is appropriate for your entry,
the screen will jump to the “Map Confirmation
Screen” directly and the process of entering the
street name or house number will be skipped. If
this is an undesirable location, touch
to retry
with another address.
Searching for the vicinity
Points of Interest (POI)
Information about various facilities (Points Of
Interest - POI), such as gas stations, parkings
or restaurants, is available. By selecting the
category (or entering the POI Name), you can
search for a POI.
Searching for POIs around the
cursor
1 Touch [Destination] on the “Top Menu”,
and then touch [POI].
2 Touch [Around Cursor].
3 Drag the map to move the cursor to the
desired position and touch [OK].
The number of nearby POIs will appear at the
bottom of the screen.
4 Touch your desired category.
If there are more detailed categories within the
selected category, repeat this step as many
times as necessary.
Touch [Search] to search for a POI by entering
the POI name in the selected category.
Searching for and selecting a location
En
26
Chapter
03

5 Touch your desired POI.
! Touching [Name] tab sorts the options in
the list in alphabetical order.
! Touching [Distance] tab sorts the options in
the list in order by distance.
p Icons are helpful for quickly telling the cate-
gory of facilities with the same name.
6 Touch on of the options at the bottom
of the “Map Confirmation Screen” to select
the next operation.
Touching [Route...] and [Go Here Now] se-
quentially enables you to set your selected po-
sition as your destination and calculate the
route up that point.
= For details concerning other operations on
the “Map Confirmation Screen”, refer to
What you can do with the “Map Confirmation
Screen” on page 36.
p Searching for a spot and touching [Info]on
the “Map Confirmation Screen” also allows
you to search for nearby POIs around the
cursor.
= For details, refer to Viewing the information
of a specified location on page 38.
Searching for a nearby POI
1 Touch [Destination] on the “Top Menu”,
and then touch [POI].
2 Touch [Around Current GPS Location].
The list of POI categories appears.
= For the subsequent operations, refer to
Searching for POIs around the cursor on the
previous page.
Searching for POIs along the
current route
p This function is available when the route is
set.
1 Touch [Destination] on the “Top Menu”,
and then touch [POI].
2 Touch [Along Route].
The list of POI categories appears.
= For the subsequent operations, refer to
Searching for POIs around the cursor on the
previous page.
Searching for POIs around the
destination
p This function is available when the route is
set.
1 Touch [Destination] on the “Top Menu”,
and then touch [POI].
2 Touch [Around Destination].
The list of POI categories appears.
= For the subsequent operations, refer to
Searching for POIs around the cursor on the
previous page.
Searching for and selecting a location
En
27
Chapter
03
Searching for and selecting a location

Using “Saved Criteria”
Memorizing your selection sequence
You can store the selected search method and
one of the categories as the shortcut to recall
it later. It allows you to search for a POI in the
same way as you did before. You can also de-
lete the shortcuts.
1 Touch [Destination] on the “Top Menu”,
and then touch [POI].
2 Touch [Register Search Criteria].
3 Touch one of the items on the list.
! Selecting an item that has already been
stored allows you to overwrite it.
4 Touch the search method that you
want to put it into memory.
The list of POI categories appears.
5 Touch the category that you want to
put it into memory.
If there are more detailed categories within the
selected category, select the desired category
from the list repeatedly until your desired cate-
gory appears.
Your selection sequence is shown on the top
of the screen.
6 Recheck the sequence and touch [Save
Criteria] to put it into memory.
Searching for and selecting a location
En
28
Chapter
03

! Touching [Save Criteria] without selecting
a category allows you to store only your se-
lected search method including all cate-
gories.
! If there aren’t anymore detailed categories,
a blank list appears. In such case, touching
[Save Criteria] allows you to store it as the
currently selected category. To know the
states of the current sequence, refer to the
top of the screen.
7 Enter the desired name and then touch
[Done] to complete the entry.
The storing process has completed and the
shortcut is available on “Saved Criteria”.
Searching for POIs by using the
memorized sequence
You can search for POIs with using the pre-
stored shortcut.
1 Touch [Destination] on the “Top Menu”,
and then touch [POI].
2 Touch [Saved Criteria].
3 Touch one of the items on the list.
4 Touch the desired POI.
5 Touch on of the options at the bottom
of the “Map Confirmation Screen” to select
the next operation.
Touching [Route...] and [Go Here Now] se-
quentially enables you to set your selected po-
sition as your destination and calculate the
route up that point.
= For details concerning other operations on
the “Map Confirmation Screen”, refer to
What you can do with the “Map Confirmation
Screen” on page 36.
Deleting the memorized POI shortcuts
1 Touch [Destination] on the “Top Menu”,
and then touch [POI].
2 Touch [Saved Criteria].
Searching for and selecting a location
En
29
Chapter
03
Searching for and selecting a location
3 Touch [Delete] on the right of the item
that you want to delete.
Searching for POIs by using
the data on external
storage devices (USB, SD)
Creating a customized POI is possible by
using the utility programme “AVIC FEEDS”
which is available separately, on your PC.
(“AVIC FEEDS” will be available on our web-
site.) Storing the customized POI properly and
connecting the external storage device (USB,
SD) enables the system to use the data for
searches.
1 Connect the USB device or insert the SD
card.
2 Touch [Destination] on the “Top Menu”,
and then touch [USB/SD].
3 Touch the desired storage that you
want to load.
4 Touch the folder that includes the de-
sired item on the list.
5 Touch one of the items on the list.
6 Touch on of the options at the bottom
of the “Map Confirmation Screen” to select
the next operation.
Touching [Route...] and [Go Here Now] se-
quentially enables you to set your selected po-
sition as your destination and calculate the
route up that point.
= For details concerning other operations on
the “Map Confirmation Screen”, refer to
What you can do with the “Map Confirmation
Screen” on page 36.
Searching for and selecting a location
En
30
Chapter
03
Searching for a location by
coordinates
Entering a latitude and longitude pinpoints
the location.
1 Touch [Destination] on the “Top Menu”,
and then touch [Route Function].
2 Touch [Coordinate].
3 Touch either the latitude key or the
longitude key, whichever you want to
enter.
The values on the latitude key or longitude key
shows the coordinates on the cursor just be-
fore entering this screen.
4 Touch
to delete the current value
and enter the desired coordinate.
! Touching [N/S]or[E/W] changes the hemi-
sphere.
5 Touch [Done].
The screen returns to the previous screen.
Touch the other key that you have not entered
yet, enter the latitude or longitude and then
touch [Done] to finish the entry.
6 Touch [OK].
The “Map Confirmation Screen” appears.
7 Touch on of the options at the bottom
of the “Map Confirmation Screen” to select
the next operation.
Searching for and selecting a location
En
31
Chapter
03
Searching for and selecting a location

Touching [Route...] and [Go Here Now] se-
quentially enables you to set your selected po-
sition as your destination and calculate the
route up that point.
= For details concerning other operations on
the “Map Confirmation Screen”, refer to
What you can do with the “Map Confirmation
Screen” on page 36.
Selecting a location you
searched for recently
The places that you have searched for in the
past are automatically stored in “History”.
Selecting the item on the list provides an easy
way to specify the position.
p “History” can store up to 32 locations. If
the entries reach the maximum, the new
entr y overwrites the oldest one.
1 Touch [Destination] on the “Top Menu”,
and then touch [History].
2 Touch the desired entry.
3 Touch on of the options at the bottom
of the “Map Confirmation Screen” to select
the next operation.
Touching [Route...] and [Go Here Now] se-
quentially enables you to set your selected po-
sition as your destination and calculate the
route up that point.
= For details concerning other operations on
the “Map Confirmation Screen”, refer to
What you can do with the “Map Confirmation
Screen” on page 36.
Deleting an entry in “History”
Items in “History” can be deleted. All entries
in “History” can also be deleted at once.
1 Touch [Destination] on the “Top Menu”,
and then touch [History].
2 Touch [Delete] on the right of the item
that you want to delete.
3 Touch [Yes].
A message will appear asking you to confirm
the deletion.
p Touching [Clear History] allows you to de-
lete all the entries.
p Because deleted data cannot be restored,
take extra care not to mistakenly delete
item.
Selecting a location stored
in “Favorites”
Storing locations you visit frequently saves
time and effort.
Searching for and selecting a location
En
32
Chapter
03
Selecting the item on the list provides an easy
way to specify the position.
p “Favorites” can store up to 30 locations.
1 Touch [Destination] on the “Top Menu”,
and then touch [Favorites].
2 Touch the desired entry.
3 Touch on of the options at the bottom
of the “Map Confirmation Screen” to select
the next operation.
Touching [Route...] and [Go Here Now] se-
quentially enables you to set your selected po-
sition as your destination and calculate the
route up that point.
= For details concerning other operations on
the “Map Confirmation Screen”, refer to
What you can do with the “Map Confirmation
Screen” on page 36.
Deleting an entry in “Favorites”
All entries in “Favorites” can be deleted at
once.
1 Touch [Destination] on the “Top Menu”,
and then touch [Favorites].
2 Touch [Clear All].
A message will appear asking you to confirm
the deletion.
3 Touch [Yes].
p Because deleted data cannot be restored,
take extra care not to mistakenly delete
item.
Setting up a route to your
home
If your home location is stored, the route
home can be calculated by touching a single
key.
% Touch [Destination] on the “Top Menu”,
and then touch [Return Home].
When the route is not set, route calculation
starts immediately.
When the route is already set, a message will
appear asking you to cancel the current route.
Touch [Yes] to start the route calculation.
p If the home location has not been stored
yet, set the location first.
= For details, refer to Setting your home po-
sition on page 90.
Setting a route by recalling
a saved route
Saving a route enables you to recall the same
route. Selecting the item on the list provides
an easy way to set the saved route.
Selecting the item on the list provides an easy
way to specify the position.
! If there are no entries on the list, save the
route first.
= For details concerning other operations,
refer to Storing the current route on page
44.
1 Touch [Destination] on the “Top Menu”,
and then touch [Saved Routes].
Searching for and selecting a location
En
33
Chapter
03
Searching for and selecting a location
2 Touch the desired entry.
When the route is not set, the saved route is
recalled and the guidance will start im-
mediately.
Searching for a location by
scrolling the map
Specifying a location after scrolling the map
enables you to set the position as an operable
target in the “Map Confirmation Screen”.
1 Press MAP button to display the navi-
gation map screen.
2 Touch and drag the screen to scroll the
map to the desired position.
3 Touch to display the “Map Confir-
mation Screen”.
The “Map Confirmation Screen” appears.
4 Touch on of the options at the bottom
of the “Map Confirmation Screen” to select
the next operation.
Touching [Route...] and [Go Here Now] se-
quentially enables you to set your selected po-
sition as your destination and calculate the
route up that point.
= For details concerning other operations on
the “Map Confirmation Screen”, refer to
What you can do with the “Map Confirmation
Screen” on page 36.
Searching for and selecting a location
En
34
Chapter
03

Searching for and selecting a location
En
35
Chapter
03
Searching for and selecting a location
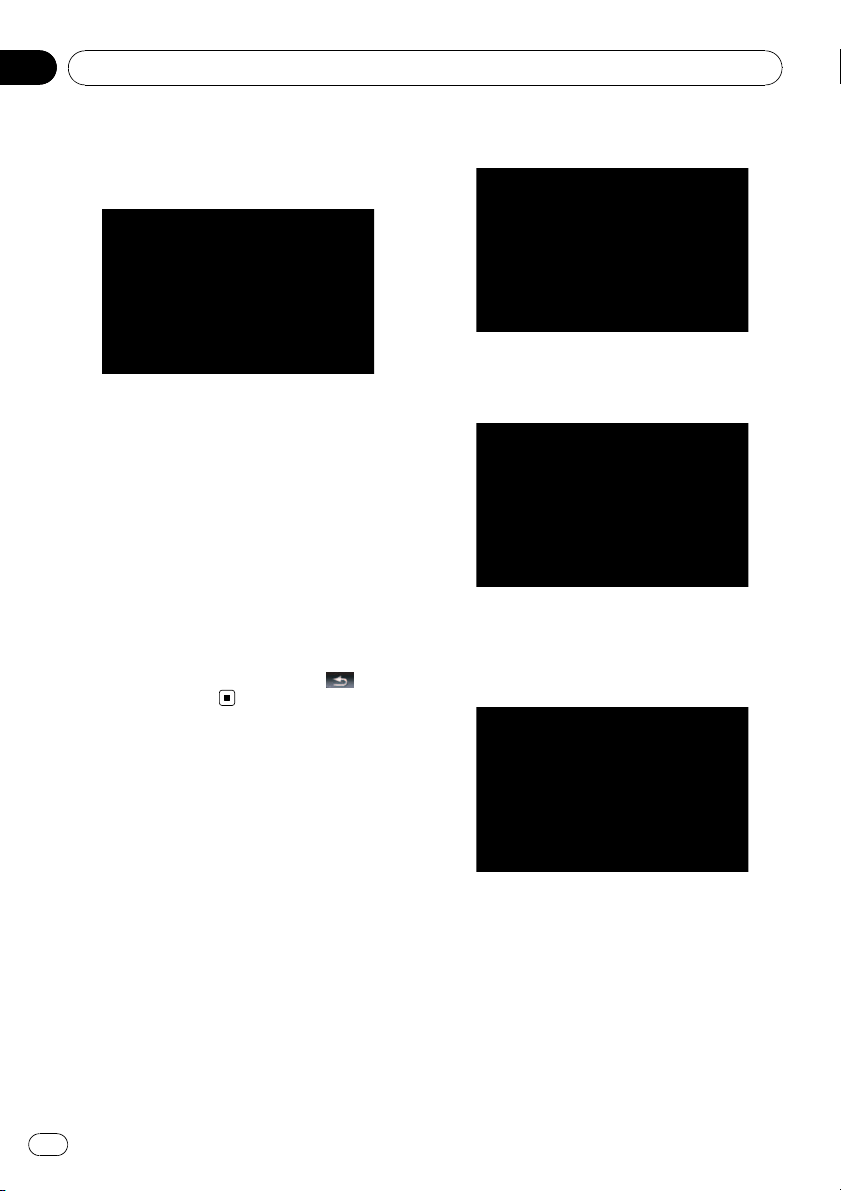
What you can do with the “Map Confirmation Screen”
Under most conditions after searching for a location, the “Map Confirmation Screen” appears to let you
select the next operation. The options shown below are available on this screen:
Map
Shows a full-screen 2D map centered on the
cursor position.
Save as...
Places a map pin, and saves the position.
= For more details concerning the operation,
refer to Save as... on the next page.
Route...
Sets the destination, waypoints, and starting
point positions.
= For more details concerning the operation,
refer to Route... on this page.
Info
Shows detailed information about the location
of the cursor position.
= For more details concerning the operation,
refer to Viewing the information of a speci-
fied location on page 38.
Enables you to call the position if a telephone
number is available. (Pairing with cellular
phone featuring Bluetooth wireless technology
is required.)
= For more details concerning the operation,
refer to Dialing a phone number on the
“Map Confirmation Scr een” on page 58.
Route...
Go Here Now
Calculates the new route by setting the cursor
position as the new destination.
= For more details concerning the operation,
refer to Setting the location as a new desti-
nation on the next page.
Add Via
Recalculates the route by adding the cursor
position as a waypoint.
= For more details concerning the operation,
refer to Setting the location as a waypoint
on the next page.
Continue
Recalculates the route by setting the cursor
position as the new destination. The previous
destination becomes a waypoint.
After the location is decided (Map Confirmation Screen)
En
36
Chapter
04

= For more details concerning the operation,
refer to Replacing the location as the new
final destination on this page.
Starting Point
Sets the location as a starting point.
= For more details concerning the operation,
refer to Setting the location as the start
point on this page.
Save as...
Add Pin
Puts a map pin at the cursor position as a
mark up.
= For details, refer to Placing a map pin on the
location on the next page.
Add POI
Stores the cursor position as a POI.
= For details, refer to Registering the location
as a customized POI on page 39.
Add Favorite
Stores the cursor position as one of the “Fa-
vorites”.
= For details, refer to Storing the location in
“Favorites” on page 40.
Setting the location as a
new destination
1 Touch [Route...] on the “Map Confirma-
tion Screen”.
2 Touch [Go Here Now].
When the route is not set, route calculation
starts immediately.
When the route is already set, a message will
appear asking you to cancel the current route.
Touch [Yes] to start the route calculation.
p When the cursor overlaps with a destina-
tion that has already been set, touch [Re-
move Dest.] to cancel the current route or
recalculate the route by setting one of the
remaining waypoints as the destination.
Setting the location as a
waypoint
1 Touch [Route...] on the “Map Confirma-
tion Screen”.
2 Touch [Add Via].
When no waypoint is set, route calculation
starts immediately.
p When the cursor overlaps a waypoint al-
ready set, touch [Remove Via] to delete the
waypoint and recalculate the route.
Replacing the location as
the new final destination
1 Touch [Route...] on the “Map Confirma-
tion Screen”.
2 Touch [Continue].
p Recalculates the route by setting the cursor
position as the new destination. The pre-
vious destination becomes a waypoint.
Setting the location as the
start point
Only setting the starting point is performed
when there is no route. Otherwise, the new
route from the starting point to the current
destination will be recalculated.
After the location is decided (Map Confirmation Screen)
En
37
Chapter
04
After the location is decided (Map Confirmation Screen)
1 Touch [Route...] on the “Map Confirma-
tion Screen”.
2 Touch [Starting Point].
p When the cursor overlaps with a starting
point already set, It changes to [Remove
Start]. All waypoints already set are
deleted.
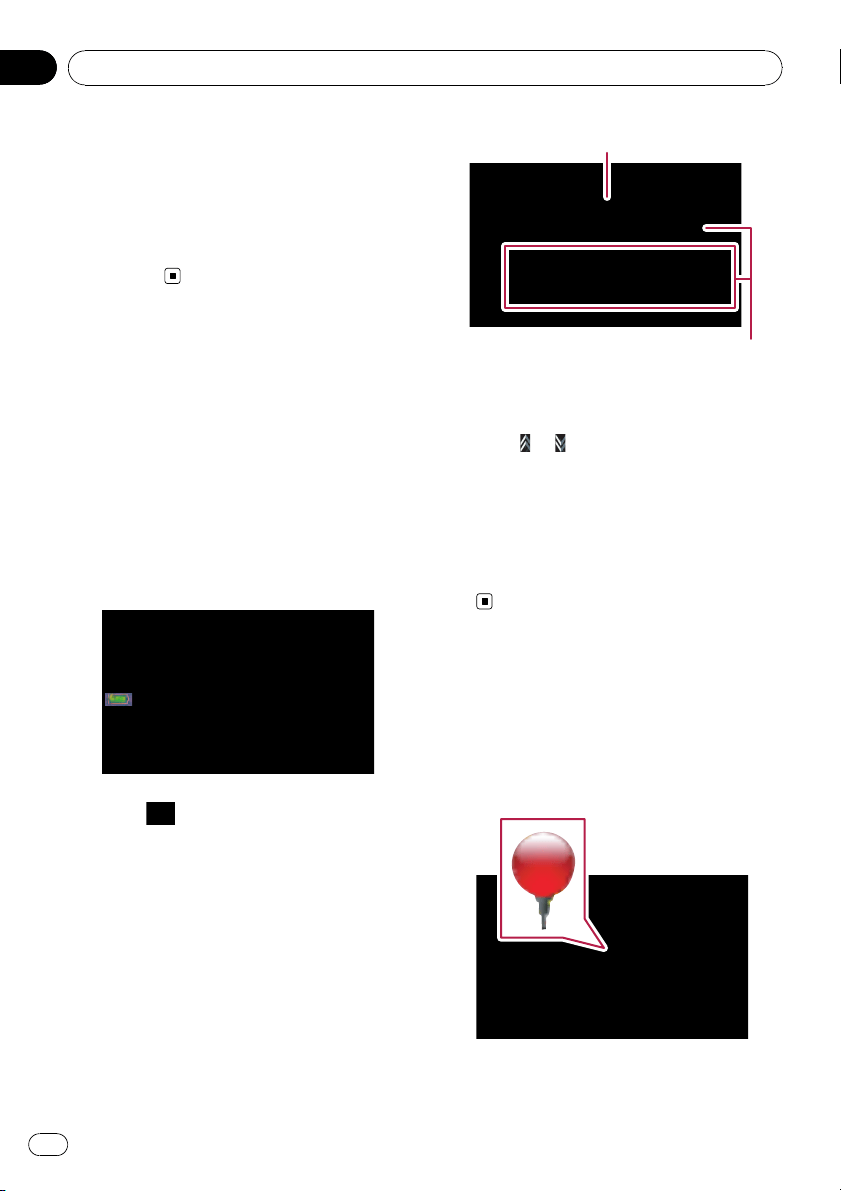
Viewing the information of
a specified location
Locating the cursor to your desired position
enables you to view detailed information about
the location by using the “Map Confirmation
Screen”.
1 Press MAP button to display the navi-
gation map screen.
2 Touch and drag the screen to scroll the
map to the desired position.
3 Touch to display the “Map Confir-
mation Screen”.
The “Map Confirmation Screen” appears.
4 Touch [Info] at the bottom of the “Map
Confirmation Screen”.
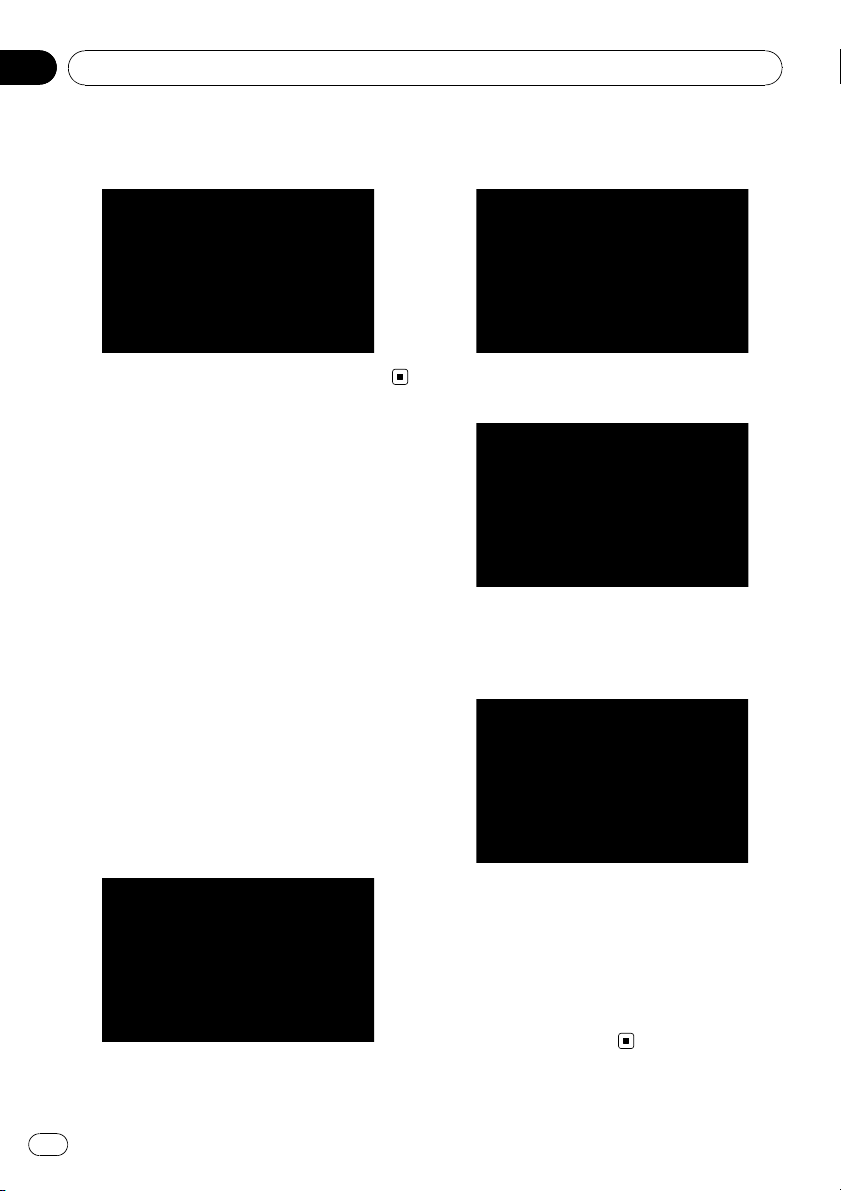
The “Point Info” screen appears.
1
2
1 The address and coordinates
2 Information about a nearby POI
5 Touch or to scroll the nearby POI list
and then touch the desired POI.
Touching one of the listed POIs enables you to
view more detailed information about the POI.
6 Touch [OK].
If you touch [OK], the “Map Confirmation
Screen” appears with a focus on the selected
POI.
Placing a map pin on the
location
The pin-shaped icons called “map pins” can
be used just like markers. Placing the colored
pins on the map makes the position stand out
and helps you to find the position easily later.
After the location is decided (Map Confirmation Screen)
En
38
Chapter
04

1 Search for a location or position the
cursor on the desired area by scrolling the
map and displaying the “Map Confirmation
Screen”.
2 Touch [Save as...] on the “Map Confir-
mation Screen”.
3 Touch [Add Pin].
The pin-shaped icon is placed on the map and
the screen returns to the map screen.
p The color of pin-shaped icon is assigned
automatically within predefined colors
when you set it up.
Removing a map pin
When the cursor overlaps a map pin that has
already been set, you can remove the map pin.
1 Locate the cursor at the pin-shaped
icon and display the “Map Confirmation
Screen”.
2 Touch [Save as...] on the “Map Confir-
mation Screen”.
3 Touch [Remove Pins].
The pin-shaped icon is removed and the
screen returns to the map screen.
Registering the location as
a customized POI
If a new business has opened, it may not be
found in the database. Registering the loca-
tion as a new POI allows you to use the item
just like a preinstalled POI.
1 Search for a location or position the
cursor on the desired area by scrolling the
map and displaying the “Map Confirmation
Screen”.
2 Touch [Save as...] on the “Map Confir-
mation Screen”.
3 Touch [Add POI].
The list of POI categories appears.
4 Touch the desired category to which
the location is to be assigned.
If there are more detailed categories within the
selected category, repeat this step as many
times as necessary.
5 Touch [Add here] when the desired ca-
tegory list appears to add the item to it.
If there aren’t any more detailed categories,
the blank list appears. In such case, touching
[Add here] allows you to add the item and
register it as an item belonging to the category
that you selected on the previous screen.
p Touching [Add here] without selecting any
category is invalid.
6 Enter the desired name and then touch
[Done] to complete the entry.
The registration is now complete and the item
is available as a customized POI.
p You can edit the stored POI later in “Man-
age POI”.
= For more details concerning the operation,
refer to Editing your customized POI on
page 88.
After the location is decided (Map Confirmation Screen)
En
39
Chapter
04
After the location is decided (Map Confirmation Screen)

Storing the location in
“Favorites”
Storing your favorite locations as “Favorites”
provides you with the opportunity to save the
time and effort of re-entering this information.
Stored items can be made available on “Fa-
vorites” later.
= For more details concerning the operation,
refer to Selecting a location stored in “ Fa-
vorites” on page 32.
p “Favorites” can store up to 30 locations.
1 Search for a location or position the
cursor on the desired area by scrolling the
map and displaying the “Map Confirmation
Screen”.
2 Touch [Save as...] on the “Map Confir-
mation Screen”.
3 Touch [Add Favorite].
4 Touch the desired entry.
Selecting an item that has already been stored
allows you to overwrite it.
5 Enter the desired name and then touch
[Done] to complete the entry.
Storage has been completed and the item is
available as a preset entry on “Favorites”.
Deleting an entry in
“Favorites”
All entries in “Favorites” can be deleted at
once.
1 Touch [Destination] on the “Top Menu”,
and then touch [Favorites].
2 Touch [Clear All].
A message will appear asking you to confirm
the deletion.
3 Touch [Yes].
p Because deleted data cannot be restored,
take extra care not to mistakenly delete
item.
After the location is decided (Map Confirmation Screen)
En
40
Chapter
04
Checking the current route
conditions
The “Route Information” screen provides you
with various detailed information about the
current route.
This is an example showing a route with two
waypoints.
p This function is available only when the
route is set and your vehicle position is on
the route.
p You can also display the “Route Informa-
tion” screen by touching “Multi-Info win-
dow” on the map screen.
= For details, refer to Multi-Info window
on page 19.
1 Touch [Destination] on the “Top Menu”,
and then touch [Route Function].
2 Touch [Route info].
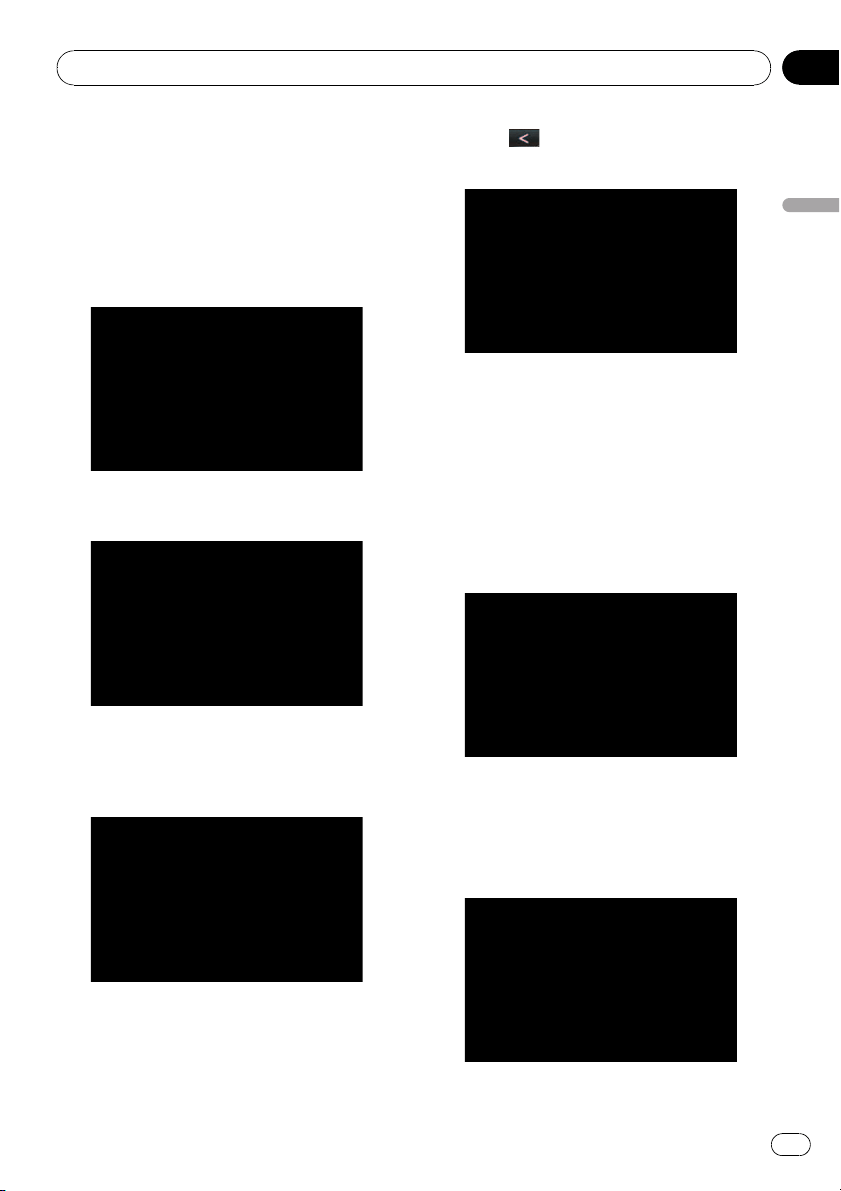
The “Route Information” screen appears.
13 4
5
6
7
8
2
1 Starting point
2 Current position
3 Waypoint
4 Destination
5 Time and distance up to the point currently
shown
The remaining distance and time, as well as
the estimated time of arrival are displayed.
6 The route calculation method that is cur-
rently set “Method:”
= For details, refer to Route on page 83.
7 Point currently shown and information re-
garding the point
8 The route conditions up to the point cur-
rently shown
Touching the icon enables you to check the
details. If there are five or more icons, touch
to show the next four icons.
Checking the current route
En
41
Chapter
05
Checking the current route
3 Touch [Dest.] to switch to the screen for
first waypoint.
The “Route Information (to via)” screen ap-
pears.
4 Touch [Via] to switch to the second
waypoint screen.
The “Route Information (to via)” screen for
next waypoint appears.
5 Touch [Via] to return to the screen for
whole route.
The “Route Information” screen appears.
p If three or more waypoints are set, each
touch of [Via] shows the screen for the next
waypoint.
Playing simulated travel at
high speed
This function allows you to play the simulated
navigation function at high speed without
voice guidance. This function is useful if you
want to browse how the current route will be
navigated.
1 Touch [Destination] on the “Top Menu”,
and then touch [Route Function].
2 Touch [Route info].
The “Route Information” screen appears.
3 Touch [Fly over].
The simulation will start.
p If you want to stop the simulation, touch
on the map.
Checking the entire route
overview on the map
You can check the entire outline of the current
route.
1 Touch [Destination] on the “Top Menu”,
and then touch [Route Function].
2 Touch [Route info].
The “Route Information” screen appears.
3 Touch [Fit to Screen].
A 2D map screen will appear with the current
overall route fitted onto the screen.
Checking the current itinerary
You can check the route details.
p This function is available only when the
route is set and your vehicle position is on
the route.
1 Touch [Destination] on the “Top Menu”,
and then touch [Route Function].
2 Touch [Itinerary].
3 Touch
or to scroll the list.
Scroll the list as necessary.
1
2
3
1 Turning direction
2 Driving distance
3 Names of the streets you are driving
through
4 Touch [Mode].
Each touch of [Mode] changes the list mode.
Checking the current route
En
42
Chapter
05

Alternative options:
! Detailed Instructions
All turning points, passed streets and other
information is shown.
! Instructions
All turning points (where voice guidance is
given) are shown.
! Road List
Displays the turning points with the most
simplified condition (the duplicate route
names are merged into one.).
p When a long distance route is calculated,
your navigation system may not be able to
list all roads. (In this case, the remaining
roads will be shown in the list as you drive
on.)
Checking the current route
En
43
Chapter
05
Checking the current route

Editing waypoints
You can edit waypoints (locations you want to
visit on the way to your destination) and recal-
culate the route so that is passes through
these locations.
Adding a waypoint
1 Search for a location.
= For more details, refer to the descriptions
from page 24 to page 34.
2 Touch [Route...] on the “Map Confirma-
tion Screen”.
3 Touch [Add Via].
When no waypoint is set, route calculation
starts immediately.
= For more details concerning the operation,
refer to Sorting waypoints on this page.
p When you set waypoints in the route to your
destination, the route up to the next way-
point will appear in light green. The rest of
the route will appear in light blue.
Sorting waypoints
You can sort waypoints and recalculate the
route.
1 Touch [Destination] on the “Top Menu”,
and then touch [Route Function].
2 Touch [Edit Route].
The “Edit Route” screen appears.
3 Touch [i]or[j] to move the waypoint
or destination.
Put them in the desired order.
Touching [Optimize] sorts the waypoints auto-
matically so that the route will compromise
the least time and distance.
4 Touch [Done].
The route is recalculated and the map of the
current position appears.
Deleting a waypoint
You can delete waypoints from the route and
then recalculate the route. (You can delete
waypoints successively.)
1 Touch [Destination] on the “Top Menu”,
and then touch [Route Function].
2 Touch [Edit Route].
The “Edit Route” screen appears.
3 Touch [Delete] on the right of the way-
point that you want to delete.
The waypoint will be deleted from the list.
4 Touch [Done].
The route is recalculated and the map of the
current position appears.
Storing the current route
Storing the current route allows you to recall
and set the stored route.
p This function is available only when the
route is set and your vehicle position is on
the route.
1 Touch [Destination] on the “Top Menu”,
and then touch [Route Function].
Editing waypoints and the destination
En
44
Chapter
06

2 Touch [Save Route].
3 Enter the desired name and then touch
[Done] to complete the entry.
The previous screen appears.
Deleting the entry in “Saved
Routes”
1 Touch [Destination] on the “Top Menu”,
and then touch [Saved Routes].
2 Touch [Delete] on the right of the item
that you want to delete.
p Because deleted data cannot be restored,
take extra care not to mistakenly delete
item.
Deleting the current route
If you no longer need to travel to your destina-
tion, follow the steps below to delete the cur-
rent route and cancel the route guidance.
1 Touch [Destination] on the “Top Menu”,
and then touch [Delete Route].
A message confirming the cancellation of the
current route appears.
2 Touch [Yes].
Editing waypoints and the destination
En
45
Chapter
06
Editing waypoints and the destination
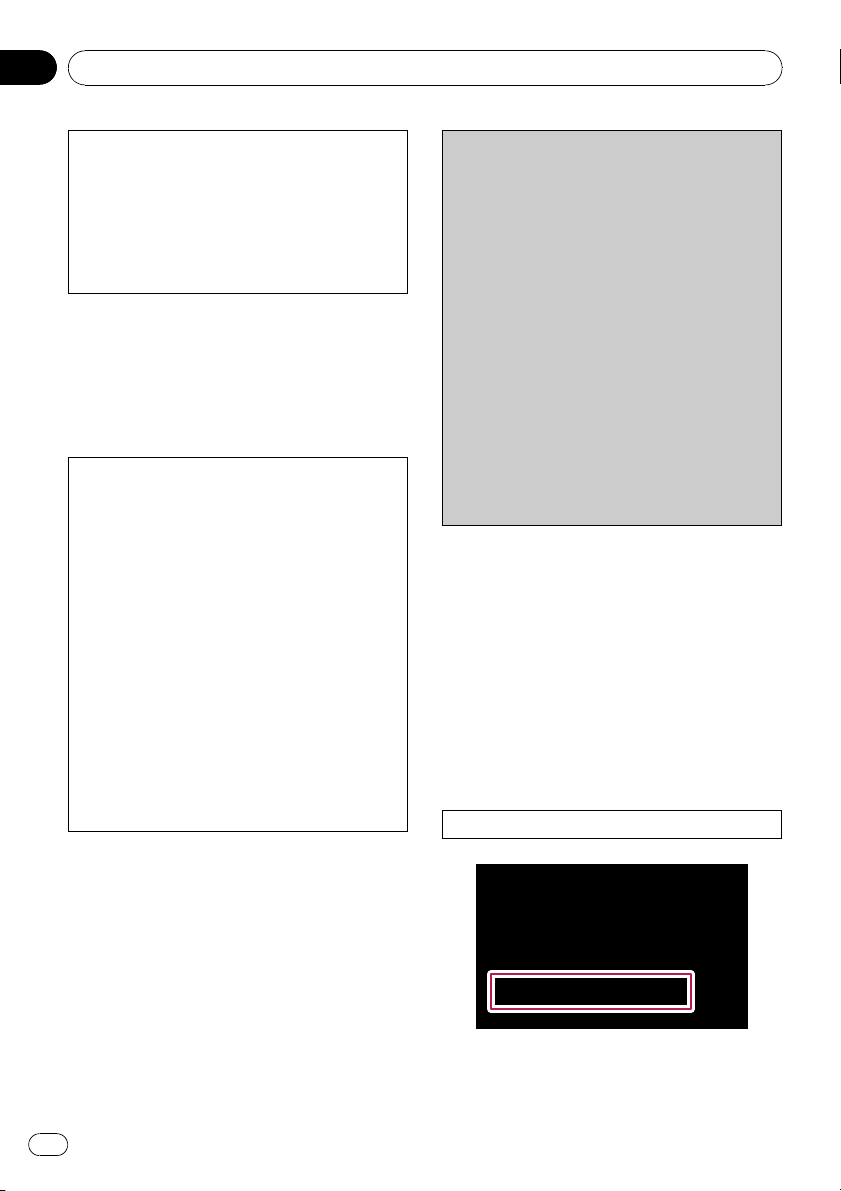
MSN Direct tuner is embedded in the cradle.
Therefore, this function is available only when
the navigation system is attached on the cra-
dle.
If the MSN Direct information has not been up-
dated for a length of time, unplug the system
cable from the cradle and plung it again.
If you have an active subscription to MSN Di-
rect service, you can check and browse var-
ious information on your navigation system,
such as gas prices, movie times, weather con-
ditions and traffic information. The informa-
tion will be updated periodically.
Notice about MSN Direct™
Pioneer is not responsible for the accuracy of
the MSN Direct content. The MSN Direct con-
tent may not be current or available at times,
and is subject to change without notice. To re-
ceive MSN Direct content, you must subscribe
to the MSN Direct service, and you must be
within the MSN Direct coverage area. Cover-
age may also be affected by the availability and
relative strength of FM transmissions, as well
as reception limitations of Microsoft’s Direct-
Band network.
Please visit
http://www.msndirect.com/pioneer
or current coverage area maps, subscription
details, and other important information about
MSN Direct.
Activating the service
You have to activate MSN Direct first.
p A web-connected computer is required for
the online subscription.
p If you have difficulty for the online subscrip-
tion, please call toll-free 1-866-658-7032.
General flow chart:
1 Check your product key.
You have to know your product key for the
subscription.
(Refer to Checking your product key on this
page.)
j
2 Make an online subscription to MSN Direct
service using your PC.
(Refer to Subscribing to the MSN Direct ser-
vice on the next page.)
j
3 Activate the MSN Direct service on this pro-
duct.
(Refer to Activating the MSN Direct function
on the next page.)
j
4 Activation is complete.
Checking your product key
The product key that you can find here is used
in the online subscription.
1 Touch [Destination] on the “Top Menu”,
and then touch [MSN Direct].
The “MSN Direct” screen appears.
2 Touch [Status].
3 Write your product key down in the fol-
lowing box;
Browsing information on MSN Direct
En
46
Chapter
07
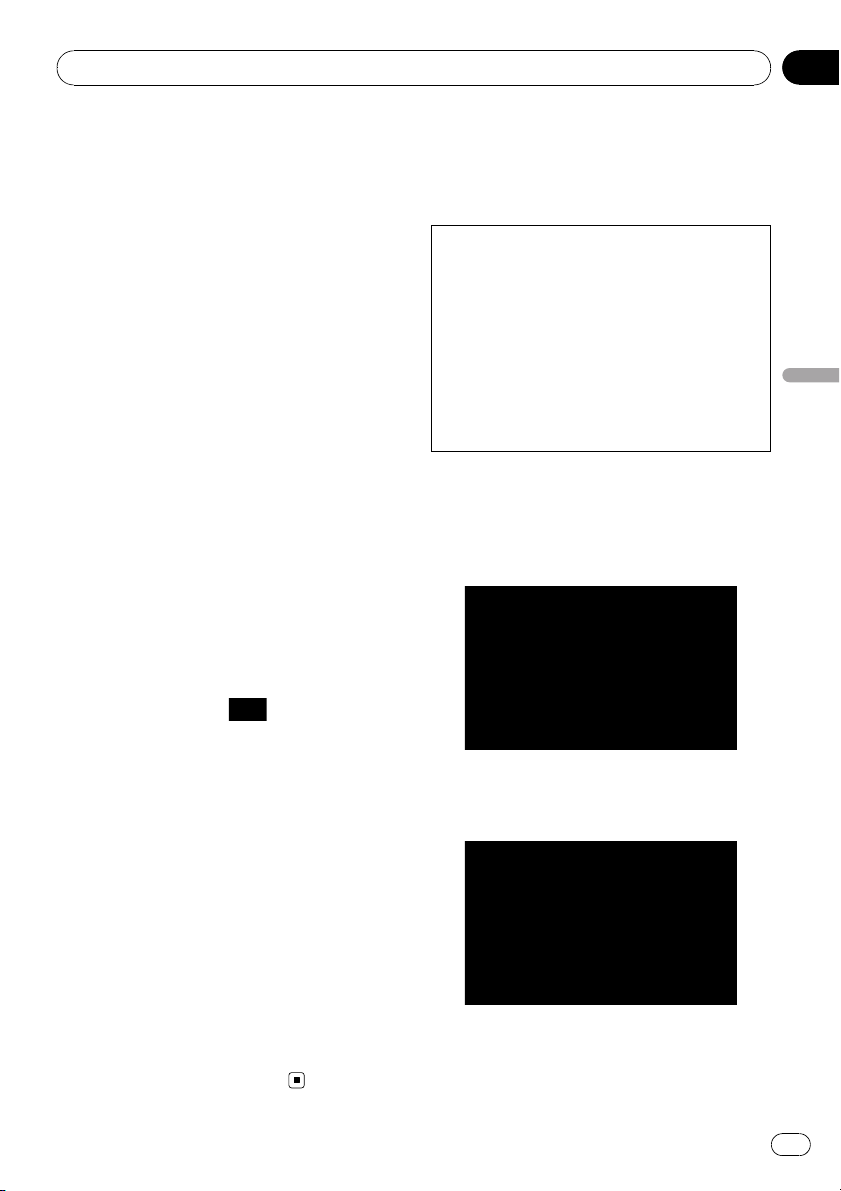
Subscribing to the MSN Direct
service
Within two days of completing the subscription,
execute Activating the MSN Direct function.
1 Access the following URL and read the
description.
http://www.msndirect.com/pioneer
2 Be sure to check the coverage area and
other availabilities of MSN Direct on the
web page.
3 Move to the page for activation and
enter your product key.
4 Follow the directions on the web page
to complete the subscription.
Activating the MSN Direct function
After the online subscription, complete the ac-
tivation so that the navigation system can re-
ceive the information.
This operation must be performed under the
following conditions
— You are currently in the coverage area of
MSN Direct.
— The signal strength (
)on“MSN Direct”
screen is not weak.
1 Boot-up your navigation system.
2 Touch [Destination] on the “Top Menu”,
and then touch [MSN Direct].
The “MSN Direct” screen appears.
Check the signal strength. If the signal is
weak, move to another location where a stron-
ger signal can be received.
3 Touch [Status].
4 Wait until the activation status changes
to “Active”.
It may take approximately 20 or 30 minutes to
complete the activation.
After activation is complete, the information
will be available on each menu.
Browsing gas prices
Recent gas prices of nearby gas stations are
displayed in a list.
This informations does not necessarily corre-
spond to actual information. Utilize the infor-
mation for your reference.
It may take up to 24 hours for all the data to be-
come available under the following conditions:
! When you use MSN Direct for the first time.
! When you have not performed this function
previously around the current area.
! After the navigation system has been
turned off for a few days.
1 Touch [Destination] on the “Top Menu”,
and then touch [MSN Direct].
The “MSN Direct” screen appears.
2 Touch [Gas Prices].
3 Touch the desired tab to change the
sort order.
Available options;
! [Distance] (default):
Browsing information on MSN Direct
En
47
Chapter
07
Browsing information on MSN Direct
Sorts the items in the list in order by dis-
tance from the vehicle position.
! [Name]:
Sorts the items in the list alphabetically.
! [Price]:
Sorts the items in the list by price.
4 Touch on the item that you want to
view in detail.
1 The names of gas stations and their loca-
tions
2 Gas prices
The information in ( ) shows how current
the information is.
3 Distance from the current position
5 Touch on of the options at the bottom
of the “Map Confirmation Screen” to select
the next operation.
= For details concerning other operations on
the “Map Confirmation Screen”, refer to
What you can do with the “Map Confirmation
Screen” on page 36.
Browsing movie times
Nearby theaters can be displayed on a list.
Switching the screen allows you to see the
movie title now showing.
This informations does not necessarily corre-
spond to actual information. Utilize the infor-
mation for your reference.
It may take up to 6 hours for all the data to be-
come available under the following conditions:
! When you use MSN Direct for the first time.
! When you have not performed this function
previously around the current area.
! After the navigation system has been
turned off for a few days.
Searching for a theater by
selecting a movie title
1 Touch [Destination] on the “Top Menu”,
and then touch [MSN Direct].
2 Touch [Movie Times].
3 Touch [All Movie Titles].
The movie titles now showing are displayed.
4 Touch the desired movie title.
The theaters that are currently showing the se-
lected movie are displayed.
Browsing information on MSN Direct
En
48
Chapter
07
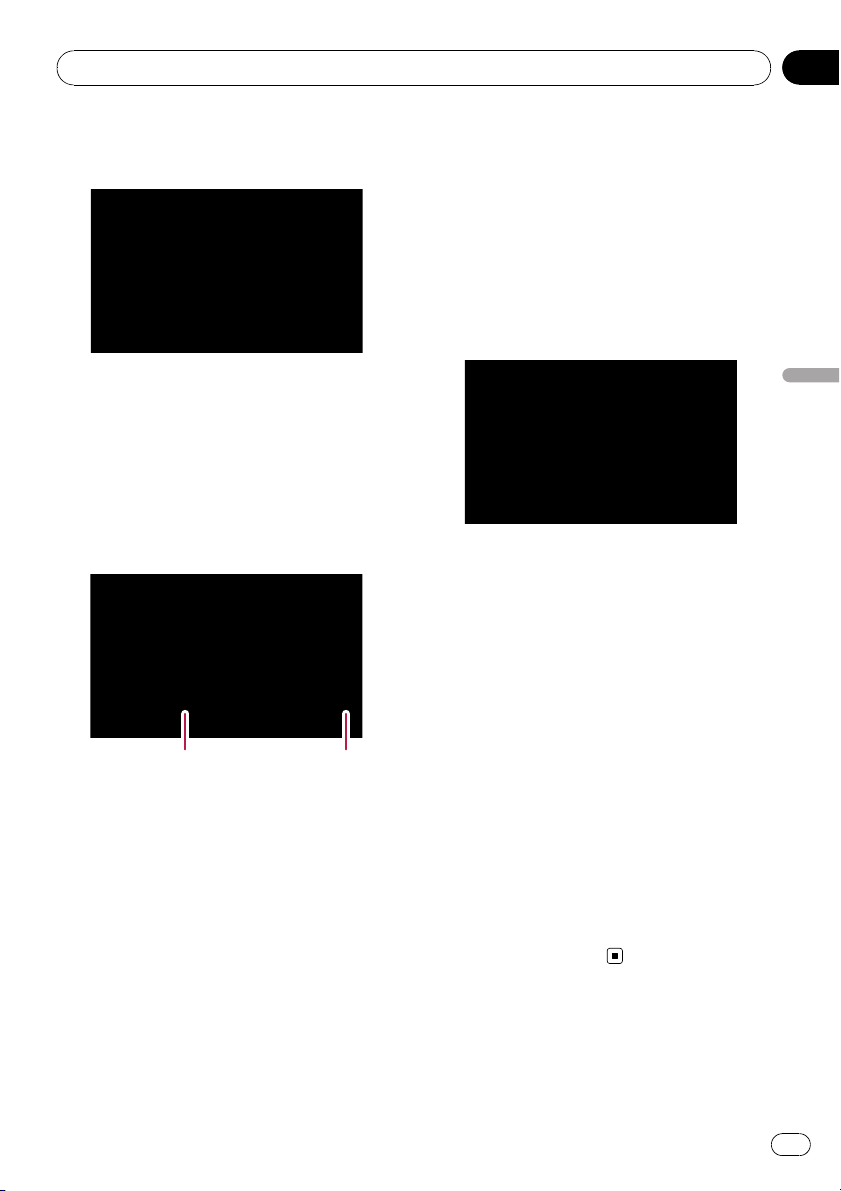
5 Touch the desired tab to change the
sort order.
Available options;
! [Distance] (default):
Sorts the items in the list in order by dis-
tance from the vehicle position.
! [Name]:
Sorts the items in the list alphabetically.
6 Touch on the item that you want to
view in detail.
12
1 The names of theaters and their locations
2 Distance from the current position
7 Touch on of the options at the bottom
of the “Map Confirmation Screen” to select
the next operation.
= For details concerning other operations on
the “Map Confirmation Screen”, refer to
What you can do with the “Map Confirmation
Screen” on page 36.
Searching for a movie title by
selecting a theater
1 Touch [Destination] on the “Top Menu”,
and then touch [MSN Direct].
2 Touch [Movie Times].
The nearby theaters are displayed.
3 Touch the desired tab to change the
sort order.
Available options;
! [Distance] (default):
Sorts the items in the list in order by dis-
tance from the vehicle position.
! [Name]:
Sorts the items in the list alphabetically.
4 Touch the desired theater.
The movie titles currently shown on the se-
lected theater are displayed.
5 Touch on the item that you want to
view in detail.
6 Touch on of the options at the bottom
of the “Map Confirmation Screen” to select
the next operation.
= For details concerning other operations on
the “Map Confirmation Screen”, refer to
What you can do with the “Map Confirmation
Screen” on page 36.
Browsing information on MSN Direct
En
49
Chapter
07
Browsing information on MSN Direct

Browsing weather
information
Local weather information can be displayed
on a list. Switching the screen allows you to
see worldwide weather conditions.
This informations does not necessarily corre-
spond to actual information. Utilize the infor-
mation for your reference.
Checking the local weather
information
1 Touch [Destination] on the “Top Menu”,
and then touch [MSN Direct].
2 Touch [Weather].
The local weather information is displayed.
The area name, distance and direction from
current position are displayed on the list. The
items on the list are sorted by distance.
3 Touch the desired area.
Detailed information is displayed.
Touching [Forecast] displays the weather fore-
casts for these three days.
Checking worldwide weather
conditions
1 Touch [Destination] on the “Top Menu”,
and then touch [MSN Direct].
2 Touch [Weather].
The local weather information is displayed.
3 Touch [Worldwide].
Worldwide weather conditions are displayed.
The area name, distance and direction from
current position are displayed on the list. The
list is sorted alphabetically by the area name.
4 Touch the desired area.
Detailed information is displayed.
Using traffic information
You can view current traffic conditions and in-
formation. When the navigation system re-
ceives updated traffic information, it will
overlay the traffic information on your map
and also display detailed text information
when available.
In the default setting, the navigation system
takes into account traffic information and tries
to avoid traffic jam and suggests better routes.
Also, when you are traveling along a route and
the system finds another better route for avoid-
ing the traffic jam, the current route will be re-
calculated automatically.
The term “traffic jam” in this section indicates
the following types of traffic conditions:
— Stop-and-go traffic
— Stopped traffic
— Closed/blocked roads
Viewing the traffic list
Traffic Information is displayed on a screen in
the form of a list. This allows you to check how
many traffic incidents have occurred, their lo-
cation and their distance from your current po-
sition.
1 Touch [Destination] on the “Top Menu”,
and then touch [MSN Direct].
2 Touch [Traffic].
A list with traffic information that has been re-
ceived is shown. The list is sorted by distance
from your current position.
Places (street names) where incidents have
occurred are displayed on the list.
Browsing information on MSN Direct
En
50
Chapter
07
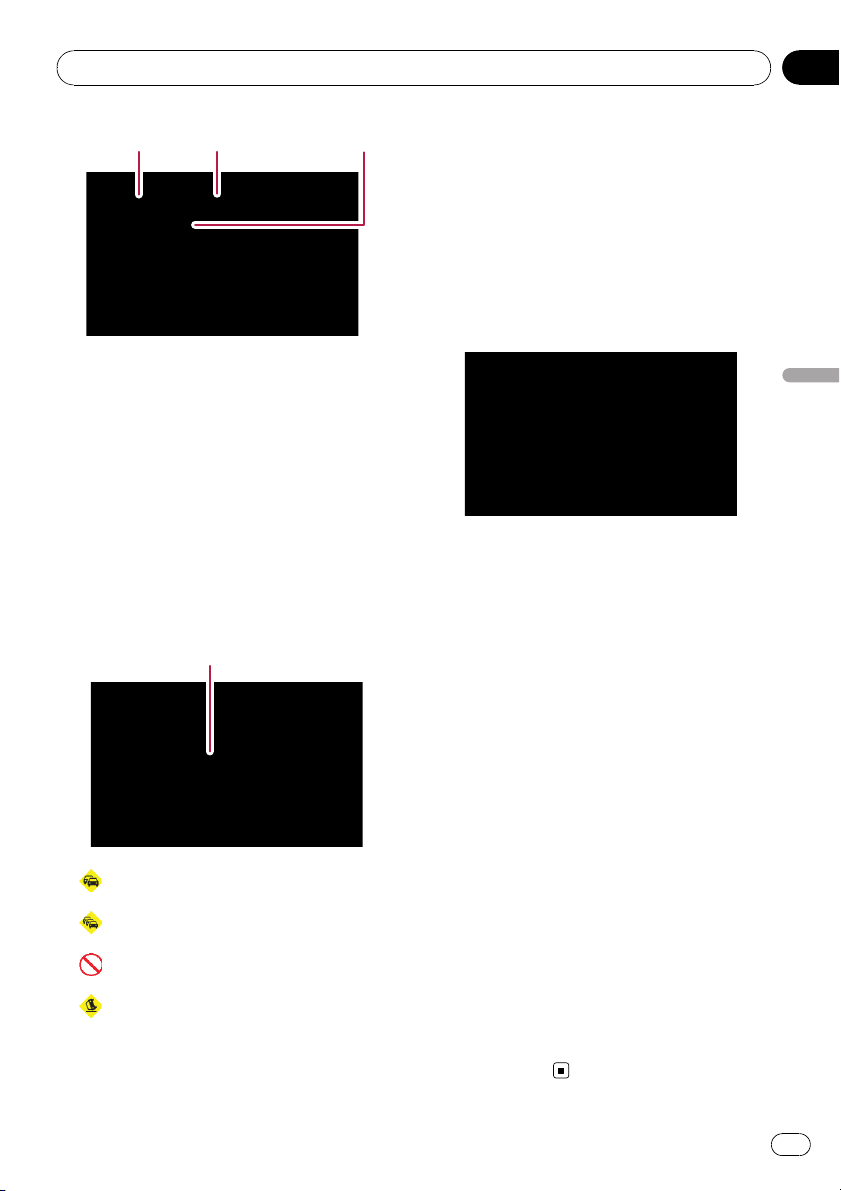
1 2 3
1 Event-related icon
2 Street or location and direction
3 Distance to the location and event
Touching the desired item allows you to check
its position on the map.
How to read traffic information
on the map
The traffic event information displayed on the
map is as follows.
p Further zooming out hides the lines and
icons of traffic information.
Traffic event icon
! with red line:
Stop-and-go traffic
!
with red line:
Stopped traffic
!
with red line:
Closed/blocked roads
!
etc.:
Accidents, constructions, etc.
Setting the traffic information
Preferred functions related to traffic informa-
tion can be set.
1 Touch [Destination] on the “Top Menu”,
and then touch [MSN Direct].
2 Touch [Traffic] and then touch [Set-
tings].
The “Traffic Settings” screen appears.
Available options;
! “Recalculate to avoid traffic”
[Enabled]:
Calculates the new route with the traffic
congestion taken into account when rerout-
ing.
[Disabled]:
Calculates the new route without the traffic
congestion taken into account when rerout-
ing.
! “Sort events by”
[Distance]:
Sorts the traffic event items in the list by
distance.
[Type]:
Sorts the traffic event items in the list by
event type.
! “Use traffic information”
[On]:
Calculates the route with the traffic conges-
tion taken into account in the initial calcula-
tion.
[Off]:
Calculates the route without the traffic con-
gestion taken into account in the initial
calculation.
Browsing information on MSN Direct
En
51
Chapter
07
Browsing information on MSN Direct
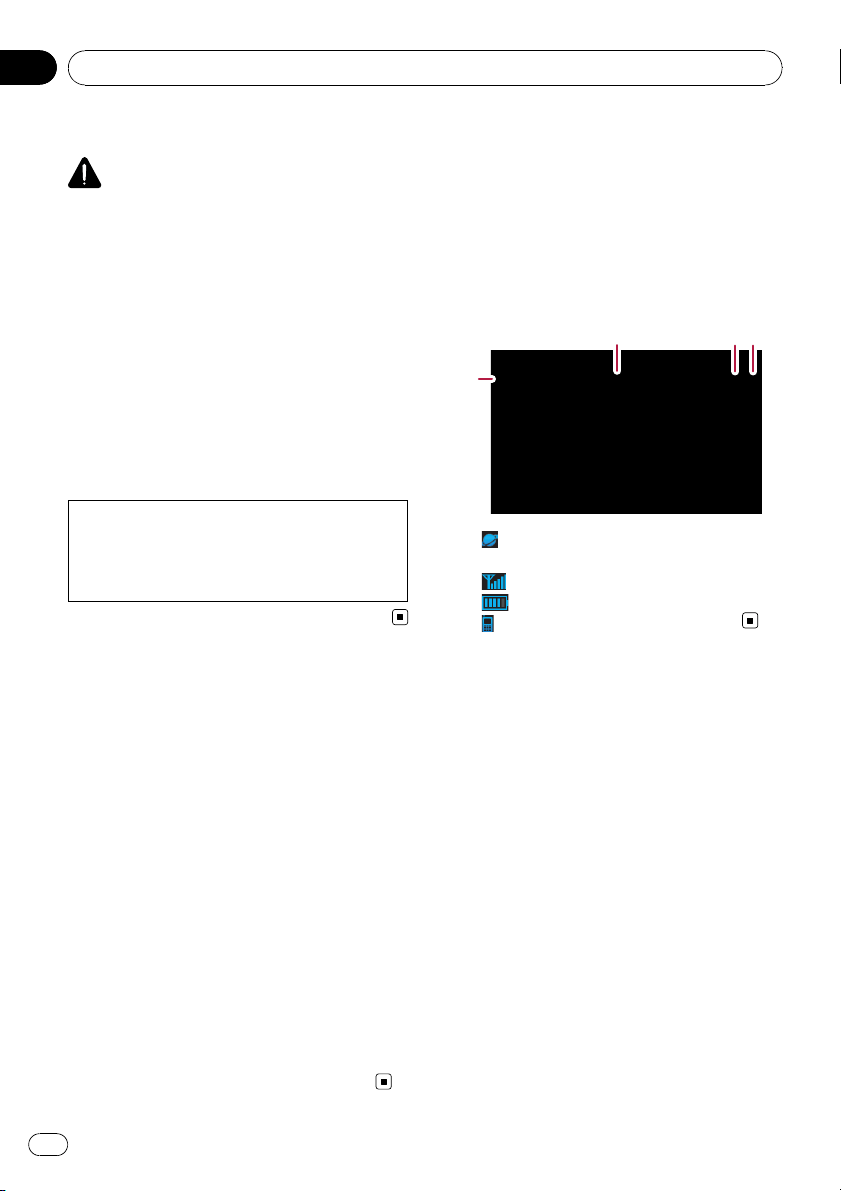
Hands-free phoning overview
CAUTION
For your safety, avoid talking on the phone as
much as possible while driving.
If your cellular phone features Bluetooth
®
technology, this navigation system can be con-
nected to your cellular phone wirelessly. Using
this hands-free function, you can operate the
navigation system to make or receive phone
calls. You can also transfer the phone book
data stored in your cellular phone to the navi-
gation system. This section describes how to
set up a Bluetooth connection and how to op-
erate a cellular phone featuring Bluetooth
technology on the navigation system.
For more information about the connectivity
with the mobile phone featuring Bluetooth
wireless technology, refer to the information
on our website.
Preparing communication
devices
This navigation system has a built-in function
to use cellular phones featuring Bluetooth
wireless technology.
While your cellular phone featuring Bluetooth
wireless technology is connected, the Blue-
tooth connection status indicator lights.
= For details, refer to Notes for hands-free
phoning on page 63.
p When the power of the navigation system
turns off, the Bluetooth connection is also
disconnected. When the system restarts,
the system automatically attempts to re-
connect the previously-connected cellular
phone. Even when the connection is sev-
ered for some reason, the system automati-
cally reconnects the specified cellular
phone (except when the connection is sev-
ered due to cellular phone operations).
Displaying the Phone Menu
Use the “Phone Menu” if you connect the cel-
lular phone to the navigation system for utiliza-
tion.
1 Press MENU button to display the “Top
Menu”.
2 Touch [Phone].
4
1
2
3
1 : Network name of the cellular phone
company
2
: Reception status of the cellular phone
3
: Battery status of the cellular phone
4
: Name of connected cellular phone
Registering your cellular
phone
You need to register your cellular phone featur-
ing Bluetooth wireless technology when you
connect it for the first time. A total of three
phones can be registered. Three registration
methods are available:
! Searching for nearby phones
! Searching for a specified phone
! Pairing from your mobile phone
p If you try to register more than three cellu-
lar phones, the system will ask you to select
one of the registered cellular phones to
overwrite.
= For details, refer to Connecting a regis-
tered cellular phone on page 55.
p The default device name displayed on the
cellular phone is “Pioneer Navi”. The PIN
code is “1111”.
Using hands-free phoning
En
52
Chapter
08

Searching for nearby phones
The system searches for available cellular
phones near the navigation system and dis-
plays them in a list, and registers them for
connection.
1 Activate the Bluetooth wireless tech-
nology on your cellular phone.
For some cellular phones, no specific action is
necessary to activate Bluetooth wireless tech-
nology. For details, refer to the instruction
manual of your cellular phone.
2 Touch [Phone Settings] on the “Phone
Menu”.
= For details, refer to Displaying the Phone
Menu on the previous page.
3 Touch [Connection].
4 Touch [Add Device], and then [Search
devices].
The system searches for cellular phones with
Bluetooth technology that are waiting for the
connection and displays them in the list if the
device has found.
p Up to 10 cellular phones will be listed in the
order that the cellular phone is found.
5 Wait until your cellular phone appears
in the list.
p If you cannot find the cellular phone you
want to connect, check that the cellular
phone is waiting for the Bluetooth wireless
technology connection.
6 Touch the cellular phone name you
want to register.
A message promptings you to enter a PIN
code appears.
7 Enter the PIN code “1111” using the cel-
lular phone.
When a connection is successfully estab-
lished, a connection complete message ap-
pears, the screen returns to the “Phone
Settings” menu by touching [OK].
Searching for a specified phone
If you cannot connect your phone in the regu-
lar two methods previously described, try this
method if your phone is found in the list.
1 Activate the Bluetooth wireless tech-
nology on your cellular phone.
For some cellular phones, no specific action is
necessary to activate Bluetooth wireless tech-
nology. For details, refer to the instruction
manual of your cellular phone.
2 Touch [Phone Settings] on the “Phone
Menu”.
= For details, refer to Displaying the Phone
Menu on the previous page.
3 Touch [Connection].
4 Touch [Add Device], and then [Select
specific devices].
Using hands-free phoning
En
53
Chapter
08
Using hands-free phoning

5 Touch the model name of the cellular
phone to be connected.
The system searches for cellular phones with
Bluetooth technology that are waiting for the
connection and displays them in the list if the
device has found.
p If you cannot find the desired model name
on the list, touch [Other phones] to search
the cellular phones available nearby.
6 Select the cellular phone you want to
register from the list.
A message promptings you to enter a PIN
code appears.
7 Enter the PIN code “1111” using the cel-
lular phone.
When a connection is successfully estab-
lished, a connection complete message ap-
pears, the screen returns to the “Phone
Settings” menu by touching [OK].
Pairing from your mobile phone
You can register the cellular phone by setting
the navigation system to standby mode and re-
questing connection from the cellular phone.
1 Activate the Bluetooth wireless tech-
nology on your cellular phone.
For some cellular phones, no specific action is
necessary to activate Bluetooth wireless tech-
nology. For details, refer to the instruction
manual of your cellular phone.
2 Touch [Phone Settings] on the “Phone
Menu”.
= For details, refer to Displaying the Phone
Menu on page 52.
3 Touch [Add Device], and then [Pair from
the mobile phone].
The navigation system waits for a Bluetooth
wireless technology connection.
4 Register the navigation system on your
cellular phone.
If your cellular phone asks you to enter a pass-
word, enter the PIN code (password) of the na-
vigation system.
After the registration is completed, the follow-
ing screen appears.
p If registration fails repeat the procedure
from the beginning.
Using hands-free phoning
En
54
Chapter
08

Connecting a registered
cellular phone
The navigation system automatically connects
the cellular phone selected as the target of
connection. However, connect the cellular
phone manually in the following cases:
! Two or more cellular phones are registered,
and you want to manually select the cellu-
lar phone to be used.
! You want to reconnect a disconnected cel-
lular phone.
! Connection cannot be established automa-
tically for some reason.
If you start connection manually, carry out the
following procedure. You can also connect the
phone by having the navigation system detect
it automatically.
= For details, refer to Setting the automatic
connection on page 62.
1 Activate the Bluetooth wireless tech-
nology on your cellular phone.
For some cellular phones, no specific action is
necessary to activate Bluetooth wireless tech-
nology. For details, refer to the instruction
manual of your cellular phone.
2 Touch [Phone Settings] on the “Phone
Menu”.
= For details, refer to Displaying the Phone
Menu on page 52.
3 Touch [Connection].
4 Touch the name of the cellular phone
that you want to connect.
Connection starts.
When a connection is successfully estab-
lished, a connection complete message ap-
pears, the screen returns to the “Phone
Settings” menu by touching [OK].
p If another cellular phone is already con-
nected, touch [Disconnect] next to the cel-
lular phone name to disconnect it, and start
connection.
p To cancel the connection to your cellular
phone, touch [Cancel].
p If connection fails, check to see whether
your cellular phone is waiting for a connec-
tion and then retry.
Disconnecting a cellular phone
1 Touch [Phone Settings] on the “Phone
Menu”.
= For details, refer to Displaying the Phone
Menu on page 52.
2 Touch [Connection].
3 Touch [Disconnect] next to the cellular
phone name.
Deleting a registered phone
If you no longer need to use a registered
phone with the navigation system, you can de-
lete it from the registration assignment to free
this spot up for another phone.
p If a registered phone is deleted, all the
phone book entries and call history lists
that correspond to the phone will be also
cleared.
1 Touch [Phone Settings] on the “Phone
Menu”.
= For details, refer to Displaying the Phone
Menu on page 52.
2 Touch [Connection].
3 Touch [Delete] next to the cellular
phone name.
The registration is canceled.
Using hands-free phoning
En
55
Chapter
08
Using hands-free phoning
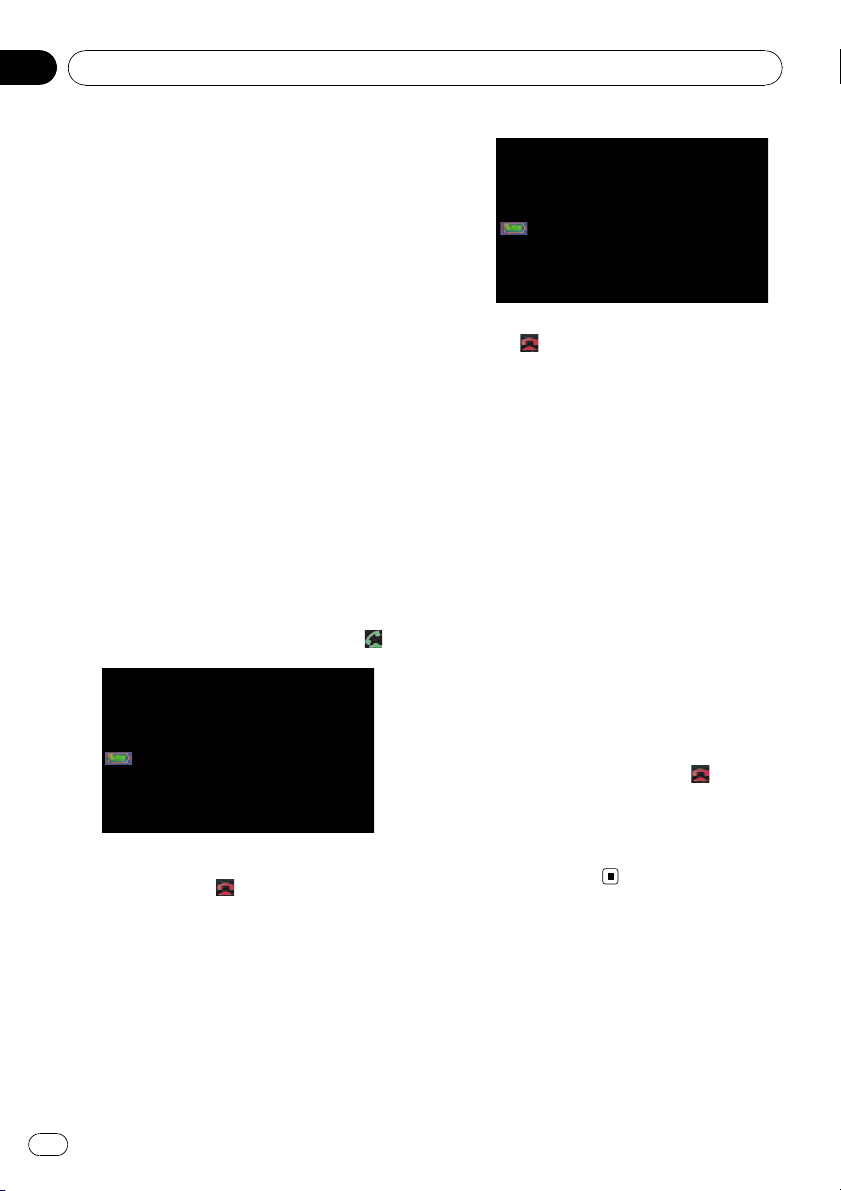
Receiving a phone call
You can perform hands-free answering by
using the navigation system.
Answering an incoming call
The system informs you that it is receiving a
call by displaying a message and producing a
ring sound once.
If [Auto Answer Preference] is set to [Off],
answer the call manually. Answering is avail-
able if any screen is displayed, such as the
map screen or the setting screen.
p You can set this navigation system to auto-
matically answer incoming calls.
= For details, refer to Answering a call
automatically on page 61.
1 When a call comes in, the answering
operation menu appears on the bottom of
the screen.
p You cannot carry out operations other than
answering calls.
2 To answer an incoming call, touch .
When there is an incoming call, you can reject
the call by touching
.
p You can adjust volume when you are talk-
ing. To adjust volume, touch [Vol -] and
[Vol +] displayed on the screen (like below)
when you are talking.
3 Touch to end the call.
The call ends.
p When there is an incoming call, pressing
MULTI-CONTROL answers the call. During
the call, pressing MULTI-CONTROL gets
you off the phone.
p If the voice on the other end of the call is
too quiet to hear, you can adjust the volume
of the received voice.
= For more details about “Phone Vo-
lume”, refer to Setting the phone volume
on page 61.
p You may hear a noise when you hang up
the phone.
Rejecting an incoming call
You can reject an incoming call.
= For details, refer to Answering a call auto-
matically on page 61.
% When a call comes in, touch
.
The call is rejected.
p The rejected call is recorded in the missed
call history list.
= For details, refer to Dialing from the history
on the next page.
Making a phone call
You can make a phone call in many different
ways.
Using hands-free phoning
En
56
Chapter
08
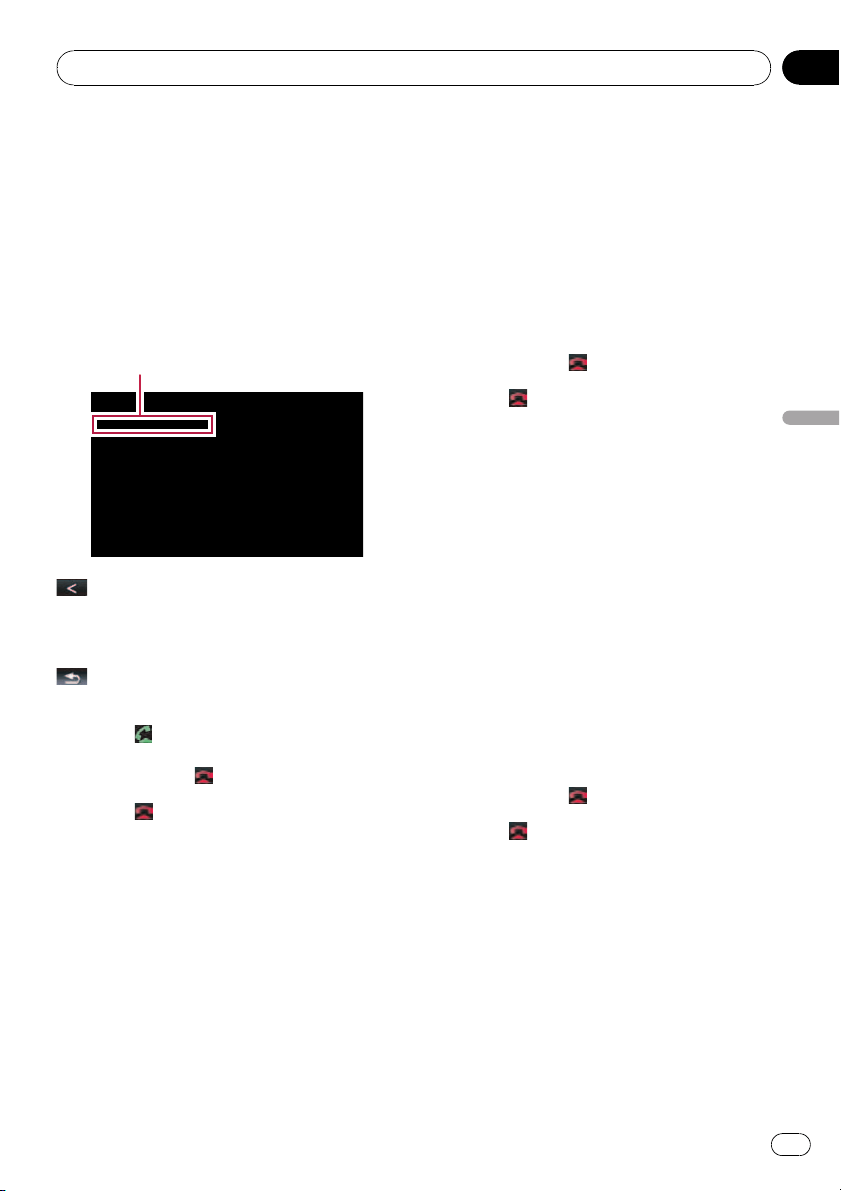
Direct dialing
1 Touch [Dial Pad] on the “Phone Menu”.
= For details, refer to Displaying the Phone
Menu on page 52.
The direct dial screen appears.
2 Touch the number keys to enter the
phone number.
The phone number that was input is dis-
played.
Input number
:
The input number is deleted letter-by-letter
from the end of the number. Continuing to
press this deletes all of the numbers.
:
Return to the previous screen.
3 Touch
to make a call.
p To cancel the call after the system starts
dialing, touch
.
4 Touch to end the call.
Dialing from the history
The most recent calls made (dialed), received
and missed are stored in the call history list.
You can browse the call histor y list and call
numbers from it.
Making a phone call using the dialed
number history
The dialed number history saves 30 calls per
registered cellular phone. If the entries exceed
30, the oldest one will be deleted.
1 Touch [Dialed Numbers] on the “Phone
Menu”.
= For details, refer to Displaying the Phone
Menu on page 52.
2 If you touch an entry on the list, dialing
starts.
p If you touch [Detail], you can check the de-
tails of the party before making a phone
call.
p To cancel the call after the system starts
dialing, touch
.
3 Touch to end the call.
Making a phone call using the
received call history
The received call history saves 30 calls per re-
gistered cellular phone. If the number of calls
exceeds 30, the oldest entry will be deleted.
1 Touch [Received Calls] on the “Phone
Menu”.
= For details, refer to Displaying the Phone
Menu on page 52.
2 If you touch an entry on the list, dialing
starts.
p If you touch [Detail], you can check the de-
tails of the party before making a phone
call.
p To cancel the call after the system starts
dialing, touch
.
3 Touch to end the call.
Making a phone call using missed
call history
The missed call history saves 20 calls per re-
gistered cellular phone. If the number of calls
exceeds 20, the oldest entry will be deleted.
1 Touch [Missed Calls] on the “Phone
Menu”.
= For details, refer to Displaying the Phone
Menu on page 52.
Using hands-free phoning
En
57
Chapter
08
Using hands-free phoning
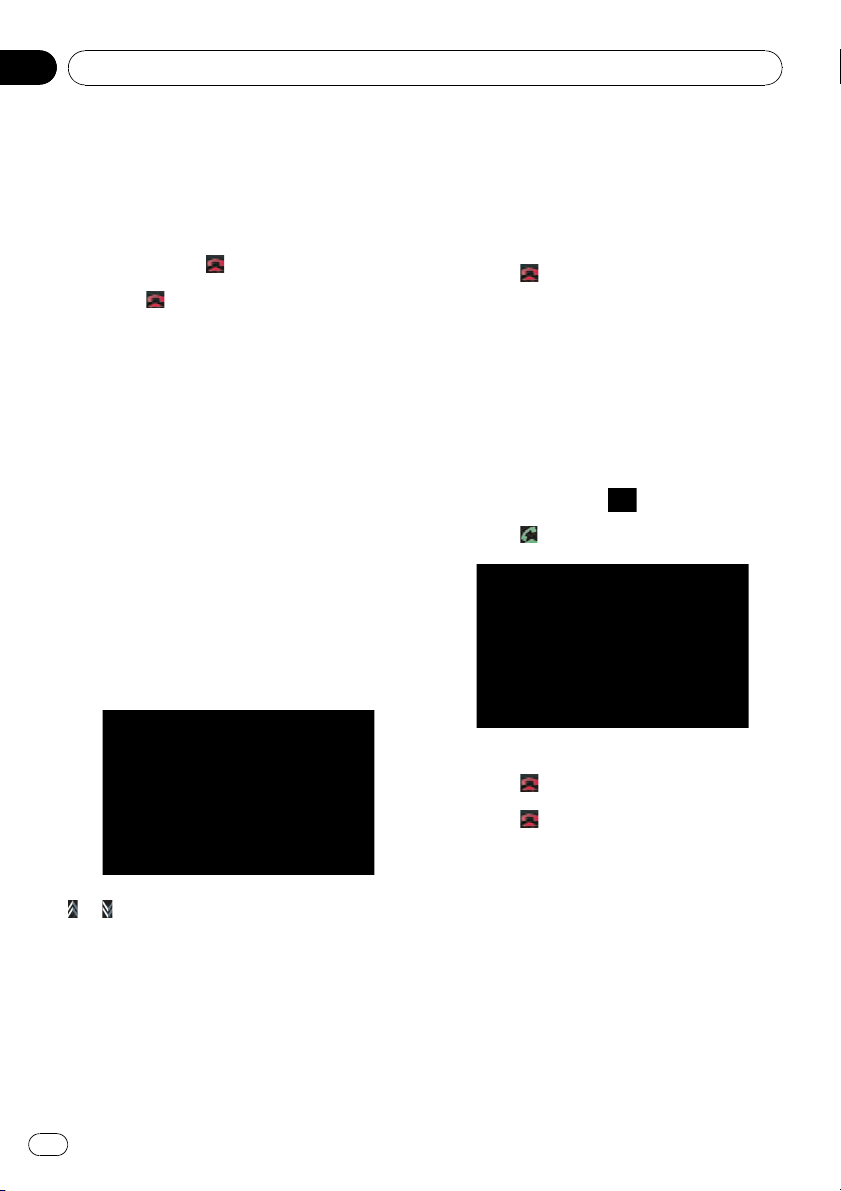
2 If you touch an entry on the list, dialing
starts.
p If you touch [Detail], you can check the de-
tails of the party before making a phone
call.
p To cancel the call after the system starts
dialing, touch
.
3 Touch to end the call.
Calling a number in the
“Contacts” screen
After finding the entry you want to call in the
“Contacts” screen, you can select the number
and make the call.
1 Press MENU button to display the “Top
Menu”.
2 Touch [Contacts].
The “Contacts” screen appears.
3 Switch the page of the list to display
the desired entry.
If you touch an alphabet tab, you can jump to
the first page of the contacts whose names
start with that letter.
or :
Shows the next or previous page.
Alphabet tabs
Makes the screen jump to the beginning of
the page including the entry whose names
start with any of selected alphabets.
Touching [#ABCDE] also displays the page in-
cluding the entry whose names start with pri-
mary symbols or numbers.
Touching [Others] displays the page including
entries that are not assigned to any of the
other tabs.
4 Touch the desired entry on the list to
make a call.
5 Touch
to end the call.
Dialing a phone number on the
“Map Confirmation Screen”
You can make a call to the searched location
or the location that you are selecting on the
map screen if the telephone number exists.
1 To display the “Map Confirmation
Screen”, search for a locations or moves
the cursor and touch
.
2 Touch
to make a call.
To cancel the call after the system starts dial-
ing, touch
.
3 Touch
to end the call.
Making a call home easily
You can call home without taking the time to
enter the phone number if the phone number
has been registered.
% Touch [Call Home] on the “Phone
Menu”.
Dialing home starts.
= For details, refer to Displaying the Phone
Menu on page 52.
Using hands-free phoning
En
58
Chapter
08
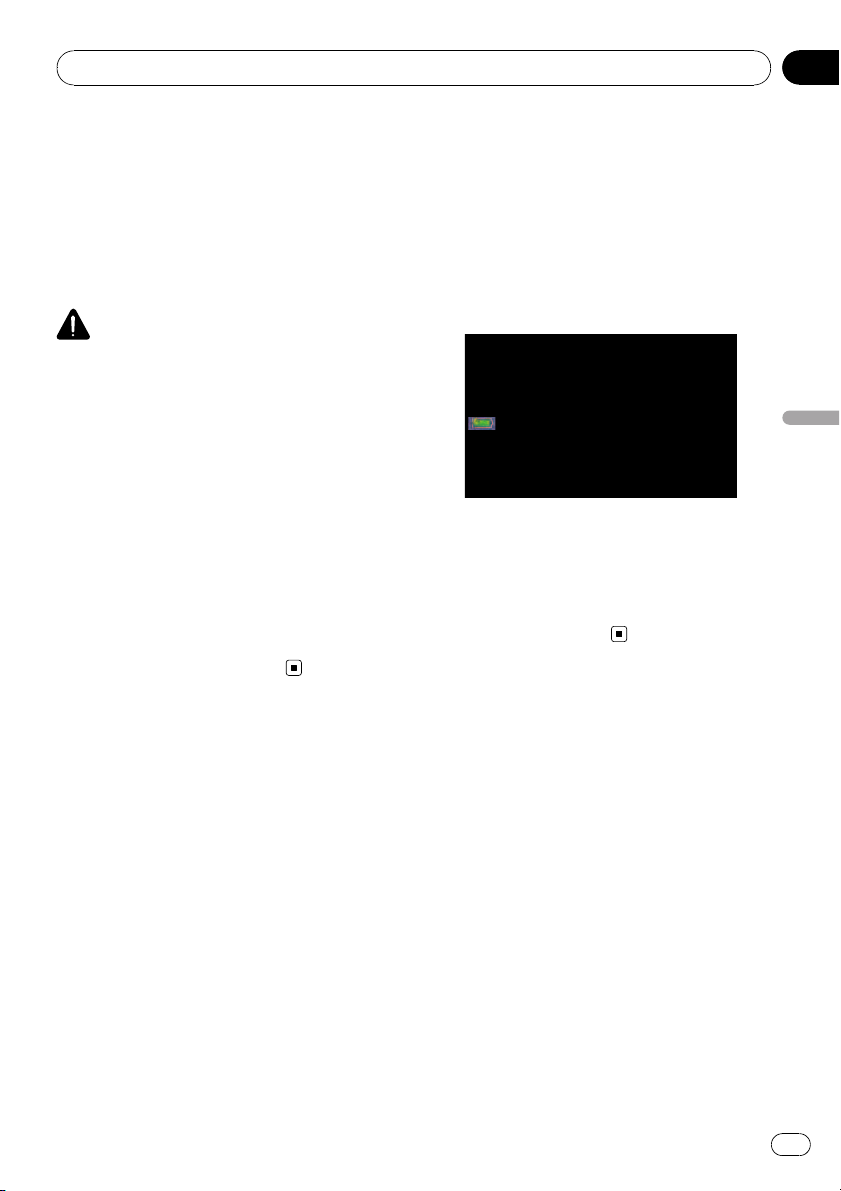
p If you have not registered your home num-
ber, a message appears. Touch [Yes]to
start registration.
= For more details about “Set Home”,
refer to Setting your home position on
page 90.
Dialing GOOG-411
CAUTION
Local and/or long distance charges for making a
phone call may apply.
You can dial GOOG-411 to dial the free busi-
ness listing service available from Google by
one touch.
1 Touch [GOOG-411] on the “Phone
Menu”.
= For details, refer to Displaying the Phone
Menu on page 52.
Dialing GOOG -411 starts.
2 You can now use the GOOG-411 phone
service.
p For details about GOOG-411 service and
availability, contact Google.
Announcing incoming
short mails
While the cellular phone and the navigation
system are connected, the following notice is
displayed when you get a new SMS message.
“New mail from: (sender’s name)” is dis-
played and the notice disappears after eight
seconds.
p If you want to delete the message, touch
anywhere on the screen.
p If the voice language with TTS is currently
used, the audible message can be output.
= For details, refer to Selecting the lan-
guage on page 91.
Transferring the phone book
You can transfer the numbers in a registered
user phone’s address book into the phone
book.
p With some cellular phones, it may not be
possible to transfer the entire phone book
at once. In this case, transfer addresses
one at a time from your phone book using
your cellular phone.
p The maximum 400 entries can be trans-
ferred per cellular phone. If the entries ex-
ceed 400, the extra entries will not be
transferred. If more than one number is re-
gistered for one person, such as work place
and home, each number is counted sepa-
rately.
p Each entry can hold up to 3 phone num-
bers.
Using hands-free phoning
En
59
Chapter
08
Using hands-free phoning

p Depending on the cellular phone that is
connected to this navigation system via
Bluetooth technology, this navigation sys-
tem may not be able to display the phone
book correctly. (Some characters may be
garbled.)
p If the phone book in the cellular phone con-
tains image data, the phone book may not
be correctly transferred.
1 Connect the cellular phone that has the
phone book to transfer.
= For details, refer to Connecting a registered
cellular phone on page 55.
2 Touch [Phone Book Transfer] on the
“Phone Menu”.
The confirmation messages appear.
3 Check the messages and touch [OK].
p If there is a phone book already transferred,
a message asking whether you can accept
the data replacement appears.
4 Check that the following screen is dis-
played, and operate your cellular phone to
transfer the phone book entries.
Transfer starts. It may take time depending on
how many entries will be transferred.
p You can send the phone book entries re-
peatedly before touching [OK]. If your cellu-
lar phone supports one-by-one transfer
only, send all the entries that you want to
transfer before touching [OK].
p If your phone has a capability for automatic
transfer of phone book, this screen is
skipped and transfer will start.
p The transferred data can not be edited on
the navigation system.
5 When the completion message ap-
pears, check the message and touch [OK].
Transfer ends.
Clearing memory
You can clear the memory of each item that
corresponds to the connected cellular phone:
phone book, dialled/received/missed call his-
tory list and preset dials.
1 Touch [Phone Settings] on the “Phone
Menu”.
= For details, refer to Displaying the Phone
Menu on page 52.
2 Touch [Clear Memory].
On this screen, you can select the following
items:
Contacts:
You can clear the registered phone book.
Received Calls List:
You can clear the received call history list.
Dialed Calls List:
You can clear the dialed call history list.
Missed Calls List:
You can clear the missed call history list.
p Touching [Clear] displays the confirmation
message for clearing the memory.
p Touching [Clear All] clears all the data that
correspond to the connected cellular
phone.
Using hands-free phoning
En
60
Chapter
08

3 Touch [OK].
Data on the selected item is cleared from this
navigation system’s memory.
p If you do not want to clear memory that you
have selected, touch [Cancel].
Setting the phone
Setting the phone volume
The volume level related with the hands-free
phoning can be adjusted.
1 Touch [Phone Volume] on the “Phone
Menu”.
= For details, refer to Displaying the Phone
Menu on page 52.
2 Adjust volume to touch the sliders of
[Phone Ringtone] and [Phone Voice].
[Phone Ringtone]:
This setting controls the incoming ring tone
volume.
[Phone Voice]:
This setting controls the incoming voice vo-
lume.
p Phone volume varies depending on the in-
coming caller's phone, volume setting and
other conditions.
= For details concerning operations, refer
to Answering an incoming call on page
56.
Stopping Bluetooth wave
transmission
You can stop transmission of electric waves by
turning off the Bluetooth function. If you do
not use the Bluetooth wireless technology, we
recommend selecting [Off].
1 Touch [Phone Settings] on the “Phone
Menu”.
= For details, refer to Displaying the Phone
Menu on page 52.
2 Touch [Off] on [Bluetooth On/Off].
Touching [Bluetooth On/Off] switching be-
tween [On] and [Off].
Answering a call automatically
The navigation system automatically answers
an incoming call to the cellular phone. You
can answer a call while holding the steering
wheel while you are driving.
1 Touch [Phone Settings] on the “Phone
Menu”.
= For details, refer to Displaying the Phone
Menu on page 52.
2 Touch any key next to [Auto Answer
Preference] (such as [Off], [After 3 seconds]
keys).
Auto Answer Preference selection appears.
3 Touch the item to configure.
[Off]: No automatic response. Respond manu-
ally
[Immediately]: Answers immediately
Using hands-free phoning
En
61
Chapter
08
Using hands-free phoning

[After 3 seconds]: Answers after three sec-
onds
[After 6 seconds]: Answers after six seconds
[After 10 seconds]: Answers after ten sec-
onds
Setting the automatic rejection
function
If this function is on, the navigation system
automatically rejects all incoming calls.
1 Touch [Phone Settings] on the “Phone
Menu”.
= For details, refer to Displaying the Phone
Menu on page 52.
2 Touch [Refuse All Calls].
Touching [Refuse All Calls] switches between
[On] and [Off].
p If both the automatic reject and automatic
answer functions are set to [On], automatic
reject is prioritized and all incoming calls
are automatically rejected.
p If the [Refuse All Calls] is set to [On], re-
jected incoming calls will not be stored in
the missed call list.
Echo canceling and noise reduction
When you are operating hands-free phoning
in the vehicle, you may hear an undesired
echo. This function reduces the undesired
echo and noise while you are doing hands-free
phoning, and maintains a certain sound qual-
ity.
1 Touch [Phone Settings] on the “Phone
Menu”.
= For details, refer to Displaying the Phone
Menu on page 52.
2 Touch [Echo Cancel].
Touching [Echo Cancel] switches between
[On] and [Off].
Setting the automatic connection
When an automatic connection is active, the
navigation system will automatically establish
a connection with a registered phone when it
comes into range. Using this feature will re-
lease you from all of the processes for estab-
lishing a connection.
p With some cellular phones, it may not be
possible to perform automatic connection.
p This unit does not initiate an automatic
connection to your registered phone while
you are operating in the “Function” menu
for hands-free phoning.
1 Touch [Phone Settings] on the “Phone
Menu”.
= For details, refer to Displaying the Phone
Menu on page 52.
2 Touch [Auto Connect].
Touching [Auto Connect] switches between
[On] and [Off].
p Automatic connection is performed in the
registration number order.
p Some cellular phones do not support auto-
matic connection.
Editing the device name
You can change the device name to be dis-
played on your cellular phone. (Default is
[Pioneer Navi].)
1 Touch [Phone Settings] on the “Phone
Menu”.
= For details, refer to Displaying the Phone
Menu on page 52.
2 Touch [Edit Name].
The keyboard to enter the name appears.
Using hands-free phoning
En
62
Chapter
08
3 Touch to delete the current name,
and enter the new name by using the key-
board.
4 Touch [Done].
The name is changed.
p Up to 30 characters can be entered for a de-
vice name.
Notes for hands-free phoning
General notes
! Connection to all cellular phones featuring
Bluetooth wireless technology is not guar-
anteed.
! The line-of-sight distance between this na-
vigation system and your cellular phone
must be 10 meters or less when sending
and receiving voice and data via Bluetooth
technology. However, the transmission dis-
tance may become shorter than the esti-
mated distance, depending on the
environment in use.
! With some cellular phones, the speakers of
the system may not produce a ring sound.
! If private mode is selected on the cellular
phone, hands-free phoning may not be per-
formed.
Registration and connection
! Cellular phone operations vary depending
on the type of cellular phone. Refer to the
instruction manual that came with your cel-
lular phone for detailed instructions.
! Depending on the mobile phone, transfer-
ring phone book may not work even though
your phone can be pairing with the naviga-
tion system. In such case, disconnect your
phone, perform pairing again from your
phone to the navigation system, and then
perform the phone book transfer.
Making and receiving calls
! You may hear a noise in the following situa-
tions:
— When you answer the phone by using
the button on the phone.
— When the person on the other end of
line hangs up the phone.
! If the person on the other end of the phone
call cannot hear the conversation due to an
echo, decrease the volume level for hands-
free phoning. This may reduce the effects
of the echo.
! With some cellular phones, even if you
press the accept button on the cellular
phone when a call comes in, hands-free
phoning may not be performed.
! The registered name appears if the phone
number of the received call is already regis-
tered in the phone book. When one phone
number is registered under different
names, the name that comes first alphabe-
tically is displayed.
! If the phone number of the received call is
not registered in the phone book, the
phone number of the received call appears.
The received call history and the dialed
number history
! Calls made or editing performed only on
your cellular phone will not be reflected to
the dialed number history or phone book in
the navigation system.
! You cannot make a call to the entry of an
unknown user (no phone number) in the re-
ceived call history.
! If calls are made by operating your cellular
phone, no history data will be recorded in
the navigation system.
Using hands-free phoning
En
63
Chapter
08
Using hands-free phoning

About phone book transfers
! If there are more than 400 phone book en-
tries on your mobile phone, all entries may
not be able to be downloaded completely.
! With some cellular phones, it may not be
possible to transfer all items in the phone
book at one time. In this case, transfer
items one by one from your cellular phone.
! Depending on the cellular phone, this navi-
gation system may not display the phone
book correctly. (Some characters may be
garbled or first name and last name are in
reverse order.)
! If the phone book in the cellular phone con-
tains image data, the phone book may not
be transferred correctly. (Image data can-
not be transferred from the cellular phone.)
! Depending on the cellular phone, phone
book transfer may not be available.
Updating the Bluetooth
wireless technology software
Downloading the files of updating will be avail-
able in the future. You will be able to download
the latest update from appropriate website by
using your PC.
p Before you download the files and install
the update, read through the instructions
on the website. For the procedure before
you display the screen used for updating,
follow the instructions on the website.
1 Touch [Phone Settings] on the “Phone
Menu”.
= For details, refer to Displaying the Phone
Menu on page 52.
2 Touch [Bluetooth Software Update].
The current version is displayed.
3 Touch [Software Update].
Update starts.
Using hands-free phoning
En
64
Chapter
08

You can play the compressed audio files
stored in the external storage device (USB,
SD).
p In the following description, the SD mem-
or y card, USB memory device and USB
portable audio player are collectively re-
ferred to as the “external storage device
(USB, SD)”. If it indicates the USB memor y
device and USB portable audio player only,
they are referred to as the “USB storage de-
vice”.
p When “SD” or “USB” selected as the AV
source, the AV sounds, the navigation gui-
dance and beep sounds are mixed and the
volume can be adjusted simultaneously.
Starting procedures
% Insert the SD memory card into the SD
card slot or plug the USB storage device to
the USB connector.
The source changes and then playback will
start if there is a playable file on the external
storage device.
= For details, refer to Plugging and unplugging
a USB storage device on page 13.
= For details, refer to Inserting and ejecting an
SD memory card on page 12.
p If the external storage device is already set,
touch [USB]or[SD] on the “AV Source”
menu.
= For details concerning operations, refer to
Screen switching overview on page 16.
p Playback is performed in order of folder
number. Folders are skipped if they con-
tains no playable files. (If there are no play-
able files on folder 001 (root folder),
playback starts from folder 002.)
Reading the screen
p Optimum performance of this unit may not
be obtained depending on the connected
external storage device.
p You can playback the files on a USB sto-
rage device compliant with Mass Storage
Class. For details about the USB Class,
refer to the manual supplied with USB sto-
rage device.
1 Source icon
Shows which source has been selected.
2 Folder number indicator
3 Track number indicator
4 Play time indicator
Shows the elapsed playing time of the current
track.
5 File type indicator
Shows the type of audio file currently playing.
6 Current folder name indicator
Shows the folder name currently playing.
7 Current file number and total number of
files
Shows the file number currently played and
the total number of playable audio files.
8 Track title indicator*
Shows the title of the track currently playing
(when available).
9 Artist name indicator*
Shows the artist name currently playing
(when available).
a Album title indicator*
Shows the title of the album for the current
track (when available).
b Playback condition indicator
Playing the music file (USB, SD)
En
65
Chapter
09
Playing the music file (USB, SD)

The marks shown below appears and indi-
cates the current playback condition.
: Repeat play
: Random play
: Scan play
Indicator Implication
Media Repeat
All audio files in the current
external storage device
(USB, SD) are played repeat-
edly. This is default condi-
tion.
Folder Repeat
Current folder is played re-
peatedly.
Track Repeat
Current file is played repeat-
edly.
Media Random
All audio files in the current
external storage device
(USB, SD) are played in ran-
dom order.
Folder Random
All audio files in the current
folder are played in random
order.
Media Scan
The beginning of each audio
file is played for about 10
seconds.
Folder Scan
The beginning of each track
in the current folder is
played for about 10 seconds.
= For more information, refer to Using the
“Function” menu on the next page.
p The information marked with an asterisk (*)
is displayed only when the information has
been encoded on the compressed audio
files. If specific information has not been
encoded on the files, “—” is displayed in-
stead.
Using the touch panel keys
(Music)
1 Recalls equalizer curves
Select one from the 11 equalizer curves.
p This function is also effective for beep
sounds.
2 Displaying the “Function” menu
= For details, refer to Using the
“Function” menu on the next page.
3 Switch the operation screen
Touching the key switches between the screen
to operate music files and the screen to oper-
ate movie files. This touch panel key is avail-
able only when there are both audio and video
file in the external storage device (USB, SD).
4 Select the previous or next folder
Touching [c]or[d] play the first playable file
on the previous or next folder. The folders that
there is no playable files are skipped.
5 Skip forward or backward
Touching [p] skips to the start of the next
file. Touching [o] once skips to the start of
the current file. Touching again will skip to the
previous file.
Fast rewind or forward
Keep touching [o]or[p] to perform fast
rewind or forward.
p There is no sound on fast rewind or for-
ward.
p Moving MULTI-CONTROL left or right
enables you to perform the equivalent
operations.
6 Playback and Pause
Playing the music file (USB, SD)
En
66
Chapter
09

Touching [f] switches between playback
and pause.
7 Displaying the map screen
Selecting a track from the list
The list lets you see the list of track titles or
folder names on a external storage device
(USB, SD). If you touch a folder on the list, you
can view its contents. If you touch a track on
the list, you can play the selected track.
1 Touch [List].
2 Touch the folder that you want to view.
Touching
or switches the selection to the
next or previous page in the list.
Touching
shows a content of the parent
folder.
p If the selected folder does not contain any
track that can be played, the track list is not
displayed.
3 Touch the track you want to play.
p To cancel the list screen, touch [Detail].
Browsing embedded text
information
Text information recorded on an compressed
audio file can be displayed.
% Touch
.
The next piece of information is displayed.
! Album Title : (album title)
! Track Title : (track title)
! Folder Title : (folder title)
! File Name : (file name)
! Artist Name : (artist name)
p If the information has not been recorded on
files, nothing may be displayed.
p For WAV files, only the information marked
with (*) can be displayed.
p If the characters recorded on the com-
pressed audio file are not compatible with
this navigation system, those characters
may turn into garbled characters.
Using the “Function” menu
1 Touch [USB] or [SD] on the “AV Source”
menu to display the “USB” or “SD” screen.
= For details concerning operations, refer to
Screen switching overview on page 16.
2 Touch [Func].
12 3
1 Repeating play
Each touch of [Repeat] changes the set-
tings as follows:
! Media — Repeat all compressed audio
files in the selected external storage de-
vice (USB, SD)
! Track — Repeat just the current track
! Folder — Repeat the current folder
p If you skip the file forward or backward
when the repeat play range in “Track”,
the repeat play range changes to
“Folder”.
2 Play tracks in a random order
Random play lets you playback tracks in
random order within the current repeat
range.
Touching [Random] switches between “On”
and “Off”.
Playing the music file (USB, SD)
En
67
Chapter
09
Playing the music file (USB, SD)

p If you turn [Random]to“On” while the
repeat play range is set to “Track”, the
repeat play range changes to “Folder”
automatically.
3 Scan folders and tracks
Scan play lets you hear the first 10 seconds
of each track. Scan play is performed in the
current repeat play range.
Touching [Scan] switches between “On”
and “Off”. When you find the desired track
touch [Scan] to turn scan play off.
p After all tracks or folders scanning are
finished, normal playback will begin
again.
p If you turn [Scan]to“On” while the re-
peat play range is set to “Track”, the re-
peat play range changes to “Folder”
automatically.
Playing the music file (USB, SD)
En
68
Chapter
09
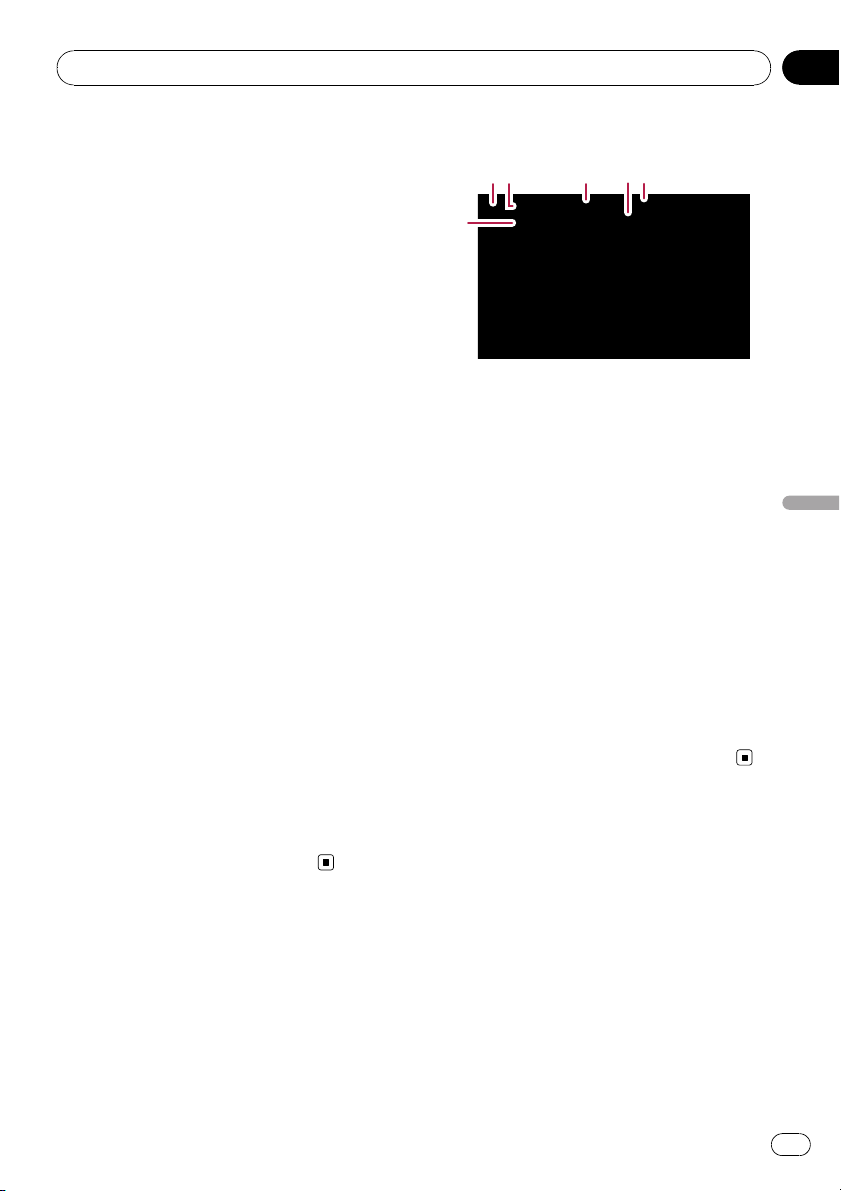
You can play the video files stored in the exter-
nal storage device (USB, SD).
p In the following description, the SD mem-
or y card, USB memory device and USB
portable audio player are collectively re-
ferred to as the “external storage device
(USB, SD)”. If it indicates the USB memor y
device and USB portable audio player only,
they are referred to as the “USB storage de-
vice”.
p When “SD” or “USB” selected as the AV
source, the AV sounds, the navigation gui-
dance and beep sounds are mixed and the
volume can be adjusted simultaneously.
Starting procedures
% Insert the SD memory card into the SD
card slot or plug the USB storage device to
the USB connector.
The source changes and then playback will
start if there is a playable file on the external
storage device.
= For details, refer to Plugging and unplugging
a USB storage device on page 13.
= For details, refer to Inserting and ejecting an
SD memory card on page 12.
p If the external storage device is already set,
touch [USB]or[SD] on the “AV Source”
menu.
p Playback is performed in order of folder
number. Folders are skipped if they con-
tains no playable files. (If there are no play-
able files on folder 001 (root folder),
playback starts from folder 002.)
Reading the screen
1 3
6
54
2
p Optimum performance of this unit may not
be obtained depending on the connected
external storage device.
p You can playback the files on a USB sto-
rage device compliant with Mass Storage
Class. For details about the USB Class,
refer to the manual supplied with USB sto-
rage device.
1 Source icon
Shows which source has been selected.
2 Folder number indicator
3 File number indicator
4 Play time indicator
Shows the elapsed playing time of the current
track.
5 File type indicator
Shows the type of audio file currently playing.
6 Current folder name indicator
Shows the folder name currently playing.
Playing the movie file (USB, SD)
En
69
Chapter
10
Playing the movie file (USB, SD)

Using the touch panel keys
(Video)
6
5
21
4
7
3
a98
1 Recalls equalizer curves
Select one from the 11 equalizer curves.
p This function is also effective for beep
sounds.
2 Displaying the “Function” menu
= For details, refer to Using the
“Function” menu on the next page.
3 Switch the operation screen
Touching the key switches between the screen
to operate music files and the screen to oper-
ate movie files. This touch panel key is avail-
able only when there are both audio and video
file in the external storage device (USB, SD).
4 Select the previous or next folder
Touching [c]or[d] play the first playable file
on the previous or next folder. The folders that
there is no playable files are skipped.
5 Skip forward or backward
Touching [p] skips to the start of the next
file. Touching [o] once skips to the start of
the current file. Touching again will skip to the
previous file.
Fast rewind or forward
Keep touching [o]or[p] to perform fast
rewind or forward.
p There is no sound on fast rewind or for-
ward.
p Moving MULTI-CONTROL left or right
enables you to perform the equivalent
operations.
6 Playback and Pause
Touching [f] switches between playback
and pause.
7 Displaying the map screen
8 Specify the chapter you want to play back
or the time to start playback by entering a
number
= For details, refer to Searching for a de-
sired scene and starting playback from a
specified time on this page.
9 Stop playback
a Hides the touch panel keys
Touching [Hide] hides the touch panel keys.
Touch anywhere on the LCD screen to display
the touch panel keys again.
Searching for a desired scene
and starting playback from a
specified time
You can search for a desired scene by specify-
ing a folder number, file number or the time.
1 Touch [Search] and then touch [Folder],
[File] or [Time].
2 Touch the keys to input the desired
number or time and then touch [Enter].
Playing the movie file (USB, SD)
En
70
Chapter
10

For folders, files
! To select 3, touch [3] and [Enter] in order.
! To select 10, touch [1] and [0] and [Enter]in
order.
For time (time search)
! To select 5 minutes 03 seconds, touch [5],
[0], [3] and [Enter] in order.
! To select 71 minutes 00 seconds, touch [7],
[1], [0], [0] and [Enter] in order.
p To clear the input numbers, touch
[Clear].
Using the “Function” menu
1 Touch [USB] or [SD] on the “AV Source”
menu to display the “USB” or “SD” screen.
= For details concerning operations, refer to
Screen switching overview on page 16.
2 Touch the screen to display the touch
panel keys.
3 Touch [Func].
p If the touch panel keys are not shown,
touching anywhere to display them.
1
1 Repeating play
Each touch of [Repeat] changes the set-
tings as follows:
! Media — Repeat all video files in the se-
lected external storage device (USB, SD)
! File — Repeat just the current file
! Folder — Repeat the current folder
p If you skip the file forward or backward
when the repeat play range in “Track”,
the repeat play range changes to
“Folder”.
Playing the movie file (USB, SD)
En
71
Chapter
10
Playing the movie file (USB, SD)

Using the USB interface cable for iPod en-
ables you to connect your iPod to the naviga-
tion system.
p For connection, USB interface cable for
iPod (CD-IU200VM) (sold separately) is re-
quired.
p iPod is a trademark of Apple Inc., regis-
tered in the U.S. and other countries.
Starting procedures
1 Touch [AV Input] on the “AV Settings”
menu to select the “iPod ”.
= For details, refer to Setting video input (AV)
on page 95.
2 Connect your iPod.
The source changes and then playback will
start.
= For details, refer to Connecting your iPod on
page 14.
p If the iPod is already connected, touch
[iPod] on the “AV Source” menu.
= For details concerning operations, refer to
Screen switching overview on page 16.
Reading the screen
Music
Video
1 Source icon
Shows which source has been selected.
2 Shuffle play indicator
Appears when the shuffle play is activated.
3 Repeat play indicator
Appears when the repeat play is activated.
: All-tracks repeat
: One-track repeat
4 Album artwork
Album art of the current song is displayed if it
is available.
5 Song title (episode) indicator
Shows the title of the current song. When the
podcast is played, the episode is displayed.
6 Artist name (podcast title) indicator
Shows the artist name currently playing.
When the podcast is played, the podcast title
is displayed.
7 Album title (release date) indicator
Shows the title of the album for the song.
When the podcast is played, the release date
is displayed.
8 Play time indicator
Shows the elapsed playing time of the current
song.
9 Song number indicator
Shows the number of the song currently play-
ing and total number of songs in the selected
list.
a Chapter number indicator
Shows the current chapter number and total
number of chapters when the video with chap-
ters played.
Using the iPod
®
(iPod)
En
72
Chapter
11
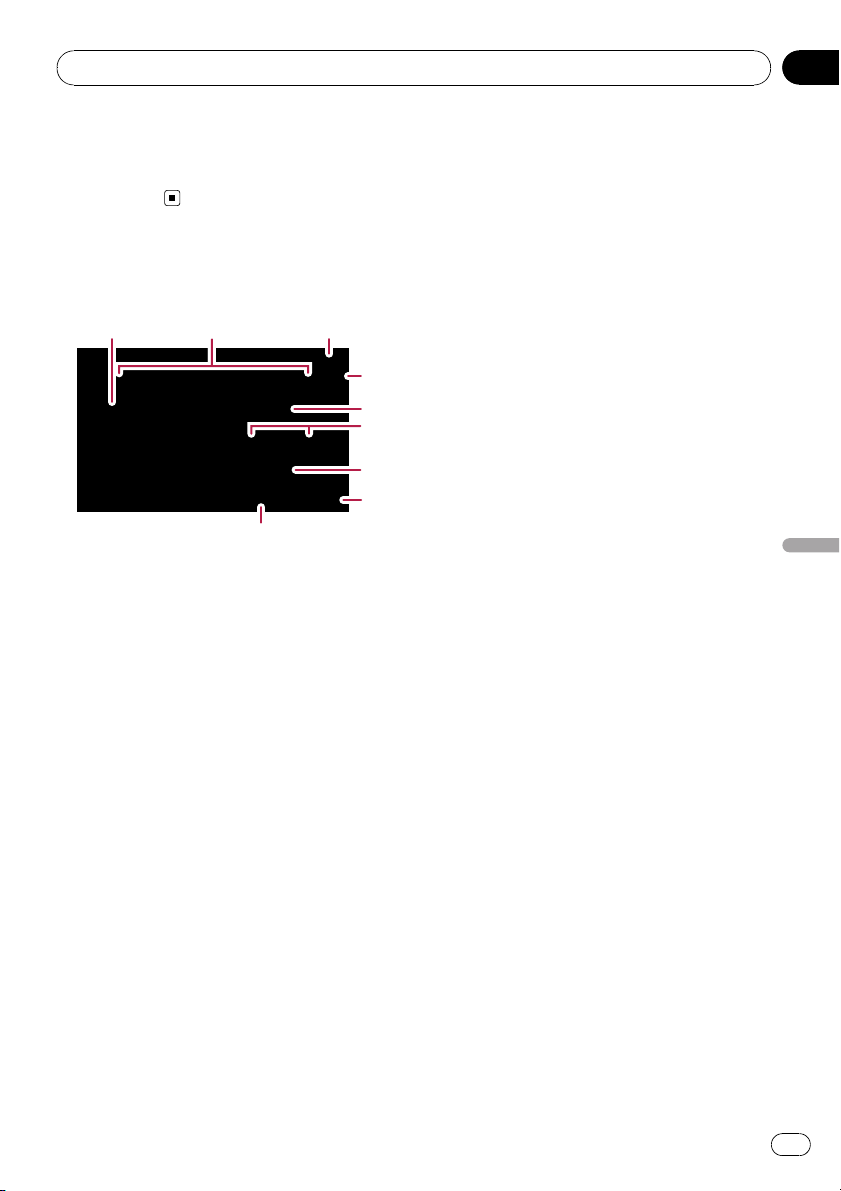
p If the characters recorded on the iPod are
not compatible with this navigation system,
those characters may turn into garbled
characters.
Using the touch panel keys
(Music)
1 Album artwork
Touch the key to enlarge the album artwork. If
you touch again, the artwork returns to a nor-
mal size.
2 Category tabs
Shows the list to narrow down the songs. If
you want to use the list of “Audiobooks”or
“Composers”, touch [Menu] to display the
lists.
3 Displaying the “Function” menu
= For details, refer to Using the
“Function” menu on page 76.
4 Switch the operation screen
Touching the key switches between the screen
to operate music files and the screen to oper-
ate movie files. After touching the key, the top
category menu appears to let you select the
item for playback.
p This touch panel key is available only
when there are both audio and video file
in your iPod.
5 Display the top category menu
Touching the key displays the top category be-
fore you use the category tabs. If you select
the song using the category tabs to play,
touching the key displays the previous list.
6 Skip back or forward to another song
Touching [p] skips to the start of the next
song. Touching [o] once skips to the start
of the current song. Touching again will skip
to the previous song. When the track with
chapters played, chapter can be skipped back
and forward.
Fast rewind or forward
Keep touching [o]or[p] to perform fast
rewind or forward.
p Moving MULTI-CONTROL left or right
enables you to perform the equivalent
operations.
7 Playback and Pause
Touching [f] switches between playback
and pause.
8 Displaying the map screen
9 Shuffle All
All songs (except for the track in “Audiobook-
s”and “Podcasts”) in your iPod can be played
randomly.
p To cancel the random play, switch
[Shuffle] on the “Function” menu to the
“Off” .
Browsing for a song
Touching the item on list allows you to search
for a song and play it in your iPod.
Narrowing down a song with the list
1 Touch your desired category tab to dis-
play the song or track list.
! Playlists (playlists)
! Genres (genres)
! Artists (artists)
! Albums (albums)
! Podcasts (podcasts)
The search screen is displayed.
Using the iPod
®
(iPod)
En
73
Chapter
11
Using the iPod
®
(iPod)
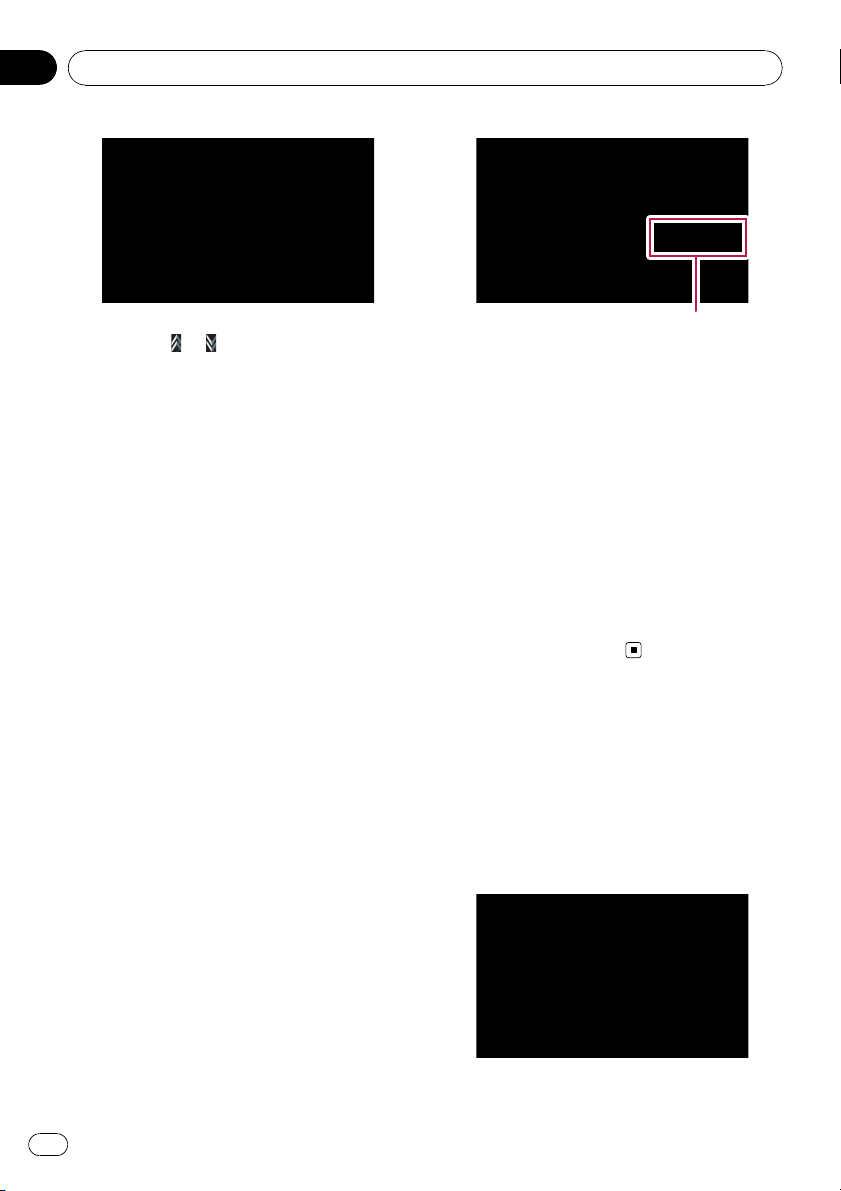
2 Touching or switches the selection
to the next or previous page in the list.
3 Touch the item that you want to refine.
Refine the item until the track title is displayed
on the list.
p Touching [All] on the list includes all op-
tions in the current list. For example, if you
touch [All] after touching [Artists], you can
proceed to next screen with selecting all ar-
tists in the list.
p After you select Artists, Albums,or
Genres, continued touching one of the list
allows you to start playing the first songs in
the selected list and display the next op-
tions.
4 On the song (or episode) list, touch the
track you want to play.
p After you select the track using this func-
tion, touching [Menu] displays the list pre-
viously selected.
Searching for applicable items by
alphabet
Using the search control displays the page in-
cludes the first applicable option.
p This function is available for the alphabeti-
cal list only.
Search control
1 Touch your desired category tab to dis-
play the list.
2 Touch the item that you want to refine.
3 Touch [c]or[d] to select the character.
p “THE” or “The” and space at the beginning
of the artist name will be ignored and the
next character will be taken into account
for searching.
4 Touch the character key to display the
page includes applicable options.
5 On the song (or episode) list, touch the
track you want to play.
Starting the video playback
This navigation system can play video if an
iPod with video capabilities is connected.
1 Touch [Video].
2 Touch one of the categories in that con-
tains the video you want to play.
Video playback will start.
Using the iPod
®
(iPod)
En
74
Chapter
11
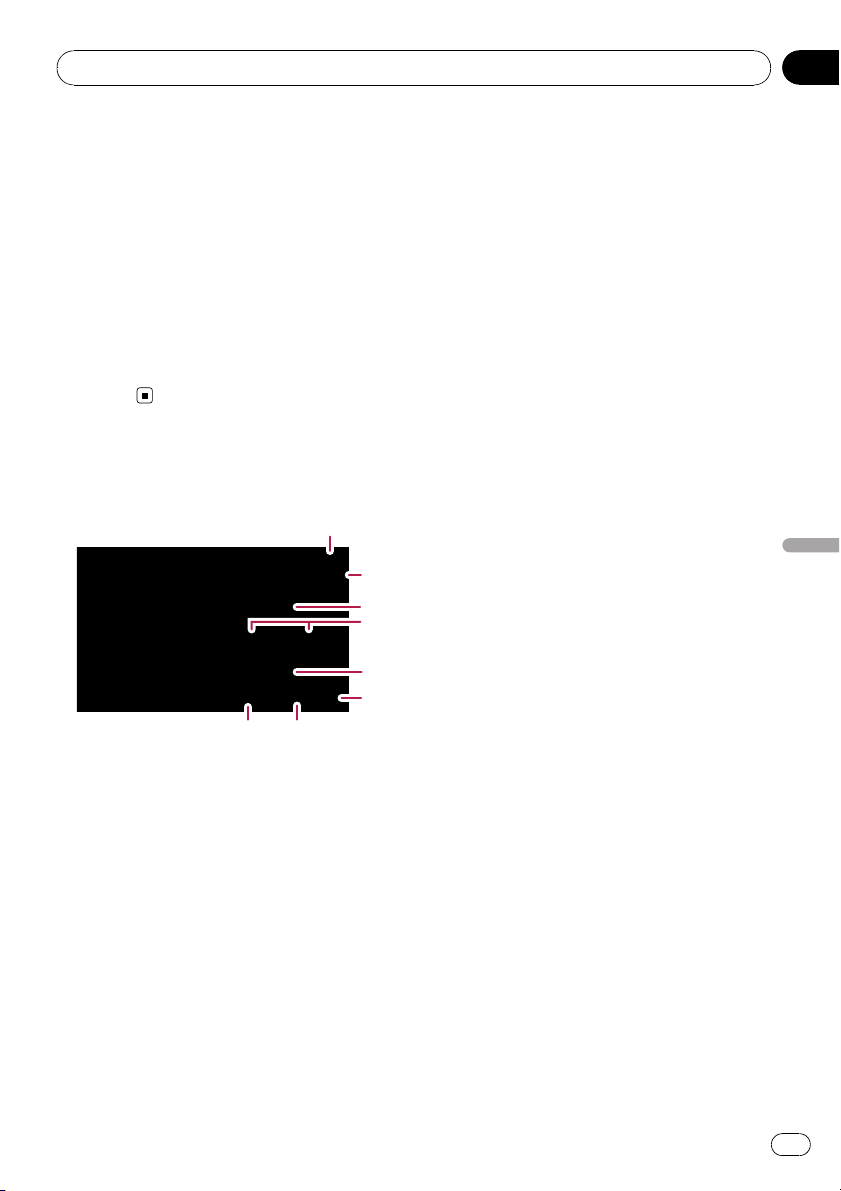
3 Touch your desired item on the list to
narrow down them until the video list ap-
pears.
= For details concerning operations, refer to
Browsing for a video on the next page.
4 On the video list, touch the video you
want to play.
5 Touch the screen to display to touch
panel keys.
= For details concerning operations, refer to
Using the touch panel keys (Video) on this
page.
Using the touch panel keys
(Video)
1 Displaying the “Function” menu
= For details, refer to Using the
“Function” menu on the next page.
2 Switch the operation screen
Touching the key switches between the screen
to operate music files and the screen to oper-
ate movie files. After touching the key, the top
category menu appears to let you select the
item for playback.
p This touch panel key is available only
when there are both audio and video file
in your iPod.
3 Display the previous selected list
If you select the video from the list to play
after touching Top Menu, touching the key
displays the previous list. (If you touch Top
Menu again but do not select a video, this key
is disabled until you select a video with the list
next time.)
4 Skip back or forward to another song
Touching [p] skips to the start of the next
video. Touching [o] once skips to the start
of the current video. Touching again will skip
to the previous video. When the video with
chapters played, chapter can be skipped back
and forward.
Fast rewind or forward
Keep touching [o]or[p] to perform fast
rewind or forward.
p Moving MULTI-CONTROL left or right
enables you to perform the equivalent
operations.
5 Playback and Pause
Touching [f] switches between playback
and pause.
6 Displaying the map screen
7 Display the top category menu for video
Touching the key displays the top category for
video playback.
8 Hides the touch panel keys
Touching [Hide] hides the touch panel keys.
Touch anywhere on the LCD screen to display
the touch panel keys again.
Using the iPod
®
(iPod)
En
75
Chapter
11
Using the iPod
®
(iPod)
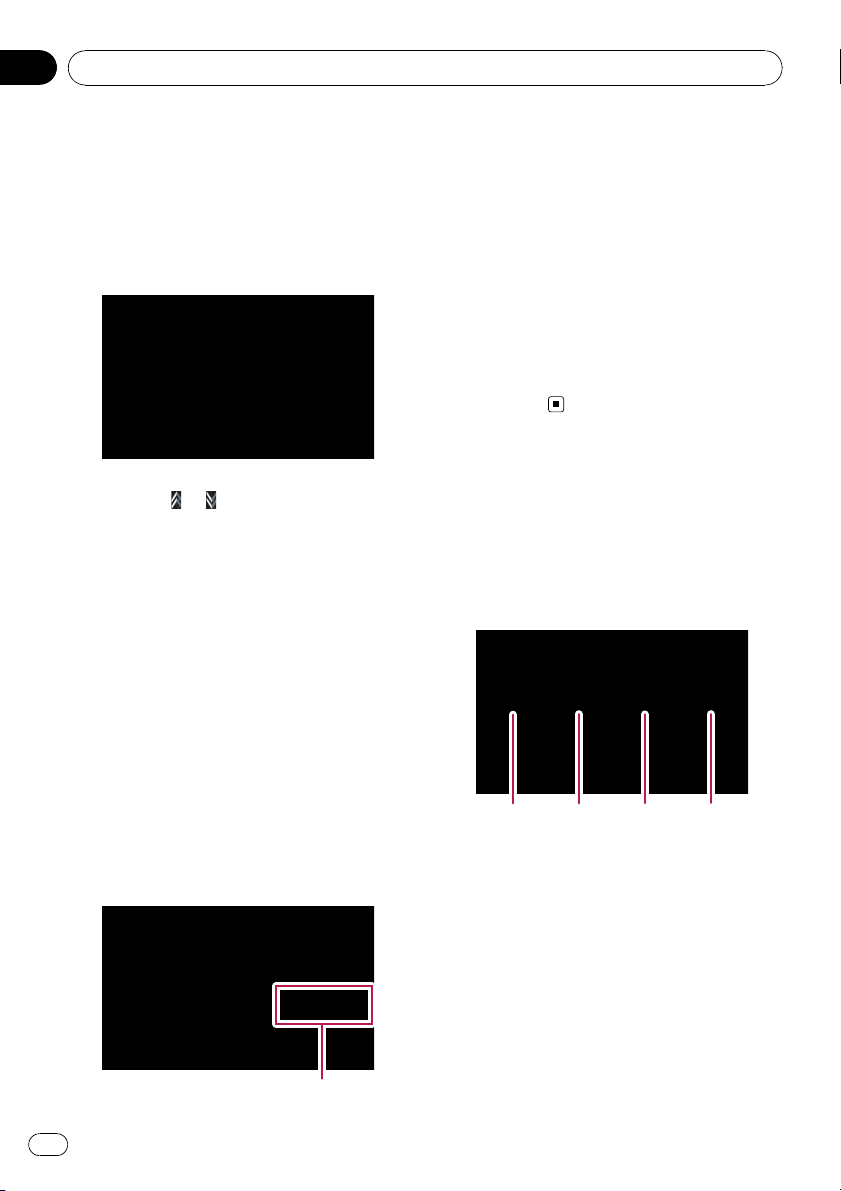
Browsing for a video
Touching the item on list allows you to search
for a video and play it in your iPod.
Narrowing down a video with the list
1 Touch your desired category.
2 Touching or switches the selection
to the next or previous page in the list.
3 Touch the item that you want to refine.
Refine the item until the track title is displayed
on the list.
4 On the video list, touch the video you
want to play.
p After you select the video using this func-
tion, touching [Menu] displays the list pre-
viously selected.
Searching for applicable items by
alphabet
Using the search control displays the page in-
cludes the first applicable option.
p This function is available for the alphabeti-
cal list only.
Search control
1 Touch your desired category.
2 Touch the item that you want to refine.
3 Touch [c]or[d] to select the character.
p “THE” or “The” and space at the beginning
of the artist name will be ignored and the
next character will be taken into account
for searching.
4 Touch the character key to display the
page includes applicable options.
5 On the video list, touch the video you
want to play.
Using the “Function” menu
1 Touch [iPod] on the “AV Source” menu
to display the control screen for “iPod”.
= For details concerning operations, refer to
Screen switching overview on page 16.
2 Touch [Func].
123
4
1 Setting the repeat play
There are two repeat play types for the play-
back.
Each touch of [Repeat] changes the set-
tings as follows:
! One — Repeats just the current track
! All — Repeats all tracks in the selected
list
2 Setting the shuffle play for music
This function shuffles songs or albums and
plays them in random order.
Each touch of [Shuffle] changes the set-
tings as follows:
Using the iPod
®
(iPod)
En
76
Chapter
11

! Off — Does not shuffle.
! Songs — Play back songs in random
order within the selected list
! Albums — Select an album randomly,
and then play back all songs in that
album in order
3 Setting the audiobook play speed
While listening to an audiobook on iPod,
playback speed can be changed.
Each touch of [Audio Book] changes the
settings as follows:
! Normal — Playback in normal speed
! Slower — Playback slower than normal
speed
! Faster — Playback faster than normal
speed
4 Playback the video on the wide screen
mode
If the video is compatible with wide screen
format, set [Widescreen]to[On] in order to
view the video image in the wide screen.
Each touch of [Widescreen] changes the
settings as follows:
! On — Outputs the wide-screen video
from iPod
! Off — Outputs the normal-sized video
from iPod
p Display size is changed after you
change “Widescreen” setting and select
the video to play.
p This setting is available only during the
video operation.
Using the iPod
®
(iPod)
En
77
Chapter
11
Using the iPod
®
(iPod)
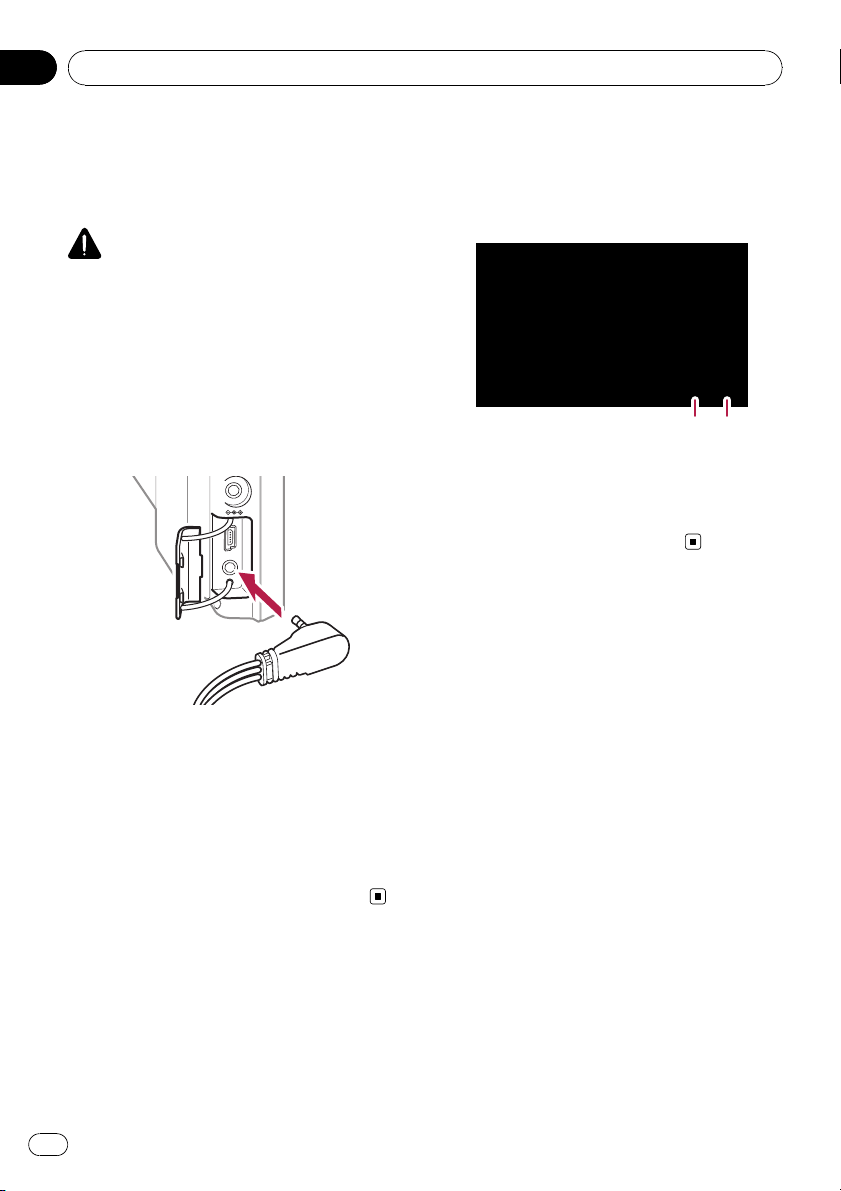
You can display “video image” output by the
equipment connected to “AV Input”.
p Use the CD-RM10 (sold separately) to con-
nect the external video component.
CAUTION
For safety reasons, video images cannot be
viewed while your vehicle is in motion. To view
video images, you must stop in a safe place and
apply the parking brake.
Starting procedures (AV)
1 Connect the dedicated AV cable (sold
separately) to AV input jack.
2 Touch [AV Input] on the “AV Settings”
menu.
= For details, refer to Setting video input (AV)
on page 95.
3 Touch [AV] on the “AV Source” menu.
The image is displayed on the screen.
= For details concerning operations, refer to
Screen switching overview on page 16.
Using the touch panel keys
% Touch the screen to display the touch
panel keys.
1 Hides the touch panel keys
Touching [Hide] hides the touch panel
keys. Touch anywhere on the LCD screen to
display the touch panel keys again.
2 Displaying the map screen
Using the AV input
En
78
Chapter
12
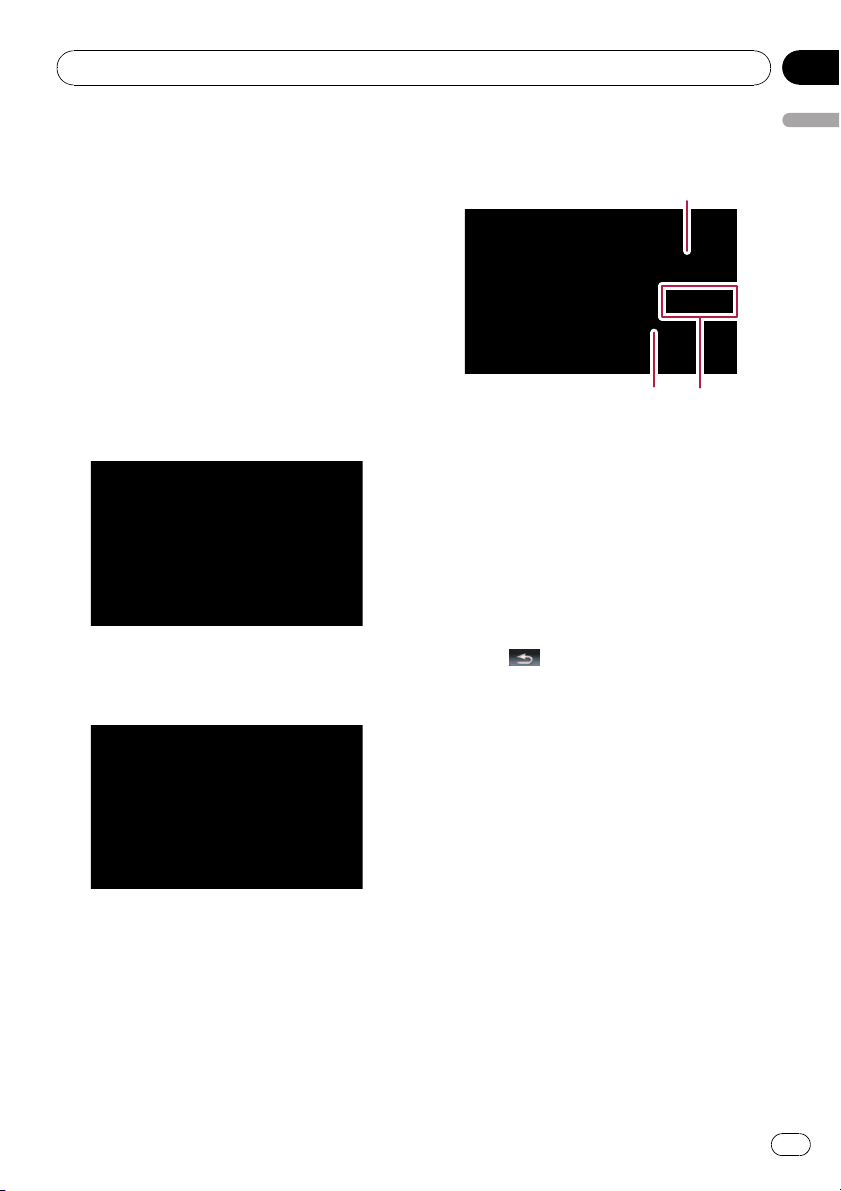
The options in the “Navi
Settings” menu
Basic operations in the “Navi
Settings” menu
Preferences related to the navigation functions
can be set.
A method for changing the volume setting for
the navigation guidance and beep is described
here, along with an operational example.
1 Press MENU button to display the “Top
Menu”, and then touch [Settings].
2 Touch [Navi Settings].
The “Navi Settings” menu appears.
3 Touch [Sound settings].
The “Sound settings” menu appears.
4 Use the tool assigned to the desired op-
tion to change the settings.
23
1
1 Slider
Touching the desired point on the bar or
dragging the slider to the desired point al-
lows you to change the value.
2 Detailed setup key
Displays the screen for setting the prefer-
ences in detail.
3 On-off control
Touching [On]or[Off] enables activation or
deactivation of this function.
5 Touch to return to the “Navi Set-
tings” menu.
GPS & Time Settings
Indicates the connection status of the GPS an-
tenna, its reception sensitivity, and from how
many satellites the signal is being received.
% Touch [GPS & Time Settings] on the
“Navi Settings” menu.
The “GPS Status” screen appears.
Customizing preferences
En
79
Chapter
13
Customizing preferences
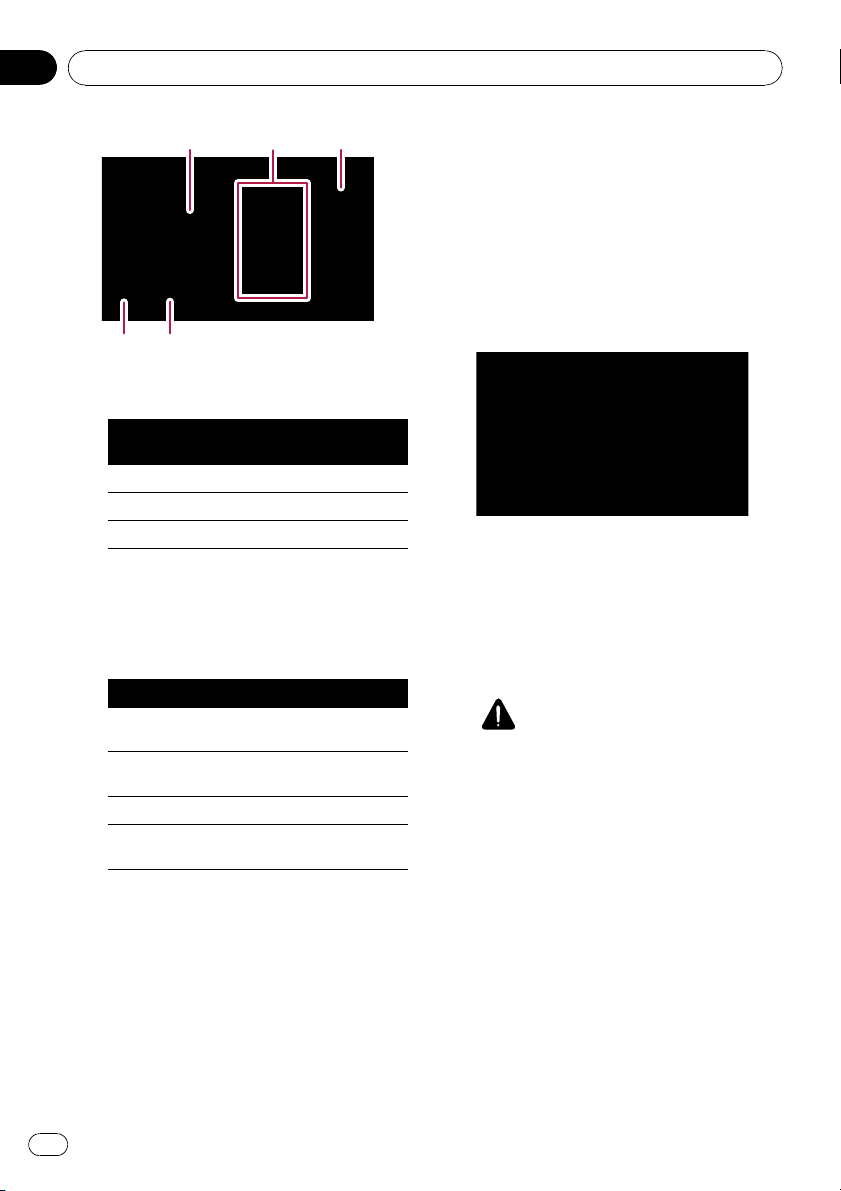
4 5
12
3
1 Positions of the GPS constellation being re-
ceived by the navigation system
Color
Signal com-
munication
Used in posi-
tioning
Green Yes Yes
Gray Yes No
Red No No
2 Shows the current comprehensive accu-
racy, altitude and speed.
3 Shows each satellite’s signal strength.
4 Shows the connection status or reception
condition of GPS antenna.
Color Condition
Green
3D reception (Normal positional
accuracy)
Yellow
2D reception (lower positional ac-
curacy)
Red Connected and no reception
Black
with x
No connection
5 Shows the GPS reception status. A blinking
green lamp indicates whether positioning is
works normally. If the lamp lights up in an-
other color, there is a problem related with
GPS reception. In such case, check whether
the connection and installation are correct.
Time Settings
The “Time Settings” screen provides you to
set the time manually.
1 Touch [GPS & Time Settings] on the
“Navi Settings” menu.
The “GPS Status” screen appears.
2 Touch [Time Settings].
The “Time Settings” screen appears.
Available options;
! “Auto Correction”
Synchronizes the internal clock of this navi-
gation system with the accurate time trans-
mitted from GPS (GMT). Changing this
preference allows you to set the time manu-
ally.
CAUTION
Turning “Auto Correction” to “Off” dis-
ables the automatic change to the appropri-
ate time zone. Note that the proper route
may not be calculated if the time you set
does not match the time zone of the area
that your route passes through.
[On]:
Corrects the current time by changing the
time zone automatically according to this
system’s whereabouts.
[Off]:
Corrects the current time according to the
settings on “Time Zone” and “Time”.
! “Time Zone”
Enables you to set the time zone manually.
Touch the key to show the list and then
touch the current time zone.
Customizing preferences
En
80
Chapter
13

! “Time”
Enables you to adjust the time difference by
one hour. Touch a or b to adjust it.
p “Time Zone” and “Time” are activated
only when [Off] is selected.
3D Settings
The 3D map screen settings can be custo-
mized.
1 Touch [Visual] on the “Navi Settings”
menu.
The “Visual Settings” screen appears.
2 Touch [3D Settings].
The “3D Visual Settings” screen appears.
Available options;
! “Landmarks”
You can select whether to draws or refrain
from drawing graphical 3D landmarks on
the map.
! “Elevated Roads”
You can select whether to draws or refrain
from drawing elevated roads, interchanges,
and bridges on the map.
! “Terrain Detail Level”
[High], [Medium], [Low]:
Draws the terrain (e.g. mountain chains) on
the map with the selected fineness.
[Off]:
Does not draw the terrain on the map.
Map Settings
The general settings related with a map screen
can be customized.
1 Touch [Visual] on the “Navi Settings”
menu.
The “Visual Settings” screen appears.
2 Touch [Map Settings].
The “Map Settings” screen appears.
Available options;
! [Map color]
Enables you to define the map color for day-
time and nighttime use. Touch this key to
show the next screen.
“Daylight color profile:”
The daytime map color can be set. Touch
the key and select the desired profile from
the list.
“Night color profile:”
The nighttime map color can be set. Touch
the key and select the desired profile from
the list.
! “Night mode”
Changes the settings for the nighttime
map.
[Automatic]:
Switches the map color defined on “Map
color” automatically between daytime and
nighttime.
[Night]:
Always displays the map in the color de-
fined on “Night color profile:”.
[Day]:
Always displays the map in the color de-
fined on “Daylight color profile:”.
! “Elevation on 2D Map”
You can select whether to draws or refrain
from drawing the terrain with a realistic
landscape on the map, such as a green
space, water place, undulating surface.
Customizing preferences
En
81
Chapter
13
Customizing preferences
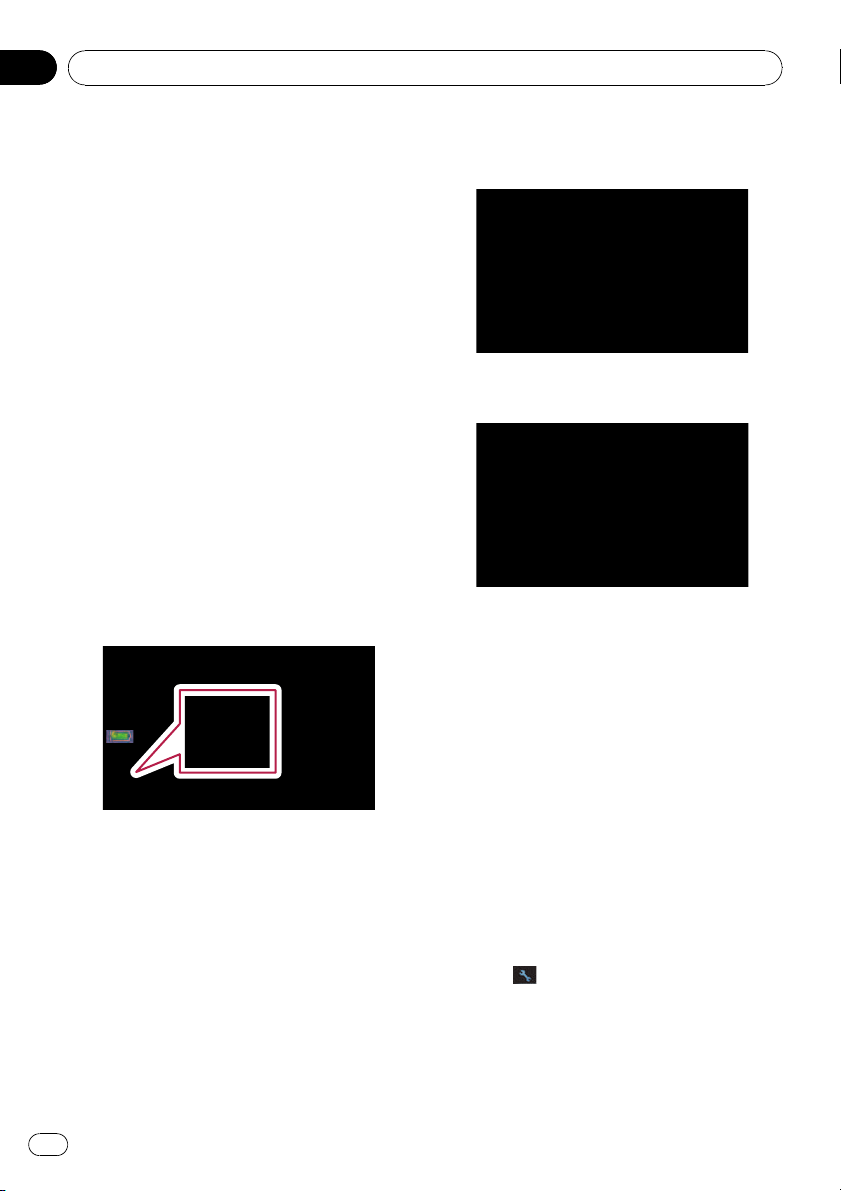
! “Show Street Labels”
Shows or hides the street names and city
names.
! “Textured Polygons”
You can select whether to draws or refrain
from drawing the map more graphically.
! “Full Screen Cockpit”
Shows-hides the “Multi-Info window” and
“Second manoeuvre arrow”.
Displayed Info
Allows you to select what options you want to
display on each part of the “Multi-Info win-
dow”.
p The estimated time of arrival is an ideal
value that the navigation system computes
internally as the route is calculated. The es-
timated time of arrival should be read just
as a reference value, and does not guaran-
tee arrival at the time indicated.
A method for changing the value of Top field:
is described here along with an operational ex-
ample.
1 Touch [Visual] on the “Navi Settings”
menu.
The “Visual Settings” screen appears.
2 Touch [Displayed Info].
The “Displayed Info” screen appears.
3 Touch the key on the right of “Top
field:” to display the options.
4 Touch your desired option.
Smart Zoom
Enables the navigation system to zoom in
automatically when you approach a guidance
point and zoom out after you pass through it.
You can setup the behavior while “Smart
Zoom” is activated.
p When the route is not set, the navigation
system will simply zoom in or out depend-
ing on your speed.
1 Touch [Visual] on the “Navi Settings”
menu.
The “Visual Settings” screen appears.
2 Touch [On] or [Off] to activate or deacti-
vate “Smart Zoom”.
Touching
allows you to enter the detailed
setting screen only when [On] has been se-
lected.
Customizing preferences
En
82
Chapter
13

Available options;
! “Zoom-in limit:”
Allows you to set the limit for zoom-in beha-
vior.
! “Zoom-out limit:”
Allows you to set the limit for zoom-out be-
havior.
! “Restore Smart Zoom”
Allows you to set whether “Smart Zoom” is
to be reactivated after changing the map
scale, tilt, or rotation.
Also, enables you to set how soon “Smart
Zoom” interval will be reactivated after
completion of the operations described pre-
viously.
! “Zoom In After Find”
Shows the “Map Confirmation Screen” with
the preset map scale after you have
searched for a position using one of the
methods on the “Destination Menu”.
Overview Mode
Enables the navigation system to zoom out
automatically up to the selected map scale
when the next guidance point is distant.
1 Touch [Visual] on the “Navi Settings”
menu.
The “Visual Settings” screen appears.
2 Touch [On] or [Off] to activate or deacti-
vate “Overview Mode”.
Touching
allows you to enter the detailed
setting screen only when [On] has been se-
lected.
Available options;
! “Route event distance for Overview
mode:”
Allows you to set a distance to activate
“Overview Mode”. The map starts zoom-
ing out when the distance to the next gui-
dance point is further than the distance set
here.
! “Overview zoom level:”
Allows you to set the map scale for zoom-
out behavior in “Overview Mode”.
Manage POI
= For more details concerning the operation,
refer to Setting the POI appearance on page
87.
Manage Track Logs
= For more details concerning the operation,
refer to Recording your travel history on
page 89.
Route
The settings related to route calculation can
be customized.
% Touch [Route] on the “Navi Settings”
menu.
The “Route Settings” screen appears.
Customizing preferences
En
83
Chapter
13
Customizing preferences

Available options;
! “Method:”
Determines which condition takes priority
for route calculation.
[Fast]:
Calculates a route with the shortest travel
time to your destination as a priority.
[Short]:
Calculates a route with the shortest dis-
tance to your destination as a priority.
[Easy]:
Calculates a route to your destination with
the fewest turning points possible as a
priority.
[Economical]:
Calculates a route on the basis of least fuel
consumption.
! “Vehicle:”
CAUTION
Be sure to choose the proper setting. Other-
wise, an inappropriate route for your cur-
rent situation may be calculated.
[Car]:
Calculates a route according to traffic re-
strictions which should be applied to the
normal vehicle and other customized set-
tings.
[Pedestrian]:
Calculates a route that excludes freeways,
ignores one-way road restrictions and pro-
vides passage through pedestrian areas.
! “U-turn penalty:”
Allows you to limit the distance increase for
U-turns.
! “Keep Position On Road”
Activates or deactivates map matching.
p This selection is available only when
“Pedestrian” is selected on “Vehicle:”.
! “Warn in pedestrian mode”
Activates or deactivates an over-speed
warning for the pedestrian.
! “Unpaved Roads”
[On]:
Calculates a route without avoidance of un-
paved roads.
[Off]:
Calculates a route with avoidance of un-
paved roads to the extent possible.
! “Highways”
[On]:
Calculates a route without avoidance of
freeways.
[Off]:
Calculates a route with avoidance of free-
ways to the extent possible.
! “Ferries”
[On]:
Calculates a route without avoidance of fer-
ries.
[Off]:
Calculates a route with avoidance of ferries
to the extent possible.
! “U-turns”
[On]:
Calculates a route without avoidance of U-
turns.
[Off]:
Calculates a route with avoidance of U-
turns to the extent possible.
p Turning back on divided highway is not
considered a U-turn.
! “Toll Roads”
[On]:
Calculates a route without avoidance of toll
roads areas.
[Off]:
Calculates a route with avoidance of toll
roads areas to the extent possible.
! “Permit Needed”
[On]:
Calculates the route without taking into ac-
count roads and areas where permission is
needed for entry.
Customizing preferences
En
84
Chapter
13
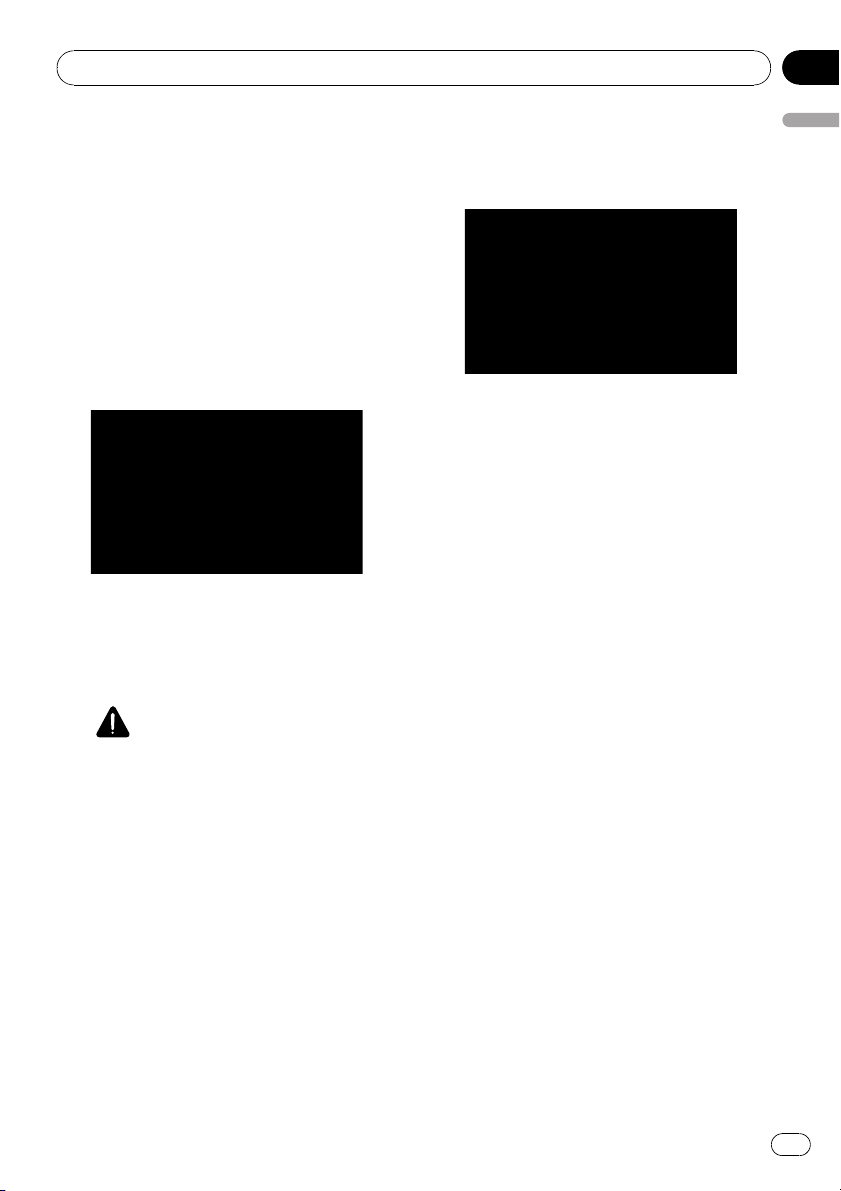
[Off]:
Calculates the route taking into account the
roads and areas where permission is
needed for entry.
Warnings
The settings related to warning operations can
be customized.
% Touch [Warnings] on the “Navi Set-
tings” menu.
The “Warning settings” screen appears.
Available options;
! “Warn When Speeding”
Establishes whether or not to enable the ex-
cessive speed warnings for when you ex-
ceed the speed limit.
CAUTION
The speed limit is based on the map data-
base. The speed limit in the database may
not match the actual speed limit of the cur-
rent road. This is not a definite value. Be
sure to drive according to the actual speed
limit.
! “Speeding Tolerance”
Sets the tolerance for the speed limit
with a percentage.
Regional Settings
The display format for the distance unit, lati-
tude and longitude, and other settings related
to time and date can be customized.
% Touch [Regional Settings] on the “Navi
Settings” menu.
The “Regional Settings” screen appears.
Available options;
! “Distance Units”
Controls the unit of distance and speed
shown.
! “Coordinate display format”
Controls the format of latitude and longi-
tude shown.
! “Date format”
Controls the format of date shown.
! “Date delimiter”
Controls the delimiter format for the date
shown.
! “Time format”
Controls the time format shown.
Restore Factory Settings
Resets various settings registered to the navi-
gation system and restores them to the default
or factory settings.
p Some data remains. Read Returning the na-
vigation system to the default or factory set-
tings before you operate this function.
= For more detailed information about the
items to be deleted, refer to Returning
the navigation system to the default or
factory settings on page 104.
1 Touch [Restore Factory Settings] on the
“Navi Settings” menu.
2 Touch [Yes].
The navigation system will now restart.
Customizing preferences
En
85
Chapter
13
Customizing preferences

Set Home
= For more details concerning the operation,
refer to Setting your home position on page
90.
Demo Mode
This is a demonstration function for retail
stores. After a route is set, touching this key to
start the simulation of the route guidance.
1 Touch [Demo Mode] on the “Navi Set-
tings” menu.
2 The demonstration guidance will
begin.
p If you want to perform the simulation at fas-
ter speed, touch [Fly over] on the “Route
Information” screen.
= For more details concerning the operation,
refer to Playing simulated travel at high
speed on page 42.
Sound settings
All settings here are effective only for the navi-
gation guidance and beep.
% Touch [Sound settings] on the “Navi
Settings” menu.
The “Sound settings” menu appears.
Available options;
! “Master”
Controls the master volume of both the na-
vigation guidance and beep.
! “Voice”
Controls the volume of the navigation gui-
dance.
! “Keys”
Controls the beep tone volume.
! “Dynamic Volume”
Increases and decreases the master vo-
lume of the navigation guidance and beep
automatically according to the current
speed. This function is very helpful when
you are driving at high speed and there is
too much noisy to hear the guidance in-
structions and beep.
Touching
allows you to enter the de-
tailed setting screen only when [On] has
been selected.
“Minimum speed:”
Enables the navigation system to automati-
cally start turning the volume up as the cur-
rent speed reaches the value set here.
“Maximum speed:”
Enables the navigation system to automati-
cally maximize the volume when the current
speed reaches the value set here.
About
Enables you to check the copyright and other
information about the map database.
1 Touch [About].
Copyright information of the database is dis-
played.
2 Touch [Maps].
Touching [Maps] allows you to view the infor-
mation regarding the map database in detail.
After that, touching the desired item on the
list allows you to view more detailed informa-
tion about the selected map database.
Customizing preferences
En
86
Chapter
13

Setting the POI appearance
You can display or hide the POI (points of inter-
est) icons on the map. To avoid the screen be-
coming crowded with POI icons, all the icons
have been made invisible as a default setting.
You can set the conditions for each category
here and also create new categories.
p If the custom POI is found on an external
storage device (USB, SD), the navigation
system will show a POI list which includes
them.
1 Touch [Visual] on the “Navi Settings”
menu.
The “Visual Settings” screen appears.
2 Touch [Manage POI].
3 Touch the desired category that you
want to display.
If there are more detailed categories within the
selected category, repeat this step as many
times as necessary.
If there aren’t anymore detailed categories, a
blank list appears. In this case, you can only
create the new category by touching [New
Group].
4 Touch [Edit] on the right of the desired
sub-category to set the appearance.
5 Touch the desired key to customize it.
Available options;
! “POI Icon Visibility Distance”
Touching the key shows the option. Touch
one of them to set the desired visibility.
When “Satellite” is selected, the POI icons
will appear even though they are far away
from your current position. When “Close” is
selected, only the nearest POI icons will ap-
pear. Selecting “Off” hides the POI icons of
this category.
! “Same Visibility in Subgroups”
[On]:
Also applies this visibility to all sub-cate-
gories belonging to this category.
[Off]:
Does not apply this visibility to all sub-cate-
gories belonging to this category.
! “Icon:”
Touching the key shows the options avail-
able. Touch one of them to set the desired
icon.
! [Remove]:
Touching the key allows you to delete the
selected category.
p [Remove] is available only for POI cate-
gories that are created on this naviga-
tion system.
Creating new categories
If your customized POI does not match any
pre-installed categories, creating a new cate-
gory allows you to edit your customized POI so
that it can belong to this newly-created cate-
gory.
Customizing preferences
En
87
Chapter
13
Customizing preferences

p If the custom POI is found on an external
storage device (USB, SD), the navigation
system will show a POI list which includes
them.
1 Touch [Visual] on the “Navi Settings”
menu.
The “Visual Settings” screen appears.
2 Touch [Manage POI].
3 Touch the desired category.
If there are more detailed categories within the
selected category, repeat this step as many
times as necessary.
If there aren’t anymore detailed categories, a
blank list appears. In this case, touching
[New Group] allows you to create a new cate-
gory.
4 Touch [New Group] at the screen where
you want to create a new category.
5 Enter the category name and touch
[Done] to complete the entry.
Editing your customized POI
If you have already stored the customized POI,
you can edit the POI property.
p If the custom POI is found on an external
storage device (USB, SD), the navigation
system will show a POI list which includes
them.
1 Touch [Visual] on the “Navi Settings”
menu.
The “Visual Settings” screen appears.
2 Touch [Manage POI].
3 Touch the desired category for editing.
If there are more detailed categories within the
selected category, repeat this step until the de-
sired POI appears.
4 Touch the desired POI.
The “Edit POI” screen appears.
5 Touch the desired key to customize it.
Available options;
! “Group:”
Customizing preferences
En
88
Chapter
13

The category that the item currently se-
lected belongs to can be changed. Touch-
ing the key shows the options available.
Touch one of them to set the desired cate-
gory.
! “POI Name:”
Touching the key displays the screen for en-
tering a new POI name. Enter the name
and then touch [Done] to complete the
entry.
! “Icon:”
Touching the key shows the options avail-
able. Touch one of them to set the desired
icon.
! [Remove]:
Touching the key allows you to delete the
selected POI.
p [Remove] is available only for POIs that are
created on this navigation system.
p The POI address is not editable.
Recording your travel history
Activating the track logger enables you to re-
cord your driving history (hereinafter called
“track log”). You can review the travel history
later and replay the travel for your reference.
Activating track logger temporarily
One-time activation is useful if you want to
create a log only for that trip.
1 Touch [Visual] on the “Navi Settings”
menu.
The “Visual Settings” screen appears.
2 Touch [Manage Track Logs].
A list of track logs already recorded appears. A
blank list appears if you have not recorded it
yet.
3 Touch [Record] to activate the track log-
ger.
The key then changes to [Stop Recording].
Touching [Stop Recording] allows you to de-
activate the track logger.
p If there is not enough space in the built-in
memory, the oldest track log will be over-
written by the new one.
p If you want to permanently activate the
track logger whenever the GPS signal is
available, switch “Enable Auto-saving” to
“On”.
= For details, refer to Setting the track log-
ger options on the next page.
Browsing and replaying the track log
1 Touch [Visual] on the “Navi Settings”
menu.
The “Visual Settings” screen appears.
2 Touch [Manage Track Logs].
A list of track logs already recorded appears.
Touching
enables you to replay the track
log with “Fly over”.
3 Touch the desired track log on the list.
More details about the track log appears.
Customizing preferences
En
89
Chapter
13
Customizing preferences

4 Touch the desired key to operate it.
Available options;
! [Rename]:
Touching this key displays the screen for en-
tering a new name for the track log. Enter
the name and then touch [Done] to com-
plete the entry.
! [Delete]:
Touching this key deletes the track log.
! [Export]:
Touching this key exports the track log cur-
rently selected to the external storage de-
vice (USB or SD).
! [Export all track logs]:
Touching this key exports all track logs cur-
rently stored to the external storage device
(USB or SD) at once.
! The key next to “Color on the map:”:
Touching this key displays the screen for
changing the color used for the route high-
lighting of the track log. Touch the desired
color on the color list. The color of track
logs is assigned automatically within prede-
fined colors when this setting is estab-
lished.
Setting the track logger options
1 Touch [Visual] on the “Navi Settings”
menu.
The “Visual Settings” screen appears.
2 Touch [Manage Track Logs].
3 Touch [Track Log Options].
4 Touch the desired key to operate it.
Available options;
! “Update interval:”
Sets how of ten the system updates the log.
! “Current autosave track size:”
Sets a size limit on automatic logging. This
setting will be effective only when “Enable
Auto-saving” is “On”.
! “Enable Auto-saving”
Sets whether the automatic logging is acti-
vated or not.
! “Limit Track DB Size”
Limits the total data size for logging.
! “Maximum track database size:”
Sets a size limit on logging. This parameter
can be adjustable only when “Limit Track
DB Size” is “On”.
! “Create NMEA Log”
Creates the log files in the SD memory
card. When this setting is “On”, the system
outputs the log files with NMEA-0183 for-
mat onto the SD memory card.
Setting your home position
Registering your home position saves time
and effort. Also, routes to home positions can
be calculated easily with a single touch of the
key from the “Destination Menu”. The regis-
tered home position can also be modified
later.
1 Touch [Set Home] on the “Navi Set-
tings” menu.
Customizing preferences
En
90
Chapter
13
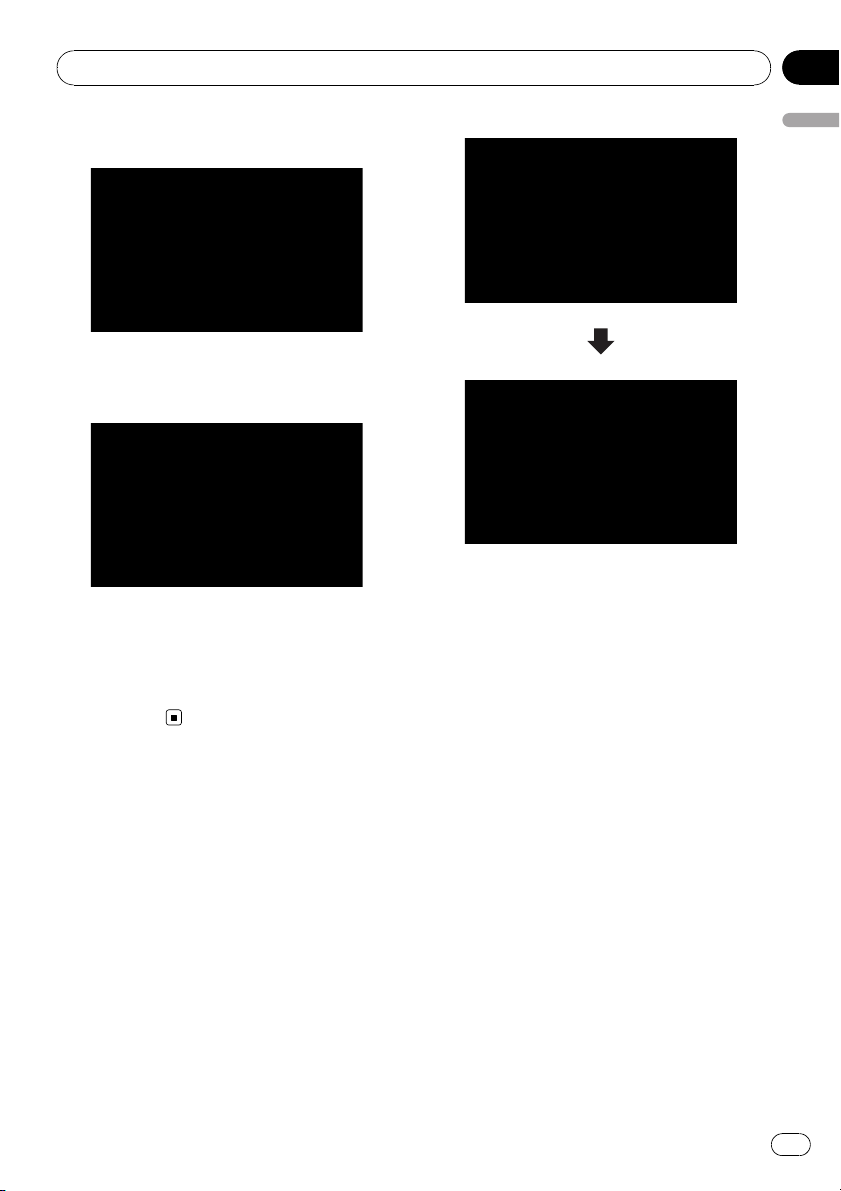
2 Touch the key next to “Address:”.
3 Perform one of the search methods and
locate the cursor on your desired position.
4 Touch [OK].
5 Touch the key next to “Phone #”.
6 Enter your home phone number, then
touch [Done].
The options on the “System
Settings” menu
Displaying the “System
Settings” menu
1 Press MENU button to display the “Top
Menu”, and then touch [Settings].
2 Touch [System Settings].
The “System Settings” menu appears.
Selecting the language
You can set the languages used on the pro-
gram and voice guidance. Each language can
be set separately.
p If you use voice operation, select [English]
in [Program language:]of“Language”.If
you select other languages, voice operation
will not be available.
= For details, refer to Basics of Voice Oper-
ation on page 98.
1 Touch [Language] on the “System Set-
tings” menu.
= For details, refer to Displaying the “System
Settings” menu on this page.
Customizing preferences
En
91
Chapter
13
Customizing preferences

2 Touch the key next to “Voice lan-
guage:”.
The language list is displayed.
3 Touch the desired language.
After the language is selected, the screen re-
turns to the previous screen.
4 Touch the key next to “Program lan-
guage:”.
5 Touch the desired language.
If you change [Program language:], a mes-
sage prompting you to reboot appears. Touch
[OK] reboots the system.
Changing the splash screen
You can change the splash screen that ap-
pears when the navigation system starts. Copy
your favorite image to the external storage de-
vice (USB, SD), and select the image to im-
port.
p Splash screen images should be used with-
in the following formats;
— BMP or JPEG files
— Allowable horizontal and vertical size
are 2 592 x 1 944 or smaller
— Allowable data size is 15 MB or smaller
p Proper compatibility with allowable files is
not guaranteed.
p Imported original images will be stored in
the built-in memory, but the ability to save
these images cannot be guaranteed com-
pletely. If your original image data is de-
leted, set the external storage device (USB,
SD) again and re-import the original image.
1 Create a folder named “Pictures” on the
top-most directory of the exter nal storage
device (USB, SD) and store the picture files
in this folder.
2 Insert the SD memory card into the SD
card slot or plug the USB storage device to
the USB connector.
3 Touch [Splash Screen] on the “System
Settings” menu.
= For details, refer to Displaying the “System
Settings” menu on the previous page.
The navigation system checks the external sto-
rage device (USB, SD). If an appropriate file is
found, the file list will be displayed.
p If there is no “Pictures” folder or loadable
file, a message appears.
p You can switch the list by touching [Import
from SD] and [Import from USB].
4 Touch the image to use as the splash
screen from the list.
The image is displayed on the screen.
5 Touch [OK].
The image is set as the splash screen, and the
system returns to the “System Settings”
menu.
Setting the rear view camera
The following two functions are available. The
rear view camera feature requires a separately
sold rear view camera (e.g. ND-BC2). (For de-
tails, consult your dealer.)
Back up camera
The navigation system features a function that
automatically switches to the full-screen rear
camera image installed on your vehicle. When
the shift lever is in the REVERSE (R) position,
the screen automatically switches to full-
screen rear view camera.
Customizing preferences
En
92
Chapter
13

Camera for “RearView”
[RearView] can be displayed the full-screen
rear camera image any time without relation
to the shift lever position after touching [Rear-
View] on the “AV Source” menu. [RearView]
is useful if you want to monitor an attached
trailer, etc.
CAUTION
Pioneer recommends the use of a camera which
outputs mirror reversed images, otherwise the
screen image may appear reversed.
p Immediately verify whether the display
changes to a rear view camera image when
the shift lever is moved to REVERSE (R)
from another position.
p When the whole screen changes to a rear
view camera image during normal driving,
switch to another setting.
p Initially, this function is set to “Off”.
1 Touch [Back Camera] on the “System
Settings” menu.
= For details, refer to Displaying the “System
Settings” menu on page 91.
The “Camera Input” screen appears.
2 Touch [On] next to “Camera” to acti-
vate the camera setting.
p Unless this setting is [On], you cannot
switch to “RearView”.
3 Touch [Battery] or [GND] next to
“Polarity” to select the appropriate polarity
setting.
! Battery — When the polarity of the con-
nected lead is positive while the shift lever
is in the REVERSE (R) position
! GND — When the polarity of the connected
lead is negative while the shift lever is in
the REVERSE (R) position
Adjusting the response
positions of the touch panels
(touch panel calibration)
If you feel that the touch panel keys on the
screen deviate from the actual positions that
respond to your touch, adjust the response po-
sitions of the touch panel screen.
p For adjustment, make sure to use a rela-
tively soft and tapered instrument so that
the screen is not scratched or damaged,
and gently touch the screen. If you press
the touch panel forcefully, the touch panel
may be damaged. Also, do not use a sharp
pointed metallic or hard tool such as a ball-
point pen or a mechanical pencil. Other-
wise the screen may become damaged.
1 Touch [Screen Calibration] on the “Sys-
tem Settings” menu.
A message confirming whether to start the ca-
libration appears.
p You can also start the calibration by keep
pressing MENU button on the “Top Menu”.
2 Touch [OK].
3 Touch and hold the arrows that point
to the center and corners of the LCD
screen.
The arrow indicates the order.
4 Touch anywhere on the screen.
The adjusted position data will be saved.
p Do not turn off the engine while saving the
adjusted position data.
Customizing preferences
En
93
Chapter
13
Customizing preferences
5 Touch [OK].
Adjusting the screen brightness
“Brightness” modifies the black level of the
screen.
1 Touch [Picture Adjustment] on the “Sys-
tem Settings” menu.
= For details, refer to Displaying the “System
Settings” menu on page 91.
2 Touch [+] or [-] to adjust the brightness.
Each time you touch [+]or[-] increases or de-
creases the level. 10 to 01 is displayed as the
level is increased or decreased.
3 Touch
to return to the previous
screen.
p You can also start the adjustment by keep
pressing MAP button.
Setting the power-saving function
You can select the setting of automatic sus-
pend and the power-saving feature of the
screen backlight to save the battery power.
1 Touch [Power Management] on the
“System Settings” menu.
= For details, refer to Displaying the “System
Settings” menu on page 91.
2 Touch the desired key to change the
setting.
Available options;
! “Auto Power Off”
Enables you to set the automatic suspend
of the system.
[Never]:
Deactivates the automatic suspend func-
tion.
[10 min]:
Suspends the system automatically if you
do nothing for 10 minutes.
! “Backlight Timeout”
Enables you to set the power-saving feature
of the screen backlight.
[Never]:
Deactivates the power-saving feature of the
screen backlight.
[30 sec]:
Dims the backlight automatically if you do
nothing for 30 seconds.
Monitoring the battery status
Displaying the battery power
You can select whether to display or hide the
battery status indicator (e.g.
) on the map
screen.
Battery status indicator
Fully charged
Sufficient power
Charging
Customizing preferences
En
94
Chapter
13
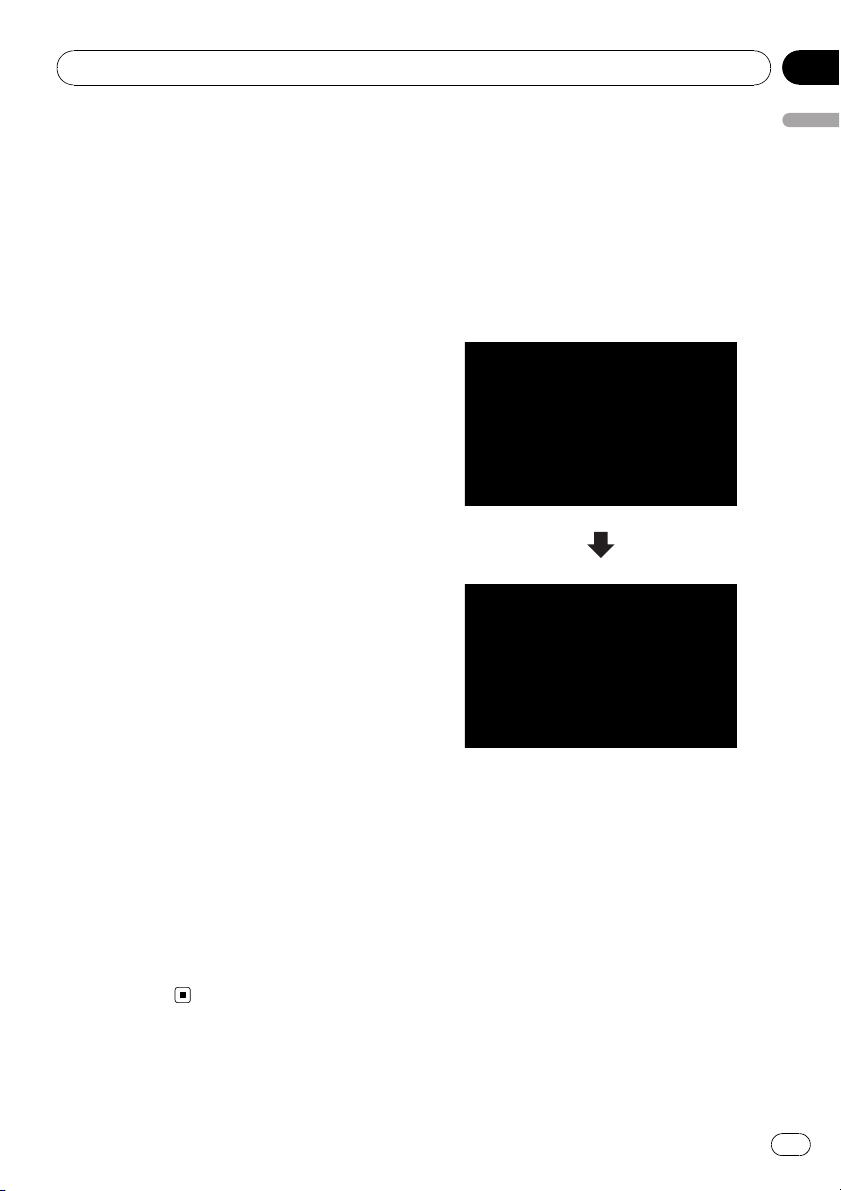
1 Touch [Battery Status] on the “System
Settings” menu.
= For details, refer to Displaying the “System
Settings” menu on page 91.
2 Touch [On] or [Off] to activate or deacti-
vate “Battery Power Indication”.
Setting the low battery caution
You can select whether to display or refrain
from displaying a warning message when bat-
tery power decreases.
1 Touch [Battery Status] on the “System
Settings” menu.
= For details, refer to Displaying the “System
Settings” menu on page 91.
2 Touch [On] or [Off] to activate or deacti-
vate “Low Battery Caution”.
Checking the version information
1 Touch [Service Information] on the
“System Settings” menu.
= For details, refer to Displaying the “System
Settings” menu on page 91.
2 Check the version information.
Turning off the screen
By turning off the backlight of the LCD screen,
you can turn off the screen display without
turning off the voice guidance.
% Touch [Screen Off] on the “System Set-
tings” menu.
= For details, refer to Displaying the “System
Settings” menu on page 91.
The screen is turned off.
p To turn on the screen, touch anywhere on
the screen.
The options on the “AV
Settings” menu
Displaying the “AV Settings” menu
1 Press MENU button to display the “Top
Menu”, and then touch [Settings].
2 Touch [AV Settings].
The “AV Settings” menu appears.
p Only when selecting the AV source with
video, you can adjust [Wide Mode].
p Only when the AV source is “OFF”,[MUTE
Input/GUIDE] can be adjusted.
Setting video input (AV)
You can switch this setting according to the
connected component.
p This setting is effective for mini-jack input
on front panel.
% Touch [AV Input] on the “AV Settings”
menu.
= For details, refer to Displaying the “AV Set-
tings” menu on this page.
Customizing preferences
En
95
Chapter
13
Customizing preferences

Each touch of [AV Input] changes the settings
as follows:
! Off — No video component is connected
! iPod — iPod connected with the USB Inter-
face cable for iPod (CD-IU200VM)
! Video — External video component
p Use the CD-RM10 (sold separately) to con-
nect the external video component.
Switching the sound muting/
attenuation
You can select the muting method when the
navigation guidance is output.
p When you use a cellular phone connected
with Bluetooth technology (dialing, talking,
incoming call), the AV source volume is al-
ways muted independently of this setting.
p When the voice recognition mode is acti-
vated, the AV source volume is always
muted independently of this setting.
p When ND-G500 is connected with this sys-
tem, the sound output from the connected
car stereo is always muted when the navi-
gation guidance outputs.
% Touch [MUTE Input/GUIDE] on the “AV
Settings” menu.
= For details, refer to Displaying the “AV Set-
tings” menu on the previous page.
Each touch of [MUTE Input/GUIDE] changes
the settings as follows:
! MUTE — Muting
! ATT — Attenuation
! Normal — Volume does not change
p Operation returns to normal when the cor-
respond action is ended.
p When “SD” or “USB” selected as the AV
source, the AV sounds, the navigation gui-
dance and beep sounds are mixed and the
volume can be adjusted simultaneously.
Changing the wide screen mod e
% Touch [Wide Mode] on the “AV Set-
tings” menu.
= For details, refer to Displaying the “AV Set-
tings” menu on the previous page.
Each touch of [Wide Mode] changes the set-
tings as follows:
Full — Normal
Full (full)
A 4:3 picture is enlarged in the horizontal di-
rection only, enabling you to enjoy a 4:3 TV pic-
ture (normal picture) without any omissions.
Normal (normal)
A 4:3 picture is displayed normally, giving you
no sense of disparity since its proportions are
the same as that of the normal picture.
p Different settings can be memorized for
each video source.
p The setting is automatically applied with
the following grouping.
! SD, USB, iPod
! AV
p When video is viewed in a wide screen
mode that does not match its original as-
pect ratio, it may appear differently.
p Remember that use of this system for com-
mercial or public viewing purposes may
constitute an infringement on the author’s
rights protected by the Copyright Law.
p The navigation map and the rear view cam-
era picture is always viewed at Full.
Setting the audio output
You can change the audio output setting de-
pending on your usage.
1 Touch [Audio Out Selection] on the “AV
Settings” menu.
= For details, refer to Displaying the “AV Set-
tings” menu on the previous page.
2 Touch [Audio Out Selection].
Each touch of [Audio Out Selection] changes
the settings as follows:
! Both — Outputs the sound from both the
built-in speaker and audio output terminal.
Customizing preferences
En
96
Chapter
13

! Built-in — Outputs the sound from the
built-in speaker only.
! Preout — Outputs the sound from the
audio output terminal only.
p This product’s audio output terminal is the
mini-plug at the cradle’s cable end.
p When the navigation system is combined
with ND-G500 (sold separately), select “Pre-
out”.
p When the headphone is connected, no
sounds are output from both the built-in
speaker and audio output terminal.
Acquiring/Cataloging iPod
music information
If you always set the language other than “Eng-
lish” on “Program language:”, this setting is
unnecessary.
Unless [VR Catalog Mode] is turned off, this
navigation system tries to acquire the informa-
tion needed to operate iPod with voice com-
mands. It may take a short period of time to
transfer the information. Change the setting
according to your usage.
The navigation system starts acquiring/catalo-
ging music information (1) when the iPod is
connected or when the system boots up while
the iPod is connected and (2) when iPod is the
selected and displayed AV Source, unless [VR
Catalog Mode] is turned off.
p If you do not use iPod, this setting is un-
necessary.
p During transfer, iPod operations (such as
[Shuffle], [Menu], or [Video]) are not
available.
p Once the cataloging is completed, you can
deactivate [VR Catalog Mode] until you
update the content/data on iPod. If you up-
date the iPod data, activate [VR Catalog
Mode] again to transfer the music informa-
tion and synchronize the music information
for voice commands with the data on iPod.
p After you select “Off” in [VR Catalog
Mode], the system doesn’t catalog the
data on the iPod. In such case, the pre-
viously cataloged data are available as
voice commands.
p Once you start the cataloging process, only
a few basic voice commands can be used
for iPod until the process has completely
finished.
p If unreadable characters are included in
the data on your iPod, names or types may
not be available as voice commands.
Important Notice regarding Voice
Control for iPods
Voice Control for iPods may be limited if cata-
loging of iPod content is not completed. Cata-
loging of iPod content only occurs when the
system is in “AV Source” mode and the “iPod”
is the selected and displayed AV source. Cata-
loging of iPod content will not occur if the sys-
tem is off, if any other “AV Source” is selected
(aside from iPod), or if the system is in any
other mode (aside from “AV Source” mode)
such as “Destination” mode, “Contacts” mode,
“Settings” mode, “Phone” mode or “Map”
mode. If you wish to use Voice Control for all
iPod content, it is recommended that you first
connect your iPod, select “iPod” as the AV
source, and keep the iPod screen displayed
until cataloging is completed — cataloging of
iPod content should only take a few minutes,
and will depend on the size of the conent
stored on your iPod. A message will be dis-
played when cataloging is completed.
1 Touch [VR Catalog Mode] on the “AV
Settings” menu.
= For details, refer to Displaying the “AV Set-
tings” menu on page 95.
2 Touch [On] or [Off] to activate or deacti-
vate “VR Catalog Mode”.
Customizing preferences
En
97
Chapter
13
Customizing preferences
To Ensure Safe Driving
Some functions of the navigation system sup-
ports voice operation.
p The navigation function is not available
using voice operation.
CAUTION
For your safety, avoid viewing the screen in the
voice operation as much as possible while
driving.
If you use voice operation, select [English]in
[Program language:]of“Language”. If you
select other languages, voice operation will not
be available.
Basics of Voice Operation
Your Pioneer navigation system uses the latest
in voice recognition technology. You can use
voice commands to operate many of its func-
tions. This chapter describes where you can
use voice commands, and also what com-
mands the system accepts.
Flow of voice operation
You can start voice operation any time even
when the map screen is displayed or audio is
operating. (Some operations are not available.)
The basic steps of voice operations are as
follows.
1 Switch the screen to map screen or AV
operation screen.
= For details concerning operations, refer to
Screen switching overview on page 16.
2 Press MULTI-CONTROL to activate voice
operations.
3 Speak a command into the microphone
after the beep.
4 When the command is recognized, the
navigation system displays next options on
the screen, and pronounces it in some case-
s.
5 Repeat previous step as necessary.
6 The requested operation will be carried
out.
p The voice operation may not be operable for a
minute after the navigation system has booted
up.
Operating Your Navigation System with Voice
En
98
Chapter
14

Starting voice operation
% Press MULTI-CONTROL on map screen
or the AV operation screen.
The voice operation screen appears.
If you lose your way...
You can listen to the brief operating instruc-
tion by touching
.
To cancel voice operation
You can cancel the voice operation feature at
any time by saying “Cancel”. After you cancel
voice operations, the display returns to the
screen displayed before the voice operation
screen appeared.
p You can also cancel voice operation if you
touch
on the voice operation screen, or
press MENU button or MAP button.
Operating iPod by voice
You can play music using voice operation from
the iPod connected to the navigation system.
p Playback of iPod movies is not available
using voice commands.
p To use the content/data on the iPod for
voice operation, transfer the data to this
system first.
= For details, refer to Acquiring/Cataloging
iPod music information on page 97.
Examples of voice operation of the iPod are
shown below. (A method for playing the album
title named “Pioneer” is described here, along
with an operational example.)
1 Press MULTI-CONTROL to start voice op-
eration.
2 Say “Change Source” to display the AV
source selection screen.
3 Say “iPod” on the selection screen to
switch the AV source to iPod.
p Touching the item on the screen also en-
ables you to select the desired AV source.
4 Press MULTI-CONTROL to start voice op-
eration.
5 Say “Play the album Pioneer” to play-
back the album name “Pioneer”.
If the command is recognized properly, play-
back starts from the first song of “Pioneer”.
Calling the entry on “Contacts”
A method for dialing the entry named “Nancy”
is described here along with an operational ex-
ample.
1 Press MULTI-CONTROL to start voice op-
eration.
2 Say “Call Nancy” to make a call.
Dialing starts.
Operating Your Navigation System with Voice
En
99
Chapter
14
Operating Your Navigation System with Voice

Available Basic Voice Commands
The navigation system can also recognize the
words in the following list.
Basic commands
Voice commands and operations
Back d Returns the previous screen.
Cancel d Cancels the voice operation.
Help d Outputs the brief operating instruction by voice.
Voice operation for the iPod
For <Artist name>, <Album name>, <Play-
list name>, <Genre name> shown on the fol-
lowing chart, say the name their name in the
iPod.
p Playback of iPod movies is not available
using voice commands.
Voice commands and operations
Shuffle play d Plays all songs randomly.
Pause the music, Stop the music d Pauses the song currently playing .
Resume the music d Resumes the song currently playing .
Next song d Plays the next song.
Previous song d Plays the previous song or return to the beginning of the song currently playing.
Play songs d Start playback from the top of “Songs”.
Play artists d Start playback from the top of “Artists”.
Play the artist <Artist name> d Start playback from the top of the selected artist.
Play albums d Start playback from the top of “Albums”.
Play the album <Album name> d Start playback from the top of the selected album.
Play playlists d Start playback from the top of “Playlists”.
Play the playlist <Playlist name> d Start playback from the top of the selected playlist.
Play genres d Start playback from the top of “Genres”.
Play the genre <Genre name> d Start playback from the top of the selected genre.
Show artists d Displays the artist list together with sub-screen to continue the voice operation. d Touch the desired
item on the list or say the desired voice commands.
Show the artist <Artist name> d Displays the album list of the selected artist together with sub-screen to continue
the voice operation. d Touch the desired item on the list or say the desired voice commands.
Show albums d Displays the album list together with sub-screen to continue the voice operation. d Touch the de-
sired item on the list or say the desired voice commands.
Show the album <Album name> d Displays the song list of the selected album together with sub-screen to con-
tinue the voice operation. d Touch the desired item on the list or say the desired voice commands.
Operating Your Navigation System with Voice
En
100
Chapter
14

Show playlists d Displays the playlist together with sub-screen to continue the voice operation. d Touch the de-
sired item on the list or say the desired voice commands.
Show the playlist <Playlist name> d Displays the song list of the selected playlist together with sub-screen to con-
tinue the voice operation. d Touch the desired item on the list or say the desired voice commands.
Show genre d Display s the genre list together with sub-screen to continue the voice operation. d Touch the desired
item on the list or say the desired voice commands.
Show the genre <Genre name> d Displays the song list of the selected genre list together with sub-screen to con-
tinue the voice operation. d Touch the desired item on the list or say the desired voice commands.
Show songs d Displays the song list together with sub-screen to continue the voice operation. d Touch the desired
item on the list or say the desired voice commands.
Page down, Page up d Displays the previous or next page of the selection list. (Note 1)
(Note 1) The voice commands is available only when the selection list is displayed.
Voice operation for AV source (other than iPod)
AV source selection
Voice commands and operations
Change Source to SD Media d Switch the AV source to SD.
Change Source to USB d Switch the AV source to USB.
Change Source to iPod d Switch the AV source to iPod.
Change Source d Switch to the AV source selection screen. d Touch the desired AV source or say the desired AV
source name.
External storage device (USB, SD)
Voice commands and operations
Shuffle play d Plays all songs randomly.
Pause the music, Stop the music d Pauses the song currently playing .
Resume the music d Resumes the song currently playing .
Next song d Plays the next song.
Previous song d Plays the previous song or return to the beginning of the song currently playing.
Operating Your Navigation System with Voice
En
101
Chapter
14
Operating Your Navigation System with Voice
Voice commands related to hands-free phoning
p You can make a phone call by voice dialing
if the cellular phone featuring Bluetooth
wireless technology is being paired with
the navigation system.
p For <entry’s name> shown on the follow-
ing chart, say the name of the entry stored
in “Contacts”.
p For <phone number> shown on the follow-
ing chart, say the desired phone number.
Voice commands and operations
Call <entry’sname>d Make a call to the entry (Note 2).
Call <entry’sname>mobile d Dial the mobile phone number of the entry (Note 3).
Call <entry’sname>home d Dial the home phone number of the entry (Note 3).
Call <entry’sname>office d Dial the office phone number of the entry (Note 3).
Call <phone number> d Dial the phone number.
Make a call d Say the phone number you want to call d The system starts dialing to the number.
Make a call d Say the name of entry stored on “Contacts” you want to call d The system starts dialing to the num-
ber (Note2).
List outgoing call s d Display the list of recent outgoing calls (“Dialed Numbers”) to select the number and call.
List recent calls d Incoming calls (Note 4) d Display the list of recently received calls (“Received Calls”) to select
the number and call.
List recent calls d Outgoing calls (Note 4) d Display the list of recent outgoing calls (“Dialed Numbers”) to select
the number and call.
List recent incoming calls d Display the list of recently received calls (“Received Calls”) to select the number and
call.
(Note 2) If the entry has multiple phone number data, selection list may appear. In such case, say the type of phone
number or touch the one of listed item that you want to dial.
(Note 3) If there is no corresponding type on the entry, the system may suggest you other phone numbers of the entry.
In such case, say the type of phone number or touch the one of listed item that you want to dial.
(Note 4) Touching the item on the screen also enables you to select the desired list.
Operating Your Navigation System with Voice
En
102
Chapter
14

Tips for Voice Operation
For your voice commands to be correctly re-
cognized and interpreted, ensure that condi-
tions are suitable for recognition.
Close the vehicle windows
Please note that wind through the vehicle win-
dow or miscellaneous noise from outside the
vehicle can interfere with voice operation.
Keep a proper distance from the
microphone
For optimum pick-up, don’t speak commands
extremely close to the microphone.
Pause before giving a command
Speaking too soon may cause the recognition
to fail.
Pronounce your commands carefully
Speak slowly, deliberately, and clearly.
Operating Your Navigation System with Voice
En
103
Chapter
14
Operating Your Navigation System with Voice
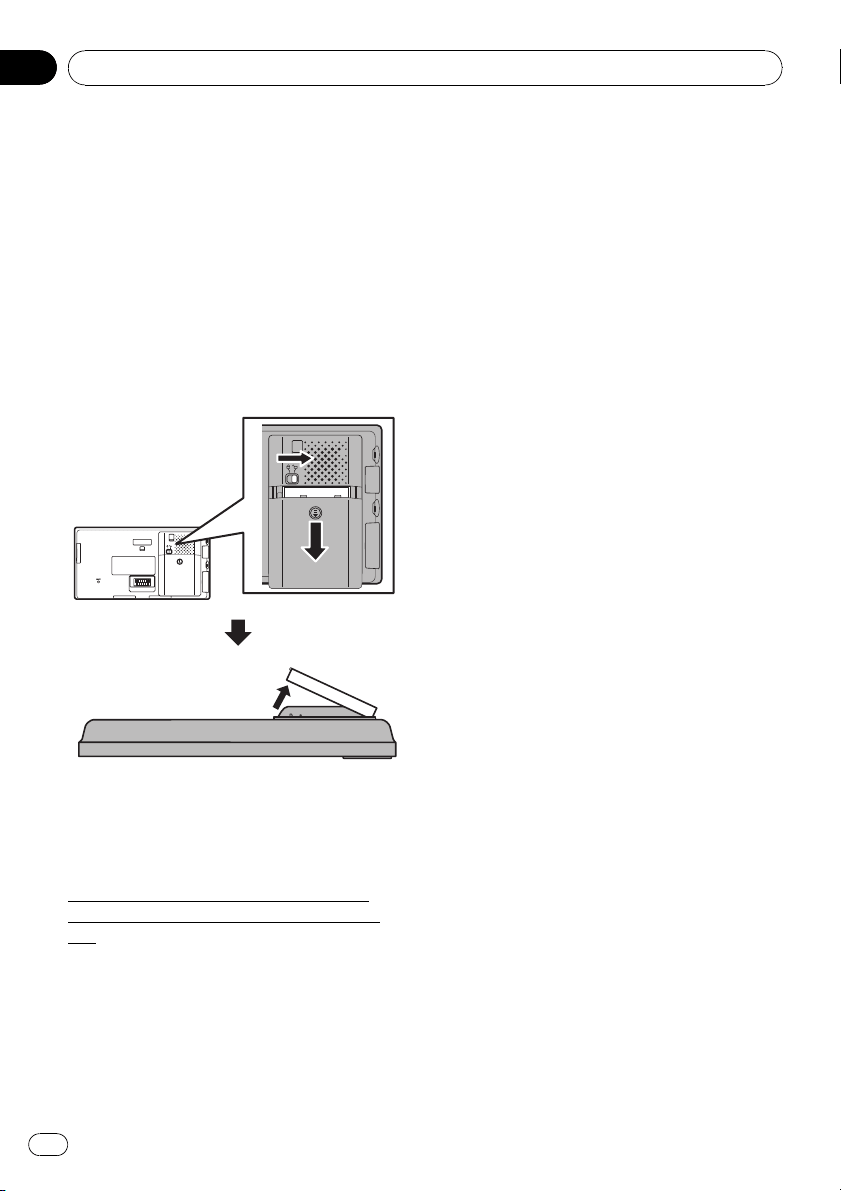
Returning the navigation
system to the default or
factory settings
You can return settings or recorded content to
the default or factory settings. There are three
methods to clear user data, and the situations
and the cleared content are different for each
method. For information regarding the content
that is cleared by each method, see the list
presented later.
Method 1: Remove the battery pack
1 Move the battery lock knob to unlock position
and slide the cover.
2 Detach the battery pack.
3 Attach the battery pack and close the cover.
4 Move the battery lock knob to lock position.
This transforms the system into the same
state as when the battery is completely run
out.
Method 2: Restore Factory Settings
Clears some items in the “Navi Settings”
menu.
= For details, refer to Restore Factory Set-
tings on page 85.
Other functions
En
104
Chapter
15
Setting items to be deleted
The items to be deleted vary depending on the
reset method. The items listed in the following
table return to the default or factory settings.
p Almost all items not listed below will be re-
tained. However, some items to be returned
to the default value are not listed if the set-
ting value can be easily recovered by user,
such as the last map scale, the last status
of AV operation screen, etc.
— : The setting will be retained.
1 : The setting will be cleared and returned to
the default or factory settings.
Navigation functions Method 1 Method 2
Destination Menu All settings on “MSN Direct”—1
Navi Settings
[Sound settings] “Master”——
[Sound settings]
“Voice”, “Keys”, “Dynamic Volume”
— 1
Other settings — 1
System Settings
[Language] — 1
Other settings ——
Audio functions Method 1 Method 2
SD, USB All settings (*1) 1 —
Volume setting for AV sources 1 —
(*1) All settings including the setting on the “Function” menu are to be deleted.
Other functions
En
105
Chapter
15
Other functions

Troubleshooting
If you have problems operating your navigation system, refer to this section. The most common
problems are listed below, along with likely causes and solutions. While this list is not comprehen-
sive, it should answer your most common problems. If a solution to your problem cannot be
found here, contact your dealer or the nearest authorized Pioneer service facility.
Problems with the navigation screen
Symptom Cause Action (See)
The power doesn’t turn on. The
navigation system doesn’t oper-
ate.
Leads and connectors are incor-
rectly connected.
Confirm once more that all connections are
correct.
The fuse (in the vehicle power char-
ger) is blown.
Rectify the reason for the fuse blowing, then
replace the fuse. Be very sure to install a cor-
rect fuse with the same rate.
Noise and other factors are causing
the built-in microprocessor to oper-
ate incorrectly.
Press RESET button. (Page 9)
You cannot position your vehicle
on the map without a significant
positioning error.
Signal quality from the GPS satel-
lites is poor causing reduced posi-
tioning accuracy. Such a loss of
signal quality may occur for the fol-
lowing reasons:
• This product is in an unsuitable lo-
cation.
• Obstacles are blocking signals
from the satellites.
• The position of satellites relative to
your vehicle is inadequate.
• Signals from the GPS satellites
have been modified to reduce accu-
racy. (GPS satellites are operated by
the US Department of Defense, and
the US government reserves the
right to distort positioning data for
military reasons. This may lead to
greater positioning errors.)
• If a cellular phone is used near
the GPS module, GPS reception
may be lost temporarily.
Check the GPS signal reception, the position
of this product and the topside clearance if
necessary, or continue driving until reception
improves.
Something covers this product’s
topside.
Do not cover this product with spray paint or
vehicle wax, because this may block the re-
ception of GPS signals.
You cannot position your vehicle
on the map without a significant
positioning error.
The navigation system may not be
mounted securely in your vehicle.
Check that the navigation system is securely
mounted and, if necessary, consult the dealer
that installed the system.
Indication of the position of your ve-
hicle is misaligned after a U-turn or
reversing.
Check whether or not the reverse gear signal
input lead (violet) is connected properly. (The
navigation system works properly without the
lead connected, but positioning accuracy will
be adversely affected.)
Appendix
En
106
Appendix

The map color does not switch
automatically between daytime
and nighttime.
[Night mode] is set to [Day]. Check [Night mode] setting and make sure
[Automatic] is selected. (Page 81)
The screen is too bright. An improper value has been set on
“Brightness”.
Check the settings.
The display is very dim. [Night] is selected in “Night
mode”.
Check the setting of [Night mode] and select
[Automatic]or[Day]. (Page 81)
An improper value has been set on
“Brightness”.
Check the settings.
No sounds of AV source are pro-
duced.
The volume level will not rise.
The volume level is low. Adjust the volume level.
A speaker lead is disconnected. Check the connection.
Adjusting the volume of naviga-
tion guidance and beeps is not
possible.
You cannot adjust these with
MULTI-CONTROL.
Turn the volume up or down according to
[Sound settings]onthe“Navi Settings”
menu. (Page 86)
The person on the other end of
the phone call cannot hear the
conversation due to an echo.
The voice from the person on the
other end of the phone call is output
from the speakers and then picked
up by the microphone again, creat-
ing an echo.
Use the following methods to reduce the
echo:
—Lower the volume on the receiver
—Have both speakers pause slightly before
speaking
There’s no picture while this pro-
duct is attached on the cradle.
The parking brake cord is not con-
nected.
Connect the parking brake cord, and apply
the parking brake.
The parking brake is not applied. Connect the parking brake cord, and apply
the parking brake.
The backlight of the LCD panel is
turned off.
Turn on the backlight. (Page 95)
Nothing is displayed and the
touch panel keys cannot be
used.
The setting for the rear view camera
is incorrect.
Select the appropriate setting for the rear
view camera.
The shift lever was placed in [R]
when the rear view camera was not
connected.
Press MAP button, and then press MENU
button to return to the “Top Menu” and then
select the correct polarity setting for [Back
Camera]. (Page 92)
There is no response when the
touch panel key are touched or
a different key responds.
The touch panel keys deviate from
the actual positions that respond to
your touch for some reason.
Perform the touch panel calibration. (Page
93)
Problems in the AV screen
Symptom Cause Action (See)
The screen is covered with the
caution message and the video
cannot be shown.
The parking brake lead is not con-
nected or applied.
Connect the parking brake lead correctly, and
apply the parking brake.
The parking brake interlock is acti-
vated.
Park your vehicle in a safe place and apply
the parking brake.
No video output from connected
equipments.
No video output from connected
iPod.
[AV Input] setting is incorrect. Establish the setting correctly. (Page 78)
The connection of the USB interface
cable for iPod is incorrect.
Connect both USB plug and mini-jack cable
side. (If only one connection has made, an
iPod will not work properly.) (Page 14)
Appendix
En
107
Appendix
Appendix
No sounds are produced.
The volume level will not rise.
Cables are not connected correctly. Connect the cables correctly.
The system is performing still, slow
motion, or frame-by-frame playback
with video.
There is no sound during still, slow motion, or
frame-by-frame playback with video.
The system is paused or perform ing,
fast reverse or forward during the
audio playback.
There is no sound on fast reverse or forward.
The picture stops (pauses) and
the navigation system cannot be
operated.
The reading of data is impossible
during video playback.
After touching g once, start playback once
more.
Cannot be operated. The iPod is frozen. ! Reconnect the iPod with the USB interface
cable for iPod.
! Update the software version of iPod.
An error has occurred. ! Reconnect the iPod with the USB interface
cable for iPod.
! Park your vehicle in a safe place, and apply
the parking brake. Turn the power off and
then turn the power on. If this does not solve
the problem, press RESET button on the navi-
gation system.
! Update the software version of iPod.
Songs on iPod connected with
this system cannot be available
as voice commands or different
song or title from the one that
you said is recognized.
iPod content/data has been up-
dated, but the data on this system’s
memor y has not been updated yet.
(i.e., system has not cataloged new
iPod content), or cataloging was not
completed)
If you update the iPod data, activate [VR Cat-
alog Mode] to catalog/transfer the music in-
formation to this system and synchronize the
music information for voice commands with
the data on iPod. (Page 97)
Problems with the phone screen
Symptom Cause Action (See)
Dialing is not possible because
the touch panel keys for dialing
are inactive.
Your phone is out of range for ser-
vice.
Retry after re-entering the range for service.
The connection betw een the cellular
phone and the navigation system
cannot be established now.
Perform the connection process.
If the screen becomes frozen...
Park your vehicle in a safe place, and apply the
parking brake. Turn the power off and then
turn the power on. If this does not solve the
problem, press RESET button on the navigation
system.
Appendix
En
108
Appendix
Messages and how to react to them
The following messages may be displayed by your navigation system.
There are occasions when you may see error messages other than those shown here. In such a
case, follow the instructions given on the display.
Messages for navigation functions
Message When What to do (See)
There is no "Pictures" folder.
Please create /Pictures/ folder
and store the appropriate
files images to be uploaded in
that Folder.
Cannot load the image because
“Pictures” folder is not found in the
inserted external storage device.
Use the appropriate data and store the data
properly. (Page 92)
“Pictures” folder exists on the exter-
nal storage device (USB, SD) but
there is no loadable data in the
folder.
Use the appropriate data and store the data
properly. (Page 92)
Data Read error. Failed to read the data for some rea-
son.
Use the appropriate data and store the data
properly. (Page 92)
The file is corrupt The data is damaged or an attempt
was made to set an image file that
was not made to specifications as
the splash screen.
Use the appropriate data and store the data
properly. (Page 92)
Connection failed. The cellular phone’s Bluetooth wire-
less technology is turned off.
Activate the target phone’s Bluetooth wire-
less technology.
The cellular phone is paired (con-
nected) with another device.
Cancel the pairing (connection) and retry.
Rejection has been received from
the cellular phone.
Operate the target phone and accept the con-
nection request from the navigation system.
(Furthermore, check the connection settings
on your cellular phone.)
The target cellular phone can not be
found.
Check whether your cellular phone is acti-
vated and, whether the distance to your cellu-
lar phone is not too far.
Could not find any available
phone.
No available phone exists in the sur-
roundings when the system
searches for connectable cellular
phones featuring Bluetooth wireless
technology.
! Activate the target phone’s Bluetooth wire-
less technology.
! Check whether your cellular phone is acti-
vated and, whether the distance to your cellu-
lar phone is not too far.
Dataloading failed. If you transferred the data from your
cellular phone in a format can not
be received with navigation system.
! Select just a suitable item, format, and then
retry. (Page 64)
! Connect your cellular phone with another
method again and retry. (Page 52)
Your mobile phone can not
support this feature.
Connected cellular phone has no
compatibility with the phone book
transfer function of this navigation
system.
Depending on the cellular phone, phone
book transfer may not be available.
Appendix
En
109
Appendix
Appendix
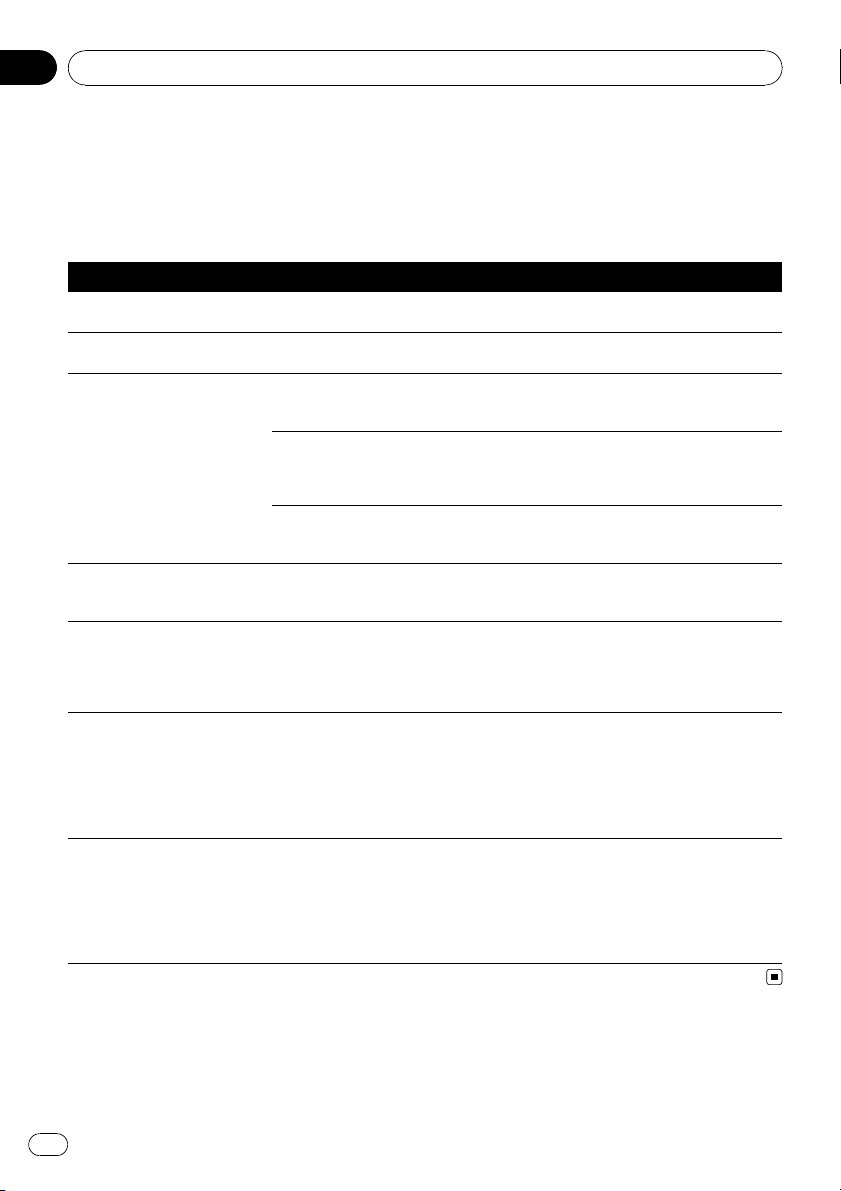
Messages for Audio Functions
When problems occur with AV source playback, an error message appears on the display. Refer
to the table below to identify the problem, then take the suggested corrective action. If the error
persists, contact your dealer or your nearest Pioneer Service Center.
SD/USB/iPod
Message Cause Action (See)
Non-playable tracks are
skipped.
Files that are protected by digital
rights management.
The protected files are skipped.
Impossible to play all tracks. All the files on the inserted external
storage device are secured by DRM.
Store playable files.
An error occurred on USB con-
nection. USB devices are not
available to use and iPod
power supply is also unavail-
able.
The USB connector or USB cable is
short-circuited.
Confirm that the USB connector or USB
cable is not caught in something or da-
maged.
The connected USB storage device
consumes more than 500 mA (maxi-
mum allowable current).
Disconnect the USB storage device and do
not use it. Turn the power off, then turn the
power on and connect the compliant USB
storage device.
The USB interface cable for iPod is
short-circuited.
Confirm that USB interface cable for iPod or
USB cable is not caught in something or da-
maged.
Connected iPod is not sup-
ported. Please check instruc-
tion manual.
The iPod is not compatible with this
navigation system.
Use an iPod with a compatible version.
iPod connection failed. Please
reconnect.
Communication failure • Disconnect the cable from iPod. Once iPod
main menu is displayed, connect the cable
again.
• If the message appears frequently, consult
your dealer.
Updating VR diction ary.
Please wait.
iPod function is restricted because
the navigation system is trying to
acquire the information needed to
operate iPod with voice commands
from the iPod currently connected.
• Wait on the iPod basic screen (Music) until
“iPod VR activation process complete.” ap-
pears.
• Switch the screen to another screen to can-
cel the acquiring process. (In such case, the
acquiring process will resume when the iPod
basic screen (Music) is displayed.) (Page 97)
Voice Synching…My voice
system will be busy until I’m
finished, but you can use the
touch interface
Voice operation is restricted be-
cause the navigation system is try-
ing to acquire the information
needed to operate iPod with voice
commands from the iPod currently
connected.
• Wait on the iPod basic screen (Music) until
“iPod VR activation process complete.” ap-
pears.
• Switch the screen to another screen to can-
cel the acquiring process. (In such case, the
acquiring process will resume when the iPod
basic screen (Music) is displayed.) (Page 97)
Appendix
En
110
Appendix
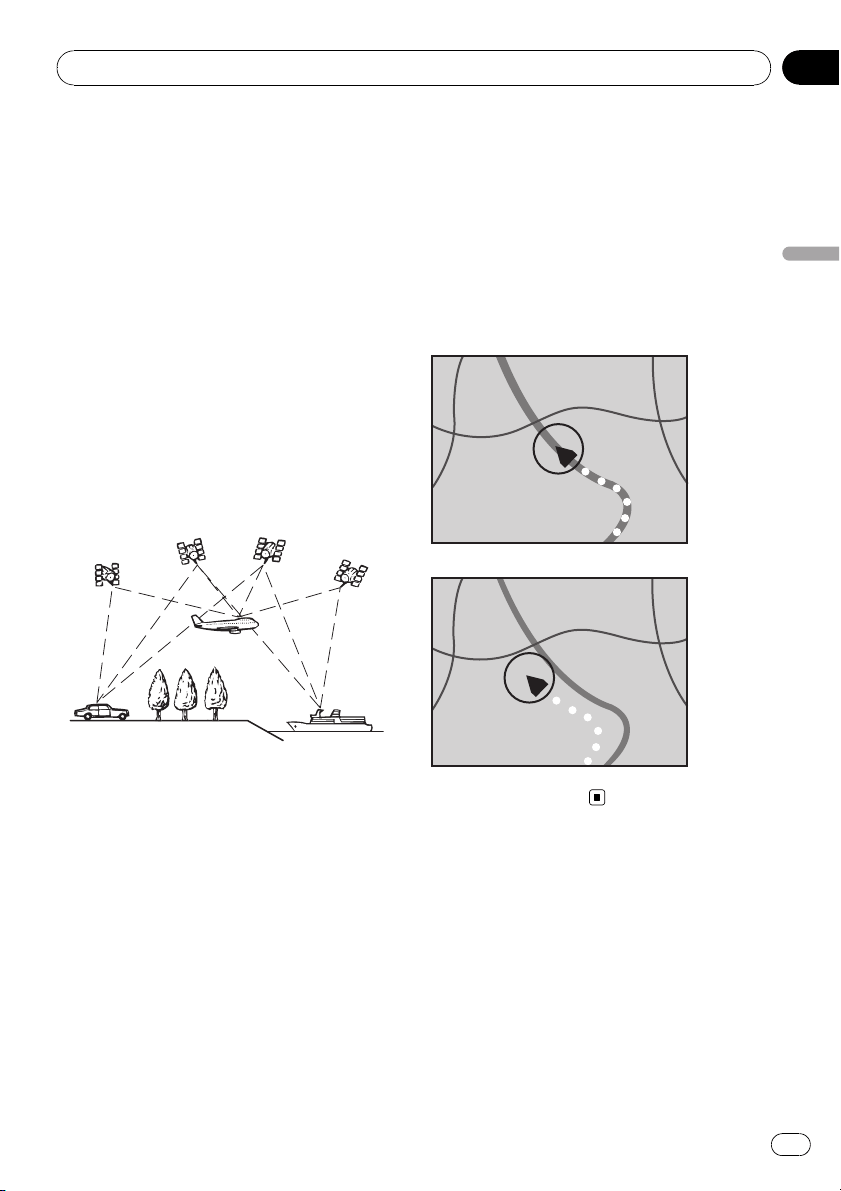
Positioning technology
Positioning by GPS
The Global Positioning System (GPS) uses a
network of satellites orbiting the Earth. Each
of the satellites, which orbit at a height of
21 000 km, continually broadcasts radio sig-
nals giving time and position information. This
ensures that signals from at least three can be
picked up from any open area on the earth’s
surface.
The accuracy of the GPS information depends
on how good the reception is. When the sig-
nals are strong and reception is good, GPS
can determine latitude, longitude and altitude
for accurate positioning in three dimensions.
But if signal quality is poor, only two dimen-
sions, latitude and longitude, can be obtained
and positioning errors are somewhat greater.
Map matching
As mentioned, the positioning systems used
by this navigation system are susceptible to
certain errors. Their calculations may, on occa-
sion, place you in a location on the map where
no road exists. In this situation, the processing
system understands that vehicles travel only
on roads, and can correct your position by ad-
justing it to a nearby road. This is called map
matching.
With map matching
Without map matching
Handling large errors
Positioning errors are kept to a minimum by
combining GPS and map matching. However,
in some situations, these functions may not
work properly, and the error may become big-
ger.
Appendix
En
111
Appendix
Appendix
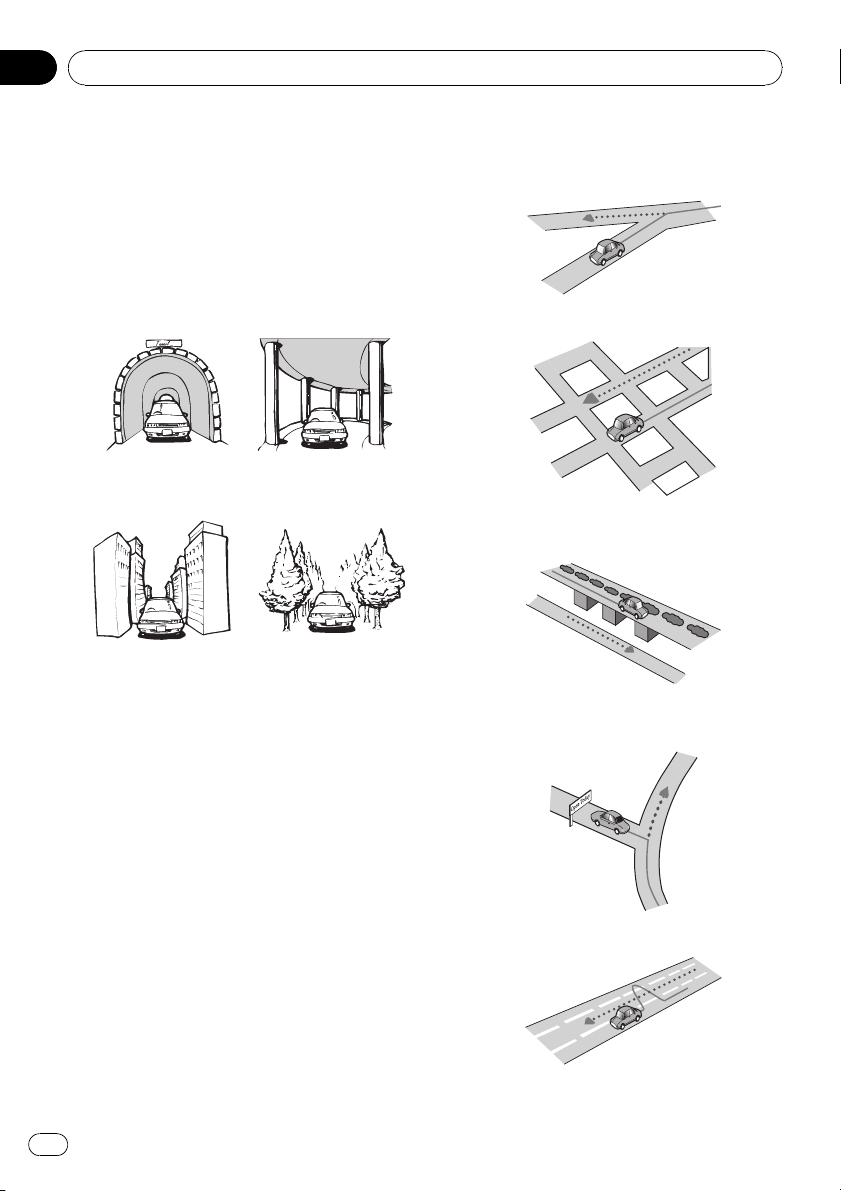
When positioning by GPS is
impossible
! If signals cannot be received from more
than two GPS satellites, GPS positioning
does not take place.
! In some driving conditions, signals from
GPS satellites may not reach your vehicle.
In this case, it is impossible for the system
to use GPS positioning.
In tunnels or en-
closed parking
garages
Under elevated
roads or similar
structures
When driving
among high build-
ings
When driving through
a dense forest or tall
trees
! If a car phone or cellular phone is used
near this product, GPS reception may be
lost temporarily.
! Do not cover this product with spray paint
or vehicle wax, because this may block the
reception of GPS signals.
p If a GPS signal have not been received for a
long time, your vehicle’s actual position
and the current position mark on the map
may diverge considerably or may not be up-
dated. In such case, once GPS reception is
restored, accuracy will be recovered.
Conditions likely to cause
noticeable positioning errors
For various reasons, such as the state of the
road you are traveling on and the reception
status of the GPS signal, the actual position of
your vehicle may differ from the position dis-
played on the map screen.
! If you make a shallow turn.
! If there is a parallel road.
! If there is another road very nearby, such
as in the case of an elevated freeway.
! If you take a recently opened road that is
not on the map.
! If you drive in zigzags.
Appendix
En
112
Appendix
! If the road has connected hairpin bends.
! If there is a loop or similar road configura-
tion.
! If you take a ferry.
! If you are driving on a long, straight road or
a gently curving road.
! If you are on a steep mountain road with
many height changes.
! If you enter or exit a multi-storey parking lot
or similar structure using a spiral ramp.
! If your vehicle is turned on a turntable or si-
milar structure.
! If your vehicle’s wheels spin, such as on a
gravel road or in snow.
! If you put on chains, or change your tires
for ones with a different size.
! If trees or other obstacles block the GPS
signals for a considerable period.
Appendix
En
113
Appendix
Appendix
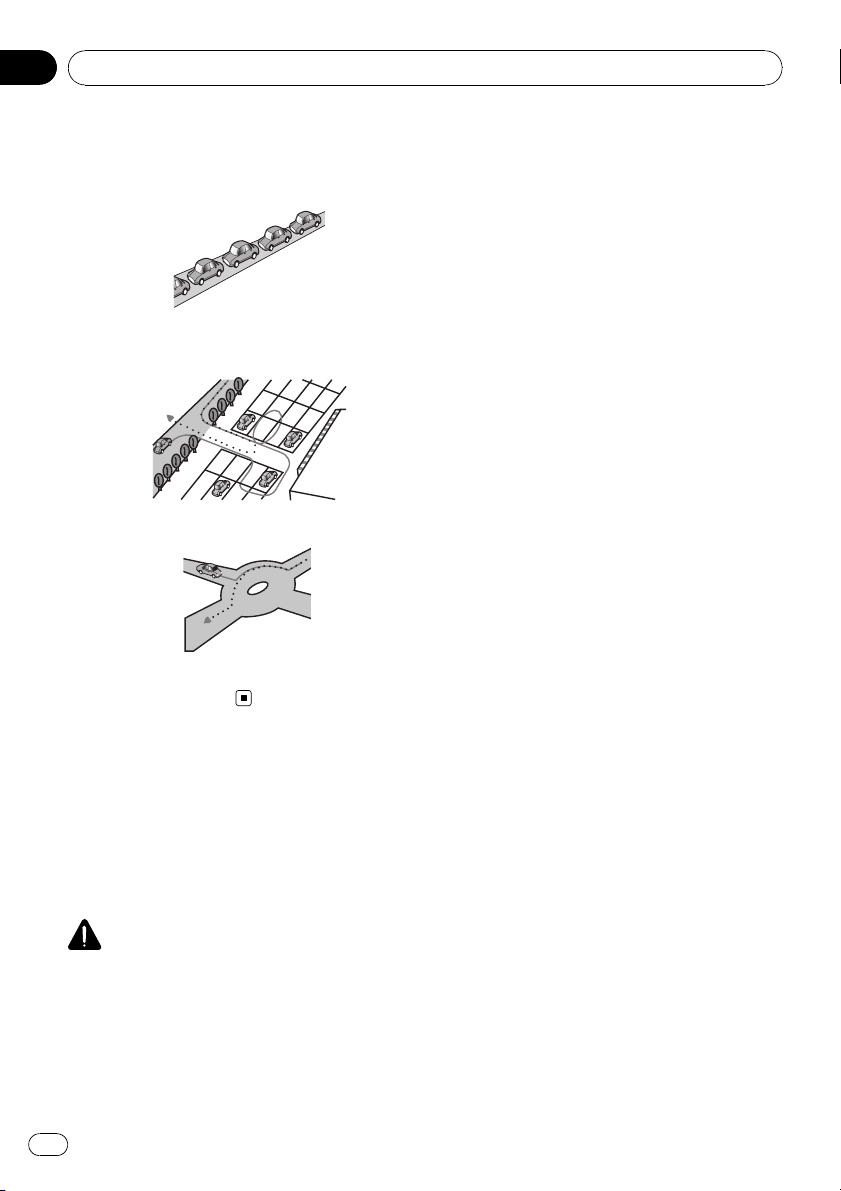
! If you drive very slowly, or in a start-and-
stop manner, as in a traffic congestion.
! If you join the road after driving around a
large parking lot.
! When you pass around a traffic circle.
! When starting driving immediately after
starting the engine.
Route setting information
Route search specifications
Your navigation system sets a route to your
destination by applying certain built-in rules to
the map data. This section provides some use-
ful information about how a route is set.
CAUTION
When a route is calculated, the route and voice
guidance for the route are automatically set.
Also, for day or time traffic regulations, only infor-
mation about traffic regulations at the time when
the route was calculated is shown. One-way
streets and street closures may not be taken into
consideration. For example, if a street is open dur-
ing the morning only, but you arrive later, it would
be against the traffic regulations so you cannot
drive along the set route. When driving, please
follow the actual traffic signs. Also, the system
may not know some traffic regulations.
! The calculated route is one example of the
route to your destination decided by the na-
vigation system while taking the type of
streets or traffic regulations into account. It
is not necessarily an optimum route. (In
some cases, you may not be able to set the
streets you want to pass. If you need to
pass a certain street, set the waypoint on
that street.)
! If the destination is too far, there may be in-
stances where the route cannot be set. (If
you want to set a long-distance route going
across several areas, set waypoints along
the way.)
! During voice guidance, turns and intersec-
tions from the freeway are announced.
However, if you pass intersections, turns,
and other guide points in rapid succession,
some may delay or not be announced.
! It is possible that guidance may direct you
off a freeway and then back on again.
! In some cases, the route may require you
to travel in the opposite direction to your
current heading. In such cases, you are in-
structed to turn around, so please turn
around safely by following the actual traffic
rules.
! In some cases, a route may begin on the
opposite side of a railway or river from your
actual current location. If this happens,
drive towards your destination for a while,
and try route calculation again.
! When there is a traffic congestion ahead, if
driving through the traffic congestion is
better than taking the detour, a detour
route may not be suggested.
! There may be instances when the starting
point, the waypoint and the destination
point are not on the highlighted route.
Appendix
En
114
Appendix
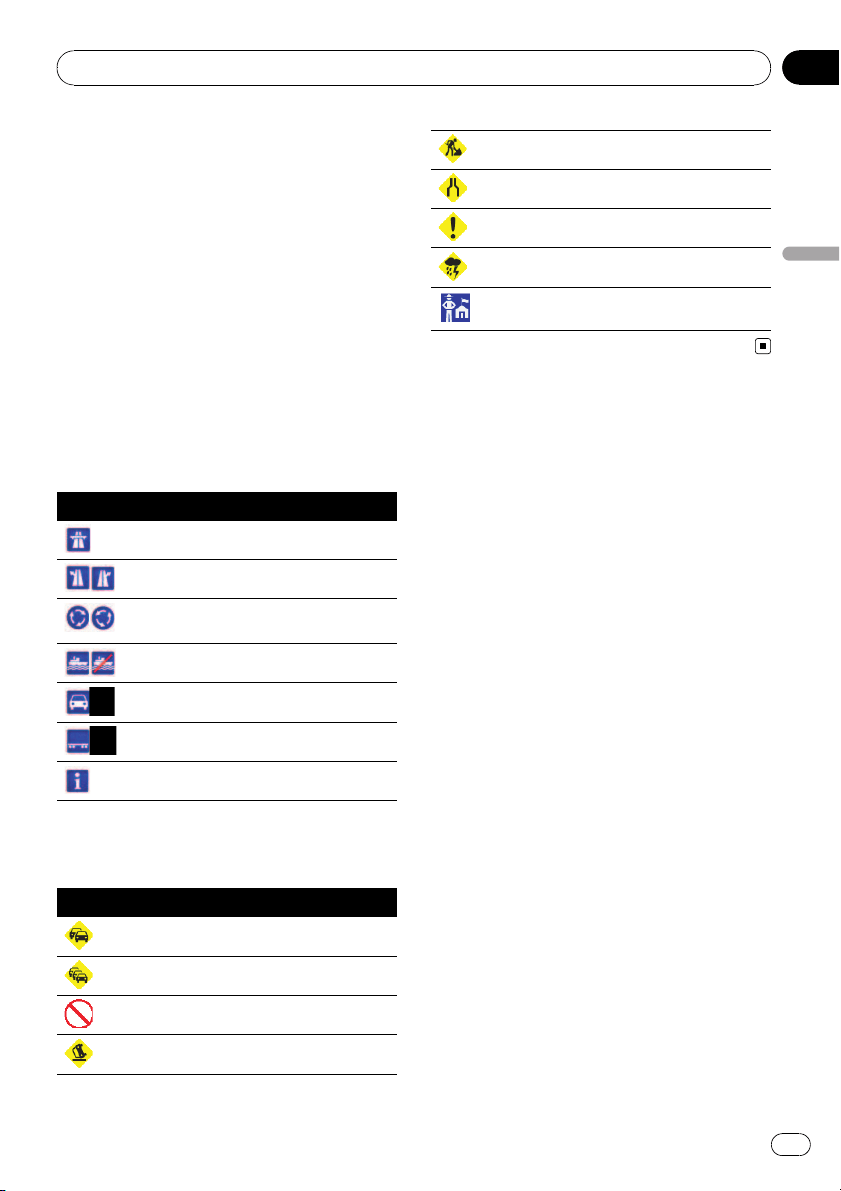
! The number of traffic circle exits displayed
on the screen may differ from the actual
number of roads.
Route highlighting
! Once set, the route is highlighted in bright
color on the map.
! The immediate vicinity of your starting
point and destination may not be high-
lighted, and neither will areas with particu-
larly complex road layouts. Consequently,
the route may appear to be cut off on the
display, but voice guidance will continue.
Supplemental information about
directions
Symbol Meanings
Highway
Motorway exit left/right
Roudabout (clockwise and anti-clock-
wise)
Ferry (start and end)
Car only road (start and end)
Car train (start and end)
Other information
Supplemental information about
traffic icon
Icon Meanings
Stop-and-go traffic
Stopped traffic
Closed/blocked roads
Accidents, constructions, etc.
Road works
Road narrows, lane closures
Warnings, other dangers
Bad weather condition
Police ahead
Detailed information for
playable media
Compatibility
Common notes about the external
storage device (USB, SD)
! Depending on the kind of the external sto-
rage device (USB, SD) you use, this naviga-
tion system may not recognize the storage
device or files may not be played back prop-
erly.
! Do not leave the external storage device
(USB, SD) in any location with high tem-
peratures.
! The text information of some audio and
video files may not be correctly displayed.
! File extensions must be used properly.
! There may be a slight delay when starting
playback of files on an external storage de-
vice (USB, SD) with numerous folder hier-
archies.
! Operations may vary depending on the
kind of an external storage device (USB,
SD).
! It may not be possible to play some music
files from SD or USB because of file char-
acteristics, file format, recor ded applica-
tion, playback environment, storage
conditions, and so on.
! Video playback from SD or USB will be
paused when the navigation is displayed.
Appendix
En
115
Appendix
Appendix

USB storage device compatibility
= For more details about USB storage device
compatibility with this navigation system,
refer to Specifications on page 128.
Protocol: bulk
Subclass: SCSI (06h)
! You cannot connect a USB storage device
to this navigation system via a USB hub.
! Partitioned USB memory is not compatible
with this navigation system.
! Firmly secure the USB storage device when
driving. Do not let the USB storage device
fall onto the floor, where it may become
jammed under the brake or gas pedal.
! There may be a slight delay when starting
playback of audio files encoded with image
data.
! Depending on the USB storage devices
connected to this navigation system, noise
may be generate on the radio.
! Do not connect anything other than the
USB portable audio player/USB memory
device.
The sequence of audio files on USB mem-
ory
For USB portable audio players, the sequence
is different from that of USB memory device
and depends on the player.
SD memory card and SDHC memory card
! For more details about SD memory card
compatibility with this navigation system,
refer to Specifications on page 128.
Handling guidelines and
supplemental information
! There is no compatibility for Multi Media
Card (MMC).
! Copyright protected files cannot be played
back.
Appendix
En
116
Appendix
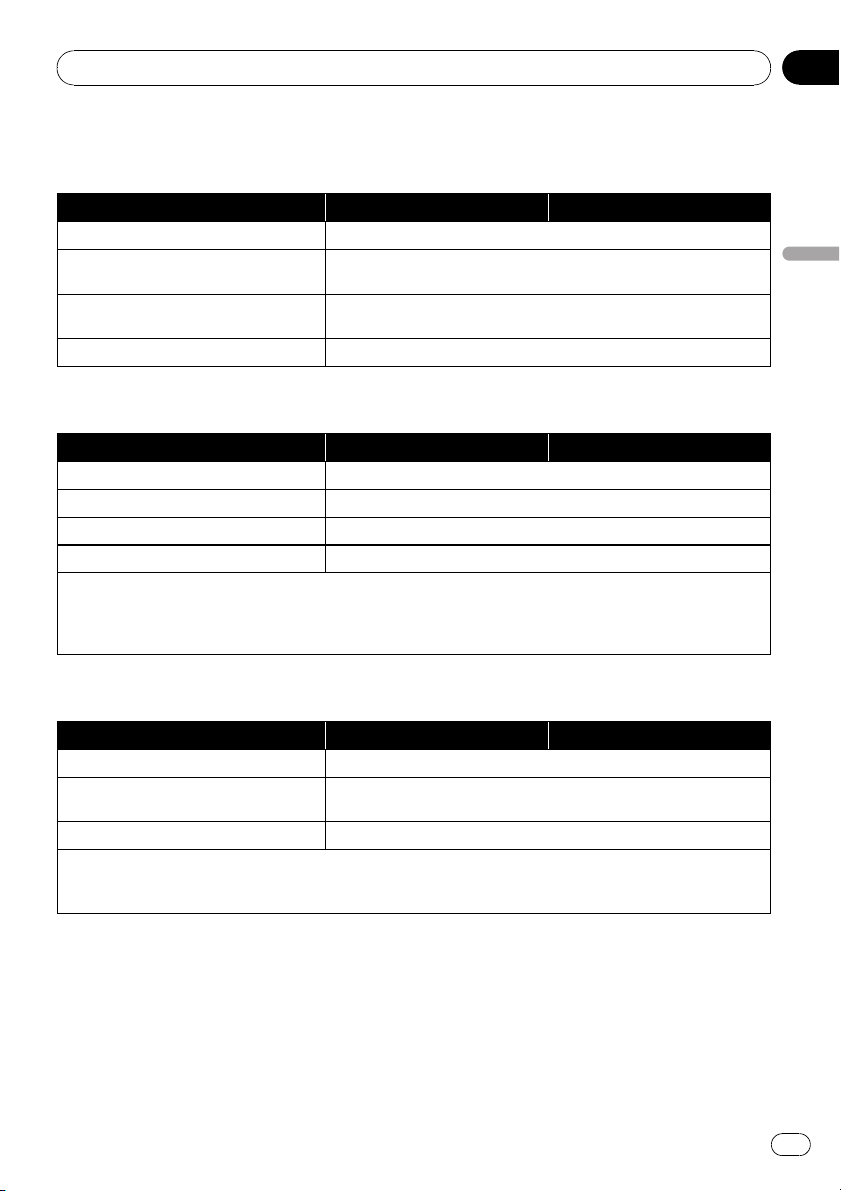
Media compatibility chart
General
Media USB storage device SD memory card
File system FAT16/FAT32
Maximum number of folders
FAT32: No limit.
FAT16: 512 (including files)
Maximum number of files
FAT32: No limit.
FAT16: 512 (including folders)
Playable file types MP3, WMA, AAC, WAV, AVI, MPEG-4
MP3 compatibility
Media USB storage device SD memory card
File extension .mp3
Bit rate 8 kbps to 320 kbps (CBR), VBR
Sampling frequency 16 kHz to 48 kHz
ID3 tag ID3 Tag Ver. 1.0, 1.1, 2.3
Notes:
! Ver. 2.x of ID3 Tag is given priority when both Ver. 1.x and Ver. 2.x exist.
! There is no compatibility with the followings:
MP3i (MP3 interactive), mp3 PRO, m3u playlist
WMA compatibility
Media USB storage device SD memory card
File extension .wma
Bit rate
Ver. 9: 5 kbps to 320 kbps (CBR), VBR
Ver. 7 or 8: 128 kbps to 192 kbps (CBR), VBR
Sampling frequency 8 kHz to 48 kHz
Note:
! There is no compatibility with the followings:
Windows Media Audio 9 Professional, Lossless, Voice
Appendix
En
117
Appendix
Appendix
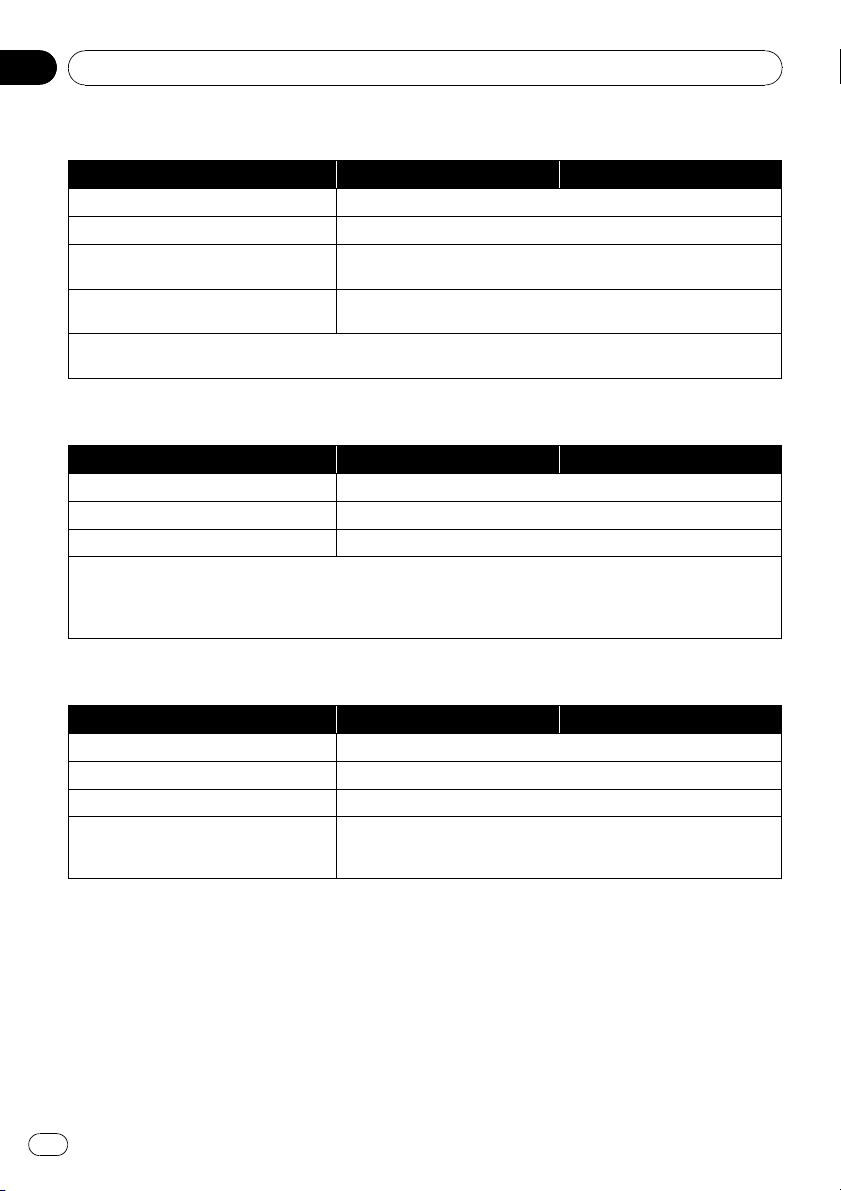
WAV compatibility
Media USB storage device SD memory card
File extension .wav
Format Linear PCM (LPCM), IMA-ADPCM
Sampling frequency
LPCM: 16 kHz to 48 kHz
IMA-ADPCM: 22.05 kHz and 44.1 kHz
Quantization bits
LPCM: 8 bits and 16 bits
IMA-ADPCM: 3 bits and 4 bits
Note:
The sampling frequency shown in the display may be rounded.
AAC compatibility
Media USB storage device SD memory card
File extension .m4a
Bit rate 8 kbps to 320 kbps (CBR)
Sampling frequency 8 kHz to 44.1 kHz
Notes:
! The navigation system plays back AAC files encoded by iTunes
®
.
! There is no compatibility with the followings:
Apple Lossless, files encoded with VBR
AVI compatibility
Media USB storage device SD memory card
File extension .avi
Compatible video codec MPEG-4
Compatible audio codec ADPCM
Recommended video specifications
Image size: VGA (640 x 480)
Bit rate: 480 kbps
Frame rate: 24 fps
Appendix
En
118
Appendix
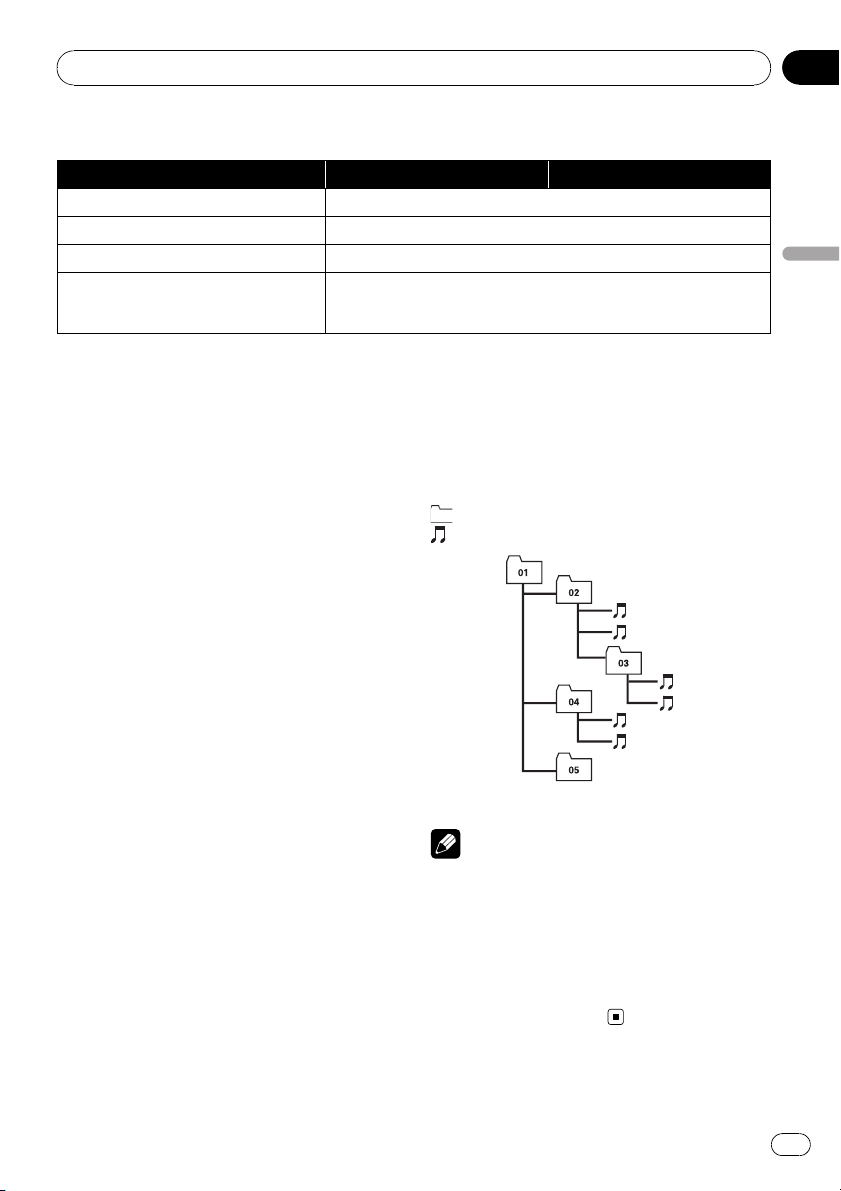
MPEG-4 compatibility
Media USB storage device SD memory card
File extension .mp4
Compatible video codec MPEG-4
Compatible audio codec AAC
Recommended video specifications
Image size: VGA (640 x 480)
Bit rate: 480 kbps
Frame rate: 24 fps
Common notes
! The navigation system may not operate cor-
rectly depending on the application used to
encode WMA files.
! Depending on the version of Windows
Media Player used to encode WMA files,
album names and other text information
may not be correctly displayed.
! There may be a slight delay when starting
playback of audio files encoded with image
data.
! There is no compatibility with packet write
data transfer.
! This navigation system can recognize 32
characters beginning with the first charac-
ter, including extension for the file and
folder name. Depending on the display
area, the navigation system try to display
them with changing the font size to smal-
ler. However, the maximum number of the
characters that you can display varies ac-
cording to the width of each character or
display area.
! Folder selection sequence or other opera-
tion may be altered depending on the en-
coding or writing software.
! Regardless of the length of blank section
between the songs of original recording,
compressed audio discs play with a short
pause between songs.
Example of a hierarchy
The following figure is an example of the tier
structure in the external storage device. The
numbers in the figure indicate the order in
which folder numbers are assigned and the
order to be played back.
: Folder
:File
1
2
3
4
5
6
L
e
v
e
l 1 L
e
v
e
l 2 L
e
v
e
l 3 L
e
v
e
l 4
Notes
! This product assigns folder numbers. The user
can not assign folder numbers.
! If there is a folder that does not contain any
playable file, the folder itself will display in the
folder list but you cannot check any files in
the folder. (The blank list will appear.) Also,
these folders will be skipped without display-
ing the folder number.
Appendix
En
119
Appendix
Appendix
About Bluetooth
Bluetooth is a short-range wireless radio con-
nectivity technology that is developed as a
cable replacement for mobile phones, hand-
held PCs and other devices. Bluetooth oper-
ates in 2.4 GHz frequency range and transmits
voice and data at speeds up to 1 megabit per
second. Bluetooth was launched by a special
interest group (SIG) that comprises of Ericsson
Inc., Intel Corp., Nokia Corp., Toshiba and IBM
in 1998, and it is currently developed by nearly
2 000 companies worldwide.
! The Bluetooth word mark and logos are
owned by the Bluetooth SIG, Inc. and any
use of such marks by Pioneer Corporation
is under license. Other trademarks and
trade names are those of their respective
owners.
About SD and SDHC logo
SD Logo is a trademark.
SDHC Logo is a trademark.
About WMA
The Windows Media™ logo printed on the box
indicates that this unit can play back WMA
data. WMA is short for Windows Media Audio
and refers to an audio compression technol-
ogy that is developed by Microsoft
Corporation. WMA data can be encoded by
using Windows Media Player version 7 or
later. Windows Media and the Windows logo
are trademarks or registered trademarks of
Microsoft Corporation in the United States
and/or other countries.
About AAC
AAC is short for Advanced Audio Coding and
refers to an audio compression technology
standard used with MPEG-2 and MPEG-4. Sev-
eral applications can be used to encode AAC
files, but file formats and extensions differ de-
pending on the application which is used to
encode. This unit plays back AAC files en-
coded by iTunes
®
version 4.6.
p iTunes is a trademark of Apple Inc., regis-
tered in the U.S. and other countries.
Detailed information
regarding connectable iPods
CAUTION
! Pioneer accepts no responsibility for data lost
on the iPod even if that data is lost while
using the navigation system.
! Do not leave the iPod in direct sunlight for ex-
tended amounts of time. Extended exposure
to direct sunlight can result in iPod malfunc-
tion due to the resulting high temperature.
! Do not leave the iPod in any location with
high temperatures.
Appendix
En
120
Appendix

! Firmly secure the iPod when driving. Do not
let the iPod fall onto the floor, where it may be-
come jammed under the brake or gas pedal.
For details, refer to the iPod’s manuals.
Using the LCD screen correctly
Handling the LCD screen
! When the LCD screen is subjected to direct
sunlight for a long period of time, it will be-
come very hot, resulting in possible da-
mage to the LCD screen. When not using
this navigation system, avoid exposing it to
direct sunlight as much as possible.
! The LCD screen should be used within the
temperature ranges shown in “Specifica-
tions”.
! Do not use the LCD screen at temperatures
higher or lower than the operating tem-
perature range because the LCD screen
may not operate normally and the LCD
screen can be damaged.
! The LCD screen is exposed in order to in-
crease its visibility within the vehicle.
Please do not press strongly on it as this
may damage it.
! Do not push the LCD screen with excessive
force as this may scratch it.
! To protect the LCD screen from damage, be
sure to touch the touch panel keys only
with your fingers. (Keep the use of other in-
struments at a minimum, and only in cases
in which the touch panel calibration is ne-
cessary.)
Liquid crystal display (LCD) screen
! If the LCD screen is near the vent of an air
conditioner, make sure that air from the air
conditioner is not blowing on it. Heat from
the heater may break the LCD screen, and
cool air from the cooler may cause moist-
ure to form inside the navigation unit, re-
sulting in possible damage.
! Small black dots or white dots (bright dots)
may appear on the LCD screen. These are
due to the characteristics of the LCD
screen and do not indicate a problem with
the LCD screen.
! The LCD screen will be difficult to see if it is
exposed to direct sunlight.
! When using a cellular phone, keep the an-
tenna of the cellular phone away from the
LCD screen to prevent disruption of the
video in the form of disturbances such as
spots or colored stripes.
Maintaining the LCD screen
! When removing dust from the LCD screen
or cleaning it, first turn the system power
off, then wipe with a soft dry cloth.
! When wiping the LCD screen, take care not
to scratch the surface. Do not use harsh or
abrasive chemical cleaners.
LED (light-emitting diode)
backlight
A light emitting diode is used inside the dis-
play to illuminate the LCD screen.
! At low temperatures, using the LED back-
light may increase image lag and degrade
the image quality because of the character-
istics of the LCD screen. Image quality will
improve with an increase in temperature.
! The product lifetime of the LED backlight is
more than 10 000 hours. However, it may
decrease if used in high temperatures.
! If the LED backlight reaches the end of its
product lifetime, the screen will become
dark and the image will no longer be pro-
jected. In this case, please consult your
dealer or the nearest authorized PIONEER
Ser vice Station.
Appendix
En
121
Appendix
Appendix
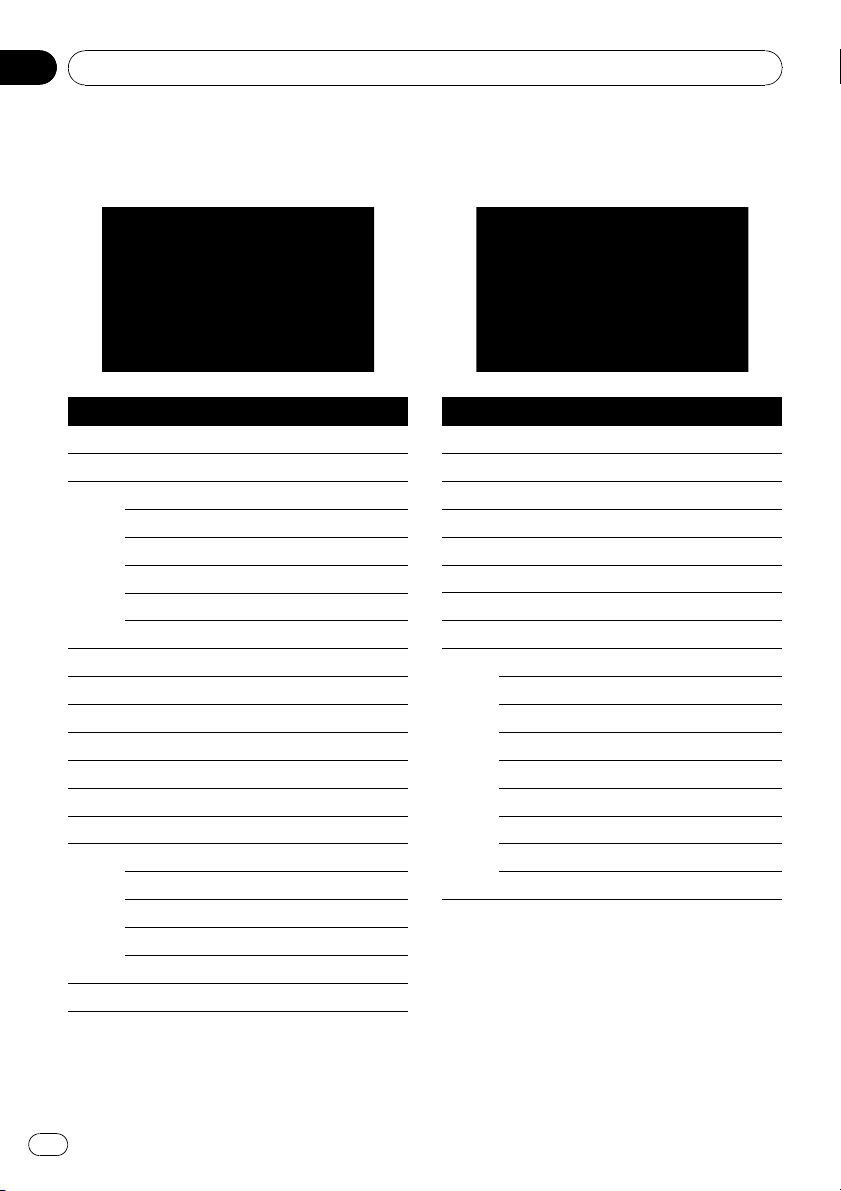
Display information
Destination Menu
Page
[Address]24
[POI]
[Around Current GPS Location]27
[Around Destination]27
[Around Cursor]26
[Along Route]27
[Saved Criteria]29
[Register Search Criteria]28
[Favorites]32
[History]32
[USB/SD]30
[Return Home]33
[Delete Route]45
[Saved Routes]33
[Route Function]
[Route info]41
[Itinerary]42
[Edit Route]44
[Save Route]44
[Coordinate]31
[MSN Direct]46
Phone Menu
Page
[Dial Pad]57
[Call Home]58
[Phone Volume]61
[Phone Book Transfer]59
[Received Calls]57
[Dialed Numbers]57
[Missed Calls]57
[Phone Settings]
[Connection]55
[Bluetooth On/Off]61
[Auto Answer Preference]61
[Refuse All Calls ]62
[Echo Cancel]62
[Auto Connect]62
[Edit Name]62
[Clear Memory]60
[Bluetooth Software Update]64
Appendix
En
122
Appendix

Settings Menu
Navi Settings
Page
[GPS & Time Settings]79
[Time Settings]80
[Visual]
[3D Settings]81
[Map Settings]81
[Displayed Info]82
[Smart Zoom]82
[Overview Mode]83
[Manage POI]87
[Manage Track Logs]89
[Route]83
[Method:]84
[Vehicle:]84
[U-turn penalty:]84
[Keep Position On Road]84
[Warn in pedestrian mode]84
[Unpaved Roads]84
[Highways]84
[Ferries]84
[U-turns]84
[Permit Needed]84
[Toll Roads ]84
[Warnings]85
[Warn When Speeding]85
[Regional Settings]85
[Restore Factory Settings]85
[Set Home]90
[Demo Mode]86
[Sound settings]86
[About]86
Appendix
En
123
Appendix
Appendix

System Settings menu
Page
[Language]91
[Splash Screen]92
[Back Camera]92
[Screen Calibration]93
[Picture Adjustment]94
[Power Management]94
[Battery Status]94
[Service Information]95
[Screen Off]95
AV Settings menu
Page
[AV Input]95
[MUTE Input/GUIDE]96
[Wide Mode]96
[Audio Out Selection]96
[VR Catalog Mode]97
Appendix
En
124
Appendix
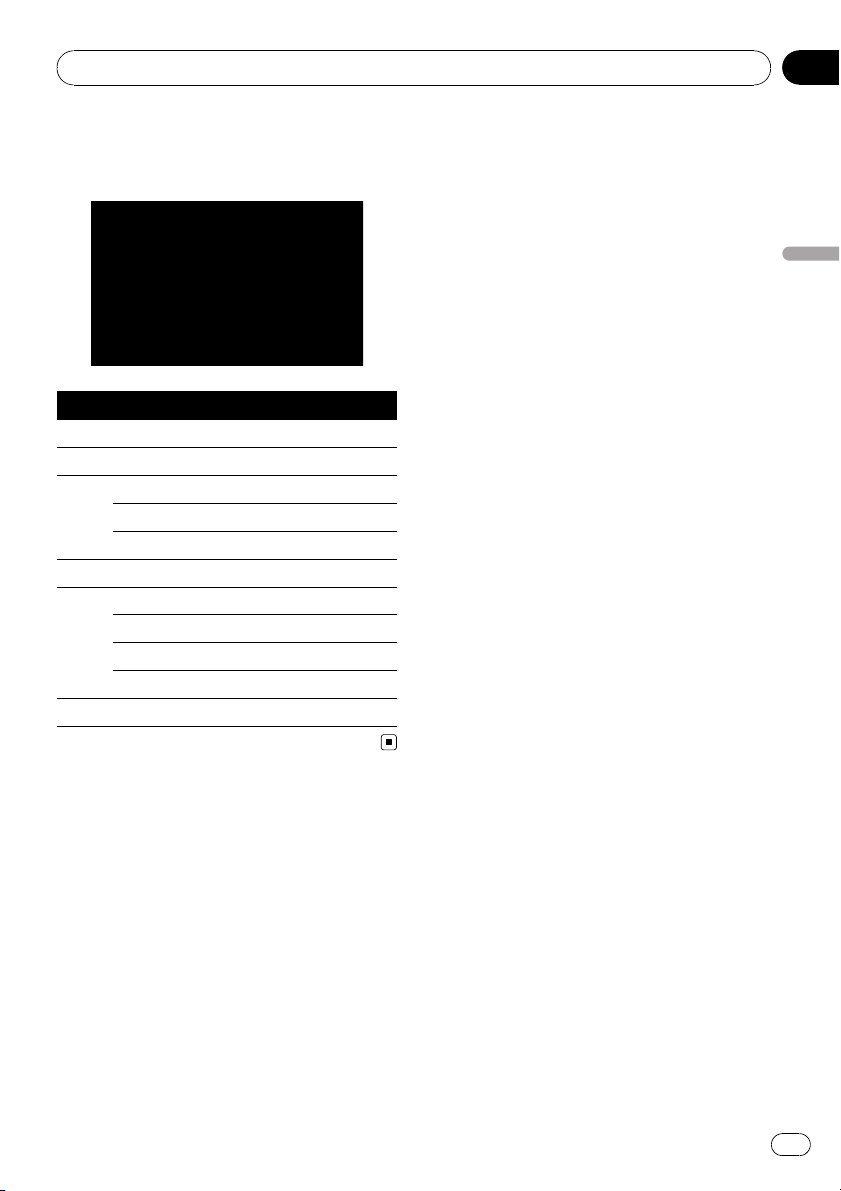

Glossary
AAC
AAC is short for Advanced Audio Coding and
refers to an audio compression technology
standard used with MPEG-2 and MPEG-4.
Aspect ratio
This is the width-to-height ratio of a TV screen.
A regular display has an aspect ratio of 4:3.
Wide screen displays have an aspect ratio of
16:9, providing a bigger picture for exceptional
presence and atmosphere.
Bit rate
This expresses data volume per second, or bps
units (bits per second). The higher the rate,
the more information is available to reproduce
the sound. Using the same encoding method
(such as MP3), the higher the rate, the better
the sound.
Current location
The present location of your vehicle; your cur-
rent location is shown on the map by a red tri-
angle mark.
Destination
A location you choose as the end point of your
journey.
Favorites
A frequently visited location (such as your
workplace or a relative’s home) that you can
register to allow easy routing.
GPS
Global Positioning System. A network of satel-
lites that provides navigation signals for a vari-
ety of purposes.
Guidance mode
The mode in which guidance is given as you
drive to your destination; the system automati-
cally switches to this mode as soon as a route
has been set.
Guidance point
These are important landmarks along your
route, generally intersections. The next gui-
dance point along your route is indicated on
the map by the yellow flag icon.
Home location
Your registered home location.
ID3 tag
This is a method of embedding track-related
information in a MP3 file. This embedded in-
formation can include the track title, the ar-
tist’s name, the album title, the music genre,
the year of production, comments and other
data. The contents can be freely edited using
software with ID3 Tag editing functions.
Although the tags are restricted by the num-
ber of characters, the information can be
viewed when the track is played back.
JPEG
This stands for Joint Photographic Experts
Group, and is an international still image com-
pression standard.
MP3
MP3 is short for MPEG Audio Layer 3. It is an
audio compression standard established by a
working group (MPEG) of the ISO (Interna-
tional Standards Organization). MP3 is able to
compress audio data to about 1/10th the size
of a conventional disc.
MPEG
This stands for Moving Pictures Experts
Group, and is an international video image
compression standard.
Phone book
An address book on user’s phone is collec-
tively referred to as “ Phone book”. Depending
on the cellular phone, “Phone book” may be
called a name such as “Contacts”, “Business
card” or something else.
Appendix
En
126
Appendix

Point of Interest (POI)
Point Of Interest; any of a range of locations
stored in the data, such as railway stations,
shops, restaurants, and amusement parks.
Route setting
The process of determining the ideal route to a
specific location; route setting is done auto-
matically by the system when you specify a
destination.
Set route
The route marked out by the system to your
destination. It is highlighted in bright color on
the map.
Track log
Your navigation system logs your course that
you already pass through if the track logger is
activated. This recorded course is called “track
log”. It is handy when you want to check a
route traveled or if returning along a complex
route.
VBR
VBR is short for variable bit rate. Generally
speaking CBR (constant bit rate) is more
widely used. But by flexibly adjusting the bit
rate according to the needs of audio compres-
sion, it is possible to achieve compression-
priority sound quality.
Voice guidance
The giving of directions by navigation voice
while in guidance.
Waypoint
A location that you choose to visit before your
destination; a journey can be built up from
multiple way points and the destination.
WMA
WMA is short for Windows Media™ Audio
and refers to an audio compression technol-
ogy that is developed by Microsoft
Corporation.
Appendix
En
127
Appendix
Appendix
Specifications
General
Rated power source ............... 5 V DC
Grounding system ................... Negative type
Max. current consumption
..................................................... 3.0 A
Dimensions (W × H × D) ... 184.8 mm × 98.1 mm ×
29.7 mm
(7-1/4 in. × 3-7/8 in. ×
1-1/8 in.)
Weight .......................................... 450 g (1 lbs)
NAND flash memory ............. 2 GB
Durable temperature range:
Power on ............................ 14 °F to 113 °F with DC IN
(32 °F to 113 °F in battery
mode)
Power off ............................ –4 °F to +176 °F
Navigation
GPS Receiver:
System ................................ L1, C/Acode GPS
SPS (Standard Positioning
Service)
Reception system .......... 30-channel multi-channel
reception system
Reception frequency .... 1 575.42 MHz
Sensitivity .......................... –140 dBm (typ)
Position update frequency
........................................... Approx. once per second
Display
Screen size/aspect ratio ....... 5.8 inch wide/16:9
(effective display area:
128 mm × 72 mm)
Pixels ............................................. 384 000 (800 × 480)
Display method ........................ TFT Active matrix driving
Color system .............................. NTSC compatible
Audio
Preout output level (max) .... 0.5 V
Preout impedance .................. 1 kohm
Headphone
Output level (max) ................... 0.2 V
Load impedance ...................... 16 W
Vehicle power charger
Rated power source ............... 14.4 V DC
(allowable voltage range:
10.8 V to 15.1 V DC)
Grounding system ................... Negative type
Max. current consumption
..................................................... 3.0 A
USB
USB standard spec. ............... USB 2.0 High Speed
Max current supply ................. 500 mA
Max capacity memory ........... 2 GB
File system .................................. FAT16, FAT32
USB class .................................... Mass storage class
Decoding format ...................... MP3/WMA/AAC/WAVE/
MPEG4
SD
Compatible physical format
..................................................... Version 2.00
Max capacity memory ........... 8 GB
File system .................................. FAT16, FAT32
Decoding format ...................... MP3/WMA/AAC/WAVE/
MPEG4
Bluetooth
Version .......................................... Bluetooth 1.2 certified
Output power ............................ +4 dBm Max.
(Power class 2)
Note
Specifications and design are subject to possible
modifications without notice due to im-
provements.
Appendix
En
128
Appendix

PIONEER CORPORATION
4-1, MEGURO 1-CHOME, MEGURO-KU
TOKYO 153-8654, JAPAN
PIONEER ELECTRONICS (USA) INC.
P.O. Box 1540, Long Beach, California 90801-1540, U.S.A.
TEL: (800) 421-1404
PIONEER EUROPE NV
Haven 1087, Keetberglaan 1, B-9120 Melsele, Belgium
TEL: (0) 3/570.05.11
PIONEER ELECTRONICS ASIACENTRE PTE. LTD.
253 Alexandra Road, #04-01, Singapore 159936
TEL: 65-6472-7555
PIONEER ELECTRONICS AUSTRALIA PTY. LTD.
178-184 Boundary Road, Braeside, Victoria 3195, Australia
TEL: (03) 9586-6300
PIONEER ELECTRONICS OF CANADA, INC.
300 Allstate Parkway, Markham, Ontario L3R 0P2, Canada
TEL: 1-877-283-5901
TEL: 905-479-4411
PIONEER ELECTRONICS DE MEXICO, S.A. de C.V.
Blvd.Manuel Avila Camacho 138 10 piso
Col.Lomas de Chapultepec, Mexico, D.F. 11000
TEL:55-9178-4270
先鋒股份有限公司
總公司 : 台北市中山北路二段44號13樓
電話 : (02) 2521-3588
先鋒電子(香港)有限公司
香港九龍尖沙咀海港城世界商業中心9樓901-6室
電話 : (0852) 2848-6488
Published by Pioneer Corporation.
Copyright © 2008 by Pioneer Corporation.
All rights reserved.
<F500OPER-UC-EN> UC
<KKYZX> <08F00000>