User Manual Smart TV
Getting started
Features
You can use your remote control to select channels which are broadcast in digital format and conventional analog format. Also, cable and satellite subscribers can access their TV channels.
You can display on the TV screen the title, contents (DTV only) and other information on the current program.
This unit automatically scans and memorizes channels available in your area, eliminating difficult setup procedures.
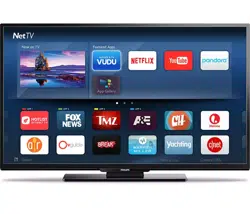
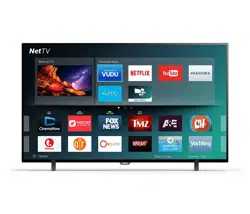
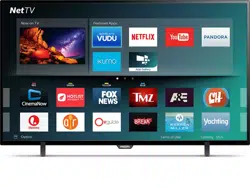
This unit lets you enjoy internet services. Use the remote control to browse the Net TV pages. You can play movies and much more, all from your TV screen.
This feature allows you to block children’s access to inappropriate programs.
Built-in closed caption decoder displays text for closed caption supported programs.
Audio can be selected from the remote control.
If there is no input signal and no operation for 15 minutes, the unit will go into standby mode automatically.
You can set the unit to go into standby mode after a specific amount of time.
- Choices for on-screen language
Select your on-screen language: English, Spanish or French.
- Stereo sound function
- PLL frequency synthesized tuning
Provides free and easy channel selection and lets you tune directly to any channel using the number and decimal point “•” keys on the remote control.
- Various adjustments for picture and sound
Customizes picture quality suitable for your room and sets your sound preference.
- EasyLink via HDMI link EasyLink
allows your other HDMI link devices to be controlled by the HDMI cable connected to your TV.
- HDMI input
- HDMI-DVI input
If your video device has a DVI output jack, use an HDMI-DVI conversion cable to connect the unit.
- Component video input
- AV input
Audio and video input from an external device.
The picture, music and video files stored on a USB memory stick can be played back on this unit.
- Digital audio output
- Headphone audio output
Headphone 3.5mm stereo jack for personal listening
Included accessories
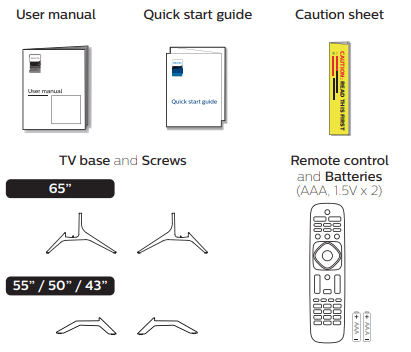
Screws packed with this unit
Symbols used in this User manual
The following is the description for the symbols used in this User manual. Description refers to:

• If neither symbol appears, the operation is applicable to both
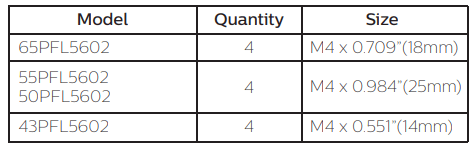
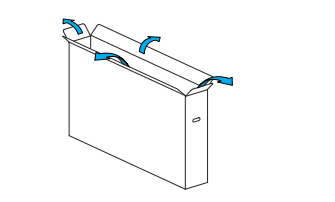
Unpacking
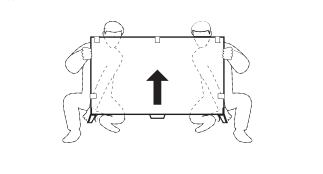
It is recommended that two or more people remove the TV set from the box. Be careful not to injure your fingers and keep children away during assembly.
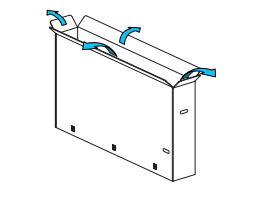
(65PFL5602)
1. Open the top flaps of the box
2. Remove all accessories.

3. Remove the packing joints from the box
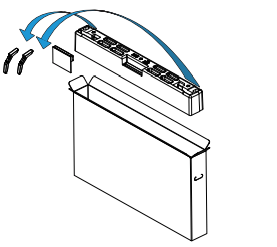
4. Remove the outer slipbox with care
5. Support the top of the TV set with a hand to prevent the TV from falling.
6. Unhinge the retaining tabs and unfold the left and right side of the bottom packaging
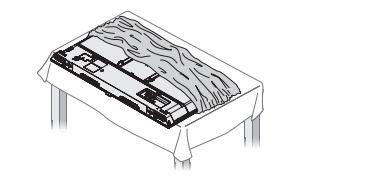
(55PFL5602, 50PFL5602)
1. Open the top flaps of the box
2. Remove all accessories
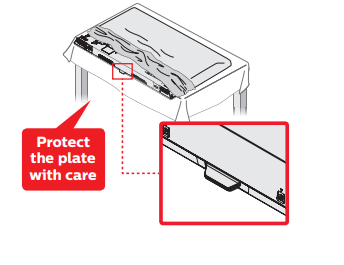
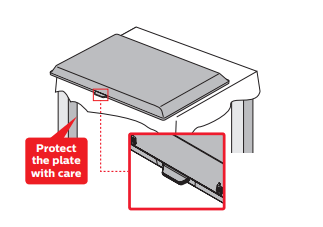
3. Prepare a table and cover the top of it with a table cloth, blanket or such to avoid damage to the TV set. Support both sides of the TV set and, move it onto the table.

4. Carefully lay the TV set, with the screen side down, on the table so as not to deform or damage Decoration plate of the bottom of the unit.
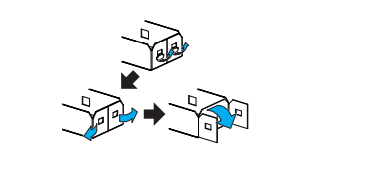
Installing the stands
(65PFL5602)
1. Remove both of the bottom polystyrene foam bases. Carefully tear the plastic bag until the bottom corner of the TV is exposed.
• Support the top of the TV set at all times to prevent the TV from falling
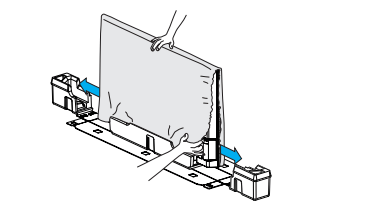
2. Lift up one side of the TV approx. 1 inch (2.5 cm) and insert the matching stand upward until it fits the main unit.

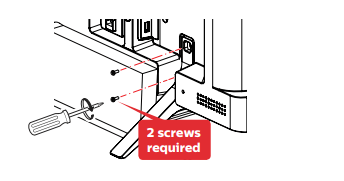
3. Fasten the matching stand to the TV with 2 screws (included).
4. In the same manner as step 2, install the other stand
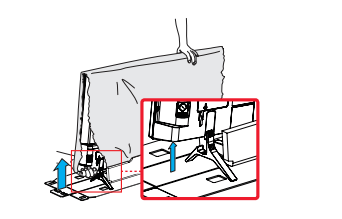
5. Fasten the other stand to the TV with 2 screws (included)
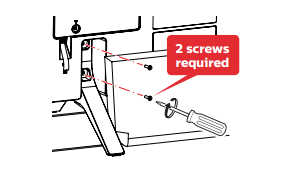
6. Both stands should now be securely fastened.
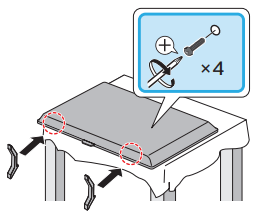
(55PFL5602, 50PFL5602)
1. Remove the tape on the bottom of the TV set and the plastic bag
2. Fasten the matching stand to the TV with 2 screws (included). While fastening the screws, hold the stand to prevent it from falling.

3. Fasten the other stand to the TV with 2 screws (included). While fastening the screws, hold the stand to prevent it from falling.
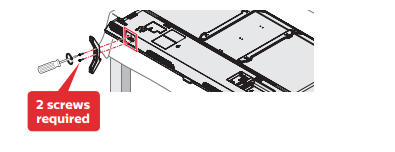
4. Both stands should now be securely fastened.

(43PFL5602)
1
2
3
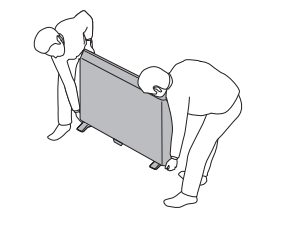
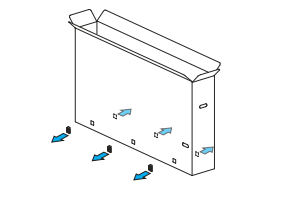
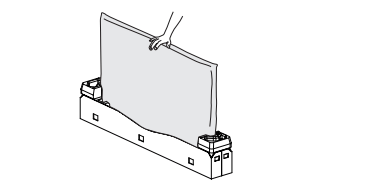
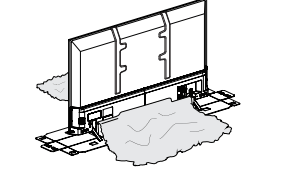
Lifting the TV set
Carefully lift the TV set as shown in the illustration and place it onto a stable, level surface.
Removing cardboard
Remove the cardboard attached to the screen. You are now ready to set up and enjoy your Philips TV.

Installing the remote control batteries
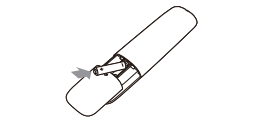
1. Slide the battery cover off the back of the remote control.
2. Insert the two included batteries (AAA, 1.5V). Be sure the + and – ends of the batteries line up with the markings inside the case.
3. Slide the cover back into position
Remote control
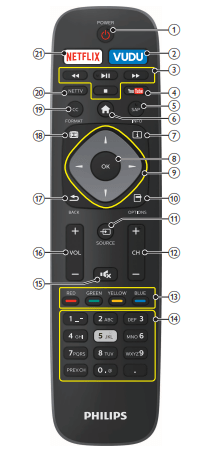
1.  (POWER)
Turns the TV on from standby or off to standby
2. VUDU
Access directly to VUDU
3. EasyLink buttons
 :Searches backward or forward through the disc
 :Starts, pauses or resumes playback
 :Stops the disc playback
4. YouTube
Access directly to YouTube.
5. SAP
Selects audio mode (MONO / STEREO / SAP) / audio language.
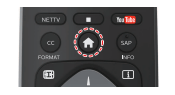
6. (Home)
Displays the main menu
7. INFO
INFO
Displays information about the current program.
8. OK
Press to decide the command of setting when the Home menu is displayed.
9.  (NAVIGATION buttons)
Moves the cursor, selects the on-screen menu items.
10.  OPTIONS
Displays a list of menu items applicable to the highlighted object or screen
11.  SOURCE
Selects connected devices.
12. CH 
13. COLOR buttons
Works as direct access to user specified net apps.
14. 0 - 9 (NUMBER buttons)
Used to enter a channel / program number.
• (DOT) : Use with 0-9 to select digital channels. For example, to enter 2.1, press 
PREV.CH : Returns to the previously viewed channel.
15. (MUTE)
Turns the sound on and off.
16. VOL + / –
Adjusts the volume.
17.  BACK
BACK
Returns to the previous menu operation. ,
18.  FORMAT
Adjusts the picture size on the TV screen.
19. CC
Selects closed caption settings (Off, On, CC w/mute).
20. NETTV
Access to Net TV menu directly.
21. NETFLIX
Access directly to Netflix.
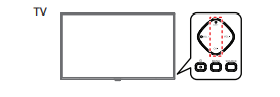
Control panel
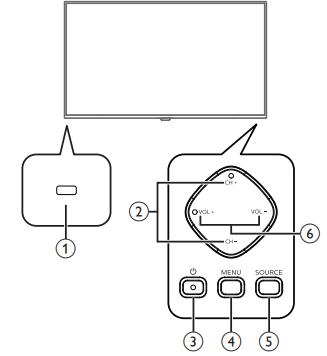
1. Remote control sensor
Receives IR signal from remote control.
2. CH + / –
Selects a channel. In the menu screen, moves the cursor up (+) / down (–).
3. (POWER)
Turns the TV on or switches the TV into standby mode.
4. MENU
Opens the main on-screen menu.
5. SOURCE
Selects connected devices.
6. VOL + / –
Adjusts the volume. In the menu screen, moves the cursor left (+) / right (–).
VOL + : Volume up
VOL – : Volume down
Terminals
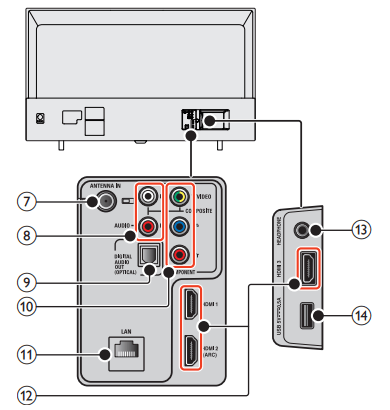
7. 75 ohm Cable / Antenna connection
Signal input from an antenna or cable / satellite set-top boxes.
8. Analog audio (L/R) input jacks
Connect analog audio signals from;
–HDMI-DVI / Analog audio (L/R) jacks signal
–Component video / Analog audio (L/R) jacks signal
–Composite video / Analog audio (L/R) jacks signal
–PC connection / Analog audio (L/R) jacks signal with stereo mini 3. 5mm plug audio cable on PC
9. Digital audio output jack
Digital audio (S/PDIF) output to home theaters and other digital audio systems.
10. Component (Y/Pb/Pr) / Composite video (VIDEO) input jack(s) for VIDEO
Composite video input (VIDEO) jack is a shared jack with component video input (Y) jack. Green / Yellow color orientation depends on model.
11. Ethernet port
For internet connection using an Ethernet cable with an RJ-45 connector.
12. HDMI input jack(s)
Digital audio and video input from high definition digital devices such as DVD / Blu-ray Disc™ players, cable / satellite set-top boxes, PC’s, etc.
- For HDMI 2 only In addition to normal HDMI and HDMI-DVI functionality, it outputs TV audio to an HDMI-ARC-compliant device, such as a home theater system. '
13. Headphone audio output jack
Headphone 3.5mm stereo jack for personal listening.
14. USB terminal
Data input from USB memory stick only. Do not connect any device to this terminal such as digital camera, keyboard, mouse, etc.
Connecting Antenna or cable / satellite / IPTV set-top box
Be sure your antenna or another device is connected properly before plugging in the AC power cord.
If connecting to an antenna through an RF cable
Any DTV programs that are broadcast in your area can be received for free through an antenna connection.
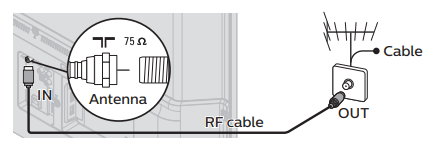
If connecting cable / satellite / IPTV set-top box using an RF cable
If the TV is connected to a cable or set-top box via a coaxial connection, set the TV to channel 3/4 or the channel specified by the service provider

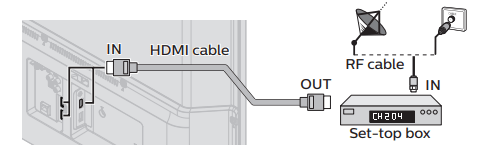
If connecting cable / satellite / IPTV set-top box using an HDMI cable
If the TV is connected to a cable / satellite set-top box via an HDMI cable, make sure you select the correct source by usingSOURCE.
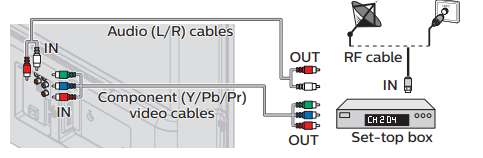
If connecting cable / satellite / IPTV set-top box using component video input
If the TV is connected to a cable / satellite set-top box via component video input, make sure you select the correct component video source by using SOURCE
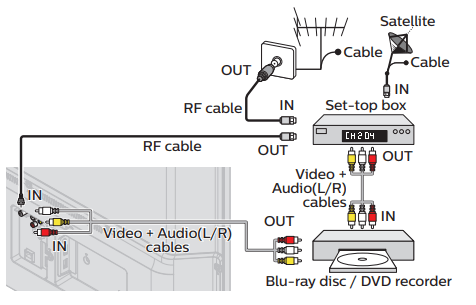
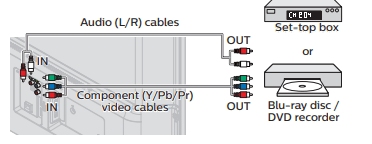
Connecting a cable / satellite / IPTV set-top box, Bluray Disc™ / DVD recorder via composite connectors and analog audio
Do not place your recorder too close to the screen because some recorders can be susceptible to harmful interference from the TV.
Plugging in the AC power cord
Make sure that the AC power cord must be plugged to an AC outlet after all the necessary connections are made
Before you connect the AC power cord:
Be sure other devices are connected properly before plugging in the AC power cord.
Selecting your connection quality
HDMI - Highest quality

Supports high-definition digital signals and gives highest picture and sound quality. Video and audio signals are combined in one cable. You must use HDMI for full high-definition video and to enable EasyLink(HDMI CEC).
Component (Y Pb Pr) - High quality
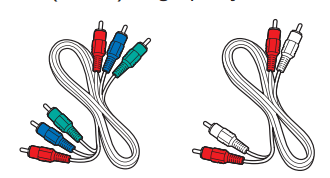
Supports high-definition analog signals but gives lower picture quality than HDMI. Component (Y/Pb/Pr) video cables combine red / green / blue video cables with red / white audio (L/R) cables. Match the cable colors when you connect to the TV.
Composite - Basic quality
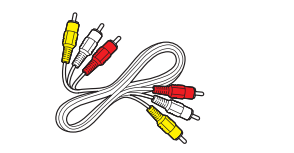
For analog connections. Composite video / Audio analog cable usually combine a yellow video cable with red / white audio (L/R) cables. With this unit, yellow cable must be connected to Y (green) jack on the component video input jacks.
Connecting your devices
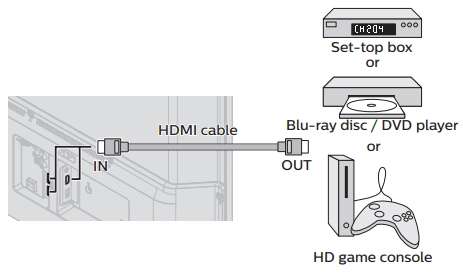
HDMI digital connection
HDMI connection offers the highest picture quality. HDMI (High-Definition Multimedia Interface) transports high-definition digital video and multi-channel digital audio through a single cable.
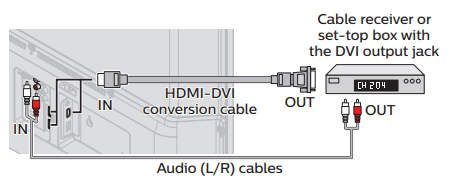
HDMI-DVI connection
This unit can be connected to a device that has a DVI terminal. Use an HDMI-DVI conversion cable for this connection and it requires audio cable for analog audio signal as well
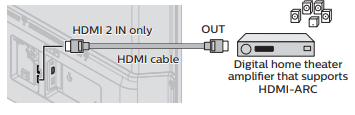
HDMI-ARC connection
HDMI-ARC allows you to use EasyLink to output TV audio directly to a connected audio device, without the need for an additional digital audio cable
Component analog video connection
Component analog video connection offers better picture quality for video devices connected to the unit. If you connect to the unit’s component video (Y/Pb/Pr) input jacks, connect analog audio cables to the analog audio (L/R) input jacks.
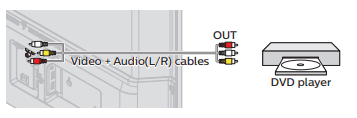
Composite analog video connection
Composite analog video connection offers standard picture quality for video devices connected to the unit.
If you connect to the unit’s component / composite video (Y/VIDEO) input jack (green), connect audio cables to the audio (L/R) input jacks. When the audio is monaural, then only connect to the audio L input jack.
Connecting the TV to the internet using an Ethernet cable

Connecting the TV to the internet using a wireless LAN

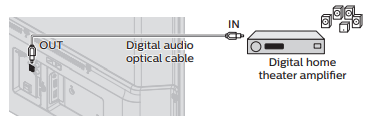
Digital audio output connection
If you connect this unit to an external digital audio device, you can enjoy multi-channel audio like 5.1ch digital broadcasting sound. Use a digital audio optical cable to connect the unit to external digital audio devices.
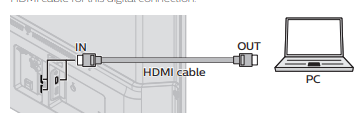
PC connection
HDMI connection
This unit can be connected to your PC that has an HDMI terminal. Use an HDMI cable for this digital connection
HDMI-DVI connection
This unit can be connected to your PC that has a DVI terminal. Use an HDMI-DVI conversion cable for this video digital connection and it requires stereo mini 3.5mm plug audio cable for analog audio signal as well.

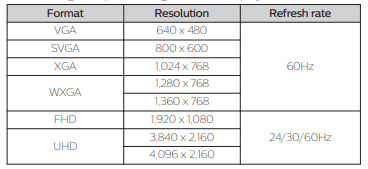
The following PC-input video signals can be displayed
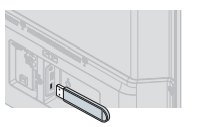
USB memory stick
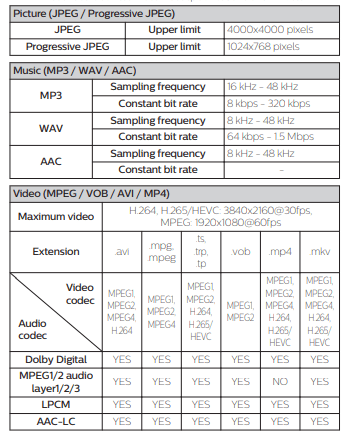
This unit offers easy playback of picture, music and video files. Insert the USB memory stick into the USB terminal shown below. For a complete list of file formats and specifications supported, refer to USB Section→ p. 27
Note(s)
- The unit recognizes only a USB memory stick
- Do not use a USB hub or an extension cable to connect an external hard disk drive to the unit. (Not supported.)
- Always insert a USB memory stick directly to this unit.
- A USB memory stick is not included with this unit.
- We do not guarantee that all USB memory sticks can be supported by this unit.
- Be sure to keep a backup copy of the original files on your USB device before you play them back on this unit. We have no responsibilities for damage or loss of your USB stored data.
- To protect your USB memory stick files from being erased place the write protect sliding tab in the protect position (if available).
- When you are ready to remove a USB memory stick, set the unit to go into standby mode to avoid any damage to your data and the unit.
- A USB memory stick that requires its own driver or the device with a special system such as fingerprint recognition are not supported
- This unit is not allowed to use the USB memory stick which requires an external power supply (500mA or more).
Initial setup
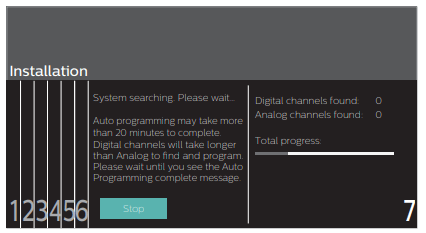
This section will guide you through the unit’s Initial setting which includes selecting a language for your on-screen menu, country, location and Autoprogram, which automatically scans and memorizes viewable channels. You can also set the network connection in this setting.
Before you begin: Make sure the unit is connected to an antenna or cable.
1. After making all the necessary connections, press to turn on the unit.
- It may take a few moments to turn on the unit for the first time.
- Initial setup menu appears automatically after the unit is turned on.
2. Use  to select the on-screen language, Voice guide, country, TV placement and location in the middle of the TV screen, then press OK.
• You must set Home in location setting. Otherwise, Picture and Sound settings you adjusted will not be memorized after the unit goes into standby mode.
3. Use  to select Skip or Next on network setup screen.
4. Use to select Wireless or Wired, then press OK.
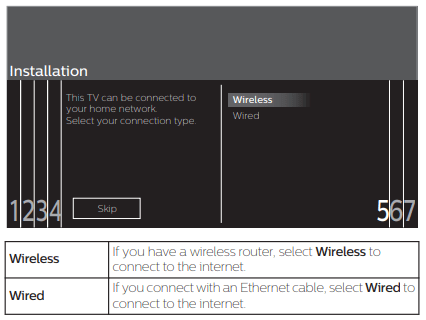
- If you have a router with easy connect function, select Wireless and use to select Easy Connect, then press OK.
- When you select On in the selection screen for Software update notification, A message will appear later if there is the latest software on the network server.
5. Use to select the signal type.
• If the TV is connected to a cable or satellite set-top box, select the 2nd one and skip to step 7
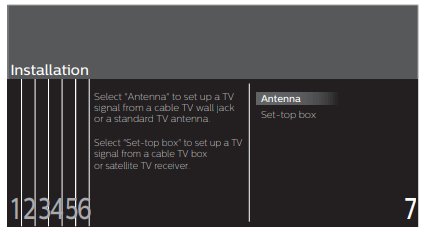
6. Use to select Antenna for TV channels or Cable for CATV channels, then press OK.
–When Antenna is selected, the TV detects antenna signals. It searches for DTV and analog TV channels available in your area.
–When Cable is selected, the TV detects signals supplied by cable. It searches for DTV, analog TV and cable channels available in your area.
• Auto programming will begin
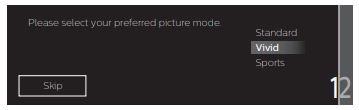
7. Use to select your preferred picture setting, then press OK
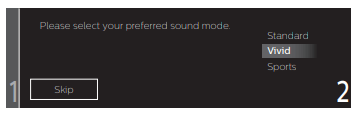
8. Use to select your preferred sound setting, then press OK
9. After Picture and sound setup is completed, a message will appear if there is the latest software on the network server
After an initial setup is completed...
- If you want to scan the channels automatically again. Search for channels→ p. 38
- If you want to change to another language. Language→ p. 34
- If you want to change the country setting. Country → p. 51
- If you want to change the location setting. Location → p. 35
- If you want to change the network setting. Connect to network→ p. 41
- If you want to restore the picture and sound setting. Picture and sound setup→ p. 31
Use your TV
Switching on your TV and putting it in standby mode

Remote control

To turn the TV on from standby or off to standby
• Press on the TV or the remote control.
Adjusting volume

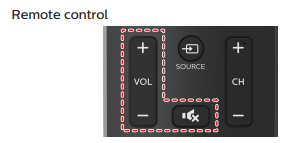
To decrease or increase volume
• Press VOL + / – on the TV or the remote control.
VOL + : Volume up
VOL – : Volume down
To mute or unmute sound
• Press  on the remote control to mute the sound.
• Press again or VOL + / – to recover the original sound.
Switching channels
Remote control
To select channels by using CH + / –
- Press CH + / – on the TV or the remote control.
To select channels by using the NUMBER buttons

- For digital channels, press a number followed by a dot “•” and the corresponding sub channel number.
–When selecting digital channel 1 1. 1 Be sure to press
- before entering the subchannel number.
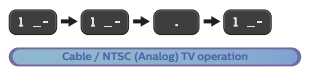
- When selecting cable or analog channel 1 1

Press PREV.CH to return to the previously viewed channel
Watching channels from an external device
Switching each input mode can easily switch with the remote control between TV and external devices when they are connected to the unit
1. Turn on the set-top box or the connected device.

- PressSOURCE and use to select the set-top box or the connected device and wait a few seconds till the picture appears

- Use the remote control of the set-top box or the connected device to select channels
Access the Home menu
1. Press
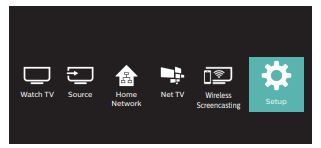
Guide to Home menu
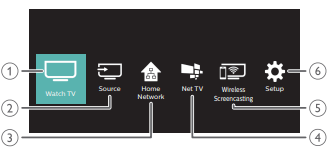
1. Watch TV : Switches back to the TV source if another source is selected.
2. Source : To select connected devices.
3. Home Network : Accesses Home network menus.
4. Net TV : Accesses Net TV menus.
5. Wireless Screencasting : Accesses Wireless Screencasting menus.
6. Setup : Accesses menus that allow you to change picture, sound and other TV settings.
Lock or unlock your device from the Home menu
This section describes how to lock or unlock specified device.
1 Press SOURCE on the remote control.
2 Use to select a device to lock or unlock.
3 Press OPTIONS on the remote control.
4 Use to select Lock or Unlock, then press OK. • If device lock is unlocked, Lock will be displayed. If device lock is locked, Unlock will be displayed at the top right of the device icons.
5 Enter your PIN. Change PIN → p. 40
Changing device type
You can change device icons displayed in the source list.
1 Press SOURCE on the remote control.
2 Use to select the desired device.
3 Press red button on the remote control.
4 Use to select the desired type, then press OK.
To reset the type
• Press OPTIONS on the remote control at step 3, then select Original icon.
Scan connections
You can rescan TV connections and update the source list.
Before you begin:
You must set On in Master EasyLink. → p. 36
1 Press SOURCE on the remote control.
2 Use to move the cursor to any device.
3 Press OPTIONS on the remote control.
4 Use to select Scan connections, then press OK.
Create a list of favorite channels
You can create lists of your preferred TV channels so that you can find those channels easily.
1 Press OK while viewing a TV program.
2 Use to select the desired channel, then press yellow button.
3 Use to select the desired favorite list (Favorites 1 - Favorites 4), then press OK to add or remove on the list of favorite channels.
 indicates that the channel is added.
 indicates that the channel is removed.
- The channel will be marked with
 icon.
icon.
Display the list of favorite channels
1 Press OK while viewing a TV program.
2 Use to select Favorites.
To change the favorite list
1 Press blue button.
2 Use to select the desired favorite list (Favorites 1 - Favorites 4).
To remove a channel from the favorite list
1 Select the desired channel, then press yellow button.
2 Use to select Yes, then press OK.
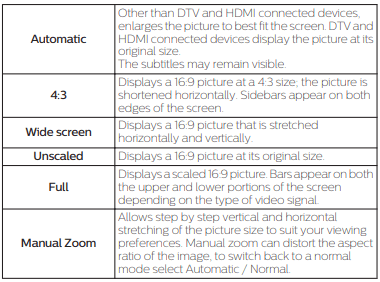
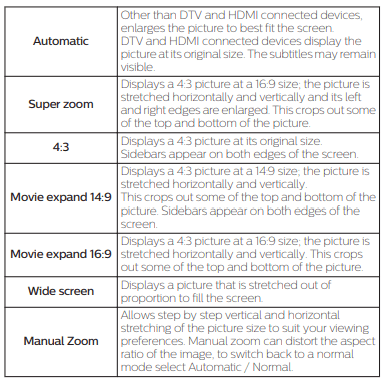
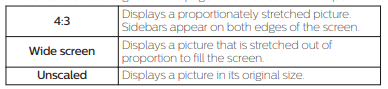
Changing Picture format
Display modes can be selected when your TV receives a 16:9 or 4:3 video signal.
Three types of display modes can be selected for a PC input signal.
Press FORMAT repeatedly to switch the TV aspect ratio.
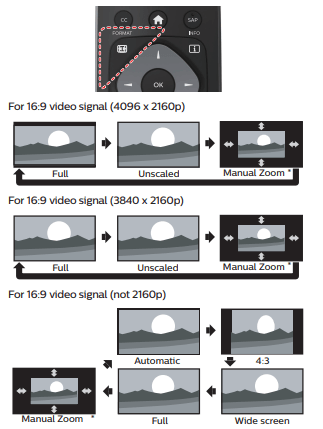
- Manual Zoom setting is not available on the following models:
- 65PFL5602/F7
- 65PFL5602/F7 D
- 55PFL5602/F7
- 50PFL5602/F7
Your model number can be confirmed on the rating label applied on the rear cabinet.
for 43 video signal

- Manual Zoom setting is not available on the following models:
- 65PFL5602/F7
- 65PFL5602/F7 D
- 55PFL5602/F7
- 50PFL5602/F7
Your model number can be confirmed on the rating label applied on the rear cabinet
For PC input signal

- This unit can also be connected to your PC that has a DVI terminal. Use an HDMI-DVI conversion cable for this video connection and it requires stereo mini 3.5mm plug audio cable for analog audio signal as well.
- Refer to 16:9 video signal on this page if the PC has HDMI output
If the signal source has side or top-bottom bars inserted into the picture, the Picture format function will not eliminate them.
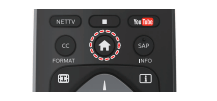
TV screen information
You can display the currently selected channel or other information such as the aspect ratio on the TV screen. In the digital mode, the detailed broadcasting information for the current off-the-air channel such as program title and program guides are displayed.
1 Press INFO.
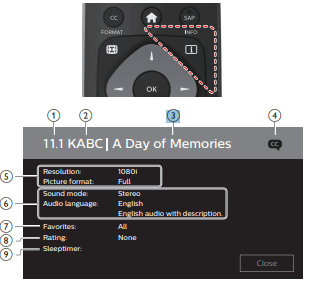
1. Channel number / Input mode
Switching channels → p. 22
Watching channels from an external device→ p. 23
2. Broadcast station
3. Program title (for DTV only)
4. CC (not available if Closed caption is set to Off)
Caption settings → p. 37
5. Program’s image aspect ratio
Changing Picture format→ p. 24 Audio language (DTV)
6. Audio mode (Analog TV)
Sound→ p. 33
7. Favorites
Create a list of favorite channels → p. 24
8. Child lock rating
Child lock→ p. 39
9. Remaining time on sleep timer
Sleeptimer → p. 34
2 Press INFO to hide the information
Using options menu
You can access to some TV settings directly by using OPTIONS.
1 Press OPTIONS to display options menu, then press OK
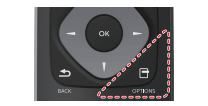
2 Use to select a desired setting, then press OK.
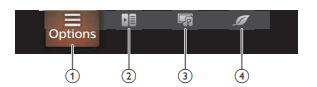
1.Options
Following settings can be configured.
2.Controls
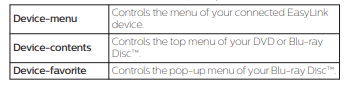
If you have our brand products such as Blu-ray Disc™ player or DVD recorder that are compatible with EasyLink functions, connect them to this unit via an HDMI cable so you can simply operate various items from this unit’s remote control.
Before you begin:
select a device connected to an HDMI connection. → p. 23 You must set On in Master EasyLink. → p. 36 Otherwise, LINK does not work even if you connected our brand devices to this unit
1 Press OPTIONS to display options menu.
2 Use to select Controls then press OK.
3 Use to select the desired item, then press OK
3. Picture and sound
Following settings can be configured
4. ECO settings
Following settings can be configured.
USB
Your TV is fitted with a USB connection that enables you to view photos, listen to music or watch video files stored on a USB memory stick.
1 Press SOURCE and use to select USB, then press OK.
2 Use to select the desired file, then press OK.
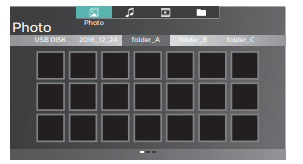
- These recorded files must meet specifications shown below:
Getting more from your TV
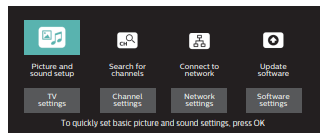
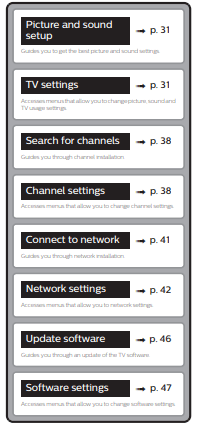
This section describes the overview of the Setup menu displayed when you press and use to Select Setup. The Setup menu consists of the function setting items below.
1 Press to display the Home menu
2 Use to select Setup, then press OK.
3 Use to select the desired menu and an item, then press OK.
Picture and sound setup
Before you begin:
You must set Home in Location. → p. 35
Otherwise, personalized picture and sound settings will not be memorized after the unit goes into standby mode.
1 Press and use to select Setup then press OK.
2 Use to select Picture and sound setup, then press OK.
3 Follow steps 7 to 8 in Initial setup → p. 21
TV settings
Picture
Before you begin:
You must set Home in Location. → p. 35 Otherwise, personalized picture and sound settings will not be memorized after the unit goes into standby mode.
1 Press and use to select Setup then press OK.
2 Use to select TV settings, then press OK.
3 Use to select Picture, then press OK.
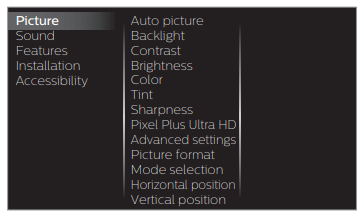
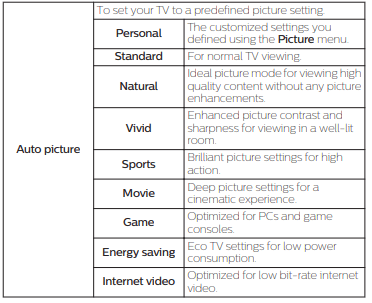
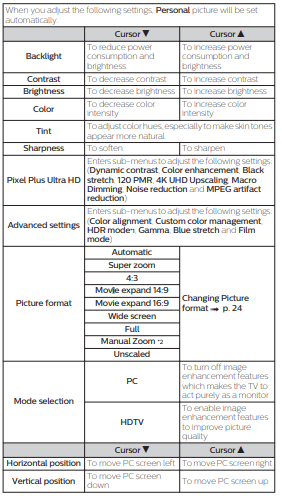
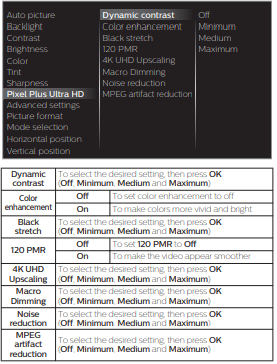
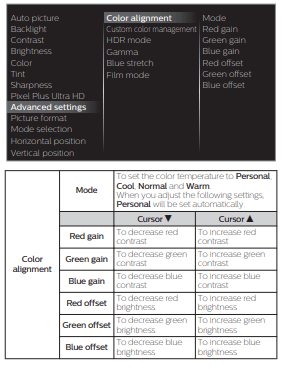
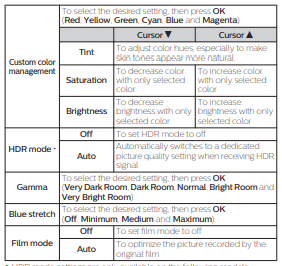
4 Use to select the item you want to adjust, then press OK. The following picture settings can be configured. Depending on the format of the picture source, some picture settings are not available.
*1 HDR mode settings are only available on the following models:
- 65PFL5602/F7
- 65PFL5602/F7 D
- 55PFL5602/F7
- 50PFL5602/F7
Other models, such as 65PFL5602/F7 C, automatically switch to the decided picture settings upon receiving HDR signals.
*2 Manual Zoom setting is not available on the following models:
- 65PFL5602/F7
- 65PFL5602/F7 D
- 55PFL5602/F7
- 50PFL5602/F7
Your model number can be confirmed on the rating label applied on the rear cabinet
You may adjust picture quality and enhancement settings using Pixel Plus Ultra HD and Advanced settings sub menus.
*HDR mode settings are only available on the following models:
- 65PFL5602/F7
- 65PFL5602/F7 D
- 55PFL5602/F7
- 50PFL5602/F7
Other models, such as 65PFL5602/F7 C, automatically switch to the decided picture settings upon receiving HDR signals. Your model number can be confirmed on the rating label applied on the rear cabinet.
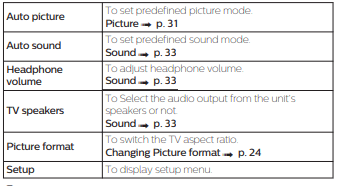
Sound
You must set Home in Location. → p. 35 Otherwise, personalized picture and sound settings will not be memorized after the unit goes into standby mode.
1 Press and use to select Setup then press OK.
2 Use to select TV settings, then press OK.
3 Use to select Sound, then press OK.
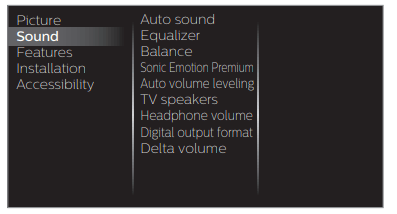
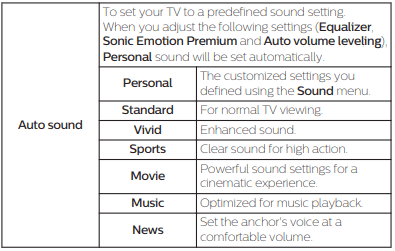
4 Use to select the item you want to adjust, then press OK. The following sound settings can be configured. Depending on the format of the broadcasting, some sound settings are not available
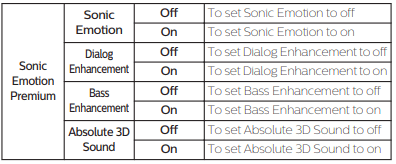
 Adjust the tonal quality for each frequency

Adjust the speakers to suit your listening preference

This selects sound modes for more spatial or surround sound reproduction
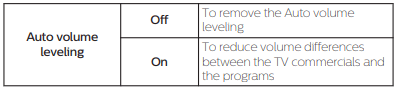
This function keeps a constant Loudness differential between the TV commercials and the programs
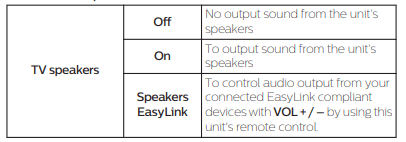
 You can select the audio output from the unit’s speakers or not. If your amplifier is HDMI link function compatible and connected by an HDMI cable to this unit, some sound operations such as volume up can be changed by using this unit’s remote control. Make sure Master EasyLink is set to On. → p. 36
 Adjust headphone volume
 You can set the digital audio output format from SPDIF/ARC
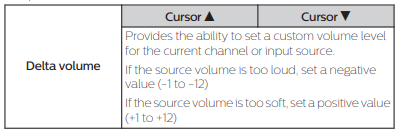
 If a channel or input device is too loud or too soft, navigate to that channel or input device
Features
1 Press and use to select Setup then press OK.
2 Use to select TV settings, then press OK.
3 Use to select Features, then press OK.
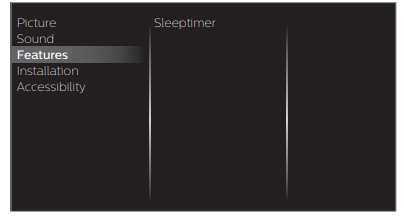
4 Adjust the following items.
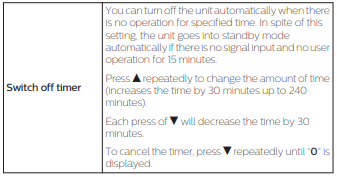
Sleeptimer
Sleep timer can set the unit to go into standby mode after an incremental period of time.
1 Use to select Sleeptimer, then press OK.
2 Use repeatedly to change the amount of time (increases the time by 5 minutes up to 180 minutes).
- Each press of
 will decrease the time by 5 minutes.
- Press INFO once to call up the display for checking the remaining time.
- To cancel the sleep timer, press repeatedly until “0” is displayed.
Installation
1 Press and use to select Setup then press OK.
2 Use to select TV settings, then press OK.
3 Use to select Installation, then press OK.
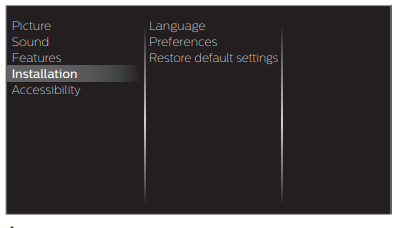
4 Adjust the following items.
Language
You can set the language for the on-screen display.
1 Use to select Language, then press OK.
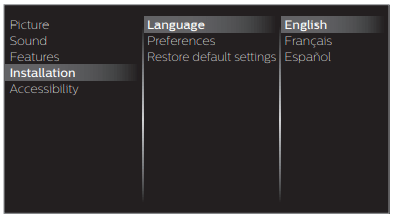
2 Use to select English, Español or Français, then press OK.
Preferences
You can set the unit to reduce the power consumption or adjust the backlight brightness in Location setting. EasyLink allows you to operate your connected EasyLink device.
Setting your location to home
Choosing Home gives you full flexibility to change predefined settings for picture and sound.
1 Use to select Preferences, then press OK.
2 Use to select Location, then press OK.
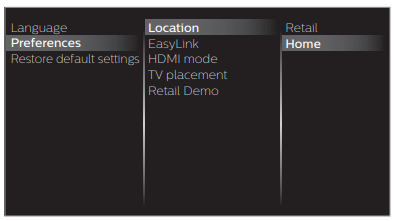
3 Use to select Home, then press OK.

HDMI mode
If there are issues with picture/color and/or sound when connecting an external device using the HDMI port, please try switching the HDMI mode following the instructions below
1 Pressand use to select Setup, then press OK.
2 Use to select TV settings, then press OK.
3 Use to select Installation, then press OK.
4 Useto select Preferences, then press OK.
5 Use to select HDMI mode, then press OK.
6 Use to select HDMI1, HDMI2 or HDMI3, then press OK.
7 Use to select Max 4K@60Hz + HDR, Max 4K@60Hz or Max 4K@30Hz (Compatibility) depending on the output capabilities of the external device, then press OK.
• When switching the HDMI configuration, the screen will black out for a moment, then come back on
TV placement
To apply the best settings for your TV, select wall mount or stand mount.
1 Use to select Preferences, then press OK.
2 Use to select TV placement, then press OK.
3 Useto select Wall mounted or On a TV stand, then press OK.
Retail Demo
When you set Location to Retail, E-sticker (Electronic Sticker) is displayed. E-sticker can be turned off using procedure below.
1 Use to select Preferences, then press OK.
2 Use to select Retail Demo, then press OK.
3 Use to select Off, then press OK.
Use Philips EasyLink
Your TV supports Philips EasyLink, which enables one-touch play and one-touch standby between EasyLink-compliant devices. Compliant devices must be connected via an HDMI connector.
One-touch play
When you connect your TV to devices that support one-touch play, you can control your TV and the devices with one remote control. For example, when you press  (Play) on your DVD remote control, your TV automatically switches to the correct channel to show the DVD content.
One-touch standby
When you connect your TV to devices that support standby, you can use your TV remote control to put your TV and all connected HDMI devices in standby mode. You can perform one-touch standby using the remote control from any of the connected HDMI devices.
System audio control
When you connect your TV to HDMI CEC compliant devices, your TV can switch automatically to play audio from the connected device. To use one-touch audio, you must map the audio input from the connected device to your TV. You can use the remote control from the connected device to adjust the volume.
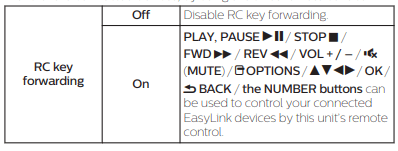
Remote control (RC) key forwarding
RC key forwarding allows you to control EasyLink-compliant devices using your TV remote control.
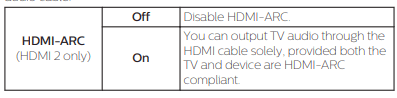
HDMI-ARC (Audio Return Channel) (HDMI 2 only)
HDMI-ARC allows you to use Philips EasyLink to output TV audio directly to a connected audio device, without the need for an additional digital audio cable. Be sure that the device is HDMI CEC and ARC compliant, and that the TV is connected to the device using an HDMI cable attached to both HDMI-ARC connectors.
EasyLink (HDMI CEC)
This function allows you to operate the linked functions between our brand devices with a EasyLink feature and this unit connecting through an HDMI cable. You must connect this unit to our brand EasyLink devices and be sure its EasyLink (HDMI CEC) setting is also set to on
1 Use to select Preferences, then press OK.
2 Use to select EasyLink, then press OK.
3 Use to select the item you want to adjust, then press OK.
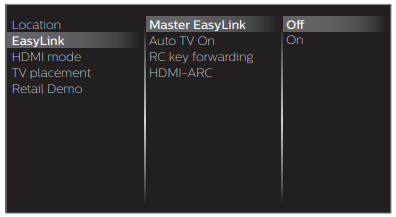 Set the Master EasyLink to On or Off. The following additional settings will be grayed out when you set them to Off.
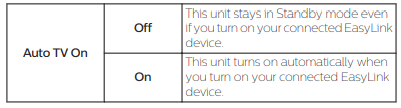
 This unit will turn on when the power on signal is sent from your connected EasyLink device.
 You can operate some functions such as disc playback or call up the menu of the connected devices, by using this unit’s remote control.
 HDMI-ARC allows you to use Philips EasyLink to output TV audio directly to a connected audio device, without the need for an additional digital audio cable
Return your settings to default values
You can return settings to their default values.
1 Use to select Restore default settings, then press OK.
2 Use to select Reset AV settings or Reset all settings, then press OK.
Accessibility
1 Press and use to select Setup then press OK.
2 Use to select TV settings, then press OK.
3 Use to select Accessibility, then press OK.
4 Adjust the following items
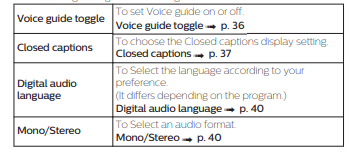
Voice guide
Lets you configure Voice guide and its settings.
1 Use to select Voice guide, then press OK
 Caption settings
Closed captions displays the audio portion of the program as superimposed text over the video.
1 Use to select Caption settings, then press OK.
In addition to the basic closed caption, DTV has its own closed caption called digital caption service. Use this menu to change the settings for digital caption service.
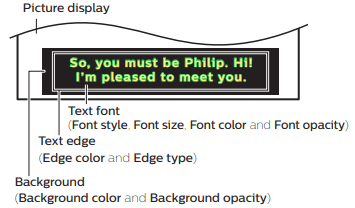
 You can choose the size, font, color, background and other characteristics of the caption text
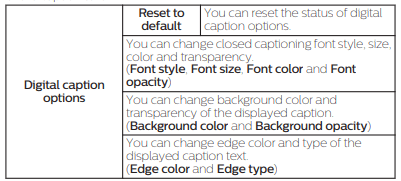
 • There are 3 display modes according to programs:
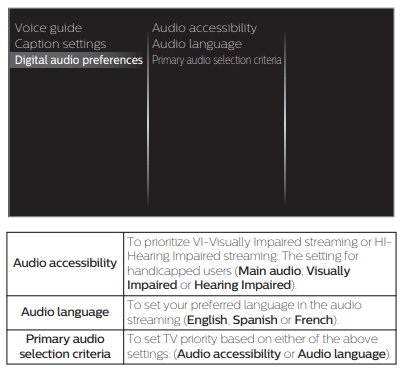
 Digital audio preferences
You can set the interpretive broadcasting by an audio explanation.
1 Use to select Digital audio preferences, then press OK
Search for channels
Be sure the RF cable is correctly connected to this unit and you are registered with your cable TV provider when you install cable channels.
1 Press and use to select Setup then press OK.
2 Use to select Search for channels,, then press OK.
3 Use to select Start, then press OK.
Install channels
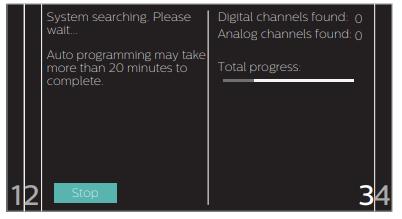
You can search and store all channels. If you move the unit to a different area after the initial setting, it is recommended to perform Autoprogramming.
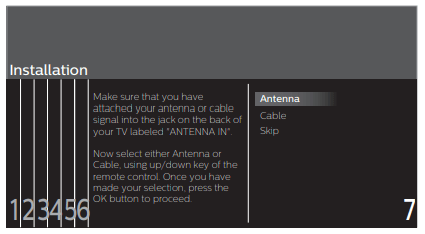
4 Useto select Antenna or Cable, then press OK.
5 Press OK on Start.
• When the scanning and memorizing of available channels is completed, the lowest memorized channel will be displayed.
6 Follow the on-screen instructions to complete the installation.
Channel settings
1 Press and use to select Setup then press OK.
2 Use to select Channel settings, then press OK.
3 Adjust the following items.
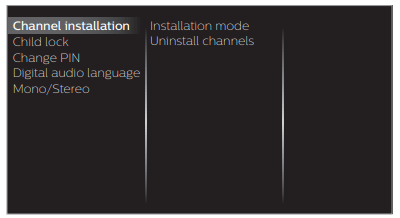
Channel installation
Be sure the RF cable is correctly connected to this unit and you are registered with your cable TV provider when you install cable channels.
Installation mode
1 Use to select Channel installation, then press OK.
2 Use to select Installation mode, then press OK.
3 Use to select Antenna or Cable, then press OK.
• When Antenna is selected, the TV detects antenna signals. It searches for DTV and analog TV channels available in your area.
• When Cable is selected, the TV detects signals supplied by cable. It searches for DTV, analog TV and cable channels available in your area.
Uninstall channels
The channels selected here can be skipped when selecting the channels using CH + / –.
Those channels can still be selected with the NUMBER buttons.
1 Use to select Channel installation, then press OK.
2 Use to select Uninstall channels, then press OK.
3 Use to select the channel you want to remove, then press OK.
• The removed channels are not displayed on the list of favorite channels.
• To reactivate a removed channel, use then press OK.
Child lock
You can prevent your children from watching certain programs or certain channels by locking the TV controls and by using ratings.
1 Use to select Child lock, then press OK.
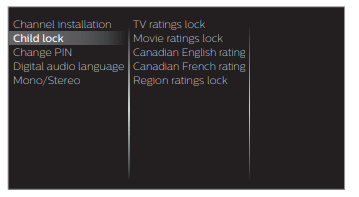
2 Use the NUMBER buttons to enter the 4-digit numbers for your PIN code.
• When you have not set up your PIN code, enter 0, 0, 0, 0.
• When the PIN code is correct, Child lock menu is displayed.
See the following description for setting each item
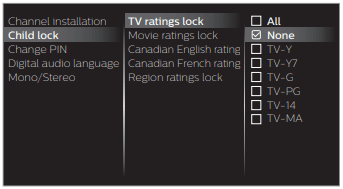
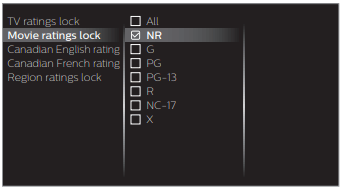
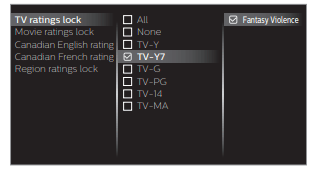
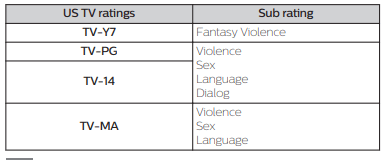
Setting TV and movie ratings
Movie ratings lock is the rating system created by MPAA. TV ratings lock has controlled access to individual programs based on their age ratings and content rating.
3 Use to select TV ratings lock or Movie ratings lock, then press OK.
4 Use to select the desired rating, then press OK repeatedly to switch between block and view.
•  indicates that the rating is locked (Blocked).
•  indicates that the sub rating is locked (Blocked).
• indicates that the rating is not locked (Viewable).
TV ratings lock
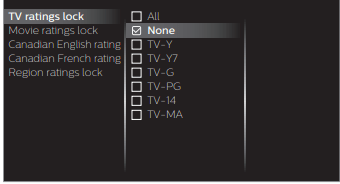
Movie ratings lock

To set the sub ratings (displayed in the right column)
For TV ratings lock, you can further set the sub ratings to block specific elements of programming. To set the sub ratings, follow the step below.
Use to select the desired rating, then press OK repeatedly to switch between , and.
Change PIN
Although the default PIN code (0000) is supplied with the unit, you can set your own PIN code.
1 Use to select Change PIN, then press OK.
2 Press the NUMBER buttons to enter the current 4-digit PIN code.
3 Press the NUMBER buttons to enter the new 4-digit PIN code.
• Enter PIN code again to confirm.
Digital audio language
You can select the audio language while your TV is receiving the digital broadcasting.
1 Use to select Digital audio language, then press OK.

Mono/Stereo

You can select an audio format while your TV is receiving the analog broadcasting.
1 Use to select Mono/Stereo, then press OK.
2 Use to select Mono, Stereo or SAP (Second Audio Program), then press OK.
Connect to network
Setup network connection settings in order to use Net TV or network upgrade functions.

1 Press and use to select Setup then press OK.
2 Use to select Connect to network, then press OK.
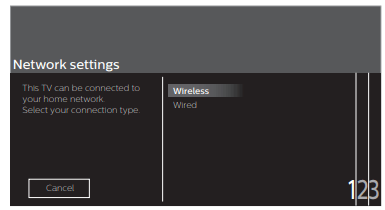
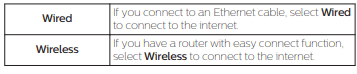
Wireless setting
Select to use a wireless LAN to connect to the internet by a wireless connection.
1 Use to select Wireless, then press OK.
2 Use to select the desired setting, then press OK, and follow the on-screen instructions.
* Easy Connect cannot be used when the security protocol is set to WEP. Change the Access Point’s security mode from WEP to others (recommended).
Wired setting
Select to use an Ethernet cable to connect to the internet by a wired connection. Please purchase shielded Ethernet cables at your local store and use it when you connect to network equipment.
1 Useto select Wired, then press OK
. • Connection test will start automatically.→ p. 44
Network settings
1 Press and use to select Setup then press OK.
2 Use to select Network settings, then press OK.
3 Adjust the following items.
Manual network settings
1 Use to select Manual network settings, then press OK.

Network selection
2 Use to select Network selection, then press OK.
3 Use to select the desired setting, then press OK
Wireless network setting
This menu is displayed only when you set Wireless in Network selection. In order to use a wireless network, you must set up a connection to the AP (e.g. wireless router).
2 Use to select Wireless network setting, then press OK.
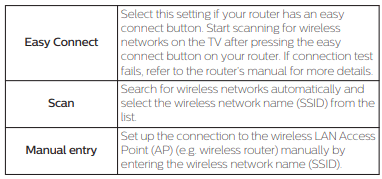
Auto Search for wireless networks automatically and select the SSID from the list.
3 Use to select Auto, then press OK.
4 The list of wireless networks will be displayed. Use to select the appropriate the SSID, then press OK.

- If you select the SSID with
 WEP*2 / others Key entry screen will appear. Enter the WEP*2 / others key of the selected wireless network using , then press OK.
- If you select the SSID has an easy connect, the easy connect setting screen will appear. Use to select a setting, then press OK.
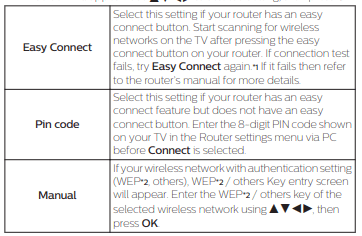
*1 Easy Connect cannot be used when the security protocol is set to WEP. Change the Access Point’s security mode from WEP to others (recommended).
*2 WEP is not recommended to be used due to its major security flaws. Change the security protocol on the wireless router to others (recommended) mode.
Confirmation message will appear. Select OK to complete the settings.
Troubleshooting tips
No power
- Make sure the AC power cord is plugged in.
- Make sure that the AC outlet supplies the proper voltage, plug another electrical appliance into the AC outlet to ensure that the AC outlet operates normally.
- If a power failure
Control buttons do not work.
- Do NOT press more than one button at the same time.
- Ensure that no buttons on the remote control are depressed and move freely.
Universal remote control does not work properly.
- Refer to the User manual of the universal remote control for the Philips code.
Power is on but no screen image.
- Check whether the connection for the antenna, cable or set-top box is connected correctly.
- Check whether all the cables to the unit are connected to the correct output jack on your separate device like Blu-ray Disc™ / DVD recorder.
- Make sure that the selected input mode is connected to the working input jack.
- Check if your computer is NOT in sleep mode when the input mode on this unit is in PC mode. Tap any key on the computer keyboard to wake it up.
- Check if the correct input mode is selected by pressing SOURCE.
No color
- View other TV channels. The problem might be limited to the broadcasting station.
- Adjust Color in Picture settings. → p. 31
Picture poor
- Adjust Contrast and Brightness in Picture settings. → p. 31
- For the best picture quality, watch “High Definition” wide screen programs. If the HD content is not available, watch “Standard Definition” programs instead.
You see pixelation on the screen.
- When the capabilities of the unit exceed the capabilities of the digital broadcasting, the signal will be increased to match the capabilities of the display on the unit. This may cause pixelation, noise or trash.
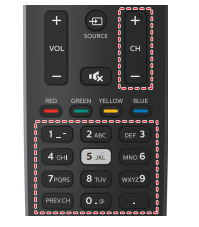
Unusual picture appears and the TV does not operate.
- Press the power button first. If it does not solve, follow the procedure below.
- Press the buttons on the remote control in the order shown below

- Unplug the AC power cord, then wait for 1 minute, and then plug it in again
No sound is heard when using the HDMI digital connection.
- Some HDMI cables and devices may not be compatible with the TV due to different HDMI specifications.
No sound, distorted sound or incorrect audio sound is heard when using the HDMI-DVI connections.
- Make sure that the analog audio signals from the HDMI-DVI device are connected to the analog audio input L/R jacks.
- When using Component analog video or Composite analog video, make sure that the analog audio (L/R) connectors are mounted into the audio (L/R) input jacks.
Sound intermittent or no sound.
- Check if the audio cable is connected into the unit correctly.
You switch to a different input and the volume changes.
- This unit will memorize the volume level from the last time you adjusted it.
- If the volume of the sound from another device is higher or lower, then the loudness will change.
- Make sure Auto volume leveling is set to On. → p. 33
No sound with distorted picture occurs when using the HDMI digital connection.
- Some HDMI cables and devices may not be compatible with the TV due to different HDMI specifications.
No picture or sound
- Check if the power is on.
- Check whether all the cables to the unit are connected to the correct output jack on your separate device like Blu-ray Disc™ / DVD recorder.
- View other TV channels. The problem might be limited to the broadcasting station or weak signal strength.
- Unplug the AC power cord and wait for about 1 minute, then plug the AC power cord and turn on the unit again
- Check whether the connection of the antenna or cable / satellite set-top box is connected correctly.
- Make sure that the selected input mode is connected to the working input jack.
- Check if your computer is NOT in sleep mode when the input mode of this unit is in PC mode. Tap any key on the keyboard to wake up your computer.
- Make sure that the sound is not muted. Press so that the volume bar and current volume level will appear on the TV screen.
- Make sure that the volume is NOT set to 0 or . If so, use VOL + / – to adjust to the desired volume.
- Make sure that the headphone is NOT connected to the headphone audio output jack.
- Make sure that the TV speakers is NOT set to Off.
- If there are issues with picture/color and/or sound when connecting an external device using the HDMI port, please try switching the HDMI mode. (Refer to HDMI mode →p. 35)
Adjusted Picture or Sound settings are not effective every time the unit is turned on.
- You must set Home in Location. → p. 35 (Otherwise, the settings you adjusted will not be memorized after the unit goes into standby mode.)
You see a distorted picture or hear an unusual sound. (Analog TV - NTSC signal)
- You may be getting NTSC (Analog) TV signal (not HDTV signal) interference from electrical appliances, automobiles, motorcycles or fluorescent lights.
- Try moving the unit to another location to see if this is the cause of the problem.
Ghosts, lines or streaks in picture.
- Electrical interference from nearby appliances may affect picture quality.
- View other TV channels. The problem might be limited to the broadcasting station or weak signal strength.
Picture poor, sound intermittent or no sound
- View other TV channels. The problem might be limited to the broadcasting station or weak signal strength.
Forgotten PIN code.
- Enter “07 1 1” to clear your password.
You switch to a different input and the screen size changes.
- This unit will memorize the viewing mode from the last time you used the particular input modes.
The display image does not cover the entire screen.
- If you are using the unit as a PC monitor, make sure that Horizontal position and Vertical position in Picture are set correctly. → p. 31
- If you are watching TV or using the composite video, component video or HDMI with 480i input, press FORMAT repeatedly to switch to various screen modes.
Different color marks on the TV screen
- View other TV channels. The problem might be limited to the broadcasting station, missing data or pixelation due to weak signal strength.
Closed captions are displayed as a white box. No closed captions are displayed in the closed captions-supported program.
- Interference from buildings or weather conditions may cause closed captions to be incomplete if watching analog TV signals.
- Broadcasting station may shorten the program to insert advertisements. The closed caption decoder cannot read the information of the shortened program
Black box is displayed on the TV screen.
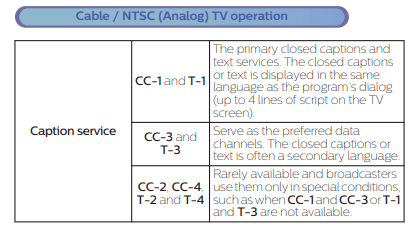
- The text mode is selected for caption. Select CC-1, CC-2, CC-3 or CC-4.
A message appears on the screen prompting for software update again.
- When you start up the TV or a net service after executing the software update, a message may appear on the screen prompting for software update again. In this case, please select Update to start USB update or network update. → p. 46
Cannot connect to the network.
- Check if the Ethernet cable connection is properly made. Turn on the broadband router and/or modem.
- Check the network settings.
- Check if the broadband router and/or modem is correctly connected
Sometimes video quality is poor when using the wireless LAN.
- The wireless network connection quality varies depending on the distance or obstacles (e.g. wall, basement, 2nd floor) between the TV wireless LAN adapter and the wireless router (access point), from other wireless networks, and brand and type of the wireless router (access point). When using the wireless LAN of the TV, it is suggested to place the wireless router as close as possible to the television.
Wireless LAN connection fails or wireless connection is poor.
- Check the installation location of the TV and wireless router (access point). Signal quality may be affected for the following reasons.
– Interference of other wireless devices, microwaves, fluorescent lights, etc., are placed nearby.
– There are floors or walls between the wireless router and TV.
– If the problems continue even after checking the above, try making a wired LAN connection.
Cannot use the wireless connection.
- Check if the wireless LAN Access Point (AP) (e.g. wireless router) is oriented properly or not placed too close between them.
- Once you have activated the wireless connection please wait 30 seconds for the connection to be established after turning on the unit, before trying to access network features such as Net TV.
Even though the speed of the internet connection improves during playback, the picture quality of Netflix streaming movie does not improve.
- The picture quality does not change during playback. It differs depending on the speed of internet connection at the time of loading.
Cannot use VUDU feature.
- VUDU is available only in the United States and Mexico.
- Check if the network connection is properly made
The picture quality of streaming movie (Netflix, VUDU or CinemaNow) is poor.
- Check the speed of your internet connection. You need speeds of at least 8 Mbps to this player for high quality uninterrupted playback.
Streaming movie (Netflix, VUDU or CinemaNow) often stops or starts buffering during playback.
- Contact your internet service provider to troubleshoot your internet connection for speed and line quality. Consistent line quality and speed are very important for internet video playback.
Cannot connect to the network while my PC is connected to the network.
- Check the content of your internet service contract to see if your internet service provider prevents multiple terminals connecting at the same time.
Cannot use Easy Connect to connect to the access point.
- Connect the unit to the access point using scan or manual entry mode. If the access point’s security mode is set to WEP*, change the setting to others (recommended), then try Easy connect again. (For access point configuration, please consult its user manual or manufacturer.)
* WEP is not recommended to be used due to its major security flaws. Change the security protocol on the wireless router to others (recommended) mode.
Folder or files stored on home network media server are not displayed in the file list or cannot be played back.
- Check the setting on your home media server. (Refer to the user manual of the home media server.)
- Check the network connection and settings.
Cannot use Pandora feature.
- Check if the network connection is properly made.
- Pandora is available only in the United States.
- You must create a Pandora account and activate this unit.
Activating Pandora → p. 52 Wireless Screencasting
- Connectivity with all Wireless Screencasting compatible devices is not guaranteed.
- Devices that do not comply with Wireless Screencasting standards may have compatibility issues.
Maintenance
Cleaning
- Clean the front panel and other exterior surfaces of the unit with a soft microfiber cloth or lens brush. Before cleaning the panel, disconnect the AC power cord.
- Never use a solvent or alcohol. Do not spray insecticide liquid near the unit. Such chemicals may cause damage and discoloration to the exposed surfaces.
- Do not spray any liquids on the screen or other exterior surfaces of this unit. If liquids enter the unit, they could cause shorts, electric shocks or fire damage.
Servicing
Should your unit become inoperative, do not try to correct the problem yourself. There are no user serviceable parts inside. Call our toll free customer support line found on the cover of this User manual to locate an authorized service center.
IR signal check
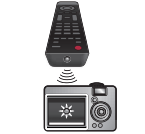
If the remote control is not working properly, you can use a digital or cell phone camera to see if it is sending out an infrared signal. e.g.) With a digital camera: Point the digital camera towards the remote control infrared diode at the front of the remote control. Press and hold any key on the remote control and look at the camera display. If an infrared pulsating light appears on the display, the remote control is sending out an IR signal.
Note: Some cameras may have an IR filter or dual camera cell phones may have an IR filter in one of the camera's and both will not display the IR signal.
Specifications