Sound Bar
HT-SD35
Operating Instructions US
Manual de instrucciones ES

2
US
Owner’s Record
The model and serial numbers are
located on the bottom of the Bar
Speaker. Record the serial numbers in
the space provided below. Refer to
them whenever you call upon your Sony
dealer regarding the Sound Bar.
Model No. HT-SD35
Serial No.
To reduce the risk of fire or electric
shock, do not expose this Sound Bar
to rain or moisture.
The Sound Bar is not disconnected from
the mains as long as it is connected to
the AC outlet, even if the Sound Bar
itself has been turned off.
To reduce the risk of fire, do not cover
the ventilation opening of the Sound
Bar with newspapers, tablecloths,
curtains, etc.
Do not expose the Sound Bar to naked
flame sources (for example, lighted
candles).
To reduce the risk of fire or electric
shock, do not expose this Sound Bar to
dripping or splashing, and do not place
objects filled with liquids, such as vases,
on the Sound Bar.
As the main plug is used to disconnect
the Sound Bar from the mains, connect
the Sound Bar to an easily accessible AC
outlet. Should you notice an
abnormality in the Sound Bar,
disconnect the main plug from the AC
outlet immediately.
Do not install the Sound Bar in a
confined space, such as a bookcase or
built-in cabinet.
CAUTION
Risk of explosion if the battery is
replaced by an incorrect type.
Do not expose batteries or appliances
with battery-installed to excessive heat,
such as sunshine and fire.
Indoor use only.
For the Bar Speaker
The nameplate is located on the bottom
of the Bar Speaker.
Important Safety Instructions
1) Read these instructions.
2) Keep these instructions.
3) Heed all warnings.
4) Follow all instructions.
5) Do not use this apparatus near
water.
6) Clean only with dry cloth.
7) Do not block any ventilation
openings. Install in accordance with
the manufacturer’s instructions.
8) Do not install near any heat sources
such as radiators, heat registers,
stoves, or other apparatus (including
amplifiers) that produce heat.
9) Do not defeat the safety purpose of
the polarized or grounding-type
plug. A polarized plug has two
blades with one wider than the
other. A grounding type plug has
two blades and a third grounding
prong. The wide blade or the third
prong are provided for your safety. If
the provided plug does not fit into
your outlet, consult an electrician for
replacement of the obsolete outlet.
10) Protect the power cord from being
walked on or pinched particularly at
plugs, convenience receptacles, and
the point where they exit from the
apparatus.
11) Only use attachments/accessories
specified by the manufacturer.
12) Use only with the cart, stand, tripod,
bracket, or table specified by the
WARNING

3
US
manufacturer, or sold with the
apparatus. When a cart is used, use
caution when moving the cart/
apparatus combination to avoid
injury from tip-over.
13) Unplug this apparatus during
lightning storms or when unused for
long periods of time.
14) Refer all servicing to qualified service
personnel. Servicing is required
when the apparatus has been
damaged in any way, such as power-
supply cord or plug is damaged,
liquid has been spilled or objects
have fallen into the apparatus, the
apparatus has been exposed to rain
or moisture, does not operate
normally, or has been dropped.
NOTE:
This Sound Bar has been tested and
found to comply with the limits for a
Class B digital device, pursuant to Part
15 of the FCC Rules. These limits are
designed to provide reasonable
protection against harmful interference
in a residential installation. This Sound
Bar generates, uses and can radiate
radio frequency energy and, if not
installed and used in accordance with
the instructions, may cause harmful
interference to radio communications.
However, there is no guarantee that
interference will not occur in a particular
installation. If this Sound Bar does cause
harmful interference to radio or
television reception, which can be
determined by turning the Sound Bar off
and on, the user is encouraged to try to
correct the interference by one or more
of the following measures:
– Reorient or relocate the receiving
antenna.
– Increase the separation between the
Sound Bar and receiver.
– Connect the Sound Bar into an outlet
on a circuit different from that to
which the receiver is connected.
– Consult the dealer or an experienced
radio/TV technician for help.
Properly shielded and grounded cables
and connectors must be used for
connection to host computers and/or
peripherals in order to meet FCC
emission limits.
If you have any questions about this
Sound Bar:
Visit: www.sony.com/support
Contact: Sony Customer Information
Service Center at 1-800-222-SONY
(7669)
Write: Sony Customer Information
Service Center 12451 Gateway Blvd., Fort
Myers, FL 33913
Supplier’s Declaration of Conformity
Trade Name: SONY
Model No.: HT-SD35
Responsible Party: Sony Electronics Inc.
Address: 16535 Via Esprillo, San Diego,
CA 92127 USA
Telephone No.: 858-942-2230
This device complies with Part 15 of the
FCC Rules. Operation is subject to the
following two conditions: (1) This device
may not cause harmful interference,
and (2) this device must accept any
interference received, including
interference that may cause undesired
operation.
CAUTION
You are cautioned that any changes or
modifications not expressly approved in
this manual could void your authority to
operate this Sound Bar.
This Sound Bar must not be co-located
or operated in conjunction with any
other antenna or transmitter.
US

4
US
This Sound Bar complies with FCC
radiation exposure limits set forth for an
uncontrolled environment and meets
the FCC radio frequency (RF) Exposure
Guidelines. This Sound Bar should be
installed and operated keeping the
radiator at least 20cm or more away
from person’s body.

5
US
Table of Contents
About These Operating
Instructions ..............................5
What’s in the Box ..........................6
What You Can Do with the Sound
Bar ............................................ 7
Guide to Parts and Controls ..........8
Connecting a TV
Mounting the Bar Speaker on a
Wall ........................................ 15
When the TV Remote Control does
not Work ................................ 16
Listening to the Sound
Listening to a TV and Other
Devices ...................................17
Adjusting the Sound .................... 18
Listening to Music/Sound
with the BLUETOOTH®
Function
Listening to Music from a Mobile
Device ....................................20
Turning the Sound Bar On by
Operating the BLUETOOTH
Device .................................... 22
Turning the BLUETOOTH Function
Off .......................................... 22
Using the Various Functions
Performing the Wireless Connection
of the Subwoofer
(SECURE LINK) ........................ 23
Using the Control for HDMI
Function .................................24
Using the “BRAVIA” Sync
Function ................................. 25
Notes on HDMI Connections .......26
Saving Power Consumption ........26
Troubleshooting
Troubleshooting .......................... 27
Resetting the Sound Bar .............32
Additional Information
Specifications ...............................33
Supported Input Audio Formats
(TV Input) ...............................34
On BLUETOOTH
Communication .....................35
Precautions ..................................36
About These Operating
Instructions
•The instructions in these Operating
Instructions describe the controls on
the remote control.
•Some illustrations are presented as
conceptual drawings, and may be
different from the actual products.
•The default settings are underlined on
each feature description.
Example: Control for HDMI function on
Connecting a TV
with an HDMI
Cable
Startup Guide
(separate
document)
6
US
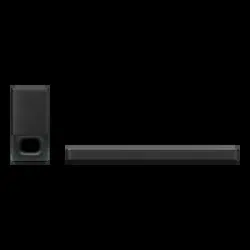
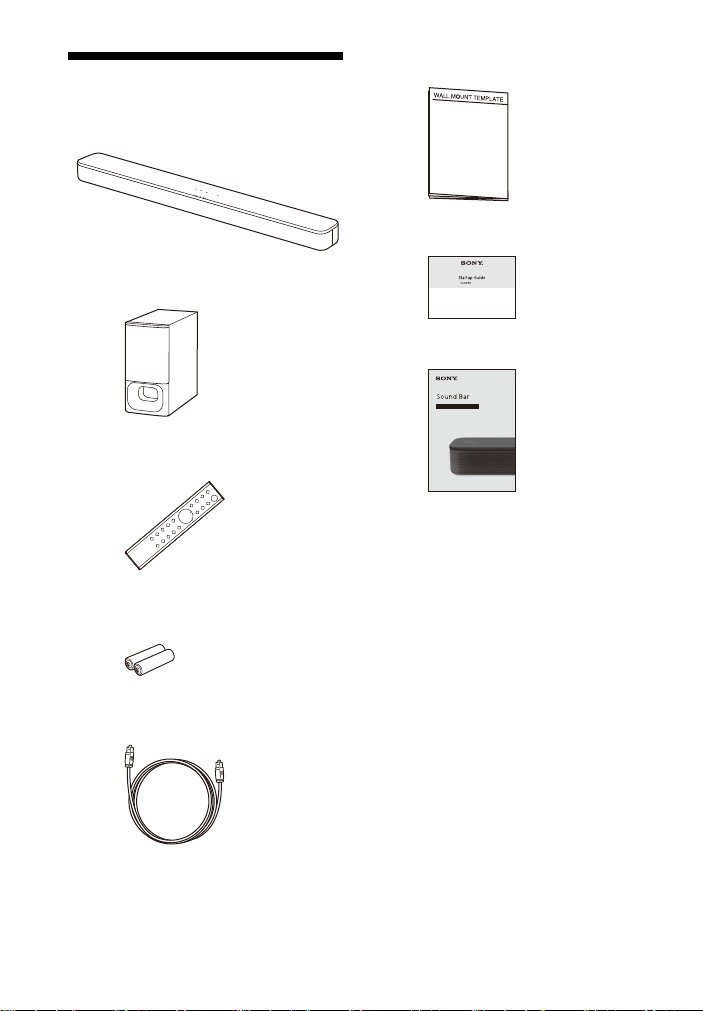
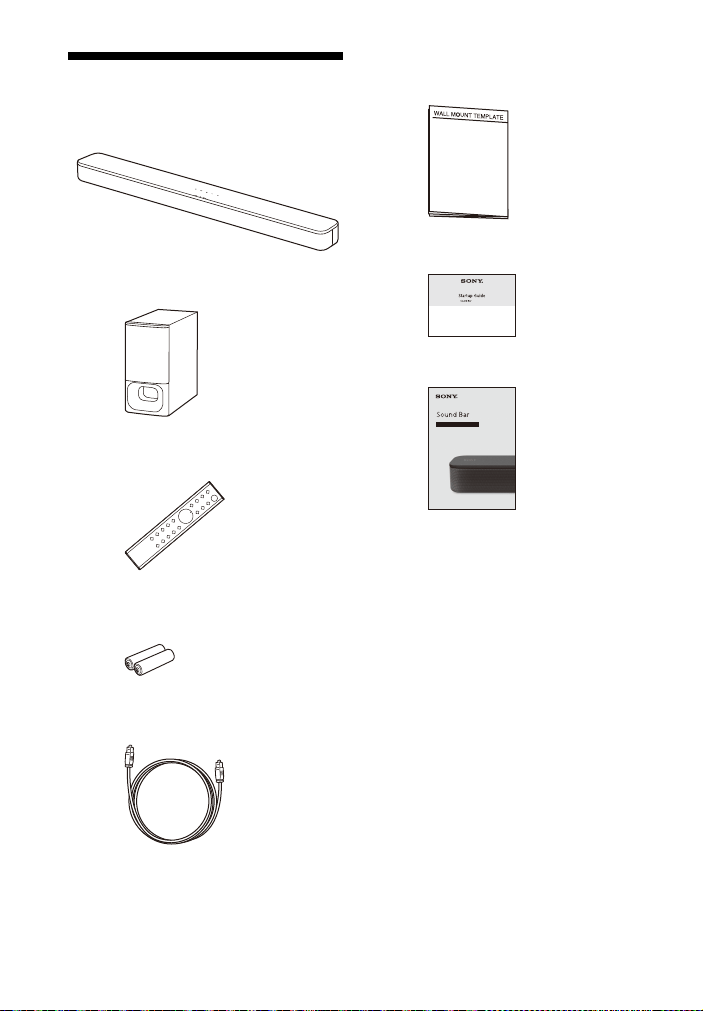
What’s in the Box
•Bar Speaker (1)
•Subwoofer (1)
• Remote control (1)
• R03 (size AAA) battery (2)
• Optical digital cable (1)
• WALL MOUNT TEMPLATE (1)
•Startup Guide
• Operating Instructions

7
US
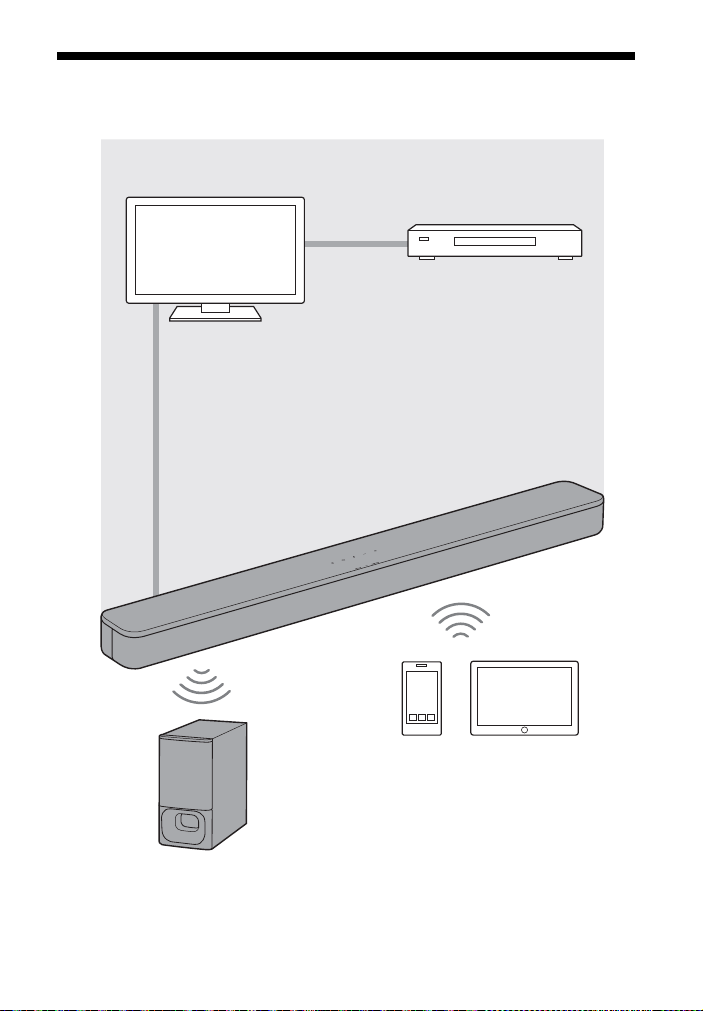
What You Can Do with the Sound Bar
“Listening to a TV and Other
Devices” (page 17)
Blu-ray Disc™ player, cable
box, satellite box, etc.
Connecting the TV
(refer to “Startup Guide” (separate
document))
“Using the Control for HDMI
Function” (page 24)
“Using the “BRAVIA” Sync
Function” (page 25)
“Performing the Wireless
Connection of the Subwoofer
(SECURE LINK)” (page 23)
“Listening to Music from a
Mobile Device” (page 20)
8
US
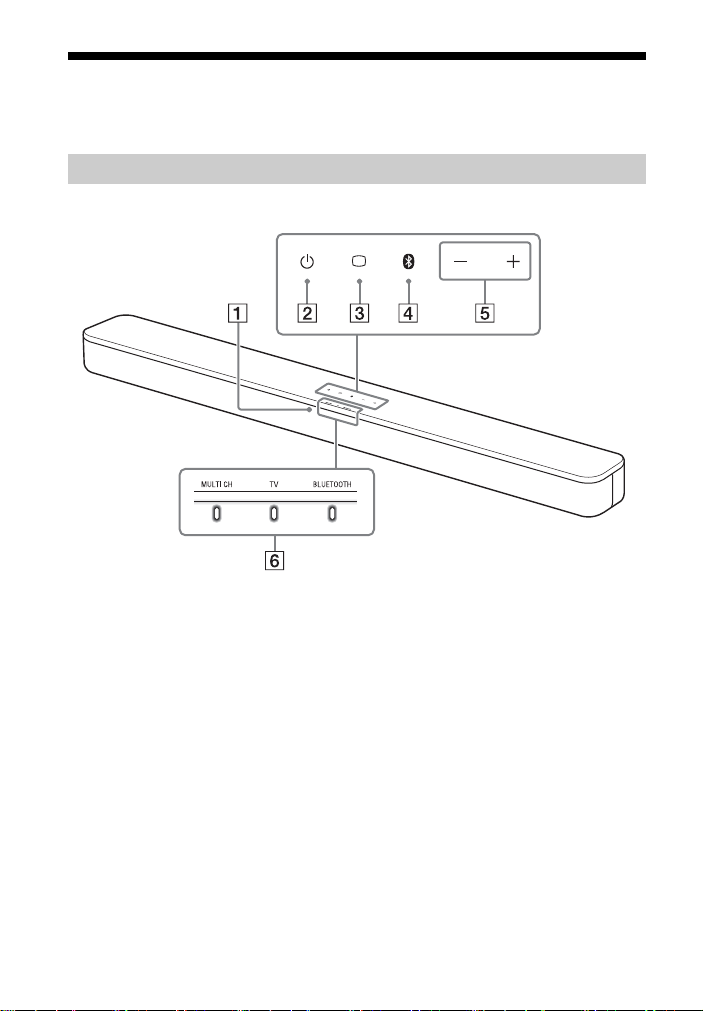
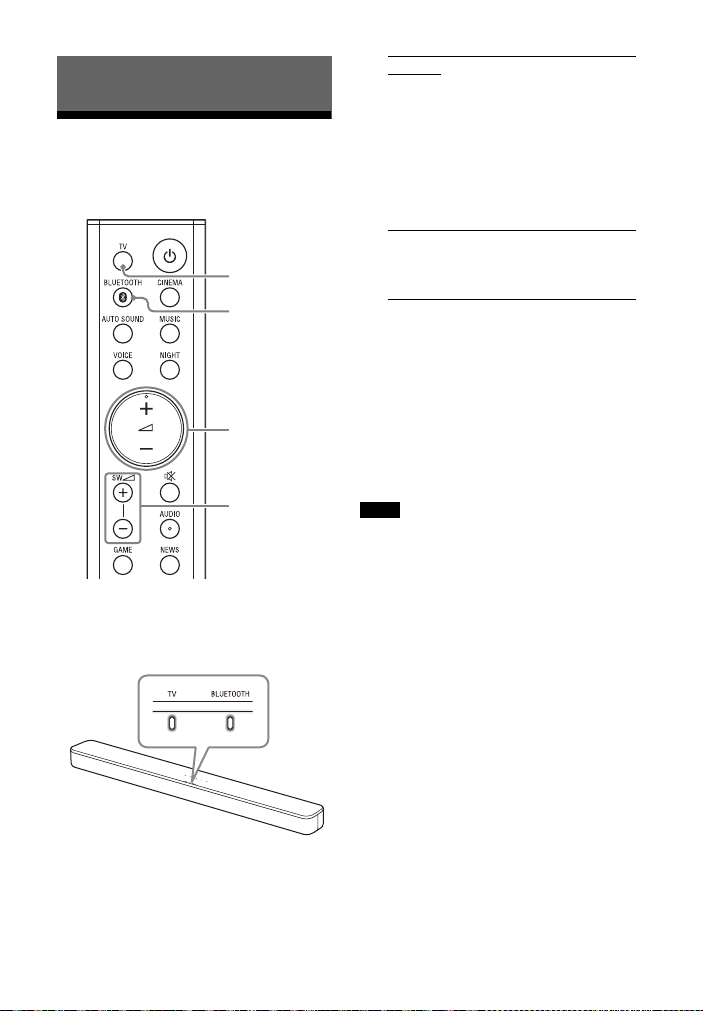
Guide to Parts and Controls
Details are omitted from the illustrations.
Front
Remote control sensor
Point the remote control at the
remote control sensor to operate
the Sound Bar.
(power) button
Turns on the Sound Bar or sets it to
standby mode.
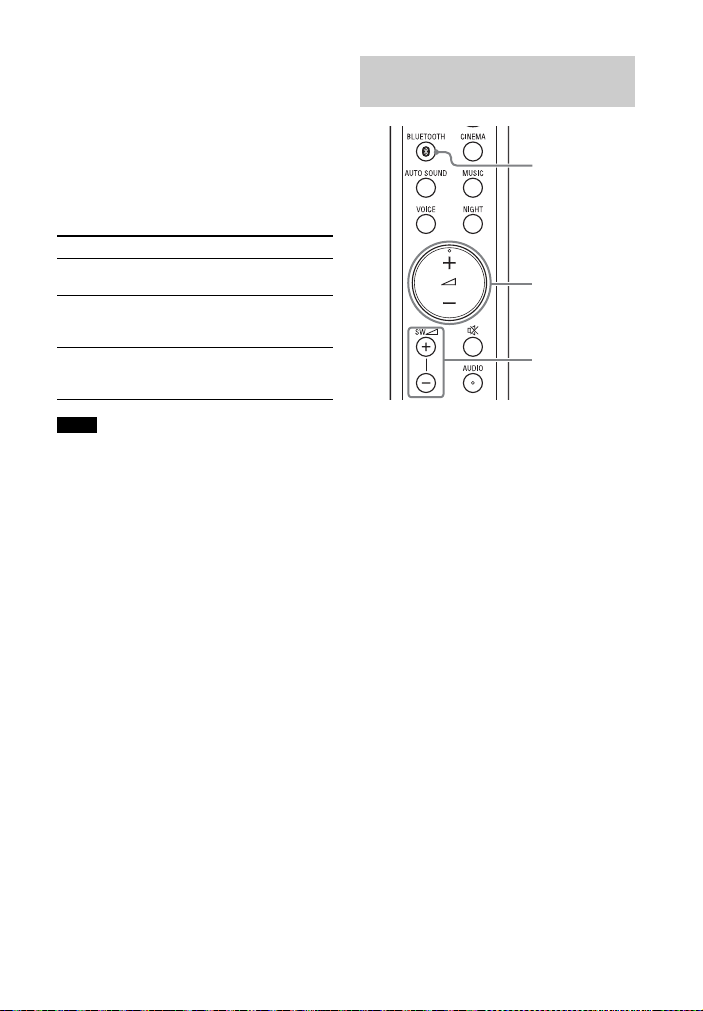
(TV) button (page 17)
BLUETOOTH button (page 20)
+/– (volume) buttons
Bar Speaker
9
US
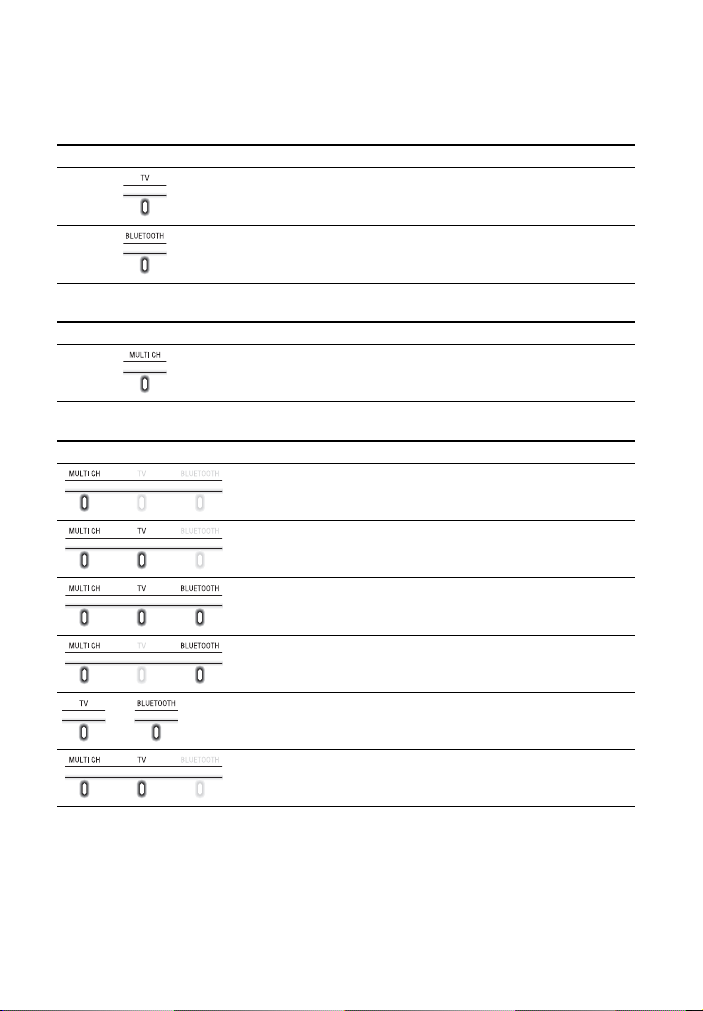
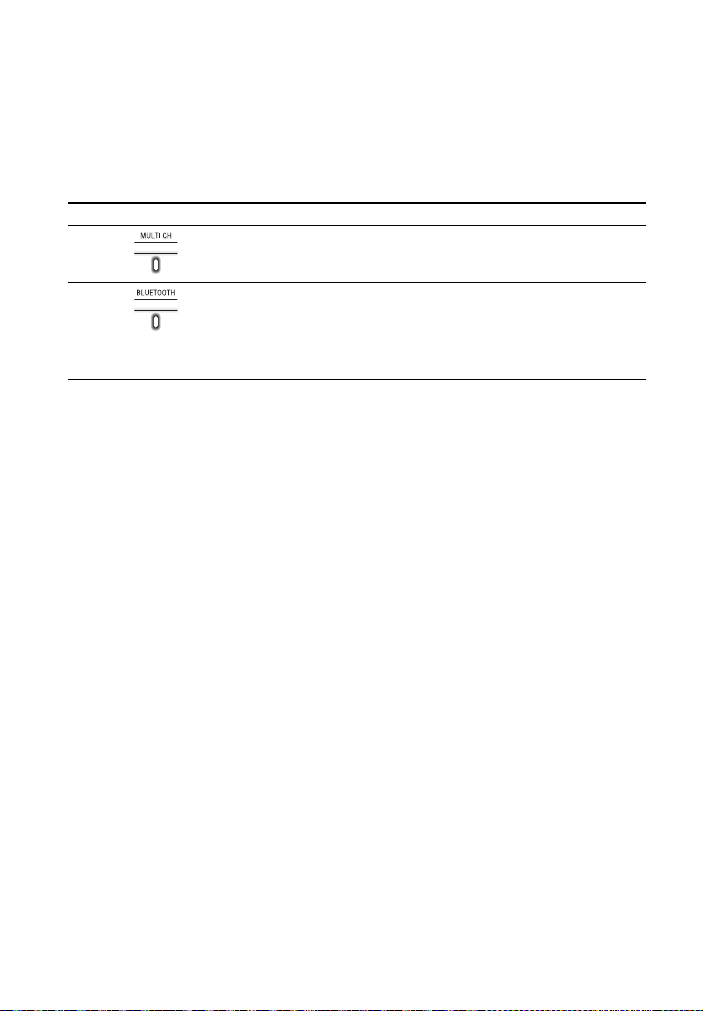
Indicators
A lighting or flashing of the indicators on the Bar Speaker indicates the following
state.
Currently selected input
Sound format, surround effect
Volume
Indicators Status
Lights while TV input is selected.
Lights while BLUETOOTH input is selected.
Indicators Status
• Lights while 5.1ch Multi-channel sound is input.
• Flashes once while the sound mode is selected (page 18).
Indicators Status
Flashes once when the volume level is set to low (1 - 20).
Flash once when the volume level is set to medium (21 - 40).
Flash once when the volume level is set to high (41 - 49).
• Flash repeatedly while the sound is muted.
• Flash twice when the volume level is set to maximum/minimum.
or
The current input indicator flashes once when adjusting the
subwoofer volume by pressing SW
+/–.
Flash three times when the subwoofer volume level is set to
maximum/minimum.

10
US
Setting value for each function
The on/off setting for each function is indicated by the number of times the following
indicator flashes.
• On: Flashes twice.
• Off: Flashes once.
For the indicator status when settings other than the on/off setting are changed, see
the description for each function.
Indicators Functions
•Night mode (page19)
•Voice mode (page19)
•Audio DRC (page19)
• Control for HDMI (page 24)
• BLUETOOTH standby (page 22)
• BLUETOOTH function (page 22)
• Auto standby (page 26)
• IR repeater (page 16)

11
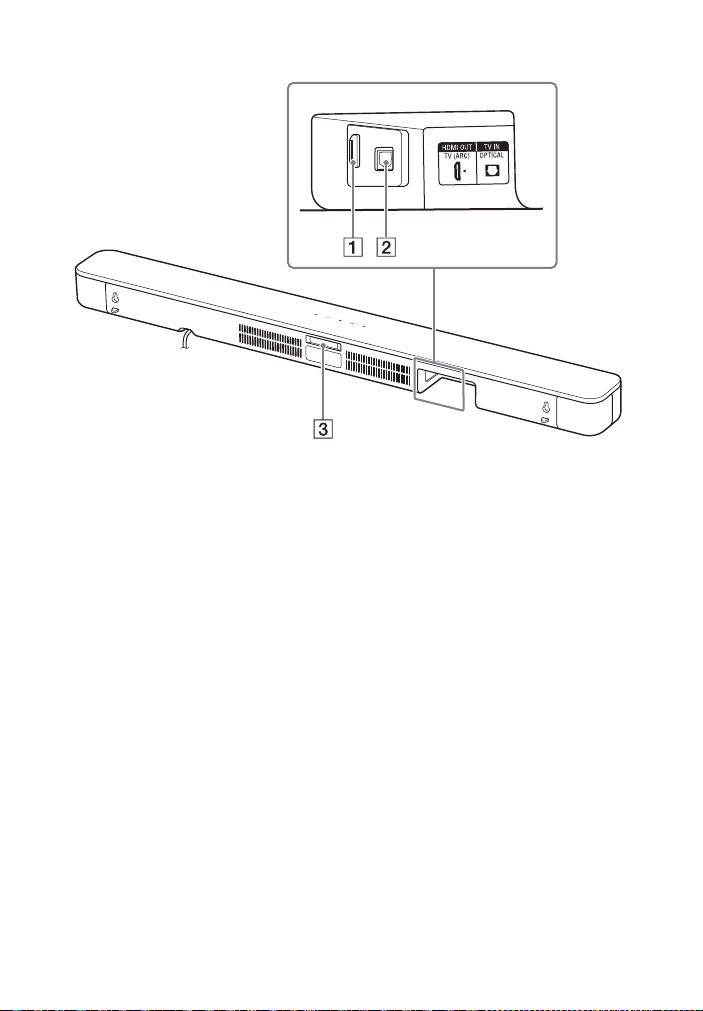
US
Rear
HDMI OUT (TV (ARC)) jack
Connect a TV that has an HDMI
input jack with an HDMI cable (not
supplied).
The Sound Bar is compatible with
ARC (page 24). ARC is the function
that sends TV sound to an AV device
such as the Sound Bar from the TV’s
HDMI input jack.
TV IN (OPTICAL) jack
IR repeater (page 16)
Transmits the remote signal of the
TV remote control to the TV.
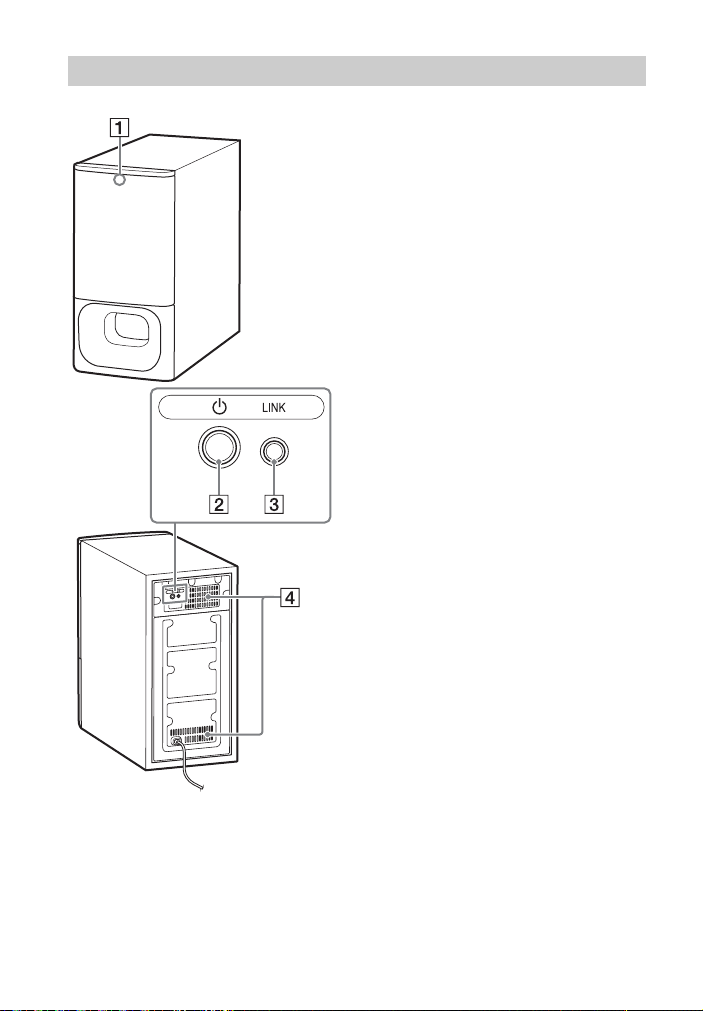
12
US
Status indicator
Indicates the status of the
subwoofer power and Bar Speaker
connection.
– Lights in green: The connection
between the subwoofer and Bar
Speaker is established.
– Flashes in green: The connection
between the subwoofer and Bar
Speaker is in progress.
– Lights in orange: The connection
between the subwoofer and Bar
Speaker is established with the
Secure Link function.
– Flashes in orange: The connection
between the subwoofer and Bar
Speaker with the Secure Link
function is in progress.
– Lights in red: The subwoofer is in
standby mode.
– Lights off: The subwoofer is
turned off.
(power) button
Turns on/off the subwoofer.
LINK button (page 23)
Ventilation holes
For safety, do not block the
ventilation holes.
Subwoofer

13
US
Some buttons function differently
depending on how long the button is
pressed. The icons below indicate how
long to press the button.
• : Press the button.
• : Press and hold the button for 5
seconds.
TV (page 17)
Selects the TV input.
BLUETOOTH (page 17, 21)
Selects the BLUETOOTH input.
AUTO SOUND (page 18)
Selects AUTO SOUND for the sound
effect.
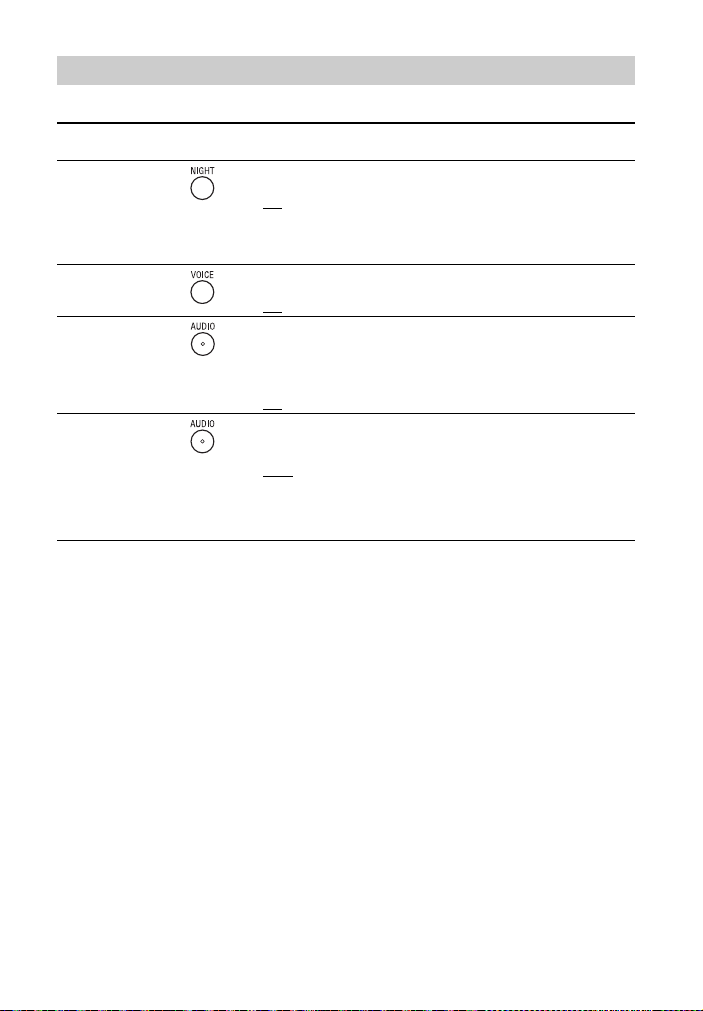
VOICE
: Turns on/off the voice mode.
(page 19)
: Turns on/off the Control for
HDMI function. (page 24)
(volume) +*/–
Adjusts the volume.
SW (subwoofer volume) +/–
Adjusts the volume of the
subwoofer.
GAME (page 18)
Selects GAME for the sound effect.
SPORTS (page 18)
Selects SPORTS for the sound effect.
SECURE LINK (page 23)
: Starts the link setting for the
Secure Link function.
(power)
Turns on the Sound Bar or sets it to
standby mode.
CINEMA (page 18)
Selects CINEMA for the sound
effect.
MUSIC (page 18)
Selects MUSIC for the sound effect.
NIGHT
: Turns on/off the night mode.
(page 19)
: Turns on/off the BLUETOOTH
standby mode. (page 22)
Remote Control

14
US
(muting)
Turns off the sound temporarily or
turns on the sound.
AUDIO*
: Selects the audio channel for
Dolby Digital multiplex broadcast.
(page 19)
: Turns on/off the Audio DRC
function. (page 19)
NEWS (page 18)
Selects NEWS for the sound effect.
STANDARD
: Selects STANDARD for the
sound effect. (page 18)
: Turns on/off the IR repeater
function. (page 16)
INDICATORS
: Turns on/off the indicators on
the Bar Speaker.
: Turns on/off the auto standby
function. (page 26)
*The + and AUDIO buttons have a
tactile dot. Use it as a guide during
operation.
Tip
You can turn the indicators off by pressing
INDICATORS.
Even if the indicators are turned off by
pressing INDICATORS, when you operate
the Sound Bar, the indicators in relation to
the operation light or flash.
About the replacement of
batteries for the remote control
When the Sound Bar does not respond
by operating with the remote control,
replace two batteries with new
batteries.
Use R03 (size AAA) manganese
batteries for replacement.
15
US
Connecting a TV with an
HDMI Cable
Refer to Startup Guide (separate
document).
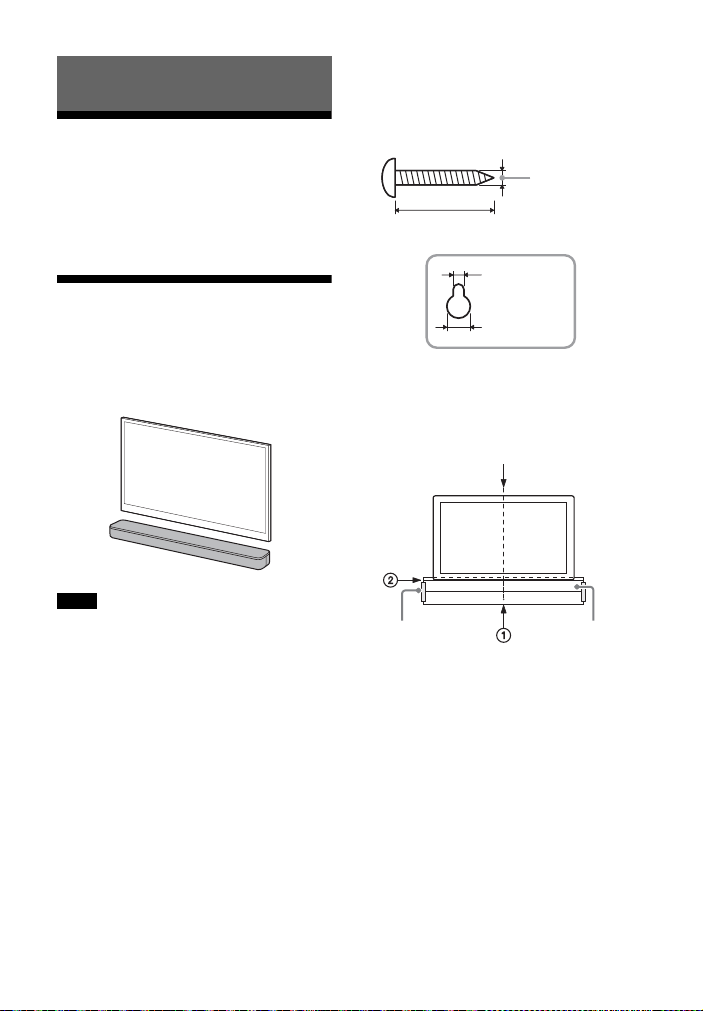
Mounting the Bar
Speaker on a Wall
You can mount the Bar Speaker on a
wall.
• Prepare screws (not supplied) that are
suitable for the wall material and
strength. As a plasterboard wall is
especially fragile, attach the screws
securely in the wall beam. Install the
speakers horizontally, hung by screws in
studs in a continuous flat section of the
wall.
• Have the installation done by a Sony
dealer or licensed contractor and pay
special attention to safety during the
installation.
• Sony shall not be held responsible for
accidents or damage caused by improper
installation, insufficient wall strength,
improper screw installation or natural
disaster, etc.
1 Prepare two screws (not supplied)
that are suitable for the wall
mount holes on the rear of the Bar
Speaker.
2 Stick WALL MOUNT TEMPLATE
(supplied) on a wall.
1 Align TV CENTER LINE () of
WALL MOUNT TEMPLATE with the
center line of your TV.
2 Align TV BOTTOM LINE () of
WALL MOUNT TEMPLATE with the
bottom of your TV, then stick
WALL MOUNT TEMPLATE on a
wall by using a commercially
available adhesive tape, etc.
Connecting a TV
Notes
Hole on the rear of the Bar Speaker
4mm (3/16 in)
More than 30 mm (1 3/16 in)
5 mm
(7/32 in)
10 mm
(13/32 in)
Center of the TV
WALL MOUNT
TEMPLATE
Adhesive tape,
etc.
16
US
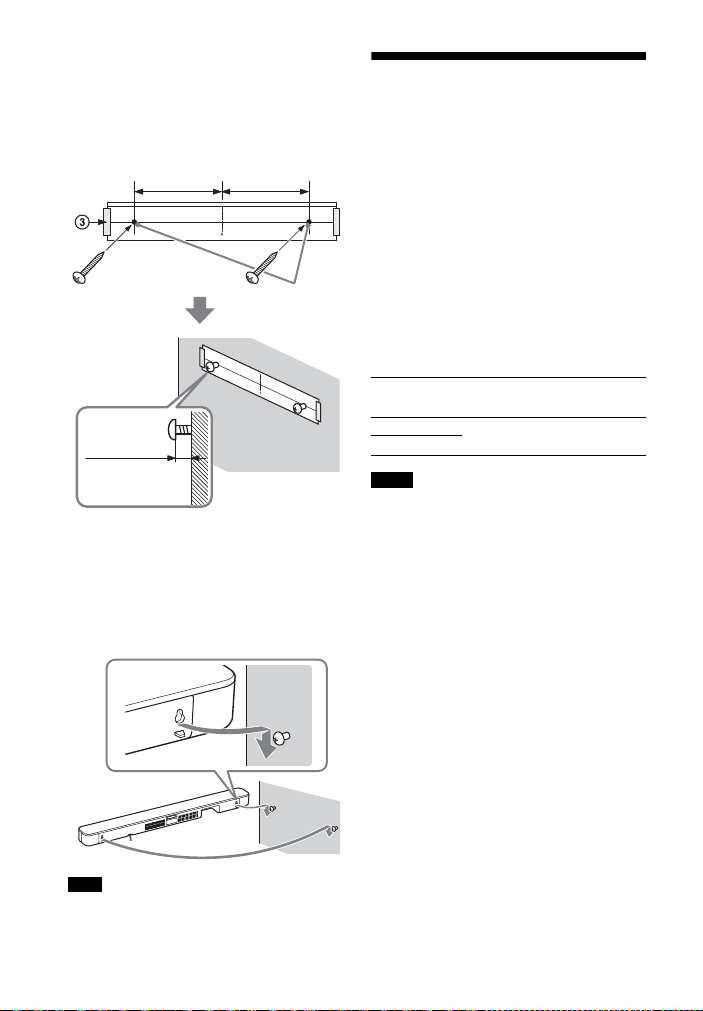
3 Fasten the screws into the marks
() on SCREW LINE () of WALL
MOUNT TEMPLATE as in the
illustration below.
4 Remove WALL MOUNT TEMPLATE.
5 Hang the Bar Speaker on the
screws.
Align the holes of the rear of the Bar
Speaker with the screws, then hang
the Bar Speaker on the two screws.
When sticking WALL MOUNT TEMPLATE,
smooth it out fully.
When the TV Remote
Control does not Work
When the Bar Speaker obstructs the
remote control sensor of the TV, the TV
remote control may not work. In that
case, enable the IR repeater function of
the Sound Bar.
You can control the TV with the TV
remote control by sending the remote
signal from the rear of the Bar Speaker.
Press and hold STANDARD for 5
seconds to set the function to on or
off.
• Be sure to check that the TV remote
control cannot control the TV, and then
set the IR repeater function to on. If it is
set to on when the remote control can
control the TV, appropriate operation
may not be obtained because of the
interference between the direct
command from the remote control and
the command via the Bar Speaker.
• If the IR repeater function is set to on, this
function may not work depending on
your TV. Also, the remote controls of
other devices such as an air conditioner
may not work correctly. In this case,
change the installation position of the Bar
Speaker or TV.
Note
Screws
Marks ()
10 mm to
11 mm
(approx.
7/16 in)
368.5 mm
(14 1/2 in)
368.5 mm
(14 1/2 in)
IR repeater on
The BLUETOOTH indicator flashes twice.
IR repeater off
The BLUETOOTH indicator flashes once.
Notes
17
US
Listening to a TV and
Other Devices
1 Press TV or BLUETOOTH.
The indicator of the selected input
on the Bar Speaker lights.
2 Adjust the volume.
• Adjust the volume by pressing
+/– on the remote control.
• Adjust the subwoofer volume by
pressing SW +/– on the remote
control.
Tip
You can also select the input by pressing
(TV) or BLUETOOTH on the Bar Speaker.
•When the input source does not contain
much bass sound, such as in TV
programs, the bass sound from the
subwoofer may be difficult to hear.
•SW +/– does not work when the
subwoofer is not connected.
Listening to the Sound
TV
+/–
SW +/–
BLUETOOTH
TV input
• TV that is connected to the TV IN
(OPTICAL) jack on the Bar Speaker
• TV compatible with the ARC function
that is connected to the HDMI OUT (TV
(ARC)) jack on the Bar Speaker
When you connect the TV to both the
HDMI OUT (TV (ARC)) and TV IN
(OPTICAL) jacks, the jack for audio input
is selected depending on which audio
signal is input first.
BLUETOOTH input
BLUETOOTH device that supports A2DP
For details, see “Listening to Music from
a Mobile Device” (page 20).
Notes
18
US
Adjusting the Sound
You can easily enjoy pre-programmed
sound effects that are tailored to
different kinds of sound sources.
Press the sound mode selecting
button to select the sound mode.
When selecting the sound mode, the
MULTI CH indicator flashes once.
Enjoying the Sound Effect
that is Tailored to Sound
Sources (Sound Mode)
AUTO SOUND
You can enjoy the sound with Sony-
recommended sound mode. The sound
mode is automatically optimized according
to playback content and function.
CINEMA
MUSIC
AUTO SOUND
NEWS
GAME
STANDARD
SPORTS
CINEMA
Sounds are played back with surround
effects, and they are realistic and powerful,
making them suitable for movies.
MUSIC
Sound effects are optimized for listening to
music.
GAME
Sounds are powerful and realistic,
suitable for game play.
NEWS
Clear speech of newscasts is recreated.
SPORTS
You can experience an atmosphere as if
you were watching an event in a stadium.
However, narrations of commentators are
reproduced vividly.
STANDARD
Sound effects are optimized for each
individual source.
19
US
You can adjust the sound with the buttons on the remote control.
Tip
AUDIO does not work while the BLUETOOTH indicator is lit.
Adjusting the Sound
Function
name
Button Function
Night mode You can enjoy clear sound with low volume at midnight.
• On: The MULTI CH indicator flashes twice.
•Off
: The MULTI CH indicator flashes once.
Note
When you turn the Sound Bar off, the night mode is set to off
automatically.
Voice mode You can make dialogs clearer.
• On: The MULTI CH indicator flashes twice.
•Off
: The MULTI CH indicator flashes once.
Audio DRC
Press and
hold for 5
seconds
You can compress the dynamic range of the audio signal
(range between the maximum and minimum volume) and
sound with low volume is easy to hear. This function works only
when playing the Dolby Digital signal.
• On: The BLUETOOTH indicator flashes twice.
•Off
: The BLUETOOTH indicator flashes once.
Multiplex
broadcast
sound
You can enjoy multiplex broadcast sounds when the Sound Bar
receives a Dolby Digital multiplex broadcast signal. The setting
changes cyclically in the order of Main
Sub Main/Sub.
•Main
: The MULTI CH indicator flashes once.
• Sub: The BLUETOOTH indicator flashes once.
• Main/Sub: Main sound is output from the left speaker and
sub sound is output from the right speaker.
The MULTI CH and BLUETOOTH indicators flash once.
20
US
Listening to Music from
a Mobile Device
You can listen to music stored on a
mobile device such as a smartphone or
tablet via a wireless connection by
connecting the Sound Bar and the
mobile device with the BLUETOOTH
function.
When connecting to the mobile device
with the BLUETOOTH function, you can
operate by simply using the supplied
remote control without turning the TV
on.
To listen to music of the mobile device
with the BLUETOOTH function, you need
to perform pairing of the Sound Bar and
mobile device.
Pairing is the process required to
mutually register the information on
BLUETOOTH devices to be connected
wirelessly in advance.
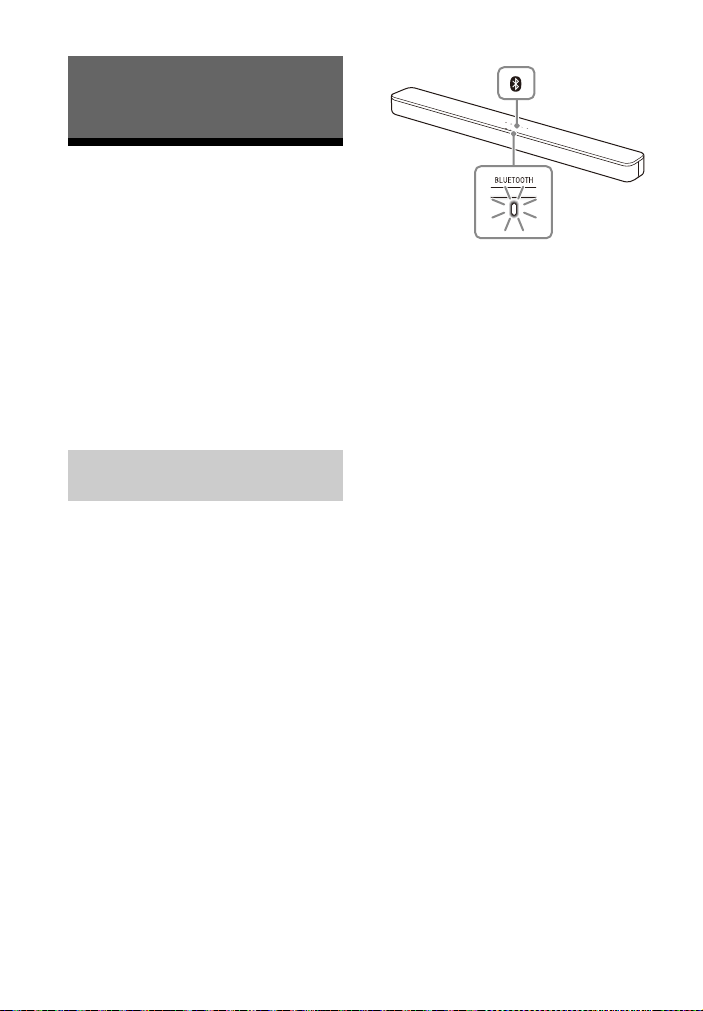
1 Press and hold the BLUETOOTH
button on the Bar Speaker for 2
seconds.
The Sound Bar enters the pairing
mode and the BLUETOOTH indicator
flashes quickly.
If pairing is not performed for 5
minutes after the Sound Bar enters
the pairing mode, the pairing mode
is canceled. In this case, perform
pairing from the start.
2 On the mobile device, search the
Sound Bar by performing the
pairing operation.
The list of the BLUETOOTH devices
that are searched appears on the
screen of the mobile device.
For the operation method to pair
the BLUETOOTH device to the
mobile device, refer to the
operating instructions of the mobile
device.
3 Pair the Sound Bar and mobile
device by selecting “HT-SD35”
from the list on the screen of the
mobile device.
If a Passkey is requested, enter
“0000.”
4 Make sure that the BLUETOOTH
indicator on the Bar Speaker lights
in blue.
A connection between the Sound
Bar and mobile device has been
established.
5 Start audio playback with the
music app on the connected
mobile device.
Sound is output from the Sound Bar.
Listening to Music/Sound with the
BLUETOOTH® Function
Listening to Music by Pairing
with a Mobile Device
BLUETOOTH
indicator
BLUETOOTH
button
21
US
6 Adjust the volume.
• Adjust the volume by pressing
+/– on the remote control.
• Adjust the subwoofer volume by
pressing SW +/– on the remote
control.
To check the connection status of
the BLUETOOTH function
• You can pair up to 10 BLUETOOTH
devices. If a new device is paired after
pairing the above number of devices, the
least recent connected device will be
replaced by the new one.
• Perform pairing for the second and
subsequent mobile devices.
Tips
• You can check the connection status of
the BLUETOOTH function by checking the
BLUETOOTH indicator status.
• While the BLUETOOTH input is being
selected, the Sound Bar enters the pairing
mode by pressing the BLUETOOTH button
on the Bar Speaker shortly.
• While the BLUETOOTH input is not
selected, the Sound Bar automatically
reconnects to the BLUETOOTH device it
was most recently connected to by
pressing the BLUETOOTH button on the
Bar Speaker shortly.
1 Turn the BLUETOOTH function of
the mobile device on.
2 Press BLUETOOTH.
The BLUETOOTH indicator flashes
and the Bar Speaker automatically
reconnects to the BLUETOOTH
device it was most recently
connected to.
3 Make sure that the BLUETOOTH
indicator lights in blue.
A connection between the Sound
Bar and mobile device has been
established.
4 Start audio playback with the
music app on the connected
mobile device.
Sound is output from the Sound Bar.
5 Adjust the volume.
• Adjust the volume by pressing
+/– on the remote control.
• Adjust the subwoofer volume by
pressing SW +/– on the remote
control.
Status BLUETOOTH indicator
During pairing
standby status
Flashes quickly in blue
Connection is
being
attempted
Flashes in blue
Connection has
been
established
Lights in blue
Notes
Listening to Music from the
Paired Mobile Device
BLUETOOTH
+/–
SW +/–

22
US
Turning the Sound Bar On
by Operating the
BLUETOOTH Device
When the Sound Bar has pairing
information, you can turn the Sound Bar
on and listen to music from a
BLUETOOTH device even when the
Sound Bar is in standby mode by setting
the BLUETOOTH standby mode to on.
Press and hold NIGHT for 5 seconds to
set the function to on or off.
While the BLUETOOTH standby mode is on,
standby power consumption increases.
Turning the BLUETOOTH
Function Off
You can turn the BLUETOOTH function off.
Press and hold , , and – on the Bar
Speaker for 10 seconds to set the
function to on or off.
BLUETOOTH standby mode on
The BLUETOOTH indicator flashes twice.
BLUETOOTH standby mode off
The BLUETOOTH indicator flashes once.
Note
BLUETOOTH function on
The BLUETOOTH indicator flashes twice.
BLUETOOTH function off
The BLUETOOTH indicator flashes once.

23
US
Performing the Wireless
Connection of the
Subwoofer (SECURE LINK)
You can specify the wireless connection
to link the Bar Speaker to the subwoofer
using the Secure Link function. We
recommend to perform the Secure Link
function to prevent interference if you
use multiple same products or your
neighbors use same products.
1 Press LINK on the rear of the
subwoofer.
The status indicator of the
subwoofer flashes in orange.
Proceed to the next step within 2
minutes.
2 Press and hold SECURE LINK on
the remote control for 5 seconds.
The link setting starts.
The MULTI CH and TV indicators
flash twice, then the indicators flash
alternately.
3 Make sure that the MULTI CH and
TV indicators stop flashing and the
status indicator of the subwoofer
lights in orange.
A connection between the Bar
Speaker and subwoofer has been
established.
If it fails, the MULTI CH and TV
indicators light for 5 seconds. In this
case, perform the Secure Link
operation again.
To deactivate the Secure Link
function
Press and hold SECURE LINK for 5
seconds.
The MULTI CH indicator flashes twice.
Using the Various Functions
LINK
Status indicator
SECURE LINK

24
US
Using the Control for
HDMI Function
Connecting a device such as a TV or Blu-
ray Disc player compatible with the
Control for HDMI function* using an
HDMI cable enables you to easily
operate the device by using a TV or Blu-
ray Disc player remote control.
These functions may work with devices
other than those manufactured by Sony,
but operation is not guaranteed.
* Control for HDMI is a standard used by
CEC (Consumer Electronics Control) for
allowing HDMI (High-Definition
Multimedia Interface) devices to control
each other.
Press and hold VOICE for 5 seconds to
set the function to on or off.
Enable the Control for HDMI function
settings for the TV and other device
connected to the TV.
When you turn off the TV, the Sound Bar
will turn off automatically.
If you turn on the Sound Bar while you
are watching the TV, the TV sound will
be output from the speakers of the
Sound Bar. The volume of the Sound Bar
can be adjusted using the TV remote
control.
When you turn on the TV, the Sound Bar
is turned on automatically and the TV
sound is output from the speakers of
the Sound Bar.
Operations can also be made by the
TV’s menu. For details, refer to the
operating instructions of your TV.
• The number for the volume level of the
Sound Bar is displayed on the TV screen
depending on the TV.
• Depending on the settings of the TV, the
System Audio Control function may not
be available. For details, refer to the
operating instructions of your TV.
• Depending on the TV, if the TV sound was
output from the speakers of the TV the
previous time you watched the TV, the
Sound Bar may not turn on by interlocking
with the TV power even if the TV is turned
on.
If the Sound Bar is connected to a TV’s
HDMI IN jack compatible with ARC, you
can listen to TV sound from the speakers
of the Sound Bar without connecting an
optical digital cable.
If the TV is not compatible with ARC, the
optical digital cable (supplied) needs to be
connected (refer to the supplied Startup
Guide).
Note
Preparing to Use the Control
for HDMI Function
Control for HDMI function on
The BLUETOOTH indicator flashes twice.
Control for HDMI function off
The BLUETOOTH indicator flashes once.
System Power Off Function
System Audio Control
Function
Notes
ARC (Audio Return Channel)
Note

25
US
When you play content on a device (Blu-
ray Disc player, “PlayStation
®
4,” etc.)
connected to the TV, the Sound Bar and
TV are turned on automatically, the
input of the Sound Bar is switched to TV
input, and sound is output from the
speakers of the Sound Bar.
• If the TV sound was output from the
speakers of the TV the previous time you
watched the TV, the Sound Bar may not
turn on and the sound and picture may be
output from the TV even if device content
is played.
• Depending on the TV, the beginning part
of content being played may not play
correctly.
Using the “BRAVIA” Sync
Function
In addition to the Control for HDMI
function, you can also use the “BRAVIA”
sync function such as the Sound mode/
Scene Select function.
This function is proprietary function of
Sony. This function cannot operate with
products other than those manufactured
by Sony.
The sound mode of the Sound Bar is
automatically switched according to the
setting of the TV’s Scene Select function
or sound mode. For details, refer to the
operating instructions of your TV.
Set the sound mode to AUTO SOUND
(page 18).
One-Touch Play Function
Notes
Note
Sound mode/Scene Select
Function

26
US
Notes on HDMI
Connections
• Use an HDMI-authorized cable.
• We recommend using a Sony High
Speed HDMI Cable with Ethernet with
the Cable Type Logo.
• We do not recommend using an
HDMI-DVI conversion cable.
• Audio signals (sampling frequency, bit
length, etc.) transmitted from an HDMI
jack may be suppressed by the
connected device.
Saving Power
Consumption
To use the Sound Bar while saving
power consumption, change the
following settings.
When you set the auto standby function
to on, the Sound Bar enters standby
mode automatically when you do not
operate the Sound Bar for about 20
minutes and the Sound Bar is not
receiving an input signal.
Press and hold INDICATORS for 5
seconds to set the function to on or
off.
To save power consumption during the
standby mode, set the BLUETOOTH
standby mode (page 22) and Control for
HDMI function (page 24) to off.
The default settings for them are on.
Turn the Sound Bar Off by
Detecting the Using State
Auto standby on
The BLUETOOTH indicator flashes twice.
Auto standby off
The BLUETOOTH indicator flashes once.
Saving Power in Standby
Mode

27
US
Troubleshooting
If you experience any of the following
difficulties while using the Sound Bar,
use this troubleshooting guide to help
remedy the problem before requesting
repairs. Should any problem persist,
consult your nearest Sony dealer.
Be sure to bring both your Bar Speaker
and subwoofer, even if it seems as
though only one has a problem, when
you request to repair.
The Sound Bar does not power up.
Check that the AC power cord (mains
lead) is connected securely.
Disconnect the AC power cord (mains
lead) from the wall outlet (mains),
and then reconnect after several
minutes.
The Sound Bar is turned off
automatically.
The auto standby function is working.
Set the auto standby function to off
(page 26).
The Sound Bar does not turn on
even when the TV is turned on.
Set the Control for HDMI function to
on (page 24). The TV must support
the Control for HDMI function. For
details, refer to the operating
instructions of your TV.
Check the speaker settings of the TV.
The Sound Bar power syncs with the
speaker settings of the TV. For details,
refer to the operating instructions of
your TV.
Depending on the TV, if the sound
was output from the speakers of the
TV the previous time, the Sound Bar
may not turn on by interlocking with
the TV power even when the TV is
turned on.
The Sound Bar turns off when the
TV is turned off.
Check the setting of the Control for
HDMI function (page 24). When the
Control for HDMI function is set to on
and the input of the Sound Bar is the
TV input, the Sound Bar turns off
automatically when you turn off the
TV.
The Sound Bar does not turn off
even when the TV is turned off.
Check the setting of the Control for
HDMI function (page 24). When you
turn off the TV, the Sound Bar turns
off automatically only if the input of
the Sound Bar is the TV input. The TV
must support the Control for HDMI
function. For details, refer to the
operating instructions of your TV.
There is no picture or the picture is
not output correctly.
When there is no picture while TV
input is selected, select the TV
channel that you want using the TV
remote control.
No TV sound is output from the
Sound Bar.
Check the type and connection of the
HDMI cable or optical digital cable
that is connected to the Sound Bar
and the TV (refer to the supplied
Startup Guide).
Disconnect the cables that are
connected between the TV and the
Sound Bar, then connect them firmly
again. Disconnect the AC power cords
of the TV and the Sound Bar from the
Troubleshooting
Power
Picture
Sound

28
US
AC outlets (mains), then connect
them again.
When the Sound Bar and TV are
connected with an HDMI cable only,
check the following.
– The HDMI jack of the connected TV
is labeled with “ARC.”
– The Control for HDMI function of the
TV is set to on.
– On the Sound Bar, the Control for
HDMI function is set to on (page 24).
If your TV is not compatible with ARC,
connect the optical digital cable
(supplied) (refer to the supplied
Startup Guide). If the TV is not
compatible with ARC, TV sound will
not be output from the Sound Bar
even if the Sound Bar is connected to
the TV’s HDMI IN jack.
Select the TV input by pressing TV
(page 17).
Increase the volume on the TV or
cancel muting.
Depending on the order in which you
connect the TV and the Sound Bar,
the Sound Bar may be muted. If this
happens, turn on the TV first, then the
Sound Bar.
Set the speakers setting of the TV
(BRAVIA) to Audio System. Refer to
the operating instructions of your TV
regarding how to set the TV.
Check the sound output of the TV.
Refer to the operating instructions of
the TV for the TV settings.
The Sound Bar supports the Dolby
Digital and PCM audio formats
(page 34). When you playback an
unsupported format, set the digital
audio out setting of the TV (BRAVIA)
to “PCM.” For details, refer to the
operating instructions of your TV.
The sound is output from both the
Sound Bar and the TV.
Change the audio output setting of
the TV so that the TV sound is output
from the external speaker.
Set the TV volume to minimum.
The output sound of the Sound Bar
is not the same level as that of the
TV even though the values of the
volume level on the Sound Bar and
TV are set to the same value.
If the Control for HDMI function is set
to on, the value of the volume level
on the Sound Bar may appear on your
TV as the TV volume. The output
sound levels of the Sound Bar and TV
differ even though the values of the
volume level on the Sound Bar and TV
are set to the same value. The output
sound levels of the Sound Bar and TV
differ depending on the sound
processing characteristics of each,
and it is not a malfunction.
The sound is interrupted while
watching a TV program or content
on a Blu-ray Disc, etc.
Check the sound mode setting
(page 18). If the sound mode is set to
AUTO SOUND, the sound may be
interrupted when the sound mode is
changed automatically according to
the information of the program that is
being played. If you do not want to
change the sound mode
automatically, set the sound mode to
a setting other than AUTO SOUND.
No sound or only a very low-level
sound of the device connected to
the Sound Bar is heard from the
Sound Bar.
Press + and check the volume
level (page 13).
Press
or + to cancel the muting
function (page 13).
Make sure the input source is
selected correctly (page 17).
Check that all the cables and cords of
the Sound Bar and the connected
device are firmly inserted.
If the connected device supports up-
sampling feature, you need to turn it
off.

29
US
The surround effect cannot be
obtained.
Depending on the input signal and
the sound mode setting, surround
sound processing may not work
effectively. The surround effect may
be subtle, depending on the program
or disc.
To play multi channel audio, check
the digital audio output setting on
the device connected to the Sound
Bar. For details, refer to the operating
instructions supplied with the
connected device.
No sound or only very low-level
sound is heard from the subwoofer.
Press SW + on the remote control
to increase the subwoofer volume.
Make sure that the status indicator on
the subwoofer is lit in green or
orange.
If the status indicator on the
subwoofer does not light, try the
following.
– Make sure the AC power cord
(mains lead) of the subwoofer is
connected properly.
–Press (power) of the subwoofer
to turn on the power.
If the status indicator on the
subwoofer lights in red, try the
following.
– Move the subwoofer to a location
near the Bar Speaker so that the
status indicator on the subwoofer
lights in green or orange.
– Follow the steps in “Performing the
Wireless Connection of the
Subwoofer (SECURE LINK)”
(page 23).
If the status indicator on the
subwoofer flashes in red, press
(power) of the subwoofer to turn off
the power and check whether the
ventilation holes of the subwoofer is
blocked or not.
If the input sources contain very little
bass sound components (i.e., a TV
broadcast), the sound from the
subwoofer may be difficult to hear.
Play the built-in demonstration music
by following the steps below and
check that the sound is output from
the subwoofer.
Press and hold (TV) on the Bar
Speaker for 5 seconds.
The built-in demonstration music
is played.
Press (TV) again.
The built-in demonstration music
is canceled and the Sound Bar
returns to the previous status.
Set the night mode to off (page 19).
BLUETOOTH connection cannot be
completed.
Make sure that the BLUETOOTH
indicator on the Bar Speaker is lit
(page 8).
Make sure the BLUETOOTH device to
be connected is turned on and the
BLUETOOTH function is enabled.
Bring the BLUETOOTH device close to
the Bar Speaker.
Pair the Sound Bar and the
BLUETOOTH device again. You may
need to cancel the pairing with the
Sound Bar using your BLUETOOTH
device first.
If the BLUETOOTH function is set to
off, set it to on (page 22).
Pairing cannot be achieved.
Bring the BLUETOOTH device close to
the Bar Speaker.
Make sure the Sound Bar is not
receiving interference from a wireless
LAN device, other 2.4 GHz wireless
devices, or a microwave oven. If a
device that generates
Subwoofer
Mobile Device Connection

30
US
electromagnetic radiation is nearby,
move the device away from the
Sound Bar.
Pairing may not be possible if other
BLUETOOTH devices are present
around the Sound Bar. In this case,
turn off the other BLUETOOTH
devices.
Sound of the connected
BLUETOOTH mobile device is not
output from the Sound Bar.
Make sure that the BLUETOOTH
indicator on the Bar Speaker is lit
(page 8).
Bring the BLUETOOTH device close to
the Bar Speaker.
If a device that generates
electromagnetic radiation, such as a
wireless LAN device, other
BLUETOOTH devices, or a microwave
oven is nearby, move the device away
from the Sound Bar.
Remove any obstacle between the
Bar Speaker and the BLUETOOTH
device or move the Bar Speaker away
from the obstacle.
If the Bar Speaker is installed under
the TV, move the Bar Speaker away
from the TV.
Reposition the connected
BLUETOOTH device.
Switch the wireless LAN frequency of
any nearby wireless LAN router or PC
to 5 GHz range.
Increase the volume on the
connected BLUETOOTH device.
The sound is not in sync with the
image.
When you are watching movies, you
may hear the sound with a slight
delay from the image.
The remote control of the Sound Bar
does not function.
Point the remote control at the
remote control sensor on the Bar
Speaker (page 8).
Remove any obstacles in the path
between the remote control and the
Sound Bar.
Replace both batteries in the remote
control with new ones, if they are
weak.
Make sure you are pressing the
correct button on the remote control
(page 13).
The TV remote control does not
work.
Install the Bar Speaker so that it does
not obstruct the remote control
sensor of the TV.
This problem might be solved by
enabling the IR repeater function
(page 16).
The Control for HDMI function does
not work properly.
Check the connection with the Sound
Bar (refer to the supplied Startup
Guide).
Enable the Control for HDMI function
on the TV. For details, refer to the
operating instructions of your TV.
Wait a while, and then try again. If
you unplug the Sound Bar, it will take
a while before operations can be
made. Wait for 15 seconds or longer,
and then try again.
Make sure the devices connected to
the Sound Bar support the Control for
HDMI function.
Enable the Control for HDMI function
of the devices connected to the
Remote Control
Others

31
US
Sound Bar. For details, refer to the
operating instructions of your device.
The type and number of devices that
can be controlled by the Control for
HDMI function is restricted by the
HDMI CEC standard as follows:
– Recording devices (Blu-ray Disc
recorder, DVD recorder, etc.): up to
3 devices
– Playback devices (Blu-ray Disc
player, DVD player, etc.): up to 3
devices
– Tuner-related devices: up to 4
devices
– Audio system (receiver/
headphone): up to 1 device (used by
the Sound Bar)
All indicators on the Bar Speaker
flash for 10 seconds and the Sound
Bar is turned off.
The protection feature is activated.
Disconnect the AC power cord (mains
lead) and make sure that the
ventilations of the Bar Speaker are
not covered and turn on the Sound
Bar after a while.
Sensors of the TV do not work
properly.
The Bar Speaker may block some
sensors (such as the brightness
sensor), the remote control sensor of
your TV or the emitter for 3D glasses
(infrared transmission) of a 3D TV that
supports the infrared 3D glass
system, or wireless communication.
Move the Bar Speaker away from the
TV within a range that allows those
parts to operate properly. For the
locations of the sensors and remote
control receiver, refer to the
operating instructions supplied with
the TV.
The Sound Bar does not work
properly.
The Sound Bar may be in demo
mode. To cancel demo mode, reset
the Sound Bar. Press and hold –
(volume) and (power) on the Bar
Speaker for more than 5 seconds
(page 32).
The following message appears.
* This screen is an example for English.
Select the TV program by using the TV
remote control.

32
US
Resetting the Sound Bar
If the Sound Bar still does not operate
properly, reset the Sound Bar as
follows.
1 Press and hold – (volume) and
(power) on the Bar Speaker for
more than 5 seconds.
All indicators on the Bar Speaker
flash 3 times, and the settings
return to their initial status.
2 Disconnect the AC power cord
(mains lead).
3 Connect the AC power cord (mains
lead), then press to turn on the
Sound Bar.
Tip
The default settings are underlined on
each feature description.

33
US
Specifications
Amplifier section
POWER OUTPUT AND TOTAL HARMONIC
DISTORTION:
(FTC)
Front L + Front R:
With 4 ohms loads, both channels
driven, from 200 - 20,000 Hz; rated
18 W per channel minimum RMS
power, with no more than 1% total
harmonic distortion from 250 mW to
rated output.
POWER OUTPUT (reference)
Front L/Front R speaker: 85 W (per
channel at 4 ohms, 1 kHz)
Inputs
TV IN (OPTICAL)
Outputs
HDMI OUT (TV (ARC))
BLUETOOTH section
Communication system
BLUETOOTH Specification version 5.0
Output
BLUETOOTH Specification Power
Class 1
Maximum communication range
Line of sight approx. 25 m
1)
Frequency band
2.4 GHz band (2.4000 GHz -
2.4835 GHz)
Modulation method
FHSS (Freq Hopping Spread Spectrum)
Compatible BLUETOOTH profiles
2)
A2DP (Advanced Audio Distribution
Profile)
AVRCP (Audio Video Remote Control
Profile)
Supported Codec
3)
SBC
4)
Transmission range (A2DP)
20 Hz - 20,000 Hz (Sampling frequency
32 kHz, 44.1 kHz, 48 kHz)
1)
The actual range will vary depending on
factors such as obstacles between
devices, magnetic fields around a
microwave oven, static electricity,
cordless phone use, reception
sensitivity, the operating system,
software applications, etc.
2)
BLUETOOTH standard profiles indicate
the purpose of BLUETOOTH
communication between devices.
3)
Codec: Audio signal compression and
conversion format
4)
Abbreviation for Subband Codec
Front L/Front R speaker block section
Speaker system
2 Speaker System
Speaker
Front L/Front R speaker: 52 mm ×
90 mm (2 1/8 in × 3 5/8 in) cone type,
4Ω
General
Power requirements
120 V AC, 60 Hz
Power consumption
On: 30 W
Standby mode: 0.5 W or less (Power
Saving mode)
(When Control for HDMI function and
BLUETOOTH Standby mode are set to
off)
Standby mode: 2 W or less*
(When Control for HDMI function and
BLUETOOTH Standby mode are set to
on)
* The Sound Bar will automatically
enter Power saving mode when
there is no HDMI connection and no
BLUETOOTH pairing history.
Dimensions* (approx.) (w/h/d)
900 mm × 64 mm × 88 mm (35 1/2 in ×
2 5/8 in × 3 1/2 in)
* Not including projection portion
Mass (approx.)
2.4 kg (5 lb 4 7/10 oz)
Additional Information
Bar Speaker (SA-SD35)

34
US
POWER OUTPUT (reference)
150 W (at 2.5 ohms, 100 Hz)
Speaker system
Subwoofer speaker system, Bass
reflex
Speaker
160 mm (6 1/2 in) cone type
Power requirements
120 V AC, 60 Hz
Power consumption
On: 25 W
Standby mode: 0.5 W or less
Dimensions* (approx.) (w/h/d)
190 mm × 382 mm × 390 mm (7 1/2 in ×
15 1/8 in × 15 3/8 in)
* Not including projection portion
Mass (approx.)
7.8 kg (17 lb 3 1/5 oz)
Frequency band
2.4 GHz (2.4000 GHz - 2.4835 GHz)
Modulation method
FHSS (Freq Hopping Spread Spectrum)
Design and specifications are subject to
change without notice.
Supported Input Audio
Formats (TV Input)
Audio formats supported by the Sound
Bar are as follows.
•Dolby Digital
•Linear PCM 2ch
Subwoofer (SA-WSD35)
Wireless Transmitter/
Receiver Section

35
US
On BLUETOOTH
Communication
• BLUETOOTH devices should be used
within approximately 10 meters
(33 feet) (unobstructed distance) of
each other. The effective
communication range may become
shorter under the following
conditions.
– When a person, metal object, wall or
other obstruction is between the
devices with a BLUETOOTH
connection
– Locations where a wireless LAN is
installed
– Around microwave ovens that are in
use
– Locations where other
electromagnetic waves occur
• BLUETOOTH devices and wireless LAN
(IEEE 802.11b/g/n) use the same
frequency band (2.4 GHz). When using
your BLUETOOTH device near a device
with wireless LAN capability,
electromagnetic interference may
occur. This could result in lower data
transfer rates, noise, or inability to
connect. If this happens, try the
following remedies:
– Use this Sound Bar at least 10 meters
(33 feet) away from the wireless LAN
device.
– Turn off the power to the wireless
LAN device when using your
BLUETOOTH device within 10 meters
(33 feet).
– Install this Sound Bar and
BLUETOOTH device as closer to each
other as possible.
• The radio waves broadcast by this
Sound Bar may interfere with the
operation of some medical devices.
Since this interference may result in
malfunction, always turn off the power
on this Sound Bar and BLUETOOTH
device in the following locations:
– In hospitals, on trains, in airplanes, at
gas stations, and any place where
flammable gasses may be present
– Near automatic doors or fire alarms
• This Sound Bar supports security
functions that comply with the
BLUETOOTH specification to ensure
secure connection during
communication using BLUETOOTH
technology. However, this security
may be insufficient depending on the
setting contents and other factors, so
always be careful when performing
communication using BLUETOOTH
technology.
• Sony cannot be held liable in any way
for damages or other loss resulting
from information leaks during
communication using BLUETOOTH
technology.
• BLUETOOTH communication is not
necessarily guaranteed with all
BLUETOOTH devices that have the
same profile as this Sound Bar.
• BLUETOOTH devices connected with
this Sound Bar must comply with the
BLUETOOTH specification prescribed
by the Bluetooth SIG, Inc., and must be
certified to comply. However, even
when a device complies with the
BLUETOOTH specification, there may
be cases where the characteristics or
specifications of the BLUETOOTH
device make it impossible to connect,
or may result in different control
methods, display or operation.
• Noise may occur or the audio may cut
off depending on the BLUETOOTH
device connected with this Sound Bar,
the communications environment, or
surrounding conditions.
If you have any questions or problems
concerning your Sound Bar, please
consult your nearest Sony dealer.

36
US
Precautions
On safety
• Should any solid object or liquid fall into
the Sound Bar, unplug the Sound Bar and
have it checked by qualified personnel
before operating it any further.
• Do not climb on the Sound Bar, as you
may fall down and injure yourself, or
Sound Bar damage may result.
On power sources
• Before operating the Sound Bar, check
that the operating voltage is identical to
your local power supply. The operating
voltage is indicated on the nameplate on
the bottom of the Bar Speaker.
• If you are not going to use the Sound Bar
for a long time, be sure to disconnect the
Sound Bar from the wall outlet (mains). To
disconnect the AC power cord (mains
lead), grasp the plug itself; never pull the
cord.
• One blade of the plug is wider than the
other for the purpose of safety and will fit
into the wall outlet (mains) only one way.
If you are unable to insert the plug fully
into the outlet, contact your dealer.
• AC power cord (mains lead) must be
changed only at a qualified service shop.
On heat buildup
Although the Sound Bar heats up during
operation, this is not a malfunction.
If you continuously use this Sound Bar at
high volume, the Sound Bar temperature at
the rear and bottom rises considerably. To
avoid burning yourself, do not touch the
Sound Bar.
On placement
• Place the Sound Bar in a location with
adequate ventilation to prevent heat
buildup and prolong the life of the Sound
Bar.
• Do not place the Sound Bar near heat
sources or in a place subject to direct
sunlight, excessive dust, or mechanical
shock.
• Do not place anything on the top of the
Bar Speaker.
• If the Sound Bar is being used in
combination with a TV, VCR, or tape deck,
noise may result and picture quality may
suffer. In such a case, place the Sound Bar
away from the TV, VCR, or tape deck.
• Use caution when placing the Sound Bar
on a surface that has been specially
treated (with wax, oil, polish, etc.), as
staining or discoloration of the surface
may result.
• Take care to avoid any possible injury
from the corners of the Bar Speaker.
On operation
Before connecting other equipment, be
sure to turn off and unplug the Sound Bar.
If you encounter color irregularity
on a nearby TV screen
Color irregularities may be observed on
certain types of TV.
• If color irregularity is observed...
Turn off the TV, then turn it on again after
15 to 30 minutes.
• If color irregularity is observed again...
Place the Sound Bar further away from
the TV.
On cleaning
Clean the Sound Bar with a soft, dry cloth.
Do not use any type of abrasive pad,
scouring powder, or solvent such as
alcohol or benzine.
If you have any question or problem
concerning your Sound Bar, please consult
your nearest Sony dealer.

37
US
This Sound Bar incorporates Dolby* Digital.
* Manufactured under license from Dolby
Laboratories.
Dolby, Dolby Audio and the double-D
symbol are trademarks of Dolby
Laboratories.
The BLUETOOTH
®
word mark and logos are
registered trademarks owned by Bluetooth
SIG, Inc. and any use of such marks by Sony
Corporation is under license. Other
trademarks and trade names are those of
their respective owners.
The terms HDMI, HDMI High-Definition
Multimedia Interface, and the HDMI Logo
are trademarks or registered trademarks of
HDMI Licensing Administrator, Inc.
“BRAVIA” logo is a trademark of Sony
Corporation.
“PlayStation” is a registered trademark or
trademark of Sony Interactive
Entertainment Inc.
MPEG Layer-3 audio coding technology
and patents licensed from Fraunhofer IIS
and Thomson.
Windows Media is either a registered
trademark or trademark of Microsoft
Corporation in the United States and/or
other countries.
This product is protected by certain
intellectual property rights of Microsoft
Corporation. Use or distribution of such
technology outside of this product is
prohibited without a license from Microsoft
or an authorized Microsoft subsidiary.
All other trademarks are trademarks of
their respective owners.
Copyrights and Trademarks

2
ES
Registro del propietario
Los números de modelo y serie están
ubicados en la parte inferior de la barra
parlante. Registre los números de serie
en el espacio proporcionado a
continuación. Indíquelos siempre que
llame a su distribuidor Sony con relación
a este producto.
N.° de modelo HT-SD35
N.° de serie
Para reducir el riesgo de incendios o
electrocución, no exponga la barra de
sonido a la lluvia ni a la humedad.
La barra de sonido no estará
desconectada de la fuente de
alimentación de ca mientras esté
conectada a la toma de pared, aunque
se haya apagado la propia barra de
sonido.
Para reducir el riesgo de incendio, no
cubra la abertura de ventilación de la
barra de sonido con periódicos, paños,
cortinas, etc.
No exponga la barra de sonido a fuentes
de llamas vivas (velas encendidas, por
ejemplo).
Para reducir el riesgo de incendio o
descarga eléctrica, no exponga la barra
de sonido a goteos ni salpicaduras de
líquidos. No coloque objetos llenos de
líquido, como vasos, sobre la barra de
sonido.
Ya que el enchufe principal se utiliza para
desconectar la barra de sonido de la red
eléctrica, conecte la barra de sonido a
una salida de CA de fácil acceso. Si nota
alguna anomalía en la barra de sonido,
desconecte el enchufe principal de la
salida de CA de inmediato.
No sitúe la barra de sonido en un
espacio cerrado, como una estantería o
un armario empotrado.
PRECAUCIÓN
Riesgo de explosión si la batería se
reemplaza por un tipo de batería
incorrecto.
No exponga las baterías ni los
dispositivos con batería a un calor
excesivo, como la luz directa del sol o
fuego.
Solo para ser usado en interiores.
Para la barra parlante
La placa de identificación se encuentra
en la parte inferior de la barra parlante.
Instrucciones de seguridad
importantes
1) Lea estas instrucciones.
2) Conserve estas instrucciones.
3) Preste atención a las advertencias.
4) Siga las instrucciones.
5) No utilice este aparato cerca del
agua.
6) Límpielo sólo con un paño seco.
7) No bloquee los orificios de
ventilación. Instale el aparato según
las instrucciones del fabricante.
8) No instale el equipo cerca de fuentes
de calor, como radiadores, rejillas de
calefacción, estufas u otros aparatos
(incluidos amplificadores) que
producen calor.
9) No anule el propósito de seguridad
del enchufe polarizado o enchufe
con descarga a tierra. Un enchufe
polarizado dispone de dos hojas,
una más ancha que la otra. Un
enchufe de tipo conexión a tierra
tiene dos hojas y una tercera clavija
para la conexión a tierra. La hoja
ancha o la tercera clavija se
proporcionan por razones de
seguridad. Si el enchufe
suministrado no entra en la toma,
ADVERTENCIA

3
ES
contacte a un electricista para que
reemplace la toma obsoleta.
10) Evite pisar o perforar los cables de
alimentación, sobre todo en la parte
del enchufe, en los receptáculos y en
el punto en el que el cable sale del
equipo.
11) Use solamente los accesorios
indicados por el fabricante.
12) Use solamente con el carrito,
soporte, trípode, ménsula o mesa
indicados por el fabricante, o que se
venden con el equipo. Al utilizar el
carrito, tenga cuidad al desplazar el
carrito con el aparato, para evitar
lesiones y que se vuelque el equipo.
13) Desenchufe este equipo durante
tormentas eléctricas o cuando no se
vaya a utilizar por períodos
prolongados.
14) Consulte a personal de servicio
calificado para cualquier
mantenimiento. Se requiere servicio
de mantenimiento cuando se ha
dañado el equipo de algún modo, tal
como cuando se daña el cable o
enchufe de alimentación, se ha
derramado líquido sobre el equipo o
han caído objetos dentro de él, se ha
expuesto el equipo a lluvia o
humedad o cuando el equipo no
opera como de costumbre o se ha
dejado caer.
NOTA:
Esta barra de sonido ha sido sometida a
pruebas y se ha determinado que
cumple con los límites requeridos por
los aparatos digitales de la clase B, en
cumplimiento con la Sección 15 de las
regulaciones de la FCC. Estas
especificaciones han sido diseñadas
para proporcionar una protección
razonable contra interferencias
perjudiciales en una instalación
residencial. Esta barra de sonido
genera, utiliza y puede emitir energía de
radiofrecuencia y, de no ser instalado y
utilizado de acuerdo con las
instrucciones podría ocasionar
interferencias perjudiciales en las
comunicaciones de radio.
No obstante, no se garantiza que no
ocurra ninguna interferencia en una
instalación particular. Si la barra de
sonido causa interferencia en la
recepción de radio o televisión, que
puede determinarse al apagar y
encender la barra de sonido, se
recomienda que el usuario intente
corregir la interferencia mediante una o
más de las siguientes medidas:
– Cambie la orientación o ubicación de
la antena de recepción.
– Aumente la separación entre la barra
de sonido y el receptor.
– Conecte la barra de sonido en una
toma de circuito distinta a la que está
conectado el receptor.
– Consulte con su distribuidor o con un
técnico especializado en radio/
televisión para solicitar asistencia.
Es preciso utilizar cables y conectores
correctamente blindados y conectados
a tierra para la conexión a anfitriones y/
o periféricos con el fin de cumplir los
límites de emisiones de la FCC.
Si tiene alguna pregunta sobre esta
barra de sonido:
Visite: www.sony.com/support
Contacto: Sony Customer Information
Service Center al 1-800-222-
SONY (7669).
Escriba a: Sony Customer Information
Service
Center 12451 Gateway Blvd., Fort Myers,
FL 33913
ES

4
ES
Declaración de Conformidad del
proveedor
Marca comercial: SONY
N.° de modelo: HT-SD35
División a cargo: Sony Electronics Inc.
Dirección: 16535 Via Esprillo, San Diego,
CA 92127 USA
N.° de teléfono: 858-942-2230
Este dispositivo cumple con las
disposiciones de la Sección 15 de la FCC.
Su funcionamiento está sujeto a las
siguientes condiciones: (1) este
dispositivo no debe ocasionar
interferencias; y (2) Este dispositivo
debe ser capaz de aceptar cualquier
tipo de interferencia, incluidas las
interferencias que puedan ocasionar un
funcionamiento no deseado del equipo.
PRECAUCIÓN
Queda notificado que ante cualquier
cambio o modificación que no haya sido
aprobado expresamente en este
manual se podrían invalidar sus
facultades para utilizar esta barra de
sonido.
Esta barra de sonido no debe colocarse
ni utilizarse junto con otras antenas o
transmisores.
Esta barra de sonido cumple con los
límites de exposición a la radiación de la
FCC definidos para un ambiente no
controlado y cumple con los
lineamientos de exposición a
radiofrecuencia (RF) de la FCC. Esta
barra de sonido se debe instalar y
operar manteniendo el radiador a una
distancia de al menos 20cm del cuerpo
de la persona.

5
ES
Índice
Acerca de este Manual de
instrucciones ...........................5
¿Qué viene en la caja? ...................6
Qué puede hacer con la barra de
sonido ...................................... 7
Guía para partes y controles .........8
Conexión al TV
Montaje de la barra parlante en una
pared ..................................... 15
Cuando el control remoto del TV no
funciona ..................................17
Cómo escuchar el sonido
Cómo escuchar el TV u otros
dispositivos ........................... 18
Ajuste del sonido ......................... 19
Escuchar música/sonido con
la función BLUETOOTH®
Escuchar música desde un
dispositivo móvil ....................21
Encendido de la barra de sonido
mediante el dispositivo
BLUETOOTH ........................... 23
Apagado de la función BLUETOOTH
................................................24
Uso de las distintas funciones
Cómo realizar la conexión
inalámbrica del subwoofer
(SECURE LINK) ........................25
Uso de la función de control para
HDMI ......................................26
Cómo usar la función “BRAVIA” Sync
................................................ 27
Notas sobre conexiones HDMI ....28
Ahorro de energía .......................28
Solución de problemas
Solución de problemas ...............29
Reconfiguración de la barra de
sonido ....................................34
Información adicional
Especificaciones ..........................35
Formatos de entrada de audio
compatibles (entrada de TV)
................................................36
Comunicación por BLUETOOTH
................................................ 37
Precauciones ...............................38
Acerca de este Manual de
instrucciones
•Las instrucciones incluidas en este
Manual de instrucciones describen las
funciones del control remoto.
•Algunas de las ilustraciones se
presentan a modo de esquemas
conceptuales, por lo que es posible
que presenten diferencias respecto de
los productos reales.
•Los ajustes predeterminados están
subrayados en la descripción de cada
función.
Ejemplo: Función de control para HDMI
activada
Cómo conectar
un TV con un
cable HDMI
Guía de inicio
(documento
aparte)
6
ES
¿Qué viene en la caja?
• Barra parlante (1)
•Subwoofer (1)
• Control remoto (1)
• Batería R03 (tamaño AAA) (2)
• Cable óptico digital (1)
• PLANTILLA PARA MONTAJE EN PARED
(1)
• Guía de inicio
• Manual de instrucciones
7
ES
Qué puede hacer con la barra de sonido
“Cómo escuchar el TV u otros
dispositivos” (página 18)
Reproductor Blu-ray Disc™,
decodificador de cable,
decodificador satelital, etc.
Conexión del TV
(consulte la “Guía de inicio”
(documento aparte))
“Uso de la función de control para
HDMI” (página 26)
“Cómo usar la función “BRAVIA”
Sync” (página 27)
“Cómo realizar la conexión
inalámbrica del subwoofer
(SECURE LINK)” (página 25)
“Escuchar música desde un
dispositivo móvil” (página 21)

8
ES
Guía para partes y controles
Los detalles se omiten de las ilustraciones.
Parte frontal
Sensor del control remoto
Apunte el control remoto al sensor
de control remoto para operar la
barra de sonido.
Botón (alimentación)
Enciende la barra de sonido o la
ajusta en el modo de espera.
Botón (TV) (página 18)
Botón BLUETOOTH (página 21)
Botones +/– (volumen)
Barra parlante
9
ES
Indicadores
El encendido o parpadeo de los indicadores en la barra parlante indican el
siguiente estado.
Entrada seleccionada en ese momento
Formato de sonido, efecto envolvente
Volumen
Indicadores Estado
Se enciende mientras se selecciona la entrada de TV.
Se enciende mientras se selecciona la entrada de BLUETOOTH.
Indicadores Estado
• Se enciende mientras ingresa sonido multicanal de 5.1 canales.
• Parpadea una vez mientras se selecciona el modo de sonido
(página 19).
Indicadores Estado
Parpadea una vez al bajar el volumen al mínimo (1-20).
Parpadea una vez al bajar el volumen al nivel medio (21-40).
Parpadea una vez al subir el volumen al máximo (41-49).
• Parpadea de forma intermitente al silenciar el sonido.
• Parpadea dos veces al configurar el volumen al máximo/
mínimo.
o
El indicador de la entrada actual parpadea una vez al ajustar el
volumen del subwoofer con los botones SW
+/–.
Parpadea tres veces al configurar el volumen del subwoofer al
máximo/mínimo.
10
ES
Configuración de valores de cada función
El ajuste de encendido/apagado para cada función se indica mediante la cantidad
de veces que parpadea el siguiente indicador.
• Encendido: parpadea dos veces.
• Apagado: parpadea una vez.
Consulte la descripción de cada función para ver qué sucede con el estado del
indicador en los casos en que las configuraciones modificadas sean otras que las de
encendido/apagado.
Indicadores Funciones
• Modo nocturno (página 20)
• Modo de voz (página 20)
• Audio DRC (página 20)
• Control para HDMI (página 26)
• Modo de espera BLUETOOTH (página 23)
• Función BLUETOOTH (página 24)
• Modo de espera automático (página 28)
• IR repeater (página 17)
11
ES
Parte trasera
Toma HDMI OUT (TV (ARC))
Conecte un TV que tenga una toma
de entrada HDMI con un cable HDMI
(no suministrado).
La barra de sonido es compatible
con ARC (página 27). ARC es la
función que envía el sonido del TV a
un dispositivo AV como la barra de
sonido desde la toma HDMI del TV.
Toma TV IN (OPTICAL)
IR repeater (página 17)
Transmite la señal remota del
control remoto del TV al TV.

12
ES
Indicador de estado
Indica el estado de la alimentación
del subwoofer y la conexión de la
barra parlante.
– Se enciende en verde: se
establece la conexión entre el
subwoofer y la barra parlante.
– Parpadea en verde: la conexión
entre el subwoofer y la barra
parlante está en proceso.
– Se enciende en anaranjado: se
establece la conexión entre el
subwoofer y la barra parlante con
la función Secure Link.
– Parpadea en anaranjado: la
conexión entre el subwoofer y la
barra parlante con la función
Secure Link está en proceso.
– Se enciende en color rojo: el
subwoofer está en modo de
espera.
– Apagado: el subwoofer está
apagado.
Botón (alimentación)
Enciende o apaga el subwoofer.
Botón LINK (página 25)
Orificios de ventilación
Por seguridad, no bloquee los
orificios de ventilación.
Subwoofer
13
ES
Algunos de los botones tienen distintas
funciones dependiendo del tiempo que
se los mantenga presionados. Los
íconos a continuación indican por
cuánto tiempo se debe presionar el
botón.
• : Presione el botón.
• : Presione el botón y manténgalo
presionado durante 5 segundos.
TV (página 18)
Seleccione la entrada de TV.
BLUETOOTH (página 18, 22)
Seleccione la entrada de
BLUETOOTH.
AUTO SOUND (página 19)
Selecciona AUTO SOUND para el
efecto de sonido.
VOICE
: Activa/desactiva el modo Voice.
(página 20)
: Activa/desactiva la función de
control para HDMI. (página 26)
(volumen) +*/–
Ajusta el volumen.
SW (volumen del subwoofer)
+/–
Ajusta el volumen del subwoofer.
GAME (página 19)
Selecciona GAME para el efecto de
sonido.
SPORTS (página 19)
Selecciona SPORTS para el efecto
de sonido.
SECURE LINK (página 25)
: Inicia el ajuste del enlace para
la función Secure Link.
(alimentación)
Enciende la barra de sonido o la
ajusta en el modo de espera.
CINEMA (página 19)
Selecciona CINEMA para el efecto
de sonido.
MUSIC (página 19)
Selecciona MUSIC para el efecto de
sonido.
Control remoto

14
ES
NIGHT
: Activa/desactiva el modo night.
(página 20)
: Activa/desactiva el modo en
espera BLUETOOTH. (página 23)
(silencio)
Apaga el sonido
momentáneamente o enciende el
sonido.
AUDIO*
: Selecciona el canal de audio
para una transmisión multiplex
Dolby Digital. (página 20)
: Activa/desactiva la función
Audio DRC. (página 20)
NEWS (página 19)
Selecciona NEWS para el efecto de
sonido.
STANDARD
: Selecciona STANDARD para el
efecto de sonido. (página 19)
: Activa/desactiva la función IR
repeater. (página 17)
INDICATORS
: Activa/desactiva los indicadores
de la barra parlante.
: Activa/desactiva la función de
espera automática. (página 28)
*Los botones + y AUDIO tienen un
punto táctil. Úselo como guía durante su
operación.
Consejo
Puede apagar los indicadores presionando
INDICATORS.
Incluso si los apaga presionando
INDICATORS, verá que los indicadores se
encienden o parpadean cuando opera la
barra de sonido.
Acerca del reemplazo de baterías
del control remoto
Cuando la barra de sonido no responda
al control remoto, reemplace con dos
nuevas baterías las baterías viejas.
Use baterías de manganeso R03
(tamaño AAA) como reemplazo.
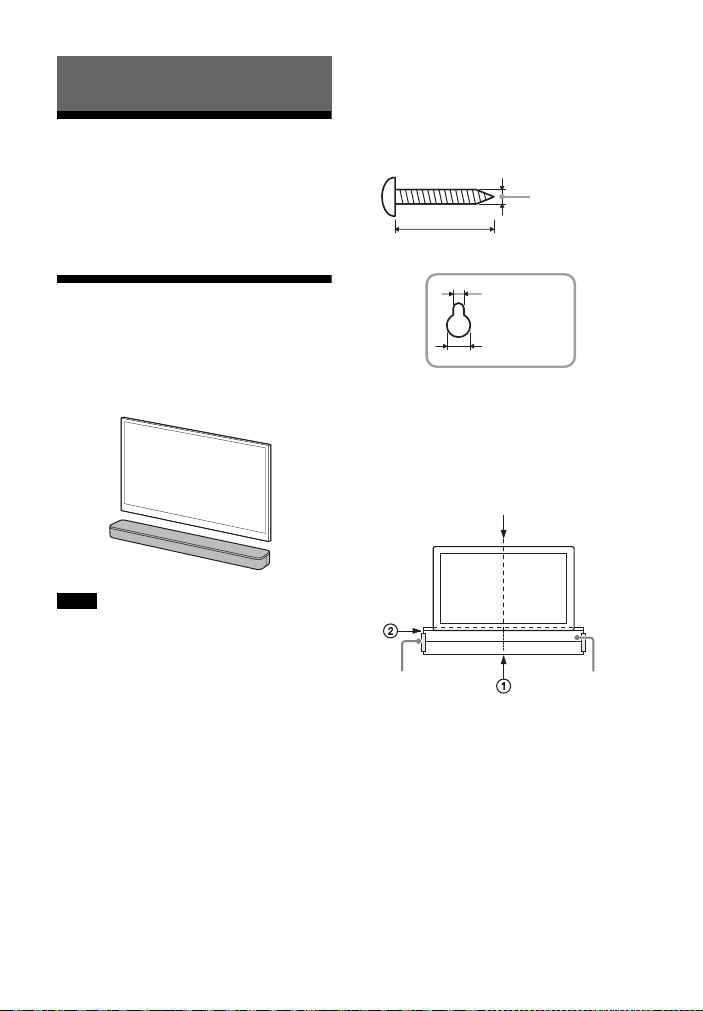
15
ES
Cómo conectar un TV con
un cable HDMI
Consulte la “Guía de inicio” (documento
aparte).
Montaje de la barra
parlante en una pared
Puede montar la barra parlante en la
pared.
• Prepare tornillos (no suministrados) que
sean apropiados para el material y la
resistencia de la pared. Como las paredes
de paneles de yeso son muy frágiles,
coloque los tornillos de forma segura en
la viga de la pared. Instale los altavoces
de forma horizontal con los tornillos
roscados en una sección plana y continua
de la pared.
• Haga que un distribuidor o contratista
licenciado de Sony realice la instalación y
preste mucha atención a la seguridad
durante la instalación.
• Sony no se responsabiliza por accidentes
o daños causados por una instalación
inadecuada, una pared de poca
resistencia, una instalación incorrecta de
los tornillos, un desastre natural, etc.
1 Prepare dos tornillos (no
suministrados) que sean
apropiados para los orificios de
montaje en pared en la parte
trasera de la barra parlante.
2 Adhiera la PLANTILLA PARA
MONTAJE EN PARED
(suministrada) en una pared.
1 Alinee la LÍNEA CENTRAL
TELEVISOR () de la PLANTILLA
PARA MONTAJE EN PARED con la
línea central de su TV.
Conexión al TV
Notas
Orificio en la parte trasera de la barra
parlante
4 mm
(3/16 pulgadas)
Más de 30 mm (1 3/16 pulgadas)
5 mm (7/32
pulgadas)
10 mm (13/32
pulgadas)
Centro del TV
PLANTILLA PARA
MONTAJE EN PARED
Cinta
adhesiva, etc.
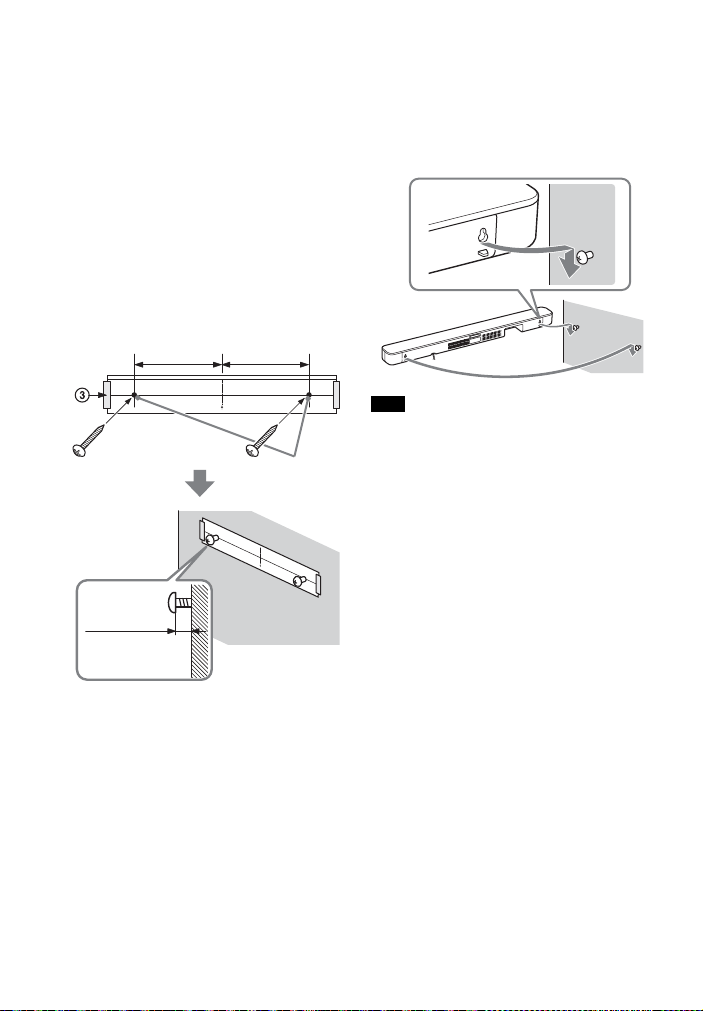
16
ES
2 Alinee la LÍNEA INFERIOR
TELEVISOR () de la PLANTILLA
PARA MONTAJE EN PARED con la
parte inferior de su TV, luego
adhiera la PLANTILLA PARA
MONTAJE EN PARED en una
pared con una cinta adhesiva de
uso comercial, etc.
3 Ajuste los tornillos en las marcas
() de la LÍNEA DE TORNILLOS ()
de la PLANTILLA PARA MONTAJE
EN PARED como se muestra en la
ilustración a continuación.
4 Quitar la PLANTILLA PARA
MONTAJE EN PARED.
5 Cuelgue la barra parlante en los
tornillos.
Alinee los orificios en la parte
trasera de la barra parlante con los
tornillos, luego cuelgue la barra
parlante en los dos tornillos.
Al adherir la PLANTILLA PARA MONTAJE EN
PARED, debe estar completamente
alisada.
Tornillos
Marcas ()
10 mm a
11 mm
(aprox.
7/16 pulgadas)
368,5 mm
(14 1/2 pulgadas)
368,5 mm
(14 1/2 pulgadas)
Nota

17
ES
Cuando el control remoto
del TV no funciona
Si la barra parlante obstruye el sensor
de control remoto del TV, es posible que
el control remoto del TV no funcione. En
ese caso, habilite la función IR repeater
de la barra de sonido.
Puede controlar el TV con el control
remoto enviando la señal remota desde
la parte trasera de la barra parlante.
Mantenga presionado STANDARD
durante 5 segundos para activar o
desactivar la función.
• Asegúrese de verificar que el control
remoto del TV no pueda controlar el TV y,
a continuación, active la función IR
repeater. Si esta función se enciende al
mismo tiempo que el control remoto
controla el TV, es posible que no funcione
correctamente debido a la interferencia
entre las órdenes directas del control
remoto y las órdenes de la barra parlante.
• Aun si está activada, puede que la
función IR repeater no funcione debido al
modelo de TV. Además, es posible que
tampoco funcionen los controles remotos
de otros dispositivos, como aires
acondicionados. En tal caso, cambie la
posición en que está instalado el TV o la
barra parlante.
Función IR repeater activada
El indicador del BLUETOOTH parpadea dos
veces.
Función IR repeater desactivada
El indicador del BLUETOOTH parpadea una
vez.
Notas
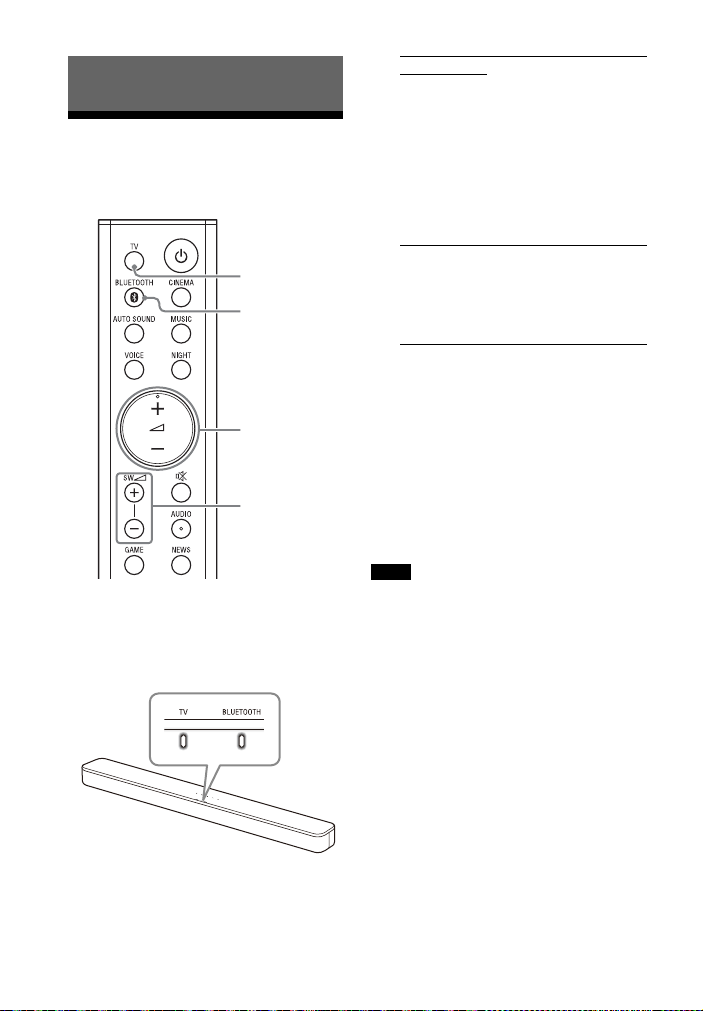
18
ES
Cómo escuchar el TV u
otros dispositivos
1 Presione TV o BLUETOOTH.
Se enciende el indicador de la
entrada seleccionada en la barra
parlante.
2 Ajuste el volumen.
• Ajuste el volumen presionando
+/– en el control remoto.
• Ajuste el volumen del subwoofer
presionando SW +/– en el
control remoto.
Consejo
También puede seleccionar el tipo de
entrada presionando (TV) o BLUETOOTH
en la barra parlante.
• Cuando la fuente de entrada no contiene
demasiados sonidos graves, tales como
programas de TV, es posible que el
sonido grave del subwoofer sea difícil de
escuchar.
•SW +/– no funciona cuando el
subwoofer no está conectado.
Cómo escuchar el sonido
TV
+/–
SW +/–
BLUETOOTH
Entrada de TV
• El TV está conectado a la toma TV IN
(OPTICAL) de la barra parlante
• El TV es compatible con la función ARC
que se encuentra conectada a la toma
HDMI OUT (TV (ARC)) de la barra
parlante
Al conectar el TV en las tomas HDMI OUT
(TV (ARC)) y TV IN (OPTICAL), la toma
para la entrada de audio se selecciona
según la señal de audio que se recibe
primero.
Entrada BLUETOOTH
Dispositivo BLUETOOTH compatible con
A2DP
Para obtener más detalles, consulte
“Escuchar música desde un dispositivo
móvil” (página 21).
Notas
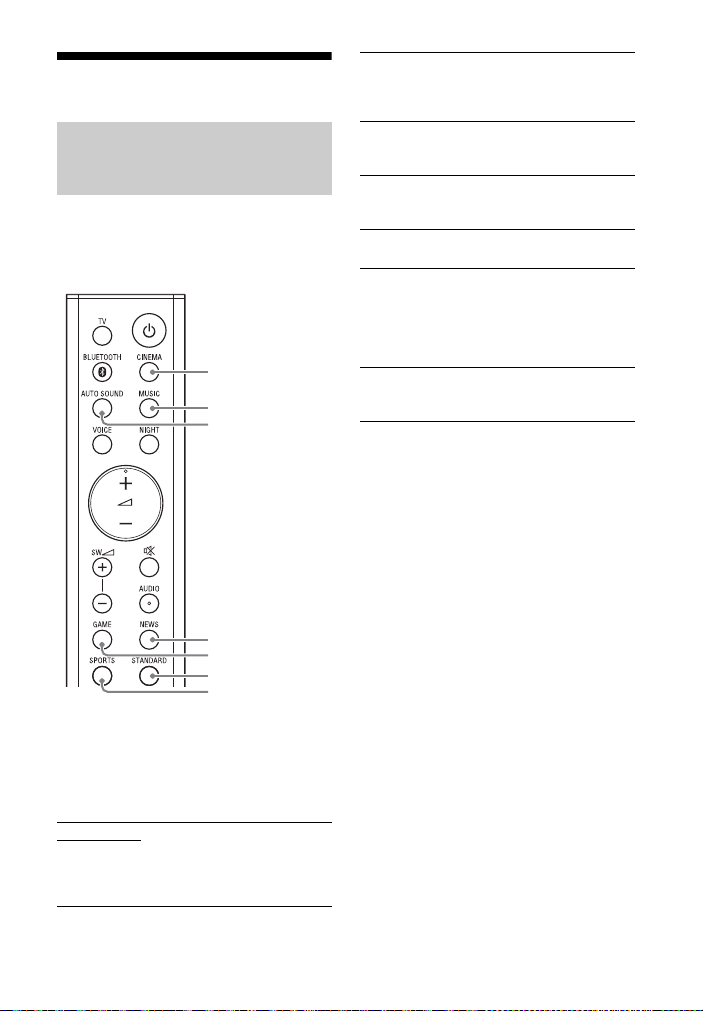
19
ES
Ajuste del sonido
Puede disfrutar fácilmente de los
efectos de sonido pre programados que
están hechos a la medida para
diferentes tipos de fuentes de sonido.
Presione el botones de selección del
modo de sonido para seleccionar el
modo de sonido.
Al seleccionar el modo de sonido, el
indicador MULTI CH parpadea una vez.
Disfrute del efecto de sonido
a la medida de las fuentes
(modo sonido)
AUTO SOUND
Puede disfrutar del sonido con el modo de
sonido recomendado por Sony. El modo de
sonido se optimiza automáticamente según
el contenido y la función de reproducción.
CINEMA
MUSIC
AUTO SOUND
NEWS
GAME
STANDARD
SPORTS
CINEMA
Los sonidos se reproducen con efectos
envolventes, son realistas y potentes, lo que
los hace adecuados para las películas.
MUSIC
Los efectos de sonido se optimizan para
escuchar música.
GAME
Los sonidos son potentes y realistas, ideales
para juegos.
NEWS
Se recrea el claro discurso de los noticieros.
SPORTS
Puede experimentar una atmósfera de la
misma forma que si estuviera mirando un
evento en un estadio. Sin embargo, las
narraciones de los comentadores se
reproducen claramente.
STANDARD
Los efectos de sonido se optimizan para
escuchar fuentes individuales.

20
ES
Puede ajustar el sonido usando los botones del control remoto.
Consejo
AUDIO no funciona mientras el indicador BLUETOOTH está encendido.
Ajuste del sonido
Nombre de la
función
Botón Función
Modo
nocturno
Permite disfrutar de un sonido nítido a bajo volumen en la
medianoche.
• Encendido: el indicador del MULTI CH parpadea dos veces.
• Apagado
: el indicador de MULTI CH parpadea una vez.
Nota
Al apagar la barra de sonido, el modo nocturno se desactiva
automáticamente.
Modo de voz Permite escuchar diálogos con mayor claridad.
• Encendido: el indicador del MULTI CH parpadea dos veces.
• Apagado
: el indicador de MULTI CH parpadea una vez.
Audio DRC
Mantenga
presionado el
botón
durante 5
segundos
Permite comprimir el rango dinámico de una señal de audio
(rango entre el volumen mínimo y máximo), lo que permite oír
con claridad audio con poco volumen. La función está
disponible únicamente al reproducir la señal Dolby Digital.
• Encendido: el indicador del BLUETOOTH parpadea dos veces.
• Apagado
: el indicador de BLUETOOTH parpadea una vez.
Sonido de
transmisión
multiplex
Puede disfrutar de un sonido de transmisión multiplex cuando
la barra de sonido recibe una señal de transmisión multiplex
Dolby Digital. La señal cambia de forma cíclica pasando de
Principal
Auxiliar Principal/Auxiliar.
•Principal
: el indicador de MULTI CH parpadea una vez.
• Auxiliar: el indicador de BLUETOOTH parpadea una vez.
• Principal/Auxiliar: el sonido principal es transmitido por el
parlante izquierdo y el sonido auxiliar, por el parlante
derecho.
Los indicadores de MULTI CH y BLUETOOTH parpadean una
vez.
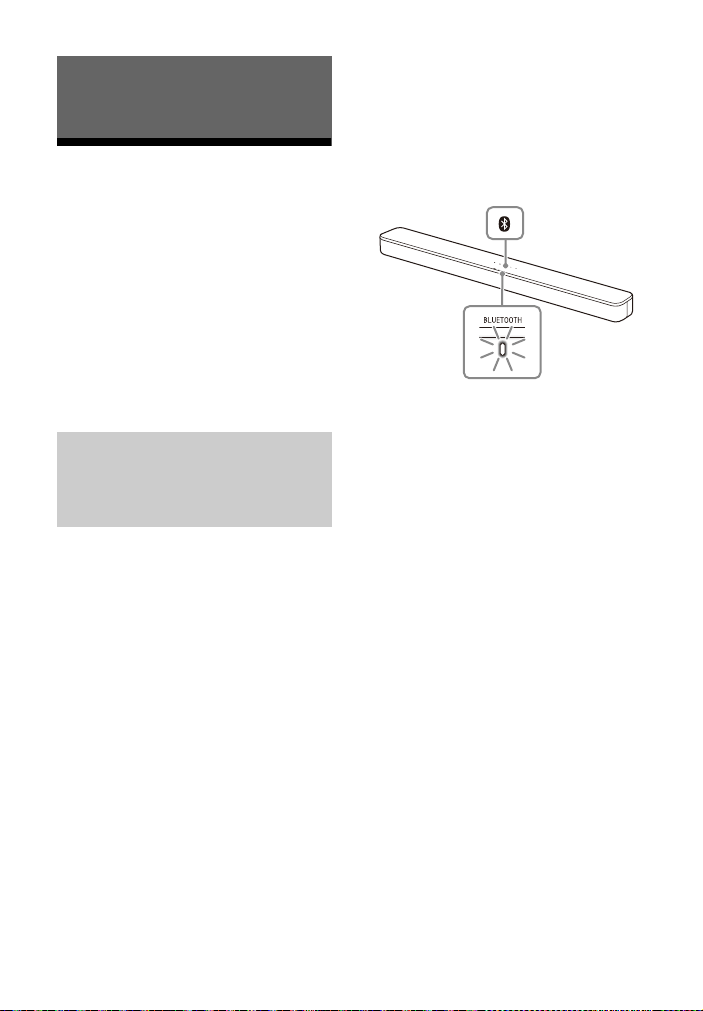
21
ES
Escuchar música desde
un dispositivo móvil
Puede escuchar música almacenada en
un dispositivo móvil tal como un
smartphone o tablet por medio de una
conexión inalámbrica conectando la
barra de sonido y el dispositivo móvil
con la función BLUETOOTH.
Cuando conecte el dispositivo móvil con
la función BLUETOOTH, puede operar
simplemente usando el control remoto
suministrado sin encender el TV.
Para poder escuchar la música de un
dispositivo móvil con la función
BLUETOOTH, debe emparejar la barra
de sonido con el dispositivo móvil.
El emparejamiento es el proceso
requerido para registrar por adelantado
mutuamente la información en los
dispositivos BLUETOOTH a conectarse
de forma inalámbrica.
1 Mantenga presionado el botón
BLUETOOTH de la barra parlante
durante 2 segundos.
La barra de sonido entra en modo
emparejamiento y el indicador
BLUETOOTH parpadea
rápidamente.
De no realizarse el emparejamiento
en los 5 minutos posteriores a que
la barra de sonido haya entrado en
modo emparejamiento, el modo
emparejamiento queda cancelado.
En tal caso, vuelva a comenzar con
el emparejamiento.
2 En el dispositivo móvil, busque la
barra de sonido mediante la
operación de emparejamiento.
La lista de los dispositivos
BLUETOOTH que se buscan aparece
en la pantalla del dispositivo móvil.
Para saber qué método de
operación empareja el dispositivo
BLUETOOTH con el dispositivo
móvil, consulte el Manual de
instrucciones del dispositivo móvil.
3 Empareje la barra de sonido y el
dispositivo móvil seleccionando
“HT-SD35” de la lista de la pantalla
del dispositivo móvil.
Si se necesita una clave de acceso,
escriba “0000”.
Escuchar música/sonido con la
función BLUETOOTH®
Escuchar música
emparejando la barra de
sonido con un dispositivo
móvil
Indicador de
BLUETOOTH
Botón
BLUETOOTH
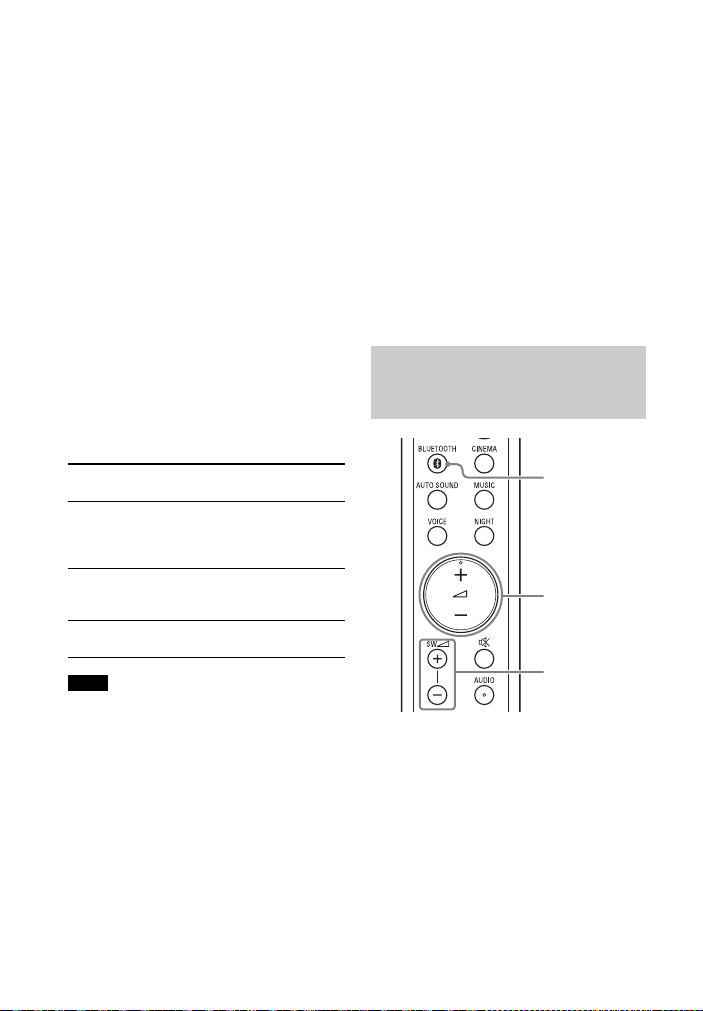
22
ES
4 Asegúrese de que el indicador
BLUETOOTH de la barra parlante
esté encendido en azul.
Se estableció una conexión entre la
barra de sonido y el dispositivo
móvil.
5 Inicie la reproducción de audio
con la aplicación de música en el
dispositivo móvil conectado.
El sonido sale de la barra de sonido.
6 Ajuste el volumen.
• Ajuste el volumen presionando
+/– en el control remoto.
• Ajuste el volumen del subwoofer
presionando SW +/– en el
control remoto.
Para comprobar el estado de
conexión de la función
BLUETOOTH
• Es posible emparejar hasta
10 dispositivos BLUETOOTH. Si se
empareja un nuevo dispositivo luego de
haber emparejado la cantidad de
dispositivos más arriba, se reemplaza el
último dispositivo emparejado por el
dispositivo entrante.
• Realice el emparejamiento para el
segundo y los subsiguientes dispositivos
móviles.
Consejos
• Puede revisar el estado de conexión de la
función BLUETOOTH corroborando el
estado del indicador BLUETOOTH.
• Si se selecciona la entrada BLUETOOTH,
presione brevemente el botón
BLUETOOTH de la barra parlante para que
la barra de sonido entre en modo
emparejamiento.
• Si no se selecciona la entrada
BLUETOOTH, al presionar el botón
BLUETOOTH en la barra parlante, la barra
de sonido vuelve a conectarse
automáticamente con el dispositivo
BLUETOOTH conectado más
recientemente.
1 Active la función BLUETOOTH del
dispositivo móvil.
2 Presione BLUETOOTH.
El indicador BLUETOOTH parpadea y
la barra parlante vuelve a
conectarse automáticamente al
dispositivo BLUETOOTH más
recientemente conectado.
Estado Indicador de
BLUETOOTH
Estado de modo
de espera
durante el
emparejamiento
Parpadea rápidamente
en azul
Intenta
realizarse la
conexión
Parpadea en azul
La conexión se
ha establecido
Se enciende en azul
Notas
Escuchar música desde un
dispositivo móvil
emparejado
BLUETOOTH
+/–
SW +/–

23
ES
3 Asegúrese de que el indicador de
BLUETOOTH esté encendido en
azul.
Se estableció una conexión entre la
barra de sonido y el dispositivo
móvil.
4 Inicie la reproducción de audio
con la aplicación de música en el
dispositivo móvil conectado.
El sonido sale de la barra de sonido.
5 Ajuste el volumen.
• Ajuste el volumen presionando
+/– en el control remoto.
• Ajuste el volumen del subwoofer
presionando SW +/– en el
control remoto.
Encendido de la barra de
sonido mediante el
dispositivo BLUETOOTH
Cuando la barra de sonido tenga
almacenada información de
emparejamiento, puede usarse un
dispositivo BLUETOOTH para encender
la barra de sonido y escuchar música
aun si la barra de sonido está en modo
de espera, activando el modo de espera
BLUETOOTH.
Mantenga presionado NIGHT durante
5 segundos para activar o desactivar
la función.
El modo de espera BLUETOOTH consume
más energía.
Modo de espera BLUETOOTH activado
El indicador BLUETOOTH parpadea dos
veces.
Modo de espera BLUETOOTH desactivado
El indicador BLUETOOTH parpadea una vez.
Nota

24
ES
Apagado de la función
BLUETOOTH
Puede optar por apagar la función
BLUETOOTH.
Mantenga presionado , y – en la
barra parlante durante 10 segundos
para activar o desactivar la función.
Función BLUETOOTH activada
El indicador BLUETOOTH parpadea dos
veces.
Función BLUETOOTH desactivada
El indicador BLUETOOTH parpadea una vez.
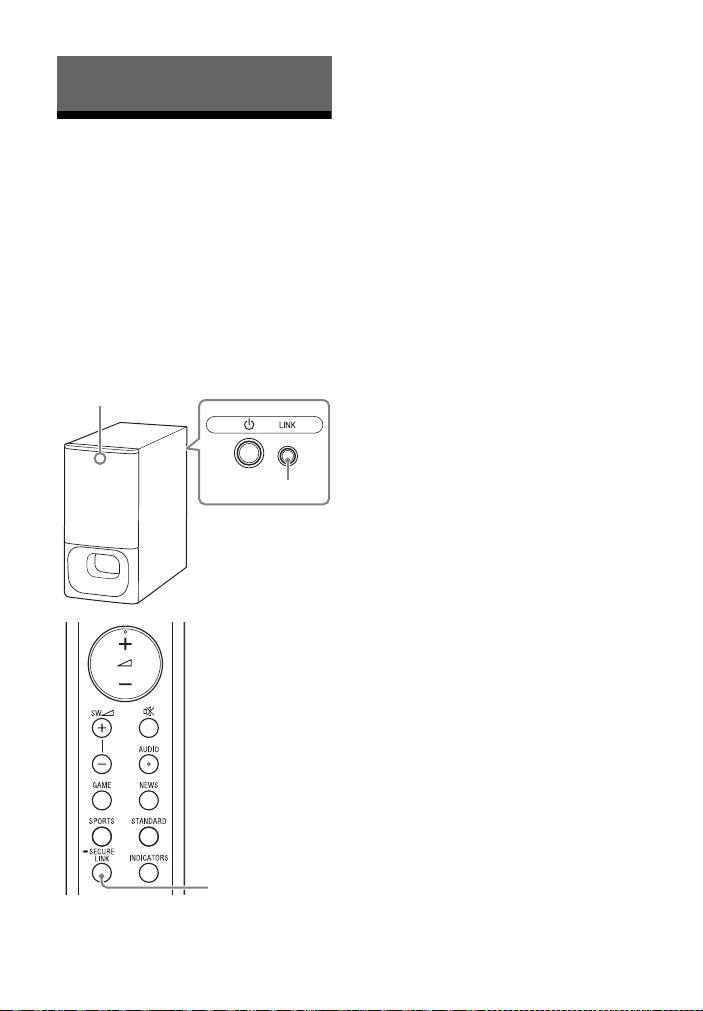
25
ES
Cómo realizar la
conexión inalámbrica del
subwoofer (SECURE LINK)
Puede especificar la conexión
inalámbrica para vincular la barra
parlante al subwoofer mediante la
función Secure Link. Recomendamos
usar la función Secure Link para evitar
interferencia si usa múltiples productos
similares o si sus vecinos usan los
mismos productos.
1 Presione LINK en la parte trasera
del subwoofer.
El indicador de estado del
subwoofer parpadea en
anaranjado.
Continúe con el siguiente paso
dentro de 2 minutos.
2 Mantenga presionado SECURE
LINK en el control remoto durante
5 segundos.
Inicia el ajuste del enlace.
Los indicadores MULTI CH y TV
parpadean dos veces, luego lo
hacen de manera alternada.
3 Asegúrese de que los indicadores
MULTI CH y TV dejen de parpadear
y que el estado del indicador del
subwoofer se encienda en
anaranjado.
Se estableció una conexión entre la
barra parlante y el subwoofer.
Si falla, las luces de los indicadores
MULTI CH y TV se encienden
durante 5 segundos. En este caso,
vuelva a realizar la operación Secure
Link.
Para desactivar la función Secure
Link
Mantenga presionado el botón SECURE
LINK durante 5 segundos.
El indicador del MULTI CH parpadea dos
veces.
Uso de las distintas funciones
LINK
Indicador de estado
SECURE LINK

26
ES
Uso de la función de
control para HDMI
Conectar un dispositivo como un TV o
un reproductor Blu-ray Disc compatible
con la función de control para HDMI*
con un cable HDMI le permite operar el
dispositivo fácilmente por medio del
control remoto del TV o del reproductor
de Blu-ray Disc.
Es posible que estas funciones puedan
utilizarse en dispositivos que no hayan sido
fabricados por Sony, pero no se garantiza
su funcionamiento.
* El control para HDMI es una norma usada
por CEC (Consumer Electronics Control)
para permitir que los dispositivos HDMI
(interfaz multimedia de alta definición) se
controlen entre sí.
Mantenga presionado VOICE durante
5 segundos para activar o desactivar
la función.
Habilite los ajustes de la función de
control para HDMI para el TV y otros
dispositivos conectados al TV.
Al apagar el TV, la barra de sonido se
apaga automáticamente.
Si enciende la barra de sonido mientras
mira TV, el sonido del TV saldrá por los
altavoces de la barra de sonido. El
volumen de la barra de sonido puede
ajustarse usando el control remoto del
TV.
Al encender su TV, la barra de sonido se
enciende automáticamente y el sonido
del TV sale de los altavoces de la barra
de sonido.
Las operaciones también se pueden
realizar con el menú del TV. Para
obtener más detalles, consulte el
Manual de instrucciones de su TV.
• Dependiendo del modelo del TV, puede
que se muestre en la pantalla el número
del nivel de volumen de la barra de
sonido.
• Dependiendo de los ajustes del TV, es
posible que no esté disponible la función
de control de audio del sistema. Para
obtener más detalles, consulte el Manual
de instrucciones de su TV.
• Dependiendo del modelo del TV, si el
sonido salió por los altavoces del TV la
última vez que lo usó, es posible que la
barra de sonido no se encienda aun si el
TV está encendido, debido al enlace con
la alimentación del TV.
Nota
Preparación para el uso de la
función de control para
HDMI
Función de control para HDMI activada
El indicador BLUETOOTH parpadea dos
veces.
Función de control para HDMI desactivada
El indicador BLUETOOTH parpadea una vez.
Función de apagado del
sistema
Función de control de audio
del sistema
Notas

27
ES
Si la barra de sonido está conectada a la
toma HDMI IN de un TV compatible con
ARC, puede escuchar el sonido del TV
desde los altavoces de la barra de
sonido sin conectar un cable óptico
digital.
Si el TV no es compatible con ARC, se debe
conectar el cable óptico digital
(suministrado) (consulte la Guía de inicio
suministrada).
Cuando reproduce contenido en un
dispositivo (reproductor de Blu-ray Disc,
“PlayStation
®
4”, etc.) conectado al TV, la
barra de sonido y el TV se encienden
automáticamente, la señal de la barra
de sonido cambia a la entrada de TV y el
sonido se emite desde los altavoces de
la barra de sonido.
• Si el sonido del TV salía por los altavoces
del TV la última vez que lo utilizó, es
posible que la barra de sonido no se
encienda y el sonido y la imagen salgan
por el TV; aun si se reproduce el
contenido del dispositivo.
• Dependiendo del modelo de TV, es
posible que la primera parte del
contenido que se está reproduciendo no
se reproduzca correctamente.
Cómo usar la función
“BRAVIA” Sync
Además de la función de control para
HDMI, puede usar la función “BRAVIA”
Sync, como la función Modo de sonido/
Selección de escena.
Estas funciones están patentadas por
Sony. Esta función no puede funcionar con
productos que no hayan sido fabricados
por Sony.
El modo de sonido de la barra de sonido
cambia automáticamente según los
ajustes de la función de selección de
escena o modo de sonido del TV. Para
obtener más detalles, consulte el
Manual de instrucciones de su TV.
Seleccione el modo de sonido AUTO
SOUND (página 19).
ARC (Audio Return Channel)
Nota
Función One-Touch Play
Notas
Nota
Función Modo de sonido/
Selección de escena

28
ES
Notas sobre conexiones
HDMI
• Utilice un cable autorizado para HDMI.
• Se recomienda utilizar un cable HDMI
de alta velocidad Sony con Ethernet
con el logotipo que indica el tipo de
cable.
• No se recomienda el uso de un cable
de conversión HDMI-DVI.
• El dispositivo conectado puede anular
las señales de audio (frecuencia de
muestreo, longitud de bits, etc.)
transmitidas desde una toma HDMI.
Ahorro de energía
Para usar la barra de sonido y ahorrar
energía, cambie las siguientes
configuraciones.
Al activar el modo de espera
automático, la barra de sonido entra
automáticamente en modo de espera
luego de transcurridos 20 minutos sin
que reciba ningún tipo de señal de
entrada ni se la opere.
Mantenga presionado INDICATORS
durante 5 segundos para activar o
desactivar la función.
Para ahorra energía mientras la barra de
sonido está en modo de espera,
desactive el modo de espera
BLUETOOTH (página 23) y la función de
control para HDMI (página 26).
Estas funciones vienen activadas de
forma predeterminada.
Apague la barra de sonido
luego de detectar si está en
uso
Modo de espera automático activado
El indicador BLUETOOTH parpadea dos
veces.
Modo de espera automático desactivado
El indicador BLUETOOTH parpadea una vez.
Ahorro de energía en el
modo de espera

29
ES
Solución de problemas
Si experimenta cualquiera de las
siguientes dificultades al utilizar la barra
de sonido, utilice esta guía de solución
de problemas y corrección de fallas para
ayudar a remediar el problema antes de
solicitar reparaciones. Si alguno de los
problemas persiste, consulte a su
distribuidor Sony más cercano.
Cuando realice la solicitud de
reparación, asegúrese de traer tanto la
barra parlante como el subwoofer, aun
cuando parezca que uno solo tiene el
problema.
La barra de sonido no se enciende.
Compruebe que el cable de
alimentación de CA esté conectado
firmemente.
Desconecte el cable de alimentación
de CA del tomacorriente de pared y
vuelva a conectarlo después de varios
minutos.
La barra de sonido se apaga
automáticamente.
Está activada la función de modo de
espera automático. Desactive la
función de modo de espera
automático (página 28).
La barra de sonido no se enciende
aun cuando el TV está encendido.
Active la función de control para
HDMI (página 26). Es necesario que el
TV sea compatible con la función de
control para HDMI. Para obtener más
detalles, consulte el Manual de
instrucciones de su TV.
Compruebe los ajustes del altavoz del
TV. La barra de sonido enciende la
función sincronización con los ajustes
del altavoz del TV. Para obtener más
detalles, consulte el Manual de
instrucciones de su TV.
Según el TV, si el sonido salió por los
altavoces del TV la vez anterior, la
barra de sonido no se encenderá, aun
si el TV está encendido, debido al
enlace con la alimentación del TV.
La barra de sonido se apaga cuando
el TV se apaga.
Revise la configuración de la función
de control para HDMI (página 26).
Cuando la función de control para
HDMI se encuentra activada y la señal
de entrada de la barra de sonido es la
entrada TV, la barra de sonido se
apaga automáticamente al apagar el
TV.
La barra de sonido no se apaga aun
cuando el TV está apagado.
Revise la configuración de la función
de control para HDMI (página 26).
Cuando apaga el televisor, la barra de
sonido se apaga automáticamente
solo si la entrada de la misma es la
entrada de TV. Es necesario que el TV
sea compatible con la función de
control para HDMI. Para obtener más
detalles, consulte el Manual de
instrucciones de su TV.
No hay imagen o la imagen no se
proyecta correctamente.
Cuando no haya ninguna imagen al
seleccionar la entrada de TV,
seleccione el canal de TV que desea a
través del control remoto del TV.
Solución de problemas
Alimentación
Imagen

30
ES
La barra de sonido no reproduce
ningún sonido proveniente del TV.
Compruebe el tipo y conexión del
cable HDMI o el cable óptico digital
que está conectado a la barra de
sonido y el TV (consulte la Guía de
inicio suministrada).
Desconecte los cables que están
conectados entre el TV y la barra de
sonido y vuelva a conectarlos
firmemente. Desconecte los cables
de alimentación de CA del TV y la
barra de sonido de las salidas de CA,
luego conéctelos nuevamente.
Cuando la barra de sonido y el TV
estén conectados mediante un cable
HDMI solamente, verifique lo
siguiente.
– La toma HDMI del TV conectado
está etiquetada con “ARC”.
– La función de control para HDMI del
TV esta activada.
– Se activa la función de control para
HDMI de la barra de sonido
(página 26).
Si el TV no es compatible con ARC, se
debe conectar el cable óptico digital
(suministrado) (consulte la Guía de
inicio suministrada). Si el TV no es
compatible con ARC, el sonido del TV
no saldrá por la barra de sonido aun si
está conectada a la toma HDMI IN del
TV.
Seleccione la entrada TV presionando
TV (página 18).
Aumente el volumen en el TV o
cancele el modo de silencio.
Según el orden en que se conecte el
televisor y la barra de sonido, se
puede silenciar la barra de sonido. Si
esto ocurre, encienda primero el TV y
luego la barra de sonido.
Ajuste la configuración de los
altavoces del TV (BRAVIA) en Sistema
de audio. Consulte el Manual de
instrucciones de su TV que indica
cómo configurarlo.
Compruebe la salida de sonido del
TV. Consulte el Manual de
instrucciones del TV para las
configuraciones del TV.
La barra de sonido admite los
formatos de audio Dolby Digital y
PCM (página 36). Cuando reproduzca
un formato no compatible,
establezca la configuración de salida
de audio digital del TV (BRAVIA) en
“PCM”. Para obtener más detalles,
consulte el Manual de instrucciones
de su TV.
El sonido se reproduce tanto en la
barra de sonido como en el TV.
Cambie la configuración de salida de
audio del TV para que el sonido del TV
se emita desde el altavoz externo.
Establezca el volumen del TV al
mínimo.
El sonido proveniente de la barra de
sonido no está al mismo volumen
que el del TV, incluso si la barra de
sonido y el TV están puestos al
mismo volumen.
Si la función de control para HDMI se
encuentra activa, es probable que el
nivel de volumen de la barra de
sonido aparezca en su TV como el
volumen del TV. El volumen del
sonido proveniente de la barra de
sonido y el TV son distintos, incluso si
la barra de sonido y el TV están
puestos al mismo volumen. El
volumen del sonido proveniente de la
barra de sonido y el TV son distintos
dependiendo de las características de
procesamiento de cada uno de estos
dispositivos, pero esto no implica que
estén funcionando mal.
Sonido

31
ES
El sonido se interrumpe al mirar un
programa de TV o algún contenido
en un disco Blu-ray, etc.
Revise los ajustes del modo de
sonido (página 19). Si el modo de
sonido está configurado como AUTO
SOUND, es posible que el sonido se
interrumpa mientras el modo de
sonido cambia de forma automática
de acuerdo con la información del
programa que se está reproduciendo.
Si no desea cambiar el modo de
sonido de forma automática, elija una
opción de configuración del modo de
sonido que no sea AUTO SOUND.
El dispositivo conectado a la barra
de sonido no reproduce ningún
sonido o reproduce sonidos a muy
bajo volumen.
Presione + y consulte el nivel de
volumen (página 13).
Presione
o + para cancelar la
función de silencio (página 13).
Asegúrese de que la fuente de
entrada esté seleccionada
correctamente (página 18).
Compruebe que todos los cables de
la barra de sonido y el dispositivo
conectado estén insertados
firmemente.
Si el dispositivo conectado admite la
función de muestreo ascendente,
debe apagarlo.
No se puede obtener el efecto
envolvente.
Según la señal de entrada y la
configuración del modo de sonido,
puede que el procesamiento del
sonido envolvente no funcione de
forma efectiva. El efecto envolvente
puede ser leve según el programa o
el disco.
Para reproducir audio multicanal,
compruebe la configuración de salida
de audio digital del dispositivo
conectado a la barra de sonido. Para
obtener detalles, consulte el Manual
de instrucciones suministrado con el
dispositivo conectado.
El subwoofer no emite sonido o
solo se escucha un nivel muy bajo
de sonido.
Presione SW + en el control
remoto para aumentar el volumen
del subwoofer.
Asegúrese de que el indicador de
estado del subwoofer esté encendido
en verde o anaranjado.
Si el indicador de estado del
subwoofer no se enciende, intente lo
siguiente:
– Asegúrese de que el cable de
alimentación de CA del subwoofer
esté conectado correctamente.
–Presione (alimentación) del
subwoofer para conectar la
alimentación.
Si el indicador de estado del
subwoofer no se enciende, intente lo
siguiente.
– Mueva el subwoofer a una
ubicación cercana a la barra
parlante para que el indicador de
alimentación del subwoofer se
encienda en verde o anaranjado.
– Siga los pasos de “Cómo realizar la
conexión inalámbrica del
subwoofer (SECURE LINK)”
(página 25).
Si el indicador de estado del
subwoofer parpadea en rojo,
presione (alimentación) en el
subwoofer para desconectar la
alimentación y verifique si los orificios
de ventilación del subwoofer están
bloqueados.
Subwoofer

32
ES
Si las fuentes de entrada que
contienen muy pocos componentes
de sonidos graves (por ejemplo, una
transmisión de TV), el sonido del
subwoofer puede ser difícil de oír.
Reproduzca el tema musical de
muestra que viene con el dispositivo
siguiendo los pasos más abajo y
asegúrese de que el sonido provenga
del subwoofer.
Mantenga presionado (TV) en
la barra parlante durante
5segundos.
Se reproduce el tema musical de
muestra que viene con el
dispositivo.
Presione nuevamente (TV).
Se para la reproducción del tema
musical de muestra que viene
con el dispositivo y la barra de
sonido regresa al estado anterior.
Coloque el modo de noche en
apagado (página 20).
No se puede completar la conexión
BLUETOOTH.
Asegúrese de que el indicador de
BLUETOOTH de la barra parlante esté
encendido (página 8).
Asegúrese de que el dispositivo
BLUETOOTH con el que se está
conectando esté encendido y que la
función BLUETOOTH esté habilitada.
Lleve el dispositivo BLUETOOTH cerca
de la barra parlante.
Vuelva a emparejar la barra de sonido
y el dispositivo BLUETOOTH. Es
posible que primero deba cancelar el
emparejamiento con la barra de
sonido mediante el dispositivo
BLUETOOTH.
Si la función BLUETOOTH está
desactivada, actívela (página 24).
No se puede hacer el
emparejamiento.
Lleve el dispositivo BLUETOOTH cerca
de la barra parlante.
Asegúrese de que la barra de sonido
no esté recibiendo interferencia de
un dispositivo de LAN inalámbrica,
cualquier otro dispositivo inalámbrico
de 2,4 GHz o un horno microondas. Si
hay un dispositivo que genera
radiación electromagnética cerca,
aléjelo de la barra de sonido.
Puede que el emparejamiento no sea
posible si hay presente otros
dispositivos BLUETOOTH cerca de la
barra de sonido. Si este es el caso,
apague los otros dispositivos
BLUETOOTH.
La barra de sonido no emite el
sonido del dispositivo móvil
BLUETOOTH conectado.
Asegúrese de que el indicador de
BLUETOOTH de la barra parlante esté
encendido (página 8).
Lleve el dispositivo BLUETOOTH cerca
de la barra parlante.
Si hay un dispositivo que genera
radiación electromagnética, como un
dispositivo LAN inalámbrico,
cualquier otro dispositivo
BLUETOOTH o un horno microondas
cerca, aléjelo de la barra de sonido.
Quite cualquier obstáculo entre la
barra parlante y el dispositivo
BLUETOOTH, o aleje la barra parlante
del obstáculo.
Si la barra parlante está instalada
debajo del televisor, aleje la barra
parlante del televisor.
Vuelva a colocar el dispositivo
BLUETOOTH.
Cambie la frecuencia de LAN
inalámbrica de cualquier enrutador
LAN inalámbrico o PC a un rango de
5GHz.
Aumente el volumen en el dispositivo
BLUETOOTH.
Conexión del dispositivo
móvil

33
ES
El sonido no está sincronizado con
la imagen.
Es posible que escuche el sonido con
un ligero retraso de la imagen al mirar
películas.
El control remoto de la barra de
sonido no funciona.
Apunte el control remoto al sensor de
control remoto de la barra parlante
(página 8).
Quite los obstáculos que estén entre
el control remoto y la barra de sonido.
Reemplace ambas baterías del
control remoto por unas nuevas si
estuvieran gastadas.
Asegúrese de estar presionando el
botón correcto del control remoto
(página 13).
El control remoto del TV no
funciona.
Instale la barra parlante para que no
obstruya el sensor del control remoto
del TV.
Este problema puede solucionarse
habilitando la función IR repeater
(página 17).
La función de control para HDMI no
funciona correctamente.
Compruebe la conexión con la barra
de sonido (consulte la Guía de inicio
suministrada).
Habilite la función de control para
HDMI del TV. Para obtener más
detalles, consulte el Manual de
instrucciones de su TV.
Espere un momento y vuelva a
intentarlo. Si desenchufa la barra de
sonido, puede demorar un poco
antes de que las operaciones se
puedan realizar. Espere 15 segundos
o más e inténtelo nuevamente.
Asegúrese de que los dispositivos
conectados a la barra de sonido
admitan la función de control para
HDMI.
Habilite la función de control para
HDMI en los dispositivos conectados
a la barra de sonido. Para más
detalles, consulte el Manual de
instrucciones de su dispositivo.
El tipo y la cantidad de dispositivos
que se pueden controlar con la
función de control para HDMI están
restringidos por la norma HDMI CEC
de esta forma:
– Dispositivos de grabación
(grabadora de Blu-ray Disc,
grabadora de DVD, etc.): hasta
3dispositivos
– Dispositivos de reproducción
(grabadora de Blu-ray Disc,
grabadora de DVD, etc.): hasta
3dispositivos
– Dispositivos relacionados con
sintonizadores: hasta 4 dispositivos
– Sistema de audio (receptor/
auriculares): hasta 1 dispositivo
(usado por la barra de sonido)
Todos los indicadores en la barra
parlante parpadean durante
10 segundos y la barra de sonido se
apaga.
Se activa la función de protección.
Desconecte el cable de alimentación
de CA y asegúrese de que las
ventilaciones de la barra parlante no
estén cubiertas y encienda la barra de
sonido al cabo de un rato.
Control remoto
Otros
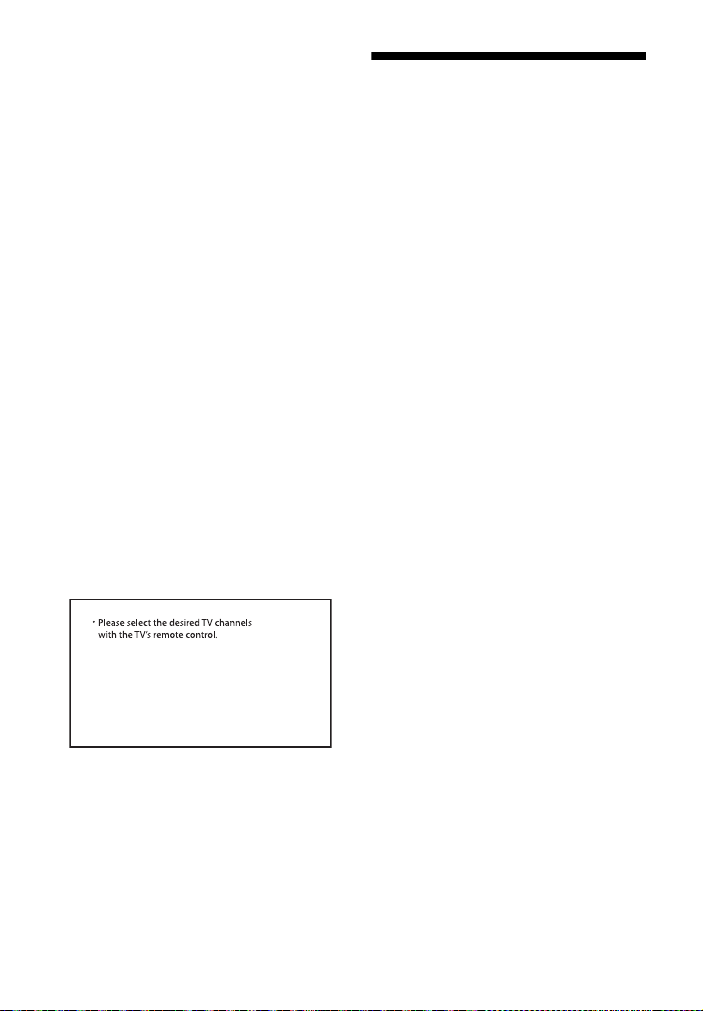
34
ES
Los sensores del TV no funcionan
correctamente.
La barra parlante puede estar
bloqueando algunos sensores (como
el sensor de brillo), el receptor del
control remoto del TV, el emisor de
gafas 3D (transmisión infrarroja) de
un TV 3D que admite el sistema de
gafas 3D infrarrojas o la
comunicación inalámbrica. Aleje la
barra parlante del TV dentro de un
rango que permita que esas partes
funcionen correctamente. Para
obtener información sobre la
ubicación de los sensores y el
receptor del control remoto, consulte
el Manual de instrucciones
suministrado con el TV.
La barra de sonido no funciona
correctamente.
Puede que la barra de sonido esté en
modo demo. Para cancelar el modo
demo, reinicie la barra de sonido.
Mantenga presionado – (volumen) y
(alimentación) en la barra parlante
durante más de 5 segundos
(página 34).
Aparece el siguiente mensaje.
* Esta pantalla es un ejemplo en inglés.
Seleccione el programa de TV con el
control remoto del TV.
Reconfiguración de la
barra de sonido
Si la barra de sonido no funciona
correctamente, restáurela de la
siguiente manera.
1 Mantenga presionado – (volumen)
y (alimentación) en la barra
parlante durante más de
5segundos.
Todos los indicadores de la barra
parlante parpadean 3 veces y las
configuraciones vuelven a su
estado inicial.
2 Desconecte el cable de
alimentación de CA.
3 Conecte el cable de alimentación
de CA y, a continuación, presione
para encender la barra de
sonido.
Consejo
Los ajustes predeterminados están
subrayados en la descripción de cada
función.

35
ES
Especificaciones
Sección del amplificador
POTENCIA DE SALIDA Y DISTORSIÓN
ARMÓNICA TOTAL:
(FTC)
Frontal IZQ + Frontal DER:
Con cargas de 4 ohms, ambos canales
impulsados, de 200 Hz - 20.000 Hz;
potencia nominal de 18 W RMS
mínimo por canal, no más del 1 % de
distorsión armónica total de 250 mW
para la salida nominal.
POTENCIA DE SALIDA (referencia)
Altavoz frontal IZQ/frontal DER: 85 W
(por canal a 4 ohms, 1 kHz)
Entradas
TV IN (OPTICAL)
Salidas
HDMI OUT (TV (ARC))
Sección BLUETOOTH
Sistema de comunicación
Especificación de BLUETOOTH versión
5.0
Salida
Especificación de BLUETOOTH
potencia clase 1
Rango de comunicación máximo
Campo visual de aprox. 25 m
1)
Banda de frecuencia
Banda de 2,4 GHz (2,4000 GHz -
2,4835 GHz)
Método de modulación
FHSS (Freq Hopping Spread Spectrum)
Perfiles compatibles con BLUETOOTH
2)
A2DP (Advanced Audio Distribution
Profile)
AVRCP (Audio Video Remote Control
Profile)
Codec compatibles
3)
SBC
4)
Rango de transmisión (A2DP)
20 Hz - 20.000 Hz (frecuencia de
muestreo 32 kHz, 44,1 kHz, 48 kHz)
1)
El rango real variará dependiendo de los
factores como obstáculos entre los
dispositivos, campos magnéticos
alrededor de un horno de microondas,
electricidad estática, uso de teléfonos
inalámbricos, sensibilidad de recepción,
sistema operativo, aplicaciones de
software, etc.
2)
Los perfiles BLUETOOTH estándar
indican el propósito de la comunicación
de BLUETOOTH entre dispositivos.
3)
Codec: compresión de señal de audio y
formato de conversión
4)
Abreviatura de Codec de subbandas
Sección del bloque de altavoces
frontal IZQ/frontal DER
Sistema de altavoces
2 sistema de altavoces
Altavoz
Frontal IZQ/frontal DER: 52 mm ×
90 mm (2 1/8 pulgadas ×
3 5/8 pulgadas) tipo cónico, 4 Ω
Generalidades
Requisitos de energía
120 V CA, 60 Hz
Consumo de energía
Encendido: 30 W
Modo de espera: 0,5 W o menos (en
modo Ahorro de energía)
(cuando la función de control para
HDMI y el BLUETOOTH modo de
espera están desactivadas)
Modo de espera: 2 W o menos*
(cuando la función de control para
HDMI y el BLUETOOTH modo de
espera están activadas)
* Cuando no detecte una conexión
HDMI ni tampoco guarde un historial
de emparejamiento BLUETOOTH, la
barra de sonido entra
automáticamente en el modo
Ahorro de energía.
Información adicional
Barra parlante (SA-SD35)

36
ES
Dimensiones* (aprox.) (ancho/alto/
profundidad)
900 mm × 64 mm × 88 mm
(35 1/2 pulgadas × 2 5/8 pulgadas ×
3 1/2 pulgadas)
* No se incluye la parte saliente
Peso (aprox.)
2,4 kg (5 lb 4 7/10 oz)
POTENCIA DE SALIDA (referencia)
150 W (a 2,5 ohms, 100 Hz)
Sistema de altavoces
Sistema de altavoces del subwoofer,
reflector de bajos
Altavoz
160 mm (6 1/2 pulgadas), tipo cono
Requisitos de energía
120 V CA, 60 Hz
Consumo de energía
Encendido: 25 W
Modo de espera: 0,5 W o menos
Dimensiones* (aprox.) (ancho/alto/
profundidad)
190 mm × 382 mm × 390 mm
(7 1/2 pulgadas × 15 1/8 pulgadas ×
15 3/8 pulgadas)
* No se incluye la parte saliente
Peso (aprox.)
7,8 kg (17 lb 3 1/5 oz)
Banda de frecuencia
2,4 GHz (2,4000 GHz - 2,4835 GHz)
Método de modulación
FHSS (Freq Hopping Spread Spectrum)
El diseño y las especificaciones están
sujetos a cambios sin previo aviso.
Formatos de entrada de
audio compatibles
(entrada de TV)
Esta barra de sonido es compatible con
los siguientes formatos de audio.
•Dolby Digital
•Linear PCM 2ch
Subwoofer (SA-WSD35)
Sección de transmisión/
recepción inalámbrica

37
ES
Comunicación por
BLUETOOTH
• Los dispositivos BLUETOOTH deben
utilizarse dentro de aproximadamente
10 metros (33 pies) (distancia sin
obstrucciones) uno del otro. El rango
de comunicación efectiva se puede
reducir en las siguientes condiciones.
– Cuando una persona, objeto
metálico, pared u otra obstrucción
esté entre los dispositivos con una
conexión BLUETOOTH
– Ubicaciones donde está instalada
una LAN inalámbrica
– Alrededor de hornos de microondas
que estén en uso
– Ubicaciones donde hay otras ondas
electromagnéticas
• Los dispositivos BLUETOOTH y las LAN
inalámbricas (IEEE 802.11b/g/n)
utilizan la misma banda de frecuencia
(2,4 GHz). Cuando utilice su dispositivo
BLUETOOTH cerca de un dispositivo
con capacidad de LAN inalámbrica, es
posible que ocurra interferencia
electromagnética. Esto podría
ocasionar tasas de transferencia de
datos bajas, ruido o incapacidad para
conectarse. Si esto llegara a suceder,
intente los siguientes remedios:
– Use esta barra de sonido al menos a
10 metros (33 pies) retirado del
dispositivo de LAN inalámbrica.
– Apague la energía al dispositivo de
la LAN inalámbrica cuando utilice su
dispositivo BLUETOOTH dentro de
los 10 metros (33 pies).
– Instale esta barra de sonido y el
dispositivo BLUETOOTH tan cerca
uno del otro como sea posible.
• La transmisión de las ondas de radio
de esta barra de sonido puede
interferir con la operación de algunos
dispositivos médicos. Puesto que esta
interferencia puede ocasionar fallas,
desconecte siempre la energía de esta
barra de sonido y del dispositivo
BLUETOOTH en las siguientes
ubicaciones:
– En hospitales, trenes, aeronaves,
gasolineras y en cualquier lugar
donde haya gases inflamables
– Cerca de puertas automáticas o
alarmas de incendio
• Esta barra de sonido es compatible
con funciones de seguridad que
cumplen con la especificación
BLUETOOTH para garantizar una
conexión segura durante la
comunicación utilizando tecnología
BLUETOOTH. Sin embargo, esta
seguridad puede ser insuficiente
dependiendo del contenido de
configuración y de otros factores, por
lo que siempre tenga cuidado cuando
realice comunicaciones utilizando
tecnología BLUETOOTH.
• Sony no puede ser responsabilizado
de ninguna manera por daños u otras
pérdidas que resulten por las fugas de
información durante la comunicación
utilizando tecnología BLUETOOTH.
• La comunicación BLUETOOTH no está
necesariamente garantizada con
todos los dispositivos BLUETOOTH
que tengan el mismo perfil que esta
barra de sonido.

38
ES
• Los dispositivos BLUETOOTH
conectados con esta barra de sonido
deben cumplir con la especificación
BLUETOOTH recomendada por
Bluetooth SIG, Inc., y deben estar
certificados para cumplimiento. Sin
embargo, incluso cuando un
dispositivo cumple con la
especificación BLUETOOTH, puede
haber casos donde las características
o especificaciones del dispositivo
BLUETOOTH hagan imposible la
conexión o conlleven a diferentes
métodos de control, visualización o
funcionamiento.
• Es posible que ocurra ruido o que el
audio se corte dependiendo del
dispositivo BLUETOOTH que esté
conectado con esta barra de sonido, el
entorno de las comunicaciones o las
condiciones circundantes.
Si tiene preguntas o problemas
relacionados con su barra de sonido,
consulte a su distribuidor Sony más
cercano.
Precauciones
Sobre seguridad
• Si algún objeto sólido o líquido cae dentro
de la barra de sonido, desenchúfela y
llévela a un técnico certificado para que la
revise antes de volver a ponerla en
funcionamiento.
• No se pare sobre la barra de sonido, ya
que puede caerse y lastimarse, o dañar la
barra de sonido.
Sobre fuentes eléctricas
• Antes de operar la barra de sonido,
verifique que el voltaje de operación sea
idéntico al suministro de energía local. El
voltaje de operación se indica en la placa
de identificación que se encuentra en la
parte inferior de la barra parlante.
• Si no va a utilizar la barra de sonido
durante mucho tiempo, asegúrese de
desconectarla del tomacorriente de
pared. Para desconectar el cable de
alimentación de CA, agarre el enchufe;
nunca jale del cable.
• Por razones de seguridad, una hoja del
enchufe es más ancha que la otra, y solo
se conectará al tomacorriente de pared
en una sola posición. Si no puede insertar
el enchufe totalmente en el
tomacorriente, póngase en contacto con
su distribuidor.
• El cable de alimentación de CA debe
cambiarse solo en una tienda de servicio
calificada.
Acumulación de calor
Aunque la barra de sonido se calienta
durante la operación, es algo normal.
Si utiliza la barra de sonido
constantemente con un volumen alto, la
temperatura de las partes trasera e inferior
del dispositivo se incrementará
considerablemente. Para no quemarse, no
toque la barra de sonido.

39
ES
Sobre la ubicación
• Coloque la barra de sonido en un lugar
bien ventilado para evitar que caliente y
alargar la vida útil del dispositivo.
• No coloque la barra de sonido cerca de
fuentes de calor o en un lugar expuesto a
la luz directa del sol, polvo excesivo o
golpes mecánicos.
• No coloque ningún objeto encima de la
barra parlante.
• Si utiliza la barra de sonido en
combinación con un TV, una
videograbadora o una pletina, es posible
que se produzcan ruidos y que la calidad
de la imagen se vea afectada. En tal caso,
coloque la barra de sonido lejos del TV, la
videograbadora o la pletina.
• Tenga cuidado al colocar la barra de
sonido en una superficie que haya
recibido algún tratamiento especial
(encerado, engrasado, pulido, etc.), ya
que es posible que la superficie se
manche o decolore.
• Asegúrese de evitar posibles lesiones
provocadas por las puntas de la barra
parlante.
Sobre el funcionamiento
Antes de conectar otros dispositivos,
asegúrese de apagar o desenchufar la
barra de sonido.
Casos de irregularidad de color
en una pantalla de TV cercana
Es posible que se observen irregularidades
de color en ciertos tipos de TV.
• Si se observa irregularidad de color...
Apague el TV y vuelva a encenderlo luego
de 15 a 30 minutos.
• Si se vuelve a observar irregularidad de
color...
Coloque la barra de sonido lejos del TV.
Sobre la limpieza
Limpie la barra de sonido con un paño
suave y seco. No utilice ningún tipo de
esponja abrasiva, polvo quitagrasa ni
solvente como alcohol o bencina.
Si tiene preguntas o problemas
relacionados con su barra de sonido,
consulte a su distribuidor Sony más
cercano.

40
ES
Esta barra de sonido incluye las funciones
de Dolby* Digital.
* Fabricado con la autorización de Dolby
Laboratories.
Dolby, Dolby Audio y el símbolo de doble
D son marcas comerciales de Dolby
Laboratories.
La marca de palabra BLUETOOTH
®
y sus
logotipos son marcas comerciales
registradas propiedad de Bluetooth SIG,
Inc. y todo uso que Sony Corporation haga
de dichas marcas está sujeto a una licencia.
Otras marcas registradas y nombres
comerciales son propiedad de sus
respectivos propietarios.
Los términos HDMI y HDMI High-Definition
Multimedia Interface, y el logotipo de
HDMI son marcas comerciales o marcas
comerciales registradas de HDMI Licensing
Administrator, Inc. en los Estados Unidos y
otros países.
El logotipo de “BRAVIA” es una marca
comercial de Sony Corporation.
“PlayStation” es una marca registrada o
una marca registrada de Sony Interactive
Entertainment Inc.
Tecnología de codificación de audio MPEG
Layer-3 y patentes con licencia de
Fraunhofer IIS y Thomson.
Windows Media es una marca comercial
registrada o marca registrada de Microsoft
Corporation en los Estados Unidos y/o en
otros países.
Este producto está protegido por ciertos
derechos de propiedad intelectual de
Microsoft Corporation. El uso o distribución
de dicha tecnología fuera de este producto
está prohibido sin una licencia de Microsoft
o de una subsidiaria autorizada de
Microsoft.
Todas las otras marcas comerciales son
marcas comerciales de sus respectivos
propietarios.
Derechos de autor y marcas
comerciales registradas


5-003-644-11(1)
http://www.sony.net/
©2019 Sony Corporation Printed in Malaysia