NC-2200w External Wireless Print/Scan Server (IEEE 802.11b)
Quick Setup Guide
Externer Wireless Print/ScanServer NC-2200w (IEEE 802.11b)
Installationsanleitung
Serveur d'impression/numérisation externe sans fil NC-2200w (IEEE 802.11b)
Guide d’installation rapide
NC-2200w Externe draadloze afdruk-/scanserver (IEEE 802.11b)
Installatiehandleiding
Server di stampa/scansione senza fili esterno NC-2200w (IEEE 802.11b)
Guida di impostazione rapida
Servidor de impresión/digitalización inalámbrico externo NC-2200w (IEEE 802.11b)
Guía de configuración rápida
NC-2200w ekstern, trådløs utskrifts-/skannerserver (IEEE 802.11b)
Hurtigoppsettguiden
NC-2200w Extern trådlös skrivar-/skannerserver (IEEE 802.11b)
Snabbguide
NC-2200w Eksternt, trådløst printer-/scannernetkort (IEEE 802.11b)
Hurtig installationsanvisning
Servidor de impressão/digitalização externo sem fios NC-2200w (IEEE 802.11b)
Guia de configuração rápida
NC-2200w 外付けワイヤレスプリント / スキャンサーバー(IEEE 802.11b)
クイックセットアップガイド
English Deutsch Français Español Norsk Svenska Dansk Português
Nederlands
Japanese
Italiano

1
English
This product is approved for use in the country of purchase only. Do not use this product outside the country of purchase
as it may violate the wireless telecommunication and power regulations of that country.
Please read this Quick Setup Guide before you install the NC-2200w and use the Brother Printer/MFC/DCP on a wireless
network. For more details about how to optimize the NC-2200w, please refer to the NC-2200w Network User’s Guide on
the CD-ROM we have supplied with the NC-2200w.
Keep this Quick Setup Guide and the supplied CD-ROM in a convenient place for quick and easy reference at all times.
Trademarks
Brother is a registered trademark of Brother Industries, Ltd.
Ethernet is trademark of Xerox Corporation.
Apple and Macintosh are registered trademarks of Apple Computer, Inc.
LAN Server is trademark of International Business Machines Corporation.
Windows and Windows NT are registered trademarks of Microsoft Corporation.
NC-2200w and BRAdmin Professional utility are trademarks of Brother Industries Ltd.
All other brand and product names mentioned in this user's guide are registered trademarks or trademarks of respective
companies.
Deutsch
Dieses Produkt ist nur zum Gebrauch in dem Land zugelassen, in dem es gekauft wurde. Benutzen Sie dieses Produkt
daher nur im Kaufland, da es in anderen Ländern möglicherweise gegen die dortigen Telekommunikation- und
Stromversorgungsbestimmungen verstößt.
Bitte lesen Sie diese Installationsanleitung bevor Sie den NC-2200w installieren und den Brother Drucker/MFC/DCP in
einem drahtlosen Netzwerk betreiben. Weitere Informationen zur Optimierung des NC-2200w finden Sie im
Netzwerkhandbuch für den NC-2200w auf der dem NC-2200w beiliegenden CD-ROM.
Bewahren Sie diese Installationsanleitung und die beiliegende CD-ROM stets gut zugänglich auf.
Warenzeichen
Brother ist ein eingetragenes Warenzeichen der Brother Industries Ltd.
Ethernet ist ein Warenzeichen der Xerox Corporation.
Apple und Macintosh sind eingetragene Warenzeichen von Apple Computer, Inc.
LAN Server ist ein Warenzeichen von International Business Machines Corporation.
Windows und Windows NT sind eingetragene Warenzeichen der Microsoft Corporation.
NC-2200w und BRAdmin Professional sind Warenzeichen von Brother Industries Ltd.
Alle übrigen Waren- und Produktbezeichnungen, die in diesem Handbuch erwähnt werden, sind Warenzeichen oder
eingetragene Warenzeichen der entsprechenden Unternehmen.
Français
Ce produit est approuvé uniquement dans le pays d'achat. Ne l'utilisez pas dans d'autres pays car il pourrait enfreindre les
réglementations relatives aux télécommunications sans fil et à l'alimentation électrique de ces pays.
Veuillez lire ce Guide d'installation rapide avant d'installer le NC-2200w et d'utiliser l'imprimante/MFC/DCP Brother sur un
réseau sans fil. Pour savoir comment optimiser le NC-2200w, consultez le Guide de l'utilisateur en réseau du NC-2200w
qui figure sur le CD-ROM fourni avec le NC-2200w.
Veuillez conserver ce Guide d'installation rapide et le CD-ROM fourni à portée de main afin de pouvoir les consulter
facilement en cas de besoin.
Marques
Brother est une marque déposée de Brother Industries, Ltd.
Ethernet est une marque de Xerox Corporation.
Apple et Macintosh sont des marques déposées d'Apple Computer, Inc.
LAN Server est une marque de International Business Machines Corporation.
Windows et Windows NT sont des marques déposées de Microsoft Corporation.
NC-2200w et BRAdmin Professional sont des marques de Brother Industries Ltd.
Tous les autres noms de marque et de produit mentionnés dans le présent guide sont les marques déposées ou non de
leurs détenteurs respectifs.

2
Nederlands
Dit product is goedgekeurd voor gebruik in alleen het land waar het gekocht is. Gebruik dit product alleen in het land van
aankoop; bij gebruik in een ander land kunnen de voorschriften voor draadloze telecommunicatie en elektrische voeding
overtreden worden.
Lees deze installatiehandleiding voordat u de NC-2200w installeert en de printer/MFC/DCP van Brother op het draadloze
netwerk gebruikt. Meer informatie over het optimaal instellen van de NC-2200w vindt u in de netwerkhandleiding van de
NC-2200w. Deze handleiding vindt u op de cd-rom die met de NC-2200w geleverd werd.
Bewaar deze installatiehandleiding en de meegeleverde cd-rom op een veilige plaats, zodat u ze wanneer nodig snel even
kunt raadplegen.
Handelsmerken
Brother is een wettig gedeponeerd handelsmerk van Brother Industries, Ltd.
Ethernet is een handelsmerk van Xerox Corporation.
Apple en Macintosh zijn wettig gedeponeerde handelsmerken van Apple Computer, Inc.
LAN Server is een handelsmerk van International Business Machines Corporation.
Windows en Windows NT zijn wettig gedeponeerde handelsmerken van Microsoft Corporation.
NC-2200w en BRAdmin Professional zijn handelsmerken van Brother Industries, Ltd.
Alle andere merknamen en productnamen die in deze handleiding worden gebruikt, zijn wettig gedeponeerde
handelsmerken of handelsmerken van de desbetreffende bedrijven.
Italiano
L'utilizzo di questo prodotto è approvato solo nel paese di acquisto. Non utilizzare questo prodotto al di fuori del paese di
acquisto poiché potrebbe violare le norme relative alle telecomunicazioni senza fili di tale paese.
Leggere questa Guida di impostazione rapida prima di installare l'NC-2200w e utilizzare la stampante/MFC/DCP Brother
in una rete senza fili. Per ulteriori dettagli sull'ottimizzazione dell'NC-2200w, fare riferimento alla Guida dell'utente abilitato
alla connessione di rete dell'NC-2200w disponibile sul CD-ROM fornito con il prodotto.
Conservare questa Guida di impostazione rapida e il CD-ROM in un luogo pratico per poterli consultare in qualsiasi
momento.
Marchi
Brother è un marchio registrato di Brother Industries, Ltd.
Ethernet è un marchio di Xerox Corporation.
Apple e Macintosh sono marchi registrati di Apple Computer, Inc.
LAN Server è un marchio di International Business Machines Corporation.
Windows e Windows NT sono marchi registrati di Microsoft Corporation.
NC-2200w e l'utilità BRAdmin Professional sono marchi di Brother Industries, Ltd.
Tutti gli altri nomi di prodotti e marchi citati in questa Guida dell'utente sono marchi registrati o marchi dei rispettivi
proprietari.
Español
Este producto sólo está aprobado para su uso en el país donde se ha realizado la compra. No utilice este producto fuera
del país donde se ha realizado la compra, ya que puede infringir la normativa eléctrica y para las comunicaciones
inalámbricas de ese país.
Lea esta Guía de configuración rápida antes de instalar el servidor de impresión inalámbrico NC-2200w y utilizar la
impresora/MFC/DCP Brother en una red inalámbrica. Para obtener más detalles sobre el modo de optimizar el servidor de
impresión inalámbrico, consulte el Manual de usuario de red en el CD-ROM suministrado con el servidor de impresión
inalámbrico NC-2200w.
Guarde esta Guía de configuración rápida y el CD-ROM que se suministra en un lugar conveniente para realizar consultas
rápidas y sencillas en cualquier momento.
Marcas registradas
Brother es una marca registrada de Brother Industries, Ltd.
Ethernet es una marca comercial de Xerox Corporation.
Apple y Macintosh son marcas registradas de Apple Computer, Inc.
LAN Server es una marca comercial de International Business Machines Corporation.
Windows y Windows NT son marcas registradas de Microsoft Corporation.
NC-2200w y la utilidad BRAdmin Professional son marcas comerciales de Brother Industries Ltd.
Todas las demás marcas y nombres de productos mencionados en el Manual del usuario son marcas registradas o marcas
comerciales de sus respectivos titulares.

3
Norsk
Dette produktet er kun godkjent for bruk i landet der det er kjøpt. Produktet må ikke brukes utenfor landet der det ble kjøpt,
da dette kan være i strid med regelverk for trådløs kommunikasjon og strømnettverk i andre land.
Les denne hurtigoppsettguiden før du installerer NC-2200w og bruker en Brother-skriver/-MFC/-DCP på det trådløse
nettverket. Hvis du vil ha mer informasjon om hvordan du optimaliserer NC-2200w, kan du se nettverksbrukerhåndboken
på CD-ROM-en som fulgte med NC-2200w.
Oppbevar hurtigoppsettguiden og CD-ROM-en på et lett tilgjengelig sted, slik at du når som helst kan slå opp i dem på en
rask og enkel måte.
Varemerker
Brother er et registrert varemerke for Brother Industries, Ltd.
Ethernet er et varemerke for Xerox Corporation.
Apple og Macintosh er registrerte varemerker for Apple Computer, Inc.
LAN Server er varemerke for International Business Machines Corporation.
Windows og Windows NT er registerert varemerke for Microsoft Corporation.
NC-2200w og BRAdmin Professional er varemerker for Brother Industries Ltd.
Alle andre merke- og produktnavn som blir omtalt i denne brukerhåndboken, er registrerte varemerker eller varemerker for
sine respektive selskaper.
Svenska
Denna produkt är endast godkänd för användning i det land där den inhandlades. Använd inte produkten i andra länder än
inköpslandet, eftersom det kan strida mot det aktuella landets lagstiftning om trådlös telekommunikation och energi.
Läs igenom den här snabbguiden innan du installerar NC-2200w och använder din Brother-skrivare/-MFC/-DCP i ett
trådlöst nätverk. Se bruksanvisningen för nätverksanvändare till NC-2200w som finns på den medföljande cd-romskivan,
för att få ytterligare information om hur du kan optimera NC-2200w.
Spara den här snabbguiden och den medföljande cd-romskivan på en lämplig plats, så att du vid behov snabbt och lätt har
tillgång till dem.
Varumärken
Brother är ett registrerat varumärke som tillhör Brother Industries, Ltd.
Ethernet är ett varumärke som tillhör Xerox Corporation.
Apple och Macintosh är registrerade varumärken som tillhör Apple Computer, Inc.
LAN Server är ett varumärke som tillhör International Business Machines Corporation.
Windows och Windows NT är registrerade varumärken som tillhör Microsoft Corporation.
NC-2200w och verktyget BRAdmin Professional är varumärken som tillhör Brother Industries Ltd.
Alla andra märken och produktnamn som nämns i den här bruksanvisningen är registrerade varumärken eller varumärken
som tillhör respektive företag.
Dansk
Dette produkt er kun godkendt til brug i det land, hvor det er købt. Brug ikke dette produkt uden for det land, hvor det er
købt, da det kan være en overtrædelse af reglerne om trådløs telekommunikation og strøm i det pågældende land.
Læs denne Hurtig installationsanvisning, før du installerer NC-2200w og bruger Brothers printer/MFC/DCP på det trådløse
netværk. Se Brugsanvisning til NC-2200w på den medfølgende cd-rom for at få flere oplysninger om, hvordan du optimerer
NC-2200w.
Opbevar altid Hurtig installationsanvisning og den medfølgende cd-rom på et tilgængeligt sted, så du hurtigt og let kan få
fat i den.
Varemærker
Brother er et registreret varemærke tilhørende Brother Industries, Ltd.
Ethernet er et varemærke tilhørende Xerox Corporation.
Apple og Macintosh er varemærker tilhørende Apple Computer, Inc.
LAN Server er et varemærke tilhørende International Business Machines Corporation.
Windows og Windows NT er registrerede varemærker tilhørende Microsoft Corporation.
NC-2200w og BRAdmin Professional er varemærker tilhørende Brother Industries Ltd.
Alle andre mærke- eller produktnavne, der er nævnt i denne brugsanvisning, er registrerede varemærker eller varemærker
tilhørende de respektive virksomheder.

4
Português
A utilização deste produto só está aprovada no país onde foi efectuada a aquisição. Não utilize este produto fora do país
onde o adquiriu, pois pode violar os regulamentos relativos a telecomunicações sem fios e a potência eléctrica no país em
questão.
Leia este Guia de configuração rápida antes de instalar a NC-2200w e de utilizar a impressora/MFC/DCP numa rede sem
fios. Para obter informações mais detalhadas sobre como optimizar a NC-2200w, consulte o Manual de utilização da rede
da NC-2200w, incluído no CD-ROM fornecido com a NC-2200w.
Guarde este Guia de configuração rápida e o CD-ROM fornecido num local acessível para poder utilizá-lo rápida e
eficazmente, sempre que for necessário.
Marcas comerciais
Brother é uma marca comercial registada da Brother Industries, Ltd.
Ethernet é uma marca comercial da Xerox Corporation.
Apple e Macintosh são marcas registadas da Apple Computer, Inc.
LAN Server é uma marca comercial da International Business Machines Corporation.
Windows e Windows NT são marcas registadas da Microsoft Corporation.
NC-2200w e BRAdmin Professional são da Brother Industries Ltd.
Todas as outras marcas e nomes de produtos mencionados neste manual de utilização são registadas ou das respectivas
empresas.
Japanese
本製品は購入した国内でのみ使用が可能です。 購入した国以外で本製品を使用した場合、その国の電波法や電気安全規
格に違反する恐れがあります。
本書をよくお読みになり、 NC-2200w を正しく安全にセットアップした後で、ブラザープリンタ /MFC/DCP をご使用く
ださい。NC-2200w に関する詳しい情報については、NC-2200w に同梱の CD-ROM に含まれているネットワーク設定
説明書をご覧ください。
商標
Brother
®
のロゴはブラザー工業株式会社の登録商標です。
Ethernet は Xerox Corporation の商標です。
Apple、Apple のロゴ、Macintosh
®
、Mac OS
®
は、アップルコンピュータ社の登録商標です。
Windows
®
および Windows NT
®
は、米国 Microsoft Corporation の米国およびその他の国における登録商標です。
LAN Server は International Business Machines Corporation の商標です。
NC-2200w および BRAdmin Professional はブラザー工業株式会社の登録商標です。
本書に記載されているその他の会社名および製品名は、各社の商標または登録商標です。
English
5
Carton Components
1
NC-2200w External Wireless Print/Scan
Server
2
AC Adapter
3
CD-ROM (including setup software and
NC-2200w Network User’s Guide)
4
Quick Setup Guide
Models Supported
The NC-2200w supports the models listed
below. If your model number is not listed,
please go to the NC-2200w page at
http://solutions.brother.com
to confirm support for the NC-2200w.
Operating System Support
Windows
®
Windows
®
98/98SE/Me/2000 /XP and
Windows NT
®
4.0
Macintosh
®
Mac OS
®
X 10.2.4 - 10.3 or greater
Supplied CD-ROM
1
Brother Solutions Center
The Brother Solutions Center
(http://solutions.brother.com) is a
one-stop resource for your Brother
Printer/MFC/DCP and NC-2200w.
Download the latest drivers and required
utilities, read the FAQs and
troubleshooting tips.
2
Setup
You can run the Wireless Setup Wizard
which guides you through the NC-2200w
configuration. You can also install the
Network Print Software and BRAdmin
Professional utility for Windows
®
.
3
Documentation
View NC-2200w Network User’s Guide
and the Quick Setup Guide in PDF
format.
The NC-2200w can be connected to the
USB interface port of the Brother
Printer/MFC/DCP. A USB cable is not
included in this product, please prepare
an appropriate USB cable (with Type
A-B) at your side.
Group 1:
HL-1440/1450/1470N/5040/5050/5070N/
5140/5150D/5170DN
MFC-9070/9180/9160
Group 2:
MFC-210C/420CN/410CN/620CN/5440CN/584
0CN/3240C/3340CN/8420/8820D/8820DN/
8220/8440/8840D/8840DN/3820CN/3420CN/
DCP-110C/310C/8020/8025D/8025DN/8040/
8045D/8045DN
1
2
4
3
A
B
(Up to 6 feet or 2 m)
If the CD supplied with your Brother
Printer/MFC/DCP does not include a
Windows NT
®
4.0 driver, you are not able
to use it in Windows NT
®
4.0
environments.
1
2
3
Type A-B
English
6
English
Setting up the Print/Scan
Server
Installing the Print Server
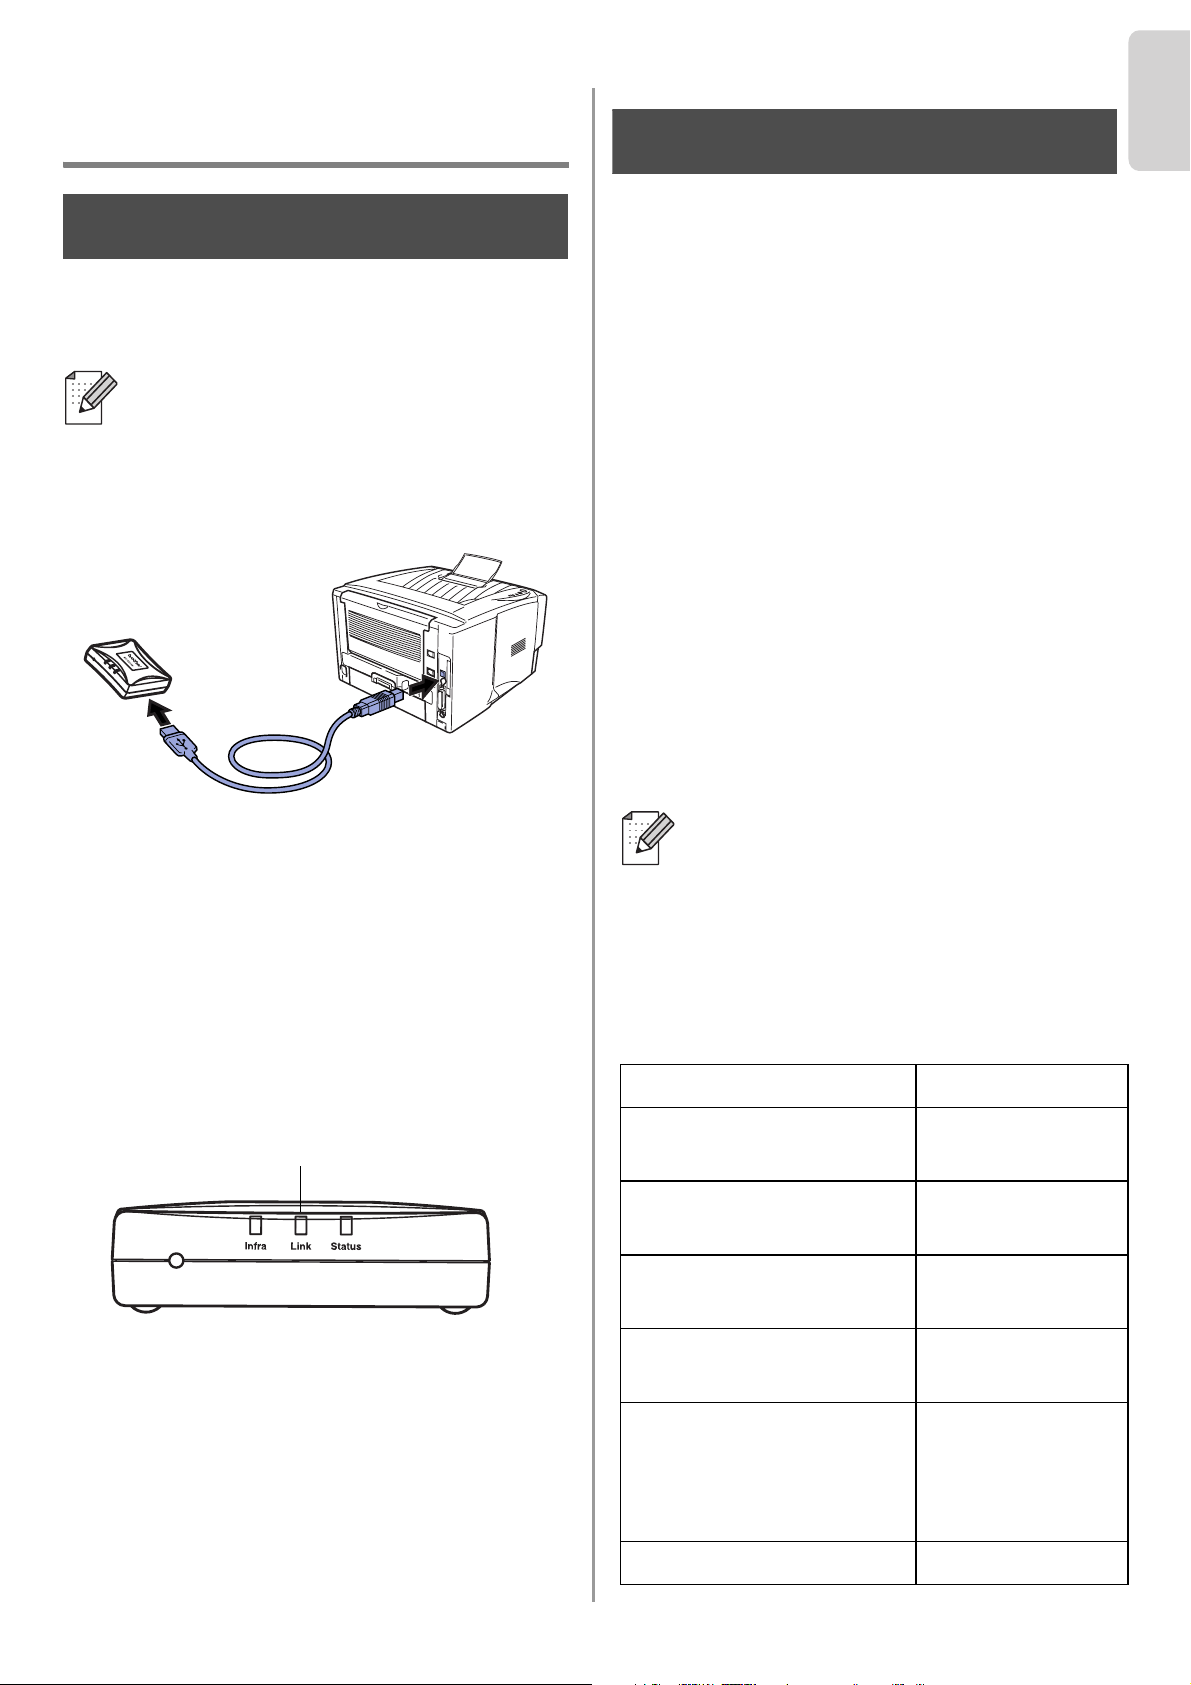
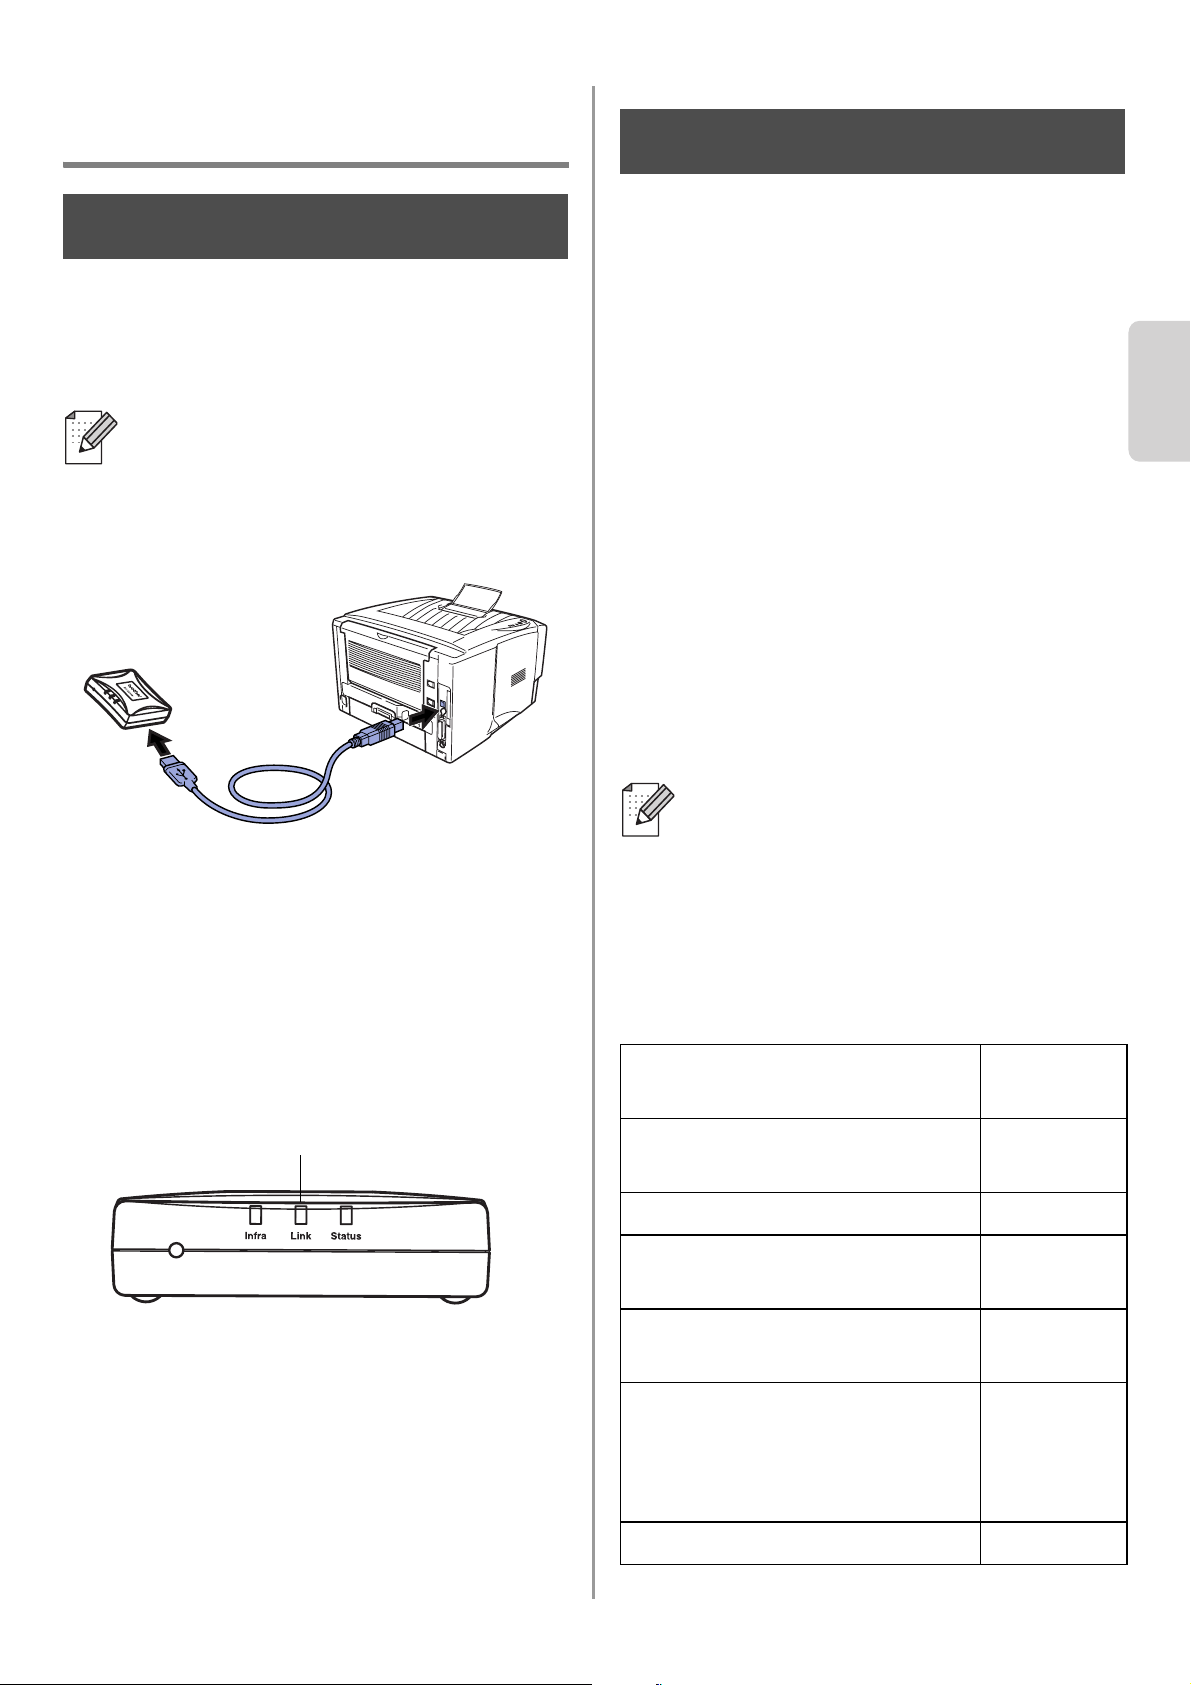
1
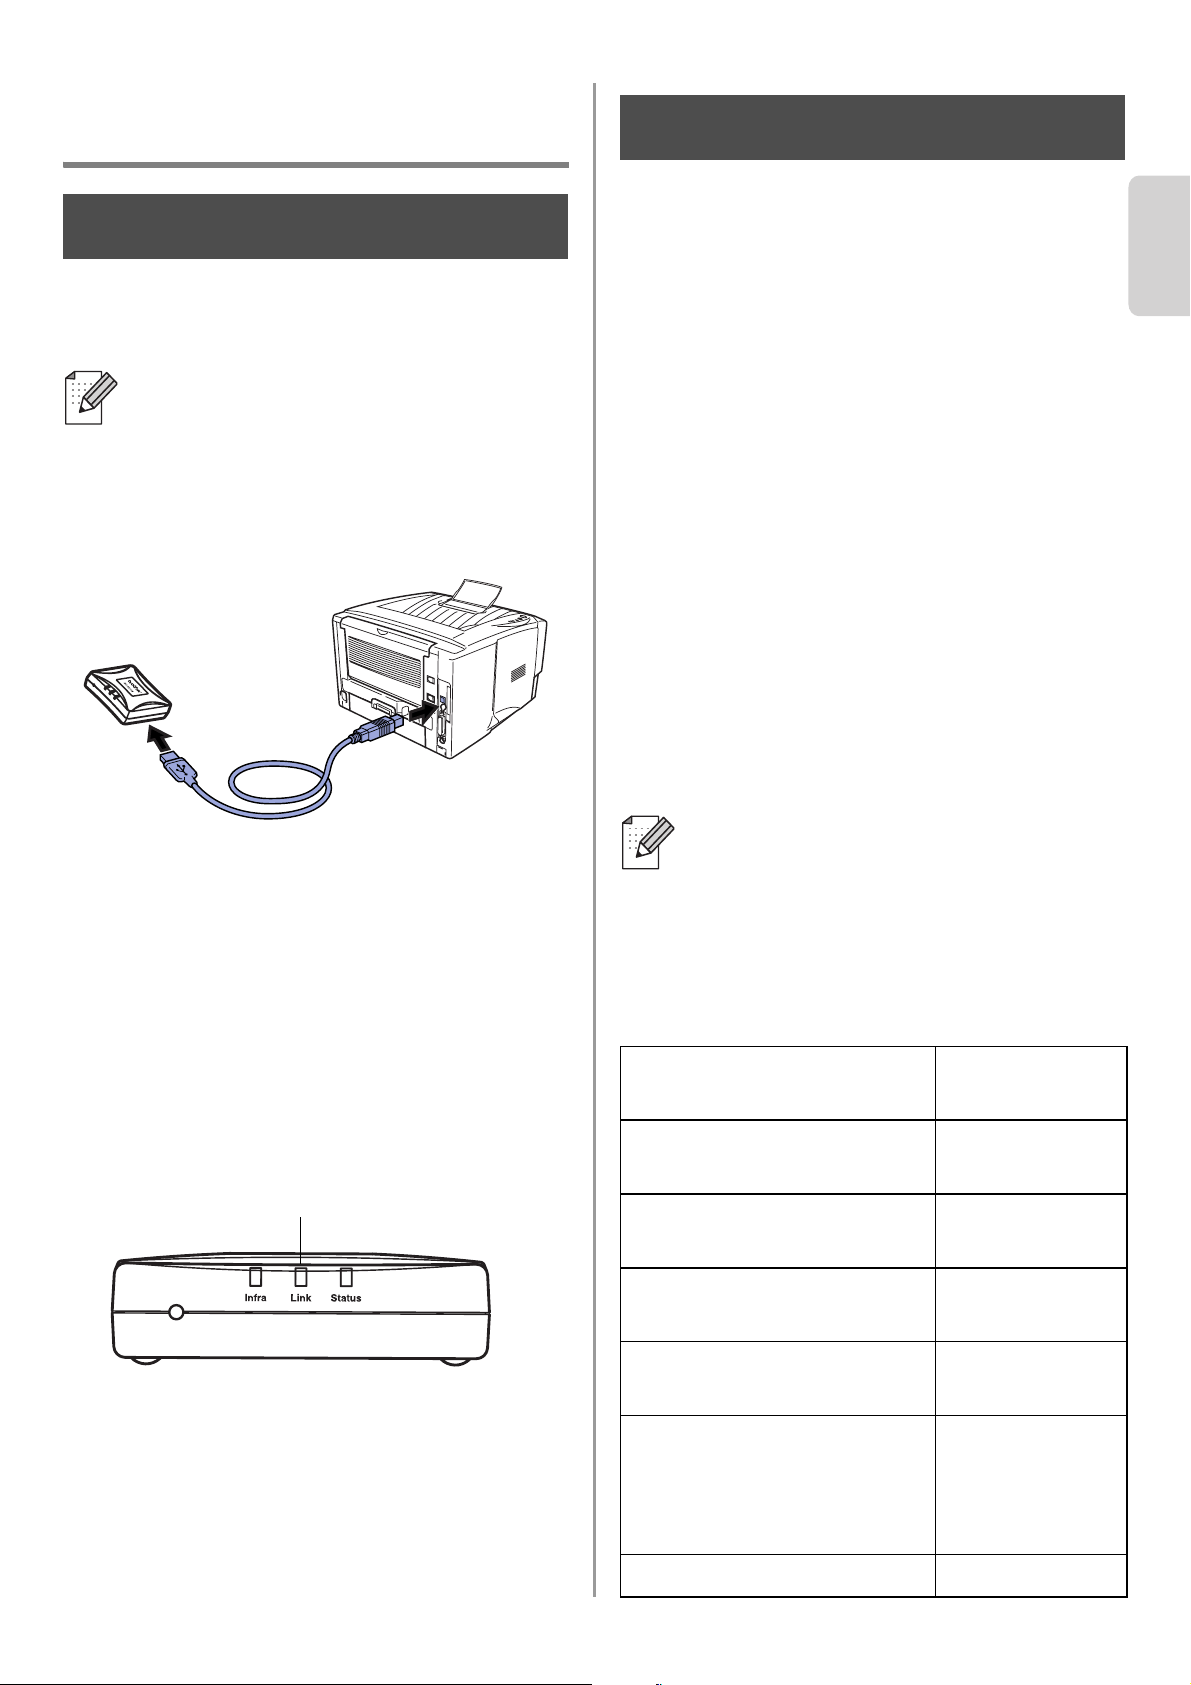
Connect the USB cable to the NC-2200w
and Brother Printer/MFC/DCP.
2
Connect the AC adapter to the
NC-2200w.
3
Plug in the AC Adapter and turn on the
Brother Printer/MFC/DCP.
4
Make sure that the Link LED of the
NC-2200w is on and wait for a few
minutes.
Before installation, if you are using
Personal Firewall software (e.g. the
Internet Connection Firewall available in
Windows XP), disable it. Once you are
sure that you can print, re-start your
Personal Firewall software.
Changing your Computer’s
Wireless Settings to configure
the NC-2200w
Before you can use the Brother
Printer/MFC/DCP in a wireless network, the
NC-2200w must be configured to match your
network configuration.
To configure the NC-2200w from a wireless
computer on your network, you must
temporarily change your current wireless
settings. Before changing the current
wireless settings of your computer, we
recommend you make a note of your current
wireless network settings. You will need to
return to these settings at the end of Step 3
on page
9.
Current wireless network settings of
your computer
The NC-2200w cannot be used with a
USB HUB.
Step 1
Link LED (Green)
We recommend you to contact your
network administrator if you need
assistance with your computers
wireless settings.
Item Current Setting
Communication Mode:
(Infrastructure / Ad-hoc)
Network Name
(SSID/ESSID)
Channel: (1-14)
*If necessary.
Encryption:
(NONE / WEP / Other)
Encryption Key Size
and Type:
(64 bit, 128 bit / ASCII,
HEX / Other)
Encryption Key:
Step 2
English
7
To communicate with the un-configured
NC-2200w change your wireless computer
settings to:
Communication mode: Ad-hoc
(channel 11)
Network name : SETUP
(SSID/ESSID) (case sensitive)
Encryption: None
Please refer to your wireless card
manufacturer instructions for changing the
wireless settings, and then go to Step 3
Configuring the Print/Scan Server.
If you are using Windows
®
XP or Mac OS
®
X 10.2.4 and you are using its built in
Wireless Ethernet capabilities, use the
following steps for each Operating
System.
1
Click Start and then Control Panel.
2
Click the Network Connections icon.
3
Select and right click Wireless Network
Connection. Click View Available
Wireless Networks.
4
You can see the Network name
(SSID/ESSID) of the NC-2200w in the
Available wireless networks box.
Select SETUP and check the Allow me
to connect... check box. Click the
Connect button.
For Windows
®
98/Me/2000,
Windows NT
®
4.0 Users
Go to Step 3 on page 9
For Windows
®
XP Users
English
8
English
5
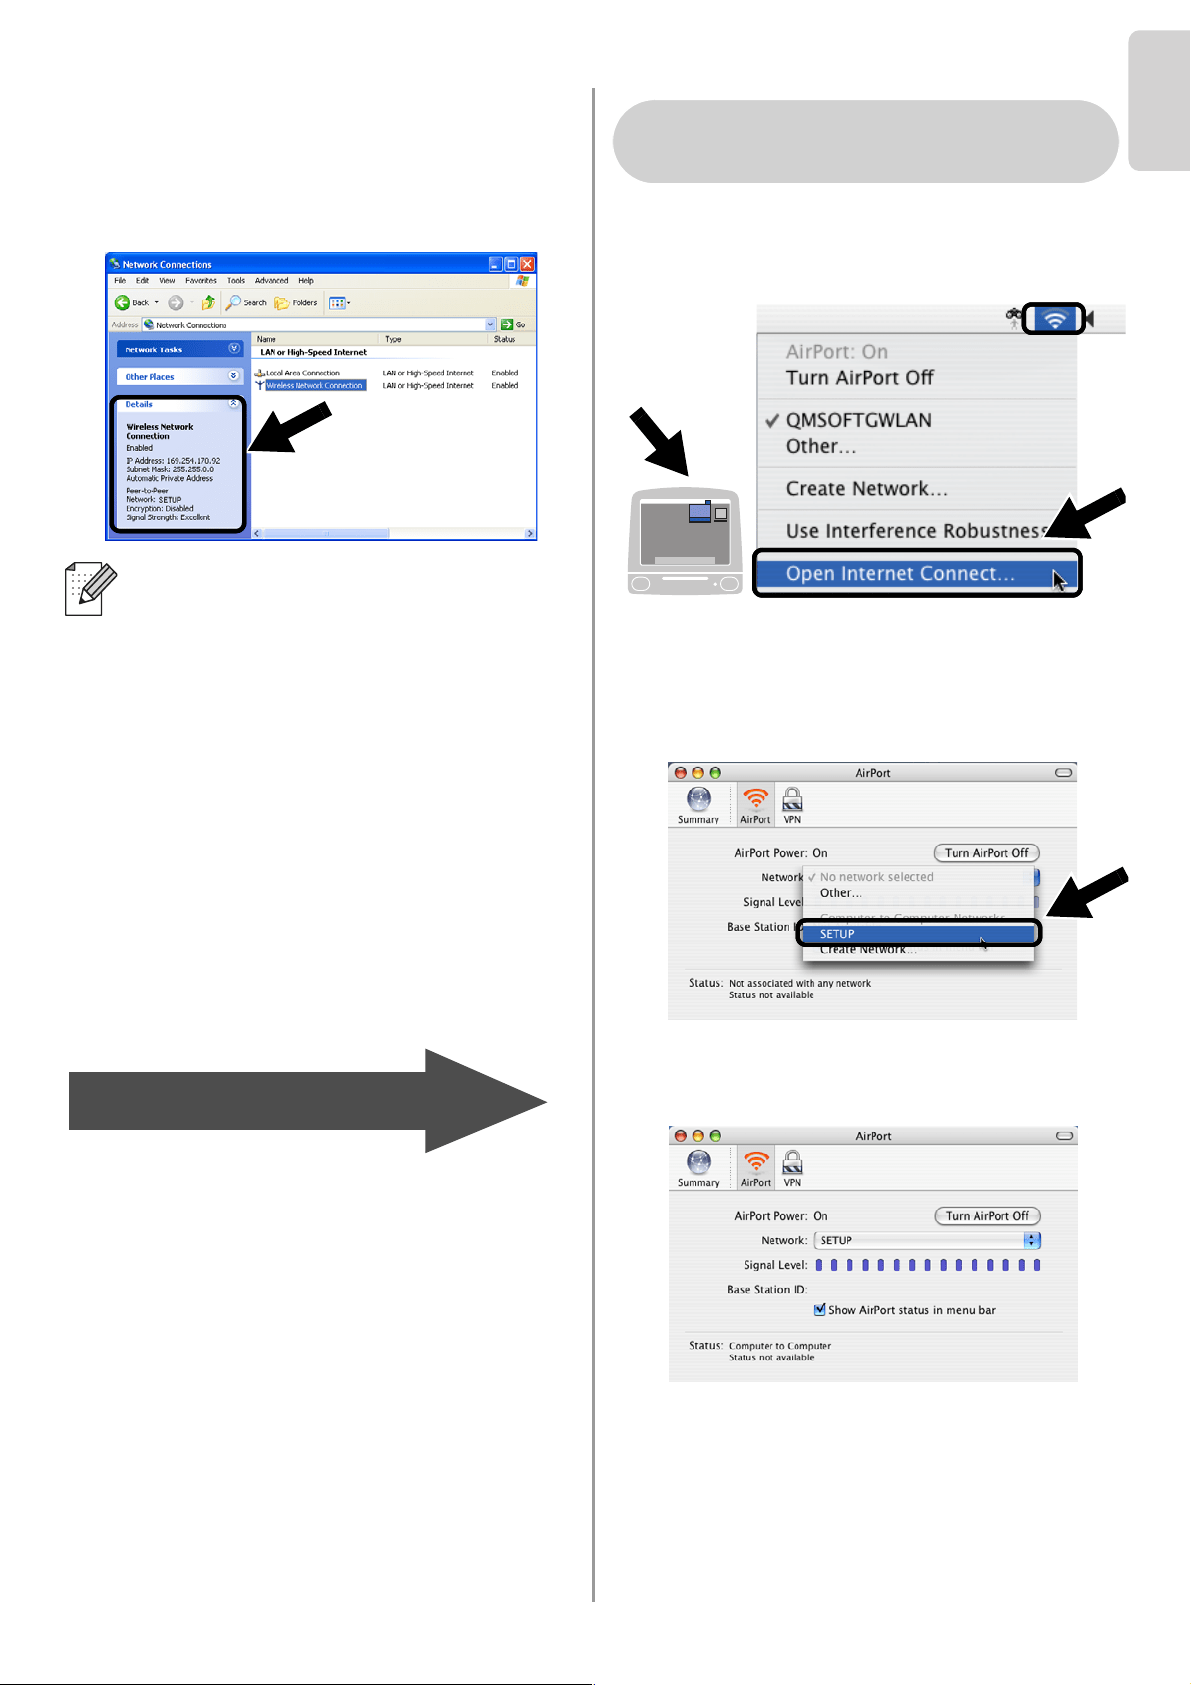
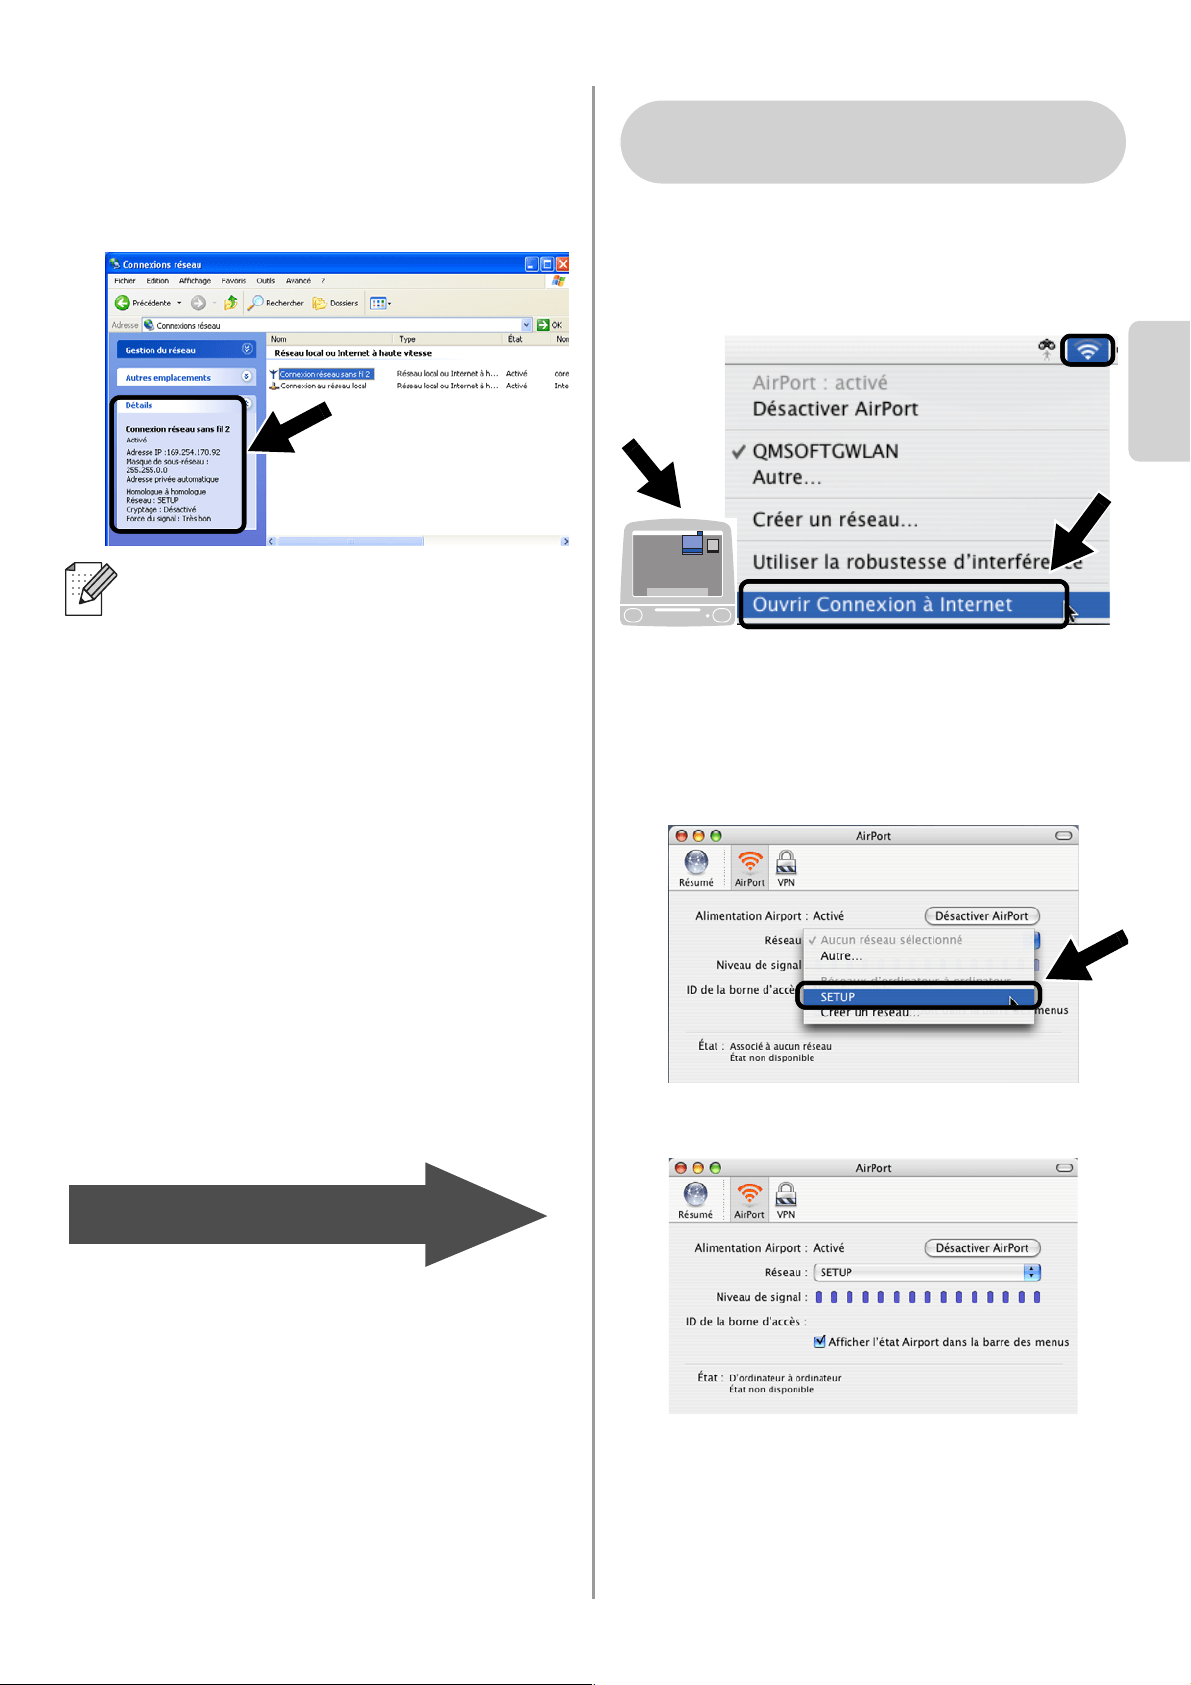
Check the wireless network connection
status. It may take a few minutes to
change from 0.0.0.0 to 169.254.x.x IP
address to be shown on screen. (where
x.x are numbers between 0 and 255).
1
Click the AirPort status icon and select
Open Internet Connect....
2
Click the Network tab to see the available
wireless devices.You can see the
Network name (SSID/ESSID) in the
Network option. Select SETUP.
3
Your wireless network is connected
successfully.
If the Network name (SSID/ESSID) you
want to choose is not listed, try the
following:
■ Unplug the AC adapter, plug it back in
again and then wait for a few minutes.
■ Move your Brother Printer/MFC/DCP
with the NC-2200w installed closer to
your computer and try again.
■ Reset the NC-2200w back to its
default factory settings and try again.
Refer to page
16 to reset to factory
default settings.
■ Refer to Chapter 6 of the NC-2200w
Network User’s Guide on the
CD-ROM we have supplied with the
NC-2200w.
Go to Step 3 on page 9
For Mac OS
®
X 10.2.4 - 10.3
or greater Users

English
9
Configuring the Print/Scan
Server
1
Insert the NC-2200w CD-ROM into your
CD-ROM drive.
(For Windows
®
users) The opening
screen will appear automatically.
(For Mac OS
®
X 10.2.4 to 10.3 or greater
users) Double-click the NC2200w icon
on your Macintosh
®
, and then
double-click the Start Here OSX icon.
2
Select your language.
3
Click Setup and then Wireless Setup
Wizard.
4
Review the Welcome information and
when you are sure you have completed
the necessary tasks, click Next.
5
Follow the screens. For more
information, refer to Chapter 2 of the
NC-2200w Network User’s Guide on the
CD-ROM we have supplied with the
NC-2200w.
6
After exiting the Wireless Setup Wizard,
change the wireless settings of your
computer back to their original settings
using the information you noted when
Changing your Computer’s Wireless
Settings to configure the NC-2200w on
page 6.
If the Network name (SSID/ESSID) you
want to choose is not listed, try the
following:
■ Unplug the AC adapter, plug it back in
again and then wait for a few minutes.
■ Move your Brother Printer/MFC/DCP
with the NC-2200w installed closer to
your computer and try again.
■ Reset the NC-2200w back to its
default factory settings and try again.
Refer to page
16 to reset to factory
default settings.
■ Refer to Chapter 6 of the NC-2200w
Network User’s Guide on the
CD-ROM we have supplied with the
NC-2200w.
Step 3
English
10
English
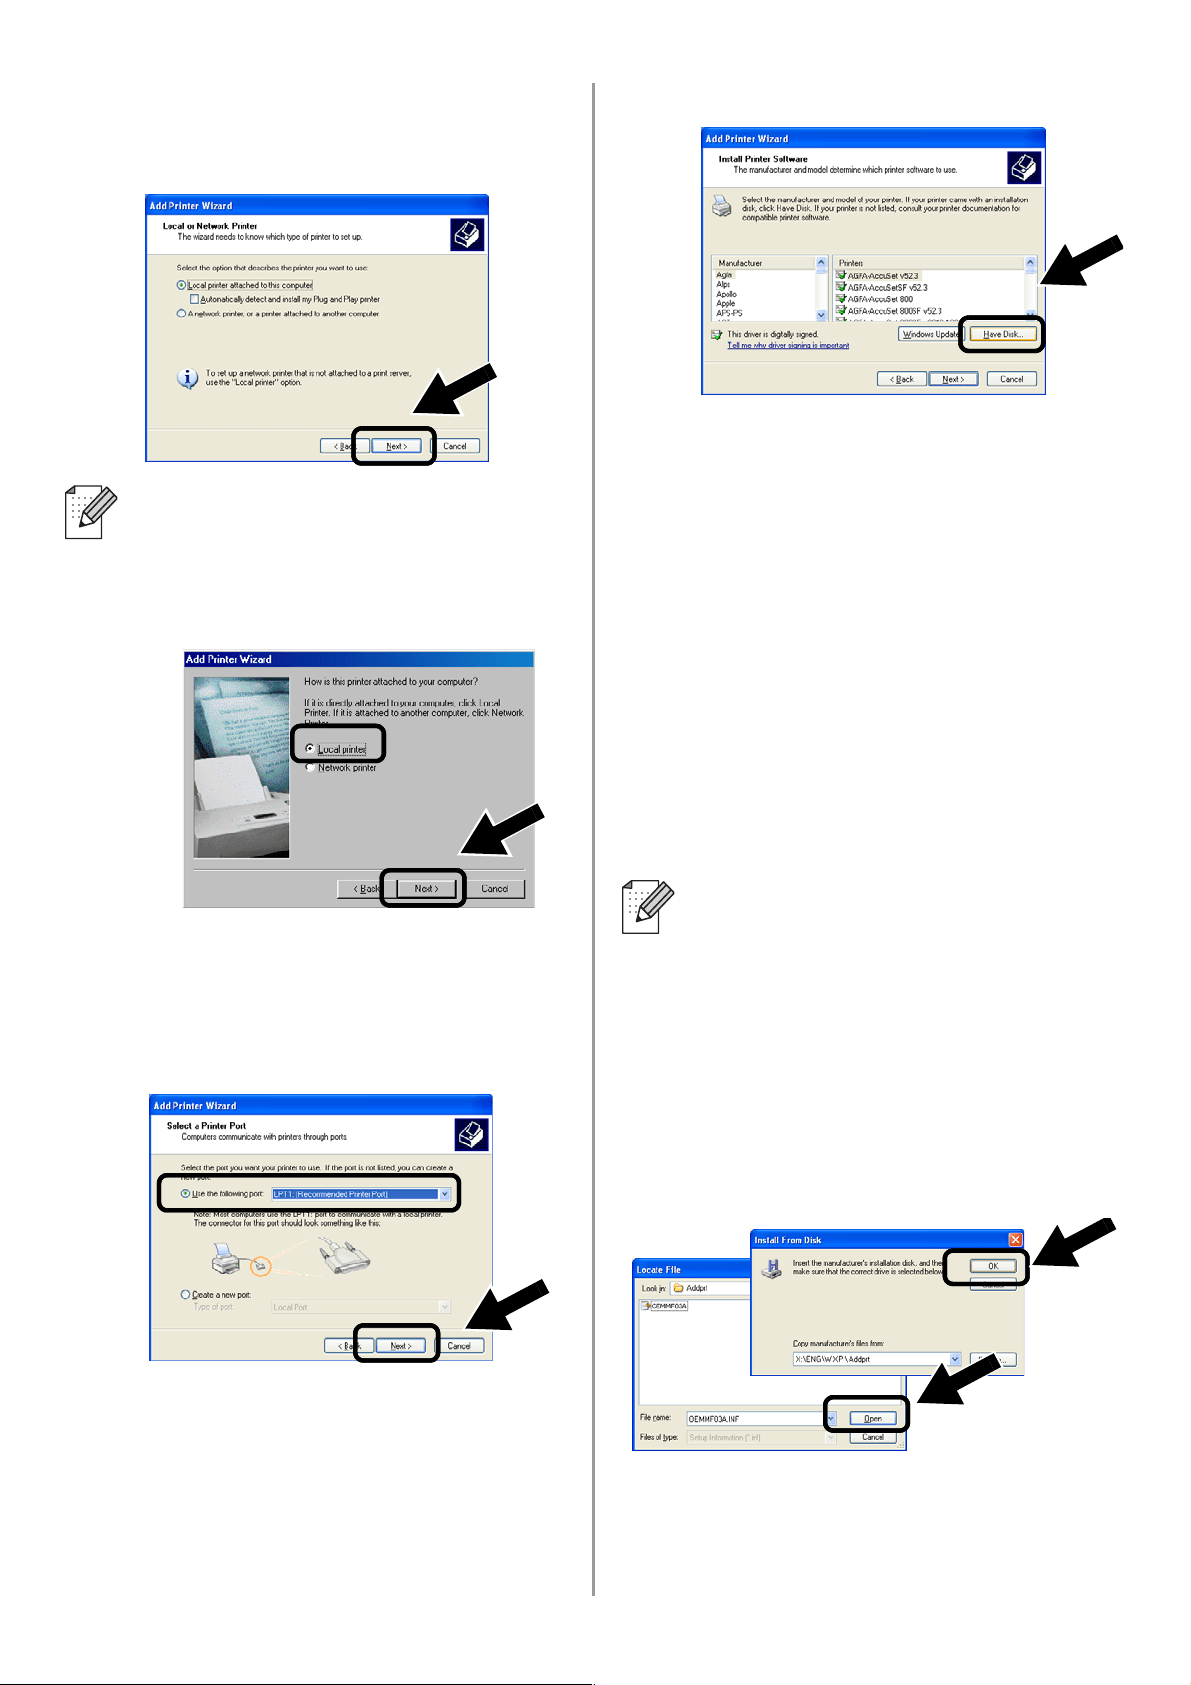
Installing the Printer Driver
The above model users need to install the
printer driver before setting up your computer
to work with the NC-2200w. If the printer
driver is already installed, you can skip this
step.The driver is on the CD-ROM included
with the Brother Printer/MFC/DCP. The
printer driver can also be downloaded from
the Brother Solutions Center at:
< http://solutions.brother.com>.
To install the printer driver using the
CD-ROM, follow the steps below.
The instructions in this section are based on
Windows
®
XP.
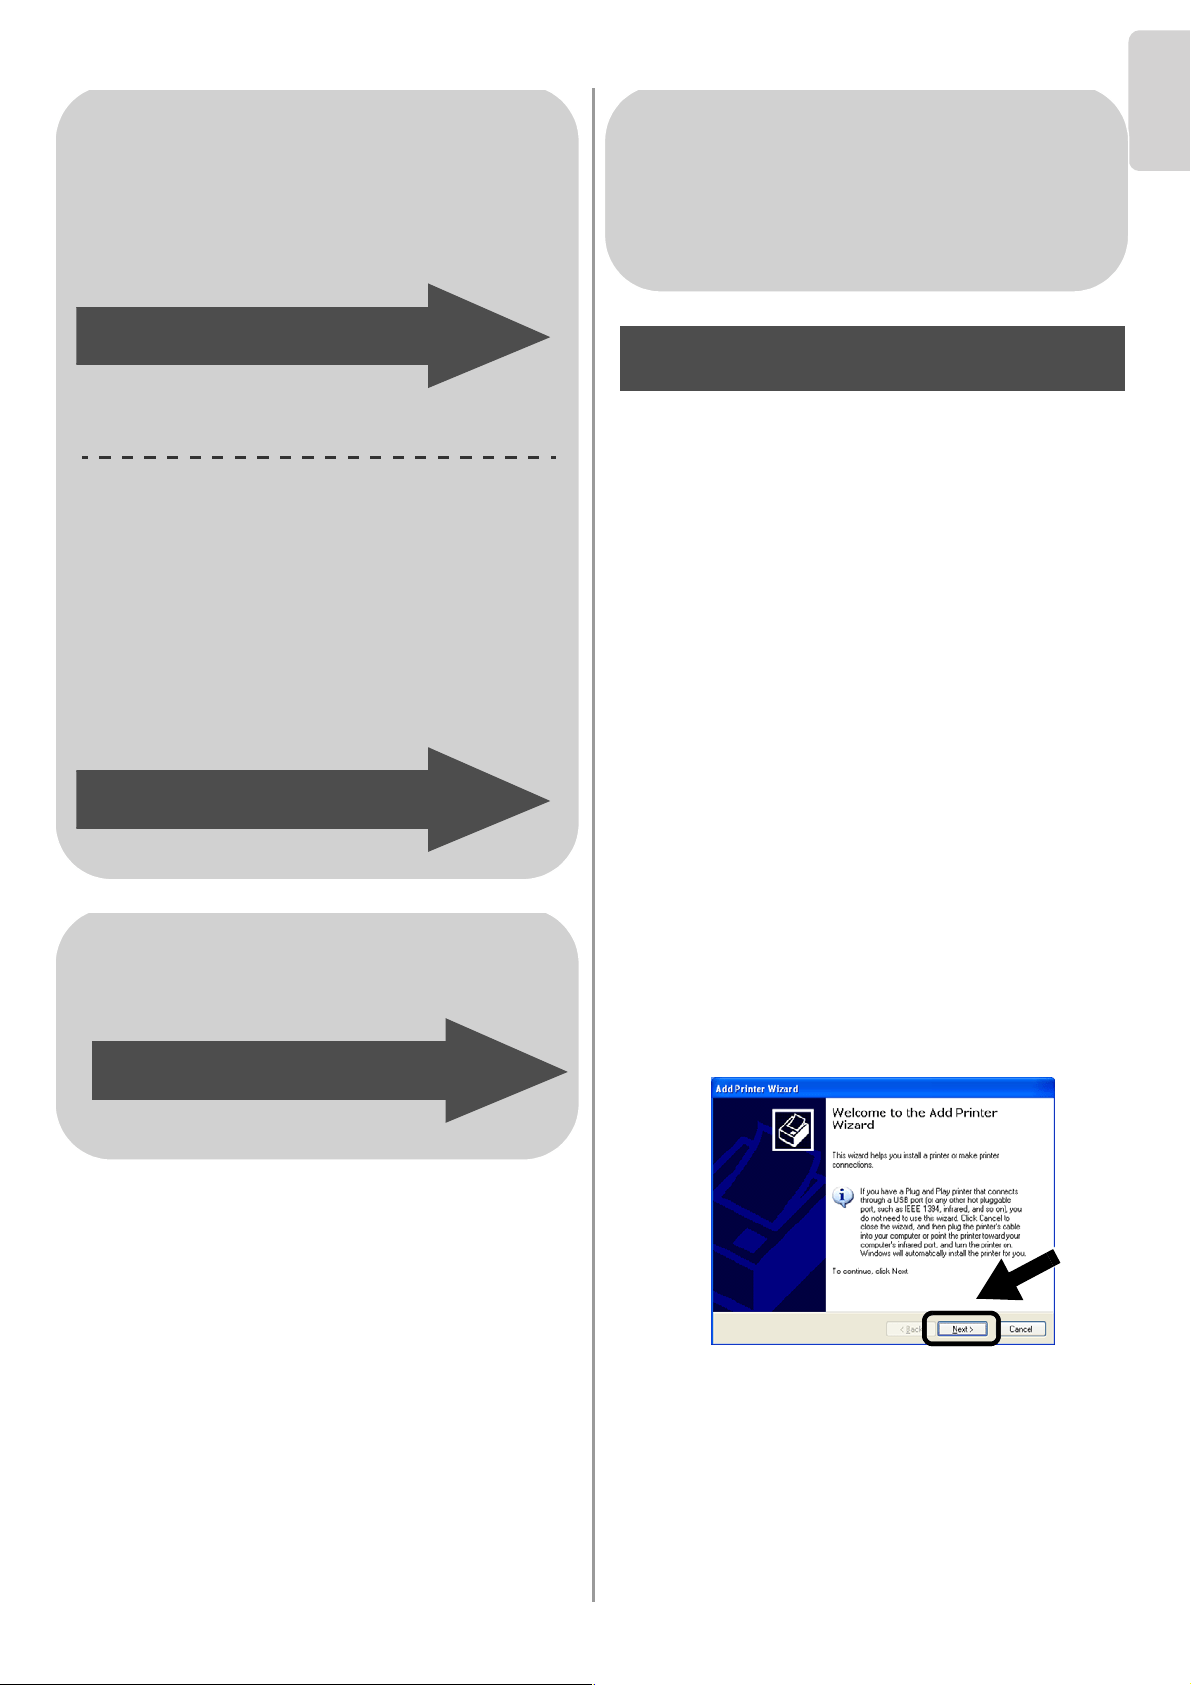
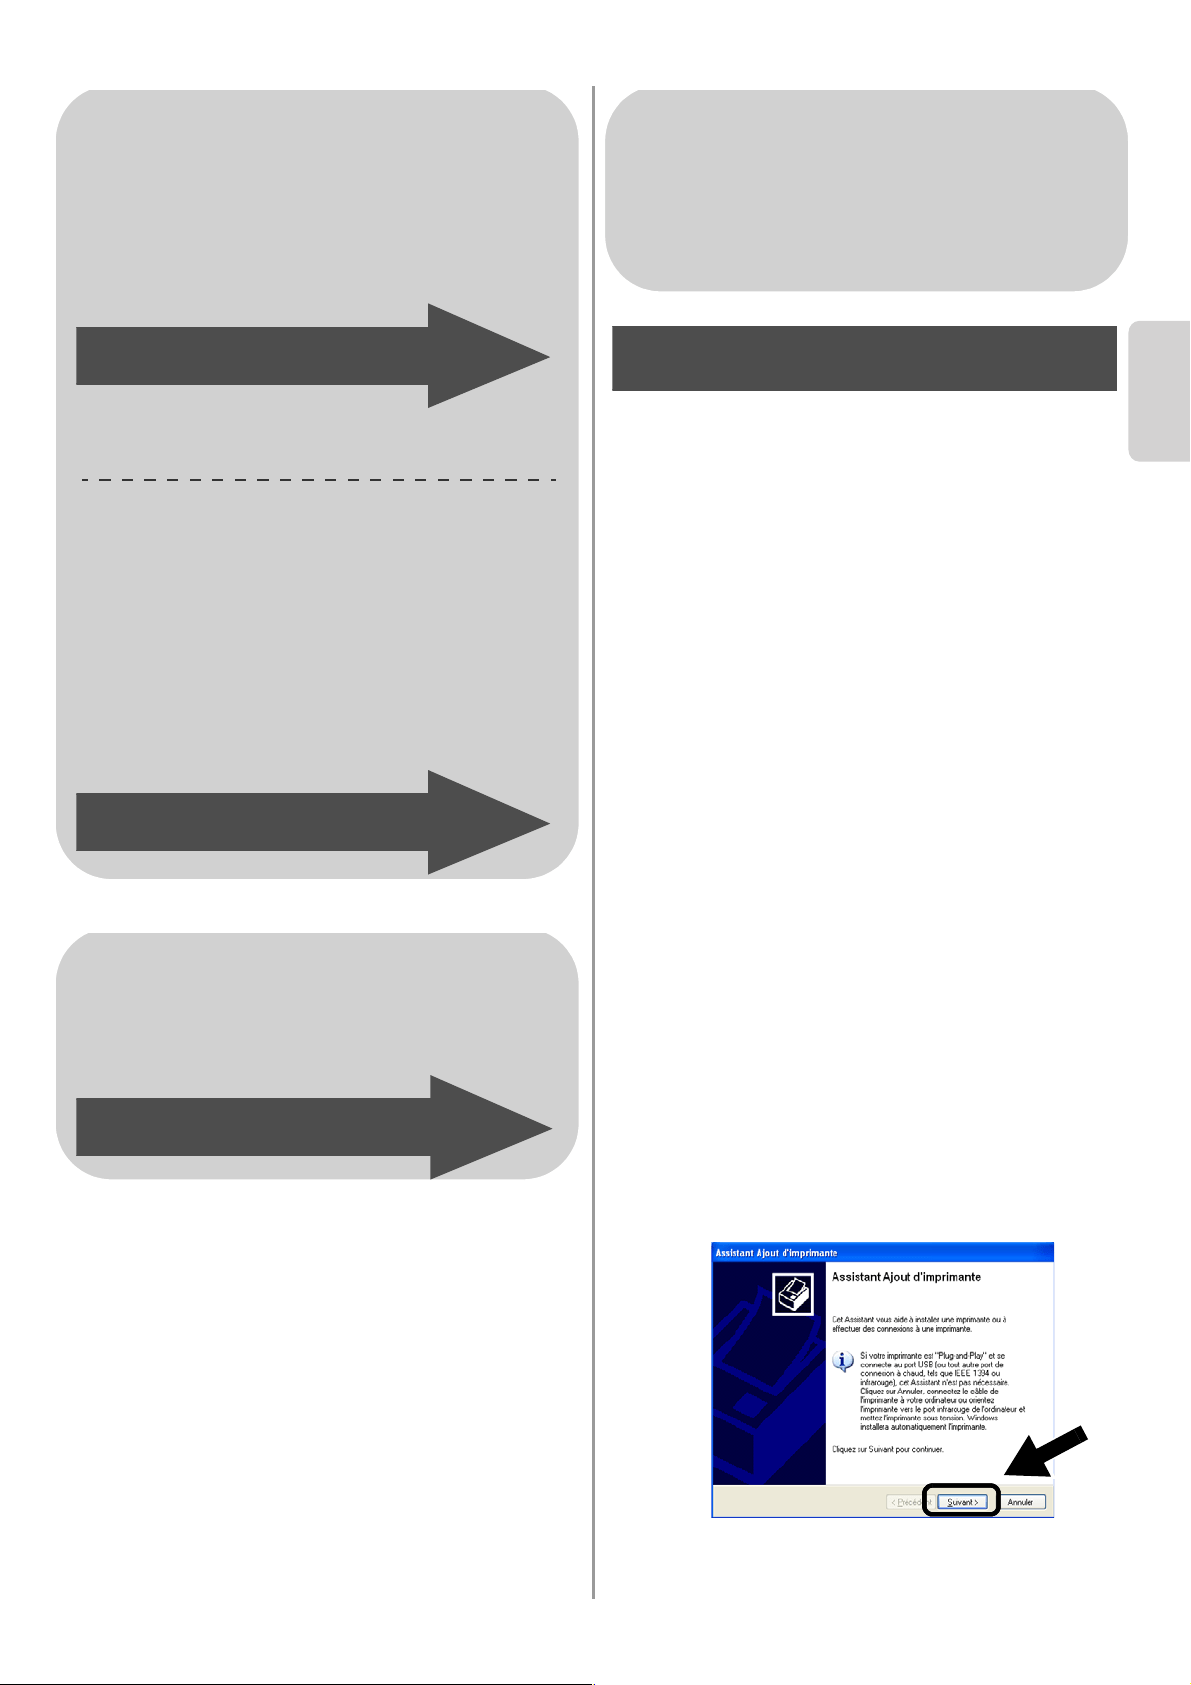
1
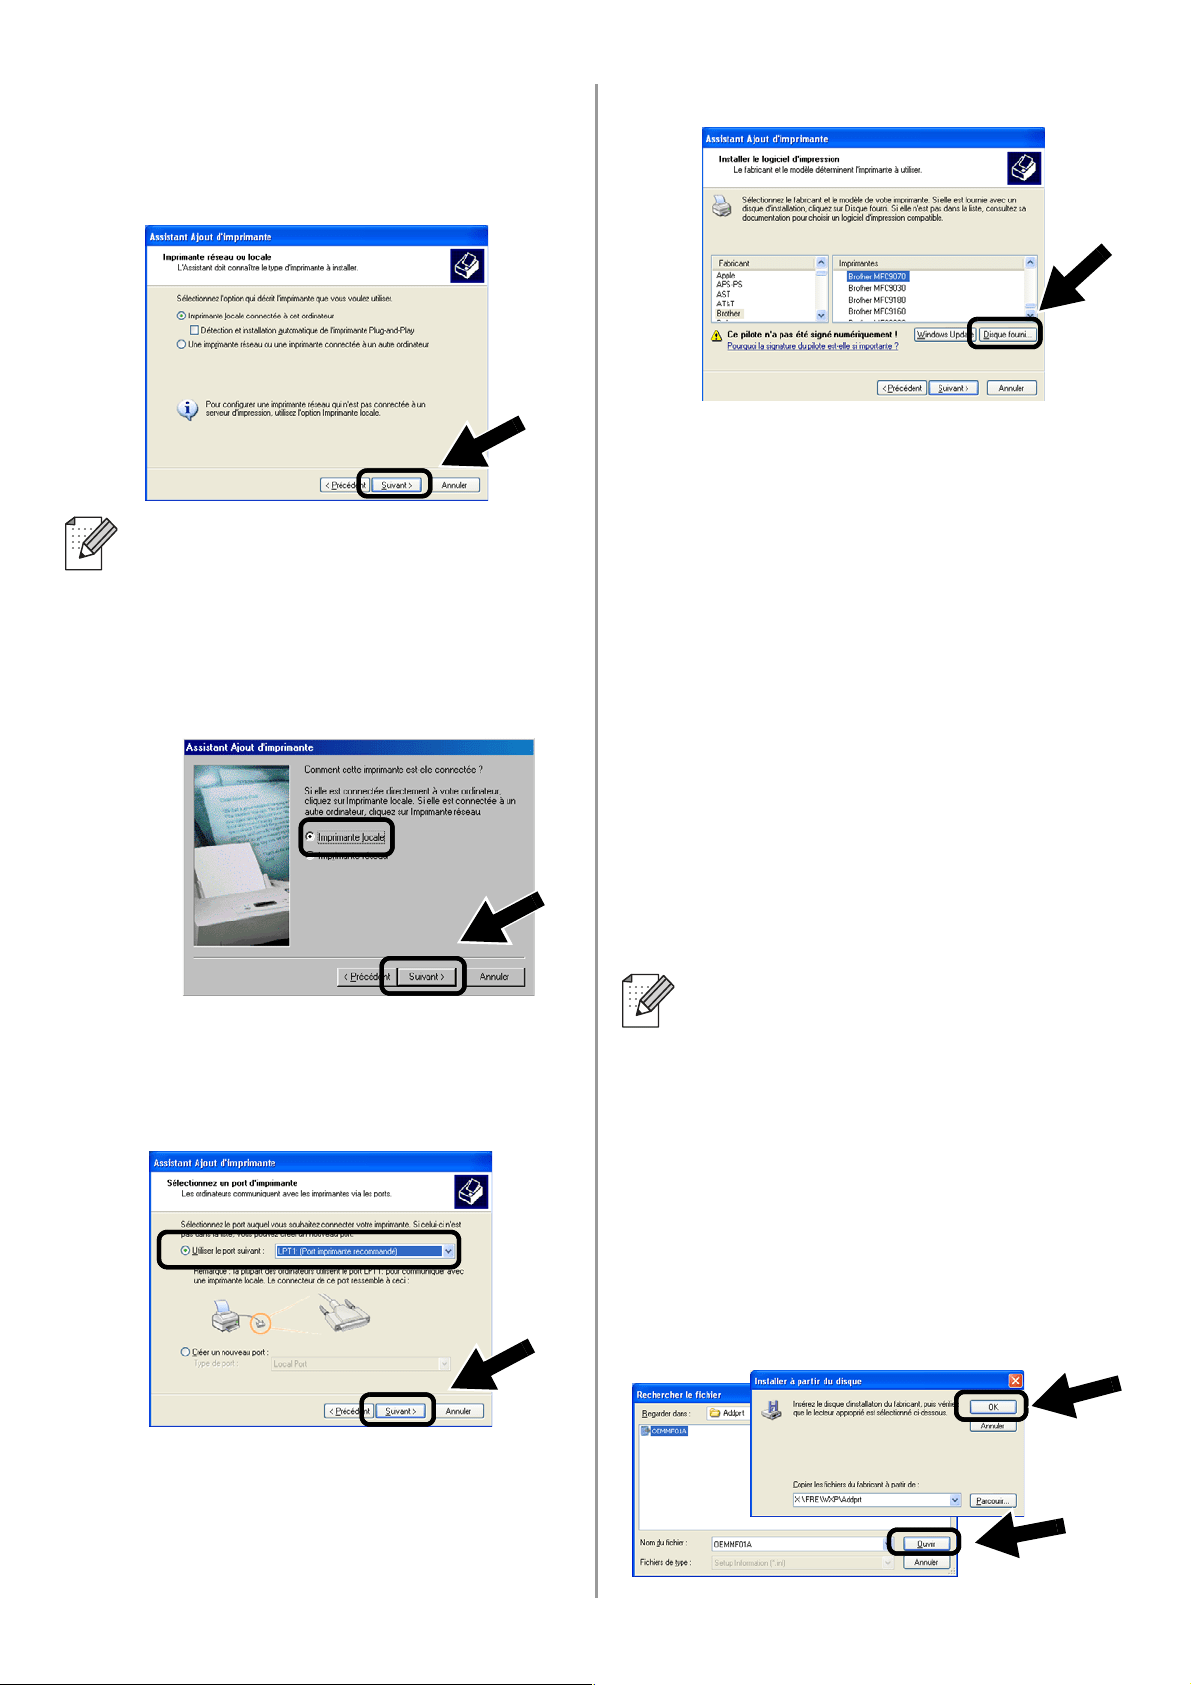
Click Start and select Printers and
Faxes. Click on Add a printer and the
Add Printer Wizard will start.When this
screen appears, click Next.
For Windows
®
Users
Group 1:
HL-1440/1450/1470N/5040/ 5050/
5070N/5070DN/5140/5150D/5170DN
MFC-9070/9180/9160
Group 2:
MFC-210C/420CN/410CN/620CN/
5440CN/5840CN/3240C/3340CN/8420/
8820D/8820DN/8220/8440/8840D/
8840DN/3820CN/3420CN/DCP-120C/
320CN/8020/8025D/8025DN/8040/
8045D/8045DN
Go to Step 4 on page 10
Go to Step 4 on page 13
For Mac OS
®
X 10.2.4 - 10.3
or greater Users
Go to Step 4 on page 15
For Windows
®
Users
Group 1:
HL-1440/1450/1470N/5040/ 5050/
5070N/5070DN/5140/5150D/5170DN
MFC-9070/9180/9160
Step 4
English
11
2
Un-check the Automatically detect and
install my Plug and Play printer
selection and then click Next.
3
Temporarily select
LPT1:(Recommended Printer Port)
from the pull down window for the Printer
Port Selection and then click Next.
4
Click on Have Disk.
5
(For Brother Laser Printer Users)
Browse the CD-ROM and select the
Driver folder and click Open, then select
the Win2k_xp folder (or the folder for
your OS) and click Open and then select
the appropriate language and click
Open.
(For Brother MFC/DCP Users)
Browse the CD-ROM and select the
appropriate language folder and click
Open, then select the WXP folder (or the
folder for your OS) and click Open and
finally select the Addprt folder and click
Open.
6
Click Open and then click OK.
■ Your OS may not have this screen.
■ (For Windows
®
98/Me/Windows NT
®
4.0 Uses) If this screen is displayed,
select Local printer and then click
Next.
■ If your OS is Windows
®
XP and the
Win2k_xp folder is not found in the
list, please select Win2k folder.
■ If you do not see the a folder for your
operating system in the Driver folder,
but instead see: inst, PCL, PS,
USBW98ME, etc. we recommend
that you select the PCL folder. You
will see the appropriate operating
system folder.
English
12
English
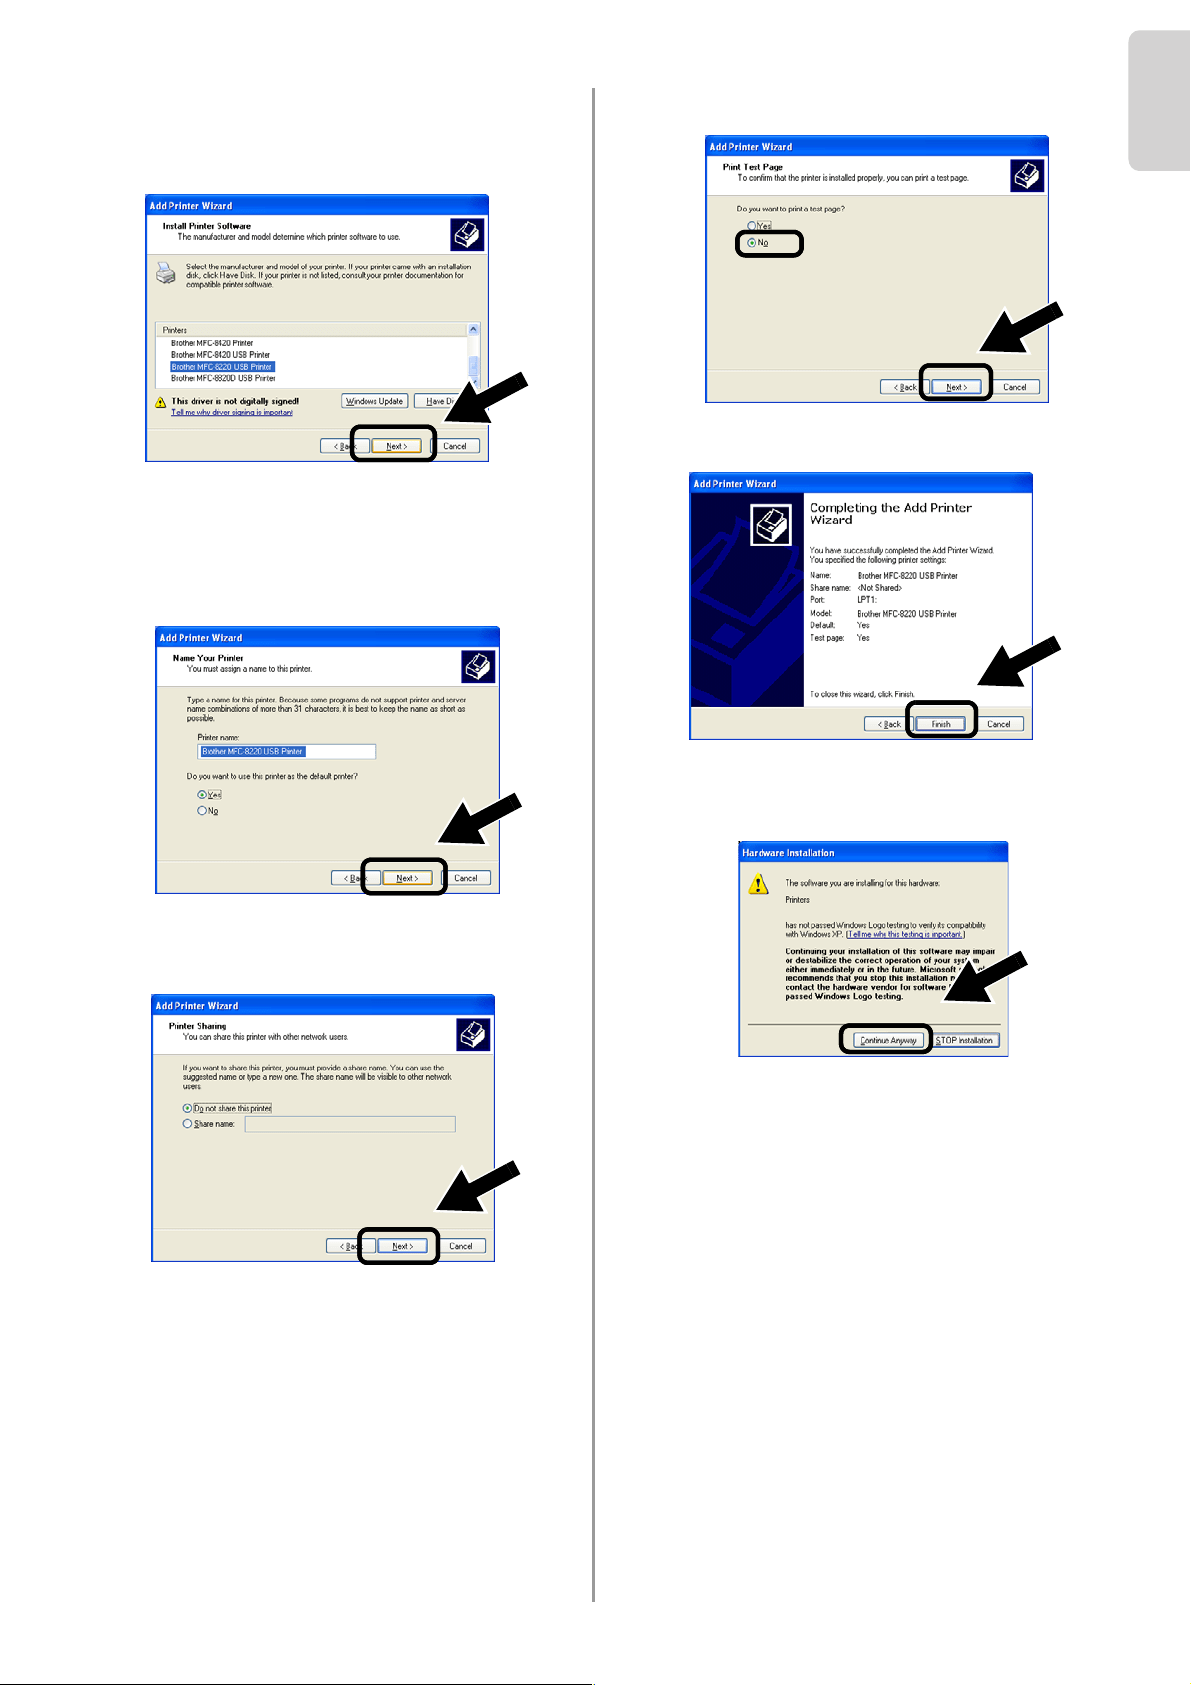
7
Highlight the model you are installing
from the list of Printer/MFC/DCPs and
click Next.
8
The model you are installing will be listed
in the window. Select Yes or No if you
want this printer to be your default
printer, and then click Next.
9
If this screen appears, select Do not
share this printer and Next.
10
Select No and Next.
11
When this screen appears, click Finish.
12
If the Windows Logo testing screen
appears, click Continue Anyway.
English
13
Installing the Network Print
Software
You need to install the network print software,
and configure it for the wireless network
connection of the Brother Printer/MFC/DCP.
Please follow the steps below.
1
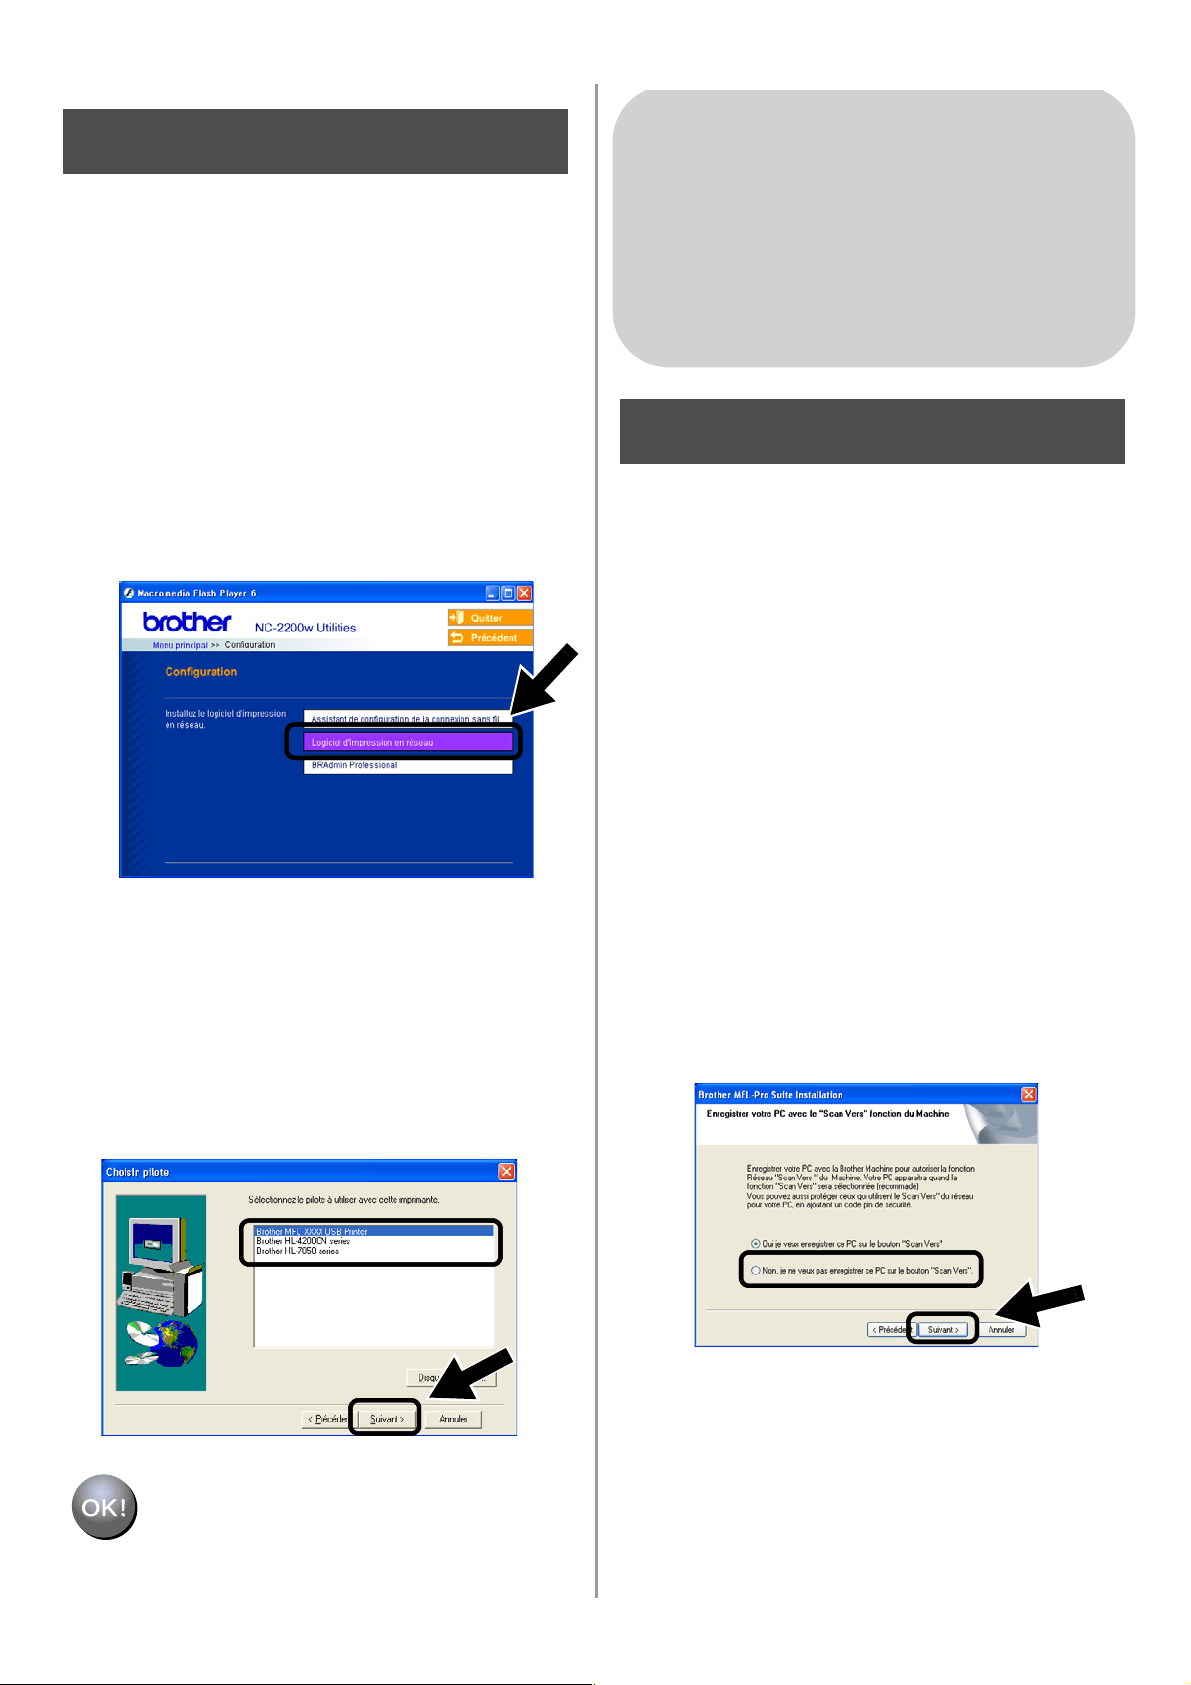
Click Network Print Software, and
follow the on-screen instructions.
2
Select the same printer driver as the one
you selected in the 7th step on page
12.
Highlight the model you are installing
from the list of Printer/MFC/DCPs and
click Next.
Setup is now complete.
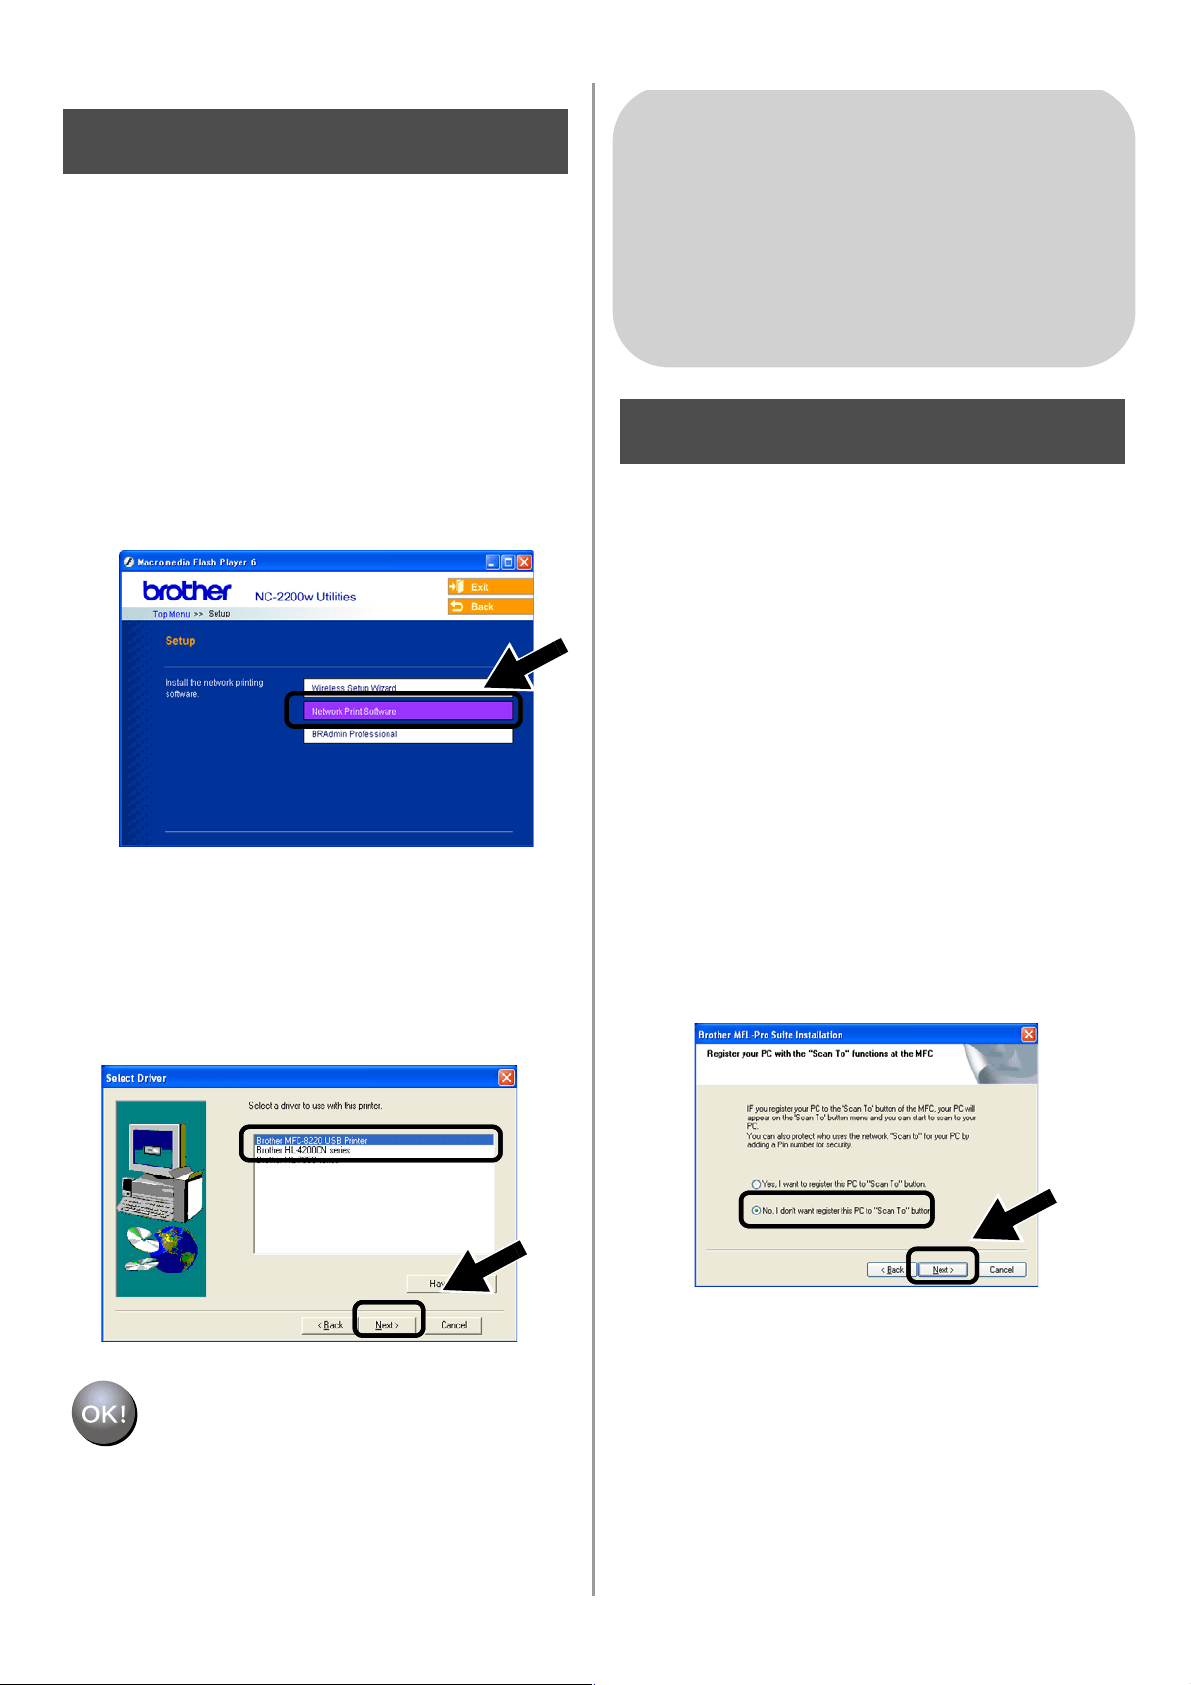
Installing the MFL-Pro Suite
You need to install the MFL-Pro Suite to
make a wireless network connection from
your computer to the Brother
Printer/MFC/DCP. The software is in the
CD-ROM included with your
Printer/MFC/DCP. To install the software,
follow the steps in ‘Installing the Driver &
Software for Network Interface Cable User’s
section of the Quick Setup Guide included
with your Printer/MFC/DCP.
■For MFC-8420/8820D/8820DN/8220/8440/
8840D/8840DN/3820CN/3420CN and
DCP-8020/8025D/8025DN/8040/8045D/8045DN
When this screen is displayed in the installation
process, select No and then click Next.
Step 5
For Windows
®
Users
Group: 2
MFC-210C/420CN/410CN/620CN/
5440CN/5840CN/3240C/3340CN/8420/
8820D/8820DN/8220/8440/8840D/
8840DN/3820CN/3420CN/DCP-120C/
320CN/8020/8025D/8025DN/8040/
8045D/8045DN
Step 4
English
14
English
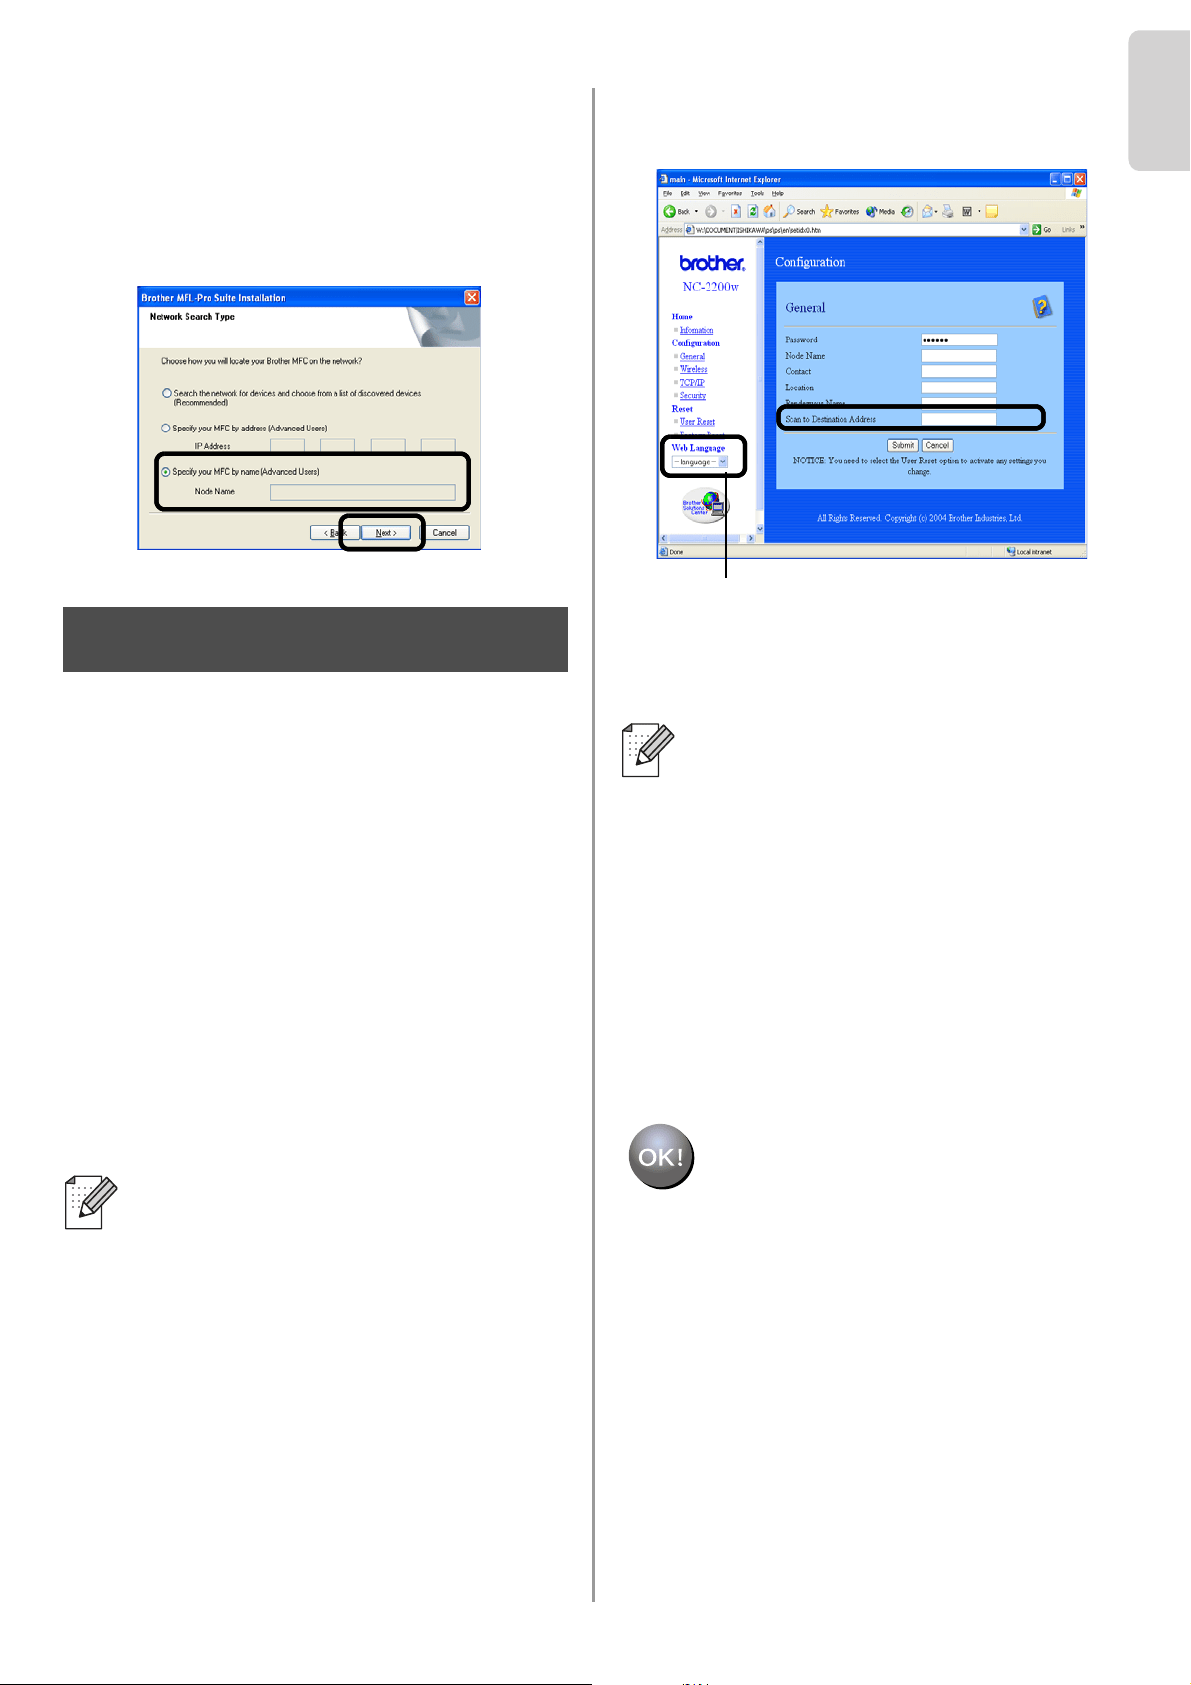
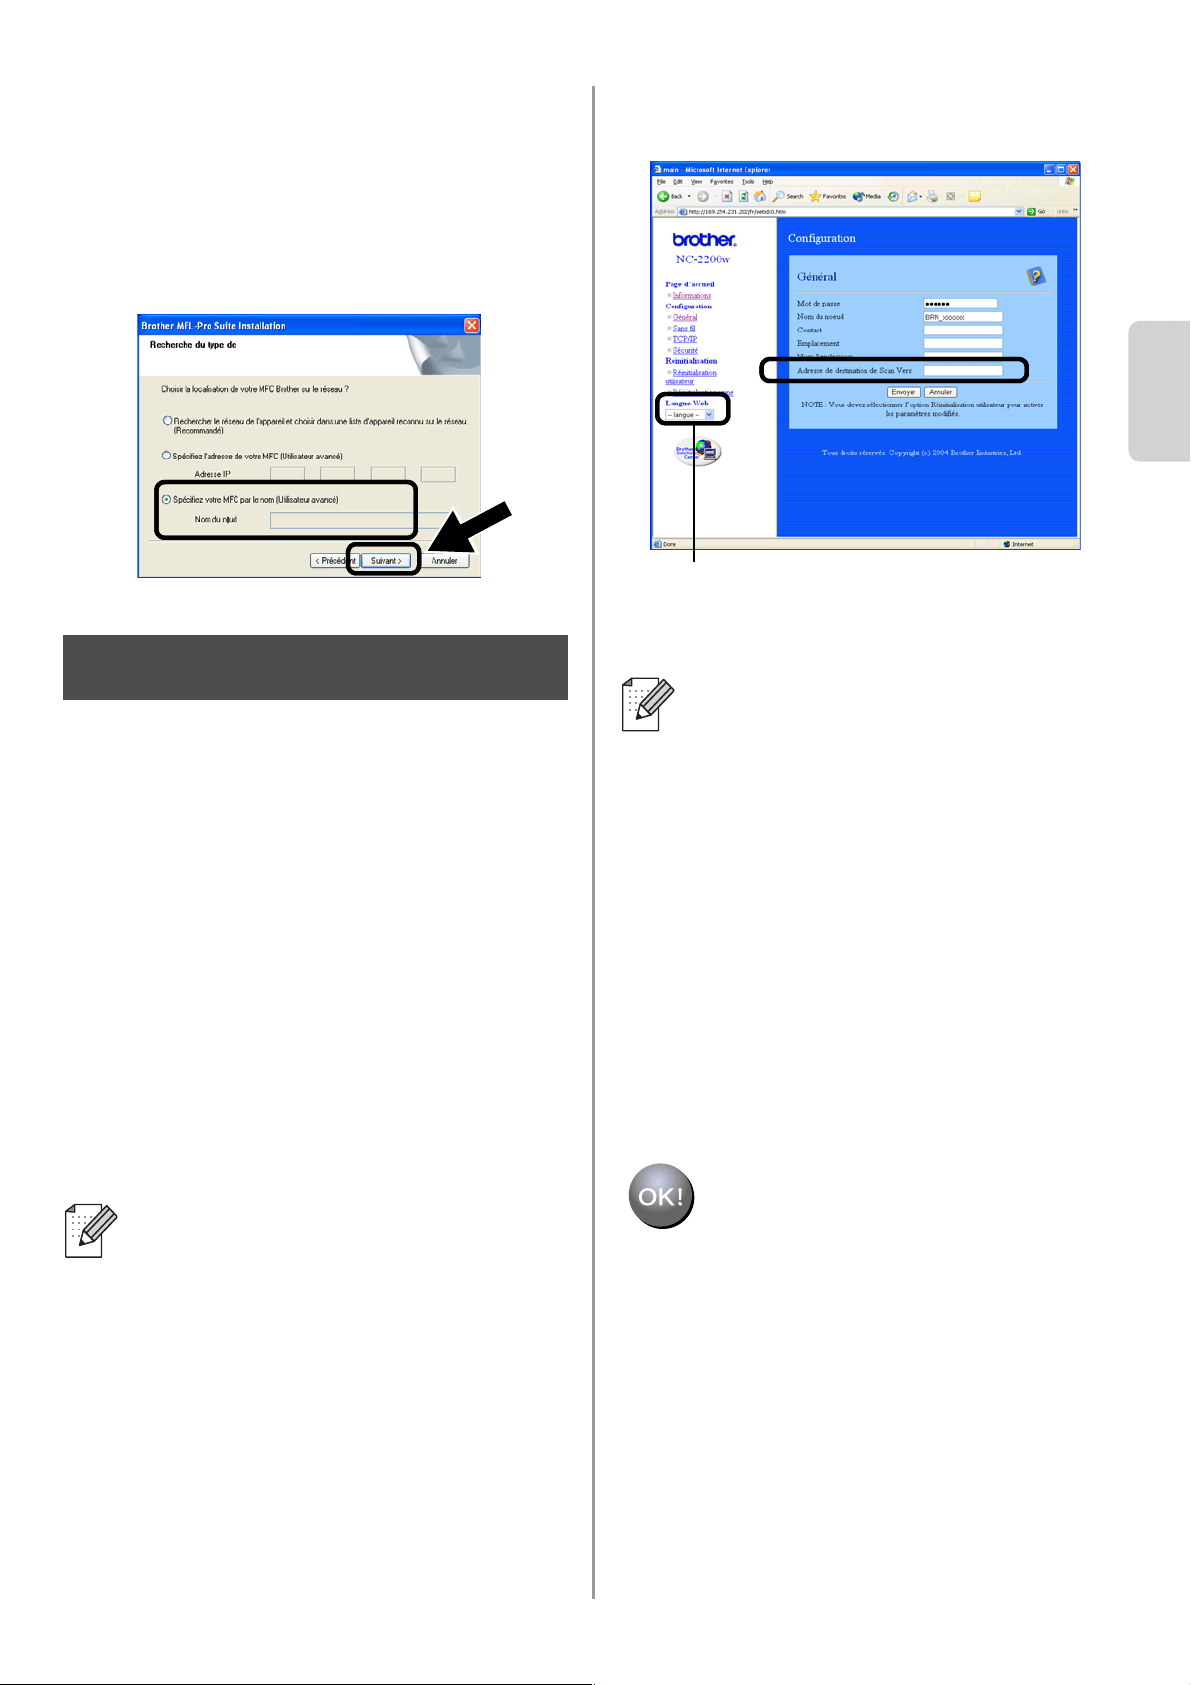
■ Some MFC/DCPs with the NC-2200w cannot
be found in the search list during installation. In
that case go back to the screen shown below
and set the node name of the NC-2200w
manually. You can see the node name on the
Network Configuration page, see
Other
Information on page 16.
Specifying the Scan Destination
Address from the NC-2200w Home
page
You need to specify the scan destination
address from the NC-2200w URL to use the
scanner on a network. Follow the steps
below.
1
Open the Internet Explorer and enter the
following in the URL field.
http://NC-2200w_ip_address
Where NC-2200w_ip_address is the
IP address or node name of your
NC-2200w.
2
Go to the General page under
Configuration.
3
Enter the IP address of your computer.
Setup is now complete.
■ The IP address or node name of your
NC-2200w is on the Network
Configuration Page. For more
information, see
Other Information on
page 16.
■ You will be asked for a user name and
password. Enter the following.
users name : admin (case sensitive)
password: access (default)
Step 5
■ If the IP address of your computer was
assigned automatically by DHCP, you
should enter the computer name
because the IP address may change.
The name can be the Windows
®
computer name or the DNS host name.
■ To learn your computer name, open
Properties from My Computer and
refer to the Computer Name tab. To
use the domain name you have to
assign the DNS server address using
the Web server of the NC-2200w and
your Web Browser.
(Available languages are English, German,
French, Dutch and Japanese.)
English
15
Installing and Configuring the
Printer Driver using the Simple
Network Configuration
Capabilities of Mac OS
®
X
You need to install the printer driver before
setting up your computer to work with the
NC-2200w. If the printer driver is already
installed, you can skip this step. The driver is
on the CD-ROM included with your
Printer/MFC/DCP or you can download the
latest printer driver from our web site:
http://solutions.brother.com
Please follow the steps below to install the
printer driver.
1
Insert the supplied CD-ROM into your
CD-ROM drive and then double-click the
Start Here OSX icon to install the
software. If the language screen
appears, select your language.
2
(For Brother Laser Printer Users) Click
Install Software and then Printer Driver
on the Menu screens.
(For Brother MFC/DCP Users) Click
MFL-Pro Suite to install.
3
Follow the on-screen instructions to
install the printer driver.
4
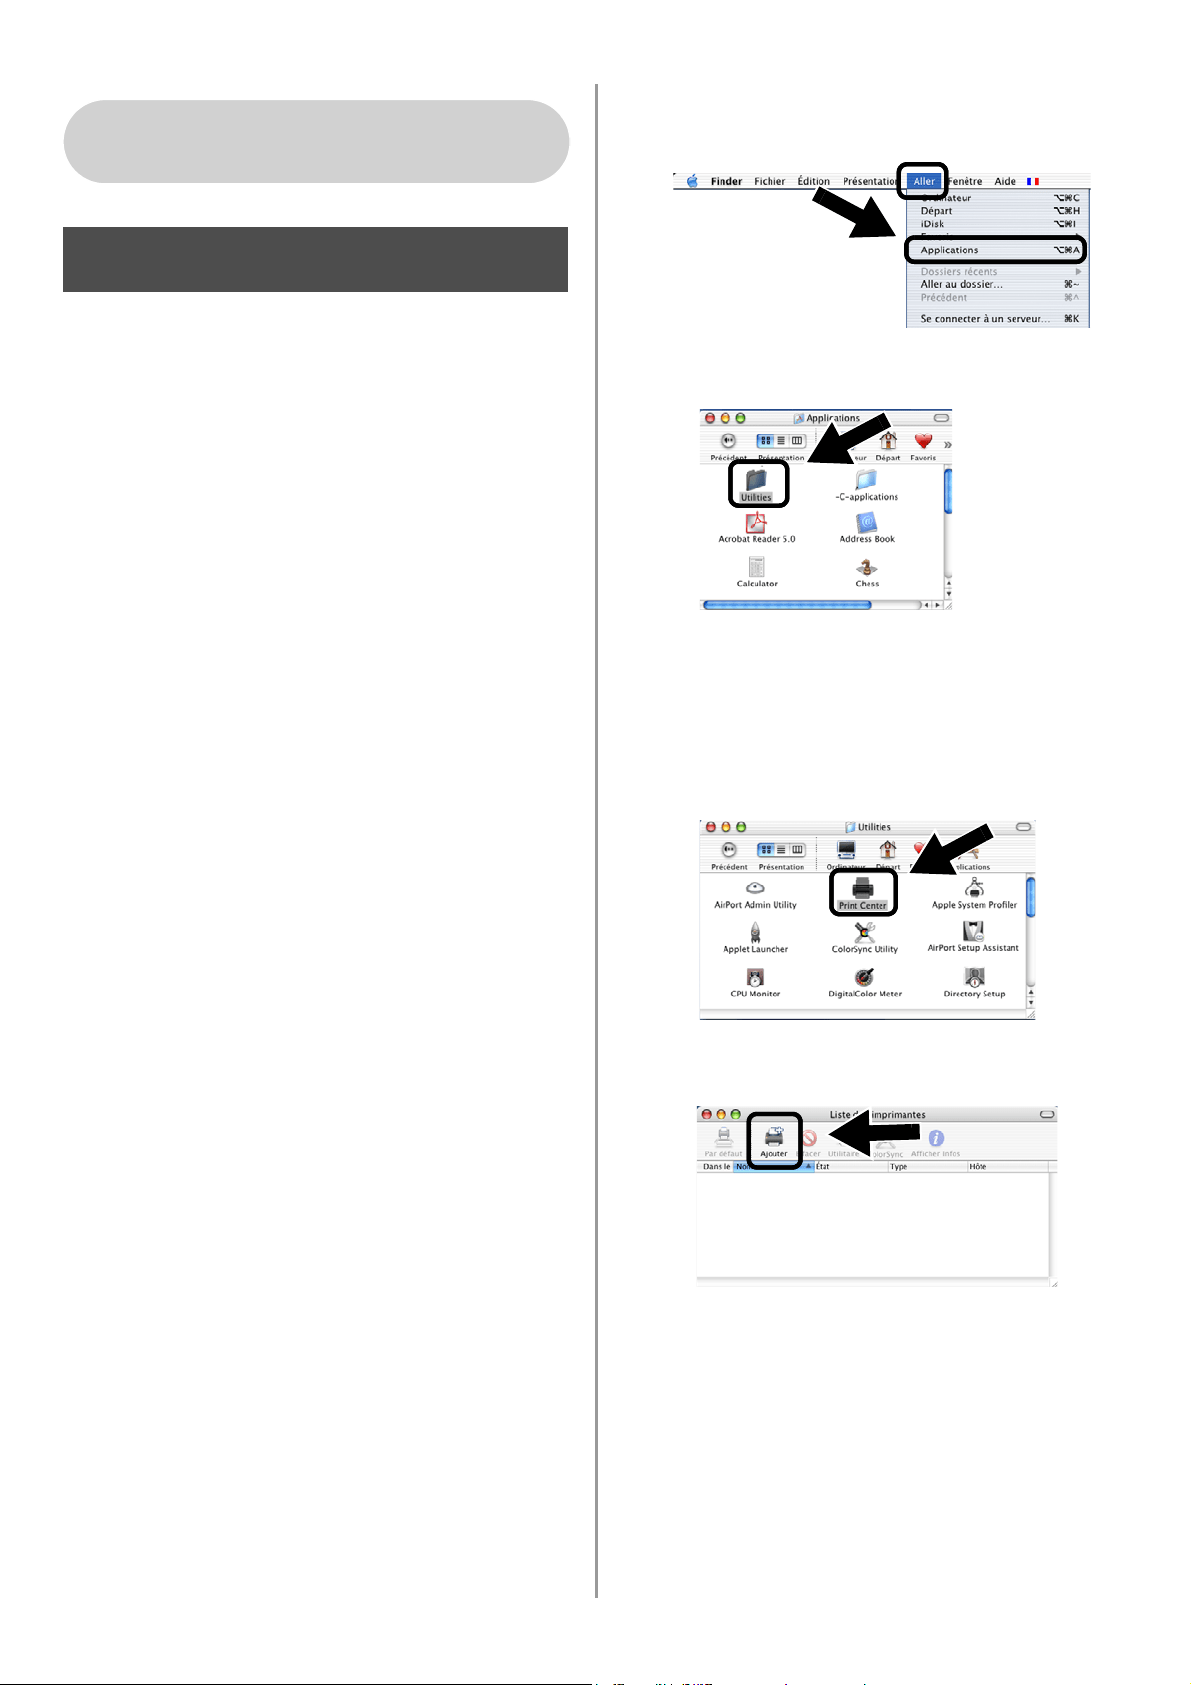
Select Applications from the Go menu.
.
5
Open the Utilities folder.
6
(For Mac OS
®
X 10.2.4 users) Open the
Print Center icon.
(For Mac OS
®
X 10.3 users) Open the
Printer Setup Utility icon.
7
Click Add button.
For Mac OS
®
X 10.2.4 - 10.3
or greater Users
Step 4
English
16
English
8
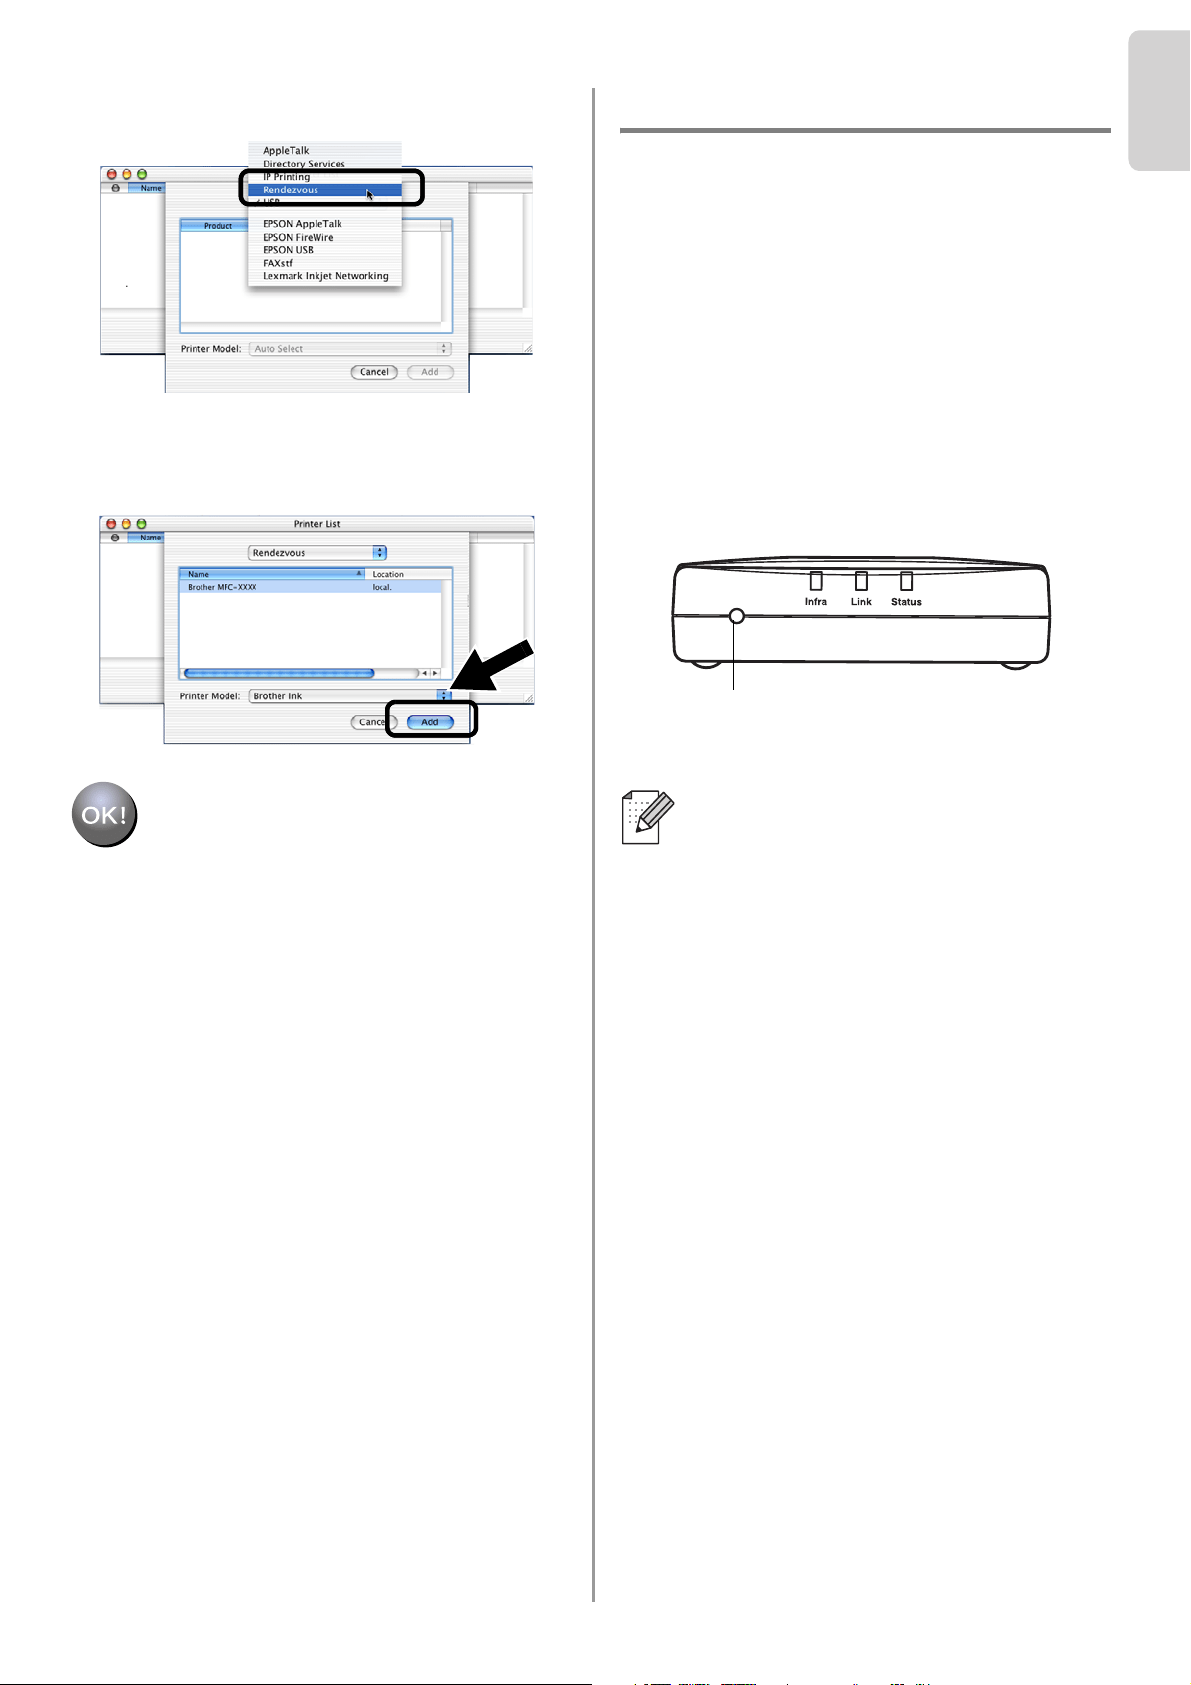
Select Rendezvous.
9
Select your machine’s model name, and
then click Add.
Setup is now complete.
Other Information
How to Print a Network Configuration
Page
To print the Network Configuration Page,
press the Test Button of the NC-2200w.
How to Reset to Factory Default Settings
If you wish to reset the NC-2200w back
to its default factory settings (resetting all
information such as the wireless settings,
password and IP address), hold down
the Test Button for more than 10
seconds.
When you reset to factory default
settings, you will need to set up again
from Step2 Changing your Computer’s
Wireless Settings to configure the
NC-2200w on page 6.
Test Button

English
17
Lieferumfang
1
Externer Wireless Print/ScanServer
NC-2200w
2
Netzadapter
3
CD-ROM (mit Installationssoftware und
Netzwerkhandbuch für den NC-2200w)
4
Installationsanleitung
Unterstützte Modelle
Der NC-2200w unterstützt folgende Modelle.
Wenn Ihre Modellnummer hier nicht
aufgeführt ist, gehen Sie bitte zur
NC-2200w-Webseite
http://solutions.brother.com
und vergewissern Sie sich, dass Ihr Modell
für den NC-2200w geeignet ist.
Unterstützte
Betriebssysteme
Windows
®
Windows
®
98/98SE/Me/2000/XP und
Windows NT
®
4.0
Macintosh
®
Mac OS
®
X 10.2.4 - 10.3 oder höher
Beiliegende CD
1
Brother Solutions Center
Sie finden alles, was Sie für Ihren Brother
Drucker/MFC/DCP oder NC-2200w
benötigen, im Brother Solutions Center
(http://solutions.brother.com). Sie
können dort die neuesten Treiber und
benötigte Dienstprogramme
herunterladen sowie Antworten auf
häufig gestellte Fragen und Tipps zur
Problemlösung lesen.
2
Installation und Einrichtung
Der Wireless Setup-Assistent wird Sie
durch die Konfiguration des NC-2200w
leiten. Sie können auch die Network Print
Software und BRAdmin Professional für
Windows
®
installieren.
3
Dokumentation
Hier finden Sie das Netzwerkhandbuch
und die Installationsanleitung für den
NC-2200w im PDF-Format.
Der NC-2200w kann an den USB-Anschluss
eines Brother Druckers/MFC/DCP
angeschlossen werden. Es ist kein
USB-Kabel im Lieferumfang inbegriffen.
Bitte halten Sie eine geeignetes USB-Kabel
(Typ A-B) bereit.
Gruppe 1:
HL-1440/1450/1470N/5040/ 5050/5070N/
5140/5150D/5170DN
MFC-9070/9180/9160
Gruppe 2:
MFC-210C/420CN/410CN/620CN/5440CN/
5840CN/3240C/3340CN/8420/8820D/8820DN/
8220/8440/8840D/8840DN/3820CN/3420CN/
DCP-110C/310C/8020/8025D/8025DN/8040/
8045D/8045DN
1
2
4
3
A
B
Wenn die Ihrem Brother
Drucker/MFC/DCP beiliegende
CD-ROM keinen Treiber für Windows
NT
®
4.0 enthält, können Sie ihn nicht
unter NT
®
4.0 benutzen.
1
2
3
Typ A-B
(höchstens 2 m)
English
Deutsch
18
Einrichten des
Print/ScanServers
Installation des PrintServers
1
Verbinden Sie den NC-2200w und Ihren
Brother Drucker/MFC/DCP mit dem
USB-Kabel.
2
Schließen Sie den Netzadapter an den
NC-2200w an.
3
Stecken Sie den Netzadapter in eine
Steckdose und schalten Sie den Brother
Drucker/MFC/DCP ein.
4
Vergewissern Sie sich, dass die
Link-LED des NC-2200w leuchtet, und
warten Sie einige Minuten.
Falls Sie Personal Firewall Software (z.B.
die Internetverbindungsfirewall unter
Windows XP) benutzen, müssen Sie diese
vor der Installation deaktivieren. Sobald
Sie sicher sind, dass Sie drucken können,
können Sie die Software wieder aktivieren.
Ändern der
Wireless-Einstellungen Ihres
Computers zur Konfiguration
des NC-2200w
Bevor Sie den Brother Drucker/MFC/DCP in
einem drahtlosen Netzwerk einsetzen können,
muss die Konfiguration des NC-2200w der des
Netzwerks angepasst werden.
Um den NC-2200w von einem
Netzwerk-Computer mit drahtloser Verbindung
aus konfigurieren zu können, müssen die
derzeitigen Wireless-Einstellungen zeitweise
geändert werden. Wir empfehlen jedoch, die
aktuellen Einstellungen aufzuzeichnen, bevor
Sie sie ändern. Zum Abschluss von Schritt 3
auf Seite
21 müssen Sie diese alten
Einstellungen wieder herstellen.
Aktuelle Einstellungen Ihres
drahtlosen Netzwerks
Der NC-2200w kann nicht zusammen mit
einem USB-Hub benutzt werden.
Schritt 1
Link-LED (Grün)
Wenn Sie Hilfe mit den
Wireless-Einstellungen Ihres Computers
benötigen, empfehlen wir Ihnen, sich an
Ihren Netzwerkadministrator zu wenden.
Thema Aktuelle
Einstellung
Kommunikationsmodus:
(Infrastruktur / Ad-hoc)
Netzwerkname
(SSID/ESSID)
Kanal: (1-14)
*sofern benötigt.
Verschlüsselung:
(KEINE / WEP / Sonstige)
Verschlüsselungs-
kodegröße und -art:
(64 Bit, 128 Bit / ASCII,
HEX / Sonstige)
Verschlüsselungskode:
Schritt 2
English
19
Um mit dem NC-2200w verbinden zu können,
solange er noch nicht konfiguriert ist, müssen
Sie die Wireless-Einstellungen Ihres
Computers auf folgende Werte setzen:
Kommunikationsmodus: Ad-hoc
(Kanal 11)
Netzwerkname (SSID/ESSID): SETUP
(Groß-/Kleinschreibung beachten)
Verschlüsselung: Keine
Folgen Sie den Anweisungen des Herstellers
Ihrer Netzwerkkarte für drahtlose
Kommunikation und machen Sie
anschließend mit Schritt 3
Konfigurieren des
Print/ScanServer weiter.
Wenn Sie unter Windows
®
XP oder Mac
OS
®
X 10.2.4 die dort integrierten
Möglichkeiten für drahtlose
Ethernet-Verbindungen nutzen möchten,
gehen Sie je nach Betriebssystem
folgendermaßen vor:
1
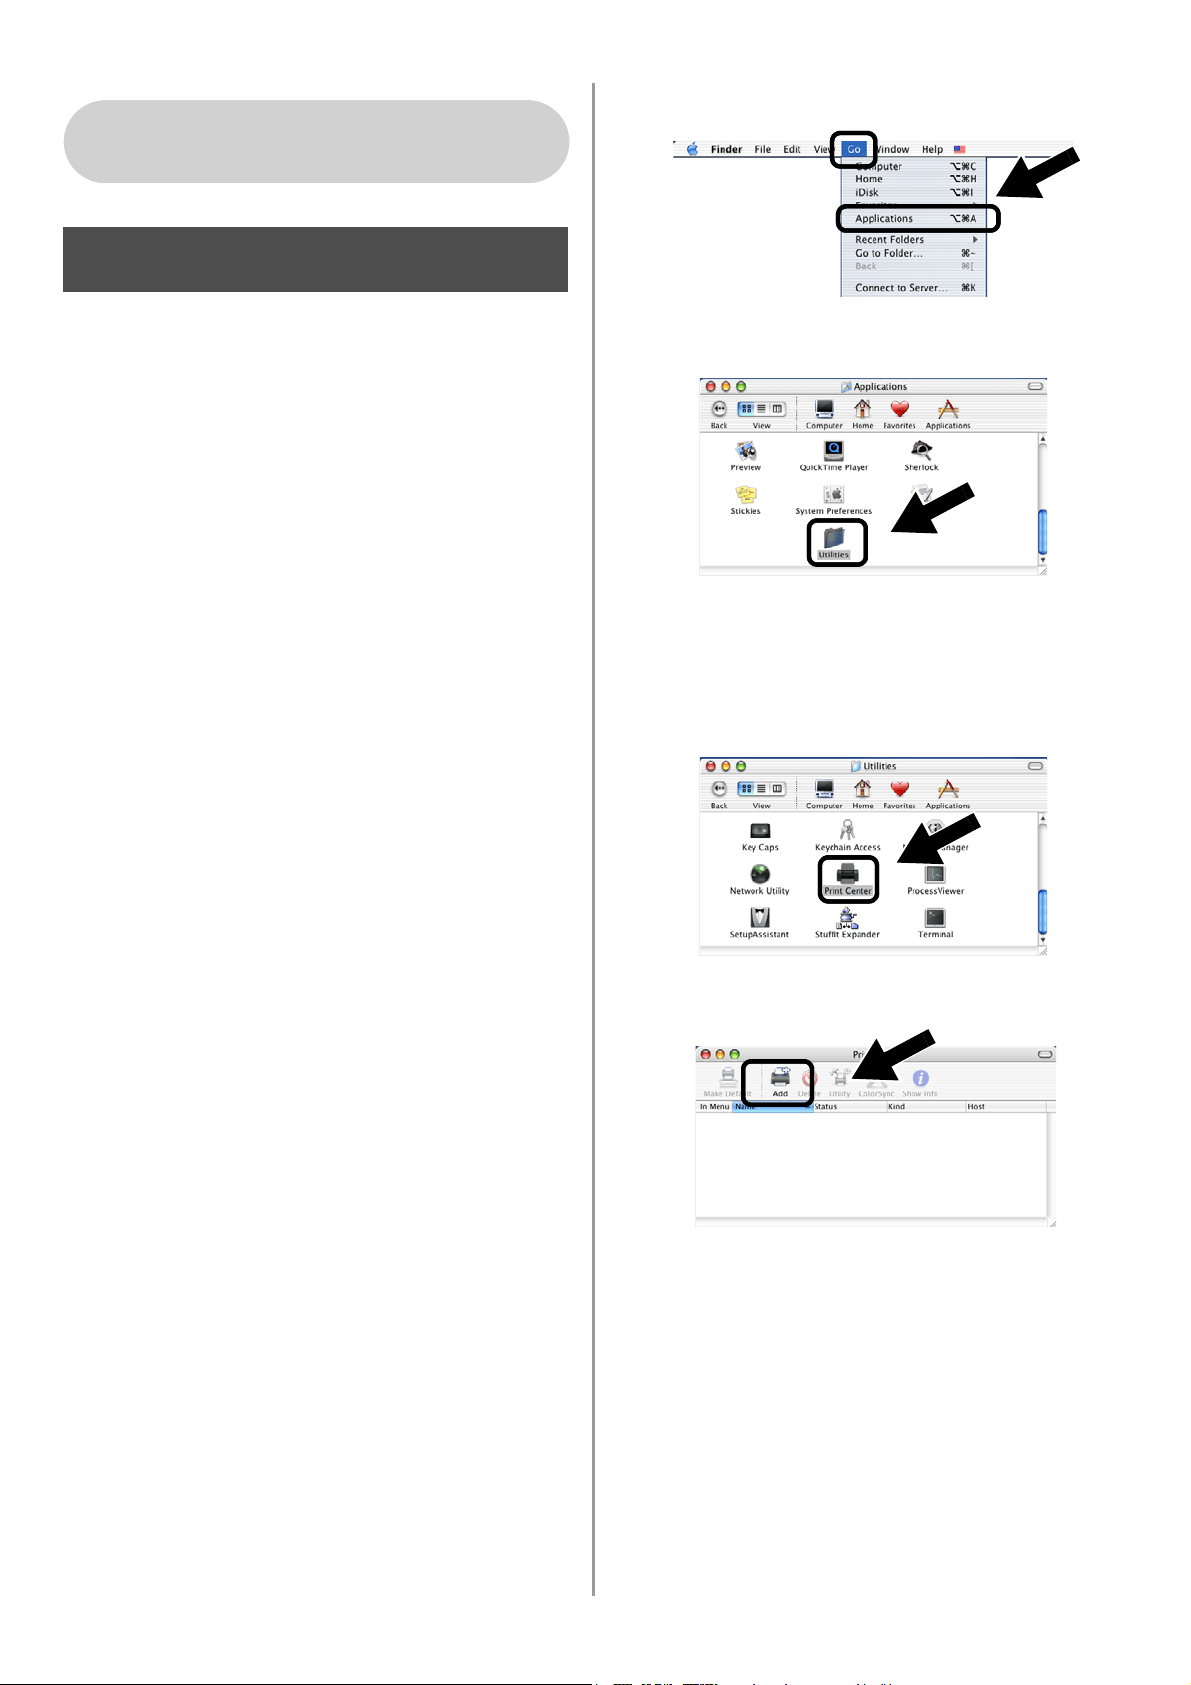
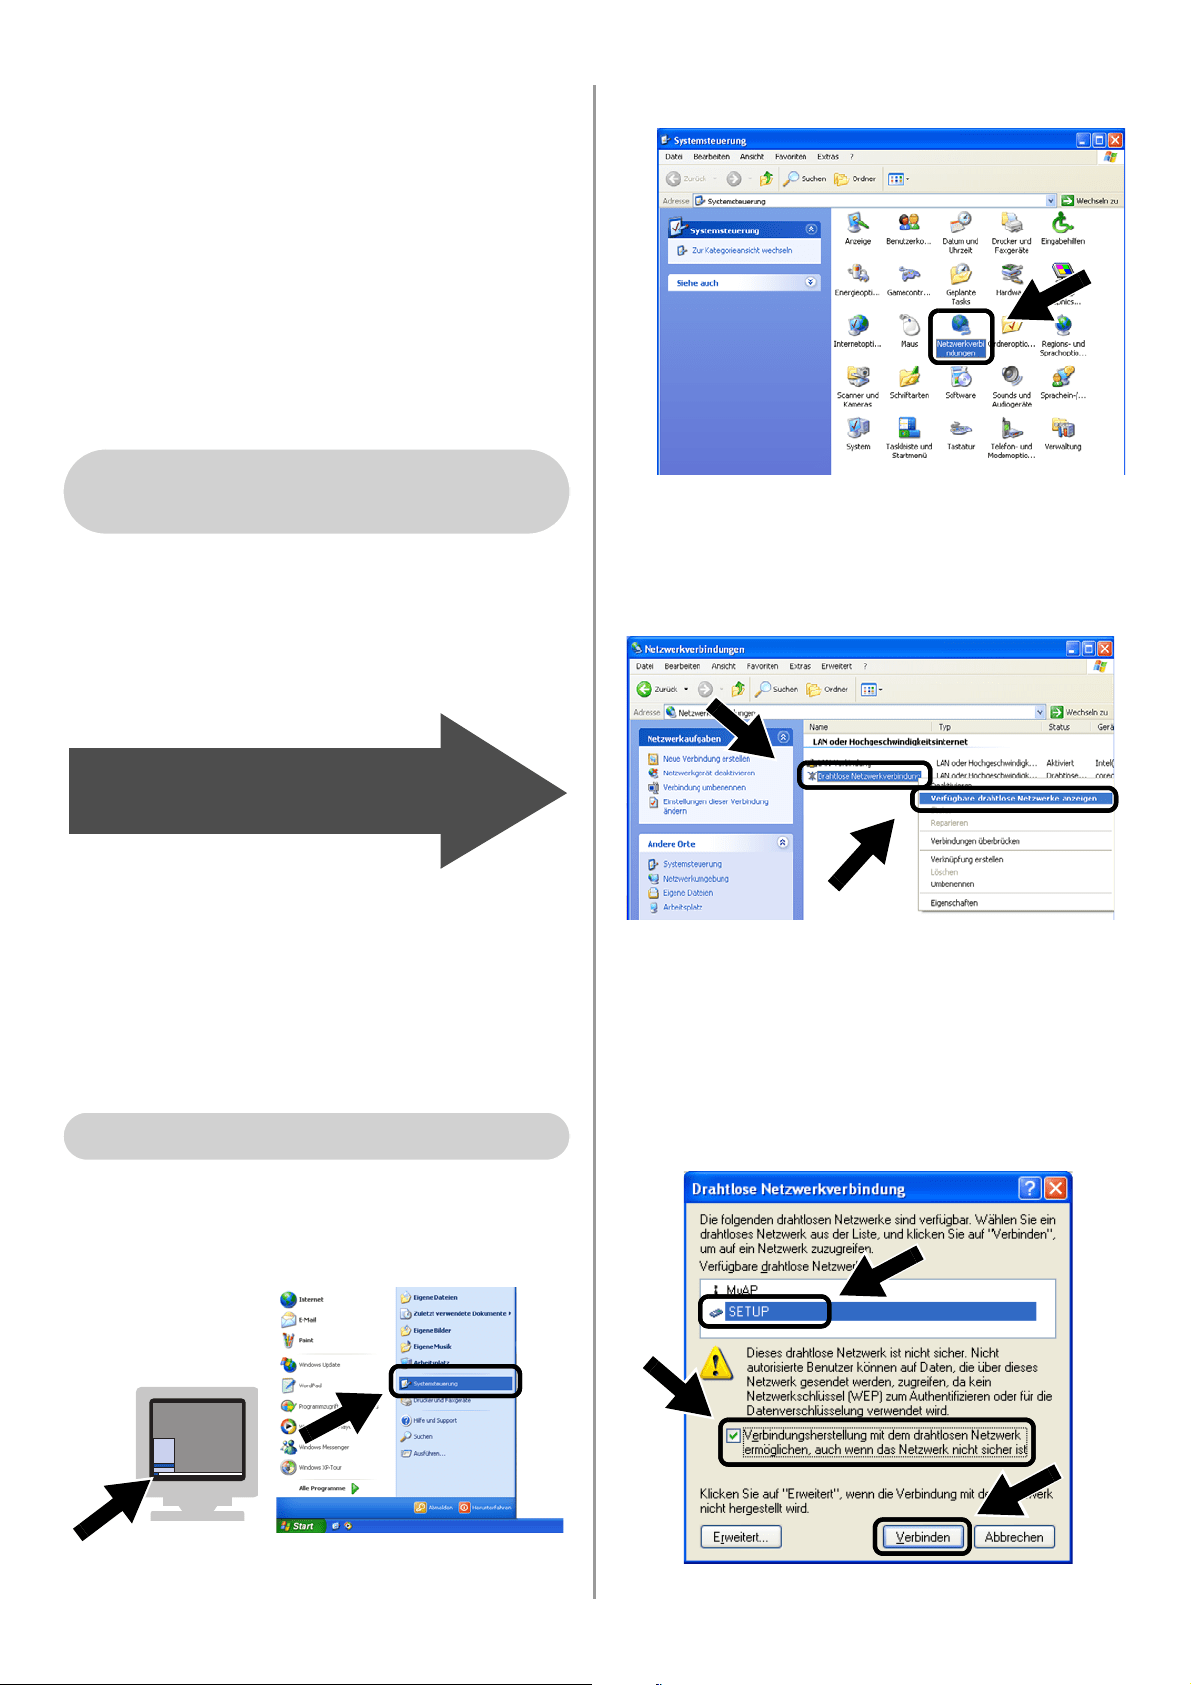
Klicken Sie auf Start und dann auf
Systemsteuerung.
2
Klicken Sie auf
Netzwerkverbindungen
.
3
Klicken Sie mit der rechten Maustaste
auf Drahtlose Netzwerkverbindung.
Klicken Sie auf Verfügbare drahtlose
Netzwerke anzeigen.
4
Im Feld
Verfügbare drahtlose Netzwerke
können Sie den Netzwerknamen
(SSID/ESSID) des NC-2200w sehen.
Wählen Sie
SETUP
und kreuzen Sie das
Kästchen
Verbindungsherstellung mit
dem drahtlosen Netzwerk...
an. Klicken
Sie auf
Verbinden
.
Für Windows
®
98 / Me / 2000,
Windows NT
®
4.0
Weiter mit
Schritt 3
auf Seite
21
Für Windows
®
XP
English
Deutsch
20
5
Überprüfen Sie den Status der
drahtlosen Netzwerkverbindung. Es
kann ein paar Minuten dauern, bis die
Änderung der IP-Adresse von 0.0.0.0 zu
169.254.x.x (wobei ein x für eine Zahl
zwischen 0 und 255 steht) angezeigt
wird.
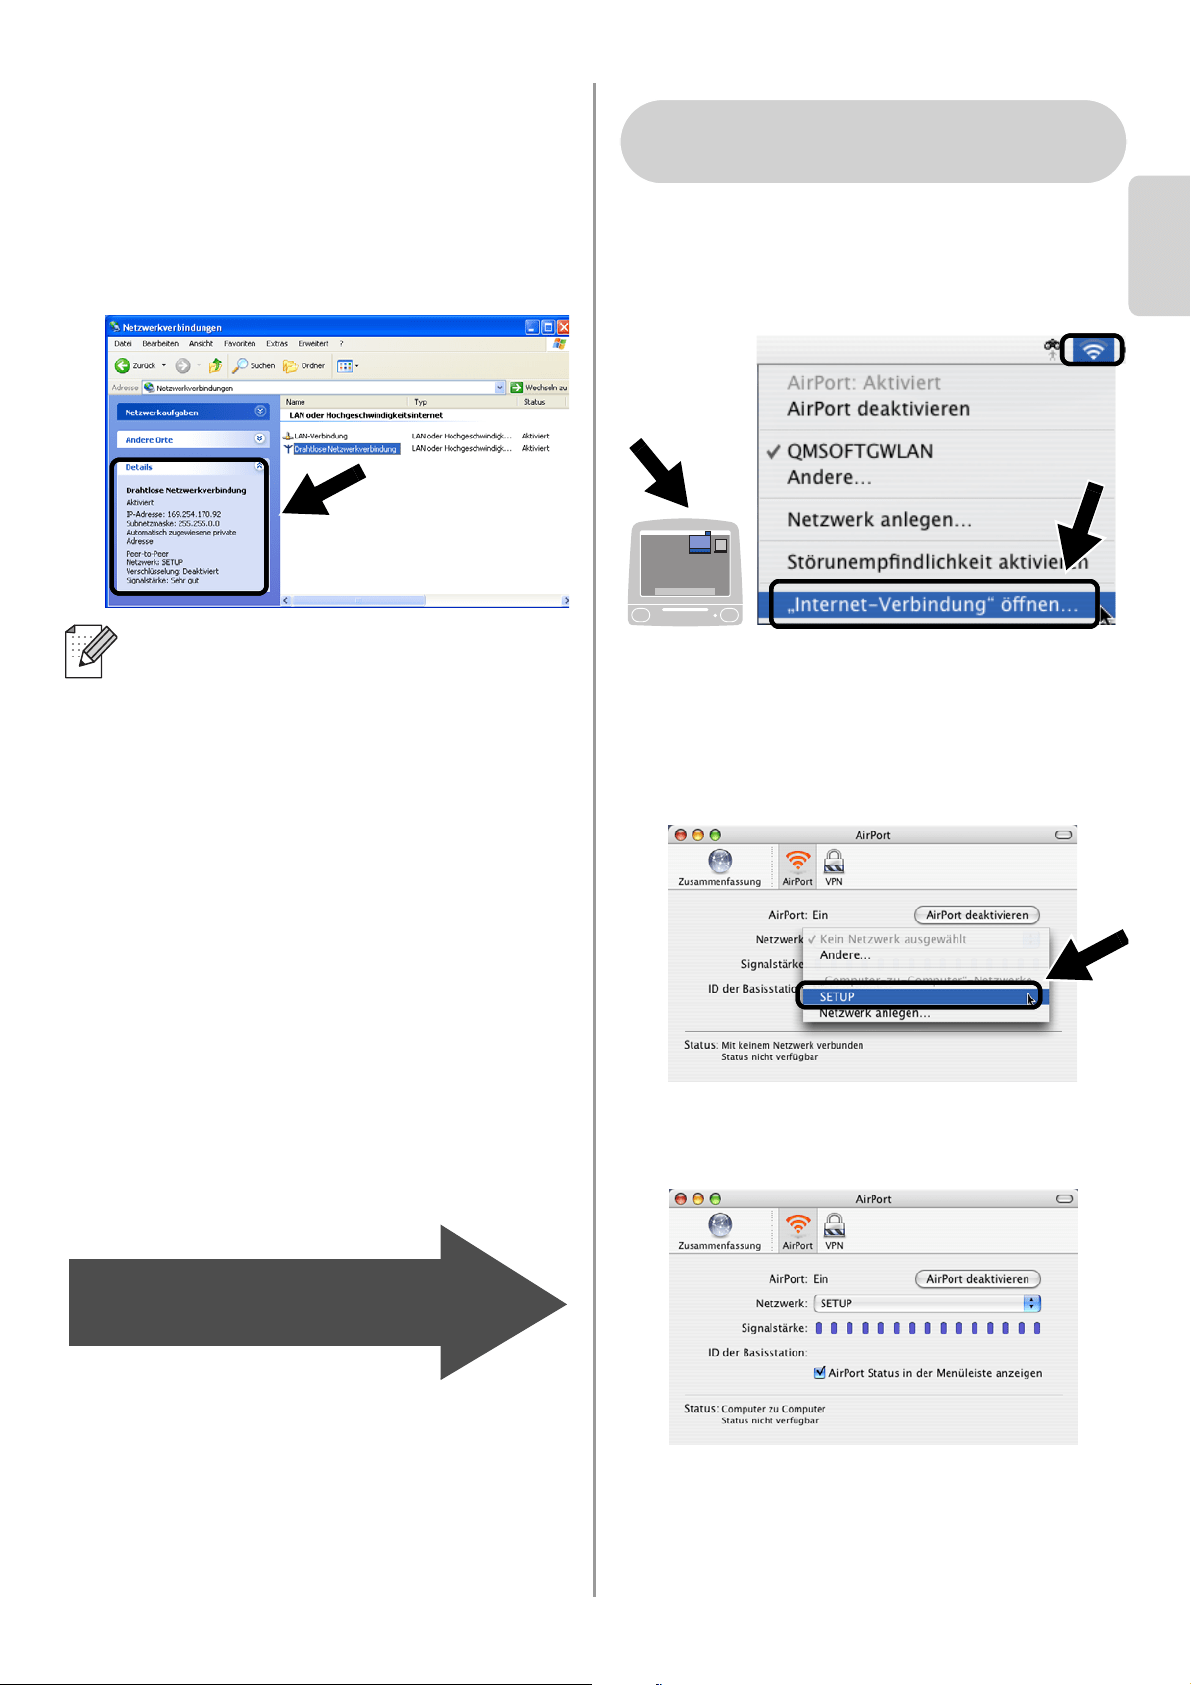
1
Klicken Sie auf das AirPort Statussymbol
und wählen Sie Internet-Verbindung
öffnen.
2
Auf der Registerkarte „Netzwerk“ können
Sie die verfügbaren drahtlosen Geräte
sehen. Der Netzwerkname (SSID
/ESSID
)
ist bei
Netzwerk
aufgeführt. Wählen Sie
SETUP
.
3
Nun ist die Verbindung zu Ihrem
drahtlosen Netzwerk hergestellt.
Wenn der von Ihnen gewünschte
Netzwerkname (SSID/ESSID) nicht
aufgeführt ist, versuchen Sie Folgendes:
■ Ziehen Sie das Netzteil aus der
Steckdose, stecken Sie es wieder ein
und warten Sie ein paar Minuten.
■ Stellen Sie Ihr Brother Gerät mit
installiertem NC-2200w näher an
Ihren Computer und versuchen Sie es
noch einmal.
■ Setzen Sie den NC-2200w auf die
werkseitigen Voreinstellungen zurück
und versuchen Sie es erneut. Wie Sie
das Gerät auf die werkseitigen
Voreinstellungen zurücksetzen,
entnehmen Sie Seite
28.
■ Weitere Informationen finden Sie in
Kapitel 6 des Netzwerkhandbuchs auf
der mit dem NC-2200w gelieferten
CD-ROM.
Weiter mit
Schritt 3
auf Seite
21
Für Mac OS
®
X 10.2.4 - 10.3
oder höher
English
21
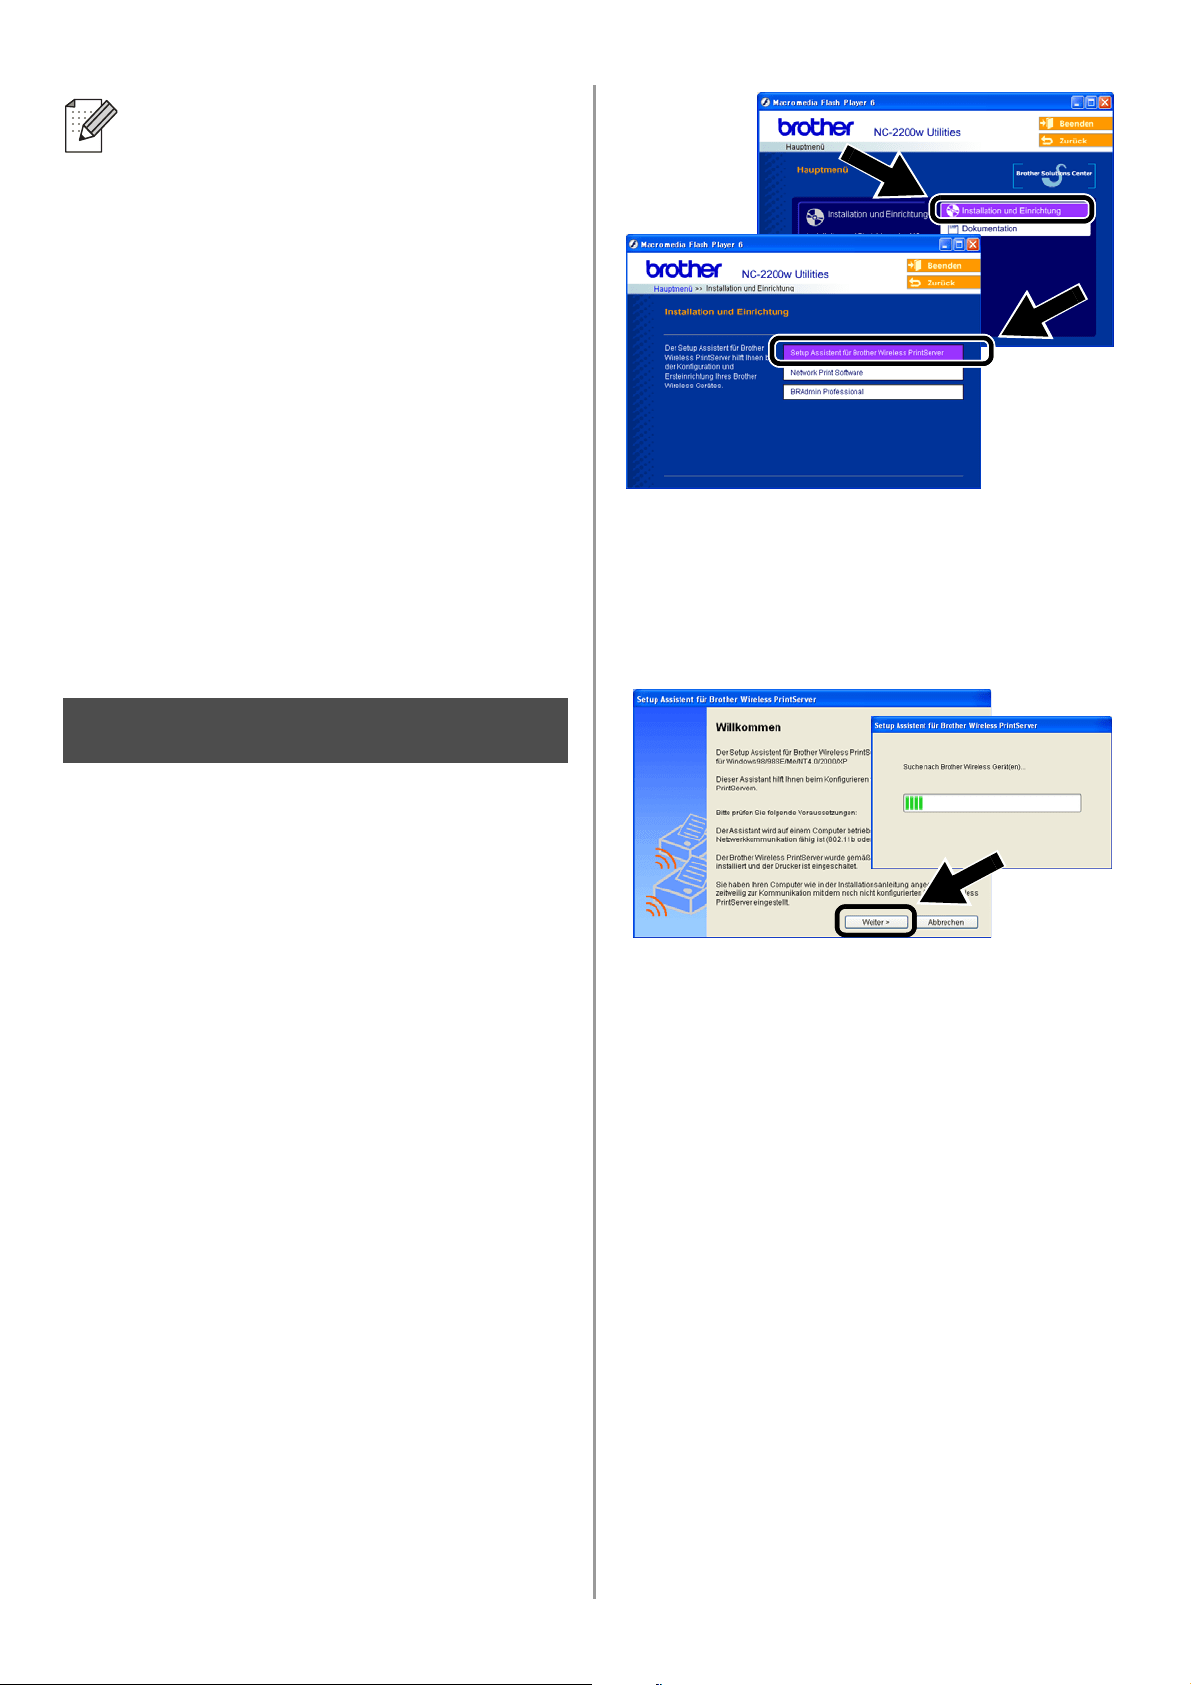
Konfigurieren des
Print/ScanServer
1
Legen Sie die NC-2200w-CD in das
CD-ROM-Laufwerk ein.
(Für Windows
®
)
Der Eröffnungsbildschirm
erscheint automatisch.
(Für Mac OS
®
X 10.2.4 bis 10.3 oder
höher) Doppelklicken Sie auf das
Symbol NC2200w auf Ihrem Macintosh
®
und danach auf Start Here OSX.
2
Wählen Sie Ihre Sprache aus.
3
Klicken Sie auf Installation und
Einrichtung und anschließend Setup
Assistent für Brother Wireless
PrintServer.
4
Lesen Sie die Hinweise auf der
Willkommen-Seite. Wenn Sie sich
sicher sind, dass Sie alle notwendigen
Voraussetzungen erfüllen, klicken Sie
auf Weiter.
5
Folgen Sie den Anweisungen auf dem
Bildschirm. Weitere Informationen finden
Sie in Kapitel 2 des Netzwerkhandbuchs
auf der mit dem NC-2200w gelieferten
CD-ROM.
6
Wenn Sie den Setup Assistent für
Brother Wireless PrintServer beendet
haben, setzen Sie die Einstellungen
Ihres Computers für drahtlose
Verbindung wieder auf die
ursprünglichen Einstellungen zurück,
welche Sie sich im Abschnitt
Ändern der
Wireless-Einstellungen Ihres Computers
zur Konfiguration des NC-2200w auf
Seite 18 notiert haben.
Wenn der von Ihnen gewünschte
Netzwerkname (SSID/ESSID) nicht
aufgeführt ist, versuchen Sie Folgendes:
■ Ziehen Sie das Netzteil aus der
Steckdose, stecken Sie es wieder ein
und warten Sie ein paar Minuten.
■ Stellen Sie Ihr Brother Gerät mit
installiertem NC-2200w näher an
Ihren Computer und versuchen Sie es
noch einmal.
■ Setzen Sie den NC-2200w auf die
werkseitigen Voreinstellungen zurück
und versuchen Sie es erneut. Wie Sie
das Gerät auf die werkseitigen
Voreinstellungen zurücksetzen,
entnehmen Sie Seite
28.
■ Weitere Informationen finden Sie in
Kapitel 6 des Netzwerkhandbuchs auf
der mit dem NC-2200w gelieferten
CD-ROM.
Schritt 3
English
Deutsch
22
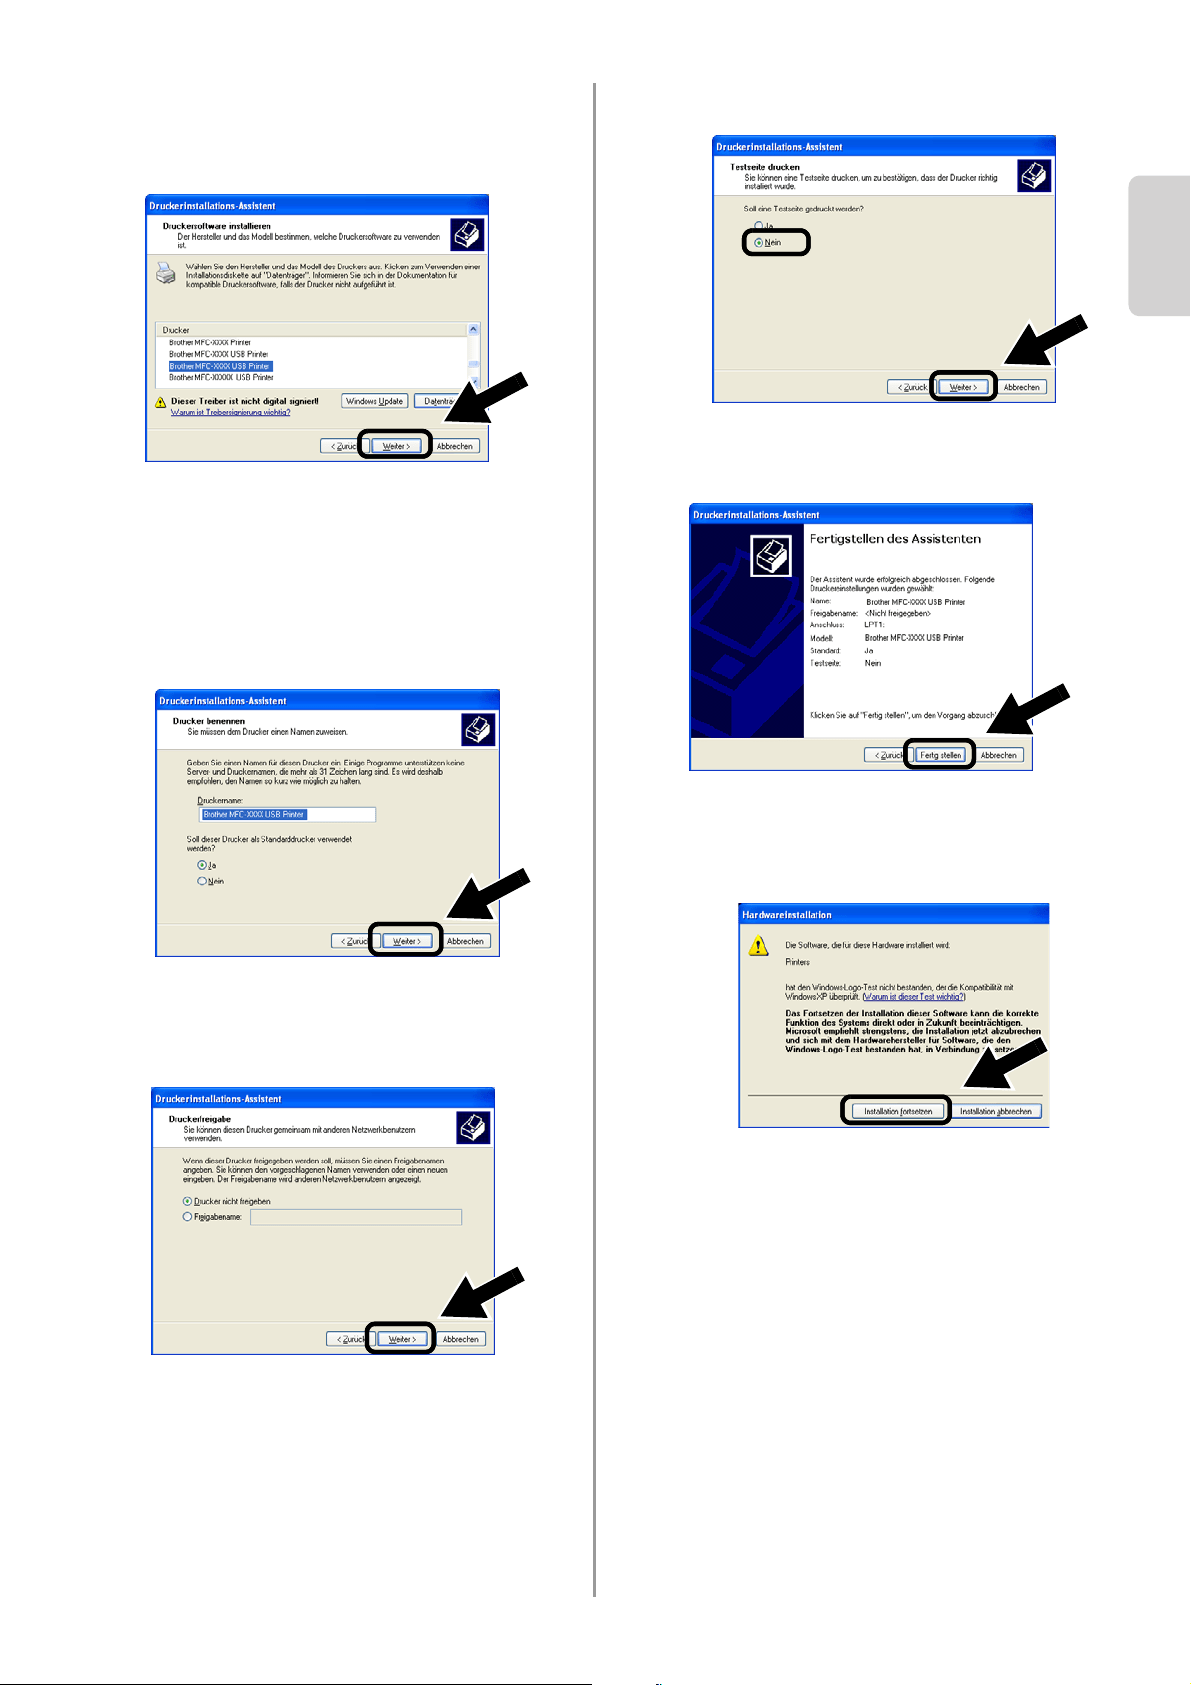
Installation des Druckertreibers
Bei den oben aufgeführten Modellen muss
der Druckertreiber installiert werden, bevor
Ihr Computer für den Einsatz des NC-2200w
eingerichtet wird. Wenn also der
Druckertreiber schon installiert ist, können
Sie diesen Schritt überspringen. Der Treiber
ist auf der dem Brother Drucker/MFC/DCP
beiliegenden CD-ROM. Sie können den
Druckertreiber aber auch vom
<
http://solutions.brother.com>
herunterladen.
Sie können den Druckertreiber mittels der
CD-ROM wie folgt installieren.
Die Anleitung in diesem Abschnitt basiert auf
Windows
®
XP.
1
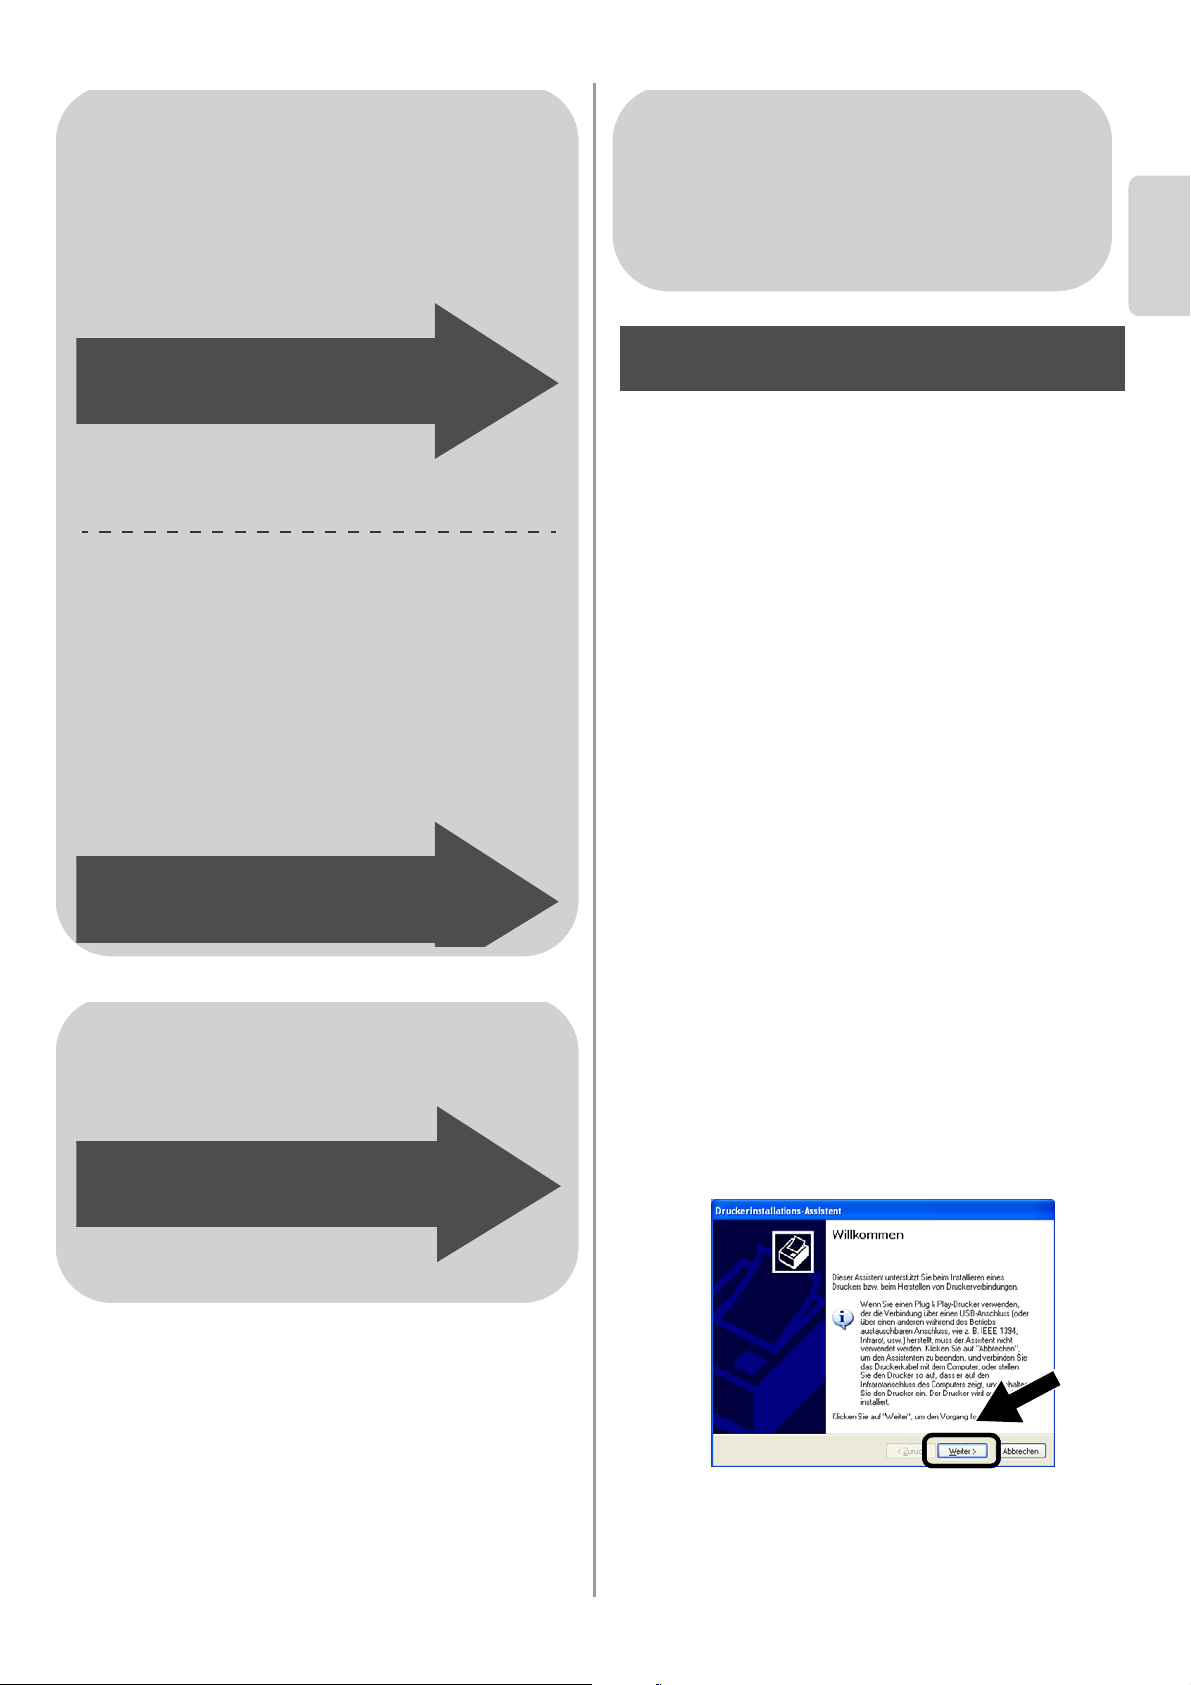
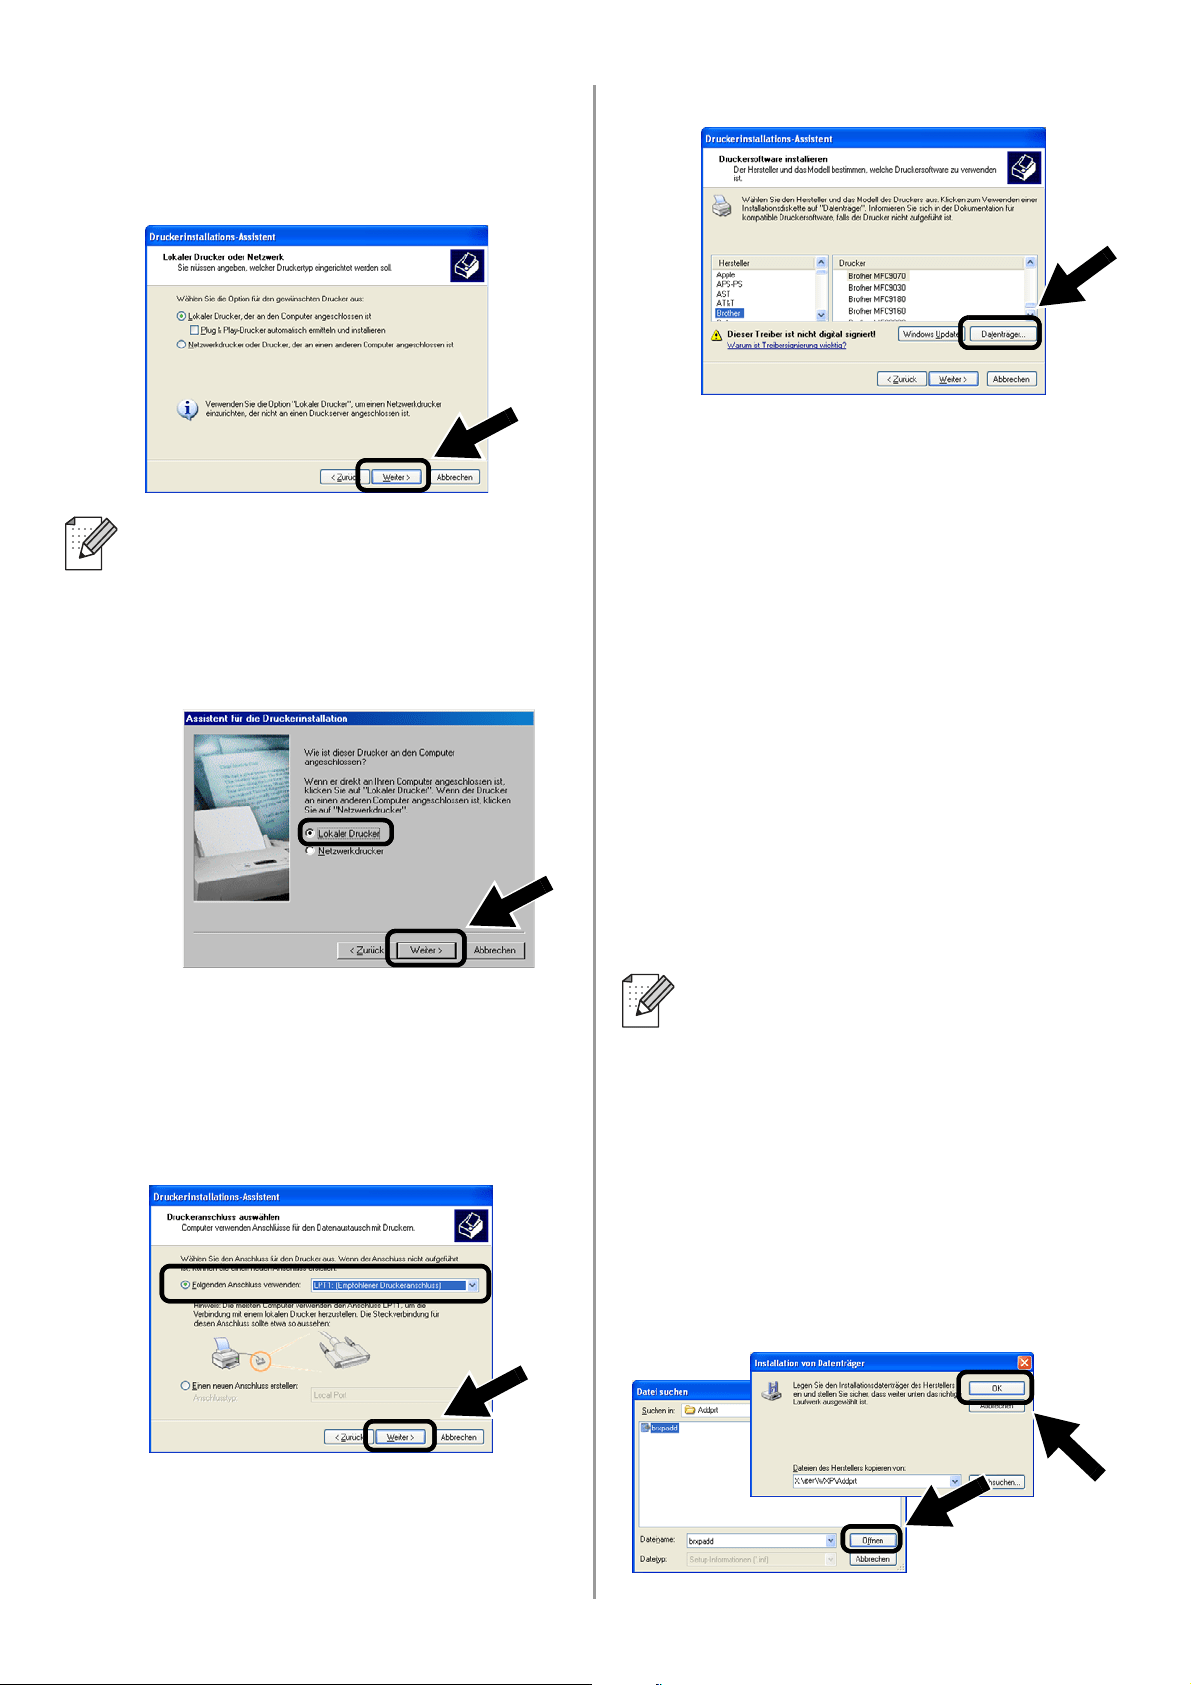
Klicken Sie auf Start und dann auf
Drucker und Faxgeräte. Klicken Sie auf
Drucker hinzufügen um den
Druckerinstallations-Assistenten zu
starten. Klicken Sie in diesem Dialogfeld
auf Weiter.
Für Windows
®
Gruppe 1:
HL-1440/1450/1470N/5040/ 5050/
5070N/5070DN/5140/5150D/5170DN
MFC-9070/9180/9160
Gruppe 2:
MFC-210C/420CN/410CN/620CN/
5440CN/5840CN/3240C/3340CN/8420/
8820D/8820DN/8220/8440/8840D/
8840DN/3820CN/3420CN/DCP-120C/
320CN/8020/8025D/8025DN/8040/
8045D/8045DN
Weiter mit
Schritt 4
auf Seite
22
Weiter mit
Schritt 4
auf Seite
25
Für Mac OS
®
X 10.2.4 - 10.3
oder höher
Weiter mit
Schritt 4
auf Seite
27
Für Windows
®
Gruppe 1:
HL-1440/1450/1470N/5040/ 5050/
5070N/5070DN/5140/5150D/5170DN
MFC-9070/9180/9160
Schritt 4
English
23
2
Deaktivieren Sie das Kontrollkästchen
Plug & Play-Drucker automatisch
ermitteln und installieren und klicken
Sie auf Weiter.
3
Wählen Sie aus dem Dropdown-Feld zur
Druckeranschlussauswahl
übergangsweise LPT1: (Empfohlener
Druckeranschluss). Klicken Sie
anschließend auf Weiter.
4
Klicken Sie auf Datenträger….
5
(Für Brother Laser Drucker)
Durchsuchen Sie die CD-ROM,
markieren Sie den Treiberordner und
klicken Sie auf Öffnen. Wählen Sie dann
den Ordner Win2k_xp (bzw. den Ordner
Ihres Betriebssystems) und klicken Sie
Öffnen. Wählen Sie Ihre Sprache und
klicken Sie wiederum auf Öffnen.
(Für Brother MFC/DCP)
Durchsuchen Sie die CD-ROM,
markieren Sie den Ordner Ihrer Sprache
und klicken Sie auf Öffnen. Wählen Sie
dann den Ordner WXP (bzw. den Ordner
Ihres Betriebssystems) und klicken Sie
auf Öffnen. Markieren Sie schließlich
den Ordner Addprt und klicken Sie auf
Öffnen.
6
Klicken Sie auf Öffnen und dann auf OK.
■ Ihr Betriebssystem zeigt Ihnen u.U.
dieses Dialogfeld nicht.
■ (Für Windows
®
98/Me/Windows NT
®
4.0) Klicken Sie in diesem Dialogfeld
auf Lokaler Drucker und
anschließend auf Weiter.
■ Wenn Ihr Betriebssystem Windows
®
XP ist,
Sie jedoch den Ordner
Win2k_xp
nicht in der Liste finden
können, wählen Sie bitte den Ordner
Win2k.
■
Wenn Sie nicht den richtigen
Treiber
order für Ihr Betriebssystem
sehen, jedoch stattdessen:
inst
,
PCL
,
PS
,
USBW98ME
, usw., sollten Sie den
PCL
-Ordner wählen. Sie werden dann
den richtigen Systemordner sehen.
English
Deutsch
24
7
Markieren Sie Ihr Modell in der Liste der
Drucker/MFC/DCPs und klicken Sie auf
Weiter.
8
Das Modell, das Sie installieren, wird in
diesem Fenster angezeigt. Wählen Sie
Ja oder Nein, je nachdem, ob Sie den
Drucker als Ihren Standarddrucker
haben möchten oder nicht. Klicken Sie
anschließend auf Weiter.
9
Falls dieser Bildschirm erscheint, wählen
Sie Drucker nicht freigeben und
Weiter.
10
Wählen Sie Nein und Weiter.
11
Falls dieses Dialogfeld erscheint klicken
Sie auf Fertig stellen.
12
Falls das Windows-Logo-Test-Fenster
erscheint, klicken Sie auf Installation
fortsetzen.
English
25
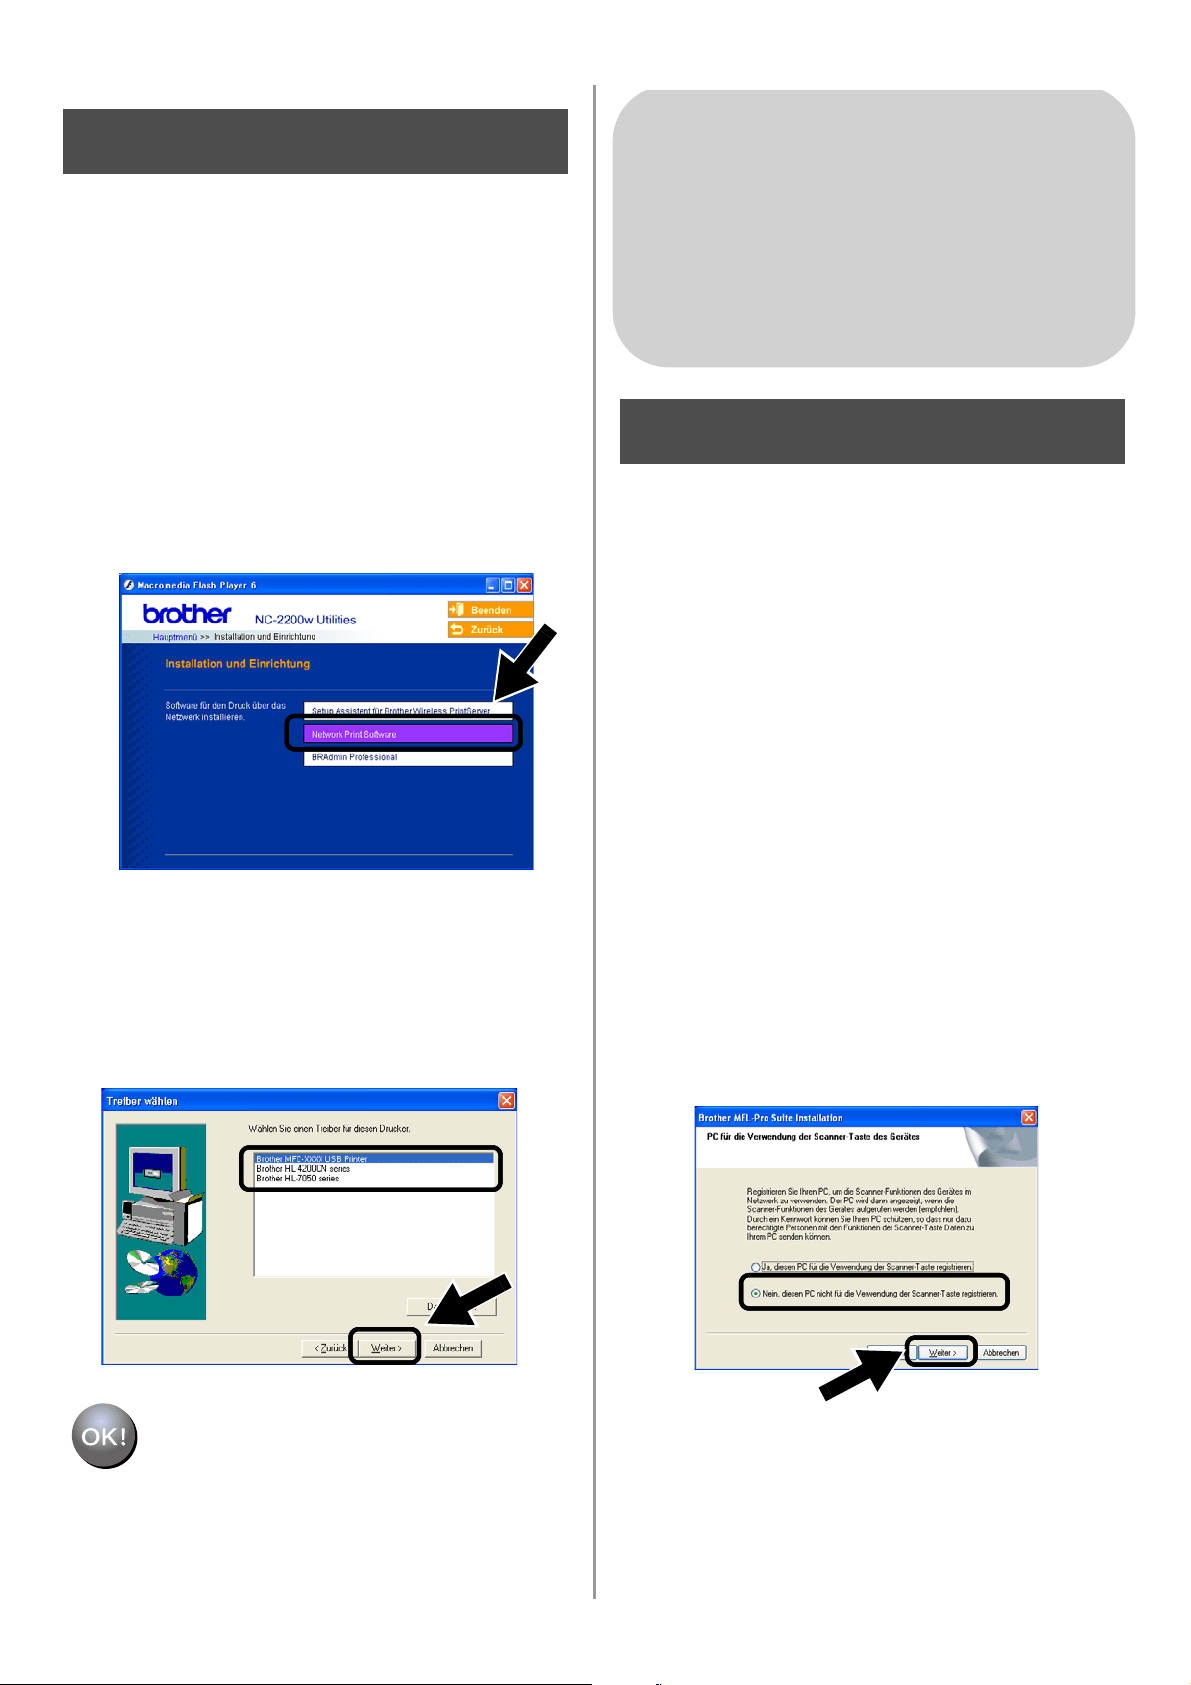
Installation des Netzwerkdrucks
Sie müssen den Netzwerkdruck installieren
und für die drahtlose Verbindung mit dem
Brother Drucker/MFC/DCP konfigurieren.
Bitte gehen Sie dazu wie nachstehend
beschrieben vor.
1
Klicken Sie auf Network Print Software
und folgen Sie den Anweisungen auf
dem Bildschirm.
2
Wählen Sie den gleichen Druckertreiber,
den Sie in 7. Schritt auf Seite
24 gewählt
haben. Markieren Sie Ihr Modell in der
Liste der Drucker/MFC/DCPs und
klicken Sie auf Weiter.
Die Einrichtung ist nun
abgeschlossen.
Installation der MFL-Pro Suite
Sie müssen die MFL-Pro Suite installieren,
damit Ihr Computer eine drahtlose
Verbindung zum Brother Drucker/MFC/DCP
herstellen kann. Die Software befindet sich
auf der CD-ROM, die Sie mit Ihrem
Printer/MFC/DCP bekamen. Befolgen Sie die
Anleitung im Abschnitt „Treiber- und
Softwareinstallation für den
Netzwerkanschluss“ der
Installationsanleitung auf der beiliegenden
CD-ROM.
■Für MFC-8420/8820D/8820DN/8220/8440/
8840D/8840DN/3820CN/3420CN und
DCP-8020/8025D/8025DN/8040/8045D/8045DN
Wenn während der Installation dieser Bildschirm
erscheint, wählen Sie Nein und klicken Sie auf
Weiter.
Schritt 5
Für Windows
®
Gruppe: 2
MFC-210C/420CN/410CN/620CN/
5440CN/5840CN/3240C/3340CN/8420/
8820D/8820DN/8220/8440/8840D/
8840DN/3820CN/3420CN/DCP-120C/
320CN/8020/8025D/8025DN/8040/
8045D/8045DN
Schritt 4

English
Deutsch
26
■ Einige MFC/DCPs mit NC-2200w können
während der Installation nicht gefunden
werden. Gehen Sie in diesem Fall zum unten
abgebildeten Dialogfeld zurück und geben Sie
den Knotennamen des NC-2200w manuell ein.
Sie können den Knotennamen der
Netzwerk-Konfigurationsseite entnehmen
(siehe
Sonstige Informationen auf Seite 28).
Eingabe der
Scanner-Zieladresse auf der
NC-2200w-Startseite
Wenn Sie den Scanner in einem Netzwerk
nutzen möchten, müssen Sie die
Scanner-Zieladresse auf der
NC-2200w-Startseite eingeben. Befolgen Sie
dazu die nachstehenden Schritte.
1
Öffnen Sie den Internet Explorer und
geben Sie folgende Adresse ein:
http://NC-2200w_ip_address
NC-2200w_ip_address steht hierbei
für die IP-Adresse oder den
Knotennamen Ihres NC-2200w.
2
Gehen Sie zur Seite Allgemeines unter
Konfiguration.
3
Geben Sie die IP-Adresse Ihres
Computers ein.
Die Einrichtung ist nun
abgeschlossen.
■
Die IP-Adresse oder den Knotennamen
Ihres NC-2200w können Sie der
Netzwerkkonfigurationsseite entnehmen.
Für weitere Informationen siehe
Sonstige Informationen auf Seite 28.
■ Sie werden nun aufgefordert, einen
Benutzernamen und ein Kennwort
einzugeben. Geben Sie Folgendes
ein:
Benutzername : admin
(Groß-/Kleinschreibung beachten)
Kennwort: access (Standard)
Schritt 5
■ Wenn Ihrem Computer automatisch
von DHCP eine IP-Adresse
zugewiesen wird, sollten Sie den
Namen Ihres Computer eingeben, da
die IP-Adresse wechseln kann. Der
Name kann der Windows
®
-Computer-
name oder der DNS-Hostname sein.
■ Sie können Ihren Computernamen in
Erfahrung bringen, indem Sie die
Eigenschaften Ihres Arbeitsplatzes
aufrufen und in die Registerkarte
Computername wechseln. Wenn Sie
den Domänennamen benutzen
möchten, müssen Sie die Adresse des
DNS-Servers mittels des Webservers
Ihres NC-2200w und Ihres
Webbrowsers zuweisen.
(Englisch, Deutsch, Französisch, Holländisch und
Japanisch stehen als Sprachen zur Verfügung.)
English
27
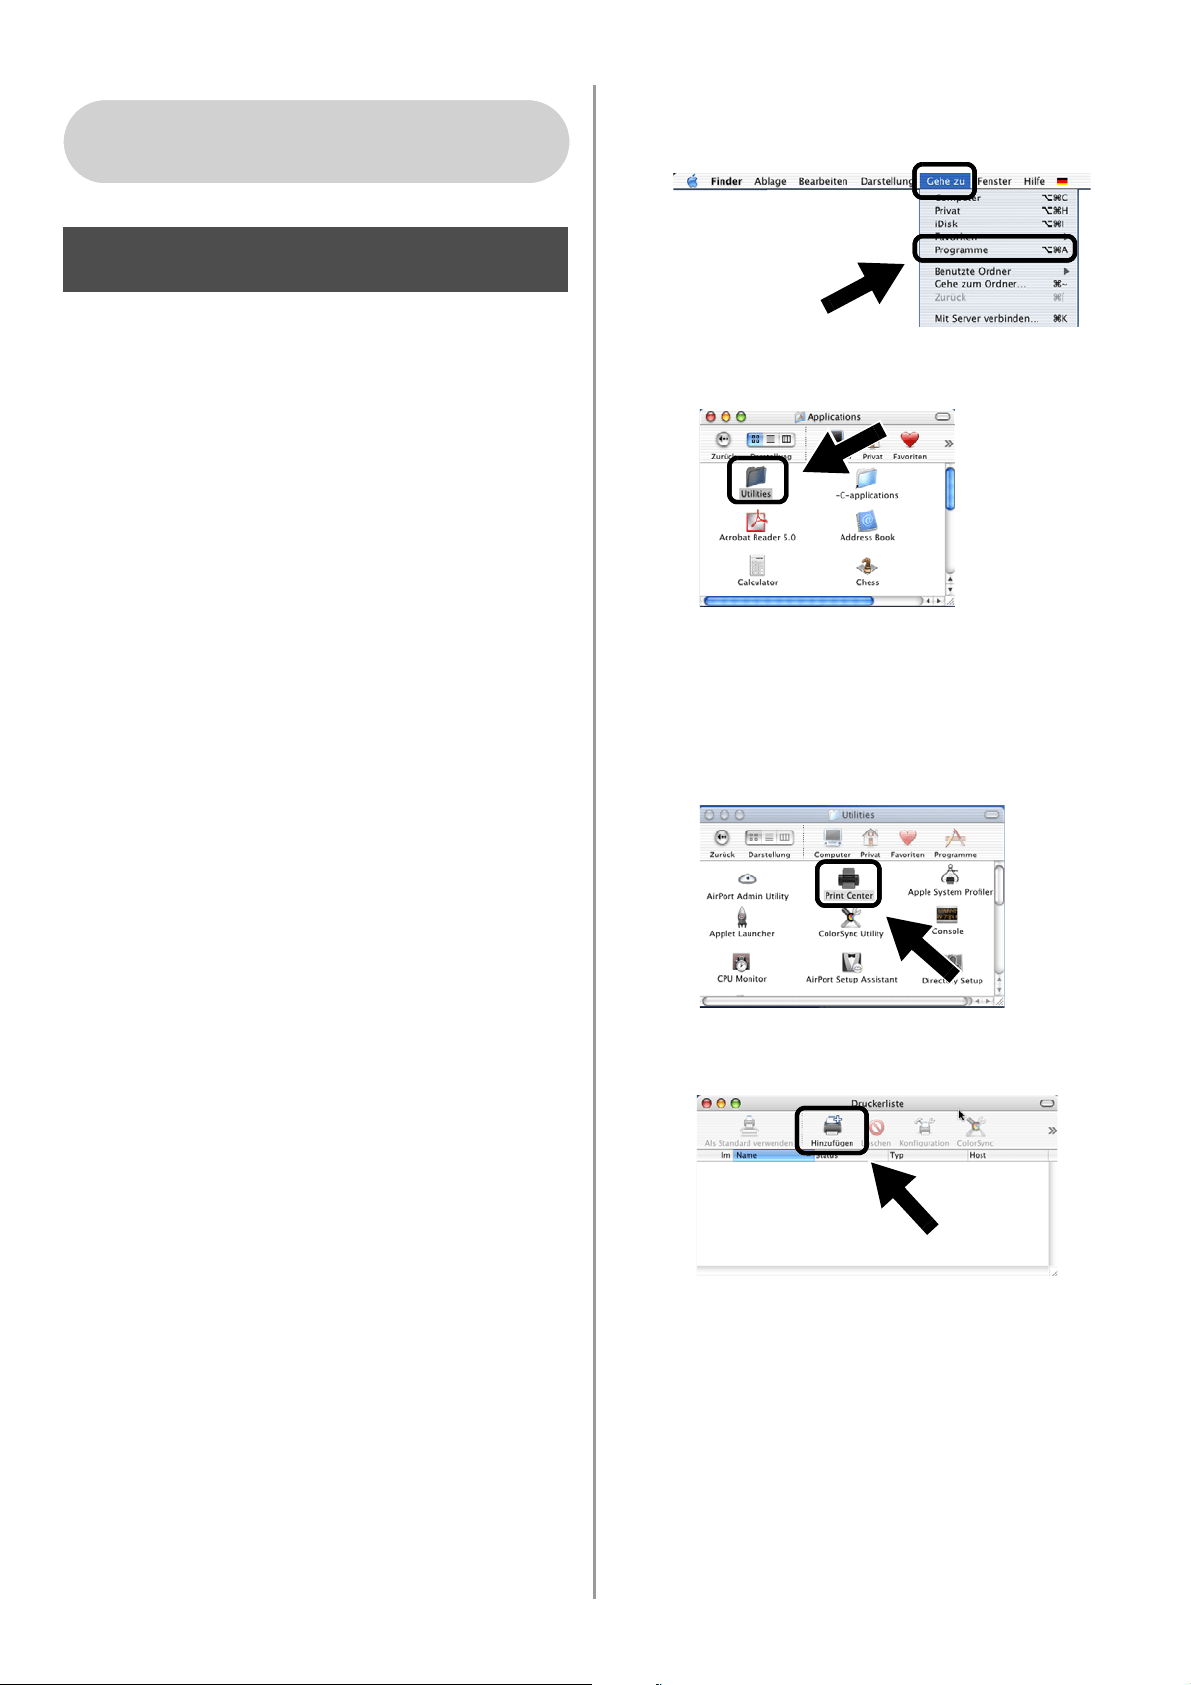
Druckertreiber mittels einfacher
Netzwerkkonfiguration unter
Mac OS
®
X installieren und
konfigurieren
Sie müssen erst den Druckertreiber
installieren, damit Sie Ihren Computer für den
Einsatz mit dem NC-2200w einrichten
können. Wenn Ihr Druckertreiber bereits
installiert ist, können Sie diesen Schritt
überspringen. Der Treiber befindet sich auf
der Ihrem Drucker/MFC/DCP beiliegenden
CD-ROM. Den neuesten Treiber erhalten Sie
stets auf unserer Website
http://solutions.brother.com
Bitte befolgen Sie folgende Anweisungen zur
Installation des Druckertreibers.
1
Legen Sie die beiliegende CD-ROM in
Ihr CD-ROM-Laufwerk ein und
doppelklicken Sie auf das Symbol Start
Here OSX. Erscheint das
Sprach-Fenster, wählen Sie Ihre
Sprache aus.
2
(Für Brother Laserdrucker) Klicken Sie
im Menü auf Software installieren und
dann auf Druckertreiber.
(Für Brother MFC/DCP) Klicken Sie zur
Installation auf MFL-Pro Suite.
3
Folgen Sie zur Installation den
Anweisungen auf dem Bildschirm.
4
Wählen Sie im Gehe zu Menü
Programme.
.
5
Öffnen Sie den Ordner Utilities.
6
(Für Mac OS
®
X 10.2.4) Öffnen Sie das
Symbol Print Center.
(Für Mac OS
®
X 10.3) Öffnen Sie das
Symbol Drucker-Dienstprogramm.
7
Klicken Sie auf Hinzufügen.
Für Mac OS
®
X 10.2.4 - 10.3
oder höher
Schritt 4
English
Deutsch
28
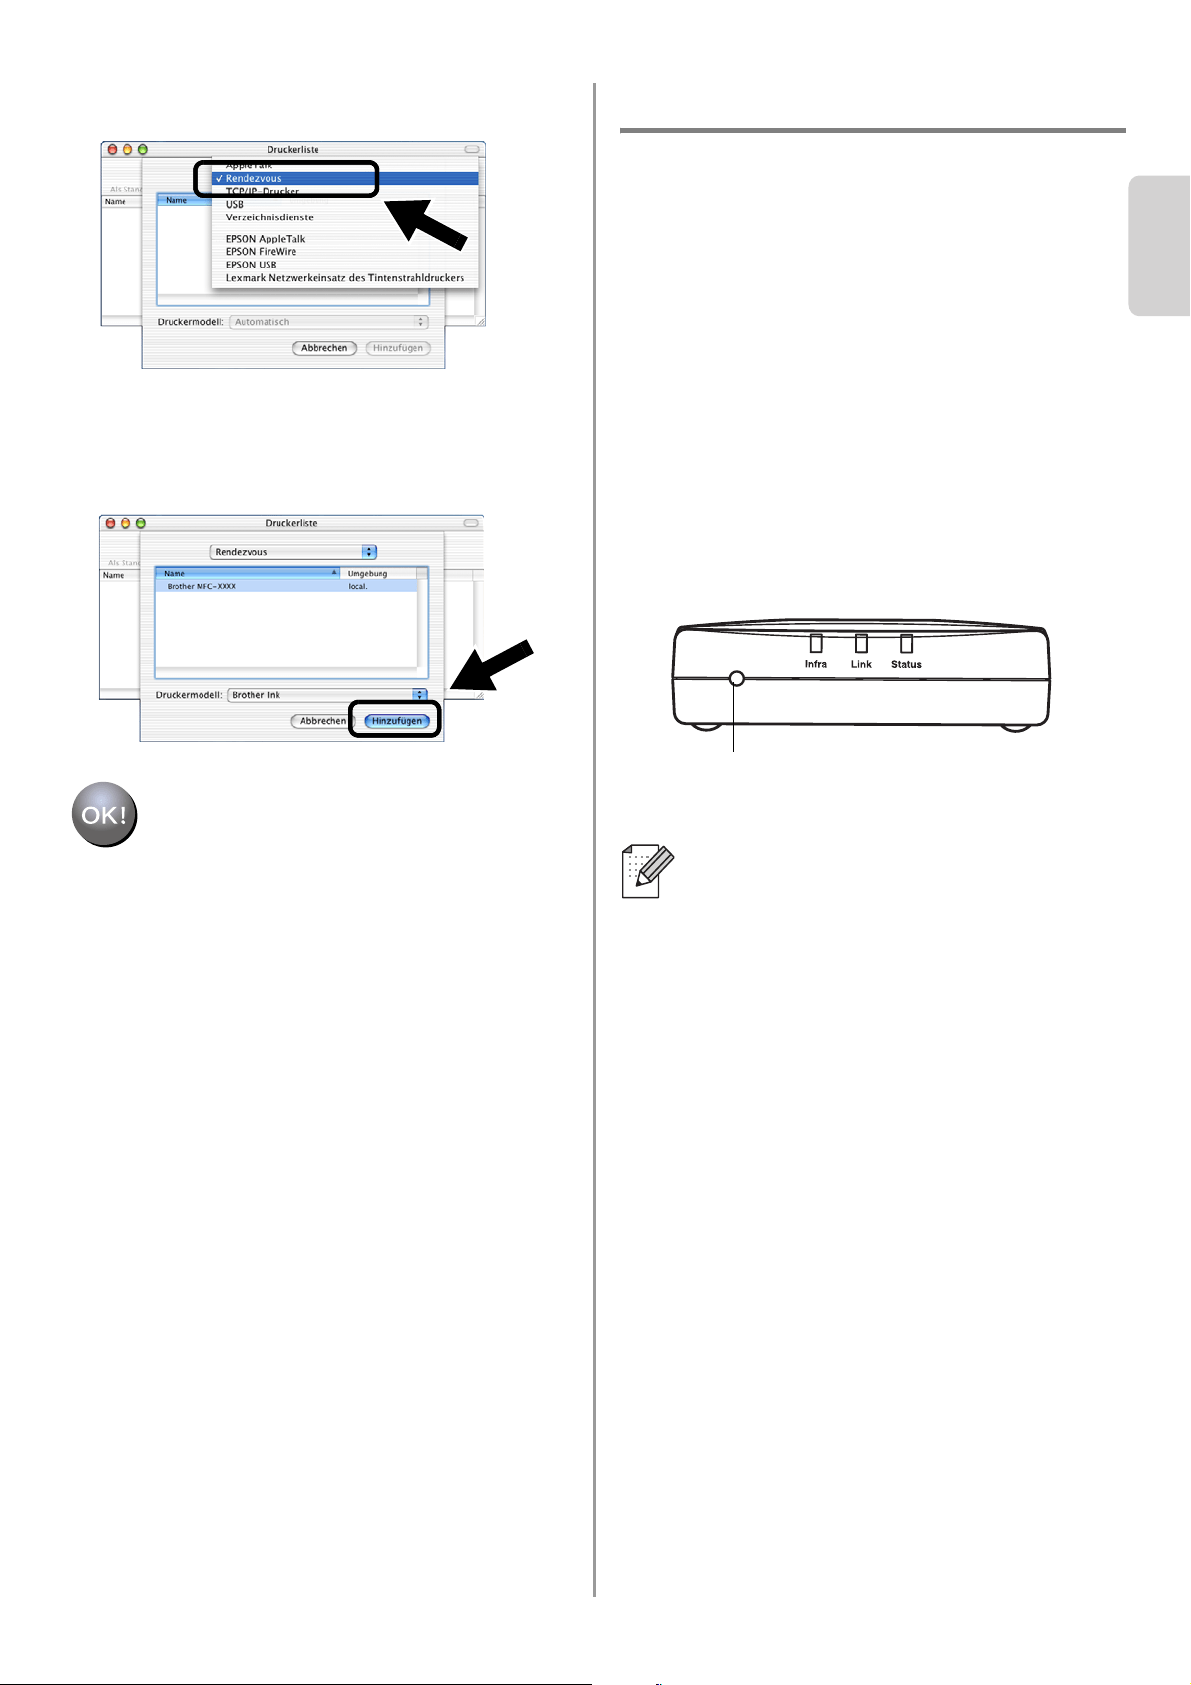
8
Wählen Sie Rendezvous.
9
Markieren Sie den Modellnamen Ihres
Geräts und klicken Sie auf Hinzufügen.
Die Einrichtung ist nun
abgeschlossen.
Sonstige Informationen
Druck der Netzwerkkonfigurationsseite
Drücken Sie die Testtaste des NC-2200w,
um die Netzwerkkonfigurationsseite
auszudrucken.
Zurücksetzen auf die werkseitigen
Voreinstellungen
Um den NC-2200w auf die werkseitigen
Voreinstellungen zurückzusetzen (dabei
werden sämtliche Angaben wie
Verbindungseinstellungen, Kennwort
und IP-Adresse zurückgesetzt), halten
Sie die Netzwerk-Testtaste länger als
10 Sekunden gedrückt.
Wenn Sie das Gerät auf die werkseitigen
Voreinstellungen zurücksetzen, müssen
Sie wieder mit Schritt 2 Ändern der
Wireless-Einstellungen Ihres Computers
zur Konfiguration des NC-2200w auf
Seite 18 anfangen.
Testtaste

English
29
Eléments fournis
1
Serveur d’impression/numérisation
externe sans fil NC-2200w
2
Adaptateur secteur
3
CD-ROM (avec le logiciel de
configuration et le Guide de l'utilisateur
en réseau du NC-2200w)
4
Guide d’installation rapide
Modèles pris en charge
Le NC-2200w peut fonctionner avec les
modèles listés ci-dessous. Si votre numéro
de modèle n'est pas listé, veuillez consulter la
page web du NC-2200w à l'adresse
http://solutions.brother.com
pour vérifier qu'il est compatible avec le
NC-2200w.
Systèmes d’exploitation
pris en charge
Windows
®
Windows
®
98/98SE/Me/2000 /XP et
Windows NT
®
4.0
Macintosh
®
Mac OS
®
X 10.2.4 - 10.3 ou une version
ultérieure
CD-ROM fourni
1
Centre de solutions Brother
Le Centre de Solutions Brother
(
http://solutions.brother.com
) regroupe en
une adresse toutes les réponses aux
questions relatives à votre
imprimante/MFC/DCP et au NC-2200w.
Téléchargez les derniers pilotes et utilitaires
requis et consultez la Foire aux Questions et
les conseils de dépistage des pannes.
2
Configuration
Vous pouvez exécuter l'Assistant de
configuration de la connexion sans fil qui
vous guidera tout au long de la
procédure d'installation du NC-2200w.
Vous pouvez aussi installer le logiciel
d'impression en réseau et l'utilitaire
BRAdmin Professional pour Windows
®
.
3
Documentation
Pour visualiser le Guide de l’utilisateur
en réseau et le Guide d’installation
rapide du NC-2200w au format PDF.
Le NC-2200w peut être connecté au port
d'interface USB de l'imprimante/MFC/DCP
Brother. Ce produit ne comprend pas de
câble USB. Veuillez vous en procurer un (de
type A-B) avant de procéder à l'installation.
Groupe 1 :
HL-1440/1450/1470N/5040/ 5050/5070N/
5140/5150D/5170DN
MFC-9070/9180/9160
Groupe 2 :
MFC-210C/420CN/410CN/620CN/5440CN/584
0CN/3240C/3340CN/8420/8820D/8820DN/
8220/8440/8840D/8840DN/3820CN/3420CN/
DCP-110C/310C/8020/8025D/8025DN/8040/
8045D/8045DN
1
2
4
3
A
B
Si le CD fourni avec votre
imprimante/MFC/DCP Brother ne
comprend pas de pilote Windows NT
®
4.0,
vous ne pourrez pas l'utiliser dans des
environnements Windows NT
®
4.0.
1
2
3
Type A-B
(2 m (6 pieds) maxi.)
English
Français
30
Configuration du serveur
d'impression/numérisation
Installation du serveur
d'impression
1
Connectez le câble USB au NC-2200w
et à l'imprimante/MFC/DCP Brother.
2
Connectez l'adaptateur secteur au
NC-2200w.
3
Branchez l'adaptateur secteur et allumez
l'imprimante/MFC/DCP Brother.
4
Vérifiez que le témoin Link du NC-2200w
est allumé et attendez quelques minutes.
Avant de commencer l’installation, si
vous utilisez un logiciel pare-feu
personnel (par ex. le logiciel Internet
Connection Firewall disponible sous
Windows XP), désactivez-le. Quand vous
êtes sûr de pouvoir imprimer, vous
pouvez relancer votre pare-feu personnel.
Changement des paramètres
sans fil de votre ordinateur
pour configurer le NC-2200w
Avant de pouvoir utiliser
l'imprimante/MFC/DCP Brother sur un
réseau sans fil, il faut d'abord configurer le
NC-2200w pour qu'il soit compatible avec la
configuration de votre réseau.
Pour configurer le NC-2200w depuis un
ordinateur sans fil de votre réseau, vous
devez changer provisoirement les
paramètres sans fil courants de cet
ordinateur. Avant de les modifier, nous vous
conseillons de les noter. Il vous faudra
redéfinir les paramètres à ces valeurs à la fin
de l'Etape 3, page
33.
Paramètres réseau sans fil courants
de votre ordinateur
Le NC-2200w ne peut pas être utilisé
avec un hub USB.
Etape 1
Témoin Link (vert)
Nous vous recommandons de
contacter votre administrateur
réseau si vous avez besoin d'aide
pour définir les paramètres sans fil
de votre ordinateur.
Paramètre Valeur
courante
Mode de communication :
(Infrastructure / Ad-hoc)
Nom du réseau (SSID/ESSID)
Canal : (1-14)
*Si nécessaire.
Cryptage :
(SANS / WEP / Autre)
Taille et type de la clé de
cryptage :
(64 bits, 128 bits / ASCII, HEX
/ Autre)
Clé de cryptage :
Etape 2
English
31
Pour communiquer avec le NC-2200w non
configuré, changez les paramètres sans fil de
votre ordinateur aux valeurs suivantes :
Mode de communication : Ad-hoc
(canal 11)
Nom du réseau (SSID/ESSID) : SETUP
(respecter la casse)
Cryptage : Sans
Veuillez consulter les instructions du
fabricant de la carte sans fil de votre PC pour
changer les paramètres sans fil, puis passez
à l'Etape 3
Configuration du serveur
d’impression.
Si vous utilisez Windows
®
XP ou
Mac OS
®
X 10.2.4 et que vous utilisez ses
fonctions Wireless Ethernet intégrées,
suivez les étapes suivantes pour le
système d'exploitation approprié.
1
Cliquez sur Démarrer puis sur Panneau
de configuration.
2
Cliquez sur l’icône Connexions réseau.
3
Sélectionnez et cliquez sur Connexion
réseau sans fil 2 à l’aide du bouton droit
de la souris. Cliquez sur Afficher les
réseaux sans fil disponibles.
4
Le nom de réseau (SSID/ESSID) du
NC-2200w apparaît dans la boîte
Réseaux sans fil disponibles.
Sélectionnez SETUP et cochez la case
Me permettre de me connecter....
Cliquez sur le bouton Connecter.
Pour les utilisateurs de Windows
®
98/Me/2000, Windows NT
®
4.0
Passez à l'Etape 3, page 33
Pour les utilisateurs de Windows
®
XP
English
Français
32
5
Vérifiez l’état de la connexion du réseau
sans fil. L'adresse IP peut prendre
quelques minutes pour passer de 0.0.0.0
à 169.254.x.x à l'écran (où x.x sont des
nombres compris entre 0 et 255).
1
Cliquez sur l’icône d’état AirPort et
sélectionnez Ouvrir Connexion à
Internet.
2
Cliquez sur l'onglet Réseau pour afficher
les appareils sans fil disponibles. Le nom
de réseau (SSID/ESSID) est indiqué
dans l'option Réseau. Sélectionnez
SETUP.
3
Votre réseau sans fil est connecté.
Si le nom de réseau (SSID/ESSID)
souhaité n'est pas listé, faites les essais
suivants :
■ Débranchez l'adaptateur secteur,
rebranchez-le et attendez quelques
minutes.
■ Rapprochez votre ordinateur de votre
imprimante/MFC/DCP Brother
équipée du serveur d'impression et
essayez à nouveau.
■ Réinitialisez le NC-2200w à ses
paramètres usine par défaut et
réessayez. Reportez-vous à la page
40 pour voir comment réinitialiser les
paramètres à leur valeur usine par
défaut.
■ Consultez le chapitre 6 du Guide de
l’utilisateur en réseau du NC-2200w
qui figure sur le CD-ROM fourni avec
le NC-2200w.
Passez à l'Etape 3, page 33
Pour les utilisateurs de Mac OS
®
X
10.2.4 - 10.3 ou une version ultérieure

English
33
Configuration du serveur
d’impression
1
Insérez le CD-ROM du NC-2200w dans
votre lecteur.
(Pour les utilisateurs de Windows
®
)
L’écran d’accueil s’affiche
automatiquement.
(Pour les utilisateurs de Mac OS
®
X
10.2.4 à 10.3 ) Double-cliquez sur l'icône
NC-2200w de votre Macintosh
®
puis
double-cliquez sur l'icône Start Here
OSX.
2
Sélectionnez votre langue.
3
Cliquez sur Configuration puis sur
Assistant de configuration de la
connexion sans fil.
4
Lisez les informations de l'écran de
Bienvenue et cliquez sur Suivant quand
vous êtes sûr d'avoir accompli toutes les
tâches requises.
5
Suivez les instructions qui s'affichent à
l'écran. Pour obtenir des compléments
d'information, consultez le chapitre 2 du
Guide de l’utilisateur en réseau du
NC-2200w qui figure sur le CD-ROM
fourni avec le NC-2200w.
6
Quand vous aurez quitté l'Assistant de
configuration de la connexion sans fil,
redéfinissez les paramètres sans fil de
votre ordinateur à leur valeur initiale à
l'aide des informations que vous avez
notées lors du
Changement des
paramètres sans fil de votre ordinateur
pour configurer le NC-2200w page 30.
Si le nom de réseau (SSID/ESSID)
souhaité n'est pas listé, faites les essais
suivants :
■ Débranchez l'adaptateur secteur,
rebranchez-le et attendez quelques
minutes.
■
Rapprochez votre
imprimante/MFC/DCP Brother équipée
du serveur d'impression de votre
ordinateur et essayez à nouveau.
■ Réinitialisez le NC-2200w à ses
paramètres usine par défaut et
réessayez. Reportez-vous à la page
40 pour réinitialiser les paramètres à
leur valeur usine par défaut.
■ Consultez le chapitre 6 du Guide de
l’utilisateur en réseau du NC-2200w
qui figure sur le CD-ROM fourni avec
le NC-2200w.
Etape 3
English
Français
34
Installation du pilote
d’imprimante
Les utilisateurs des modèles ci-dessus
doivent installer le pilote d'imprimante avant
de configurer leur ordinateur pour fonctionner
avec le NC-2200w. Si le pilote d'imprimante
est déjà installé, vous pouvez sauter cette
étape. Le pilote se trouve sur le CD-ROM
livré avec l'imprimante/MFC/DCP Brother.
Vous pouvez également télécharger le pilote
d'imprimante du Centre de solutions Brother
à l'adresse :
<http://solutions.brother.com>.
Pour installer le pilote d'imprimante à l'aide
du CD-ROM, suivez la procédure suivante.
Les instructions de cette section
correspondent à Windows
®
XP.
1
Cliquez sur le menu Démarrer et
choisissez Imprimantes et
télécopieurs. Cliquez sur Ajout d'une
imprimante pour lancer l'Assistant Ajout
d'imprimante. Quand vous obtenez cet
écran, cliquez sur Suivant.
Pour les utilisateurs de Windows
®
Groupe 1 :
HL-1440/1450/1470N/5040/ 5050/
5070N/5070DN/5140/5150D/5170DN
MFC-9070/9180/9160
Groupe 2 :
MFC-210C/420CN/410CN/620CN/
5440CN/5840CN/3240C/3340CN/8420/
8820D/8820DN/8220/8440/8840D/
8840DN/3820CN/3420CN/DCP-120C/
320CN/8020/8025D/8025DN/8040/
8045D/8045DN
Passez à l'Etape 4, page 34
Passez à l'Etape 4, page 37
Pour les utilisateurs de Mac OS
®
X
10.2.4 - 10.3
ou une version ultérieure
Passez à l'Etape 4, page 39
Pour les utilisateurs de Windows
®
Groupe 1 :
HL-1440/1450/1470N/5040/ 5050/
5070N/5070DN/5140/5150D/5170DN
MFC-9070/9180/9160
Etape 4
English
35
2
Désélectionnez la case Détection et
installation automatique de
l'imprimante Plug-and-Play puis
cliquez sur Suivant.
3
Pour le port d'imprimante, sélectionnez
provisoirement LPT1: (Port imprimante
recommandé) puis cliquez sur Suivant.
4
Cliquez sur Disque fourni.
5
(Pour les utilisateurs d'imprimantes laser
Brother)
Parcourez le CD-ROM pour sélectionner le
dossier
Pilote
. Cliquez sur
Ouvrir
, puis
sélectionnez le dossier
Win2k_xp
(ou le
dossier correspondant à votre système
d'exploitation). Cliquez sur
Ouvrir
et
sélectionnez la langue appropriée avant
de cliquer sur
Ouvrir
.
(Pour les utilisateurs de MFC/DCP Brother)
Parcourez le CD-ROM pour sélectionner le
dossier de langue approprié puis cliquez
sur
Ouvrir
. Sélectionnez le dossier
WXP
(ou le dossier correspondant à votre
système d'exploitation) puis cliquez sur
Ouvrir
et sélectionnez le dossier
Addprt
avant de cliquer sur
Ouvrir
.
6
Cliquez sur Ouvrir puis sur OK.
■ Il est possible que votre système
d'exploitation ne présente pas cet
écran.
■ (Pour les utilisateurs de Windows
®
98/Me/Windows NT
®
4.0) Si l'écran
s'affiche, sélectionnez Imprimante
locale puis cliquez sur Suivant.
■ Si vous utilisez Windows
®
XP et que
le dossier
Win2k_xp
ne se trouve pas
dans la liste, veuillez sélectionner le
dossier Win2k.
■
Si vous ne voyez pas le dossier
correspondant à votre système
d'exploitation dans le dossier
Pilote
, mais
que vous voyez :
inst
,
PCL
,
PS
,
USBW98ME
, etc..., nous vous
recommandons de sélectionner le
dossier
PCL
. Vous verrez alors le dossier
de système d'exploitation approprié.

English
Français
36
7
Sélectionnez le modèle que vous êtes en
train d'installer dans la liste des
imprimantes/MFC/DCP puis cliquez sur
Suivant.
8
Le modèle que vous installez est listé
dans la fenêtre. Sélectionnez Oui ou
Non pour indiquer si vous souhaitez que
cette imprimante devienne votre
imprimante par défaut puis cliquez sur
Suivant.
9
Si cet écran s'affiche, sélectionnez Ne
pas partager cette imprimante puis
cliquez sur Suivant.
10
Sélectionnez Non puis cliquez sur
Suivant.
11
Quand cet écran apparaît, cliquez sur
Terminer.
12
Si l'écran de test pour obtenir le logo
Windows apparaît, cliquez sur
Continuer.
English
37
Installation du logiciel
d’impression en réseau
Vous devez installez le logiciel d'impression
en réseau et le configurer pour la connexion
réseau sans fil de l'imprimante/MFC/DCP
Brother. Veuillez suivre les étapes suivantes.
1
Cliquez sur Logiciel d'impression
réseau et suivez les instructions qui
s’affichent à l’écran.
2
Sélectionnez le même pilote
d'imprimante que celui que vous avez
sélectionné dans la 7ème étape de la
page
36. Sélectionnez le modèle que
vous êtes en train d'installer dans la liste
des imprimantes/MFC/DCP puis cliquez
sur Suivant.
La configuration est alors terminée.
Installation de MFL-Pro Suite
Vous devez installer le programme MFL-Pro
Suite afin d'établir une connexion réseau
sans fil depuis votre ordinateur vers
l'imprimante/MFC/DCP Brother. Le logiciel se
trouve sur le CD-ROM fourni avec votre
imprimante/MFC/DCP. Pour installer le
logiciel, suivez les étapes de la rubrique
traitant de l'installation du pilote et du logiciel
pour le câble d'interface réseau du Guide
d'installation rapide de votre
imprimante/MFC/DCP.
■Pour le MFC-8420/8820D/8820DN/8220/8440/
8840D/8840DN/3820CN/3420CN et
DCP-8020/8025D/8025DN/8040/8045D/8045DN
Quand cet écran s'affiche pendant le processus
d'installation, sélectionnez Non puis cliquez sur
Suivant.
Etape 5
Pour les utilisateurs de Windows
®
Groupe : 2
MFC-210C/420CN/410CN/620CN/
5440CN/5840CN/3240C/3340CN/8420/
8820D/8820DN/8220/8440/8840D/
8840DN/3820CN/3420CN/DCP-120C/
320CN/8020/8025D/8025DN/8040/
8045D/8045DN
Etape 4
English
Français
38
■ Avec le NC-2200w, certains MFC/DCP
n'apparaissent pas dans la liste de recherche
du processus d'installation. Dans ce cas,
retournez à l'écran ci-dessous et définissez le
nom de noeud du NC-2200w manuellement. Le
nom de noeud est indiqué dans la page de
configuration du réseau. Voir
Informations
complémentaires page 40.
Spécification de l'adresse de
destination de Scan Vers dans
la page d'accueil du NC-2200w
Pour utiliser le scanner sur le réseau, vous
devez d'abord spécifier l'adresse de
destination de la numérisation dans la page
web du NC-2200w. Procédez comme suit.
1
Ouvrez Internet Explorer et entrez la
chaîne suivante dans le champ URL.
http://NC-2200w_ip_address
Où NC-2200w_ip_address
correspond à l'adresse IP ou au nom de
noeud de votre NC-2200w.
2
Allez à la page Général sous
Configuration.
3
Entrez l’adresse IP de votre ordinateur.
La configuration est alors terminée.
■
L'adresse IP ou le nom de noeud de
votre NC-2200w se trouve sur la page
de configuration du réseau. Pour en
savoir plus, reportez-vous à la rubrique
Informations complémentaires page 40.
■ Il vous faudra entrer un nom
d'utilisateur et un mot de passe.
Entrez les valeurs suivantes :
nom d’utilisateur : admin (respecter la
casse)
mot de passe : access (défaut)
Etape 5
■ Si l'adresse IP de votre ordinateur a été
automatiquement assignée avec
DHCP, vous devez entrer le nom de
l'ordinateur car l'adresse IP pourrait
changer. Le nom peut être le nom
d'ordinateur Windows
®
ou le nom
d'hôte DNS.
■ Pour connaître le nom de votre
ordinateur, cliquez sur Cet ordinateur
à l'aide du bouton droit de la souris puis
sélectionnez Propriétés et consultez
l'onglet Nom de l'ordinateur. Pour
utiliser le nom de domaine, vous devez
assigner l'adresse du serveur DNS à
l'aide du serveur Web du NC-2200w et
de votre navigateur Web.
(Les langues disponibles sont l'anglais, l'allemand,
le français, le néerlandais et le japonais.)
English
39
Installation et configuration du
pilote d'imprimante à l’aide des
fonctions de configuration
simple du réseau de Mac OS
®
X
Vous devez installer le pilote d'imprimante
avant de configurer votre ordinateur pour
fonctionner avec le NC-2200w. Si le pilote
d'imprimante est déjà installé, vous pouvez
sauter cette étape. Le pilote se trouve sur le
CD-ROM fourni avec votre
imprimante/MFC/DCP ou vous pouvez
télécharger le dernier pilote d'imprimante
depuis notre site Web :
http://solutions.brother.com
Veuillez suivre les étapes suivantes pour
installer le pilote d'imprimante.
1
Insérez le CD-ROM fourni dans votre
lecteur puis double-cliquez sur l'icône
Start Here OSX pour installer le logiciel.
Si l’écran de langue s’affiche,
sélectionnez votre langue.
2
(Pour les utilisateurs d'imprimante laser
Brother) Cliquez sur Installer le logiciel
puis sur Pilote d'imprimante sur les
écrans de menu.
(Pour les utilisateurs de MFC/DCP
Brother) Cliquez sur MFL-Pro Suite pour
l'installer.
3
Suivez les instructions qui s'affichent à
l'écran pour installer le pilote
d'imprimante.
4
Sélectionnez Applications dans le
menu Aller.
.
5
Ouvrez le dossier Utilities.
6
(Pour les utilisateurs de Mac OS
®
X 10.2.4)
Ouvrez l'icône Print Center.
(Pour les utilisateurs de Mac OS
®
X 10.3)
Ouvrez l'icône Configuration
d'imprimante.
7
Cliquez sur le bouton Ajouter.
Pour les utilisateurs de Mac OS
®
X
10.2.4 - 10.3 ou une version ultérieure
Etape 4
English
Français
40
8
Sélectionnez Rendezvous.
9
Sélectionnez le nom du modèle de votre
appareil puis cliquez sur Ajouter.
La configuration est alors terminée.
Informations
complémentaires
Impression de la page de configuration du
réseau
Pour imprimer la page de configuration du
réseau, appuyez sur le bouton Test du
NC-2200w.
Réinitialisation des paramètres à leur
valeur par défaut
Si vous voulez ramener le NC-2200w à
ses paramètres d’usine (ce qui
réinitialisera toutes les informations
telles que les paramètres sans fil et
l’adresse IP), maintenez le bouton Test
enfoncé pendant plus de 10 secondes.
Quand vous réinitialisez aux paramètres
par défaut, vous devez recommencer la
configuration à partir de l'étape 2.
Changement des paramètres sans fil de
votre ordinateur pour configurer le
NC-2200w page 30.
Bouton Test

English
41
Onderdelen in de doos
1
NC-2200w Externe draadloze
afdruk-/scanserver
2
Wisselstroomadapter
3
CD-ROM (inclusief installatiesoftware en
netwerkhandleiding voor de NC-2200w)
4
Installatiehandleiding
Ondersteunde modellen
De NC-2200w ondersteunt de hieronder
vermelde modellen. Wordt uw modelnummer
niet vermeld, kijk dan op de pagina voor de
NC-2200w op
http://solutions.brother.com
om te zien of de NC-2200w uw model
ondersteunt.
Ondersteunde
besturingssystemen
Windows
®
Windows
®
98/98SE/Me/2000 /XP en
Windows NT
®
4.0
Macintosh
®
Mac OS
®
X 10.2.4 - 10.3 of recenter
Meegeleverde cd-rom
1
Brother Solutions Center
Op het Brother Solutions Center
(http://solutions.brother.com) vindt u alle
benodigde informatie over de
printer/MFC/DCP en NC-2200w van
Brother. Download de meest recente
drivers en hulpprogramma’s, lees de
veelgestelde vragen en de tips voor het
oplossen van problemen.
2
Installatie
De Wireless Setup Wizard helpt u met de
configuratie van de NC-2200w. U kunt
ook de Network Print Software en
BRAdmin Professional voor Windows
®
installeren.
3
Documentatie
De netwerkhandleiding en
installatiehandleiding van de NC-2200w
in PDF-formaat bekijken.
De NC-2200w kan worden aangesloten
op de USB-interfacepoort van de
printer/MFC/DCP van Brother. Met dit
product wordt geen USB-kabel geleverd.
Zorg dat u een geschikte USB-kabel bij
de hand hebt (met Type A-B).
Groep 1:
HL-1440/1450/1470N/5040/ 5050/5070N/
5140/5150D/5170DN
MFC-9070/9180/9160
Groep 2:
MFC-210C/420CN/410CN/620CN/5440CN/584
0CN/3240C/3340CN/8420/8820D/8820DN/
8220/8440/8840D/8840DN/3820CN/3420CN/
DCP-110C/310C/8020/8025D/8025DN/8040/
8045D/8045DN
1
2
4
3
A
B
Als op de cd-rom die met de
printer/MFC/DCP van Brother geleverd
werd geen driver voor Windows NT
®
4.0
staat, kunt u deze niet in Windows NT
®
4.0-omgevingen gebruiken.
1
2
3
Type A-B
(Max. 2 meter)
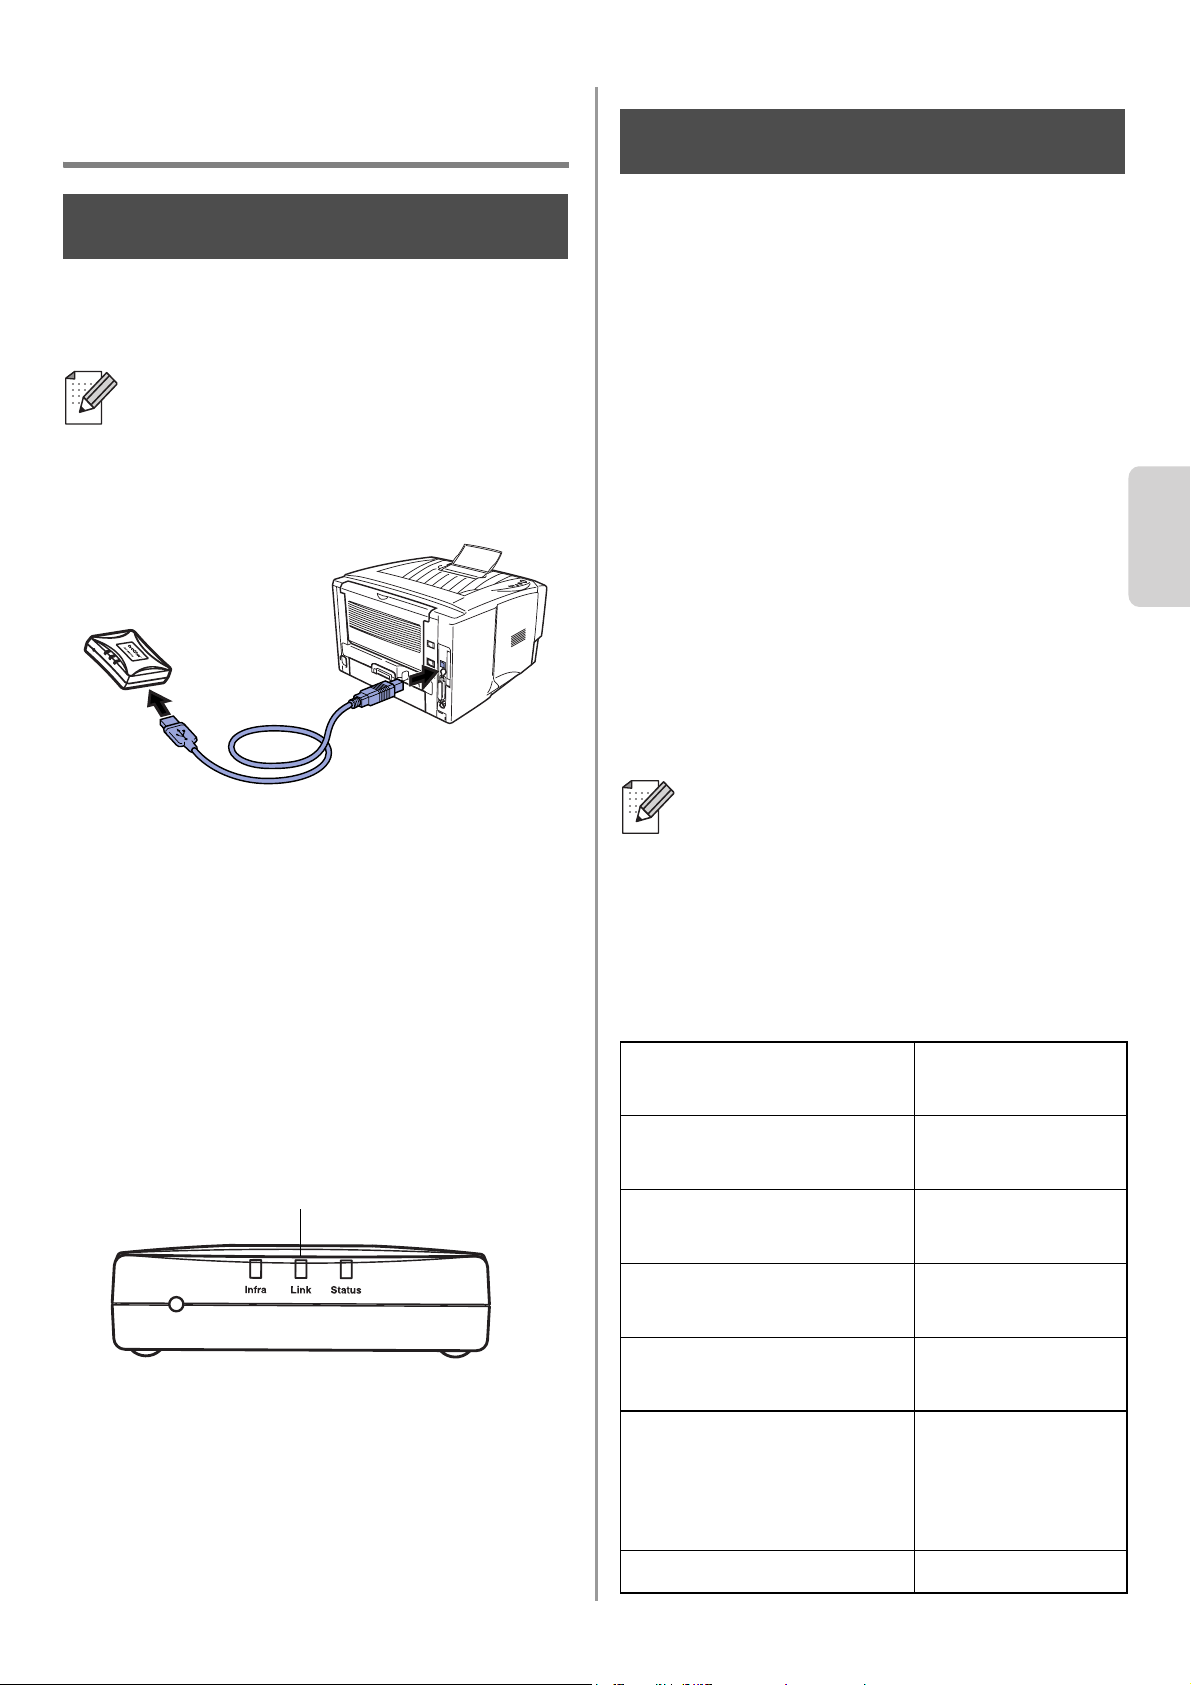
English
Nederlands
42
De afdruk-/scanserver
instellen
De afdrukserver installeren
1
Sluit de USB-kabel aan op de NC-2200w
en de printer/MFC/DCP van Brother.
2
Sluit de wisselstroomadapter op de
NC-2200w aan.
3
Steek de stekker van de
wisselstroomadapter in het stopcontact
en zet de printer/MFC/DCP van Brother
aan.
4
Controleer dat het Link-lampje op de
NC-2200w brandt en wacht een paar
minuten.
Als u persoonlijke firewallsoftware gebruikt
(bijvoorbeeld de firewall voor
internetverbindingen in Windows XP), moet
voordat u met de installatie begint controleren
dat de firewall is uitgeschakeld. Wanneer u
zeker weet dat u kunt afdrukken, moet u de
persoonlijke firewall weer activeren.
De draadloze instellingen van
de computer wijzigen om de
NC-2200w te configureren
U kunt de printer/MFC/DCP van Brother pas in
een draadloos netwerk gebruiken nadat u de
configuratie van NC-2200w hebt aangepast
aan de configuratie van uw netwerk.
Als u de NC-2200w wilt configureren vanaf
een draadloze computer op uw netwerk, dient
u de huidige draadloze instellingen tijdelijk te
wijzigen. Het is raadzaam de huidige
draadloze instellingen van de computer te
noteren alvorens u deze wijzigt. Aan het
einde van stap 3 op pagina
45 moet u deze
instellingen namelijk weer activeren.
Huidige draadloze
netwerkinstellingen van uw computer
De NC-2200w kan niet worden gebruikt
met een USB-hub.
Stap 1
Link-lampje (Groen)
Wij raden u aan uw
netwerkbeheerder om advies te
vragen als u hulp nodig hebt bij het
wijzigen van de draadloze
instellingen op uw computer.
Item Huidige
instelling
Communicatiemodus:
(Infrastructuur / Ad-hoc)
Netwerknaam
(SSID/ESSID)
Kanaal: (1-14)
*Indien nodig.
Versleuteling:
(GEEN / WEP / Anders)
Sleutelgrootte en type
versleuteling:
(64 bits, 128 bits /
ASCII, HEX / Anders)
Sleutel:
Stap 2
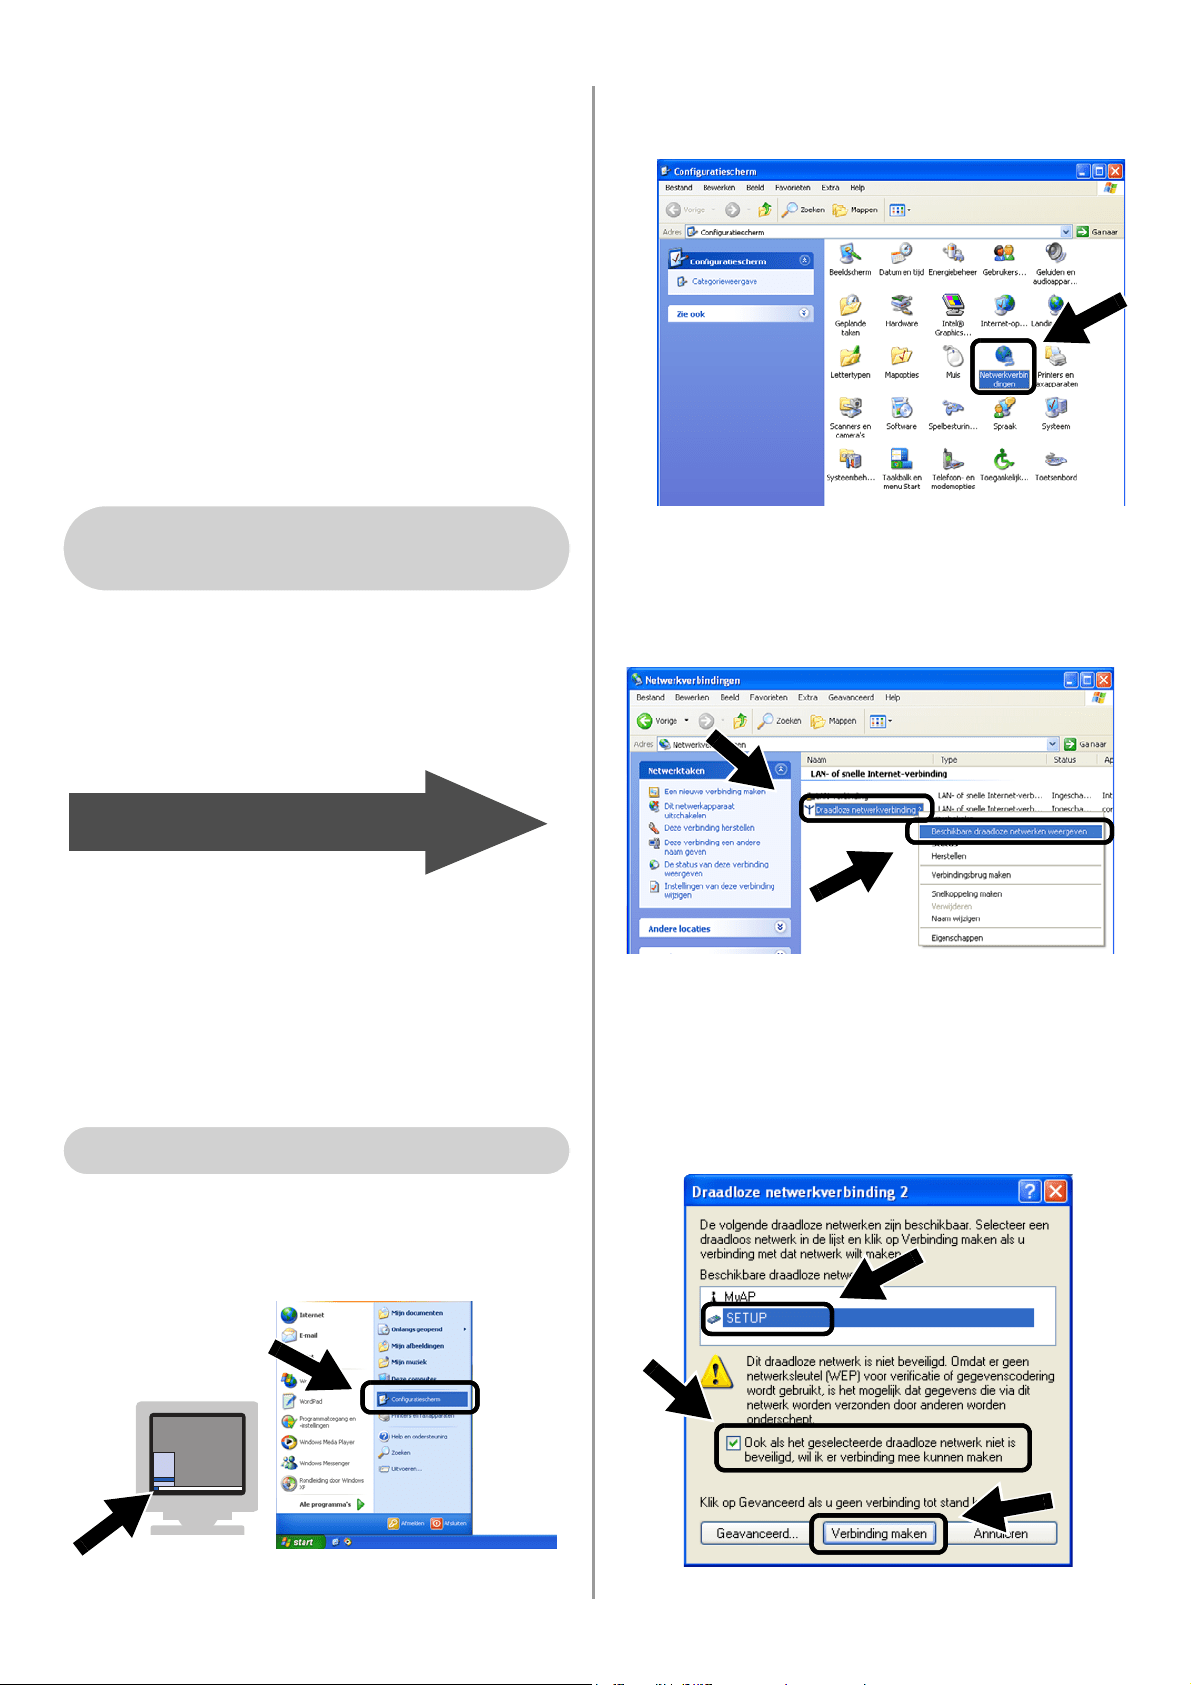
English
43
Om te kunnen communiceren met de
niet-geconfigureerde NC-2200w, dient u de
draadloze instellingen op uw computer als
volgt te wijzigen:
Communicatiemodus: Ad-hoc
(kanaal 11)
Netwerknaam (SSID/ESSID): SETUP
(er wordt onderscheid gemaakt tussen
kleine letters en hoofdletters)
Versleuteling: Geen
Raadpleeg de instructies van de fabrikant
van uw draadloze kaart om te zien hoe u de
draadloze instellingen kunt wijzigen, en ga
daarna naar stap 3
De afdruk-/scanserver
configureren.
Als u Windows
®
XP of Mac OS
®
X 10.2.4
gebruikt en u de ingebouwde draadloze
Ethernetfuncties gebruikt, dient u de
volgende stappen voor uw
besturingssysteem te volgen.
1
Klik op Start en vervolgens op
Configuratiescherm.
2
Klik op het pictogram
Netwerkverbindingen.
3
Selecteer
Draadloze netwerkverbinding
en klik met de rechtermuisknop op deze
optie. Klik op
Beschikbare draadloze
netwerken weergeven
.
4
U ziet de netwerknaam (SSID/ESSID)
van de NC-2200w in het vak
Beschikbare draadloze netwerken.
Selecteer SETUP en selecteer het vakje
Ook als het geselecteerde draadloze
netwerk.... Klik op Verbinding maken.
Bij gebruik van Windows
®
98/Me/2000, Windows NT
®
4.0
Ga door naar
stap 3
op pagina
45
Bij gebruik van Windows
®
XP
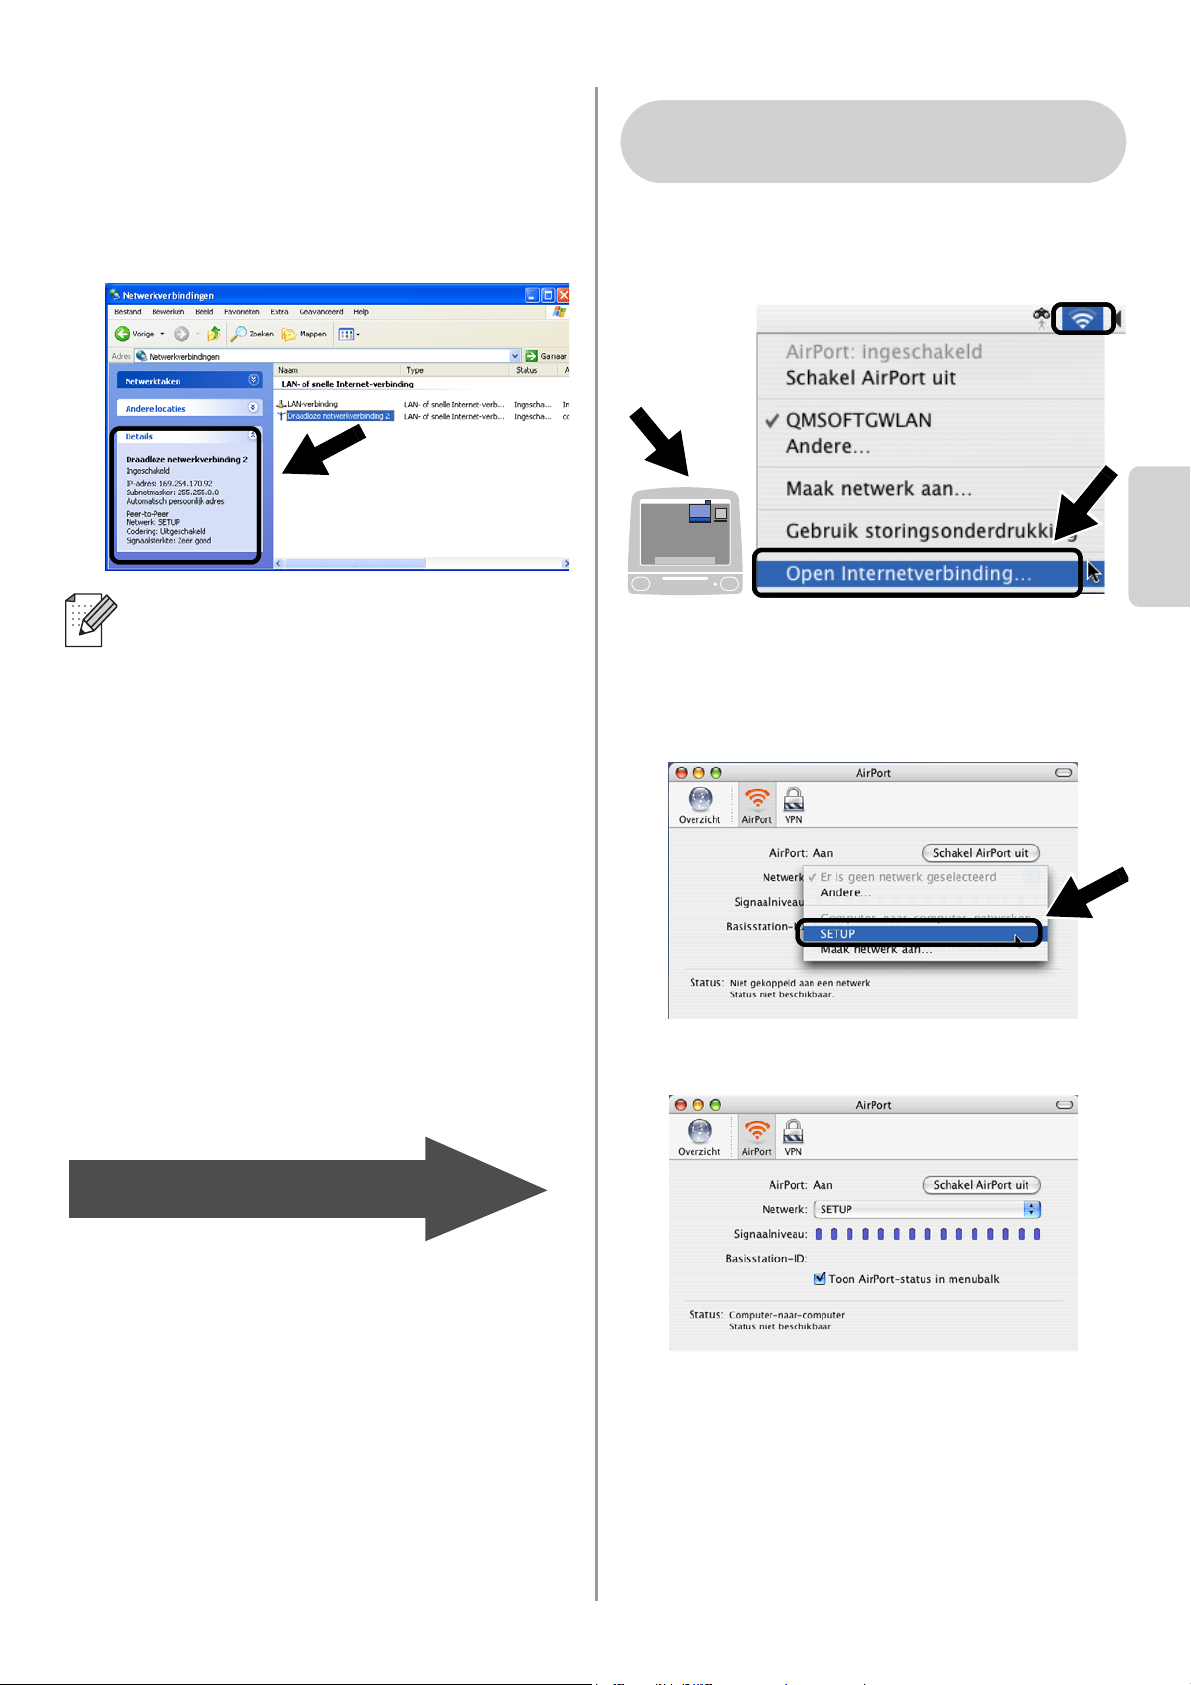
English
Nederlands
44
5
Controleer de status van de draadloze
netwerkverbinding. Het kan een paar
minuten duren voordat in plaats van
0.0.0.0 het IP-adres 169.254.x.x op het
scherm wordt weergegeven. (Waar x.x
nummers tussen de 0 en 255 zijn.)
1
Klik op het statuspictogram AirPort en
selecteer Open Internetverbinding....
2
Klik op het tabblad Netwerk om de
draadloze apparaten weer te geven. U
ziet de netwerknaam (SSID/ESSID) in
het vak Netwerk. Selecteer SETUP.
3
Uw draadloze netwerk is nu verbonden.
Als de netwerknaam (SSID/ESSID) die u
wilt kiezen niet wordt weergegeven, kunt
u het volgende proberen:
■ Koppel de wisselstroomadapter los,
sluit deze opnieuw aan en wacht een
paar minuten.
■ Zet de printer/MFC/DCP met de
NC-2200w van Brother dichter bij de
computer en probeer het opnieuw.
■ Stel de NC-2200w terug op de
fabrieksinstellingen en probeer het
opnieuw. Raadpleeg pagina
52 voor
nadere informatie over het herstellen
van de fabrieksinstellingen.
■ Raadpleeg hoofdstuk 6 in de
netwerkhandleiding van de
NC-2200w op de meegeleverde
cd-rom.
Ga door naar
stap 3
op pagina
45
Bij gebruik van Mac OS
®
X
10.2.4 - 10.3 of recenter

English
45
De afdruk-/scanserver
configureren
1
Plaats de cd-rom van de NC-2200w in
uw cd-rom-station.
(Bij gebruik van Windows
®
) Het eerste
scherm wordt automatisch geopend.
(Bij gebruik van Mac OS
®
X 10.2.4 t/m
10.3 of recenter) Dubbelklik op het
pictogram NC2200w op uw Macintosh
®
,
en dubbelklik op het pictogram Start
Here OSX.
2
Selecteer uw taal.
3
Klik op Installatie en vervolgens op
Wireless Setup Wizard.
4
Lees de verwelkoming en klik als u
zeker weet dat u alle benodigde
handelingen hebt uitgevoerd op
Volgende.
5
Volg de instructies op het scherm.
Raadpleeg hoofdstuk 2 in de
netwerkhandleiding van de NC-2200w
op de meegeleverde cd-rom voor nadere
informatie.
6
Nadat u de Wireless Setup Wizard hebt
afgesloten, moet u de oorspronkelijke
draadloze instellingen van de computer
herstellen, die u genoteerd had bij
De
draadloze instellingen van de computer
wijzigen om de NC-2200w te
configureren op pagina 42.
Als de netwerknaam (SSID/ESSID) die u
wilt kiezen niet wordt weergegeven, kunt
u het volgende proberen:
■ Koppel de wisselstroomadapter los,
sluit deze opnieuw aan en wacht een
paar minuten.
■ Zet de printer/MFC/DCP met de
NC-2200w van Brother dichter bij de
computer en probeer het opnieuw.
■ Stel de NC-2200w terug op de
fabrieksinstellingen en probeer het
opnieuw. Raadpleeg pagina
52 voor
nadere informatie over het herstellen
van de fabrieksinstellingen.
■ Raadpleeg hoofdstuk 6 in de
netwerkhandleiding van de
NC-2200w op de meegeleverde
cd-rom.
Stap 3
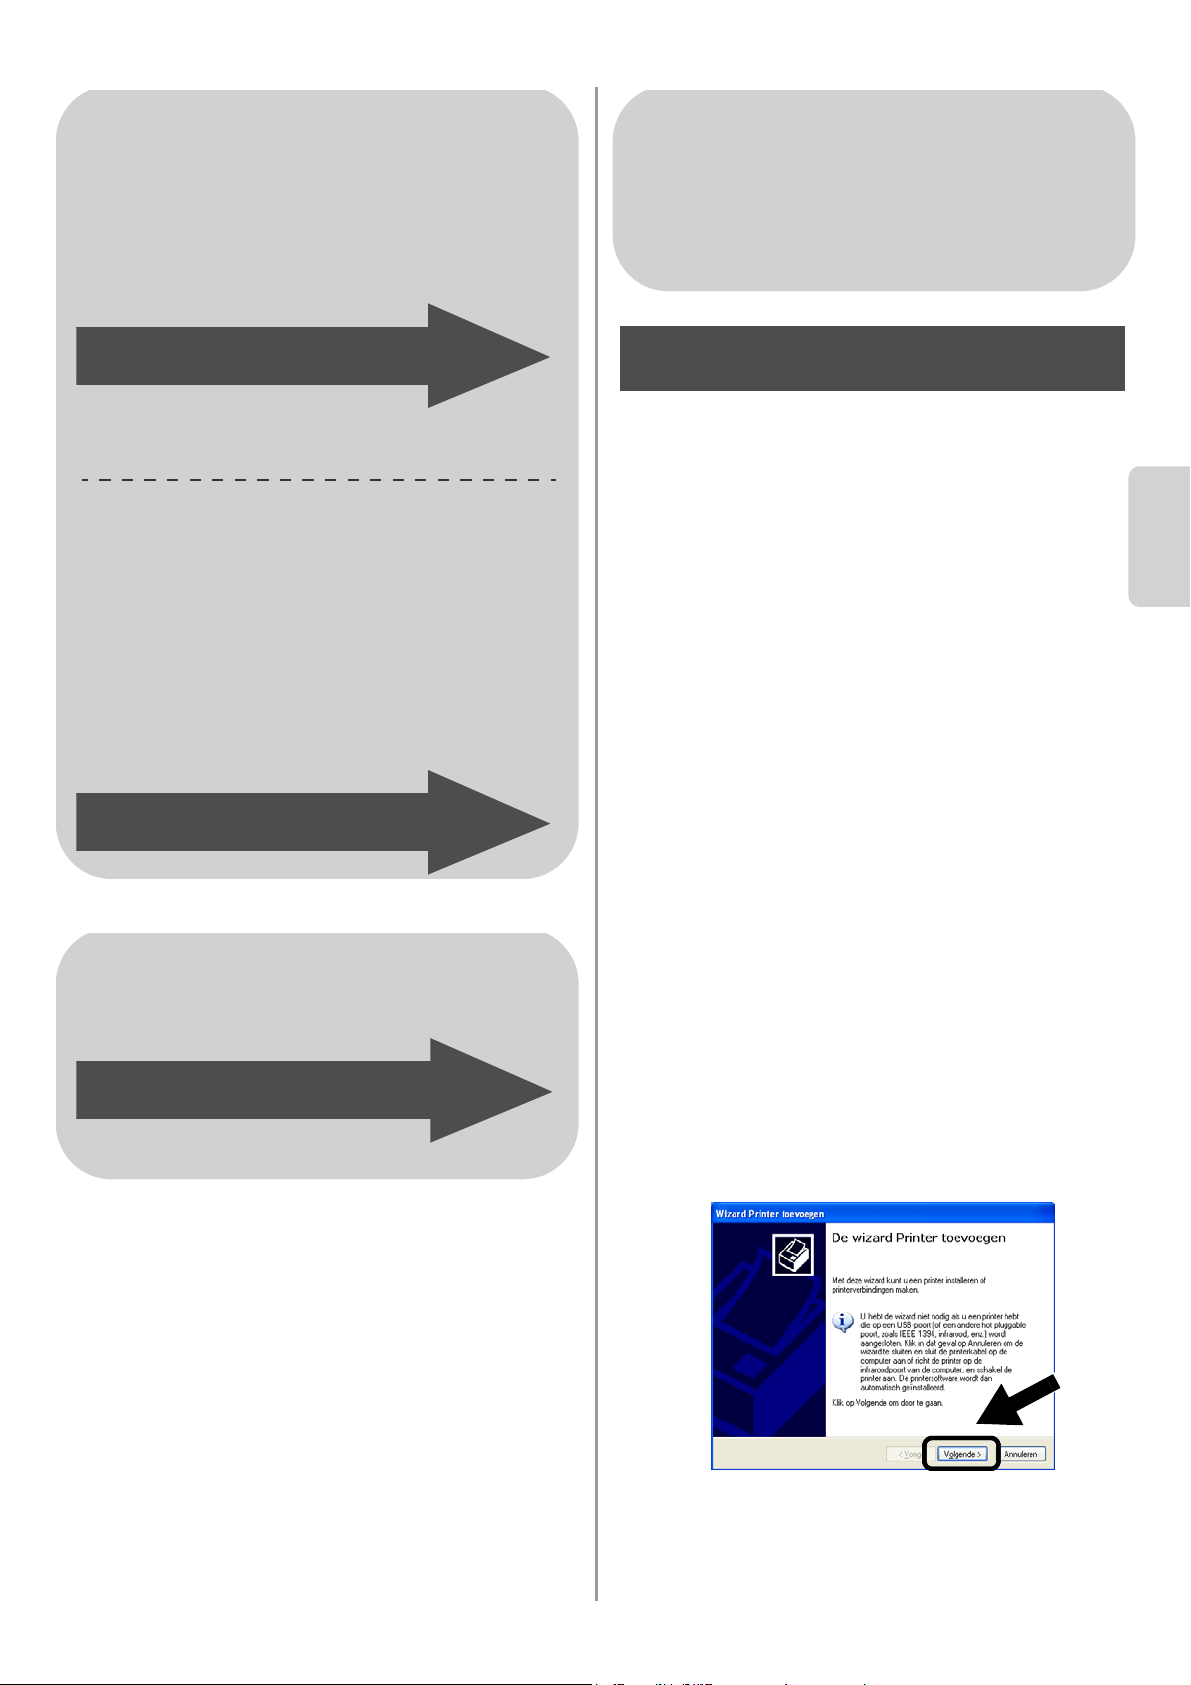
English
Nederlands
46
De printerdriver installeren
Bij gebruik van de bovenstaande modellen
moet eerst de printerdriver geïnstalleerd
worden, pas dan kan de computer worden
ingesteld om te werken met de NC-2200w.
Als de printerdriver reeds geïnstalleerd is,
kunt u deze stap overslaan. De driver staat
op de cd-rom die met de printer/MFC/DCP
van Brother geleverd werd. U kunt de
printerdriver ook downloaden vanaf het
Brother Solutions Center op:
<http://solutions.brother.com>.
Volg de onderstaande stappen om de
printerdriver vanaf de cd-rom te installeren.
De instructies in dit hoofdstuk zijn gebaseerd
op Windows
®
XP.
1
Klik op Start en Printers en
faxapparaten. Klik op Een printer
toevoegen. De wizard Printer toevoegen
wordt gestart. Wanneer dit scherm wordt
weergegeven, moet u op Volgende
klikken.
Bij gebruik van Windows
®
Groep 1:
HL-1440/1450/1470N/5040/ 5050/
5070N/5070DN/5140/5150D/5170DN
MFC-9070/9180/9160
Groep 2:
MFC-210C/420CN/410CN/620CN/
5440CN/5840CN/3240C/3340CN/8420/
8820D/8820DN/8220/8440/8840D/
8840DN/3820CN/3420CN/DCP-120C/
320CN/8020/8025D/8025DN/8040/
8045D/8045DN
Ga door naar
stap 4
op pagina
46
Ga door naar
stap 4
op pagina
49
Bij gebruik van Mac OS
®
X 10.2.4 -
10.3 of recenter
Ga door naar
stap 4
op pagina
51
Bij gebruik van Windows
®
Groep 1:
HL-1440/1450/1470N/5040/ 5050/
5070N/5070DN/5140/5150D/5170DN
MFC-9070/9180/9160
Stap 4
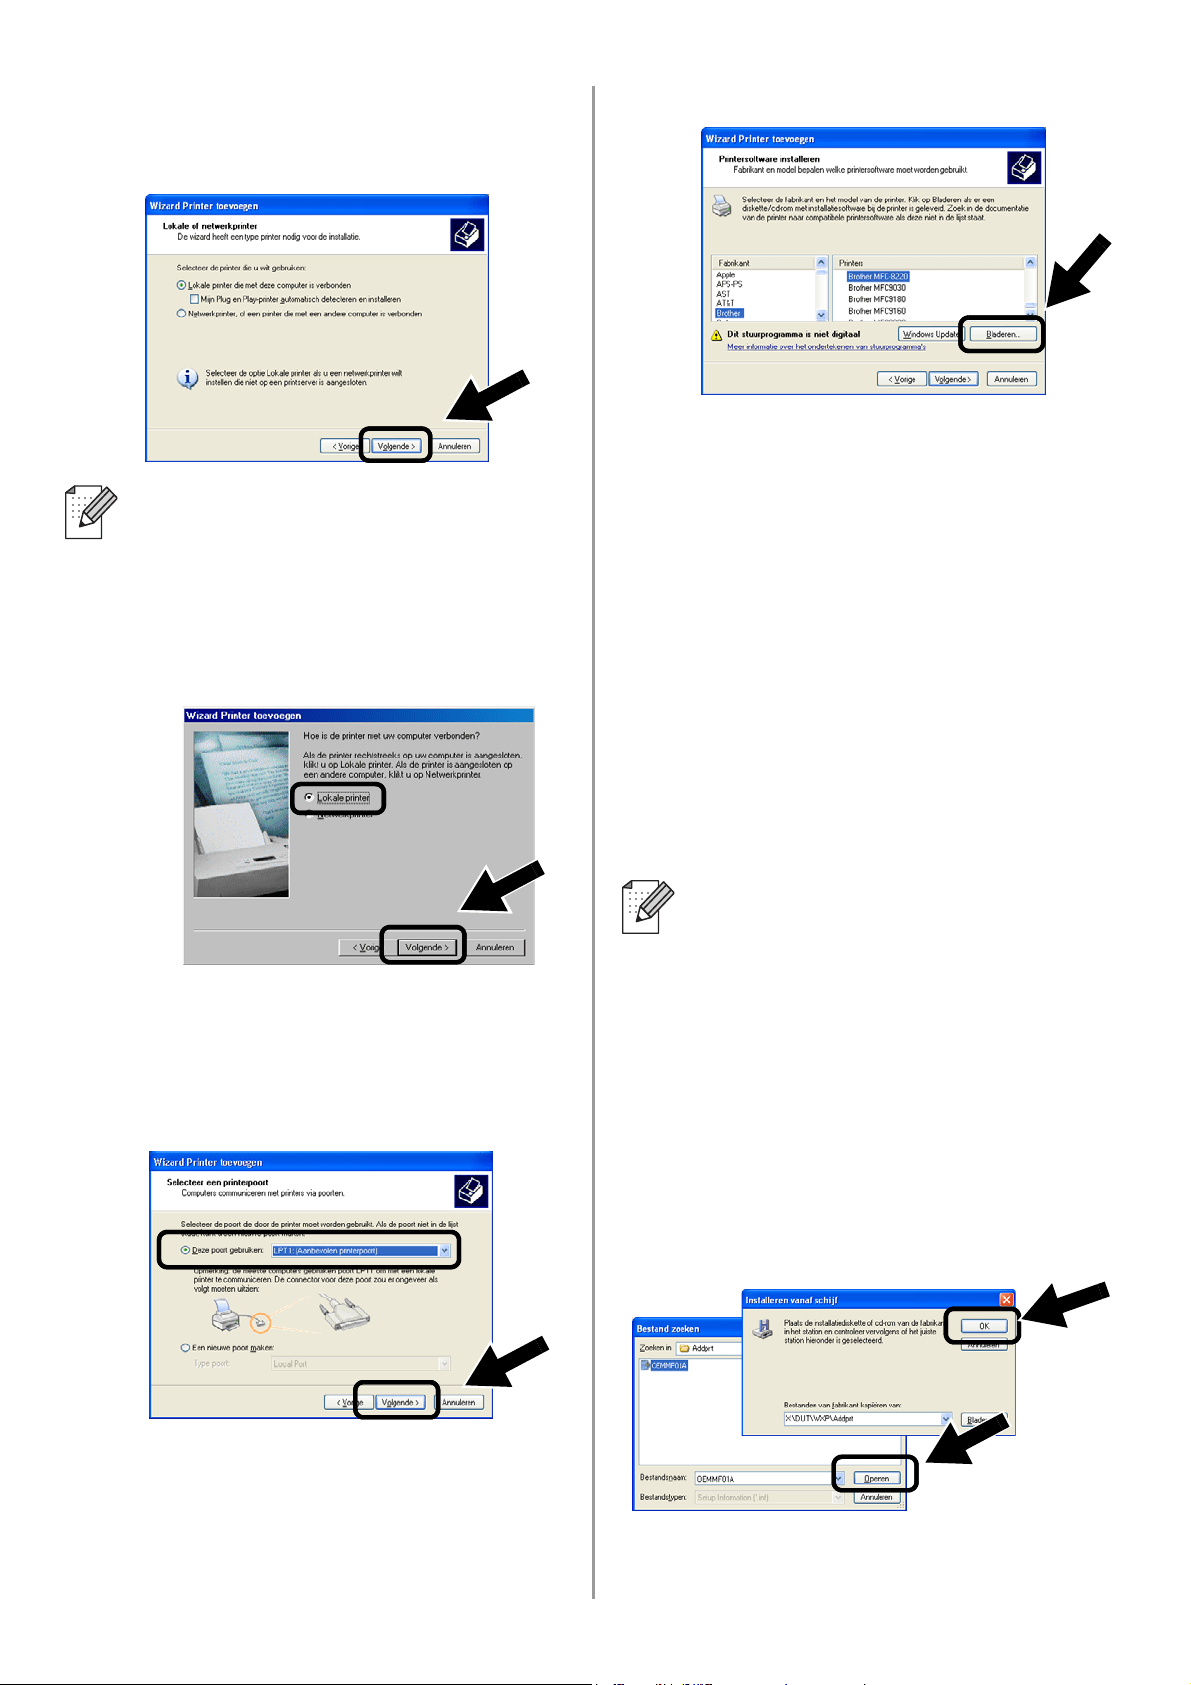
English
47
2
Schakel de optie Mijn Plug en
Play-printer automatisch detecteren
en installeren uit en klik op Volgende.
3
Selecteer in het keuzemenu voor de
printerpoort tijdelijk de optie
LPT1:(Aanbevolen printerpoort) en
klik op Volgende.
4
Klik op Bladeren.
5
(Bij gebruik van de Brother-laserprinter)
Blader de cd-rom, selecteer de map
Driver en klik op Openen. Selecteer
vervolgens de map Win2k_xp (of de
map voor uw besturingssysteem), klik op
Openen, selecteer de gewenste taal en
klik op Openen.
(Bij gebruik van de Brother-MFC/DCP)
Blader de cd-rom, selecteer de map met
de gewenste taal en klik op Openen,
selecteer de map WXP (of de map voor
uw besturingssysteem) en klik op
Openen. Selecteer nu de map Addprt
en klik op Openen.
6
Klik op Openen en klik vervolgens op
OK.
■ Dit scherm wordt misschien niet door
uw besturingssysteem weergegeven.
■ (Bij gebruik van Windows
®
98/Me/Windows NT
®
4.0) Als dit
scherm wordt weergegeven,
selecteert u Lokale printer en klikt u
op Volgende.
■ Als uw besturingssysteem Windows
®
XP is en de map Win2k_xp niet in de
lijst staat, moet u de map Win2k
selecteren.
■ Als er in de map Driver geen map
voor uw besturingssysteem staat,
maar u wel de volgende optie ziet:
inst, PCL, PS, USBW98ME, enz.,
dan raden wij u aan de map PCL te
selecteren. U zult dan de juiste map
met het besturingssysteem zien.
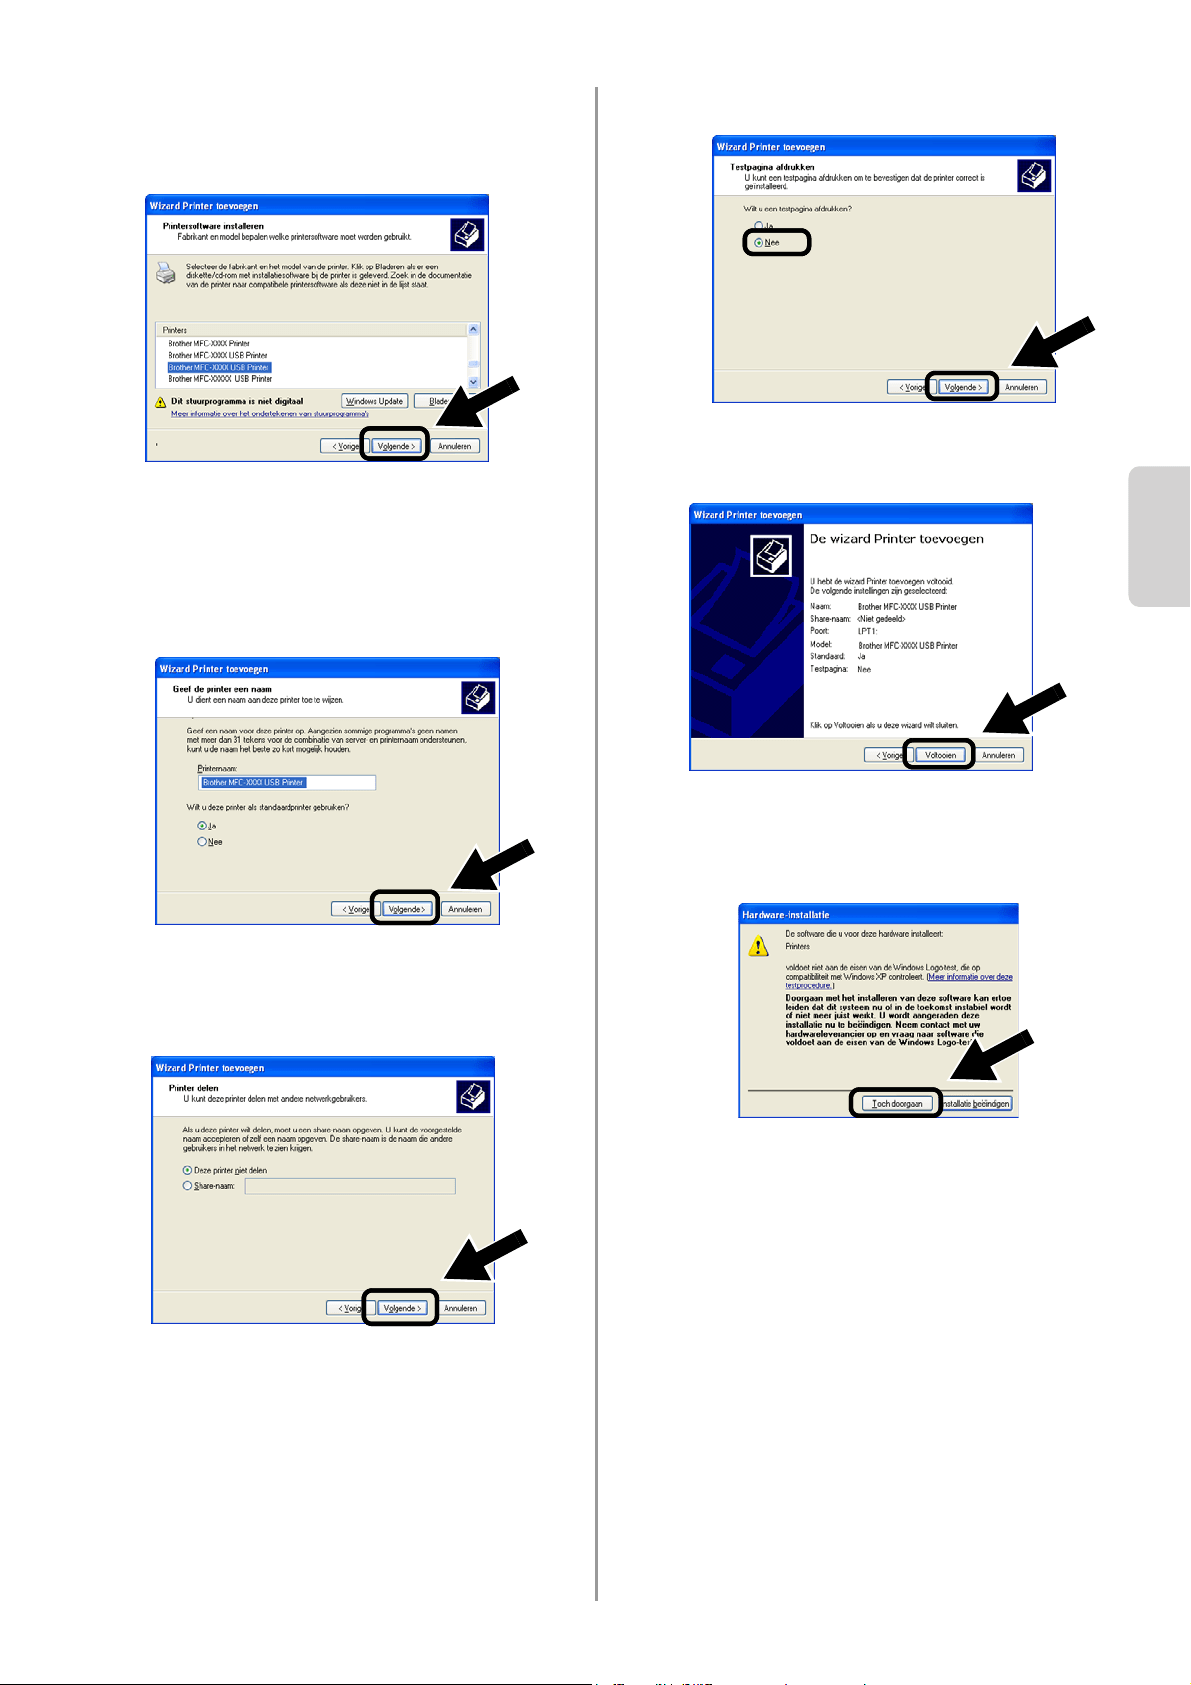
English
Nederlands
48
7
Markeer het model dat u wilt installeren
in de lijst met printers/MFC's/DCP's en
klik op Volgende.
8
Nu wordt het model dat u wilt installeren
weergegeven. Selecteer Ja of Nee om
aan te geven of deze printer de
standaardprinter moet zijn en klik op
Volgende.
9
Als dit scherm wordt weergegeven,
selecteert u Deze printer niet delen en
klikt u op Volgende.
10
Selecteer Nee en klik op Volgende.
11
Wanneer dit scherm wordt
weergegeven, klikt u op Voltooien.
12
Als het scherm van de Windows
Logo-test wordt weergegeven, moet u op
Toch doorgaan klikken.
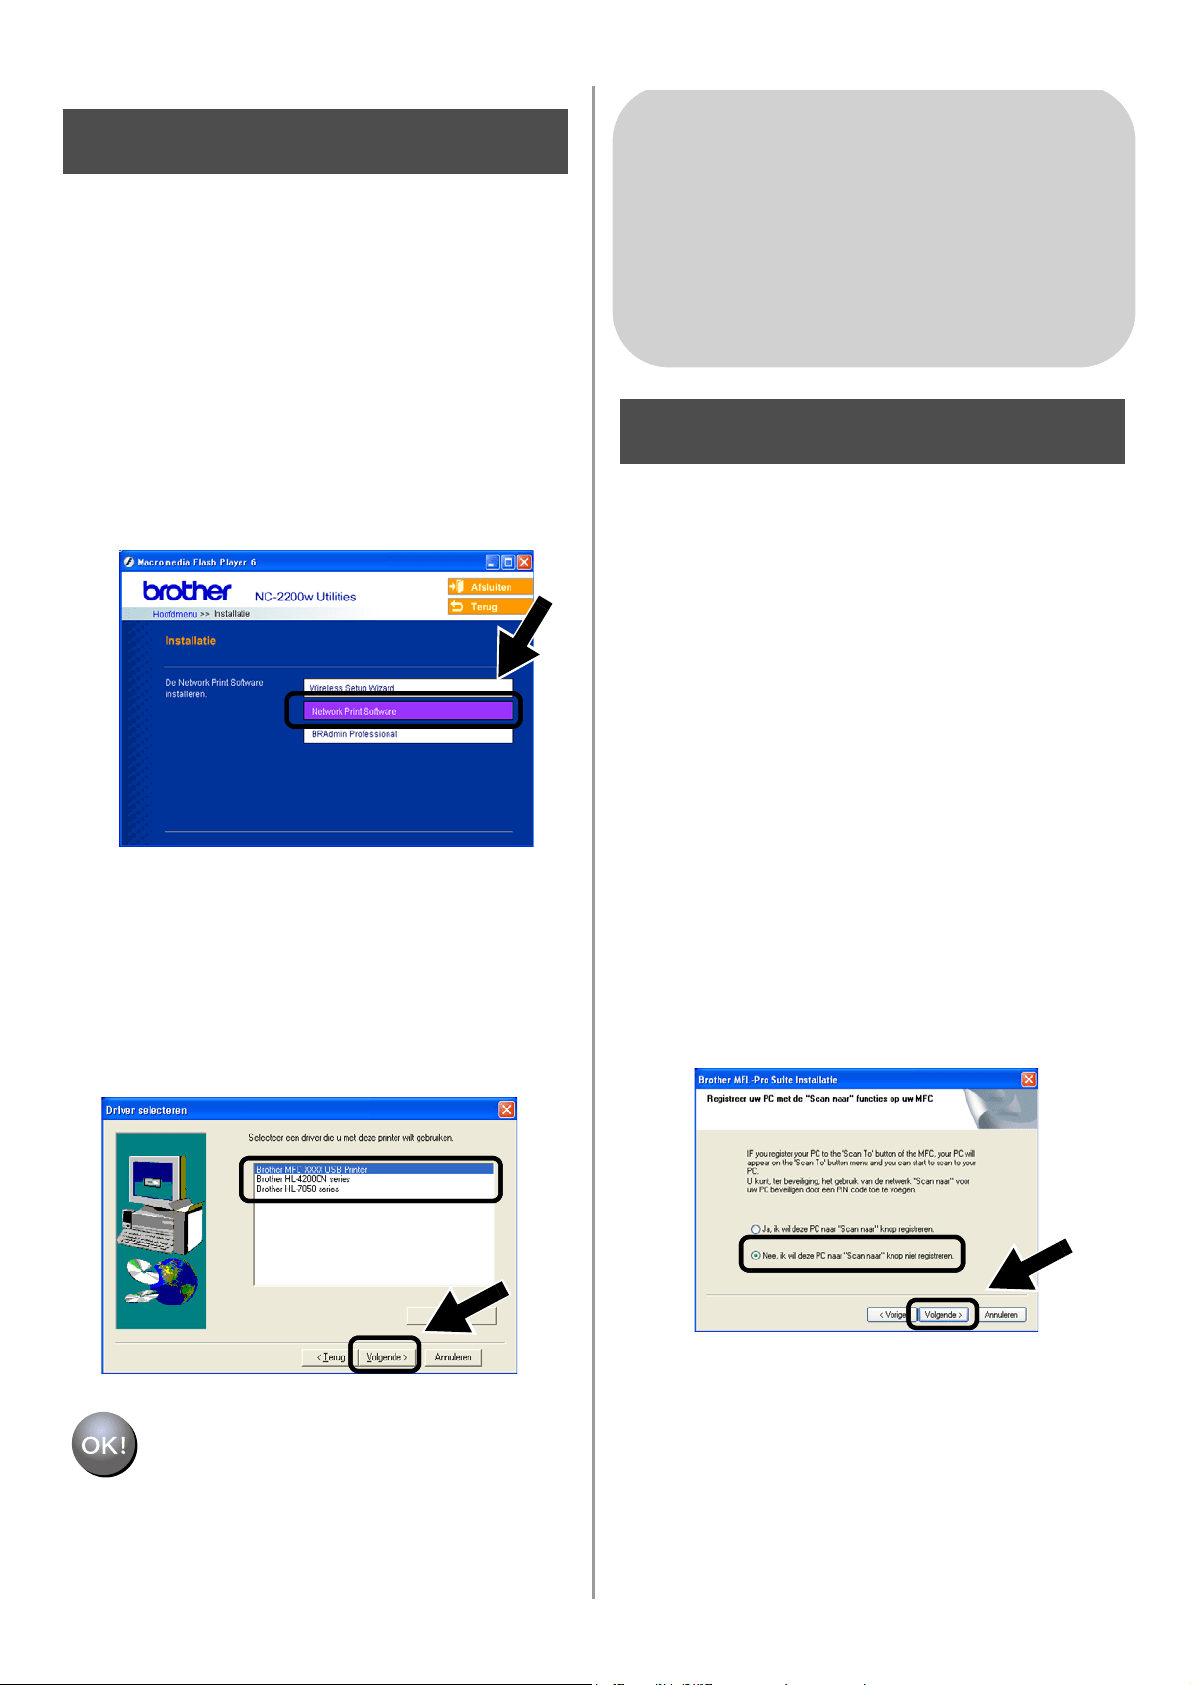
English
49
De Network Print Software
installeren
U moet de Network Print Software installeren
en deze configureren voor de draadloze
netwerkaansluiting van de printer/MFC/DCP
van Brother. Volg de onderstaande stappen.
1
Klik op Network Print Software en volg
de instructies op het scherm.
2
Selecteer dezelfde printerdriver als de
driver die u in stap 7 op pagina
48
geselecteerd hebt. Markeer het model
dat u wilt installeren in de lijst met
printers/MFC's/DCP's en klik op
Volgende.
De installatie is nu voltooid.
De MFL-Pro Suite installeren
U moet de MFL-Pro Suite installeren om een
draadloze netwerkverbinding tussen uw
computer en de printer/MFC/DCP van
Brother te maken. De software staat op de
cd-rom die met de printer/MFC/DCP geleverd
werd. Volg de stappen in het hoofdstuk
‘Driver en software installeren bij gebruik van
de netwerkinterfacekabel' van de
installatiehandleiding die met de
printer/MFC/DCP geleverd werd.
■Voor de MFC-8420/8820D/8820DN/8220/8440/
8840D/8840DN/3820CN/3420CN en
DCP-8020/8025D/8025DN/8040/8045D/8045DN
Als tijdens de installatie dit scherm wordt
weergegeven, selecteert u Nee en klikt u op
Volgende.
Stap 5
Bij gebruik van Windows
®
Groep: 2
MFC-210C/420CN/410CN/620CN/
5440CN/5840CN/3240C/3340CN/8420/
8820D/8820DN/8220/8440/8840D/
8840DN/3820CN/3420CN/DCP-120C/
320CN/8020/8025D/8025DN/8040/
8045D/8045DN
Stap 4
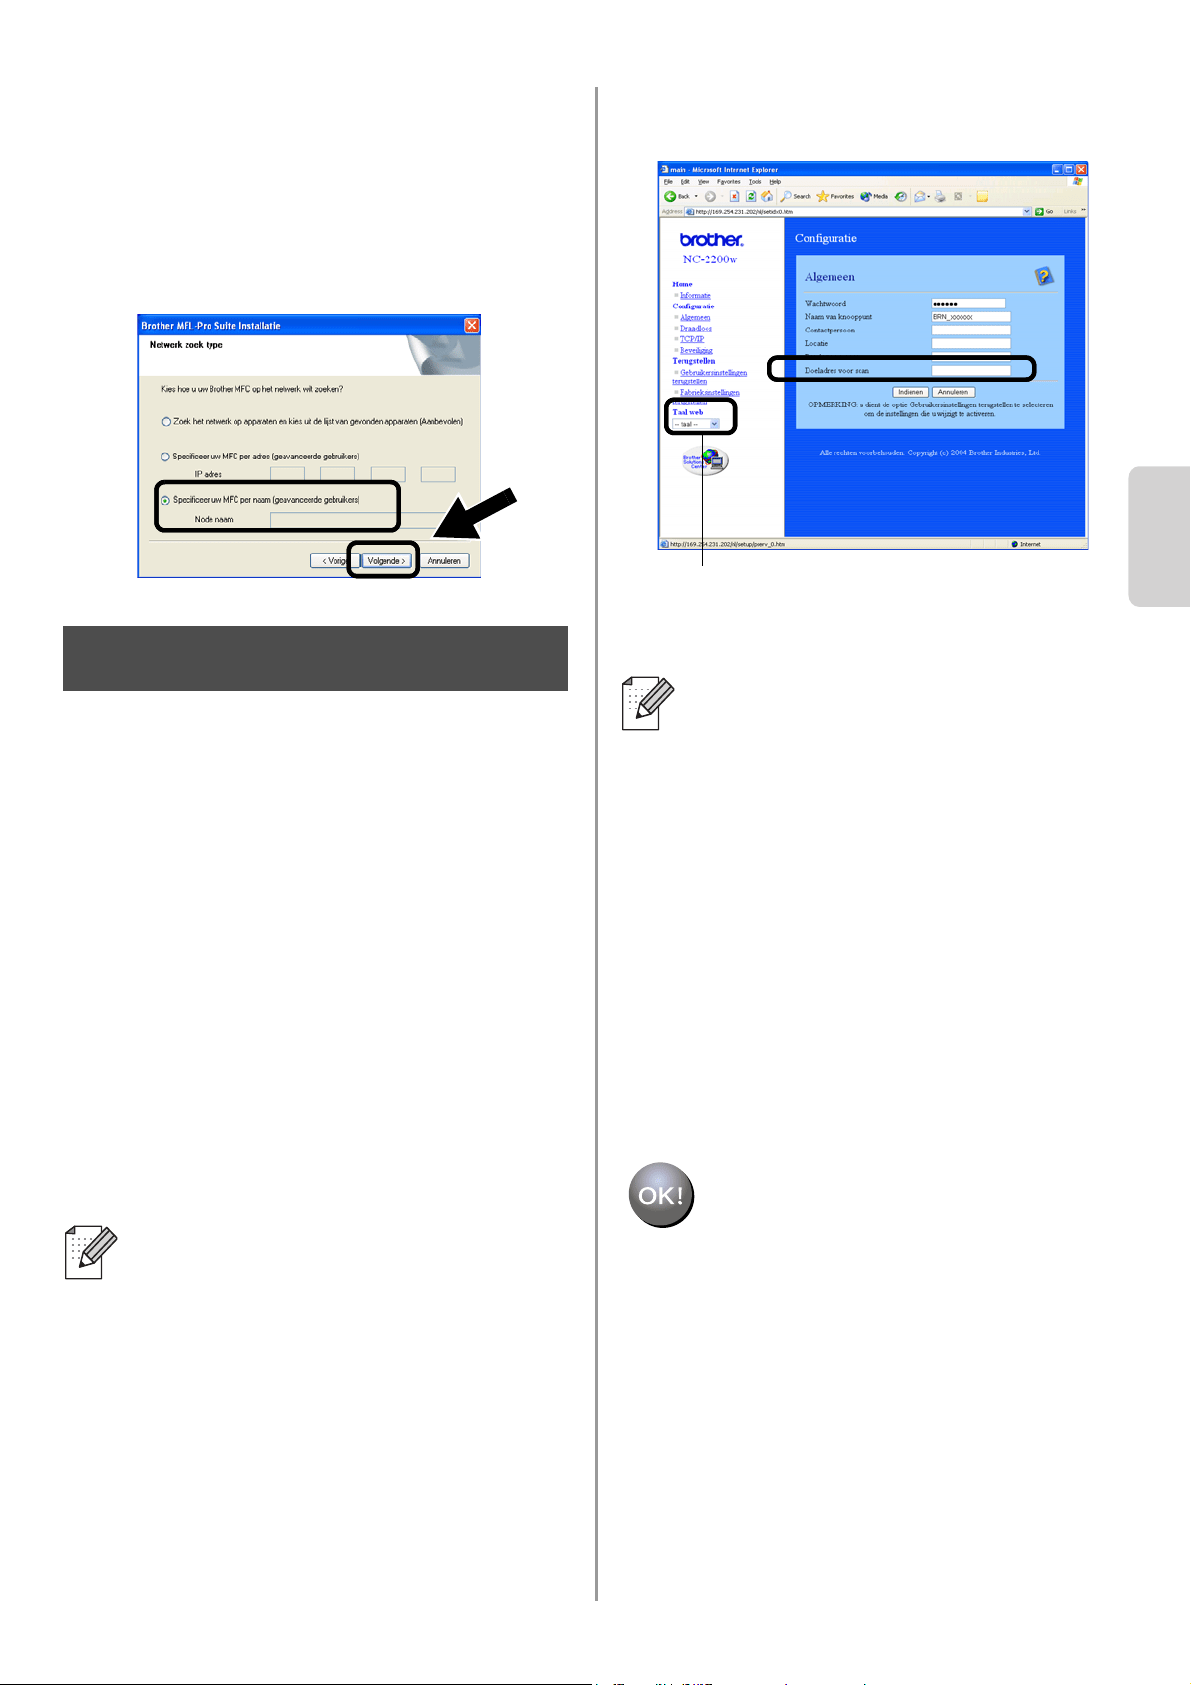
English
Nederlands
50
■ Sommige MFC's/DCP's met een NC-2200w
worden tijdens de installatie niet gevonden. In
dat geval moet u terugkeren naar het hieronder
afgebeelde scherm en de knooppuntnaam van
de NC-2200w handmatig invoeren. De
knooppuntnaam staat op de
netwerkconfiguratiepagina. Zie
Overige
informatie op pagina 52.
Het doeladres voor de scan
specificeren met de homepage
van de NC-2200w
Als u de scanner op een netwerk wilt
gebruiken, dient u het adres waarnaar de
scan gestuurd moet worden te specificeren
via de URL van de NC-2200w. Volg de
onderstaande stappen.
1
Open Internet Explorer voer de volgende
URL in.
http://NC-2200w_ip_adres
Waar NC-2200w_ip_adres het
IP-adres of de knooppuntnaam van de
NC-2200w is.
2
Ga naar het tabblad Algemeen onder
Configuratie.
3
Voer het IP-adres van uw computer in.
De installatie is nu voltooid.
■ U vindt het IP-adres of de
knooppuntnaam van de NC-2200w op
de netwerkconfiguratiepagina.
Raadpleeg
Overige informatie op
pagina 52 voor meer informatie
hierover.
■ U wordt om een gebruikersnaam en
wachtwoord gevraagd. Voer de
onderstaande gegevens in.
Gebruikersnaam: admin (er wordt
onderscheid gemaakt tussen kleine
letters en hoofdletters)
Wachtwoord: access (standaard)
Stap 5
■ Als het IP-adres van uw computer
automatisch door DHCP werd
toegewezen, dient u de naam van de
computer in te voeren omdat het
IP-adres kan veranderen. De naam
kan de naam van de
Windows
®
-computer of de naam van
de DNS-host zijn.
■ Als u de computernaam niet kent, moet
u het tabblad Eigenschappen openen
via Deze computer en in het tabblad
Computernaam kijken. Als u de
domeinnaam wilt gebruiken, moet u het
adres van de DNS-server toewijzen via
de webserver van de NC-2200w en uw
webbrowser.
(Beschikbare talen zijn Engels, Duits,
Frans, Nederlands en Japans.)
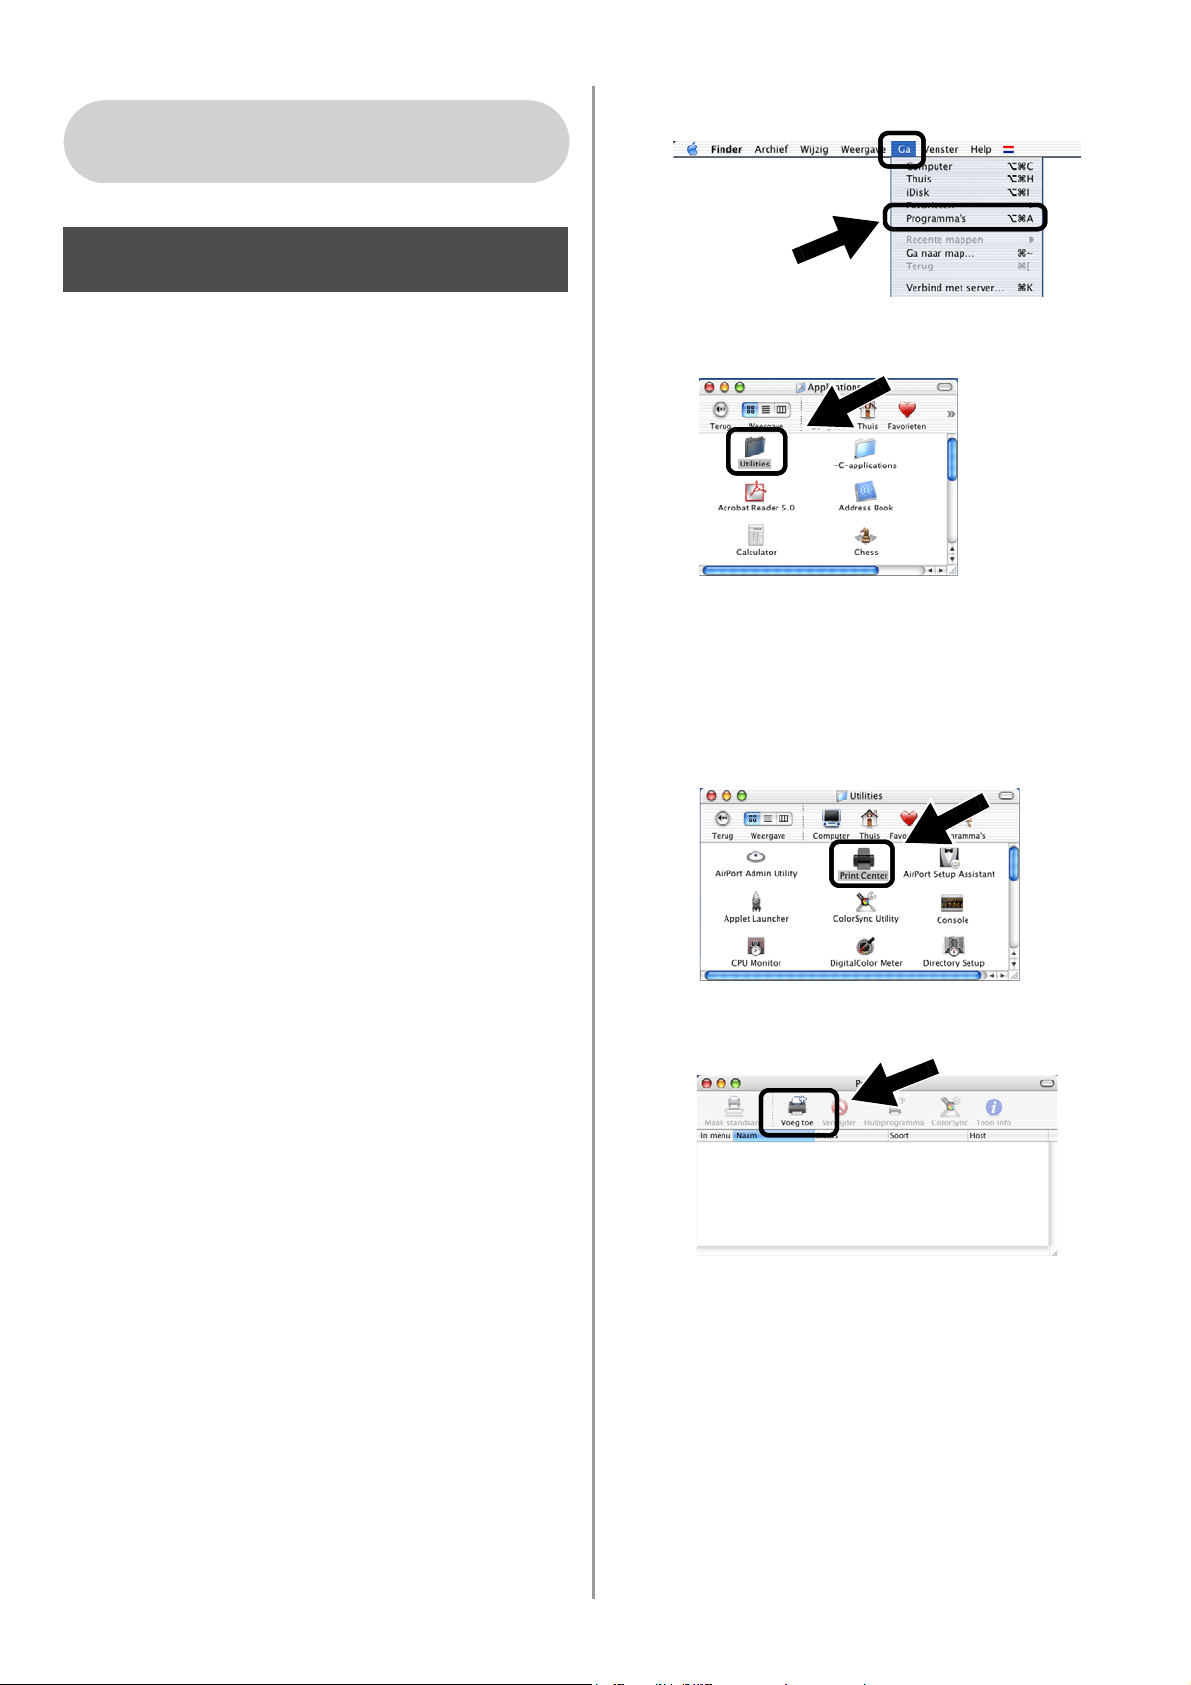
English
51
De printerdriver installeren en
configureren met de eenvoudige
netwerkconfiguratie van Mac
OS
®
X
U dient eerst de printerdriver te installeren,
pas dan kan de computer worden ingesteld
om te werken met de NC-2200w. Als de
printerdriver reeds geïnstalleerd is, kunt u
deze stap overslaan. De driver staat op de
cd-rom die met de printer/MFC/DCP werd
geleverd. U kunt de meest recente
printerdriver echter ook van onze website
downloaden:
http://solutions.brother.com
Volg de onderstaande stappen om de
printerdriver te installeren.
1
Plaats de meegeleverde cd-rom in het
cd-rom-station en dubbelklik op het
pictogram Start Here OSX om de
software te installeren. Als het scherm
met de taalkeuze wordt weergegeven,
selecteert u de gewenste taal.
2
(Bij gebruik van de Brother-laserprinter)
Klik in het scherm met het menu op
Software-installatieprogramma en
Printerdriver.
(Bij gebruik van de Brother-MFC/DCP)
Klik op MFL-Pro Suite om deze software
te installeren.
3
Volg de instructies op het scherm om de
printerdriver te installeren.
4
Selecteer Programma's in het menu Ga.
.
5
Open de map Utilities.
6
(Bij gebruik van Mac OS
®
X 10.2.4)
Open het pictogram met het
Print Center
.
(Bij gebruik van Mac OS
®
X 10.3)
Open het pictogram van de
Printerconfiguratie.
7
Klik op de knop Voeg toe.
Bij gebruik van Mac OS
®
X
10.2.4 - 10.3 of recenter
Stap 4

English
Nederlands
52
8
Selecteer Rendezvous.
9
Selecteer de modelnaam van uw
machine en klik op Voeg toe.
De installatie is nu voltooid.
Overige informatie
Een netwerkconfiguratiepagina afdrukken
Druk op de testtoets van de NC-2200w om de
netwerkconfiguratiepagina af te drukken.
De fabrieksinstellingen herstellen
Als u de NC-2200w op de
standaardinstellingen wilt terugstellen
(alle informatie terugstellen, zoals
draadloze instellingen, wachtwoord en
IP-adres), moet u de netwerktesttoets
ten minste 10 seconden ingedrukt
houden.
Als u de standaardinstellingen hebt
teruggesteld, moet u de installatie
opnieuw uitvoeren vanaf stap 2 De
draadloze instellingen van de computer
wijzigen om de NC-2200w te
configureren op pagina 42.
Testtoets
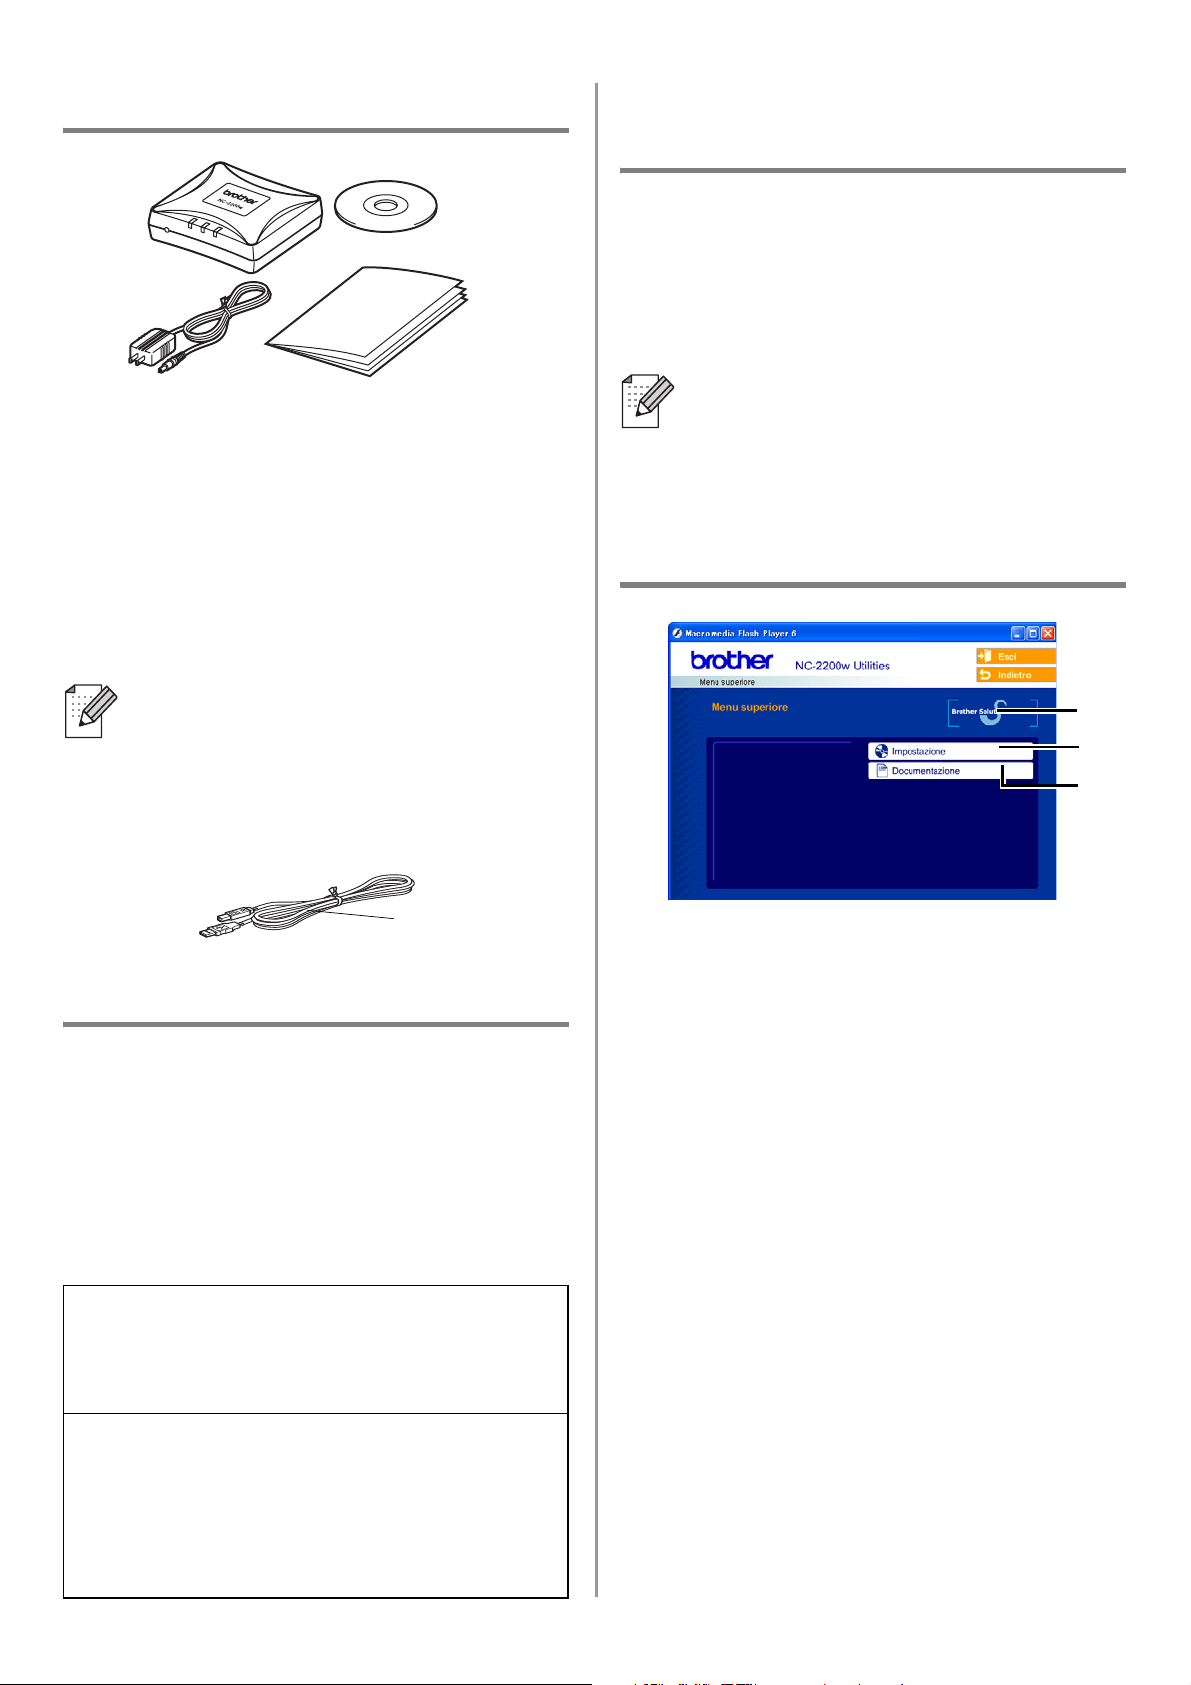
English
53
Contenuto della confezione
1
Server di stampa/scansione senza fili
esterno NC-2200w
2
Adattatore CA
3
CD-ROM (include software di
installazione e Guida dell'utente abilitato
alla connessione di rete dell'NC-2200w)
4
Guida di impostazione rapida
Modelli supportati
L'NC-2200w supporta i modelli elencati di
seguito. Se il numero del modello in uso non
è elencato, vedere la pagina dell'NC-2200w
sul sito Web all'indirizzo
http://solutions.brother.com
per verificare che il modello sia supportato
dall'NC-2200w.
Supporto dei sistemi
operativi
Windows
®
Windows
®
98/98SE/Me/2000/XP e
Windows NT
®
4.0
Macintosh
®
Mac OS
®
X 10.2.4 - 10.3 o versioni successive
CD-ROM
1
Brother Solutions Center
Per qualsiasi necessità relativa alla
stampante/MFC/DCP Brother, visitare il
sito Web Brother Solutions Center
all'indirizzo http://solutions.brother.com.
Dal sito Web è possibile scaricare le
utilità e i driver più aggiornati, leggere le
domande frequenti e i suggerimenti
relativi alla risoluzione dei problemi.
2
Impostazione
È possibile visualizzare l'Impostazione
guidata senza fili che assiste l'utente
nella configurazione dell'NC-2200w. È
anche possibile installare il software di
stampa di rete e l'utilità BRAdmin
Professional per Windows
®
.
3
Documentazione
Consente di visualizzare la Guida
dell’utente abilitato alla connessione di
rete dell'NC-2200w e la Guida di
impostazione rapida in formato PDF.
È possibile collegare l'NC-2200w alla
porta di interfaccia USB della
stampante/MFC/DCP Brother. Con il
prodotto non è incluso un cavo USB,
preparare quindi un cavo USB appropriato
(Tipo A-B) a portata di mano.
Gruppo 1:
HL-1440/1450/1470N/5040/ 5050/5070N/
5140/5150D/5170DN
MFC-9070/9180/9160
Gruppo 2:
MFC-210C/420CN/410CN/620CN/5440CN/584
0CN/3240C/3340CN/8420/8820D/8820DN/
8220/8440/8840D/8840DN/3820CN/3420CN/
DCP-
110C/310C/8020/8025D/8025DN/8040/
8045D/8045DN
1
2
4
3
A
B
Se il CD fornito con la
stampante/MFC/DCP Brother non
include un driver per Windows NT
®
4.0,
non è possibile utilizzare il prodotto in
ambienti Windows NT
®
4.0.
1
2
3
Tipo A-B
(Fino a 2 m)
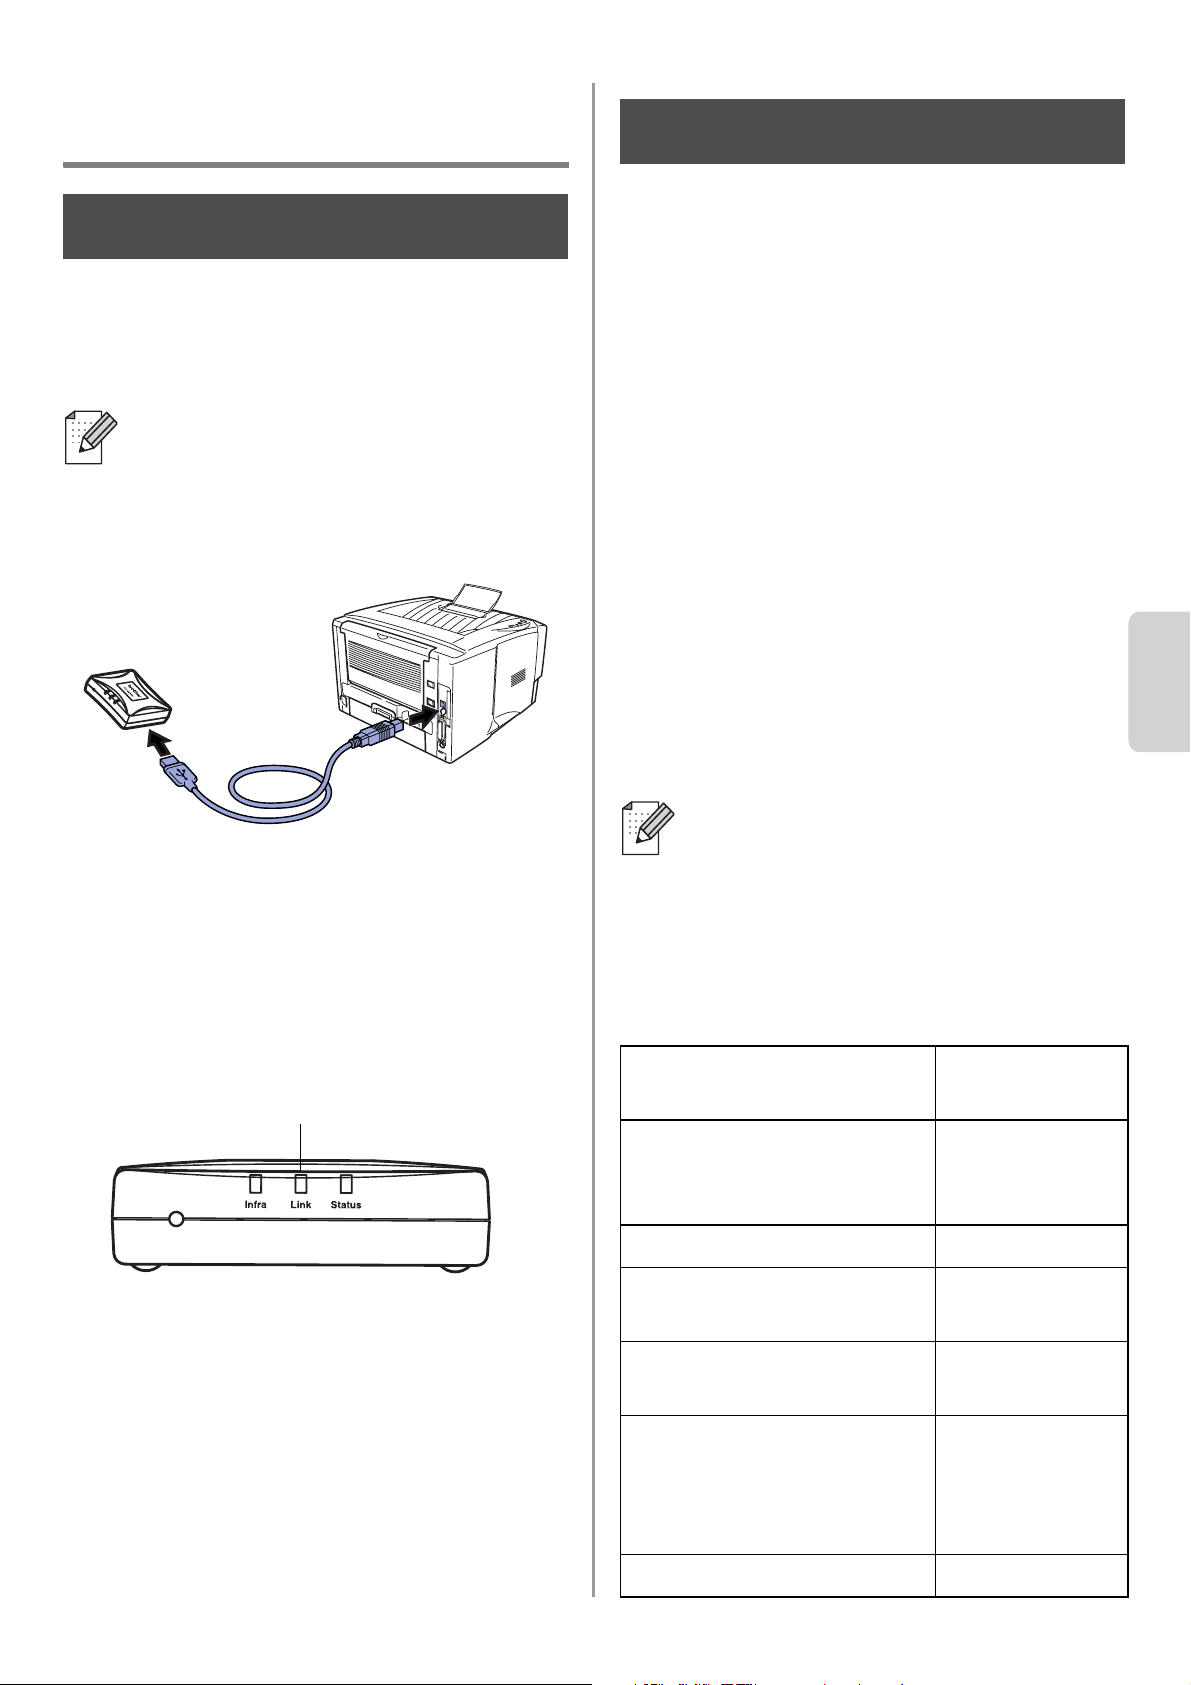
English
Italiano
54
Impostazione del server di
stampa/scansione
Installazione del server di
stampa
1
Collegare il cavo USB all'NC-2200w e
alla stampante/MFC/DCP Brother.
2
Collegare l'adattatore CA all'NC-2200w.
3
Inserire l'adattatore CA e accendere la
stampante/MFC/DCP Brother.
4
Accertarsi che il LED Link dell'NC-2200w
sia acceso e attendere alcuni minuti.
Prima dell'installazione, se si utilizza un
firewall personale, ad esempio Internet
Connection Firewall disponibile in
Windows XP, disabilitarlo. Quando si è
sicuri di poter stampare, riavviare il
software Personal Firewall.
Modifica delle impostazioni
senza fili del computer per
configurare l'NC-2200w
Prima di poter utilizzare la
stampante/MFC/DCP Brother in una rete
senza fili, è necessario configurare
l'NC-2200w in modo che corrisponda alla
configurazione della rete.
Per configurare l'NC-2200w da un computer
senza fili sulla rete, è necessario modificare
temporaneamente le impostazioni senza fili
correnti. Prima di modificare le impostazioni
senza fili correnti del computer, annotare le
impostazioni correnti della rete senza fili.
Sarà necessario ripristinare tali impostazioni
alla fine del passaggio 3 a pagina
57.
Impostazioni correnti della rete senza
fili del computer
L'NC-2200w non può essere utilizzato
con un hub USB.
Passaggio 1
LED Link (verde)
È consigliabile contattare
l'amministratore di rete se occorre
assistenza relativa alle impostazioni
senza fili dei computer.
Voce Impostazione
corrente
Modalità di
comunicazione:
(Infrastruttura / Ad-hoc)
Nome rete (SSID/ESSID)
Canale: (1-14)
*Se necessario.
Crittografia:
(NESSUNA / WEP / Altro)
Dimensione e tipo chiave
di crittografia:
(64 bit, 128 bit / ASCII,
HEX / Altro)
Chiave di crittografia:
Passaggio 2
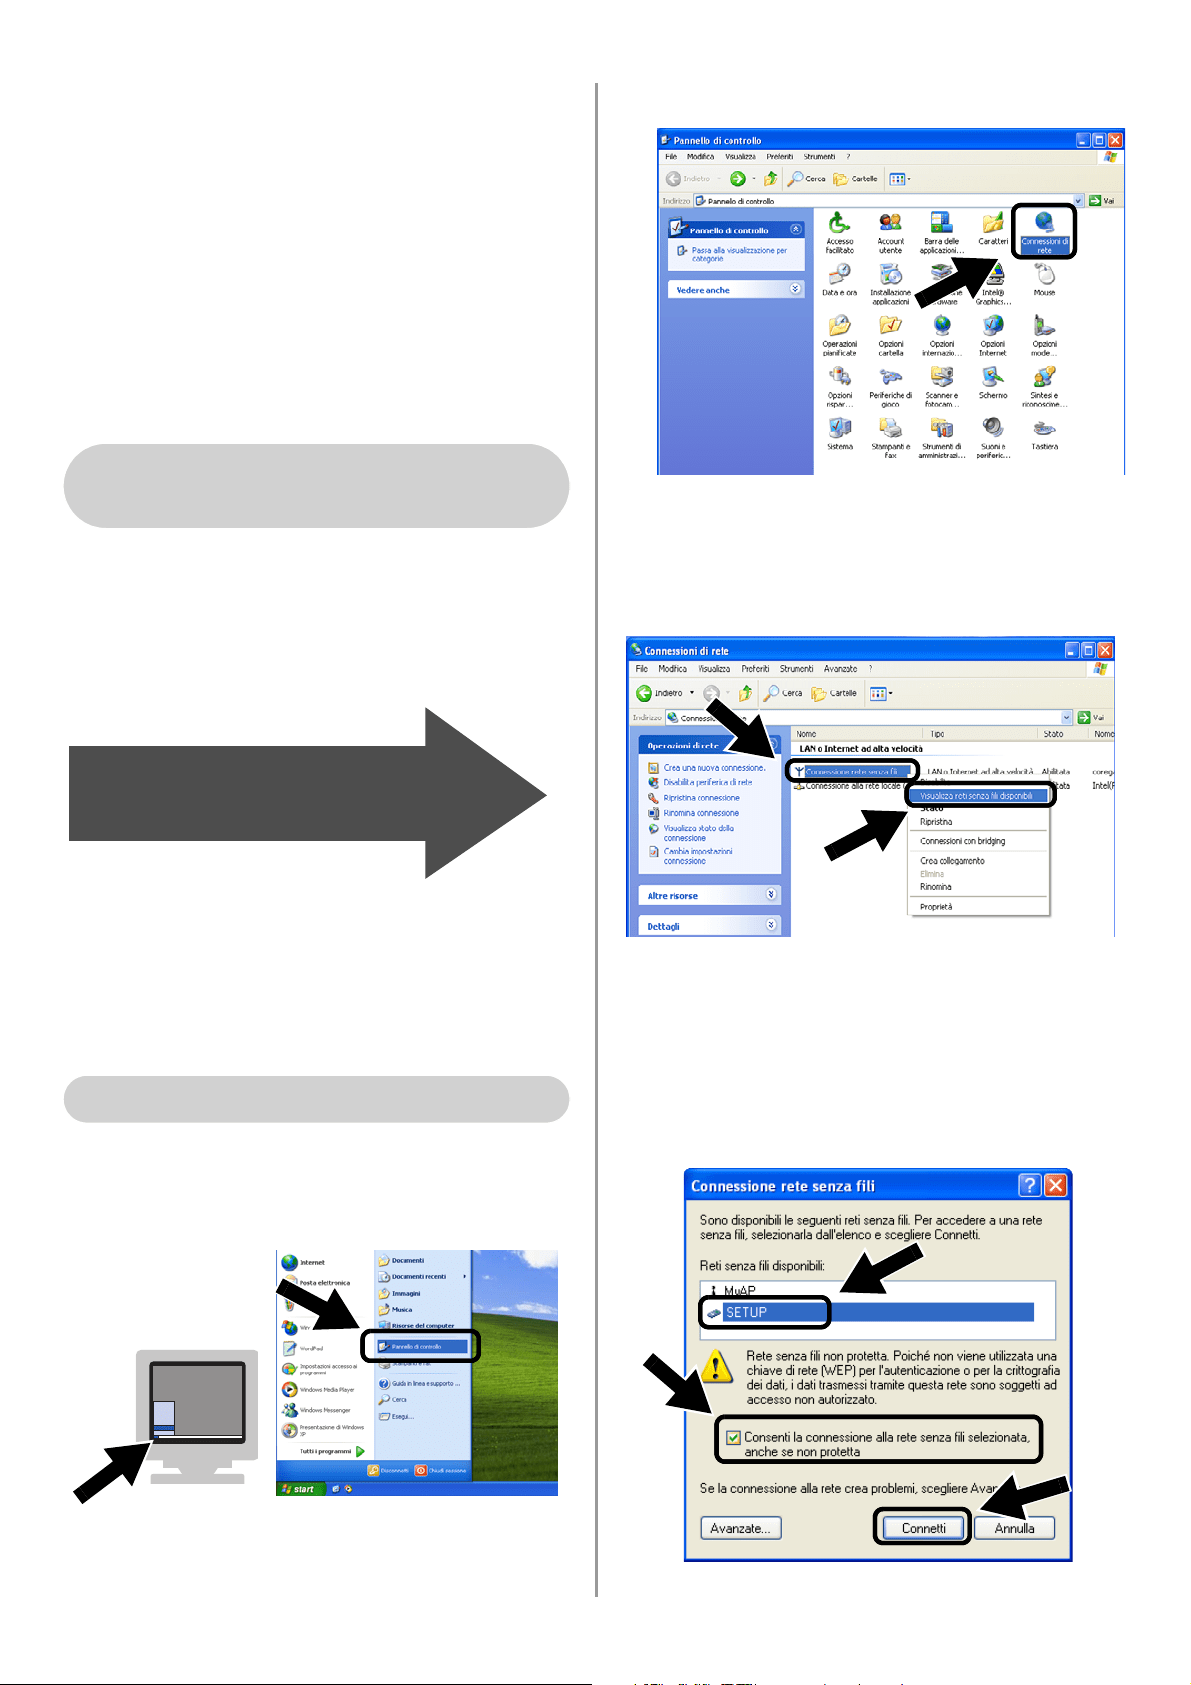
English
55
Per comunicare con l'NC-2200w non
configurato modificare le impostazioni senza
fili del computer come segue:
Modalità di comunicazione: Ad-hoc
(canale 11)
Nome rete (SSID/ESSID): SETUP
(distinzione maiuscole/minuscole)
Crittografia: Nessuna
Fare riferimento alle istruzioni del produttore
della scheda senza fili per la modifica delle
impostazioni senza fili, quindi andare al
passaggio 3
Configurazione del server di
stampa/scansione.
Se si utilizza Windows
®
XP o Mac OS
®
X
10.2.4 e le funzionalità Wireless Ethernet
incorporate, procedere come segue per
ciascun sistema operativo.
1
Fare clic su Start e su Pannello di
controllo.
2
Fare clic sull'icona Connessioni di rete.
3
Selezionare e fare clic con il pulsante
destro del mouse su Connessione rete
senza fili. Fare clic su Visualizza reti
senza fili disponibili.
4
Il nome della rete (SSID/ESSID)
dell'NC-2200w è visualizzato nella casella
Reti senza fili disponibili
. Selezionare
SETUP
e selezionare la casella di
controllo
Consenti la connessione...
.
Fare clic sul pulsante
Connetti
.
Per gli utenti di Windows
®
98/Me/2000 e Windows NT
®
4.0
Andare al passaggio 3
a pagina 57
Per gli utenti di Windows
®
XP
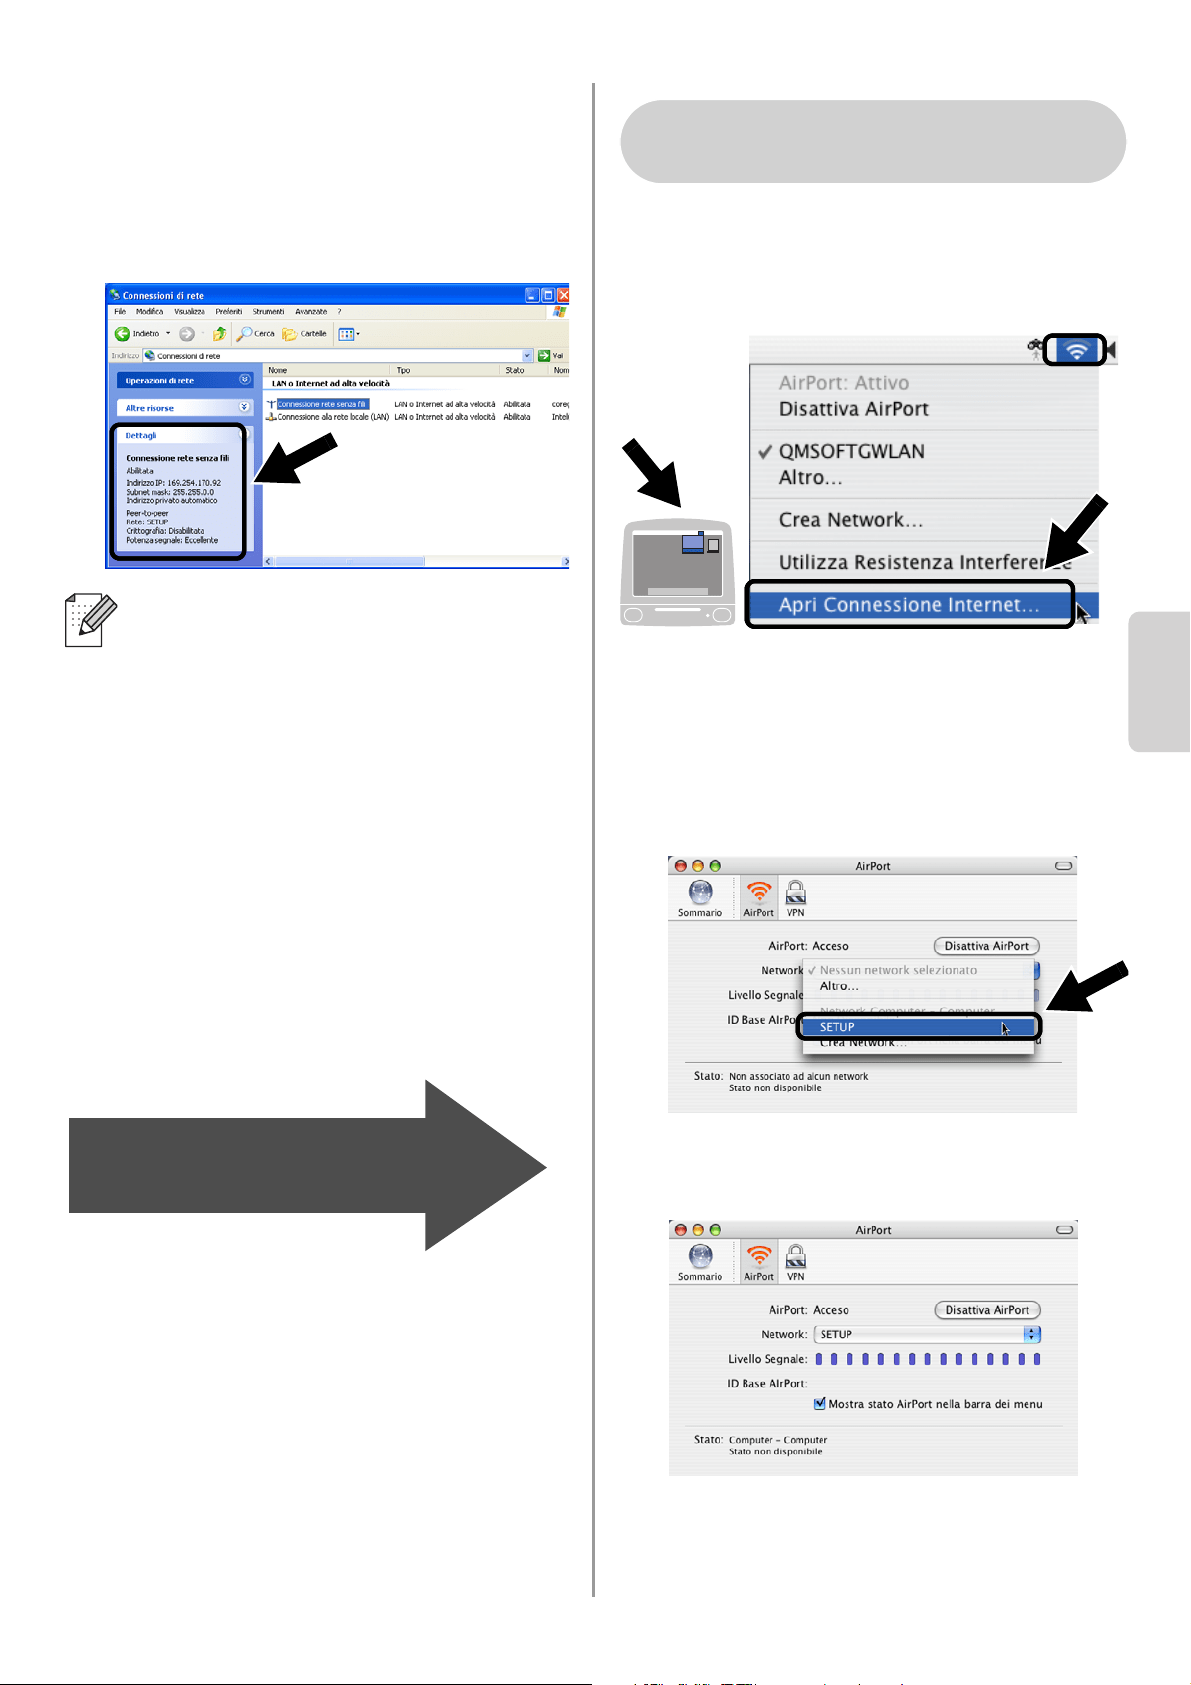
English
Italiano
56
5
Verificare lo stato della connessione
della rete senza fili. La visualizzazione
sullo schermo della modifica
dell'indirizzo IP da 0.0.0.0 a 169.254.x.x
può richiedere alcuni minuti (x.x sono
numeri compresi tra 0 e 255).
1
Fare clic sull'icona di stato AirPort e
selezionare Apri Connessione
Internet.
2
Fare clic sulla scheda Network per
visualizzare i dispositivi senza fili
disponibili. Il nome della rete
(SSID/ESSID) è visualizzato
nell'opzione Network. Selezionare
SETUP.
3
La connessione della rete senza fili è
completa.
Se il nome della rete (SSID/ESSID)
desiderato non è elencato, tentare le
seguenti operazioni:
■ Scollegare l'adattatore CA, reinserirlo
e attendere alcuni minuti.
■ Spostare la stampante/MFC/DCP
Brother con l'NC-2200w installato più
vicino al computer e riprovare.
■ Ripristinare le impostazioni di fabbrica
predefinite per l'NC-2200w e
riprovare. Vedere a pagina
64 per
ripristinare le impostazioni di fabbrica.
■ Vedere il Capitolo 6 della Guida
dell'utente abilitato alla connessione
di rete dell'NC-2200w sul CD-ROM
fornito con l'NC-2200w.
Andare al passaggio 3
a pagina 57
Per gli utenti di Mac OS
®
X 10.2.4 -
10.3 o versioni successive

English
57
Configurazione del server di
stampa/scansione
1
Inserire il CD-ROM dell'NC-2200w
nell'apposita unità.
Per gli utenti di Windows
®
: viene
automaticamente visualizzata la
schermata di apertura.
Per gli utenti di Mac OS
®
X 10.2.4 - 10.3
o versioni successive: fare doppio clic
sull'icona NC2200w su Macintosh
®
,
quindi sull'icona Start Here OSX.
2
Selezionare la lingua.
3
Fare clic su Impostazione, quindi su
Impostazione guidata senza fili.
4
Rivedere le informazioni nella Pagina
iniziale e dopo avere completato le
attività necessarie, fare clic su Avanti.
5
Seguire le istruzioni. Per ulteriori
informazioni, vedere il Capitolo 2 della
Guida dell'utente abilitato alla
connessione di rete dell'NC-2200w sul
CD-ROM fornito con l'NC-2200w.
6
Dopo la chiusura dell'Impostazione
guidata senza fili, ripristinare le
impostazioni senza fili originali del
computer utilizzando le informazioni
annotate al passaggio
Modifica delle
impostazioni senza fili del computer per
configurare l'NC-2200w a pagina 54.
Se il nome della rete (SSID/ESSID)
desiderato non è elencato, tentare le
seguenti operazioni:
■ Scollegare l'adattatore CA, reinserirlo
e attendere alcuni minuti.
■ Spostare la stampante/MFC/DCP
Brother con l'NC-2200w installato più
vicino al computer e riprovare.
■ Ripristinare le impostazioni di
fabbrica predefinite per l'NC-2200w e
riprovare. Vedere a pagina
64 per
ripristinare le impostazioni di fabbrica.
■ Vedere il Capitolo 6 della Guida
dell'utente abilitato alla connessione
di rete dell'NC-2200w sul CD-ROM
fornito con l'NC-2200w.
Passaggio 3
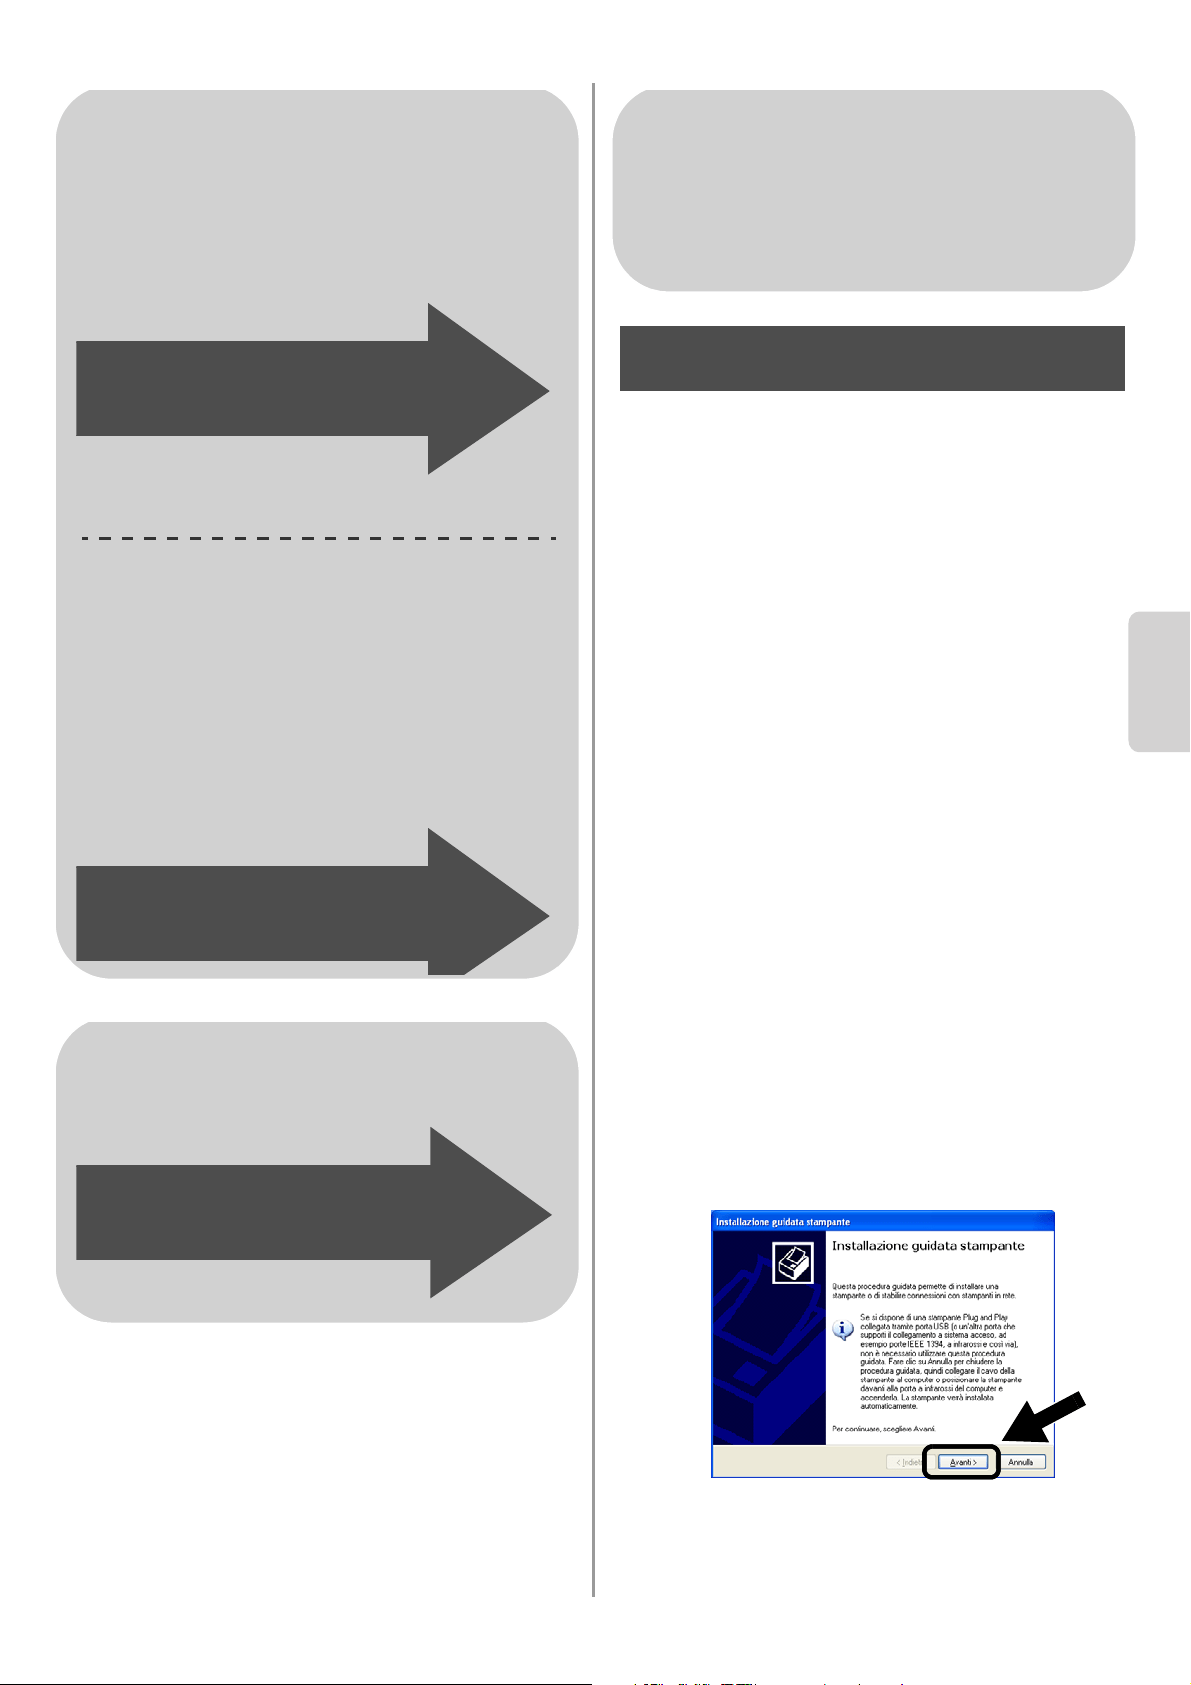
English
Italiano
58
Installazione del driver della
stampante
Gli utenti dei modelli elencati sopra devono
installare il driver della stampante prima di
impostare il computer su cui utilizzare
l'NC-2200w. Se il driver della stampante è
già installato, è possibile saltare questo
passaggio. Il driver è fornito sul CD-ROM
incluso con la stampante/MFC/DCP
Brother. È inoltre possibile scaricare il driver
della stampante più aggiornato dal sito Web
Brother Solutions Center all’indirizzo:
<http://solutions.brother.com>.
Per installare il driver della stampante dal
CD-ROM, attenersi alla procedura seguente.
Le istruzioni di questa sezione fanno
riferimento a Windows
®
XP.
1
Fare clic su Start e su Stampanti e fax.
Fare clic su Aggiungi stampante. Viene
visualizzata l'Installazione guidata
stampante. A questo punto, fare clic su
Avanti.
Per gli utenti di Windows
®
Gruppo 1:
HL-1440/1450/1470N/5040/ 5050/
5070N/5070DN/5140/5150D/5170DN
MFC-9070/9180/9160
Gruppo 2:
MFC-210C/420CN/410CN/620CN/
5440CN/5840CN/3240C/3340CN/8420/
8820D/8820DN/8220/8440/8840D/
8840DN/3820CN/3420CN/DCP-120C/
320CN/8020/8025D/8025DN/8040/
8045D/8045DN
Andare al passaggio 4
a pagina 58
Andare al passaggio 4
a pagina 61
Per gli utenti di Mac OS
®
X 10.2.4 -
10.3 o versioni successive
Andare al passaggio 4
a pagina 63
Per gli utenti di Windows
®
Gruppo 1:
HL-1440/1450/1470N/5040/ 5050/
5070N/5070DN/5140/5150D/5170DN
MFC-9070/9180/9160
Passaggio 4
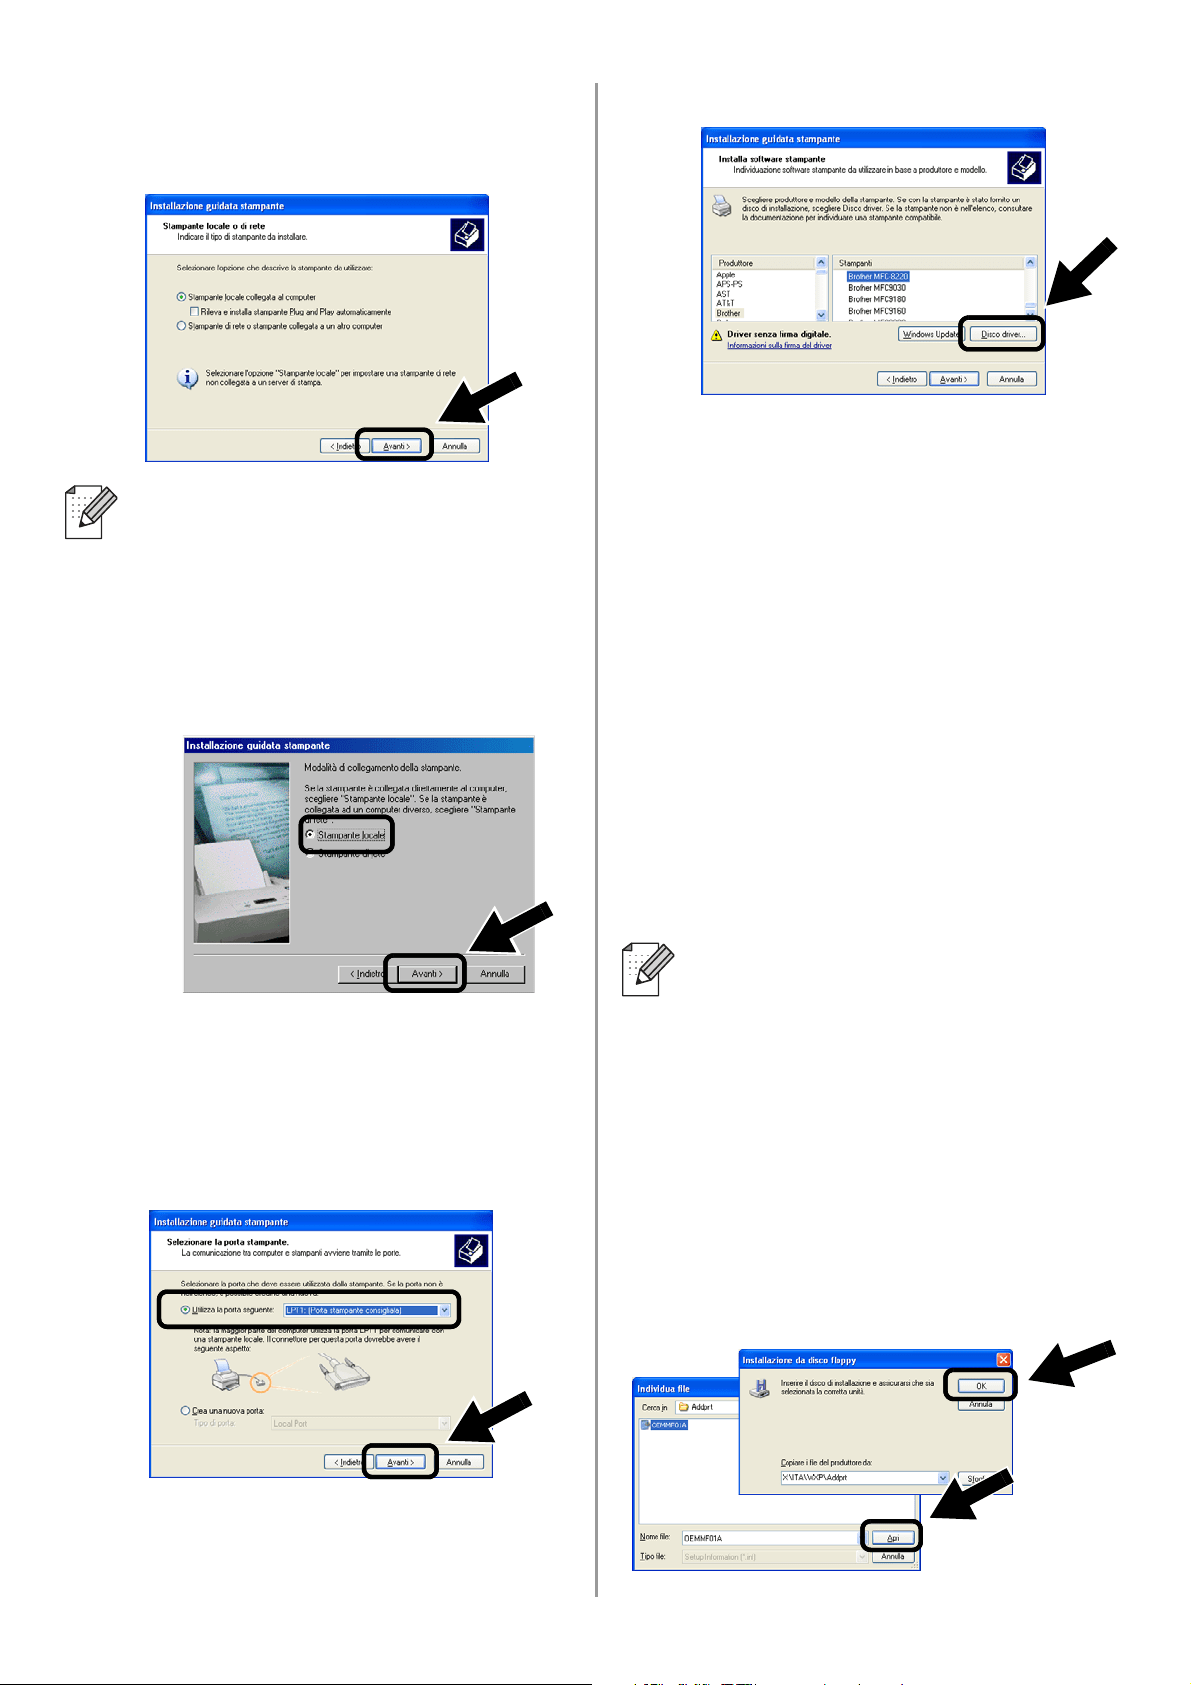
English
59
2
Deselezionare l'opzione Rileva e
installa stampante Plug and Play
automaticamente e fare clic su Avanti.
3
Selezionare temporaneamente LPT1:
(Porta stampante consigliata)
dall'elenco a discesa per l'opzione
Utilizza la porta seguente, quindi fare clic
su Avanti.
4
Fare clic su Disco driver.
5
(Per gli utenti di stampanti laser Brother)
Esplorare il CD-ROM e selezionare la
cartella Driver, fare clic su Apri,
selezionare la cartella Win2k_xp o la
cartella corrispondente al sistema
operativo in uso e fare clic su Apri, quindi
selezionare la lingua appropriata e fare
clic su Apri.
(Per gli utenti di MFC/DCP Brother)
Esplorare il CD-ROM e selezionare la
cartella della lingua appropriata e fare
clic su Apri, selezionare la cartella WXP
o la cartella corrispondente al sistema
operativo in uso e fare clic su Apri, quindi
selezionare la cartella Addprt e fare clic
su Apri.
6
Fare clic su Apri, quindi su OK.
■ È possibile che questa schermata
non sia presente sul sistema
operativo in uso.
■ (Per gli utenti di Windows
®
98/Me/Windows NT
®
4.0) Se viene
visualizzata questa schermata,
selezionare Stampante locale e fare
clic su Avanti.
■ Se si utilizza il sistema operativo
Windows
®
XP e la cartella Win2k_xp
non è presente in questo elenco,
selezionare la cartella Win2k.
■ Se la cartella per il sistema operativo
in uso non è presente nella cartella
Driver, ma sono presenti le cartelle
inst, PCL, PS, USBW98ME e così
via, è consigliabile selezionare la
cartella PCL. Verrà visualizzata la
cartella del sistema operativo
appropriato.
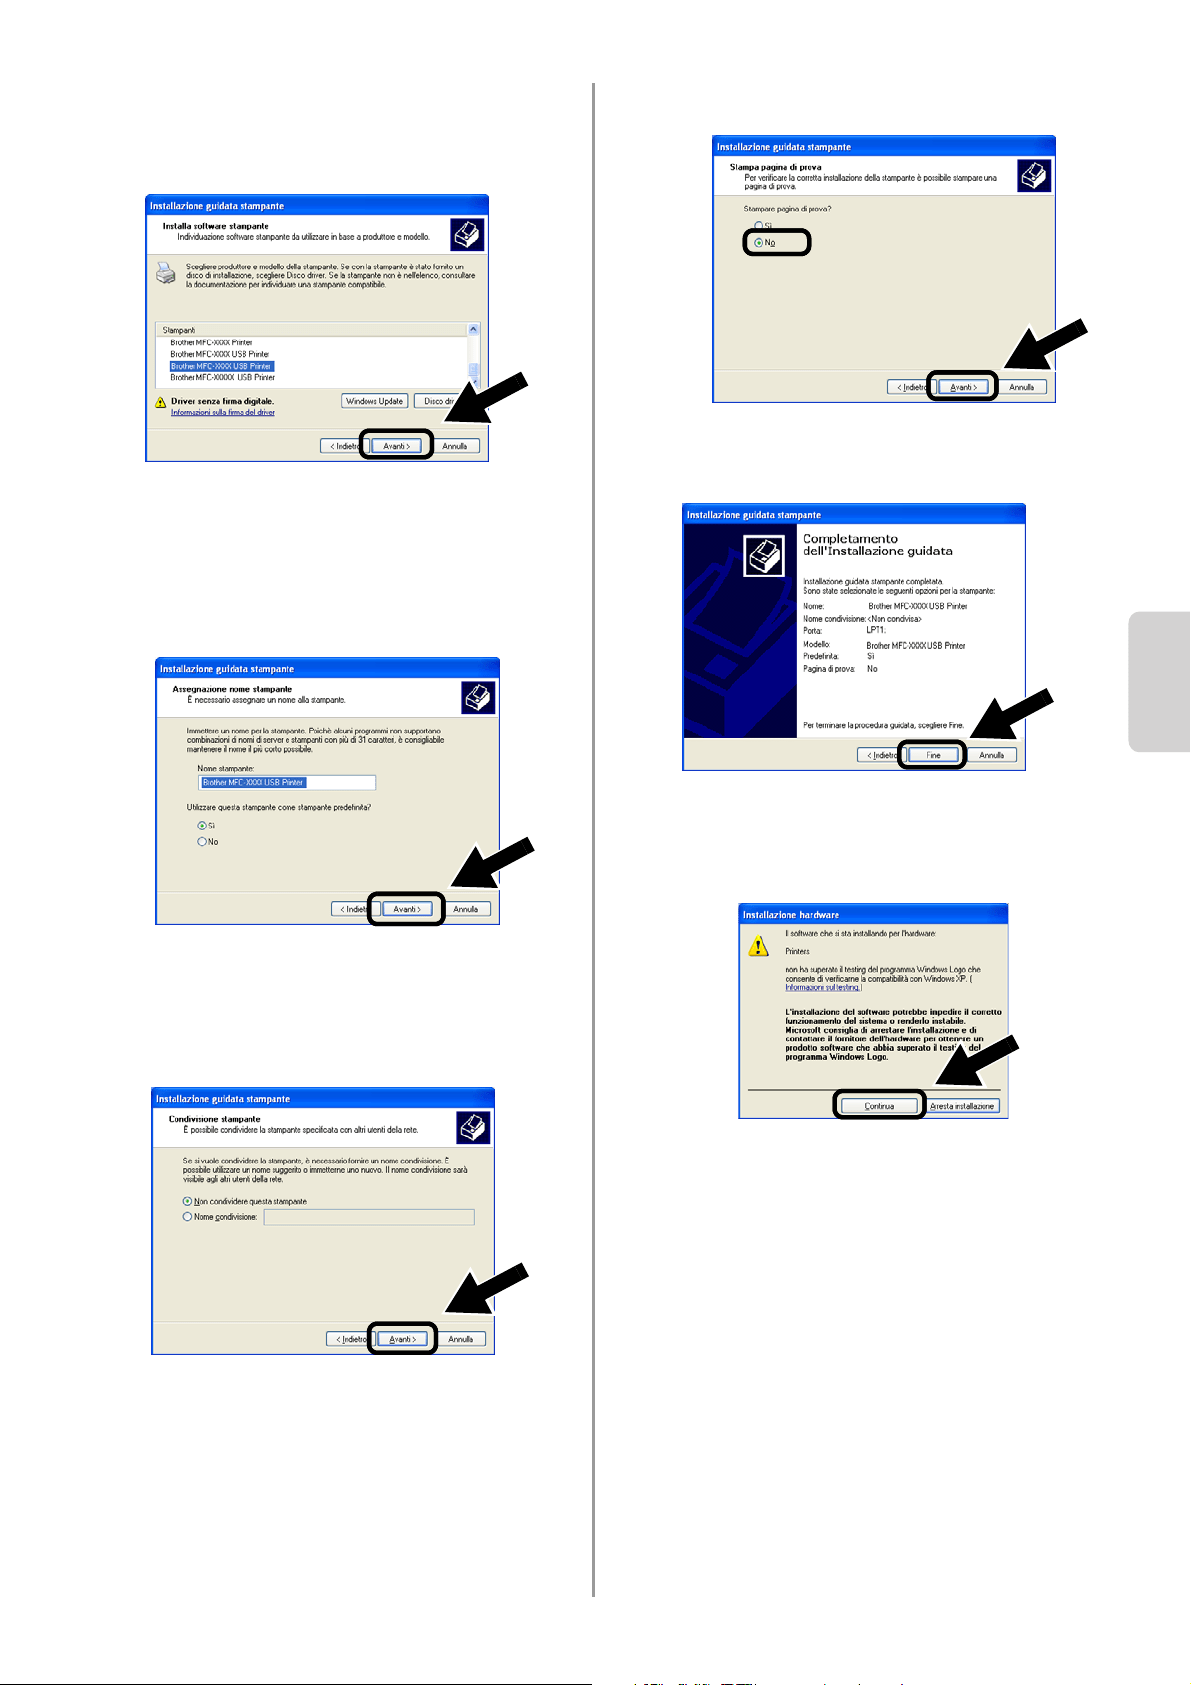
English
Italiano
60
7
Evidenziare il modello da installare
dall'elenco di stampanti/MFC/DCP e fare
clic su Avanti.
8
Il modello da installare verrà elencato
nella finestra. Selezionare Sì o No a
seconda che si desideri o meno
impostare questa stampante come
predefinita, quindi fare clic su Avanti.
9
Se viene visualizzata la seguente
schermata, selezionare Non
condividere questa stampante e
Avanti.
10
Selezionare No e Avanti.
11
Quando viene visualizzata questa
schermata, fare clic su Fine.
12
Se viene visualizzata la schermata del
testing di Windows Logo, fare clic su
Continua.

English
61
Installazione del software di
stampa di rete
È necessario installare il software di stampa
di rete e configurarlo per la connessione alla
rete senza fili della stampante/MFC/DCP
Brother. Eseguire la procedura riportata di
seguito.
1
Fare clic sul pulsante Software di
stampa di rete e seguire le istruzioni
visualizzate sullo schermo.
2
Selezionare lo stesso driver della
stampante selezionato al passaggio 7 a
pagina
60. Evidenziare il modello da
installare dall'elenco di
stampanti/MFC/DCP e fare clic su
Avanti.
L'impostazione è completata.
Installazione di MFL-Pro Suite
È necessario installare MFL-Pro Suite per
creare una connessione di rete senza fili dal
computer alla stampante/MFC/DCP Brother.
Il software è fornito sul CD-ROM incluso con
la stampante/MFC/DCP. Per installare il
software, seguire le istruzioni della sezione
relativa all'installazione del driver e del
software per l'utente del cavo dell'interfaccia
di rete nella Guida di impostazione rapida
fornita con la stampante/MFC/DCP.
■Per MFC-8420D/8820D/8820DN/8220/8440/
8840D/8840DN/3820CN/3420CN e
DCP-8020/8025D/8025DN/8040/8045D/8045DN
Quando viene visualizzata questa schermata
durante il processo di installazione, selezionare
No, quindi fare clic su Avanti.
Passaggio 5
Per gli utenti di Windows
®
Gruppo: 2
MFC-210C/420CN/410CN/620CN/
5440CN/5840CN/3240C/3340CN/8420/
8820D/8820DN/8220/8440/8840D/
8840DN/3820CN/3420CN/DCP-120C/
320CN/8020/8025D/8025DN/8040/
8045D/8045DN
Passaggio 4

English
Italiano
62
■ Alcuni MFC/DCP con NC-2200w non vengono
trovati nell'elenco di ricerca durante
l'installazione. In tal caso, tornare alla
schermata riportata di seguito e impostare il
nome del nodo dell'NC-2200w manualmente. Il
nome del nodo è reperibile nella pagina di
configurazione della rete. Vedere
Ulteriori
informazioni a pagina 64.
Specifica dell'indirizzo di
destinazione della scansione
dalla home page dell'NC-2200w
È necessario specificare l'indirizzo di
destinazione della scansione dall'URL
dell'NC-2200w per utilizzare lo scanner in
rete. Eseguire la procedura riportata di
seguito.
1
Aprire Internet Explorer e immettere
quanto segue nel campo dell'URL.
http://indirizzo_ip_NC-2200w
Dove indirizzo_ip_NC-2200w è
l'indirizzo IP o il nome del nodo
dell'NC-2200w.
2
Andare alla pagina General in
Configuration.
3
Immettere l'indirizzo IP del computer.
L'impostazione è completata.
■ L'indirizzo IP o il nome del nodo
dell'NC-2200w è reperibile nella
pagina di configurazione della rete.
Per ulteriori informazioni, vedere
Ulteriori informazioni a pagina 64.
■ Verrà richiesto di immettere un nome
utente e una password. Immettere
quanto segue:
nome utente: admin (distinzione tra
maiuscole e minuscole)
password: access (predefinita)
Passaggio 5
■ Se l'indirizzo IP del computer è stato
assegnato automaticamente mediante
DHCP, immettere il nome del computer
poiché l'indirizzo IP può essere
modificato. Il nome può essere il nome
del computer Windows
®
o il nome host
DNS.
■ Per conoscere il nome del computer in
uso, aprire Proprietà da Risorse del
computer e consultare la scheda
Nome computer. Per utilizzare il nome
del dominio è necessario assegnare
l'indirizzo del server DNS mediante il
server Web dell'NC-2200w e il browser
Web.
Disponibile nelle lingue inglese, francese,
tedesco, olandese e giapponese.
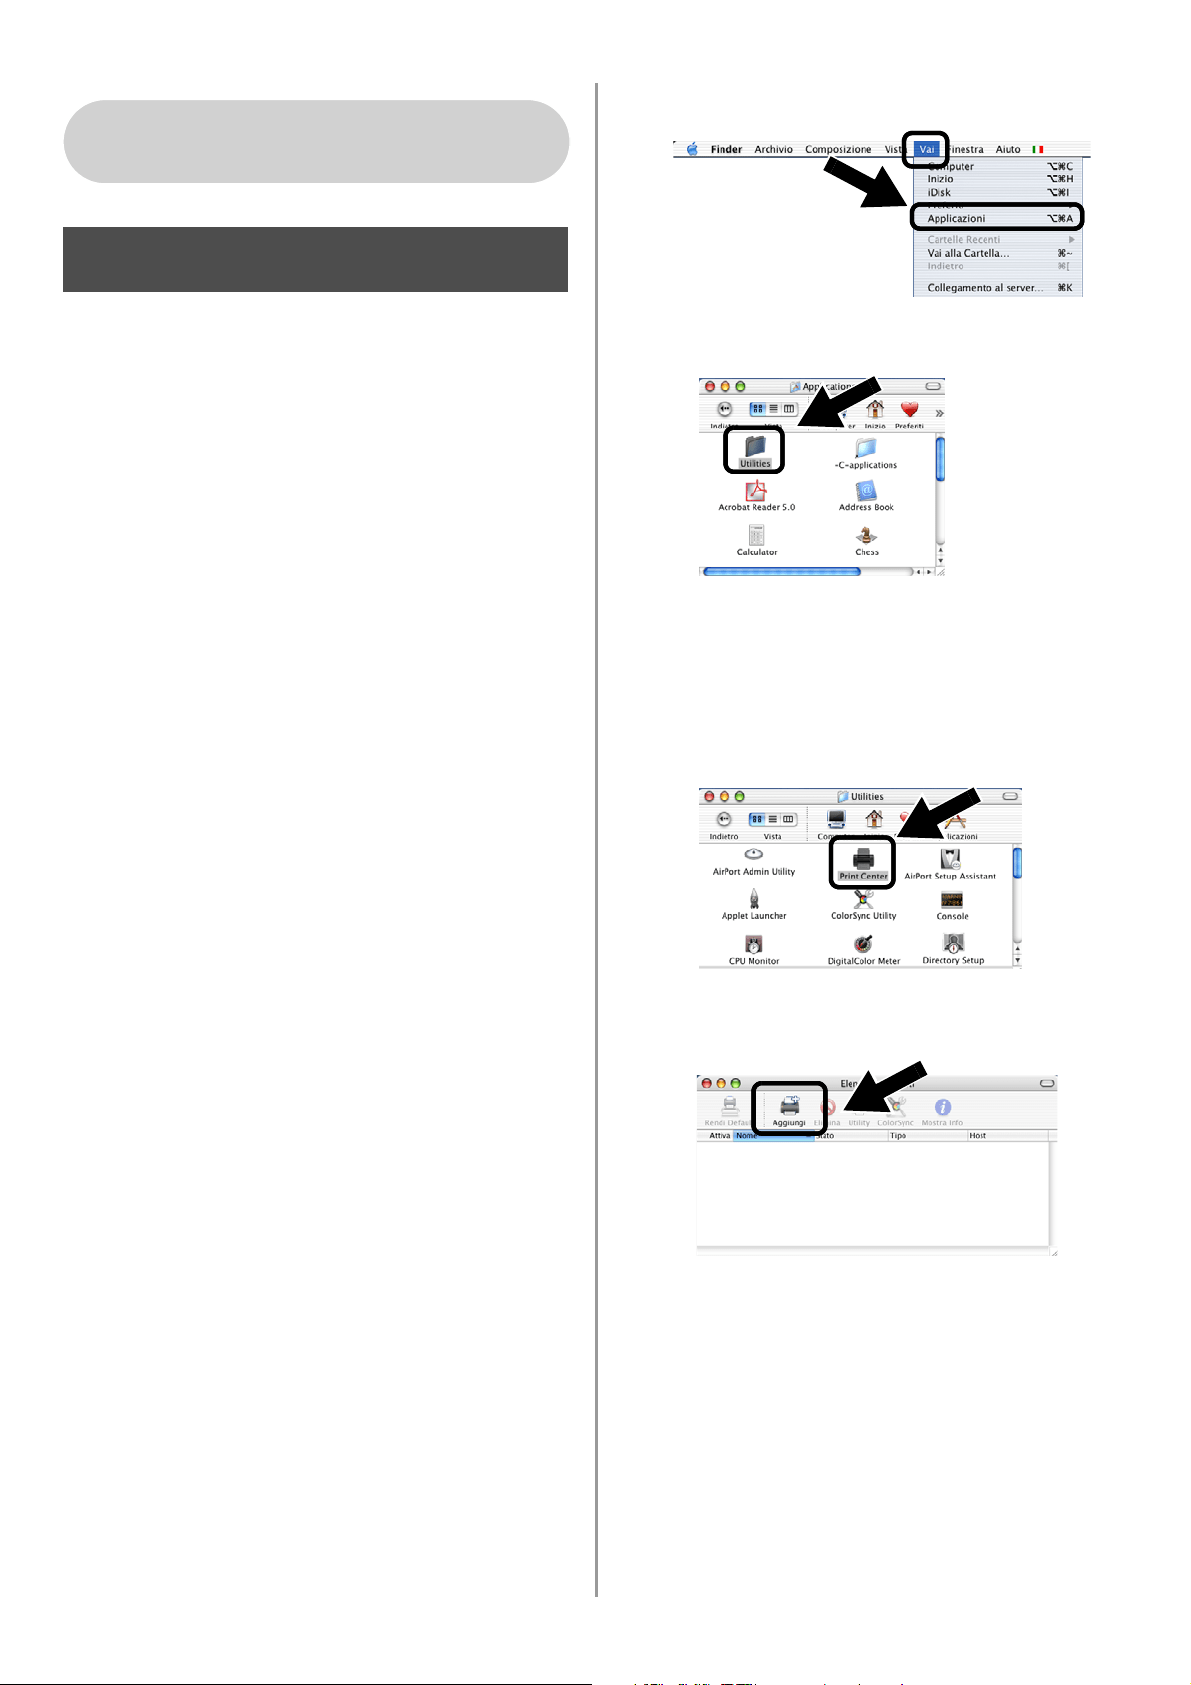
English
63
Installazione e configurazione del
driver della stampante mediante
le funzionalità di configurazione
di rete semplice di Mac OS
®
X
È necessario installare il driver della
stampante prima di impostare il computer su
cui utilizzare l'NC-2200w. Se il driver della
stampante è già installato, è possibile saltare
questo passaggio. Il driver è fornito sul
CD-ROM incluso con la
stampante/MFC/DCP oppure è possibile
scaricare il driver più aggiornato dal sito Web
Brother all'indirizzo:
http://solutions.brother.com
Eseguire le operazioni riportate di seguito per
installare il driver della stampante.
1
Inserire il CD-ROM fornito nell'apposita
unità e fare doppio clic sull'icona Start
Here OSX per installare il software. Se
viene visualizzata la schermata della
lingua, selezionare la lingua desiderata.
2
(Per gli utenti di stampanti laser Brother)
Fare clic su Installa software e su
Driver della stampante nella schermata
dei menu.
(Per gli utenti di MFC/DCP Brother) Fare
clic su MFL-Pro Suite per procedere
all'installazione.
3
Seguire le istruzioni visualizzate sullo
schermo per installare il driver della
stampante.
4
Selezionare Applicazioni dal menu Vai.
.
5
Aprire la cartella Utilities.
6
(Per gli utenti di Mac OS
®
X 10.2.4)
Aprire l'icona Print Center.
(Per gli utenti di Mac OS
®
X 10.3)
Aprire l'Utility di configurazione
stampante.
7
Fare clic su Aggiungi.
Per gli utenti di Mac OS
®
X 10.2.4 -
10.3 o versioni successive
Passaggio 4
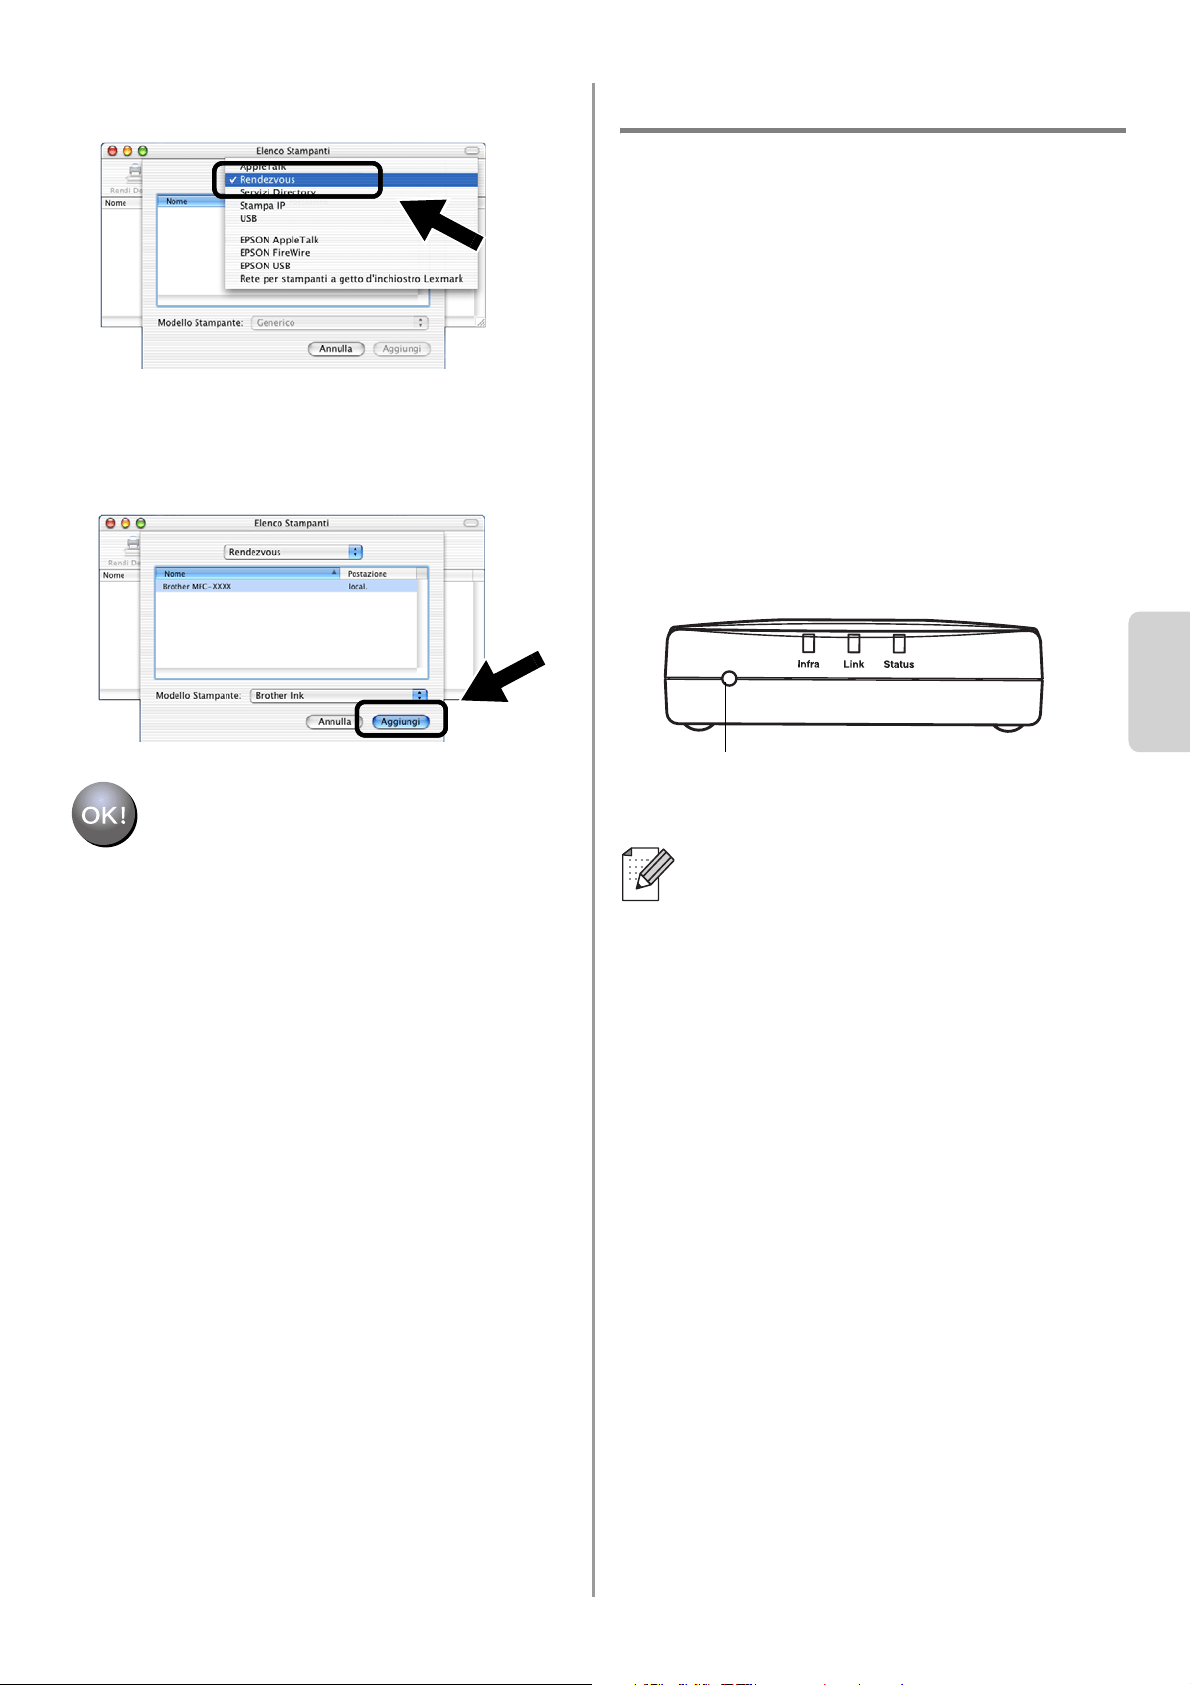
English
Italiano
64
8
Selezionare Rendezvous.
9
Selezionare il nome del modello della
macchina in uso e fare clic su Aggiungi.
L'impostazione è completata.
Ulteriori informazioni
Come stampare una pagina di
configurazione della rete
Per stampare la pagina di configurazione
della rete, premere il pulsante di prova
dell'NC-2200w.
Come ripristinare le impostazioni di
fabbrica
Per ripristinare le impostazioni di
fabbrica dell'NC-2200w e tutte le
informazioni quali le impostazioni senza
fili, la password e l'indirizzo IP, tenere
premuto il pulsante di prova per più di 10
secondi.
Quando si ripristinano le impostazioni di
fabbrica, è necessario ripetere
l'impostazione dal passaggio 2 Modifica
delle impostazioni senza fili del computer
per configurare l'NC-2200w a pagina 54.
Pulsante di prova
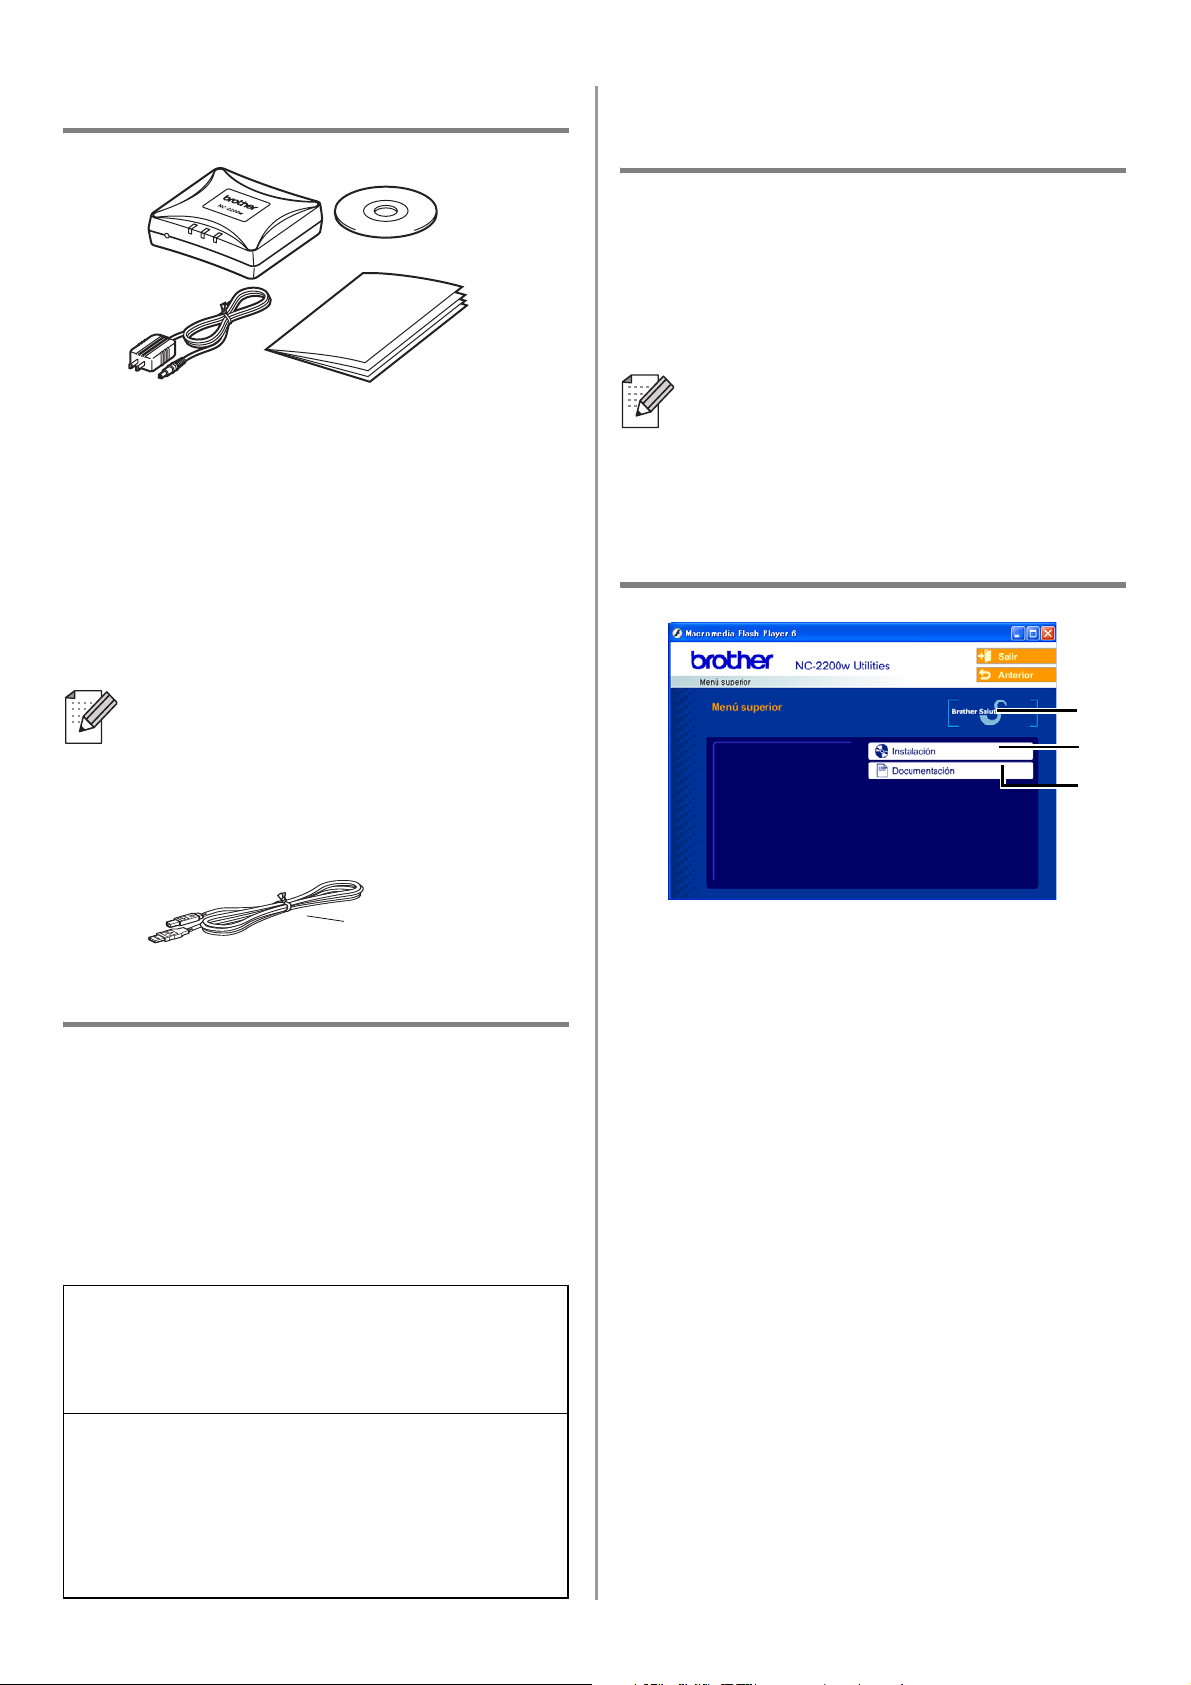
English
65
Componentes en la caja
1
Servidor de impresión/digitalización
inalámbrico externo NC-2200w
2
Adaptador de CA
3
CD-ROM (incluyendo el software de
instalación y el Manual del usuario de red
del dispositivo NC-2200w)
4
Guía de configuración rápida
Modelos admitidos
El dispositivo NC-2200w admite los modelos
enumerados a continuación. Si no se
enumera su modelo, visite la página del
dispositivo NC-2200w en
http://solutions.brother.com
para confirmar la admisión del dispositivo
NC-2200w.
Admisión de sistemas
operativos
Windows
®
Windows
®
98/98SE/Me/2000/XP y
Windows NT
®
4.0
Macintosh
®
Mac OS
®
X 10.2.4 - 10.3 o posterior
CD-ROM suministrado
1
Centro de soluciones de Brother
El Centro de soluciones de Brother
(http://solutions.brother.com) es un
punto de referencia para todas las
necesidades de su impresora/MFC/DCP
de Brother. Descargue los controladores
y utilidades más actualizados y lea las
sugerencias de solución de problemas y
preguntas más frecuentes.
2
Instalación
Puede ejecutar el Asistente de
configuración inalámbrica, que le guiará
durante la configuración del dispositivo
NC-2200w. También puede instalar el
software de impresión de red y la utilidad
BRAdmin Professional para Windows
®
.
3
Documentación
Vea el Manual del usuario de red y la
Guía de configuración rápida del
dispositivo NC-2200w en formato PDF.
El dispositivo NC-2200w puede
conectarse al puerto de interfaz USB de
la impresora/MFC/DCP Brother. No se
incluye un cable USB con este producto;
tenga preparado un cable USB
apropiado (Tipo A-B).
Grupo 1:
HL-1440/1450/1470N/5040/ 5050/5070N/
5140/5150D/5170DN
MFC-9070/9180/9160
Grupo 2:
MFC-210C/420CN/410CN/620CN/5440CN/584
0CN/3240C/3340CN/8420/8820D/8820DN/
8220/8440/8840D/8840DN/3820CN/3420CN/
DCP-110C/310C/8020/8025D/8025DN/8040/
8045D/8045DN
1
2
4
3
A
B
Si el CD que se suministra con la
impresora/MFC/DCP Brother no incluye
un controlador para Windows NT
®
4.0,
no podrá utilizarlo en entornos bajo
Windows NT
®
4.0.
1
2
3
Tipo A-B
(hasta 2 m. o 6 pies)
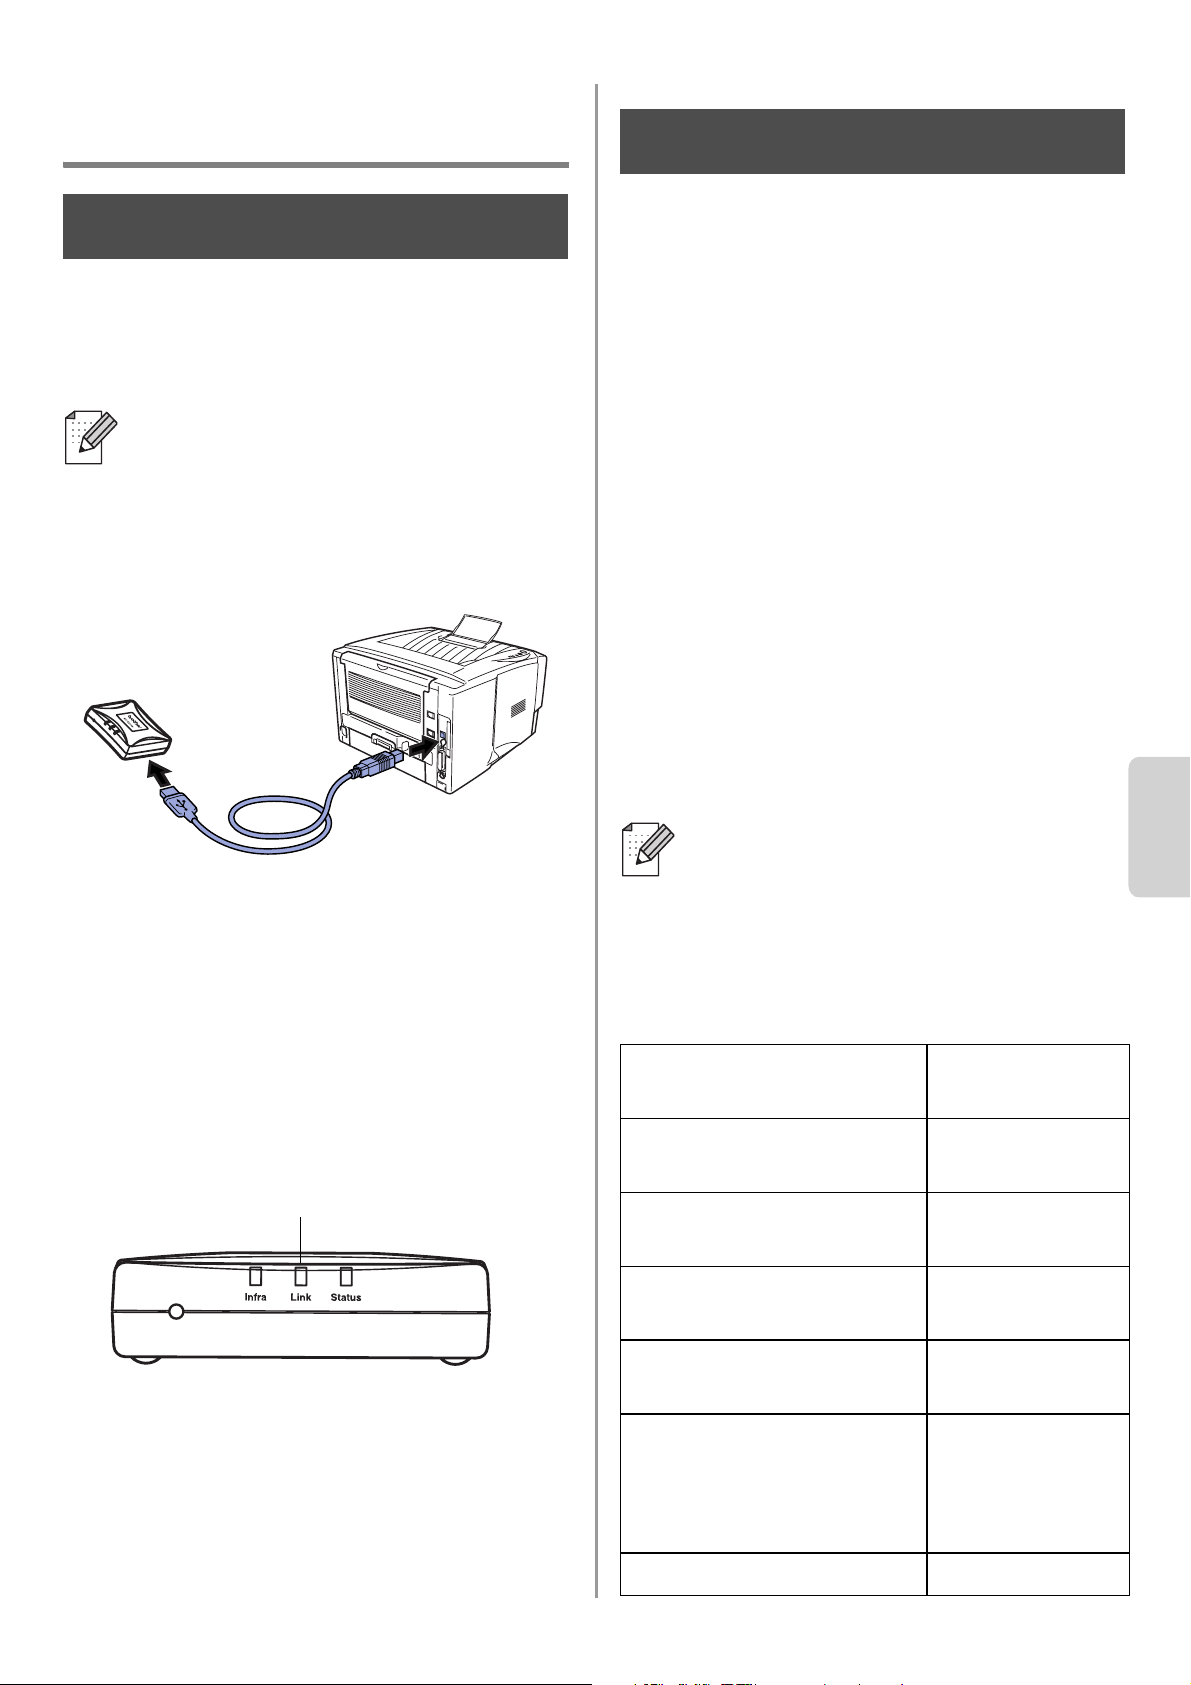
English
Español
66
Configuración del servidor
de impresión/digitalización
Instalación del servidor de
impresión
1
Conecte el cable USB al dispositivo
NC-2200w y a la impresora/MFC/DCP
Brother.
2
Conecte el adaptador de CA al
dispositivo NC-2200w.
3
Enchufe el adaptador de CA y encienda
la impresora/MFC/DCP Brother.
4
Asegúrese de que el testigo de enlace
del dispositivo NC-2200w está
encendido y espere unos minutos.
Antes de realizar la instalación, si está
utilizando una aplicación de cortafuegos
(por ej., la función de cortafuegos
disponible en Windows XP), desactívela.
Una vez haya comprobado que puede
imprimir, reinicie su aplicación de
cortafuegos.
Cambio de la configuración
inalámbrica de su sistema
para configurar el dispositivo
NC-2200w
Antes de que pueda utilizar la
impresora/MFC/DCP Brother en una red
inalámbrica, la configuración del dispositivo
NC-2200w debe coincidir con la de su red.
Para configurar el dispositivo NC-2200w
desde un sistema inalámbrico de la red, debe
cambiar temporalmente la configuración
inalámbrica en vigor. Antes de cambiar la
configuración inalámbrica que tiene en su
sistema, recomendamos que anote los
parámetros de dicha configuración. Tendrá
que volver a introducir estos parámetros al
final del paso 3 en la página
69.
Configuración inalámbrica en vigor
de su sistema
No se puede utilizar el dispositivo
NC-2200w con un concentrador USB.
Paso 1
Testigo de enlace (verde)
Recomendamos que se ponga en
contacto con su administrador de red
si necesita ayuda con la configuración
inalámbrica de su sistema.
Elemento Configuración
en vigor
Modo de comunicación:
(Ad-hoc / Infraestructura)
Nombre de red
(SSID/ESSID)
Canal: (1-14)
*Si es necesario.
Encriptación:
(NINGUNA / WEP / Otra)
Tamaño y tipo de clave
de encriptación:
(64 bits, 128 bits / ASCII,
HEX / Otra)
Clave de encriptación:
Paso 2
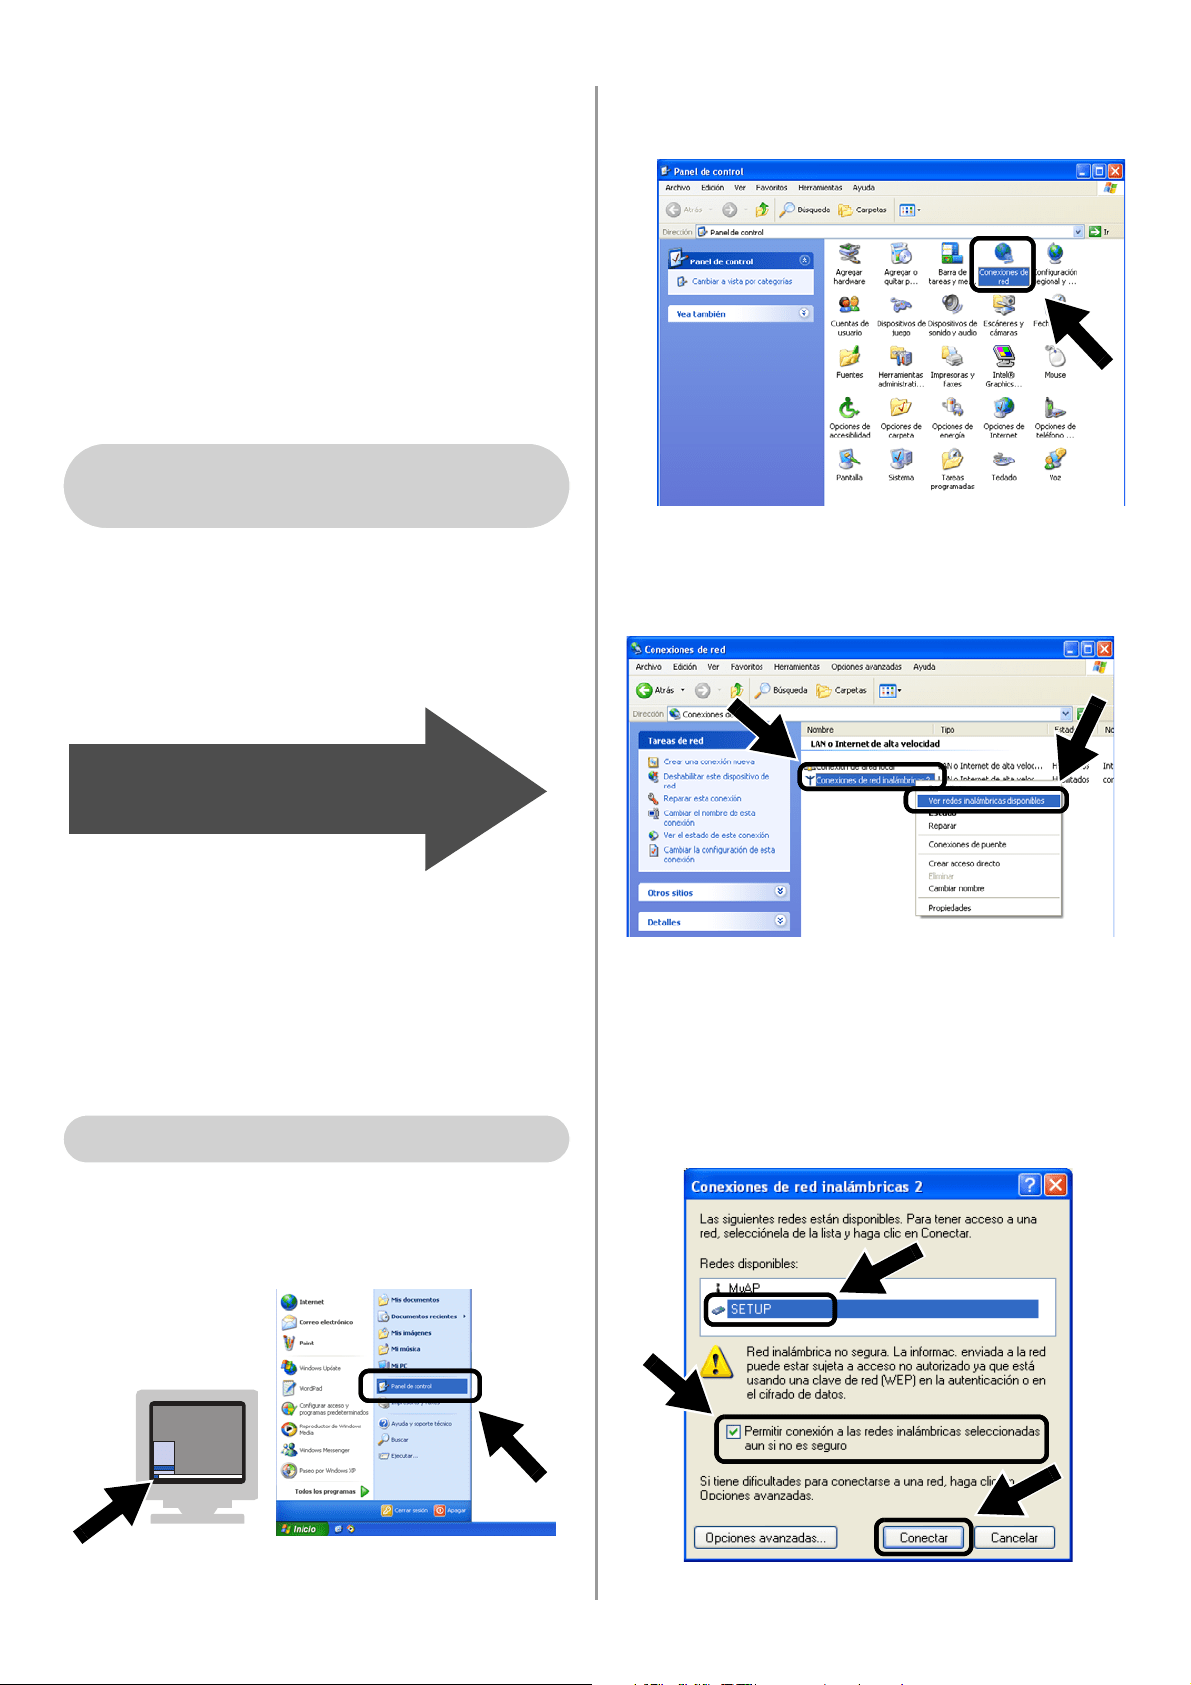
English
67
Para establecer la comunicación con el
dispositivo NC-2200w sin configurar, cambie
la configuración del sistema a:
Modo de comunicación: Ad-hoc
(canal 11)
Nombre de red (SSID/ESSID): SETUP
(sensible a mayúsculas y minúsculas)
Encriptación: Ninguna
Consulte las instrucciones del fabricante de
su tarjeta inalámbrica para cambiar la
configuración inalámbrica; a continuación,
siga en el paso 3
Configuración de servidor
de impresión/digitalización.
Si está utilizando Windows
®
XP o Mac
OS
®
X 10.2.4 y emplea sus capacidades
Ethernet inalámbricas incorporadas,
realice los siguientes pasos para cada
sistema operativo.
1
Haga clic en Inicio y abra el Panel de
control.
2
Haga clic en el icono Conexiones de
red.
3
Seleccione y haga clic en Conexiones
de red inalámbricas. Haga clic en Ver
redes inalámbricas disponibles.
4
Verá el nombre de red (SSID/ESSID) del
dispositivo NC-2200w en el cuadro
Redes disponibles. Seleccione SETUP
y marque la casilla de verificación
Permitir conexión.... Haga clic en el
botón Conectar.
Para usuarios de Windows
®
98/Me/2000, Windows NT
®
4.0
Siga en el paso 3
en la página 69
Para usuarios de Windows
®
XP
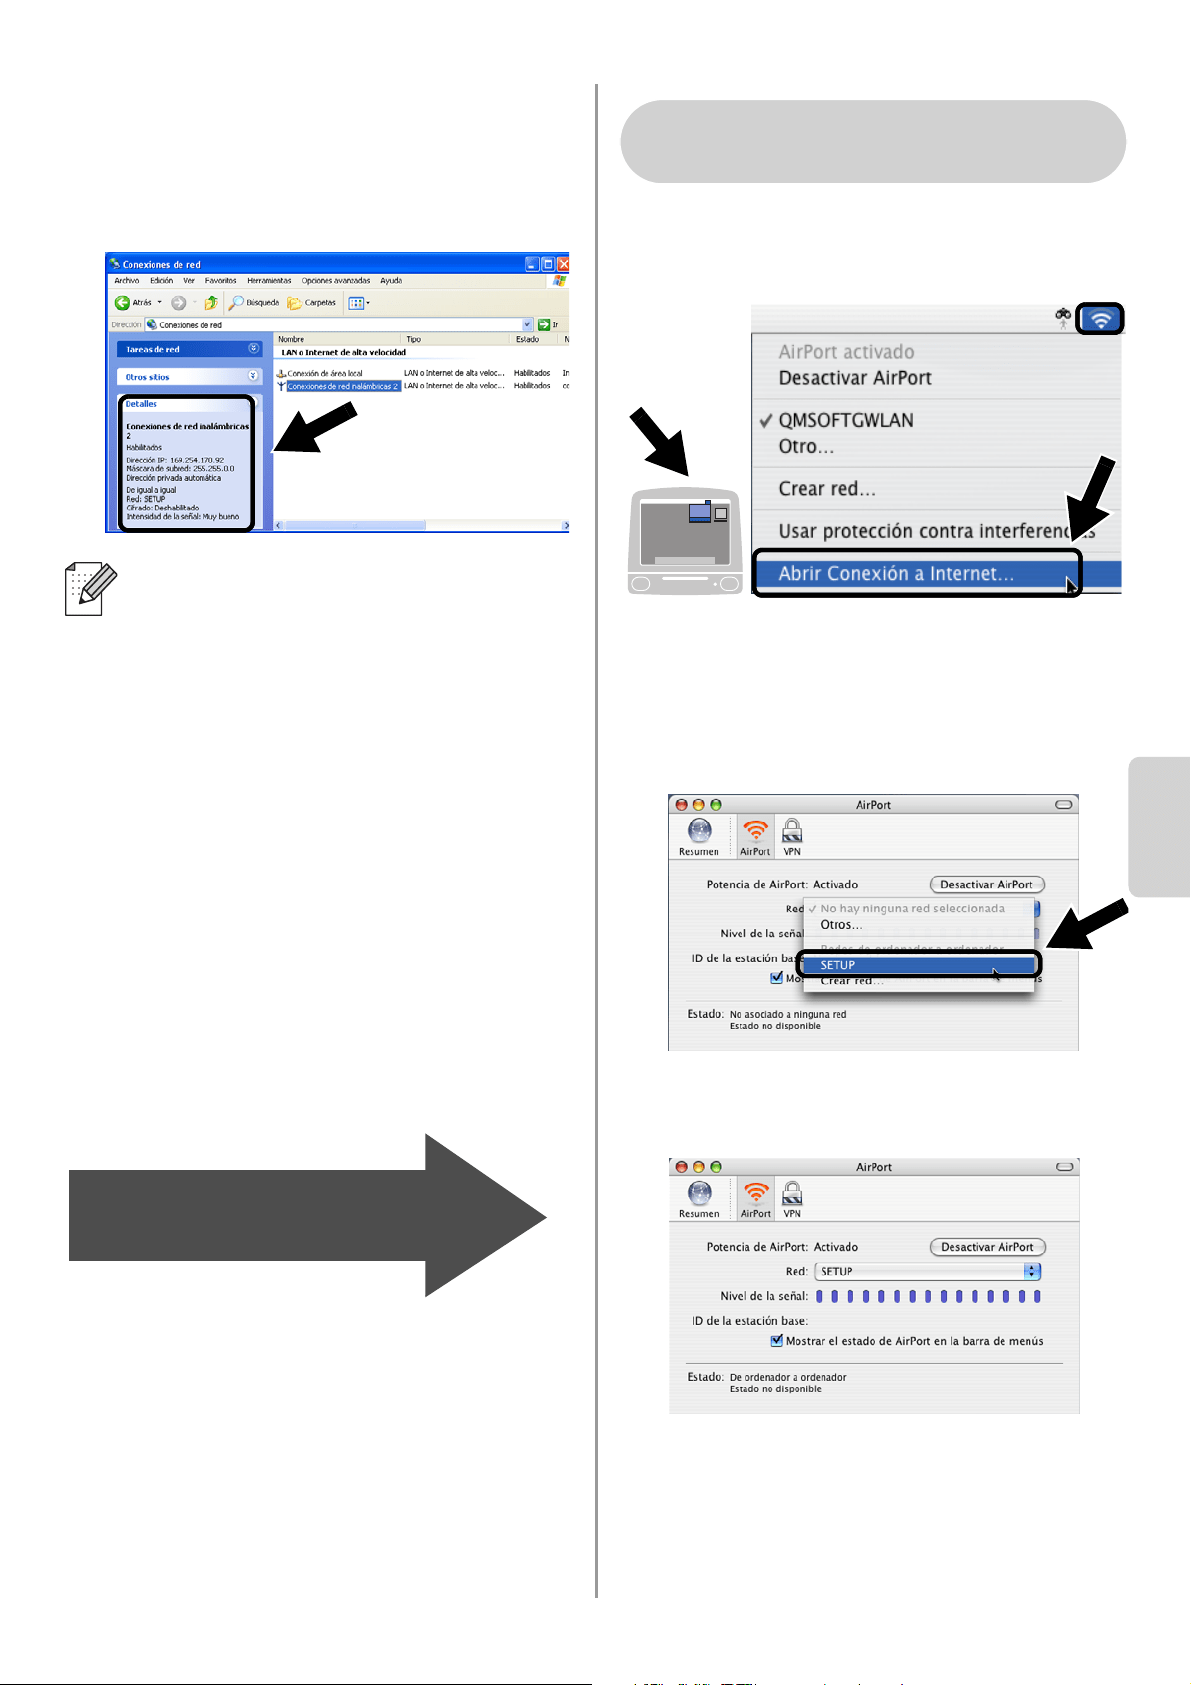
English
Español
68
5
Compruebe el estado de la conexión de
red inalámbrica. Pueden pasar unos
minutos hasta que cambie la dirección IP
0.0.0.0 a 169.254.x.x en la pantalla.
(donde x.x son números entre 0 y 255).
1
Haga clic en el icono de estado AirPort y
seleccione Abrir Conexión a Internet....
2
Haga clic en la ficha Red para ver los
dispositivos inalámbricos disponibles.
Podrá ver el nombre de red
(SSID/ESSID) en la opción Red.
Seleccione SETUP.
3
Su red inalámbrica estará conectada
correctamente.
Si no se enumera el nombre de red
(SSID/ESSID) que desea seleccionar,
pruebe el siguiente método:
■ Desenchufe el adaptador de CA,
vuelva a enchufarlo y espere unos
minutos.
■ Desplace la impresora/MFC/DCP
Brother con el dispositivo NC-2200w
montado a un punto más cercano a su
sistema e inténtelo de nuevo.
■ Restablezca la configuración de
fábrica del dispositivo NC-2200w e
inténtelo de nuevo. Consulte la
página
76 para restablecer la
configuración de fábrica.
■ Consulte el Capítulo 6 del Manual del
usuario de red del dispositivo
NC-2200w en el CD-ROM que se
proporciona con este dispositivo.
Siga en el paso 3
en la página 69
Para usuarios de Mac OS
®
X
10.2.4 - 10.3 o posterior

English
69
Configuración de servidor de
impresión/digitalización
1
Inserte el CD-ROM del dispositivo
NC-2200w en su unidad de CD-ROM.
(Para usuarios de Windows
®
) La pantalla
de bienvenida aparecerá
automáticamente.
(Para usuarios de Mac OS
®
X 10.2.4 a
10.3 o posterior) Haga doble clic en el
icono NC2200w en el Macintosh
®
; a
continuación, haga doble clic en el icono
Start Here OSX.
2
Seleccione su idioma.
3
Haga clic en Instalación y, a
continuación, en Asistente de
configuración inalámbrica.
4
Revise la información de Bienvenida y
cuando esté seguro de que ha
completado las tareas necesarias, haga
clic en Siguiente.
5
Siga las instrucciones de las pantallas.
Para obtener más información, consulte
el Capítulo 2 del Manual del usuario de
red del dispositivo NC-2200w en el
CD-ROM que se proporciona con este
dispositivo.
6
Después de salir del Asistente de
configuración inalámbrica, cambie la
configuración inalámbrica en su sistema
a los parámetros originales empleando
la información que se anotó en la sección
Cambio de la configuración inalámbrica
de su sistema para configurar el
dispositivo NC-2200w en la página 66.
Si no se enumera el nombre de red
(SSID/ESSID) que desea seleccionar,
pruebe el siguiente método:
■ Desenchufe el adaptador de CA,
vuelva a enchufarlo y espere unos
minutos.
■ Desplace la impresora/MFC/DCP
Brother con el dispositivo NC-2200w
montado a un punto más cercano a
su sistema e inténtelo de nuevo.
■ Restablezca la configuración de
fábrica del dispositivo NC-2200w e
inténtelo de nuevo. Consulte la
página
76 para restablecer la
configuración de fábrica.
■ Consulte el Capítulo 6 del Manual del
usuario de red del dispositivo
NC-2200w en el CD-ROM que se
proporciona con este dispositivo.
Paso 3
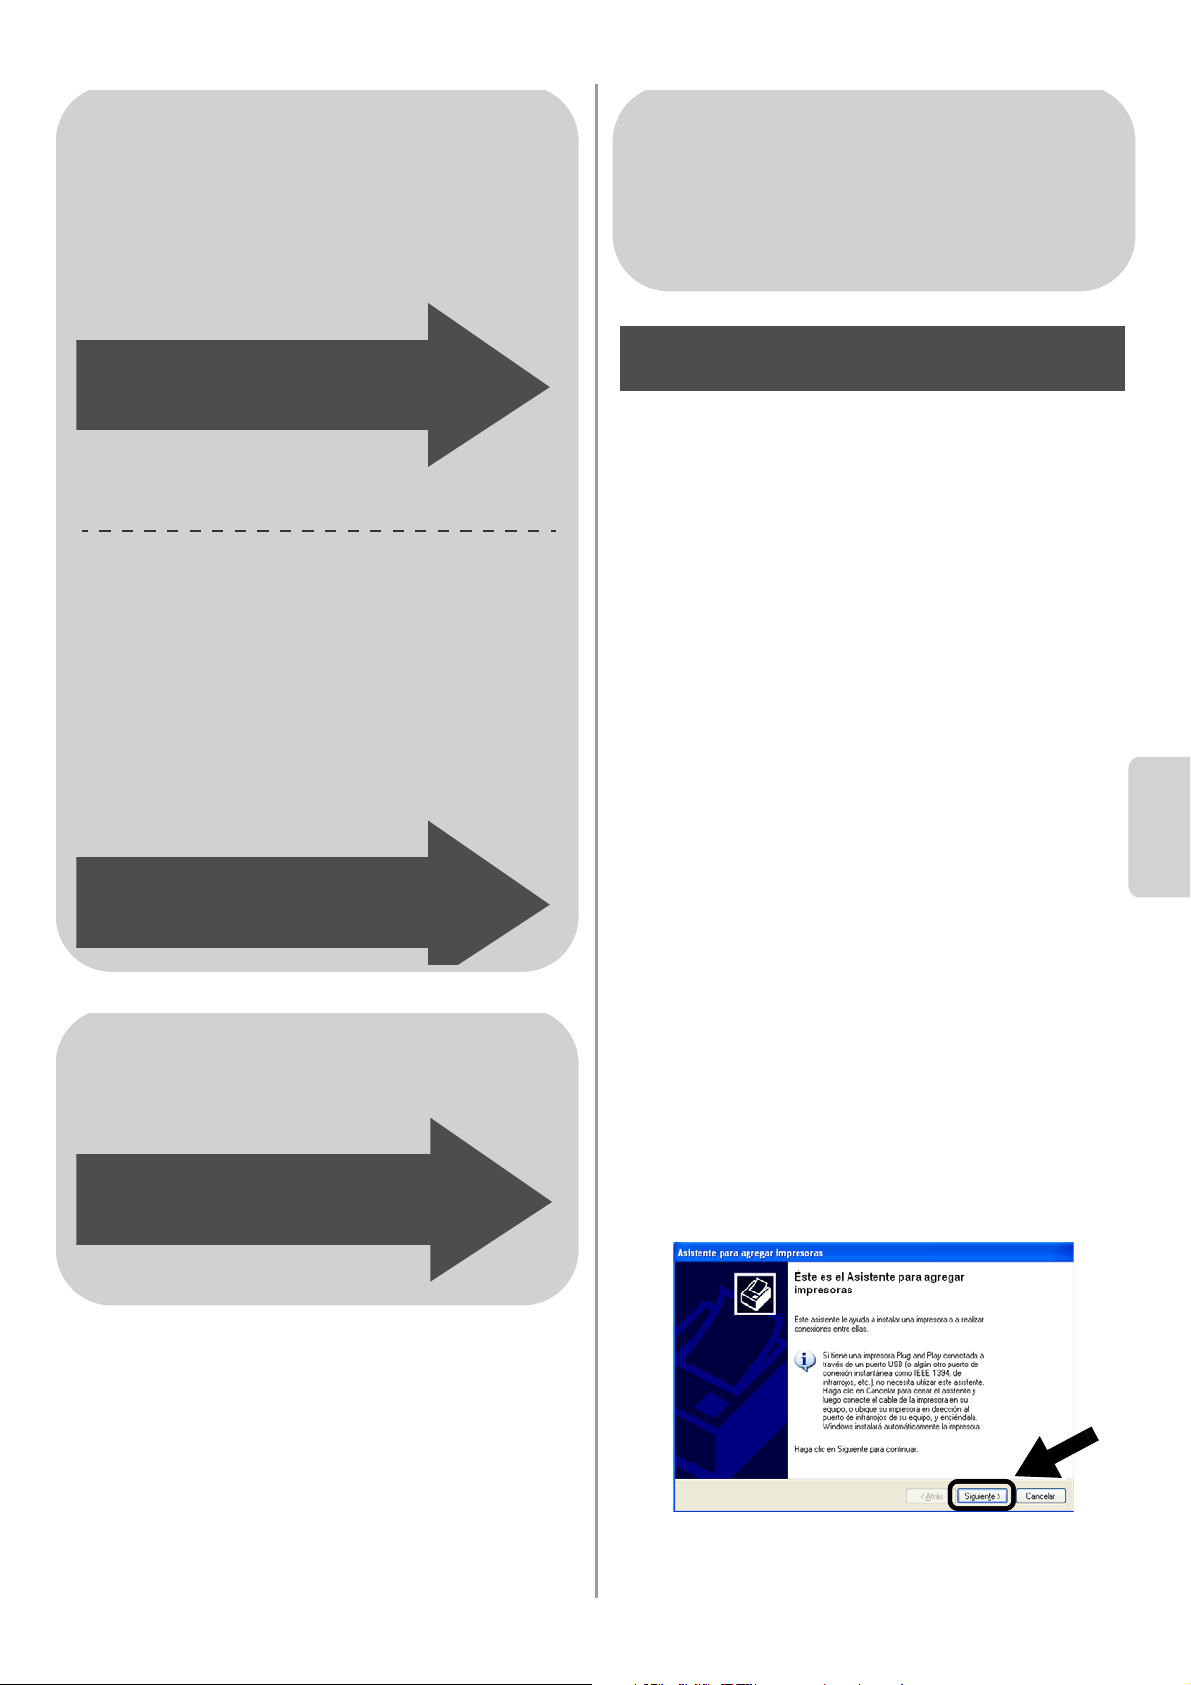
English
Español
70
Instalación del controlador de
impresora
Los usuarios de los modelos anteriores
deben instalar el controlador de impresora
antes de configurar el sistema para que
funcione con el dispositivo NC-2200w. Si el
controlador de impresora ya está instalado,
puede omitir este paso. El controlador se
encuentra en el CD-ROM que se incluye con
la impresora/MFC/DCP. También puede
descargar el controlador de impresora desde
el Centro de soluciones de Brother en:
<http://solutions.brother.com>
Para instalar el controlador de impresora con
el CD-ROM, realice los siguientes pasos.
Las instrucciones de esta sección toman
como base Windows
®
XP.
1
Haga clic en Inicio y seleccione
Impresoras y faxes. Haga clic en
Agregar impresora; a continuación, se
abrirá el Asistente para agregar
impresoras. Cuando esta pantalla
aparezca, haga clic en Siguiente.
Para usuarios de Windows
®
Grupo 1:
HL-1440/1450/1470N/5040/5050/
5070N/5070DN/5140/5150D/5170DN
MFC-9070/9180/9160
Grupo 2:
MFC-210C/420CN/410CN/620CN/
5440CN/5840CN/3240C/3340CN/8420/
8820D/8820DN/8220/8440/8840D/
8840DN/3820CN/3420CN/DCP-120C/
320CN/8020/8025D/8025DN/8040/
8045D/8045DN
Siga en el paso 4
en la página 70
Siga en el paso 4
en la página 73
Para usuarios de Mac OS
®
X
10.2.4 - 10.3 o posterior
Siga en el paso 4
en la página 75
Para usuarios de Windows
®
Grupo 1:
HL-1440/1450/1470N/5040/5050/
5070N/5070DN/5140/5150D/5170DN
MFC-9070/9180/9160
Paso 4
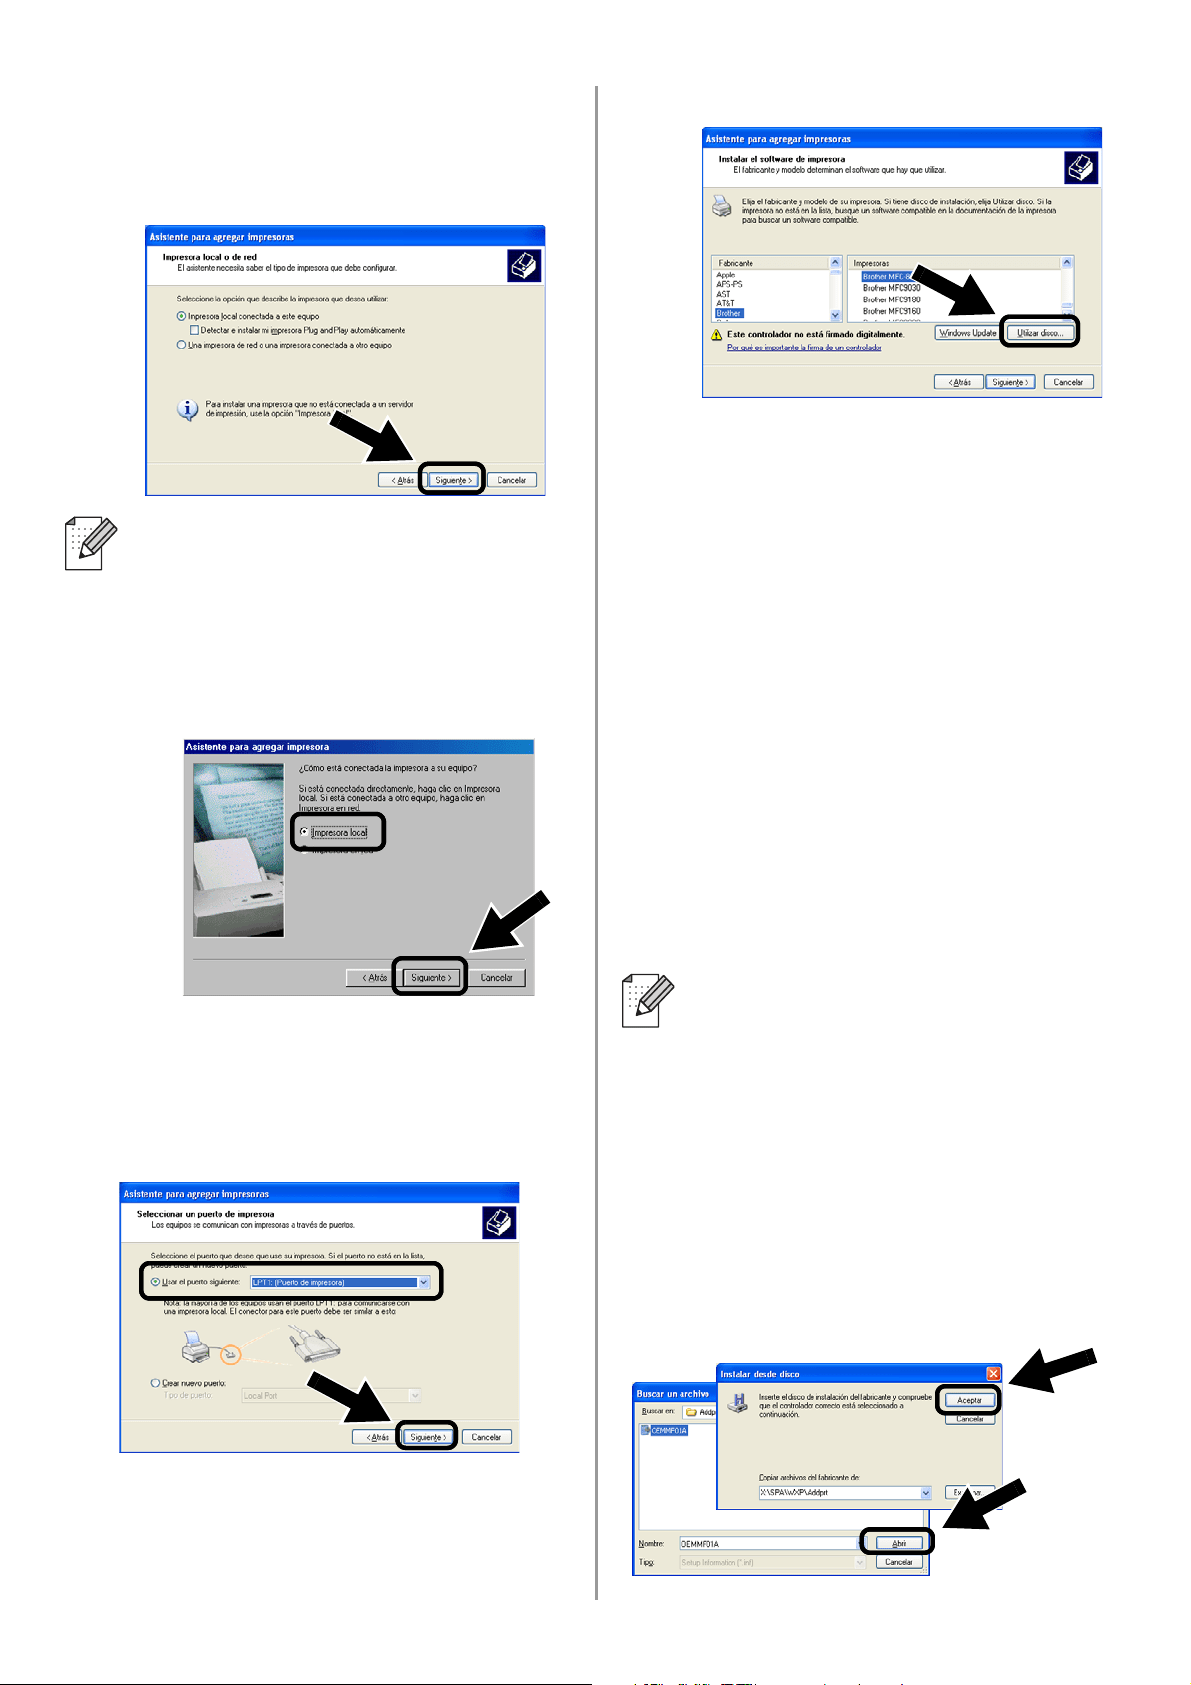
English
71
2
Quite la marca de verificación de
Detectar e instalar mi impresora Plug
and Play automáticamente y haga clic
en Siguiente.
3
Seleccione temporalmente LPT1:
(Puerto de impresora) en la lista
desplegable en Usar el puerto siguiente
y haga clic en Siguiente.
4
Haga clic en Utilizar disco.
5
(Para usuarios de impresoras láser
Brother)
Busque en el CD-ROM la carpeta Driver
y haga clic en Abrir; a continuación,
seleccione la carpeta Win2k_xp (o la
carpeta de su SO) y haga clic en Abrir;
seleccione el idioma apropiado y haga
clic en Abrir.
(Para usuarios de dispositivos MFC/DCP
Brother)
Busque en el CD-ROM y seleccione la
carpeta de idioma apropiado; haga clic
en Abrir; a continuación, seleccione la
carpeta WXP (o la carpeta de su SO) y
haga clic en Abrir; finalmente,
seleccione la carpeta Addprt y haga clic
en Abrir.
6
Haga clic en Abrir y después en
Aceptar.
■ Su sistema operativo puede no tener
esta pantalla.
■ (Para usuarios de Windows
®
98/Me/Windows NT
®
4.0) Si se
muestra esta pantalla, seleccione
Impresora local y haga clic en
Siguiente.
■ Si su SO es Windows
®
XP y no
encuentra la carpeta Win2k_xp en la
lista, seleccione la carpeta Win2k.
■ Si no ve una carpeta para su sistema
operativo en la carpeta Driver,
busque en su lugar: inst, PCL, PS,
USBW98ME, etc. Recomendamos
que seleccione la carpeta PCL. Verá
la carpeta del sistema operativo
apropiado.
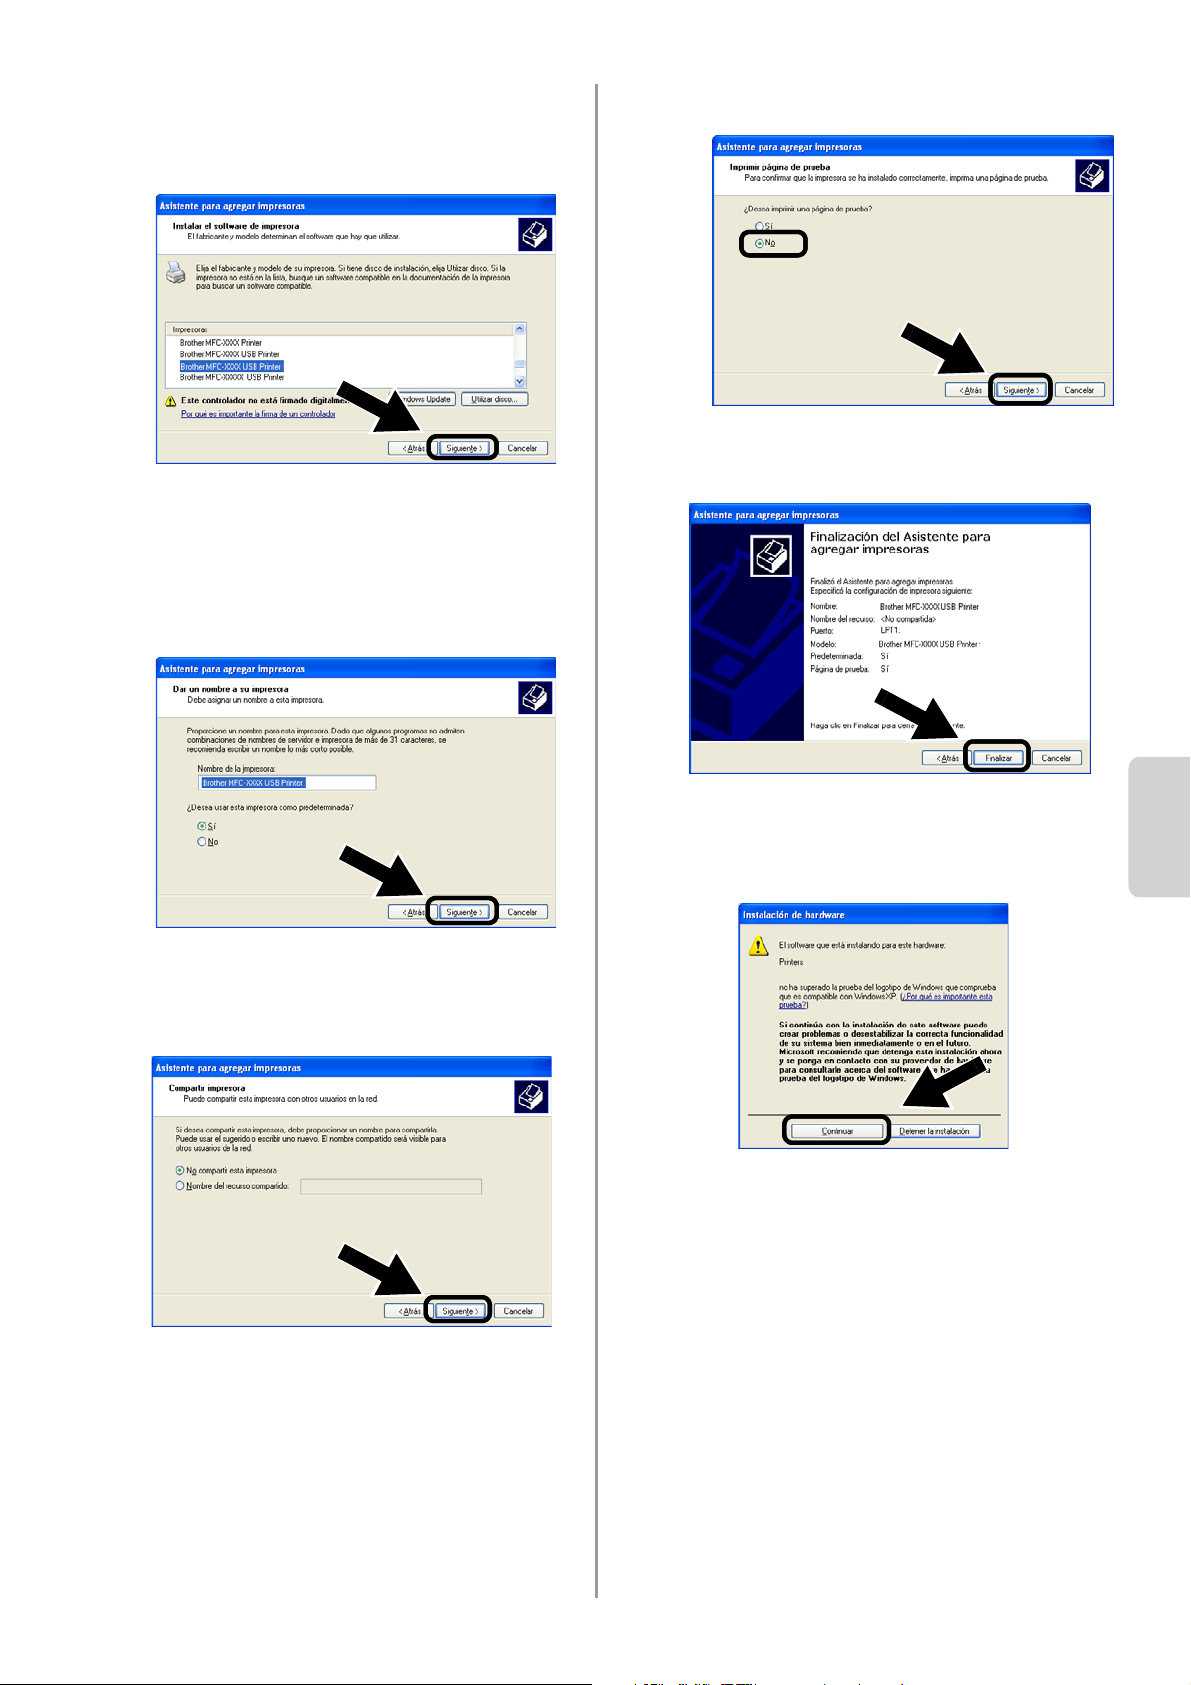
English
Español
72
7
Resalte el modelo que esté instalando
de la lista de impresoras/MFC/DCP y
haga clic en Siguiente.
8
El modelo que esté instalando aparecerá
en la ventana. Seleccione Sí o No si
desea que esta impresora sea la
predeterminada del sistema; a
continuación, haga clic en Siguiente.
9
Si aparece esta pantalla, seleccione No
compartir esta impresora y haga clic
en Siguiente.
10
Seleccione No y pulse Siguiente.
11
Cuando aparezca esta pantalla, haga
clic en Finalizar.
12
Si aparece la pantalla de prueba del
logotipo de Windows, haga clic en
Continuar.
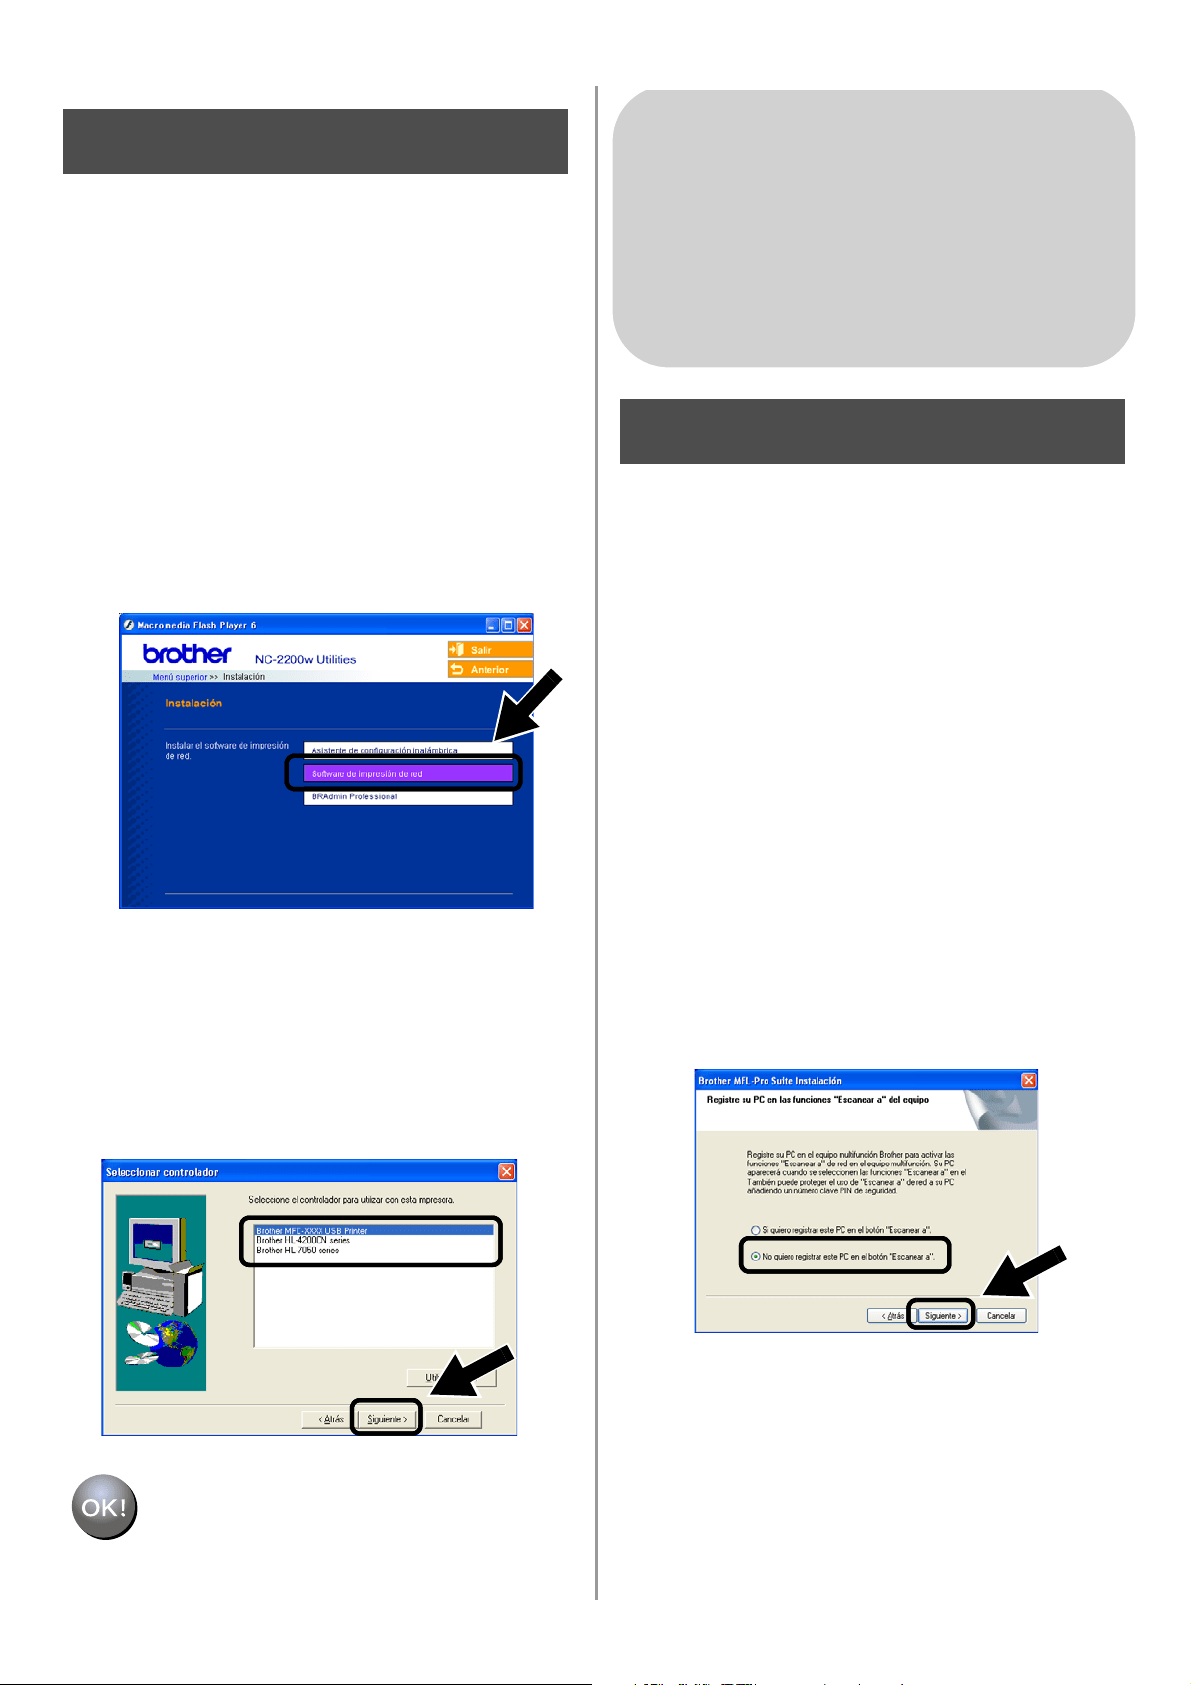
English
73
Instalación del software de
impresión de red
Tendrá que instalar el software de impresión
de red y configurarlo para la conexión de red
inalámbrica de la impresora/MFC/DCP
Brother. Siga los pasos descritos a
continuación.
1
Haga clic en Software de impresión de
red y siga las instrucciones que irán
apareciendo en pantalla.
2
Seleccione el mismo controlador de
impresora que se seleccionó en el
séptimo paso en la página
72. Resalte el
modelo que esté instalando de la lista de
impresoras/MFC/DCP y haga clic en
Siguiente.
La configuración habrá finalizado.
Instalación de MFL-Pro Suite
Tendrá que instalar MFL-Pro Suite para
realizar una conexión de red inalámbrica
desde su sistema a la impresora/MFC/DCP
Brother. El software está en el CD-ROM que
se incluye con su impresora/MFC/DCP. Para
instalar el software, siga los pasos de la
sección “Instalación del controlador y el
software para usuarios de cable de interfaz
de red” de la Guía de configuración rápida
que se incluye con su impresora/MFC/DCP.
■Para MFC-8420/8820D/8820DN/8220/8440/
8840D/8840DN/3820CN/3420CN y
DCP-8020/8025D/8025DN/8040/8045D/8045DN
Cuando se muestre esta pantalla en el proceso
de instalación, seleccione No y haga clic en
Siguiente.
Paso 5
Para usuarios de Windows
®
Grupo 2:
MFC-210C/420CN/410CN/620CN/
5440CN/5840CN/3240C/3340CN/8420/
8820D/8820DN/8220/8440/8840D/
8840DN/3820CN/3420CN/DCP-120C/
320CN/8020/8025D/8025DN/8040/
8045D/8045DN
Paso 4
English
Español
74
■ No se encontrarán algunos dispositivos
MFC/DCP con NC-2200w en la lista de
búsqueda durante la instalación. En ese caso,
vuelva a la pantalla que se muestra a
continuación y defina el nombre de nodo del
dispositivo NC-2200w de forma manual. Podrá
ver el nombre de nodo en la página de
configuración de red, consulte
Otra información
en la página 76.
Especificación de la dirección
de destino de digitalización
para la página principal del
dispositivo NC-2200w
Es necesario especificar la dirección de
destino de digitalización desde el URL del
dispositivo NC-2200w para utilizar el escáner
en una red. Siga los pasos descritos a
continuación.
1
Abra Internet Explorer e introduzca lo
siguiente en el campo Dirección.
http://dirección_ip_NC-2200w
Donde dirección_ip_NC-2200w es
la dirección IP o el nombre de nodo de su
dispositivo NC-2200w.
2
Abra la página General bajo
Configuration.
3
Introduzca la dirección IP de su sistema.
La configuración habrá finalizado.
■ La dirección IP o el nombre de nodo
de su dispositivo NC-2200w está en la
página de configuración de red. Para
obtener más información, consulte
Otra información en la página 76.
■
Se le solicitará un nombre y
contraseña de usuario. Introduzca lo
siguiente.
nombre de usuario:
admin
(sensible a mayúsculas y minúsculas)
contraseña:
access
(predeterminada)
Paso 5
■ Si la dirección IP de su sistema fue
asignada automáticamente por DHCP,
debe introducir el nombre del sistema,
debido a que la dirección IP puede
cambiar. El nombre puede ser el
nombre de sistema bajo Windows
®
o el
nombre del anfitrión DNS.
■ Para averiguar el nombre del sistema,
abra Propiedades en Mi PC y consulte
la ficha Nombre de equipo. Para
utilizar el nombre de dominio, hay que
asignar a la dirección del servidor DNS
por medio del servidor Web del
dispositivo NC-2200w y su navegador
Web.
(Los idiomas disponibles son inglés, alemán,
francés, holandés y japonés.)

English
75
Instalación y configuración
del controlador de impresora
por medio de la capacidad de
configuración simple de red
de Mac OS
®
X
Es necesario instalar el controlador de
impresora antes de configurar el sistema
para que funcione con el dispositivo
NC-2200w. Si el controlador de impresora ya
está instalado, puede omitir este paso. El
controlador está en el CD-ROM que se
incluye con su impresora/MFC/DCP; también
puede descargar el controlador de impresora
más actualizado desde nuestro sitio Web:
http://solutions.brother.com
Realice los siguientes pasos para instalar el
controlador de impresora.
1
Inserte el CD-ROM que se suministra en
su unidad de CD-ROM y haga doble clic
en el icono Start Here OSX para instalar
el software. Si aparece la pantalla de
idioma, seleccione su idioma.
2
(Para usuarios de impresoras láser
Brother) Haga clic en Instalación y, a
continuación, en Controlador de
impresora en las pantallas de menú.
(Para usuarios de dispositivos MFC/DCP
Brother) Haga clic en MFL-Pro Suite
para realizar la instalación.
3
Siga las instrucciones que irán
apareciendo en pantalla para instalar el
controlador de impresora.
4
Seleccione Aplicaciones en el menú Ir.
.
5
Abra la carpeta Utilities.
6
(Para usuarios de Mac OS
®
X 10.2.4)
Abra el icono Print Center.
(Para usuarios de Mac OS
®
X 10.3) Abra
el icono Printer Setup Utility.
7
Haga clic en el botón Añadir.
Para usuarios de Mac OS
®
X
10.2.4 - 10.3 o posterior
Paso 4
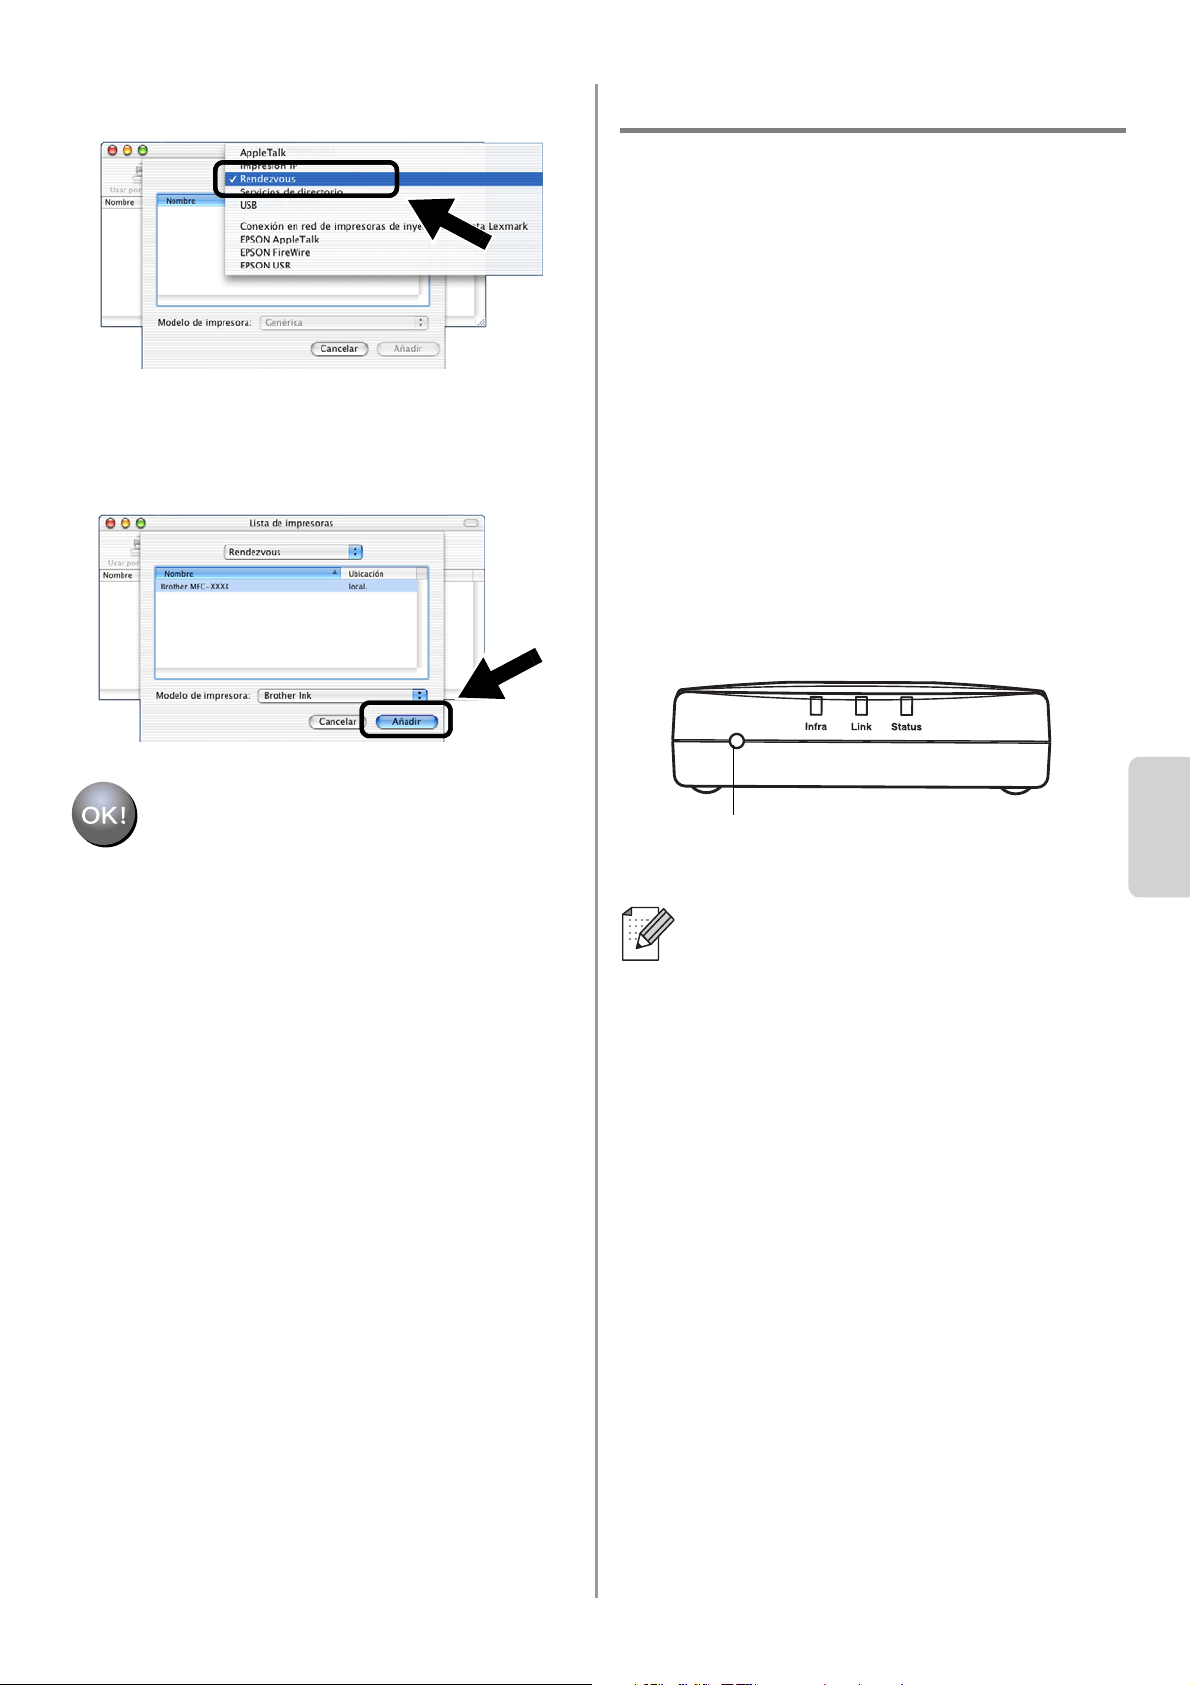
English
Español
76
8
Seleccione Rendezvous.
9
Seleccione el nombre de su modelo de
máquina y haga clic en Añadir.
La configuración habrá finalizado.
Otra información
Cómo imprimir una página de
configuración de red
Para imprimir la página de configuración de
red, pulse el botón de prueba del dispositivo
NC-2200w.
Cómo restablecer la configuración a los
valores predeterminados de fábrica
Si desea restaurar el dispositivo
NC-2200w a sus valores
predeterminados de fábrica (se
restaurará toda la información como la
configuración inalámbrica, la contraseña
y la dirección IP), mantenga pulsado el
botón de prueba durante más de 10
segundos.
Cuando restablezca la configuración
predeterminada de fábrica, tendrá que
realizar la configuración de nuevo desde
el paso 2 Cambio de la configuración
inalámbrica de su sistema para
configurar el dispositivo NC-2200w en la
página 66.
Botón de prueba
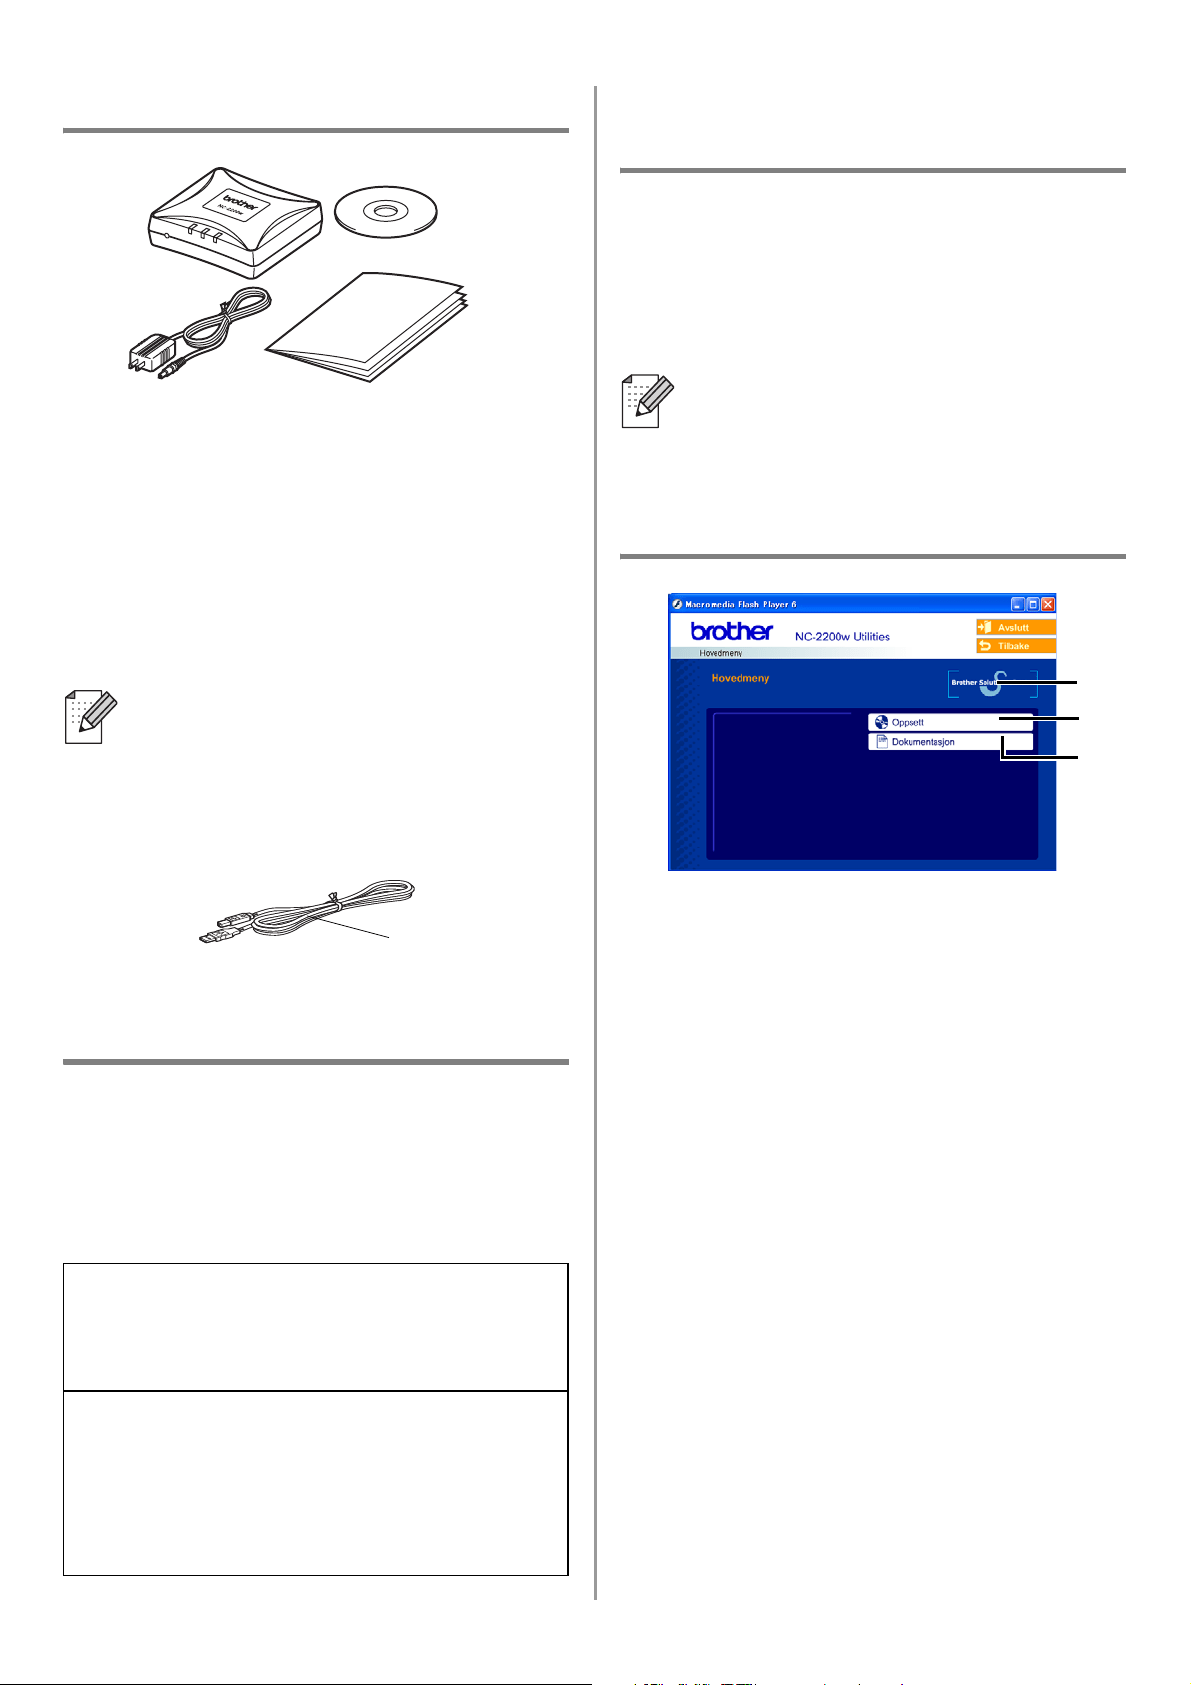
English
77
Komponenter
1
NC-2200w ekstern, trådløs
utskrifts-/skanneserver
2
Strømadapter
3
CD-ROM (inkludert
installasjonsprogramvare og
nettverkshåndbok for NC-2200w)
4
Hurtigoppsettguide
Modeller som støttes
NC-2200w støtter modellene som listes opp
nedenfor. Hvis ditt modellnummer ikke
nevnes, gå til NC-2200w-siden på
http://solutions.brother.com
for å bekrefte støtte til NC-2200w.
Operativsystemer som
støttes
Windows
®
Windows
®
95/98/98SE/Me/2000/XP og
Windows NT
®
4.0
Macintosh
®
Mac OS
®
X 10.2.4–10.3 eller høyere
Vedlagt CD-ROM
1
Brother Solutions Center
Brother Solutions Center
(http://solutions.brother.com) har all
programvaren og informasjonen du
trenger til Brother-skriveren/-MFC/-DCP
og NC-2200w. Du kan laste ned de
seneste driverne og verktøyene, lese
svar på vanlige spørsmål og få tips om
problemløsing.
2
Installasjon
Du kan kjøre veiviseren for trådløst
oppsett som guider deg gjennom
konfigureringen av NC-2200w. Du kan
også installere programvare for
nettverksutskrift og BRAdmin
Professional for Windows
®
.
3
Dokumentasjon
Se nettverkshåndboken for NC-2200w
og hurtigoppsettguiden i PDF-format.
NC-2200w kan kobles til
USB-grensesnittsporten på
Brother-skriveren/-MFC/-DCP. Det
følger ikke en USB-kabel med dette
produktet, så ha en korrekt USB-kabel
klar (med type A-B).
Gruppe 1:
HL-1440/1450/1470N/5040/ 5050/5070N/
5140/5150D/5170DN
MFC-9070/9180/9160
Gruppe 2:
MFC-210C/420CN/410CN/620CN/5440CN/584
0CN/3240C/3340CN/8420/8820D/8820DN/
8220/8440/8840D/8840DN/3820CN/3420CN/
DCP-110C/310C/8020/8025D/8025DN/8040/
8045D/8045DN
1
2
4
3
A
B
Hvis CD-en som følger med din
Brother-skriver/-MFC/-DCP ikke inkluderer
en Windows NT
®
4.0-driver, kan du ikke
bruke den i et Windows NT
®
4.0-miljø.
1
2
3
Type A-B
(Opp til 2 m)
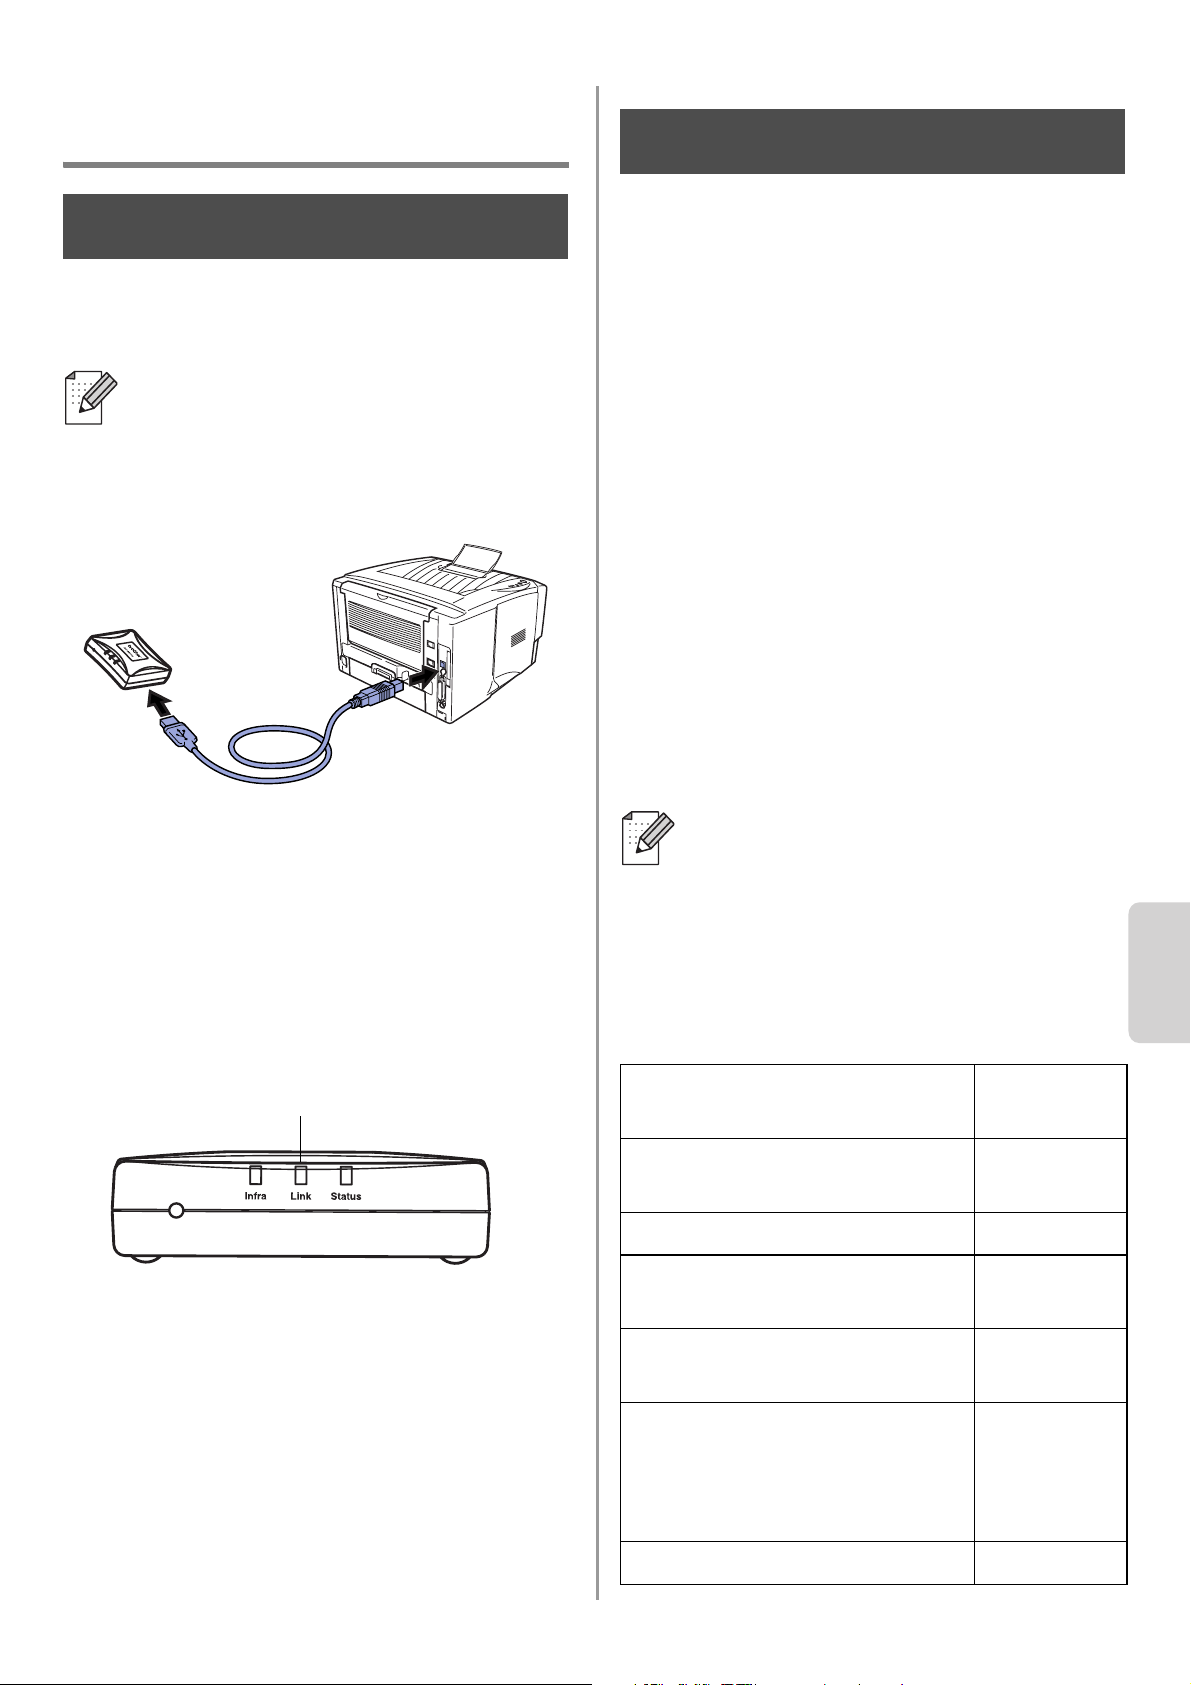
English
Norsk
78
Installere
utskrifts-/skanneserver
Installere utskriftsserveren
1
Koble en USB-kabel til NC-2200w og
Brother-skriveren/-MFC/-DCP.
2
Koble strømledningen fra
vekselstrømadapteren til NC-2200w.
3
Koble til vekselstrømadapteren og skru
på Brother-skriveren/-MFC/-DCP.
4
Påse at LED-diodelampen på NC-2200w
er på og vent i noen minutter.
Om du bruker personlig brannmur-
programvare (for eksempel Brannmur for
Internett-tilkobling som er tilgjengelig i
Windows XP), skru denne av før installering.
Når du er sikker på at du kan skrive ut, start
personlig brannmur-programvaren på nytt.
Endre din datamaskins
trådløse innstilling for å
konfigurere NC-2200w
Før du kan bruke
Brother-skriveren/-MFC/-DCP i et trådløst
nettverk, må NC-2200w være konfigurert til å
passe din nettverkskonfigurasjon.
For å konfigurere NC-2200w fra en trådløs
datamaskin på ditt nettverk, må du midlertidig
endre dine gjeldende trådløse innstillinger.
Før du endrer de gjeldende trådløse
innstillingene på din datamaskin, anbefaler vi
at du noterer deg dine gjeldende trådløse
nettverksinnstillinger. Du må gå tilbake til
disse innstillingene på slutten av trinn 3 på
side
81.
Gjeldende trådløse
nettverksinnstillinger på din datamaskin
NC-2200w kan ikke brukes med en
USB-HUB.
Trinn 1
Link-lys (grønt)
Vi anbefaler at du tar kontakt med
din nettverksadministrator hvis du
trenger assistanse med din
datamaskins trådløse innstillinger.
Enhet Gjeldende
innstilling
Kommunikasjonsmodus:
(Infrastruktur/ad-hoc)
Nettverksnavn (SSID/ESSID)
Kanal: (1-14)
*Om nødvendig.
Kryptering:
(INGEN/WEP/Annen)
Krypteringsnøkkelens
størrelse og type:
(64 bit, 128 bit / ASCII, HEX /
Annen)
Krypteringsnøkkel:
Trinn 2
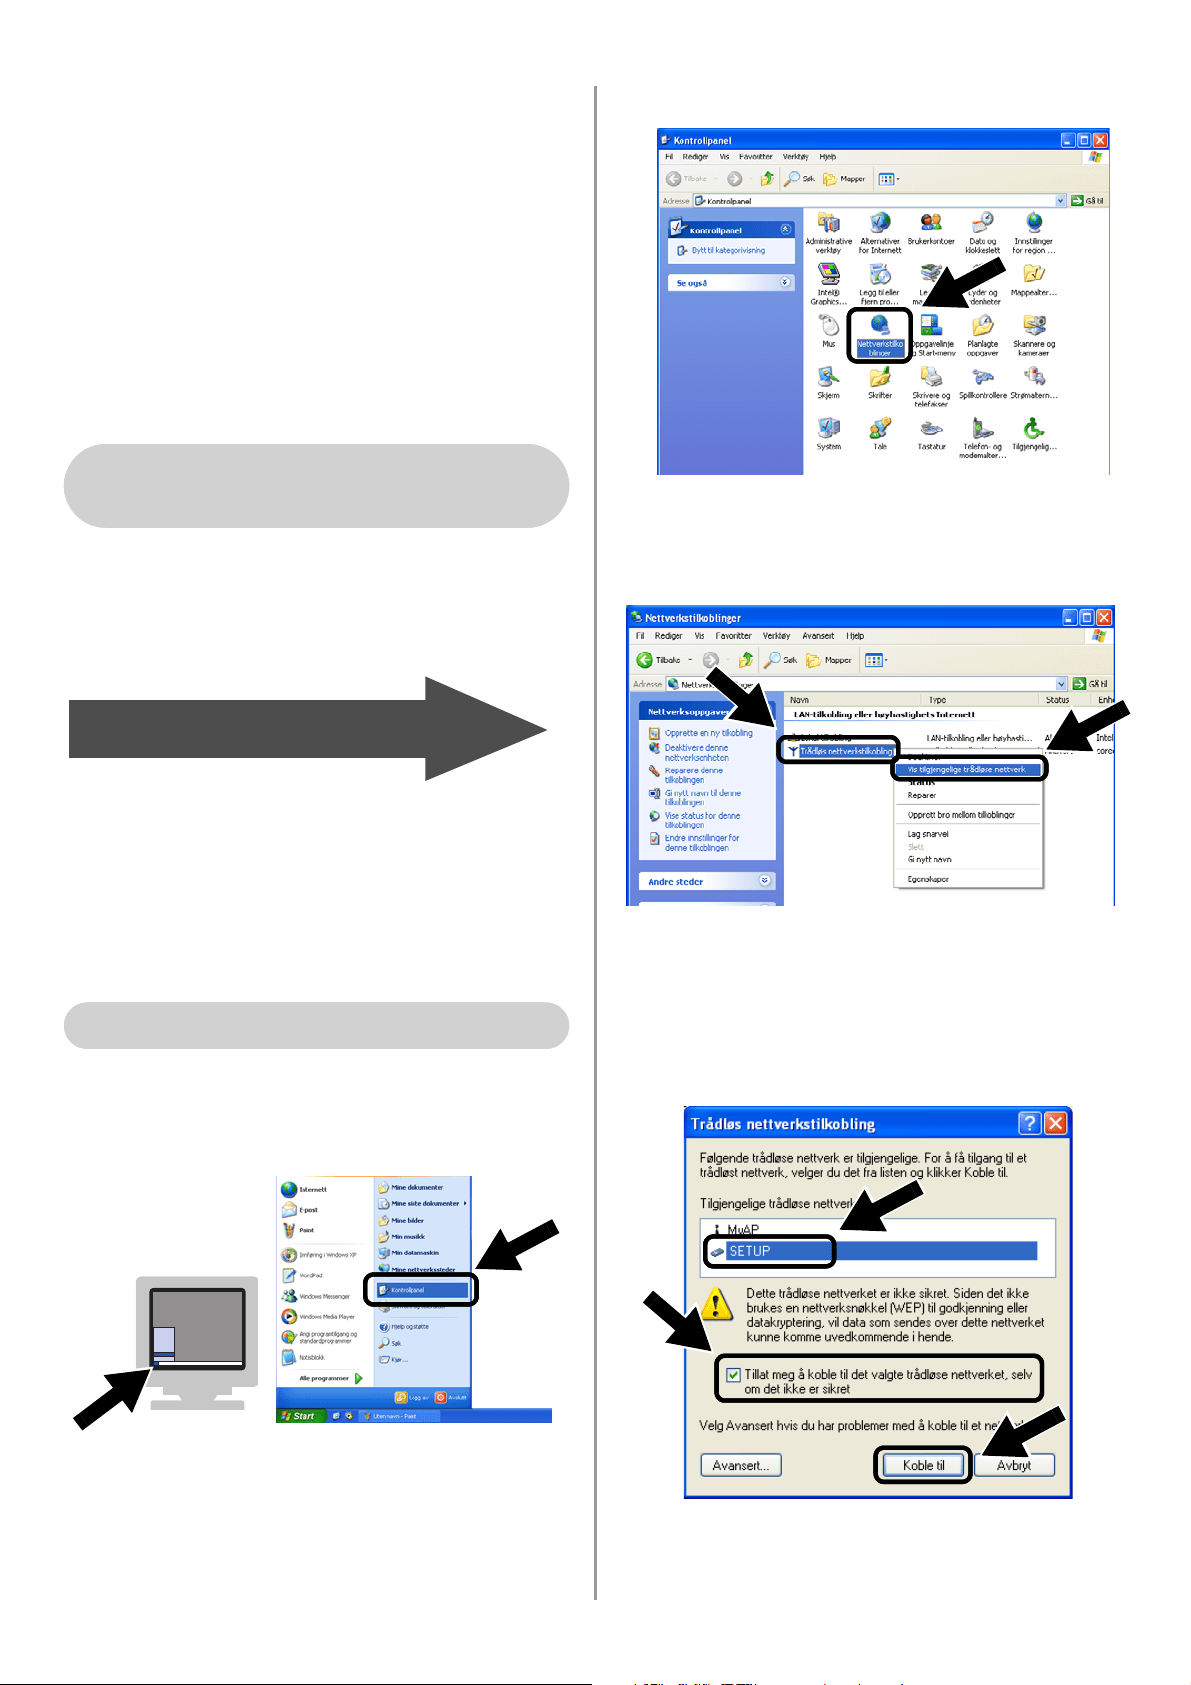
English
79
For å kommunisere med ikke-konfigurert
NC-2200w, endre din trådløse
datamaskininnstilling til:
Kommunikasjonsmodus: Ad-hoc
(kanal 11)
Nettverksnavn (SSID/ESSID): SETUP
(skiller mellom små og store bokstaver)
Kryptering: Ingen
Se instruksjonene fra produsenten av det
trådløse kortet for hvordan du endrer de
trådløse innstillingene, og gå deretter til trinn
3
Konfigurere utskrifts-/skanneserveren.
Hvis du bruker Windows
®
XP eller Mac
OS
®
X 10.2.4 og du bruker disses innebygde
trådløse Ethernet-egenskaper, bruk
følgende trinn for hvert operativsystem.
1
Klikk på Start og deretter på
Kontrollpanel.
2
Klikk på ikonet Nettverkstilkoblinger.
3
Velg og høyreklikk på Trådløs
nettverkstilkobling. Klikk Vis
tilgjengelige trådløse nettverk.
4
Du kan se nettverksnavnet (SSID/ESSID)
til NC-2200w i boksen
Tilgjengelige
trådløse nettverk
. Velg
SETUP
og merk
av i boksen for
Tillat meg å koble...
. Klikk
på knappen
Koble til
.
For brukere av Windows
®
98/Me/2000 og Windows NT
®
4.0
Gå til trinn 3 på side 81
For brukere av Windows
®
XP
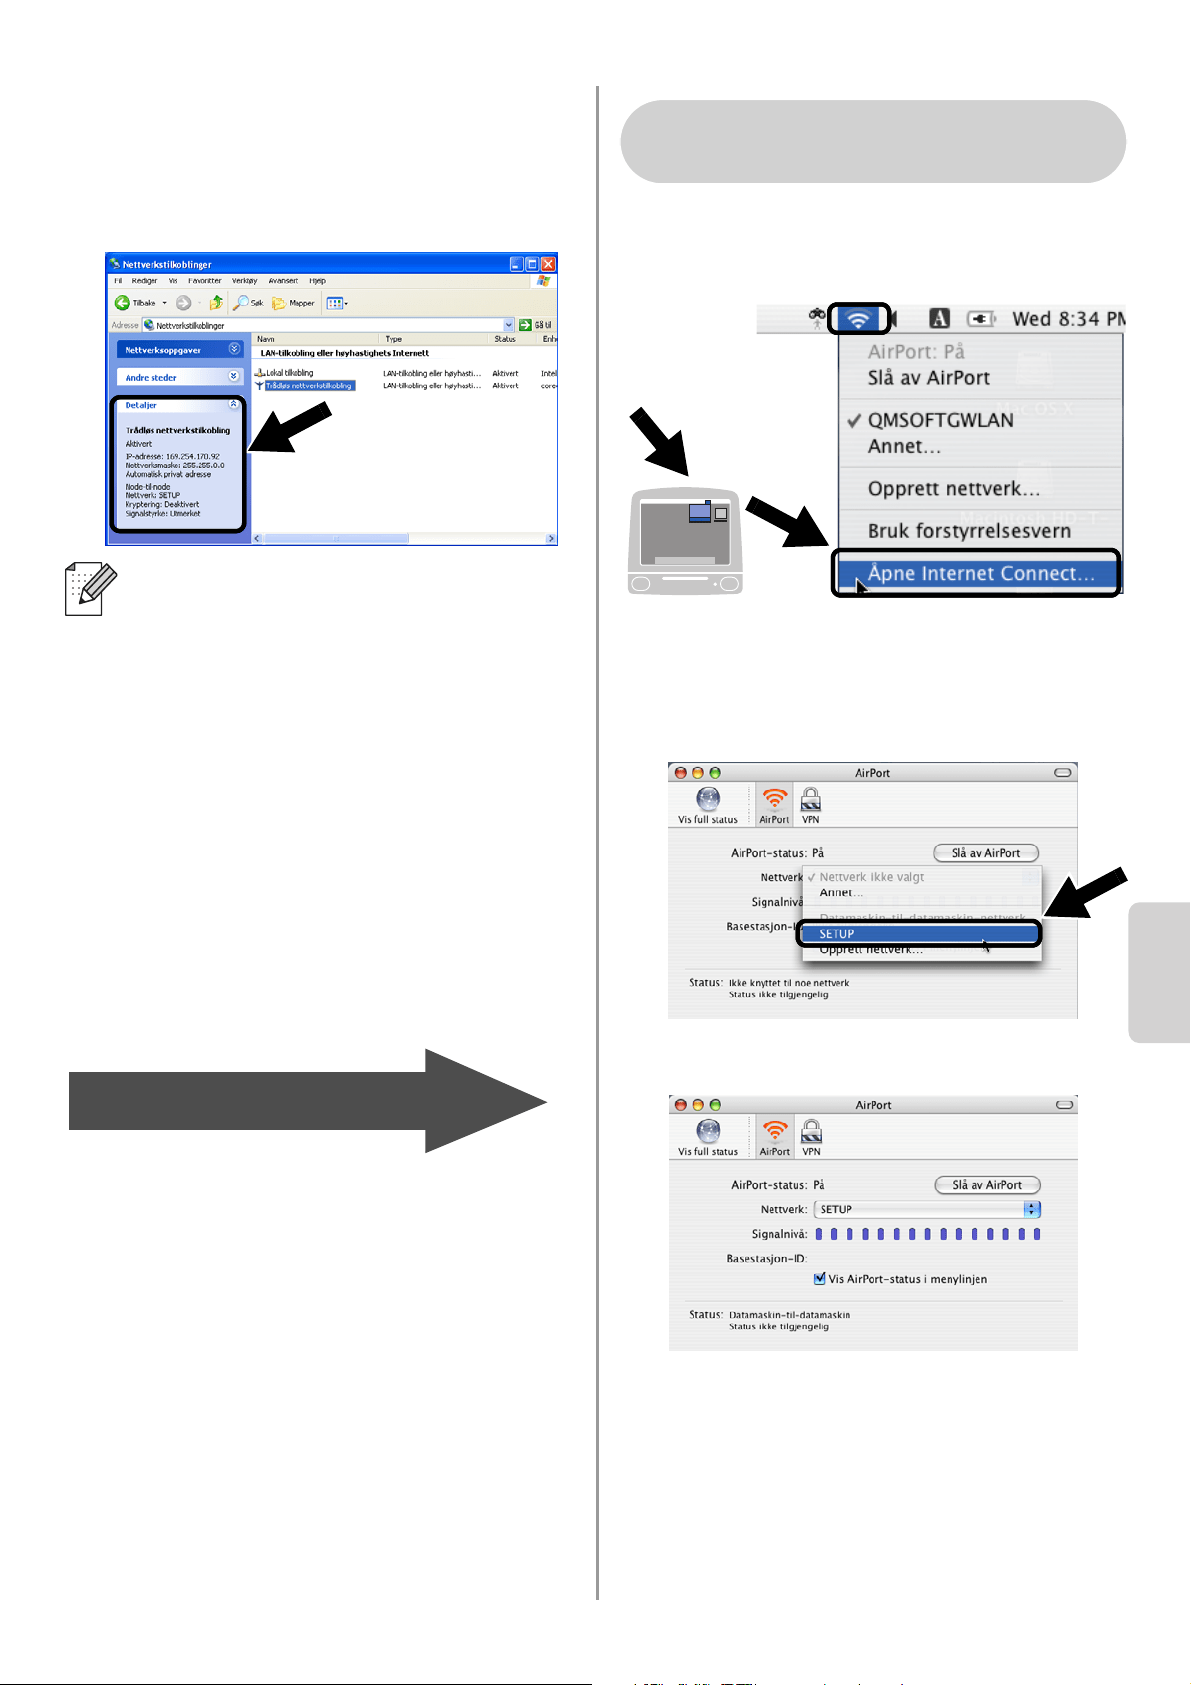
English
Norsk
80
5
Sjekk statusen for det trådløse
nettverket. Det kan ta noen minutter å
endre fra visning fra 0.0.0.0- til
169.254.x.x-IP-adresse på skjermen.
(der x.x er tall mellom 0 og 255).
1
Klikk på ikonet for AirPort-status og velg
Åpne Internet Connect....
2
Klikk på kategorien Nettverk for å se
tilgjengelige trådløse nettverk. Du kan se
nettverksnavnet (SSID/ESSID) i
alternativet Nettverk. Velg SETUP.
3
Ditt trådløse nettverk er oppkoblet.
Hvis nettverksnavnet (SSID/ESSID) du
ønsker å bruke ikke er listet, prøv å gjøre
følgende:
■ Koble fra strømadapteren, sett den
inn igjen og vent så i noen minutter.
■ Flytt Brother-skriveren/-MFC/-DCP
med NC-2200w installert nærmere til
din datamaskinen og prøv igjen.
■ Nullstill NC-2200w tilbake til standard
fabrikkinnstillinger og prøv på nytt. Se
side
88 for informasjon om
tilbakestilling til fabrikkinnstillinger.
■ Se kapittel 6 i
nettverksbrukerhåndboken til
NC-2200w på CD-ROM-en som
leveres med NC-2200w.
Gå til trinn 3 på side 81
For brukere av Mac OS
®
X
10.2.4–10.3 eller høyere

English
81
Konfigurere
utskrifts-/skanneserveren.
1
Sett CD-ROM-en for NC-2200w inn i
CD-ROM-stasjonen.
(For Windows
®
-brukere)
Åpningsskjermen vil vises automatisk.
(For brukere av Mac OS
®
X 10.2.4 til 10.3
eller høyere) Dobbeltklikk på ikonet
NC2200w på din Macintosh
®
, og
dobbeltklikk deretter på ikonet Start
Here OSX.
2
Velg ditt språk.
3
Klikk på Oppsett og deretter Veiviser
for trådløs oppsett.
4
Gå gjennom Velkommen-informasjonen
og når du er sikker på at du har fullført de
nødvendige oppgavene, klikk på Neste.
5
Følg skjermene. For mer informasjon, se
kapittel 2 i nettverksbrukerhåndboken til
NC-2200w på CD-ROM-en som vi
leverer med NC-2200w.
6
Etter å ha gått ut av veiviseren for
trådløst oppsett, endre de trådløse
innstillingene på datamaskinen tilbake til
deres originale innstilling ved å bruke
informasjonen du merket deg under
Endre din datamaskins trådløse
innstilling for å konfigurere NC-2200w på
side 78.
Hvis nettverksnavnet (SSID/ESSID) du
ønsker å bruke ikke er listet, prøv å gjøre
følgende:
■ Koble fra strømadapteren, sett den
inn igjen og vent så i noen minutter.
■ Flytt Brother-skriveren/-MFC/-DCP
med NC-2200w installert nærmere til
din datamaskinen og prøv igjen.
■ Nullstill NC-2200w tilbake til standard
fabrikkinnstillinger og prøv på nytt. Se
side
88 for informasjon om
tilbakestilling til fabrikkinnstillinger.
■ Se kapittel 6 i
nettverksbrukerhåndboken til
NC-2200w på CD-ROM-en som
leveres med NC-2200w.
Trinn 3:
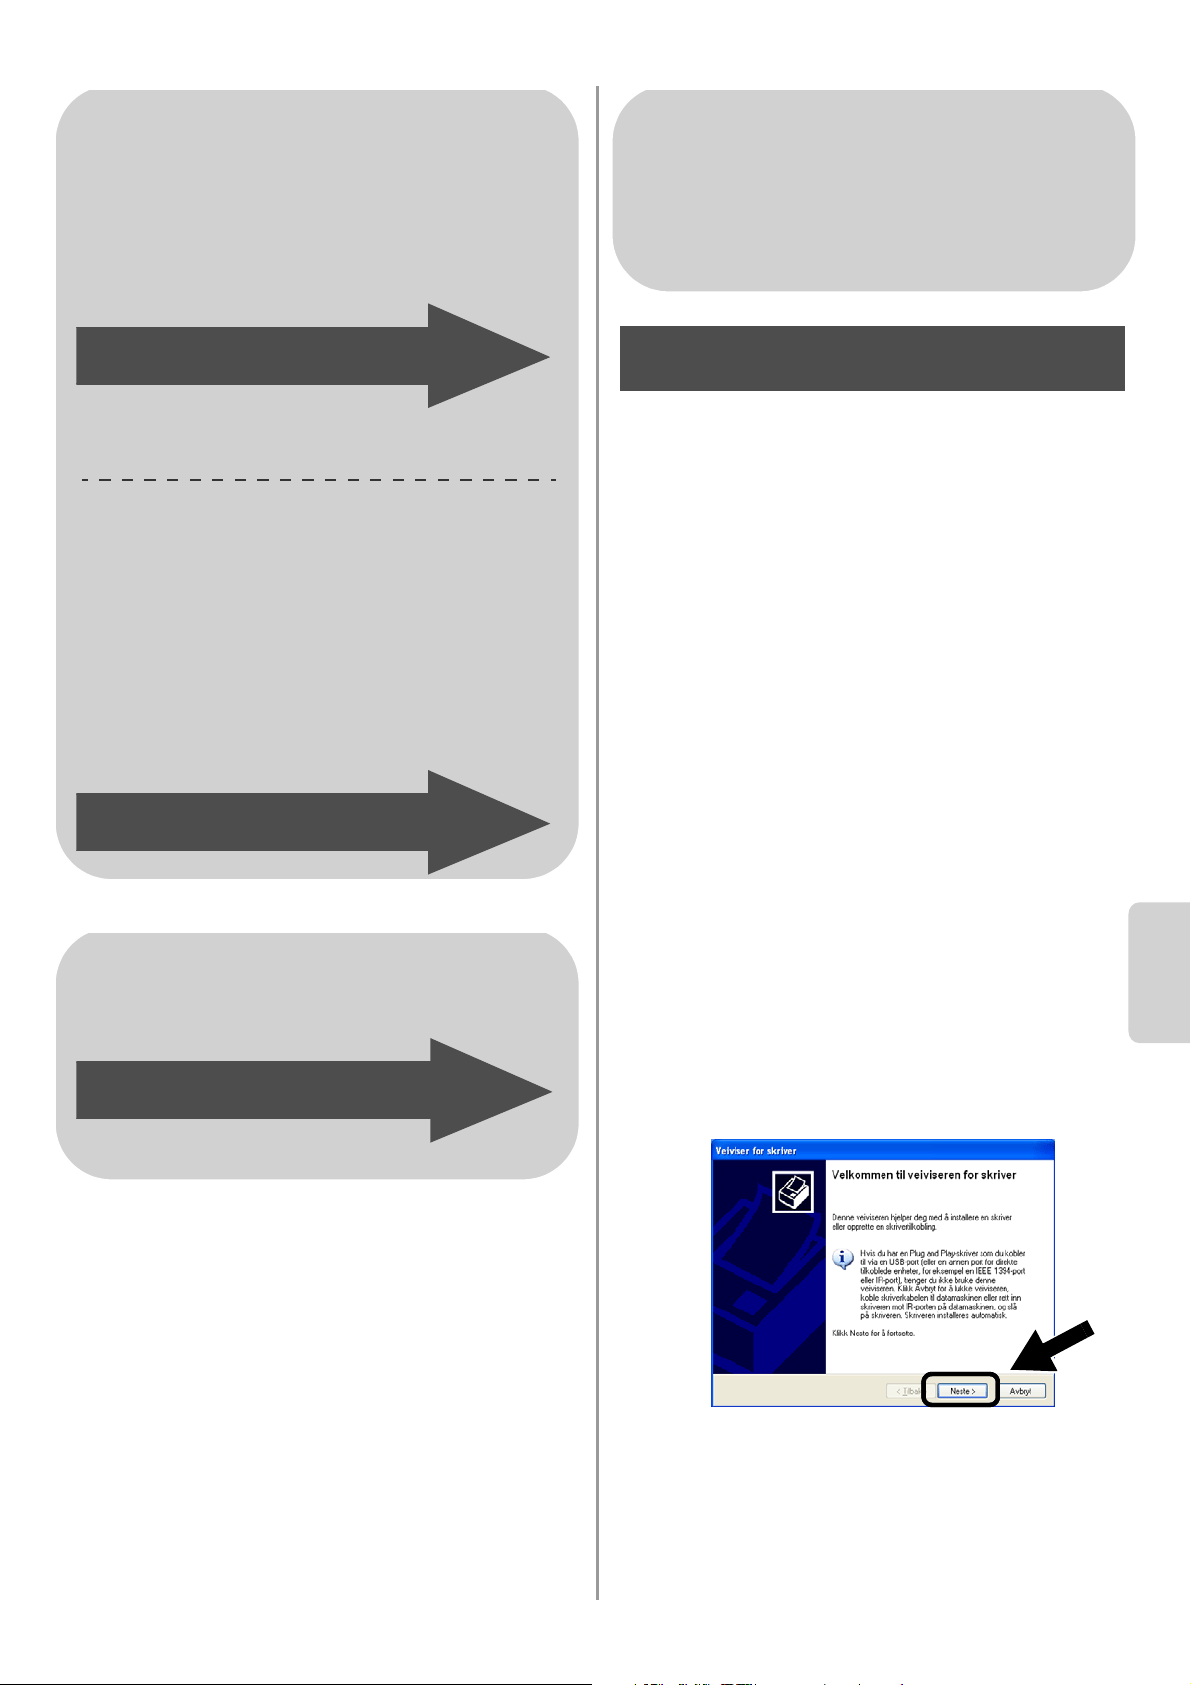
English
Norsk
82
Installere skriverdriveren
Brukere av ovenfor nevnte modeller må
installere skriverdriveren før de kan stille inn
datamaskinen til å fungere sammen med
NC-2200w. Hvis skriverdriveren allerede er
installert, kan du hoppe over dette trinnet.
Driveren finnes på CD-ROM-en som følger
med Brother-skriveren/-MFC/-DCP.
Skriverdriveren kan også lastes ned fra
Brother Solutions Center:
<http://solutions.brother.com>.
For å installere skriverdriveren ved å bruke
CD-ROM-en, følg trinnene under.
Instruksjonene i denne delen er basert på
Windows
®
XP.
1
Velg Start og deretter Skrivere og
telefakser. Klikk på Legg til skriver og
veiviseren for skriverinstallasjon starter.
Når denne skjermen vises, klikker du på
Neste.
For Windows
®
-brukere
Gruppe 1:
HL-1440/1450/1470N/5040/ 5050/
5070N/5070DN/5140/5150D/5170DN
MFC-9070/9180/9160
Gruppe 2:
MFC-210C/420CN/410CN/620CN/
5440CN/5840CN/3240C/3340CN/8420/
8820D/8820DN/8220/8440/8840D/
8840DN/3820CN/3420CN/DCP-120C/
320CN/8020/8025D/8025DN/8040/
8045D/8045DN
Gå til trinn 4 på side 82
Gå til trinn 4 på side 85
For brukere av Mac OS
®
X
10.2.4 – 10.3 eller høyere
Gå til trinn 4 på side 87
For Windows
®
-brukere
Gruppe 1:
HL-1440/1450/1470N/5040/ 5050/
5070N/5070DN/5140/5150D/5170DN
MFC-9070/9180/9160
Trinn 4
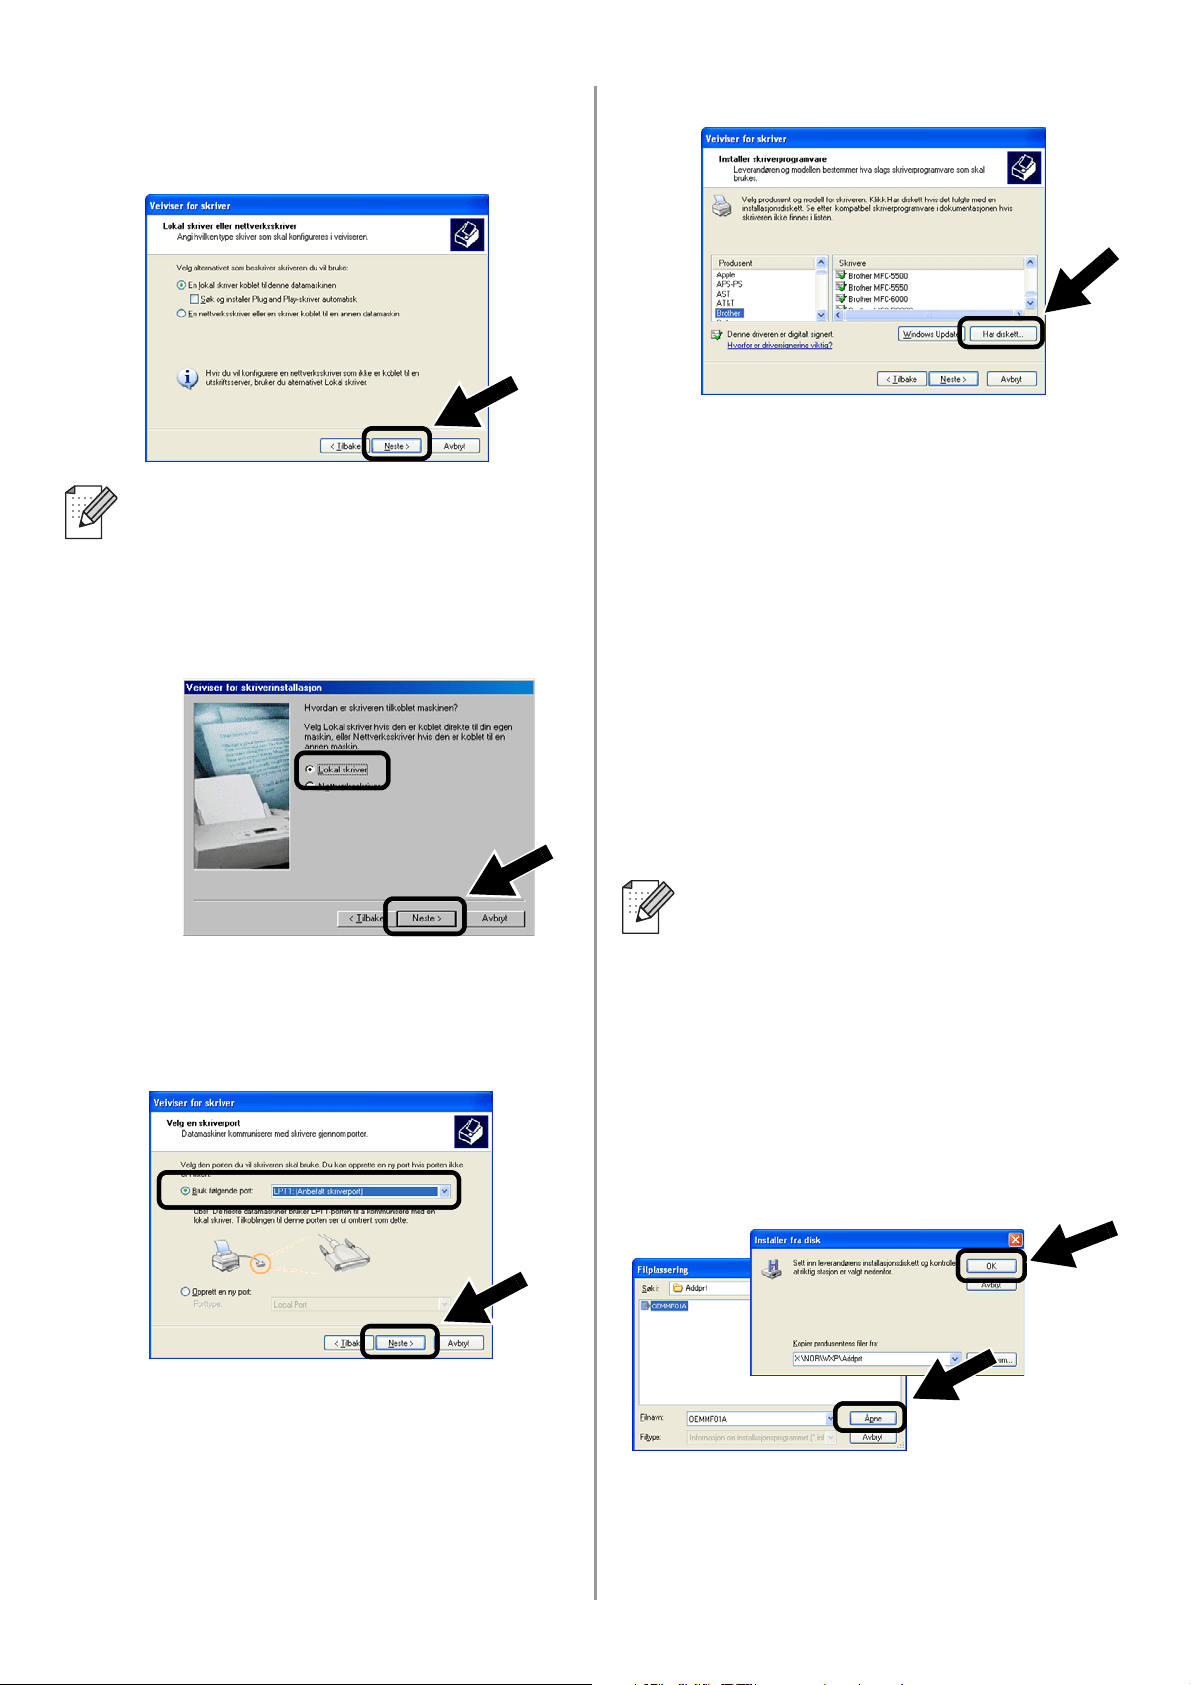
English
83
2
Fjern markeringen for Søk og installer
Plug and Play-skriver automatisk og
klikk så på Neste.
3
Velg LPT1:(Anbefalt skriverport) fra
listen for valg av skriverport, og klikk på
Neste.
4
Velg Har diskett.
5
(For brukere av Brother-laserskriver)
Se gjennom CD-ROM-en og velg
mappen Driver og klikk på Åpne. Velg
så mappen Win2k_xp (eller mappen for
ditt operativsystem) og klikk på Åpne, og
velg deretter ønsket språk og klikk på
Åpne.
(For brukere av Brother-MFC/-DCP)
Se gjennom CD-ROM-en og velg
mappen for ønsket språk. Klikk på Åpne,
velg deretter mappen WXP (eller
mappen for ditt operativsystem) og klikk
på Åpne. Velg til slutt mappen Addprt og
klikk på Åpne.
6
Velg Åpne og klikk deretter OK.
■ Operativsystemet ditt har kanskje
ikke denne skjermen.
■ (For brukere av Windows
®
98/Me/Windows NT
®
4.0) Hvis denne
skjermen vises, velg Lokal skriver og
klikk så på Neste.
■ Hvis operativsysstemet ditt er
Windows
®
XP og mappen Win2k_xp
ikke finnes på listen, velg mappen
Win2k.
■ Hvis du ikke ser en mappe for
operativsystemet ditt i mappen
Driver, men du istedet ser: inst, PCL,
PS, USBW98ME, osv. anbefaler vi at
du velger mappen PCL. Du vil se den
korrekte mappen i operativsystemet.
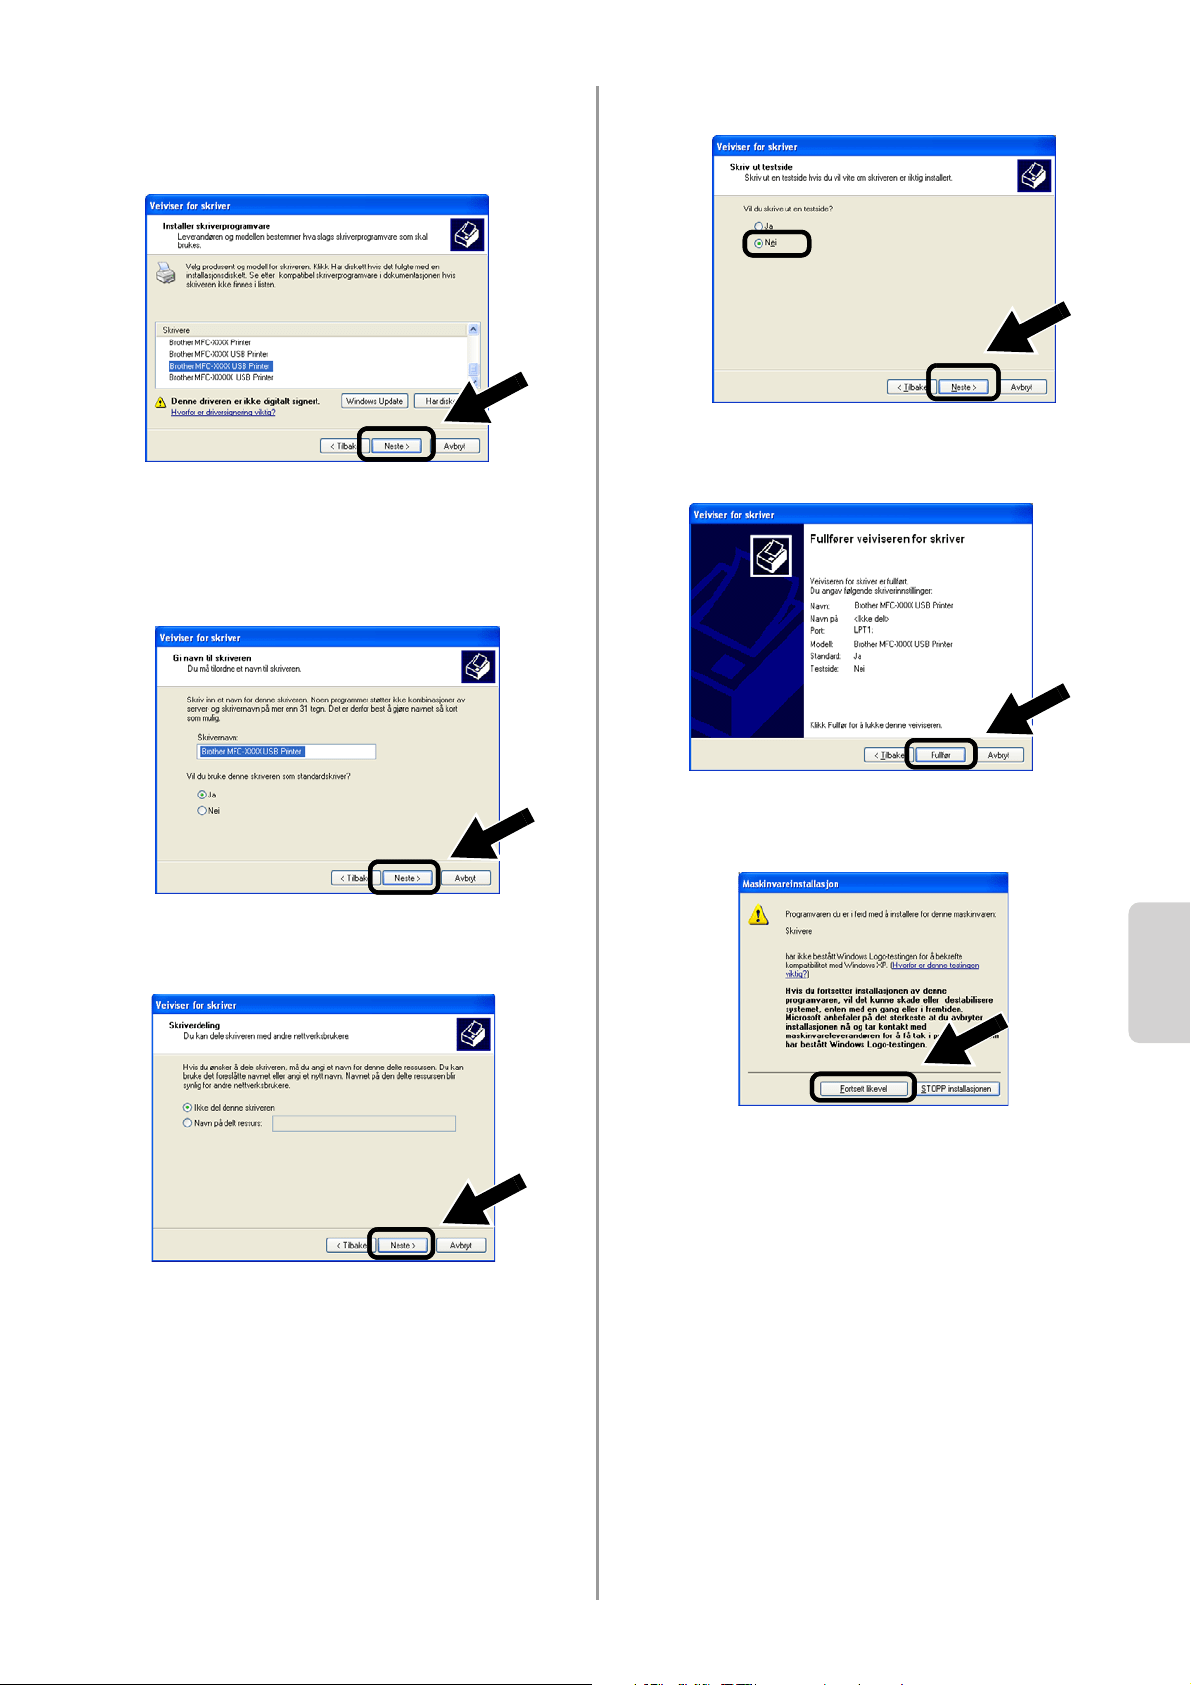
English
Norsk
84
7
Velg modellen du installerer fra listen
over skrivere/MFC-er/DCP-er og klikk på
Neste.
8
Modellen du installerer vises i vinduet.
Velg Ja eller Nei hvis du vil at denne
skriveren skal være din standardskriver,
og klikk så på Neste.
9
Hvis denne skjermen vises, velg Ikke del
denne skriveren og Neste.
10
Velg Nei, og klikk deretter på Neste.
11
Når denne skjermen vises, klikk på
Fullfør.
12
Hvis testskjermen med Windows-logoen
vises, klikk på Fortsett likevel.
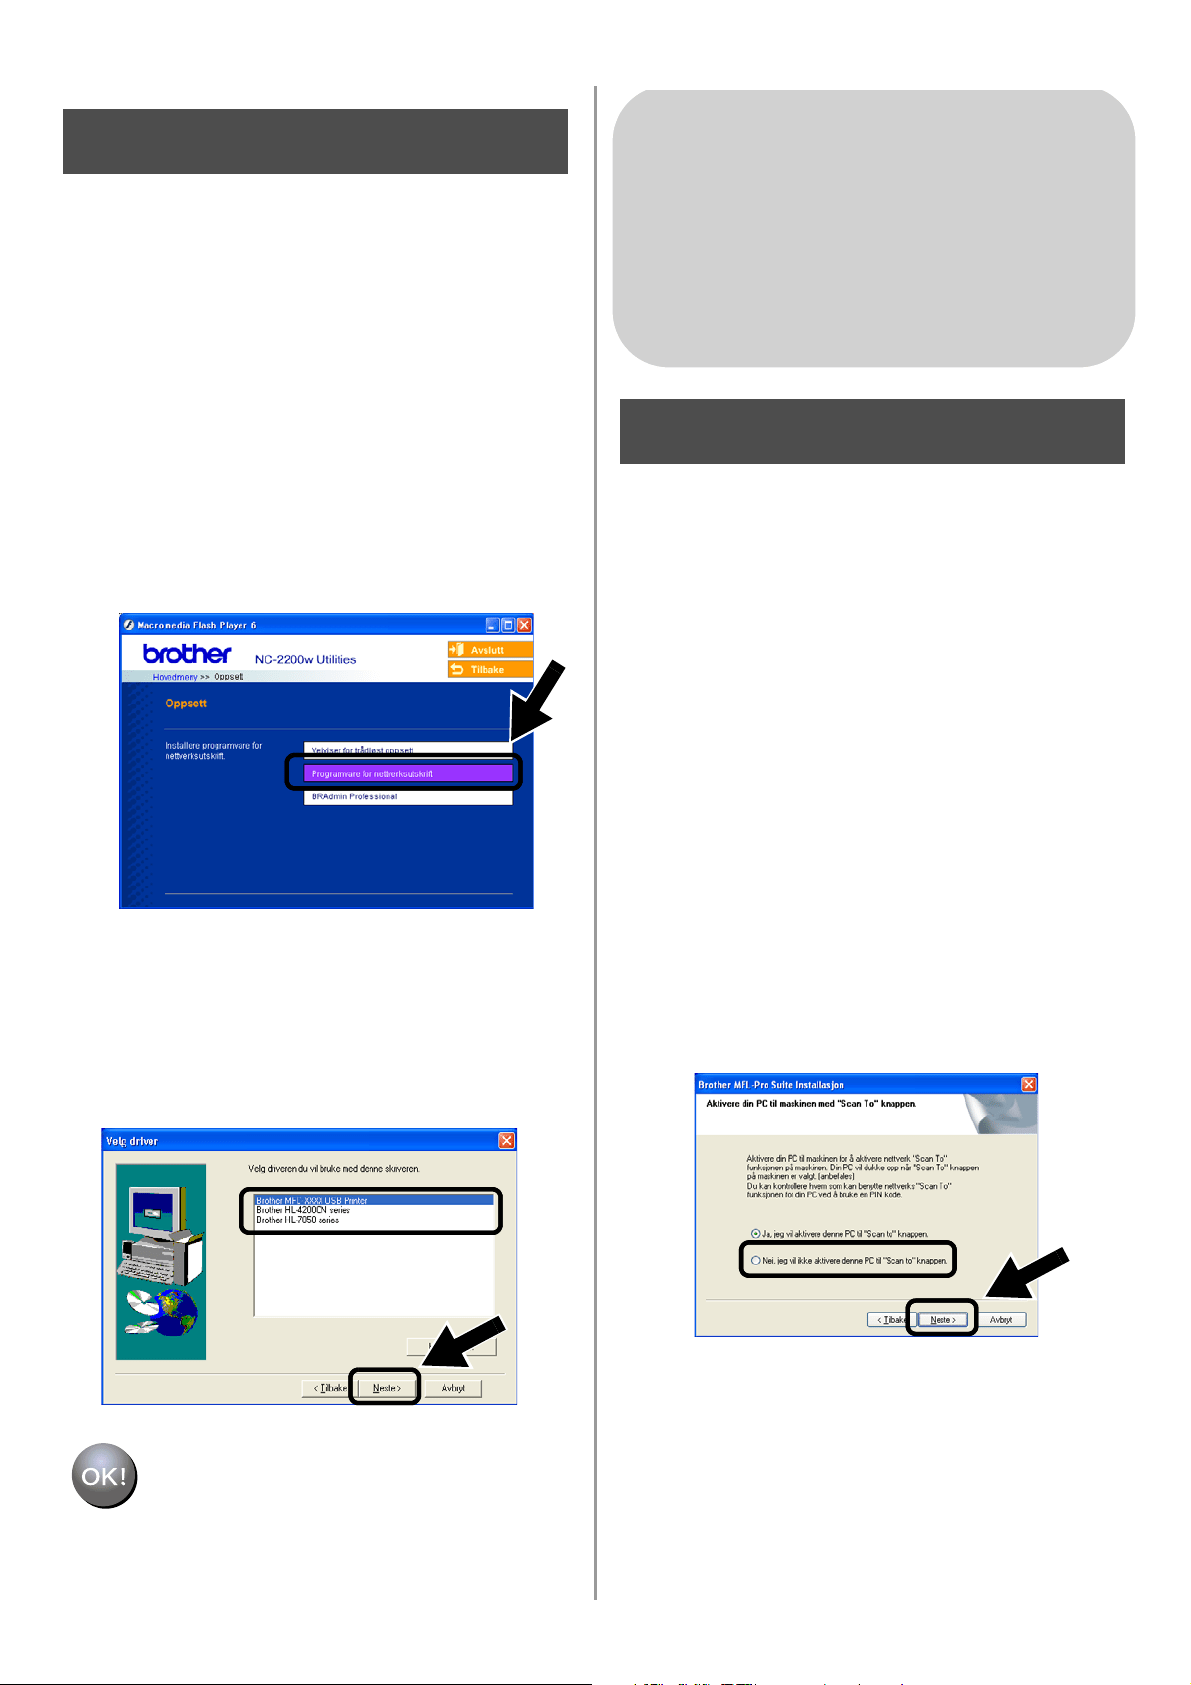
English
85
Installere programvare for
nettverksutskrift
Du må installere programvaren for
nettverksutskrift, og konfigurere den for den
trådløse nettverksforbindelsen til Brothers
skriver/MFC/DCP. Følg trinnene beskrevet
under.
1
Klikk på Programvare for
nettverksutskrift, og følg deretter
instruksene på skjermen.
2
Velg den samme skriverdriveren som
den du valgte i trinn sju på side
84. Velg
modellen du installerer fra listen over
skrivere/MFC-er/DCP-er og klikk på
Neste.
Installasjonen er fullført.
Installere MFL-Pro Suite
Du må installere MFL-Pro Suite for å lage en
trådløs nettverksforbindelse fra din
datamaskin til Brother-skriveren/-MFC/-DCP.
Denne programvaren finnes på CD-ROM-en
som følger med din MFC/DCP. For å
installere programvaren følger du trinnene i
"Installere driver og programvare for brukere
av nettverksgrensesnittkabel" i
hurtigoppsettguiden som følger med din
skriver/MFC/DCP.
■For MFC-8420/8820D/8820DN/8220/8440/
8840D/8840DN/3820CN/3420CN og
DCP-8020/8025D/8025DN/8040/8045D/8045DN
Når dette skjermbildet vises under
installasjonsprosessen, velg Nei og klikk så på
Neste.
Trinn 5
For Windows
®
-brukere
Gruppe: 2
MFC-210C/420CN/410CN/620CN/
5440CN/5840CN/3240C/3340CN/8420/
8820D/8820DN/8220/8440/8840D/
8840DN/3820CN/3420CN/DCP-120C/
320CN/8020/8025D/8025DN/8040/
8045D/8045DN
Trinn 4
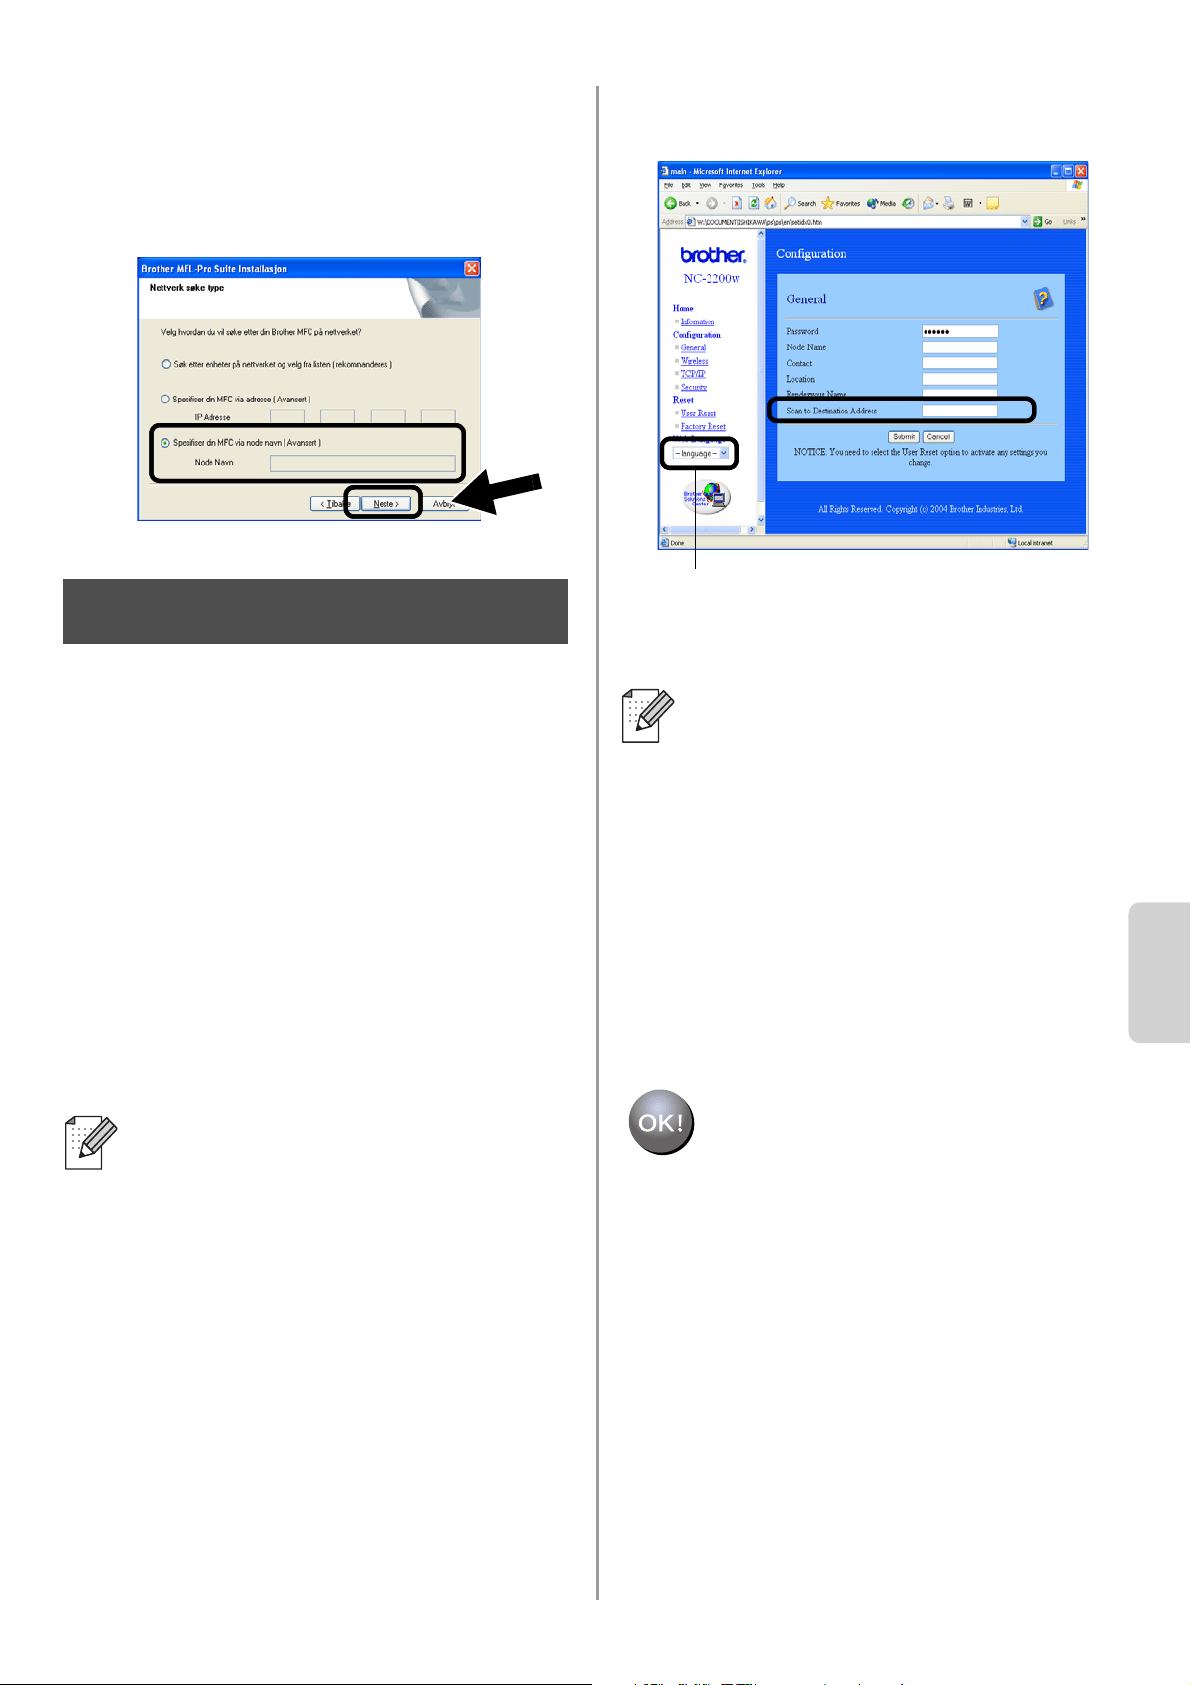
English
Norsk
86
■
Noen MFC-er/DCP-er med NC-2200w kan ikke
finnes i søkelisten under installering. Hvis dette er
tilfelle, gå tilbake til skjermbildet vist nedenfor og
still inn nodenavn for NC-2200w manuelt. Du kan
se nodenavnet på nettverkskonfigurasjonssiden,
Annen informasjon på side 88.
Spesifisere måladresse for
skanning ved hjelp av
hjemmesiden til NC-2200w
Du må spesifisere skannemåladressen fra
URL-en NC-2200w for å bruke skanneren på
et nettverk. Følg trinnene beskrevet under.
1
Åpne Internet Explorer og skriv inn det
følgende i URL-feltet.
http://NC-2200w_ip_adresse
Der NC-2200w_ip_adresse er
IP-adressen eller nodenavnet til
NC-2200w.
2
Gå til siden Generelt under
Konfigurasjon.
3
Tast inn din datamaskins IP-adresse.
Installasjonen er fullført.
■ IP-adressen eller nodenavnet til din
NC-2200w er skrevet på
nettverkskonfigurasjonssiden. For
mer informasjon, se
Annen
informasjon på side 88.
■ Du blir bedt om å angi et brukernavn
og et passord. Angi følgende.
brukernavn : admin (skiller mellom
små og store bokstaver)
passord: access (standard)
Trinn 5
■ Hvis din datamaskins IP-adresse ble
automatisk tildelt ved hjelp av DCHP,
bør du angi datamaskinnavnet fordi
IP-adressen kan endres. Dette navnet
kan være Windows
®
-datamaskinens
navn eller navnet til en DNS-vert.
■ For å finne datamaskinens navn, åpne
Egenskaper fra Min datamaskin og
se kategorien Datamaskinnavn. For å
bruke domenenavnet må du tildele
DNS-serveradressen ved å bruke
nettserveren i NC-2200w og din
nettleser.
(Tilgjengelige språk er engelsk, tysk,
fransk, nederlandsk og japansk.)
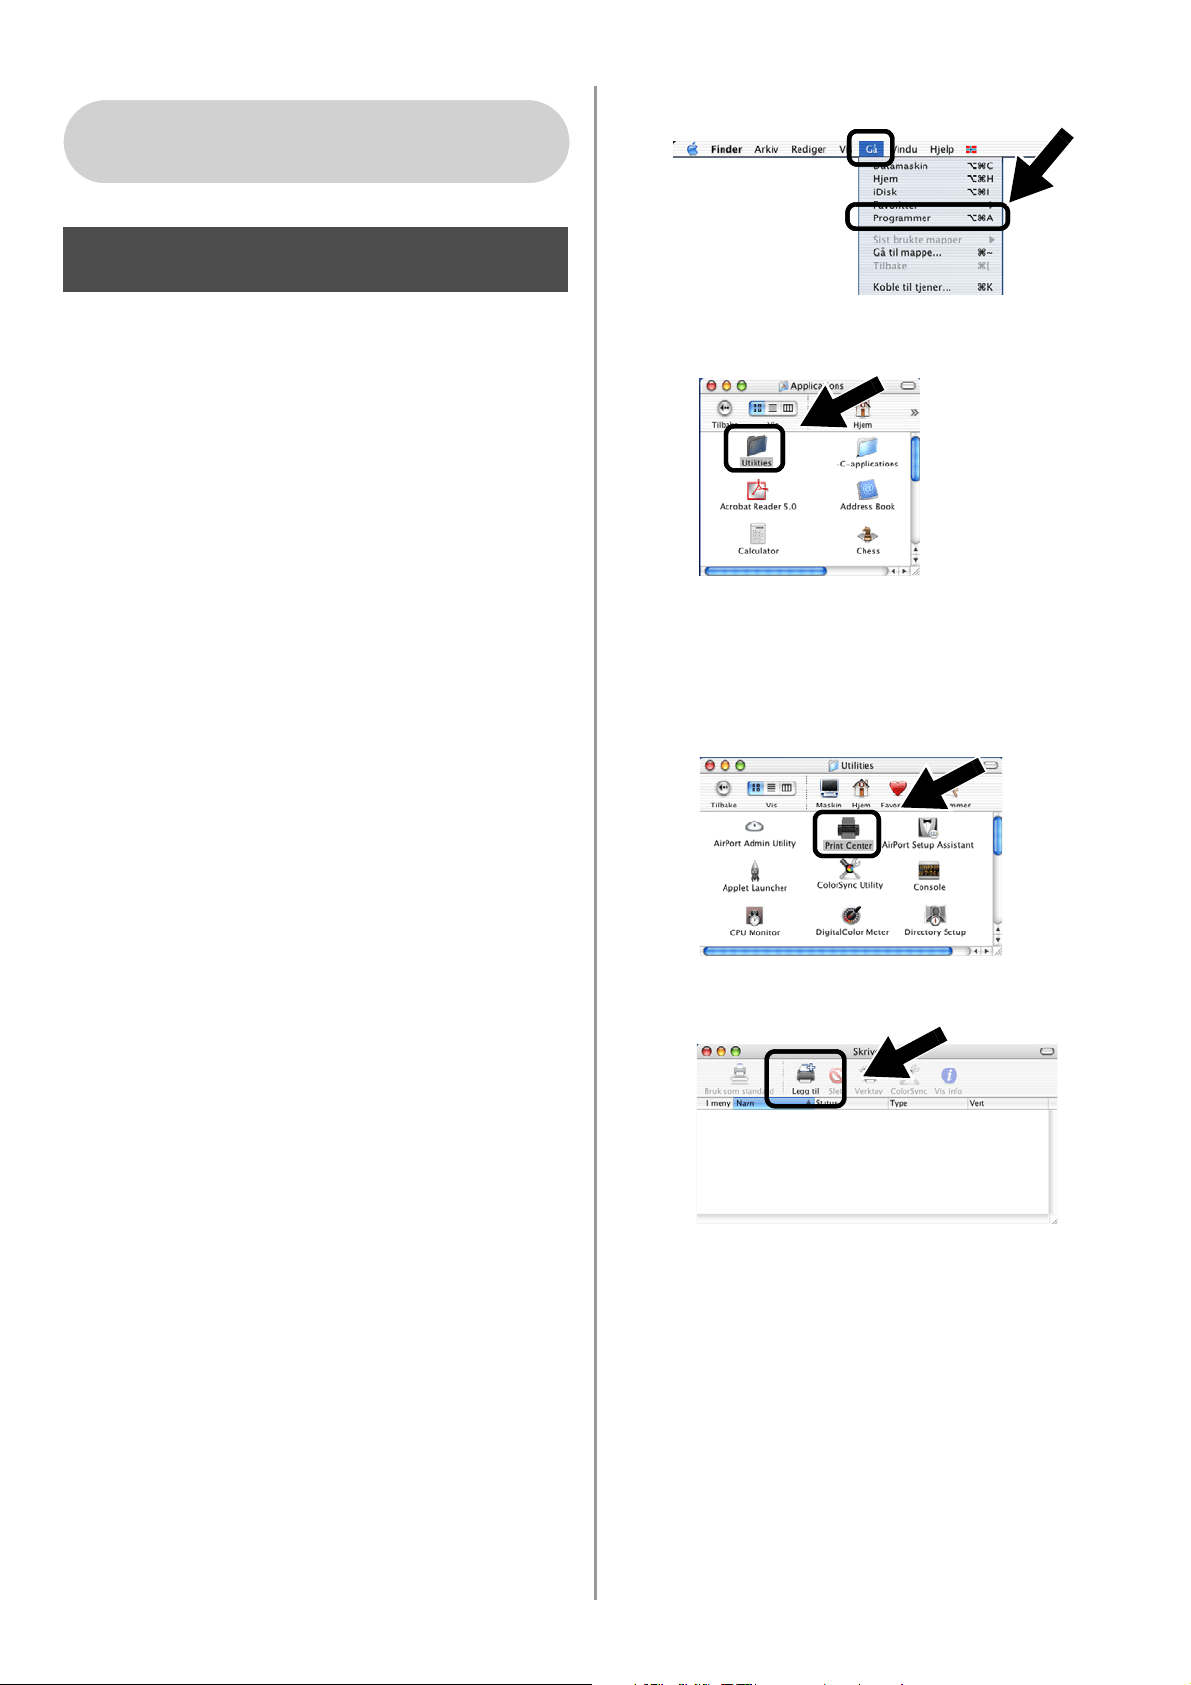
English
87
Installere og konfigurere
skriverdriveren ved hjelp av
funksjonene for enkel
nettverkskonfigurasjon i Mac
OS
®
X
Du må installere skriverdriveren før du kan
stille inn datamaskinen til å fungere sammen
med NC-2200w. Hvis skriverdriveren
allerede er installert, kan du hoppe over dette
trinnet. Driveren finnes på CD-ROM-en som
fulgte med din skriver/MFC/DCP eller du kan
laste ned den nyeste skriverdriveren fra vårt
nettsted:
http://solutions.brother.com
Følg trinnene nedenfor for å installere
skriverdriveren.
1
Sett den vedlagte CD-ROM-en i
CD-ROM-stasjonen og dobbeltklikk på
ikonet Start Here OSX for å installere
programvaren. Hvis skjermen for
språkvalg vises, velg ditt språk.
2
(For brukere av Brother-laserskriver)
Klikk Programvarinstallasjon og
deretter Skriverdriver på
menyskjermene.
(For brukere av Brother MFC/DCP) Klikk
MFL-Pro Suite for å installere.
3
Følg instruksjonene på skjermen for å
installere skriverdriveren.
4
Velg Programmer fra Gå-menyen.
.
5
Åpne mappen Utilities.
6
(For brukere av Mac OS
®
X 10.2.4 ) Åpne
ikonet Print Center.
(For brukere av Mac OS
®
X 10.3)
Åpne Skriveoppsettverktøy.
7
Velg Legg til.
For brukere av Mac OS
®
X
10.2.4–10.3 eller høyere
Trinn 4
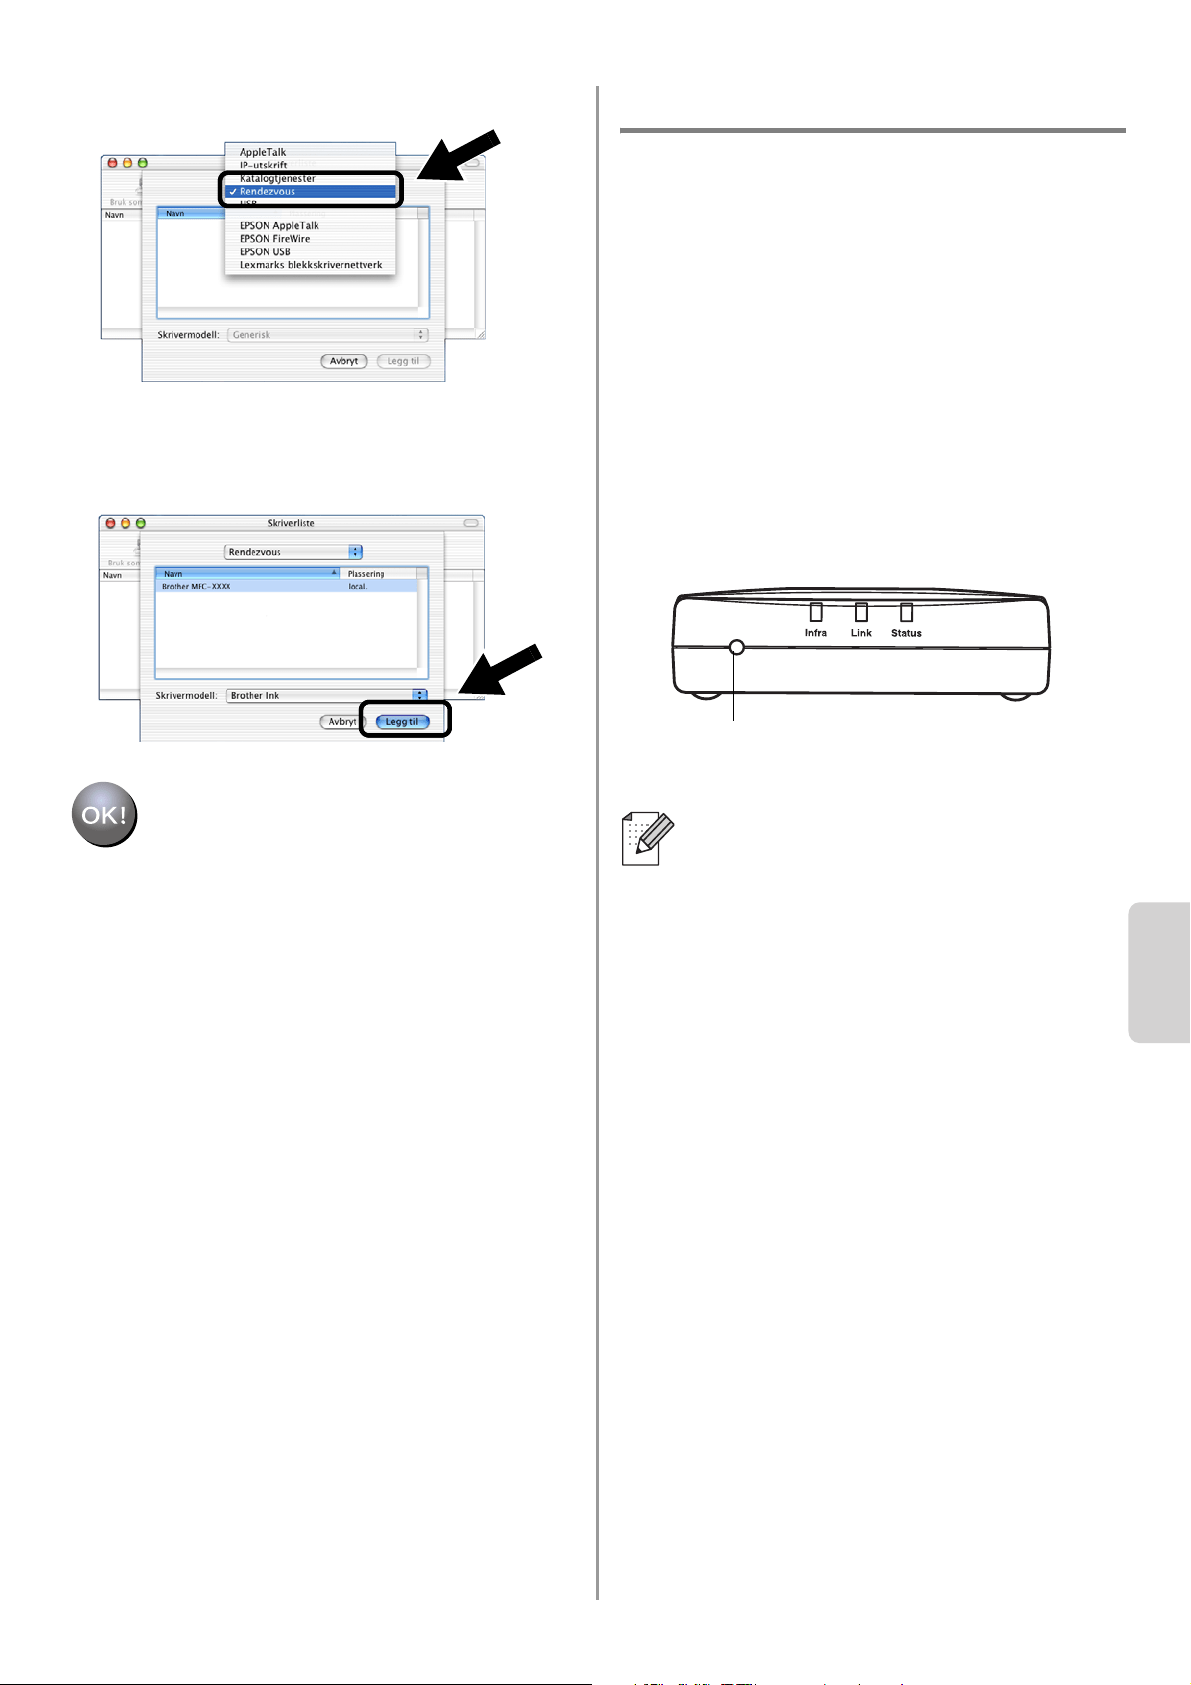
English
Norsk
88
8
Velg Rendezvous.
9
Velg navnet til din modell og klikk på
Legg til.
Installasjonen er fullført.
Annen informasjon
Slik skriver du ut en
nettverkskonfigurasjonsside
Trykk på testknappen på NC-2200w for å
skrive ut nettverkskonfigurasjonssiden.
Slik tilbakestiller du til
standardinnstillingene fra fabrikken
Hvis du vil tilbakestille utskriftsserveren
til standard fabrikkinnstillinger
(tilbakestilling av all informasjon, for
eksempel passordet og IP-adressen),
holder du nede knappen for testing av
nettverket i mer enn ti sekunder.
Når du tilbakestiller standardinnstillngene
fra fabrikken, vil du bli nødt til å
konfigurere en gang til fra trinn 2. Endre
din datamaskins trådløse innstilling for å
konfigurere NC-2200w på side 78.
Testknapp

English
89
Komponenter i kartongen
1
NC-2200w Extern trådlös
skrivar-/skannerserver
2
Nätadapter
3
Cd-romskiva (inklusive
installationsprogram och bruksanvisning
för nätverksanvändare till NC-2200w)
4
Snabbguide
Modeller som stödjs
NC-2200w stödjer modellerna i listan nedan.
Om ditt modellnummer inte finns i listan ber vi
dig besöka sidan för NC-2200w på
http://solutions.brother.com
för att kontrollera att modellen stödjs av
NC-2200w.
Operativsystemsstöd
Windows
®
Windows
®
98/98SE/Me/2000/XP och
Windows NT
®
4.0
Macintosh
®
Mac OS
®
X 10.2.4–10.3 eller senare
Medföljande cd-romskiva
1
Brother Solutions Center
På Brother Solutions Center
(http://solutions.brother.com) finns hjälp
för alla dina behov som rör Brothers
skrivare/MFC/DCP och NC-2200w.
Ladda ner de senaste drivrutinerna och
de verktyg som krävs, samt läs igenom
avsnittet med vanliga frågor och
felsökningstips.
2
Installation
Du kan köra Installationsguiden för
trådlösa enheter, som leder dig genom
konfigurationen av NC-2200w. Du kan
även installera programvaran för
nätverksutskrift och verktyget BRAdmin
Professional för Windows
®
.
3
Dokumentation
Visa bruksanvisningen för
nätverksanvändare och snabbguiden till
NC-2200w i PDF-format.
NC-2200w kan anslutas till USB-porten
på din Brother-skrivare/-MFC/-DCP. Det
medföljer ingen USB-kabel med denna
produkt, och vi ber dig därför att själv
köpa en lämplig USB-kabel (typ A–B).
Grupp 1:
HL-1440/1450/1470N/5040/5050/5070N/
5140/5150D/5170DN
MFC-9070/9180/9160
Grupp 2:
MFC-210C/420CN/410CN/620CN/5440CN/584
0CN/3240C/3340CN/8420/8820D/8820DN/
8220/8440/8840D/8840DN/3820CN/3420CN/
DCP-110C/310C/8020/8025D/8025DN/8040/
8045D/8045DN
1
2
4
3
A
B
Om det inte ingår en drivrutin för
Windows NT
®
4.0 på den cd-skiva som
medföljde din
Brother-skrivare/-MFC/-DCP, kan du inte
använda den i Windows NT
®
4.0-miljöer.
1
2
3
Typ A–B
(Upp till 2 m)
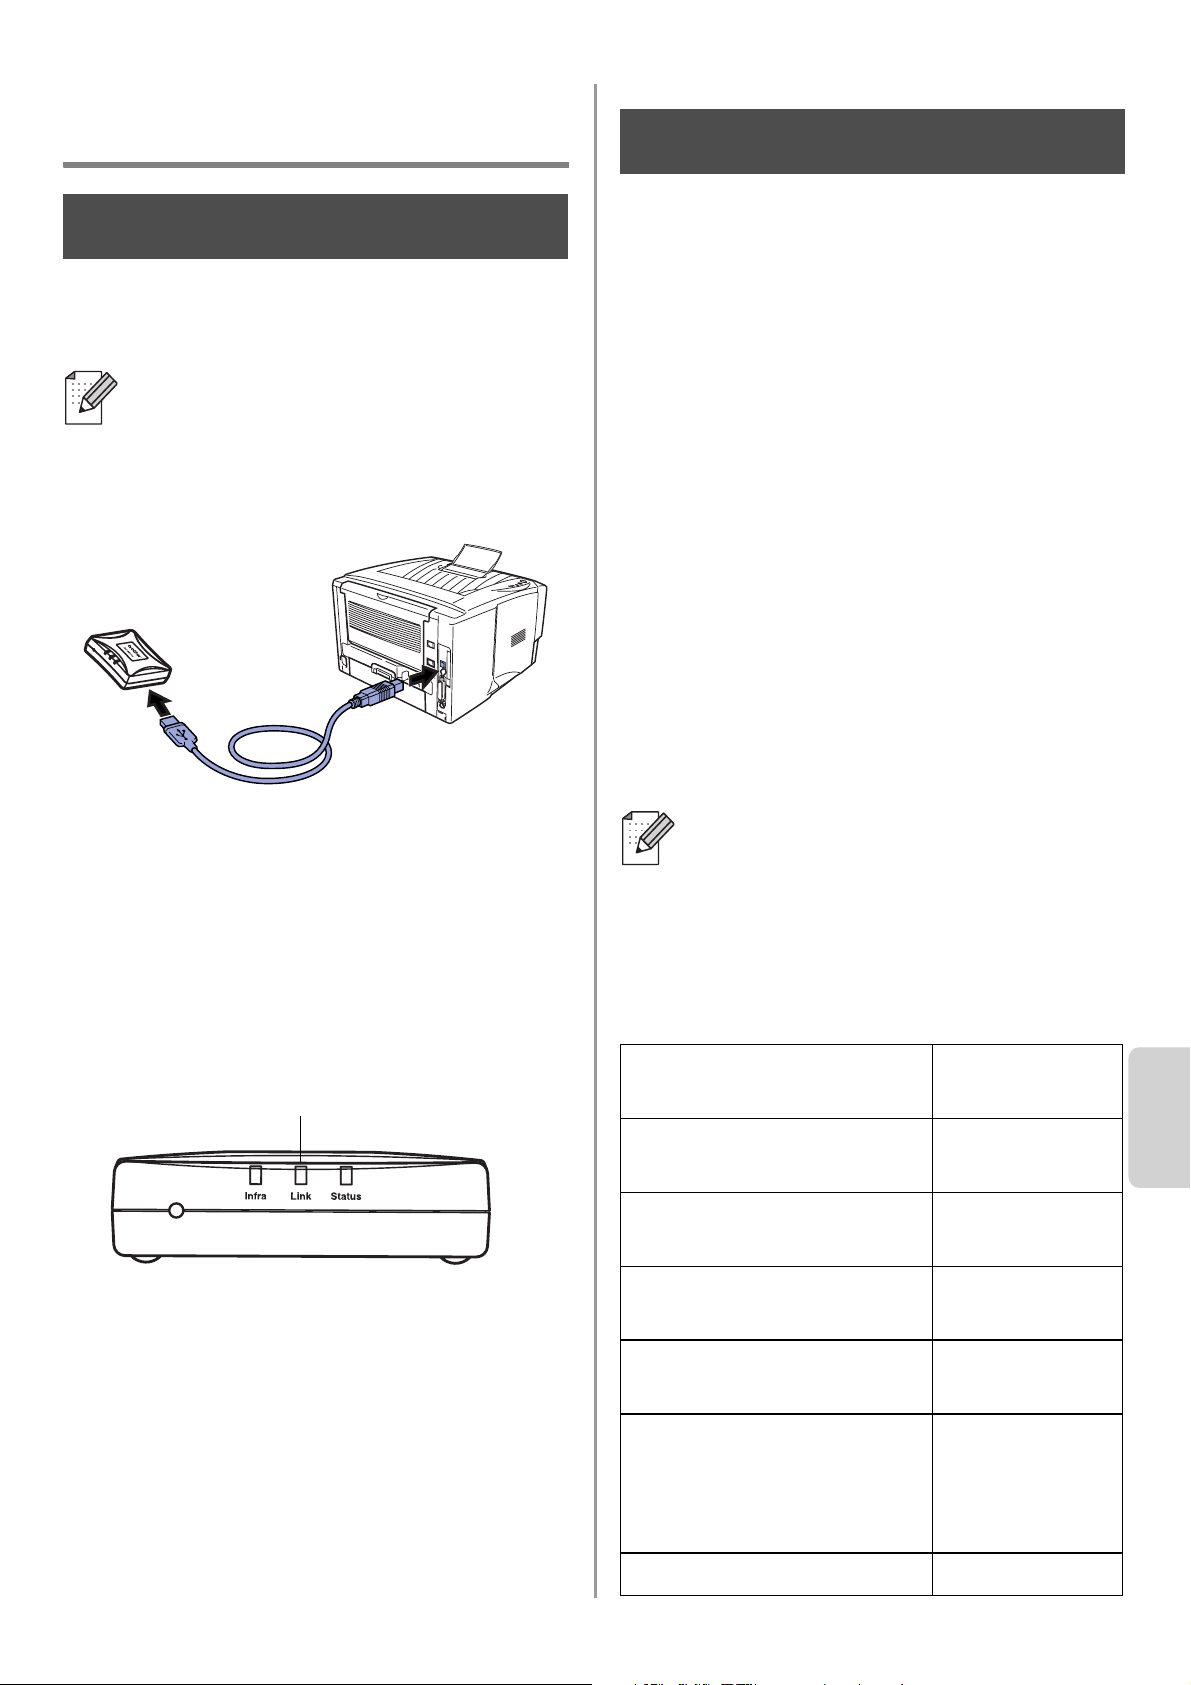
English
Svenska
90
Ställa in
skrivar-/skannerservern
Installera skrivarservern
1
Anslut USB-kabeln till NC-2200w och din
Brother-skrivare/-MFC/-DCP.
2
Anslut nätadaptern till NC-2200w.
3
Koppla in adaptern och slå på din
Brother-skrivare/-MFC/-DCP.
4
Kontrollera att Link-lampan på
NC-2200w lyser, och vänta i några
minuter.
Du bör stänga av din personliga
brandvägg (t.ex. Brandvägg för
Internet-anslutning som finns tillgänglig i
Windows XP) före installationen. Sätt på
din personliga brandvägg igen när du är
säker på att du kan skriva ut.
Ändra datorns trådlösa
inställningar för att
konfigurera NC-2200w
Innan du kan använda Brothers
skrivare/MFC/DCP i ett trådlöst nätverk,
måste NC-2200w konfigureras så att den
matchar din nätverkskonfiguration.
För att kunna konfigurera NC-2200w från en
trådlös dator i ditt nätverk, måste du tillfälligt
ändra dina befintliga trådlösa inställningar. Vi
rekommenderar att du skriver ner vilka
befintliga inställningar du har för ditt trådlösa
nätverk, innan du ändrar de aktuella
inställningarna i din dator. Du kommer att
behöva återvända till dessa inställningar i
slutet av steg 3 på sidan
93.
Befintliga inställningar för trådlöst
nätverk på din dator
NC-2200w kan inte användas med en
USB-hubb.
Steg 1
Link-lampa (grön)
Vi rekommenderar att du kontaktar
din nätverksadministratör om du
behöver hjälp med din dators
trådlösa inställningar.
Enhet Befintlig
inställning
Kommunikationsläge:
(Infrastruktur/Ad-hoc)
Nätverksnamn
(SSID/ESSID)
Kanal: (1–14)
*Vid behov
Kryptering:
(INGEN/WEP/Annan)
Krypteringskodsstorlek
och -typ:
(64 bitar, 128 bitar/ASCII,
HEX/Annan)
Krypteringskod:
Steg 2
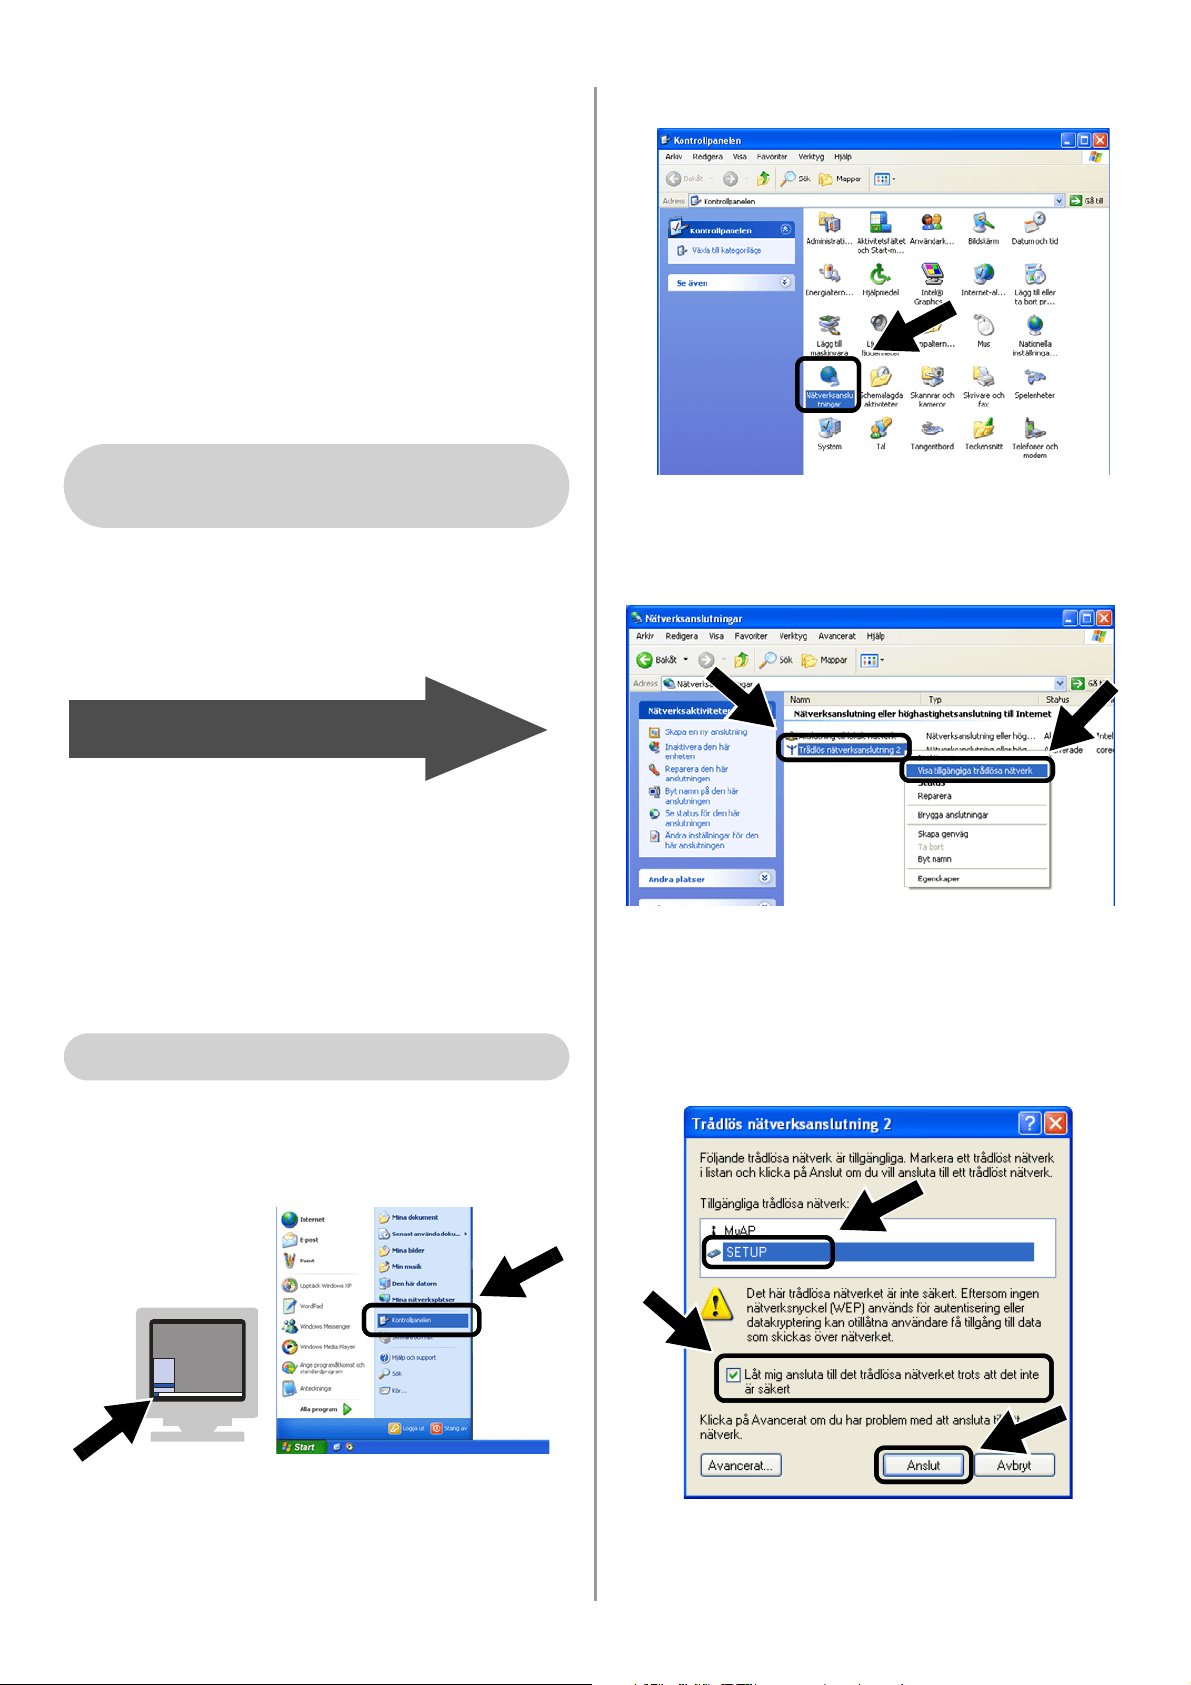
English
91
Ändra dina trådlösa datorinställningar till
följande, för att kommunicera med den
okonfigurerade NC-2200w:
Kommunikationsläge: Ad-hoc
(kanal 11)
Nätverksnamn (SSID/ESSID): SETUP
(skiftlägeskänsligt)
Kryptering: Ingen
Se anvisningarna från tillverkaren av det
trådlösa kortet för att få hjälp med att ändra
de trådlösa inställningarna, och gå sedan till
Steg 3
Konfigurera skrivar-/skannerservern.
Utför följande steg för respektive
operativsystem, om du använder
Windows
®
XP eller Mac OS
®
X 10.2.4 och
du använder dess inbyggda trådlösa
Ethernet-funktion.
1
Klicka på Start och sedan på
Kontrollpanelen.
2
Klicka på ikonen Nätverksanslutningar.
3
Markera och högerklicka på Trådlös
nätverksanslutning. Klicka på Visa
tillgängliga trådlösa nätverk.
4
Du ser nätverksnamnet (SSID/ESSID)
för NC-2200w i rutan Tillgängliga
trådlösa nätverk. Välj SETUP och
markera rutan Låt mig ansluta till....
Klicka på knappen Anslut.
För användare av Windows
®
98/Me/2000, Windows NT
®
4.0
Gå till Steg 3 på sidan 93
För Windows
®
XP-användare
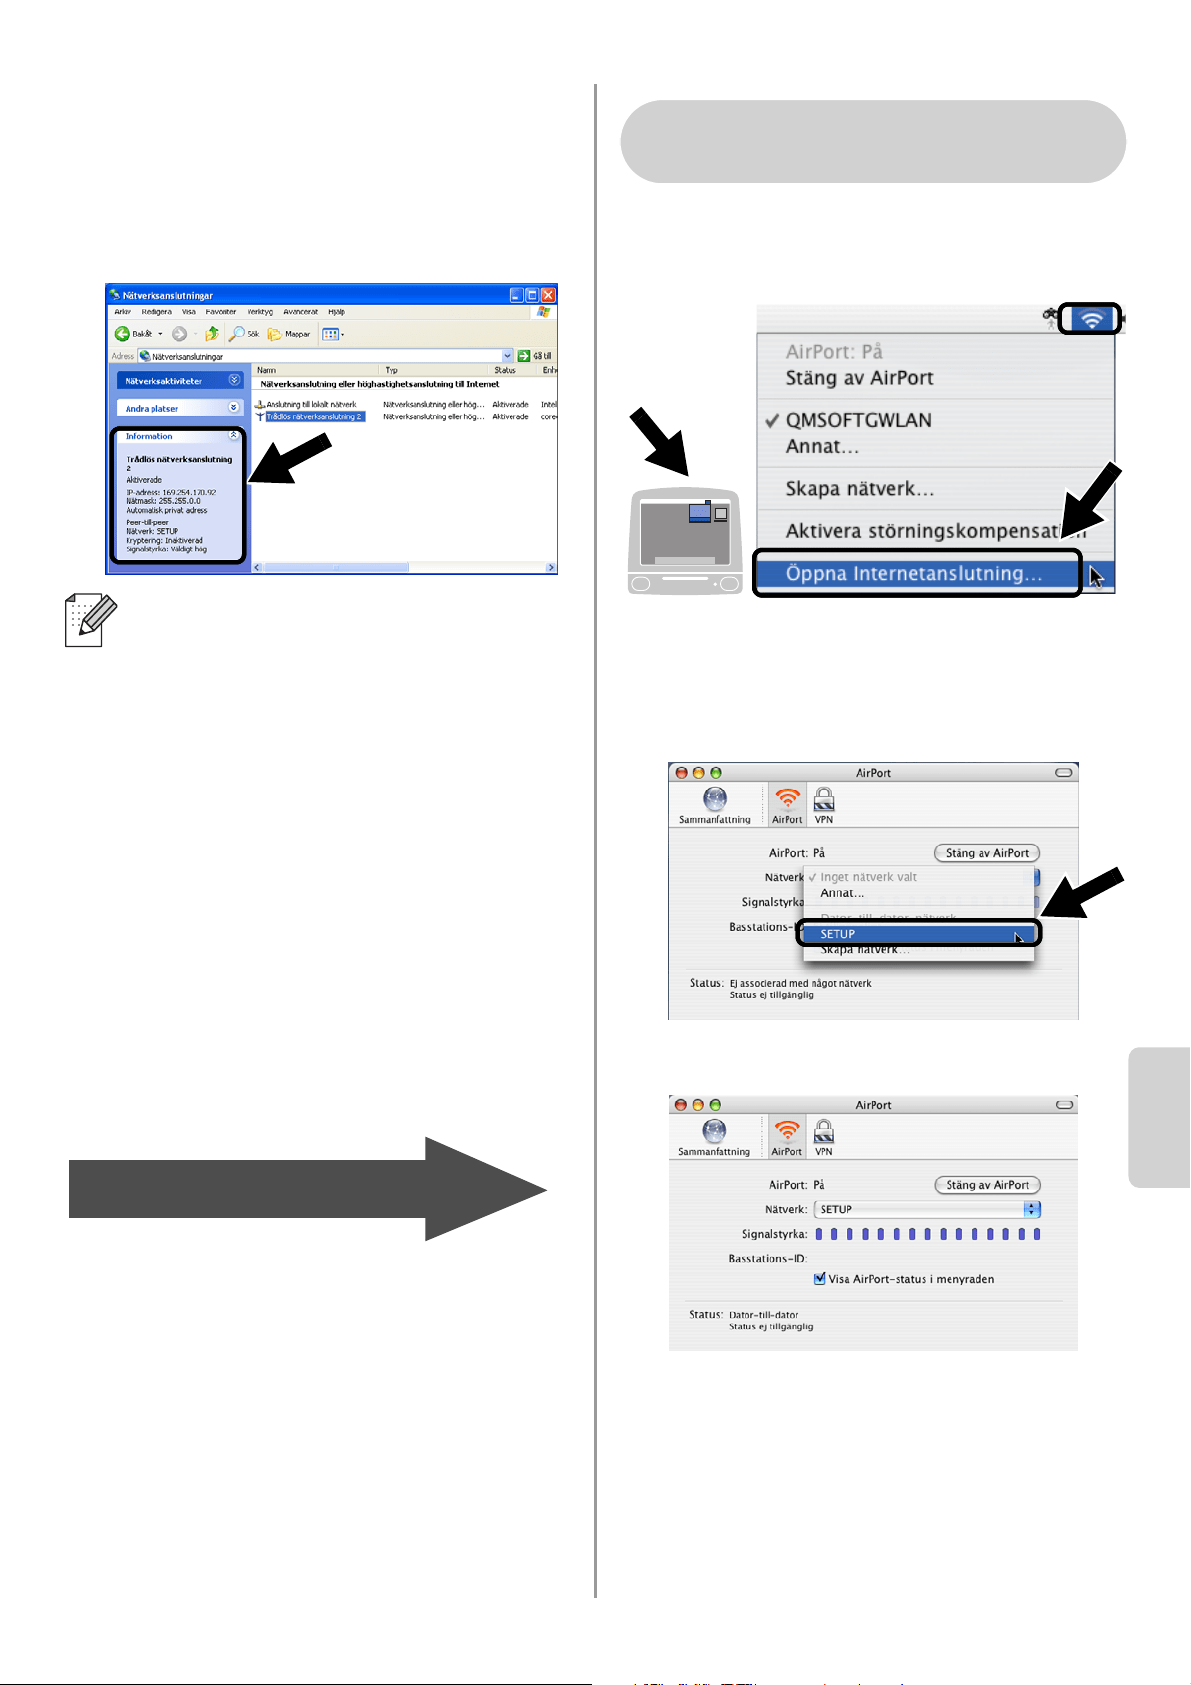
English
Svenska
92
5
Kontrollera statusen för den trådlösa
nätverksanslutningen. Det kan ta några
minuter att växla från att visa
IP-adressen 0.0.0.0 till 169.254.x.x på
skärmen (där x.x är nummer mellan 0
och 255).
1
Kontrollera ikonen för AirPort-status och
markera Öppna Internetanslutning....
2
Klicka på nätverksfliken för att se de
tillgängliga trådlösa enheterna. Du kan
se nätverksnamnet (SSID/ESSID) i
alternativet Nätverk. Välj SETUP.
3
Ditt trådlösa nätverk har anslutits.
Om det nätverksnamn (SSID/ESSID) du
vill ha inte finns med i listan, kan du göra
följande:
■ Koppla bort nätadaptern, anslut den
igen och vänta några minuter.
■ Flytta din
Brother-skrivare/-MFC/-DCP där
NC-2200w är installerad närmre intill
din dator och försök på nytt.
■ Återställ NC-2200w till de
ursprungliga fabriksinställningarna
och försök på nytt. Se sidan
100 för att
återställa de ursprungliga
fabriksinställningarna.
■ Se kapitel 6 i bruksanvisningen för
nätverksanvändare till NC-2200w på
cd-romskivan som medföljer
NC-2200w.
Gå till Steg 3 på sidan 93
För användare av Mac OS
®
X
10.2.4–10.3 eller senare
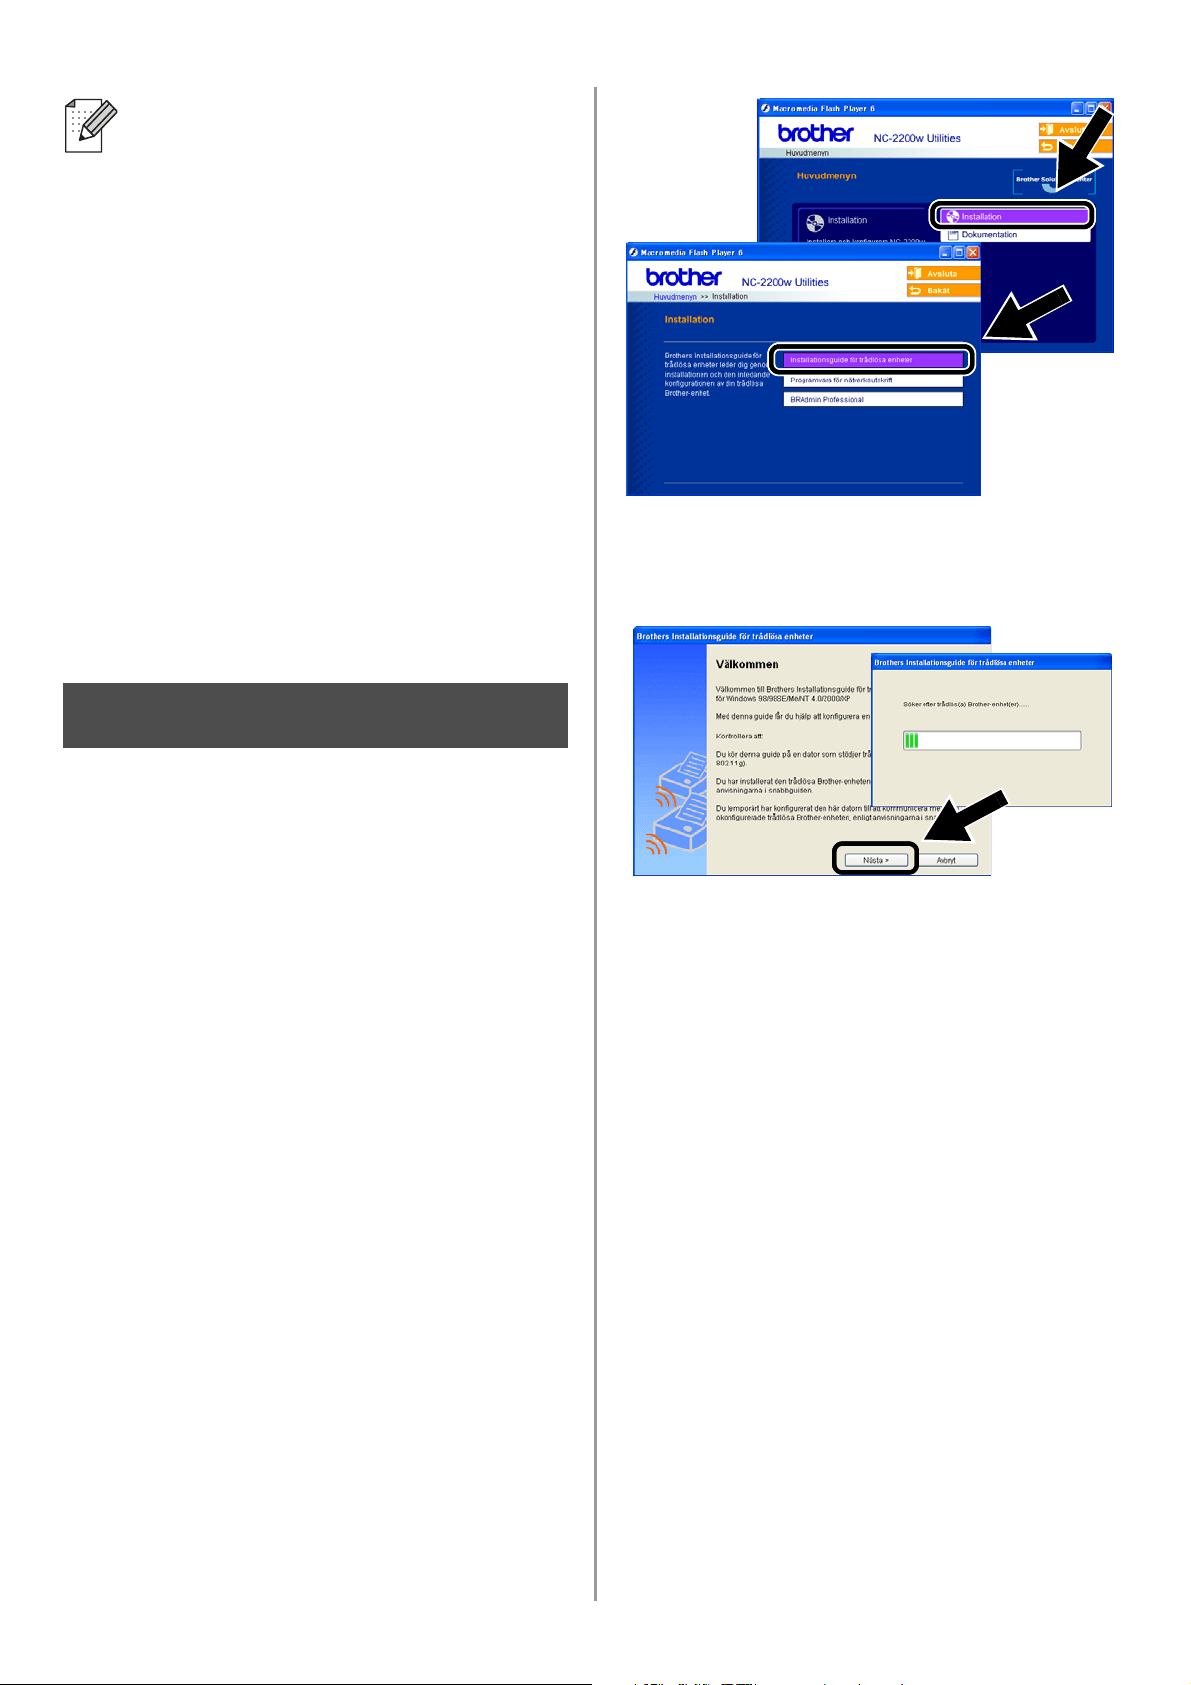
English
93
Konfigurera
skrivar-/skannerservern
1
Sätt i cd-romskivan för NC-2200w i
cd-romenheten.
(För användare av Windows
®
)
Startbilden visas automatiskt.
(För användare av Mac OS
®
X 10.2.4 till
10.3 eller senare) Dubbelklicka på
symbolen NC2200w på din Macintosh
®
,
och dubbelklicka sedan på symbolen
Start Here OSX.
2
Välj språk.
3
Klicka på Installation och sedan på
Installationsguide för trådlösa
enheter.
4
Granska välkomstinformationen, och
klicka på Nästa när du är säker på att du
har utfört det som krävs.
5
Följ anvisningarna på skärmarna. För
ytterligare information, se kapitel 2 i
bruksanvisningen för nätverksanvändare
till NC-2200w på den medföljande
cd-romskivan.
6
Då du har lämnat Installationsguiden
för trådlösa enheter, ska du återställa
de trådlösa inställningarna på din dator
till de ursprungliga inställningarna med
hjälp av de anteckningar du gjorde i
avsnittet
Ändra datorns trådlösa
inställningar för att konfigurera
NC-2200w på sidan 90.
Om det nätverksnamn (SSID/ESSID) du
vill ha inte finns med i listan, kan du göra
följande:
■ Koppla bort nätadaptern, anslut den
igen och vänta några minuter.
■ Flytta din
Brother-skrivare/-MFC/-DCP där
NC-2200w är installerad närmre intill
din dator och försök på nytt.
■ Återställ NC-2200w till de
ursprungliga fabriksinställningarna
och försök på nytt. Se sidan
100 för
att återställa de ursprungliga
fabriksinställningarna.
■ Se kapitel 6 i bruksanvisningen för
nätverksanvändare till NC-2200w på
cd-romskivan som medföljer
NC-2200w.
Steg 3
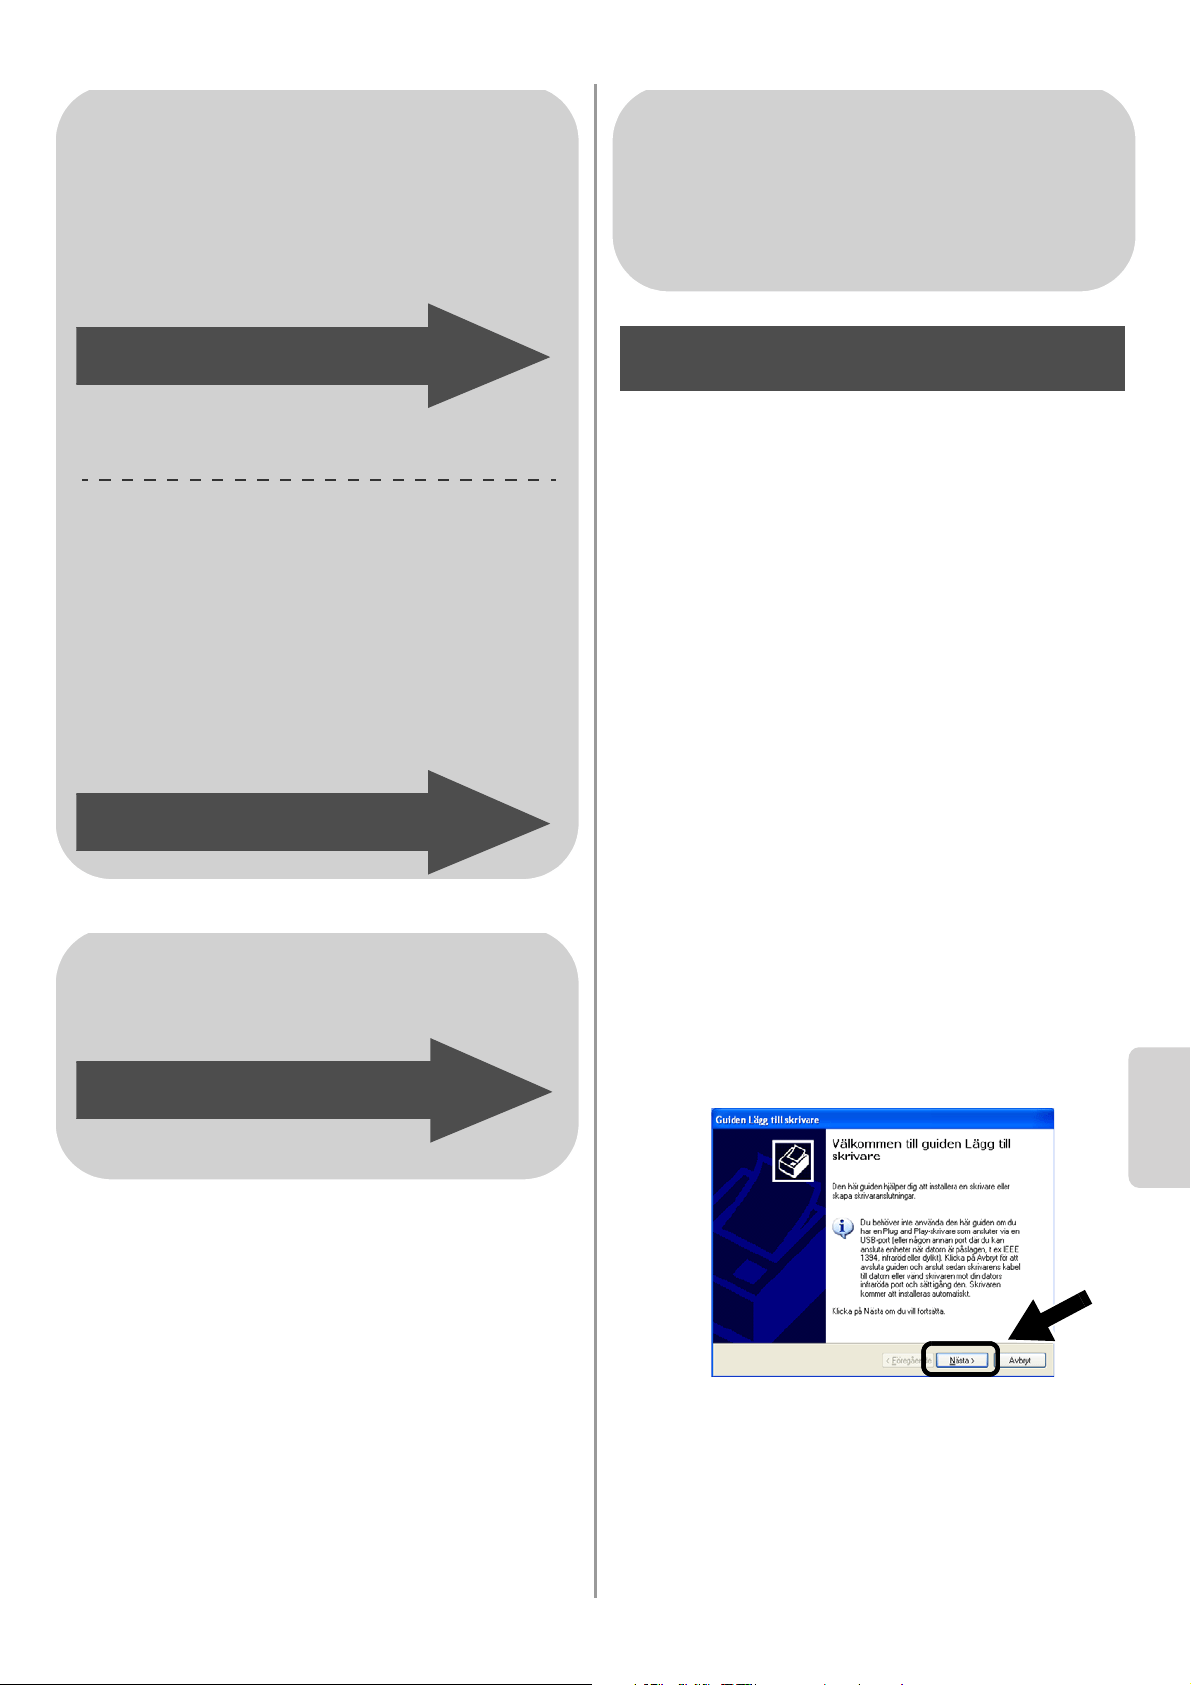
English
Svenska
94
Installera skrivardrivrutinen
Användare av modellerna ovan måste
installera skrivardrivrutinen innan de ställer in
sina datorer till att fungera tillsammans med
NC-2200w. Hoppa över detta steg om
skrivardrivrutinen redan har installerats.
Drivrutinen finns på cd-romskivan som
medföljde Brothers skrivare/MFC/DCP.
Skrivardrivrutinen kan även laddas ner från
Brother Solutions Center på:
<http://solutions.brother.com>.
Följ stegen nedan för att installera
skrivardrivrutinen med hjälp av cd-romskivan.
Instruktionerna i detta avsnitt baseras på
Windows
®
XP.
1
Klicka på Start och välj Skrivare och
fax. Klicka på Lägg till en skrivare, så
startar guiden Lägg till skrivare. Klicka på
Nästa då denna skärm visas.
För användare av Windows
®
Grupp 1:
HL-1440/1450/1470N/5040/5050/
5070N/5070DN/5140/5150D/5170DN
MFC-9070/9180/9160
Grupp 2:
MFC-210C/420CN/410CN/620CN/
5440CN/5840CN/3240C/3340CN/8420/
8820D/8820DN/8220/8440/8840D/
8840DN/3820CN/3420CN/DCP-120C/
320CN/8020/8025D/8025DN/8040/
8045D/8045DN
Gå till Steg 4 på sidan 94
Gå till Steg 4 på sidan 97
För användare av Mac OS
®
X
10.2.4–10.3 eller senare
Gå till Steg 4 på sidan 99
För användare av Windows
®
Grupp 1:
HL-1440/1450/1470N/5040/5050/
5070N/5070DN/5140/5150D/5170DN
MFC-9070/9180/9160
Steg 4
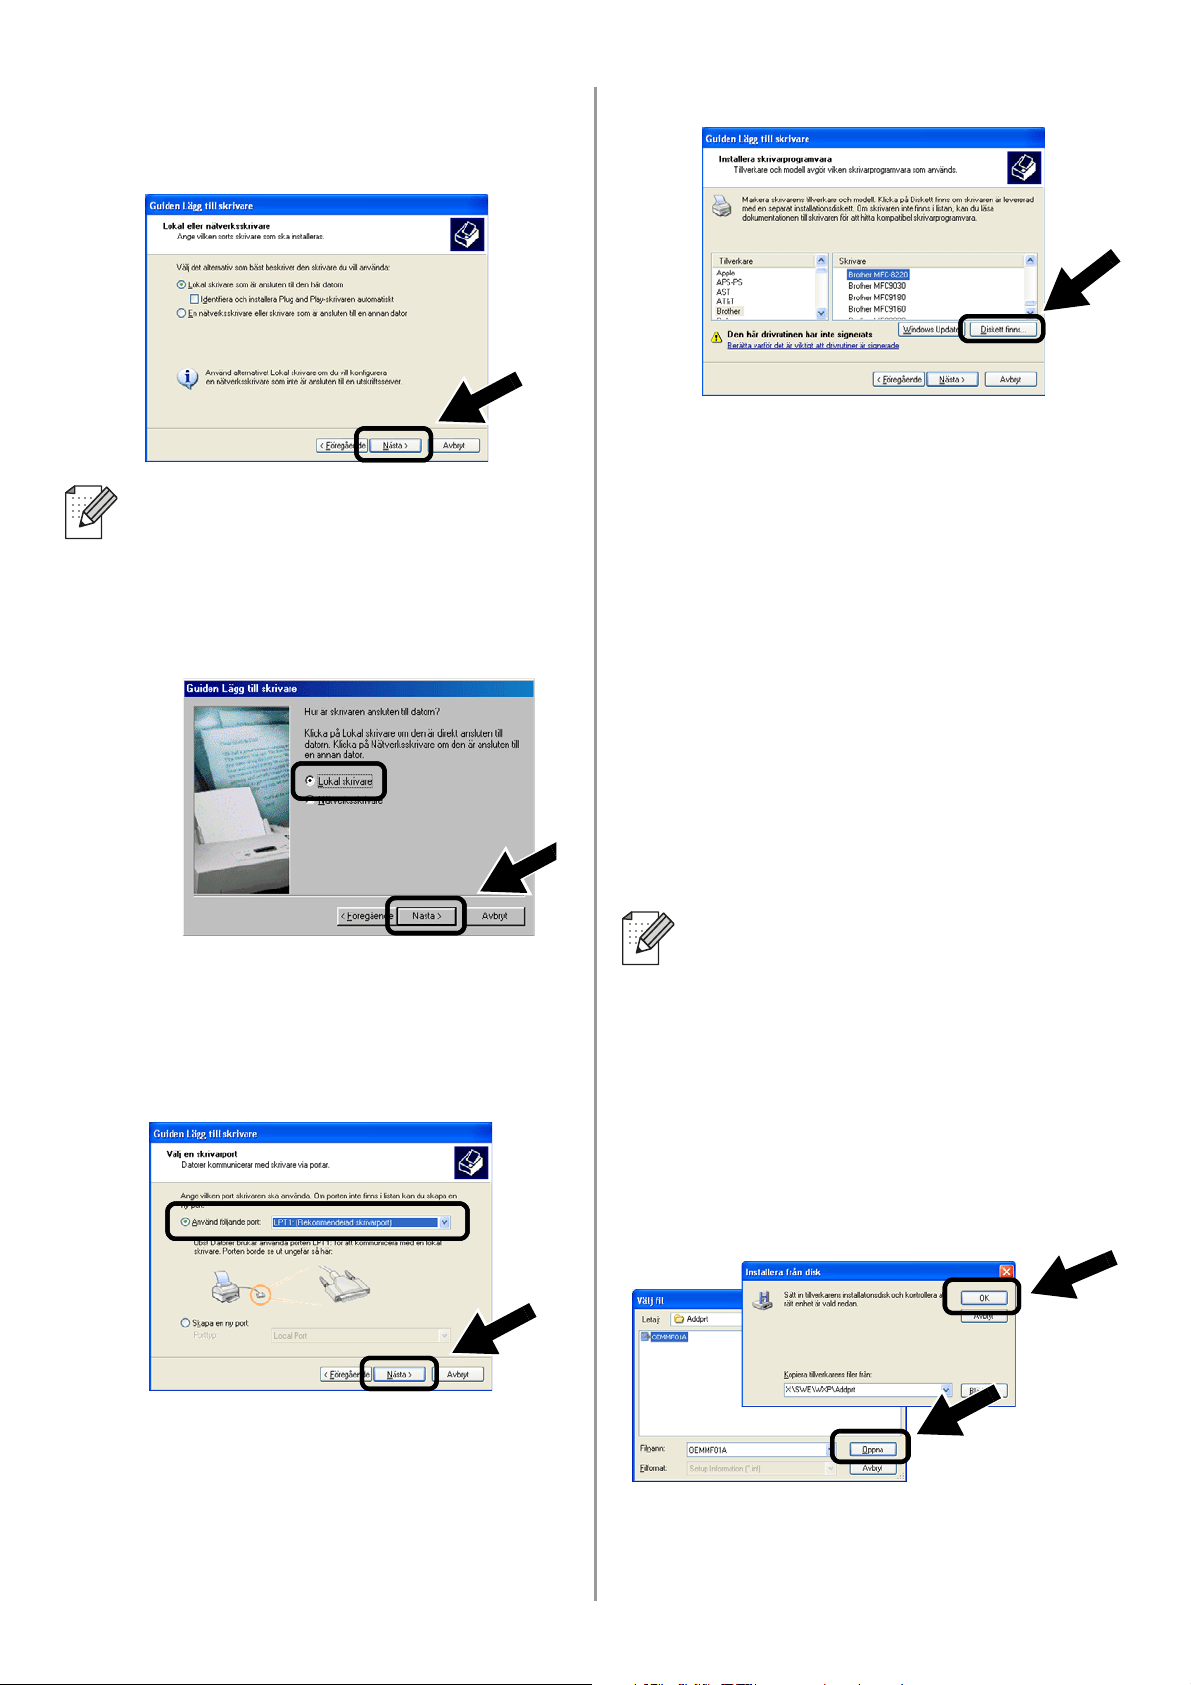
English
95
2
Avmarkera alternativet Identifiera och
installera Plug and Play-skrivaren
automatiskt och klicka sedan på Nästa.
3
Välj LPT1:(Rekommenderad
skrivarport) tillfälligt i rullgardinsfönstret
för skrivarportsval, och klicka sedan på
Nästa.
4
Klicka på Diskett finns.
5
(För användare av Brothers
laserskrivare)
Välj drivrutinsmappen på cd-romskivan
och klicka på Öppna. Välj mappen
Win2k_xp (eller mappen för ditt
operativsystem), klicka på Öppna och
välj sedan aktuellt språk och klicka på
Öppna.
(För användare av Brother MFC/DCP)
Välj mapp för aktuellt språk på
cd-romskivan och klicka på Öppna. Välj
sedan WXP-mappen (eller mappen för
ditt operativsystem), klicka på Öppna
och välj till slut mappen Addprt och
klicka på Öppna.
6
Klicka på Öppna och därefter på OK.
■ Denna skärm kanske inte finns i ditt
operativsystem.
■ (För användare av Windows
®
98/Me/Windows NT
®
4.0) Om denna
skärm visas ska du välja Lokal
skrivare och sedan klicka på Nästa.
■ Om du använder operativsystemet
Windows
®
XP och mappen
Win2k_xp inte finns i listan, ska du
välja mappen Win2k.
■ Om du inte ser någon mapp för ditt
operativsystem i drivrutinsmappen,
men istället ser: inst, PCL, PS,
USBW98ME, etc. rekommenderar vi
att du väljer mappen PCL. Då visas
aktuell operativsystemsmapp.
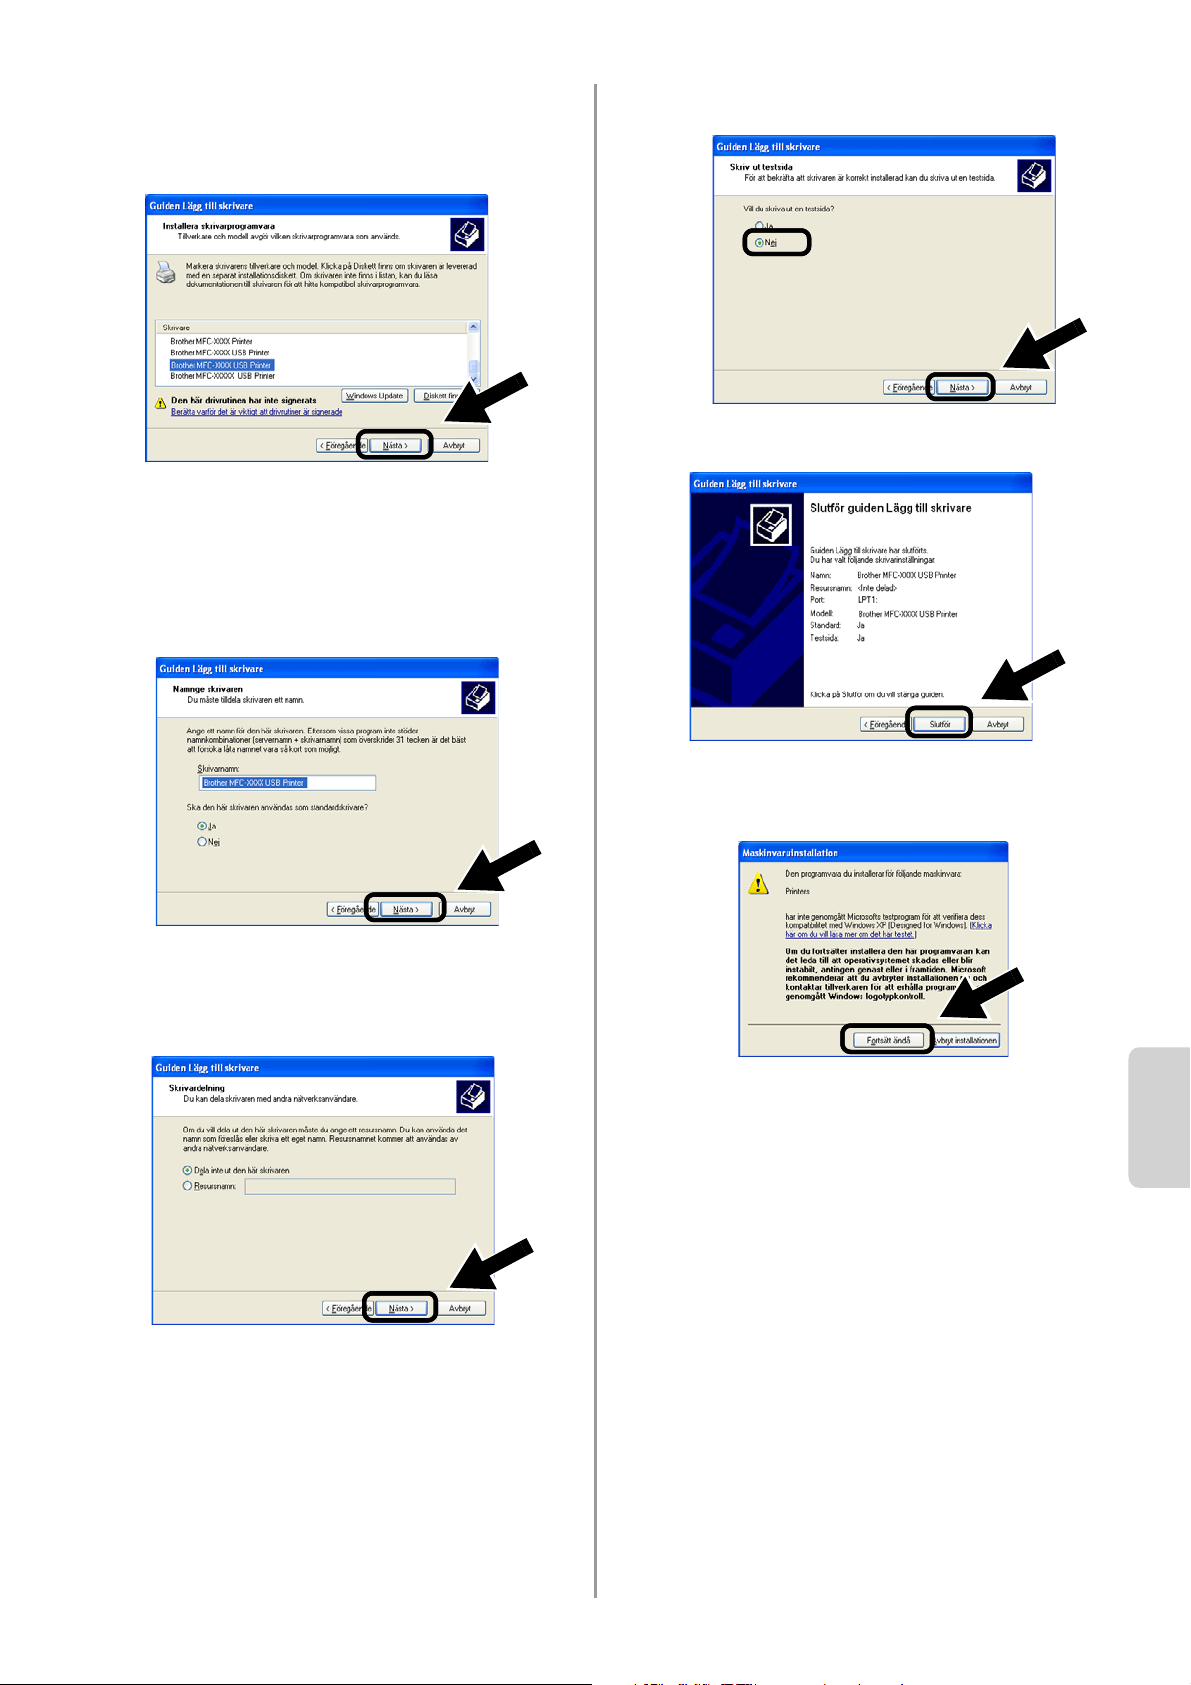
English
Svenska
96
7
Markera den modell du installerar i listan
över skrivare/MFC:er/DCP:er, och klicka
på Nästa.
8
Den modell du installerar visas i fönstret.
Markera Ja eller Nej för att välja om
skrivaren ska användas som
standardskrivare, och klicka därefter på
Nästa.
9
Välj Dela inte ut den här skrivaren och
klicka på Nästa om den här skärmen
visas.
10
Markera Nej och klicka på Nästa.
11
Klicka på Slutför då denna skärm visas.
12
Klicka på Fortsätt ändå om Windows
skärm för logotypkontroll visas.

English
97
Installera programvaran för
nätverksutskrift
Du måste installera programvaran för
nätverksutskrift och konfigurera den för den
trådlösa nätverksanslutningen till din
Brother-skrivare/-MFC/-DCP. Följ stegen
nedan.
1
Klicka på Programvara för
nätverksutskrift och följ instruktionerna
på skärmen.
2
Välj samma skrivardrivrutin som du valde
i steg 7 på sidan
96. Markera den modell
du installerar i listan över
skrivare/MFC:er/DCP:er, och klicka på
Nästa.
Installationen har nu slutförts.
Installation av MFL-Pro Suite
Du måste installera MFL-Pro Suite för att
skapa en trådlös nätverksanslutning mellan
din dator och din
Brother-skrivare/-MFC/-DCP. Programvaran
finns på den cd-romskiva som medföljde din
skrivare/MFC/DCP. Installera programvaran
genom att följa stegen i avsnittet om att
installera drivrutinen och programvaran för
användare av nätverkskabel, som finns i den
snabbguide som medföljde din
skrivare/MFC/DCP.
■För MFC-8420/8820D/8820DN/8220/8440/
8840D/8840DN/3820CN/3420CN och
DCP-8020/8025D/8025DN/8040/8045D/8045DN
Då den här skärmen visas under
installationsprocessen ska du välja Nej och
sedan klicka på Nästa.
Steg 5
För användare av Windows
®
Grupp: 2
MFC-210C/420CN/410CN/620CN/
5440CN/5840CN/3240C/3340CN/8420/
8820D/8820DN/8220/8440/8840D/
8840DN/3820CN/3420CN/DCP-120C/
320CN/8020/8025D/8025DN/8040/
8045D/8045DN
Steg 4
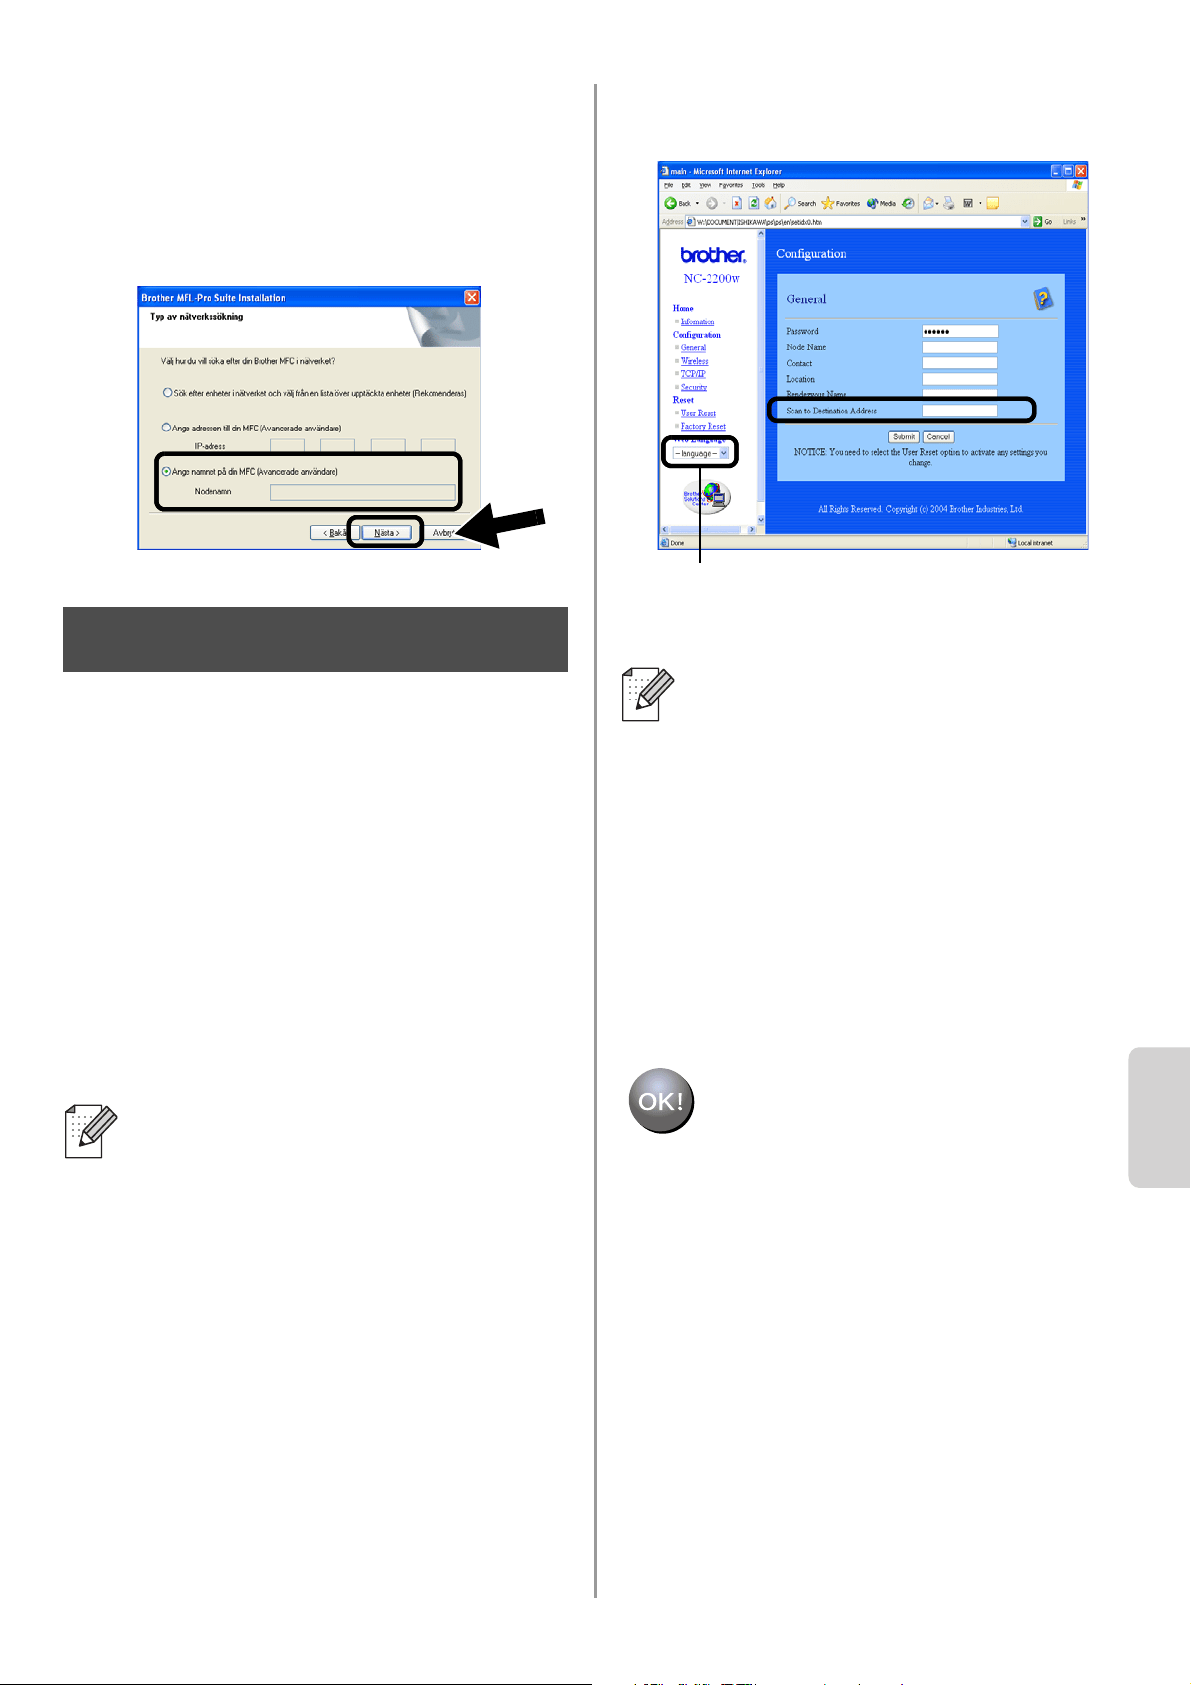
English
Svenska
98
■ Vissa MFC:er/DCP:er med NC-2200w finns inte
i söklistan under installationen. Om detta
inträffar ska du gå tillbaka till den skärm som
visas nedan och ställa in nodnamnet för
NC-2200w manuellt. Du finner nodnamnet på
nätverkskonfigurationssidan; se
Övrig
information på sidan 100.
Specificera skannermåladressen
från hemsidan för NC-2200w
Du måste specificera skannermåladressen
från NC-2200w-sidan för att kunna använda
skannern i ett nätverk. Följ stegen nedan.
1
Öppna Internet Explorer och ange
följande i adressfältet.
http://NC-2200w_ip_adress
Där NC-2200w_ip_adress är
IP-adressen eller nodnamnet för din
NC-2200w.
2
Gå till sidan General under
Configuration.
3
Ange din dators IP-adress.
Installationen har nu slutförts.
■ Du finner IP-adressen eller
nodnamnet för din NC-2200w på
nätverkskonfigurationssidan. Se
Övrig information på sidan 100 för att
få ytterligare information.
■ Du blir ombedd att skriva in ett
användarnamn och ett lösenord. Skriv
in följande.
användarnamn: admin
(skiftlägeskänsligt)
lösenord: access (fabriksinställt)
Steg 5
■ Om din dators IP-adress tilldelades
automatiskt via DHCP, ska du ange
datornamnet eftersom IP-adressen
kan variera. Namnet kan vara
Windows
®
-datornamnet eller
DNS-värdnamnet.
■ Du finner ditt datornamn genom att
öppna Egenskaper i Den här datorn
och titta på fliken Datornamn. Om du
vill använda domännamnet måste du
tilldela DNS-serveradressen med
webbservern för NC-2200w och din
webbläsare.
(Tillgängliga språk är engelska, tyska,
franska, holländska och japanska.)
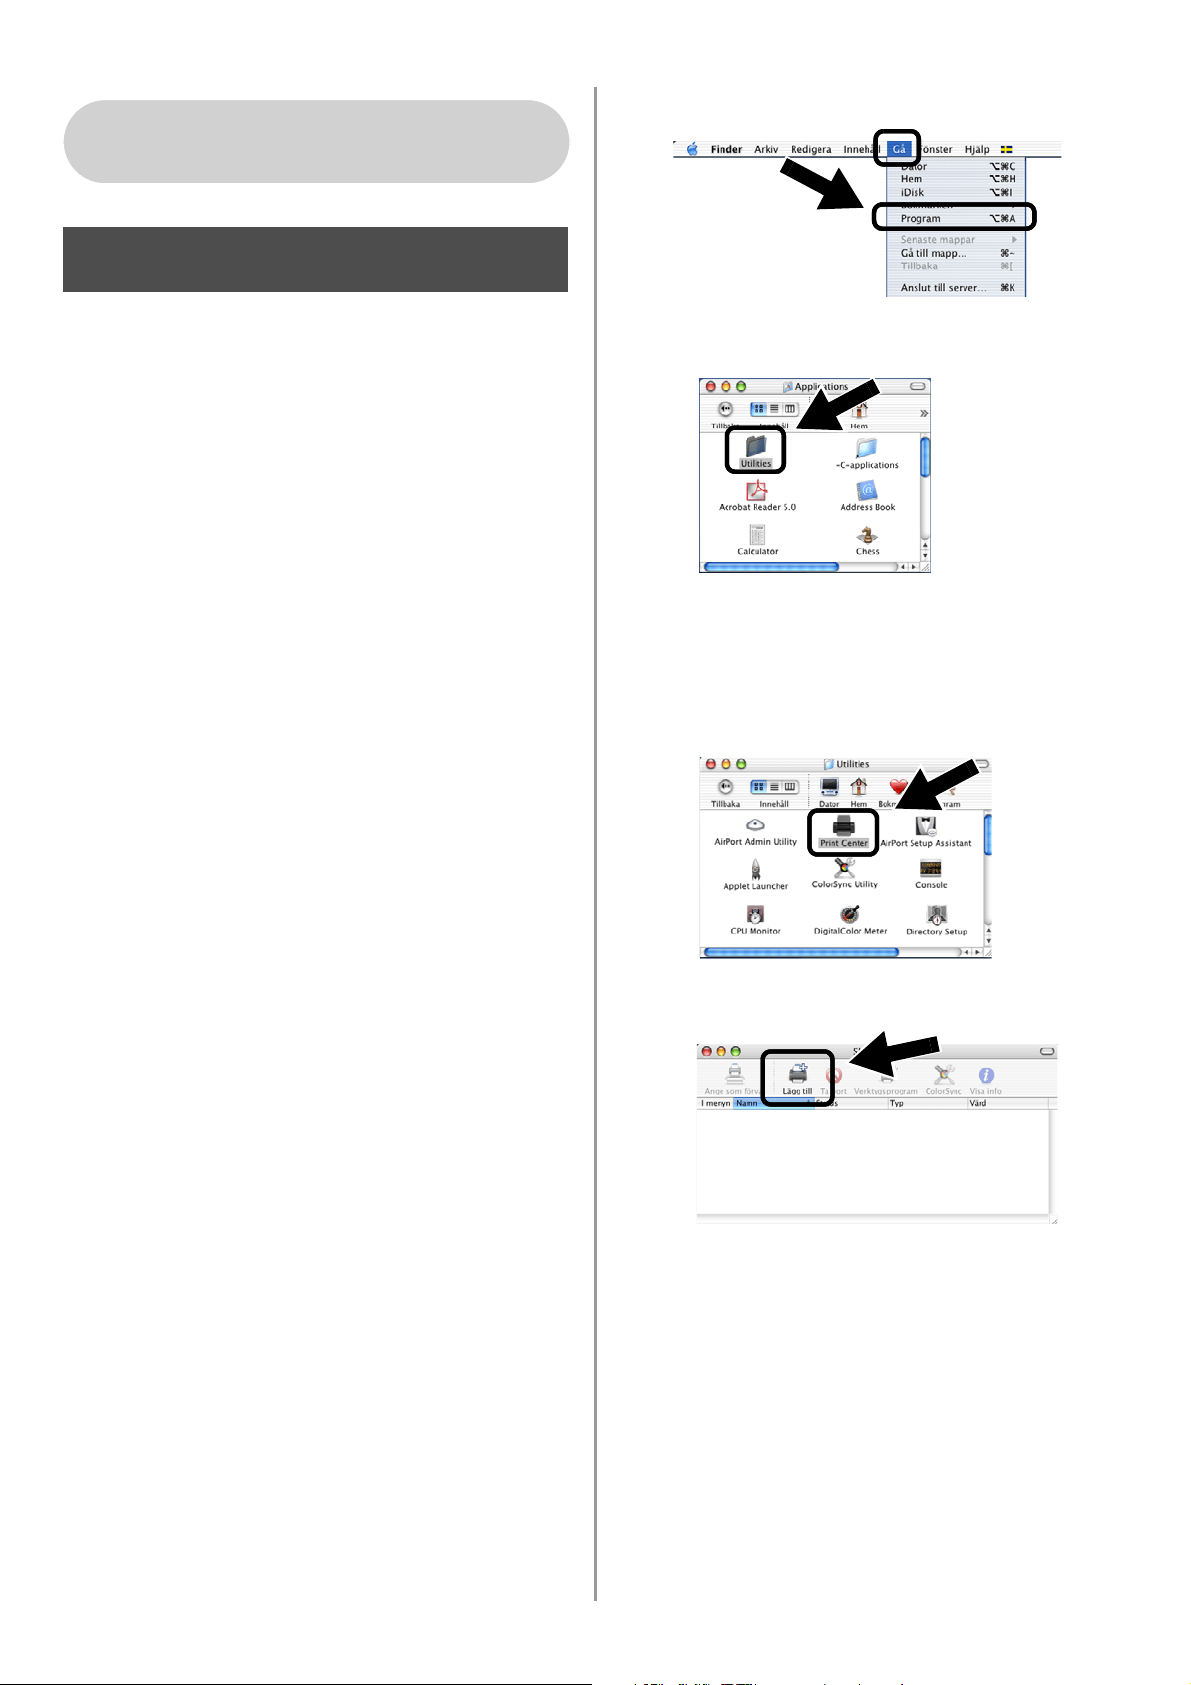
English
99
Installera och konfigurera
skrivardrivrutinen med hjälp
av funktionerna för enkel
nätverkskonfiguration i Mac
OS
®
X
Du måste installera skrivardrivrutinen innan
du ställer in din dator till att fungera
tillsammans med NC-2200w. Hoppa över
detta steg om du redan har installerat
skrivardrivrutinen. Drivrutinen finns på den
cd-romskiva som medföljde din
skrivare/MFC/DCP, och du kan också ladda
ned den senaste skrivardrivrutinen från vår
webbplats på:
http://solutions.brother.com
Följ stegen nedan för att installera
skrivardrivrutinen.
1
Sätt i den medföljande cd-romskivan i din
cd-romenhet och dubbelklicka på
symbolen Start Here OSX för att
installera programvaran. Välj språk om
skärmen för språkval visas.
2
(För användare av Brothers
laserskrivare) Klicka på Installera
program och sedan på Skrivardrivrutin
på menyskärmarna.
(För användare av Brothers MFC/DCP)
Klicka på MFL-Pro Suite för att utföra
installationen.
3
Följ anvisningarna på skärmen för att
installera skrivardrivrutinen.
4
Välj Program i Gå-menyn.
.
5
Öppna mappen Utilities.
6
(För användare av Mac OS
®
X 10.2.4)
Öppna symbolen Print Center.
(För användare av Mac OS
®
X 10.3)
Öppna symbolen Skrivarinställning.
7
Klicka på knappen Lägg till.
För användare av Mac OS
®
X
10.2.4–10.3 eller senare
Steg 4
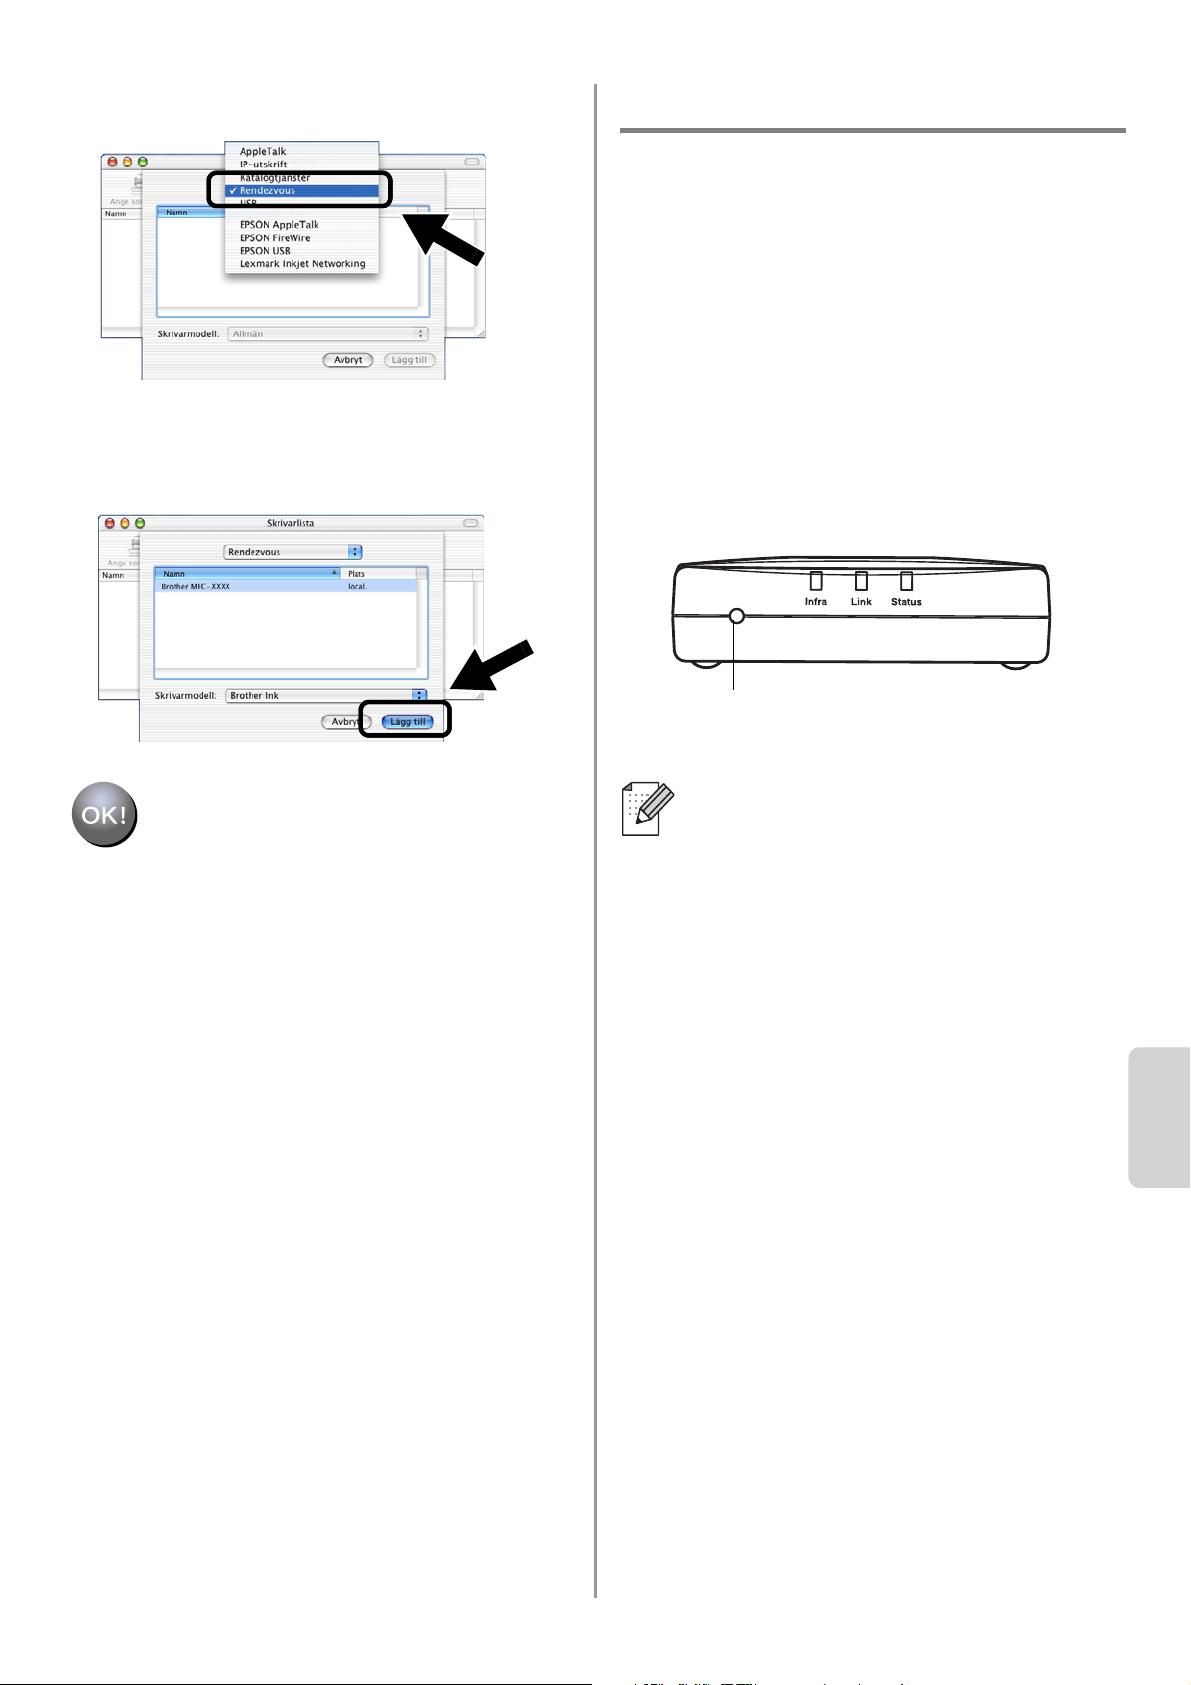
English
Svenska
100
8
Välj Rendezvous.
9
Välj din maskins modellnamn och klicka
på Lägg till.
Installationen har nu slutförts.
Övrig information
Skriva ut en nätverkskonfigurationssida
Tryck på testknappen på NC-2200w för att
skriva ut nätverkskonfigurationssidan.
Återställa de ursprungliga
fabriksinställningarna
Om du vill återställa NC-2200w till de
ursprungliga fabriksinställningarna
(varvid man återställer all information om
t.ex. trådlösa inställningar, lösenord och
IP-adress), ska du hålla ned testknappen
i mer än tio sekunder.
Om du återställer fabriksinställningarna
kommer du att behöva utföra
installationen på nytt från och med steg 2
Ändra datorns trådlösa inställningar för
att konfigurera NC-2200w på sidan 90.
Testknapp
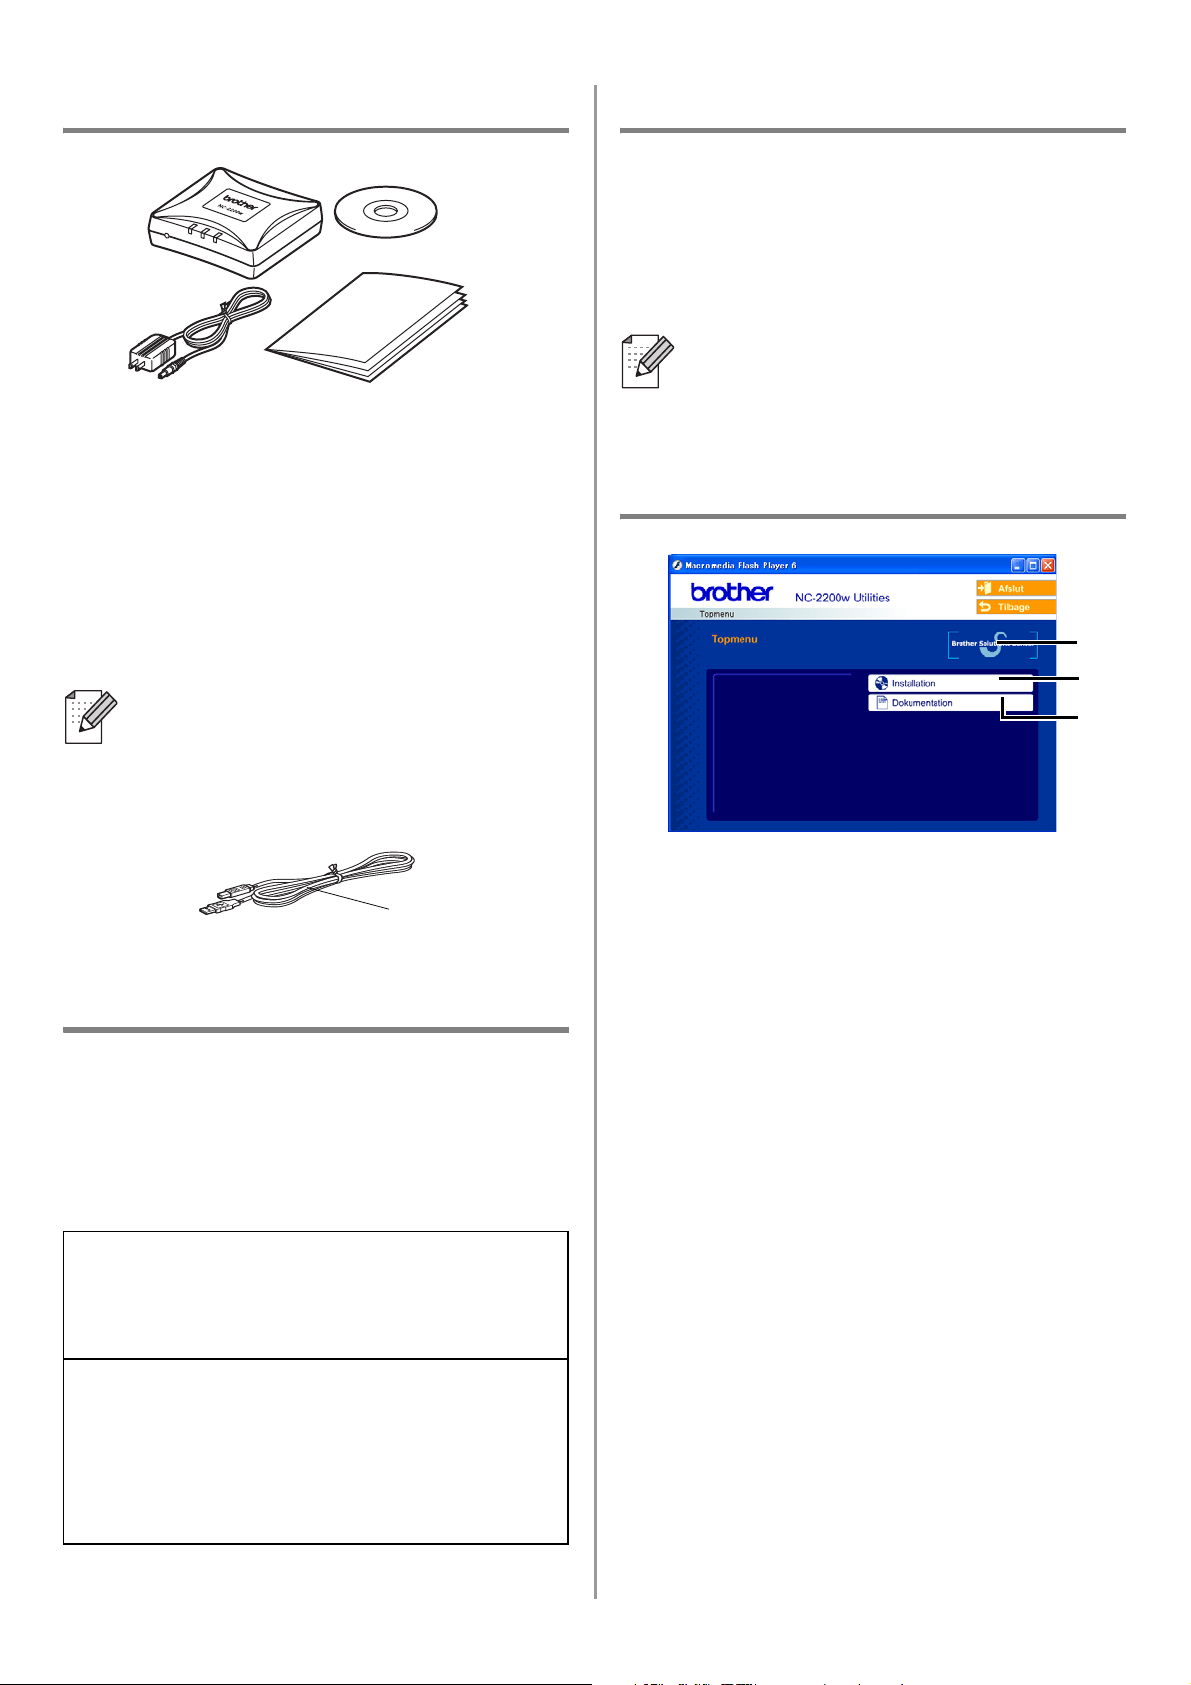
English
101
Kassens indhold
1
NC-2200w eksternt trådløst
printer-/scannernetkort
2
Vekselstrømsadapter:
3
Cd-rom (inklusive installationssoftware
og brugsanvisning til netværk,
NC-2200w)
4
Hurtig installationsanvisning
Understøttede modeller
NC-2200w understøtter de nedenfor anførte
modeller. Hvis dit modelnummer ikke er
anført, skal du gå til siden for NC-2200w på
http://solutions.brother.com for at bekræfte
understøtning af NC-2200w.
Operativsystemunderstøtning
Windows
®
Windows
®
98/98SE/Me/2000 /XP og
Windows NT
®
4.0
Macintosh
®
Mac OS
®
X 10.2.4 - 10.3 eller nyere
Medfølgende cd-rom
1
Brother Solutions Center
Brother Solutions Center
(http://solutions.brother.com) er stedet,
hvor du kan finde alle de ressourcer, du
måtte have brug for til Brothers
printer/MFC/DCP og NC-2200w.
Download de seneste drivere og
hjælpeprogrammer, læs de ofte stillede
spørgsmål (FAQ) og tips til
problemløsning.
2
Installation
Du kan køre Installationsguide til trådløs
enhed, som fører dig gennem alle trinene
i konfigurationen af NC-2200w. Du kan
også installere netværksinstallationssoft-
ware og BRADmin Professional til
Windows
®
.
3
Dokumentation
Se Brugsanvisning til netværk,
NC-2200w og Hurtig
installationsanvisning i PDF-format.
NC-2200w kan forbindes til
USB-interfaceporten på Brothers
printer/MFC/DCP. Der følger ikke et
USB-kabel med dette produkt. Skaf
derfor et USB-kabel (med type A-B).
Gruppe 1:
HL-1440/1450/1470N/5040/ 5050/5070N/
5140/5150D/5170DN
MFC-9070/9180/9160
Gruppe 2:
MFC-210C/420CN/410CN/620CN/5440CN/584
0CN/3240C/3340CN/8420/8820D/8820DN/
8220/8440/8840D/8840DN/3820CN/3420CN/
DCP-110C/310C/8020/8025D/8025DN/8040/
8045D/8045DN
1
2
4
3
A
B
Hvis cd-rom'en, der leveres med din
Brothers printer/MFC/DCP, ikke indeholder
en Windows NT
®
4.0-driver, kan du ikke
bruge den i Windows NT
®
4.0-miljøer.
1
2
3
Type A-B
(Op til 2 m)
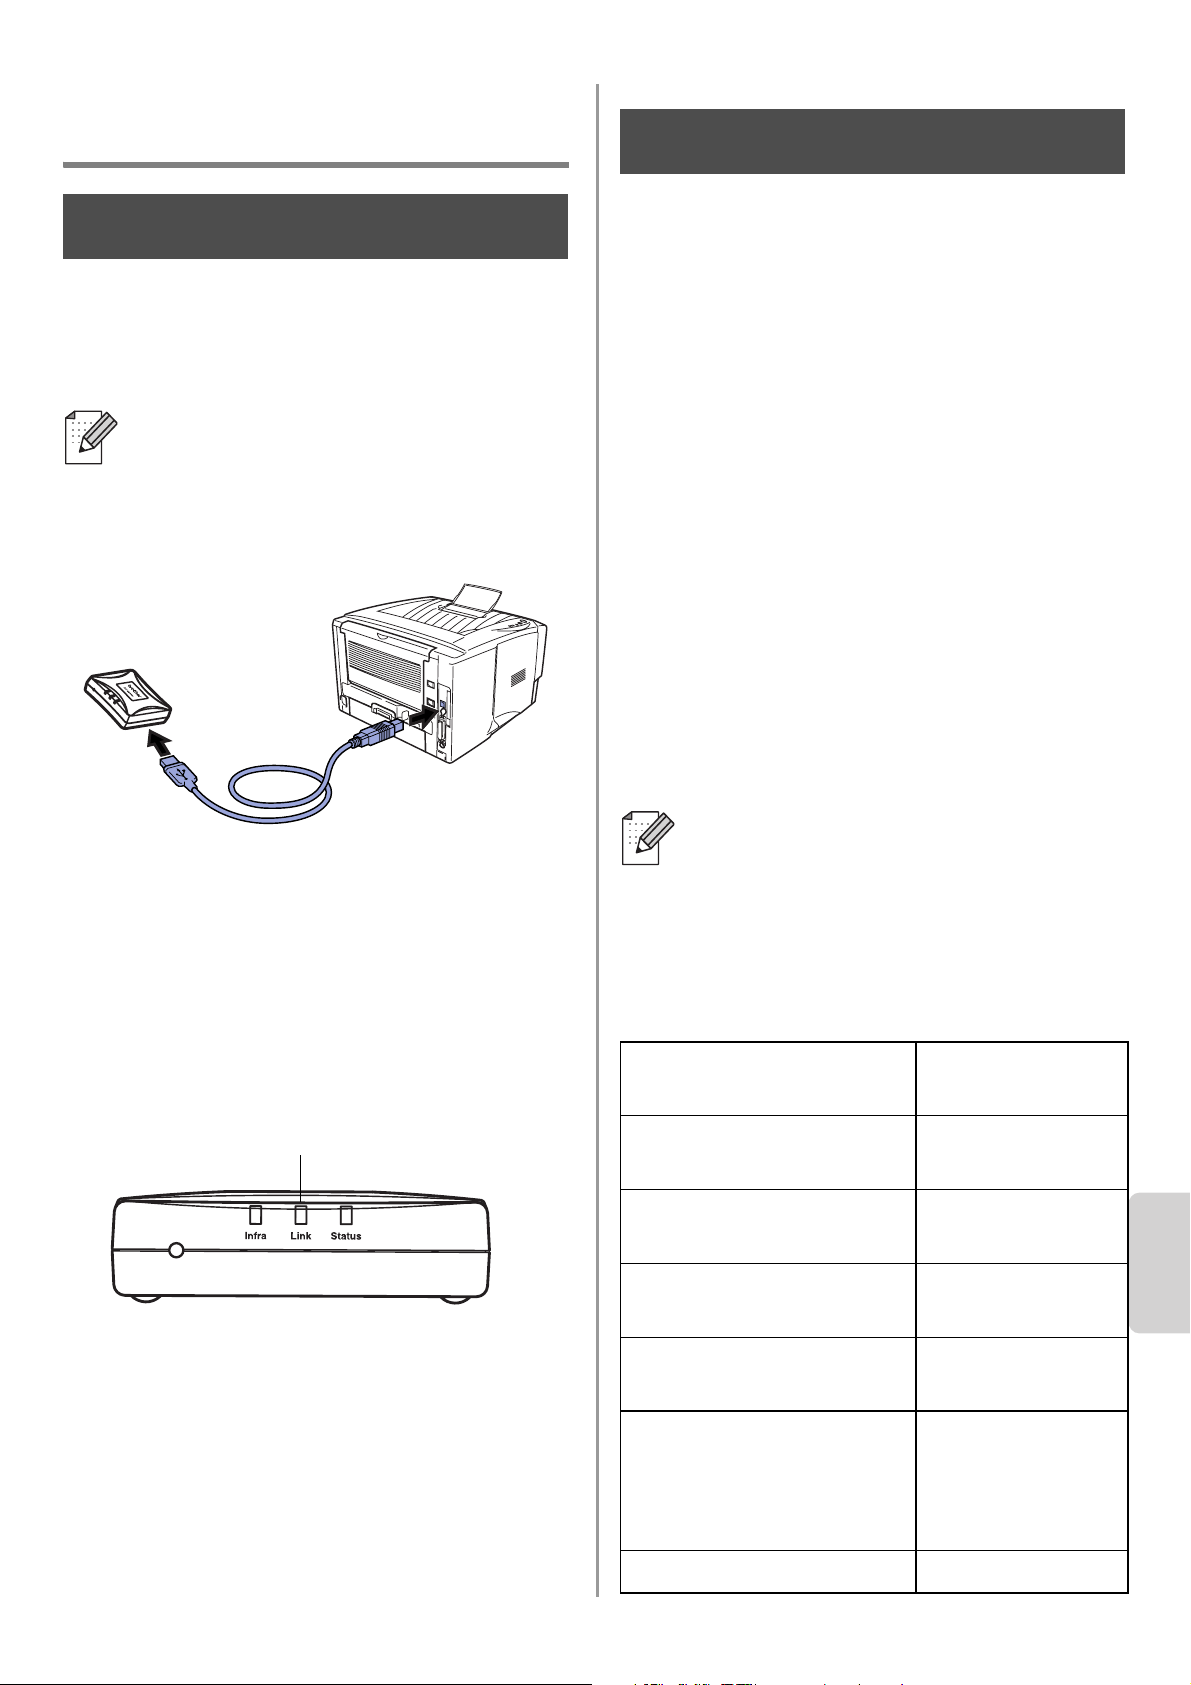
English
Dansk
102
Installation af
printer-/scannernetkortet
Sådan installerer du
printernetkortet.
1
Tilslut USB-kablet til NC-2200w og
derefter til Brothers printer/MFC/DCP.
2
Slut vekselstrømsadapteren til
NC-2200w.
3
Sæt vekselstrømsadapteren i stikket, og
tænd Brothers printer/MFC/DCP.
4
Sørg for, at lysdioden link på NC-2200w
er tændt, og vent nogle minutter.
Før installation skal du deaktivere din
personlige firewall-software (f.eks.
Firewall til Internetforbindelse i
Windows XP). Når du er sikker på, at du
kan udskrive, skal du genstarte din
personlige firewall-software igen.
Ændring af computerens
trådløse indstillinger for
konfiguration af NC-2200w.
Før du kan bruge Brothers printer/MFC/DCP
i et trådløst netværk, skal det trådløse
printer-/scannernetkort NC-2200w
konfigureres for at kunne svare til din
netværkskonfiguration.
For at kunne konfigurere NC-2200w fra en
trådløs computer på dit netværk, skal du
midlertidigt ændre dine nuværende trådløse
indstillinger. Før du ændrer din computers
nuværende trådløse indstillinger, anbefaler
vi, at du noterer dig dine nuværende trådløse
indstillinger. Du skal vende tilbage til disse
indstillinger efter trin 3 på side
105.
Computerens nuværende trådløse
netværksindstillinger
NC-2200w kan ikke bruges med en
USB-hub.
Trin 1
Lysdioden link (grøn)
Vi anbefaler, at du kontakter din
netværksadministrator, hvis du har
behov for hjælp med din computers
trådløse indstillinger.
Punkt Nuværende
indstilling
Kommunikationsmode:
(Infrastruktur / Ad hoc)
Netværksnavn
(SSID/ESSID)
Kanal: (1-14)
*Om nødvendigt.
Kryptering:
(INGEN / WEP / Andet)
Kryptering,
kodestørrelse og -type:
(64 bit, 128 bit / ASCII,
HEX / Andet)
Krypteringsnøgle:
Trin 2
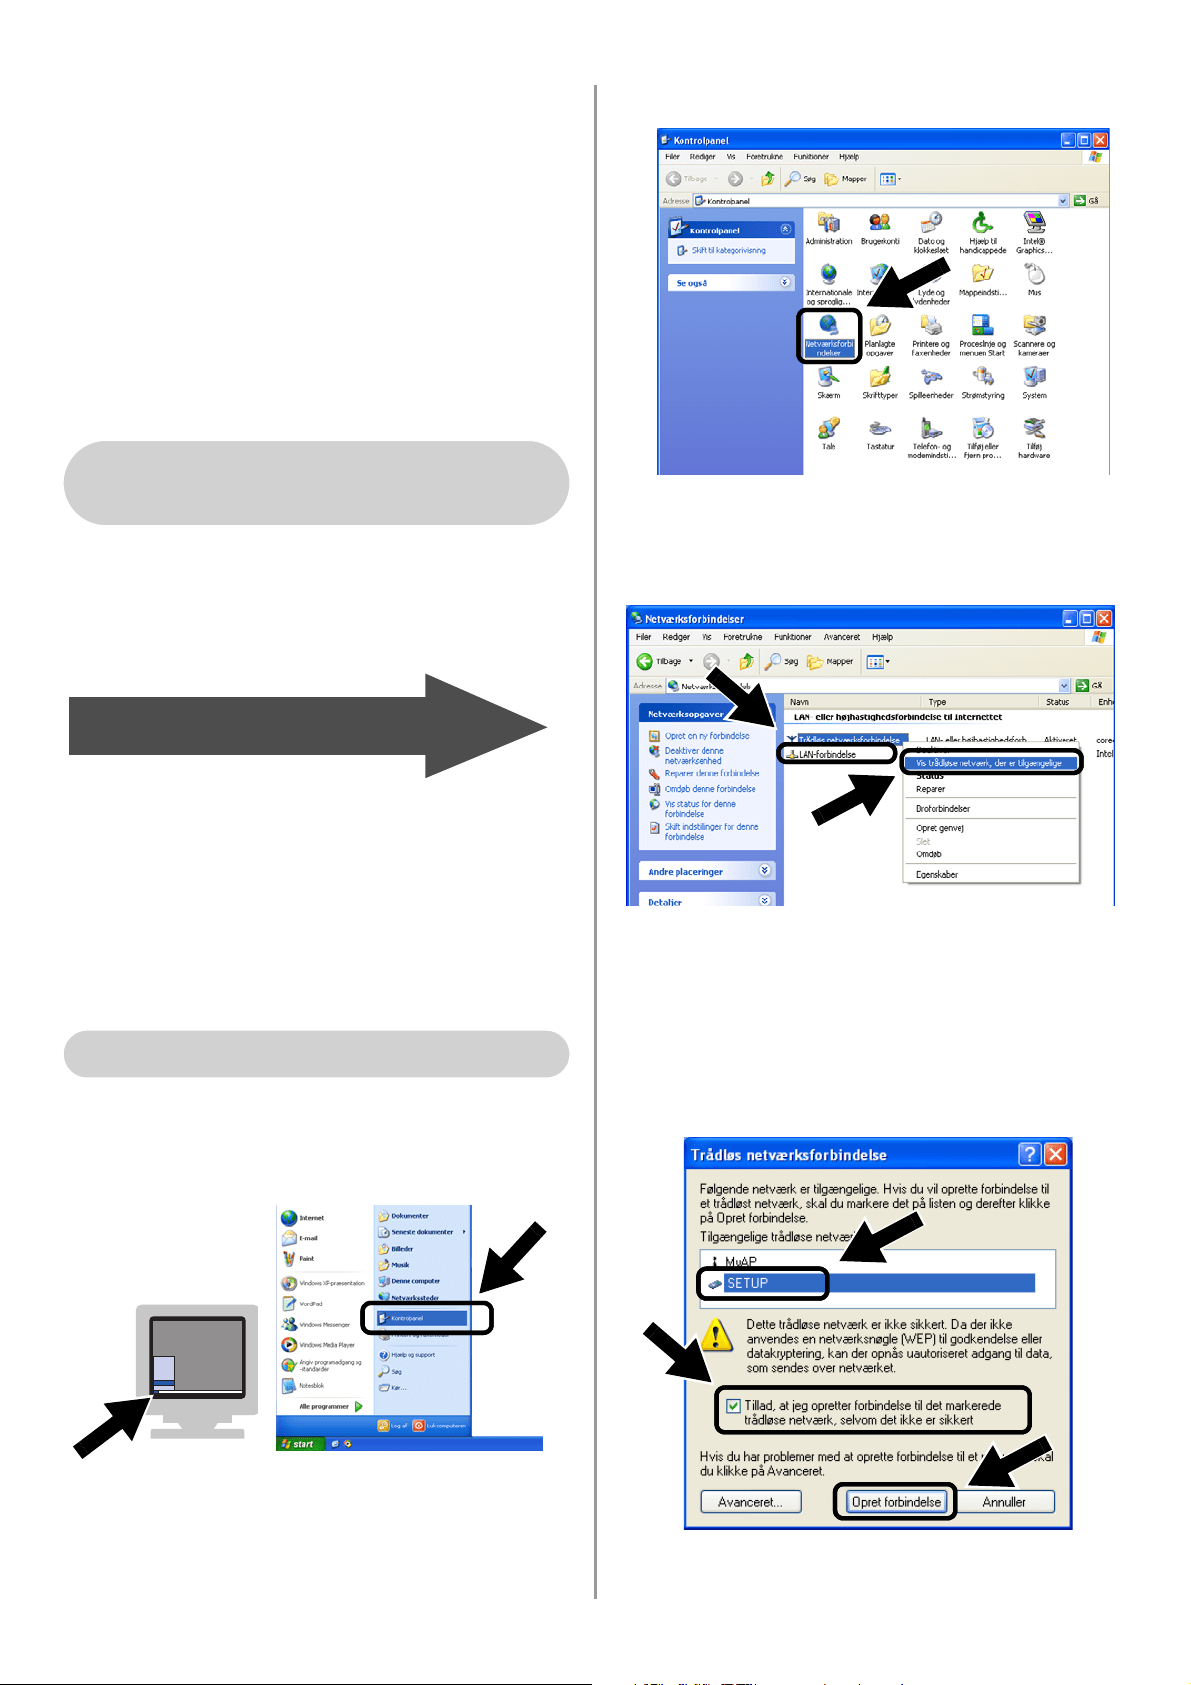
English
103
For at kunne kommunikere med det
ukonfigurerede printer-/scannernetkort,
NC-2200w, skal du ændre din computers
trådløse indstillinger til:
Kommunikationsmode: Ad hoc
(kanal 11)
Netværksnavn (SSID/ESSID): SETUP
(Forskel på store og små bogstaver)
Kryptering: Ingen
Se instruktionerne fra producenten af dit
trådløse kort for at ændre de trådløse
indstillinger. Gå herefter til Trin 3
Konfigurering af printer-/scannernetkortet.
Hvis du bruger Windows
®
XP eller Mac
OS
®
X 10.2.4, og du benytter dets
indbyggede trådløse Ethernet-netkort,
skal du følge disse trin for hvert
operativsystem.
1
Klik på Start og derefter på
Kontrolpanel.
2
Klik på ikonet Netværksforbindelser.
3
Vælg og højreklik på Netværksforbin-
delser. Klik på Vis trådløse netværk,
der er tilgængelige.
4
Du kan se netværksnavnet
(SSID/ESSID) for NC-2200w i feltet
Tilgængelige trådløse netværk. Vælg
SETUP, og afkryds afkrydsningsfeltet
Tillad, at jeg opretter forbindelse....
Klik på Opret forbindelse.
Windows
®
98/Me/2000,
Windows NT
®
4.0
Gå til Trin 3 på side 105
Windows
®
XP-brugere
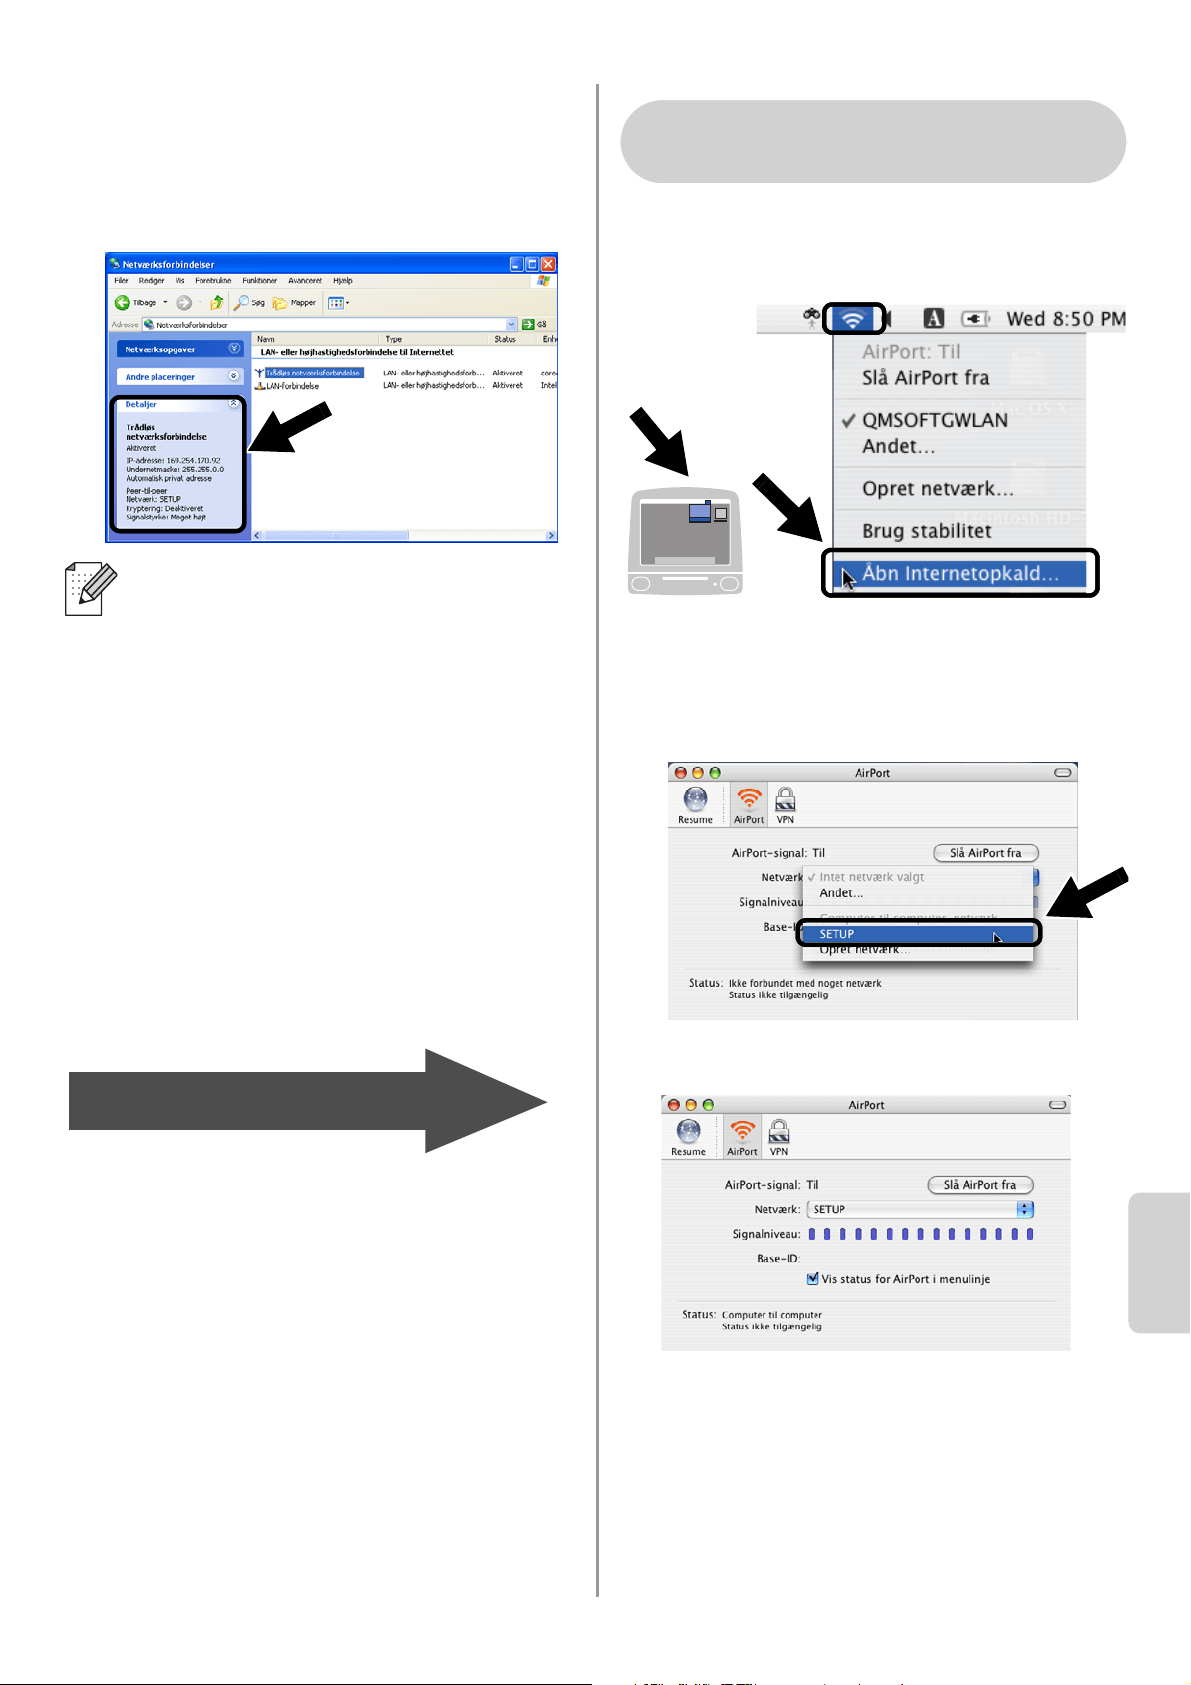
English
Dansk
104
5
Kontroller statussen for det trådløse
netværk. Det kan tage nogle få minutter
at ændre IP-adressen fra 0.0.0.0 til
169.254.x.x, som er vist på skærmen.
(hvor x.x er tal mellem 0 og 255).
1
Klik på ikonet for AirPort status, og vælg
Åbn Internetopkald.
2
Klik på netværksfanen for at se de
tilgængelige trådløse enheder. Du kan
se netværksnavnet (SSID/ESSID) på
netværket. Vælg SETUP.
3
Det trådløse netværk er nu tilsluttet.
Hvis det netværksnavn (SSID/ESSID),
du ønsker at vælge, ikke er anført, så
prøv følgende:
■ Træk vekselstrømsadapteren ud af
stikket, sæt det i igen, og vent nogle få
minutter.
■ Flyt Brothers printer/MFC/DCP med
printer-/scannernetkortet NC-2200w
tættere på computeren, og prøv igen.
■ Nulstil printer-/scannernetkortet
NC-2200w til dets fabriksindstillinger,
og prøv igen. Se side
112 for at
nulstille fabriksindstillingerne.
■ Se kapitel 6 i brugsanvisningen til
netværk, NC-2200w, på den
medfølgende cd-rom.
Gå til Trin 3 på side 105
For brugere af Mac OS
®
X
10.2.4 - 10.3 eller nyere
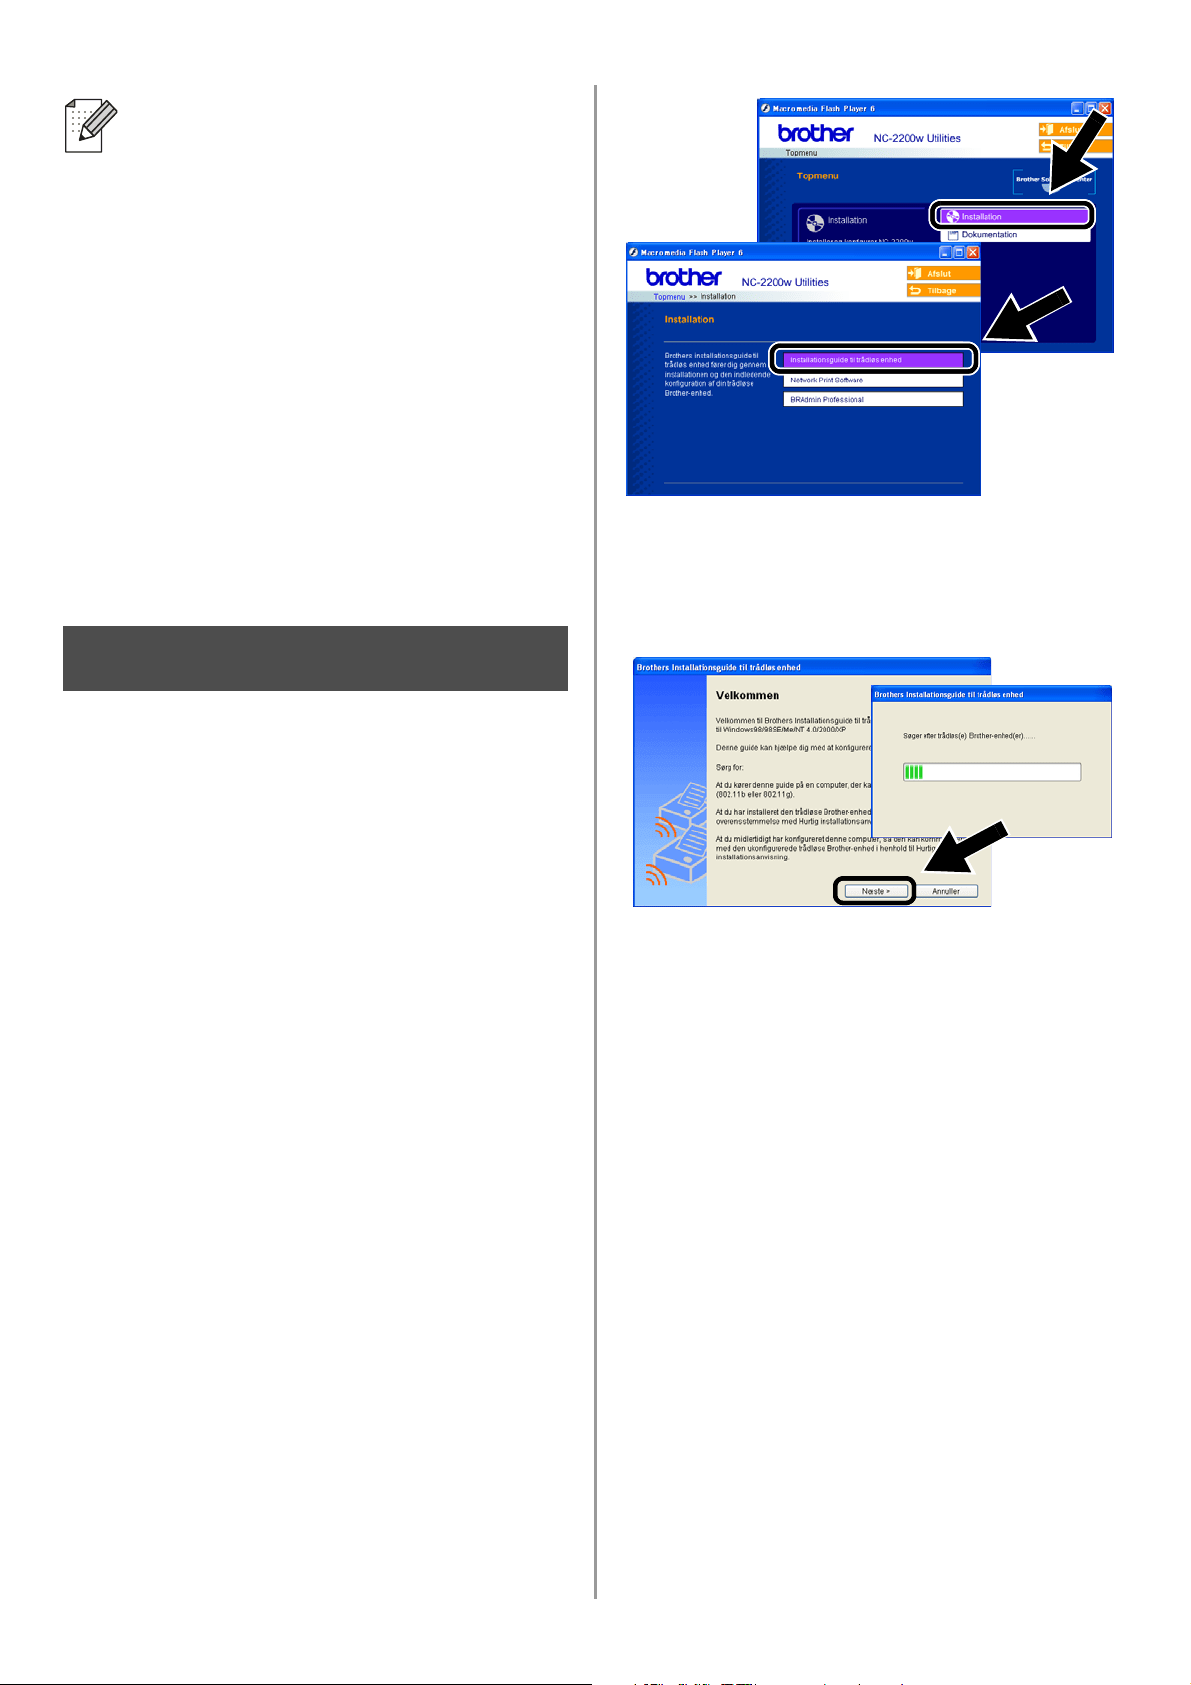
English
105
Konfigurering af
printer-/scannernetkortet
1
Indsæt cd-rom’en for NC-2200w i
cd-rom-drevet.
(For Windows
®
brugere) Åbningsskærm-
billedet vises automatisk.
(For brugere af Mac OS
®
X 10.2.4 til 10.3
eller nyere) Dobbeltklik på
NC2200w-ikonet på din Macintosh
®
, og
dobbeltklik herefter på start her
OSX-ikonet.
2
Vælg dit sprog.
3
Klik på Installation og herefter på
Trådløs enhed.
4
Gennemse oplysningerne under
Velkommen, og når du er sikker på at
have gennemført de nødvendige
opgaver, skal du klikke på Næste.
5
Følg skærmbillederne. Se kapitel 2 i
brugsanvisningen til netværk,
NC-2200w, på den medfølgende cd-rom.
6
Når du er gået ud af Installationsguide
til trådløs enhed skal du stille din
computers trådløse indstillinger tilbage til
de oprindelige indstillinger ved at bruge
de oplysninger, du noterede under
Ændring af computerens trådløse
indstillinger for konfiguration af
NC-2200w. på side 102.
Hvis det netværksnavn (SSID/ESSID),
du ønsker at vælge, ikke er anført, så
prøv følgende:
■ Træk vekselstrømsadapteren ud af
stikket, sæt det i igen, og vent nogle få
minutter.
■ Flyt Brothers printer/MFC/DCP med
printer-/scannernetkortet NC-2200w
tættere på computeren, og prøv igen.
■ Nulstil printer-/scannernetkortet
NC-2200w til dets fabriksindstillinger,
og prøv igen. Se side
112 for at
gendanne fabriksindstillingerne.
■ Se kapitel 6 i brugsanvisningen til
netværk, NC-2200w, på den
medfølgende cd-rom.
Trin 3
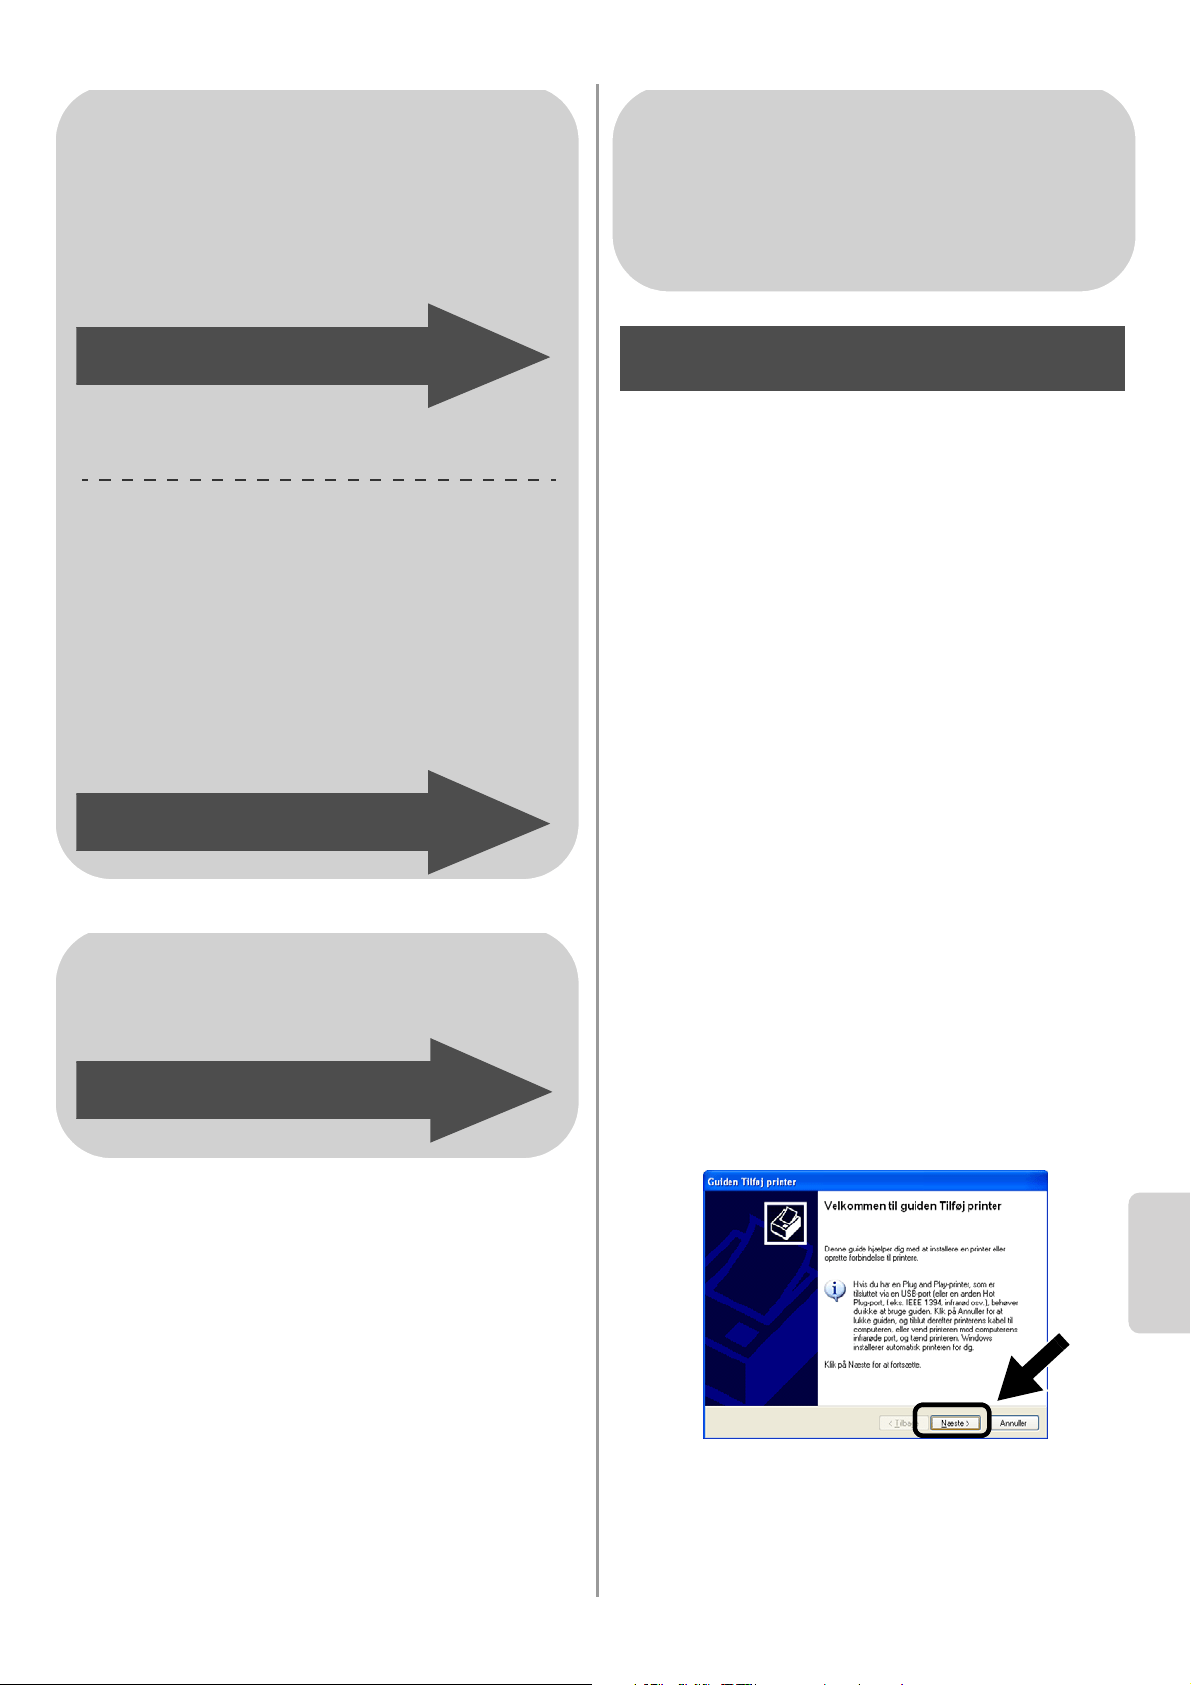
English
Dansk
106
Installation af printerdriveren
Brugerne af ovennævnte modeller skal
installere printerdriveren, før computeren
indstilles til at arbejde med NC-2200w. Hvis
printerdriveren allerede er installeret, skal du
spring dette trin over. Driveren er på den
medfølgende cd-rom til Brothers
printer/MFC/DCP. Du kan også downloade
printerdriveren ved at gå til webstedet Brother
Solutions Center.
<http://solutions.brother.com>.
For at installere printerdriveren ved
anvendelse af cd-rom'en skal du følge trinene
nedenfor.
Skærmbillederne i dette afsnit stammer fra
Windows
®
XP.
1
Klik på Start og vælg Printere og
faxenheder. Klik på Tilføj printer og
Tilføj Printer-guiden begynder. Når dette
skærmbillede vises, skal du klikke på
Næste.
For brugere af Windows
®
Gruppe 1:
HL-1440/1450/1470N/5040/5050/5070N/
5070N/5070DN/5140/5150D/5170DN
MFC-9070/9180/9160
Gruppe 2:
MFC-210C/420CN/410CN/620CN/
5440CN/5840CN/3240C/3340CN/8420/
8820D/8820DN/8220/8440/8840D/
8840DN/3820CN/3420CN/DCP-120C/
320CN/8020/8025D/8025DN/8040/
8045D/8045DN
Gå til Trin 4 på side 106
Gå til Trin 4 på side 109
For brugere af Mac OS
®
X
10.2.4 - 10.3 eller nyere
Gå til Trin 4 på side 111
For brugere af Windows
®
Gruppe 1:
HL-1440/1450/1470N/5040/ 5050/
5070N/5070DN/5140/5150D/5170DN
MFC-9070/9180/9160
Trin 4
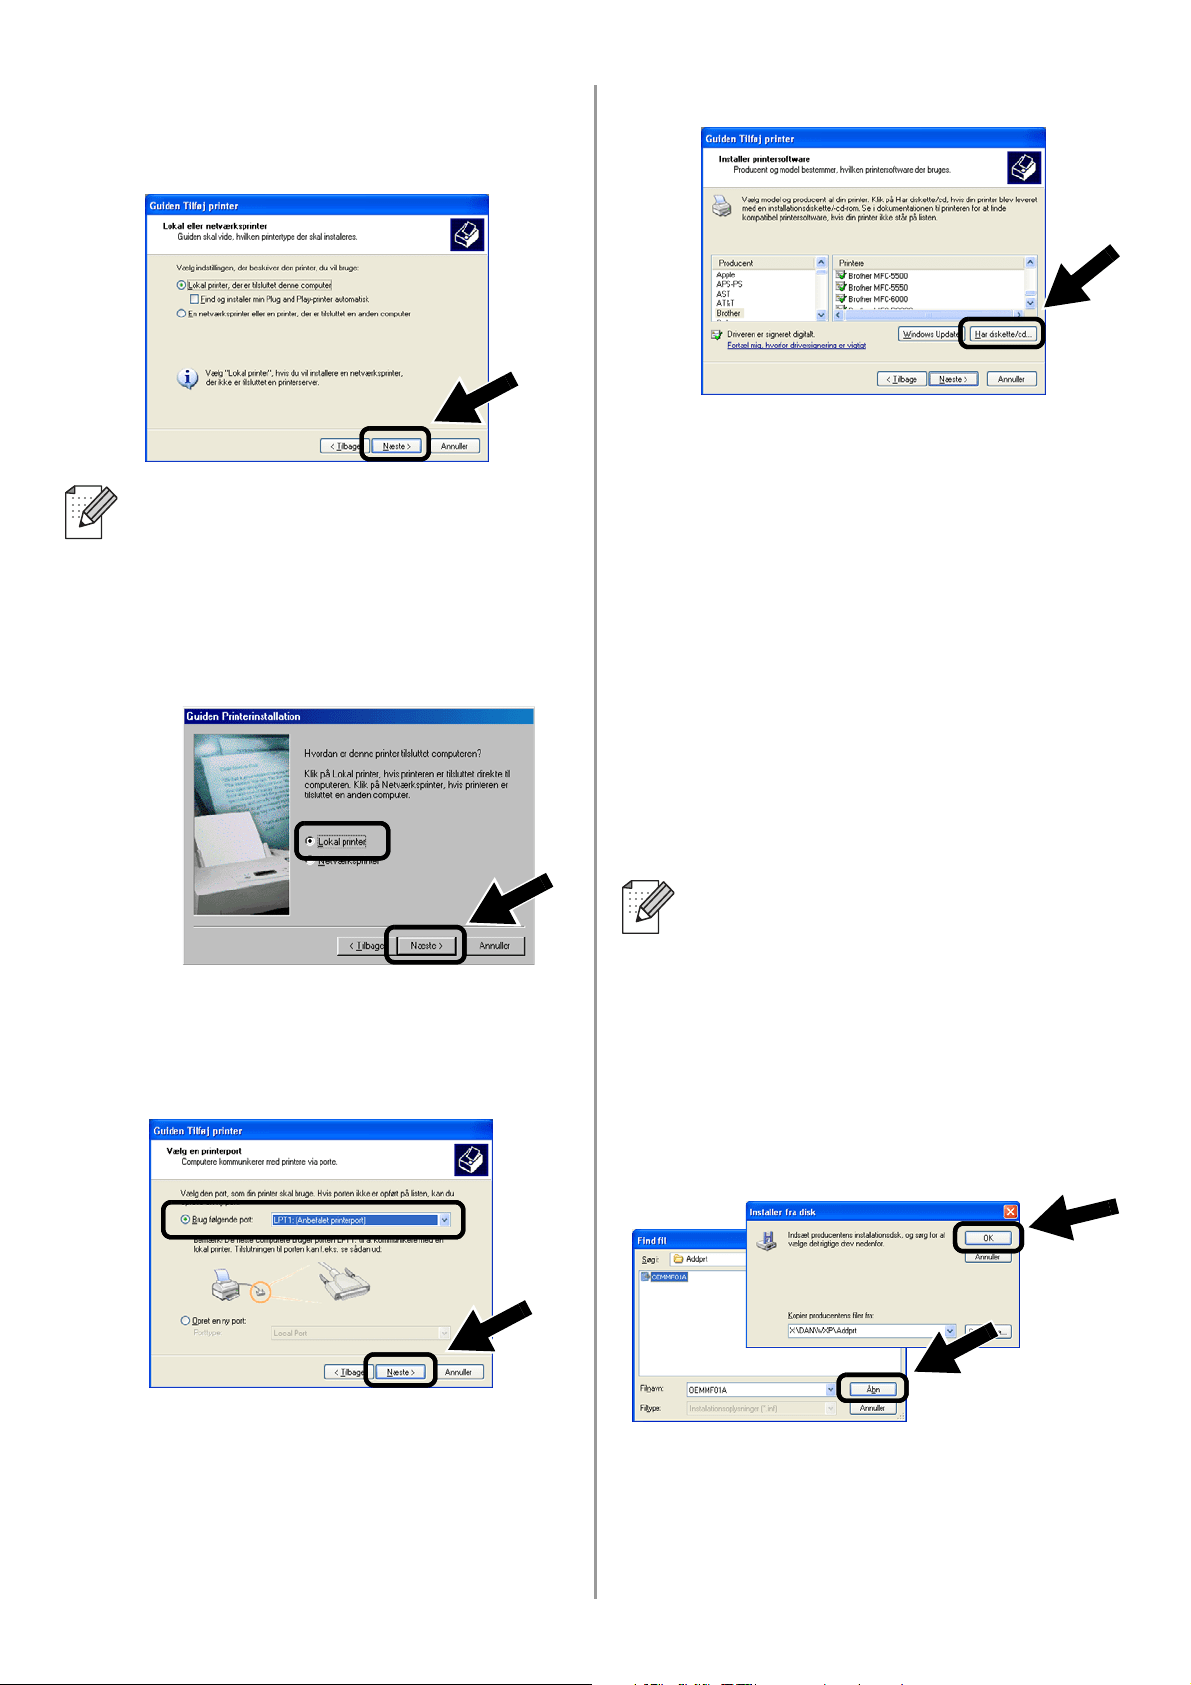
English
107
2
Fjern markeringen af Find og installer
min Plug and Play-printer automatisk,
og klik herefter på Næste.
3
Vælg midlertidigt LPT1: (Anbefalet
printerport) i rullevinduet for valg af
printerport, og klik herefter på Næste.
4
Klik på Har diskette/cd.
5
(For brugere af Brother-laserprintere)
Du skal bladre i cd-rom'en og vælge
mappen Driver og klikke på Åbn. Vælg
herefter mappen Win2k_xp (eller
mappen for din OS), og klik på Åbn, og
vælg herefter det rette sprog og klik på
Åben.
(Til brugere af Brother MFC/DCP)
Du skal bladre i CD-ROM og vælge
mappen for det rette sprog og klikke på
Åbn. Vælg herefter WXP mappen (eller
mappen for din OS), og klik på Åbn.
Vælg endelig mappen Addprt, og klik på
Åbn.
6
Klik på Åbn, og klik derefter på OK.
■ Dit OS har muligvis ikke denne
skærm.
■ (For brugere af Windows
®
98/Me/Windows NT
®
4.0). Hvis
denne menu vises, skal du vælge
Lokal printer og herefter klikke på
Næste.
■ Hvis dit OS er Windows
®
XP og
Win2k_xp mappen ikke er anført,
skal du vælgeWin2k mappen.
■ Hvis du ikke kan se mappen til dit
operativsystem iDriver-mappen, men
i stedet kan se: inst, PCL, PS,
USBW98ME osv., anbefaler vi, at du
vælger PCL-mappen. Du får herefter
vist den rette operativsystemmappe.
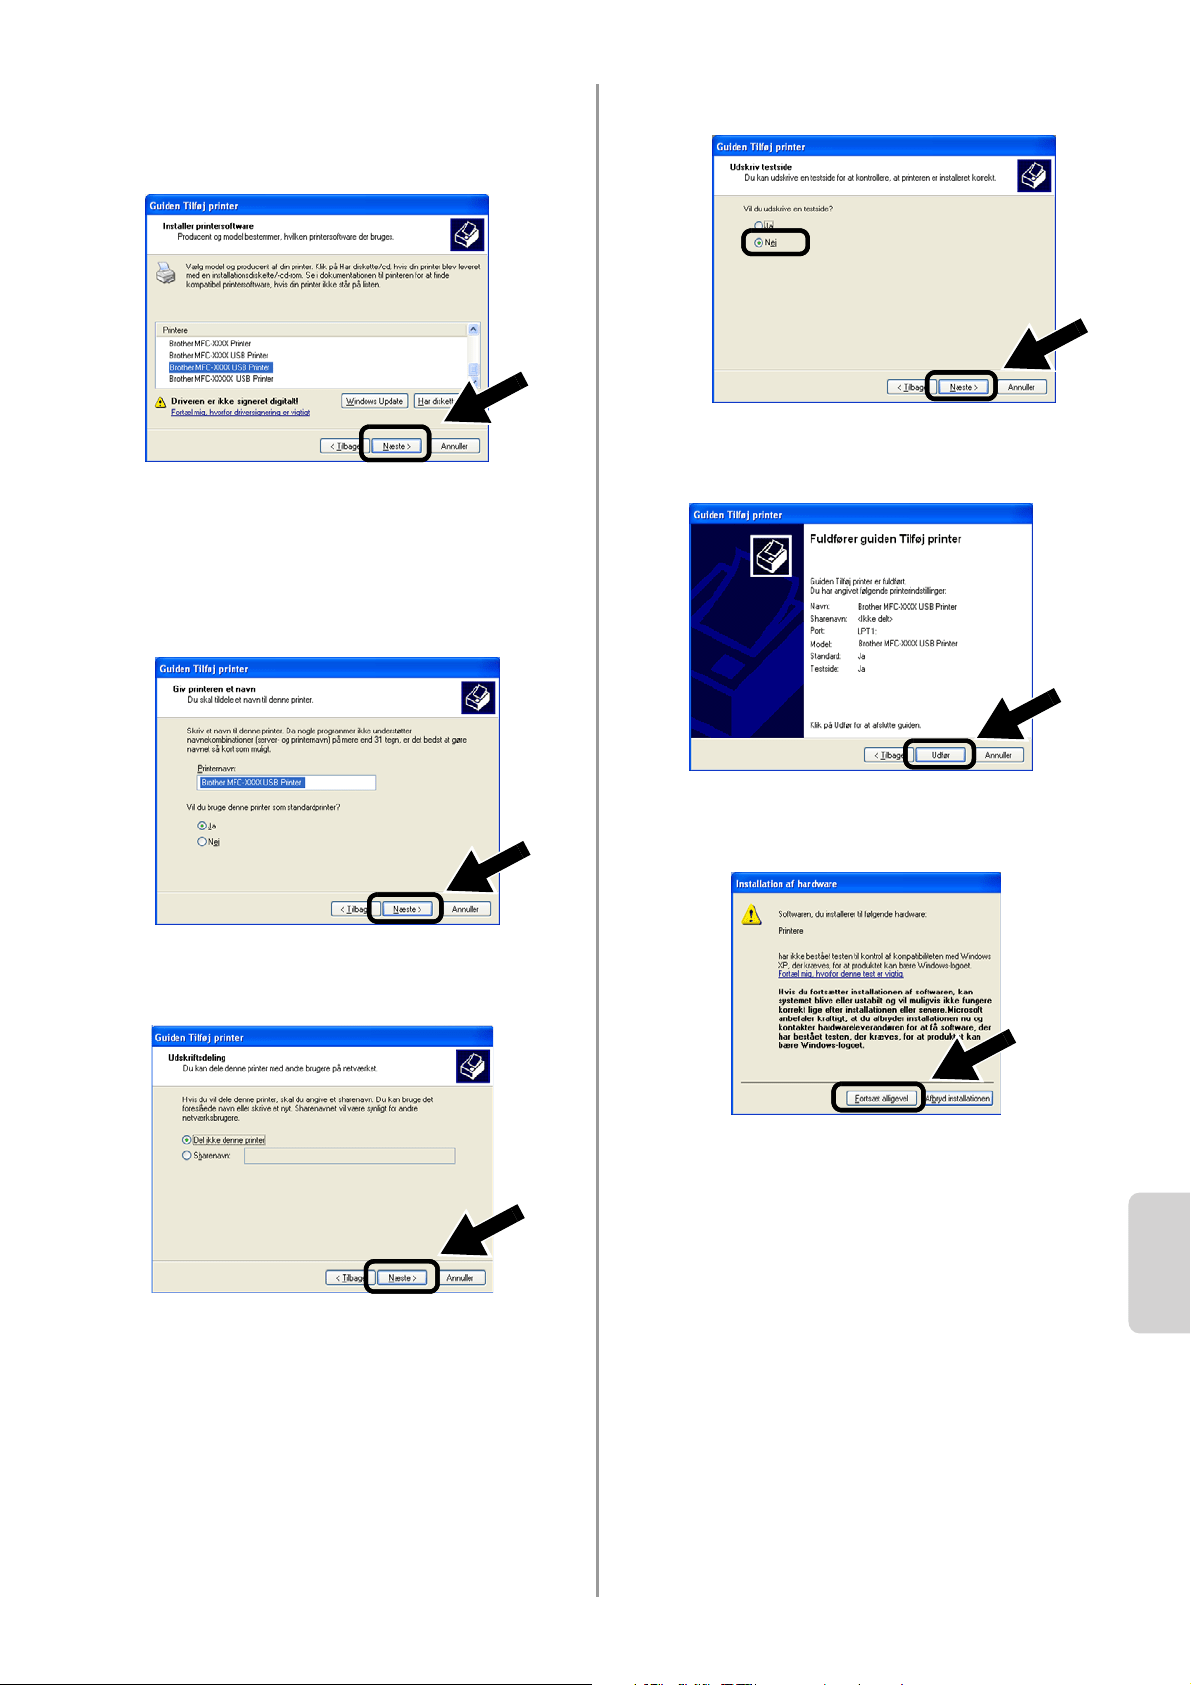
English
Dansk
108
7
Marker den model, du er ved at installere
fra listen over Brothers
printer/MFC/DCP, og klik på Næste.
8
Modellen, du installerer, vil blive vist i
vinduet. Vælg Ja eller Nej, hvis du
ønsker denne printer som
standardprinter, og klik herefter på
Næste.
9
Hvis denne skærm vises, skal du vælge
Del ikke denne printer og Næste.
10
Vælg Nej, og Næste.
11
Når denne skærm vises, skal du klikke
på Udfør.
12
Når Windows testskærmbillede vises,
skal du klikke på Fortsæt alligevel.
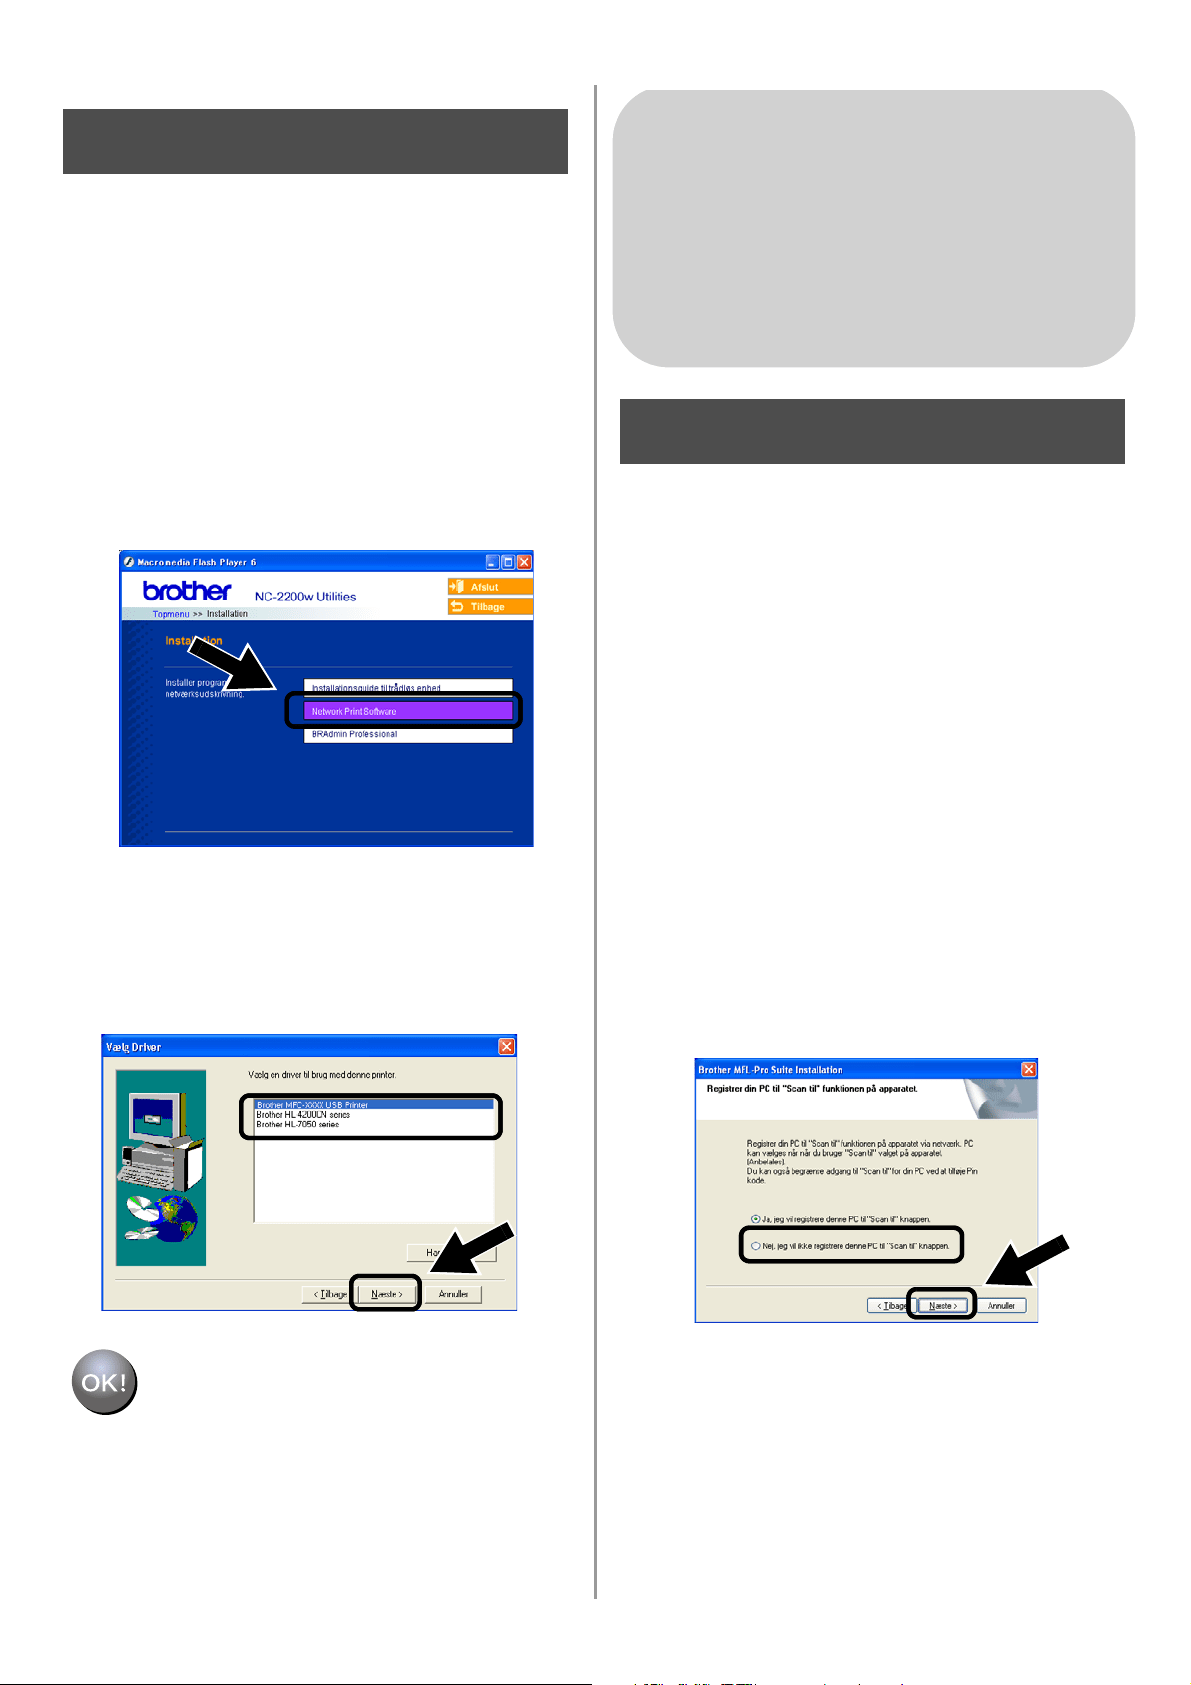
English
109
Klik på Installation af
Network Print Software.
Du skal installere softwaren til
netværksudskrivning og konfigurere det til
Brothers printer/MFC/DCP's trådløse
netværksforbindelse. Følg trinene nedenfor.
1
Klik på Network Print Software, og følg
instrukserne på skærmen.
2
Vælg den samme printerdriver som den,
du valgte i trin 7 på side
108. Marker den
model, du er ved at installere fra listen af
MFC/DCP-printere, og klik på Næste.
Installationen er nu gennemført.
Installation af MFL-Pro Suite
Du skal installere MFL-Pro Suite for at danne
en trådløs netværksforbindelse fra din
computer til Brothers printer/MFC/DCP's.
Softwaren findes på den medfølgende
cd-rom til Brothers printer/MFC/DCP. For at
installere softwaren skal du følge trinene i
"Installation af driver og program til brugere af
netværksinterfacekabel" i den medfølgende
Hurtig installationsanvisning til Brothers
printer/MFC/DCP.
■Til MFC-8420/8820D/8820DN/8220/8440/
8840D/8840DN/3820CN/3420CN og
DCP-8020/8025D/8025DN/8040/8045D/8045DN
Når denne skærm vises i installationsprocessen,
skal du vælge Nej og herefter klikke på Næste.
Trin 5
For brugere af Windows
®
Gruppe 2
MFC-210C/420CN/410CN/620CN/
5440CN/5840CN/3240C/3340CN/8420/
8820D/8820DN/8220/8440/8840D/
8840DN/3820CN/3420CN/DCP-120C/
320CN/8020/8025D/8025DN/8040/
8045D/8045DN
Trin 4
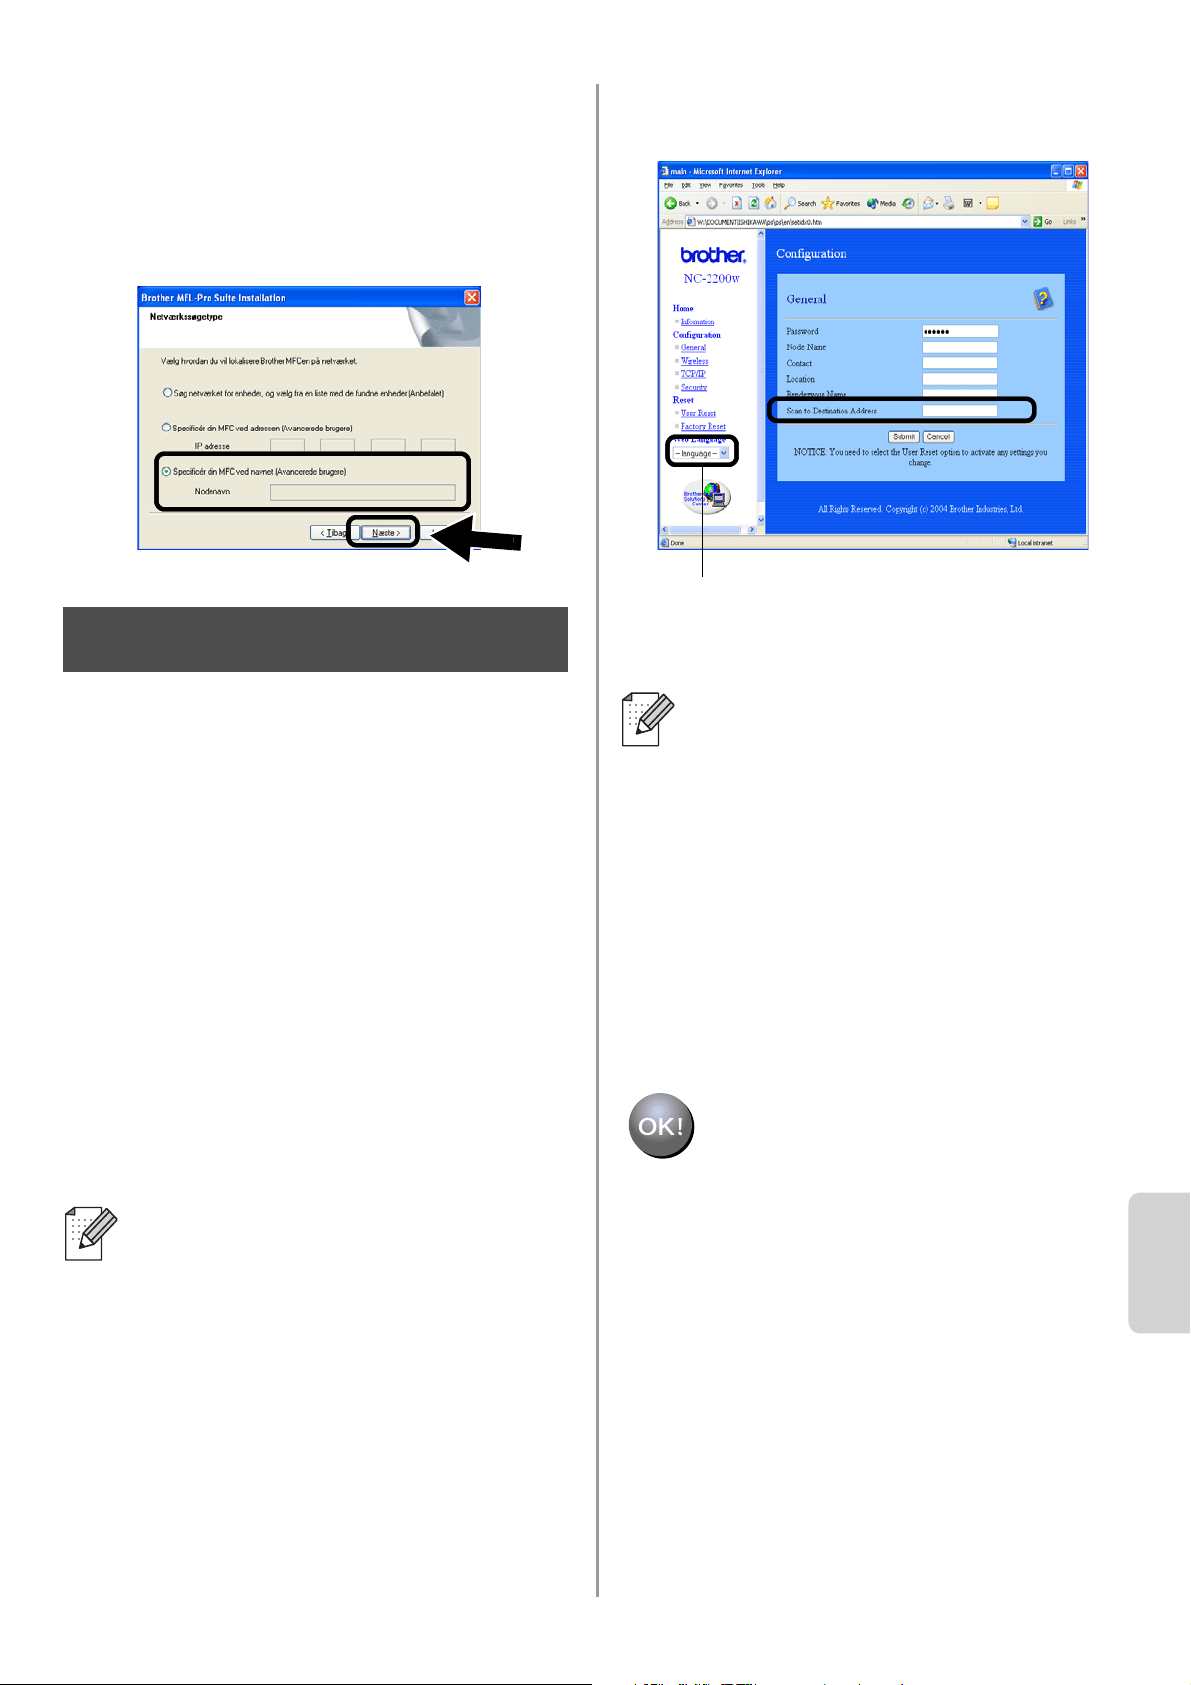
English
Dansk
110
■ Der er nogle MFC'er/DCP'er til NC-2200w, der
ikke findes i søgelisten under installationen. I så
fald skal du gå tilbage til det skærmbillede, der
er vist nedenfor, og indstille nodenavnet for
NC-2200w manuelt. Du kan se nodenavnet på
netværkskonfigurationssiden. Se
Andre
oplysninger på side 112.
Specificering af scanningsdesti-
nationsadressen fra hjemmesiden
for NC-2200w.
Du skal specificere scanningsdesti-
nationsadressen fra NC-2200w
URL-adressen for at kunne benytte
scanneren i feltet Netværk. Følg trinene
nedenfor.
1
Åbn Internet Explorer, og indtast
følgende i URL-feltet:
http://NC-2200w_ip_address
Hvor NC-2200w_ip_addressen er
IP-adressen eller nodenavnet for din
NC-2200w-printer.
2
Gå videre til siden General under
Configuration.
3
Indtast computerens IP-adresse.
Installationen er nu gennemført.
■ IP-adressen eller nodenavnet for din
NC-2200w er på netværkskonfigura-
tionssiden. Du kan få flere oplysninger
ved at se
Andre oplysninger på side
112.
■ Du bliver derefter bedt om et
brugernavn og en adgangskode.
Indtast følgende:
brugernavn: admin (der skelnes
mellem store og små bogstaver)
adgangskode: access (standard)
Trin 5
■ Hvis din computers IP-adresse
automatisk blev tildelt af DHCP, skal du
indtaste computernavnet, da
IP-adressen kan blive ændret. Navnet
kan være Windows
®
computernavnet
eller DNS-værtsnavnet.
■ Du kan finde dit computernavn ved at
åbne Egenskaber fra Denne
computer og se computernavnet. For
at bruge domænenavnet skal du tildele
DNS-serveradressen ved at bruge
Web-serveren til NC-2200w og din
Web-browser.
(Tilgængelige sprog: engelsk, tysk,
fransk, hollandsk og japansk).

English
111
Installation og konfiguration
af printerdriveren ved hjælp
af funktionerne til enkel
netværkskonfiguration i Mac
OS
®
X
Du skal installere printerdriver, før
computeren indstilles til at arbejde med
NC-2200w. Hvis printerdriveren allerede er
installeret, kan du springe dette trin over.
Driveren er på den medfølgende cd-rom til
Brothers printer/MFC/DCP. Du kan også
downloade den seneste printerdriver fra
vores webside:
http://solutions.brother.com
For at installere printerdriveren skal du følge
trinene nedenfor.
1
Indsæt cd-rom'en i dit cd-rom-drev og
dobbeltklik på Start Here OSX-ikonet for
at installere softwaren. Hvis denne
skærm vises, skal du vælge dit sprog.
2
(For brugere af Brother-laserprinter)
Klik på Installer software og herefter på
Printerdriver på menuen.
(For brugere af Brother MFC/DCP)
Klik på MFL-Pro Suite for installation.
3
Følg instruktionerne på skærmen for at
installere printerdriveren.
4
Vælg Programmer i menuen Flyt.
.
5
Åbn mappen Utilities.
6
(For brugere af Mac OS
®
X 10.2.4)
Åbn ikonet Print Center.
(For brugere af Mac OS
®
X 10.3)
Åbn ikonet Printerværktøj.
7
Klik på knappen Tilføj.
For brugere af Mac OS
®
X
10.2.4 - 10.3 eller nyere
Trin 4
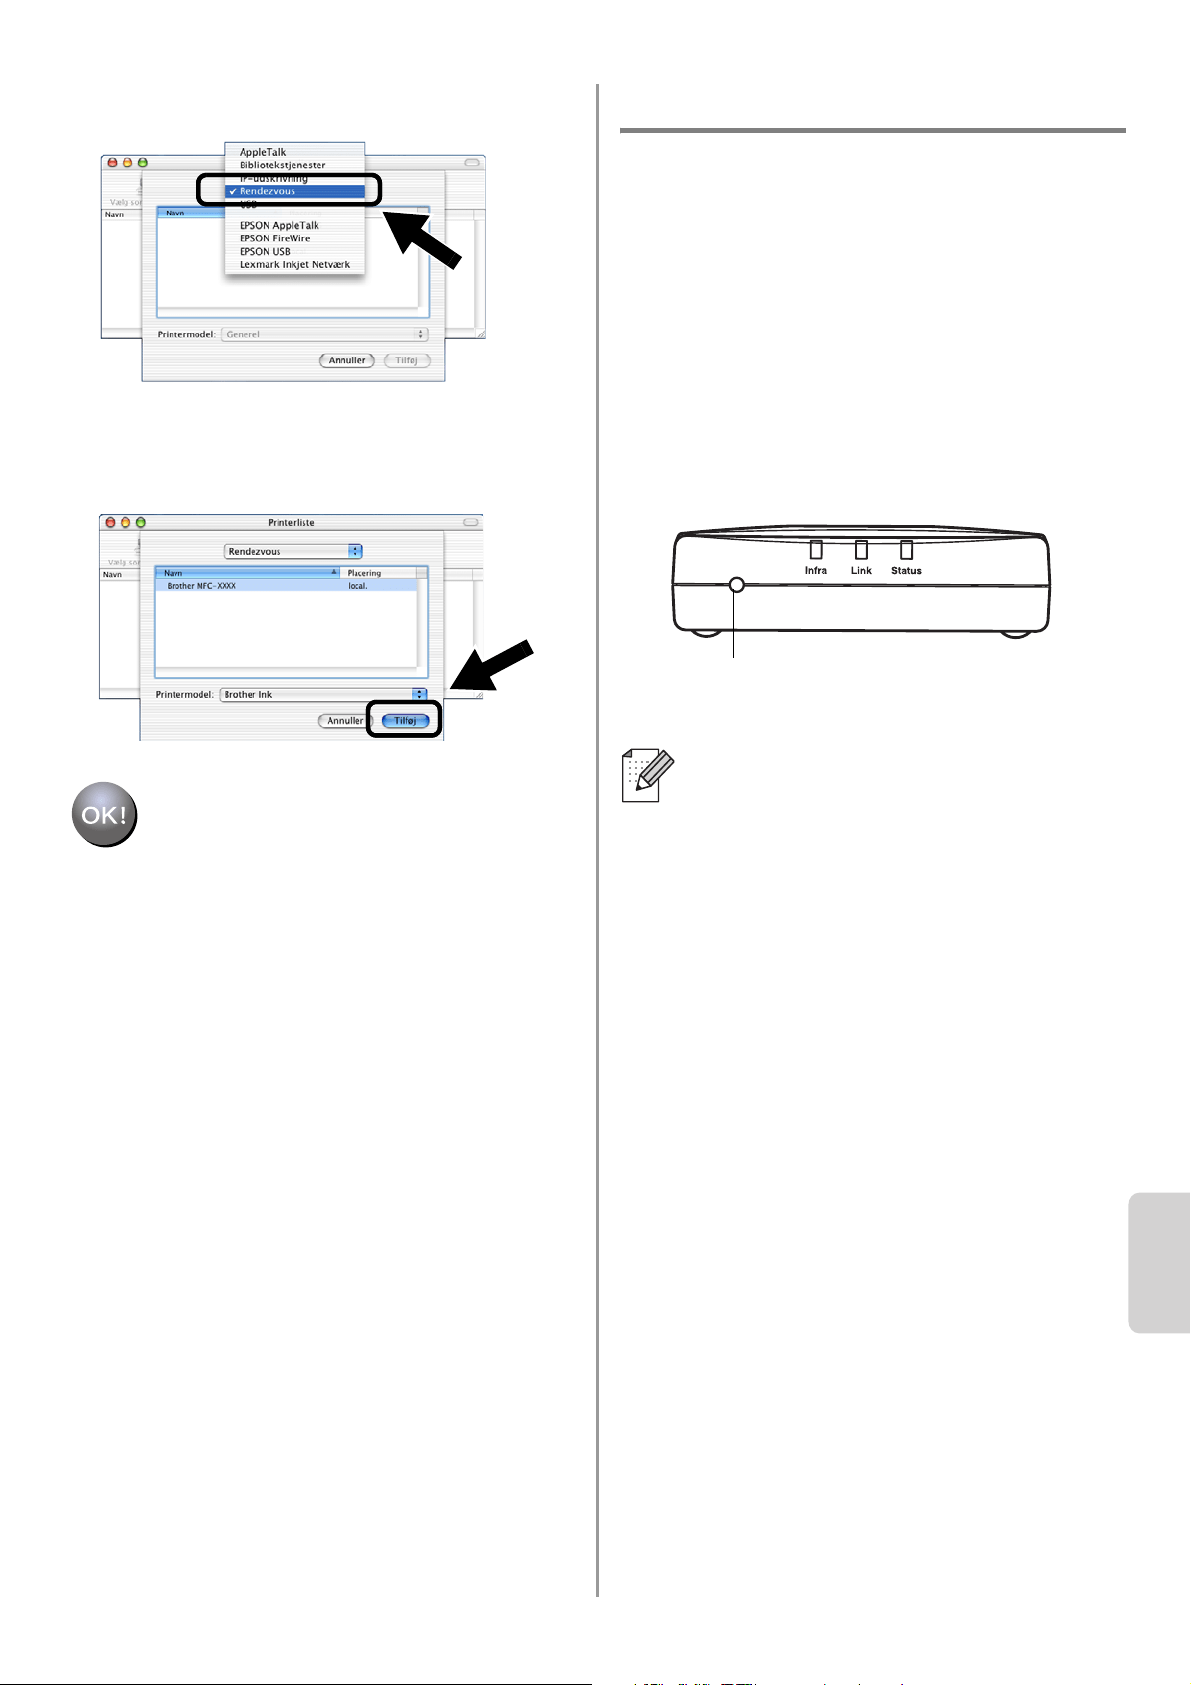
English
Dansk
112
8
Vælg Rendezvous.
9
Vælg modelnavnet, og klik derefter på
Tilføj.
Installationen er nu gennemført.
Andre oplysninger
Udskrivning af netværkskonfigurationsside
For at udskrive netværkskonfigurationssiden
skal du trykke på testknappen på NC-2200w.
Nulstilling til fabriksindstillinger
Hvis du ønsker at nulstille NC-2200w til
dens fabriksindstillinger (hvilket også
nulstiller alle oplysninger som f.eks.
trådløse indstillinger, adgangskode og
IP-adresse), skal du holde testknappen
nede i mere end 10 sekunder.
Når du nulstiller til fabriksindstillinger,
skal du genindstille printeren fra Trin 2
Ændring af computerens trådløse
indstillinger for konfiguration af
NC-2200w. på side 102.
Test knap

English
113
Componentes da caixa
1
Servidor de impressão/digitalização
externo sem fios NC-2200w
2
Adaptador CA
3
CD-ROM (incluindo software de
configuração e Manual de utilização da
rede da NC-2200w)
4
Guia de configuração rápida
Modelos suportados
A NC-2200w suporta os modelos listados a
seguir. Se o número do seu modelo não se
encontrar na lista, consulte a página
correspondente à NC-2200w, no site
http://solutions.brother.com
para confirmar os modelos uportados pela
NC-2200w.
Sistemas operativos
suportados
Windows
®
Windows
®
98/98SE/Me/2000 /XP e Windows
NT
®
4.0
Macintosh
®
Mac OS
®
X 10.2.4 - 10.3 ou superior
CD-ROM fornecido
1
Brother Solutions Center
O Brother Solutions Center
(
http://solutions.brother.com
) é um
recurso central para tudo o que esteja
relacionado com a impressora/MFC/DCP
e com a NC-2200w. Transfira os
controladores e utilitários necessários,
leia as secções de FAQ e as sugestões
para resolução de problemas.
2
Configuração
Pode executar o Assistente de
configuração de dispositivos sem fios, que
o auxiliará na configuração da NC-2200w.
Também pode instalar o software de
impressão em rede e o utilitário BRAdmin
Professional para Windows
®
.
3
Documentação
Ver o Manual de utilização da rede e o
Guia de configuração rápida da
NC-2200w no formato PDF.
A NC-2200w pode ser ligada à porta de
interface USB da impressora/MFC/DCP
da Brother. Este produto não inclui
nenhum cabo USB, pelo que deverá ter o
cabo USB apropriado (Tipo A-B) à mão.
Grupo 1:
HL-1440/1450/1470N/5040/ 5050/5070N/
5140/5150D/5170DN
MFC-9070/9180/9160
Grupo 2:
MFC-210C/420CN/410CN/620CN/5440CN/584
0CN/3240C/3340CN/8420/8820D/8820DN/
8220/8440/8840D/8840DN/3820CN/3420CN/
DCP-110C/310C/8020/8025D/8025DN/8040/
8045D/8045DN
1
2
4
3
A
B
Se o CD fornecido com a
impressora/MFC/DCP Brother não
incluir um controlador para Windows
NT
®
4.0, não poderá utilizar o produto em
ambientes Windows NT
®
4.0.
1
2
3
Tipo A-B
(Até 2 m)
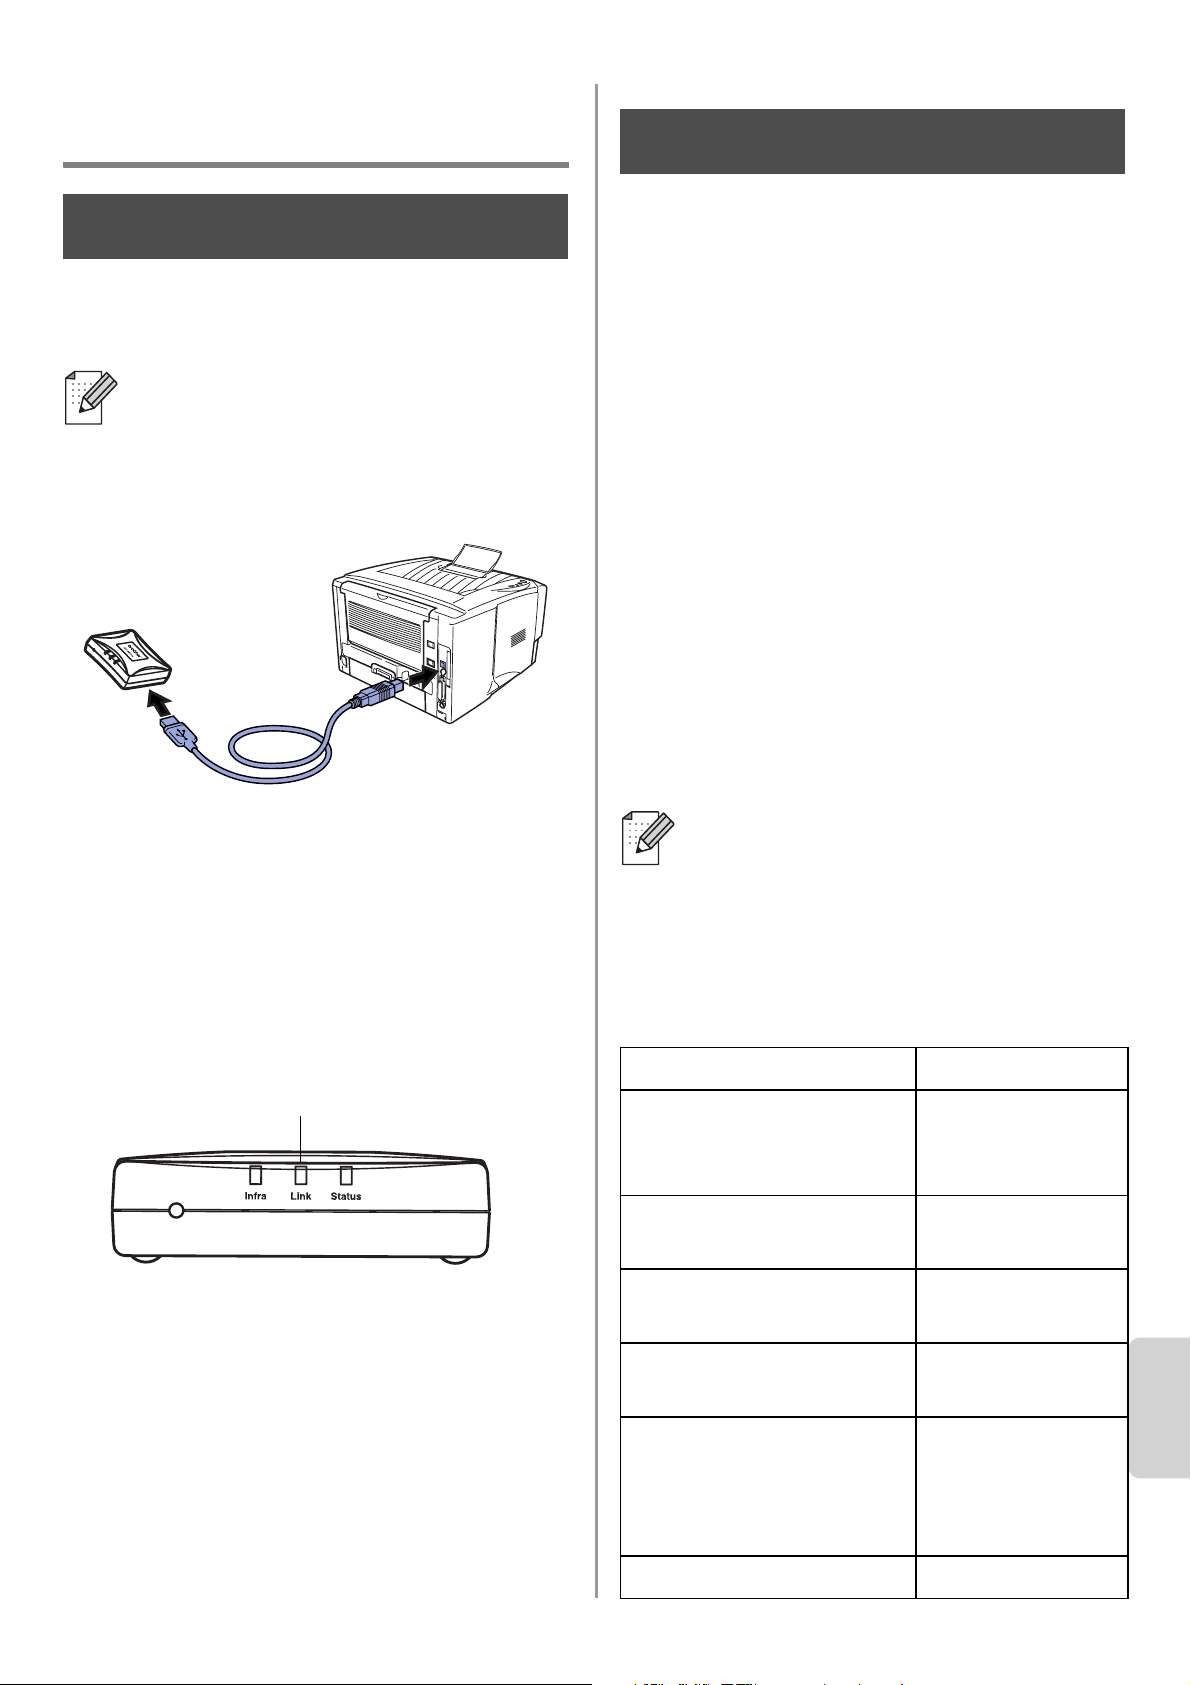
English
Português
114
Configurar o servidor de
impressão/digitalização
Instalar o servidor de impressão
1
Ligue o cabo USB à NC-2200w e à
impressora/MFC/DCP Brother.
2
Ligue o adaptador CA à NC-2200w.
3
Ligue o adaptador CA à corrente e ligue
a impressora/MFC/DCP Brother.
4
Certifique-se de que o LED Link da
NC-2200w está ligado e aguarde alguns
minutos.
Antes da instalação, se estiver a utilizar
uma firewall pessoal (por exemplo, a
Firewall de ligação à Internet no
Windows XP), desactive-a. Quando vir
que já pode imprimir, reinicie o software
de firewall pessoal.
Alterar as definições de rede
sem fios do seu computador
para configurar a NC-2200w
Antes de poder utilizar a
impressora/MFC/DCP Brother numa rede
sem fios, tem de configurar a NC-2200w,
para que corresponda à configuração da
rede.
Para configurar a NC-2200w a partir de um
computador sem fios da rede, tem de alterar
temporariamente as definições actuais de
rede sem fios. Antes de alterar as definições
actuais de rede sem fios do seu computador,
recomendamos que tome nota das
definições actuais. Terá de repor estas
definições no final do Passo 3 na página
117.
Definições actuais de rede sem fios
do seu computador
A NC-2200w não pode ser utilizada com
um hub USB.
Passo 1
LED Link (verde)
Recomendamos que contacte o
administrador da rede se necessitar
de ajuda com as definições de rede
sem fios do seu computador.
Item
Definição actual
Modo de
comunicações:
(Infra-estrutura/Ad-hoc)
Nome da rede
(SSID/ESSID)
Canal: (1-14)
*Se necessário.
Encriptação:
(NENHUM/WEP/Outro)
Tamanho e tipo da
chave de encriptação:
(64 bits, 128 bits/ASCII,
HEX/Outro)
Chave de encriptação:
Passo 2

English
115
Para comunicar com a NC-2200w não
configurada, altere as definições de rede sem
fios do computador para:
Modo de comunicações: Ad-hoc
(canal 11)
Nome da rede (SSID/ESSID): SETUP
(sensível a maiúsculas e minúsculas)
Encriptação: Nenhum
Consulte as instruções do fabricante da sua
placa de rede sem fios para alterar as definições
e, em seguida, siga para o Passo 3
Configurar o
servidor de impressão/digitalização.
Se estiver a utilizar o sistema Windows
®
XP ou Mac OS
®
X 10.2.4 e estiver a usar as
respectivas capacidades integradas de
rede Ethernet sem fios, execute os
seguintes passos, para cada sistema
operativo.
1
Clique em Iniciar e, depois, em Painel
de controlo.
2
Clique no ícone Ligações de rede.
3
Seleccione e clique com o botão direito
do rato em Conexão de rede sem fio 2.
Clique em Ver 'Redes sem fios
disponíveis'.
4
Pode ver o nome de rede (SSID/ESSID)
da NC-2200w na caixa Redes sem fios
disponíveis. Seleccione SETUP e
marque a caixa Permitir ligar-me....
Clique no botão Ligar.
Utilizadores de Windows
®
98/Me/2000, Windows NT
®
4.0
Siga para o Passo 3 na
página
117
Utilizadores de Windows
®
XP
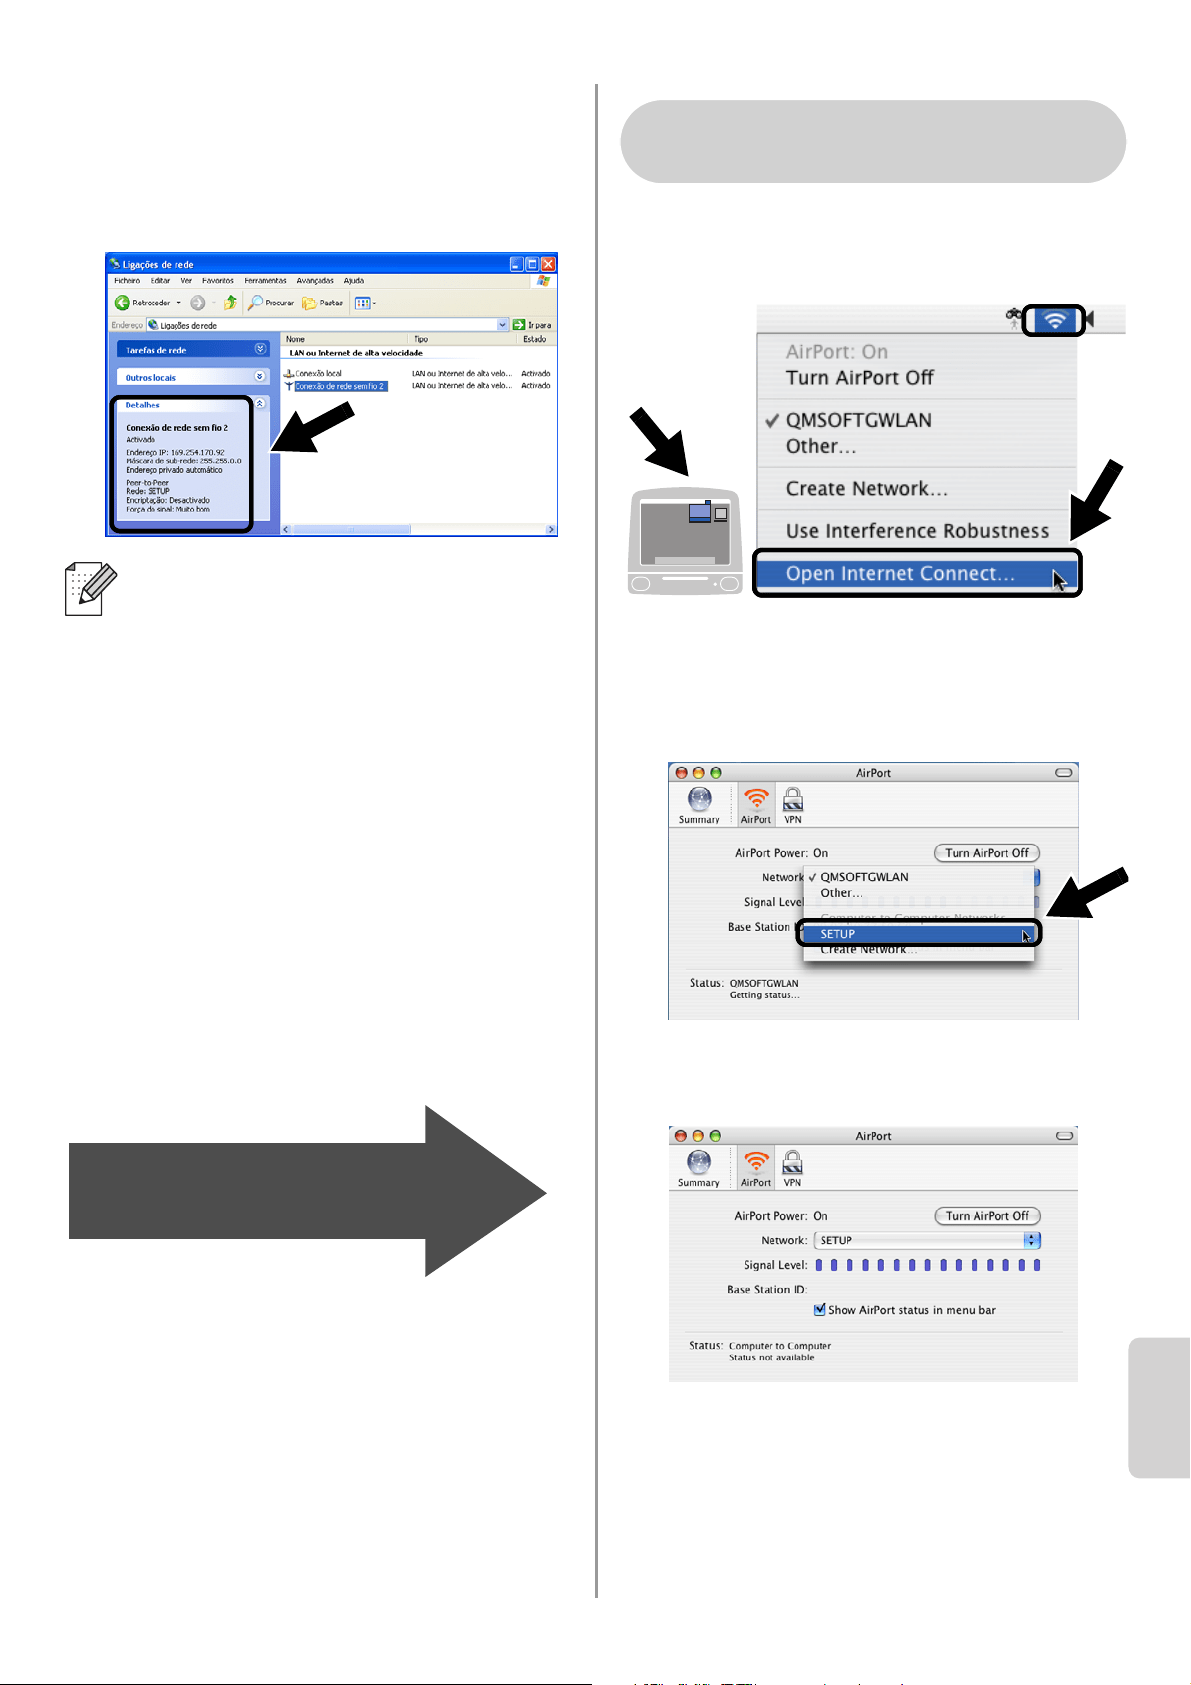
English
Português
116
5
Verifique o estado da ligação à rede sem
fios. Poderá demorar alguns minutos até
que o endereço IP mude de 0.0.0.0 para
169.254.x.x, no ecrã. (em que x.x são
números entre 0 e 255).
1
Clique no ícone de estado AirPort e
seleccione Open Internet Connect....
2
Clique no separador Network, para ver
os dispositivos de rede disponíveis.
Pode ver o nome de rede (SSID/ESSID)
na opção Network. Seleccione SETUP.
3
A rede sem fios está, agora,
correctamente configurada.
Se o nome de rede (SSID/ESSID) que
pretende escolher não se encontrar na
lista, tente o seguinte:
■ Desligue o adaptador CA da corrente,
torne a ligá-lo e, em seguida, aguarde
alguns minutos.
■ Coloque a impressora/MFC/DCP
Brother com a NC-2200w instalada
mais próximo do computador e tente
novamente.
■ Reponha as predefinições de fábrica
da NC-2200w e tente novamente.
Consulte a página
124 para repor as
predefinições de fábrica.
■ Consulte o Capítulo 6 do Manual de
utilização da rede da NC-2200w,
incluído no CD-ROM fornecido com a
NC-2200w.
Siga para o Passo 3
na página 117
Utilizadores de Mac OS
®
X
10.2.4 - 10.3 ou superior
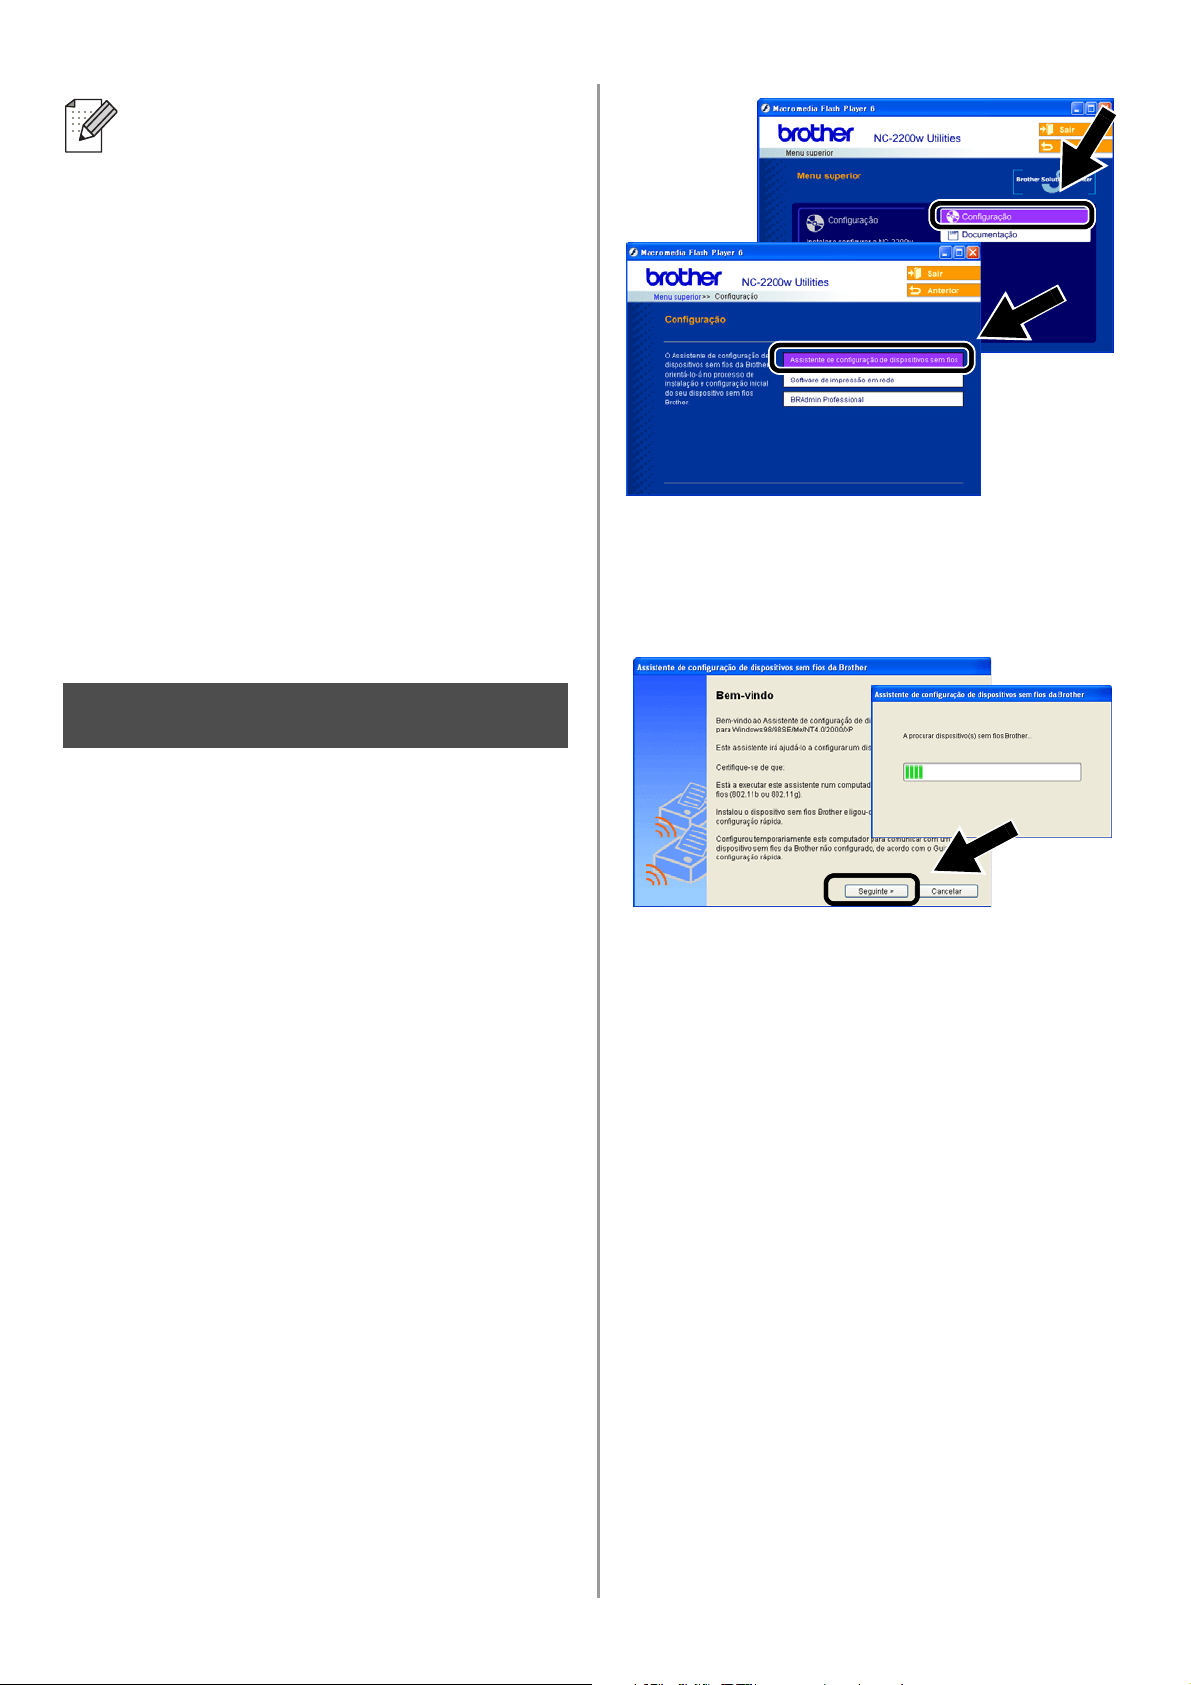
English
117
Configurar o servidor de
impressão/digitalização
1
Coloque o CD-ROM da NC-2200w na
unidade de CD-ROM.
(Utilizadores de Windows
®
) O ecrã inicial
aparecerá automaticamente.
(Utilizadores de Mac OS
®
X 10.2.4 a
10.3 ou superior) Clique duas vezes no
ícone NC-2200w do ambiente de
trabalho do Macintosh
®
e, em seguida,
clique duas vezes no ícone Start Here
OSX.
2
Seleccione o idioma pretendido.
3
Clique em Configuração e, em seguida,
em Assistente de configuração de
dispositivos sem fios.
4
Leia as informações da caixa
Bem-vindo e, quando tiver executado
as tarefas necessárias, clique em
Seguinte.
5
Siga as instruções apresentadas nos
ecrãs. Para obter mais informações,
consulte o Capítulo 2 do Manual de
utilização da rede da NC-2200w, incluído
no CD-ROM fornecido com a NC-2200w.
6
Quando sair do Assistente de
configuração de dispositivos sem
fios, reponha as definições originais de
rede sem fios do seu computador,
utilizando as informações registadas ao
Alterar as definições de rede sem fios do
seu computador para configurar a
NC-2200w na página 114.
Se o nome de rede (SSID/ESSID) que
pretende escolher não se encontrar na
lista, tente o seguinte:
■ Desligue o adaptador CA da corrente,
torne a ligá-lo e, em seguida, aguarde
alguns minutos.
■ Coloque a impressora/MFC/DCP
Brother com a NC-2200w instalada
mais próximo do computador e tente
novamente.
■ Reponha as predefinições de fábrica
da NC-2200w e tente novamente.
Consulte a página
124 para repor as
predefinições de fábrica.
■ Consulte o Capítulo 6 do Manual de
utilização da rede da NC-2200w,
incluído no CD-ROM fornecido com a
NC-2200w.
Passo 3
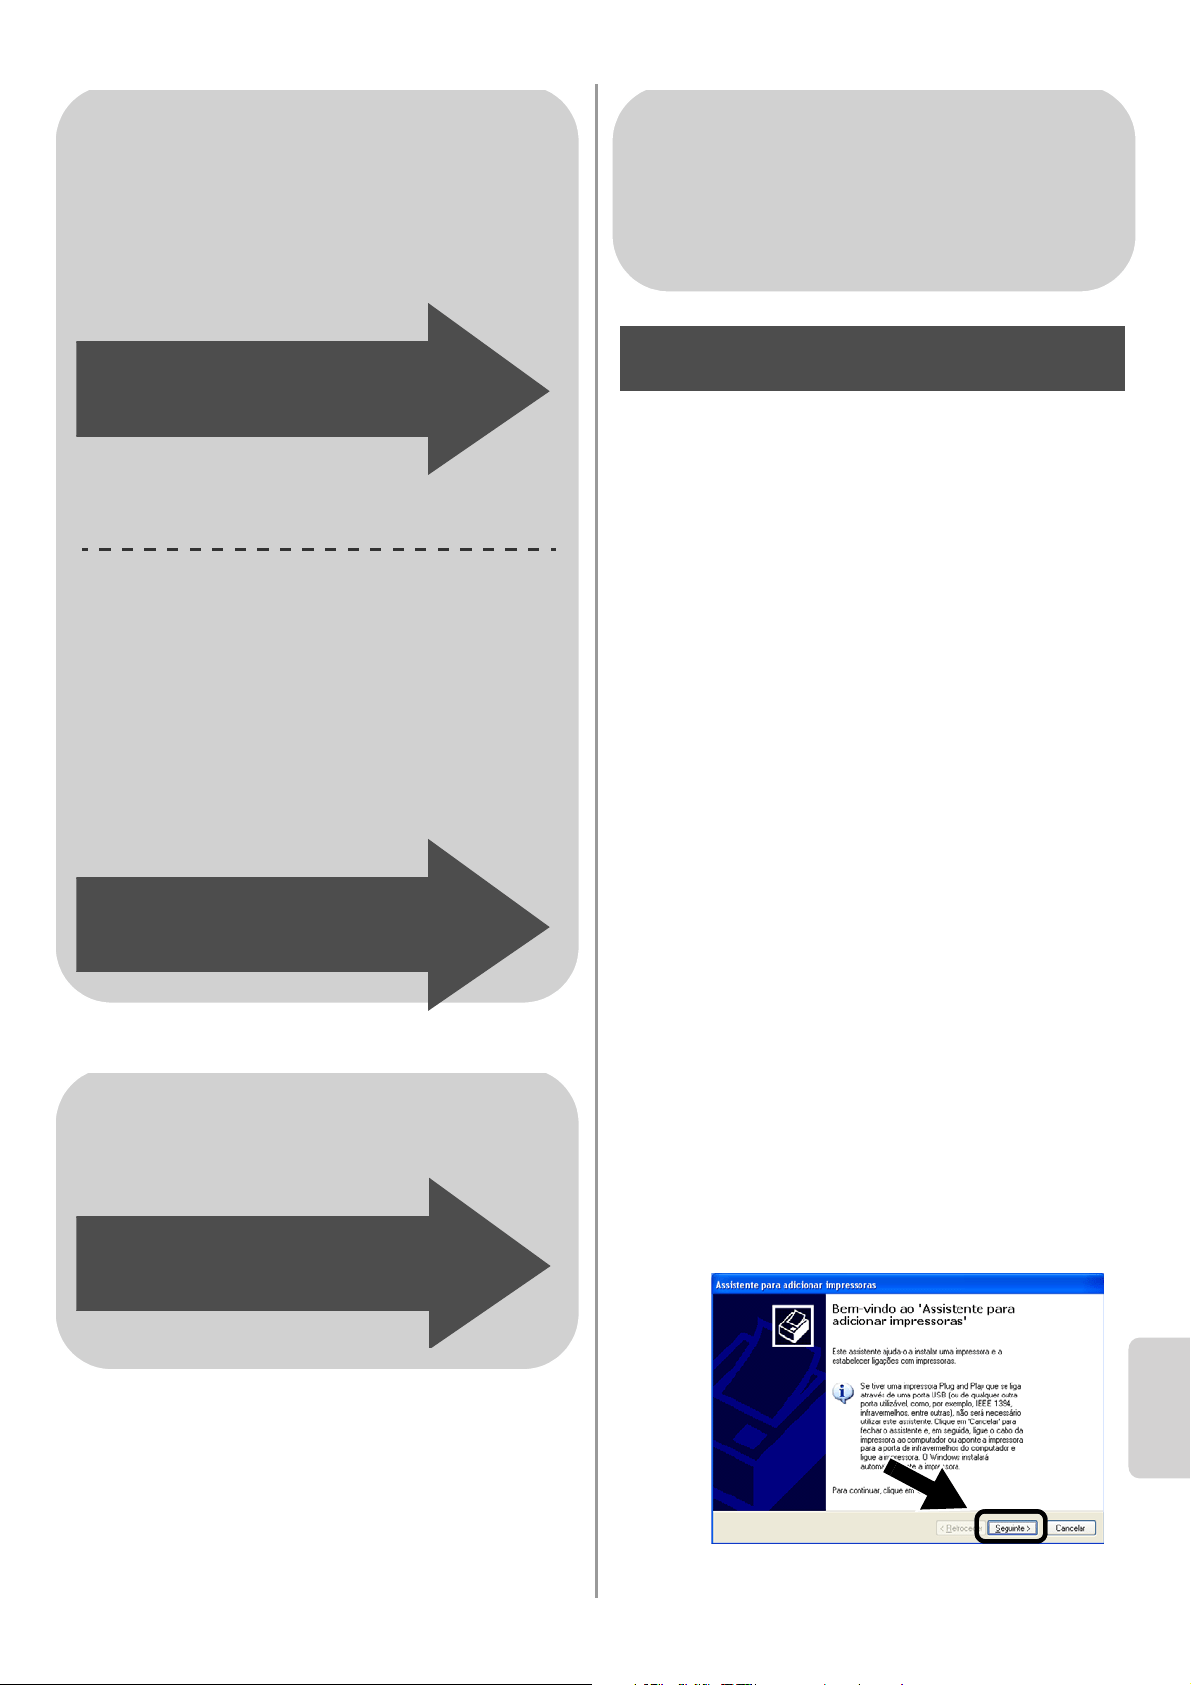
English
Português
118
Instalar o controlador de
impressora
Os utilizadores dos modelos acima referidos
têm de instalar o controlador de impressora
antes de configurarem o computador para
utilizar a NC-2200w. Se o controlador de
impressora já estiver instalado, pode ignorar
este passo. O controlador encontra-se no
CD-ROM incluído com a
impressora/MFC/DCP Brother. Também
pode transferir o controlador de impressora
do Brother Solutions Center, no site:
<http://solutions.brother.com>.
Para instalar o controlador de impressora
através do CD-ROM, execute os passos que
se seguem.
As instruções desta secção baseiam-se no
Windows
®
XP.
1
Clique em Iniciar e seleccione
Impressoras e faxes. Clique em
Adicionar impressora e o Assistente
para adicionar impressoras iniciar-se-á.
Quando este ecrã aparecer, clique em
Seguinte.
Utilizadores de Windows
®
Grupo 1:
HL-1440/1450/1470N/5040/ 5050/
5070N/5070DN/5140/5150D/5170DN
MFC-9070/9180/9160
Grupo 2:
MFC-210C/420CN/410CN/620CN/
5440CN/5840CN/3240C/3340CN/8420/
8820D/8820DN/8220/8440/8840D/
8840DN/3820CN/3420CN/DCP-120C/
320CN/8020/8025D/8025DN/8040/
8045D/8045DN
Siga para o Passo 4
na página 118
Siga para o Passo 4
na página 121
Utilizadores de Mac OS
®
X 10.2.4 -
10.3 ou superior
Siga para o Passo 4
na página 123
Utilizadores de Windows
®
Grupo 1:
HL-1440/1450/1470N/5040/ 5050/
5070N/5070DN/5140/5150D/5170DN
MFC-9070/9180/9160
Passo 4
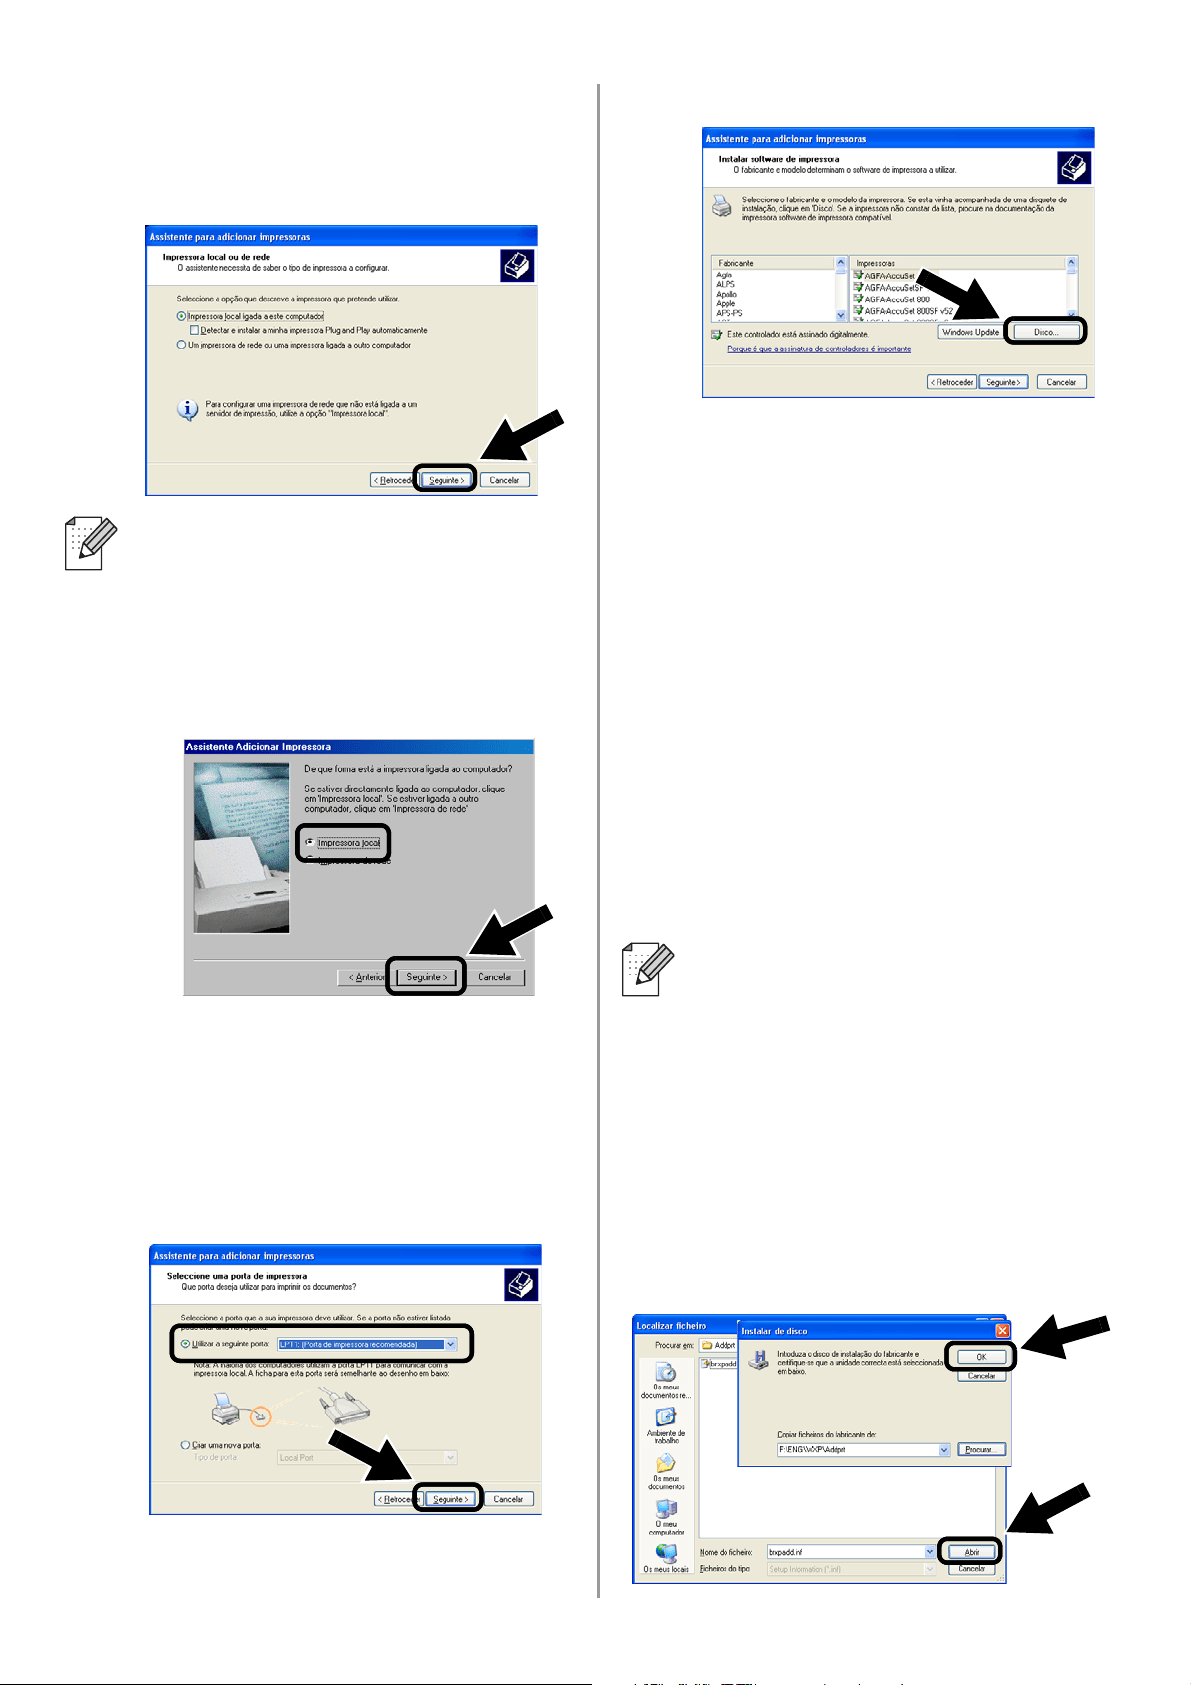
English
119
2
Desmarque a opção Detectar e instalar
a minha impressora Plug and Play
automaticamente e clique em
Seguinte.
3
Seleccione temporariamente
LPT1:(Porta de impressora
recomendada), a partir do menu
pendente, na janela de selecção da
porta de impressora e, em seguida,
clique em Seguinte.
4
Clique em Disco....
5
(Utilizadores de impressoras a laser
Brother)
Procure e seleccione a pasta
Driver
no
CD-ROM, clique em
Abrir
, seleccione a
pasta
Win2k_xp
(ou a pasta
correspondente ao seu sistema operativo),
clique em
Abrir
, seleccione o idioma
pretendido e, por fim, clique novamente
em
Abrir
.
(Utilizadores de MFC/DCP Brother)
Procure e seleccione a pasta do idioma
pretendido, no CD-ROM, clique em
Abrir
,
seleccione a pasta
WXP
(ou a pasta
correspondente ao seu sistema operativo),
clique em
Abrir
e, por fim, seleccione a
pasta
Addprt
e clique em
Abrir
.
6
Clique em Abrir e depois em OK.
■ O seu sistema operativo poderá não
apresentar este ecrã.
■ (Utilizadores de Windows
®
98/Me/Windows NT
®
4.0) Se este
ecrã aparecer, seleccione
Impressora local e clique em
Seguinte.
■ Se o seu sistema operativo for o
Windows
®
XP e não encontrar a
pasta
Win2k_xp
na lista, seleccione a
pasta Win2k.
■
Se não encontrar uma pasta
correspondente ao seu sistema
operativo na pasta
Driver
, mas
encontrar:
inst
,
PCL
,
PS
,
USBW98ME
,
etc., recomendamos que seleccione a
pasta
PCL
. Verá então a pasta
correspondente ao sistema operativo.
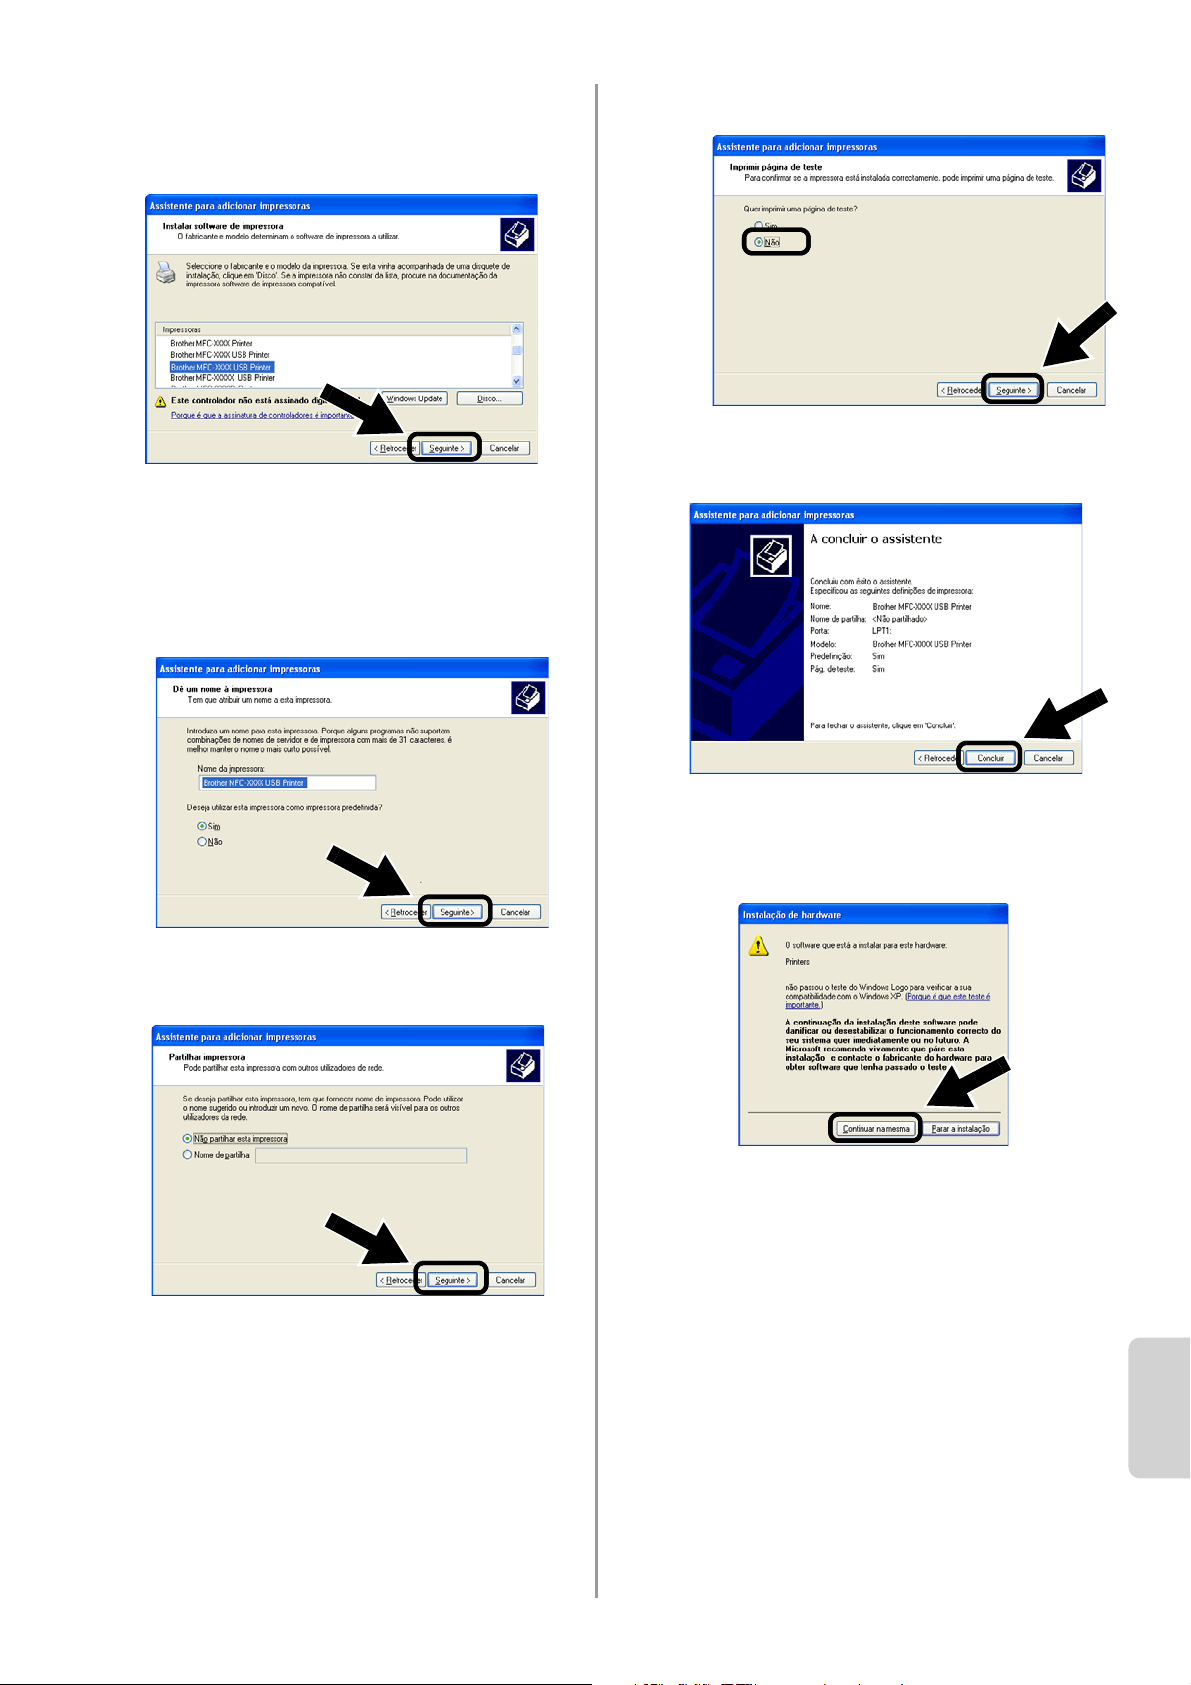
English
Português
120
7
Seleccione o modelo que está a instalar,
na lista de impressoras/MFC/DCP, e
clique em Seguinte.
8
O modelo que está a instalar aparecerá
na janela. Seleccione Sim ou Não, para
determinar se pretende ou não que esta
seja a sua impressora predefinida, e
clique em Seguinte.
9
Se este ecrã aparecer, seleccione Não
partilhar esta impressora e Seguinte.
10
Seleccione Não e Seguinte.
11
Quando este ecrã aparecer, clique em
Concluir.
12
Se o ecrã de teste do Windows Logo
aparecer, clique em Continuar na
mesma.

English
121
Instalar o software de
impressão em rede
É necessário instalar o software de
impressão em rede, e configurá-lo para uma
ligação em rede, sem fios, à
impressora/MFC/DCP Brother. Execute os
seguintes passos.
1
Clique em Software de impressão em
rede e siga as instruções apresentadas
no ecrã.
2
Seleccione o mesmo controlador de
impressora que seleccionou no Passo 7,
na página
120. Seleccione o modelo que
está a instalar, na lista de
impressoras/MFC/DCP, e clique em
Seguinte.
A instalação está terminada.
Instalar o MFL-Pro Suite
Tem de instalar o MFL-Pro Suite para
estabelecer uma ligação de rede sem fios do
seu computador para a
impressora/MFC/DCP Brother. O software
encontra-se no CD-ROM incluído com a
impressora/MFC/DCP. Para instalar o
software, siga os passos da secção
'Instalação do controlador e do software para
utilizadores de cabo de interface de rede', no
Guia de configuração rápida fornecido com a
impressora/MFC/DCP.
■Modelos MFC-8420/8820D/8820DN/8220/8440/
8840D/8840DN/3820CN/3420CN e
DCP-8020/8025D/8025DN/8040/8045D/8045DN
Quando este ecrã aparecer no processo de
instalação, seleccione Não e, em seguida, clique
em Seguinte.
Passo 5
Utilizadores de Windows
®
Grupo: 2
MFC-210C/420CN/410CN/620CN/
5440CN/5840CN/3240C/3340CN/8420/
8820D/8820DN/8220/8440/8840D/
8840DN/3820CN/3420CN/DCP-120C/
320CN/8020/8025D/8025DN/8040/
8045D/8045DN
Passo 4

English
Português
122
■ Alguns MFC/DCPs com a NC-2200w não
podem ser localizados na lista durante a
instalação. Nesse caso, regresse ao ecrã
abaixo indicado e defina manualmente o nome
do nó da NC-2200w. Pode ver o nome do nó na
página de configuração da rede; consulte
Outras informações na página 124.
Especificar o endereço de
destino da digitalização na
página inicial da NC-2200w
Tem de especificar o endereço de destino da
digitalização, a partir do URL da NC-2200w,
para utilizar o scanner em rede. Execute os
seguintes passos.
1
Abra o Internet Explorer e introduza o
seguinte URL.
http://NC-2200w_endereco_ip
Em que NC-2200w_endereco_ip
corresponde ao endereço IP ou nome do
nó da NC-2200w.
2
Vá para a página General, em
Configuration.
3
Introduza o endereço IP do seu
computador.
A instalação está terminada.
■ O endereço IP ou o nome do nó da
NC-2200w pode ser consultado na
página de configuração da rede. Para
obter mais informações, consulte
Outras informações na página 124.
■ Ser-lhe-á pedido um nome de
utilizador e uma palavra-passe.
Introduza o seguinte.
users name : admin
(sensível a maiúsculas e minúsculas)
password: access (predefinição)
Passo 5
■ Se o endereço IP do seu computador
tiver sido atribuído automaticamente
pelo DHCP, deverá introduzir o nome
do computador, pois o endereço IP
pode mudar. Este nome pode ser o
nome do computador Windows
®
ou o
nome do sistema anfitrião DNS.
■ Para saber qual é o nome do seu
computador, abra a janela
Propriedades de O meu computador
e consulte o separador Nome do
computador. Para utilizar o nome de
domínio, tem de atribuir o endereço do
servidor DNS utilizando o servidor Web
da NC-2200w e o seu Web browser.
(Os idiomas disponíveis são Inglês, Alemão,
Francês, Holandês e Japonês.)
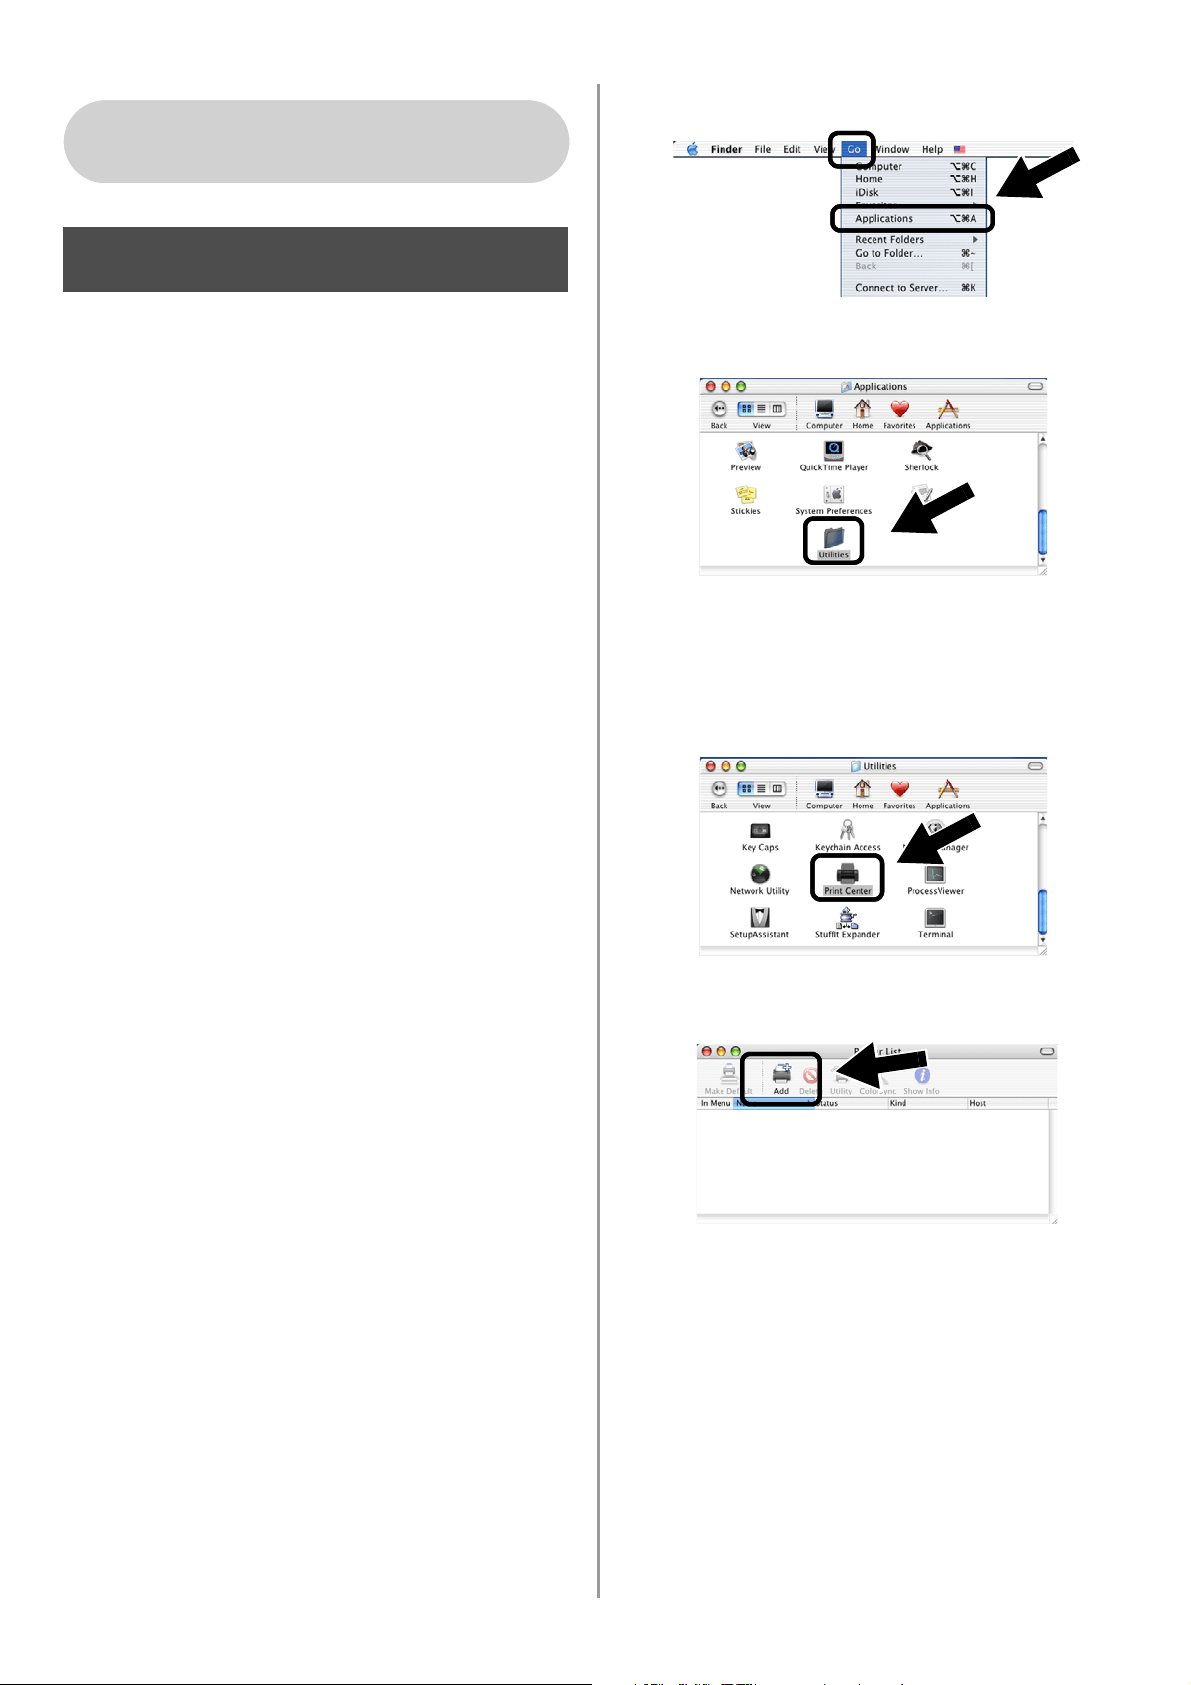
English
123
Instalar e configurar o controlador
de impressora utilizando a
funcionalidade de Configuração de
rede simples no Mac OS
®
X
Tem de instalar o controlador de impressora
antes de configurar o computador para
utilizar a NC-2200w. Se o controlador de
impressora já estiver instalado, pode ignorar
este passo. O controlador encontra-se no
CD-ROM incluído na impressora/MFC/DCP,
podendo também ser transferido a partir do
nosso Web site:
http://solutions.brother.com
Execute os passos que se seguem para
instalar o controlador de impressora.
1
Insira o CD-ROM fornecido na unidade
de CD-ROM e clique duas vezes no
ícone Start Here OSX para instalar o
software. Se aparecer o ecrã de
selecção do idioma, escolha o idioma
pretendido.
2
(Utilizadores de impressoras a laser
Brother) Clique em Instalar software e
depois em Controlador de impressora
nos ecrãs de menu.
(Utilizadores de MFC/DCP Brother)
Clique em MFL-Pro Suite para instalar.
3
Siga as instruções apresentadas no ecrã
para instalar o controlador de
impressora.
4
Seleccione Applications no menu Go.
.
5
Abra a pasta Utilities.
6
(Utilizadores de Mac OS
®
X 10.2.4)
Abra o ícone Print Center.
(Utilizadores de Mac OS
®
X 10.3)
Abra o ícone Printer Setup Utility.
7
Clique no botão Add.
Utilizadores de Mac OS
®
X
10.2.4 - 10.3 ou superior
Passo 4
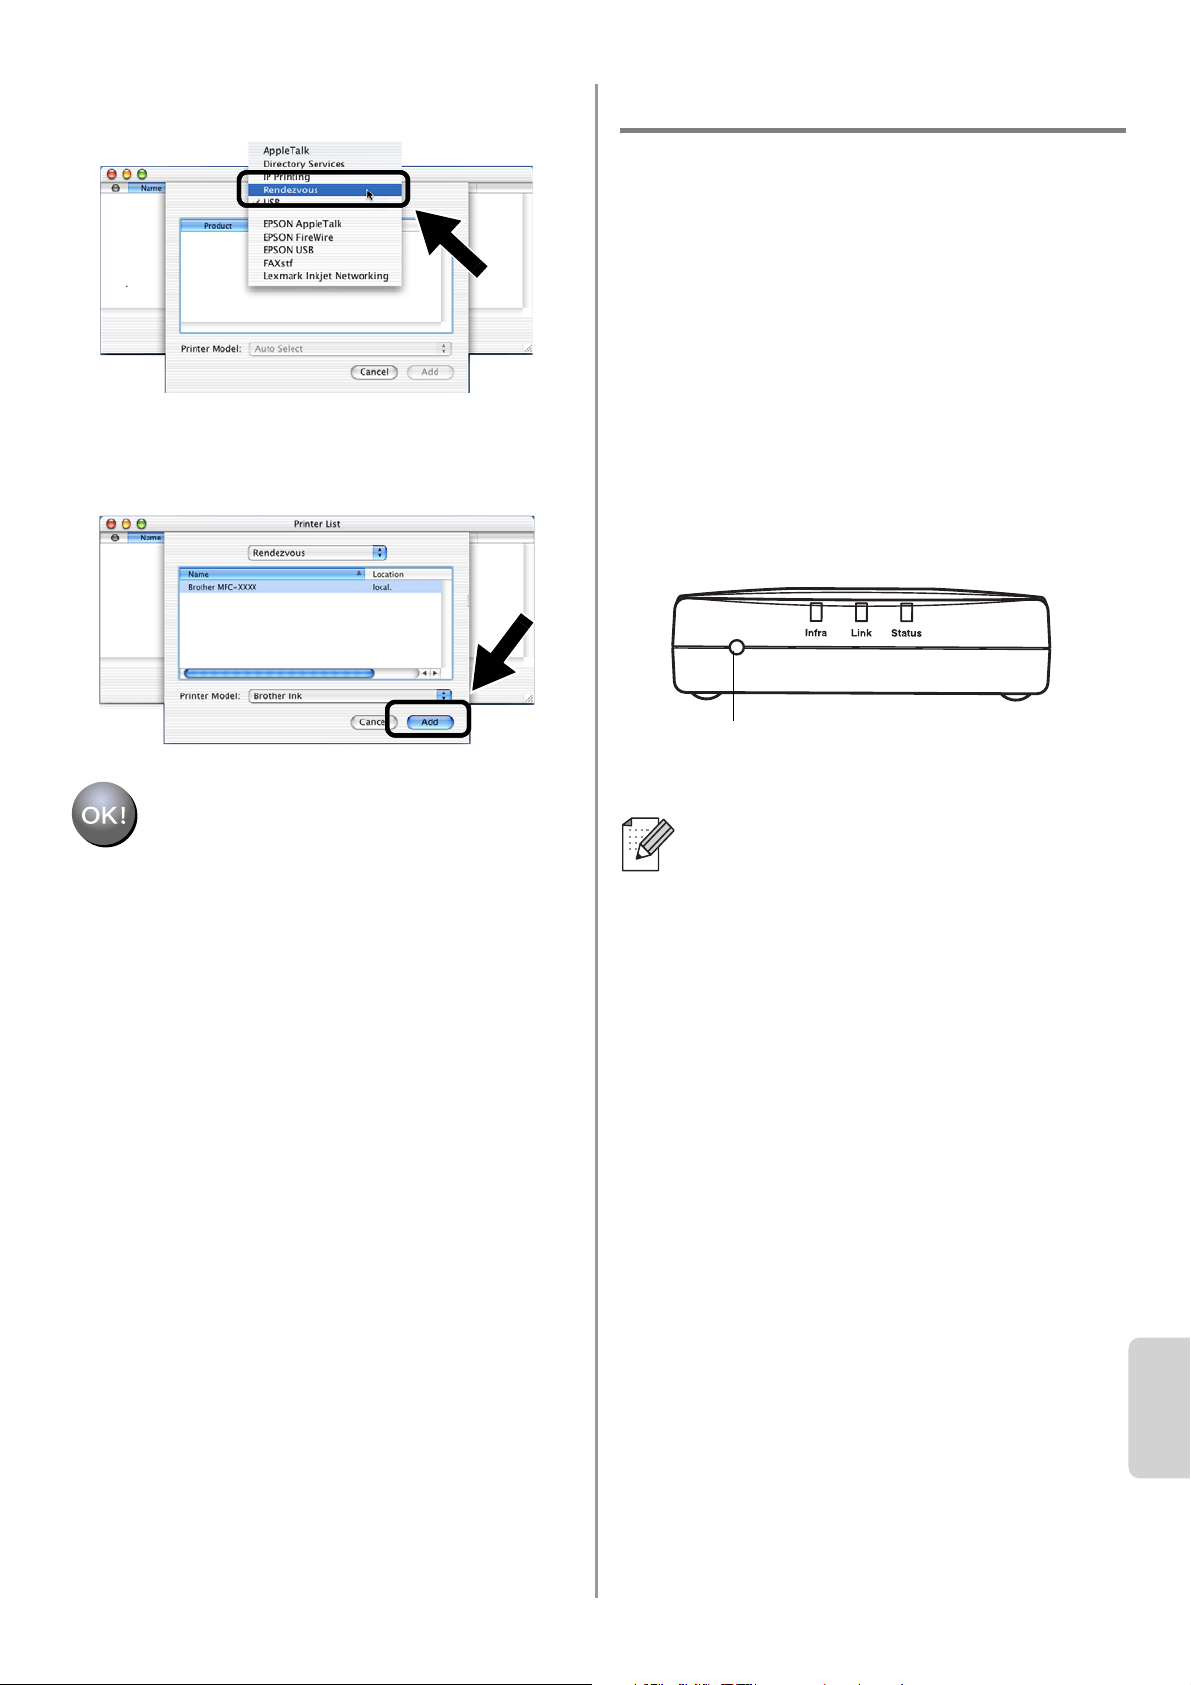
English
Português
124
8
Seleccione Rendezvous.
9
Seleccione o nome do modelo da sua
máquina e, em seguida, clique em Add.
A instalação está terminada.
Outras informações
Como imprimir uma página de
configuração da rede
Para imprimir a página de configuração da
rede, prima o botão de teste da NC-2200w.
Como repor as predefinições de fábrica
de rede
Se quiser repor as predefinições de
fábrica da NC-2200w (repor todas as
informações como, por exemplo, as
informações de palavra-passe e
endereço IP) mantenha o botão de teste
premido por mais de 10 segundos.
Se repuser as predefinições de fábrica,
terá de recomeçar a configuração a partir
do Passo 2 Alterar as definições de rede
sem fios do seu computador para
configurar a NC-2200w na página 114.
Botão de teste

English
125
梱包内容
1
外付けワイヤレスプリント
/
スキャン
サーバー
2
AC
アダプタ
3
CD-ROM
(セットアップソフトとネッ
トワーク設定説明書を含む。)
4
クイックセットアップガイド
サポート対象機種
NC-2200
w は、以下の表の機種に対応して
います。ご使用の機種が掲載されていない
場合は、
Brother Solutions Center
(ブラ
ザーソリューションセンター)
(
http://solutions.brother.co.jp
)でご確認く
ださい。
サポート対象
OS
Windows
®
Windows
®
98/98SE/Me/2000 /XP
および
Windows NT
®
4.0
Macintosh
®
Mac OS
®
X 10.2.4
~
10.3
およびそれ以降
の
Mac OS
®
CD-ROM
の内容
1
Brother Solutions Center
クリックするとインターネット上にあ
る
Brother Solutions Center
(ブラザー
ソリューションセンター)
(
http://solutions.brother.co.jp
)にアク
セスします。ご使用のブラザープリン
タ
/MFC/DCP
および
NC-2200
wに関
する情報を提供しています。最新のド
ライバやユーティリティがダウンロー
ドでき、よくある質問およびトラブル
シューティングも掲載しています。
2
セットアップ
NC-2200
w を設定するための「ワイヤレ
スセットアップウィザード」を起動、ま
たはネットワークプリントソフトウェア
と
Windows
®
用の
BRAdmin Professional
をインストールします。
3
説明書
PDF
形式のネットワーク設定説明書お
よびクイックセットアップガイドを表
示します。
■
NC-2200
w は、ブラザープリンタ
/
MFC /DCP
の
USB
ポートに接続で
きます。本製品には、
USB
ケーブル
は含まれておりません。接続前に
USB
ケーブル(
A-B
タイプ)をご用
意ください。
■
USB
ケーブルは長さが
2.0m
以下の
ものをご使用ください
Group 1:
HL-5040/5070DN/6050DN
MFC-8210J
Group 2:
MFC-8820J/3820JN/410CN/610CLN/
610CLWN/620CLN
DCP-110C/8025J
1
2
4
3
A
B
A-B
タイプ
ブラザープリンタ
/MFC/DCP
に同梱の
CD-ROM
に、
Windows NT
®
4.0
用の
ドライバが含まれていない機種をご使
用の場合は、
Windows NT
®
4.0
環境で
は使用できません。
2
3
1
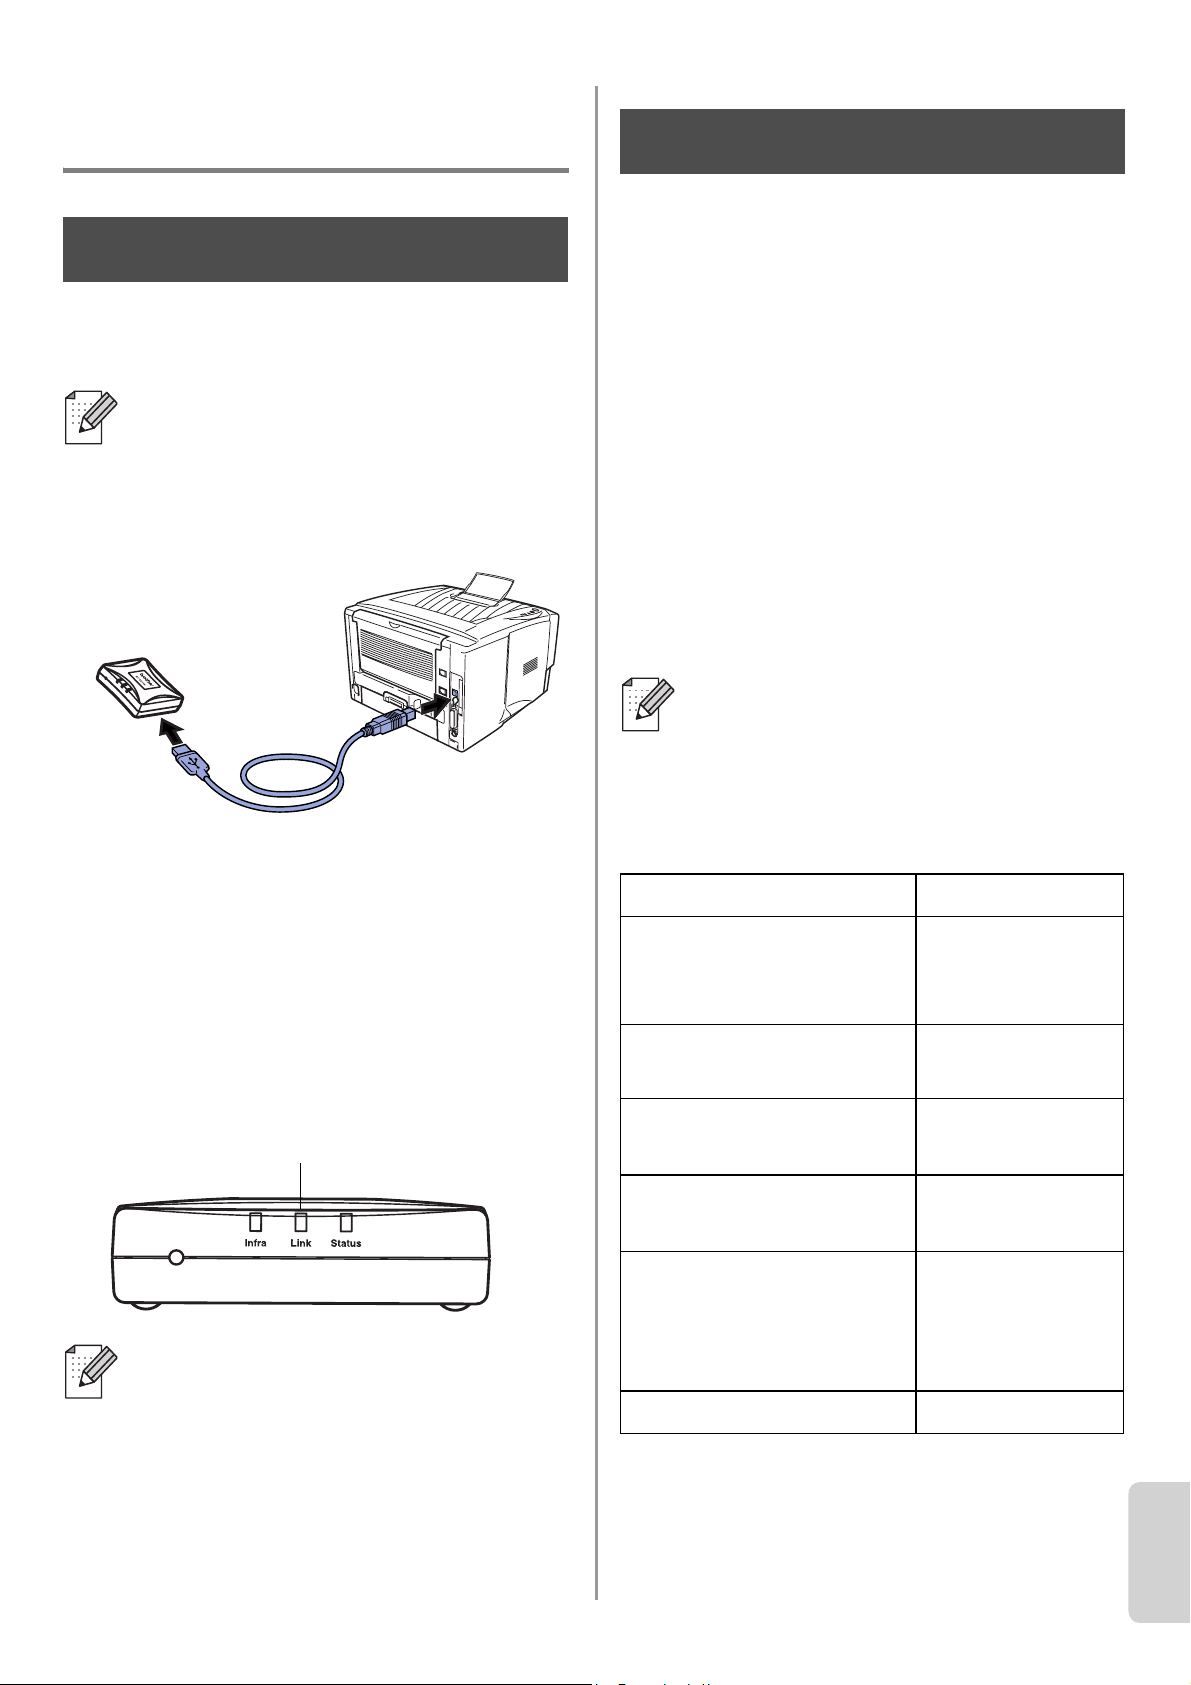
English
126
Japanese
外付けワイヤレスプリント
/
スキャンサーバーの設定
NC-2200
w を接続する
1
NC-2200
w とブラザープリンタ
/MFC/
DCP
を
USB
ケーブルで接続します。
2
NC-2200
wに
AC
アダプタを接続しま
す。
3
AC
アダプタを電源コンセントに接続
し、ブラザープリンタ
/MFC/DCP
の電
源をオンにします。
4
NC-2200
wの
LED
ランプが緑色に点灯
していることを確認し、数分待ちます。
コンピュータのワイヤレス設
定を変更する
ブラザープリンタ
/MFC/DCP
をワイヤレス
ネットワーク環境で使用するために、
NC-2200
w の設定をする必要があります。
NC-2200
w を設定するために、一時的にコ
ンピュータのワイヤレス設定を変更する必
要があります。
ご使用のコンピュータのワイヤレス設定を
変更する前に、ワイヤレス設定情報をメモ
などに書き留めておくことをお勧めします。
現在のワイヤレス設定
NC-2200
w はコンピュータの
USB
ポートにしないでください。
USB
ハブ
を使用しないでください。
コンピュータに市販のファイアウォー
ル等の機能を有するソフトウェアをイ
ンストールしている場合は、一旦停止
させてからを各ソフトウェアのインス
トールをしてください。設定の詳細は
販売元へご相談ください。
Step 1
Link LED
(緑色)
ご使用のコンピュータのワイヤレス設定
に関して不明な点がある場合は、ネット
ワーク管理者に相談してください。
項目 現在の設定
接続モード
(インフラストラク
チャー
/
アドホック)
ネットワーク名
(
SSID/ESSID
)
チャンネル
:
(
1-14
)
※必要な場合
暗号化
(なし
/WEP/
その他)
暗号化キーの種類とサ
イズ
(
64
ビット、
128
ビット
/
ASCII,HEX /
その他)
暗号化キー
Step 2
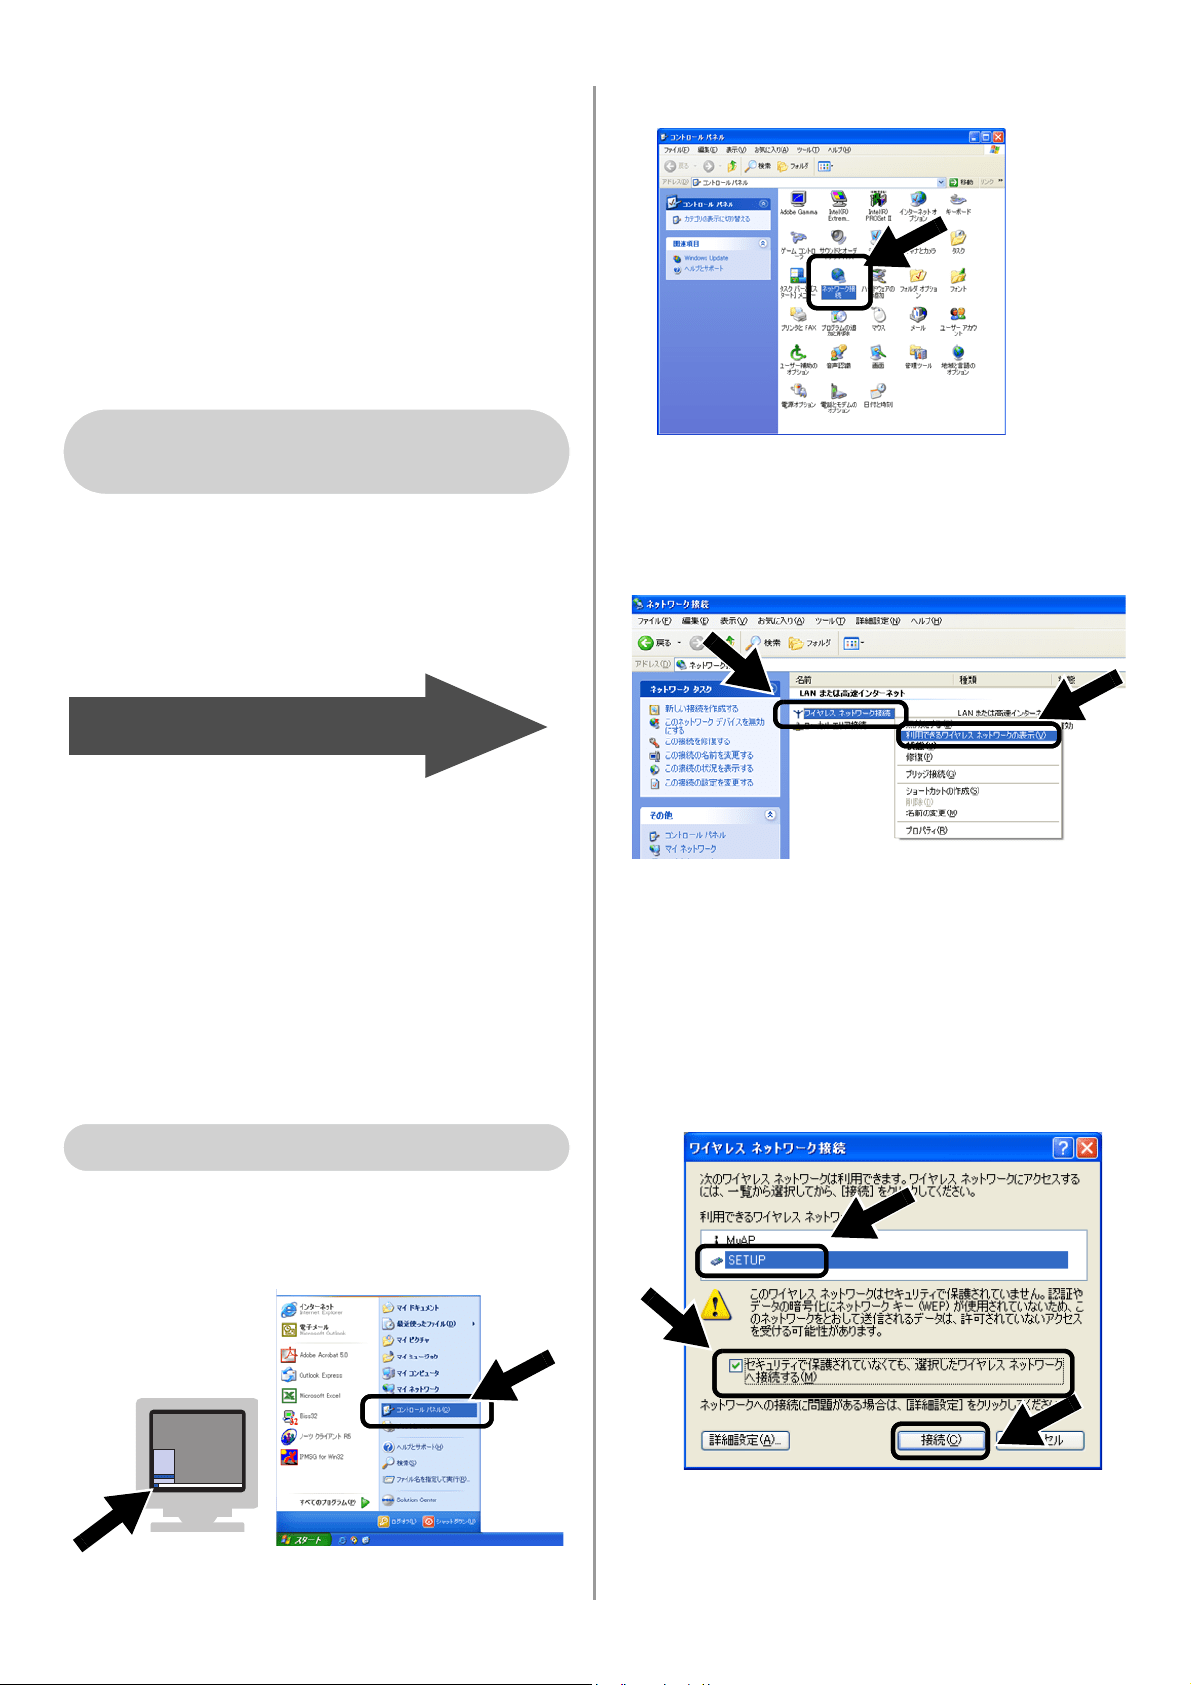
English
127
未設定の
NC-2200
w と通信する場合は、ご
使用のコンピュータを以下のように変更し
てください。
接続モード
:
アドホック
(チャンネル
11
)
ネットワーク名(
SSID/ESSID
)
: SETUP
(状況によって異なります。)
暗号化
:
なし
コンピュータのワイヤレス設定を変更する
には、ご使用のワイヤレスカードに同梱の
取扱説明書を参照してください。「Step 3」
の「
NC-2200
w を設定する」(
129
ページ)
に進みます。
Windows
®
XP
または
Mac OS
®
X10.2.4
ユーザの方で
OS
標準で内蔵されている設
定機能をご使用の場合は、以降の手順を実
行します。それ以外の方はご使用のワイヤ
レスカードに同梱の取扱説明書を参照して
コンピュータのワイヤレス設定を変更し、
「Step 3」の「
NC-2200
w を設定する」(
129
ページ)へ進みます。
1
[スタート]
をクリックし、[コントロー
ルパネル]
をクリックします。
2
[ネットワーク接続]
をクリックします。
3
[ワイヤレスネットワーク接続]を右ク
リックします。ポップアップメニュー
から[利用できるワイヤレスネット
ワークの表示]
をクリックします。
4
NC-2200
w のネットワーク名
(
SSID/ESSID
)
を
[ワイヤレスネット
ワーク接続]
ボックスで確認します。
[
SETUP
]
を選択し、[
セキュリティで
保護されていなくても
...
]
チェックボッ
クスをチェックします。
[接続]をクリックします。
Windows
®
98/Me/2000,
Windows NT
®
4.0
をご使用の場合
129
ページの
Step 3
へ
Windows
®
XP
をご使用の場合
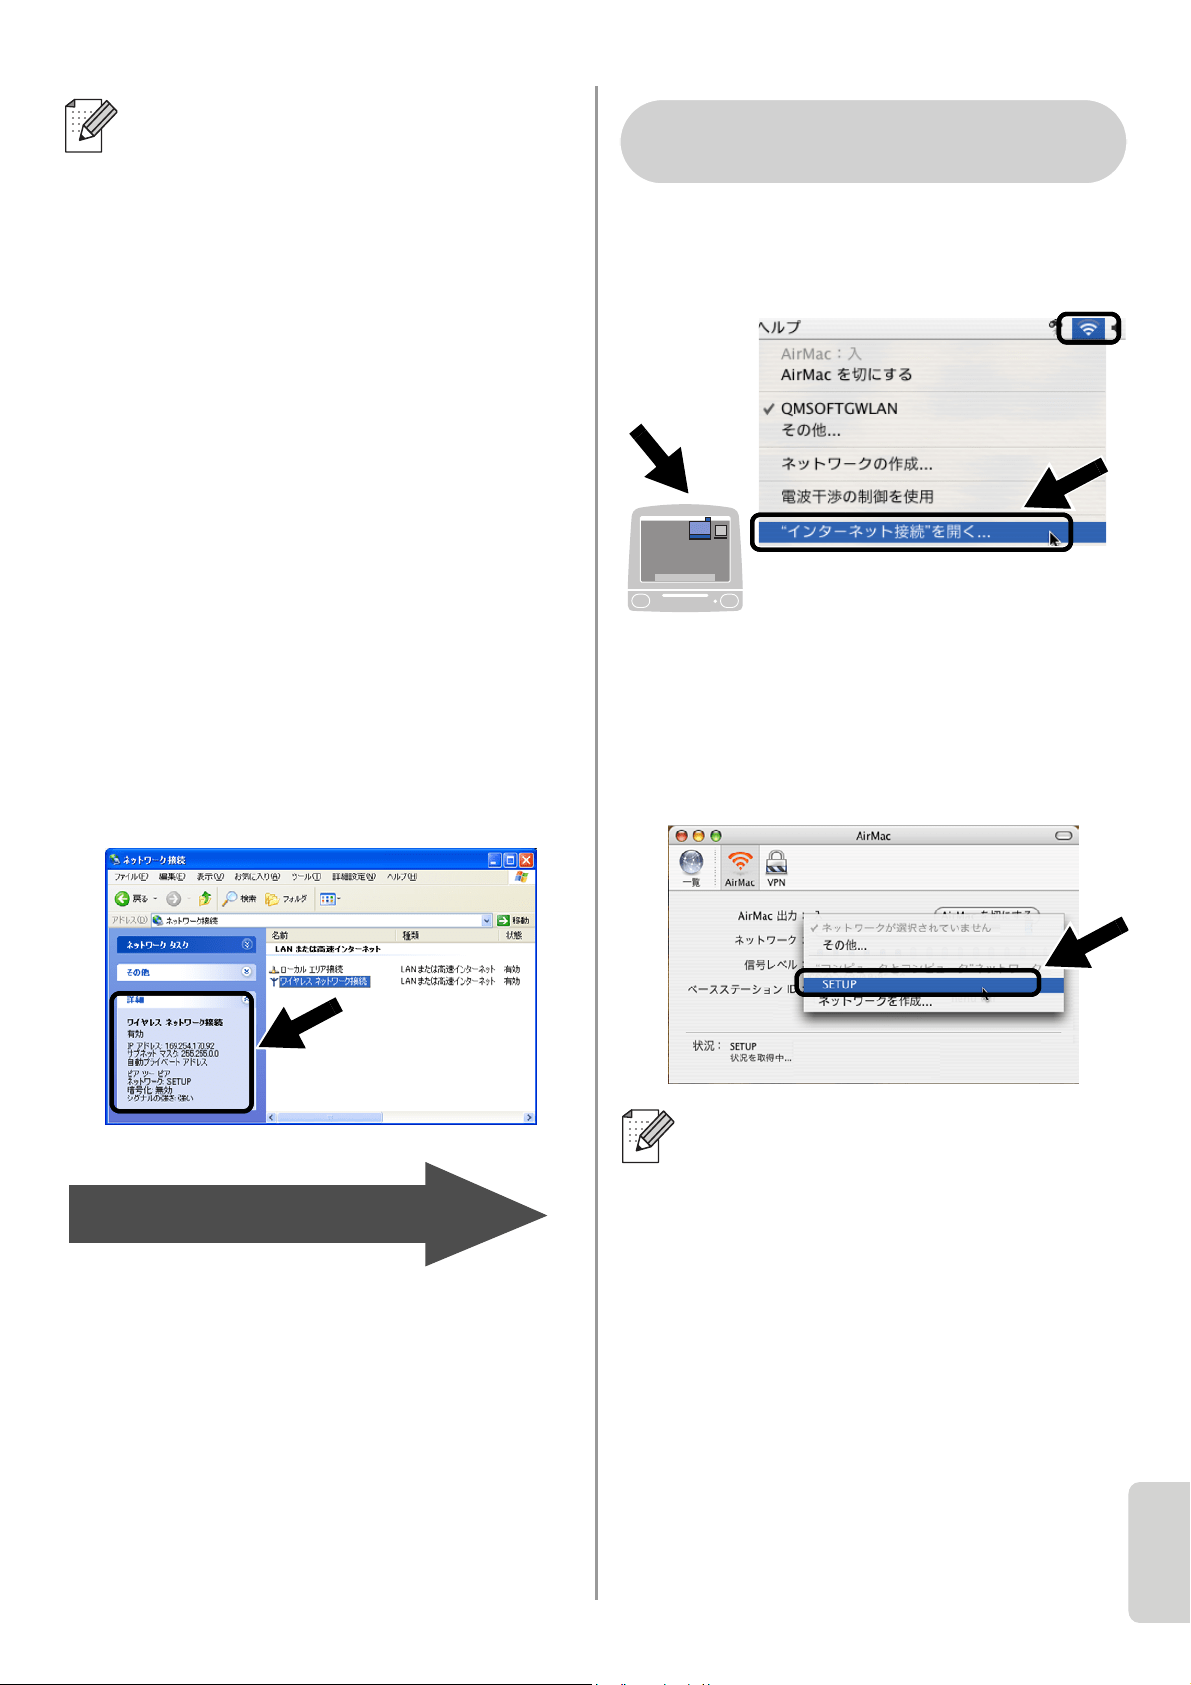
English
128
Japanese
5
ワイヤレス・ネットワーク接続状況を
確認します。
ネットワークを認識し、アドレスが
0.0.0.0
から
169.254.x.x
になるまでに
は、数分かかることがあります。
(
x.x
は、
0
~
255
までの数字です。)
1
[
AirPort
]
ステータスアイコンをクリッ
クし、[”インターネット接続”を開
く]
をクリックします。
2
[ネットワーク]タブをクリックします。
使用できるワイヤレス機器の一覧が表
示されます。
[ネットワーク]
オプショ
ン内にネットワーク名
(
SSID/ESSID
)
が表示されます。
[
SETUP
]
をクリックします。
選択したいネットワーク名
(
SSID/ESSID
)
が表示されないときは、
次の方法を試してください。
■
AC
アダプタを電源コンセントから
抜き、再度電源コンセントに接続し、
数分待ちます。
■
NC-2200
w を接続しているブラザー
プリンタ
/MFC/DCP
をコンピュータ
の近くに設置し直して、もう一度上
記の手順を実行します。
■
NC-2200
w をリセットし、工場出荷
時の初期設定に戻します。リセット
する方法については、
136
ページを
参照してください。
■ ネットワーク設定説明書の「
6
章
ト
ラブルシューティング」を参照して
ください。
129
ページの
Step 3
へ
選択したいネットワーク名
(
SSID/ESSID
)
が表示されないときは、
次の方法を試してください。
■
AC
アダプタを電源コンセントから
抜き、再度電源コンセントに接続し、
数分待ちます。
■
NC-2200
w を接続しているブラザー
プリンタ
/MFC/DCP
をコンピュー
タの近くに設置し直して、もう一度
上記の手順を実行します。
■
NC-2200
w をリセットし、工場出荷
時の初期設定に戻します。リセット
する方法については、
136
ページを
参照してください。
■ ネットワーク設定説明書の「
6
章
ト
ラブルシューティング」を参照して
ください。
Mac OS
®
X 10.2.4
~
10.3
以降をご使用の場合
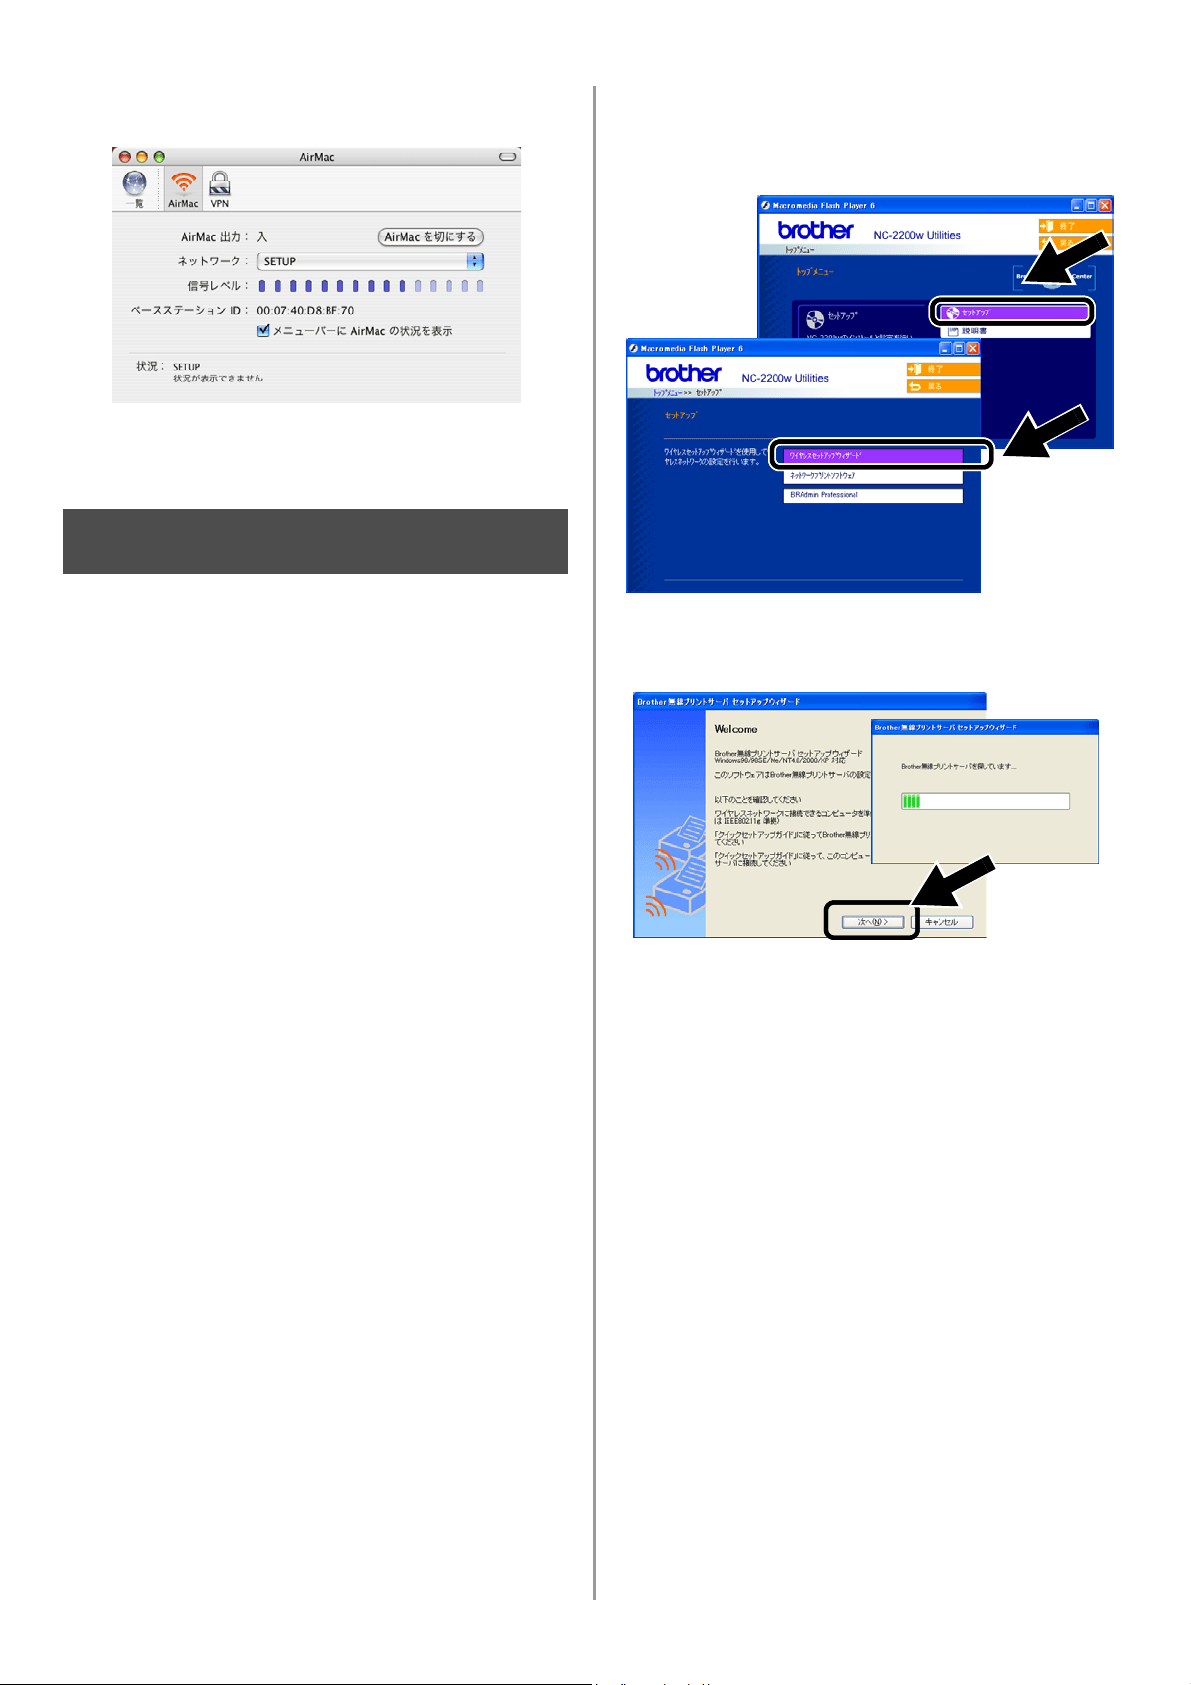
English
129
3
ワイヤレスネットワークに正しく接続
されます。
NC-2200
w を設定する
1
NC-2200
w に同梱の
CD-ROM
をコン
ピュータの
CD-ROM
ドライブに挿入し
ます。
Windows
®
をご使用の場合は、自動的に
画面が表示されます。
Mac OS
®
X 10.2.4
~
10.3
以降をご使
用の場合は、
Macintosh
®
上で表示され
る[
NC2200w
]アイコンをダブルク
リックし、さらに[
Start Here OSX
]
ア
イコンをダブルクリックしてください。
2
使用する言語を選択します。
3
[セットアップ]
をクリックし、
[ワイ
ヤレスセットアップウィザード]
をク
リックします。
4
[
Welcome
]
情報を確認し、[次へ]
をク
リックします。
5
画面の指示にしたがってインストール
作業を進めてください。インストール
について詳しくはネットワーク設定説
明書の「
2
章
セットアップする」を参
照してください。
6
[ワイヤレスセットアップウィザード]
を終了後は、ご使用のコンピュータの
ワイヤレス設定を「コンピュータのワ
イヤレス設定を変更する」(
126
ペー
ジ)を参照して、あらかじめ書き留め
た設定情報に戻します。
Step 3
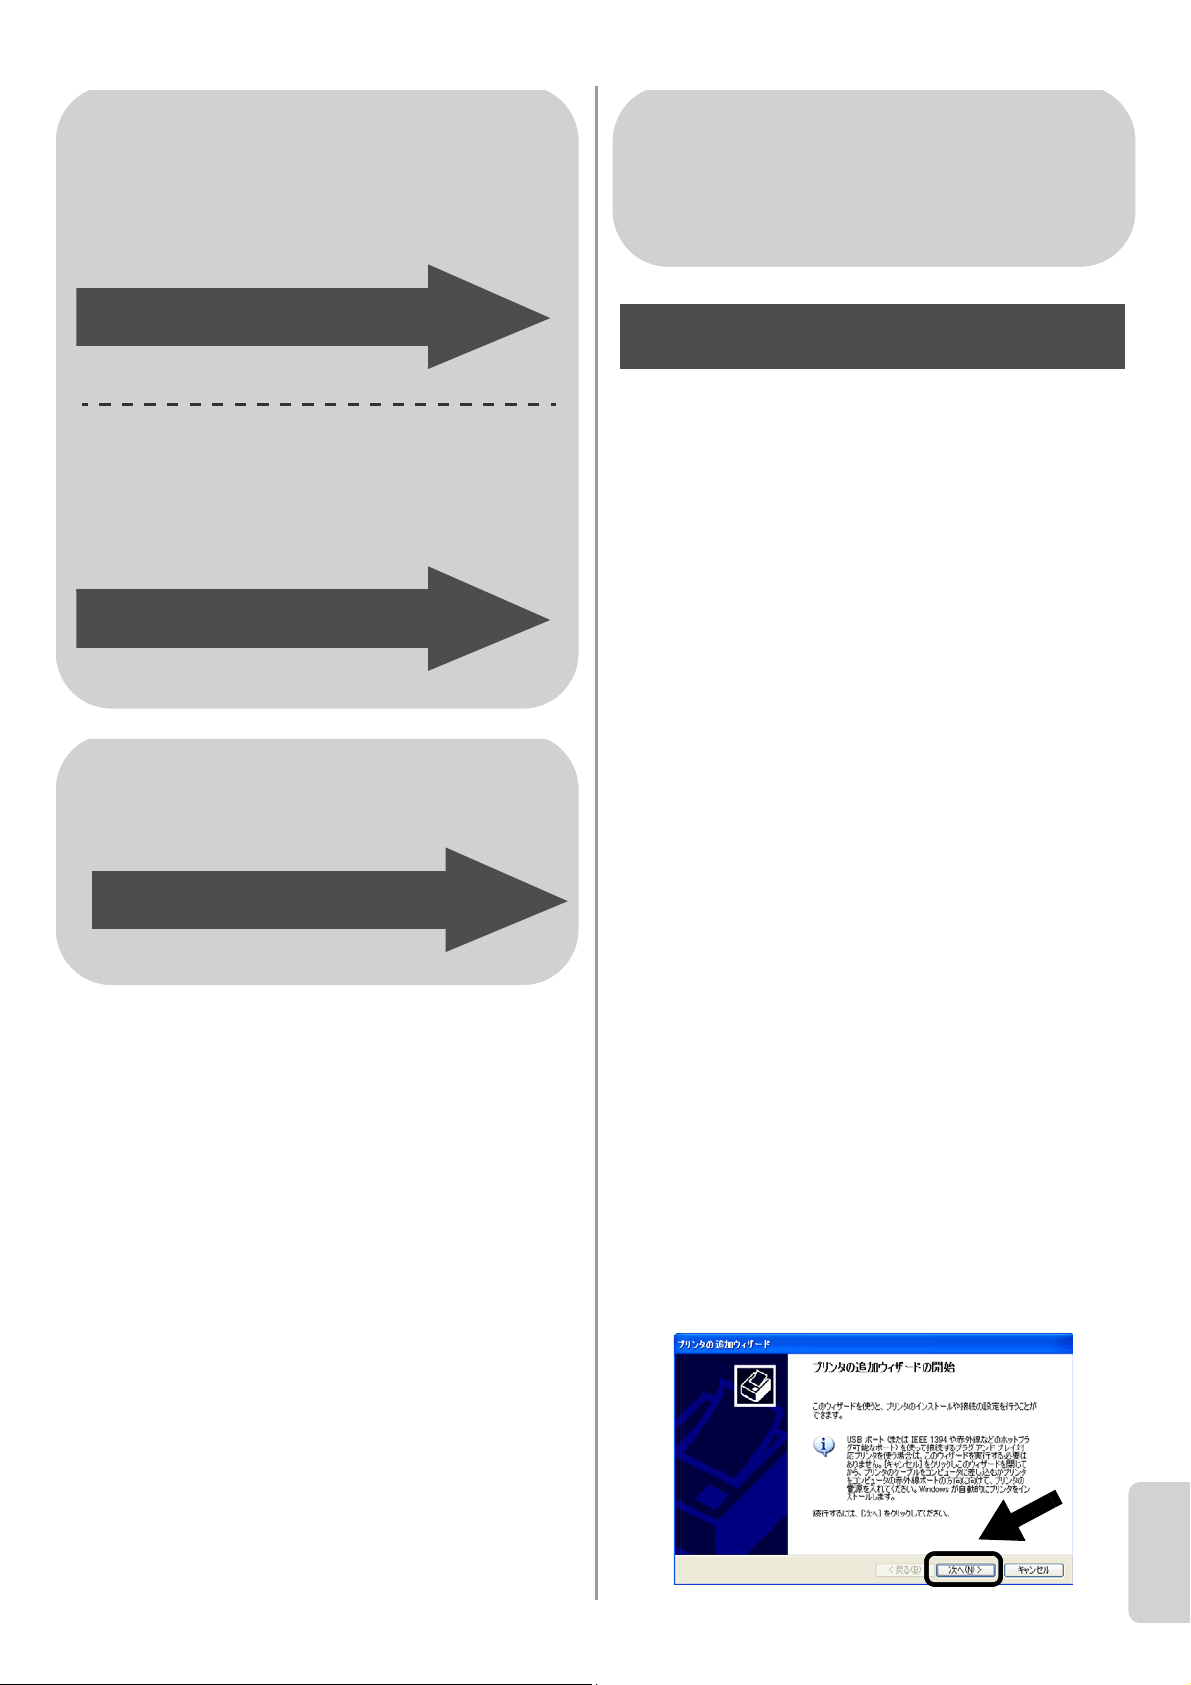
English
130
Japanese
プリンタドライバをインス
トールする
上記の機種をご使用の場合、
NC-2200
wを
設定する前に、プリンタドライバをあらか
じめインストールする必要があります。
プリ
ンタドライバがインストールされている場
合は、このステップは必要ありません。
「Step 5」の「ネットワークプリントソフト
ウェアをインストールする」(
133
ページ)
にお進みください。
プリンタドライバは、ご使用のブラザープ
リンタ
/MFC/DCP
に同梱されている
CD-ROM
に含まれています。また、プリン
タドライバはインターネット上の
Brother
SolutionsCenter
(ブラザーソリューション
センター)
(
http://solutions.brother.co.jp
)
からダウンロードすることもできます。
次の手順で、
CD-ROM
を使用してプリンタ
ドライバをインストールします。ここでは
Windows
®
XP
を使用して説明しています。
1
[スタート]をクリックして、[プリン
タと
FAX
]
をクリックします。
[プリン
タのインストール]
をクリックします。
「プリンタの追加ウィザードの開始」画
面が表示されますので、[次へ]
をク
リックします。
Windows
®
をご使用の場合
Group 1:
HL-5040/5070DN/6050DN
MFC-8210J
Group 2:
MFC-8820J/3820JN/410CN/610CLN/
610CLWN/620CLN
DCP-110C/8025J
このページの
Step
4
へ
133
ページの
Step 4
へ
Mac OS
®
X 10.2.4
~
10.3
以降をご使用の場合
135
ページの
Step 4
へ
Windows
®
をご使用の場合
Group 1:
HL-5040/5070DN/6050DN
MFC-8210J
Step 4

English
131
2
[プラグアンドプレイ対応プリンタを自
動的に検出してインストールする]
チェックボックスのチェックを外し、
[このコンピュータに接続されている
ローカルプリンタ]を選択して[次へ]
をクリックします。
3
リストから[
LPT1:
(推奨プリンタポー
ト)]を選択して、[次へ]をクリック
します。
4
[ディスク使用]をクリックします。
5
(ブラザープリンタユーザの方)
CD-ROM
の内容を表示して[
Driver
]
フォルダを選択し、[開く]
をクリック
します。その後、[
Win2k_xp
]
フォルダ
(ご使用の
OS
に対応するフォルダ)
を
選択してから[開く]をクリックしま
す。
(ブラザー
MFC/DCP
ユーザの方)
CD-ROM
の内容を表示して使用する言
語のフォルダを選択し、[開く]
をク
リックします。その後、[
WXP
]
フォル
ダ
(ご使用の
OS
に対応するフォルダ)
を選択して、[開く]
をクリックし、
[
Addprt
]
フォルダを選択して
[開く]
をクリックします。
6
[開く]
をクリックし、[
OK
]
をクリッ
クします。
■ご使用の
OS
によってはこの画面が
表示されない場合があります。
■
Windows
®
98/Me/Windows NT
®
4.0
をご使用の場合でこの画面が表示さ
れた場合は、
[ローカルプリンタ]
を選択して[次へ]をクリックして
ください。
■ Windows
®
XP で[
Win2k_xp
]フォ
ルダが存在しない場合は、[
Win2k
]
フォルダを選択してください。
■ フォルダ名が
OS
ごとに分けられて
おらず、[
inst
]、[
PCL
]、[
PS
]、
[
USBW98 ME
]といったフォルダ
で分けられている場合は、[
PCL
]
フォルダを選択してください。
[
PCL
]フォルダの下に
OS
ごとに
分けられたフォルダが表示されます。
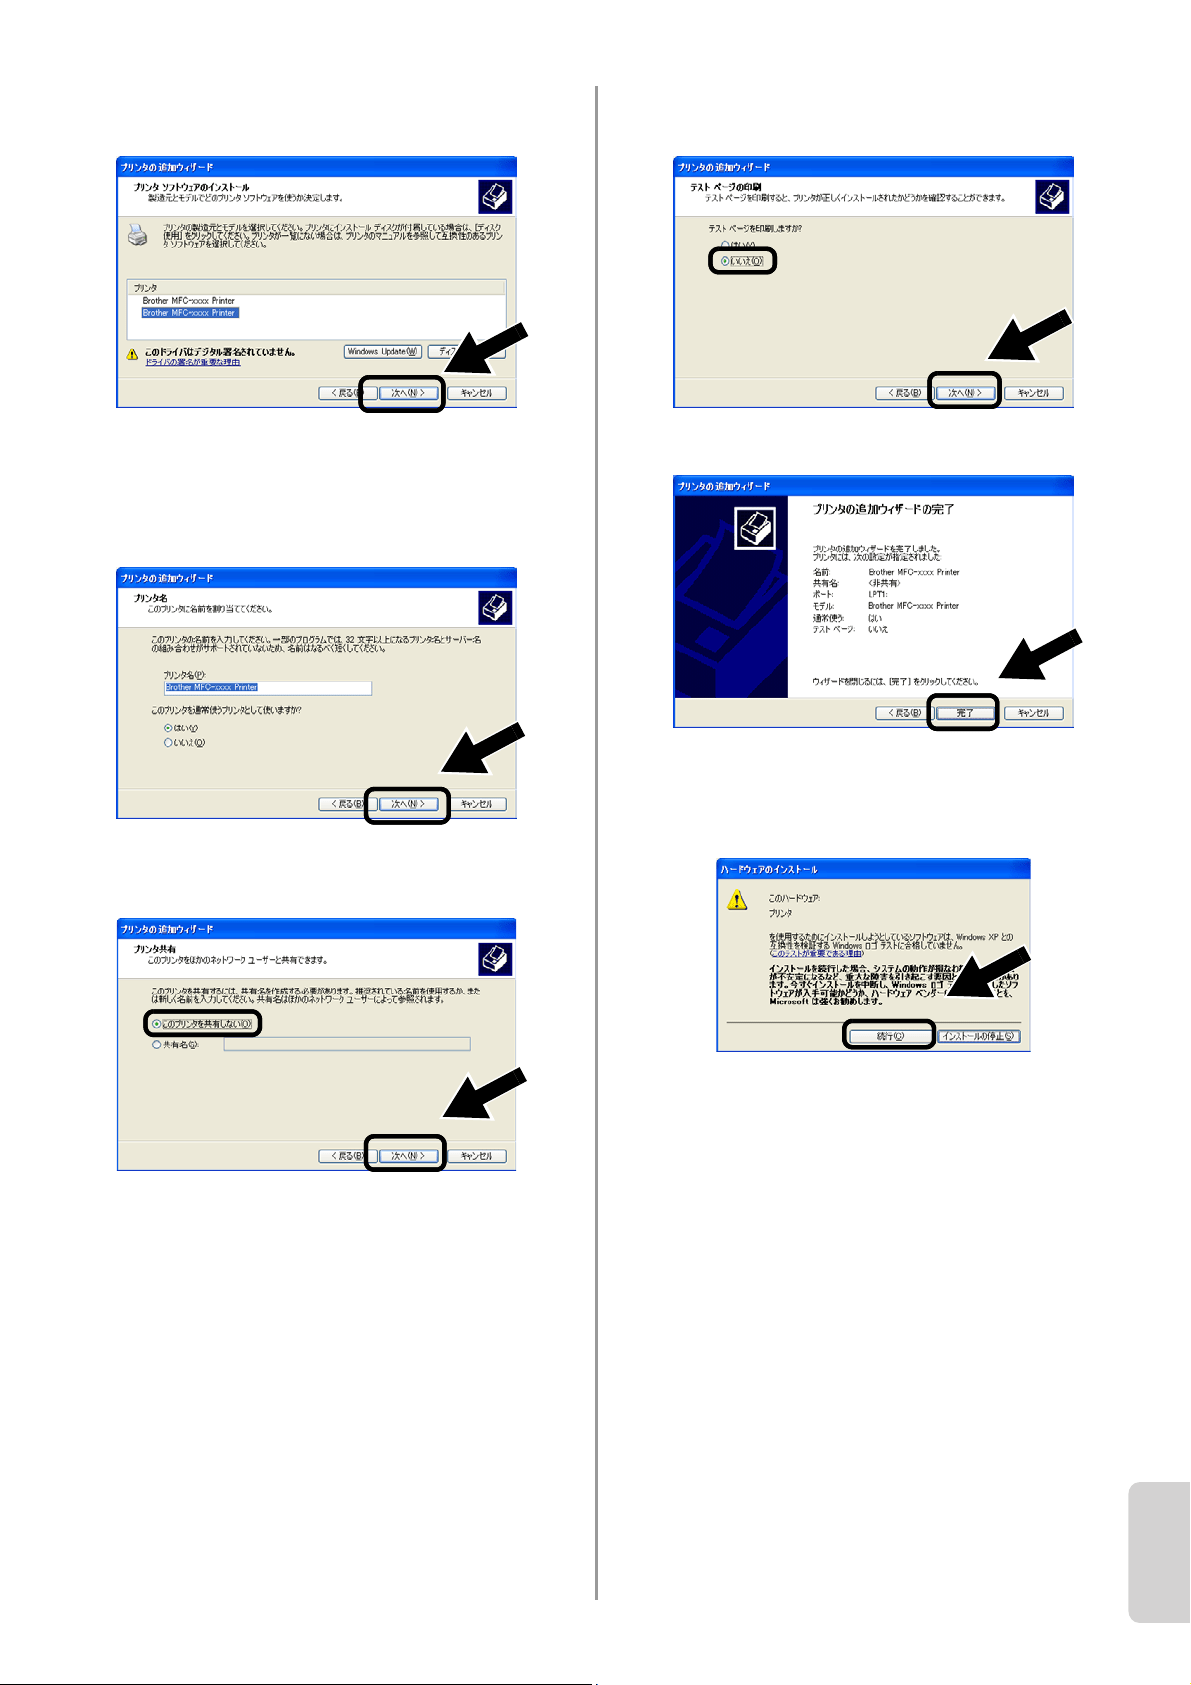
English
132
Japanese
7
一覧からインストールする機種を選択
して、[次へ]をクリックします。
8
インストールするプリンタをいつも使
用するプリンタとして設定する場合は
[はい]を選択します。
[次へ]をクリックします。
9
[このプリンタを共有しない]
を選択し
て[次へ]をクリックします。
10
[いいえ]
を選択し、[次へ]
をクリック
します。
11
[完了]
をクリックします。
12
Windows
ロゴ検証の確認画面が表示さ
れた場合は、[続行]
をクリックしてイ
ンストールを続行してください。
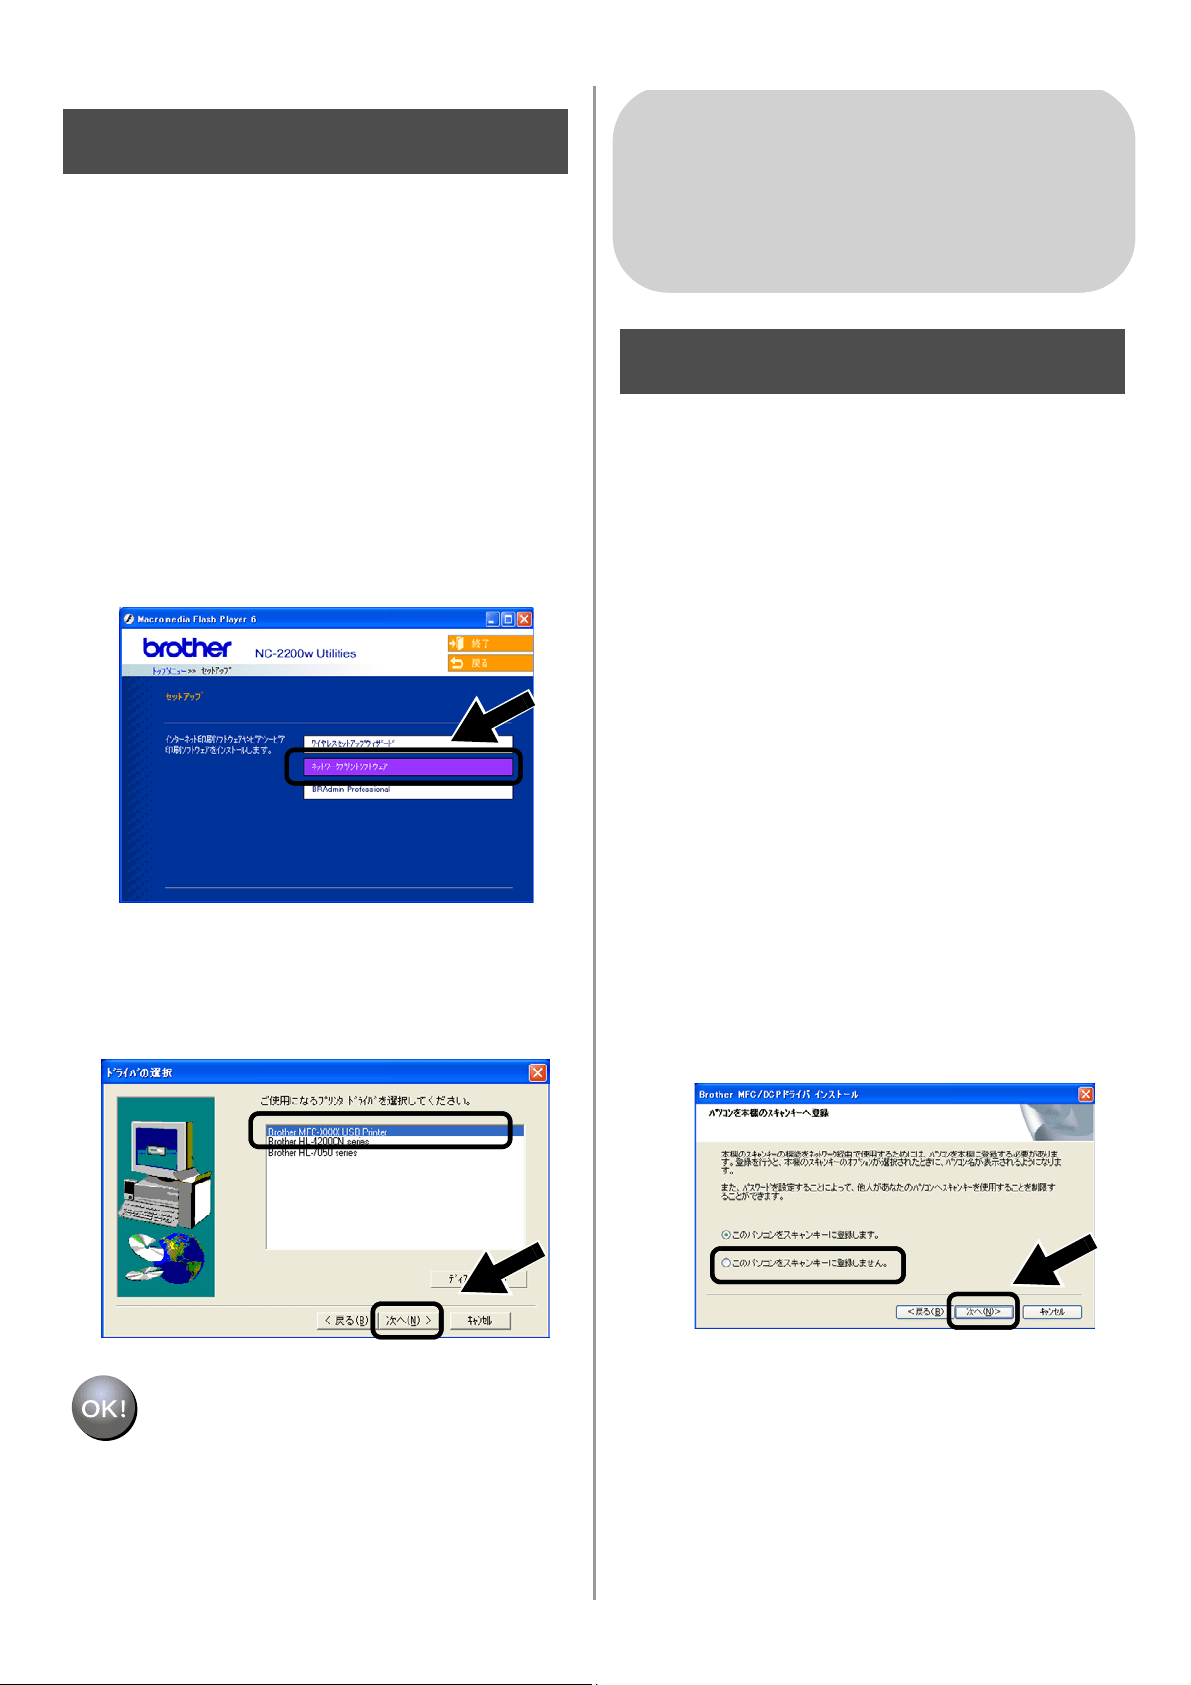
English
133
ネットワークプリントソフト
ウェアをインストールする
ブラザープリンタ
/MFC/DCP
をワイヤレス
ネットワーク接続を行うために、ネット
ワークプリントソフトウェアをインストー
ルします。
次の手順でインストールします。
1
[ネットワークプリントソフトウェア]
をクリックし、画面の指示に従ってイ
ンストールします。
2
132
ページの手順
7
で選択した機種と同
じプリンタドライバを選択し、[次へ]
をクリックします。
セットアップが完了しました。
MFC/DCP
ドライバをインス
トールする
ブラザー
MFC/DCP
をワイヤレスネット
ワーク接続するために、
MFC/DCP
ドライ
バをインストールして設定します。
MFC/DCP
ドライバはブラザー
MFC/DCP
同梱の
CD-ROM
に含まれています。
MFC/DCP
ドライバの詳しいインストール
方法は、ブラザー
MFC/DCP
同梱のかんた
ん設置ガイドにある、「ネットワークケーブ
ルユーザ用のドライバおよびソフトウェア
をインストールする方法」を参照してくだ
さい。
■
MFC-8820J/3820JN/DCP-8025J
の機種をご
使用で次の画面が表示された場合は、「このパ
ソコンをスキャンキーに登録しません」を選
択して[次へ]を選択してインストールを続
行してください。
Step 5
Windows
®
をご使用の場合
Group: 2
MFC-8820J/3820JN/410CN/610CLN/
610CLWN/620CLN
DCP-110C/8025J
Step 4
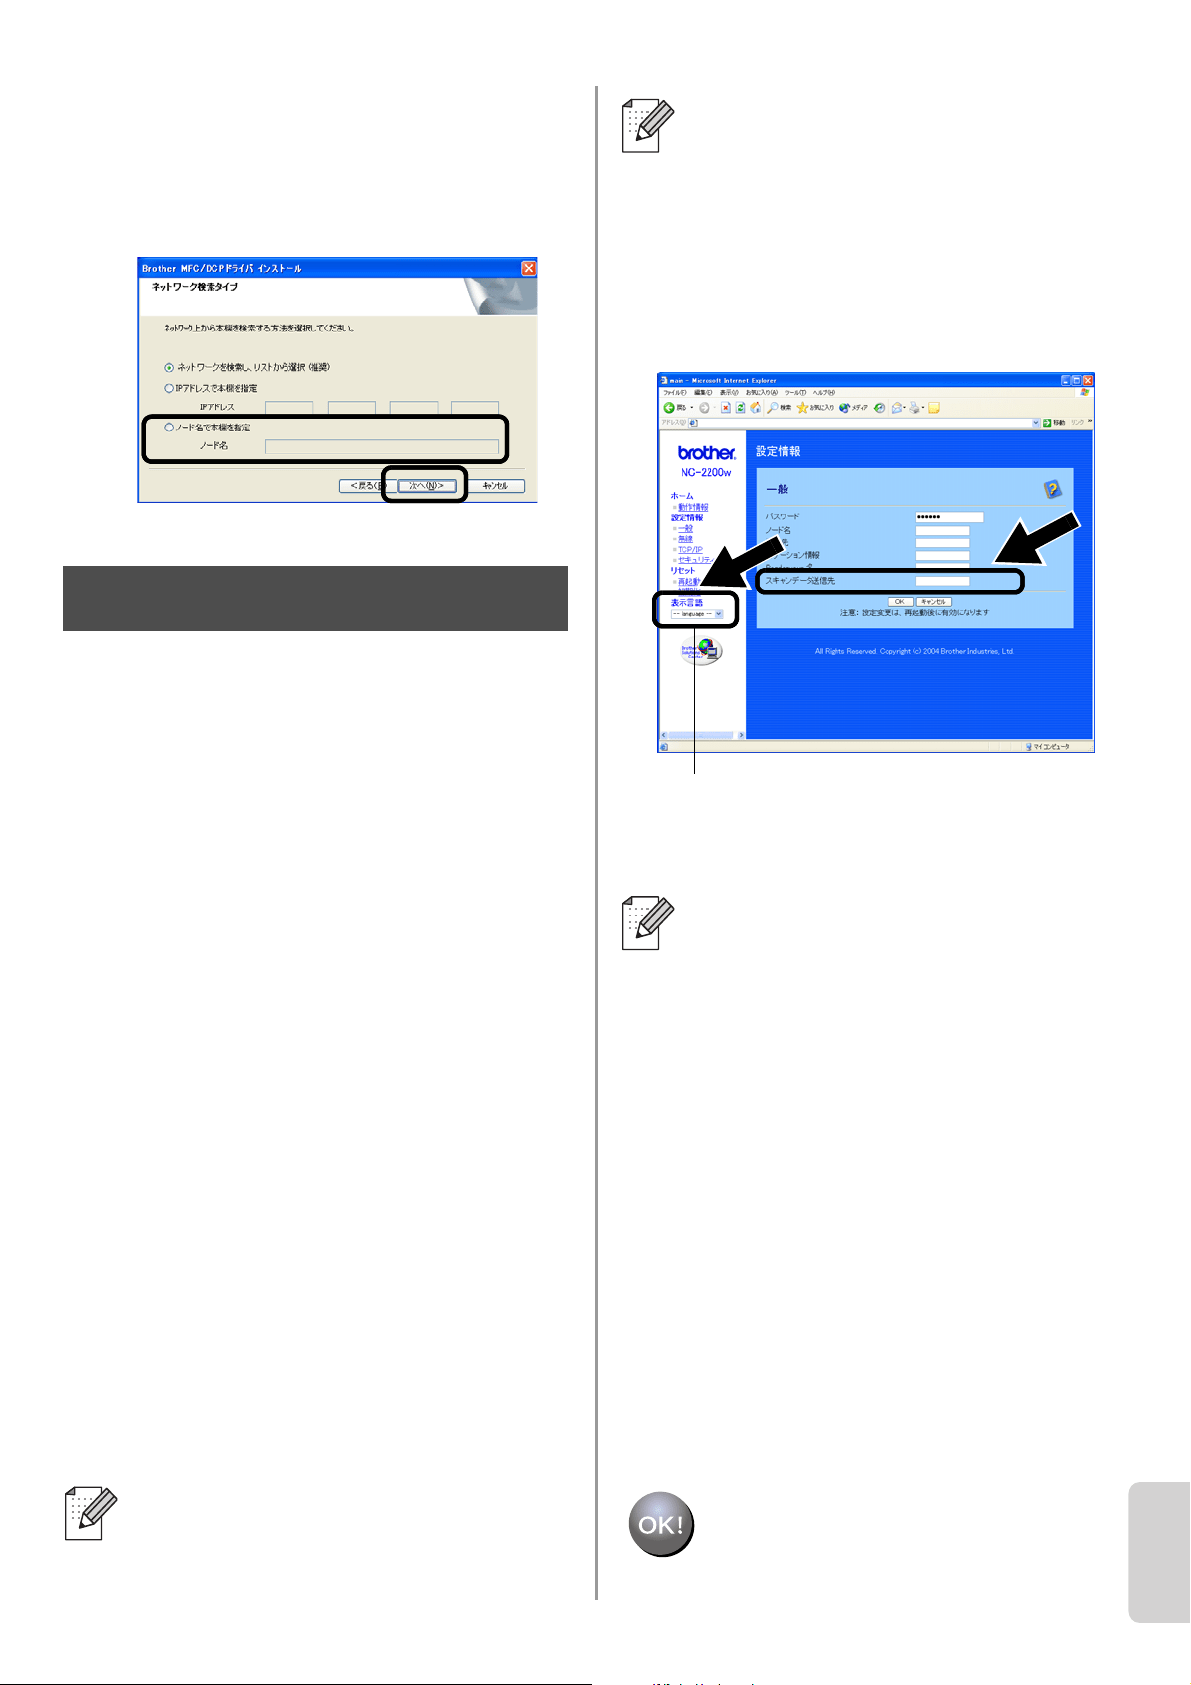
English
134
Japanese
■ インストールする
MFC/DCP
が検索リストに
表示されない場合は、下記の画面まで戻り
NC-2200
w のノード名を直接入力してくださ
い。ノード名は、ネットワーク設定ページで
確認できます。「その他の情報」(
136
ページ)
.
NC-2200
w ホームページから
スキャンデータ送信先アドレ
スを設定する
スキャナをネットワーク上で使用する場合
は、スキャンデータ送信先アドレスを
NC-2200
w に内蔵されているホームページ
の設定画面から指定する必要があります。
次の手順で指定します。
ウェブブラウザは
Internet Explorer
バー
ジョン
6.XX
以降をお勧めします。
1
ウェブブラウザを起動して、次の
URL
を入力します。
IP
アドレスの場合
http://
192.168.xxx.xxx
ノード名の場合
http://
BRN_xxxx
この場合 192.168.xxx.xxx や
BRN_xxxx は、それぞれ
NC-2200
wの
IP
アドレスまたはノード名です。
2
[設定情報]
の下にある
[一般]をク
リックします。
3
使用しているコンピュータの
IP
アドレ
スを入力します。
セットアップが完了しました。
■
IP
アドレスまたはノード名は、ネッ
トワーク設定ページで確認できます。
詳しくは「その他の情報」(
136
ペー
ジ)を参照してください。
Step 5
■ 設定関連のリンクをクリックすると、
ユーザー名およびパスワードの入力
を要求されます。次のユーザー名と
パスワードを入力してください。
ユーザー名:
admin
(大文字と小
文字を区別する)
パスワード:
access
(初期設定)
■ コンピュータの
IP
アドレスが
DHCP
によって自動的に割り当てられてい
る場合は、
IP
アドレスが変わること
が予想されます。このため、
IP
アド
レスは使用せずにコンピュータ名を
入力してください。コンピュータ名
には半角の英数文字しか使用できま
せん。コンピュータ名には、
Windows
®
で使用しているコンピュー
タ名または
DNS
ホスト名を使用でき
ます。
■ コンピュータ名を確認する場合は、
[マイコンピュータ]
から
[システム
の情報を表示する]
を選択してシス
テムのプロパティを表示し、[コン
ピュータ名]
タブを参照します。
ドメイン名を使用するには、
NC-2200
w に内蔵されているホーム
ページの設定画面から
DNS
サー
バーを割り当てる必要があります。
[
Japanese
]を選択して日本語表示にします。
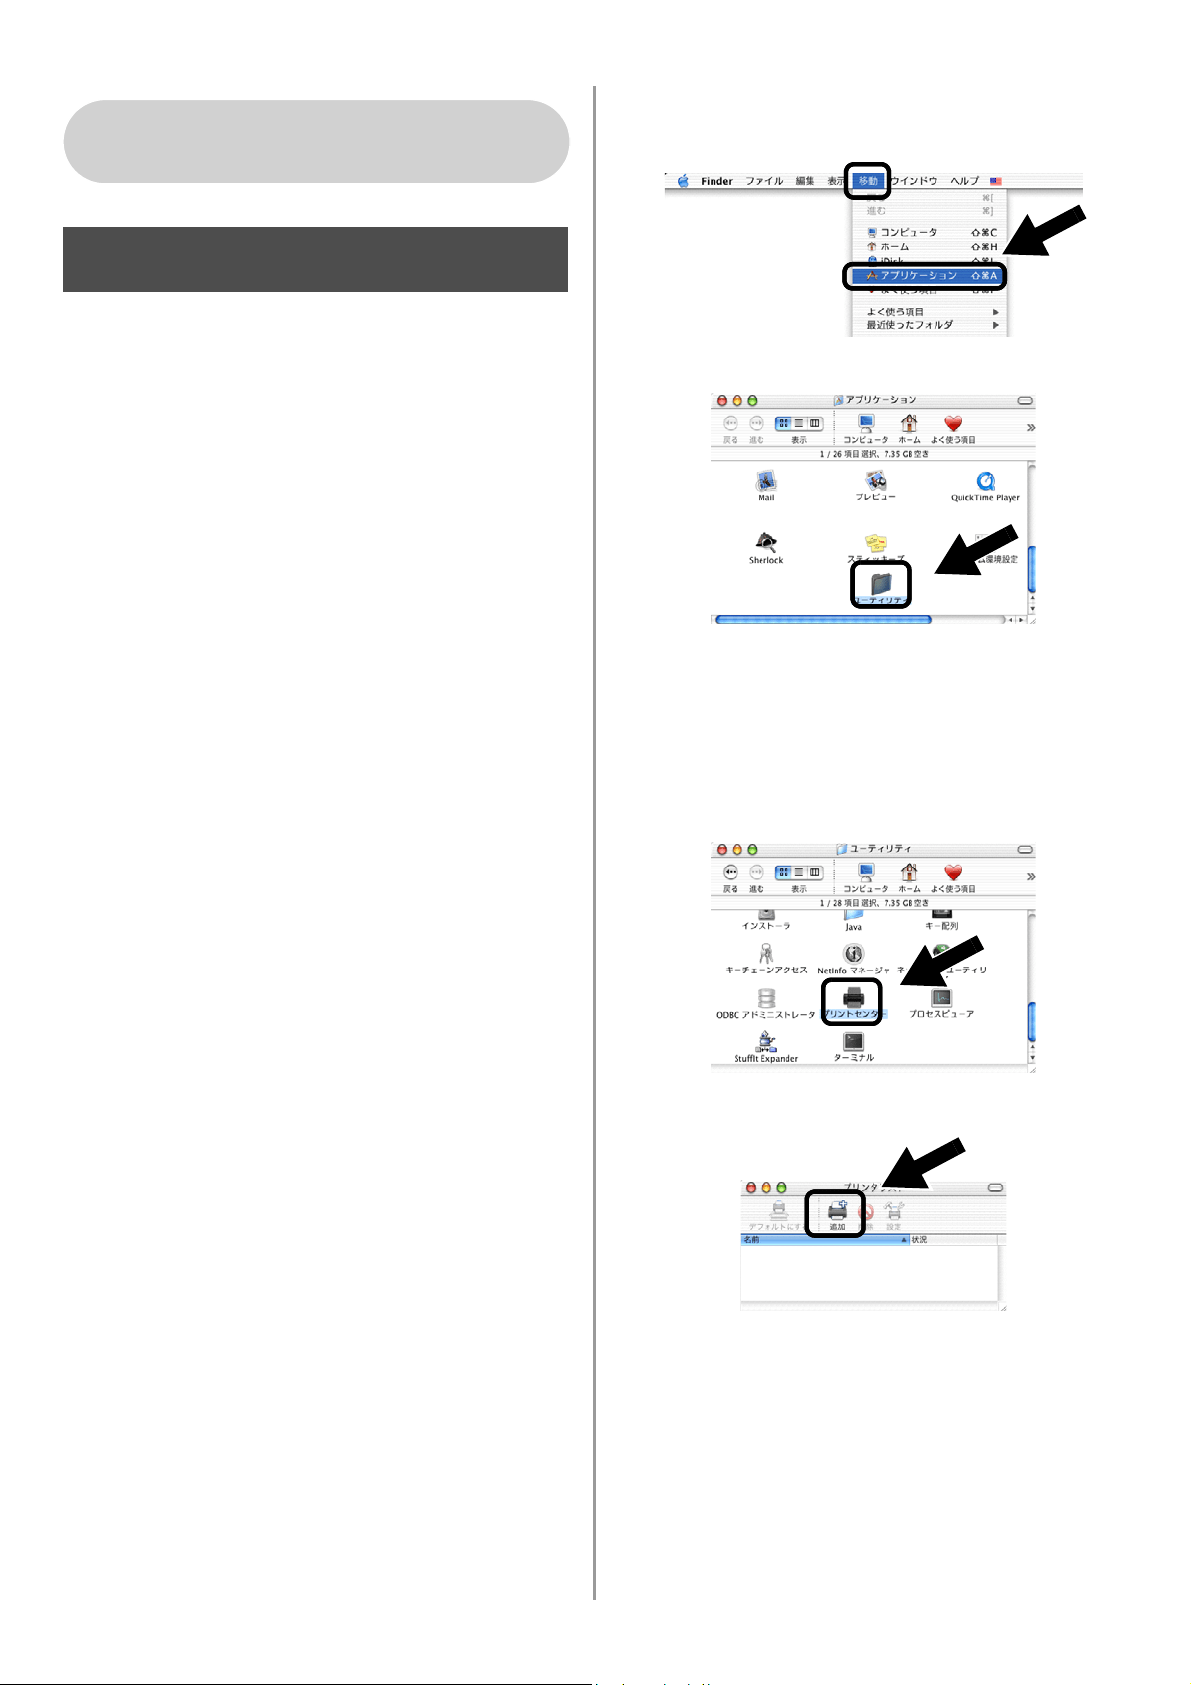
English
135
簡易ネットワーク設定機能を
使用して、プリンタドライバ
をインストールする
プリンタドライバがインストールされてい
る場合は、「Step 5」の「
NC-2200
w ホーム
ページからスキャンデータ送信先アドレス
を設定する」(
134
ページ)にお進みくださ
い。
プリンタドライバは、ご使用のブラザープ
リンタ
/MFC/DCP
に同梱されている
CD-ROM
に含まれています。また、プリン
タドライバはインターネット上の
Brother
SolutionsCenter
(ブラザーソリューション
センター)
(
http://solutions.brother.co.jp
)
からダウンロードすることもできます。
次の手順で、プリンタドライバをインス
トールします。
1
CD-ROM
をコンピュータの
CD-ROM
ド
ライブに挿入し、[
Start Here OSX
]
ア
イコンをダブルクリッします。ソフト
ウェアをインストールします。
言語選択画面が表示された場合は使用
する言語を選択してください。
2
(ブラザープリンタユーザの方)
[
Install Software
]
をクリックし、メ
ニュー画面から
[
Printer Driver
]
を選
択します。
(ブラザー
MFC/DCP
ユーザの方)
[
MFC/DCP
ドライバ]
をクリックしま
す。
3
画面の指示に従ってプリンタドライバ
をインストールします。
4
[移動]
メニューから
[アプリケーショ
ン]
を選択します。
.
5
[ユーティリティ]フォルダを開きます。
6
(
Mac OS
®
X 10.2.4
ユーザの方)
[プリントセンター]
アイコンをクリッ
クします。
(
Mac OS
®
X 10.3
ユーザの方)
[プリンタ設定ユーティリティ]
アイコ
ンをクリックします。
7
[追加]
をクリックします。
Mac OS
®
X 10.2.4
~
10.3
以降をご使用の場合
Step 4
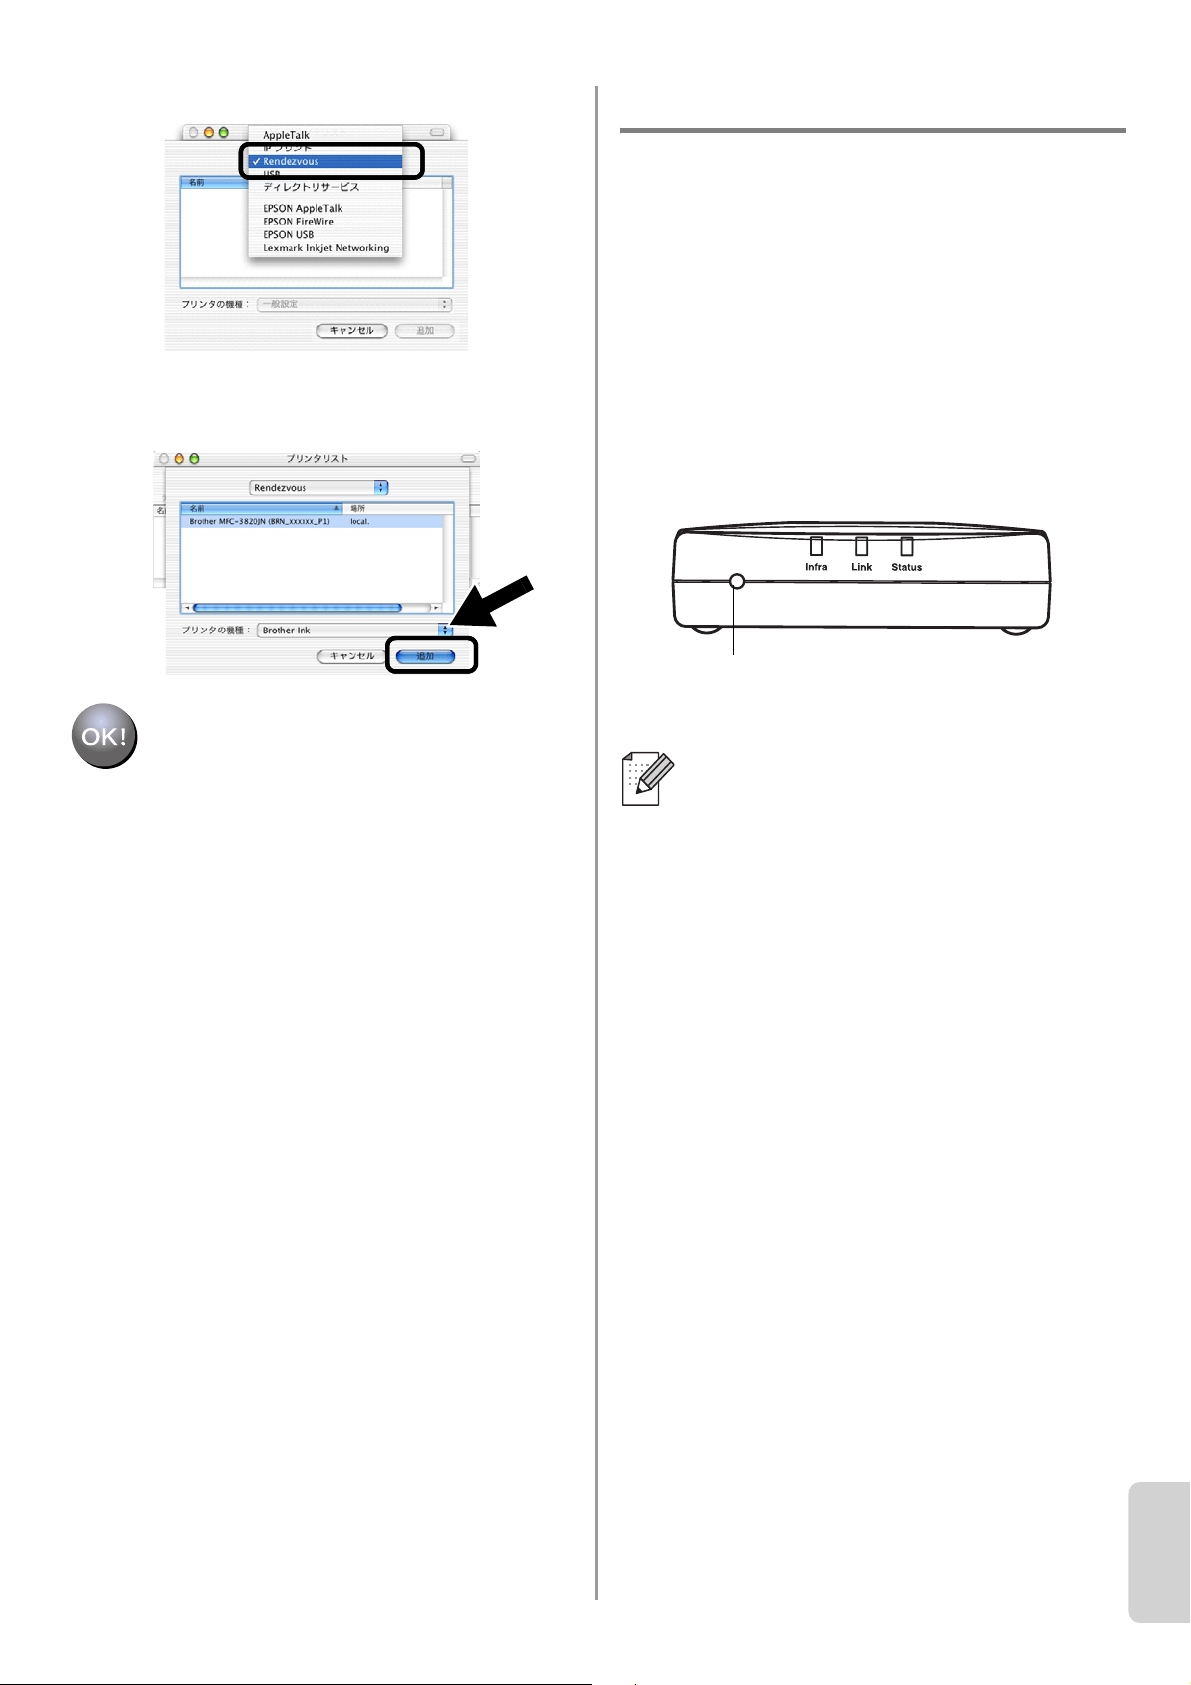
English
136
Japanese
8
Rendezvous
を選択します。
9
ご使用の機種を選択し、[追加]
をク
リックします。
セットアップが完了しました。
その他の情報
ネットワーク設定ページを印刷する
NC-2200
w のテストボタンを押します。
10
秒以上押し続けないでください。
設定を工場出荷時の初期設定に戻す
NC-2200
w のテストボタンを
10
秒以上押
します。
NC-2200
w
のワイヤレス設定、パ
スワード、
IP
アドレスなどすべての情報を
リセットして工場出荷時の初期設定に戻し
ます。
工場出荷時の初期設定に戻した後は、再
度
NC-2200w
の設定を行ってください。
テストボタン

137
Important Information: Regulations
Federal Communications Commission (FCC) Declaration
of Conformity (For USA)
Responsible Party: Brother International Corporation
100 Somerset Corporate Boulvard
Bridgewater, NJ 08807-0911, USA
Telephone: (908) 704-1700
declares, that the products
Product Name: Brother External Wireless Print/Scan Server
Model Number: NC-2200w
complies with Part 15 of the FCC Rules. Operation is subject to the following two conditions: (1)
This device may not cause harmful interference, and (2) this device must accept any
interference received, including interference that may cause undersired operation.
This equipment has been tested and found to comply with the limits for a Class B digital device,
pursuant to Part 15 of the FCC Rules. These limits are designed to provide reasonable
protection against harmful interference in a residential installation. This equipment generates,
uses, and can radiate radio frequency energy and, if not installed and used in accordance with
the instructions, may cause harmful interference to radio communications. However, there is no
guarantee that interference will not occur in a particular installation. If this equipment does
cause harmful interference to radio or television reception, which can be determined by turning
the equipment off and on, the user is encouraged to try to correct the interference by one or
more of the following measures:
■ Reorient or relocate the receiving antenna.
■ Increase the separation between the equipment and receiver.
■ Connect the equipment into an outlet on a circuit different from that to which the receiver is
connected.
■ Consult the dealer or an experienced radio/TV technician for help.
Important
Changes or modifications not expressly approved by Brother Industries, Ltd. could void the
user's authority to operate the equipment.
Industry Canada Compliance Statement
(For Canada only)
This Class B digital apparatus complies with Canadian ICES-003.
Cet appareil numérique de la classe B est conforme à la norme NMB-003 du Canada.

English
138
EC Declaration of Conformity
under the R & TTE Directive
Manufacturer
Brother Industries, Ltd.,
15-1, Naeshiro-cho, Mizuho-ku,
Nagoya 467-8561, Japan
Herewith declare that:
Products description:External Wireless
Print/Scan Server
Product Name:NC-2200w
is in conformity with provisions of the R & TTE
Directive 1999/5/EC and we declare
compliance with the following standards:
Radio : EN301489-1:2000
EN301489-17:2000
EN300328-2 V1.1.1
LVD : EN60950:
1992+A1+A2+A3+A4+A11
EMC : EN55022:1998 Class B
EN55024:1998
EN61000-3-2:1995+A14:2000
EN61000-3-3:1995
Year in which CE marking was first affixed:
2004
Issued by: Brother Industries, Ltd.
Date: 6 February, 2004
Place: Nagoya, Japan
Signature:
Takashi Maeda
Regulations Manager
Quality Management Group
Quality Management Dept.
Information & Document
Company
Hereby, Brother Industries, Ltd., declares
that this NC-2200w is in compliance with the
essential requirements and other relevant
provisions of Directive 1999/5/EC.
Intel Copyright and
License Information
This products includes object code from
Intel's UPnP SDK.
The following is the copyright and licensing
information for Intel UPnP SDK.
Copyright Intel Corporation 2004
All rights reserved.
Redistribution and use in source and binary
forms, with or without modification, are
permitted provided that the following
conditions are met:
■ Redistributions of source code must retain the
above copyright notice this list of conditions
and the following disclaimer.
■ Redistributions in binary form must reproduce
the above copyright notice, this list of
conditions and the following disclaimer in the
documentation and/or other materials
provided with the distribution.
■ Neither name of Intel Corporation nor the
names of its contributors may be used to
endorse or promote products derived from this
software without specific prior written
permission.
THIS SOFTWARE IS PROVIDED BY THE
COPYRIGHT HOLDERS AND CONTRIBUTORS
"AS IS" AND ANY EXPRESS OR IMPLIED
WARRANTIES, INCLUDING, BUT NOT LIMITED
TO, THE IMPLIED WARRANTIES OF
MERCHANTABILITY AND FITNESS FOR A
PARTICULAR PURPOSE ARE DISCLAIMED. IN
NO EVENT SHALL INTEL OR CONTRIBUTORS
BE LIABLE FOR ANY DIRECT, INDIRECT,
INCIDENTAL, SPECIAL, EXEMPLARY, OR
CONSEQUENTIAL DAMAGES (INCLUDING,
BUT NOT LIMITED TO, PROCUREMENT OF
SUBSTITUTE GOODS OR SERVICES; LOSS OF
USE, DATA, OR PROFITS; OR BUSINESS
INTERRUPTION) HOWEVER CAUSED AND ON
ANY THEORY OF LIABILITY, WHETHER IN
CONTRACT, STRICT LIABILITY, OR TORT
(INCLUDING NEGLIGENCE OR OTHERWISE)
ARISING IN ANY WAY OUT OF THE USE OF
THIS SOFTWARE, EVEN IF ADVISED OF THE
POSSIBILITY OF SUCH DAMAGE.

139
Wichtige Information: Vorschriften
Federal Communications Commission (FCC)
Declaration of Conformity (For U.S.A. only)
Responsible Party: Brother International Corporation
100 Somerset Corporate Boulevard
Bridgewater, NJ 08807-0911, USA
Telephone: (908) 704-1700
declares, that the products
Product Name: Brother External Wireless Print/Scan Server
Model Number: NC-2200w
complies with Part 15 of the FCC Rules. Operation is subject to the following two conditions: (1)
This device may not cause harmful interference, and (2) this device must accept any
interference received, including interference that may cause undesired operation.
This equipment has been tested and found to comply with the limits for a Class B digital device,
pursuant to Part 15 of the FCC Rules. These limits are designed to provide reasonable
protection against harmful interference in a residential installation. This equipment generates,
uses, and can radiate radio frequency energy and, if not installed and used in accordance with
the instructions, may cause harmful interference to radio communications. However, there is no
guarantee that interference will not occur in a particular installation. If this equipment does
cause harmful interference to radio or television reception, which can be determined by turning
the equipment off and on, the user is encouraged to try to correct the interference by one or
more of the following measures:
■ Reorient or relocate the receiving antenna.
■ Increase the separation between the equipment and receiver.
■ Connect the equipment into an outlet on a circuit different from that to which the receiver is
connected.
■ Consult the dealer or an experienced radio/TV technician for help.
Important
Changes or modifications not expressly approved by Brother Industries, Ltd. could void the
user’s authority to operate the equipment.
Industry Canada Compliance Statement
(For
Canada only)
This Class B digital apparatus complies with Canadian ICES-003.
Cet appareil numérique de la classe B rest conforme à la norme NMB-003 du Canada.

Englisch
140
EU-Konformitätserklärung
gemäß R & TTE-Richtlinie
Hersteller
Brother Industries, Ltd.,
15-1, Naeshiro-cho, Mizuho-ku,
Nagoya 467-8561, Japan
erklärt hiermit, dass:
Produktbeschreibung: Externer Wireless
Print/ScanServer
Produktname: NC-2200w
erfüllt die Anforderungen der R & TTE-
Richtlinie 1999/5/EG und entspricht den
folgenden Normen:
Funk: EN301489-1:2000
EN301489-17:2000
EN300328-2 V1.1.1
LVD: EN60950:
1992+A1+A2+A3+A4+A11
EMC: EN55022:1998 Class B
EN55024:1998
EN61000-3-2:1995+A14:2000
EN61000-3-3:1995
Erste Kennzeichnung mit dem CE-Zeichen:
2004
Herausgeber: Brother Industries, Ltd.
Datum: 6. Februar 2004
Ort: Nagoya, Japan
Unterschrift:
Takashi Maeda
Regulations Manager
Qualitätssicherung
Abt. Qualitätsmanagement
Information & Document
Company
Hiermit erklärt Brother Industries, Ltd., dass
sich dieser/diese/dieses NC-2200w in
Übereinstimmung mit den grundlegenden
Anforderungen und den anderen relevanten
Vorschriften der Richtlinie 1999/5/EG befindet.
Intel Copyright und
Lizenzvereinbarung
Dieses Produkt enthält Intel UPnP SDK
Objektcode.
Es folgt Copyright- und Lizenzinformation für
Intel UPnP SDK.
Urheberrecht Intel Corporation 2004
Alle Rechte vorbehalten.
Weitergabe und Verwendung von Quellcode
und in binärer Form, mit oder ohne
Veränderungen, sind erlaubt, wenn folgende
Bedingungen eingehalten werden:
■ Die Weitergabe von Quellcode muss die oben
angegebene Copyright-Notiz, diese Liste von
Bedingungen und die folgende
Verzichtserklärung enthalten.
■ Die Weitergabe in binärer Form muss in der
Dokumentation und/oder anderen Materialien,
die zur Weitergabe gehören, die oben
angegebene Copyright-Notiz, diese Liste von
Bedingungen und die folgende
Verzichtserklärung enthalten.
■ Der Name der Intel Corporation sowie die
Namen sämtlicher Intel-Mitarbeiter dürfen nur
mit vorheriger schriftlicher Genehmigung zur
Auszeichnung, Werbung und
Verkaufsförderung von auf dieser Software
basierenden Produkten verwendet werden.
DIESE SOFTWARE WIRD VON DEN COPYRIGHT-IN-
HABERN UND BEITRAGENDEN WIE VORLIEGEND
GELIEFERT UND JEGLICHE AUSDRÜCKLICHEN
ODER STILLSCHWEIGENDEN GARANTIEN, EIN-
SCHLIESSLICH, JEDOCH NICHT BESCHRÄNKT AUF
DIE HANDELSÜBLICHEN INBEGRIFFENEN GARANTI-
EN UND DIE EIGNUNG FÜR EINEN BESTIMMTEN
ZWECK WERDEN NICHT ANERKANNT. KEINESFALLS
IST INTEL SOWIE IHRE MITARBEITER FÜR DIREKTE,
INDIREKTE, ZUFÄLLIGE, BESONDERE, EXEMPLARI-
SCHE SCHÄDEN ODER FOLGESCHÄDEN VERANT-
WORTLICH (EINSCHLIESSLICH, JEDOCH NICHT
BESCHRÄNKT AUF DIE BESCHAFFUNG ODER DEN
ERSATZ VON WAREN ODER DIENSTLEISTUNGEN,
DEN VERLUST VON ARBEITSZEIT, DATEN, EINNAH-
MEN ODER GESCHÄFTSAUSFALL), UNERHEBLICH
AUS WELCHEM GRUND UND IN WESSEN VERANT-
WORTUNGSBEREICH, OB NACH VERTRAG, STRIK-
TER VERBINDLICHKEIT ODER SCHADENSERSATZ-
RECHT (EINSCHLIESSLICH NACHLÄSSIGKEIT ODER
ANDERES), DER SICH IN IRGENDEINER WEISE AUS
DEM EINSATZ DIESER SOFTWARE ERGIBT, SELBST
BEI VORHERIGER BENACHRICHTIGUNG DER MÖG-
LICHKEIT EINES SOLCHEN SCHADENS.

141
Informations importantes : Réglementations
Federal Communications Commission (FCC)
Declaration of Conformity (pour les Etats-Unis)
Responsible Party : Brother International Corporation
100 Somerset Corporate Boulvard
Bridgewater, NJ 08807-0911, USA
Telephone: (908) 704-1700
declares, that the products
Product Name: Brother External Wireless Print/Scan Server
Model Number: NC-2200w
complies with Part 15 of the FCC Rules. Operation is subject to the following two conditions: (1)
This device may not cause harmful interference, and (2) this device must accept any
interference received, including interference that may cause undesired operation.
This equipment has been tested and found to comply with the limits for a Class B digital device,
pursuant to Part 15 of the FCC Rules. These limits are designed to provide reasonable
protection against harmful interference in a residential installation. This equipment generates,
uses, and can radiate radio frequency energy and, if not installed and used in accordance with
the instructions, may cause harmful interference to radio communications. However, there is no
guarantee that interference will not occur in a particular installation. If this equipment does
cause harmful interference to radio or television reception, which can be determined by turning
the equipment off and on, the user is encouraged to try to correct the interference by one or
more of the following measures:
■ Reorient or relocate the receiving antenna.
■ Increase the separation between the equipment and receiver.
■ Connect the equipment into an outlet on a circuit different from that to which the receiver is
connected.
■ Consult the dealer or an experienced radio/TV technician for help.
Important
Changes or modifications not expressly approved by Brother Industries, Ltd. could void the
user's authority to operate the equipment.
Déclaration de conformité aux prescriptions de
Industry Canada
(Canada uniquement)
This Class B digital apparatus complies with Canadian ICES-003.
Cet appareil numérique de la classe B est conforme à la norme NMB-003 du Canada.

Français
142
Déclaration de conformité
pour la CE conformément à
la Directive R & TTE
Le fabricant
Brother Industries, Ltd.,
15-1, Naeshiro-cho, Mizuho-ku,
Nagoya 467-8561, Japon
déclare dans la présente que :
Descriptif du produit : Serveur
d'impression/
numérisation externe
sans fil
Nom du produit : NC-2200w
est conforme aux dispositions de la Directive
R & TTE 1999/5/EC et déclare que ce produit
respecte les normes suivantes :
Radio : EN301489-1:2000
EN301489-17:2000
EN300328-2 V1.1.1
LVD : EN60950:
1992+A1+A2+A3+A4+A11
EMC : EN55022:1998 Classe B
EN55024:1998
EN61000-3-2:1995+A14:2000
EN61000-3-3:1995
Année d’apposition du label CE : 2004
Délivré par : Brother Industries, Ltd.
Date : 6 février 2004
Lieu : Nagoya, Japon
Signature :
Takashi Maeda
Responsable de la réglementation
Groupe Management de la qualité
Service de gestion de la qualité
Information & Document Company
Par la présente Brother Industries, Ltd.
déclare que l'appareil NC-2200w est
conforme aux exigences essentielles et aux
autres dispositions pertinentes de la directive
1999/5/CE.
Informations de
copyright et de licence
Intel
Ce produit comprend du code objet du kit de
développement logiciel (SDK) UPnP de Intel.
Vous trouverez ci-dessous les informations
de copyright et de licence relatives à
l’utilisation du SDK UPnP de Intel.
Copyright Intel Corporation 2004
Tous droits réservés.
La redistribution et l’utilisation des formes
source et binaire, avec ou sans modification,
sont autorisées sous réserve du respect des
conditions suivantes :
■ Les redistributions du code source doivent
conserver l’avis de copyright ci-dessus, cette
liste de conditions et la clause de désistement
suivante.
■ Les redistributions sous forme binaire doivent
reproduire l’avis de copyright ci-dessus, cette
liste de conditions et la clause de désistement
suivante dans la documentation et/ou tout
autre matériel fourni avec la distribution.
■ Ni le nom Intel Corporation ni les noms de ses
collaborateurs ne peuvent être utilisés pour
endosser ou promouvoir des produits dérivés
de ce logiciel sans autorisation préalable
écrite et spécifique.
CE LOGICIEL EST FOURNI PAR LES DETENTEURS DU
COPYRIGHT ET SES COLLABORATEURS "TEL QUEL"
ET AUCUNE GARANTIE EXPRESSE OU TACITE N’EST
CONSENTIE, Y COMPRIS SANS POUR AUTANT S’Y
LIMITER, LES GARANTIES TACITES CONCERNANT LE
CARACTERE MARCHAND ET IDOINE POUR UNE FIN
DONNEE. INTEL OU SES COLLABORATEURS NE
SONT EN AUCUN CAS REDEVABLES EN CAS DE
DOMMAGES DIRECTS, INDIRECTS, ACCESSOIRES,
DETERMINES, EXEMPLAIRES OU CONSECUTIFS (Y
COMPRIS SANS POUR AUTANT S’Y LIMITER, LA MISE
A DISPOSITION DE BIENS OU DE SERVICES DE
REMPLACEMENT, LA PRIVATION DE JOUISSANCE,
LA PERTE DE DONNEES, LE MANQUE A GAGNER OU
L’ARRET D’EXPLOITATION), QUELLE QU’EN SOIT LA
CAUSE ET QUELLE QUE SOIT LA THEORIE DE
RESPONSABILITE, QU’IL S’AGISSE D’UNE ACTION EN
DROIT COMMERCIAL, DROIT STRICT OU DROIT CIVIL
(Y COMPRIS POUR NEGLIGENCE OU AUTRE)
DECOULANT D’UNE MANIERE OU D’UNE AUTRE DE
L’UTILISATION DE CE LOGICIEL, MEME SI LE RISQUE
D’UN TEL DOMMAGE A ETE STIPULE.

143
Belangrijke informatie: Reguleringen
Federal Communications Commission (FCC)
Declaration of Conformity (alleen voor de VS)
Responsible Party: Brother International Corporation
100 Somerset Corporate Boulvard
Bridgewater, NJ 08807-0911, USA
Telephone: (908) 704-1700
declares, that the products
Product Name: Brother External Wireless Print/Scan Server
Model Number: NC-2200w
complies with Part 15 of the FCC Rules. Operation is subject to the following two conditions:
(1)This device may not cause harmful interference, and (2)this device must accept any
interference received, including interference that may cause undesired operation.
This equipment has been tested and found to comply with the limits for a Class B digital device,
pursuant to Part 15 of the FCC Rules. These limits are designed to provide reasonable
protection against harmful interference in a residential installation. This equipment generates,
uses, and can radiate radio frequency energy and, if not installed and used in accordance with
the instructions, may cause harmful interference to radio communications. However, there is no
guarantee that interference will not occur in a particular installation. If this equipment does
cause harmful interference to radio or television reception, which can be determined by turning
the equipment off and on, the user is encouraged to try to correct the interference by one or
more of the following measures:
■ Reorient or relocate the receiving antenna.
■ Increase the separation between the equipment and receiver.
■ Connect the equipment into an outlet on a circuit different from that to which the receiver is
connected.
■ Consult the dealer or an experienced radio/TV technician for help.
Important
Changes or modifications not expressly approved by Brother Industries, Ltd. could void the
user's authority to operate the equipment.
Industry Canada Compliance Statement
(alleen voor Canada)
This Class B digital apparatus complies with Canadian ICES-003.
Cet appareil numérique de la classe B est conforme à la norme NMB-003 du Canada.

English
144
EG
Conformiteitsverklaring
onder de richtlijn R & TTE
Producent
Brother Industries, Ltd.,
15-1, Naeshiro-cho, Mizuho-ku,
Nagoya 467-8561, Japan
Verklaren hierbij dat:
Productomschrijving: Externe draadloze
afdruk-/scanserver
Productnaam: NC-2200w
voldoet aan de bepalingen van de richtlijn R
& TTE (1999/5/EG) en wij verklaren dat het
product aan de volgende normen:
Radio: EN301489-1:2000
EN301489-17:2000
EN300328-2 V1.1.1
LVD: EN60950:
1992+A1+A2+A3+A4+A11
EMC: EN55022:1998 Class B
EN55024:1998
EN61000-3-2:1995+A14:2000
EN61000-3-3:1995
Jaar waarin CE-certificatie voor het eerst was
toegekend: 2004
Uitgegeven door: Brother Industries, Ltd.
Datum: 6 februari 2004
Plaats: Nagoya, Japan
Handtekening:
Takashi Maeda
Regulations Manager
Quality Management Group
Quality Management Dept.
Information & Document
Company
Hierbij verklaart Brother Industries, Ltd. dat
deze NC-2200w voldoet aan de essentiële
eisen en de overige relevante bepalingen van
richtlijn 1999/5/EG.
Informatie over copyright
en licenties van Intel
Dit product is uitgerust met het
doelprogramma van Intel’s UPnP SDK.
Het volgende is informatie over copyright en
licenties voor Intel's UPnP SDK.
Copyright 2004 Intel Corporation
Alle rechten voorbehouden.
Herdistributie en gebruik in bronprogramma’s
en binaire vorm, al dan niet met wijzigingen,
is toegestaan mits aan de volgende
voorwaarden wordt voldaan:
■ Bij herdistributie van het bronprogramma
dienen de hierboven vermelde gegevens
m.b.t. auteursrechten, deze lijst van
voorwaarden en de volgende disclaimer in het
programma behouden te blijven.
■ Bij herdistributie in binaire vorm dienen de
hierboven vermelde gegevens m.b.t.
auteursrechten, deze lijst van voorwaarden en
de volgende disclaimer in de documentatie
en/of ander materiaal te worden meegeleverd.
■ Noch de naam Intel Corporation noch de
naam van enige partij die een bijdrage heeft
geleverd mag worden gebruikt voor het
ondersteunen of promoten van producten die
zijn afgeleid van deze software zonder dat
daarvoor voorafgaand schriftelijke
toestemming is verkregen.
DE HOUDERS VAN DE AUTEURSRECHTEN EN ENIGE
PARTIJ DIE EEN BIJDRAGE HEEFT GELEVERD,
VERSTREKKEN DEZE SOFTWARE IN DE STAAT WAARIN
DEZE VOOR VERKOOP WERD AANGEBODEN, EN ENIGE
UITDRUKKELIJK VERSTREKTE OF STILZWIJGENDE
GARANTIES, MET INBEGRIP VAN MAAR NIET BEPERKT TOT
DE STILZWIJGENDE GARANTIES OP VERKOOPBAARHEID
EN GESCHIKTHEID VOOR ENIG DOEL, WORDEN VAN DE
HAND GEWEZEN. IN GEEN ENKEL GEVAL ZAL INTEL OF
ENIGE PARTIJ DIE EEN BIJDRAGE HEEFT GELEVERD
AANSPRAKELIJK ZIJN VOOR ENIGE DIRECTE OF
INDIRECTE, INCIDENTELE OF SPECIALE SCHADE, MORELE
SCHADEVERGOEDING OF GEVOLGSCHADE (MET
INBEGRIP VAN MAAR NIET BEPERKT TOT DE LEVERING
VAN VERVANGENDE GOEDEREN OF DIENSTEN; VERLIES
VAN GEBRUIK, GEGEVENS OF WINSTEN; OF
BEDRIJFSSCHADE) ONGEACHT DE WIJZE WAAROP DEZE
WERD VEROORZAAKT EN ONGEACHT OP BASIS VAN
WELKE THEORIE VAN AANSPRAKELIJKHEID, HETZIJ IN
CONTRACT, STRIKTE AANSPRAKELIJKHEID OF
ONRECHTMATIGE DAAD (MET INBEGRIP VAN
NALATIGHEID OF ANDERSZINS) OP ENIGE WIJZE
VOORTVLOEIEND UIT HET GEBRUIK VAN DEZE
SOFTWARE, ZELFS INDIEN IS GEWEZEN OP DE
MOGELIJKHEID VAN DERGELIJKE SCHADE.

145
Informazioni importanti: Normative
Federal Communications Commission (FCC)
Declaration of Conformity (Solo per gli Stati Uniti)
Responsible Party : Brother International Corporation
100 Somerset Corporate Boulevard
Bridgewater, NJ 08807-0911, USA
Telephone: (908) 704-1700
declares, that the products
Product Name: Brother External Wireless Print/Scan Server
Model Number: NC-2200w
complies with Part 15 of the FCC Rules. Operation is subject to the following two conditions: (1)
This device may not cause harmful interference, and (2) this device must accept any
interference received, including interference that may cause undersired operation.
This equipment has been tested and found to comply with the limits for a Class B digital device,
pursuant to Part 15 of the FCC Rules. These limits are designed to provide reasonable
protection against harmful interference in a residential installation. This equipment generates,
uses, and can radiate radio frequency energy and, if not installed and used in accordance with
the instructions, may cause harmful interference to radio communications. However, there is no
guarantee that interference will not occur in a particular installation. If this equipment does
cause harmful interference to radio or television reception, which can be determined by turning
the equipment off and on, the user is encouraged to try to correct the interference by one or
more of the following measures:
■ Reorient or relocate the receiving antenna.
■ Increase the separation between the equipment and receiver.
■ Connect the equipment into an outlet on a circuit different from that to which the receiver is
connected.
■ Consult the dealer or an experienced radio/TV technician for help.
Important
Changes or modifications not expressly approved by Brother Industries, Ltd. could void the
user's authority to operate the equipment.
Industry Canada Compliance Statement
(Solo per il Canada)
This Class B digital apparatus complies with Canadian ICES-003.
Cet appareil numérique de la classe B est conforme à la norme NMB-003 du Canada.

English
146
Dichiarazione di
conformità CE in base alla
Direttiva R&TTE
Il produttore
Brother Industries, Ltd.,
15-1, Naeshiro-cho, Mizuho-ku,
Nagoya 467-8561, Giappone
dichiara che:
Descrizione del prodotto: Server di
stampa/scansione
senza fili esterno
Nome del prodotto: NC-2200w
è conforme alle disposizioni della Direttiva
R&TTE 1999/5/CE e ai seguenti standard:
Radio: EN301489-1:2000
EN301489-17:2000
EN300328-2 V1.1.1
LVD: EN60950:
1992+A1+A2+A3+A4+A11
EMC: EN55022:1998 Class B
EN55024:1998
EN61000-3-2:1995+A14:2000
EN61000-3-3:1995
Primo anno di apposizione del marchio CE: 2004
Pubblicata da: Brother Industries, Ltd.
Data: 6 febbraio 2004
Località: Nagoya, Giappone
Firma:
Takashi Maeda
Responsabile normative
Quality Management Group
Quality Management Dept.
Information & Document
Company
Con la presente Brother Industries, Ltd.
dichiara che questo NC-2200w è conforme ai
requisiti essenziali ed alle altre disposizioni
pertinenti stabilite dalla direttiva 1999/5/CE.
Copyright Intel e
informazioni sulla licenza
Questo prodotto include una parte di codice
proveniente da Intel UPnP SDK.
Di seguito sono riportate informazioni sul
copyright e sulla licenza per Intel UPnP SDK.
Copyright Intel Corporation 2004
Tutti i diritti riservati.
La ridistribuzione e l'impiego in forma binaria
o sorgente, con o senza modifiche, sono
consentiti purché vengano rispettate le
seguenti condizioni:
■ La ridistribuzione del codice sorgente deve
presentare il precedente avviso sul copyright,
questo elenco di condizioni e il seguente
avviso sulla limitazione di responsabilità.
■ La ridistribuzione in forma binaria deve
riprodurre il precedente avviso sul copyright,
questo elenco di condizioni e il seguente
avviso sulla limitazione di responsabilità nella
documentazione e/o altri materiali forniti con
la distribuzione.
■ Né il nome di Intel Corporation né i nomi dei
relativi collaboratori possono essere utilizzati
per approvare o promuovere prodotti derivati
da questo software senza una specifica
autorizzazione scritta.
QUESTO SOFTWARE È FORNITO DAI TITOLARI
DEL COPYRIGHT E DAI RELATIVI
COLLABORATORI "COSÌ COM'È" E NON SONO
PREVISTE GARANZIE ESPRESSE O IMPLICITE,
INCLUSE, IN VIA ESEMPLIFICATIVA, LE GARANZIE
IMPLICITE DI COMMERCIABILITÀ E IDONEITÀ A
UNO SCOPO PARTICOLARE. IN NESSUN CASO
INTEL O I SUOI COLLABORATORI POTRANNO
ESSERE RITENUTI RESPONSABILI DI EVENTUALI
DANNI DIRETTI, INDIRETTI, INCIDENTALI,
SPECIALI, O CONSEQUENZIALI (INCLUSI, MA NON
LIMITATI ALL'APPROVVIGIONAMENTO DI BENI O
SERVIZI DI SOSTITUZIONE; PERDITA DI DATI O
PROFITTI, INTERRUZIONE DELL'ATTIVITÀ) IN
QUALUNQUE MODO CAUSATI O PER
QUALSIVOGLIA TEORIA DI RESPONSABILITÀ, SIA
SULLA BASE DEL CONTRATTO, RIGIDA
RESPONSABILITÀ O VIOLAZIONE (INCLUSA LA
NEGLIGENZA O ALTRO) DERIVANTI
DALL'UTILIZZO DI QUESTO SOFTWARE, ANCHE
SE AVVERTITI DELLA POSSIBILITÀ DI TALI DANNI.

147
Información importante: Normativas
Declaración de conformidad con la Federal
Communications Commission (FCC) (para EE.UU.)
Parte responsable : Brother International Corporation
100 Somerset Corporate Boulvard
Bridgewater, NJ 08807-0911, USA
Teléfono: (908) 704-1700
declara que los productos
Nombre de producto: Servidor de impresión/digitalización inalámbrico externo
Número de modelo: NC-2200w
cumple la Parte 15 del Reglamento de la FCC. El funcionamiento está sujeto a las dos
condiciones siguientes: (1) Este dispositivo no debe provocar interferencias perjudiciales y (2)
este dispositivo debe aceptar cualquier interferencia recibida, incluyendo interferencias que
puedan provocar un funcionamiento indebido.
Tras las pruebas realizadas en este equipo, confirmamos que cumple los límites para
dispositivos digitales de Clase B, en virtud de lo estipulado en la Parte 15 del Reglamento de
la FCC. Estos límites se han estipulado para disponer una protección razonable contra
interferencias perjudiciales en instalaciones residenciales. Este equipo genera, utiliza y puede
irradiar radiofrecuencia y, en caso de no instalarse y utilizarse según las instrucciones, puede
provocar interferencias perjudiciales a las comunicaciones de radio. Sin embargo, esto no
garantiza que no vayan a producirse interferencias en una determinada instalación. En caso de
que este equipo provocase interferencias perjudiciales a la recepción de radio y televisión, lo
que podrá determinarse apagándolo y encendiéndolo, se recomienda al usuario intentar
corregir la interferencia empleando cualquiera de las siguientes medidas:
■ Reorientar o reubicar la antena de recepción.
■ Aumentar la separación entre el equipo y el receptor.
■ Conectar el equipo a una toma de red en un circuito diferente al que esté conectado el
receptor.
■ Solicitar ayuda al distribuidor o a un técnico de radio/TV cualificado.
Importante
Todo cambio o modificación no aprobado expresamente por Brother Industries, Ltd. podría
dejar sin efecto la autorización al usuario para hacer funcionar el equipo.
Declaración de cumplimiento de la industria canadiense
(sólo para Canadá)
Este aparato digital de Clase B cumple todos los requisitos de la normativa ICES-003 canadiense.
Cet appareil numérique de la classe B est conforme à la norme NMB-003 du Canada.

English
148
Declaración de
conformidad CE bajo la
directiva R y TTE
Fabricante
Brother Industries, Ltd.,
15-1, Naeshiro-cho, Mizuho-ku,
Nagoya 467-8561, Japón
Declaramos que:
Descripción Servidor de
del producto: impresión/digitalización
inalámbrico externo
Nombre de producto: NC-2200w
cumple las disposiciones de la Directiva R y
TTE (1999/5/CE) y declaramos el
cumplimiento de los siguientes estándares:
Radio: EN301489-1:2000
EN301489-17:2000
EN300328-2 V1.1.1
LVD: EN60950:
1992+A1+A2+A3+A4+A11
EMC: EN55022:1998 Class B
EN55024:1998
EN61000-3-2:1995+A14:2000
EN61000-3-3:1995
Año en el que se aplicó por primera vez la
marca CE: 2004
Expedido por: Brother Industries, Ltd.
Fecha: 6 de febrero de 2004
Lugar : Nagoya, Japón
Firma:
Takashi Maeda
Administrador de normativas
Quality Management Group
Quality Management Dept.
Information & Document
Company
Por medio de la presente Brother Industries,
Ltd. declara que el NC-2200w cumple con los
requisitos esenciales y cualesquiera otras
disposiciones aplicables o exigibles de la
Directiva 1999/5/CE.
Copyright e información
de licencia de Intel
Este producto incluye código objeto del SDK
de UPnP de Intel.
A continuación se incluye el copyright y la
información de licencia del SDK de UPnP de
Intel.
Copyright 2004 Intel Corporation
Todos los derechos reservados.
La redistribución y el uso en formas fuente y
binarias, con o sin modificaciones, está
permitido siempre que se cumplan las
siguientes condiciones:
■ Las redistribuciones del código fuente debe
retener la advertencia de derechos de autor
anterior, esta lista de condiciones y el
siguiente descargo.
■ La redistribución en formato binario deben
reproducir la advertencia de derechos de
autor anterior, esta lista de condiciones en la
documentación y/otros materiales que se
proporcionen con la distribución.
■ No podrán utilizarse ni el nombre de Intel
Corporation ni los nombres de sus
colaboradores para endosar o promocionar
productos derivados de este software sin
permiso previo específico por escrito.
ESTE SOFTWARE SE PROPORCIONA A TRAVÉS DE
LOS TITULARES DE LOS DERECHOS DE AUTOR Y
COLABORADORES “TAL CUAL” Y SE RECHAZA
CUALQUIER GARANTÍA EXPRESA O IMPLÍCITA,
INCLUYENDO PERO SIN LIMITACIÓN A LAS
GARANTÍAS IMPLÍCITAS DE COMERCIABILIDAD Y
ADECUACIÓN PARA UN PROPÓSITO EN
PARTICULAR. EN NINGÚN CASO SERÁ INTEL O SUS
COLABORADORES RESPONSABLES DE CUALQUIER
DAÑO DIRECTO, INDIRECTO, INCIDENTAL,
ESPECIAL, EJEMPLAR O CONSECUENTE
(INCLUYENDO PERO SIN LIMITARSE A LA
PROCURACIÓN O SUSTITUCIÓN DE BIENES O
SERVICIOS, PÉRDIDA DE USO, DATOS O
BENEFICIOS O INTERRUPCIÓN DE NEGOCIO)
CAUSADO SIN EMBARGO Y EN CUALQUIER TEORÍA
DE RESPONSABILIDAD, YA SEA EN CONTRATO,
RESPONSABILIDAD ESTRICTA O
EXTRACONTRACTUAL (INCLUYENDO LA
NEGLIGENCIA U OTRAS) EMERGENTES DEL USO DE
ESTE SOFTWARE, INCLUSO SI SE ADVIERTE DE LA
POSIBILIDAD DE DICHOS DAÑOS.

149
Viktig informasjon: Vedtekter
Federal Communications Commission (FCC)
Declaration of Conformity (kun for USA)
Responsible Party : Brother International Corporation
100 Somerset Corporate Boulevard
Bridgewater, NJ 08807-0911, USA
Telephone: (908) 704-1700
declares, that the products
Product Name: Brother External Wireless Print/Scan Server
Model Number: NC-2200w
complies with Part 15 of the FCC Rules. Operation is subject to the following two conditions: (1)
This device may not cause harmful interference, and (2) this device must accept any
interference received, including interference that may cause undersired operation.
This equipment has been tested and found to comply with the limits for a Class B digital device,
pursuant to Part 15 of the FCC Rules. These limits are designed to provide reasonable
protection against harmful interference in a residential installation. This equipment generates,
uses, and can radiate radio frequency energy and, if not installed and used in accordance with
the instructions, may cause harmful interference to radio communications. However, there is no
guarantee that interference will not occur in a particular installation. If this equipment does
cause harmful interference to radio or television reception, which can be determined by turning
the equipment off and on, the user is encouraged to try to correct the interference by one or
more of the following measures:
■ Reorient or relocate the receiving antenna.
■ Increase the separation between the equipment and receiver.
■ Connect the equipment into an outlet on a circuit different from that to which the receiver is
connected.
■ Consult the dealer or an experienced radio/TV technician for help.
Important
Changes or modifications not expressly approved by Brother Industries, Ltd. could void the
user's authority to operate the equipment.
Industry Canada Compliance Statement
(kun for
Canada)
This Class B digital apparatus complies with Canadian ICES-003.
Cet appareil numérique de la classe B est conforme à la norme NMB-003 du Canada.

N
orsk
150
Konformitetserklæring for
EU etter R & TTE-direktivet
Produsent
Brother Industries, Ltd.,
15-1, Naeshiro-cho, Mizuho-ku,
Nagoya 467-8561, Japan
erklærer herved at:
Produktbeskrivelse: Ekstern, trådløs
utskrifts-/skanneserver
Produktnavn: NC-2200w
er i overensstemmelse med bestemmelsene
i R & TTE-direktivet (1999/5/EC) og med
følgende standarder:
Radio: EN301489-1:2000
EN301489-17:2000
EN300328-2 V1.1.1
LVD: EN60950:
1992+A1+A2+A3+A4+A11
EMC: EN55022:1998 Class B
EN55024:1998
EN61000-3-2:1995+A14:2000
EN61000-3-3:1995
Første år med CE-merking: 2004
Utlevert av: Brother Industries, Ltd.,
Dato: 6. februar 2004
Sted: Nagoya, Japan
Signatur:
Takashi Maeda
Regelverksansvarlig
Quality Management Group
Quality Management Dept.
Information & Document
Company
Herved erklærer Brother Industries, Ltd. at
denne NC-2200w er i overensstemmelse
med krav og andre relevante bestemmelser i
direktiv 1999/5/EC.
Intel copyright- og
lisensinformasjon
Dette produktet inneholder objektkode fra
Intels UPnP SDK.
Følgende er copyright- og lisensinformasjon
for Intel UPnP SDK.
Copyright Intel Corporation 2004
Med enerett.
Omfordeling og bruk i kilde- og
binærformater, med eller uten modifisering,
er tillatt så lenge følgende krav er innfridd:
■ Omfordelinger av kildekoder må ha den
ovennevnte copyrightnotisen, denne listen
over forhold og følgende dementi.
■ Omfordelinger i binærformat må reprodusere
den ovennevnte copyrightnotisen, denne
listen over forhold og følgende dementi i
dokumentasjonen og/eller annet materiale
som følger med i omfordelingen.
■ Verken navnet på Intel Corporation eller deres
medarbeidere kan brukes til å støtte eller
fremme produkter som kommer fra denne
programvaren uten å ha fått spesifikk skriftlig
avtale på forhånd.
DENNE PROGRAMVAREN ER LAGET AV
COPYRIGHTINNEHAVERNE OG
MEDARBEIDERNE SOM DEN ER, OG ALLE
UTTRYKTE ELLER UNDERFORSTÅTTE
GARANTIER, INKLUDERT, MEN IKKE BEGRENSET
TIL, DE UNDERFORSTÅTTE GARANTIENE FOR
SALGBARHET OG EGNETHET FOR ET SPESIELT
FORMÅL ER IKKE ERKJENT. IKKE I NOE TILFELLE
SKAL INTEL ELLER MEDARBEIDERE STÅ
ANSVARLIG FOR DIREKTE, INDIREKTE,
TILFELDIGE, SPESIELLE, EKSEMPLARISKE
ELLER KONSEKVENTE SKADER (INKLUDERT,
MEN IKKE BEGRENSET TIL, ANSKAFFELSE AV
RESERVEGODS ELLER -TJENESTER, TAP AV
BRUK, DATA, ELLER FORTJENESTE ELLER
AVBRUDDSTAP) UANSETT HVORDAN DE
OPPSTO OG HVEM SOM VAR ANSVARLIG, ENTEN
DET ER PÅ KONTRAKT, OBJEKTIVT ANSVAR
ELLER FORVOLDT SKADE (INKLUDERT
UAKTSOMHET ELLER ANNET) SOM OPPSTÅR PÅ
NOEN SOM HELST MÅTE NÅR PROGRAMVAREN
IKKE ER I BRUK, SELV OM MAN ER OPPLYST OM
MULIGHETEN FOR SLIK SKADE.

151
Important Information: Regulations
Federal Communications Commission (FCC)
Declaration of Conformity (för USA)
Responsible Party: Brother International Corporation
100 Somerset Corporate Boulvard
Bridgewater, NJ 08807-0911, USA
Telephone: (908) 704-1700
declares, that the products
Product Name: Brother External Wireless Print/Scan Server
Model Number: NC-2200w
complies with Part 15 of the FCC Rules. Operation is subject to the following two conditions: (1)
This device may not cause harmful interference, and (2) this device must accept any
interference received, including interference that may cause undersired operation.
This equipment has been tested and found to comply with the limits for a Class B digital device,
pursuant to Part 15 of the FCC Rules. These limits are designed to provide reasonable
protection against harmful interference in a residential installation. This equipment generates,
uses, and can radiate radio frequency energy and, if not installed and used in accordance with
the instructions, may cause harmful interference to radio communications. However, there is no
guarantee that interference will not occur in a particular installation. If this equipment does
cause harmful interference to radio or television reception, which can be determined by turning
the equipment off and on, the user is encouraged to try to correct the interference by one or
more of the following measures:
■ Reorient or relocate the receiving antenna.
■ Increase the separation between the equipment and receiver.
■ Connect the equipment into an outlet on a circuit different from that to which the receiver is
connected.
■ Consult the dealer or an experienced radio/TV technician for help.
Important
Changes or modifications not expressly approved by Brother Industries, Ltd. could void the
user's authority to operate the equipment.
Industry Canada Compliance Statement
(endast för Kanada)
This Class B digital apparatus complies with Canadian ICES-003.
Cet appareil numérique de la classe B est conforme à la norme NMB-003 du Canada.

Swedish
152
Försäkran om
överensstämmelse (EU)
i enlighet med
RTTE-direktivet
Tillverkare
Brother Industries Ltd.,
15-1, Naeshiro-cho, Mizuho-ku,
Nagoya 467-8561, Japan
förklarar härmed att:
Produktbeskrivning: Extern trådlös
skrivar-/skannerserver
Produktnamn: NC-2200w
överensstämmer med föreskrifterna i
RTTE-direktivet 1999/5/EG och vi bekräftar
att produkten uppfyller kraven i följande
standarder:
Radio: EN301489-1:2000
EN301489-17:2000
EN300328-2 V1.1.1
LVD: EN60950:
1992+A1+A2+A3+A4+A11
EMC: EN55022:1998 Class B
EN55024:1998
EN61000-3-2:1995+A14:2000
EN61000-3-3:1995
År då CE-märke först gavs: 2004
Utgiven av: Brother Industries, Ltd.
Datum: 6 februari 2004
Plats: Nagoya, Japan
Underskrift:
Takashi Maeda
Regelverksansvarig
Kvalitetskontrollgruppen
Kvalitetsledningsavdelningen
Information & Document
Company
Härmed intygar Brother Industries, Ltd. att
denna NC-2200w står I överensstämmelse
med de väsentliga egenskapskrav och övriga
relevanta bestämmelser som framgår av
direktiv 1999/5/EG.
Copyright- och
licensinformation från Intel
I den här produkten finns en objektkod från
Intels UPnP SDK.
Följande upplysningar är copyright- och
licensinformationen till Intel UPnP SDK.
Copyright Intel Corporation 2004
Med ensamrätt.
Distribution och användning i källform och
binär form, med eller utan ändringar, tillåts
om följande villkor uppfylls:
■ Vid distribution i källkodsform måste
ovanstående copyrightmeddelande, den här
listan med villkor och nedanstående
friskrivningsmeddelande medfölja.
■ Vid distribution i binär form måste
ovanstående copyrightmeddelande, den här
listan med villkor och nedanstående
friskrivningsmeddelande finnas med i de
dokument och/eller annat material som
medföljer.
■ Varken namnet Intel Corporation eller
namnen på deras partners får användas för att
marknadsföra produkter som skapats med
den här programvaran utan ett särskilt
föregående, skriftligt tillstånd.
DEN HÄR PROGRAMVARAN TILLHANDAHÅLLS AV
UPPHOVSRÄTTSÄGARNA OCH DERAS PARTNERS I
BEFINTLIGT SKICK OCH ALLA DIREKTA ELLER
INDIREKTA GARANTIER BESTRIDS, DÄRIBLAND,
MEN INTE BEGRÄNSAT TILL, DE UNDERFÖRSTÅDDA
GARANTIERNA OM SÄLJBARHET OCH
ÄNDAMÅLSENLIGHET. UNDER INGA
OMSTÄNDIGHETER SKA INTEL ELLER DERAS
PARTNERS ANSVARA FÖR NÅGON DIREKT,
INDIREKT, OFÖRUTSEDD ELLER FÖRHÖJD SKADA
ELLER FÖLJDSKADA (INRÄKNAT, MEN INTE
BEGRÄNSAT TILL, INFÖRSKAFFANDE AV
ERSÄTTNINGSVAROR ELLER TJÄNSTER, MINSKAD
ANVÄNDBARHET, FÖRLUST AV DATA ELLER
FÖRTJÄNST, ELLER STÖRNINGAR I VERKSAMHETEN
) HUR SKADAN ÄN HAR UPPSTÅTT, VARE SIG DET
GÄLLER ENLIGT AVTAL, EGENTLIGT ANSVAR ELLER
SKADESTÅNDSSKYLDIGHET (INRÄKNAT
FÖRSUMLIGHET ELLER ANDRA FALL) OCH SOM PÅ
NÅGOT SÄTT HAR UPPSTÅTT PÅ GRUND AV
ANVÄNDNING AV DEN HÄR PROGRAMVARAN ÄVEN
OM DE HAR KÄNNEDOM OM MÖJLIGHETEN ATT
SÅDANA SKADOR KAN UPPSTÅ.

153
Vigtig information: Bestemmelser
Federal Communications Commission (FCC)
Declaration of Conformity (kun for USA)
Responsible Party: Brother International Corporation
100 Somerset Corporate Boulevard
Bridgewater, NJ 08807-0911, USA
Telephone: (908) 704-1700
declares, that the products
Product Name: Brother External Wireless Print/Scan Server
Modelnummer :NC-2200w
complies with Part 15 of the FCC Rules. Operation is subject to the following two conditions: (1)
This device may not cause harmful interference, and (2) this device must accept any
interference received, including interference that may cause undersired operation
This equipment has been tested and found to comply with the limits for a Class B digital device,
pursuant to Part 15 of the FCC Rules. These limits are designed to provide reasonable
protection against harmful interference in a residential installation. This equipment generates,
uses, and can radiate radio frequency energy and, if not installed and used in accordance with
the instructions, may cause harmful interference to radio communications. However, there is no
guarantee that interference will not occur in a particular installation. If this equipment does
cause harmful interference to radio or television reception, which can be determined by turning
the equipment off and on, the user is encouraged to try to correct the interference by one or
more of the following measures:
■ Reorient or relocate the receiving antenna.
■ Increase the separation between the equipment and receiver.
■ Connect the equipment into an outlet on a circuit different from that to which the receiver is
connected.
■ Consult the dealer or an experienced radio/TV technician for help.
Important
Changes or modifications not expressly approved by Brother Industries, Ltd. could void the
user's authority to operate the equipment.
Industry Canada Compliance Statement
(kun for Canada)
This Class B digital apparatus complies with Canadian ICES-003.
Cet appareil numérique de la classe B est conforme à la norme NMB-003 du Canada.

Engelsk
154
EU-overensstemmelseser-
klæring i henhold til
R & TTE-direktivet
Producent
Brother Industries, Ltd.,
15-1, Naeshiro-cho, Mizuho-ku,
Nagoya 467-8561, Japan
Erklærer hermed, at:
Produktbeskrivelse: Eksternt trådløst
printer-/scannernetkort
Produktnavn: NC-2200w
er i overensstemmelse med bestemmelserne
I R & TTE-direktivet (1999/5/EF) og
overholder følgende standarder:
Radio: EN301489-1:2000
EN301489-17:2000
EN300328-2 V1.1.1
LVD: EN60950:
1992+A1+A2+A3+A4+A11
EMC: EN55022:1998 Class B
EN55024:1998
EN61000-3-2:1995+A14:2000
EN61000-3-3:1995
År for første påsætning af CE-mærke: 2004
Udgivet af: Brother Industries, Ltd.
Dato: 6. februar 2004
Sted: Nagoya, Japan
Underskrift:
Takashi Maeda
Regelsætsansvarlig
Kvalitetskontrolgruppen
Kvalitetsstyringsafdelingen
Information & Document
Company
Undertegnede Brother Industries, Ltd.
erklærer herved, at følgende udstyr
NC-2200w overholder de væsentlige krav og
øvrige relevante krav i direktiv 1999/5/EF
Copyright- og
licensinformation fra Intel
Dette produkt indeholder objektkode fra
Intels udviklerværktøj UPnP.
Følgende er copyright- og licensop-
lysningerne til Intels udviklerværktøj UPnP.
Copyright©2004 Intel Corporation
Alle rettigheder forbeholdes.
Videredistribution og brug i kilde- og
binærform med eller uden ændringer er
tilladt, for så vidt følgende betingelser
overholdes:
■ Videredistributioner af kildekode skal bevare
ovennævnte copyrightmeddelelse, denne liste
over betingelser og følgende ansvarsfraskri-
velseserklæring.
■ Videredistribution i binær form skal gengive
ovennævnte copyrightmeddelelse, denne liste
over betingelser og følgende ansvarsfraskri-
velseserklæring i dokumentationen og/eller
andre materialer, som vedlægges
distributionen.
■ Hverken navnet Intel Corporation eller
navnene på medarbejdere heri må bruges til
at støtte eller fremme produkter med relation
til denne software uden forudgående
udtrykkelig skriftlig tilladelse.
DENNE SOFTWARE ER LEVERET AF
COPYRIGHTINDEHAVERNE OG
UNDERLEVERANDØRERNE, "SOM DEN ER OG
FOREFINDES", OG DER FRALÆGGES ETHVERT
ANSVAR FOR EVENTUELLE DIREKTE ELLER
INDIREKTE GARANTIER, HERUNDER MEN IKKE
BEGRÆNSET TIL, DE INDIREKTE GARANTIER FOR
KVALITET OG EGNETHED TIL ET BESTEMT FORMÅL.
INTEL ELLER UNDERLEVERANDØRER ER UNDER
INGEN OMSTÆNDIGHEDER ANSVARLIGE FOR
EVENTUEL DIREKTE, INDIREKTE, HÆNDELIG,
SÆRLIG ELLER PØNALT BEGRUNDET ERSTATNING
(HERUNDER, MEN IKKE BEGRÆNSET TIL, INDKØB AF
ERSTATNINGSVARER ELLER -TJENESTER; AFSAVN,
DATA ELLER OVERSKUD; ELLER
DRIFTSAFBRYDELSE), UANSET ÅRSAG OG PÅ
NOGEN FORMODNING OM ERSTATNINGSANSVAR,
HVAD ENTEN DET MÅTTE VÆRE I HENHOLD TIL
KONTRAKT, OBJEKTIVT ANSVAR ELLER
ERSTATNINGSRET (HERUNDER FORSØMMELIGHED
ELLER ANDET), DER MÅTTE OPSTÅ PÅ EN HVILKEN
SOM HELST MÅDE VED BRUGEN AF DENNE
SOFTWARE, SELV HVIS DER ER GJORT
OPMÆRKSOM PÅ MULIGHEDEN FOR SÅDAN SKADE.

155
Informação importante: Regulamentos
Federal Communications Commission (FCC)
Declaration of Conformity (Para os E.U.A.)
Responsible Party: Brother International Corporation
100 Somerset Corporate Boulevard
Bridgewater, NJ 08807-0911, USA
Telephone: (908) 704-1700
declares, that the products
Product Name: Brother External Wireless Print/Scan Server
Model Number: NC-2200w
complies with Part 15 of the FCC Rules. Operation is subject to the following two conditions: (1)
This device may not cause harmful interference, and (2) this device must accept any
interference received, including interference that may cause undersired operation.
This equipment has been tested and found to comply with the limits for a Class B digital device,
pursuant to Part 15 of the FCC Rules. These limits are designed to provide reasonable
protection against harmful interference in a residential installation. This equipment generates,
uses, and can radiate radio frequency energy and, if not installed and used in accordance with
the instructions, may cause harmful interference to radio communications. However, there is no
guarantee that interference will not occur in a particular installation. If this equipment does
cause harmful interference to radio or television reception, which can be determined by turning
the equipment off and on, the user is encouraged to try to correct the interference by one or
more of the following measures:
■ Reorient or relocate the receiving antenna.
■ Increase the separation between the equipment and receiver.
■ Connect the equipment into an outlet on a circuit different from that to which the receiver is
connected.
■ Consult the dealer or an experienced radio/TV technician for help.
Important
Changes or modifications not expressly approved by Brother Industries, Ltd. could void the
user's authority to operate the equipment.
Industry Canada Compliance Statement
(Apenas para o Canadá)
This Class B digital apparatus complies with Canadian ICES-003.
Cet appareil numérique de la classe B est conforme à la norme NMB-003 du Canada.

P
ortuguês
156
Declaração de
Conformidade da CE sob a
Directiva R & TTE
Fabricante
Brother Industries, Ltd.,
15-1, Naeshiro-cho, Mizuho-ku,
Nagoya 467-8561, Japão
Declara que:
Descrição Servidor de
do produto: impressão/digitalização
externo sem fios
Nome do produto: NC-2200w
está em conformidade com as disposições
da Directiva R & TTE 1999/5/EC e declara
que o produto está em conformidade com as
seguintes normas:
Rádio: EN301489-1:2000
EN301489-17:2000
EN300328-2 V1.1.1
DBT: EN60950:
1992+A1+A2+A3+A4+A11
CEM: EN55022:1998 Classe B
EN55024:1998
EN61000-3-2:1995+A14:2000
EN61000-3-3:1995
Ano do primeiro selo de qualidade da CE: 2004
Emitido pela: Brother Industries, Ltd.
Data: 6 de Fevereiro de 2004
Local: Nagoya, Japão
Assinatura:
Takashi Maeda
Gestor de Regulamentos
Grupo de Gestão da Qualidade
Dept. de Gestão de Qualidade
Empresa de Documentação e
Informação
Brother Industries, Ltd. declara que este
NC-2200w está conforme com os requisitos
essenciais e outras disposições da Directiva
1999/5/CE.
Informações de copyright
e de licenciamento da Intel
Este produto inclui código de objecto da SDK
UPnP da Intel.
Seguem-se as informações de copyright e de
licenciamento da Intel UPnP SDK.
Copyright Intel Corporation 2004
Todos os direitos reservados.
A redistribuição e reutilização do código de
origem e binário, com ou sem modificação,
são permitidas desde que se cumpram as
seguintes condições:
■ Eventuais redistribuições do código de origem
deverão conter o aviso de copyright acima
indicado, a presente lista de condições e a
seguinte declaração de renúncia.
■ Eventuais redistribuições em forma binária
deverão reproduzir o aviso de copyright acima
indicado, a presente lista de condições e a
seguinte declaração de renúncia na
documentação e/ou outros materiais
fornecidos com a distribuição.
■ Nem o nome da Intel Corporation nem os
nomes dos respectivos participantes poderão
ser utilizados para apoiar ou promover
produtos derivados deste software sem
autorização prévia por escrito.
ESTE SOFTWARE É FORNECIDO PELOS
DETENTORES DO COPYRIGHT E RESPECTIVOS
PARTICIPANTES "TAL COMO ESTÁ" E É RENUNCIADA
QUALQUER GARANTIA EXPRESSA OU IMPLÍCITA,
INCLUINDO, MAS NÃO SE LIMITANDO A, AS
GARANTIAS IMPLÍCITAS DE COMERCIALIZAÇÃO E
ADEQUAÇÃO A UM DETERMINADO FIM. EM
CIRCUNSTÂNCIA ALGUMA A INTEL OU OS
RESPECTIVOS PARTICIPANTES SE
RESPONSABILIZARÃO POR QUALQUER DANO
DIRECTO, INDIRECTO, ACIDENTAL, ESPECIAL,
PONTUAL OU CONSEQUENCIAL (INCLUINDO, MAS
NÃO SE LIMITANDO A, BENS OU SERVIÇOS DE
AQUISIÇÃO OU SUBSTITUIÇÃO; PERDA DE
CAPACIDADE DE UTILIZAÇÃO, DADOS OU LUCROS;
OU INTERRUPÇÃO DE SERVIÇO) DE ALGUMA FORMA
CAUSADO, NEM POR QUALQUER TEORIA OU
RESPONSABILIDADE, QUER CONTRATUAL, QUER
RESPONSABILIDADE ESTRITA OU DANO (INCLUINDO
NEGLIGÊNCIA OU OUTRA) CONSEQUENTES DA
UTILIZAÇÃO DESTE SOFTWARE, AINDA QUE
CIENTES DA POSSIBILIDADES DESSE DANO.
༗!બ!
ȁ!ܥྴ
NC-2200w
ฃષ ଼ ා
༿ྴ အȁ
ȁɧ
ɠɠɠ
.
ɠɠɠɠ
ഩდȁȁȁȪȁ!ȁȁȫ
ུȂུܱඤယྫၳၑ࣐௵ȃ
ฃષܱܢۼಎવอાࣣȂུ
াષȂฃષ์คഝȂݖအௗ࢛ၑ
ջှȃ
Ȇഝྴ
֣
ഩდȁȁ!Ȫȁȁȁ!ȫ
ɧ 467-0841ȁྴࡣؚঌଠ༠ߊຠయ15-1
࿚ࣣ
ͺέΗȜȜΫΑȂະྶതાࣣȂ
ئܱ࿚ࣣȃ
ήρΎȜȜσΓϋΗȜ
UFM! ȇ!1231.254.521
ັশۼ!ȇ!ȡ߄!:;11ȡ31;11Ȃാ!:;11ȡ28;11
ɦȆݞ൚২ݝ
ݖ
အ
์
ค
ഝ
ུఘˍා
༗બܢۼ
1)
取扱説明書等の注意書に従った正常な状態で、保証期間内
に故障した場合は無料で修理します。この場合は、表記の
販売店もしくは、お客様相談窓口にご依頼ください。
2)保証期間内でも、次の場合は有料修理となります。
・取扱い上の不注意、誤用による故障及び損傷。
・当社又は表記の販売店以外による修理、改造による
故障及び損傷。
・火災、天災地変又は異常電圧、公害、塩害、異物又
はゴキブリや虫の侵入等による故障及び損傷。
・油煙、熱、塵、水、直射日光等の劣悪設置環境による
場合。
・本書のご提示がない場合。
・本書の所定事項の未記入、あるいは字句を書き替え
られた場合。
・接続している他の機器に起因した故障及び損傷。
・消耗部分の消耗、損傷。
3)本書は再発行いたしませんので、大切に保管してく
ださい。
4)故障その他による営業上の機会損失は当社では補償
いたしません。
5)本書は日本国内においてのみ有効です。
ThiswarrantyisvalidonlyinJapan.
修理メモ
※ この保証書は、以上の保証規定により無料修理をお約
束するためのもので、これによりお客様の法律上の権
利を制限するものではありません。
保証規定

©2004 Brother Industries, Ltd.