Loading ...
Loading ...
Loading ...
1716
EN
CHAPTER 5
SETTING UP
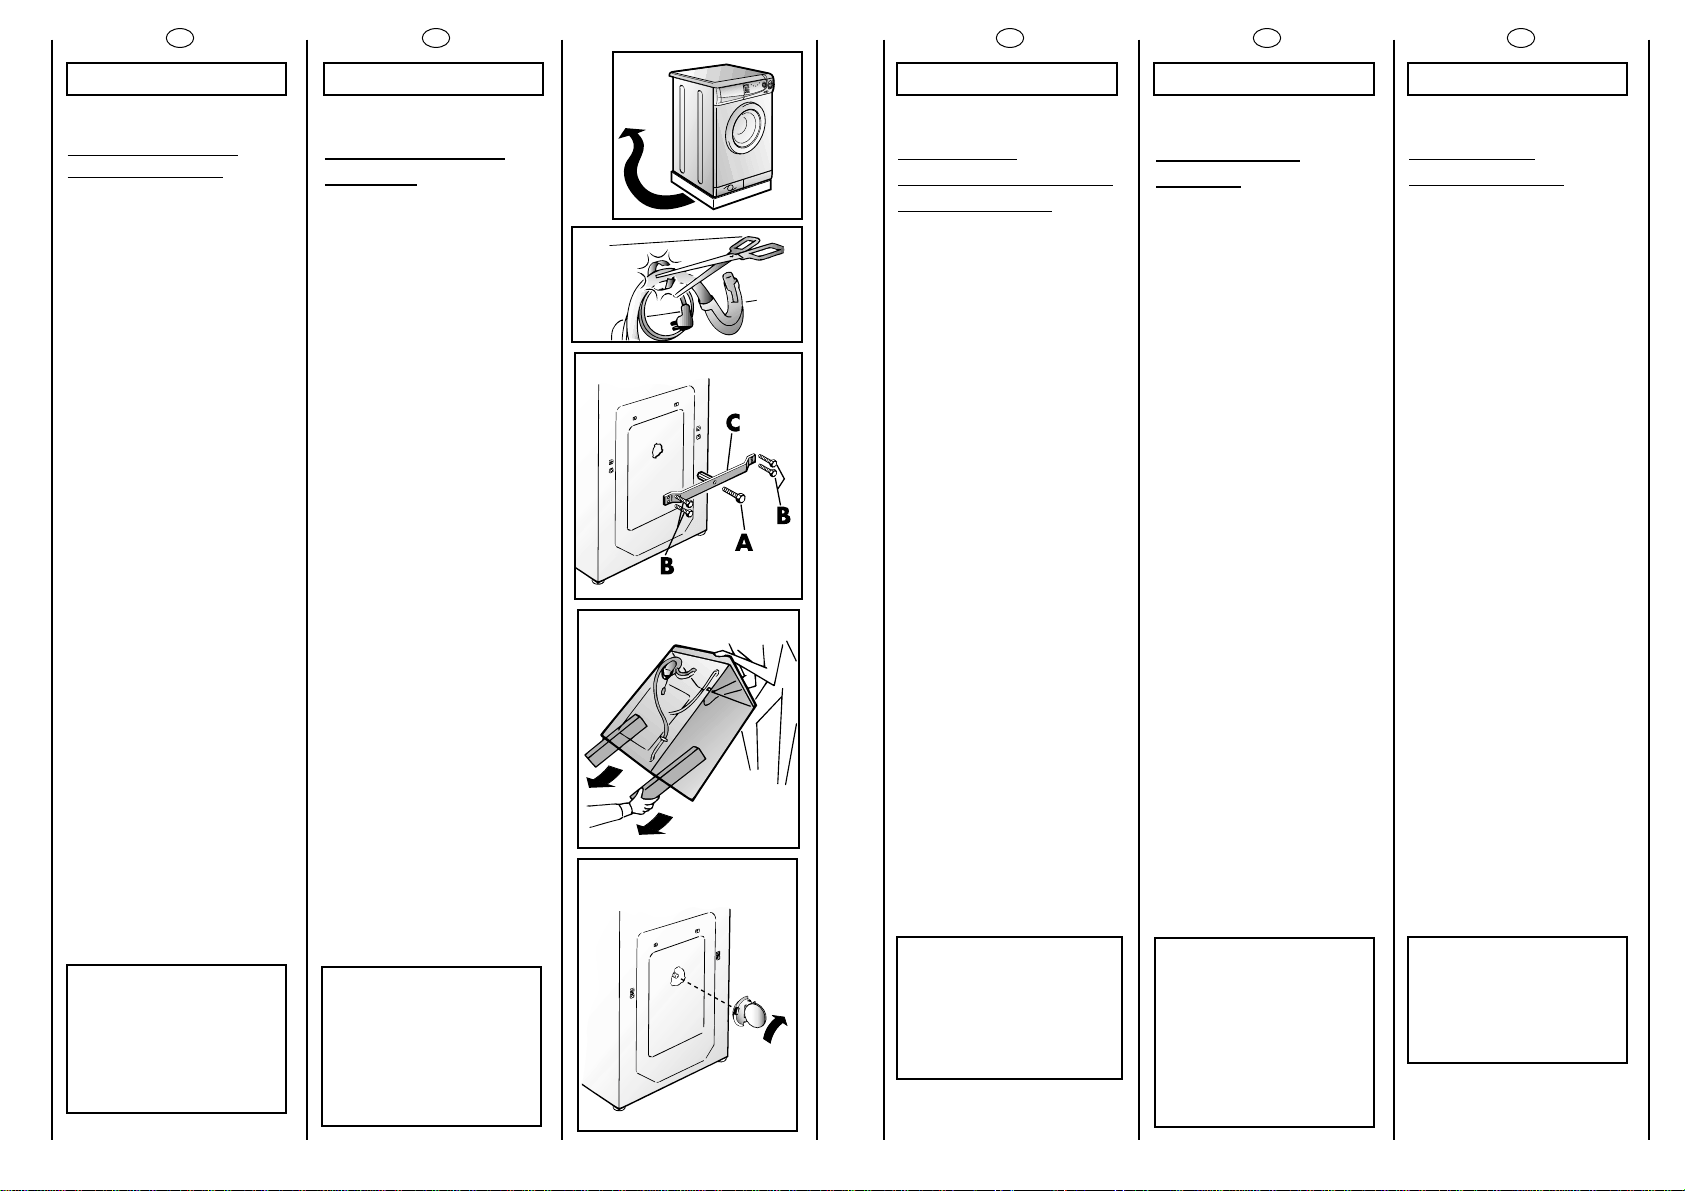
INSTALLATION
Move the machine near its
permanent position without
the packaging base.
Cut tube-holding straps.
Unscrew the central screw
(A); unscrew the 4 lateral
screws (B) and remove the
cross piece (C).
Lean the machine forward
and remove the plastic
bags containing the two
polystyrene blocks at the
sides, pulling downwards.
Press the plug (to be found
in the envelope with the
instructions) into the hole.
WARNING:
DO NOT LEAVE THE
PACKAGING IN THE
REACH OF CHILDREN
AS IT IS A POTENTIAL
SOURCE OF DANGER.
PL
RROOZZDDZZIIAAÄÄ 55
INSTALACJA
PRALKI
Ustawiç pralkë w miejscu
przeznaczenia bez
opakowania.
Przeciåç taémy
przytrzymujåce wëãe i
przewody.
Wykrëciç érodkowå érubë
(
AA
), 4 boczne (
BB
) po czym
zdemontowaç blokadë.
Pochyliç pralkë do przodu i
wyciågnåç dwie wkäadki
styropianowe.
Zatkaç otwór w tylnym
panelu zatyczkå
dostarczonå wraz z pralkå.
UUWWAAGGAA::
NNIIEE NNAALLEEÃÃYY
PPOOZZOOSSTTAAWWIIAAÇÇ
EELLEEMMEENNTTÓÓWW
OOPPAAKKOOWWAANNIIAA DDOO
ZZAABBAAWWYY DDZZIIEECCIIOOMM,,
GGDDYYÃÃ EELLEEMMEENNTTYY TTEE
MMOOGGÅÅ SSTTAANNOOWWIIÇÇ
PPOOTTEENNCCJJAALLNNEE ÃÃRRÓÓDDÄÄOO
NNIIEEBBEEZZPPIIEECCZZEEÑÑSSTTWWAA..
FR
CHAPITRE 5
MISE EN PLACE
INSTALLATION
Placer la machine près du
lieu d’utilisation sans la base
d’emballage.
Couper les bandes
serre-tubes
Dévisser la vis centrale (A);
dévisser les 4 vis latérales (B)
et enlever l’axe (C).
Incliner la machine en avant
et enlever les sachets en
plastique qui contiennent les
2 arrêts en polystyrène qui
se trouvent sur les 2 côtés en
tirant vers le bas.
Refermer le trou en utilisant
le bouchon se trouvant dans
le sachet “instructions”.
ATTENTION:
NE PAS LAISSER À LA
PORTÉE DES ENFANTS
DES ELEMENTS
D’EMBALLAGE QUI
PEUVENT CAUSER DES
RISQUES.
EL
K 5
.
K
.
(A) 4
(B)
(C).
,
,
.
T (
)
.
:
K K
XOMENO
TH YKEYAIA
IOTI MOPEI
NA AOTEEEI
MEITO KYNINO.
ES
CAPÍTULO 5
PUESTA EN
FUNCIONAMIENTO
INSTALACIÓN
Ponga la máquina cerca
del lugar de uso sin la base
del embalaje.
Corte las cintas del tubo.
Desenroscar el tornillo
central (A); desenroscar los
4 tornillos laterales (B) y
extraer el travesaño (C).
Inclinar la máquina hacia
delante y sacar los sacos de
plástico que contienen los
dos protectores de plástico
puestos sobre 2 lados,
tirando hacia abajo.
Tapar un agujero utilizando
el tapón que contiene la
bolsa con las instrucciones.
ATENCIÓN:
NO DEJE AL ALCANCE
DE LOS NIÑOS LOS
ELEMENTOS DE
EMBALAJE YA QUE
PUEDEN SER
PELIGROSOS.
Loading ...
Loading ...
Loading ...