
SHARP Digital Signage Software
PN-SS01
PN-SS02
PN-SV01
OPERATION MANUAL

2
Introduction
Precautions on use ........................................................................................................................... 5
Trademarks ........................................................................................................................................ 6
How to read this manual ................................................................................................................... 6
●Icons ............................................................................................................................................................ 6
●Notation ....................................................................................................................................................... 6
Denitions .......................................................................................................................................... 7
System operation precautions ......................................................................................................... 7
Features of SHARP Digital Signage Software................................................................................. 9
Program distribution workow ........................................................................................................ 9
Installing/Launching
Required operating environment ................................................................................................... 11
Installing SHARP Digital Signage Software .................................................................................. 12
●Installing SHARP Digital Signage Software ........................................................................................... 12
●Setting the environment of the target PC .............................................................................................. 15
●Uninstalling SHARP Digital Signage Software ...................................................................................... 24
Launching and closing the Launcher window .............................................................................. 26
●Launching the Launcher window ............................................................................................................ 26
●Closing the Launcher window ................................................................................................................. 26
●The Launcher window .............................................................................................................................. 26
Program Creation/Editing
The main Program Editor window ................................................................................................. 28
●Launching Program Editor ...................................................................................................................... 28
●The main Program Editor window .......................................................................................................... 28
Creating programs .......................................................................................................................... 30
●Valid content les ..................................................................................................................................... 30
●Positioning content (Layout) ................................................................................................................... 31
●Setting the background/frames 1-4 ....................................................................................................... 34
●Setting the scroll message ...................................................................................................................... 38
●Setting audio and music .......................................................................................................................... 44
●Setting the PIP window ............................................................................................................................ 45
●Saving a program ..................................................................................................................................... 45
●Opening a program .................................................................................................................................. 47
●Checking a program ................................................................................................................................. 47
●Preview Program Display Settings ......................................................................................................... 48
●Deleting a program ................................................................................................................................... 48
●Displaying program properties ............................................................................................................... 49
●Importing/exporting a program ............................................................................................................... 50
Conditional Content
Basic Screens for SHARP Digital Signage Software Conditional Content Editor ..................... 52
●Launching SHARP Digital Signage Software Conditional Content Editor .......................................... 52
●Basic Screens for SHARP Digital Signage Software Conditional Content Editor .............................. 52
Creating Conditional Content ......................................................................................................... 54
●Compatible Content File Formats ........................................................................................................... 54
●Conguring Conditional Contents .......................................................................................................... 54
Creating/Editing a Timetable
The main Timetable Editor window ................................................................................................ 60
●Launching Timetable Editor .................................................................................................................... 60
●The main Timetable Editor window ........................................................................................................ 60
Contents

3
Contents
Creating a timetable ........................................................................................................................ 62
●Registering a program in the timetable .................................................................................................. 62
●Registering panel control in a timetable ................................................................................................ 63
●Adjusting a timetable ............................................................................................................................... 65
●Saving a timetable .................................................................................................................................... 66
●Opening a timetable ................................................................................................................................. 66
●Checking a timetable ................................................................................................................................ 67
●Deleting a timetable .................................................................................................................................. 67
●Changing timetable name and timetable color ...................................................................................... 67
●Importing/exporting a timetable .............................................................................................................. 68
Creating/Editing Schedules
The main Schedule Editor window ................................................................................................ 70
●Launching Schedule Editor ..................................................................................................................... 70
●The main Schedule Editor window ......................................................................................................... 70
Creating a schedule ........................................................................................................................ 72
●Registering a timetable in the schedule ................................................................................................. 72
●Saving a schedule .................................................................................................................................... 74
●Opening a schedule ................................................................................................................................. 74
●Deleting a schedule .................................................................................................................................. 75
●Changing schedule name ........................................................................................................................ 75
●Importing/exporting a schedule .............................................................................................................. 76
Panel Management and Option
Managing panels ............................................................................................................................. 78
●Launching Panel Control Management .................................................................................................. 78
●The main Panel Management window .................................................................................................... 78
●Adding/editing a panel ............................................................................................................................. 79
●Adding/editing a group ............................................................................................................................ 80
●Controlling a panel manually .................................................................................................................. 81
●Deleting a panel or group ........................................................................................................................ 81
Option ............................................................................................................................................... 82
●Launching Option ..................................................................................................................................... 82
●Checking version information ................................................................................................................. 82
●Adding default panel settings for panels ............................................................................................... 83
Distributing schedules
The main Schedule Distribution Tool window .............................................................................. 84
●Launching Schedule Distribution Tool ................................................................................................... 84
●The main Schedule Distribution Tool window ....................................................................................... 84
Distributing schedules .................................................................................................................... 85
●Distributing via a network ........................................................................................................................ 85
●Distributing to your own PC .................................................................................................................... 87
●Distributing with USB memory or other external storage device ........................................................ 88
Displaying break-in programs ........................................................................................................ 90
●Distributing via a network and making a break-in display ................................................................... 90
●Distributing to your own PC and making a break-in display ................................................................ 92
List of Reserved Distribution/List of Distribution Log ................................................................. 95
●List of Reserved Distribution .................................................................................................................. 95
●List of Distribution Log ............................................................................................................................ 95
Schedule Management
Server Scheduler ............................................................................................................................. 97

4
Schedule Reception/Program Display
FTP Server ........................................................................................................................................ 98
●Launching the FTP Server ....................................................................................................................... 98
Client Scheduler .............................................................................................................................. 99
●Launching Client Scheduler .................................................................................................................... 99
●Client Scheduler menu ............................................................................................................................. 99
Distributing content directly by using USB memory or another external storage device ..... 104
Program Viewer ............................................................................................................................. 105
Key/Mouse Monitoring
Key/Mouse Monitoring Tool Window ........................................................................................... 106
●Launching the Key/Mouse Monitoring Tool window ........................................................................... 106
●Key/Mouse Monitoring Tool menu ........................................................................................................ 106
Monitoring status
The main Status Monitoring Tool window ................................................................................... 109
●Launching Status Monitoring Tool ....................................................................................................... 109
●The main Status Monitoring Tool window ............................................................................................ 109
Acquiring and displaying panel status ........................................................................................ 112
●Acquiring status of selected panels ..................................................................................................... 112
●Setting panels for which status will not be obtained .......................................................................... 113
●Controlling target PC power .................................................................................................................. 113
●Displaying detailed information for a panel ......................................................................................... 114
●Changing thumbnail size ....................................................................................................................... 115
Setting the operation environment .............................................................................................. 116
Contents
5
Thank you for purchasing SHARP Digital Signage Software.
SHARP Digital Signage Software comes in three versions: The Standalone, Network, and Viewer Versions. This
manual covers all three versions. Where editions differ in terms of usage restrictions and functionality, this fact is
clearly indicated.
IMPORTANT:
To aid reporting in case of loss or theft,
please record the product’s model and
serial numbers in the space provided.
Model No.:
Serial No.:
U.S.A. ONLY
Precautions on use
•Thisproductissubjecttoexactingqualitycontrolandproductinspectionbeforeshipment.Intheunlikelyevent
that a failure or malfunction occurs, contact your retailer.
•PleasenotethatSHARPCORPORATIONbearsnoresponsibilityforanyfailure,malfunction,ordamagesdue
toimproperuseofthisproductbythecustomerorathirdparty,exceptwhereindemnityliabilityisrecognized
under law.
•Undercopyrightlaw,theuseofthisproducttoduplicate,editorotherwisealtercopyrightedmaterialisonly
permitted in cases where such duplicated or edited material is for individual or home use.
If material is duplicated and/or edited beyond this scope, and if such duplicated or edited material is used,
(exceptincaseswheretheuserthemselvesholdsthecopyrightfortheobjectoftheduplicatedmaterialor
where the user has received permission from the copyright holder), this will constitute a violation of copyright
law and may lead to the copyright holder or other parties claiming compensation for damages. Such use
should therefore be strictly avoided.
When using photo image data, DVD images, TV broadcasts or similar material with this product, the above
usesthatconstitutecopyrightviolationshould,naturally,bestrictlyavoided.Using,modifying,orotherwise
altering images of other people without permission constitutes a violation of portrait rights, and should also be
strictly avoided.
•WhenshowingTV,DVDs,orsimilarcopyrightedprogramsand/ormaterialyoumustobtainthepermissionof
the copyright holder or copyright holders.
•Transcribingorduplicatingpartorallofthismanualand/orthissoftwarewithoutpermissionfromourcompany
is not permitted.
•Asapartofourpolicyofcontinuousimprovement,SHARPreservestherighttomakedesignandspecification
changesforproductimprovementwithoutpriornotice.Theperformancespecificationfiguresindicatedare
nominal values of production units. There may be some deviations from these values in individual units.
Introduction
6
Trademarks
•Microsoft,Windows,WindowsVista,PowerPoint,andWindowsMediaareeitherregisteredtrademarksor
trademarksofMicrosoftCorporationintheUnitedStatesand/orothercountries.
•TheMicrosoftInternetExplorerlogoisatrademarkofMicrosoftCorporationintheUnitedStatesandother
countries.
•FlashandFlashPlayerareeitherregisteredtrademarksortrademarksofAdobeSystemsIncorporatedinthe
UnitedStatesand/orothercountries.
•Intel,Celeron,andPentiumareeitherregisteredtrademarksortrademarksofIntelCorporationand/orits
subsidiariesintheUnitedStatesand/orothercountries.
•QuickTimeandtheQuickTimelogoaretrademarksofAppleComputer,Inc.,registeredintheUnitedStates
and other countries.
Names of products and other proper nouns are the registered trademarks or trademarks of their respective
copyright holders.
How to read this manual
This manual describes SHARP Digital Signage Software Version 3.0.
●Icons
indicates reference information, related details, and restrictions.
F
indicates pages that contain related information.
●Notation
• Keyboard keys are indicated with square brackets.
E.g.[Shift],[Ctrl],etc.
• Menus, windows, dialog boxes, buttons, and tabs etc are indicated with square brackets.
E.g.
1. From the [Option] menu click [Grid Setting].
The[GridSetting]dialogboxwillappear.
• Items, check boxes, and option buttons, etc., are indicated with double inverted commas.
E.g.“X”,“PresetScreenSize”optionbutton,etc.
• This manual assumes that this product has been installed in the following location.
If you have installed the software in a different location, this can be interpreted to refer to the folder where you
installed it.
C:\Program Files\SHARP\SHARP Digital Signage Software (default)
• The screenshots and operational procedures in this manual are only examples.
These may change depending on your monitor, screen settings, or the version of the OS you are using and
otherfactors.ThismanualgivesinstructionsusingWindowsXPasanexample.
Thecontentfilesandfontsinthismanualareonlyexamples.Notalloftheseareincludedwiththissoftware.
• This manual does not contain basic operating instructions for Windows.
Trademarks / How to read this manual
7
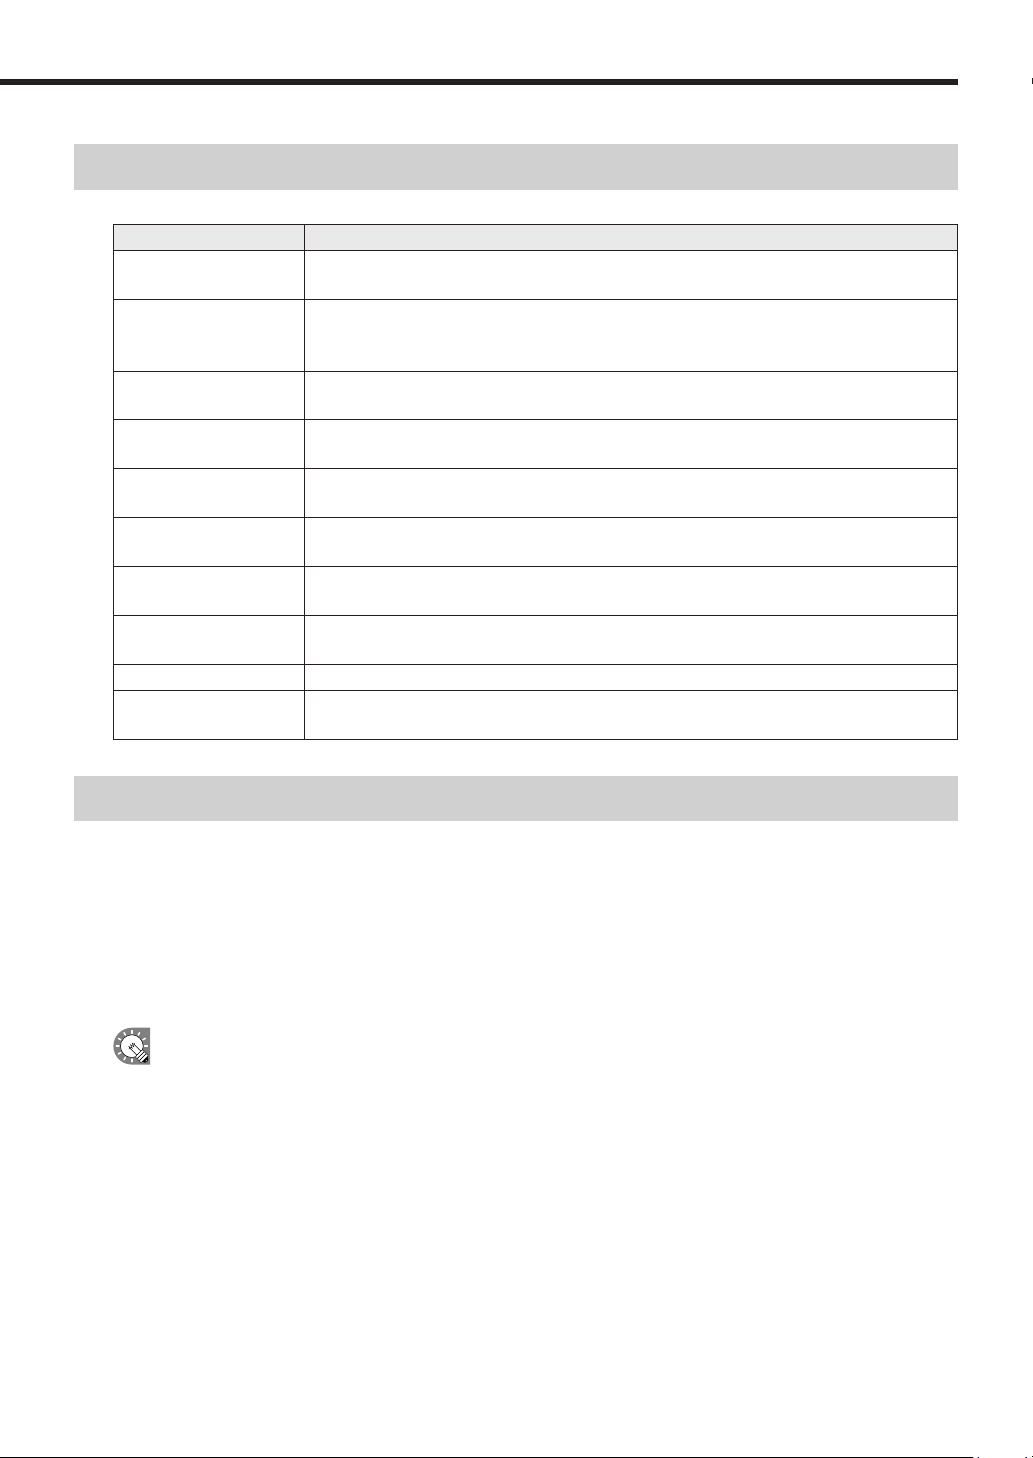
Denitions
Thischartprovidesdefinitionsoftermsusedinthismanual.
Term Denition
ControllerPC
ThePCthatisusedtocreateanddistributeprograms,timetablesandschedules.
Alsoreferredtoasa“ServerPC”.
TargetPC
APCthatdisplayscontentaccordingtoaschedule.
Alsoreferredtoasa“PanelPC”ora“ClientPC”.“Panel”referstoanLCDmonitor
connectedtoatargetPC.
Content(files)
Material(i.e.files)suchasmovies,stillimages,andaudiofilesthatareplayedonthepanel.
These are usually prepared by the user.
Playlist
A list that plays multiple content in a desired order.
Containsinformationsuchascontentdata,orderofplay,andduration,etc.
Frame
Refers to a sub-screen that is used as a display unit when a single panel is divided into
multiple frames.
Scroll message
A scrolling message.
Uptotwoscrollmessagescanbedisplayed.
Program
Programs consist of a frame layout, multiple frames and their assigned playlist
information, scroll message information, etc.
Timetable
Timetables contain information regarding the order and duration of play for multiple
programs that have been assigned to a one-day time frame.
Schedule Schedules contain multiple timetables assigned to desired dates of play.
Attachedfiles
Thecollectivetermfortheimagefiles,etc,whicharerequiredwhendisplayingHTMLfiles,
etc.
System operation precautions
Points to note when creating content and programs
Beforeoperatingthesystem,runatestusingtheactualcontenttobedisplayedonthepanel.IfthePCdoesnot
havesufficientprocessingpower,contentmaynotbeplayedcorrectly.
•Movieplayers
Playing multiple videos simultaneously is not recommended.
WindowsMediaPlayergenerallyplacesaheavierloadontheCPUthanFlashPlayer(althoughthisdepends
on the content).
•Aseparate,fee-basedcodecmaybenecessarytoplayvideofiles.
•QuickTimePlayerisrequiredinordertoplayQuickTimecontent.
•Flashcontent
Takecarewhenplayingcontentthatmakesfrequentuseofimagetransparencyprocessing(imagefade-in/
fade-out),asthismayplaceanextremelyheavyloadontheCPU.
•Enlarging/reducingstillimagesandmovies
Asimagesizeanddisplaysizeincrease,sodoestheloadplacedontheCPU.CPUloadalsoincreaseswhen
imagesaredisplayedatanenlargedorreducedsize.Keepthesizeofthecontentdisplayarea(framesize)as
smallaspossible.Contentshouldalsobecreatedusingthesameimagesizeasthedisplaysize.
•Stillimageswitching
UsingstillimageswitchingwillincreasetheloadontheCPU.Itseffectisdependentontheperformanceofthe
video card.
Denitions / System operation precautions

8
•Scrollmessagecontent
DisplayingscrollmessagesrequiresagreatdealofCPUprocessingpower.Whenusingscrollmessages,
programs should be tested by actually displaying them before operation.
· Making the background color transparent will increase the load.
·ScrollmessageswithalargerdisplayareaplacealargerloadonthePC.Donotmakethescrollmessage
display area unnecessarily large.
· If there are a lot of characters in a scroll message line, display may become distorted. If this occurs, start a
newline.(Upto100charactersperlinerecommended.)
•PowerPoint
Set PowerPoint data so that it plays repetitively by setting slide transition to advance slides automatically
(automatic slideshow).
PowerPointViewerisnotcapableofsimultaneousmultipledisplay.DonotassignPowerPointfilestomultiple
frames in the same program. It should also be noted that PowerPoint Viewer only proceeds to play slideshows
when the focus is on itself. Do not click other frames with the mouse or another tool when PowerPoint content
is displayed.
ThenewfileformatofPowerPoint2007(.pptx)isnotsupported.Savecontentinpptformat.
PowerPointViewer2003/2007isrequired.EvenifyoualreadyhaveMicrosoftPowerPoint2003/2007installed
onyourPC,youmustmakeaseparateinstallationofPowerPointViewer2003/2007.
Continuous operation of target PC
Thissoftwareisnotdesignedforcontinuous24-hour-a-dayoperation.Besuretoturnthepoweroffonthe
targetPCeveryday.(RefertoPowerControlonp.71)
PC internal clock
ThissoftwareexecutesschedulesbasedonthePC’sinternalclock.YoushouldensurethatyourPC’s
internalclockisalwaysaccuratebysynchronizingitwithaninternettimeserverorothermeans.
Accuracy of program display time
Program display is controlled by a timer that starts at 0 seconds every minute. Programs cannot be switched at
intervalsoflessthan1minute,orduringa1minuteinterval(i.e.inintervalsoflessthan60seconds).
Be aware that there may be some delay before content is actually displayed depending on the time taken to
launchapplicationsthatdisplaycontentandthetimetakentoloadcontentfiles.
Backups
Thissoftwaredoesnothaveabackupfunction.Youshouldmakeregularbackupcopiesofcontentfiles,
etc., during operation.
Daisy chain conguration
Thissoftwarecannotsenddifferentpanelcontrolcommands(monitorpowersupplyON/OFFandpanelinput
commands)toindividualSHARPLCDmonitors(PNseries)connectedinadaisychain.
Still images
The Network Version of SHARP Digital Signage Software can send different panel control commands (monitor
powersupplyON/OFFandpanelinputcommands)toSHARPLCDMonitors(PNSeries)connectedinadaisy
chain.(RefertoPanelManagementandOption,p.78)
Date display
ThissoftwaredisplaysthedateinYYYY/MM/DDformat.
System operation precautions
9
Features of SHARP Digital Signage Software
SHARP Digital Signage Software is SHARP’s original content distribution and display software.
Easy-to-use user interface
Programs can be laid out in editable time schedules similar to newspaper TV guides or calendar-style monthly
schedules.
Variety of display options and scroll message function
Frameswithcompletelycustomizablelayout(x4,)aswellasbackgroundsandscrollmessages(x2)canbe
used.Verticalscrollmessagesarealsosupported,allowingeffectiveexpressionandinformationdisplay.
Reserved distribution function
MakesitpossibletodistributereservedcontentoveranLCDmonitornetwork.
Monitor control and break-in distribution functions
Turn monitors on and off and distribute break-in programs during emergencies for smooth monitor control.
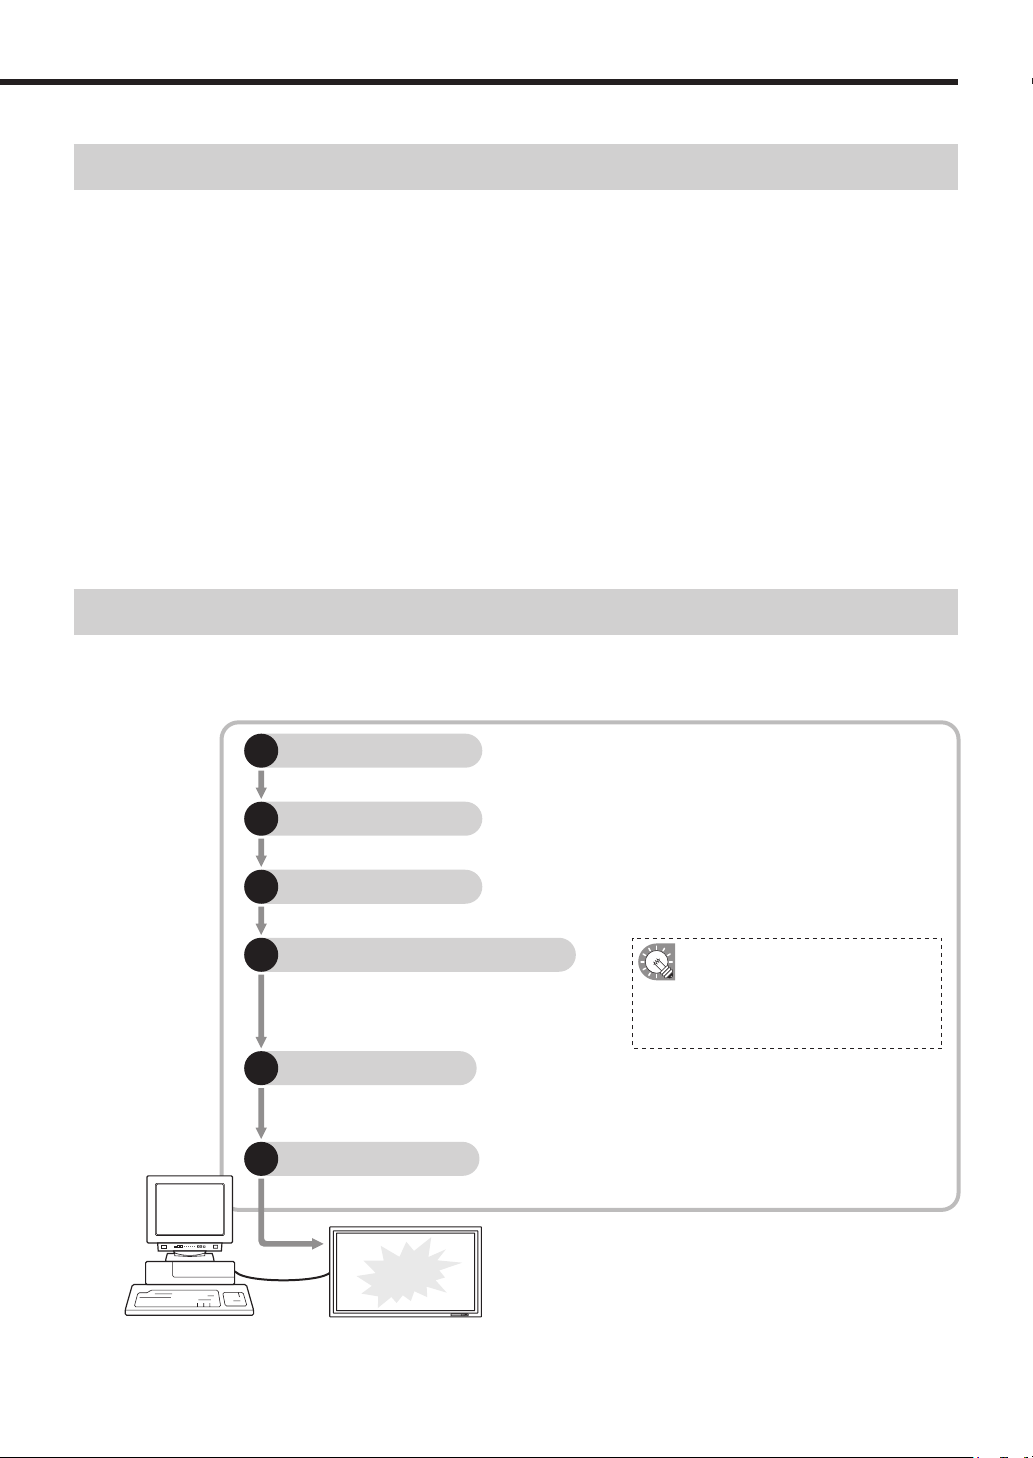
Program distribution workow
This chart details the process from program creation to the stage where programs can be displayed on a panel.
Standalone Version
Lay out your chosen content and create a program. (
p.28)
1
Program Editor
Assign the hour of the day that your program will be shown. (
p.60)
2
Timetable Editor
Assign the dates when daily timetables you have created will be shown. (
p.70)
3
Schedule Editor
Distribute schedules and programs you have
created to Client Scheduler. (
p.84)
4
Schedule Distribution Tool
Control Program Viewer so that it displays schedules and programs at a set time. (
p.99)
5
Client Scheduler
Program Viewer displays programs when instructed to do so by Client Scheduler. (
p.105)
6
Program Viewer
Program
displayed
You can distribute to a target PC
that has Program Viewer installed
by using USB memory or other
external storage devices. (
p.104)
(Standalone Version)
Features of SHARP Digital Signage Software / Program distribution workow
10
Network Version
Lay out your chosen content and create a program. (
p.28)
1
Program Editor
Assign the hour of the day that your program will be shown. (
p.60)
2
Timetable Editor
Assign the dates when daily timetables you have created will be shown. (
p.70)
3
Schedule Editor
Distribute schedules and programs you have created
to a target PC connected to the network. (
p.84)
4
Schedule Distribution Tool
Control the distribution schedule and distribute
scheduled times to the FTP server. (
p.97)
Server Scheduler
The FTP server passes schedules and programs it receives to Client Scheduler. (
p.98)
5
FTP Server
Control Program Viewer so that it displays schedules and programs at a set time. (
p.99)
6
Client Scheduler
Program Viewer displays programs when instructed to do so by Client Scheduler. (
p.105)
7
Program Viewer
Program
displayed
Controller PC
(Network Version)
Target PC
(Viewer Version)
You can distribute to a target PC
that has Program Viewer installed
by using USB memory or other
external storage devices. (
p.79)
Schedules and programs can be loaded from USB
memory or other external storage devices. (From )
Distributed via a network
Obtain panel status data and control
target PC power. (
p.112)
Status Monitoring Tool
Program distribution workow
11
Installing/Launching
This section provides installation instructions and information regarding the necessary operating environment,
as well as instructions on how to start and close down SHARP Digital Signage Software. Be sure to read this
before using the software.
Required operating environment
Item Description
PC
CPU:CeleronM1.3GHzorhigher
2GHzorhigherPentium4processorisrecommendedformovie/content-heavy
programs.
OS
MicrosoftWindowsXP,WindowsVista,Windows7(Englishversion),
WindowsServer2003/2008(Englishversion)
Memory 256MBorhigher(512MBorhigherrecommended)
Hard disk 20MBormorefreespace(Additionalspacerequiredforsavingdata)
Monitor(forcontrollerPC)
*1
Fullcolordisplaywithresolutionofatleast1024x768
Monitor(fortargetPC)
*2
PNseriesLCDmonitor
LB-1085
*3
,LB-46GX35
*4
,LB-52GX35
*4
Interfaces
•USBport(onlyrequiredifusingUSBmemory)
•LANport(onlyrequiredforNetworkVersion[TCP/IPcommunicationmust
befunctional])
Others
MicrosoftInternetExplorer6.0orlater
PowerPointViewer2003/2007
Windows Media Player 9 or later
FlashPlayer6orlater
QuickTimePlayer7orlater(inordertoplayQuickTimecontent)
IfthereareanyenvironmentalrequirementsfortheOStooperatebesidestheabove,theymustalsobemet.
If the OS of the target PC is Windows Vista or Windows 7, disable the user account control of the target
PC.
*1 Usedforcreating/editingprogramsandschedules.
*2 UsedtodisplayprogramswiththeStandaloneandViewerVersions.
Panelcontrolcanbeperformed.Toperformpanelcontrol,thetargetPCandthepanelmustbeconnected
withanRS-232CcableorthepanelmustbeconnectedtotheLAN.Forthespecificationsofthepaneland
its connection and setting methods, read the operation manual of your panel.
*3 ToperformpanelcontrolwiththeLB-1085,performa“Testconnection”oncewiththeSHARPDigital
SignageSoftwareClientScheduler(
F
p.92).
Thepanelcontrolcannotbeperformedunlessa“Testconnection”isperformed.
*4 ForJapanesemarketonly.
•WhencontrollingthetargetPCmanually(whenturningthepanelPCon),theWakeOnLANfunction
thatoperatesbyMagicPacketsfromthetargetPCmustbeenabled.
IfthetargetPCisoutsidethesameLANsegment,MagicPacketsmaynotgetthroughdependingon
routerspecs/settings.Contactyournetworkadministratorformoredetails.
•Regardlessofwhichversionofthissoftwareyouareusing,youmusthaveFlashPlayer,WindowsMedia
Player,andPowerPointViewer2003/2007installedonthePConwhichthissoftwareisinstalled.
If you have not installed all of these programs, or have installed different versions of them, a message
prompting you to install may appear. If this happens, download the appropriate programs from the
relevant website and install them.
•Aseparate,fee-basedcodecmaybenecessarytoplayvideofiles.
12
Installing SHARP Digital Signage Software
Youmustloginasanadministratorbeforebeginningtheinstallationprocess.
●Installing SHARP Digital Signage Software
1. Start your PC
2. Close down all applications.
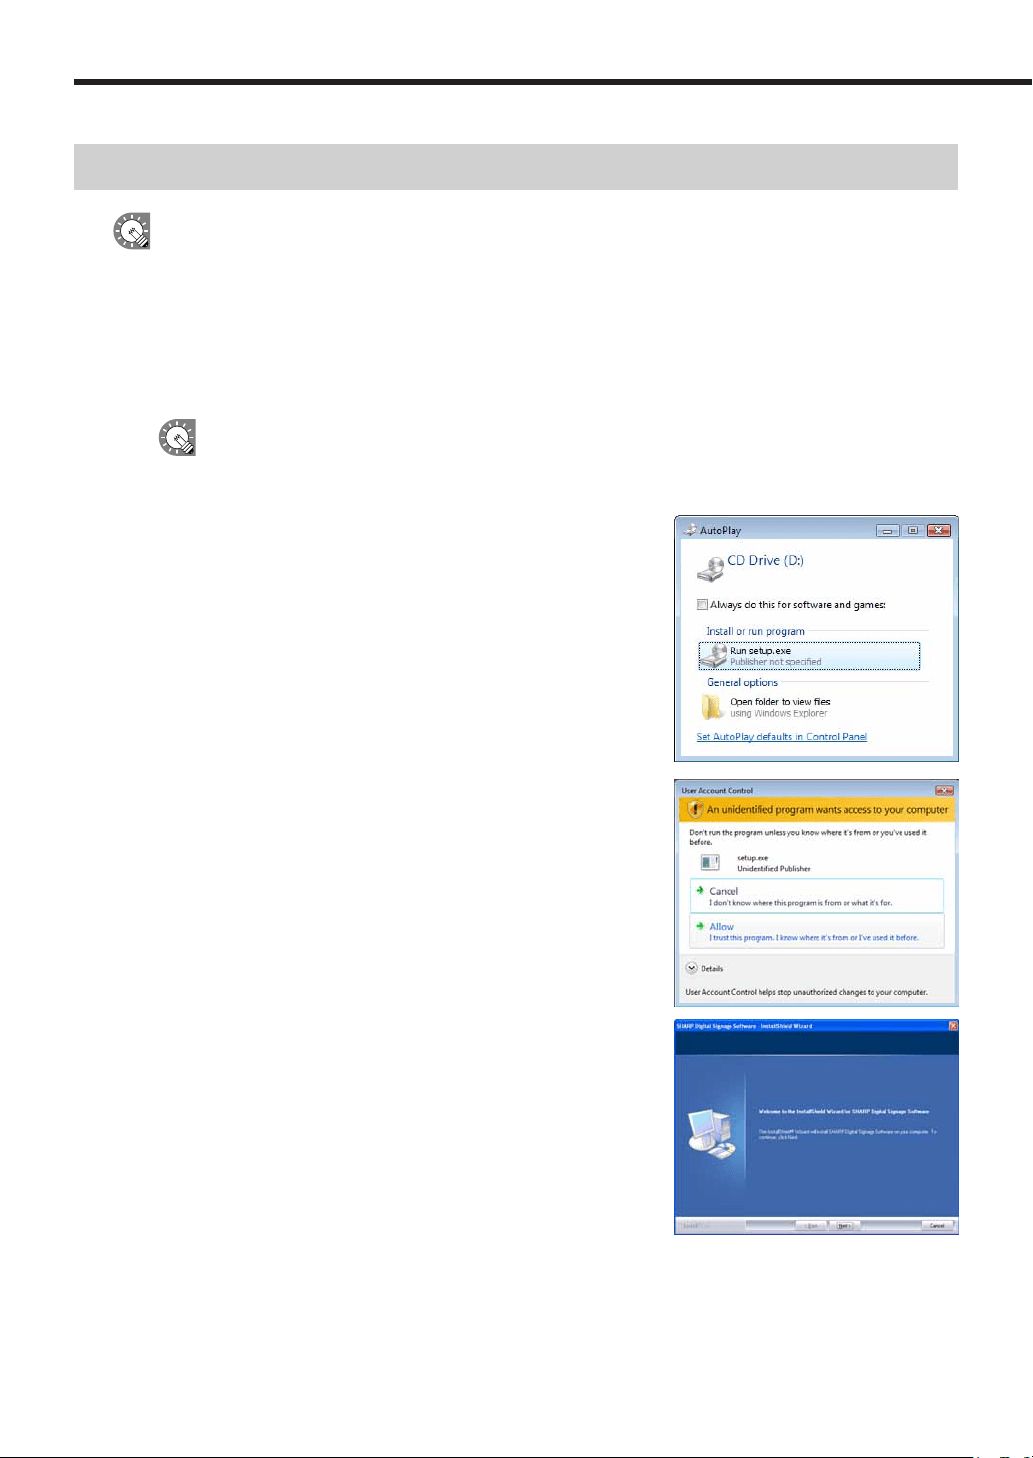
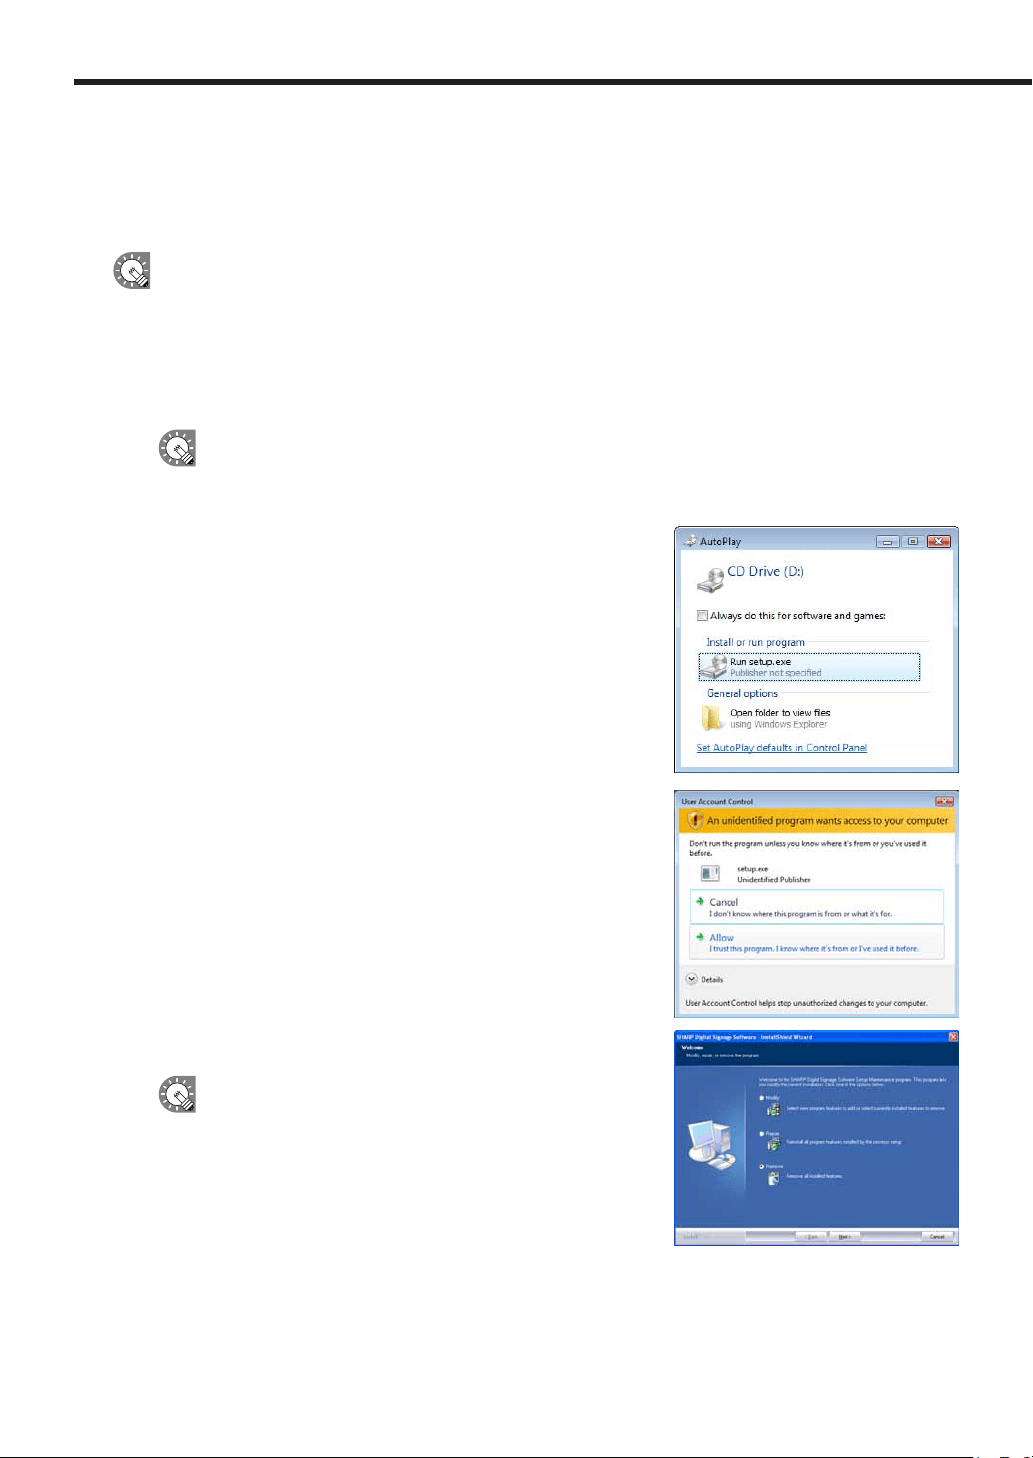
3. Launch the SHARP Digital Signage Software setup program (setup.exe).
Double-clickthesetup.exefiletolaunchthesetupprogram.
Ifasecuritywarningsaying‘Thepublishercouldnotbeverified.’isdisplayedduringtheinstallation,
click[Run].
If using the “SHARP Digital Signage Software CD-ROM”
1) Ifthesetupprogramislaunchedautomatically,proceed
tostep4.Ifthesetupprogramdoesnotlaunchaftera
fewmoments,launchtheSetup.exefileintheCD-ROM
folder.
2) Inthe[AutoPlay]dialogbox,click“Runsetup.exe”.
Ifthe[AutoPlay]dialogboxdoesnotappear,double-click
theSetup.exefileintheCD-ROMfolder.
3) Whenthe[UserAccountControl]dialogbox
appears,click[Allow](forWindowsVista)or[Yes](for
Windows7).
4. In the [Welcome to the Install Shield wizard...] window,
click [Next].
Installing SHARP Digital Signage Software
13
5. Software license agreement will appear.
Read the entire software license agreement.
6. If you agree to the terms of the agreement, select the “I accept the terms of the license agreement”
option button, and click [Next].
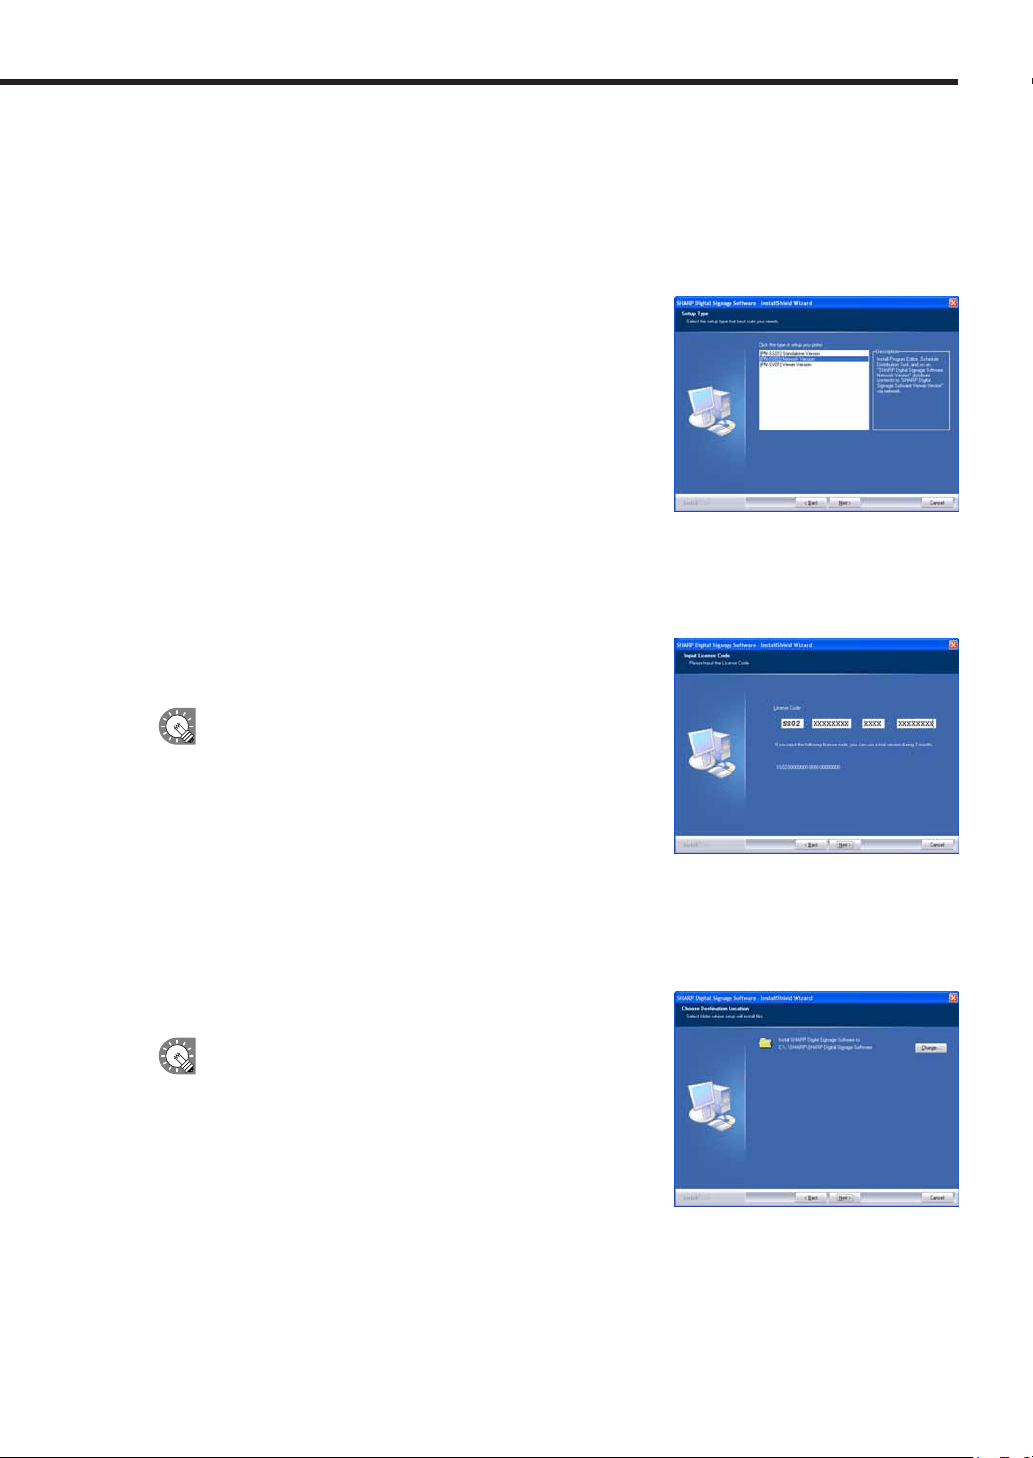
7. Select the version that you have purchased and click [Next].
The three following versions are available:
• [PN-SS01]StandaloneVersion
Forcreatingprogramsanddistributing/displayingschedules
withasinglePC.
• [PN-SS02]NetworkVersion
ForuseonacontrollerPCtocreateprograms,distribute
schedules, and check panel status.
AlsousedfordistributingprogramsandschedulestotargetPCs
runningthe“ViewerVersion”.
• [PN-SV01]ViewerVersion
Only installs software for content display.
ForuseonatargetPC.Displaysreceivedprogramsaccordingtoaschedule.
8. Enter the appropriate license code for your version and click
[Next].
If you entered a temporary license code, you will only be
abletousethesoftwareforatwo-monthtrialperiod.You
should register the license code you obtained before the
end of the trial period.
•IfyouareusingtheStandaloneorNetworkVersion,
licensecodescanberegisteredusingthe[Register
LicenseCode]dialogboxfromthe[Option]menu.
(
F
p.73)
•IfyouareusingtheViewerVersion,licensecodescanberegisteredfromthe[Version]dialogbox
inClientScheduler.(
F
p.93)
9. Click [Next].
If you want to change the location where the installation will
bemade,click[Change]andspecifyadifferentdirectory.
Installing SHARP Digital Signage Software
14
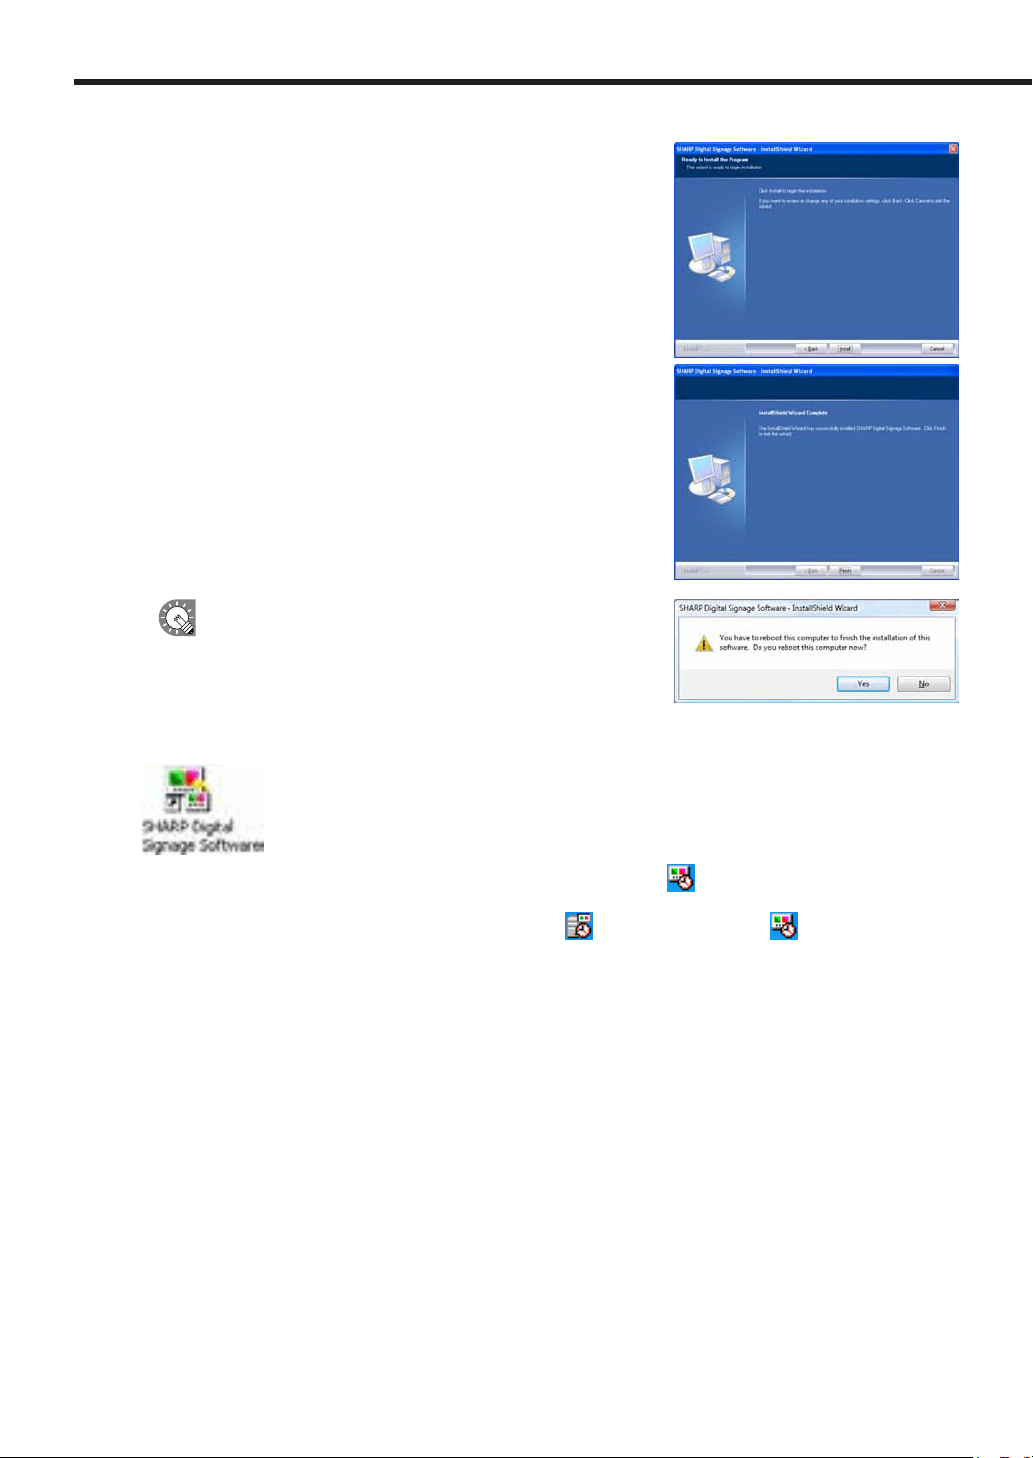
10. Click [Install].
The installation will start.
11. Click [Finish].
The installation is now complete.
Ifthefollowingscreenappears,click[Yes]torestartyour
PC.
If you are using the Standalone or Network Versions, a shortcut to SHARP Digital Signage Software will be
created on your desktop.
IfyouareusingtheStandaloneorViewerVersions,ClientScheduler( ) will launch and appear in the
Task Tray.
If you are using the Network Version, Server Scheduler (
)andClientScheduler( ) will launch and
appear in the Task Tray.
Installing SHARP Digital Signage Software
15
●Setting the environment of the target PC
Oncetheinstallationiscomplete,changethesettingsofthetargetPCbeforeusingthissoftware.A
descriptionisgivenbelow,usingWindowsXP/Vista/7asanexample.
Auto login settings
IfthetargetPCistobeusedwithoutanoperator,Windowsautologinshouldbeenabled.
If using Windows Vista, use the following procedure to enable auto login.
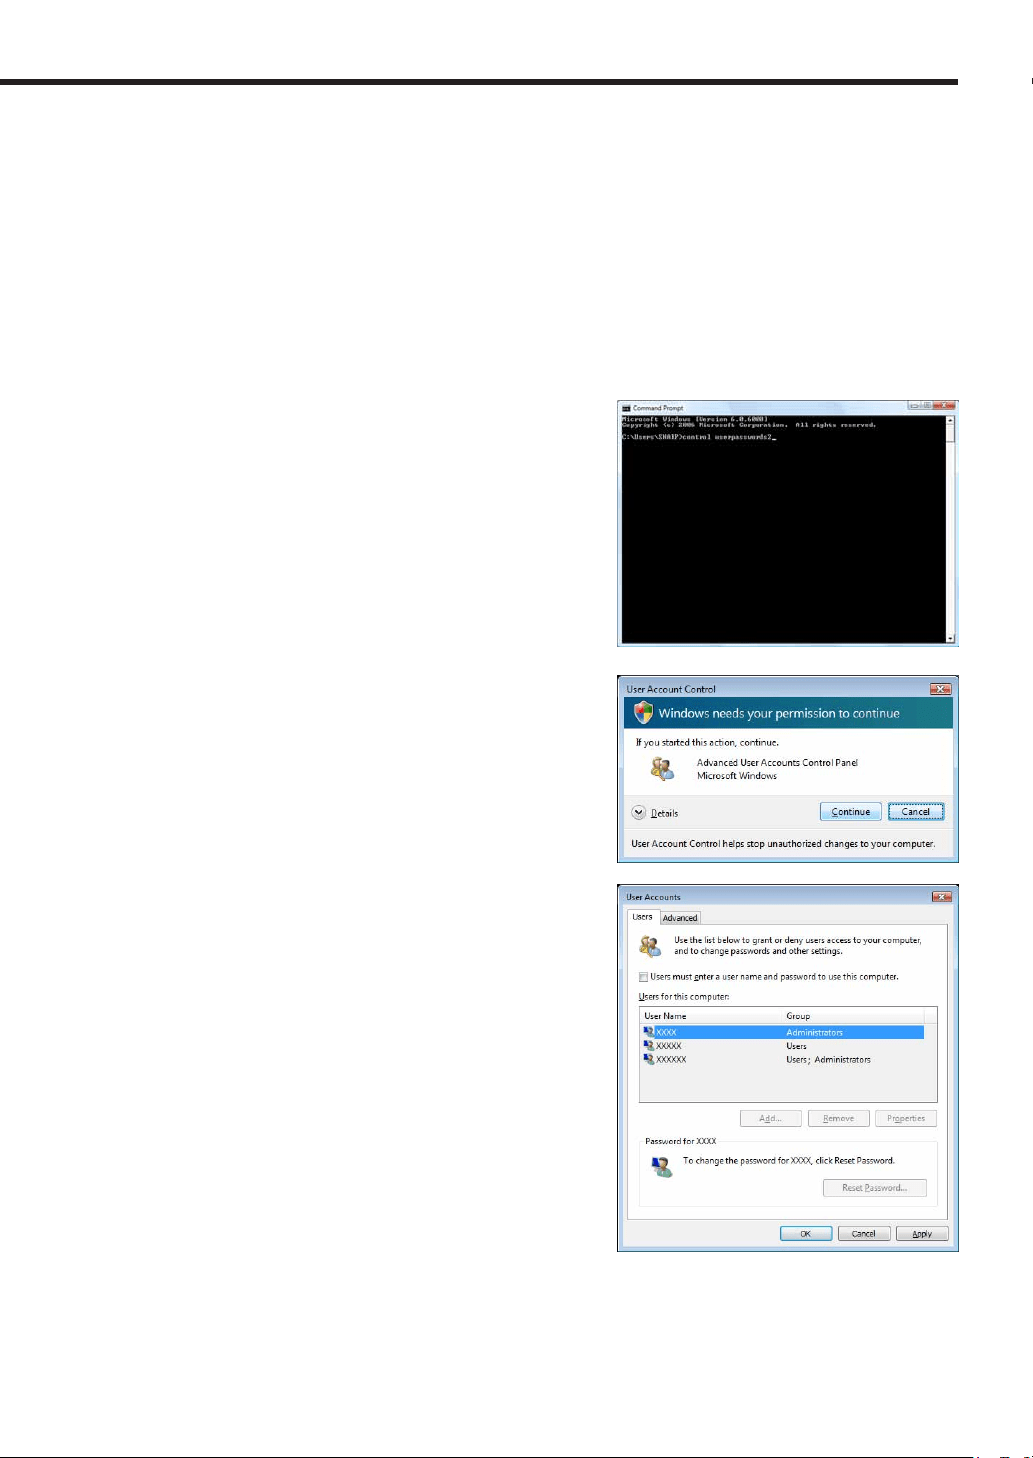
1. From the Windows Taskbar, click [Start], [All Programs], [Accessories], and then [Command
Prompt].
The[CommandPrompt]windowwillappear.
2. Type in “control userpasswords2” (without the inverted
commas) and push [Enter].
3. If the [User Account Control] window appears, click
[Continue].
The[UserAccounts]dialogboxwillappear.
4. Clear the “Users must enter a user name and password
to use this computer” check box.
5. Click [OK].
6. In the [Automatically Log On] window, enter a “User
Name” and “Password”, and click [OK].
7. Type in “exit” and then press [Enter].
Installing SHARP Digital Signage Software
16
Welcome Center settings (Windows Vista only)
ThesesettingsdonotapplytoWindowsXP/7.
Underdefaultsettings,the“WelcomeCenter”isdisplayedwhen
Windows Vista is started.
Clearthe“Runatstartup”checkbox,tostopthe“Welcome
Center”frombeingdisplayedwhenaprogramisdisplayedin
ProgramViewer.The“WelcomeCenter”willnotappearfromthe
nexttimethePCisstarted.
If“WelcomeCenter”isclosedyoucandisplayitusing
either of the following methods.
•FromtheWindowsTaskbar,click[Start],[ControlPanel],
[SystemandMaintenance],andthen[WelcomeCenter].
•FromtheWindowsTaskbar,click[Start],[AllPrograms],[Accessories],andthen[WelcomeCenter].
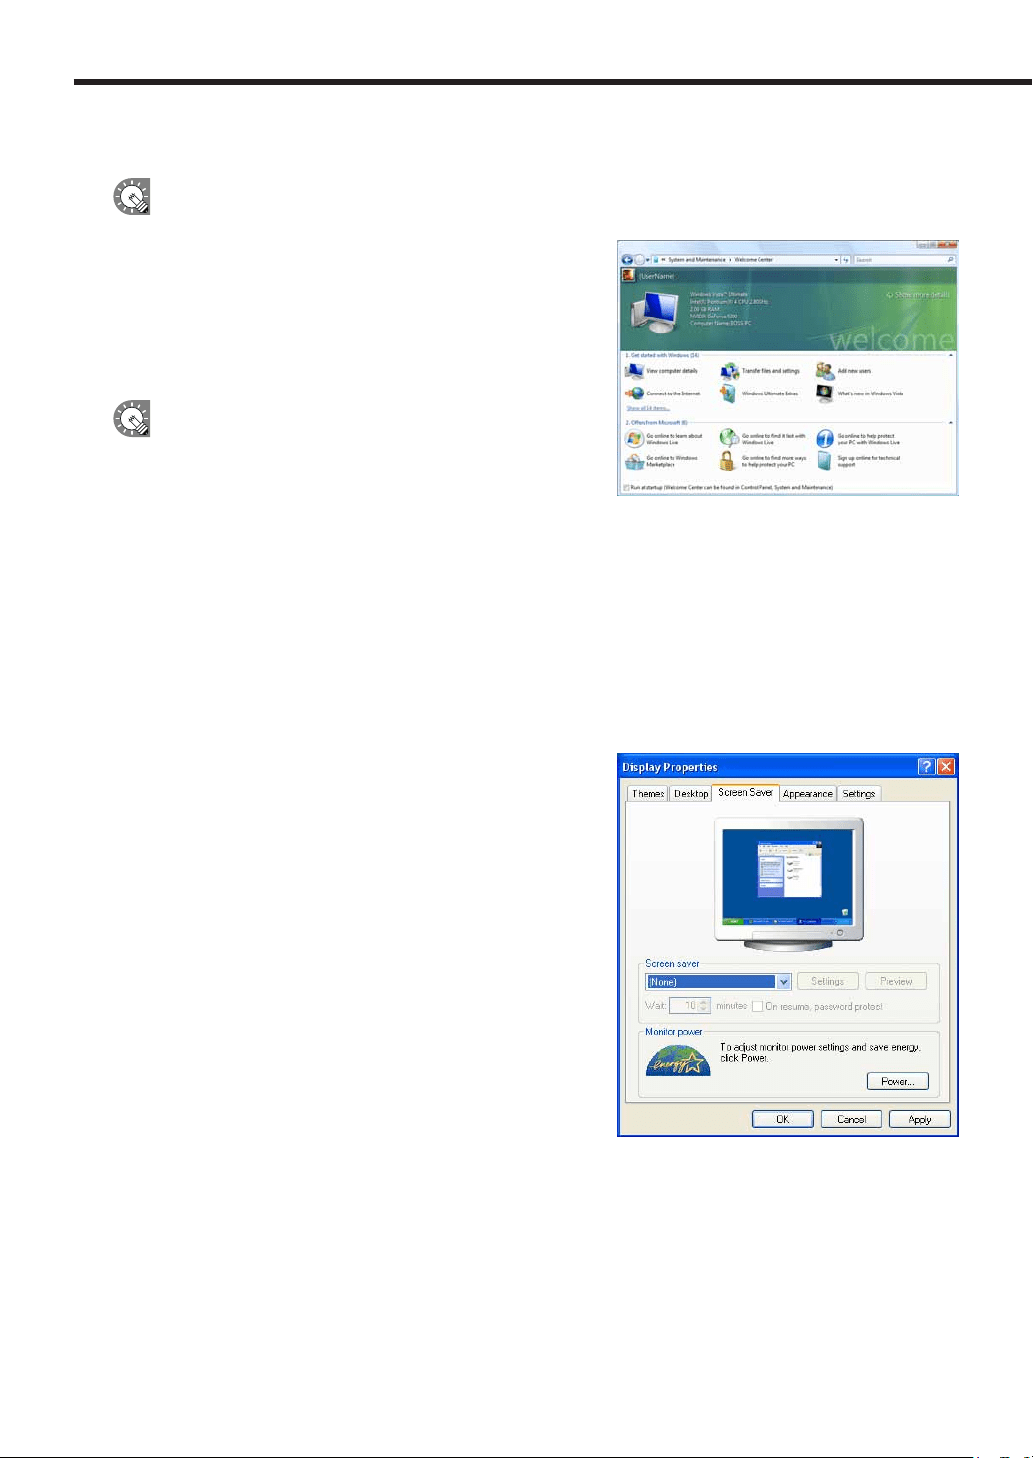
Screen saver settings
Disable the screen saver so that it does not display on the monitor when a program is displayed in Program
Viewer.
•If using Windows XP
1. Right-click on an empty area of the desktop, and from the menu that appears, click [Properties].
The[DisplayProperties]dialogboxwillappear.
2. Click the [Screen Saver] tab and select “(None)” from the
“Screen saver” list.
3. Click [OK].
Installing SHARP Digital Signage Software
17
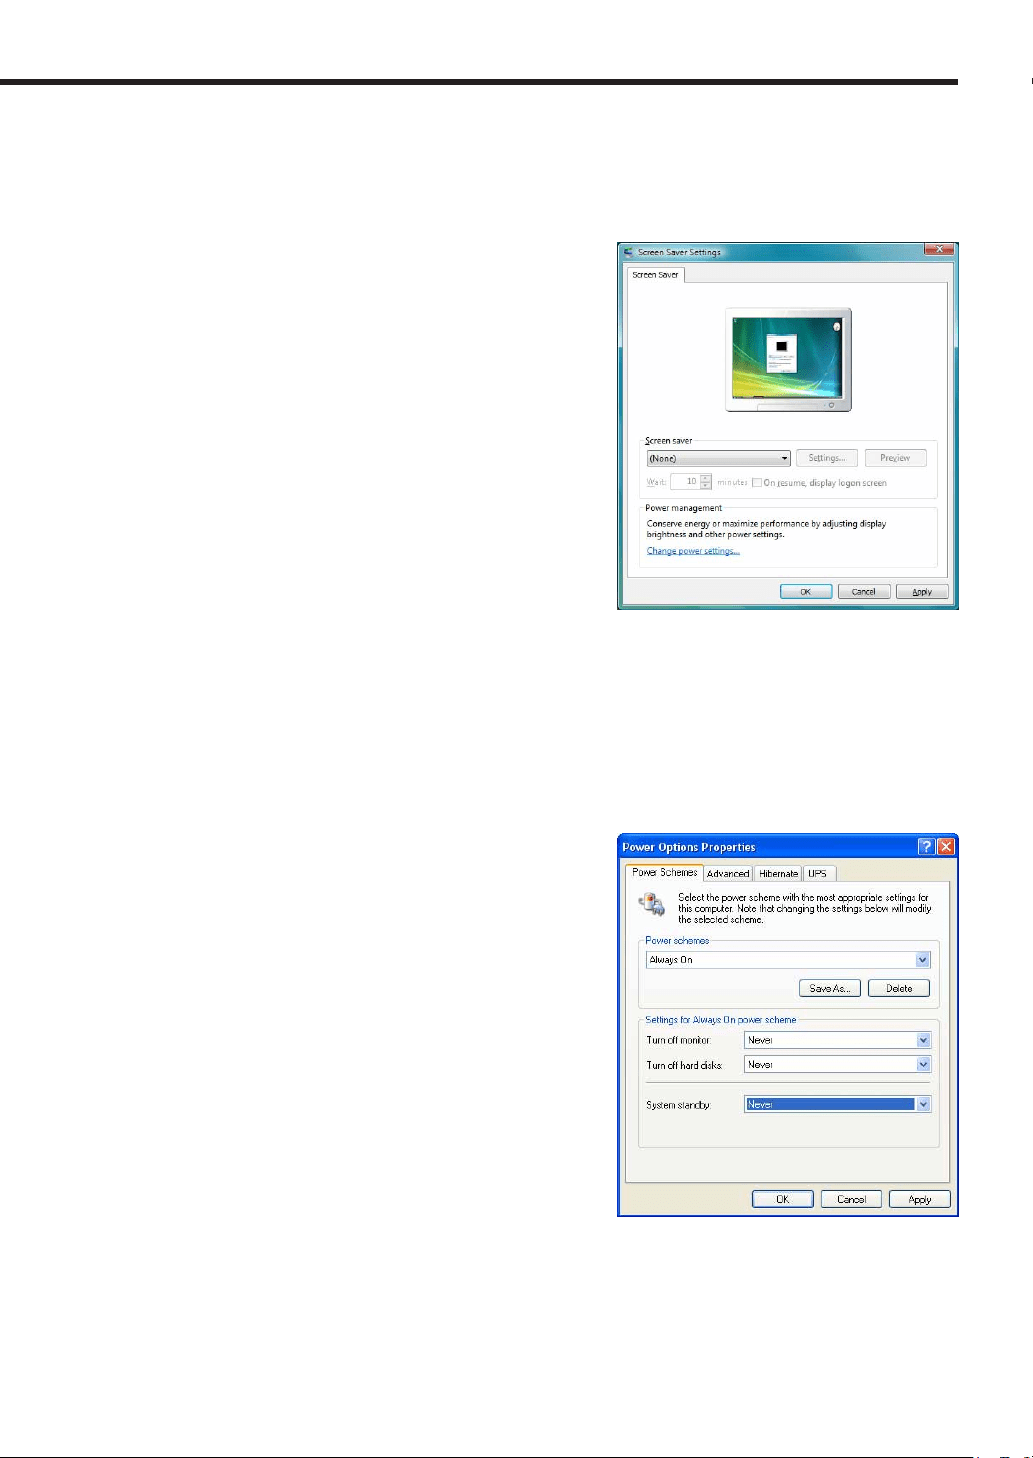
• If using Windows Vista/7
1. Right-click on an empty area of the desktop and from the menu that appears, click [Personalize] and
then [Screen Saver].
The[ScreenSaverSettings]dialogboxwillappear.
2. Select “(None)” from the “Screen saver” list.
3. Click [OK].
Power control
Adjustsettingssothatthepanelorharddiskdonotturnofforgointosystemstandbywhileaprogramis
displayed in Program Viewer.
•If using Windows XP
1. From the Windows Taskbar, click [Start], [Control Panel], [Performance and Maintenance], and then
[Power Options].
The[PowerOptionsProperties]dialogboxwillappear.
2. Select “Never” from the “Turn off monitor”, “Turn off
hard disks”, and “System standby” pull-down menus on
the [Power Schemes] tab.
3. Click [OK].
Installing SHARP Digital Signage Software
18
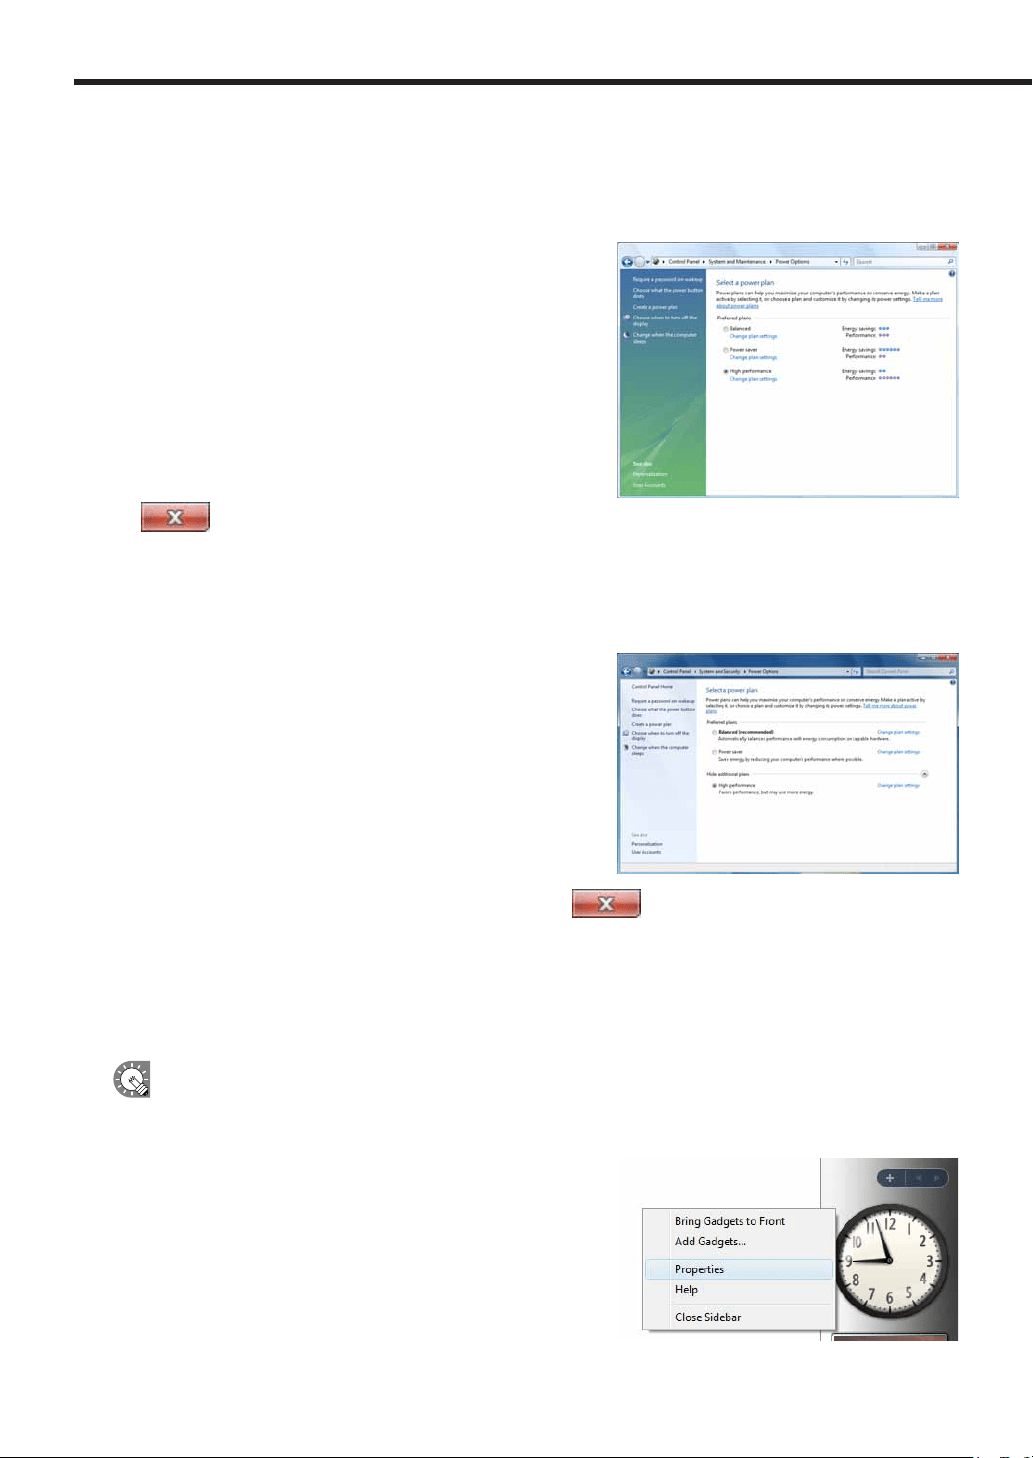
• If using Windows Vista
1. From the Windows Taskbar, click [Start], [Control Panel], [System and Maintenance], and then
[Power Options].
The[PowerOptions]dialogboxwillappear.
2. Select “High performance” and click [Change plan
settings].
3. Select “Never” from the “Turn off the display” and “Put
the computer to sleep” lists.
4. Click [Save changes].
Returntothe[PowerOptions]dialogbox.
5. Close the [Power Options] dialog box by clicking the
button in the upper right corner of the window.
• If using Windows 7
1. From the Windows Taskbar, click [Start], [Control Panel], [System and Security], and then [Power
Options].
The[PowerOptions]dialogboxwillappear.
2. Click “Show additional plans” select “High performance”
and click [Change plan settings].
3. Select “Never” from the “Turn off the display” and “Put
the computer to sleep” lists.
4. Click [Save changes].
Returntothe[PowerOptions]dialogbox.
5. Close the [Power Options] dialog box by clicking the
button in the upper right corner of the
window.
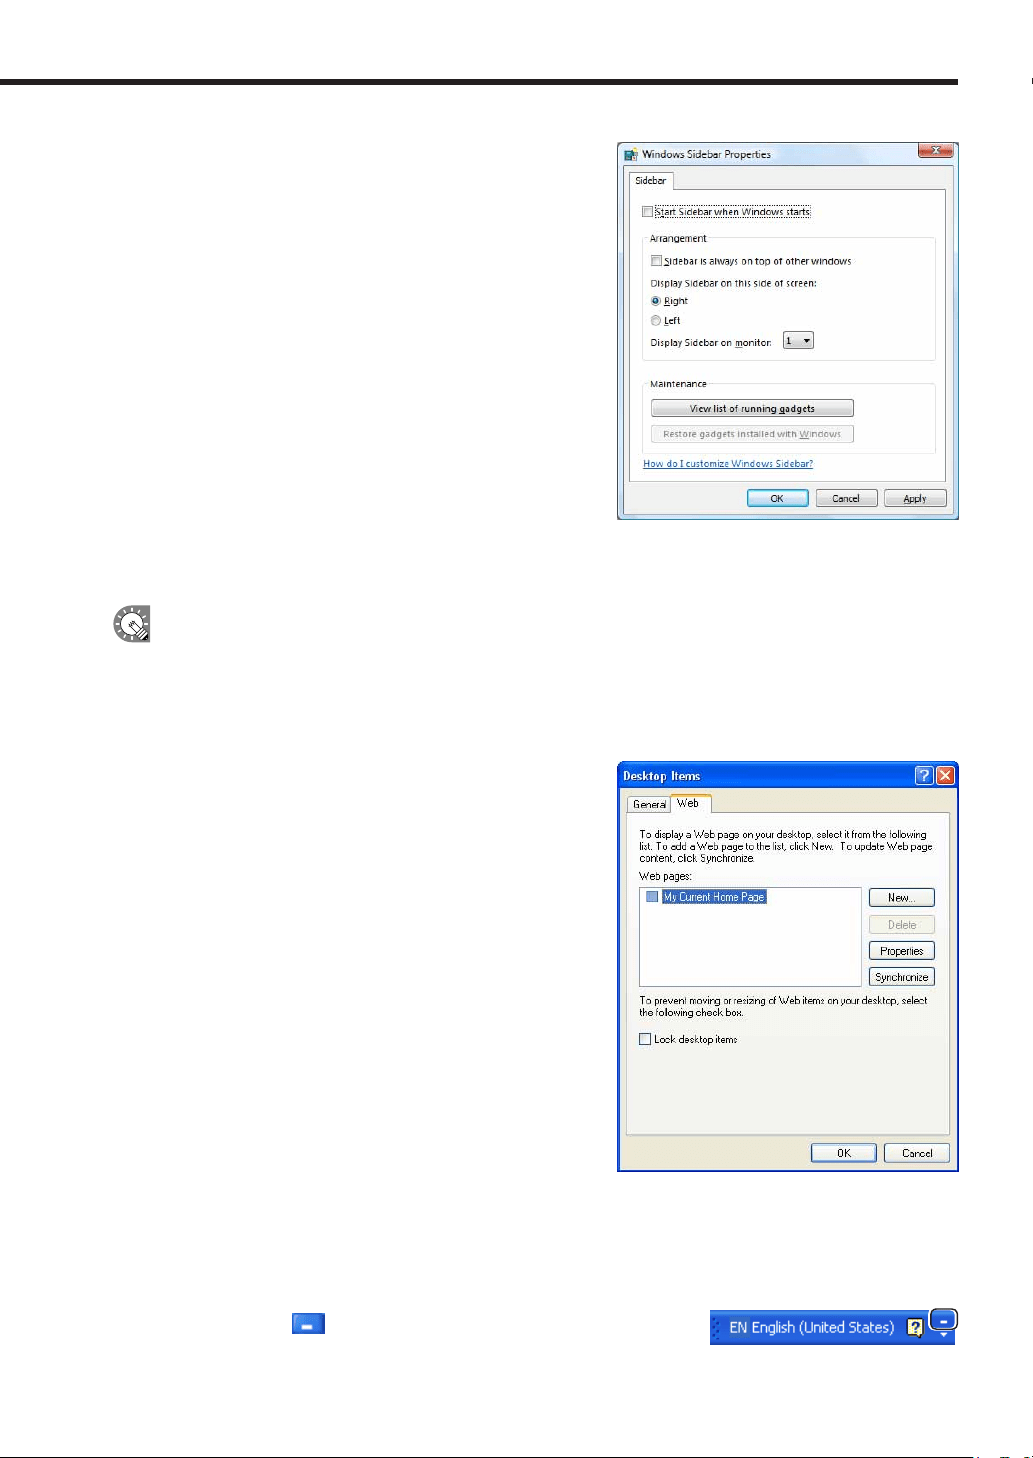
Windows Sidebar (Gadget) settings (Windows Vista Only)
ThesesettingsdonotapplytoWindowsXP/7
AdjustWindowsSidebar(Gadget)settingssothattheSidebar(Gadgets)isnotdisplayed.
1. Right-click on an empty area of the Windows Sidebar,
and from the menu that appears, click [Properties].
The[WindowsSidebarProperties]dialogboxwillappear.
Installing SHARP Digital Signage Software
19
2. Clear the “Start Sidebar when Windows starts” check
box.
3. Click [OK].
4. Restart your PC.
TheWindowsSidebar(Gadgets)willnolongerappearfromthe
nexttimeyoustartWindowsVista.
Active desktop settings (Windows XP Only)
Turn Active desktop settings off.
These settings do not apply if you are using Windows Vista.
1. Right-click on an empty area of the desktop, and from the menu that appears, click [Properties].
The[DisplayProperties]dialogboxwillappear.
2. Click the [Desktop] tab, and then click [Customize Desktop].
The[DesktopItems]dialogboxwillappear.
3. Click the [Web] tab and clear all the check boxes under
“Web pages”.
4. Click [OK].
IME Toolbar settings
ThesesettingsarenotrequirediftheIMEToolbarisnotdisplayed.
StoretheIMEToolbarintheTaskbarsothatitisnotdisplayedwhenaprogramisbeingdisplayedinProgram
Viewer.
1. Right-click on the IME Toolbar and, from the menu that appears, click [Minimize].
You can also click to minimize the Toolbar.
Installing SHARP Digital Signage Software
20
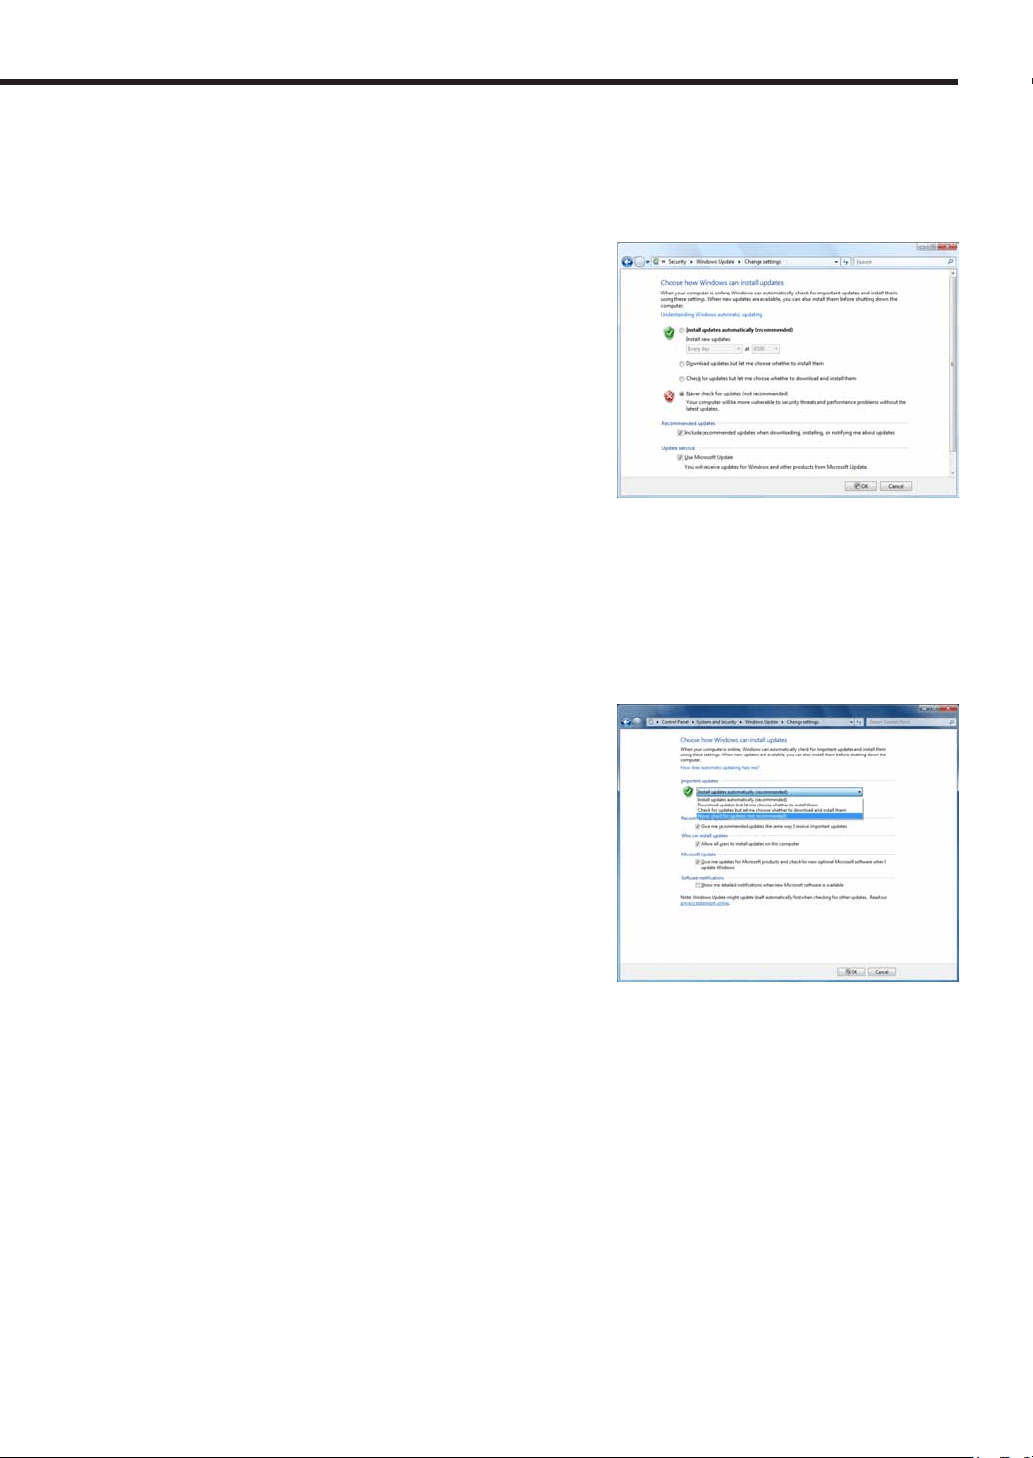
Taskbar settings (Windows XP/Vista only)
AdjusttheTaskbarsettingssothattheTaskbarisnotdisplayedwhenaprogramisbeingdisplayedinProgram
Viewer.
1. Right-click on an empty area of the Taskbar, and from the menu that appears, click [Properties].
The[TaskbarandStartMenuProperties]dialogboxwillappear.
2. Under “Taskbar appearance” on the [Taskbar] tab, clear
the “Auto-hide the taskbar” and “Keep the taskbar on
top of other windows” check boxes.
3. Click [OK].
Windows Update settings
SetWindowsUpdatesothatitdoesnotupdateautomaticallyanddisplaypopupmessages(dialogboxes),etc.,
while a program is being displayed in Program Viewer.
Ifyouhavedisabledautomaticupdates,remembertochecktheWindowsUpdatewebsite
(http://windowsupdate.microsoft.com/) regularly and download and install updates manually. Not installing the
latest updates is a security risk and may also lead to performance related issues.
•If using Windows XP
1. From the Windows Taskbar, click [Start], [Control Panel], [Performance and Maintenance], and then
[System].
The[SystemProperties]dialogboxwillappear.
2. Click the [Automatic Updates] tab and select the “Turn
off Automatic Updates” option button.
3. Click [OK].
Installing SHARP Digital Signage Software
21
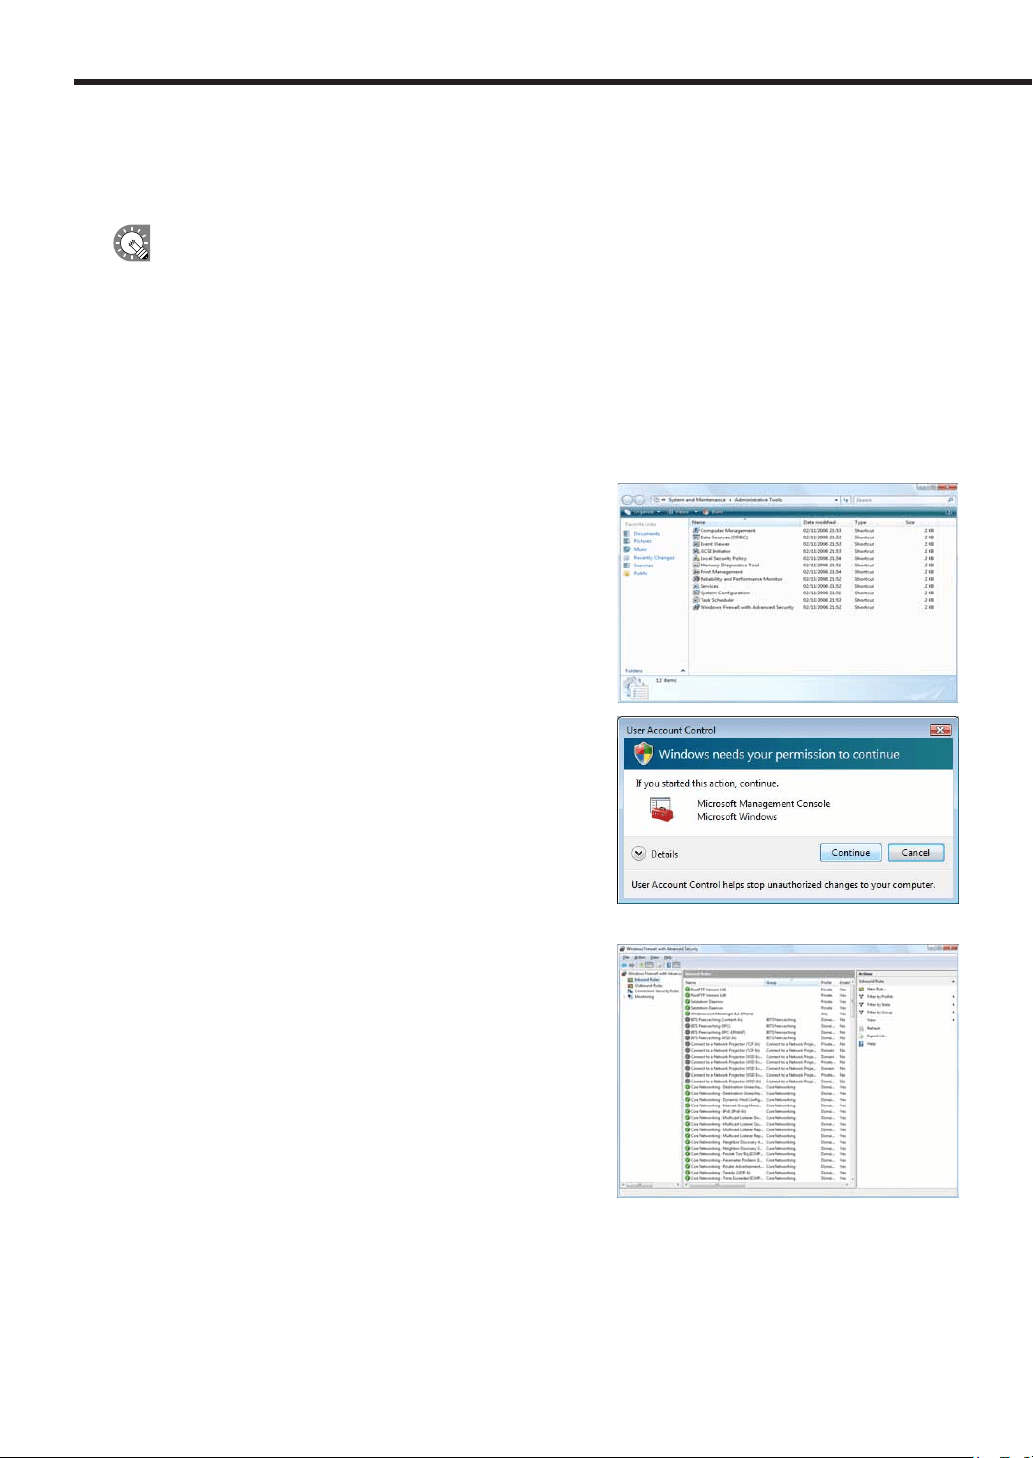
•If using Windows Vista
1. From the Windows Taskbar, click [Start], [Control Panel], [Security], and then [Turn automatic
updating on or off].
The[Changesettings]dialogboxwillappear.
2. Select the “Never check for updates” option button.
3. Click [OK].
4. If the [User Account Control] window appears, click [Continue].
The[Changesettings]dialogboxwillclose.
•If using Windows 7
1. From the Windows Taskbar, click [Start], [Control Panel], [System and Security], and then [Turn
automatic updating on or off].
The[Changesettings]dialogboxwillappear.
2. From the menu of “Important updates,” select the “Never
check for updates (not recommended)” option button.
3. Click [OK].
4. If the [User Account Control] window appears, click [Yes].
The[Changesettings]dialogboxwillclose.
Resident application settings
Adjustsettingsforresidentapplications(e.g.virusscanners)sothattheydonotdisplaypopupmessages(dialog
boxes)whenaprogramisbeingdisplayedinProgramViewer.
Installing SHARP Digital Signage Software
22
Personal rewall settings
Ifyouplantodistributecontentoveranetwork,youmustfreeaTCP/IPportforthissoftwaretousewhenthe
distributionportisassignedtoapersonalfirewall.
IfyouhaveinstalledtheViewerVersion,auniqueFTPserverwillbeinstalled,andstartedasaservice.
ThedefaultTCP/IPportnumbersare20and21.Ifyouchangetheportnumber,youmustalsochange
theFTPsettingsforthecontrollerPC(
F
p.80),andtheFTPsettingsforClientScheduleronthetarget
PC(
F
p.101)tothesameportnumber.
Firewall settings for Status Monitoring Tool (Windows Vista/7 Only)
IfusingWindowsVista/7,usethefollowingproceduretochangethesesettings.
1. From the Windows Taskbar, click [Start], [Control Panel], [System and Maintenance] (for Windows
Vista) or [System and Security] (for Windows 7), and then [Administrative Tools].
2. Double-click “Windows Firewall with Advanced Security”.
3. If the [User Account Control] window appears,
click [Continue] (for Windows Vista) or [Yes] (for
Windows 7).
The[WindowsFirewallwithAdvancedSecurity]dialogbox
will appear.
4. On the left of the window, click [Inbound Rules], then
click “New Rule” under [Actions] in the pane on the right
of the window.
The[NewInboundRuleWizard]dialogboxwillappear.
Installing SHARP Digital Signage Software
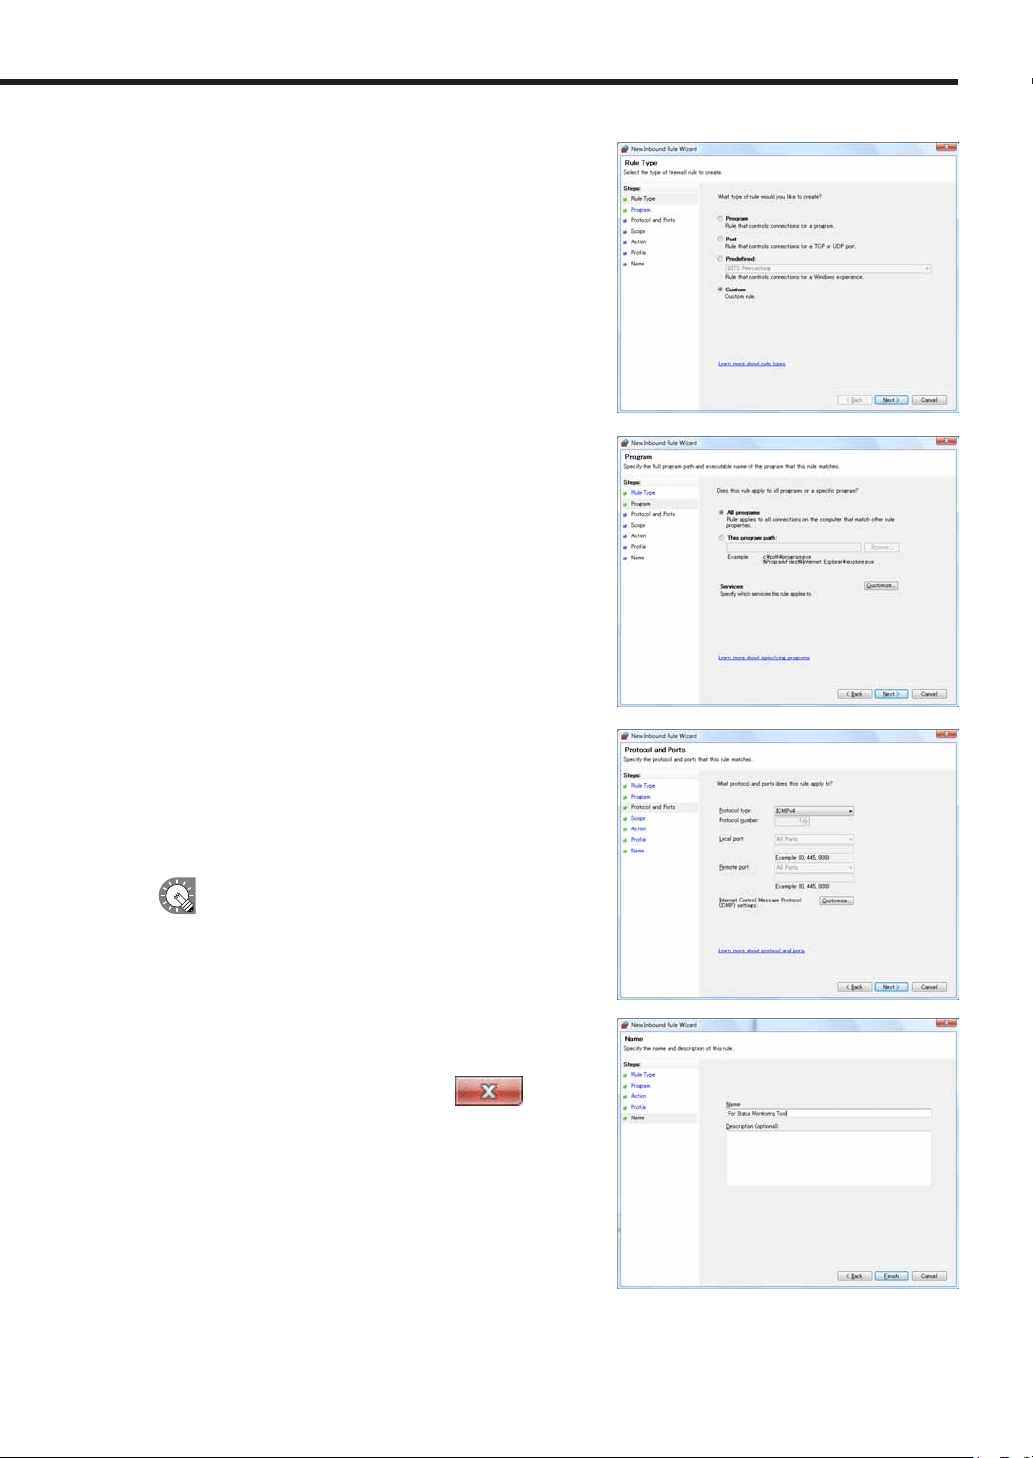
23
5. Select the “Custom” option button, and click [Next].
6. Select the “All programs” option button, and click [Next].
7. From the “Protocol type” list, select “ICMPv4”.
8. Set “Protocol and Ports”, “Scope”, “Action”, and
“Prole” in order as necessary. Click [Next] to be taken
to the settings screen for the next step.
Confirmwithyournetworkadministratorbefore
adjustingthesesettings.
9. Enter a “Name”, and click [Finish].
10. Close the dialog boxes by clicking the
button at
the top right of each window.
Installing SHARP Digital Signage Software
24
●Uninstalling SHARP Digital Signage Software
Ifthissoftwarefrequentlyshutsdownincorrectlywhenaprogramisbeingdisplayedorcreated,youshould
modify the program. If the problem persists even after doing so, we recommend uninstalling, then reinstalling
this software.
Uninstallingthissoftwarewillnotdeleteanyprograms,schedulesorcontentfilesthatyouhavealready
created.Youwillbeabletousethesefilesagainuponreinstallingthissoftware.
1. Start your PC.
2. Close down all applications.
3. Launch the SHARP Digital Signage Software setup maintenance program (setup.exe).
Double-clickthesetup.exefiletolaunchthesetupmaintenanceprogram.
Ifasecuritywarningsaying‘Thepublishercouldnotbeverified.’isdisplayedduringtheinstallation,
click[Run].
If using the “SHARP Digital Signage Software CD-ROM”
1) Ifthesetupprogramislaunchedautomatically,proceed
tostep4.Ifthesetupmaintenanceprogramdoesnot
launchafterafewmoments,launchtheSetup.exefilein
theCD-ROMfolder.
2) Inthe[AutoPlay]dialogbox,click“Runsetup.exe”.
Ifthe[AutoPlay]dialogboxdoesnotappear,double-click
theSetup.exefileintheCD-ROMfolder.
3) Whenthe[UserAccountControl]dialogbox
appears,click[Allow](forWindowsVista)or[Yes](for
Windows7).
4. Select the “Remove” option button, and click [Next].
Ifyouselectthe“Modify”optionbutton,youwillhaveto
re-enter a license code.
Installing SHARP Digital Signage Software

25
5. Click [Yes].
The uninstallation will start.
IftheServerSchedulerortheClientSchedulerhasbeenstarted,amessagewillappear.Inthis
case,click[Yes].TheServerSchedulerandtheClientSchedulerwillbeforciblyterminatedandthe
uninstallation will continue.
6. Click [Finish].
The uninstallation is now complete.
Installing SHARP Digital Signage Software
26
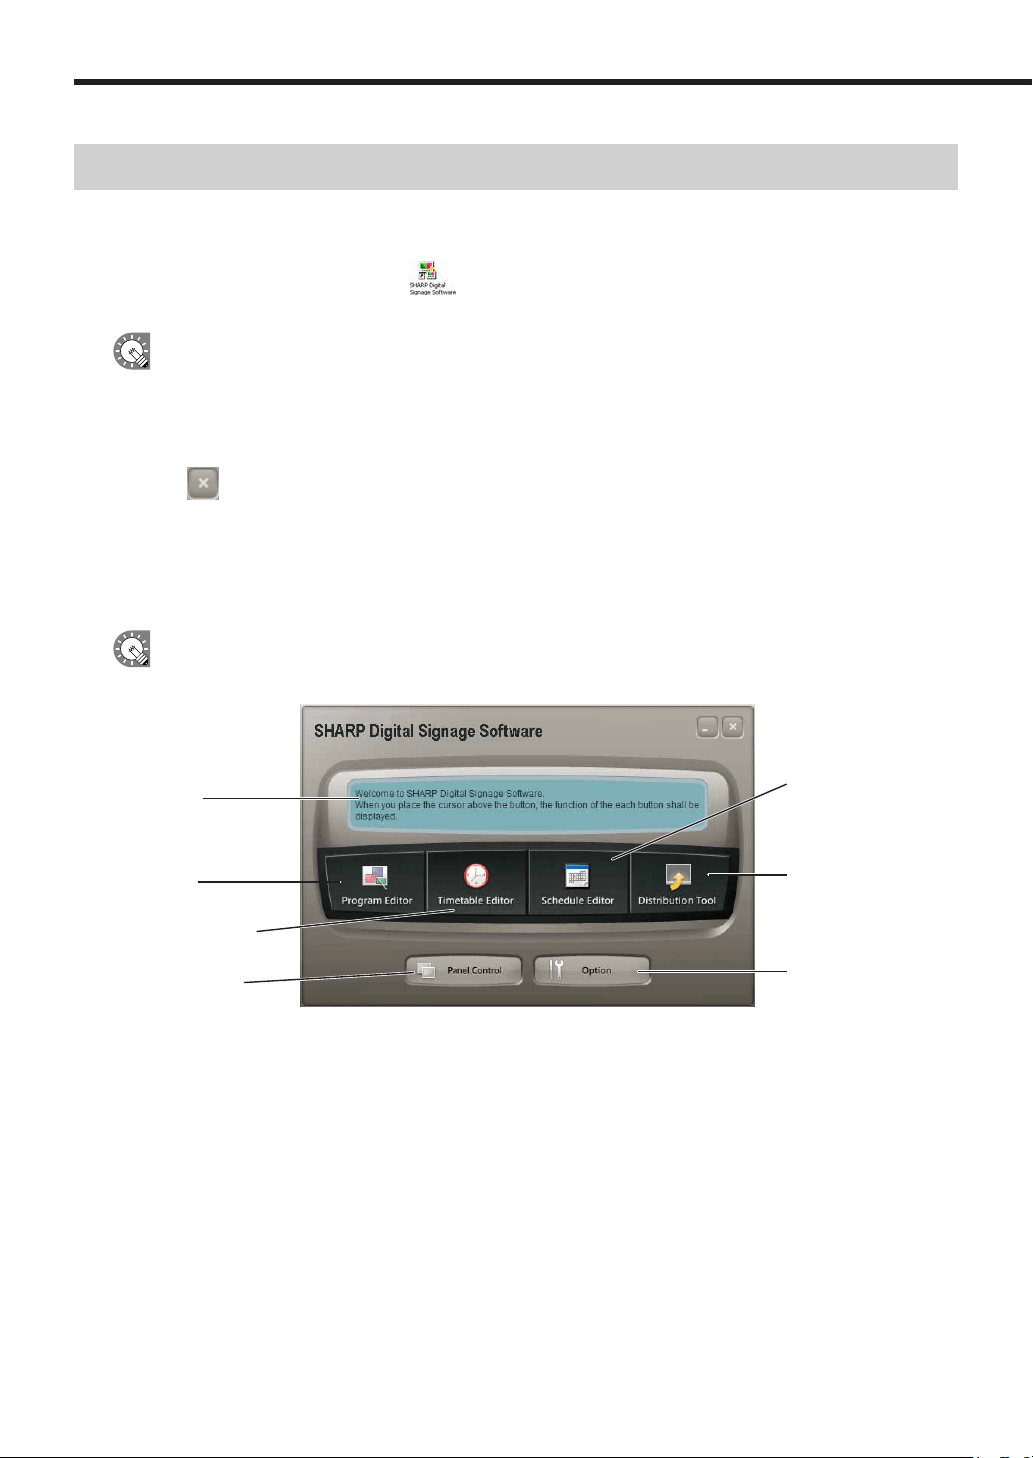
Launching and closing the Launcher window
●Launching the Launcher window
1. On the desktop, double-click the short cut.
TheLauncherwindowwilllaunch.
TheLaunchercanalsobestartedbygoingtotheWindowsTaskbarandclicking[Start],[AllPrograms],
[SHARPDigitalSignageSoftware],andthen[SHARPDigitalSignageSoftware].
●Closing the Launcher window
1. Click on the Launcher window.
TheLauncherwindowwillclose.
●The Launcher window
TheLauncherwindowisthewindowfromwhichoperationsarestarted.
Therearesixbuttonsfordifferentfunctionssuchasprogramcreationandprogramdistribution.
Ifanothertoolordialogboxisalreadylaunched,itwillbedisplayedintheforeground.
2)Programcreation/
editing
3) Timetable
creation/editing
4)Schedulecreation/
editing
5)Scheduledistribution
6)Panelcontrol
7)Option
1)Button
description
window
1) Button description window
Whenthecursorisplacedoverabutton,anexplanationofthebutton’sfunctionisdisplayedinthiswindow.
2) Program creation/editing (
F
p.28)
Thisbuttonlaunches“ProgramEditor”.ProgramEditorletsyoucreateprogramsbysettingscreensizesand
layouts, as well as content and scroll messages.
Launching and closing the Launcher window

27
3) Timetable creation/editing (
F
p.60)
Thisbuttonlaunches“TimetableEditor”.TimetableEditorletsyoucreateone-daytimetablesbyassigning
programs you have created to be shown at desired times.
4) Schedule creation/editing (
F
p.70)
Thisbuttonlaunches“ScheduleEditor”.ScheduleEditorletsyoucreateschedulesbyassigningtimetablesyou
havecreatedtobeexecutedondesireddates.
5) Schedule distribution (
F
p.84)
Thisbuttonlaunches“ScheduleDistributionTool”.ScheduleDistributionToolletsyousendtheschedulesyou
havecreatedtospecifiedpanels.
6) Panel control (
F
p.78)
Thisbuttonlaunchesthe[PanelManagement]dialogbox.Whendistributingprogramstomultiplepanelsusing
theNetworkVersion,youcanregisterandcontrolpanelsfromthisdialogbox.
This function is only available with the Network Version.
7) Option (
F
p.82)
Thisbuttonlaunchesthe[Option]dialogbox.ThisdialogboxdisplaysversioninformationabouttheLauncher,
and also lets you register license codes.
Launching and closing the Launcher window
28
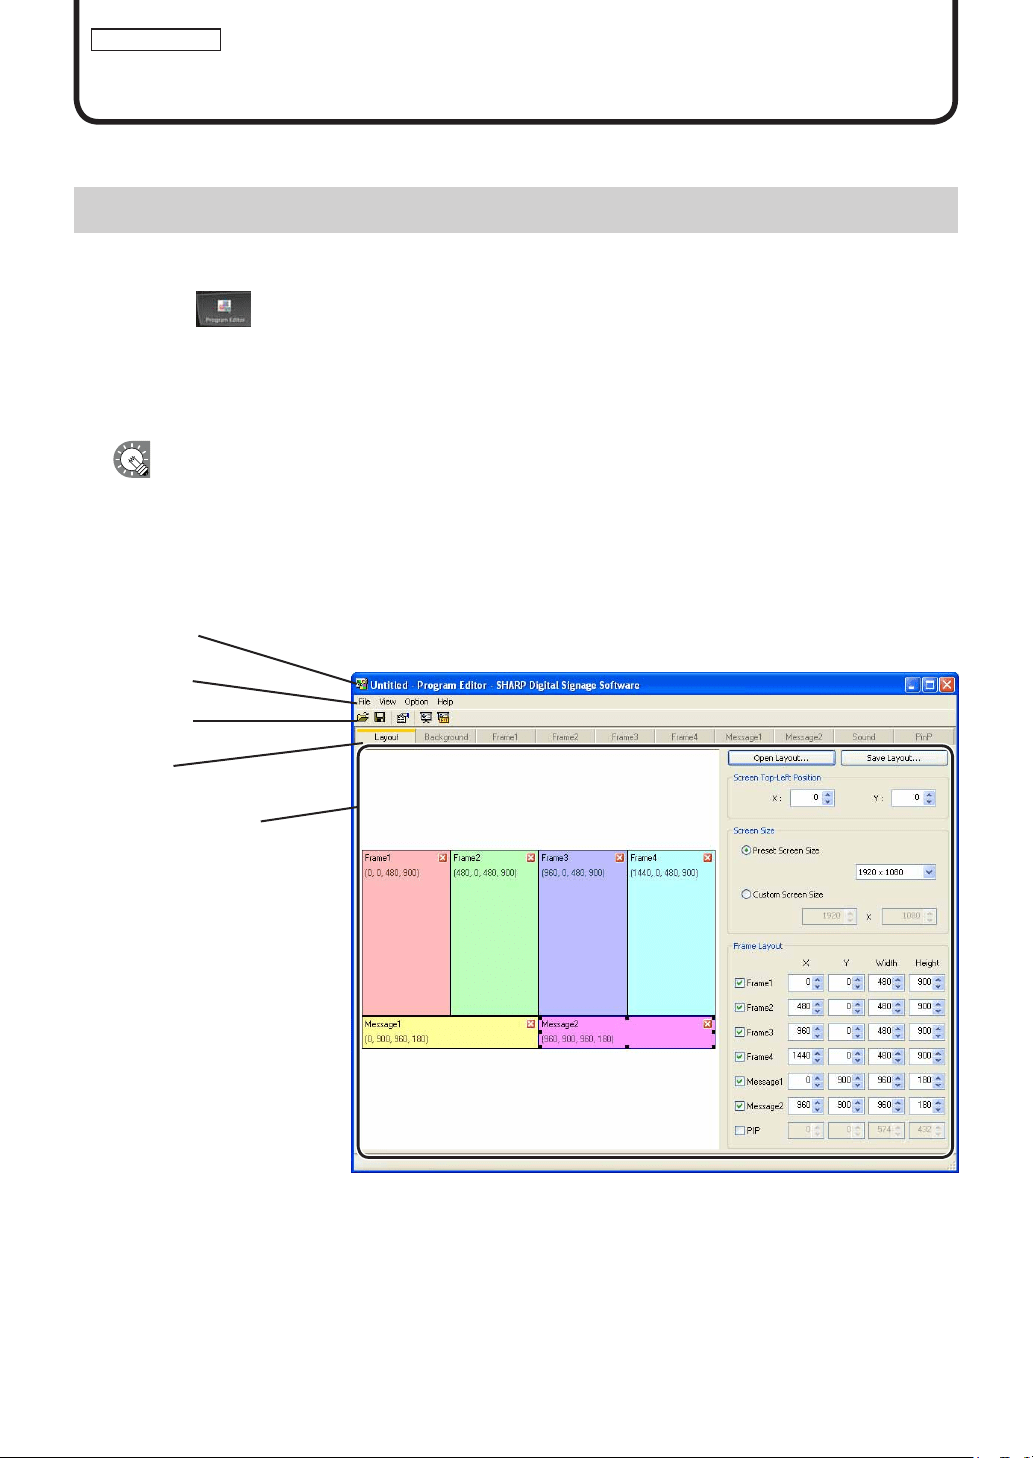
Program Editor
Program Creation/Editing
Createprograms(content)todisplayonapanel.
The main Program Editor window
●Launching Program Editor
1. Click on the Launcher window.
“ProgramEditor”willlaunch.
AssoonasProgramEditorlaunches,fourpre-definedframesandtwoscrollmessagesforcreatingnew
programs will be displayed in the main window. Programs are completed by setting program content in this
window.
•ProgramEditorcanalsobestartedbygoingtotheWindowsTaskbar,andclicking[Start],[AllPrograms],
[SHARPDigitalSignageSoftware],[Tools],andthen[ProgramEditor].
•ThefirsttimeProgramEditorislaunched,the[ContentPreview]windowwillappear.(
F
p.36)
•IfQuickTimePlayerandPowerPointViewerarenotinstalled,amessagewillappear.
●The main Program Editor window
1)Titlebar
2)Menus
3) Toolbar
4)Tabs
5)Settingswindow
1) Title bar
The name of the program will be displayed here.
WhenProgramEditorlaunches,thetitlebarwillread“Untitled”.Whenaprogramissaved,itwillchangetothe
name of the program. When content of an opened program is changed, the title bar will display an asterisk (*)
after the program name.
29
Program Editor
2) Menus
Menu options are as follows:
Menu option Description
Relevant
page
File
CreateNewProgram Opens a new program. -
Open Program Loadsasavedprogram.
F
p.47
Save Program Overwrites the currently edited program.
F
p.45
Save Program As Saves the currently edited program under a different name.
F
p.46
Delete Program Allows the user to specify and delete programs.
F
p.48
Properties of Program
Displays program properties and allows the user to change
them.
F
p.49
Import Program
ReadsaprogramthathasbeenexportedfromanotherPC
so that it can be used.
F
p.51
ExportProgram
Writes out a saved program so that it can be used on
anotherPC.
F
p.50
Exit ExitsProgramEditor. -
View
Preview Program
[Originalsize]
Displays a preview of the currently edited program at its
originalsize.
F
p.47
Preview Program
[Fitscreen]
Displaysapreviewofthecurrentlyeditedprogramfittedto
thesizeofthescreen.
F
p.47
SetConfigurationbefore
Preview Program
Checkthisoptionwhenpreviewingprograms.Setsand
displays display conditions.
F
p.48
Refresh
UpdatestheContentfoldertoreectadditionsordeletionsof
contentfiles.
-
Option
GridSetting
Allowstheusertofinetunegridsettingsforpositioning
frames and scroll messages with the grid.
F
p.33
Help AboutProgramEditor DisplaysversioninformationforProgramEditor. -
3) Toolbar
The toolbar buttons perform the following actions:
Icon Menu option Description
Relevant
page
Open Program Loadsasavedprogram.
F
p.47
Save Program Overwrites the currently edited program.
F
p.45
Properties of Program
Displays program properties and allows the user to change
them
F
p.49
Preview Program
[Originalsize]
Displays a preview of the currently edited program at its
originalsize.
F
p.47
Preview Program
[Fitscreen]
Displaysapreviewofthecurrentlyeditedprogramfittedto
thesizeofthescreen.
F
p.47
4) Tabs
Clickingatabswitchestothesettingswindowforeachitem.
5) Settings window
Allows the user to set advanced settings for the selected tab.
The main Program Editor window
30
Program Editor
Creating programs
●Valid content les
Filetypesthatcanbeusedascontentareasfollows:
Content name File type
Background,
Frames1-4
MPEG,MPEG-1,MPEG-2,MPEG-4,
WMV(WindowsMediaVideo–filetypeplayablewithWindowsMediaPlayer),
Flash(filetypeplayablewithFlashPlayer),Conditionalcontent(.dcv)forbackground,frames,
MOV(filetypeplayablewithQuickTimePlayer),
PowerPoint,HTML,JPEG,BMP,GIF,PNG
Scrollmessages1-2 ScrollmessagescreatedinScrollMessageEditor,Conditionalcontent(.dct)forscroll
messages
Audio WAVE,MP3,AU,AIFF,
WMA(WindowsMediaAudio–filetypeplayablewithWindowsMediaPlayer),
MOV(filetypeplayablewithQuickTimePlayer),
MIDI,Conditionalcontent(.dca)foraudio
Audiofilescannotbepositionedinthelayout.Theyareusedasaudioormusic(backgroundmusic)that
plays while a program is displayed.
Contentfilesarerecognizedbytheirfileextensions.
Certainfiletypesrequiretheinstallationofcorrespondingsoftware.
File extension Content type Required software
.avi .mpeg .mpg .wmv .asf
Movie
Windows Media Player
.mov QuickTimePlayer
.swf Flash FlashPlayer
.ppt .pps PowerPoint PowerPoint Viewer
.htm .html HTML InternetExplorer
.tlp Scroll message None
.wav .mp3 .au .aif .aiff
.wma .mid .midi
Audio
Windows Media Player
.mov QuickTimePlayer
.jpeg .jpg .gif .png .bmp Still image None
•TheJPEGfilesupportstheRGBformatbutdoesnotsupporttheCMYKformat.Inaddition,JPEG2000
is not supported.
•AnimationGIFisnotsupported.
•TwoormorePowerPointfilescannotbedisplayedatthesametime.
•ThenewfileformatofPowerPoint2007(.pptx)isnotsupported.Createcontentinpptformat.
•ThePowerPointcontentdoesnotsupportthefollowing:
Executionofmacros,executionofprograms,displayoflinkobjects,displayofembeddedobjects
•IftoomanyanimationsareusedinthePowerPointcontent,displayedcharactersmaybeillegible.
•ThefontusedinthecontentmustalsobeinstalledonthetargetPC.
•TheHTMLfileandtheWebpagecannotbeenlargedorreduced.
•Adjustmentofthesoundvolumesupportsvideoandaudio.ItdoesnotsupportFlashandPowerPoint.
Creating programs
31
Program Editor
●Positioning content (Layout)
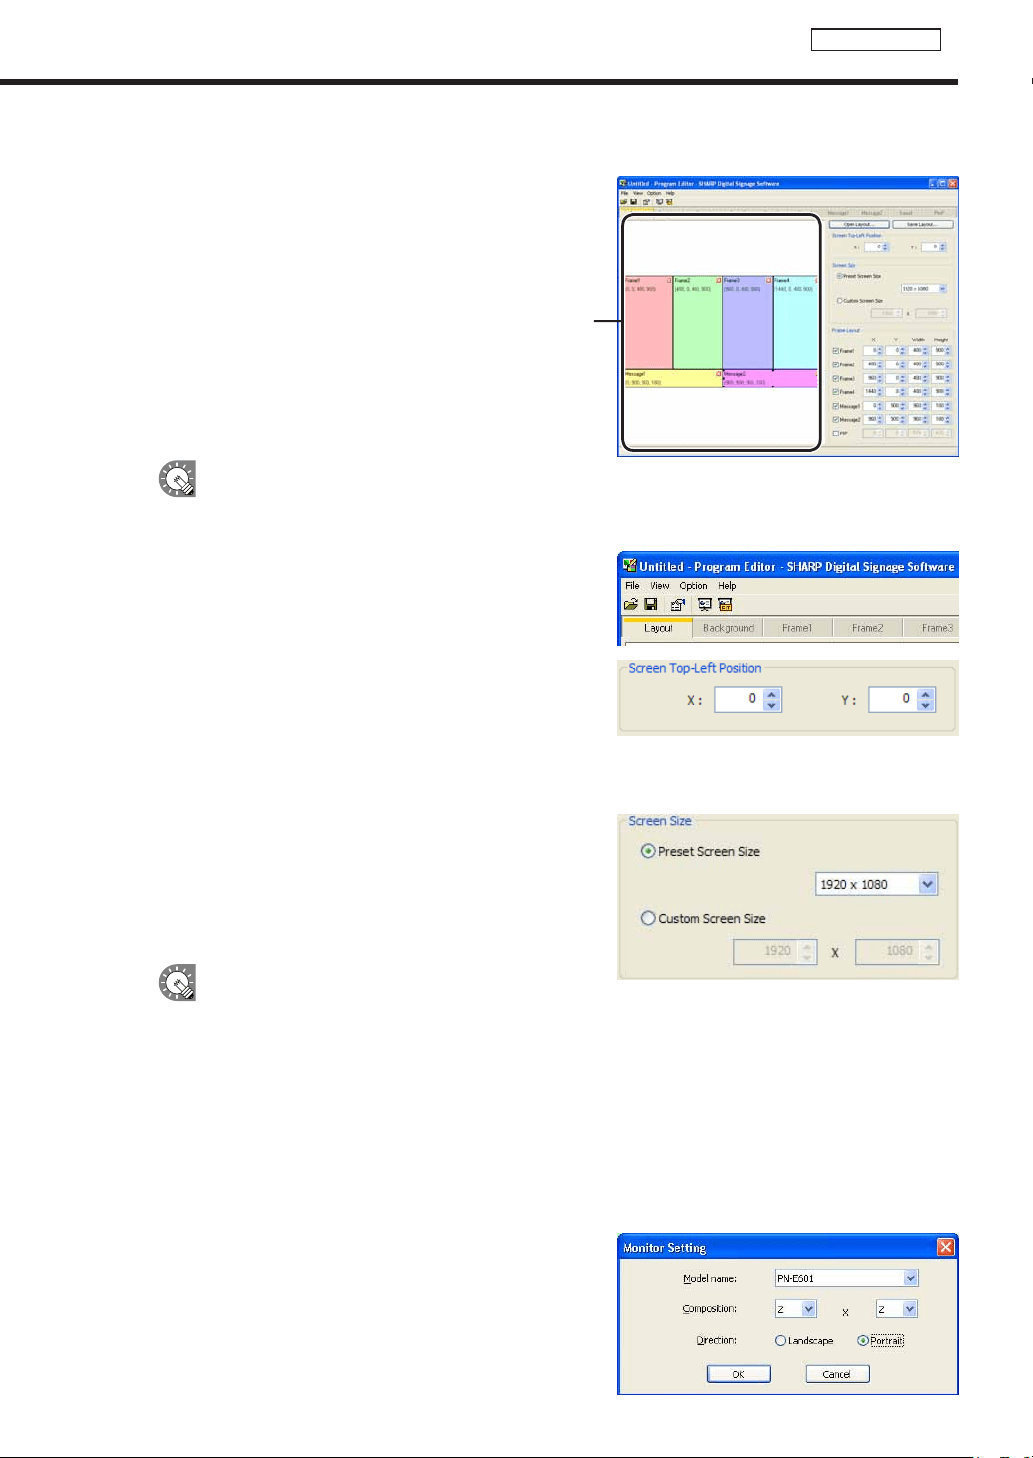
[Layout]window
Screensandcontentsizeandposition,etc.,aresetinthe
[Layout]window.
When“LayoutLocked.”isdisplayedinthecenterofthelayoutwindow,thelayoutcannotbe
edited.
Clearthe“Thelayouteditislocked.”checkboxinthe[PropertiesofProgram]dialogbox(
F
p.49).
1. Check that the [Layout] tab is selected.
Ifitisnot,clickthe[Layout]tabtoselectit.
2. Set a [Screen Top-Left Position].
Set the coordinates (-9999 - 9999) for where you want the
top left hand corner of the background to be positioned in the
panel.
“X”and“Y”areusuallysetto“0”.(Default)
3. Set the “Screen Size”.
Thescreensizeisthesizeofthebackground.
Selectthe“PresetScreenSize”optionbutton,andchoosea
sizefromthelist.
Thisisusuallysettothesizeofthepanel(i.e.panel
resolution).
•Ifthesizeyouwantisnotinthelist,selectthe
“CustomScreenSize”optionbutton,andentera
size.
•Tochangethepresetscreensizesinthelist,editthe“ScreenSize.dat”filefoundinthefolder
whereyouinstalledthissoftware(thedefaultdirectoryis,C:\ProgramFiles\SHARP\SHARPDigital
SignageSoftware)specifyingsizesinorderof“width”then“height”asintheexamplesbelow.
1280,1024
1920,1080
1024,768
WhenyoustartProgramEditorthescreensizeonthefirstlinewillbeselected.
•If you want to combine multiple panels and have
themdisplayedasonepanel,click[Calculate
screensizeforMultidisplay]andsetthescreen
sizesimplybyselectingthemodelnameand
direction.
Creating programs

32
Program Editor
4. Set [Frame Layout].
1) Checkthecheckboxesbesidetheframes,scroll
messages, or PIP that you want to display.
Youcanalsoclickthe button at the top right
hand corner of a frame or scroll message to hide it.
2) Set“X”,“Y”,“Width”,and“Height”coordinatesforeach
frame or scroll message.
•Only“X”and“Y”coordinatescanbeadjustedfor
thePIPframe.ToadjustthesizeofthePIPframe,
clickthe[PinP]tab,andspecifya“Value”forthe
“Size”under“Key”.
•Clickonaframeorascrollmessagetoselectit.
Eightresizehandleswillappeararoundtheborder
of the frame. By dragging these handles with the
mouse,youcanresizeaframeorscrollmessage,
andconfirmchangesvisually.
The frame and scroll messages can be moved by
dragginganareaotherthantheresizehandleusing
the mouse.
· Draggingwhileholdingdown[Shift]allowsyoutoresizeaframewhilekeepingthesameaspect
ratio.
· Youcanalsomoveframesorscrollmessagesusingthearrowkeys.
·
Youwillstillbeabletoadjustthesizeofaframeifyouholddown[Shift]whileusingthearrowkeys.
•Youcanmoveorresizeitemsaccuratelybyaligningthemwiththegrid.(
F
p.33)
E.g.
Frame1: X=25, Y=20, Width=1338, Height=835
Frame2: X=1380, Y=25, Width=523, Height=830
Message1: X=20, Y=869, Width=1883, Height=194
PIP: X=576, Y=395
The above coordinates would produce a layout like the screenshot below.
•Thename,positionanddimensions
(Xcoordinateoftopleftcorner,
Ycoordinateoftopleftcorner,width,
height) are displayed in the top left of
each frame or scroll message.
•ThePIPframecannotbemovedin1pt
increments.Locationswhereitemscan
be positioned depend on the kind of
LCDmonitorused.
Creating programs
33
Program Editor
Using the grid
Usingthegridmakesiteasytopositionitemsaccurately.Itemscanbedraggedwiththemouseandalignedon
the grid. The grid can be set with the following procedure:
1. From the [Option] menu click [Grid Setting].
The[GridSetting]dialogboxwillappear.
2. Set the “Frame Layout”.
Checkthe“FramepositioninGrid”checkboxtousethegrid.
Clearthecheckboxtopositionframesin1ptincrements.
3. Set the “Interval” for the grid.
Enterawholenumberbetween2-100pt.(Thedefaultvalue
is8pt)
•Showorhidethegridbycheckingorclearingthe“ShowGrid”checkbox.Evenifthegridishidden,if
youhavecheckedthe“FramepositioninGrid”checkbox,frameswillbealignedtothegridwhenmoved
orresized.
•Evenifyouhavecheckedthe“FramepositioninGrid”checkbox,youwillbeabletoignorethegridand
moveitemsin1ptincrementsbydoingthefollowing:
·Dragginganitemwhileholdingdown[Ctrl].Thiswillallowyoutoignorethegridwhenresizing.
·Dragginganitemwhileholdingdown[Shift]+[Ctrl].Thiswillallowyoutomaintaintheaspectratioofa
framewhileyouresizeitandignorethegridatthesametime.
· Holdingdown[Ctrl]whileusingthearrowkeys.Thiswillallowyoutomoveitemsin1ptincrements.
· Holdingdown[Shift]+[Ctrl]whileusingthearrowkeys.Thiswillallowyoutoresizeitemsin1pt
increments.
Display priority order
Background
Frame1
Frame2
Frame3
Frame4
If frames overlap when a program is displayed, programs will be
displayed in the following order from foreground to background.
“Frame4” → “Frame3” → “Frame2” → “Frame1” → “Background”
•Thedisplaypriorityordercannotbeset.
•IfthecontentoftheframeorbackgroundisaPowerPoint
orEXEfile,itwillbedisplayedintheforeground,
regardless of the display priority order.
•Scrollmessagesaredisplayedaheadofthebackground
frame.
•Inallcases,thePIPframeisdisplayedaheadofthebackground,frame,andscrollmessages.
•Ifmoviesaredisplayedinthebackground,theymaybedisplayedinfrontofotherframesinsome
cases.Setmoviesinframes1-4,notthebackground.
Using a layout you have created
Click[SaveLayout]tosavetheLayoutyouhavecreated.Thenexttimeyoucometocreateaprogramyouwill
thenbeabletoclickon[OpenLayout]tousethesavedlayout.
When you save a layout, frame settings are not saved.
OnlyScreenTop-LeftPosition,ScreenSize,andFrameLayoutaresaved.
Creating programs
34
Program Editor
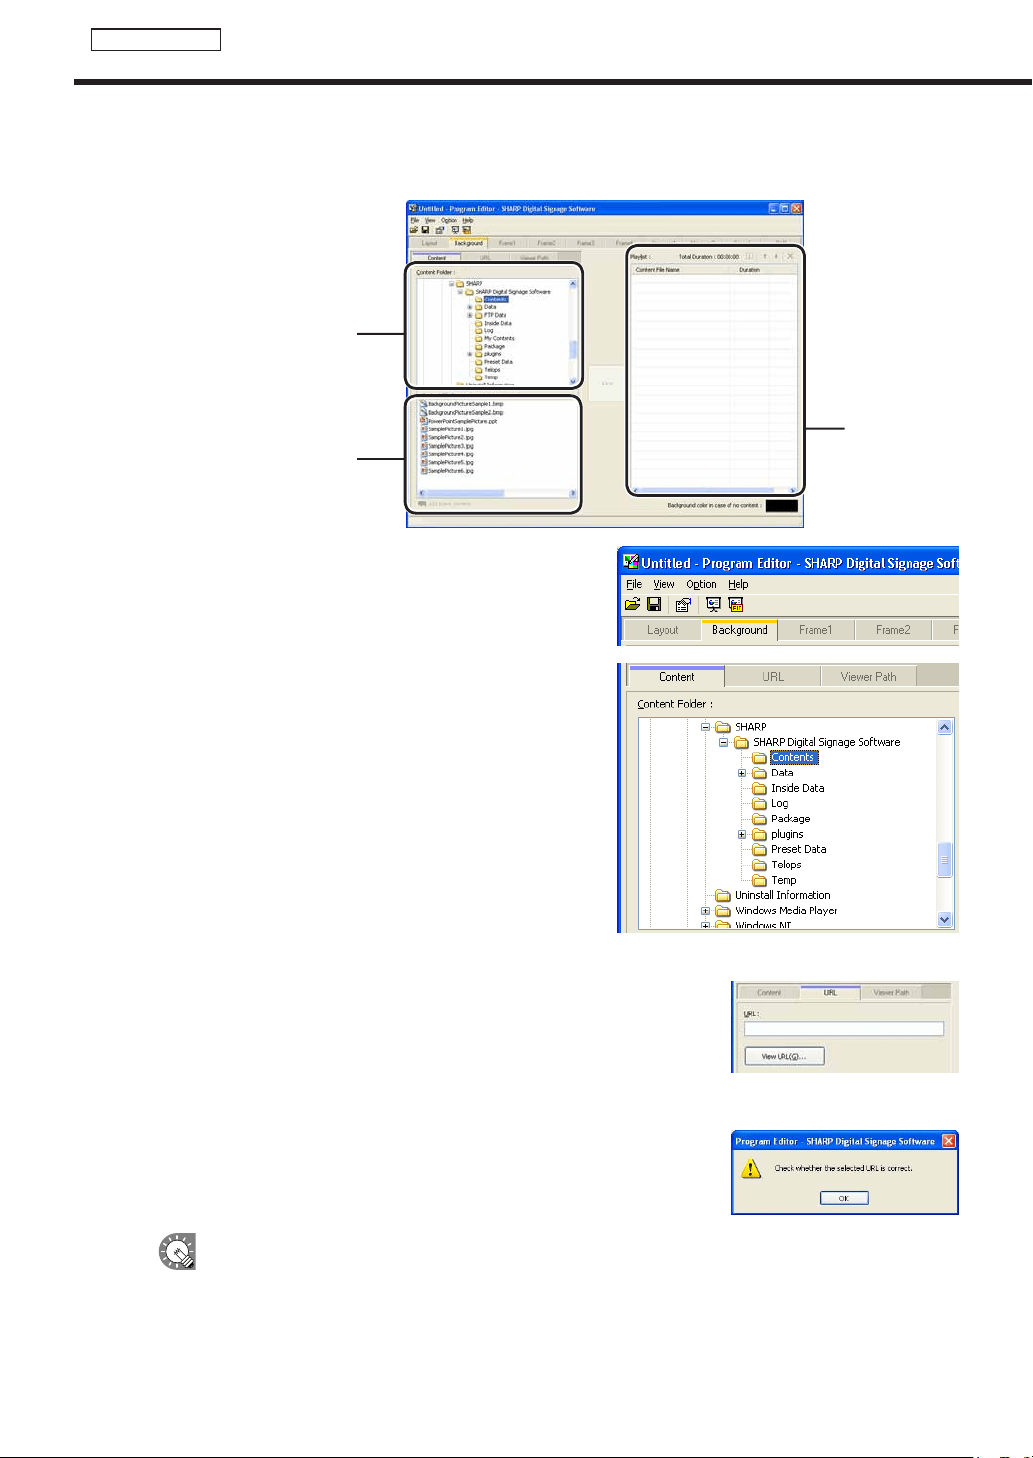
●Setting the background/frames 1-4
Setcontent,orderofplayanddurationforcontentinthebackgroundandframes1-4.
“ContentFolder”tree
“ContentFile”list
Playlist
1. Click any of the [Background] or [Frame1] – [Frame4]
tabs.
2. From the “Content Folder” tree, select the folder where
the content les you want to use are located.
Confirmthatthe[Content]tabisselected.Ifthetabisnot
selected, click on it.
Youcanalsodisplaycontentbyspecifying“URL”or“ViewerPath”.
The [URL] tab
DisplaystheHTMLofaspecifiedURLascontent.
EnteraURLthatcanbereferencedbythetargetPC.
IfyourPCcanconnecttotheInternet,clicking[ViewURL]willconnectto
theURLyouhaveentered.Checkthatyouhaveconnectedproperlyand
thattheURLhasbeendisplayedcorrectly.
IftheURLisincorrect,adialogboxliketheoneontherightwillappear.
•UsediscretionwhendisplayingURLsaswebsitesaresubjecttocopyright.
•Ifthepageyouwanttodisplaycontainserrorsitwillnotbedisplayedcorrectly.
•Ifthepagethatyouwanttodisplayrequiresaplug-inthetargetPCmusthavetheplug-ininstalled.
Creating programs
35
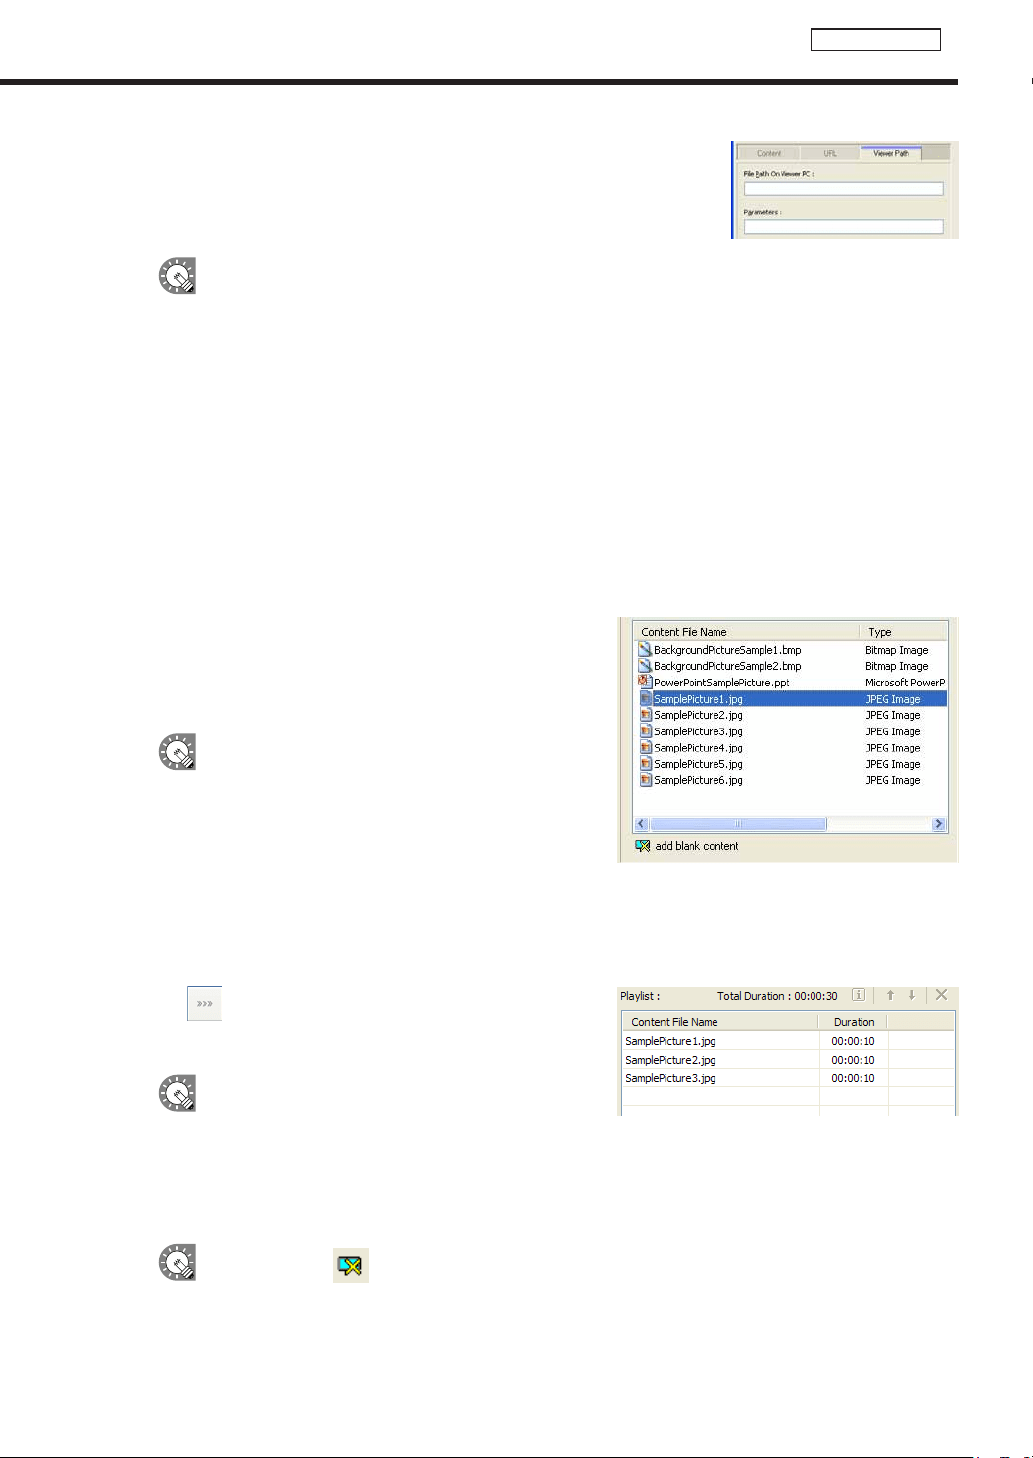
Program Editor
[Viewer Path] tab
Displaysthecontentfilespecifiedwith“FilePathOnViewerPC.”You
canspecifyanEXEfile.Enterapaththatcanbereferencedbythe
targetPC.ForanEXEfile,“Parameters”canbeadded.
•Whendisplayinglargecontentfilesthatarenotfrequentlyupdated,savethefilesonthetargetPC
in advance, and only enter the paths that refer to them. This will help reduce the time it takes to
send program contents.
•SpecifytheabsolutepathofthetargetPCortherelativepathfromMyContentsfolder(
F
p.100).
•Thefollowingparameterscanbeused:
%L: Xcoordinateoftopleftcornerofframe
%T: Ycoordinateoftopleftcornerofframe
%W : Width of frame
%H : Height of frame
•Thissoftwareonlylaunchesorclosesspecifiedexecutablefilesataspecifiedtime.Itdoesnot
guaranteetheactionsofanyexecutablefilesitlaunches.
•Dependingonthespecificationsofthefilethatisexecuted,itmaynotbeabletolaunchorclose
correctly, or it may not be able to display windows in the correct position.
3. Select the content you want to use from the “Content
File” list.
Refertop.30foralistoffiletypesthatcanbeusedwiththe
backgroundandframes1-4.
•Clickwhileholdingdown[Ctrl]or[Shift]toselect
multiplecontentfilesatthesametime.
•Youcanpreviewcontentfilesinthe[Content
Preview]window.(
F
p.36)
•IfusingHTMLcontent,makesurethatimages,
moviesandotherfilesreferredtointheHTML
codearetransferredtothesamelocation,orasubdirectoryofthesamelocation,wheretheHTML
fileitselfisstored(attachedfiles).Thesecanbeaddedfromcontentfileproperties.(
F
p.37)
MakesurethatallattachedfilesaredefinedbytheirrelativepathsintheHTMLfile.
4. Click .
Contentfilesareaddedtotheendoftheplaylist.
Formoredetailsabouttheplaylistrefertop.36.
•Instep3,youcanalsoregistercontentfilesby
double-clicking them, or dragging them from the
“ContentFile”listtothe“Playlist”.
•Thecontentfilesintheplaylistcanbecopiedbydragginganddroppingthemwhileholdingdown
the[Ctrl]key.
5. Repeat steps 1 to 4 as necessary. You can set the other frames in the same manner.
By clicking the ( )button“addblankcontent”atthebottomofthe“ContentFile”listonthe
[Frame1]-[Frame4]tabs,youcanaddahiddensectiontotheplaylist.Likeothercontentfiles,the
duration and order of play can be set for hidden sections. The frame set in the hidden section is
not displayed.
Creating programs
36
Program Editor
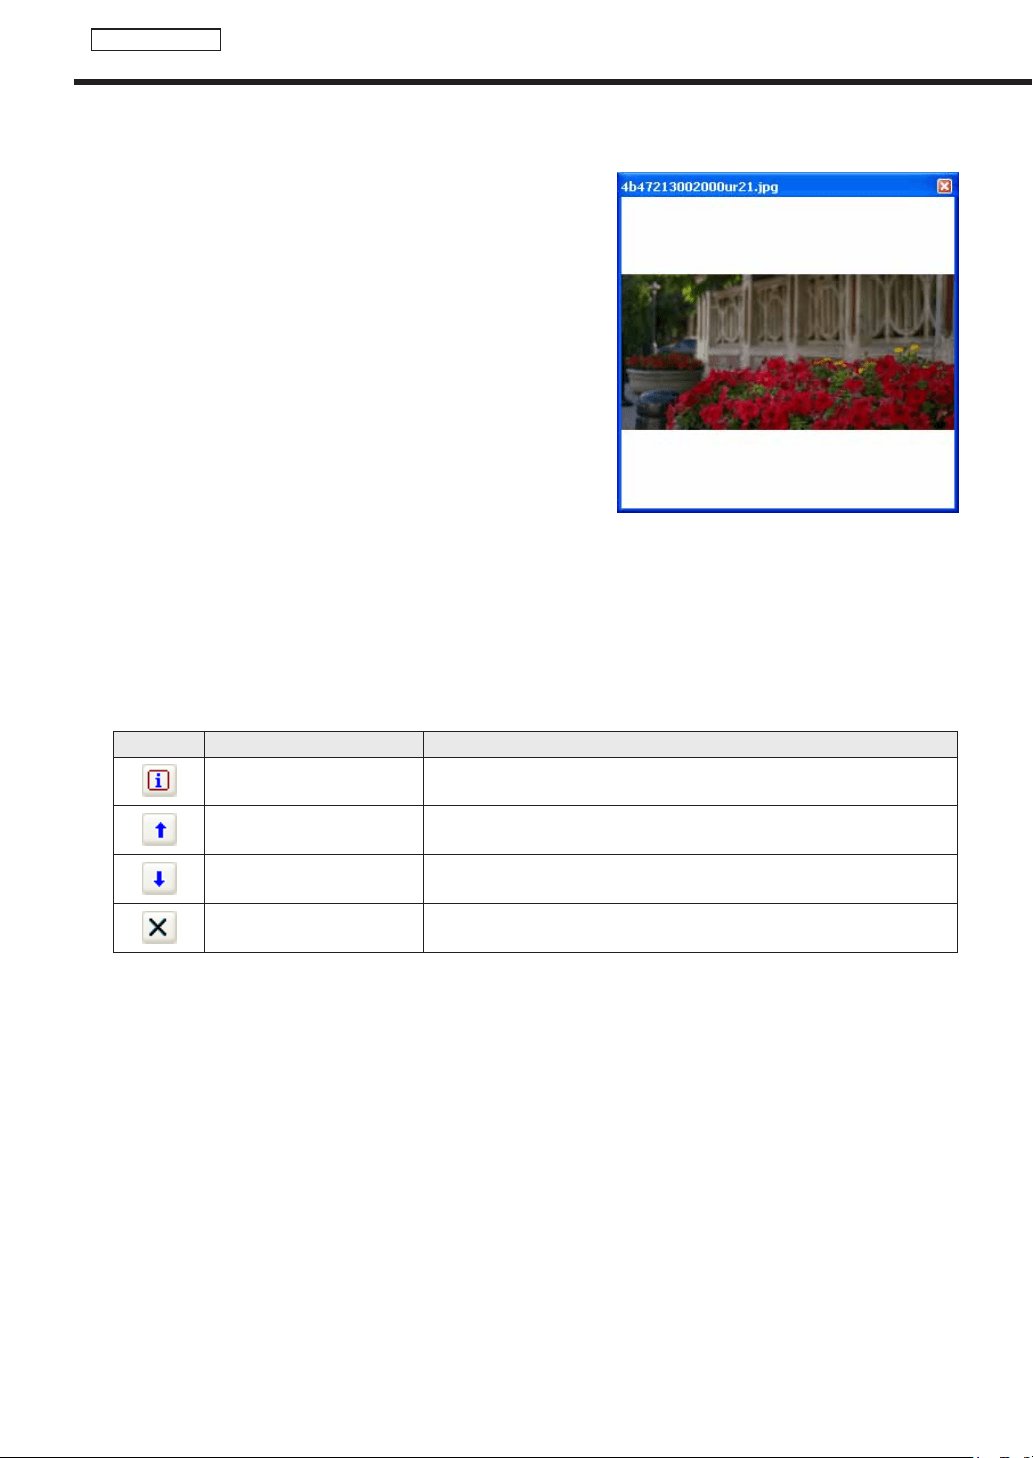
Content preview
Youcanpreviewcontentfilesinthe[ContentPreview]window.
Click[ContentPreview]fromthe[View]menutopreviewthefiles.
Previewsforthefollowingtypesoffileswillnotbedisplayed
immediately.Topreviewthesefiles,clicktherelevanticon
displayedinthe[ContentPreview]window.(Clickthetextstringif
previewing a scroll message.)
•Fileswithasizeof2MBorhigher
•Videofiles
•PowerPointfiles(Previewdisplayedinfullscreenmode)
•Scrollmessagefiles(Previewdisplayedinfullscreenmode)
Playlists
Playlistcontentisplayedinorderstartingwiththecontentfileatthetopofthelist.
“Duration”displaysthelengthoftimetakentoplayaparticularcontentfile.
“TotalDuration”displaysthelengthoftimetakentoplaytheentirecontentsoftheplaylist.
Therearecaseswherethetotaldurationisdifferentfromtheactualduration(forexample,when“PlayNext
Content”issetintheplaysetting,orwhenusingconditionalcontent)
Clickingthebuttonsonthetoprightofaplaylistperformsthefollowingactions:
Icon Menu option Description
Show the properties of the
content
Displaysthepropertiesofthecurrentlyselectedcontentfile.Formore
details,refertop.37.
Move the content to upwards
Movestheselectedcontentfileoneplaceforward(up)inthelist.
(Cannotmovemultiplecontentfiles.)
Move the content to
downwards
Movestheselectedcontentfileoneplacebackward(down)inthelist.
(Cannotmovemultiplecontentfiles.)
Delete the content
Deletestheselectedcontentfilesfromthelist.
Contentfilesmayalsobedeletedbypressing[Delete].
Creating programs
37
Program Editor
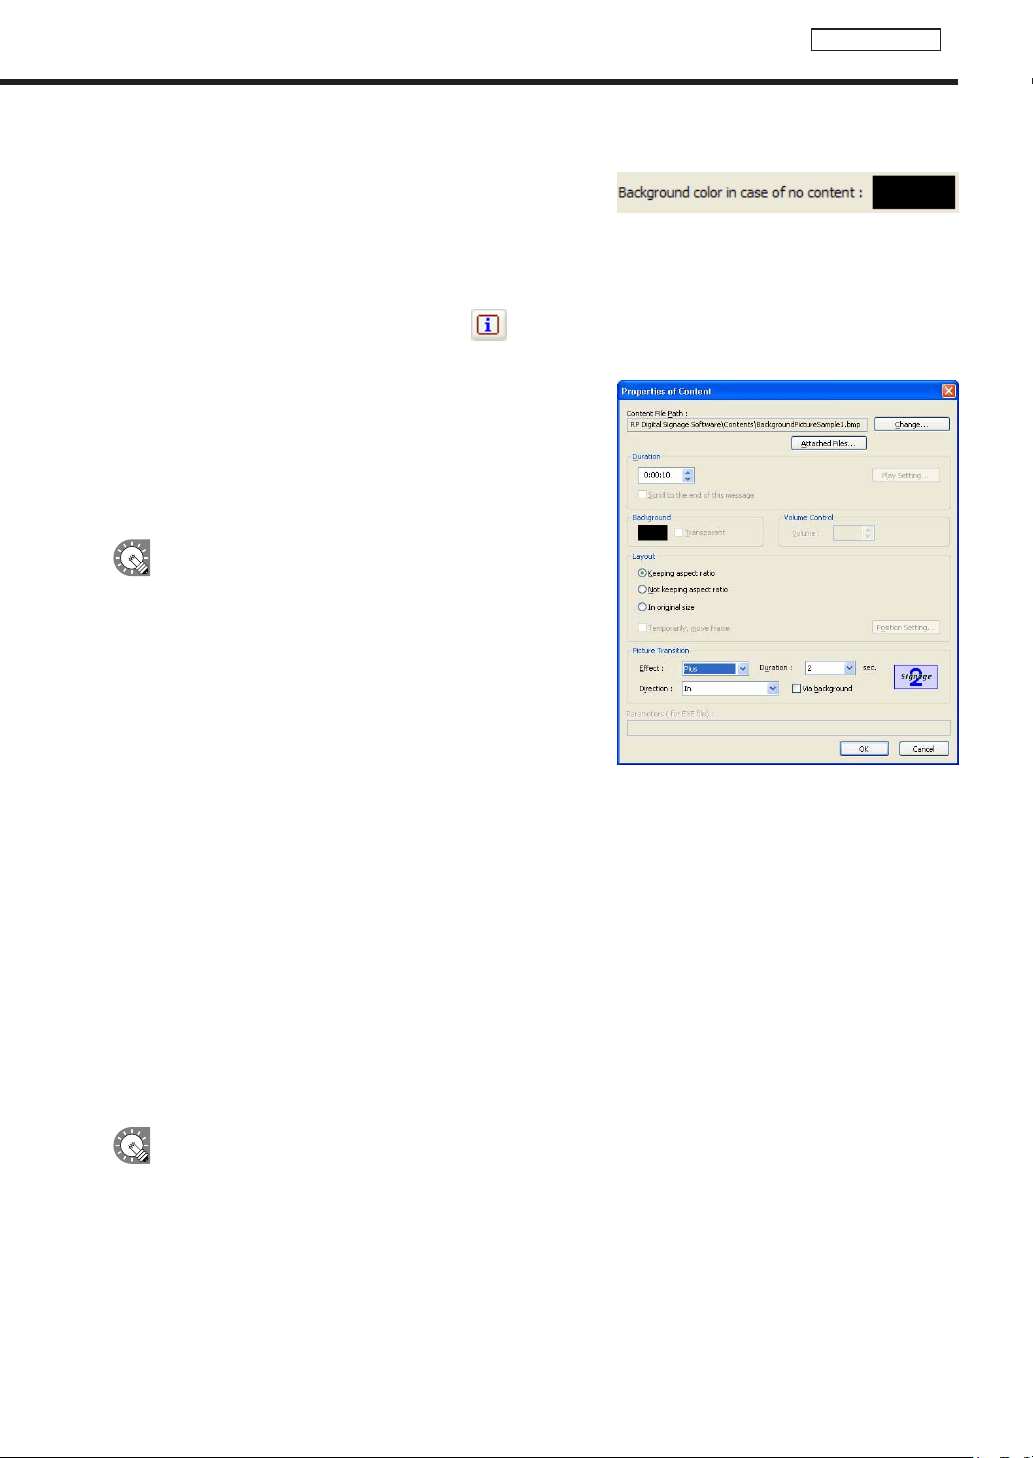
Background color when content is not displayed
Whencontentisnotbeingplayed,framescanbefilledinusinga
specifiedcolor.
Clickthecolorswatchtodisplaythe[Color]dialogboxand
change the background color.
Properties of content
Fromtheplaylist,selectacontentfile,andclick todisplaythe[PropertiesofContent]dialogbox.
Thefollowingsettingsmaybeadjusted:
1) Content File Path
Displaysthepathtothecontentfile.
•Clicking[AttachedFiles]willallowyoutoaddafileorfiles
fromthe[AttachedFiles]dialogboxwhichappears.
•Clicking[Change]willallowyoutochangethefileviathe
[Open]dialogboxthatappears.
IfusingHTMLcontent,makesurethatimages,movies
andotherfilesreferredtointheHTMLcodeare
transferred to the same location, or a subdirectory of the
samelocation,wheretheHTMLfileitselfisstored.Make
surethatallattachedfilesreferencedintheHTMLfileare
definedbytheirrelativepaths.
2) Duration
The duration of play can be set.
•Whenthecontenttypeisvideo,audio,orscrollmessage,you
can set the operation to be performed when playback of the
contentisfinishedbeforethespecifieddurationisreached.
Tosetthis,click[PlaySetting].
•Whenthe“Scrolltotheendofthismessage”checkboxiscleared,playbackofscrollmessagesisforcibly
terminatedafterthespecifieddurationisreachedevenifplaybackisnotfinishedyet(effectivewhenthe
content type is scroll message).
•Ifthesamecontentfilesareplacedintheplaylistsuccessively,playisresumedafterreturningtothetopof
thecontentfilesaftertheplaytimehasexpired.
3) Background
Ifthecontentisastillimagefileandyouhavecheckedthe“Keepingaspectratio”optionbutton,youcan
specify a background color for the content.
Clickthecolorswatchtodisplaythe[Color]dialogboxandchangethebackgroundcolor.
Clicktheboxnextto“Transparent”tomakethebackgroundtransparent.
The background color for the background frame cannot be set to transparent.
4) Volume Control
The volume can be set.
Creating programs
38
Program Editor
5) Layout
•“Keepingaspectratio”,“Notkeepingaspectratio”,and“Inoriginalsize”optionbuttons
Youcanselect“Notkeepingaspectratio”whenthecontenttypeisastillimageorFlash.
Youcanselect“Inoriginalsize”whenthecontenttypeisastillimage.
•“Temporarily,moveframe”checkbox
Tochangethescreenpositionofthecontenttemporarily,checkthischeckboxandclick[PositionSetting].
Thepositionandsizeoftheframecanbespecifiedforeachcontent.Thescreenpositionmustbesetwithin
the background frame.
6) Picture Transition
When the content type is still image, the effect at screen switching can be set.
Select the effect from each pull-down menu.
Ifyoucheckthe“Viabackground”checkbox,theeffectofdisplayingthebackgroundcoloratthetimeof
screen switching is added.
7) Parameters (for EXE le)
DisplaysparametersforEXEfiles.
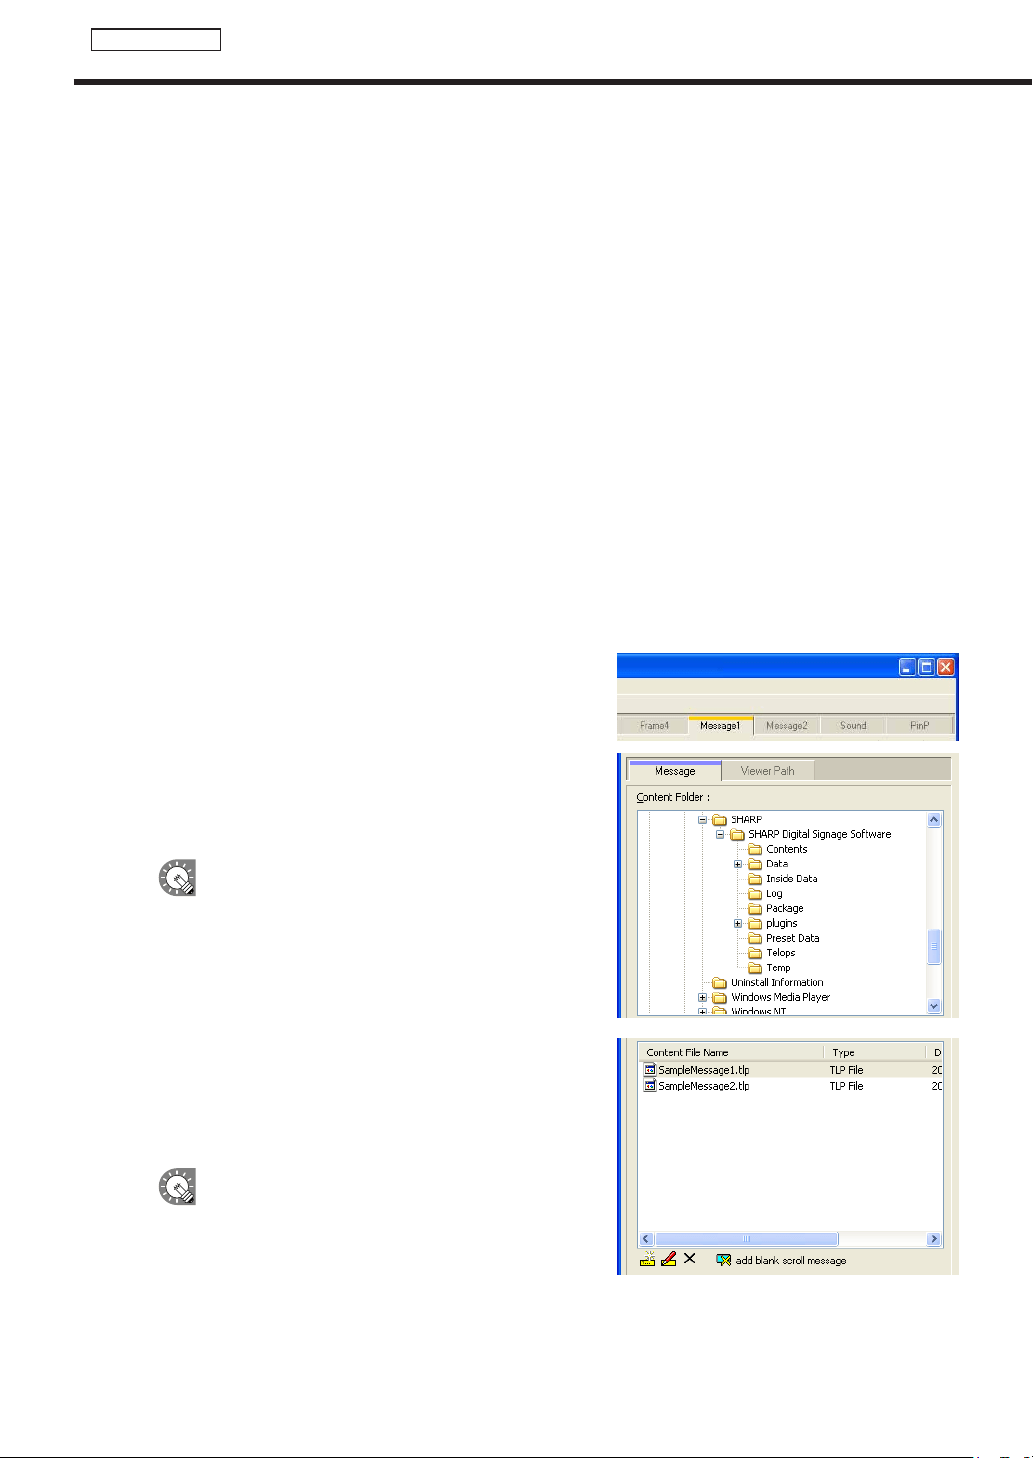
●Setting the scroll message
Set scroll message content, order of play and duration of play.
Ascrollmessagefilecontainingtexttobedisplayedinthescrollmessagemustbepreparedinadvance.For
detailsabouthowtocreateascrollmessagefile,refertop.40.
1. Click the [Message1] or [Message2] tab.
2. From the “Content Folder” tree, select the folder where
the scroll message le you want to use is located.
Confirmthatthe[Message]tabisselected.Ifthetabisnot
selected, click on it.
•Youcanalsodisplaythecontentfilespecifiedwith
“FilePathOnViewerPC”onthe[ViewerPath]tab.
SpecifytheabsolutepathofthetargetPCorthe
relativepathoftheMyContentsfolder(
F
p.100).
3. Select the scroll message le you want to use from the
“Content File” list.
Onlyscrollmessagefiles(.tlp)andconditionalcontentfor
scrollmessagefiles(.dct)canbeusedwithMessage1and
Message2.
•Clickwhileholdingdown[Ctrl]or[Shift]toselect
multiplescrollmessagefilesatthesametime.
•Youcanpreviewscrollmessagefiles.Scroll
messagefilepreviewsareavailableinfullscreen
mode only. (
F
p.36)
Creating programs

39
Program Editor
Clickingthebuttonsatthebottomofthe“ContentFile”listperformsthefollowingactions:
Icon Menu option Description
CreateNewScroll
Message
LaunchesScrollMessageEditorandallowsyoutocreatenewscroll
messages.
EditScrollMessage
LaunchesScrollMessageEditorandallowsyoutoeditthescroll
messageselectedinthe“ContentFile”list.
Delete Scroll Message Deletesthescrollmessagesselectedinthe“ContentFile”list.
add blank scroll
message
Ahiddensectioncanbeaddedtotheplaylist.Likeothercontentfiles,
the duration and order of play can be set for hidden sections.
FormoredetailsaboutScrollMessageEditor,refertop.40.
4. Click .
Scrollmessagefilesareaddedtotheendoftheplaylist.
Formoredetailsabouttheplaylist,refertop.36.
Instep3,youcanalsoregisterscrollmessagefiles
by double-clicking them, or dragging them from the
“ContentFile”listtothe“Playlist”.
5. Repeat steps 1 to 4 as necessary. You can set other scroll messages in the same manner.
Creating programs
40
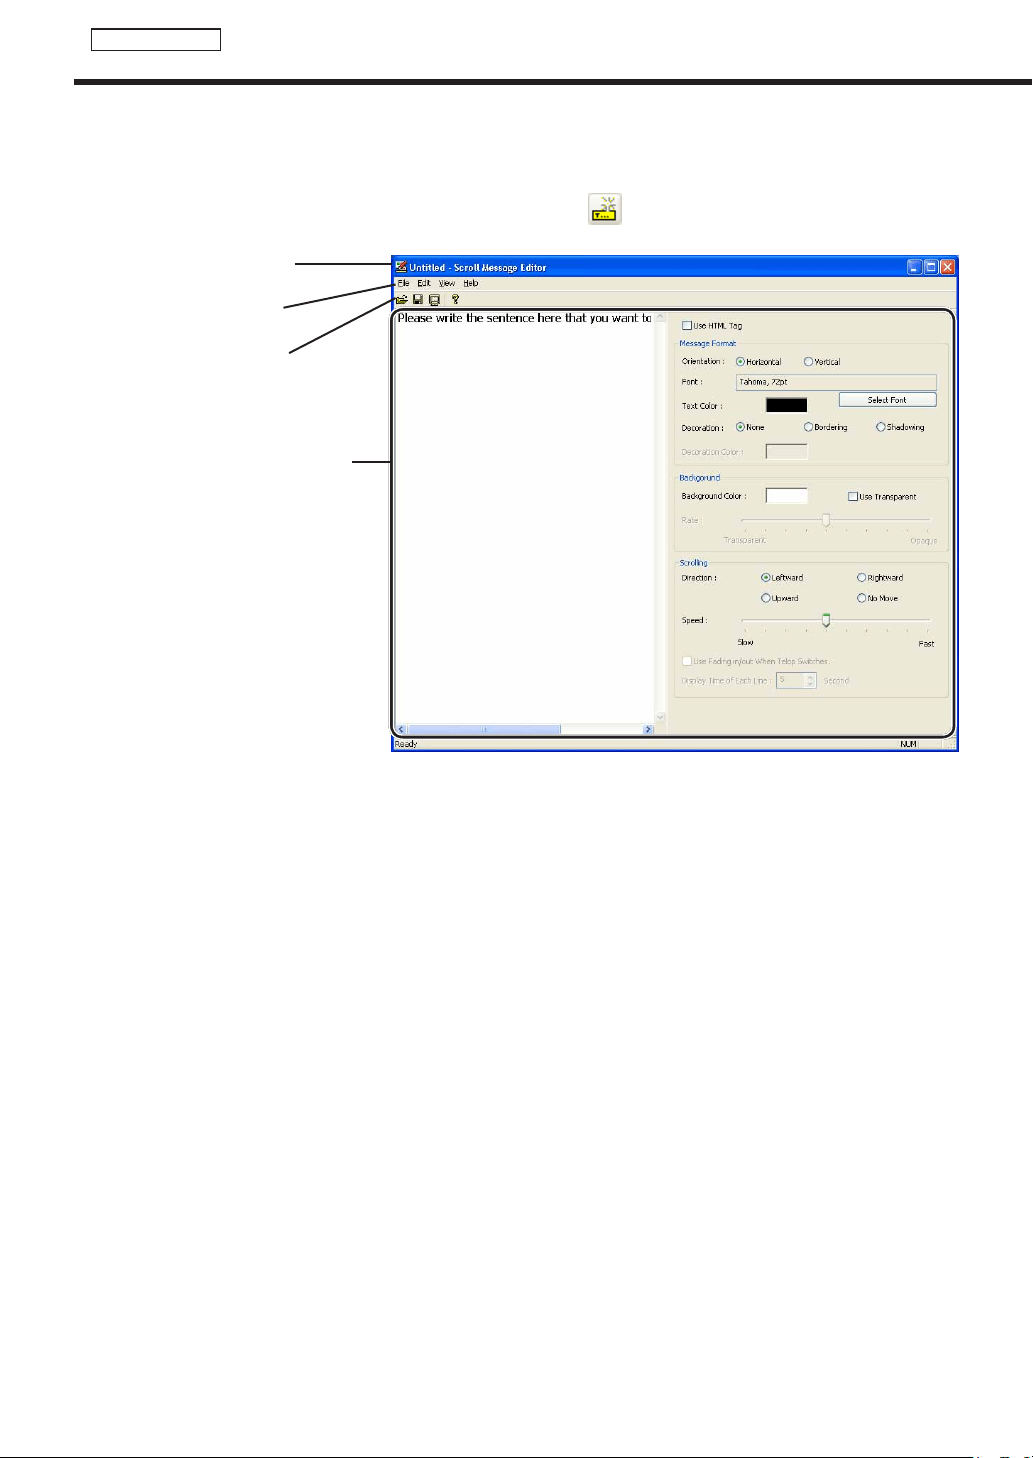
Program Editor
Creating scroll message les
Createamessagetobedisplayedinascrollmessage.
1. Click the [Message1] or [Message2] tab, and then click
under the “Content File” list.
ScrollMessageEditorwilllaunch.
1) Title bar
Afilenamewillbedisplayed.
WhenScrollMessageEditorlaunches,thetitlebarwillread“Untitled”.Whenafileissaved,itwillchangeto
thenameofthefile.Whencontentofanopenedfileischanged,thetitlebarwilldisplayanasterisk(*)after
thefilename.
1)Titlebar
2)Menus
3) Toolbar
4)Settingswindow
Creating programs
41
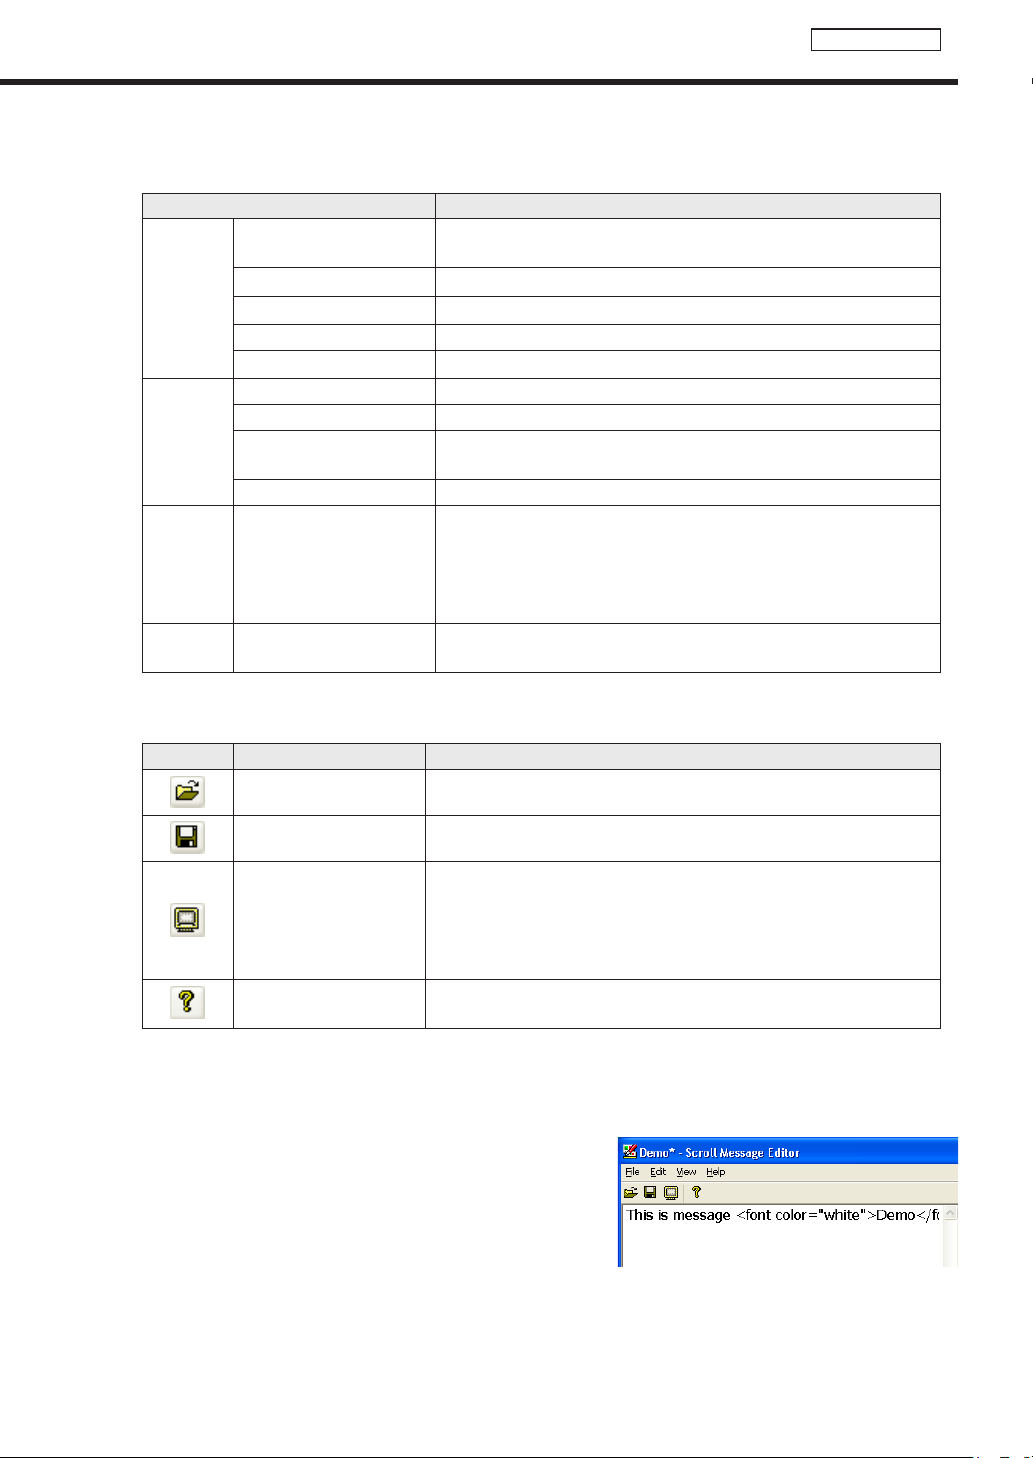
Program Editor
2) Menus
Menu options are as follows:
Menu option Description
File
CreateNewScroll
Message
Opensanewscrollmessagefile.
Open Scroll Message Loadsasavedscrollmessagefile.
Save Scroll Message Overwritesthecurrentlyeditedscrollmessagefile.
Save Scroll Message As Savesthecurrentlyeditedscrollmessagefileunderadifferentname.
Exit ExitsScrollMessageEditor.
Edit
Cut Cutsthetextstringselectedinthe“Scrollmessageeditbox”.
Copy Copiesthetextstringselectedinthe“Scrollmessageeditbox”.
Paste
Pastesatextstringthathasbeencutorcopiedintothe“Scroll
messageeditbox”.
Undo Undoesthelastactionperformedinthe“Scrollmessageeditbox”.
View Preview Scroll Message
Displaysapreviewofthecurrentlyeditedscrollmessagefile.
Press[Esc]toclosethepreview.Ifawindowotherthanthewindow
for scroll messages is clicked during the preview, it cannot be
terminatedevenifthe[Esc]keyispressed.Clickthepreviewonce
andthenclickthe[Esc]key.
Help
About Scroll Message
Editor
DisplaysversioninformationforScrollMessageEditor.
3) Toolbar
The toolbar buttons (icons) perform the following actions:
Icon Menu option Description
Open Scroll Message Loadsasavedscrollmessagefile.
Save Scroll Message Overwritesthecurrentlyeditedscrollmessagefile.
Preview Scroll Message
Displaysapreviewofthecurrentlyeditedscrollmessagefile.
Press[Esc]toclosethepreview.Ifawindowotherthanthewindowfor
scroll messages is clicked during the preview, it cannot be terminated
evenifthe[Esc]keyispressed.Clickthepreviewonceandthenclick
the[Esc]key.
About Scroll Message
Editor
DisplaysversioninformationforScrollMessageEditor.
4) Settings window
Formoredetails,continuereadingfromstep2.
2. Enter a text string that you want to use in a scroll
message into the “Scroll message edit box”.
Thelongerthetextstringis,themorememorywillbeused.
We recommend starting a new line at a suitable interval so
that lines do not get too long.
Creating programs
42
Program Editor
Checkingthe[UseHTMLtag]checkboxallowsyoutouse
thefollowingHTMLtagsinthe“Scrollmessageeditbox”to
definethefontcolor,sizeandotherstyles.
Tag Explanation
<FONT>
Definesthetext.TakestheCOLOR,SIZEandFACEattributeswhichrespectivelydefinethe
textcolor,textsizeandtypeface.
<B> Definesboldtext.
<I> Definesitalictext.
<U> Definesunderlinedtext.
<S> Definesstrikethroughtext.
<BIG> Definesbiggertext.
<SMALL> Definessmallertext.
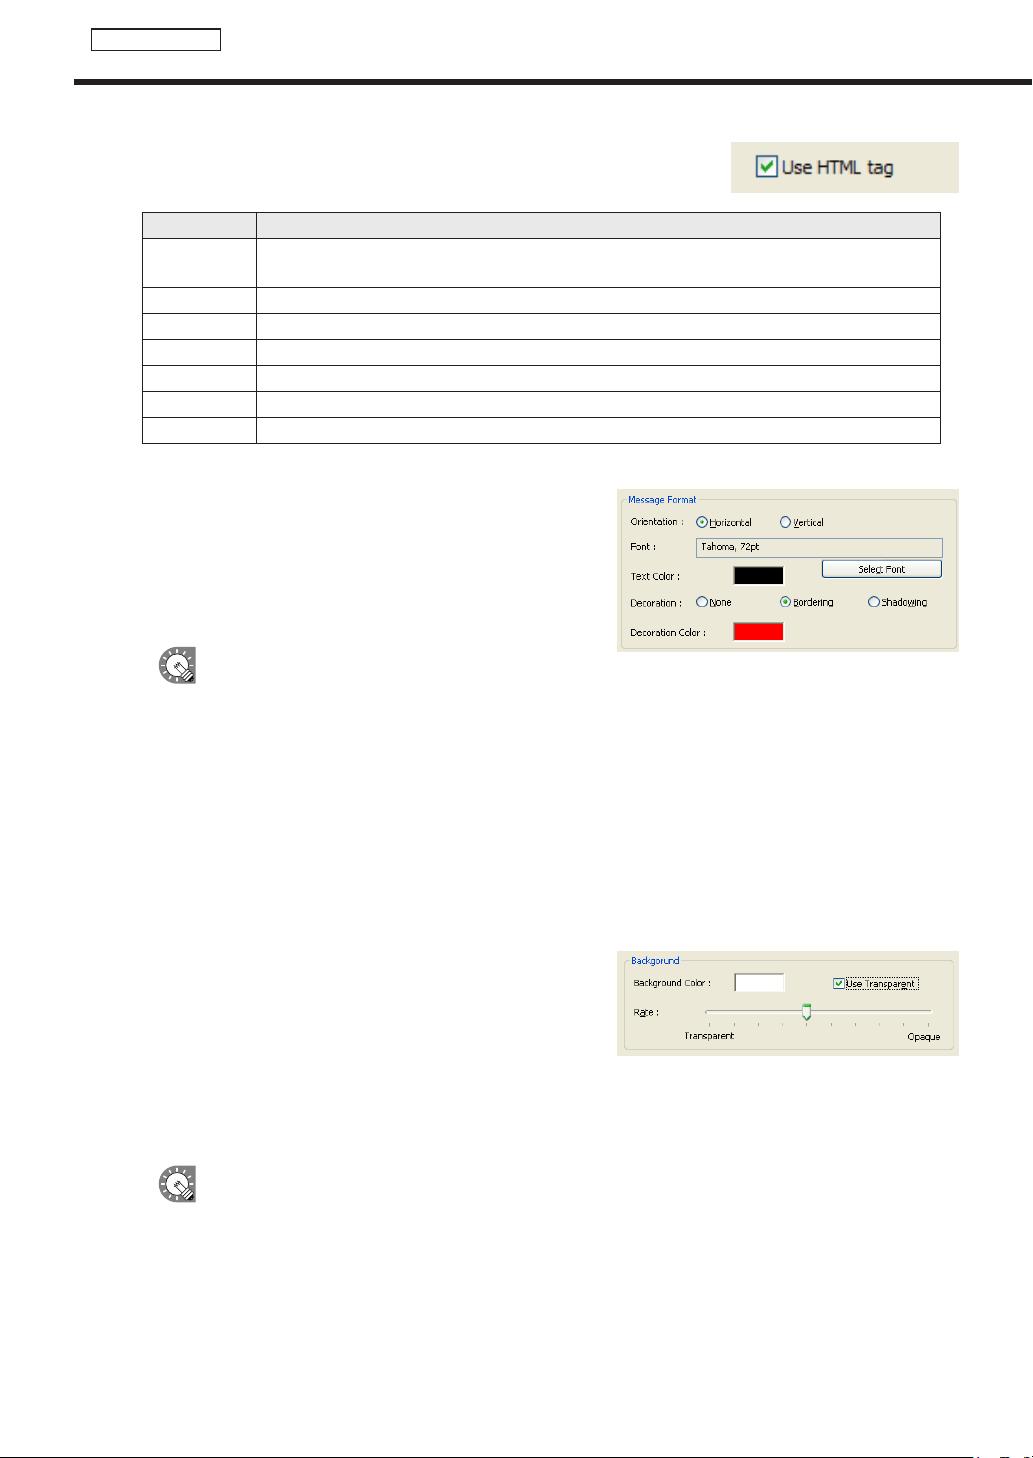
3. Set the “Message Format”.
Setthedisplaydirectionoftext,fontandtextcolor.
1) Nextto“Orientation”,selectthedisplaydirectionoftext.
2) Tochangethefont,click[SelectFont]andchooseafont
fromthe[Font]dialogbox.
•YoumusthavethesamefontinstalledonthetargetPC.
•Dependingonthetypeoffontused,textsizemaynotbeacquiredcorrectlyresultinginscrolling
being interrupted.
3) Setthe“TextColor.”
Inthe[Color]dialogboxthatappearswhenclickingtherectangleinwhichacolorisdisplayed,thecolor
can be changed.
4) Select“Decoration”fromthe“None,”“Bordering,”or“Shadowing”optionbutton.
If“Bordering”or“Shadowing”isselected,thetextcolorcanbechangedinthe[Color]dialogboxthat
appearswhenclickingtherectangleof“DecorationColor”.
4. Set “Background.”
Set the background of scroll messages.
1) Set“BackgroundColor.”
Thecolorcanbechangedinthe[Color]dialogboxthat
appears when clicking the rectangle in which a color is
displayed.
2) Checkingthe“UseTransparent”checkboxallowsyoutomakethebackgroundcolortransparent.
Dragthe“Rate”slidertotheleftorrighttosetthetransparency(10stepsavailable).
•Donotcheckthecheckboxwhenyoudonotwanttomakethebackgroundcolortransparent.
Evenifthesliderissettoopaqueattherightend,thebackgrounddoesnotbecomecompletely
non-transparent.
•Whenthecheckboxischecked,thecolorsetforthebackgrounditselfismadetransparent.
Therefore,if“TextColor”and“DecorationColor”arethesameas“BackgroundColor,”“TextColor”
and“DecorationColor”arealsomadetransparent.
•Iftransparent/semi-transparentscrollmessagesarelocatedonavideo,thedesiredeffectmaynot
be obtained.
Creating programs
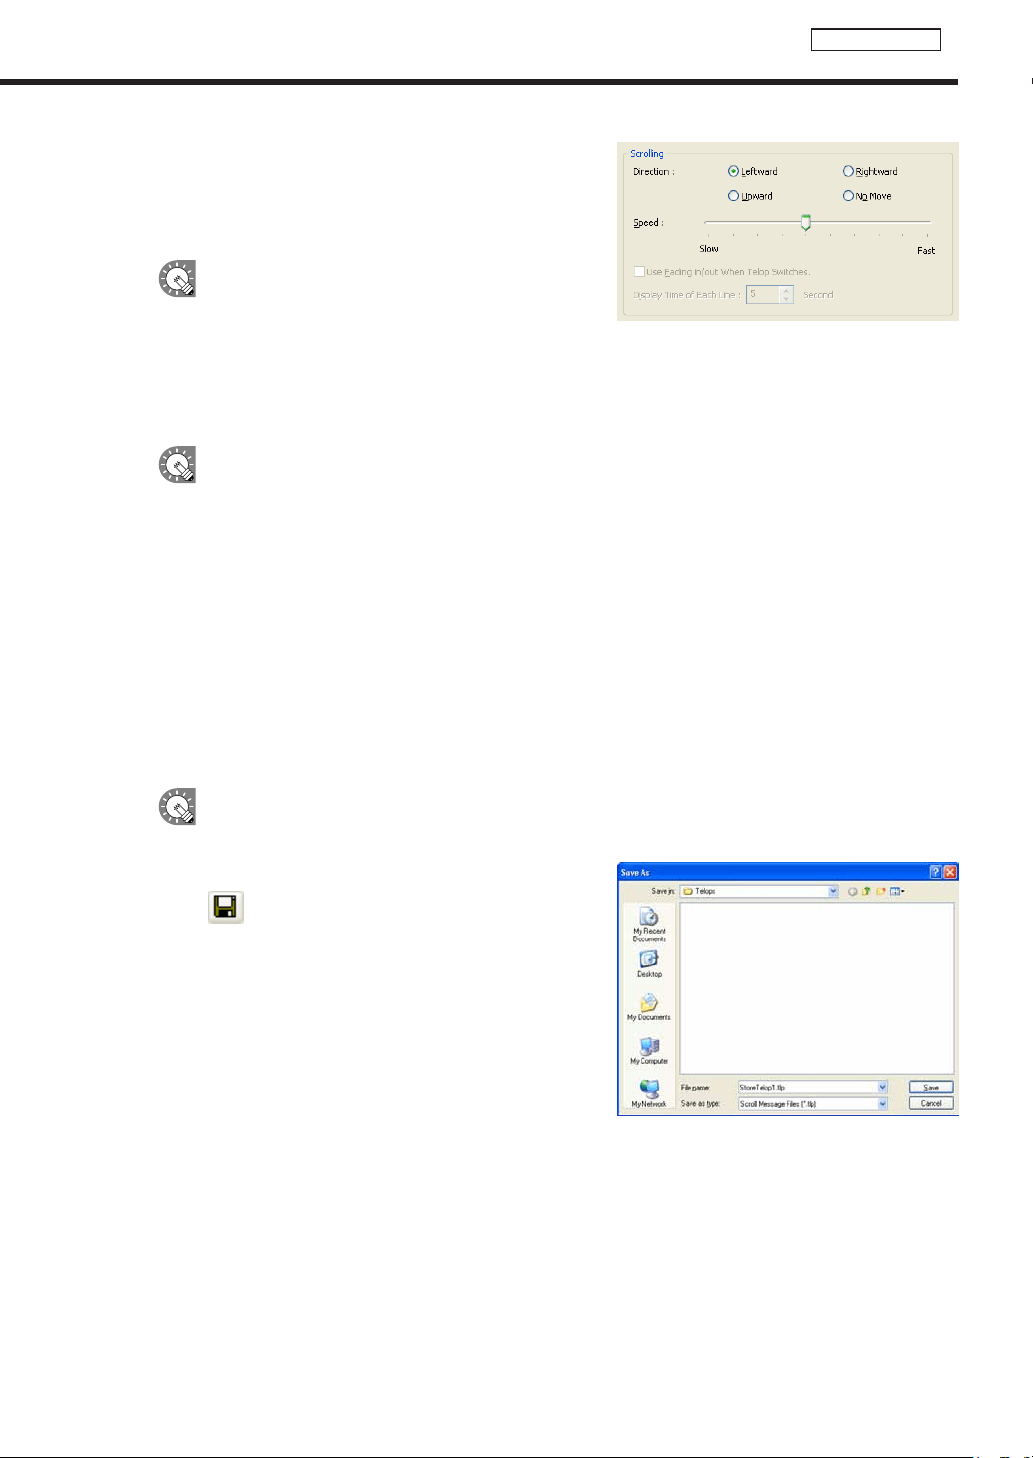
43
Program Editor
5. Set “Scrolling.”
Set the scroll direction and speed of scroll messages.
1) Selectthe“Direction”from“Leftward,”“Rightward,”
“Upward”and“NoMove”optionbuttons.
•Ifthe“Vertical”optionbuttonisselectedin
“MessageFormat,”the“Leftward”or“Rightward”
option button cannot be selected.
•If“NoMove”isselected,scrollmessagesaredisplayedatthecenterofthespecifiedrangelineby
line. (The portion that is outside of this range is not displayed.)
2) Dragthe“Speed”slidertotheleftorrighttosetthescrollspeed(10stepsavailable).
•Evenifthescrollmessagespeedissetatthesamevalue,theactualscrollspeedmaydiffer
dependingontheperformanceofthePC.
•Whenthe“UseTransparent”checkboxischecked,thescrollspeedmaybelowercomparedwith
thatofopaquescrollmessages.Itisrecommendedthattestsbeconductedbyactuallydisplaying
scroll messages before operation.
Settingstobemadewhenthe“NoMove”optionbuttonisselected
3) Set“DisplayTimeofEachLine.”(0to9999seconds)
Scroll messages are displayed line by line. Set the display time.
4) Setwhethertoperformfade-inandfade-out.
Todisplayscrollmessagessothatthecurrentlydisplayedscrollmessagefadesoutandthenextscroll
messagefadesinwhenswitchingbetweenscrollmessages,checkthe“UseFadingin/outWhenTelop
Switches.”checkbox.
If fade-in/fade-out scroll messages are located on a video, the desired effect may not be obtained.
6. Click [Save Scroll Message] from the [File] menu.
Or click
.
The[SaveAs]dialogboxwillappear.
7. Enter a new name in “File Name” and click [Save].
Thecreationofthescrollmessagefileisnowcomplete.
Creating programs
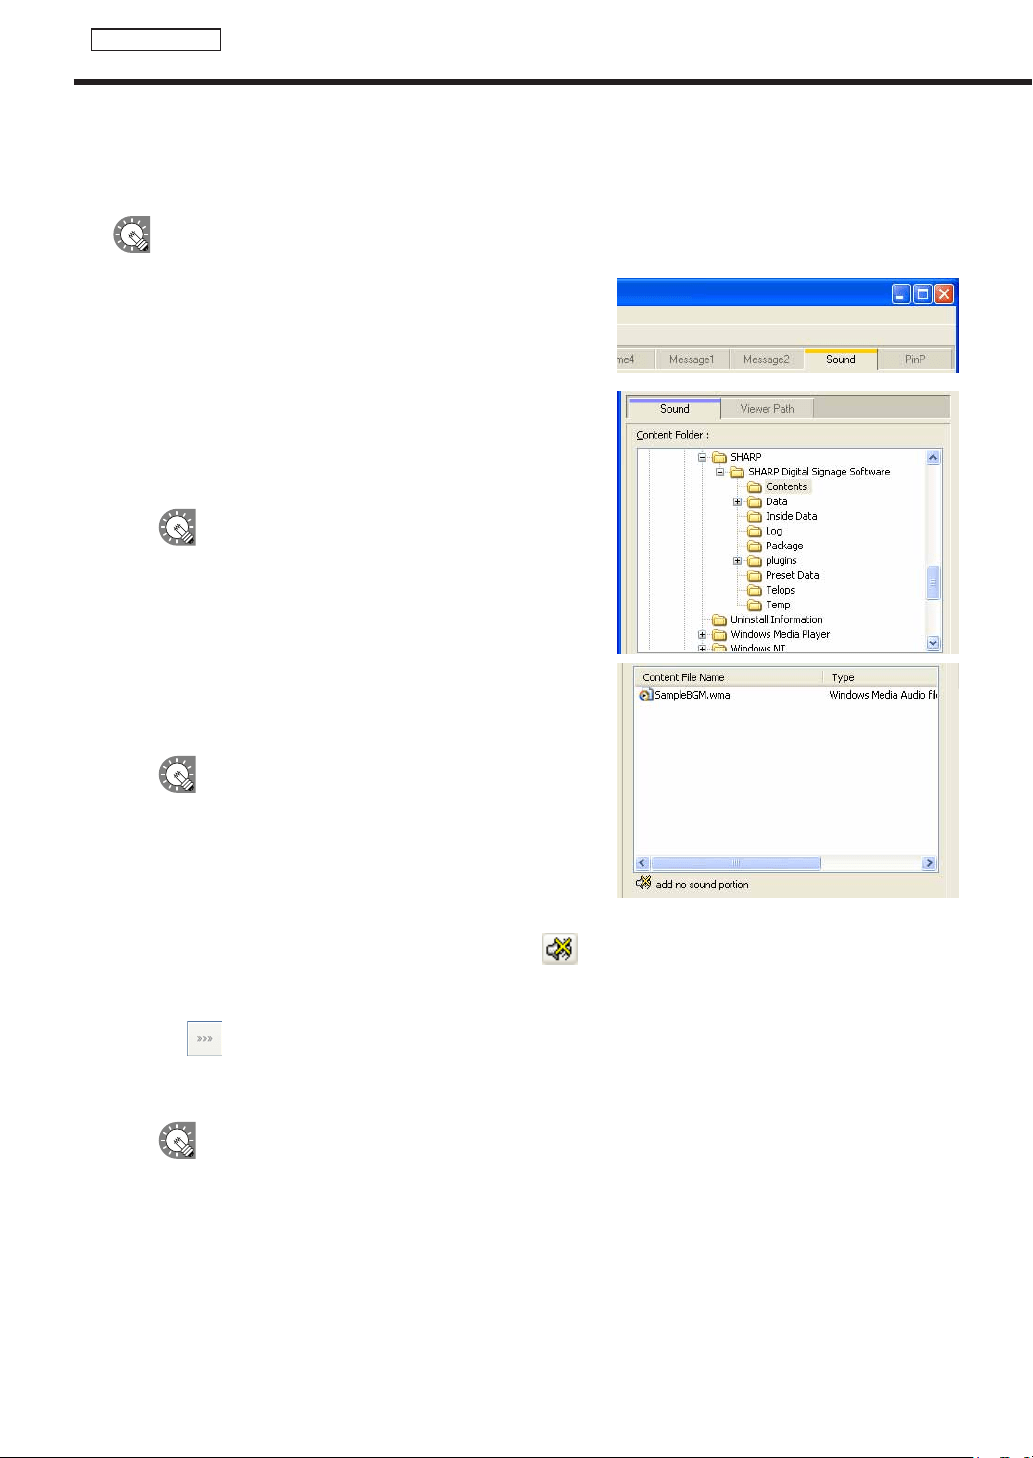
44
Program Editor
●Setting audio and music
Set audio and music (background music) for program display.
Iftwoormorecontentfilescontainingaudioaresetindifferentframes,bothwillplay.
1. Click the [Sound] tab.
2. From the “Content Folder” tree, select the folder where
the content les you want to use are located.
Confirmthatthe[Sound]tabisselected.Ifthetabisnot
selected, click on it.
Youcanalsoplaybackthecontentfilespecified
with“FilePathOnViewerPC”onthe[ViewerPath]
tab.SpecifytheabsolutepathofthetargetPCor
therelativepathoftheMyContentsfolder(
F
p.91).
3. Select the content you want to use from the “Content
File” list.
Foralistofcompatibleaudiofiletypes,refertop.30.
•Clickwhileholdingdown[Ctrl]or[Shift]toselect
multiplecontentfilesatthesametime.
•Audiocannotbepositionedinalayout.Ifyou
selectamovieforthecontentfilethatwillbeused
as audio, a movie preview will be displayed in the
[ContentPreview]window,butonlyaudiowillbe
used when the program is actually displayed.
•Clickingthe“addnosoundportion”button(
)atthebottomofthe“ContentFile”listwillallow
you to add a soundless portion to the playlist. Settings for duration and order of play can be set for
soundlessportionsinthesamewayasforothercontentfiles.
4. Click
.
Contentfilesareaddedtotheendoftheplaylist.
Formoredetailsabouttheplaylist,refertop.36.
Instep3,youcanalsoregistercontentfilesbydouble-clickingthem,ordraggingthemfromthe
“ContentFile”listtothe“Playlist”.
Creating programs

45
Program Editor
●Setting the PIP window
Settheframesize,aspectratio,inputsource,andaudiosourceforthePIPframe.Thisfunctioncanbeused
onlywiththeSHARPLCDmonitor(PNseries).
1. Click the [PinP] tab.
2. Select the “Monitor Model Name”.
3. Set values for each item.
Alistwillappearwhenyouclickonacellinthe“Value”
column.
If using a PN-655 monitor
*Itemsdisplayedvaryaccordingtothe“MonitorModel
Name”.
1) Select“Size”.
Monitorsizesvaryaccordingtoaspectratio.
2) Selecteither“16:9”or“4:3”fromthe“AspectRatio”list.
* Select this according to the video or images that you
want to display.
3) Select“D-Terminal”,“Composite(Video)”,or
“Component”forthe“InputSource”option.
4) Selecteither“PC”or“AV”for“SoundSource”.
5) “Direction”canonlybesetto“Landscape”.
*ThevideosignalmaycausemisalignmentwithPIPlocationandsize.
●Saving a program
Save program
Usethisoptionwhenyouwanttosavethecurrentlyeditedprogramunderitsoriginalname.
1. From the [File] menu, click [Save Program].
You can also save by clicking
.
Aconfirmationmessageforcreatingathumbnailwillappear.
When“ProgramEditor”isstarted,thetitlebarwillread“Untitled”.Ifyouattempttosaveatthis
stagethe[SaveProgram]dialogboxwillbedisplayed.Fortheremainingsteps,pleasereferto
step2of“Saveprogramas”.
2. When you want to create a thumbnail, click [Yes]. When you do not
want to create a thumbnail, click [No].
Whenyouclick[Yes],asmallprogrampreviewforcreatingathumbnail
will appear. Do not perform any operation before this preview screen
disappears.
Formoredetailsabouttheprogramthumbnail,refertop.46.
If you have already created a thumbnail, the program thumbnail is not deleted even if you click
[No].Thepreviousthumbnailisdisplayed.
Creating programs
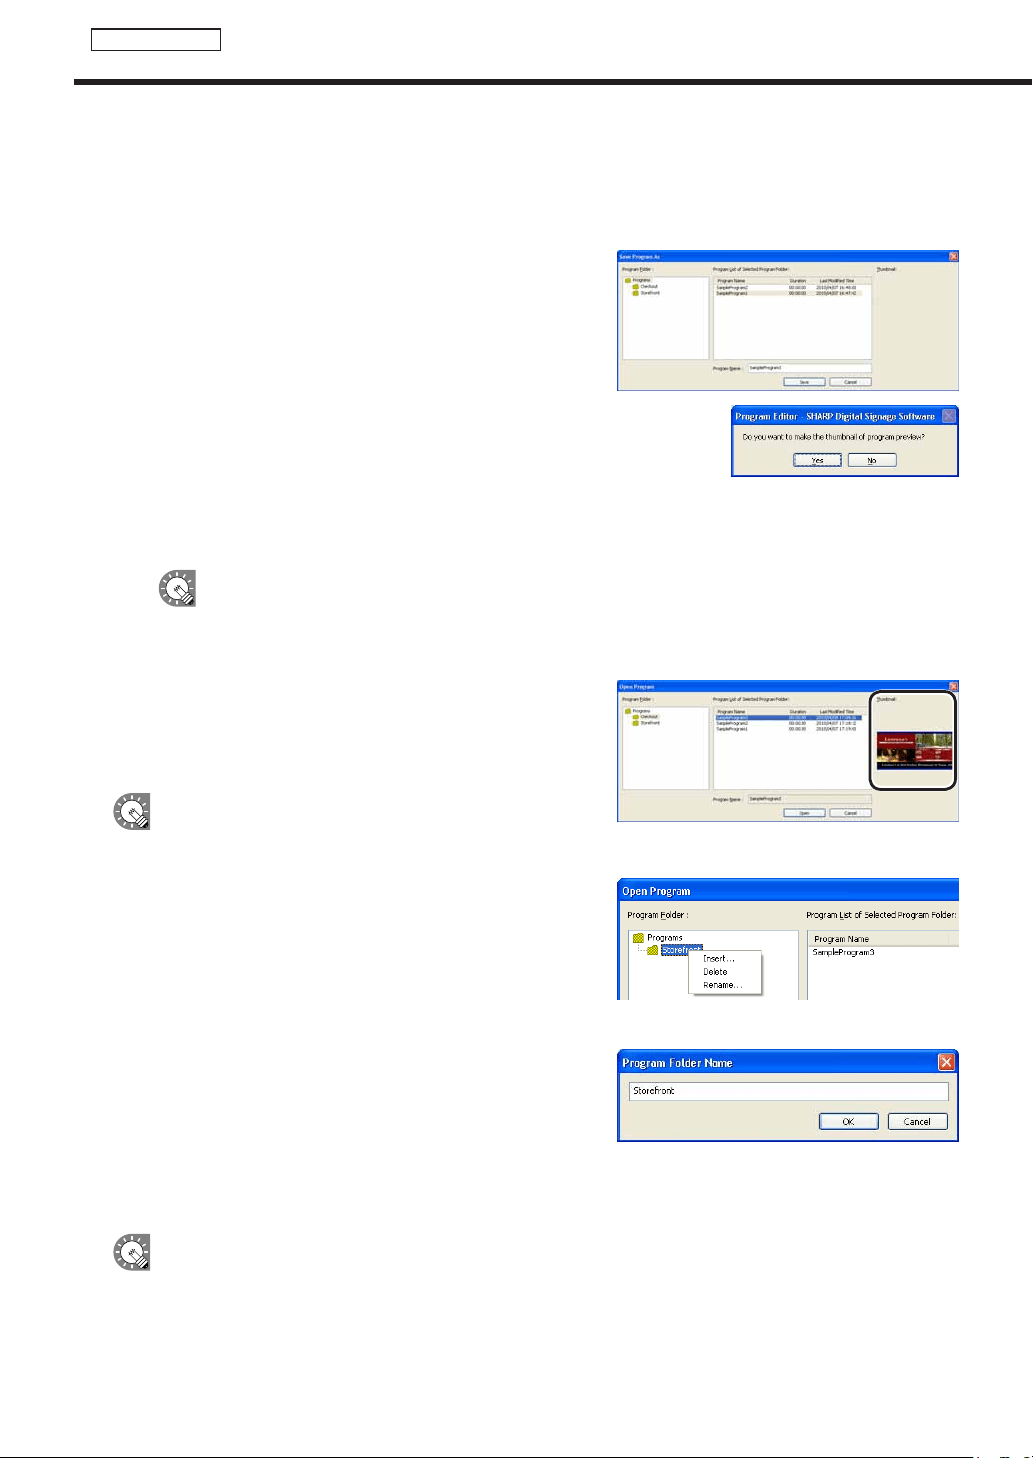
46
Program Editor
Save program as
Usethisoptionwhenyouwanttosavethecurrentlyeditedprogramunderadifferentname.
1. From the [File] menu, click [Save Program As].
The[SaveProgramAs]dialogboxwillappear.
2. Select the program folder in which the program is to be
saved.
Formoredetailsabouttheprogramfolder,seethefollowing.
3. Enter a new name in “Program Name” and click [Save].
Aconfirmationmessageforcreatingathumbnailwillappear.
4. When you want to create a thumbnail, click [Yes].
When you do not want to create a thumbnail, click [No].
Whenyouclick[Yes],asmallprogrampreviewforcreatingathumbnail
will appear. Do not perform any operation before this preview screen
disappears.
Formoredetailsabouttheprogramthumbnail,seethefollowing.
If you have already created a thumbnail, the program thumbnail is not deleted even if you click
[No].Thepreviousthumbnailisdisplayed.
Program thumbnails
When a program thumbnail is created, it is displayed in the
[OpenProgram],[SaveProgramAs],[DeleteProgram],[Import
Program],and[ExportProgram]dialogboxesandthe[Program]
tab of the timetable editor.
•Therearecasesinwhichavideoisnotdisplayed.
•IfthePIPfunctionisused,thePIPportionisnot
displayed.
Program Folder
•Programscanbesavedindifferentprogramfoldersaccording
to the type of program.
•Theprogramsintheselectedprogramfolderaredisplayedin
“ProgramListofSelectedProgramFolder.”
•
In the menu that appears when right-clicking the program storage folder, the following operation can be performed.
•Insert:
Adds a new program folder under the selected folder.
Enteranewnameinthe[ProgramFolderName]
dialogboxandclick[OK].
•Delete: Deletestheselectedfolder.Iftheselectedfolder
contains a program, it cannot be deleted.
•Rename:Changesthenameoftheselectedfolder.Enteranewnameinthe[ProgramFolderName]dialog
boxandclick[OK].
•The“Programs”folderinthefirstlevelcannotbedeletedorrenamed.
•Iftheselectedfoldercontainsaprogram,itcannotbedeleted.
•Bydragginganddroppingthefolder,thelocationofthefoldercanbechanged.
•Bydragginganddroppingaprogramin“ProgramListofSelectedProgramFolder”toanotherfolder,the
program can be moved.
Creating programs
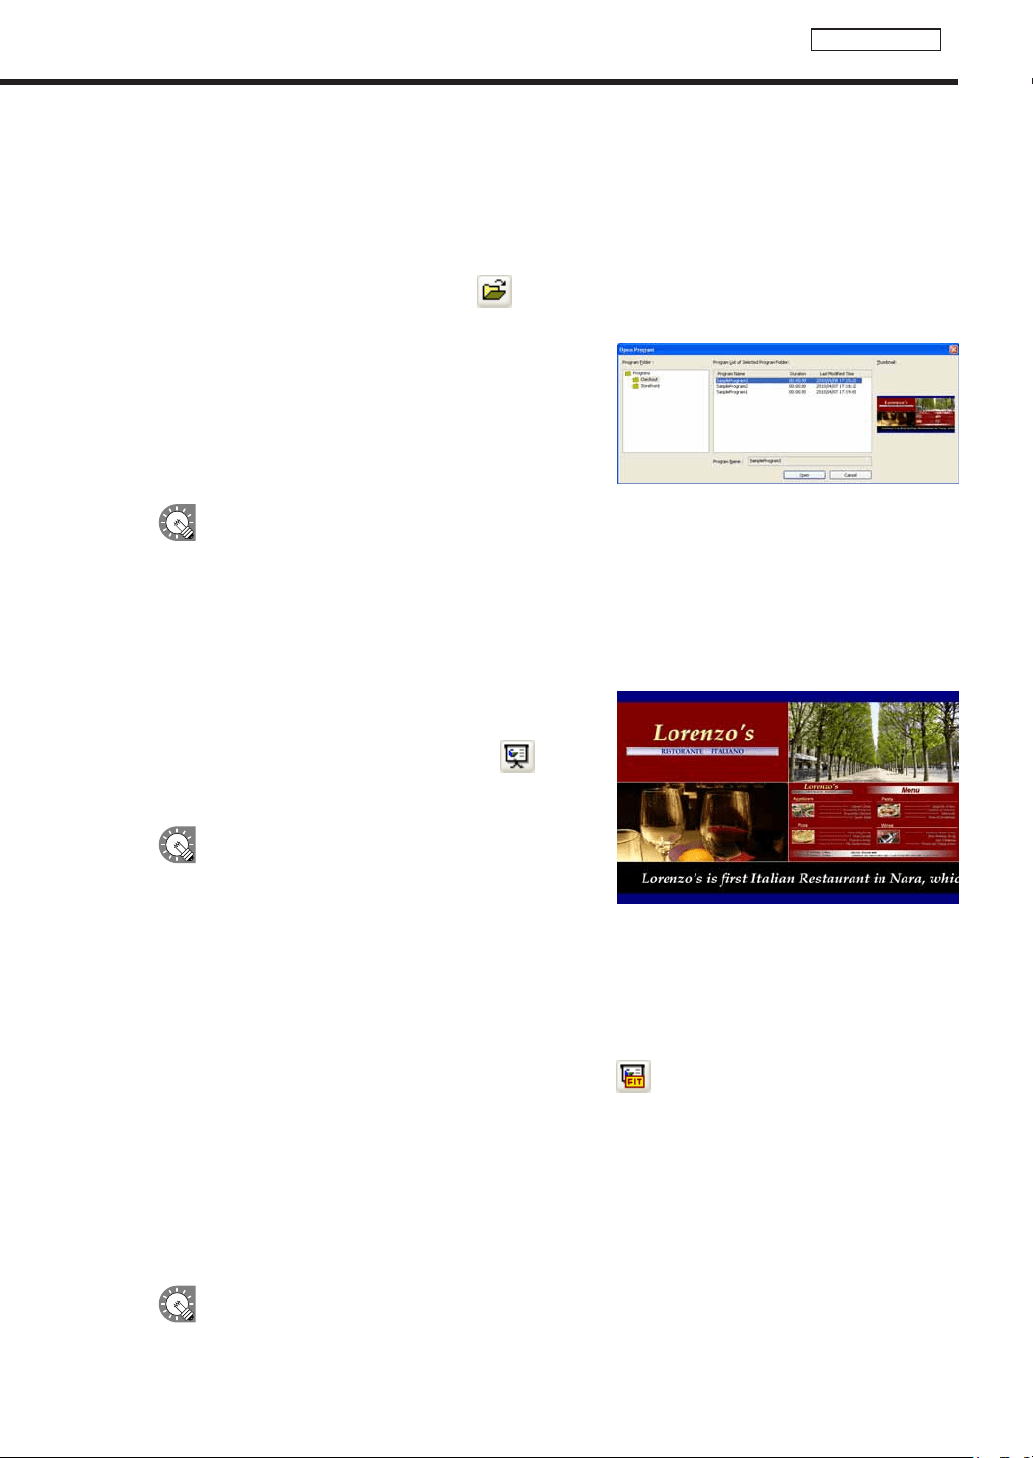
47
Program Editor
●Opening a program
Loadaprogramthatyouhavealreadysavedanduseit.
Editingonlytheplacesyouwanttochangeinanexistingfileandsavingthefileunderanewnameisan
effective way to create programs.
1. From the [File] menu, click [Open Program].
You can also open a program by clicking
.
The[OpenProgram]dialogboxwillappear.
2. Select the program folder containing the program.
3. From the “Program List”, select a program, and click
[Open].
TheprogramyouselectedwillbeloadedintoProgramEditor
and you will be able to edit it.
Takecarewhensavingtheprogramyouhaveeditedusingthe[SaveProgram]option,asthe
changesyouhavemadewillbereectedintheoriginalfile.
●Checking a program
Checkaprogramusingtheprogrampreviewfunction.
Two previews with the same data will be displayed.
1. If you want to preview a program at its original size, click
[Preview Program [Original size]] from the [View] menu.
You can also preview a program by clicking
.
A preview of the currently edited program will be displayed at
itsoriginalsize.
•Previewscanalsobedisplayedbypressing[F5].
•Ifyouwanttousetheprogrampreviewfunctionon
amoredetailedsetting,check“SetConfiguration
beforePreviewProgram”onthe[View]menu.
•Thisenablesyoutosetspecificdatesand
times,specificpaneldisplaysandotherprogram
conditions and display previews.
If you want to preview a program at screen size, click [Preview Program [Fit screen]] from the [View]
menu.
You can also preview a program at screen size by clicking
.
Apreviewofthecurrentlyeditedprogramfittedtothesizeofthescreenwillbedisplayed.
2. Check the preview.
PowerPoint and scroll messages will be displayed in the foreground, regardless of display priority order.
Set PowerPoint data so that it plays repetitively by setting slide transition to advance slides automatically
(automatic slideshow).
Do not use the mouse or keyboard (e.g. to click on a window etc.) during program display. Doing so may
change the window display order or alter the content to be played.
•Toclosethepreview,clickthepreviewwindowandpress[Esc].
•Iftheprogramscreensizeislargerthanthedisplayresolutionofthemonitor,thepreviewcannot
be displayed in full screen mode.
Creating programs
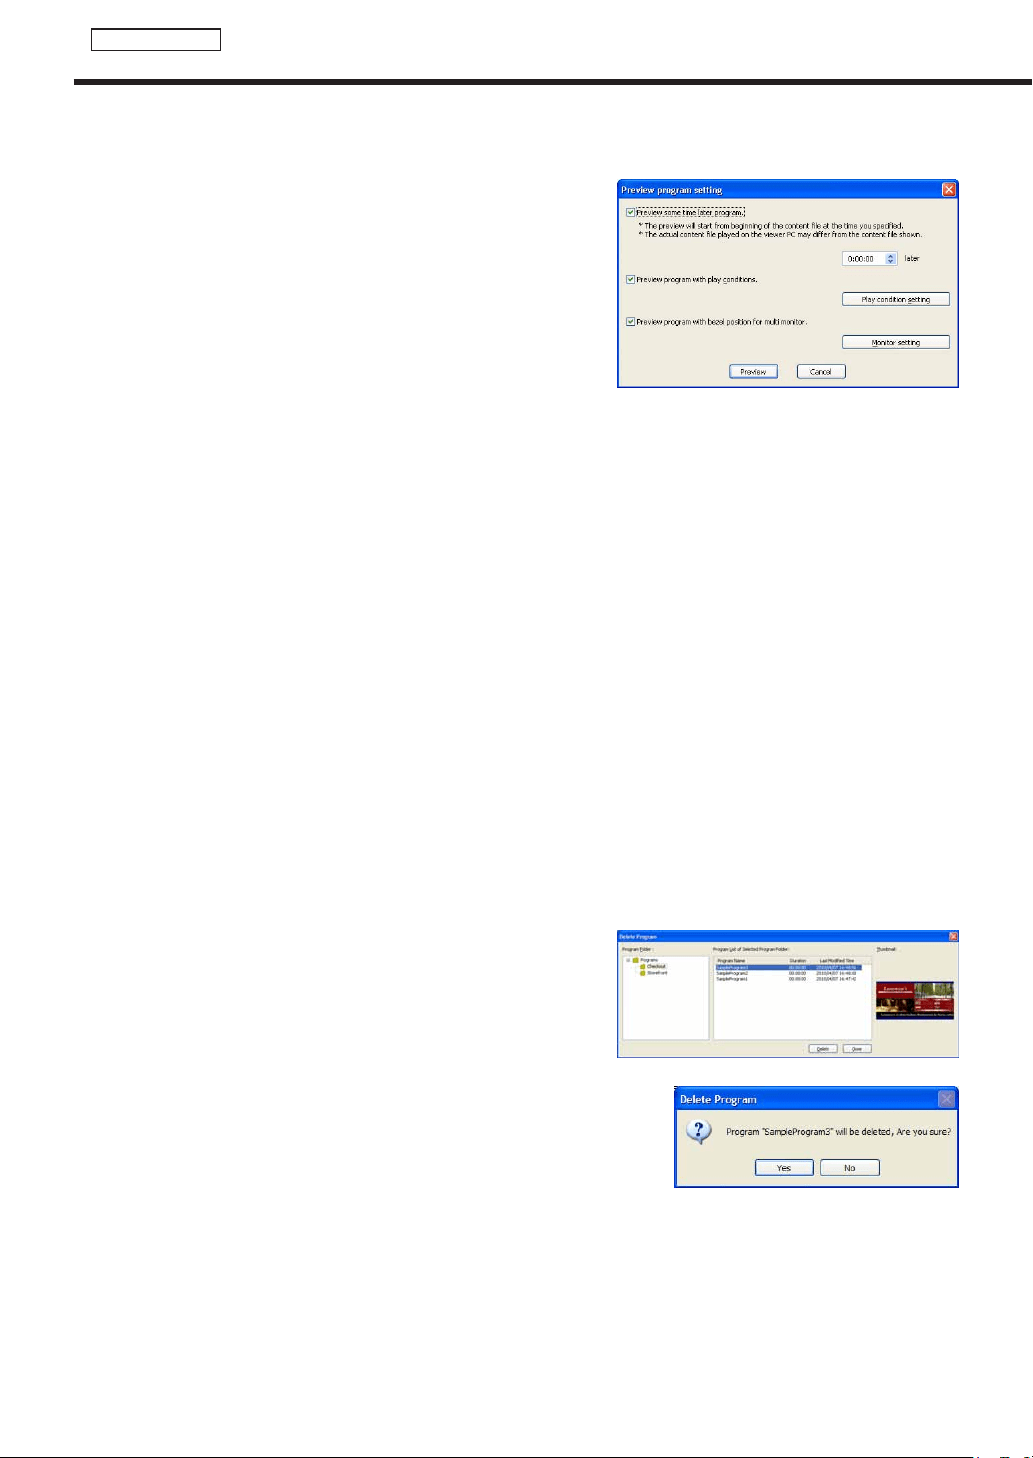
48
Program Editor
●Preview Program Display Settings
Ifyoucheck“SetConfigurationbeforePreviewProgram”onthe
[View]menu,the“Previewprogramsetting”screen(*ascreen
image displayed on the screen) will be displayed during the
programpreview.Youcansetthefollowingconditions,andif
youclickthe“Preview”button,thepreviewwilloccurunderthe
conditions you have set.
•Previewthisprogramafterasetamountoftimehaspassed:
Displaystheprogrampreviewafteraspecifiedamountoftime
haspassed.Theveryfirstcontenttobeplayedwillplayfrom
thebeginningofthatcontent,startingatthespecifiedtimeand
playing for the amount of time set on the Playlist. There are
caseswheretheveryfirstcontenttobeplayedwillendabruptly,
andthepreviewwillcontinueontothenextcontent.
•Previewthisprogramaftersettingreferenceconditionsforconditionalcontent:
Click“PlayConditionSetting”tosetconditions
•“Playdate” :
Sets the date on which the program will be played.
•“PlayTime” :
Sets the time at which the program will be played.
•“Panelname” :
Sets the panel on which the program will be played.
•“Group” :
Sets the group with which the program will be played.
•“Comment” :
Sets comments on the panel on which the program will be played.
•Displaythisprogrampreviewovertheedgesofmultiplemonitors:
Displays the program preview over the edges between panels when using multiple monitors
* Think of the edges as rough estimates.
•“Modelname” :
Select the monitor model name.
•“Composition” :
Select the multi-monitor setup.
●Deleting a program
Delete unnecessary programs.
1. Click [Delete Program] from the [File] menu.
The[DeleteProgram]dialogboxwillappear.
2. Select the program folder containing the program.
3. Select a program from the “Program List” and click
[Delete].
4. Click [Yes].
The selected program has now been deleted.
5. Click [Close].
Creating programs
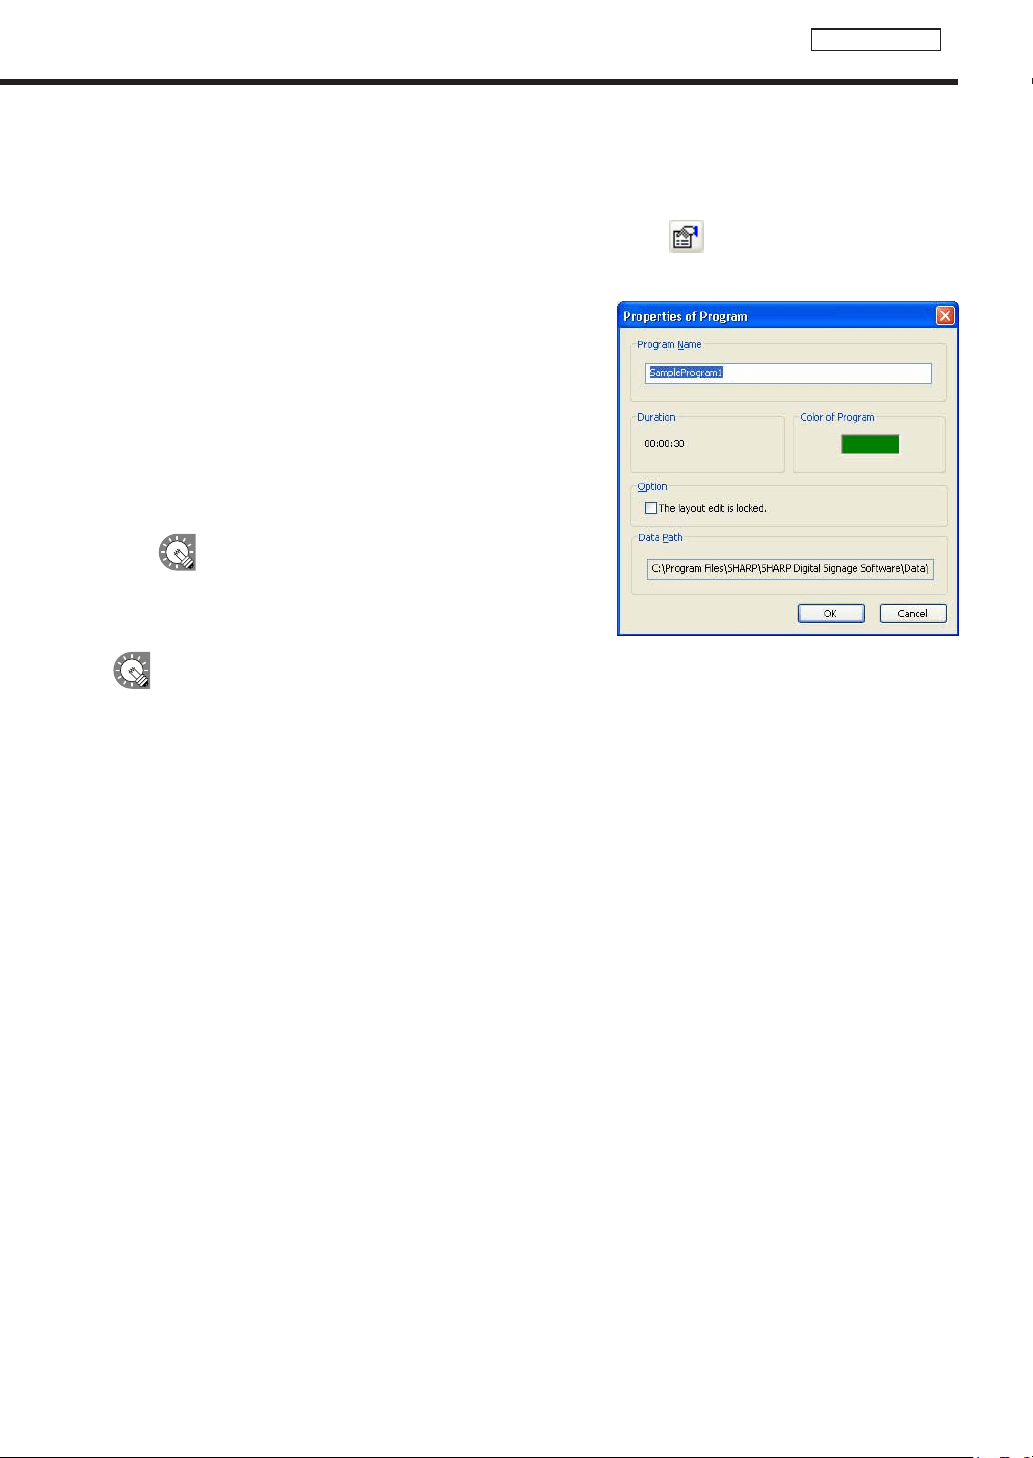
49
Program Editor
●Displaying program properties
Changeprogramnamesandprogramcolors.
1. Click [Properties of Program] from the [File] menu.
You can also display and change program properties by clicking
.
The[PropertiesofProgram]dialogboxwillappear.
Informationaboutthe“ProgramName”,“Duration”,“Colorof
Program”,“Option”,and“DataPath”isdisplayed.
• The“ProgramName”canbechanged.
• Clickthecolorswatchtodisplaythe[Color]dialogbox
and change the program color.
• Ifyoucheckthe“Thelayouteditislocked.”checkbox,
layouteditingisdisabled.Checkthischeckboxwhen
you want to prevent the layout from being changed due
toamistakeduringtheoperationofProgramEditor.
The“ColorofProgram”isthecolorusedtodisplay
theprogramintheTimetableEditor.
2. Click [OK].
“Duration”maybedifferentfromtheactualduration.
Creating programs
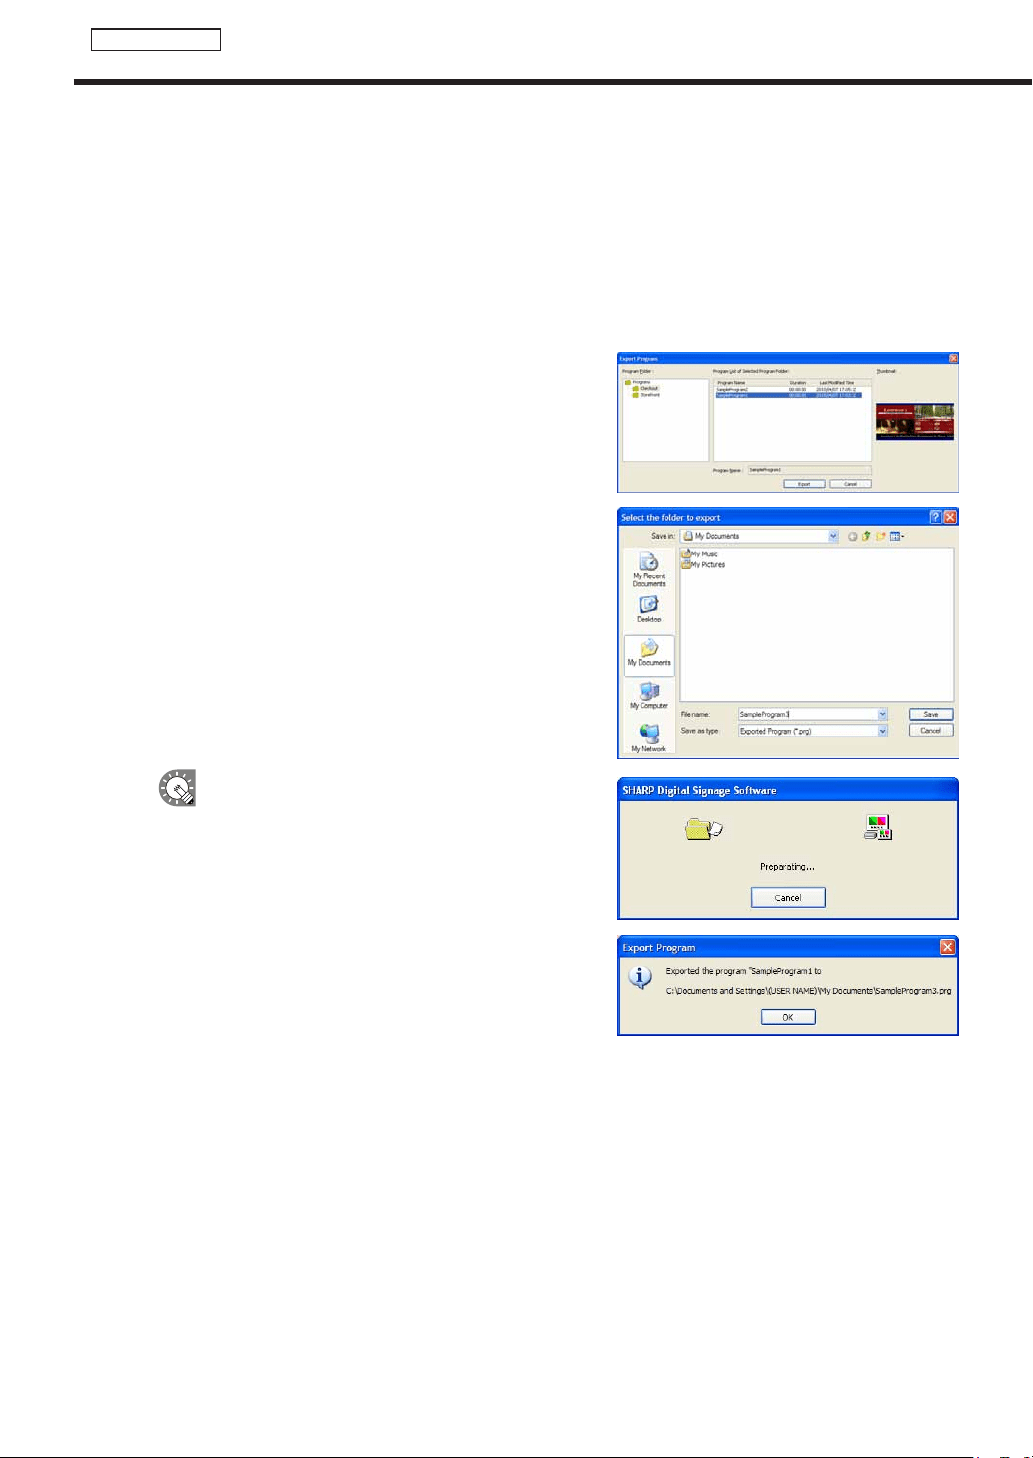
50
Program Editor
●Importing/exporting a program
Exporting a program
TheexportfunctionisusedtowriteoutaprogramsothatitcanbeusedwiththisproductonanotherPC.
1. From the [File] menu, click [Export Program].
The[ExportProgram]dialogboxwillappear.
2. Select the program folder containing the program.
3. From the “Program List”, select a program, and click
[Export].
The[Selectthefoldertoexport]dialogboxwillappear.
4. Specify the directory where you want to save the le,
enter a “File name”, and click [Save].
The[ExportProgram]dialogboxwillappear.
A screen like the one on the right will appear during
theexport.Click[Cancel]tocanceltheexport.
5. Click [OK].
Theprogramexportisnowcomplete.
Creating programs
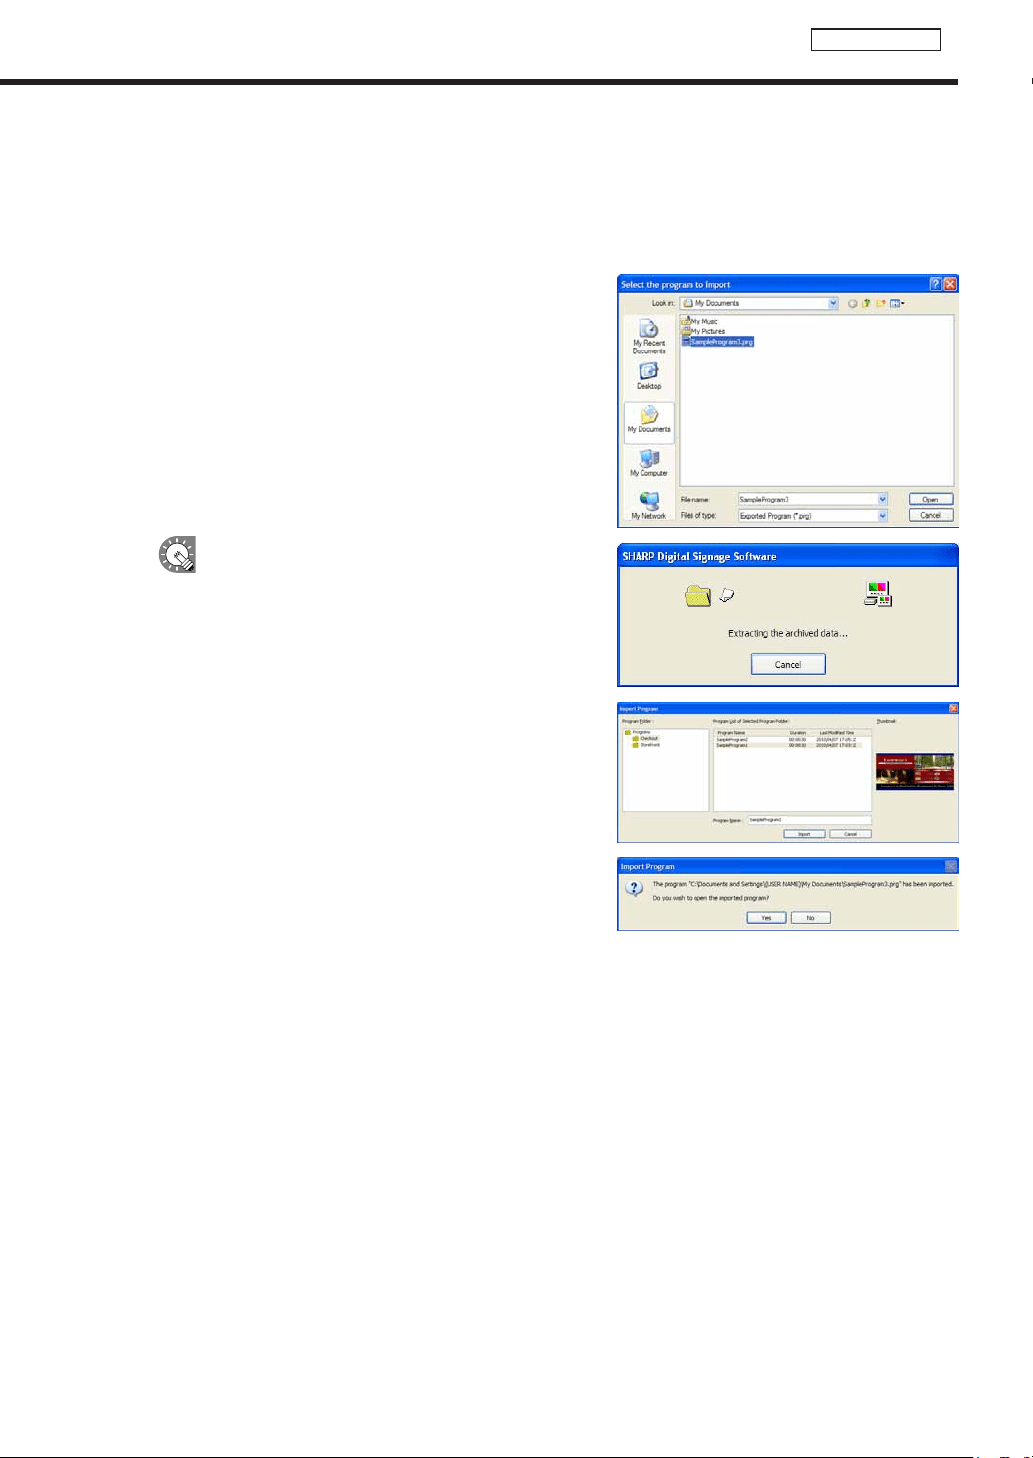
51
Program Editor
Creating programs
Importing a program
TheimportfunctionisusedtoloadanexportedprogramthathasbeencreatedwiththisproductonanotherPC.
1. From the [File] menu, click [Import Program].
The[Selecttheprogramtoimport]dialogboxwillappear.
2. Select a (.prg) le to import, and click [Open].
The[ImportProgram]dialogboxwillappear.
A screen like the one on the right will appear while
theimportisbeingprepared.Click[Cancel]to
cancel the import.
3. Select the program folder in which the program is to be
saved.
4. Enter a “Program Name”, and click [Import].
5. Click [Yes].
The program will be saved with the name you entered.
The program import is now complete.
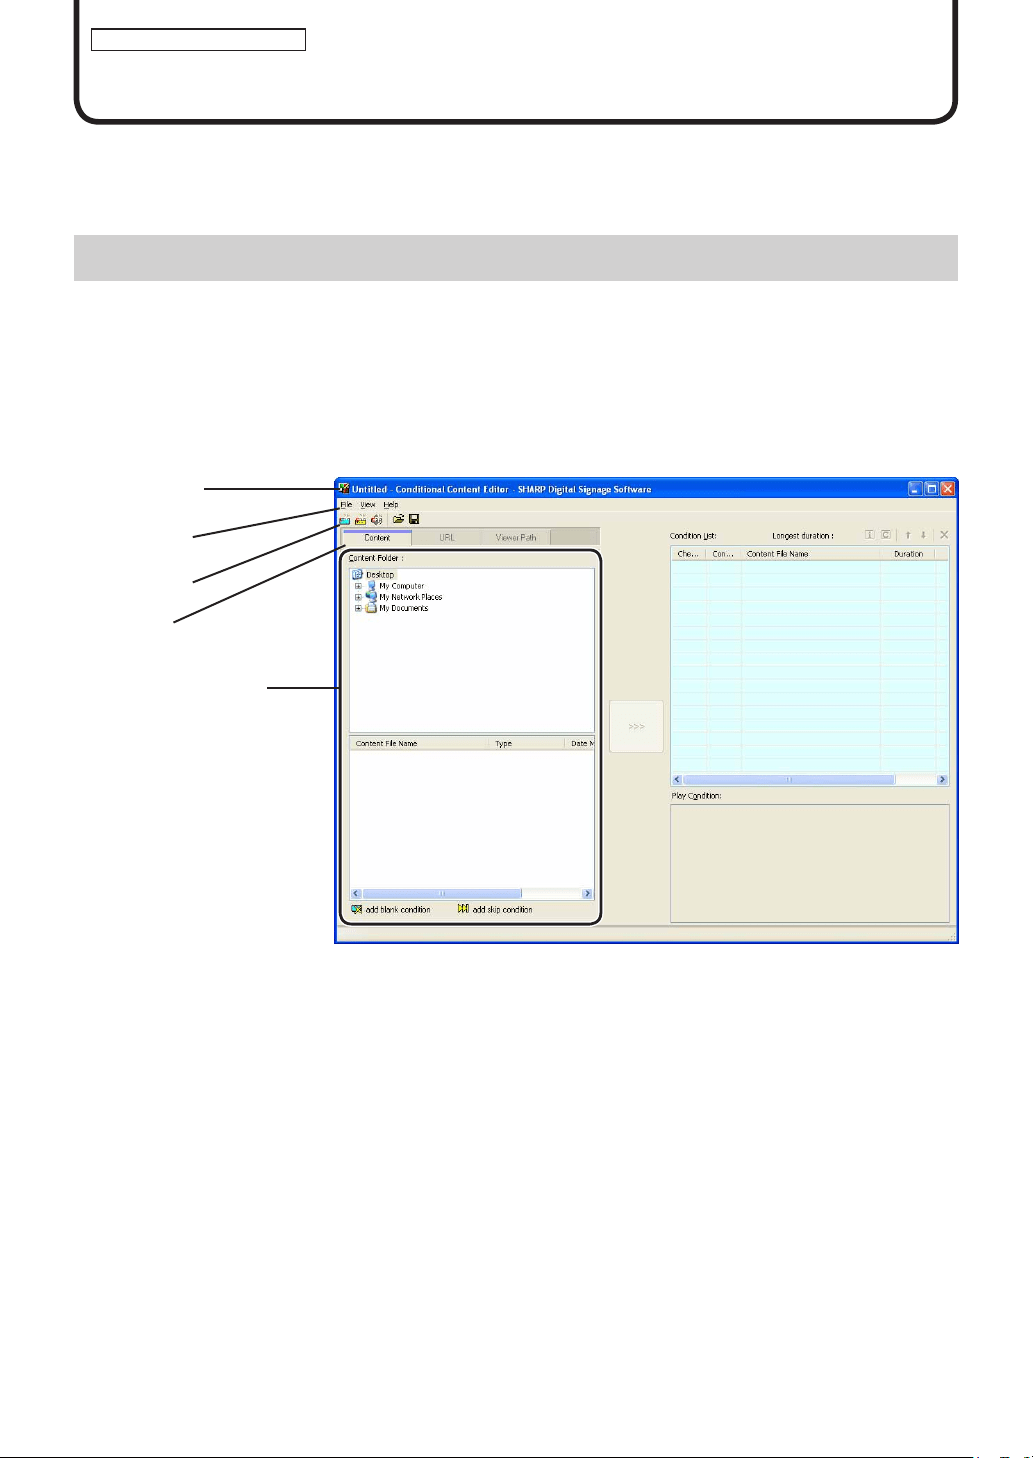
52
Conditional Content Editor
Conditional Content
When creating Playlists with the program editor, most of the content is the same, and in many cases, multiple
Playlists with only one differing part are created. In these cases, you can display Playlists with only the differing
partchangedaccordingtospecifiedconditionswhenusingconditionalcontent.
Basic Screens for SHARP Digital Signage Software Conditional Content Editor
●Launching SHARP Digital Signage Software Conditional Content Editor
1. Click the [Start] button on the Windows Taskbar, and then click “All Programs” – “SHARP Digital
Signage Software” – “Tools” – “Conditional Content Editor” in order.
Thiswilllaunch“ConditionalContentEditor.”
●Basic Screens for SHARP Digital Signage Software Conditional Content Editor
1) Title bar
Displaysthefilename.WhenEditorlaunches,thetitlebarwillread“Untitled.”Whenafileissaved,itwillchange
tothenameofthefile.
Whencontentofanopenedfileischanged,thetitlebarwilldisplayanasterisk(*)afterthefilename.
*YoucanregisterandeditPlaylistsbyselecting“ReplacetoConditionalContent”fromtheprogrameditor
Playlist.
1)Titlebar
2)Menus
3) Toolbar
4)Tabs
5)SettingsWindow
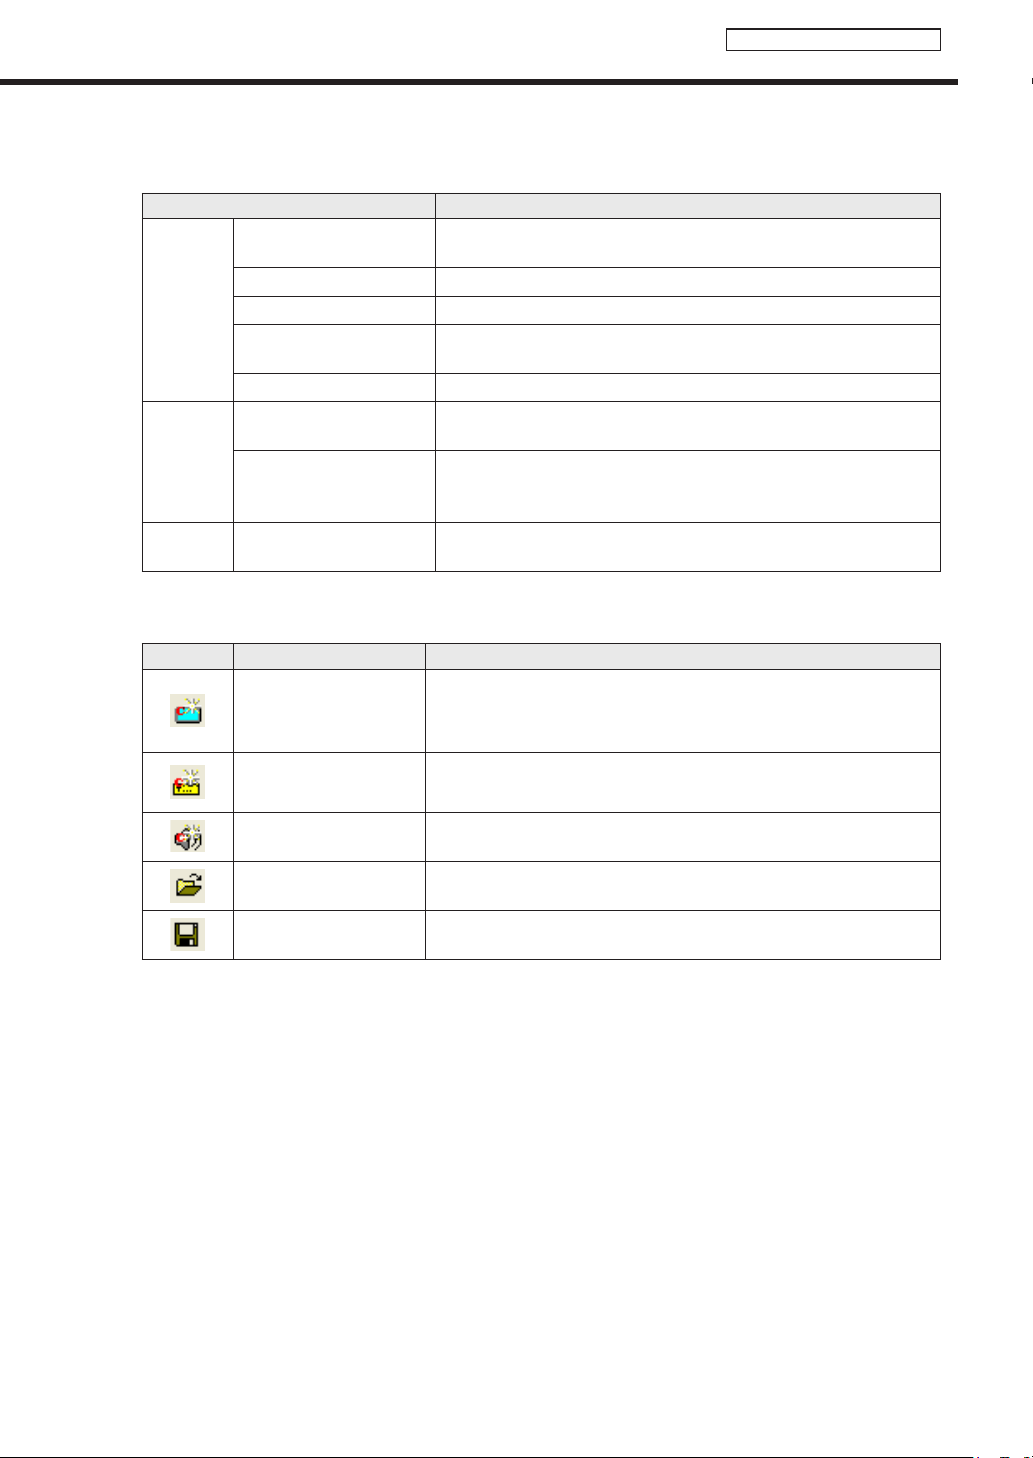
53
Conditional Content Editor
Basic Screens for SHARP Digital Signage Software Conditional Content Editor
2) Menus
Thefollowingarethecontentsofthe[File],[View],and[Help]menus.
Menu option Description
File
CreateNewConditional
Content
Opensanewfile.
OpenConditionalContent Reads saved conditional content.
SaveConditionalContent Saves the currently edited conditional content.
SaveConditionalContent
As
Saves the currently edited conditional content under a different name.
Exit QuitsConditionalContentEditor.
View
ShowContentPreview
window
Displays a preview of the currently edited conditional content in a
windowthesizeofthepreviewwindow.
Refresh
Updatescontentfromthecontentfoldersintheeventthatcontent
fileshavebeenaddedtoordeletedfromtheConditionalContent
FoldersinceSHARPDigitalSignageSoftwarewaslaunched.
Help
AboutConditionalContent
Editor
DisplaysversioninformationforConditionalContentEditor.
3) Toolbar
The function of each button (icon) is as follows.
Icon Menu option Description
CreateNewConditional
ContentforBackground/
Frames
Createsnewconditionalcontentforbackground/frames.
CreateNewConditional
ContentforMessages
Createsnewconditionalcontentforscrollmessages.
CreateNewConditional
ContentforSound
Createsnewconditionalcontentforsound.
OpenConditional
Content
Reads saved conditional content.
SaveConditional
Content
Saves conditional content.
4) Tabs
Whenyouclickanyofthe[Content],[URL]or[ViewerPath]tabs,youwillgotothesettingwindowforthat
tab.
5) Settings Window
Set details for the tab that you selected.

54
Conditional Content Editor
Creating Conditional Content
Creating Conditional Content
●Compatible Content File Formats
Thefollowingfileformatscanbeusedascontent.
Types of Conditional
Content
Compatible File Extensions
Background,Frame
.jpg,.jpeg,.gif,.png,.bmp,.avi,.mpeg,.mpg,.wmv,.asf,.mov,.swf,.ppt,
.pps,.htm,.html,.exe
Scroll Messages .tlp
Audio .wav, .mp3, .au, .aif, .aiff, .wma, .mid, .midi, .mov
●Conguring Conditional Contents
Setprojectnames,playbackstartdates,andTargetPCpanelattributesforconditionalcontent.
ContentFoldertree
ContentFileList
ConditionList
PlayCondition
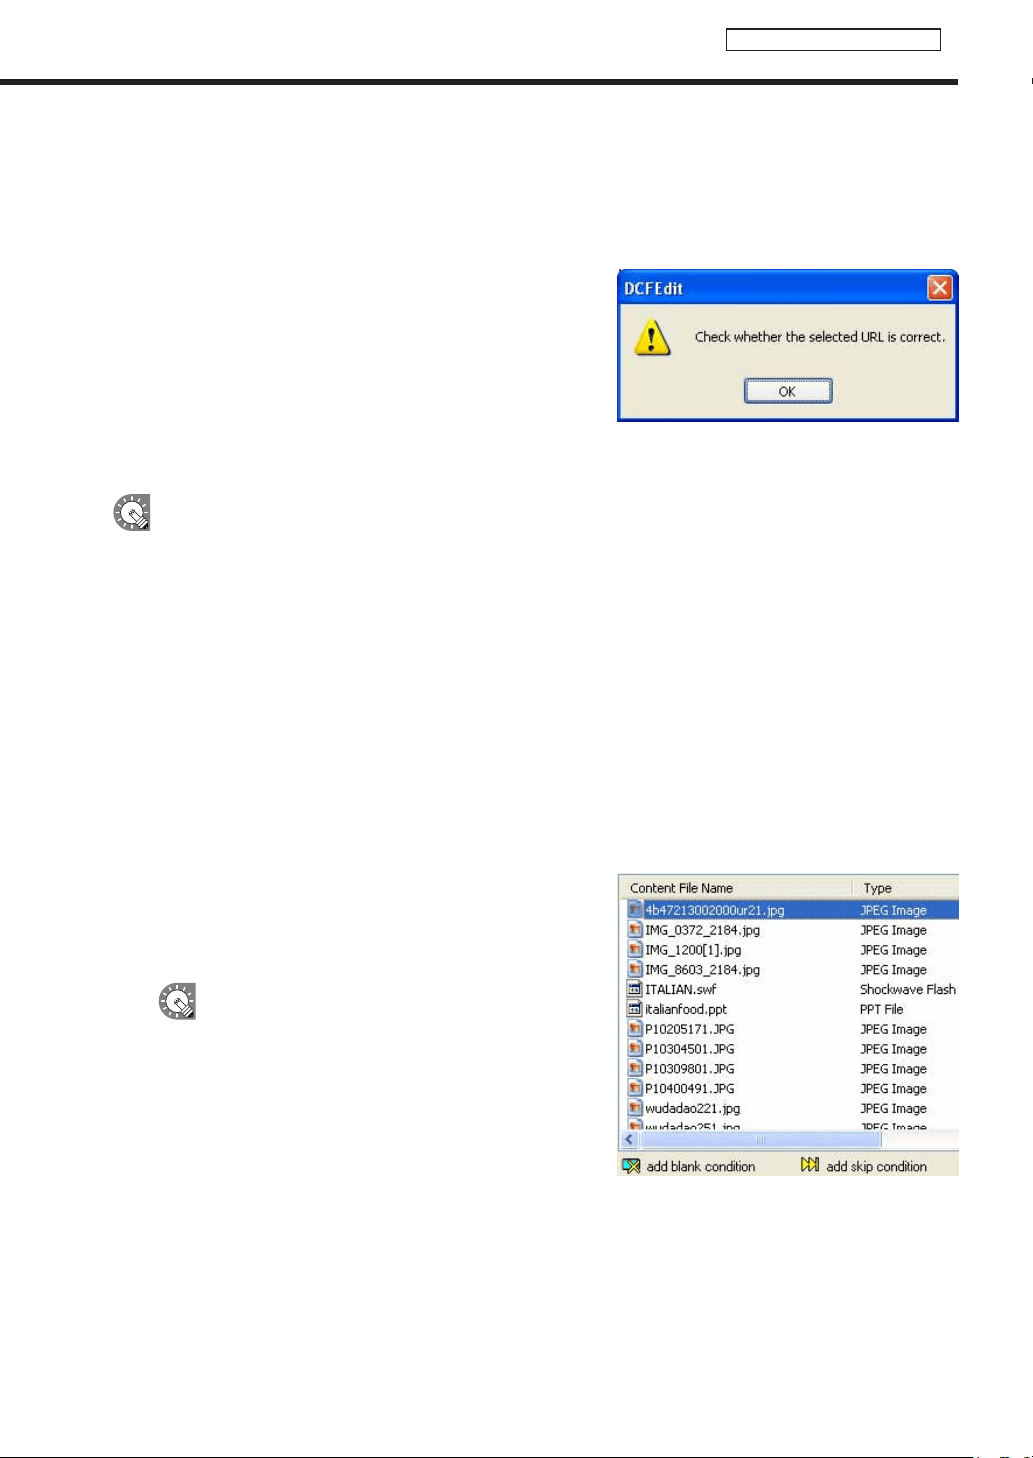
55
Conditional Content Editor
Creating Conditional Content
1. From the “Content Folder” tree, Select the folder where the content les you want to use are
located.
The [URL] Tab
DisplaystheHTMLofaspecifiedURLascontent.
EnteraURLthatcanbereferencedbytheTargetPC.
IfyourPCcanconnecttotheInternet,clicking[ViewURL]will
connecttotheURLyouhaveentered.
CheckthatyouhaveconnectedproperlyandthattheURL
has been displayed correctly.
IftheURLisincorrect,adialogboxliketheoneontheright
will appear.
[Viewer Path] Tab
Displaysthecontentfilespecifiedwith[FilePathOnViewerPC].YoucanspecifyanEXEfile.Enterapath
thatcanbereferencedbythetargetPC.ForanEXEfile,“Parameters”canbeadded.
•Whendisplayinglargecontentfilesthatarenotfrequentlyupdated,savethefilesonthetargetPC
in advance and only enter the paths that refer to them. This will help reduce the time it takes to send
program contents.
•SpecifytheabsolutepathofthetargetPCortherelativepathfromMyContentsFolder(refertop.100).
•Thefollowingparameterscanbeused.
%L : Xcoordinateoftopleftcornerofframe
%T : Ycoordinateoftopleftcornerofframe
%W : Width of frame
%H : Height of frame
•Thissoftwareonlylaunchesorclosesspecifiedexecutablefilesataspecifiedtime.Itdoesnotguarantee
theactionsofanyexecutablefilesitlaunches.
•Dependingonthespecificationsofthefilethatisexecuted,itmaynotbeabletolaunchorclose
correctly, or it may not be able to display windows in the correct position.
2. Select the content les you want to use from the Content
File List.
RefertoPage54forfileformatscompatiblewithbackgrounds
and frames.
•Youcancheckcontentfilepreviewsinthe[Show
ContentPreviewWindow]window.(refertop.56)
•IfusingHTMLcontent,makesurethatimages,
moviesandotherfilesreferredtointheHTML
code are transferred to the same location, or a
subdirectoryofthesamelocation,wheretheHTML
fileitselfisstored(attachedfiles).
Thesecanbeaddedfromcontentfileproperties.
(refertop.57)
Makesurethatallattachedfilesaredefinedbytheir
relativepathsintheHTMLfile.
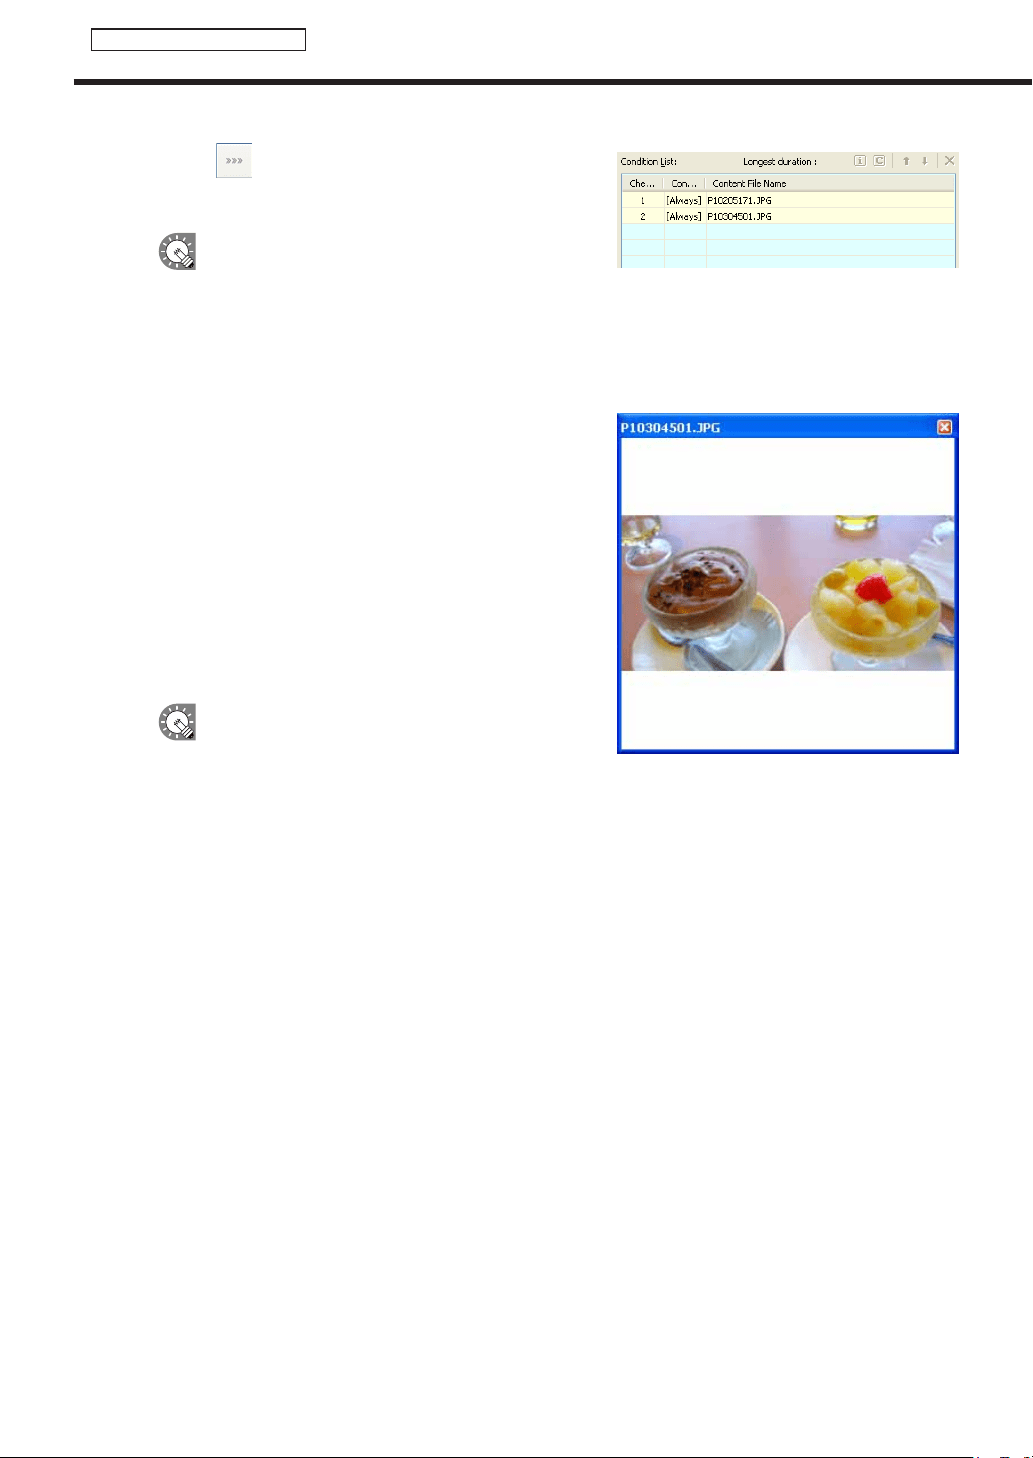
56
Conditional Content Editor
Creating Conditional Content
3. Click the icon.
Contentfilesareaddedtotheendoftheconditionlist.
Formoredetailsabouttheconditionlist,refertoPage59.
•InStep3,youcanregistercontentfilesbydouble-
clickingthemorbydraggingthemfromtheContent
Filelisttothe[conditionlist].
•Thecontentfilesfromtheconditionslistcanbecopiedbydroppinganddraggingthemwhile
holdingthe[Ctrl]key.
Preview Content
Youcanpreviewcontentfilesinthe[ShowContentPreview
Window]window.
Click[ShowContentPreviewWindow]fromthe[View]menu
topreviewthefiles.
Previewsfromthefollowingtypesoffileswillnotbedisplayed
immediately.Topreviewthesefiles,clicktherelevanticon
displayedinthe[ShowContentPreviewWindow]window.
(Clickthetextstringifpreviewingascrollmessage.)
•Fileswithasizeof2MBorhigher
•Videofiles
•PowerPointfiles(Previewdisplayedinfullscreenmode)
•
Scrollmessagefiles(Previewdisplayedinfullscreenmode)
•SetPowerPointdatasothatitplaysrepetitively
by setting slide transition to advance slides
automatically (automatic slideshow).
•Donotusethemouseorkeyboard(e.g.toclickonawindowetc.)duringprogramdisplay.Doing
so may change the window display order or alter the content to be played.
Conditional Content
Contentconditionsarecheckedandonlythefirstcontentthatmatchesthoseconditionsisdisplayed.Thelist
plays in order starting from the top, and contents that do not match conditions are skipped.
The duration is the amount of time it takes to play content.
ContentfilesontheplaylistwiththelongestdurationsaredisplayedontheMaximumDurationList.
Therearecaseswherethemaximumdurationisdifferentfromtheactualduration(forexample,when“Play
Nextcontent”issetinthe“playsetting”)
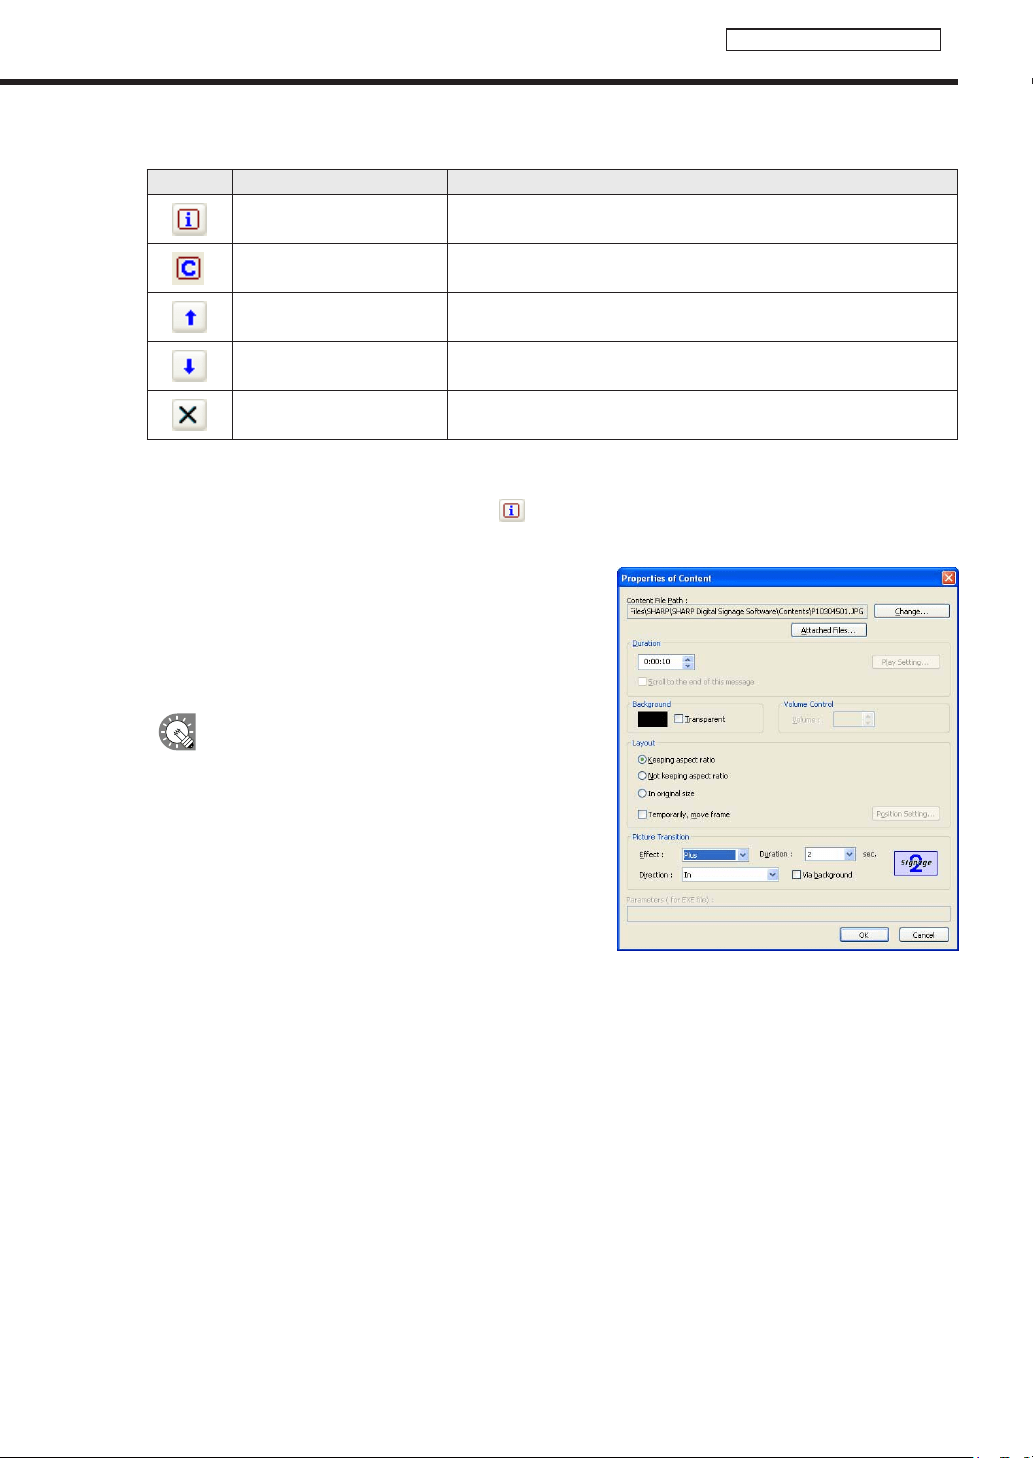
57
Conditional Content Editor
Creating Conditional Content
Clickingthebuttonsonthetoprightofaplaylistperformsthefollowingactions:
Icon Menu option Description
Show the properties of the
content
Displaysthepropertiesofthecurrentlyselectedcontentfile.
See below for more details.
Set content playback
conditions
Sets playback conditions for selected content.
Formoredetails,refertoPage59.
Move content upward
Movestheselectedcontentfileoneplaceforward(up)onthelist.
(Youcannotmovemultiplecontentfiles.)
Move content downward
Movestheselectedcontentfileoneplacebackward(down)onthelist.
(Youcannotmovemultiplecontentfiles.)
Delete content
Deletestheselectedcontentfilesfromtheconditionslist.
Youcandeletecontentfilesbypressingthe[Delete]key.
Properties of content
Fromtheplaylist,selectacontentfile,andclick
todisplaythe[PropertiesofContent]dialogbox.
Thefollowingsettingsmaybecheckedandadjusted:
1) Content File Path
Displaysthepathtothecontentfile.
•Clicking[AttachedFiles]willallowyoutoaddafileorfiles
fromthe[AttachedFiles]dialogboxthatappears.
•Clicking[Change]willallowyoutochangethefileviathe
[Open]dialogboxthatappears.
IfusingHTMLcontent,makesurethatimages,
moviesandotherfilesreferredtointheHTML
code are transferred to the same location, or a
subdirectoryofthesamelocation,wheretheHTML
fileitselfisstored.Makesurethatallattachedfiles
referencedintheHTMLfilearedefinedbytheir
relative paths.
2) Duration
The duration of play can be set.
•Whenthecontenttypeisvideo,audio,orscrollmessage,youcansettheoperationtobeperformed
whenplaybackofthecontentisfinishedbeforethespecifieddurationisreached.Tosetthis,click[play
setting].
•Whenthe“Scrolltotheendofthismessage”checkboxiscleared,playbackofscrollmessageisforcibly
terminatedafterthespecifieddurationisreachedevenifplaybackisnotfinishedyet(effectivewhenthe
content type is scroll message).

58
Conditional Content Editor
Creating Conditional Content
3) Background
Ifthecontentisastillimagefileandyouhavecheckedthe“Keepingaspectratio”optionbutton,youcan
specify a background color for the content.
Clickthecolorswatchtodisplaythe[Color]dialogboxandchangethebackgroundcolor.
Clicktheboxnextto“Transparent”tomakethebackgroundtransparent.
The background color for the background frame will be displayed as black if the background color
is set to transparent.
4) Volume Control
The volume can be set.
5) Layout
•“Keepingaspectratio”/“Notkeepingaspectratio”/and“Inoriginalsize”optionbuttons
Youcanselect“Notkeepingaspectratio”whenthecontenttypeisastillimageorFlash.
Youcanselect“Inoriginalsize”whenthecontenttypeisastillimage.
•“Temporarily,moveframe”checkbox
Tochangethescreenpositionofthecontenttemporarily,checkthisboxandclick[PositionSetting].The
positionandsizeoftheframecanbespecifiedforeachcontent.
6) Picture Transition
When the content type is still image, the effect at screen switching can be set.
Select the effect from each pull-down menu.
Ifyoucheckthe“Viabackground”checkbox,theeffectofdisplayingthebackgroundcoloratthetimeof
screen switching is added.
7) Parameters
DisplaysparametersforEXEfiles.
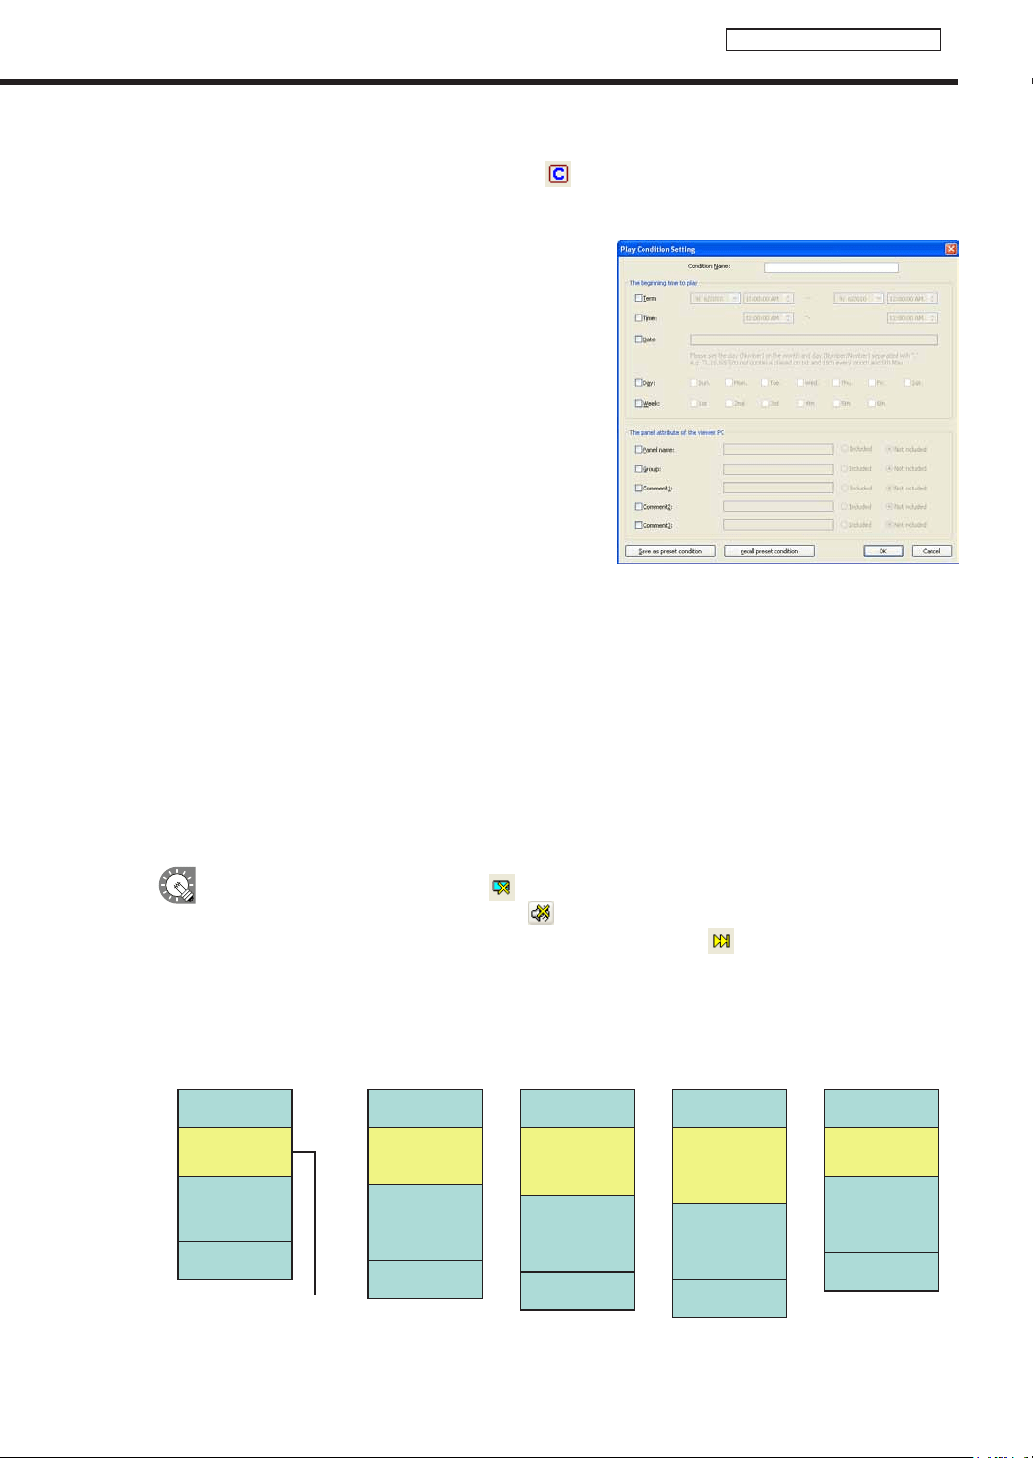
59
Conditional Content Editor
Creating Conditional Content
Play Condition Setting
Fromtheconditionslist,selectacontentfileandclick
todisplaythe[PropertiesofContent]dialogbox.
Selectfilesfromthelistandright-clickthem.Thedisplaywillremainvisibleevenwhen[SetPlayCondition]is
selected.
Thefollowingsettingsmaybecheckedandadjusted:
1) Condition Name
Youcansettheplaybackconditionname
2) Term
Youcansetthebeginningandenddates.
3) Time
Youcansetthebeginningandendtimes.
4) Date
Youcansettheplaybackdate.
5) Day
Youcansetthedayoftheweekforplayback.
Youcanselectmultipledaysoftheweek(e.g.Sunday-
Monday).
6) Week
Youcansetplaybacktooccuronacertainweekofevery
month.Youcanselectmultipleweeksoutofeverymonth
(e.g.firstandthirdweeks).
7) Panel name
Youcanusethe[OK]buttontosetplaybacktooccuronthepanelsthatincludethecharactersyou
entered or to play back on the panels that do not include those characters.
8) Group
Youcanusetheoptionbuttontosetplaybacktooccurornottooccurinthegroupsthatcontainthe
characters you enter.
9) Comment
Youcanusetheoptionbuttontosetplaybacktooccuronthepanelconfiguredwiththecommentthat
includes the characters you entered, or to play back on the panels that do not include those characters.
•Youcanhidecontentbyclickingthe icon on the bottom left of the screen.
•Youcanturnthesoundoffbyclickingthe icon on the bottom left of the screen.
•
Youcanskipconditionalcontentandplaythenextplaylistbyclickingthe on the bottom left of the screen.
•Bysettingtheplaybackconditions,theselectedplaybackconditionswillappearintheframebelow
the conditions list.
Conditional Content and Total Duration
Still Image (5 seconds)
Still Image (5 seconds)
Video (20 seconds)
Conditional Content
(10 seconds)
Still Image (5 seconds)
Still Image (5 seconds)
Video (20 seconds)
Monday’ s Content
(10 seconds)
Still Image (5 seconds)
Still Image (5 seconds)
Video (20 seconds)
Tuesday’ s Content
(15 seconds)
Still Image (5 seconds)
Still Image (5 seconds)
Video (20 seconds)
Wednesday’ s Content
(20 seconds)
Still Image (5 seconds)
Still Image (5 seconds)
Video (20 seconds)
Unconditional Content
(10 seconds)
Program Information
(Total Duration: 40 seconds)
The Program Editor will reflect the maximum duration from within the total duration when you close the Conditional Content Editor.
Monday’ s Content
Tuesday’ s Content
Wednesday’ s Content
Unconditional Content
10 seconds
15 seconds
20 seconds
10 seconds
Monday’ s Program
(Total Duration: 40 seconds)
Tuesday’ s Program
(Total Duration: 45 seconds)
Wednesday’ s Program
(Total Duration: 50 seconds)
Other Programs (Not M-T-W)
(Total Duration: 40 seconds)

60
Timetable Editor
SetprogramscreatedwithProgramEditortodisplayatasethouroftheday.
The main Timetable Editor window
●Launching Timetable Editor
1. Click on the Launcher window.
“TimetableEditor”willlaunch.
WhenTimetableEditorlaunches,anewblanktimetablewithnoprogramsassignedwillbedisplayed.
Timetables are completed after program is set on this screen.
TimetableEditorcanalsobelaunchedbygoingtotheWindowsTaskbarandclicking[Start],
[AllPrograms],[SHARPDigitalSignageSoftware],[Tools],andthen[TimetableEditor].
●The main Timetable Editor window
1)Titlebar
2)Menus
3) Toolbar
4)Tabs
5)Program/Panel
Controllist
6)Timetable
1) Title bar
The name of the timetable will be displayed here.
WhenTimetableEditorlaunches,thetitlebarwillread“Untitled”.Whenatimetableissaved,itwillchangeto
the name of the timetable. When content of an opened timetable is changed, the title bar will display an asterisk
(*) after the timetable name.
Creating/Editing a Timetable
61
Timetable Editor
2) Menus
Menu options are as follows:
Menu option Description
Relevant
page
File
CreateNewTimetable Opens a new timetable. -
Open Timetable Loadsasavedtimetable.
Fp.66
Save Timetable Overwrites the currently edited timetable.
Fp.65
Save Timetable As
Saves the currently edited timetable under a different
name.
Fp.66
Delete Timetable Allows the user to specify and delete saved timetables.
Fp.67
Preview Timetable
Tests the currently edited timetable. Note that all the
registered timetable data and schedule data is erased
in the SHARP Digital Signage Software standalone
version(PN-SS01).
Fp.66
Properties of Timetable Displays timetable properties.
Fp.67
Import Timetable
Readsatimetablethathasbeenexportedfromanother
PCsothatitcanbeused.
Fp.69
ExportTimetable
Writes out a timetable so that it can be used on another
PC.
Fp.68
Exit ExitsTimetableEditor. -
Edit
Select All Selects all programs in the timetable. -
Delete
Deletes the selected programs from the list.
Programsmayalsobedeletedbypressing[Delete].
-
Copy Copiestheselectedprogram. -
Paste
Pastes the copied program into a timetable.
If a program in the timetable is selected, the copied
programwillbeallocatedimmediatelyafteritfinishes.If
no programs are selected, it will be pasted at 00:00.
-
Option Set Timetable Span
Setsthetimetabletoatargettimespan(startandfinish
times). This is used for setting business hours as a time
span, etc.
Fp.65
Help
About Panel Support Displays“Tableofsupportingpanelcontrols.”
Fp.63
AboutTimetableEditor DisplaysversioninformationforTimetableEditor. -
3) Toolbar
The toolbar buttons (icons) perform the following actions:
Icon Menu option Description
Relevant
page
Open Timetable Loadsasavedtimetable.
Fp.66
Save Timetable Overwrites the currently edited timetable.
Fp.65
4) Tabs
Clickingatabswitchestothesettingswindowforeachitem.
5) Program/Panel Control list
Whenthe[Program]tabisselected,theprogramfolder,programthumbnails,andprogramlistaredisplayed.
Formoredetailsabouttheprogramfolderandprogramthumbnails,refertop.46.
Whenthe[PanelControl]tabisselected,thelistofpanelcontrolcommandsisdisplayed.
6) Timetable
Displays a timetable.
The main Timetable Editor window
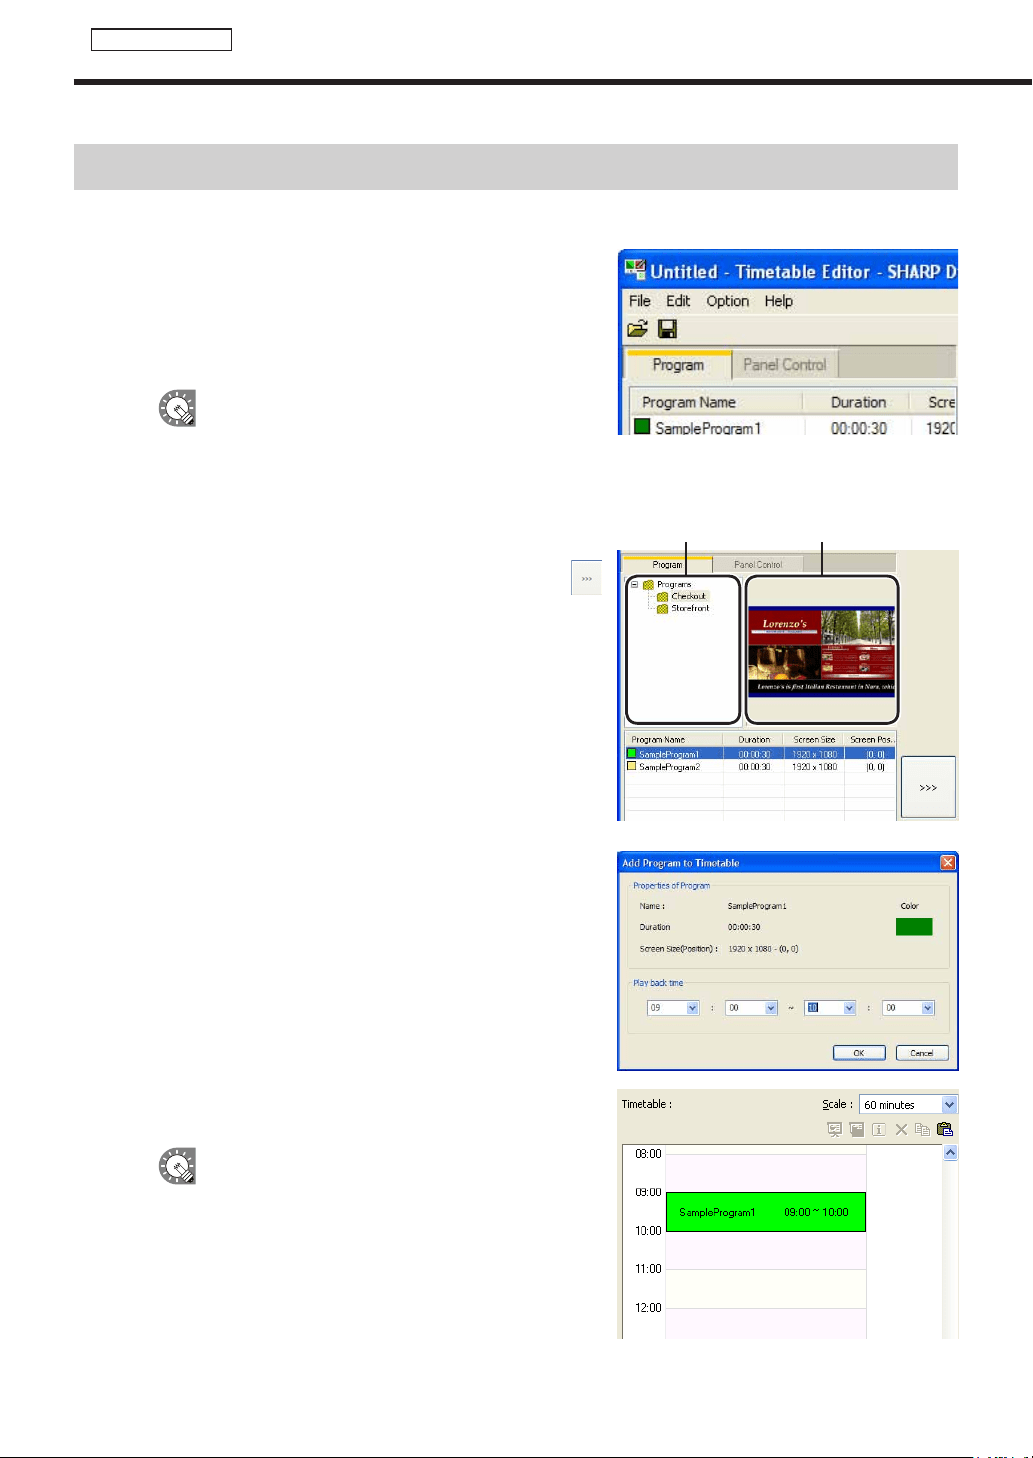
62
Timetable Editor
Creating a timetable
●Registering a program in the timetable
1. Check that the [Program] tab is selected.
Ifitisnot,clickthe[Program]tabtoselectit.
The program list will be displayed here.
Therearefourcategoriesinthelist:“ProgramName”,
“Duration”,“ScreenSize”,and“ScreenPosition”.
Thecoloroftheiconinfrontofthe“ProgramName”
representsthe“ColorofProgram”.Click[Properties
ofProgram]fromthe[File]menuin“Program
Editor”tochangeit.(
F
p.48)
Program folder Program thumbnails
2. Select the program folder containing the program.
3. From the “Program Name”, select a program, and click
,
or alternatively, double-click the program.
The[AddProgramtoTimetable]dialogboxwillappear.
4. Set the “Play back time”.
This is the time of day when the program will be played.
Specifytimesbetween00:00and24:00.
5. Click [OK].
The program will be registered to the timetable.
Programs may also be registered by dragging
themfromthe“ProgramName”tothe“Timetable”.
Registered programs can be changed in the
Timetable. (
F
p.64)
6. Repeat steps 2 to 4 as necessary and set all the
programs that you want to display over the course of the
day.
Creating a timetable
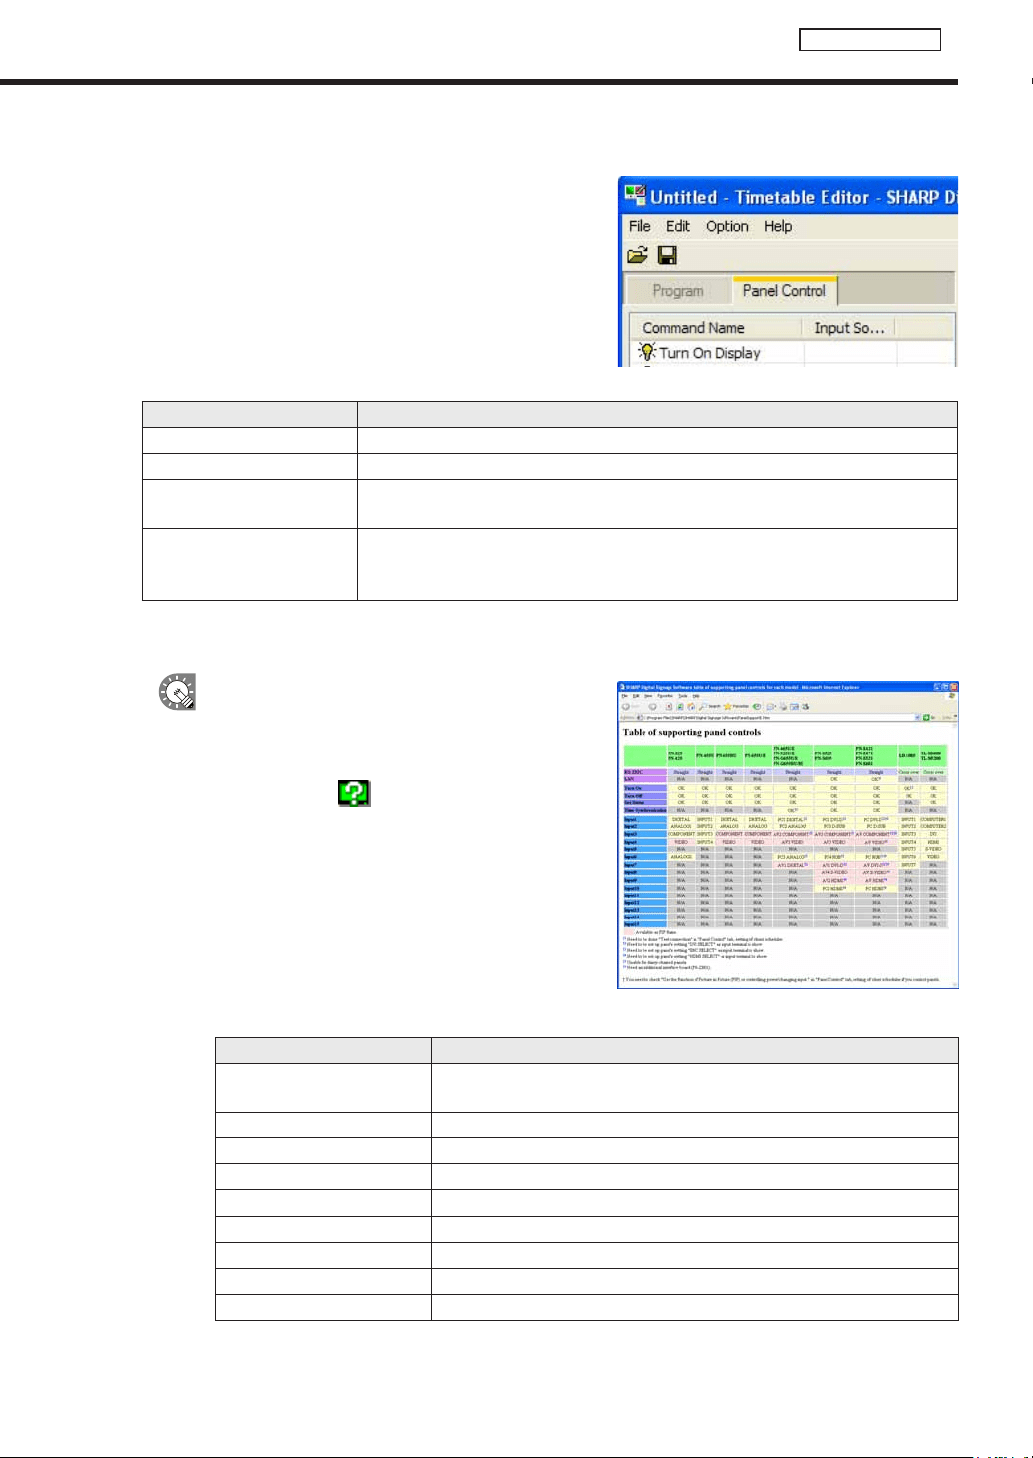
63
Timetable Editor
●Registering panel control in a timetable
1. Click the [Panel Control] tab.
A list of panel control commands will be displayed.
Therearetwocategories:“CommandName”and“InputSource”.Commandsareasfollows:
Command Description
Turn On Display *
1
Turns the panel (monitor) power ON.
Turn Off Display Puts the panel (monitor) into standby mode.
Switch Input Source
(Input“No.”)
Switches the panel (monitor) input source.
TV *
2
Switchtheinputsourceofthepanel(monitor)to“TVinput”.Thechannelatthe
timeofswitchingtotheTVcannotbespecified.Thechannelthatwasselectedby
the TV immediately before switching is displayed.
*1 ItcannotbeusedwiththeLB-46GX35andLB-52GX35.
*2 ItcannotbeusedwiththeSHARPLCDmonitor(PNseries)andtheLB-1085.
•Thecommandssupportedbythepanel(monitor)
canbecheckedwith“Tableofsupportingpanel
controls.”
•Todisplay“Tableofsupportingpanelcontrols,”
click the button (
)“AboutPanelSupport”atthe
lower left of the panel control command list. Or, click
[AboutPanelSupport]from[HelpMenu].
Thecontentsof“Tableofsupportingpanelcontrols”areasfollows:
Menu option Description
RC-232C
Indicates the cable to be used for the connection (straight cable or cross cable).
Indicates transmission speeds supported.
LAN IndicateswhetherLANconnectionissupported.
Turn On
Indicateswhetherthe“TurnOnDisplay”panelcontrolcommandissupported.
Turn Off
Indicateswhetherthe“TurnOffDisplay”panelcontrolcommandissupported.
GetStatus
IndicateswhetherGetStatus(
F
p.101)issupported.
H/WErrorDetection Indicates whether IDP hardware error detection is supported.
TimeSynchronization
IndicateswhetherTimeSynchronization(
F
p.91,92)issupported.
Input“No.” Indicates which input of the panel (monitor) is supported.
TV Indicates whether TV input is supported.
Creating a timetable
64
Timetable Editor
2. Select the panel control command you want to use from
the “Command Name” and click
.
The[AddPanelControlCommandtoTimetable]dialogbox
will appear.
3. Set the “Time”.
Thisisthetimethatthecommandwillbeexecuted.
Specifytimesbetween00:00and24:00.
4. Click [OK].
The panel control command will be registered in the timetable
and the control command icons (Turn On Display:
, Turn
Off Display:
, Switch Input Source: , TV: ) will be
displayed to the right of the timetable.
Commandsmayalsoberegisteredbydraggingthemfromthe“CommandName”tothe
“Timetable”.
5. Repeat steps 2 to 4 as necessary and set all the panel control commands that you want to execute
over the course of the day.
Creating a timetable
65
Timetable Editor
●Adjusting a timetable
Clickingthebuttonsonthetoprightofthetimetableperformsthefollowingactions:
Icon Menu option Description
Preview Program Displaysapreviewoftheselectedprogramatitsoriginalsize.
Preview Program
(FitScreen)
Displaysapreviewoftheselectedprogramfittedtothesizeofthe
screen.
Properties for Program/
Command
Displays the properties of the selected program/panel control command.
DeleteProgram/Command
Deletes the selected programs/panel control commands from the timetable.
Programs/panelcontrolcommandmayalsobedeletedbypressing[Delete].
CopyPrograms/
PanelControlCommands
Copiestheselectedprogram/panelcontrolcommand.
Paste Programs/
PanelControlCommands
Positions the copied program/panel control command into a timetable. If a
program in the timetable is selected, the copied program will be allocated
immediatelyafteritfinishes.Ifnoprogramsareselected,itwillbepastedat00:00.
Clickaprogramorpanelcontrolcommandpositionedonthe
timetable to select it.
Dragaresizehandletoadjusttheplaybacktime/timeforthe
programorpanelcontrolcommandandconfirmthechanges
visually.
The program and the panel control command can be moved by
dragginganareaotherthantheresizehandleusingthemouse.
Changing the timetable span
1. From the [Option] menu, click [Set Timetable Span].
The[TimetableSpan]dialogboxwillappear.
2. Set the “Start” and “End” times.
Specifytimesbetween00:00and24:00.
3. Click [OK].
Thenewtimeswillbereectedinthetimetable.
Creating a timetable

66
Timetable Editor
Adjusting the scale
Selectintervalsof5,10,15,30or60minutesfromthe“Scale”
list.
●Saving a timetable
Save timetable
Usethisoptionwhenyouwanttosavethecurrentlyeditedtimetableunderitsoriginalname.
1. From the [File] menu, click [Save Timetable].
You can also save a timetable by clicking
.
Thetimetablefilewillbeoverwrittenandsavedwiththesamename.
When“TimetableEditor”isstarted,thetitlebarwillread“Untitled”.Ifyouattempttosaveatthis
stagethe[SaveTimetable]dialogboxwillbedisplayed.Fortheremainingsteps,refertostep2of
“Savetimetableas”.
Save timetable as
Usethisoptionwhenyouwanttosavethecurrentlyeditedtimetableunderadifferentname.
1. From the [File] menu, click [Save Timetable As].
The[SaveAs]dialogboxwillappear.
2. Select the timetable folder in which the timetable is to be
saved.
3. Enter a “Timetable Name” and click [Save].
The timetable will be saved with a different name.
●Opening a timetable
Loadatimetablethatyouhavealreadysaved,anduseit.
Editingonlytheplacesyouwanttochangeinanexistingfileandsavingthefileunderanewnameisanefficient
way to create timetables.
1. From the [File] menu, click [Open Timetable].
You can also open a timetable by clicking
.
The[OpenTimetable]dialogboxwillappear.
2. Select the timetable folder containing the timetable.
3. From the “List of Timetable”, select a timetable, and
click [Open].
The timetable you selected will be loaded into Timetable
Editorandyouwillbeabletoeditit.
Takecarewhensavingatimetableyouhaveeditedusingthe[SaveTimetable]option,asthe
changesyouhavemadewillbereectedintheoriginalfile.
Creating a timetable
67
Timetable Editor
●Checking a timetable
Checkatimetableusingtheprogrampreviewfunction.
All the registered schedule data and timetable data is erased in the SHARP Digital Signage Software
standaloneversion(PN-SS01).
1. From the [File] menu, click [Preview Timetable].
A preview of the timetable will be displayed.
2. Check the preview.
•Toclosethepreview,clickthepreviewwindowandpress[Esc]tostopthedisplay,andthendelete
thescheduleinformationfromtheClientSchedulerofthetasktray.(
F
p.99)
•IftheprogramscreensizeislargerthanthedisplayresolutionofthePCmonitor,thepreviewwill
not be able to display the entire program screen.
●Deleting a timetable
Delete unnecessary timetables.
1. From the [File] menu, click [Delete Timetable].
The[DeleteTimetable]dialogboxwillappear.
2. Select the timetable folder containing the timetable.
3. From the “List of Timetable”, select a timetable, and
click [Delete].
4. Click [Yes].
The selected timetable is now deleted.
5. Click [Close].
●Changing timetable name and timetable color
1. From the [File] menu, click [Properties of Timetable].
The[PropertiesofTimetable]dialogboxwillappear.
Checkthe“Name”and“Color”.
• The“Name”canbechanged.
• Clickthecolorswatchtodisplaythe[Color]dialogbox
and change the timetable color.
The“Color”isthecolorusedtodisplaythe
timetableinScheduleEditor.
2. Click [OK].
Creating a timetable

68
Timetable Editor
●Importing/exporting a timetable
Exporting a timetable
TheexportfunctionisusedtowriteoutatimetablesothatitcanbeusedwiththisproductonanotherPC.
Exportedtimetabledataincludesprogramsregisteredintimetables.
1. From the [File] menu, click [Export Timetable].
The[ExportTimetable]dialogboxwillappear.
2. Select the timetable folder containing the timetable.
3. From the “List of Timetable”, select a timetable, and
click [Export].
The[Selectthefoldertoexport]dialogboxwillappear.
4. Specify the directory where you want to save the le,
enter a “File name”, and click [Save].
The[ExportTimetable]dialogboxwillappear.
A screen like the one on the right will appear during
theexport.Click[Cancel]tocanceltheexport.
5. Click [OK].
Thetimetableexportisnowcomplete.
Creating a timetable

69
Timetable Editor
Importing a timetable
TheimportfunctionisusedtoloadanexportedtimetablethathasbeencreatedwiththisproductonanotherPC.
1. From the [File] menu, click [Import Timetable].
The[Selectthetimetabletoimport]dialogboxwillappear.
2. Select a (.tbl) le to import, and click [Open].
The[ImportTimetable]dialogboxwillappear.
A screen like the one on the right will appear while
theimportisbeingprepared.Click[Cancel]to
cancel the import.
3. Select the timetable folder in which the timetable is to be
saved.
4. Enter a “Timetable Name” and click [Import].
IfthesameprogramalreadyexistsonthePC
wheretheimportistobeused,aconfirmation
dialogboxwillappear.Choosewhethertooverwrite
theexistingfileorimportthefileunderanewname.
5. Click [Yes].
The timetable will be saved with the name you entered.
The timetable import is now complete.
Creating a timetable
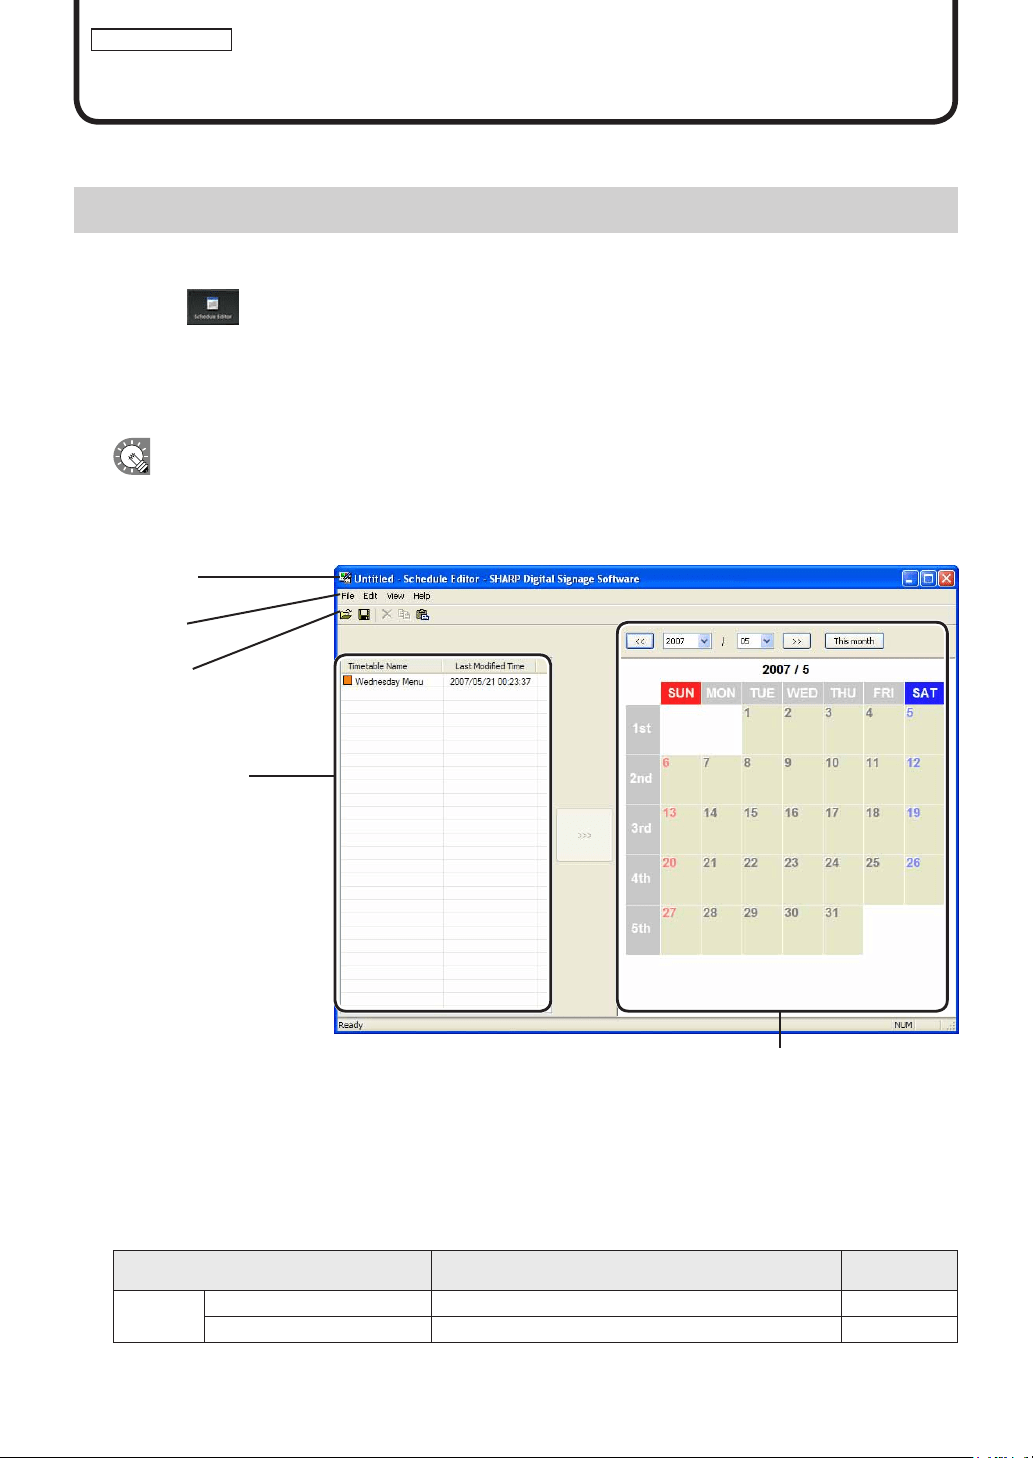
70
Schedule Editor
Creating/Editing Schedules
SettimetablescreatedwithTimetableEditortodisplayonasetday.
The main Schedule Editor window
●Launching Schedule Editor
1. Click on the Launcher window.
“ScheduleEditor”willlaunch.
WhenScheduleEditorlaunches,anewblankschedulewithnotimetablesassignedwillbedisplayed.
Schedules are completed after timetable is set on this screen.
ScheduleEditorcanalsobestartedbygoingtotheWindowsTaskbar,andclicking[Start],[All
Programs],[SHARPDigitalSignageSoftware],[Tools],andthen[ScheduleEditor].
●The main Schedule Editor window
1)Titlebar
2)Menus
3) Toolbar
4)“Timetable”list
5)Calendar
1) Title bar
The name of the schedule will be displayed here.
WhenScheduleEditorlaunches,thetitlebarwillread“Untitled”.Whenascheduleissaved,itwillchangetothe
name of the schedule. When content of an opened schedule is changed, the title bar will display an asterisk (*)
after the schedule name.
2) Menus
Menu options are as follows:
Menu option Description
Relevant
page
File
CreateNewSchedule Opens a new schedule. -
Open Schedule Loadsasavedschedule.
Fp.74
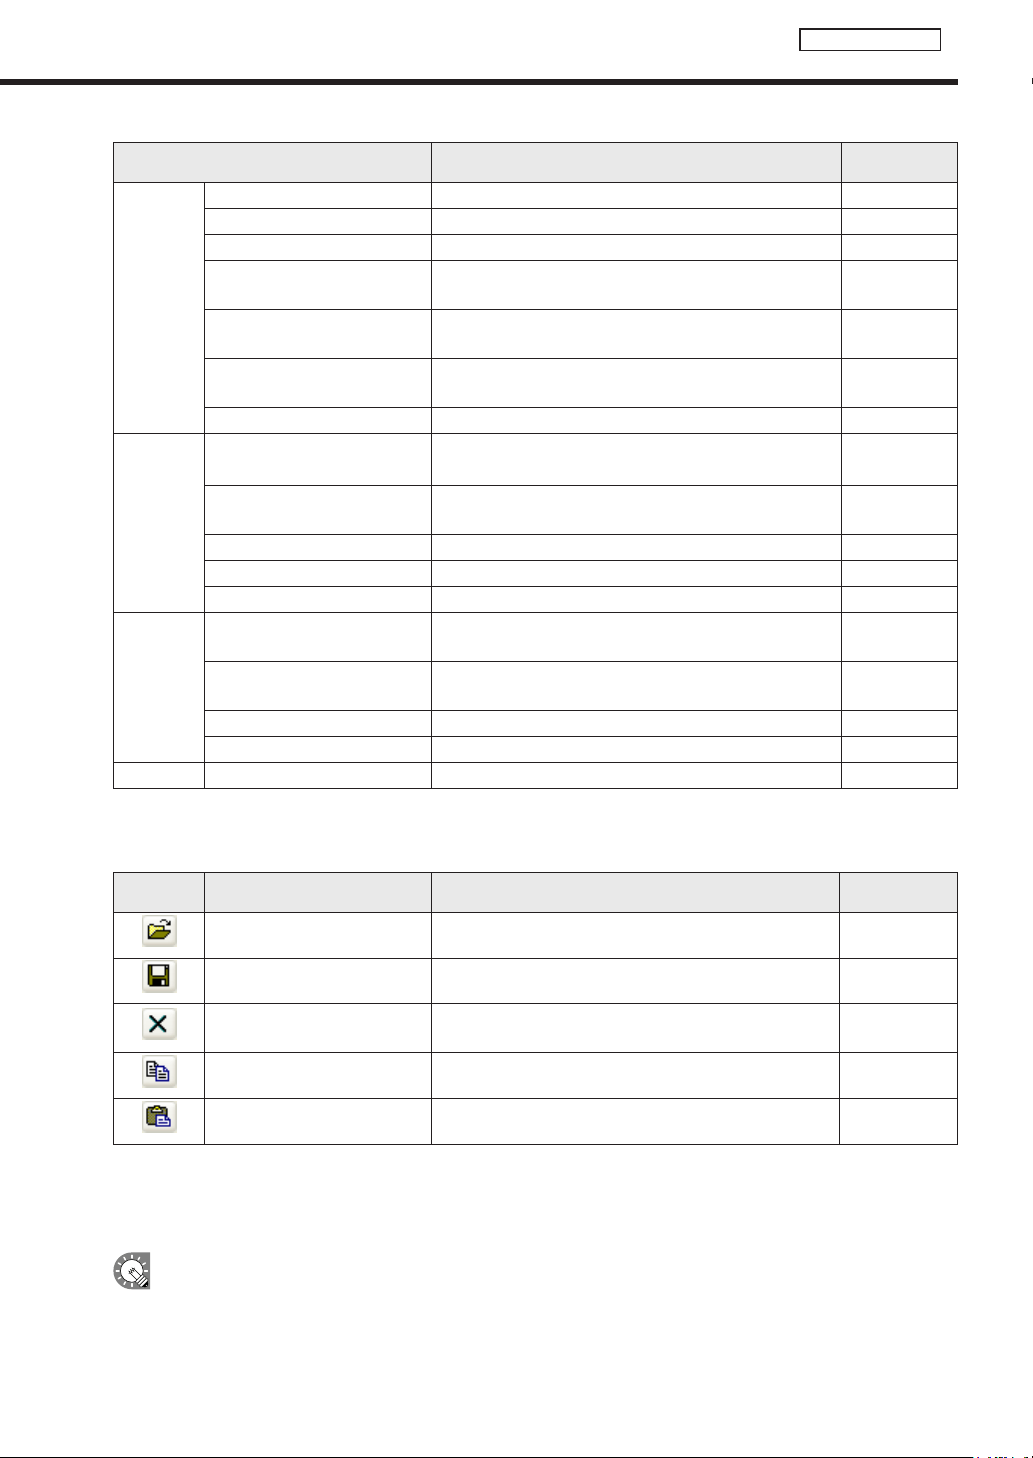
71
Schedule Editor
The main Schedule Editor window
Menu option Description
Relevant
page
File
Save Schedule Overwrites the currently edited schedule
F
p.74
Save Schedule As
Saves the currently edited schedule under a different name.
F
p.74
Delete Schedule Allows the user to specify and delete saved schedules.
F
p.75
Properties of Schedule
Allows the user to display and change the schedule
name.
F
p.75
Import Schedule
Readsaschedulethathasbeenexportedfromanother
PCsothatitcanbeused.
F
p.77
ExportSchedule
Writes out a schedule so that it can be used on another
PC.
F
p.76
Exit ExitsScheduleEditor. -
Edit
Add Timetable to Schedule
Addsthetimetablethatisselectedinthe“Timetable”
list to the schedule.
F
p.72
Delete Timetable from
Schedule
Deletesthetimetablethatisselectedinthe“Calendar”.
Timetablemayalsobedeletedbypressing[Delete].
F
p.73
CopyTimetable Copiestheselectedtimetable. -
Paste Timetable Pastes the copied timetable into a schedule. -
Select All Selects all timetables in the schedule. -
View
Show Previous Month
Displays the month before the month that is currently
displayed in the calendar.
F
p.73
ShowNextMonth
Displays the month after the month that is currently
displayed in the calendar.
F
p.73
Show This Month Displays the current month in the calendar.
F
p.73
Refresh Updatesthe“Timetable”list. -
Help AboutScheduleEditor DisplaysversioninformationforScheduleEditor. -
3) Toolbar
The toolbar buttons (icons) perform the following actions:
Icon Menu option Description
Relevant
page
Open Schedule Loadsasavedschedule.
F
p.74
Save Schedule Overwrites the currently edited schedule.
F
p.74
Delete Timetable
Deletesthetimetablethatisselectedinthe“Calendar”.
Timetablemayalsobedeletedbypressing[Delete].
F
p.73
CopyTimetable Copiestheselectedtimetable. -
Paste Timetable Pastes the copied timetable into a schedule. -
4) “Timetable” list
ThetimetablefolderandthelistoftimetablescreatedwithTimetableEditoraredisplayed.
Inthelistoftimetable,therearetwocategories:“Name”and“LastModifiedTime”.
Thecoloroftheiconinfrontofthenameofeachtimetablerepresentsthe“timetablecolor”.Click
[PropertiesofTimetable]fromthe[File]menuin“TimetableEditor”tochangeit.(
F
p.73)
5) Calendar
Timetables are positioned on the calendar to create schedules.
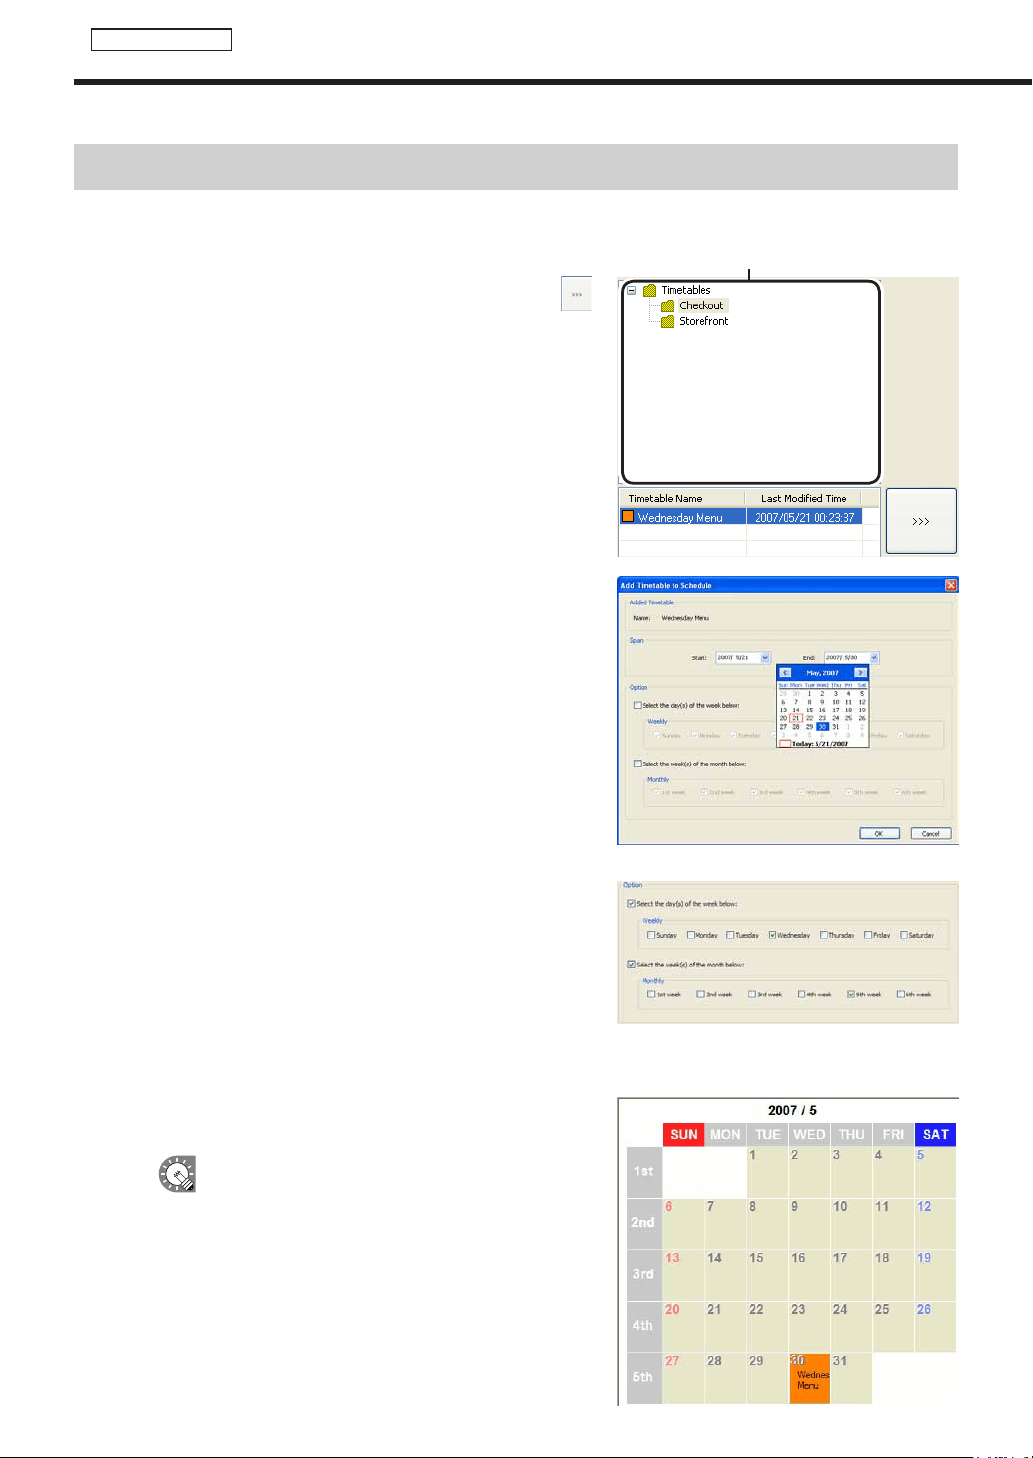
72
Schedule Editor
Creating a schedule
Creating a schedule
●Registering a timetable in the schedule
Timetable folder
1. Select the timetable folder containing the timetable.
2. Select a timetable from the “Timetable” list and click
,
or alternatively, double-click the timetable, or from the
[Edit] menu, click [Add Timetable to Schedule].
The[AddTimetabletoSchedule]dialogboxwillappear.
3. Set a “Span”.
This is the length of time that the program will be played for.
Specifydatesbetween1/1/2005and12/31/2020.
Ifyoudonotsetthe“Option”area,thetimeschedulewillbe
addedtotheentirespanfrom“Start”to“End”.
Usethe“Option”settingstoaddtimetablestospecifieddays
or weeks.
• Ifyoucheckthe“Selecttheday(s)oftheweekbelow:”
checkboxandthe“Sunday”to“Saturday”checkboxes,
thetimetablewillonlybeaddedtothespecifieddaysof
the week during the span.
• Ifyoucheckthe“Selecttheweek(s)ofthemonth
below:”checkboxandthe“1stweek”to“6thweek”
checkboxes,thetimetablewillonlybeaddedtothe
specifiedweeksduringthespan.
•
Ifyouspecifyboth“Selecttheday(s)oftheweekbelow:”
and“Selecttheweek(s)ofthemonthbelow:”,thetimetable
will only be added to days that meet both sets of conditions.
Forexample,setting“Selecttheday(s)oftheweekbelow:”to“Wednesday”,and“Selecttheweek(s)of
themonthbelow:”to“2ndweek”,wouldaddthetimetabletothesecondWednesdayofeverymonth.
4. Click [OK].
The timetable will be registered in the schedule.
Timetables may also be registered by dragging
themfromthe“Timetable”listtothe“Calendar”.
Registered timetables can be changed in the
calendar. (
F
p.64)
5. Repeat steps 2 to 3 as necessary and add all the
timetables that you want to display to the schedule.
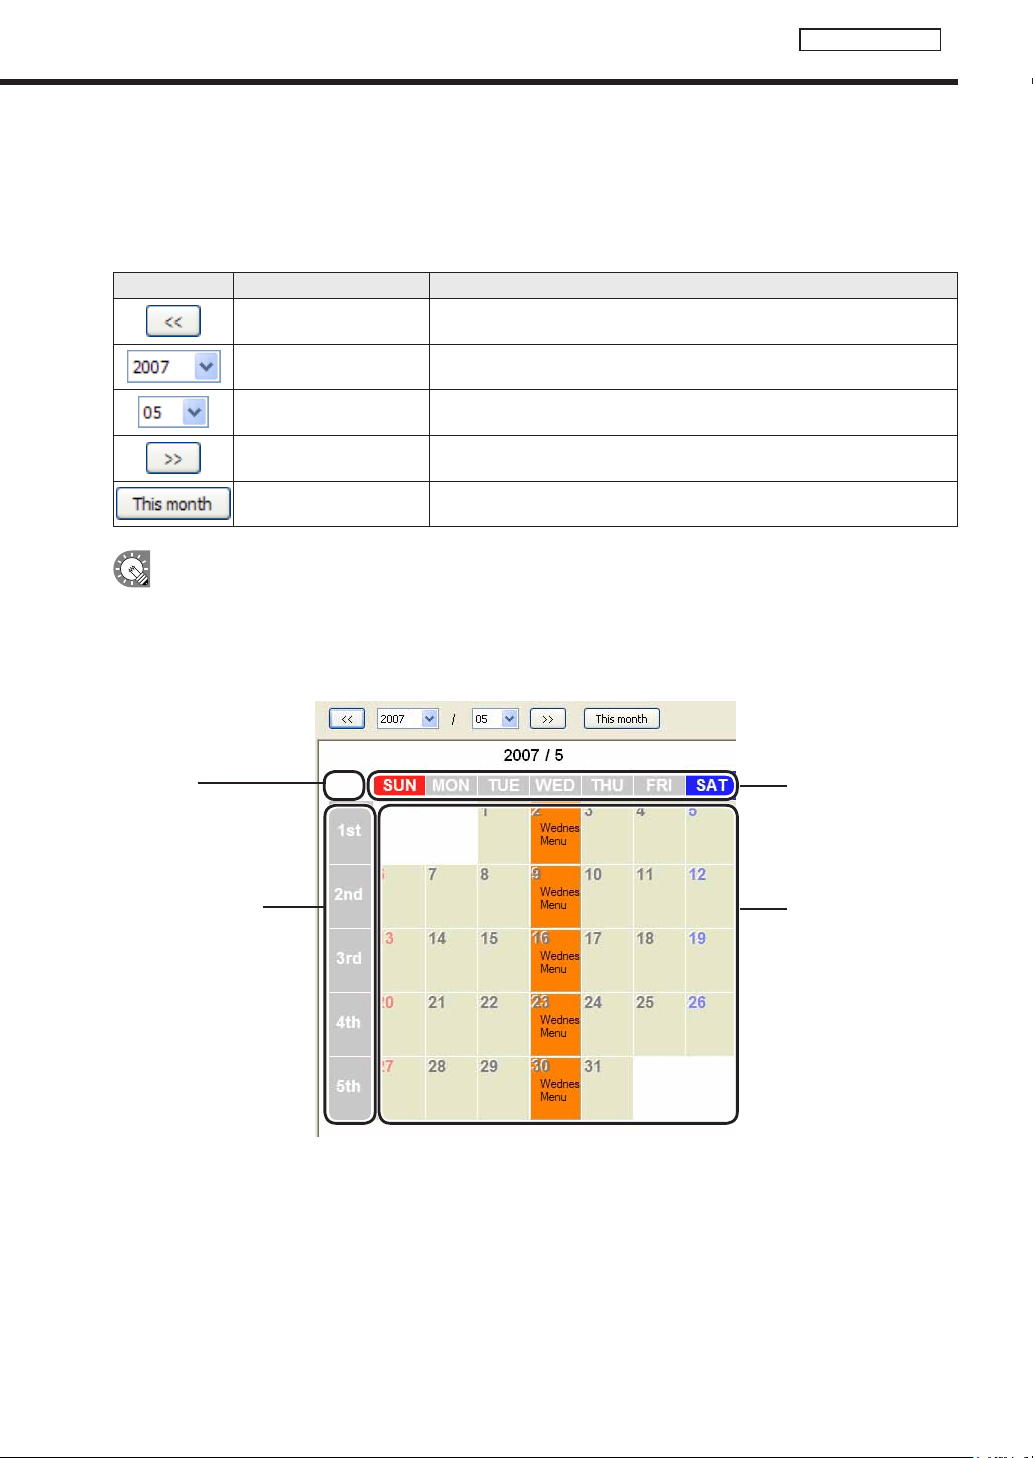
73
Schedule Editor
The calendar
ThecalendarcandisplaydatesbetweenJanuary2005andDecember2020.
Daysonwhichatimetableisregisteredshowthe“timetablecolor”andthe“timetablename”.
The buttons and lists at the top of the calendar perform the following actions:
Icon Menu option Description
Show Previous Month Displays the month before the month that is currently displayed.
SelectYear Displays the year selected for the month that is currently displayed.
Select Month Displays the month selected for the year that is currently displayed.
ShowNextMonth Displays the month after the month that is currently displayed.
Show This Month Displays the current month.
•Clickwhileholdingdown[Ctrl]or[Shift]toselectmultipledaysatthesametime.
•Selectatimetableandpress[Delete]todeleteitfromthecalendar.
Timetables are registered to different days depending on where they are dragged on the calendar.
Days that already have timetables registered to them will not be overwritten.
1)Dates
2)Weekdaytitles
3) Week titles
4)All
1)Dates: Timetableswillbeaddedtothedaytowhichtheyaredragged.
2)Weekdaytitles:Timetableswillbeaddedtothedayoftheweektowhichtheyaredraggedforthecurrently
displayed month.
3) Week titles: Timetables will be added to the week to which they are dragged for the currently displayed
month.
4)All: Timetableswillbeaddedtoeverydayofthecurrentlydisplayedmonth.
Creating a schedule
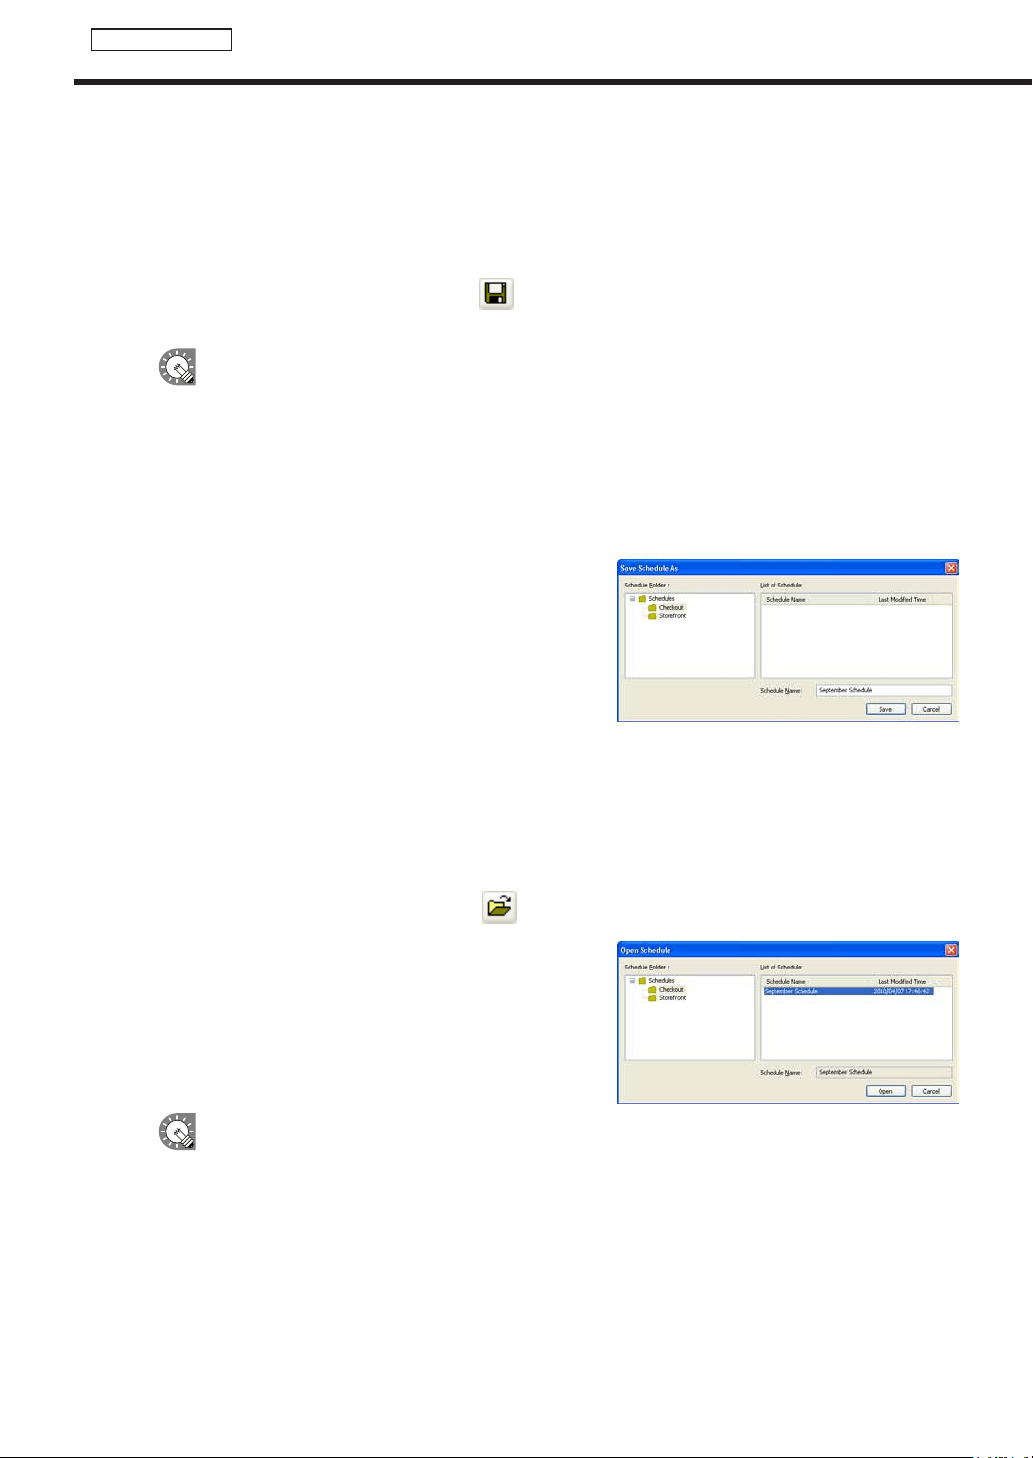
74
Schedule Editor
Creating a schedule
●Saving a schedule
Save schedule
Usethisoptionwhenyouwanttosavethecurrentlyeditedscheduleunderitsoriginalname.
1. From the [File] menu, click [Save Schedule].
You can also save a schedule by clicking
.
Theschedulefilewillbeoverwrittenandsavedwiththesamename.
When“ScheduleEditor”isstarted,thetitlebarwillread“Untitled”.Ifyouattempttosaveatthis
stagethe[SaveSchedule]dialogboxwillbedisplayed.Fortheremainingsteps,refertostep2of
“Savescheduleas”.
Save schedule as
Usethisoptionwhenyouwanttosavethecurrentlyeditedscheduleunderadifferentname.
1. From the [File] menu, click [Save Schedule As].
The[SaveScheduleAs]dialogboxwillappear.
2. Select the schedule folder in which the schedule is to be
saved.
3. Enter a “Schedule Name”, and click [Save].
The schedule will be saved with a different name.
●Opening a schedule
Loadaschedulethatyouhavealreadysaved,anduseit.
Editingonlytheplacesyouwanttochangeinanexistingfileandsavingthefileunderanewnameisanefficient
way to create schedules.
1. From the [File] menu, click [Open Schedule].
You can also open a schedule by clicking
.
The[OpenSchedule]dialogboxwillappear.
2. Select the schedule folder containing the schedule.
3. From the “List of Schedule”, select a schedule, and click
[Open].
The schedule you selected will be loaded into Schedule
Editorandyouwillbeabletoeditit.
Takecarewhensavingascheduleyouhaveeditedusingthe[SaveSchedule]option,asthe
changesyouhavemadewillbereectedintheoriginalfile.

75
Schedule Editor
●Deleting a schedule
Delete unnecessary schedules.
1. From the [File] menu, click [Delete Schedule].
The[DeleteSchedule]dialogboxwillappear.
2. Select the schedule folder containing the schedule.
3. From the “List of Schedule”, select a schedule, and click
[Delete].
4. Click [Yes].
The selected schedule will be deleted.
5. Click [Close].
●Changing schedule name
1. From the [File] menu, click [Properties of Schedule].
The[PropertiesofSchedule]dialogboxwillappear.
Checktheschedulenameandchangeitifyouwish.
2. Click [OK].
Creating a schedule
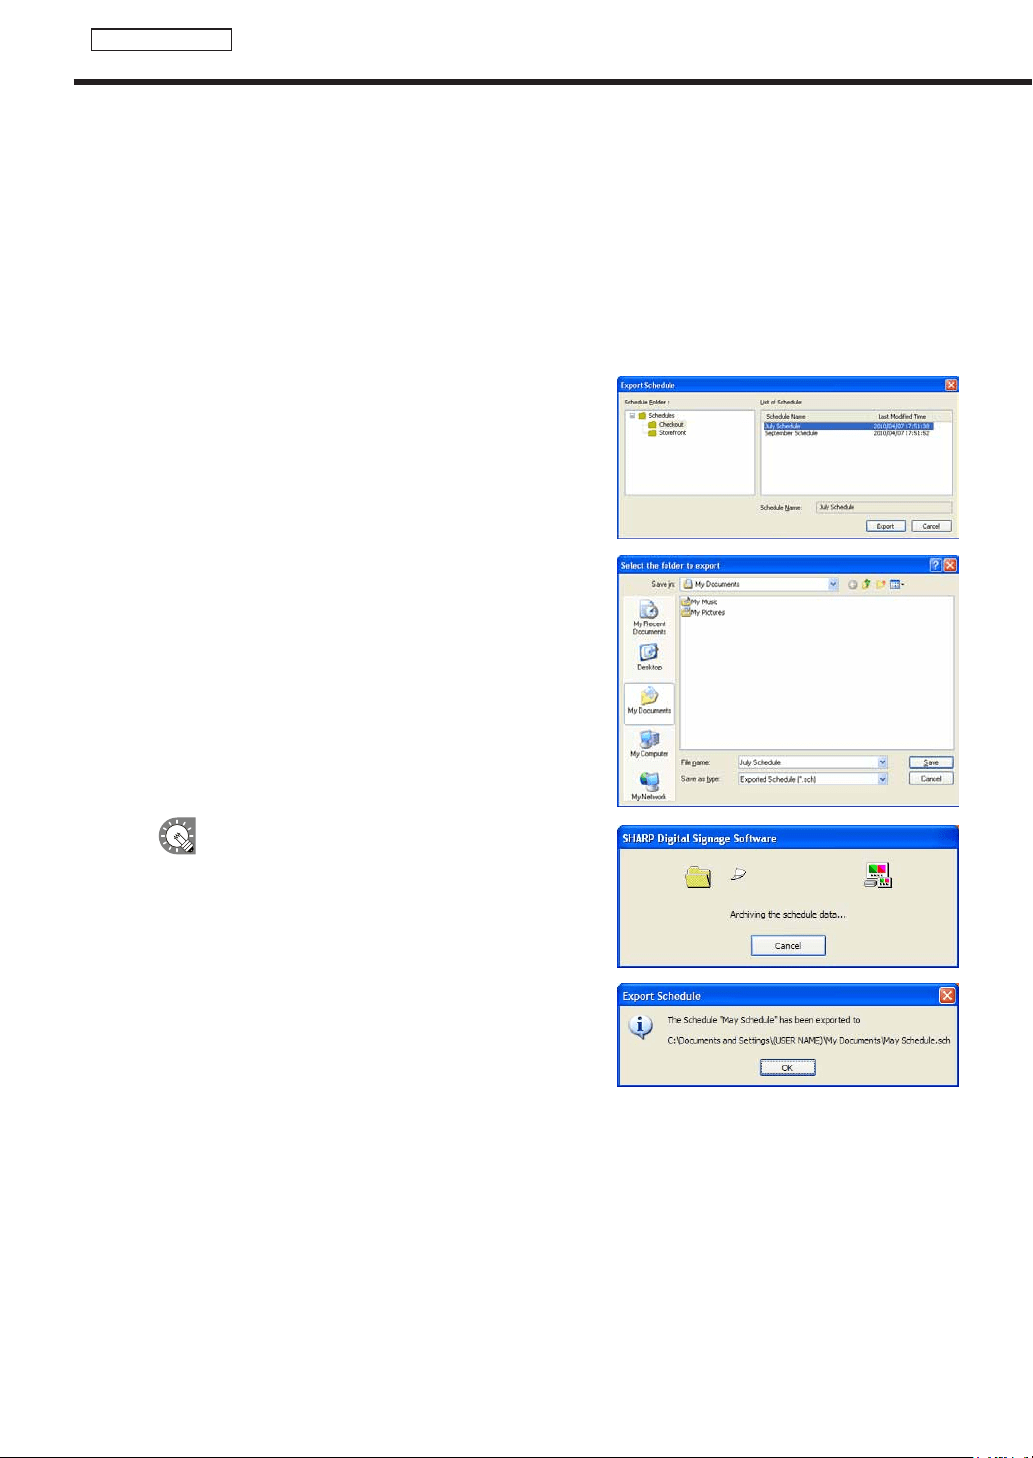
76
Schedule Editor
Creating a schedule
●Importing/exporting a schedule
Exporting a schedule
TheexportfunctionisusedtowriteoutaschedulesothatitcanbeusedwiththisproductonanotherPC.
Exportedscheduledataincludesprogramsandtimetablesthatareregisteredtotheschedule.
1. From the [File] menu, click [Export Schedule].
The[ExportSchedule]dialogboxwillappear.
2. Select the schedule folder containing the schedule.
3. From the “List of Schedule”, select a schedule, and click
[Export].
The[Selectthefoldertoexport]dialogboxwillappear.
4. Specify the directory where you want to save the le,
enter a “File name” and click [Save].
The[ExportSchedule]dialogboxwillappear.
A screen like the one on the right will appear during
theexport.Click[Cancel]tocanceltheexport.
5. Click [OK].
Thescheduleexportisnowcomplete.
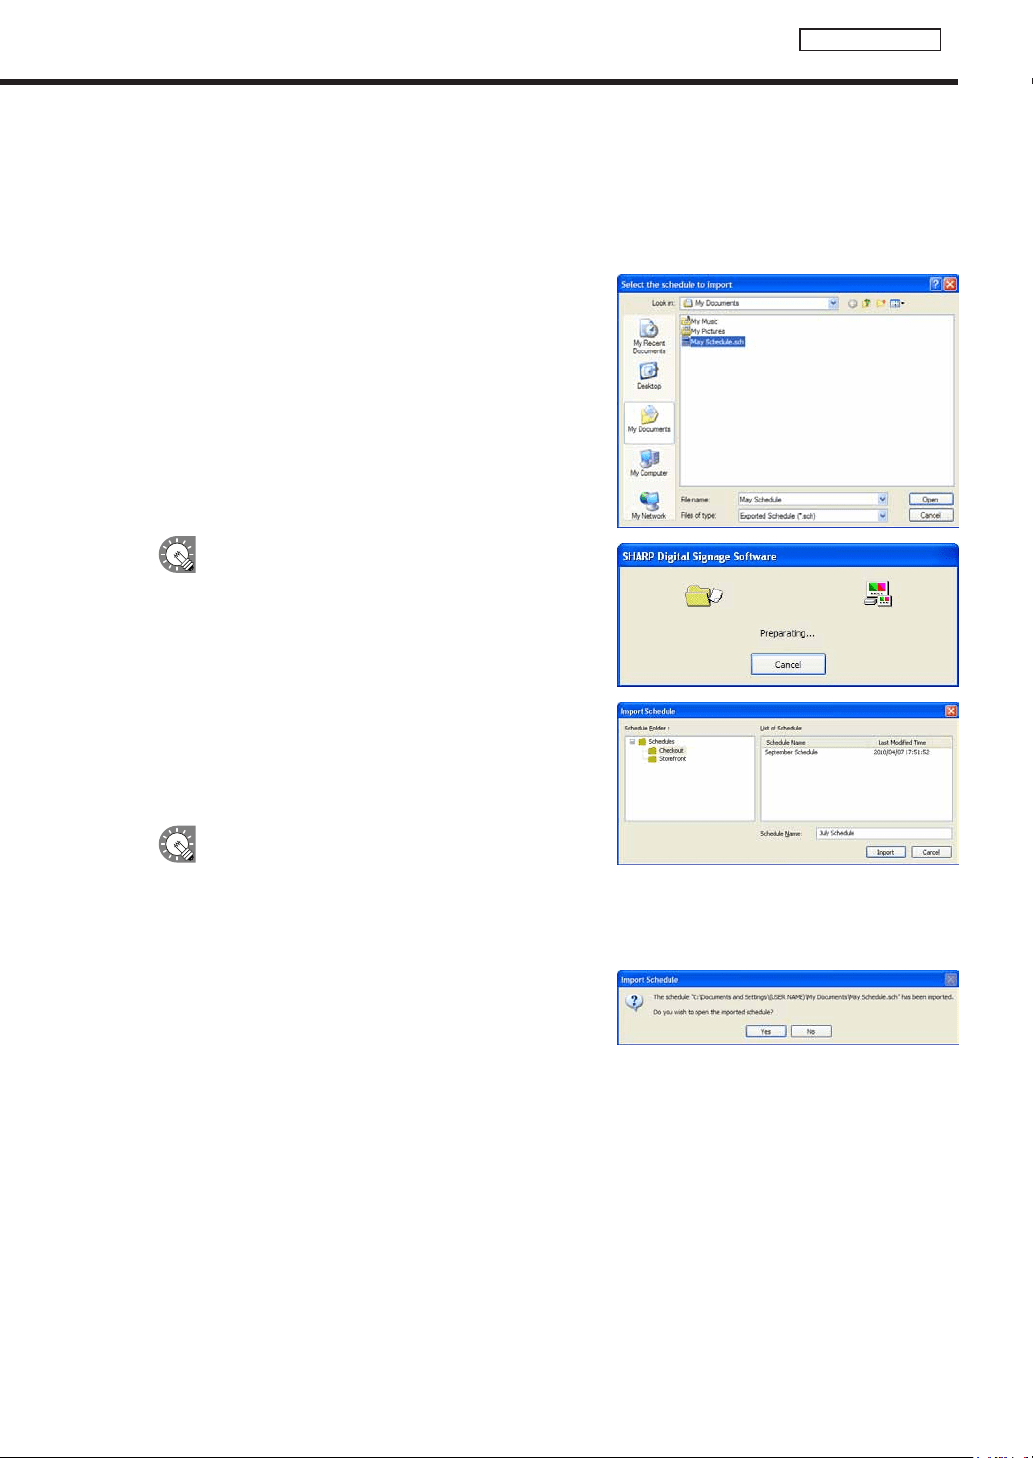
77
Schedule Editor
Importing a schedule
TheimportfunctionisusedtoloadanexportedschedulethathasbeencreatedwiththisproductonanotherPC.
1. From the [File] menu, click [Import Schedule].
The[Selectthescheduletoimport]dialogboxwillappear.
2. Select a (.sch) le to import, and click [Open].
The[ImportSchedule]dialogboxwillappear.
A screen like the one on the right will appear while
theimportisbeingprepared.Click[Cancel]to
cancel the import.
3. Select the schedule folder in which the schedule is to be
saved.
4. Enter a “Schedule Name”, and click [Import].
If the same program name or timetable name
alreadyexistsonthePCwheretheimportistobe
used,aconfirmationdialogboxwillappear.Choose
whethertooverwritetheexistingfilesorimport
them under a new name.
5. Click [Yes].
The schedule will be saved with the name you entered.
The schedule import is now complete.
Creating a schedule
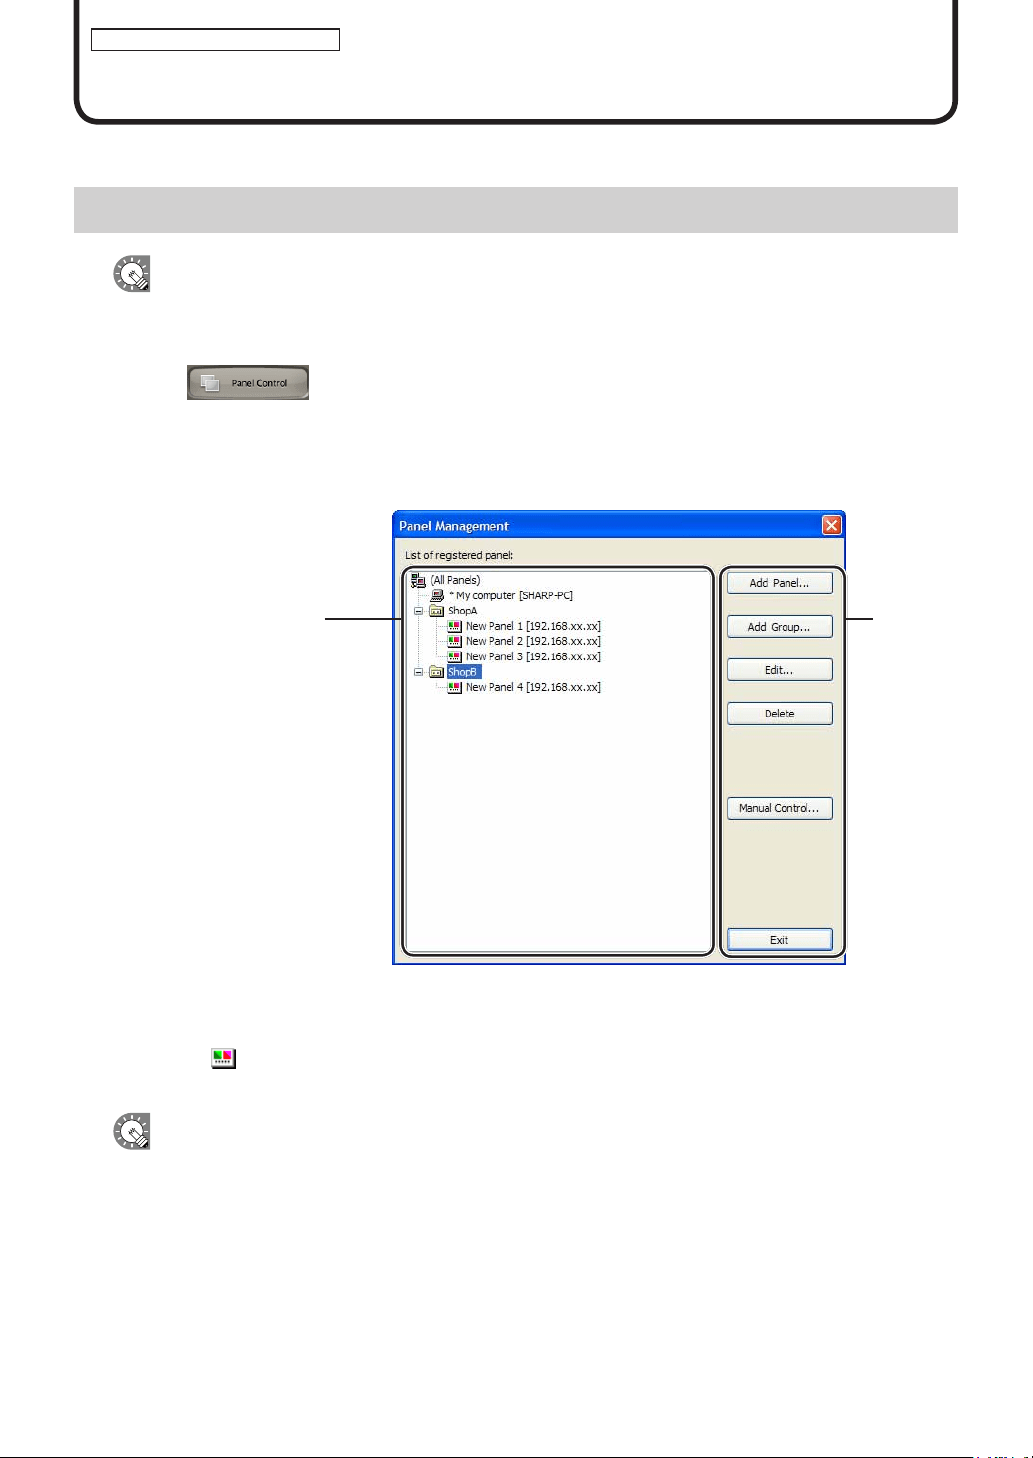
78
Panel Management and Option
Panel Management and Option
WhendistributingprogramstomultiplepanelswiththeNetworkVersion,youmustfirstsetthepanels.
Managing panels
This function is only available with the Network Version.
●Launching Panel Control Management
1. Click on the Launcher window.
The[PanelManagement]dialogboxwillappear.
●The main Panel Management window
1) The “List of registered panel” tree
Displays a list of all registered panels.
Panel icons (
)canbedraggedanddroppedinsidethislisttochangetheirattribution(“(AllPanels)”oran
“arbitrarygroup”).
Thenumberofpanelsthatcanbemanageddependsonthelicense.(Maximumlimitis100panels)
1)The“Listofregistered
panel”tree
2)Buttons
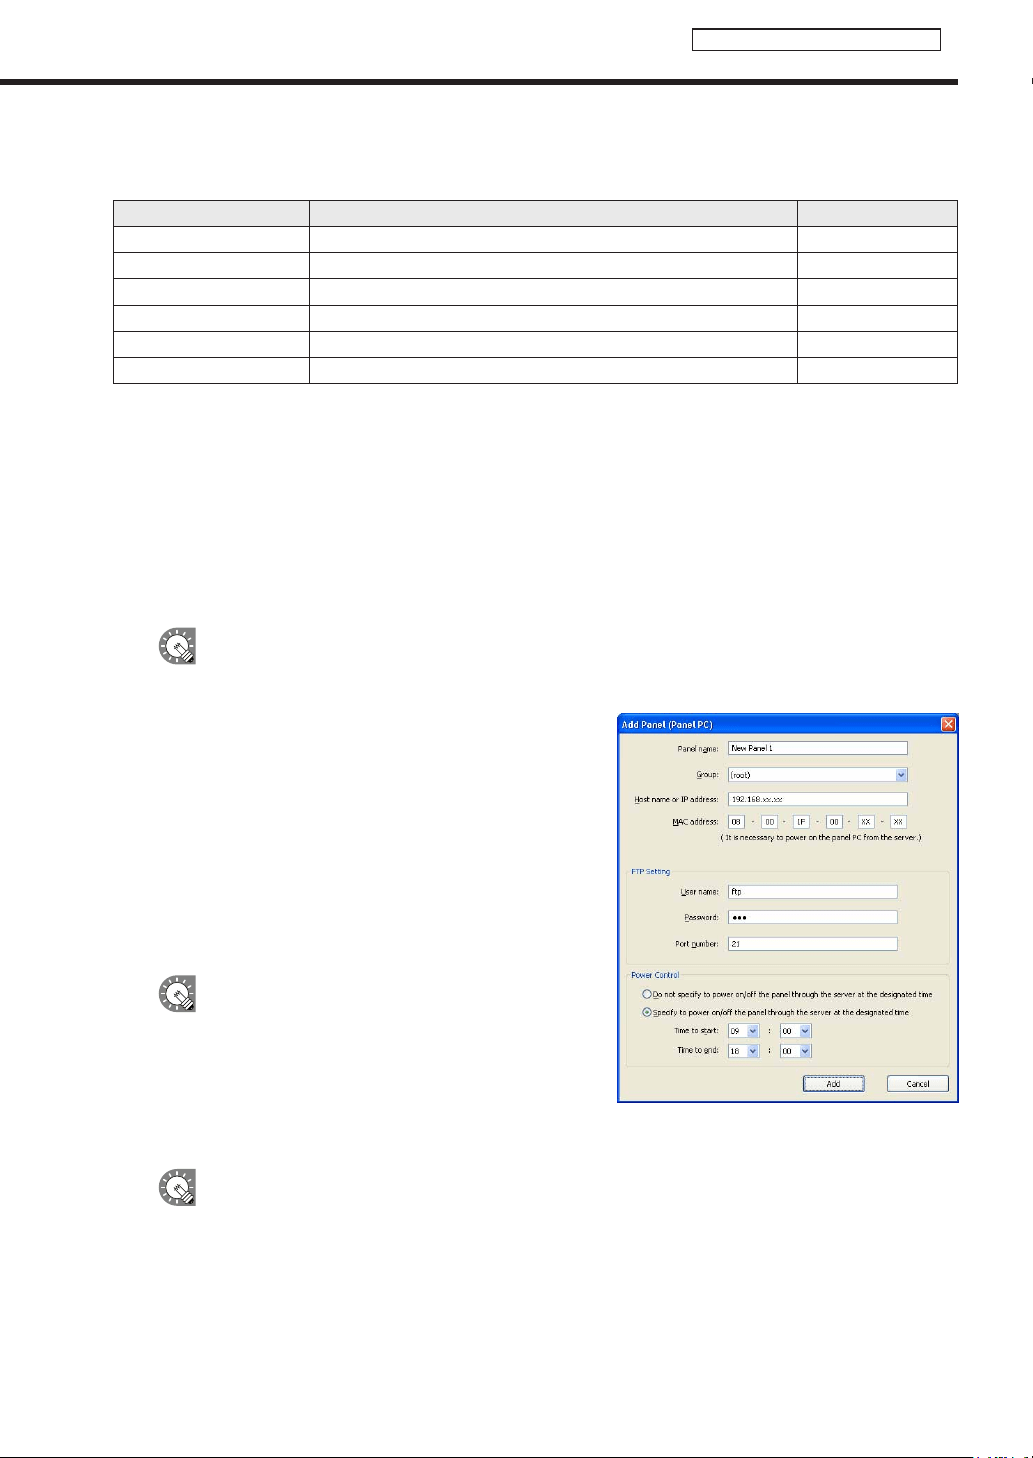
79
Panel Management and Option
2) Buttons
The buttons perform the following actions:
Name Description Relevant page
Add Panel Adds a new panel to be managed.
F
Below
AddGroup Adds a new group.
F
p.80
Edit Changesthecontentoftheselectedpanelorgroup.
F
Below,p.80
Delete Deletes the selected panel or group.
F
p.81
ManualControl Sets panels and control commands to be controlled manually.
F
p.81
Exit Closesthe[PanelManagement]window. -
●Adding/editing a panel
1. Click [Add Panel] to add a new panel to manage.
The[AddPanel(PanelPC)]dialogboxwillappear.
Click [Edit] to edit an existing panel.
The[EditPanel(PanelPC)]dialogboxwillappear.
Thesettingsforthe[AddPanel(PanelPC)]and[EditPanel(PanelPC)]dialogboxesarethe
same. Panels can also be edited after they have been added.
2. Set the options.
1) Panelname(Compulsory)
Chooseanamethatwillmakeiteasytoidentifythe
panel.(Namesmustbewithin50characters)
2) Group
IntheGroupbox,selectagrouptoaddthepanelto.
If you do not want to assign the panel to any particular
group,select“(none)”.Panelsthatarenotassignedto
anyparticulargroupwillbeaddedunder“AllPanels”.
Clicking[AddPanel]whilethe“Listofregistered
panel”treegrouporapanelassignedtoagroupis
selected will add the panel to the respective group.
3) HostnameorIPaddress(Compulsory)
SetsthehostnameorIPaddressoftargetPCwhichcanbeaccessedfromtheserver.
It is not possible to create two or more panels with the same host name or IP address.
Managing panels
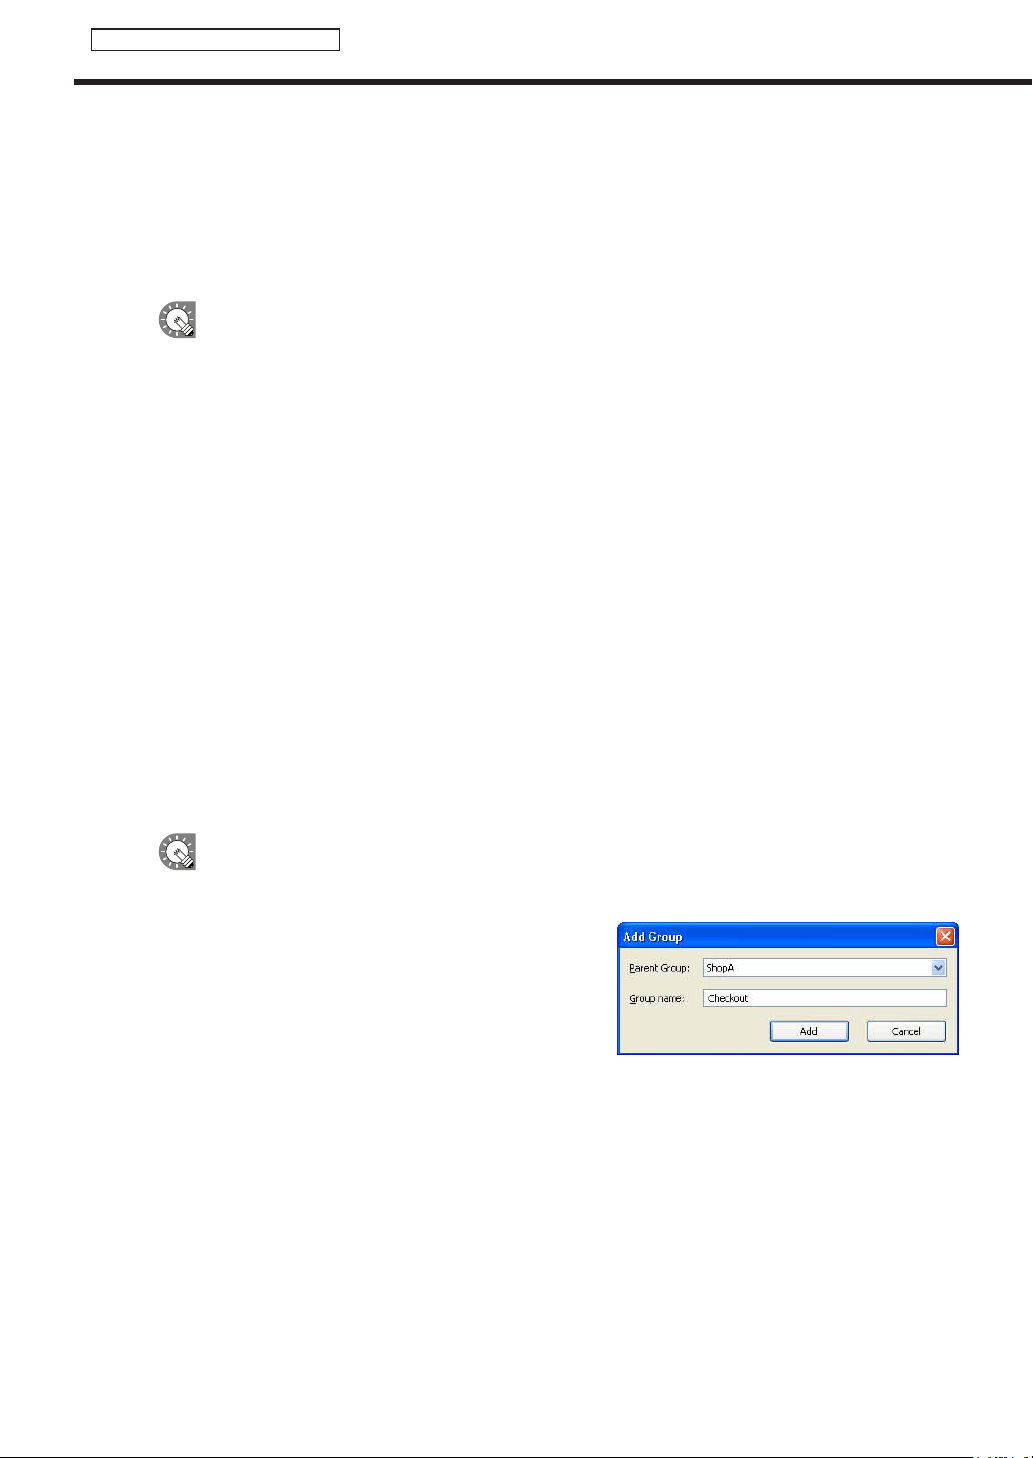
80
Panel Management and Option
Managing panels
4) MACaddress
SettheMACaddressforthetargetPCifyouwanttoturnitonfromthecontrollerPC.
5) FTPSetting
Enterthe“Username”(within30alphanumericcharacters),“Password”(within30alphanumeric
characters),and“Portnumber”(1-32000)thatyousetforthetargetPCFTPsettings.
•FTPsettingsforaddingapanelcanbesetinadvance.(
F
p.83)
•IfyouhaveinstalledtheViewerVersion,auniqueFTPServerwillbeinstalled,andstartedasa
service.ThedefaultTCP/IPportnumbersare20and21.Ifthisportnumberisalreadyusedby
anotherservice,changetheportnumber.TheFTPsettingsofthetargetPCClientScheduler
must use the same port number. (
F
p.101)
6) PowerControl
IfyouwanttoturnthepowerofthetargetPConoroffataspecifiedtime,selectthe“Specifytopower
on/offthepanelthroughtheserveratthedesignatedtime”,andsetthe“Timetostart”and“Timeto
end”.(Timescanbespecifiedinincrementsof5minutes)
3. Click [Add] or [Cancel].
●Adding/editing a group
1. To add a group, click [Add Group].
The[AddGroup]dialogboxwillappear.
To edit a group, select the group you want to edit and click [Edit].
The[EditGroup]dialogboxwillappear.
•Agroupcanbecreatedwithinagroup
•Itisnotpossibletocreatetwoormoregroupswiththesamename.
2. Select the parent group.
3. Enter a “Group name”.
(Namesmustbewithin50characters)
4. Click [Add] or [Cancel].
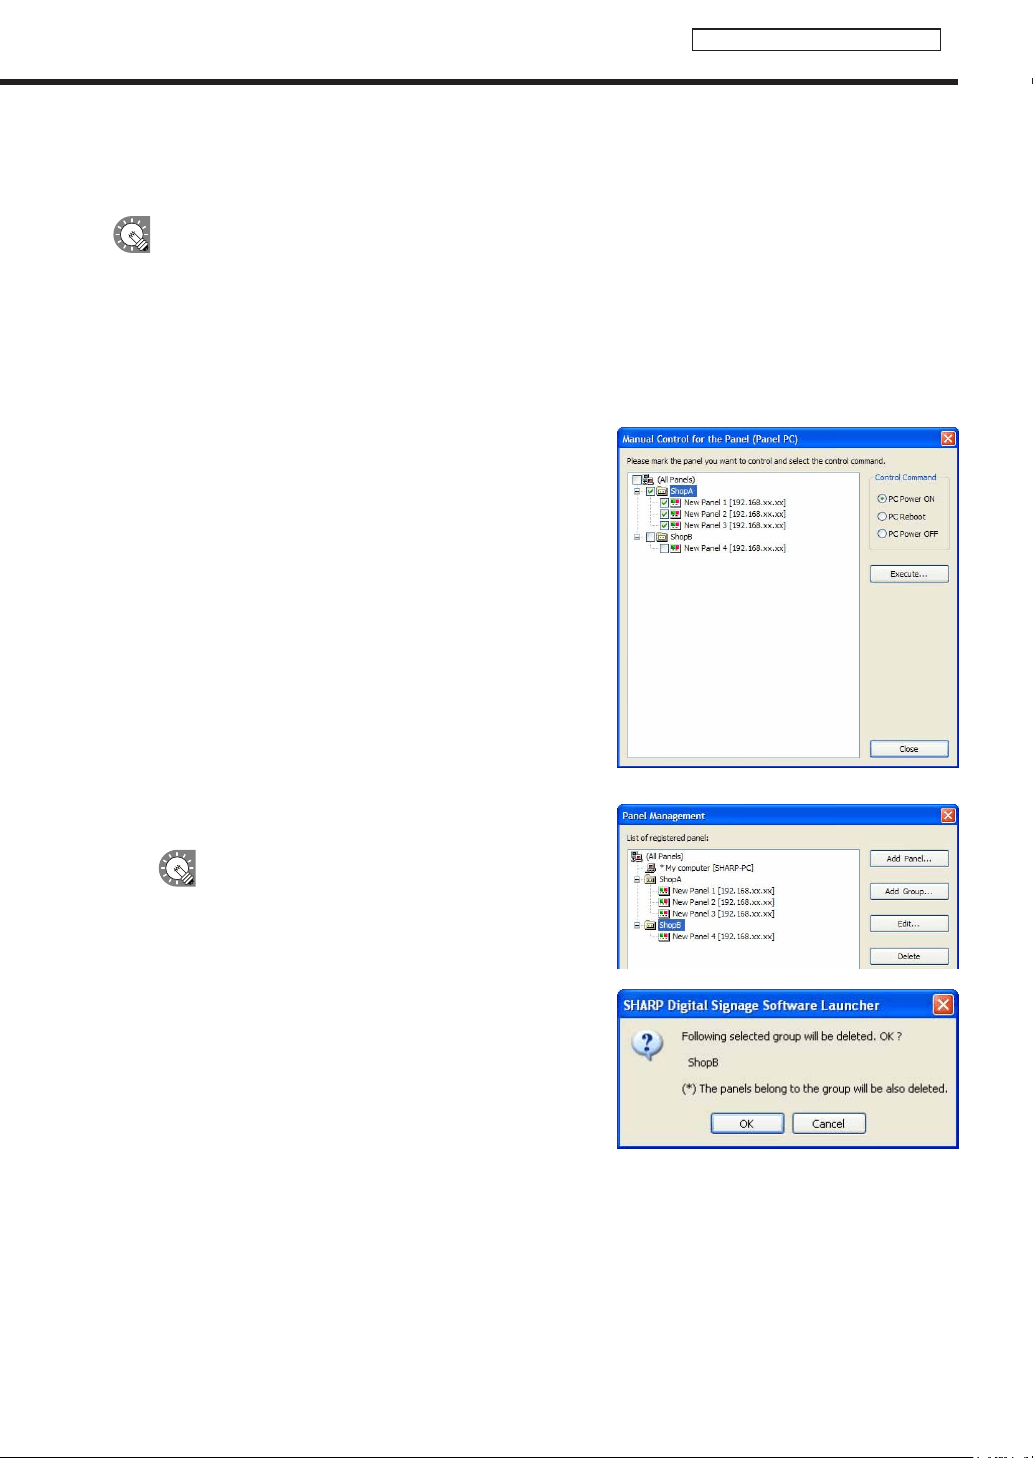
81
Panel Management and Option
●Controlling a panel manually
SetthisoptionwhenyouwanttocontrolthetargetPCmanually.
WhencontrollingthetargetPCmanually,(whenturningonthepanelPC),theWakeOnLANfunction
thatoperatesbyMagicPacketssentfromthetargetPCmustbeenabled.
IfthetargetPCisoutsidethesameLANsegment,MagicPacketsmaynotgetthroughdependingon
routerspecsandsettings.Contactyournetworkadministratorformoredetails.
1. Click [Manual Control].
The[ManualControlforthePanel(PanelPC)]dialogboxwillappear.
2. Check the check boxes next to the panels or groups that
you want to control.
Selecta“ControlCommand”.
The following three control commands can be sent:
•PCPowerON
•PCReboot
•PCPowerOFF
3. Click [Execute].
The control command will be sent.
●Deleting a panel or group
1. Select the panel or group that you want to delete.
If you select a group, all the panels assigned to that
group will be deleted.
2. Click [Delete].
Aconfirmationdialogboxwillappear.
3. Click [OK].
Managing panels
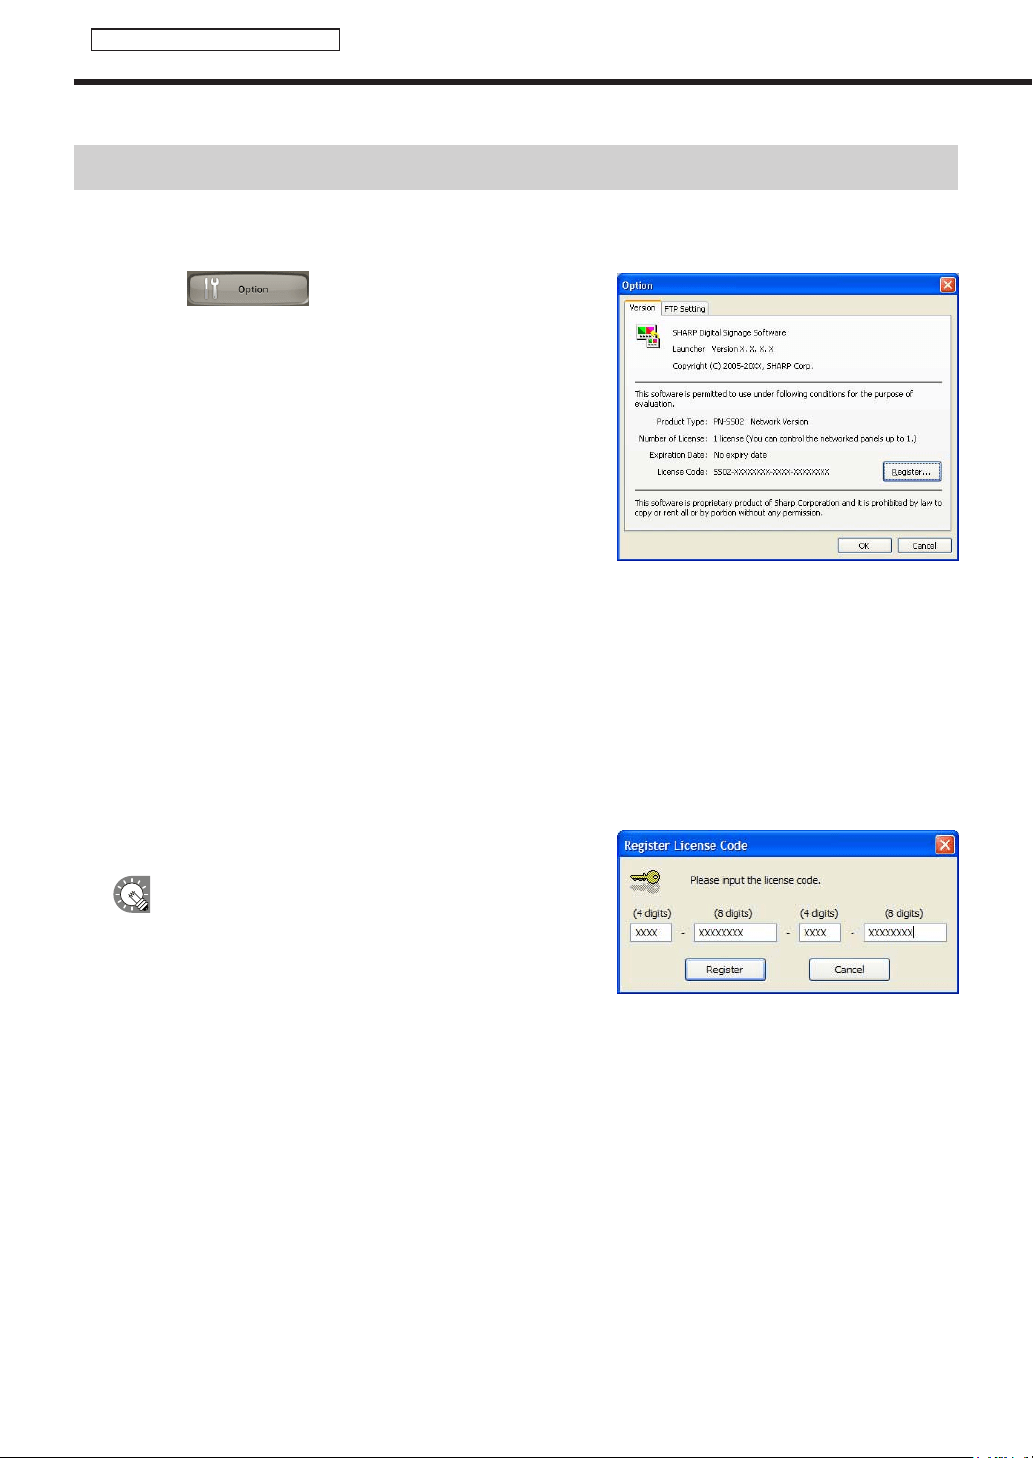
82
Panel Management and Option
Option
Option
Option allows you to check product version information and to set values for adding panels in advance.
●Launching Option
1. Click on the Launcher window.
The[Option]dialogboxwillappear.
●Checking version information
The[Version]tabdisplaysversioninformation.
Registering a license code
If you input a temporary license code when installing, you will only be able to use the software for a two-month
trial period. Register your license code before the end of the trial period.
1. Click [Register].
The[RegisterLicenseCode]dialogboxwillappear.
2. Enter your “license code” and click [Register].
IfusingWindowsVista/7,click[Allow](forWindows
Vista)or[Yes](forWindows7)ifaUserAccount
Controlwindowappears.
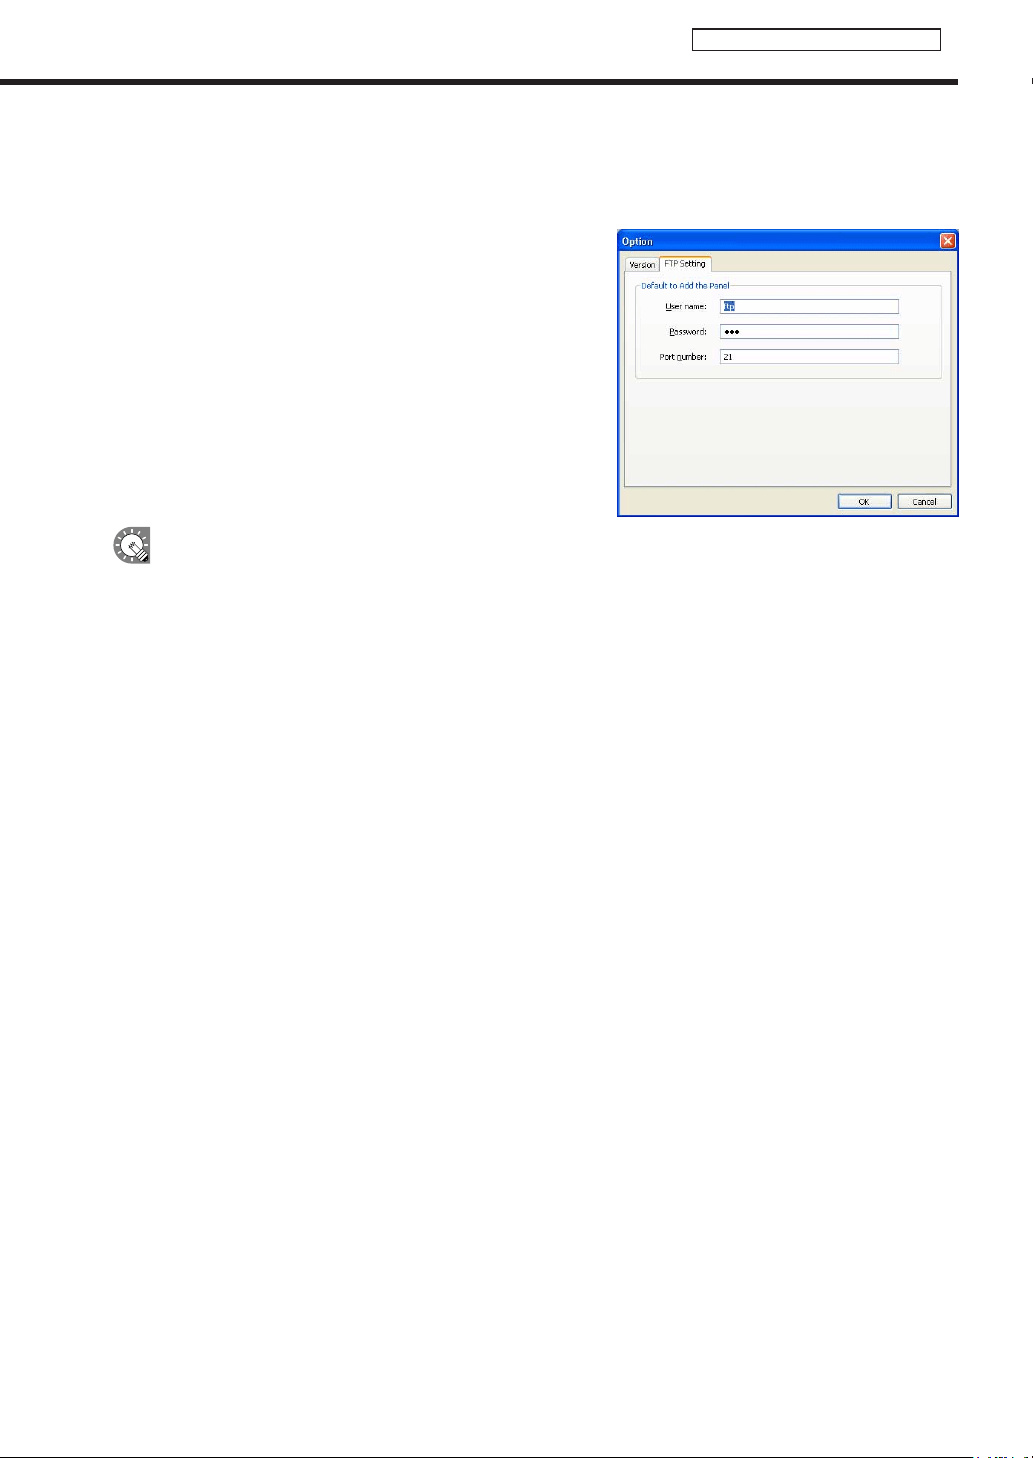
83
Panel Management and Option
●Adding default panel settings for panels
SetdefaultvaluesforFTPsettingsthatareappliedtoallnewly-addedpanels.
1. Click the [FTP Setting] tab.
2. Set the [Default to Add the Panel].
•Username(within30alphanumericcharacters)
•Password(within30alphanumericcharacters)
•Portnumber(1-32000)
The initial default values are:
•Username:ftp
•Password:ftp
•Portnumber:21
•IfyouhaveinstalledtheViewerVersion,auniqueFTPServerwillbeinstalled,andstartedasaservice.
ThedefaultTCP/IPportnumbersare20and21.Ifthisportnumberisalreadyusedbyanotherservice,
changetheportnumber.TheFTPsettingsofthetargetPCClientSchedulermustusethesameport
number. (
F
p.101)
•Theportnumbershouldalsobechangediftherearesecurityissues.
Option
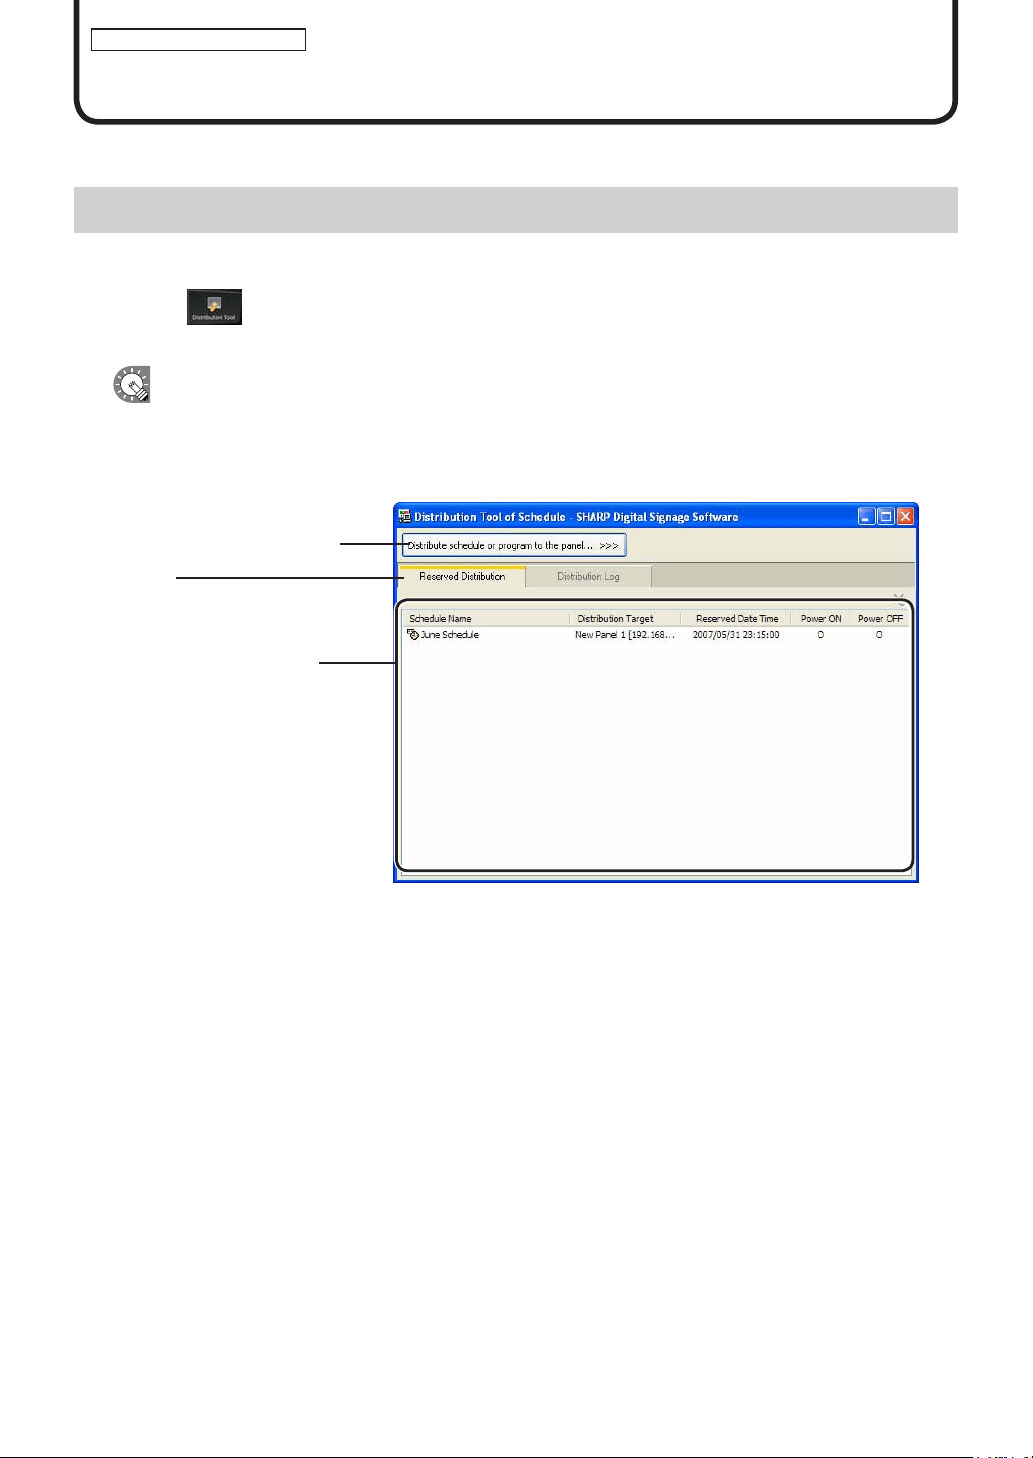
84
Schedule Distribution Tool
DistributeschedulescreatedwithScheduleEditortothetargetPC.
The main Schedule Distribution Tool window
●Launching Schedule Distribution Tool
1. Click on the Launcher window.
“ScheduleDistributionTool”willlaunch.
ScheduleDistributionToolcanalsobestartedbygoingtotheWindowsTaskbarandclicking[Start],[All
Programs],[SHARPDigitalSignageSoftware],[Tools],andthen[ScheduleDistributionTool].
●The main Schedule Distribution Tool window
1)Distributionsettingsbutton
2)Tabs
3) Distribution Reservation/
Logwindow
1) Distribution settings button
Launchesawizardforsystemanddistributionmethodsettings.
2) Tabs
Clickingatabswitchestothelistwindowforeachitem.
3) Distribution Reservation/Log window
Displays details for the selected tab.
Distributing schedules
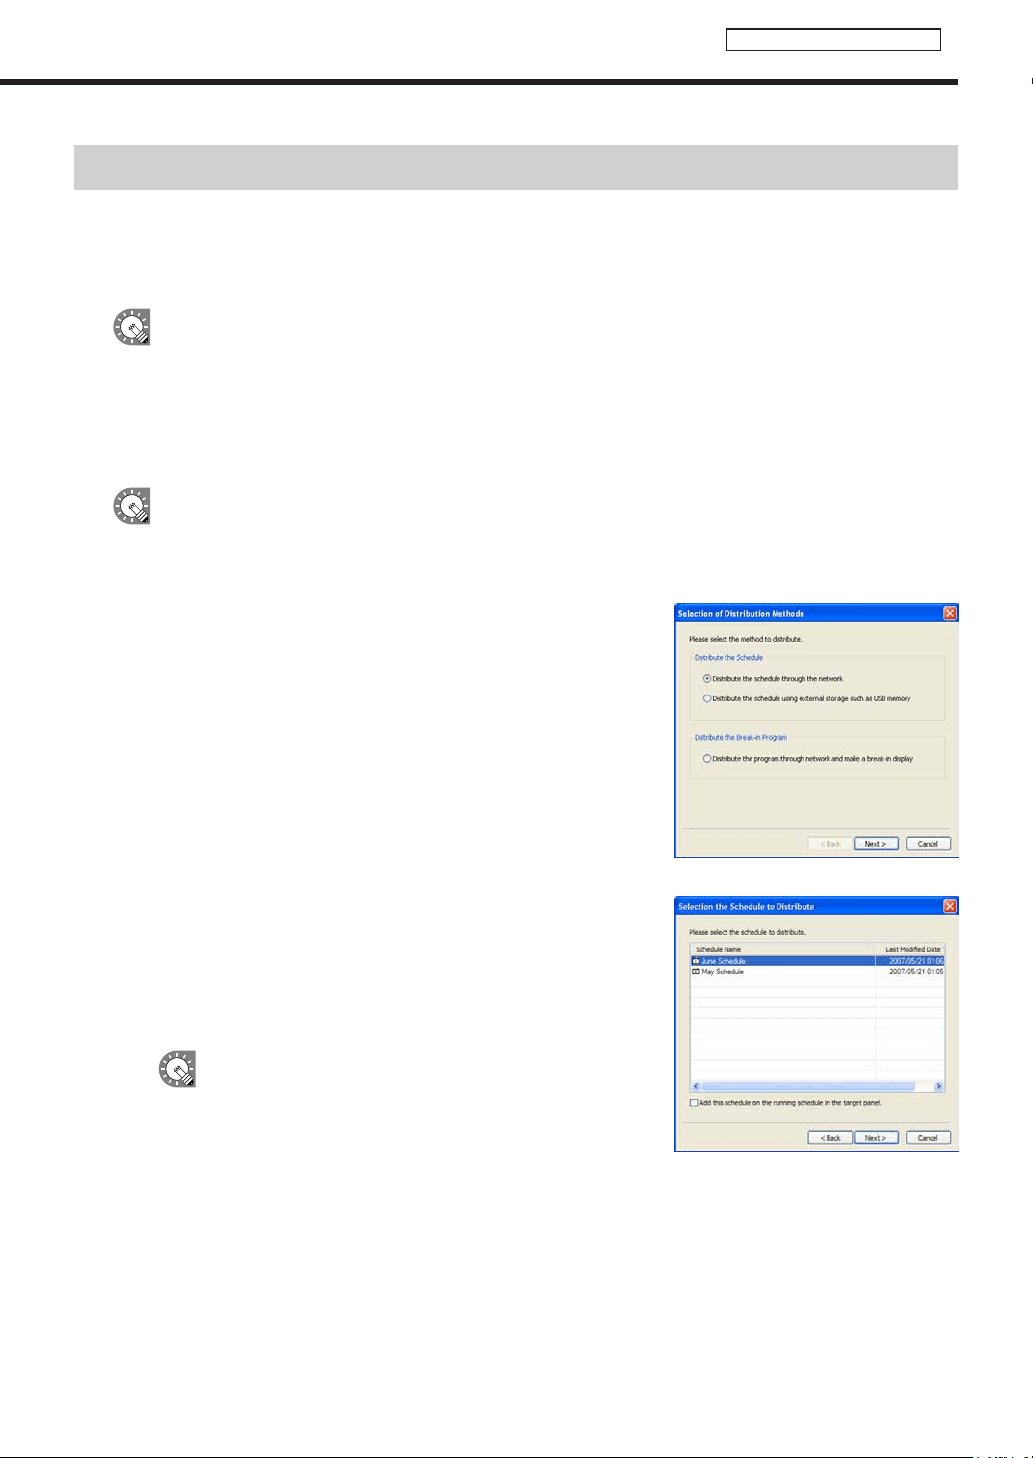
85
Schedule Distribution Tool
Distributing schedules
Schedules can be distributed in the following ways:
•DistributedtoatargetPCviaanetwork(NetworkVersiononly)
•DistributedtoyourownPC
•DistributedviaUSBmemoryorotherexternaldevice
Themaximumtotalsizeofschedules(includingprogramsandcontent)thatcanbedistributedwith
ScheduleDistributionToolis2GB.Datagreaterthanthissizecannotbedistributed.
●Distributing via a network
DistributeschedulestothetargetPCviaanetwork.
These instructions only apply to the Network Version.
1. Click [Distribute schedule or program to the panel].
The[SelectionofDistributionMethods]dialogboxwillappear.
2. Select the “Distribute the schedule through the network”
option button, and click [Next].
The[SelectiontheScheduletoDistribute]dialogboxwill
appear.
3. Select a schedule.
If you would like to add the selected schedule to the current
scheduleonthetargetPC,checkthe“Addthisscheduleon
therunningscheduleinthetargetpanel”checkbox.Ifthebox
isnotchecked,thecurrentscheduleonthetargetPCwillbe
replaced with the currently selected schedule.
Schedule replacement is performed in units of
days. It cannot be changed to units of hours.
4. Click [Next].
The[SelectionoftheDistributionTarget]dialogboxwillappear.
Distributing schedules

86
Schedule Distribution Tool
Distributing schedules
5. Check the check boxes for all the panels and/or groups
that the schedule is to be sent to.
Clickingthebuttonsinthetoprightofthewindowwillallow
you to add or edit panels and groups in the same way as the
[PanelManagement]window(
F
p.78).
The buttons perform the following actions:
Button Name Description Relevant page
AddPanel(PanelPC)
Adds a new panel to be managed.
F
p.79
AddGroup Adds a new group.
F
p.80
EditPanel/Group
Changesthecontentoftheselectedpanelor
group.
F
p.79-80
DeletePanel/Group Deletes the selected panel or group.
F
p.81
6. Click [Next].
The[SelectionoftheDistributionDateTimeandOption]dialogboxwillappear.
7. Select a “Distribution Date Time”.
• “Distributenow”optionbutton
Distributesscheduleassoonasthedistributionwizard
exits.
• “Distributeatspecifieddatetime”optionbutton
Distributes schedule at the set date and time.
8. Set “Distribution Options”.
• “PowerONthepanelPCbeforethedistribution”checkbox
DistributesthescheduleafterturningthetargetPConifitisnot
already turned on at the time of distribution.
• “PowerOFFthepanelPCafterthedistribution”checkbox
TurnsthetargetPCpoweroffaftertheschedulehasbeendistributed.
9. Click [Next].
A[Confirmation]dialogboxwillappear.
10. Check the distribution settings, and click [Finish].
Thedistributionordistributionreservationwillbeexecuted.
Distribution data can be packaged and saved as
asinglefilethatincludesscheduleinformation
including programs, timetables, and content.
Click[SavethePackage],andinthe[Savethe
Package]dialogboxthatappears,specifya
directorytosavethefileto.Thenentera“File
name”,andclick[Save].Thereisusuallynoneedto
use this function.

87
Schedule Distribution Tool
11. If you selected the “Distribute now” option button in step
7, a screen like the one on the right will appear. Check
that the distribution was successful and click [Close].
If you selected the “Distribute at specied date time”
option button in step 7, a screen like the one on the right
will appear. Click [OK].
•Scheduleandprogramdistributionmaytakesometime.Ifyouperformsimultaneousdistributionto
multiplepanels,dataisactuallysentsequentially.Forthisreason,theremaybesometimedifferencein
schedule and program distribution.
•Oldschedulesarenolongerrequiredafternewscheduleshavebeensent.Unnecessaryschedulesand
theirassociatedcontentwillbeautomaticallydeletedthenexttimeClientSchedulerstarts.
●Distributing to your own PC
These instructions only apply to the Standalone Version.
1. Click [Distribute schedule or program to the panel].
The[SelectionofDistributionMethods]dialogboxwillappear.
2. Select the “Distribute the schedule to your PC (My
computer)” option button, and click [Next].
The[SelectiontheScheduletoDistribute]dialogboxwill
appear.
3. Select a schedule.
If you want to add the selected schedule to the current open
scheduleonyourPC,checkthe“Addthisscheduleonthe
runningscheduleinthetargetpanel”checkbox.Iftheboxis
notchecked,thecurrentlyopenscheduleonyourPCwillbe
replaced with the currently selected schedule.
4. Click [Next].
A[Confirmation]dialogboxwillappear.
Distributing schedules
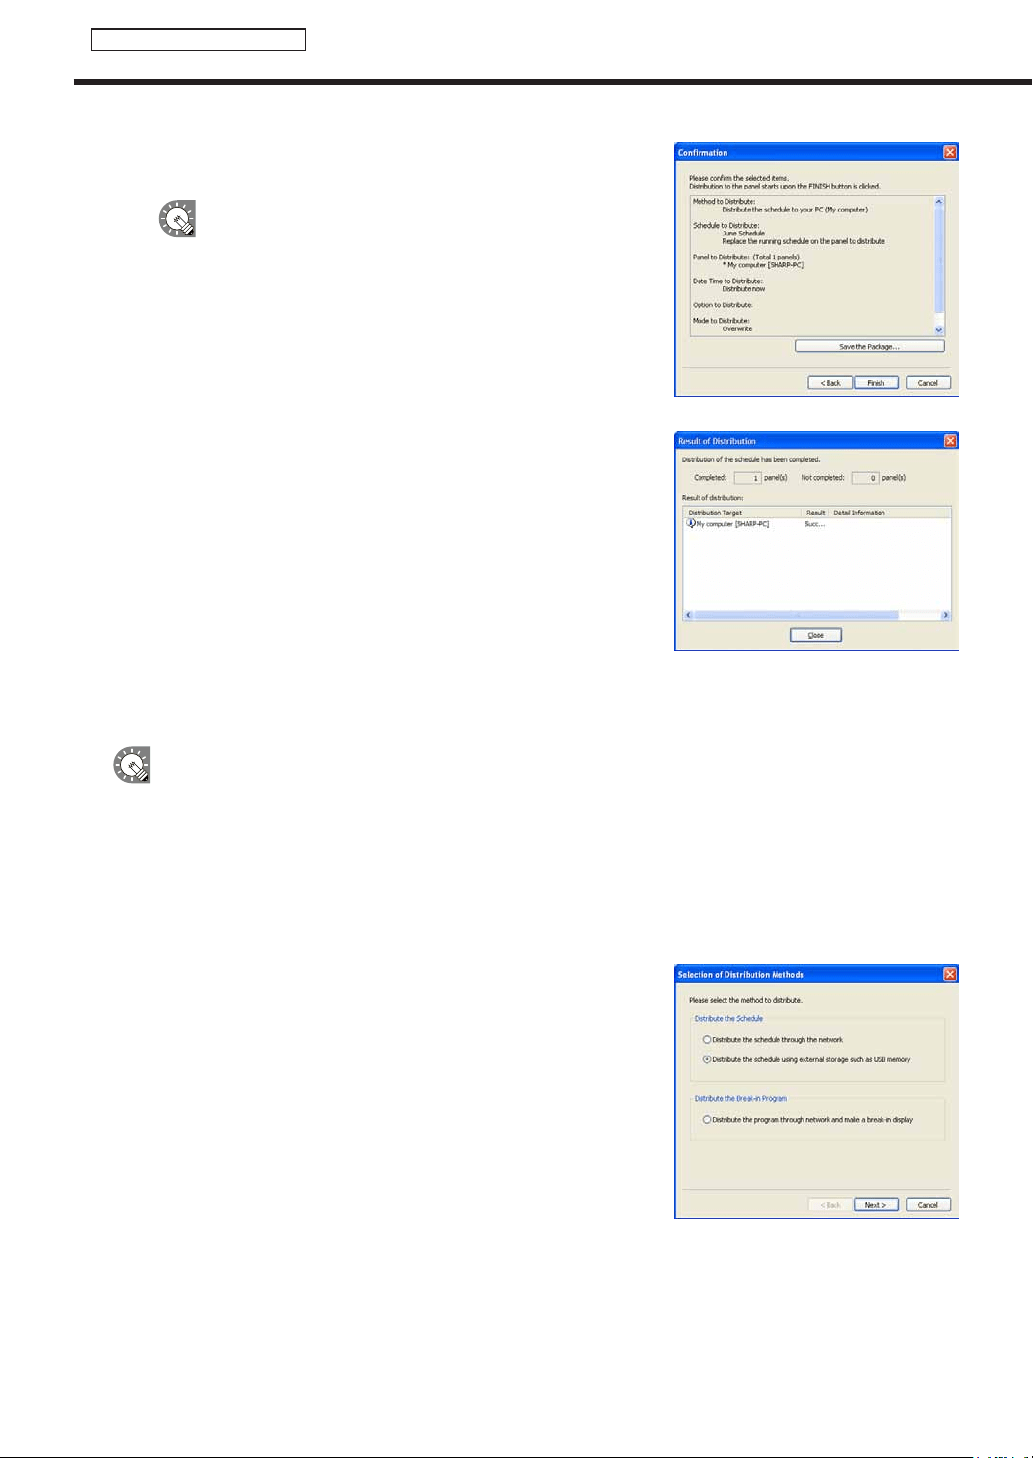
88
Schedule Distribution Tool
Distributing schedules
5. Check the distribution settings, and click [Finish].
Thedistributionwillbeexecuted.
Distribution data can be packaged and saved as
asinglefilethatincludesscheduleinformation
including programs, timetables, and content.
Click[SavethePackage],andinthe[Savethe
Package]dialogboxthatappears,specifya
directorytosavethefileto.Thenentera“File
name”,andclick[Save].Thereisusuallynoneedto
use this function.
6. A screen like the one on the right will appear. Check that
the distribution was successful and click [Close].
●Distributing with USB memory or other external storage device
•DonotremovetheUSBmemoryorotherexternalstoragedevicefromyourPCuntilthetransferis
complete.
•CertainUSBdevicesandotherexternalstoragedevicesmaynotbeabletodistributecorrectly.
•SetthetargetPCto“Normalmode.”Ifitissetto“Contentsdirectdistributemode,”schedulescannotbe
distributed (
F
p.103).
1. Click [Distribute schedule or program to the panel].
The[SelectionofDistributionMethods]dialogboxwillappear.
2. Select the “Distribute the schedule using external
storage such as USB memory” option button, and click
[Next].
The[SelectiontheScheduletoDistribute]dialogboxwill
appear.
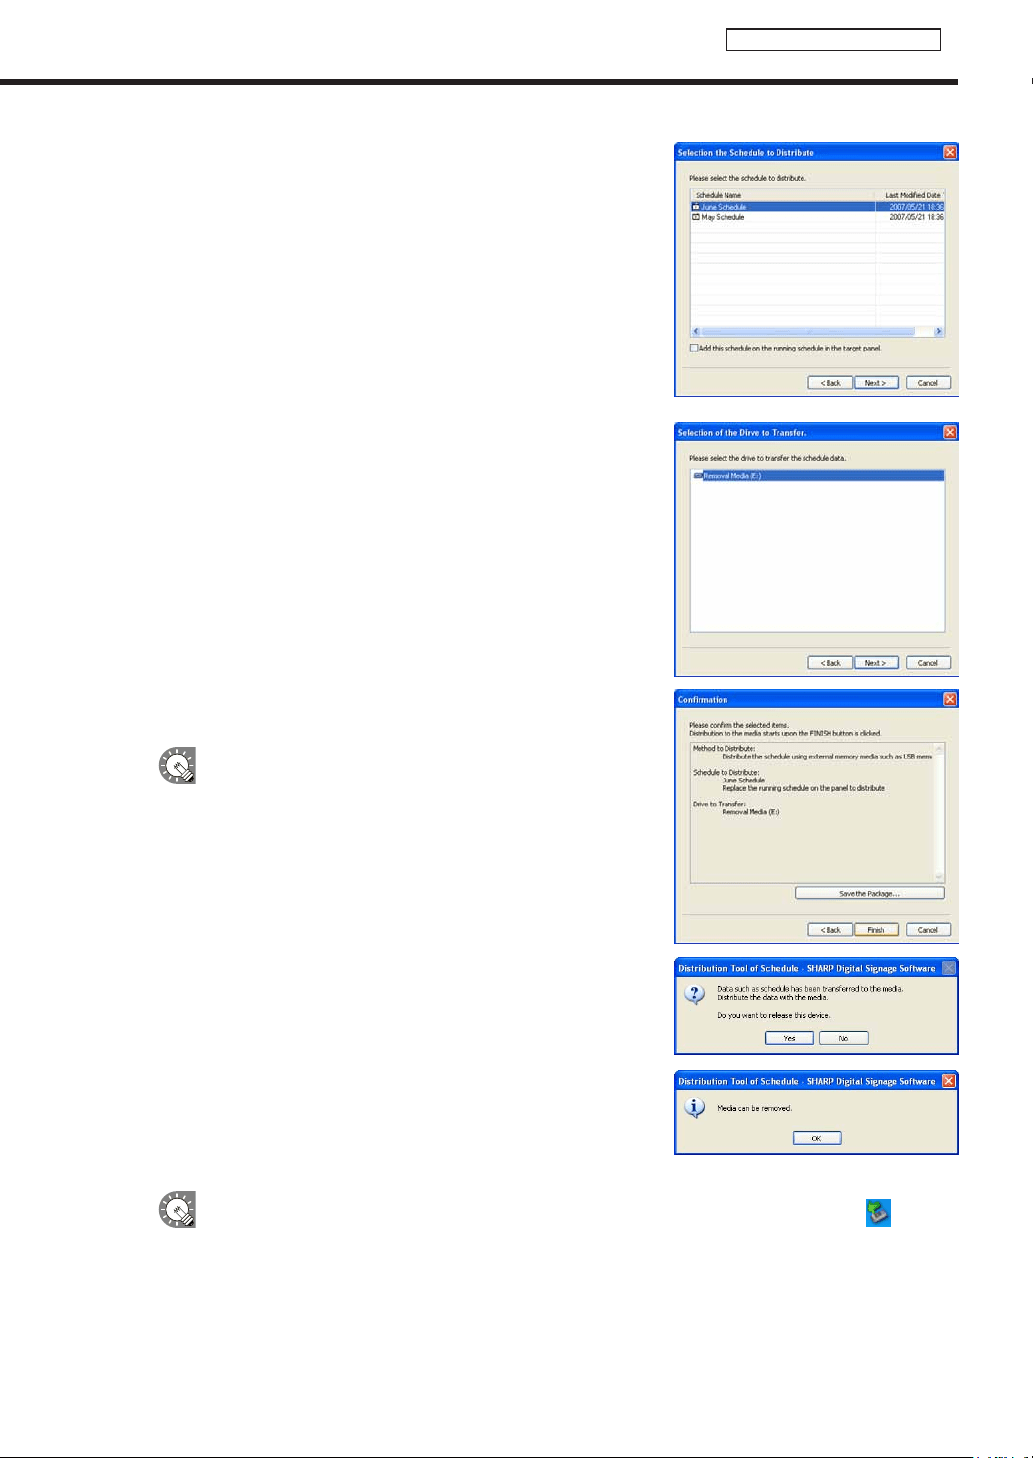
89
Schedule Distribution Tool
3. Select a schedule.
If you would like to add the selected schedule to the currently
openscheduleonthetargetPC,checkthe“Addthis
scheduleontherunningscheduleinthetargetpanel.”check
box.Iftheboxisnotchecked,thecurrentlyopenschedule
onthetargetPCwillbereplacedwiththecurrentlyselected
schedule.
4. Click [Next].
The[SelectionoftheDrivetoTransfer]dialogboxwillappear.
5. Select the drive to which you want to transfer the schedule to.
6. Click [Next].
A[Confirmation]dialogboxwillappear.
7. Check the distribution settings, and click [Finish].
Thedistributionwillbeexecuted.
Distribution data can be packaged and saved as a single
filethatincludesscheduleinformationincludingprograms,
timetables, and content.
Click[SavethePackage],andinthe[SavethePackage]
dialogboxthatappears,specifyadirectorytosavethe
fileto.Thenentera“Filename”,andclick[Save].Thereis
usually no need to use this function.
8. Click [Yes].
Aconfirmationdialogboxwillappearagain.
9. Click [OK].
10. Remove the USB memory or other storage device from
the PC.
Ifyouclicked[No]instep8,removethedeviceviatheSafelyRemoveHardwareicon( ) in the
Task Tray.
11. Connect the USB memory or other external storage device to the target PC.
Theschedulewillbeautomaticallydistributed.TheUSBmemoryorotherexternalstoragedevicewill
automaticallystopwhenthedistributioniscomplete.Checkthemessage,andremovethedevice.
Distributing schedules
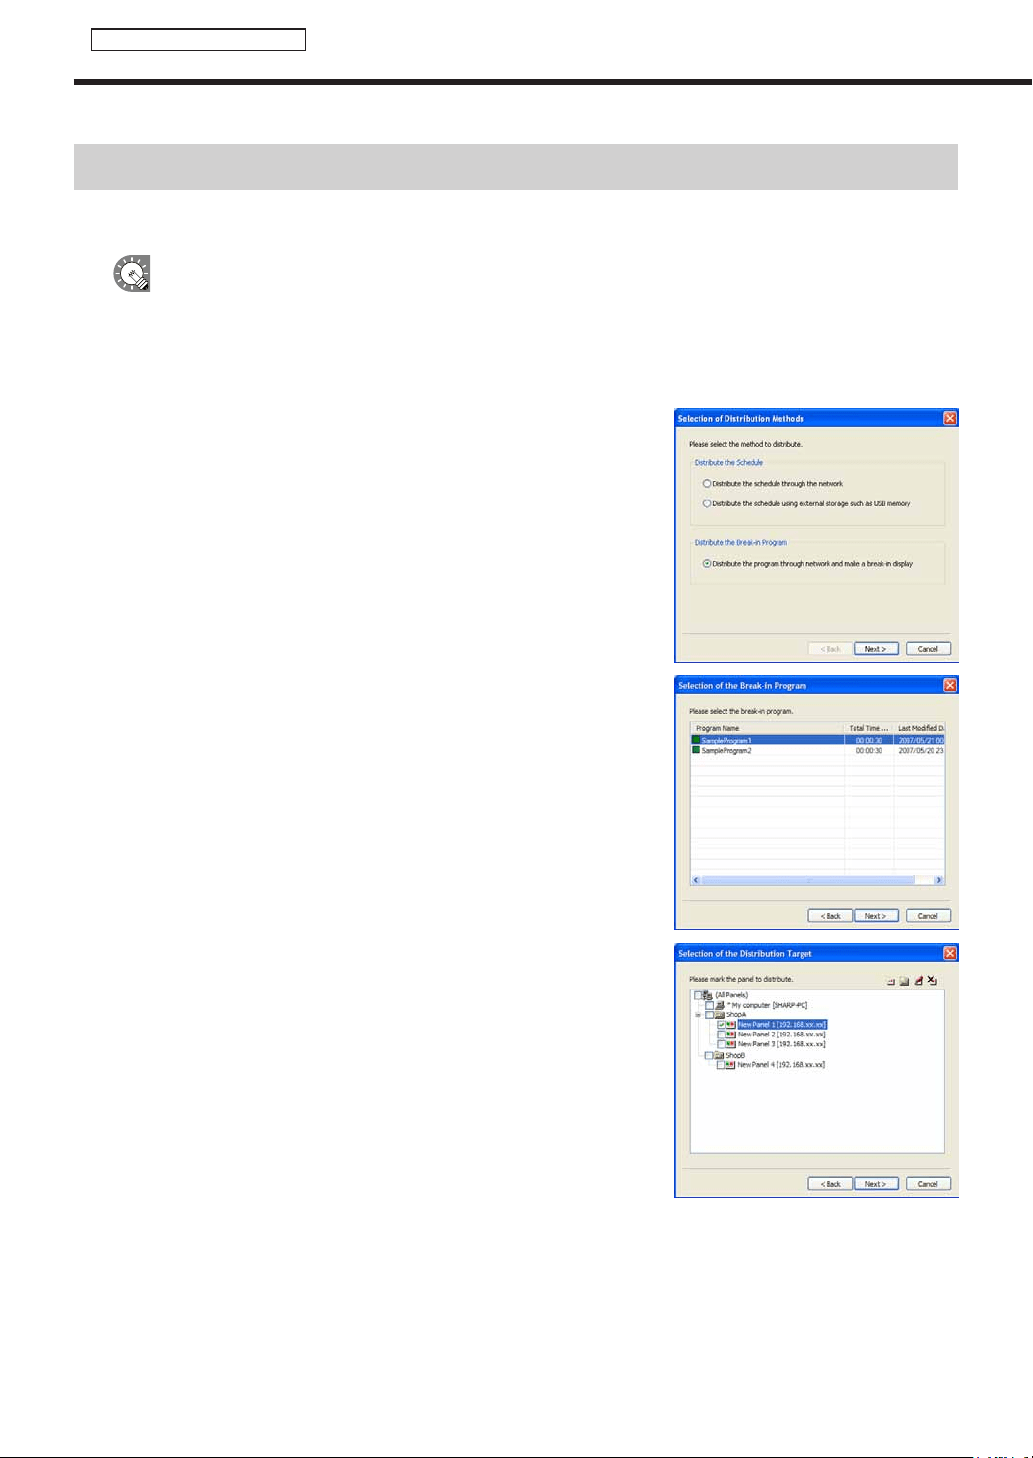
90
Schedule Distribution Tool
Displaying break-in programs
Displaying break-in programs
●Distributing via a network and making a break-in display
•ThisfunctionisonlyavailablewiththeNetworkVersion.
•Ifordinaryscheduledistributionandbreak-indistributionoverlap,thebreak-indistributionhasthehigher
priority in processing.
1. Click [Distribute schedule or program to the panel].
The[SelectionofDistributionMethods]dialogboxwillappear.
2. Select the “Distribute the program through network and make a
break-in display” radio button, and click [Next].
The[SelectionoftheBreak-inProgram]dialogboxwillappear.
3. Select a program, and click [Next].
The[SelectionoftheDistributionTarget]dialogboxwillappear.
4. Check the check boxes for all the panels and/or groups that the
schedule is to be sent to.
Clickingthebuttonsinthetoprightofthewindowwillallowyou
toaddoreditpanelsandgroupsinthesamewayasthe[Panel
Management]window(
F
p.78).Foradescriptionofbuttonactions,
refertop.86.
5. Click [Next].
The[DisplayTimeandPeriodsofBreak-inProgram]willappear.
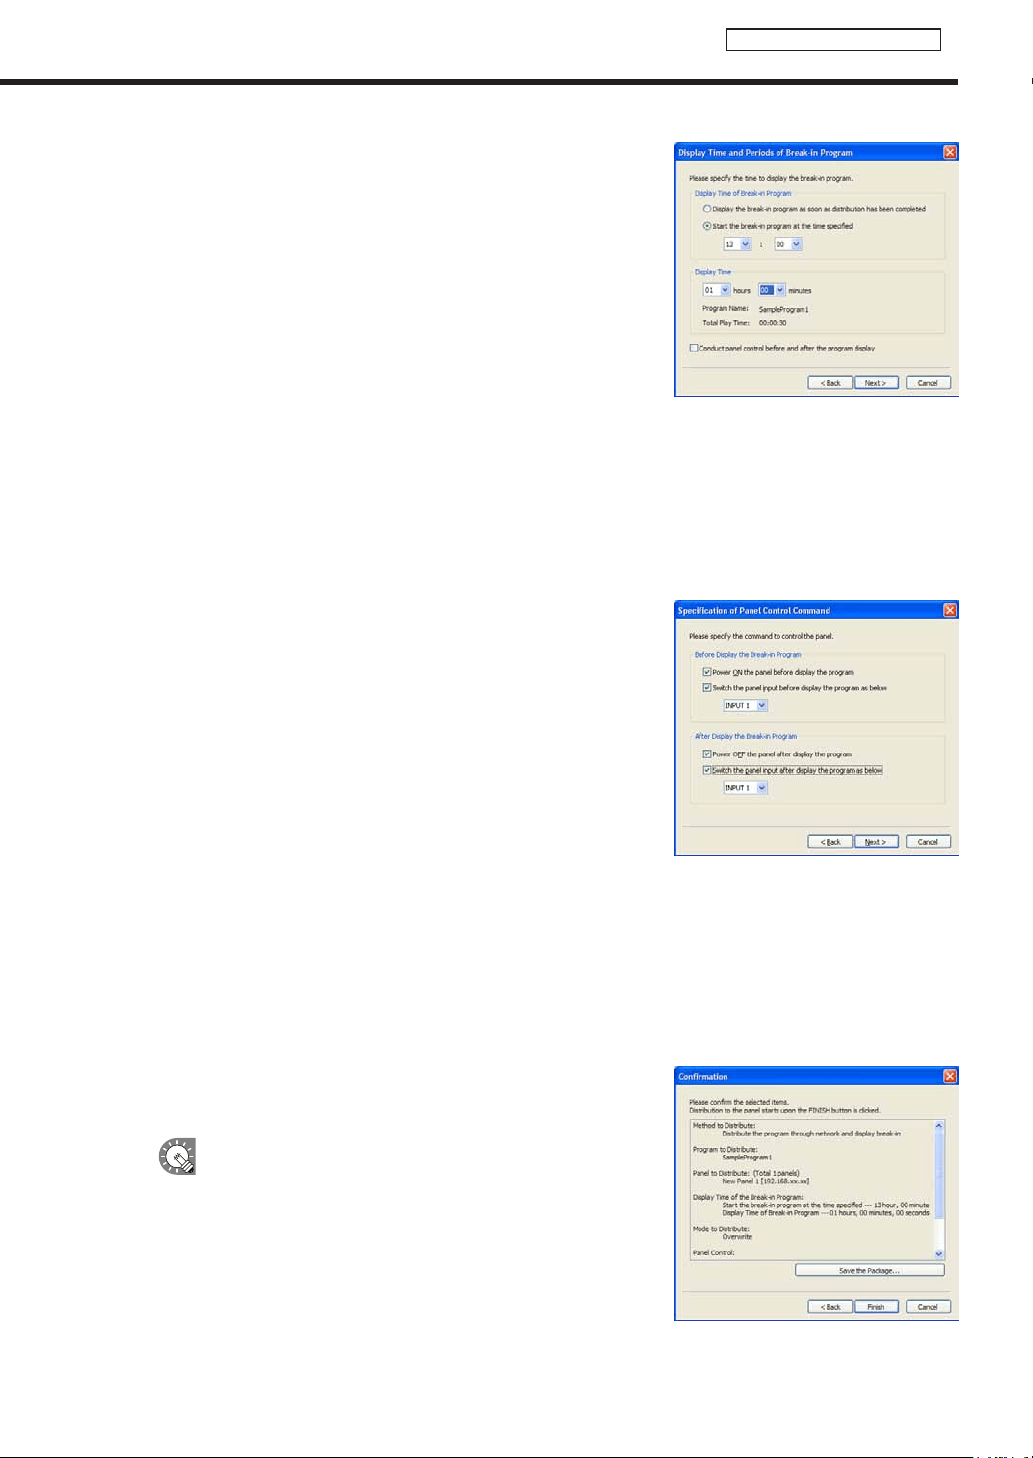
91
Schedule Distribution Tool
6. Set the “Display Time of Break-in Program” area.
• “Displaythebreak-inprogramassoonasdistributionhasbeen
completed”optionbutton
Displaystheprogramassoonasthedistributionwizardexits.
• “Startthebreak-inprogramatthetimespecified”optionbutton
Starts program display at the set time.
7. Set a “Display Time”
8. If you want to perform panel control operations before
and after a break-in program, check the “Conduct panel
control before and after the program display” check box,
and click [Next].
The[SpecificationofPanelControlCommand]dialogboxwill
appear.
If you do not want to perform panel control operations before and after a break-in program, clear the
“Conduct panel control before and after the program display” check box, and click [Next].
A[Confirmation]dialogboxwillappear.Proceedtostep11.
9. Set the [Panel Control Command].
“BeforeDisplaytheBreak-inProgram”
• “PowerONthepanelbeforedisplaytheprogram”check
box
Turns the panel on before displaying the break-in
program.
*ItcannotbeusedwiththeLB-46GX35andLB-52GX35.
• “Switchthepanelinputbeforedisplaytheprogramas
below”checkbox
Switchestothespecifiedinputbeforedisplayingthe
break-in program.
“AfterDisplaytheBreak-inProgram”
• “PowerOFFthepanelafterdisplaytheprogram”checkbox
Turnsthepaneloffafterthebreak-inprogramhasfinished.
• “Switchthepanelinputafterdisplaytheprogramasbelow”checkbox
Switchestothespecifiedinputafterdisplayingthebreak-inprogram.
10. Click [Next].
A[Confirmation]dialogboxwillappear.
11. Check the distribution settings, and click [Finish].
The break-in program display or display reservation will be
executed.
By packaging distribution data, program information
containing break-in programs and other contents
canbesavedasasinglefile.
Click[SavethePackage],andinthe[Savethe
Package]dialogboxthatappears,specifya
directorytosavethefileto.Thenentera“File
name”,andclick[Save].Thereisusuallynoneedto
use this function.
Displaying break-in programs
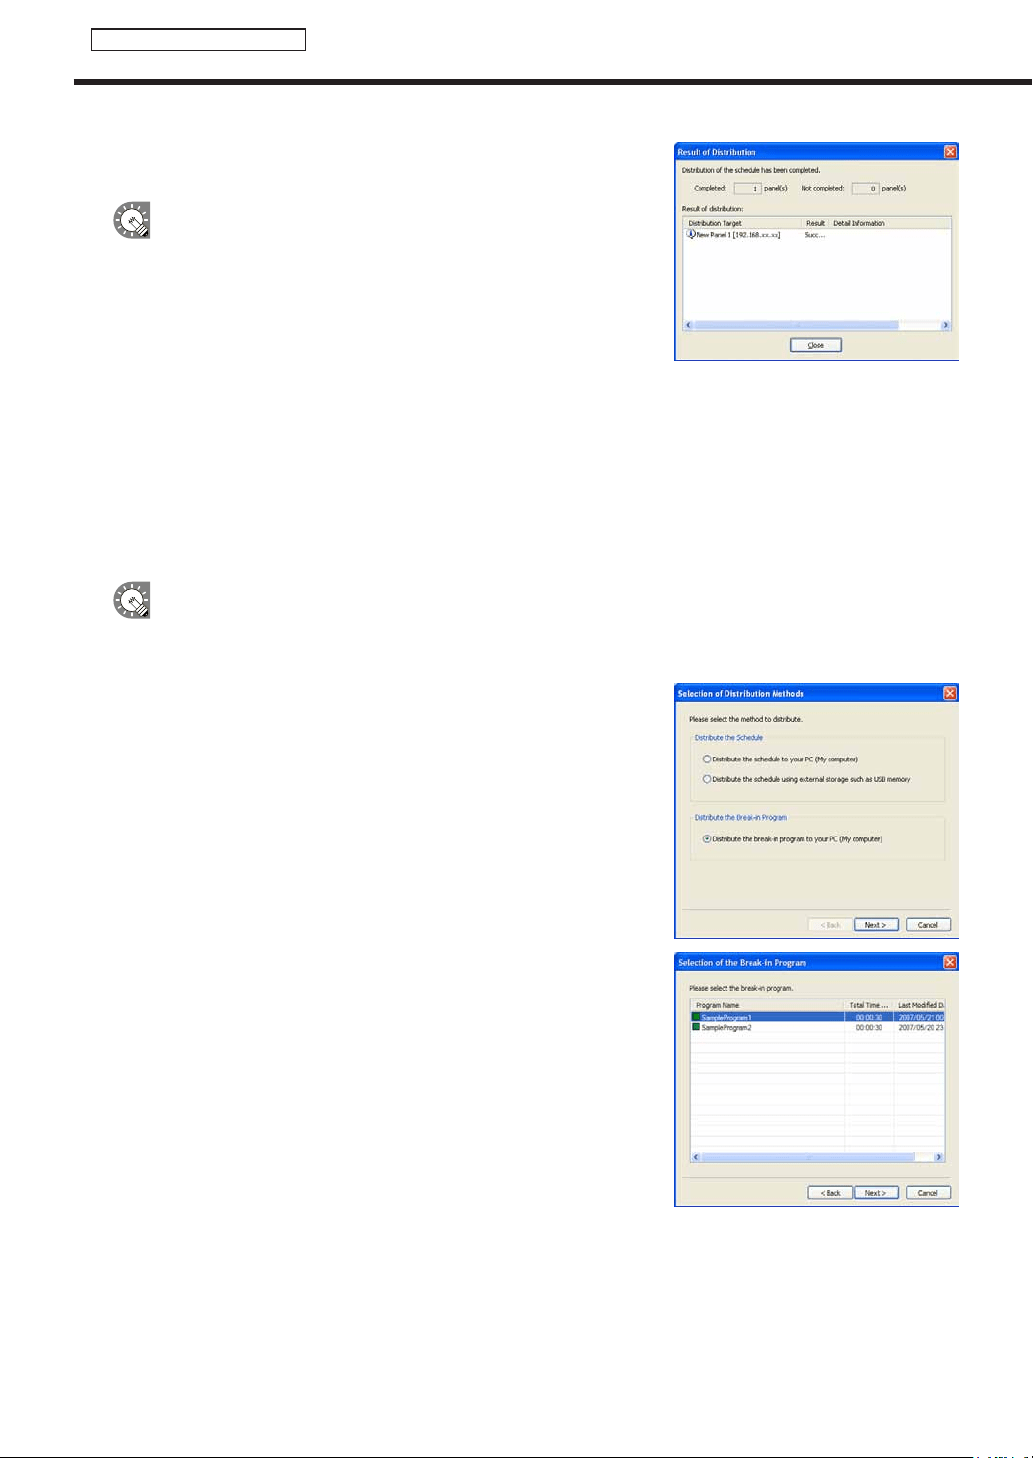
92
Schedule Distribution Tool
Displaying break-in programs
12. A screen like the one on the right will appear. Check that
the distribution was successful and click [Close].
•Ifthesettimehasalreadypassedthebreak-inprogram
will not be displayed.
•Oncethebreak-inprogramhasbeendisplayedinthe
targetpanelfortheamountoftimespecifiedin“Display
Time”,thepanelwillreturntotheoriginalprogram.
Display will resume from the start of the program that
would otherwise have been playing when the break-in
program ends.
•Whetherabreak-inprogramhasendedischeckedeveryminute(atsecond00).Thepointatwhichthe
displayofthebreak-inprogramendsandtheoriginalprogramstartsisthefirstsecond00aftertheend
of the break-in program.
•Onlyonebreak-inprogramcanberegistered.Programsdistributedlaterwillbegivenpriority.
●Distributing to your own PC and making a break-in display
This function is only available with the Standalone Version.
1. Click [Distribute schedule or program to the panel].
The[SelectionofDistributionMethods]dialogboxwillappear.
2. Select the “Distribute the break-in program to your PC
(My computer)” option button, and click [Next].
The[SelectionoftheBreak-inProgram]dialogboxwill
appear.
3. Select a program, and click [Next].
The[DisplayTimeandPeriodsofBreak-inProgram]will
appear.

93
Schedule Distribution Tool
4. Set the “Display Time of Break-in Program” area.
• “Displaythebreak-inprogramassoonasdistributionhas
beencompleted”optionbutton
Displaystheprogramassoonasthedistributionwizard
exits.
• “Startthebreak-inprogramatthetimespecified”option
button
Starts program display at the set time.
5. Set a “Display Time”
6. If you want to perform panel control operations before and after a break-in program, check the
“Conduct panel control before and after the program display” check box, and click [Next].
The[SpecificationofPanelControlCommand]dialogboxwillappear.
If you do not want to perform panel control operations before and after a break-in program, clear the
“Conduct panel control before and after the program display” check box, and click [Next].
A[Confirmation]dialogboxwillappear.Proceedtostep9.
7. Set the [Panel Control Command].
“BeforeDisplaytheBreak-inProgram”
• “PowerONthepanelbeforedisplaytheprogram”checkbox
Turns the panel on before displaying the break-in program.
*ItcannotbeusedwiththeLB-46GX35andLB-52GX35.
• “Switchthepanelinputbeforedisplaytheprogramas
below”checkbox
Switchestothespecifiedinputbeforedisplayingthe
break-in program.
“AfterDisplaytheBreak-inProgram”
• “PowerOFFthepanelafterdisplaytheprogram”checkbox
Turnsthepaneloffafterthebreak-inprogramhasfinished.
• “Switchthepanelinputafterdisplaytheprogramasbelow”checkbox
Switchestothespecifiedinputafterdisplayingthebreak-inprogram.
8. Click [Next].
A[Confirmation]dialogboxwillappear.
9. Check the distribution settings, and click [Finish].
The break-in program display or display reservation will be
executed.
By packaging distribution data, program information
containing break-in programs and other contents
canbesavedasasinglefile.
Click[SavethePackage],andinthe[Savethe
Package]dialogboxthatappears,specifya
directorytosavethefileto.Thenentera“File
name”,andclick[Save].Thereisusuallynoneedto
use this function.
Displaying break-in programs
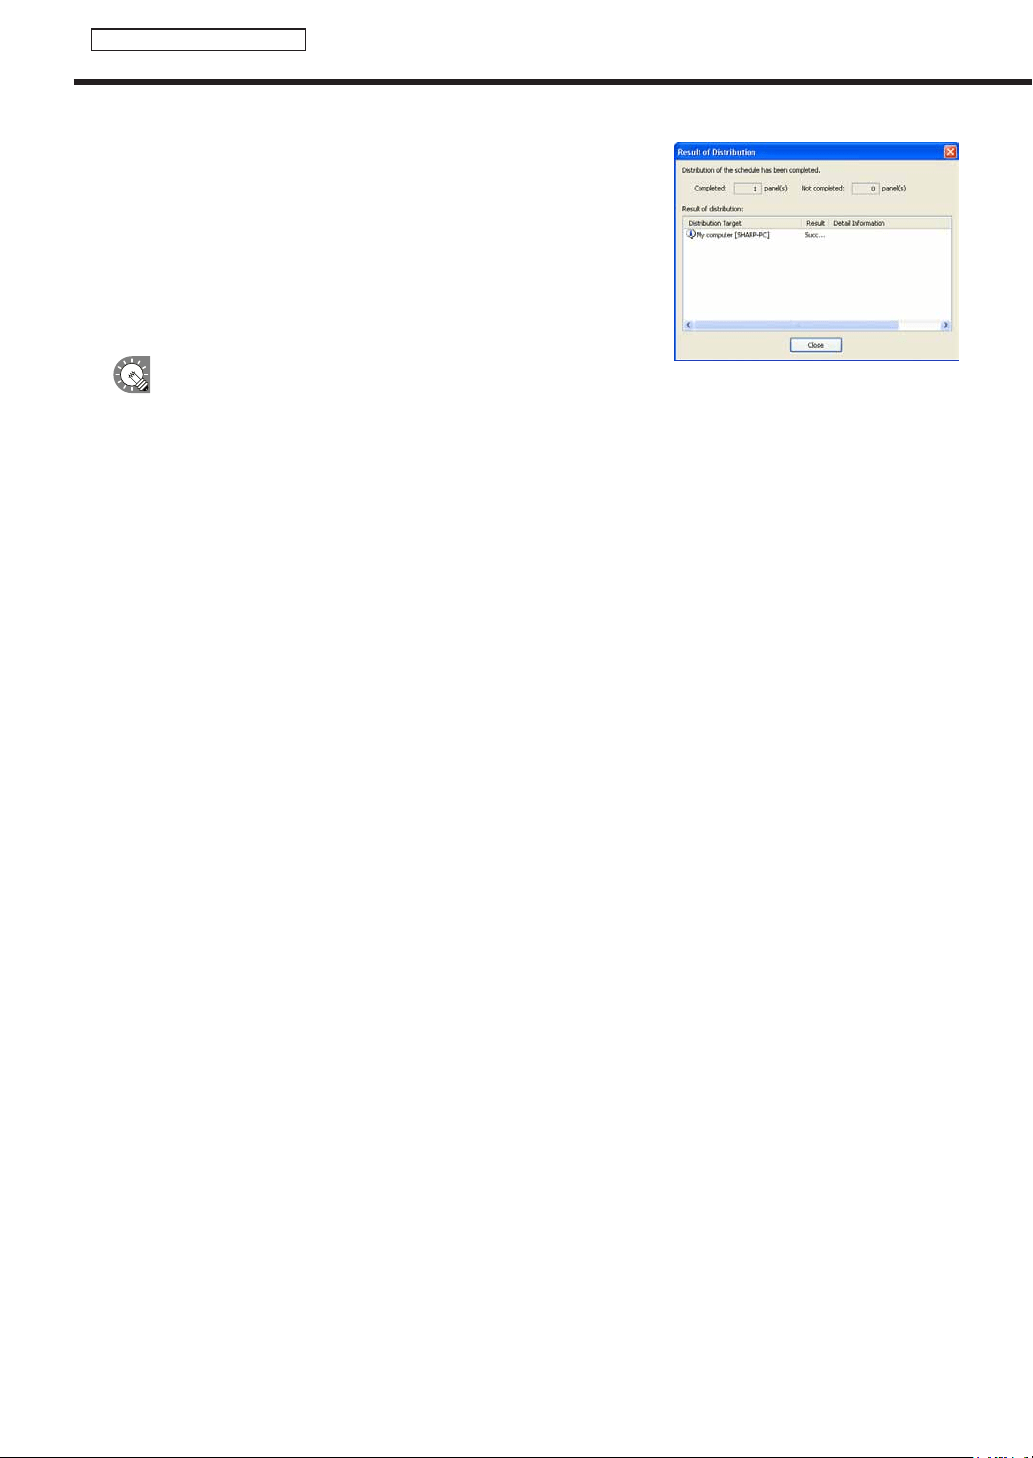
94
Schedule Distribution Tool
Displaying break-in programs
10. A screen like the one on the right will appear. Check that
the distribution was successful and click [Close].
•Ifthesettimehasalreadypassedthebreak-inprogramwillnotbedisplayed.
•Oncethebreak-inprogramhasbeendisplayedinthetargetpanelfortheamountoftimespecifiedin
“DisplayTime”,thepanelwillreturntotheoriginalprogram.Displaywillresumefromthestartofthe
program that would otherwise have been playing when the break-in program ends.
•
Whether a break-in program has ended is checked every minute (at second 00). The point at which the display of the
break-inprogramendsandtheoriginalprogramstartsisthefirstsecond00aftertheendofthebreak-inprogram.
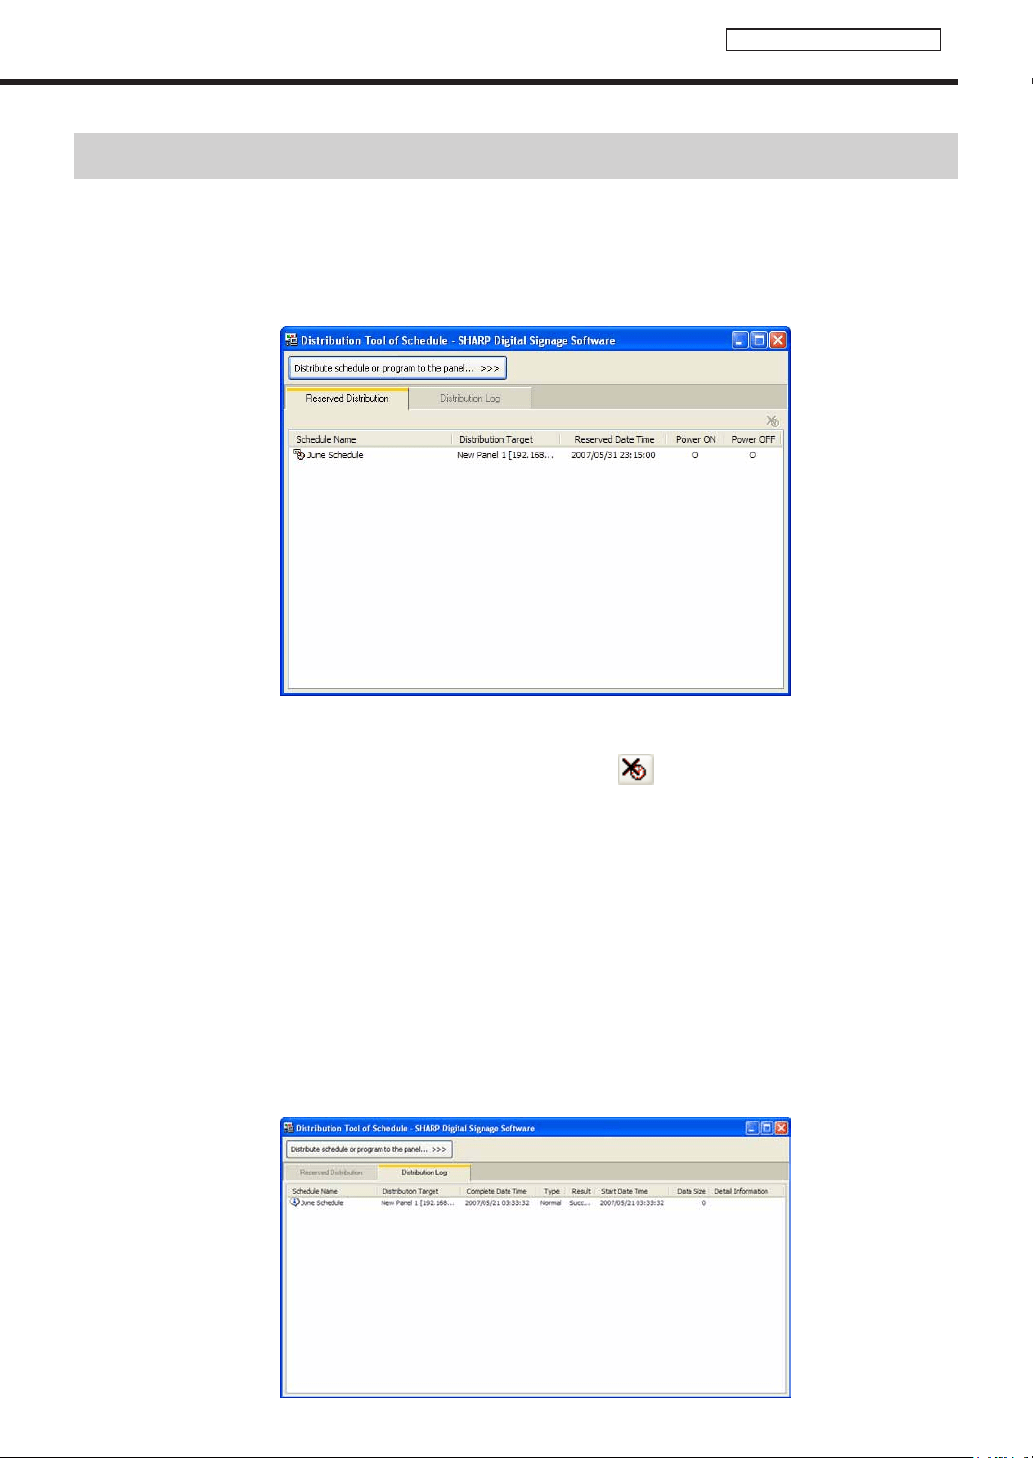
95
Schedule Distribution Tool
List of Reserved Distribution/List of Distribution Log
●List of Reserved Distribution
Clickthe[ReservedDistribution]tabtodisplaythelistofcurrentlyreserveddistributions.Therearefive
categories:ScheduleName,DistributionTarget,ReservedDateTime,PowerON,andPowerOFF.Clickingona
categorywillorganizethereservationsinascendingordescendingorder.
Deleting reserved distributions
Reserved distributions can be deleted by any of the following three methods:
•Selectareservationandclickthebuttonatthetoprightofthelist(
).
•Right-clickonareservation,andfromthemenuthatappears,click[DeletetheReservedDistribution].
•Selectareservationandpress[Delete].
Updating
Reserved distributions can be updated by either of the two following methods:
•Right-clickintheReservedDistributionList,andfromthemenuthatappears,click[RefreshtheInformation].
•Press[F5].
●List of Distribution Log
Clickthe[DistributionLog]tabtodisplayadistributionlogofschedulesandbreak-inprograms.
Thereareeightcategories:ScheduleName,DistributionTarget,CompleteDateTime,Type,Result,StartDate
Time,DataSize,andDetailInformation.Clickingonacategorywillorganizethereservationsinascendingor
descending order.
List of Reserved Distribution/List of Distribution Log

96
Schedule Distribution Tool
List of Reserved Distribution/List of Distribution Log
Deleting the entire distribution log
The entire contents of the distribution log can be deleted by either of the following two methods:
•Right-clickintheDistributionLog,andfromthemenuthatappears,click[DeleteAllDistributionLog].
•Press[Delete].
Aconfirmationdialogboxwillappear.Click[OK].
Updating
The distribution log can be updated by either of the two following methods:
•Right-clickintheDistributionLog,andfromthemenuthatappears,click[RefreshtheInformation].
•Press[F5].
Outputting CSV File of Distribution Log
ThedistributionlogcanbeoutputasaCSVfile.
1. Right-click in the Distribution Log, and from the menu that appears, click [Output CSV File of
Distribution Log].
The[SelecttheCSVfileyouwanttowritedown]dialogboxwillappear.
2. Enter a “File Name”, and click [Save].

97
Server Scheduler
Schedule Management
This function is only available with the Network Version.
Server Scheduler
ServerSchedulercontrolsreserveddistributionschedulesthathavebeenreservedwith“ScheduleDistribution
Tool”,anddistributesschedulestothetargetPCatthescheduledtime.
Server Scheduler is automatically started when Windows launches.
When Server Scheduler launches, an icon (
) is displayed (and resides permanently) in the Task Tray.
DonotexitServerSchedulerunnecessarily.
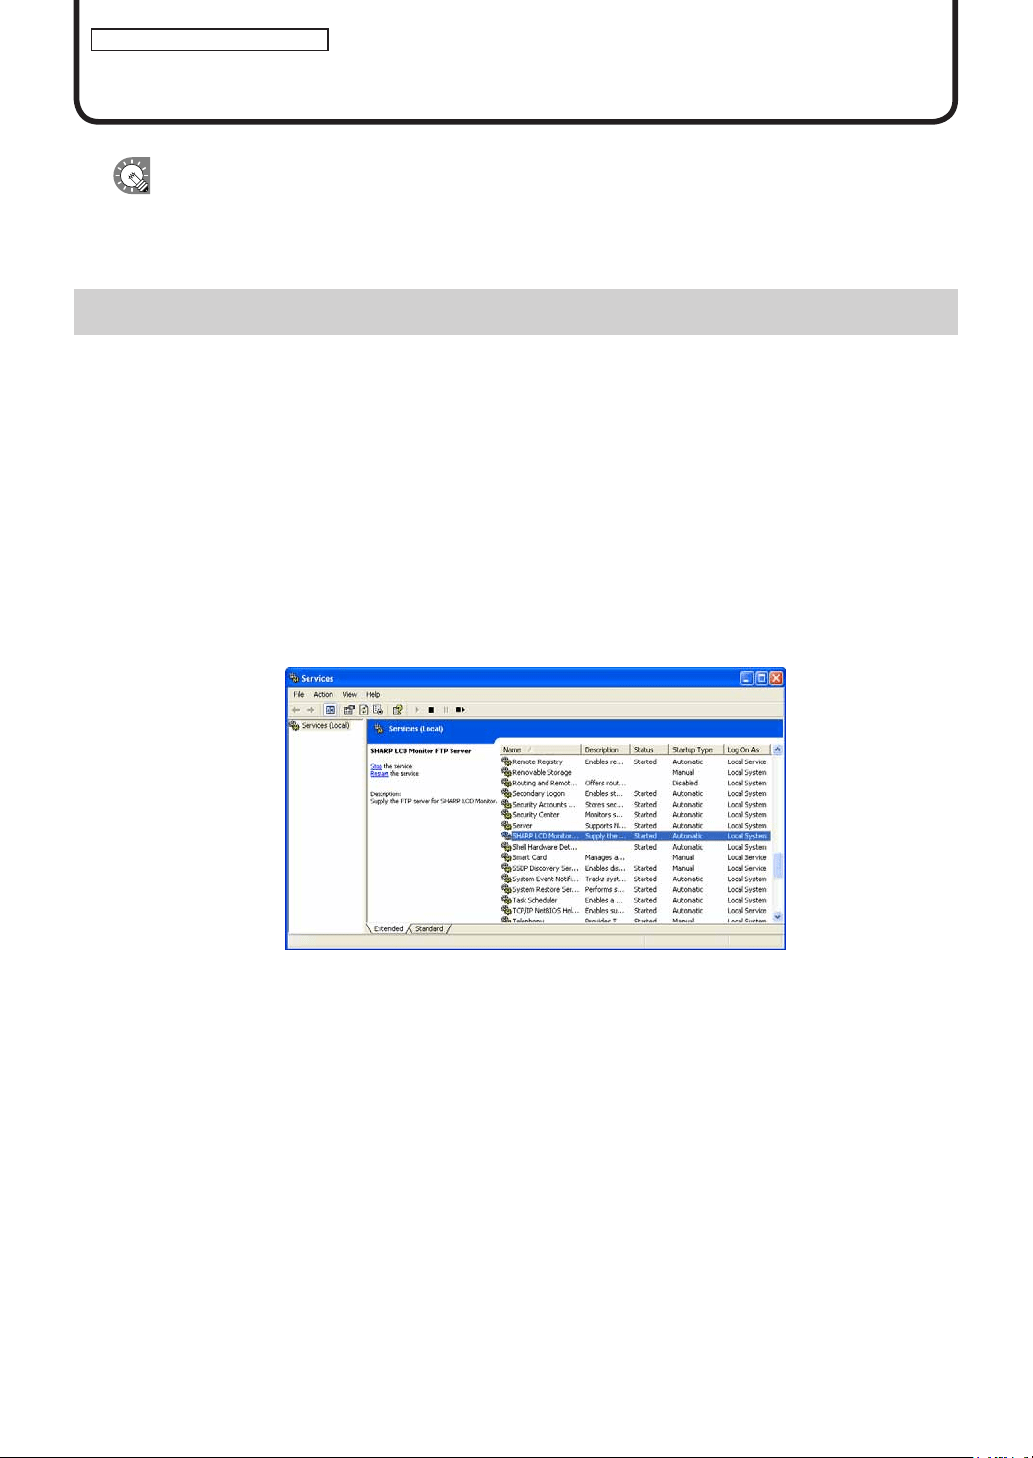
98
FTP Server/Client Scheduler
Schedule Reception/Program Display
This function is available on the Viewer Versions.
ThissectiongivesdetailsfortargetPCsettingswhenschedulesandprogramsaredistributedfromthecontroller
PCusingtheNetworkVersion.
FTP Server
TheFTPServerreceivesschedulesandbreak-inprogramsfromthecontrollerPC,andpassesthemtothe
ClientScheduler.
●Launching the FTP Server
TheFTPServerlaunchesautomaticallywhenWindowsislaunched.
TocheckiftheFTPServerserviceisstartedornot,usethefollowingmethod:
• If using Windows XP
1. From the Windows Taskbar click [Start], [Control Panel], [Performance and Maintenance],
[Administrative Tools], [Services].
The[Services]windowwillappear.
2. Check that the status of “SHARP LCD Monitor FTP Server” under “Services” is “Started”.
Iftheserviceisnotstartedclick“StarttheService”.
• If using Windows Vista
1. Right-click on an empty area of the Taskbar, and from the menu that appears, click [Taskbar].
The[WindowsTaskManager]dialogwillappear.
2. Click the [Processes] tab and conrm that “FTPD.exe” is displayed.
• If using Windows 7
1. Right-click on an empty area of the Taskbar, and from the menu that appears, click [Start Task
Manager].
The[WindowsTaskManager]dialogwillappear.
2. Click the [Processes] tab and conrm that “FTPD.exe” is displayed.

99
FTP Server/Client Scheduler
Client Scheduler
ClientSchedulerisusedonthetargetPC.
Itloadstheschedulesandbreak-inprogramsthathavebeenreceivedbytheFTPServer,andcontrolsthe
ProgramViewertodisplayspecifiedprogramsatthespecifiedtime.
●Launching Client Scheduler
ClientSchedulerisautomaticallylaunchedby“Startup”whenWindowslaunches.
WhenClientSchedulerlaunches,anicon(
) is displayed (and resides permanently) in the Task Tray.
●Client Scheduler menu
The menu that appears when the icon in the Task Tray is
right-clicked performs the following actions:
Setting
Clickingthe[Setting]menudisplaysthe[SettingofClientScheduler]dialogbox.Thetabsinthisdialogbox
contain the following settings:
[Program Viewer] tab
ContainsdetailedsettingsfortheProgramViewer.
• Youcanviewprogramsevenwhenthereareno
programsbeingdisplayedbycheckingthe“Paintthe
programviewarea,ifnoprogramplayed.”checkbox.Set
thedisplaycontentbyclicking[PaintSetting].
· [Darkblue]optionbutton
Displaystheareadefinedby“Displayarea”settingsin
dark blue.
· “Contentfile”optionbutton
Setsthecontentfilepath,displaymethod,and
backgroundcolorfromthe[Settingofthecontentsfile]
dialogboxthatappearswhen[Setting]isclicked.
1) Click[Ref],andselectacontentfile.Youmayselect
anyfileformatthatissupportedbythisproduct.
2) Selecta“Displaymode”fromthe“Keepingaspect
ratio”,“Notkeepingaspectratio”,or“Inoriginalsize”
option buttons.
3) Setthe“Backgroundcolor”.
· “Program”optionbutton
Click[Import],andselectanexistingprogram.Youmay
selectprogramsthathavebeenexportedwithProgram
Editor.
Client Scheduler

100
FTP Server/Client Scheduler
• Theareasetunderthe[DisplayArea]tabwillbethedisplayarea(exceptwhenaprogramisspecified).
• “Smoothcontentschange”checkbox
Checkthischeckboxtoswitchbetweencontentssmoothlybypreparingtheplaybackofthenext
contentbeforetheendofthecurrentcontent.Alsocheckthischeckboxwhenitisnecessaryto
synchronizethecontentdisplaybetweenframes.
Clicking[PreloadSetting]allowsyoutosetthecontentthatistobereadinadvance.
•Makingtheswitchingofcontentssmoothwill
increasetheloadontheCPUandthememoryuse
amount. It is recommended that tests be conducted
by actually displaying programs before operation.
•Whenperformingadvancedreadingofacontent
that can be played with Windows Media Player,
thevideoacceleratorisdisabled.Checkthatyour
PChasenoughperformancetodisplaycontents
without the video accelerator.
•IfacontentthatcanbeplayedwithInternet
Explorerisreadinadvance,Flashcontentsand
banners embedded in the content may be started
from the middle.
• “Setlimitofprintscreenarea”checkbox
WhenyouareoutputtingmultiplescreensonatargetPC,
theScreenCapturefunctioncapturestheentiredesktop.
Checkthisboxtocapturejustapartofthescreenoutput.
Click[AreaSetting]anddefinetheareayouwantto
capture.
• “Don’tmovefocuswhileprogramviewerstarts”checkbox
Thisboxisusuallyleftunchecked.
CheckthisboxifyoudonotwanttheProgramViewerfocustomovewhenyoulaunchtheProgram
Viewer.
• “Hidetaskbarwhileshowing”checkbox
Whenthischeckboxischecked,thetaskbarishiddenwhenProgramViewerislaunchedanditis
re-displayed when Program Viewer is closed.
• “MyContentsfolder”:Enterthepathofthefolderinwhichcontentstobedistributedinadvancearetobe
saved.
The initial default values are:
•MyContentsfolder:C:\ProgramFiles\SHARP\SHARPDigitalSignageSoftware\MyContents\
(ForWindowsVista/7,C:\ProgramData\SHARP\SHARPDigitalSignageSoftware\MyContents\)
Client Scheduler
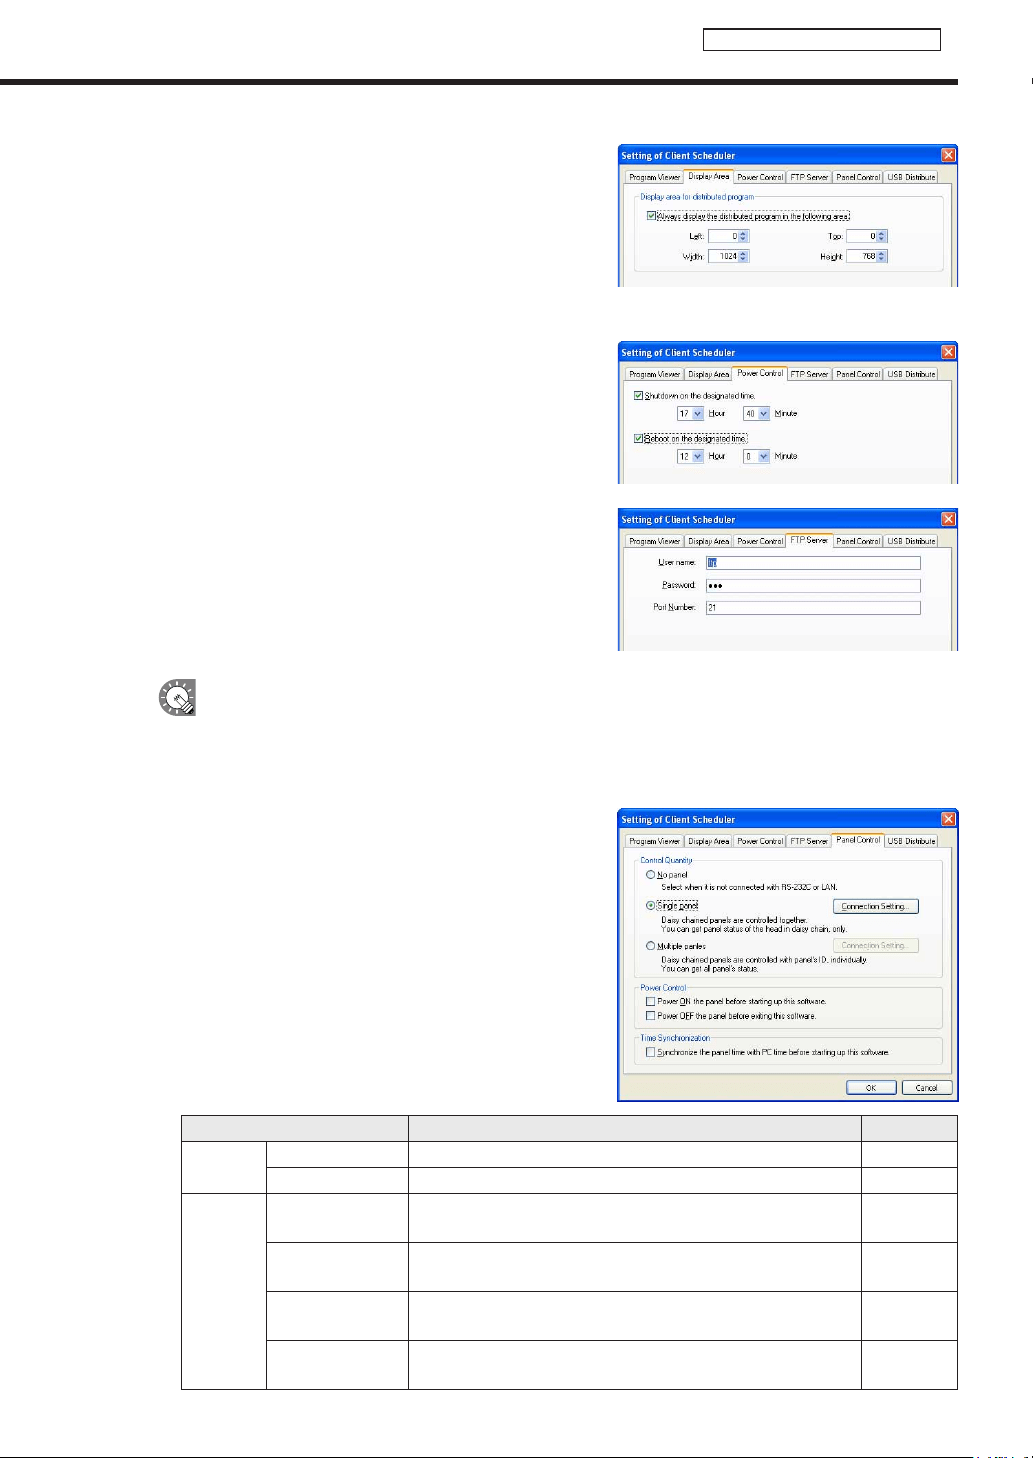
101
FTP Server/Client Scheduler
[Display Area] tab
• “Displayareafordistributedprogram”
When the display area of the program and the resolution
of the panel are different, this tab allows you to display the
program regardless of the display area set for the program.
Checkthe“Alwaysdisplaythedistributedprograminthe
followingarea”checkboxandsettheareainwhichthe
program is to be displayed.
[Power Control] tab
ManagespowerontargetPCscurrentlybeingconfigured.
• “Shutdownonthedesignatedtime”checkbox
CheckthisboxtoturnoffthetargetPCatthespecifiedtime.
• “Rebootonthedesignatedtime”checkbox
CheckthisboxtorestartthetargetPCatthespecifiedtime.
[FTP Server] tab
SetstheFTPServer.
• “Username”:Mustbekeptwithin30alphanumeric
characters.
• “Password”:Mustbekeptwithin30alphanumeric
characters.
• “PortNumber”:Enteravaluebetween1and32000.
IfyouhaveinstalledtheViewerVersion,auniqueFTPServerwillbeinstalled,andstartedasa
service.ThedefaultTCP/IPportnumbersare20and21.Ifthisportnumberisalreadyusedby
anotherservice,changetheportnumber.TheFTPsettingsofthepanelsregisteredwith“Panel
Management”onthecontrolPCmustusethesameportnumber.(Fp.80)
[Panel Control] tab
• “Nopanel”optionbutton
Panels will not be controlled.
• “Singlepanel”optionbutton
Click[ConnectionSetting]andselectthepanelcontrol
method(RS-232C/LAN).
• [ConnectionSetting]
Selecteither“RS-232C”or“LAN”fromthe[Connecting
interface]optionbuttons.
Setting Description Default
RS-232C
COMport COM1~COM256 COM1
Baud Rate 9600,19200,38400 9600
LAN
Host name or IP
address
EnterthehostnameortheIPaddressofthepaneltobe
controlledwithin32alphanumericcharacters.
-
Data port
Enteradataportnumberbetween1025and65535forthe
panels to be controlled.
10008
Username
Entertheusername,ifoneexistsforthepanelstobe
controlled,in8charactersorless.
-
Password
Enterthepassword,ifoneexistsforthepanelstobe
controlled,in8charactersorless.
-
Client Scheduler
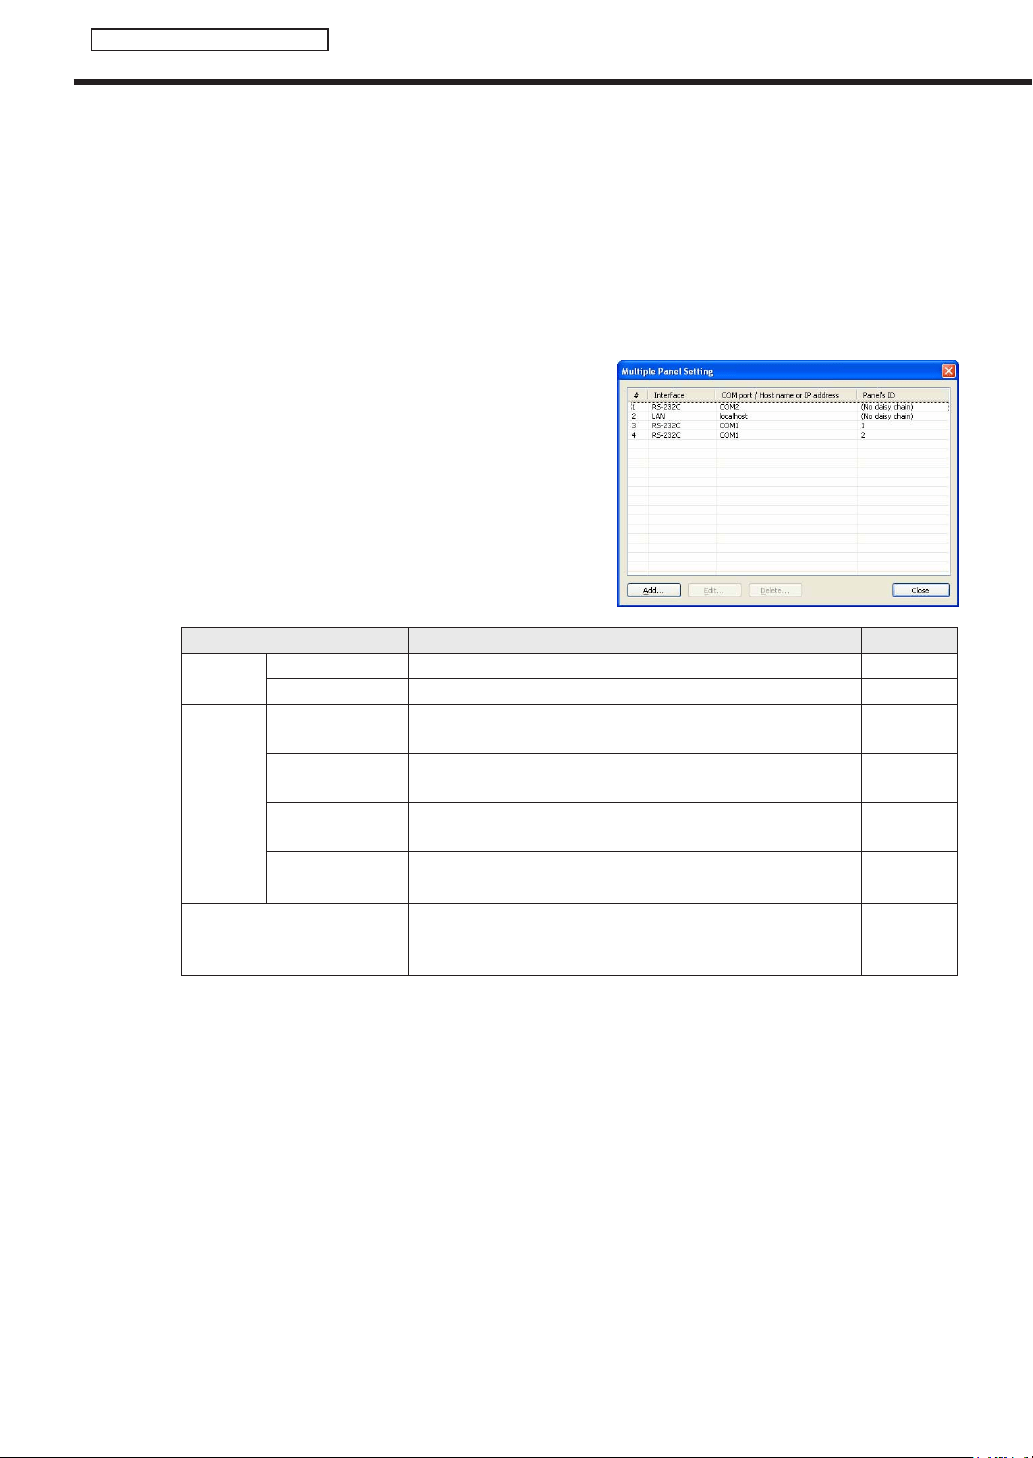
102
FTP Server/Client Scheduler
• [Testconnection]
Checktheconnectiontoconfirmthatthepanelcanbecontrolled.Aftertheconnectionisestablished
successfully,themodelnameofthepanelisacquiredanddisplayed.Performoperationwiththepower
ofthepanelturnedon.TocontrolthepanelwiththeLB-1085,besuretochecktheconnectiononce.The
panelcannotbecontrolledunlessa“Testconnection”isperformed.
• “MultiplePanels”optionbutton
Youcanselectandcontrolpanelsfromupto25panels.Youcanalsosetpowercontrol,entrymethod,
timing,andPIPfunctions.Inaddition,youcanacquirethestatusofeachpanelandotherinformation.
• [ConnectionSetting]
A list of connected panels appears when you click
[ConnectionSetting].
Addpanelstothelistthefirsttimeyouusethisfunction
byclicking[Add].
Setting Description Default
RS-232C
COMport COM1~COM256 COM1
Baud Rate 9600,19200,38400 9600
LAN
Host name or IP
address
EnterthehostnameortheIPaddressofthepaneltobe
controlledwithin32alphanumericcharacters.
-
Data port
Enteradataportnumberbetween1025and65535forthe
panels to be controlled.
10008
Username
Entertheusername,ifoneexistsforthepanelstobe
controlled,in8charactersorless.
-
Password
Enterthepassword,ifoneexistsforthepanelstobe
controlled,in8charactersorless.
-
Panel IDs
SelectIDsinordertoidentifypanelswhenPCsareconnected
in a daisy chain.
(Donotconnectinadaisychain),1-255
(Do not
connect in a
daisy chain)
• “PowerONthepanelbeforestartingupthissoftware.”checkbox
Whenthischeckboxischecked,thepowerofthepanelisturnedonwhentheClientScheduleris
started.
*ThefunctionofturningonthepowerofthepanelcannotbeusedwiththeLB-46GX35and
LB-52GX35.
• “PowerOFFthepanelbeforeexitingthissoftware.”checkbox
Whenthischeckboxischecked,thepowerofthepanelisturnedoffwhentheClientScheduleris
terminated.
• “SynchronizethepaneltimewithPCtimebeforestartingupthissoftware.”checkbox
Whenthischeckboxischecked,theclockofthepanelissettothetimeofthetargetPCwhentheClient
Scheduler is launched.
Client Scheduler
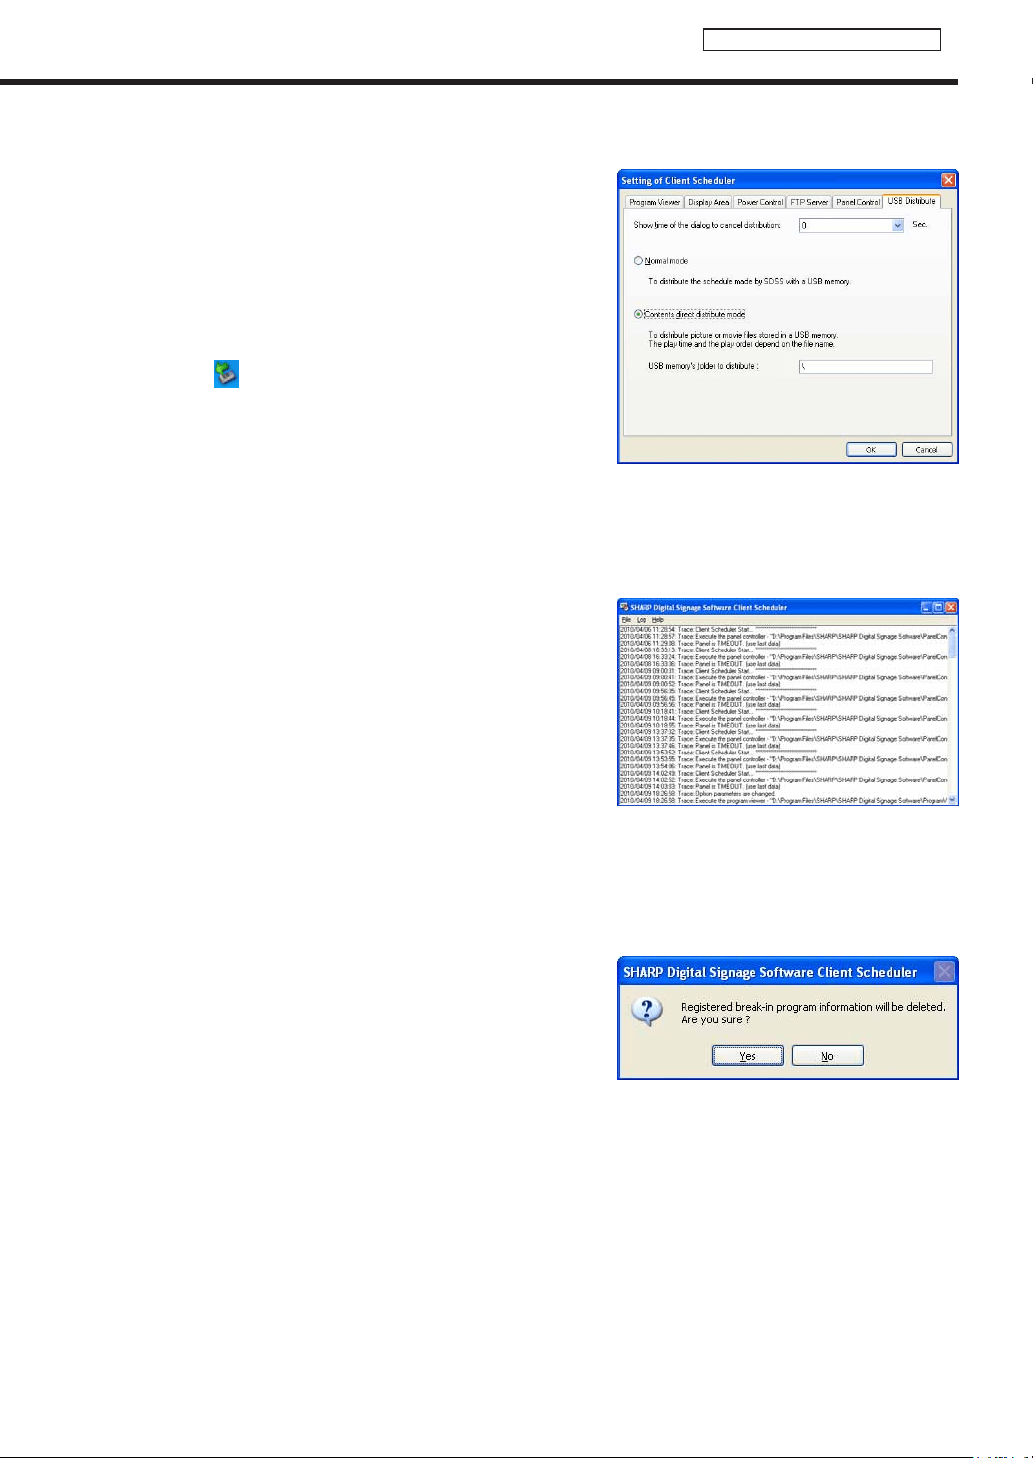
103
FTP Server/Client Scheduler
[USB Distribute] tab
SetsthedetailsofUSBdistribution.
• “Showtimeofthedialogtocanceldistribution”
If you set a time longer than one second, the distribution
canceldialogboxisdisplayedwhenUSBmemoryor
anotherexternalstoragedeviceisinserted.
Ifyouclick[Yes]inthedistributioncanceldialogbox,
distributioniscanceled.RemoveUSBmemoryor
anotherexternalstoragedeviceusingthesaferemoval
icon (
) in the Task Tray.
• “Normalmode”optionbutton
SelectthisbuttontoperformUSBdistributionwith
“ScheduleDistributionTool”(
F
p.104).
• “Contentsdirectdistributemode”optionbutton
SelectthisbuttontoperformUSBdistributionwith“Contentsdirectdistributemode”(
F
p.104).
• “USBmemory’sfoldertodistribute”
Ifyouperformdistributionwith“Contentsdirectdistributemode,”enterthepathofthefolderoftheUSB
memory containing the content.
Displaying the log
Clickthe[ViewtheLog]menutodisplayalogofClientScheduler
operations.
The log can be cleared and updated.
Pausing a program
Clickingthe[PausetoViewProgram]menuwillpausethecurrentlydisplayedprogram.Whentheprogram
ispausedacheckmarkwillbedisplayedtotheleftofthemenu.Clicking[PausetoViewProgram]againwill
restart program display.
Deleting Schedule Information
Clickthe[DeleteScheduleInformation]menu.Aconfirmation
messagewillappear.Click[Yes]todeleteallregisteredschedule
informationcurrentlysavedinClientScheduler.
Deleting Break-in Program Information
Clickthe[DeleteBreak-inProgramInformation]menu.Aconfirmationmessagewillappear.Click[Yes]todelete
allregisteredbreak-inprograminformationcurrentlysavedinClientScheduler.
Get data from management PC
TargetPCsreceivedatafromthecontrollerPCwhenyouclickthe[GetdatafrommanagementPC]menu.
Thisfunctioncanonlybeusedwith“Pull-baseddatadelivery.”
Client Scheduler
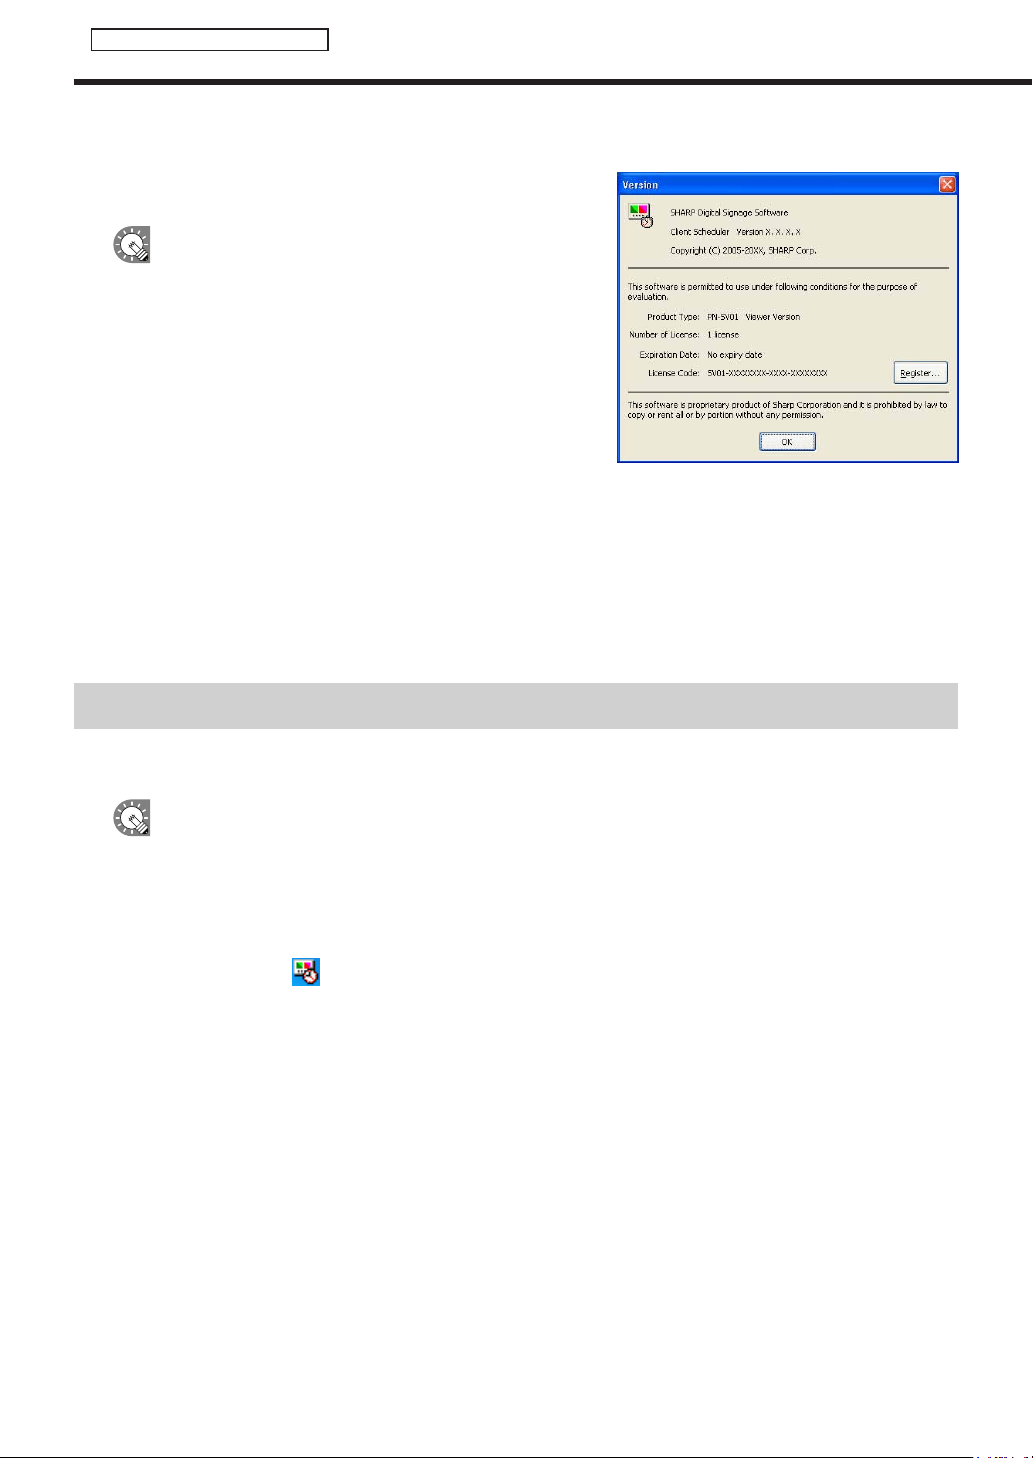
104
FTP Server/Client Scheduler
Version information
Clickthe[Version]menu.TheClientScheduler[Version]dialog
boxwillappear.
Youmaybeaskedtoprovideversioninformationin
the event that you need to contact SHARP regarding a
problem with SHARP Digital Signage Software.
If you input a temporary license code when installing, you will
only be able to use the software for a two-month trial period.
Register your license code before the end of the trial period.
ForinstructionsonhowtoregisterLicenseCodesrefertop.82.
Exiting Client Scheduler
ToexitClientScheduler,clickthe[ExitClientScheduler]menu.
DonotexitClientSchedulerunnecessarily.
Distributing content directly by using USB memory or another external storage device
ThecontentcanbedisplayedsimplybyinsertingUSBmemoryoranotherexternalstoragedevicecontaining
copiedcontentintothetargetPC.
•DonotremovetheUSBmemoryoranotherexternalstoragedevicefromthePCbeforetransferis
completed.
•DependingontheexternalstoragedevicesuchasUSBmemory,distributioncannotbeperformed
successfully.
1. Set the target PC to “Contents direct distribute mode.”
1) Clicktheicon(
)intheTaskTrayinthetargetPCandclickthe[Setting]menu.
2) Clickthe[USBDistribute]tabandselectthe“Contentsdirectdistributemode”optionbutton(
F
p.92).
3) Set“USBmemory’sfoldertodistribute”asrequired.
4) Click[OK].
Distributing content directly by using USB memory or another external storage device

105
FTP Server/Client Scheduler
Program Viewer
2. Copy the content to be distributed to USB memory or another external storage device.
CopythecontenttothefoldersetinStep1-(3).
The contents placed in folders lower than the set folder are not displayed.
•IntheContentsdirectdistributemode,HTMLfilescannotbedisplayed.
•Contentsareexecutedinascendingorderofthefilenames.
Byattachingaserialnumbersuchas“001,”“002,”…,attheheadofeachfilename,theorderofplay
can be set.
•Theplaytimeofcontentisusually10seconds.Forvideo,itisthetimeuntilplayiscompleted.
Byappending“_[numericalvalue]m”(minutes)or“_[numericalvalue]s”(seconds)tothefilenameofthe
content,theplaytimeofthecontentcanbeset(24hoursmaximum).
[Example]Ifimage_30s.jpgisspecified,thecontentisdisplayedfor30seconds.
•ByplacingTelop.txt(textfile)inthespecifiedfolder,itscontentscanbedisplayedasscrollmessages.
3. Remove the external storage device such as USB memory from the PC.
Remove it from the safe removal icon (
) in the Task Tray.
4. Insert the external storage device such as USB memory into the target PC.
Thecontentwillbedistributedautomatically.Afterdistributioniscomplete,theexternalstoragedevicesuch
asUSBmemorystopsautomatically.Checkthemessageandremoveit.
Program Viewer
ProgramViewerisusedonthetargetPC.
Itdisplaysprogramsbasedonschedulesandbreak-inprogramsloadedbyClientScheduler.
•Topauseaprogram,right-clicktheClientSchedulericon,andfromthemenuthatappears,click[Pause
toViewProgram].
•TochangeadvancedsettingsforProgramViewer,right-clicktheClientSchedulericonandfromthe
menuthatappears,click[Setting].Settingscanbeadjustedfromthe[SettingofClientScheduler]dialog
boxthatappears.(
F
p.99)
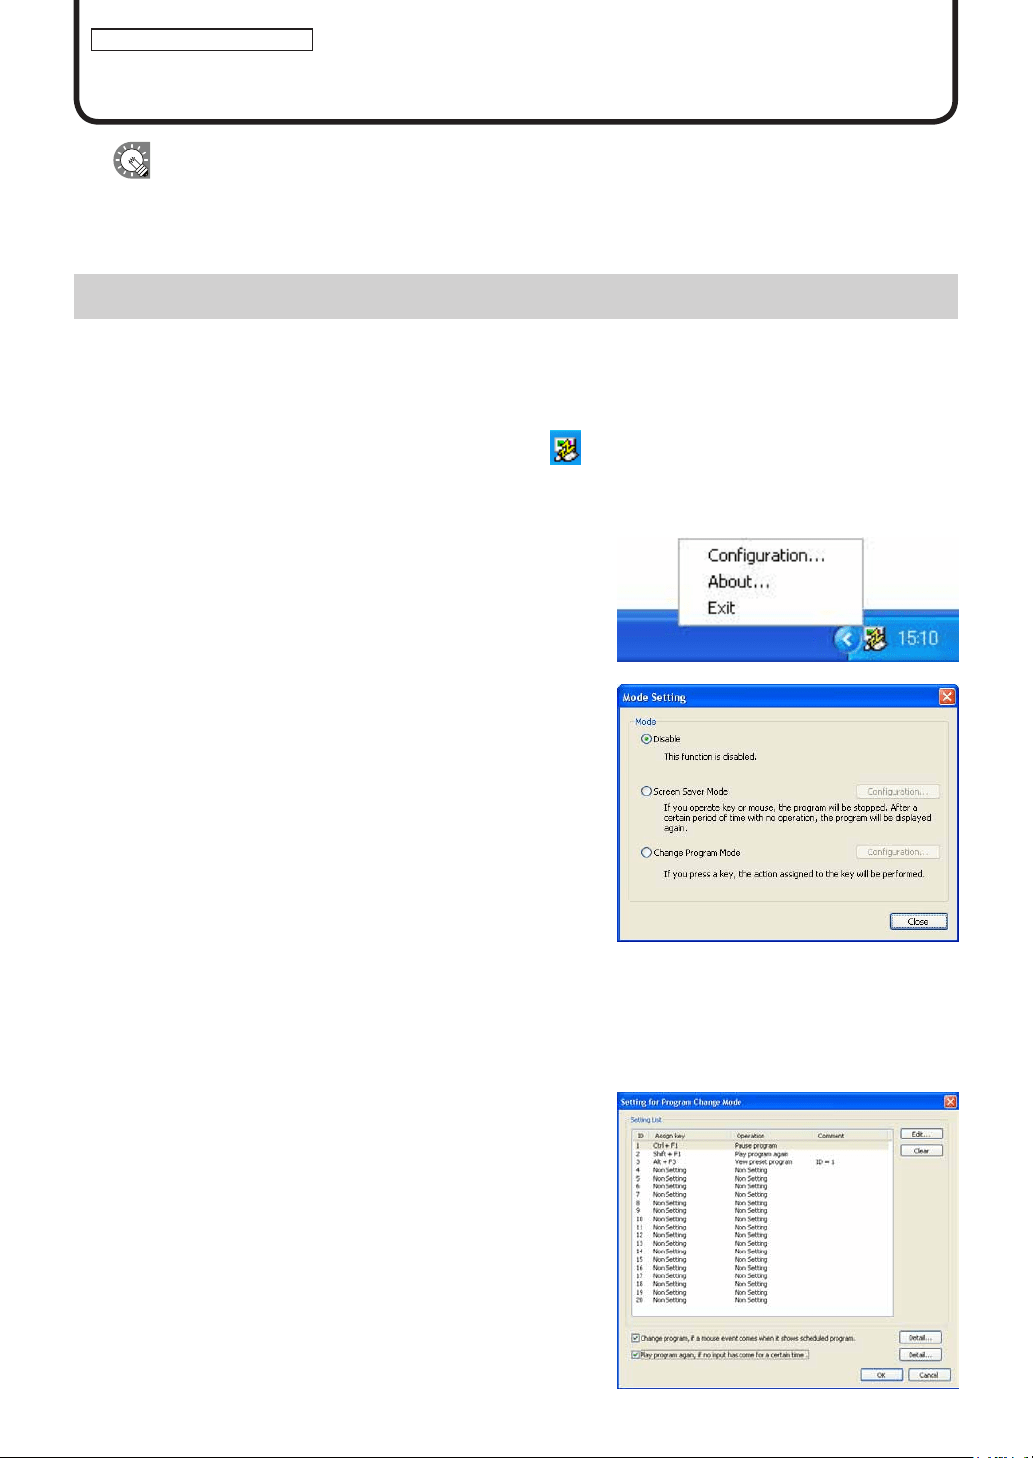
106
Key/Mouse Monitoring Tool
Key/Mouse Monitoring
This function is available with the Viewer Versions.
Thissectionexplainsthefunctionofswitchingdisplayedprogramsusingkeyboardandmouseoperations.
Key/Mouse Monitoring Tool Window
●Launching the Key/Mouse Monitoring Tool window
1. From the Windows Taskbar, click [Start], [All Programs], [SHARP Digital Signage Software], [Tools]
and then [Key-Mouse Watcher].
The key/mouse monitoring tool launches and an icon (
) is displayed (and remains permanently) in the
Task Tray.
●Key/Mouse Monitoring Tool menu
FromthemenuthatappearswhentheiconintheTaskTrayis
right-clicked, the following operations can be performed.
Conguration
SettheoperationmodeoftheKey/MouseMonitoringTool.
• “Disable”optionbutton
DisablestheoperationoftheKey/MouseMonitoringTool.
• “ScreenSaverMode”optionbutton
If a keyboard or mouse operation is performed, display of
the program is stopped temporarily.
If a keyboard or mouse operation is not performed for a
certain period of time, the distributed program is displayed.
Byclicking[Configuration],thefollowingsettingcanbe
performed.
The period of time before the program display is
resumed
Theprogramdisplayisresumedbypressingthe[Ctrl],
[Alt],and[V]keys.
• “ChangeProgramMode”optionbutton
By assigning an action to a combination of keys, the
action can be performed by key operation.
Upto20actionscanbeassigned.
Set the key assignment and action by clicking
[Configuration].
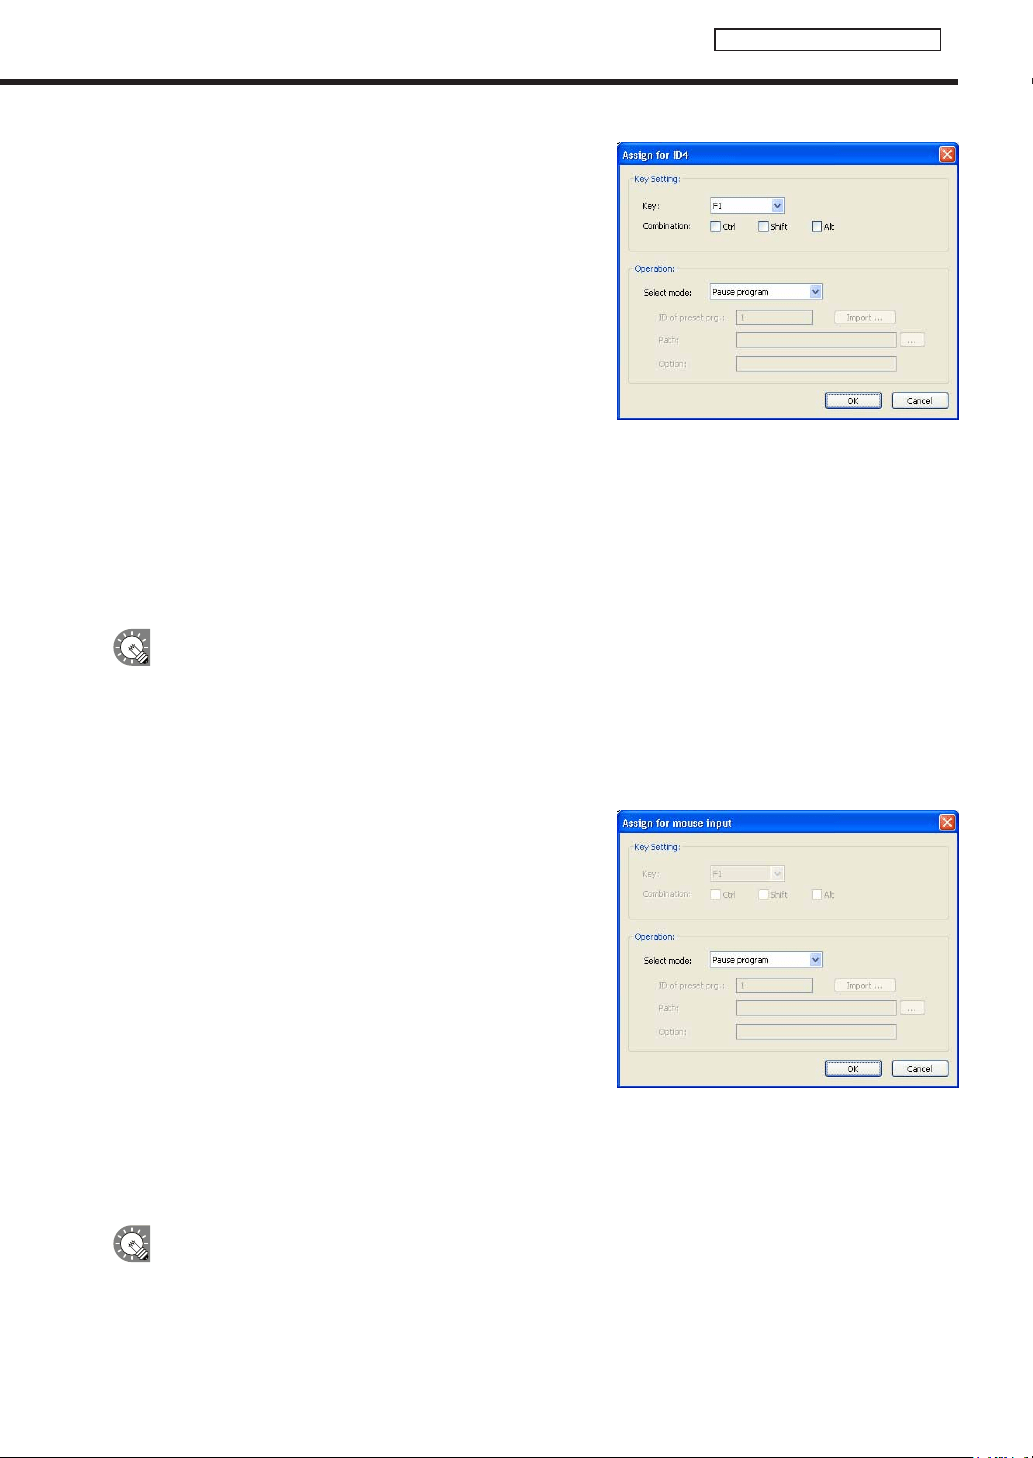
107
Key/Mouse Monitoring Tool
1) Click the option to be edited and click [Edit].
Adialogboxwillappear.
2) Set the options.
•“KeySetting”
Set the combination of keys to be registered.
•“Operation”
Set the action of the registered key.
•Ifyouselect“Viewpresetprogram,”specifytheIDnumberof
thepresetprogramtobedisplayedin“IDofpresetprg.”.
If the preset program has not been imported, specify the ID
number and import the program.
1) Enteranumberin“IDofpresetprg.”.
2) Click[Import].
3) Specifytheexportedprogramdataandclick[Open].
TheprogramisimportedtothespecifiedpresetnumberID.
•Ifyouselect“Runapplication,”enterthepathoftheapplicationtobeexecutedin“Path.”Itisalsopossibleto
enter“Option.”
3) Click [OK].
•IfthesamekeyisassignedtodifferentIDs,theassignedactionisperformedinascendingorderofIDs.
•Ifthe[Ctrl]keyispressedwhenPowerPointViewerislaunched,PowerPointcontentisnotdisplayedin
the correct position. Take care when displaying a program containing PowerPoint content.
•“Changeprogram,ifamouseeventcomeswhenitshowsscheduledprogram.”checkbox.
Whenthischeckboxischecked,actionsareassignedtomouseoperationssothatactionscanbeperformed
by operating the mouse.
1) Click [Detail].
“Assignformouseinput”willappear.
2) Set the options.
•“Operation”
Set the action of the registered mouse operation.
•Ifyouselect“Viewpresetprogram,”specifytheIDnumberof
thepresetprogramtobedisplayedin“IDofpresetprg.”.
If the preset program has not been imported, specify the ID
number and import the program.
1) EntertheIDnumberin“IDofpresetprg.”.
2) Click[Import].
3) Specifytheexportedprogramdataandclick[Open].
•Ifyouselect“Runapplication,”enterthepathoftheapplicationtobeexecutedin“Path.”Itisalsopossibleto
enter“Option.”
3) Click [OK].
•“Program”referstoascheduledprogramorabreak-inprogram.Whenapresetprogramisbeing
displayed, the assigned action cannot be performed.
Key/Mouse Monitoring Tool Window
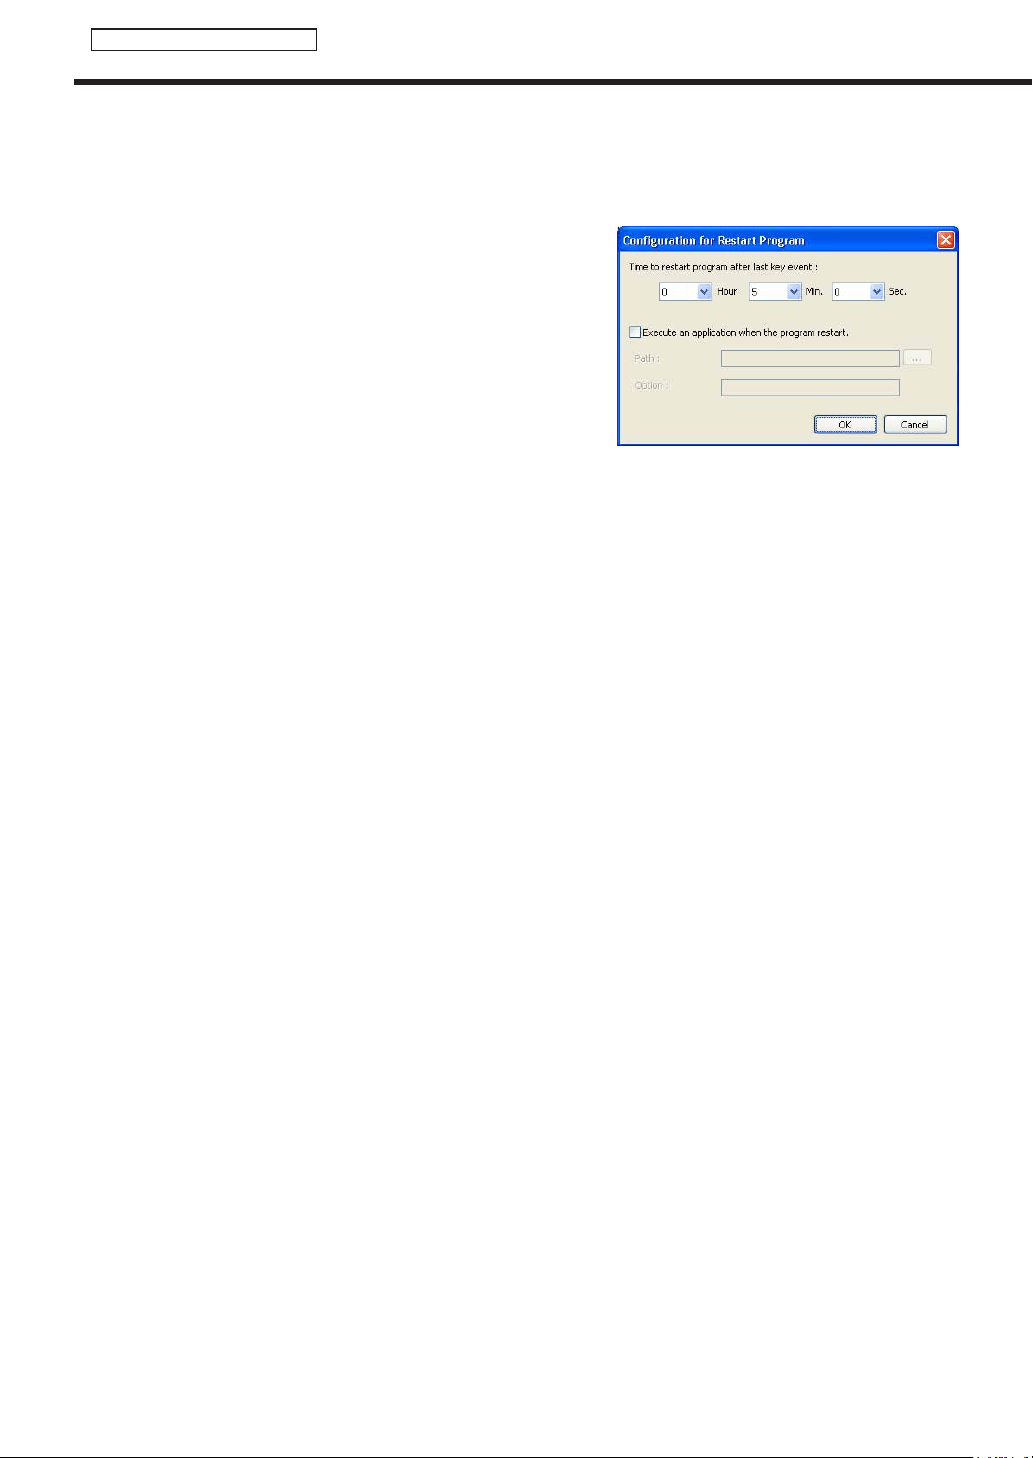
108
Key/Mouse Monitoring Tool
•“Playprogramagain,ifnoinputhascomeforacertaintime”checkbox
Whenthischeckboxischecked,thenormalprogramisresumedifthekeyormouseisnotoperatedfora
certain period of time.
1) Click [Detail].
The“ConfigurationforRestartProgram”dialogboxwillappear.
2) Set the options.
•“Timetorestartprogramafterlastkeyevent”
Set the period of time before program display is resumed.
•“Executeanapplicationwhentheprogramrestart.”checkbox
Ifyoucheckthischeckbox,enterthepathoftheapplication
tobeexecutedin“Path.”Itisalsopossibletoenter“Option.”
3) Click [OK].
About
DisplaystheversionoftheKey/MouseMonitoringTool.
Exit
ExitstheKey/MouseMonitoringTool.
Key/Mouse Monitoring Tool Window

109
Status Monitoring Tool
This function is only available with the Network Version.
TheStatusMonitoringToolallowsyoutocheckpanelstatusandcontroltargetPCpower.
The main Status Monitoring Tool window
●Launching Status Monitoring Tool
1. From the Windows Taskbar, click [Start], [All Programs], [SHARP Digital Signage Software], [Tools],
[Status Monitoring Tool].
“StatusMonitoringTool”willlaunch.
●The main Status Monitoring Tool window
1)Menus
2)Toolbar
3)Grouptree
4)Panellist
1) Menus
Menu options are as follows:
Menu option Description
Relevant
page
File Exit ExitsStatusMonitoringTool. -
Panel
Select all panels Selects all panels displayed in the panel list.
F
p.112
Select panels without
response
Selects all panels in the panel list that are not responding
(includingpanelsforwhichstatushasnotbeenacquired).
F
p.112
Select panels with
response
Selects all panels in the panel list that are responding.
F
p.112
Monitoring status
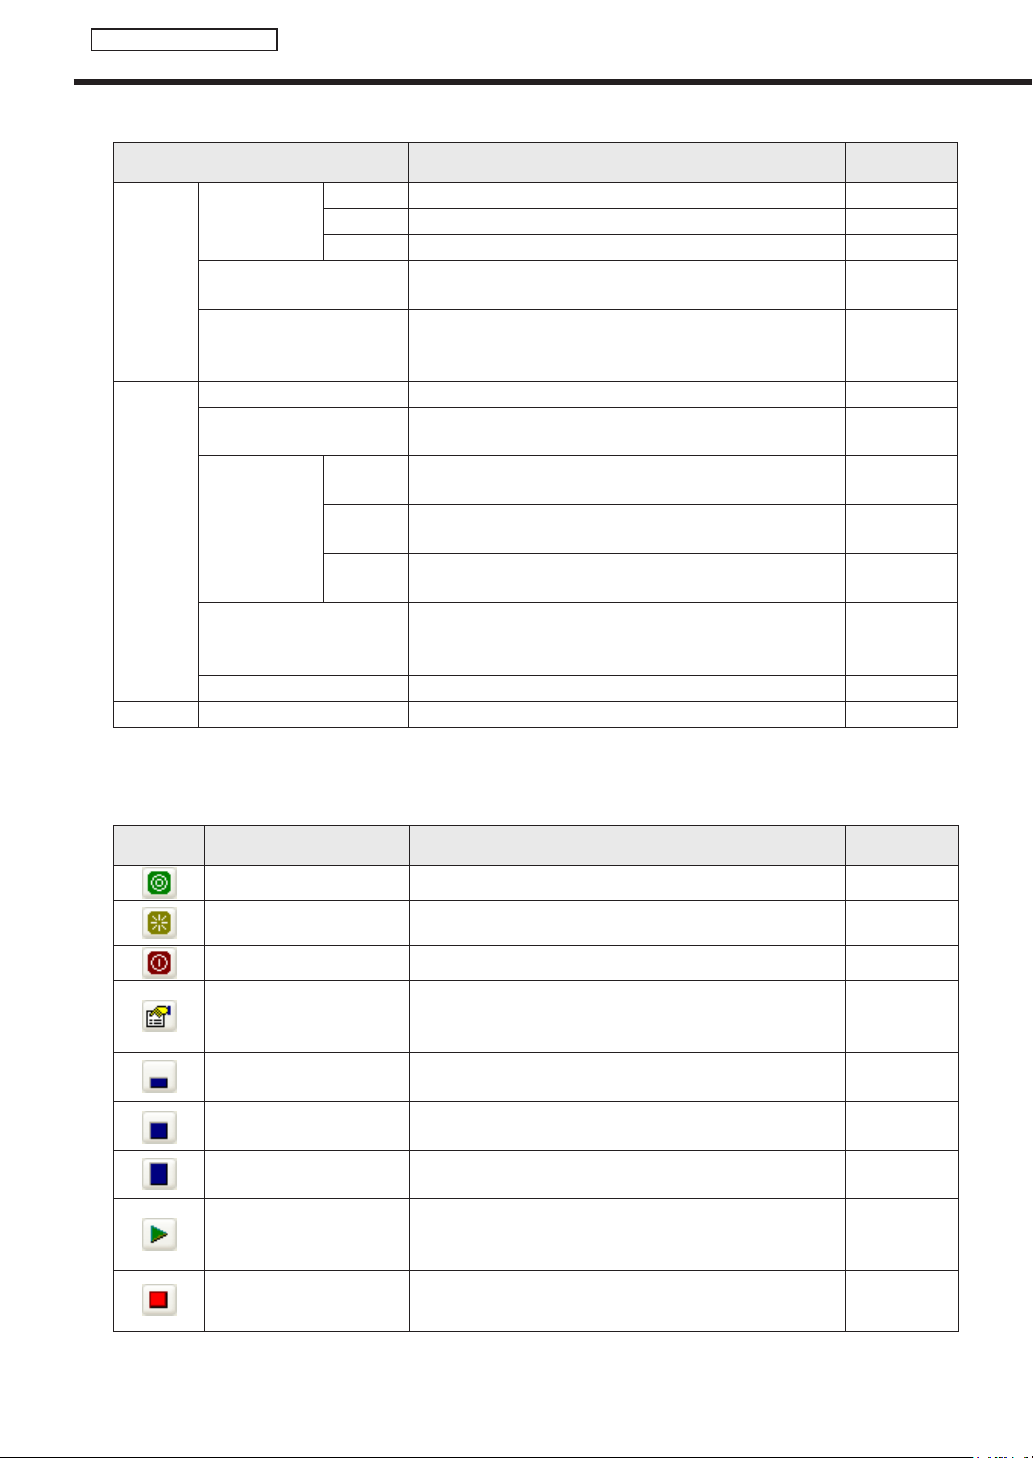
110
Status Monitoring Tool
The main Status Monitoring Tool window
Menu option Description
Relevant
page
Panel
Power control
ofcontrollerPC
Power on TurnsonthetargetPCofselectedpanels.
F
p.113
Reboot RestartsthetargetPCofselectedpanels.
F
p.113
Power off TurnsoffthetargetPCofselectedpanels.
F
p.113
Statusacquisitionof
selected panels
Startsstatusacquisitionofselectedpanels.
F
p.112
Property
Displays panel status details if only one panel is selected.
ThisfunctioncanbeusedonlywiththeSHARPLCD
monitor (PN series).
F
p.114
Option
Operation environment Displaysthe[Settingofoperationenvironment]dialogbox.
F
p.116
Panel setting without status
acquisition
Displaysthe[Panelsettingwithoutstatusacquisition]dialog
box.
F
p.113
Thumbnailsize
Small
Changesthesizeofthumbnailsdisplayedinthepanellist
to Small.
F
p.115
Medium
Changesthesizeofthumbnailsdisplayedinthepanellist
to Medium.
F
p.115
Large
Changesthesizeofthumbnailsdisplayedinthepanellist
toLarge.
F
p.115
Startofstatusacquisition
StartsstatusacquisitionofallpanelsregisteredinPanel
Management(exceptforpanelssetwithoutstatus
acquisition).
F
p.112
Cancelofstatusacquisition Cancelspanelstatusacquisition.
F
p.112
Help About Status Monitoring Tool Displays version information for Status Monitoring Tool. -
2) Toolbar
The toolbar buttons (icons) perform the following actions:
Icon Menu option Description
Relevant
page
Power on TurnsonthetargetPCofselectedpanels.
F
p.113
Rebot RestartsthetargetPCofselectedpanels.
F
p.113
Power off TurnsoffthetargetPCofselectedpanels.
F
p.113
Show the panel information
Displays panel status details if only one panel is selected.
ThisfunctioncanbeusedonlywiththeSHARPLCD
monitor (PN series).
F
p.114
Small thumbnail
Changesthesizeofthumbnailsdisplayedinthepanellist
to Small.
F
p.115
Medium thumbnail
Changesthesizeofthumbnailsdisplayedinthepanellist
to Medium.
F
p.115
Largethumbnail
Changesthesizeofthumbnailsdisplayedinthepanellist
toLarge.
F
p.115
Startofstatusacquisition
StartsstatusacquisitionofallpanelsregisteredinPanel
Management(exceptforpanelssetwithoutstatus
acquisition).
F
p.112
CancelofStatus
acquisition
Cancelspanelstatusacquisition.
F
p.112
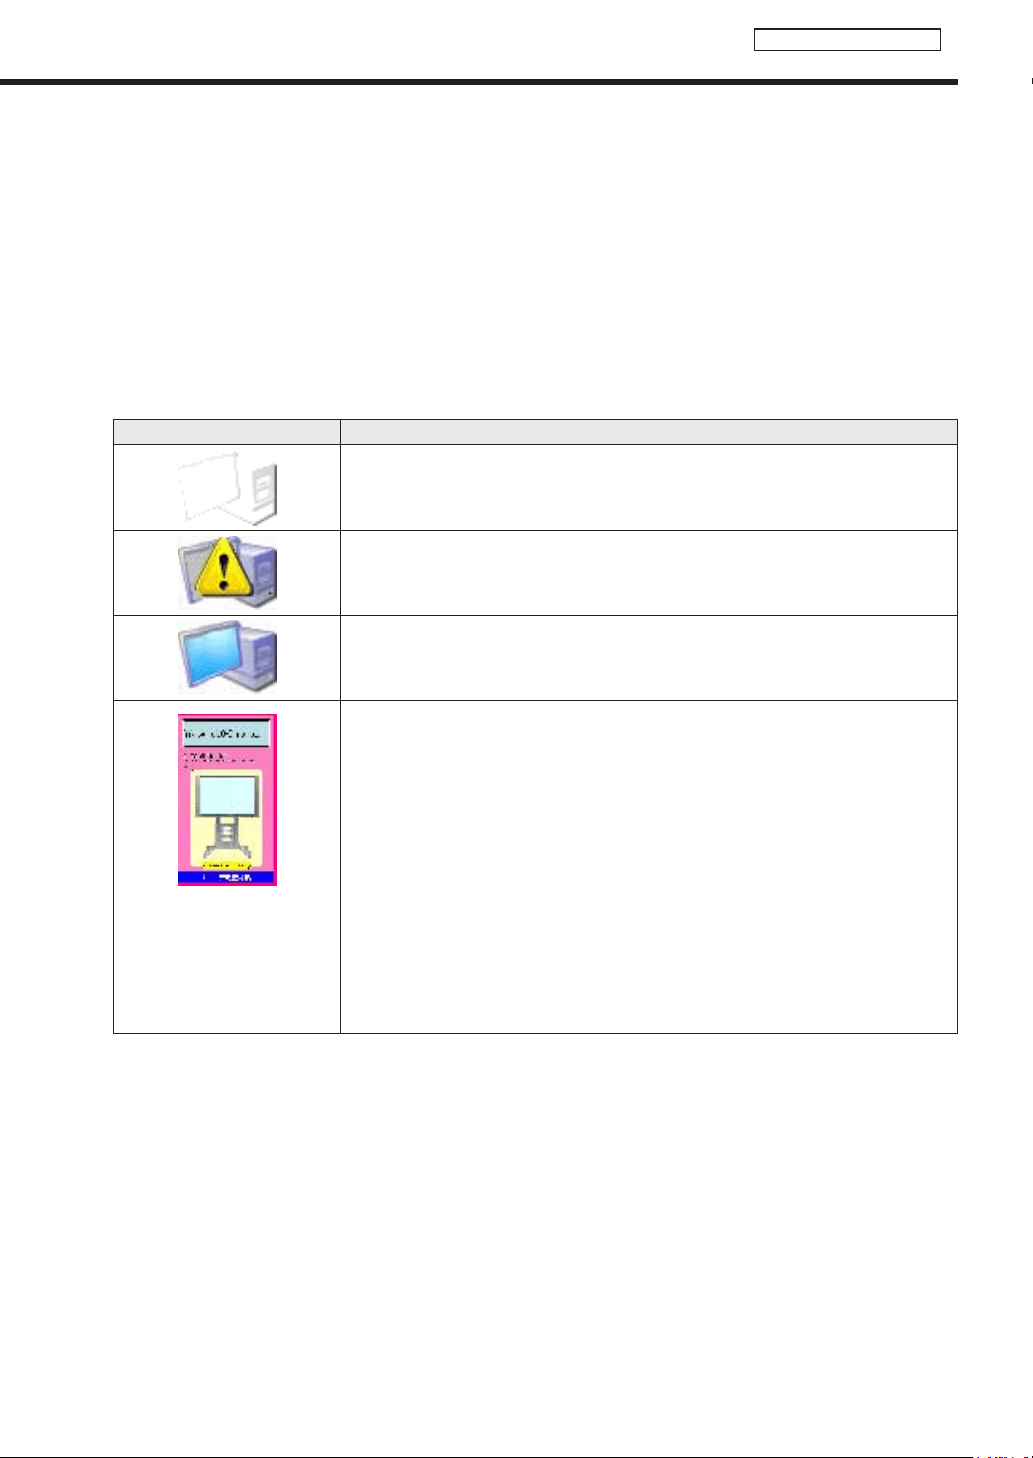
111
Status Monitoring Tool
3) Group tree
Displays groups registered in Panel Management.(
F
p.78)
Whenagroupisselected,allthepanelsthatbelongtoit(exceptforpanelssetwithoutstatusacquisition)are
displayed in the panel list.
When“(Selectallpanels)”isselected,allpanels(exceptforpanelssetwithoutstatusacquisition)aredisplayed
in the panel list.
4) Panel list
Displaysalistofallpanelsintheselectedgroupsinthegrouptree(exceptforpanelssetwithoutstatus
acquisition).
Panel icons and thumbnails change according to panel status.
Panel icon/thumbnail Description
DisplayedwhenthestatusesofthepanelandthetargetPChavenotbeenacquired.
DisplayedwhenthereisnoresponsefromthetargetPC.
DisplayedwhenthereisaresponsefromthetargetPC,butscreencapturesofthe
currentlydisplayedscreencannotbeacquired.
(Exampleimageonly)
This warning icon will appear
when there is an error in
acquiringIDPstatus(e.g.
power-off, hardware error,
etc.).
DisplayedwhenthereisaresponsefromthetargetPCandscreencapturesofthe
currentlydisplayedscreencanbeacquired.
*Thumbnailsofacquiredscreencaptureswillbedisplayed.(Itdiffersdependingon
thedisplayofthetargetPC.)
*Toacquireanimagecaptureofthescreen,check“Acquisitionofscreencapture
displayingbycontrollerPC”inthe[Settingofoperationenvironment]dialogbox.
(Fp.105)
The main Status Monitoring Tool window
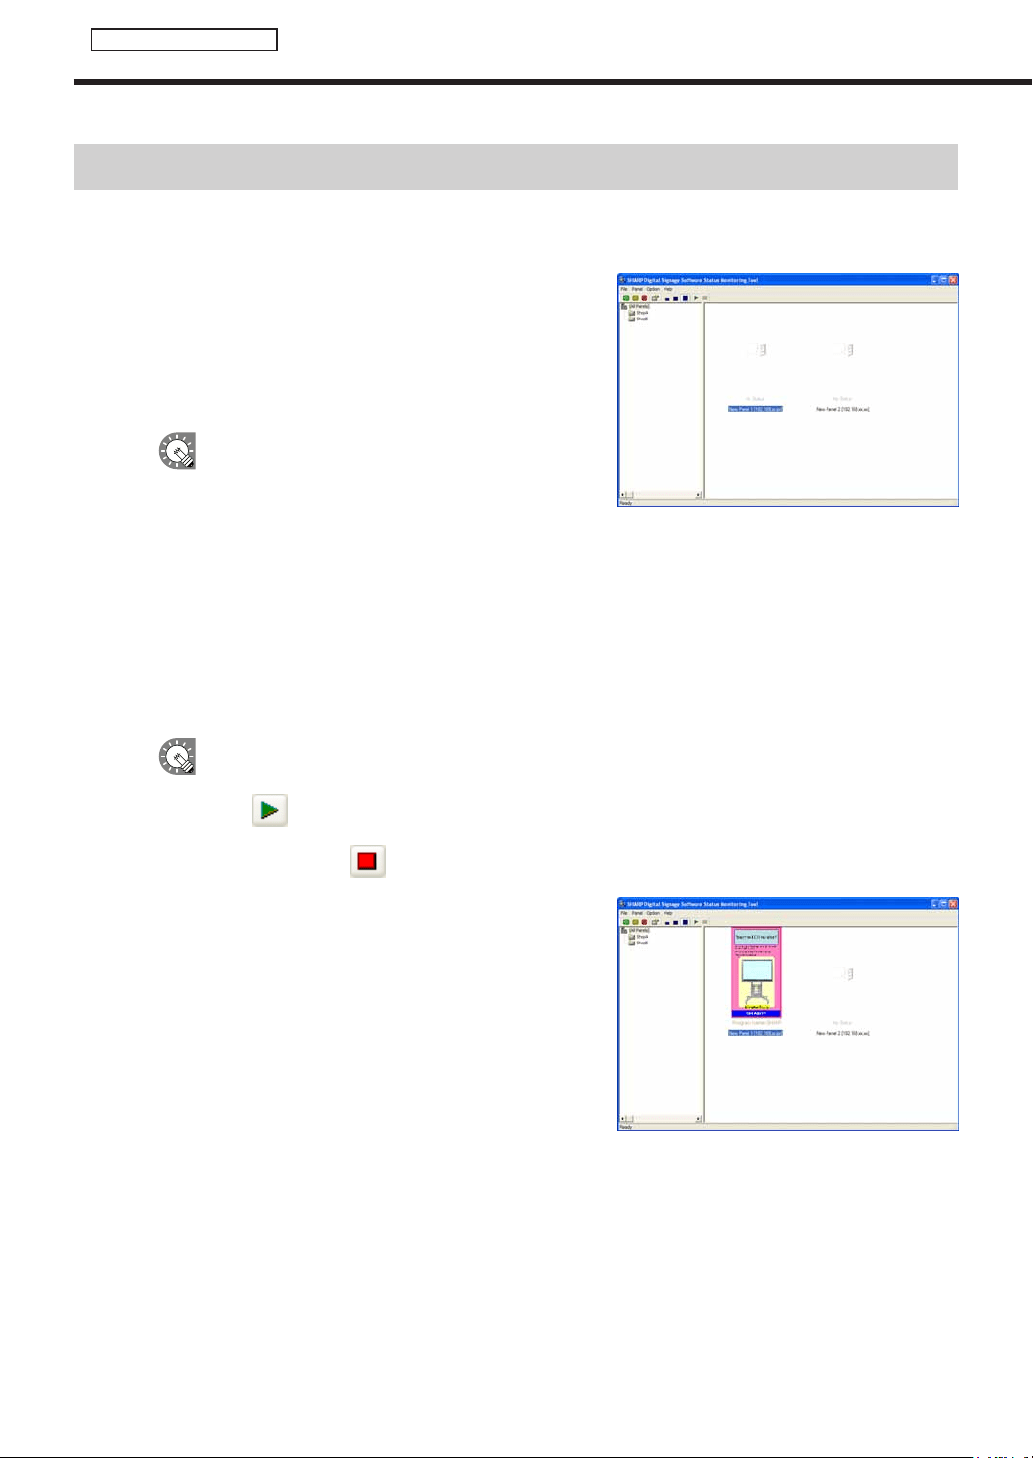
112
Status Monitoring Tool
Acquiring and displaying panel status
Acquiring and displaying panel status
●Acquiring status of selected panels
1. Select a group from the group tree, and then select a
panel from the panel list.
•Toselectallpanelsinthepanellist,eitherclick
[Selectallpanels]fromthe[Panel]menu,orpress
[Ctrl]+[A].
•Toselectallpanelsinthepanellistthatarenotresponding
(including panels for which status has not
beenacquired)
,eitherclick[Selectpanelswithoutresponse]fromthe[Panel]menu,orpress[Ctrl]
+[Shift]+[A].
•Toselectallpanelsinthepanellistthatareresponding,eitherclick[Selectpanelswithresponse]
fromthe[Panel]menu,orpress[Ctrl]+[Alt]+[A].
2. From the [Panel] menu, click [Status acquisition of selected panels].
Statusacquisitionofselectedpanelswillstart.
•ToacquirepanelstatusforallpanelsregisteredinPanelManagement(exceptforpanelsset
withoutstatusacquisition),click[Startofstatusacquisition]fromthe[Option]menu,oralternatively,
click
.
•Tocancelpanelstatusacquisition,click[Cancelofstatusacquisition]fromthe[Option]menu,or
alternatively, click
.
Whenpanelstatusisacquired,paneliconsandthumbnails
will change.
The image can be enlarged by double-clicking it.
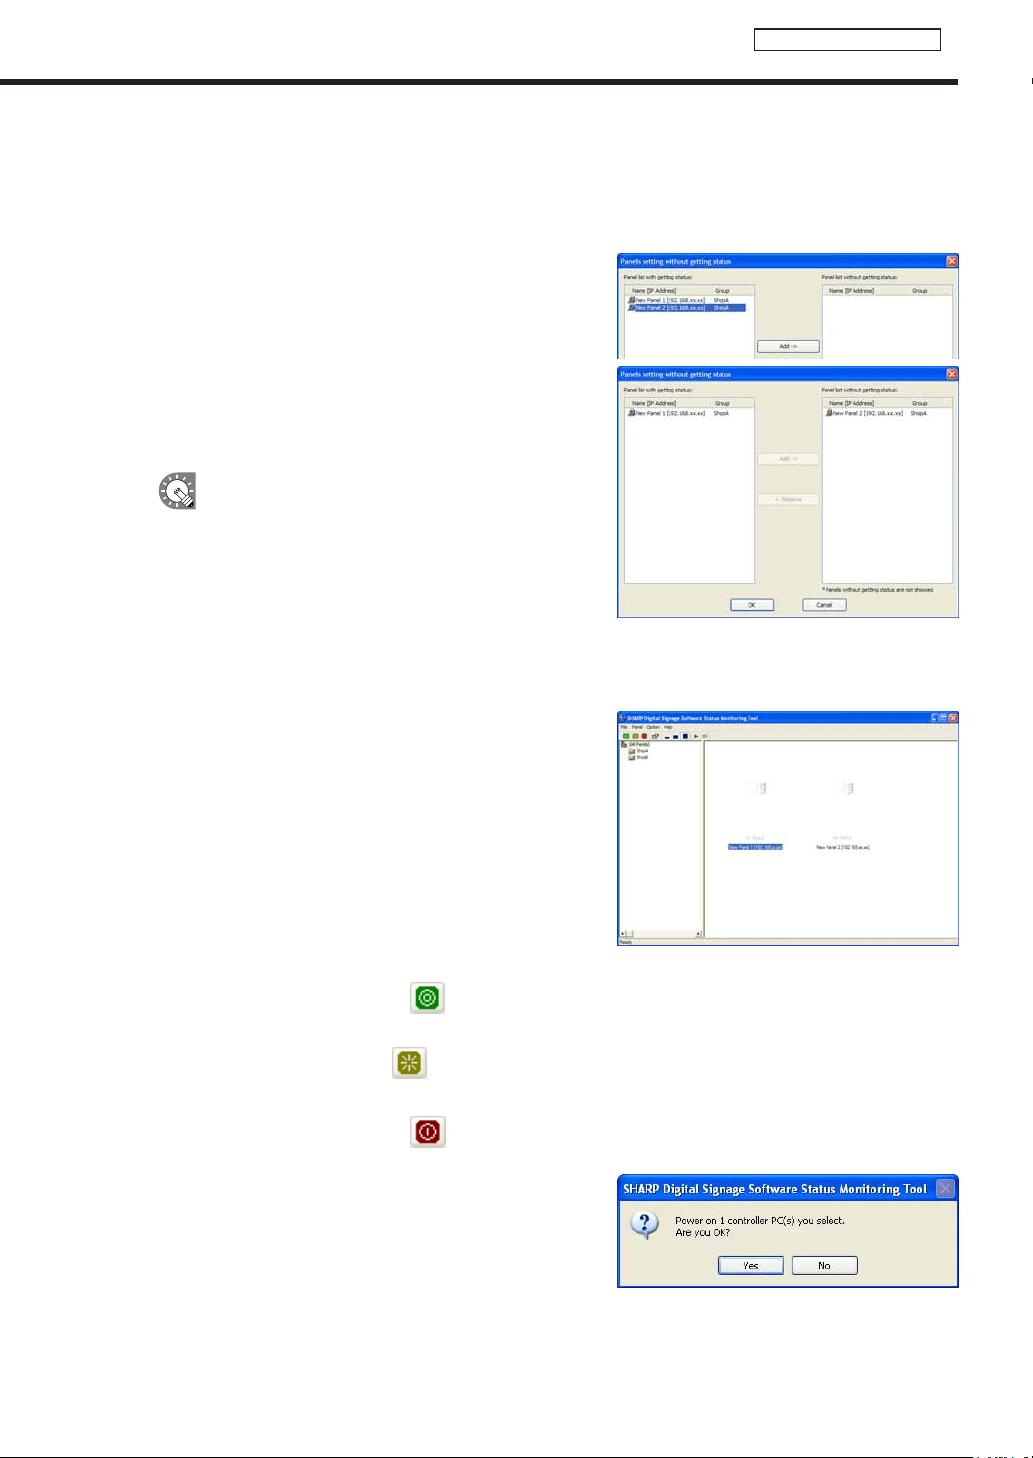
113
Status Monitoring Tool
●Setting panels for which status will not be obtained
Itispossibletosetpanelsforwhichstatuswillnotbeacquiredsothattheywillnotbedisplayedinthepanellist.
1. From the [Option] menu click [Panel setting without status acquisition].
2. Select panels from the “Panel list with getting status”.
3. Click [Add].
Theselectedpanelswillmovetothe“Panellistwithout
gettingstatus”.
4. Click [OK].
Toresetapanelsothatitsstatuswillbeacquired,
selectitfromthe“Panellistwithoutgettingstatus”,
andclick[Remove].
●Controlling target PC power
ThetargetPCcanbeturnedonandoff,andrestarted.
1. Select a group from the group tree, and then select a
panel from the panel list.
2. To turn the target PC on, from the [Panel] menu, click [Power control of controller PC] and then
[Power on], or alternatively, click
.
To restart the target PC, from the [Panel] menu, click [Power control of controller PC] and then
[Reboot], or alternatively, click
.
To turn the target PC off, from the [Panel] menu, click [Power control of controller PC] and then
[Power off], or alternatively, click
.
Aconfirmationdialogboxwillappear.
3. Click [Yes].
Theprocesswillbeexecuted.
Acquiring and displaying panel status
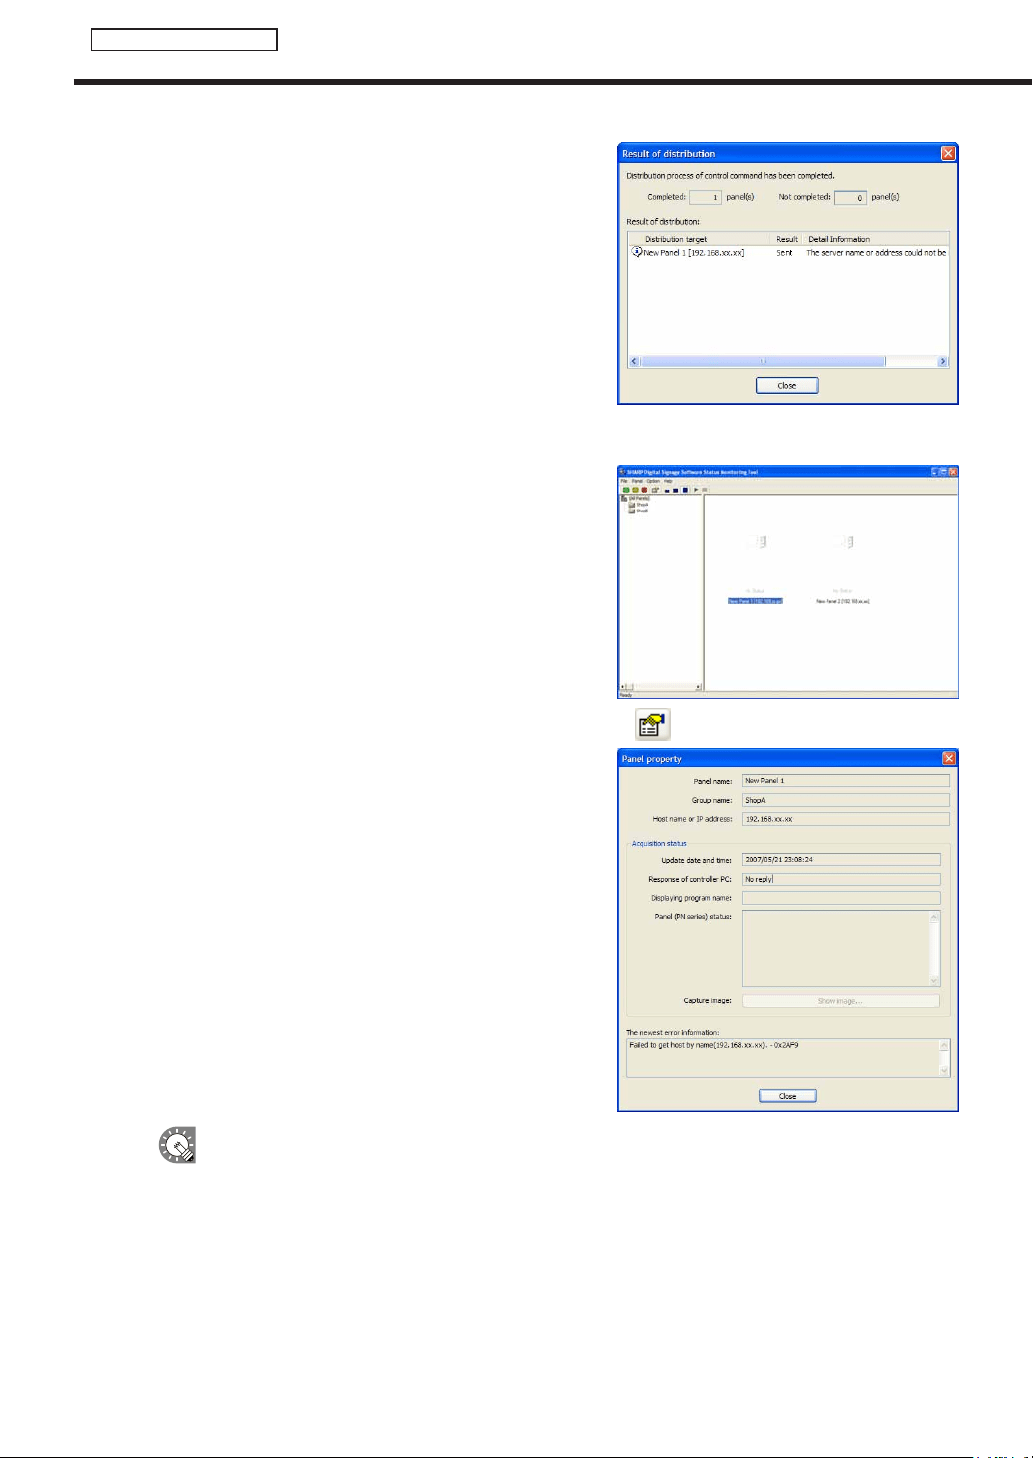
114
Status Monitoring Tool
Acquiring and displaying panel status
4. A screen like the one on the right will appear. Check that
the distribution was successful and click [Close].
●Displaying detailed information for a panel
1. Select a group from the group tree, and then select a
panel from the panel list.
2. From the [Panel] menu click [Property], or alternatively, click
.
The[Panelproperty]dialogboxwillappear.
3. Check the settings, and click [Close].
•Todisplay“Panel(PNseries)status,”check“Statusacquisitionofpanel(PNseries)”inthe[Setting
ofoperationenvironment]dialogbox(
F
p.116)
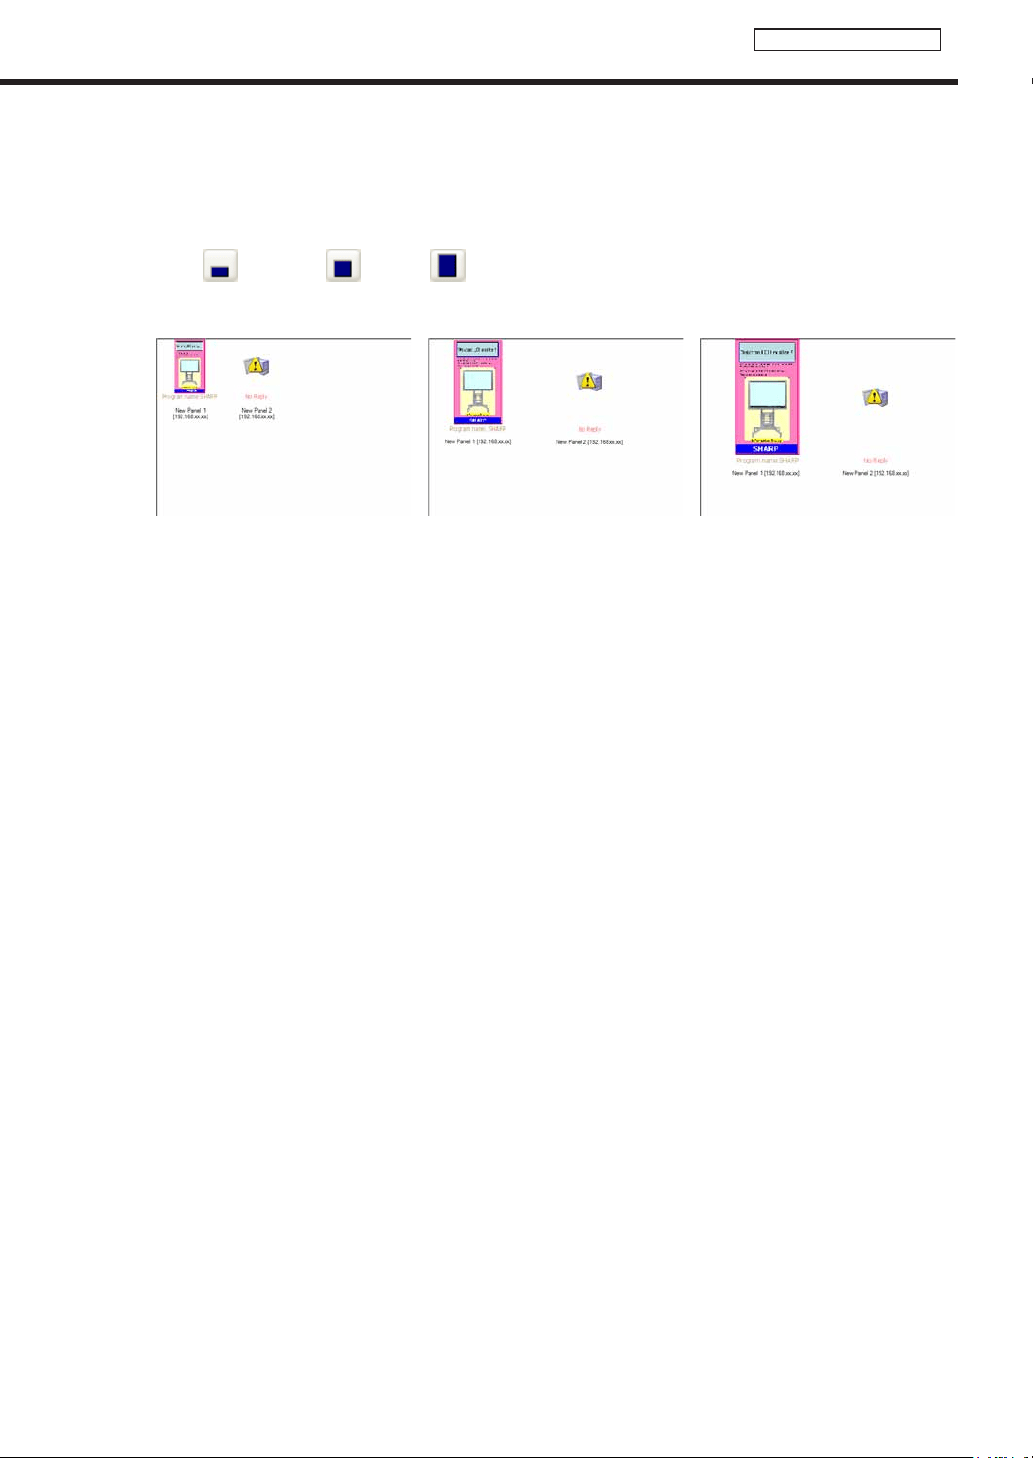
115
Status Monitoring Tool
●Changing thumbnail size
Itispossibletochangethesizeofthethumbnailsofthescreencapturesacquiredfromthepanels.
1. Click the buttons on the toolbar.
(Small:
, Medium:
, Large:
)
Or alternatively, from the [Option] menu, click [Thumbnail size], and select the size you want to use.
Small Medium Large
Acquiring and displaying panel status

116
Status Monitoring Tool
Setting the operation environment
Setadvancedsettingsforpanelstatusacquisition.
1. From the [Option] menu click [Operation environment].
The[Settingofoperationenvironment]dialogboxwillappear.
2. Set the options.
1) Checkthe“ResponseconfirmationofcontrollerPC
throughICMPECHOpacket”checkbox.(Compulsory)
Thecheckboxcannotbecleared.
•Timeout(seconds)
Setsthetimeoutvalueforconfirmingaresponsefrom
thetargetPC.Valuesoffrom1-10secondscanbe
selected.
•Retrycount
Setsthenumberofretriespermittedwhenconfirming
aresponsefromthetargetPC.Valuesoffrom1-10
times can be selected.
Ifthereisnoresponse,adelayof“timeoutvaluexnumberofretries”secondswilloccur.
2) “Acquisitionofdisplayingprograminformation”checkbox
CheckthisboxtoacquireinformationaboutthecurrentlydisplayedprogramfromthetargetPC.
3) “AcquisitionofscreencapturedisplayingbycontrollerPC”checkbox
CheckthisboxtoacquirethecurrentlydisplayedscreencapturefromthetargetPC.Theacquired
screen captures will be displayed as thumbnails.
Itmaynotalwaysbepossibletoacquirescreencapturesofmovies.
4) “Statusacquisitionofpanel(PNseries)”checkbox
CheckthisboxtoacquireinformationaboutthepanelfromthetargetPC.
ThisfunctioncanbeusedonlywiththeSHARPLCDmonitor(PNseries).
5) “Acquisitionoflicenseinformation”checkbox
CheckthecheckboxtoviewthelicensecodeandthefileversionoftheSHARPDigitalSignage
Software viewer version.
6) “Autoacquisitionunderthefollowinginterval”checkbox
Checkthisboxtoautomaticallyacquirepanelstatusatregularintervals.
•Acquisitioninterval
Settheintervalatwhichyouwanttoobtainpanelstatus.Valuesof1-60minutescanbeset.
3. Click [OK].
Setting the operation environment

PN-SS01/SS02/SV0110D(2)