
Safe Operation Practices • Set-Up • Operation • Service • Troubleshooting
WARNING
READ AND FOLLOW ALL SAFETY RULES AND INSTRUCTIONS IN THIS MANUAL
BEFORE ATTEMPTING TO OPERATE THIS MACHINE.
FAILURE TO COMPLY WITH THESE INSTRUCTIONS MAY RESULT IN PERSONAL INJURY.
OperatOr’s Manual
Form No. 769-13411
(January 10, 2018)
Safe Operation Practices ........................................ 2
Assembly & Set-Up .................................................. 6
Controls & Operation .............................................. 9
Service .....................................................................10
Troubleshooting .....................................................12
Spanish .................................................................... 13
French ..................................................................... 25
Parts/Warranty .............. See Separate Supplement
Table of Contents
NOTE: This Operator’s Manual covers several models. Features may vary by model. Not all features in this manual are applicable to all
models and the model depicted may differ from yours.
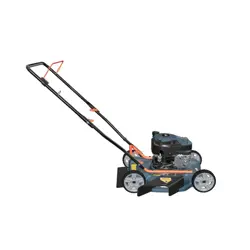
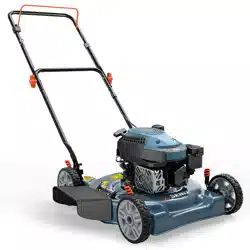
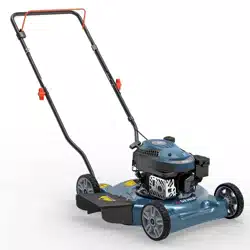
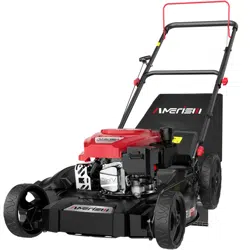
Push Mower
Model Series A0, A1, A2, A9, B0, B1, B2, & B9
Important Safe Operation Practices
1
2
WARNING! This symbol points out
important safety instructions which,
if not followed, could endanger the
personal safety and/or property of
yourself and others. Read and
follow all instructions in this manual before
attempting to operate this machine. Failure to
comply with these instructions may result in
personal injury. When you see this symbol.
HEED ITS WARNING!
DANGER: This machine was built to
be operated according to the safe
operation practices in this manual.
As with any type of power
equipment, carelessness or error on
the part of the operator can result in serious
injury. This machine is capable of amputating
fingers, hands, toes and feet and throwing foreign
objects. Failure to observe the following safety
instructions could result in serious injury or death.
CALIFORNIA PROPOSITION 65
WARNING! Engine Exhaust,
some of its constituents, and
certain vehicle components
contain or emit chemicals
known to State of California to cause cancer
and birth defects or other reproductive harm.
Battery posts, terminals, and related
accessories contain lead and lead compounds,
chemicals known to the State of California to
cause cancer and reproductive harm. Wash
hands after handling.
General Operation
1. Read this operator’s manual carefully in
its entirety before attempting to assemble
this machine. Read, understand, and
follow all instructions on the machine and
in the manual(s) before operation. Keep
this manual in a safe place for future and
regular reference.
2. Be completely familiar with the controls
and the proper use of this machine before
operating it.
3. This machine is a precision piece of power
equipment, not a plaything. Therefore,
exercise extreme caution at all times. This
machine has been designed to perform
one job: to mow grass. Do not use it for any
other purpose.
4. Never allow children under 14 years of
age to operate this machine. Children 14
and over should read and understand the
instructions and safe operation practices
in this manual and on the machine and
should be trained and supervised by an
adult.
5. Only responsible individuals who are
familiar with these rules of safe operation
should be allowed to use this machine.
6. Thoroughly inspect the area where the
equipment is to be used. Remove all
stones, sticks, wire, bones, toys and other
foreign objects, which could be tripped
over or picked up and thrown by the
blade. Thrown objects can cause serious
personal injury.
7. Plan your mowing pattern to avoid
discharge of material toward roads,
sidewalks, bystanders and the like. Also,
avoid discharging material against a
wall or obstruction, which may cause
discharged material to ricochet back
toward the operator.
8. To help avoid blade contact or a thrown
object injury, stay in operator zone
behind handles and keep children,
bystanders, helpers and pets at least 75
feet from mower while it is in operation.
Stop machine if anyone enters area.
9. Always wear safety glasses or safety
goggles during operation and while
performing an adjustment or repair to
protect your eyes. Thrown objects which
ricochet can cause serious injury to the
eyes.
10. Wear sturdy, rough-soled work shoes
and close-fitting slacks and shirts. Shirts
and pants that cover the arms and legs
and steel-toed shoes are recommended.
Never operate this machine in bare feet,
sandals, slippery or light-weight (e.g.
canvas) shoes.
11. Do not put hands or feet near rotating
parts or under the cutting deck. Contact
with blade can amputate fingers, hands,
toes and feet.
12. A missing or damaged discharge cover
can cause blade contact or thrown object
injuries.
13. Many injuries occur as a result of the
mower being pulled over the foot during
a fall caused by slipping or tripping.
Do not hold on to the mower if you are
falling; release the handle immediately.
14. Never pull the mower back toward
you while you are walking. If you must
back the mower away from a wall or
obstruction first look down and behind
to avoid tripping and then follow these
steps:
a. Step back from mower to fully
extend your arms.
b. Be sure you are well balanced with
sure footing.
c. Pull the mower back slowly, no
more than half way toward you.
d. Repeat these steps as needed.
15. Do not operate the mower while under
the influence of alcohol or drugs.
16. Do not engage the self-propelled
mechanism on machines so equipped
while starting engine.
17. The blade control is a safety device. Never
attempt to bypass its operation. Doing
so makes the safety device inoperative
and may result in personal injury through
contact with the rotating blade. The
blade control must operate easily in both
directions and automatically return to the
disengaged position when released.
18. Never operate the mower in wet grass.
Always be sure of your footing. A slip and
fall can cause serious personal injury. If you
feel you are losing your footing, release
the blade control handle immediately and
the blade will stop rotating within three
seconds.
19. Mow only in daylight or good artificial
light. Walk, never run.
20. Stop the blade when crossing gravel
drives, walks or roads.
21. If the equipment should start to vibrate
abnormally, stop the engine and check
immediately for the cause. Vibration is
generally a warning of trouble.
22. Shut the engine off and wait until the
blade comes to a complete stop before
removing the grass catcher or unclogging
the chute. The cutting blade continues to
rotate for a few seconds after the blade
control is released. Never place any part
of the body in the blade area until you are
sure the blade has stopped rotating.
23. Never operate mower without proper
trail shield, discharge cover, grass catcher,
blade control or other safety protective
devices in place and working. Never
operate mower with damaged safety
devices. Failure to do so can result in
personal injury.
24. Muffler and engine become hot and can
cause a burn. Do not touch.
25. Never attempt to make a wheel or cutting
height adjustment while the engine is
running.
26. Only use parts and accessories made for
this machine by the manufacturer. Failure
to do so can result in personal injury.
27. When starting engine, pull cord slowly
until resistance is felt, then pull rapidly.
Rapid retraction of starter cord (kickback)
will pull hand and arm toward engine
faster than you can let go. Broken bones,
fractures, bruises or sprains could result.
28. If situations occur which are not covered
in this manual, use care and good
judgement. Contact Customer Support
for assistance or the name of the nearest
service dealer.

3Section 1 — important Safe operation practiceS
Slope Operation
Slopes are a major factor related to slip and
fall accidents, which can result in severe injury.
Operation on slopes requires extra caution. The
machine is heavy and can speed up when going
downhill. Be prepared to maintain control of
the machine. If you feel uneasy on a slope, do
not mow it. For your safety, use the slope gauge
included as part of this manual to measure
slopes before operating this machine on a
sloped or hilly area. If the slope is greater than 15
degrees, do not mow it.
Do:
1. Mow across the face of slopes; never up
and down to avoid loss of control.
2. Exercise extreme caution when changing
direction on slopes; turn uphill not down.
3. Watch for holes, ruts, rocks, hidden
objects, or bumps which can cause you to
slip or trip. Tall grass can hide obstacles.
4. Always be sure of your footing. A slip
and fall can cause serious personal
injury. If you feel you are losing your
balance, release the blade control handle
immediately and the blade will stop
rotating within three (3) seconds.
Do Not:
1. Do not mow near drop-offs, ditches
or embankments, you could lose your
footing or balance.
2. Do not mow slopes greater than 15
degrees as shown on the slope gauge.
3. Do not mow on wet grass. Unstable
footing could cause slipping.
Children
Tragic accidents can occur if the operator is not
alert to the presence of children. Children are
often attracted to the mower and the mowing
activity. They do not understand the dangers.
Never assume that children will remain where
you last saw them.
1. Keep children out of the mowing area and
under watchful care of a responsible adult
other than the operator.
2. Be alert and turn mower off if a child
enters the area.
3. Before and while moving backwards, look
behind and down for small children.
4. Use extreme care when approaching blind
corners, doorways, shrubs, trees, or other
objects that may obscure your vision of a
child who may run into the mower.
5. Keep children away from hot or running
engines. They can suffer burns from a hot
muffler.
6. Never allow children under 14 years of
age to operate this machine. Children 14
and over should read and understand the
instructions and safe operation practices
in this manual and on the machine and be
trained and supervised by an adult.
7. After stopping engine, remove Electric
Start Push Key (if equipped) and keep it in
a safe place out of the reach of children.
Service
Safe Handling Of Gasoline:
1. To avoid personal injury or property
damage use extreme care in handling
gasoline. Gasoline is extremely flammable
and the vapors are explosive. Serious
personal injury can occur when gasoline is
spilled on yourself or your clothes, which
can ignite. Wash your skin and change
clothes immediately.
2. Use only an approved gasoline container.
3. Never fill containers inside a vehicle or on
a truck or trailer bed with a plastic liner.
Always place containers on the ground
away from your vehicle before filling.
4. Remove gas-powered equipment from the
truck or trailer and refuel it on the ground.
If this is not possible, then refuel such
equipment on a trailer with a portable
container, rather than from a gasoline
dispenser nozzle.
5. Keep the nozzle in contact with the rim of
the fuel tank or container opening at all
times until fueling is complete. Do not use
a nozzle lock-open device.
6. Extinguish all cigarettes, cigars, pipes and
other sources
of ignition.
7. Never fuel machine indoors because
flammable vapors will accumulate in the
area.
8. Never remove gas cap or add fuel while
engine is hot or running. Allow engine to
cool at least two minutes before refueling.
9. Never over fill fuel tank. Fill tank to no
more than 1 inch below bottom of filler
neck to provide for fuel expansion.
10. Replace gasoline cap and tighten securely.
11. If gasoline is spilled, wipe it off the engine
and equipment. Move machine to another
area. Wait 5 minutes before starting
engine.
12. Never store the machine or fuel container
near an open flame, spark or pilot light as
on a water heater, space heater, furnace,
clothes dryer or other gas appliances.
13. To reduce fire hazard, keep machine free
of grass, leaves, or other debris build-up.
Clean up oil or fuel spillage and remove
any fuel soaked debris.
14. Allow machine to cool at least 5 minutes
before storing.
General Service:
1. Never run an engine indoors or in a poorly
ventilated area. Engine exhaust contains
carbon monoxide, an odorless and deadly
gas.
2. Before cleaning, repairing, or inspecting,
make certain the blade and all moving
parts have stopped. Disconnect the spark
plug wire and ground against the engine
and remove Electric Start Push Key (if
equipped) to prevent unintended starting.
3. Check the blade and engine mounting
bolts at frequent intervals for proper
tightness. Also, visually inspect blade
for damage (e.g., bent, cracked, worn).
Replace blade with the original equipment
manufacture’s (O.E.M.) blade only, listed
in this manual. “Use of parts which
do not meet the original equipment
specifications may lead to improper
performance and compromise safety!”
4. Mower blades are sharp and can cut. Wrap
the blade or wear gloves, and use extra
caution when servicing them.
5. Keep all nuts, bolts, and screws tight to
be sure the equipment is in safe working
condition.
6. Never tamper with safety devices. Check
their proper operation regularly.
7. After striking a foreign object, stop
the engine, disconnect the spark plug
wire and ground against the engine.
Thoroughly inspect the mower for any
damage. Repair the damage before
starting and operating the mower.
8. Never attempt to make a wheel or cutting
height adjustment while the engine is
running.
9. Grass catcher components, discharge
cover, and trail shield are subject to wear
and damage which could expose moving
parts or allow objects to be thrown.
For safety protection, frequently check
components and replace immediately
with original equipment manufacturer’s
(O.E.M.) parts only, listed in this manual.
“Use of parts which do not meet the
original equipment specifications may
lead to improper performance and
compromise safety!”
10. Do not change the engine’s governor
setting or over-speed the engine. The
governor controls the maximum safe
operating speed of the engine.
11. Check fuel line, tank, cap, and fittings
frequently for cracks or leaks. Replace if
necessary.
12. Do not crank engine with spark plug
removed.
13. Maintain or replace safety and instruction
labels, as necessary.
14. Observe proper disposal laws and
regulations. Improper disposal of fluids
and materials can harm the environment.
15. According to the Consumer Products
Safety Commission (CPSC) and the U.S.
Environmental Protection Agency (EPA),
this product has an Average Useful Life of
seven (7) years, or 140 hours of operation.
At the end of the Average Useful Life
have the machine inspected annually by
an authorized service dealer to ensure
that all mechanical and safety systems
are working properly and not worn
excessively. Failure to do so can result in
accidents, injuries or death.
4 Section 1 — important Safe operation practiceS
WARNING! Your Responsibility—Restrict the use of this power machine to persons who read, understand and follow the warnings
and instructions in this manual and on the machine.
SAVE THESE INSTRUCTIONS!
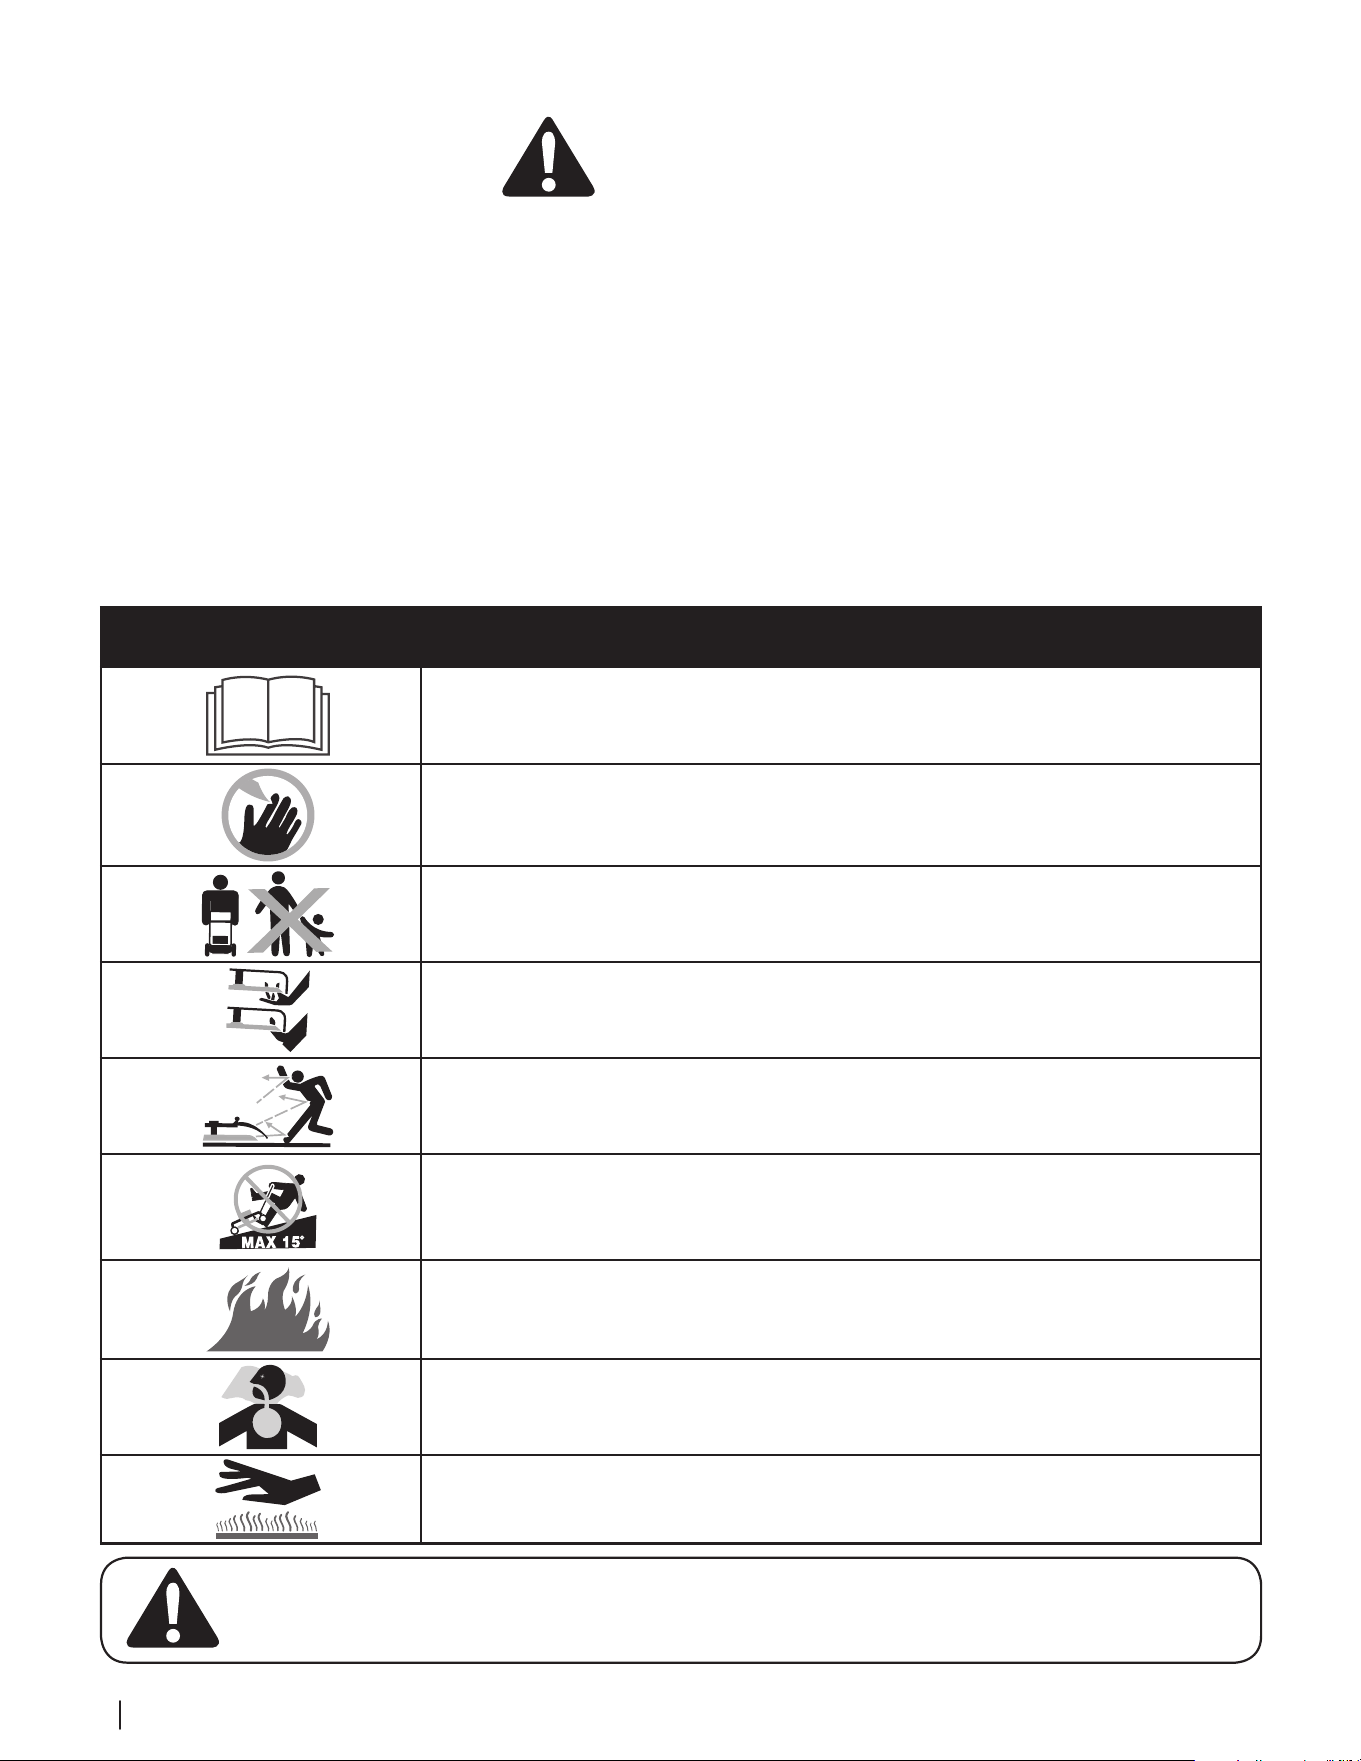
Safety Symbols
This page depicts and describes safety symbols that may appear on this product. Read, understand, and follow all instructions on the machine before
attempting to assemble and operate.
Symbol Description
READ THE OPERATOR’S MANUAL(S)
Read, understand, and follow all instructions in the manual(s) before attempting to assemble and operate.
DANGER — ROTATING BLADES
To reduce the risk of injury, keep hands and feet away. Do not operate unless discharge cover or grass catcher is
in its proper place. If damaged, replace immediately.
DANGER — BYSTANDERS
Do not mow when children or others are around.
DANGER — HAND/ FOOT CUT
Keep hands and feet away from rotating parts.
DANGER — THROWN DEBRIS
Remove objects that can be thrown by the blade in any direction. Wear safety glasses.
DANGER — SLOPES
Use extra caution on slopes. The machine is heavy and can speed up when going downhill. Be prepared to maintain
control of the machine. To avoid loss of control, operate across slopes, not up and down. When turning, turn uphill,
not down. Do not operate on slopes greater than 15°.
WARNING—GASOLINE IS FLAMMABLE
Allow the engine to cool at least two minutes before refueling.
WARNING— CARBON MONOXIDE
Never run an engine indoors or in a poorly ventilated area. Engine exhaust contains carbon monoxide, an
odorless and deadly gas.
WARNING— HOT SURFACE
Engine parts, especially the muffler, become extremely hot during operation. Allow engine and muffler to cool
before touching.
Do not modify engine
To avoid serious injury or death, do not modify
engine in any way. Tampering with the governor
setting can lead to a runaway engine and cause
it to operate at unsafe speeds. Never tamper
with factory setting of engine governor.
Notice Regarding Emissions
Engines which are certified to comply with
California and federal EPA emission regulations
for SORE (Small Off Road Equipment) are
certified to operate on regular unleaded
gasoline, and may include the following
emission control systems: Engine Modification
(EM), Oxidizing Catalyst (OC), Secondary Air
Injection (SAI) and Three Way Catalyst (TWC) if
so equipped.
Spark Arrestor
WARNING: This machine is
equipped with an internal
combustion engine and should
not be used on or near any
unimproved forest-covered,
brush covered or grass-covered land unless the
engine’s exhaust system is equipped with a
spark arrestor meeting applicable local or state
laws (if any).
If a spark arrestor is used, it should be
maintained in effective working order by the
operator. In the State of California the above is
required by law (Section 4442 of the California
Public Resources Code). Other states may have
similar laws. Federal laws apply on federal
lands.
A spark arrestor for the muffler is available
through your nearest engine authorized
service dealer or contact the service
department, P.O. Box 361131 Cleveland, Ohio
44136-0019.
5Section 1 — important Safe operation practiceS
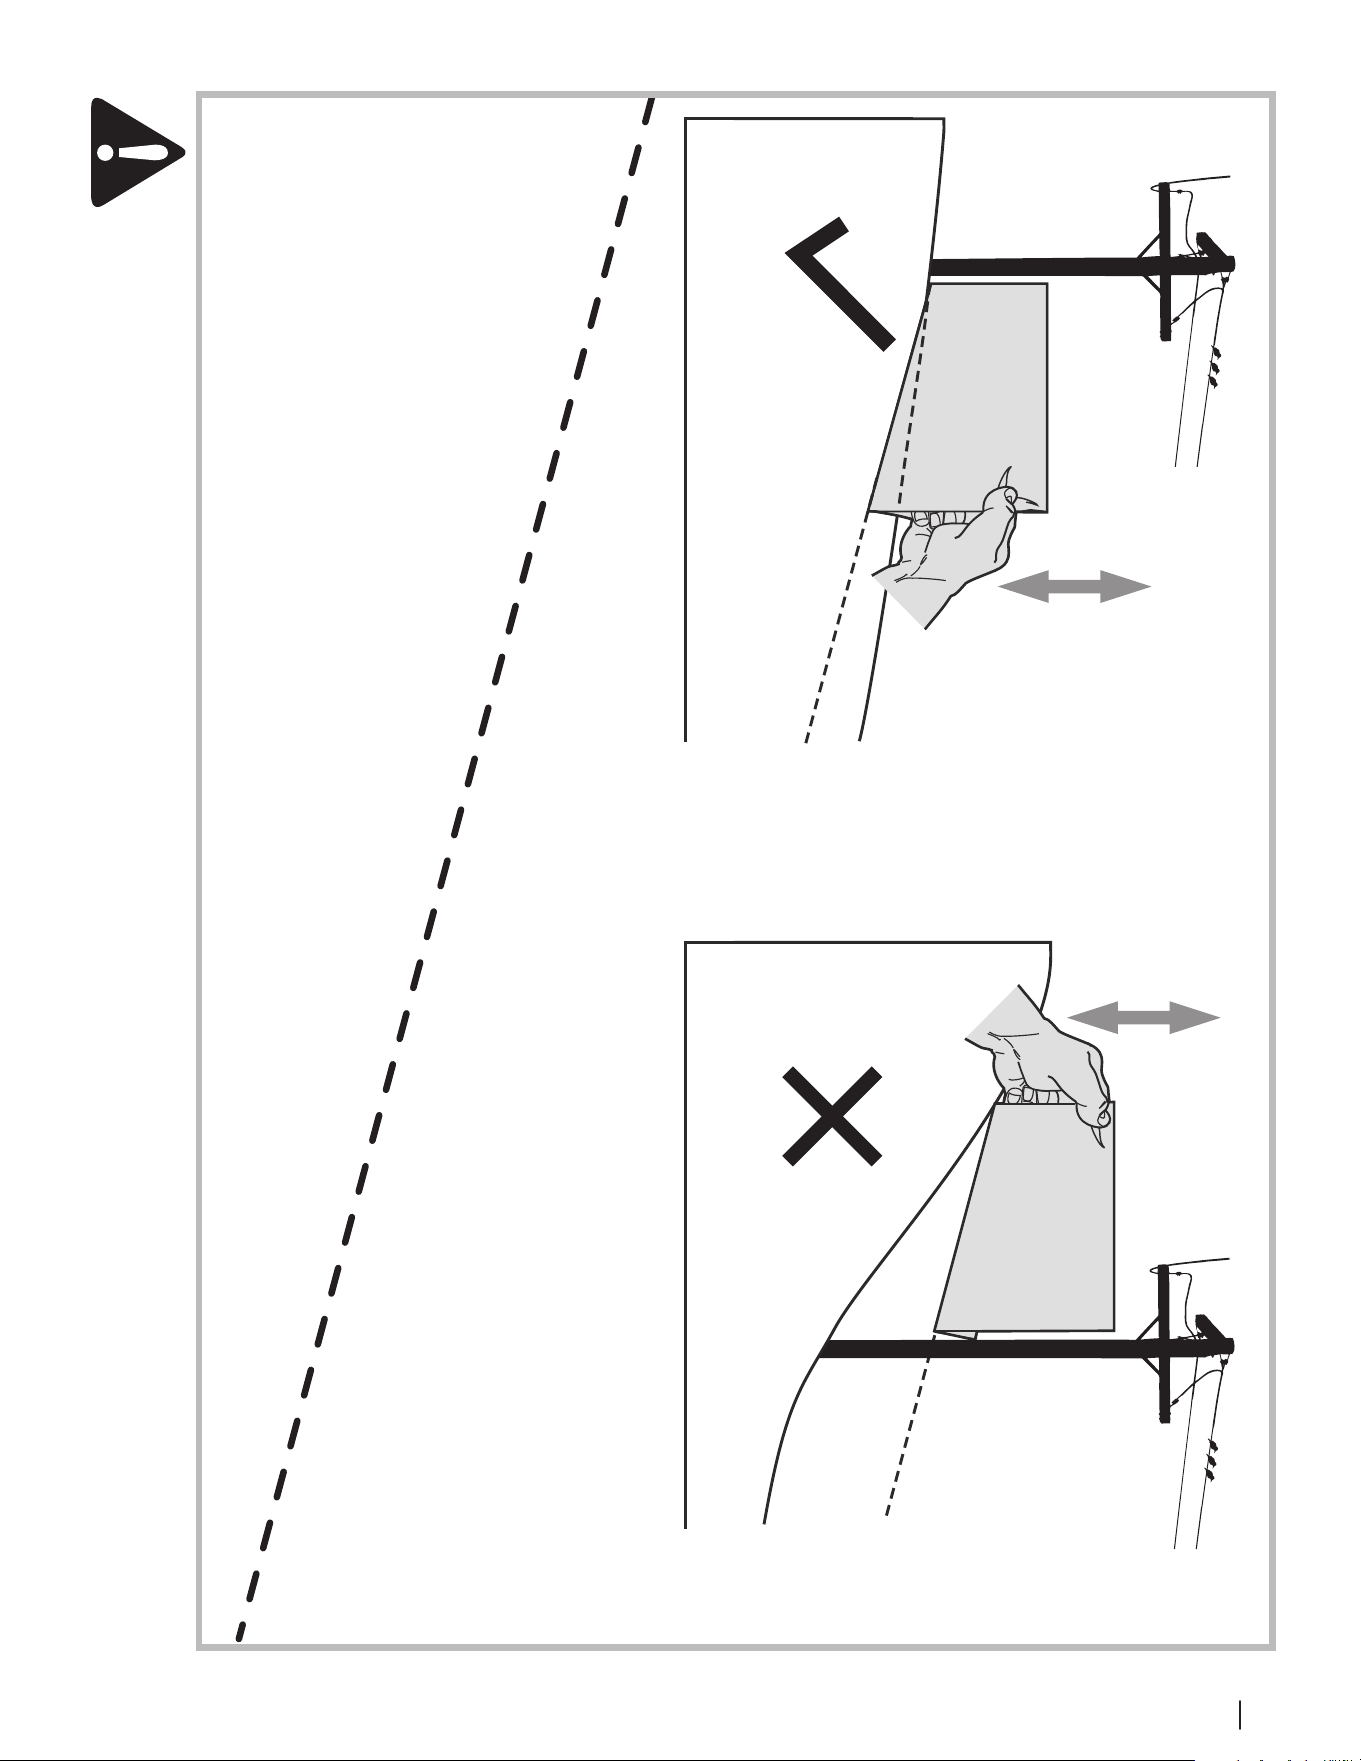
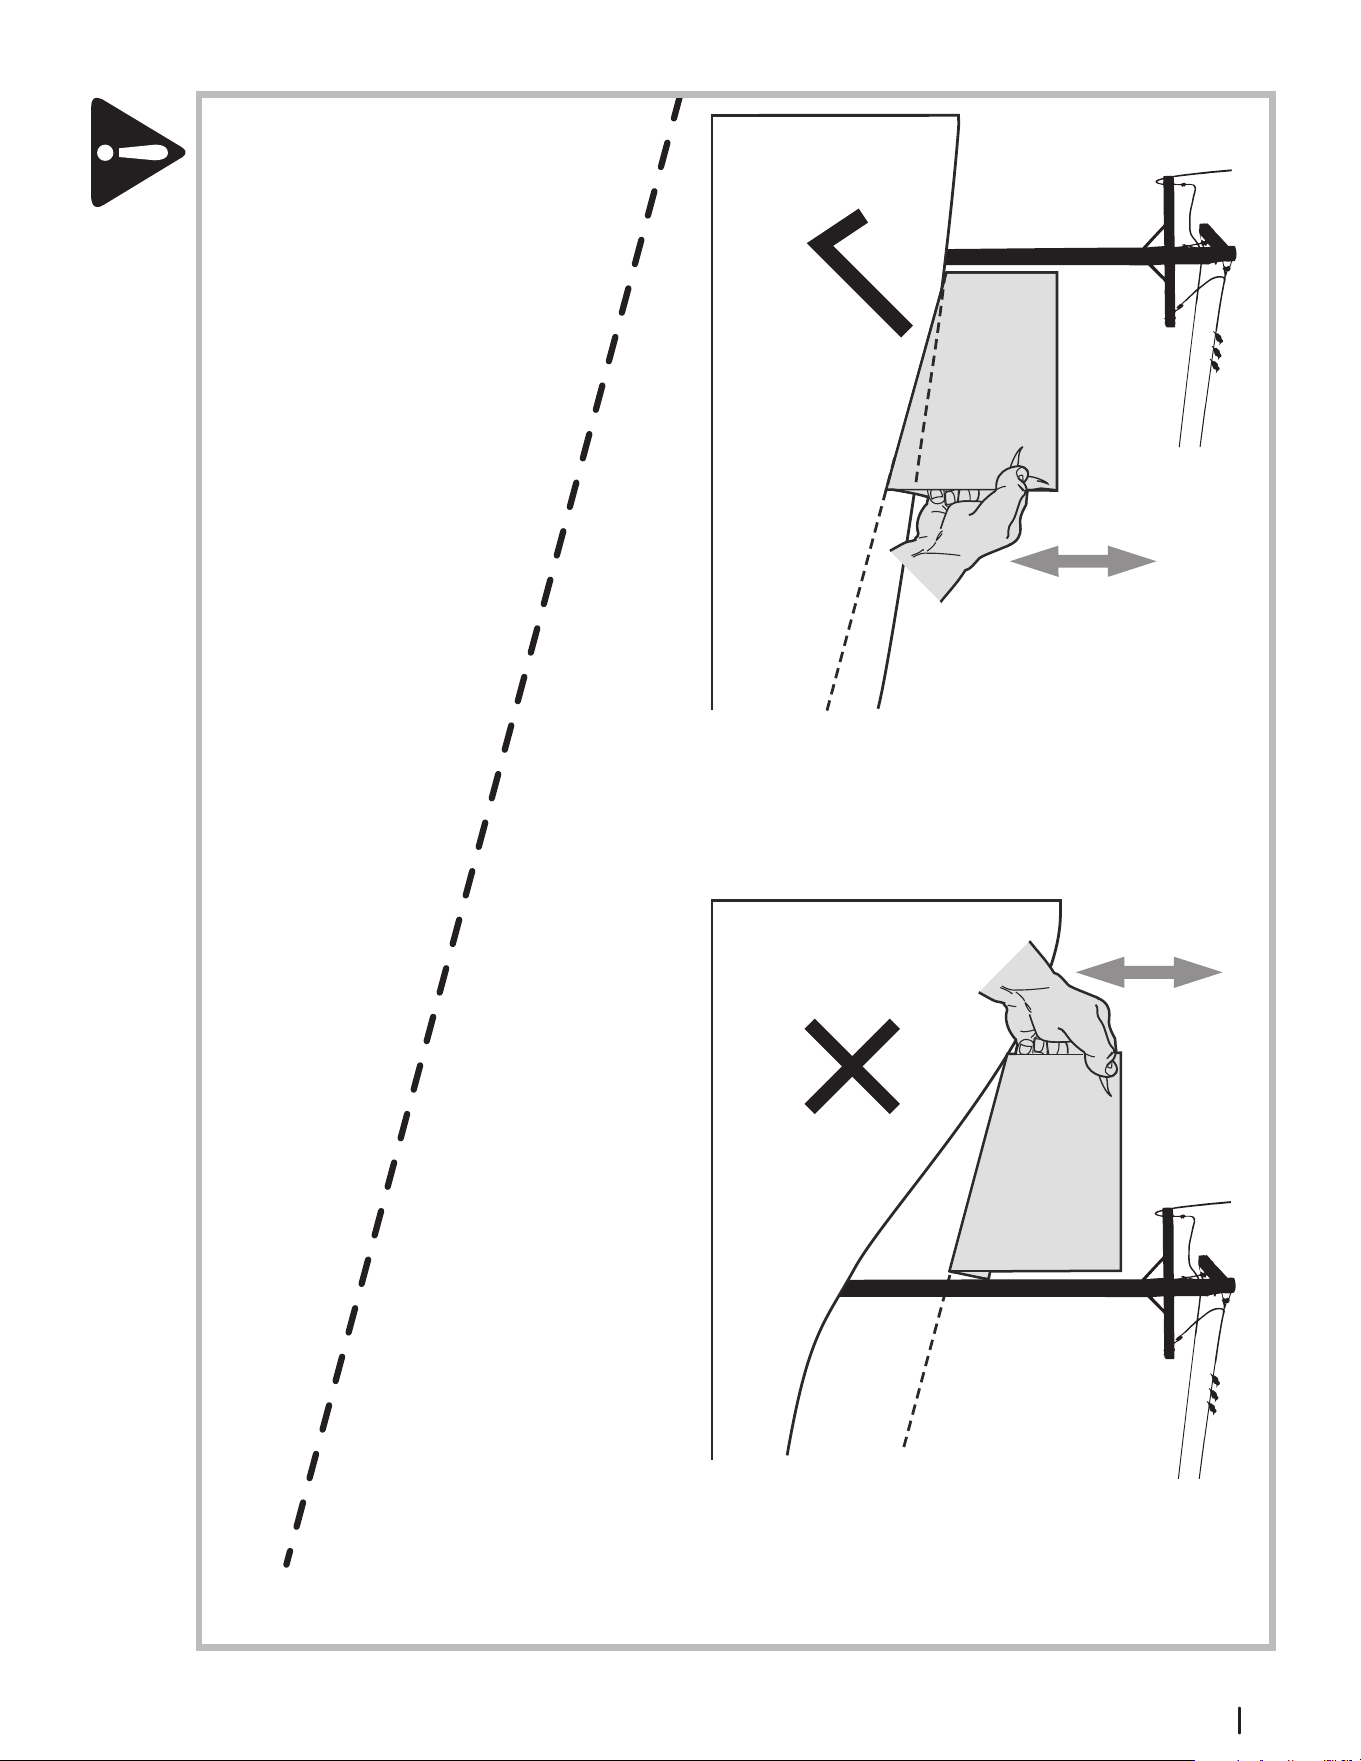
(OK) (TOO STEEP)
USE THIS SLOPE GAUGE TO DETERMINE
IF A SLOPE IS TOO STEEP FOR SAFE OPERATION!
To check the slope, proceed as follows:
1. Remove this page and fold along the dashed line.
2. Locate a vertical object on or behind the slope (e.g. a pole, building, fence, tree, etc.)
3. Align either side of the slope gauge with the object (See Figure 1 and Figure 2 ).
4. Adjust gauge up or down until the left corner touches the slope (See Figure 1 and Figure 2).
5. If there is a gap below the gauge, the slope is too steep for safe operation (See Figure 2 above).
15°/25% dashed line
Slope Gauge
Figure 2Figure 1
15°/25% Slope
15°/25%
Slope
WARNING! Slopes are a major factor related to slip and fall accidents which can result in severe injury or death.
The machine is heavy and can speed up when going downhill. Be prepared to maintain control of the machine. To avoid loss of control, operate across slopes, not up and down. When turning,
turn uphill, not down. Do not operate machine on slopes in excess of 15 degrees.
Assembly & Set-Up
2
6
Thank you for purchasing this product. It was carefully engineered to
provide excellent performance when properly operated and maintained.
Please read this entire manual prior to operating the equipment. It instructs
you how to safely and easily set up, operate and maintain your machine.
Please be sure that you, and any other persons who will operate the
machine, carefully follow the recommended safety practices at all times.
Failure to do so could result in personal injury or property damage.
All information in this manual is relative to the most recent product
information available at the time of printing. Review this manual frequently
to familiarize yourself with the machine, its features and operation. Please
be aware that this Operator’s Manual may cover a range of product
specifications for various models. Characteristics and features discussed
and/or illustrated in this manual may not be applicable to all models. We
reserve the right to change product specifications, designs and equipment
without notice and without incurring obligation.
If applicable, the power testing information used to establish the power
rating of the engine equipped on this machine can be found at
www.opei.org or the engine manufacturer’s web site.
If you have any problems or questions concerning the machine, phone your
local authorized service dealer or contact us directly. We want to ensure
your complete satisfaction at all times.
Throughout this manual, all references to ri ght and left side of the machine
are observed from the operating position.
The engine manufacturer is responsible for all engine-related issues with
regards to performance, power-rating, specifications, warranty and service.
Please refer to the engine manufacturer’s Owner’s/Operator’s Manual,
packed separately with your machine, for more information.
Thank You
Contents of Carton
• Lawn Mower (1) • Grass Catcher † (1) • Side Discharge Chute † (1)
• Fast Attach Deck Wash Nozzle † (1) • Lawn Mower Operator’s Manual (1) • Engine Operator’s Manual (1)
• Parts/Warranty Document (1) • Fast Start Guide † (1) • Product Registration Card † (1)
• Oil (1) † If Equipped
NOTE: This Operator’s Manual covers several models. Features may vary by model. Not all features in this manual are applicable to all models and the
model depicted may differ from yours. Handle assembly is the same on all units.
NOTE: This unit is shipped without gasoline or
oil in the engine. Fill up with gasoline and oil as
instructed in the accompanying engine manual
BEFORE operating your mower.
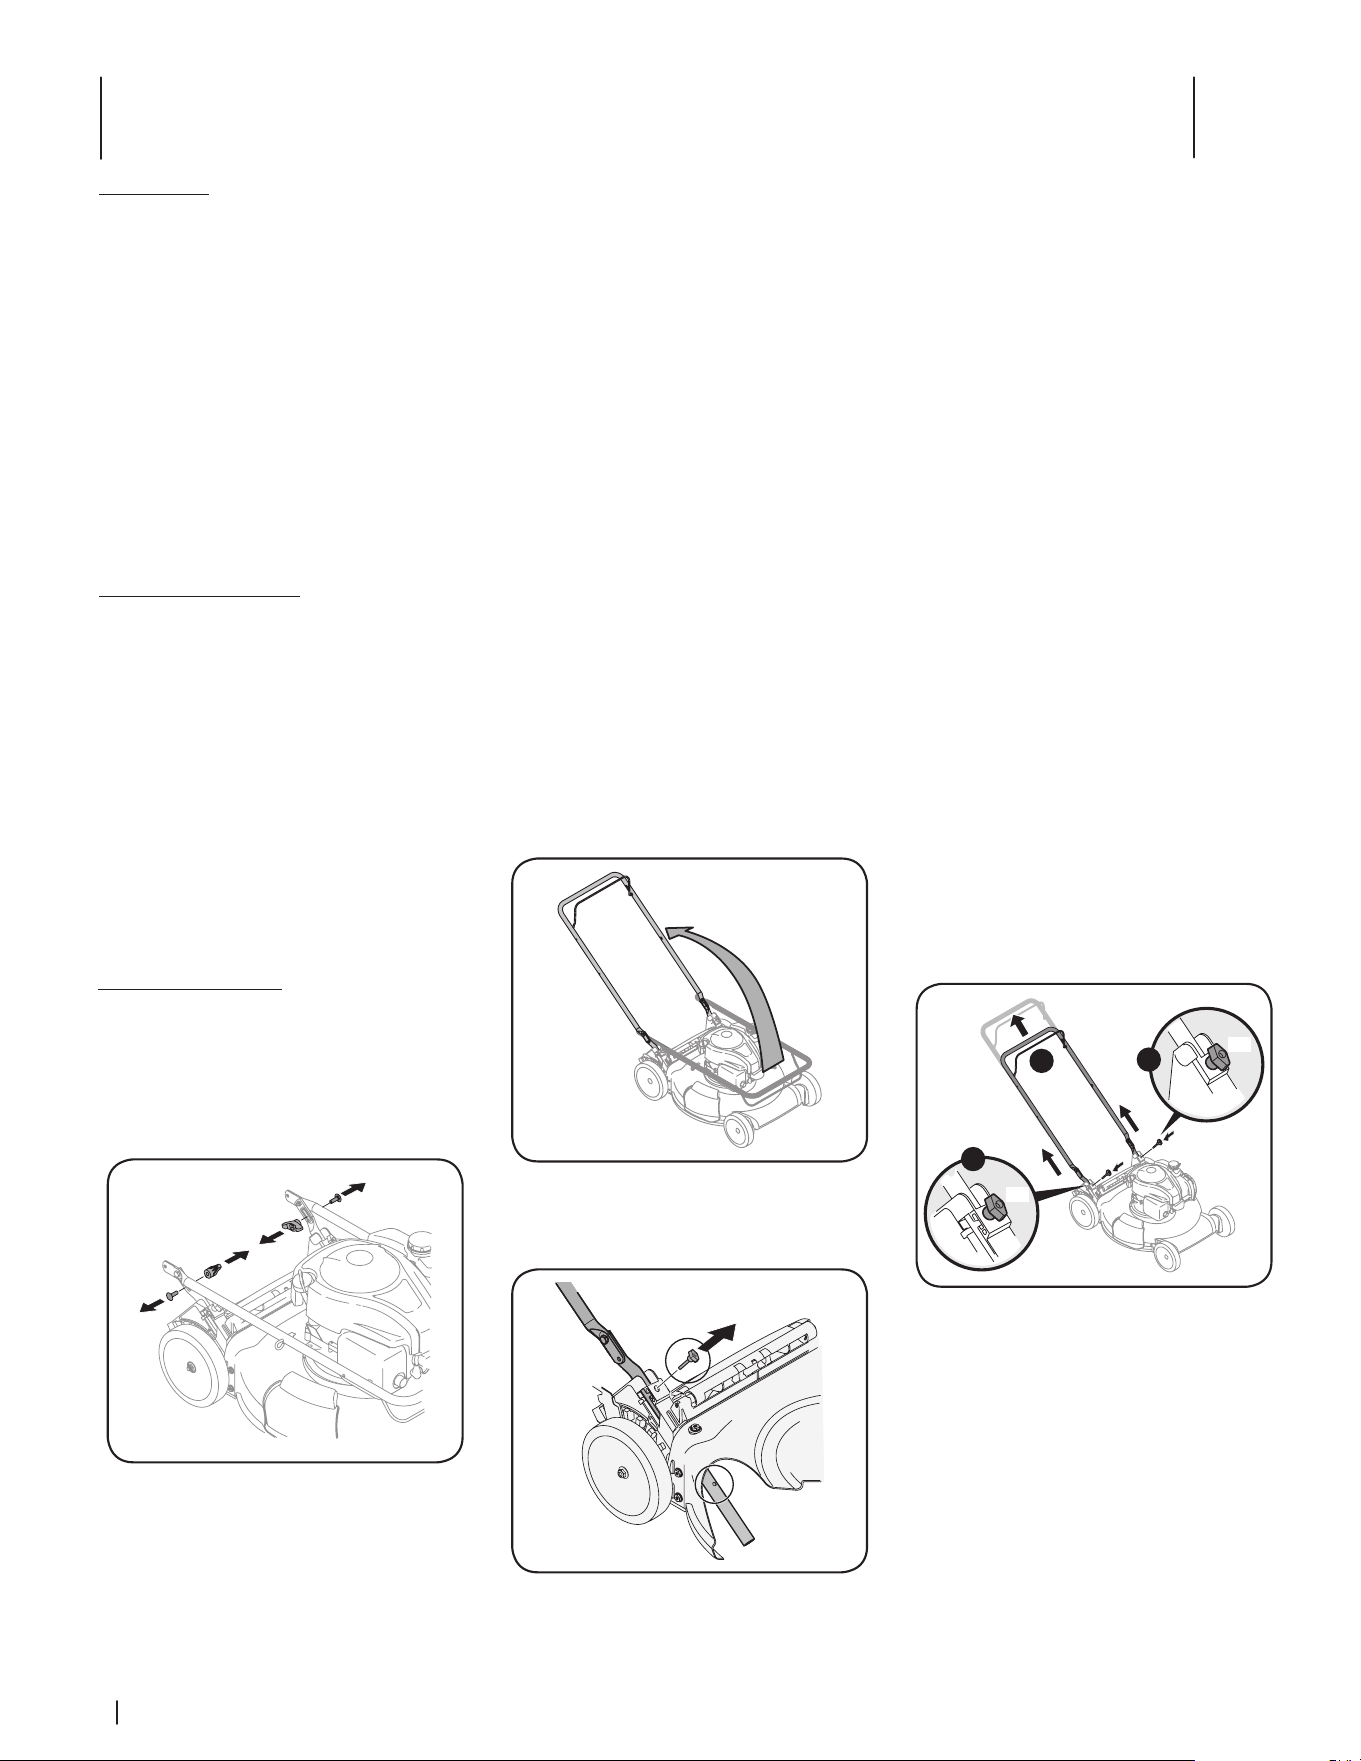
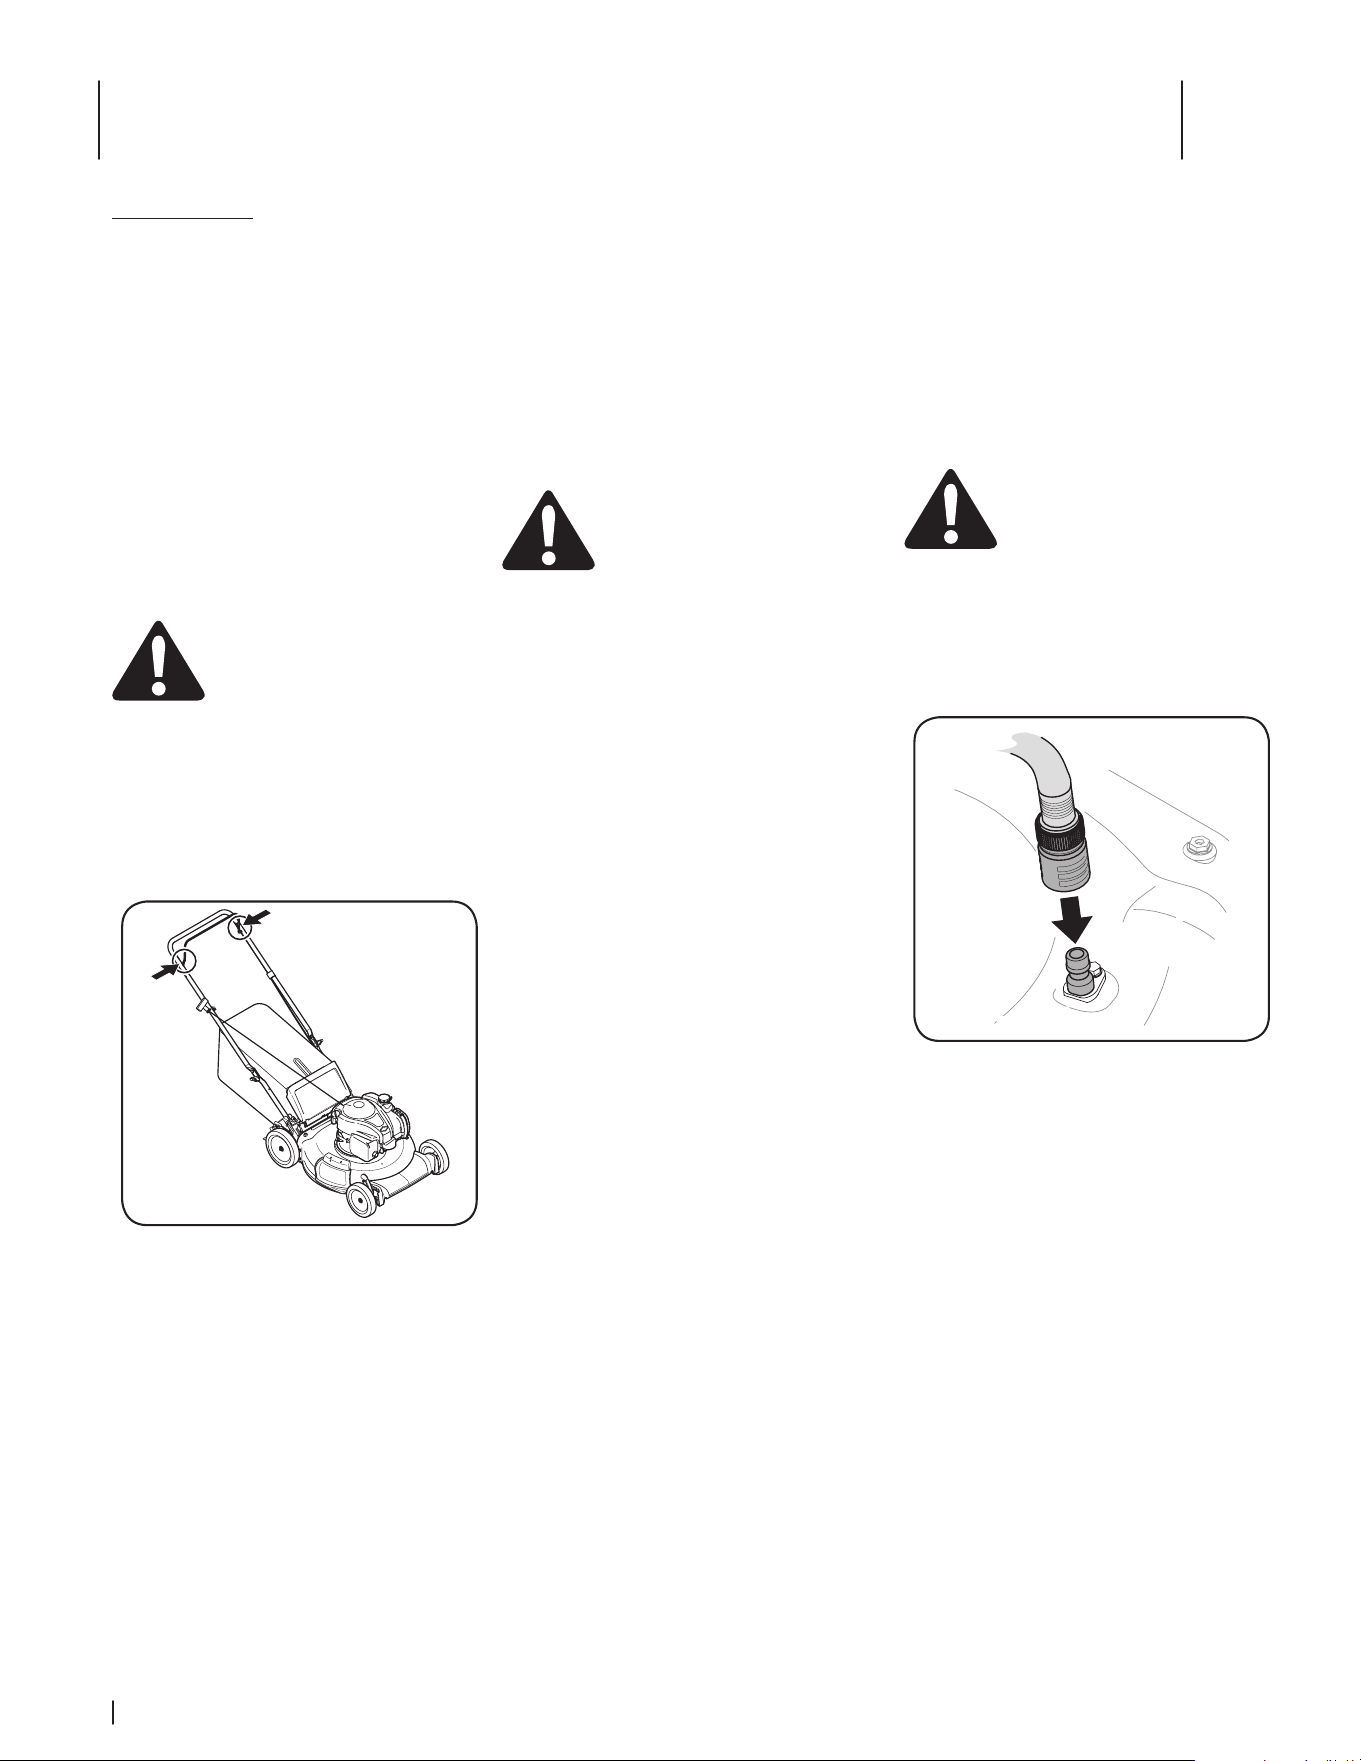
Handle Assembly
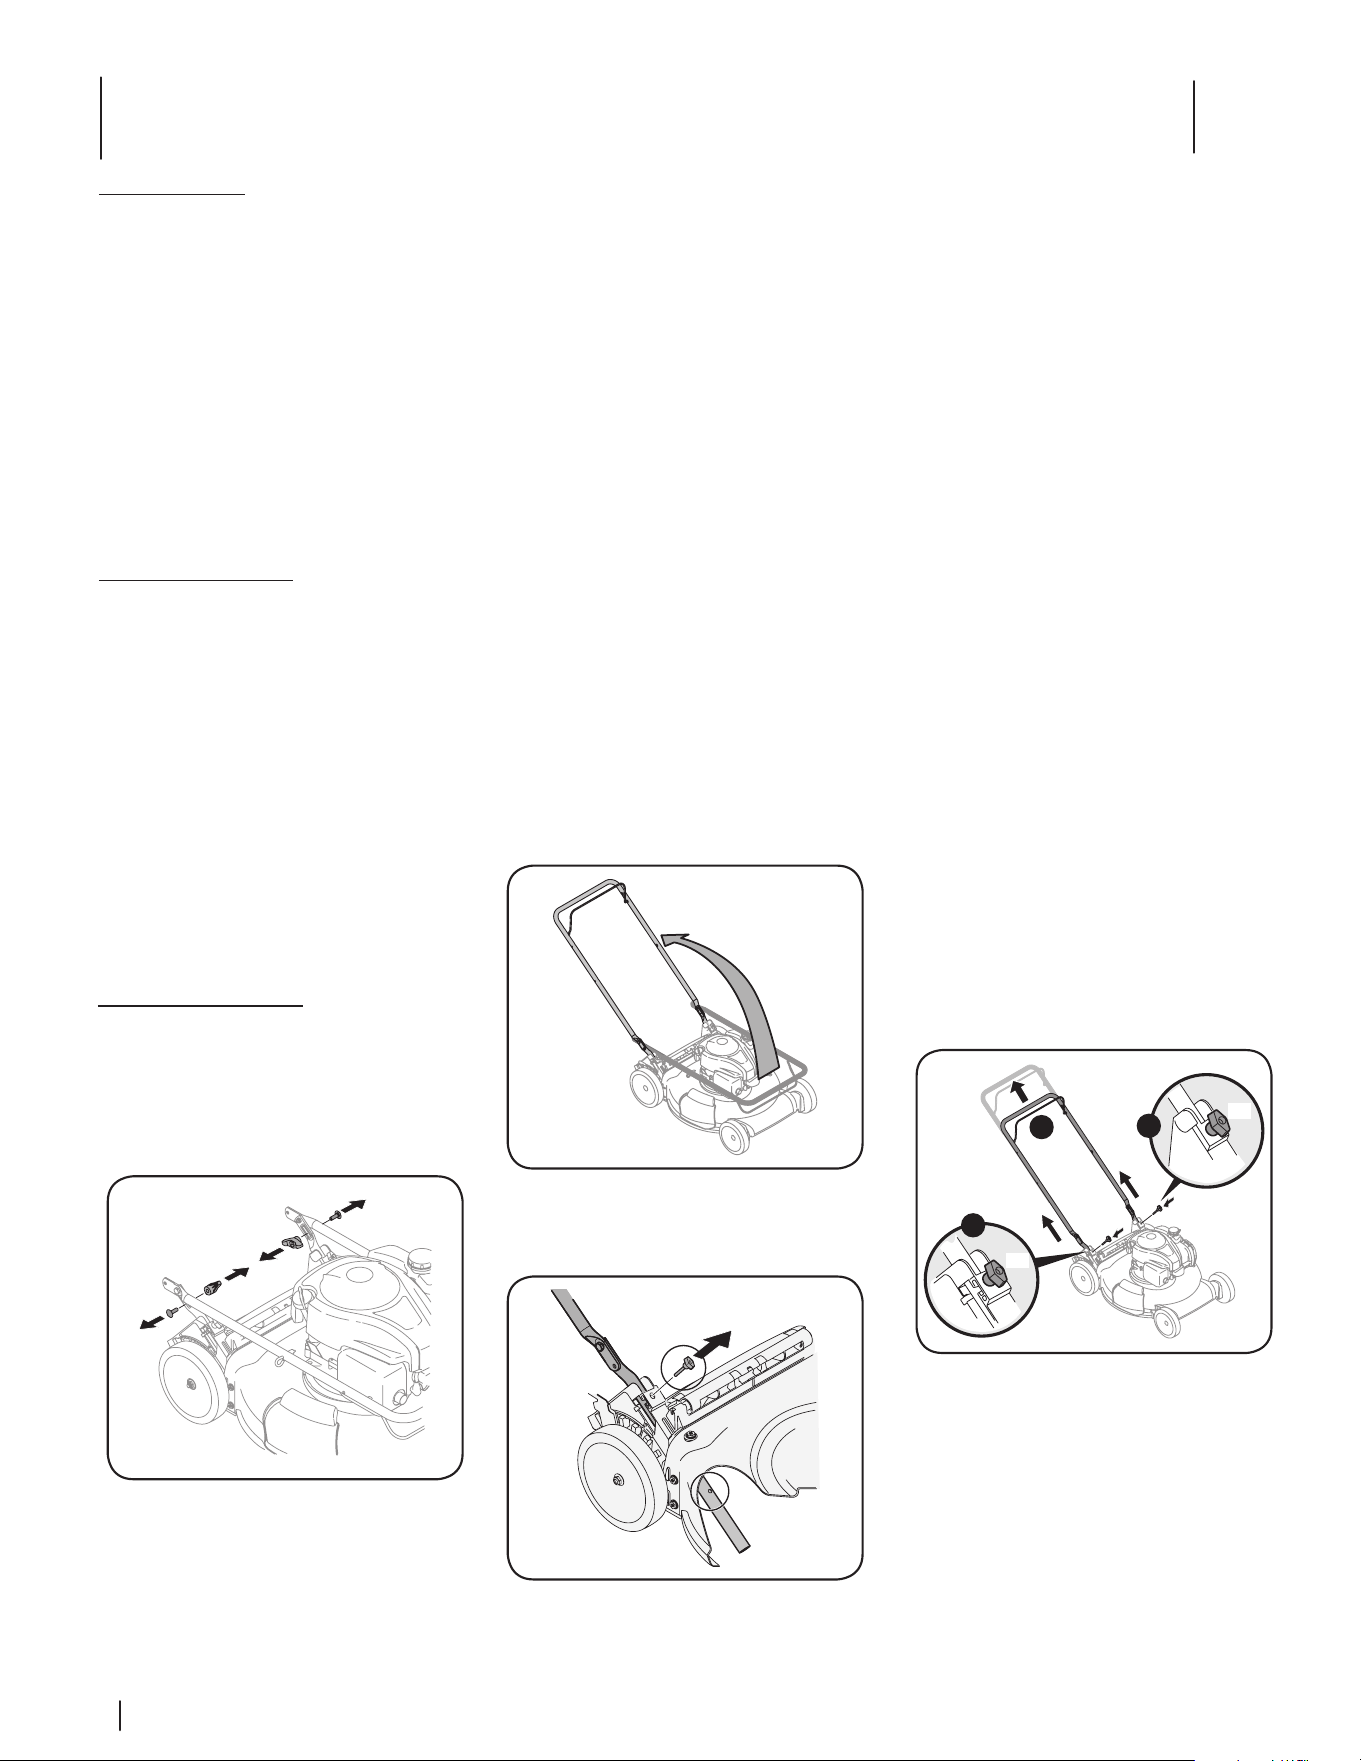
1. Remove any packing material which may
be between upper and lower handles.
2. Remove wing knobs (a) and carriage
bolts (b) from handle as shown in Figure
2-1. Do not loosen or remove adjacent
hex head screws.
(a)
(b)
(b)
(a)
Figure 2-1
3. While stabilizing mower so it doesn’t
move, pivot upper handle up as shown
in Figure 2-2. Do not crimp cable while
lifting the handle up.
Figure 2-2
4. Remove the T-bolts (a) from the handle
brackets as shown in Figure 2-3.
(a)
Figure 2-3
5. Follow the steps below to complete
handle assembly:
a. Pull upward on the handle until
holes in lower handle (shown in
Figure 2-3 deck cutaway) line up
with holes in handle bracket. See
Figure 2-4.
A
B
B
(a)
(a)
Figure 2-4
NOTE: When pulling upward on handle,
make sure to not pull handle all the way
out.
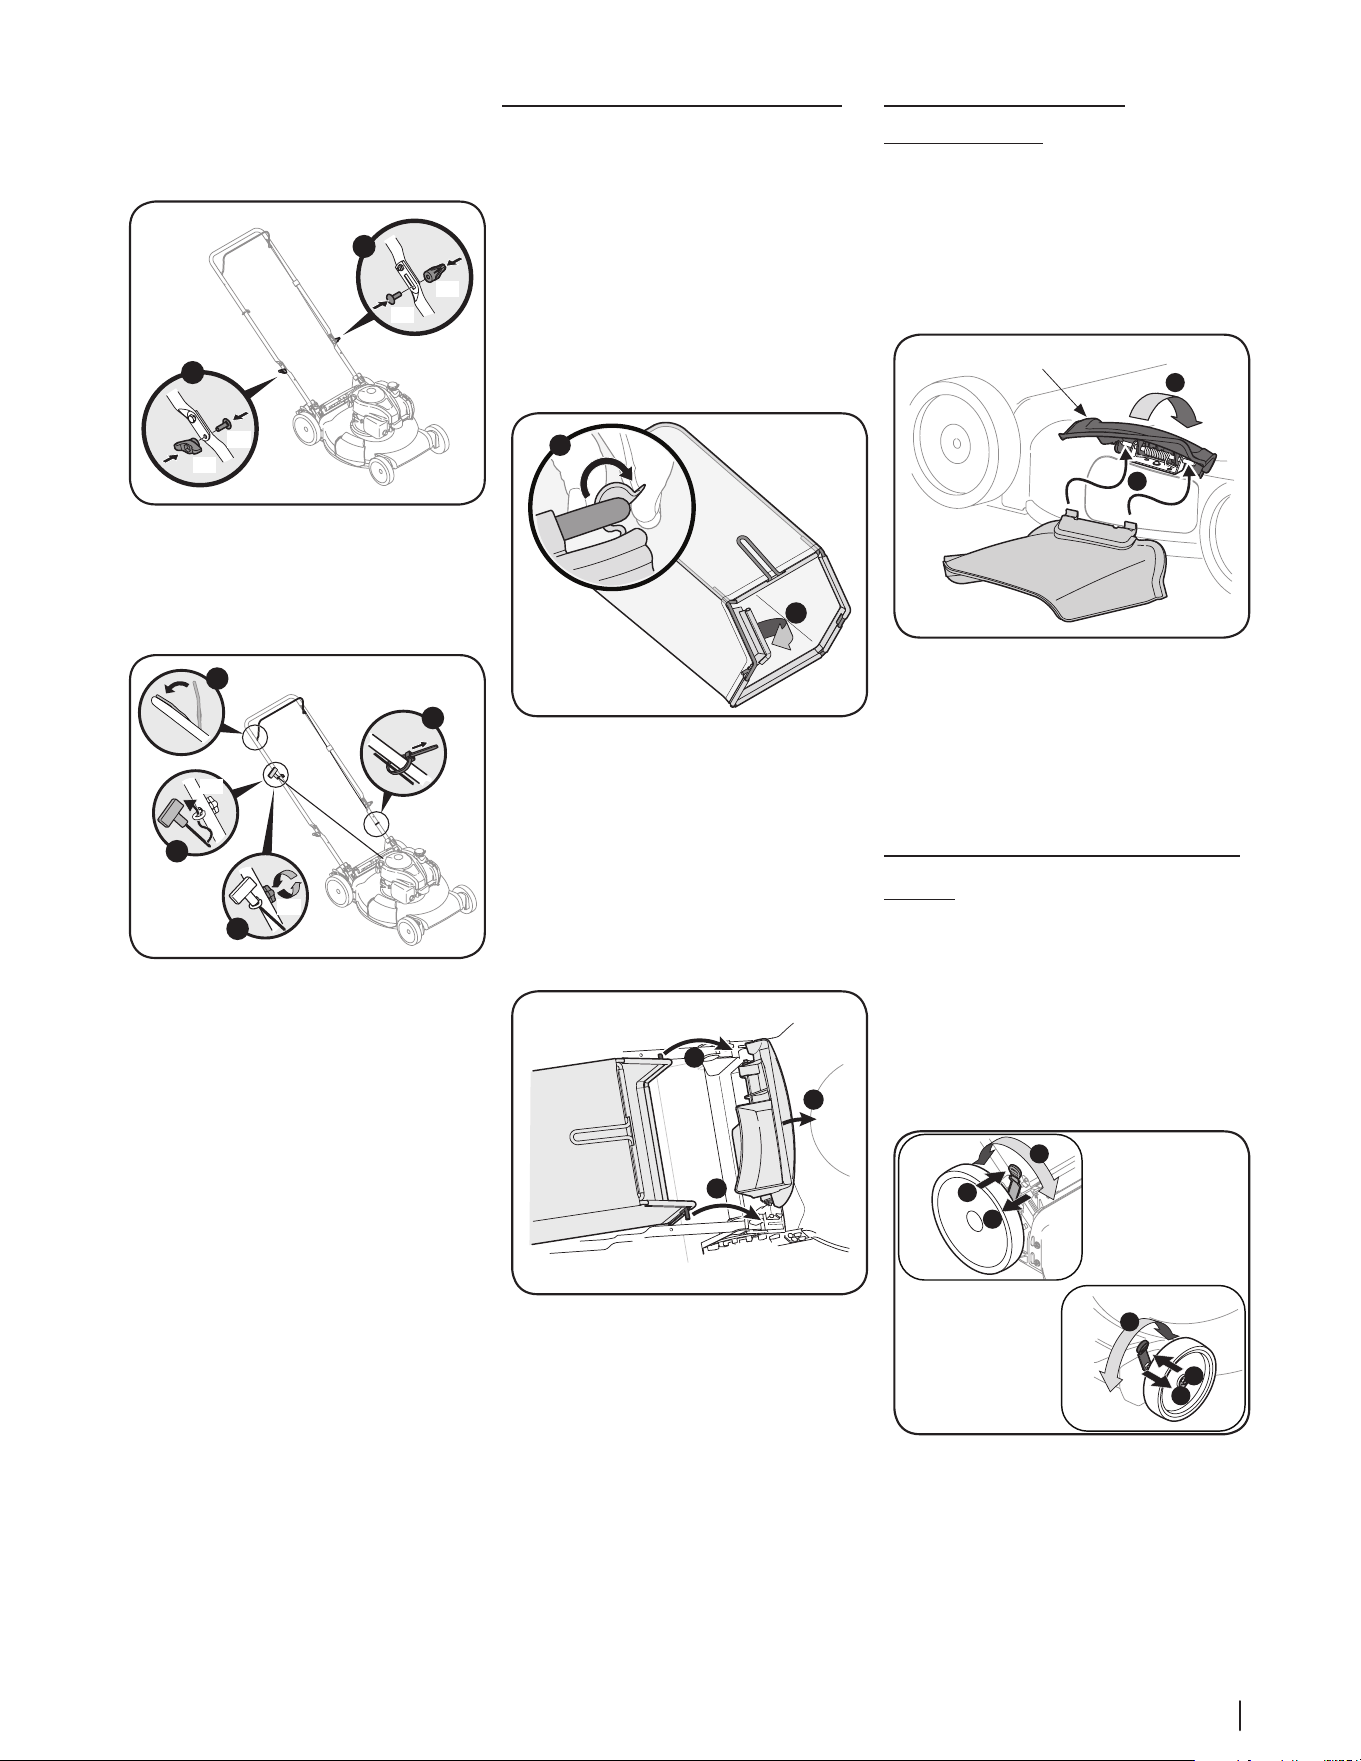
b. Insert the T-bolts (a) removed
in Step 4 through the handle
brackets and lower handle and
tighten securely to secure the
handle in place. See Figure 2-4.
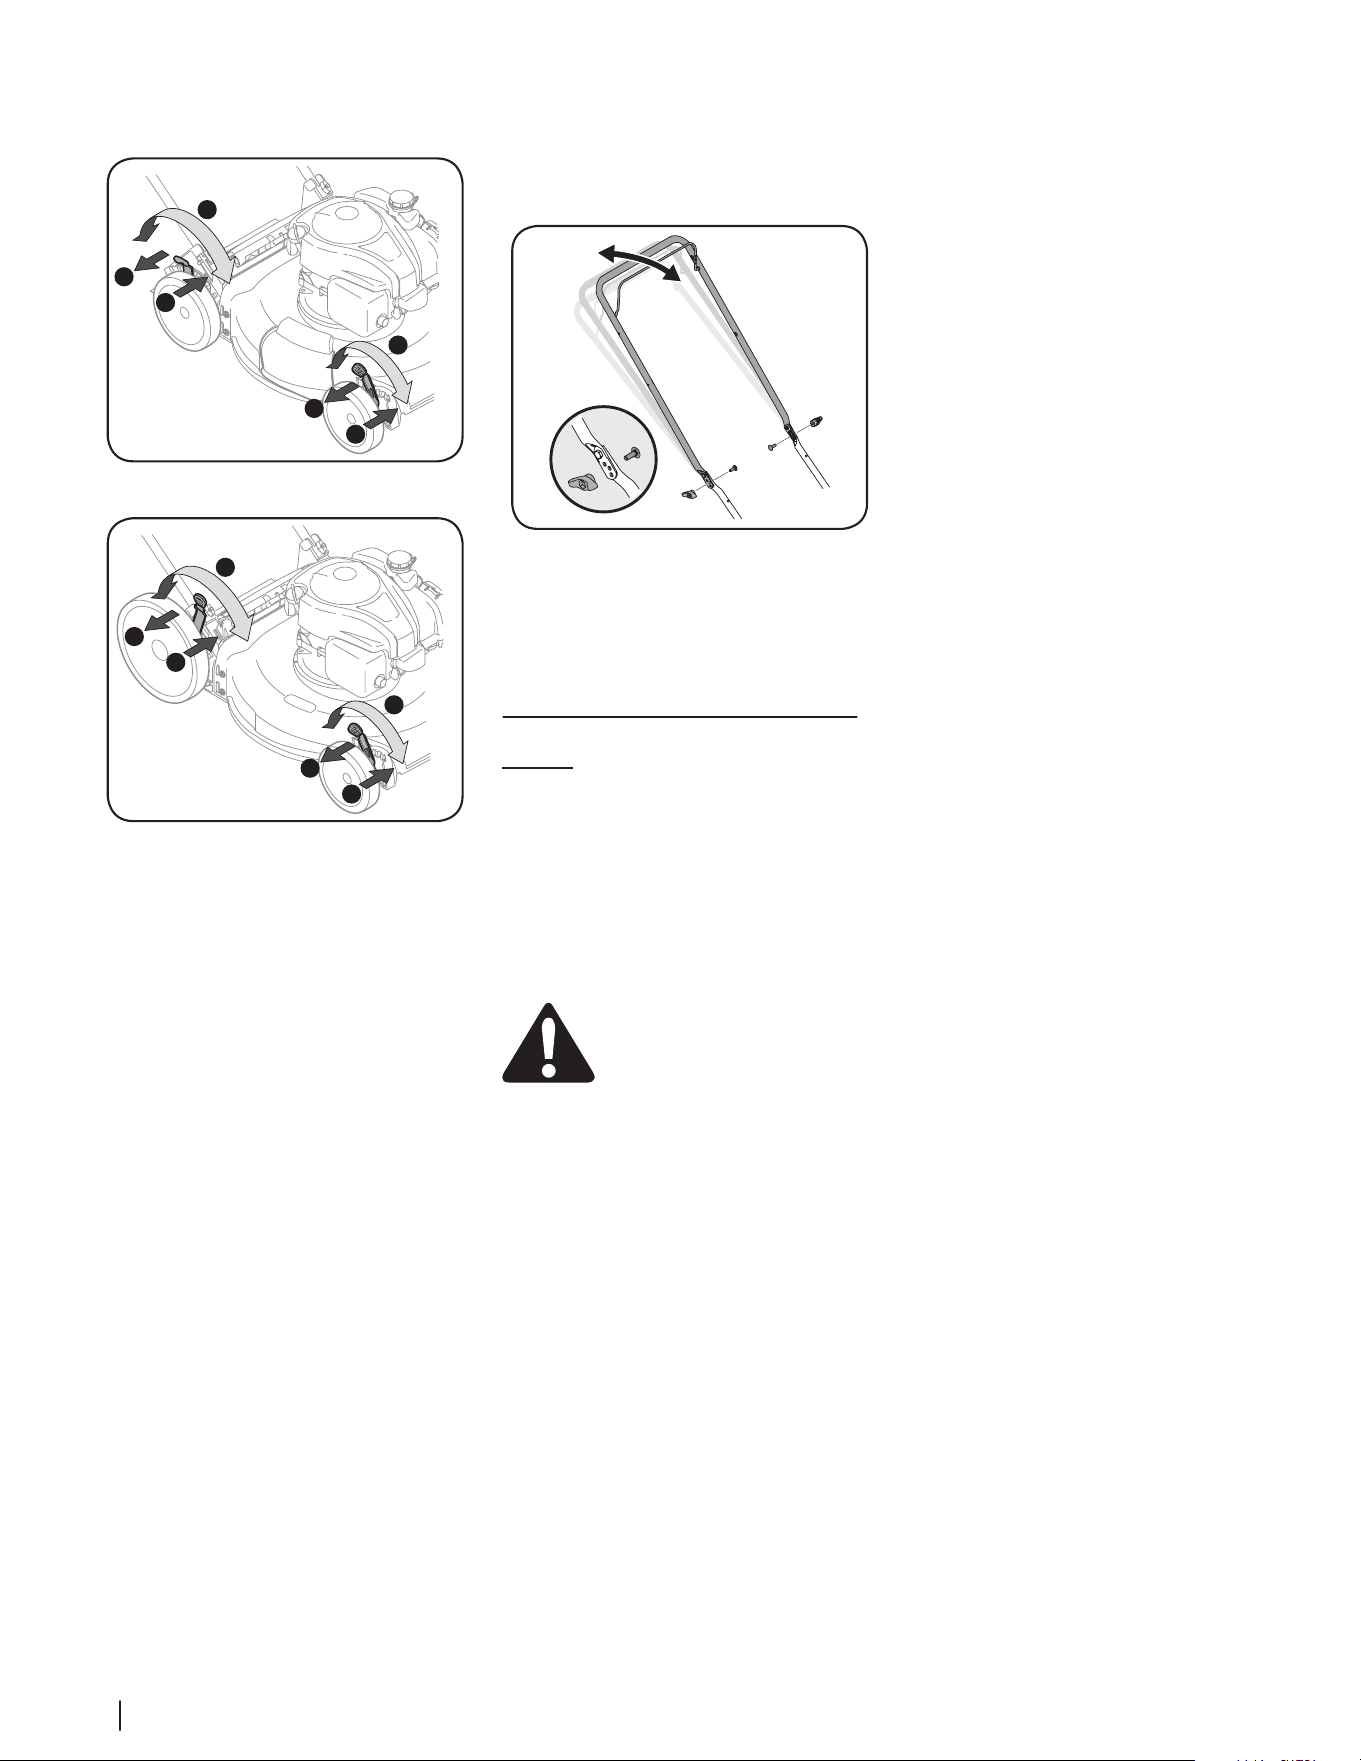
c. Reattach wing knobs (a) and
carriage bolts (b) removed in
Step 2 into lower holes of handle
as shown in Figure 2-5.

7Section 2 — ASSembly & Set-Up
C
C
(a)
(a)
(b)
(b)
Figure 2-5
6. The rope guide is attached to the right
side of the upper handle. Loosen the
wing knob (a) which secures the rope
guide. See Figure 2-6.
A
B
C
D
(a)
(a)
Figure 2-6
a. Hold blade control against upper
handle.
b. Slowly pull starter rope handle
from engine and slip starter rope
into the rope guide.
c. Tighten rope guide
wing knob (a).
d. Use cable tie(s) to secure cable(s)
to lower handle.
Grass Catcher (If Equipped)
1. Follow steps below to assemble the
grass catcher (if needed). Make certain
bag is turned right side out before
assembling (warning label will be on the
outside). See Figure 2-7.
a. Place bag over frame so that
its black plastic side is at the
bottom.
b. Slip plastic channel of grass bag
over hooks on the frame.
B
A
Figure 2-7
2. Follow steps below to attach grass
catcher: See Figure 2-8.
a. Lift mower rear discharge door.
b. Place grass catcher into the slots
in the handle brackets. Let go of
discharge door so that it rests on
the grass catcher.
A
B
B
Figure 2-8
To remove grass catcher, lift mower rear
discharge door. Lift grass catcher up and off
the slots in the handle brackets. Release mower
rear discharge door to allow it to close rear
opening of mower.
Side Discharge Chute
(If Equipped)
Your mower may be shipped as a mulcher.
To convert to side discharge, make sure grass
catcher (if equipped) is off the unit and mower
rear discharge door (if equipped) is closed.
1. On the side of the mower, lift the mulch
plug. See Figure 2-9.
2
1
Mulching Plug
Figure 2-9
2. Slide two hooks of side discharge
chute under hinge pin on mulch plug
assembly. Lower the mulch plug.
NOTE: Do not remove mulch plug at any
time.
Adjustments
Cutting Height
The cutting height adjustment lever is located
above the front and rear right wheel.
NOTE: On select models, the front cutting
height adjustment lever is located above the
front left wheel. Refer to Figure 2-10 and the
following instructions to adjust cutting height.
3
3
1
1
2
2
Lower
Lower
Higher
Higher
Figure 2-10
1. Pull the cutting height adjustment lever
towards wheel.
8 Section 2 — ASSembly & Set-Up
2. Move lever to desired position for a
change in cutting height. See Figure 2-11
and Figure 2-12.
3
2
2
1
3
1
Lower
Lower
Higher
Higher
Low Wheel
Figure 2-11
3
2
2
1
3
1
Lower
Lower
Higher
Higher
High Wheel
Figure 2-12
NOTE: For mowers with low wheels, the
cutting height adjustment levers move
in the opposite direction to adjust; for
mowers with high wheels, the levers
move in the same direction.
IMPORTANT: Both the front and rear
wheels must be placed in the same
relative position. For rough or uneven
lawns, move the height adjustment
levers to a higher position. This will stop
scalping of grass.
3. Release lever towards deck.
See Figure 2-11 and Figure 2-12.
Handle Pitch (If Equipped)
If equipped, the pitch of the handle can be
adjusted as follows:
1. Remove wing nuts (a) and carriage
bolts (b) from handle. See Figure 2-13.
(b)
(b)
(a)
(a)
Figure 2-13
2. Position the handle in one of the three
positions that is most comfortable. See
Figure 2-13 inset.
3. Secure into position with wing nuts (a)
and carriage bolts (b) removed in Step 1.
Set-Up
Gas and Oil Fill-Up
Refer to the separate Engine Operator’s Manual
for additional engine information.
1. Add provided oil before starting mower
for the first time.
2. Service the engine with gasoline as
instructed in the separate Engine
Operator’s Manual.
WARNING: Use extreme care
when handling gasoline.
Gasoline is extremely flammable
and the vapors are explosive.
Never fuel the machine indoors
or while the engine is hot or
running. Extinguish cigarettes,
cigars, pipes and other sources of
ignition.
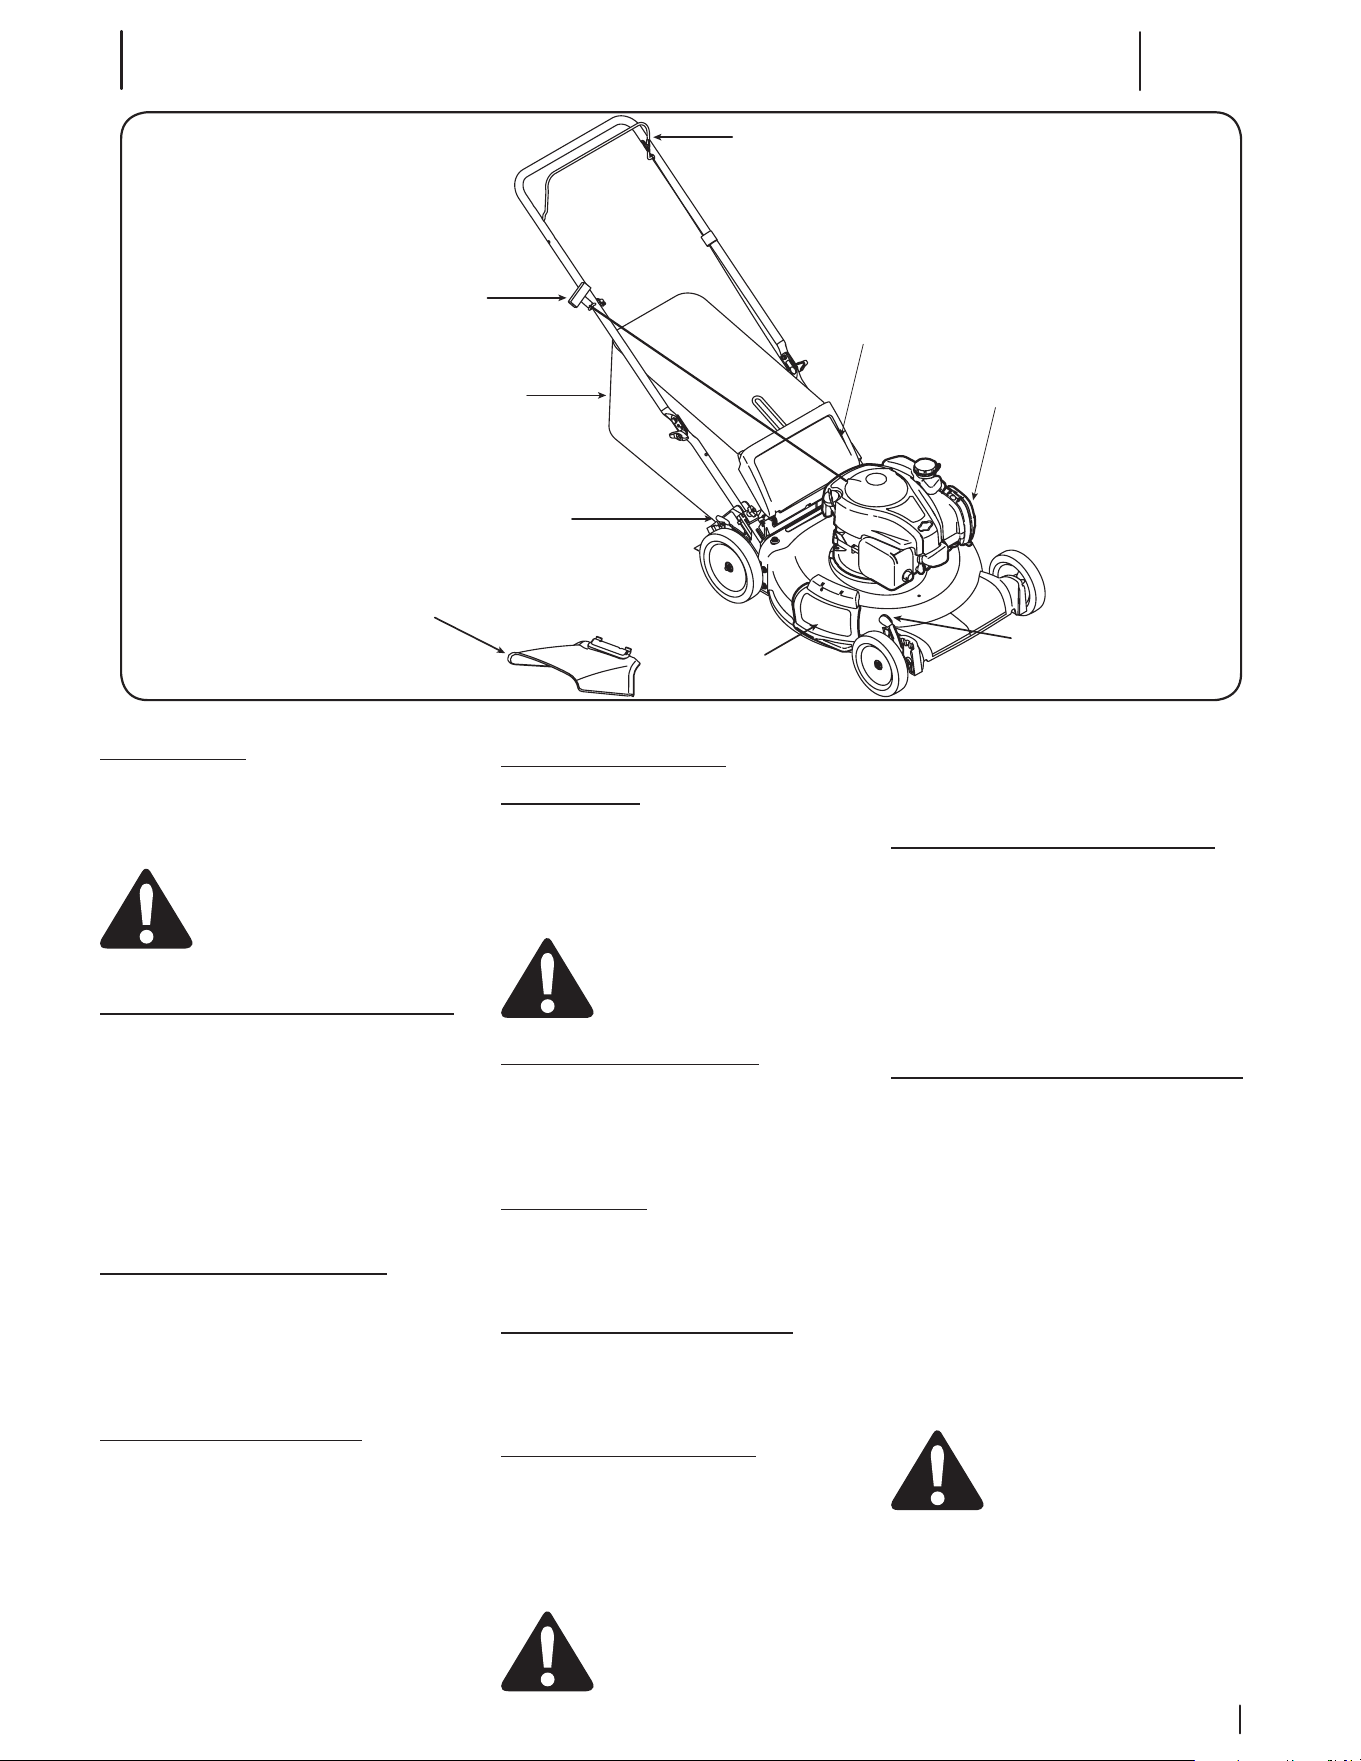
Controls & Operation
3
9
Blade Control
Recoil Starter
Mulch Plug †
Cutting Height
Adjustment Lever
Cutting Height
Adjustment Lever
Grass Catcher †
Side Discharge
Chute †
Deck Wash †
Rear Discharge Door
† If Equipped
Figure 3-1
Blade Control
The blade control is attached to the upper
handle of the mower. Depress and squeeze it
against the upper handle to operate the unit.
Release it to stop engine and blade.
WARNING: The blade control is a
safety device. Never attempt to
bypass its operations.
Cutting Height Adjustment Lever
One adjustment lever is located on the right
rear wheel and one is located on the right front
wheel. Both levers must be at the same relative
position to ensure a uniform cut. To adjust
the cutting height, refer to Cutting Height
Adjustment on page 7.
NOTE: On select models, the front cutting height
adjustment lever is located above the front left
wheel.
Grass Catcher (If Equipped)
The grass catcher, located at the rear of the
mower, is used to bag the grass clippings for
disposal. Once the bag is full, remove it up
through the handles using the grass catcher
handle and empty it.
Mulch Plug (If Equipped)
The mulch plug is used for mulching purposes.
Instead of collecting the grass clippings in a grass
catcher or using the side discharge chute, some
mower models have the option of recirculating
the clippings back to the lawn. This is called
mulching.
Side Discharge Chute
(If Equipped)
Your mower may be shipped as a mulcher.
To discharge the grass clippings to the side,
follow the instructions in the Side Discharge
Chute section on page 7 to attach the side
discharge chute.
WARNING: Keep hands and feet
away from the chute area on
cutting deck. Refer to warning
label on the unit.
Deck Wash (If Equipped)
Your mower’s deck may be equipped with a fast
attach deck wash nozzle on its surface as part of
its deck wash system. Use the deck wash to rinse
grass clippings from the deck’s underside.
Recoil Starter
The recoil starter is attached to the right upper
handle. Stand behind the unit and pull the recoil
starter rope to start the unit.
Starting & Stopping Engine
Refer to the Engine Operator’s Manual for
instructions on starting and stopping the
engine.
Using Your Lawn Mower
Be sure lawn is clear of stones, sticks, wire, or
other objects which could damage lawn mower
or engine. Such objects could be accidently
thrown by the mower in any direction and cause
serious injury to the operator, others, or the
equipment.
WARNING: The operation of any
lawn mower can result in foreign
objects being thrown into the
eyes, which can damage your eyes
severely. Always wear safety glasses while
operating the mower, or while performing any
adjustments or repairs on it.
Using as Mulcher (If Equipped)
For mulching grass, remove the side discharge
chute (if equipped) or the grass catcher (if
equipped) and allow the rear discharge door (if
equipped) to close the rear opening of mower.
For effective mulching, do not cut wet grass. If
the grass has been allowed to grow in excess of
four inches, mulching is not recommended. Use
the grass catcher to bag clippings instead.
Using Grass Catcher (If Equipped)
Use the grass catcher to collect clippings while
you are operating the mower.
1. Attach grass catcher following instructions
in the Grass Catcher section on page 7.
Grass clippings will automatically collect
in bag as you run mower. Operate mower
until grass bag is full.
2. Stop engine completely by releasing the
blade control. Make sure that the unit has
come to a complete stop.
3. Lift discharge door and pull grass bag up
and away from the mower to remove the
bag. Dispose of the grass clippings and
reinstall the bag when complete.
WARNING: If you strike a foreign
object, stop the engine. Remove
wire from the spark plug,
thoroughly inspect mower for any
damage, and repair damage
before restarting and operating.
Extensive vibration of mower
during operation is an indication
of damage. The unit should be
promptly inspected and repaired.
Service
4
10
Maintenance
General Recommendations
• Always observe safety rules when
performing any maintenance.
• The warranty on this lawn mower
does not cover items that have been
subjected to operator abuse or
negligence. To receive full value from
warranty, operator must maintain the
lawn mower as instructed here.
• Changing of engine-governed speed
will void engine warranty.
• All adjustments should be checked at
least once each season.
• Periodically check all fasteners and make
sure these are tight.
WARNING: Always stop engine,
allow engine to cool, disconnect
spark plug, and ground against
engine before performing any
type of maintenance on your
machine.
Lubrication
1. Lubricate pivot points on the blade
control at least once a season with light
oil. The blade control must operate
freely in both directions. See Figure 4-1.
Figure 4-1
2. Follow the Engine Operator’s Manual for
lubrication schedule and instruction for
engine lubrication.
Deck Care
Clean underside of the mower deck after each
use to prevent build-up of grass clippings or
other debris. Follow steps below for proper
cleaning.
1. Allow the engine to run until it is out of
fuel. Do not attempt to pour fuel from
the engine. Disconnect spark plug wire.
Refer to Engine Operator’s Manual.
2. Tip mower so that it rests on the
housing. Keep the side with the air
cleaner facing up. Hold mower firmly.
WARNING: Never tip the mower
more than 90º in any direction
and do not leave the mower
tipped for any length of time. Oil
can drain into the upper part of
the engine causing a starting
problem.
3. Scrape and clean the underside of the
deck with a suitable tool.
4. Put the mower back on its wheels on the
ground.
Engine Care
A list of key engine maintenance jobs required
for good performance by the mower are listed
below. Follow the Engine Operator’s Manual
for a detailed list and instructions.
• Maintain oil level as instructed in Engine
Operator’s Manual.
• Service air cleaner every 25 hours of
use under normal conditions. Clean
every few hours under extremely dusty
conditions. Poor engine performance
and flooding usually indicates that the
air cleaner should be serviced. To service
the air cleaner, refer to the Engine
Operator’s Manual.
• Clean spark plug and reset the gap
once a season. Spark plug replacement
is recommended at the start of
each mowing season. Check Engine
Operator’s Manual for correct plug type
and gap specifications.
• Clean engine regularly with a cloth or
brush. Keep the top of the engine clean
to permit proper air circulation. Remove
all grass, dirt, and combustible debris
from muffler area.
• Engines stored between 30 and 90
days need to be treated with a gasoline
stabilizer to prevent deterioration and
gum from forming in fuel system or on
essential carburetor parts.
Deck Wash (If Equipped)
Your mower’s deck may be equipped with a
water port on its surface as part of its deck
wash system.
Use the deck wash to rinse grass clippings from
the deck’s underside and prevent the buildup
of corrosive chemicals. Complete the following
steps AFTER EACH MOWING:
1. Push the mower to a level, clear location
on your lawn. Ensure your garden hose
can reach your mower.
CAUTION: Make certain the
mower’s discharge chute is
directed AWAY from your house,
garage, parked cars, etc.
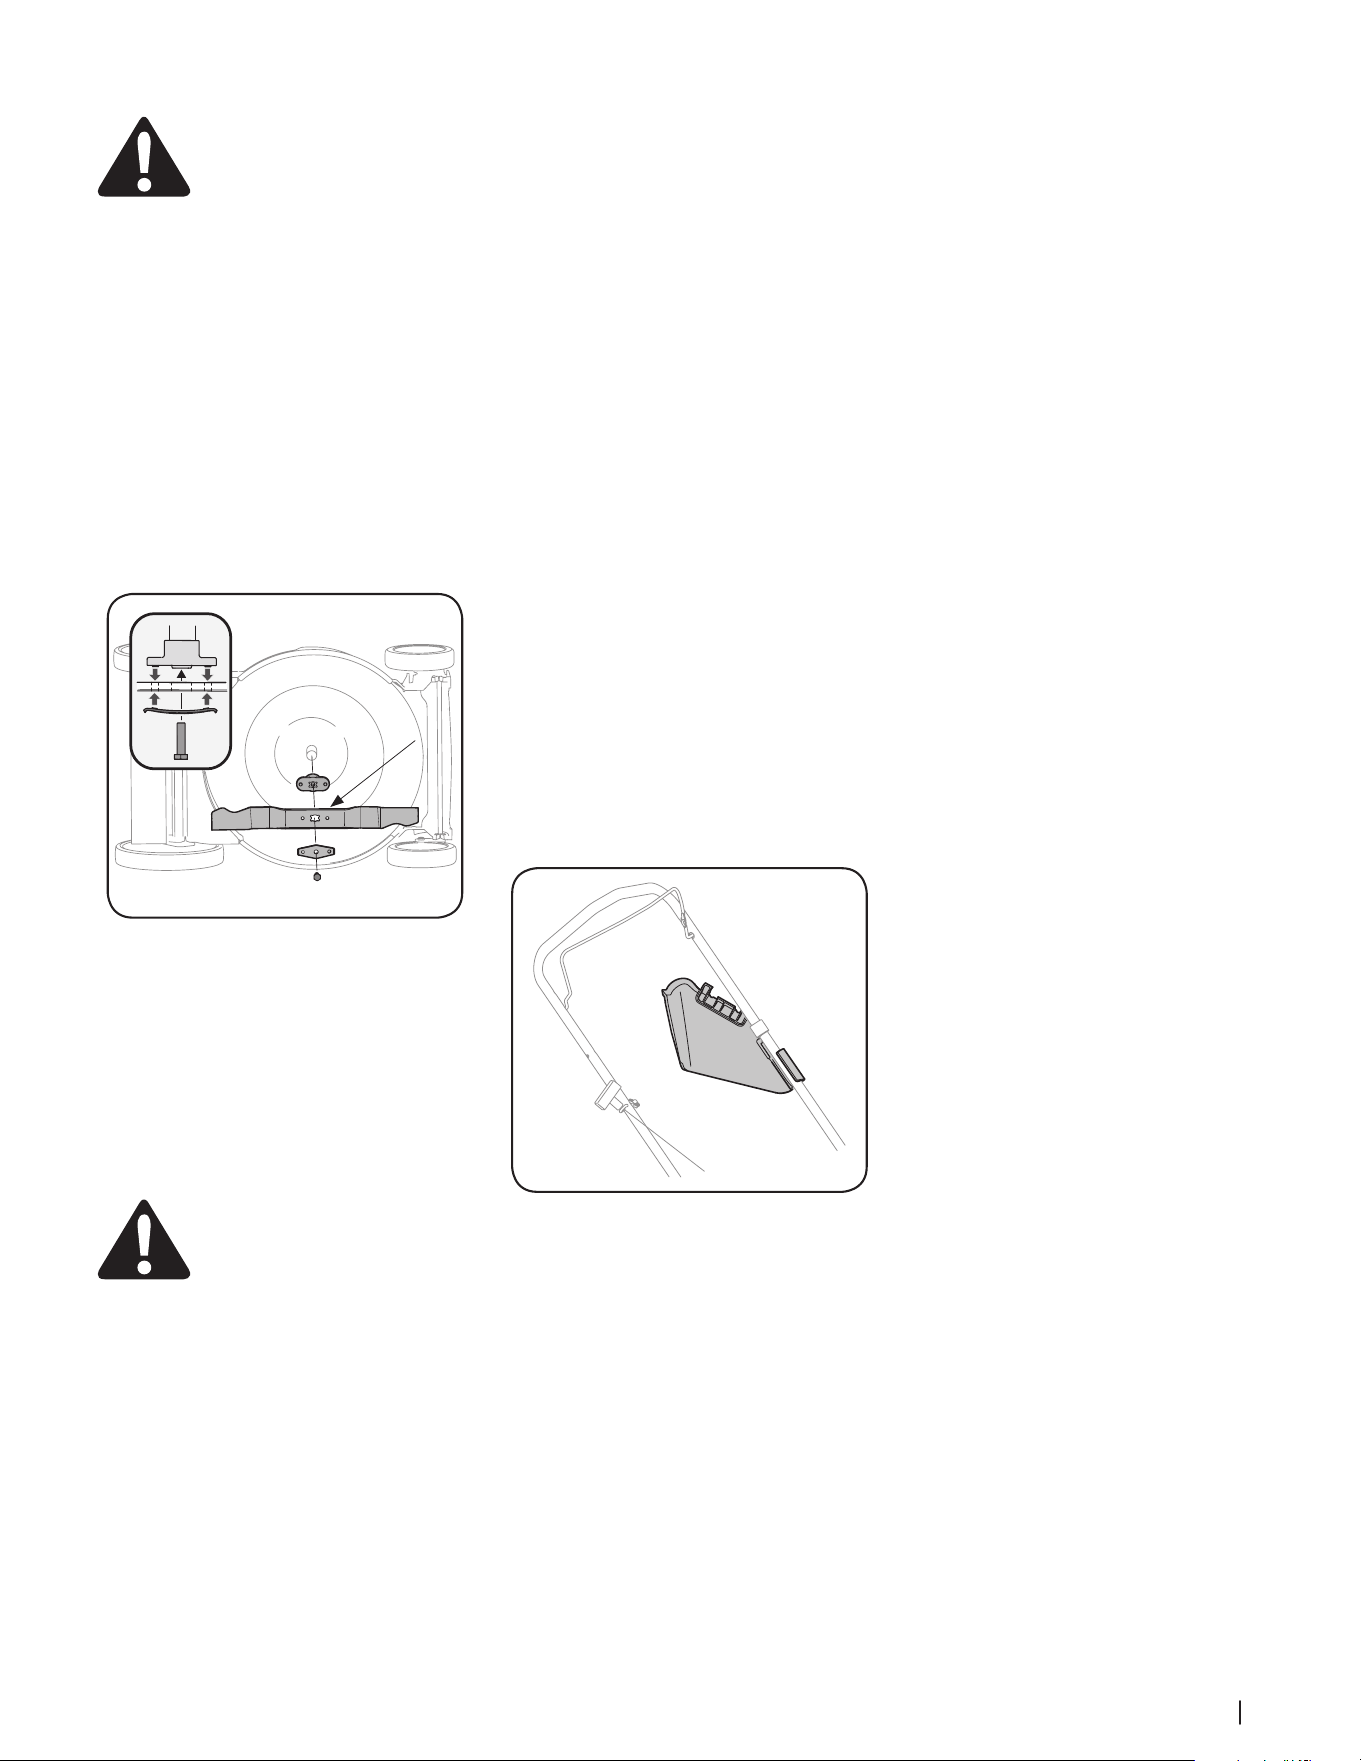
2. Remove the fast attach deck wash
nozzle from the mower deck and thread
it onto the end of your garden hose.
3. Attach garden hose with the deck wash
nozzle to the water port on your deck’s
surface. See Figure 4-2.
Figure 4-2
4. Turn the water ON.
5. Start the engine as described in the
Engine Operator’s Manual.
6. Run the engine for a minimum of two
minutes, allowing the underside of the
cutting deck to thoroughly rinse.
7. Release blade control to stop the engine
and blade.
8. Turn the water OFF and detach the deck
wash nozzle from the water port on your
deck’s surface.
After cleaning your deck, restart the mower.
Keep the engine and blade running for a
minimum of two minutes, allowing the
underside of cutting deck to thoroughly dry.
11Section 4 — Service
Blade Care
WARNING: When removing the
cutting blade for sharpening or
replacement, protect your hands
with a pair of heavy gloves or use a
heavy rag to hold the blade.
Periodically inspect the blade adapter for cracks,
especially if you strike a foreign object. Replace
when necessary. Follow the steps below for blade
service.
1. Allow the engine to run until it is out of
fuel. Do not attempt to pour fuel from the
engine. Disconnect spark plug wire. Refer
to Engine Operator’s Manual.
2. Turn mower on its side making sure that
the air filter and the carburetor are facing
up.
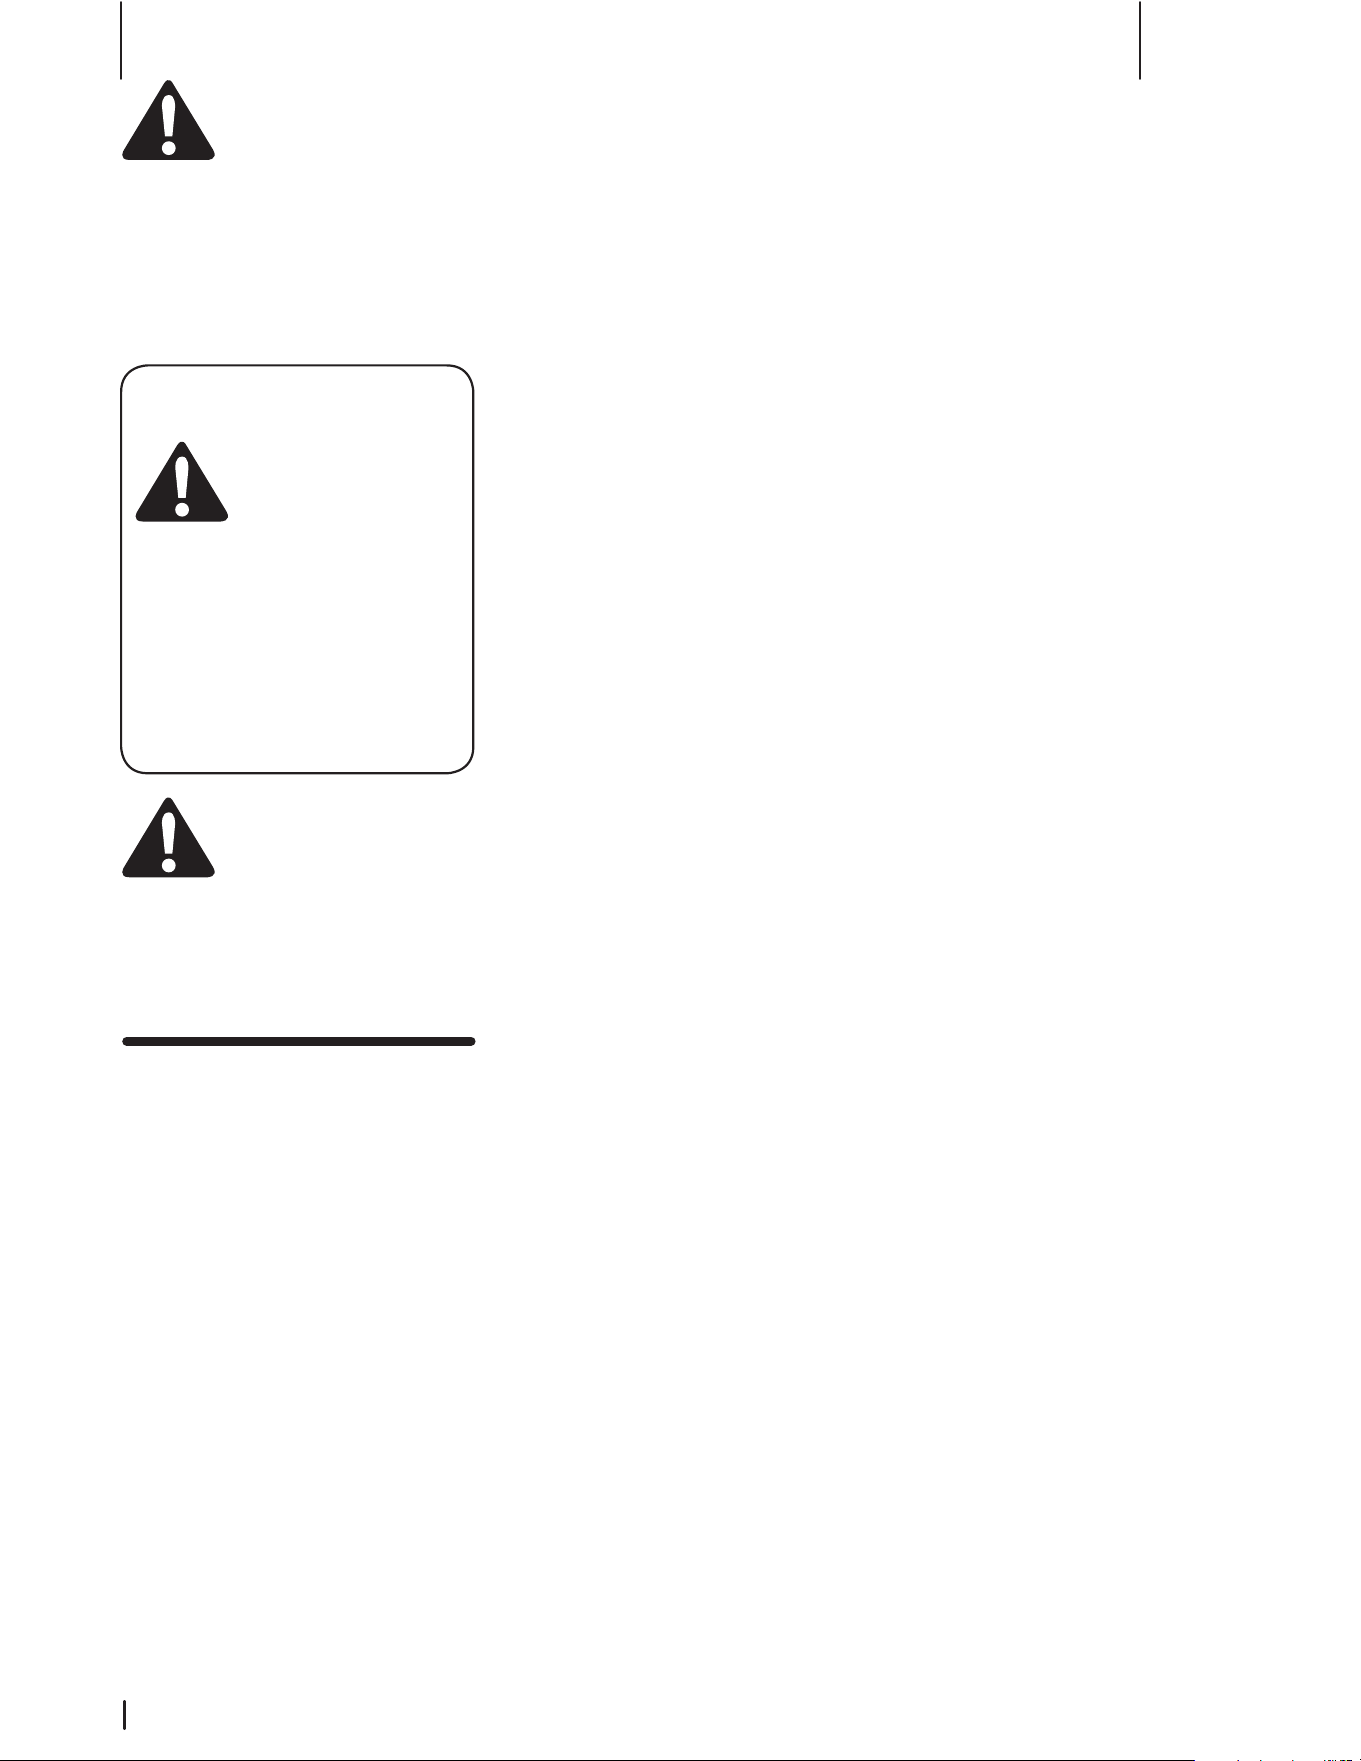
3. Remove bolt (a) and blade bell
support (b) which hold the blade and the
blade adapter to the engine crankshaft.
See Figure 4-3.
(a)
(c)
(d)
(b)
Blade
Figure 4-3
4. Remove blade (c) and adapter (d) from the
crankshaft. See Figure 4-3.
5. Remove blade from the adapter for testing
balance. Balance the blade on a round
shaft screwdriver to check. Remove metal
from the heavy side until it balances
evenly. When sharpening the blade, follow
the original angle of grind. Grind each
cutting edge equally to keep the blade
balanced.
WARNING: An unbalanced blade
will cause excessive vibration when
rotating at high speeds. It may
cause damage to mower and could
break causing personal injury.
6. Lubricate the engine crankshaft and the
inner surface of the blade adapter with
light oil. Slide the blade adapter (d) onto
the engine crankshaft. Place the blade
on the adapter such that the side of the
blade marked “Grass Side” (or with part
number) faces the ground when the
mower is in the operating position. Make
sure that the blade is aligned and seated
on the blade adapter flanges.
See Figure 4-3 inset.
7. Place blade bell support (b) on the
blade (c). Align notches on the blade bell
support with small holes in blade.
8. Replace hex bolt (a) and tighten hex
bolt to torque: 450 in-lb (min.), 600 in lb
(max.).
To ensure safe operation of your mower,
periodically check the blade bolt for correct
torque.
Off-Season Storage
The following steps should be taken to prepare
your lawn mower for storage.
• Clean and lubricate mower thoroughly as
described in Lubrication section on page
10.
• Apply a coat of chassis grease to mower’s
cutting blade to prevent rusting.
• Refer to Engine Operator’s Manual for
correct engine storage instructions.
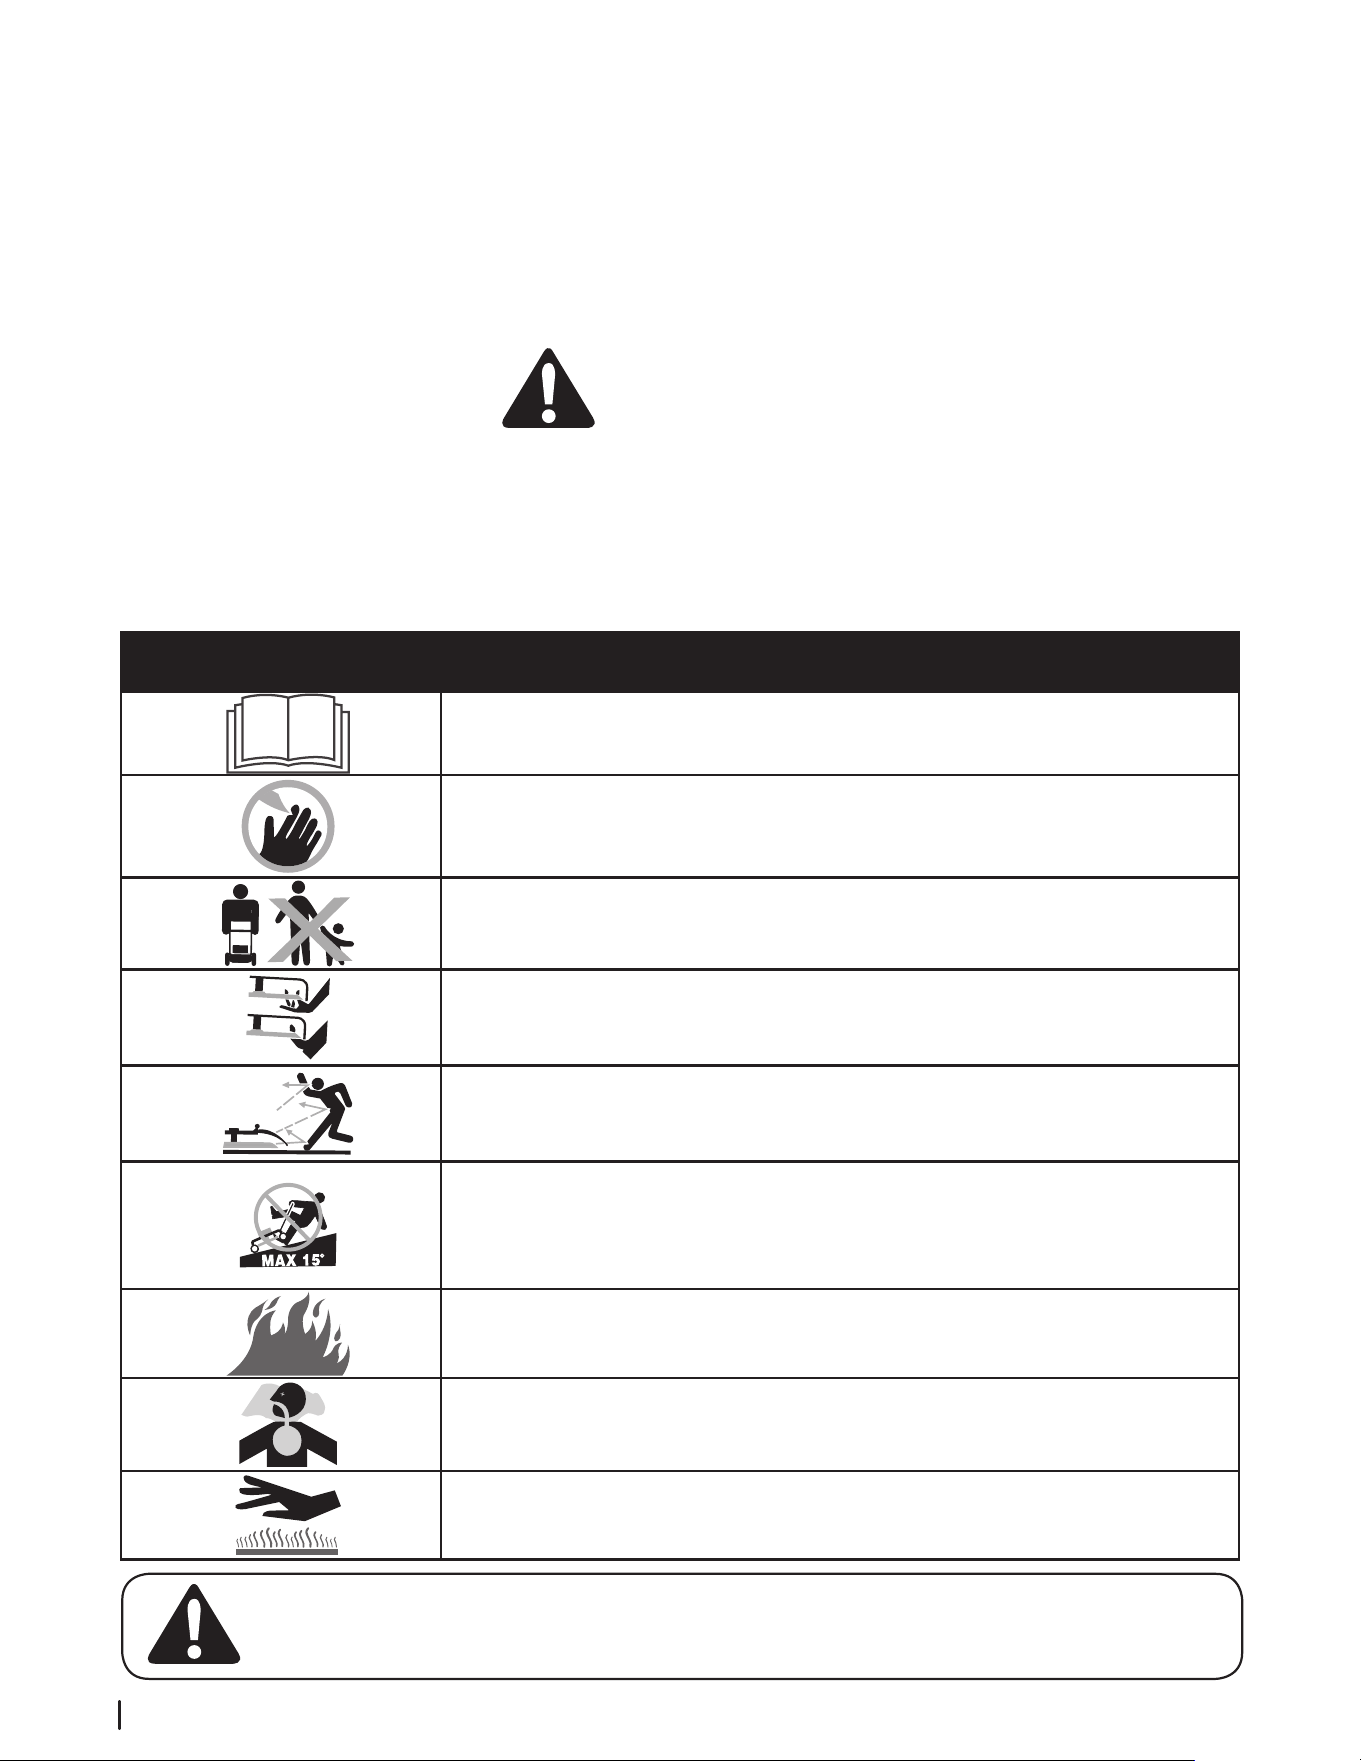
• Secure side discharge chute to handle (if
applicable) as shown in Figure 4-4.
Figure 4-4
• Do not use a pressure washer to clean
your unit.
• Store mower in a dry, clean area. Do not
store next to corrosive materials, such as
fertilizer.
When storing any type of power equipment in
a poorly ventilated or metal storage shed, care
should be taken to rust-proof the equipment.
Using a light oil or silicone, coat the equipment,
especially cables and all moving parts of your
lawn mower before storage.

Troubleshooting
5
12
Problem Cause Remedy
Engine fails to start 1. Blade control disengaged.
2. Spark plug boot disconnected.
3. Fuel tank empty or stale fuel.
4. Engine not primed (if equipped with primer).
5. Faulty spark plug.
6. Blocked fuel line.
7. Engine flooded.
8. Fuel valve (if equipped) closed.
9. Engine not choked (if equipped with choke).
1. Engage blade control.
2. Connect wire to spark boot.
3. Fill tank with clean, fresh gasoline.
4. Prime engine as instructed in the Engine
Operator’s Manual.
5. Clean, adjust gap, or replace.
6. Clean fuel line.
7. Wait a few minutes to restart; do not
prime.
8. Open fuel valve. See Engine Operator’s Manual.
9. Choke engine. See Engine Operator’s Manual.
Engine runs erratic 1. Spark plug boot loose.
2. Blocked fuel line or stale fuel.
3. Vent in gas cap plugged.
4. Water or dirt in fuel system.
5. Dirty air cleaner.
6. Unit running with CHOKE (if equipped) applied.
1. Connect and tighten spark plug boot.
2. Clean fuel line; fill tank with clean, fresh
gasoline.
3. Clear vent.
4. Drain fuel tank. Refill with fresh fuel.
5. Refer to Engine Operator’s Manual.
6. Push CHOKE knob in.
Engine overheats 1. Engine oil level low.
2. Air flow restricted.
1. Fill crankcase with proper oil.
2. Clean area around and on top of engine.
Occasional skips
(hesitates) at
high speed
1. Spark plug gap too close. 1. Adjust spark plug gap. Refer to Engine
Operator’s Manual.
Idles poorly 1. Spark plug fouled, faulty, or gap too wide.
2. Dirty air cleaner.
1. Reset gap or replace spark plug.
2. Refer to Engine Operator’s Manual.
Excessive vibration/noise 1. Cutting blade loose or unbalanced.
2. Bent/damaged blade or blade adapter.
1. Tighten blade and adapter. Balance blade.
2. See an authorized service dealer.
Mower will not
mulch grass (if equipped)
1. Wet grass.
2. Excessively high grass.
3. Dull blade.
1. Do not mow when grass is wet; wait until
dry to cut.
2. Mow once at a high cutting height, then mow
again at desired height or make a narrower
cutting path.
3. Sharpen or replace blade.
Uneven cut 1. Wheels not positioned correctly.
2. Dull blade.
1. Place front and rear wheels in same height
position. (Dual lever height adjusters only)
2. Sharpen or replace blade.

Impreso en EE.UU.
Medidas de seguridad • Conguración • Funcionamiento • Servicio • Solución de problemas
ADVERTENCIA
LEA Y OBSERVE TODAS LAS NORMAS E INSTRUCCIONES DE SEGURIDAD INCLUIDAS
EN ESTE MANUAL ANTES DE PONER EN FUNCIONAMIENTO LA MÁQUINA.
SI NO SIGUE ESTAS INSTRUCCIONES PUEDE PROVOCAR LESIONES PERSONALES.
Manual del OperadOr
Medidas de seguridad ............................................ 2
Montaje y conguración ........................................ 6
Controles y funcionamiento ................................... 9
Servicio ....................................................................10
Solución de problemas ..........................................12
Piezas/Garantía ................ Consulte el suplemento
que se adjunta por separado
Índice
NOTA: Este Manual del Operador, corresponde a numerosos modelos. Las características técnicas pueden variar según los modelos.
No todas las características técnicas que se incluyen en este manual se aplican a todos los modelos y la máquina que se ilustra aquí
puede diferir de la suya.
Cortadora de césped de empuje
Modelo de la Serie A0, A1, A2, A9, B0, B1, B2 y B9
Importantes medidas de seguridad
1
2
¡ADVERTENCIA! La presencia
de este símbolo indica que se
trata de instrucciones de
seguridad importantes que se
deben respetar para evitar poner
en peligro su seguridad personal y/o material y
la de otras personas. Lea y cumpla todas las
instrucciones de este manual antes de intentar
hacer funcionar esta máquina. Si no respeta
estas instrucciones puede provocar lesiones
personales.
Cuando vea este símbolo, ¡RESPETE LA
ADVERTENCIA!
PELIGRO: Esta máquina está
diseñada para ser utilizada
respetando las normas de seguridad
contenidas en este manual. Al igual
que con cualquier tipo de equipo
motorizado, un descuido o error por parte del
operador puede producir lesiones graves. Esta
máquina es capaz de amputar dedos, manos y pies
y de arrojar objetos extraños con gran fuerza. De no
respetar las instrucciones de seguridad siguientes,
se pueden ocasionar lesiones graves o la muerte.
Funcionamiento general
1. Lea con atención el contenido de en este
manual antes de intentar ensamblar la
máquina. Lea, comprenda y siga todas las
instrucciones que figuran en la máquina y
en los manuales antes de hacerla funcionar.
Guarde este manual en un lugar seguro para
consultas futuras y periódicas, así como para
solicitar repuestos.
2. Antes de hacer funcionar este equipo,
familiarícese totalmente con los controles y el
uso correcto del mismo.
3. Esta máquina es un equipo motorizado de
precisión, no un juguete.
Por lo tanto, tenga mucho cuidado en todo
momento. Esta máquina fue diseñada para
realizar una tarea: cortar el césped. No lo
utilice para ningún otro fin.
4. No permita nunca que los niños menores de
14 años utilicen esta máquina. Los niños de
14 años en adelante deben leer y entender
las instrucciones de funcionamiento y
las normas de seguridad contenidas en
este manual y en la máquina y deben ser
entrenados y supervisados por un adulto.
5. Sólo se debe permitir usar esta máquina a
individuos responsables
y familiarizados con sus reglas de seguridad.
PROPOSICIÓN 65 DE
CALIFORNIA
¡ADVERTENCIA! El escape del
motor, algunos de los
elementos del mismo y algunos
componentes del vehículo
contienen o liberan sustancias
químicas que según el Estado de California
pueden producir cáncer, defectos de
nacimiento u otros problemas reproductivos.
Los bornes, terminales y accesorios de la
batería contienen plomo y compuestos de
plomo, sustancias químicas que según lo
establecido por el Estado de California causan
cáncer y daños en el sistema reproductivo.
Lávese las manos después de estar en contacto
con estos componentes.
6. Inspeccione minuciosamente el área donde
utilizará el equipo. Saque todas las piedras,
palos, cables, huesos, juguetes y otros objetos
extraños con los que podría tropezar o que
podrían ser arrojados por la cuchilla.
Los objetos arrojados por la máquina pueden
causar lesiones graves.
7. Planifique el patrón de corte, para evitar que
la descarga de material se realice hacia los
caminos, las veredas, los observadores, etc.
Evite además descargar material contra las
paredes u obstrucciones que podrían provocar
que el material descargado rebote contra el
operador.
8. Para ayudar a evitar el contacto con la
cuchilla o una lesión por un objeto arrojado,
manténgase en la zona del operador
detrás de las manijas y mantenga a los
niños, observadores, ayudantes y mascotas
apartados al menos 25 metros de la podadora
mientras está en funcionamiento. Detenga la
máquina si alguien entra en el área.
9. Para protegerse los ojos utilice siempre
anteojos o antiparras de seguridad mientras
hace funcionar la máquina o mientras le hace
ajustes o reparaciones. Los objetos arrojados
que rebotan pueden lesionar gravemente
los ojos.
10. Utilice zapatos de trabajo resistentes, de
suela fuerte, así como pantalones y camisas
ajustados. Se recomienda vestir camisas y
pantalones que cubren brazos y piernas y
usar zapatos con puntera de acero. Nunca
haga funcionar la máquina descalzo, con
sandalias, zapatos resbalosos o livianos (por
ej. de lona).
11. No ponga las manos ni los pies cerca de las
piezas rotatorias ni debajo de la plataforma
de corte. El contacto con las cuchillas puede
amputar dedos, manos o pies.
12. Una cubierta de descarga faltante o dañada
puede provocar lesiones por contacto con la
cuchilla o por objetos arrojados.
13. Muchas lesiones ocurren como resultado
de pasar la cortadora sobre los pies durante
una caída luego de resbalar o tropezar. No se
sostenga de la cortadora si se está cayendo,
suelte la barra de control inmediatamente.
14. Nunca tire la cortadora hacia usted mientras
camina. Si debe retroceder con la cortadora
para evitar una pared u obstáculo, mire
primero abajo y atrás para evitar tropezarse y
luego siga estos pasos:
a. Retroceda de la cortadora hasta
estirar completamente
los brazos.
b. Asegúrese que tiene buen equilibrio
y está bien parado.
c. Jale la cortadora lentamente hacia
usted, no más de la
mitad de la distancia entre usted y la
cortadora.
d. Repita estos pasos tantas veces como
sea necesario.
15. No opere esta cortadora bajo los efectos del
alcohol o las drogas.
16. No enganche el mecanismo autopropulsado
en las máquinas equipadas mientras arranca
el motor.
17. El mecanismo de control de la cuchilla es
un dispositivo de seguridad. Nunca intente
anular su funcionamiento. De hacerlo,
dejarían de operar los dispositivos de
seguridad y podrían producirse lesiones
personales por el contacto con la cuchilla
giratoria. El control de la cuchilla debe
funcionar bien en ambas direcciones y
regresar automáticamente a la posición
desengranada cuando se lo suelta.
18. Nunca opere la cortadora sobre césped
húmedo. Asegúrese siempre de estar bien
parado. Si resbala y cae puede lesionarse
gravemente.
Si siente que pierde el equilibrio, suelte
inmediatamente la manija
de control de la cuchilla y la misma dejará de
rotar en tres segundos.
19. Úsela solamente con luz natural o con buena luz
artificial. Camine, nunca corra.
20. Detenga la cuchilla cuando cruce sendas,
senderos o caminos de grava.
21. Si la máquina comenzara a vibrar de manera
anormal, detenga el motor, y busque
inmediatamente la causa. La vibración
generalmente advierte que hay algún
problema.
22. Apague el motor y espere hasta que la
cuchilla se detenga completamente antes de
retirar el colector de césped o de desbloquear
la tolva. La cuchilla continúa rotando por unos
cuantos segundos después de que se suelta el
control de la cuchilla. Nunca coloque ninguna
parte del cuerpo en el área de la cuchilla hasta
que esté seguro de que la misma ha detenido
su movimiento giratorio.
23. Nunca opere la cortadora sin los escudos
apropiados, la cubierta de descarga, el
colector de césped, el control de la cuchilla u
otros dispositivos de seguridad y protección
en su lugar y funcionando. Nunca opere la
cortadora si los dispositivos de seguridad
están dañados. De lo contrario podrían
producirse lesiones personales.
24. El silenciador y el motor se calientan y pueden
causar quemaduras.
No los toque.
25. Nunca intente ajustar una rueda o la altura de
corte mientras el motor está en marcha.
26. Utilice solamente repuestos y accesorios
manufacturados para
esta máquina por el fabricante. De lo contra-
rio podrían producirse lesiones personales.
27. Para encender el motor, tire lentamente de
la cuerda hasta sentir resistencia, luego tire
rápidamente. El repliegue rápido de la cuerda
de arranque (retroceso o rebote) le jalará la
mano y el brazo hacia el motor más rápido de
lo que usted tarda en soltarla. Puede llegar a
causar huesos rotos, fracturas, hematomas y
esguinces.
28. Si se presentan situaciones que no están
previstas en este manual, tenga cuidado y
use el sentido común. Comuníquese con
Atención al cliente para solicitar ayuda o
el nombre del distribuidor de servicio más
cercano.
Funcionamiento en pendiente
Las pendientes son uno de los principales factores
asociados a los accidentes por derrapes y caídas y
pueden ocasionar lesiones graves. El funcionamiento
en pendiente exige mayor precaución. La máquina es
pesada y puede acelerar al descender una pendiente.
Debe estar preparado para mantener el control de la

3
Sección 1 — importanteS medidaS de Seguridad
máquina. Si no se siente seguro en una pendiente, no
corte el césped. Para su seguridad, use el indicador
de pendientes que se adjunta a este manual para
medir la pendiente antes de operar la máquina en
una zona inclinada.
Si la pendiente supera los 15°, no corte el césped.
Haga lo siguiente:
1. Corte en sentido transversal a la cara de la
pendiente; nunca hacia arriba
y abajo, a fin de evitar perder el control.
2. Tenga mucho cuidado al cambiar de
dirección en las pendientes; gire hacia la parte
superior de la pendiente, no hacia abajo.
3. Esté atento a los agujeros, raíces, rocas, objetos
ocultos o montículos que puedan hacerlo
resbalar o tropezar. El césped alto puede
ocultar obstáculos.
4. Asegúrese siempre de estar bien parado. Si
resbala y cae puede lesionarse gravemente.
Si siente que pierde el equilibrio, suelte
inmediatamente la manija de control de la
cuchilla y la cuchilla dejará de girar en tres (3)
segundos.
No haga lo siguiente:
1. No corte el césped cerca de caídas, zanjas o
terraplenes, puede perder
el equilibrio.
2. No corte en pendientes mayores de 15° como
ilustra el indicador
de pendientes.
3. No corte el césped húmedo. Si no está
firmemente parado,
puede resbalarse.
Niños
Pueden ocurrir accidentes trágicos si el operador
no está atento a la presencia de niños. Por lo
general a los niños les atraen las cortadoras y la
actividad de cortar el césped. No entienden los
riesgos ni los peligros. Nunca suponga que los niños
permanecerán en el lugar donde los vio por última
vez.
1. Mantenga a los niños fuera del área de
trabajo y bajo estricta vigilancia
de un adulto responsable además del
operador.
2. Esté alerta y apague la cortadora si un niño
ingresa al área.
3. Antes de moverse hacia atrás y mientras lo
esté haciendo, mire hacia
atrás y cuide que no haya niños.
4. Tenga mucho cuidado cuando se aproxime a
las esquinas ciegas, puertas, arbustos, árboles
u otros objetos que puedan obstaculizarle la
vista de
un niño que pudiese correr hacia la cortadora.
5. Mantenga a los niños alejados de los
motores en marcha o calientes. Pueden sufrir
quemaduras con un silenciador caliente.
6. No permita nunca que los niños menores de
14 años utilicen esta máquina. Los niños de
14 años en adelante deben leer y entender
las instrucciones y las normas de seguridad
contenidas en este manual y en la máquina,
y deben ser entrenados y supervisados por
un adulto.
7. Después de parar el motor, extraiga la llave
de arranque eléctrico (si se cuenta con una) y
guárdela en un lugar seguro fuera del alcance
de los niños.
Servicio
Manejo seguro de la gasolina:
1. Para evitar lesiones personales o daños
materiales tenga mucho cuidado
al manipular la gasolina. La gasolina es
sumamente inflamable y sus vapores pueden
causar explosiones. Se puede lesionar
gravemente si se derrama gasolina sobre el
cuerpo o la ropa ya que se puede prender
fuego. Lávese la piel y cámbiese de ropa de
inmediato.
2. Utilice sólo los recipientes para gasolina
autorizados.
3. Nunca llene los recipientes dentro de un
vehículo o un camión o un remolque con
recubrimiento plástico. Coloque siempre los
recipientes
en el piso y lejos del vehículo antes de
llenarlo.
4. Retire el equipo a gasolina del camión o
remolque y llénelo en el piso. Si esto no es
posible, llene el equipo en un remolque
con un recipiente portátil, en vez de hacerlo
desde una boquilla dispensadora de gasolina.
5. En todo momento mantenga la boquilla
en contacto con el borde del depósito de
combustible o con la abertura del recipiente,
hasta terminar la carga. No utilice un
dispositivo de apertura/cierre de la boquilla.
6. Apague los cigarrillos, puros, pipas y toda otra
fuente de combustión.
7. Nunca cargue combustible en la máquina en
espacios cerrados porque
los vapores inflamables podrían acumularse
en el lugar.
8. Nunca saque el tapón de la gasolina ni
agregue combustible mientras
el motor está caliente o en marcha. Deje que
el motor se enfríe por
lo menos dos minutos antes de volver a
cargar combustible.
9. Nunca llene en exceso el depósito de
combustible. Llene el tanque a
no más de 1 pulgada por debajo de la base
del cuello del tapón de carga, para permitir la
expansión del combustible.
10. Vuelva a colocar el tapón de combustible y
ajústelo bien.
11. Limpie el combustible que se haya derramado
sobre el motor y el equipo. Traslade la
máquina a otra zona. Espere 5 minutos antes
de encender
el motor.
12. Nunca guarde la máquina o el recipiente de
combustible cerca de una llama expuesta,
chispas o aparatos con piloto como por
ejemplo, calentadores de agua, calefactores,
hornos, secadores de ropa u otros aparatos
a gas.
13. Para reducir el riesgo de incendio, mantenga
la máquina limpia de pasto, hojas y residuos
acumulados. Limpie los derrames de aceite
o combustible y saque todos los residuos
embebidos en combustible.
14. Deje que la máquina se enfríe por lo menos 5
minutos antes de guardarla.
Servicio general:
1. Nunca encienda el motor en espacios
cerrados o en una zona con poca ventilación.
El escape del motor contiene monóxido de
carbono, un gas inodoro y letal.
2. Antes de limpiar, reparar o inspeccionar
la máquina, compruebe que la cuchilla y
todas las partes móviles se hayan detenido.
Desconecte los cables de las bujías y
colóquelos de manera que hagan masa
contra el motor, y extraiga la llave de
arranque eléctrico (si se cuenta con una)
para evitar que alguien encienda
accidentalmente el motor.
3. Revise los pernos de montaje de la cuchilla y
del motor a intervalos frecuentes para verificar
que estén bien apretados. Además, debe
inspeccionar visualmente la cuchilla en busca
de daños (por ejemplo, abolladuras, desgaste,
roturas). Reemplace la cuchilla únicamente
con equipo original del fabricante (OEM)
listado en este manual. “¡El uso de repuestos
que no cumplen con las especificaciones del
equipo original puede resultar en rendimiento
inadecuado y puede comprometer la
seguridad!”.
4. Las cuchillas de las cortadoras son muy filosas
y podría cortarse.
Envuelva la cuchilla o utilice guantes y
extreme las precauciones
cuando les haga mantenimiento.
5. Mantenga todos los pernos, tuercas y
tornillos bien ajustados para asegurarse de
que la máquina se encuentra en condiciones
seguras
de funcionamiento.
6. Nunca altere los dispositivos de seguridad.
Controle periódicamente que funcionen
correctamente.
7. Después de golpear algún objeto extraño,
detenga el motor, desconecte el cable de
la bujía y conéctelo a tierra con el motor.
Inspeccione minuciosamente la máquina para
determinar si está dañada. Repare el daño
antes de encenderla y operarla.
8. Nunca intente ajustar una rueda o la altura de
corte mientras el motor está en marcha.
9. Los componentes del colector de césped,
la cubierta de descarga y el escudo de
recorrido, están sujetos a desgaste y daños
que podrían dejar expuestas las partes
en movimiento o permitir que se arrojen
objetos. Para proteger su seguridad, verifique
frecuentemente todos los componentes
y reemplácelos inmediatamente sólo por
repuestos de los fabricantes del equipo
original (O.E.M.) listados en este manual. “¡El
uso de repuestos que no cumplen con las
especificaciones del equipo original puede
resultar en rendimiento inadecuado y puede
comprometer la seguridad!”.
10. No cambie la configuración del regulador
del motor ni acelere demasiado el motor. El
regulador del motor controla la velocidad
máxima de funcionamiento seguro del motor.
11. Verifique frecuentemente la línea de
combustible, el depósito, el tapón, y los
accesorios buscando rajaduras o pérdidas.
Reemplace cuando sea necesario.
12. No dé arranque al motor si no está la bujía de
encendido.
13. Mantenga o reemplace las etiquetas
de seguridad e instrucciones según sea
necesario.
14. Observe las leyes y normas aplicables
para la eliminación adecuada de residuos.
La eliminación incorrecta de líquidos o
materiales puede dañar
el medio ambiente.
4 Sección 1 — importanteS medidaS de Seguridad
¡ADVERTENCIA! Su Responsabilidad. Esta máquina motorizada sólo puede ser usada por personas que lean, comprendan y respeten las
advertencias e instrucciones que aparecen en este manual y en la máquina.
¡GUARDE ESTAS INSTRUCCIONES!
Símbolos de seguridad
En esta página se presentan y describen los símbolos de seguridad que pueden aparecer en este producto. Lea, comprenda y siga todas las instrucciones incluidas
en la máquina antes de intentar armarla y hacerla funcionar.
Símbolo Descripción
LEA LOS MANUALES DEL OPERADOR
Lea, comprenda y siga todas las instrucciones incluidas en los manuales antes de intentar armarla
y hacerla funcionar.
PELIGRO — CUCHILLAS GIRATORIAS
Para reducir el riesgo de lesiones, mantenga alejados manos y pies. No haga funcionar sin que la tapa de descarga
o el colector de césped se encuentren en el lugar que corresponde. Si están dañados, reemplácelos inmediatamente.
PELIGRO — OBSERVADORES
No debe cortar el césped cuando hay niños u otras personas alrededor.
PELIGRO — CORTE DE MANOS/PIES
Mantenga las manos y los pies alejados de las piezas giratorias.
PELIGRO — ARROJA DESECHOS
Retire los objetos que puedan ser arrojados por la cuchilla en cualquier dirección. Use gafas de seguridad.
PELIGRO — PENDIENTES
Tenga más precaución en las pendientes. La máquina es pesada y puede acelerar al descender una pendiente.
Debe estar preparado para mantener el control de la máquina. Para evitar perder el control, desplácese en sentido
transversal a la pendiente, no hacia arriba y abajo. Al girar, gire hacia la parte superior de la pendiente, no hacia abajo.
No pode las pendientes que superen los 15°.
ADVERTENCIA—LA GASOLINA ES INFLAMABLE
Deje que el motor se enfríe por lo menos dos minutos antes de volver a cargar combustible.
ADVERTENCIA — MONÓXIDO DE CARBONO
Nunca encienda el motor en espacios cerrados o en una zona con poca ventilación. El escape del motor contiene
monóxido de carbono, un gas inodoro y letal.
ADVERTENCIA— SUPERFICIE CALIENTE
Las piezas del motor, especialmente el silenciador, se recalientan durante el funcionamiento. Deje que el motor y el
silenciador se enfríen antes de tocarlos.
15. Según la Comisión de Seguridad de
Productos para el Consumidor de los Estados
Unidos (CPSC) y la Agencia de Protección
Ambiental de los Estados Unidos (EPA), este
producto tiene una vida útil media de siete
(7) años ó 140 horas de funcionamiento. Al
finalizar la vida útil media haga inspeccionar
anualmente esta unidad por un distribuidor
de servicio autorizado para cerciorarse de que
todos los sistemas mecánicos y de seguridad
funcionan correctamente y no tienen
excesivo desgaste.
Si no lo hace, pueden producirse accidentes,
lesiones o la muerte.
No modifique el motor
Para evitar lesiones graves o la muerte, no
modifique el motor de ninguna manera. Si altera
la configuración del regulador, el motor se puede
desbocar y funcionar a velocidades que no son
seguras. Nunca cambie la configuración de fábrica
del regulador del motor.
Aviso referido a emisiones
Los motores que están certificados y cumplen con las
normas sobre emisiones federales EPA y de California
para SORE (Equipos pequeños todo terreno) están
certificados para funcionar con gasolina sin plomo
común y pueden incluir los siguientes sistemas
de control de emisiones: Modificación de motor
(EM), catalizador oxidante (OC), inyección de aire
secundaria (SAI) y catalizador de tres vías (TWC) si
están instalados.
Amortiguador de chispas
ADVERTENCIA: Esta máquina está
equipada con un motor
de combustión interna y no debe ser
utilizada en o cerca de un terreno
agreste cubierto por bosque, malezas
o hierba excepto que el sistema de escape del motor
esté equipado con un amortiguador de chispas que
cumpla con las leyes locales o estatales
correspondientes (en caso de existir).
Si se utiliza un amortiguador de chispas el
operador lo debe mantener en condiciones de uso
adecuadas. En el Estado de California, las medidas
anteriormente mencionadas son exigidas por ley
(Artículo 4442 del Código de Recursos Públicos de
California). Es posible que existan leyes similares
en otros estados. Las leyes federales se aplican
en los territorios federales. Puede conseguir el
amortiguador de chispas para el silenciador a través
de su distribuidor de mantenimiento de motores
autorizado más cercano o poniéndose en contacto
con el departamento de servicios, P.O. Box 361131
Cleveland, Ohio 44136-0019.
5
Sección 1 — importanteS medidaS de Seguridad
(OK) (DEMASIADO EMPINADA)
¡USE ESTE INDICADOR DE PENDIENTE PARA DETERMINAR SI UNA PENDIENTE ES
DEMASIADO EMPINADA PARA OPERAR CON SEGURIDAD!
Para comprobar la pendiente, proceda de la siguiente manera:
1. Retire esta página y pliéguela por la línea de guiones.
2. Ubique un objeto vertical que esté sobre la pendiente o detrás de la misma (por ejemplo, un poste,
un edicio, un cerco, un árbol, etc.)
3. Alinee uno de los dos lados del indicador de pendiente con el objeto (vea las Figuras 1 y 2).
4. Ajuste el indicador hacia arriba o hacia abajo hasta que la esquina izquierda toque la pendiente (vea
las Figuras 1 y 2).
5. Si hay una separación debajo del indicador, la pendiente es demasiado empinada para operar con
seguridad (vea la Figura 2 anterior).
Línea de guiones a 15°
Indicador de pendiente
Figura 2Figura 1
Pendiente de 15°
Pendiente de 15°
¡ADVERTENCIA! Las pendientes son un factor importante relacionado con accidentes por resbalones y caídas que pueden producir lesiones graves o la muerte.
La máquina es pesada y puede acelerar al descender una pendiente. Debe estar preparado para mantener el control de la máquina. Para evitar perder el control, desplácese en sentido transversal
a la pendiente, no hacia arriba y abajo. Al girar, gire hacia la parte superior de la pendiente, no hacia abajo. No utilice la máquina en pendientes de más de 15°.
6 7Sección 2 — Montaje y configuraciónSección 2 — Montaje y configuración
Montaje y configuración
2
Gracias por comprar este producto. Ha sido cuidadosamente diseñado para brindar
excelente rendimiento si se lo hace funcionar y se lo mantiene correctamente.
Por favor lea todo este manual antes de hacer funcionar el equipo. El manual le indica
cómo configurar, hacer funcionar y mantener la máquina de manera fácil y segura.
Por favor asegúrese de que usted, y cualquier otra persona que utilice la máquina,
siga atentamente y en todo momento las medidas de seguridad recomendadas. De
lo contrario, se podrían producir lesiones personales o daños materiales.
Toda la información contenida en este manual hace referencia a la más reciente
información de producto disponible en el momento de la impresión. Revise el
manual frecuentemente para familiarizarse con la máquina, sus características y su
funcionamiento. Por favor tenga en cuenta que este Manual del Operador puede
abarcar una variedad de especificaciones para productos de diversos modelos. Es
posible que las características y funciones incluidas y/o ilustradas en este manual
no se apliquen a todos los modelos. Nos reservamos el derecho de modificar las
especificaciones de los productos, diseños y equipos sin previo aviso y sin generar
responsabilidad por obligaciones de ningún tipo.
Si corresponde, la información sobre las prueba de potencia utilizada para
determinar la potencia nominal del motor equipado en esta máquina se puede
consultar en www.opei.org o en el sitio web del fabricante del motor.
Si tiene algún problema o duda con respecto a esta máquina, llame a su distribuidor
de servicio local autorizado o póngase en contacto directamente con nosotros.
Queremos garantizar su entera satisfacción en todo momento.
En este manual, todas las referencias al lado derecho e izquierdo de la máquina se
observan desde la posición del operador
El fabricante del motor es el responsable de todas las cuestiones relacionadas con
el rendimiento, potencia de salida, especificaciones, garantía y mantenimiento del
motor. Para más información consulte el Manual del Propietario/Operador entregado
por el fabricante del motor y que acompaña, embalado por separado, a su máquina.
Muchas gracias
Contenido de la caja
• Cortadora de césped (1) • Colector de césped † (1) • Tolva de descarga lateral † (1)
• Pico de lavado de plataforma de sujeción rápida † (1) • Manual del Operador de la Cortadora
de Césped (1)
• Manual del Operador del Motor (1)
• Documento de Garantía/Piezas (1) • Guía de arranque rápido † (1) • Tarjeta para registrar el producto † (1)
• Aceite (1) † Si viene equipado
NOTA: Este Manual del Operador, corresponde a numerosos modelos. Las características técnicas pueden variar según los modelos. No todas las características técnicas
que se incluyen en este manual se aplican a todos los modelos y la máquina que se ilustra aquí puede diferir de la suya.
NOTA: Esta unidad se envía sin gasolina ni aceite en
el motor. Llene con gasolina y aceite como se indica
en las instrucciones que se incluyen en el manual de
motor adjunto ANTES de poner en funcionamiento su
cortadora.
Montaje de la manija
1. Retire el material de empaque que pudiera
estar entre las manijas superior e inferior.
2. Retire las perillas de aleta (a) y los pernos de
carro (b) de la manija como se muestra en la
Figura 2-1. No afloje o quite los tornillos de
cabeza hexagonal adyacentes.
(a)
(b)
(b)
(a)
Figura 2-5
3. Mientras estabiliza la cortadora para que no
se mueva, gire la manija superior hacia arriba
como se muestra en la Figura 2-2. No prense los
cables mientras levanta la manija.
Figura 2-6
4. Retire los pernos T (a) de la ménsula de la
manija como se muestra en la Figura 2-3.
(a)
Figura 2-7
5. Siga los siguientes pasos para completar el
montaje de la manija:
a. Tire hacia arriba en la manija hasta
que los orificios de la manija inferior
(mostrados en la vista en corte )
se alineen con los orificios de la
ménsula de la manija.
Consulte la Figura 2-4.
A
B
B
(a)
(a)
Figura 2-8
NOTA: Cuando tira hacia arriba la manija,
asegúrese de no tirar de la manija
completamente.
b. Inserte los pernos T (a), quitados en
el paso 4, a través de la ménsula de
la manija y la manija inferior, y ajuste
bien para asegurar la manija en el
lugar. Consulte la Figura 2-4.
6 7Sección 2 — Montaje y configuraciónSección 2 — Montaje y configuración
c. Vuelva a colocar las perillas de aleta
(a) y los pernos de carro (b) retirados
en el paso 2 en los orificios inferiores
de la manija como se muestra en la
Figura 2.5.
C
C
(a)
(a)
(b)
(b)
Figura 2-9
6. La guía de la cuerda está unida al costado
derecho de la manija superior. Afloje la
perilla de aleta (a) que sujeta la guía de la
cuerda. Consulte la Figura 2-6.
A
B
C
D
(a)
(a)
Figura 2-10
a. Sostenga la cuchilla contra la manija
superior.
b. Lentamente tire de la manija de
la cuerda de arranque del motor y
deslice la cuerda de arranque en la
guía de la cuerda.
c. Ajuste la perilla de aleta
de la guía de la cuerda (a).
d. Use unión(es) de cable para sujetar
el/los cable(s) a la manija inferior.
Colector de césped (si está incluido)
1. Siga los pasos a continuación para ensamblar
el colector de recortes de césped (si fuera
necesario). Asegúrese que la bolsa para
recortes está con el lado derecho hacia
afuera antes de ensamblar (la etiqueta de
advertencia estará hacia afuera).
Consulte la Figura 2-7.
a. Coloque la bolsa sobre el marco de
modo que el lado de plástico negro
quede en el fondo.
b. Deslice el canal plástico de la bolsa
sobre los ganchos en el marco.
B
A
Figura 2-11
2. Siga los pasos a continuación para ensamblar
el colector de césped: Consulte la Figura 2-8.
a. Levante la puerta de descarga
trasera de la cortadora.
b. Coloque el colector de césped
dentro de las ranuras de los soportes
de la manija. Suelte la puerta de
descarga de modo que descanse
sobre el colector de césped.
A
B
B
Figura 2-12
Para retirar el colector de césped, levante la puerta
de descarga trasera de la cortadora. Levante el
colector de césped hacia afuera de las ranuras en los
soportes de la manija. Suelte la puerta de descarga
trasera de la cortadora para permitir que la misma
cierre la abertura trasera de la cortadora.
Tolva de descarga lateral
(Si está incluido)
Su cortadora puede ser enviada como abonadora.
Si hace la conversión a descarga lateral, asegúrese
de que el colector de césped (si está incluido) esté
fuera de la unidad y que la puerta de descarga
trasera (si está incluida) esté cerrada.
1. En el costado de la cortadora, levante el
adaptador para abono. Consulte la Figura 2-9.
2
1
Clavija para abono
Figura 2-13
2. Deslice los dos ganchos de la tolva de
descarga lateral debajo del pasador de
bisagra sobre el montaje del adaptador para
abono. Baje el adaptador para abono.
NOTA: No retire el adaptador para abono en
cualquier momento.
Ajustes
Altura de corte
La palanca de ajuste de altura de corte se ubica por
encima de la rueda izquierda delantera y trasera.
NOTA: En ciertos modelos, la palanca de ajuste de
altura de corte delantera está ubicada por encima de
la rueda izquierda delantera. Consulte la Figura 2-10
y las siguientes instrucciones para ajustar la altura
de corte.
3
3
1
1
2
2
Superior
Superior
Inferior
Inferior
Figura 2-14
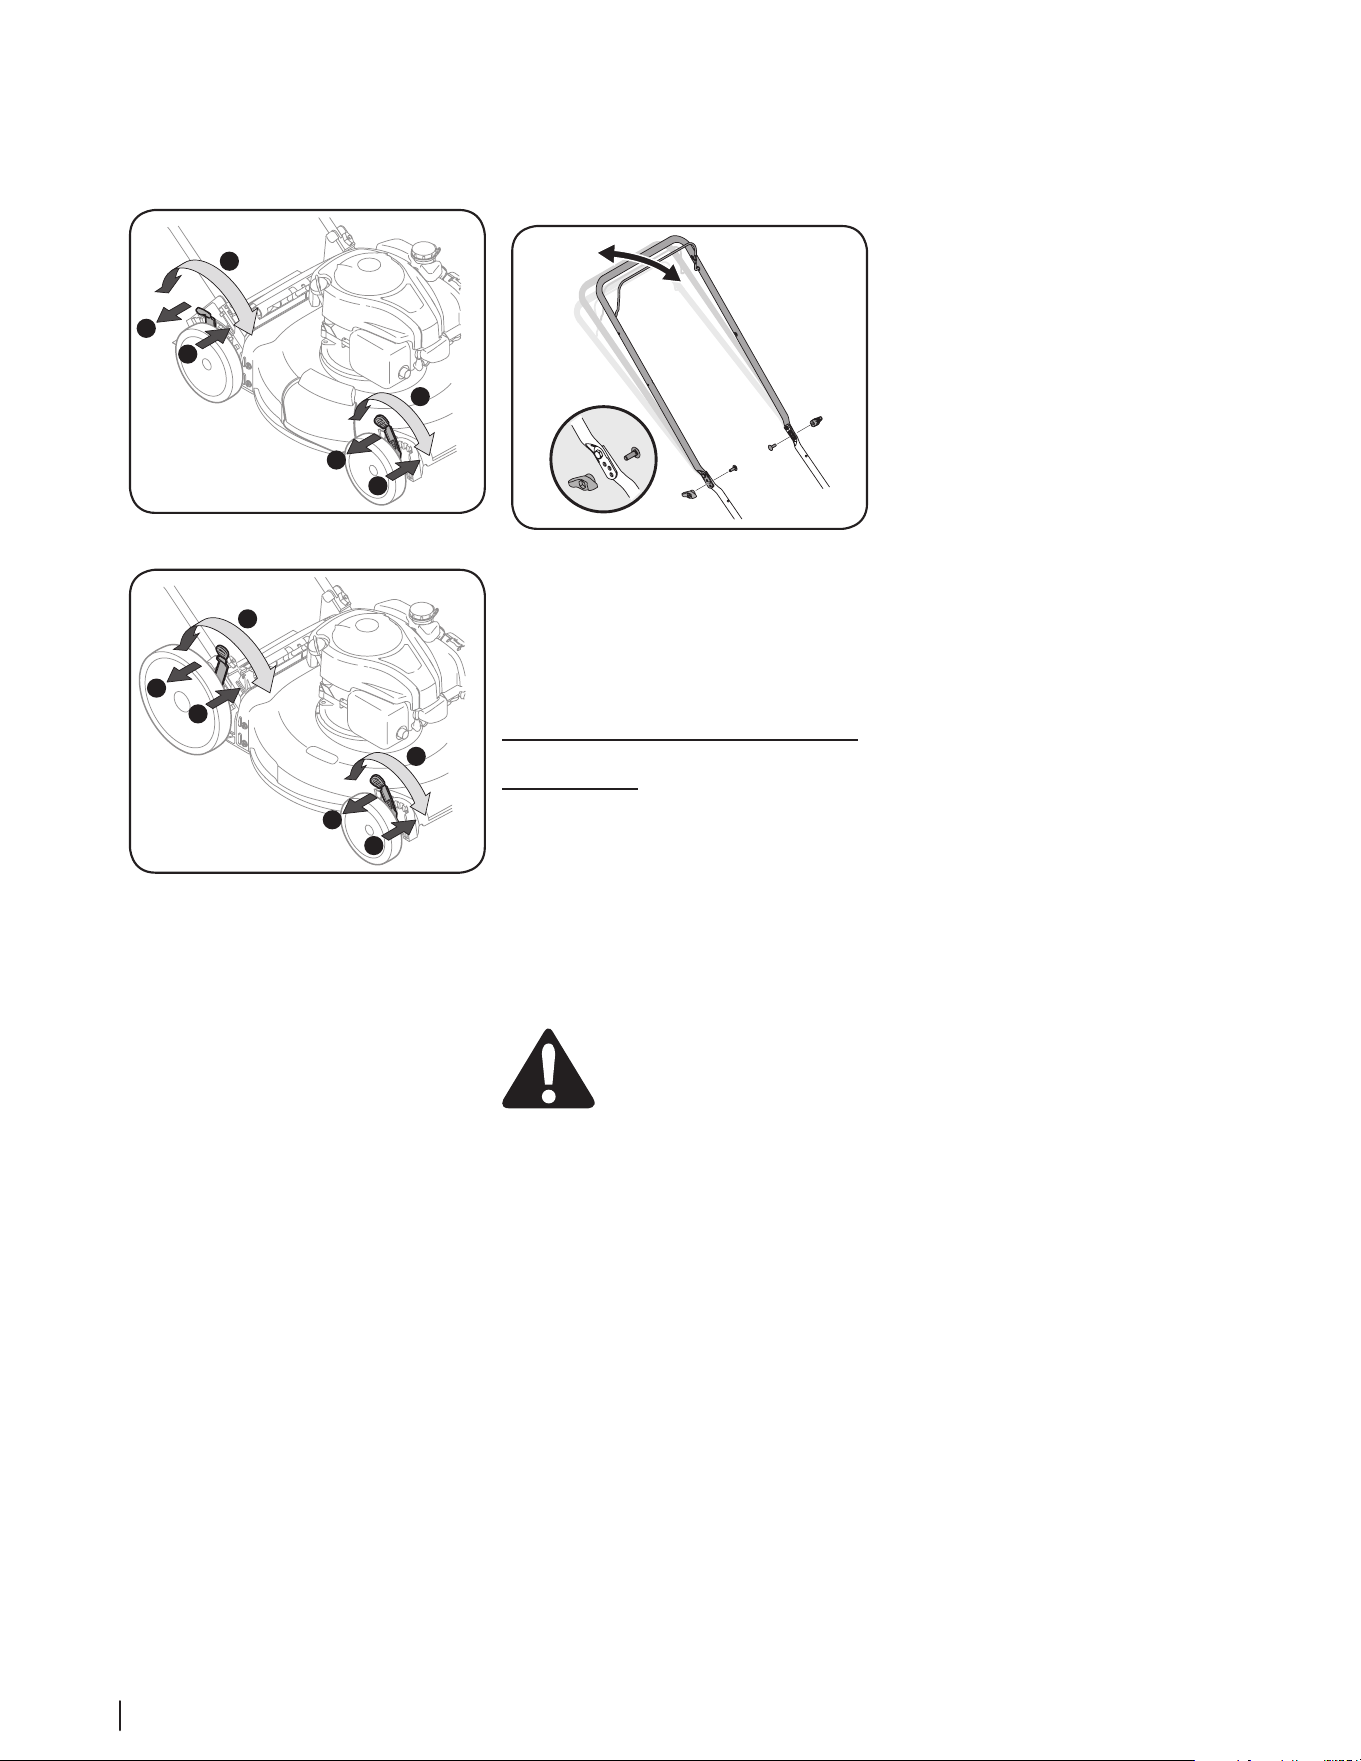
8 PBSección 2 — Montaje y configuraciónSección 2 — Montaje y configuración
1. Tire de la palanca de ajuste de la altura
de corte hacia la rueda.
2. Mueva la palanca a la posición deseada
para cambiar la altura de corte.
Consulte las Figuras 2-11 y 2-12.
3
2
2
1
3
1
Rueda baja
Figura 2-15
3
2
2
1
3
1
Rueda alta
Superior
Superior
Inferior
Inferior
Figura 2-16
NOTA: En las cortadoras de césped con
ruedas bajas, las palancas de ajuste de
altura se mueven en la dirección opuesta
para realizar el ajuste; en las cortadoras con
ruedas altas, las palancas se mueven en la
misma dirección.
IMPORTANTE: Las ruedas delanteras y
traseras se deben colocar en la misma
posición relativa. Cuando el terreno es
agreste o irregular mueva las palancas de
ajuste de la altura a una posición más alta.
De esta manera se cuida más el césped.
3. Libere la palanca hacia la plataforma.
Consulte las Figuras 2-11 y 2-12.
Inclinación de la manija (si está incluida)
Si está incluida, la inclinación de la manija se puede
ajustar de la siguiente manera:
1. Retire las perillas de aleta (a) y los pernos de
carro (b) de la manija. Consulte la Figura 2-13.
(b)
(b)
(a)
(a)
Figura 2-17
2. Coloque la manija en una de las tres
posiciones que sea más cómoda.
Consulte la Figura 2-13.
3. Sujete en la posición con las tuercas de
mariposa (a) y los pernos de carro
(b) que extrajo en el Paso 1.
Configuración
Llenado de gasolina y aceite
Consulte en el Manual del operador del motor
información adicional sobre el motor.
1. Agregue el aceite provisto antes de arrancar
la cortadora de césped la primera vez.
2. Realice el mantenimiento del motor con
gasolina como se indica en el Manual del
operador del motor.
ADVERTENCIA: Tenga mucho
cuidado al trabajar con gasolina.
La gasolina es sumamente
inflamable y sus vapores pueden
causar explosiones. Nunca agregue
combustible a la máquina en
espacios cerrados ni mientras el
motor está caliente o funcionando.
Apague cigarrillos, cigarros, pipas
y otras fuentes de combustión.
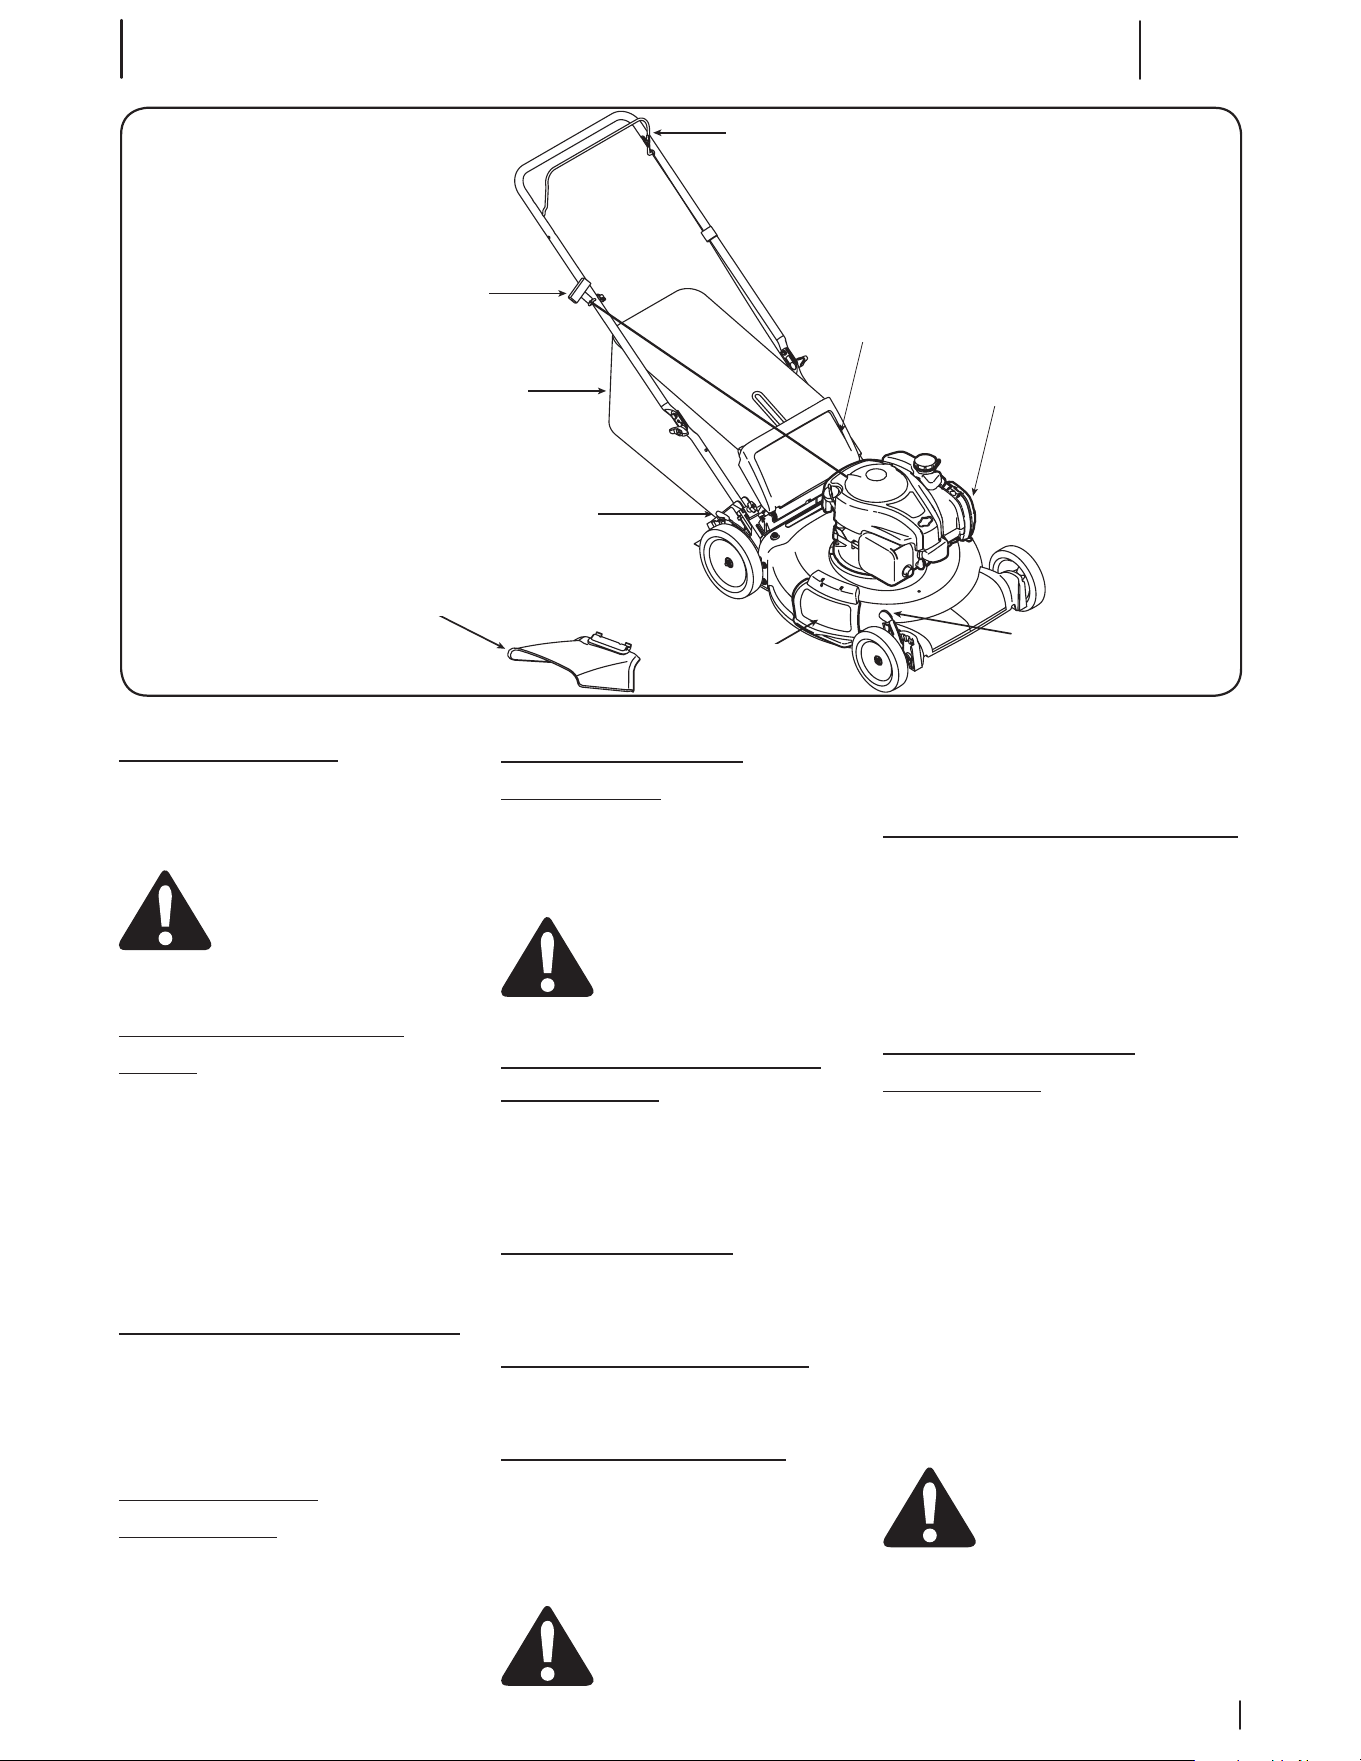
Controles y funcionamiento
3
9
Blade Control
Recoil Starter
Mulch Plug †
Cutting Height
Adjustment Lever
Cutting Height
Adjustment Lever
Grass Catcher †
Side Discharge
Chute †
Deck Wash †
Rear Discharge Door
† Si viene equipado
Figura 3-1
Control de las cuchillas
El control de la cuchilla está unido a la manija
superior de la cortadora. Presione el control de la
cuchilla contra la manija superior para operar la
unidad. Suéltelo para detener el motor y la cuchilla.
ADVERTENCIA: El mecanismo
de control de la cuchilla es un
dispositivo de seguridad. Nunca
intente anular su funcionamiento.
Palanca de ajuste de la altura
de corte
Una palanca de ajuste está ubicada en la rueda
trasera derecha y otra en la rueda delantera derecha.
Ambas palancas deben estar en la misma posición
relativa para asegurar un corte uniforme. Para ajustar
la altura de corte, consulte el Ajuste de la altura de
corte en la página 7.
NOTA: En ciertos modelos, la palanca de ajuste de
altura de corte delantera está ubicada por encima de
la rueda izquierda delantera.
Colector de césped (si está incluido)
El colector de césped, ubicado en la parte trasera
de la cortadora, se usa para embolsar los recortes del
césped para desecharlos. Cuando se llena la bolsa,
retirela a través de las manijas utilizando la manija
del colector de césped y vacíela.
Tapón de abonadora
(si está incluido)
El adaptador para abono se utiliza únicamente
para propósitos de abono. En vez de recolectar los
recortes del césped en un colector de césped o tolva
de descarga lateral, algunos modelos de cortadora
tienen la opción de recircular los recortes en el
césped. Esto se llama abonar.
Tolva de descarga lateral
(Si está incluido)
Su cortadora puede ser enviada como abonadora.
Para descargar los recortes de césped por el costado,
siga las instrucciones de la sección Tolva
de descarga lateral en página 7 para acoplar la
tolva de descarga lateral.
ADVERTENCIA: Mantenga sus ma-
nos y pies alejados del área de la
tolva sobre la plataforma de corte.
Consulte la etiqueta de advertencias
en la unidad.
Sistema de lavado de plataforma
(si está incluido)
La plataforma de su cortadora puede estar equipada
con un pico de lavado de plataforma de sujeción rápida
como parte del sistema de lavado de plataforma. Uti-
lice el sistema de lavado de plataforma para quitar los
recortes de césped de la parte inferior de la plataforma.
Arrancador de retroceso
El arrancador de retroceso está unido a la manija supe-
rior derecha. Para arrancar la unidad colóquese detrás
de la misma y tire del cordel del arrancador de retroceso.
Arranque y detención del motor
Consulte el Manual del Operador del motor para obte-
ner instrucciones sobre cómo arrancar y parar el motor.
Uso de la cortadora de césped
Asegúrese de que el césped está libre de piedras,
palos, cables u otros objetos que pudiesen dañar
la cortadora o el motor. Dichos objetos pueden ser
arrojados accidentalmente por la cortadora en cual
-
quier dirección y provocar lesiones personales graves
al operador, a otras personas o al equipo.
ADVERTENCIA: Al hacer funcionar la
cortadora de césped puede ser que
arroje objetos extraños a los ojos, lo
cual puede dañarlos gravemente.
Utilice siempre gafas de seguridad durante el
funcionamiento de la cortadora o mientras
hace ajustes o la repara.
Uso de la abonadora (si está incluida)
Para abonar el césped, retire la tolva de descarga
lateral (si está incluido) o el colector de césped (si está
incluido) y deje que la puerta de descarga trasera (si
está incluida) cierre la abertura trasera de la cortadora.
Para un abono eficiente, no corte césped húmedo.
Si el césped ha crecido más de cuatro pulgadas, no
se recomienda el uso de abono. En ese caso, use el
colector de césped para embolsar los recortes.
Uso del colector de césped
(si está incluido)
Utilice el colector de césped para recoger recortes
mientras opera la cortadora.
1. Acople el colector de césped siguiendo las
instrucciones de la sección de Colector de
césped en página 7. Los recortes de césped
son recolectados en la bolsa de forma
automática a medida que pasa la cortadora.
Opere la cortadora hasta que la bolsa de
recolección esté llena.
2. Detenga el motor por completo soltando la
manija de control de la cuchilla. Compruebe
que la unidad se haya detenido por completo.
3. Para retirar la bolsa, levante la puerta de
descarga y tire de la bolsa de recolección
hacia arriba, apartándola de la cortadora.
Deseche los recortes de césped y vuelva a
colocar la bolsa cuando haya terminado.
ADVERTENCIA: Si golpea un objeto
extraño, detenga el motor. Retire el
cable de la bujía, inspeccione
detenidamente la cortadora para ver
que no tenga daños, y repare el daño
antes de volver a encender y operar.
El exceso de vibración de la cortadora
durante la operación es una indicación
de daño. Se debe inspeccionar
y reparar la unidad lo antes posible.
Control de las cuchillas
Puerta de descarga trasera
Arrancador de retroceso
Colector de césped†
Sistema de lavado de plataforma †
Palanca de ajuste de
la altura de corte
Tolva de descarga
lateral †
Clavija para abono †
Palanca de ajuste
de la altura de corte
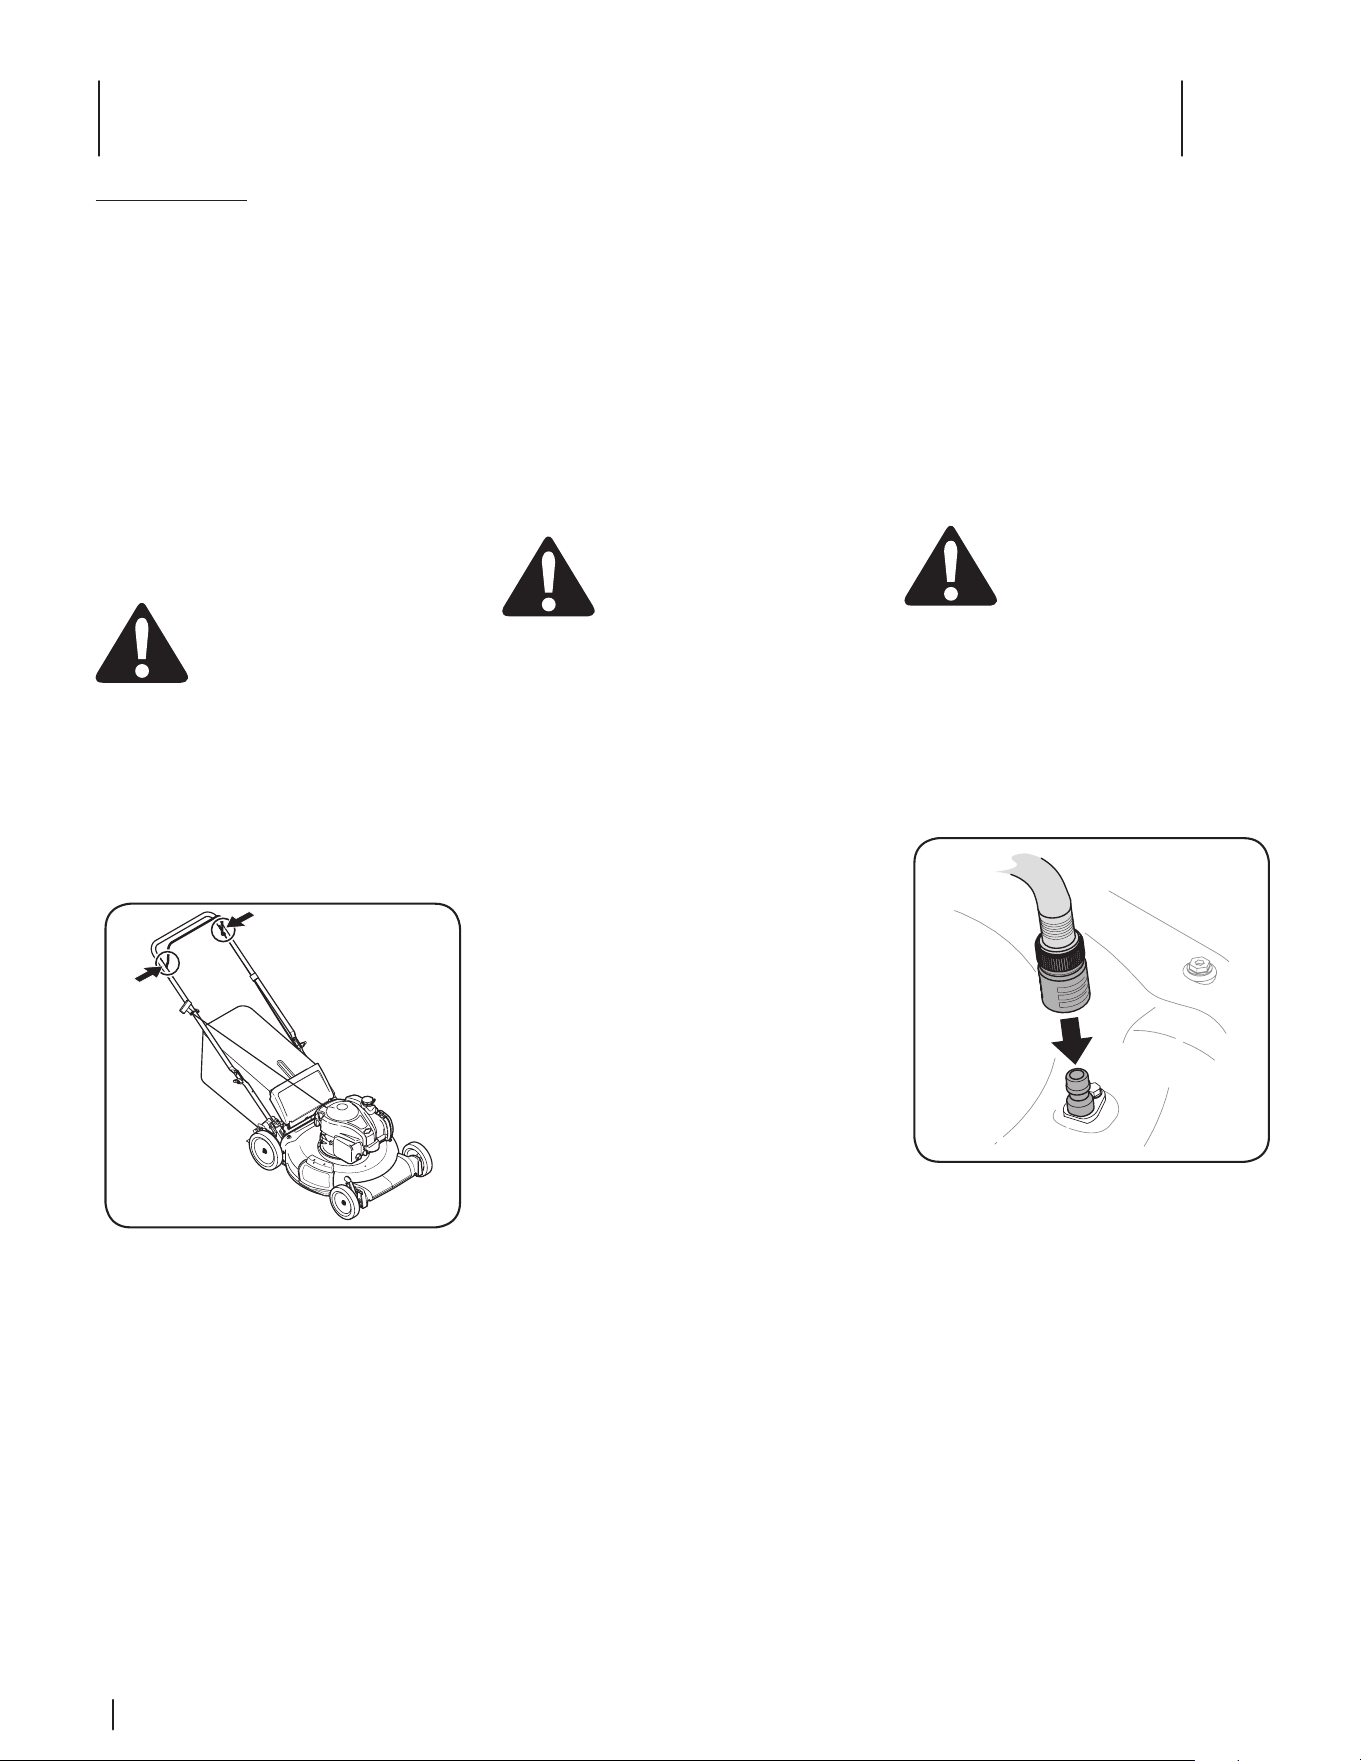
Servicio
4
10
Mantenimiento
Recomendaciones generales
• Respete siempre las reglas de seguridad al
realizar tareas de mantenimiento.
• La garantía de esta cortadora no cubre
elementos que han estado sujetos al mal uso
o la negligencia del operador. Para recibir el
reembolso total de la garantía, el operador
deberá mantener la cortadora como se
indica en este manual.
• El cambio de la velocidad controlada del
motor invalidará la garantía del motor.
• Todos los ajustes deben ser inspeccionados
al menos una vez por temporada.
• Revise periódicamente todos los sujetadores
y compruebe que estén bien ajustados.
ADVERTENCIA: Detenga siempre el
motor, déjelo enfriar, desconecte la
bujía y haga masa contra el motor
antes de realizar cualquier tarea de
mantenimiento a su máquina.
Lubricación
1. Lubrique con aceite ligero los puntos
de pivote del control de la cuchilla al menos
una vez cada estación. El control de la
cuchilla debe funcionar libremente en
ambas direcciones. Consulte la Figura 4-1.
Figura 4-1
2. Consulte el Manual del operador del motor
para ver el programa de lubricación del
motor y la instrucción para lubricar el motor.
Cuidado de la plataforma
Debe limpiar la parte inferior de la plataforma de
la cortadora después de cada uso para prevenir
la acumulación de recortes de césped u otros
desechos. Consulte los siguiente pasos para
una limpieza adecuada.
1. Deje el motor en marcha hasta que se
acabe el combustible. No intente verter
combustible del motor. Desconecte el cable
de la bujía. Consulte el Manual del operador
del motor.
2. Incline la cortadora de manera que quede
apoyada sobre la caja. Mantenga hacia arriba
el lateral donde se encuentra el filtro de aire.
Sostenga firmemente la cortadora.
ADVERTENCIA: Nunca incline la
cortadora más de 90 grados en
ninguna dirección y no deje la
cortadora inclinada. Se puede filtrar
aceite dentro de la parte superior
del motor y causar problemas
de arranque.
3. Raspe y limpie la parte inferior de la
plataforma mediante el uso de una
herramienta adecuada.
4. Vuelva a colocar la cortadora sobre
sus ruedas en el suelo.
Cuidados del motor
A continuación se presenta una lista de tareas
de mantenimiento necesarias para el buen
funcionamiento de la cortadora. Consulte el Manual
del operador del motor para ver una lista detallada
e instrucciones.
• Mantenga el nivel de aceite como se indica
en el Manual del operador del motor.
• Limpie el filtro de aire cada 25 horas en
condiciones de uso normal. Limpie a
intervalos de pocas horas cuando haya
mucho polvo. El bajo rendimiento del
motor y el ahogamiento normalmente
son indicaciones de que el filtro de aire
necesita mantenimiento. Para realizar el
mantenimiento del filtro de aire, consulte el
Manual del operador del motor.
• Limpie la bujía y reajuste la separación
por lo menos una vez por temporada. Se
recomienda reemplazar la bujía al comenzar
cada temporada de corte de césped.
Consulte el Manual del operador del motor
para ver el tipo de bujía correcto y las
especificaciones de la distancia disruptiva.
• Limpie periódicamente el motor con
un trapo o cepillo. Mantenga limpia la
parte superior del motor para permitir la
circulación de aire apropiada. Quite todo el
césped, suciedad y residuos combustibles
del área del silenciador.
• Para almacenar motores entre 30 y 90 días
es necesario tratarlos con un estabilizador
de gasolina para evitar deterioros y la
formación de depósitos de goma en el
sistema de combustible o en componentes
fundamentales del carburador.
Sistema de lavado de plataforma
(si está incluido)
La plataforma de la cortadora puede estar equipada
con un puerto de agua sobre su superficie como
parte del sistema de lavado de la plataforma.
Utilice el sistema de lavado de plataforma para
lavar la parte inferior de la plataforma e impedir
la acumulación de sustancias corrosivas.
Realice los siguientes pasos DESPUÉS DE CADA
CORTE DE CÉSPED:
1. Empuje la cortadora hasta un nivel, despeje
el lugar en el césped. Asegúrese de que
la manguera del jardín pueda llegar
a la cortadora.
PRECAUCIÓN: Asegúrese de
que la tolva de descarga de la
cortadora esté orientada ALEJADA
de la casa, el garaje, los vehículos
estacionados, etc.
2. Retire de la plataforma de la cortadora el
pico de lavado de la plataforma de sujeción
rápida y enrósquelo en el extremo de la
manguera del jardín.
3. Una la manguera con el pico de lavado
al puerto de agua que se encuentra
en la superficie de la plataforma.
Consulte la Figura 4-2.
Figura 4-2
4. Abra el suministro de agua.
5. Encienda el motor, tal como se indicó
anteriormente en el Manual del operador
del motor.
6. Haga funcionar el motor durante dos
minutos por lo menos para permitir que
se seque totalmente la parte inferior
de la plataforma de corte.
7. Suelte la manija de control de la cuchilla para
detener el motor y la cuchilla.
8. Desconecte el agua y retire el pico de lavado
de la plataforma del puerto de agua que se
encuentra en la superficie de la plataforma.
Luego de limpiar la plataforma, vuelva a arrancar
la cortadora. Mantenga el motor y la cuchilla en
funcionamiento durante dos minutos por lo menos
para permitir que se seque totalmente la parte
inferior de la plataforma de corte.
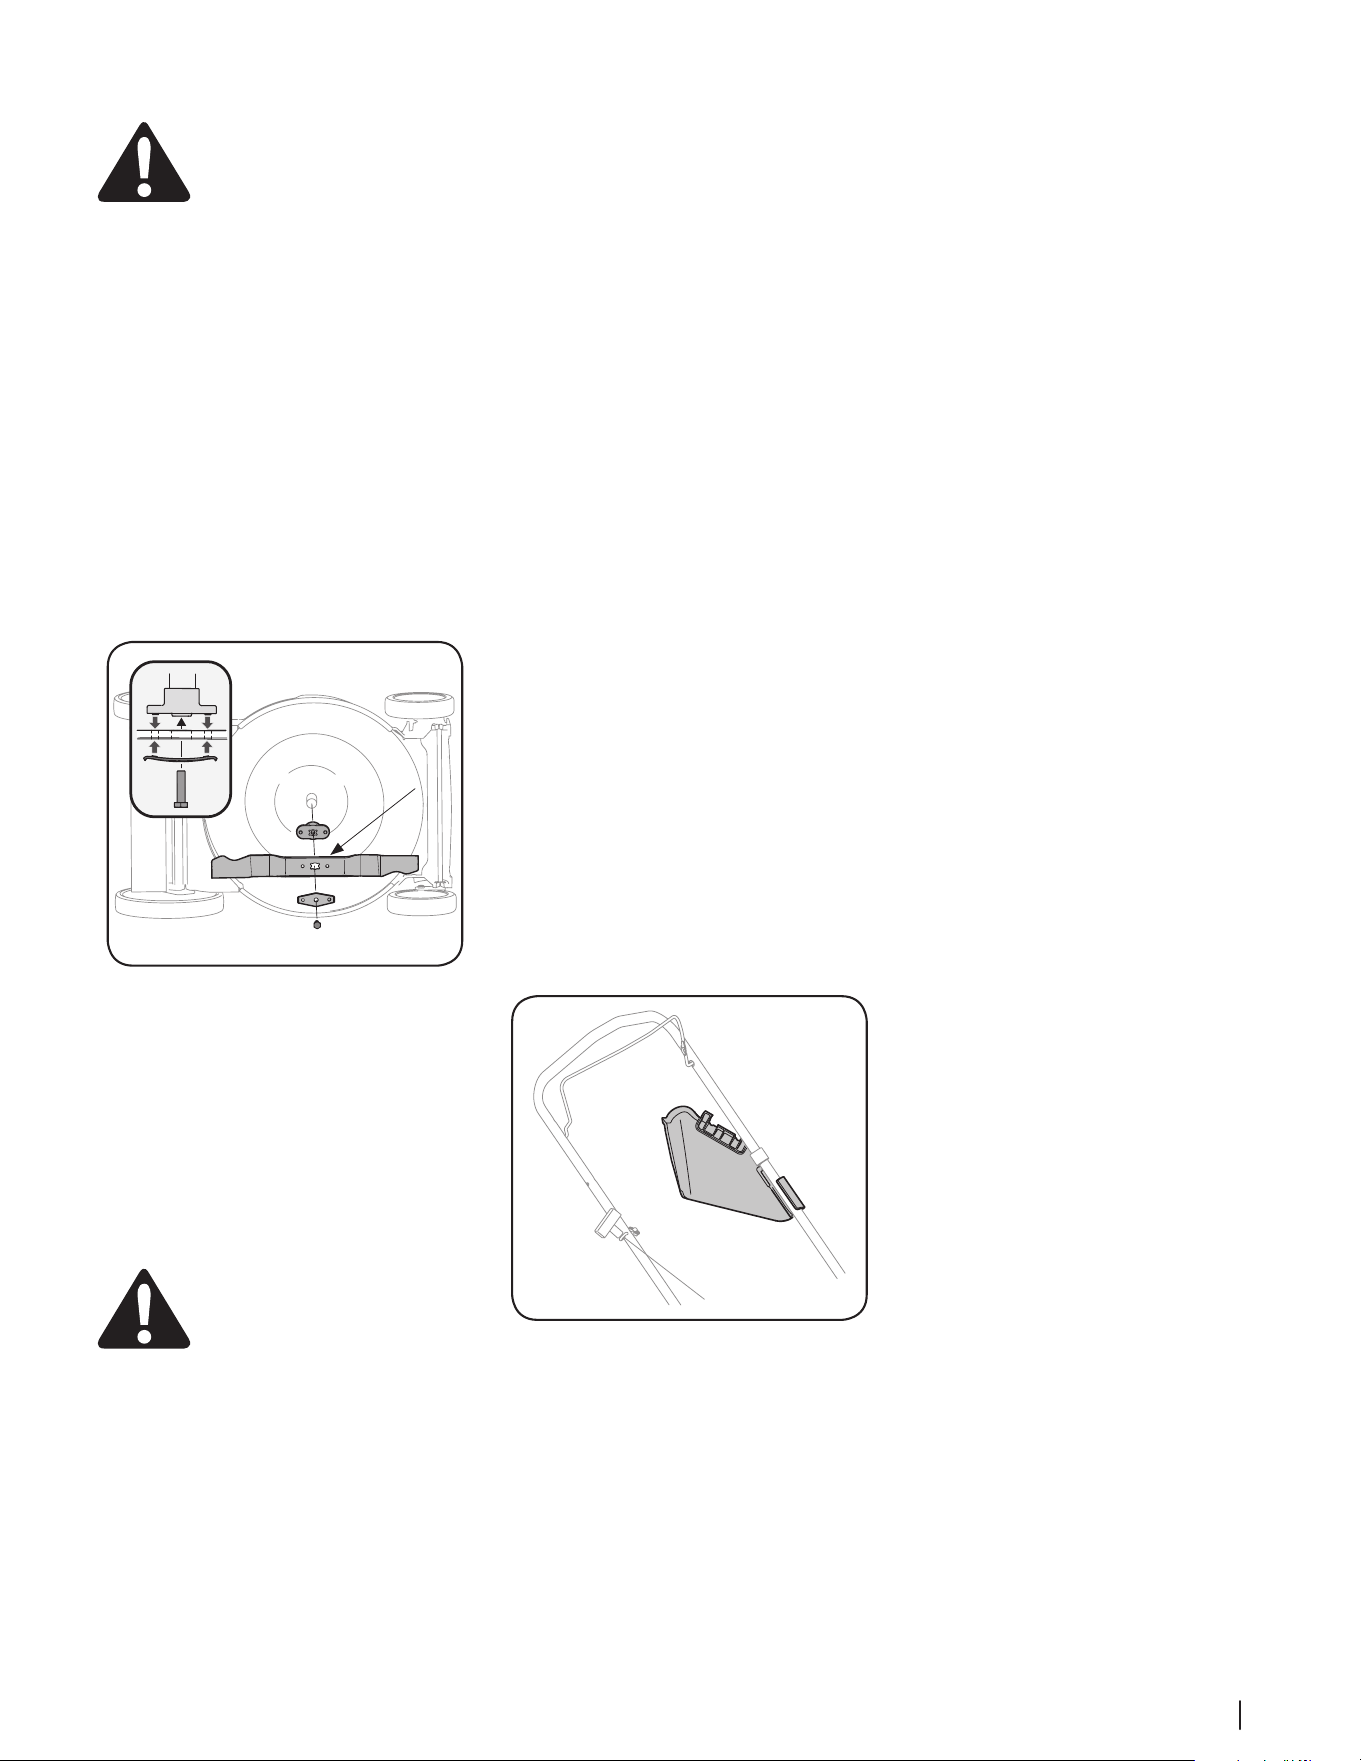
11Sección 4 — Servicio
Cuidado de la cuchilla
ADVERTENCIA: Cuando saque
la cuchilla de corte para afilarla
o reemplazarla, protéjase las manos
usando un par de guantes gruesos
o un trapo grueso para sostener
la cuchilla.
Inspeccione periódicamente el adaptador de la
cuchilla en busca de rajaduras, especialmente
cuando golpee un objeto extraño. Reemplace según
necesidad. Siga los pasos que aparecen debajo para
realizar el mantenimiento de la cuchilla.
1. Deje el motor en marcha hasta que se
acabe el combustible. No intente verter
combustible del motor. Desconecte el cable
de la bujía. Consulte el Manual del operador
del motor.
2. Gire la cortadora de césped sobre el costado
y compruebe que el filtro de aire y el
carburador queden mirando hacia arriba.
3. Retire el perno (a) y el soporte de la cuchilla
(b) que sostienen la cuchilla y el adaptador
al cigüeñal del motor. Consulte la Figura 4-3.
(a)
(c)
(d)
(b)
Cuchilla
Figura 4-3
4. Saque la cuchilla (c) y el adaptador (d)
del cigüeñal. Consulte la Figura 4-3.
5. Saque la cuchilla del adaptador para
comprobar el equilibrio. Balancee la cuchilla
sobre un destornillador de eje redondo
para inspeccionarla. Saque el metal del lado
pesado hasta que quede bien equilibrada.
Cuando afile la cuchilla, siga el ángulo
original de afilado como guía. Afile cada
borde de corte por igual para mantener
el balance de la cuchilla.
ADVERTENCIA: Si la cuchilla está
desequilibrada causará demasiada
vibración al rotar a altas velocidades.
Puede dañar la cortadora de césped
y se puede romper, causando
lesiones personales.
6. Lubrique el cigüeñal del motor y la superficie
interna del adaptador de la cuchilla con
aceite ligero. Deslice el adaptador de la
cuchilla (d) sobre el cigüeñal del motor.
Instale la cuchilla en el adaptador con el lado
marcado “Grass Side” (lado del césped)
(o con el número de parte) hacia el piso
cuando la cortadora de césped está en
posición de funcionamiento. Asegúrese que
la cuchilla quede alineada y asentada en las
bridas del adaptador. Vea el recuadro de la
Figura 4-3.
7. Coloque el soporte de campana de la cuchilla
(b) en la misma (c). Alinee las muescas del
soporte de campana de la cuchilla con los
orificios pequeños de la cuchilla.
8. Vuelva a colocar el perno hexagonal (a)
y ajústelo según los siguientes valores
de torsión: 450 lb-pulg (como mínimo),
600 lb-pulg (como máximo).
Para asegurar la operación segura de la cortadora
revise periódicamente el perno de la cuchilla para
determinar si está bien ajustado.
Almacenamiento fuera de temporada
Se deben seguir estos pasos para la preparación
de la cortadora para su almacenamiento.
• Limpie y lubrique bien la cortadora como
se describe en la sección de Lubricación en
página 10.
• Aplicar una capa de grasa de chasis a la
cuchilla de corte de la cortadora para evitar
la oxidación.
• Consulte el Manual del operador del
motor para obtener instrucciones sobre
su almacenamiento correcto.
• Sujete la tolva de descarga lateral a la manija
(si corresponde) como se muestra en la
Figura 4-4.
Figura 4-4
• No limpie la unidad con una lavadora
a presión.
• Almacene la unidad en una zona limpia
y seca. No la almacene cerca de productos
corrosivos como por ejemplo fertilizantes.
Cuando almacene cualquier tipo de equipo
motorizado en un galpón de depósito metálico
o con poca ventilación, tenga especial cuidado
de realizarle un tratamiento antioxidante al equipo.
Use aceite ligero o silicona para recubrir el equipo,
especialmente los cables y partes móviles de
su cortadora antes de almacenarla.

Solución de problemas
5
12
Problema Caus a Solución
El motor no arranca 1. Control de la cuchilla desenganchado.
2. Se ha desconectado el capuchón de la bujía.
3. El depósito de combustible está vacío o el
combustible se ha echado a perder.
4. La bujía no funciona correctamente.
5. El motor no está cebado (si está equipado con
cebador).
6. Motor ahogado.
7. La línea del combustible está bloqueada.
8. Líneas de combustible (si están instaladas)
cerradas.
9. El motor no está cebado (si está equipado
con cebador).
1. Engrane el control de la cuchilla.
2. Conecte el cable al capuchón de la bujía.
3. Llene el tanque con gasolina limpia y nueva.
4. Utilice el cebador del motor como se indica en el
Manual del operador del motor.
5. Límpiela, ajuste la separación, o cambie la bujía.
6. Limpie la línea del combustible.
7. Espere unos minutos para reencender; no realice
el cebado.
8. Abra la válvula de combustible. Consulte el
Manual del operador del motor.
9. Cebe el motor. Consulte el Manual del operador
del motor.
El funcionamiento del motor es
irregular
1. El capuchón de la bujía está flojo.
2. La línea del combustible está tapada
o el combustible se ha echado a perder.
3. La ventilación de la tapa del combustible
está obstruida.
4. Hay agua o suciedad en el sistema de
combustible.
5. El depurador de aire está sucio.
6. La unidad está funcionado con el CEBADOR
aplicado (si está equipado).
1. Conecte y ajuste el capuchón de la bujía.
2. Limpie la línea de combustible; llene
el tanque con gasolina limpia y fresca.
3. Destape la ventilación.
4. Vacíe el tanque de combustible. Vuelva a llenar
con combustible nuevo.
5. Consulte el Manual del operador del motor.
6. Presione la perilla del CEBADOR.
El motor recalienta 1. El nivel de aceite del motor está bajo.
2. Restricción en el flujo de aire.
1. Llene el cárter con el aceite adecuado.
2. Limpie el área de alrededor y la parte superior
del motor.
Saltos ocasionales (titubea) a
alta velocidad
1. La separación de la bujía es muy pequeña. 1. Ajuste la separación de la bujía.
Consulte el Manual del operador del motor.
No ralentiza bien 1. Bujía sucia, averiada o con exceso de separación.
2. El depurador de aire está sucio.
1. Vuelva a ajustar la separación o reemplace
la bujía.
2. Consulte el Manual del operador del motor.
Vibración/ruido excesivos 1. Cuchilla de corte floja o descentrada.
2. Adaptador de cuchilla o cuchilla doblada/dañada.
1. Apriete la cuchilla y el adaptador Equilibre la
cuchilla.
2. Consulte a un distribuidor de servicio autorizado.
La cortadora de césped no
realiza el abono del césped
(si cuenta con este equipo)
1. Pasto mojado.
2. Césped demasiado alto.
3. Cuchilla desafilada.
1. No corte el césped cuando esté mojado; espere a
que se seque para hacerlo.
2. Corte una vez a altura de corte elevada, luego
vuelva a cortar a la altura deseada o haga un
sendero de corte más angosto.
3. Afile o cambie la cuchilla.
Corte desigual 1. La posición de las ruedas no es correcta.
2. Cuchilla desafilada.
1. Coloque las ruedas delanteras y traseras en la
misma posición de altura. (ajustadores de altura
de doble palanca únicamente)
2. Afile o cambie la cuchilla.

Consignes de sécurité • Montage • Fonctionnement • Service • Dépannage
Notice d’utilisation
AVERTISSEMENT
PRIÈRE DE LIRE TOUTES LES INSTRUCTIONS FIGURANT DANS CETTE NOTICE D’UTILISATION
AVANT D’ESSAYER DE VOUS SERVIR DE CETTE MACHINE. LE NON-RESPECT DE CES
INSTRUCTIONS PEUT ENTRAÎNER DES BLESSURES CORPORELLES.
Service à la clientèle : 1-800-668-1238
Consignes de sécurité ............................................. 2
Assemblage et Montage ......................................... 6
Commandes & Fonctionnement ............................ 9
Service technique ...................................................10
Dépannage .............................................................12
Pièces de rechange/Garantie
...........................................Voir document séparé
Table des matières
NOTE : Cette notice d’utilisation se rapporte à plusieurs modèles. Les caractéristiques peuvent varier selon le modèle. Certaines
caractéristiques décrites dans cette notice peuvent ne pas s’appliquer à tous les modèles. Votre appareil peut différer du modèle illustré.
Tondeuse poussée
Modèles/Séries A0, A1, A2, A9, B0, B1, B2, & B9
Consignes de sécurité
1
2
AVERTISSEMENT : Ce symbole
attire votre attention sur des
consignes de sécurité importantes
qui, si elles ne sont pas respectées,
peuvent mettre en danger non
seulement votre personne et vos biens, mais
aussi ceux d’autrui. Prière de lire toutes les
instructions figurant dans cette notice
d’utilisation avant d’essayer de vous servir de
cette machine. Le non-respect de ces
instructions peut entraîner des blessures
corporelles.
RESPECTEZ L’AVERTISSEMENT
QUI ACCOMPAGNE CE SYMBOLE!
DANGER: Cette machine doit
être utilisée conformément aux
consignes de sécurité qui figurent
dans la notice d’utilisation.
Comme avec tout appareil
motorisé, une négligence ou une erreur de la
part de l’utilisateur peut entraîner des blessures
graves. Cette machine peut amputer mains et
pieds et projeter des débris. Par conséquent, le
non-respect de ces consignes peut causer des
blessures corporelles graves et même mortelles.
Utilisation en général
1. Veuillez lire attentivement la notice
d’utilisation avant d’essayer d’assembler la
machine. Assurez-vous de lire et de bien
comprendre toutes les instructions qui
figurent sur la machine et dans la notice
d’utilisation avant de la mettre en marche.
Conservez cette notice d’utilisation à
un endroit sûr pour toute consultation
ultérieure et pour commander des pièces
de rechange.
2. Familiarisez-vous avec les commandes et les
conseils d’utilisation de la machine avant de
vous en servir.
3. Cette machine motorisée est un outil de
précision, pas un jouet. Soyez par conséquent
toujours très prudent. Le seul rôle de cette
machine est de tondre le gazon. Ne l’utilisez
jamais dans un autre but.
4. Ne permettez jamais à des enfants
de moins de 14 ans de se servir de la
machine. Des enfants plus âgés doivent
lire et comprendre le mode d’emploi de la
PROPOSITION 65 – Californie
AVERTISSEMENT: Les gaz
d’échappement de ce produit
contiennent des produits
chimiques reconnus dans
l’État de Californie comme
causant le cancer, des anomalies
congénitales ou d’autres problèmes liés à la
reproduction.Les bornes et cosses de
batterie et d’autres accessoires annexes
contiennent du plomb et des mélanges à
base de plomb, soit des produits chimiques
reconnus cancérigènes et responsables
d’anomalies congénitales ou autres par l’État
de Californie. Il est impératif de bien se laver
les mains après toute manutention.
machine et les consignes de sécurité qui
figurent dans cette notice d’utilisation. Un
adulte doit leur apprendre à se servir de
cette machine et les surveiller.
5. Seules des personnes mûres ayant pris
connaissance des consignes de sécurité
doivent être autorisées à utiliser cette
machine.
6. Examinez soigneusement la zone de
travail. Ramassez les pierres, bâtons, fils
métalliques, os, jouets et autres objets
qui pourraient vous faire trébucher ou qui
risquent d’être ramassés et projetés par la
lame. Les objets projetés par la machine
peuvent causer des blessures graves.
7. Prévoyez de travailler en évitant de projeter
l’herbe vers des rues, des trottoirs, des
spectateurs, etc. Évitez d’éjecter l’herbe
en direction d’un mur ou d’un obstacle. De
cette façon, les débris éventuels ne risquent
pas de ricocher et de blesser quelqu’un.
8. Pour éviter tout risque de contact avec
la lame ou de blessure par un projectile,
éloignez les enfants, passants et animaux à
au moins 75 pieds de la tondeuse pendant
qu’elle fonctionne. Arrêtez la machine si
quelqu’un s’approche.
9. Portez toujours des lunettes de sécurité
en utilisant la machine ou en effectuant
un réglage ou une réparation. Un objet
peut en effet être projeté, ricocher et vous
blesser aux yeux.
10. Portez des chaussures robustes à semelle
épaisse et des vêtement bien ajustés. Une
chemise et un pantalon qui protègent les
bras et les jambes et des chaussures à bout
d’acier sont recommandés. N’utilisez jamais
la tondeuse si vous êtes pieds nus ou si
vous portez des sandales ou des tennis.
11. Ne placez jamais vos mains ou vos pieds
près d’une pièce en mouvement ou sous le
plateau de coupe. La lame peut amputer
mains et pieds.
12. L’absence du clapet de la goulotte
d’éjection ou un clapet endommagé peut
causer des blessures en cas de contact avec
la lame ou projeter des objets.
13. De nombreuses blessures se produisent
lorsque la tondeuse passe sur le pied
à la suite d’une chute. Ne retenez pas
la tondeuse si vous tombez. Lâchez
immédiatement le guidon.
14. Ne tirez jamais la tondeuse vers vous en
marchant. S’il faut faire reculer la tondeuse
près d’un mur d’un autre obstacle, regardez
d’abord par terre et derrière vous, puis
procédez comme suit:
a. Éloignez-vous de la tondeuse à bout
de bras.
b. Assurez votre stabilité.
c. Reculez la tondeuse lentement
et d’une demi-longueur de bras
seulement.
d. Répétez selon les besoins.
15. N’utilisez jamais la tondeuse en
état d’ébriété ou si vous prenez des
médicaments ralentissant les réactions.
16. Dégagez le dispositif d’auto-propulsion
ou l’embrayage d’entraînement, le cas
échéant, avant de faire démarrer le moteur.
17. La poignée de commande de la lame est
un dispositif de sécurité. Ne tentez jamais
de contourner son rôle. Ceci empêche
le dispositif de sécurité de fonctionner
correctement et peut causer des blessures
en cas de contact avec la lame. La poignée
de commande de la lame doit bouger
facilement dans les deux sens et revenir
automatiquement à la position non
énclenchée quand on la lâche.
18. N’utilisez jamais la tondeuse si le gazon est
mouillé. Soyez toujours bien en équilibre.
Faites attention de ne pas glisser et de
ne pas tomber pour éviter des blessures
graves. Si vous perdez votre équilibre,
lâchez la poignée de commande de la lame
immédiatement et la lame arrêtera de
tourner en trois secondes.
19. Utilisez la tondeuse seulement dans la
lumière du jour ou dans la bonne lumière
artificielle. Marchez, ne courrez pas.
20. Arrêtez la lame avant de traverser des
allées, trottoirs ou chemins recouverts de
gravier.
21. Si la machine commence à vibrer d’une
manière anormale, arrêtez le moteur
et cherchez immédiatement la cause.
En général, toute vibration indique un
problème.
22. Arrêtez le moteur et attendez que la lame
se soit immobilisée avant de détacher le sac
à herbe ou de déboucher la goulotte. La
lame continue à tourner pendant quelques
secondes après que le moteur s’est éteint.
Ne placez jamais une partie du corps dans
le secteur de la lame avant d’être certain
que celle-ci est immobile.
23. N’utilisez jamais la tondeuse si l’abattant de
protection arrière, la goulotte d’éjection, un
sac à herbe, la poignée de commande de
la lame ou tout autre dispositif de sécurité
approprié n’est pas en place et qui en bon
état de fonctionnent. N’utilisez jamais la
tondeuse avec des dispositifs de sécurité
endommagés. Le non-respect de ces
consignes peut causer des blessures graves.
24. Le silencieux et le moteur deviennent très
chauds et peuvent causer des brûlures. Ne
les touchez pas.
25. N’essayez jamais d’ajuster une roue ou de
changer la hauteur de coupe pendant que
la moteur tourne.
26. N’utilisez que des accessoires
recommandés par le fabricant de la
machine. Le non-respect de ce consigne
peut causer des blessures graves.
27. Pour mettre le moteur en marche, tirez
lentement la poignée du démarreur à
lanceur jusqu’à ce que vous sentiez une
légère résistance, puis tirez-la rapidement.
Le retour rapide de la corde du démarreur
(le recul) attirera votre main et votre
bras vers le moteur plus vite que vous ne
pourrez lâcher la poignée. Des fractures
des os, hématomes ou foulures peuvent en
résulter.

3Section 1 — importanteS conSigneS de Sécurité
28. En cas de situations non mentionnées
dans cette notice, soyez prudent et faites
preuve de bon sens. Contactez le service
à la clientèle pour obtenir le nom du
concessionaire local.
Utilisation sur une pente
Les pertes de contrôle et les renversements se
produisent souvent sur des pentes et peuvent
causer de graves blessures. Travailler sur un
terrain en pente demande des précautions
supplémentaires. Cet appareil est lourd et risque
d’accélérer en descendant une pente. Assurez-
vous de maintenir le contrôle de l’appareil en
tout temps. Si vous ne vous sentez pas à l’aise
sur la pente, n’y travaillez pas. Par mesure de
sécurité utilisez l’inclinomètre fourni dans la
notice d’utilisation pour mesurer la pente du
terrain avant de commencer à travailler. Si
selon l’inclinomètre, la pente est supérieure à
15°, n’utilisez pas la tondeuse pour éviter toute
blessure grave.
À faire:
1. Tondez à travers les pentes, et non de haut
en bas, pour éviter la perte de contrôle.
2. Faites très attention en changeant de direction
sur une pente ; effectuez des virages en
remontant la pente.
3. Faites attention aux trous et ornières. La
machine peut se retourner sur un terrain
accidenté. Des herbes hautes peuvent
cacher des obstacles.
4. Vérifiez toujours votre équilibre. Vous
risquez de glisser, de tomber et de vous
blesser grièvement. Si vous sentez que
vous allez perdre l’équilibre, lâchez
immédiatement le guidon, et la lame
arrêtera de tourner en trois secondes.
À ne pas faire:
1. Ne tondez pas près d’une falaise ou d’un
talus. Le conducteur peut facilement perdre
l’équilibre.
2. Ne tondez pas sur une pente supérieure à
15° selon l’inclinomètre.
3. Ne tondez pas de l’herbe mouillée. La
traction réduite peut provoquer un
dérapage.
Enfant
Un accident grave risque de se produire si
le conducteur n’est pas toujours vigilant en
présence d’enfants. Les enfants sont souvent
attirés par la machine et la tonte de l’herbe. Ils
ne comprennent pas les dangers. Ne supposez
jamais qu’ils vont rester là où vous les avez vus.
1. Éloignez les enfants de la zone de travail et
placez-les sous la surveillance d’un adulte
autre que le conducteur de la machine.
2. Restez vigilant et arrêtez la machine si des
enfants s’approchent de la zone de travail.
3. Regardez toujours derrière vous et par terre
avant de reculer et en reculant.
4. Faites très attention en approchant d’angles
morts, de buissons, d’autres objets qui
peuvent gêner votre visibilité.
5. Éloignez les enfants des moteurs chauds ou
en cours d’utilisation. Les enfants peuvent
subir des brûlures graves au contact d’un
silencieux chaud.
6. Ne permettez jamais à des enfants de
moins de 14 ans d’utiliser la tondeuse. Des
adolescents âgés de 14 ans ou plus doivent
lire la notice d’utilisation, bien comprendre le
fonctionnement de la machine et respecter
les consignes de sécurité. Ils doivent
apprendre à utiliser la machine et s’en servir
sous la surveillance étroite d’un adulte.
7. Une fois le moteur arrêté, retirez la clé à
pousser du démarreur électrique (le cas
échéant) et rangez-la dans un endroit sûr,
hors de la portée des enfants.
Entretien
Manipulation de l’essence:
1. Pour éviter toute blessure ou dégât
matériel, faites très attention en manipulant
de l’essence. Il s’agit d’un produit
extrêmement inflammable et les vapeurs
risquent d’exploser. Vous pouvez être
grièvement blessé si des éclaboussures
sur votre peau ou sur vos vêtements
s’enflammaient. Rincez votre peau et
changez immédiatement de vêtements.
2. Remissez le carburant dans des bidons
homologués seulement.
3. Ne faites jamais le plein dans un véhicule, ni à
l’arrière d’une camionnette dont le plancher
est recouvert d’un revêtement en plastique.
Placez toujours les bidons par terre et loin de
votre véhicule avant de les remplir.
4. Dans la mesure du possible, déchargez
l’équipement motorisé de la remorque et
faites le plein par terre. Si cela n’est pas
possible, faites le plein avec un bidon plutôt
que directement de la pompe à essence.
5. Maintenez le gicleur en contact avec
le bord du réservoir d’essence ou avec
l’ouverture du bidon jusqu’à ce que le
plein soit terminé. N’utilisez pas un gicleur
équipé d’un dispositif de blocage en
position ouverte.
6. Éteignez toute cigarette ou pipe,
tout cigare ou toute autre chaleur
incandescente.
7. Ne faites jamais le plein à l’intérieur car
des vapeurs inflammables risquent de
s’accumuler.
8. N’enlevez jamais le capuchon d’essence
et n’ajoutez pas d’essence pendant que le
moteur tourne ou s’il est chaud. Laissez le
moteur refroidir pendant au moins deux
minutes avant de faire le plein.
9. Ne faites jamais déborder le réservoir.
Laissez un espace d’un demi-pouce environ
pour permettre l’expension du carburant.
10. Resserrez bien le capuchon d’essence.
11. En cas de débordement, essuyez toute
éclaboussure de carburant ou d’huile et
enlevez tous les débris imbibés d’essence.
Déplacez la machine à un autre endroit.
Attendez 5 (cinq) minutes avant de mettre
en marche le moteur.
12. Ne remisez jamais la machine ou les bidons
d’essence à l’intérieur s’il y a une flamme,
une étincelle (chauffe-eau à gaz, radiateur,
sèche-linge, etc.).
13. Limitez les risques d’incendie en
débarrassant le moteur des brins d’herbe,
feuilles et autres saletés. Essuyez les
éclaboussures de carburant ou d’huile et
enlevez tous les débris imbibés d’essence.
14. Laissez la machine refroidir pendant au
moins 5 minutes avant de la remiser.
Entretien général:
1. Ne faites jamais fonctioner la machine dans
un local clos car les gaz d’échappement
du moteur contiennent du monoxyde de
carbone, un gaz inodore très dangereux.
2. Avant de nettoyer, de réparer ou
d’examiner la machine, vérifiez que la
lame et toutes les pièces mobiles se
sont immobilisées. Débranchez le fil de
la bougie et mettez-le à la terre contre
le moteur et retirez la clé à poussser du
démarreur électrique (le cas échéant)
pour empêcher tout démarrage non
intentionnel.
3. Vérifiez souvent que la lame et les boulons
de montage du moteur sont bien serrés.
Examinez visuellement la lame pour
détecter toute usure excessive, tout
fendillement. Remplacez-la avec une lame
authentique seulement (de la liste de pièces
qui se trouve dans cette notice). «L’emploi de
pièces non conformes aux caractéristiques
de l’équipement d’origine peut causer
des performances inférieures et réduire la
sécurité.»
4. La lame est coupante et peut causer des
blessures graves. Enveloppez-la avec un
chiffon ou portez des gants et faites très
attention en la manipulant.
5. Assurez-vous que tous les écrous, boulons et
vis sont bien serrés pour que l’équipement
soit toujours en bon état de marche.
6. Ne modifiez jamais les dispositifs
de sécurité. Vérifiez souvent qu’ils
fonctionnent bien.
7. Si vous heurtez un objet, arrêtez
immédiatement le moteur, débranchez le
fil de la bougie et examinez soigneusement
la machine. Réparez les dégâts éventuels
avant de remettre la machine en marche.
8. N’essayez jamais d’ajuster une roue ou de
changer la hauteur de coupe pendant que
la moteur tourne.
9. Les pièces du sac à herbe et le clapet de
la goulotte d’éjection peuvent s’user et
être endommagés et, par conséquent,
exposer les pièces mobiles ou causer
la projection de débris. Par mesure de
sécurité, vérifiez souvent les pièces et
remplacez-les immédiatement avec des
pièces authentiques seulement (de la liste
de pièces qui se trouve dans cette notice).
«L’emploi de pièces non conformes aux
caractéristiques de l’équipement d’origine
peut causer des performances inférieures
et réduire la sécurité.»
10. Ne modifiez pas le réglage du régulateur
et ne laissez pas le moteur s’emballer.
Le régulateur maintient le moteur à son
régime maximal de fonctionnement sans
danger.
11. Vérifiez souvent l’état des conduites
d’essence, du réservoir, du bouchon
d’essence et autres raccords. Remplacez-les si
vous détectez un fendillement ou une fuite.
12. Ne faites pas tourner le moteur si la bougie
n’est pas installée.
13. Prenez soin des étiquettes d’instructions et
remplacez-les au besoin.
14. Respectez les règlements concernant
l’élimination des déchets et liquides
qui risquent de nuire à la nature et à
l’environnement.
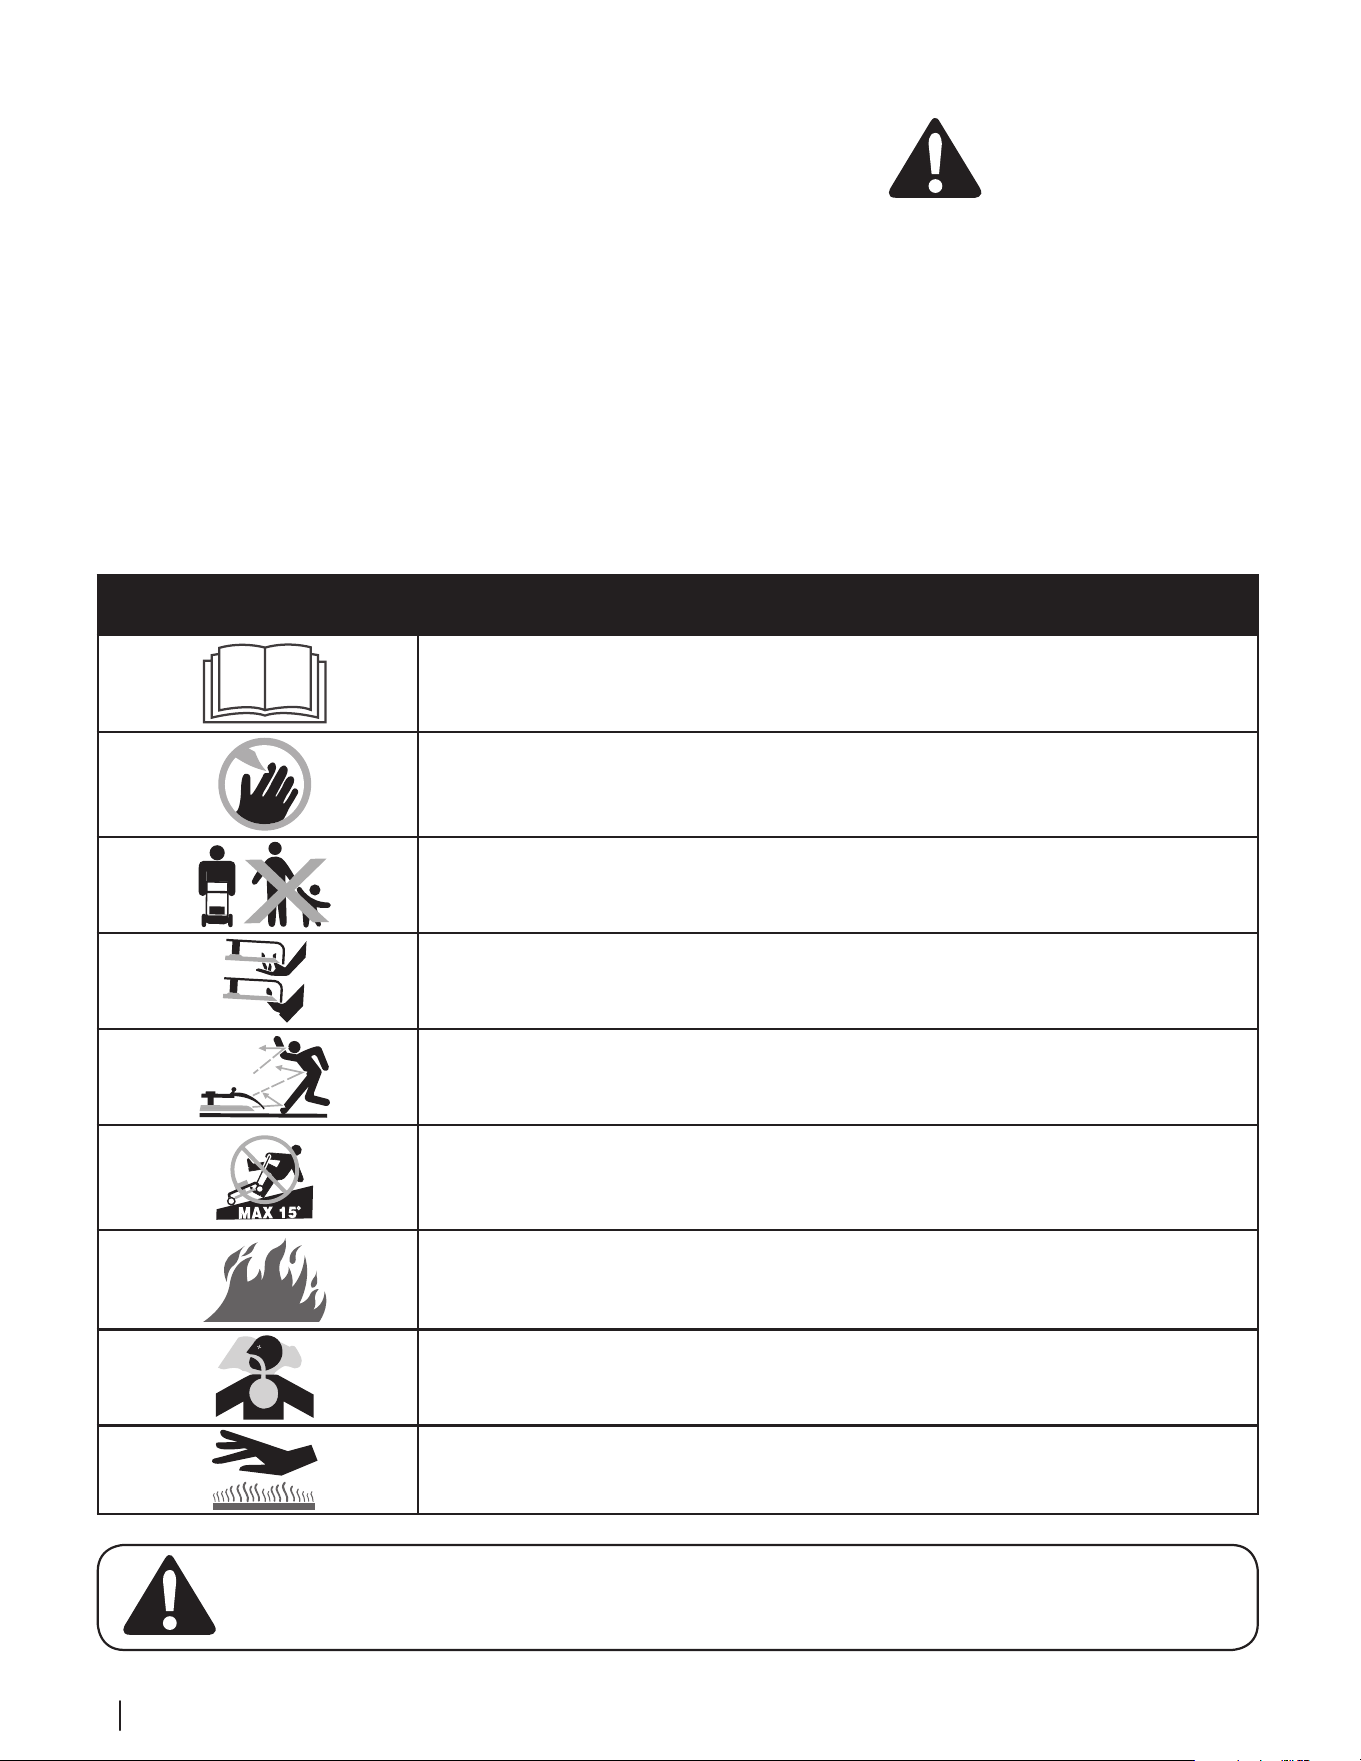
4 Section 1 — importanteS conSigneS de Sécurité
AVERTISSEMENT : Votre responsabilité. Cette machine ne doit être utilisée que par des personnes qui peuvent lire, comprendre et
respecter les avertissements et instructions qui figurent dans cette notice et sur la machine.
CONSERVEZ CES INSTRUCTIONS!
Symboles de sécurité
Cette page illustre et explique les symboles de sécurité qui peuvent se trouver sur cette machine. Veuillez lire et suivre toutes les instructions sur la
machine et vous assurer de bien les comprendre avant d’essayer d’assembler et d’utiliser la machine.
Symbol Description
VEUILLEZ LIRE LA OU LES NOTICES D’UTILISATION.
Veuillez lire et suivre toutes les instructions sur la machine et vous assurer de bien les comprendre avant
d’essayer d’assembler et d’utiliser la machine.
DANGER – LAMES EN MOUVEMENT
Pour éviter les risques de blessures, n’approchez jamais les mains ni les pieds des pièces en mouvement.
N’utilisez pas la machine si le déflecteur de la goulotte ou si le sac à herbe n’est pas en place. S’ils sont
endommagés, remplacez-les immédiatement.
DANGER – SPECTATEURS
Ne tondez pas si des enfants ou autres spectateurs sont à proximité.
DANGER – AMPUTATION DES MAINS/PIEDS
N’’approchez jamais les mains ni les pieds des pièces en mouvement.
DANGER – OBJETS PROJETÉS
Enlevez tous les objets qui pourraient être projetés par les lames dans des directions différentes. Portez des
lunettes de sécurité.
DANGER — SLOPES
Use extra caution on slopes. The machine is heavy and can speed up when going downhill. Be prepared to maintain
control of the machine. To avoid loss of control, operate across slopes, not up and down. When turning, turn uphill,
not down. Do not operate on slopes greater than 15°.
AVERTISSEMENT – L’ESSENCE EST UN PRODUIT INFLAMMABLE.
Laissez le moteur refroidir pendant au moins deux minutes avant de refaire le plein.
AVERTISSEMENT – MONOXYDE DE CARBONE
Ne faites jamais fonctionner un moteur à l’intérieur ou dans un bâtiment mal ventilé. Les gaz d’échappement
contiennent du monoxyde de carbone, un gaz inodore et mortel.
AVERTISSEMENT – SURFACE CHAUDE
Les pièces du moteur, en particulier le silencieux, ont tendance à chauffer pendant le fonctionnement de la
machine. Laissez le moteur et le silencieux refroidir avant de les toucher.
15. D’après la Consumer Products Safety
Commission (CPSC - Commission sur la
sécurité des produits de consommation) et
la “U.S. Environmental Protection Agency”
(EPA - Agence américaine de protection de
l’environnement), ce produit a une durée
de vie utile moyenne de sept (7) ans, ou
140 heures de fonctionnement. Au terme
de cette durée de vie utile moyenne,
achetez une machine neuve ou faites
inspecter la machine chaque année par
une station technique agréée pour vous
assurer que tous les dispositifs mécaniques
et de sécurité sont en bon état de marche
et ne sont pas usés de façon excessive.
Le non-respect de ces recommandations
peut causer des accidents et des blessures
graves ou mortelles.
Ne modifiez pas le moteur
Pour éviter toute blessure grave ou fatale,
ne modifiez pas du tout le moteur. Toute
modification du réglage du régulateur peut
provoquer l’emballement du moteur et entraîner
son fonctionnement à des vitesses dangereuses.
Ne modifiez jamais le réglage de l’usine du
régulateur.
Avis concernant les émissions de gaz
Les moteurs certifiés conformes aux normes
régulatrices de la Californie et de l’agence EPA
fédérales pour SORE (petit équipement hors
route) sont certifiés pour fonctionner avec de
l’essence sans plomb ordinaire et peuvent être
dotés des systèmes de contrôle des émissions de
gaz suivants : Engine Modification (EM) et Three
Way Catalyst (TWC) le cas échéant.
Pare-étincelles
AVERTISSEMENT: Cette
machine est équipée d’un moteur
à combustion interne et elle ne
doit pas être utilisée sur un terrain
non entretenu, recouvert de broussailles ou
d’herbe si le système d’échappement du moteur
n’est pas muni d’un pare-étincelles,
conformément aux lois et règlements
provinciaux ou locaux (le cas échéant).
Si un pare-étincelles est utilisé, il doit être
maintenu en bon état de marche par l’utilisateur
de la machine.
La station technique agréée la plus proche
peut vous fournir un pare-étincelles pour le pot
d’échappement de cette machine.
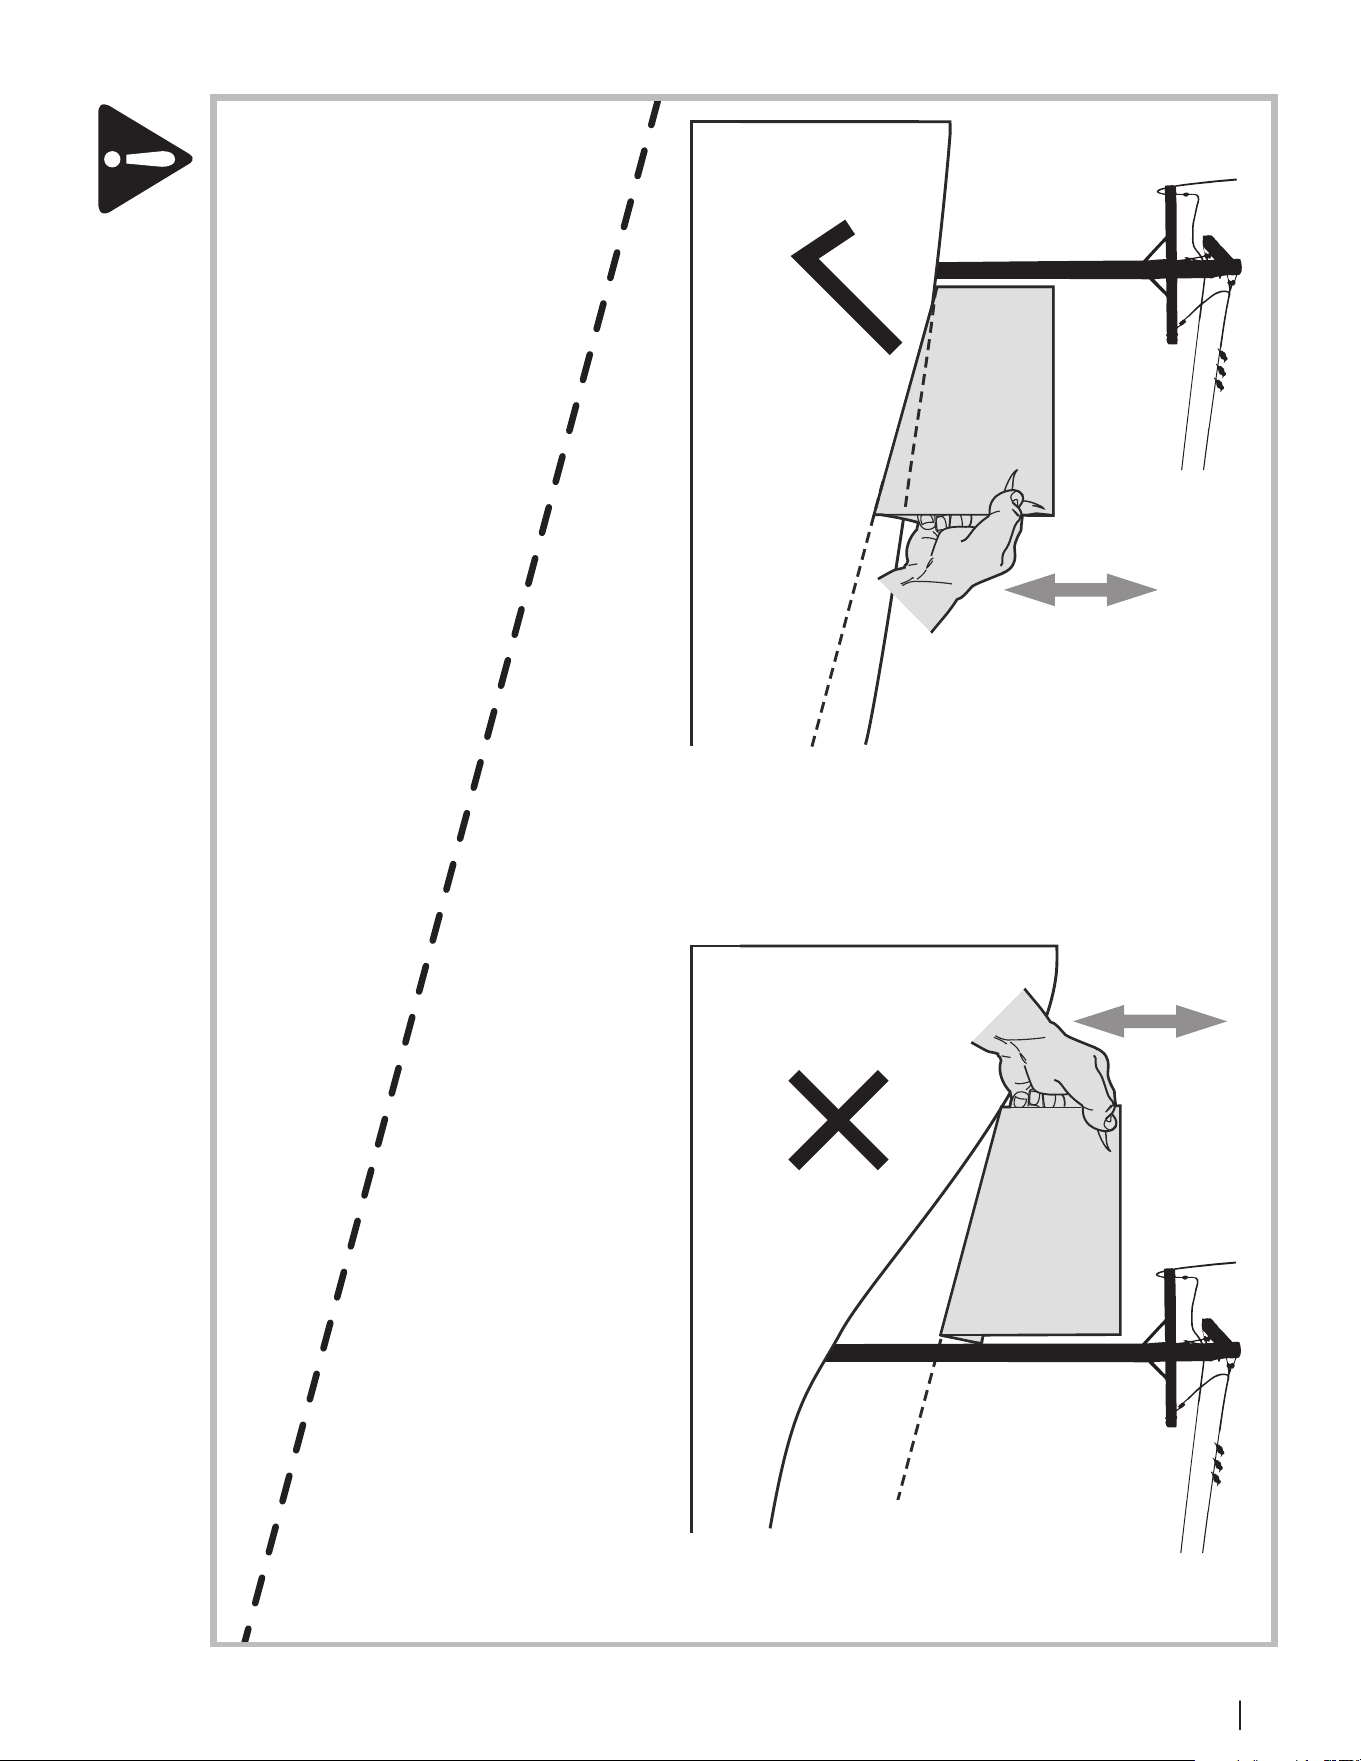
5Section 1 — importanteS conSigneS de Sécurité
(OK)
Ligne pointillée à 15°/25%
Figure 2Figure 1
(TROP ABRUPTE)
Procédez comme suit pour vérier la pente :
1. Détachez cette page et pliez-la en suivant la ligne pointillée.
2. Trouvez un objet vertical sur ou derrière la pente (un poteau téléphonique, une clôture, un arbre, etc.).
3. Alignez un côté de cette page avec l’objet (Voir les Figures 1 et 2).
4. Remontez ou abaissez l’inclinomètre jusqu’à ce que le coin gauche touche la pente (Voir les Figures 1 et 2).
5. S’il y a un espace sous l’inclinomètre, la pente est trop abrupte pour y travailler en toute sécurité. (Voir la Figure 2 ci-dessus).
Inclinomètre
Pente à
15°/25%
UTILISEZ CET INCLINOMÈTRE POUR DÉTERMINER SI UNE PENTE EST TROP
ABRUPTE POUR PERMETTRE L’UTILISATION SANS DANGER DE LA MACHINE.
Pente à
15°/25%
AVERTISSEMENT: Les accidents provoqués par des chutes et des glissades, qui surviennent souvent sur des pentes, peuvent
causer des blessures graves. Travailler sur un terrain en pente demande des précautions supplémentaires. Si vous ne vous
sentez pas à l’aise sur la pente, n’y travaillez pas.
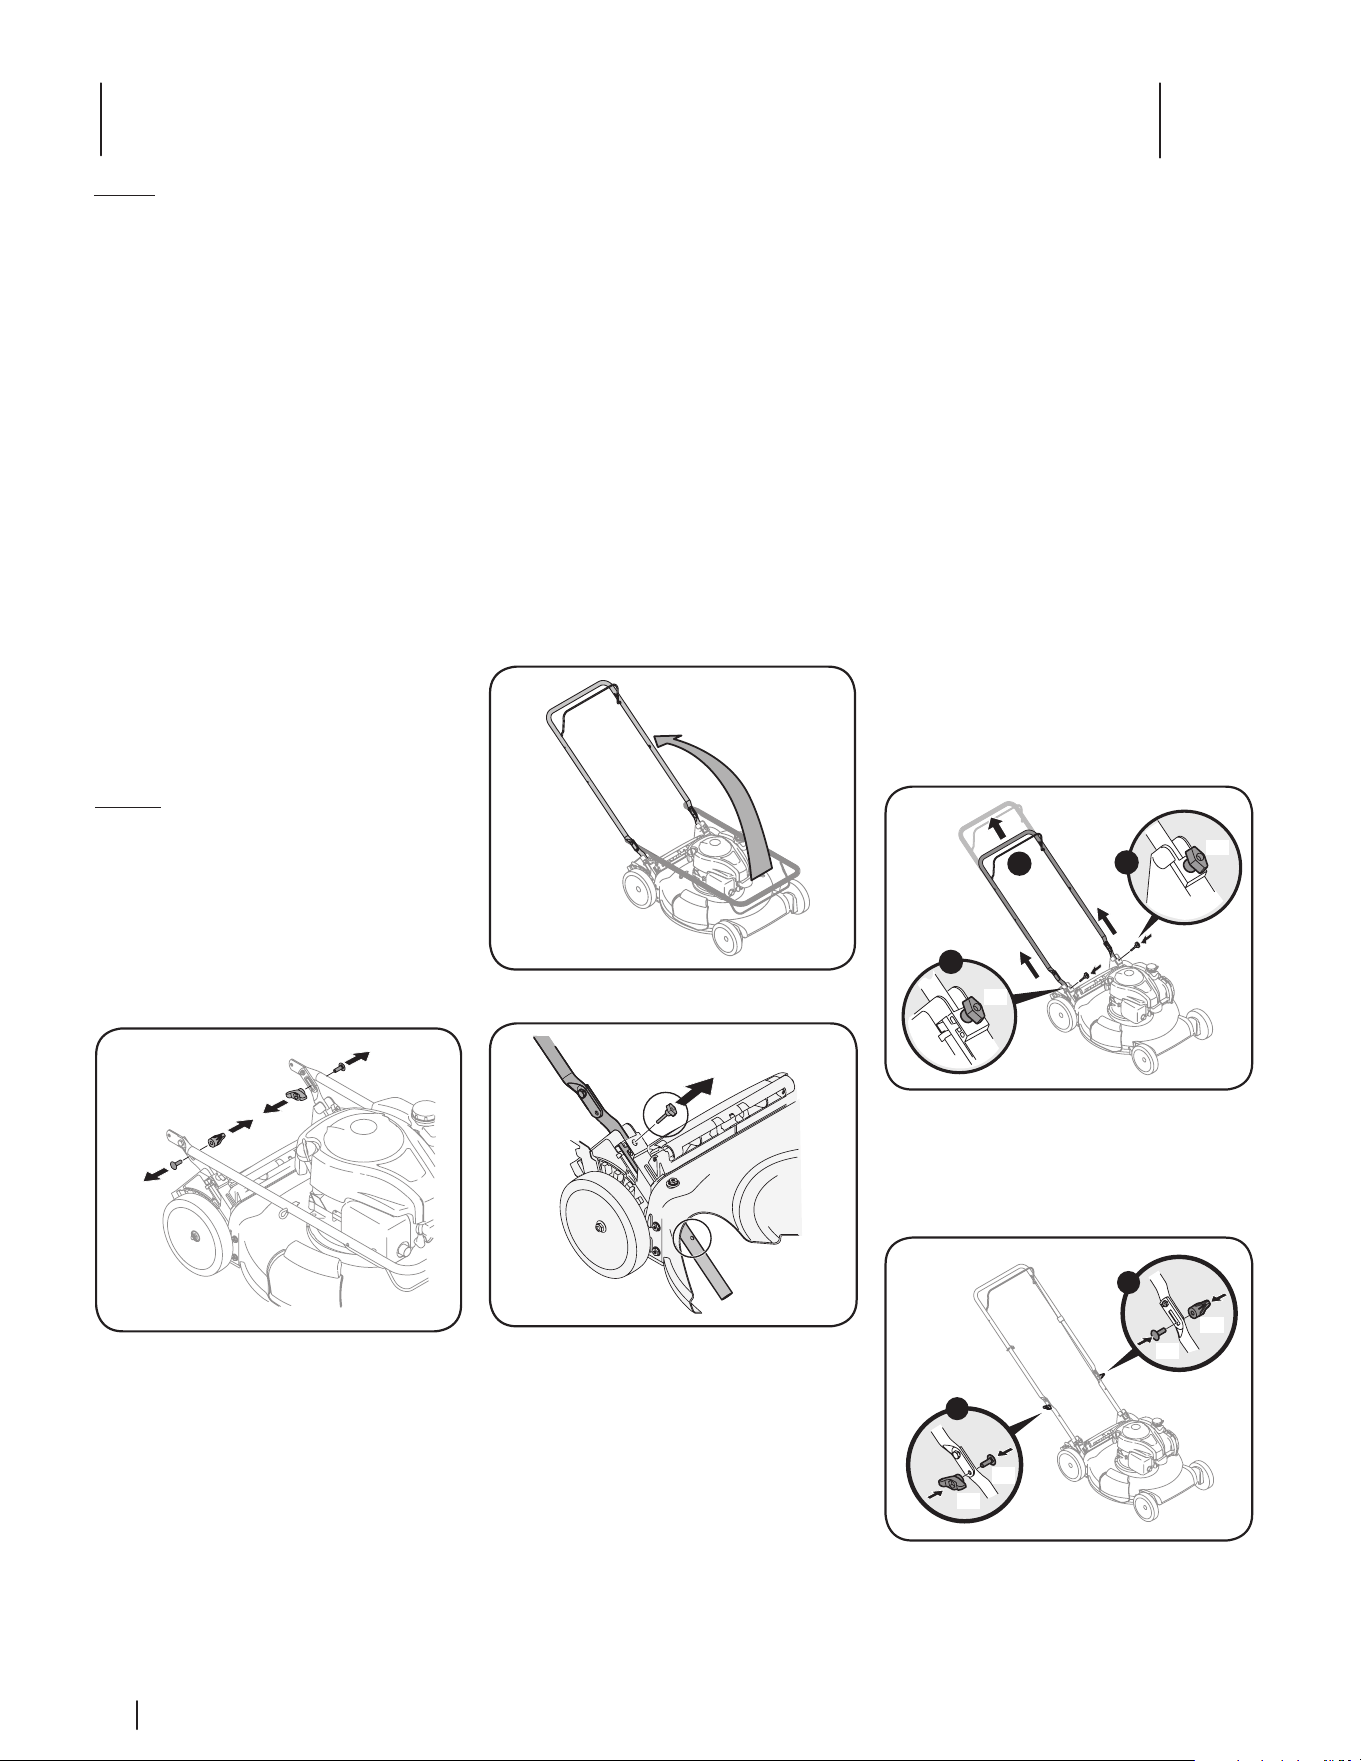
Assemblage et Montage
2
6
NOTE : Ce manuel de l’utilisateur se rapporte à plusieurs modèles. Les caractéristiques peuvent varier selon le modèle. Certaines caractéristiques décrites
dans ce manuel peuvent ne pas s’appliquer à tous les modèles. Votre appareil peut différer du modèle illustré. Tous les modèles sont dotés du même
type de poignée. Référez-vous à la Figure 3-1 de la section Commandes et utilisation aux pages 10 et 11 de ce manuel pour plus d’informations sur les
commandes d’utilisation de votre modèle. .
REMARQUE : Cette machine est expédiée SANS
HUILE NI ESSENCE. Après l’assemblage, faites les
pleins d’essence et d’huile conformément aux
instructions de la notice d’utilisation du moteur
fournie avec la machine. .
Guidon
1. Retirez les pièces détachées et les
garnitures d’emballage qui peuvent se
trouver entre les guidons supérieur et
inférieur.
2. Enlevez les écrous à oreilles (a) et les
boulons ordinaires (b) du guidon, comme
à la Figure 2-1. Ne desserrez pas ou
n’enlevez pas les vis à tête hex. adjacentes.
(a)
(b)
(b)
(a)
Figure 2-5
3. Stabilisez la tondeuse pour qu’elle
ne bouge pas, puis relevez le guidon
supérieur, comme à la Figure 2-2. Ne
pincez pas le câble en redressant le
guidon.
4. Retirez les boulons à tête en T (a) des
supports du guidon, comme la Figure 2-3.
Figure 2-6
(a)
Figure 2-7
5. Suivez les instructions ci-dessous pour
terminer l’assemblage du guidon .
a. Relevez le guidon jusqu’à ce que les
trous du guidon inférieur (voir l’éclaté
de la Figure 2-3) s’alignent avec les
trous des supports du guidon. Voir la
Figure 2-4.
NOTE : Quand vous relevez le guidon, assurez-
vous de ne pas le dégager complètement.
b. Insérez les boulons à tête en T, enlevés
au paragraphe 1b, dans les supports
du guidon et dans le guidon inférieur
et serrez à fond pour maintenir le
guidon en place. Voir la Figure 2-4.
A
B
B
(a)
(a)
Figure 2-8
c. Remettez les écrous à oreilles et les
boulons ordinaires dans les trous
inférieurs du guidon, comme à la
Figure 2-5.
C
C
(a)
(a)
(b)
(b)
Figure 2-9
Merci d’avoir acheté votre nouvel équipement. Ce véhicule a été
soigneusement conçu pour vous offrir des performances remarquables s’il
est correctement utilisé et entretenu.
Veuillez lire cette notice d’utilisation au complet avant d’utiliser
l’équipement. Elle vous explique comment préparer la machine et comment
l’utiliser et l’entretenir facilement et en toute sécurité. Veuillez vous assurer
que toute personne qui utilisera la machine suivra soigneusement les
consignes de sécurité énoncées. Le non respect de ces consignes peut
causer des blessures corporelles ou des dégâts matériels.
Tous les renseignements fournis ici sont les plus récents qui sont
disponibles à propos de ce produit au moment de l’impression de
cette notice d’utilisation. Consultez souvent cette notice d’utilisation
pour vous familiariser avec la machine, ses caractéristiques et son
fonctionnement. Sachez que cette notice peut mentionner une vaste
gamme de spécifications techniques concernant différents modèles. Les
caractéristiques et les avantages mentionnés et/ou illustrés dans cette
notice peuvent ne pas s’appliquer à tous les modèles. Le fabricant se
réserve le droit de modifier les caractéristiques techniques du produit, les
modèles et l’équipement sans préavis et sans obligation.
Le fabricant du moteur est responsable pour tous les problèmes concernant
la performance, la puissance, les caractéristiques techniques, la garantie
et l’entretien du moteur. Veuillez consulter la notice d’utilisation du
moteur, fournie séparément avec la machine, pour obtenir de plus amples
renseignements.
En cas de problème ou de question concernant cette machine, adressez-
vous au concessionnaire de service de votre localité ou appelez-nous
directement. Nous voulons nous assurer que nos clients seront toujours
satisfaits.
Les mentions de droite et de gauche dans cette notice d’utilisation
s’entendent à partir du poste de conduite.
Merci !
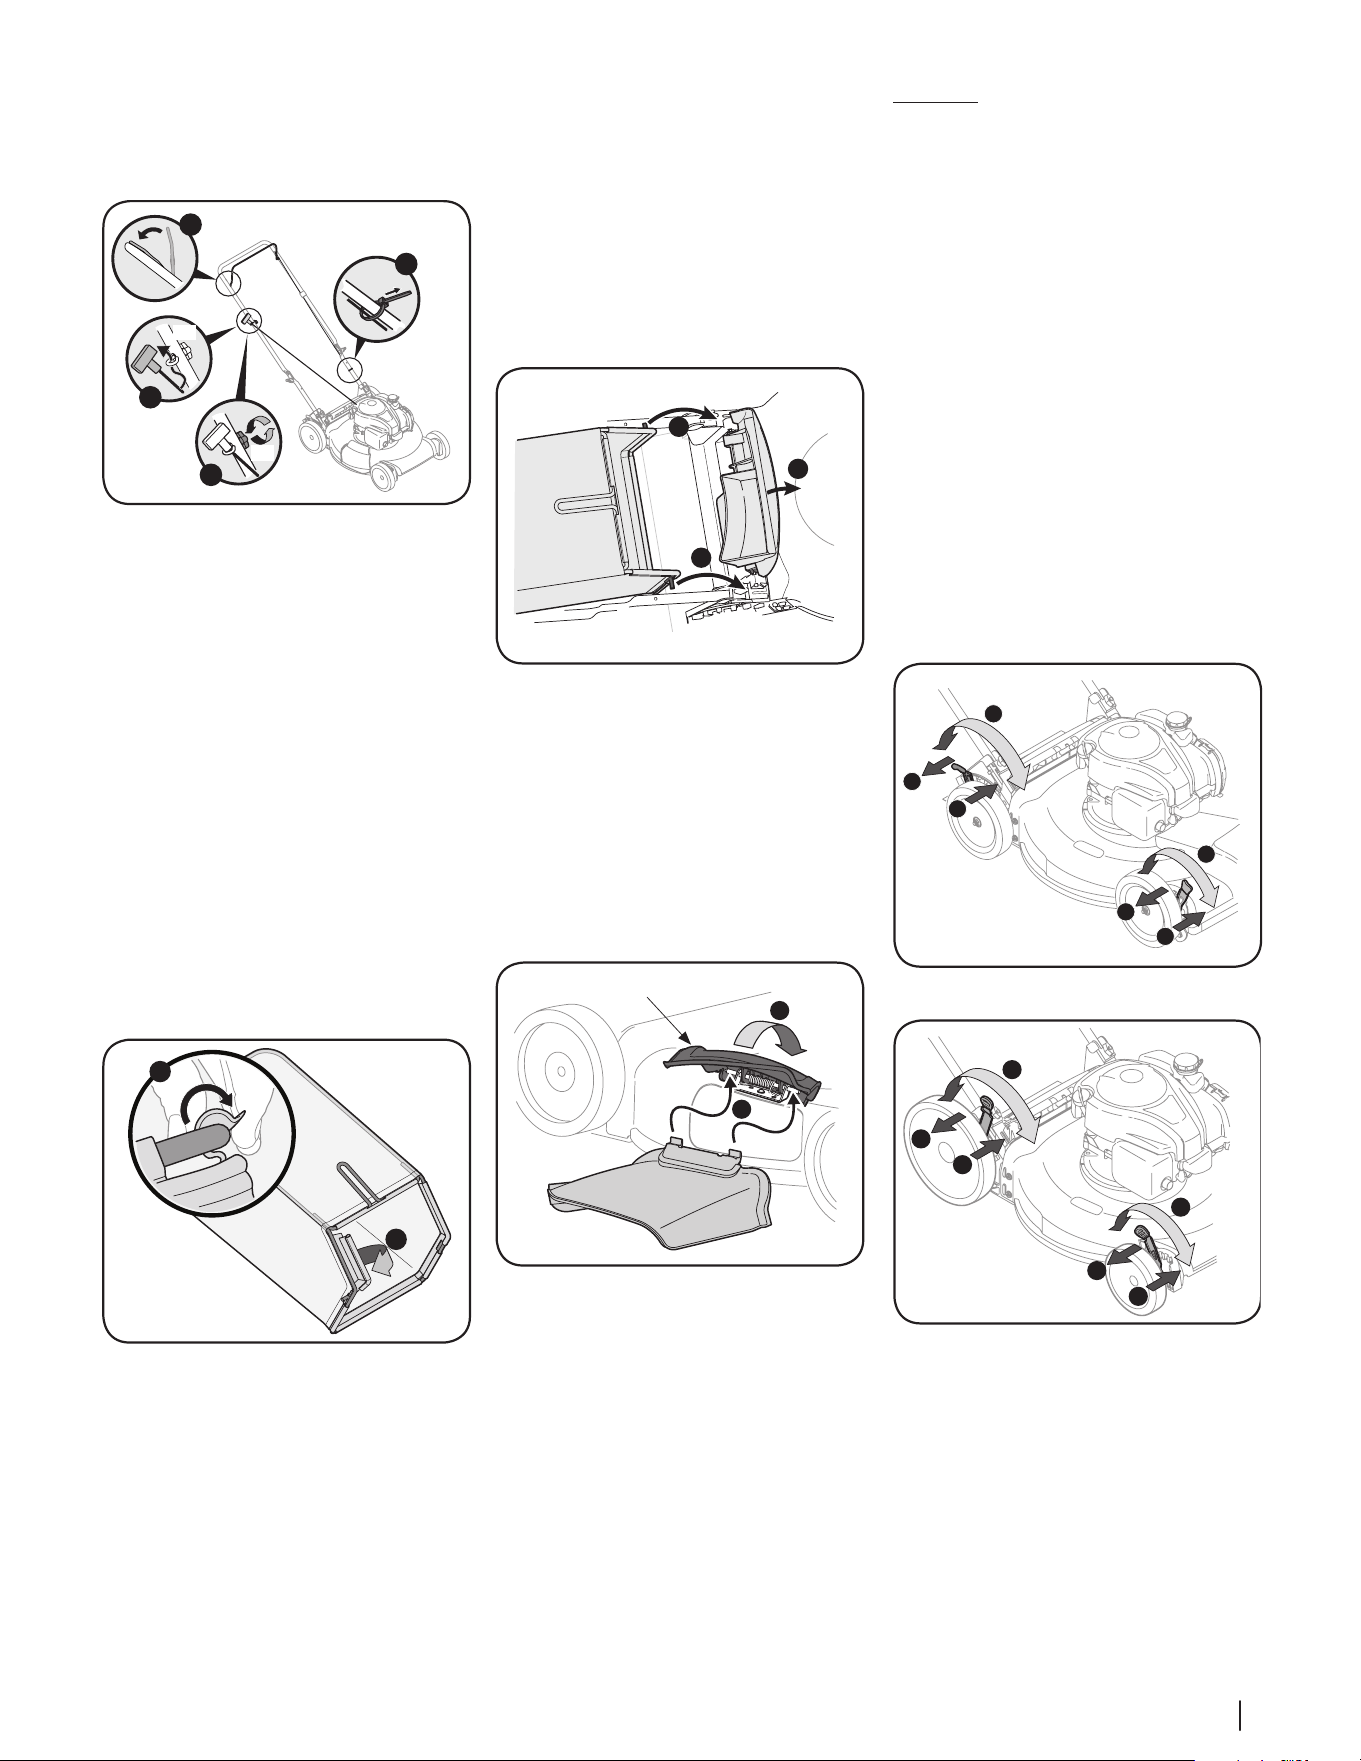
7Section 2 — ASSemblAge et montAge
2. Procédez comme suit pour installer le sac à
herbe. Voir la Figure 2-8.
a. Relevez le clapet d’éjection arrière.
b. Installez le sac à herbe dans les fentes
aménagées dans les supports du
guidon. Lâchez le clapet pour qu’il
repose sur le sac à herbe.
Pour enlever le sac à herbe, relevez le clapet
d’éjection arrière de la tondeuse. Relevez le sac à
herbe et dégagez-le des fentes des supports du
guidon. Lâchez le clapet d’éjection arrière pour
fermer l’ouverture sur l’arrière de la tondeuse.
A
B
B
Figure 2-12
Déflecteur d’éjection latérale (si équipé)
La tondeuse a été expédiée pour fonctionner
comme une tondeuse déchiqueteuse. Si la
tondeuse est adaptée pour éjecter l’herbe
sur le côté, assurez-vous que le sac à herbe a
été démonté de la tondeuse et que le clapet
d’éjection arrière (si équipé) est fermé.
1. Relevez le bouchon de déchiquetage
à charnière qui se trouve sur le côté du
plateau de coupe. Voir la Figure 2-9.
2
1
Bouchon de déchiquetage
Figure 2-13
2. Glissez les deux crochets du déflecteur
d’éjection latérale sous la goupille de la
charnière du bouchon de déchiquetage
à charnière. Rabaissez le bouchon de
déchiquetage à charnière.
NOTE: Ne retirez jamais le bouchon de
déchiquetage à charnière, même quand
vous ne déchiquetez pas.
6. Le guide de la corde du démarreur est
installé sur la droite du guidon supérieutr.
Desserrez le boulon à oreilles qui
maintient le guide de la corde en place.
Voir la Figure 2-6.
A
B
C
D
(a)
(a)
Figure 2-10
a. Tenez la commande de la lame contre
le guidon supérieur.
b. Dégagez lentement la poignée du
démarreur à lanceur du moteur et
faites passer la corde dans son guide..
c. Serrez le bouton à oreilles du guide (a).
d. Utilisez l’attache-câble pour maintenir
les câbles contre le guidon inférieur.
Sac à herbe (si équipé)
1. Procédez comme suit pour installer le
sac à herbe sur la tondeuse s’il n’est pas
déjà installé. Vérifiez que le sac à herbe
est bien à l’endroit avant l’assemblage
(l’étiquette d’avertissement doit se
trouver sur l’extérieur). Voir la Figure 2-7.
a. Glissez le sac sur l’armature (côté en
plastique noir sur le dessous).
b. Attachez le sac sur l’armature en
accrochant les glissières sur l’armature.
B
A
Figure 2-11
Réglages
Hauteur de coupe
La manette de réglage de la hauteur de coupe
se trouve au-dessus des roues avant et arrière
droites.
1. Tirez la manette de réglage vers la roue.
2. Placez la manette à la position désirée
pour changer la hauteur de coupe. Voir les
Figures 2-10 et 2-11.
REMARQUE : Les manettes de réglage
de la hauteur bougent dans la direction
opposée sur les tondeuses à petites roues.
Les manettes de réglage bougent dans
la même direction sur les tondeuses à
grandes roues.
IMPORTANT: Les roues avant et arrière
doivent être réglées à la même position
relative. Pour travailler sur un terrain
accidenté, placez le levier à une hauteur
plus élevée. Vous éviterez ainsi d’arracher
l’herbe.
3. Laissez la manette revenir vers le plateau
de coupe. Voir les Figures 2-10 et 2-11.
3
2
1
2
3
1
Baiser
Baiser
Lever
Lever
Petite roue
Figure 2-14
3
2
2
1
3
1
Grande roue
Baiser
Baiser
Lever
Lever
Figure 2-15
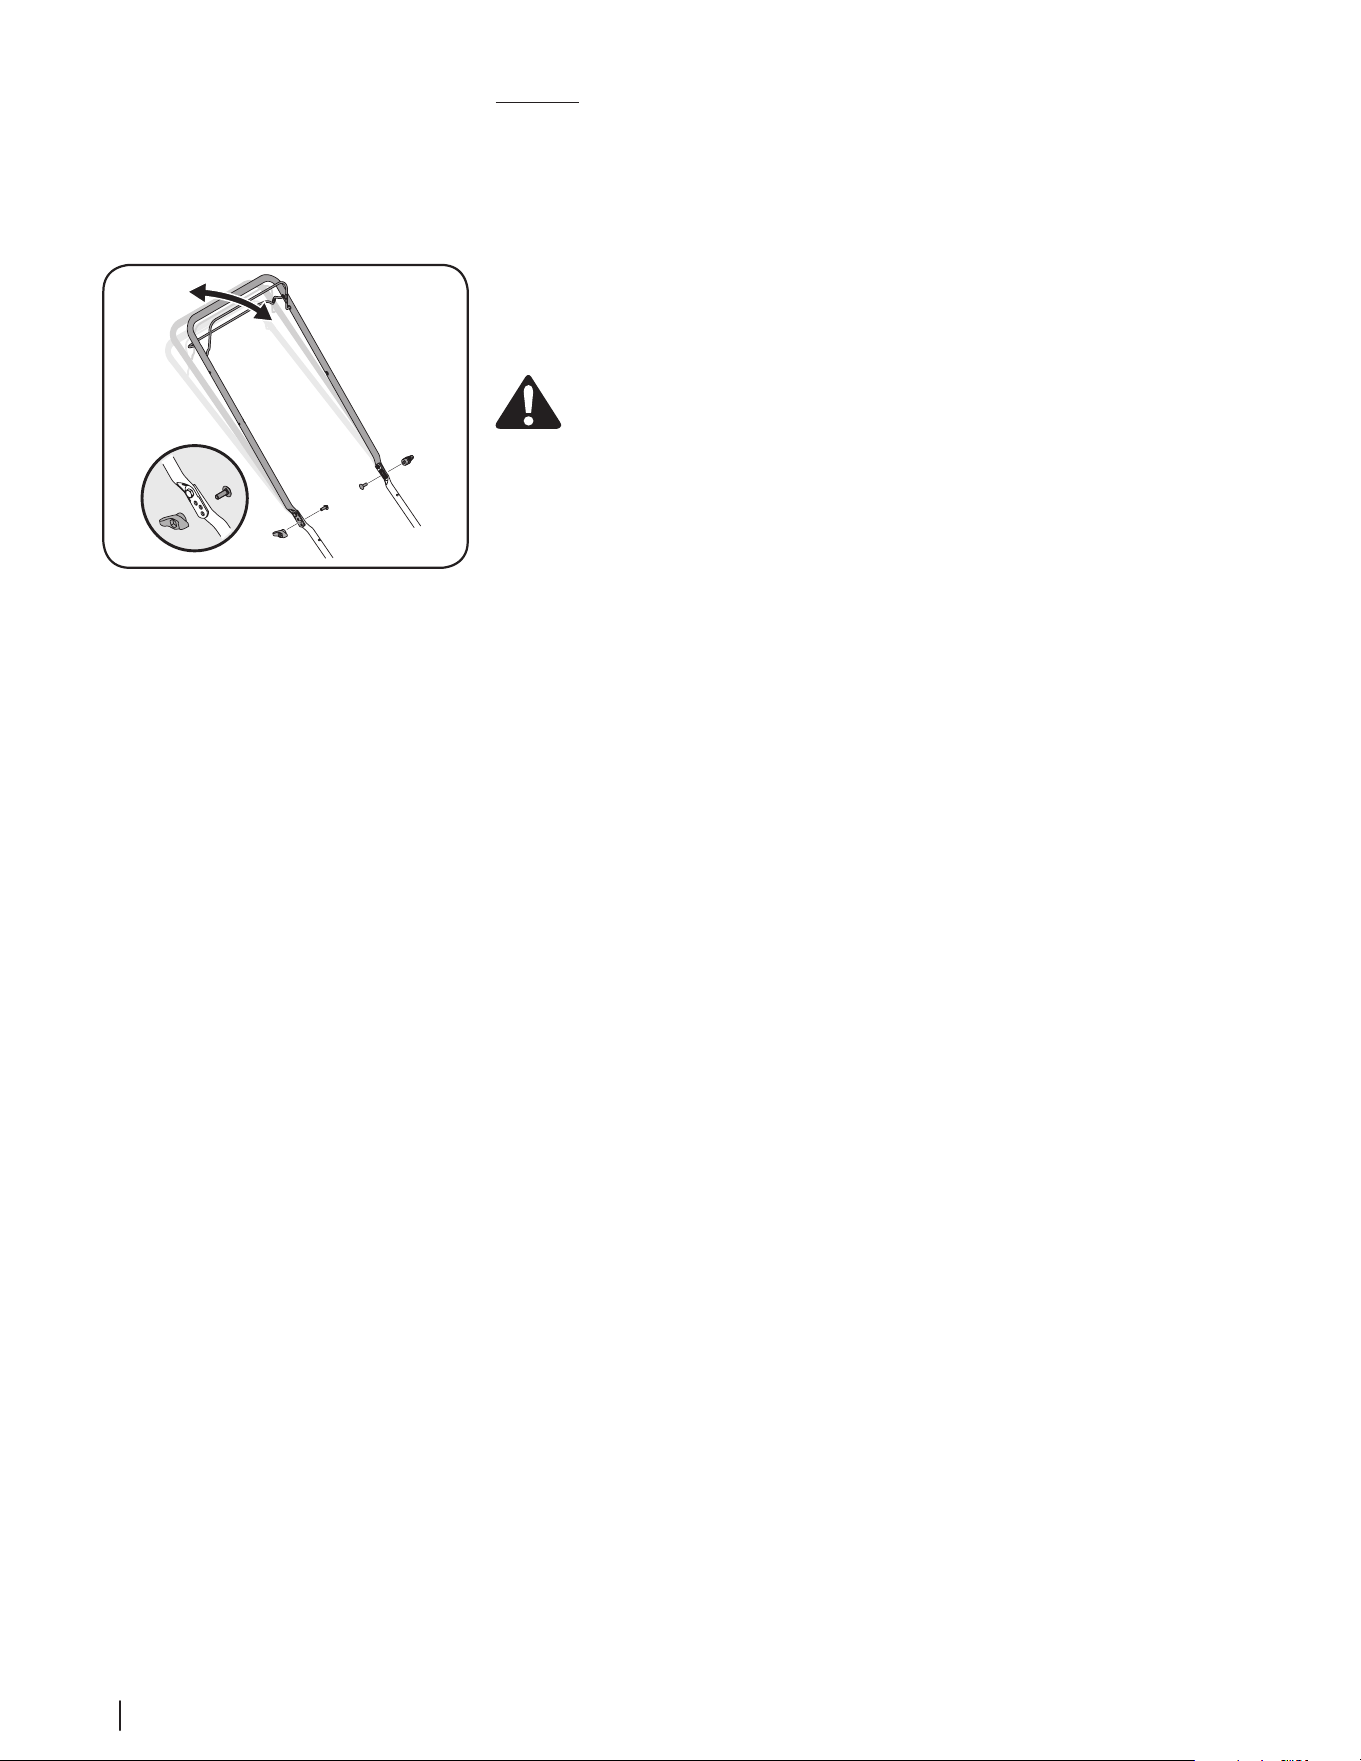
8 Section 2 — ASSemblAge et montAge
tInclinaison du guidon (si équipé)
Il est possible d’ajuster l’inclinaison du guidon
pour faciliter l’utilisation de la tondeuse.
Procédez comme suit :
1. Retirez les écrous à oreilles (a) et les
boulons ordinaires (b) du guidon. Voir la
Figure 2-12.
(b)
(b)
(a)
(a)
Figure 2-16
2. Choisissez la position la plus confortable
parmi les trois positions possibles. Voir le
détail de la Figure 2-12.
3. Remettez en place les écrous à oreilles (a)
et les boulons ordinaires (b) retirés plus
tôt.
Montage
Pleins d’essence et d’huile
Consultez la notice d’utilisation du moteur pour
tout renseignement supplémentaire concernant
le moteur.
1. Faites le plein avec l’huile fournie la
première fois que vous utilisez la machine
après son assemblage.
2. Faites le plein d’essence conformément
aux instructions fournies dans la notice
d’utilisation du moteur.
AVERTISSEMENT : Faites très attention
en manipulant de l’essence. L’essence
est extrêmement inflammable et les
vapeurs sont explosives. Ne faites jamais
le plein d’essence à l’intérieur, pendant que le
moteur tourne ou quand le moteur est chaud.
Éteignez toute cigarette ou pipe, tout cigare ou
toute autre source incandescente.
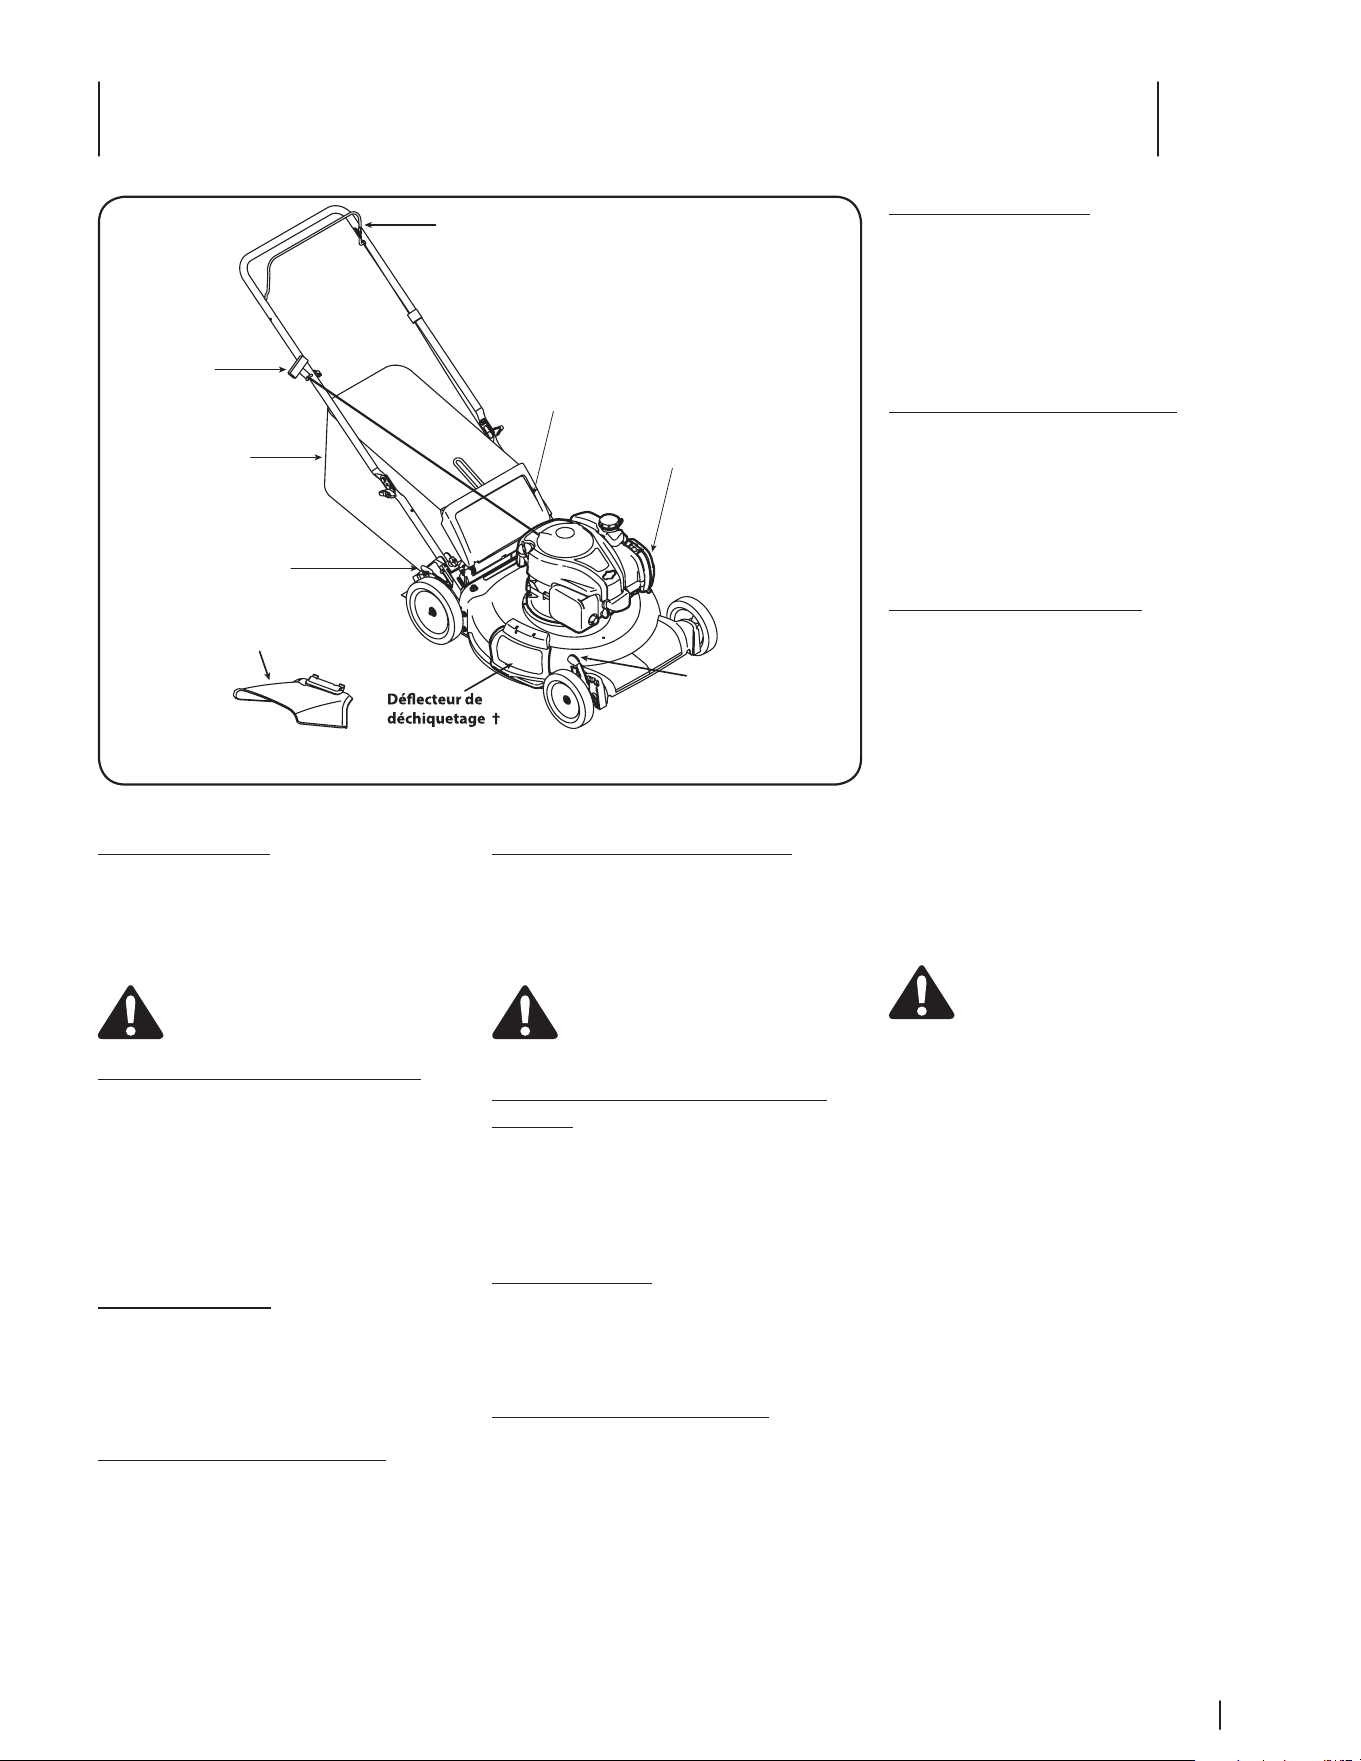
Commandes et caractéristiques
3
9
Commande de la lame
La commande de la lame se trouve sur le guidon
supérieur de la tondeuse. Il faut serrer cette
commande contre le guidon pour que la tondeuse
fonctionne. Le fait de lâcher la commande de la
lame arrête le moteur et la lame.
AVERTISSEMENT: La commande de la
lame est un dispositif de sécurité.
N’essayez jamais d’éviter son emploi.
Leviers de réglage de la hauteur de coupe
Un levier de réglage se trouve sur la roue arrière
droite et un autre est placé sur la roue avant
droite. Les deux leviers doivent se trouver à la
même position relative pour assurer une tonte
uniforme. Pour modifier la hauteur de coupe,
consultez le chapitre « Assemblage et montage ».
NOTE : Sur certains modèles, le levier de réglage
est situé sur la roue avant gauche.
Sac à herbe (si equipé)
Le sac à herbe, placé à l’arrière de la tondeuse,
sert à ramasser les brins d’herbe coupée pour
les jeter ailleurs. Lorsque le sac est plein, il faut
le détacher de la tondeuse et le vider avant de
continuer à tondre.
Bouchon de déchiquetage (si equipé)
Il est utilisé pour le déchiquetage de l’herbe.
Au lieu de ramasser les brins d’herbe coupée
dans un sac à herbe ou d’utiliser une goulotte
d’éjection latérale, certaines tondeuses offrent
l’option de les renvoyer dans la pelouse après les
avoir déchiquetés.
Goulotte d’éjection latérale (si equipé)
La tondeuse expédiée est prête pour
déchiqueter l’herbe. Si vous préférez éjecter
l’herbe sur le côté, suivez les instructions du
chapitre « Assemblage et montage » pour
installer la goulotte d’éjection latérale.
AVERTISSEMENT : Éloignez les pieds et
les mains de la proximité de la goulotte
sur le plateau de coupe. Lisez l’étiquette
d’avertissement placée sur la machine.
Système de nettoyage du plateau de coupe
(si equipé)
Un orifice à eau peut être incorporé au plateau
de coupe de cette tondeuse et fait partie du
système de nettoyage de celui-ci. Servez-vous
du système de nettoyage pour éliminer les brins
d’herbe du dessous du plateau de coupe.
Démarreur à lanceur
Il est installé sur la droite du guidon supérieur.
Tenez-vous derrière la tondeuse et tirez sur
le démarreur à lanceur pour faire démarrer la
tondeuse.
Mise en marche et arrêt du moteur
Consultez la notice d’utilisateur du moteur
emballé avec votre tondeuse pour les
instructions concernant la mise en marche et
l’arrêt du moteur.
Utilisation de la tondeuse
Vérifiez qu’il n’y a plus de pierres, de morceaux
de bois, de fils métalliques ou autres objets sur la
pelouse, qui risquent d’endommager la tondeuse
ou le moteur. Ces objets pourraient être projetés
par la tondeuse dans une direction ou une autre
et blesser grièvement le conducteur ou toute
autre personne présente, ou de l’équipement.
Fonction de déchiquetage (si equipé)
Pour déchiqueter l’herbe, enlevez le sac à herbe
et la goulotte d’éjection latérale de la tondeuse.
Pour de meilleurs résultats, ne déchiquetez
pas une herbe mouillée. Le déchiquetage est
déconseillé si l’herbe mesure plus de quatre
pouces de longueur. Utilisez plutôt le sac à
herbe.
Emploi du sac à herbe (si equipé)
Vous pouvez utiliser le sac à herbe pour ramasser
l’herbe coupée pendant que vous travaillez.
1. Installez le sac à herbe selon les
instructions du chapitre « Installation ». Les
brins d’herbe sont automatiquement mis
en sac pendant que vous travaillez. Tondez
l’herbe jusqu’à ce que le sac soit plein.
2. Arrêtez le moteur en lâchant la commande
de la lame et assurez-vous que celle-ci est
tout à fait immobile.
3. Relevez le clapet d’éjection et soulevez le
sac à herbe en l’éloignant de la tondeuse
pour le retirer. Videz le sac et remettez-le
en place.
AVERTISSEMENT: Arrêtez le moteur si
vous heurtez un objet quelconque.
Débranchez le fil de la bougie, cherchez
soigneusement tout signe de dégât à la
tondeuse et réparez-la avant de la
remettre en marche et de vous en servir.
Des vibrations importantes de la
tondeuse indiquent des dégâts. Faites
examiner et réparer la machine
rapidement.
Figure 3-1
Levier de réglage de
la hauteur de coupe
Sac à herbe
†
Démarreur à
lanceur
Levier de réglage de
la hauteur de coupe
Goulotte d’éjection
latérale
†
Commande
de la lame
Nettoyage du plateau
de coupe †
Clapet d’éjection arrière
† If Equipped
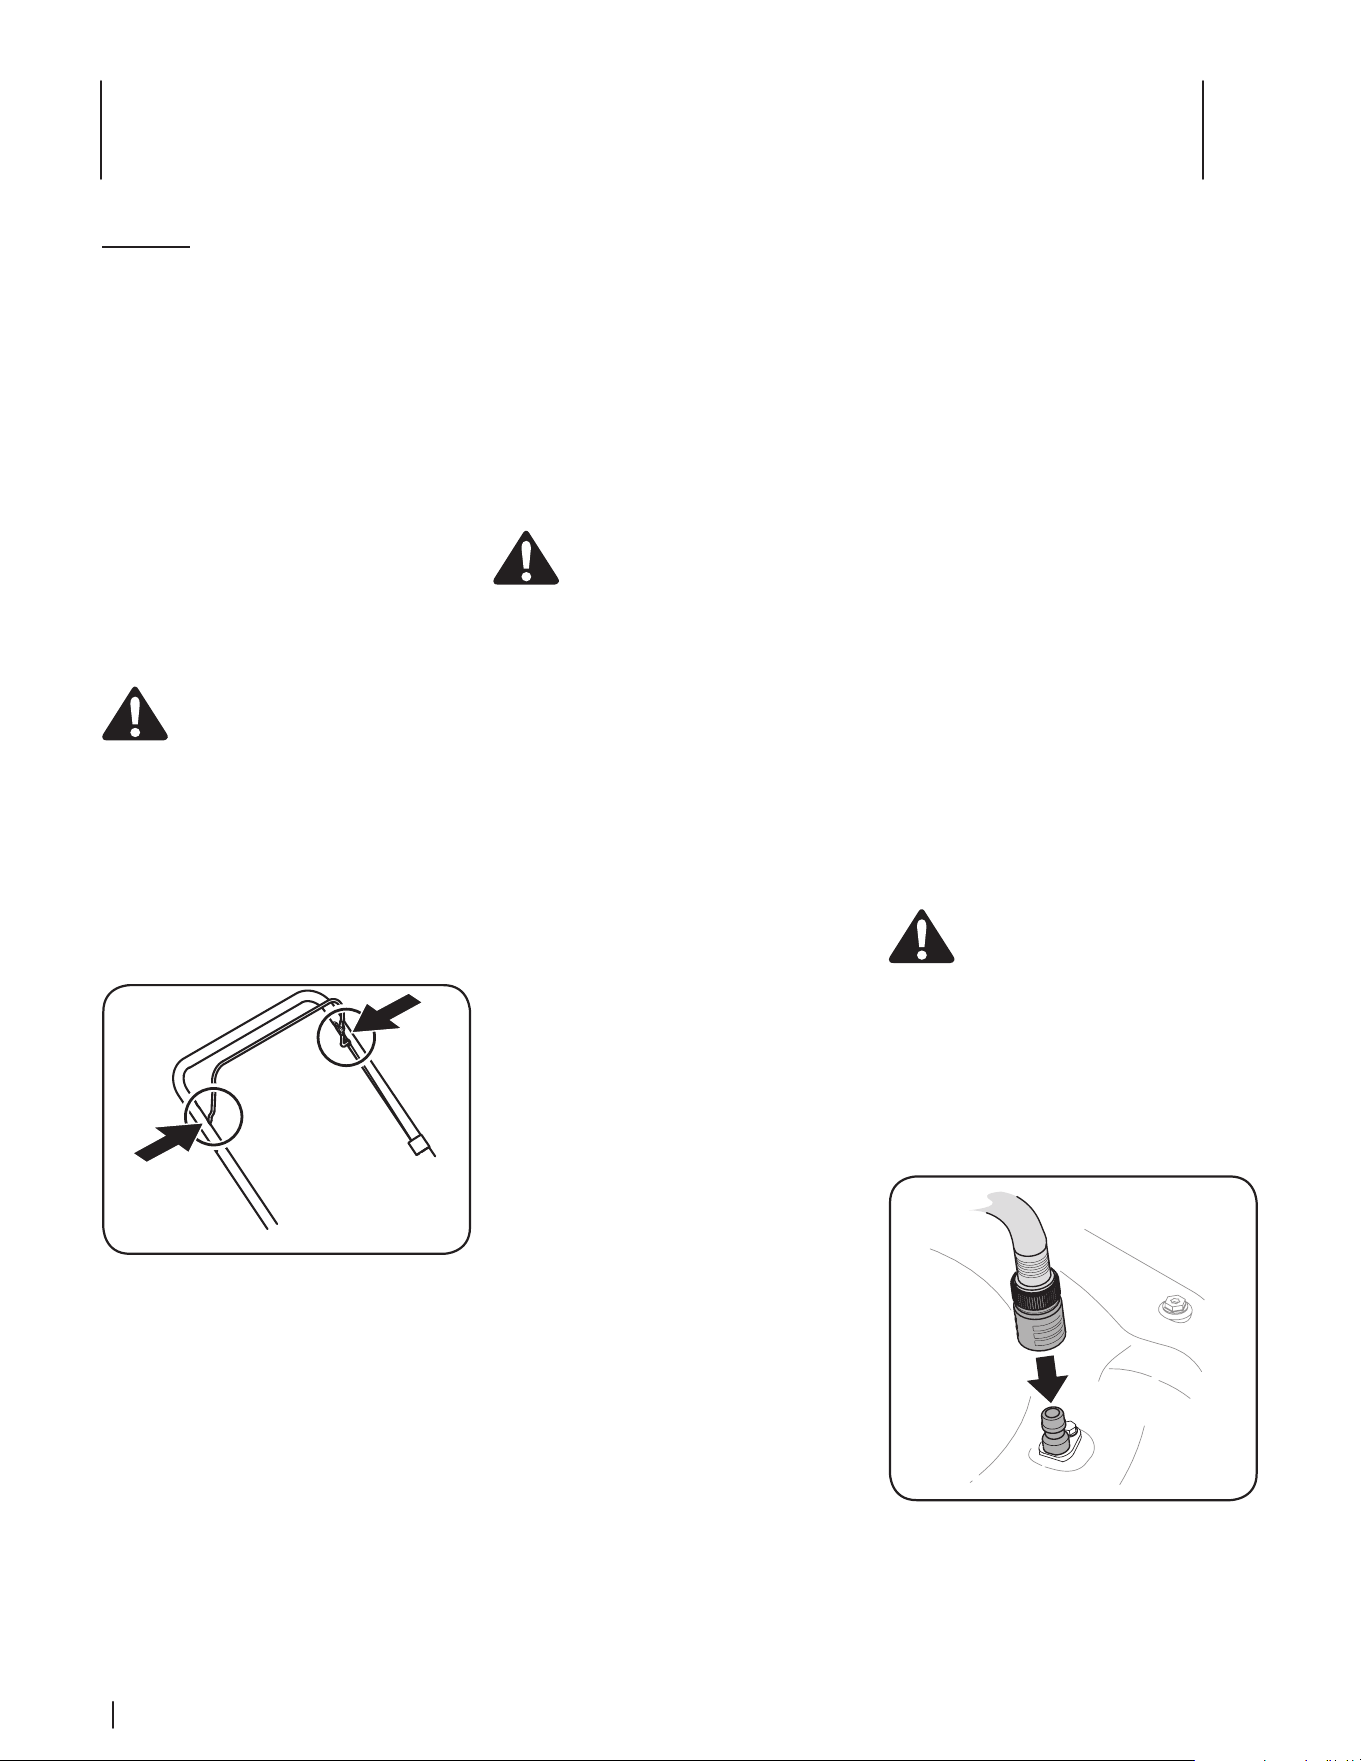
Service
4
10
Entretien
Recommandations d’ordre général
• Suivez toujours les consignes de sécurité
lors de tout entretien.
• La garantie de cette tondeuse ne s’applique
pas à toute pièce qui a fait l’objet d’un
emploi abusif ou d’une négligence. Pour
bénéficier au maximum de la garantie,
l’utilisateur doit entretenir la tondeuse
conformément aux instructions de cette
notice.
• La garantie sera nulle et non avenue si une
modification est apportée au régulateur du
moteur.
• Vérifiez tous les réglages au moins une fois
par saison.
• Vérifez régulièrement que toute la
boulonnerie est bien serrée.
AVERTISSEMENT: Arrêtez toujours le
moteur et débranchez le fil de la bougie
et mettez-le à la masse contre le moteur
avant tout nettoyage, toute lubrification
ou autre entretien sur la machine.
Lubrification
1. Lubrifiez les points de pivot de la poignée
de commande de la lame au moins une
fois par saison avec une huile légère. La
commande de la lame doit fonctionner
facilement dans les deux sens. Voir la See
Figure 4-1.
Figure 4-1
2. Lubrifiez les roulements à billes (s’il en est)
des roues au moins une fois par saison
avec de l’huile fluide. Tous les autres types
de roues n’ont pas besoin d’être lubrifiées.
Toutefois, si les roues doivent être
démontées pour une raison quelconque,
lubrifiez la surface du boulon d’essieu et
la surface intérieure de la roue avec une
huile automobile légère.
3. La transmission a été lubrifiée et scellée
à l’usine et il n’est pas néceesaire de la
lubrifier.
4. Consultez la notice d’utilisation du moteur
pour les instructions de lubrification.
Entretien du plateau de coupe
Nettoyez le dessous du plateau de coupe après
chaque utilisation de la tondeuse pour éviter toute
accumulation de débris. Procédez comme suit :
1. Laissez le moteur tourner jusqu’à ce qu’il
tombe en panne d’essence. N’essayez pas
de verser l’essence du moteur. Débranchez
le fil de la bougie. Consultez la notice
d’utilisation du moteur.
2. Inclinez la tondeuse pour qu’elle repose
sur l’habitacle. Le côté du filtre à air doit
se trouver sur le dessus. Tenez bien la
tondeuse.
AVERTISSEMENT: Ne basculez jamais la
tondeuse à plus de 90º dans toute
direction et ne la laissez pas dans cette
position longtemps. L’huile peut couler
dans la partie supérieure du moteur et
causer des problèmes au démarrage.
3. Grattez et nettoyez le dessous du plateau
de coupe avec un outil adéquat. N’utilisez
pas un jet d’eau.
4. Redressez la tondeuse sur ses 4 roues.
Moteur
Pour améliorer la performance de la tondeuse,
consultez la liste des travaux d’entretien
importants du moteur ci-dessous. Consultez
la notice d’utilisation du moteur pour les
instructions et la liste détaillée des travaux
d’entretien.
• Utilisez l’huile à moteur recommandée dans
la notice d’utilisation du moteur fournie
avec la tondeuse.
• Dans des conditions normales nettoyez le
filtre à air selon les recommandations de
la notice d’utilisation du moteur fournie
avec la tondeuse. Nettoyez-le à intervalles
plus rapprochés dans des conditions très
poussiéreuses. Une mauvaise performance
du moteur et sa «noyade» sont des
indications que le filtre à air doit être
nettoyé.
• Nettoyez la bougie et ajustez l’écartement
une fois par saison. Il est recommandé de
remplacer la bougie au début de chaque
saison. Vérifiez le type de bougie à utiliser
et l’écartement correct dans la notice
d’utilisation du moteur.
REMARQUE: Ce système d’allumage par étincelle
de véhicule respecte toutes les exigences du
Règlement sur le matériel brouilleur du Canada.
• Nettoyez le moteur régulièrement avec un
linge ou une brosse. Gardez le système de
refroidissement (à proximité du ventilateur)
propre pour assurer la bonne circulation
d’air essentielle aux bonnes performances
et à la longévité du moteur. Enlevez tous
les brins d’herbe, la saleté et autres débris
combustibles se trouvant à proximité du
silencieux.
• Moteurs remisé plus de 30 jours doivent
être traités avec un stabilisateur d’essence
pour empêcher toute détérioration et toute
formation de gomme dans les conduits
d’essence ou sur les pièces principales du
carburateur.
Système de nettoyage du plateau de coupe
(si equipé)
Un orifice à eau peut être incorporé au plateau
de coupe de cette tondeuse et fait partie du
système de nettoyage de celui-ci.
Servez-vous du système de nettoyage pour
éliminer les brins d’herbe du dessous du plateau
de coupe et pour empêcher toute accumulation
de produits chimiques corrosifs. Procédez
comme suit APRÈS CHAQUE UTILISATION:
1. Stationnez la tondeuse sur une surface
plane et dégagée sur la pelouse,
suffisamment proche d’un robinet d’eau
pour pouvoir y brancher un boyau
d’arrosage.
ATTENTION : Vérifiez que la goulotte
d’éjection de la tondeuse n’est pas
dirigée vers un bâtiment, un garage, des
véhicules, etc.
2. Vissez le raccord pour boyau d’arrosage
(fourni avec cette notice d’utilisation) sur
l’extrémité du boyau d’arrosage.
3. Attachez le raccord pour boyau d’arrosage
à l’orifice incorporé à la surface du plateau
de coupe. Voir la Figure 4-2.
Figure 4-2
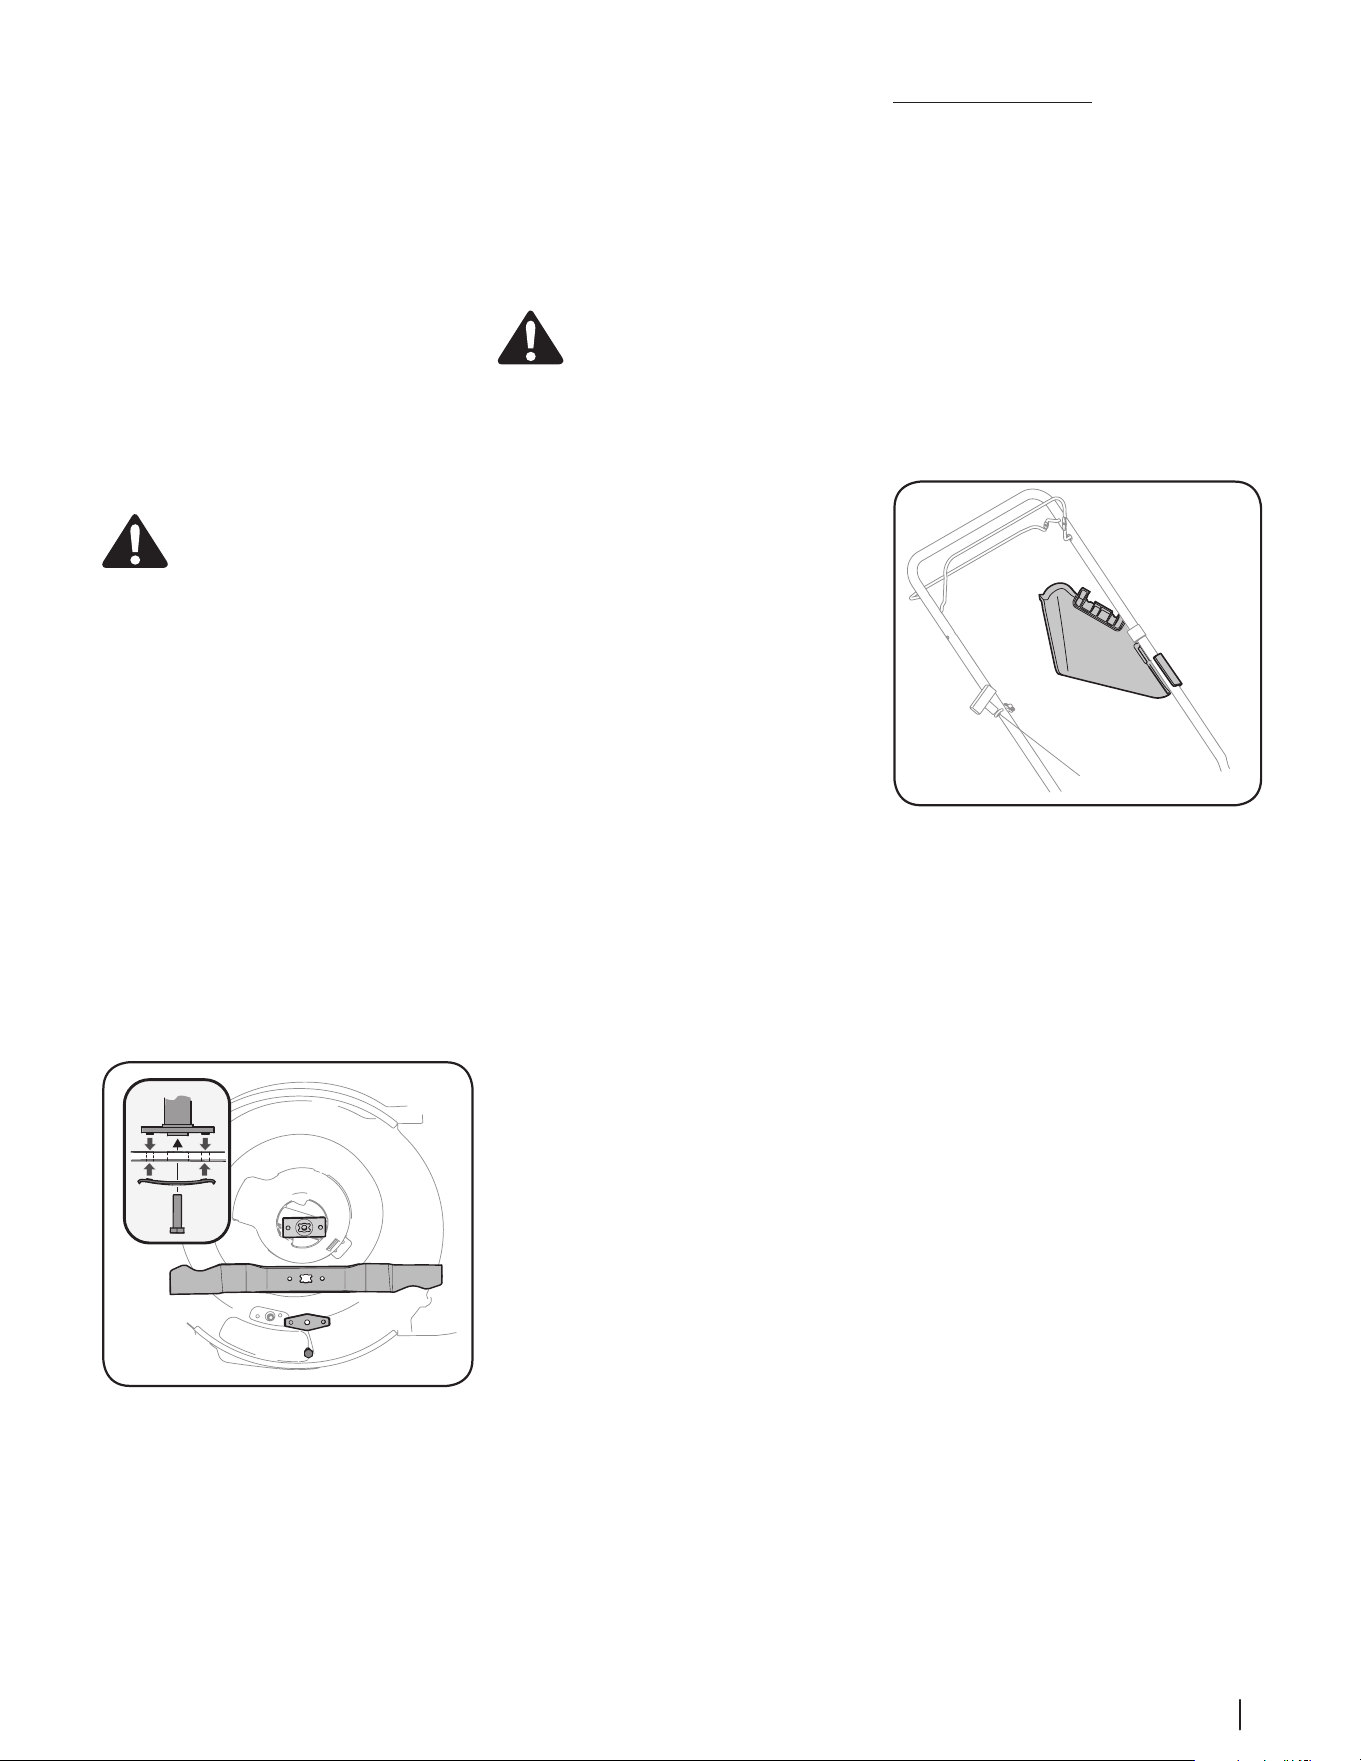
11Section 4 — Service
4. Ouvrez le robinet d’eau.
5. Faites démarrer le moteur selon les
instructions dans le chapitre «Utilisation».
6. Laissez tourner le moteur pendant au
moins deux minutes pour que le dessous
du plateau de coupe soit bien rincé.
7. Lâchez la commande de la lame pour
arrêter le moteur et la lame.
8. Fermez le robinet d’eau et débranchez le
raccord du boyau d’arrosage de l’orifice
sur la surface du plateau de coupe.
Une fois le nettoyage du plateau de coupe
terminé, faites à nouveau démarrer la tondeuse.
Laissez tourner le moteur et la lame pendant
au moins deux minutes pour que le dessous du
plateau de coupe puisse bien sécher.
Entretien de la lame
AVERTISSEMENT : En enlevant la lame
pour la remplacer ou l’aiguiser, portez
toujours des gants épais ou utilisez un
chiffon épais pour la tenir.
Examinez périodiquement l’adaptateur de lame
pour y détecter tout fendillement éventuel,
surtout après avoir heurté un objet. Remplacez-
le au besoin. Procédez comme suit pour
l’entretien de la lame:
1. Laissez le moteur tourner jusqu’à ce qu’il
tombe en panne d’essence. N’essayez pas
de verser l’essence du moteur. Débranchez
le fil de la bougie. Consultez la notice
d’utilisation du moteur.
2. Inclinez la tondeuse pour qu’elle repose
sur le plateau de coupe. Le côté du filtre
à air et du carburateur doit se trouver sur
le haut.
3. Enlevez le boulon (a) et le support de
la lame (b) qui maintiennent la lame et
l’adaptateur sur le vilebrequin. Voir la
Figure 4-3.
(a)
(c)
(d)
(b)
Figure 4-3
4. Remove blade (c) and adapter (d) from the
crankshaft. See Figure 4-3.
5. Remove blade from the adapter for testing
balance. Balance the blade on a round
shaft screwdriver to check. Remove metal
from the heavy side until it balances
evenly. When sharpening the blade, follow
the original angle of grind. Grind each
cutting edge equally to keep the blade
balanced.
AVERTISSEMENT: Une lame
déséquilibrée peut causer des vibrations
excessives à vitesse élevée. Elle risque
aussi d’endommager la tondeuse et, si
elle se brise, elle peut causer des
blessures corporelles.
6. Lubrifiez le vilebrequin et la surface
intérieure de l’adaptateur de la lame avec
une huile légère. Glissez l’adaptateur de
la lame sur le vilebrequin et positionnez
la lame sur l’adaptateur de façon que le
côté « Bottom » (ou le numéro de pièce) se
trouve sur le dessous (vers le sol) pendant
le fonctionnement. Assurez-vous que la
lame est bien alignée et qu’elle repose sur
les paliers de l’adaptateur. Voir le détail de
la Figure 4-3.
7. Placez le support coudé (b) sur la lame (c).
Alignez les encoches du support coudé
avec les petits trous de la lame.
8. Remettez le boulon hex. en place et
serrez-le à un couple de 450 po-lb min.,
600 po-lb max.
Vérifiez périodiquement que TOUS les écrous et
boulons de la machine sont bien serrés.
Remisage hors saison
Tondeuse
Procédez de la manière suivante pour préparer
votre tondeuse pour un entreposage prolongé.
• Nettoyez et lubrifiez soigneusement
la tondeuse selon les instructions de
lubrification à la page 11.
• Enduisez la lame de la tondeuse d’une
graisse à châssis pour l’empêcher de
rouiller.
• Consultez la notice d’utilisation du moteur
quant aux instructions d’entreposage du
moteur.
• Fixez le déflecteur d’éjection sur la poignée
(le cas échéant). Voir la Figure 4-4.
Figure 4-4
• N’utilisez jamais un nettoyeur sous pression
pour nettoyer votre appareil.
• Entreposez la tondeuse dans un endroit
sec et propre. Ne la remisez pas près de
produits corrosifs, comme des engrais.
Il est très important de bien protéger le matériel
contre la rouille s’il doit être entreposé dans un
abri métallique non ventilé. Enduisez toute la
machine, en particulier les câbles et toutes les
pièces mobiles, avec une huile légère ou de la
silicone.

Dépannage
5
12
Problème Cause Solution
Le moteur ne
démarre pas.
1. La poignée de commande de la lame
n’est pas embrayée.
2. Fil de la bougie débranché.
3. Le réservoir est vide ou l’essence est
éventée.
4. Moteur non amorcé.
5. La bougie est défectueuse.
6. Canalisation de carburant bouchée.
7. Le moteur est noyé.
8. La soupape de carburant (le cas échéant)
est fermée.
9. Le volet de départ (le cas échéant) n’a pas
été utilisé.
1. Embrayez la commande de la lame.
2. Branchez le fil à la bougie.
3. Faites le plein avec une essence propre et
fraîche.
4. Consultez la notice d’utilisation du moteur.
5. Nettoyez, réglez l’écartement ou remplacez la
bougie.
6. Nettoyez la canalisation.
7. Attendez quelques minutes avant d’essayer de
faire démarrer le moteur sans l’amorcer.
8. Ouvrez la soupape de carburant. Voir la notice
d’utilisation du moteur.
9. Utilisez le volet de départ. Voir la notice
d’utilisation du moteur.
Le moteur tourne
irrégulièrement.
1. Fil de la bougie desserré.
2. La canalisation de carburant est bouchée
ou l’essence est eventée.
3. L’évent du capuchon du réservoir est
bouché.
4. De l’eau ou une saleté est présente dans
le système.
5. Le filtre à air est sale.
6. Le volet de départ est fermé ou à la
position « ON » ( marche) (le cas échéant).
1. Branchez et serrez le fil de la bougie.
2. Nettoyez la canalisation. Faites le plein avec une
essence propre et fraîche.
3. Débouchez l’évent.
4. Videz le réservoir à carburant. Faites
le plein avec une essence fraîche.
5. Consultez la notice d’utilisation du moteur.
6. Placez le volet de départ à la position « OFF »
(arrêt).
Le moteur surchauffe. 1. Niveau d’huile trop bas.
2. La circulation d’air est gênée.
1. Faites le plein d’huile du carter.
2. Démontez l’habitacle du ventilateur et
nettoyez-le.
Le moteur hésite parfois à
régime élevé.
1. L’écartement de la bougie est trop petit.
1. Réglez l’écartement à 0,030 po. Consultez la
notice d’utilisation du moteur.
Le moteur tourne
irrégulièrement.
1. La bougie est sale, défectueuse ou
l’écartement est trop grand.
2. Le filtre à air est sale.
1. Réglez l’écartement à 0,030 po ou remplacez
la bougie. Consultez la notice d’utilisation du
moteur.
2. Consultez la notice d’utilisation du moteur.
Vibrations excessives. 1. La lame est desserrée ou mal équilibrée.
2. La lame est déformée.
1. Serrez la lame et l’adaptateur. Équilibrez la lame.
2. Remplacez la lame.
La tondeuse ne
déchiquette pas l’herbe.
(si equipé)
1. L’herbe est mouillée.
2. L’herbe est trop haute.
3. La lame est émoussée.
1. Ne tondez pas quand l’herbe est mouillée.
Attendez qu’elle sèche.
2. Coupez l’herbe à un réglage élevé, puis tondez
à nouveau à la hauteur voulue ou sur une
largeur plus étroite.
3. Aiguisez ou remplacez la lame.
La coupe est irrégulière 1. Les roues ne sont pas bien positionnées.
2. La lame est émoussée.
1. Placez les quatre roues à la même hauteur.
2. Aiguisez ou remplacez la lame.