
EnglishV 1.1SENIXTOOLS.COM
GAS PUSH MOWER
• SAFETY
• ASSEMBLY
• OPERATION
• MAINTENANCE
• WARRANTY
CAUTION: Before using this tool, please read this manual completely,
and follow all operating safety measures.
YAT USA INC. 10506 Bryton Corporate Center Dr, #500 Huntersville, NC 28078
For customer support, please call 1-800-261-3981 or email us at [email protected]
Instruction Manual
Model: LSPG-L5

EN - 2
SENIXTOOLS.COM
SAFETY &
INTERNATIONAL
SYMBOLS
The following table depicts and describes
safety and international symbols and
pictographs that may appear on this product.
Read, understand, and follow all instructions
on the machine and in the instruction manual
for complete safety, assembly, operating,
maintenance, and repair information before
attempting to assemble and operate.
READ THE OPERATOR’S
MANUAL(S)-Read, understand,
and follow all instructions in the
manual(s) before attempting to
assemble and operate.
Wear eye protection.
Wear a dust mask.
Wear safety footwear.
Wear protective gloves.
Do not expose the product to rain or
wet conditions.
Keep bystanders and children a
safe distance away.
DANGER! Rotating blades. Keep
hands and feet away.
DANGER — SLOPES. Use extra
caution on slopes. Do not mow
slopes greater than 15°.
DANGER — THROWN DEBRIS.
Remove objects that can be thrown
by the blade in any direction. Wear
safety glasses.
Look behind when backing up with
the lawn mower.
WARNING—GASOLINE IS
FLAMMABLE. Allow the engine to
cool at least two minutes before
refueling.
WARNING— CARBON MONOXIDE.
Never run an engine indoors or in
a poorly ventilated area. Engine
exhaust contains carbon monoxide,
an odorless and deadly gas.
WARNING— HOT SURFACE. Engine
parts, especially the muffler,
become extremely hot during
operation. Allow engine and muffler
to cool before touching.
WARNING— DO NOT OPEN OR
REMOVE SAFETY SHIELDS WHILE
ENGINE IS RUNNING.
Blades continue to rotate after
machine is switched off.
SAFETY INSTRUCTIONS
GENERAL INFORMATION
Read this operator’s manual carefully in
its entirety before attempting to assemble
this machine. Read, understand, and follow
all instructions on the machine and in the
manuals before operation. Keep this manual
in a safe place for reference and ordering
replacement parts
• Be completely familiar with the controls
and the proper use of this machine before
operating it.
• This machine is a precision piece of power
TABLE OF CONTENTS
SAFETY & INTERNATIONAL SYMBOLS ..............2
SAFETY INSTRUCTIONS .........................................2
SLOPE GAUGE ............................................................6
KNOW YOUR UNIT ..................................................... 7
SPECIFICATIONS* .....................................................8
ASSEMBLY ...................................................................8
OPERATION ................................................................10
MAINTENANCE ..........................................................11
TROUBLESHOOTING ..............................................15
WARRANTY ................................................................ 16

3 - EN
SENIXTOOLS.COM
equipment, not a plaything. Therefore,
exercise extreme caution at all times. This
machine has been designed to perform
one job: to mow grass. Do not use it for any
other purpose.
• Never allow children to operate this
machine.
• Only responsible individuals who are
familiar with these rules of safe operation
should be allowed to use this machine.
• Thoroughly inspect the area where the
equipment is to be used. Remove all
stones, sticks, wire, toys and other foreign
objects, which could be tripped over or
picked up and thrown by the blade. Thrown
objects can cause serious personal injury.
• Plan your mowing pattern to avoid
discharge of material toward roads,
sidewalks, bystanders and the like. Also,
avoid discharging material against a
wall or obstruction, which may cause
discharged material to ricochet back
toward the operator.
• To help avoid blade contact or a thrown
object injury, stay in operator zone behind
handles and keep children, bystanders,
helpers and pets at least 75 feet from
mower while it is in operation. Stop
machine if anyone enters area.
• Always wear safety glasses or safety
goggles during operation and while
performing an adjustment or repair to
protect your eyes. Thrown objects which
ricochet can cause serious injury to the
eyes.
• Wear sturdy, rough-soled work shoes,
lose-fitting slacks, shirts and hearing
protection. Shirts and pants that cover
the arms and legs and steel-toed shoes
are recommended. Never operate this
machine in bare feet, sandals, slippery or
light-weight (e.g. canvas) shoes.
• Do not put hands or feet near rotating
parts or under the cutting deck. Contact
with blade can amputate fingers, hands,
toes and feet. Keep clear of the discharge
opening at all times.
• A missing or damaged discharge cover
can cause blade contact or thrown object
injuries.
• Many injuries occur as a result of the
mower being pulled over the foot during
a fall caused by slipping or tripping. Do
not hold on to the mower if you are falling:
release the handle immediately.
• Never pull the mower back toward you
while you are walking. If you must back the
mower away from a wall or obstruction
first look down and behind to avoid tripping
and then follow these steps:
a. Step back from mower to fully extend
your arms forward.
b. Be sure you are well balanced with sure
footing.
c. Pull the mower back slowly, no more
than half way toward you.
d. Repeat these steps as needed.
• Do not operate the mower while under the
influence of alcohol or drugs.
• Never operate the mower in wet grass.
Always be sure of your footing. A slip and
fall can cause serious personal injury.
• Mow only in daylight or good artificial light.
Walk, never run.
• Stop the blade when crossing gravel
drives, walks or roads.
• If the equipment should start to vibrate
abnormally, stop the engine and check
immediately for the cause. Vibration is
generally a warning of trouble.
• Shut the engine off and wait until the blade
comes to a complete stop before removing
the grass catcher or unclogging the chute.
The cutting blade continues to rotate for
a few seconds after the blade control is
released.
• Never place any part of the body in the
blade area until you are sure the blade has
stopped rotating.
• Never operate mower without proper trail
shield, discharge cover, grass catcher,
blade control handle or other safety
protective devices in place and working.
Never operate mower with damaged
safety devices. Failure to do so can result
in personal injury. Check frequently for
signs of wear or deterioration and replace
as needed.
• Muffler and engine become hot and can
cause a burn. Do not touch.
• Never attempt to make a wheel or cutting
height adjustment while the engine is
running.
• Only use parts and accessories made
for this machine by the manufacturer as
listed in the parts pages of this Operator’s
Manual. Failure to do so can result in
personal injury.
• When starting engine, pull cord slowly
until resistance is felt, then pull rapidly.
Rapid retraction of starter cord (kickback)
will pull hand and arm toward engine

EN - 4
SENIXTOOLS.COM
faster than you can let go. Broken bones,
fractures, bruises or sprains could result.
• If situations occur which are not covered
in this manual, use care and good
judgement.
SLOPE OPERATION
Slopes are a major factor related to slip and
fall accidents, which can result in severe injury.
Operation on slopes requires extra caution. If
you feel uneasy on a slope, do not mow it. For
your safety, use the Slope Guide included as
part of this manual to measure slopes before
operating this machine on a sloped or hilly
area. If the slope is greater than 15 degrees, do
not mow it.
Do:
• Mow across the face of slopes; never up
and down. Exercise extreme caution when
changing direction on slopes.
• Watch for holes, ruts, rocks, hidden
objects, or bumps which can cause you to
slip or trip. Tall grass can hide obstacles.
Uneven terrain could overturn the
machine, or cause operator to lose their
balance or footing.
• Always be sure of your footing. A slip and
fall can cause serious personal injury.
• Use extra care while operating
machine with a grass catcher or other
attachment(s). They can affect the
stability of the machine.
Do Not:
• Do not start and stop on slopes. Avoid
making sudden changes in speed or
direction. Make turns slowly and gradually.
• Do not mow near drop-offs, ditches or
embankments, because you could lose
your footing or balance.
• Do not mow slopes greater than 15
degrees as shown on the slope guide.
• Do not mow on wet grass. Unstable footing
could cause slipping.
HAULING
Use full width ramps for loading and unloading
a machine for transport.
CHILDREN
Tragic accidents can occur if the operator is
not alert to the presence of children. Children
are often attracted to the mower and the
mowing activity. They do not understand the
dangers. Never assume that children will
remain where you last saw them.
• Keep children out of the mowing area and
under watchful care of a responsible adult
other than the operator.
• Be alert and turn mower off if a child
enters the area.
• Before and while moving backwards, look
behind and down for small children.
• Use extreme care when approaching blind
corners, doorways, shrubs, trees, or other
objects that may obscure your vision of a
child who may run into the mower.
• Keep children away from hot or running
engines. They can suffer burns from a hot
muffler.
• Never allow children under 14 years of
age to operate this machine. Children 14
and over should read and understand the
instructions and safe operation practices
in this manual and on the machine and be
trained and supervised by an adult.
SERVICE
Safe Handling of Gasoline
To avoid personal injury or property damage
use extreme care in handling gasoline.
Gasoline is extremely flammable and the
vapors are explosive. Serious personal injury
can occur when gasoline is spilled on yourself
or your clothes which can ignite. Wash your
skin and change clothes immediately.
• Use only an approved gasoline container.
• Never fill containers inside a vehicle or on
a truck or trailer bed with a plastic liner.
Always place containers on the ground
away from your vehicle before filling.
• Remove gas-powered equipment from
the truck or trailer and refuel it on the
ground. If this is not possible, then refuel
such equipment on a trailer with a portable
container, rather than from a gasoline
dispenser nozzle.
• Keep the nozzle in contact with the rim of
the fuel tank or container opening at all
times until fueling is complete. Do not use
a nozzle lock-open device.
• Extinguish all cigarettes, cigars, pipes and
other sources of ignition.
• Never fuel machine indoors because
flammable vapors will accumulate in the
area.
• Never remove gas cap or add fuel while
engine is hot or running. Allow engine to

5 - EN
SENIXTOOLS.COM
cool at least two minutes before refueling.
• Never over-fill fuel tank. To allow for
expansion of the fuel, do not fill above the
bottom of the fuel tank neck.
• Replace gasoline cap and tighten securely.
• If gasoline is spilled, wipe it off the engine
and equipment. Move machine to another
area. Wait 5 minutes before starting
engine.
• Never store the machine or fuel container
near an open flame, spark or pilot light as
on a water heater, space heater, furnace,
clothes dryer or other gas appliances.
• To reduce fire hazard, keep machine free
of grass, leaves, or other debris build-up.
Clean up oil or fuel spillage and remove
any fuel-soaked debris.
• Allow machine to cool at least 5 minutes
before storing.
GENERAL SERVICE
Never run an engine indoors or in a poorly
ventilated area. Engine exhaust contains
carbon monoxide, an odorless and deadly gas.
• Before cleaning, repairing, or inspecting,
make certain the blade and all moving
parts have stopped. Disconnect the spark
plug wire and ground against the engine to
prevent unintended starting.
• Check the blade and engine mounting
bolts at frequent intervals for proper
tightness. Also, visually inspect blade for
damage (e.g., bent, cracked, worn).
• Replace blade with the original equipment
manufacture’s (O.E.M.) blade only, listed
in the Parts pages of this manual. Use
of parts which do not meet the original
equipment specifications may lead to
improper performance and compromise
safety!
• Mower blades are sharp and can cut. Wrap
the blade or wear gloves, and use extra
caution when servicing them.
• Keep all nuts, bolts, and screws tight to
be sure the equipment is in safe working
condition.
• Never tamper with safety devices. Check
their proper operation regularly.
• After striking a foreign object, stop the
engine, disconnect the spark plug wire and
ground against the engine. Thoroughly
inspect the mower for any damage. Repair
the damage before starting and operating
the mower.
• Never attempt to make a wheel or cutting
height adjustment while the engine is
running.
• Grass catcher components are subject
to wear and damage which could expose
moving parts or allow objects to be thrown.
For safety protection, frequently check
components and replace immediately
with original equipment manufacturer’s
(O.E.M.) parts only, listed in the Parts
pages of this manual. Use of parts which
do not meet the original equipment
specifications may lead to improper
performance and compromise safety!
• Do not change the engine’s governor
setting or over-speed the engine. The
governor controls the maximum safe
operating speed of the engine.
• Check fuel line, tank, cap, and fittings
frequently for cracks or leaks. Replace if
necessary.
• Do not crank engine with spark plug
removed.
• Maintain or replace safety and instruction
labels, as necessary.
• Observe proper disposal laws and
regulations. Improper disposal of fluids
and materials can harm the environment.
• At the end of the Average Useful Life have
the machine inspected annually to ensure
that all mechanical and safety systems are
working properly and not worn excessively.
Failure to do so can result in accidents,
injuries or death.
DO NOT MODIFY ENGINE
To avoid serious injury or death, do not
modify engine in any way. Tampering with the
governor setting can lead to a runaway engine
and cause it to operate at unsafe speeds.
Never tamper with factory setting of engine
governor.
SAVE THESE
INSTRUCTIONS
INTENDED USE
This lawn mower is only intended for cutting
grass in domestic use. Do not use it for other
purpose.
EN - 6
SENIXTOOLS.COM
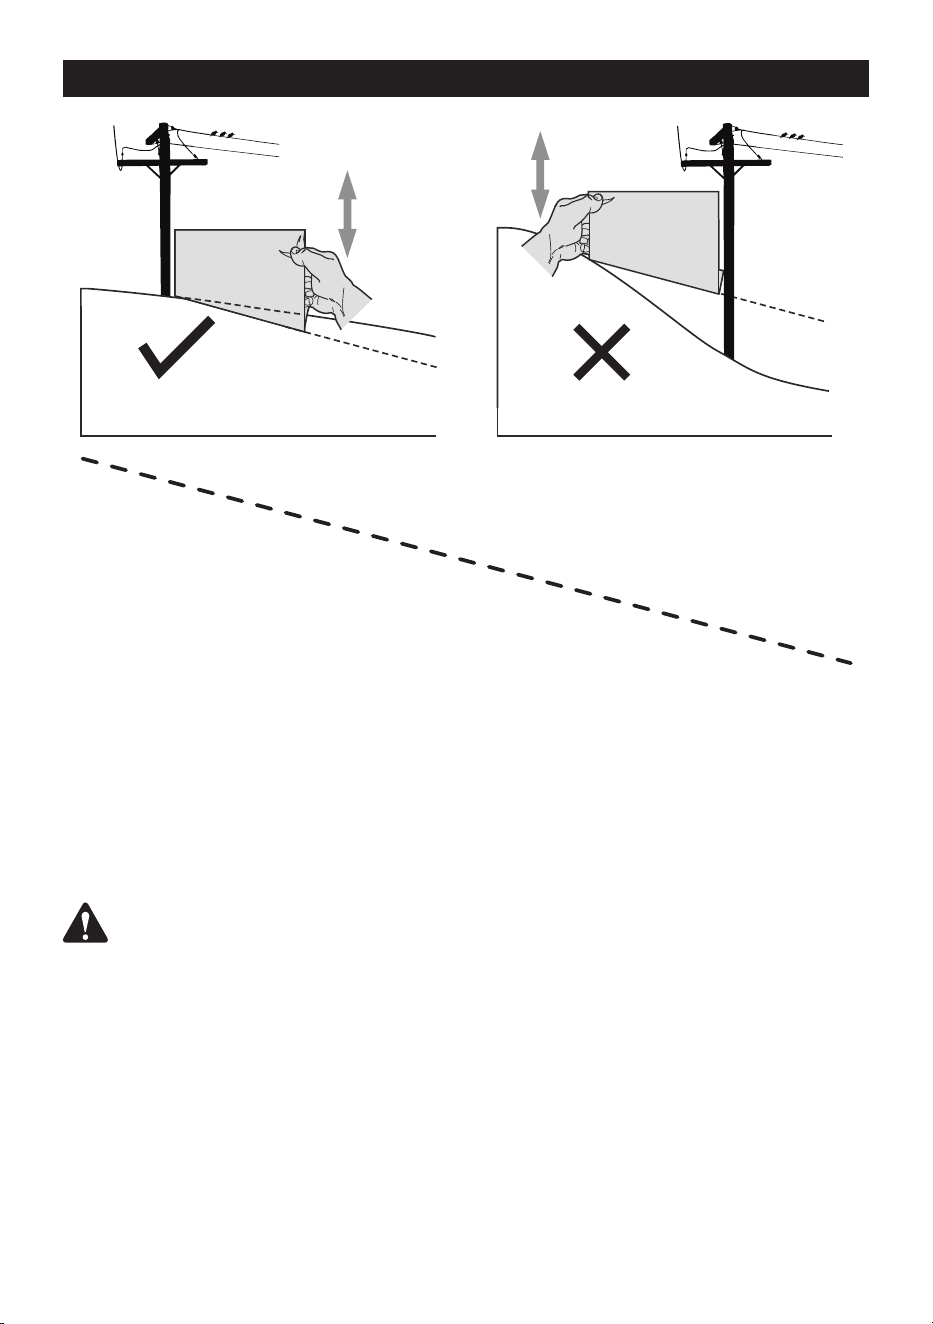
SLOPE GAUGE
USE THIS SLOPE GAUGE TO DETERMINE
IF A SLOPE IS TOO STEEP FOR SAFE OPERATION!
To check the slope, proceed as follows:
1. Remove this page and fold along the dashed line.
2. Locate a vertical object on or behind the slope (e.g. a pole, building, fence, tree, etc.)
3. Align either side of the slope gauge with the object (See Figure 1 and Figure 2 ).
4. Adjust gauge up or down until the left corner touches the slope (See Figure 1 and Figure 2).
5. If there is a gap below the gauge, the slope is too steep for safe operation (See Figure 2
above).
WARNING!
Slopes are a major factor related to tip-over and roll-over accidents which can result in severe
injury or death. Do not operate machine on slopes in excess of 15 degrees. All slopes require extra
caution. Always mow across the face of slopes, never mow up and down slopes.
15° dashed line
15° Slope
15° Slope
TOO STEEP
OK
Figure 2Figure 1
7 - EN
SENIXTOOLS.COM
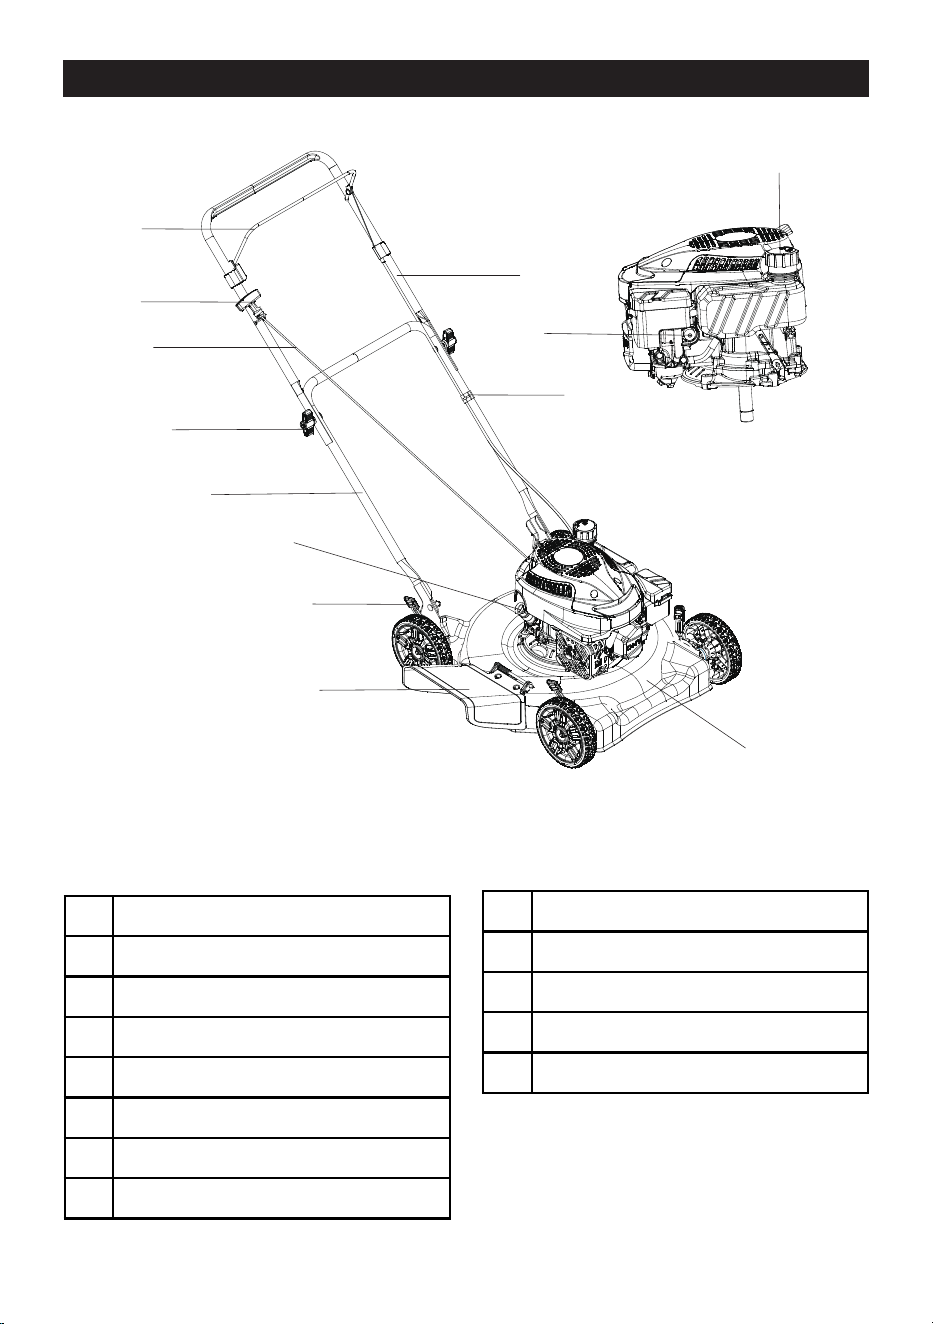
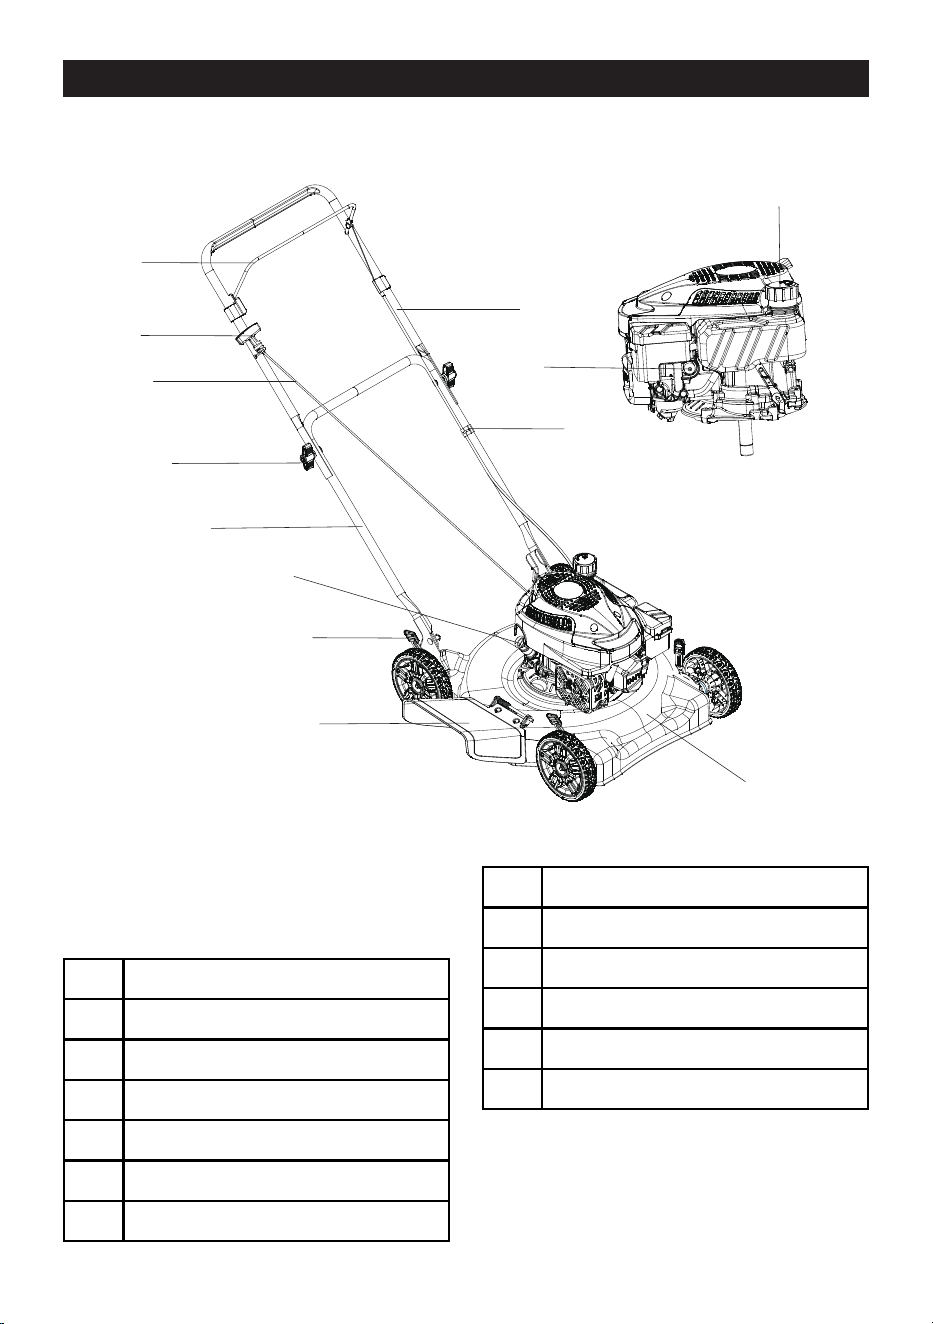
KNOW YOUR UNIT
12
13
1
2
3
4
5
6
7
8
9
10
11
APPLICATIONS
Model: LSPG-L5
As a gasoline lawn mower:
Cutting grass in domestic use.
1 Bail
2 Recoil Starter Hanlde
3 Recoil Starter Rope
4 Handle Connecting Knob
5 Lower Handle
6 Oil Tank Cap
7 Cutting Height Adjustment Lever
8 Side Discharge Cover
9 Mower Deck
10 Cable Clamp
11 Upper Handle
12 Primer
13 Fuel Tank Cap

EN - 8
SENIXTOOLS.COM
SPECIFICATIONS*
Model LSPG-L5
Engine Type 144cc (RV145-S)
No-Load Speed 3000 RPM
Cutting Width 20”
Engine Oil SAE 30
Height Adjustment 1.25”-3.75”, 5 positions
Deck Material Steel
Drive Type Push
Product Weight 45.53 Lbs
ASSEMBLY
1. Unpack all parts and lay them on a flat,
stable surface:
2. Remove all packing materials and shipping
devices, if applicable.
3. The scope of delivery varies depending on
the country and purchased variant.
• Lawn mower x1
• Handle connecting knob x2
• Rear trailing shield x1
• Bottle of oil x1
• Instruction manual x1
4. If you find that parts are missing or show
damage do not use the product but
contact your dealer. Using an incomplete
or damaged product represents a hazard
to people and property.
5. Ensure that you have all the accessories
and tools needed for assembly and
operation. This also includes suitable
personal protective equipment.
WARNING!
Wear protective gloves for this
assembly work and always lay the
product on a flat and stable surface
while assembling. Follow the
assembly instructions step-by-step
and use the pictures provided as a
visual guide to easily assemble the
product!
WARNING!
This unit is shipped without gasoline or oil in
the engine. Make sure to service engine with
gasoline and oil as instructed before starting
or running the machine.
NOTE:
Reference to right and left hand side of the
Lawn Mower is observed from the operating
position.
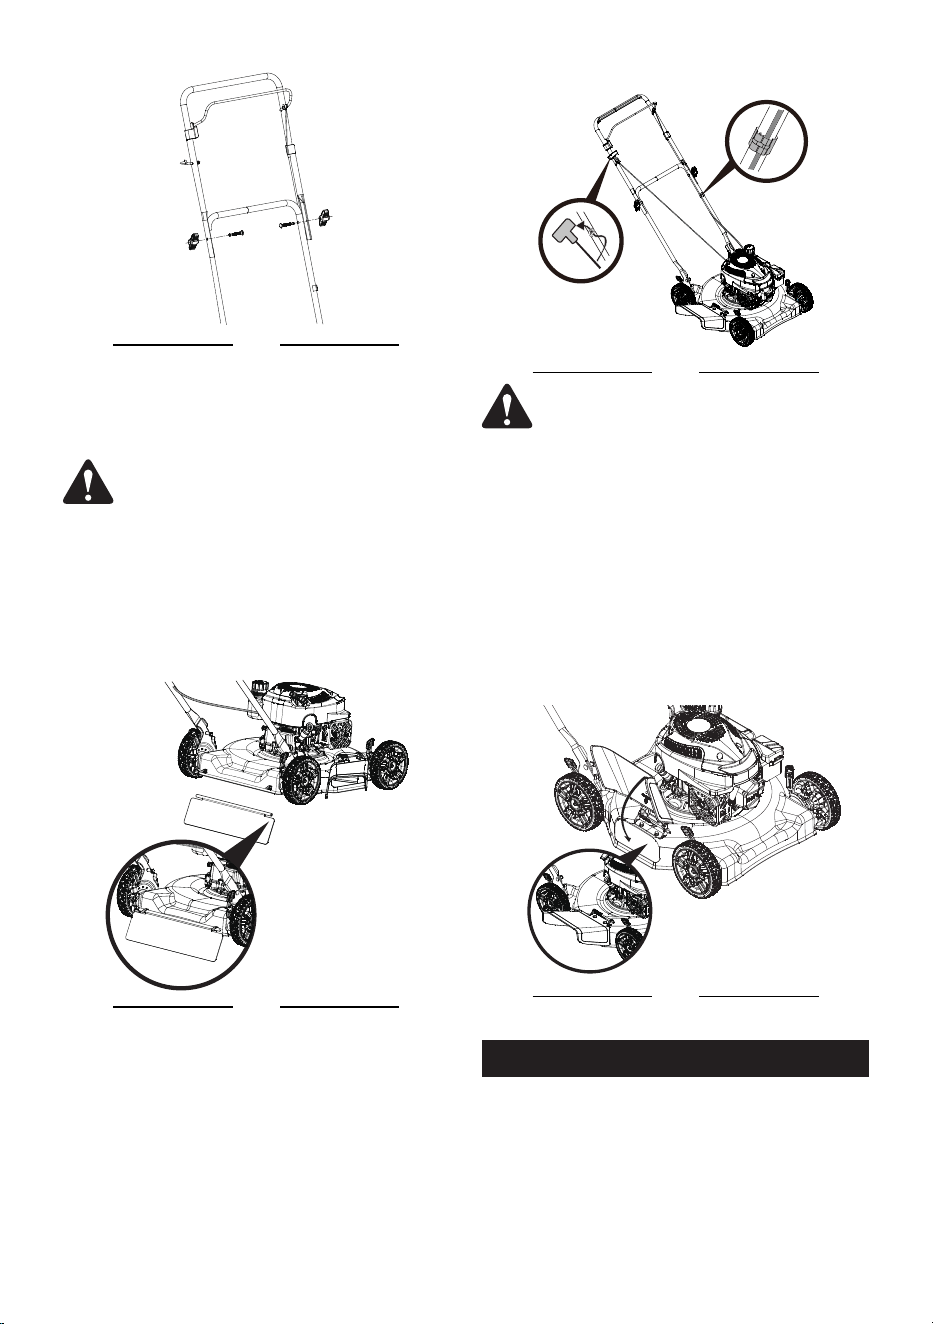
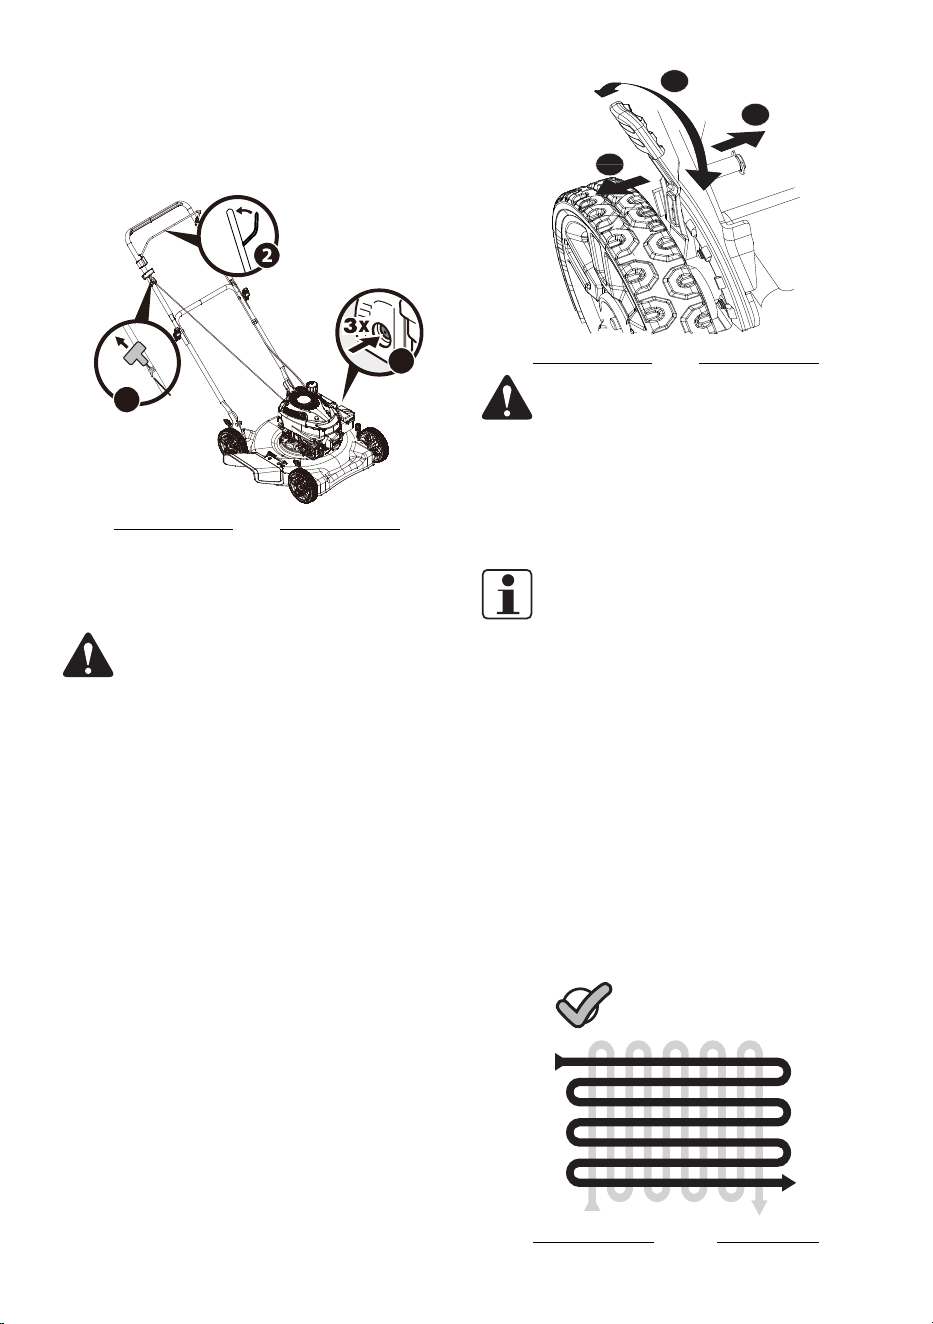
ATTACHING HANDLE
WARNING!
Do not crimp the cord when assembling the
handle.
1. Raise handle from folding position to
working position.
Fig. 1
2. Apply a pressure to the lower handle so it
can be pivoted and located into the handle
holder slots of the mower. Release and
check that the handle is locked into place.
Fig. 2
3. Tighten the handle connecting knobs to
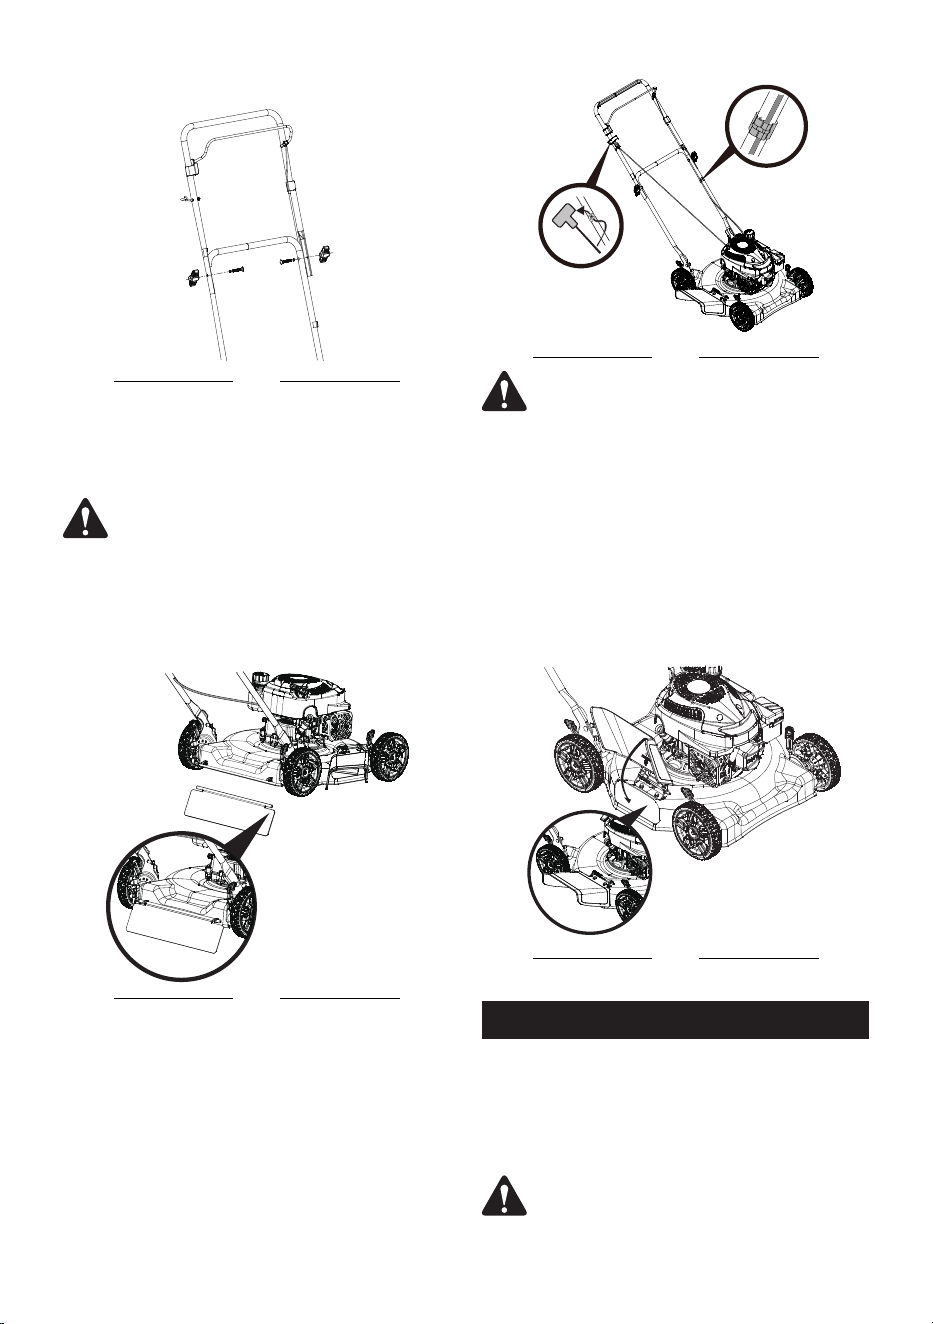
9 - EN
SENIXTOOLS.COM
connect the upper handle with the lower
handle.
Fig. 3
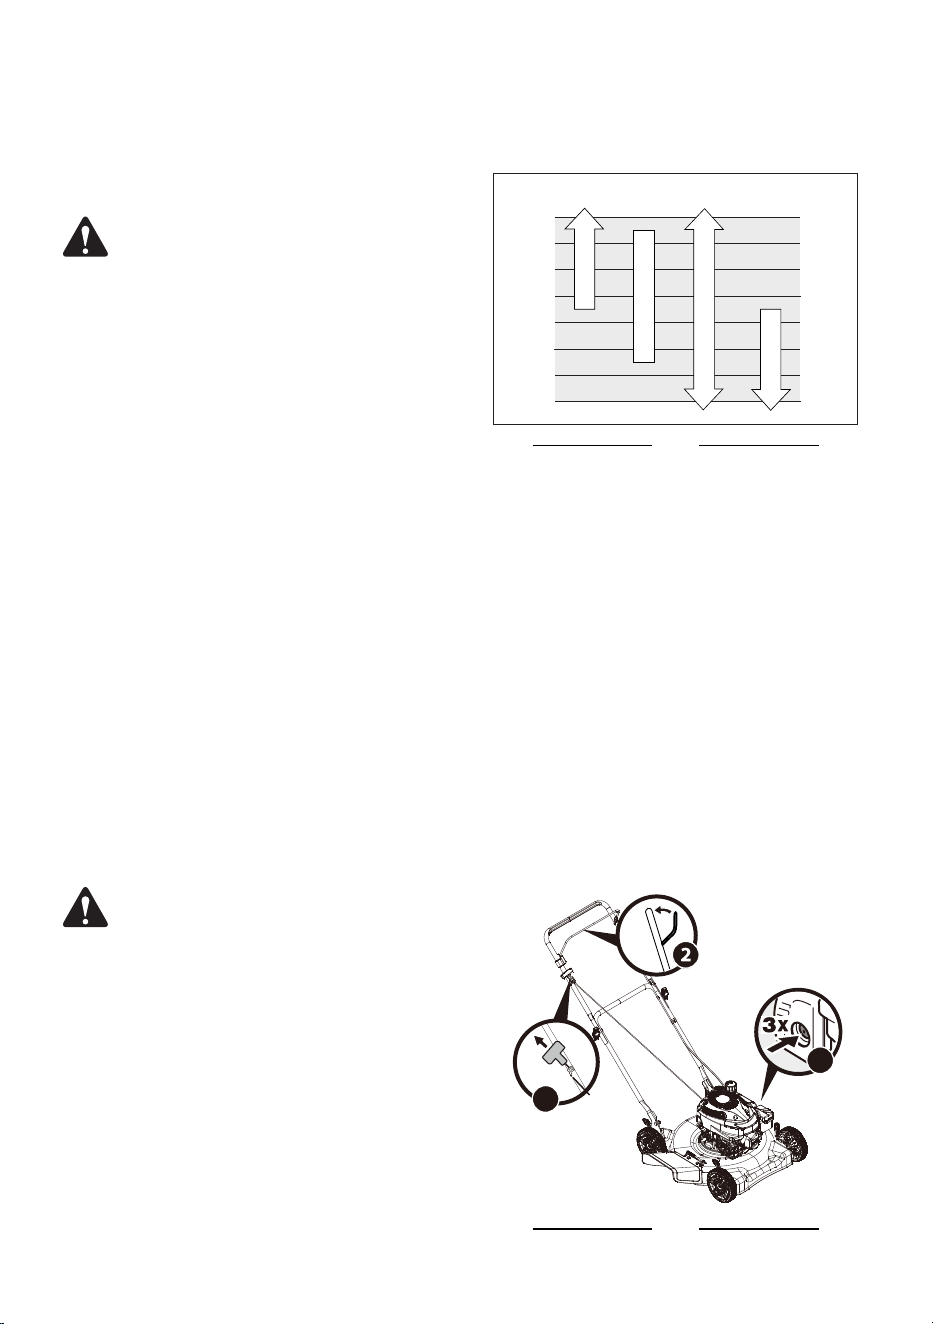
ATTACH REAR TRAILING
SHIELD
WARNING!
Do not operate unless an rear trailing shield is
assembled in place.
Pass the rear trailing shield through two shield
holders on the mower. Ensure the rear trailing
shield is hanging down.
Fig. 4
POSITION STARTER ROPE
AND CABLE
1. Hold the bail against the upper handle.
Slowly pull starter rope handle from engine
and slip starter rope into the rope guide.
2. Use the cable clamp to secure the control
cable to the lower handle.
Fig. 5
WARNING!
To reduce wear and allow for proper operation,
make sure to leave some slack in the upper
portion of the cable.
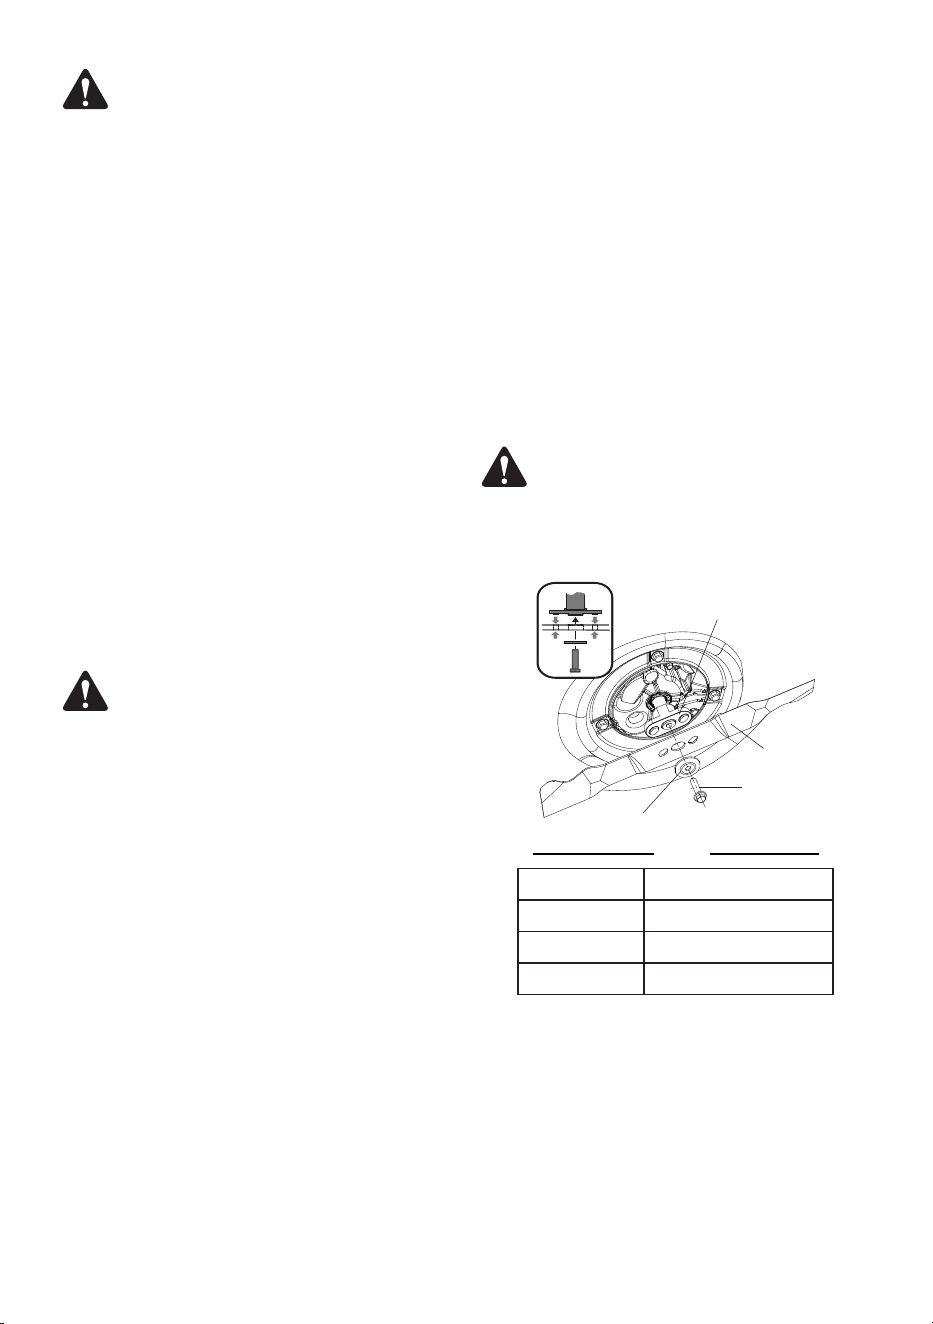
POSITION SIDE DISCHARGE
COVER
The side discharge cover has already been
mounted. Turn the side discharge cover down
before working and turn it upside when it is
idle for easy storage.
Fig. 6
OPERATION
BLADE CONTROL
The blade control bail is attached to the upper
handle of the mower. Depress and hold it
against the upper handle to start the mower.
Release to stop the engine and blade.
WARNING!
This blade control bail is a safety device. Never
attempt to bypass its operation.
EN - 10
SENIXTOOLS.COM
SIDE DISCHARGE COVER
The side discharge cover has been installed
before delivery. Follow instructions in the
assembly section to use the side discharge
cover.
WARNING!
Keep hands and feet away from the chute area
on cutting deck.
CUTTING HEIGHT
ADJUSTMENT LEVER
There are four cutting height adjustment
levers respectively located on four wheels.
Five cutting heights (from 1.25 inch to 3.75
inch) can be achieved by these four levers.
To adjust the cutting height, refer to the
assembly section.
RECOIL STARTER
Pull the recoil starter rope to drive the recoil
starter until the engine starts. Recoil starter
rope can be clamped into the rope guide on
the right upper handle for facilitating the
pulling operation. Stand behind the mower,
depress the bail, then pull the recoil starter
rope to start the mower.
PRIMER
The primer is located on the left side of the
engine. The primer is used to pump fuel into
the carburetor and aid in starting the engine.
WARNING!
Make sure no one other than the operator is
standing near the lawn mower while starting
engine or operating mower. Never run engine
indoors or in enclosed, poorly ventilated areas.
Engine exhaust contains carbon monoxide,
an odorless and deadly gas. Keep hands, feet,
hair and loose clothing away from any moving
parts on engine and lawn mower.
FUEL AND OIL
We recommend the use of Rato engine
Warranty Certified oils for best performance.
Other high-quality detergent oils are
acceptable if classified for service SF. SG, SH,
SJ or higher. Do not use special additives.
Outdoor temperatures determine the proper
oil viscosity for the engine. Use the chart
to select the best viscosity for the outdoor
temperature range expected.
104
86
68
50
32
14
-4
22
ºF ºC
40
30
20
10
0
-10
-20
-30
SAE 30 *
5W-30
10W-30 **
Synthetic 50W-30
Fig. 7
* Below 40°F (4°C) the use of SAE 30 will
result in hard starting.
** Above 80°F (27°C) the use of 10W-30 may
cause increased oil consumption. Check oil
level more frequently.
TO START/STOP ENGINE
To start:
1. Push the primer three times. Do not prime
to restart a warm engine.
2. Standing behind the mower, pull the bail
back against the upper handle.
3. While holding the bail against the upper
handle, keep a firm grip on the starter
handle and pull rope out with a rapid,
continuous, full arm stroke. Repeat until
engine starts. Let the rope rewind each
time slowly.
1
3
Fig. 8

11 - EN
SENIXTOOLS.COM
To stop:
Release the bail to stop the engine and blade.
WARNING!
Wait for the blade to stop completely before
performing any work on the mower.
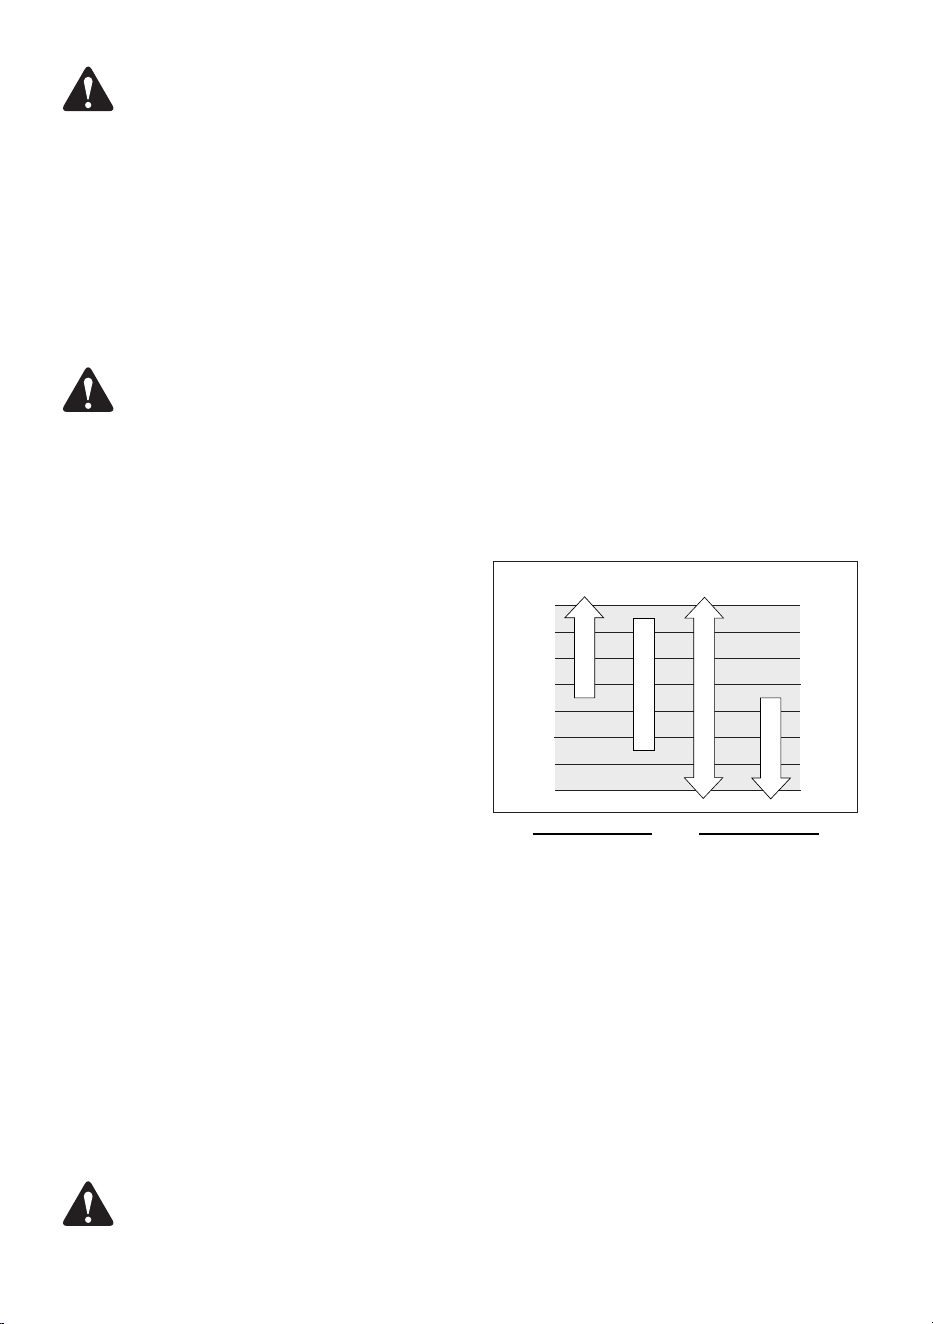
ADJUSTING CUTTING
HEIGHT
Cutting height adjustment levers are located
on each wheel. Five cutting heights (from 1.25
inch to 3.75 inch) can be achieved.
1. Pull the cutting height adjustment lever
outward towards wheel .
2. Move levers to a desired position.
3. Release lever towards deck.
1
3
2
Fig. 9
WARNING!
To avoid unbalance, always keep four wheels
at same cutting height.
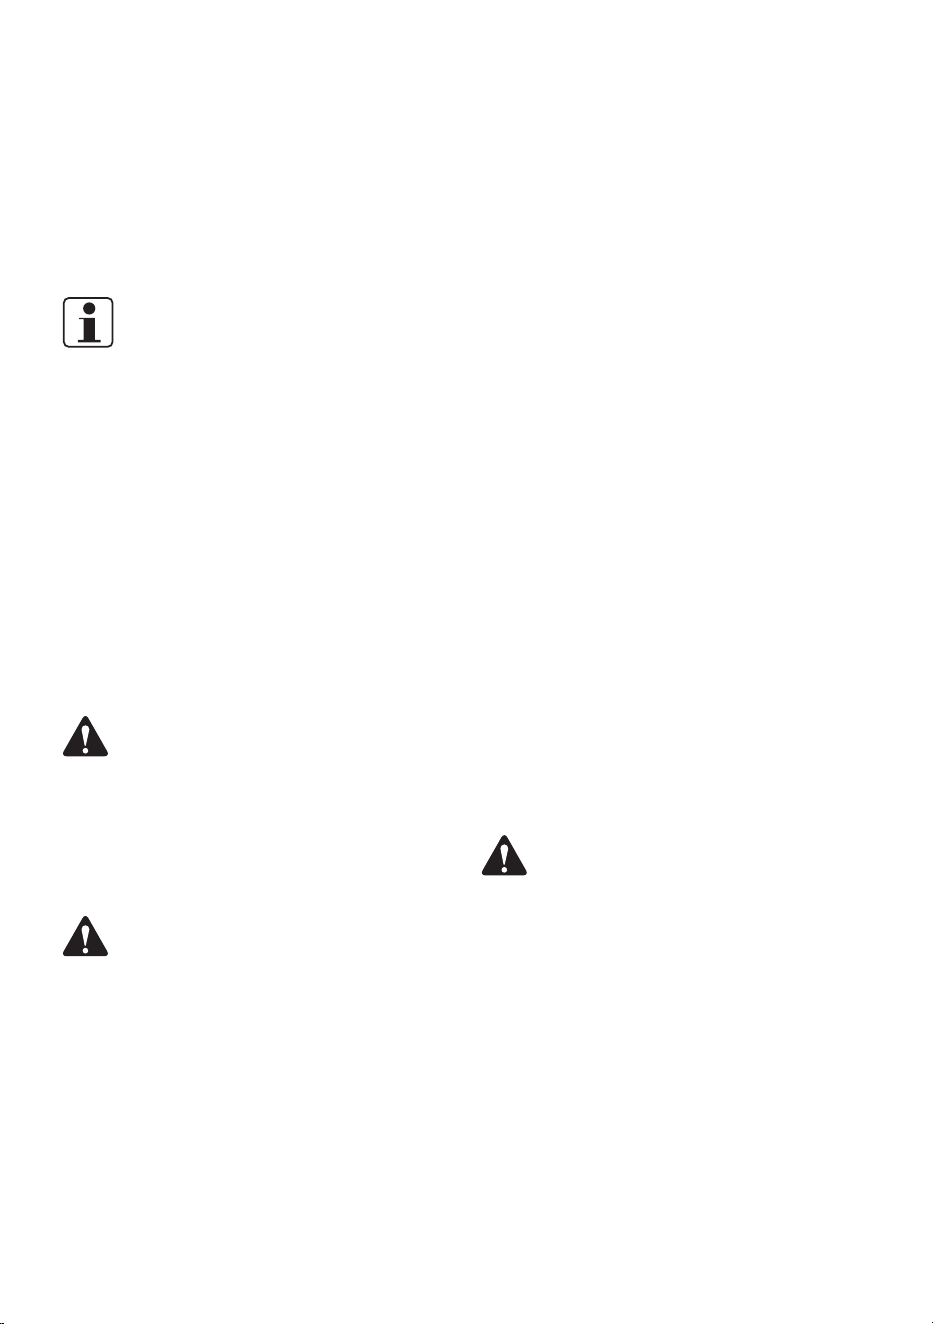
MOWING TIPS
NOTE:
A sharp blade will greatly enhance the
performance of the mower, especially when
cutting tall grass. Make sure to check the
sharpness of the blade before mowing.
Verify that the lawn is free of stones, sticks,
wires, and other objects which could damage
the lawn mower or motor. Such objects could
be accidentally thrown by the mower in any
direction and could cause serious personal
injury to the operator and to others.
• For best results, do not mow in circles.
Travel back and forth across the lawn.
Fig. 10
• When cutting thick grass, reduce your
walking speed in order to allow for a more
effective cut and a proper discharge of the
clippings.
• To maintain a healthy lawn, cut o only
one-third or less of the total length of the
grass.
MAINTENANCE
WARNING!
Before performing any type of maintenance/
service, disengage all controls and stop the
engine. Wait until all moving parts have come
to a complete stop. Disconnect spark plug wire
and ground it against the engine to prevent
unintended starting.
WARNING!
Only perform cleaning and maintenance work
according to these instructions! All further
works must be performed by a qualified
specialist! And only use specified spare parts
for replacement.
WARNING!
When servicing, use only identical
replacement parts. Use of any other parts may
create a hazard or cause product damage. To
ensure safety and reliability, all repairs should
be performed by a qualified service technician.
Follow the maintenance schedule given below.
This chart describes service guidelines only.
Use the Service Log column to keep track of
completed maintenance tasks. See the Engine
Operator’s Manual for fuel, oil, air filter and
spark plug instructions.

EN - 12
SENIXTOOLS.COM
Interval Item Service Service Log
After each use
Engine oil level Check
Loose or missing
hardware
Tighten or replace
Unit and engine Clean
After first 5 hours
of use
Engine oil Change
Annually, or every
25 hours
Spark Plug Check
Control linkages/pivots
and wheels
Lube with light oil
Underside of mower deck
2
Clean
Annually, or every
50 hours
Air filter & Pre-Cleaner(If
Equipped)
1
Clean
Engine Oil Change
Annually, or every
200 hours of use
Air filter & Pre-Cleaner
1
Change
Annually Spark plug Replace
Before Storing for
long term / over
winter
Fuel system
Drain gas tank and
carb before storing for
long intervals. Add fuel
stabilizer for adding
protection.
1
Clean more often under dusty conditions or when airborne debris is present.
2
Check and clean more often if mower is typically used in the mulching configuration.
13 - EN
SENIXTOOLS.COM
WARNING!
Always stop engine, disconnect spark plug
wire, and ground against engine before
performing any type of maintenance on your
machine.
GENERAL
RECOMMENDATIONS
• Always observe safety rules when
performing any maintenance.
• The warranty on this lawn mower does not
cover items that have been subjected to
operator abuse or negligence. To receive
full value from warranty, operator must
maintain the equipment as instructed
here.
• Changing of engine-governed speed will
void engine warranty.
• All adjustments should be checked at least
once each season.
• Periodically check all fasteners and make
sure these are tight.
BLADE CARE
WARNING!
When removing the cutting blade for
sharpening or replacement, protect your
hands with a pair of heavy gloves or use a
heavy rag to hold the blade. Do not repair or
alter blade.
Periodically inspect the blade adapter for
cracks, especially if you strike a foreign object.
Replace when necessary. Follow the steps
below for blade service.
1. Disconnect spark plug boot from spark
plug. Turn mower on its side making sure
that the air filter and the carburetor are
facing up.
2. Remove the bolt and the blade bell support
which hold the blade and the blade adapter
to the engine crankshaft.
3. Remove blade and adapter from the
crankshaft.
4. Remove blade from the adapter for testing
balance. Balance the blade on a round
shaft screwdriver to check. Remove metal
from the heavy side until it balances
evenly. When sharpening the blade, follow
the original angle of grind. Grind each
cutting edge equally to keep the blade
balanced.
5. Lubricate the engine crankshaft and the
inner surface of the blade adapter with
light oil. Slide the blade adapter onto the
engine crankshaft. Place the blade on the
adapter such that the side of the blade
marked “Bottom” (or with part number)
faces the ground when the mower is in
the operating position. Make sure that the
blade is aligned and seated on the blade
adapter flanges.
6. Place blade bell support on the blade. Align
notches on the blade bell support with
small holes in blade.
7. Replace hex bolt and tighten hex bolt to
torque: 29.5-33.2 Ft-Lbs. (40-45 Nm)
max.
WARNING!
An unbalanced blade will cause excessive
vibration when rotating at high speeds. It may
cause damage to mower and could break
causing personal injury.
A
B
C
D
Fig. 11
A Blade Adapter
B Blade
C Bolt
D Blade Bell Support
CLEANING
• Switch the product off, and make sure the
product is totally stopped.
• Always keep the lawn mower clean and
free of grass, dirt, or other debris.
• Keep the handles dry, clean, and free of oil
and grease.
• Use a small brush to clean the outside of
the product. Do not use strong detergents.
EN - 14
SENIXTOOLS.COM
Household cleaners that contain aromatic
oils such as pine and lemon, and solvents
such as kerosene, can damage plastic.
Wipe off any moisture with a soft cloth.
• After each cutting session, remove
accumulated grass clippings and debris
using either a dry cloth or hand brush.
• Inspect the product before and after each
use for worn and damaged parts. Do not
operate it if you find worn and damaged
parts.
NOTE:
If the cutting blade is blocked by foreign
objects during the operating, stop the product,
wait for the cutting blade stops entirely,
remove the foreign objects and clean the
cutting blade.
cleaning the engine
• Daily or before every use, clean grass,
chaff or accumulated debris from engine.
Keep linkage, spring, and controls clean.
Keep area around and behind muffler free
of any combustible debris.
• Keeping engine clean allows air movement
around engine.
• Engine parts should be kept clean to
reduce the risk of overheating and ignition
of accumulated debris.
WARNING!
Do not use water to clean engine parts. Water
could contaminate fuel system. Use a brush or
dry cloth.
STORAGE
OFF-SEASON STORAGE
WARNING!
Never store lawn mower with fuel in tank
indoors or in poorly ventilated areas where
fuel fumes may reach an open flame, spark,
or pilot light as on a furnace, water heater,
clothes dryer, or gas appliance.
Preparing the engine:
For engines stored over 30 days:
• To prevent gum from forming in fuel
system or on carburetor parts, run engine
until it stops from lack of fuel or use
gasoline mixed with gas additive. If you
use a gas additive, run the engine for
several minutes to circulate the additive
through the carburetor—after which the
engine and fuel can be stored longer than
30 days.
• While engine is still warm, change the oil.
• Clean engine of surface debris.
Preparing the lawn mower:
• Clean and lubricate mower thoroughly as
described in the lubrication instructions.
• Do not use a pressure washer or garden
hose to clean your unit.
• Coat mower’s cutting blade with chassis
grease to prevent rusting.
• Refer to Preparing the Engine for correct
engine storage instructions.
• Store mower in a dry, clean area. Do not
store next to corrosive materials, such as
fertilizer.
• When storing any type of power equipment
in a poorly ventilated or metal storage
shed, care should be taken to rust-proof
the equipment. Using a light oil or silicone,
coat the equipment, especially cables and
all moving parts of your lawn mower before
storage.
TRANSPORTATION
• Empty residual fuel into an approved con-
tainer beforehand.
• Secure the tool and protect from any
heavy impact or strong vibrations which
may occur during transportation in vehi-
cles.
• Enclosed vehicle is not recommended for
transportation.
WARNING!
Do not incline the engine so as to avoid fuel’s
spill in transporting. Spilled fuel or fuel vapor
may ignite to cause fire.

15 - EN
SENIXTOOLS.COM
TROUBLESHOOTING
Suspected malfunctions are often due to causes that the users can fix themselves. Therefore,
check the product using this section. In most cases the problem can be solved quickly.
This section addresses minor service issues. Refer to your RATO engine manual for details.
PROBLEM POSSIBLE CAUSE SOLUTION
Engine fails to
start.
Blade control disengaged.
Ensure bail is depressed when starting
mower.
Spark plug boot disconnected. Connect wire to spark boot.
Fuel tank empty or stale fuel. Fill tank with clean, fresh gasoline
Engine not primed (If
equipped with primer).
Prime engine as instructed in this
manual.
Faulty spark plug. Clean, adjust gap, or replace.
Engine flooded Wait a few minutes to restart.
Blocked fuel line.
Contact your service dealer to clean
the fuel line.
Engine runs
roughly
Spark plug boot loose. Connect and tighten spark plug boot.
Stale fuel. Fill tank with clean, fresh gasoline.
Vent in gas cap plugged. Clear vent.
Water or dirt in fuel system.
Run engine until it stops from lack of
fuel. Refill with fresh fuel. Carb / Fuel
cleaner additives can also help clear
out engine.
Dirty air cleaner. Refer to Clean section.
Blocked fuel line.
Contact your service dealer to clean
the fuel line cleaned.
Engine
overheats.
Engine oil level low. Fill crankcase with proper oil.
Air flow restricted. Clean area around and on top of engine.
Occasional skips
(hesitates)
Spark plug gap too close. Adjust gap by a qualified specialist.
Idles poorly.
Spark plug fouled, faulty, or
gap too wide.
Reset gap or replace spark plug.
Dirty air cleaner.
Refer to Air Cleaner in Engine
Maintenance section.
Excessive
vibration.
Cutting blade loose or
unbalanced.
Tighten blade and adapter. Balance
blade.
Bent cutting blade. Replace blade.

EN - 16
SENIXTOOLS.COM
WARRANTY
SENIX TOOLS LIMITED WARRANTY
FOR TWO YEARS from the date of original purchase this lawnmower product, except for the RATO engine
(see below), is warranted against defects in material or construction.
WITH PROOF OF ORIGINAL PURCHASE a defective product will receive free repair. If the product cannot be
repaired it will be replaced free of charge.
For details to obtain warranty coverage, visit senixtools.com, email senix.support@yatusa.com or call
1-800-261-3981.
• This warranty does not cover repairs necessary due to product accident or abuse, or failure to operate or
maintain the product according to all supplied instructions.
• This warranty does not cover expendable items that can wear out from normal use within the warranty
period, including but not limited to blades, grass collection bags, spark plugs and filters.
• This warranty does not apply to damage resulting from repairs to the product made or attempted by other
than SENIX authorized agents.
• This warranty does not apply to repairs necessary due to improper fuel mixture, contaminated or stale fuel.
• This warranty does not cover the cost of mailing or transporting the product to receive warranty coverage.
• The warranty is void if the product has been used for commercial, professional, or rental service purposes.
• The warranty applies to the original retail purchaser and is not transferable.
• Proof of purchase is required to obtain warranty coverage.
THIS WARRANTY IS GIVEN IN LIEU OF ALL OTHERS, INCLUDING THE IMPLIED WARRANTY OF MERCHANTABILITY
AND FITNESS FOR A PARTICULAR PURPOSE, AND EXCLUDES ALL INCIDENTAL OR CONSEQUENTIAL DAMAGE.
Some states do not allow limitations on how long an implied warranty lasts or the exclusion or limitation of incidental
or consequential damages, so these limitations may not apply to you. This warranty gives you specific legal rights
and you may have other rights which vary in certain states or provinces.
RATO ENGINE LIMITED WARRANTY. Refer to the RATO Engine Manual for engine warranty and engine parts
related issues.
60-DAY MONEY-BACK GUARANTEE. If for any reason within 60 days from the date of original purchase you are
not completely satisfied with the performance of this SENIX product, you can return it with the original sales receipt
for a full refund.
Latin America: This warranty does not apply to products sold in Latin America. For products sold in Latin America,
see the country-specific warranty information contained in the packaging, call the retailer from which it was
purchased, or visit the website for warranty information.
Free warning label replacement: If your warning labels become illegible or are missing, call 1-800-261-3981 for a
free replacement.
REGISTER ONLINE - senixtools.com/pages/product-registration
Thank you for your purchase! Register your product now for:
Warranty Service: Registering your product will help you obtain more ecient warranty service in case of a problem
with your product.
Confirmation of Ownership: In case of an insurance loss, such as fire, flood, or theft, your ownership registration
will serve as proof of purchase.
For your safety: Registering your product will allow us to contact you in the unlikely event a safety notification is
required under the Federal Consumer Safety Act.
YAT USA INC. 10506 Bryton Corporate Center Dr, #500 Huntersville, NC 28078
For customer support, please call 1-800-261-3981 or email us at senix.support@yatusa.com
EspañolSENIXTOOLS.COM
Manual de instrucciones
Modelo: LSPG-L5
PODADORA DE EMPUJE A
GASOLINA
•SEGURIDAD
•MONTAJE
•FUNCIONAMIENTO
•MANTENIMIENTO
•GARANTÍA
PRECAUCIÓN: Antes de utilizar esta herramienta, lea detenidamente este
manual y respete todas las medidas de seguridad de funcionamiento.
YAT USA INC. 10506 Bryton Corporate Center Dr, #500 Huntersville, NC 28078
Para atención al cliente, llame al 1-800-261-3981 o envíenos un correo electrónico a

ES - 18
SENIXTOOLS.COM
SEGURIDAD Y SÍMBOLOS
INTERNACIONALES
La siguiente tabla muestra y describe los
símbolos y pictogramas de seguridad e
internacionales que pueden aparecer en este
producto. Lea, comprenda y siga todas las
instrucciones de la máquina y del manual
de instrucciones para obtener información
completa sobre seguridad, montaje,
funcionamiento, mantenimiento y reparación
antes de intentar montar y utilizar la máquina.
LEA EL(LOS) MANUAL(ES) - DEL
OPERADOR Lea, comprenda y siga
todas las instrucciones del (los)
manual(es) del usuario antes de
intentar ensamblar y operar
Lleve protección ocular.
Lleve una máscara antipolvo.
Lleve calzado de seguridad.
Utilice guantes de protección.
No utilizar en condiciones de lluvia
o humedad.
PELIGRO: TRANSEÚNTES - No corte
el césped cuando haya niños u
otras personas alrededor.
PELIGRO: CUCHILLAS GIRATORIAS.
ÍNDICE
SEGURIDAD Y SÍMBOLOS INTERNACIONALES
........................................................................................18
INSTRUCCIONES DE SEGURIDAD.....................19
MEDIDOR DE PENDIENTE ...................................23
CONOZCA SU UNIDAD ..........................................24
ESPECIFICACIONES* ............................................ 25
ENSAMBLAJE .......................................................... 25
OPERACIÓN ..............................................................26
MANTENIMIENTO ................................................... 29
SOLUCIÓN DE PROBLEMAS ............................... 33
GARANTÍA .................................................................35
Mantenga las manos y los pies
alejados de las partes móviles.
PELIGRO : PENDIENTES - Tenga
especial cuidado en las pendientes.
No corte el césped en pendientes
superiores a 15°.
PELIGRO: ESCOMBROS LANZADOS
- Retire los objetos que puedan ser
arrojados por la hoja en cualquier
dirección. Use anteojos de
seguridad.
ADVERTENCIA: MIRE HACIA ATRÁS
MIENTRAS RETROCEDE.
ADVERTENCIA: LA GASOLINA ES
INFLAMABLE - Deje que el motor
se enfríe por lo menos dos minutos
antes de reabastecerse.
ADVERTENCIA: MONÓXIDO DE
CARBONO - Nunca encienda un
motor en interiores o en un área
mal ventilada. El escape del motor
contiene monóxido de carbono, un
gas inodoro y mortal.
ADVERTENCIA: MONÓXIDO DE
CARBONO - Nunca encienda un
motor en interiores o en un área
mal ventilada. El escape del motor
contiene monóxido de carbono, un
gas inodoro y mortal.
ADVERTENCIA: NO ABRA NI RETIRE
LOS PROTECTORES DE SEGURIDAD
MIENTRAS EL MOTOR ESTÉ EN
FUNCIONAMIENTO.
Las cuchillas siguen girando
después de apagar la máquina.

19 - ES
SENIXTOOLS.COM
INSTRUCCIONES DE
SEGURIDAD
INFORMACIÓN GENERAL
Lea este manual del operador detenidamente
en su totalidad antes de intentar ensamblar
esta máquina. Lea, entienda y siga todas las
instrucciones de la máquina y del(de los)
manual(es) antes de la operación. Guarde este
manual en un lugar seguro para consultarlo y
solicitar piezas de repuesto.
• Familiarícese completamente con los con-
troles y el uso adecuado de esta máquina
antes de operarla.
• Esta máquina es un equipo motorizado de
precisión, no un juguete. Por lo tanto, tenga
mucho cuidado en todo momento. Esta
máquina ha sido diseñada para realizar
un trabajo: cortar césped. No la use para
ningún otro propósito.
• Nunca permita que los niños operen esta
máquina.
• Solo las personas responsables que
estén familiarizadas con estas reglas de
operación segura deben poder usar esta
máquina.
• Inspeccione minuciosamente el área
donde se utilizará el equipo. Quite todas las
piedras, palos, alambres, huesos, juguet-
es y otros objetos extraños que puedan
tropezarse o levantarse, o que la cuchil-
la pueda arrojar. Los objetos arrojados
pueden provocar lesiones personales
graves.
• Planifique su patrón de corte para evitar
la descarga de material hacia caminos,
aceras, transeúntes y similares. Además,
evite descargar material contra una pared
u obstrucción, lo que puede hacer que
el material descargado rebote hacia el
operador.
• Para ayudar a evitar el contacto con la
cuchilla o una lesión por objeto arroja-
do, permanezca en la zona del operador
detrás de las manijas y mantenga a los
niños, transeúntes, ayudantes y mascotas
al menos a 23 metros de distancia de la
podadora mientras esté en funcionamien-
to. Detenga la máquina si alguien ingresa
al área.
• Siempre use anteojos o gafas de seguri-
dad durante la operación y mientras realiza
un ajuste o reparación para proteger sus
ojos. Los objetos arrojados que rebotan
pueden provocar lesiones oculares graves.
• Use zapatos de trabajo resistentes, de
suela áspera, pantalones holgados, cami-
sas y protección auditiva. Se recomiendan
camisas y pantalones que cubran los
brazos y las piernas y zapatos con punta
de acero. Nunca opere esta máquina des-
calzo, con sandalias, zapatos resbalosos o
muy livianos (por ejemplo, de lona).
• No coloque las manos ni los pies cerca de
las piezas giratorias o debajo de la plata-
forma de corte. El contacto con la hoja
puede amputar los dedos, manos, dedos
de los pies y pies. Manténgase alejado de
la abertura de descarga en todo momento.
• Una cubierta de descarga faltante o daña-
da puede causar el contacto de la cuchilla
o lesiones por objetos lanzados.
• Muchas lesiones ocurren como resultado
de que la cortadora de césped se pase
sobre el pie durante una caída causada
por resbalones o tropiezos. No se agarre
a la podadora si se está cayendo: suelte el
mango inmediatamente.
• Nunca jale la podadora hacia usted mien-
tras camine. Si debe alejar la podadora de
una pared u obstrucción, primero mire ha-
cia abajo y hacia atrás para evitar tropezar
y luego siga estos pasos:
a. Aléjese de la podadora para extender
completamente los brazos hacia adelante.
b. Asegúrese de estar bien equilibrado con
una base segura.
c. Jale la podadora hacia atrás lentamente,
no más de la mitad de su camino hacia
usted.
d. Repita estos pasos según sea
necesario.
• No opere la podadora bajo la influencia de
alcohol o drogas.
• No active el mecanismo autopropulsado en
máquinas así equipadas mientras arran-
que el motor.
• El mango de control de la hoja es un dis-
positivo de seguridad. Nunca intente omitir
su funcionamiento. Si lo hace, el dispos-
itivo de seguridad quedará inoperante y
podría provocar lesiones personales por
contacto con la cuchilla giratoria. El mango
de control de la cuchilla debe funcionar

ES - 20
SENIXTOOLS.COM
fácilmente en ambas direcciones y volver
automáticamente a la posición desengan-
chada cuando se suelte.
• Nunca opere la máquina sobre hierba
mojada. Siempre fíjese dónde pisa. Un res-
balón y una caída pueden causar lesiones
personales graves. Si siente que está
perdiendo el equilibrio, suelte el mango de
control de la cuchilla inmediatamente y la
cuchilla dejará de girar en tres segundos.
• Opere sólo a la luz del día o con una buena
luz artificial. Camine, nunca corra.
• Detenga la cuchilla al cruzar calles de
grava, senderos o caminos.
• Si el equipo comienza a vibrar de forma
anormal, detenga el motor y compruebe
inmediatamente la causa. La vibración es
generalmente un indicador de problemas.
• Apague el motor y espere hasta que la
cuchilla se detenga por completo an-
tes de retirar el recogedor de césped o
desatascar el conducto. La hoja de corte
continúa girando durante unos segundos
después de que se suelta el control de la
hoja.
• Nunca coloque ninguna parte del cuerpo
en el área de la cuchilla hasta que esté se-
guro de que la cuchilla ha dejado de girar.
• Nunca opere la cortadora de césped sin
el protector de seguimiento adecuado,
la cubierta de descarga, el recogedor de
césped, el mango de control de la cuchilla
u otros dispositivos de protección de segu-
ridad en su lugar y funcionando. Nunca
opere la podadora con dispositivos de
seguridad dañados. Si lo hace, se pueden
producir lesiones personales. Verifique con
frecuencia signos de desgaste o deterioro
y reemplace según sea necesario.
• El silenciador y el motor se calientan y
pueden causar quemaduras. No tocar.
• Nunca intente hacer un ajuste de la altura
de corte o de una rueda con el motor en
marcha.
• Utilice únicamente piezas y accesorios
fabricados para esta máquina por el fab-
ricante que se mencionan en las páginas
de piezas de este Manual del operador.
Si lo hace, se pueden producir lesiones
personales.
• Al arrancar el motor, tire del cable lenta-
mente hasta sentir resistencia, luego tire
rápidamente. La retracción rápida del ca-
ble de arranque (contragolpe) empujará la
mano y el brazo hacia el motor más rápido
de lo que usted lo pueda soltar. Podrían
producirse huesos rotos, fracturas, contu-
siones o esguinces.
• Si ocurren situaciones que no están cubi-
ertas en este manual, tenga cuidado y use
su buen juicio.
OPERACIÓN EN
PENDIENTES
Las pendientes son un factor importante rel-
acionado con los accidentes por resbalones y
caídas, que pueden provocar lesiones graves.
La operación en pendientes requiere precau-
ción adicional. Si se siente incómodo en una
pendiente, no la corte. Para su seguridad, uti-
lice la guía de pendientes incluida como parte
de este manual para medir pendientes antes
de operar esta máquina en un área inclinada
o montañosa. Si la pendiente es superior a 15
grados, no la corte.
Lo que se debe hacer:
• Trabaje en pendientes de forma lateral,
nunca hacia arriba o hacia abajo. Tenga
mucho cuidado al cambiar de dirección en
las pendientes.
• Esté atento a los agujeros, los surcos, las
rocas, los objetos ocultos o los baches que
puedan hacer que se resbale o tropiece. El
césped alto puede ocultar obstáculos. Un
terreno irregular podría volcar la máquina
o hacer que el operador pierda el equilibrio
o se caiga.
• Siempre fíjese dónde pisa. Un resbalón y
una caída pueden causar lesiones perso-
nales graves. Si siente que está perdiendo
el equilibrio, suelte el mango de control de
la cuchilla inmediatamente y la cuchilla
dejará de girar en tres (3) segundos.
• Tenga especial cuidado al operar la máqui-
na con un recogedor de césped u otros
accesorios. Pueden afectar la estabilidad
de la máquina.
Lo que no se debe hacer:
• No arranque ni se detenga en las pendi-
entes. Evite hacer cambios repentinos de
velocidad o dirección. Haga giros lenta y
gradualmente.
• No corte el césped cerca de desniveles,

21 - ES
SENIXTOOLS.COM
zanjas o terraplenes, ya que podría perder
el equilibrio o caerse..
• No corte el césped en pendientes supe-
riores a 15 grados como se muestra en la
guía de pendientes.
• No corte sobre la hierba mojada. Una base
inestable podría provocar resbalones.
TRANSPORTACIÓN
Utilice rampas de ancho completo para cargar
y descargar una máquina para su transporte.
NIÑOS
Pueden ocurrir accidentes trágicos si el
operador no es consciente de la presencia de
niños. Los niños a menudo se sienten atraídos
por la podadora y la actividad de podar. No
comprenden los peligros. Nunca asuma que
los niños se quedarán en el mismo lugar en
que las vio por última vez.
• Mantenga a los niños fuera del área de
corte y bajo el cuidado de un adulto re-
sponsable que no sea el operador.
• Esté alerta y apague la podadora si un niño
ingresa al área.
• Antes y durante el movimiento de retro-
ceso, mire hacia atrás y hacia abajo para
detectar la presencia de niños.
• Tenga mucho cuidado al acercarse a es-
quinas ciegas, puertas, arbustos, árboles
u otros objetos que puedan ocultar de su
vista a un niño que pueda acceder al cami-
no de la cortadora de césped.
• Mantenga a los niños alejados de los mo-
tores calientes o en marcha. Pueden sufrir
quemaduras por un silenciador caliente.
• Nunca permita que niños menores de
14 años operen esta máquina. Los niños
mayores de 14 años deben leer y compren-
der las instrucciones y las prácticas de
operación segura de este manual y de la
máquina, y deben ser entrenados y super-
visados por un adulto.
SERVICIO
Manejo seguro de la gasolina
Para evitar lesiones personales o daños a la
propiedad, tenga mucho cuidado al manipular
la gasolina. La gasolina es extremadamente
inflamable y los vapores son explosivos. Se
pueden producir lesiones personales graves
cuando se derrama gasolina sobre usted o su
ropa, lo que puede incendiarse. Lávese la piel y
cámbiese de ropa inmediatamente.
• Utilice únicamente un recipiente de gasoli-
na aprobado.
• Nunca llene contenedores dentro de un ve-
hículo o en un camión o caja de remolque
con un revestimiento de plástico. Siempre
coloque los contenedores en el suelo lejos
de su vehículo antes de llenarlos.
• Retire el equipo a gasolina del camión o
remolque y reabastezca de gasolina en el
suelo. Si esto no es posible, reabastezca
dicho equipo en un remolque con un con-
tenedor portátil, en lugar de hacerlo con
una boquilla dispensadora de gasolina.
• Mantenga la boquilla en contacto con
el borde del tanque de combustible o la
abertura del recipiente en todo momento
hasta que se complete el reabastecimien-
to. No utilice un dispositivo de bloqueo de
boquilla para abrir.
• Apague todos los cigarrillos, puros, pipas y
otras fuentes de ignición.
• Nunca suministre combustible a la máqui-
na en interiores porque se acumularán
vapores inflamables en el área.
• Nunca quite la tapa de la gasolina ni ag-
regue combustible mientras el motor esté
caliente o en funcionamiento. Deje que el
motor se enfríe por lo menos dos minutos
antes de reabastecer.
• Nunca llene excesivamente el depósito de
combustible. Para permitir la expansión
del combustible, no llene por encima de
la parte inferior del cuello del tanque de
combustible.
• Vuelva a colocar la tapa de la gasolina y
ajústela firmemente.
• Si se derrama gasolina, límpiela del motor
y del equipo. Mueva la máquina a otra área.
Espere 5 minutos antes de arrancar el
motor.
• Nunca almacene la máquina o el recipiente
de combustible cerca de una llama abierta,
chispa o luz piloto como en un calentador
de agua, calentador de espacio, horno,
secadora de ropa u otros aparatos de gas.
• Para reducir el peligro de incendio, man-
tenga la máquina libre de la acumulación
de hierbas, hojas u otros escombros.

ES - 22
SENIXTOOLS.COM
Limpie los derrames de aceite o combusti-
ble y elimine cualquier residuo empapado
de combustible.
• Deje que la máquina se enfríe por lo menos
5 minutos antes de guardarla.
NO MODIFIQUE EL MOTOR
Para evitar lesiones graves o la muerte, no
modifique el motor de ninguna manera. La
manipulación indebida de la configuración del
regulador puede provocar un motor fuera de
control y hacer que funcione a velocidades
peligrosas. Nunca manipule la configuración
de fábrica del regulador del motor.
USO PREVISTO
Este cortacésped sólo está diseñado para
cortar césped en uso doméstico. No lo utilice
para otros otro fin.

23 - ES
SENIXTOOLS.COM
MEDIDOR DE PENDIENTE
¡USE ESTE MEDIDOR DE PENDIENTES PARA DETERMINAR
SI UNA PENDIENTE ES DEMASIADO EMPINADA PARA UNA OPERACIÓN SEGURA!
Para comprobar la pendiente, proceda de la siguiente manera:
1. Retire esta página y dóblela por la línea discontinua.
2. Ubique un objeto vertical en o detrás de la pendiente (por ejemplo, un poste, edificio, cerca,
árbol, etc.)
3. Alinee cualquier lado del indicador de pendiente con el objeto (consulte la Figura 1 y la Figura
2).
4. Ajuste el medidor hacia arriba o hacia abajo hasta que la esquina izquierda toque la pendi-
ente (consulte la Figura 1 y la Figura 2).
5. Si hay un espacio debajo del indicador, la pendiente es demasiado empinada para una op-
eración segura (consulte la Figura 2 arriba).
¡ADVERTENCIA!
Las pendientes son un factor importante relacionado con los accidentes de vuelco y ruedo que
pueden provocar lesiones graves o la muerte. No opere la máquina en pendientes de más de 15
grados. Todas las pendientes requieren precaución adicional. Trabaje en pendientes de forma
lateral, nunca corte hacia arriba o hacia abajo.
Línea discontinua de 15°
Pendiente de 15°
DEMASIADO EMPINADA
OK
Figura 2Figura 1
Pendiente de 15°
ES - 24
SENIXTOOLS.COM
CONOZCA SU UNIDAD
APLICACIONES
Modelo: LSPG-L5
Como cortadora de pasto a gasolina:
Cortando el pasto en uso doméstico.
1 Barra de control del interruptor
2 Guía del cordón
3 Cordón de arranque
4 Perilla de conexión del mango
5 Mango inferior
6 Tapa del tanque de aceite
7 Palanca de ajuste de altura de corte
12
13
1
2
3
4
5
6
7
8
9
10
11
8 Cubierta de descarga lateral
9 Plataforma de corte
10 Abrazadera del cable
11 Mango superior
12 Cebador
13 Tapa del tanque de combustible

25 - ES
SENIXTOOLS.COM
ESPECIFICACIONES*
Modelo LSPG-L5
Tipo de motor 144 cm
3
(RV145-S)
Velocidad sin carga 3 000 RPM
Anchura de corte 50.8 cm
Aceite de motor SAE 30
Ajuste de altura
3.18 cm-9.53 cm,
5 posiciones
Material de cubierta Acero
Tipo de accionamiento Empuje
Peso del producto 20.65 kg
ENSAMBLAJE
1. Desembale todas las piezas y colóquelas
sobre una superficie plana y estable:
2. Retire todos los materiales de embalaje y
dispositivos de envío, si procede.
3. El volumen de suministro varía en función
del país y de la variante adquirida.
• Podadora x1
• Perilla de conexión del mango x2
• Escudo trasero x1
• Botella de aceite x1
• Manual de instrucciones x1
4. Si faltan piezas o están dañadas. No utilice
el producto. Póngase en contacto con su
distribuidor local.
¡ADVERTENCIA!
Esta unidad se envía sin gasolina o aceite en el
motor. Asegúrese de dar servicio al motor con
gasolina y aceite como se indica en el Manual
del motor antes de arrancar o hacer funcionar
la máquina.
NOTA:
La referencia al lado derecho e izquierdo de
la cortadora de césped se observa desde la
posición de funcionamiento.
FIJE EL MANGO
¡ADVERTENCIA!
No retuerza el cable cuando monte el asa.
1. Levante el mango de la posición de
plegado a la posición de trabajo.
Fig. 1
2. Aplique presión al mango inferior para
que pueda girar y ubicarse en las ranuras
del soporte del mango de la cortadora de
césped. Suelte y verifique que el mango
esté bloqueado en su lugar.
Fig. 2
3. Apriete las perillas de conexión del mango
para conectar el mango superior con el
mango inferior.
ES - 26
SENIXTOOLS.COM
Fig. 3
COLOQUE EL PROTECTOR
DE SEGUIMIENTO TRASERO
¡ADVERTENCIA!
No lo opere a menos que tenga un protector
de seguimiento trasero sin daños ensamblado
en su lugar.
Pase el protector de seguimiento trasero a
través de dos soportes. Asegúrese de que
el protector de seguimiento trasero cuelgue
hacia abajo.
Fig. 4
COLOQUE EL CORDÓN DE
ARRANQUE
1. Sujete el mando de las cuchillas contra la
empuñadura superior. Tire lentamente de
la empuñadura de la cuerda de arranque
desde el motor y deslice la cuerda de
arranque en la guía de la cuerda.
2. Utilice la abrazadera para fijar el cable de
control a la empuñadura inferior.
Fig. 5
¡ADVERTENCIA!
Para reducir el desgaste y permitir un
funcionamiento adecuado, asegúrese de dejar
algo de holgura en la parte superior del cable.
COLOQUE LA CUBIERTA DE
DESCARGA LATERAL
La cubierta de descarga lateral ya ha sido
montada. Gire la cubierta de descarga lateral
hacia abajo antes de trabajar y colóquela boca
abajo cuando esté inactiva para un fácil alma-
cenamiento.
Fig. 6
OPERACIÓN
CONTROL DE LA CUCHILLA
La barra de control de las cuchillas está supe-
rior del cortacésped. Presiónelo y sosténgalo
contra el mango superior para encender la
cortadora. Suéltelo para detener el motor y la
cuchilla.
27 - ES
SENIXTOOLS.COM
¡ADVERTENCIA!
Esta fianza de control de la cuchilla es un dis-
positivo de seguridad. Nunca intente omitir su
funcionamiento.
CUBIERTA DE DESCARGA
LATERAL
La cubierta de descarga lateral se ha instalado
antes de la entrega. Siga las instrucciones en
la sección de ensamblaje para usar la cubierta
de descarga lateral.
¡ADVERTENCIA!
Mantenga las manos y los pies alejados del
área del conducto en la plataforma de corte.
Consulte la etiqueta de advertencia de la uni-
dad.
PALANCA DE AJUSTE DE LA
ALTURA DE CORTE
Hay cuatro palancas de ajuste de la altura de
corte ubicadas respectivamente en cuatro
ruedas. Se pueden lograr 5 alturas de corte (de
3.2 a 9.5 cm) con estas cuatro palancas. Para
ajustar la altura de corte, consulte la sección
de montaje.
ARRANCADOR DE
RETROCESO
Tire de la cuerda del arrancador de retroceso
para impulsar el arrancador de retroceso
hasta que arranque el motor. La cuerda del
arrancador de retroceso se puede sujetar
a la guía de la cuerda en el mango superior
derecho para facilitar la operación de tracción.
Colóquese detrás del cortacésped, presione
la palanca y tire de la cuerda de arranque para
arrancar el cortacésped.
CEBADOR
El cebador está situado en el lado izquierdo
del motor. El cebador se utiliza para bombear
combustible al carburador y ayudar a arrancar
el motor.
¡ADVERTENCIA!
Asegúrese de que no hay nadie más que
el operador cerca de la podadora mientras
arranca el motor o hace funcionar la podadora.
Nunca haga funcionar el motor en interiores o
en áreas cerradas y mal ventiladas. Los gases
de escape del motor contienen monóxido de
carbono, un gas inodoro y mortal. Mantenga
las manos, los pies, el pelo y la ropa suelta
alejados de cualquier pieza móvil del motor y
de la podadora.
COMBUSTIBLE Y ACEITE
Recomendamos el uso de aceites certificados
de garantía Motor Rato para obtener el mejor
rendimiento. Otros aceites detergentes de alta
calidad son aceptables si están clasificados
para servicio SF. SG, SH, SJ o superior. No
utilice aditivos especiales. Las temperaturas
exteriores determinan la viscosidad adecuada
del aceite para el motor. Utilice la tabla para
seleccionar la mejor viscosidad para el
intervalo de temperaturas exteriores previsto.
104
86
68
50
32
14
-4
22
ºF ºC
40
30
20
10
0
-10
-20
-30
SAE 30 *
5W-30
10W-30 **
Synthetic 50W-30
Fig. 7
* Por debajo de 40°F (4°C) el uso de SAE 30
provocará un arranque difícil.
** Por encima de 80°F (27°C) el uso de 10W-
30 puede provocar un mayor consumo de
aceite. Compruebe el nivel de aceite con más
frecuencia.
PARA ARRANCAR/PARAR
EL MOTOR
Para arrancer:
1. Presione el cebador tres veces. No cebe
para volver a arrancar un motor caliente.
2. De pie detrás del cortacésped, tire del en-
ganche hacia atrás contra la empuñadura
superior.
3. Mientras sujeta el fiador contra la em-
ES - 28
SENIXTOOLS.COM
puñadura superior, mantenga un agarre
firme en la empuñadura de arranque y tire
de la cuerda con un rápido rápido, contin-
uo y con todo el brazo. Repita hasta que
el motor arranque. Deje que la cuerda se
rebobine cada lentamente.
1
3
Fig. 8
Para parar el motor:
Suelte el fiador para parar el motor y la
cuchilla.
¡ADVERTENCIA!
Espere a que la cuchilla se detenga
completamente antes de realizar cualquier
trabajo en la podadora.
AJUSTE DE LA ALTURA DE
CORTE
Las palancas de ajuste de la altura de corte
están ubicadas en cada rueda. Se pueden
lograr 5 alturas de corte (de 3.2 a 9.5 cm).
1. Tire de la palanca de ajuste de la altura de
corte hacia afuera, hacia la rueda.
2. Mueva las palancas a la posición deseada.
3. Suelte la palanca hacia la plataforma.
1
3
2
Fig. 9
¡ADVERTENCIA!
Para evitar el desequilibrio, mantenga siempre
las cuatro ruedas a la misma altura de corte.
CONSEJOS PARA CORTAR
EL CÉSPED
NOTA:
Una cuchilla afilada mejorará enormemente el
rendimiento de la podadora, especialmente al
cortar hierba alta. Asegúrese de comprobar el
filo de la cuchilla antes de cortar el césped.
Verifique que el césped esté libre de piedras,
palos, alambres y otros objetos que puedan
dañar la podadora o el motor. Dichos objetos
podrían ser arrojados accidentalmente por
la podadora en cualquier dirección y podrían
causar lesiones personales graves al operador
y a otras personas.
• Para obtener mejores resultados, no corte
en círculos. Viaja de un lado a otro por el
césped.
Fig. 10

29 - ES
SENIXTOOLS.COM
• Al cortar césped grueso, reduzca la
velocidad al caminar para permitir un corte
más eficaz y una descarga adecuada de
los recortes.
• Para mantener un césped sano, corte sólo
un tercio o menos de la longitud total del
césped.
MANTENIMIENTO
¡ADVERTENCIA!
Antes de realizar cualquier tipo de
mantenimiento/servicio, desactive todos
los controles y detenga el motor. Asegúrese
de que todas las piezas móviles se hayan
detenido por completo. Desconecte el cable
de la bujía y póngalo a tierra contra el motor
para evitar un arranque involuntario.
¡ADVERTENCIA!
¡Realice los trabajos de limpieza y
mantenimiento únicamente según estas
instrucciones! ¡Todos los trabajos posteriores
deben ser realizados por un especialista
cualificado! Y utilice únicamente repuestos
especificados para el reemplazo.
¡ADVERTENCIA!
Al realizar tareas de mantenimiento, utilice
únicamente piezas de repuesto idénticas.
El uso de cualquier otra pieza puede crear
un peligro o causar daños al producto. Para
garantizar la seguridad y confiabilidad, todas
las reparaciones deben ser realizadas por un
técnico de servicio calificado.
Siga el programa de mantenimiento que se
indica a continuación. Este cuadro describe
únicamente las pautas de servicio. Utilice la
columna Registro de servicio para realizar un
seguimiento de las tareas de mantenimiento
completadas. Consulte el Manual del operador
del motor para obtener instrucciones sobre
el combustible, el aceite, el filtro de aire y las
bujías.

ES - 30
SENIXTOOLS.COM
Intervalo Ítem Servicio Registro de servicio
Después de cada
uso
Nivel de aceite del motor
Verificar
Hardware suelto o faltante Ajustar o reemplazar
Unidad y motor Limpiar
Tras las primeras 5
horas de uso
Aceite del motor Cambiar
Anualmente, o cada
25 horas
Bujía Verificar
Control de conexiones/
pivotes y ruedas
Lubricar con aceite
ligero
Parte inferior de la plata-
forma de corte
2
Limpiar
Anualmente, o cada
50 horas
Filtro de aire y prefiltro (si
está equipado)
1
Limpiar
Aceite de motor Cambiar
Anualmente, o cada
200 horas de uso
Filtro de aire y prefiltro
1
Cambiar
Anualmente Bujía Reemplazar
Antes de almace-
nar a largo plazo /
durante el invierno
Sistema de combustible
Drene el depósito de
gasolina y el carbura-
dor antes de guardar-
los durante largos
intervalos. Añada esta-
bilizador de combusti-
ble para mayor protec-
ción.
1
Limpie con más frecuencia en condiciones de mucho polvo o cuando haya residuos en el aire.
2
Verifique y limpie con más frecuencia si la cortadora de césped se usa típicamente en la config-
uración de lecho del césped.

31 - ES
SENIXTOOLS.COM
¡ADVERTENCIA!
Siempre detenga el motor, desconecte el
cable de la bujía y ponga a tierra contra el
motor antes de realizar cualquier tipo de
mantenimiento en su máquina.
RECOMENDACIONES
GENERALES
• Observe siempre las reglas de seguridad
al realizar cualquier mantenimiento.
• La garantía de esta unidad no cubre
artículos que hayan quedado sujetos al
abuso o negligencia del operador. Para
recibir el valor total de la garantía, el
operador debe mantener el equipo como
se indica aquí.
• El cambio de la velocidad regulada por el
motor anulará la garantía del motor.
• Todos los ajustes deben verificarse al
menos una vez por temporada.
• Revise periódicamente todos los
sujetadores y asegúrese de que estén
ajustados.
CUIDADOS DE LA CUCHILLA
¡ADVERTENCIA!
Cuando retire la hoja de corte para
reemplazarla, protéjase las manos con un par
de guantes gruesos o use un trapo grueso
para sujetar la hoja. No repare ni altere la hoja.
Inspeccione periódicamente el adaptador de
la cuchilla en busca de grietas, especialmente
si golpea un objeto extraño. Reemplazar
cuando sea necesario. Siga los pasos a
continuación para el servicio de la cuchilla.
1. Desconecte la funda de la bujía de la bujía.
Gire la cortadora de lado asegurándose de
que el filtro de aire y el carburador estén
mirando hacia arriba.
2. Quite el perno y el soporte de campana de
la hoja que sujetan la hoja y el adaptador
de la hoja al cigüeñal del motor.
3. Retire la cuchilla y el adaptador del
cigüeñal.
4. Retire la cuchilla del adaptador para
probar el equilibrio. Equilibre la hoja en
un destornillador de eje redondo para
comprobar. Retire el metal del lado pesado
hasta que se equilibre uniformemente.
Al afilar la hoja, siga el ángulo de afilado
original. Muela cada borde de corte por
igual para mantener la hoja equilibrada.
5. Lubrique el cigüeñal del motor y la
superficie interior del adaptador de la
cuchilla con aceite ligero. Deslice el
adaptador de la cuchilla en el cigüeñal
del motor. Coloque la cuchilla en el
adaptador de manera que el lado de la
cuchilla marcado como “Abajo” (o con
el número de pieza) mire hacia el suelo
cuando la cortadora esté en la posición
de funcionamiento. Asegúrese que la hoja
esté alineada y asentada en las bridas del
adaptador de la hoja.
6. Coloque el soporte de la campana de la
hoja sobre la hoja. Alinee las muescas del
soporte de la campana de la hoja con los
pequeños orificios de la hoja.
7. Reemplace el perno hexagonal (1) y ajuste
el perno hexagonal al par: 29.5-33.2 pie-
libra (40-45 Nm) máx.
¡ADVERTENCIA!
Una hoja desequilibrada provocará una
vibración excesiva al girar a altas velocidades.
Puede causar daños a la cortadora y podría
romperse y causar lesiones personales.
A
B
C
D
Fig. 11
A Adaptador de la hoja
B Hoja
C Perno
D
Soporte de campana
de la hoja
LIMPIEZA
• Apague el producto y asegúrese de que
producto está totalmente parado.
• Mantenga siempre el cortacésped limpio y
libre de hierba, suciedad u otros residuos.
• Mantenga las empuñaduras secas, limpias
y libres de aceite y grasa.
• Utilice un cepillo pequeño para limpiar del
producto. No utilice detergentes fuertes.
Limpiadores domésticos que contengan

ES - 32
SENIXTOOLS.COM
aceites aromáticos, como pino y limón, y
disolventes como el queroseno, pueden
dañar el plástico. Limpie cualquier resto de
humedad con un paño suave.
• Después de cada sesión de corte, retire
los restos de hierba acumulados con un
paño seco o un cepillo de mano.
• Inspeccione el producto antes y después
de cada antes y después de cada uso. No
utilice No lo utilice si encuentra piezas
desgastadas o dañadas.
NOTA:
Si la cuchilla de corte se bloquea objetos
extraños durante el funcionamiento, detenga
el producto, espere a que la cuchilla de corte
se detenga por completo, retire los objetos
extraños y limpie la cuchilla de corte.
Limpieza del motor:
• Diariamente o antes de cada uso, limpie el
césped, la paja o la suciedad acumulada
del motor. Mantenga limpios el las
conexiones, los resortes y los controles.
Mantenga el área alrededor y detrás del
silenciador libre de residuos combustibles.
• Mantener el motor limpio permite el
movimiento del aire alrededor del motor.
• Las piezas del motor deben mantenerse
limpias para reducir el riesgo de
sobrecalentamiento y la ignición de los
desechos acumulados.
¡ADVERTENCIA!
No utilice agua para limpiar las piezas del
motor. El agua podría contaminar el sistema
de combustible. Utilice un cepillo o un paño
seco.
ALMACENAMIENTO
Almacenamiento fuera de temporada
¡ADVERTENCIA!
Nunca almacene la podadora de césped con
combustible en el tanque en interiores o
en áreas mal ventiladas donde los vapores
del combustible pueden alcanzar una llama
abierta, chispa o luz piloto como en un horno,
calentador de agua, secadora de ropa o
aparato de gas.
Preparación del motor
Para motores almacenados durante 30 días:
• Para evitar que se forme goma en el
sistema de combustible o en las piezas del
carburador, haga funcionar el motor hasta
que se detenga por falta de combustible
o use gasolina mezclada con aditivo
de gas. Si usa un aditivo de gas, haga
funcionar el motor durante varios minutos
para hacer circular el aditivo a través del
carburador, después de lo cual el motor y
el combustible se pueden almacenar por
más de 30 días.
• Mientras el motor aún está caliente,
cambie el aceite.
• Limpie el motor de los residuos de la
superficie.
Preparación de la cortadora de césped
• Limpie y lubrique la cortadora a fondo
como se describe en las instrucciones de
lubricación.
• No use una lavadora a presión o una
manguera de jardín para limpiar su unidad.
• Recubra la cuchilla de corte de la
cortadora con grasa para chasis para
evitar que se oxide.
• Consulte Preparación del motor para
obtener las instrucciones correctas
acerca de cómo almacenar el motor.
• Guarde la cortadora en un área limpia y
seca. No almacenar cerca de materiales
corrosivos, como fertilizantes.
• Al almacenar cualquier tipo de
equipo eléctrico en un cobertizo de
almacenamiento metálico o mal ventilado,
se debe tener cuidado de proteger
el equipo contra la oxidación. Con un
aceite ligero o silicona, cubra el equipo,
especialmente los cables y todas las
partes móviles de su cortadora de césped
antes de guardarla.
TRANSPORTE
• Vacíe previamente el combustible residual
en un recipiente homologado.
• Asegure la herramienta y protéjala de
cualquier impacto fuerte o vibraciones
fuertes que puedan producirse durante el
transporte en vehículos.
• No se recomienda el transporte en vehícu-
los cerrados.
¡ATENCIÓN!
No incline el motor para evitar el derrame
de combustible durante el transporte. El
combustible derramado o los vapores del
combustible pueden inflamarse y provocarse
un incendio.

33 - ES
SENIXTOOLS.COM
SOLUCIÓN DE PROBLEMAS
Las averías que se sospechan suelen deberse a causas que los usuarios pueden solucionar
por sí mismos. Por lo tanto, solucione los problemas del producto utilizando esta sección. En la
mayoría de los casos, el problema puede resolverse rápidamente.
Problema Posible causa Solución
El motor no arranca.
Control de la cuchilla desactivado.
Asegúrese de que la palanca
esté presionada al arrancar el
cortacésped.
Funda de la bujía desconectada.
Conecte el cable a la funda de la
bujía.
Depósito de combustible vacío o
combustible rancio.
Llene el tanque con gasolina
nueva y limpia.
Motor no arranca (si está
equipado con arrancador).
Arranque el motor como se
indica en la sección Operación.
Bujía defectuosa.
Limpiar, ajustar el espacio o
reemplazar.
Motor ahogado.
Espere unos minutos para
reiniciar.
Línea de combustible bloqueada.
El paquete de baterías no está
bien colocado
Póngase en contacto con el
servicio técnico para limpiar el
conducto de combustible.
El motor funciona
más o menos.
La funda de la bujía está suelta.
Conecte y ajuste la funda de la
bujía.
Combustible rancio.
Llene el tanque con gasolina
nueva y limpia.
Conducto en la tapa de la gasolina
obstruido.
Limpie el conducto.
Agua o suciedad en el sistema de
combustible.
Haga funcionar el motor hasta
que se detenga por falta de
combustible. Vuelva a llenar
con combustible nuevo. Carb
/ aditivos limpiadores de
combustible también puede
ayudar a limpiar el motor.
Filtro de aire sucio.
Consulte Filtro de aire en la
sección Mantenimiento del
motor.
Línea de combustible bloqueada.
Comuníquese con su distribuidor
de servicio para limpiar la línea
de combustible.

ES - 34
SENIXTOOLS.COM
El motor se
sobrecalienta
Nivel de aceite del motor bajo.
Llene el cárter con el aceite
adecuado.
Flujo de aire restringido.
Limpie el área alrededor y
encima del motor.
Saltos ocasionales
(vacila)
El espacio de la bujía es
demasiado pequeño.
Ajuste la brecha con un
especialista calificado.
No entra en
inactividad
correctamente
Bujía sucia, defectuosa o la
brecha es demasiado amplia.
Acorte la brecha o reemplace la
bujía.
Filtro de aire sucio.
Consulte Filtro de aire en la
sección Mantenimiento del
motor.
Vibración excesiva
Cuchilla de corte suelta o
desequilibrada.
Ajuste la cuchilla y el adaptador.
Equilibre la hoja.
Cuchilla de corte doblada. Reemplace la cadena.

EspañolSENIXTOOLS.COM
GARANTÍA
GARANTÍA LIMITADA SENIX TOOLS
DURANTE DOS AÑOS a partir de la fecha de compra original este producto cortacésped, excepto el motor RATO
(ver más abajo), está garantizado contra defectos de material o construcción. CON PRUEBA DE LA COMPRA ORIGINAL
un producto defectuoso recibirá reparación gratuita. Si el producto no puede ser reparado, será reemplazado
gratuitamente.
Para obtener más detalles sobre la cobertura de la garantía, visite senixtools.com, envíe un correo
electrónico a senix.support@yatusa.com o llame a 1-800-261-3981.
• Esta garantía no cubre las reparaciones necesarias debido a accidentes o abuso del producto, o por no utilizar o
mantener el producto de acuerdo con todas las instrucciones suministradas.
• Esta garantía no cubre los artículos fungibles que puedan desgastarse por el uso normal dentro del periodo de
garantía, incluyendo, entre otros, las cuchillas, las bolsas de recogida de hierba, las bujías y los filtros.
• Esta garantía no se aplica a los daños resultantes de reparaciones del producto realizadas o intentadas por
agentes no autorizados por SENIX.
• Esta garantía no se aplica a las reparaciones necesarias debido a una mezcla de combustible inadecuada,
combustible contaminado o rancio.
• Esta garantía no cubre los gastos de envío o transporte del producto para recibir la cobertura de la garantía.
• La garantía queda anulada si el producto se ha utilizado con fines comerciales, profesionales o para servicios de
alquiler.
• La garantía se aplica al comprador minorista original y no es transferible.
• Se requiere un comprobante de compra para obtener la cobertura de la garantía.
ESTA GARANTÍA SE OTORGA EN LUGAR DE TODAS LAS DEMÁS, INCLUIDA LA GARANTÍA IMPLÍCITA DE COMERCIABILIDAD
E IDONEIDAD PARA UN PROPÓSITO PARTICULAR, Y EXCLUYE TODOS LOS DAÑOS INCIDENTALES O CONSECUENCIALES.
Algunos estados no permiten limitaciones sobre la duración de una garantía implícita o la exclusión o limitación de daños
incidentales o consecuentes, por lo que es posible que estas limitaciones no se apliquen en su caso. Esta garantía le
otorga derechos legales específicos y usted puede tener otros derechos que varían en ciertos estados o provincias.
GARANTÍA LIMITADA DEL MOTOR RATO. Consulte el manual del motor RATO para conocer la garantía del motor y las
cuestiones relacionadas con las piezas del motor.
GARANTÍA DE DEVOLUCIÓN DEL DINERO EN 60 DÍAS. Si por cualquier motivo en un plazo de 60 días a partir de la fecha
de compra original no está completamente satisfecho con el rendimiento de este producto SENIX, puede devolverlo con
el recibo de compra original para obtener un reembolso completo.
Latinoamérica: Esta garantía no se aplica a los productos vendidos en América Latina. Para los productos vendidos en
Latinoamérica, consulte la información de garantía específica del país que figura en el embalaje, llame al minorista donde
lo compró o visite el sitio web para obtener información sobre la garantía.
Sustitución gratuita de las etiquetas de advertencia: Si sus etiquetas de advertencia se vuelven ilegibles o faltan, llame a
1-800-261-3981 para obtener una sustitución gratuita.
YAT USA INC. 10506 Bryton Corporate Center Dr, #500 Huntersville, NC 28078
For customer support, please call 1-800-261-3981 or email us at senix.support@yatusa.com
SÓLAMENTE PARA PROPÓSITO DE MÉXICO
Importado y Distribuido por SENIX TOOLS S. DE R.L. DE C.V.
Puerto Grande 201, Salinas Victoria, Nuevo León, C.P. 65500 Tel. 81-3147-7166 | R.F.C. STO2111234L5
Para localizar los centros de servicio autorizados y franquiciados en la República Mexicana, donde podrá hacer
efectiva su garantía y adquirir partes, refacciones y accesorios originales, contactarnos al teléfono 81-3147-7166
ó al correo electrónico [email protected]
Para hacer efectiva esta garantía deberá presentar la herramienta, y esta póliza sellada por el establecimiento comercial donde se adquirió el producto, de
no contar con ésta, bastará el comprobante de compra (recibo, nota, o factura).
PÓLIZA DE GARANTÍA
IDENTIFICACÓN DEL PRODUCTO (Datos para ser llenados por el Distribuidor)
Sello o firma del Distribuidor: __________________________________________ Fecha de compra y/o fecha de entrega del product:
Nombre del producto: _________________________________________________ ______________________________________________________________________
Número de modelo: ___________________________________________________ Nombre y domicilio del Distribuidor donde se adquirió el producto:
Número de serie: _____________________________________________________ ______________________________________________________________________
Marca: _______________________________________________________________ ______________________________________________________________________
REGÍSTRESE EN LÍNEA - senixtools.com/pages/product-registration
¡Gracias por su compra! Registre su producto ahora para:
Servicio de Garantía: El registro de su producto le ayudará a obtener un servicio de garantía
más eficaz en caso de que surja algún problema con su producto.
Confirmación de propiedad: En caso de siniestro, como incendio, inundación o robo, su
registro de propiedad servirá como prueba de compra.
Por su seguridad: El registro de su producto nos permitirá ponernos en contacto con usted en
el improbable caso de que se requiera una notificación de seguridad en virtud de la Ley Federal
de Seguridad de los Consumidores.