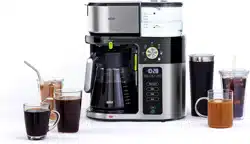
User Manual for Coffee Machine

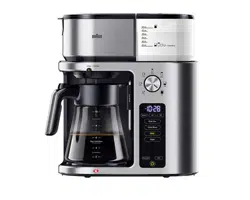
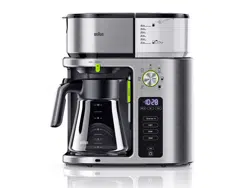
Control Panel
Display shows the following options:
• Time of the day 1
• Temperature (F/C)*
– Hot water function 2
• Freshness Indicator
– Provides an indication of your coffee freshness based on the period of time since brewing started. 3


Functions: 4
Auto on: Use to program the start time of the brew cycle and activate the brew cycle.
Set: Use to program the time of day and auto on.
Clock: Use to set/change time of day.
Over Ice: Use to brew over –ice coffee.
Light/Gold/Bold: Use to select the brew mode and start the brew cycle.
Temp:* Use to select the water temperature (-/+) when heating up water. To change from F to C press + and - at the same time for a few seconds.
Water:* Use to begin the hot water dispensing.
Clean: Descaling indicator and use to activate the descaling process.
On/Off button: Use to switch on/off the unit.
Before first use
Please read instructions carefully and completely before using the appliance.
Remove all packaging material and stickers from the appliance.
Switch on the appliance.
Set “time of day”, “water hardness level” and “altitude” (see explanation in dedicated paragraphs hereafter).
Run the coffee maker through a complete brew cycle without ground coffee.
Use a full carafe (10 cups) of fresh cold water. This will remove any dust from the manufacturing process or residues that have remained in the unit.
During the setting process the information displayed will be saved after 10 seconds.
Time of day
When the coffee maker is first plugged in or when power is restored after an interruption, the display starts flashing 2:00 AM and you hear an acoustic signal.

1. Switch on and press and hold CLOCK for 2 seconds.
2. Press and hold SET to scroll through the hours. Release it once the desired hour is displayed.
3. To set the minutes, press CLOCK. The minutes start flashing.
4. Press and hold SET to scroll through the minutes. Release it once the desired minutes are displayed.
5. Press CLOCK again to save the desired time.
NOTE: When the number count passes 12, the PM light will be displayed.
Water hardness level
Set the water hardness level on the coffee maker to the water hardness level for your local area.
1. Switch on the appliance and press and hold CLEAN for 2 seconds.
2. The default setting (h3) is flashing.
3. Press SET to scroll through the options (h1 = soft, h2 = normal, h3 = hard) and select the appropriate water hardness level.
4. Press CLEAN to save the hardness level.
Altitude setting
To ensure your coffee maker works properly at higher altitudes, enable the altitude setting. This setting avoids that the coffee maker develops steam rather than boiling at the standard boiling temperature (100°C/212°F).
1. Switch on the appliance. Press and hold SET for 2 seconds.
2. The default setting (A 1) is flashing.
3. Press SET to scroll through the following options:
|
Altitude (m/ft)
|
0 – 499 / 0 – 1637
|
500 – 999 / 1638 – 3278
|
1000 – 1499 / 3279 – 4918
|
1500 – 1999 / 4919 – 6558
|
2000 > / 6559 >
|
|
Parameter
|
A1
|
A2
|
A3
|
A4
|
A5
|
4. Press and hold SET for 2 seconds to save the desired altitude.
Operation Instructions
Installing the Charcoal Water Filter

Use of the charcoal water filter is optional, but strongly recommended. The filter eliminates chlorine, bad tastes and odors from tap water. The coffee maker will operate normally without it. Replacement water filters can be purchased in stores, through the Braun website, or by calling Customer Service.
Switching On/Off
• To switch on the coffee maker press the On/Off button (H). The green indicator light will illuminate indicating that the coffee maker is in “ready” mode. Time of the day is displayed.
NOTE: When switching on and the lever is in position “Drip Stop”, the On/Off button starts flashing.
• To switch off the coffee maker, press the On/Off button again. The green indicator light will turn off indicating that the coffee maker is in “stand by” mode. Time of day remains visible.
NOTE: If the On/Off button is pressed and no further function is selected within 60 seconds the coffee maker goes into “stand by” mode. The last selected brewing mode and the LED of the On/Off button disappear. To get out of stand by mode, press the On/ Off button.
Programming the Coffee Maker
Before programming, always switch the coffee maker on.
NOTE: The coffee maker features a 60-second power loss back-up system that remembers all programmed information, including time of day and auto on time in the event of a power interruption.
Setting the AUTO ON Time
The AUTO ON time can be set for any time, day or night. “PM” is displayed on the LED for nighttime program times.
1. Place the lever in position “Coffee” or “Drip Stop”.
2. Press AUTO ON for a minimum of 2 seconds.
3. The time of day in the display starts flashing.
4. Press and hold SET to scroll through the hours. Release it once the desired hour is displayed.
5. To set the minutes, press AUTO ON. The minutes in the display starts flashing.
6. Press and hold SET to scroll through the minutes. Release it once the desired minutes is displayed.
7. Press AUTO ON to save the desired time.
8. The set auto on time disappears after a few seconds and the time of day shows on the display.
Activate the AUTO ON Time
This function can only be activated if the AUTO ON time and the time of the day have been set.
• Place the lever (E) in position “Coffee” and select the beverage size (F).
• Place the carafe or your empty cup underneath the brew basket outlet. For smaller cups use the Single-serve cup holder.
• Press AUTO ON and select the desired taste. AUTO ON turns permanently on. The coffee maker will start to brew at the preset auto on time.
• The preset AUTO ON time and the selected taste disappears after a few seconds.
• To switch off the function, press AUTO ON again: AUTO ON will disappear.
NOTE: The AUTO ON function remains activated and is permanently on even when the appliance has been switched off.
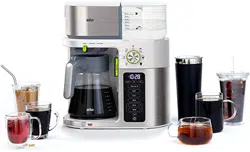
Features
Beverage Size Option Selector

The keep warm plate and the freshness indicator are only activated with size options

and the LED (J) is illuminated.
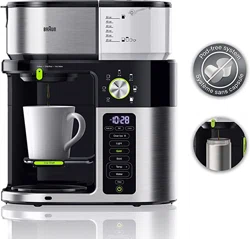
Single-Serve Cup Holder
Pull down the cup holder to brew directly into your favorite cup or mug. Brew into a cup or travel mug:
NOTE: Do not place the travel mug on the keep warm plate when the indicator (J) is illuminated.
travel mug

All other steps are described under “Making Coffee”.
Brew modes

Light: Brew setting is automatically adjusted so you get a milder cup of coffee.
Gold: This mode has been certified by the SCA (Specialty Coffee Association) to meet their rigorous technical requirements using the black filter basket, a paper filter and water volume of 1.5L (corresponding to the 50 oz. mark in the water tank) with a brew ratio of 55 g of coffee to 1.0L of water (82.5 g of coffee for 1.5 L).
If a brewer passes all of the tests in the certification procedure, as conducted by the SCA, that brewer will be eligible to be recognized as an examplary home brewer and join the short list of SCA Certified Home Brewers. The Braun coffee maker has met these SCA requirements when using the “Gold” setting.
Bold: Brew setting is automatically adjusted so you get a stronger cup of coffee.
Making Coffee
1. Fill water in the water reservoir.

2. Insert the gold tone permanent filter (Q) or a paper filter (cone type # 4) in the filter basket (O). Never use both at the same time
3. Add the desired amount of ground coffee, corresponding to the number of cups being brewed. We recommend using the Braun coffee measuring scoop. Refer to the indications on the Braun coffee measuring scoop (S).
4. Close the water reservoir and place the carafe or your empty cup underneath the filter basket outlet.
5. Press the On/Off button (H).
6. Place the lever (E) in position “Coffee”.

7. Select the beverage size (F).

8. Select your brew mode to start the brew cycle. After the brew mode has been selected the brewing process starts immediately.

9. During brewing, the On/Off button and the selected brewing mode are illuminated continuously.
10. The unit will beep when the brew is complete.

11. Place the lever in position “Drip Stop”.

12. If the size options  or
or  have been selected the coffee maker goes into the keep warm function and the LED (J) turns on. After 2 hours the coffee maker switches off automatically.
Recommended Use of 2-sided coffee measuring scoop

2-sided coffee measuring scoop (S)

For Best Results
• When using paper filters, be sure that it is completely open and fully inserted in the basket. It may help to fold and flatten the seams of the paper filter beforehand.
• Once the coffee has finished brewing, stir it before serving to blend the flavors. The coffee at the bottom of the carafe will be somewhat stronger than the coffee at the top.
Brew over – ice coffee
1. Fill water in the water reservoir.
2. Insert the gold tone permanent filter (Q) or a paper filter (cone type # 4) in the filter basket (O). Never use both at the same time
3. Add the desired amount of ground coffee, corresponding to the number of cups being brewed. We recommend using the Braun coffee measuring scoop. Refer to the indications on the Braun coffee measuring scoop (S).
4. Fill your desired carafe/cup with ice cubes and place it underneath the filter basket outlet.
5. Press the On/Off button (H).
6. Place the lever (E) in position “Coffee”.

7. Select the beverage size (F).

8. Press the “Over Ice” button.

9. Select the brew mode to start the brewing cycle. It is recommended to use the Bold mode for an intense over-ice coffee.
10. The selected brew mode and the On/Off button (H) are illuminated continously during the brewing process.
11. The unit will beep when the brew is complete and the selected brew mode and “Over Ice” turn off.
12. Place the lever (E) in position “Drip Stop”.

NOTE: Be sure the cup size fits to the selected beverage size. Never fill ice cubes in the water reservoir.
We recommend using the carafe or a thermo-resistant glass.
Pause during brewing process
1. Move the lever (E) to “Drip Stop” position.

2. The brewing process will be paused and the selected brewing mode is flashing.
3. The lever should be moved back to the “Coffee” position within maximum 2 minutes.

4. The brewing process will be continued.
NOTE: If the lever is not moved back to “Coffee” position within 2 minutes, the brewing process is terminated with an acoustic signal. If you pause the brewing process the GOLD/SCA brew mode requirements might not be met.
Dispensing hot water*
1. Fill water in the water reservoir.
2. Place the carafe on the keep warm plate or a cup on the cup holder.
3. Press the On/Off button.
* certain models only
4. Place the lever (E) in position “Hot Water”. The buttons “Water” and “Temp” are illuminated. The default temperature is shown in the display.

5. Press + or - on the “Temp” button to select the temperature. You can choose one of the 6 pre-set temperatures.

6. Select the beverage size (F).

7. Press “Water” to start the dispensing process. The button “Water” and the On/Off button are illuminated.

8. If dispensing is completed the process is terminated with an acoustic signal.
9. Place the lever (E) in position “Drip Stop”.

Recommended Temperature Setting Chart
|
70°C / 158 °F
|
75°C / 167°F
|
80°C / 176°F
|
85°C / 185°F
|
90°C / 194°F
|
95°C / 203°F
|
|
White tea
|
Green tea
|
Jasmine tea
|
Oolong tea
|
Instant tea
|
Herbal teas and infusions (Black, Peppermint, Camomile)
|
Descaling
For the best performance from your Braun coffee maker, descale the unit when the LED CLEAN starts flashing. This indicates it is time to descale your coffee maker.

Frequency will depend upon the hardness of your tap water, beverage size and how often you use the coffee maker.
We recommend using the Braun Descaling Solution (can be purchased in stores, through the Braun website, or by calling Customer Service).
1. CLEAN is flashing.
2. Fill the descaling solution (follow packaging instruction on the descaling agent) in the water reservoir.
3. Remove the gold tone permanent filter (Q) and the charcoal filter(B).
4. Place the empty carafe in its position on the keep warm plate (H).
5. Place the lever in position “Coffee”.

6. Press the On/Off button (K).
7. Press CLEAN to start the descaling program.

CLEAN turns permanently on and the countdown timer starting from “23” apInterface pears in the display.

Once the descaling process has started, it is not possible to stop the program until finished.
8. When the water reservoir is empty the countdown timer in the display shows “4” and CLEAN starts flashing.

9. Empty the carafe.
10. Refill the water reservoir with a full carafe (not exceeding 10 cups) of fresh water, place the empty carafe on the keep warm plate and press again CLEAN to start the rinsing cycle.
11. When the descaling program has been completed, the On/Off button and CLEAN turn off.
12. Empty the carafe and rinse it thoroughly with water.
We recommend running the coffee maker through two complete brew cycles to flush the unit after descaling. Use a full carafe of fresh cold water each time.
Cleaning and Maintenance
• Always turn coffee maker off and remove the plug from the electrical outlet before cleaning.
• Lift up the reservoir cover. Remove the gold tone permanent filter and discard the ground coffee.
• Remove the carafe from the keep warm plate and discard any remaining coffee.
• The filter basket, gold tone permanent filter, carafe including lid and the water reservoir including lid can be washed in warm, soapy water and rinsed thoroughly, or cleaned in the upper rack of the dishwasher. Dry all parts after use.
• Do not use any scouring agents or harsh cleansers on any part of the coffee maker.

• Never immerse the unit in water or other liquids.
• To clean base, simply wipe with a clean, damp cloth and dry before storing.
• Do not put any water in the unit once the filter basket has been removed. Wipe the area under the filter basket with a damp cloth.
• Fingerprints and other blemishes on the housing can be wiped off with soap and water or a non-abrasive cleaning solution.
• Do not dry the inside of the water reservoir with a cloth, as lint may remain.
Troubleshooting guide
| PROBLEM |
CAUSE |
SOLUTION |
| Display does not show a time |
The appliance is unplugged |
Plug unit in |
| Display flashes “2:00 AM” |
• Initial operation
• There was a power outage
|
Set clock |
| It is not possible to set the AUTO ON time |
• Lever not positioned in the “Coffee” position
• Clock has not been set
|
• Position lever in position “Coffee”
• Set clock time
|
| It is not possible to activate the AUTO ON time |
• AUTO ON time has not been set |
• Set AUTO ON time |
| Coffee is not brewing |
• The appliance is unplugged
• There was a power outage
• Brew mode was not selected
• There is no water in the water reservoir
• The appliance is in stand-by mode
• AUTO-ON function is not activated
• Lever is positioned in “Drip Stop” position
• Water reservoir cover is not closed
|
• Plug unit in
• Wait for power to be restored
• Select brew mode to start
• Pour water into the water reservoir
• Switch on the appliance
• Activate AUTO-ON function
• Place lever in position “Coffee”
• Close the water reservoir cover
|
|
The coffee maker is only brewing water
|
There are no coffee grounds in the filter basket |
Add the desired amount of coffee to the filter |
| The coffee maker is overflowing |
The filter basket is not properly inserted |
Insert the filter basket correctly |
| Using too much coffee grounds |
Remove filter from the filter basket If using a paper filter, replace with new one Restart the coffee brewing process with proper amount of coffee grounds (not exceeding 10 coffee measuring scoops or tablespoons) |
| Using coffee that is too finely ground |
Use only coffee that is ground for drip coffee makers |
| Paper filter and gold tone permanent filter are used together |
Use either paper or the gold tone permanent filter, never both at the same time |
| The coffee flow through the lid is blocked |
Remove the insert from the middle of the lid Rinse the lid properly under running water |
| The filter basket spring popped out during cleaning |
Reattach the spring to the filter basket |
| There are coffee grounds at the bottom of the carafe |
The paper filter was not inserted correctly into the filter basket |
Rinse filter basket, set filter into the filter basked and restart brewing |
|
• Paper filter collapsed
• Coffee powder is too finely ground
|
• Remove filter, rinse filter basket and restart brewing with a new paper filter
• Use only coffee that is ground for drip coffee makers
|
| On/Off button is flashing. |
The lever is on “Drip Stop”. |
Move the lever to “Coffee” or “Hot water” (if available depending the model). |
| After the brewing process is finished some water remains in the water reservoir. |
This is normal. The unit only uses the amount of water according to the chosen beverage size option. |
|
| Display shows “Lid” |
Lid of the water reservoir is open |
Close the lid |
| Display shows E02, E05, E08, E09, E16, E18 |
|
Unplug the appliance, wait for 5 minutes and plug in again. Perform a decalcification. If the error persists contact an authorised Braun customer service. |
| Display shows E03, E04, E06, E07, E10, E11, E12, E13, E14, E15, E17, E19 |
|
Unplug the appliance, wait for 5 minutes, plug in again and retry. If the error occurs again contact an authorised Braun customer service. |
| Display shows E21 |
|
Fill the water reservoir. Switch off and switch on again. If the error remains contact an authorised Braun customer service. |