
Introduction 2
Description 3
Operation 10
Troubleshooting 12
All rights reserved. Reproduction by any means, electronic or mechanical
including photocopying, recording or by any information storage and retrieval
system or translation in whole or part is not permitted without written
authorization from Ford Motor Company. Ford may change the contents without
notice and without incurring obligation.
Copyright © 2000 Ford Motor Company
Table of contents
1

Your Family Entertainment System (FES) allows you to watch movie
rentals and your favorite home videocassettes. Please review this user
manual to become familiar with the FES features and controls as well as
the very important safety information.
SAFETY INFORMATION
Read all of the safety and operating instructions before operating the
system and retain for future reference.
Do not attempt to service, repair or modify the rear entertainment
system. See your Ford or Lincoln-Mercury dealer.
Do not insert foreign objects into the VCP tape cassette compartment.
The front glass on the liquid crystal display may break when hit
with a hard surface. If the glass breaks, do not touch the liquid
crystalline material. In case of contact with skin, wash immediately
with soap and water.
Do not expose the liquid crystal display to direct sunlight or
intensive ultraviolet rays for extensive periods of time.
Ultraviolet rays deteriorate the liquid crystal.
Avoid touching auxiliary input jacks with your fingers. Do not blow on
them or allow them to get wet or dirty.
Do not clean any part of the FES with benzene, paint thinner or any
other solvent.
FEDERAL COMMUNICATION COMMISSION (FCC) COMPLIANCE
Changes or modifications not approved by Ford Lincoln-Mercury could
void user’s authority to operate the equipment. This equipment has been
tested and found to comply with the limits for a Class B digital device,
pursuant to Part 15 of the FCC Rules. These limits are designed to
provide reasonable protection against harmful interference in a
residential installation. This equipment generates, uses and can radiate
radio frequency energy and, if not installed and used in accordance with
the instructions, may cause harmful interference and radio
communications.
However, there is no guarantee that interference will not occur in a
particular installation. If this equipment does cause harmful interference
to radio or television reception, which can be determined by turning the
equipment off and on, the user is encouraged to consult the dealer or an
experienced radio/TV technician for help.
Introduction
2

FAMILY ENTERTAINMENT SYSTEM (FES)
Features
• videocassette player (VCP) with auto-tracking and dew sensor
• 6.8” flip-down color LCD flat screen monitor
• Media control panel with touch controls
• Standard headphone jacks (
1
⁄
8
”)
• Wireless headphones (two sets)
• Remote control unit
• Video and audio jacks for connecting video games and video
equipment*
* Auxiliary video or game equipment may require a 12–volt AC power
converter.
Playback and format
• The videocassette player of your Family Entertainment System can
only be used in the “playback” mode.
• The system plays standard videocassettes marked “VHS” (or “S-VHS”).
Audio system
A headphone/speaker switch (
/ ) on the media control panel
allows the rear seat passengers to listen to audio from a videocassette
over the vehicle’s speakers or over headphones connected the media
control panel directly.
VCP PROTECTION CIRCUITS
Dew sensor circuit
• Under high moisture (dewed) conditions, the cassette heads and
cassette may be damaged if the VCP is operated.
• When the vehicle’s cabin temperature is very low and then is heated
quickly, or the humidity is very high within the vehicle, the inside of
the VCP may become dewed.
• When a dewed condition exists, the dew sensor circuit stops machine
operation and the DEW indicator lamp on the VCP will flash. The
lamp will flash until the system is dry enough to operate safely (20
minutes to one hour).
Description
3
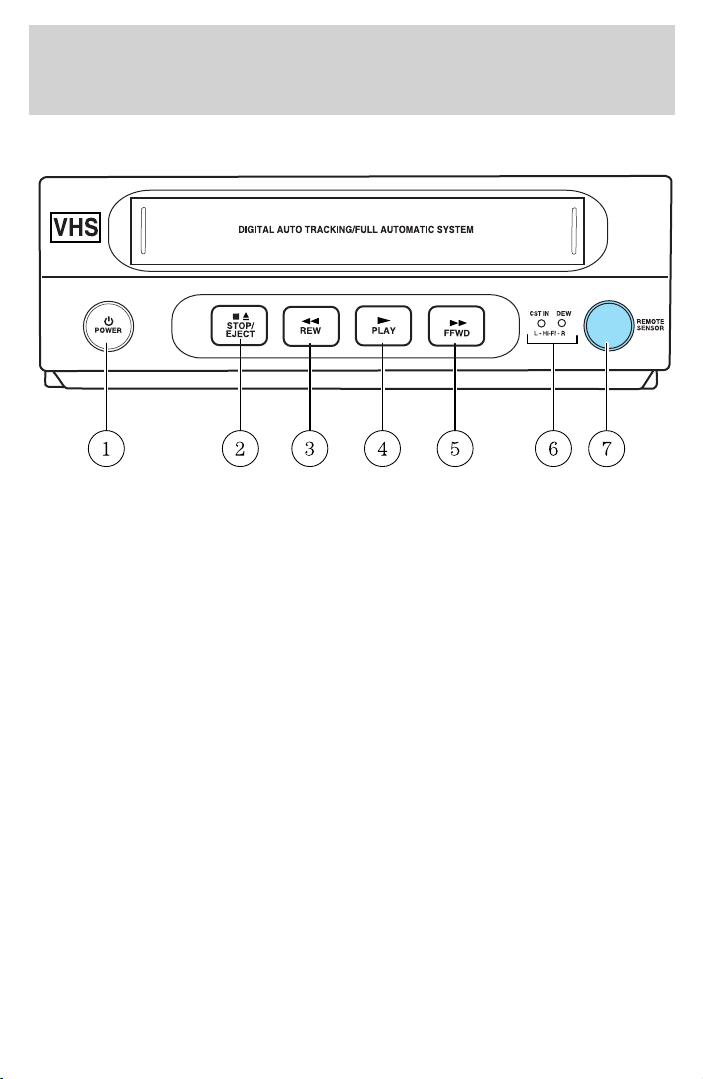
VIDEO CASSETTE PLAYER (VCP) CONTROLS
1. POWER button
Press to turn the VCP ON or OFF.
2. STOP/EJECT button
When videocassette is playing, press once to stop playback operation,
press again to eject the videocassette. When a videocassette is loaded
but not playing, press once to eject the videocassette.
3. REW (Rewind) button
Press to rewind the cassette.
4. PLAY button
Press to playback a videocassette.
5. FF (Fast Forward) button
Press to fast-forward the cassette.
6. Indicator Lamps
Lamps illuminate green except when a specific function is being
performed. For example, when the Play button is activated, the lamp will
change from green to red. The Power button illuminates red when power
to the VCP is activated.
7. REMOTE SENSOR
To operate the VCP with the remote control unit, aim it toward the VCP
or the monitor.
Description
4
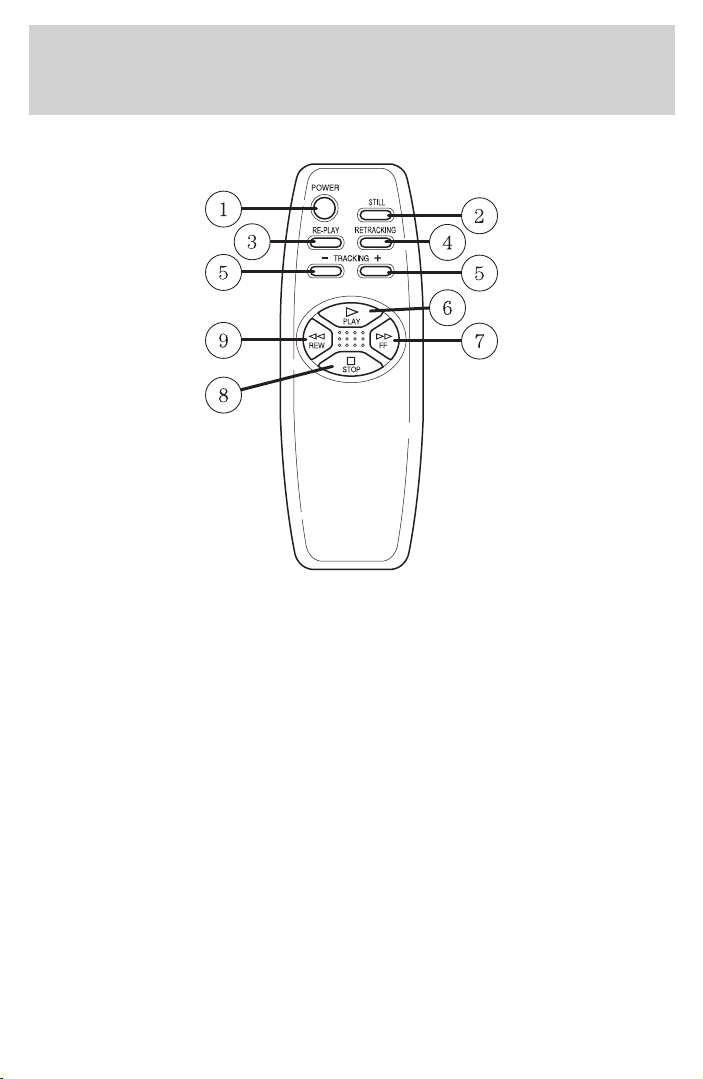
REMOTE CONTROL
1. POWER button
Press to turn the VCP player ON or OFF.
2. STILL button
Press to temporarily suspend playback.
3. RE-PLAY
Press to reverse the videocassette for five seconds. Normal playback will
then resume when in playback mode.
4. RETRACKING
Press to activate AutoTracking in the playback mode.
5. TRACKING (+/−) buttons
Press for manual cassette tracking.
6. PLAY button
Press to play a videocassette.
7. FF (Fast-Forward) button
Press to fast-forward the videocassette.
Description
5
8. STOP button
Press once to stop videocassette play, twice to eject the videocassette.
9. REW (Rewind) button
Press to rewind the videocassette.
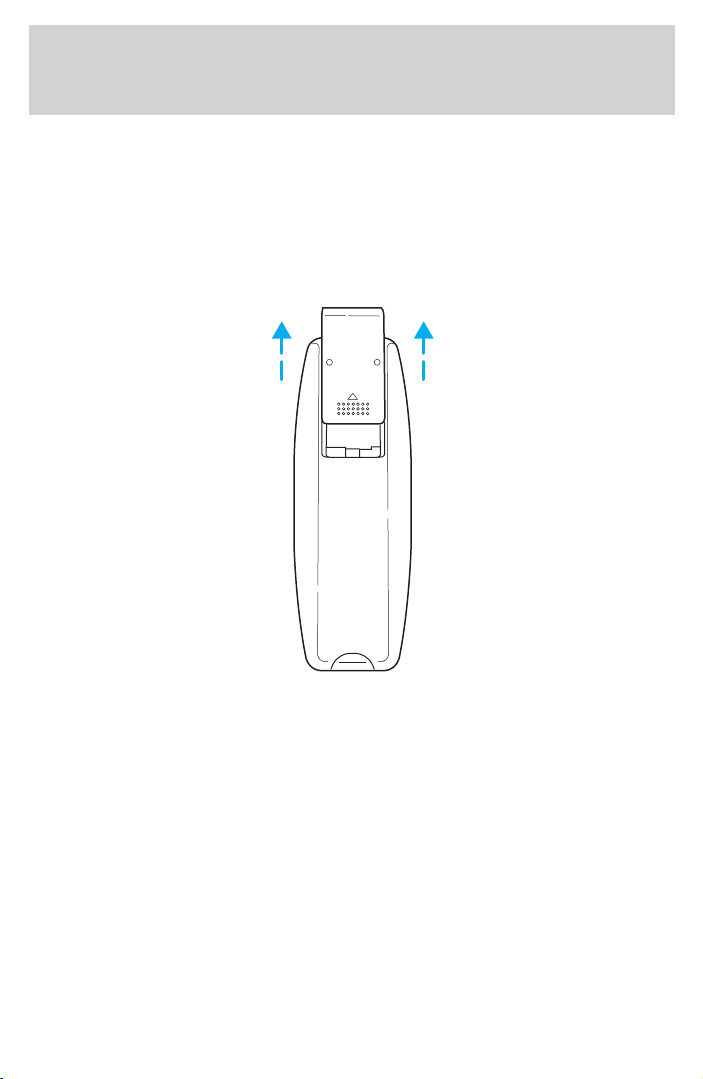
BATTERY REPLACEMENT
Slide battery cover off as shown on remote control to access the
batteries.
The remote control unit uses two AAA batteries.
The need for battery replacement is usually indicated if the remote
control only functions at extremely close distances to the entertainment
center or not at all.
When replacing batteries, use new batteries (alkaline recommended) and
install with correct orientation (+ and − polarities).
Description
6
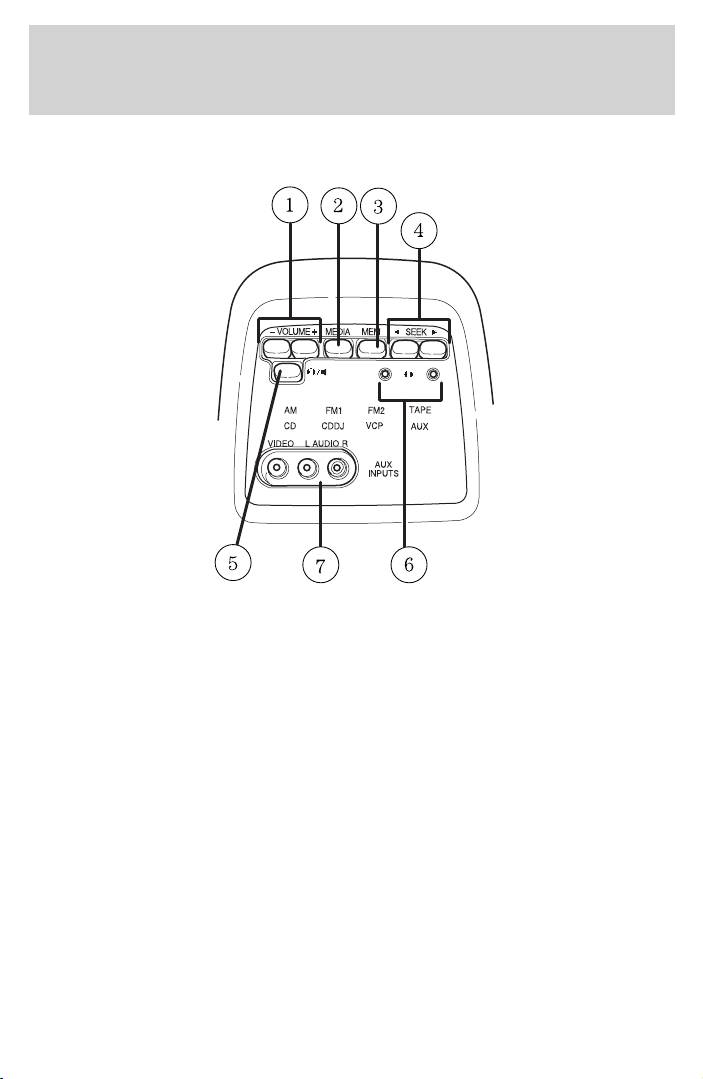
REAR SEAT ENTERTAINMENT MODULE (RSEM)
1. VOLUME buttons
Press (+) or (−) button to decrease or increase speaker volume through
the radio. Will not allow the volume to be turned up past the volume
which the radio is set. If you would like the volume set at a higher level,
the radio volume must be adjusted.
2. MEDIA button
Press to switch between AM/FM1/FM2/CD/TAPE/VCP/AUX modes.
3. MEM button
In radio mode, press MEM to scroll through the radio memory presets in
AM/FM1/FM2.
4. SEEK UP/DOWN
Press to change radio stations from the rear seats. This function is only
available when AM/FM modes are activated through the MEDIA control.
Description
7

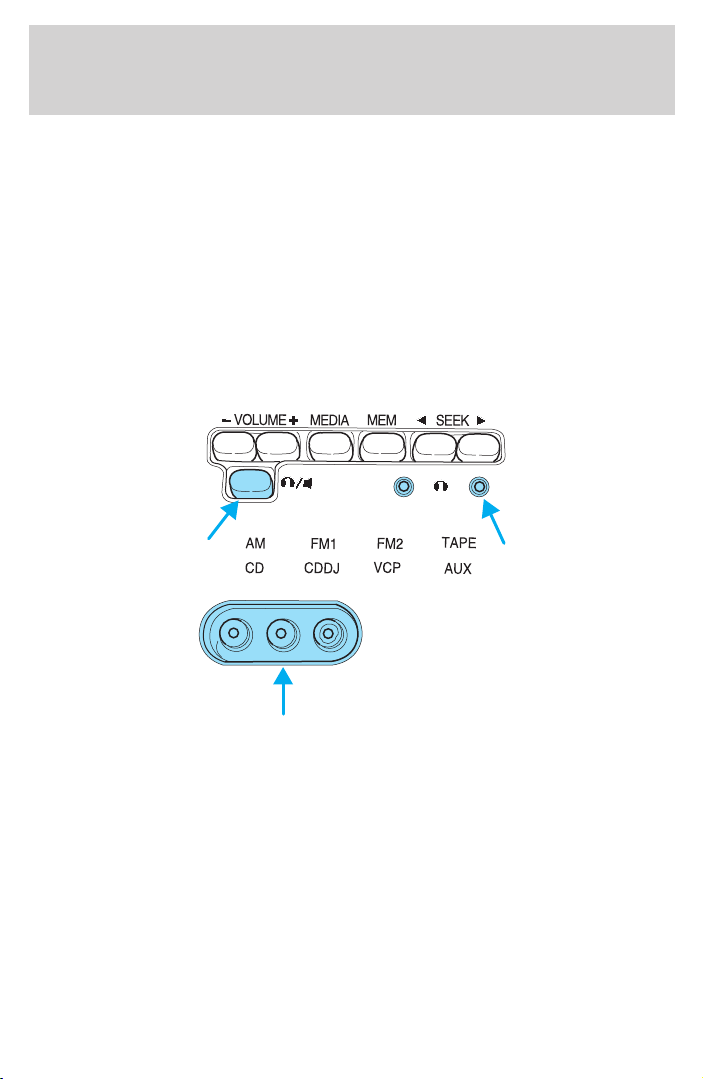
5. / (headphone/speaker) button
Press to switch between “Dual Play/Single Play” Modes. See “Dual
Play/Single Play” for more information. Operation of this control will
affect the speakers and headphone jacks on the Media Control Panel.
Headphone jacks are only active during “Dual Play” mode.
6. Headphone jacks
7. Auxiliary jacks
• VIDEO (yellow) - This is the video input to the system. Connect this
terminal to the video output terminals of your device (game system or
camcorder).
• AUDIO OUT L/R (white/red) - These are the audio inputs to the
system. Connect these terminal(s) to the audio output terminals of
your device (game system or camcorder).
DUAL PLAY/SINGLE PLAY MODES
Dual Play mode allows the driver and front seat passenger to listen to
the radio while the video system is playing in the rear (through
headphones only). Dual Play is activated by pressing the
/ control
on the media control panel. Depending on which radio is installed in
your vehicle, the radio display will either show “Dual Play-Single Play” or
“Dual Play On-Dual Play Off” when the feature is activated or
deactivated.
Single Play Mode
All speakers will be playing whichever sound source is selected
(AM/FM/VCP/AUX). Volume adjustment will affect all speakers.
Dual Play Mode
The rear speakers are muted so the radio and the media control panel
can be operated independently. For example, both can be on VCP or the
radio can be on AM/FM/CD while the media control panel is on VCP. The
headphone jacks on the media control panel are only operational when in
Dual Play mode.
When using Dual Play for the first time (or after the battery has been
disconnected and reconnected or a system fuse has blown), one of the
following events may occur when pressing the
/ control:
• If done while the VCP is playing a videocassette, the system will
switch to radio mode and the media control panel will be in the same
Description
8
mode as the radio. Pressing the MEDIA control will switch modes
without affecting the mode of the radio. Anytime the MEDIA control is
pressed after this and dual play is activated, the media control panel
will switch to the last dual play mode it was in when dual play was
last deactivated.
• If done while the media control panel is in AM/FM/CD mode, the only
change will be that the rear speakers will be muted.
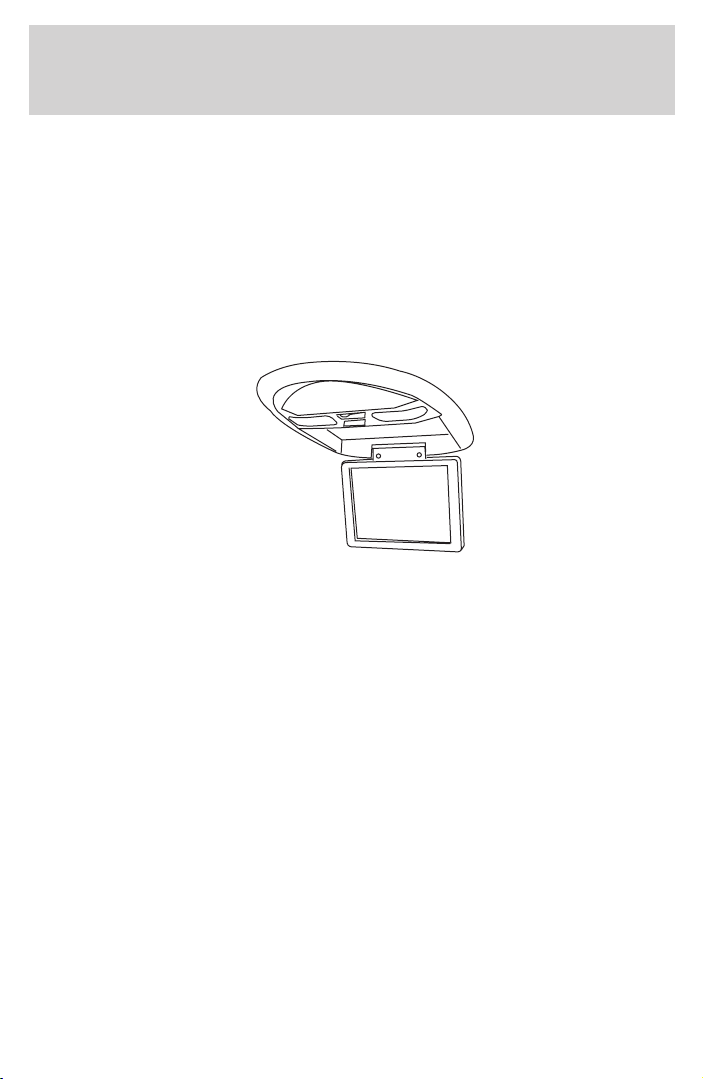
FLIP-DOWN SCREEN
6.8” color LCD flat screen monitor and housing.
INFRARED (IR) WIRELESS HEADPHONES
Your rear entertainment system is equipped with 2 sets of infrared (IR)
wireless headphones. The IR wireless headphones will only function
when used in the rear seating positions and with the doors closed since
they receive signals from the transmitter located in the overhead
console. Also, the IR wireless headphones are only designed to be used
with the VCP; they will not function in other audio modes
(AM/FM1/FM2/AUX).
Two AAA batteries are needed to operate the IR wireless headphones
and will work for approximately 30 hours on a set of fresh batteries.
When replacing the batteries, use two new batteries (alkaline
recommended) and install them with the correct + and - orientation.
Description
9

GENERAL OPERATION
• When the engine is not running, use the system sparingly otherwise it
will run the battery down.
• When the ignition is turned to OFF, the Rear Seat Entertainment
System is also turned OFF.
• Do not leave the videocassette in the VCP overnight or for long
periods of time.
Inserting/removing videocassette
Inserting videocassette
Slide a videocassette into the compartment. Inserting a videocassette
into the VCP automatically turns the power ON (the RED power
indicator lamp will illuminate) and the cassette will begin playback and
the picture will come on in approximately 10 seconds.
Removing videocassette
Press the STOP/EJECT button twice to eject the videocassette.
Playback operation
1. Insert videocassette into the VCP.
2. Video should automatically begin playback and a picture will come on
in approximately 10 seconds.
3. Tracking is automatically adjusted.
• If excessive video “noise” (picture fluctuates up and down) occurs,
manually adjust cassette tracking with the TRACKING (+) (−)
buttons.
4. Press the STOP/EJECT button to discontinue playback, or press
STOP/EJECT again to remove the cassette.
Fast-forward or rewind (no picture)
1. With the cassette stopped, press the FF or REW button.
2. Fast-forwarding or rewinding stops when the cassette reaches its end
or beginning.
Fast-forward or rewind (with picture)
1. While the cassette is playing, momentarily press the FF button or
REW button.
Operation
10
2. The VCP starts search playback in the normal (FF button) or reverse
(REW button) direction at a higher speed than normal.
3. To play the cassette normally, press the PLAY button.
AUXILIARY INPUT DEVICE CONNECTION
Connecting auxiliary video equipment
The Rear Seat Entertainment System accepts video and audio RCA type
connectors for all standard video games and video equipment (such as
camcorders) at the auxiliary input jacks of the media control panel.
Using AUX mode
1. Plug device into AUX input jacks on the media control panel.
2. Select AUX mode using the MEDIA control on the media control
panel.
3. Select Dual Play mode using the headphone/speaker control on the
media control panel.
Use only wired headphones plugged into the headphone jacks on the
media control panel. The wireless headphones are for the VCP only.
Operation
11
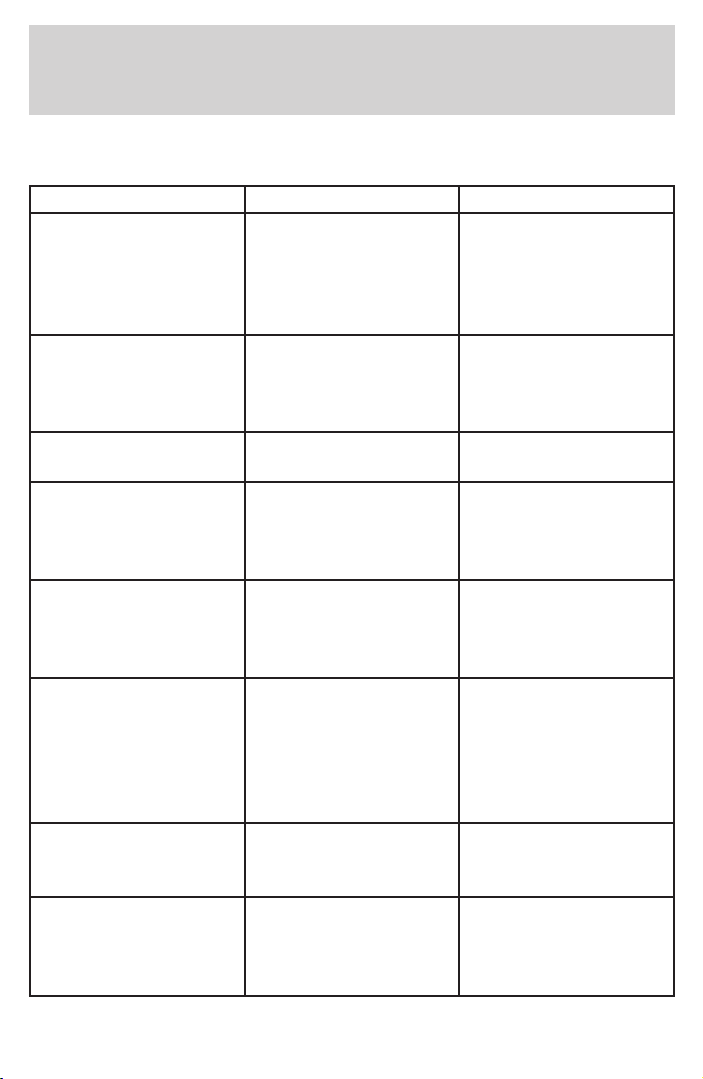
Use the following troubleshooting chart to remedy symptoms you may
experience.
Symptom Possible Cause Remedy
No picture on screen
after inserting a
videocassette (and
videocassette is
playing)
RSEM control panel
not in VCP mode.
Press MEDIA control
until VCP is selected.
Videocassette inserted
into VCP, but picture
does not come on
right away
The VCP takes
approximately 10
seconds to play back
the videocassette.
Wait 10 seconds for
picture to come on the
screen.
Snowy picture VCP heads are dirty. Use a head cleaner
cartridge.
VCP won’t play and
DEW light is flashing
red
Moisture is present
inside VCP and DEW
mode is active.
Allow VCP to dry for
at least 20 minutes
(may take up to one
hour).
No sound over rear
speakers in any mode.
Audio system is in
Dual Play mode.
Press
headphone/speaker
control on RSEM
control panel.
Wireless headphones
don’t function in
AM/FM1/FM2/AUX
modes
Wireless headphones
will not function in
these modes. Wireless
headphones are only
functional in VCP
mode.
Plug wired
headphones into the
media control panel
headphone jacks when
in AM/FM1/FM2/AUX
modes.
Wireless headphones
have either no sound
or poor sound quality
Wireless headphones
may have weak or
dead batteries.
Replace worn-out
batteries.
Wireless headphones
do not work when I sit
in the front seat.
The wireless
headphones only
function when worn in
a rear seating position.
Move to a rear seating
position.
Troubleshooting
12