Operating Instructions Heat-pump Dryer
Operating the tumble dryer
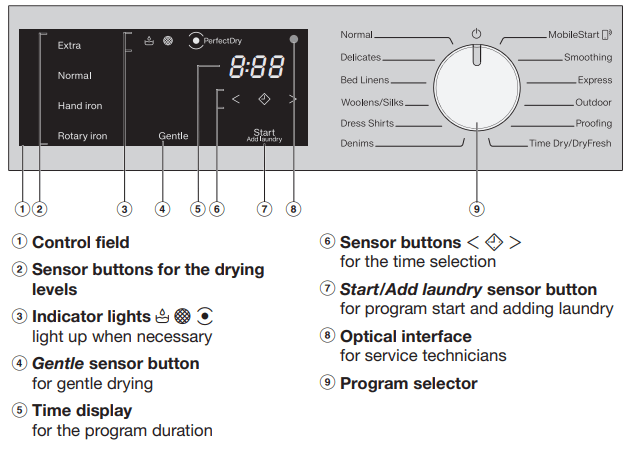
Control panel
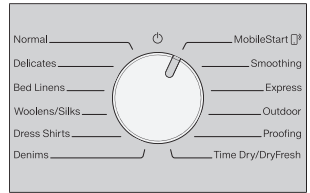
How the program selector works
- The program selector is used to select programs. The tumble dryer is switched on when you select a program and switched off by turning the program selector to the
 position.
- MobileStart
 : You can operate your tumble dryer remotely with the Miele@mobile app.
How the control field works

- The 2, 4, 6, and 7 sensor buttons react to fingertip contact. Selection is possible as long as the respective sensor button is lit.
- If a sensor button is brightly lit, this means it is currently selected.
- If a sensor button is dimly lit, this means it can be selected.
2 Sensor buttons for the drying levels: After selecting a drying level program with the program selector, the recommended drying level lights up. The drying levels that can be selected in this program are dimly lit.
3 Indicator lights
 lights up when the condensed water container needs to be emptied.
  lights up when the plinth filter needs to be cleaned.
 PerfectDry: The PerfectDry system measures the residual moisture present in the laundry in programs with selectable drying levels and provides a more precise drying result.
The PerfectDry indicator
- will flash until the program duration has been determined, and then go out
- lights up again when the selected drying level is reached toward the end of the program
- does not light up at all with the programs Woolens Handcare, Time Dry/DryFresh
4 Gentle sensor button
- This should be selected for temperature-sensitive textiles with the
 symbol. When the sensor button is touched, Gentle will light up brightly.
- With some programs, Gentle is always active (lights up) or inactive (does not light up)
5 Time display
- The remaining program duration will be displayed in hours and minutes.
- With most programs, the duration displayed may vary or “jump”. The following factors, among others, affect the program duration displayed: the quantity of laundry, the type of fabric, and the residual moisture in the laundry.
- The electronic continually assesses conditions in the appliance and then adjusts the program duration with increasing accuracy.
6. Sensor buttons <  >
>
- After touching the sensor button, a later start time for the program (Delay Start) can be selected. Once selected, lights up brightly.
- < > The < or > sensor buttons are used for selecting the duration of the Delay Start period or the duration of the Time Dry/DryFresh program.
7 Start/Add laundry sensor button
- Touching the Start/Add laundry sensor button starts a program. The current program can be interrupted to add laundry. The program can be started when the sensor button is flashing on and off. The sensor button lights up constantly once the program has started.
Energy-saving tips
This dryer with heat-pump technology is designed for energy-saving drying cycles. However, you can save a little more energy with the following measures as the drying time is not extended unnecessarily.
- Make sure your laundry is spun at the maximum spin speed in the washing machine before drying. The higher the spin speed, the greater the savings that can be made in energy and time during drying, e.g., approx. 20% energy can be saved if spun at 1,600 rpm instead of 1,000 rpm. - Load according to the optimum amount of laundry recommended for the drying program being used. This will mean that the energy consumption for the amount of laundry is at its most economical.
- Make sure that the room temperature is not too high. If there are other heatproducing appliances in the room in which the dryer is located, make sure the room is well ventilated and switch the other appliances off, if possible.
- Clean the lint filters in the door opening after every drying cycle.
Functioning of the heat-pump dryer
Two separate circuits ensure that the laundry is dried:
Dry air circuit
The drying air flows through a heat exchanger, the drum, and several filters. This is ensured by a blower in the dryer.
- The drying air flows through the heat exchanger in the longitudinal direction and is heated in the rear area.
- The drying air is then blown into the drum, where it absorbs the moisture of the laundry.
- The damp drying air is blown back through the heat exchanger via several filters in the fill area and the plinth area of the dryer.
- The drying air cools down in the front, cool area of the heat exchanger, and loses its moisture.
- The circuit begins again.
Refrigerant circuit
The refrigerant circuit regulates the heating and cooling of the drying air through the heat exchanger. The heat pump is the central component: This is a compressor that is connected to a pipeline system which is filled with refrigerant.
- The pipeline system surrounds the heat exchanger in several bends.
- The compressor draws in the gaseous refrigerant and compresses it, causing the temperature to rise.
- The hot refrigerant is passed through the pipeline system to the rear of the heat exchanger. The heat is released into the drying air, which flows through the heat exchanger.
- The refrigerant liquifies by dissipating the heat.
- The liquid refrigerant then flows through a capillary tube (a very thin tube) to the front area of the heat exchanger. This changes the pressure of the refrigerant.
- The refrigerant cools and reverts to its gaseous state. This in turn cools the front area of the heat exchanger and dehumidifies the drying air.
- The circuit begins again.
Initial set-up
Miele@home
- Your tumble dryer is equipped with an integrated WiFi module.
- To use this feature, you will need:
- a WiFi network - the Miele@mobile app
- a Miele user account You can create a user account via the Miele@mobile app.
- The Miele@mobile app will guide you as you connect your tumble dryer to your home WiFi network.
- Once your dryer is connected to your WiFi network, you can use the app to carry out various activities, such as:
- controlling your tumble dryer remotely
- calling up information on the operating status of your tumble dryer
- calling up information on the program sequence of your tumble dryer
- Connecting your tumble dryer to your WiFi network will increase energy consumption, even when the tumble dryer is switched off.
- Before installing the dryer in its final location, ensure the signal strength is sufficient for your WiFi network.
Availability of the WiFi connection: The WiFi connection shares a frequency range with other appliances (including microwave ovens and remote control toys). This can cause sporadic or even complete connection failures. Therefore, the availability of featured functions cannot be guaranteed.
Miele@home availability
- The ability to use the Miele app depends on the availability of the Miele@home service in your country.
- The Miele@home service is not available in every country.
- For information about availability, please visit www.miele.com.
Miele App
- The Miele App is available to download free of charge from the Apple App Store® or from the Google Play Store™.

Downtime after installation
- Damage caused by switching the appliance on too soon. This can damage the heat pump. After setting up the tumble dryer, wait for at least one hour before starting a drying program.
Removing the protective film and stickers
- Remove:
- any protective film from the door
- any stickers from the front and from the lid
- Please do not remove any labels (e.g., the data plate) which are visible when you open the door.
Setting up Miele@home
There are 2 ways of connecting:
- via the Miele@mobile app (default)
- via WPS To do so, you will need a WPScompatible router.
Logging in via the Miele@mobile app: The Miele@mobile app can be used to connect to your network.
- Turn the program selector to MobileStart
 appears on the time display and the timeout starts to count down from 10 minutes. The Miele@mobile app will guide you through the remaining steps.
- When you have successfully connected,
 will appear on the time display
Logging in via WPS
- Turn the program selector to MobileStart .
- Touch the sensor button until appears on the time display and a short keypad tone sounds. The timeout then starts to count down from 2 minutes on the time display.
- Activate the WPS function on your router within 2 minutes.
When you have successfully connected, will appear on the time display.
Tip: If the connection has not been set up when the timeout has finished counting down, repeat the process.
Carrying out the procedure for initial commissioning outlined in these instructions
- Please see “1. Notes on correct laundry care” and “2. Loading the tumble dryer”.
- You can then load the tumble dryer and select a program as described in “3. Selecting a program and starting it”
Loading the tumble dryer
Loading the laundry
- Textiles may be damaged. Before loading, read “1. Notes on correct laundry care”.
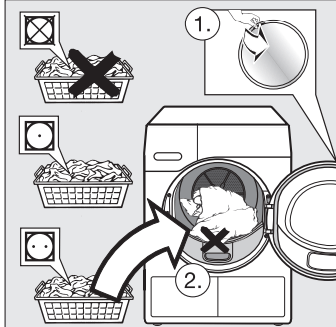
- Unfold the laundry and load loosely into the drum.
- Do not overload the drum. Overloading can cause unnecessary wear and tear to the laundry, give a disappointing drying result, and cause more creasing.
- This can result in damage to the laundry. When closing the door, make sure that laundry does not get trapped in the door opening.
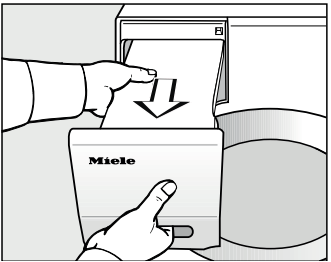
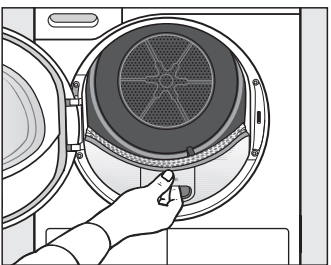
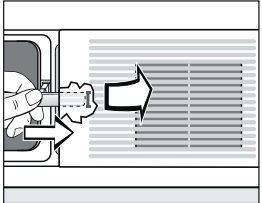
Socket for the fragrance flacon
- The “Fragrance flacon” chapter describes how to use the fragrance flacon.
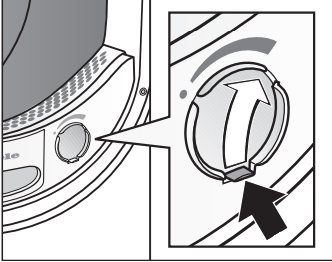
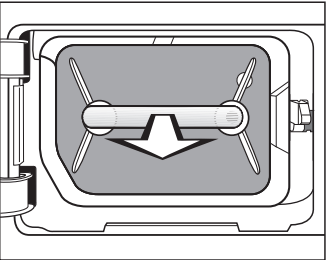
- If you are not using a fragrance flacon: Push the tab down completely (see arrow) so that the socket is closed. Otherwise, lint will accumulate here
Closing the door
- Shut the door with a gentle swing
Selecting a program and starting it
Switching on the tumble dryer
The tumble dryer is switched on when you select a program and switched off by turning the program selector to the position.

- Turn the program selector to a program.
Selecting a program
There are 2 possible ways to select a program:
- Selecting drying programs using the program selector
- Turn the program selector to the required program. A drying level may light up and durations will appear on the time display.
- Selecting drying programs via the MobileStart program selector position
- Turn the program selector to MobileStart . will light up on the time display.
- Touch the Start/Add laundry sensor button. Once the program has started, the tumble dryer can be operated with the Miele app.
Selecting the drying level for programs with a selectable drying level
- Normal, Delicates, Bed Linens, Dress Shirts, Denims, Smoothing, Express, Outdoor
- The preset drying level can be changed if required.
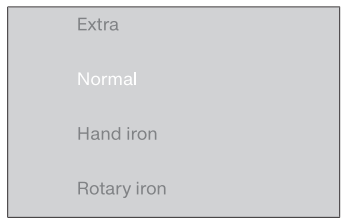
- Touch the sensor button for the drying level you want. It will then light up brightly.
- Any drying level can be selected for the Normal, Express, and Bed Linens programs. A more limited range is available when using the other programs.
Time-controlled and other programs
- Time Dry/DryFresh: You can set the duration in ten-minute increments from 0 : 20 minutes to 2 : 00 hours.
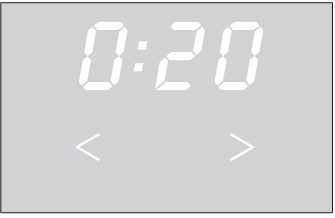
- Touch the < or > sensor button repeatedly until the required program duration appears on the time display.
- Woolens/Silks, Proofing: The drying result is preset by the dryer and cannot be altered.
Removing the laundry at the end of the program
End of program/Anti-crease
- End of program: 0 : 00 lights up in the time display and the Start/Add laundry sensor button goes out.
Removing the laundry
- Only open the door when the drying process has finished. Otherwise, the laundry will not be properly dried through and cooled down.
- Pull the door open at the side with the orange marker.
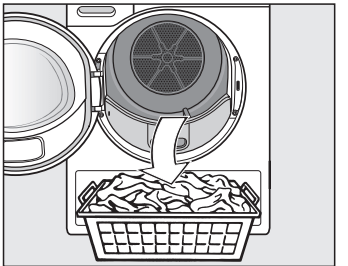
- Remove the laundry. Items left in the dryer could be damaged by over-drying when the dryer is used the next time. Always remove all items from the drum.
- Turn the program selector to the position.
- Remove the lint from the 2 lint filters in the door opening: see “Cleaning and care”, “Cleaning lint filters”.
- Shut the door gently.
- Empty the condensed water container.
Drum lighting: The inside of the drum lights up so that you don't forget any items of laundry when you empty it. The drum lighting switches off automatically (energy saving)
Changing the program sequence
Changing a program once it has started
- It is no longer possible to change the selected program. This prevents the appliance being operated unintentionally.
- If you adjust the program selector, the - 0 - symbol will light up in the display. The - 0 - symbol goes out when you select the original program.
Canceling the current program
- Turn the program selector to the position. The program is canceled. You can now select a new program.
Adding or removing laundry
You have forgotten an item of laundry, but the program has already started.
- Touch the Start/Add laundry sensor button.
The word  will appear in the time display. The Start/Add laundry sensor button flashes slowly.
- Open the door.
- Add or remove laundry items. You can still change the program selection.
- Close the door. Touch the Start / Add laundry sensor button. The program continues. Exceptions when adding laundry
Exceptions when adding laundry
- In some cases – for example, during the cooling phase or the Proofing program – it is not possible to add laundry items.
- In these cases, the word Add is not displayed.
- In exceptional cases, the door can be opened while the program is running.
Condensed water container
Emptying the condensed water container
- The condensed water is collected in the condensed water container.
- Empty the condensed water container after every drying program.
- The indicator light will light up if the maximum level of the condensed water container is reached. To turn the indicator light off: Open and close the door while the dryer is switched on.
- Remove the condensed water container.
- To prevent water from running out, keep it in a horizontal position when carrying it. Hold the condensed water container at the front and towards the back.
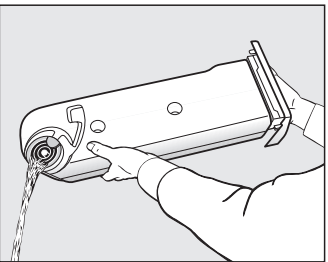
- Empty the condensed water container.
- Replace the condensed water container in the dryer
It can cause health problems in people and animals. Do not drink condensed water.
You can use the condensed water in the household (e.g., for steam irons or humidifiers). For this, however, you should pour the condensed water through a fine sieve or a coffee filter. This filters the finest pieces of lint, which could possibly cause damage, out of the water.
Fragrance flacon
FragranceDos
- Fragrance flacons (optional accessories) can be used to give your laundry a pleasant scent.
- Tip: You can simply close the fragrance flacon if you want to dry textiles without adding fragrance.
- Risk of fire and damage to the health if fragrance flacons are used incorrectly. The leaked fragrance can damage your health if it comes into contact with your body. Leaked fragrance can cause fire. Before using a fragrance flacon, please read “IMPORTANT SAFETY INSTRUCTIONS”, “Using the fragrance flacon (optional accessory)”.
Removing the protective seal from the fragrance flacon
- Only hold the fragrance flacon as illustrated. Do not hold it at an angle or tip it as the fragrance will leak out of the flacon.
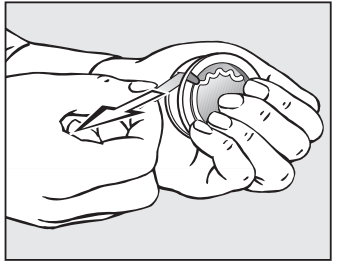
- Hold the flacon securely so that you do not open it by mistake.
- Pull off the protective seal
Inserting the fragrance flacon
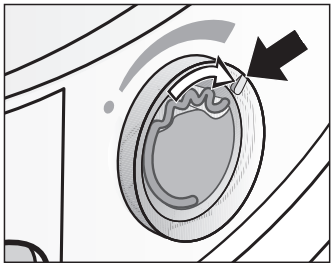
- Open the door of the tumble dryer. The fragrance flacon is inserted in the upper lint filter next to the recessed grip.
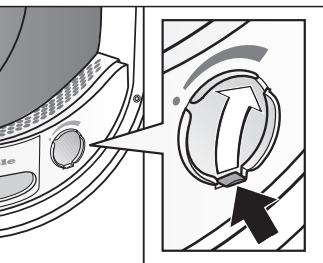
- Open the cover using the tab until the tab is right at the top as shown.
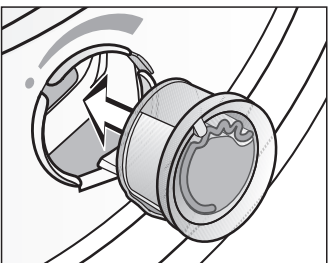
- Insert the fragrance flacon into the socket as far as it will go
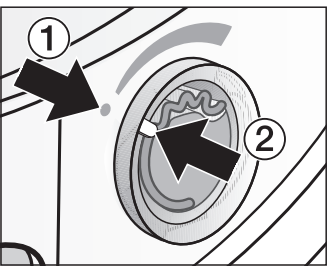
Markers 1 and 2 must line up with one another.
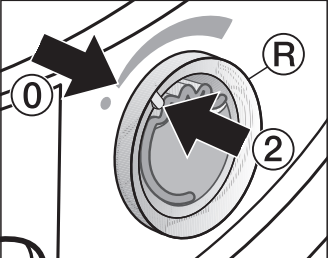
- Turn the outer ring
 clockwise a little.
The fragrance flacon can slip out. Turn the outer ring in such a way that markers 2 and 0 line up.
Opening the fragrance flacon
- Before drying, you can select the intensity of the fragrance.
- Turn the outer ring clockwise: The further you open the fragrance flacon, the more intense the fragrance.
- Damp laundry and longer drying durations with sufficient heat transfer are needed for the fragrance to be released into the laundry effectively. The fragrance will also be noticeable in the room air during the process.
Closing the fragrance flacon
- After drying, the fragrance flacon should be closed to prevent the fragrance from escaping needlessly.
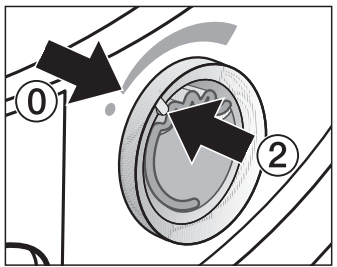
- Turn the outer ring counterclockwise until marker 2 is in position 0. Replace the fragrance flacon with a new one when the intensity of the fragrance is no longer sufficient.
Cleaning and care
Lint filters
- This tumble dryer has 2 lint filters in the door opening: The upper and lower lint filters trap lint produced during the drying process.
- Clean the lint filters after each drying program. This prevents an extension of the program duration.
- Also clean the lint filters when the indicator light comes on
To turn the indicator light off:
- Open and close the door while the dryer is switched on.
Removing the fragrance flacon
- The intensity of the fragrance will be reduced if the lint filters and plinth filter are not cleaned.
- Remove the fragrance flacon. See “Fragrance flacon”, “Removing/ replacing the fragrance flacon”.
Removing visible lint Tip: You can also use a vacuum cleaner so that you can remove the lint without touching it.
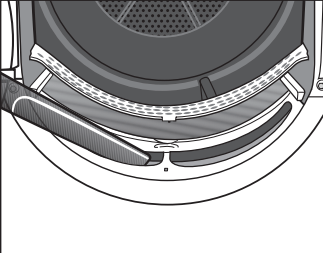
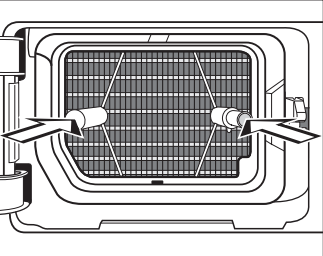
- Pull the upper lint filter forward to remove it.
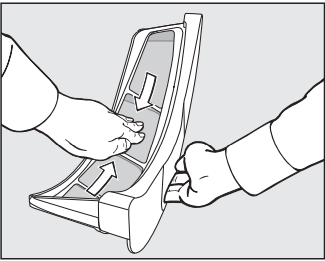
- Remove the lint (see arrows).
- Remove the lint (see arrows) from the filter surface of all the lint filters and the perforated laundry deflector.
- Push the upper lint filter back into position until it clicks.
- Close the door.
Cleaning the lint filters and air flow openings thoroughly: If the drying duration has become longer or the surface of the filters is visibly compacted with lint, you should carry out the following cleaning procedure.
- Remove the fragrance flacon. See “Fragrance flacon”.
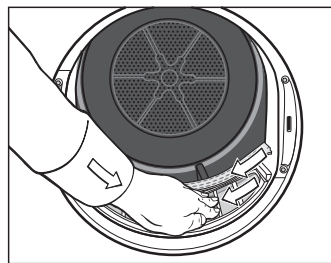
- Pull the upper lint filter forward to remove it.
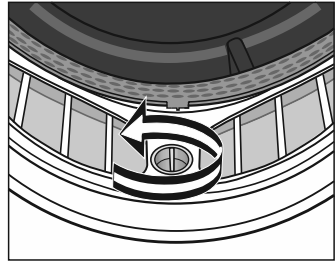
- Turn the yellow dial on the lower lint filter in the direction of the arrow (until you hear it click).
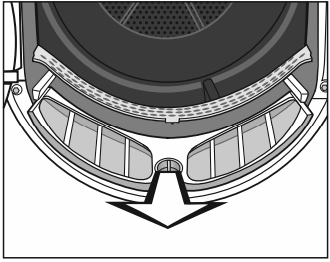
- Hold the dial and pull the lint filter forward to remove it.
- Use a vacuum cleaner with a long crevice nozzle attached to remove any visible lint from the upper air flow openings.
Finally, clean the lint filters with water.
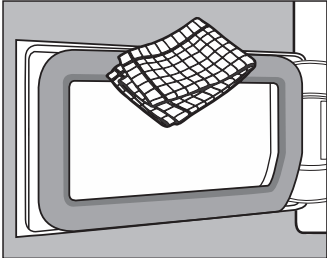
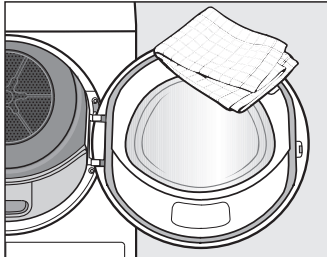
Cleaning the lint filters with water
- Wipe the smooth plastic surfaces of the lint filters with a damp cloth to clean them.
- Flush the lint filters through with warm running water.
- Shake the lint filters thoroughly and then dry them carefully.
Ensure the filters are dry before replacing them. Wet filters could cause operational faults.
- Push the lower lint filter in completely and lock it with the yellow dial.
- Push the upper lint filter in completely.
- Close the door
Cleaning instructions when using fabric softener sheets
- If you are using fabric softener sheets, please follow these warnings and instructions
- First, clean the filters as described in “Cleaning the lint filters with water”. If the surfaces of the lint filters are still strongly compacted with lint, then follow these measures. Please note the plastic and surfaces of the lint filters can be damaged by the cleaning process described below.
- If the surfaces of the lint filters are not cleaned, this can extend the drying time and increase the energy consumption.
- Try the following 3 cleaning instructions to determine the one that achieves the best results.
Option 1: Wipe the surfaces of the lint filters several times with a cleaning cloth with an alcohol base until you have removed any debris//obstructions.
- Risk of fire! Then rinse the filter surfaces thoroughly with warm water to remove all residues.
Option 2
- Clean the lint filters in the dishwasher without any other dishes. Use a hightemperature program.
Option 3
- Wet the surfaces of the lint filters with a liquid color detergent (e.g., Miele Ultra Color Liquid Laundry Detergent).
- Leave it on for approx. 2 hours.
Risk of fire! Then rinse the filter surfaces thoroughly with warm water to remove all residues.
Cleaning the plinth filter
Clean the plinth filter whenever the indicator light comes on or when the program duration is longer than usual.
To turn the indicator light off:
- Open and close the door while the dryer is switched on.
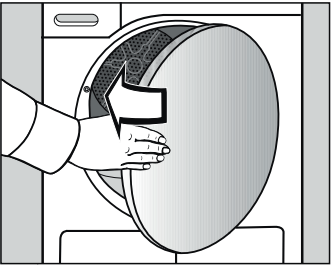
Removing the plinth filter
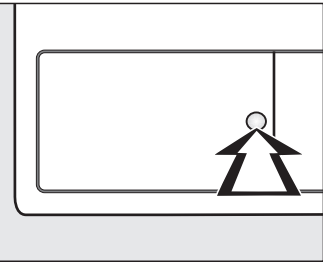
- Press the round, indented area on the heat exchanger access panel to open it. The access panel will spring open.
- Pull the plinth filter out by the handle. The right-hand guide pin comes out when the plinth filter is removed. The guide pin prevents the access panel from closing without the plinth filter.
Cleaning the plinth filter
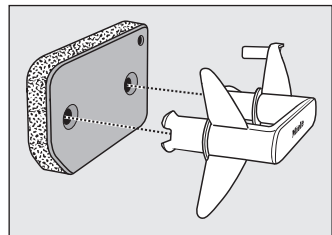
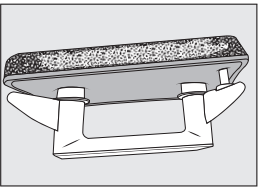
- Pull the handle out of the plinth filter.
- Clean the plinth filter thoroughly under running water.
- Squeeze the plinth filter very carefully several times as you rinse it.
- Rinse the plinth filter until all visible residues have been removed.
- Use a damp cloth to remove any lint from the handle
Damage caused by a damaged or worn plinth filter. The heat exchanger will clog up if the plinth filter is not in good working order. This can cause a fault. Check the plinth filter following the instructions provided in “Frequently Asked Questions – Replacing the plinth filter”. Replace the plinth filter if necessary.
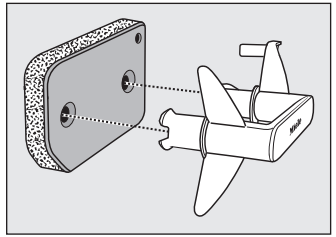
- Install the plinth filter back on the handle. Make sure it is the correct way round.
- Push the plinth filter in completely. This will push in the right-hand guide pin at the same time
Cleaning the plinth-filter access panel
- Use a damp cloth to remove any lint. Make sure that you do not damage the rubber seal when doing this.
- Close the heat-exchanger access panel.
Damage or ineffective drying if drying takes place without a plinth filter or when the heat-exchanger access panel is open. An excessive accumulation of lint can damage the tumble dryer. If the system is not leak-tight, this can make the drying ineffective. Only operate the tumble dryer with the plinth filter installed and the heatexchanger access panel closed
Cleaning the dryer
Disconnect the tumble dryer from the electrical supply.
Damage due to the use of unsuitable care products. Unsuitable care products could damage plastic surfaces and other parts. Do not use any solvents, abrasive cleaners, glass cleaners, or allpurpose cleaners.
- Clean the tumble dryer and the seal on the inside of the door with a slightly damp soft cloth and a mild solution of liquid dish soap and water.
- Dry all the parts with a soft cloth.
Frequently Asked Questions
With the help of the following guide minor faults in the performance of the machine, some of which may result from incorrect operation, can be remedied without contacting the Service Department.
This guide may help you to find the reason for the fault, and how to correct it.
Indicator lights or information on the time display
| Problem |
Possible cause and solution |
| The indicator light comes on at the end of the program. |
The tumble dryer is not working correctly or economically. Possible causes could be clogging caused by lint or detergent residue.
- Please see “Cleaning and care” for notes on cleaning.
- Clean the lint filters.
- Also check the plinth filter and clean it if necessary.
- To turn the indicator light off: open and close the door (while the dryer is switched on).
You can influence when the indicator lights up.
- To do this, follow the instructions in “Programmable functions –
 Airways indicator” Airways indicator”
|
 and and  light up after a program has been canceled, a signal sounds. light up after a program has been canceled, a signal sounds. |
The system has been clogged by lint or detergent residue.
- Turn off : turn the tumble dryer off and then on again.
- Clean the lint filters and the plinth filter.
Please see “Cleaning and care” for notes on cleaning.
- Check that the lint filters and the plinth filter are not damaged or worn.
If all lint filters are damaged, deformed, or cannot be cleaned anymore, they must be replaced. For information on when to replace a plinth filter that is not functioning properly, refer to “Frequently Asked Questions – Replacing the plinth filter”.
|
| and continue to flash after a program has been canceled, despite thorough cleaning |
The plinth filter looks clean after thorough cleaning. However, the program terminates and the fault message appears again. It is likely that there is still underlying residue that could not be removed.
- Turn off : turn the tumble dryer off and then on again.
- Check for the possible causes described below.
The heat exchanger is clogged.
- Check the heat exchanger. Follow the instructions described in “Frequently Asked Questions – Checking the heat exchanger”.
The plinth filter is clogged further down.
- Check the plinth filter. Follow the instructions described in “Frequently Asked Questions – Replacing the plinth filter”.
- If the plinth filter is not deformed or defective, you can reactivate it in the washing machine. Follow the instructions described in “Frequently Asked Questions – Reactivating the plinth filter”
|
| The indicator light comes on after a program has been cancelled and a signal sounds. |
The condensed water container is full or there is a kink in the drain hose.
- Empty out the condensed water container.
- Check the drain hose.
- See “Cleaning and care”.
To switch the indicator light off:
- Open and close the door (with the dryer switched on).
|
| - 0 - lights up. |
The program selector has been moved.
- Select the original program. The time left will appear on the display again.
|
Bars flash on the display at the end of a program:  |
The program has finished but the laundry has not yet cooled down.
- Either remove the laundry and spread it out to cool down or leave it in the tumble dryer to cool down during the cooling phase.
|
Lines flash and light up after turning on:  Program selection is not possible. Program selection is not possible. |
Access via a PIN code has been activated.
- See “Programmable functions”, “
 PIN code” PIN code”
|
| and another number combination flash after a program has been cancelled, a signal sounds. |
There is no obvious cause.
- Switch the dryer off and then on again.
- Start a program.
If the program is interrupted again and an error message appears, there is a fault. Contact Miele Service
|
| 0 : 00 lights up and the program has been cancelled, a signal sounds. |
The laundry is unevenly distributed or has rolled up.
- Untangle the laundry and remove a few items if necessary.
- Switch the dryer off and then on again.
- Start a program.
|
 lit and program start is not possible. lit and program start is not possible. |
An update is available for the tumble dryer. See “Programmable functions –  RemoteUpdate” for more information. RemoteUpdate” for more information. |
Unsatisfactory drying results
| Problem |
Possible cause and solution |
| The laundry is not sufficiently dry. |
The load consisted of different types of fabric.
- Finish drying using the Time Dry/DryFresh program.
- Select a more suitable program next time.
Useful tip: you can alter the drying levels for some programs.
See “Programmable functions“, sections “ Normal drying levels“ and “ Normal drying levels“ and “ Wrinkle-free drying levels”. Wrinkle-free drying levels”.
|
| The laundry or featherfilled pillows develop a smell after drying. |
The laundry was washed with insufficient detergent. Feathers have the property of developing a significant odor when they are warm.
- Laundry: use sufficient detergent.
- Pillows: take out of the tumble dryer and air them.
- Use a fragrance flacon (available as an optional accessory) for your favorite fragrance.
|
| Items made of synthetic fibers are charged with static electricity after drying. |
Synthetic fibers tend to attract static charge.
- Static charge can be reduced by adding a fabric softener to the final rinse in the washing program.
|
| There is a build-up of lint. |
Lint is principally the result of friction when garments are being worn and to some extent when they are being washed. Machine drying hardly causes any lint to form.
Lint is collected by the lint filters and the plinth filter and can be removed easily.
|
The drying cycle duration is very long
| Problem |
Possible cause and solution |
| The drying process goes on too long or even switches off.* |
The room where the tumble dryer is located is too warm.
- Ventilate the room thoroughly.
Detergent residues, hair, and fine lint can clog the filters.
- Clean the lint filters and the plinth filter.
- Remove visible lint:
- at the bottom left, behind the panel in the heat exchanger cavity (see “Cleaning and care”)
- at the bottom right of the cooling fins behind the grille (see the end of this section)
The laundry is unevenly distributed or has rolled up. The drum is too full.
- Untangle the laundry and remove a few items.
- Start a program.
The cool air intake (bottom right grille) is blocked.
- Move any objects, such as a laundry basket, away from the dryer.
The laundry is too damp.
- Spin using a higher spin speed in the washing machine.
Metallic components, e.g., zippers, have prevented the dryer from registering the correct moisture level.
- Open the zippers next time.
- If the problem recurs, dry these items using the Time Dry/DryFresh program.
|
* Switch the tumble dryer off and on again before starting a new program.
Other problems
| Problem |
Possible cause and solution |
| You can hear operating noises (buzzing/humming) |
This is not a fault. The compressor is operating. These noises are quite normal and can be heard when the compressor is operating. |
| A program does not start. |
There is no obvious cause.
- Connect the power plug.
- Turn on the tumble dryer.
- Close the door.
- Check whether the fuse has tripped.
Power outage? When power is restored, any previously running program will restart automatically
|
| Only the Start/Add laundry sensor button flashes slowly when the program is running. |
- Once the program has been running for 10 minutes, the indicators go out. The Start/Add laundry sensor button flashes slowly. This is not a fault, but a normal function to help save energy.
- Touch a sensor button to switch on the indicators.
- See “Programmable functions –
 Control field switch-off status”. Control field switch-off status”.
|
| The tumble dryer is switched off at the end of the program. |
The dryer switches off automatically to save energy. This is not a fault, but a normal function.
- To switch the dryer on, select a program.
|
| The interior drum lighting does not come on. |
The drum lighting switches off automatically ... ... when the door is closed. ... after a few minutes when the door is open to save energy.
The drum lighting will come on when the door is opened if the dryer is switched on.
|
Replacing the plinth filter
- The heat exchanger can clog up. Replace the plinth filter immediately if you see the following signs of wear before or after cleaning (optional accessory).
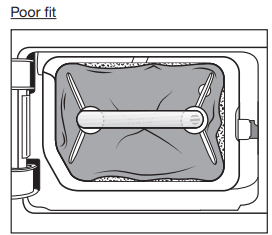
- The edges of the plinth filter do not sit properly and the plinth filter is deformed. Lint will blow into the heat exchanger unfiltered through edges that do not sit properly. This will cause a permanent obstruction in the heat exchanger.

- Deformations indicate that the plinth filter has become worn.
Cracks, tears, indentations
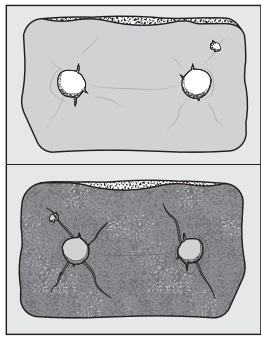
- Lint will blow into the heat exchanger through cracks and tears. This will cause a permanent obstruction in the heat exchanger.
White residues or residues of other colors
- Residues arise from laundry fibers and traces of detergent components. They can be found on the front and side edges of the plinth filter. In extreme cases, they can form stubborn crust. Residues are a sign that the plinth filter no is longer a snug fit at the sides, even if it appears to be perfect: Lint is getting in unfiltered at the edges.
- Reactivate the plinth filter. If these residues appear on the plinth filter again soon after cleaning, the plinth filter must be replaced.
Reactivating the plinth filter
- You can reactivate one or more dirty plinth filters in the washing machine. You will then be able to use the plinth filter again.
- Prior to reactivation, check that the plinth filter is in good order. Check the plinth filter following the instructions provided in “Frequently Asked Questions - Replacing the plinth filter”. Replace the plinth filter if it has worn out.
- Wash the plinth filter(s) separately, not with any laundry items. Do not add any detergent.
- Select a short wash program with a maximum temperature of 104°F (40°C) and a maximum spin speed of 600 rpm.
- You can re-insert the plinth filter once the wash and spin cycle is complete.
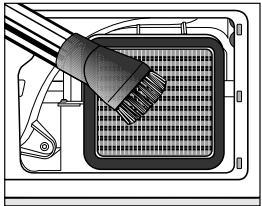
Checking the heat exchanger unit
Risk of injury from sharp cooling fins. You could cut yourself. Do not touch the cooling fins with your hands.
- Look to see if lint has accumulated. Remove any lint you can see.
Damage due to incorrect cleaning of the heat exchanger. The tumble dryer will not dry if the cooling fins are damaged or bent. Clean using a vacuum cleaner with a dusting brush attached. Only pass the vacuum cleaner dusting brush over the heat-exchanger fins lightly, without applying any pressure.
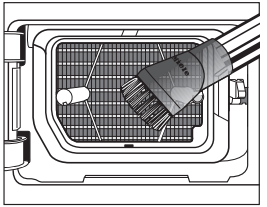
- Vacuum up any lint and residues
Bottom right grille
In general, the cooling fins behind the grille on the bottom right do not need cleaning. They should only be cleaned if the drying process is taking an exceptionally long time due to a very high level of dust or lint in the room in which the dryer is located.
- First open the panel for the plinth filter (bottom left). To remove the grille, the catch underneath it needs to be released using a teaspoon.
- Insert a spoon handle underneath the grille in the middle.
- Press the spoon handle against the catch and lever the grille open.
- Remove the grille.
Danger of injury! Do not touch the cooling fins with your hands. You could cut yourself.
Clean using a vacuum cleaner with a dusting brush attached. Only pass the vacuum cleaner brush over them lightly, without applying any pressure. Take care not to bend the cooling fins out of shape or to damage them
- Carefully vacuum up any visible lint or dirt.
- Re-insert the 3 hooks on the grille into the appropriate holes in the front of the dryer.
- Press the grille firmly back into position by pressing it in at the middle on the left.