
COREDY VM3311 Digital Voice Recorder
GET STARTED
EN

Warning .......................................
CAUTION......................................
Notice for users.................................
1.1 Checking the Parts and Controls...............
1.2 Using the Display Window.....................
1.3 Preventing Unintentional......................
1.4 Turning the Recorder On......................
1.4.1 Recharging the battery using a computer....
1.4.2 Disconnecting the Coredy recorder from your
computer.....................................
1.4.3 Recharging the battery using a USB AC
adaptor ......................................
1.4.4 Disconnecting the Coredy recorder from the
USB AC adaptor...............................
1.4.5 Turning the power on.....................
1.4.6 Turning the power off .....................
1.5 Setting the Clock.............................
1.5.1Setting the clock after preparing a power
source.......................................
1.5.2 Setting the clock using the menu...........
1.6 Selecting a Folder and a File...................
1.7 Switching the Counter Information Display.......
2
4
9
11
11
12
13
14
16
16
17
17
19
20
22
1
1
1
Table of contents
1 Preparing the recorder

23
25
25
26
27
27
28
29
31
33
33
34
35
36
37
38
38
39
39
2.1 Basic recording.............................
2.1.1 REC MON ( Monitoring the recording ).....
2.1.2 Stopping the recording...................
2.1.3 Other operations........................
2.2 Changing the Recording Settings..............
2.2.1 Selecting a recording scene for each
situation.....................................
2.2.2 Tips for better recording..................
2.2.3 Selecting a recording mode...............
2.3 Starting to Record Automatically in
Response to Sound – the VOR Function...........
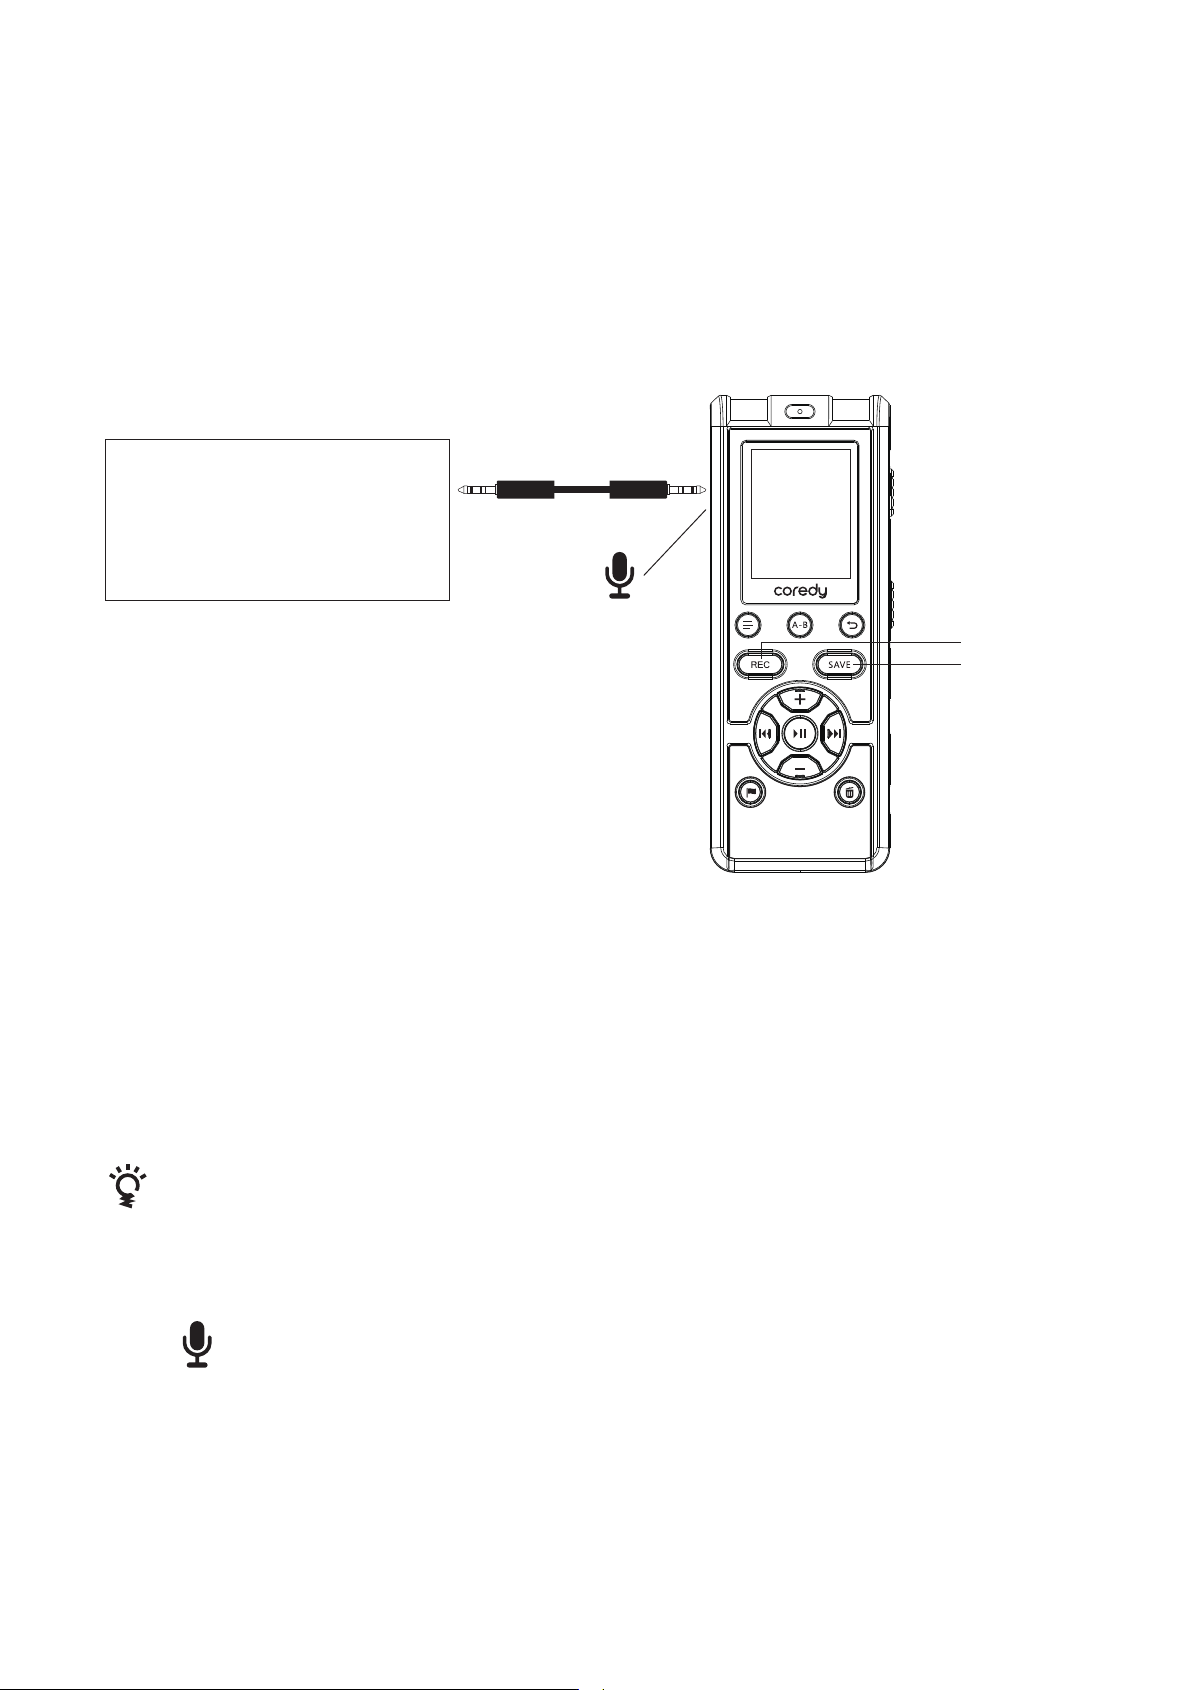
2.4 Recording via Other Devices................
2.4.1 Recording with an external microphone.....
2.4.2 Recording from other equipment...........
2.4.3 Recording from Telephone................
2 Recording Files
3.1 Basic Playback .............................
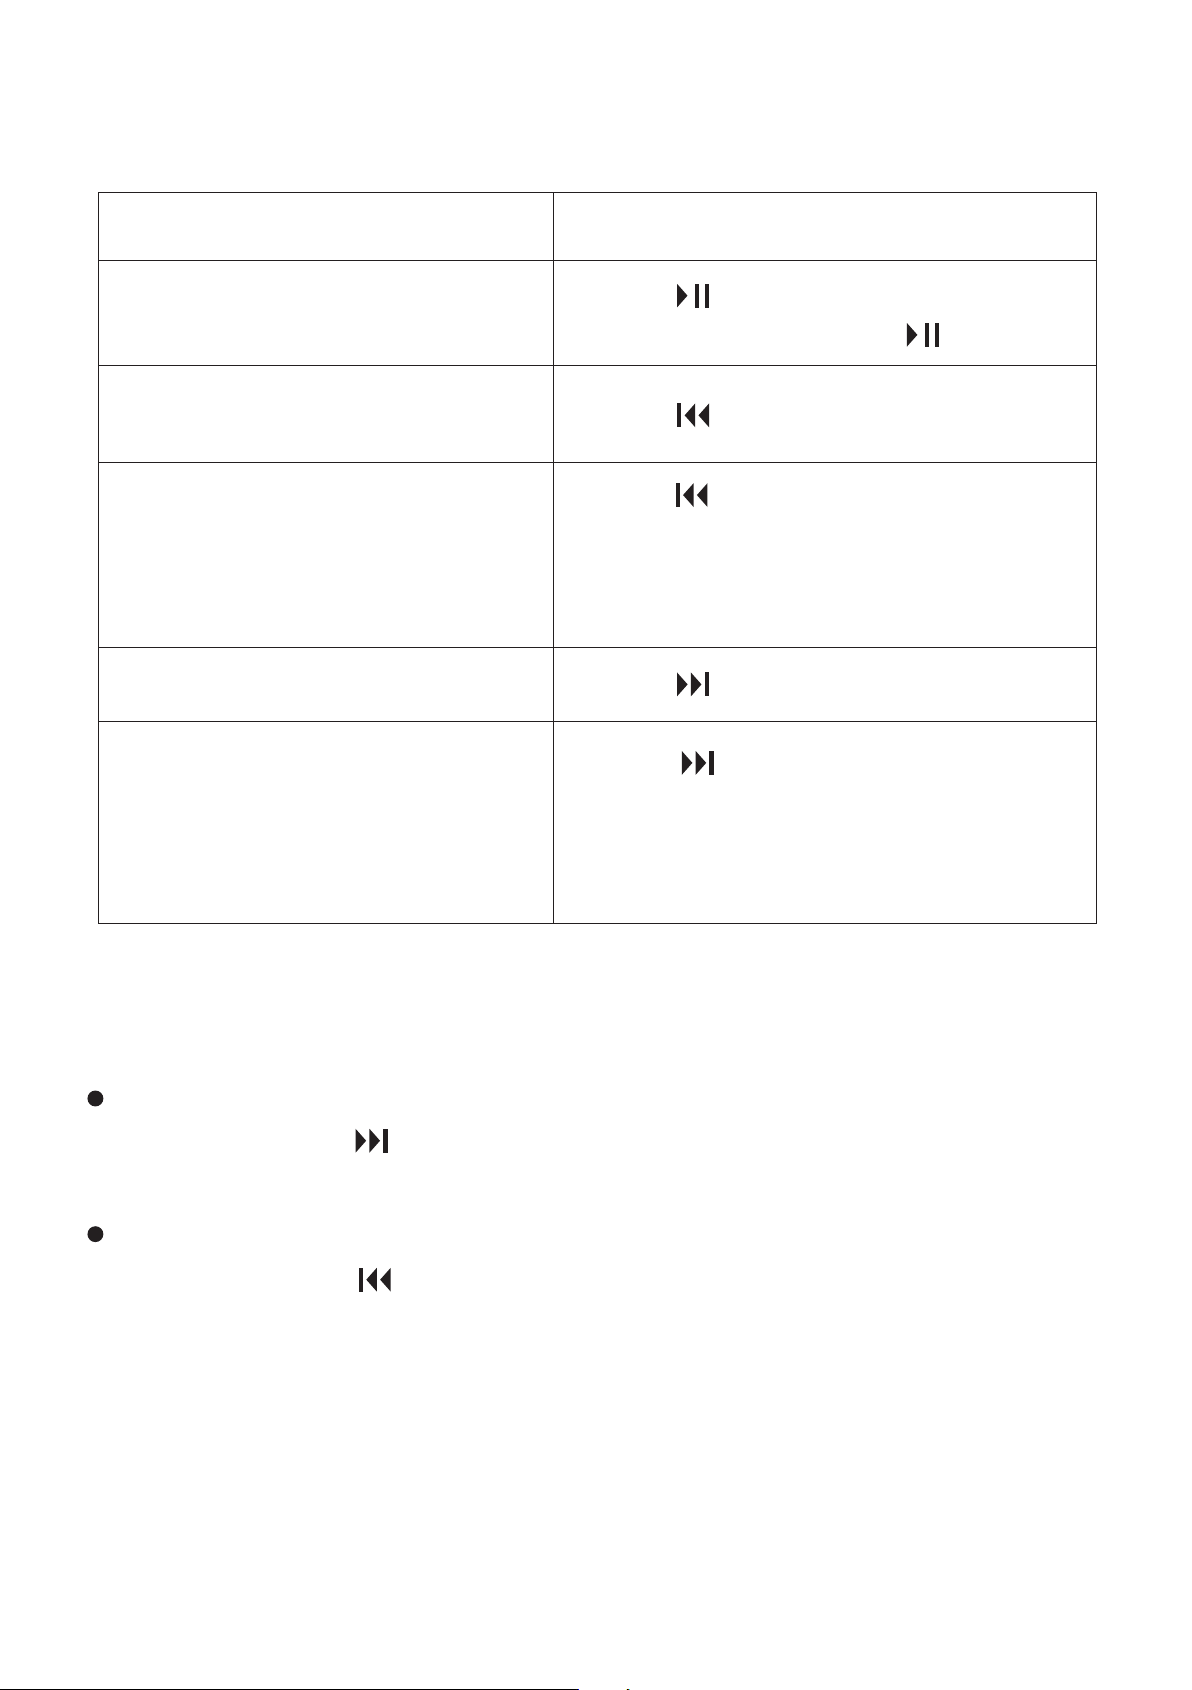
3.1.1 Stopping playback.......................
3.1.2 Other operations ........................
3.1.3 Searching forward/backward during
playback – Cue/Review .......................
3.2 Changing the Playback Settings...............
3.2.1 Adjusting the playback speed – the DPC
(Digital Pitch Control) function..................
3 Playing Files

41
41
42
44
44
44
44
45
47
48
48
49
51
54
55
55
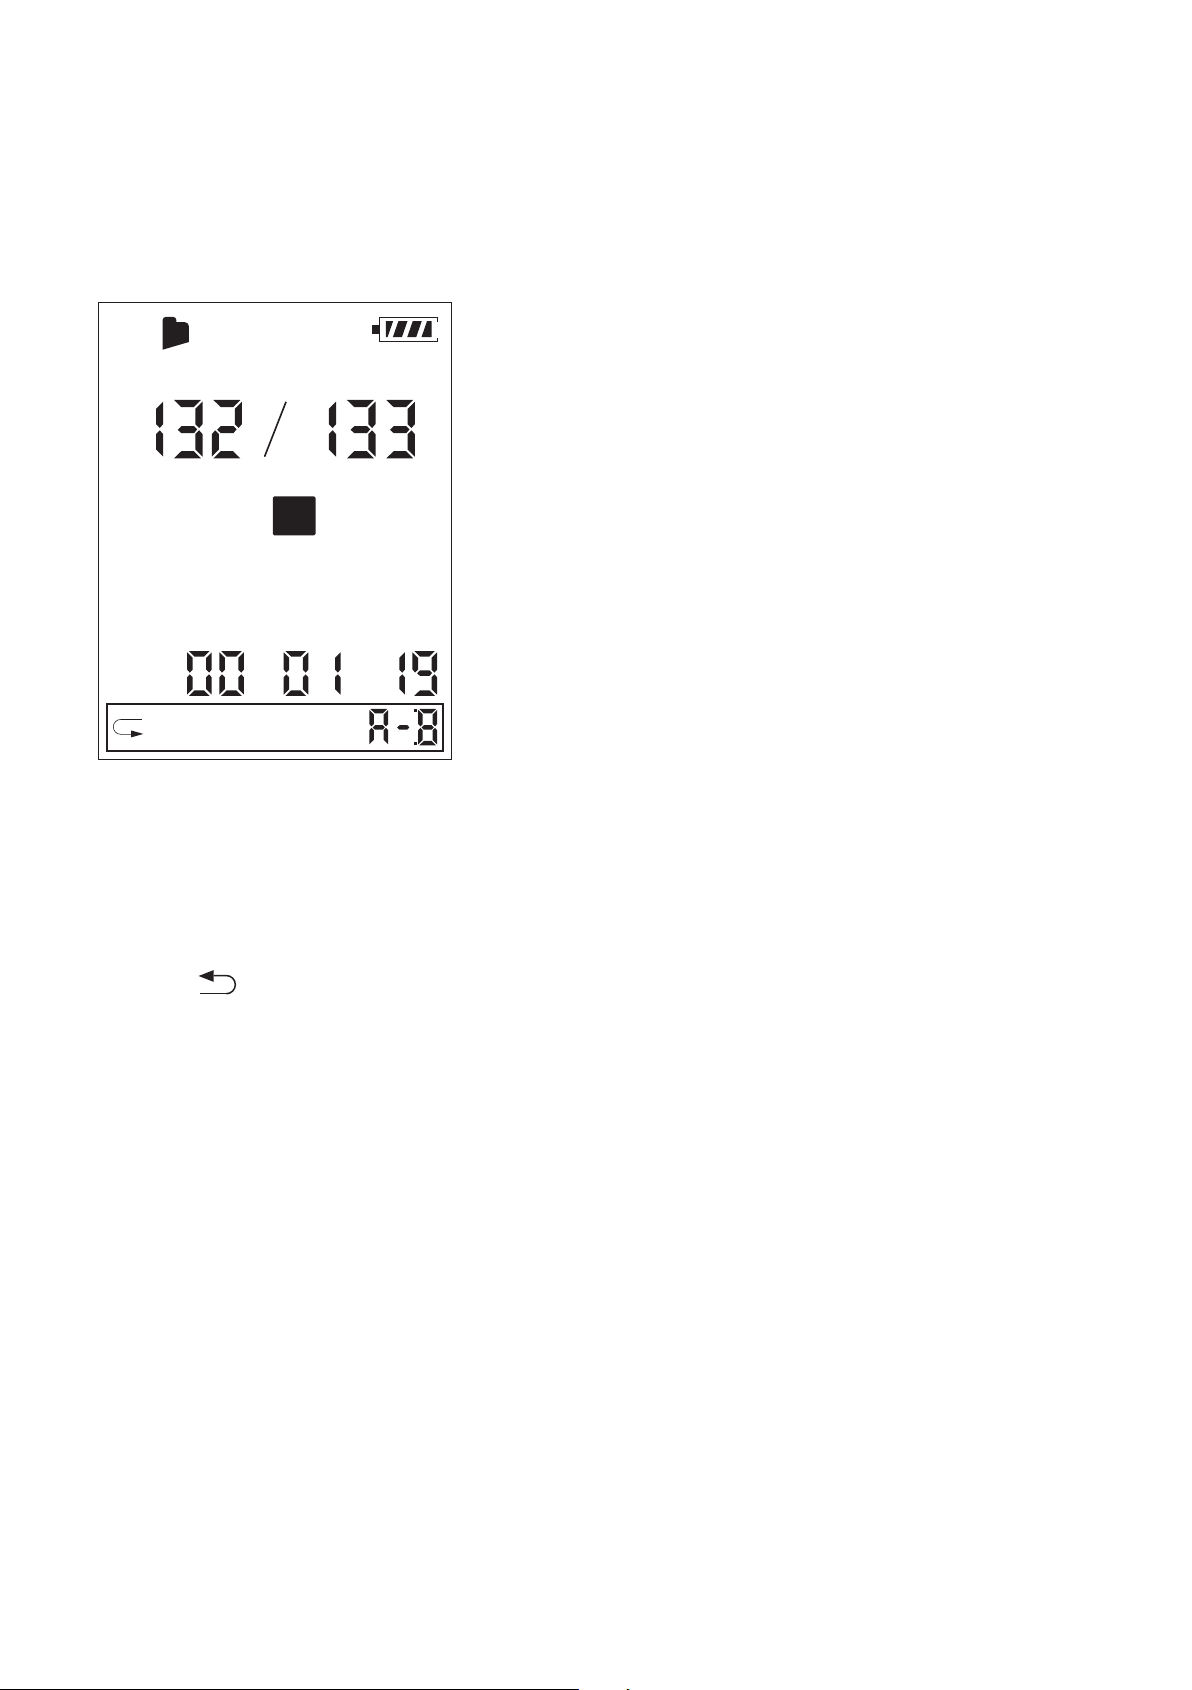
3.3 Changing the Playback Mode.................
3.3.1 Playing back a file repeatedly.............
3.3.2 Playing back a specified section
repeatedly –A-B repeat .......................
3.4 Convenient Playback Methods................
3.4.1 Listening with better sound quality.........
3.5 Playback via Other Devices..................
3.5.1 Recording with other equipment...........
4.1 Erasing a Files..............................
4 Erasing File
5.1 Adding a Playback marks.....................
5.2 Skip the Playback marks.....................
5.3 Erasing a Playback marks....................
5 Playback Marks
6.1 Making Settings for the Menu.................
6.2 Menu Settings ..............................
6 About the Menu Function
7.1 Using the Coredy recorder with Your Computer..
7.1.1 Connecting the Coredy recorder to your
computer....................................
7.1.2 Structure of folders and files ..............
7 Utilizing Your Computer

57
58
59
60
61
61
62
63
63
65
67
68
69
69
74
75
75
7.1.3 Disconnecting the Coredy recorder from
your computer.................................
7.2 Copying Files from the Coredy recorder to
Your Computer..................................
7.3 Copying Music Files from Your Computer to the
Coredy recorder and Playing Them Back ...........
7.3.1 Copying a music file from your computer to
the Coredy recorder (drag and drop) .............
7.3.2 Playing back music files copied from your
computer using the Coredy recorder .............
7.4 Using the Coredy recorder as USB Memory......
8.1 Precautions .................................
8.2 Specifications................................
8.2.1 System requirements .....................
8.2.2 Design and specifications .................
8.2.3 Battery life *1............................
8.2.4 About compatible memory card ............
8 Additional Information
9.1 Troubleshooting.............................
9.1.1 On the Coredy recorder operations ........
9.2 Messages List ..............................
9.3 System Limitations ..........................
9.4 Trademarks.................................
9 Troubleshooting

Win free products and enjoy exclusive deals by
following us on social media.
Want new product releases for Free?Sign up for our
Super Member Project!
facebook.com/coredytech
Scan me to learn more!
coredytech.com/smp
Scan me to learn more!
@coredytech

Do not expose the VM3311 Voice Recorder to
excessive heat such as sunshine, fire or the like for a
long time.
Warning
Risk of explosion if battery is using by an incorrect type.
CAUTION
The supplied connection cable is for the voice recorder
VM3311. You cannot connect other voice recorders.
Display windows in this manual may differ from what are
actually displayed on your voice recorder depending on
the area you purchased the voice recorder and the
settings you have made.
What you record is for personal enjoyment and use
only.
Copyright laws prohibit other forms of use without
the permission of the copyright holders.
Notice for users
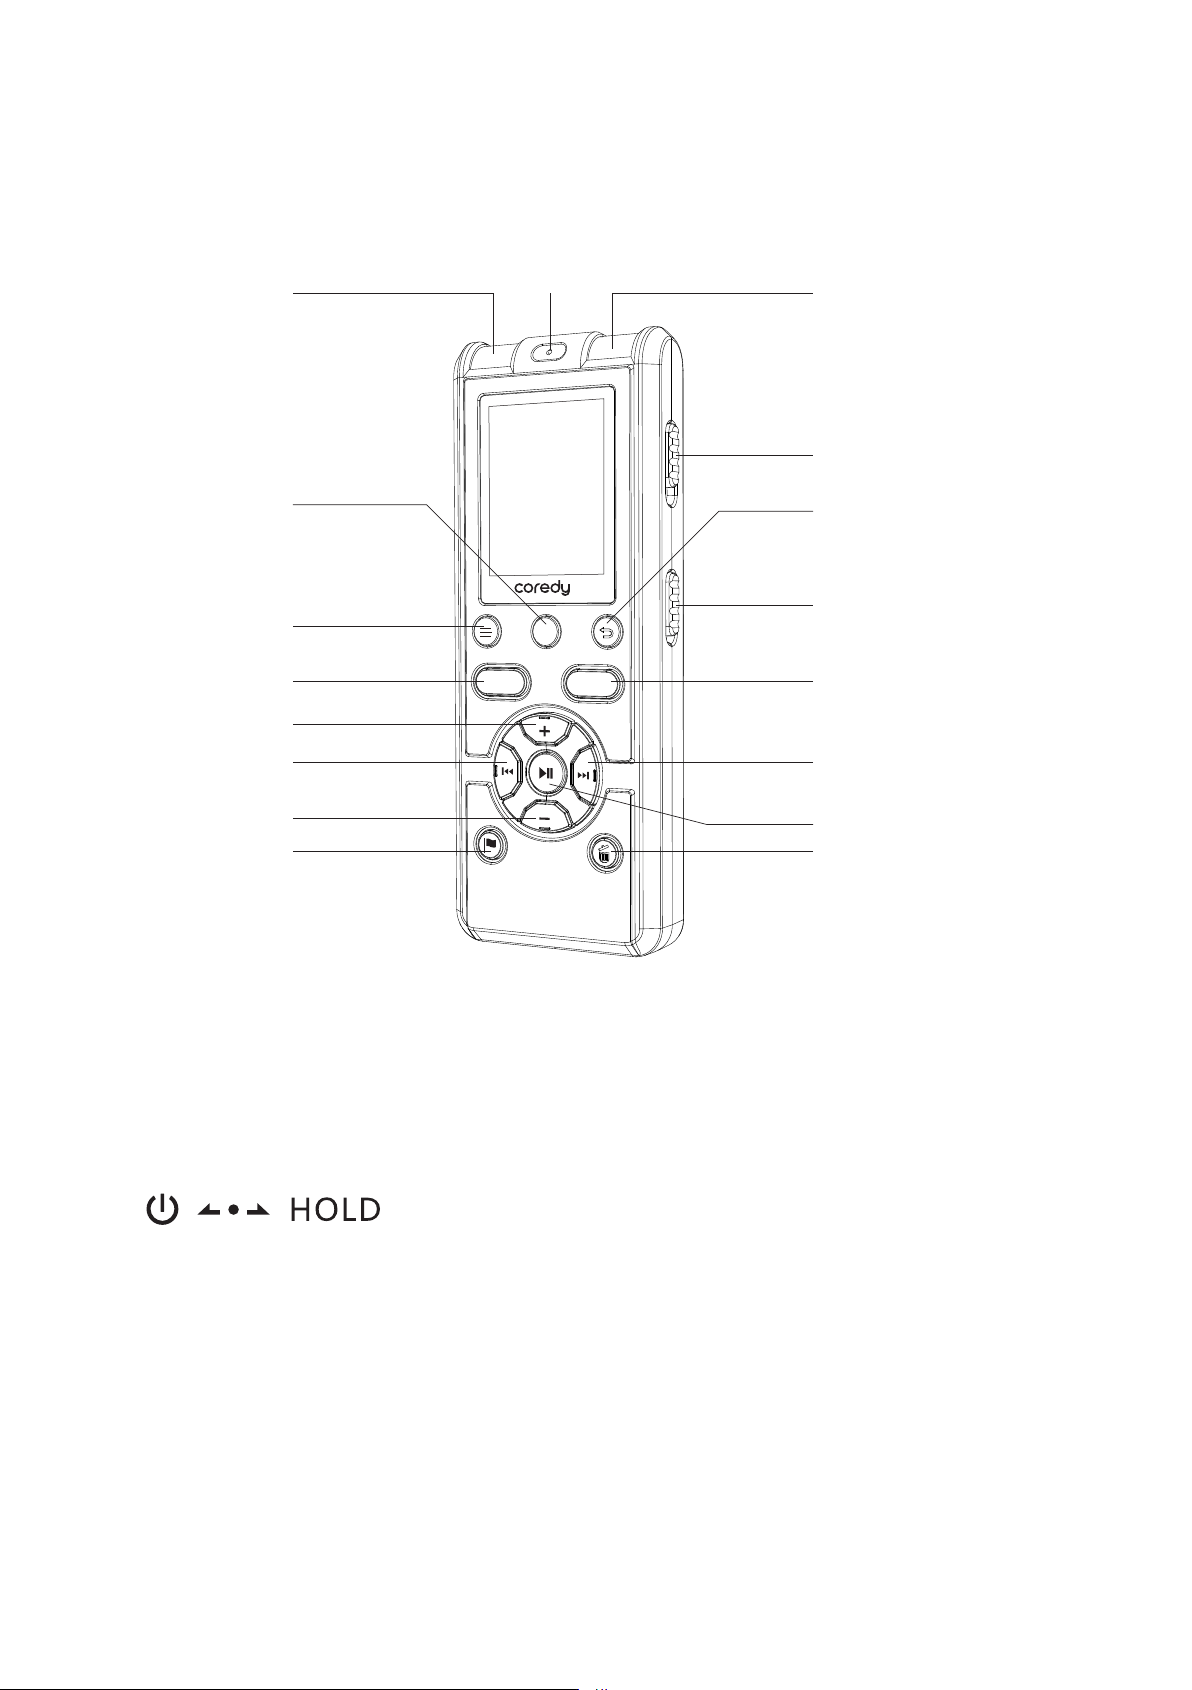
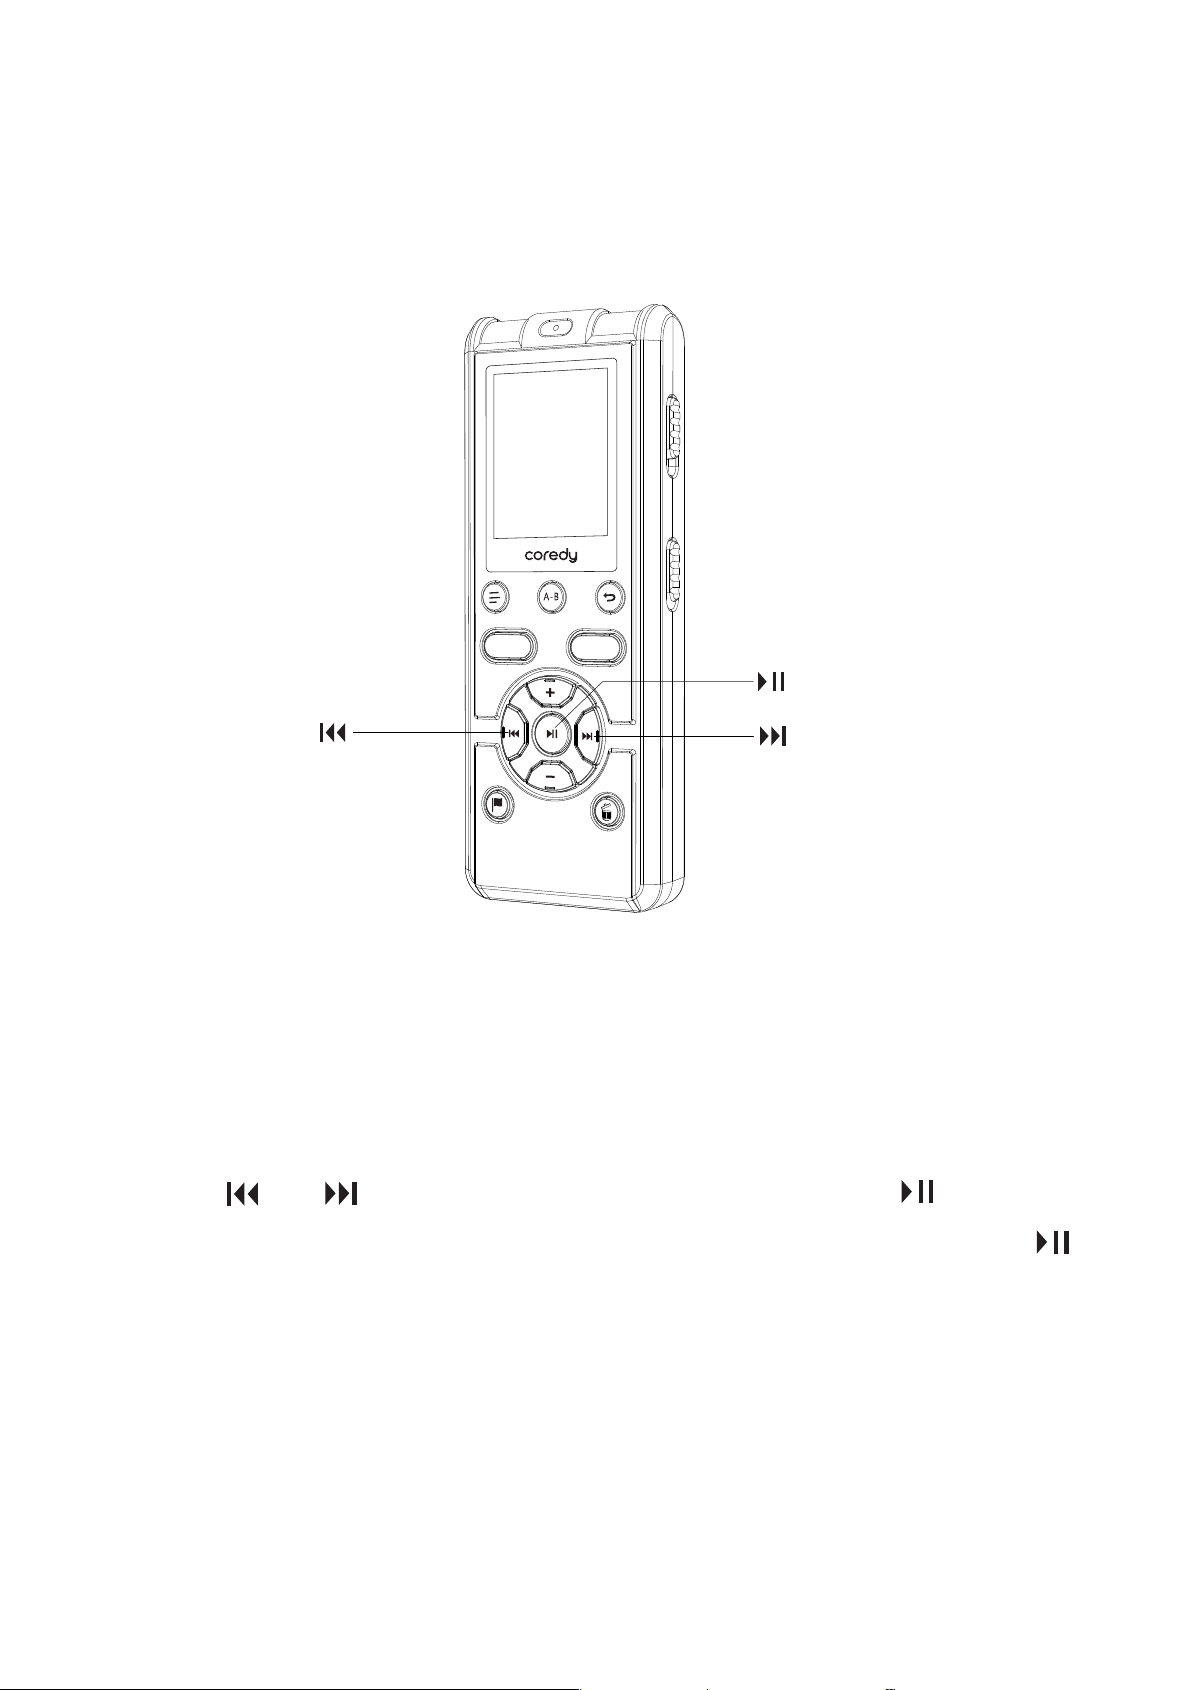
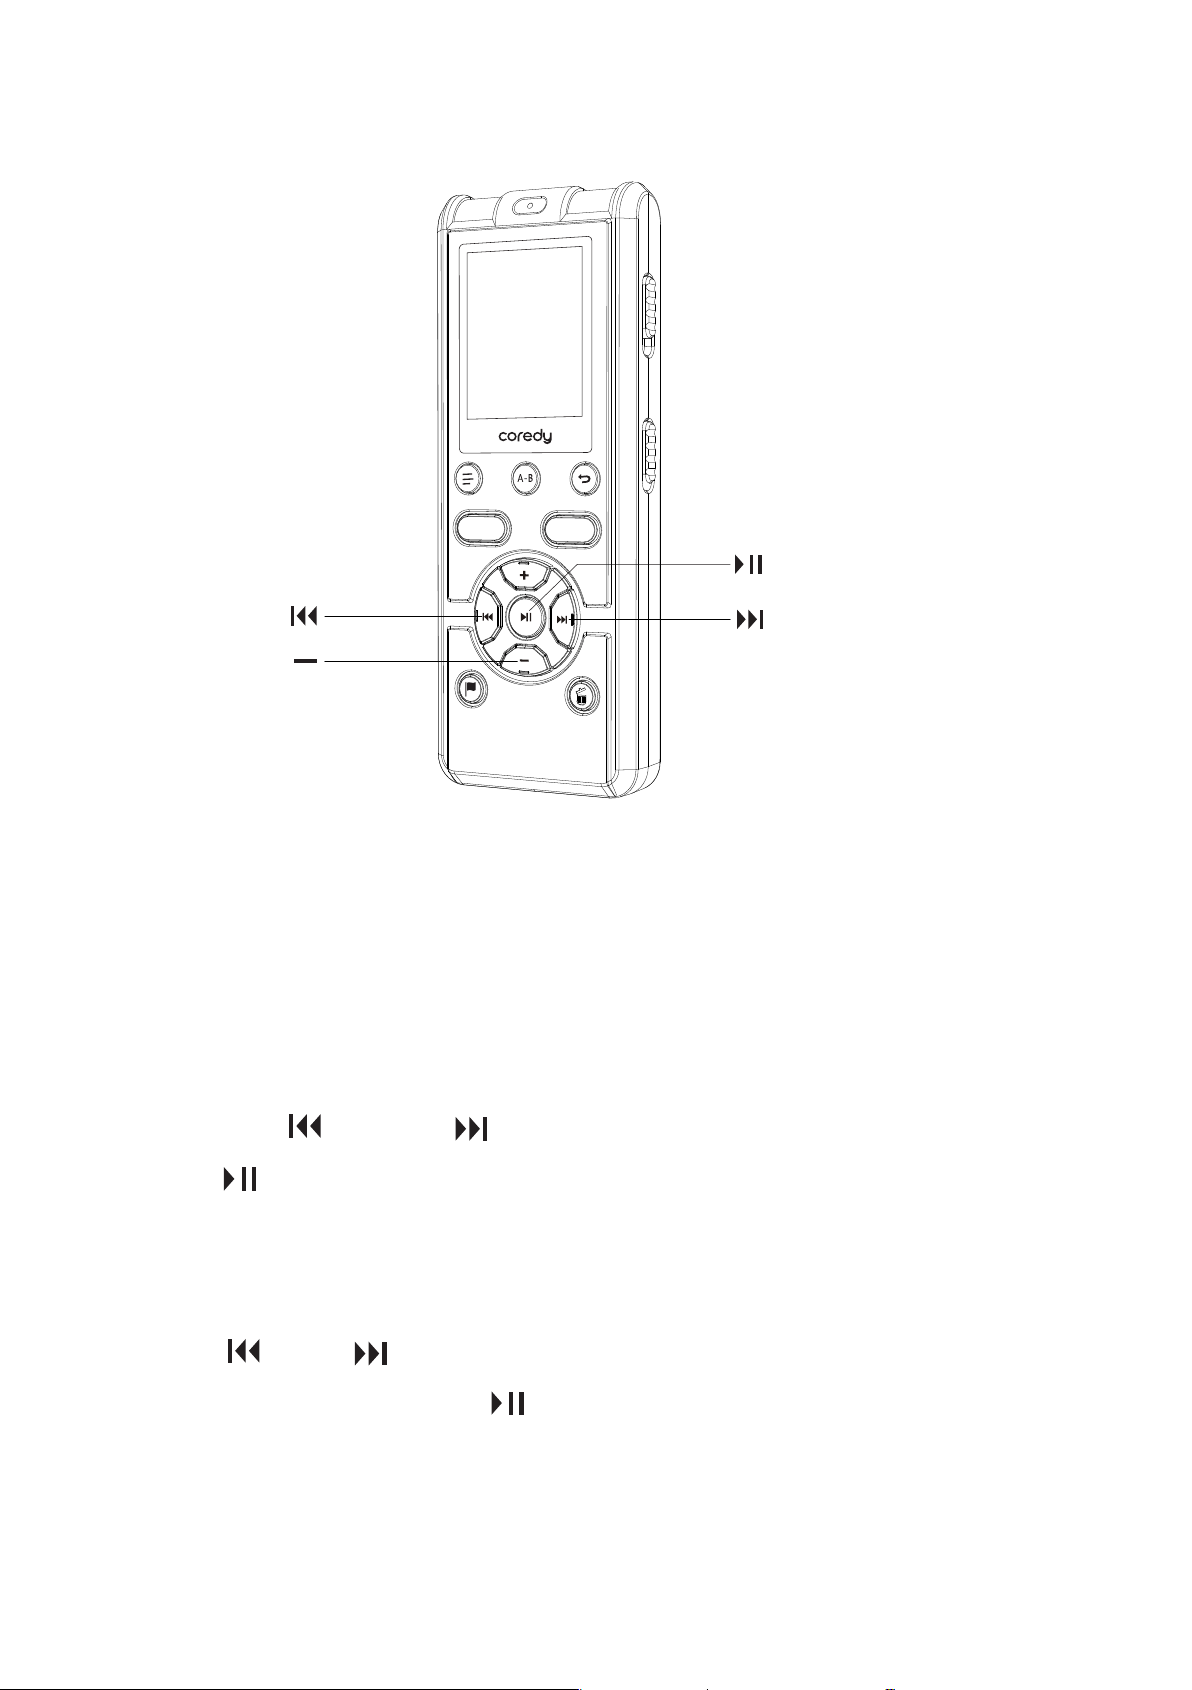
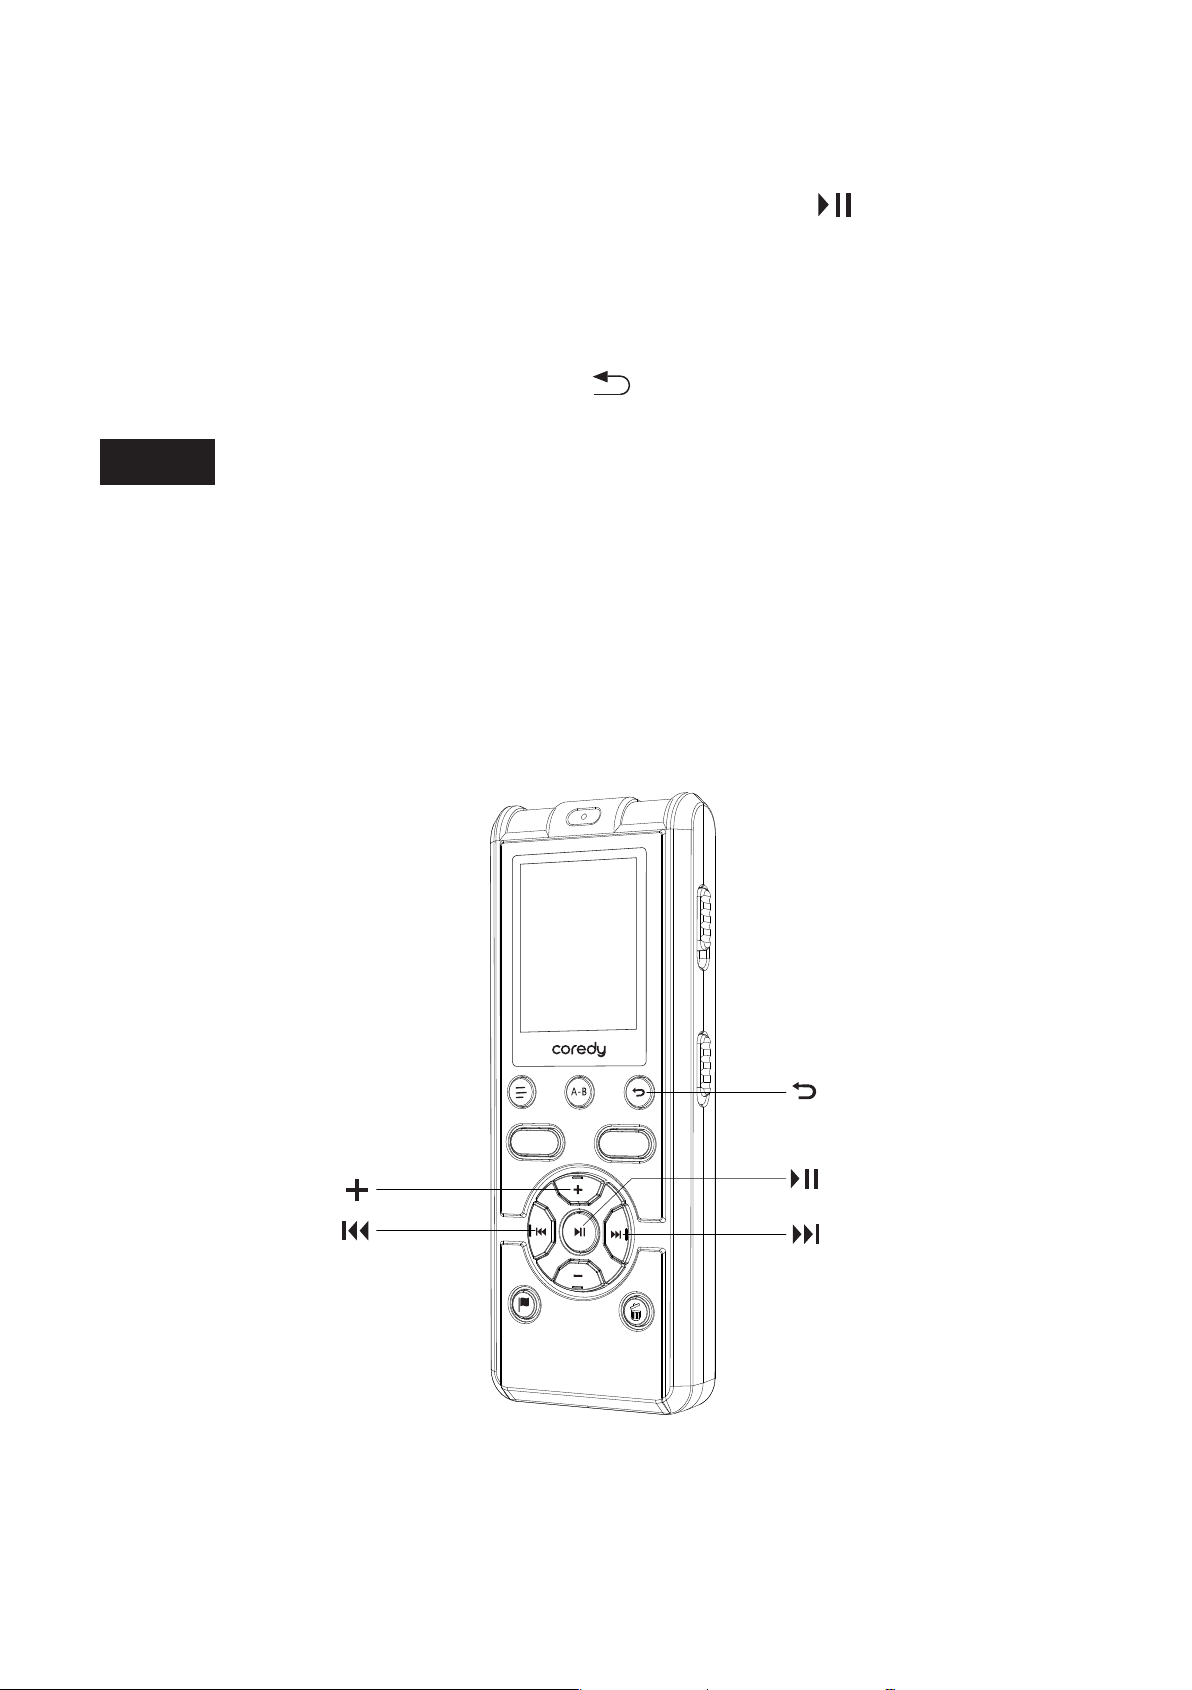
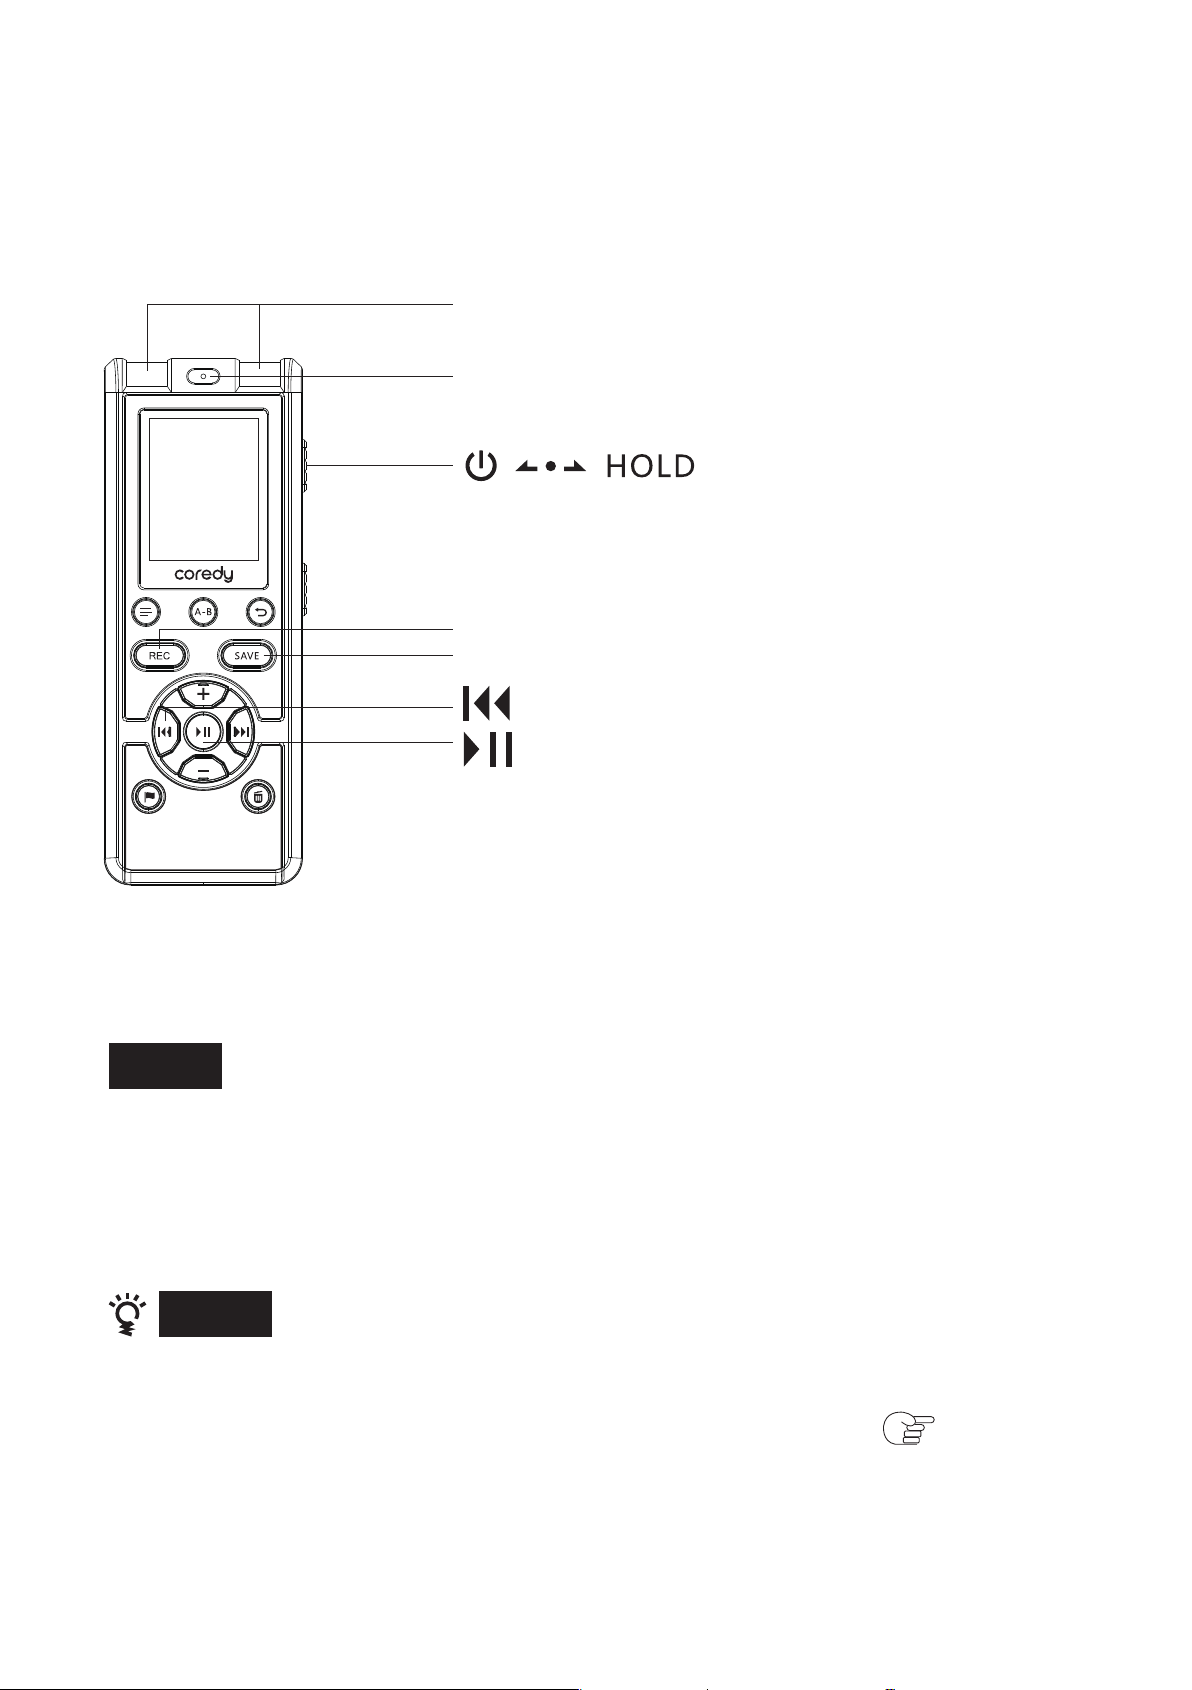
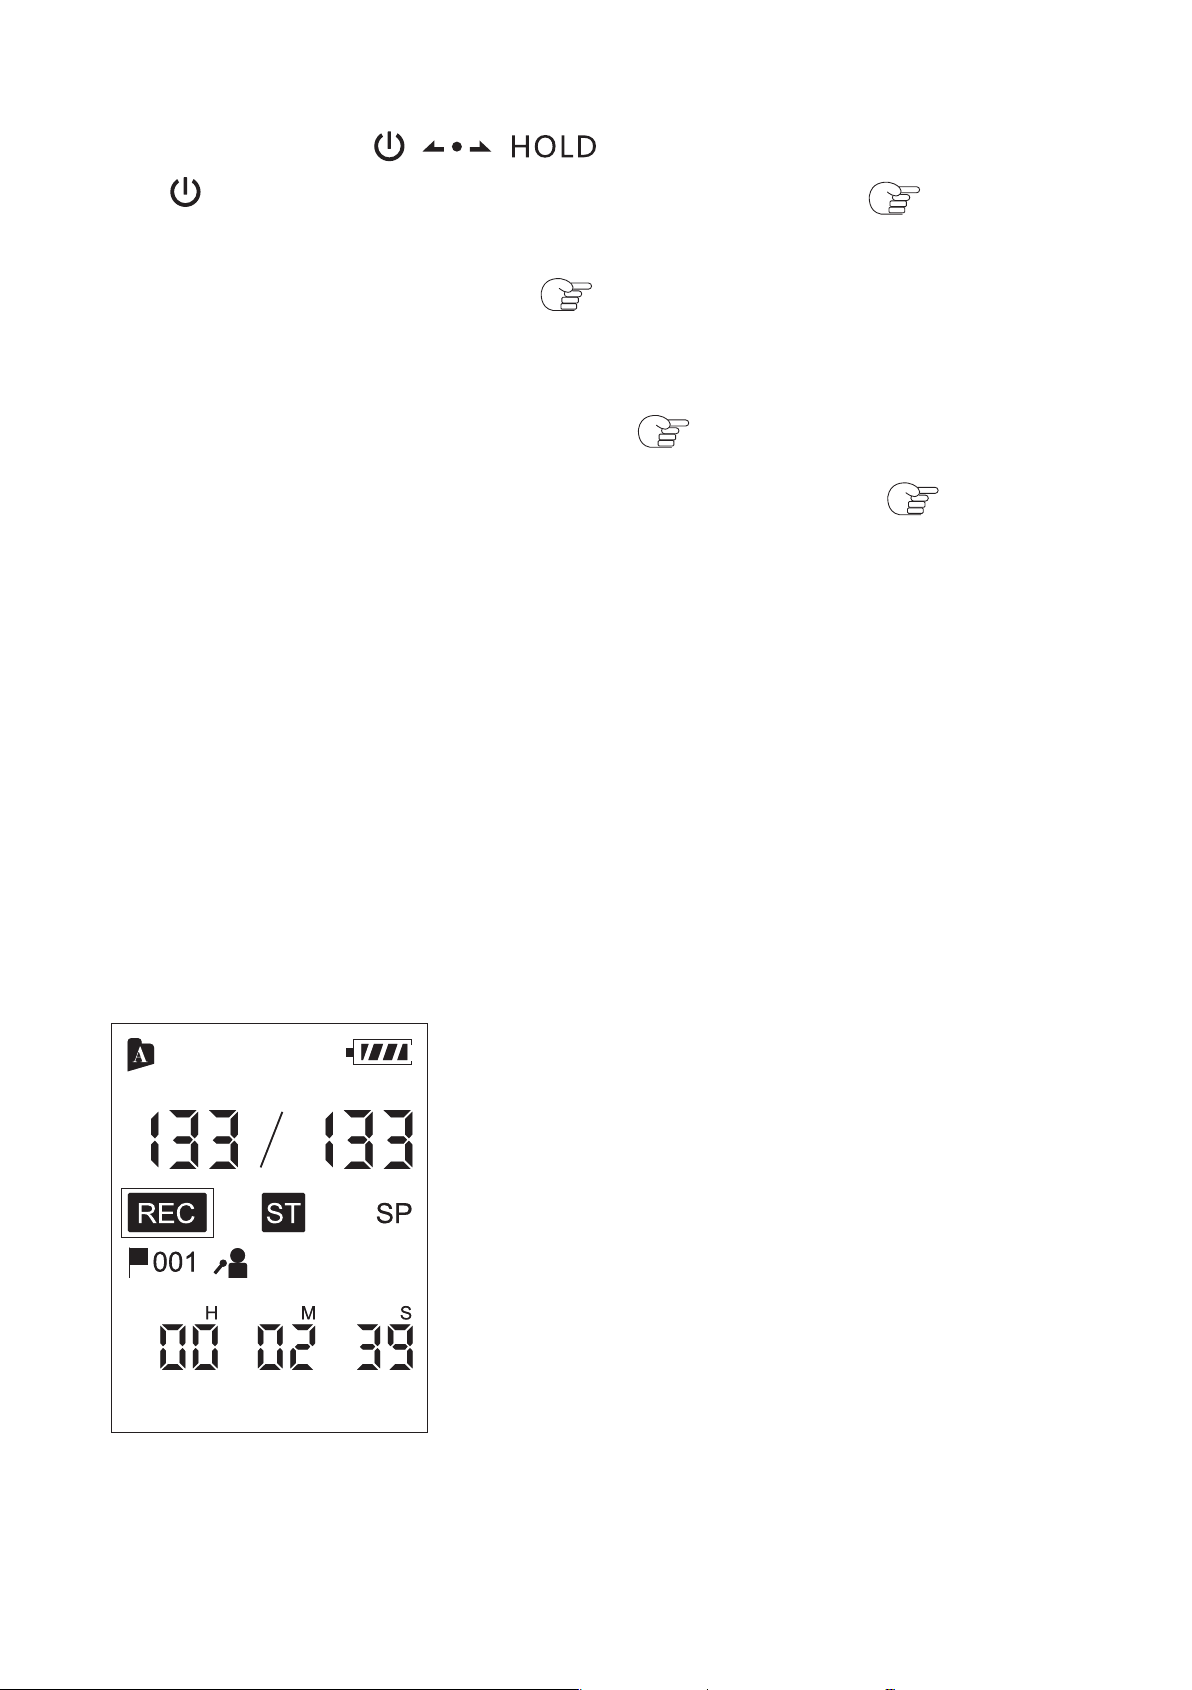
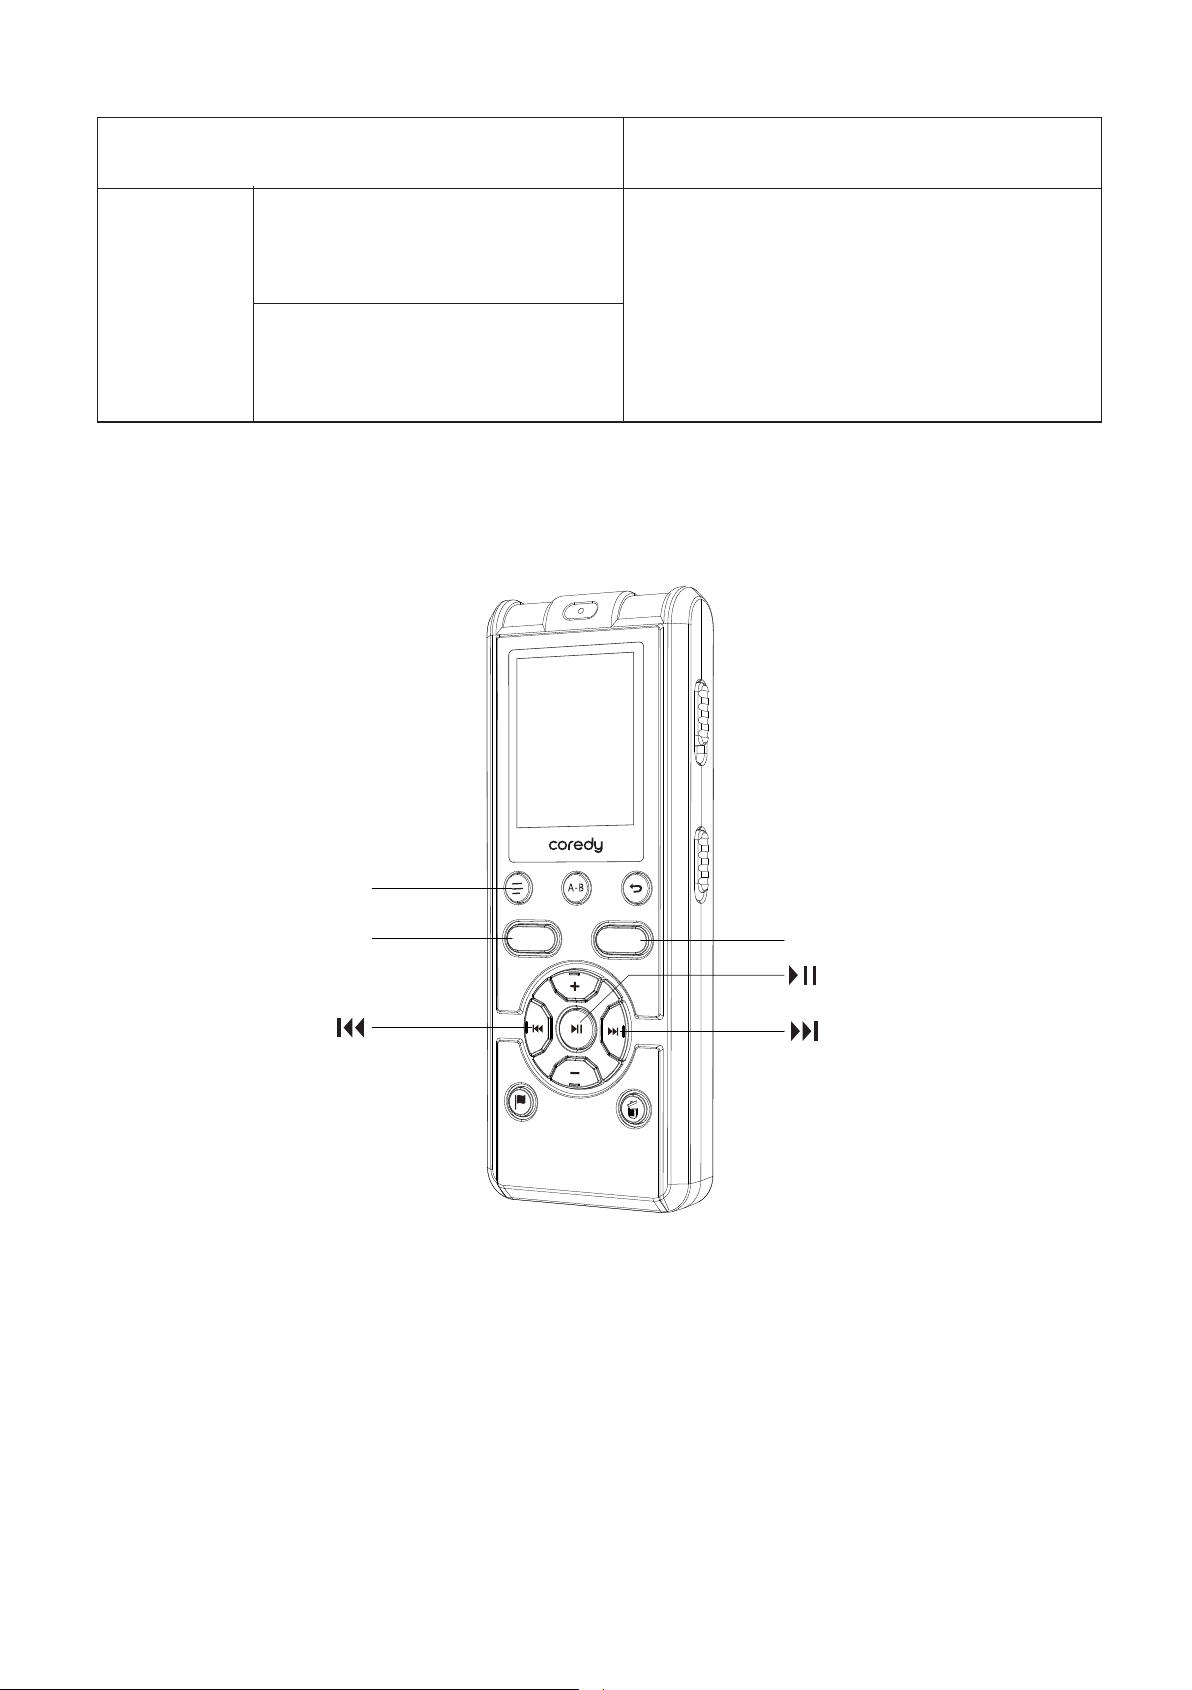
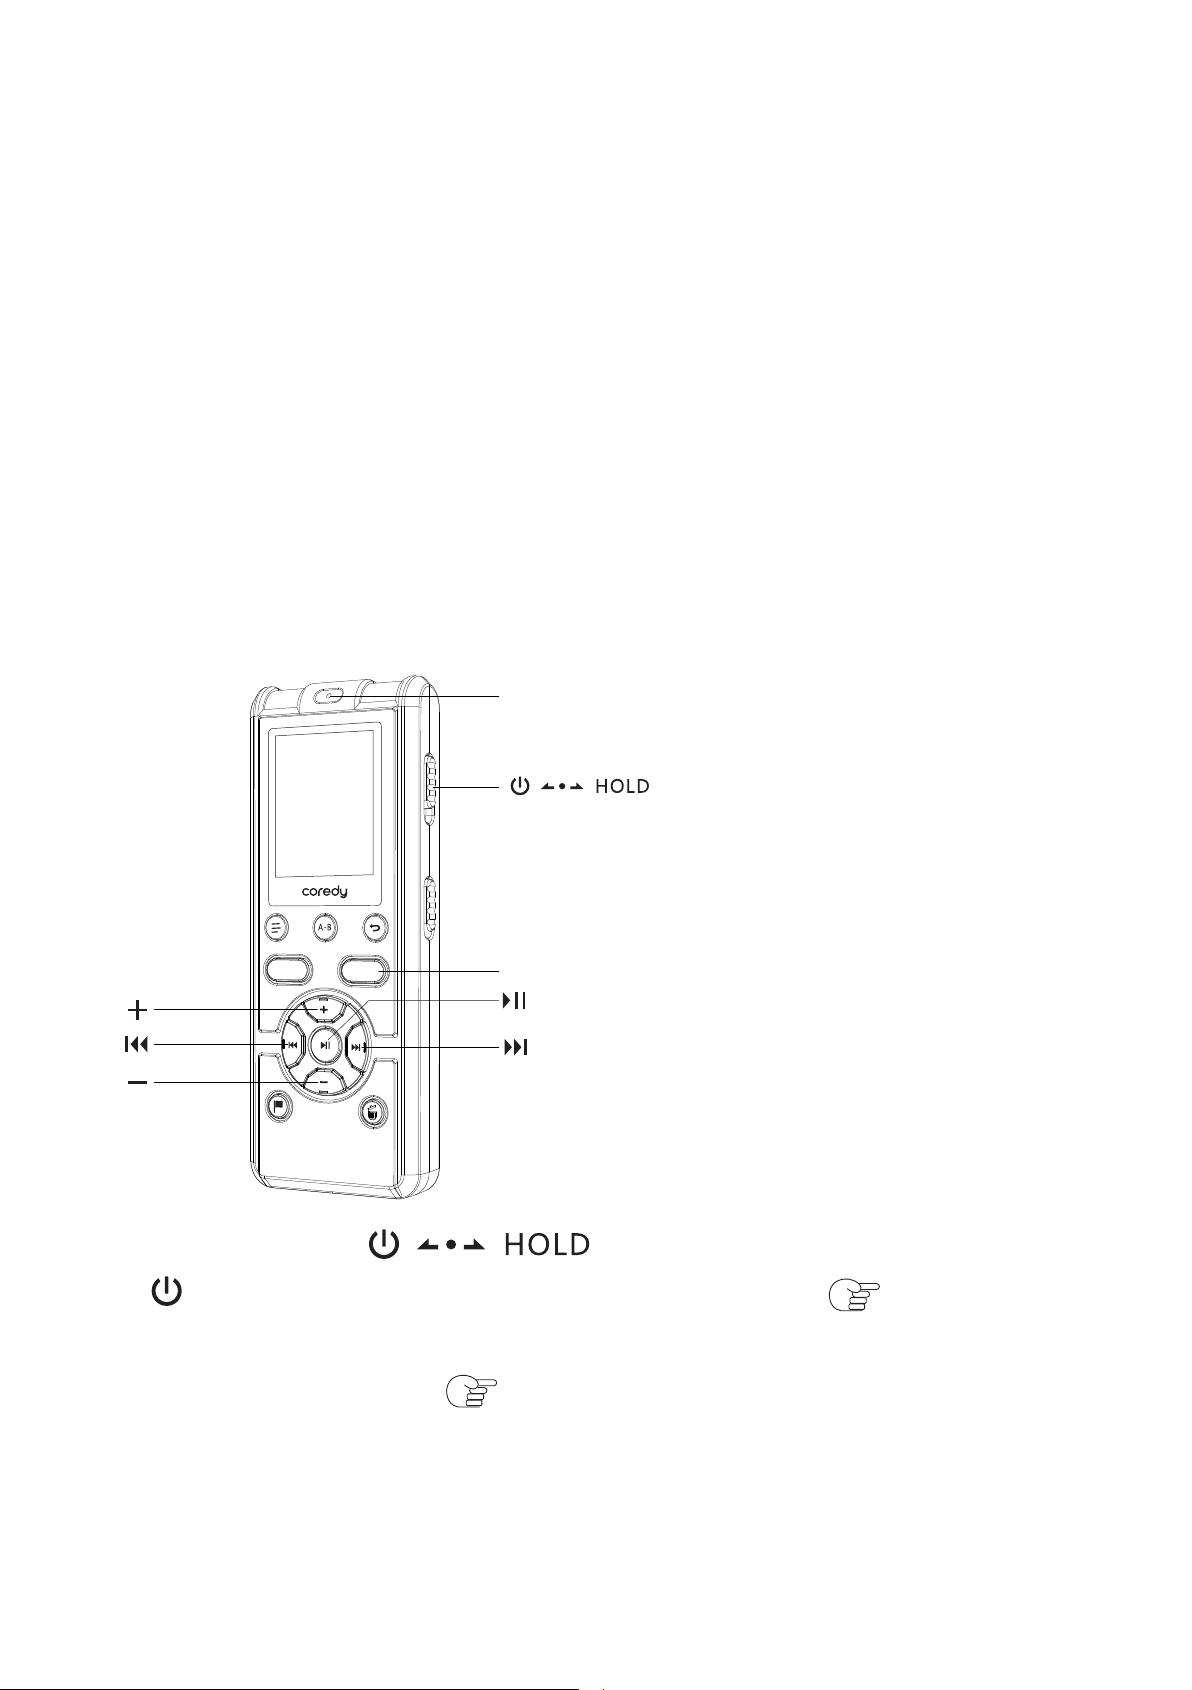
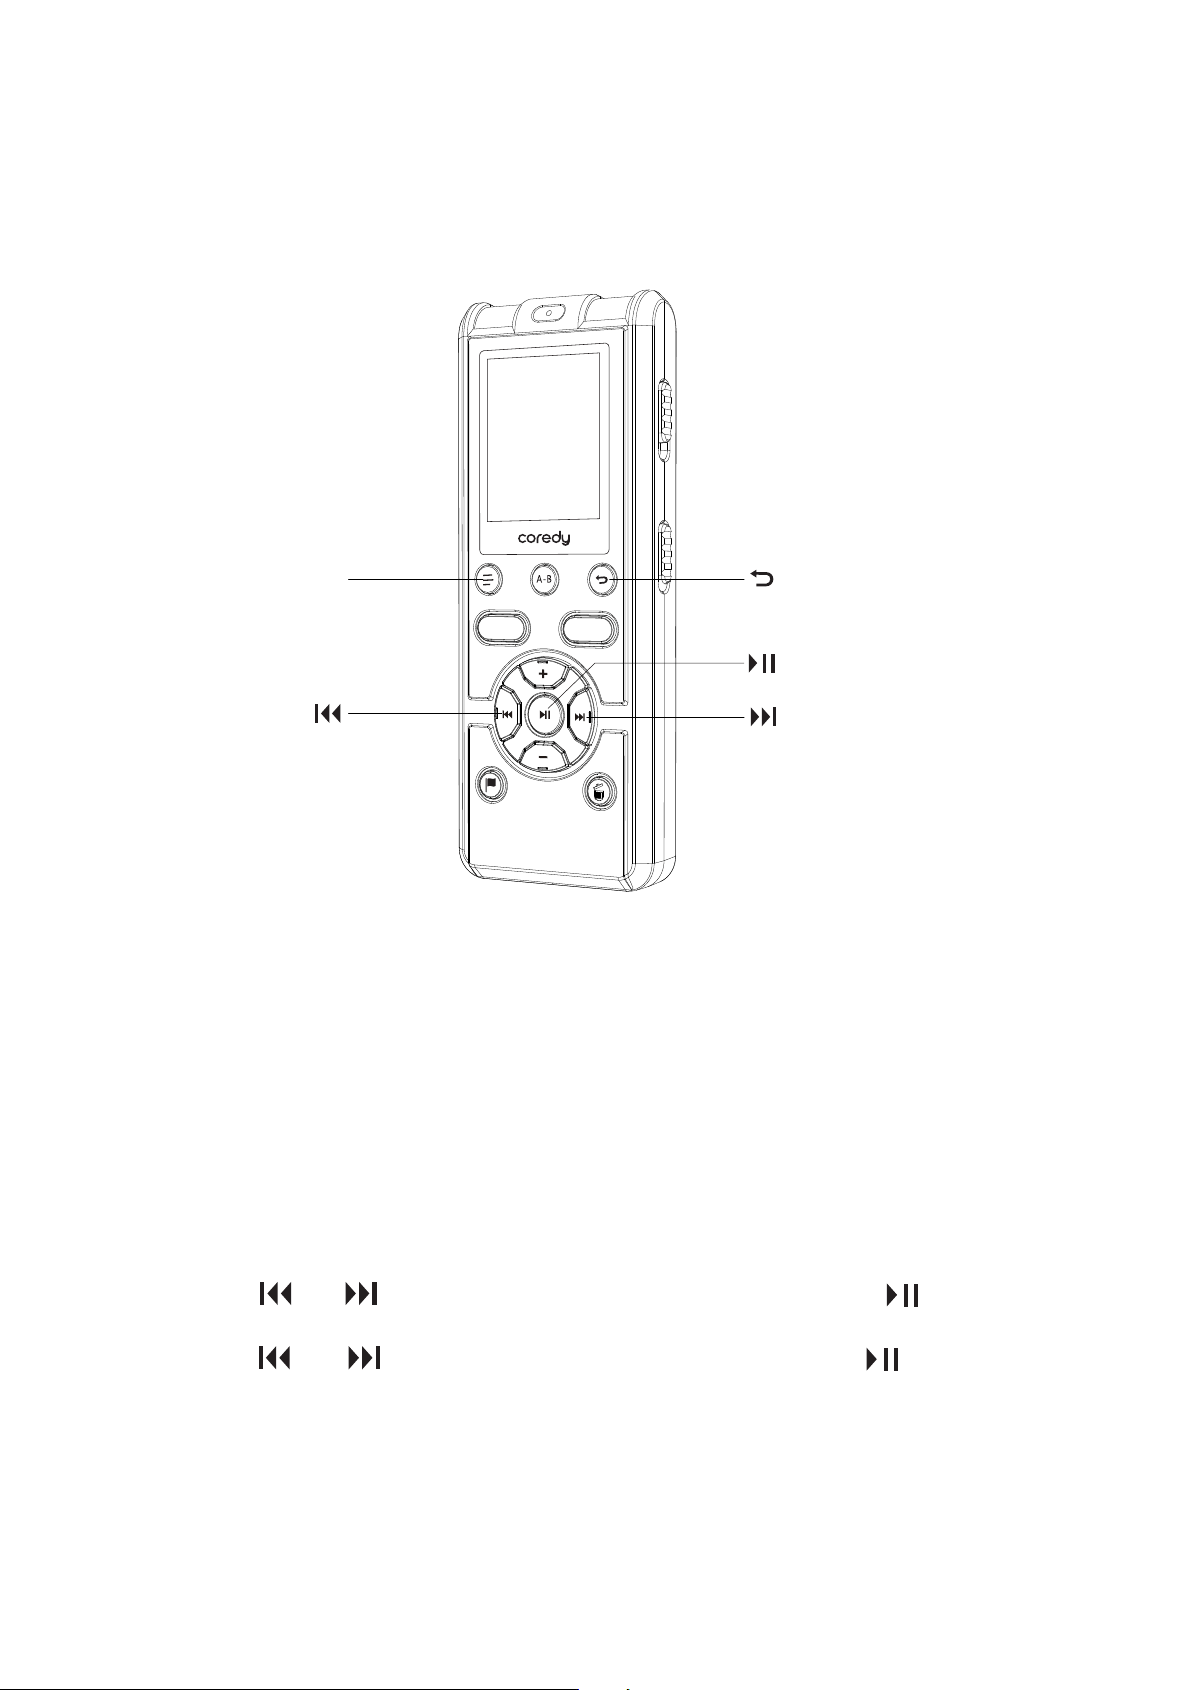
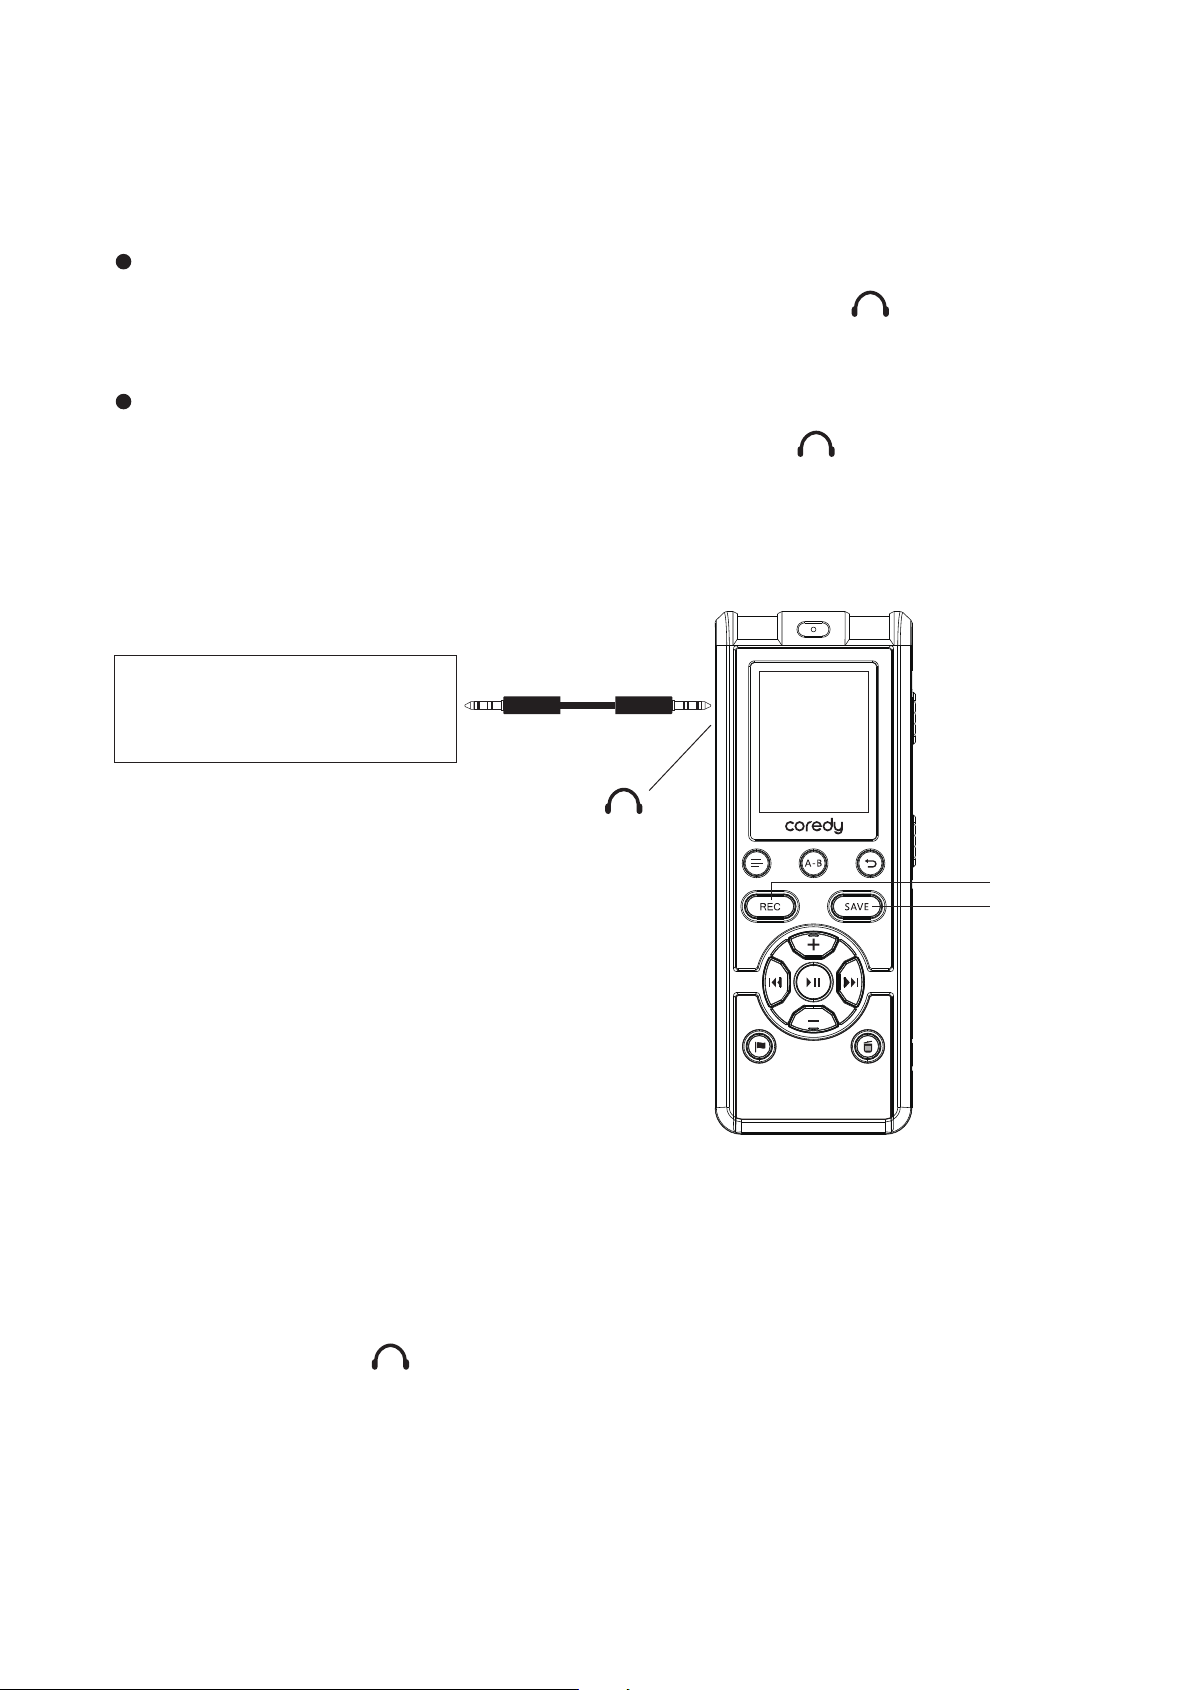
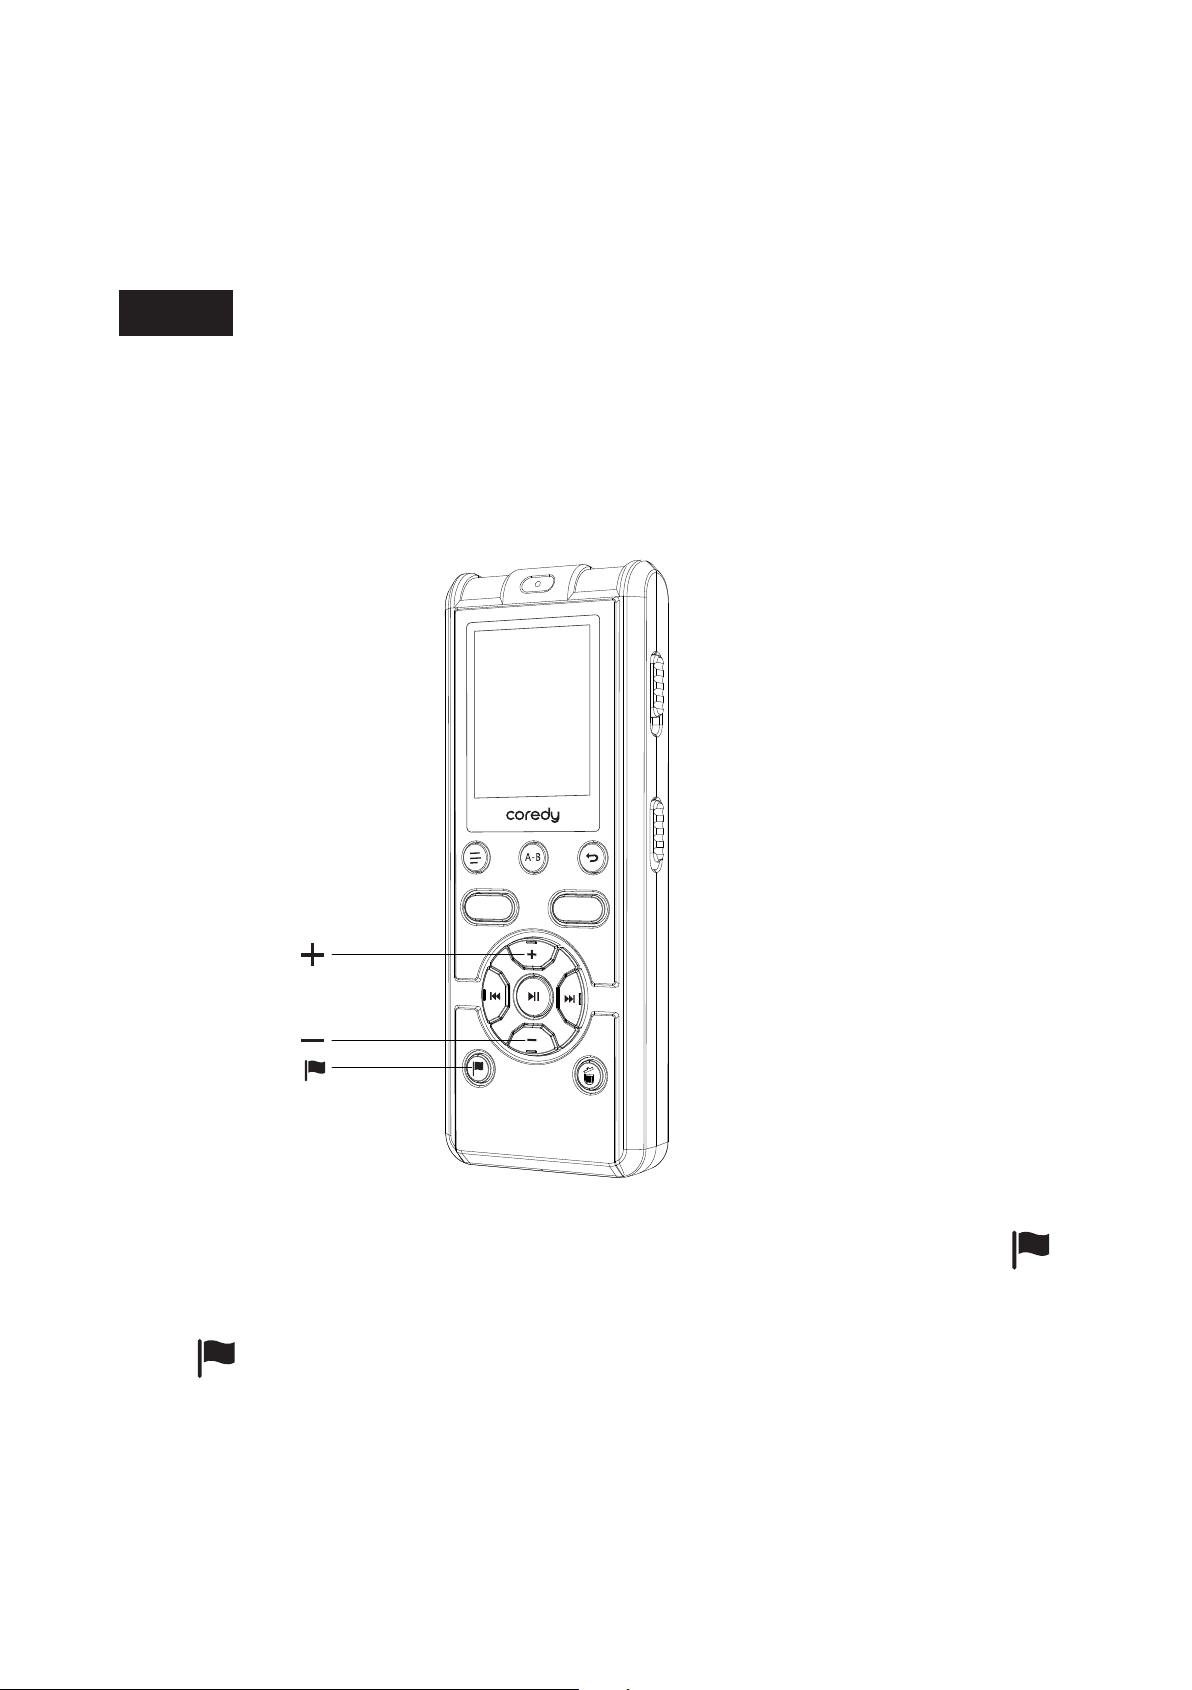
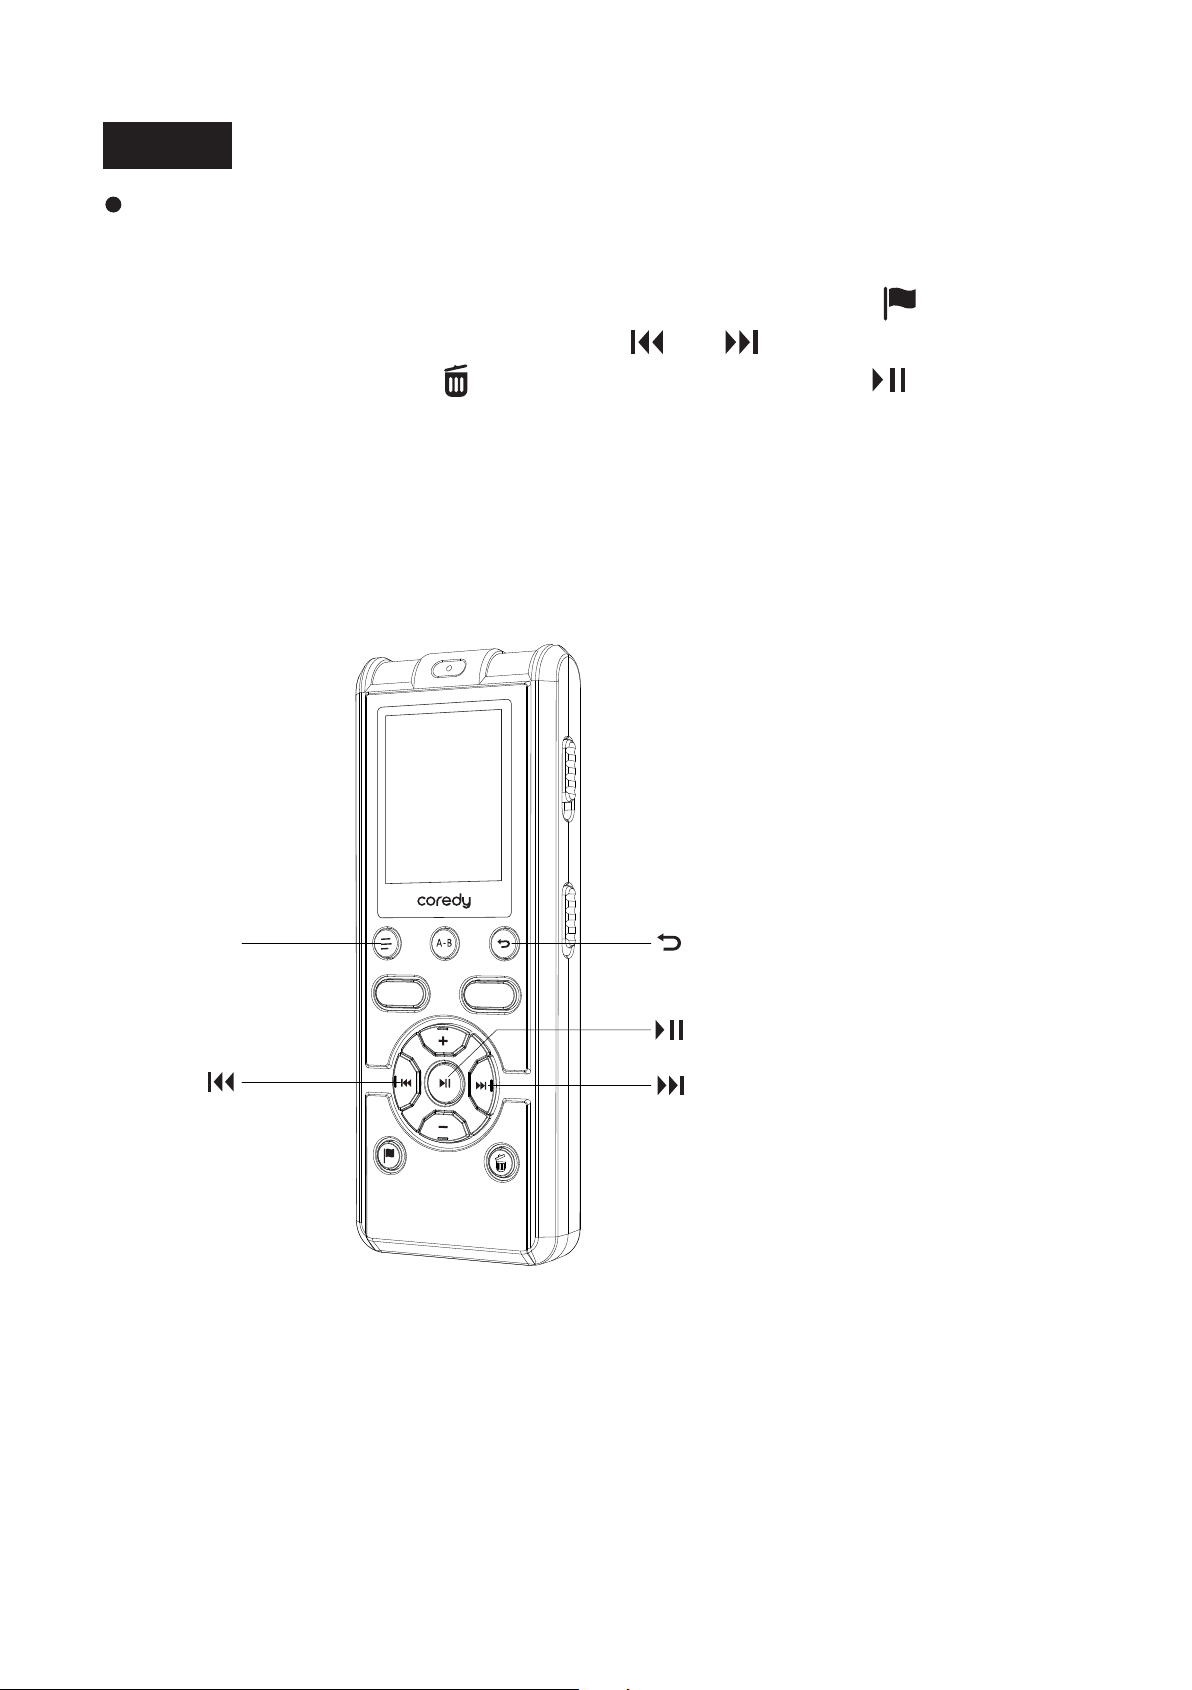
1.1 Checking the Parts and Controls
1, Operation indicator
2, Built-in microphones (stereo)
(L/R)
3, switch
4, SCENE (MY VOICE/CLASS) switch
5, DISPLAY/MENU button
6, Repeat A-B button
7, Back button
1 Preparing the recorder
A-B
REC
SAVE
1
2
6
5
8
10
12
11
15
2
3
7
4
9
13
14
16
01
8, REC (record) button
9, SAVE (record) button
10, Volume + / Previous P-MARK
11, Volume - / Next P-MARK
12, Review/fast backward button
13, Cue/fast forward button
14, Play /Pause /Enter button
15, P-MARK button
16, Erasing button
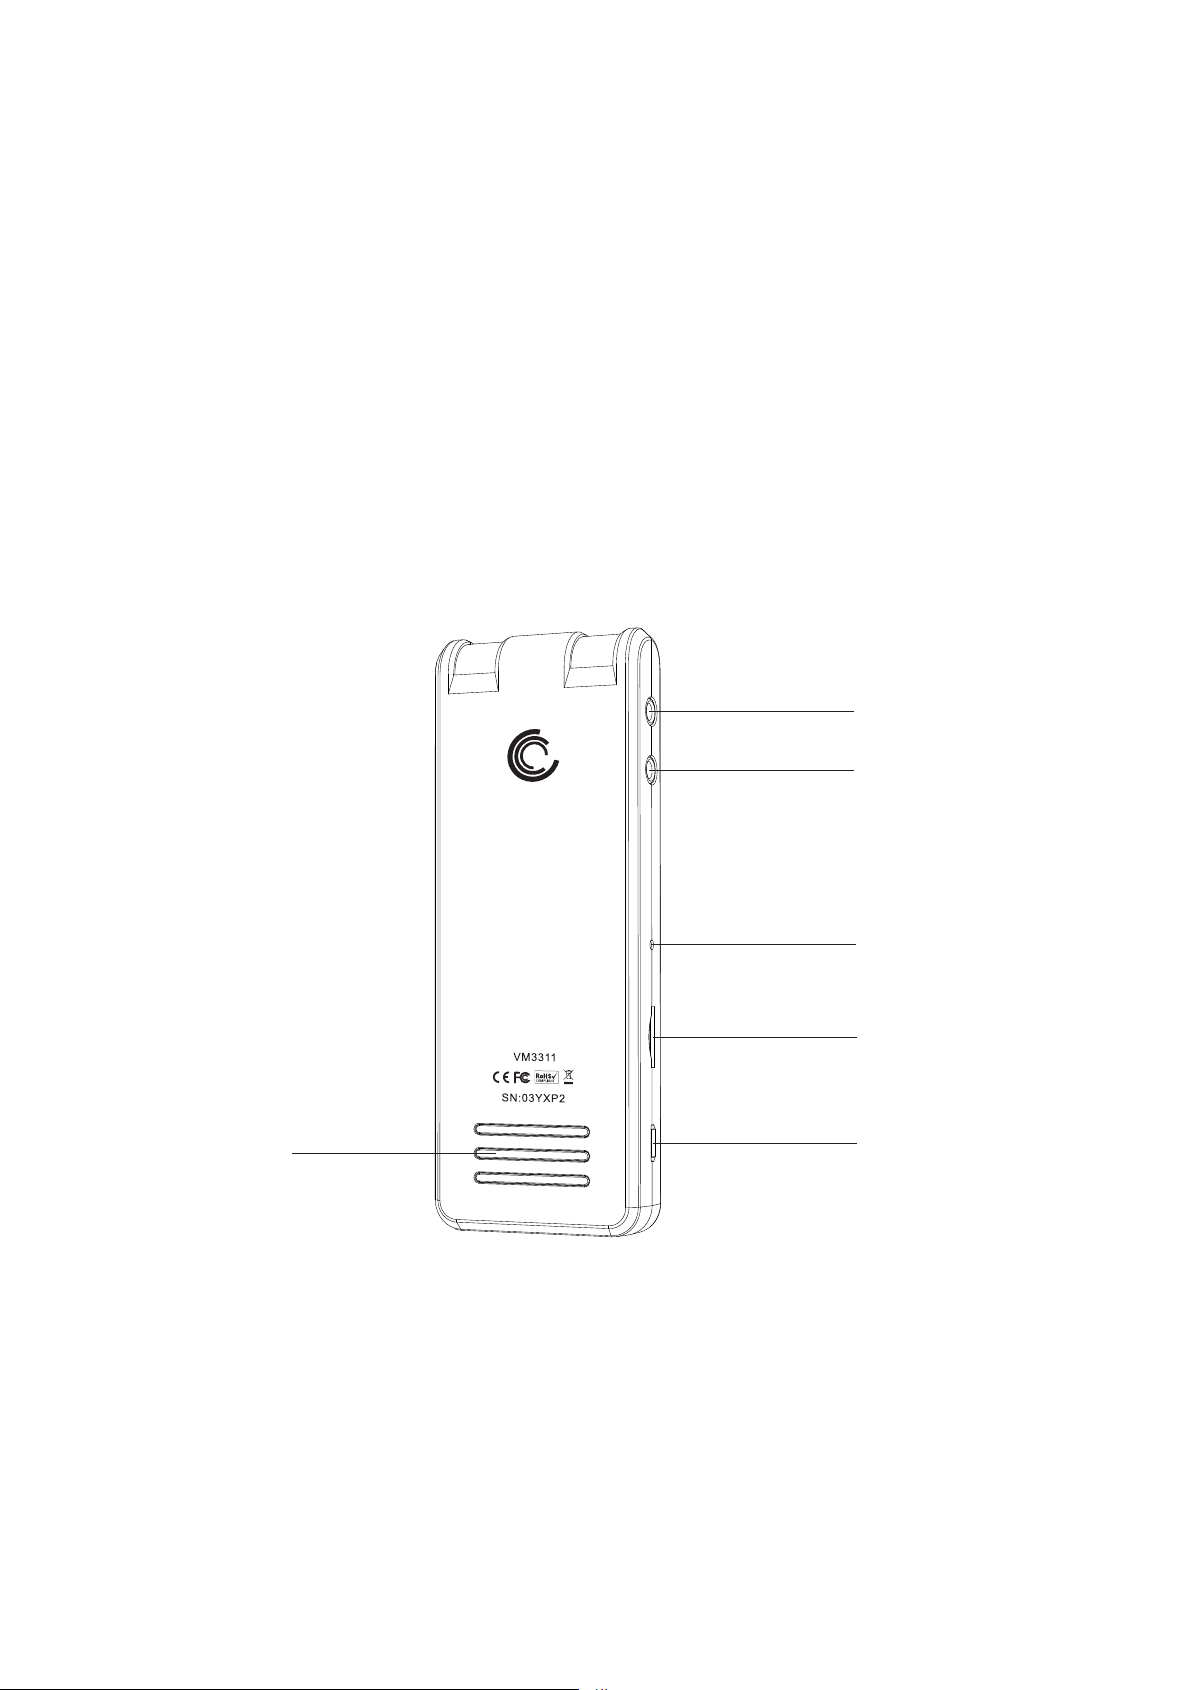
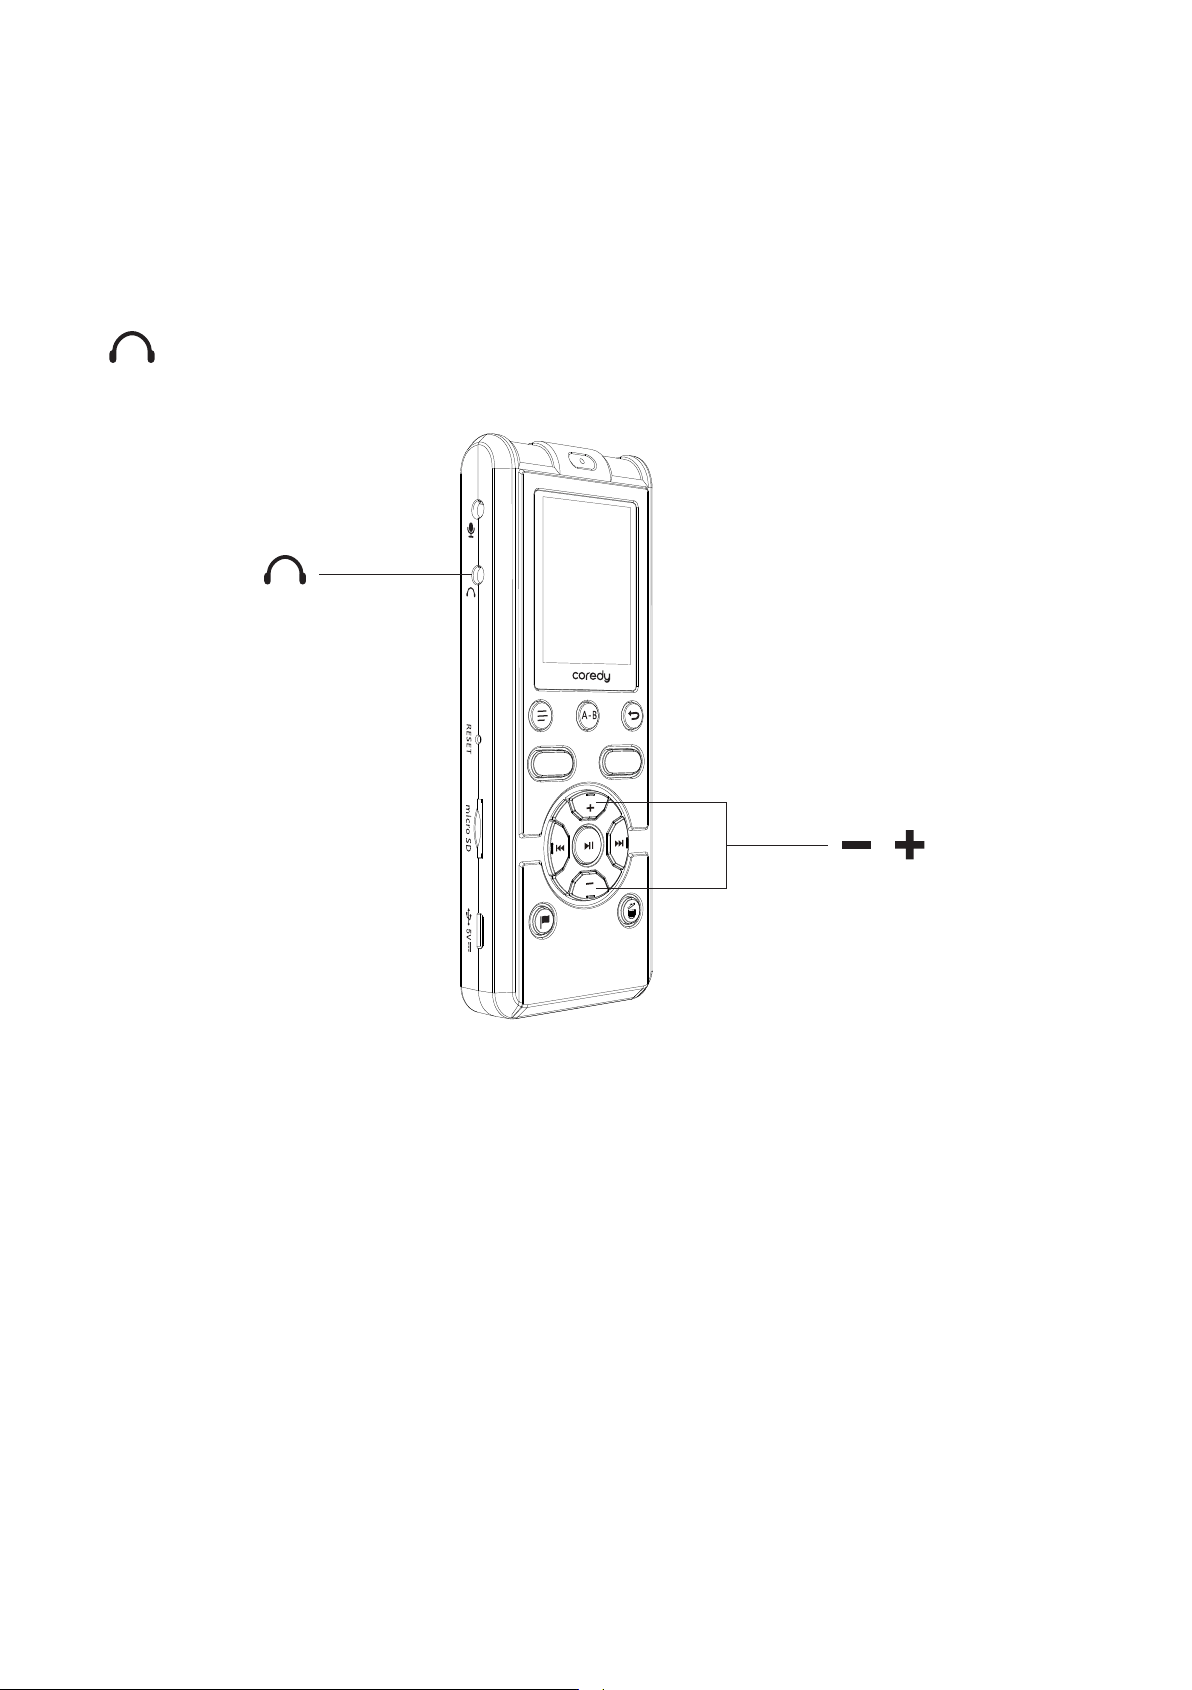
1, Microphone jack 2, Headphone jack
3, RESET button 4, M2™/microSD card slot
5, USB Port 6, Speaker
1
2
3
4
5
6
02
1, Audio Output Jack 2, RJ11 LINE Jack
3, RJ11 TELPHONE Jack 4, Telephones Cable
5, LINE-IN Audio Cable
1
3
2
4
5
1.2 Using the Display Window
Display During Stopped
1
4
5
2
3
03
Battery indicator
Displays the remaining battery power.
2
Recording mode indicator
Displays the recording mode set using the menu
when the Coredy recorder is in the stop or recording
mode, and displays the recording mode of the
current file when the Coredy recorder is in the
playback mode.
STHQ: Stereo high-quality recording mode
STSP: Stereo standard-play recording mode
3
The above and other windows in this section display
indications, numbers, or items for explanatory purposes.
The actual windows may differ from those displayed
here.
Folder indicator
Displays the folder you have selected.
/ / : Folders where you can record a file. Files
you record with the Coredy recorder will be stored
and managed in these folders.
(Music): A folder for playback only. Music files
transferred from your computer will be displayed
and managed in this folder.
1
Note
04

Recording scene indicator
Display the recording scene when the recorder is in
the stop or recording mode.
: My Voice recording mode
: Class recording mode
4
Current date and time display
Displays the current date (year, month, and day) and
the current time (hour and minutes)
5
05
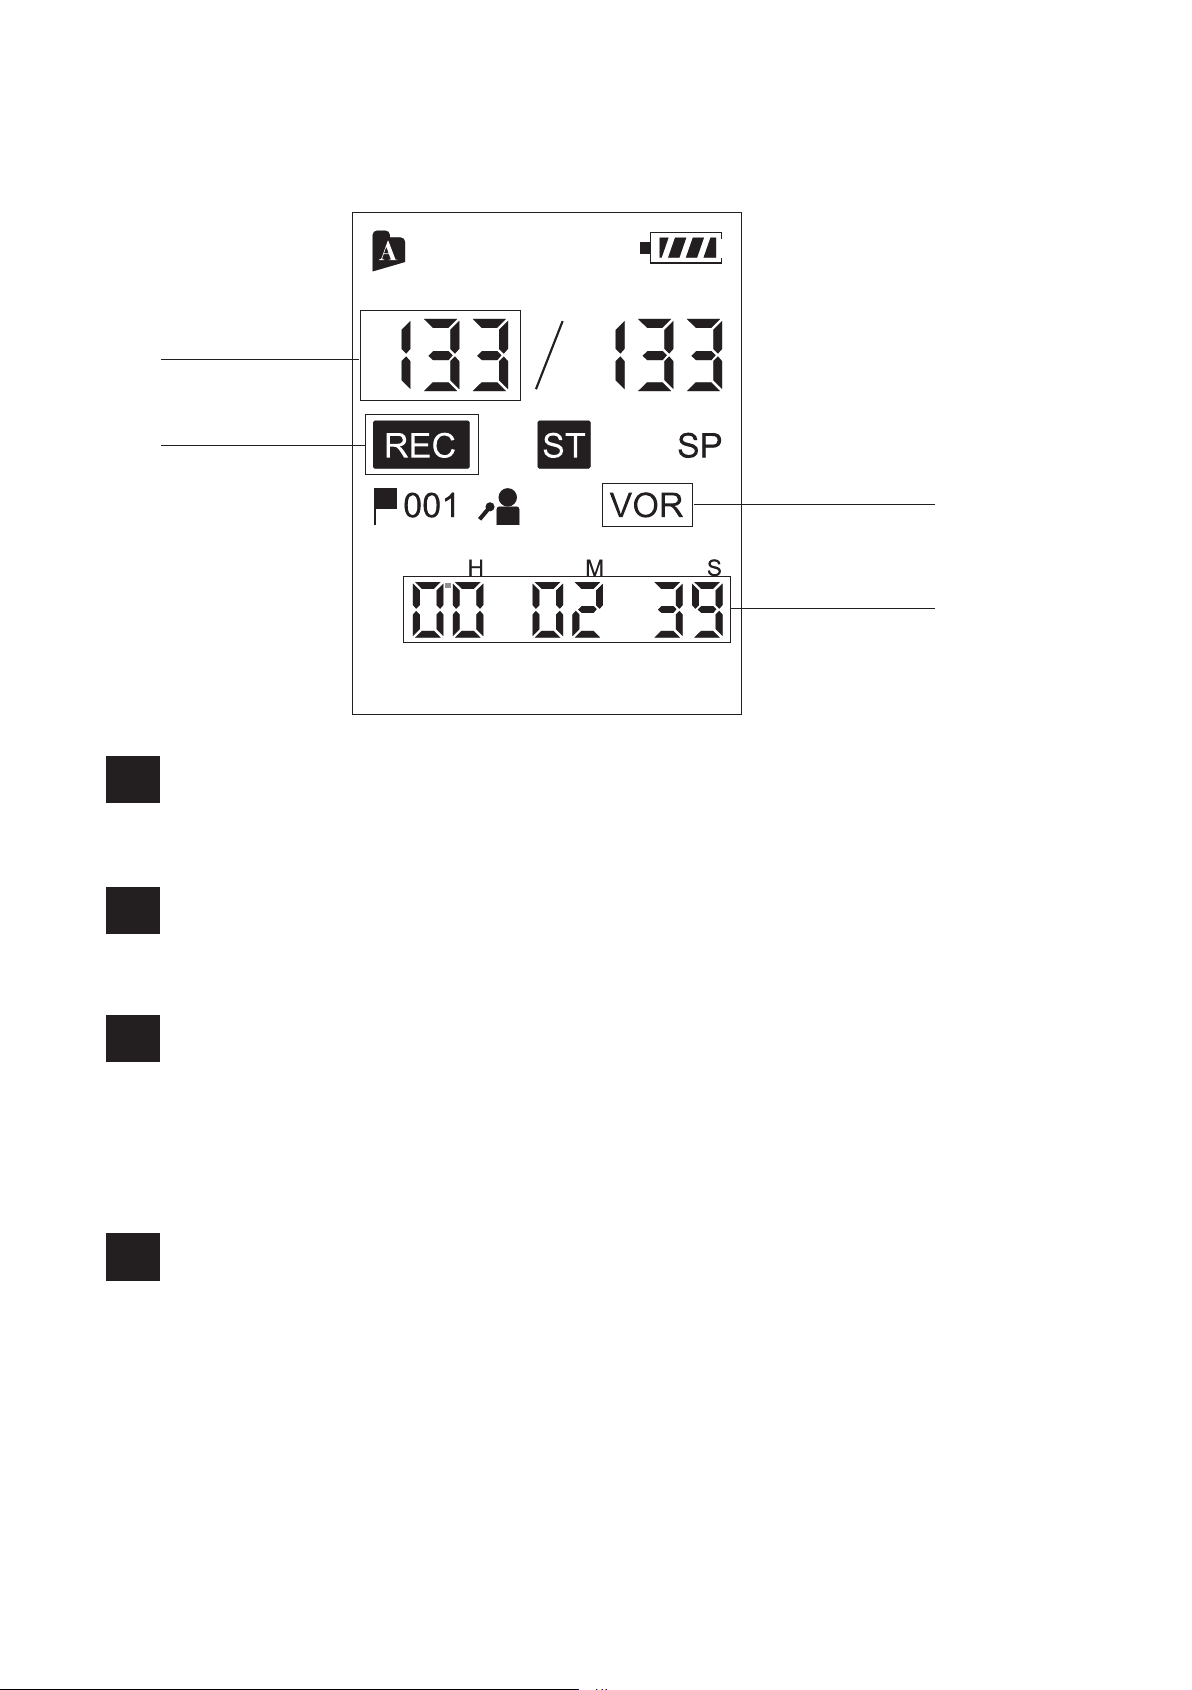
Display when recording
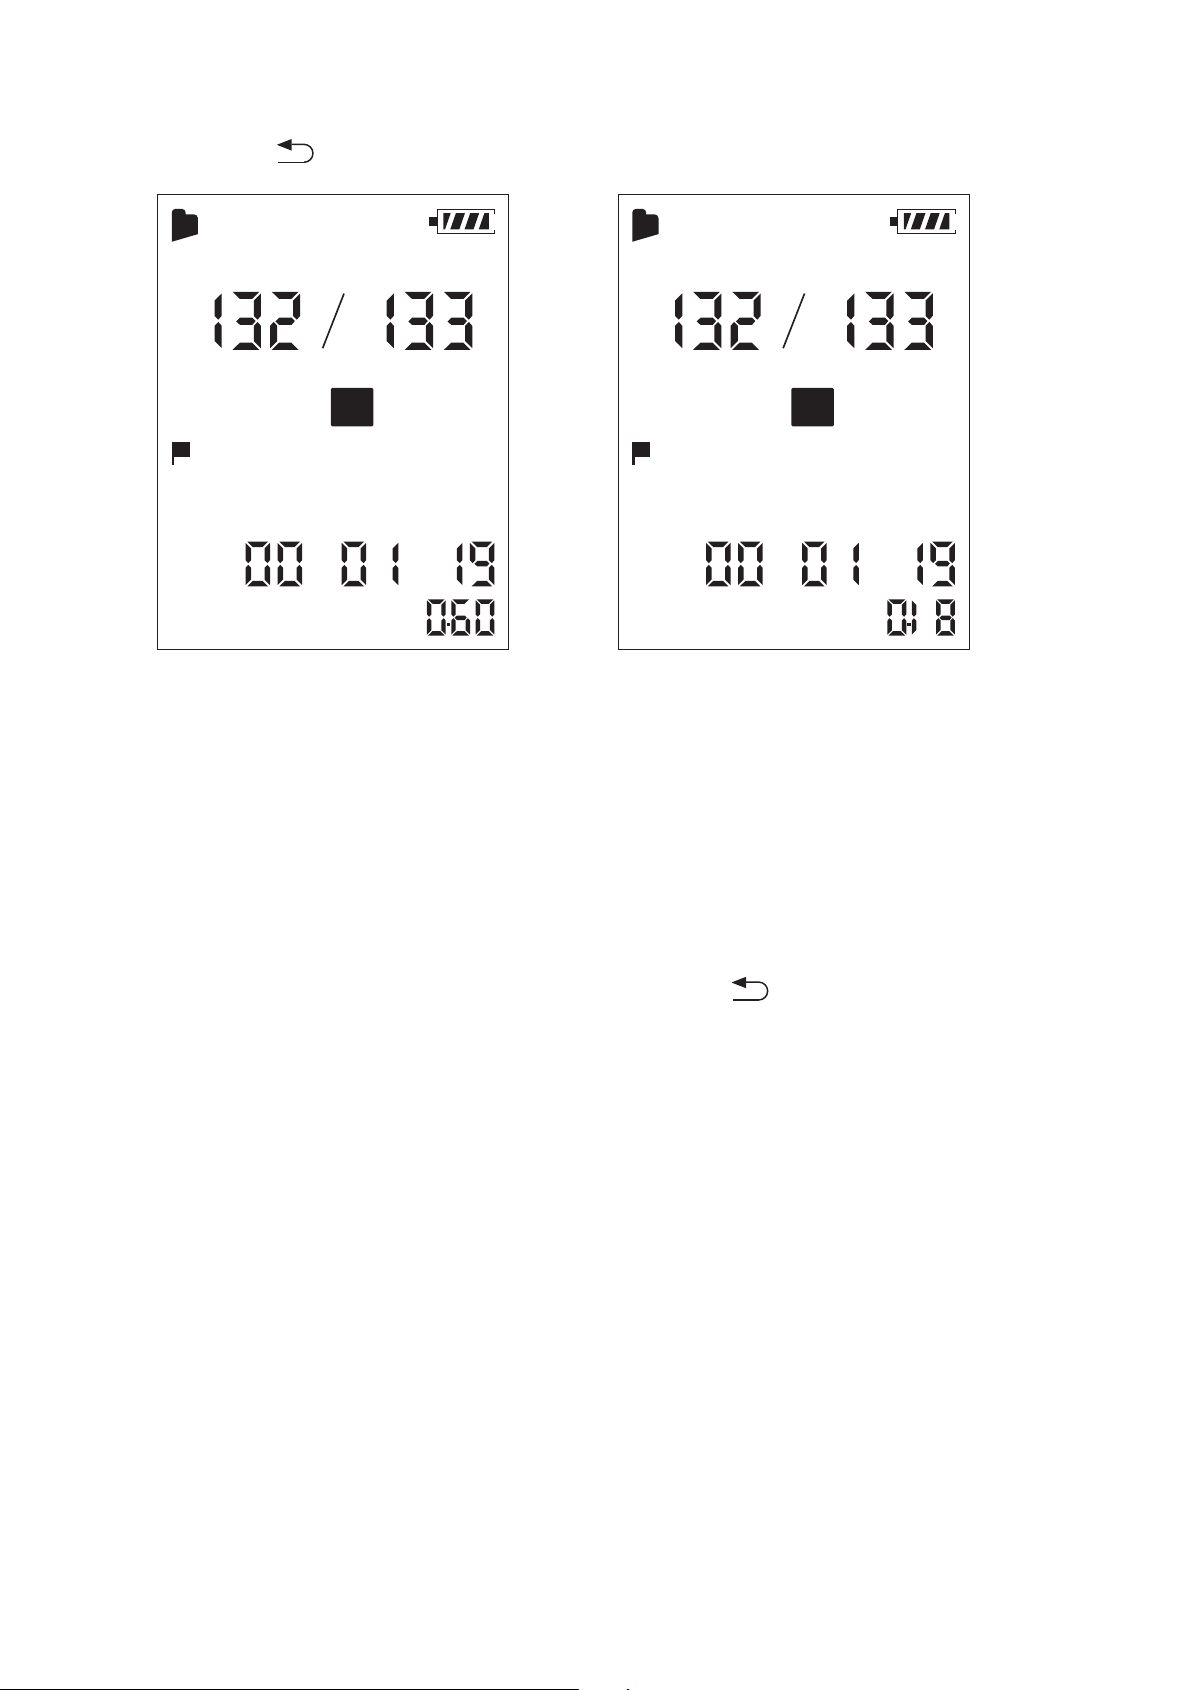
File number indicator
Displays the file number you are recording.
1
Recording indicator
Appears while the Coredy recorder is recording.
2
VOR (Voice Operated Recording) indicator
Appears while the Coredy recorder is recording with
the VOR function.
You can set “VOR” to “ON” in the menu.
3
Counter indication
Displays the following file information. You can
switch the display mode by pressing MENU briefly:
Elapsed time -> Remaining time (with “REMAIN”
indicator)
4
1
2
3
4
06
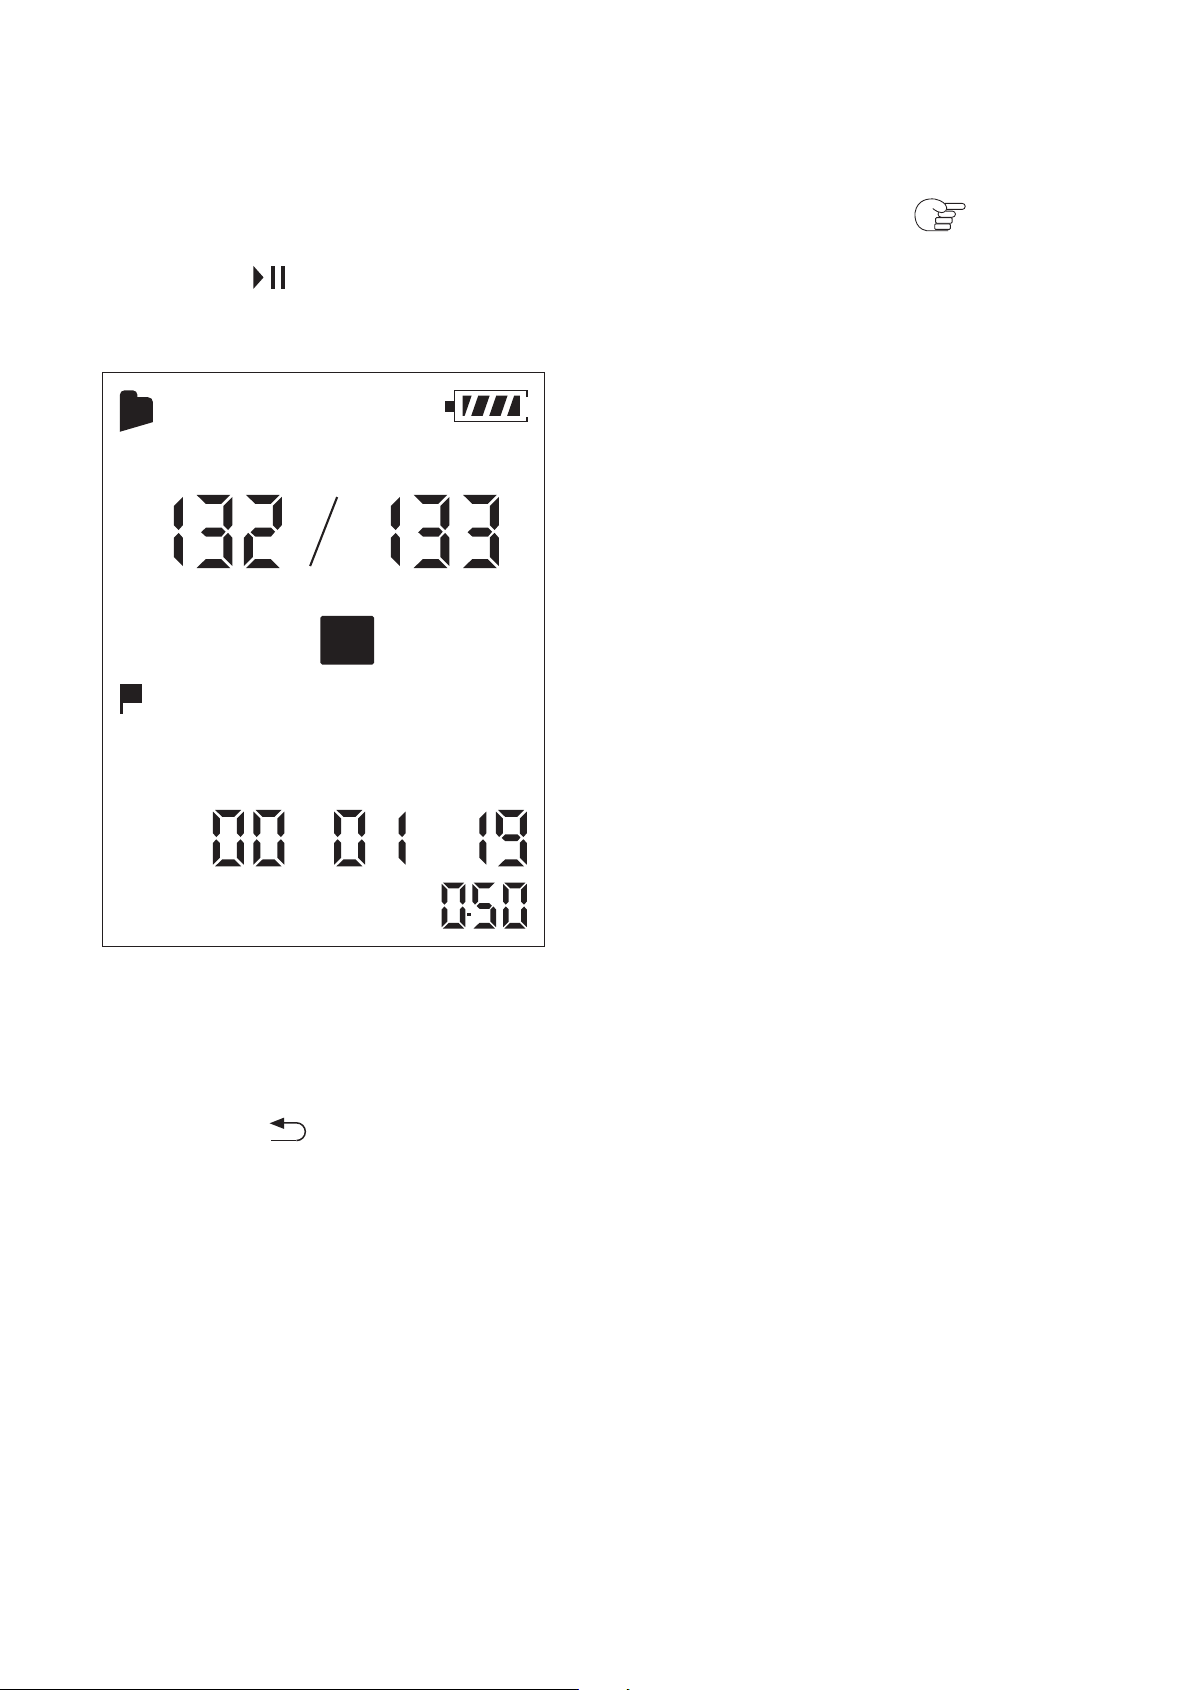
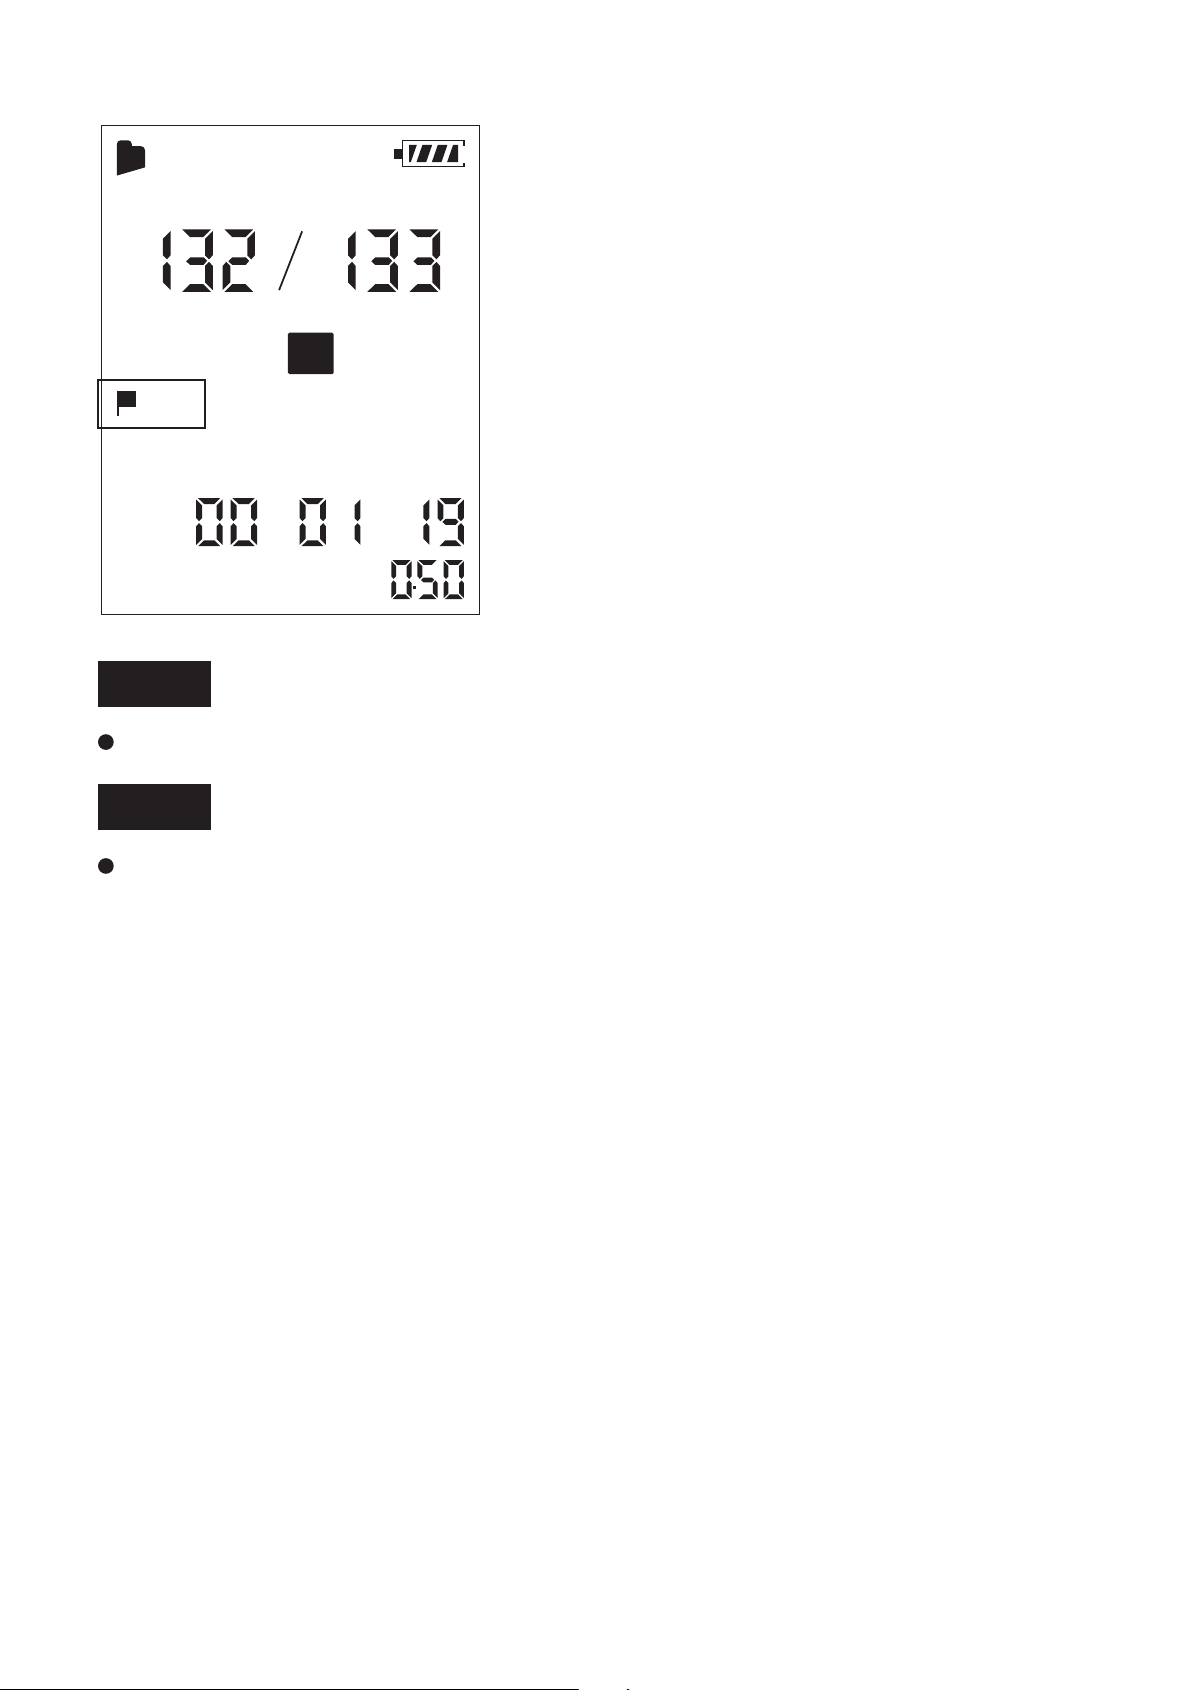
Display during playback
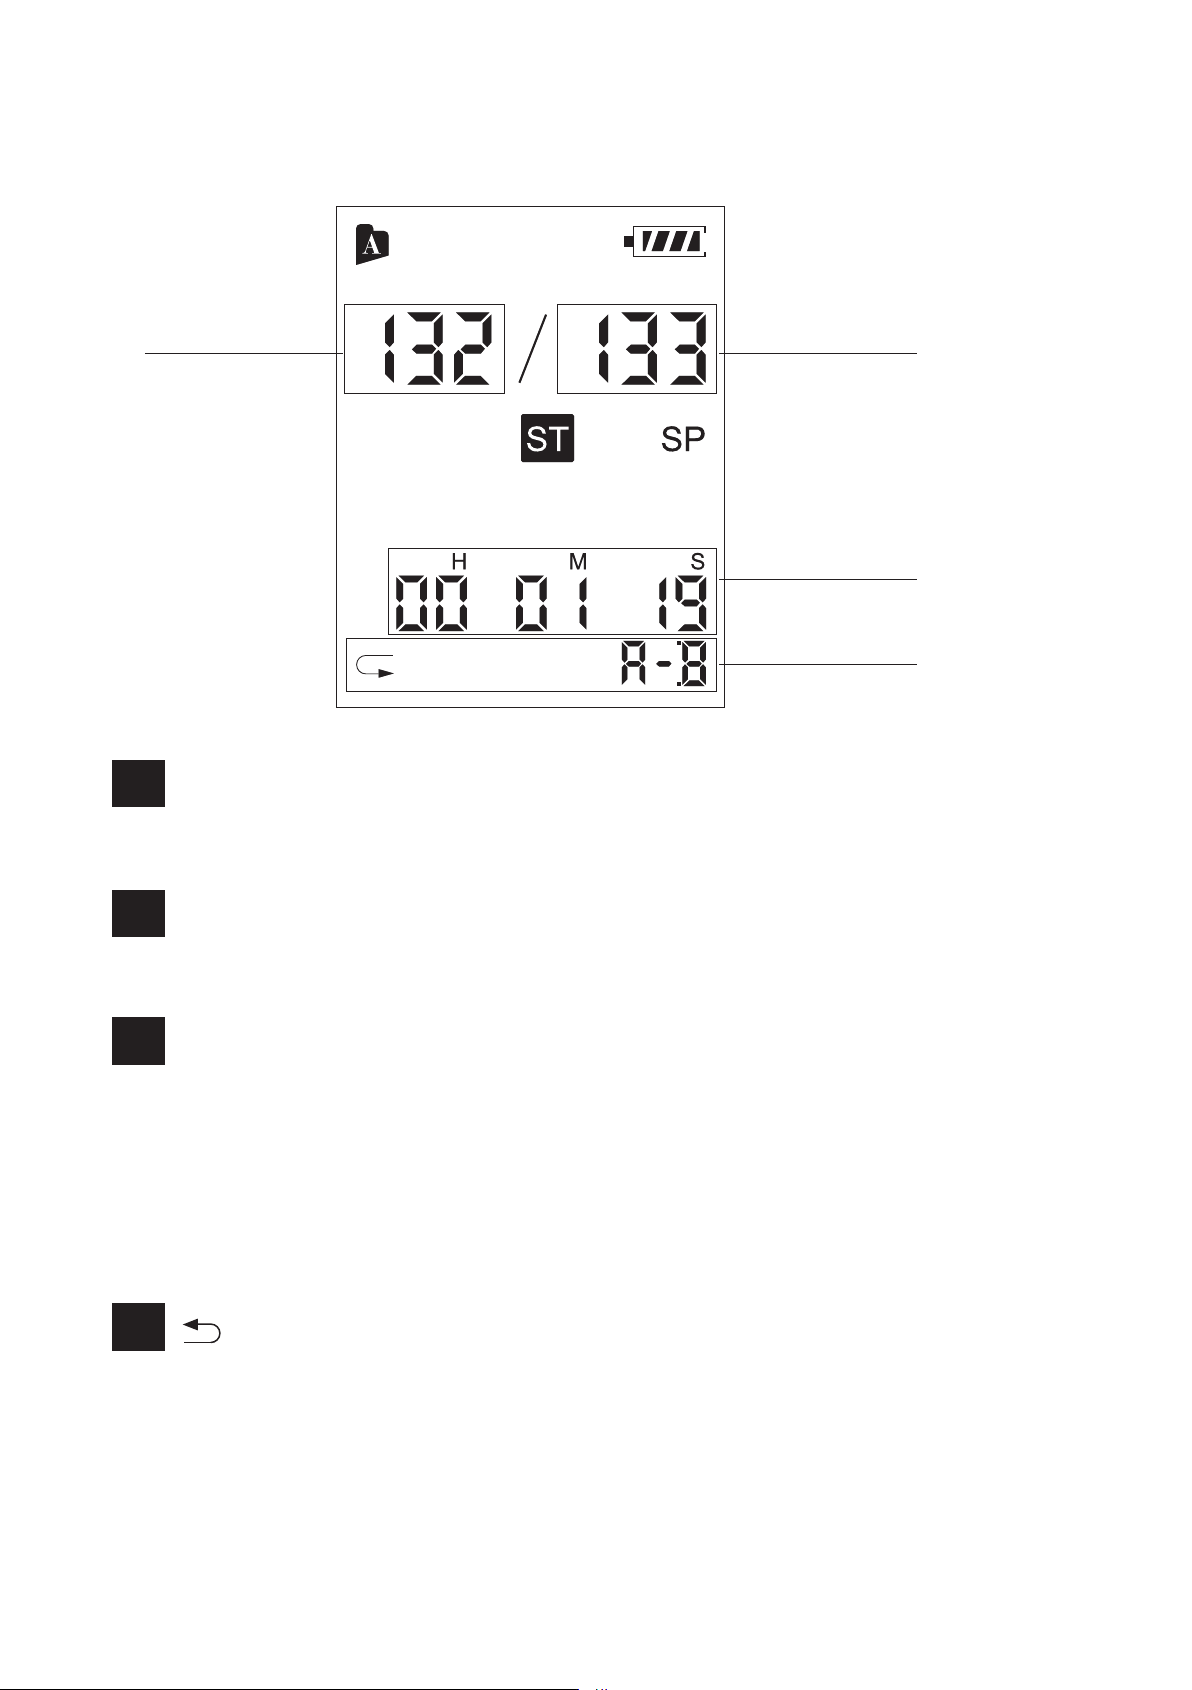
File number indicator
Displays the file number you are playing.
1
Total file number indicator
Display the total file number of the folders.
2
Counter indication
Displays the following file information. You can
switch the display mode by pressing MENU briefly:
Elapsed time -> Remaining time (with “REMAIN”
indicator)
3
(A-B repeat play mode) indicator
4
1 2
3
4
07
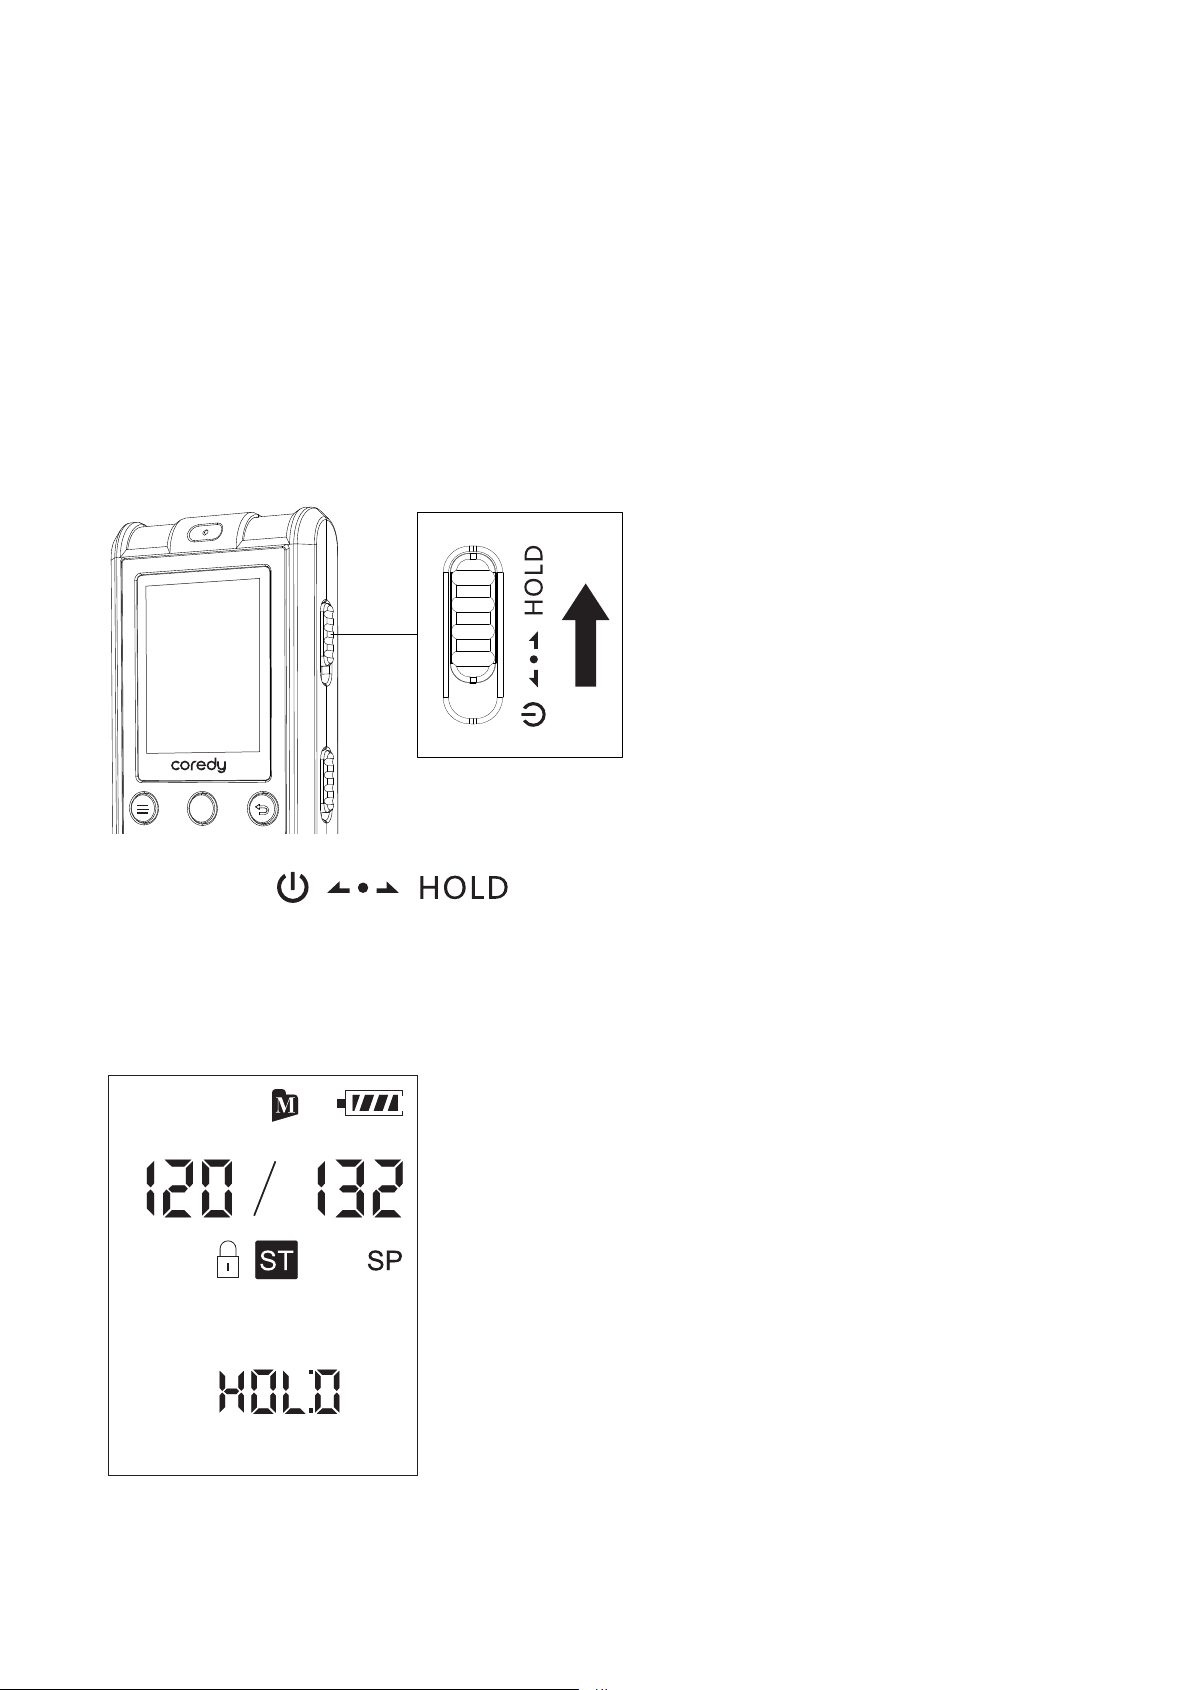
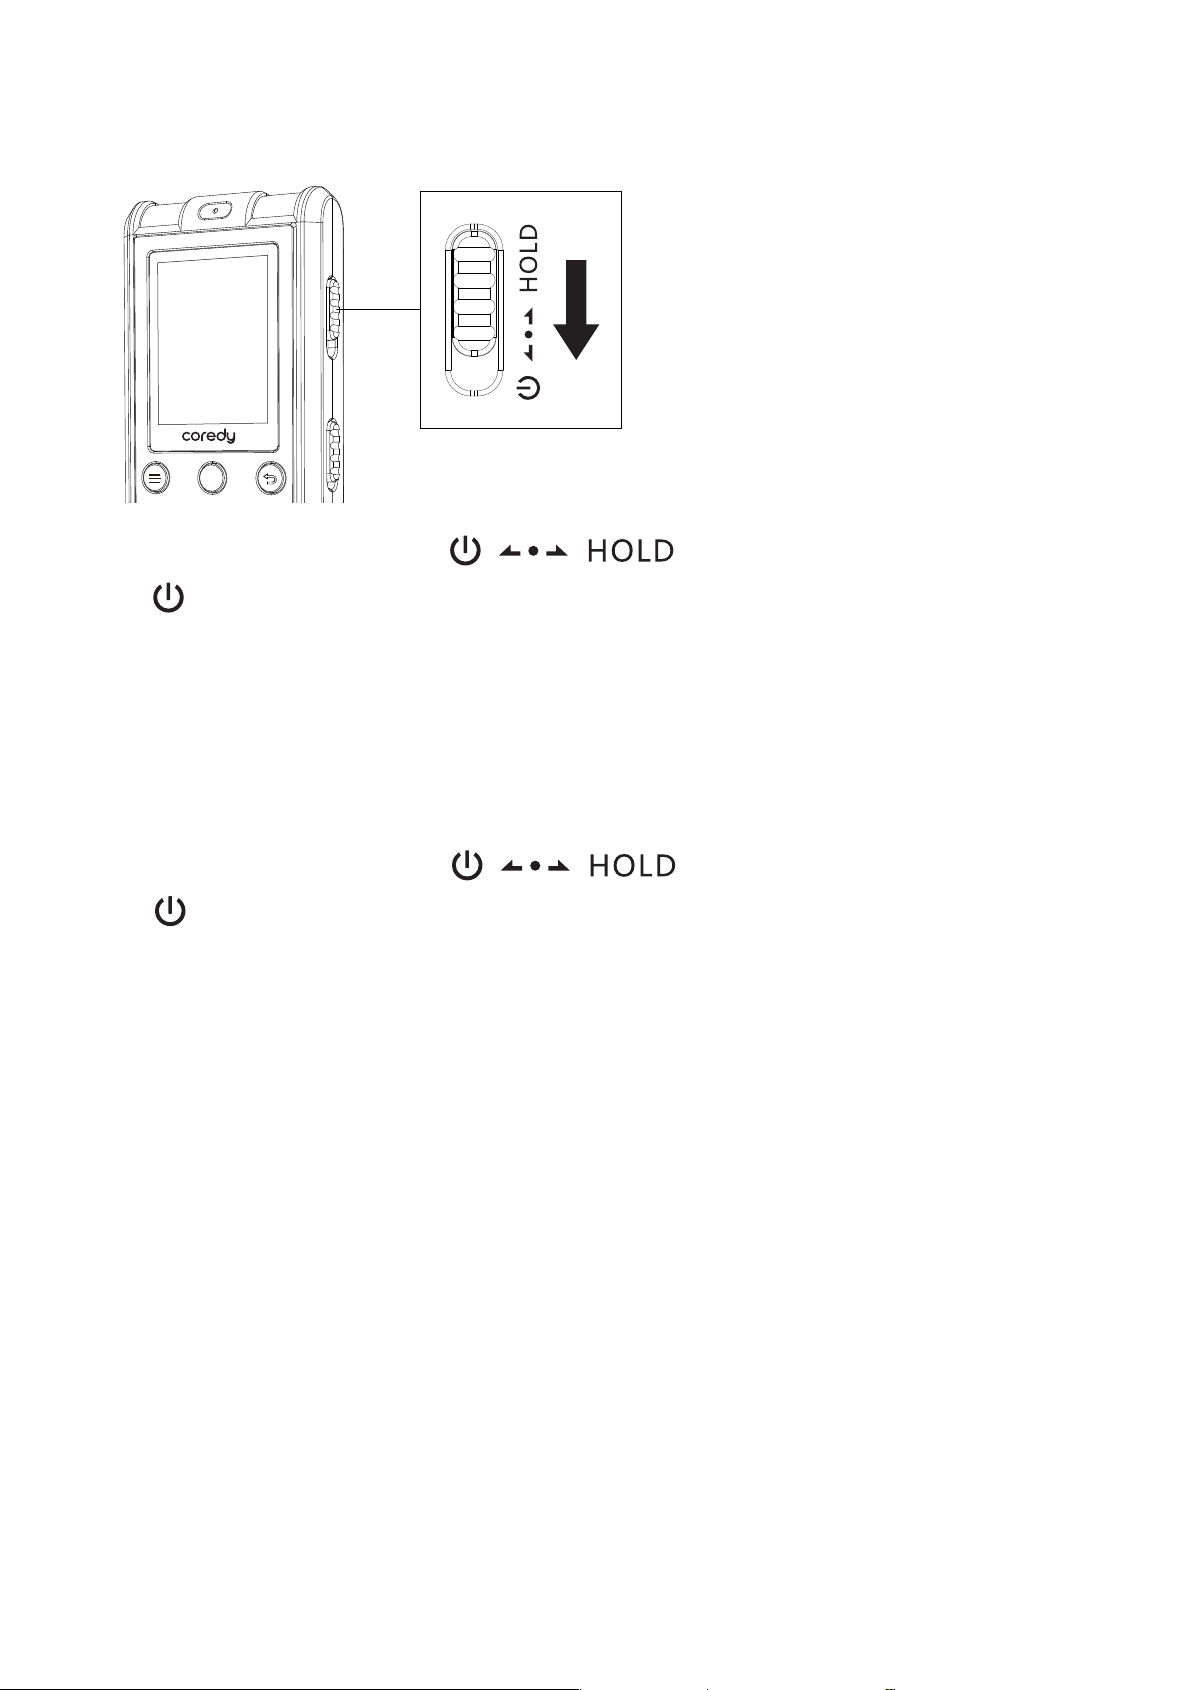
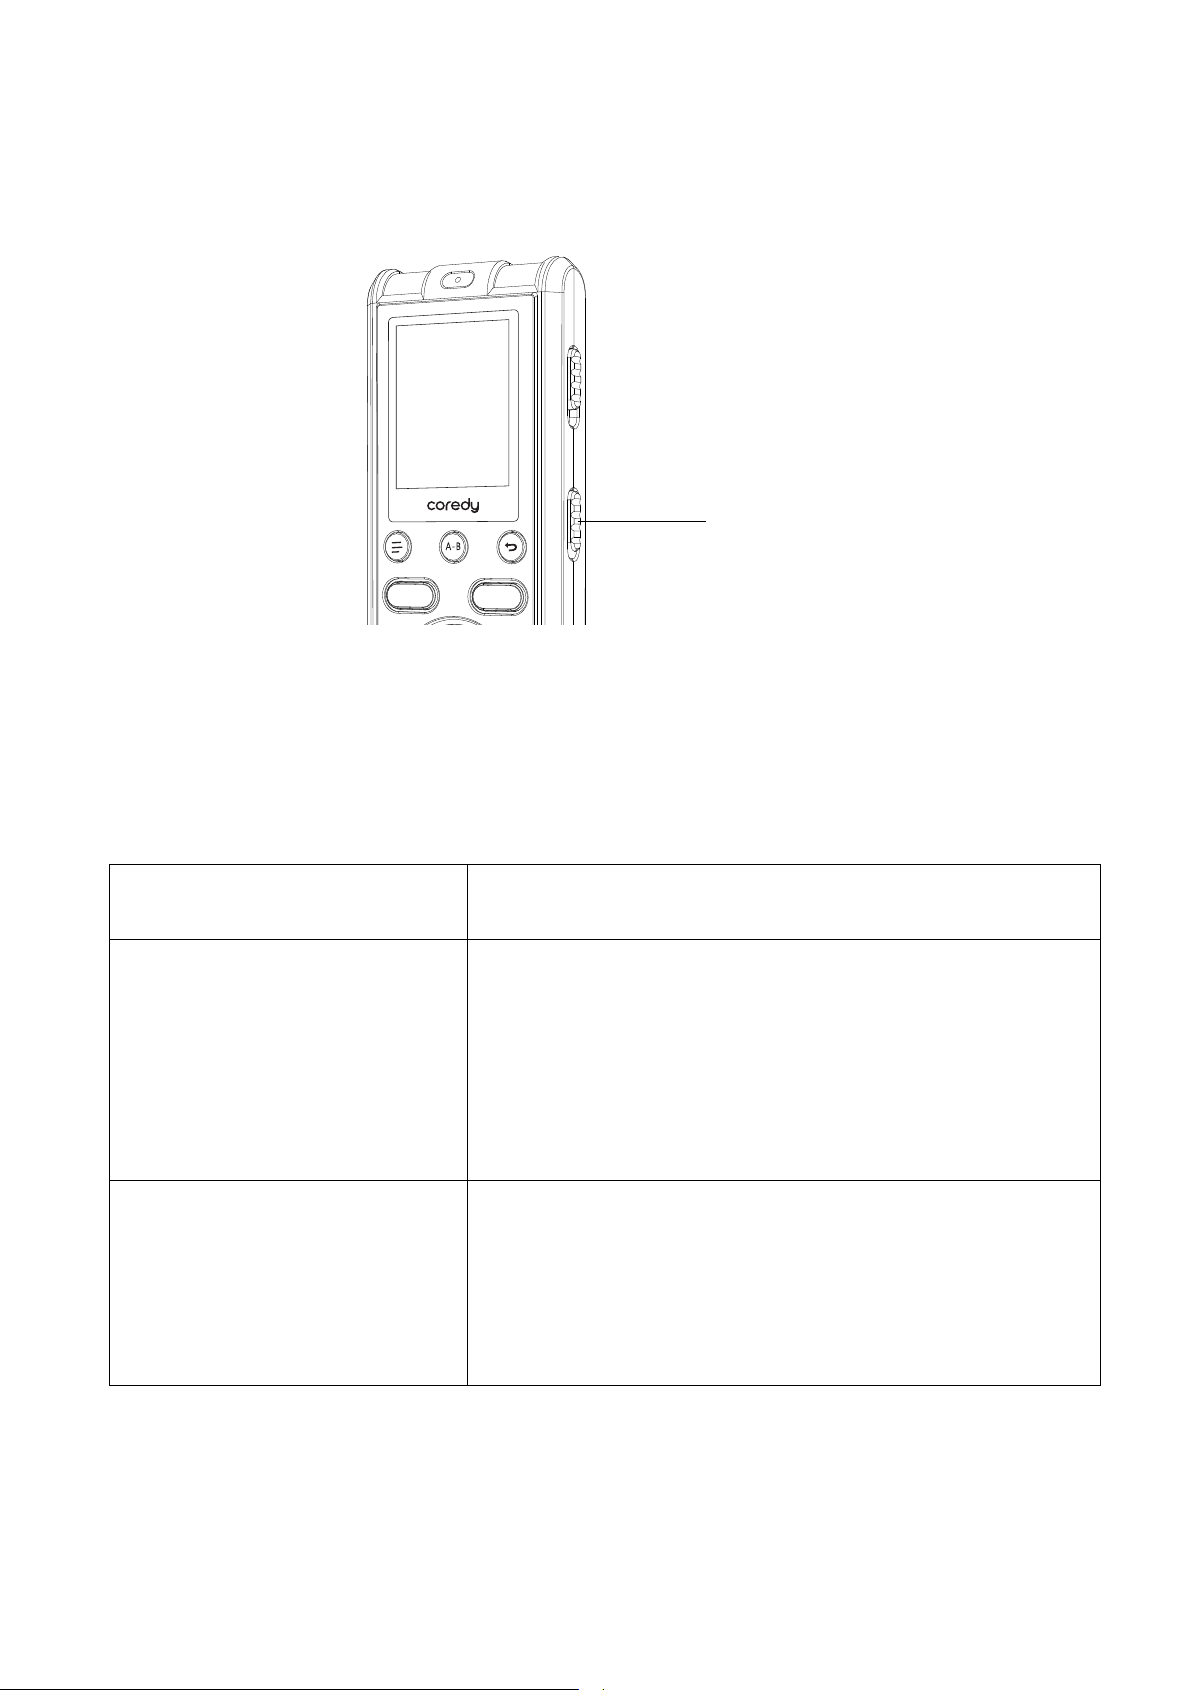
1.3 Preventing Unintentional
Operations (HOLD)
You can disable all the button operations in order to
prevent unintentional operations (HOLD status) when
you carry the Coredy recorder, etc.
Slide the switch in the direction of “HOLD”
to disable the buttons while the power is on.
“HOLD” will appear for approximately 3 seconds,
indicating that all the button operations are disabled.
To disable the button operations (HOLD status)
A-B
REC
SAVE
08
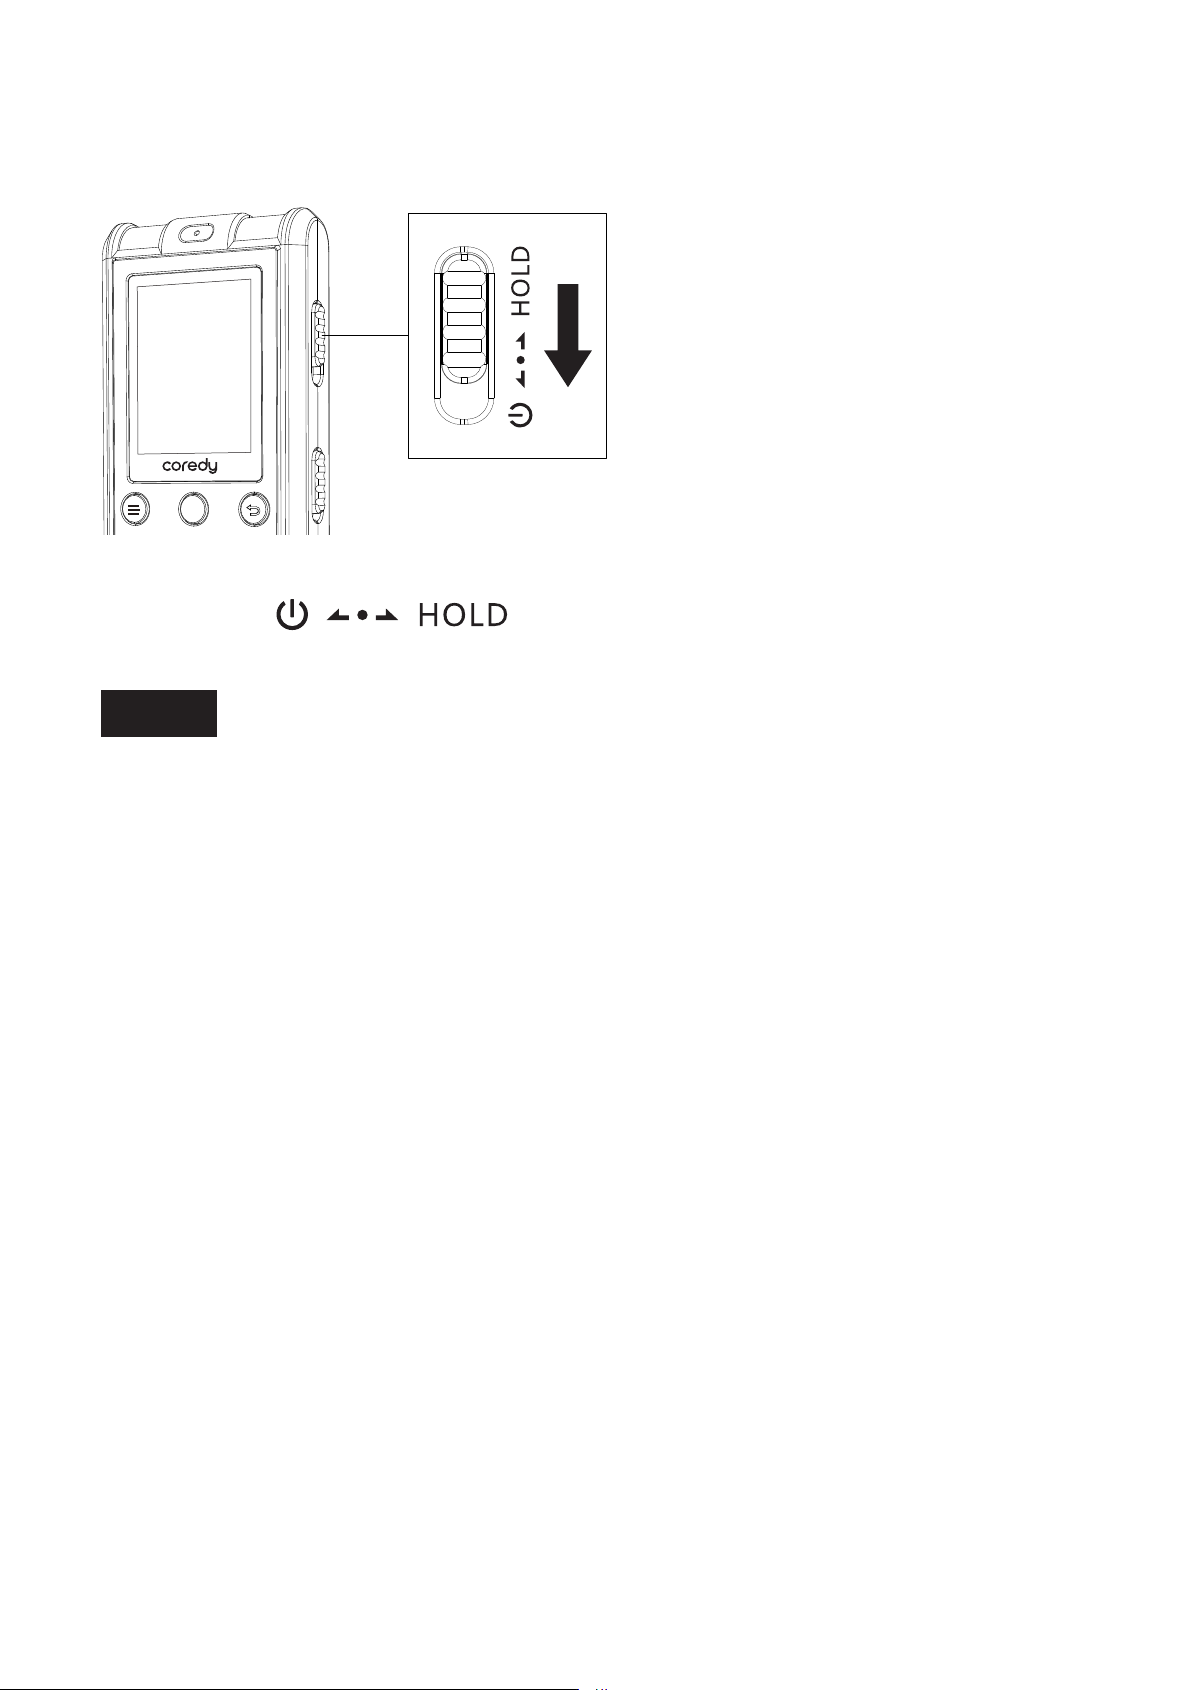
Note
Slide the switch towards the center.
When the HOLD function is activated during recording,
all the button operations are disabled. To stop recording,
cancel the HOLD function first.
To enable the button operations
A-B
REC
SAVE
09
1.4 Turning the Recorder On
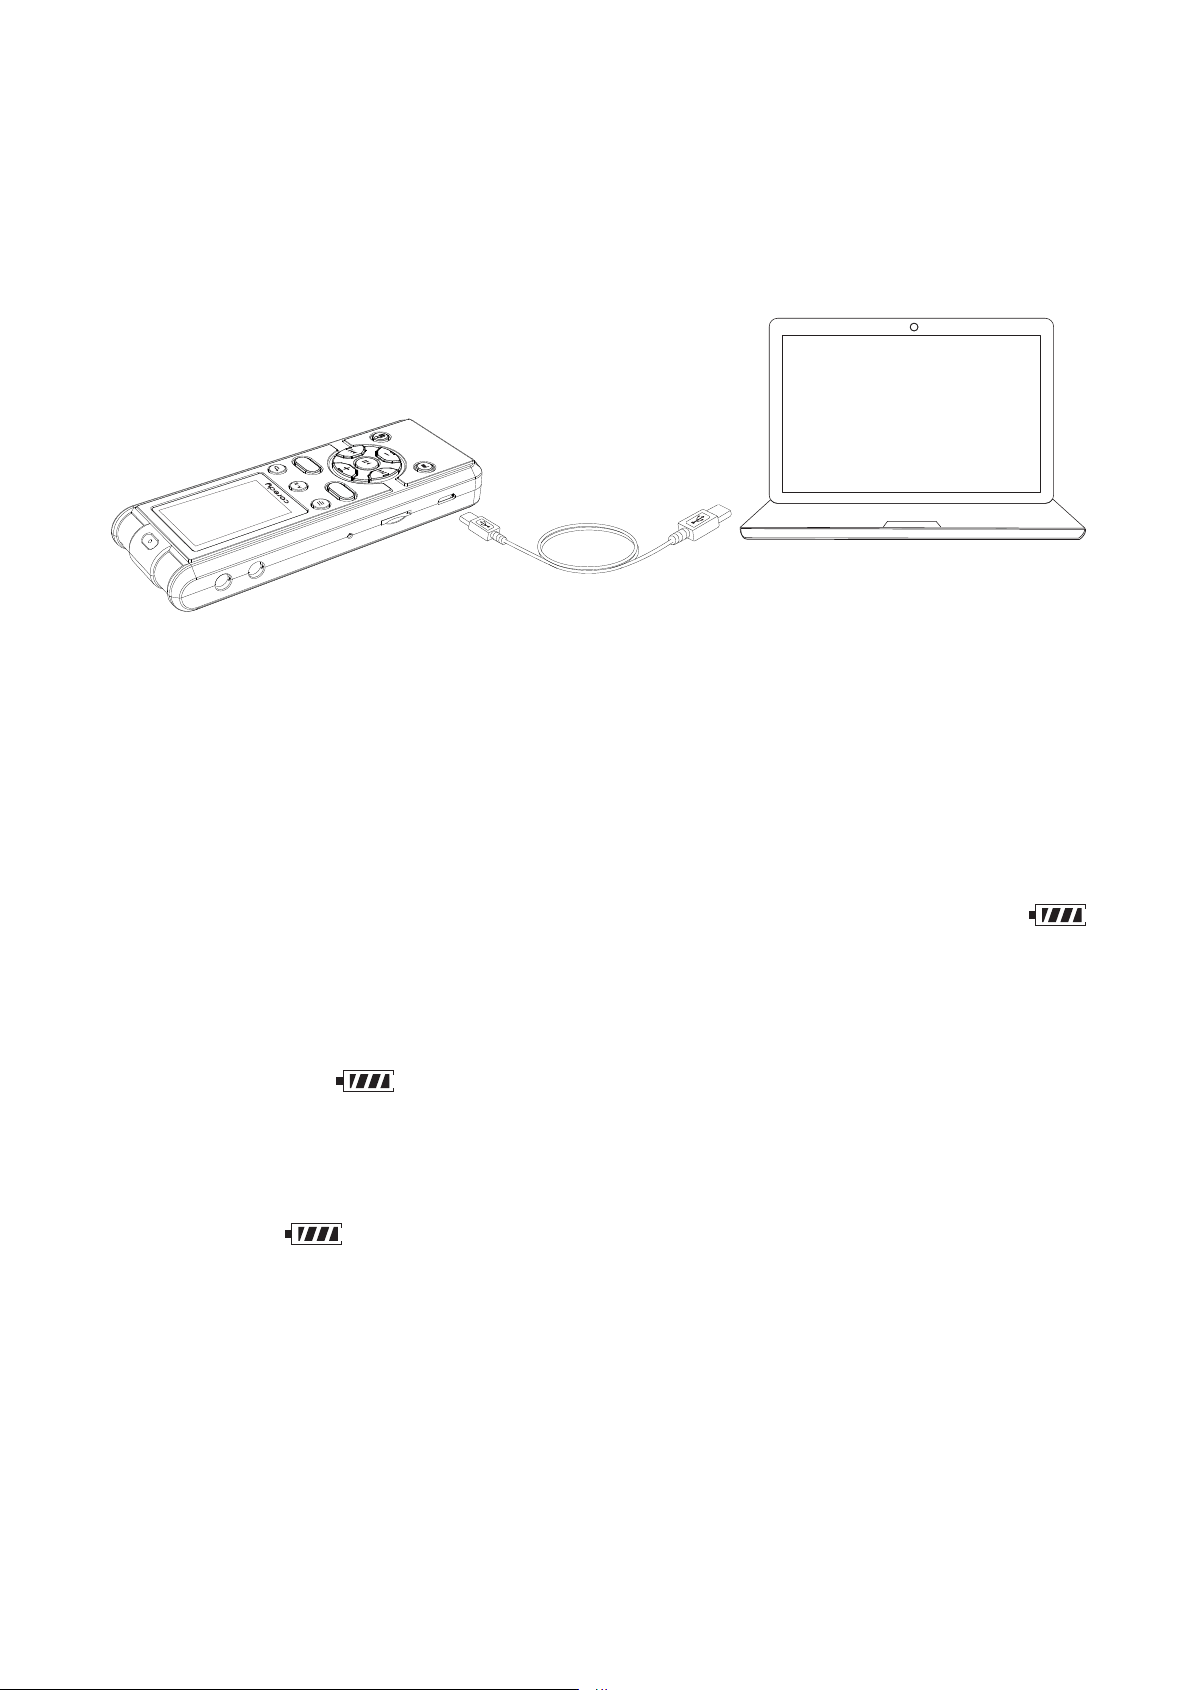
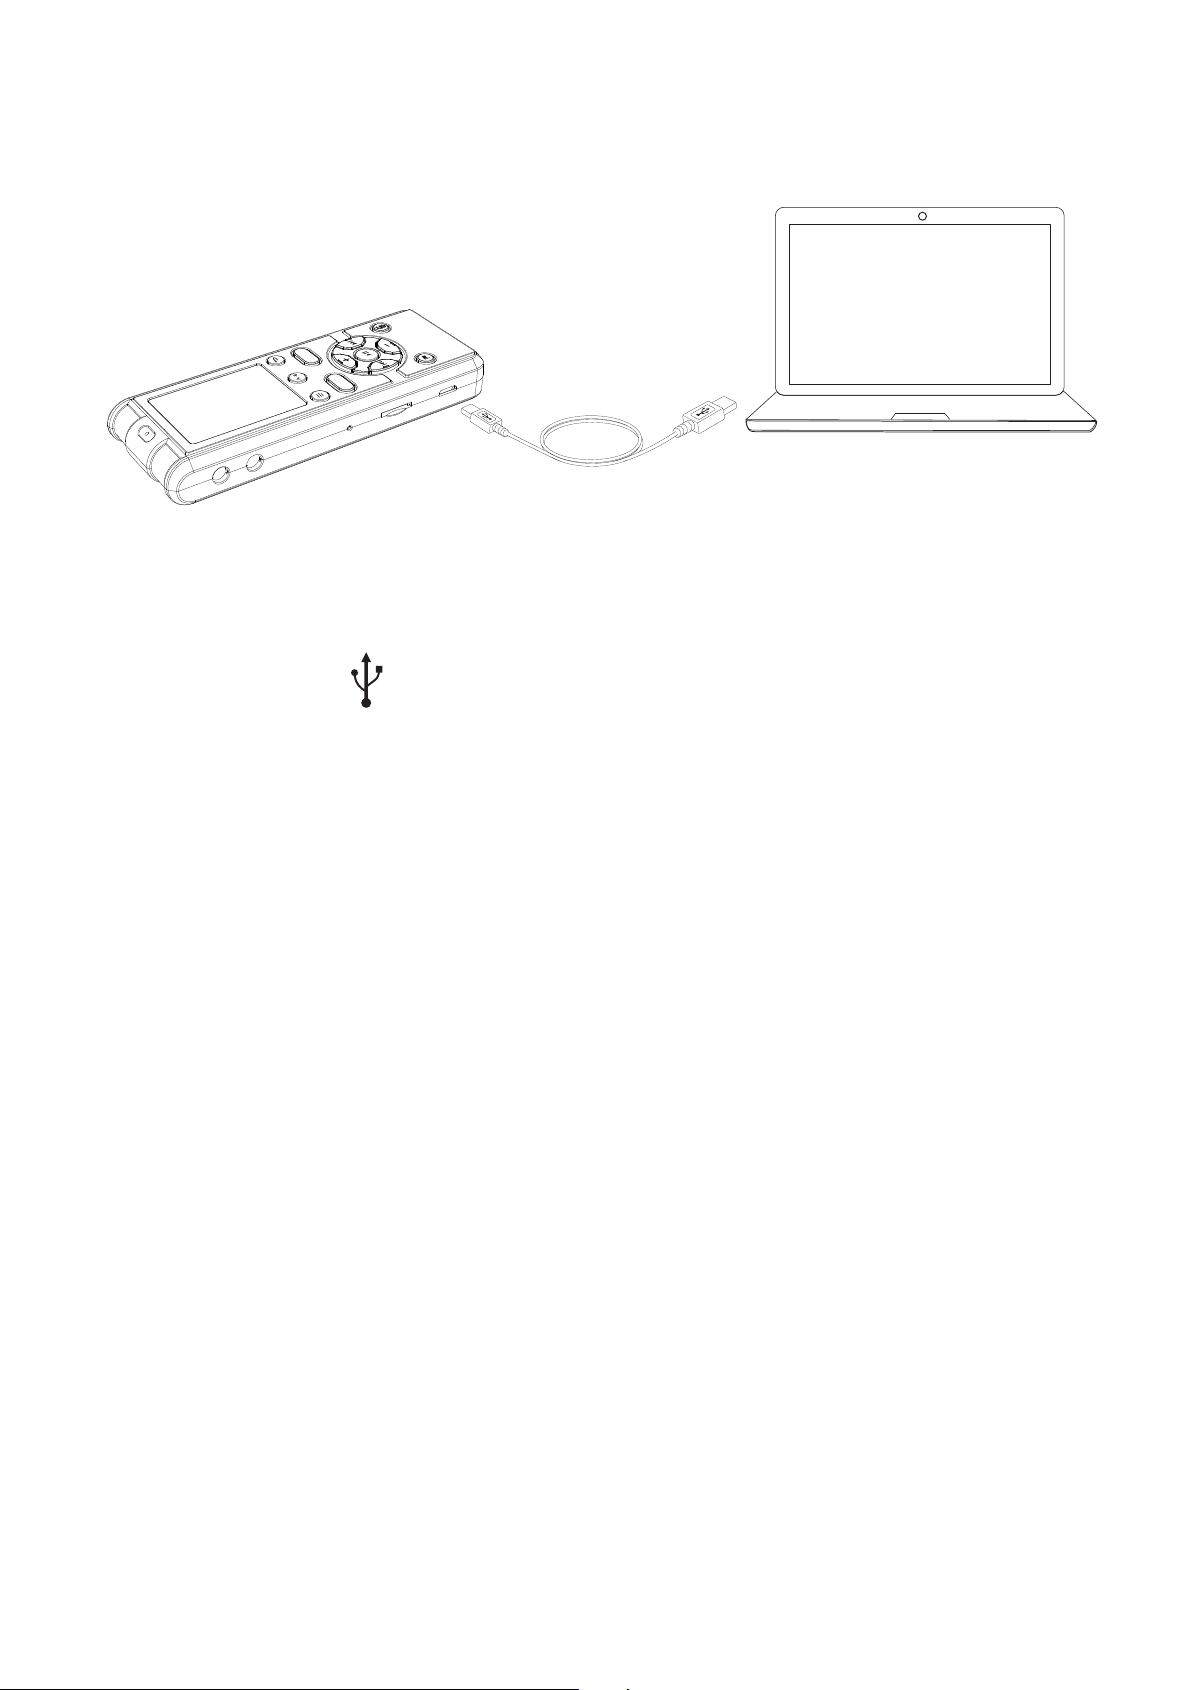
1.4.1 Recharging the battery using a computer
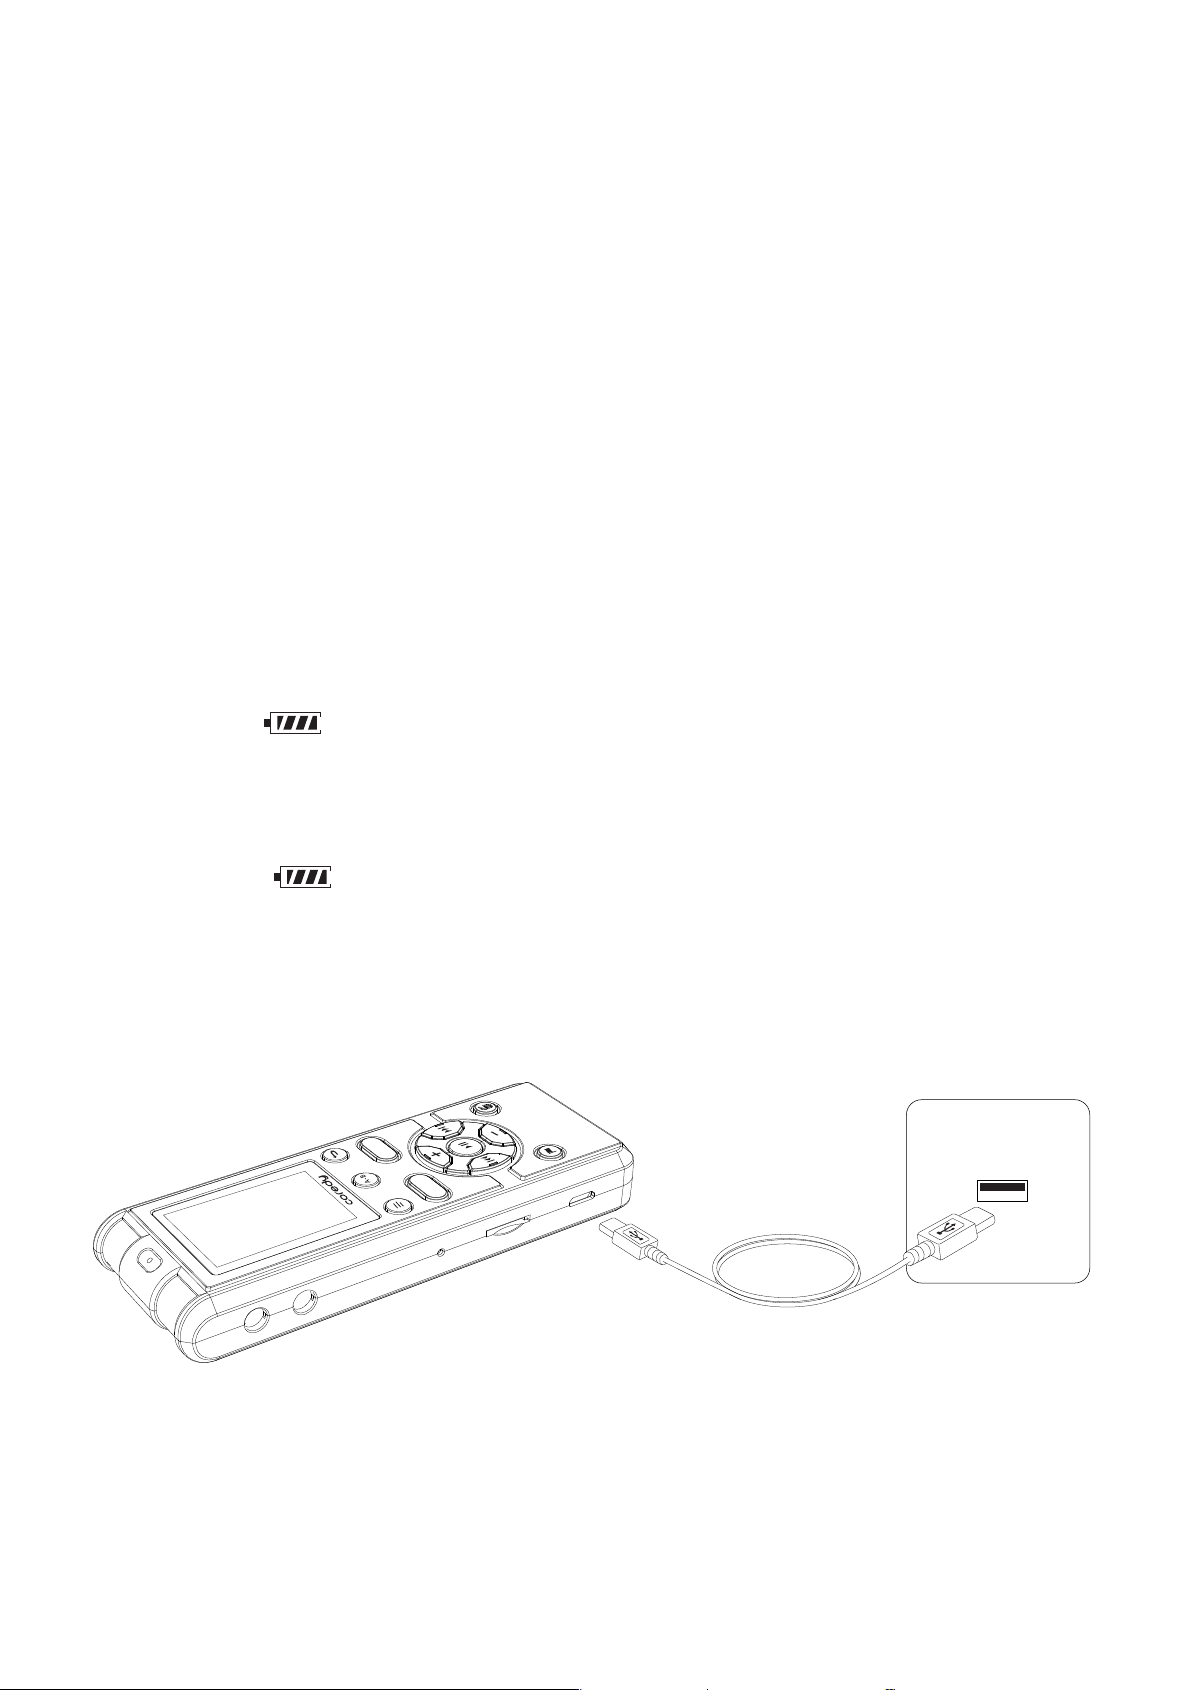
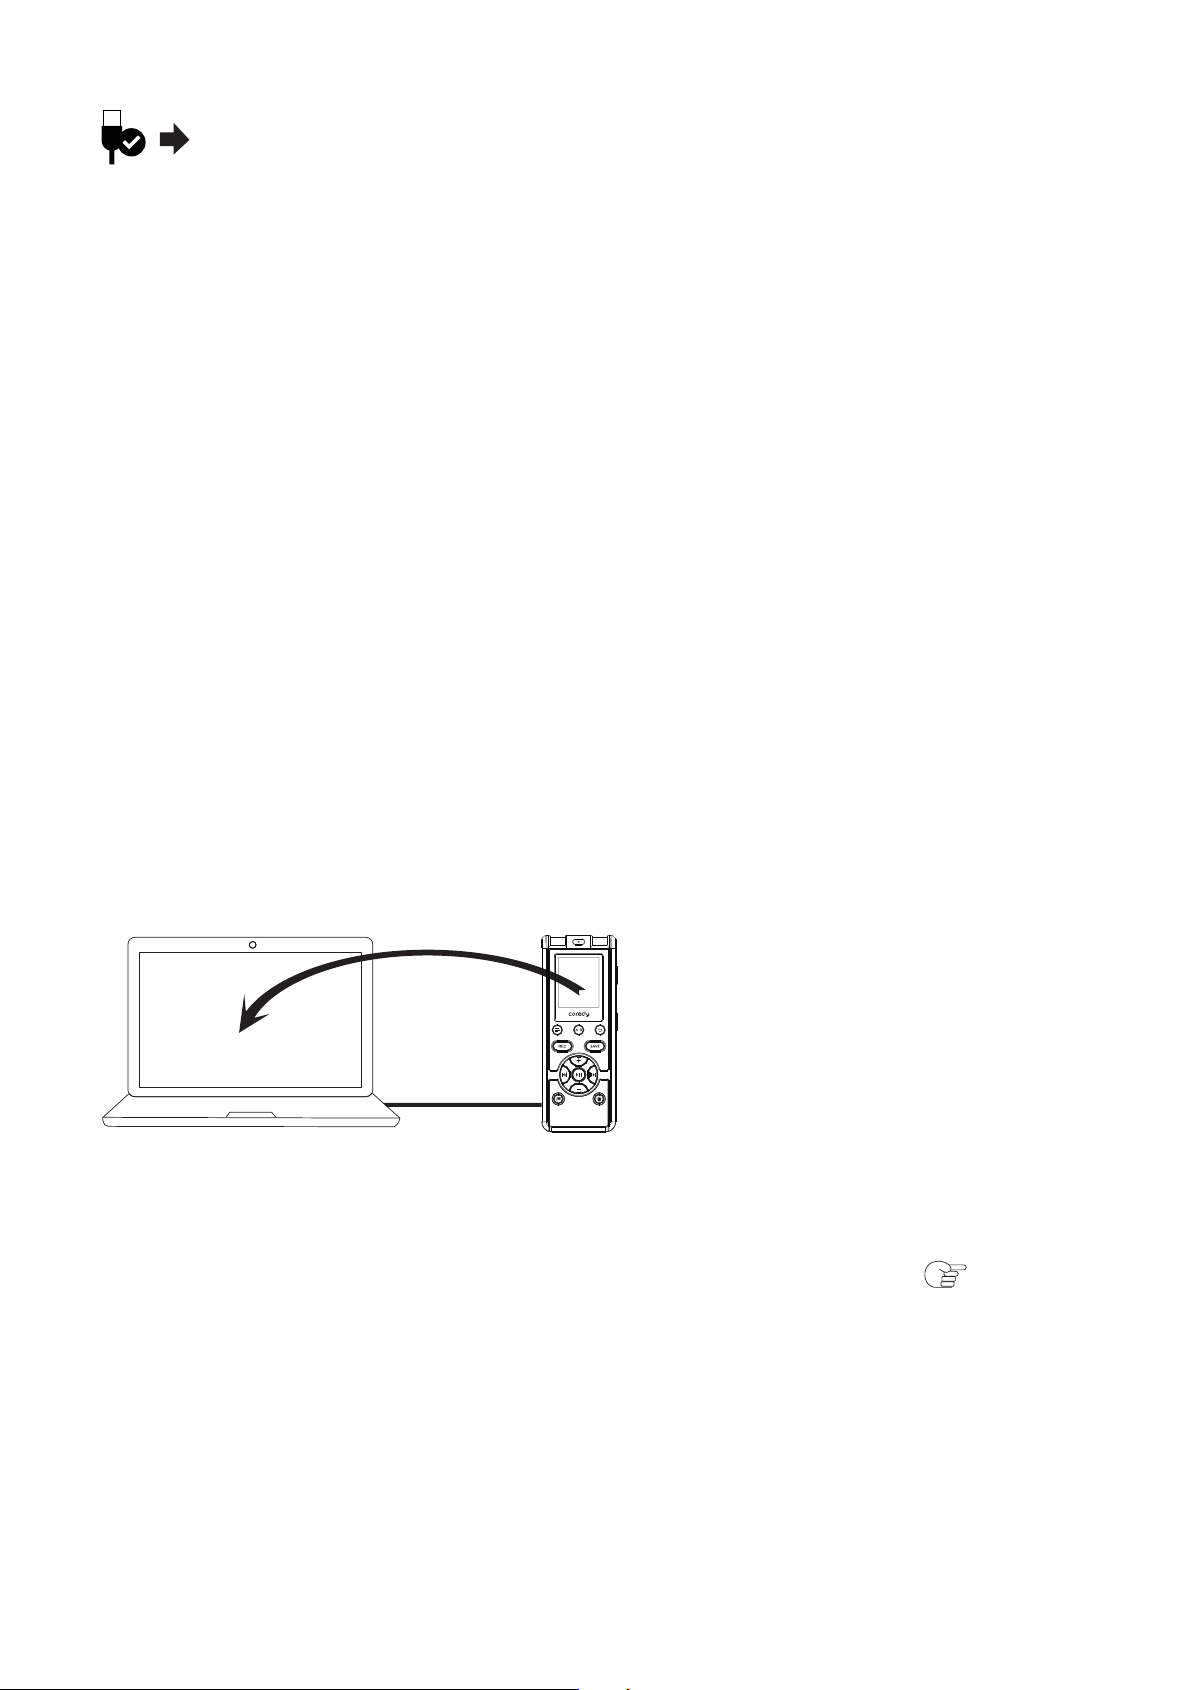
Connect the Coredy recorder to your computer.
Connect the (USB) port of the Coredy recorder with the
USB port of your running computer with the supplied
USB connecting cable inserted into the ports securely
until each plug stops to the end.
While the battery is charging, the battery indicator ( )
are displayed in an animation.
When the battery is fully charged, the battery indicator
will indicate “ ”. When you charge the Coredy recorder
for the first time, or when you have not used the Coredy
recorder for a long time, charge the rechargeable battery
until the “ ” indicator appears on the display. It takes
about 3 hours and 30 minutes to fully charge an
exhausted battery.
Coredy recorder
USB connecting cable (supplied)
Your computer
To USB port of
your computer
SAVE
REC
10

Note
When you connect the Coredy recorder to a computer
which is not running, the battery will not be charged.
Even if the computer is on, and the computer is in a mode
of reduced operation (standby or sleep), you cannot
charge the battery.
Follow the procedures below; otherwise, data may be
damaged.
On the Windows taskbar at the bottom right of the
desktop, left-click the following icon:
Left-click “Eject COREDY RECORDER” (Windows 7), or
“Safely remove USB
Mass Storage Device” (Windows XP, Windows Vista).
The icon and menu displayed can be different on
different operating systems. The icon may not be always
displayed on the taskbar depending on your computer
settings.
1.4.2 Disconnecting the Coredy recorder from your
computer
① Make sure that the operation indicator of the
Coredy recorder does not light.
② Perform the following operation on your computer.
11
On a Macintosh screen, click the “COREDY
RECORDER” ejection icon on the Finder.
You can charge the rechargeable battery or use the
Coredy recorder by connecting it to an AC outlet using a
USB AC adaptor (not supplied). This is useful when you
want to record for a long time.
When the battery is fully charged, the battery indicator will
indicate “ ”. When you charge the Coredy recorder for
the first time, or when you have not used the Coredy
recorder for a long time, charge the rechargeable battery
until the “ ” indicator appears on the display. It takes
about 3 hours and 30 minutes to fully charge an
exhausted battery.
1.4.3 Recharging the battery using a USB AC adaptor
③ Disconnect the USB connecting cable from the
Coredy recorder and the USB port of the computer.
SAVE
REC
12

Note
A: USB AC adaptor (not supplied)
Connect the (USB) port of the Coredy recorder with the
USB port of your USB AC adaptor with the supplied USB
connecting cable inserted into the ports securely.
While the battery is charging, the battery indicator ( )
are displayed in an animation.
While playing back files using the built-in speaker, you
cannot charge the battery.
During recording (the operation indicator lights or flashes
in red) or accessing data (the operation indicator flashes
in orange),
-the Coredy recorder should not be connected to or
disconnected from the USB AC adaptor connected to the
AC outlet.
-the USB AC adaptor connected to the Coredy recorder
should not be connected to or disconnected from the AC
outlet.
Follow the procedures below; otherwise, when the
Coredy recorder contains data files, the files may be
damaged or become unplayable.
Doing so may damage the data.
1.4.4 Disconnecting the Coredy recorder from the
USB AC adaptor
13

Note
If you are recording or playing back a file, press the SAVE
or back button to stop the Coredy recorder.
Make sure that the operation indicator of the Coredy
recorder does not light.
Disconnect the Coredy recorder from the USB AC
adaptor, and then disconnect the USB AC adaptor from
the AC outlet.
During recording (the operation indicator lights or flashes
in red) or accessing data (the operation indicator flashes
in orange),
-the Coredy recorder should not be connected to or
disconnected from the USB AC adaptor connected to the
AC outlet.
-the USB AC adaptor connected to the Coredy recorder
should not be connected to or disconnected from the AC
outlet.
Doing so may damage the data.
14
Slide and hold the switch in the direction of
“ ” for more than 1 second. The “ACCESS” animation
appears, and the Coredy recorder is turned on.
Slide and hold the switch in the direction of
“ ” for more than 1 second. “OFF” appears, and the
Coredy recorder is turned off.
1.4.5 Turning the power on
1.4.6 Turning the power off
When the Coredy recorder is in the stop mode, and you
leave the Coredy recorder without attempting an operation
for approximately 5 minutes, the auto power off function
will take effect.
Hint
A-B
REC
SAVE
15
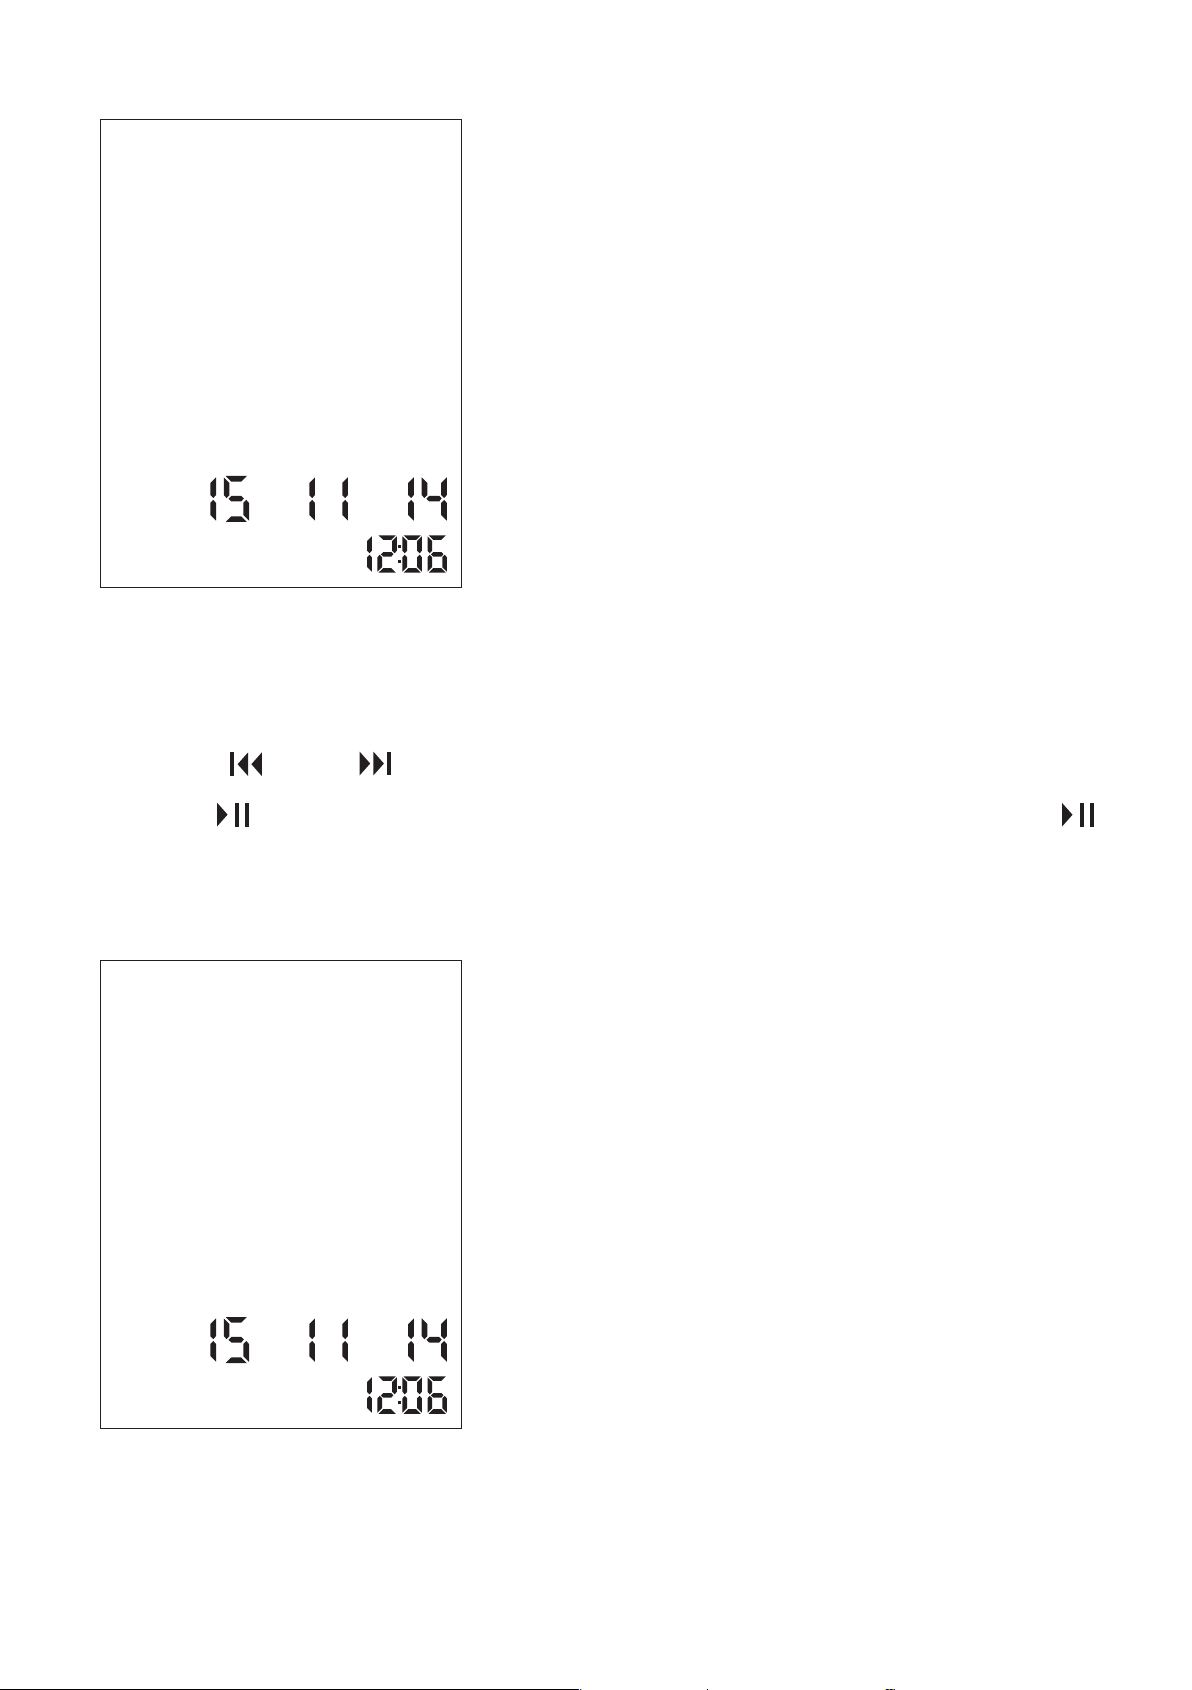
1.5.1 Setting the clock after preparing a power source
1.5 Setting the Clock
You need to set the clock to record the date and time.
When you power on the recorder for the first time, the
“SET DATE” appears, and then the year section begins to
flash in the clock setting display window.
Press or to set the year, and then press /ENTER.
Select the last two digits of the year. When you press
/ENTER, the cursor moves to the month section.
① Set the year.
REC
SAVE
16
Press or to select the desired figures, and then
press /ENTER. When you set the minute and press
/ENTER, the “ACCESS” animation is displayed, and then
the stop mode window appears.
② Set the month, day, hour and minute in sequence in
the same way.
MY D
MY D
17
While the Coredy recorder is in the stop mode, you can set
the clock using the menu.
1. In the stop mode, press and hold MENU to enter the
menu mode. The menu mode window will be displayed.
2. Press or to select “SET DATE,” and then
press /ENTER. The clock setting window will be
displayed.
Press or to set the year (the last two digits of the
year), and then press /ENTER. Repeat this procedure
to set month, day, hour, and minute in sequence.
1.5.2 Setting the clock using the menu
① Select “SET DATE” in the menu.
② Set year, month, day, hour and minute.
REC
SAVE
18
Note
To return to the previous operation, press MENU.
When you set the minute and press /ENTER, the
“ACCESS” animation is displayed, and then “SET DATE”
will appear again.
If there is no operation for 1 minute or longer between
steps, the clock setting is canceled and the window will
return to the display of the stop mode.
1.6 Selecting a Folder and a File
③ Press the back button to exit the menu mode.
REC
SAVE
19
1. In the stop mode, press and hold MENU to enter the
menu mode.
The menu mode window will be displayed.
2. Press or to select “FOLDER,” and then press
/ENTER. The folder selection menu window will be
displayed.
The selected folder icon flashes.
3. Press or to select the desired folder, and then
press /ENTER. The folder selection is determined and
the folder icon stops flashing.
You can select the following folders.
4. Press the back button to exit the menu mode.
In the stop mode, press /ENTER into playback mode,
then press or to select the desired file.
You can select a folder and a file for recording, playing or
editing as follows:
① Select a folder in which you want to record, play, or
edit a file.
② Select a file which you want to play, or edit.
/ / :Recordable area to be used to manage files
recorded with the Coredy recorder.
(Music): Playback-only area to be used to manage music
files transferred from your computer.
20

You can switch the counter information display for the
current file.
Press MENU briefly to switch the display as follows:
Elapsed time
Displays the elapsed
playback/recording time of one
file.
Remaining time
Displays the remaining playback
time of the current file in the
playback mode, or the remaining
recordable time in the stop and
recording modes,both with the
“REMAIN” indicator.
1.7 Switching the Counter Information Display
21
Note
Note
The following are the basic recording procedures using the
specified scene setting and recording mode.
Noise may be recorded if an object, such as your finger,
etc., accidentally rubs or scratches the Coredy recorder
during recording.
Before you start recording, we recommend you make a
trial recording first, or monitor the recording ( p.2.1.1)
2.1 Basic recording
2 Recording Files
Built-in microphones (L/R)
Operation indicator
REC
SAVE
22
The stop mode window appears.
The operation indicator flashes in orange, and then lights
in red.
You do not need to press and hold REC while recording.
The new file will be automatically recorded as the last file
in the current folder.
① Slide the switch in the direction of
“ ” to turn on the Coredy recorder ( p. 1.4.5),
or towards the center to release the Coredy recorder
from the HOLD status( p. 1.3).
② Select the desired folder( p. 1.6).
③ Select the desired scene for recording( p. 2.2).
④ Place the Coredy recorder so that the built-in
microphones face the direction of the source to be
recorded.
⑤ Press REC in the stop mode.
23
You can set the REC MON ( Monitoring the recording )
function to “ON”, you can monitor the recording If you
connect the stereo headphones (dose not supplied) to the
(headphone) jack,. You can adjust the monitoring
volume by pressing –/+, but the recording level is fixed.
2.1.1 REC MON ( Monitoring the recording )
The “ACCESS” animation appears and the Coredy
recorder stops at the beginning of the current recording file.
The Coredy recorder is recording data and storing it on the
memory when the “ACCESS” animation appears on the
display.
2.1.2 Stopping the recording
① Press SAVE to stop recording.
Note while accessing
REC
SAVE
/
24

While the Coredy recorder is accessing data, do not
remove the battery. Doing so may damage the data.
2.1.3 Other operations
To
pause recording*
release pause and
resume recording
Press
During recording pause,
the“PAUSE” appear on
the display window.
Press again. Recording
resumes from that point.
(To stop recording after
pausing recording, press
SAVE button.)
review the current
recording instantly
Press button. Recording
stops and playback starts
from the beginning of the file
just recorded.
Do this
25
In the stop or recording mode, you can slide the SCENE
switch to the desired position for recording. The most
suitable microphone sensitivity is set for the selected
scene.
To record a lecture in your
classroom. Useful for a variety of
situations, such as recording in a
spacious conference room.
2.2 Changing the Recording Settings
2.2.1 Selecting a recording scene for each situation
Scenes
CLASS
To record your voice in front of
your mouth. Useful for language
study or other occasions.
MY VOICE
Descriptions
REC
SAVE
SCENE
26

There are ways of making better recordings in addition to
using scene Selection.
2.2.2 Tips for better recording
Set the SCENE switch to “CLASS.”
Place the Coredy recorder so that the built-in microphones
face the lecturer. By placing the Coredy recorder on a
handkerchief, etc., you can record with clear, low-noise
sound, without vibration noise from the desk.
Recording a lecture at a classroom
SAVE
REC
27
2.2.3 Selecting a recording mode
DISPLAY/MENU
Set the SCENE switch to “MY VOICE.”
By placing the Coredy recorder close to one side of your
mouth, you can prevent breathing on the built-in
microphones, and record with clear Sound.
Recording your voice
REC
SAVE
28
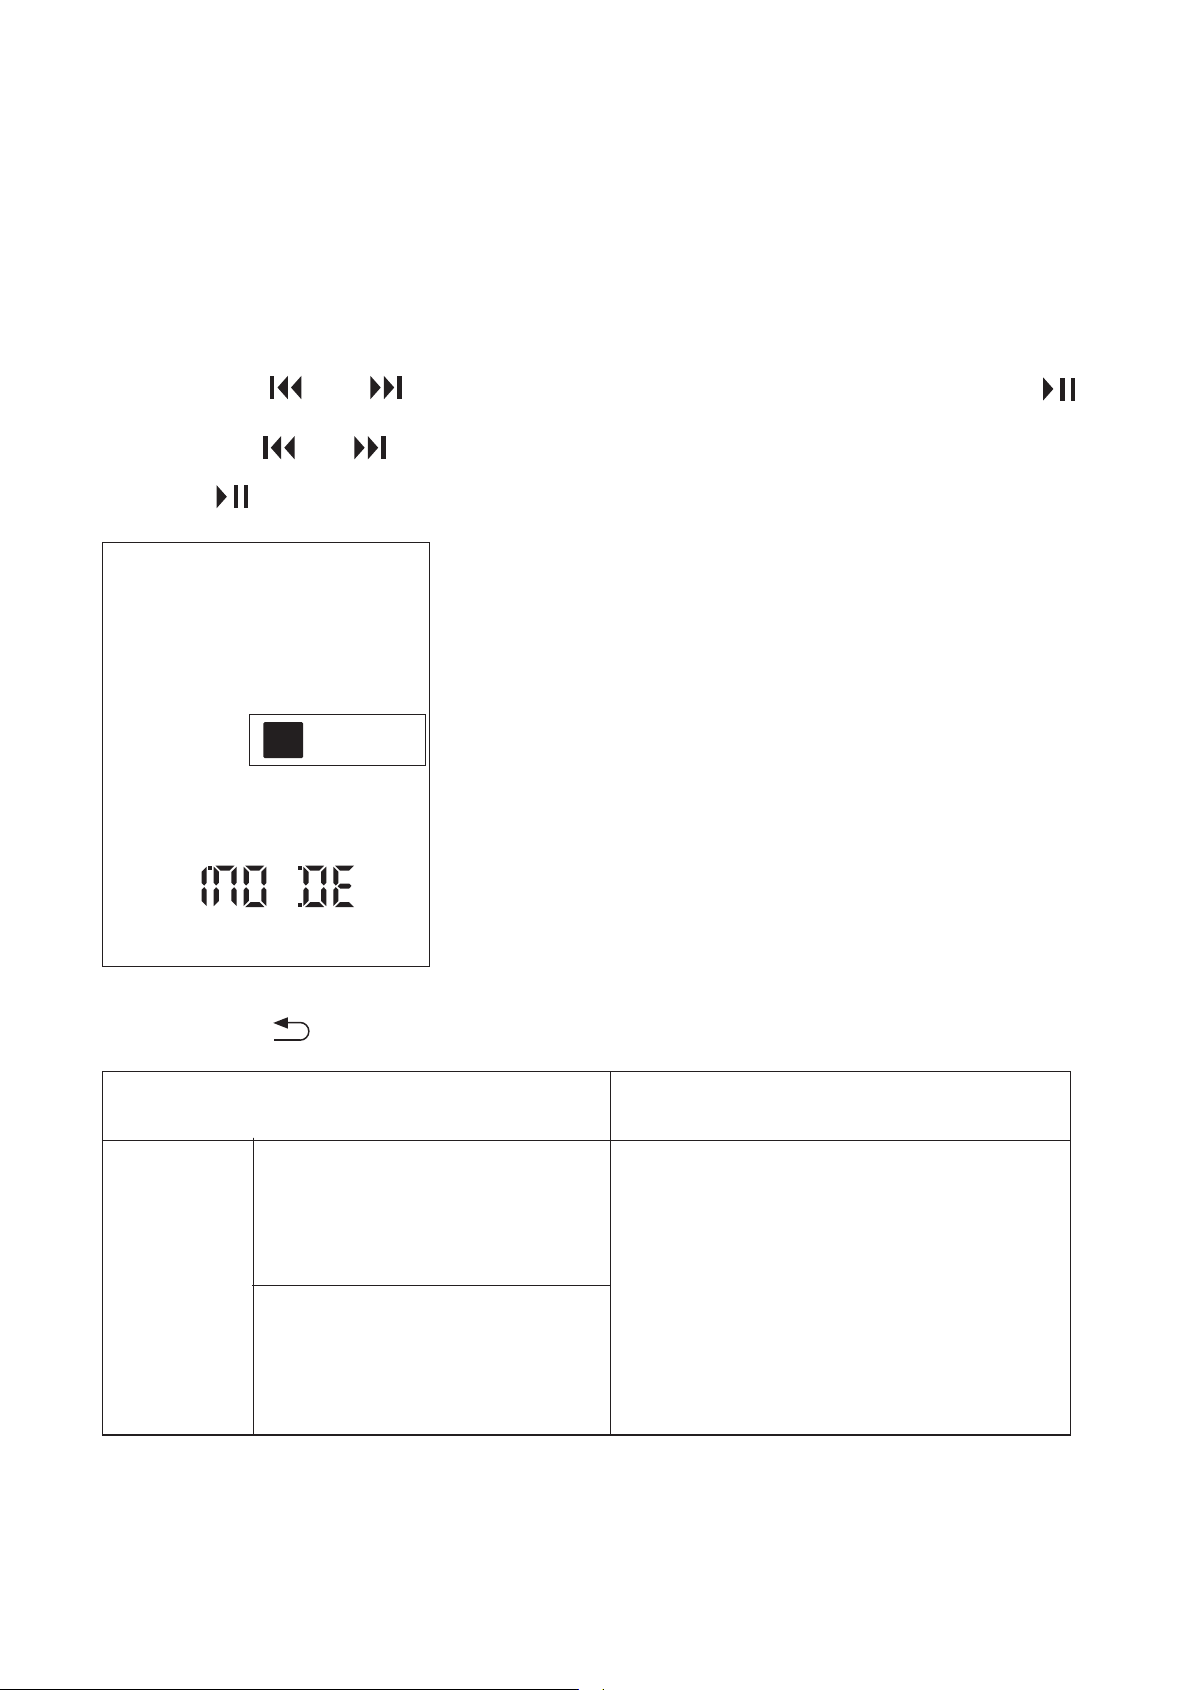
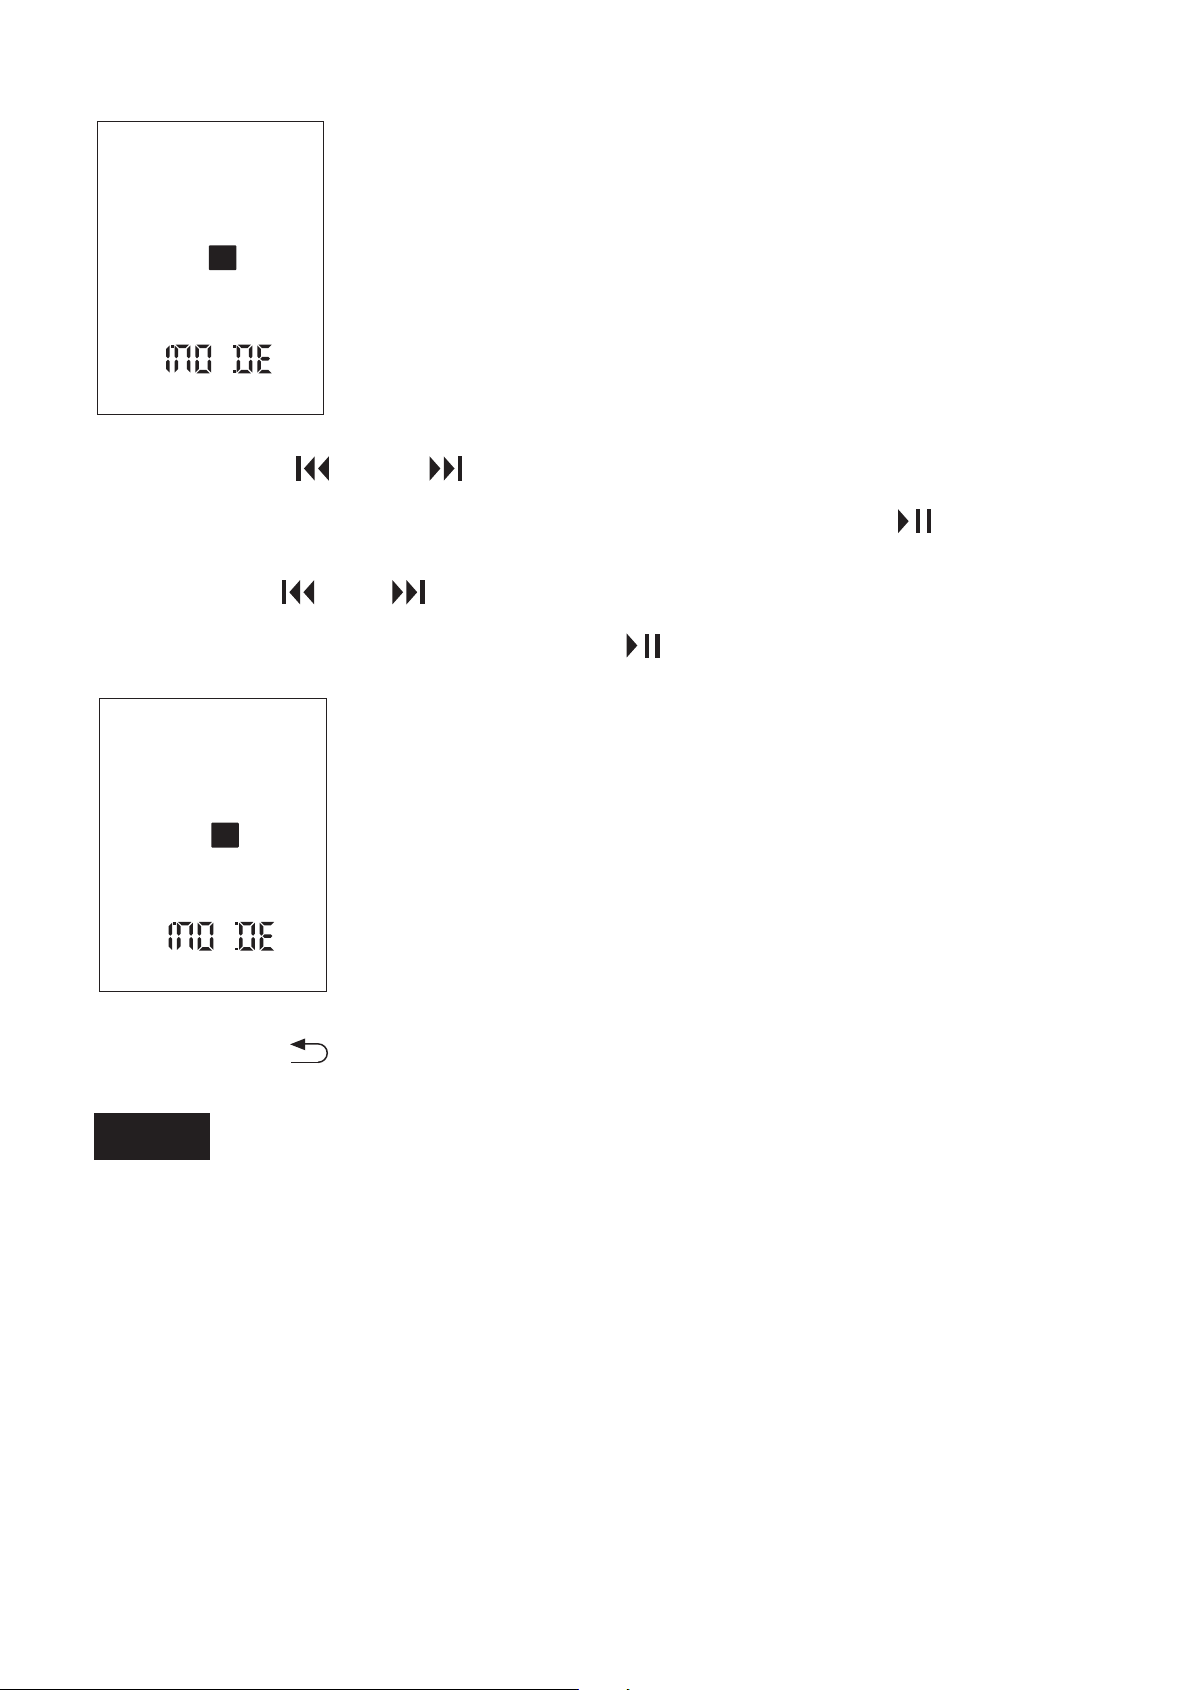
You can select a recording mode in the menu.
The menu mode window will be displayed.
① In the stop mode, press and hold DISPLAY/MENU to
enter the menu Mode.
② Press or to select “MODE,” and then press .
③ Press or to select “ST HQ,” or “ST SP,” and then
press .
④ Press to exit the menu mode.
Scenes
ST HQ
MY VOICE (192kbps )
To record in the stereo
high-quality mode . You can
make a higher quality
recording while the total
recordable time becomes
shorter than that in the STSP
mode.
CLASS ( 80kbps )
Descriptions
SPST
29
2.3 Starting to Record Automatically in
Response to Sound – the VOR Function
You can set the VOR (Voice Operated Recording) function
to “ON,” to make the Coredy recorder start recording
when the Coredy recorder detects sound, and pause
when no sound is heard, eliminating recording during
soundless periods.
REC
DISPLAY/MENU
SAVE
REC
SAVE
Scenes
ST SP
MY VOICE (128kbps)
To record in the stereo
standard-play mode. You
can make a longer recording
than you can in the STHQ
mode.
CLASS (128kbps)
Descriptions
30
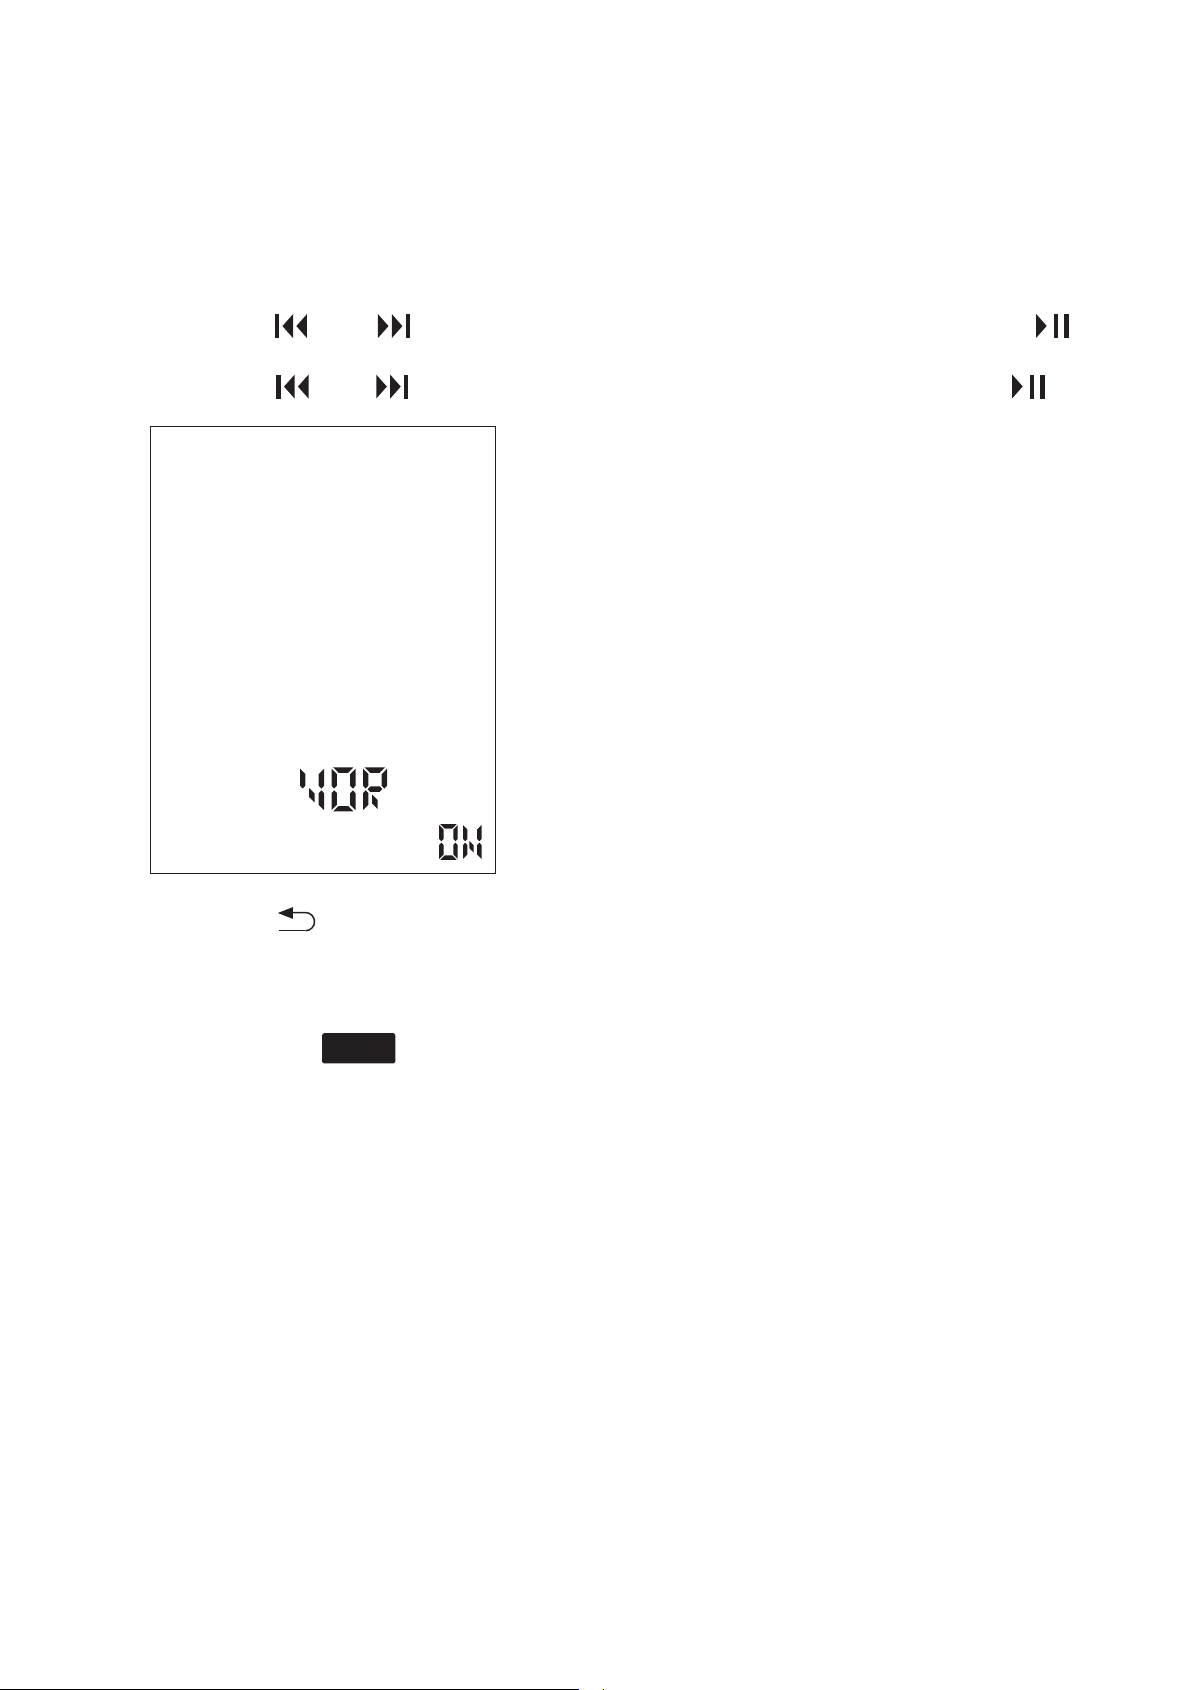
① In the stop or recording mode, press and hold
DISPLAY/MENU to enter the menu mode.
② Press or to select “VOR,” and then press .
③ Press or to select “ON,” and then press .
④ Press to exit the menu mode.
⑤ Press REC.
⑥ Press SAVE to stop recording.
The menu mode window will be displayed.
“VOR” and “ ” appear in the display window.
To cancel the VOR function
Set “VOR” to “OFF” in step ③.
The recording pauses when no sound is detected and
“VOR” and “PAUSE” display.
When the Coredy recorder detects sound, the VOR
recording starts again.
REC
31
Note
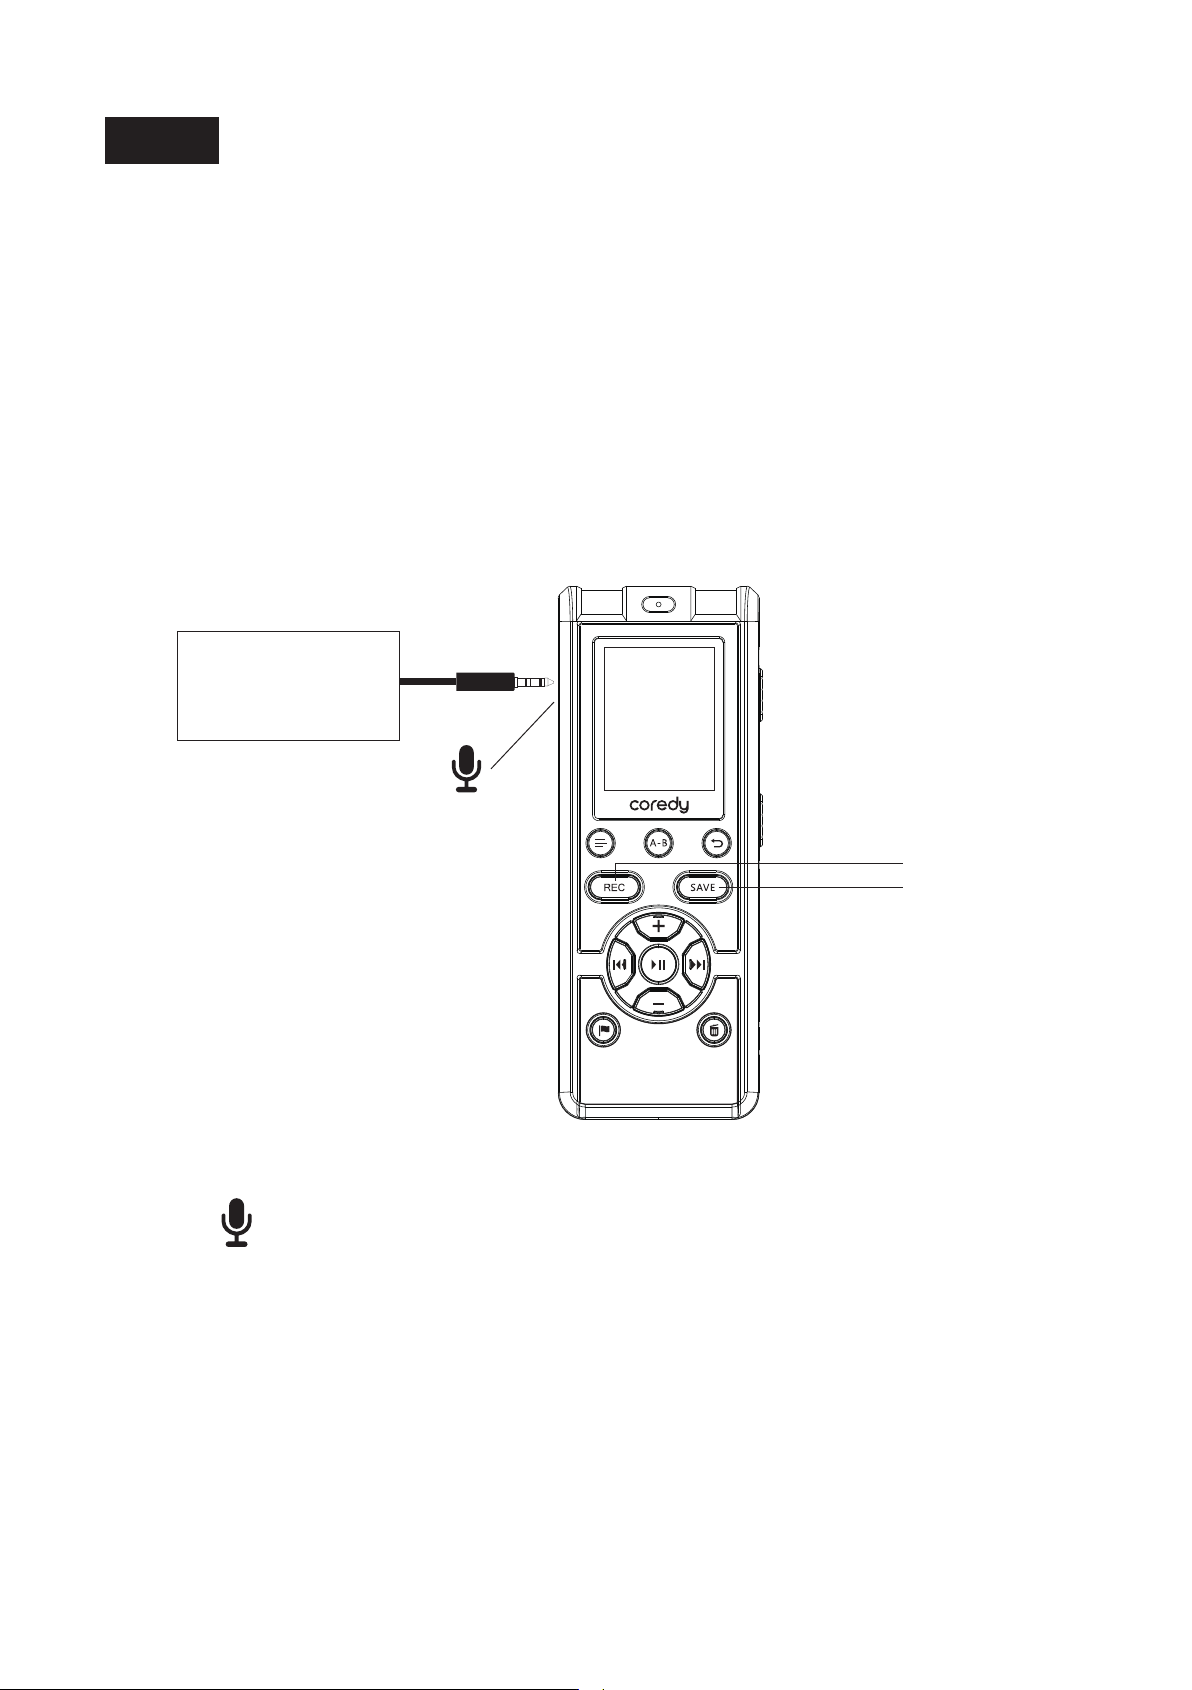
① In the stop mode, connect an external microphone
to the jack.
② Press REC to start recording.
2.4 Recording via Other Devices
2.4.1 Recording with an external microphone
The VOR function is affected by the sound around you.
Set the SCENE switch according to the recording
conditions. If recording is not satisfactory after you have
changed the SCENE setting, or for an important
recording, set “VOR” to “OFF” in the menu.
The built-in microphones are automatically cut off.
If the input level is not strong enough, change the SCENE
switch position on the Coredy recorder.
REC
SAVE
stereo
microphone
jack
32
③ Press SAVE to stop recording.
2.4.2 Recording from other equipment
When a plug in power type microphone is connected,
power is automatically supplied to the microphone from
the Coredy recorder.
You can make music files without using the computer by
recording sound/music from other equipment such as a
radio cassette recorder, a tape recorder, Smartphone,
MP3 etc. connected to the Coredy recorder. You also can
recording the Telephone call with the Coredy recorder.
Hint
If the input level is not strong enough, connect the
headphone jack (minijack, stereo) of other equipment to
the jack of the Coredy recorder and adjust the volume
level on the piece of equipment connected to the Coredy
recorder.
REC
SAVE
Radio cassette recorder,
tape recorder,
Smartphone, MP3
Telephone calls recording, etc
jack
33
① In the stop mode, connect other equipment to the
Coredy recorder.
① Connect the Telephone recording adapter to you
telephone and Coredy recorder as below.
② Press REC to start recording.
③ Start playback on the piece of equipment connected
to the Recorder.
④ Press SAVE to stop recording.
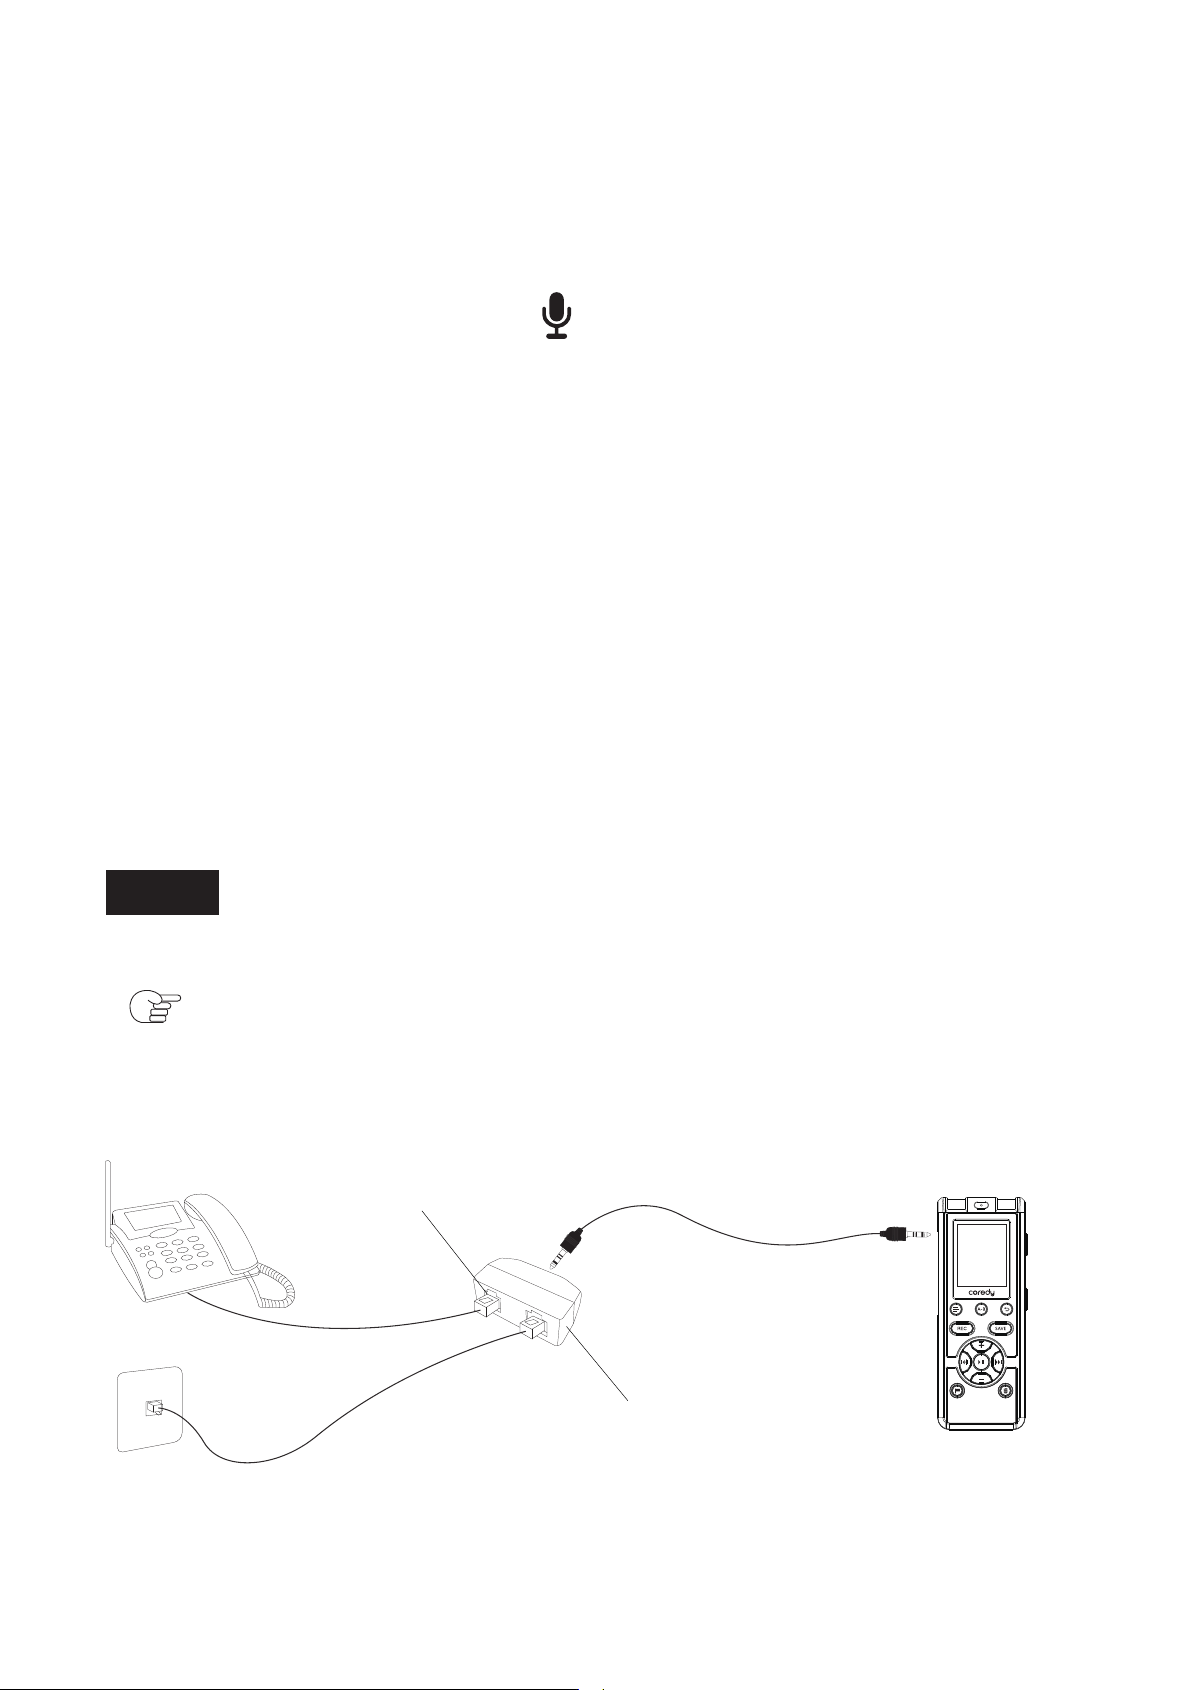
2.4.3 Recording from Telephone
Note
VOR Function can not be used for Telephone recording
( p.2.3).
Connect the audio output connector (stereo mini-jack) of
other equipment to the jack of the Coredy recorder
using an audio connecting cable.
The built-in microphones are automatically cut off and the
sound from the connected piece of equipment is recorded.
LINE-IN Audio Cable
Telephone Recorder Adapter
Telephones Cable
Land Line
RJ11 TELPHONE Jack
34
① Slide the switch in the direction of
“ ” to turn on the Coredy recorder ( p. 1.4.5), or
towards the center to release the Coredy recorder from
the HOLD status ( p. 1.3).
② Press REC to start recording.
③ Start dial-out or answer the telephone calls
connected to the Recorder.
④ Press SAVE to stop recording.
The built-in microphones are automatically cut off and the
sound from the connected Telephone.
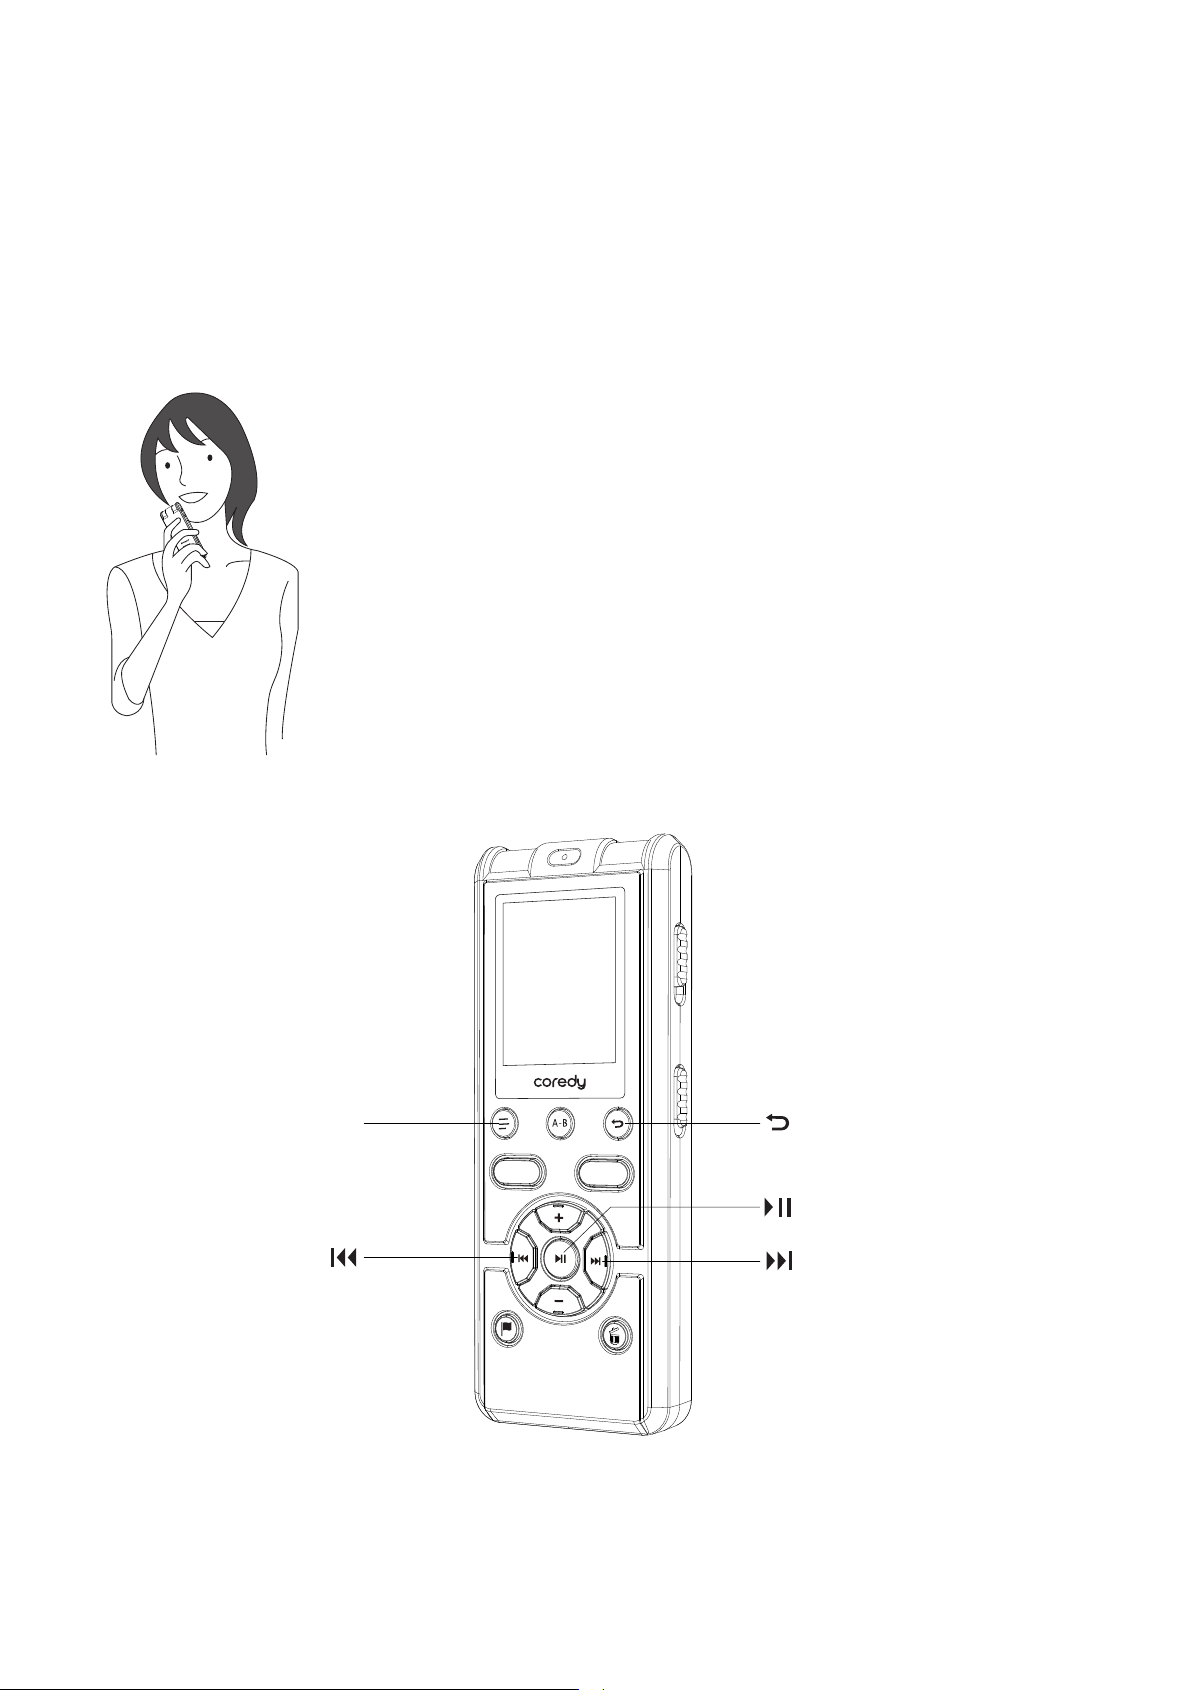
3.1 Basic Playback
3 Playing Files
SAVE
Operation indicator
REC
SAVE
35
② Select the desired file to be played back ( p. 1.6)
③ Start
3.1.1 Stopping playback
④ Hold on
Press –/+ to adjust the volume.
① Press .
The stop mode window appears.
Playback starts, and the operation indicator will light in green.
DPC
X
001
MH S
A
SPST
36
3.1.2 Other operations
3.1.3 Searching forward/backward during playback –
Cue/Review
To search forward (Cue):
Press and hold during playback and release it at the point you
wish to resume playback.
To search backward (Review):
Press and hold during playback and release it at the point you
wish to resume playback.
The Coredy recorder searches at slow speed with playback sound.
This is useful to check one word forward or back. Then, if you press
and hold the button, the Coredy recorder starts to search at higher
speed.
To
stop at the current position
(Playback Pause function)
Press . To resume playback
from that point, press again.
go back to the beginning of
the current file
go back to previous files
skip to the next file
skip to the succeeding files
Press once.
Press once.
Press repeatedly. (During the
stop mode, keep the button
pressed to go back the files
continuously.)
Press repeatedly. (During the
stop mode, keep the button
pressed to skip the files
continuously.)
Do this
37
3.2 Changing the Playback Settings
REC
SAVE
DISPLAY/MENU
You can play back a file faster or slower by adjusting the playback
speed in a range from 0.60 times to 1.80 times the actual speed,
which is useful for language study. The file is played back in natural
tones by means of a digital processing function.
The menu mode window will be displayed.
3.2.1 Adjusting the playback speed – the DPC (Digital
Pitch Control) function
① In the stop or playback mode, press and hold
DISPLAY/MENU to enter the menu mode.
② Press or to select “DPC” and then press .
③ Press or to select “NO” and then press .
38
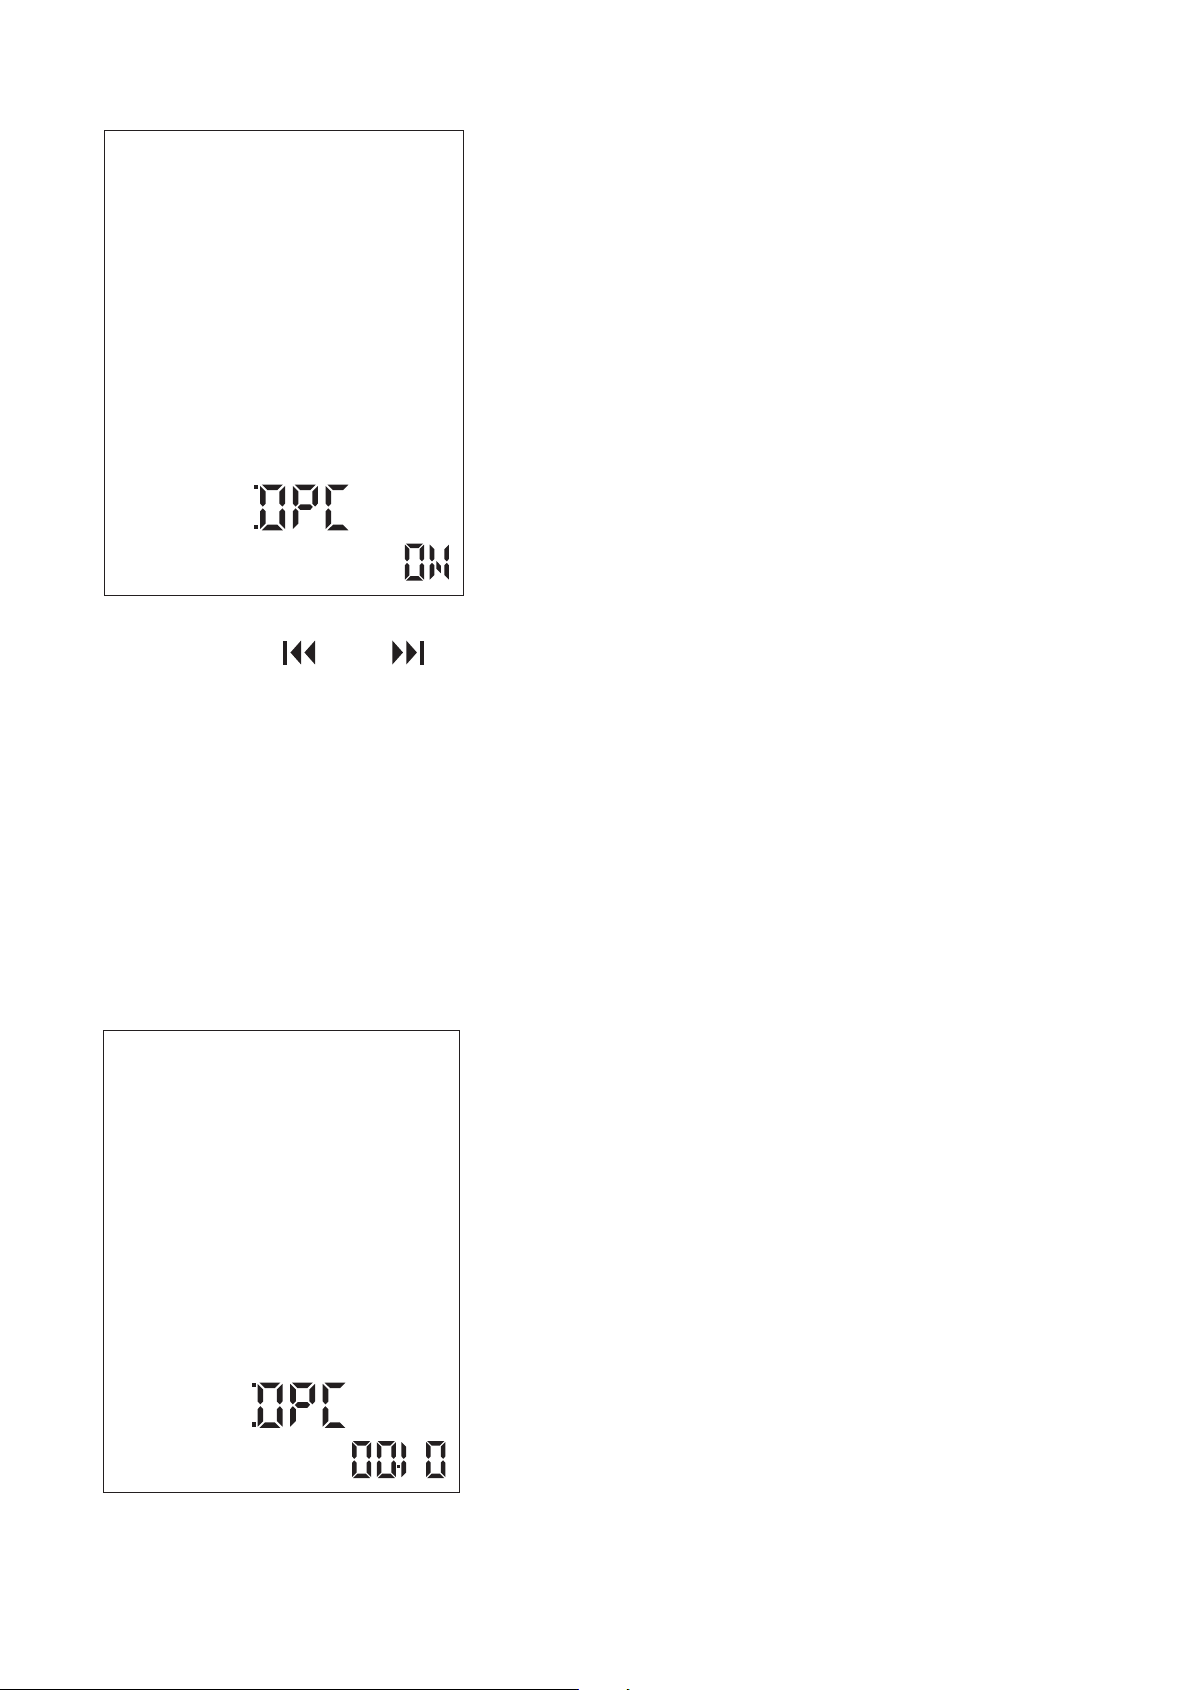
The speed decreases by 0.05 times (from ×0.60 to ×1.00).
The speed increases by 0.10 times (from ×1.00 to ×1.80).
When you press and hold each button, you can change the speed
continuously. The playback speed is set to “×1.00” when you
purchase the Coredy recorder.
Playback sound reflects the setting immediately. In the stop mode,
the current file is played back automatically at the specified
playback speed for confirmation.
④ Press or to adjust the playback speed.
39
During playback, press and hold A-B until (repeat) appears. The
selected file will be played back repeatedly.
Press A-B again.
⑤ Press to exit the menu mode.
To resume normal playback speed
3.3 Changing the Playback Mode
3.3.1 Playing back a file repeatedly
To resume normal playback
Set “
DPC” to “OFF” in step ③.
DPC
X
001
MH S
A
SPST
DPC
X
001
MH S
A
SPST
40

A-B
REC
SAVE
① During playback, press A-B to specify the starting
point A.
“A-B” is displayed and “B” flashes.
3.3.2 Playing back a specified section repeatedly –
A-B repeat
DPC
X
MH S
B
ST HQ
41
② Press A-B again to specify the finishing point B.
To change the segment specified for A-B repeat
playback:
During A-B repeat playback, press A-B again to specify a new
starting point
A. Then specify a new finishing point B, as in step ②.
“ A-B” is displayed and the specified section is played back
repeatedly.
To resume normal playback:
To stop A-B repeat playback:
Press A-B.
Press .
DPC
X
MH S
B
ST HQ
42
3.4 Convenient Playback Methods
3.4.1 Listening with better sound quality
3.5 Playback via Other Devices
3.5.1 Recording with other equipment
① Connect the (headphone) jack of the Coredy recorder to
the external input terminal of other equipment using an audio
connecting Cable.
To listen with the headphones:
Connect the supplied stereo headphones to the (headphone)
jack. The built-in speaker will be automatically disconnected.
Connect an active or passive speaker to the (headphone) jack.
You can record the sound of the Coredy recorder with other
equipment.
Before you start recording, we recommend you make a trial
recording first.
To listen from an external speaker:
REC
SAVE
Tape recorder, Mini disc
recorder,etc.
(headphone) jack
43
Note
4 Erasing File
Erasing
REC
SAVE
4.1 Erasing a Files
② Press to start playback and at the same time set the
connected equipment to the recording mode.
③ Press on the Coredy recorder and the connected
equipment at the same time to stop recording.
① Slide the switch in the direction of “ ” to
turn on the Coredy recorder ( p. 1.4.5), or towards the center
to release the Coredy recorder from the HOLD status ( p. 1.3).
A file from the Coredy recorder will be recorded on the equipment
connected.
Once a file has been erased, you cannot retrieve it.
44
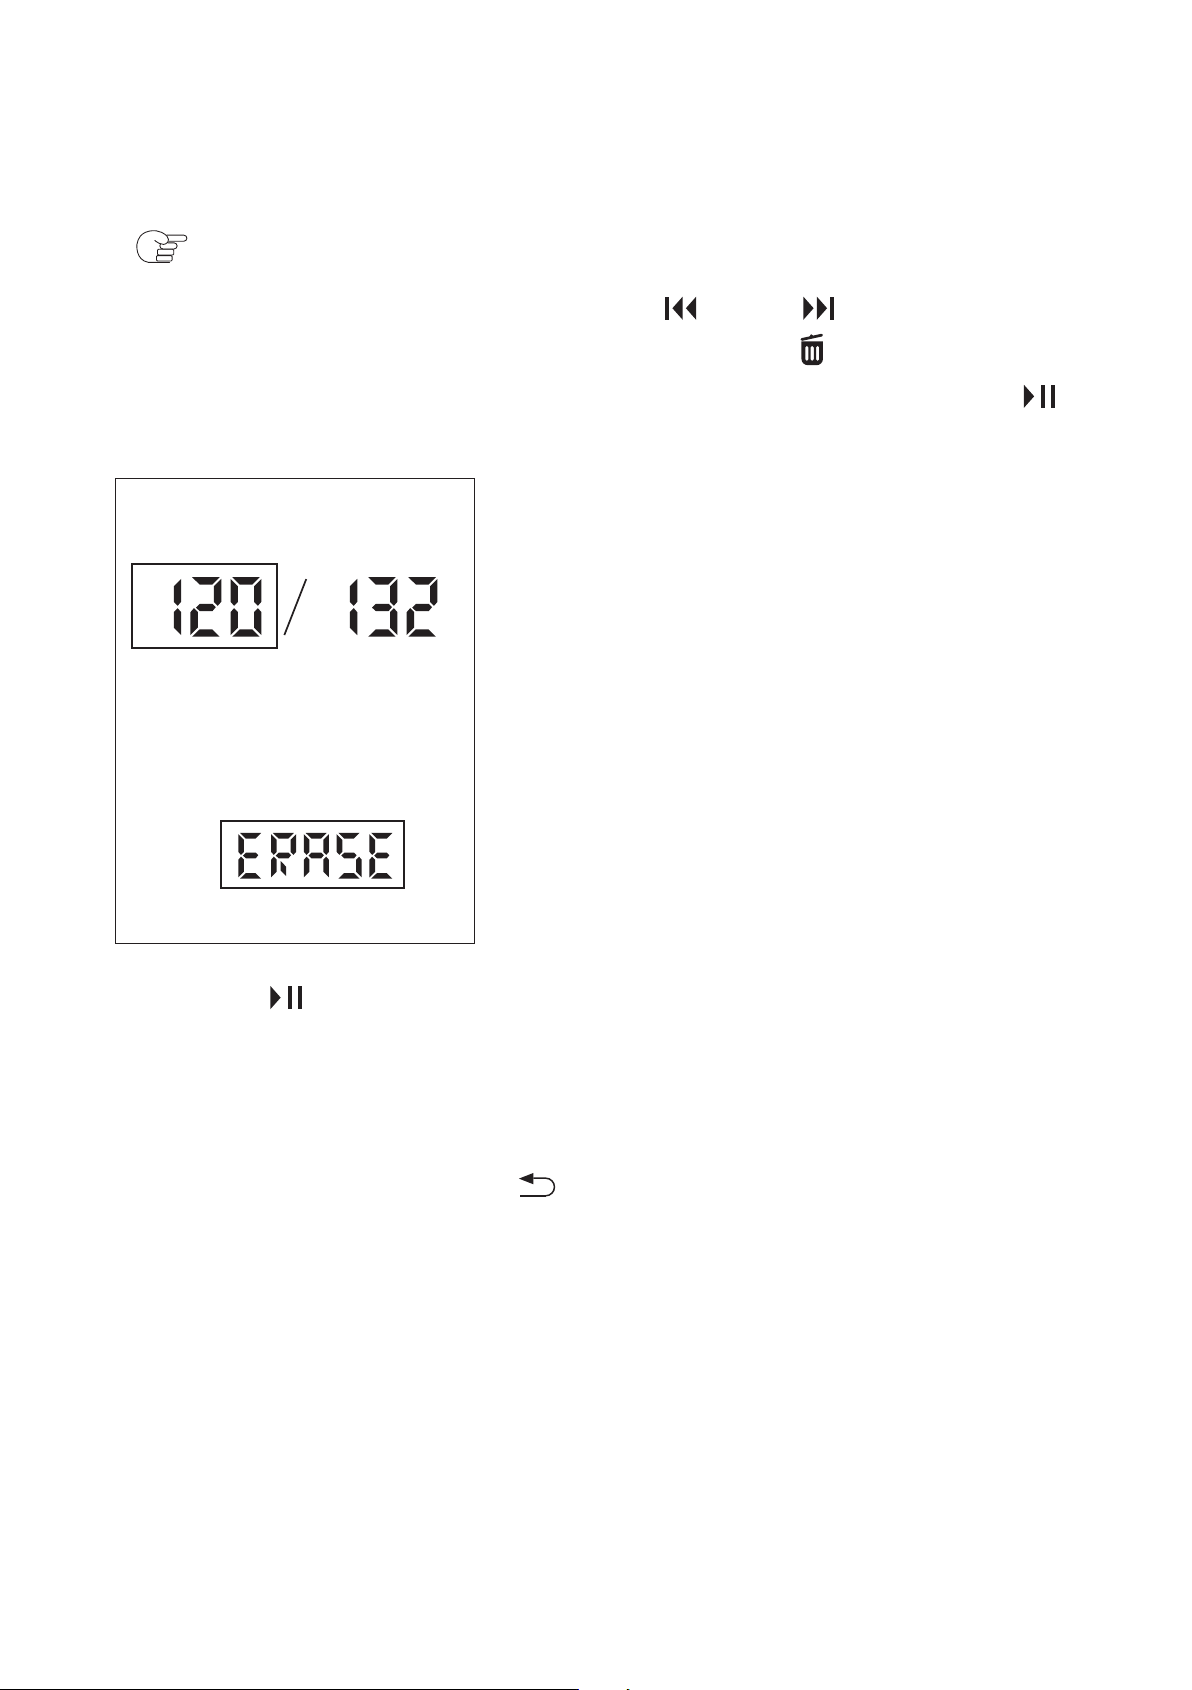
② In the playback mode, select a file you want to erase
( p.1.6).
③ In the playback mode, Press or to select “The
recording file” want to Erasing, press the /Erasing button
about 2 seconds, the “ERASE” appeared. Then press the
/ENTER button, the file number and “ERASE” flash.
④ Press /ENTER.
The stop mode window appears.
The “ACCESS” animation appears and the selected file will be
erased. The remaining files will advance so that there will be no
space between files.
To cancel erasing Press in step ③ to return to the previous
window.
45
5 Playback Marks
REC
SAVE
5.1 Adding a Playback marks
The (audio mark) indicator flashes three times, and a audio
mark is added.
5.1.1 During playing back, or recording pausing, press
(P-MARK) at the position you want to add a audio mark.
Note
Each file can add a maximum of 10 Playback marks.
You can add a playback marks at a point at which you would like to
divide a file later or locate during playback. You can add a
maximum of 10 playback marks to each file.
46
Note
Hint
5.2 Skip the Playback marks
5.3 Erasing a Playback marks
Press Volume + / Previous P-MARK once.
When a playback marks is set, the Coredy recorder goes forward to
the playback marks after the current point.
When a playback marks is set, the Coredy recorder goes backward
to the playback marks before the current point.
You cannot add audio mark to music files or during recording.
You can add audio mark when the Coredy recorder is in the
transcription playback mode.
DPC
X
001
MH S
A
SPST
Press Volume – / Next P-MARK once.
47
6 About the Menu Function
6.1 Making Settings for the Menu
① Press DISPLAY/MENU to enter the menu mode.
The menu mode window will be displayed.
DISPLAY/ MENU
REC
SAVE
Notes
Once a P-MARK has been erased, you cannot retrieve it.
During playing back, or recording pausing, select the file from
which you want to erase playback marks ,press the (P-MARK)
button about 2 seconds, press the or to select the playback
marks then press the /ERASING button, press /Enter.
48
Note
② Press or to select a menu item for which
you want to make setting, and then press .
③ Press or to select the setting that you
want to set, and then press .
If you do not press any button for 10 seconds, the menu mode is
automatically canceled and the window will return to the normal
display.
Press DISPLAY/MENU during menu mode.
To return to the previous window
To exit the menu mode
④ Press to exit the menu mode.
SPST
SPST
49
Menu items
MODE
VOR
DPC
SET DATE
REC MON
BEEP
LED
SYSTEM
FORMAT
FOLDER
MEMORY
Stop mode Playback mode Recording mode
Operation mode
( : the setting can be made/ : the setting
cannot be made)
6.2 Menu Settings
o
o
o o
o
o
o o
o
o
o
o
o
o
50

Menu items Settings (* : Initial setting)
MODE
Sets the recording mode.
STHQ*: Stereo high-quality recording mode (MP3
192kbps)
STSP: Stereo standard-play recording mode (MP3
128kbps)
VOR( p. 2.3)
Sets the VOR (Voice Operated Recording) function.
ON: Recording starts when the Coredy recorder
detects sound and pause when no sound is heard,
eliminating recording during soundless periods. The
VOR function is activated when REC/PAUSE is
pressed. OFF*: The VOR function does not work.
DPC( p. 3.2.1)
Sets the DPC (Digital Pitch Control) function.
ON: A file is played back at the specified speed
(xn.nn:n=0 to 9) using the DPC function. You can
adjust the playback speed in a range from 0.60 times
to 1.80 times the normal speed. (x1.00*)
OFF*: The DPC function does not work.
SET DATE
( p. 1.5.2)
REC MON
Sets the clock by setting year, month, day, hour, and
minute in sequence. (17Y 1M 1D 0:00*)
Sets the REC MON (Monitoring the recording)
function.
ON*: If you connect the stereo headphones (does not
supplied) to the (headphone) jack, you can monitor
the recording. You can adjust the monitoring volume
by pressing VOL –/+, but the recording level is fixed.
OFF: The REC MON function does not work.
BEEP
Sets whether a beep will be heard or not.
ON*: A beep will sound to indicate that an operation
has been accepted or an error has occurred.
OFF: No beep sound will be heard.
51
Turns the operation indicator on or off during
operation.
ON*: During recording or playback, the operation
indicator lights or flashes.
OFF: The operation indicator does not light or flash,
even during operation.
LED
Note
When the Coredy recorder is connected to a
computer, the operation indicator lights or flashes
even if “LED” is set to “OFF.”
SYSTEM
Displays the version number of the software.
FOLDER( p. 1.6)
MEMORY
Select a folder from / / folders for recording,
playing or editing, or (Music) folder for playing.
(* (folder A) )
BUIL* : Select a build-in memory to
recording ,playing or editing.
CARD: Select a memory Card (do not supplied) of
MicroSD Card or M2 Card to recording ,playing or
editing.
FORMAT
Formats the built-in memory, erasing all the data in
the memory and resetting the folder structure to its
default status.
YES: The “ACCESS” animation appears and the
built-in memory will be formatted.
NO*: The built-in memory will not be formatted.
Notes
When you format the built-in memory, all the data
which you have stored on the memory will be
erased.
Once the memory has been erased, you cannot
retrieve the data that was erased.
When you format the built-in memory, the
Operating instructions stored in the built-in memory
will also be erased. To get another copy of the
operating instructions, please visit the
www.coredy.com for more details. ( p.8.1).
52

7 Utilizing Your Computer
7.1 Using the Coredy recorder with Your
Computer
When the Coredy recorder is connected to your computer, you can
transfer data between them.
Copying files from the Coredy recorder to your computer to store
them ( p. 7.2)
Copying music files from your computer to the Coredy recorder to
play them back ( p. 7.3)
Using the Coredy recorder as USB memory ( p. 7.4)
You can store image data or text data stored on the computer
temporarily in the Coredy recorder.
For details on the system requirements for your computer, see
page 7.2.
The Coredy recorder supports MP3 files only. Files of other
formats transferred from your computer cannot be recognized nor
displayed on the Coredy recorder.
System requirements for your computer
Note
This Coredy recorder does not support the Podcast function.
Even if you create a Podcast folder and transfer files to that folder,
those files are not regarded as podcasts.
53
7.1.1 Connecting the Coredy recorder to your
computer
7.1.2 Structure of folders and files
To exchange music files between the Coredy recorder and your
computer, connect the Coredy recorder to your computer.
① Connect the (USB) port of the Coredy recorder with the USB
port of your running computer with the supplied USB connecting
cable inserted into the ports securely until each plug stops to the
end.
On the Windows screen; open “My Computer” or “Computer,” and
make sure that “COREDY RECORDER” has been recognized.
On the Macintosh screen; make sure that an “COREDY
RECORDER” drive is displayed on the Finder.
The Coredy recorder is recognized by the computer as soon as the
connection is made. While the Coredy recorder is connected to the
computer, “PC LINK” is displayed in the display window of the
Coredy recorder.
The folders and files on the Coredy recorder are displayed on the
computer screen as shown.
① Make sure the Coredy recorder has been recognized properly.
Coredy recorder
USB connecting cable (supplied)
Your computer
To USB port of
your computer
SAVE
REC
54
Built-in memory
On a Windows screen using Explorer, and on a Macintosh screen
using Finder, folders and files can be displayed by opening
“COREDY RECORDER.”
You cannot add a folder to the Coredy recorder. When you transfer
music files to the Coredy recorder, drag and drop them onto the
MUSIC folder.
*1 The / / folders under the VOICE folder are used to contain
the files recorded in the Coredy recorder. You cannot transfer files
from your computer to those folders.
*2 The music files transferred separately or by folder from your
computer to the MUSIC folder are recognized and displayed as
files in the (Music) folder of the Coredy recorder.
*3 The Coredy recorder can recognize up to 8 levels of folders
transferred to it from a computer.
COREDY RECORDER
VOICE
*1
Folders for files recorded
using the Coredy recorder
Folders for files transferred
from your computer
MUSIC
*2
Instructions
*4
MP3
E
A
*1
B
*1
C
*1
MP3
*
3
55

Structure of folders displayed in the display window
of the Coredy recorder
7.1.3 Disconnecting the Coredy recorder from your
computer
① Make sure that the operation indicator of the Coredy
recorder does not Light.
② Perform the following operation on your computer.*
Note
*4 The operating instructions of the Coredy recorder are stored in
the “Instructions” folder directly under the “COREDY RECORDER”
folder.
The display of the structure of the folders seen in the display
window of the Coredy recorder is different from that seen on the
display of a computer.
The folder indicators in the display window of the Coredy recorder
are as follows: / / : Folders where you can record a file. Files
you recorded with the Coredy recorder will be stored and managed
in these folders.
(Music): A folder for playback only. Music files transferred from
your computer to the MUSIC folder will be displayed and managed
in this folder.
If there are multiple levels of folders in the MUSIC folder, files
inside a folder of a lower level will be displayed as component files
of the MUSIC folder.
Follow the procedures below; otherwise, data may be damaged.
On the Windows taskbar at the bottom right of the desktop,
left-click the following icon:
56
③ Disconnect the USB connecting cable from the Coredy
recorder and the USB port of the computer.
7.2 Copying Files from the Coredy recorder to
Your Computer
Left-click “Eject COREDY RECORDER” (Windows 7), or
“Safely remove USB Mass Storage Device” (Windows XP,
Windows Vista).
The icon and menu displayed can be different on different
operating systems. The icon may not be always displayed on the
taskbar depending on your computer settings.
On a Macintosh screen, click the “COREDY RECORDER” ejection
icon on the Finder.
* For details on disconnecting the Coredy recorder from your
computer, refer to the operating instructions supplied with your
computer.
You can copy files and folders from the Coredy recorder to your
computer to store them.
Drag and drop the files or folders you want to copy from “COREDY
RECORDER” to the local disk on your computer.
① Connect the Coredy recorder to your computer ( p. 7.1.1).
② Copy files or folders you want to transfer to your computer.
57
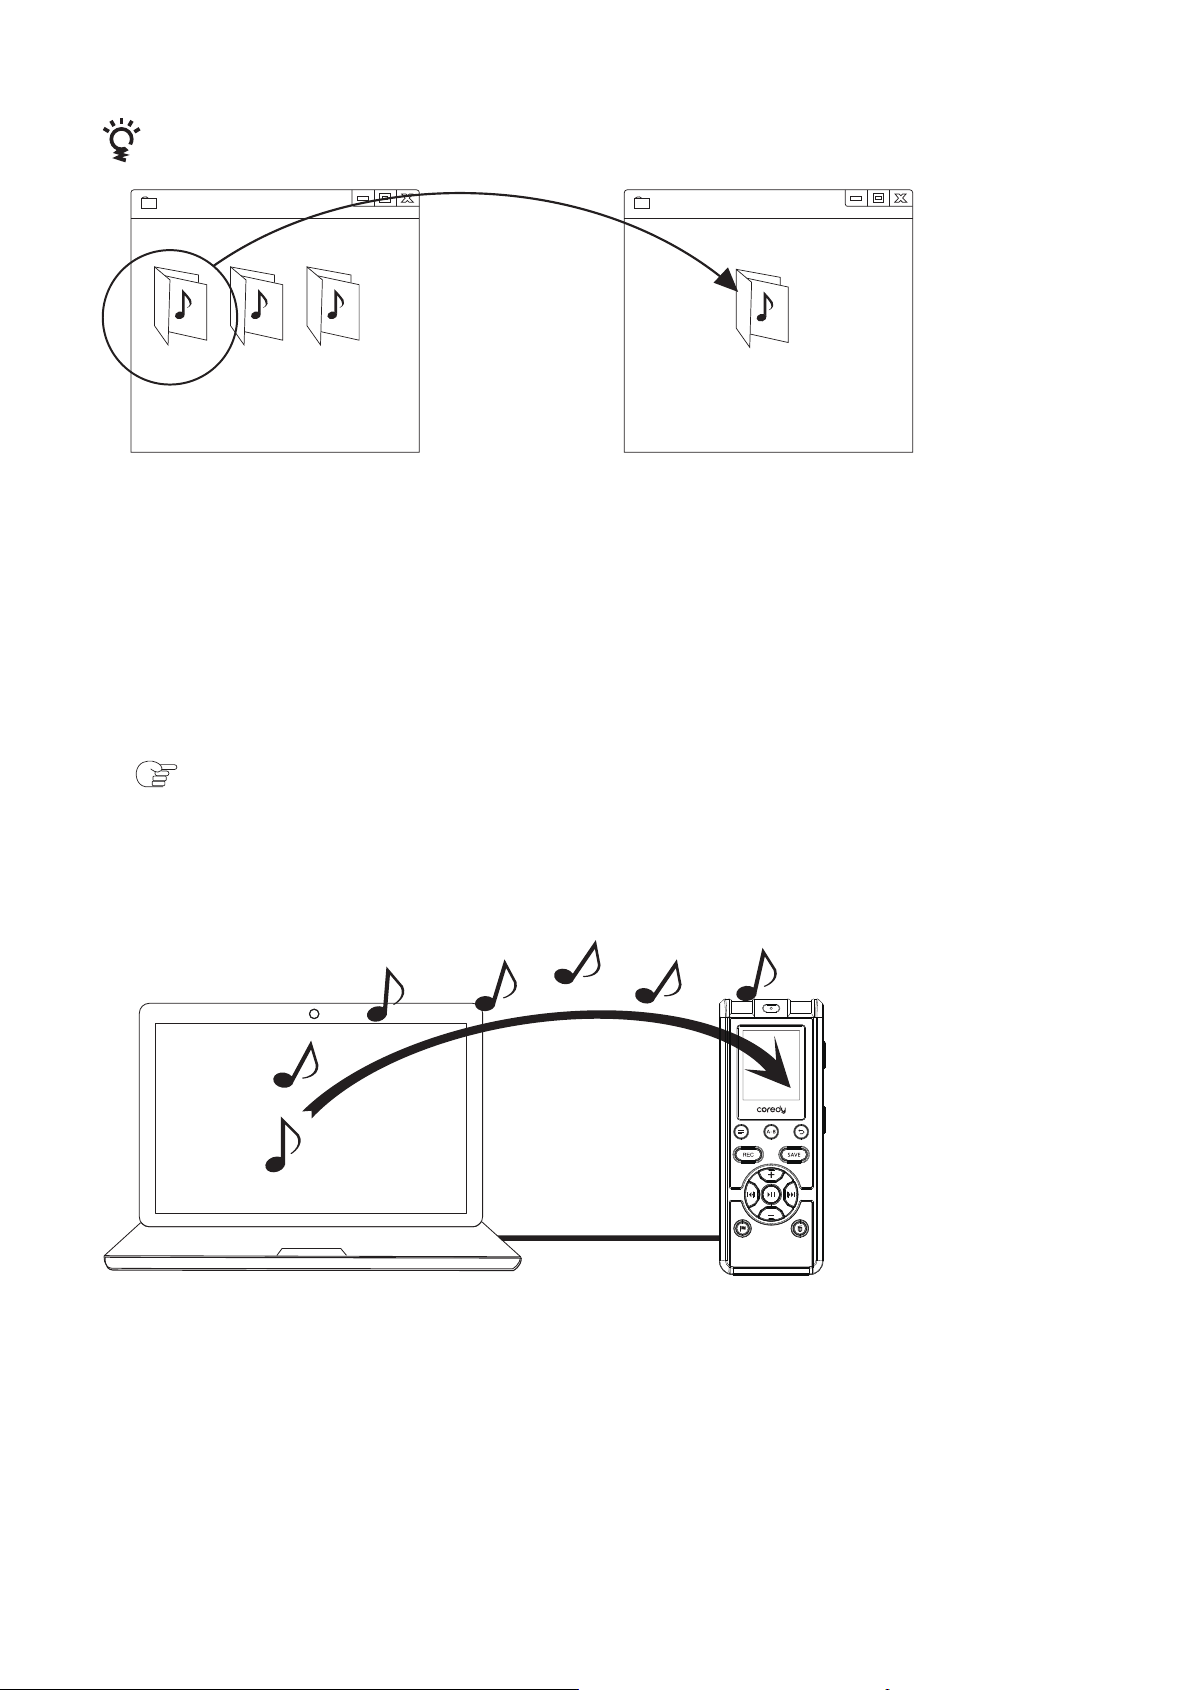
7.3 Copying Music Files from Your Computer
to the Coredy recorder and Playing Them Back
You can copy music files* from your computer to the Coredy
recorder by dragging and dropping them, and you can play
them back using the Coredy recorder.
① Click and hold,
② drag,
③ and then drop.
To copy a file or folder (Drag and drop)
Coredy recorder Your computer
③ Disconnect the Coredy recorder from your computer
( p. 7.1.3).
A
①
②
③
Removable Disk Removable Disk
A B MUSIC
58

7.3.1 Copying a music file from your computer to the
Coredy recorder (drag and drop)
* For the file formats that can be played back using the Coredy
recorder, see “Specifications”( p. 7.2.1).
① Connect the Coredy recorder to your computer ( p. 7.1.1).
② Copy music files or the folder in which the music files are
stored to the MUSIC folder of the Coredy recorder.
③ Disconnect the Coredy recorder from your computer ( p.
7.1.3).
On a Windows screen using Explorer, or on a Macintosh screen
using Finder, drag and drop the music files onto the MUSIC folder
of the “COREDY RECORDER.
Make sure to drag the music files from your computer and drop
them onto the MUSIC folder of the Coredy recorder. If you drop files
onto other folders or destinations on the Coredy recorder, the
Coredy recorder may not be able to recognize the transferred files
or other problems may occur.
The music files transferred from your computer are recognized
and displayed as files in the (Music) folder on the Coredy recorder.
Note
Hints
You can copy up to 199 files to one folder. Moreover, the Coredy
recorder can recognize up to a total of 796 files.
59
7.3.2 Playing back music files copied from your
computer using the Coredy recorder
7.4 Using the Coredy recorder as USB Memory
① Press and hold DISPLAY/MENU to enter the menu mode.
② Press or to select “FOLDER,” and then press .
③ Press or to select the (Music) folder in which
transferred music files are stored, and then press .
④ Press to exit the menu mode.
⑤ Press to start playback.
⑥ Press or to select the music file you want to play.
⑦ Press to stop playback.
The menu mode window will be displayed.
A music file copied from your computer can be played back with the
Coredy recorder. Dividing a files may not be performed.
When the Coredy recorder is connected to your computer, image
data or text data on the computer, as well as files recorded using
the Coredy recorder can be temporarily stored on the Coredy
recorder.
Your computer must meet the specified system requirements to
use the Coredy recorder as USB memory.
For details on the system requirements, see page 7.2.
Note
60

8 Additional Information
8.1 Precautions
On safety
Do not operate the unit while driving, cycling or operating any
motorized Vehicle.
On noise
On handling
Do not leave the unit in a location near heat sources, or in a place
subject to direct sunlight, excessive dust or mechanical shock.
Noise may be heard when the unit is placed near an AC power
source, a fluorescent lamp or a mobile phone during recording or
playback.
Should any solid object or liquid fall into the unit, remove the
battery and have the unit checked by qualified personnel before
operating it any further.
Be careful not to allow water to splash on the unit. The unit is not
waterproof. In particular, be careful in the following situations.
- When you have the unit in your pocket and go to the bathroom,
etc. When you bend down, the unit may drop into the water and
may get wet.
- When you use the unit in an environment where the unit is
exposed to rain, snow, or humidity.
- In circumstances where you get sweaty. If you touch the unit with
wet hands or if you put the unit in the pocket of sweaty clothes, the
unit may get wet.
You may feel pain in your ears if you use the headphones when
the ambient air is very dry. This is not because of a malfunction of
the headphones, but because of static electricity accumulated in
your body. You can reduce static electricity by wearing
non-synthetic clothes that prevent the emergence of static
electricity.
61

8.2 Specifications
Operating systems
8.2.1 System requirements
On maintenance
To clean the exterior, use a soft cloth slightly moistened in water.
Then use a soft dry cloth to wipe the exterior. Do not use alcohol,
benzine or thinner.
Backup recommendations
To avoid potential risk of data loss caused by accidental operation
or malfunction of the Coredy recorder, we recommend that you
save a backup copy of your recorded files to a computer, etc.
To use your computer with the Coredy recorder, or to use the
Coredy recorder as a USB mass storage device, your computer
must meet the operating system requirements and port
environment described below.
Windows 10
Windows 8.1
Windows 8
Windows 8 Pro
Windows 7 Ultimate
Windows 7 Professional
Windows 7 Home Premium
Windows 7 Home Basic
Windows 7 Starter
If you have any questions or problems concerning your unit, please
contact Coredy customer support team.
Noise may be recorded when an object, such as your finger, etc.,
rubs or scratches the unit during recording.
62

Windows Vista Home Basic Service Pack 2 or higher
Windows Vista Home Premium Service Pack 2 or higher
Windows Vista Business Service Pack 2 or higher
Windows Vista Ultimate Service Pack 2 or higher
Windows XP Media Center Edition 2005 Service Pack 3 or higher
Windows XP Professional Service Pack 3 or higher
Windows XP Home Edition Service Pack 3 or higher
Mac OS X (v10.5-v10.11)
Pre-installed.
Note
Note
One of the above operating systems should be by default
pre-installed. Any operating system other than those indicated
above (Windows 98, Windows 2000 or Linux, etc.), upgraded
operating systems or multi-boot environment are not supported.
64 bit versions of Windows XP are not supported.
For the latest version information and compatibility with your
operating system, please access the support home page for the
Coredy recorder ( p. 9.1.1).
Hardware environment:
Port: USB port
The following systems are not supported:
Operating systems other than the ones indicated above
Personally constructed computers or operating systems
Upgraded operating systems
Multi-boot environment
Multi-monitor environment
63
8.2.2 Design and specifications
Coredy recorder section
Capacity (User available capacity)
4 GB
A part of the memory capacity is used as a management area.
Maximum number of folders
4 folders (fixed)
Maximum number of files (for a folder)
199 files
Maximum number of files (for all folders)
796 files
Frequency range
Compatible file formats
MP3
MP3 192kbps (STHQ)
(MY VOICE MODE)
75 Hz - 20,000 Hz
MP3 128kbps (STSP)
(CLASS MODE)
75 Hz - 17,000 Hz
MP3 80kbps (STHQ)
(CLASS MODE)
75 Hz - 8,000 Hz
MP3 128kbps (STSP)
(MY VOICE MODE)
200 Hz - 8,000 Hz
Bit rate: 32 kbps - 320 kbps (Supports
variable bit rate (VBR))
Sampling frequencies: 16/ 22.05/ 24/
32/ 44.1/ 48 kHz
File extension: .mp3
The playback of MP3 files recorded
using the Coredy recorder is also
supported. Not all encoders are
supported.
64
General section
Speaker
Approx. 30 mm dia.
Input/Output
Microphone jack
Headphone jack
(minijack, stereo) recommended load
impedance: 16 ohms
USB port
Playback speed control (DPC)
1.8 times - 0.60 times
Power output
90 mW
Operating temperature
5 °C - 35 °C
Dimensions (w/h/d) (not incl. projecting parts and controls)
Approx. 45.0 mm × 120.0 mm × 20.0 mm
Mass
Approx. 60 g
Supplied accessories
See supplied Quick Start Guide
Coredy VM3311 Digital Voice Recorder x 1 User Guide x1
Power and Sync Cable x1 Telephone recording adapter x1
3.5mm Line-in Cable x1 RJ11 Cable x1
Design and specifications are subject to change without notice.
MP3
(USB Micro-B jack)
High-Speed USB compatible
(minijack, stereo)
input for plug in power, minimum
input level 0.9 mV
65
Maximum recording time
8.2.3 Battery life *1
The maximum recording time of all the folders is as follows.
*1 The battery life may shorten depending on how you operate the
Coredy recorder.
*2 When playing back music through the internal speaker with the
volume level set to 30.
MP3 192kbps
(STHQ)
Approx. 21h. Approx. 18h. Approx. 12h.
MP3 128kbps
(STSP)
Approx. 22h. Approx. 18h. Approx. 12h.
MODE (recording
modes)
Recording Playback through
speaker*2
Playback using
the headphones
When you are going to record continuously for a long time, you
may have to recharging the battery in the midst of recording.
The maximum recording time in the above table is for your
reference only.
Recording MODE
Built-in Memory 4 GB
ST HQ (Stereo high-quality
recording mode)
ST SP (Stereo standard-play
recording mode)
Recording Scene
My Voice Class
48Hrs45Mins 48Hrs45Mins
73Hours 73Hours
66

8.2.4 About compatible memory card
You can use the following memory cards with the Coredy recorder.
•microSD cards of up to 2 GB: supported
•microSDHC cards from 4 GB to 32 GB: supported
•microSDXC cards of up to 64GB: supported
•M2™ cards of up to 16 GB: supported
Due to the file system specifications of the Coredy recorder, you
can record and play back an MP3 file smaller than 1 GB using a
memory card.
•Operations of all types of compatible memory cards are not
guaranteed.
Note
67
9 Troubleshooting
9.1 Troubleshooting
9.1.1 On the Coredy recorder operations
1.Noise is heard.
1. The Coredy recorder cannot be turned on. The Coredy
recorder does not operate, even if you press any button.
An object, such as your finger, etc., accidentally rubbed or
scratched the Coredy recorder during recording so that noise was
recorded.
Noise
Power source
The Coredy recorder was placed near an AC power source, a
fluorescent lamp or a mobile phone during recording or playback.
The plug of the connected external microphone (not supplied) is
dirty.
Clean the plug.
The plug of the connected headphones is dirty.
Clean the plug.
The battery is weak.
The power of the Coredy recorder is off.
Slide and hold the switch in the direction of “ ”
for more than 1 second. The power is turned on ( p. 1.4.5).
The HOLD function is activated.
Slide the switch in the center direction ( p. 1.3).
68
2. The Coredy recorder is powered off automatically.
Recording
Slide and hold the switch in the direction of “ ”
for more than 1 second. “OFF” is displayed, and the Coredy
recorder is turned off. ( p. 1.4.5).
3. The Coredy recorder is powered off automatically.
When the Coredy recorder is in the stop mode and you leave the
Coredy recorder without attempting an operation for approximately
10 minutes, the auto power off function will take effect.
4. The battery life is short.
5. The operation indicator does not light.
1. You cannot record a file.
The battery life on page 55 is based on playback with the volume
level set to 13. The battery life may shorten depending on the
operation of the Coredy recorder.
Even if you do not use the Coredy recorder, the battery is
consumed slightly. If you do not intend to use the Coredy recorder
for an extended period of time, it is recommended that you turn the
power off.
You are using a battery in an environment with a temperature of
under 5 °C. Battery life becomes shorter as a result of the battery
characteristics. This is not a Malfunction.
“LED” is set to “OFF.”
Display the menu and set “LED” to “ON” ( p. 5.2).
The remaining memory capacity is insufficient.
199 files have been recorded in the selected folder, or the total
number of files stored on the Coredy recorder has exceeded the
maximum.
69
Playback
2. Recording is interrupted.
3. When recording from other equipment, the input level is too
strong or not strong enough.
1. The playback volume is low.
2. No sound comes from the speaker.
You cannot record a file in the (Music) folder for playback only. If
the (Music) folder is selected, the folder is automatically switched
to a recordable folder ( , , or ) when you start recording.
The VOR function is activated. When you are not using the VOR
function, set “VOR” to “OFF” in the menu ( p. 2.3).
Connect the headphone jack of other equipment to the
(microphone) jack of the Coredy recorder and adjust the volume
level on the piece of equipment connected to the Coredy recorder.
Continued
The built-in speaker is mainly for monitoring, and the playback
volume is low.
Use the supplied headphones.
Headphones are plugged in ( p. 3.4).
3. Sound comes from the speaker even when the headphones
are plugged in.
If you plug in the headphones not securely during playback, the
sound may come from the speaker.
Unplug the headphones, and then insert them securely.
Erase some of the files ( p. 4.1) or erase all the files after you
store them on your computer or other device.
70
Clock
Display
4. Playback speed is too fast or too slow.
The playback speed is adjusted with the DPC.
Adjust the speed in DPC again in the menu ( p. 3.2.1).
1.“--Y--M--D --:--” is displayed.
You have not set the clock ( p. 1.5).
2.“--Y--M--D --:--” is displayed on the REC DATE display.
1. There are fewer menu items displayed in the menu mode.
Files
1. The “FULL” is displayed and you cannot start recording.
The date and time of recording will not be displayed if you
recorded the file when the clock was not set.
During playback or recording modes, there are menu items that
are not displayed ( p. 6.2).
2. The remaining time displayed in the display window is
shorter than that displayed in the computer.
The Coredy recorder requires a certain amount of memory for
system operation. That amount is subtracted from the remaining
time, which is the reason for the difference.
The memory is full.
Erase some of the files ( p. 4.1) or erase all the files after
you store them on the your computer or other device.
71
Computers
2. The “FILE FULL” is displayed and you cannot operate the
Coredy recorder.
199 files have been recorded in the selected folder or 796 files in
total have been recorded. Therefore you cannot record another file,
or move a file.
3. You cannot find files copied (transferred) from your
computer.
1. It takes a long time to copy a file.
Make sure to place the files copied from your computer in the
MUSIC folder. You can play them back as files in the (Music)
folder of the Coredy recorder. (The maximum number of files: 199)
If files are placed directly, not in a folder, under the A, B, or C
folder, you can play them back as files in the , , or folder
of the Coredy recorder.
In case files are copied by using neither of the above methods,
they may not be able to be found or played back because of the
system limitations of the Coredy recorder.
If the file size of a file is large, it takes a considerable time to finish
copying. Wait until the copying is finished.
2. The Coredy recorder is not recognized by your computer. A
folder/file cannot be transferred from your computer.
Disconnect the Coredy recorder from your computer and
reconnect it.
Do not use a USB hub or USB extension cable other than
supplied USB connecting cable.
Erase some of the files ( p. 4.1) or erase all the files after
you store them on your computer or other device.
72
9.2 Messages List
3. The file transferred from your computer cannot be played
back.
4. The computer cannot start.
Operation is not guaranteed if you use any system requirements
other than those described on page 52.
Depending on the USB port position, the Coredy recorder may
not be recognized. If this happens, try another port.
The Coredy recorder can recognize up to 8 levels of folders
transferred to the Coredy recorder.
The file format may differ from those that can be played back
using the Coredy recorder (MP3(.mp3)). Check the compatible file
formats( p. 8.2.2)
If you reboot the computer with the Coredy recorder connected
to the computer, the computer may freeze or may not start properly.
Disconnect the Coredy recorder from the computer and reboot
the computer again.
Follow the instructions below if a message appears in the display.
Message
HOLD
SET DATE
Cause/Remedy
All the button operations are disabled because the
Coredy recorder is in the HOLD status to prevent
unintentional operations. Slide the
switch towards the center to release the Coredy
recorder from the HOLD status ( p. 1.3).
Set the clock; otherwise, you cannot display the
recorded date and time for a file.
AdFU
A system error other than the above has occurred,
using a reset pin to press the reset button to reset
the recorder, if the problem still happen, contact
Coredy support team for more assistance.
73

9.3 System Limitations
There are some system limitations of the Coredy recorder.
Troubles as mentioned below are not malfunctions of the Coredy
recorder.
9.4 Trademarks
Microsoft, Windows, Windows Vista and Windows Media are
registered trademarks or trademarks of Microsoft Corporation in
the United States and/ or other countries.
Macintosh and Mac OS are trademarks of Apple Inc., registered
in the USA and other countries.
MPEG Layer-3 audio coding technology and patents licensed
from Fraunhofer IIS and Thomson.
All other trademarks and registered trademarks are trademarks or
registered trademarks of their respective holders. Furthermore, “
™” and “®” are not mentioned in each case in this manual.
Symptom
You cannot
display or play
back music files
in order.
When you set
A-B repeat
playback, the set
positions move a
little.
Cause/Remedy
If you have transferred music files using your
computer, those files may not be transferred in
order of transfer because of system limitations. If
you transfer music files from your computer to the
Coredy recorder one by one, you can
display and play back the music files in transferred
order.
Depending on the files, the set positions may move.
74

Coredy VM3311
Toll Free US: +1-800-999-8470
(English Service) Mon-Fri 10:00-19:00 (CST)
Toll Free UK: +44-808-134-9909
(English Service) Mon-Fri 15:00-01:00 (GMT)
E-Mail: support@coredytech.com
Website: www.coredy.com