
Please read this manual carefully before operating
your set and retain it for future reference.
www.lg.com
*Disclaimer: LG LED Monitor applies LCD screen with LED backlights.
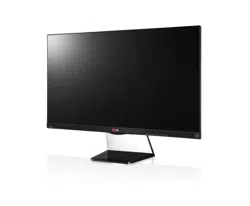
This product is a computer monitor and not for television purpose.
Owner's Manual
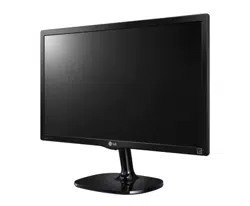
IPS LED COMPUTER
MONITOR
LED LCD COMPUTER
MONITOR
(LED COMPUTER
MONITOR*)
IPS LED Computer Monitor (LED Computer Monitor) Model List
19M37A
19M37D
19M37H
20M37A
20M37D
20M37H
20MP37A
22M37A
22M37D
22M37H
22M37HQ
22MC37D
24M37A
24M37D
24M37H
24M37HQ
24MC37D
27M37D
27MP37HQ
27MP37VQ
27MC37HQ
27MP36HQ

2
ENG
ENGLISH
TABLE OF CONTENTS
CONTENTS
3 LICENSE
4 ASSEMBLINGANDPREPAR-
ING
4 Unpacking
6 Partsandbuttons
7 MovingandLiftingtheMonitor
8 SettinguptheMonitorset
8 - AttachingtheStandBase
9 - DetachingtheStandBase
10 - Mountingonatable
10 - Usingthecableholder
12 - Mountingonawall
13 USINGTHEMONITORSET
13 ConnectingtoaPC
13 - D-SUBconnection
13 - DVI-Dconnection
14 - HDMIconnection
15 ConnectingtoExternalDevices
15 - Peripheraldeviceconnection
16 CUSTOMIZINGSETTINGS
17 CustomizingSettings
17 - MenuSettings
19 -Picture
20 -Color
21 -Display
21 -Audio
22 -Others
23 READERSetting
24 FUNC.Setting
24 -SMARTENERGYSAVING
25 -PictureMode
26 -Colorwizard
27 -DUALDISPLAY
27 -DUALWEB
28 TROUBLESHOOTING
30 SPECIFICATIONS
40 PresetModes(Resolution)
41 Indicator
42 PROPERPOSTURE
42 ProperpostureforusingtheMonitorset.

3
ENG
ENGLISH
LICENSE
LICENSE
Eachmodelhasdifferentlicenses.Visitwww.lg.comformoreinformationonthelicense.
ThetermsHDMIandHDMIHigh-DefinitionMultimediaInterface,andthe
HDMIlogoaretrademarksorregisteredtrademarksofHDMILicensingLLC
intheUnitedStatesandothercountries.
27MP37VQ
ThefollowingcontentisonlyappliedtothemonitorwhichissoldinEuropemarketandwhichneedsto
meettheErPDirective:
*Thismonitorissettobeturnedoffautomaticallyin4hoursafteryouturnedondisplayifthereisnoadjust-
menttodisplay.
*Tomakethissettingbedisabled,changetheoptionto‘Off’inOSDmenuof“AutomaticStandby”.
19M37H
27MC37HQ
20M37H 22M37H 22M37HQ 24M37H 24M37HQ 27MP37HQ 27MP37VQ
27MP36HQ
4
ENG
ENGLISH
ASSEMBLING AND PREPARING
ASSEMBLINGANDPREPARING
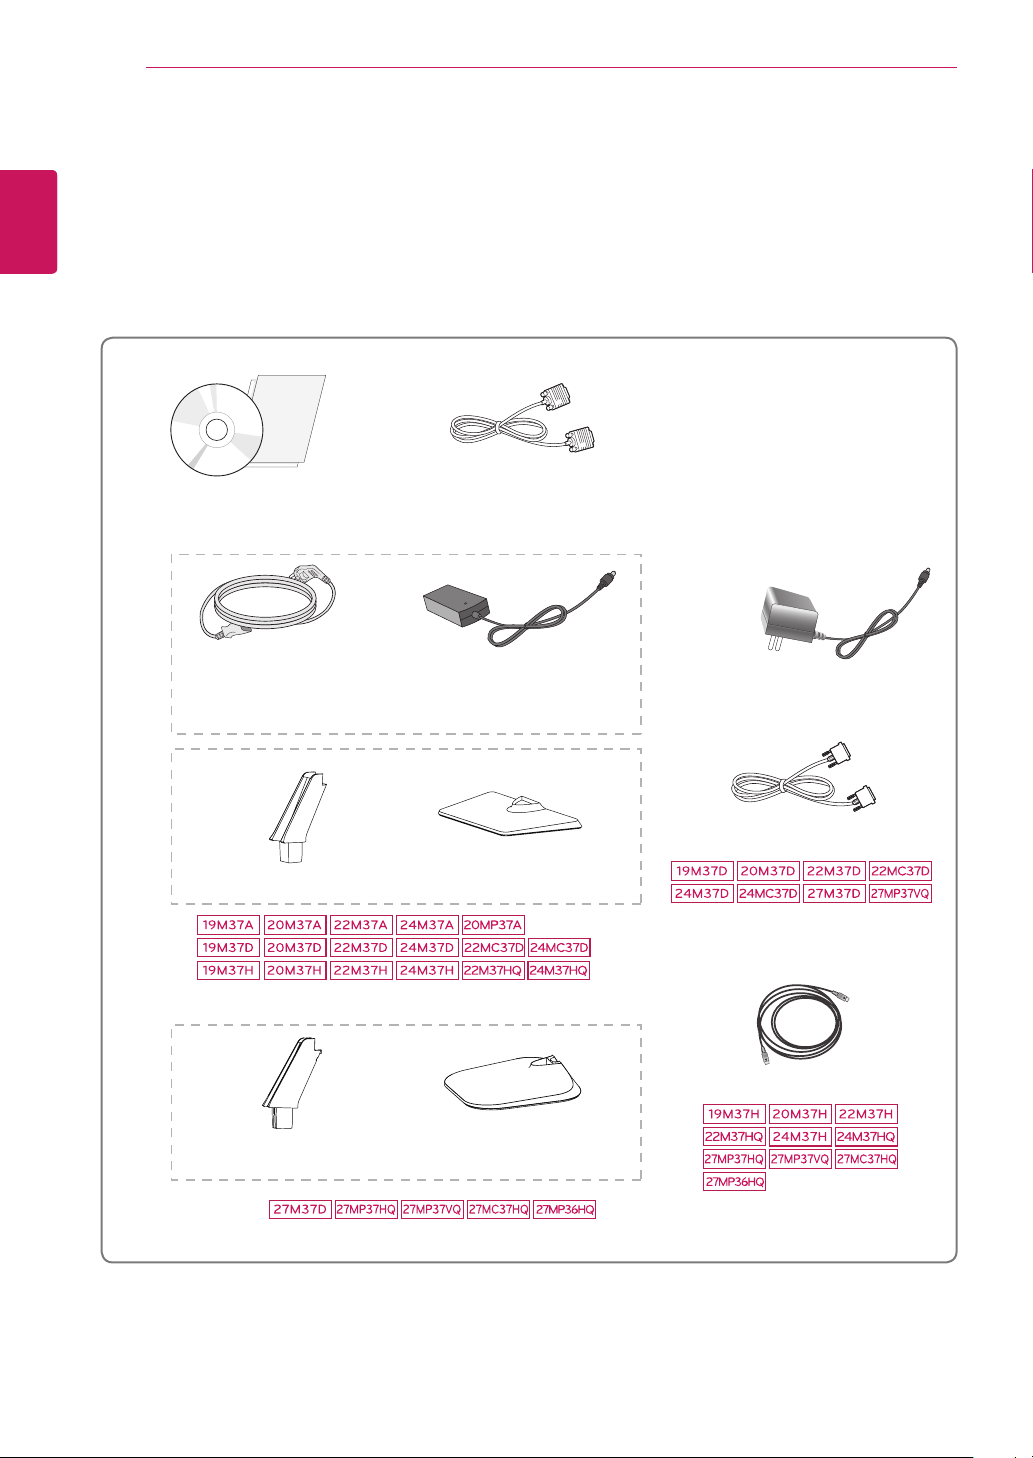
Unpacking
Checkyourproductboxforthefollowingitems.Ifthereareanymissingaccessories,contactthelocal
dealerwhereyoupurchasedyourproduct.Theillustrationsinthismanualmaydifferfromtheactualproduct
andaccessories.
CD(Owner'sManual)/
Card
(Dependingonthecountry)
(Dependingonthecountry)
PowerCord
AC-DCAdapter
AC-DCAdapter
or
D-SUBCable
(Thiscableisnotincludedinall
countries.)
HDMICable
StandBody
StandBase
StandBase
DVI-DCable
(Thiscableisnotincludedinall
countries.)
(Thiscableisnotincludedinall
countries.)
StandBody

5
ENG
ENGLISH
ASSEMBLING AND PREPARING
Donotuseanyunapprovedaccessoriestoensurethesafetyandproductlifespan.
Anydamagesorinjuriesbyusingunapprovedaccessoriesarenotcoveredbythewarranty.
Theaccessoriessuppliedwithyourproductmayvarydependingonthemodel.
Productspecificationsorcontentsinthismanualmaybechangedwithoutpriornoticeduetoupgrade
ofproductfunctions.
CAUTION
NOTE
6
ENG
ENGLISH
ASSEMBLING AND PREPARING
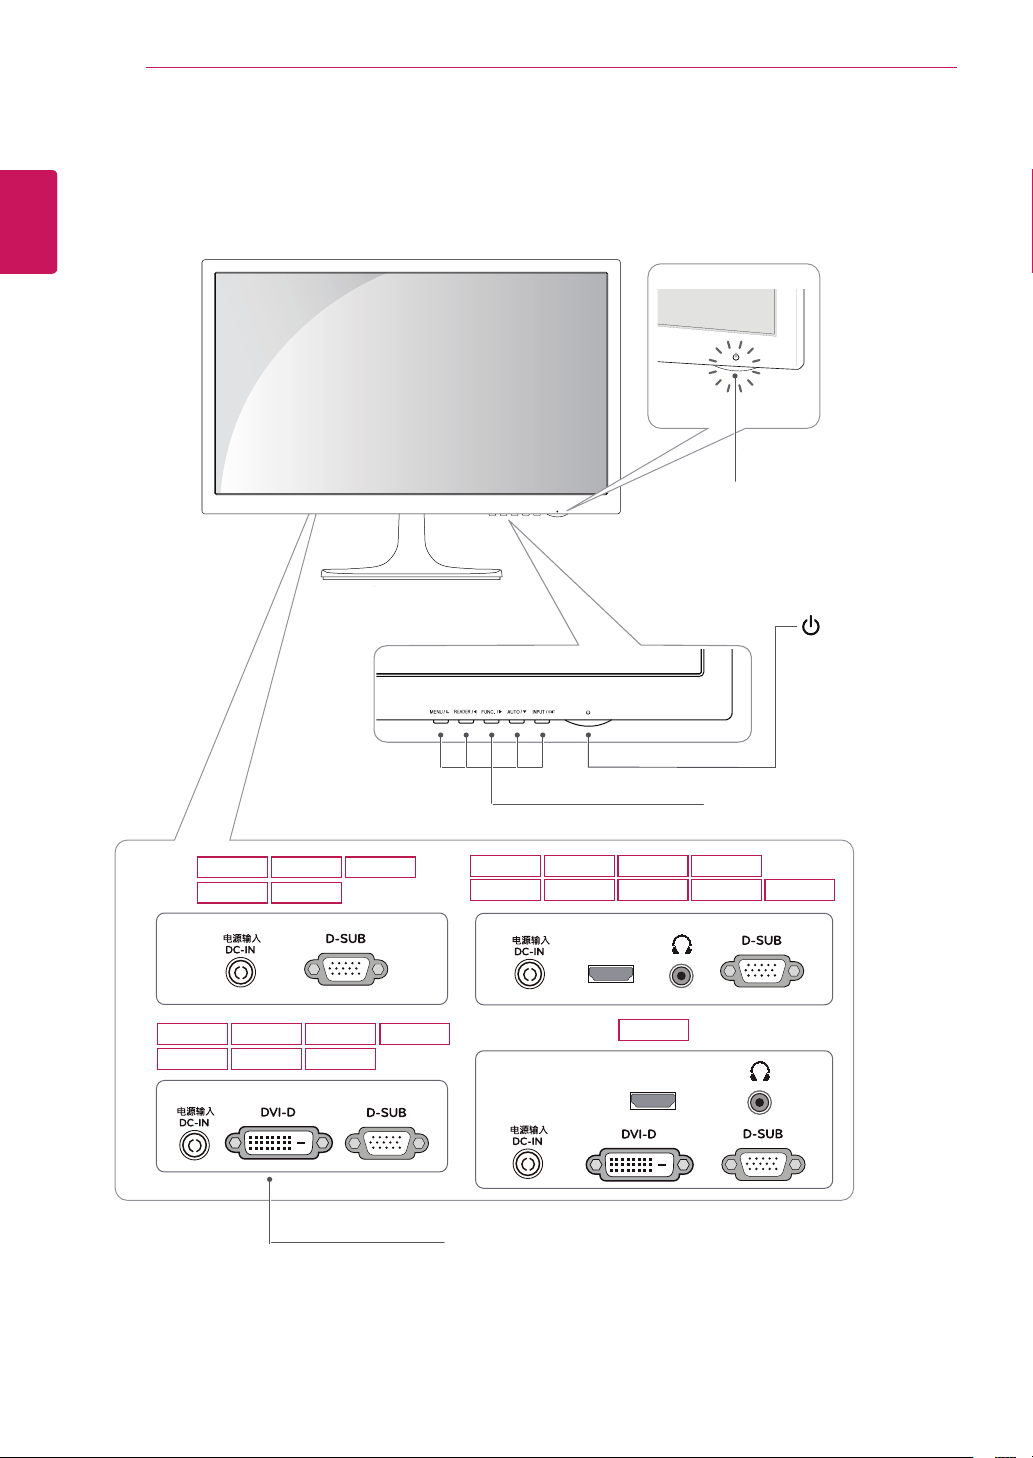
Partsandbuttons
HDMI IN
HDMI IN
22M37HQ
19M37A
20M37A
20MP37A
22M37A
24M37A
19M37H
20M37H 22M37H 24M37H
24M37HQ
19M37D
20M37D 22M37D 22MC37D
24M37D 24MC37D 27M37D
27MP37HQ 27MC37HQ
27MP37VQ
27MP36HQ
PowerIndicator
LightingOn:Turnedon
LightingOff:Turnedoff
Connectionpanel(Seep.13~15)
Button(Seep.16)
(PowerButton)

7
ENG
ENGLISH
ASSEMBLING AND PREPARING
MovingandLiftingtheMonitor
Whenmovingorliftingthemonitor,followthese
instructionstopreventthemonitorfrombeing
scratchedordamagedandtoensuresafetrans-
portationregardlessofitsshapeorsize.
Asfaraspossible,avoidtouchingthemoni-
torscreen.Thismayresultindamagetothe
screenorsomeofthepixelsusedtocreate
images.
Itisadvisabletoplacethemonitorinthe
originalboxorpackingmaterialbeforeat-
temptingtomoveit.
Beforemovingorliftingthemonitor,discon-
nectthepowercordandallcables.
Holdthetopandbottomofthemonitorframe
firmly.Donotholdthepanelitself.
Whenholdingthemonitor,thescreenshould
faceawayfromyoutopreventitbeing
scratched.
Whenmovingthemonitor,avoidanystrong
shockorvibrationstotheproduct.
Whenmovingthemonitor,keepitupright,
neverturnthemonitoronitssideortiltit
sideways.
CAUTION
8
ENG
ENGLISH
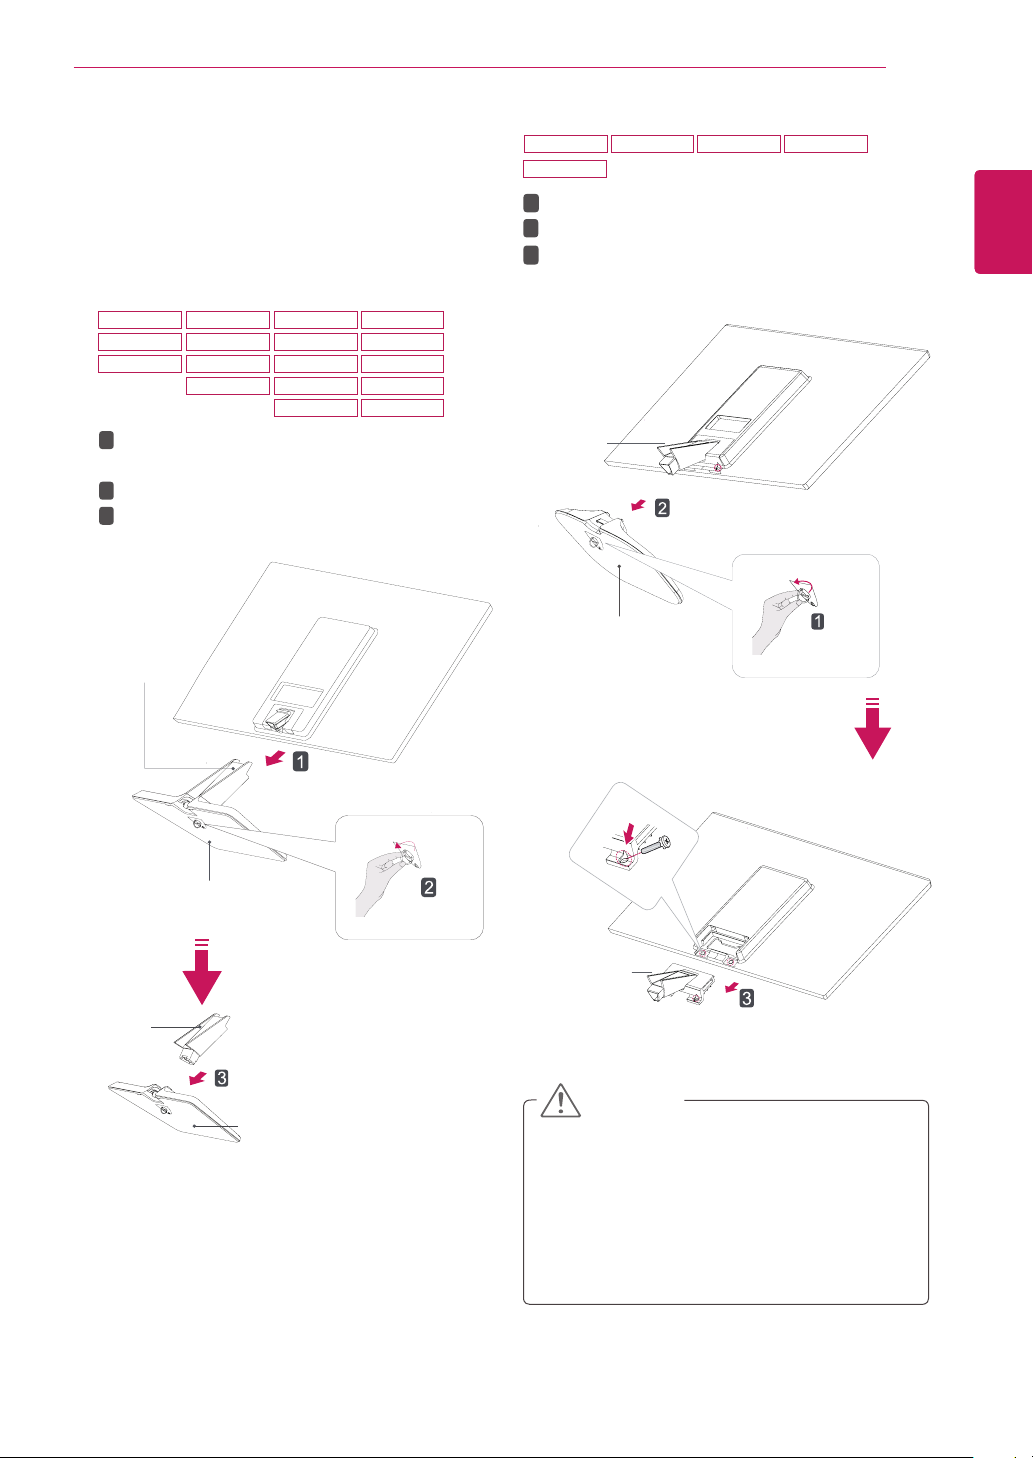
ASSEMBLING AND PREPARING
Attachthe
StandBody
tothemonitorset.
Attachthe
StandBase
.
Tightenthescrewtotheright.
SettinguptheMonitorset
AttachingtheStandBase
1
PlacetheMonitorsetwiththescreenside
downonaflatandcushionedsurface.
Layafoammatorsoftprotectivecloth
onthesurfacetoprotectthescreenfrom
damage.
CAUTION
2
StandBase
StandBody
1
2
3
StandBody
StandBase
19M37A 20M37A 22M37A 24M37A
19M37D 20M37D 22M37D 24M37D
19M37H 20M37H 22M37H 24M37H
20MP37A 22M37HQ 24M37HQ
22MC37D 24MC37D
27M37D 27MP37HQ 27MP37VQ 27MC37HQ
27MP36HQ
9
ENG
ENGLISH
ASSEMBLING AND PREPARING
DetachingtheStandBase
1
PlacetheMonitorsetwiththescreenside
downonaflatandcushionedsurface.
StandBase
StandBase
StandBody
StandBody
Pulloutthe
StandBody
and
StandBase
fromthemonitorset.
Turnthescrewtotheleft.
Pulloutthe
StandBase
.
1
2
3
Thisillustrationdepictsthegeneralmodelof
connection.Yourmonitormaydifferfromthe
itemsshowninthepicture.
Donotcarrytheproductupsidedownholding
onlythestandbase.Theproductmayfall
andgetdamagedorinjureyourfoot.
CAUTION
Turnthescrewtotheleft.
Pulloutthe
StandBase
fromthe
StandBody
.
Removetwoscrewsandpulloutthe
Stand
Body
fromthemonitorset.
1
2
3
StandBody
StandBody
StandBase
2
19M37A 20M37A 22M37A 24M37A
19M37D 20M37D 22M37D 24M37D
19M37H 20M37H 22M37H 24M37H
20MP37A 22M37HQ 24M37HQ
22MC37D 24MC37D
27M37D 27MP37HQ 27MP37VQ 27MC37HQ
27MP36HQ
10
ENG
ENGLISH
ASSEMBLING AND PREPARING
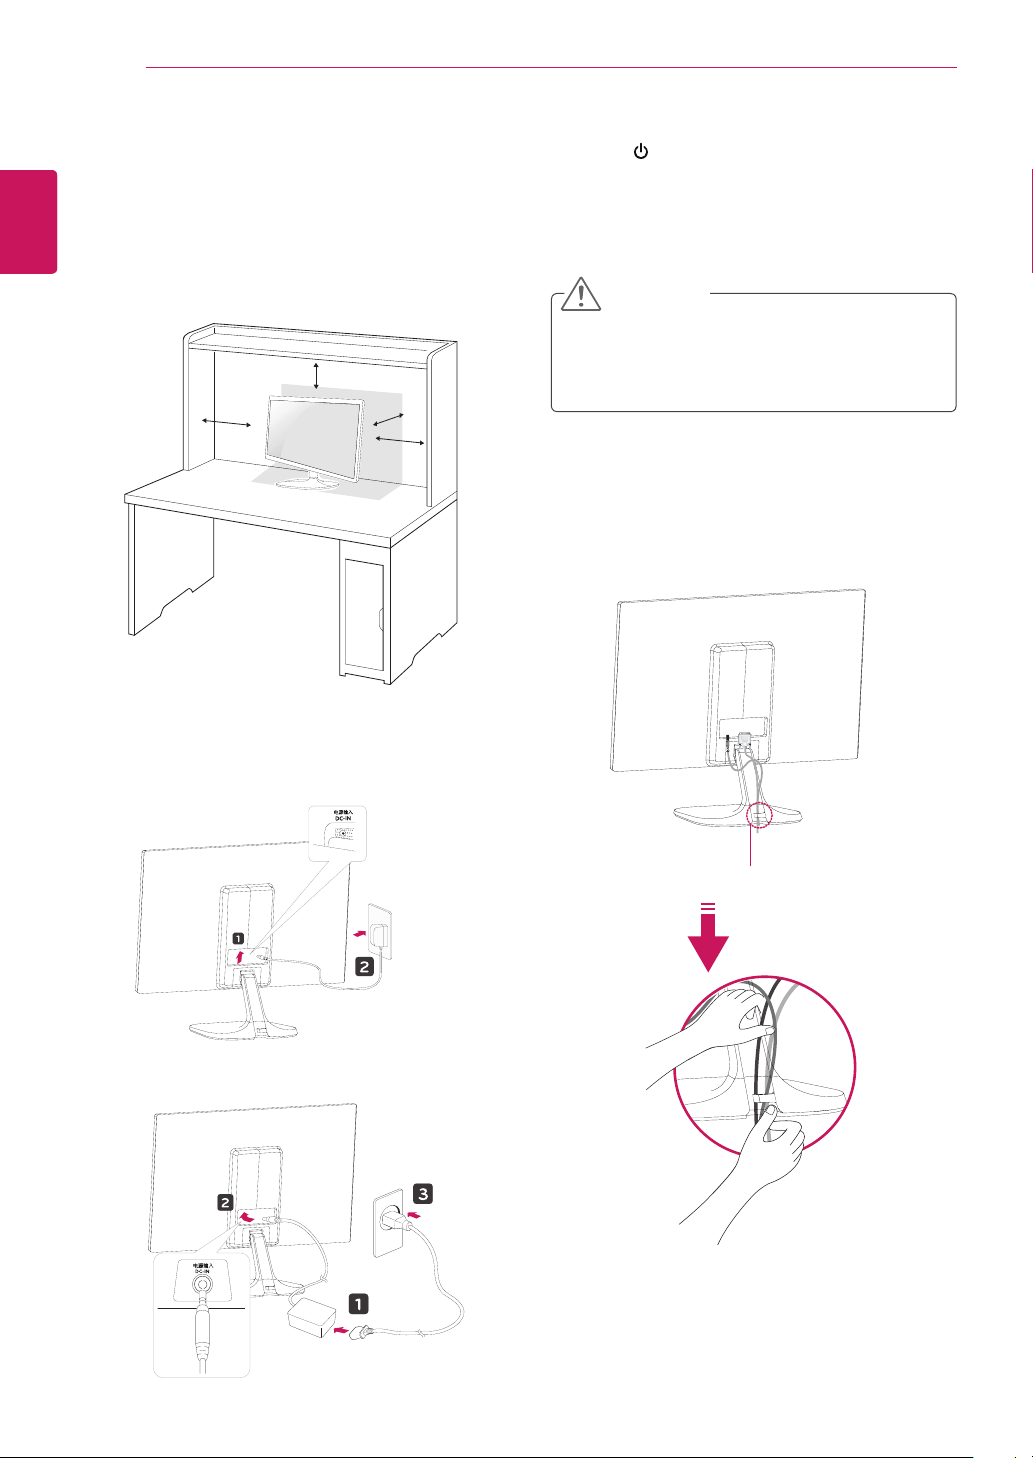
Mountingonatable
1
LiftandtilttheMonitorsetintoitsupright
positiononatable.
Leavea10cm(minimum)spacefromthewall
forproperventilation.
Usingthecableholder
2
ConnecttheAC-DCAdapterandPowerCord
toawalloutlet.
3
Press (Power)buttononthebottomswitch
paneltoturnthepoweron.
10 cm
10 cm
10 cm
10 cm
Unplugthepowercordbeforemovingthe
Monitortoanotherlocation.Otherwiseelectric
shockmayoccur.
CAUTION
Cableholder
or
11
ENG
ENGLISH
ASSEMBLING AND PREPARING
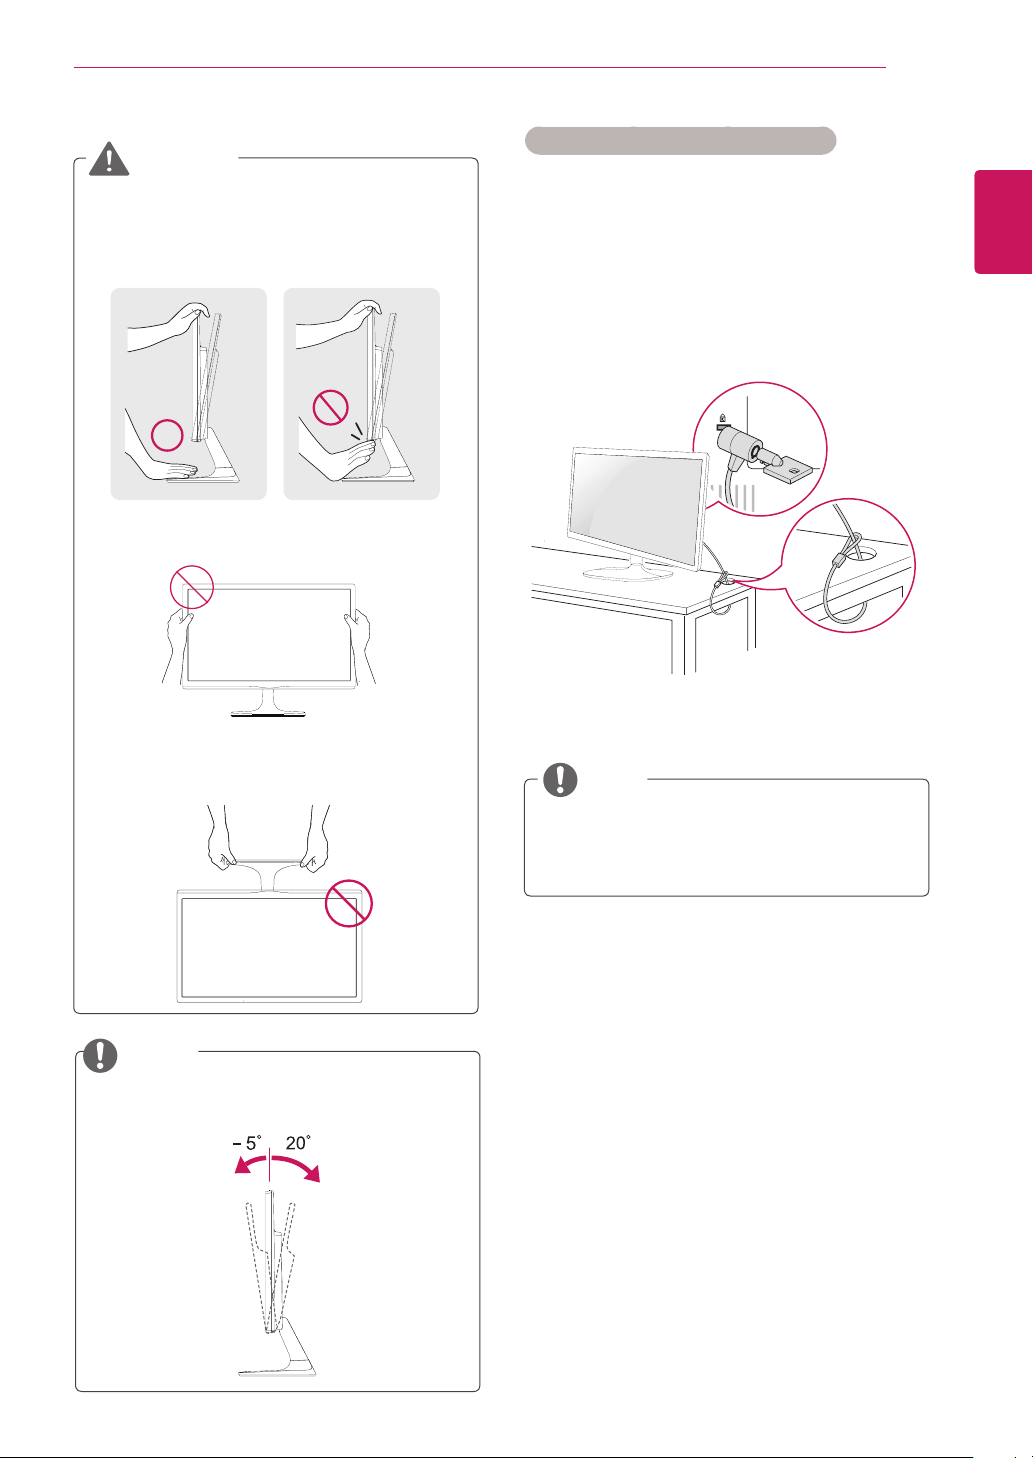
UsingtheKensingtonsecuritysystem
TheKensingtonsecuritysystemconnectoris
locatedatthebackoftheMonitorset.Formore
informationofinstallationandusing,refertothe
manualsuppliedwiththeKensingtonsecurity
systemorvisit
http://www.kensington.com
.
ConnecttheKensingtonsecuritysystemcable
betweentheMonitorsetandatable.
TheKensingtonsecuritysystemisoptional.
Youcanobtainitfrommostelectronicsstores.
NOTE
Whenyouadjusttheangle,donotholdthe
bottomoftheMonitorsetframeasshownon
thefollowingillustration,asmayinjureyour
fingers.
Donottouchorpressthescreenwhen
adjustingtheangleofthemonitor.
Donotholdthissetlikebelowpicture.Monitor
screencandetachfromstandbaseandinjure
yourbody.
WARNING
Tiltfrom+20to-5degreesupordowntoadjust
theangleoftheMonitorsettosuityourview.
NOTE
Front Rear
12
ENG
ENGLISH
ASSEMBLING AND PREPARING
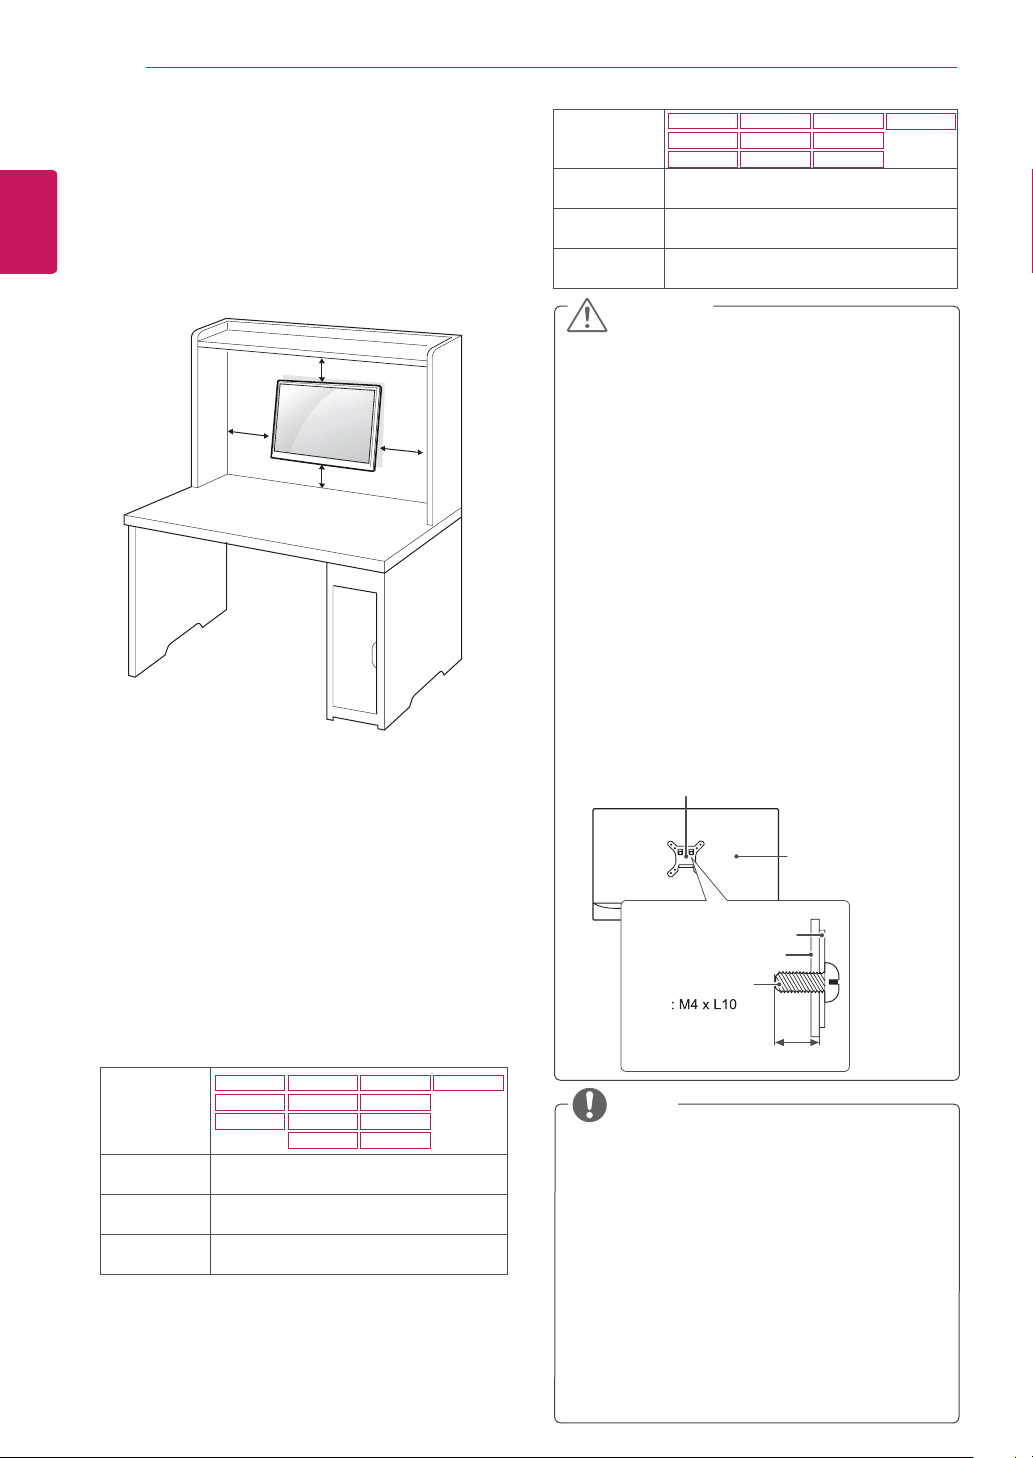
Mountingonawall
Forproperventilation,allowaclearanceof10cm
oneachsideandfromthewall.Detailed
instructionsareavailablefromyourdealer,seethe
optionalTiltWallMountingBracketInstallationand
SetupGuide.
IfyouintendtomounttheMonitorsettoawall,
attachWallmountinginterface(optionalparts)to
thebackoftheset.
WhenyouinstalltheMonitorsetusingawall
mountinginterface(optionalparts),attachit
carefullysoitwillnotdrop.
1Ifyouusescrewlongerthanstandard,themoni-
tormightbedamagedinternally.
2Ifyouuseimproperscrew,theproductmightbe
damagedanddropfrommountedposition.
Inthiscase,LGElectronicsisnotresponsible
forit.
10 cm
10 cm
10 cm
10 cm
Disconnectthepowercordfirst,andthen
moveorinstalltheMonitorset.Otherwise
electricshockmayoccur.
IfyouinstalltheMonitorsetonaceilingor
slantedwall,itmayfallandresultinsevere
injury.
UseonlyanauthorizedLGwallmount
andcontactthelocaldealerorqualified
personnel.
Donotovertightenthescrewsasthismay
causedamagetotheMonitorsetandvoid
yourwarranty.
Useonlyscrewsandwallmountsthat
meettheVESAstandard.Anydamages
orinjuriesbymisuseorusinganimproper
accessoryarenotcoveredbythewarranty.
Screwlengthfromoutersurfaceofback
covershouldbeunder8mm.
UsethescrewsthatarelistedontheVESA
standardscrewspecifications.
Thewallmountkitwillincludeaninstallation
manualandnecessaryparts.
Thewallmountbracketisoptional.Youcan
obtainadditionalaccessoriesfromyourlocal
dealer.
Thelengthofscrewsmaydifferdepending
onthewallmount.Besuretousetheproper
length.
Formoreinformation,refertothe
instructionssuppliedwiththewallmount.
CAUTION
NOTE
BackCover
WallmountPad
WallmountPad
BackCover
Standardscrew
Max.8mm
Model
19M37A
19M37D
19M37H
20M37A
20M37D
20M37H
20MP37A
22M37A
22M37D
22M37H
22M37HQ
22MC37D
WallMount
(AxB)
75x75
Standard
screw
M4
Numberof
screws
4
Model
WallMount
(AxB)
100x100
Standard
screw
M4
Numberof
screws
4
27MP36HQ
27MC37HQ
24MC37D
27M37D
24M37A
24M37D
27MP37HQ
24M37H
24M37HQ
27MP37VQ
13
ENG
ENGLISH
USING THE MONITOR SET
USINGTHEMONITORSET
ConnectingtoaPC
YourMonitorsetsupportsPlug&Play*.
*Plug&Play:APCrecognizesaconnected
devicethatusersconnecttoaPCandturn
on,withoutdeviceconfigurationoruser
intervention.
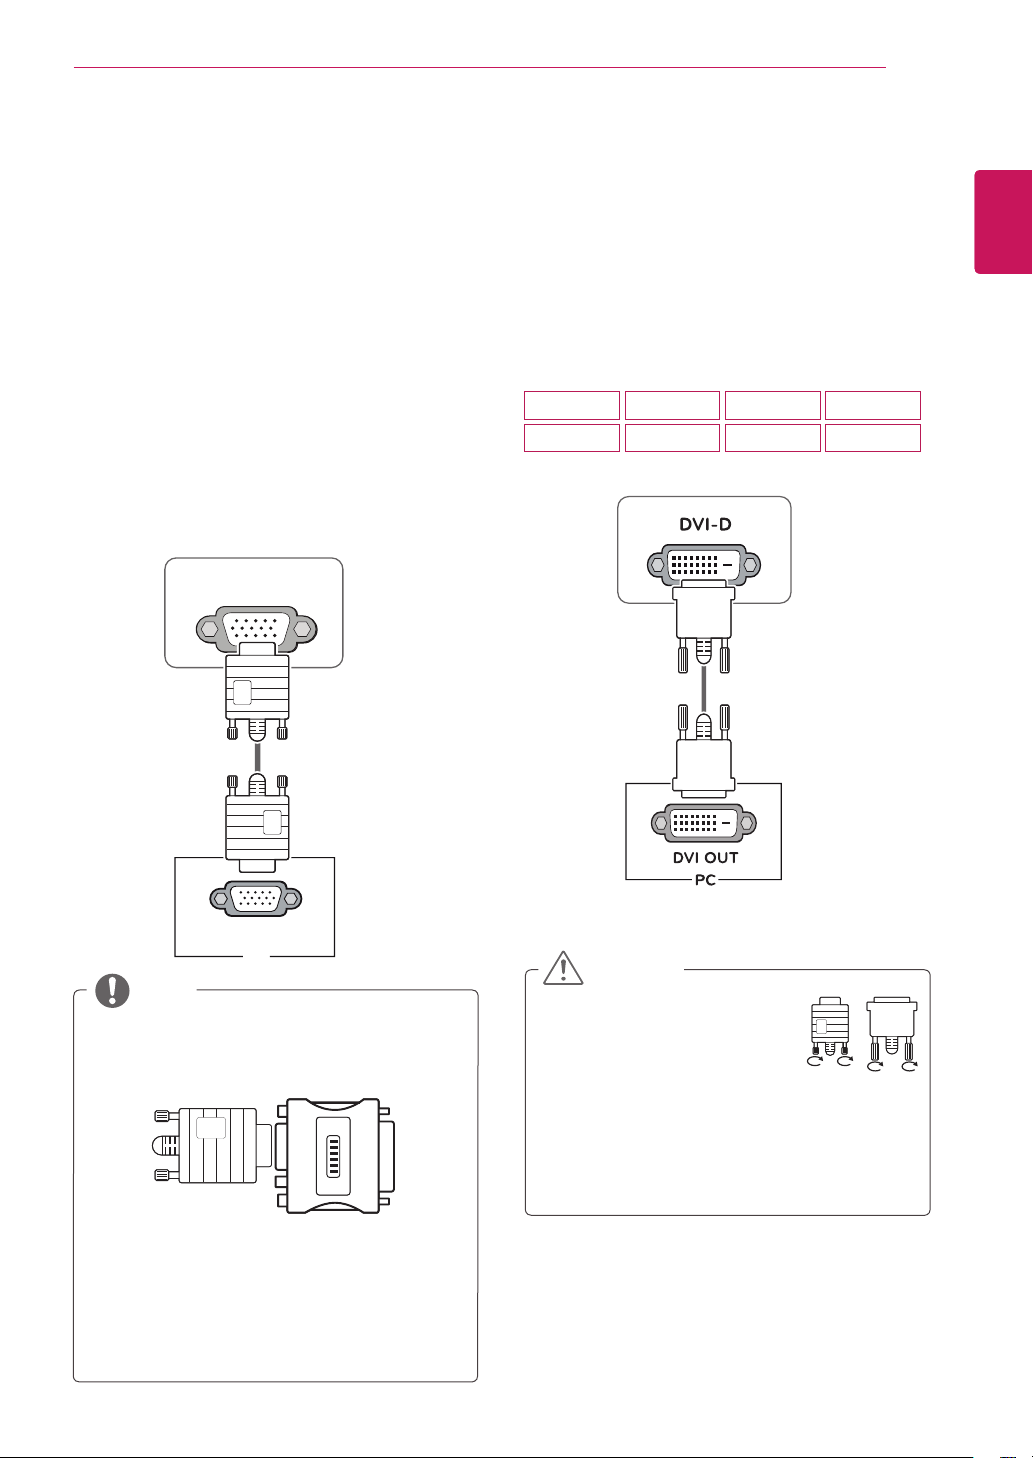
D-SUBconnection
TransmitsanalogvideofromyourPCtothe
Monitorset.ConnectthePCandtheMonitorset
withthesuppliedD-sub15pinsignalcableas
showninthefollowingillustrations.
Macadapter
ForAppleMacintoshuse,aseparateplug
adapterisneededtochangethe15pin
highdensity(3row)D-SUBVGAconnector
onthesuppliedcabletoa15pin2row
connector.
WhenusingaD-Subsignalinputcable
connectorforMacintosh
NOTE
DVI-Dconnection
TransmitsadigitalvideosignalfromyourPCto
theMonitorset.ConnectthePCandtheMonitor
setwithaDVIcableasshowninthefollowing
illustrations.
D-SUB
RGB OUT
PC
Connectthesignalinputcable
andtightenitbyturningthe
screwsclockwise.
Donotpressthescreenwith
yourfingerforalongtimeasthismay
resultintemporarydistortiononthescreen.
Avoiddisplayingafixedimageonthe
screenforalongperiodoftimetoprevent
imageburn.Useascreensaverifpossible.
CAUTION
19M37D
24M37D
20M37D
27M37D
22M37D
27MP37VQ
22MC37D
24MC37D
14
ENG
ENGLISH
USING THE MONITOR SET
WhenyouwanttousetwoPCinourMonitor,
pleaseconnectthesignalcable(D-SUB/
DVI-D/HDMI)respectivelyinMonitorset.
IfyouturntheMonitorsetonwhileitiscold,
thescreenmayflicker.Thisisnormal.
Somered,green,orbluespotsmayappear
onthescreen.Thisisnormal.
NOTE
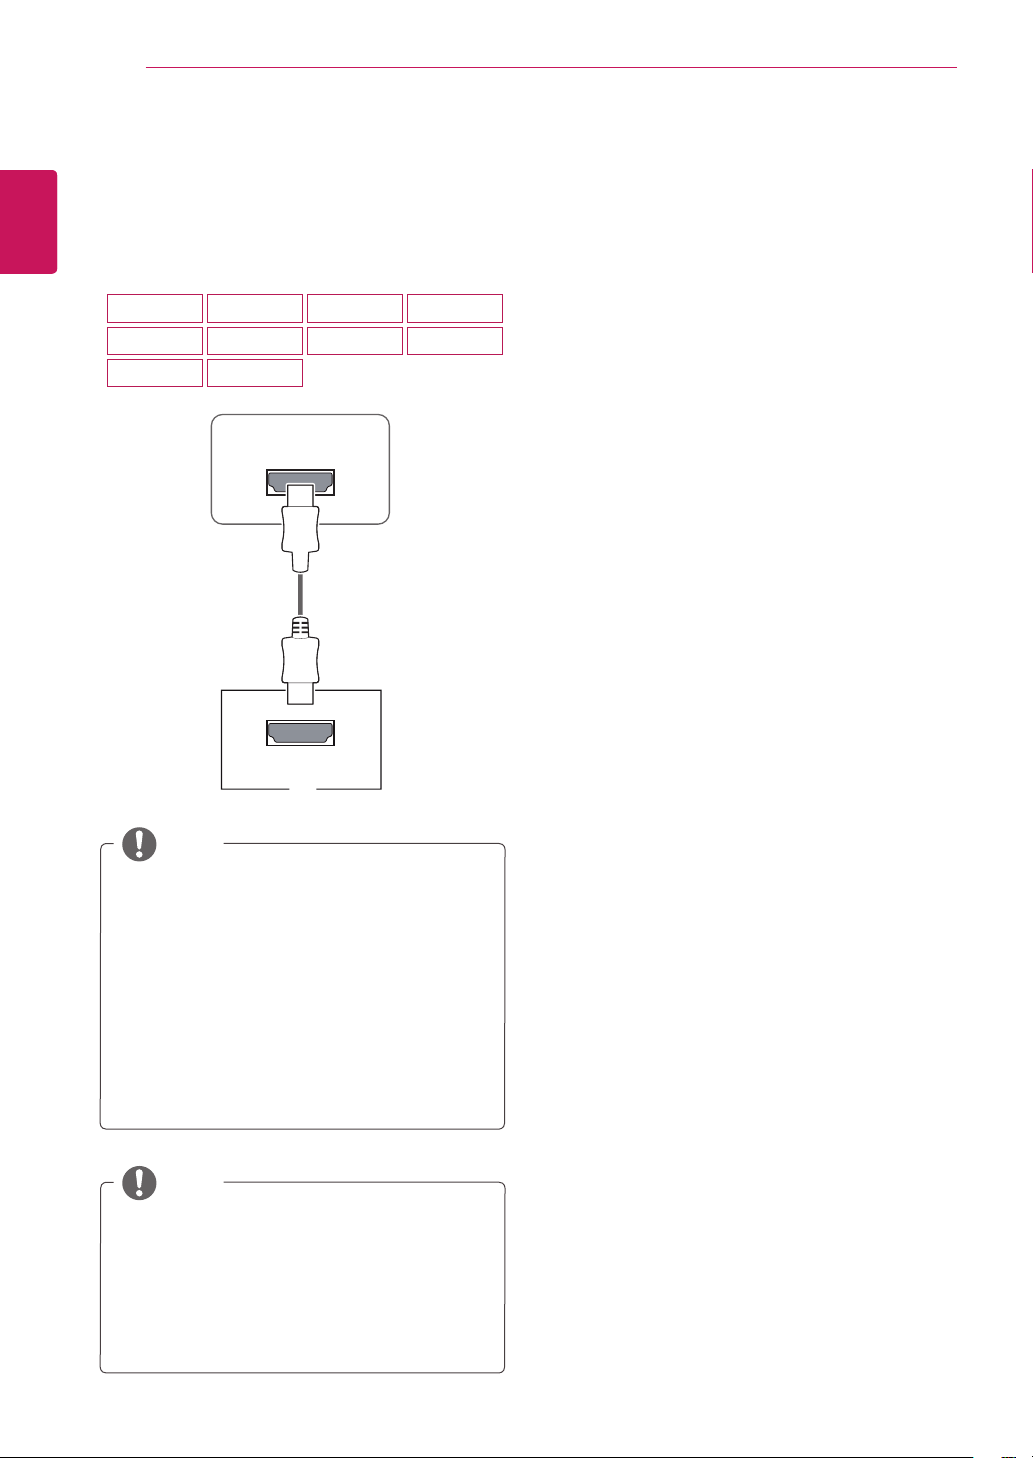
HDMIconnection
Transmitsthedigitalvideoandaudiosignalsfrom
yourPCtotheMonitorset.ConnectthePCand
theMonitorsetwiththeHDMIcableasshownin
thefollowingillustrations.
NOTE
IfyouuseHDMIPC,itcancausecompatibility
problem.
UseacertifiedcablewiththeHDMIlogo
attached.IfyoudonotuseacertifiedHDMI
cable,thescreenmaynotdisplayora
connectionerrormayoccur.
RecommendedHDMIcabletypes
-High-SpeedHDMI
®
/
TM
Cable
-High-SpeedHDMI
®
/
TM
CablewithEthernet
HDMI IN
HDMI OUT
PC
19M37H
24M37H
27MC37HQ
20M37H
24M37HQ
22M37H
27MP37HQ
22M37HQ
27MP37VQ
27MP36HQ
15
ENG
ENGLISH
USING THE MONITOR SET
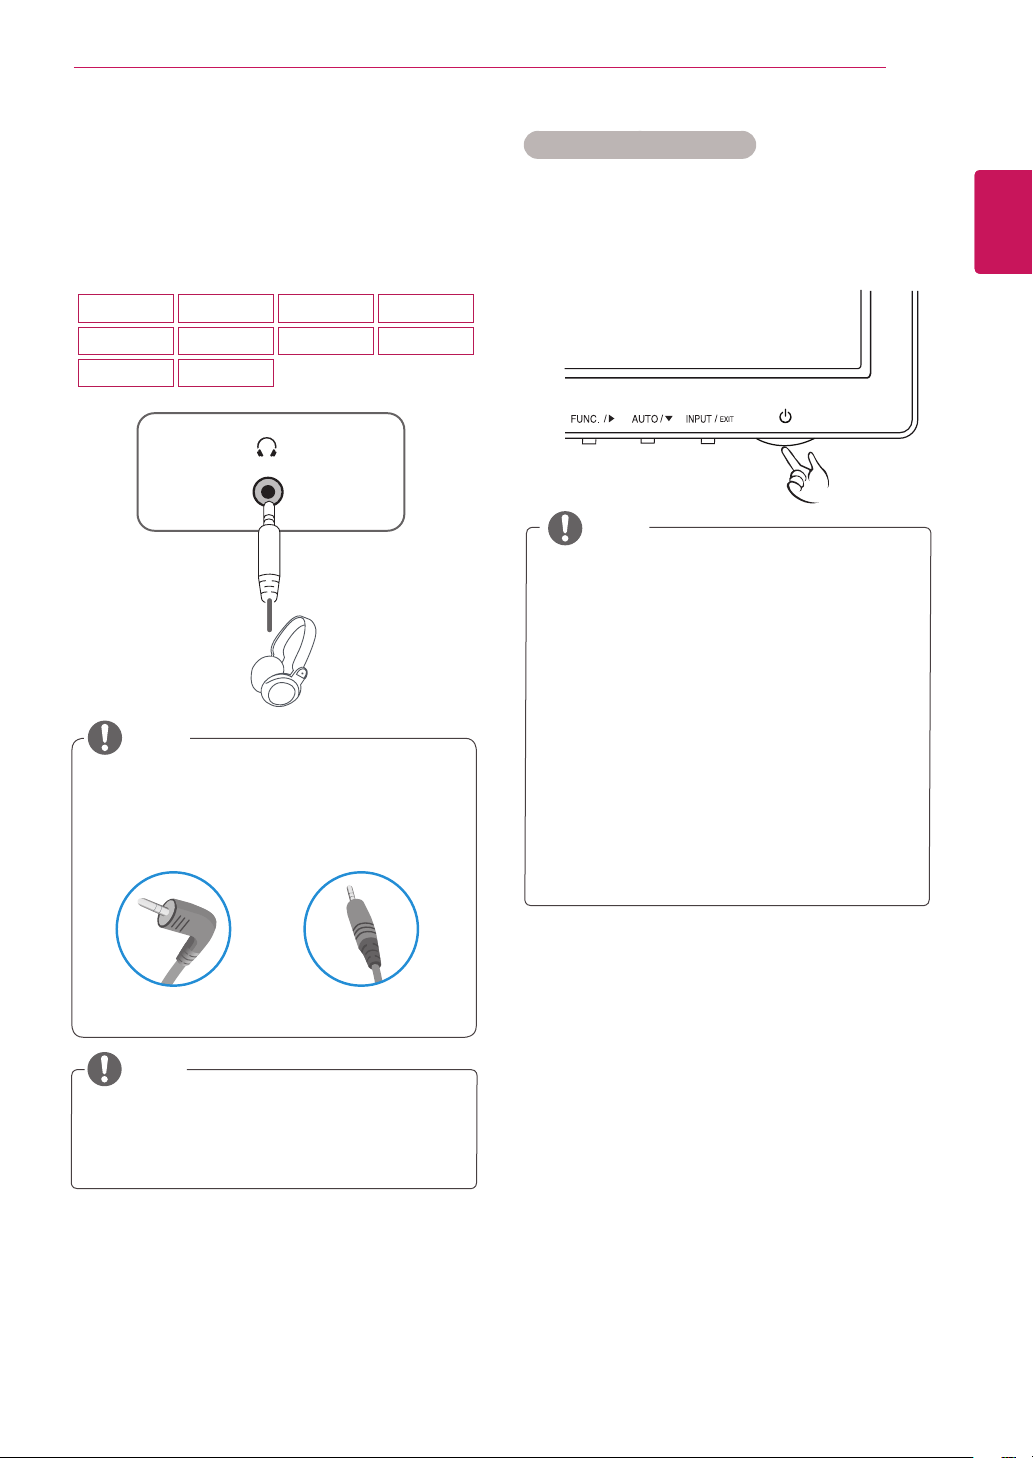
ConnectingtoExternalDevices
Peripheraldeviceconnection
Connectperipheraldevicestothemonitorusing
headphoneports.
Peripheraldevicesaresoldseparately.
Cableswithangledplugsmayhaveclear-
anceissues,usestraightplugswhenpos-
sible.
AngleType StraightType
NOTE
NOTE
Headphonesorspeakersmaynotworknor-
mally,dependingontheserverPCsettings.
"SelfImageSetting"Function.
Thisfunctionprovidestheuserwithoptimal
displaysettings.Whentheuserconnects
themonitorforthefirsttime,thisfunction
automaticallyadjuststhedisplaytooptimal
settingsforindividualinputsignals.(Only
supportedinAnalogMode)
‘AUTO’Function.
Whenyouencounterproblemssuchas
blurryscreen,blurredletters,screenflicker
ortiltedscreenwhileusingthedeviceor
afterchangingscreenresolution,pressthe
AUTOfunctionbuttontoimproveresolution.
(OnlysupportedinAnalogMode)
NOTE
SelfImageSettingFunction
Pressthepowerbuttononthebottompanelto
turnthepoweron.Whenmonitorpoweristurned
on,the"
SelfImageSetting
"Functionisexecuted
automatically.(OnlysupportedinAnalogMode)
19M37H
24M37H
27MC37HQ
20M37H
24M37HQ
22M37H
27MP37HQ
22M37HQ
27MP37VQ
27MP36HQ
16
ENG
ENGLISH
CUSTOMIZING SETTINGS
CUSTOMIZINGSETTINGS
1
PressthedesiredbuttononthebottomoftheMonitorset.
2
ChangethevalueofthemenuitembypressingthebuttonsonthebottomoftheMonitorset.
Toreturntotheuppermenuorsetothermenuitems,usetheuparrow( )button.
3
Select
EXIT
toleavetheOSDmenu.
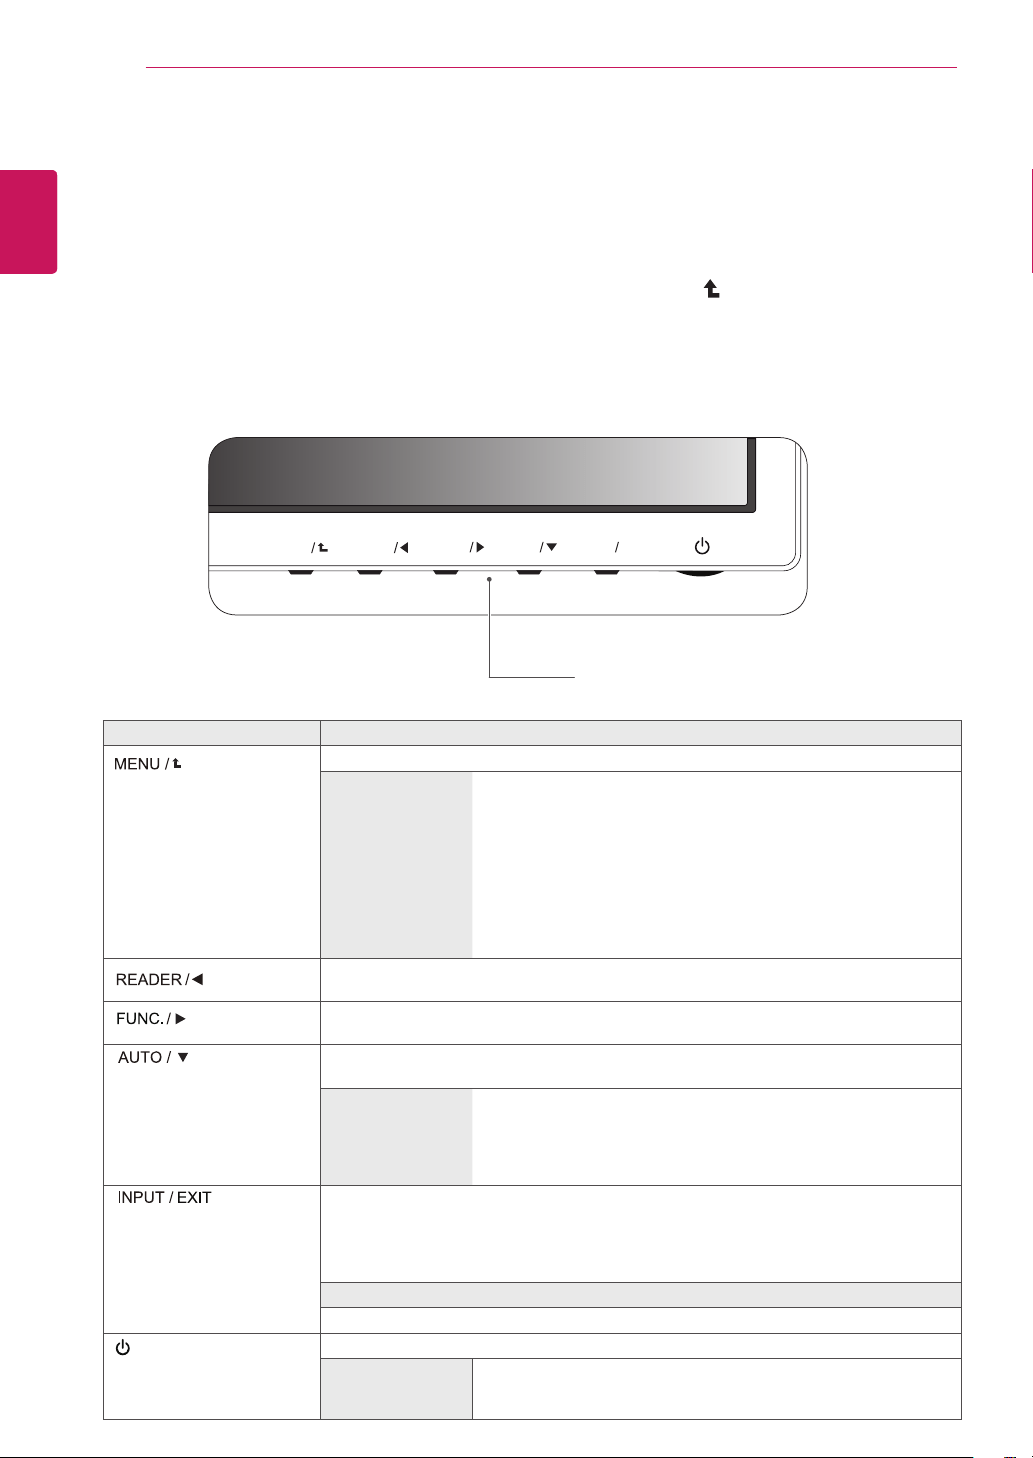
MonitorsetButtons
Button Description
Accessesthemainmenus.(Seep.17)
OSDLocked/OSD
Unlocked
Thisfunctionallowyoutolockthecurrentcontrolsettings,sothat
theycannotbeinadvertentlychanged.
PressandholdtheMENUbuttonforseveralseconds.ThenOSD
of“OSDLock”willappear.Afterthat,usercanselectlockorunlock
bypressingleft/rightbutton.
Ifuserselectsthe“Lock”iconbypressingthe“OK”button,the
message“OSDLocked”willappear.Otherwise,“OSDUnlocked”
willappear.Afterselectingthe“Lock”,Ifyouwanttochangeto
Unlock,youcanpushthe“MENU”buttonforseveralseconds.The
message“OSDUnlocked”willappear.
UsethisbuttontoenterReaderModemenu.Itsfunctionworkstodisplayscreenas
paper-likepictureforEyecomfort.Ifyouwanttomoreinformation(Seep.23).
UsethisbuttontoenterSMARTENERGYSAVING,PictureMode,ColorWizard,DUAL
DISPLAY,DUALWEBmenus.(Seep.24~27)
Whenadjustingyourdisplaysettings,alwayspresstheAUTObuttonontheMONITOR
SETUPOSD.(OnlysupportedinAnalogMode)
Thebestdisplay
mode
19M37A/19M37D/19M37H:1366x768
20M37A/20M37D/20M37H/20MP37A:1600x900
22M37A/22M37D/22MC37D/22M37H/22M37HQ/24M37A/24M37D/
24MC37D/24M37H/24M37HQ/27M37D/27MP37HQ/27MP37VQ/27
MC37HQ/27MP36HQ:1920x1080
Youcanchoosetheinputsignal.
• Whentwoinputsignalsareconnected,youcanselecttheinputsignal(D-SUB/DVI-D/
HDMI)youwant.
• Whenonlyonesignalisconnected,itisautomaticallydetected.Thedefaultsettingis
D-SUB.
EXIT
EXITtheOSD(OnScreenDisplay).
(PowerButton)
Turnsthepoweronoroff.
PowerIndicator Thepowerindicatorstayswhiteifthedisplayisrunningproperly(On
Mode).IfthedisplayisinSleepMode,thepowerindicatorblinks
white.
MENU
FUNC.
AUTO
INPUT
EXIT
READER
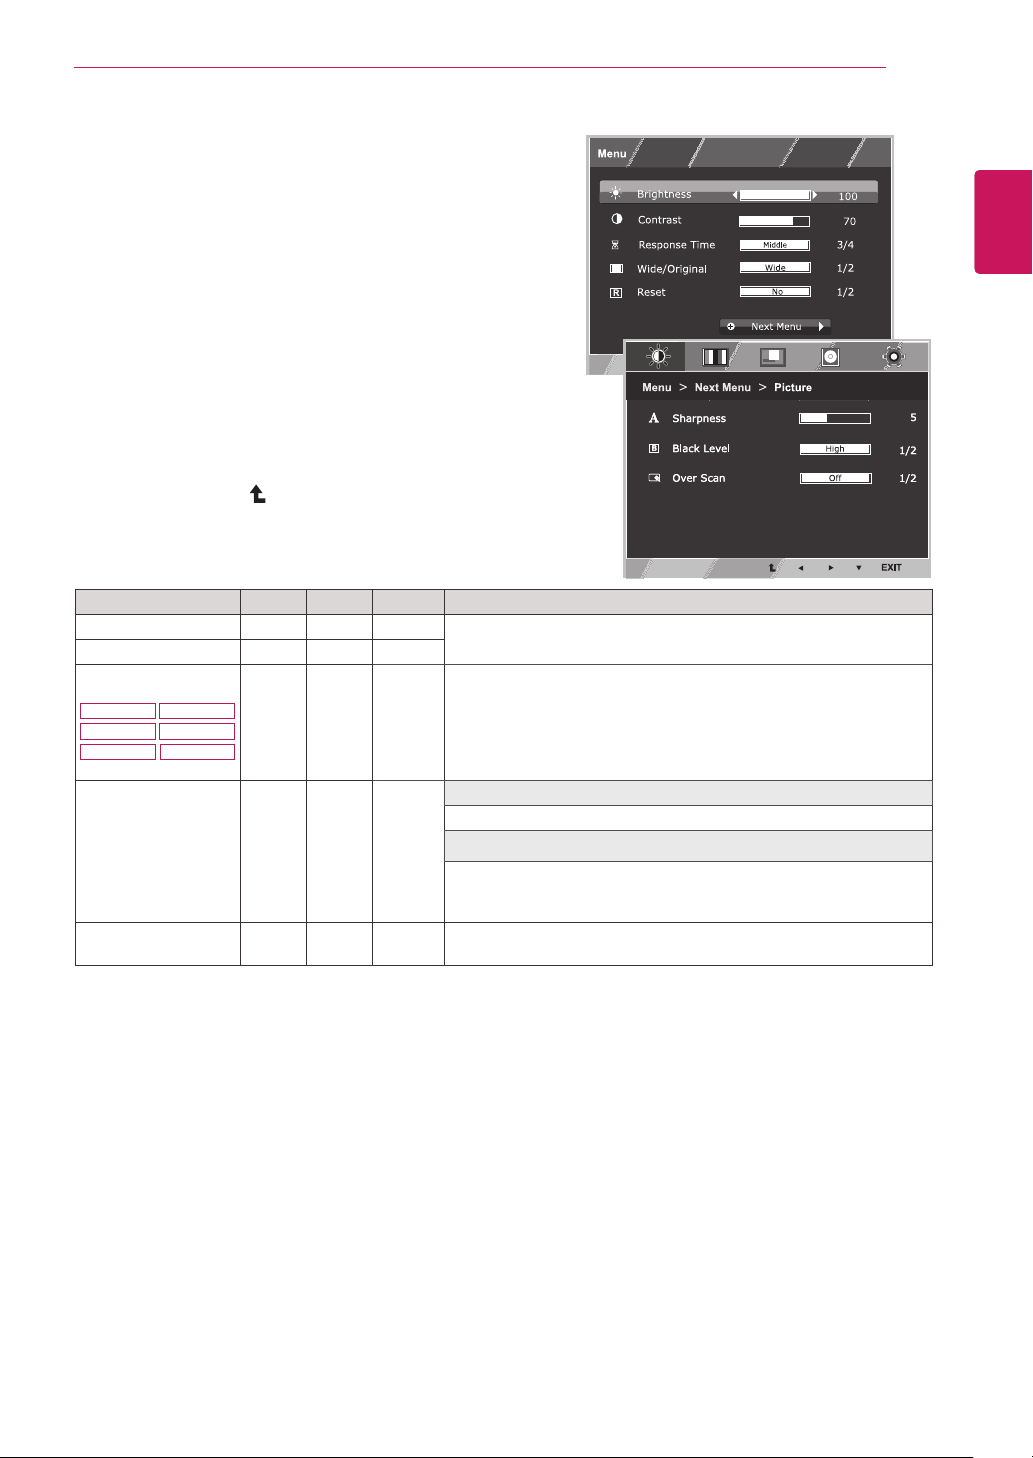
17
ENG
ENGLISH
CUSTOMIZING SETTINGS
Customizing Settings
Menu Settings
1
Press
MENU button on the bottom of the Monitor set
to display the Menu OSD.
2
Settheoptionsbypressingthe◄or►or▼
buttons.
3
Select the "
Next Menu" button to enter the more
option settings.
4
Select
EXIT to leave the OSD menu.
To return to the upper menu or set other menu items,
use the up arrow (
) button.
Each option is explained below.
Menu Analog Digital HDMI Description
Brightness ● ● ●
To adjust the brightness, contrast of the screen.
Contrast ● ● ●
Response Time
● ● ●
You can set a response time for displayed pictures based on the
speed of the screen. For a normal environment, it is recommended
that you use 'Off'. For a fast-moving picture, it is recommended that
you use 'High'.
Wide/Original
● ● ●
Wide
Switch to full screen mode according to input image signal.
Original
Change the input image signal ratio to original.
* This function works only if input resolution is lower than Monitor
set ratio (16:9).
Reset
● ● ●
Restore all factory default settings. Press the
◄
,
►
buttons to reset
immediately.
22M37HQ 24M37HQ
27MP37HQ
27MC37HQ
27MP37VQ
27MP36HQ

18
ENG
ENGLISH
CUSTOMIZING SETTINGS
Menu>NextMenu Analog Digital HDMI Description
Picture Sharpness ● ● ●
Toadjusttheclearnessofthescreen
BlackLevel
●
Tosetoffsetlevel
OverScan
●
Toimprovetheclarityandstabilityofthe
screen
Color Gamma
● ● ●
Tocustomizethecolorofthescreen
ColorTemp
SixColor
ColorReset
20MP37A
27MP37HQ 27MP37VQ
27MC37HQ
27MP36HQ
Display Horizontal
●
Toadjustthepositionofthescreen
Vertical
Clock
●
Toimprovetheclarityandstabilityofthe
screen
Phase
Audio
Volume ●
Toadjustthevolume
Others Language
● ● ●
Tocustomizethescreenstatusforauser's
operatingenvironment
PowerIndicator
AutomaticStandby
● ● ●
Resolution ●
Analog:
D-SUB(Analogsignal)input.
Digital:
DVI-D(Digitalsignal)input.
HDMI:
HDMI(Digitalsignal)input.
27MP36HQ
19M37H 20M37H
22M37H
22M37HQ
24M37H
24M37HQ
27MP37HQ 27MP37VQ
27MC37HQ
27MP36HQ
19M37H 20M37H
22M37H
22M37HQ
24M37H
24M37HQ
27MP37HQ 27MP37VQ
27MC37HQ
27MP36HQ
19M37H 20M37H
22M37H
22M37HQ
24M37H
24M37HQ
27MP37HQ 27MP37VQ
27MC37HQ
27MP36HQ
19M37H 20M37H
22M37H
22M37HQ
24M37H
24M37HQ
27MP37HQ 27MP37VQ
27MC37HQ
20MP37A
27MP37HQ 27MP37VQ
27MC37HQ
27MP36HQ
19
ENG
ENGLISH
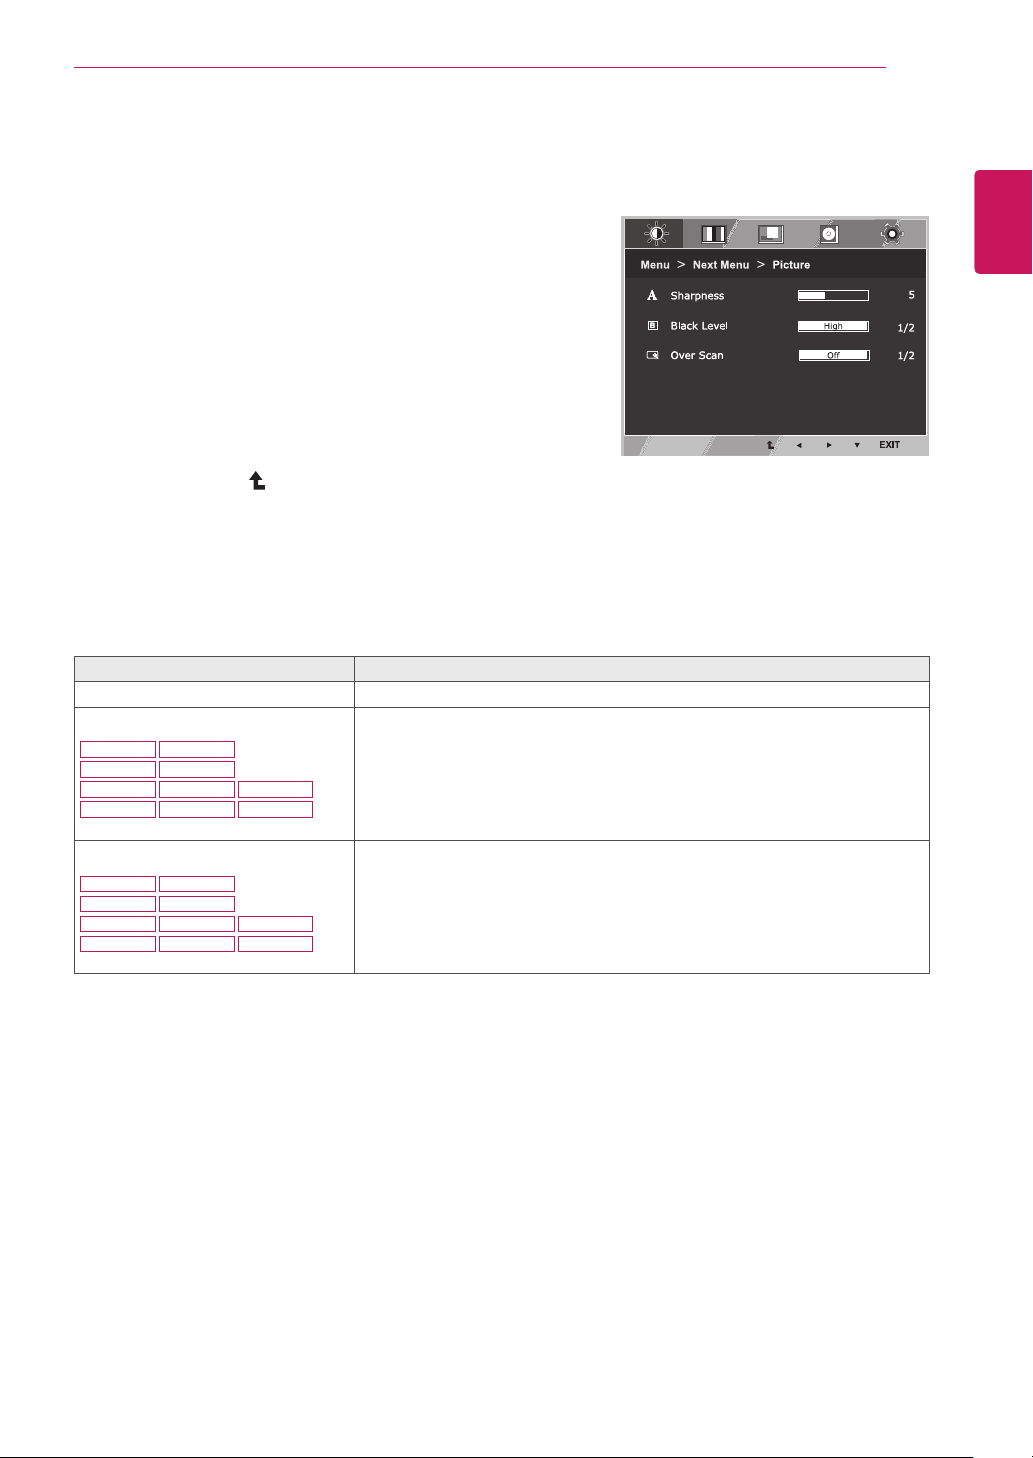
CUSTOMIZING SETTINGS
Picture
1
Press
MENU
buttononthebottomoftheMonitorset
todisplaythe
Menu
OSD.
2
Selectthe"
NextMenu
"buttontoenterthemore
optionsettings.
3
Enterto
Picture
bypressingthe▼button.
4
Settheoptionsbypressingthe◄or►or▼
buttons.
5
Select
EXIT
toleavetheOSDmenu.
Toreturntotheuppermenuorsetothermenuitems,
usetheuparrow( )button.
Eachoptionisexplainedbelow.
Menu>NextMenu>Picture Description
Sharpness Toadjusttheclearnessofthescreen.
BlackLevel Youcansettheoffsetlevel.Ifyouselect'High',thescreenwillbebrightandif
youselect‘Low’,thescreenwillbedark.(onlyforHDMIinput)
*Offset?Asthecriteriaforvideosignal,itisthedarkestscreenthemonitorcan
show.
OverScan ToselecttherangeofoutputimageforDTVtiminginHDMIinput.(onlyforHDMI
input)RecommendoverscanfunctiontoturnonwhenconnectAVequipment.
27MP36HQ
19M37H 20M37H
22M37H
22M37HQ
24M37H
24M37HQ
27MP37HQ 27MP37VQ
27MC37HQ
27MP36HQ
19M37H 20M37H
22M37H
22M37HQ
24M37H
24M37HQ
27MP37HQ 27MP37VQ
27MC37HQ
20
ENG
ENGLISH
CUSTOMIZING SETTINGS
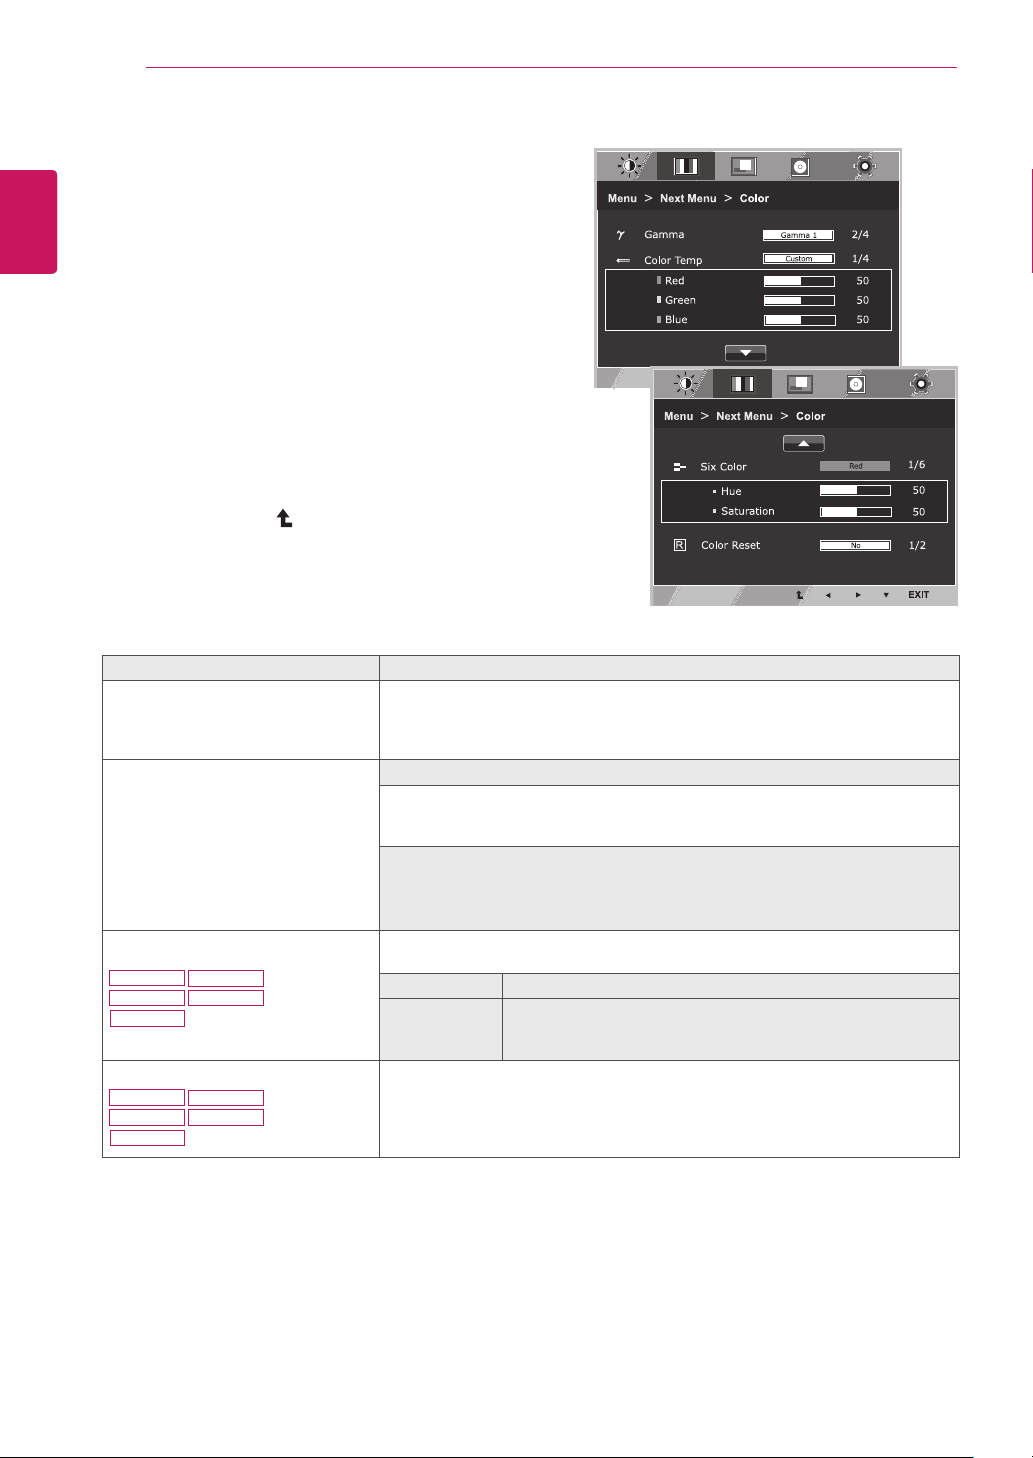
Color
1
Press
MENU
buttononthebottomoftheMonitorset
todisplaythe
Menu
OSD.
2
Selectthe"
NextMenu
"buttontoenterthemore
optionsettings.
3
Select
Color
bypressingthe►button.
4
Enterto
Color
bypressingthe▼button.
5
Settheoptionsbypressingthe◄or►or▼
buttons.
6
Select
EXIT
toleavetheOSDmenu.
Toreturntotheuppermenuorsetothermenuitems,
usetheuparrow( )button.
Eachoptionisexplainedbelow.
Menu>NextMenu>Color Description
Gamma Setyourowngammavalue.:Gamma0,Gamma1,Gamma2,Offon
themonitor,highgammavaluesdisplaywhitishimagesandlowgamma
valuesdisplayblackishimages.
Ifuserdon'twantadjustedgamma,usercanselectGammaoff.
ColorTemp Custom
•Red:
Setyourownredcolorlevels.
•Green:
Setyourowngreencolorlevels.
•Blue:
Setyourownbluecolorlevels.
Selectthescreencolor.
Warm:
Setthescreentowarmcolortemperature(morered).
Medium:
Setthescreentomediumcolortemperature.
Cool:
Setthescreentocoolcolortemperature(moreblue).
SixColor Setsandstoresthehueandsaturationforsixcolors(Red/Green/Blue/Cyan/
Magenta/Yellow)tosatisfythecolorrequirementsofauser.
Hue Adjuststhescreenhue.
Saturation Adjuststhecolorsharpnessonthescreen.Lowervaluesmake
thecolorsharpnessweakerandcolorslighterwhilehigher
valuesmakethecolorsharpnessstrongerandcolorsdark.
ColorReset Resetsthecolorsettingstothefactorydefaultsettingsforthecurrentinput
device.
20MP37A
27MP37HQ 27MP37VQ
27MC37HQ
27MP36HQ
20MP37A
27MP37HQ 27MP37VQ
27MC37HQ
27MP36HQ

21
ENG
ENGLISH
CUSTOMIZING SETTINGS
Display
1
Press
MENU
buttononthebottomoftheMonitorset
todisplaythe
Menu
OSD.
2
Selectthe"
NextMenu
"buttontoenterthemore
optionsettings.
3
Select
Display
bypressingthe►button.
4
Enterto
Display
bypressingthe▼button.
5
Settheoptionsbypressingthe◄or►or▼
buttons.
6
Select
EXIT
toleavetheOSDmenu.
Toreturntotheuppermenuorsetothermenuitems,
usetheuparrow( )button.
Eachoptionisexplainedbelow.
Audio
1
Press
MENU
buttononthebottomoftheMonitorsettodisplay
the
Menu
OSD.
2
Selectthe"
NextMenu
"buttontoenterthemoreoption
settings.
3
Select
Audio
bypressingthe►button.
4
Enterto
Volume
bypressingthe▼button.
5
Settheoptionsbypressingthe◄or►buttons.
6
Select
EXIT
toleavetheOSDmenu.
Toreturntotheuppermenuorsetothermenuitems,usethe
uparrow( )button.
Eachoptionisexplainedbelow.
Menu>NextMenu>Display Description
Horizontal Tomoveimageleftandright.
Vertical Tomoveimageupanddown.
Clock Tominimizeanyverticalbarsorstripesvisibleonthescreenbackground.The
horizontalscreensizewillalsochange.
Phase Toadjustthefocusofthedisplay.Thisitemallowsyoutoremoveanyhorizontal
noiseandclearorsharpentheimageofcharacters.
Menu>NextMenu>Audio Description
Volume Toadjustthevolumeofheadphone/earphone.(OnlyforHDMIinput)
19M37H 20M37H 22M37H
22M37HQ
24M37H
24M37HQ
27MP37HQ 27MP37VQ 27MC37HQ
27MP36HQ

22
ENG
ENGLISH
CUSTOMIZING SETTINGS
Others
1
Press
MENU
buttononthebottomoftheMonitorset
todisplaythe
Menu
OSD.
2
Selectthe"
NextMenu
"buttontoenterthemore
optionsettings.
3
Select
Others
bypressingthe►button.
4
Enterto
Others
bypressingthe▼button.
5
Settheoptionsbypressingthe◄or►or▼
buttons.
6
Select
EXIT
toleavetheOSDmenu.
Toreturntotheuppermenuorsetothermenuitems,
usetheuparrow( )button.
Eachoptionisexplainedbelow.
Menu>NextMenu>Others Description
Language Tochoosethelanguageinwhichthecontrolnamesaredisplayed.
PowerIndicator UsethisfunctiontosetthepowerindicatoronthebottomsideofthemonitortoOnor
Off.IfyousetOff,itwillgooff.
IfyousetOnatanytime,thepowerindicatorwillautomaticallybeturnedon.
AutomaticStandby Themonitorwillautomaticallyswitchtostandbymodeafteracertainperiod.
Resolution Usercansetthedesiredresolution.Thefunctionisenabledonlywhenthescreen
resolutiononyourcomputerissettothefollowing,exceptthatthePCoutputwrong
resolution.
19M37A 19M37D 19M37H
Off,1024x768,1280x768,1360x768,
1366x768
Off,1024x768,1280x768,1360x768,
1366x768
Off,1280x960,1600x900
Off,1440x900,1600x900
27MP36HQ
19M37H 20M37H
22M37H
22M37HQ
24M37H
24M37HQ
27MP37HQ 27MP37VQ
27MC37HQ
27MP36HQ
20M37A 20M37D
22M37A
24M37A
22M37D
24M37D
27M37D
22MC37D
27MP37HQ
24MC37D
20M37H 20MP37A
22M37H
24M37H 24M37HQ
27MP37VQ
27MC37HQ
22M37HQ
23
ENG
ENGLISH
CUSTOMIZING SETTINGS
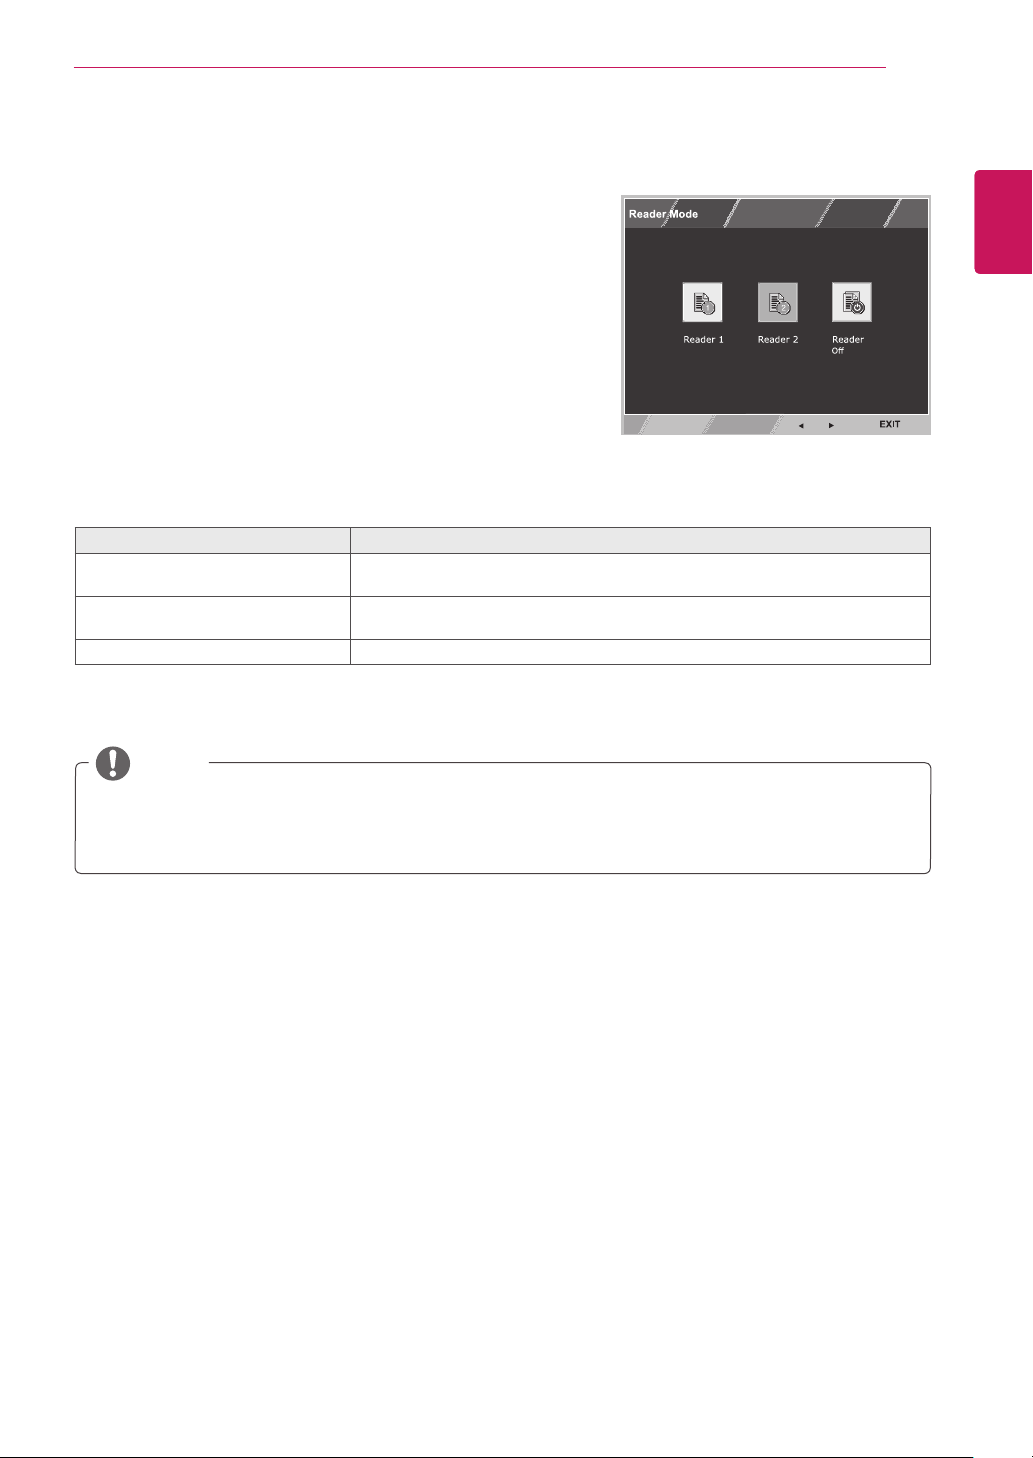
READERSetting
1
Press
READER
buttononthebottomoftheMonitor
settodisplaythe
ReaderMode
OSD.
2
Settheoptionsbypressingthe◄or►buttons.
3
Select
EXIT
toleavetheOSDmenu.
ReaderMode Description
Reader1 Itisamodethatthescreenisadjustedtothebestforthenewspaper.Ifyou
wantscreenmorebright,youcancontrolbrightnessinMenuOSD.
Reader2 Itisamodethatthescreenisadjustedtothebestforthecartoon.Ifyouwant
screenmorebright,youcancontrolbrightnessinMenuOSD.
ReaderOff Itisamodethatreadermodeisoff.
Eachoptionisexplainedbelow.
NOTE
IfoptionofReaderModeisReader1orReader2,PictureModewillautomaticallybeCustomand
SMARTENERGYSAVINGandColorWizardwillautomaticallybeOff.
24
ENG
ENGLISH
CUSTOMIZING SETTINGS
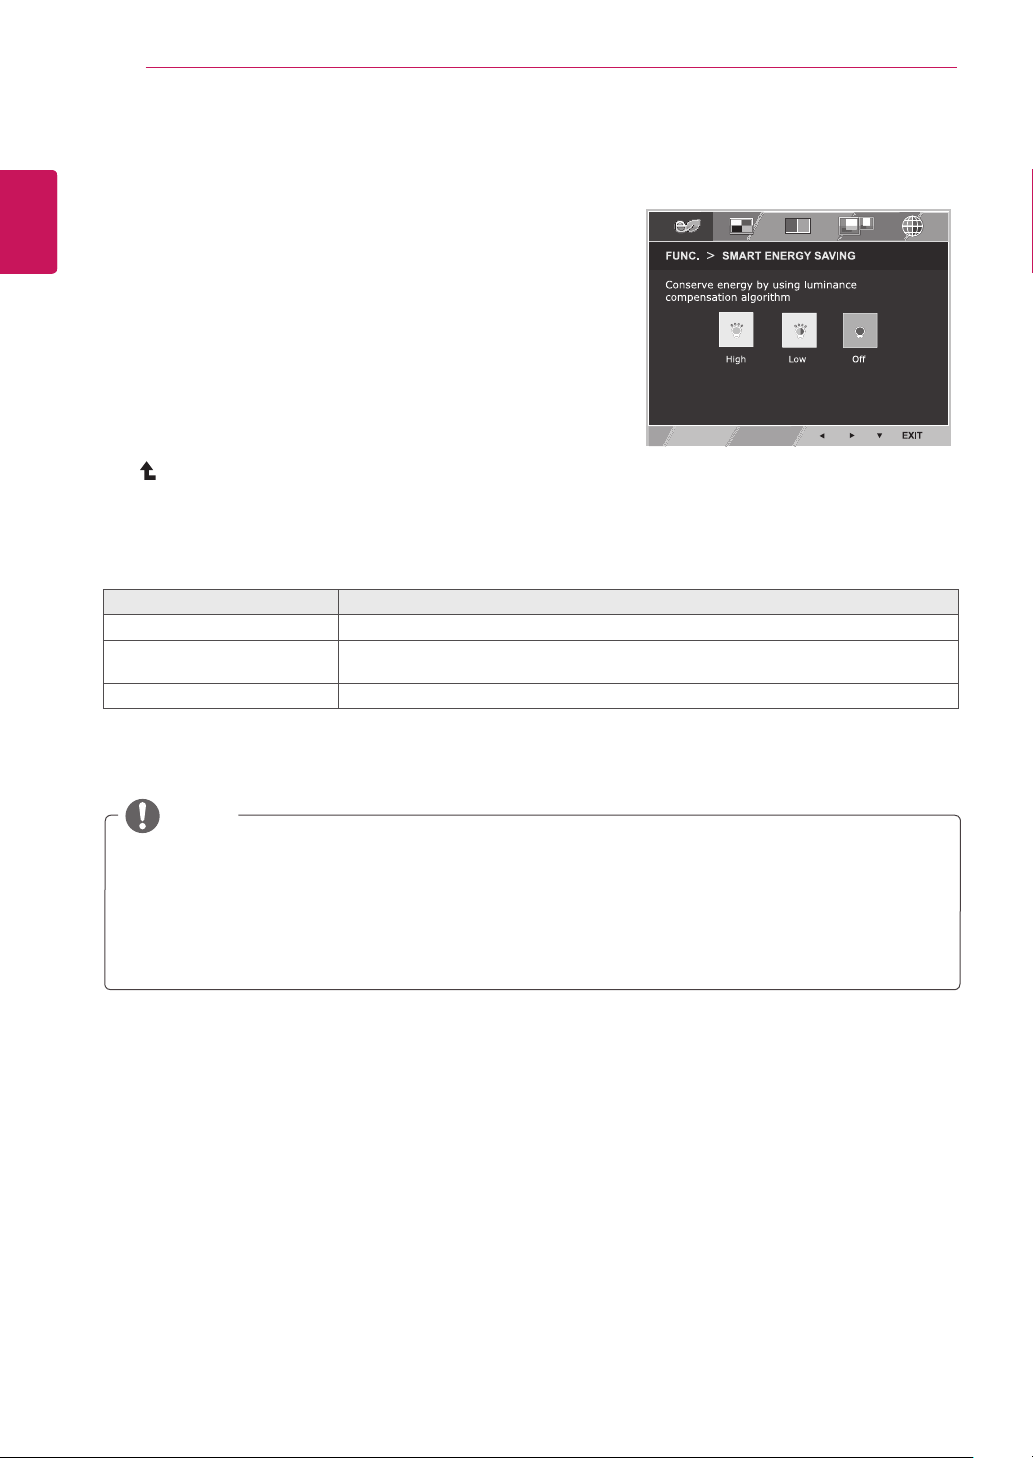
SMART ENERGY SAVING
1
Press FUNC. button on the bottom of the Monitor set to
display the FUNC. OSD.
2
Enter to
SMART ENERGY SAVING by pressing the ▼
button.
3
Set the options by pressing the ◄ or ► buttons.
4
Select
EXIT
to leave the OSD menu.To return to the
upper menu or set other menu items, use the up arrow
( ) button.
Each option is explained below.
SMART ENERGY SAVING Description
High
Enables SMART ENERGY SAVING you can save energy with this energy- high efficient function.
Low
Enables SMART ENERGY SAVING you can save energy with this energy- low efficient
function.
Off Disables SMART ENERGY SAVING .
y
Saving Data depends on the Panel. So,those values should be different from each panel and panel
vendor.If option of SMART ENERGY SAVING is High or Low, monitor luminance become higher or
lower depend on source.
y
If option of SMART ENERGY SAVING is High or Low, Picture Mode will automatically be Custom and
Reader Mode and Color Wizard will automatically be Off.
NOTE
FUNC. Setting
* SMART ENERGY SAVING: Conserve energy by using luminance compensation algorithm.
25
ENG
ENGLISH
CUSTOMIZING SETTINGS
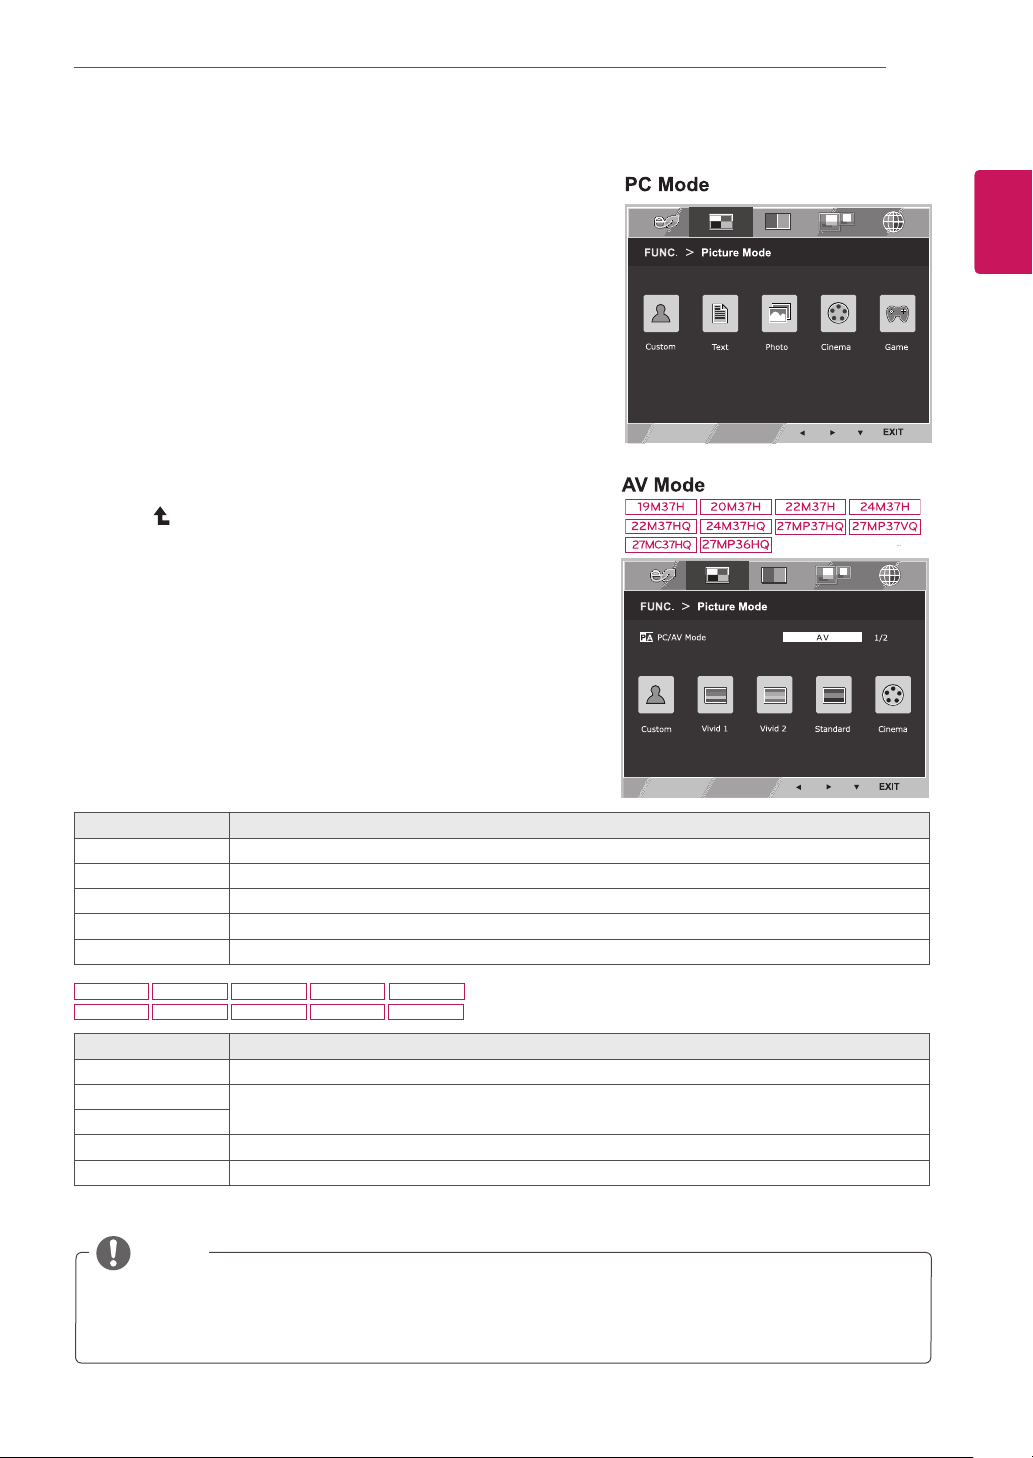
PictureMode
1
Press
FUNC.
buttonon thebottomoftheMonitorset
todisplaythe
FUNC.
OSD.
2
Select
PictureMode
bypressingthe►button.
3
Enterto
PictureMode
bypressingthe▼button.
4
Settheoptionsbypressingthe◄or►buttons.
5
Select
EXIT
toleavetheOSDmenu.Toreturntothe
uppermenuorsetothermenuitems,usetheup
arrow( )button.
PictureMode Description
Custom Itisamodethattheusercanadjusteachelement.ItcanadjustthecolormodeoftheMainMenu.
Text Itisamodethatthescreenisadjustedtothebestforthetextworks.
Photo Itisamodethatthescreenisadjustedtothebesttoviewpictures.
Cinema Itisamodethatthescreenisadjustedtothebesttoviewthevideos.
Game Itisamodethatthescreenisadjustedtothebesttoplayagame.
Eachoptionisexplainedbelow.
PictureMode Description
Custom Itisamodethattheusercanadjusteachelement.ItcanadjustthecolormodeoftheMainMenu.
Vivid1 Adjuststhevideoimagefortheretailenvironmentbyenhancingthecontrast,brightness,Colour,
andsharpness.
Vivid2
Standard Adjuststheimageforthenormalenvironment.
Cinema Itisamodethatthescreenisadjustedtothebesttoviewthevideos.
NOTE
IfoptionofPictureModeisnon-Custom,ReaderMode,SMARTENERGYSAVINGandColorWizard
willautomaticallybeOff.
19M37H 20M37H 22M37H
22M37HQ
24M37H
24M37HQ
27MP37HQ 27MP37VQ 27MC37HQ
27MP36HQ
26
ENG
ENGLISH
CUSTOMIZING SETTINGS
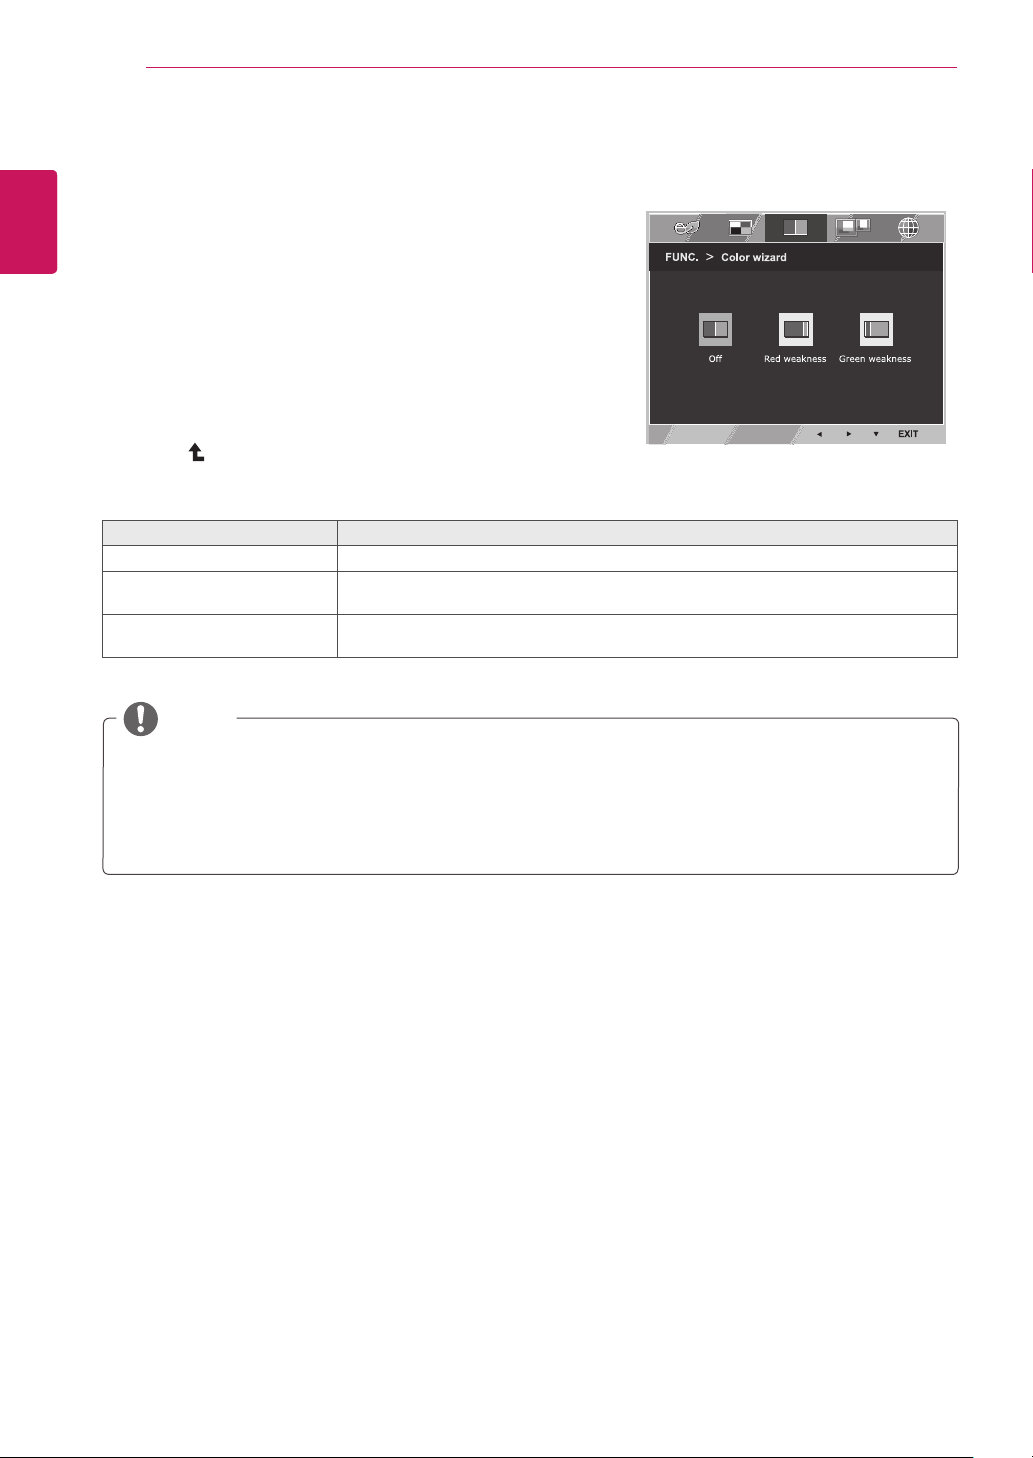
1
Press
FUNC.
buttononthebottomoftheMonitorset
todisplaythe
FUNC.
OSD.
2
Select
Colorwizard
bypressingthe►button.
3
Enterto
Colorwizard
bypressingthe▼button.
4
Settheoptionsbypressingthe◄or►buttons.
5
Select
EXIT
toleavetheOSDmenu.Toreturntothe
uppermenuorsetothermenuitems,usetheup
arrow( )button.
Eachoptionisexplainedbelow.
Colorwizard Description
Off
ItisamodethatColorWizardmodeisoff.
Redweakness Itisamodeforuserwhohasinabilitytoseeredcolor.Itmakecolorweaknessuser
caneasilydistinguishredcolors.
Greenweakness Itisamodeforuserwhohasinabilitytoseegreencolor.Itmakecolorweaknessuser
caneasilydistinguishgreencolors.
Colorwizard
NOTE
Thisissubsidiaryforcolorweaknessuser.Thereforeifyoufeeluncomfortablewiththescreen,please
turnoffthisfunction.
Thisfunctioncan’tdistinguishsomecolorsinsomeimages.
IfoptionofColorWizardisnotOff,ReaderModeandSMARTENERGYSAVINGwillbeOffand
PictureModewillautomaticallybeCustom.
27
ENG
ENGLISH
CUSTOMIZING SETTINGS
NOTE
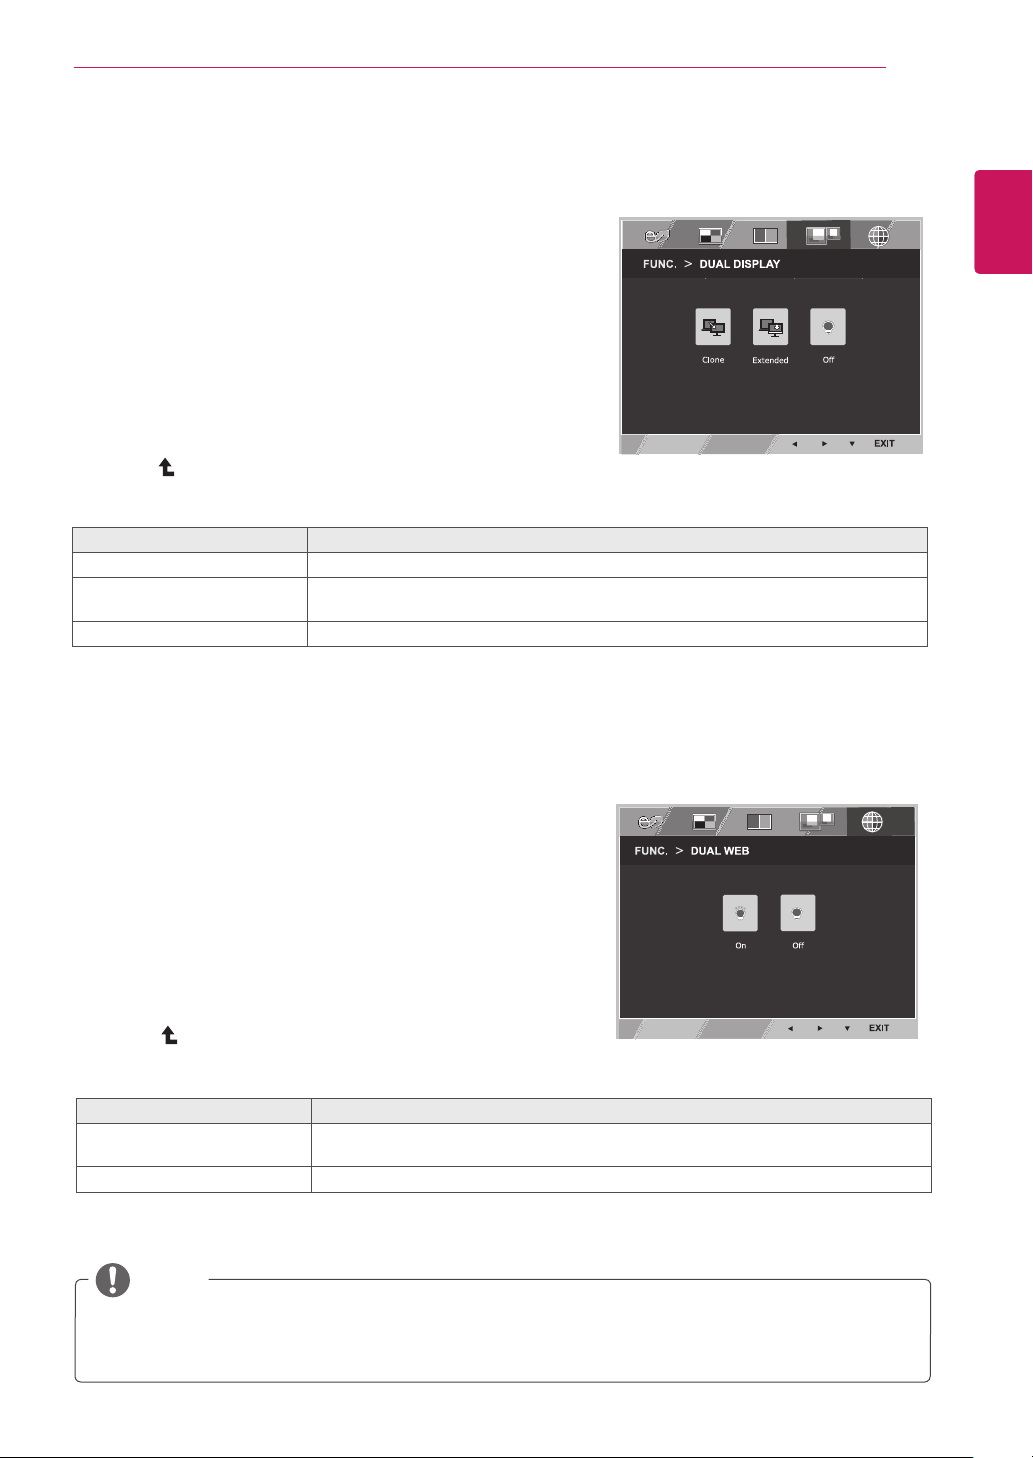
Whenmonitorgoestopowersavingmodewithpcsavingoption->Pressinganybutton->OSD
appearandusershouldpressdualbutton->Usercanbringbacktonormalmode.
DUALDISPLAY
1
Press
FUNC.
buttononthebottomoftheMonitorset
todisplaythe
FUNC.
OSD.
2
Select
DUALDISPLAY
bypressingthe►button.
3
Enterto
DUALDISPLAY
bypressingthe▼button.
4
Settheoptionsbypressingthe◄or►buttons.
5
Select
EXIT
toleavetheOSDmenu.Toreturntothe
uppermenuorsetothermenuitems,usetheup
arrow( )button.
*Beforeusingbelowfunctions,pleaseinstallDUALSMARTSOLUTIONprogramme.
Eachoptionisexplainedbelow.
DUALDISPLAY Description
Clone ByselectingClone,usercanusesecondarymonitorasdonemodeofprimarymonitor.
Extended ByselectingExtended,usercanusesecondarymonitorasextendedmodeofprimary
monitor.
Off IfselectOff,DUALDISPLAYisoff.
DUALWEB
1
Press
FUNC.
buttononthebottomoftheMonitorset
todisplaythe
FUNC.
OSD.
2
Select
DUALWEB
bypressingthe►button.
3
Enterto
DUALWEB
bypressingthe▼button.
4
Settheoptionsbypressingthe◄or►buttons.
5
Select
EXIT
toleavetheOSDmenu.Toreturntothe
uppermenuorsetothermenuitems,usetheup
arrow( )button.
*Beforeusingbelowfunctions,pleaseinstallDUALSMARTSOLUTIONprogramme.
Eachoptionisexplainedbelow.
DUALWEB Description
On Helpusertobrowsewebefficientlybydividinginhalf.Helptoarrangeandmove
windowsonscreen.Helpusertocontroldividedwindowsratio.
Off IfselectOff,DUALWEBisoff.
28
ENG
ENGLISH
TROUBLESHOOTING
TROUBLESHOOTING
Checkthefollowingbeforecallingforservice.
Noimageappears
Isthepowercordofthedisplay
connected?
Checkandseeifthepowercordisconnectedproperlytothepower
outlet.
Isthepowerindicatorlighton?
PressthePowerbutton.
Isthepoweronandthepower
indicatorWhite?
Adjustthebrightnessandthecontrast.
Isthepowerindicatorflickering?
Ifthedisplayisinpowersavingmode,trymovingthemouseor
pressinganykeyonthekeyboardtobringupthescreen.
TrytoturnonthePC.
Doyouseean"OUTOFRANGE"
messageonthescreen?
ThismessageappearswhenthesignalfromthePC(videocard)is
outofhorizontalorverticalfrequencyrangeofthedisplay.Seethe
'Specifications'sectionofthismanualandconfigureyourdisplay
again.
Doyouseea"NOSIGNAL"
messageonthescreen?
Whenthemonitorison"No-Signal"in5minutes,themonitorgoesto
DPMmode.
Doyouseea"OSDLOCKED"messageonthescreen?
Doyousee“OSDLOCKED”when
youpushMENUbutton?
Youcansecurethecurrentcontrolsettings,sothattheycannotbe
inadvertentlychanged.YoucanunlocktheOSDcontrolsatanytime
bypushingtheMENUbuttonforseveralseconds:themessage“OSD
UNLOCKED”willappear.
Displayimageisincorrect
DisplayPositionisincorrect.
Pressthe
AUTO
buttontoautomaticallyadjustyourdisplayimageto
theidealsetting.
Onthescreenbackground,vertical
barsorstripesarevisible.
Pressthe
AUTO
buttontoautomaticallyadjustyourdisplayimageto
theidealsetting.
Anyhorizontalnoiseappearingin
anyimageorcharactersarenot
clearlyportrayed.
Pressthe
AUTO
buttontoautomaticallyadjustyourdisplayimageto
theidealsetting.
Check
ControlPanel►Display►Settings
andadjustthedisplay
totherecommendedresolutionoradjustthedisplayimagetotheideal
setting.Setthecolorsettinghigherthan24bits(truecolor).
29
ENG
ENGLISH
TROUBLESHOOTING
Displayimageisincorrect
Thescreencolorismonoor
abnormal.
Checkifthesignalcableisproperlyconnectedanduseascrewdriver
tofastenifnecessary.
Makesurethevideocardisproperlyinsertedintheslot.
Setthecolorsettinghigherthan24bits(truecolor)at
ControlPanel
►
Settings
.
Thescreenblinks.
Checkifthescreenissettointerlacemodeandifyes,changeittothe
recommendresolution.
Doyouseean"Unrecognizedmonitor,Plug&Play(VESADDC)monitorfound"message?
Haveyouinstalledthedisplay
driver?
BesuretoinstallthedisplaydriverfromthedisplaydriverCD(or
diskette)thatcomeswithyourdisplay.Or,youcanalsodownloadthe
driverfromourwebsite:http://www.lg.com.
MakesuretocheckifthevideocardsupportsPlug&Playfunction.
Check
ControlPanel►Display►Settings
andseeifthefrequencyortheresolutionwere
changed.Ifyes,readjustthevideocardtotherecommendresolution.
Iftherecommendedresolution(optimalresolution)isnotselected,lettersmaybeblurredandthe
screenmaybedimmed,truncatedorbiased.Makesuretoselecttherecommendresolution.
ThesettingmethodcandifferbycomputerandO/S(OperationSystem),andresolutionmentioned
abovemaynotbesupportedbythevideocardperformance.Inthiscase,pleaseasktothecomputer
orthevideocardmanufacturer.
CAUTION
30
ENG
ENGLISH
SPECIFICATIONS
SPECIFICATIONS
Display Screen Type Flat Panel Active matrix-TFT LCD
Anti-Glare coating
Pixel Pitch 0.3 mm x 0.3 mm (Pixel Pitch)
Resolution Max 1366 x 768 @ 60 Hz
Recommend VESA 1366 x 768 @ 60 Hz
Power
Consumption
On Mode : 13 W (ENERGY STAR® standard)*
Sleep Mode ≤ 0.3 W
Off Mode ≤ 0.3 W
Power Input 19 V
0.8 A
AC-DC Adapter
Type ADS-18SG-19-3 19016G, manufactured by SHENZHEN HONOR ELECTRONIC
or Type ADS-18FSG-19 19016GPG, manufactured by SHENZHEN HONOR ELECTRONIC
or Type ADS-18FSG-19 19016GPI, manufactured by SHENZHEN HONOR ELECTRONIC
or Type ADS-18FSG-19 19016GPCU, manufactured by SHENZHEN HONOR ELECTRONIC
or Type ADS-18FSG-19 19016GPB, manufactured by SHENZHEN HONOR ELECTRONIC
or Type LCAP42, manufactured by LIEN CHANG ELECTRONIC ENTERPRISE
or Type LCAP36-A, manufactured by LIEN CHANG ELECTRONIC ENTERPRISE
or Type LCAP36-E, manufactured by LIEN CHANG ELECTRONIC ENTERPRISE
or Type LCAP36-I, manufactured by LIEN CHANG ELECTRONIC ENTERPRISE
or Type LCAP36-U, manufactured by LIEN CHANG ELECTRONIC ENTERPRISE
OUTPUT: 19 V
0.84 A
Dimensions
(Width x Height x
Depth)
With Stand 44.1 cm x 34.9 cm x 16.8 cm
Without Stand 44.1 cm x 27.5 cm x 5.7 cm
Weight 2.1 kg
Tilt Range -5° to 20°
Environmental
conditions
Operating Temperature
Operating Humidity
10°C to 35 °C
10 % to 80 %
Storage Temperature
Storage Humidity
-20°C to 60 °C
5 % to 90 % non-Condensing
Stand Base Attached ( ), Detached (O)
Power cord Wall-outlet type
Product specifications shown above may be changed without prior notice due to upgrade of product
functions.
* The power consumption level can be different by operating condition and monitor setting.
* The On mode power consumption is measured with ENERGY STAR® test standard.
19M37A 19M37D 19M37H

31
ENG
ENGLISH
SPECIFICATIONS
Sync Input Horizontal
Frequency
30 kHz to 83 kHz
(Automatic)
30 kHz to 61 kHz
(Automatic)
● ● ●
Vertical
Frequency
56 Hz to 75 Hz
(D-SUB)
● ● ●
56 Hz to 75 Hz
(DVI-D)
●
56 Hz to 61 Hz
(HDMI)
●
Input Form Separate Sync.
● ● ●
Digital
● ●
Video Input Signal Input 15 pin D-SUB
Connector
● ● ●
DVI-D Connector
(Digital)
●
HDMI Connector
●
Input Form RGB Analog (0.7
Vp-p/ 75 ohm)
● ● ●
Digital
● ●
Plug & Play DDC 2B(Analog)
● ● ●
DDC 2B(Digital)
●
DDC 2B(HDMI)
●
19M37A 19M37D 19M37H
32
ENG
ENGLISH
SPECIFICATIONS
SPECIFICATIONS
Display Screen Type Flat Panel Active matrix-TFT LCD
Anti-Glare coating
Pixel Pitch 0.271 mm x 0.262 mm (Pixel Pitch)
Resolution Max 1600 x 900 @ 60 Hz
Recommend VESA 1600 x 900 @ 60 Hz
Power
Consumption
On Mode : 16 W (ENERGY STAR® standard)*
Sleep Mode ≤ 0.3 W
Off Mode ≤ 0.3 W
Power Input 19 V
0.8 A
AC-DC Adapter
Type ADS-18SG-19-3 19016G, manufactured by SHENZHEN HONOR ELECTRONIC
or Type ADS-18FSG-19 19016GPG, manufactured by SHENZHEN HONOR ELECTRONIC
or Type ADS-18FSG-19 19016GPI, manufactured by SHENZHEN HONOR ELECTRONIC
or Type ADS-18FSG-19 19016GPCU, manufactured by SHENZHEN HONOR ELECTRONIC
or Type ADS-18FSG-19 19016GPB, manufactured by SHENZHEN HONOR ELECTRONIC
or Type LCAP42, manufactured by LIEN CHANG ELECTRONIC ENTERPRISE
or Type LCAP36-A, manufactured by LIEN CHANG ELECTRONIC ENTERPRISE
or Type LCAP36-E, manufactured by LIEN CHANG ELECTRONIC ENTERPRISE
or Type LCAP36-I, manufactured by LIEN CHANG ELECTRONIC ENTERPRISE
or Type LCAP36-U, manufactured by LIEN CHANG ELECTRONIC ENTERPRISE
OUTPUT: 19 V
0.84A
Dimensions
(Width x Height x
Depth)
With Stand 46.3 cm x 35.7 cm x 16.8 cm
Without Stand 46.3 cm x 28.7 cm x 5.7 cm
Weight 2.2 kg
Tilt Range -5° to 20°
Environmental
conditions
Operating Temperature
Operating Humidity
10°C to 35 °C
10 % to 80 %
Storage Temperature
Storage Humidity
-20°C to 60 °C
5 % to 90 % non-Condensing
Stand Base Attached ( ), Detached (O)
Power cord Wall-outlet type
Product specifications shown above may be changed without prior notice due to upgrade of product
functions.
* The power consumption level can be different by operating condition and monitor setting.
* The On mode power consumption is measured with ENERGY STAR® test standard.
20M37A 20M37D 20M37H 20MP37A

33
ENG
ENGLISH
SPECIFICATIONS
Sync Input Horizontal
Frequency
30 kHz to 83 kHz
(Automatic)
● ● ● ●
30 kHz to 61 kHz
(Automatic)
Vertical Frequency 56 Hz to 75 Hz
(D-SUB)
● ● ● ●
56 Hz to 75 Hz
(DVI-D)
●
56 Hz to 61 Hz
(HDMI)
●
Input Form Separate Sync.
● ● ● ●
Digital
● ●
Video Input Signal Input 15 pin D-SUB
Connector
● ● ● ●
DVI-D Connector
(Digital)
●
HDMI Connector
●
Input Form RGB Analog (0.7
Vp-p/ 75 ohm)
● ● ● ●
Digital
● ●
Plug & Play DDC 2B(Analog)
● ● ● ●
DDC 2B(Digital)
●
DDC 2B(HDMI)
●
20M37A 20M37D
20M37H
20MP37A

34
ENG
ENGLISH
SPECIFICATIONS
Display Screen Type Flat Panel Active matrix-TFT LCD
Anti-Glare coating
Pixel Pitch 0.248 mm x 0.248 mm (Pixel Pitch)
Resolution Max 1920 x 1080 @ 60 Hz
Recommend VESA 1920 x 1080 @ 60 Hz
Power
Consumption
On Mode : 18 W (ENERGY STAR® standard)*
Sleep Mode ≤ 0.3 W
Off Mode ≤ 0.3 W
Power Input 19 V
1.2 A
AC-DC Adapter
Type ADS-40SG-19-3 19025G, manufactured by SHENZHEN HONOR ELECTRONIC
or Type ADS-40FSG-19 19025GPG-1, manufactured by SHENZHEN HONOR ELECTRONIC
or Type ADS-40FSG-19 19025GPBR-1, manufactured by SHENZHEN HONOR ELECTRONIC
or Type ADS-40FSG-19 19025GPI-1, manufactured by SHENZHEN HONOR ELECTRONIC
or Type ADS-40FSG-19 19025GPCU-1, manufactured by SHENZHEN HONOR ELECTRONIC
or Type ADS-40FSG-19 19025GPB-2, manufactured by SHENZHEN HONOR ELECTRONIC
or Type LCAP21, manufactured by LIEN CHANG ELECTRONIC ENTERPRISE
or Type LCAP26-A, manufactured by LIEN CHANG ELECTRONIC ENTERPRISE
or Type LCAP26-E, manufactured by LIEN CHANG ELECTRONIC ENTERPRISE
or Type LCAP26-I, manufactured by LIEN CHANG ELECTRONIC ENTERPRISE
or Type LCAP26-B, manufactured by LIEN CHANG ELECTRONIC ENTERPRISE
OUTPUT: 19 V
1.3 A
Dimensions
(Width x Height x
Depth)
With Stand 50.9 cm x 38.7 cm x 18.1 cm
Without Stand 50.9 cm x 31.6 cm x 5.7 cm
Weight 2.6 kg
Tilt Range -5° to 20°
Environmental
conditions
Operating Temperature
Operating Humidity
10°C to 35 °C
10 % to 80 %
Storage Temperature
Storage Humidity
-20°C to 60 °C
5 % to 90 % non-Condensing
Stand Base Attached ( ), Detached (O)
Power cord Wall-outlet type
Product specifications shown above may be changed without prior notice due to upgrade of product
functions.
* The power consumption level can be different by operating condition and monitor setting.
* The On mode power consumption is measured with ENERGY STAR® test standard.
SPECIFICATIONS
22M37A 22M37D 22M37H 22M37HQ 22MC37D

35
ENG
ENGLISH
SPECIFICATIONS
Sync Input Horizontal
Frequency
30 kHz to 83 kHz
(Automatic)
● ● ● ●
30 kHz to 61 kHz
(Automatic)
Vertical Frequency 56 Hz to 75 Hz
(D-SUB)
● ● ● ●
56 Hz to 75 Hz
(DVI-D)
●
56 Hz to 61 Hz
(HDMI)
● ●
Input Form Separate Sync.
● ● ● ●
Digital
● ● ●
Video Input Signal Input 15 pin D-SUB
Connector
● ● ● ●
DVI-D Connector
(Digital)
●
HDMI Connector
● ●
Input Form RGB Analog (0.7
Vp-p/ 75 ohm)
● ● ● ●
Digital
● ● ●
Plug & Play DDC 2B(Analog)
● ● ● ●
DDC 2B(Digital)
●
DDC 2B(HDMI)
● ●
22M37A
22M37D/
22MC37D
22M37H
22M37HQ

36
ENG
ENGLISH
SPECIFICATIONS
Display Screen Type Flat Panel Active matrix-TFT LCD
Anti-Glare coating
Pixel Pitch 0.272 mm x 0.272 mm (Pixel Pitch)
Resolution Max 1920 x 1080 @ 60 Hz
Recommend VESA 1920 x 1080 @ 60 Hz
Power
Consumption
On Mode : 19 W (ENERGY STAR® standard)*
Sleep Mode ≤ 0.3 W
Off Mode ≤ 0.3 W
Power Input 19 V
1.2 A
AC-DC Adapter
Type ADS-40SG-19-3 19025G, manufactured by SHENZHEN HONOR ELECTRONIC
or Type ADS-40FSG-19 19025GPG-1, manufactured by SHENZHEN HONOR ELECTRONIC
or Type ADS-40FSG-19 19025GPBR-1, manufactured by SHENZHEN HONOR ELECTRONIC
or Type ADS-40FSG-19 19025GPI-1, manufactured by SHENZHEN HONOR ELECTRONIC
or Type ADS-40FSG-19 19025GPCU-1, manufactured by SHENZHEN HONOR ELECTRONIC
or Type ADS-40FSG-19 19025GPB-2, manufactured by SHENZHEN HONOR ELECTRONIC
or Type LCAP21, manufactured by LIEN CHANG ELECTRONIC ENTERPRISE
or Type LCAP26-A, manufactured by LIEN CHANG ELECTRONIC ENTERPRISE
or Type LCAP26-E, manufactured by LIEN CHANG ELECTRONIC ENTERPRISE
or Type LCAP26-I, manufactured by LIEN CHANG ELECTRONIC ENTERPRISE
or Type LCAP26-B, manufactured by LIEN CHANG ELECTRONIC ENTERPRISE
OUTPUT: 19 V
1.3 A
Dimensions
(Width x Height x
Depth)
With Stand 55.6 cm x 41.7 cm x 18.1 cm
Without Stand 55.6 cm x 34.4 cm x 5.7 cm
Weight 3.0 kg
Tilt Range -5° to 20°
Environmental
conditions
Operating Temperature
Operating Humidity
10°C to 35 °C
10 % to 80 %
Storage Temperature
Storage Humidity
-20°C to 60 °C
5 % to 90 % non-Condensing
Stand Base Attached ( ), Detached (O)
Power cord Wall-outlet type
Product specifications shown above may be changed without prior notice due to upgrade of product
functions.
* The power consumption level can be different by operating condition and monitor setting.
* The On mode power consumption is measured with ENERGY STAR® test standard.
SPECIFICATIONS
24M37A 24M37D 24M37H 24M37HQ 24MC37D

37
ENG
ENGLISH
SPECIFICATIONS
Sync Input Horizontal
Frequency
30 kHz to 83 kHz
(Automatic)
● ● ● ●
30 kHz to 61 kHz
(Automatic)
Vertical Frequency 56 Hz to 75 Hz
(D-SUB)
● ● ● ●
56 Hz to 75 Hz
(DVI-D)
●
56 Hz to 61 Hz
(HDMI)
● ●
Input Form Separate Sync.
● ● ● ●
Digital
● ● ●
Video Input Signal Input 15 pin D-SUB
Connector
● ● ● ●
DVI-D Connector
(Digital)
●
HDMI Connector
● ●
Input Form RGB Analog (0.7
Vp-p/ 75 ohm)
● ● ● ●
Digital
● ● ●
Plug & Play DDC 2B(Analog)
● ● ● ●
DDC 2B(Digital)
●
DDC 2B(HDMI)
● ●
24M37D/
24MC37D
24M37H
24M37A 24M37HQ

38
ENG
ENGLISH
SPECIFICATIONS
Display Screen Type Flat Panel Active matrix-TFT LCD
Anti-Glare coating
Pixel Pitch 0.311 mm x 0.311 mm (Pixel Pitch)
Resolution Max 1920 x 1080 @ 60 Hz
Recommend VESA 1920 x 1080 @ 60 Hz
Power
Consumption
On Mode : 27 W (ENERGY STAR® standard)*
Sleep Mode ≤ 0.3 W
Off Mode ≤ 0.3 W
Power Input 19 V
1.6 A
AC-DC Adapter
Type ADS-40SG-19-3 19032G, manufactured by SHENZHEN HONOR ELECTRONIC
or Type ADS-40FSG-19 19032GPG-1, manufactured by SHENZHEN HONOR ELECTRONIC
or Type ADS-40FSG-19 19032GPBR-1, manufactured by SHENZHEN HONOR ELECTRONIC
or Type ADS-40FSG-19 19032GPI-1, manufactured by SHENZHEN HONOR ELECTRONIC
or Type ADS-40FSG-19 19032GPCU-1, manufactured by SHENZHEN HONOR ELECTRONIC
or Type LCAP21A, manufactured by LIEN CHANG ELECTRONIC ENTERPRISE
or Type LCAP26A-A, manufactured by LIEN CHANG ELECTRONIC ENTERPRISE
or Type LCAP26A-E, manufactured by LIEN CHANG ELECTRONIC ENTERPRISE
or Type LCAP26A-I, manufactured by LIEN CHANG ELECTRONIC ENTERPRISE
or Type LCAP26A-B, manufactured by LIEN CHANG ELECTRONIC ENTERPRISE
OUTPUT: 19 V
1.7 A
Dimensions
(Width x Height x
Depth)
With Stand 64.1 cm x 48.8 cm x 21.2 cm
Without Stand 64.1 cm x 39.3 cm x 7.1 cm
Weight 4.8 kg
Tilt Range -5° to 20°
Environmental
conditions
Operating Temperature
Operating Humidity
10°C to 35 °C
10 % to 80 %
Storage Temperature
Storage Humidity
-20°C to 60 °C
5 % to 90 % non-Condensing
Stand Base Attached ( ), Detached (O)
Power cord Wall-outlet type
Product specifications shown above may be changed without prior notice due to upgrade of product
functions.
* The power consumption level can be different by operating condition and monitor setting.
* The On mode power consumption is measured with ENERGY STAR® test standard.
SPECIFICATIONS
27M37D 27MP37HQ 27MP36HQ27MP37VQ 27MC37HQ
39
ENG
ENGLISH
SPECIFICATIONS
Sync Input Horizontal
Frequency
30 kHz to 83 kHz
(Automatic)
● ● ●
30 kHz to 61 kHz
(Automatic)
Vertical
Frequency
56 Hz to 75 Hz
(D-SUB)
● ● ●
56 Hz to 75 Hz
(DVI-D)
● ●
56 Hz to 61 Hz
(HDMI)
● ●
Input Form Separate Sync.
● ● ●
Digital
● ● ●
Video Input Signal Input 15 pin D-SUB
Connector
● ● ●
DVI-D Connector
(Digital)
● ●
HDMI Connector
● ●
Input Form RGB Analog (0.7 Vp-
p/ 75 ohm)
● ● ●
Digital
● ● ●
Plug & Play DDC 2B(Analog)
● ● ●
DDC 2B(Digital)
● ●
DDC 2B(HDMI)
● ●
27MP37HQ/
27MC37HQ/
27MP36HQ
27MP37VQ
27M37D
40
ENG
ENGLISH
SPECIFICATIONS
Preset Modes (Resolution)
D-SUB/DVI-D Timing
19M37A 19M37D 19M37H
Display Modes (Resolution)
Horizontal
Frequency(kHz)
Vertical
Frequency(Hz)
Polarity(H/V)
720 x 400 31.468 70 -/+
640 x 480 31.469 60 -/-
640 x 480 37.500 75 -/-
800 x 600 37.879 60 +/+
800 x 600 46.875 75 +/+
832 x 624 49.725 75 -/-
1024 x 768 48.363 60 -/-
1366 x 768 47.712 60 +/+ Recommend Mode
20M37A 20M37D 20M37H 20MP37A
Display Modes (Resolution)
Horizontal
Frequency(kHz)
Vertical
Frequency(Hz)
Polarity(H/V)
720 x 400 31.468 70 -/+
640 x 480 31.469 60 -/-
640 x 480 37.500 75 -/-
800 x 600 37.879 60 +/+
800 x 600 46.875 75 +/+
1024 x 768 48.363 60 -/-
1024 x 768 60.023 75 +/+
1152 x 864 67.500 75 +/+
1600 x 900 60.000 60 +/+ Recommend Mode
22M37A 22M37D 22M37H 22M37HQ 24M37A 24M37D
24M37H 24M37HQ 27M37D 27MP37HQ 27MP37VQ 22MC37D 24MC37D 27MC37HQ
27MP36HQ
Display Modes (Resolution)
Horizontal
Frequency(kHz)
Vertical
Frequency(Hz)
Polarity(H/V)
720 x 400 31.468 70 -/+
640 x 480 31.469 60 -/-
640 x 480 37.500 75 -/-
800 x 600 37.879 60 +/+
800 x 600 46.875 75 +/+
1024 x 768 48.363 60 -/-
1024 x 768 60.023 75 +/+
1152 x 864 67.500 75 +/+
1280 x 1024 63.981 60 +/+
1280 x 1024 79.976 75 +/+
1680 x 1050 65.290 60 -/+
1920 x 1080 67.500 60 +/+ Recommend Mode
41
ENG
ENGLISH
SPECIFICATIONS
HDMI Timing
Factory support mode
(Preset Mode)
Horizontal
Frequency(kHz)
Vertical
Frequency(Hz)
HDMI
480P 31.50 60 O
576P 31.25 50 O
720P 37.50 50 O
720P 45.00 60 O
1080P 56.25 50 O
1080P 67.50 60
O
Recommend Mode
Indicator
Mode LED Color
On Mode White (Only 15 seconds)
Sleep Mode Blinking White
Off Mode Off
27MP36HQ
22M37H 22M37HQ
24M37H 24M37HQ 27MP37HQ 27MP37VQ 27MC37HQ
19M37H
20M37H
42
ENG
ENGLISH
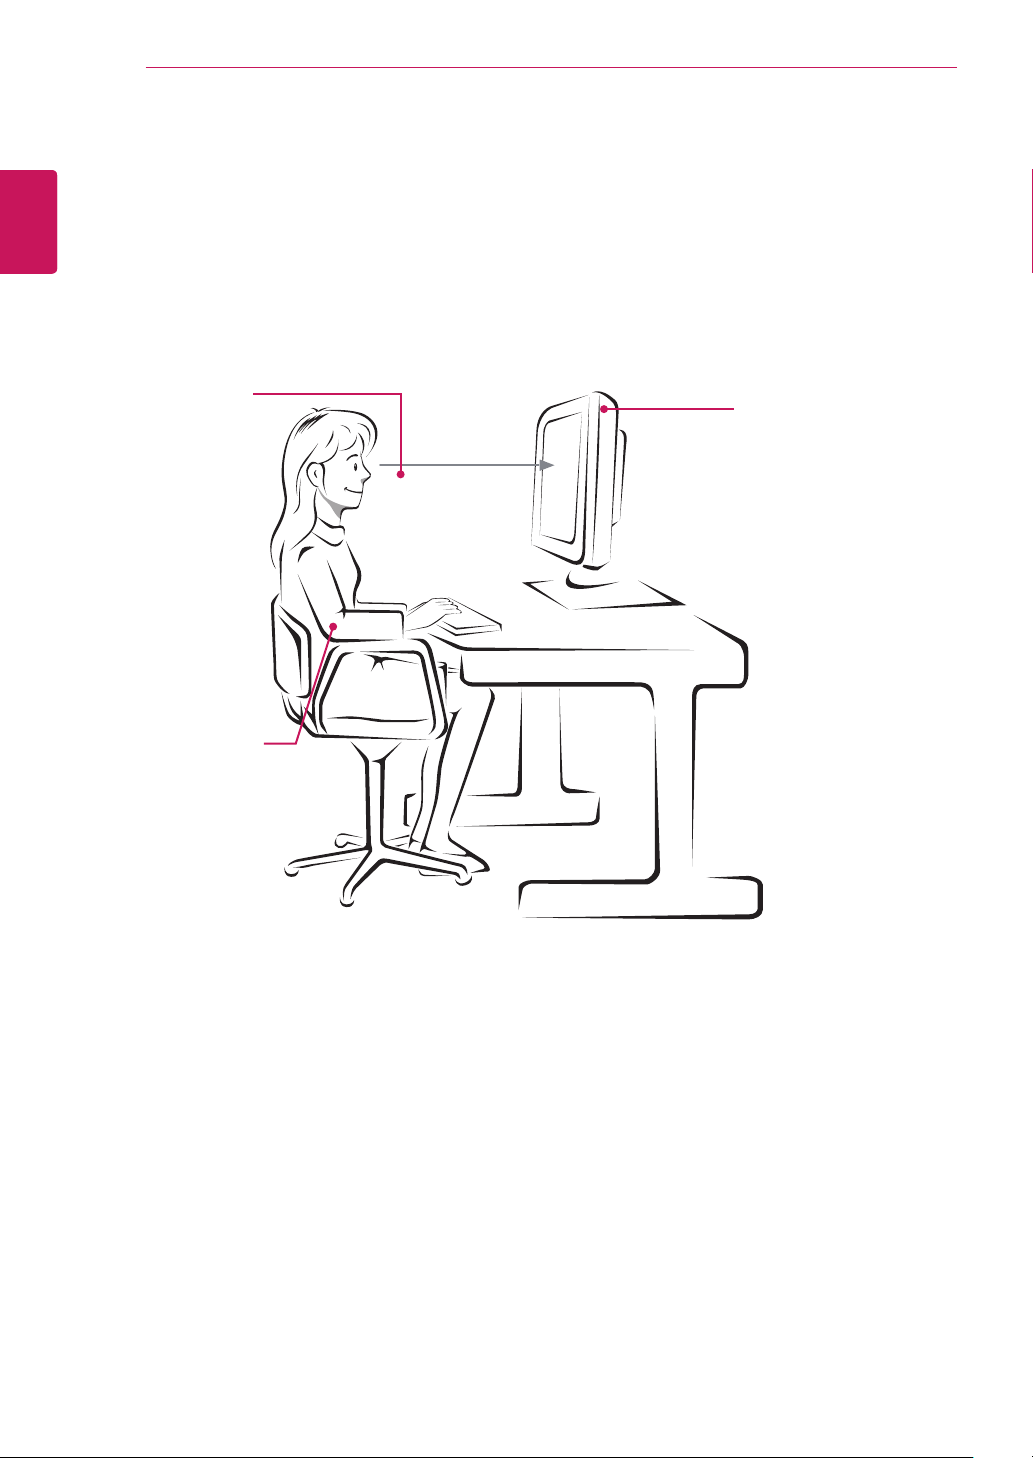
PROPER POSTURE
Proper posture for using the Monitor set.
PROPER POSTURE
Adjust the
Monitor set and
your posture to
allow you to view
images at the
optimal viewing
angle.
Place your hands
gently on the
keyboard, keeping
your arms bent at
the elbows and
horizontally outright.
Adjust the location of the
Monitor set to avoid it
reflecting light.

Make sure to read the Safety Precautions before
using the product.
Keep the Owner’s Manual (CD) in an accessible
place for future reference.
The model and serial number of the SET is
located on the back and one side of the SET.
Record it below should you ever need service.
MODEL
SERIAL
*above information is only for USA FCC Regulatory
Declaration of Conformity
Trade Name: LG
Model : 19M37A, 19M37D, 19M37H, 20M37A,
20M37D, 20M37H, 20MP37A, 22M37A,
22M37D, 22MC37D, 22M37H, 22M37HQ,
24M37A, 24M37D, 24MC37D, 24M37H,
24M37HQ, 27M37D, 27MP37HQ,
27MP37VQ, 27MC37HQ, 27MP36HQ
Responsible Party: LG Electronics Inc.
Address : 1000 Sylvan Ave. Englewood Cliffs
NJ 07632 U.S.A
TEL: 201-266-2534