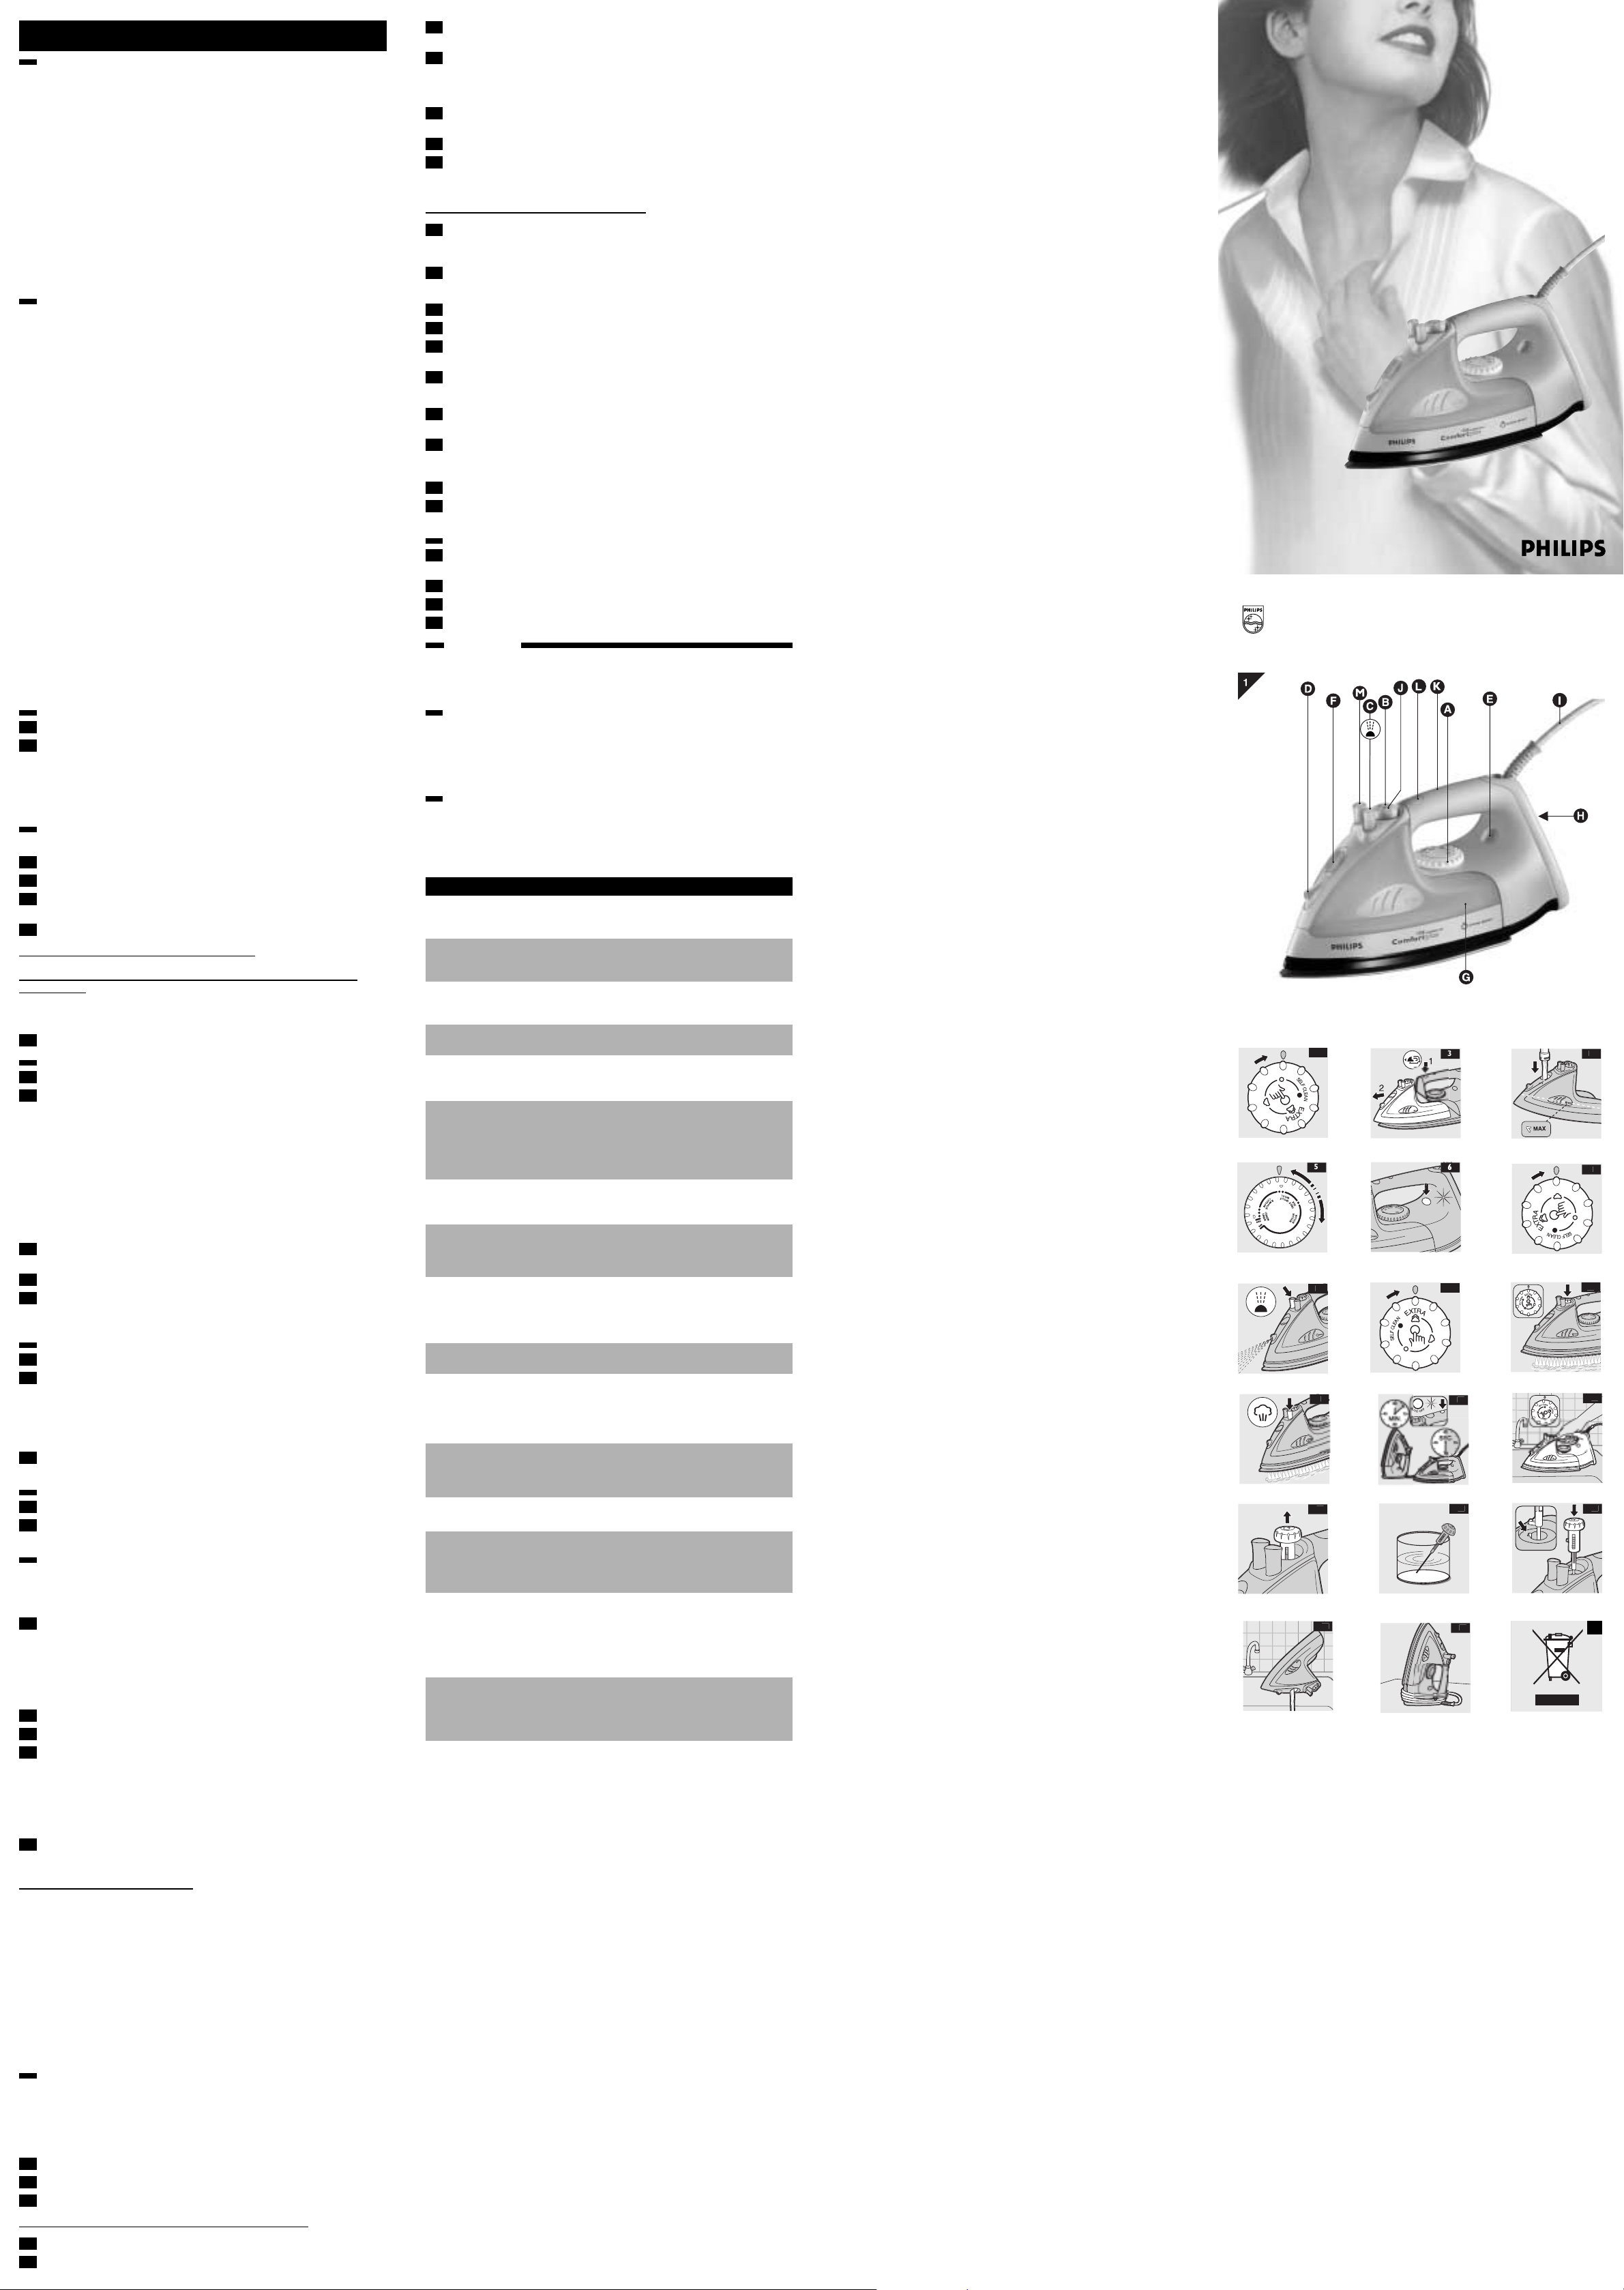
General description (fig. 1)IIIIIIIIIIIIIIIIIIIIIIIIIIIIIIIIIIIIIIIIIIIIIIIIIIIIIIIIIIIIIIIIIIIIIIIIIIIIIIIIIIIIIIIIIIIIIIIIIIIIIIIIIIIIIIIIIIIIIIIIIIIIIIIIIIIIIIIIIIIII
A Temperature control dial
B Steam control dial
O = no steam
q = moderate steam
w = maximum steam
x = Calc-Clean function
C Spray button T
D Spray nozzle
E Temperature pilot light
F Water filling opening
G Water tank
H Type plate
I Cord
J Extra Steam function (press steam control dial) (type GC1580)
K Auto shut-off (type GC1580)
L Release button for water tank
M Shot of Steam function (type GC1573 and GC1575)
ImportantIIIIIIIIIIIIIIIIIIIIIIIIIIIIIIIIIIIIIIIIIIIIIIIIIIIIIIIIIIIIIIIIIIIIIIIIIIIIIIIIIIIIIIIIIIIIIIIIIIIIIIIIIIIIIIIIIIIIIIIIIIIIIIIIIIIIIIIIIIIIIIIIIIIIIIIIIIIIIIIIIIIIIIIIIIIIIIIIIIIIIIIIIIIIIIIIIIIIIIIIIIIIIIIIIII
Read these instructions for use carefully before using the appliance and save them
for future reference.
◗ Check if the voltage indicated on the type plate corresponds to the local
mains voltage before you connect the appliance.
◗ If the appliance is provided with an earthed plug, it must be plugged into an
earthed wall socket.
◗ Do not use the appliance if the plug, the cord or the appliance itself shows
visible damage, or if the appliance has been dropped or is leaking.
◗ Check the cord regularly for possible damage.
◗ If the mains cord is damaged, it must be replaced by Philips, a service centre
authorised by Philips or similarly qualified persons in order to avoid a hazard.
◗ Never leave the appliance unattended when it is connected to the mains.
◗ Never immerse the iron and the stand, if provided, in water.
◗ Keep the appliance out of the reach of children.
◗ Young children should be supervised to ensure that they do not play with the
appliance.
◗ This appliance is not intended for use by young children or infirm persons
without supervision.
◗ The soleplate of the iron can become extremely hot and may cause burns if
touched.
◗ Do not allow the cord to come into contact with the soleplate when it is hot.
◗ When you have finished ironing, when you clean the appliance, when you fill
or empty the water tank and also when you leave the iron even for a short
while: set the steam control to position O, put the iron on its heel and
remove the mains plug from the wall socket.
◗ Always place and use the iron and the stand, if provided, on a stable, level
and horizontal surface.
◗ Do not put perfume, vinegar, starch, descaling agents, ironing aids or other
chemicals in the water tank.
◗ This appliance is intended for household use only.
Before first useIIIIIIIIIIIIIIIIIIIIIIIIIIIIIIIIIIIIIIIIIIIIIIIIIIIIIIIIIIIIIIIIIIIIIIIIIIIIIIIIIIIIIIIIIIIIIIIIIIIIIIIIIIIIIIIIIIIIIIIIIIIIIIIIIIIIIIIIIIIIIIIIIIIIIIIIIIIIIIIIIIIIIIIIIIIIIIIIIIIIIIIIIIIIII
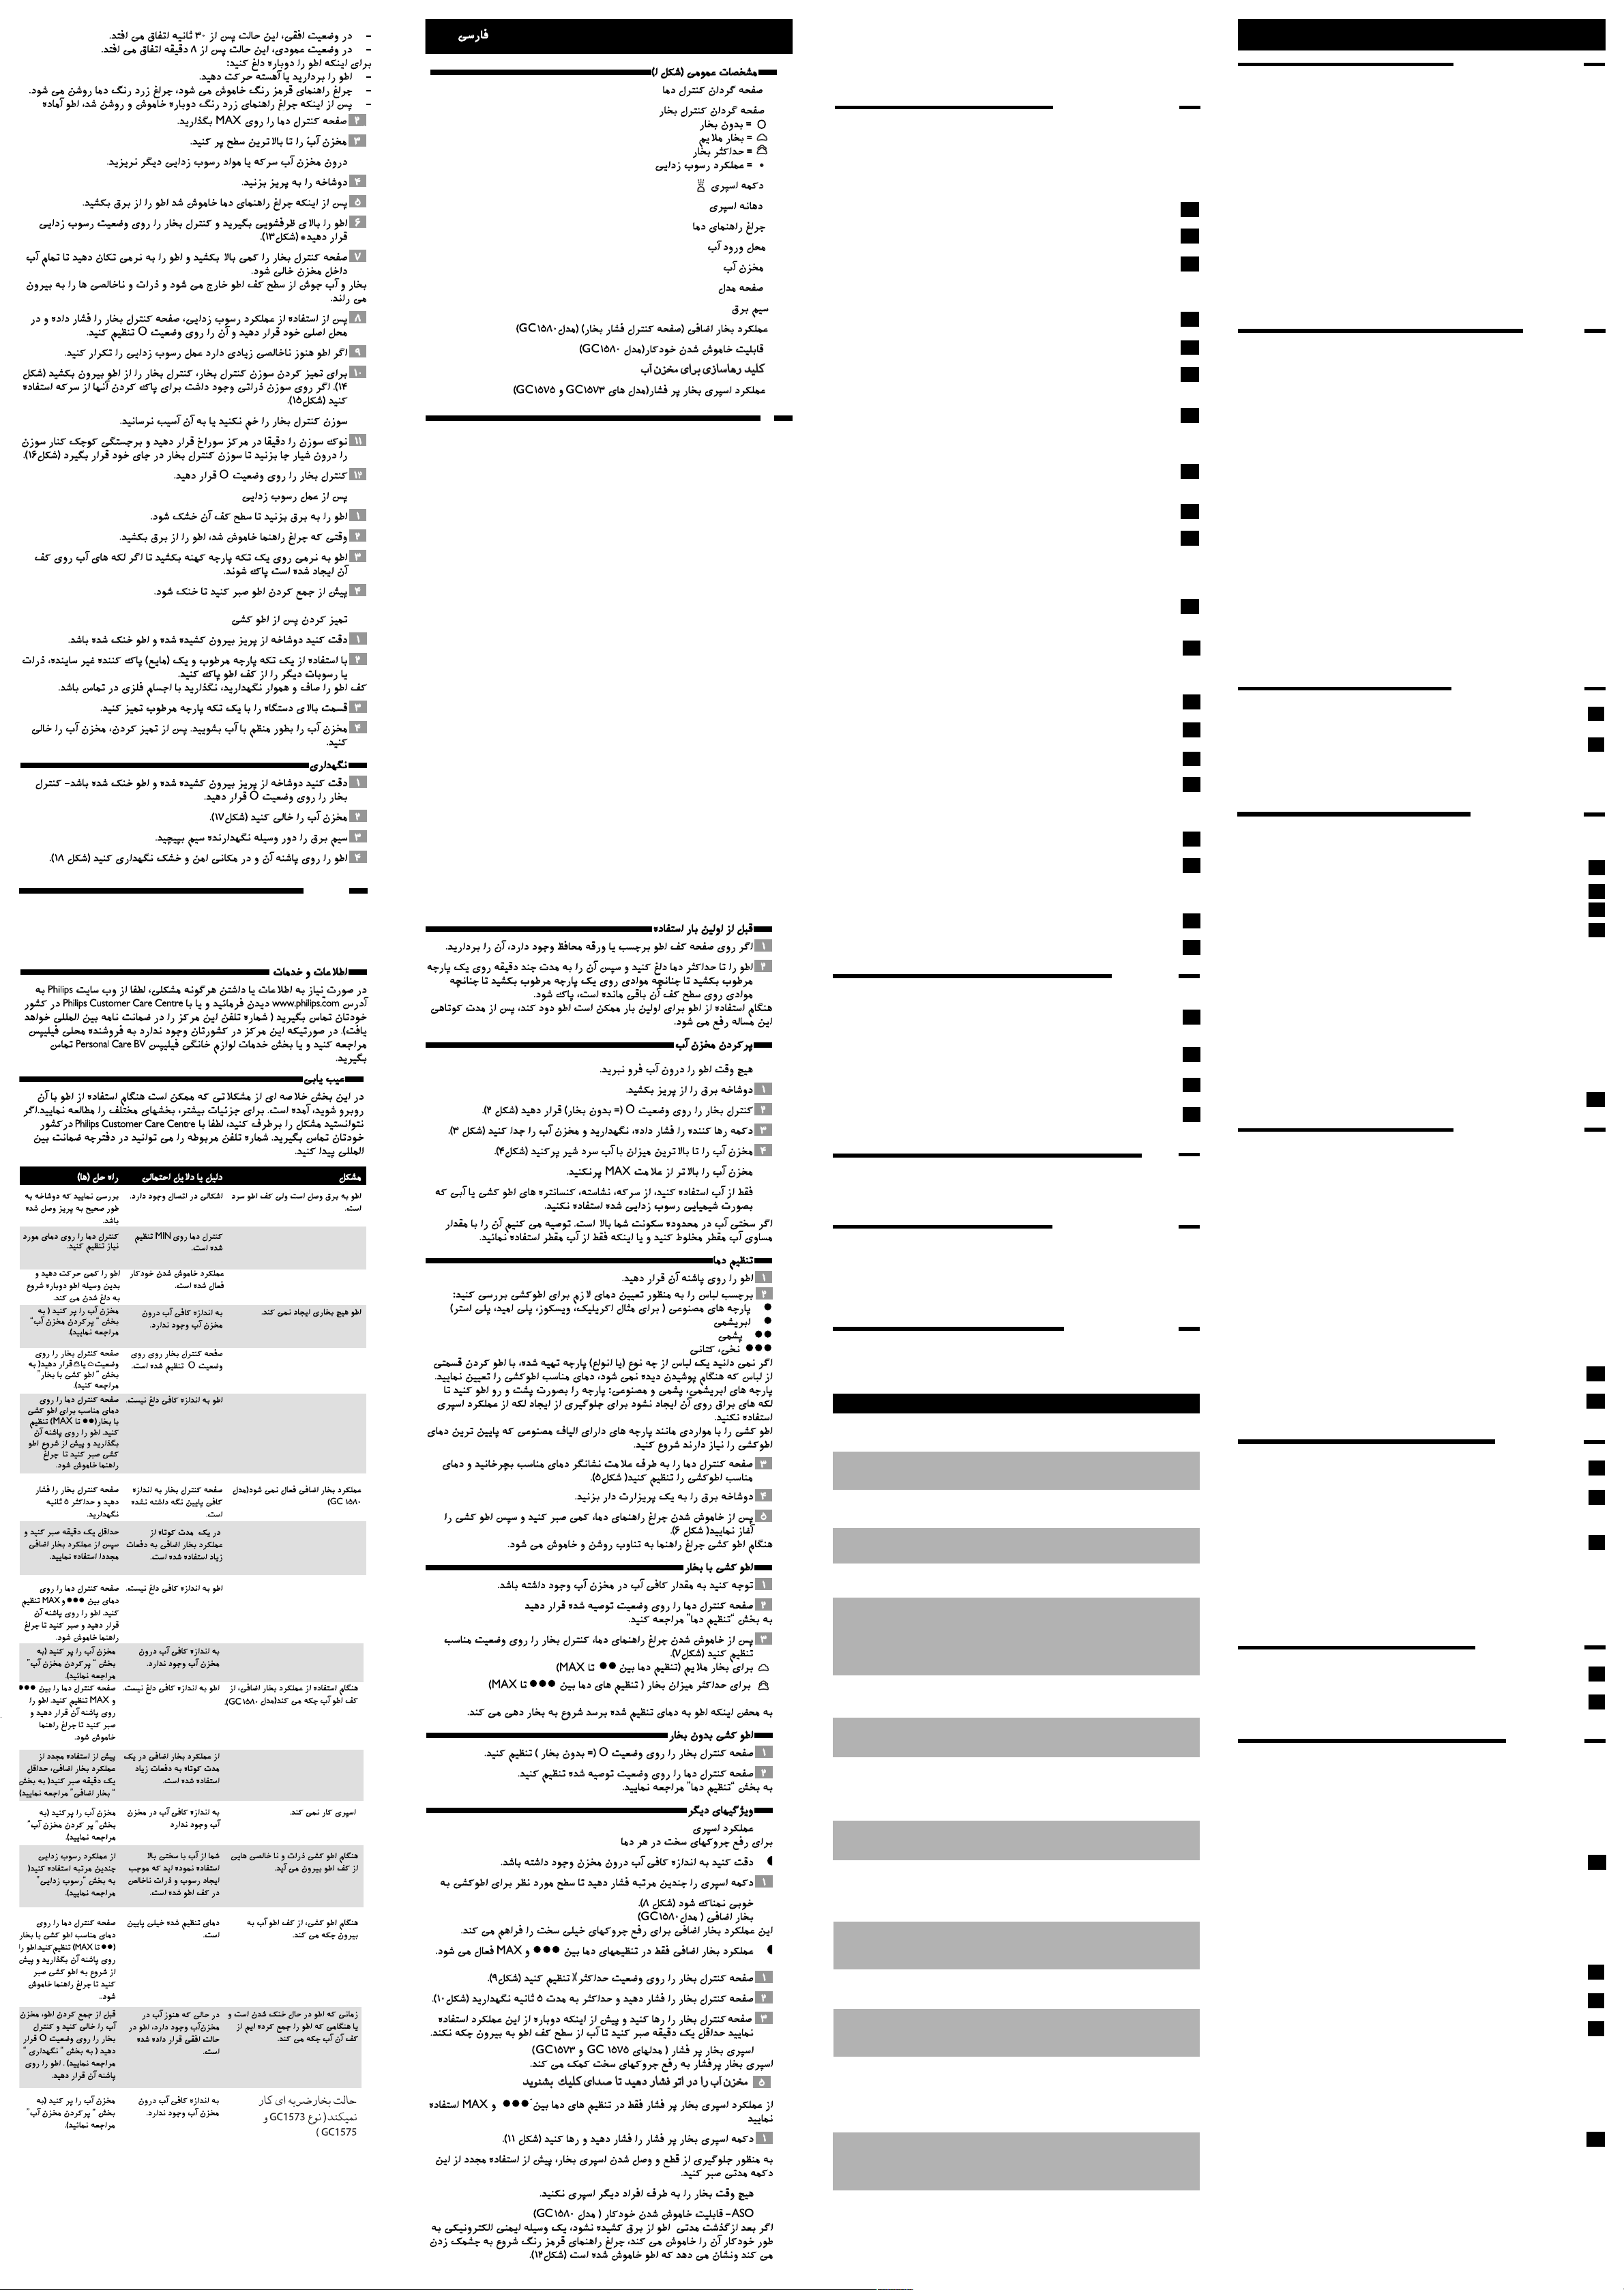
1 Remove sticker or protective foil from the soleplate if there is any.
2 Heat up the iron to the maximum temperature and pass the iron over a
piece of damp cloth for several minutes to remove any residues from the
soleplate.
The iron may give off some smoke when you use it for the first time. This will cease
after a short while.
Filling the water tankIIIIIIIIIIIIIIIIIIIIIIIIIIIIIIIIIIIIIIIIIIIIIIIIIIIIIIIIIIIIIIIIIIIIIIIIIIIIIIIIIIIIIIIIIIIIIIIIIIIIIIIIIIIIIIIIIIIIIIIIIIIIIIIIIIIIIIIIIIIIIIIIIIIIIIIIIIIIIIIIIIII
Never immerse the iron in water.
1 Remove the mains plug from the wall socket.
2 Set the steam control to position O (= no steam) (fig. 2).
3 Press and hold the release button and remove the detachable water tank
(fig. 3).
4 Fill the water tank with cold tap water up to the maximum level (fig. 4).
Do not fill the water tank beyond the MAX indication.
Only use water. Do not use vinegar, starch, ironing concentrates or chemically
descaled water.
If the tap water in your area is very hard, we advise you to mix it with an equal
amount of distilled water or to use distilled water only.
5 Push the water tank back into the iron until you hear a ‘click’.
Setting the temperatureIIIIIIIIIIIIIIIIIIIIIIIIIIIIIIIIIIIIIIIIIIIIIIIIIIIIIIIIIIIIIIIIIIIIIIIIIIIIIIIIIIIIIIIIIIIIIIIIIIIIIIIIIIIIIIIIIIIIIIIIIIIIIIIIIIIIIIIIIIIIIIIIIIIIIII
1 Put the iron on its heel.
2 Check the garment label for the required ironing temperature:
1 Synthetic fabrics (e.g. acrylic, viscose, polyamide, polyester)
1 Silk
2 Wool
3 Cotton, linen
If you do not know what kind of fabric(s) a garment is made of, determine the right
ironing temperature by ironing a part that will be invisible when you wear the
garment.
Silk, woollen and synthetic materials: iron the reverse side of the fabric to prevent
shiny patches. Avoid using the spray function to prevent stains.
Start ironing the articles that require the lowest ironing temperature, such as those
made of synthetic fibres.
3 Set the temperature control dial to the required ironing temperature by
turning it to the appropriate temperature indication (fig. 5).
4 Put the mains plug in an earthed wall socket.
5 When the temperature pilot light has gone out, wait a while before you start
ironing (fig. 6).
The pilot light will go on from time to time during ironing.
Steam ironingIIIIIIIIIIIIIIIIIIIIIIIIIIIIIIIIIIIIIIIIIIIIIIIIIIIIIIIIIIIIIIIIIIIIIIIIIIIIIIIIIIIIIIIIIIIIIIIIIIIIIIIIIIIIIIIIIIIIIIIIIIIIIIIIIIIIIIIIIIIIIIIIIIIIIIIIIIIIIIIIIIIIIIIIIIIIIIIIIIIIIIIIIIIIIIIIIII
1 Make sure that there is enough water in the water tank.
2 After the temperature pilot light has gone out, set the steam control to the
appropriate steam position (fig. 7).
q for moderate steam (temperature settings 2 to MAX)
w for maximum steam (temperature settings 3 to MAX)
The iron will start producing steam as soon as the set temperature has been
reached.
3 Set the temperature control dial to the recommended position.
See 'Setting the temperature'.
Ironing without steamIIIIIIIIIIIIIIIIIIIIIIIIIIIIIIIIIIIIIIIIIIIIIIIIIIIIIIIIIIIIIIIIIIIIIIIIIIIIIIIIIIIIIIIIIIIIIIIIIIIIIIIIIIIIIIIIIIIIIIIIIIIIIIIIIIIIIIIIIIIIIIIIIIIIIIIIIIIIIIII
1 Set the steam control dial to position O (= no steam).
2 Set the temperature control dial to the recommended position.
See 'Setting the temperature'.
Other featuresIIIIIIIIIIIIIIIIIIIIIIIIIIIIIIIIIIIIIIIIIIIIIIIIIIIIIIIIIIIIIIIIIIIIIIIIIIIIIIIIIIIIIIIIIIIIIIIIIIIIIIIIIIIIIIIIIIIIIIIIIIIIIIIIIIIIIIIIIIIIIIIIIIIIIIIIIIIIIIIIIIIIIIIIIIIIIIIIIIIIIIIIIIIIIIII
Spray function
To remove stubborn creases at any temperature
◗ Make sure there is enough water in the water tank.
1 Press the spray button several times to moisten the article to be ironed
(fig. 8).
Extra Steam (type GC1580)
This function provides extra steam to remove very stubborn creases.
◗ The Extra Steam function only works at temperature settings between 3
and MAX.
1 Set the steam control dial to the maximum position w (fig. 9).
2 Press and hold the steam control dial for maximal 5 seconds (fig. 10).
3 Release the steam control dial and wait at least 1 minute before using this
function again to prevent water from dripping out of the soleplate.
Shot of steam (types GC1575 and GC1573)
A powerful shot of steam helps to remove stubborn creases.
Use the Shot-of-Steam function only at temperature settings between 3 and
MAX.
1 Press and release the Shot of steam button (fig. 11).
Wait for while before using the button again to avoid spluttering.
Never direct the steam towards people.
ASO - Auto shut off (type GC1580)
An electronic safety device will automatically switch off the iron if it has not been
removed for a while.
To indicate that the iron has been switched-off, the red auto-off pilot light will start
blinking (fig. 12).
- In a horizontal position, this will happen after 30 seconds.
- In a vertical position, this will happen after 8 minutes.
To heat up the iron again:
- Pick up the iron or move it slightly.
- The red auto-off pilot light will go out. The amber temperature pilot light will go
on.
- When the amber pilot light has gone out and goes on again, the iron is ready
for use.
Cleaning and maintenanceIIIIIIIIIIIIIIIIIIIIIIIIIIIIIIIIIIIIIIIIIIIIIIIIIIIIIIIIIIIIIIIIIIIIIIIIIIIIIIIIIIIIIIIIIIIIIIIIIIIIIIIIIIIIIIIIIIIIIIIIIIIIIIIIIIIIIIIIIIIIII
Calc-Clean function
The Calc-Clean function removes scale and impurities.
Use the Calc-Clean function once every two weeks. If the water in your area is very
hard (i.e. when flakes come out of the soleplate during ironing), you should use the
Calc-Clean function more frequently.
1 Set the steam control dial to position O.
2 Set the temperature control dial to MAX.
3 Fill the water tank to the maximum level.
Do not pour vinegar or other descaling agents into the water tank.
4 Put the plug in the wall socket.
5 Unplug the iron when the temperature pilot light has gone out.
6 Hold the iron over the sink and set the steam control to the Calc-Clean
position • (fig. 13).
7 Pull the steam control dial slightly upwards and gently shake the iron until all
water in the tank has been used up.
Steam and boiling water will come out of the soleplate, flushing out impurities and
scale.
8 Press the steam control dial back to its original position and set it to position
O after having used the Calc-Clean function.
9 Repeat the Calc-Clean process if the iron still contains a lot of impurities.
10 To clean the steam control needle, pull the steam control out of the
appliance (fig. 14). Use vinegar to remove scale, if any, from the needle
(fig. 15).
Do not bend or damage the steam control needle.
1 Reinsert the steam control needle by placing the point of the needle exactly
in the centre of the hole and by fitting the small projection on the side of the
needle into the slot (fig. 16).
2 Set the steam control to position O.
After the Calc-Clean process
1 Connect the iron to the mains to let the soleplate dry.
2 Unplug the iron when the pilot light has gone out.
3 Move the iron gently over a piece of used cloth to remove any water stains
that may have formed on the soleplate.
4 Let the iron cool down before you store it.
Cleaning after ironing
1 Make sure the plug has been removed from the wall socket and the iron has
cooled down.
2 Wipe scale and any other deposits off the soleplate with a damp cloth and a
non-abrasive (liquid) cleaner.
Keep the soleplate smooth: avoid contact with metal objects.
3 Clean the upper part of the appliance with a damp cloth.
4 Regularly rinse the water tank with water. Empty the water tank after
cleaning.
StorageIIIIIIIIIIIIIIIIIIIIIIIIIIIIIIIIIIIIIIIIIIIIIIIIIIIIIIIIIIIIIIIIIIIIIIIIIIIIIIIIIIIIIIIIIIIIIIIIIIIIIIIIIIIIIIIIIIIIIIIIIIIIIIIIIIIIIIIIIIIIIIIIIIIIIIIIIIIIIIIIIIIIIIIIIIIIIIIIIIIIIIIIIIIIIIIIIIIIIIIIIIIIIIIIIIIIIIIIIIIIII
1 Make sure the plug has been removed from the wall socket and the iron has
cooled down. Set the steam control to position O.
2 Empty the water tank (fig 17).
3 Wind the mains cord round the cord storage facility.
4 Store the iron standing on his heel in a safe and dry place (fig. 18).
Environment
.
◗ Do not throw the appliance away with the normal household waste at the
end of its life, but hand it in at an official collection point for recycling.
By doing this you will help to preserve the environment (fig. 19).
Information & serviceIIIIIIIIIIIIIIIIIIIIIIIIIIIIIIIIIIIIIIIIIIIIIIIIIIIIIIIIIIIIIIIIIIIIIIIIIIIIIIIIIIIIIIIIIIIIIIIIIIIIIIIIIIIIIIIIIIIIIIIIIIIIIIIIIIIIIIIIIIIIIIIIIIIIIIIIIIIIIIIIIII
If you need information or if you have a problem, please visit the Philips Web site at
www.philips.com or contact the Philips Customer Care Centre in your country (you
will find its phone number in the worldwide guarantee leaflet). If there is no
Customer Care Centre in your country, turn to your local Philips dealer or contact
the Service Department of Philips Domestic Appliances and Personal Care BV.
TroubleshootingIIIIIIIIIIIIIIIIIIIIIIIIIIIIIIIIIIIIIIIIIIIIIIIIIIIIIIIIIIIIIIIIIIIIIIIIIIIIIIIIIIIIIIIIIIIIIIIIIIIIIIIIIIIIIIIIIIIIIIIIIIIIIIIIIIIIIIIIIIIIIIIIIIIIIIIIIIIIIIIIIIIIIIIIIIIIIIIIIIIIIIIII
This chapter summarises the most common problems you could encounter with
your iron. Please read the different sections for more details. If you are unable to
solve the problem, please contact the Philips Customer Care Centre in your
country. You can find its telephone number in the worldwide guarantee leaflet.
ENGLISH
Comfort
GC1580, GC1575, GC1573, GC1565
2
4
5
7
8
9
1
0
1
3
14
1
5
1
6
1
7
1
8
12
3
8
Solution(s)
Check if the plug is connected
to the wall socket properly.
Set the temperature control dial
to the required temperature.
Move the iron slightly and the
iron will start heating up again.
c
Fill the water tank (see 'Filling
the water tank').
Set the steam control dial to
position q or w (see 'Steam
ironing').
Set the temperature control dial
to a temperature suitable for
steam ironing (2 to MAX).
Put the iron on its heel and wait
until the pilot light has gone out
before you start ironing.
Press and hold the steam
control dial for maximal
5 seconds.
Wait at least 1 minute before
using the Extra Steam function
again.
Set the temperature control dial
to a temperature between
3 and MAX. Put the iron on
its heel and wait until the pilot
light has gone out.
Fill the water tank (see 'Filling
the water tank').
Set the temperature control dial
to a temperature between
3 and MAX. Put the iron on
its heel and wait until the pilot
light has gone out.
Wait at least 1 minute before
using the Extra Steam function
again (see 'Extra Steam').
Fill the water tank (see 'Filling
the water tank').
Use the Calc-Clean function a
few times (see 'Calc-Clean').
Set the temperature control dial
to a temperature suitable for
steam ironing (2 to MAX).
Put the iron on its heel and wait
until the pilot light has gone out
before you start ironing.
Empty the water tank and set
the steam control to position O
before storing the iron (see
'Storage'). Place the iron on its
heel.
Fill the water tank (see 'Filling
the water tank').
Possible cause(s)
There is a connection
problem.
The temperature
control dial has been
set to MIN.
The auto-off function is
activated.
There is not enough
water in the water tank.
The steam control dial
has been set to
position O.
The iron is not hot
enough.
The steam control dial
has not been pressed
long enough.
The Extra Steam
function has been used
too often in a short
period.
The iron is not hot
enough.
There is not enough
water in the water tank.
The iron is not hot
enough.
The Extra Steam
function has been used
too often in a short
period.
There is not enough
water in the water tank.
You have been using
hard water, which has
caused scale flakes to
develop inside the
soleplate.
The set temperature is
too low.
The iron has been put
in horizontal position
while there is still water
in the water tank.
There is not enough
water in the water tank.
Problem
The iron is plugged in
but the soleplate is
cold.
The iron does not
produce any steam.
The Extra Steam
function does not work
(type GC1580)
Water leaks from the
soleplate when I use
the Extra Steam
function (type
GC1580)
The spray function
does not work
Flakes and impurities
come out of the
soleplate during ironing.
Water leaks from the
soleplate during ironing.
Water leaks from the
soleplate while the iron
is cooling down or after
it has been stored.
The Shot of steam
function does not work
(types GC1575 and
GC1573).
19
www.philips.com
u
4239 000 52692
((11 ºº°°SSQQ)) ΩΩÉÉYY ∞∞°°UUhh
IQGô◊G áLQóH ºµëàdG ¢Uôb
QÉîÑdÉH ºµëàdG ¢Uôb
OQÉîH ’ =
q∫óà©e QÉîH =
w»ª¶YCG QÉîH =
xºcGΟG ¢ù∏µdG ∞«¶æJ áØ«Xh =
AÉŸG ñÉîH ìÉàØeT
AÉŸG ñÉîH áëàa
IQGô◊G ô°TDƒe Aƒ°V
AÉŸÉH ójhõàdG áëàa
AÉŸG ¿GõN
äÉØ°UGƒŸG áë«Ø°U
»FÉHô¡µdG ∂∏°ùdG
RGôW) (QÉîÑdÉH ºµëàdG ¢Uôb §¨°VEG) ‘É°VE’G QÉîÑdG áØ«Xh(GC1580
RGôW) »FÉ≤∏J ∞bƒJ(GC1580
AÉŸG ¿Gõÿ ôjôëàdG ìÉàØe
…RGôW) QÉîÑdG ™aO áØ«XhGC1575 , GC1573(
A
B
C
D
E
F
G
H
I
J
K
L
M
∫∫hhCC’’GG ∫∫Éɪª©©àà°°SS’’GG ππÑÑbb
..ππ°°UUCC’’ÉÉHH kkGGOOƒƒLLƒƒee ¿¿ÉÉcc ¿¿EEGG ……ƒƒµµddGG ááëë««ØØ°°UU ≈≈∏∏YY øøee »»bbGGƒƒddGG ±±ÓÓ¨¨ddGG hhCCGG áábbÉÉ°°üü∏∏ddGG ´´õõffGG
óóbb ÖÖFFGGƒƒ°°TT ……CCGG ááddGGRREE’’ ääGGôôee IIóó©©dd ¢¢TTÉɪª≤≤ddGG øøee áá©©££bb ¥¥ƒƒbb ÉÉggQQôôeehh IIQQGGôôMM ááLLQQOO ≈≈°°üübbCC’’ IIGGƒƒµµŸŸGG øøîî°°SS
..……ƒƒµµddGG ááëë««ØØ°°UU ≈≈∏∏YY áá≤≤ddÉÉYY ¿¿ƒƒµµJJ
.Iõ«Lh IÎa ó©H ∞bƒà«°S Gògh ¤hC’G Iôª∏d ÉgÉjEG ∂eGóîà°SG óæY ¿ÉNódG ¢†©H IGƒµŸG ≥∏£J ób
1
2
AAÉÉŸŸGG ¿¿GGõõNN ááÄÄÑÑ©©JJ
kGóHCG AÉŸG ‘ IGƒµŸG ¢ùª¨J’
..áábbÉÉ££ddGG áᣣ≤≤ff øøee »»°°ùù««FFôôddGG ¢¢ùùHHÉÉ≤≤ddGG ´´õõffEEGG
)) áá««©©°°VVƒƒddGG ≈≈∏∏YY QQÉÉîîÑÑddGG ººµµ–– ¢¢UUôôbb ™™°°VV
O
((22 ºº°°SSQQ)) ((QQÉÉîîHH ’’)) == ((
..(( 33ºº°°SSQQ)) ∫∫ÉÉ°°üüØØffEEÓÓdd ππHHÉÉ≤≤ddGG AAÉÉŸŸGG ¿¿GGõõNN ππ°°üüaaGGhh ππ°°üüØØddGG ììÉÉààØØee ≈≈∏∏YY IIÎÎØØdd ÉÉ££ZZÉÉ°°VV ≈≈≤≤HHGGhh §§¨¨°°VVGG
((44 ºº°°SSQQ)) iiƒƒàà°°ùùee ≈≈∏∏YYCCGG ¤¤EEGG OOQQÉÉÑÑddGG QQƒƒÑÑææ°°üüddGG AAÉÉÃà ¿¿GGõõÿÿGG CCÓÓeeEEGG
``HH ¬¬««ddEEGG QQÉÉ°°ûûŸŸGG »»ªª¶¶YYCC’’GG iiƒƒàà°°ùùŸŸGG ¥¥ƒƒaa ÉÉee ¤¤EEGG AAÉÉŸŸGG ¿¿GGõõNN CCÓÓ““ ’’
MAX
..
..iiôôNNCC’’GG áá««FFÉÉ««ªª««µµddGG ππ««ddÉÉÙÙGG hhCCGG IIõõccôôŸŸGG »»µµddGG ππFFGGƒƒ°°SS hhCCGG AAÉÉ°°ûûææddGG hhCCGG ππÿÿGG ¢¢ùù««ddhh ..§§≤≤aa AAÉÉee ΩΩóóîîàà°°SSGG
hCG ô£≤ŸG AÉŸG øe á∏Kɇ ᫪c ™e ¬Lõ“ ¿CG ∂ë°üæf IÒãc ÖFGƒ°T ∂jód QƒÑæ°üdG AÉe iƒàMG GPEG
.§≤a ô£≤ŸG AÉŸG Ωóîà°SG
.''∂«∏c'' 䃰U ™ª°ùJ ¿CG ¤G IGƒµŸG πNGO AÉŸG ¿GõN ™aOEG
hCG ô£≤ŸG AÉŸG øe á∏Kɇ ᫪c ™e ¬Lõ“ ¿CG ∂ë°üæf IÒãc ÖFGƒ°T ∂jód QƒÑæ°üdG AÉe iƒàMG GPEG
.§≤a ô£≤ŸG AÉŸG Ωóîà°SG
.''∂«∏c'' 䃰U ™ª°ùJ ¿CG ¤G IGƒµŸG πNGO AÉŸG ¿GõN ™aOEG
ÉÉggóó©©≤≤ee ≈≈∏∏YY IIGGƒƒµµŸŸGG ™™°°VV
ááHHƒƒ∏∏££ŸŸGG IIQQGGôô◊◊GG ááLLQQOO ááaaôô©©ŸŸ áábbÉÉ««ddGG ∞∞∏∏NN áá≤≤∏∏©©ŸŸGG ÉÉ¡¡ààMMƒƒdd ∫∫ÓÓNN øøee ¢¢TTÉɪª≤≤ddGG »»∏∏bb ääÉɪª««∏∏©©JJ CCGGôôbbGG
::ÉÉ¡¡jjƒƒµµdd
•(ΰù«dƒÑdGh 󫪫dƒÑdGh Rƒµ°ù«ØdGh ,∂«∏jôcC’G πãe) »YÉ棰UG ∂jôHÉa
•ôjô◊G
••±ƒ°üdG
•••¿ÉàµdGh ,ø£≤dG
,,ááHHƒƒZZôôŸŸGG IIQQGGôô◊◊GG ááLLQQOO ¤¤EEGG √√QQóóJJ ¿¿CCÉÉHH ∂∂ddPPhh ÉÉ¡¡HH ÖÖZZôôJJ »»ààddGG ááLLQQóóddGG ≈≈∏∏YY IIQQGGôô◊◊GG ººµµ–– ¢¢UUôôbb ™™°°VV
..((55 ºº°°SSôôddGG ôô¶¶ffGG))
…ƒcGh áë«ë°üdG IQGô◊G áLQO ÎNG ,¬æe ¢Tɪ≤dG ™æ°U ób ∂jôHÉØdG øe ´ƒf …CG ±ô©J ⁄ GPEG
.É¡jóJôJ ÉeóæY á«Fôe ¿ƒµJ ød »àdG á©£≤dG øe AGõLC’G
.á©e’ ™≤H ∫ƒ°üM ™æªàd ∂jôHÉØdG øe ¢Tɪb â– iƒµJ á«YÉ棰U’Gh á«aƒ°üdG á°ûªbC’Gh ôjô◊G
.™≤ÑdG ™æŸ ïÑdG áØ«Xh ΩGóîà°SG ÖæŒ
.»YÉ棰UE’G ∂jôHÉØdG øe áYƒæ°üŸG ¢ùHÓŸÉc ,k’hCG á°†Øîæe IQGôM Ö∏£àJ »àdG ¢ùHÓŸG …ƒµH CGóHG
..»»°°VVQQCC’’GG ∂∂∏∏°°SS ™™ee áá∏∏°°üüààŸŸGG áábbÉÉ££ddGG áᣣ≤≤ff ‘‘ ¢¢ùùHHÉÉ≤≤ddGG ππ°°UU
((66 ºº°°SSôôddGG ôô¶¶ffGG)) áá««ffÉÉKK IIGGƒƒµµŸŸGG π𨨰°ûûJJ ¿¿CCGG ππÑÑbb áággÈÈdd ôô¶¶ààffGG IIQQGGôô◊◊GG ôô°°TTDDƒƒee AAƒƒ°°VV ÅÅØØ££ææjj ÉÉeeóóææYY
.…ƒµdG AÉæKCG ôNBGh ÚM ÚH Å°†«°S IQGô◊G ô°TDƒe Aƒ°V
AAÉÉŸŸGG ¿¿GGõõNN ‘‘ ±±ÉÉcc AAÉÉee OOƒƒLLhh øøee óóccCCÉÉJJ
..ááÑÑ°°SSÉÉæ柟GG áá««©©°°VVƒƒddGG ≈≈∏∏YY IIQQGGôô◊◊GG ººµµ–– ¢¢UUôôbb §§ÑÑ°°VVGG
''IQGô◊G áLQO §Ñ°V'' ô¶fG
á᪪FFÓÓŸŸGG áá««©©°°VVƒƒddGG ≈≈∏∏YY QQÉÉîîÑÑddÉÉHH ººµµëëààddGG ¢¢UUôôbb §§ÑÑ°°VVGG IIQQGGôô◊◊GG ôô°°TTDDƒƒee AAƒƒ°°VV ÅÅØØ££jj ¿¿CCGG óó©©HH
((77 ºº°°SSôôddGG ôô¶¶ffGG))
øe IQGô◊G §Ñ°VG) ∫óà©ŸG QÉîÑ∏d•• ¤EGMAX (
øe IQGô◊G §Ñ°VG) »ª¶YC’G QÉîÑ∏d••• ¤EGMAX (
.¬«∏Y â£Ñ°V …òdG ó◊G ¤EG IQGô◊G áLQO ∫ƒ°Uh Oôéà QÉîÑdG êÉàfÉH IGƒµŸG CGóÑà°S
)) áá««©©°°VVƒƒddGG ≈≈∏∏YY QQÉÉîîÑÑddGG ººµµ–– ¢¢UUôôbb §§ÑÑ°°VVGG
O
((QQÉÉîîHH ’’ ==)) ((
..ááÑÑ°°SSÉÉæ柟GG áá««©©°°VVƒƒddGG ≈≈∏∏YY IIQQGGôô◊◊GG ººµµ–– ¢¢UUôôbb §§ÑÑ°°VVGG
''IQGô◊G áLQO §Ñ°V'' ô¶fG
ïïÑÑddGG ááØØ««XXhh
.IQGôM áLQO …CG ‘ á«°SÉ≤dGh áÑ©°üdG ó«YÉéàdG øe ¢ü∏îà∏d
..¿¿GGõõÿÿGG ‘‘ AAÉÉŸŸGG øøee áá««aaÉÉcc áá««ªªcc OOƒƒLLhh øøee óóccCCÉÉJJ --
..((88 ºº°°SSôôddGG ôô¶¶ffGG)) ..ÉÉ¡¡jjƒƒcc ππÑÑbb áá©©££≤≤ddGG ÖÖWWôôJJ »»µµdd ääGGôôee IIóóYY ïïÑÑddGG ììÉÉààØØee §§¨¨°°VVGG
‘‘ÉÉ°°VVEEGG QQÉÉîîHH ´´ƒƒff))
GC1580
((
.Ió«æ©dGh áÑ©°üdG ó«YÉéàdG ´õæd á«aÉ°VEG QÉîH ᫪µH OhõJ áØ«XƒdG √òg
)) ÚÚHH IIQQGGôôMM ááLLQQOO ≈≈∏∏YY π𪪩©JJ ‘‘ÉÉ°°VVEE’’GG QQÉÉîîÑÑddGG ááØØ««XXhh --
•••
hh
MAX
..((
..((99 ºº°°SSôôddGG ôô¶¶ffGG)) iiƒƒ°°üü≤≤ddGG áá««©©°°VVƒƒddGG ≈≈∏∏YY QQÉÉîîÑÑddGG ººµµ–– ¢¢UUôôbb §§ÑÑ°°VVGG
..((1100 ºº°°SSôôddGG ôô¶¶ffGG)) ÊÊGGƒƒKK 55 IIóóŸŸ QQÉÉîîÑÑddÉÉHH ººµµëëààddGG ¢¢UUôôbb ∂∂°°ùùeeGGhh §§¨¨°°VVGG
»»µµdd áá««ffÉÉKK ááØØ««XXƒƒddGG √√òògg ΩΩGGóóîîàà°°SSGG ππÑÑbb IIóóMMGGhh áá≤≤««bbOO ππbbCC’’GG ≈≈∏∏YY ôô¶¶ààffGGhh QQÉÉîîÑÑddÉÉHH ººµµëëààddGG ¢¢UUôôbb QQôôMM
..……ƒƒµµddGG ááëë««ØØ°°UU êêQQÉÉNN ¤¤EEGG ÜÜÉɵµ°°ùùffEE’’GG øøee AAÉÉŸŸGG ™™ææ““
……RRGGôôWW)) áájjQQÉÉîîÑÑddGG áá©©aaóóddGG
GC1575 , GC1573
((
.Ió«æ©dGh áÑ©°üdG ó«YÉéàdG øe ¢ü∏îàdG ≈∏Y óYÉ°ùJ ájƒ≤dG ájQÉîÑdG á©aódG
) ÚH IQGôM áLQO ≈∏Y §≤a ájQÉîÑdG á©aódG áØ«Xh Ωóîà°SG••• hMAX.(
..((1111 ºº°°SSôôddGG ôô¶¶ffGG)) √√QQ
qq
ôôMMhh áájjQQÉÉîîÑÑddGG áá©©aaóóddGG ììÉÉààØØee §§¨¨°°VVGG
.QÉîÑdG á≤Ñ≤H Öæéàd GOó› ìÉàØŸG ΩGóîà°SG πÑb Iõ«Lh IÎØd ô¶àfG
..GGóóHHCCGG ¢¢SSÉÉææddGG √√ÉÉŒŒÉÉHH QQÉÉîîÑÑddGG ¬¬LLƒƒJJ ’’
»»FFÉÉ≤≤∏∏ààddGG ∞∞bbƒƒààddGG RRGGôôWW))
GC1580
((
.IOófi IÎØd É¡∏ªM ºàj ⁄ GPG É«µ«JÉeƒJhG IGƒµŸG ±É≤jÉH áeÓ°ù∏d ÊhεdG ô°üæY Ωƒ≤j
.(12 º°SQ) ¢†«eƒdÉH ôªMC’G »Fƒ°†dG ô°TDƒŸG CGóÑj ,É¡aÉ≤jG ” IGƒµŸG ¿CÉH IQÉ°TG AÉ£Y’
.á«fÉK 30 ó©H ∂dP π°üëj ,»≤aC’G ™°VƒdG ‘ -
.≥FÉbO 8 ó©H ∂dP π°üëj ,…OƒeÉ©dG ™°VƒdG ‘ -
1
2
3
4
5
IIQQGGôô◊◊GG ááLLQQOO ππjjóó©©JJ
4
5
QQÉÉîîÑÑddÉÉHH »»µµddGG
1
2
3
QQÉÉîîHH ¿¿hhóóHH »»µµddGG
1
2
iiôôNNCCGG ÉÉjjGGõõee
ººccGGÎΟŸGG ¢¢ùù∏∏µµddGG ∞∞««¶¶ææJJ ááØØ««XXhh
.ôµ©dGh áÑ°SΟG Qƒ°û≤dG πjõJ ºcGΟG ¢ù∏µdG ∞«¶æJ áØ«Xh
kGóL kGôµY ∂à≤£æe ‘ AÉŸG ¿Éc GPEGh .ÚYƒÑ°SG πc IóMGh Iôe ºcGΟG ¢ù∏µdG ∞«¶æJ áØ«Xh Ωóîà°SG
.∂dP øe ÌcCG ºcGΟG ¢ù∏µdG ∞«¶æJ áØ«Xh ΩGóîà°SG ∂«∏Y Öé«a
)) áá««©©°°VVƒƒddGG ≈≈∏∏YY QQÉÉîîÑÑddGG ººµµ–– ¢¢UUôôbb §§ÑÑ°°VVGG
O
.. ((
)) áá««©©°°VVƒƒddGG ≈≈∏∏YY IIQQGGôô◊◊GG ººµµ–– ¢¢UUôôbb §§ÑÑ°°VVGG
MAX
.. ((
..≈≈°°üübbCC’’GG óó◊◊GG ¤¤EEGG AAÉÉŸŸÉÉHH ¿¿GGõõÿÿGG CCÓÓeeGG
.iôNC’G á«FÉ«ª«µdG π«dÉÙG hCG IõcôŸG …ƒµdG πFGƒ°S hCG AÉ°ûædG hCG πÿG hCG πN Öµ°ùJ ’
..áábbÉÉ££ddGG áᣣ≤≤ff ‘‘ ¢¢ùùHHÉÉ≤≤ddGG ππ°°UU
IIQQGGôô◊◊GG ôô°°TTDDƒƒee AAƒƒ°°VV ÅÅØØ££ææjj ÉÉeeóóææYY ¢¢ùùHHÉÉ≤≤ddGG ´´õõffGG
ººccGGÎΟŸGG ¢¢ùù∏∏µµddGG ∞∞««¶¶ææJJ ááØØ««XXhh≈≈∏∏YY QQÉÉîîÑÑddGG ººµµ–– §§ÑÑ°°VVGGhh »»∏∏÷÷GG ¢¢VVƒƒMM ¥¥ƒƒaa IIGGƒƒµµŸŸGG ππªªMMGG
..((1133 ºº°°SSôôddGG ôô¶¶ffGG))
ππeeÉÉcc ΩΩGGóóîîàà°°SSGG ººààjj ≈≈ààMM IIGGƒƒµµŸŸGG ∞∞««ØØNN ππµµ°°ûûHH õõgghh ≈≈∏∏YYCC’’GG áá¡¡LL ∞∞££∏∏HH QQÉÉîîÑÑddÉÉHH ººµµëëààddGG ¢¢UUôôbb ÖÖëë°°SSGG
..AAÉÉŸŸGG áá««ªªcc
.ôµ©dGh Qƒ°û≤dG GhOô£«d …ƒµdG áë«Ø°U øe ¿ÉLôî«°S »∏¨dG AÉeh QÉîÑdG
)) áá««©©°°VVhh ≈≈∏∏YY ¬¬££ÑÑ°°VVGG ººKK ¤¤hhCC’’GG ¬¬àà««©©°°VVhh ¤¤EEGG ∞∞∏∏ÿÿGG ƒƒëëff QQÉÉîîÑÑddÉÉHH ººµµëëààddGG ¢¢UUôôbb §§©©°°VVGG
O
¿¿CCGG óó©©HH ((
..ººccGGÎΟŸGG ¢¢ùù∏∏µµddGG ∞∞««¶¶ææJJ ááØØ««XXhh ââeeóóîîàà°°SSGG óóbb ¿¿ƒƒµµJJ
..ôôµµ©©ddGG hhCCGG QQƒƒ°°ûû≤≤ddGG OOƒƒLLhh ∫∫ÉÉMM ººccGGÎΟŸGG ¢¢ùù∏∏µµddGG ∞∞««¶¶ææJJ ááØØ««XXhh ΩΩGGóóîîàà°°SSGG áá««∏∏ªªYY QQôôcc
ππÿÿGG ΩΩóóîîàà°°SSGG ..((1144 ºº°°SSôôddGG ôô¶¶ffGG)) RRÉÉ¡¡÷÷GG øøee QQÉÉîîÑÑddÉÉHH ººµµëëààddGG ´´õõffGG QQÉÉîîÑÑddÉÉHH ººµµëëààddGG IIôôHHEEGG ∞∞¶¶ææJJ »»µµdd
ºº°°SSôôddGG ôô¶¶ffGG)) ..IIôôHHEE’’GG ≈≈∏∏YY ÉÉggOOƒƒLLhh ∫∫ÉÉMM ‘‘ ääÉÉÑÑ°°SSÎÎddGG ´´õõæædd((1155
QÉîÑdÉH ºµëàdG IôHEG …PDƒJ hCG »æ–’
≈≈∏∏YY AAƒƒààææddGG ââ««ÑÑããààHHhh ááëëààØØddGG õõccôôee ‘‘ kkÉÉeeÉÉ““ IIôôHHEE’’GG ¢¢SSCCGGQQ ™™°°VVƒƒHH QQÉÉîîÑÑddÉÉHH ººµµëëààddGG IIôôHHEEGG ∫∫ÉÉNNOOEEGG óóYYCCGG
((1166 ºº°°SSôôddGG ôô¶¶ffGG)) ∞∞jjƒƒééààddGG ‘‘ IIôôHHEE’’GG ÖÖffÉÉLL
)) áá««©©°°VVƒƒddGG ≈≈∏∏YY QQÉÉîîÑÑddGG ººµµ–– §§ÑÑ°°VVGG
O
((
ÖÖ°°SSÎΟŸGG ¢¢ùù∏∏µµddGG ááddGGRREEGG áá««∏∏ªªYY óó©©HH
……ƒƒµµddGG ááëë««ØØ°°UU ∞∞ŒŒ ≈≈ààMM AAÉÉHHôô¡¡µµddÉÉHH IIGGƒƒµµŸŸGG ππ°°UU
IIQQGGôô◊◊GG ôô°°TTDDƒƒee AAƒƒ°°VV ÅÅØØ££ææjj ÉÉeeóóææYY ¢¢ùùHHÉÉ≤≤ddGG ´´õõffGG
..……ƒƒµµddGG ááëë««ØØ°°UU ≈≈∏∏YY ââ∏∏µµ°°ûûJJ óóbb ââffÉÉcc AAÉÉee ™™≤≤HH ……CCGG ´´õõæædd áá««ddÉÉHH ¢¢TTÉɪªbb áá©©££bb ≈≈∏∏YY ∞∞££∏∏HH IIGGƒƒµµŸŸGG ∑∑ôôMM
..ÉÉ¡¡ffõõîîJJ ¿¿CCGG ππÑÑbb OOÈÈJJ IIGGƒƒµµŸŸGG ∑∑ôôJJGG
……ƒƒµµddGG óó©©HH ∞∞««¶¶ææààddGG
kkÉÉeeÉÉ““ ääOOôôHH óóbb IIGGƒƒµµŸŸGG ¿¿CCGGhh áábbÉÉ££ddGG áᣣ≤≤ff øøee ¢¢ùùHHÉÉ≤≤ddGG ´´õõff øøee óóccCCÉÉJJ
ÒÒZZ ππFFÉÉ°°ùùHHhh áá««ddÉÉHH áábbôôîîHH ……ƒƒµµddGG ááëë««ØØ°°UU ≈≈∏∏YY øøee iiôôNNCC’’GG ÉÉjjÉÉ≤≤ÑÑddGG ™™««ªªLLhh áájjôô°°ûû≤≤ddGG ääÉÉÑÑ°°SSÎÎddGG íí°°ùùeeGG
..»»°°††eeÉÉMM
.iôNCG ¿OÉ©e …CG ™e É¡cɵàMG ÖæŒh áªYÉf …ƒµdG áë«Ø°U »≤HG
áá««ddÉÉHH áábbôôîîHH RRÉÉ¡¡÷÷GG øøee ……ƒƒ∏∏©©ddGG ºº°°ùù≤≤ddGG ∞∞¶¶ff
.. ∞∞««¶¶ææààddGG óó©©HH ¿¿GGõõÿÿGG ÆÆôôaaCCGGhh AAÉÉŸŸÉÉHH AAÉÉŸŸGG ¿¿GGõõNN ππ°°ùùZZGG ÉɪªFFGGOO
≈≈∏∏YY QQÉÉîîÑÑddGG ººµµ–– §§ÑÑ°°VVGG hh kkÉÉeeÉÉ““ ääOOôôHH óóbb IIGGƒƒµµŸŸGG ¿¿CCGGhh áábbÉÉ££ddGG áᣣ≤≤ff øøee ¢¢ùùHHÉÉ≤≤ddGG ´´õõff øøee óóccCCÉÉJJ
)) áá««©©°°VVƒƒddGG
O
..((
..((1177 ºº°°SSôôddGG ôô¶¶ffGG)) ..AAÉÉŸŸGG øøee ¿¿GGõõÿÿGG ÆÆôôaaCCGG
..øøjjõõîîààddGG IIÒÒééMM ‘‘ ¬¬©©°°VVhh »»°°ùù««FFôôddGG AAÉÉHHôô¡¡µµddGG ππÑÑcc ∞∞dd
..((1188 ºº°°SSôôddGG ôô¶¶ffGG)) ..±±ÉÉLLhh øøeeBBGG ¿¿Éɵµee ‘‘ ÉÉggóó©©≤≤ee ≈≈∏∏YY ±±ƒƒbbƒƒddGG ¬¬««©©°°VVƒƒHH IIGGƒƒµµŸŸGG ¿¿õõNN
ááffÉÉ««°°üüddGGhh ∞∞««¶¶ææààddGG
3
2
1
9
10
6
7
8
5
4
11
12
3
2
1
4
3
4
2
1
øøjjõõîîààddGG
3
2
1
4
ááeeóóÿÿGGhh ääÉÉeeƒƒ∏∏©©ŸŸGG
GGóóLL ºº¡¡ee
AÉHô¡µdÉH á∏°üàe IGƒµŸG
IOQÉH …ƒµdG áë«Ø°U øµdh
QÉîH êôîJ’ IGƒµŸG
’ ‘É°VE’G QÉîÑdG áØ«Xh
´ƒf) πª©JGC1580(
áë«Ø°U øe Üô°ùàj AÉŸG
áØ«Xh Ωóîà°SG ÉeóæY …ƒµdG
´ƒf) ‘É°VE’G QÉîÑdG
GC1580(
πª©J ’ ïÑdG áØ«Xh
ôµY AÉeh áÑ°SÎe ™£b
…ƒµdG áë«Ø°U øe êôîj
…ƒµdG AÉæKCG
áë«Ø°U øe Üô°ùàj AÉŸG
…ƒµdG AÉæKCG …ƒµdG
áë«Ø°U øe Üô°ùàj AÉŸG
hCG IGƒµŸG ójÈJ AÉæKCG …ƒµdG
É¡æjõîJ ºàj ¿CG ó©H
’ QÉîÑdG ™aO áØ«Xh
…RGôW) πª©J
GC1575h
(GC1573
π«°UƒàdG ‘ á∏µ°ûe óLƒJ
•ƒÑ°†e IQGô◊ÉH ºµëàdG ¢Uôb
) iô¨°üdG áLQódG ≈∏YMIN(
∞bƒàdG áØ«Xh 𫨰ûJ ”
»FÉ≤∏àdG
¿GõN ‘ ‘Éc AÉe óLƒj ’
AÉŸG
•ƒÑ°†eQÉîÑdÉH ºµëàdG ¢Uôb
á«©°VƒdG ≈∏Y(0)
¬«a Éà áæNÉ°S â°ù«d IGƒµŸG
ájÉصdG
§¨°†j ⁄ QÉîÑdÉH ºµëàdG ¢Uôb
‘ɵdG πµ°ûdÉH
‘É°VE’G QÉîÑdG áØ«Xh
IÒ°üb Ióe ‘ kGÒãc âeóîà°SG
πµ°ûdÉH áæNÉ°S â°ù«d IGƒµŸG
‘ɵdG
¿GõN ‘ ‘Éc AÉe óLƒj ’
AÉŸG
Qó≤dÉH áæNÉ°S â°ù«d IGƒµŸG
‘ɵdG
QÉîÑdG áØ«Xh ΩGóîà°SG ”
IÎa ‘ kGóL kGÒãc ‘É°VE’G
Iõ«Lh
¿GõN ‘ ‘Éc AÉe óLƒj ’
AÉŸG
ɇ »≤f ÒZ
k
AÉe Ωóîà°ùJ âæc
äÉÑ°SÎdG ¿ƒµJ ¤EG iOCG
…ƒµdG áë«Ø°U πNGO Qƒ°û≤dGh
kGóL á°†Øîæe IOóÙG IQGô◊G
πµ°T ‘ â©°Vh IGƒµŸG ¿C’
‘ AÉŸG OƒLh AÉæKCG »≤aCG
¿GõÿG
¿GõN ‘ ‘Éc AÉe óLƒj ’
AÉŸG
IóMƒH π°üàe ¢ùHÉ≤dG ¿CG øe ócCÉJ
»¨Ñæj ɪc ábÉ£dG
≈∏Y IQGô◊ÉH ºµëàdG ¢Uôb §Ñ°VG
áªFÓŸG IQGô◊G
IGƒµŸG CGóÑJ ±ƒ°Sh áØîH IGƒµŸG ∑
q
ôM
Úî°ùàdÉH
Aπe á«Ø«c'' ô¶fG) AÉŸG ¿GõN CÓeEG
(AÉŸÉH ¿GõÿG
hCG QÉîÑdÉH ºµëàdG ¢Uôb §Ñ°VG
(''QÉîÑdÉH …ƒµdG'' ô¶fG)
≈∏Y IQGô◊ÉH ºµëàdG ¢Uôb §Ñ°VG
) QÉîÑdÉH …ƒµ∏d áªFÓŸG IQGô◊G••
¤EGMAX≈∏Y IGƒµŸG ™°V (
ô°TDƒe Aƒ°V CÉØ£j ≈àM Égó©≤e
…ƒµdG CGóÑJ ¿CG πÑb IQGô◊G
QÉîÑdÉH ºµëàdG ¢Uôb ∂°ùeGh §¨°VG
ÊGƒK 5 IóŸ
¿CG πÑb á≤«bO 1 πbC’G ≈∏Y ô¶àfG
Iôe ‘É°VE’G QÉîÑdG áØ«Xh Ωóîà°ùJ
á«fÉK
ÚH IQGô◊ÉH ºµëàdG ¢Uôb §Ñ°VG
)•••hMAX .(
CÉØ£j ≈àM Égó©≤e ≈∏Y IGƒµŸG ™°V
IQGô◊G ô°TDƒe Aƒ°V
Å∏e á≤jôW'' ô¶fG) AÉŸÉH ¿GõÿG CÓeEGG
(''AÉŸÉH ¿GõÿG
ÚH IQGô◊ÉH ºµëàdG ¢Uôb §Ñ°VG
)•••hMAX .(
CÉØ£j ≈àM Égó©≤e ≈∏Y IGƒµŸG ™°V
IQGô◊G ô°TDƒe Aƒ°V
¿CG πÑb á≤«bO 1 πbC’G ≈∏Y ô¶àfG
Iôe ‘É°VE’G QÉîÑdG áØ«Xh Ωóîà°ùJ
.''‘É°VE’G QÉîÑdG áØ«Xh'' ô¶fCG ,á«fÉK
Å∏e á≤jôW'' ô¶fG) AÉŸÉH ¿GõÿG CÓeEG
(''AÉŸÉH ¿GõÿG
äÉÑ°SÎdG ádGREG áØ«Xh Ωóîà°SG
áØ«Xh'' ô¶fG) .πbCG äGôe Oó©d á«°ù∏µdG
''ºcGΟG ¢ù∏µdG ∞«¶æJ
≈∏Y IQGô◊ÉH ºµëàdG ¢Uôb §Ñ°VG
) QÉîÑdÉH …ƒµ∏d áªFÓŸG IQGô◊G••
¤EGMAX≈∏Y IGƒµŸG ™°V (
ô°TDƒe Aƒ°V CÉØ£j ≈àM Égó©≤e
…ƒµdG CGóÑJ ¿CG πÑb IQGô◊G
ºµ– ¢Uôb §Ñ°VGh AÉŸG ¿GõN ÆôaCG
) á«©°VƒdG ≈∏Y QÉîÑdGOøjõîJ πÑb (
IGƒµŸG ™°V .(øjõîàdG ô¶fG) IGƒµŸG
.Égó©≤e ≈∏Y
Aπe á«Ø«c'' ô¶fG) AÉŸG ¿GõN CÓeEG
(AÉŸÉH ¿GõÿG
áá∏∏µµ°°ûûŸŸGGππªªààÙÙGG ÖÖÑÑ°°ùùddGGππ◊◊GG
1
1
2
3
1
ππccÉÉ°°ûûŸŸGG ππMM ππ««ddOO
áá««HHôô©©ddGG
A
B
C
D
E
F
G
H
I
J
K
L
M
.πÑ≤à°ùŸG ‘ ∂d ™Lôªc º¡H »¶ØàMGh RÉ¡÷G ΩGóîà°SG πÑb Gó«L ∫ɪ©à°SÓd äGOÉ°TQ’G √òg …CGôbG
æ∑ó∏H ‘ ô°TÉÑŸG »FÉHô¡µdG QÉ«àdG ≥HÉ£j RGô£dG áë«Ø°U ≈∏Y ¬«dG QÉ°ûŸG »FÉHô¡µdG QÉ«àdG ¿CÉH …ócCÉJ
.RÉ¡÷G π«°UƒJ πÑb
æ¢VQDƒe »FÉHô¡c §FÉM ¢ùHÉb ¤G ¬∏«°UƒJ Öéj ,¢VQDƒe »FÉHô¡c ¢ùÑ≤à RÉ¡÷G ójhõJ ” GPG
æ•É≤°SG ” GPG hCG ,ÉØdÉJ ¬°ùØf RÉ¡÷G hCG »FÉHô¡µdG ∂∏°ùdG hCG »FÉHô¡µdG ¢ùÑ≤ŸG ¿Éc GPG RÉ¡÷G »eóîà°ùJ ’
.¬∏NGóH Üô°ùJ óLh hCG ¢VQC’G ≈∏Y RÉ¡÷G
æ.πªàfi ∞∏J OÉéj’ ΩɶàfÉH »FÉHô¡µdG ∂∏°ùdG »°üëaG
æπÑb øe ¢ùÑ«∏«a ácô°ûd ™HÉJ áeóN õcôe hCG ¢ùÑ«∏«a πÑb øe ¬dGóÑà°SG Öéj ,»FÉHô¡µdG ∂∏°ùdG ∞∏J GPG
.áMOÉa QÉ£NCG çhóM Öæéàd AÉØcCGh Ú∏gDƒe ¢UÉî°TCG
æ.AÉHô¡µdÉH É¡∏«°UƒJ AÉæKCG GóHG áÑbGôe ¿hóH IGƒµŸG »YóJ ’
æ.AÉŸG πNGO ,RÉ¡÷G ™e ÉgójhõJ ” GPG ,É¡Jõ«cQ hCG IGƒµŸG GóHG …ôª¨J ’
æ.∫ÉØWC’G ∫hÉæàe øY RÉ¡÷G …ó©HCG
æ.RÉ¡÷ÉH åÑ©dG ΩóY øe ócCÉà∏d øjô°UÉ≤dG ∫ÉØWC’G áÑbGôe Öéj
æ.áÑbGôe ¿hO øeh øjô°UÉ≤dG ∫ÉØWC’G πÑb øe ∫ɪ©à°SÓd ºª°üe ÒZ RÉ¡÷G
æ.É¡à°ùeÓe ádÉM ‘ ¥hôM ÖÑ°ùJ ¿CG øµÁh GóL áæNÉ°S íÑ°üJ ¿CG IGƒµŸG IóYÉ≤d øµÁ
æ.áæNÉ°S ¿ƒµJ ÉeóæY IGƒµŸG IóYÉb á°ùeÓà »FÉHô¡µdG ∂∏°ù∏d »ëª°ùJ ’
æágÈd IGƒµŸG ∑ôJ óæYh AÉŸG ¿GõN ÆGôaG hCG Aπe óæYh IGƒµŸG ∞«¶æJ óæYh »µdG á«∏ªY øe AÉ¡àf’G óæY
™°Vh ¤G QÉîÑdÉH ºµëàdG ìÉàØe §Ñ°†H »eƒb ,âbƒdG øe
O»YõfGh É¡∏MÉc ≈∏Y IGƒµŸG »©°Vh
.§FÉ◊G ¢ùHÉb øe »FÉHô¡µdG ¢ùÑ≤ŸG
æ.í£°ùeh º«≤à°ùeh âHÉK í£°S ≈∏Y ,RÉ¡÷G ™e ÉgójhõJ ” GPG ,É¡Jõ«cQh IGƒµŸG ÉehO »©°V
æ.AÉŸG ¿GõN πNGO iôNCG ájhɪ«c OGƒe ájCG hCG ¢ù∏µdG ∞«¶æJ OGƒe hCG AÉ°ûædG hCG πÿG hCG ô£©dG »©°†J ’
æ.§≤a ‹õæŸG ΩGóîà°SÓd RÉ¡÷G ºª°U ó≤d
:ójóL øe IGƒµŸG Úî°ùJ IOÉYE’
Ó«∏b É¡côM hCG IGƒµŸG πªMG -
.IQGôë∏d ôØ°UC’G »Fƒ°†dG ô°TDƒŸG A»°†«°S .¢†«eƒdG øY ôªMC’G »Fƒ°†dG ô°TDƒŸG ∞bƒà«°S -.
-IõgÉL IGƒµŸG ¿ƒµJ ,ójóL øe A»°†jh IQGôë∏d ôØ°UC’G »Fƒ°†dG ô°TDƒŸG A≈Ø£æj ÉeóæY
.ΩGóîà°SÓd
¿GƒæY â– âfÎf’G ≈∏Y ¢ùÑ«∏«a áëØ°U IQÉjR ∂æe ƒLôf á∏µ°ûe ájCG â¡LGh hCG áeóN ájCG ¤G âéàMG GPG
www.philips.comºbQ ≈∏Y ∫ƒ°ü◊G ∂æµÁ ) ∑ó∏H ‘ øFÉHõdG áeóÿ ¢ùÑ«∏«a õcôà ∫É°üJ’G hCG
π°üJEG ,¬«a ø£≤J …òdG ó∏ÑdG ‘ øFÉHõdG áeóN õcôe ∑Éæg øµj ⁄ GPG .(»ŸÉ©dG ¿Éª°†dG ≥ë∏e øe ∞JÉ¡dG
.á«°üî°ûdG ájÉæ©dGh á«dõæŸG äGhOCÓd ¢ùÑ«∏«a áeóN õcôà π°üJEG hCG ¢ùÑ«∏«a äÉéàæe π«cƒH
øe ójõŸ iôNC’G ΩÉ°ùbC’G IAGôb AÉLôdG .»µdG á«∏ªY óæY IOÉY çó– »àdG πcÉ°ûŸG ¢üî∏j Aõ÷G Gòg
ΩÉbQCG OÉéjG ∂æµÁ .∑ó∏H ‘ ¢ùÑ«∏«a áeóN õcôà ∫É°üJE’G AÉLôdG á∏µ°ûŸG πM ™£à°ùJ ⁄ GPG .π«°UÉØàdG
.»ŸÉ©dG ¿Éª°†dG Iô°ûf ‘ ∞JÉ¡dG
ááÄÄ««ÑÑddGG
溫∏°ùJ õcôe ¤G ¬ª«∏°ùàH »eƒb πH ,√ôªY AÉ¡àfG óæY ájOÉ©dG ∫õæŸG äÉjÉØf ™e RÉ¡÷G »eôJ ’
ô¶fG) áÄ«ÑdG ≈∏Y ®ÉØ◊ÉH âªb ób ʃµJ ∂dòH .¬dɪ©à°SG IOÉY’ »ª°SQ
(19 º°SôdG.
rNî
ÁbM|¬ tF3«dî È«d! vKæî ñœ «ñ UNï¬ Ë bOï«u‹! Xèœ U! ÁU~¶<œ “« ÁœUH¶<« “« q§è «ñ d|“ ÈUNKLFì«ñu¶<œ
ÆbOMë Èñ«bN~ï
æq§èv~MÙULÙ qæî ‚d! U! ÁU~¶<œ ÈËñ ÁbÅ h‹Aî ˛U¶ìË të bOMë Xèœ ‚d! t! ÁU~¶<œ ‰UB"« “«
ÆbÅU! t¶Å«œ
æÆœdë qË ñ«œ †ñ« e|dÄ p| t! «ñ ʬ b|U! ¨X<« ÁbÅ tz«ñ« ñ«œ †ñ« t8UÅËœ U! ÁU~¶<œ dÖ«
æÁU~¶<œ dÖ« U| ¨Áœu! X|Ëñ q!Uè VO<¬ È«ñ«œ ÁU~¶<œ œu8 U| rO< ¨t8UÅËœ të v"ñu ñœ ÁU~¶<œ “«
ÆbOMJï ÁœUH¶<« ¨bMë XAï U| ËbÅU! Áœdë ◊uI<
æÆbOMë v<ñd! vìUL¶4« VO<¬ œu3Ë XN3 t! rEMî ñuD! «ñ ‚d! rO<
æU| fáOKOã XëdÅ j<u" ÁbÅ bO|U" f|Ëd< eëdî «ñ ʬ b|U! ¨bÅU! Áb|œ tîb ‚d! rO< dÖ«
ÆbM|U/ i|uF" ¨dD8 œUº|« “« »UM¶3« È«d! d~|œ ÁbÅ bO|U" Èœ«dã«
æÆbOMJï UÙñ t3u" ÊËb! X<« qË ‚d! t! të vïUî“ ñœ «ñ u"« eÖdÙ
æÆb|d§ï Ëdã »¬ ñœ ¨bÅU! ÁbÅ t|«ñ« të v"ñu ñœ ¨«ñ ʬ t|UÄ U| u"« ÁU~âOÙ
æÆb|ñ«œ ÁU~ï ñËœ ÊUëœuë ”d¶<œ “« «ñ ÁU~¶<œ
æÆœ«œ ñ«dè †ñUEï X% «ñ UNï¬ b|U! ÁU~¶<œ U! ÊUëœuë È“U! Âbà “« ÊUMOLÉ« È«d!
æ ÆX<« ÁbAï t¶ãdÖ dEï ñœ ‰uKFî œ«dã« U| ÊUëœuë †ñUEï ÊËb! ÁœUH¶<« È«d! ÁU~¶<œ s|«
æÆœuÅ v~¶8u< YàU! X<« sJ2 ”U9 †ñu ñœ Ë œuÅ ⁄«œ ñUOfi! bï«u" vî u"« tæH
æÆbMë qU4 ”U9 X<« ⁄«œ të vîU~MÙ ñœ u"« tæH U! ‚d! rO< të bOÙbï Á“U3«
æË u"« »¬ Êe‹î të v¶èË ¨bOMë vî „UÄ «ñ ÁU~¶<œ të v¶èË ¨bO<ñ ÊU|UÄ t! vAëu"« të v¶èË
¨bOÙœ ñ«dè ∞ XOF{Ë ñœ «ñ ñU‹! ‰d¶Më ∫bOMë vî UÙñ vÙU"uë †bî È«d! «ñ u"« të v¶èË 5MâLÙ
ÆbOAJ! ÊËdO! e|dÄ “« «ñ ‚d! t8UÅËœ Ë Áœ«œ ñ«dè tMÅUÄ ÈËñ «ñ u"«
æË Áœ«œ ñ«dè vIã« Ë “«d" ¨ñ«b|UÄ væD< ÈËñ «ñ ¨bÅU! ÁbÅ t|«ñ« të v"ñu ñœ ¨t|UÄ Ë u"« tAOLÙ
ÆbOMë ÁœUH¶<«
æo|dÉ t! ÁbÅ v|«œ“ Âd3 »¬ U| ¨vAë u"« vïœËdã« œ«uî ¨«œ“ Âd3 œ«uî ¨t¶<UAï ¨tëd< ¨dDà
Æb|e|dï »¬ Êe‹î ÊËñœ «ñ v|UOLOÅ œ«uî d|U< U| v|UOLOÅ
æÆX<« ÁbÅ v4«dÉ v~ïU8 ÁœUH¶<« È«d! jIã ÁU~¶<œ s|«
Xfi|“ jOæî
æ
ññËËœœ ÁÁbbÅÅ 55OOFF"" ÈÈUUNNKKææîî ññœœ ««ññ Êʬ¬ ËË ¨¨bb||ee||ddïï ññËËœœ vv~~ïïUU88 ÈÈUUÙÙ ttììUU!!““ dd||UU<< bbMMïïUUîî ««ññ ÁÁUU~~¶¶<<œœ
ÆÆ©©±±ππ qqJJÅÅ®® bbOOMMëë vvîî ppLLëë XXfifi||““ jjOOææîî kkHH44 tt!! UULLÅÅ ññUUëë ss||«« ÂÂUU$$«« UU!! ÆÆbb||ee||dd!!