Loading ...
Loading ...
Loading ...
14 31-2000815 Rev. 0
Installation
10
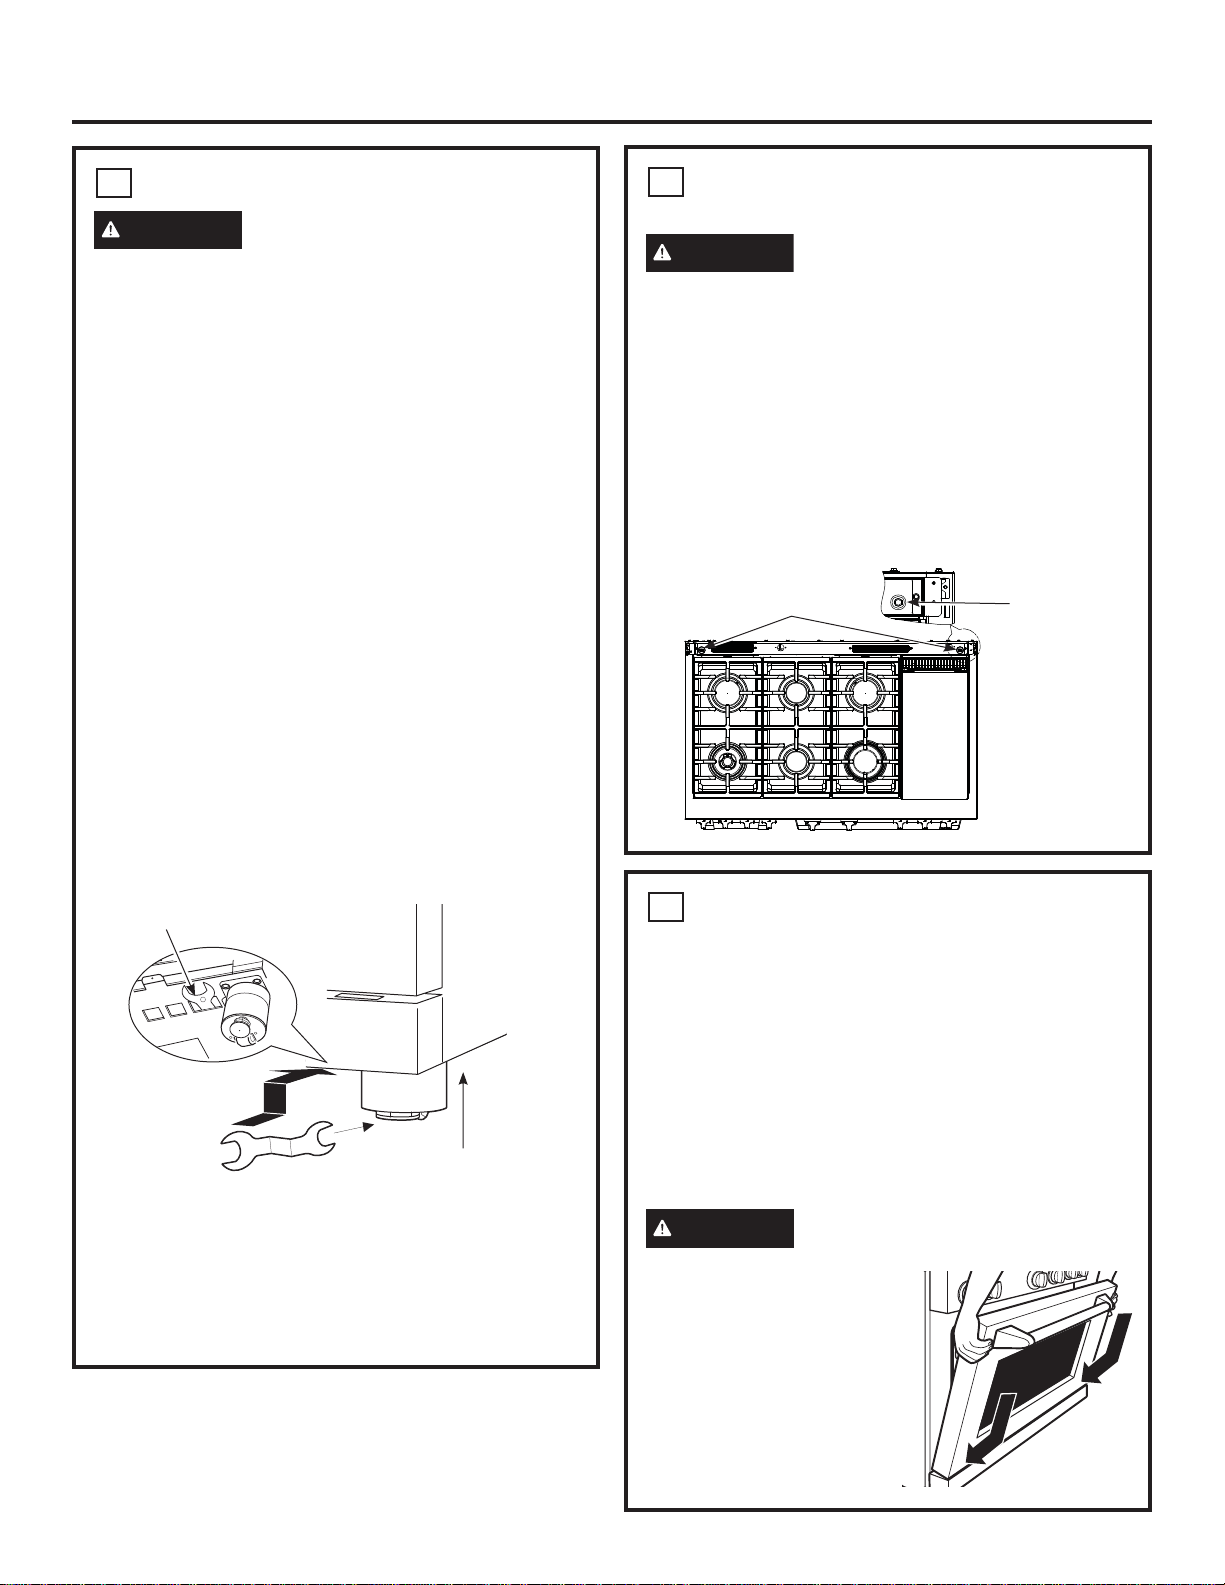
LEVEL THE RANGE
WARNING
The range must be level and be
supported by the legs—not the wheels. The range could
move if the wheels make contact with the floor. Be sure
all legs make contact with the floor in any installation.
Ŷ$OOOHJVPXVWEHOHYHOHGDIWHUWKHSURGXFWLVLQVWDOOHG
Ŷ&KHFNWREHVXUHWKHDGMRLQLQJFDELQHWVFRXQWHUWRSV
DUHOHYHOIURQWWREDFNDQGOHIWWRULJKWDFURVVWKH
opening of the range.
Ŷ
Measure the distance from the floor to the top of the
countertop in the left and right rear corners.
Ŷ
Adjust the height of the range to countertop height
or higher.
IMPORTANT: This range should always be installed
at countertop height or higher. DO NOT INSTALL THE
RANGE LOWER THAN ADJACENT COUNTERTOP
+(,*+77KHUDQJHPXVWEHVXSSRUWHGE\DOOOHJV
regardless of countertop height.
FRONT LEG ADJUSTMENT
Ŷ$OHYHOLQJOHJZUHQFKLVVXSSOLHG5HDFKXQGHUWKH
front of the range near the right leg. Locate and
UHPRYHDWKXPEVFUHZWKHQVOLGHZUHQFKRXWRI
the slot.
Ŷ6OLGHIURQWF\OLQGHUVXSWRDFFHVVIURQWOHYHOLQJOHJV
Be careful not to damage cylinder.
Ŷ8VHWKHVXSSOLHGZUHQFKWRDGMXVWWKHIURQWOHYHOLQJ
OHJV7XUQFORFNZLVHWRH[WHQGWKHOHJVWROLIWDQG
stabilize the range. Turn counterclockwise to retract
the legs and allow the range to rest on its rollers.
Ŷ%HVXUHWRUHWXUQWKHZUHQFKWRLWVVWRUDJHVORWIRU
future use.
10
LEVEL THE RANGE (cont.)
REAR LEG ADJUSTMENT
WARNING
To reduce the risk of fire or electric
VKRFNDOZD\VUHSODFHWKHVSLOOSOXJVLQWKHOHYHOLQJ
rod holes.
Ŷ
Remove two screws from rear vent trim. Slide vent
WULPIRUZDUGWKHQOLIWXSWRUHPRYH
Ŷ
Remove the 2 spill plugs to locate the rear leg
H[WHQVLRQOHYHOLQJURGV8VHD´GULYHURUVRFNHW
wrench to adjust the left or right rear legs.
Ŷ
)LQGWKHWZRUHDUOHJH[WHQVLRQURGV8VHD´GULYHU
or wrench to adjust the left or right rear legs.
Ŷ
Replace the 2 spill plugs and then replace the rear
vent trim using the original screws.
Slide leg
cylinder up.
Thumb Screw
11
REPLACE OVEN DOOR(S)
Skip this step if oven doors are in place.
IMPORTANT: Do not lift the door by the handle.
To replace the oven doors:
Ŷ
Firmly grasp the door at the top sides. This is critical.
Ŷ$SSURDFKWKHUDQJHZLWKWKHGRRUDQJOHGLQD
vertical position.
Ŷ*XLGHWKHKLQJHVLQWRWKHVORWV
Ŷ3XVKWKHGRRULQILUPO\ZKLOHRSHQLQJ
Ŷ2QFHLQSRVLWLRQRSHQWKHGRRUFRPSOHWHO\3XVK
the hinge locks back in toward the front frame.
CAUTION
Take care when replacing the oven
doors. If the hinge latch
LVQRWVHFXUHO\ORFNHG
the hinge may snap back
and separate. If the hinge
VHSDUDWHV\RXPXVWDSSO\
pressure (possibly with
your foot) to press it back
together and then engage
the hinge latch.
Spill Plugs
Rear Leg
([WHQVLRQ
Rods
Loading ...
Loading ...
Loading ...