
Table Of Contents
Help Guide IC Recorder ICD-BX140 i...............................................................................................
How to Use 1.....................................................................................................................................
Preparation 6...............................................................................................................................
Parts description 21...............................................................................................................
Parts and controls 57.......................................................................................................
Display window 22.................................................................................................................
Display when stopped 58.................................................................................................
Display when recording 59...............................................................................................
Display during playback 60..............................................................................................
Display in the HOLD status 61.........................................................................................
Display of the current date and time 62...........................................................................
Power 23................................................................................................................................
Inserting batteries 63.......................................................................................................
Turning the power on 64..................................................................................................
Turning the power off 65..................................................................................................
Clock setting 24.....................................................................................................................
Setting the clock 66.........................................................................................................
Setting the clock using the menu 68................................................................................
Selecting items on the display 25..........................................................................................
Selecting a folder and a file 70........................................................................................
HOLD 26................................................................................................................................
Preventing unintentional operations (HOLD) 71..............................................................
Releasing the HOLD function 72.....................................................................................
Recording 7.................................................................................................................................
Recording 27.........................................................................................................................
Recording sound from the built-in microphone 73...........................................................
About the remaining memory indicator 75.......................................................................
Monitoring sound while recording 76...............................................................................
Various operations while recording 77.............................................................................
Dividing a file during recording 78....................................................................................
Various operations/settings 28..............................................................................................
Tips for better recording 79..............................................................................................
Starting to record automatically in response to sound – the VOR
function 80.......................................................................................................................
Selecting the recording mode (MODE) 82.......................................................................
Selecting the microphone sensitivity (SENS) 83..............................................................
Adding a recording to a previously recorded file (ADD) 84..............................................
Adding an overwrite recording during playback (OVER) 86............................................
TOC-1

Recording with an external microphone 88......................................................................
Recording from external equipment 89............................................................................
Using external devices 29......................................................................................................
Recording the playback sound of the IC recorder on external
equipment 90...................................................................................................................
Playback 8...................................................................................................................................
Playing 30..............................................................................................................................
Playing back the recorded sound 91...............................................................................
Various operations while playing 92................................................................................
Various operations/settings 31..............................................................................................
Reducing noise in the playback sound and making the human voice
clearer (N-CUT)– the noise cut function 93....................................................................
Adjusting the playback speed – the DPC (Digital Pitch Control)
function 94.......................................................................................................................
Playing back a file repeatedly 95.....................................................................................
Playing back all files in a folder continuously (CONT) – the
continuous play 96...........................................................................................................
Listening with better sound quality 97..............................................................................
Searching forward/backward during playback (Cue/Review) 98.....................................
Searching the desired point quickly (EASY-S) – the Easy search
function 99.......................................................................................................................
Setting an alarm 32................................................................................................................
Playing back a file at a desired time with an alarm (ALARM) 100...................................
Editing 9.......................................................................................................................................
Erasing files 33......................................................................................................................
Erasing a file 102.............................................................................................................
Erasing all files in a folder (ERASE ALL) 104..................................................................
Organizing files 34.................................................................................................................
Moving a file to a different folder (MOVE) 105.................................................................
Dividing files 35......................................................................................................................
Dividing a file 106............................................................................................................
Protecting files 36..................................................................................................................
Protecting a file (LOCK) 108............................................................................................
Menu 10.......................................................................................................................................
Using menus 37.....................................................................................................................
Using the menu 109.........................................................................................................
Menu list 110...................................................................................................................
Menu items 38.......................................................................................................................
Reducing noise when recording (LCF) – the Low Cut Filter function 112......................
Selecting the display mode (DISPLAY) 113....................................................................
TOC-2

Selecting the clock display (HOUR) 114..........................................................................
Turning the beep sound on or off (BEEP) 115.................................................................
Turning the operation indicator on or off (LED) 116.........................................................
Resetting all menu items to the default setting (MENU INIT) 117...................................
Checking the system information (SYSTEM) 118............................................................
Formatting the memory (FORMAT) 119..........................................................................
Specifications 11.........................................................................................................................
Specifications 39....................................................................................................................
Design and specifications 120.........................................................................................
Battery life 122.................................................................................................................
Announcements 12......................................................................................................................
Notes on use 4.......................................................................................................................
Notes on use 40...............................................................................................................
Safety regulations 41.............................................................................................................
Safety regulations 126.....................................................................................................
Important information 42........................................................................................................
Listening for a Lifetime 128..............................................................................................
Copyrights/Trademarks 43....................................................................................................
Trademarks 130...............................................................................................................
Notice for users 131.........................................................................................................
Support website 44................................................................................................................
Customer support websites 132......................................................................................
Troubleshooting 2..............................................................................................................................
IC recorder operations 13............................................................................................................
If you have problems 45........................................................................................................
Troubleshooting 133........................................................................................................
Noise 46.................................................................................................................................
The recorded file is noisy and you want to record with less noise in
your recording. 134..........................................................................................................
A rustling noise is recorded. 135......................................................................................
A buzzing or humming noise is recorded. 136.................................................................
Noise is recorded when you record a file using an external
microphone (not supplied). 137.......................................................................................
Noise is heard when you listen to the file using headphones. 138..................................
Noise is heard in the playback even though the noise cut function is
active. 139.......................................................................................................................
Power 47................................................................................................................................
The IC recorder cannot be turned on. The IC recorder does not
operate, even if you press any button. 140......................................................................
The IC recorder cannot be turned off. 141.......................................................................
TOC-3

The IC recorder cannot be turned on. 142.......................................................................
Help Guide | The IC recorder is powered off automatically. 143.....................................
Help Guide | The battery life is short. 144........................................................................
Help Guide | There is no battery power remaining after you have left
the batteries inserted for long time without using the IC recorder. 145............................
Help Guide | The battery life of the rechargeable batteries is short. 146.........................
General operations 48...........................................................................................................
The IC recorder does not operate correctly. 147.............................................................
It takes a long time for the IC recorder to start. 148.........................................................
The IC recorder does not operate, even if you press any button. 149.............................
The operation indicator does not light. 150......................................................................
Recording 49.........................................................................................................................
You cannot record a file. 151...........................................................................................
Recording is interrupted. 152...........................................................................................
You cannot add a recording or an overwrite recording. 153............................................
The VOR function does not work. 154.............................................................................
Recording level is low. 155..............................................................................................
When recording from other equipment, the input level is too strong or
not strong enough. 156....................................................................................................
Playback 50...........................................................................................................................
The playback volume is low. 157.....................................................................................
No sound comes from the speaker. 158..........................................................................
Sound comes from only one channel. 159.......................................................................
Sound comes from the speaker even when the headphones are
plugged in. 160................................................................................................................
Playback speed is too fast or too slow. 161.....................................................................
Playback sound is not good when a recorded file is played back. 162............................
Editing 51...............................................................................................................................
You cannot divide a file. 163............................................................................................
You cannot move a file. 164............................................................................................
You cannot erase a file. 165............................................................................................
Clock 52.................................................................................................................................
“--:--” is displayed. 166....................................................................................................
The recording date of a file appears as “--Y--M--D” or “--:--.” 167.................................
Display 53..............................................................................................................................
There are fewer menu items displayed in the menu mode. 168......................................
“ACCESS” display does not disappear. 169...................................................................
Files 54..................................................................................................................................
“FULL” is displayed and you cannot start recording. 170...............................................
“FILE FULL” is displayed and you cannot operate the IC recorder. 171........................
TOC-4

Messages 14...............................................................................................................................
Messages list 55....................................................................................................................
System limitations 15...................................................................................................................
System limitations 56.............................................................................................................
List of Topics 3..................................................................................................................................
How to Use 16.............................................................................................................................
Troubleshooting 19......................................................................................................................
Precautions 124.................................................................................................................................
Messages list 172..............................................................................................................................
System limitations 174.......................................................................................................................
TOC-5

Help Guide
How to Use
Preparation
Recording
Playback
Editing
Menu
Specifications
Announcements
Troubleshooting
List of Topics
IC Recorder
ICD-BX140
How to Use
Select the item you want to check from the navigation
pane on the left.
If you cannot find the item:
In the “List of Topics,” you can see headers for all of the topics in this help
guide.
You can search for what you want by entering keywords in the search
window at the top of the page.
Go to Page Top
Back Back to Top
4-530-204-12(1)
© 2016 Sony Corporation Notes on use
1
Search
Help Guide
How to Use
Troubleshooting
IC recorder operations
Messages
System limitations
List of Topics
IC Recorder
ICD-BX140
Troubleshooting
Select the item you want to check from the navigation
pane on the left.
If you cannot find the item:
In the “List of Topics,” you can see headers for all of the topics in this help
guide.
You can search for what you want by entering keywords in the search
window at the top of the page.
Go to Page Top
Back Back to Top
4-530-204-12(1)
© 2016 Sony Corporation Notes on use
2
Search

Help Guide
How to Use
Troubleshooting
List of Topics
How to Use
Troubleshooting
IC Recorder
ICD-BX140
List of Topics
In the “List of Topics,” you can see headers for all of the
topics in this help guide. Select the item you want to
check from the navigation pane on the left.
If you cannot find the item:
You can search for what you want by entering keywords in the search
window at the top of the page.
Go to Page Top
Back Back to Top
4-530-204-12(1)
© 2016 Sony Corporation Notes on use
3
Search

Help Guide
How to Use
Troubleshooting
List of Topics
IC Recorder
ICD-BX140
Before use
To make full use of this website, please read the following notes thoroughly.
Please note that the contents of this website are subject to change without prior
notice.
Go to Page Top
Recommended system environment
The following system environments are recommended for displaying your Help
Guide. You may not be able to view some of the contents on other system
environments.
Web browser
To view the Help
Guide on Microsoft
Windows
Microsoft Internet Explorer 8 or later
Mozilla Firefox: latest version
Google Chrome: latest version
To view the Help
Guide on Apple Mac
OS
Apple Safari Ver. 5 or later
Mozilla Firefox: latest version
Google Chrome: latest version
Display size
1024 x 768 pixels or larger
JavaScript
JavaScript is used with Sony Help Guides for viewing convenience. If JavaScript is
disabled in your web browser settings, your Help Guide may not be displayed
correctly or may not operate properly.
Style Sheets
Cascading Style Sheets are used in designing Sony Help Guides. Your Help Guide
layout may not be as intended if you view your Help Guide with style sheets
disabled or on a web browser that is not compatible with style sheets. However,
Help Guide operation will not be affected.
Cookies
Sony Help Guides use cookies. To use services in the Help Guide, you need to set
to allow all cookies or to enable cookies for the originating website only.
Go to Page Top
Handling of personal information obtained from websites
Sony may use cookies, web beacons or similar technologies to analyze customers'
web browsing behavior to provide better-customized service for individual
customers.
Back
Back to Top
October 2012
Notes on use
4
Search

Cookies, web beacon and similar technologies are used to make statistical analysis
of customers while preserving anonymity, and information in such analysis may be
linked to customers' personal information to provide better-customized service to
users of our members-only websites.
You are free to disable the link between your personal information and information
obtained by cookies or anonymous information generated by web beacons. To do
so, you need to change web browser settings and refuse to accept cookie-
generated or similar data. Please note that, by doing so, you may not be able to
make purchases or use services on members-only websites.
Go to Page Top
4-530-204-12(1)
© 2016 Sony Corporation Notes on use
5

Help Guide
How to Use
Preparation
Recording
Playback
Editing
Menu
Specifications
Announcements
Troubleshooting
List of Topics
IC Recorder
ICD-BX140
Preparation
Parts description
Display window
Power
Clock setting
Selecting items on the display
HOLD
Go to Page Top
Back Back to Top
4-530-204-12(1)
© 2016 Sony Corporation Notes on use
6
Search


Help Guide
How to Use
Preparation
Recording
Playback
Editing
Menu
Specifications
Announcements
Troubleshooting
List of Topics
IC Recorder
ICD-BX140
Announcements
Notes on use
Safety regulations
Important information
Copyrights/Trademarks
Support website
Go to Page Top
Back Back to Top
4-530-204-12(1)
© 2016 Sony Corporation Notes on use
12
Search
Help Guide
How to Use
Troubleshooting
IC recorder operations
Messages
System limitations
List of Topics
IC Recorder
ICD-BX140
IC recorder operations
If you have problems
Noise
Power
General operations
Recording
Playback
Editing
Clock
Display
Files
Go to Page Top
Back Back to Top
4-530-204-12(1)
© 2016 Sony Corporation Notes on use
13
Search

Help Guide
How to Use
Troubleshooting
List of Topics
How to Use
Troubleshooting
IC Recorder
ICD-BX140
How to Use
Preparation
Parts description
Parts and controls
Display window
Display when stopped
Display when recording
Display during playback
Display in the HOLD status
Display of the current date and time
Power
Inserting batteries
Turning the power on
Turning the power off
Clock setting
Setting the clock
Setting the clock using the menu
Selecting items on the display
Selecting a folder and a file
HOLD
Preventing unintentional operations (HOLD)
Releasing the HOLD function
Recording
Recording
Recording sound from the built-in microphone
About the remaining memory indicator
Monitoring sound while recording
Various operations while recording
Dividing a file during recording
Various operations/settings
Tips for better recording
Starting to record automatically in response to sound – the VOR function
Selecting the recording mode (MODE)
Selecting the microphone sensitivity (SENS)
Adding a recording to a previously recorded file (ADD)
Adding an overwrite recording during playback (OVER)
Back
Back to Top
16
Search

Recording with an external microphone
Recording from external equipment
Using external devices
Recording the playback sound of the IC recorder on external equipment
Playback
Playing
Playing back the recorded sound
Various operations while playing
Various operations/settings
Reducing noise in the playback sound and making the human voice clearer (N-
CUT)– the noise cut function
Adjusting the playback speed – the DPC (Digital Pitch Control) function
Playing back a file repeatedly
Playing back all files in a folder continuously (CONT) – the continuous play
Listening with better sound quality
Searching forward/backward during playback (Cue/Review)
Searching the desired point quickly (EASY-S) – the Easy search function
Setting an alarm
Playing back a file at a desired time with an alarm (ALARM)
Editing
Erasing files
Erasing a file
Erasing all files in a folder (ERASE ALL)
Organizing files
Moving a file to a different folder (MOVE)
Dividing files
Dividing a file
Protecting files
Protecting a file (LOCK)
Menu
Using menus
Using the menu
Menu list
Menu items
Reducing noise when recording (LCF) – the Low Cut Filter function
Selecting the display mode (DISPLAY)
Selecting the clock display (HOUR)
Turning the beep sound on or off (BEEP)
Turning the operation indicator on or off (LED)
Resetting all menu items to the default setting (MENU INIT)
17

Checking the system information (SYSTEM)
Formatting the memory (FORMAT)
Specifications
Specifications
Design and specifications
Battery life
Announcements
Notes on use
Precautions
Safety regulations
Safety regulations
Important information
Listening for a Lifetime
Copyrights/Trademarks
Trademarks
Notice for users
Support website
Customer support websites
Go to Page Top
4-530-204-12(1)
© 2016 Sony Corporation Notes on use
18
Help Guide
How to Use
Troubleshooting
List of Topics
How to Use
Troubleshooting
IC Recorder
ICD-BX140
Troubleshooting
IC recorder operations
If you have problems
Troubleshooting
Noise
The recorded file is noisy and you want to record with less noise in your
recording.
A rustling noise is recorded.
A buzzing or humming noise is recorded.
Noise is recorded when you record a file using an external microphone (not
supplied).
Noise is heard when you listen to the file using headphones.
Noise is heard in the playback even though the noise cut function is active.
Power
The IC recorder cannot be turned on. The IC recorder does not operate, even if
you press any button.
The IC recorder cannot be turned off.
The IC recorder cannot be turned on.
The IC recorder is powered off automatically.
The battery life is short.
There is no battery power remaining after you have left the batteries inserted for
long time without using the IC recorder.
The battery life of the rechargeable batteries is short.
General operations
The IC recorder does not operate correctly.
It takes a long time for the IC recorder to start.
The IC recorder does not operate, even if you press any button.
The operation indicator does not light.
Recording
You cannot record a file.
Recording is interrupted.
You cannot add a recording or an overwrite recording.
The VOR function does not work.
Recording level is low.
When recording from other equipment, the input level is too strong or not strong
enough.
Playback
The playback volume is low.
No sound comes from the speaker.
Sound comes from only one channel.
Back
Back to Top
19
Search

Sound comes from the speaker even when the headphones are plugged in.
Playback speed is too fast or too slow.
Playback sound is not good when a recorded file is played back.
Editing
You cannot divide a file.
You cannot move a file.
You cannot erase a file.
Clock
“--:--” is displayed.
The recording date of a file appears as “--Y--M--D” or “--:--.”
Display
There are fewer menu items displayed in the menu mode.
“ACCESS” display does not disappear.
Files
“FULL” is displayed and you cannot start recording.
“FILE FULL” is displayed and you cannot operate the IC recorder.
Messages
Messages list
Messages list
System limitations
System limitations
System limitations
Go to Page Top
4-530-204-12(1)
© 2016 Sony Corporation Notes on use
20
Help Guide
How to Use
Preparation
Recording
Playback
Editing
Menu
Specifications
Announcements
Troubleshooting
List of Topics
IC Recorder
ICD-BX140
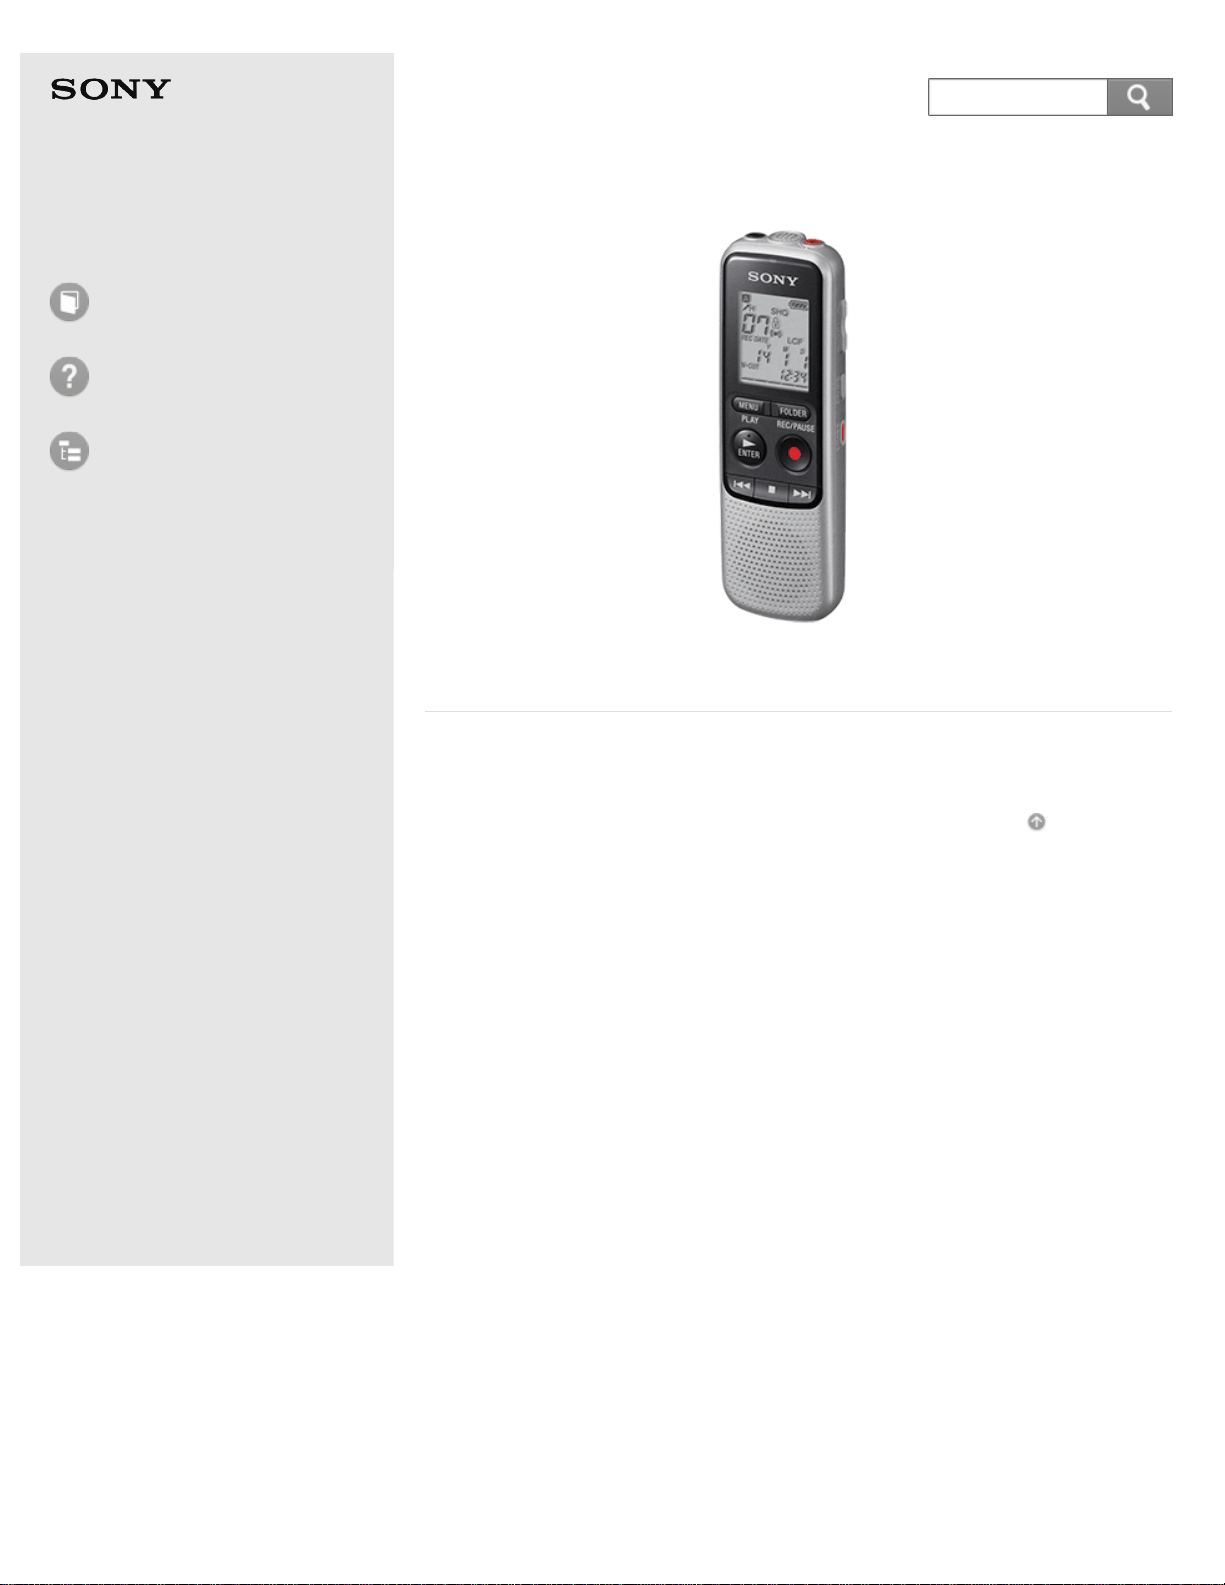
Parts description
Parts and controls
Explains the name of parts, such as buttons and switches, on the IC recorder.
Go to Page Top
Back Back to Top
4-530-204-12(1)
© 2016 Sony Corporation Notes on use
21
Search
Help Guide
How to Use
Preparation
Recording
Playback
Editing
Menu
Specifications
Announcements
Troubleshooting
List of Topics
IC Recorder
ICD-BX140
Display window
Display when stopped
Explains the items and icons that appear in the display window while the IC
recorder is stopped.
Display when recording
Explains the items and icons that appear in the display window while the IC
recorder is recording.
Display during playback
Explains the items and icons that appear in the display window while the IC
recorder is playing back.
Display in the HOLD status
Shows the message that appears in the display window when you operate the IC
recorder while the HOLD function is set to “ON.”
Display of the current date and time
Explains the display that indicates the current date and time.
Go to Page Top
Back Back to Top
4-530-204-12(1)
© 2016 Sony Corporation Notes on use
22
Search
Help Guide
How to Use
Preparation
Recording
Playback
Editing
Menu
Specifications
Announcements
Troubleshooting
List of Topics
IC Recorder
ICD-BX140
Power
Inserting batteries
Explains how to insert batteries.
Turning the power on
Explains how to turn the power of the IC recorder on with the HOLD·POWER
ON/OFF switch.
Turning the power off
Explains how to turn the power of the IC recorder off with the HOLD·POWER
ON/OFF switch.
Go to Page Top
Back Back to Top
4-530-204-12(1)
© 2016 Sony Corporation Notes on use
23
Search

Help Guide
How to Use
Preparation
Recording
Playback
Editing
Menu
Specifications
Announcements
Troubleshooting
List of Topics
IC Recorder
ICD-BX140
Clock setting
Setting the clock
Explains how to set the clock when the clock setting window appears.
Setting the clock using the menu
Explains how to set the clock from the menu.
Go to Page Top
Back Back to Top
4-530-204-12(1)
© 2016 Sony Corporation Notes on use
24
Search

Help Guide
How to Use
Preparation
Recording
Playback
Editing
Menu
Specifications
Announcements
Troubleshooting
List of Topics
IC Recorder
ICD-BX140
Selecting items on the display
Selecting a folder and a file
Explains how to select a file or a folder in the display window.
Go to Page Top
Back Back to Top
4-530-204-12(1)
© 2016 Sony Corporation Notes on use
25
Search
Help Guide
How to Use
Preparation
Recording
Playback
Editing
Menu
Specifications
Announcements
Troubleshooting
List of Topics
IC Recorder
ICD-BX140
HOLD
Preventing unintentional operations (HOLD)
Explains how to disable all button operations to prevent unintentional
operations.
Releasing the HOLD function
Explains how to release the HOLD function to enable button operations.
Go to Page Top
Back Back to Top
4-530-204-12(1)
© 2016 Sony Corporation Notes on use
26
Search
Help Guide
How to Use
Preparation
Recording
Playback
Editing
Menu
Specifications
Announcements
Troubleshooting
List of Topics
IC Recorder
ICD-BX140
Recording
Recording sound from the built-in microphone
Explains the basic recording procedures using the built-in microphone.
About the remaining memory indicator
Explains the remaining memory indicator to confirm the remaining memory of
the IC recorder.
Monitoring sound while recording
Explains how to monitor the sound while recording with the headphones.
Various operations while recording
Introduces various operations you can perform while recording.
Dividing a file during recording
Explains how to divide a file into two parts during recording.
Go to Page Top
Back Back to Top
4-530-204-12(1)
© 2016 Sony Corporation Notes on use
27
Search
Help Guide
How to Use
Preparation
Recording
Playback
Editing
Menu
Specifications
Announcements
Troubleshooting
List of Topics
IC Recorder
ICD-BX140
Various operations/settings
Tips for better recording
Introduces hints for recording in various situations.
Starting to record automatically in response to sound – the VOR
function
This function starts and pauses recording automatically according to the volume
of the sound (input level) that the IC recorder detects.
Selecting the recording mode (MODE)
Explains how to set the recording mode for the file to be recorded.
Selecting the microphone sensitivity (SENS)
Explains how to set the microphone sensitivity for the built-in microphone.
Adding a recording to a previously recorded file (ADD)
Explains how to add a recording to the file during playback.
Adding an overwrite recording during playback (OVER)
Explains how to add an overwrite recording to the file during playback.
Recording with an external microphone
Explains how to record with an external microphone that is connected to the IC
recorder.
Recording from external equipment
Explains how to record from external equipment that is connected to the IC
recorder.
Go to Page Top
Back Back to Top
4-530-204-12(1)
© 2016 Sony Corporation Notes on use
28
Search
Help Guide
How to Use
Preparation
Recording
Playback
Editing
Menu
Specifications
Announcements
Troubleshooting
List of Topics
IC Recorder
ICD-BX140
Using external devices
Recording the playback sound of the IC recorder on external
equipment
Explains how to record the playback sound of the IC recorder on external
equipment.
Go to Page Top
Back Back to Top
4-530-204-12(1)
© 2016 Sony Corporation Notes on use
29
Search

Help Guide
How to Use
Preparation
Recording
Playback
Editing
Menu
Specifications
Announcements
Troubleshooting
List of Topics
IC Recorder
ICD-BX140
Playing
Playing back the recorded sound
Explains how to play back the recorded sound with the speaker of the IC
recorder.
Various operations while playing
Introduces various operations you can perform while playing.
Go to Page Top
Back Back to Top
4-530-204-12(1)
© 2016 Sony Corporation Notes on use
30
Search

Help Guide
How to Use
Preparation
Recording
Playback
Editing
Menu
Specifications
Announcements
Troubleshooting
List of Topics
IC Recorder
ICD-BX140
Various operations/settings
Reducing noise in the playback sound and making the human voice
clearer (N-CUT)– the noise cut function
Explains how to reduce ambient noise, which makes the human voice clearer
when playing back a file.
Adjusting the playback speed – the DPC (Digital Pitch Control)
function
Explains how to adjust the playback speed in a range from 0.50 times to 2.00
times.
Playing back a file repeatedly
Explains how to play back a file repeatedly.
Playing back all files in a folder continuously (CONT) – the continuous
play
Explains how to play back all files in a folder continuously.
Listening with better sound quality
Explains how you can listen to a file with the high quality sound by connecting
headphones or speakers to the IC recorder.
Searching forward/backward during playback (Cue/Review)
Explains how to find a desired point in the file by cueing/reviewing during
playback.
Searching the desired point quickly (EASY-S) – the Easy search
function
Explains how to quickly locate the point at which you wish to start playback.
Go to Page Top
Back Back to Top
4-530-204-12(1)
© 2016 Sony Corporation Notes on use
31
Search
Help Guide
How to Use
Preparation
Recording
Playback
Editing
Menu
Specifications
Announcements
Troubleshooting
List of Topics
IC Recorder
ICD-BX140
Setting an alarm
Playing back a file at a desired time with an alarm (ALARM)
Explains how to start playing back a file with alarm sound at a desired time you
set.
Go to Page Top
Back Back to Top
4-530-204-12(1)
© 2016 Sony Corporation Notes on use
32
Search

Help Guide
How to Use
Preparation
Recording
Playback
Editing
Menu
Specifications
Announcements
Troubleshooting
List of Topics
IC Recorder
ICD-BX140
Erasing files
Erasing a file
Explains how to erase a file stored on the IC recorder.
Erasing all files in a folder (ERASE ALL)
Explains how to erase all files in a selected folder at once.
Go to Page Top
Back Back to Top
4-530-204-12(1)
© 2016 Sony Corporation Notes on use
33
Search

Help Guide
How to Use
Preparation
Recording
Playback
Editing
Menu
Specifications
Announcements
Troubleshooting
List of Topics
IC Recorder
ICD-BX140
Organizing files
Moving a file to a different folder (MOVE)
Explains how to move a selected file to a selected folder.
Go to Page Top
Back Back to Top
4-530-204-12(1)
© 2016 Sony Corporation Notes on use
34
Search
Help Guide
How to Use
Preparation
Recording
Playback
Editing
Menu
Specifications
Announcements
Troubleshooting
List of Topics
IC Recorder
ICD-BX140
Dividing files
Dividing a file
Explains how to divide a file into two parts at the desired position.
Go to Page Top
Back Back to Top
4-530-204-12(1)
© 2016 Sony Corporation Notes on use
35
Search

Help Guide
How to Use
Preparation
Recording
Playback
Editing
Menu
Specifications
Announcements
Troubleshooting
List of Topics
IC Recorder
ICD-BX140
Protecting files
Protecting a file (LOCK)
Explains how to protect a file so that you cannot erase or edit it.
Go to Page Top
Back Back to Top
4-530-204-12(1)
© 2016 Sony Corporation Notes on use
36
Search
Help Guide
How to Use
Preparation
Recording
Playback
Editing
Menu
Specifications
Announcements
Troubleshooting
List of Topics
IC Recorder
ICD-BX140
Using menus
Using the menu
Explains how to set menus.
Menu list
Introduces the menus and in which operation mode the IC recorder can make
changes to the menu. It also includes a link to each menu topic.
Go to Page Top
Back Back to Top
4-530-204-12(1)
© 2016 Sony Corporation Notes on use
37
Search

Help Guide
How to Use
Preparation
Recording
Playback
Editing
Menu
Specifications
Announcements
Troubleshooting
List of Topics
IC Recorder
ICD-BX140
Menu items
Reducing noise when recording (LCF) – the Low Cut Filter function
Explains how to reduce ambient noise or the roaring noise from wind, which
allows you to record a file more clearly.
Selecting the display mode (DISPLAY)
Explains how to set which information is to be displayed (elapsed time,
remaining time, etc.) in the display window.
Selecting the clock display (HOUR)
Explains how to select from 12 hour-clock or 24 hour-clock.
Turning the beep sound on or off (BEEP)
Explains how to turn the operation beep on or off.
Turning the operation indicator on or off (LED)
Explains how to turn the operation indicator on or off while you are operating
the IC recorder.
Resetting all menu items to the default setting (MENU INIT)
Changes menu settings back to the default settings. (Some of the menu items
such as the clock setting, will not be changed.)
Checking the system information (SYSTEM)
Explains how to check the version number of the software.
Formatting the memory (FORMAT)
Explains how to format the memory, erasing all files and changing the folder
structure back to the initial status.
Go to Page Top
Back Back to Top
4-530-204-12(1)
© 2016 Sony Corporation Notes on use
38
Search
Help Guide
How to Use
Preparation
Recording
Playback
Editing
Menu
Specifications
Announcements
Troubleshooting
List of Topics
IC Recorder
ICD-BX140
Specifications
Design and specifications
Shows the specifications of the IC recorder (such as dimensions and weight, the
size of the memory, etc.).
Battery life
Shows the battery life for alkaline batteries and rechargeable batteries, in each
file format.
Go to Page Top
Back Back to Top
4-530-204-12(1)
© 2016 Sony Corporation Notes on use
39
Search

Help Guide
How to Use
Preparation
Recording
Playback
Editing
Menu
Specifications
Announcements
Troubleshooting
List of Topics
IC Recorder
ICD-BX140
Notes on use
Precautions
Explains notes on operations, such as the places you use the IC recorder, and
information on handling or maintenance.
Go to Page Top
Back Back to Top
4-530-204-12(1)
© 2016 Sony Corporation Notes on use
40
Search

Help Guide
How to Use
Preparation
Recording
Playback
Editing
Menu
Specifications
Announcements
Troubleshooting
List of Topics
IC Recorder
ICD-BX140
Safety regulations
Safety regulations
Describes important information (warnings or notes) for your safety.
Go to Page Top
Back Back to Top
4-530-204-12(1)
© 2016 Sony Corporation Notes on use
41
Search

Help Guide
How to Use
Preparation
Recording
Playback
Editing
Menu
Specifications
Announcements
Troubleshooting
List of Topics
IC Recorder
ICD-BX140
Important information
Listening for a Lifetime
Important information on the sound level.
Go to Page Top
Back Back to Top
4-530-204-12(1)
© 2016 Sony Corporation Notes on use
42
Search
Help Guide
How to Use
Preparation
Recording
Playback
Editing
Menu
Specifications
Announcements
Troubleshooting
List of Topics
IC Recorder
ICD-BX140
Copyrights/Trademarks
Trademarks
List of trademarks/registered trademarks
Notice for users
Important notice on copyrights
Go to Page Top
Back Back to Top
4-530-204-12(1)
© 2016 Sony Corporation Notes on use
43
Search
Help Guide
How to Use
Preparation
Recording
Playback
Editing
Menu
Specifications
Announcements
Troubleshooting
List of Topics
IC Recorder
ICD-BX140
Support website
Customer support websites
Introduces URLs of the customer support websites.
Go to Page Top
Back Back to Top
4-530-204-12(1)
© 2016 Sony Corporation Notes on use
44
Search

Help Guide
How to Use
Troubleshooting
IC recorder operations
Messages
System limitations
List of Topics
IC Recorder
ICD-BX140
Noise
The recorded file is noisy and you want to record with less noise in
your recording.
A rustling noise is recorded.
A buzzing or humming noise is recorded.
Noise is recorded when you record a file using an external microphone
(not supplied).
Noise is heard when you listen to the file using headphones.
Noise is heard in the playback even though the noise cut function is
active.
Go to Page Top
Back Back to Top
4-530-204-12(1)
© 2016 Sony Corporation Notes on use
46
Search

Help Guide
How to Use
Troubleshooting
IC recorder operations
Messages
System limitations
List of Topics
IC Recorder
ICD-BX140
Power
The IC recorder cannot be turned on. The IC recorder does not
operate, even if you press any button.
The IC recorder cannot be turned off.
The IC recorder cannot be turned on.
The IC recorder is powered off automatically.
The battery life is short.
There is no battery power remaining after you have left the batteries
inserted for long time without using the IC recorder.
The battery life of the rechargeable batteries is short.
Go to Page Top
Back Back to Top
4-530-204-12(1)
© 2016 Sony Corporation Notes on use
47
Search

Help Guide
How to Use
Troubleshooting
IC recorder operations
Messages
System limitations
List of Topics
IC Recorder
ICD-BX140
General operations
The IC recorder does not operate correctly.
It takes a long time for the IC recorder to start.
The IC recorder does not operate, even if you press any button.
The operation indicator does not light.
Go to Page Top
Back Back to Top
4-530-204-12(1)
© 2016 Sony Corporation Notes on use
48
Search
Help Guide
How to Use
Troubleshooting
IC recorder operations
Messages
System limitations
List of Topics
IC Recorder
ICD-BX140
Recording
You cannot record a file.
Recording is interrupted.
You cannot add a recording or an overwrite recording.
The VOR function does not work.
Recording level is low.
When recording from other equipment, the input level is too strong or
not strong enough.
Go to Page Top
Back Back to Top
4-530-204-12(1)
© 2016 Sony Corporation Notes on use
49
Search

Help Guide
How to Use
Troubleshooting
IC recorder operations
Messages
System limitations
List of Topics
IC Recorder
ICD-BX140
Playback
The playback volume is low.
No sound comes from the speaker.
Sound comes from only one channel.
Sound comes from the speaker even when the headphones are
plugged in.
Playback speed is too fast or too slow.
Playback sound is not good when a recorded file is played back.
Go to Page Top
Back Back to Top
4-530-204-12(1)
© 2016 Sony Corporation Notes on use
50
Search


Help Guide
How to Use
Troubleshooting
IC recorder operations
Messages
System limitations
List of Topics
IC Recorder
ICD-BX140
Display
There are fewer menu items displayed in the menu mode.
“ACCESS” display does not disappear.
Go to Page Top
Back Back to Top
4-530-204-12(1)
© 2016 Sony Corporation Notes on use
53
Search
Help Guide
How to Use
Troubleshooting
IC recorder operations
Messages
System limitations
List of Topics
IC Recorder
ICD-BX140
Files
“FULL” is displayed and you cannot start recording.
“FILE FULL” is displayed and you cannot operate the IC recorder.
Go to Page Top
Back Back to Top
4-530-204-12(1)
© 2016 Sony Corporation Notes on use
54
Search


Help Guide
How to Use
Preparation
Recording
Playback
Editing
Menu
Specifications
Announcements
Troubleshooting
List of Topics
Print
IC Recorder
ICD-BX140
Parts and controls
1. Built-in microphone
2.
(headphone) jack
3. Operation indicator
4. Display window
5. FOLDER button
6. MENU button
7.
PLAY/ENTER button (*)
8.
(review/fast backward) button
9.
(stop) button
10.
(microphone) jack (PLUG IN POWER) (*)
11. VOL (volume) –/+ button (*)
12. DIVIDE button
13. ERASE button
14.
REC/PAUSE (record/pause) button
15.
(cue/fast forward) button
16. Speaker
17. HOLD·POWER ON/OFF switch
18. Battery compartment
19. Strap hole (A strap is not supplied.)
*
These buttons and the jack have a tactile dot. Use it as a reference point for operations, or to
identify each terminal.
Back Back to Top
57
Search
Help Guide
How to Use
Preparation
Recording
Playback
Editing
Menu
Specifications
Announcements
Troubleshooting
List of Topics
Print
IC Recorder
ICD-BX140
Display when stopped
Note
The window shown above displays indications, numbers or items for explanatory
purposes. The actual window may differ from those displayed here.
1. File number indicator
Displays the file number you have selected.
2. Microphone sensitivity indicator
Displays the level of the microphone sensitivity that has been set in the menu.
: High
: Low
3. Folder indicator
Displays the folder you have selected.
4. Battery indicator
Displays the remaining battery power.
5. Recording mode indicator
The recording mode selected in the menu is displayed.
SHQ: Super high quality mode
HQ: High quality mode
SP: Standard play mode
LP: Long play mode
6. Protect indicator
Appears when the protection is set for a file.
7. REC DATE (recorded date) indicators
Appears when the recorded date and time is displayed on the counter (with the
“REC DATE” indicator).
8. Remaining memory indicator
Displays the remaining memory and decreases one by one during recording.
9. LCF (Low Cut Filter) indicator
Appears when “LCF” is set to “ON” in the menu.
10. Alarm indicator
Appears when the alarm is set in a file.
Back
Back to Top
58
Search
Help Guide
How to Use
Preparation
Recording
Playback
Editing
Menu
Specifications
Announcements
Troubleshooting
List of Topics
Print
IC Recorder
ICD-BX140
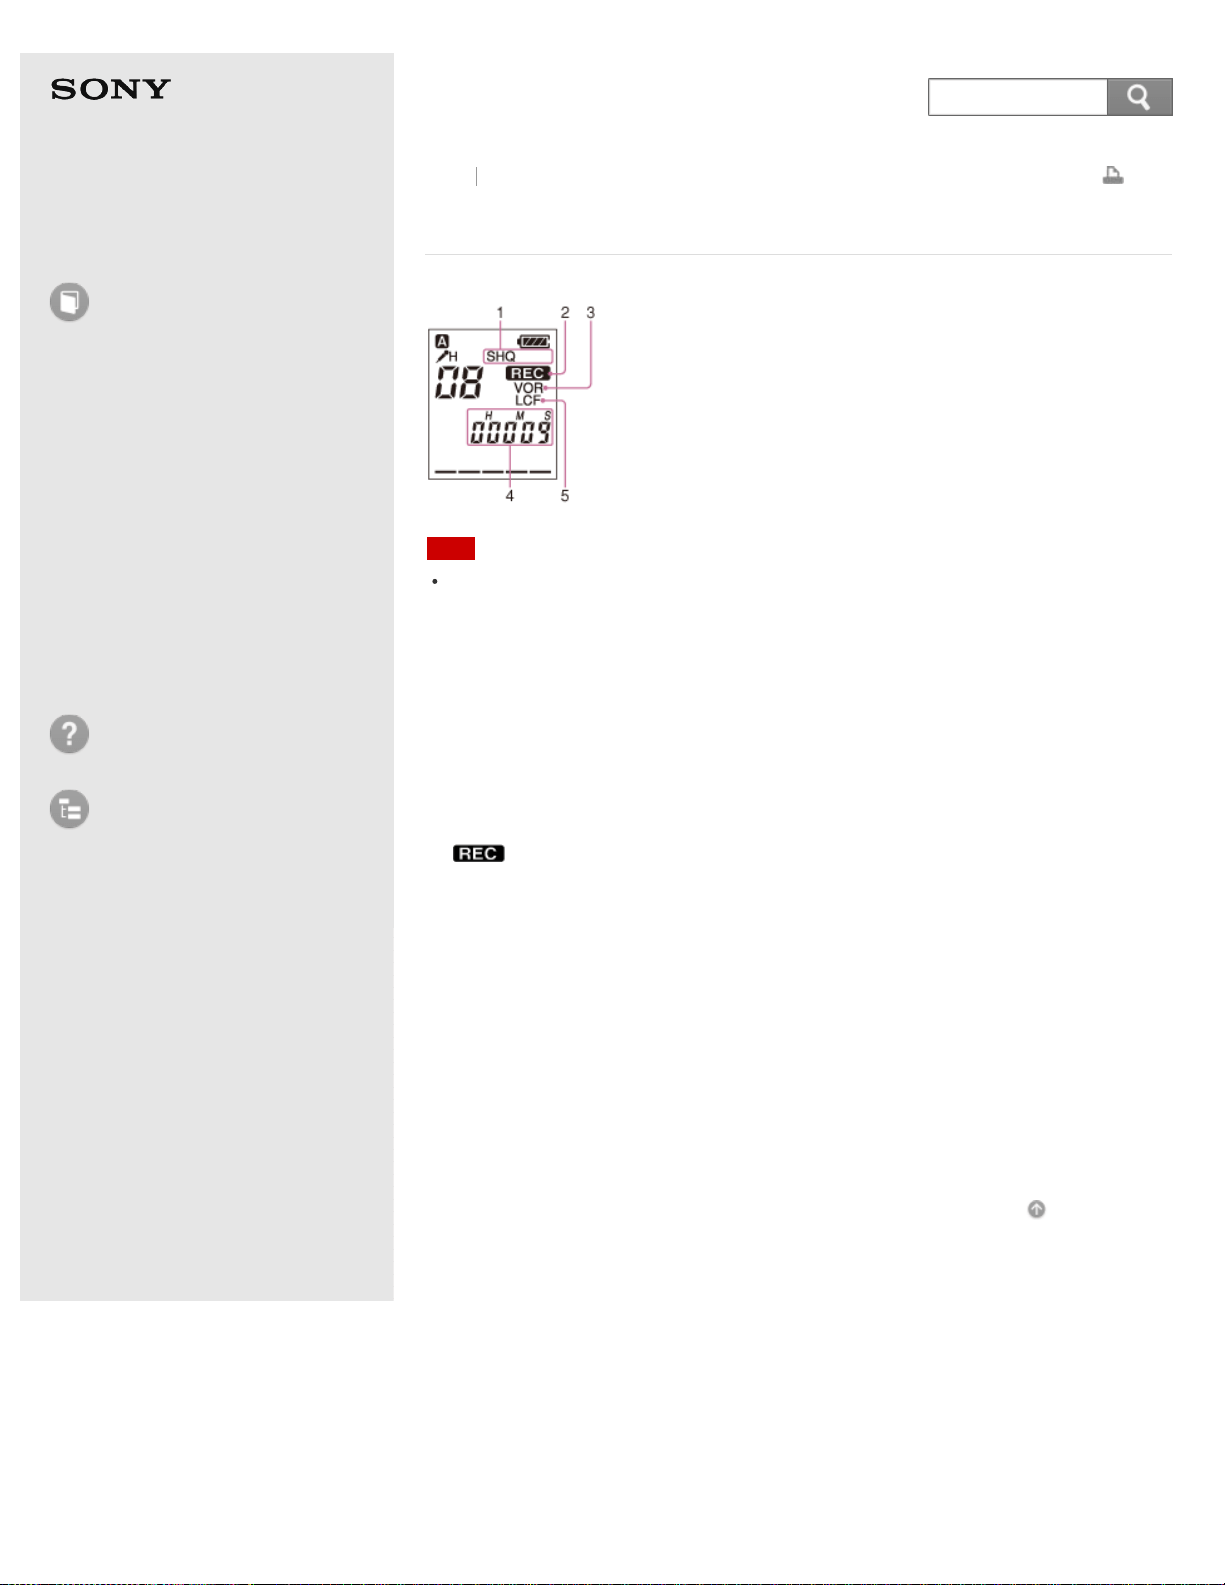
Display when recording
Note
The window shown above displays indications, numbers or items for explanatory
purposes. The actual window may differ from those displayed here.
1. Recording mode indicator
Displays the recording mode of the currently recorded file.
SHQ: Super high quality mode
HQ: High quality mode
SP: Standard play mode
LP: Long play mode
2.
(recording) indicator
Appears while the IC recorder is recording.
3. VOR (Voice Operated Recording) indicator
Appears while the IC recorder is recording with the VOR function.
You can set “VOR” to “ON” in the menu.
4. Counter indication
You can select the display mode in the menu.
ELAPSE: Displays the elapsed recording time of a file.
REMAIN: Displays the remaining recording time of a file.
5. LCF (Low Cut Filter) indicator
Appears when “LCF” is set to “ON” in the menu.
Go to Page Top
Back Back to Top
4-530-204-12(1)
© 2016 Sony Corporation Notes on use
59
Search
Help Guide
How to Use
Preparation
Recording
Playback
Editing
Menu
Specifications
Announcements
Troubleshooting
List of Topics
Print
IC Recorder
ICD-BX140
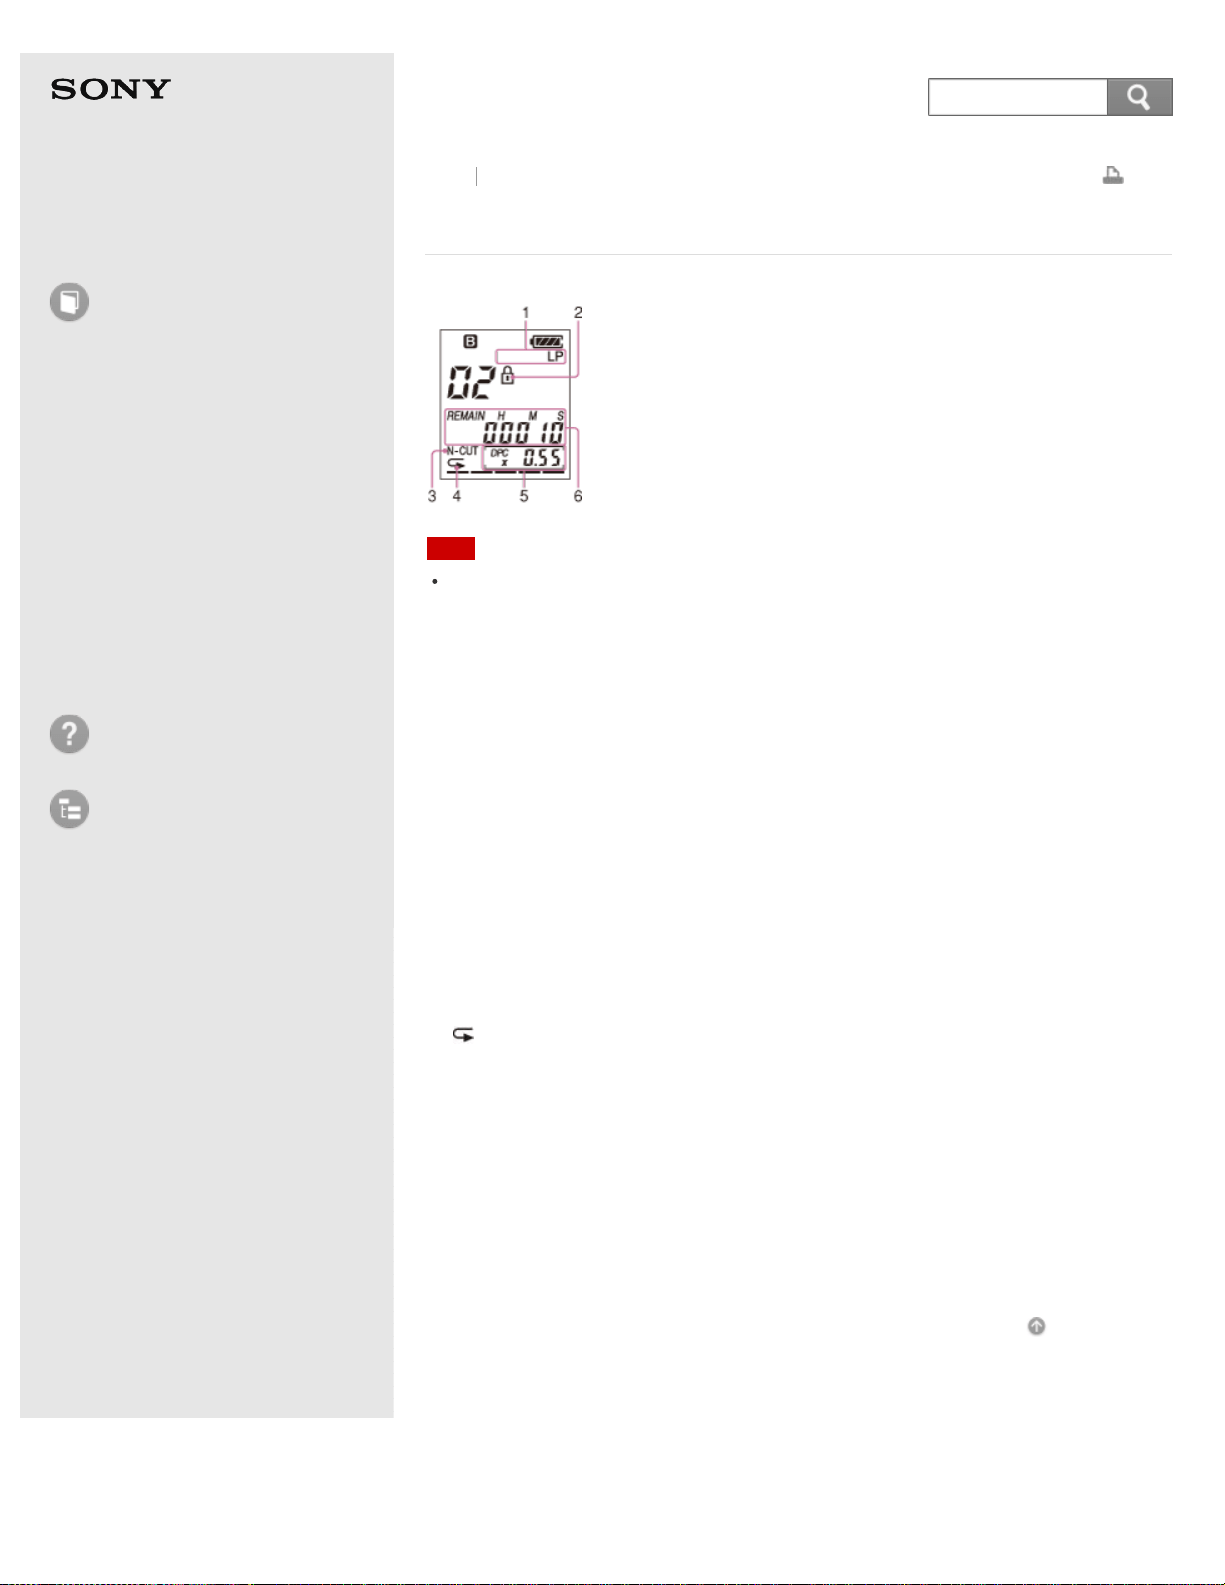
Display during playback
Note
The window shown above displays indications, numbers or items for explanatory
purposes. The actual window may differ from those displayed here.
1. Recording mode indicator
When the IC recorder is playing a file, the recording mode of the file is
displayed.
SHQ: Super high quality mode
HQ: High quality mode
SP: Standard play mode
LP: Long play mode
2. Protect indicator
Appears when the protection is set for a file.
3. N-CUT (Noise Cut) indicator
Appears when the noise cut function is active. You can set “N-CUT” to “ON” in
the menu.
4.
(repeat play) indicator
Appears when a file is played back repeatedly.
5. DPC (Digital Pitch Control) indicator
Appears when the DPC (Digital Pitch Control) function is set in the menu.
You can adjust the playback speed in the menu.
6. Counter indication
You can select the display mode in the menu.
ELAPSE: Displays the elapsed playback time of a file.
REMAIN: Displays the remaining playback time of a file.
Go to Page Top
Back Back to Top
4-530-204-12(1)
© 2016 Sony Corporation Notes on use
60
Search
Help Guide
How to Use
Preparation
Recording
Playback
Editing
Menu
Specifications
Announcements
Troubleshooting
List of Topics
Print
IC Recorder
ICD-BX140
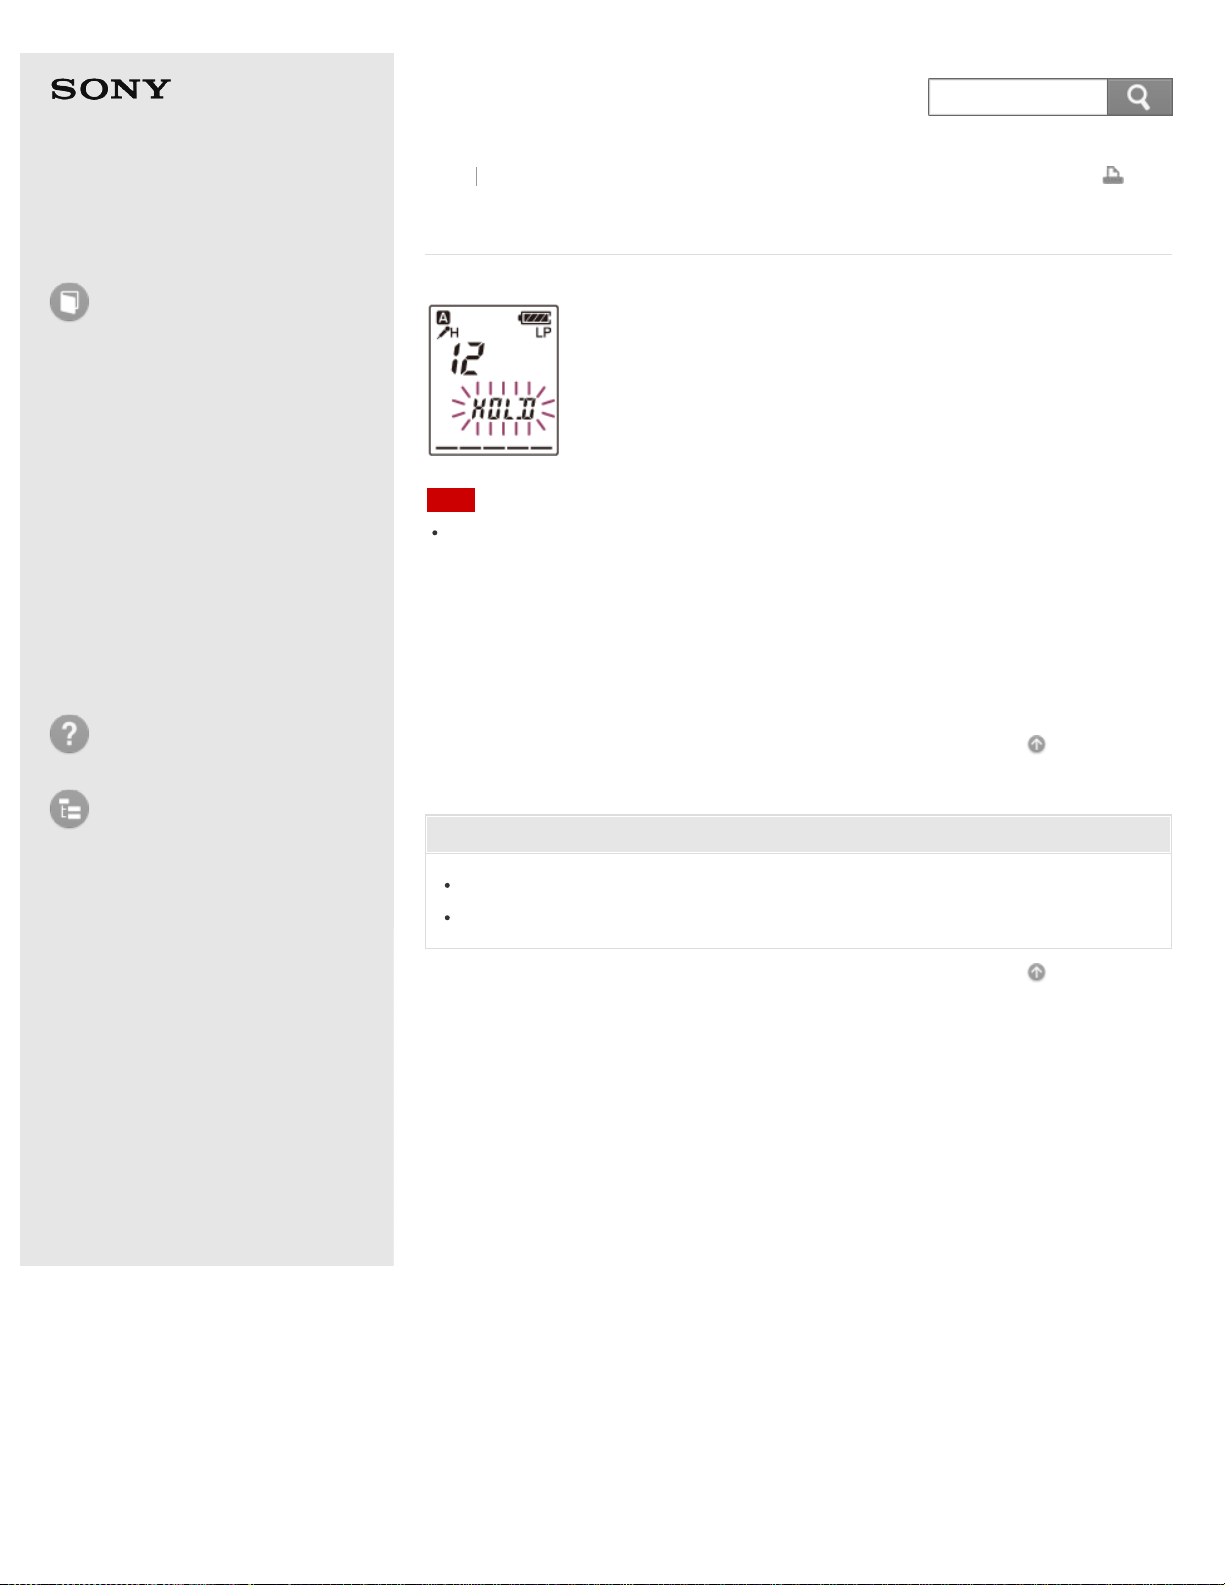
Display in the HOLD status
Note
The window shown above displays indications, numbers or items for explanatory
purposes. The actual window may differ from those displayed here.
1. HOLD indicator
Flashes when you attempt to operate the IC recorder while the HOLD function
is set to prevent unintentional operations. All button operations are disabled.
Go to Page Top
Related Topic
Preventing unintentional operations (HOLD)
Releasing the HOLD function
Go to Page Top
Back Back to Top
4-530-204-12(1)
© 2016 Sony Corporation Notes on use
61
Search
Help Guide
How to Use
Preparation
Recording
Playback
Editing
Menu
Specifications
Announcements
Troubleshooting
List of Topics
Print
IC Recorder
ICD-BX140
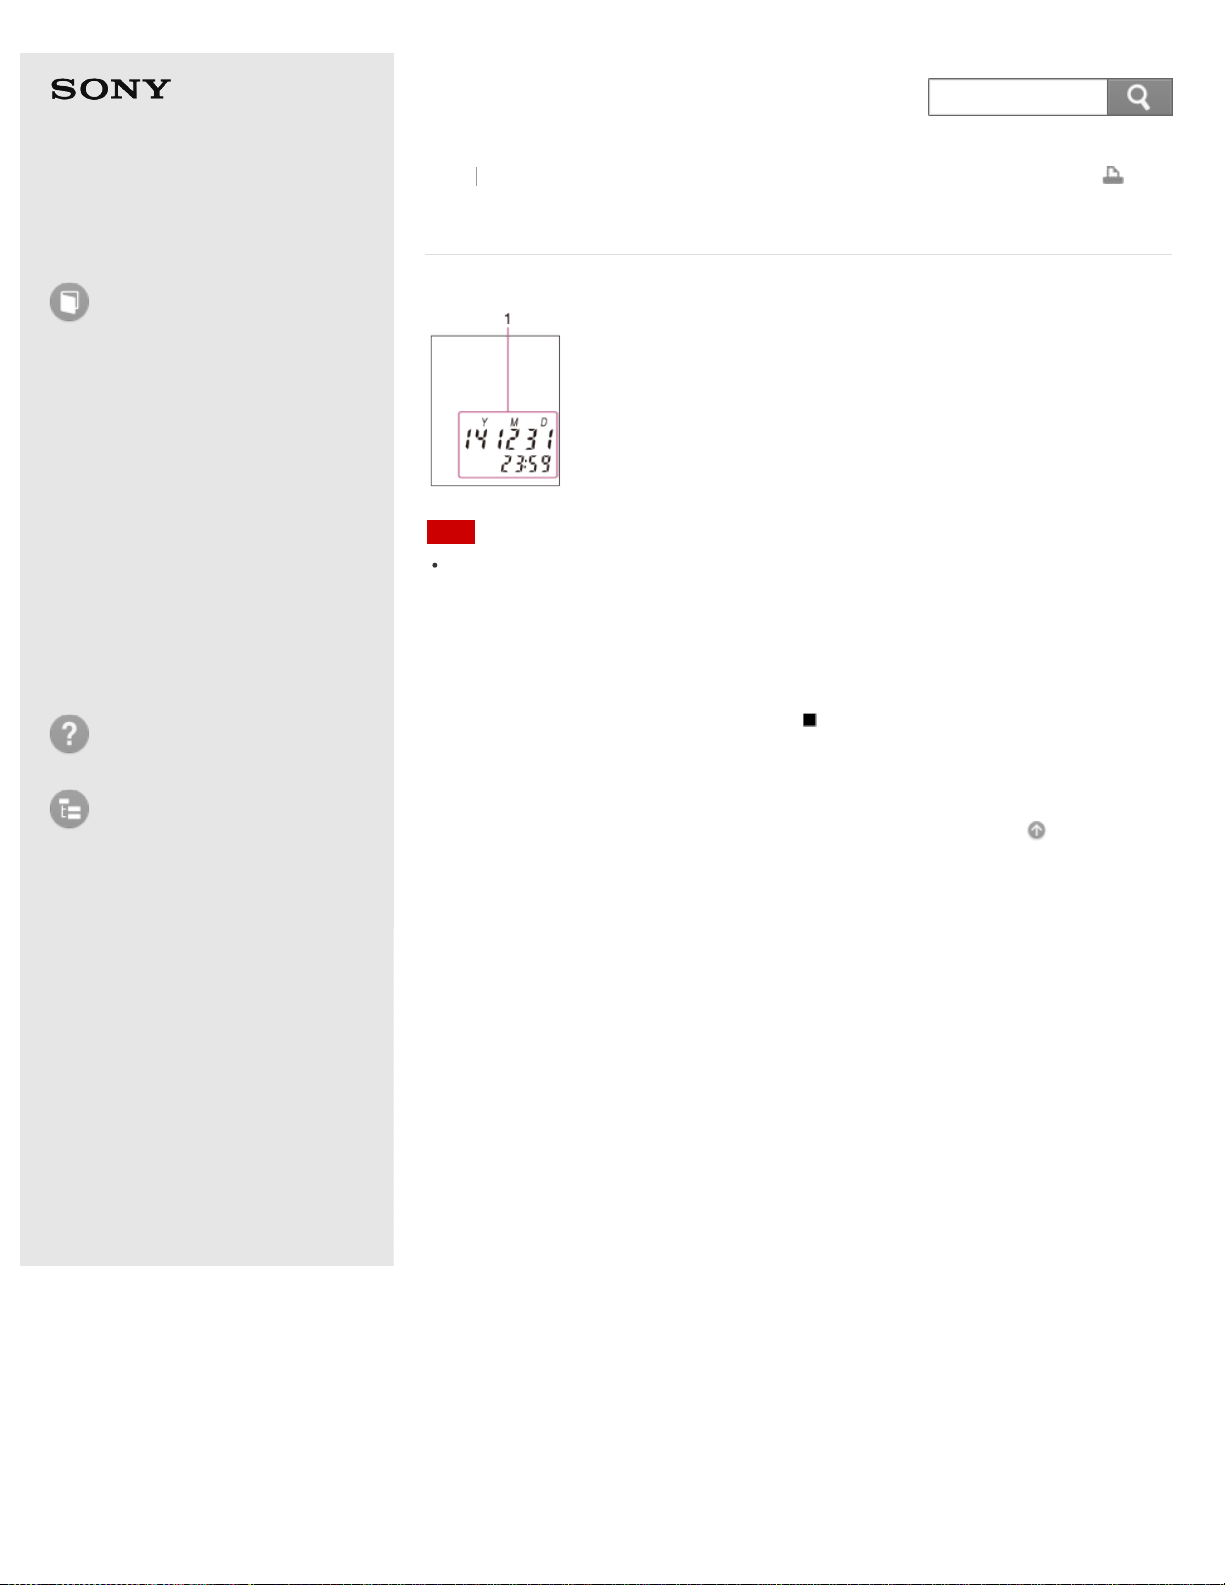
Display of the current date and time
Note
The window shown above displays indications, numbers or items for explanatory
purposes. The actual window may differ from those displayed here.
1. Current date and time
Displays the current date (year, month, and day) and the current time (hour
and minutes) while you press and hold
(stop) in the stop mode. When you
release the button, after about one second the window returns to the stop
mode display. e.g.: 14Y12M 31D 23:59 (December 31, 2014, 11:59 p.m.)
Go to Page Top
Back Back to Top
4-530-204-12(1)
© 2016 Sony Corporation Notes on use
62
Search
Help Guide
How to Use
Preparation
Recording
Playback
Editing
Menu
Specifications
Announcements
Troubleshooting
List of Topics
Print
IC Recorder
ICD-BX140
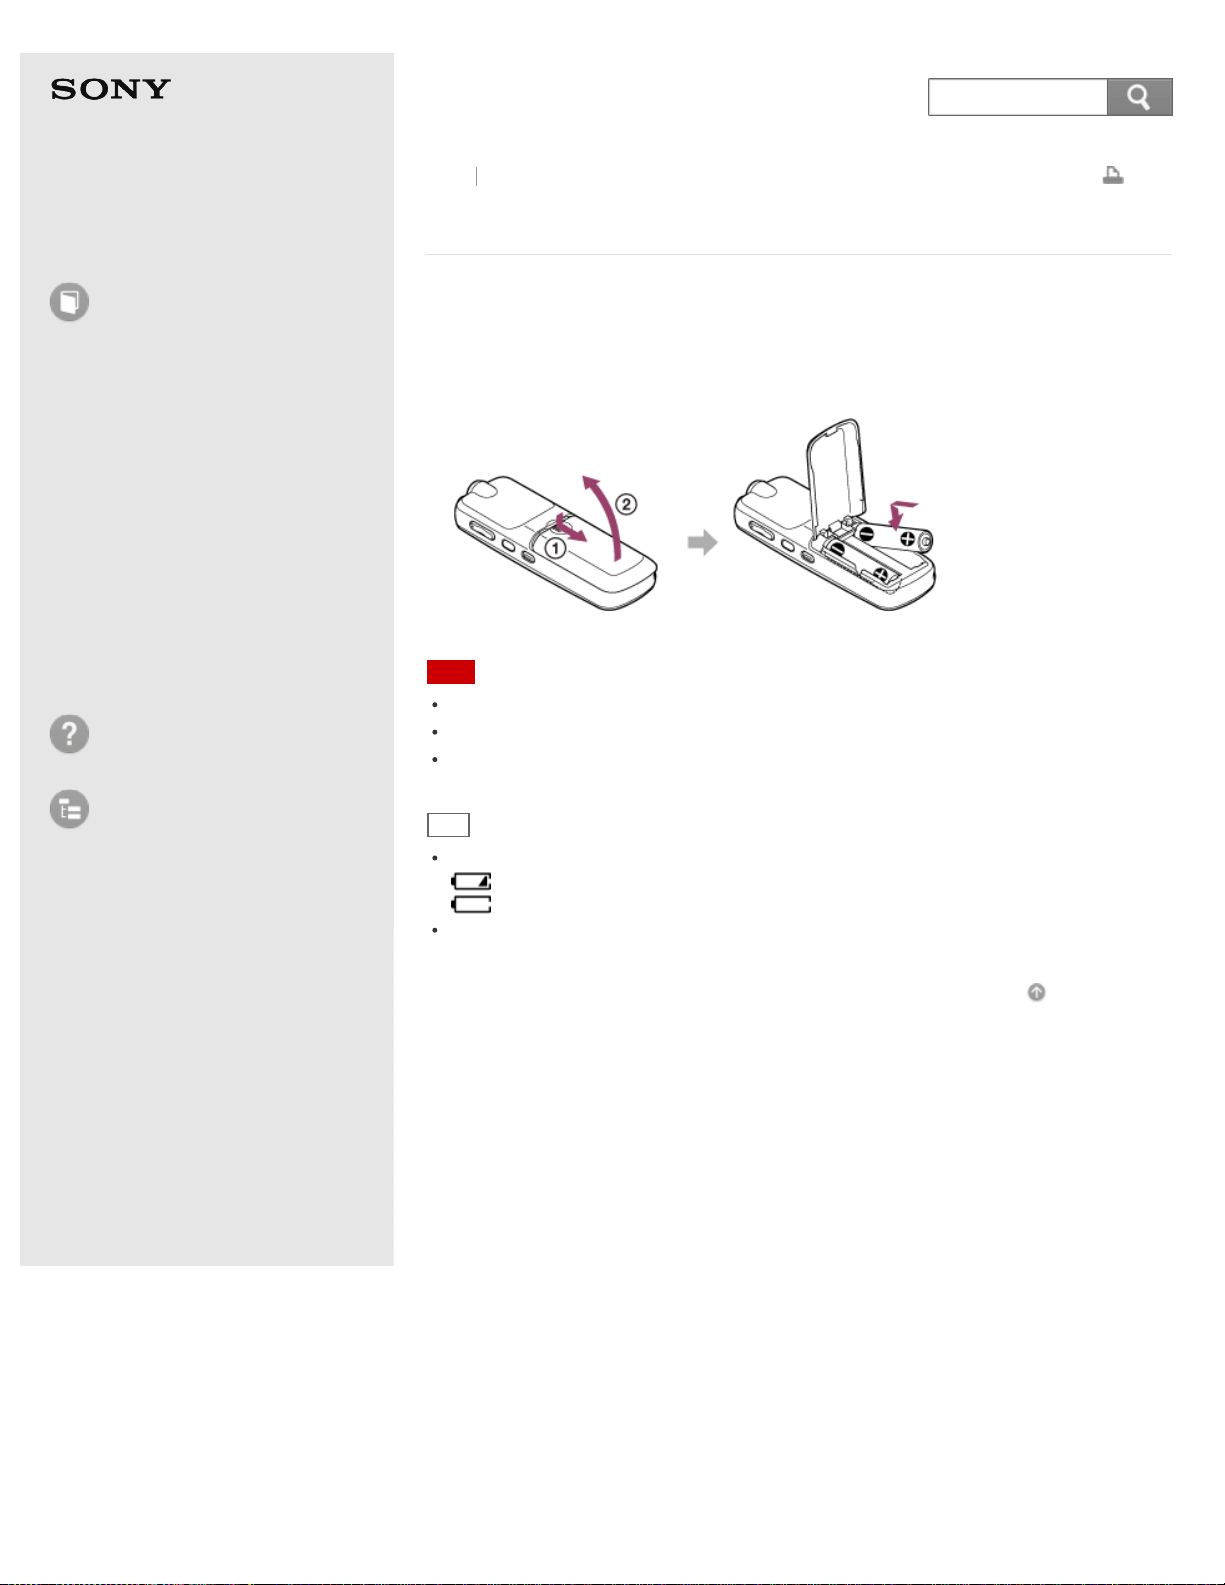
Inserting batteries
1. Insert batteries.
Slide and lift the battery compartment lid, insert two LR03 (size AAA) alkaline
batteries (supplied) or two NH-AAA rechargeable batteries (not supplied) with
correct polarity, and close the lid.
Note
Do not use manganese batteries for this IC recorder.
When replacing the batteries, be sure to replace both batteries with new ones.
When you are not going to use the IC recorder for a long time, remove the batteries
to prevent damage from battery leakage and corrosion.
Hint
The battery indicator in the display window shows the battery condition.
: “LOW BATT” flashes. Replace the old batteries with new ones.
: “LOW BATT” flashes and the IC recorder will stop operation.
When replacing the batteries, files recorded or alarm settings are not erased even
when you remove the batteries.
Go to Page Top
Back Back to Top
4-530-204-12(1)
© 2016 Sony Corporation Notes on use
63
Search
Help Guide
How to Use
Preparation
Recording
Playback
Editing
Menu
Specifications
Announcements
Troubleshooting
List of Topics
Print
IC Recorder
ICD-BX140
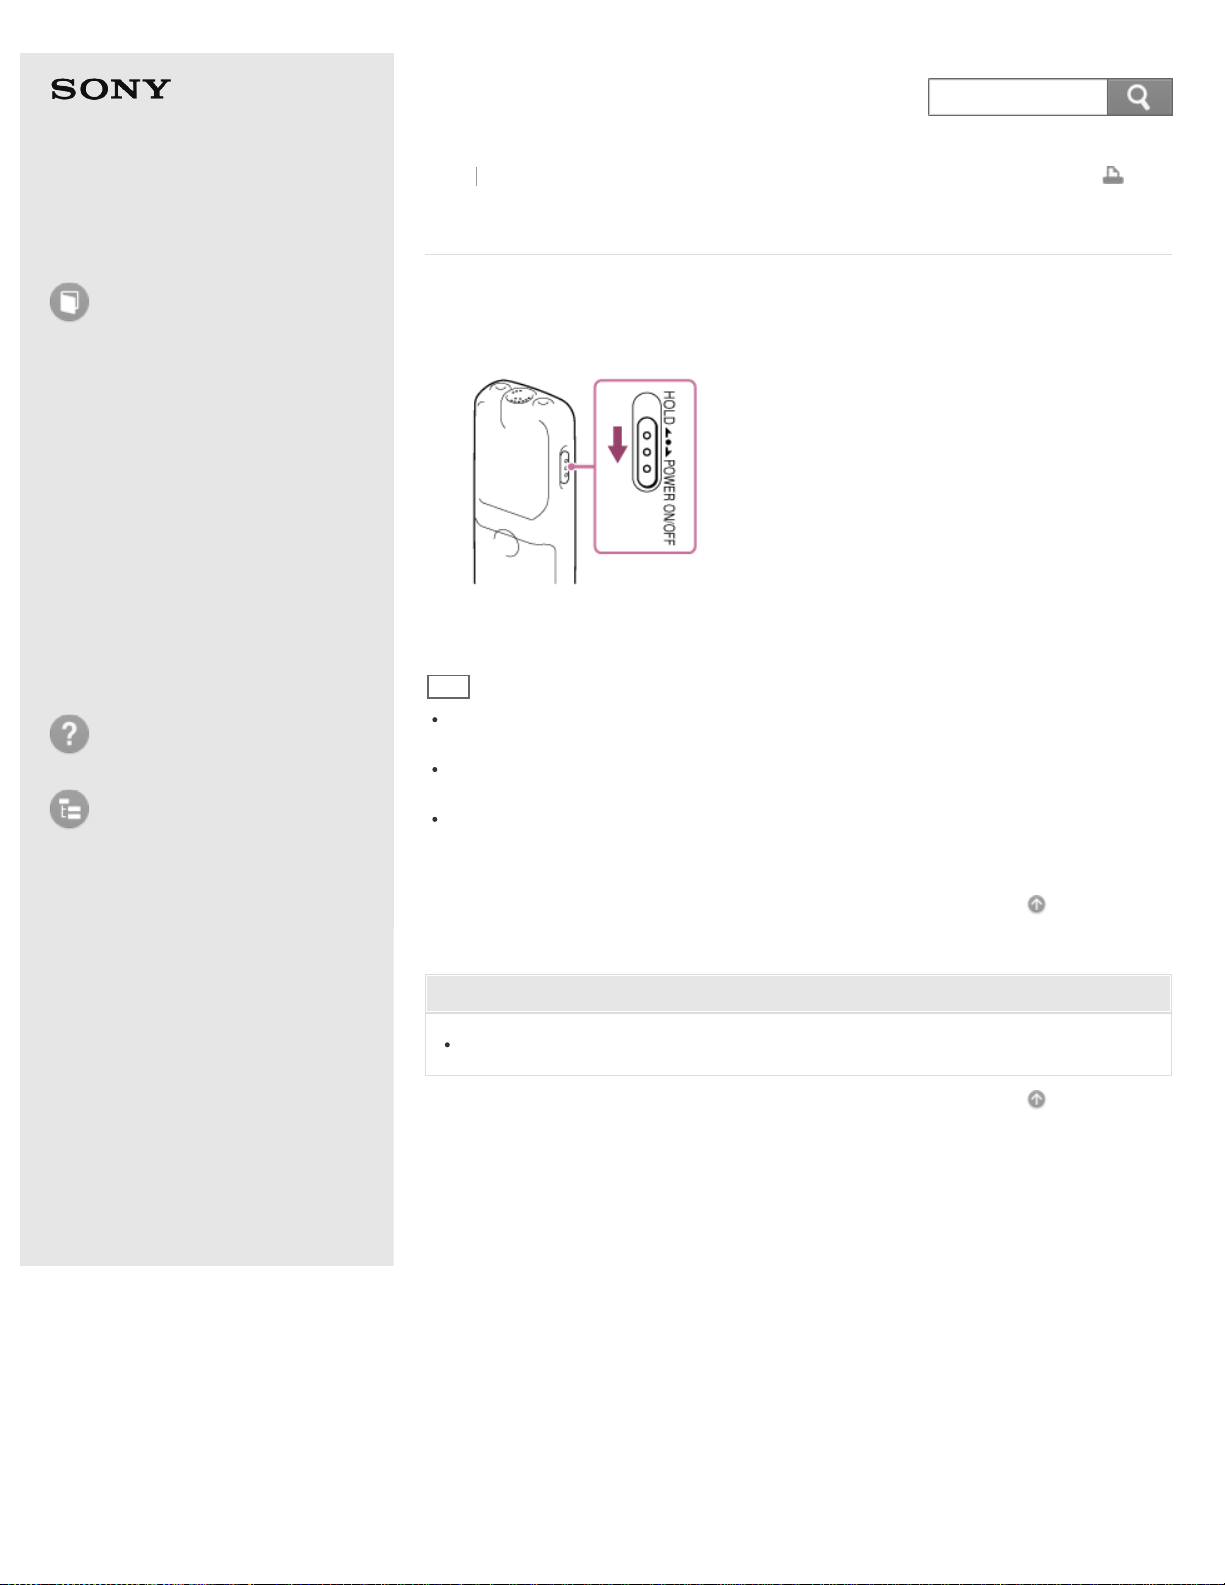
Turning the power on
1. Slide and hold the HOLD·POWER ON/OFF switch in the direction of “POWER
ON/OFF” until the window display appears.
“ACCESS” is displayed, and the IC recorder is turned on.
Hint
The remaining recording time will be displayed for about 3 seconds, and then the
display window returns to the stop mode display.
When you are not going to use the IC recorder for a long time, we recommend to
turn off the IC recorder.
When the IC recorder is in the stop mode, and you leave the IC recorder without
attempting an operation for approximately 10 minutes, the auto power off function
will take effect.
Go to Page Top
Related Topic
Turning the power off
Go to Page Top
Back Back to Top
4-530-204-12(1)
© 2016 Sony Corporation Notes on use
64
Search
Help Guide
How to Use
Preparation
Recording
Playback
Editing
Menu
Specifications
Announcements
Troubleshooting
List of Topics
Print
IC Recorder
ICD-BX140
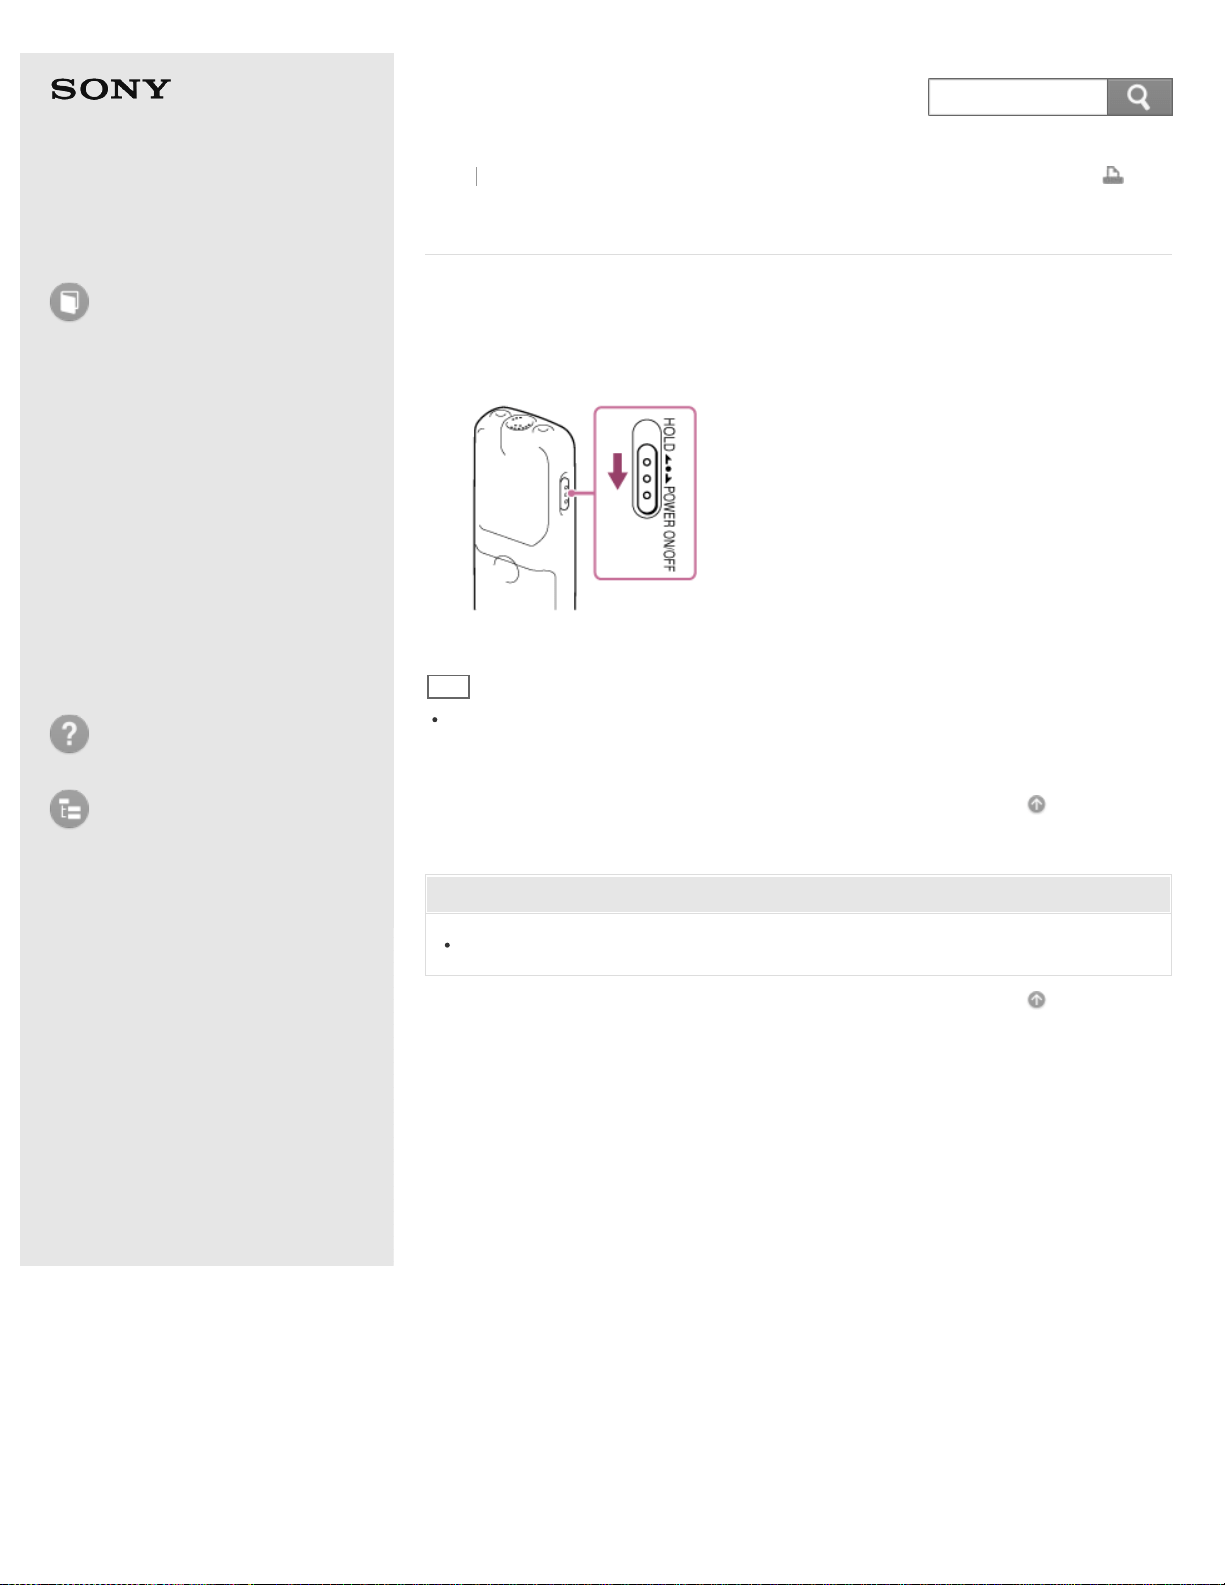
Turning the power off
1. Slide and hold the HOLD·POWER ON/OFF switch in the direction of “POWER
ON/OFF” until “OFF” is displayed.
The IC recorder is turned off.
Hint
When the IC recorder is in the stop mode, and you leave the IC recorder without
attempting an operation for approximately 10 minutes, the auto power off function
will take effect.
Go to Page Top
Related Topic
Turning the power on
Go to Page Top
Back Back to Top
4-530-204-12(1)
© 2016 Sony Corporation Notes on use
65
Search
Help Guide
How to Use
Preparation
Recording
Playback
Editing
Menu
Specifications
Announcements
Troubleshooting
List of Topics
Print
IC Recorder
ICD-BX140
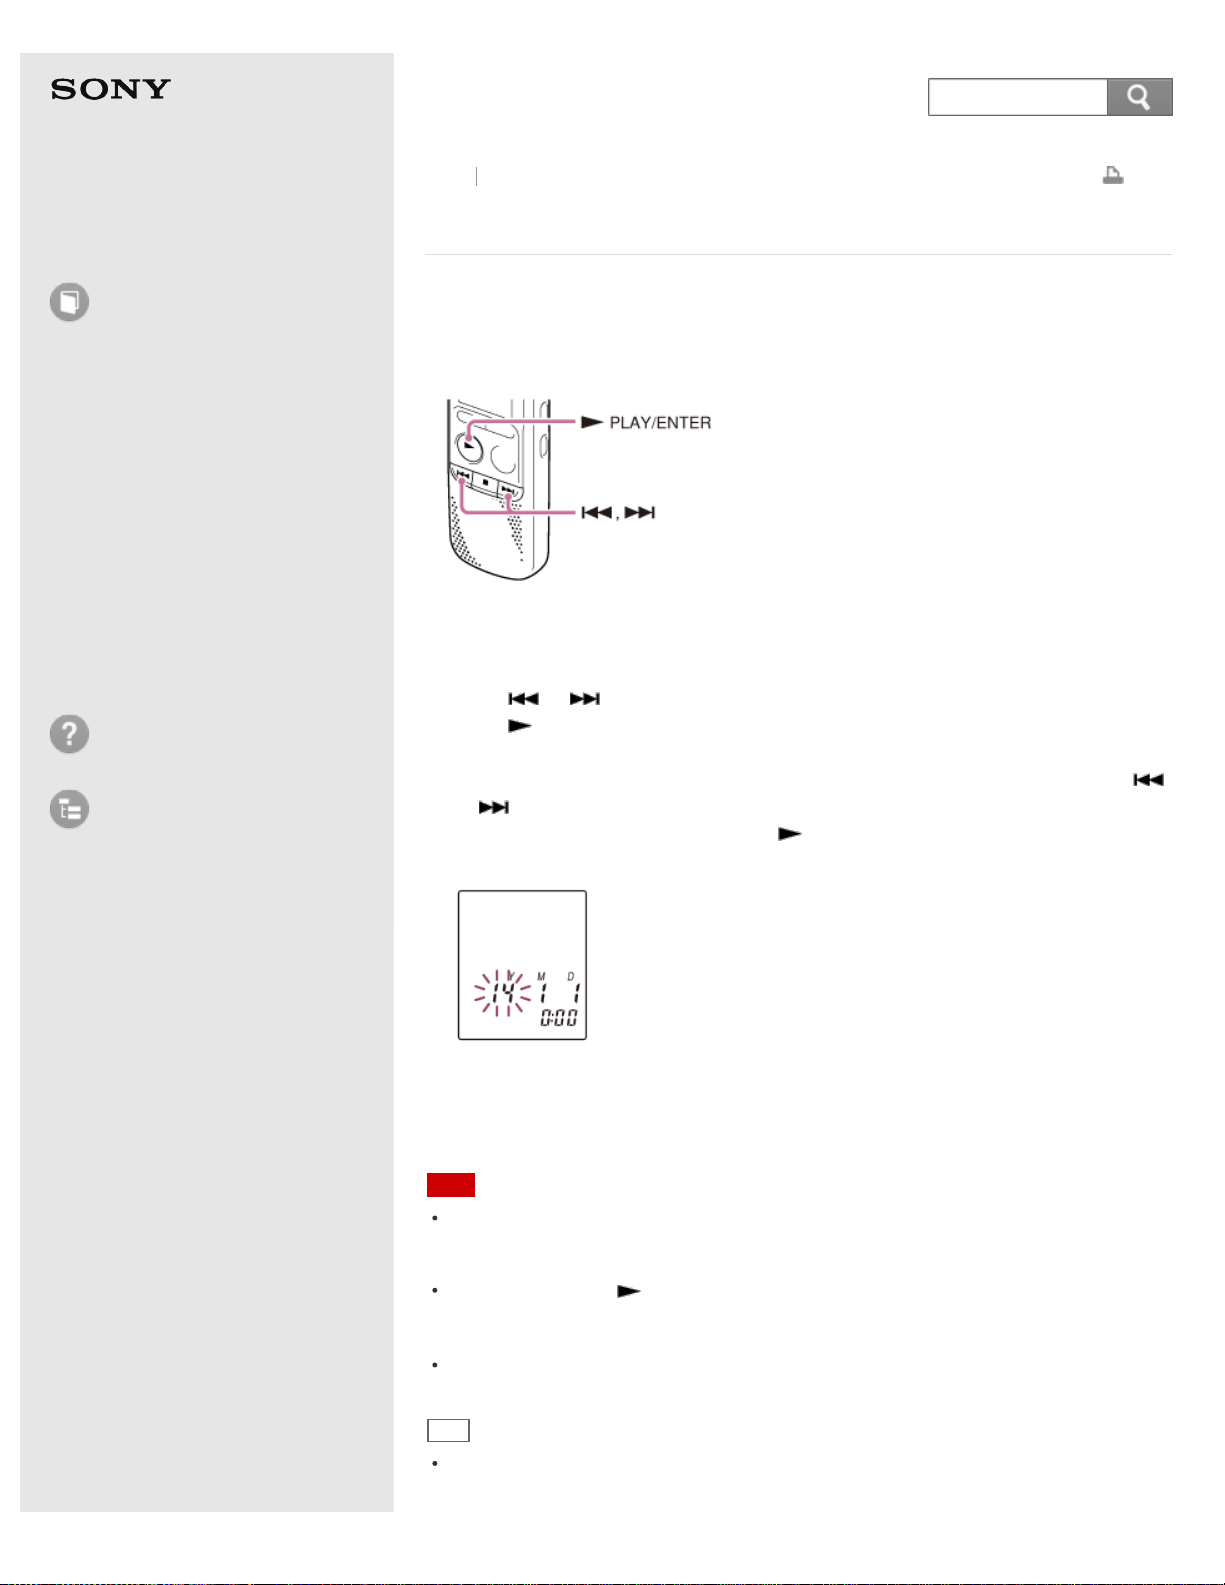
Setting the clock
You need to set the clock to use the alarm function or record the date and time.
When you insert batteries and turn the power on, the year section begins to flash
in the clock setting display window.
1. Set year, month, day, hour and minute.
Press
or to set the year (the last two digits of the year), and then
press
PLAY/ENTER.
Repeat this procedure to set month, day, hour, and minute in sequence. You
can move the cursor to the year, month, day, hour and minute by pressing
or .
When you set the minute and press
PLAY/ENTER, the clock reflects the
setting.
When you finish setting the clock, the remaining recording time will be
displayed for about 3 seconds, and then the display window returns to the stop
mode display.
Note
The clock setting display appears every time you replace batteries, and the
approximate time when you last operated the unit before replacing the batteries is
displayed. You must set the clock to the current time again.
If you do not press PLAY/ENTER within 1 minute of entering the clock setting data,
the clock setting mode is canceled and the window will return to the display of the
stop mode.
The time is displayed either in 12-Hour with “AM” or “PM,” or in 24-Hour, depending
on the “HOUR” setting in the menu.
Hint
You can set the clock using the menu as well.
Go to Page Top
Back Back to Top
66
Search

Help Guide
How to Use
Preparation
Recording
Playback
Editing
Menu
Specifications
Announcements
Troubleshooting
List of Topics
Print
IC Recorder
ICD-BX140
Setting the clock using the menu
While the IC recorder is stopped, you can set the clock using the menu.
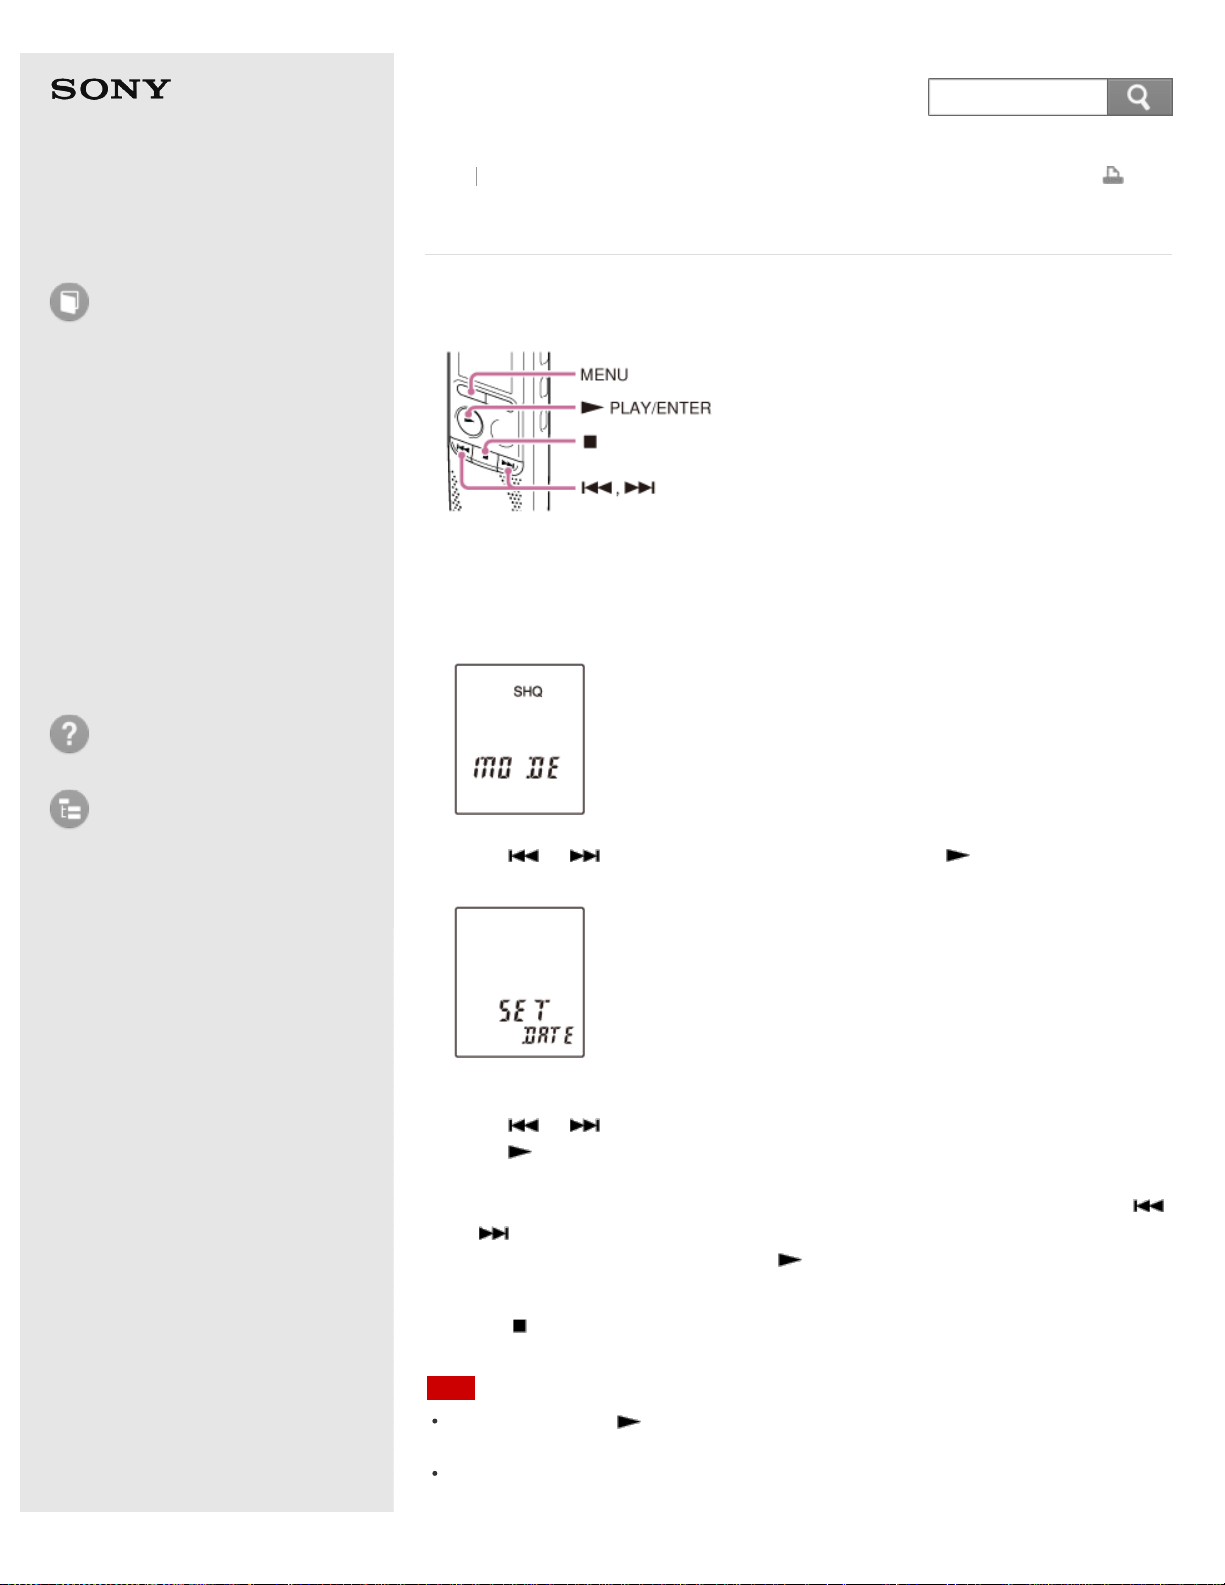
1. Press MENU to enter the menu mode.
The menu mode window will be displayed.
2. Press or to select “SET DATE,” and then press PLAY/ENTER.
The clock setting window will be displayed.
3. Set year, month, day, hour and minute.
Press
or to set the year (the last two digits of the year), and then
press
PLAY/ENTER.
Repeat this procedure to set month, day, hour, and minute in sequence. You
can move the cursor to the year, month, day, hour and minute by pressing
or .
When you set the minute and press
PLAY/ENTER, the clock reflects the
setting.
4. Press
(stop) to exit the menu mode.
Note
If you do not press within 1 minute of entering the clock setting data, the clock
setting mode is canceled and the window will return to the display of the stop mode.
The time is displayed either in 12-Hour with “AM” or “PM,” or in 24-Hour, depending
on the “HOUR” setting in the menu.
Back Back to Top
68
Search

Help Guide
How to Use
Preparation
Recording
Playback
Editing
Menu
Specifications
Announcements
Troubleshooting
List of Topics
Print
IC Recorder
ICD-BX140
Selecting a folder and a file
While the IC recorder is in the stop mode, you can select a folder and a file for
recording, playing or editing.
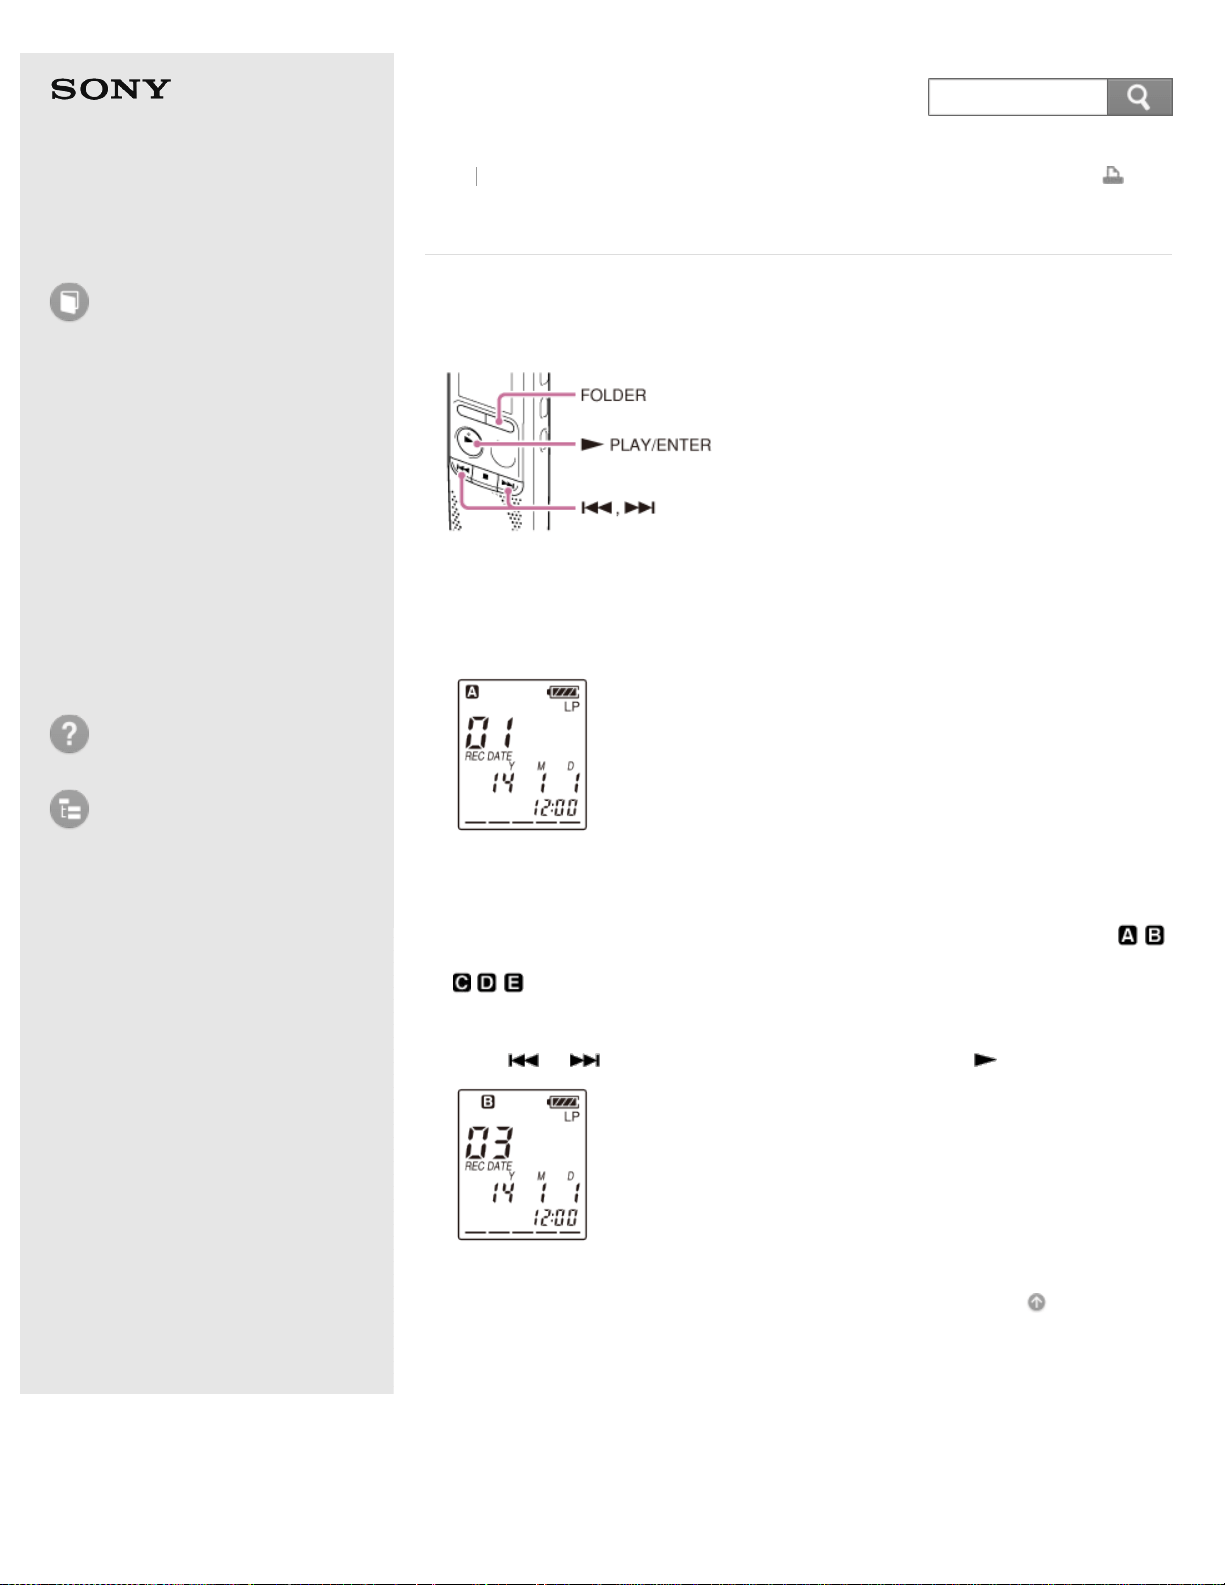
1. Press FOLDER.
The folder selection window is displayed.
2. Select a folder.
Press FOLDER repeatedly to select the desired folder.
When you purchase the IC recorder, there are 5 folders already available (
).
3. Select a file.
Press
or to select the desired file, and then press PLAY/ENTER.
Go to Page Top
Back Back to Top
4-530-204-12(1)
© 2016 Sony Corporation Notes on use
70
Search
Help Guide
How to Use
Preparation
Recording
Playback
Editing
Menu
Specifications
Announcements
Troubleshooting
List of Topics
Print
IC Recorder
ICD-BX140
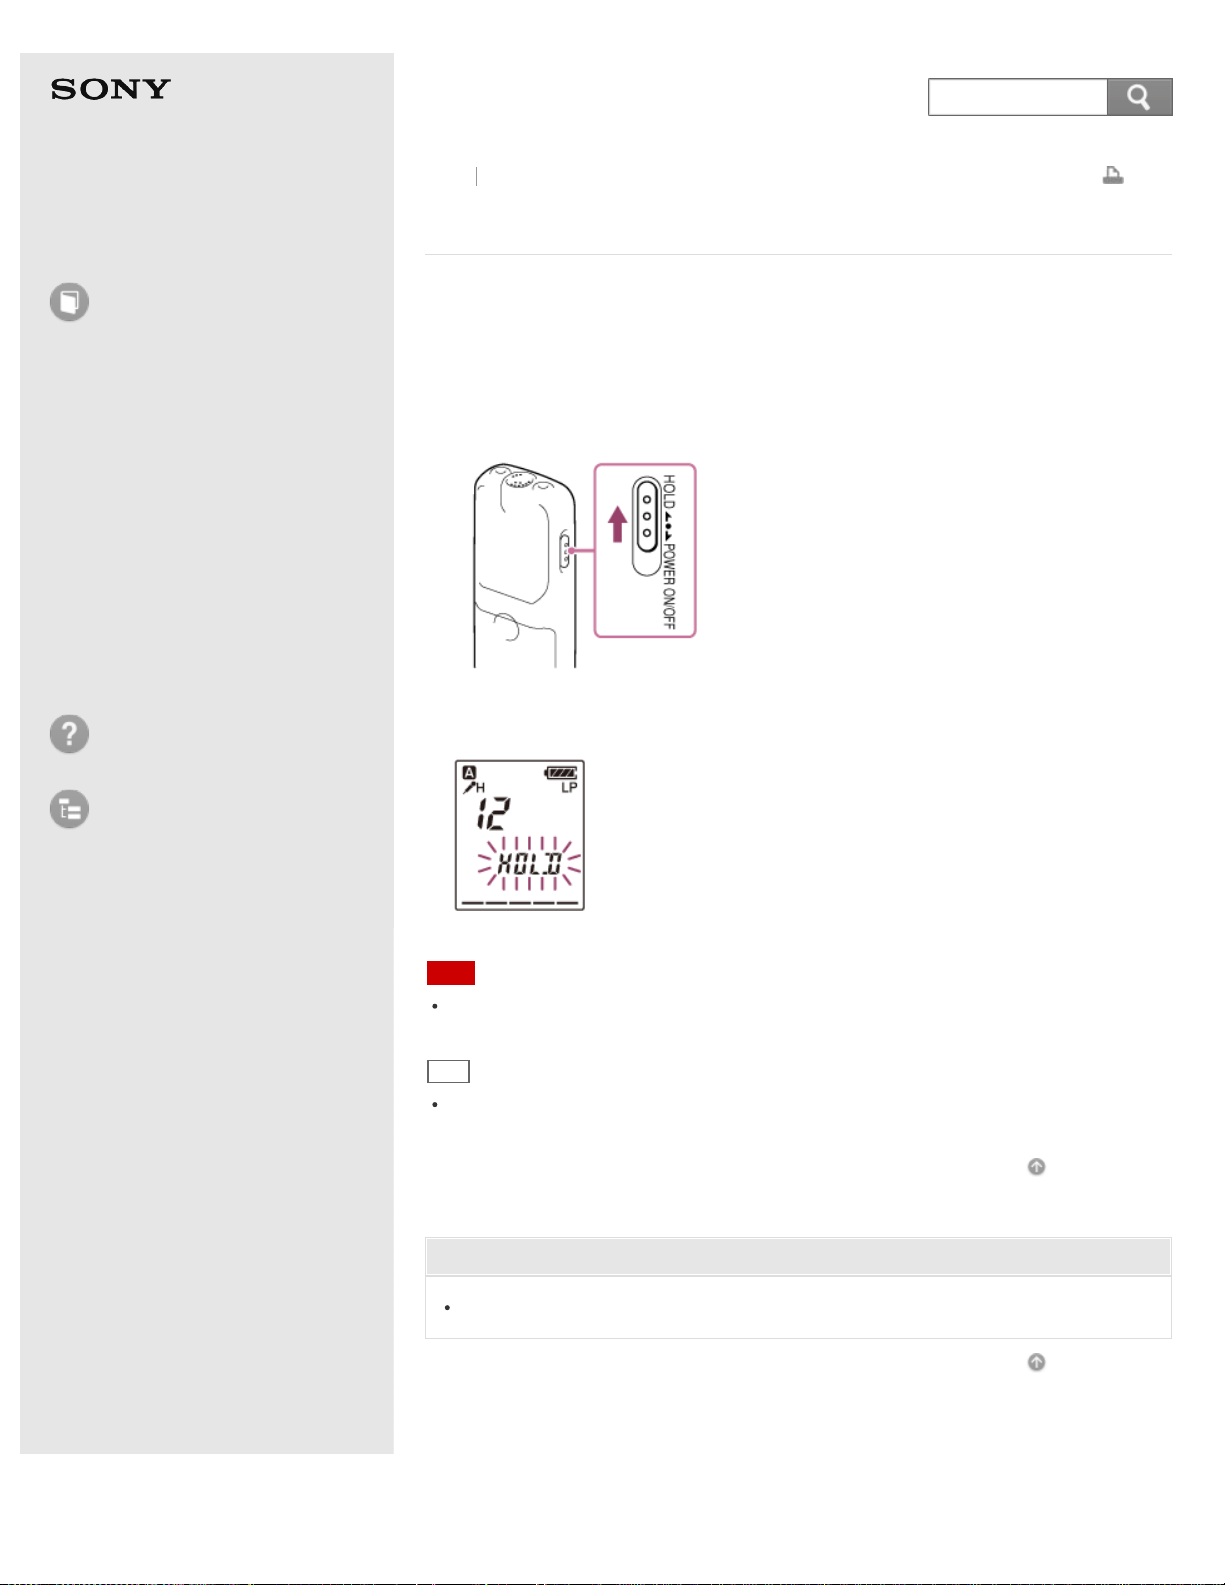
Preventing unintentional operations (HOLD)
You can disable all the buttons (HOLD) in order to prevent unintentional operations
when you carry the IC recorder, etc.
1. Slide the HOLD·POWER ON/OFF switch in the direction of “HOLD” to disable the
buttons while the power is on.
“HOLD” flashes for approximately 3 seconds, indicating that all the button
operations are disabled.
Note
When the HOLD function is activated during recording, all button operations are
disabled. To stop recording, cancel the HOLD function first.
Hint
Even if the HOLD function is activated, you can stop the alarm playback by pressing
any button. (You cannot stop normal playback.)
Go to Page Top
Related Topic
Releasing the HOLD function
Go to Page Top
Back Back to Top
4-530-204-12(1)
© 2016 Sony Corporation Notes on use
71
Search
Help Guide
How to Use
Preparation
Recording
Playback
Editing
Menu
Specifications
Announcements
Troubleshooting
List of Topics
Print
IC Recorder
ICD-BX140
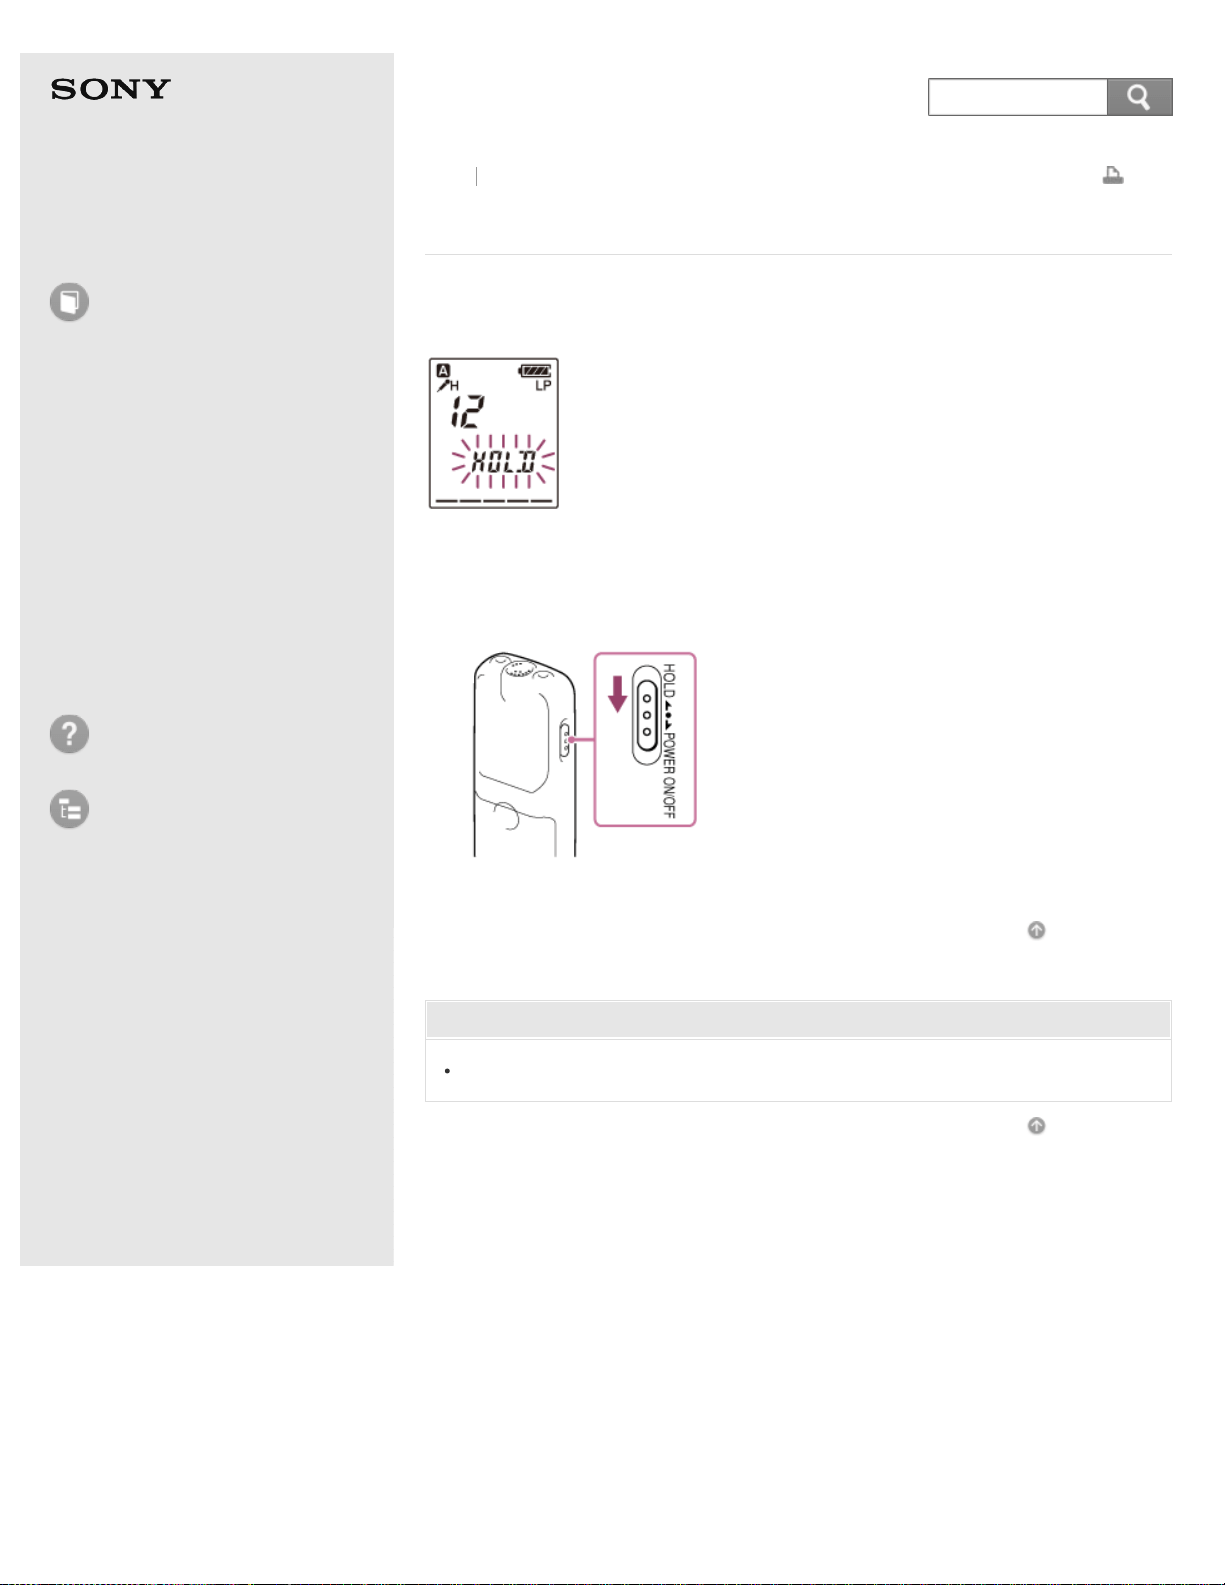
Releasing the HOLD function
If you operate buttons on the IC recorder when the HOLD function is set, “HOLD”
flashes on the display.
Release the HOLD function when you operate the IC recorder.
1. Slide the HOLD·POWER ON/OFF switch towards the center.
Go to Page Top
Related Topic
Preventing unintentional operations (HOLD)
Go to Page Top
Back Back to Top
4-530-204-12(1)
© 2016 Sony Corporation Notes on use
72
Search
Help Guide
How to Use
Preparation
Recording
Playback
Editing
Menu
Specifications
Announcements
Troubleshooting
List of Topics
Print
IC Recorder
ICD-BX140
Recording sound from the built-in microphone
The following steps are the basic recording procedures using the specified
microphone sensitivity and recording mode.
Note
Before making a recording, be sure to check the battery indicator.
Noise may be recorded if an object, such as your finger, etc., accidentally rubs or
scratches the IC recorder during recording.
Hint
Before you start recording, we recommend you make a trial recording first, or
monitor the recording.
1. Slide the HOLD·POWER ON/OFF switch in the direction of “POWER ON/OFF” to
turn on the IC recorder, or towards the center to release the IC recorder from
the HOLD status.
The stop mode window appears.
2. Select the desired folder.
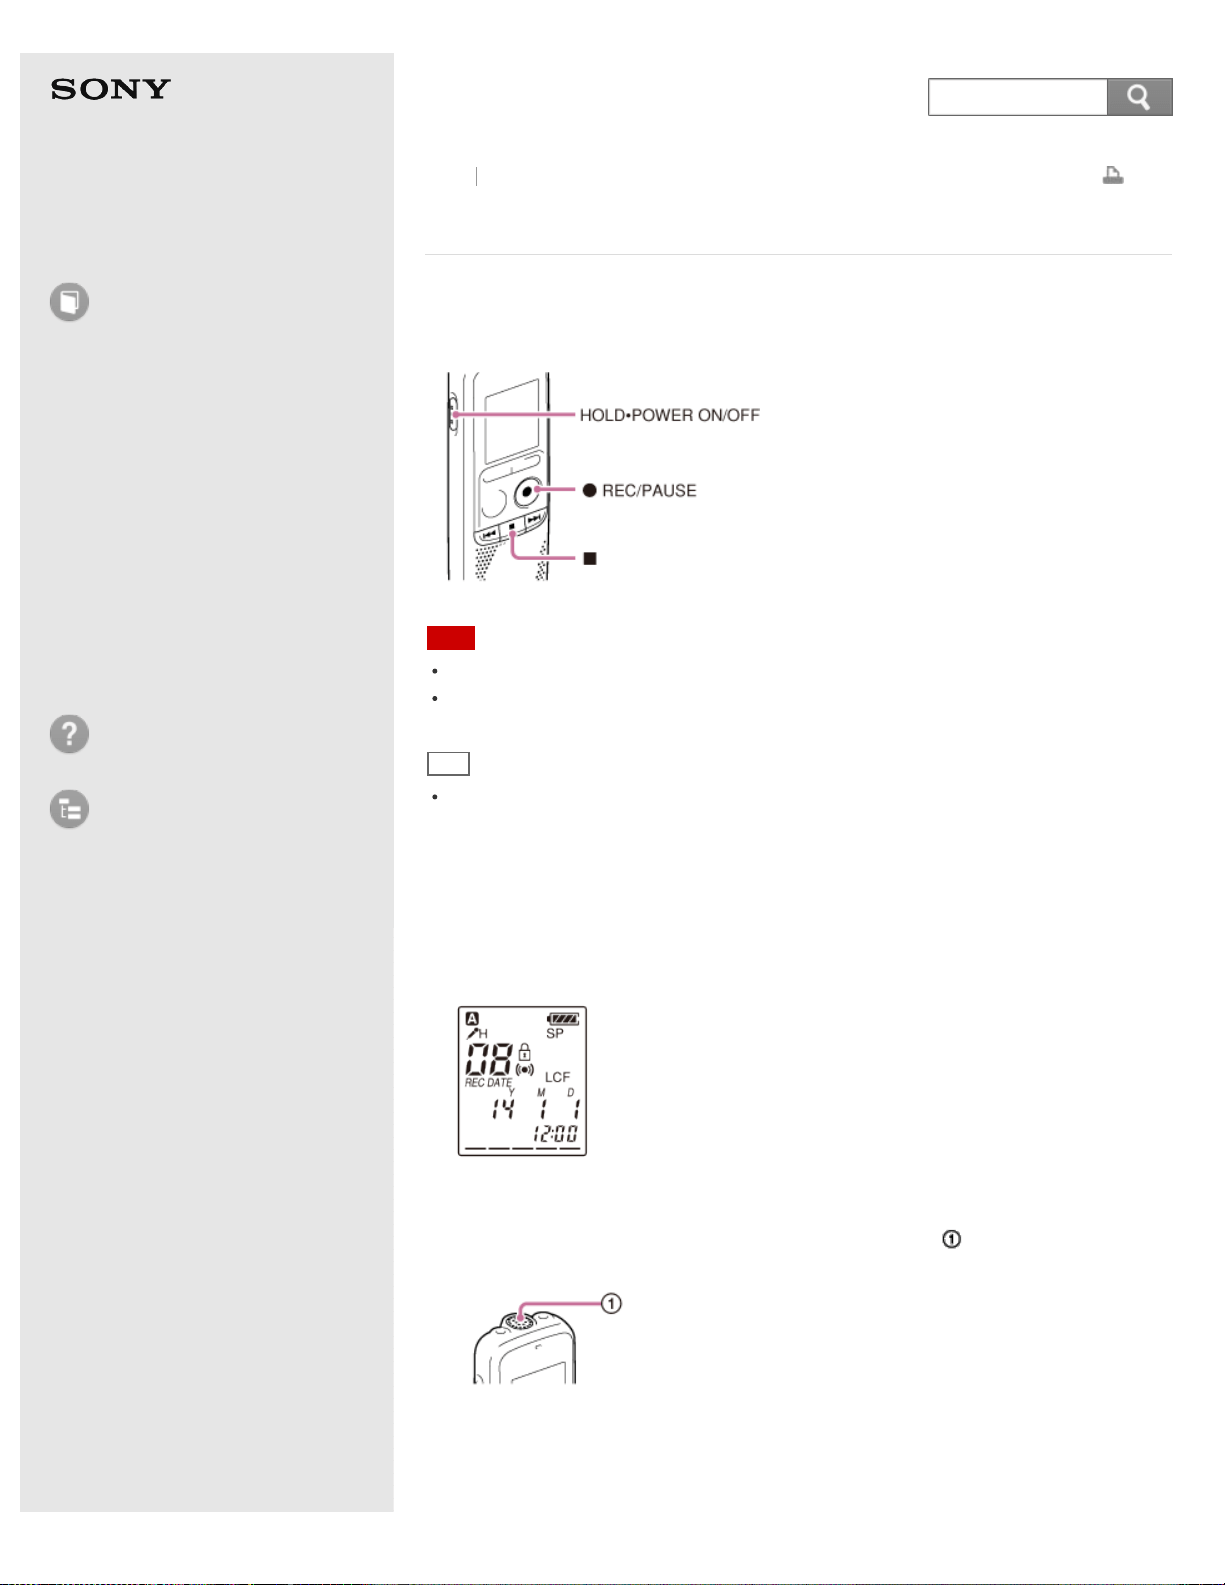
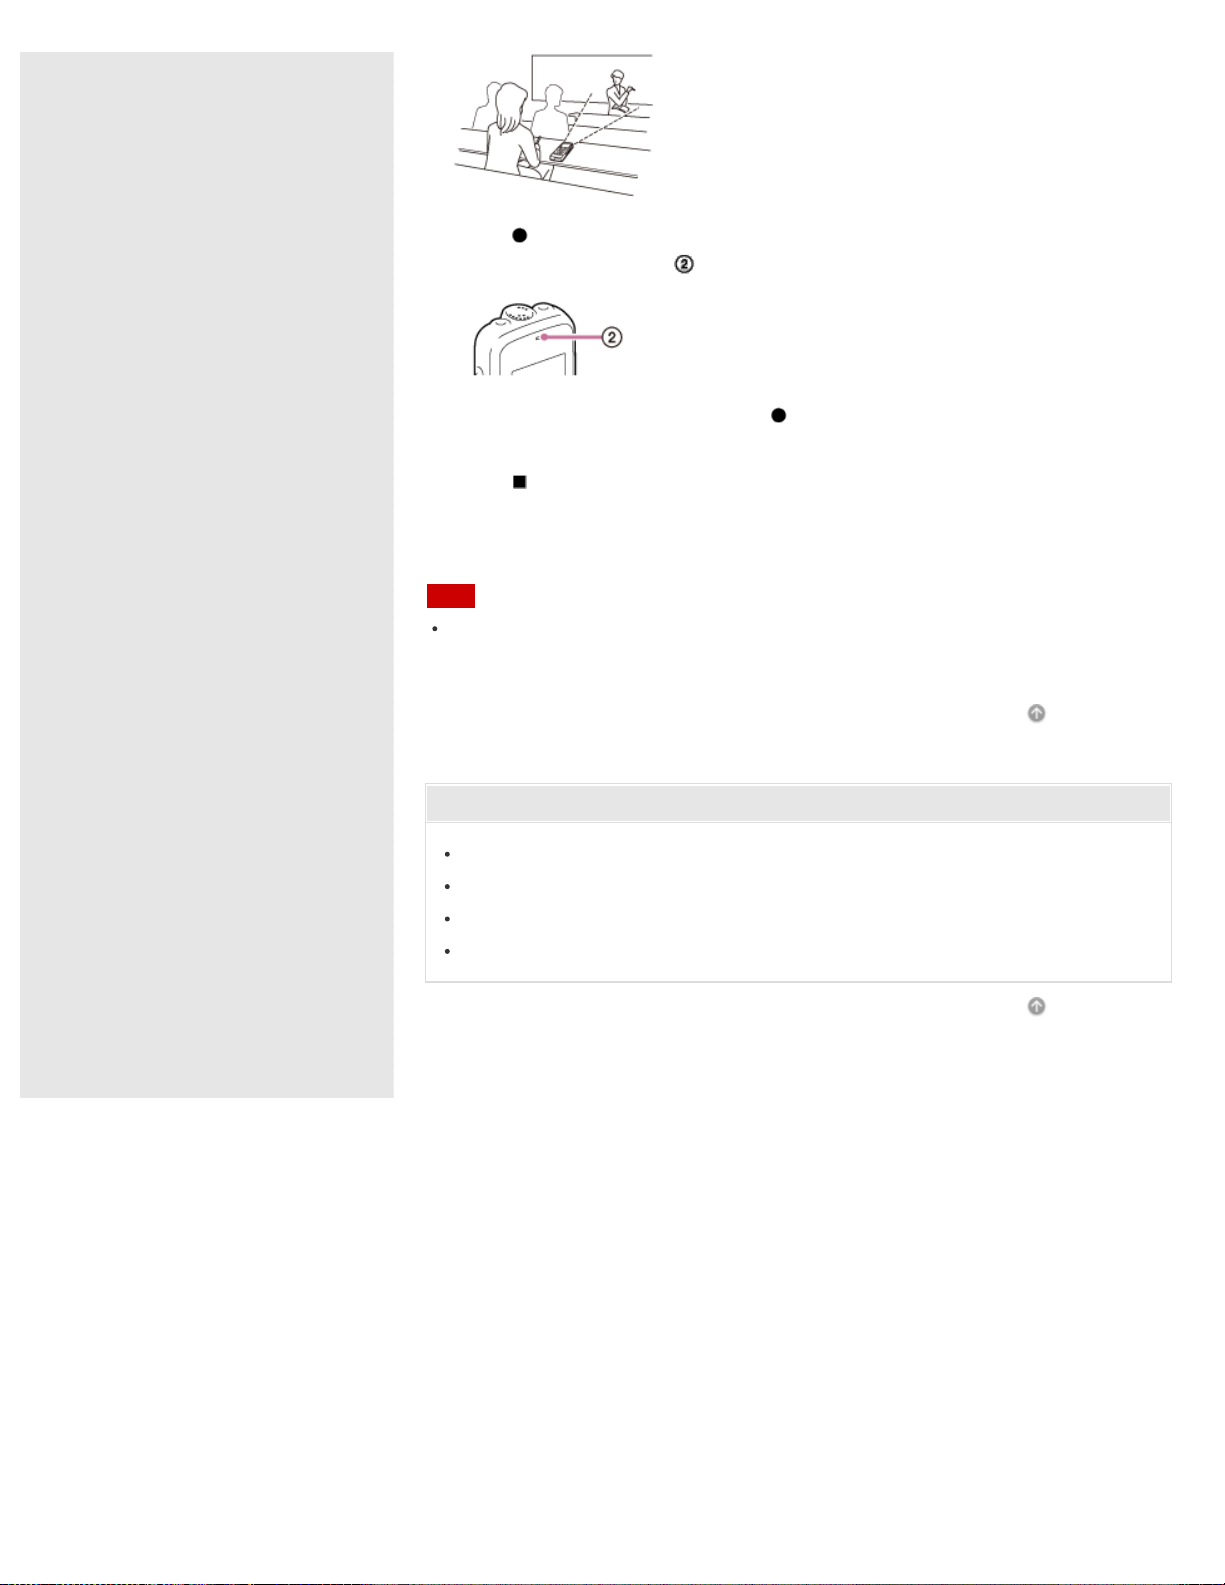
3. Place the IC recorder so that the built-in microphone (
) faces the direction of
the source to be recorded.
Back Back to Top
73
Search
4. Press REC/PAUSE in the stop mode.
The operation indicator (
) lights in red.
You do not need to press and hold REC/PAUSE while recording.
The new file will be automatically recorded as the last file in the current folder.
5. Press
(stop) to stop recording.
“ACCESS” appears and the IC recorder stops at the beginning of the current
recording file.
Note
The IC recorder is recording data and storing it on the memory when “ACCESS”
appears on the display. While the IC recorder is accessing data, do not remove the
batteries. Doing so may damage the data.
Go to Page Top
Related Topic
Monitoring sound while recording
Turning the power on
Releasing the HOLD function
Various operations while recording
Go to Page Top
4-530-204-12(1)
© 2016 Sony Corporation Notes on use
74
Help Guide
How to Use
Preparation
Recording
Playback
Editing
Menu
Specifications
Announcements
Troubleshooting
List of Topics
Print
IC Recorder
ICD-BX140
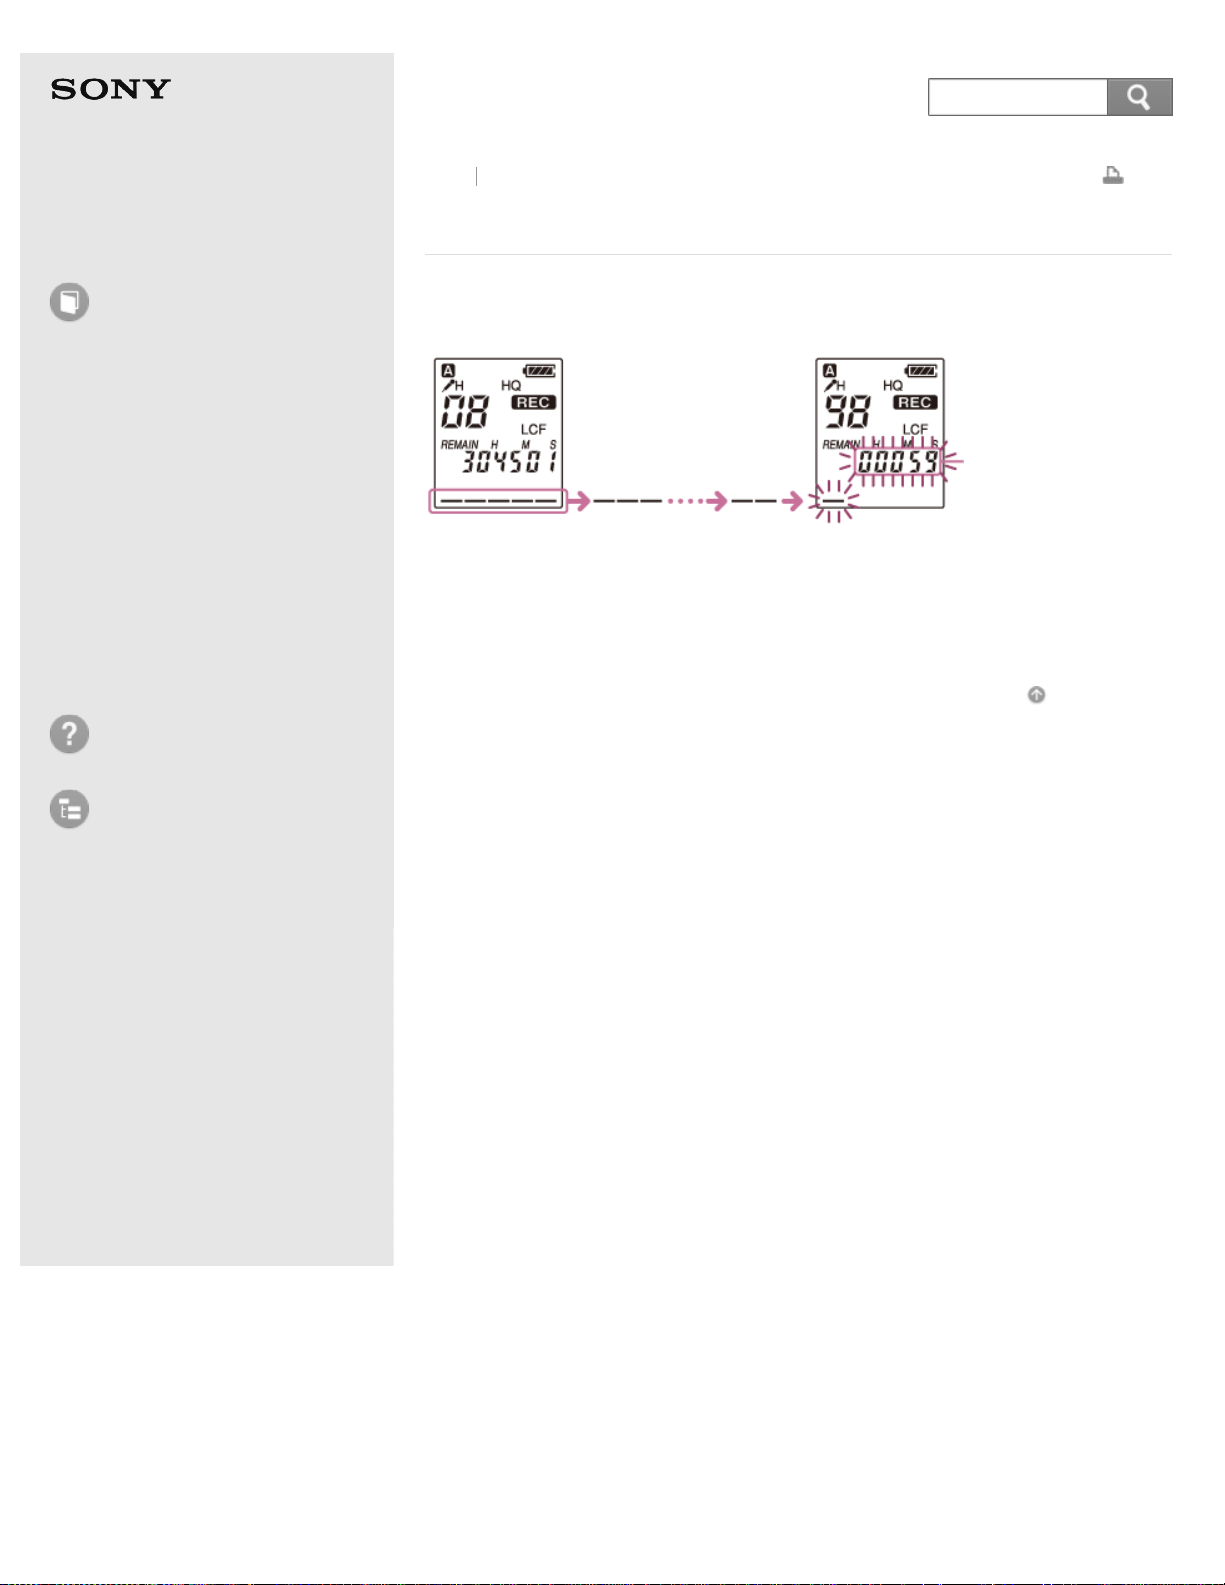
About the remaining memory indicator
The Remaining memory indicator displays current memory status of the IC
recorder. During recording, the remaining memory indicator decreases one by one.
When the remaining time of recording reaches 10 minutes, the last one of the
indicator flashes. When the remaining time reaches 1 minute, the counter display
will be changed automatically to the remaining time display, and the remaining
recording time display will also flash. To continue recording, first erase some of
the files.
Go to Page Top
Back Back to Top
4-530-204-12(1)
© 2016 Sony Corporation Notes on use
75
Search
Help Guide
How to Use
Preparation
Recording
Playback
Editing
Menu
Specifications
Announcements
Troubleshooting
List of Topics
Print
IC Recorder
ICD-BX140
Monitoring sound while recording
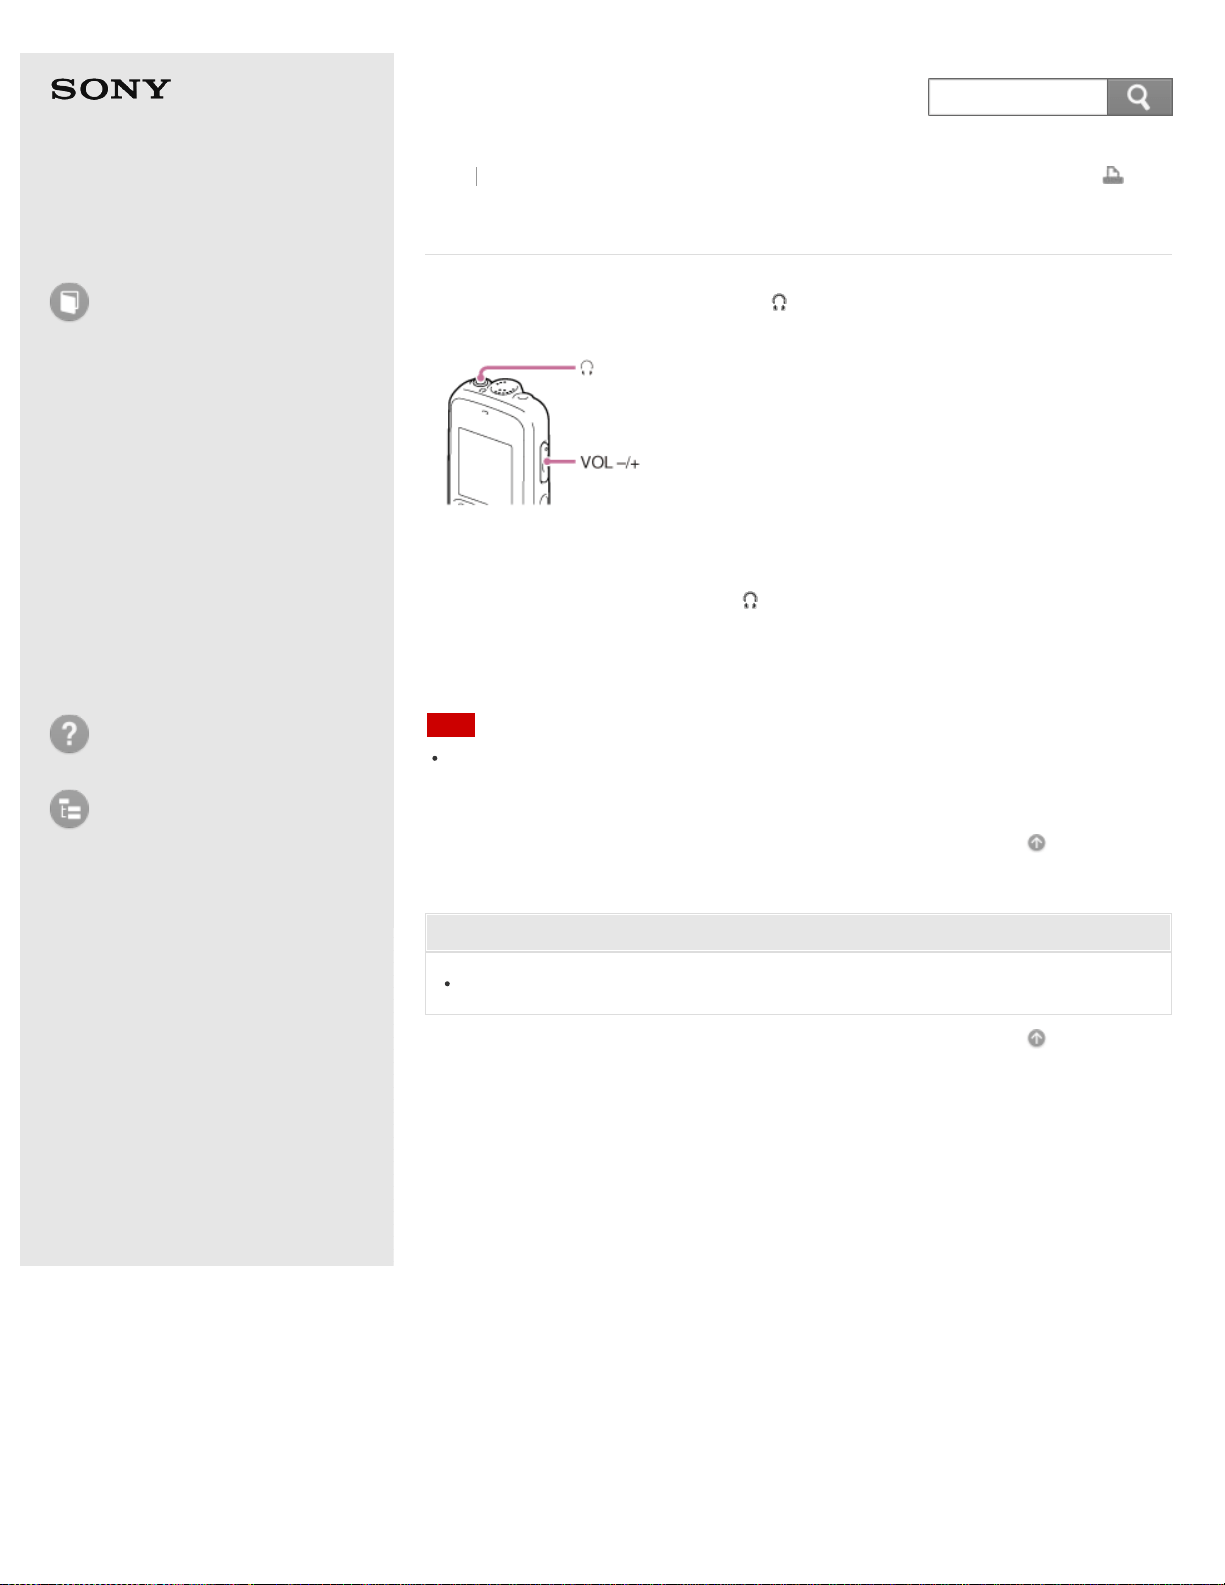
If you connect the headphones to the (headphone) jack, you can monitor the
recording.
1. Connect the headphones to the (headphone) jack.
2. Press VOL –/+ to adjust the monitoring volume.
Monitoring volume does not affect to the recording level.
Note
When the cord of the headphones touches the IC recorder while you are monitoring
the recording, the IC recorder may record a rustling noise. The rustling noise can be
reduced by holding the cord away from the IC recorder.
Go to Page Top
Related Topic
Recording sound from the built-in microphone
Go to Page Top
Back Back to Top
4-530-204-12(1)
© 2016 Sony Corporation Notes on use
76
Search
Help Guide
How to Use
Preparation
Recording
Playback
Editing
Menu
Specifications
Announcements
Troubleshooting
List of Topics
Print
IC Recorder
ICD-BX140
Various operations while recording
You can perform the following operations while recording.
To pause recording
Press
REC/PAUSE.
During recording pause, the operation indicator flashes in red and “PAUSE” begins
to flash in the display window.
(An hour after you pause recording, recording pause is automatically released and
the IC recorder enters the stop mode.)
To release pause and resume recording
Press
REC/PAUSE again.
Recording resumes from that point. (To stop recording after pausing recording,
press
(stop).)
To review the current recording instantly
Press
PLAY/ENTER.
Recording stops and playback starts from the beginning of the file just recorded.
To review during recording
Press and hold
during recording or recording pause.
Recording stops and you can search backwards while listening to fast playback
sound. After you release
, playback starts from that point.
Hint
Files recorded using this IC recorder will be recorded as MP3 files.
You can record up to 99 files in each folder.
Go to Page Top
Related Topic
Recording sound from the built-in microphone
Go to Page Top
Back Back to Top
4-530-204-12(1)
© 2016 Sony Corporation Notes on use
77
Search
Help Guide
How to Use
Preparation
Recording
Playback
Editing
Menu
Specifications
Announcements
Troubleshooting
List of Topics
Print
IC Recorder
ICD-BX140
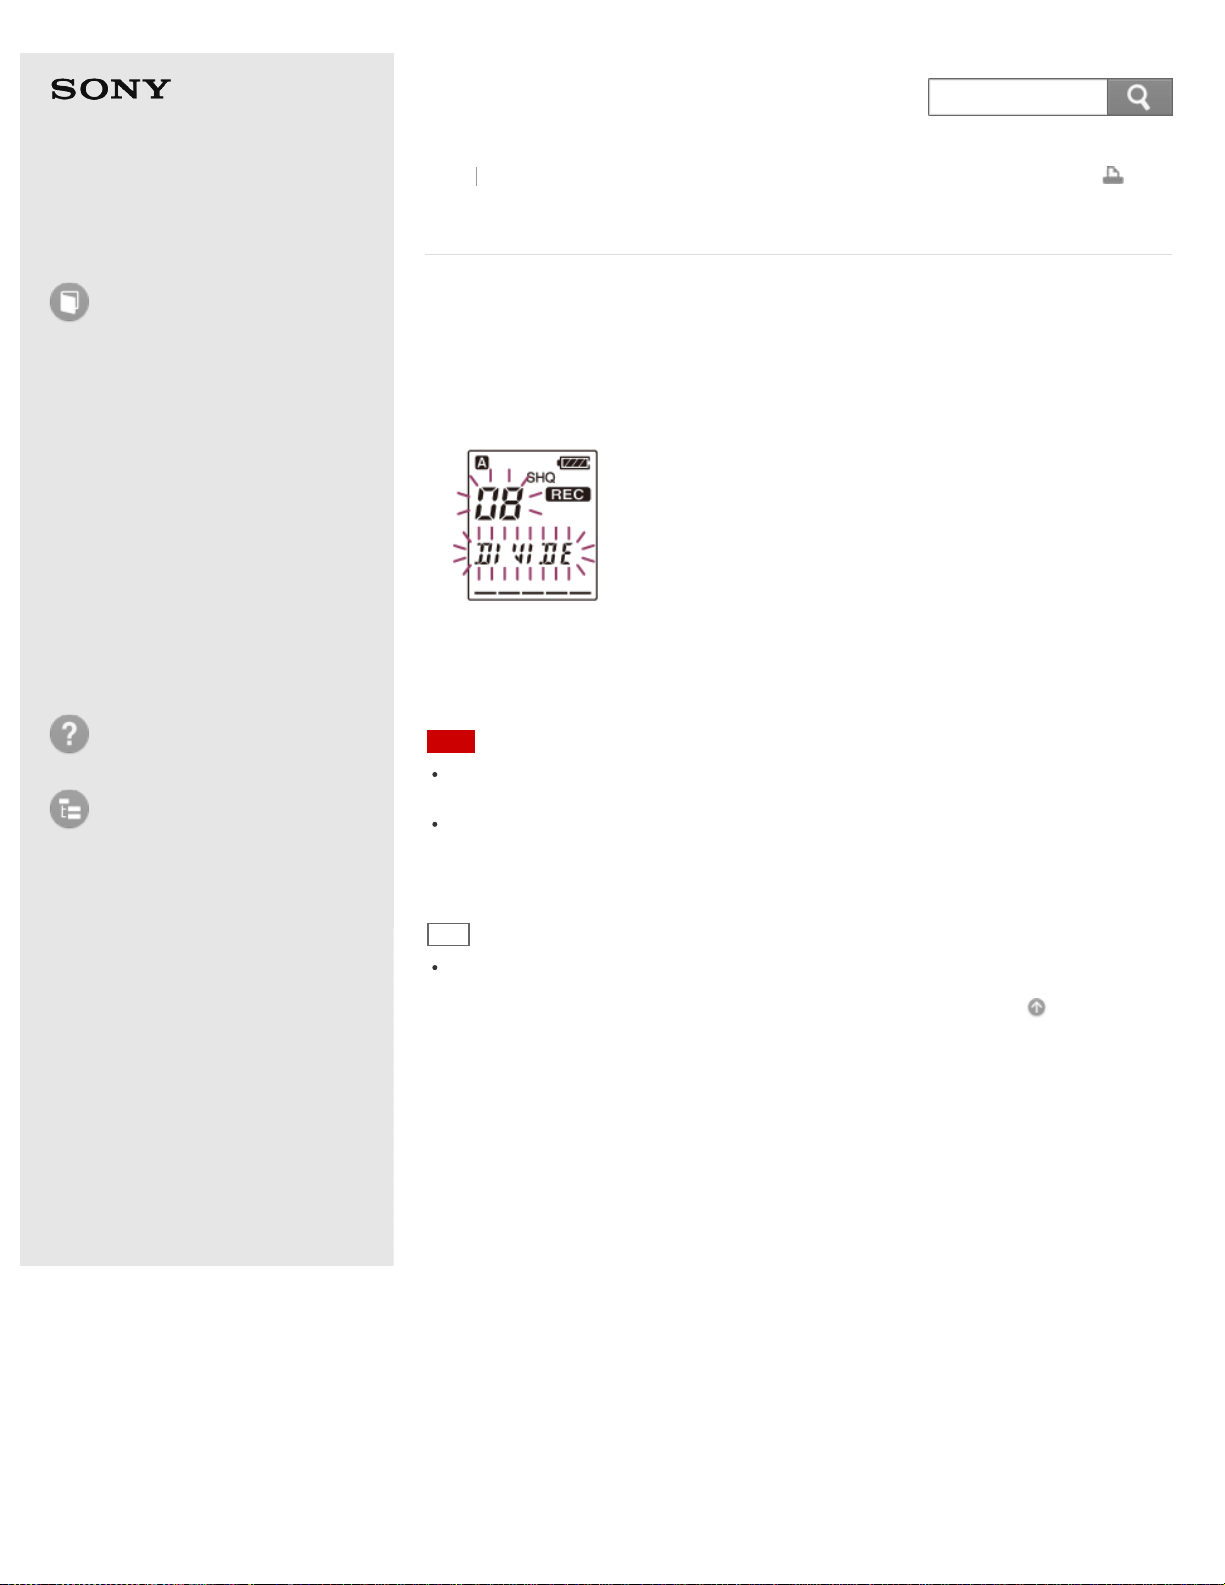
Dividing a file during recording
You can divide a file during recording so that the file is divided into two parts, and
a new file number is added to the newer part of the divided file.
Once a file is divided, you cannot re-combine the divided files.
1. Press DIVIDE during recording.
“DIVIDE” and a new file number flash in the display window and the new file
number is added at the point you pressed the button. The message will be
recorded as two files, however recording continues without stopping.
Note
When you divide a file into two, at the point of division, the end of the first file and
the beginning of the second file may be interrupted.
If you divide files too frequently while the IC recorder is recording them, the
following phenomenon may occur: The operation indicator keeps flashing, and you
cannot operate the IC recorder for a certain period. This is not a malfunction. Wait
until the operation indicator goes off.
Hint
You can divide the currently recorded file during recording pause.
Go to Page Top
Back Back to Top
4-530-204-12(1)
© 2016 Sony Corporation Notes on use
78
Search
Help Guide
How to Use
Preparation
Recording
Playback
Editing
Menu
Specifications
Announcements
Troubleshooting
List of Topics
Print
IC Recorder
ICD-BX140
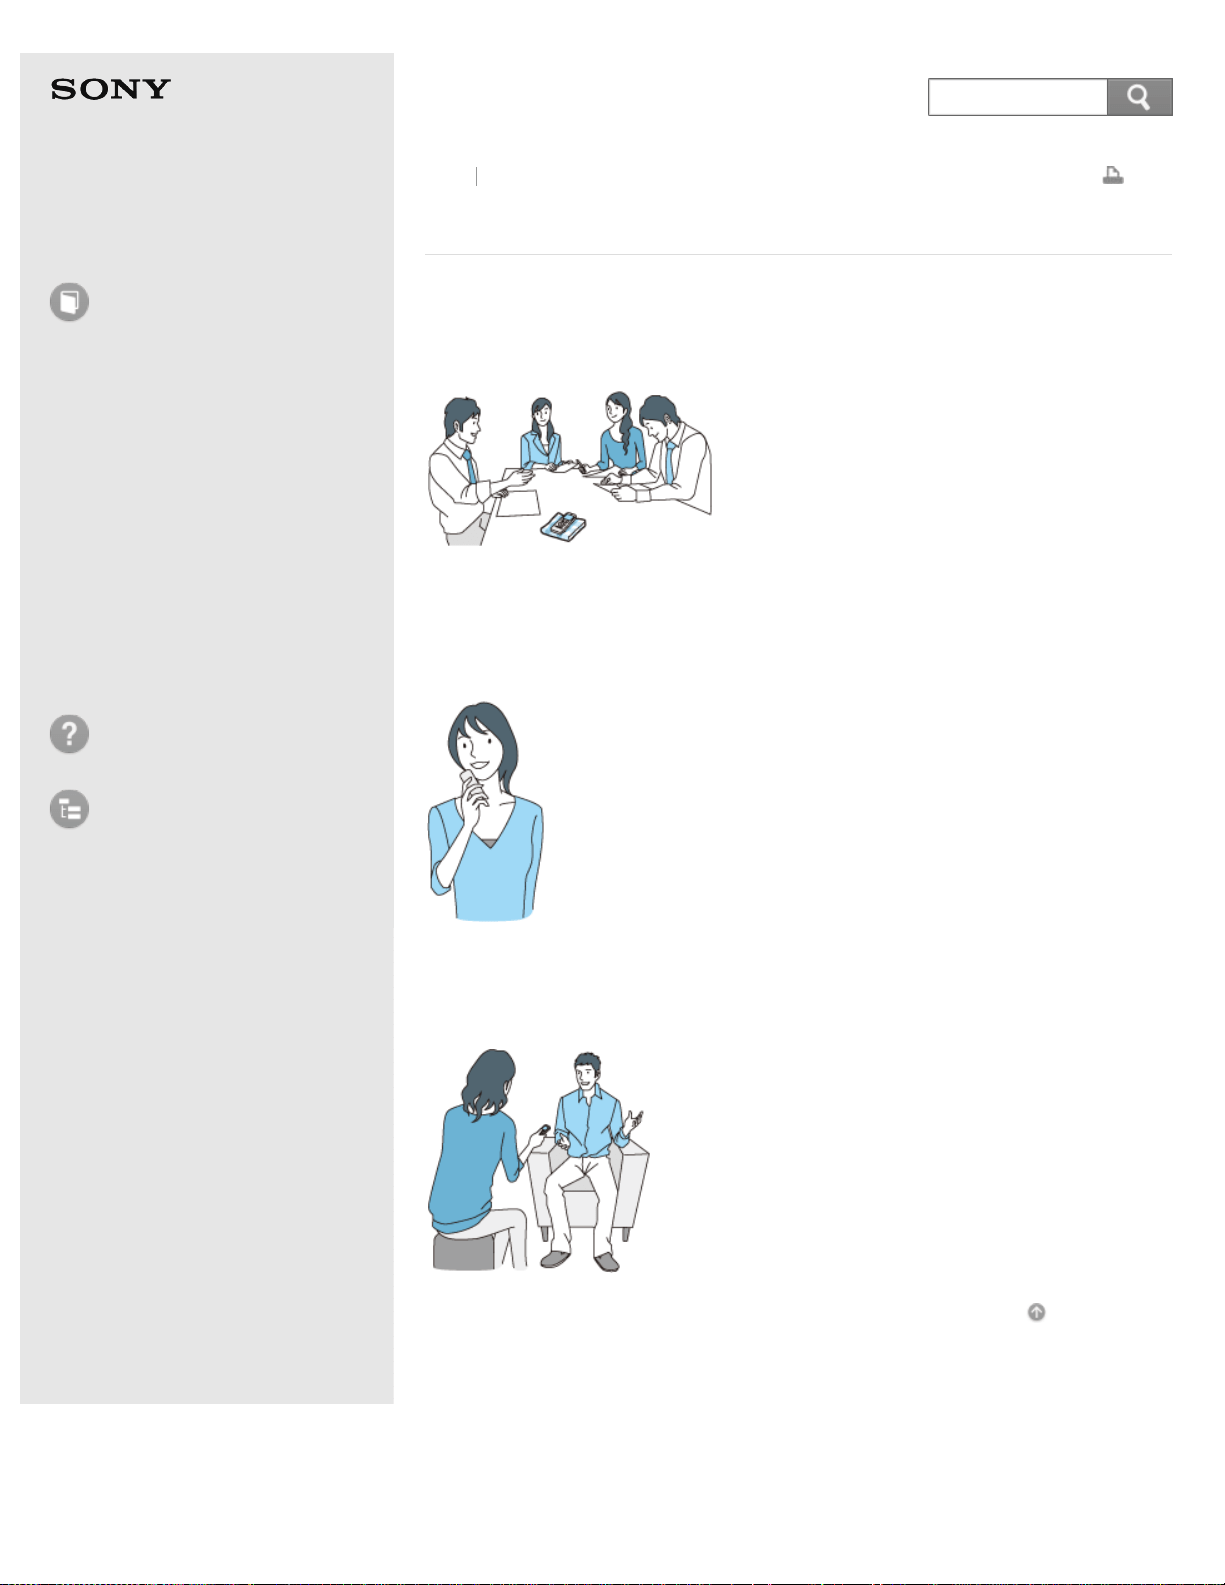
Tips for better recording
Recording at a meeting
By placing the IC recorder on a handkerchief, etc. substituting for a stand, you can
record with clear, low-noise sound, without vibration noise from the desk.
Recording a voice note
By placing the IC recorder close to one side of your mouth, you can prevent
breathing on the built-in microphone, and record with clear sound.
Recording an interview
Place the IC recorder so that the built-in microphone faces the interviewee.
Go to Page Top
Back Back to Top
4-530-204-12(1)
© 2016 Sony Corporation Notes on use
79
Search
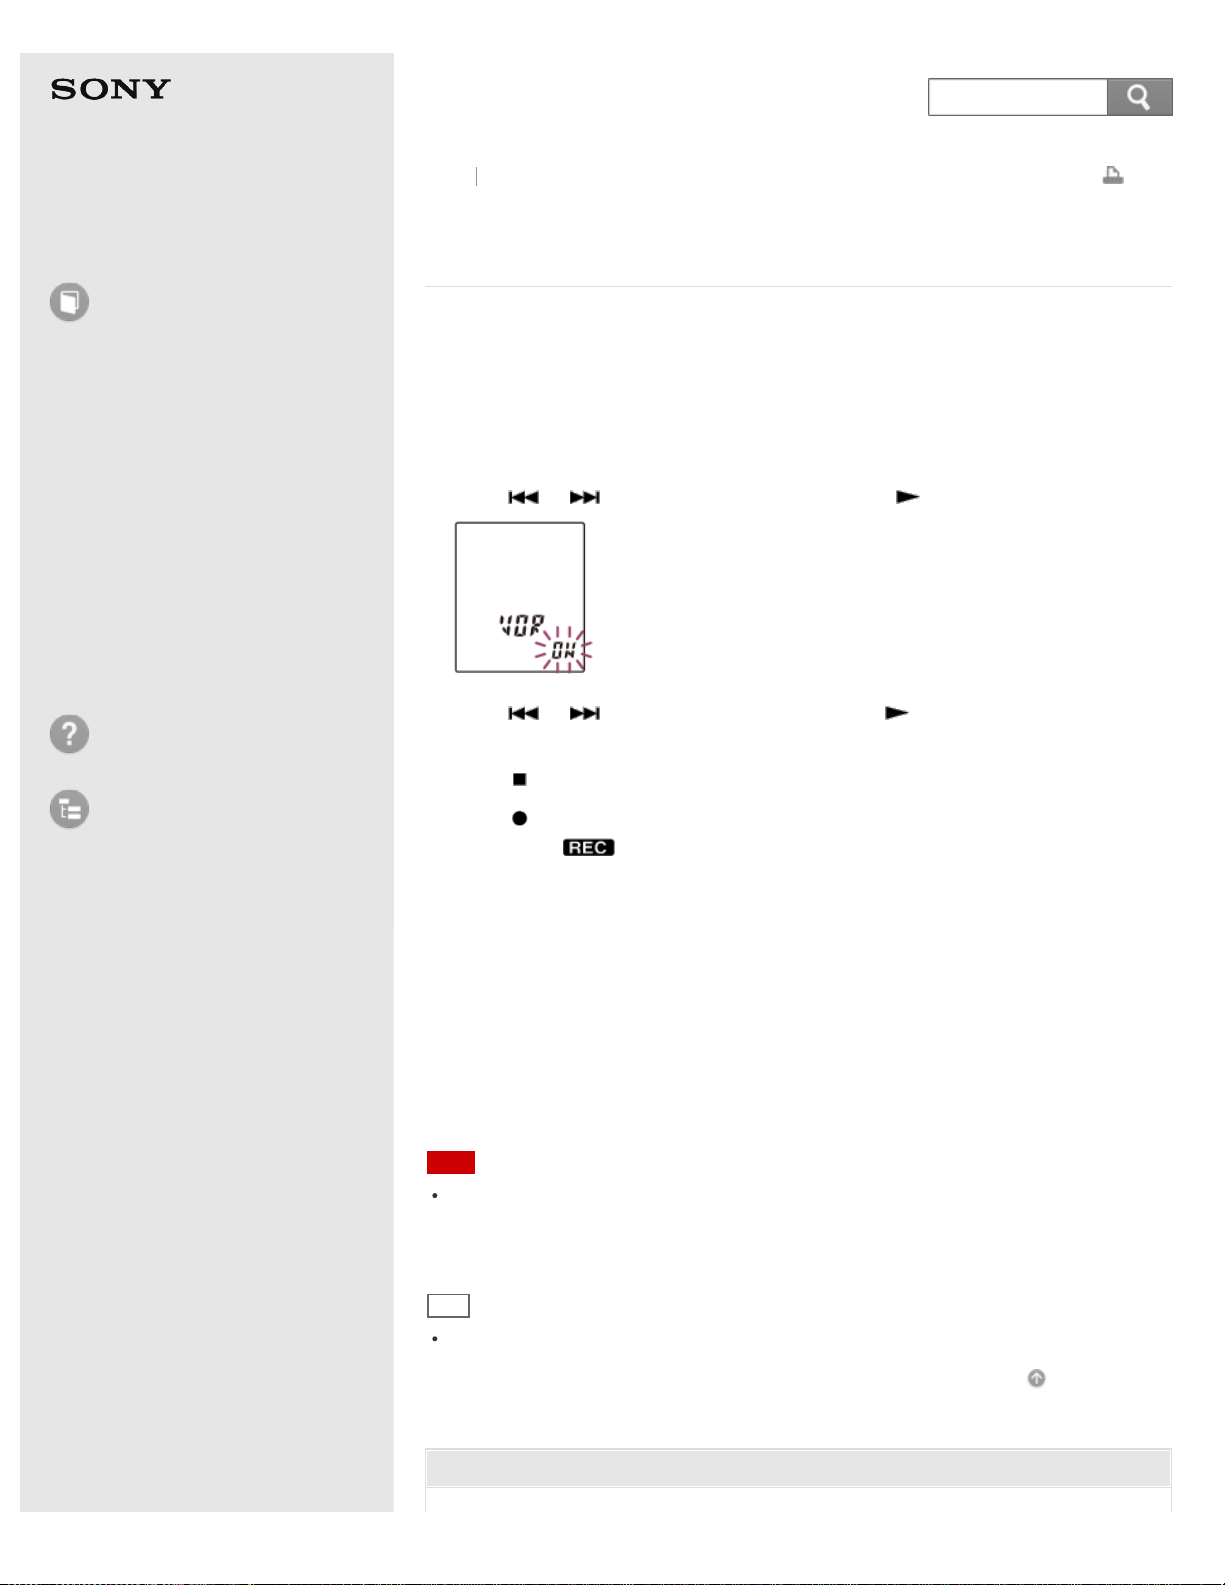
Help Guide
How to Use
Preparation
Recording
Playback
Editing
Menu
Specifications
Announcements
Troubleshooting
List of Topics
Print
IC Recorder
ICD-BX140
Starting to record automatically in response to sound
– the VOR function
You can set the VOR (Voice Operated Recording) function to “ON,” to make the IC
recorder start recording when the IC recorder detects sound, and pause when no
sound is heard, eliminating recording during soundless periods.
1. In the stop or recording mode, press MENU to enter the menu mode.
2. Press
or to select “VOR,” and then press PLAY/ENTER.
3. Press or to select “ON,” and then press PLAY/ENTER.
“VOR” is set to “OFF” when you purchase the IC recorder.
4. Press
(stop) to exit the menu mode.
5. Press
REC/PAUSE.
“VOR” and “
” appear in the display window.
The recording pauses when no sound is detected and “VOR” and “PAUSE” flash.
When the IC recorder detects sound again, the recording starts again.
Descriptions of menu items
You can select one of the menu items available.
ON:
The IC recorder starts recording when it detects sound.
OFF:
The VOR function does not work.
(Initial setting)
Note
The VOR function is affected by the sound around you. Set “SENS” (microphone
sensitivity) in the menu according to the recording conditions. If recording is not
satisfactory after you have changed the “SENS” setting, or for an important
recording, set “VOR” to “OFF” in the menu.
Hint
To cancel the VOR function, set “VOR” to “OFF” in step 3.
Go to Page Top
Related Topic
Back
Back to Top
80
Search

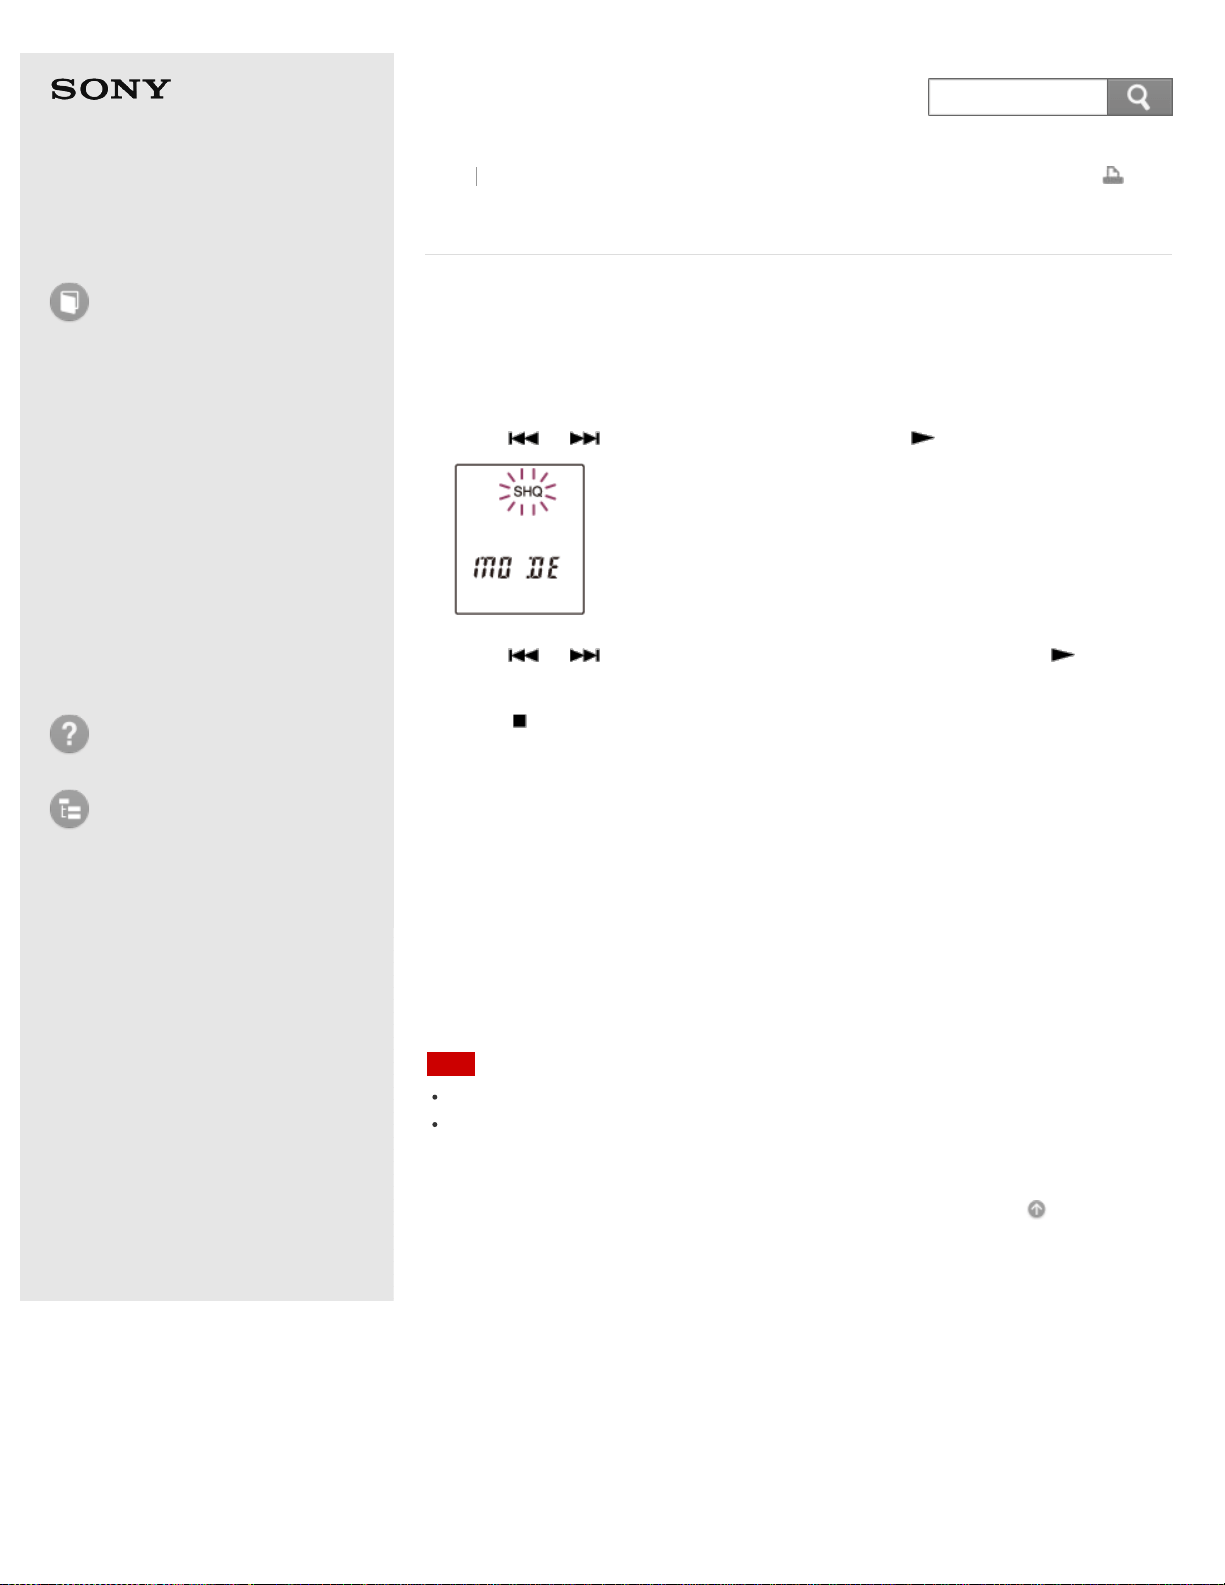
Help Guide
How to Use
Preparation
Recording
Playback
Editing
Menu
Specifications
Announcements
Troubleshooting
List of Topics
Print
IC Recorder
ICD-BX140
Selecting the recording mode (MODE)
You can set the recording mode for the files to be recorded. Set this menu item
before you start recording.
1. In the stop mode, press MENU to enter the menu mode.
2. Press
or to select “MODE,” and then press PLAY/ENTER.
3. Press or to select desired recording mode, and then press
PLAY/ENTER.
4. Press
(stop) to exit the menu mode.
Descriptions of menu items
You can select one of the menu items available.
SHQ
Super high quality mode (MP3 192 kbps) (Initial setting)
HQ
High quality mode (MP3 128 kbps)
SP
Standard play mode (MP3 8 kbps)
LP
Long play mode (MPEG-4 HVXC 2 kbps)
Note
You cannot set the recording mode while recording.
The sound quality of LP mode is set for dictation. Set the microphone sensitivity to L.
LP mode is not suitable for music recording. Set SHQ mode when you want to record
music or record with high-quality sound.
Go to Page Top
Back Back to Top
4-530-204-12(1)
© 2016 Sony Corporation Notes on use
82
Search

Help Guide
How to Use
Preparation
Recording
Playback
Editing
Menu
Specifications
Announcements
Troubleshooting
List of Topics
Print
IC Recorder
ICD-BX140
Selecting the microphone sensitivity (SENS)
You can set the microphone sensitivity for the built-in microphone. Set this menu
item before you start recording.
1. In the stop or recording mode, press MENU to enter the menu mode.
2. Press
or to select “SENS,” and then press PLAY/ENTER.
3. Press or to select “ ” or “ ,” and then press PLAY/ENTER.
4. Press
(stop) to exit the menu mode.
Descriptions of menu items
You can select one of the menu items available.
:
To record a sound far away from the IC recorder or a low sound, such as
recording in a spacious room.
(Initial setting)
:
To record dictation with a microphone in front of your mouth, a sound near the IC
recorder, or a loud sound.
Go to Page Top
Back Back to Top
4-530-204-12(1)
© 2016 Sony Corporation Notes on use
83
Search
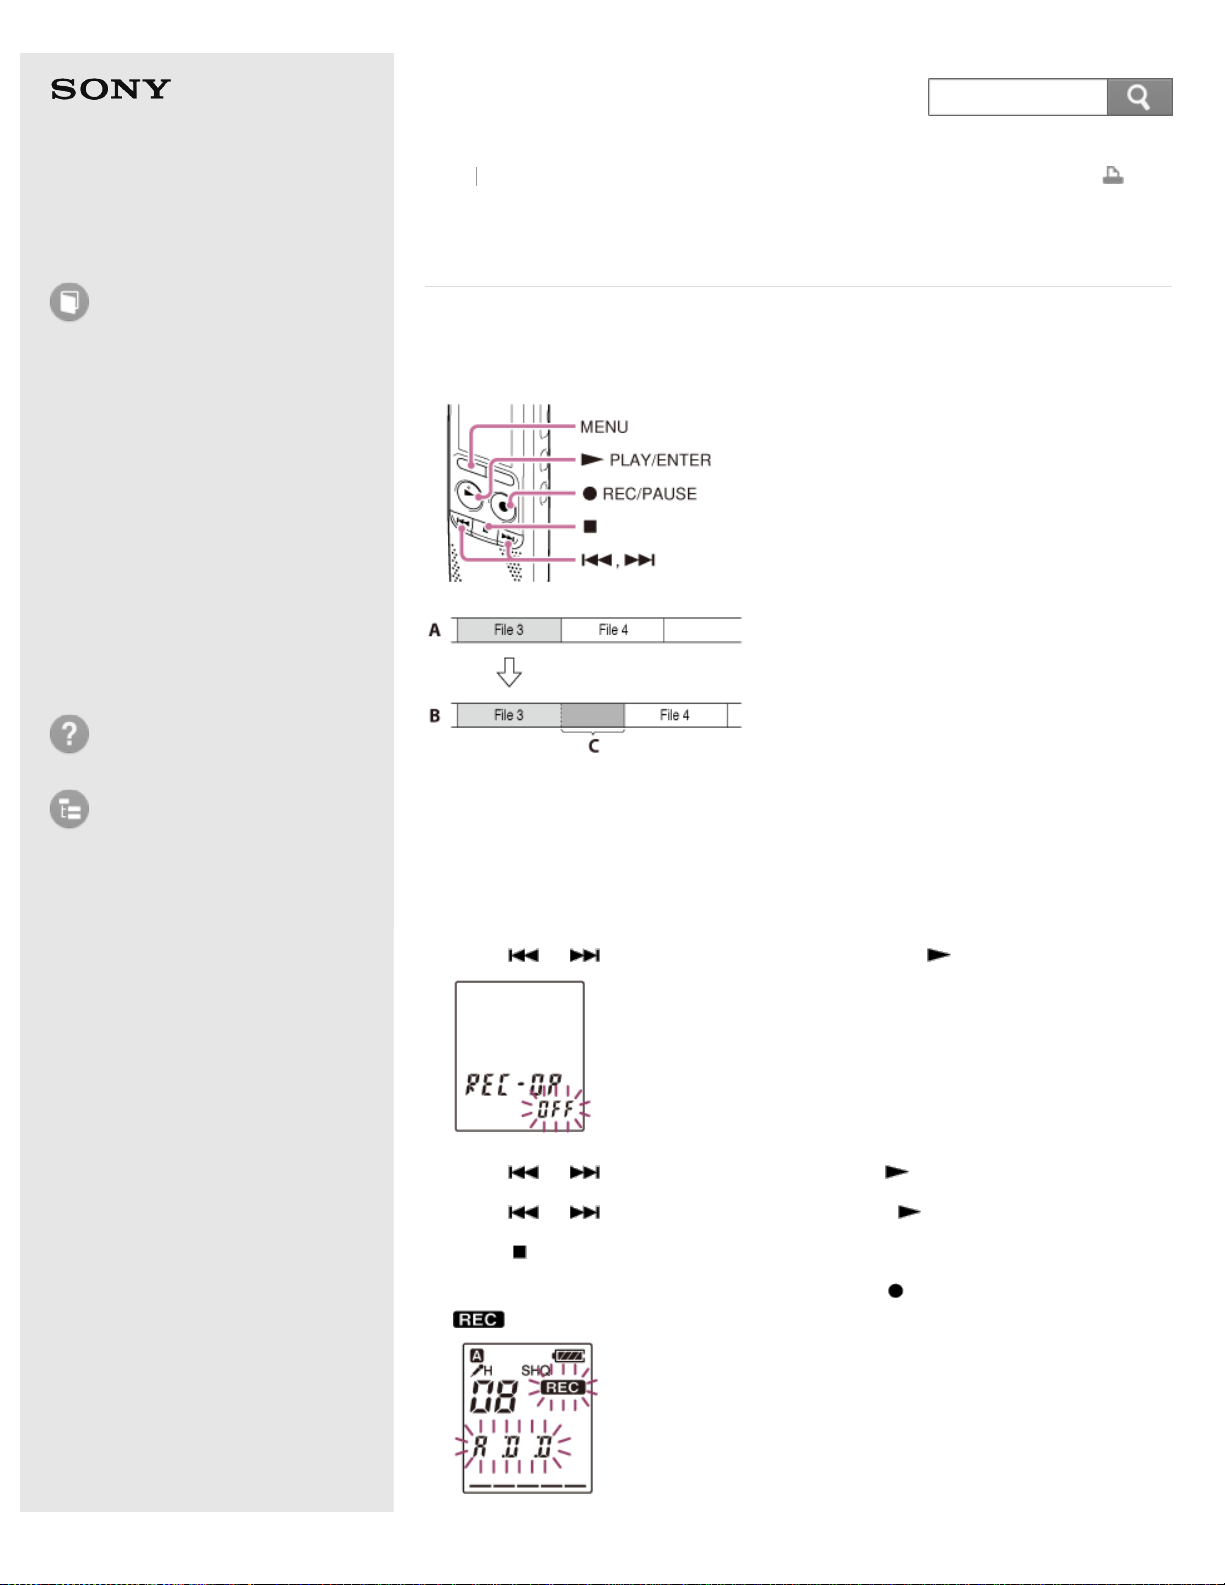
Help Guide
How to Use
Preparation
Recording
Playback
Editing
Menu
Specifications
Announcements
Troubleshooting
List of Topics
Print
IC Recorder
ICD-BX140
Adding a recording to a previously recorded file
(ADD)
You can add a recording to the file being played back. The added recording will be
placed after the current file, and will be counted as a part of the file.
A: During playback of file 3
B: After adding a recording
C: Added recording
1. In the stop mode, press MENU to enter the menu mode.
2. Press
or to select “REC-OP,” and then press PLAY/ENTER.
3. Press or to select “ON,” and then press PLAY/ENTER.
4. Press
or to select “ADD,” and then press PLAY/ENTER.
5. Press
(stop) to exit the menu mode.
6. When the file to be added is played back, press
REC/PAUSE.
and “ADD” flash and the IC recorder stops in the recording pause mode.
Back Back to Top
84
Search

7. While “ADD” is flashing, press REC/PAUSE.
The operation indicator lights in red, and the recording is added at the end of
the current file.
8. Press
(stop) to stop recording.
Descriptions of menu items
You can select one of the menu items available.
ON:
The REC-OP function is active. You can add recording to the file being played, by
selecting “ADD” after selecting “REC-OP.”
OFF:
The REC-OP function does not work.
(Initial setting)
Note
You cannot add a recording if the remaining memory is insufficient.
You cannot add a recording to a protected file. To add a recording, release the
protection first.
The added portion of a file will be recorded in the same recording mode.
If 10 minutes have passed after step 6, you must start the procedure again from the
beginning.
Go to Page Top
4-530-204-12(1)
© 2016 Sony Corporation Notes on use
85
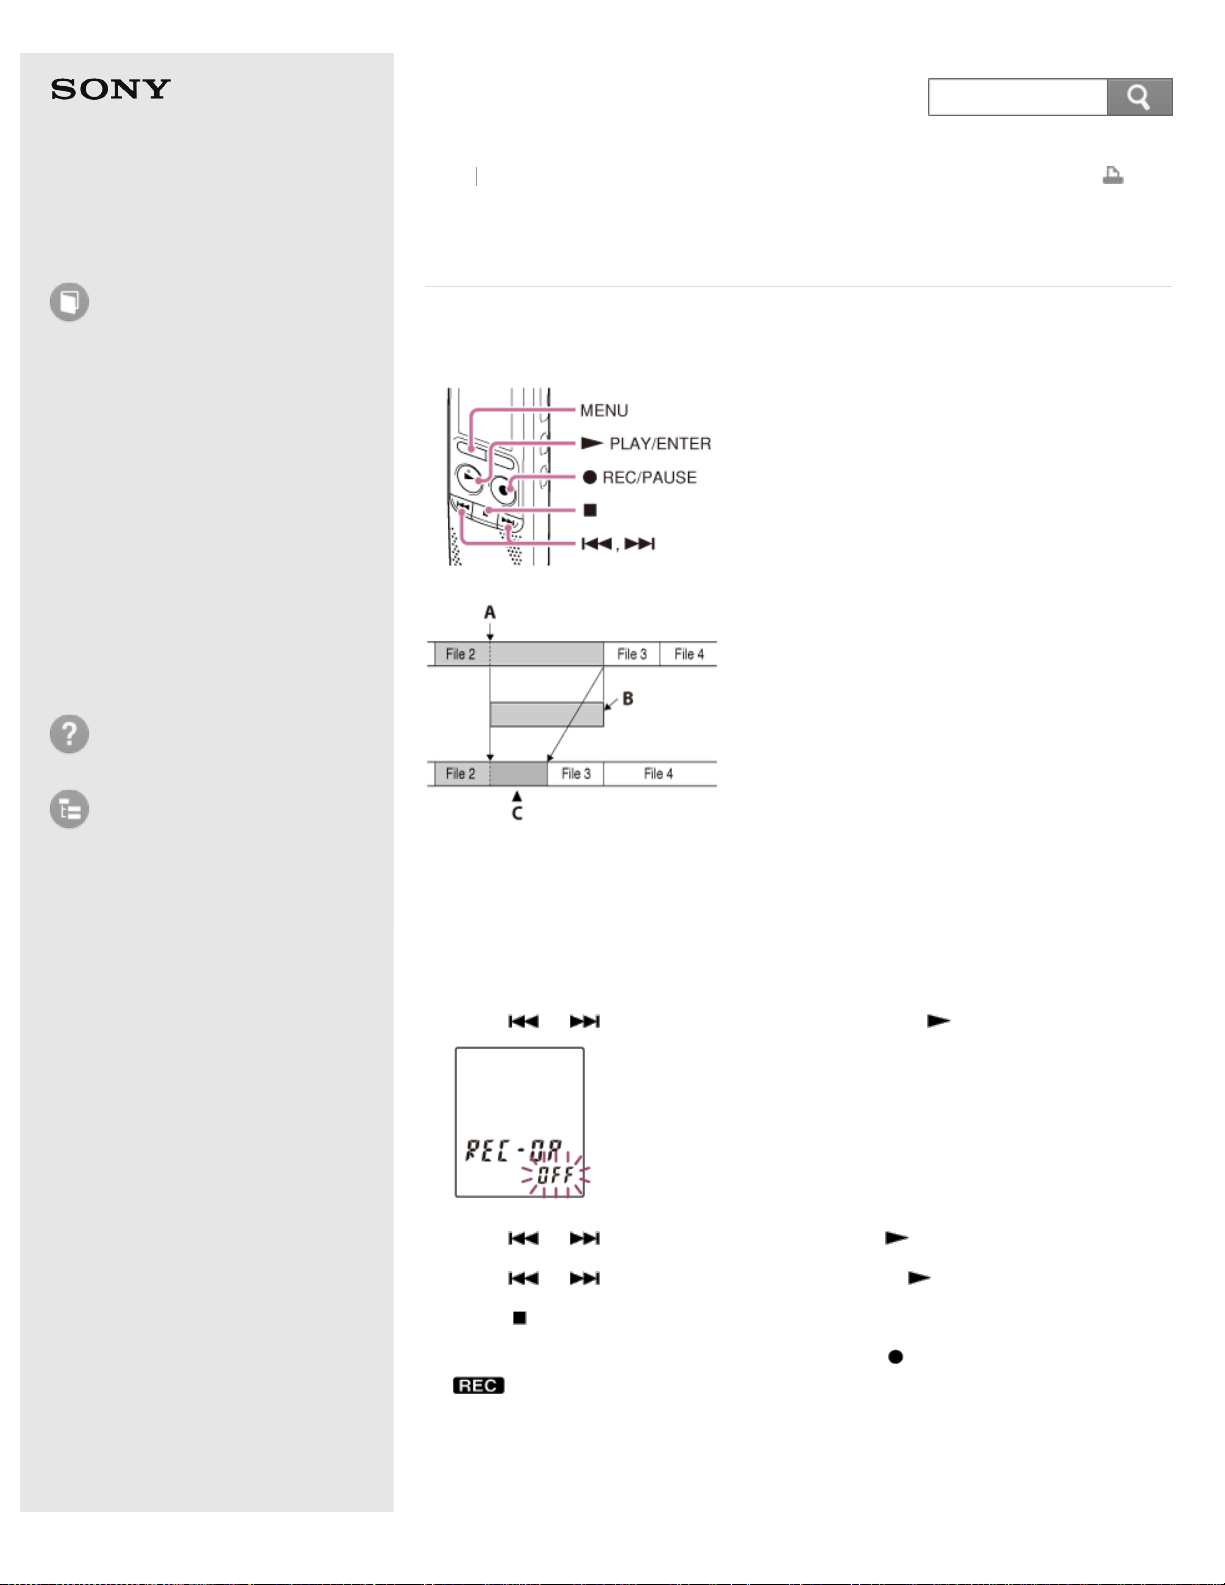
Help Guide
How to Use
Preparation
Recording
Playback
Editing
Menu
Specifications
Announcements
Troubleshooting
List of Topics
Print
IC Recorder
ICD-BX140
Adding an overwrite recording during playback
(OVER)
You can add an overwrite recording after a selected point in a recorded file. The
remainder of the file after the selected point is deleted.
A: Starting point of overwrite recording
B: Deleted part of file 2
C: Added overwrite recording in file 2
1. In the stop mode, press MENU to enter the menu mode.
2. Press
or to select “REC-OP,” and then press PLAY/ENTER.
3. Press or to select “ON,” and then press PLAY/ENTER.
4. Press
or to select “OVER,” and then press PLAY/ENTER.
5. Press
(stop) to exit the menu mode.
6. When the file to be added is played back, press
REC/PAUSE.
and “OVER” flash and the IC recorder stops in the recording pause mode.
Back
Back to Top
86
Search
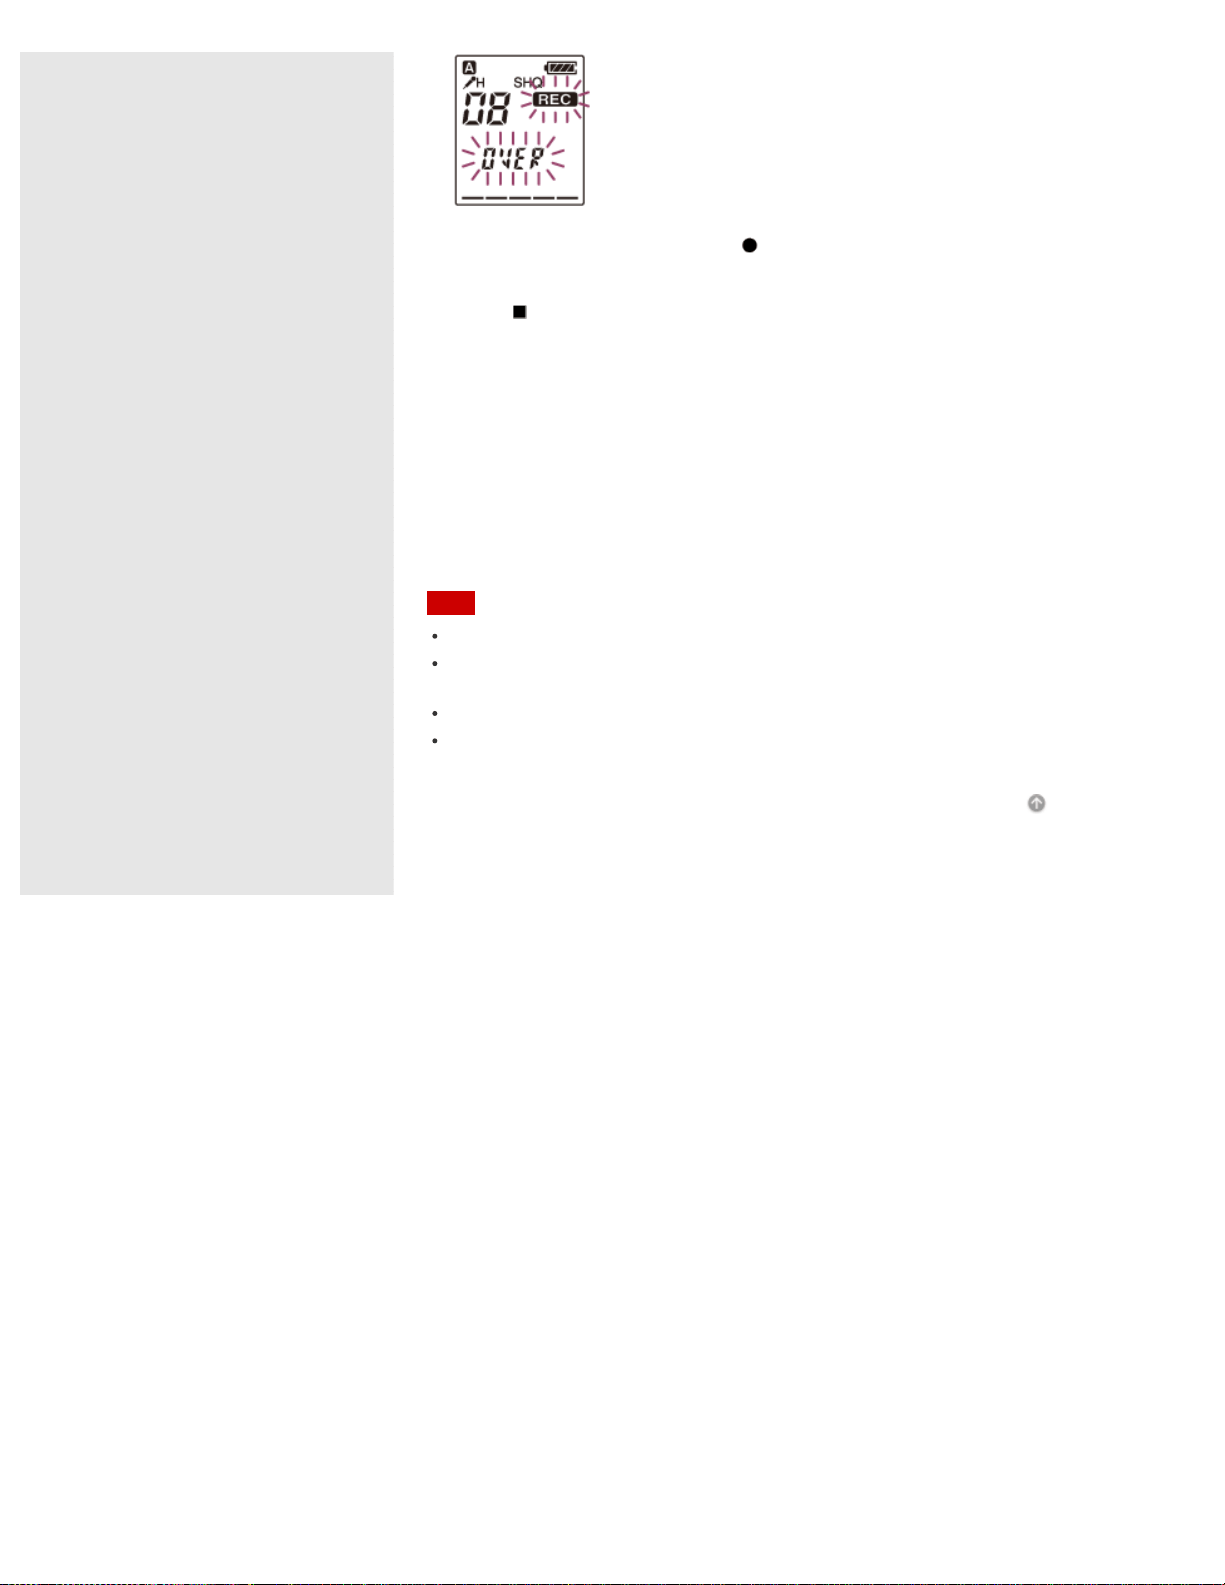
7. While “OVER” is flashing, press REC/PAUSE again.
The operation indicator lights in red and recording starts.
8. Press
(stop) to stop recording.
Descriptions of menu items
You can select one of the menu items available.
ON:
The REC-OP function is active. You can add overwrite recording by selecting
“OVER” after selecting “REC-OP.”
OFF:
The REC-OP function does not work.
(Initial setting)
Note
You cannot overwrite a recording if the remaining memory is insufficient.
You cannot overwrite a recording to a protected file. To overwrite a recording, release
the protection first.
The overwritten portion of a file is recorded in the same recording mode.
If 10 minutes have passed after step 6, you must start the procedure again from the
beginning.
Go to Page Top
4-530-204-12(1)
© 2016 Sony Corporation Notes on use
87
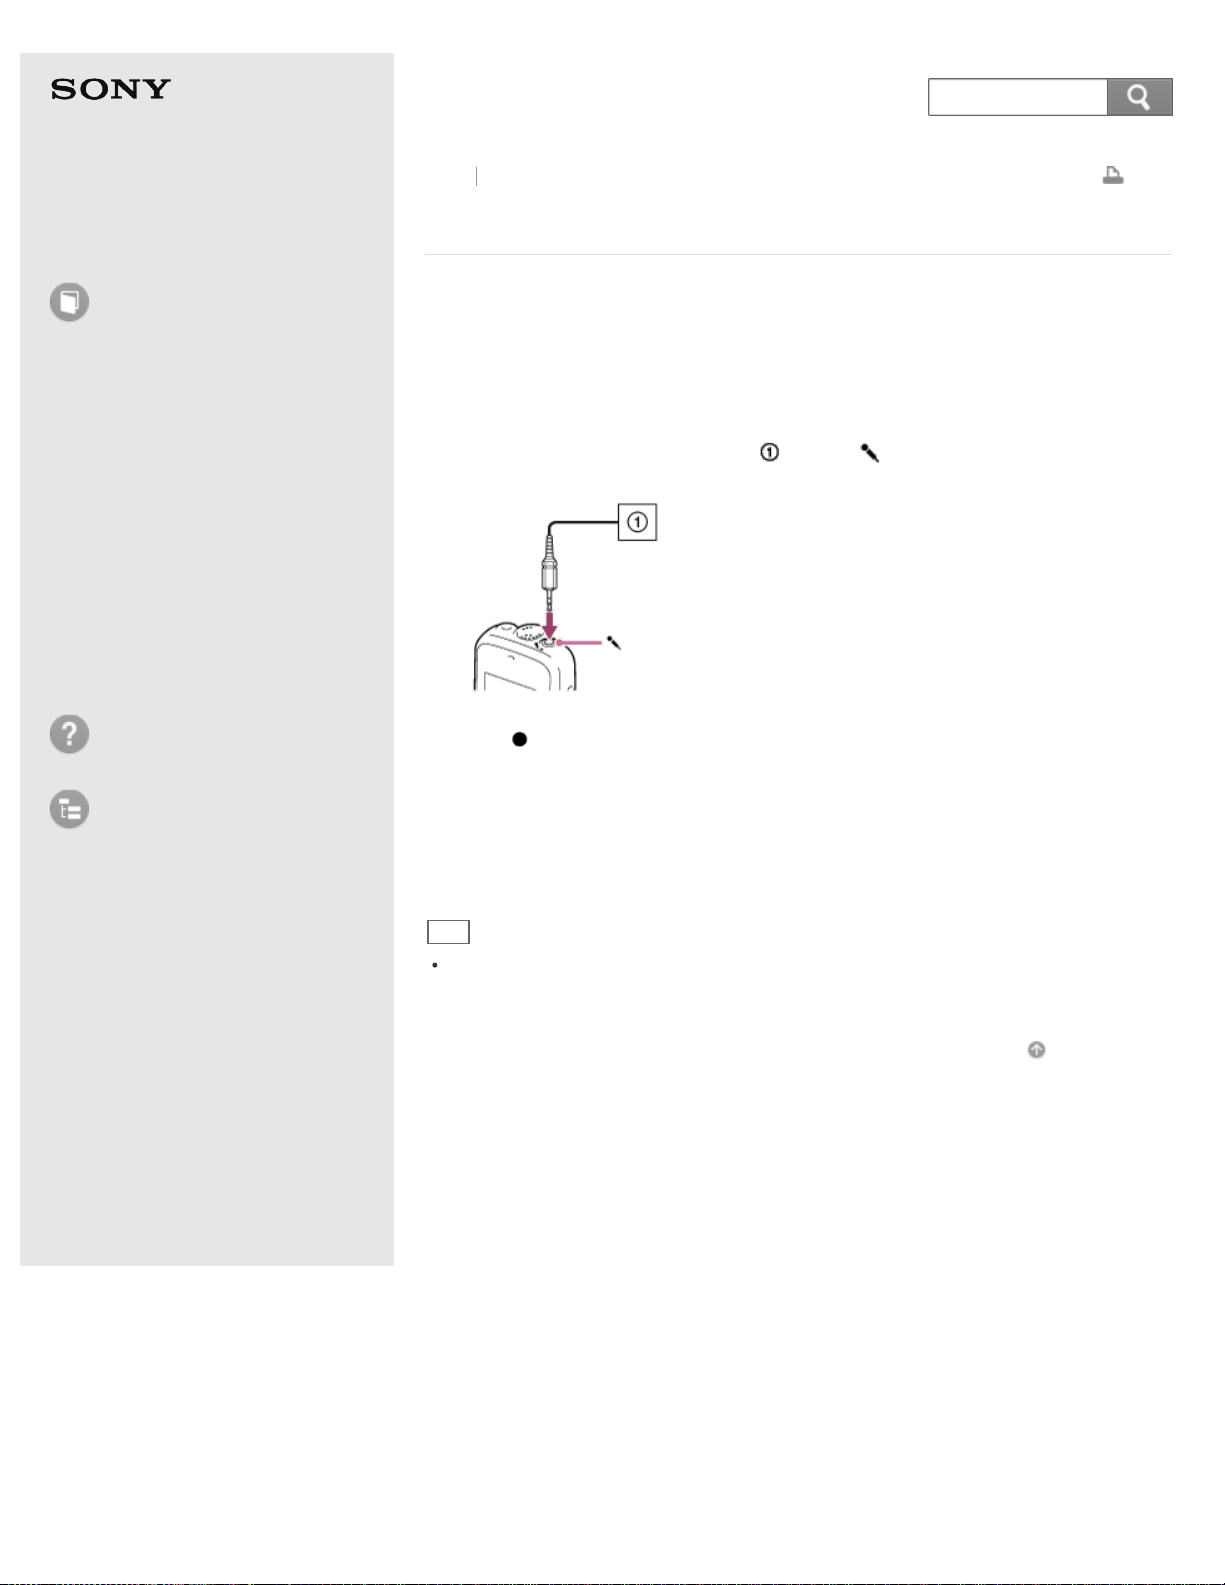
Help Guide
How to Use
Preparation
Recording
Playback
Editing
Menu
Specifications
Announcements
Troubleshooting
List of Topics
Print
IC Recorder
ICD-BX140
Recording with an external microphone
You can record sound using an externally connected microphone.
When you connect a stereo microphone (not supplied) to the IC recorder and the
MODE (recording mode) is set to “SHQ” or “HQ” mode, you can record sound in
stereo. You can play back the sound in stereo using the stereo headphones.
1. Connect an external microphone (
) to the (microphone) jack when the IC
recorder is in the stop mode.
2. Press REC/PAUSE to start recording.
The built-in microphone is automatically cut off.
If the input level is not strong enough, adjust the “SENS” (microphone
sensitivity) setting on the IC recorder.
When a plug in power type microphone is connected, power is automatically
supplied to the microphone from the IC recorder.
Hint
You can use a headphone-type electret condenser microphone (not supplied) to
record sound from a telephone or a cell phone. For details on how to make the
connection, refer to the operating instructions supplied with the microphone.
Go to Page Top
Back Back to Top
4-530-204-12(1)
© 2016 Sony Corporation Notes on use
88
Search
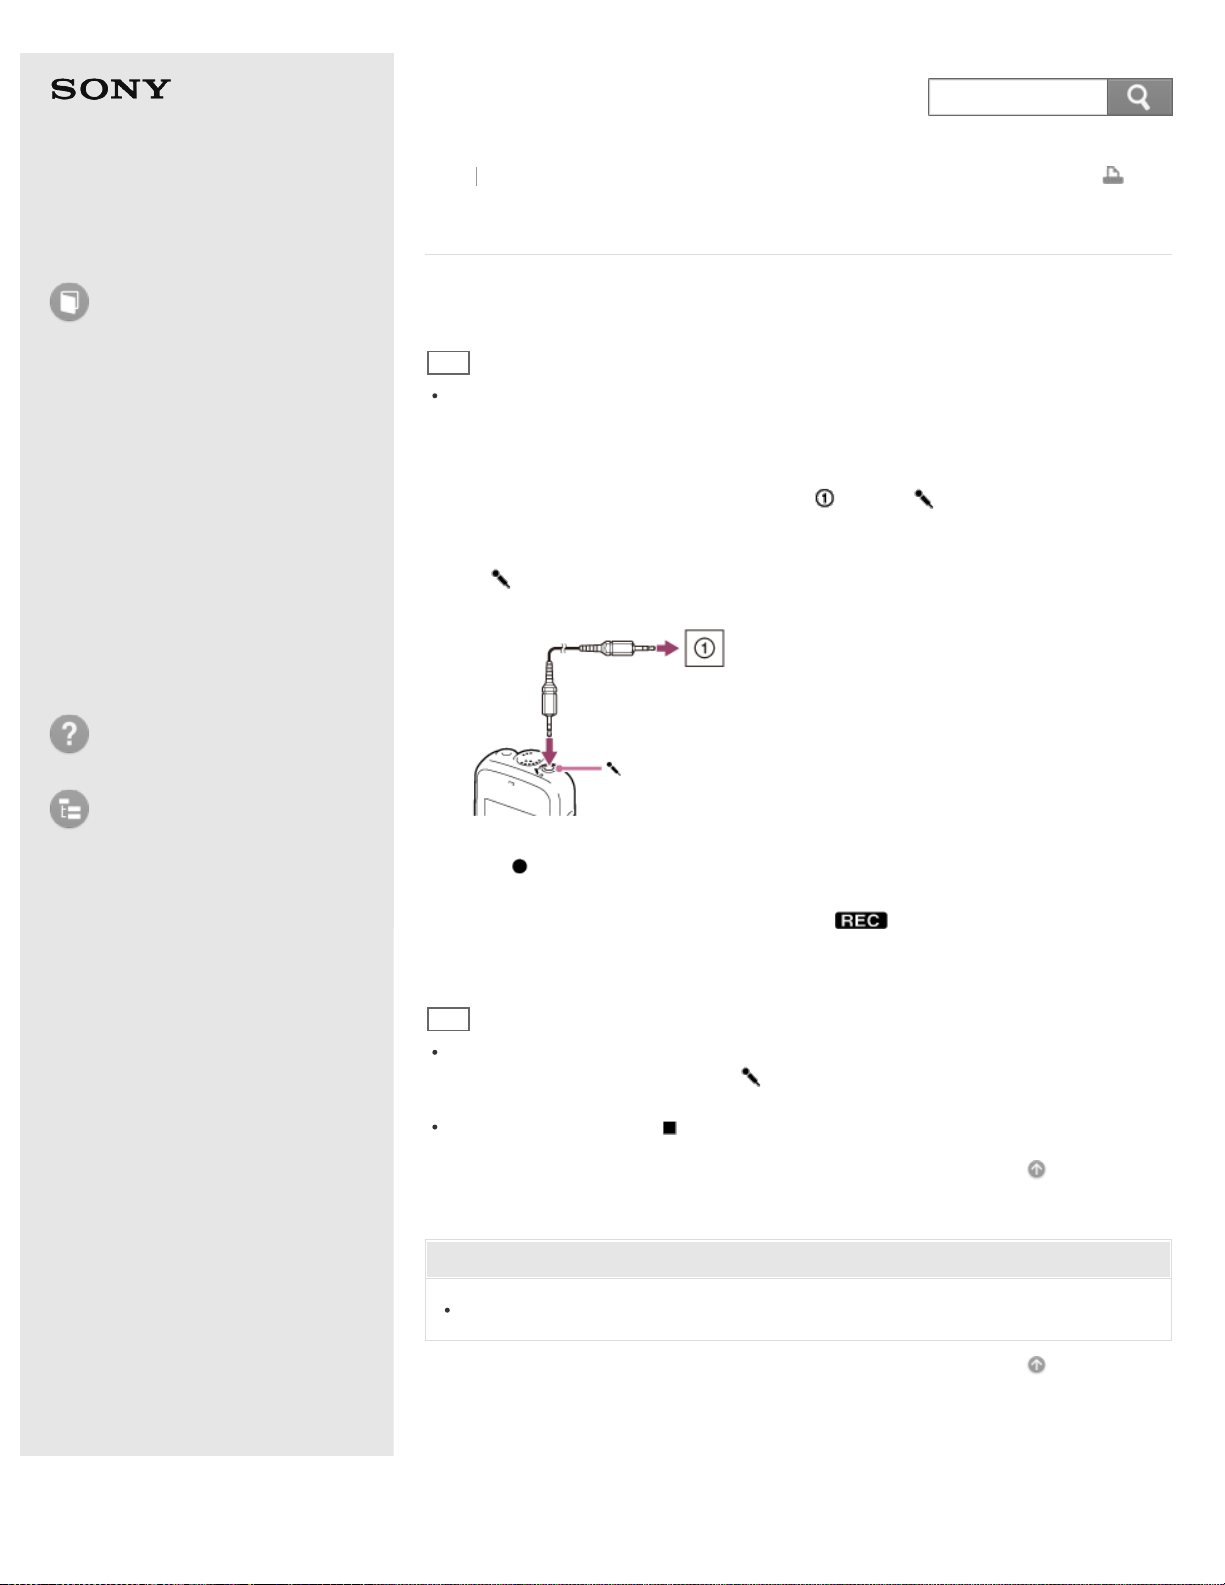
Help Guide
How to Use
Preparation
Recording
Playback
Editing
Menu
Specifications
Announcements
Troubleshooting
List of Topics
Print
IC Recorder
ICD-BX140
Recording from external equipment
You can make music files by recording sound/music from other equipment such as
a radio cassette recorder, a tape recorder, etc. connected to the IC recorder.
Hint
Before you start recording, we recommend you make a trial recording first, or
monitor the recording.
1. Connect a piece of external equipment ( ) to the (microphone) jack of the
IC recorder when the IC recorder is in the stop mode.
Connect the audio output connector (stereo mini-plug) of other equipment to
the
(microphone) jack of the IC recorder using an audio connecting cable
(not supplied).
2. Press REC/PAUSE to start recording.
The built-in microphone is automatically cut off and the sound from the
connected piece of equipment is recorded.
lights up in the display.
3. Start playback on the piece of equipment connected to the IC recorder.
Hint
If the input level is not strong enough, connect the headphone jack (minijack,
stereo) of other equipment to the
(microphone) jack of the IC recorder and
adjust the volume level on the piece of equipment connected to the IC recorder.
To stop recording, press (stop).
Go to Page Top
Related Topic
Recording the playback sound of the IC recorder on external equipment
Go to Page Top
Back Back to Top
4-530-204-12(1)
© 2016 Sony Corporation Notes on use
89
Search
Help Guide
How to Use
Preparation
Recording
Playback
Editing
Menu
Specifications
Announcements
Troubleshooting
List of Topics
Print
IC Recorder
ICD-BX140
Recording the playback sound of the IC recorder on
external equipment
You can record the playback sound of the IC recorder with externally connected
equipment.
Before you start recording, we recommend you make a trial recording first.
1. Connect an audio connecting cable (not supplied) to the
(headphone) jack
of the IC recorder and to the external input terminal of other equipment.
2. Press
PLAY/ENTER to start playback and at the same time set the connected
equipment to the recording mode.
A file from the IC recorder will be recorded on the equipment connected.
3. Press
(stop) on the IC recorder and the connected equipment at the same
time to stop recording.
Go to Page Top
Back Back to Top
4-530-204-12(1)
© 2016 Sony Corporation Notes on use
90
Search
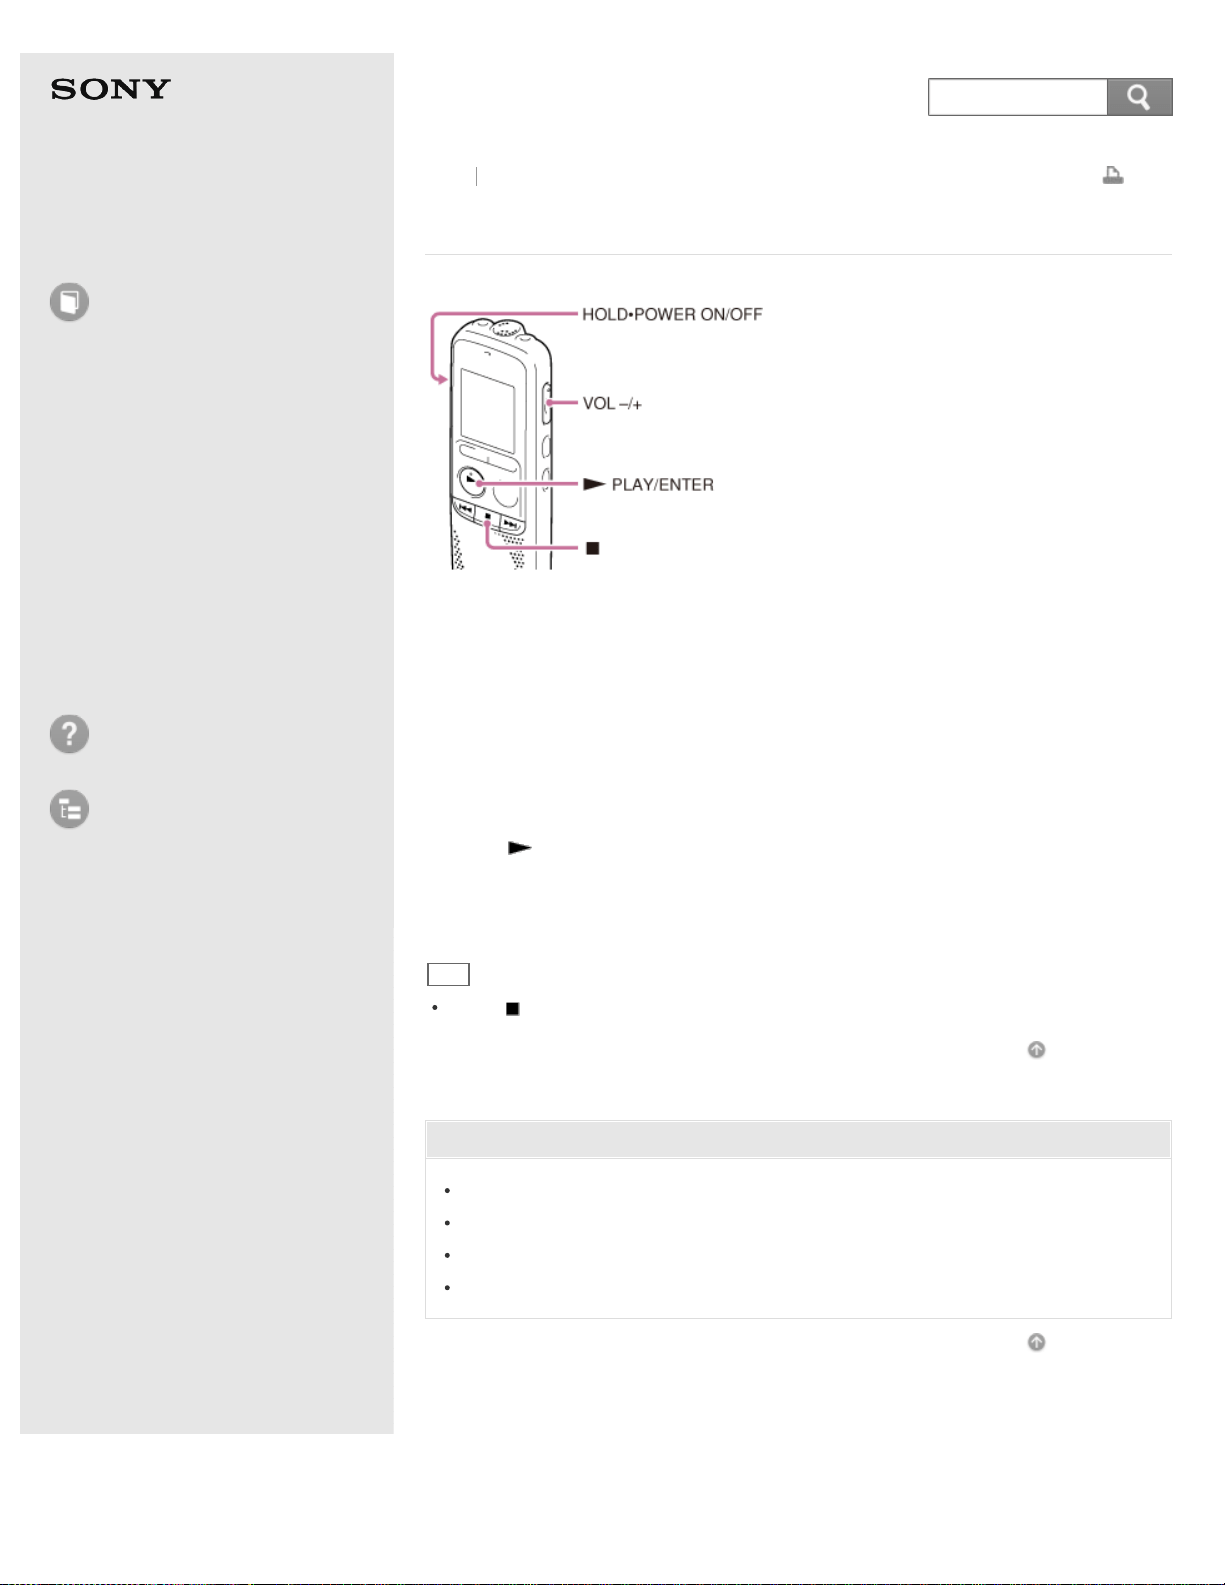
Help Guide
How to Use
Preparation
Recording
Playback
Editing
Menu
Specifications
Announcements
Troubleshooting
List of Topics
Print
IC Recorder
ICD-BX140
Playing back the recorded sound
1. Slide the HOLD·POWER ON/OFF switch in the direction of “POWER ON/OFF” to
turn on the IC recorder, or towards the center to release the IC recorder from
the HOLD status.
The stop mode window appears.
2. Select the desired file to be played back.
If you do not select a file, the file just recorded will be played back.
3. Press
PLAY/ENTER.
Playback starts, and the operation indicator lights in green.
4. Press VOL –/+ to adjust the volume.
Hint
Press (stop) to stop playback.
Go to Page Top
Related Topic
Turning the power on
Releasing the HOLD function
Selecting a folder and a file
Various operations while playing
Go to Page Top
Back Back to Top
4-530-204-12(1)
© 2016 Sony Corporation Notes on use
91
Search
Help Guide
How to Use
Preparation
Recording
Playback
Editing
Menu
Specifications
Announcements
Troubleshooting
List of Topics
Print
IC Recorder
ICD-BX140
Various operations while playing
You can perform the following operations while the IC recorder is playing.
To stop at the current position (Playback Pause function)
Press
PLAY/ENTER. To resume playback from that point, press PLAY/ENTER
again.
To go back to the beginning of the current file
Press
once.
To go back to previous files
Press
repeatedly.
(During the stop mode, keep the button pressed to go back the files continuously.)
To skip to the next file
Press
once.
To skip to the succeeding files
Press
repeatedly.
(During the stop mode, keep the button pressed to skip the files continuously.)
Go to Page Top
Related Topic
Playing back the recorded sound
Searching the desired point quickly (EASY-S) – the Easy search function
Go to Page Top
Back Back to Top
4-530-204-12(1)
© 2016 Sony Corporation Notes on use
92
Search
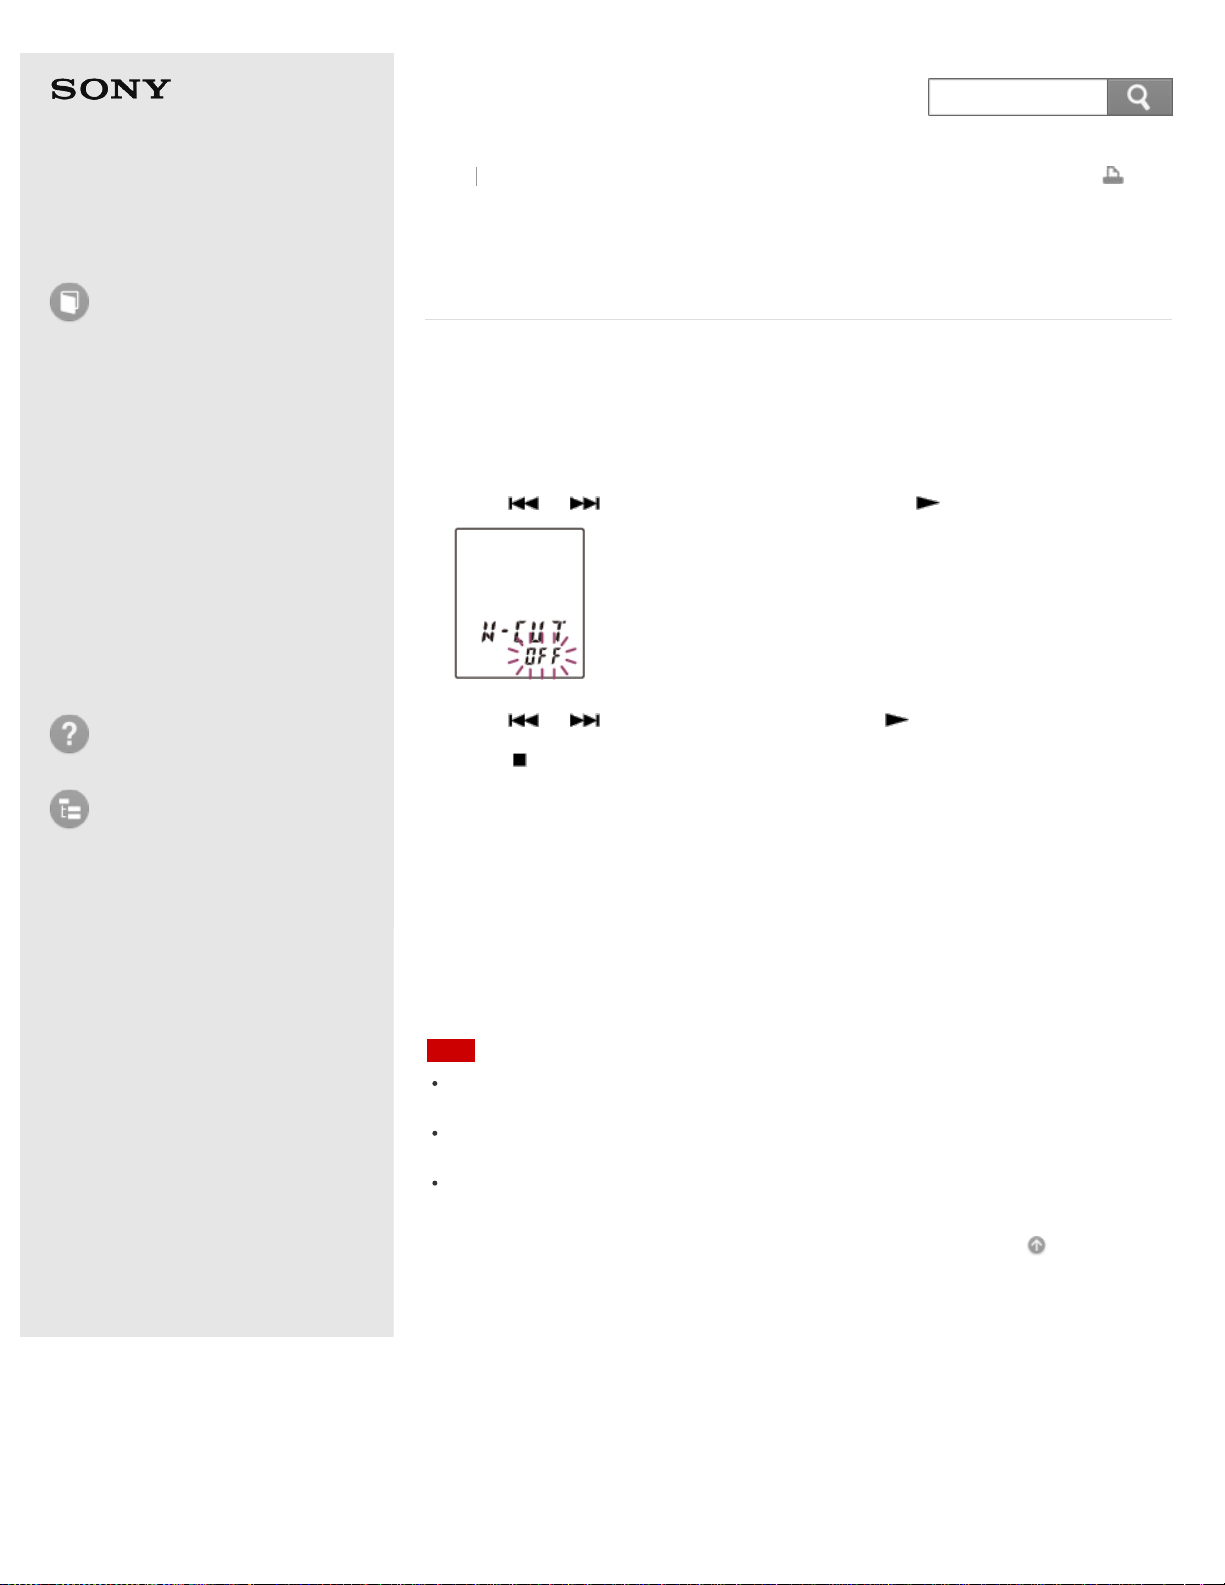
Help Guide
How to Use
Preparation
Recording
Playback
Editing
Menu
Specifications
Announcements
Troubleshooting
List of Topics
Print
IC Recorder
ICD-BX140
Reducing noise in the playback sound and making
the human voice clearer (N-CUT)– the noise cut
function
The noise cut function reduces ambient noise other than the human voice, which
makes the human voice clearer when you listen to the playback sound.
1. In the stop or playback mode, press MENU to enter the menu mode.
2. Press
or to select “N-CUT,” and then press PLAY/ENTER.
3. Press or to select “ON,” and then press PLAY/ENTER.
4. Press
(stop) to exit the menu mode.
Descriptions of menu items
You can select one of the menu items available.
ON:
The noise cut level will be adjusted automatically according to the surrounding
sound level.
OFF:
The noise cut function will be turned off.
(Initial setting)
Note
The effect of the noise cut function may be different depending on the condition of
the recorded voice.
When playing back a recorded file in good sound quality, make sure to set the noise
cut function to “OFF.”
The noise cut function works when you listen to sound through the headphones. It
does not work when you play back sound using the built-in speaker.
Go to Page Top
Back Back to Top
4-530-204-12(1)
© 2016 Sony Corporation Notes on use
93
Search

Help Guide
How to Use
Preparation
Recording
Playback
Editing
Menu
Specifications
Announcements
Troubleshooting
List of Topics
Print
IC Recorder
ICD-BX140
Adjusting the playback speed – the DPC (Digital Pitch
Control) function
You can adjust the playback speed in a range from 0.50 times to 2.00 times. The
file is played back in natural tones by means of a digital processing function.
1. In the stop or playback mode, press MENU to enter the menu mode.
2. Press
or to select “DPC,” and then press PLAY/ENTER.
3. Press or to select “ON,” and then press PLAY/ENTER.
4. During playback, press
or to adjust the playback speed.
The speed decreases by 0.05 times (from ×0.50 to ×1.00).
The speed increases by 0.10 times (from ×1.00 to ×2.00).
When you press and hold each button, you can change the speed continuously.
The playback speed is set to “×0.70” when you purchase the IC recorder.
Descriptions of menu items
You can select one of the menu items available.
ON:
You can adjust the playback speed in a range from 0.50 times to 2.00 times.
OFF:
The DPC function does not work.
(Initial setting)
Hint
To resume normal playback speed, set “DPC” to “OFF” in step 3.
Go to Page Top
Back Back to Top
4-530-204-12(1)
© 2016 Sony Corporation Notes on use
94
Search

Help Guide
How to Use
Preparation
Recording
Playback
Editing
Menu
Specifications
Announcements
Troubleshooting
List of Topics
Print
IC Recorder
ICD-BX140
Playing back a file repeatedly
1. During playback, press and hold PLAY/ENTER until “ ” (repeat) appears.
The selected file will be played back repeatedly.
Hint
To resume normal playback, press PLAY/ENTER or (stop).
Go to Page Top
Back Back to Top
4-530-204-12(1)
© 2016 Sony Corporation Notes on use
95
Search

Help Guide
How to Use
Preparation
Recording
Playback
Editing
Menu
Specifications
Announcements
Troubleshooting
List of Topics
Print
IC Recorder
ICD-BX140
Playing back all files in a folder continuously (CONT)
– the continuous play
You can play back all files in a folder continuously.
1. In the stop or playback mode, press MENU to enter the menu mode.
2. Press
or to select “CONT,” and then press PLAY/ENTER.
3. Press or to select “ON,” and then press PLAY/ENTER.
4. Press
(stop) to exit the menu mode.
Descriptions of menu items
You can select one of the menu items available.
ON:
You can play back all files in a folder continuously.
OFF:
The CONT function does not work.
(Initial setting)
Hint
To resume normal playback, set “CONT” to “OFF” in step 3.
Go to Page Top
Back Back to Top
4-530-204-12(1)
© 2016 Sony Corporation Notes on use
96
Search
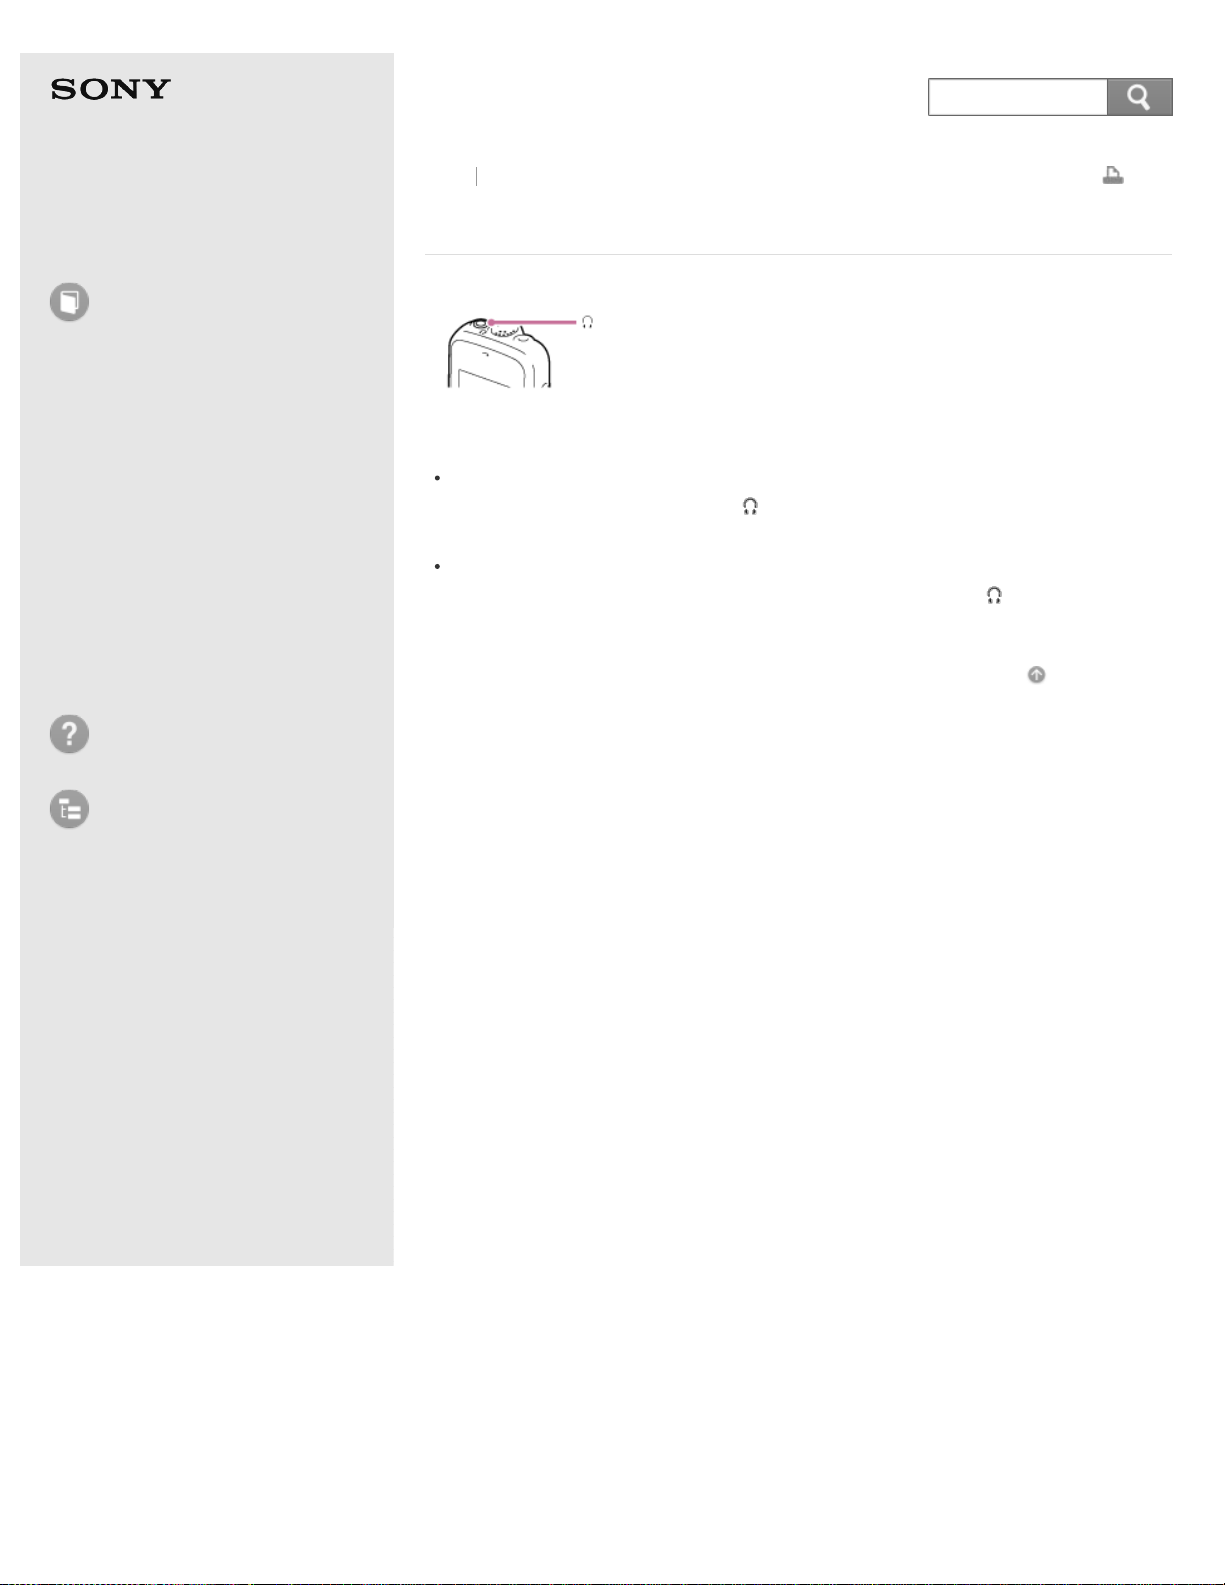
Help Guide
How to Use
Preparation
Recording
Playback
Editing
Menu
Specifications
Announcements
Troubleshooting
List of Topics
Print
IC Recorder
ICD-BX140
Listening with better sound quality
Listening to the sound with the headphones:
Connect the headphones to the
(headphone) jack. The built-in speaker will
be automatically disconnected.
Listening to the sound from an external speaker:
Connect an active or passive speaker (not supplied) to the
(headphone)
jack.
Go to Page Top
Back Back to Top
4-530-204-12(1)
© 2016 Sony Corporation Notes on use
97
Search
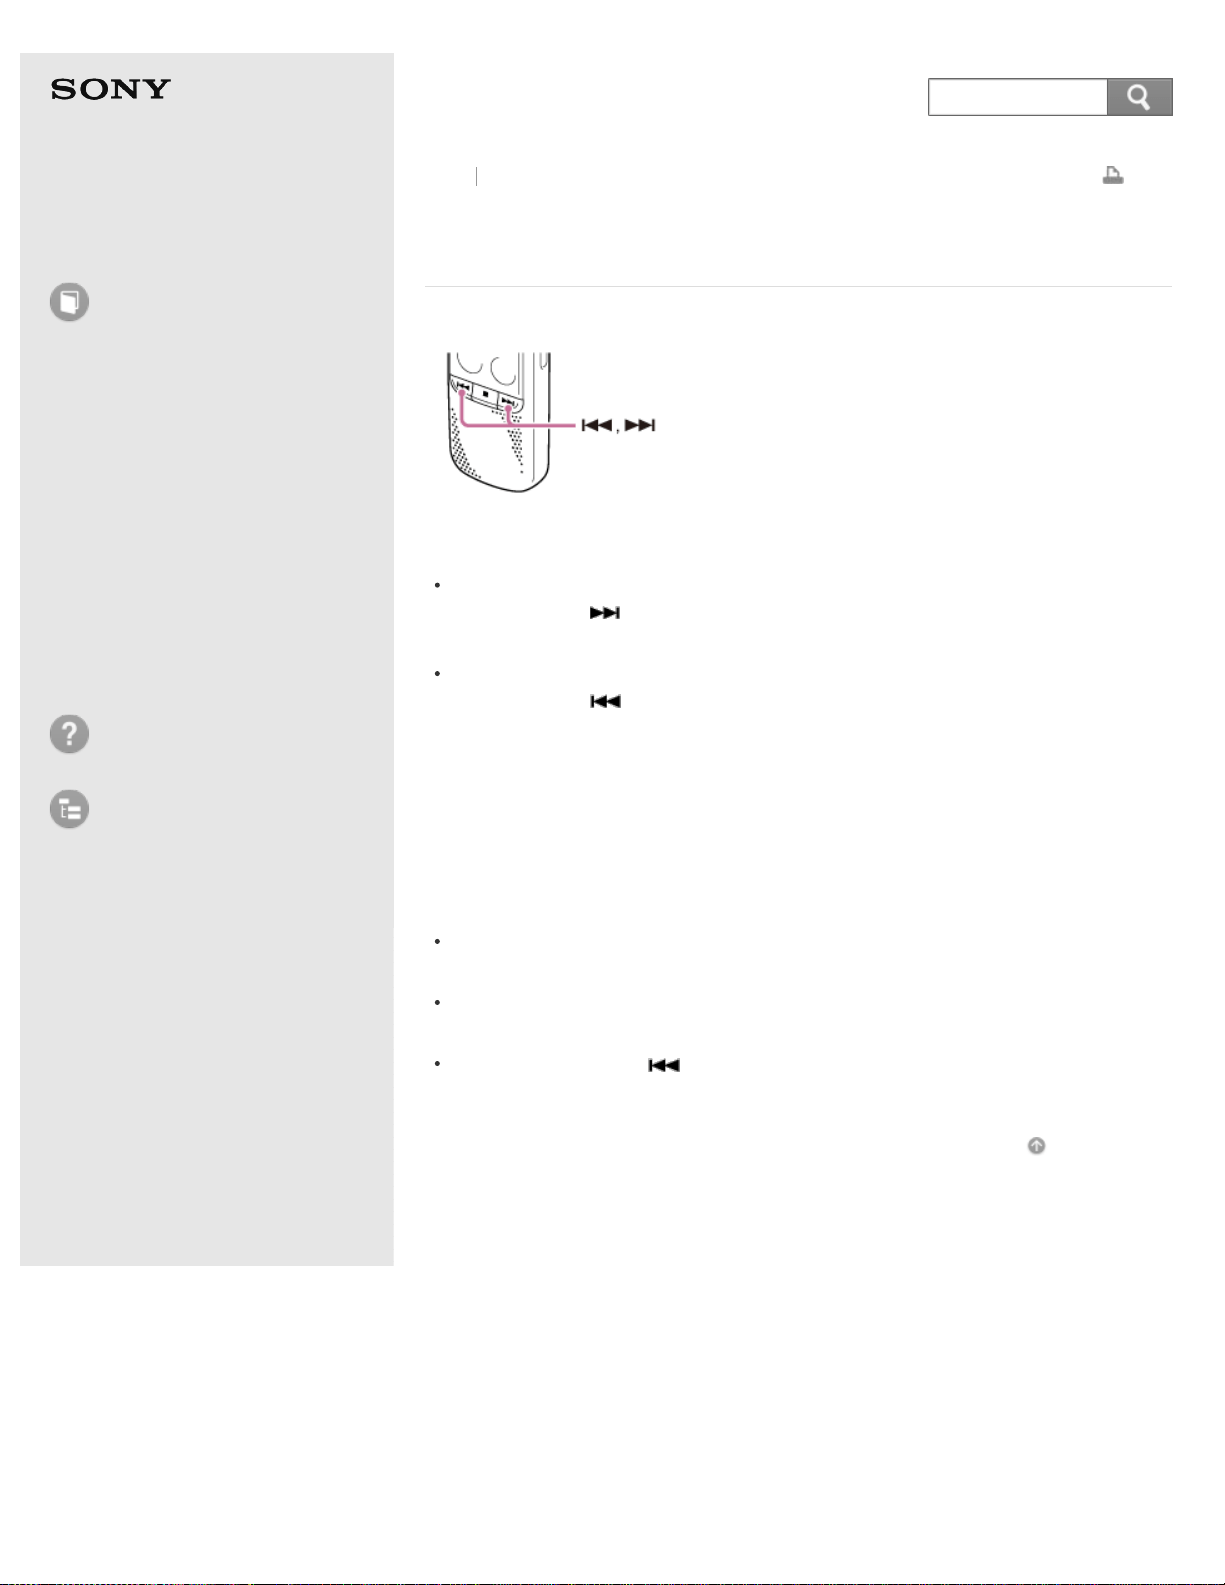
Help Guide
How to Use
Preparation
Recording
Playback
Editing
Menu
Specifications
Announcements
Troubleshooting
List of Topics
Print
IC Recorder
ICD-BX140
Searching forward/backward during playback
(Cue/Review)
To search forward (Cue):
Press and hold
during playback and release it at the point you wish to
resume playback.
To search backward (Review):
Press and hold
during playback and release it at the point you wish to
resume playback.
The IC recorder searches at slow speed with playback sound. This is useful to
check one word forward or back. Then, if you press and hold the button, the IC
recorder starts to search at higher speed.
When files are played back or searched to the end of the last file
When you play back or fast play back to the end of the last file, “END” flashes
for approximately 5 seconds.
When “END” and the operation indicator go off, the IC recorder will stop at the
beginning of the last file.
If you press and hold while “END” is lit, the files are played back rapidly,
and normal playback will start at the point you release the button.
Go to Page Top
Back Back to Top
4-530-204-12(1)
© 2016 Sony Corporation Notes on use
98
Search
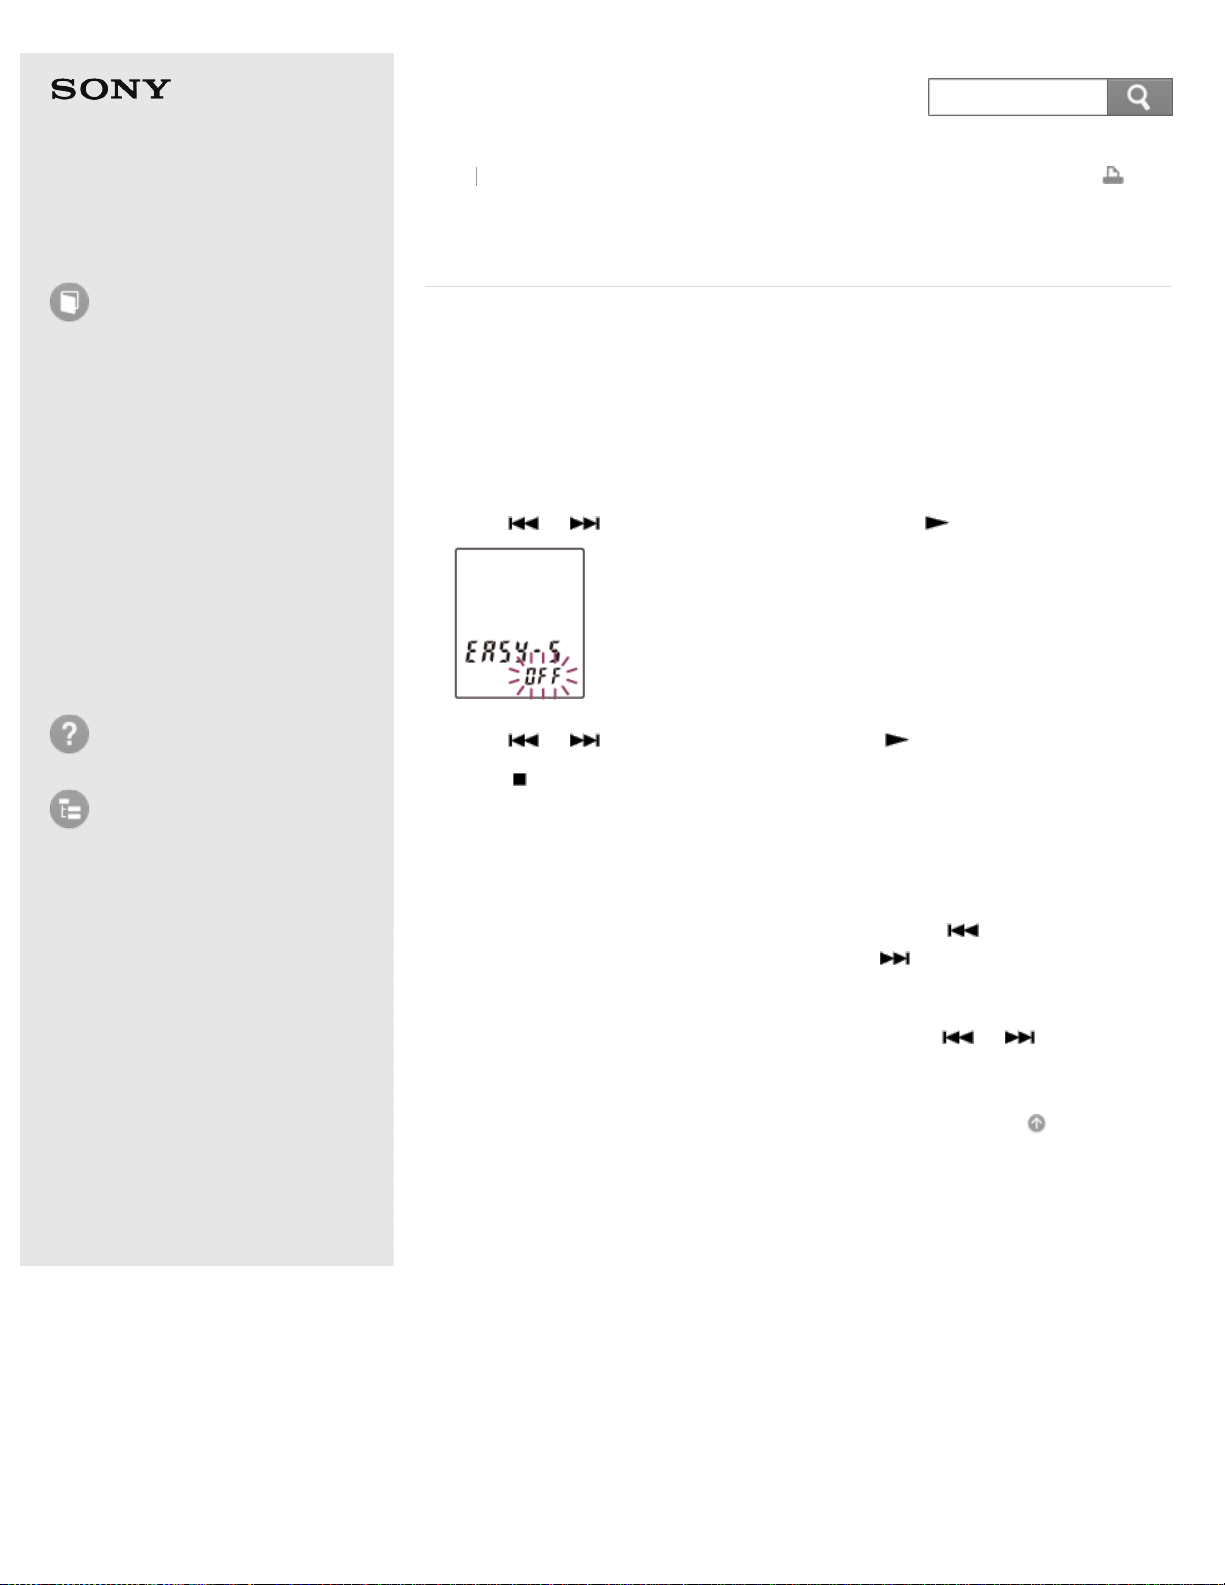
Help Guide
How to Use
Preparation
Recording
Playback
Editing
Menu
Specifications
Announcements
Troubleshooting
List of Topics
Print
IC Recorder
ICD-BX140
Searching the desired point quickly (EASY-S) – the
Easy search function
The Easy Search function allows you to quickly locate the point at which you wish
to start playback.
This function is useful for locating a specific point in a long recording such as at a
meeting.
1. In the stop or playback mode, press MENU to enter the menu mode.
2. Press
or to select “EASY-S,” and then press PLAY/ENTER.
3. Press or to select “ON,” and then press PLAY/ENTER.
4. Press
(stop) to exit the menu mode.
Descriptions of menu items
You can select one of the menu items available.
ON:
You can go back for approximately 3 seconds by pressing
once, and can go
forward for approximately 10 seconds by pressing
once during playback. This
function is useful when attempting to locate desired point in a long recording.
OFF:
The easy search function does not work. When you press
or , a file will be
moved forward or backward.
(Initial setting)
Go to Page Top
Back Back to Top
4-530-204-12(1)
© 2016 Sony Corporation Notes on use
99
Search
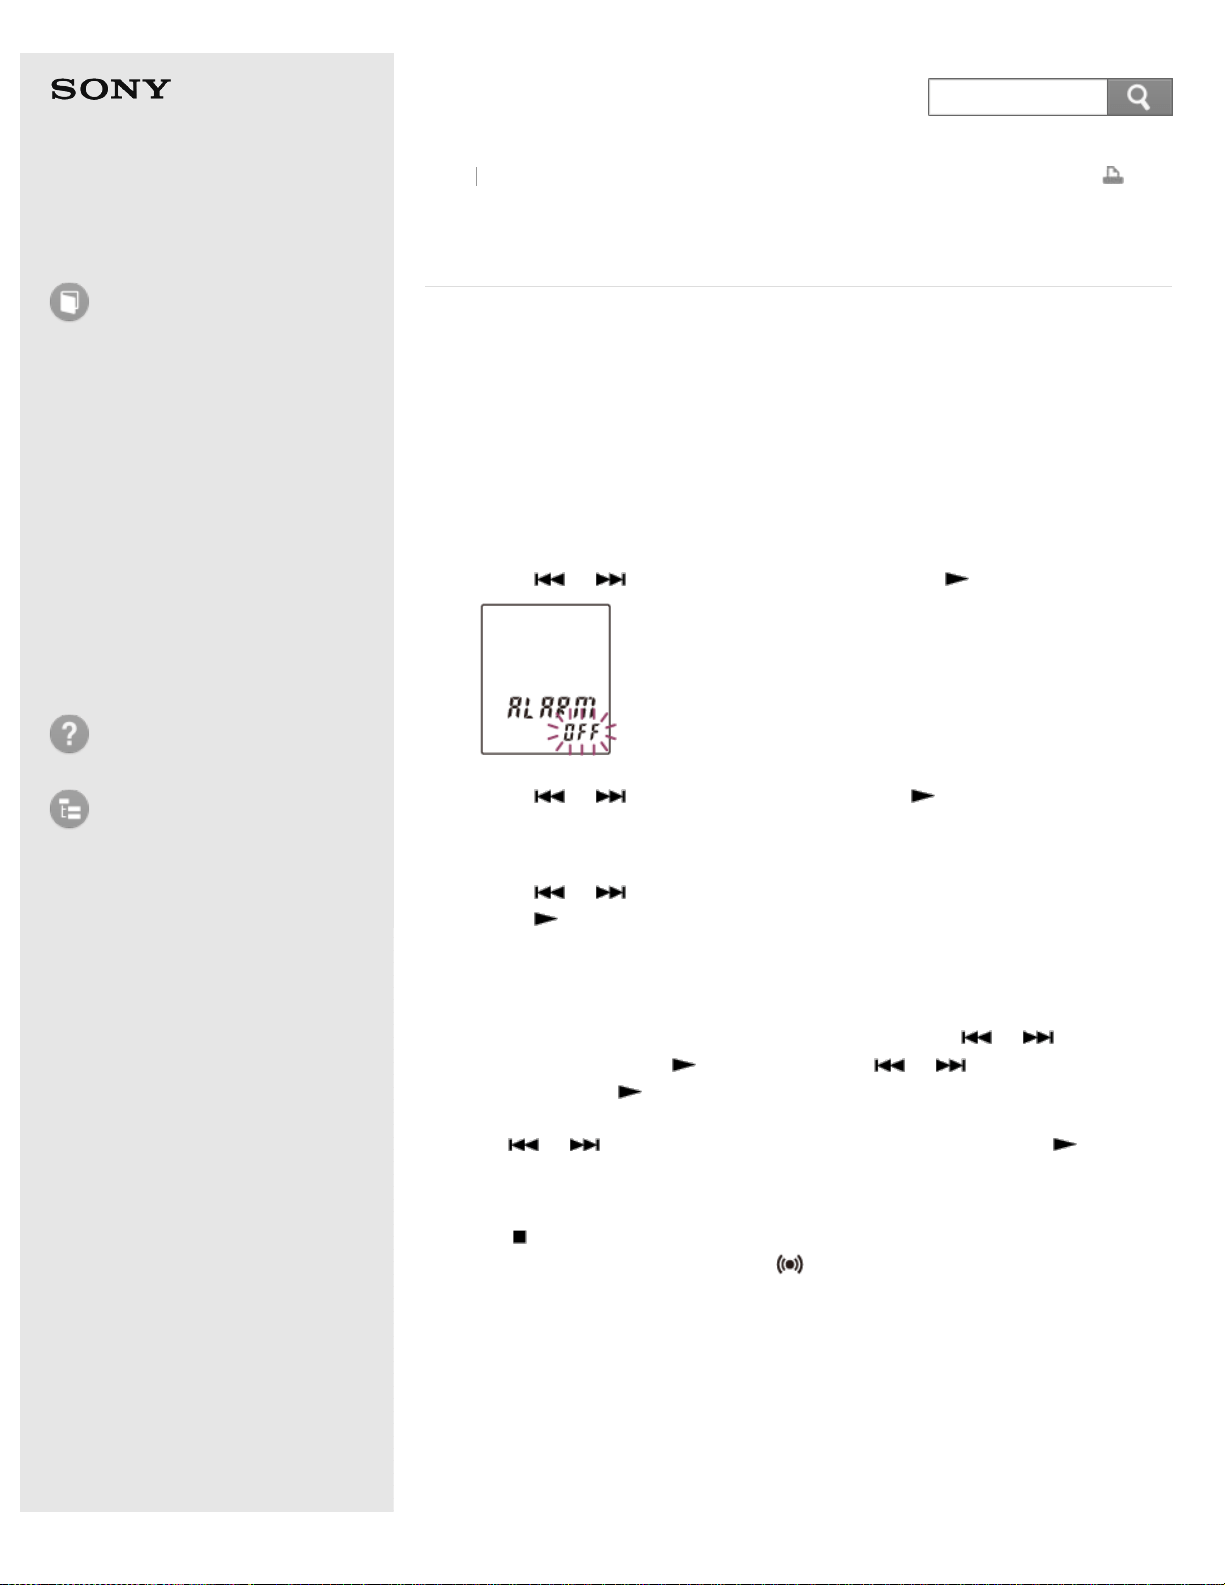
Help Guide
How to Use
Preparation
Recording
Playback
Editing
Menu
Specifications
Announcements
Troubleshooting
List of Topics
Print
IC Recorder
ICD-BX140
Playing back a file at a desired time with an alarm
(ALARM)
You can sound an alarm and start playback of a selected file at a desired time. You
can have a file played back on a specified date, once every week, or at the same
time every day. You can set an alarm for a file.
1. Select the file you want to play back with an alarm.
2. Enter the alarm setting mode.
1. In the stop mode, press MENU to enter the menu mode.
2. Press
or to select “ALARM,” and then press PLAY/ENTER.
3. Press or to select “ON,” and then press PLAY/ENTER.
3. Set the alarm date and time.
1. Press
or to select “DATE,” a day of the week, or “DAILY,” and then
press
PLAY/ENTER.
2. Do one of the following operations.
When you select “DATE,” set the year, month, day, hour, and minute in
sequence, as described in “Setting the clock.”
When you select a day of the week or “DAILY,” press
or to set the
hour, and then press
PLAY/ENTER. Press or to set the minute,
and then press
PLAY/ENTER.
4. Press
or to select a favorite alarm pattern, and then press
PLAY/ENTER.
“ALARM ON,” is displayed.
5. Press
(stop) to exit the menu mode.
The setting process is finished and “
” (alarm indicator) appears in the display
window.
When the set date and time comes, the IC recorder is automatically turned on and
“ALARM” is displayed in the display window. Then the alarm and the selected file
will be played back using the selected alarm pattern. When the playback ends, the
IC recorder will stop automatically. (When the alarm pattern is set to “B-PLAY” or
“PLAY,” the IC recorder will stop at the beginning of the selected file.)
Descriptions of the alarm pattern
Back
Back to Top
100
Search

You can select one of the menu items available.
B-PLAY:
The selected file is played back after the alarm sounds.
BEEP:
Only the alarm sounds.
PLAY:
Only the selected file is played back.
Note
An alarm set will not sound during recording. The alarm will start playing after you
stop the recording.
Hint
To change the alarm setting, select the file you want to change its alarm setting, and
then follow steps 2 through 5.
To cancel the alarm setting, follow steps 1 and 2. In step 2, select “OFF” (instead of
“ON”) and press
PLAY/ENTER. The alarm will be canceled and the alarm indicator
will disappear from the display window.
To stop the alarm playback, press any button other than VOL –/+ while the alarm
sound is heard. If the HOLD function is activated, you can stop the alarm playback
by pressing any button.
The alarm sounds even if you set “BEEP” to “OFF” in the menu.
Go to Page Top
Related Topic
Setting the clock
Go to Page Top
4-530-204-12(1)
© 2016 Sony Corporation Notes on use
101
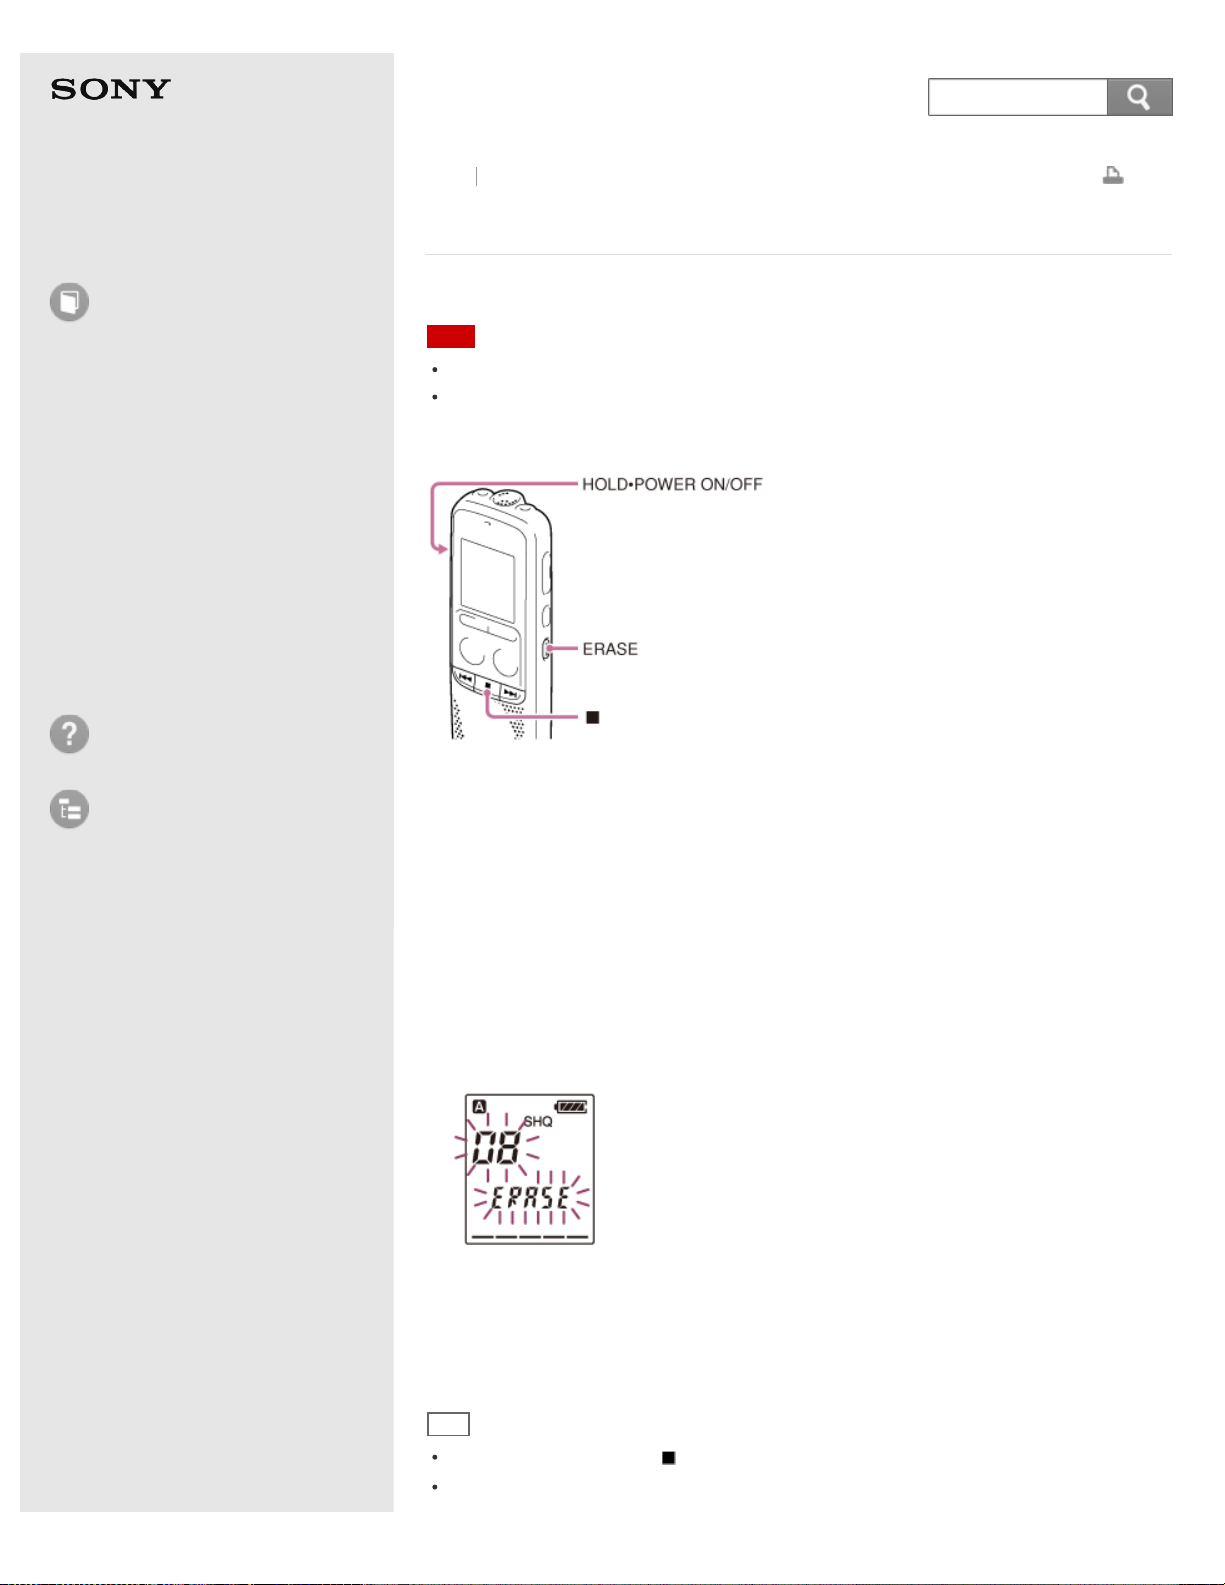
Help Guide
How to Use
Preparation
Recording
Playback
Editing
Menu
Specifications
Announcements
Troubleshooting
List of Topics
Print
IC Recorder
ICD-BX140
Erasing a file
You can select a file and erase it.
Note
Once a file has been erased, you cannot retrieve it.
You cannot erase a protected file. To erase the file, release the protection first, and
then erase the file.
1. Slide the HOLD·POWER ON/OFF switch in the direction of “POWER ON/OFF” to
turn on the IC recorder, or towards the center to release the IC recorder from
the HOLD status.
The stop mode window appears.
2. Select the file you want to erase when the IC recorder is in the stop or playback
mode.
3. Erase a selected file.
When the IC recorder is in the stop mode, press and hold ERASE.
When the IC recorder is in the playback mode, press ERASE.
4. Press ERASE.
“ACCESS” appears in the display window and the selected file will be erased.
When a file is erased, the remaining files will advance so that there will be no
space between files.
Hint
To cancel erasing, press (stop) in step 3.
To erase a part of a file, divide the file into two files first, and then proceed with
Back Back to Top
102
Search
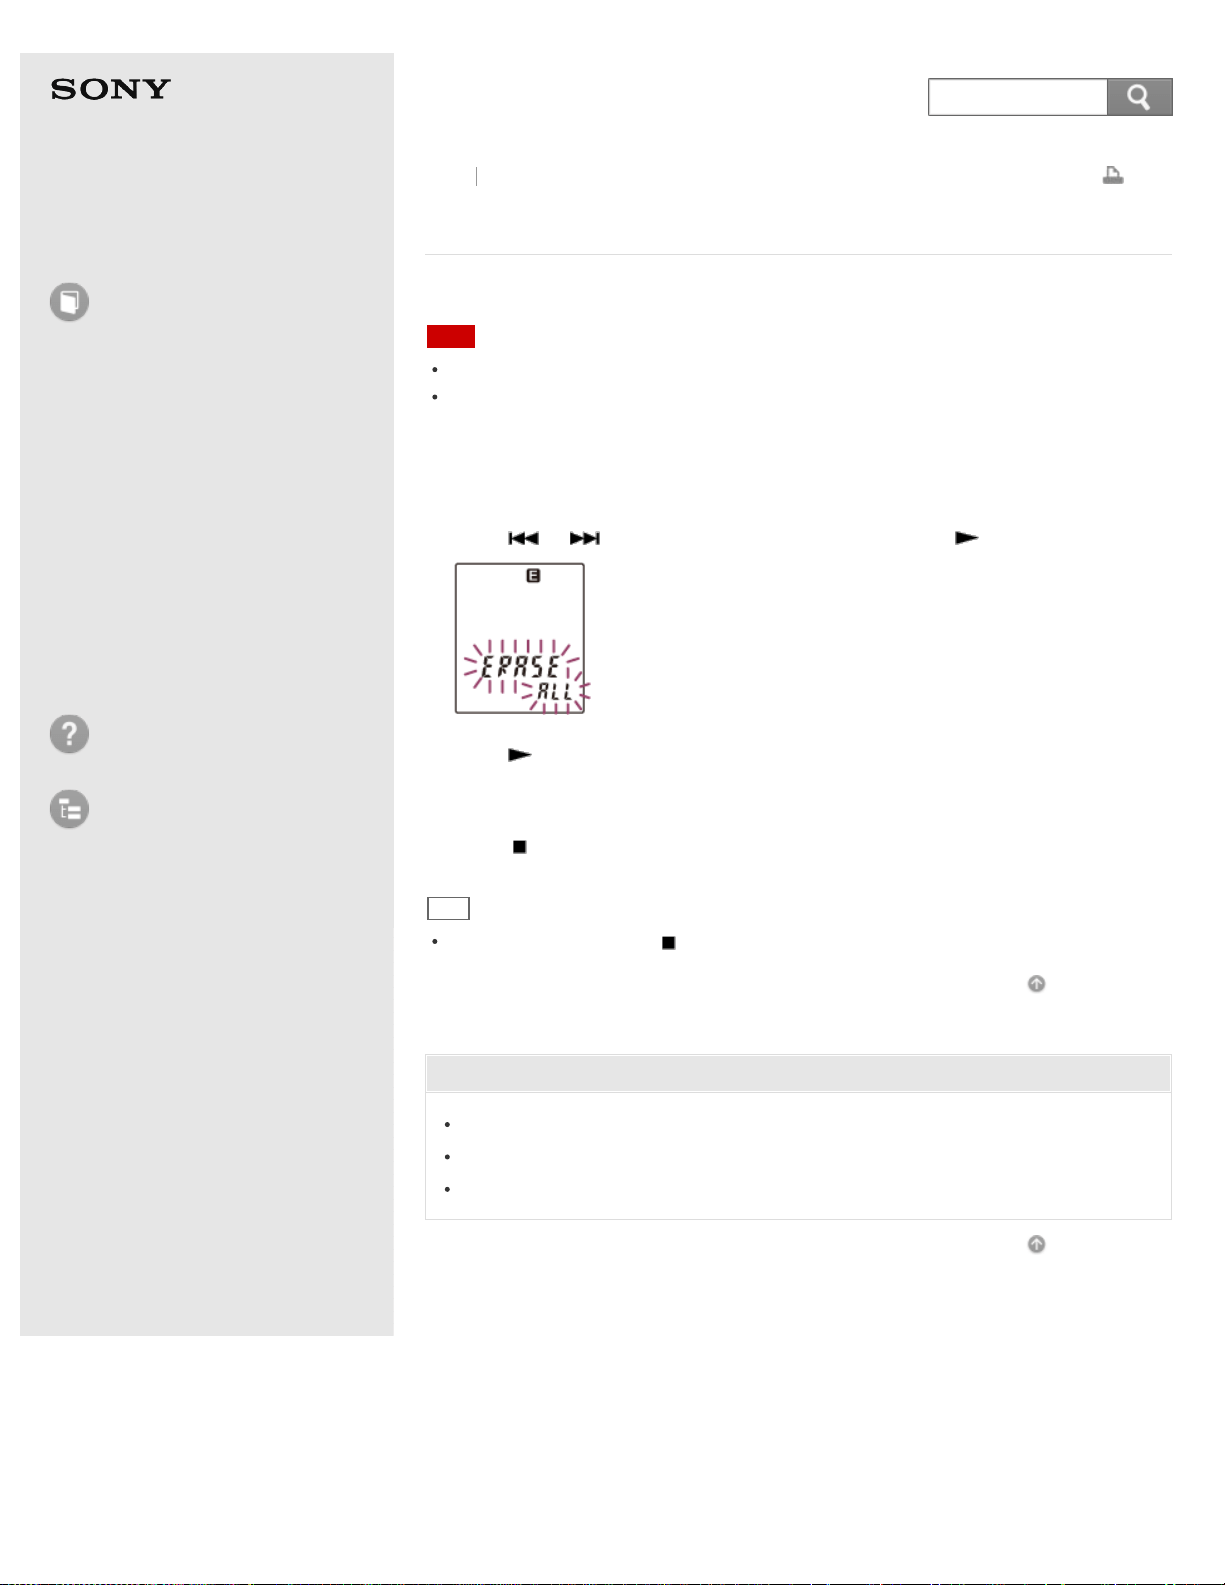
Help Guide
How to Use
Preparation
Recording
Playback
Editing
Menu
Specifications
Announcements
Troubleshooting
List of Topics
Print
IC Recorder
ICD-BX140
Erasing all files in a folder (ERASE ALL)
You can erase all files in the selected folder.
Note
Once a file has been erased, you cannot retrieve it.
You cannot erase a protected file. To erase the file, release the protection first, and
then erase the file.
1. In the stop mode, press MENU to enter the menu mode.
2. Press
or to select “ERASE ALL,” and then press PLAY/ENTER.
3. Press PLAY/ENTER.
“ACCESS” appears in the display window and all files in the selected folder will
be erased.
4. Press
(stop) to exit the menu mode.
Hint
To cancel erasing, press (stop) in step 2.
Go to Page Top
Related Topic
Protecting a file (LOCK)
Selecting a folder and a file
Erasing a file
Go to Page Top
Back Back to Top
4-530-204-12(1)
© 2016 Sony Corporation Notes on use
104
Search
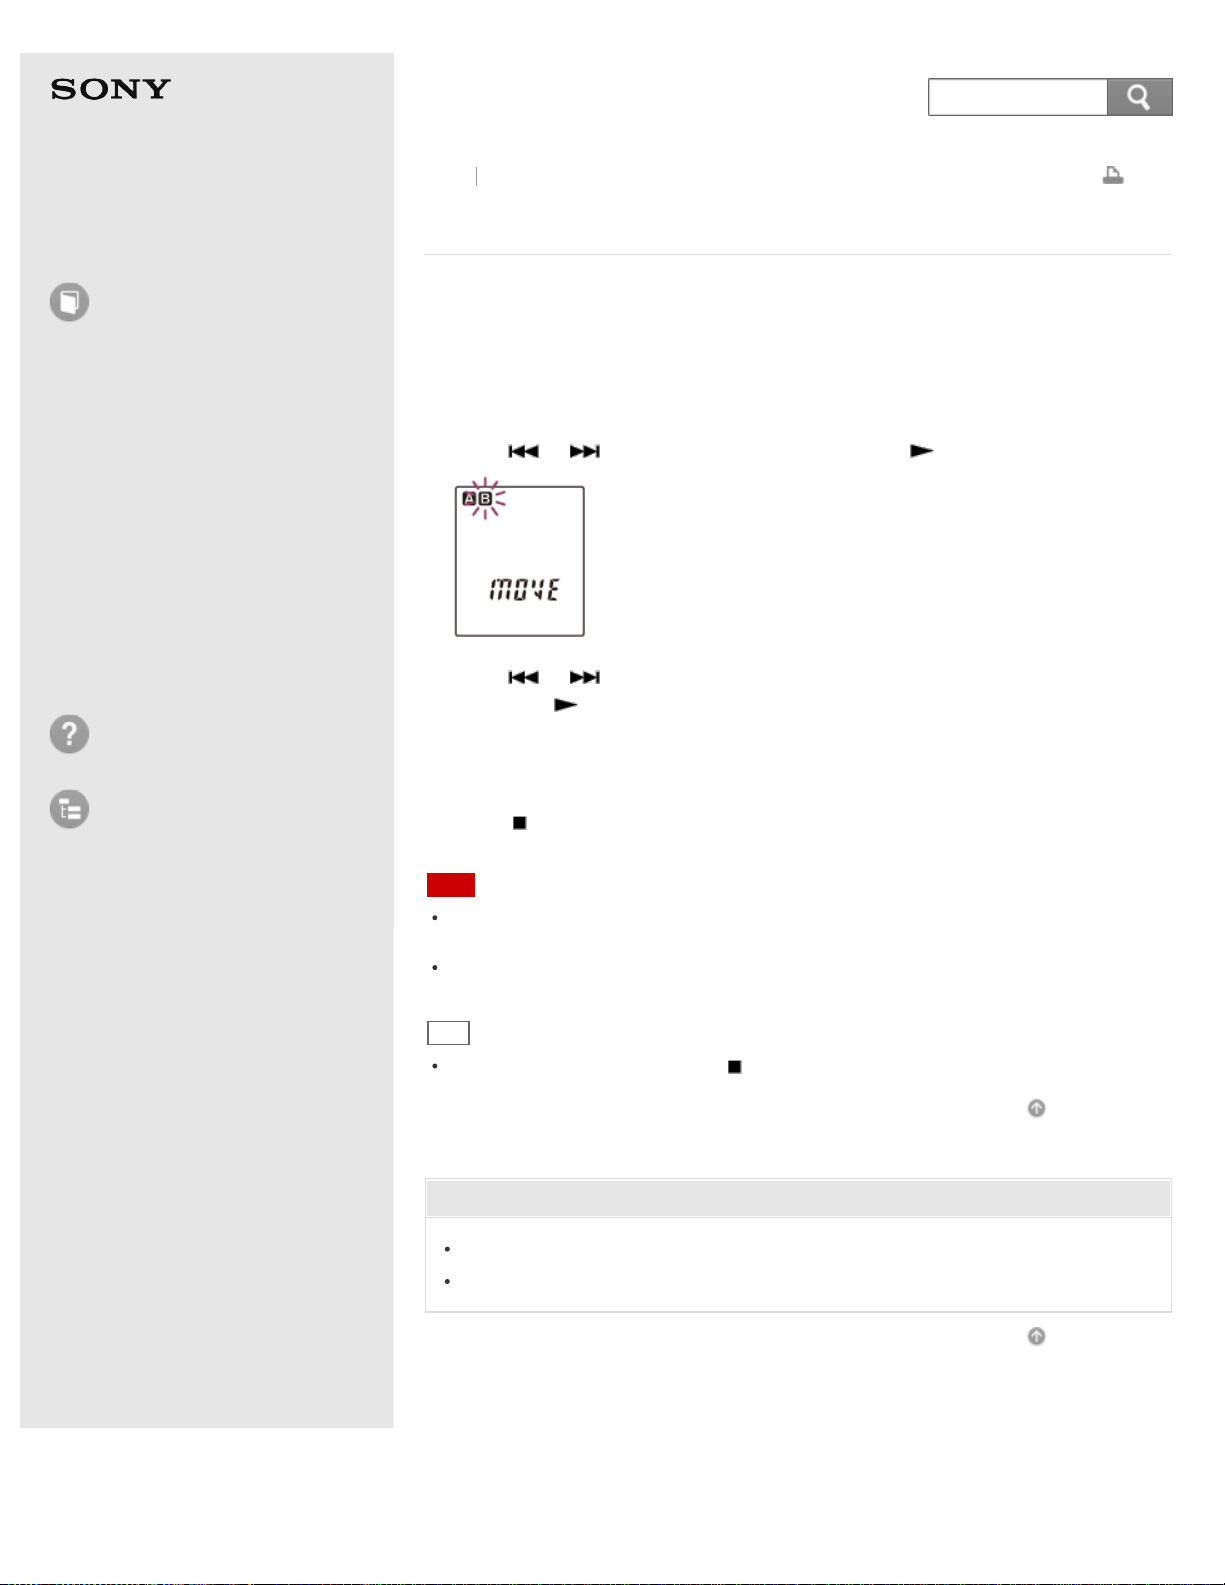
Help Guide
How to Use
Preparation
Recording
Playback
Editing
Menu
Specifications
Announcements
Troubleshooting
List of Topics
Print
IC Recorder
ICD-BX140
Moving a file to a different folder (MOVE)
Moves the selected file to the selected folder.
1. Select the file you want to move.
2. In the stop mode, press MENU to enter the menu mode.
3. Press
or to select “MOVE,” and then press PLAY/ENTER.
4. Press or to select the folder that you want to move the file into, and
then press
PLAY/ENTER.
The file is moved to the last position in the destination folder.
When you move a file to another folder, the original file in the previous folder
will be erased.
5. Press
(stop) to exit the menu mode.
Note
You cannot move a protected file. To move the file, release the protection first, and
then move the file.
If 99 files have been recorded in the folder to which you want to move a file, you
cannot move it.
Hint
To cancel moving the file, press (stop) before step 4.
Go to Page Top
Related Topic
Protecting a file (LOCK)
Selecting a folder and a file
Go to Page Top
Back Back to Top
4-530-204-12(1)
© 2016 Sony Corporation Notes on use
105
Search
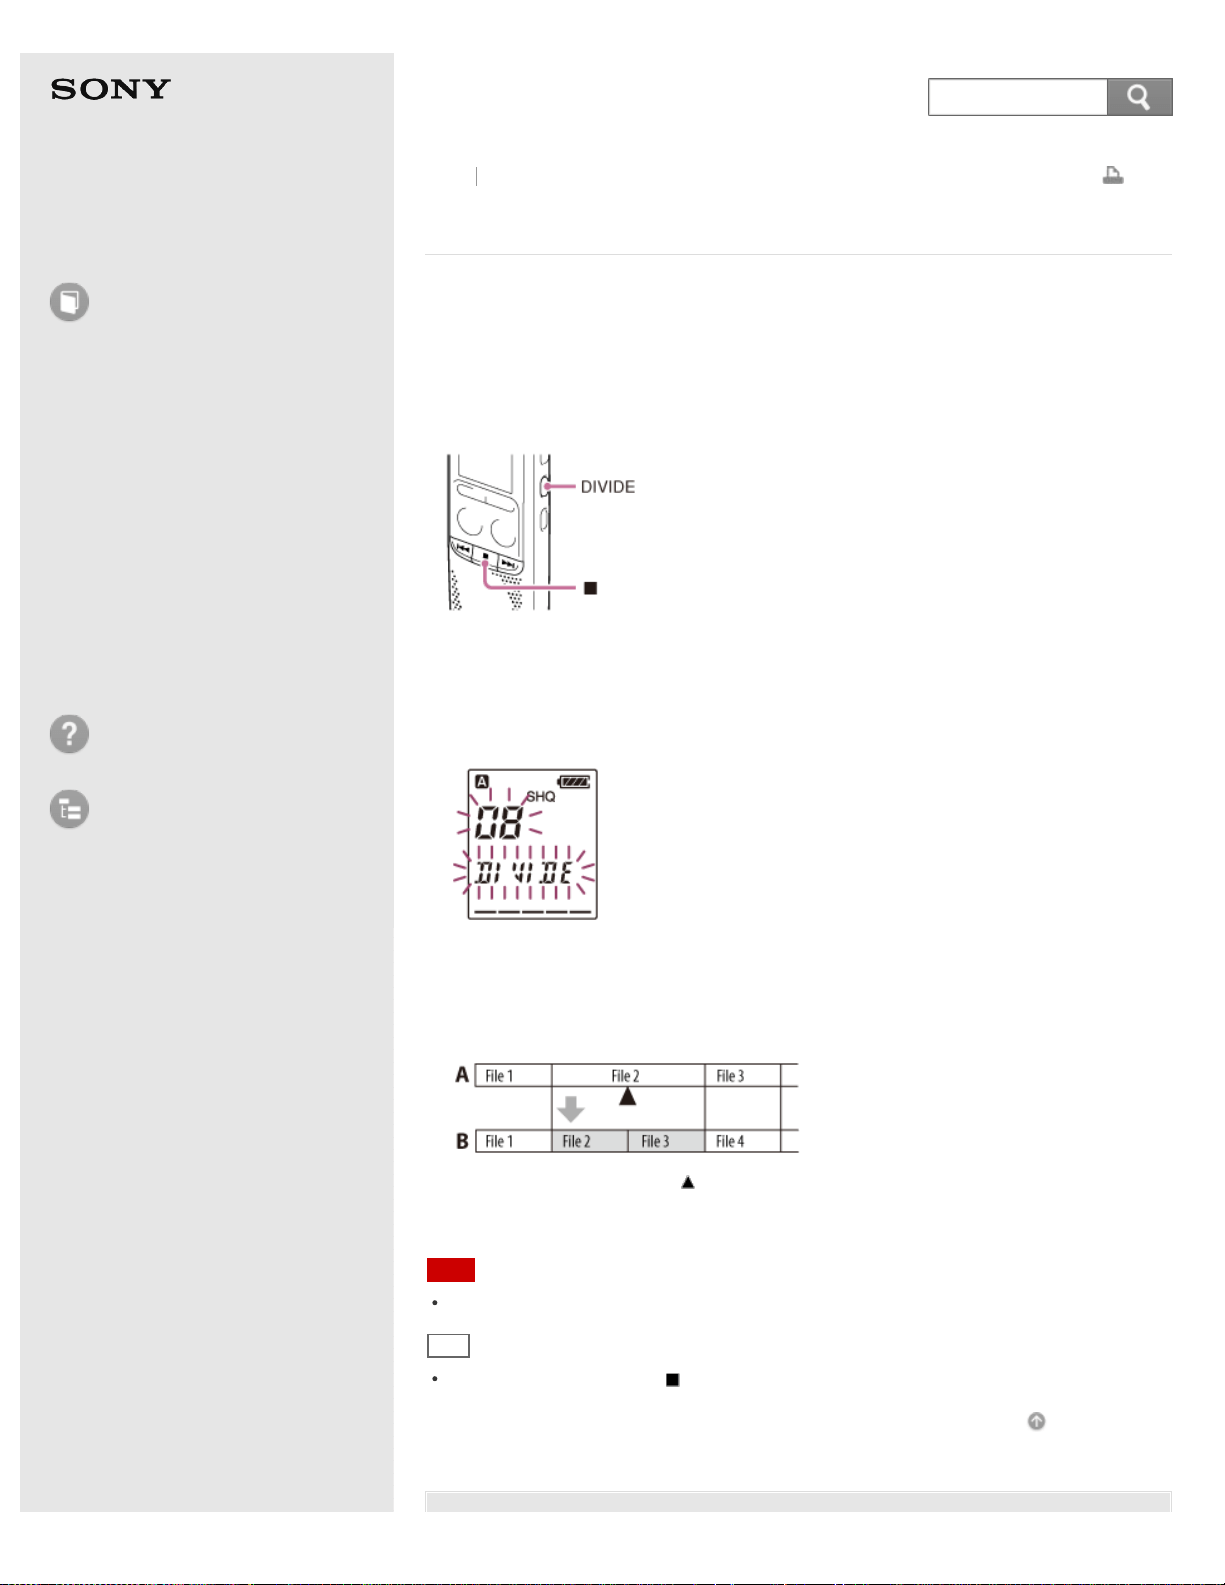
Help Guide
How to Use
Preparation
Recording
Playback
Editing
Menu
Specifications
Announcements
Troubleshooting
List of Topics
Print
IC Recorder
ICD-BX140
Dividing a file
You can divide a file, so that the file is divided into two parts and new file numbers
are added to the divided file names. By dividing a file, you can easily find the point
from which you want to play back when you make a long recording such as at a
meeting. You can divide a file until the total number of files in the folder reaches
the maximum number allowed.
1. Play back the file you want to divide.
2. Press DIVIDE at the point you want to divide.
The current file number and “DIVIDE” flash.
3. Press DIVIDE again.
“ACCESS” appears, and the new file number is added to the divided file. The file
numbers of the following files will increase by one.
A. Before dividing a file: is the position you want to divide.
B. After dividing a file: The file numbers are incremented.
Note
You cannot divide a protected file. To divide the file, release the protection first.
Hint
To cancel dividing, press (stop) in step 2.
Go to Page Top
Back Back to Top
106
Search

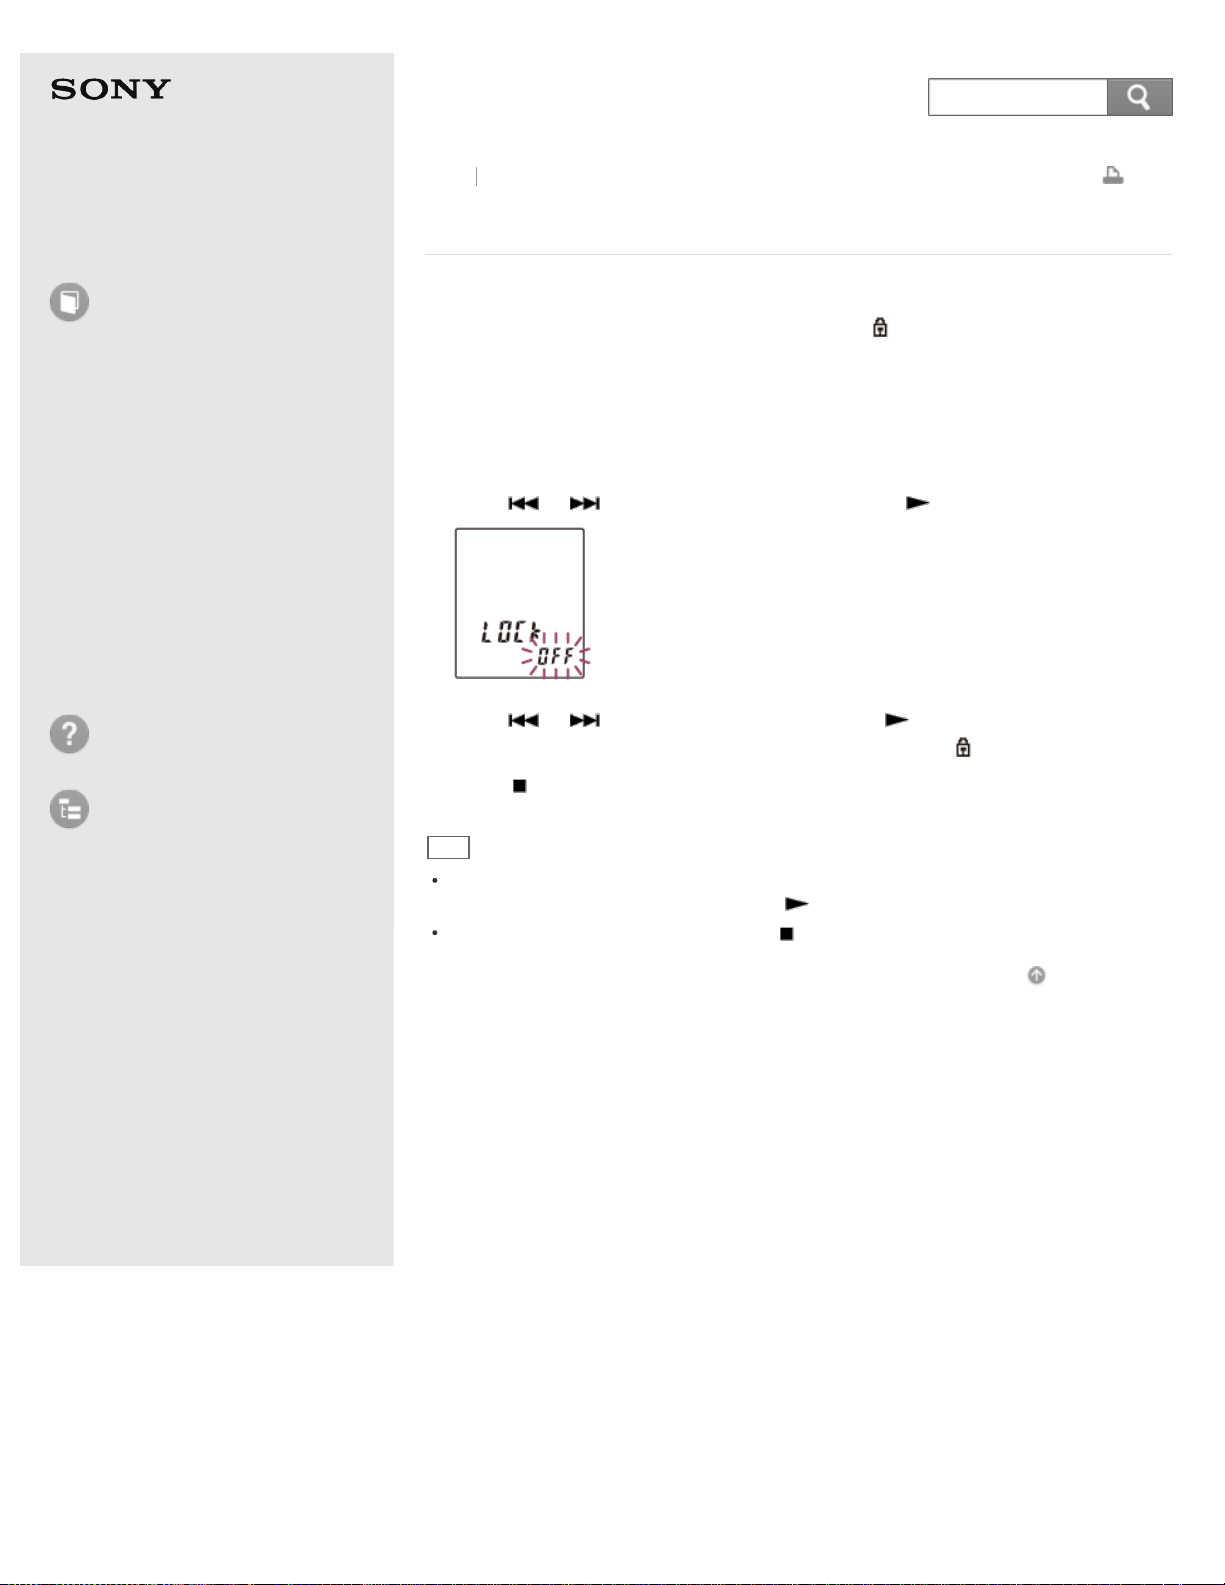
Help Guide
How to Use
Preparation
Recording
Playback
Editing
Menu
Specifications
Announcements
Troubleshooting
List of Topics
Print
IC Recorder
ICD-BX140
Protecting a file (LOCK)
To prevent a file from being accidentally erased or edited, you can protect an
important file. A protected file is marked with the
(protect) indicator and is
regarded as a read-only file you cannot erase or edit.
1. Display the file which you want to protect.
2. In the stop mode, press MENU to enter the menu mode.
3. Press
or to select “LOCK,” and then press PLAY/ENTER.
4. Press or to select “ON,” and then press PLAY/ENTER.
The file is protected. A protected file is marked with the
(protect) indicator.
5. Press
(stop) to exit the menu mode.
Hint
To release protection, select the protected file, and then proceed with steps 2
through 5. Select “OFF” and then press
PLAY/ENTER in step 4.
To cancel setting the protection, press (stop) in step 3.
Go to Page Top
Back Back to Top
4-530-204-12(1)
© 2016 Sony Corporation Notes on use
108
Search

Help Guide
How to Use
Preparation
Recording
Playback
Editing
Menu
Specifications
Announcements
Troubleshooting
List of Topics
Print
IC Recorder
ICD-BX140
Using the menu
1. Press MENU to enter the menu mode.
The menu mode window will be displayed.
2. Press or to select a menu item for which you want to make setting,
and then press
PLAY/ENTER.
3. Press
or to select the setting that you want to set, and then press
PLAY/ENTER.
4. Press
(stop) to exit the menu mode.
Note
If you do not press any button for 1 minute, the menu mode is automatically
canceled and the window will return to the normal display.
Hint
To return to the previous window, press MENU during menu mode.
To exit the menu mode, press (stop) or MENU.
Go to Page Top
Back Back to Top
4-530-204-12(1)
© 2016 Sony Corporation Notes on use
109
Search

Help Guide
How to Use
Preparation
Recording
Playback
Editing
Menu
Specifications
Announcements
Troubleshooting
List of Topics
Print
IC Recorder
ICD-BX140
Menu list
The list below shows the menu items and in which operation mode the IC recorder
can make changes to the menus.
MODE: Stop mode
Selecting the recording mode (MODE)
SENS: Stop mode, Recording mode
Selecting the microphone sensitivity (SENS)
LCF: Stop mode, Recording mode
Reducing noise when recording (LCF) – the Low Cut Filter function
VOR: Stop mode, Recording mode
Starting to record automatically in response to sound – the VOR function
REC-OP (ADD): Stop mode
Adding a recording to a previously recorded file (ADD)
REC-OP (OVER): Stop mode
Adding an overwrite recording during playback (OVER)
DPC: Stop mode, Playback mode
Adjusting the playback speed – the DPC (Digital Pitch Control) function
N-CUT: Stop mode, Playback mode
Reducing noise in the playback sound and making the human voice clearer (N-
CUT)– the noise cut function
EASY-S: Stop mode, Playback mode
Searching the desired point quickly (EASY-S) – the Easy search function
CONT: Stop mode, Playback mode
Playing back all files in a folder continuously (CONT) – the continuous play
DISPLAY: Stop mode, Playback mode, Recording mode
Selecting the display mode (DISPLAY)
SET DATE: Stop mode
Setting the clock using the menu
HOUR: Stop mode
Selecting the clock display (HOUR)
BEEP: Stop mode
Turning the beep sound on or off (BEEP)
LED: Stop mode
Turning the operation indicator on or off (LED)
MENU INIT: Stop mode
Resetting all menu items to the default setting (MENU INIT)
SYSTEM: Stop mode
Checking the system information (SYSTEM)
FORMAT: Stop mode
Formatting the memory (FORMAT)
Back
Back to Top
110
Search

ALL ERASE: Stop mode
Erasing all files in a folder (ERASE ALL)
MOVE: Stop mode
Moving a file to a different folder (MOVE)
LOCK: Stop mode
Protecting a file (LOCK)
ALARM: Stop mode
Playing back a file at a desired time with an alarm (ALARM)
*1
For the European models only
Go to Page Top
4-530-204-12(1)
© 2016 Sony Corporation Notes on use
111
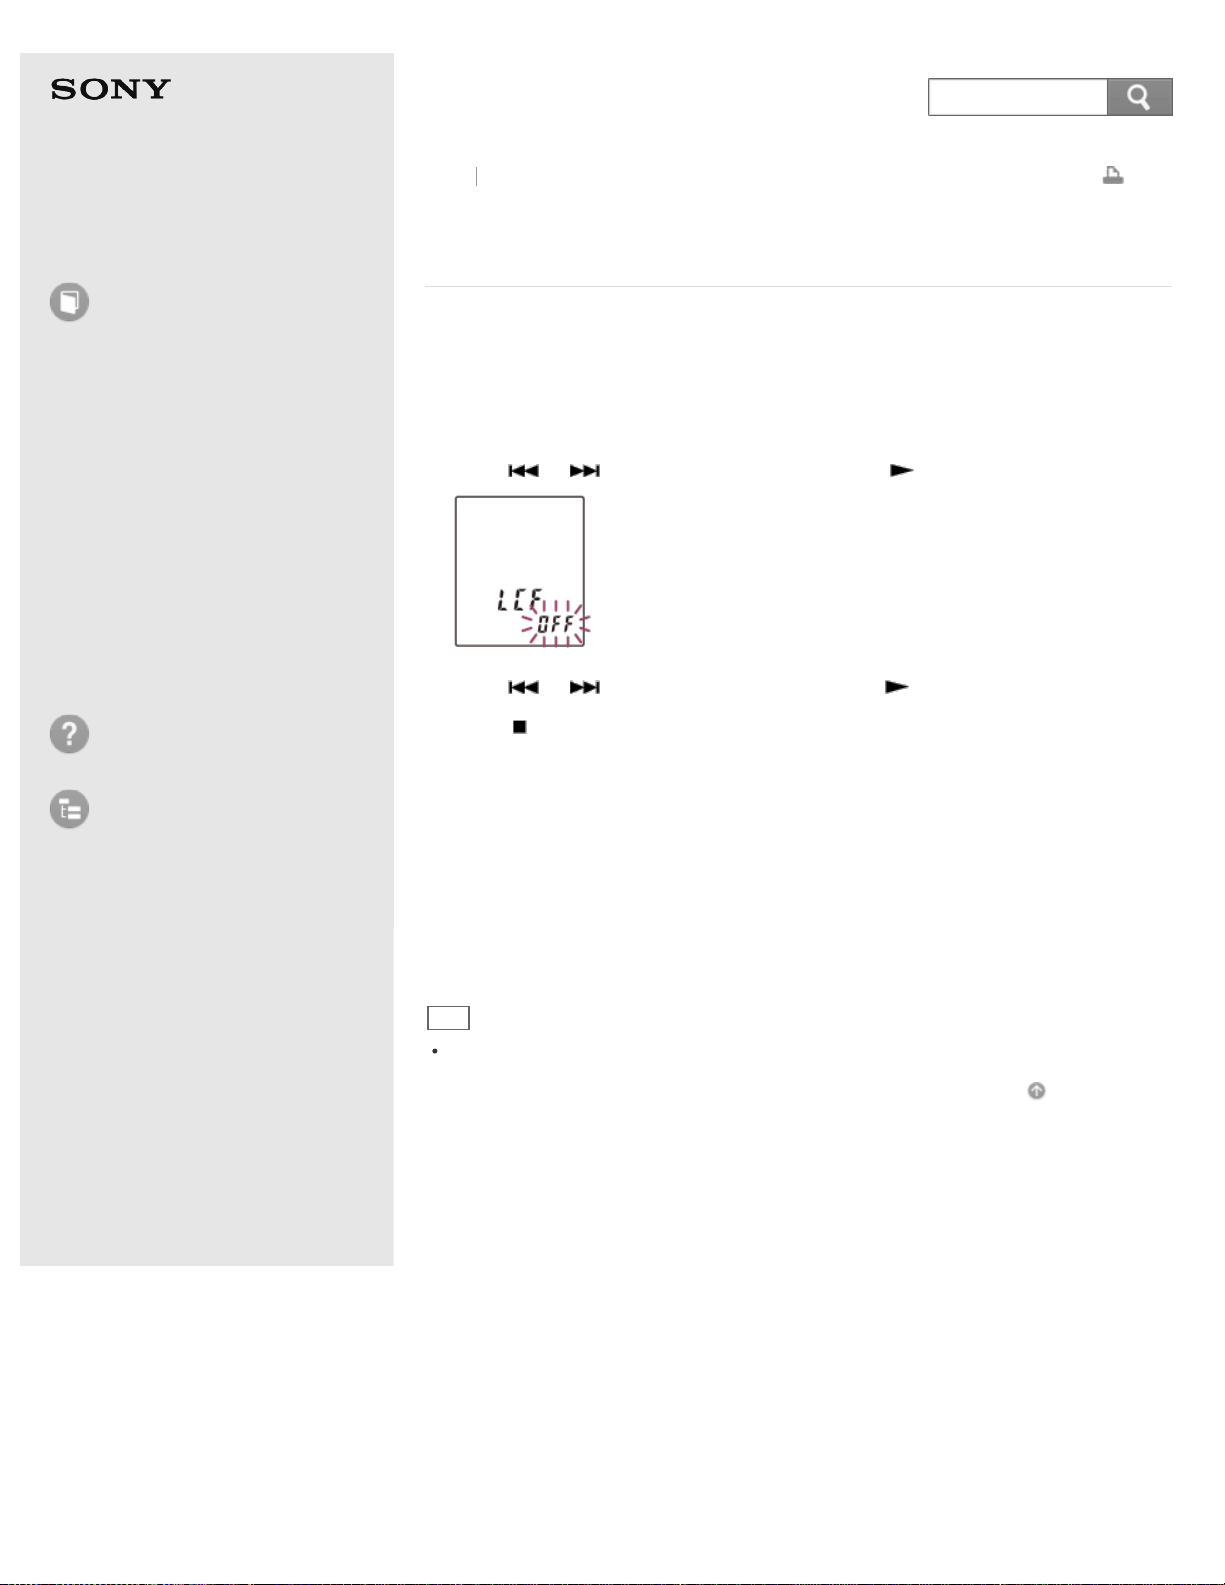
Help Guide
How to Use
Preparation
Recording
Playback
Editing
Menu
Specifications
Announcements
Troubleshooting
List of Topics
Print
IC Recorder
ICD-BX140
Reducing noise when recording (LCF) – the Low Cut
Filter function
You can record with less noise in the recorded sound by using the “LCF” (Low Cut
Filter) function.
1. In the stop or recording mode, press MENU to enter the menu mode.
2. Press
or to select “LCF,” and then press PLAY/ENTER.
3. Press or to select “ON,” and then press PLAY/ENTER.
4. Press
(stop) to exit the menu mode.
Descriptions of menu items
You can select one of the menu items available.
ON:
The IC recorder cuts low frequency noise such as projector machine sound or
roaring noise from the wind, etc.
OFF:
Cancels the low cut filter function.
(Initial setting)
Hint
Select “OFF” in step 3 to cancel the low cut filter function.
Go to Page Top
Back Back to Top
4-530-204-12(1)
© 2016 Sony Corporation Notes on use
112
Search
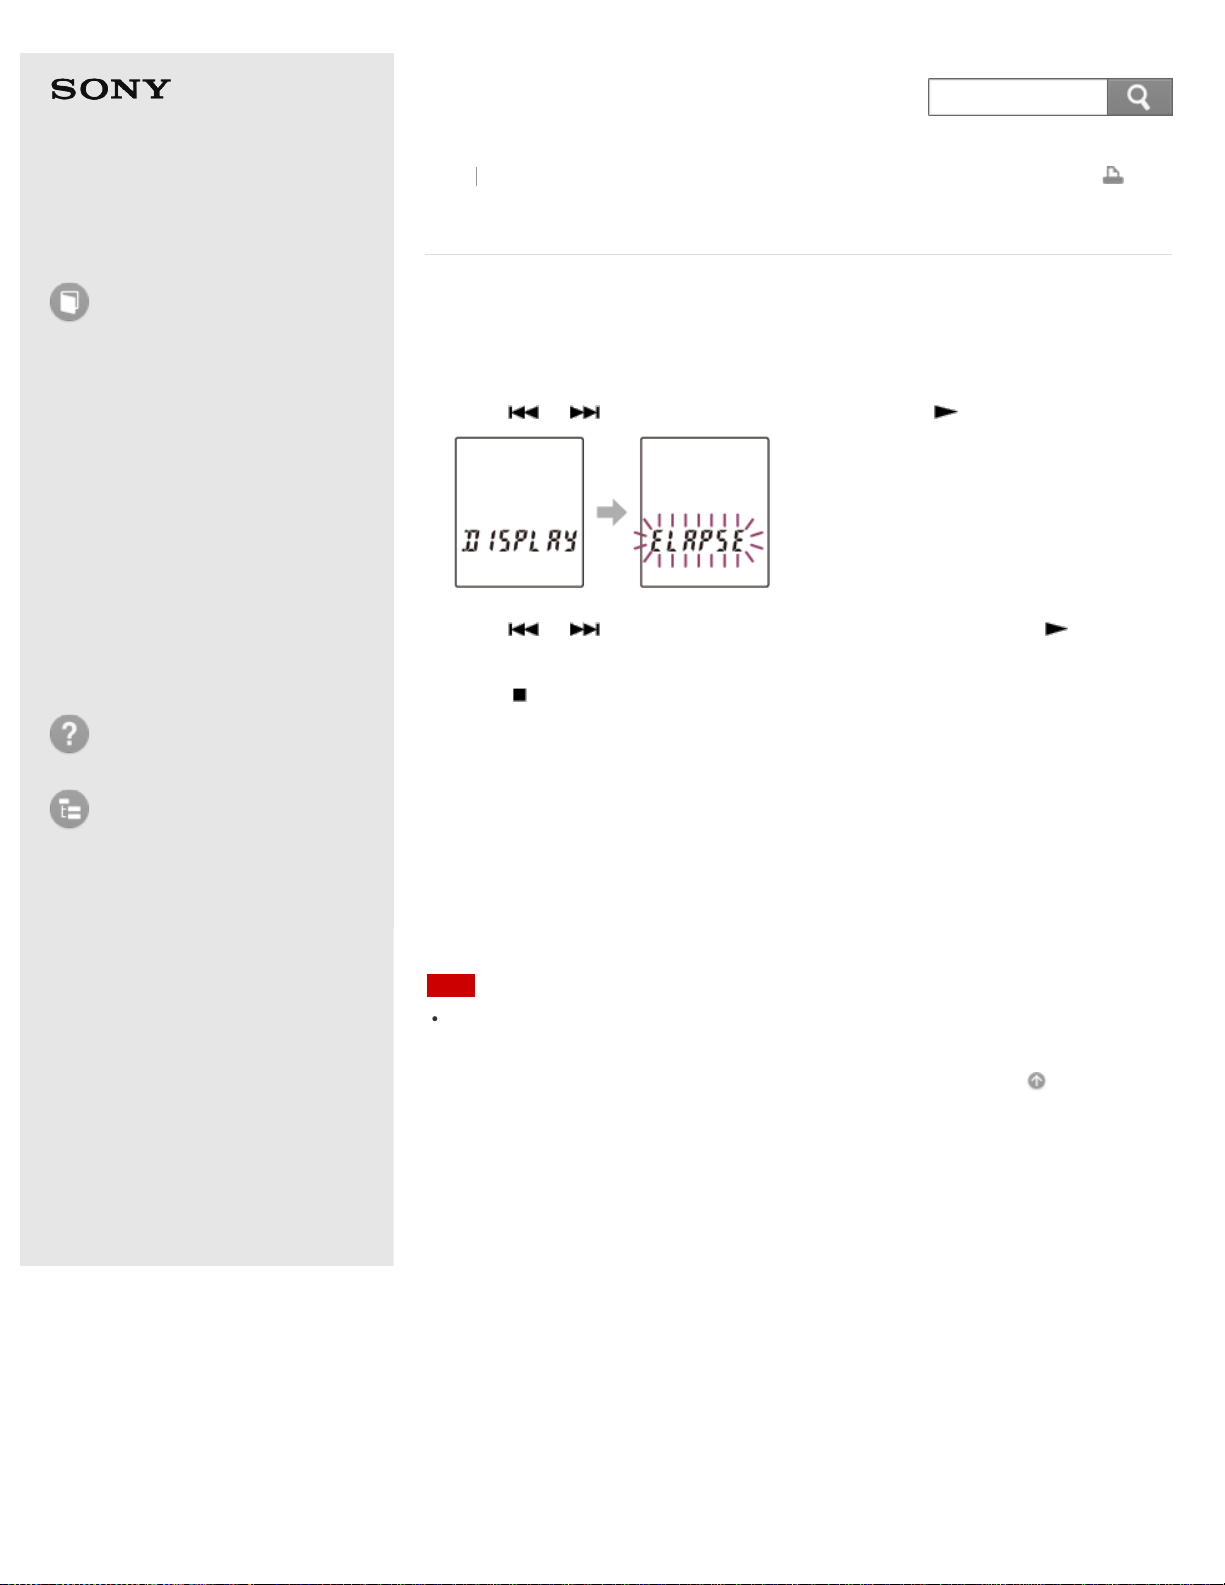
Help Guide
How to Use
Preparation
Recording
Playback
Editing
Menu
Specifications
Announcements
Troubleshooting
List of Topics
Print
IC Recorder
ICD-BX140
Selecting the display mode (DISPLAY)
You can set which information to be displayed in the display window.
1. Press MENU to enter the menu mode.
2. Press
or to select “DISPLAY,” and then press PLAY/ENTER.
3. Press or to select “ELAPSE” or “REMAIN,” and then press
PLAY/ENTER.
4. Press
(stop) to exit the menu mode.
Descriptions of menu items
You can select one of the menu items available.
ELAPSE:
Elapsed playback time of one file
(Initial setting)
REMAIN:
During stop or playback, the remaining time of one file
During recording, the available recording time
Note
When the IC recorder is in the stop mode, recorded date and time is displayed
regardless of the display setting.
Go to Page Top
Back Back to Top
4-530-204-12(1)
© 2016 Sony Corporation Notes on use
113
Search
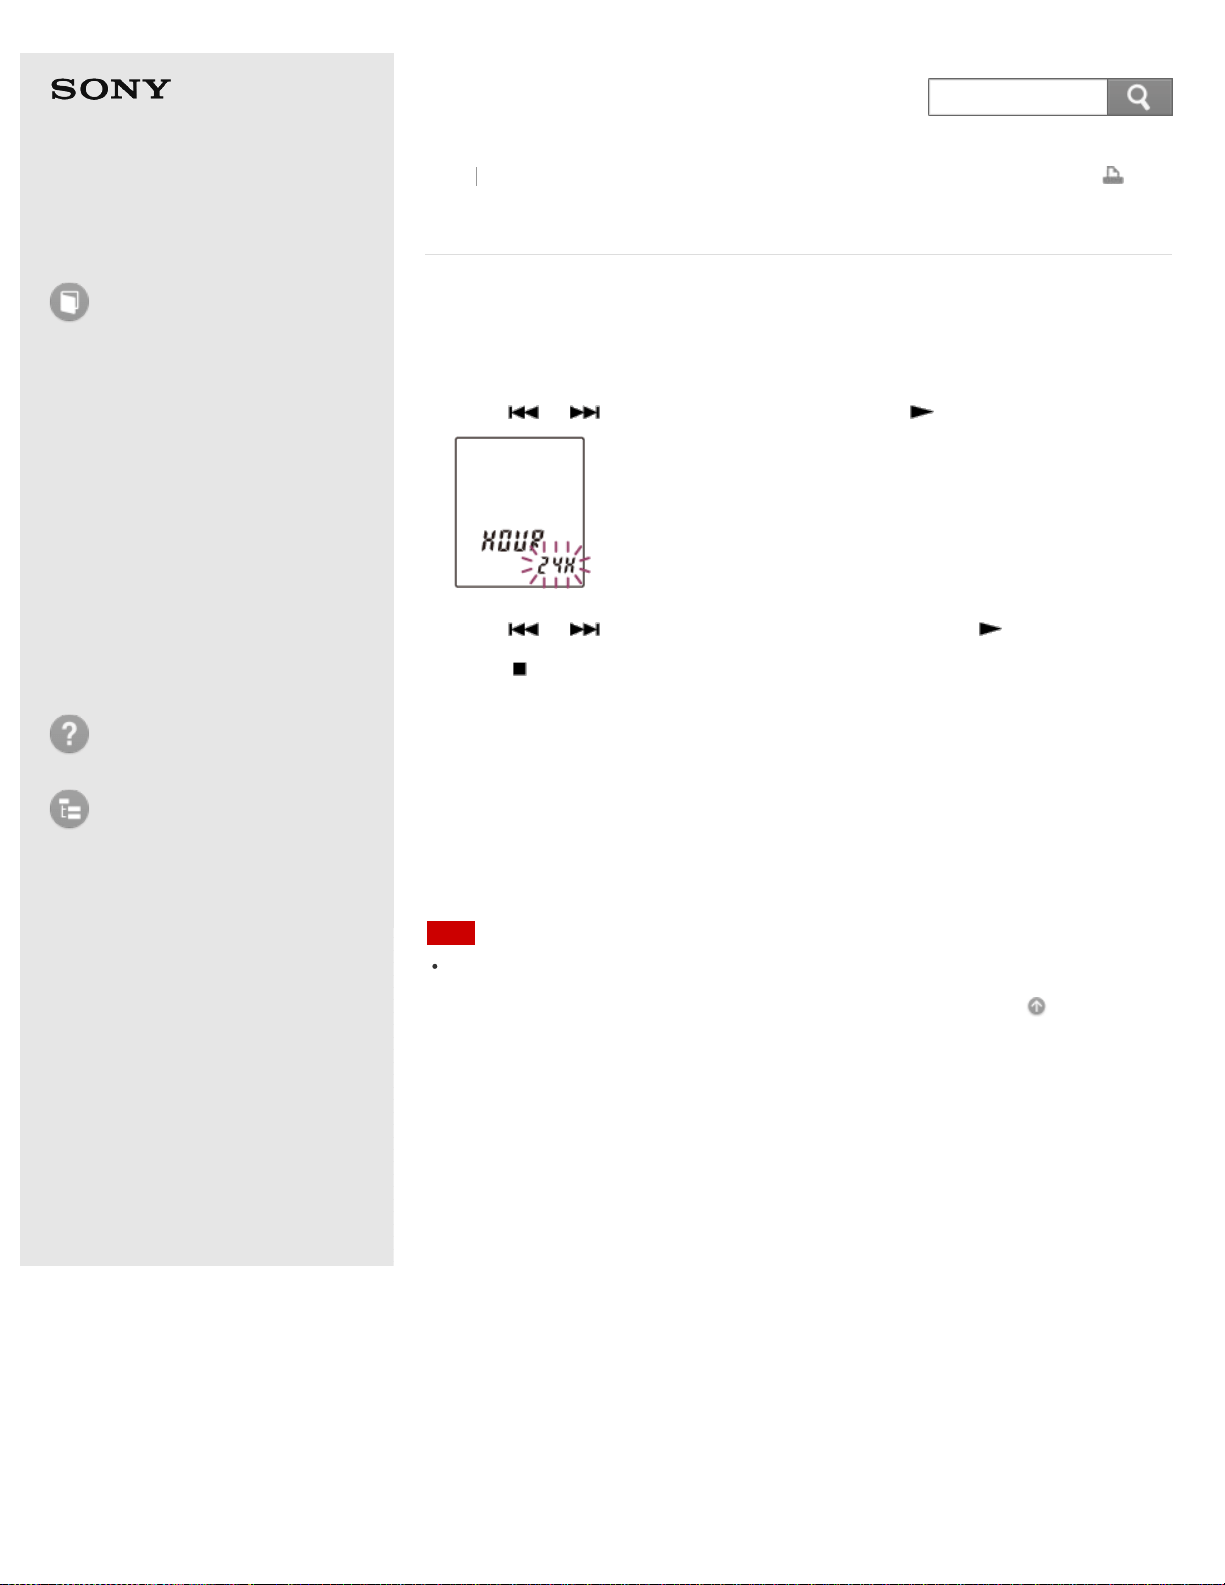
Help Guide
How to Use
Preparation
Recording
Playback
Editing
Menu
Specifications
Announcements
Troubleshooting
List of Topics
Print
IC Recorder
ICD-BX140
Selecting the clock display (HOUR)
You can select from 12 hour-clock or 24 hour-clock.
1. In the stop mode, press MENU to enter the menu mode.
2. Press
or to select “HOUR,” and then press PLAY/ENTER.
3. Press or to select “12H” or “24H,” and then press PLAY/ENTER.
4. Press
(stop) to exit the menu mode.
Descriptions of menu items
You can select one of the menu items available.
12H:
12:00AM = midnight, 12:00PM = noon
24H:
0:00 = midnight, 12:00 = noon
(Initial setting)
Note
The default setting differs depending on the area you purchased your IC recorder.
Go to Page Top
Back Back to Top
4-530-204-12(1)
© 2016 Sony Corporation Notes on use
114
Search

Help Guide
How to Use
Preparation
Recording
Playback
Editing
Menu
Specifications
Announcements
Troubleshooting
List of Topics
Print
IC Recorder
ICD-BX140
Turning the beep sound on or off (BEEP)
You can turn the operation beep on or off.
1. In the stop mode, press MENU to enter the menu mode.
2. Press
or to select “BEEP,” and then press PLAY/ENTER.
3. Press or to select “ON” or “OFF,” and then press PLAY/ENTER.
4. Press
(stop) to exit the menu mode.
Descriptions of menu items
You can select one of the menu items available.
ON:
A beep will sound to indicate that an operation has been accepted or an error has
occurred.
(Initial setting)
OFF:
No beep sound will be heard.
Note
The alarm sounds even if you set “BEEP” to “OFF” in the menu.
Go to Page Top
Back Back to Top
4-530-204-12(1)
© 2016 Sony Corporation Notes on use
115
Search

Help Guide
How to Use
Preparation
Recording
Playback
Editing
Menu
Specifications
Announcements
Troubleshooting
List of Topics
Print
IC Recorder
ICD-BX140
Turning the operation indicator on or off (LED)
This setting turns the operation indicator on or off during operation.
1. In the stop mode, press MENU to enter the menu mode.
2. Press
or to select “LED,” and then press PLAY/ENTER.
3. Press or to select “ON” or “OFF,” and then press PLAY/ENTER.
4. Press
(stop) to exit the menu mode.
Descriptions of menu items
You can select one of the menu items available.
ON:
During recording or playback, the operation indicator lights or flashes.
(Initial setting)
OFF:
The operation indicator does not light or flash, even during operation.
Go to Page Top
Back Back to Top
4-530-204-12(1)
© 2016 Sony Corporation Notes on use
116
Search

Help Guide
How to Use
Preparation
Recording
Playback
Editing
Menu
Specifications
Announcements
Troubleshooting
List of Topics
Print
IC Recorder
ICD-BX140
Resetting all menu items to the default setting
(MENU INIT)
You can re-set all menu items to the default setting.
However, the following menu items cannot be initialized.
SET DATE (clock setting)
LOCK (protected files)
ALARM
1. In the stop mode, press MENU to enter the menu mode.
2. Press
or to select “MENU INIT,” and then press PLAY/ENTER.
3. Press or to select “YES,” and then press PLAY/ENTER.
4. Press
(stop) to exit the menu mode.
Hint
To cancel the operation, select “NO” in step 3.
Go to Page Top
Back Back to Top
4-530-204-12(1)
© 2016 Sony Corporation Notes on use
117
Search
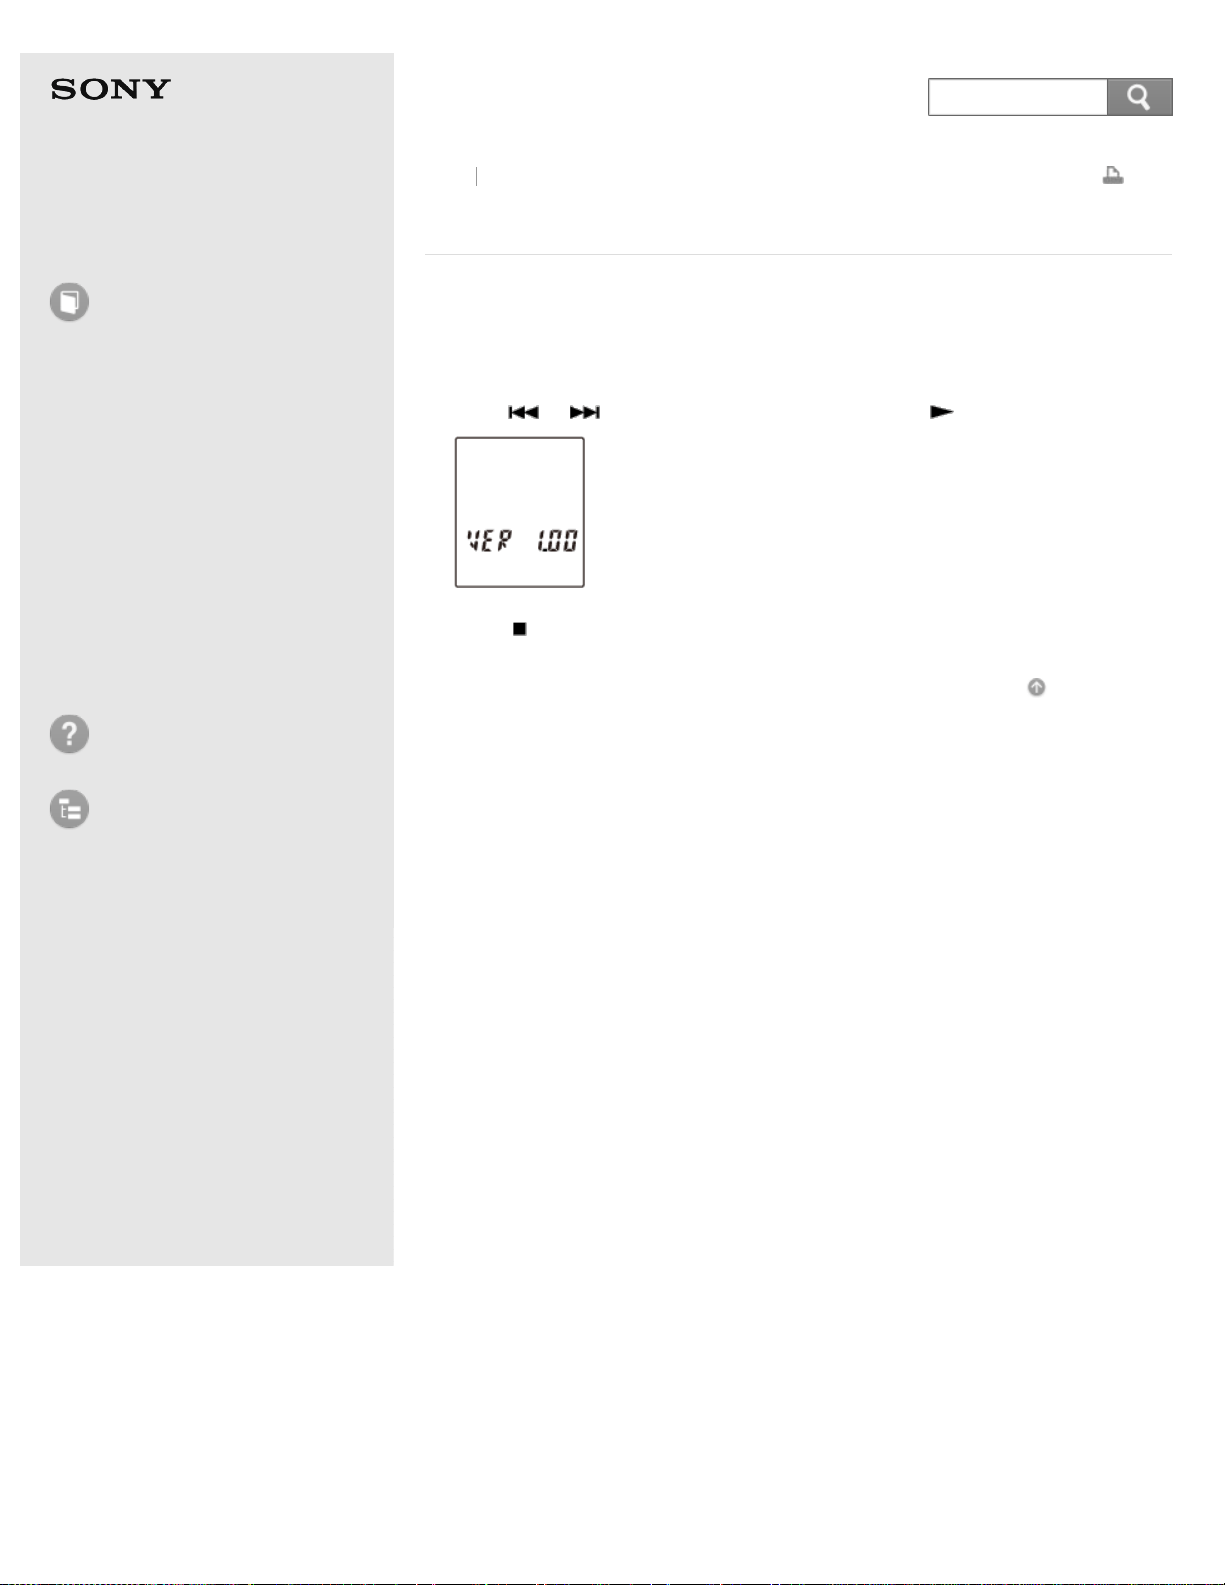
Help Guide
How to Use
Preparation
Recording
Playback
Editing
Menu
Specifications
Announcements
Troubleshooting
List of Topics
Print
IC Recorder
ICD-BX140
Checking the system information (SYSTEM)
You can check the system information such as the version number of the software.
1. In the stop mode, press MENU to enter the menu mode.
2. Press
or to select “SYSTEM,” and then press PLAY/ENTER.
3. Press (stop) to exit the menu mode.
Go to Page Top
Back Back to Top
4-530-204-12(1)
© 2016 Sony Corporation Notes on use
118
Search
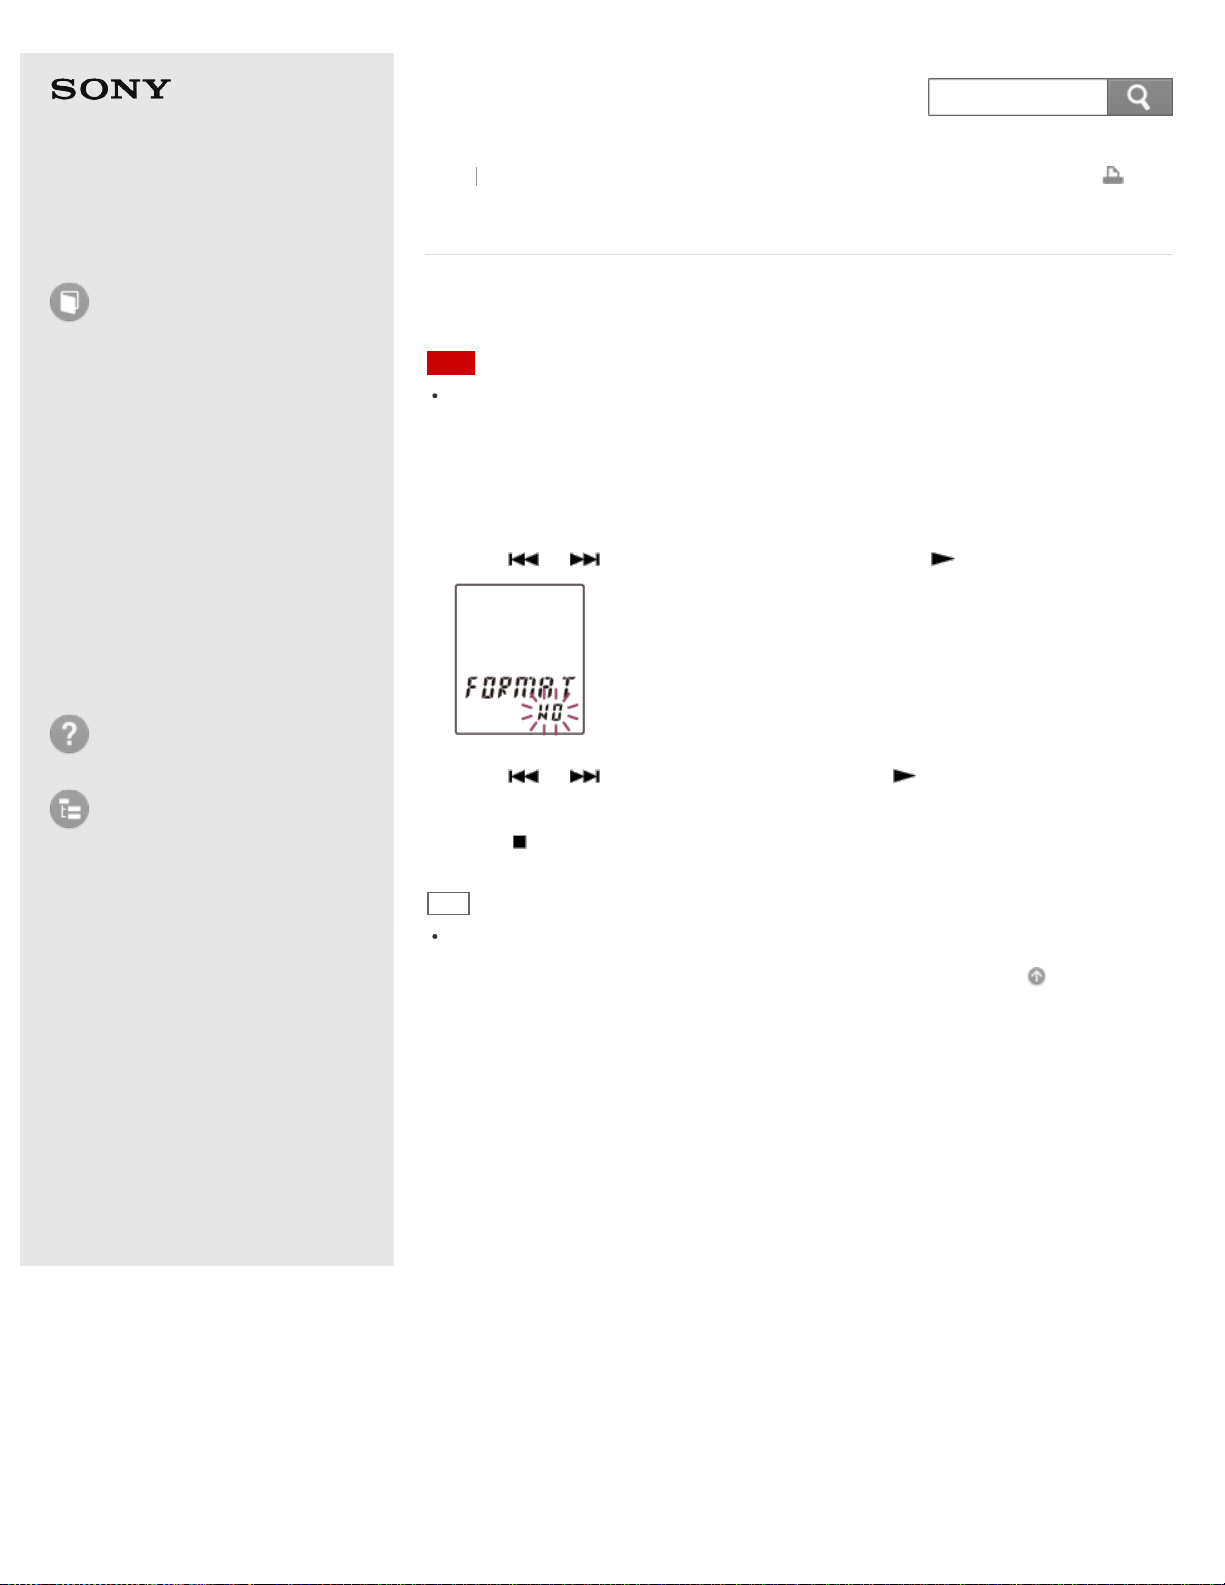
Help Guide
How to Use
Preparation
Recording
Playback
Editing
Menu
Specifications
Announcements
Troubleshooting
List of Topics
Print
IC Recorder
ICD-BX140
Formatting the memory (FORMAT)
You can format the built-in memory, erasing all the data in the memory and
resetting the folder structure to its default status.
Note
If you format the built-in memory, all data stored there will be erased. (Protected
files and the Help Guide will also be erased.) Note that once the files are erased, you
cannot retrieve them.
1. In the stop mode, press MENU to enter the menu mode.
2. Press
or to select “FORMAT,” and then press PLAY/ENTER.
3. Press or to select “YES,” and then press PLAY/ENTER.
“ACCESS” appears and the built-in memory will be formatted.
4. Press
(stop) to exit the menu mode.
Hint
To cancel formatting the built-in memory, select “NO” in step 3.
Go to Page Top
Back Back to Top
4-530-204-12(1)
© 2016 Sony Corporation Notes on use
119
Search
Help Guide
How to Use
Preparation
Recording
Playback
Editing
Menu
Specifications
Announcements
Troubleshooting
List of Topics
Print
IC Recorder
ICD-BX140
Design and specifications
Capacity (User available capacity) (*)
4 GB (approx. 3.50 GB = 3,758,096,384 Byte)
A small amount of the built-in memory is used for file management and therefore
not available for user storage.
*
When the built-in memory is formatted with the IC recorder.
Maximum number of folders (for a drive)
5 folders
Maximum number of files (for a folder)
99 files
Maximum number of files (for a drive)
495 files (When 5 folders are contained in a drive.)
Frequency range
SHQ: 75 Hz - 15,000 Hz
HQ: 75 Hz - 15,000 Hz
SP: 75 Hz - 3,000 Hz
LP: 100 Hz - 3,000 Hz
Microphone
Approx. 6 mm (1/4 in.) dia. monaural, omnidirecitonal
Speaker
Approx. 28 mm (1 1/8 in.) dia.
Input/Output
Microphone jack (minijack, stereo)
input for plug in power
Headphone jack (minijack, stereo)
output for 16 Ω impedance headphones
Playback speed control (DPC)
2.00 times - 0.50 times
Power output
300 mW
Power requirements
Two LR03 (size AAA) alkaline batteries (supplied): 3.0 V DC
Two NH-AAA rechargeable batteries (not supplied): 2.4 V DC
Operating temperature
5 °C - 35 °C (41 °F to 95 °F)
Dimensions (w/h/d) (not incl. projecting parts and controls) (JEITA) (*1)
Approx. 38.5 mm × 115.2 mm × 21.3 mm (1 9/16 in. × 4 5/8 in. × 27/32 in.)
Back
Back to Top
120
Search

Mass (JEITA) (*1)
Approx. 72 g (2 1/2 oz) including two LR03 (size AAA) alkaline batteries
Supplied accessories
See “Quick Start Guide” supplied with your IC recorder.
Design and specifications are subject to change without notice.
*1
Measured value by the standard of JEITA (Japan Electronics and Information Technology
Industries Association)
Maximum recording time (*1)
The maximum recording time of all the folders is as follows.
SHQ (Super high quality mode)
43 h. 25 m.
HQ (High quality mode)
65 h. 10 m.
SP (Standard play mode)
1,043 h.
LP (Long play mode)
4,175 h.
(h.: hours/m.: minutes)
*1
When you are going to record continuously for a long time, you may have to replace the
batteries with new ones in the midst of recording. For details on the battery life, see “Battery
life.”
Go to Page Top
4-530-204-12(1)
© 2016 Sony Corporation Notes on use
121
Help Guide
How to Use
Preparation
Recording
Playback
Editing
Menu
Specifications
Announcements
Troubleshooting
List of Topics
Print
IC Recorder
ICD-BX140
Battery life
When using Sony LR03 (SG) (size AAA) alkaline batteries (*1)
SHQ (Super high quality mode)
Recording: Approx. 26 h.
Playback through speaker (*2): Approx. 13 h.
Playback using the headphones: Approx. 32 h.
HQ (High quality mode)
Recording: Approx. 28 h.
Playback through speaker (*2): Approx. 14 h.
Playback using the headphones: Approx. 34 h.
SP (Standard play mode)
Recording: Approx. 45 h.
Playback through speaker (*2): Approx. 16 h.
Playback using the headphones: Approx. 48 h.
LP (Long play mode)
Recording: Approx. 30 h.
Playback through speaker (*2): Approx. 16 h.
Playback using the headphones: Approx. 50 h.
*1
Measured value by the standard of JEITA (Japan Electronics and Information Technology
Industries Association). The battery life may shorten depending on how you operate the IC
recorder.
*2
When playing back music through the internal speaker with the volume level set to 28.
When using Sony NH-AAA rechargeable batteries (*1)
SHQ (Super high quality mode)
Recording: Approx. 18 h.
Playback through speaker (*2): Approx. 10 h.
Playback using the headphones: Approx. 22 h.
HQ (High quality mode)
Recording: Approx. 20 h.
Playback through speaker (*2): Approx. 10 h.
Playback using the headphones: Approx. 22 h.
SP (Standard play mode)
Recording: Approx. 29 h.
Playback through speaker (*2): Approx. 11 h.
Playback using the headphones: Approx. 32 h.
LP (Long play mode)
Recording: Approx. 20 h.
Playback through speaker (*2): Approx. 11 h.
Playback using the headphones: Approx. 32 h.
*1
Measured value by the standard of JEITA (Japan Electronics and Information Technology
Back Back to Top
122
Search


Help Guide
How to Use
Preparation
Recording
Playback
Editing
Menu
Specifications
Announcements
Troubleshooting
List of Topics
Print
IC Recorder
ICD-BX140
Precautions
On power
Operate the unit only on 3.0 V or 2.4 V DC. Use two LR03 (size AAA) alkaline
batteries or two NH-AAA rechargeable batteries.
On safety
Do not operate the unit while driving, cycling or operating any motorized vehicle.
On handling
Do not leave the unit in a location near heat sources, or in a place subject to
direct sunlight, excessive dust or mechanical shock.
Should any solid object or liquid fall into the unit, remove the batteries and
have the unit checked by qualified personnel before operating it any further.
Be careful not to allow water to splash on the unit. The unit is not waterproof.
In particular, be careful in the following situations.
When you have the unit in your pocket and go to the bathroom, etc.
When you bend down, the unit may drop into the water and may get wet.
When you use the unit in an environment where the unit is exposed to rain,
snow, or humidity.
In circumstances where you get sweaty. If you touch the unit with wet hands or if
you put the unit in the pocket of sweaty clothes, the unit may get wet.
You may feel pain in your ears if you use the headphones when the ambient air
is very dry. This is not because of a malfunction of the headphones, but
because of static electricity accumulated in your body. You can reduce static
electricity by wearing non-synthetic clothes that prevent the emergence of
static electricity.
On noise
Noise may be heard when the unit is placed near an AC power source, a
fluorescent lamp or a mobile phone during recording or playback.
Noise may be recorded when an object, such as your finger, etc., rubs or
scratches the unit during recording.
On maintenance
To clean the exterior, use a soft cloth slightly moistened in water. Then use a soft
dry cloth to wipe the exterior. Do not use alcohol, benzine or thinner.
If you have any questions or problems concerning your unit, please consult your
nearest Sony dealer.
Backup recommendations
Back Back to Top
124
Search

Help Guide
How to Use
Preparation
Recording
Playback
Editing
Menu
Specifications
Announcements
Troubleshooting
List of Topics
Print
IC Recorder
ICD-BX140
Safety regulations
WARNING
Do not expose the batteries (battery pack or batteries installed) to excessive heat
such as sunshine, fire or the like for a long time.
CAUTION
Risk of explosion if battery is replaced by an incorrect type. Dispose of used
batteries according to the instructions.
For customers in Europe
Disposal of waste batteries and electrical and electronic
equipment (applicable in the European Union and other European
countries with separate collection systems)
This symbol on the product, the battery or on the packaging indicates that the
product and the battery shall not be treated as household waste. On certain
batteries this symbol might be used in combination with a chemical symbol. The
chemical symbols for mercury (Hg) or lead (Pb) are added if the battery contains
more than 0.0005% mercury or 0.004% lead. By ensuring these products and
batteries are disposed of correctly, you will help prevent potentially negative
consequences for the environment and human health which could otherwise be
caused by inappropriate waste handling. The recycling of the materials will help to
conserve natural resources.
In case of products that for safety, performance or data integrity reasons require a
permanent connection with an incorporated battery, this battery should be
replaced by qualified service staff only. To ensure that the battery and the
electrical and electronic equipment will be treated properly, hand over these
products at end-of-life to the applicable collection point for the recycling of
electrical and electronic equipment. For all other batteries, please view the section
on how to remove the battery from the product safely. Hand the battery over to
the applicable collection point for the recycling of waste batteries. For more
detailed information about recycling of this product or battery, please contact your
local Civic Office, your household waste disposal service or the shop where you
purchased the product or battery.
Notice for the customers: the following information is only
applicable to equipment sold in the countries applying EU
directives
This product has been manufactured by or on behalf of Sony Corporation, 1-7-1
Konan Minato-ku Tokyo, 108-0075 Japan. Inquiries related to product compliance
based on European Union legislation shall be addressed to the authorized
Back Back to Top
126
Search

representative, Sony Belgium, bijkantoor van Sony Europe Limited, Da Vincilaan 7-
D1, 1935 Zaventem, Belgium. For any service or guarantee matters, please refer
to the addresses provided in the separate service or guarantee documents.
Go to Page Top
4-530-204-12(1)
© 2016 Sony Corporation Notes on use
127
Help Guide
How to Use
Preparation
Recording
Playback
Editing
Menu
Specifications
Announcements
Troubleshooting
List of Topics
Print
IC Recorder
ICD-BX140
Listening for a Lifetime
Selecting fine audio equipment such as the unit you've just purchased is only the
start of your musical enjoyment. Now it's time to consider how you can maximize
the fun and excitement your equipment offers. This manufacturer, the Consumer
Electronics Association (CEA)
®
and the American Speech- Language-Hearing
Association (ASHA) want you to get the most out of your equipment by playing it
at a safe level; a level that lets the sound come through clearly without annoying
blaring or distortion and, most importantly, without damaging your sensitive
hearing.
Sound can be deceiving. Over time your hearing “comfort level” adapts to higher
volumes of sound. So what sounds “normal” can actually be loud and harmful to
your hearing. Guard against this by setting your equipment at a safe level BEFORE
your hearing adapts.
TO ESTABLISH A SAFE LEVEL
Set your volume control to the lowest level where you can hear the music
comfortably and clearly. Prolonged exposure to anything over 85 decibels can
cause gradual hearing loss.
Once you have established a sound level where you can hear the audio
comfortably, clearly and without distortion, set the dial and leave it there.
See if your music player has a volume limiter that allows you to set a safe
listening level by establishing a maximum volume level on your player. This is a
great solution for parents to ensure their children listen at a safe level.
Limit listening time to give your hearing “quiet breaks.”
BE SURE TO OBSERVE THE FOLLOWING GUIDELINES WHEN
WEARING YOUR HEADPHONES OR EARBUDS
Do not turn up the volume so high that you can't hear sounds around you.
Do not use headphones or earbuds while operating a motorized vehicle; it may
create a traffic hazard and is illegal in many areas.
Used wisely, your new sound equipment will provide years of fun and enjoyment.
Since hearing damage from loud noise is often undetectable until it is too late, this
manufacturer, CEA and ASHA recommend that you avoid prolonged exposure to
excessive noise. The following list of sound levels is included for your information
so that you can better protect your hearing.
DECIBEL LEVEL EXAMPLES:
30 Whisper
40 Quiet room
50 Moderate rainfall
60 Normal conversation
70 Busy traffic, vacuum cleaner
Back
Back to Top
128
Search

80 Alarm clock
CONSTANT EXPOSURE TO THESE NOISES CAN BE DANGEROUS:
90 Lawn mower, motorcycle
100 Chain saw
110 Rock concert
120 Jet plane takeoff
130 Jackhammer
140 Firecrackers
This information courtesy of the American Speech-Language-Hearing Association
(ASHA), the national professional, scientific and credentialing association for more
than 135,000 audiologists, speech-language pathologists, and speech, language
and hearing scientists. For information on protection against noise-induced hearing
loss, call the ASHA Action Center (800-638-8255), Monday through Friday, 8:30
a.m. to 5 p.m. To find an audiologist in your area, visit www.asha.org/findpro.
Parents can find helpful information about how to protect their children's hearing
and how to teach them about safe listening at www.listentoyourbuds.org, an ASHA
award-winning public education campaign sponsored in part by CEA.
A safety tip from the Consumer Electronics Association, 1919 South Eads Street,
Arlington, VA 22202 and the American Speech-Language-Hearing Association,
2200 Research Boulevard, Rockville, MD 20850.
Go to Page Top
4-530-204-12(1)
© 2016 Sony Corporation Notes on use
129
Help Guide
How to Use
Preparation
Recording
Playback
Editing
Menu
Specifications
Announcements
Troubleshooting
List of Topics
Print
IC Recorder
ICD-BX140
Trademarks
MPEG Layer-3 audio coding technology and patents licensed from Fraunhofer
IIS and Thomson.
All other trademarks and registered trademarks are trademarks or registered
trademarks of their respective holders. Furthermore, “™” and “®” are not
mentioned in each case in this Help Guide.
Go to Page Top
Back Back to Top
4-530-204-12(1)
© 2016 Sony Corporation Notes on use
130
Search
Help Guide
How to Use
Preparation
Recording
Playback
Editing
Menu
Specifications
Announcements
Troubleshooting
List of Topics
Print
IC Recorder
ICD-BX140
Notice for users
All rights reserved. This Help Guide or the software described herein, in whole or
in part, may not be reproduced, translated or reduced to any machine readable
form without prior written approval from Sony Corporation.
IN NO EVENT SHALL SONY CORPORATION BE LIABLE FOR ANY INCIDENTAL,
CONSEQUENTIAL OR SPECIAL DAMAGES, WHETHER BASED ON TORT, CONTRACT,
OR OTHERWISE, ARISING OUT OF OR IN CONNECTION WITH THIS HELP GUIDE,
THE SOFTWARE OR OTHER INFORMATION CONTAINED HEREIN OR THE USE
THEREOF.
Sony Corporation reserves the right to make any modification to this Help Guide or
the information contained herein at any time without notice.
Display windows in this Help Guide may differ from what are actually displayed
on your IC recorder depending on the area you purchased the IC recorder and
the settings you have made.
What you record is for personal enjoyment and use only. Copyright laws
prohibit other forms of use without the permission of the copyright holders.
Go to Page Top
Back Back to Top
4-530-204-12(1)
© 2016 Sony Corporation Notes on use
131
Search
Help Guide
How to Use
Preparation
Recording
Playback
Editing
Menu
Specifications
Announcements
Troubleshooting
List of Topics
Print
IC Recorder
ICD-BX140
Customer support websites
Please access the following support home page to get the support information
about your IC recorder:
For customers in Europe:
http://support.sony-europe.com/DNA
For customers in Latin America:
http://www.sony-latin.com/index.crp
For customers in the U.S.A.:
http://www.sony.com/recordersupport
For customers in Canada:
http://www.sony.ca/ElectronicsSupport
http://fr.sony.ca/ElectronicsSupport
For customers in other countries/regions:
http://www.sony-asia.com/support
Note that recorded files may be deleted during service or repair work.
Go to Page Top
Back Back to Top
4-530-204-12(1)
© 2016 Sony Corporation Notes on use
132
Search

Help Guide
How to Use
Troubleshooting
IC recorder operations
Messages
System limitations
List of Topics
Print
IC Recorder
ICD-BX140
Troubleshooting
Before taking the IC recorder for repair, check it as follows.
Check the items listed in “Troubleshooting.”
Re-insert the batteries.
Some problems may be solved when you re-insert the batteries.
Charge the batteries if you are using rechargeable batteries.
Some problems may be solved when the batteries are charged.
Should any problem persist after you have made these checks, consult your
nearest Sony dealer.
Please access the following support home page to get the support information
about your IC recorder:
For customers in Europe:
http://support.sony-europe.com/DNA
For customers in Latin America:
http://www.sony-latin.com/index.crp
For customers in the U.S.A.:
http://www.sony.com/recordersupport
For customers in Canada:
http://www.sony.ca/ElectronicsSupport
http://fr.sony.ca/ElectronicsSupport
For customers in other countries/regions:
http://www.sony-asia.com/support
Note that recorded files may be deleted during service or repair work.
Go to Page Top
Back Back to Top
4-530-204-12(1)
© 2016 Sony Corporation Notes on use
133
Search
Help Guide
How to Use
Troubleshooting
IC recorder operations
Messages
System limitations
List of Topics
Print
IC Recorder
ICD-BX140
The recorded file is noisy and you want to record
with less noise in your recording.
If you set “LCF” in the menu to “ON” before recording, you can record a file
with less noise from the recording environment.
Go to Page Top
Related Topic
Reducing noise when recording (LCF) – the Low Cut Filter function
Go to Page Top
Back Back to Top
4-530-204-12(1)
© 2016 Sony Corporation Notes on use
134
Search

Help Guide
How to Use
Troubleshooting
IC recorder operations
Messages
System limitations
List of Topics
Print
IC Recorder
ICD-BX140
A rustling noise is recorded.
A rustling noise may be recorded if the IC recorder is rubbed by your hand or
clothing while you are recording.
If possible, please do not touch the IC recorder until you finish recording.
Go to Page Top
Back Back to Top
4-530-204-12(1)
© 2016 Sony Corporation Notes on use
135
Search

Help Guide
How to Use
Troubleshooting
IC recorder operations
Messages
System limitations
List of Topics
Print
IC Recorder
ICD-BX140
A buzzing or humming noise is recorded.
A buzzing or humming noise may be recorded if the IC recorder is placed near
an AC power source, a fluorescent lamp, or a mobile phone during recording or
playback.
Keep the IC recorder away from such equipment when recording.
Go to Page Top
Back Back to Top
4-530-204-12(1)
© 2016 Sony Corporation Notes on use
136
Search

Help Guide
How to Use
Troubleshooting
IC recorder operations
Messages
System limitations
List of Topics
Print
IC Recorder
ICD-BX140
Noise is recorded when you record a file using an
external microphone (not supplied).
The plug of the connected external microphone is dirty.
Clean the plug.
Go to Page Top
Back Back to Top
4-530-204-12(1)
© 2016 Sony Corporation Notes on use
137
Search
Help Guide
How to Use
Troubleshooting
IC recorder operations
Messages
System limitations
List of Topics
Print
IC Recorder
ICD-BX140
Noise is heard when you listen to the file using
headphones.
The plug of the connected headphones is dirty.
Clean the plug.
Go to Page Top
Back Back to Top
4-530-204-12(1)
© 2016 Sony Corporation Notes on use
138
Search

Help Guide
How to Use
Troubleshooting
IC recorder operations
Messages
System limitations
List of Topics
Print
IC Recorder
ICD-BX140
Noise is heard in the playback even though the noise
cut function is active.
When playing back files using the built-in speaker or monitoring sound during
recording, the noise cut function does not work.
Go to Page Top
Related Topic
Reducing noise in the playback sound and making the human voice clearer
(N-CUT)– the noise cut function
Go to Page Top
Back Back to Top
4-530-204-12(1)
© 2016 Sony Corporation Notes on use
139
Search

Help Guide
How to Use
Troubleshooting
IC recorder operations
Messages
System limitations
List of Topics
Print
IC Recorder
ICD-BX140
The IC recorder cannot be turned on. The IC
recorder does not operate, even if you press any
button.
The batteries are weak.
The batteries have been inserted with incorrect polarity.
The power of the IC recorder is off.
Slide and hold the HOLD·POWER ON/OFF switch in the direction of “POWER
ON/OFF” until the window display appears. The power is turned on.
The HOLD function is activated.
Slide the HOLD·POWER ON/OFF switch in the center direction.
Go to Page Top
Related Topic
Turning the power on
Parts and controls
Releasing the HOLD function
Go to Page Top
Back Back to Top
4-530-204-12(1)
© 2016 Sony Corporation Notes on use
140
Search

Help Guide
How to Use
Troubleshooting
IC recorder operations
Messages
System limitations
List of Topics
Print
IC Recorder
ICD-BX140
The IC recorder cannot be turned off.
Slide and hold the HOLD·POWER ON/OFF switch in the direction of “POWER
ON/OFF” until “OFF” is displayed when the IC recorder is stopped. The power is
turned off.
Go to Page Top
Related Topic
Turning the power off
Parts and controls
Go to Page Top
Back Back to Top
4-530-204-12(1)
© 2016 Sony Corporation Notes on use
141
Search

Help Guide
How to Use
Troubleshooting
IC recorder operations
Messages
System limitations
List of Topics
Print
IC Recorder
ICD-BX140
The IC recorder cannot be turned on.
The HOLD function is activated. Slide the HOLD·POWER ON/OFF switch in the
center direction.
The batteries have been inserted with incorrect polarity.
Go to Page Top
Related Topic
Turning the power on
Releasing the HOLD function
Inserting batteries
Go to Page Top
Back Back to Top
4-530-204-12(1)
© 2016 Sony Corporation Notes on use
142
Search

Help Guide
How to Use
Troubleshooting
IC recorder operations
Messages
System limitations
List of Topics
Print
IC Recorder
ICD-BX140
The IC recorder is powered off automatically.
When the IC recorder is in the stop mode and you leave the IC recorder without
attempting an operation for approximately 10 minutes, the auto power off
function will take effect.
Go to Page Top
Back Back to Top
4-530-204-12(1)
© 2016 Sony Corporation Notes on use
143
Search
Help Guide
How to Use
Troubleshooting
IC recorder operations
Messages
System limitations
List of Topics
Print
IC Recorder
ICD-BX140
The battery life is short.
The battery life listed in this Help Guide is based on playback with the volume
level set to 28. The battery life may shorten depending on the operation of the
IC recorder.
You are using manganese batteries for this IC recorder. You cannot use the IC
recorder with manganese batteries.
Go to Page Top
Related Topic
Turning the power off
Battery life
Go to Page Top
Back Back to Top
4-530-204-12(1)
© 2016 Sony Corporation Notes on use
144
Search

Help Guide
How to Use
Troubleshooting
IC recorder operations
Messages
System limitations
List of Topics
Print
IC Recorder
ICD-BX140
There is no battery power remaining after you have
left the batteries inserted for long time without using
the IC recorder.
Even if you do not use the IC recorder, the batteries are consumed slightly. If
you do not intend to use the IC recorder for an extended period of time, it is
recommended that you turn the power off or remove the batteries.
Go to Page Top
Related Topic
Turning the power off
Go to Page Top
Back Back to Top
4-530-204-12(1)
© 2016 Sony Corporation Notes on use
145
Search

Help Guide
How to Use
Troubleshooting
IC recorder operations
Messages
System limitations
List of Topics
Print
IC Recorder
ICD-BX140
The battery life of the rechargeable batteries is
short.
You are using the rechargeable batteries in an environment with a temperature
of under 5 °C (41 ºF). Battery life becomes shorter as a result of the battery
characteristics. This is not a malfunction.
The rechargeable batteries have deteriorated.
The rechargeable batteries can be charged about 1,000 times (this depends on
the environment where the IC recorder is used). If the length of time that the
IC recorder can be used approximates only half of the normal time, even after
the rechargeable batteries are fully charged, replace the batteries with new
ones.
Go to Page Top
Back Back to Top
4-530-204-12(1)
© 2016 Sony Corporation Notes on use
146
Search

Help Guide
How to Use
Troubleshooting
IC recorder operations
Messages
System limitations
List of Topics
Print
IC Recorder
ICD-BX140
The IC recorder does not operate correctly.
Take out the batteries and insert them again.
Go to Page Top
Related Topic
Formatting the memory (FORMAT)
Go to Page Top
Back Back to Top
4-530-204-12(1)
© 2016 Sony Corporation Notes on use
147
Search

Help Guide
How to Use
Troubleshooting
IC recorder operations
Messages
System limitations
List of Topics
Print
IC Recorder
ICD-BX140
It takes a long time for the IC recorder to start.
If the IC recorder is required to process a large amount of data, it may take
longer for the IC recorder to start. This is not a malfunction of the IC recorder.
Wait until the start-up display disappears.
Go to Page Top
Back Back to Top
4-530-204-12(1)
© 2016 Sony Corporation Notes on use
148
Search

Help Guide
How to Use
Troubleshooting
IC recorder operations
Messages
System limitations
List of Topics
Print
IC Recorder
ICD-BX140
The IC recorder does not operate, even if you press
any button.
The batteries are weak.
The HOLD function is activated. Slide the HOLD·POWER ON/OFF switch in the
center direction.
Go to Page Top
Related Topic
Turning the power on
Releasing the HOLD function
Go to Page Top
Back Back to Top
4-530-204-12(1)
© 2016 Sony Corporation Notes on use
149
Search

Help Guide
How to Use
Troubleshooting
IC recorder operations
Messages
System limitations
List of Topics
Print
IC Recorder
ICD-BX140
The operation indicator does not light.
“LED” is set to “OFF.”
Display the menu and set “LED” to “ON.”
Go to Page Top
Related Topic
Turning the operation indicator on or off (LED)
Go to Page Top
Back Back to Top
4-530-204-12(1)
© 2016 Sony Corporation Notes on use
150
Search


Help Guide
How to Use
Troubleshooting
IC recorder operations
Messages
System limitations
List of Topics
Print
IC Recorder
ICD-BX140
Recording is interrupted.
The VOR function is activated. When you are not using the VOR function, set
“VOR” to “OFF” in the menu.
Go to Page Top
Related Topic
Starting to record automatically in response to sound – the VOR function
Go to Page Top
Back Back to Top
4-530-204-12(1)
© 2016 Sony Corporation Notes on use
152
Search
Help Guide
How to Use
Troubleshooting
IC recorder operations
Messages
System limitations
List of Topics
Print
IC Recorder
ICD-BX140
You cannot add a recording or an overwrite
recording.
The remaining memory capacity is insufficient. The overwritten part will be
deleted after the overwriting part finishes recording. Therefore, you can only
overwrite within the remaining recording time.
You cannot add or overwrite a recording to a file which was not recorded using
the IC recorder.
You cannot add or overwrite a recording to a protected file. To add a recording,
release the protection first.
Go to Page Top
Related Topic
Adding a recording to a previously recorded file (ADD)
Adding an overwrite recording during playback (OVER)
Protecting a file (LOCK)
Go to Page Top
Back Back to Top
4-530-204-12(1)
© 2016 Sony Corporation Notes on use
153
Search

Help Guide
How to Use
Troubleshooting
IC recorder operations
Messages
System limitations
List of Topics
Print
IC Recorder
ICD-BX140
The VOR function does not work.
The VOR function is set to “OFF.” Set “VOR” to “ON” in the menu.
Go to Page Top
Related Topic
Starting to record automatically in response to sound – the VOR function
Go to Page Top
Back Back to Top
4-530-204-12(1)
© 2016 Sony Corporation Notes on use
154
Search

Help Guide
How to Use
Troubleshooting
IC recorder operations
Messages
System limitations
List of Topics
Print
IC Recorder
ICD-BX140
Recording level is low.
When recording from the built-in microphone or using an external microphone,
“SENS” (microphone sensitivity) is set to “L.”
Set “SENS” to “H” in the menu.
Go to Page Top
Related Topic
Selecting the microphone sensitivity (SENS)
Go to Page Top
Back Back to Top
4-530-204-12(1)
© 2016 Sony Corporation Notes on use
155
Search
Help Guide
How to Use
Troubleshooting
IC recorder operations
Messages
System limitations
List of Topics
Print
IC Recorder
ICD-BX140
When recording from other equipment, the input
level is too strong or not strong enough.
Connect the headphone jack of other equipment to the (microphone) jack of
the IC recorder and adjust the volume level on the piece of equipment
connected to the IC recorder.
If you use an audio connecting cable with high resistance, the input level
becomes low during recording. Use an audio connecting cable without
resistance.
Go to Page Top
Related Topic
Recording from external equipment
Go to Page Top
Back Back to Top
4-530-204-12(1)
© 2016 Sony Corporation Notes on use
156
Search

Help Guide
How to Use
Troubleshooting
IC recorder operations
Messages
System limitations
List of Topics
Print
IC Recorder
ICD-BX140
The playback volume is low.
The built-in speaker is mainly for monitoring, and the playback volume is low.
Use the supplied headphones.
The volume is turned down completely. Press VOL – /+ to adjust the volume.
Go to Page Top
Back Back to Top
4-530-204-12(1)
© 2016 Sony Corporation Notes on use
157
Search
Help Guide
How to Use
Troubleshooting
IC recorder operations
Messages
System limitations
List of Topics
Print
IC Recorder
ICD-BX140
No sound comes from the speaker.
Headphones are plugged in.
The volume is turned down completely.
Go to Page Top
Related Topic
Listening with better sound quality
Go to Page Top
Back Back to Top
4-530-204-12(1)
© 2016 Sony Corporation Notes on use
158
Search

Help Guide
How to Use
Troubleshooting
IC recorder operations
Messages
System limitations
List of Topics
Print
IC Recorder
ICD-BX140
Sound comes from only one channel.
When audio output of an external device connected to the IC recorder is
monaural and the recording mode is set to “SHQ” or “HQ,” sounds are recorded
only in one channel. Set the recording mode to “SP” or “LP” in the menu.
Go to Page Top
Related Topic
Selecting the recording mode (MODE)
Go to Page Top
Back Back to Top
4-530-204-12(1)
© 2016 Sony Corporation Notes on use
159
Search

Help Guide
How to Use
Troubleshooting
IC recorder operations
Messages
System limitations
List of Topics
Print
IC Recorder
ICD-BX140
Sound comes from the speaker even when the
headphones are plugged in.
If you plug in the headphones not securely during playback, the sound may
come from the speaker.
Unplug the headphones, and then insert them securely.
Go to Page Top
Back Back to Top
4-530-204-12(1)
© 2016 Sony Corporation Notes on use
160
Search

Help Guide
How to Use
Troubleshooting
IC recorder operations
Messages
System limitations
List of Topics
Print
IC Recorder
ICD-BX140
Playback speed is too fast or too slow.
The playback speed has been adjusted in “DPC.”
Adjust the speed in “DPC” again in the menu.
Go to Page Top
Related Topic
Adjusting the playback speed – the DPC (Digital Pitch Control) function
Go to Page Top
Back Back to Top
4-530-204-12(1)
© 2016 Sony Corporation Notes on use
161
Search

Help Guide
How to Use
Troubleshooting
IC recorder operations
Messages
System limitations
List of Topics
Print
IC Recorder
ICD-BX140
Playback sound is not good when a recorded file is
played back.
When you play back a music file with “N-CUT” in the menu is set to “ON”
playback sound may be deteriorated.
Set “N-CUT” to “OFF.”
Go to Page Top
Related Topic
Reducing noise in the playback sound and making the human voice clearer
(N-CUT)– the noise cut function
Go to Page Top
Back Back to Top
4-530-204-12(1)
© 2016 Sony Corporation Notes on use
162
Search
Help Guide
How to Use
Troubleshooting
IC recorder operations
Messages
System limitations
List of Topics
Print
IC Recorder
ICD-BX140
You cannot divide a file.
You need a certain amount of free space in the memory to divide a file.
99 files have been recorded in the selected folder.
Erase some of the files or erase all the files.
Because of the system limitations, you may not be able to divide a file at the
very beginning or at the very end of the file.
You cannot divide files other than those recorded using the IC recorder.
You cannot divide a protected file. To divide the file, release the protection first.
Go to Page Top
Related Topic
Erasing a file
Protecting a file (LOCK)
Go to Page Top
Back Back to Top
4-530-204-12(1)
© 2016 Sony Corporation Notes on use
163
Search
Help Guide
How to Use
Troubleshooting
IC recorder operations
Messages
System limitations
List of Topics
Print
IC Recorder
ICD-BX140
You cannot move a file.
You cannot move a protected file. To move the file, release the protection first.
If 99 files have been recorded in the folder to which you want to move a file,
you cannot move it.
Go to Page Top
Related Topic
Protecting a file (LOCK)
Go to Page Top
Back Back to Top
4-530-204-12(1)
© 2016 Sony Corporation Notes on use
164
Search
Help Guide
How to Use
Troubleshooting
IC recorder operations
Messages
System limitations
List of Topics
Print
IC Recorder
ICD-BX140
You cannot erase a file.
You cannot erase a protected file. To erase the file, release the protection first.
Go to Page Top
Related Topic
Protecting a file (LOCK)
Go to Page Top
Back Back to Top
4-530-204-12(1)
© 2016 Sony Corporation Notes on use
165
Search
Help Guide
How to Use
Troubleshooting
IC recorder operations
Messages
System limitations
List of Topics
Print
IC Recorder
ICD-BX140
“--:--” is displayed.
You have not set the clock.
Go to Page Top
Related Topic
Setting the clock
Setting the clock using the menu
Go to Page Top
Back Back to Top
4-530-204-12(1)
© 2016 Sony Corporation Notes on use
166
Search

Help Guide
How to Use
Troubleshooting
IC recorder operations
Messages
System limitations
List of Topics
Print
IC Recorder
ICD-BX140
The recording date of a file appears as “--Y--M--D”
or “--:--.”
The date of recording will not be displayed if you recorded the file when the
clock was not set.
Go to Page Top
Related Topic
Setting the clock
Setting the clock using the menu
Go to Page Top
Back Back to Top
4-530-204-12(1)
© 2016 Sony Corporation Notes on use
167
Search

Help Guide
How to Use
Troubleshooting
IC recorder operations
Messages
System limitations
List of Topics
Print
IC Recorder
ICD-BX140
There are fewer menu items displayed in the menu
mode.
During playback or recording, there are menu items that are not displayed.
Go to Page Top
Related Topic
Menu list
Go to Page Top
Back Back to Top
4-530-204-12(1)
© 2016 Sony Corporation Notes on use
168
Search

Help Guide
How to Use
Troubleshooting
IC recorder operations
Messages
System limitations
List of Topics
Print
IC Recorder
ICD-BX140
“ACCESS” display does not disappear.
If the IC recorder is required to process excessive amount of data, “ACCESS”
may be displayed for an extended period of time. This is not a malfunction of
the IC recorder.
Wait until the message disappears.
Go to Page Top
Back Back to Top
4-530-204-12(1)
© 2016 Sony Corporation Notes on use
169
Search

Help Guide
How to Use
Troubleshooting
IC recorder operations
Messages
System limitations
List of Topics
Print
IC Recorder
ICD-BX140
“FULL” is displayed and you cannot start recording.
The memory is full.
Erase some of the files or erase all the files.
Go to Page Top
Related Topic
Erasing a file
Go to Page Top
Back Back to Top
4-530-204-12(1)
© 2016 Sony Corporation Notes on use
170
Search

Help Guide
How to Use
Troubleshooting
IC recorder operations
Messages
System limitations
List of Topics
Print
IC Recorder
ICD-BX140
“FILE FULL” is displayed and you cannot operate the
IC recorder.
99 files have been recorded in the selected folder or 495 files (when there are 5
folders) in total have been recorded. Therefore you cannot record another file,
or move a file.
Erase some of the files or erase all the files.
Go to Page Top
Related Topic
Erasing a file
Go to Page Top
Back Back to Top
4-530-204-12(1)
© 2016 Sony Corporation Notes on use
171
Search
Help Guide
How to Use
Troubleshooting
IC recorder operations
Messages
System limitations
List of Topics
Print
IC Recorder
ICD-BX140
Messages list
Follow the instructions below if a message appears on the display.
HOLD
All the button operations are disabled because the IC recorder is in the HOLD
status to prevent unintentional operations. Slide the HOLD·POWER ON/OFF switch
towards the center to release the IC recorder from the HOLD status.
(See “Releasing the HOLD function.”)
LOW BATT (
flashes at the same time)
You cannot format the memory or erase all the files in a folder because of
insufficient battery power. Replace the old batteries with new ones.
(See “Inserting batteries.”)
LOW BATT (
flashes at the same time)
The batteries are exhausted. Replace the old batteries with new ones.
(See “Inserting batteries.”)
FULL (
flashes at the same time)
The remaining memory capacity of the IC recorder is insufficient. Erase some files
before recording.
(See “Erasing a file.”)
FULL (folder indicator flashes at the same time)
As there are already the maximum number of files in the folder to which you want
to move a file, you cannot move the file. Erase some files before moving.
(See “Erasing a file.”)
FILE FULL
When there are already the maximum number of files in the selected folder or the
total number of files stored on the IC recorder has exceeded the maximum, you
cannot record a new file or you cannot divide a file. Erase some files before
recording or dividing.
(See “Erasing a file.”)
DATA ERR
You cannot play back or edit files, because the data of the selected file is
damaged.
SET DATE
Set the clock; otherwise, you cannot set the alarm.
NO FILE
The selected folder does not have any files. You cannot move a file or set the
alarm, etc., because of this.
LOCK (
flashes at the same time)
The selected file is protected file. You cannot erase it, add a recording to it, add an
overwritten file to it, or divide it. Cancel the protection on the IC recorder to edit
Back
Back to Top
172
Search

the file using the IC recorder.
(See “Protecting a file (LOCK).”)
PRE SET
You set the alarm to play back a file at a date and time previously set on another
file. Change the alarm setting.
BACK DATE
You set the alarm when the time has already passed. Check it and set the
appropriate date and time.
(See “Playing back a file at a desired time with an alarm (ALARM).”)
NO EDIT
You cannot add a recording or overwrite a recording because the file to which you
want to add a recording or overwrite a recording is over the maximum size limit.
NO MOVE (folder indicator flashes at the same time)
You cannot move a message, because there is more than one folder that has files
with the same name. Change the file names.
REC-OP OFF
You cannot add a recording or overwrite a recording because “REC-OP” is set to
“OFF.” Set it to “ON.”
(See “Adding a recording to a previously recorded file (ADD)” and “Adding an
overwrite recording during playback (OVER).”)
NEW (the message number flashes at the same time)
The file being recorded has reached the maximum size limit. The file will be divided
automatically and recording will continue as a new file.
ACCESS ERR
A system error other than the above has occurred. Remove the batteries and re-
insert them.
ERROR 01 - ERROR 06
A system error other than the above has occurred. Remove the batteries and re-
insert them.
Go to Page Top
4-530-204-12(1)
© 2016 Sony Corporation Notes on use
173

Help Guide
How to Use
Troubleshooting
IC recorder operations
Messages
System limitations
List of Topics
Print
IC Recorder
ICD-BX140
System limitations
There are some system limitations of the IC recorder. Troubles as mentioned
below are not malfunctions of the IC recorder.
A file is divided automatically.
The file being recorded has reached the maximum size limit. Therefore it is
automatically divided.
The remaining recording time becomes shorter when you divide a file.
You need a certain amount of free space for a file management area to divide a
file, therefore the remaining recording time will be shortened.
Go to Page Top
Back Back to Top
4-530-204-12(1)
© 2016 Sony Corporation Notes on use
174
Search