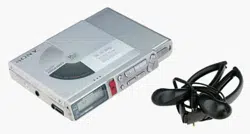

3-866-346-11 (1)
Portable
MiniDisc Recorder
Operating Instructions
MZ-R37
1999 by Sony Corporation
TM
2
You are cautioned that any changes or
modifications not expressly approved in
this manual could void your authority to
operate this equipment.
For Customers in Australia
If the supply cord of the AC power
adaptor is damaged, the AC power
adaptor must be returned to the
manufacturer or his agent for the cord to
be replaced.
For the customers in the USA
RECYCLING NICKEL-CADMIUM
BATTERIES
Nickel Cadmium batteries
are recyclable.
You can help preserve our
environment by returning
your unwanted batteries to
your nearest point for collection, recycling
or proper disposal.
Note: In some areas the disposal of nickel
cadmium batteries in household or
business trash may be prohibited.
RBRC (Rechargeable Battery Recycling
Corporation) advises you about spent
battery collection by the following phone
number.
Call toll free number: 1-800-822-8837
(United States and Canada only)
Caution: Do not handle damaged or
leaking nickel-cadmium batteries.
WARNING
To prevent fire or shock
hazard, do not expose the
unit to rain or moisture.
To avoid electrical shock,
do not open the cabinet.
Refer servicing to
qualified personnel only.
Caution
The use of optical instruments with this
product will increase eye hazard.
Information
For Customers in the USA
This equipment has been tested and
found to comply with the limits for a
Class B digital device, pursuant to Part 15
of the FCC Rules. These limits are
designed to provide reasonable protection
against harmful interference in a
residential installation. This equipment
generates, uses, and can radiate radio
frequency energy and, if not installed and
used in accordance with the instructions,
may cause harmful interference to radio
communications. However, there is no
guarantee that interference will not occur
in a particular installation. If this
equipment does cause harmful
interference to radio or television
reception, which can be determined by
turning the equipment off and on, the
user is encouraged to try to correct the
interference by one or more of the
following measures:
— Reorient or relocate the receiving
antenna.
— Increase the separation between the
equipment and receiver.
— Connect the equipment into an outlet
on a circuit different from that to which
the receiver is connected.
— Consult the dealer or an experienced
radio/TV technician for help.
IN NO EVENT SHALL SELLER BE
LIABLE FOR ANY DIRECT,
INCIDENTAL OR CONSEQUENTIAL
DAMAGES OF ANY NATURE, OR
LOSSES OR EXPENSES RESULTING
FROM ANY DEFECTIVE PRODUCT
OR THE USE OF ANY PRODUCT.
“MD WALKMAN” is a trademark of
Sony Corporation.

3
Welcome!
Welcome to the world of the MiniDisc!
Here are some of the capabilities and
features you'll discover with the new
MiniDisc Recorder.
• Recording MiniDisc Walkman with a
new, thin body design — Easy to carry
in your bag.
• Easy-to-operate remote control with
editing capabilities — You can label
discs and tracks, move or erase tracks,
etc., from the remote control as well as
the main unit.
• Battery compartment adapted for the
rechargeable battery —The
rechargeable batteries fits in the same
battery compartment of the MiniDisc
player as the dry battery. The
rechargeable batteries can be charged
in this comparment as well.
• High-fidelity recording — Low-noise,
low-distortion, high-fidelity recording
through the optical digital input jack.
• Digital synchro-recording — When
recording from a digital equipment
with optical output, the recorder
automatically starts and pauses
recording in sync with operation on the
digital source.
• Digital AGC (Auto Gain Control) —
Automatic recording level adjustment
without sacrificing superb digital
sound.
• Long-time recording with monaural
sound — You can record up to 148
minutes on a disc using monaural
recording.
Owner's Record
The serial number is located at the rear of
the disc compartment lid and the model
number is located at the top and bottom.
Record the serial number in the space
provided below. Refer to them whenever
you call upon your Sony dealer regarding
this product.
Model No. MZ-R37
Serial No.

4
Table of contents
Recording an MD right away! ................................ 6
Playing an MD right away!..................................... 8
Various ways of recording .................................... 10
Two ways of connecting to a sound source ....................................... 10
Recording with digital input (optical cable required) ...................... 11
To start/stop recording in sync with the source player
(Synchro-recording) ........................................................................ 11
Recording from a microphone ............................................................. 12
Recording in monaural for double the normal recording time ...... 13
Adjusting the recording level manually (Manual recording) .........13
Checking the remaining time or the recording position .................. 14
Various ways of playback ..................................... 15
Playing tracks repeatedly ..................................................................... 15
Emphasizing bass (DIGITAL MEGA BASS) ...................................... 15
Protecting your hearing (AVLS) ..........................................................16
Checking the remaining time or the playing position ..................... 16
Locking the controls (HOLD) .............................................................. 17
Connecting to a stereo system ............................................................. 17
Editing recorded tracks ......................................... 18
Erasing tracks ......................................................................................... 18
To erase a track ................................................................................ 18
To erase the whole disc ................................................................... 18
Adding a track mark ............................................................................. 19
Erasing a track mark .............................................................................20
Moving recorded tracks ........................................................................ 20
Labeling recordings............................................................................... 21

5
Power sources........................................................ 23
Charging the nickel-cadmium rechargeable batteries...................... 23
Using on dry batteries...........................................................................24
Additional information ......................................... 25
Precautions ............................................................................................. 25
Troubleshooting .....................................................................................27
System limitations ................................................................................. 29
Messages ................................................................................................. 30
Specifications.......................................................................................... 32
What is an MD?...................................................................................... 33
Looking at the controls ......................................................................... 35
6
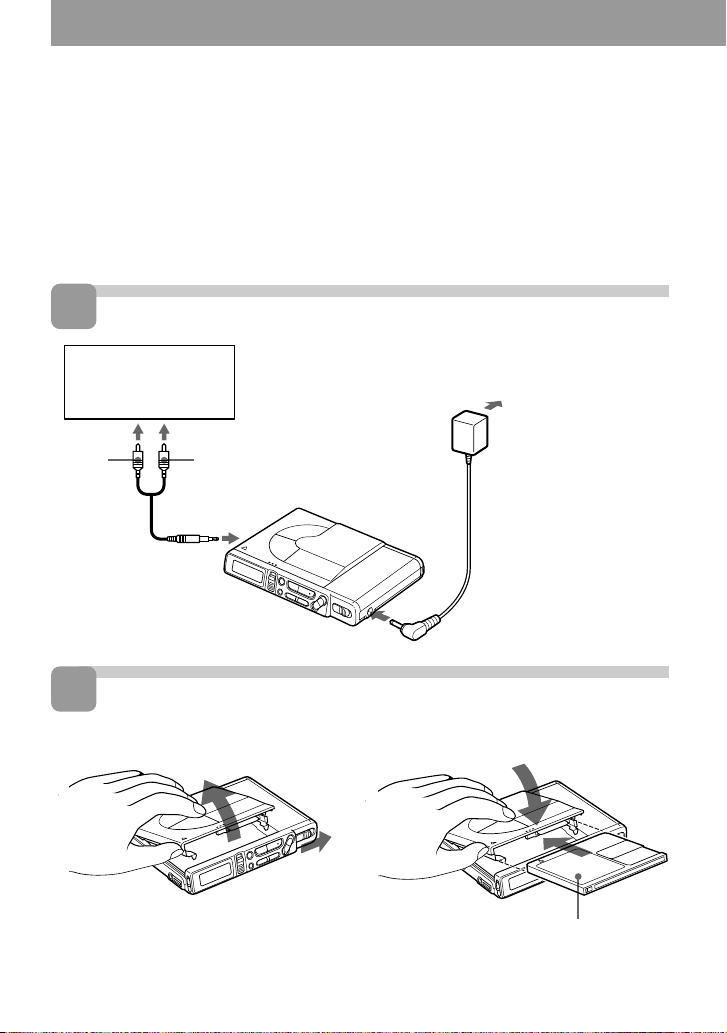
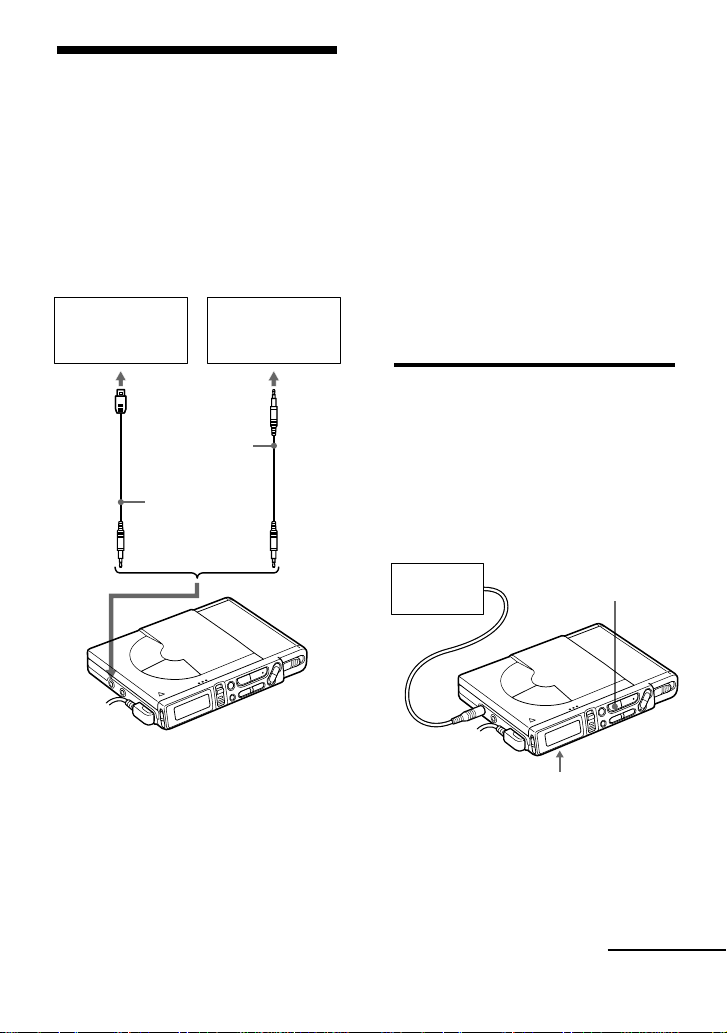
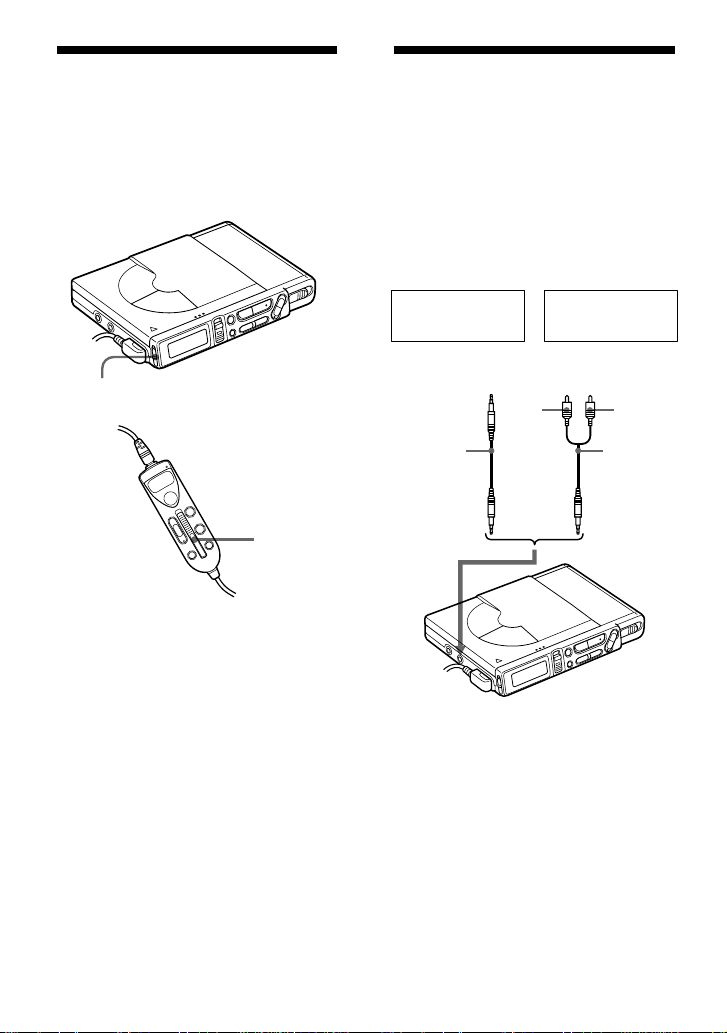
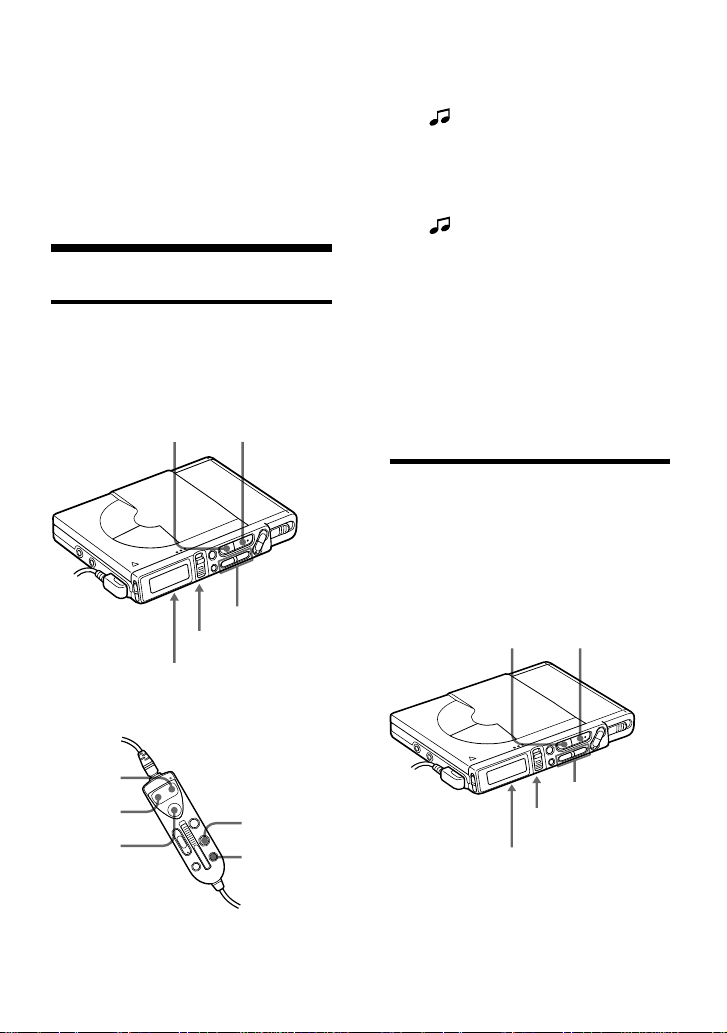
Make connections. (Connect securely.)
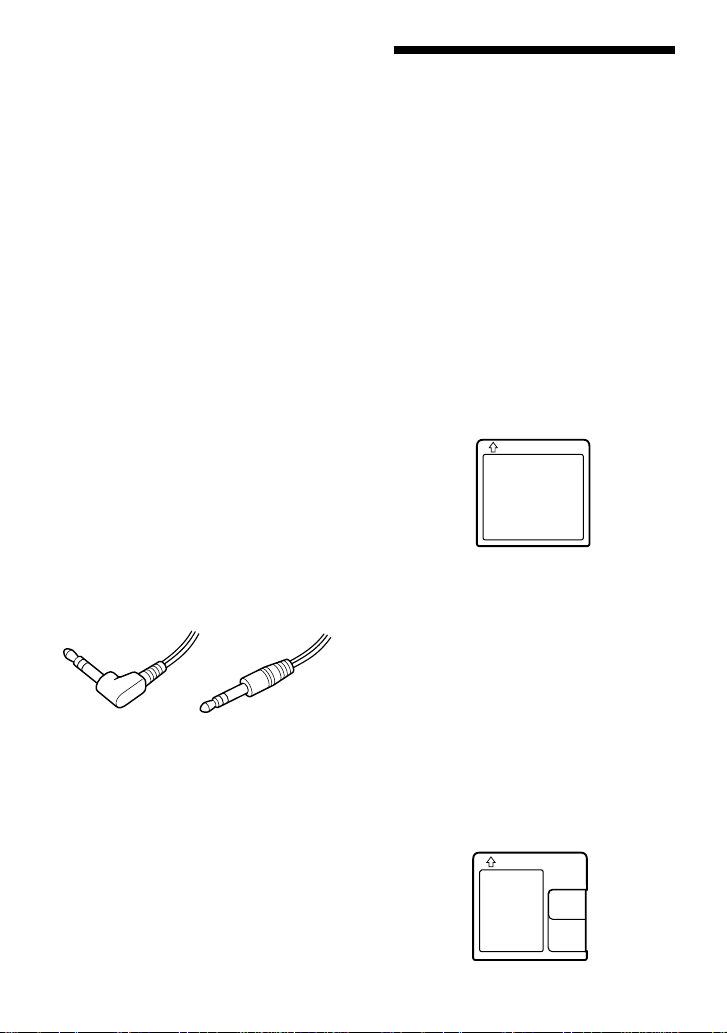
Insert a recordable MD.
1 Slide OPEN and open the lid.
2 Insert a recordable MD with the label side
facing up, and press the lid down to close.
2
1
to LINE OUT
to (OPTICAL)
LINE IN
R (red)
L (white)
to
DC IN 4.5V
AC power adaptor
(supplied)
CD player,
cassette recorder,
etc. (source)
Line cable
(RK-G129,
not supplied)*
to a wall outlet
*Use the connecting cords
without an attenuator. To
connect to a portable CD
player with a stereo mini-
jack, use the RK-G136
connecting cord (not
supplied).
Recording an MD right away!
The sound will be sent from the connected equipment as analog
signal but will be recorded digitally on the disc. To record from a
digital source, see “Recording with digital input” (page 11).
7
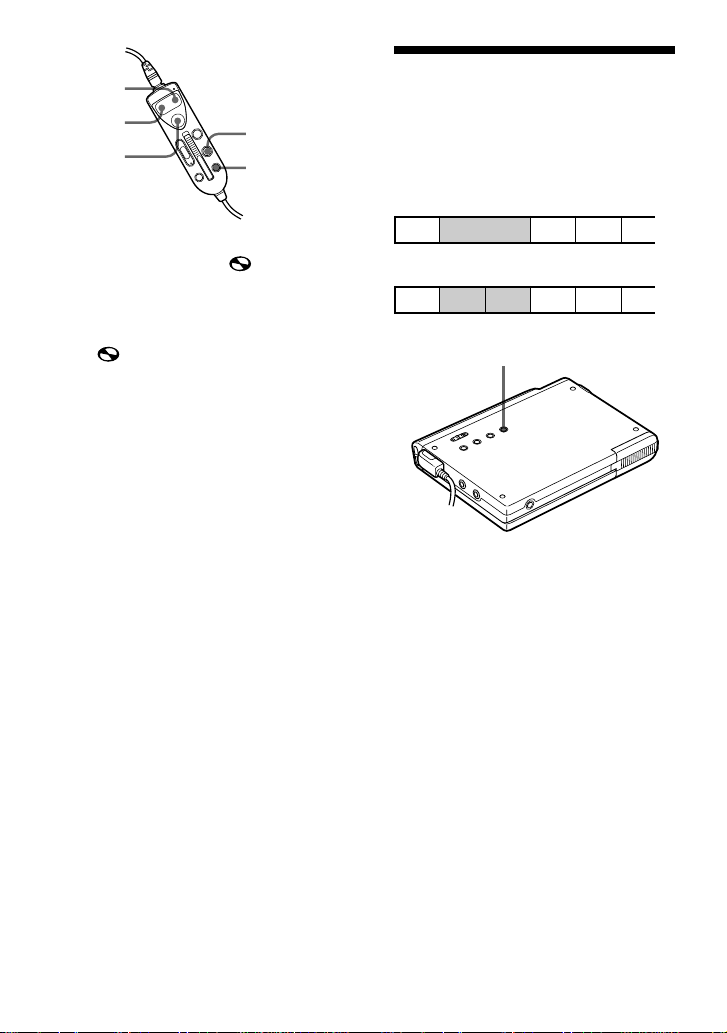
Record an MD.
3
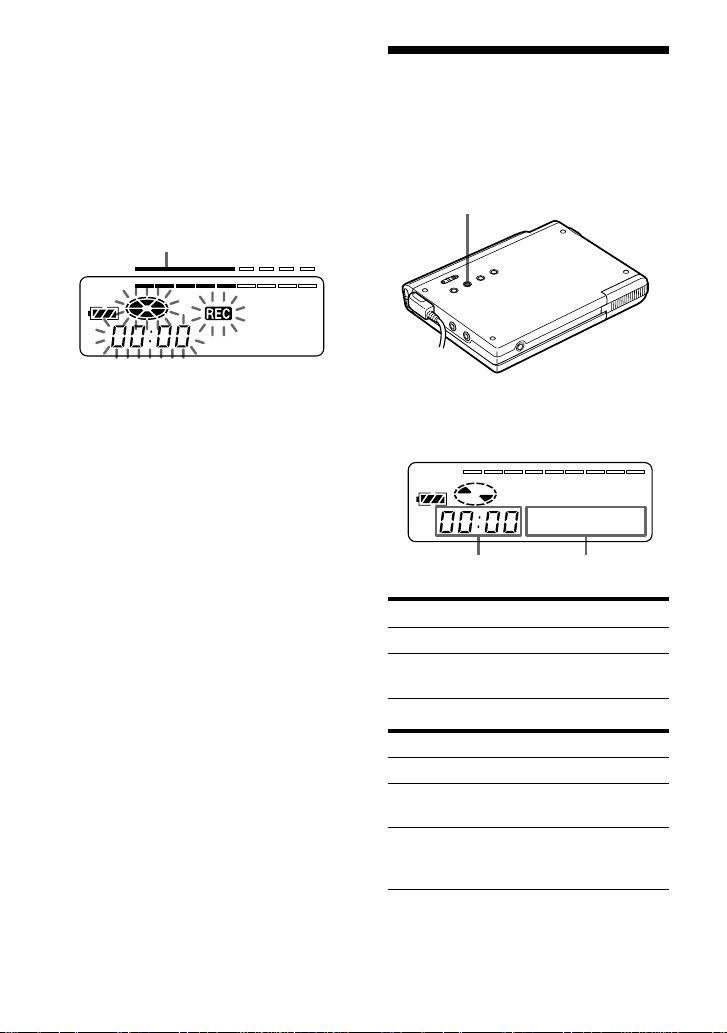
1 Press and slide REC upward.
“REC” lights up and recording starts.
2 Play the CD or tape you want to
record.
To stop recording, press p.
“EDIT” flashes while data of the recording
(the track’s start and end points, etc.) is
being recorded. Do not move or jog the
recorder or disconnect the power source
while the indication is flashing in the
display.
CD player,
cassette recorder,
etc. (source)
To
Pause
Record from the end of the
previous recording
Record partway through the
previous recording
Remove the MD
1)
A track mark is added at the point where you press P; thus the remainder of the track will be
counted as a new track.
2)
Once you open the lid, the point to start recording will change to the beginning of the first track.
Check the point to start recording on the display.
If the recording does not start
•Make sure the recorder is not locked (page
17).
•Make sure the MD is not record-protected
(page 26).
•Premastered MDs cannot be recorded over.
Note
If the power supply is disrupted (i.e. the
battery is removed or becomes exhausted or
the AC power adaptor is disconnected)
when the recorder is operating, the lid will
not open until the power is restored.
p•CHARGE
Press
P
1)
Press P again to resume recording.
END SEARCH and slide REC upward.
(, + or = to find the start point
of recording and press p to stop. Then
slide REC upward.
p and slide OPEN to open the lid.
2)
z
•The level of the recorded sound is adjusted
automatically.
•You can monitor the sound during
recording. Connect the supplied
headphones with remote control to
PHONES/REMOTE and adjust the volume
by pressing VOL +/–. This does not affect
the recording level.
REC

8
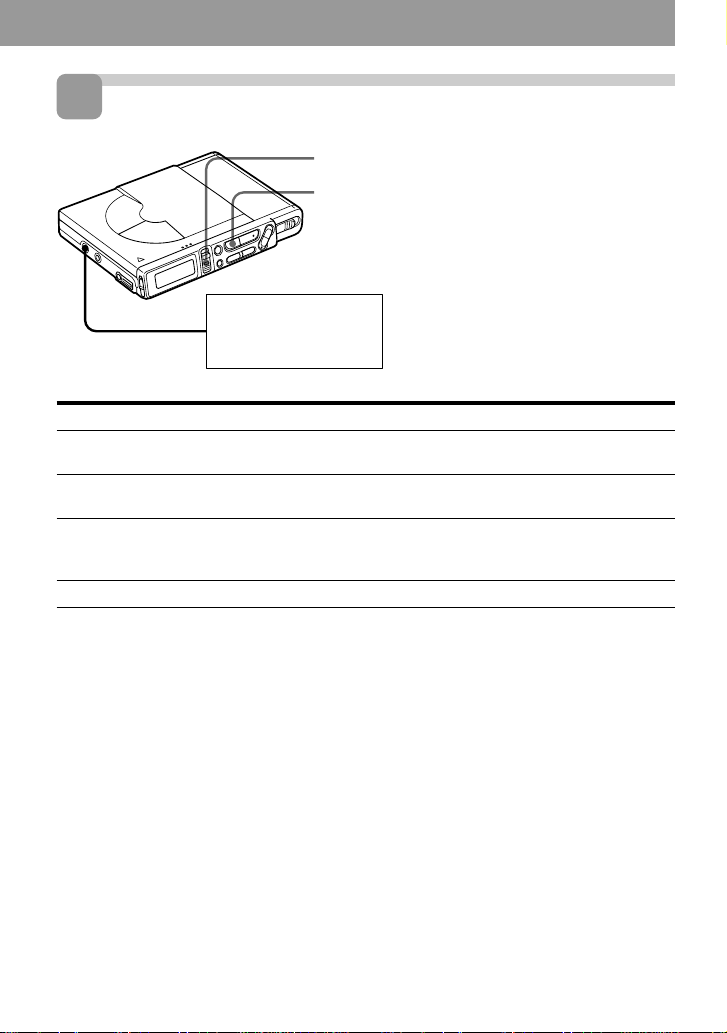
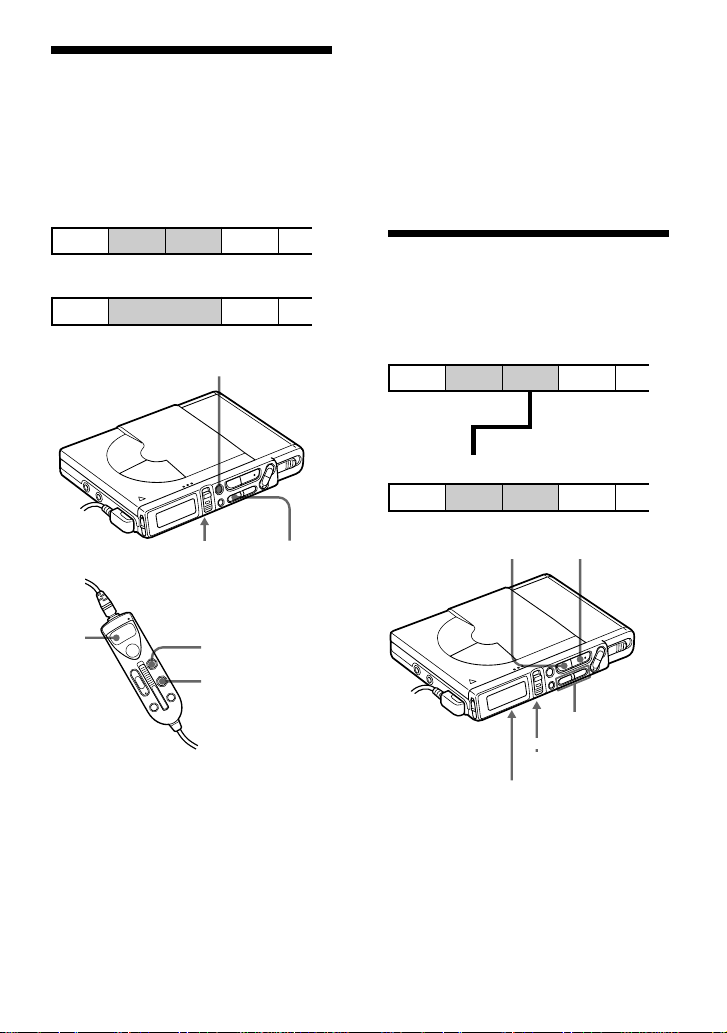
Playing an MD right away!
To use the recorder on rechargeable batteries or dry batteries, see
“Power Sources” (pages 23, 24).
Make connections. (Connect securely.)
Insert an MD.
2 Insert an MD with the label side facing
up, and press the lid down to close.
1 Slide OPEN and open the lid.
to a wall outlet
AC power adaptor
(supplied)
to DC IN 4.5V
to PHONES/
REMOTE
Headphones with a
remote control
(supplied)
Wear the earpiece
marked R in your
right ear and the one
marked L in your
left ear.
2
1
9
Play an MD.
3
VOL +/–
p
•CHARGE
(
•ENTER
VOL
•
POSITION +/–
1 Press ( ((•+ on the
remote control).
A short beep sounds in the
headphones when you operate on the
remote control.
2 Press VOL +/– to adjust the
volume.
The volume will be shown in the
display.
To stop play, press p.
A long beep sounds in the headphones
when you operate on the remote control.
p
•ENTER
To
Pause
Find the beginning of the current track
Find the beginning of the next track
Go backwards while playing
1)
Go forward while playing
1)
Remove the MD
1)
To go backward or forward quickly without listening, press P and then keep pressing = or
+ ((•+ on the remote control).
2)
Once you open the lid, the point to start play will change to the beginning of the first track.
If the play does not start
Make sure the recorder is not locked (page
17).
When using optional headphones
Use only headphones with stereo mini plugs.
You cannot use headphones with micro
plugs.
z
Playback will switch automatically between
stereo and monaural according to the sound
source.
Note
•The sound may skip during playback when
the recorder is exposed to continuous
vibration, such as while jogging.
Do this (Beeps in the headphones)
Press P (Continuous short beeps)
Press P again to resume play.
Press = once (Three short beeps)
Press + once ((•+ on the remote
control) (Two short beeps)
Keep pressing =
Keep pressing + ((•+ on the remote
control)
Press p and slide OPEN to open the lid.
2)
(•+

10
Two ways of connecting to a sound source
The input jack of this recorder works as both digital and analog input jacks. Connect the
recorder to a CD player or a cassette recorder using either digital input or analog input. To
record, see “Recording with digital input” (page 11) to record using digital input, and
“Recording an MD right away!” (page 6) to record using analog input.
Difference between digital and analog inputs
zVarious ways of recording
Connectable source
Usable cord
Signal from the source
Recorded track
numbers
Recorded sound level
Equipment with an analog
(line) output jack
Line cable (with 2 phono
plugs and a stereo-mini plug)
Analog
Even when a digital source
(such as a CD) is connected,
the signal sent to the recorder
is analog.
Marked automatically
•after more than 2 seconds
of blank or low-level
segment.
•when the recorder is paused
while recording.
You can erase unnecessary
marks after recording
(“Erasing a track mark”, page
20).
Adjusted automatically.
Can also be adjusted
manually (“Adjusting the
recording level manually”,
page 13).
Equipment with an optical
digital output jack
Digital cable (with an optical
and an optical-mini plug)
Digital
Marked (copied)
automatically
•at the same positions as the
source.
•when the recorder is paused
while recording.
You can erase unnecessary
marks after recording
(“Erasing a track mark”,
page 20).
Same as the source
Note
Track marks may be copied incorrectly :
•when you record from some CD players or multi disc players using digital input.
•when the source is in shuffle or program play mode while recording using digital input. In this
case, play the source in normal play mode.
•when recording BS or CS programs through digital input.
Difference Input Digital input Analog (line) input
11
To start/stop recording in
sync with the source player
(Synchro-recording)
You can easily make digital recordings of
a digital source on an MD.
Before synchro-recording, make
connections to the digital source with a
digital cable, and insert a recordable MD.
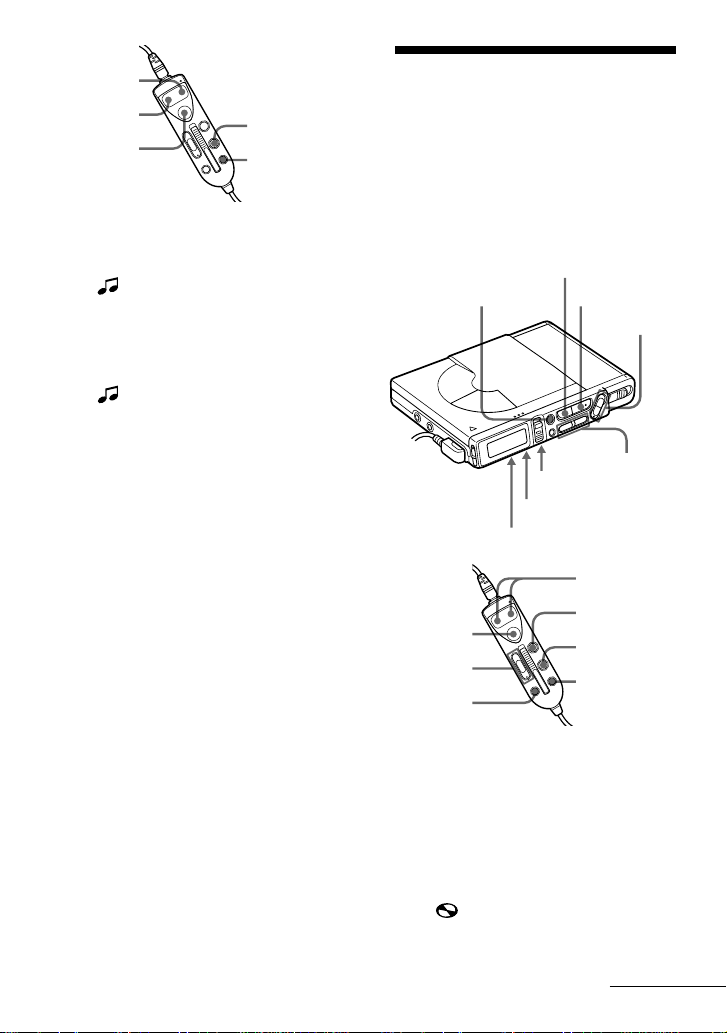
Recording with digital
input (optical cable
required)
Connect to a digital source using the
supplied optical cable, or POC-5B or
POC-5AB (not supplied) to make digital
recordings. Digital recording is possible
even from digital equipment with
different sampling rates, such as a DAT
deck or a BS tuner, using the built-in
sampling rate converter.
SYNCHRO REC (at the bottom)
Portable CD
player, etc.
Optical
mini-
plug
Optical
plug
CD player, MD
player, digital
amplifier, etc.
to
(OPTICAL)
LINE IN
POC-5B
(not supplied)
etc.
Optical
connecting cord
(supplied) etc.
CD players,
etc.
continued
p•CHARGE
(OPTICAL) LINE IN jack is for both
digital and analog input
The recorder automatically recognizes the
type of line cable and switches to digital or
analog input.
To stop recording, press p.
Notes
•You can make a digital recording only from an
optical type output.
•When recording from a portable CD player,
play it on AC power and disable the anti-skip
function (such as ESP*).
•Digital output may be disabled on some
portable CD players when the player is not run
on AC power.
* Electronic Shock Protection
1 Insert a recordable MD and start
recording.
For recording operations, see
“Recording an MD right away !”
(page 6). To record from a portable
CD player, set the CD player to pause
and then start recording.
12
Recording from a
microphone
Connect a stereo microphone (ECM-717,
ECM-MS907, ECM-MS957, etc.; not
supplied) to the MIC (PLUG IN POWER)
jack.
to MIC
(PLUG IN
POWER)
Stereo microphone
1 Slide SYNCHRO REC to ON.
“SYNC” appears in the display.
2 Press and slide REC upward.
The recorder stands by for recording.
3 Play the source sound.
The recorder starts recording when it
receives the playing sound.
To stop recording, press p.
Notes
•You cannot pause manually during
synchro-recording.
•When there is no sound from the player for
more than 3 seconds during synchro-
recording, the recorder goes into the
standby mode automatically. When the
sound comes from the player again, the
recorder resumes synchro-recording. If the
recorder is kept in the standby mode for 5
minutes or longer, the recorder stops
automatically.
•Do not switch SYNCHRO REC after step 2.
Recording may not be done properly.
•Even when there is no recorded sound on
the sound source, there may be cases when
recording does not pause automatically
during synchro-recording due to the noise
level emitted from the sound source.
z
When recording in monaural, follow steps 1
and 2 of “Recording in monaural for double
the normal recording time” (page 13) before
synchro-recording.
1 Insert a recordable MD and start
recording.
Press and slide REC upward.
“REC” lights up and recording starts.
For other operations, see “Recording
an MD right away! ” (page 6).
To stop recording, press p.
Notes
•When recording sources with large sound,
adjust recording manually to prevent
distortion (see “Adjusting the recording
level manually”, page 13).
•You cannot record through the microphone
while an optical cable is connected to the
(OPTICAL) LINE IN jack. The recorder
automatically switches input in the
following order; optical input, microphone
input, and analog input.
•The microphone may pick up the operating
sound of the recorder itself. Use the
microphone away from the recorder in
such cases.
001
13
Recording in monaural
for double the normal
recording time
For longer recordings, choose to record in
monaural. The recording time becomes
double the normal.
MODE•DELETE
(at the bottom)
P•CAPS
Adjusting the recording
level manually
(Manual recording)
When you record with an analog input,
the sound level is adjusted automatically.
If necessary, you can set the level
manually.
1 While pressing P, slide and hold
REC upward for more than 2
seconds.
“Manual” appears and the recorder
stands by for recording.
To return to the automatic control,
while the recorder is in standby
mode, slide and hold REC upward
again for more than 2 seconds.
2 Play the source.
=
+
REC
P•CAPS
REC
continued
Manual
1 While pressing P, press and slide
REC upward.
The recorder stands by for recording.
2 Press MODE.
“Mono” appears in the display, and
the recorder switches to monaural
recording.
Press MODE again to record in
stereo.
3 Press P again to start recording.
4 Play the sound source.
To stop recording, press p.
The recorder switches back to stereo
recording when you record the next time.
Notes
•If you record a stereo source in monaural,
the sounds from left and right will be
mixed.
•You cannot record in monaural if
SYNCHRO REC is slid to ON.
•The MDs recorded in monaural can be
played back only with an MD player/
recorder that has the monaural playing
function.
•Sound recorded through digital input can
be monitored in stereo through
headphones, etc.
14
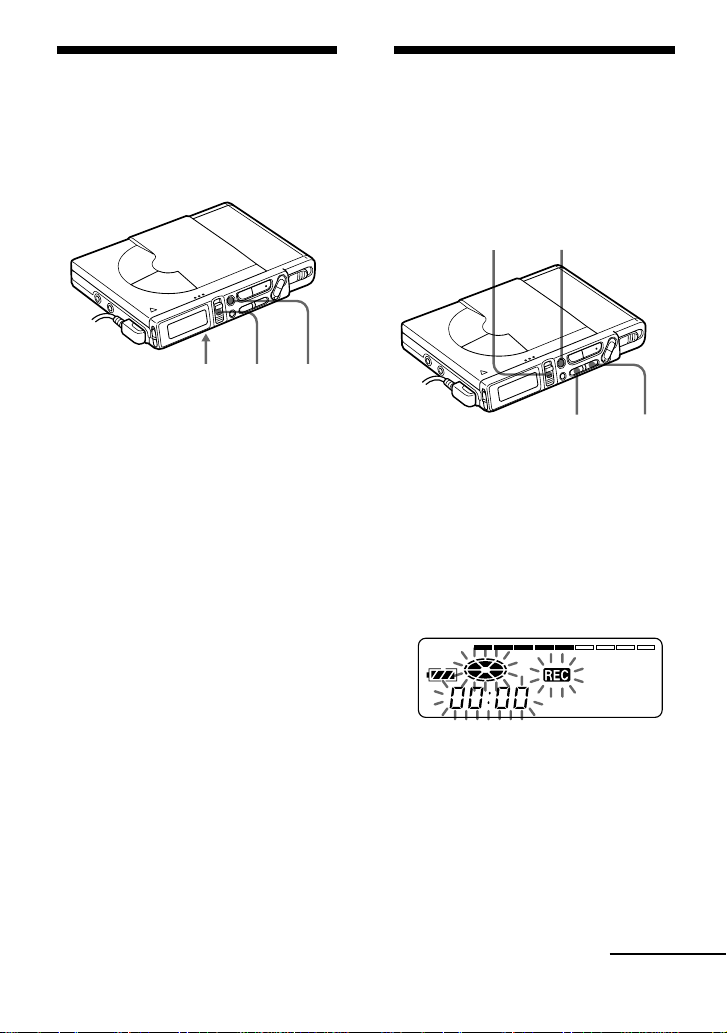
Checking the remaining
time or the recording
position
You can check the remaining time, track
number, etc. when recording or during
stop.
1 Press DISPLAY while recording or in
stop mode. Each time you press the
button, the display changes as
follows.
B
A
A
Track number
Track number
B
Elapsed time
Remaining time for
recording
While recording
DISPLAY•EDIT•INSERT
001
3 While observing the level meter in
the display, adjust the recording level
by pressing + (+) or = (–).
Set the level so that it hits the 5th
indicator from the left (i.e., the length
of the lit recording level indicator
reaches the full length of the
recording level guide) at maximum
input level.
.
Note
Adjust the recording level while the
recorder is in standby mode. You
cannot adjust it while recording.
4 Press P again to start recording.
To stop recording, press p.
The recording level control is switched back
to automatic control when you record the
next time.
Bottom
In stop mode
A
Track number
Track name
1)
Disc name
1)
B
Elapsed time
Remaining time for
recording
Remaining time
after the current
location
1)
Appears only if the track has been labeled.
z
If you want to check the playing position or
track name while playing, see page 16.
Recording level guide
REC19
15
Indication
none
“ ”
“
““”
“
Emphasizing bass
(DIGITAL MEGA BASS)
Mega Bass function intensifies low
frequency sound for richer quality audio
reproduction. It affects only the sound
from the headphones.
Notes
•If the sound becomes distorted when
emphasizing bass, turn down the volume.
•Mega Bass function does not affect the
sound being recorded.
•Mega Bass does not function when a line
cable is connected to the LINE OUT jack on
the recorder.
Play mode
Normal play
Mega Bass (slight
effect)
Mega Bass (strong
effect)
MEGA BASS indication
Digital MEGA BASS•AVLS
zVarious ways of
playback
Playing tracks
repeatedly
You can play tracks repeatedly in three
ways — all repeat, single repeat, and
shuffle repeat.
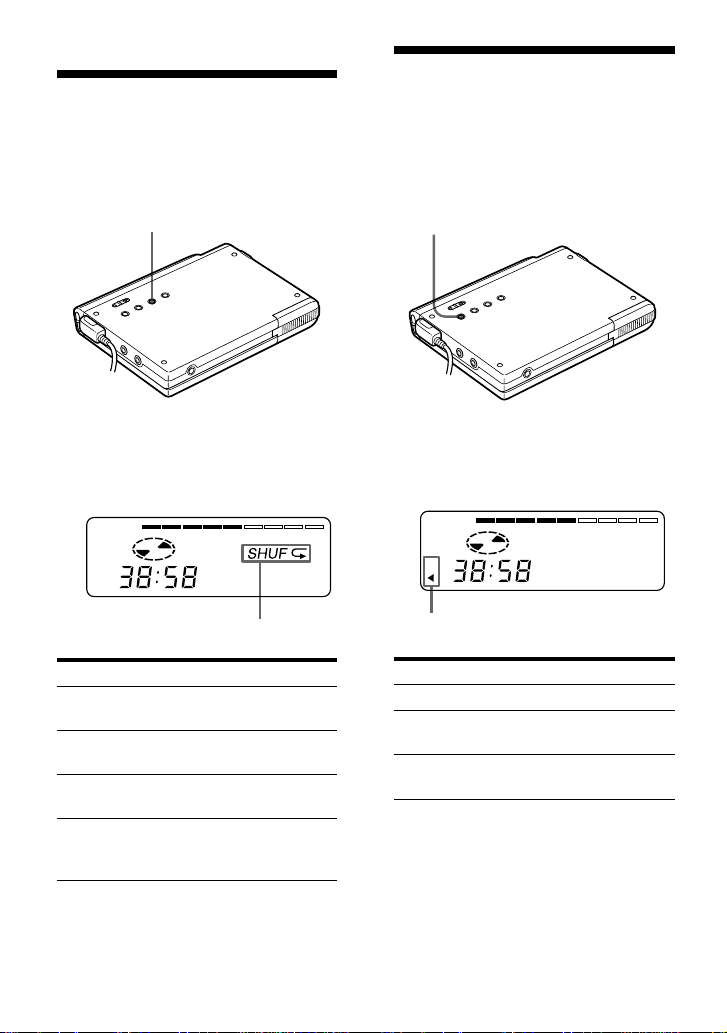
Play mode indication
MODE•DELETE
1 Press MODE while the recorder is
playing an MD.
Each time you press the button, the
play mode indication changes as
follows.
004
Indication
none
(normal play)
“f”
(all repeat)
“f
1
”
(single repeat)
“
SHUF
f”
(shuffle repeat)
Play mode
All the tracks are
played once.
All the tracks are
played repeatedly.
A single track is
played repeatedly.
All the tracks are
played repeatedly in
random order.
1 Press Digital MEGA BASS.
Each time you press Digital MEGA
BASS, the Mega Bass indication
changes as follows.
004
Bottom
Bottom
16
Protecting your hearing
(AVLS)
The AVLS (Automatic Volume Limiter
System) function keeps down the
maximum volume to protect your ears.
Digital MEGA BASS•AVLS
1 Keep pressing AVLS for 2 seconds or
longer.
The AVLS indication lights up.
When you try to turn the volume too
high, “AVLS” appears in the display.
The volume is kept to a moderate
level.
004
A
Track number
Track name
1)
Disc name
1)
B
Elapsed time
Remaining time of
the current track
Remaining time
after the current
location
Checking the remaining
time or the playing
position
You can check the track name, disc name,
etc. during playback.
DISPLAY•EDIT•INSERT
AB
1)
Appears only if the track has been labeled.
z
If you want to check the remaining time or
the recording position while recording or in
stop mode, see page 14.
1 Press DISPLAY while playing.
Each time you press DISPLAY, the
display changes as follows.
001
AVLS indication
Bottom
Bottom
17
Locking the controls
(HOLD)
To prevent the buttons from being
accidentally operated when you carry the
recorder, use this function.
HOLD
HOLD
Connecting to a stereo
system
Connect the LINE OUT jack of the
recorder to the LINE IN jacks of an
amplifier or a tape player with a line cable
(RK-G129 or RK-G136, not supplied). The
output is analog. The recorder plays the
MD digitally and sends analog signals to
the connected equipment.
Note
The Mega Bass does not function or will be
cancelled when the LINE OUT jack is
connected with a line cable.
Portable DAT
recorder
Stereo
system, etc.
to LINE IN
2 phono plugs
R
(red)
L (white)
RK-G136
(not
supplied)
RK-G129
(not
supplied)
Stereo
mini-plug
to LINE OUT
1 Slide HOLD in the direction of the
C.
On the recorder, slide HOLD to lock
the controls of the recorder. On the
remote control, slide HOLD to lock
the controls of the remote control.
Slide HOLD in the opposite direction
of the arrow to unlock the controls.
18
Erasing tracks
To erase a track
You can quickly erase a recorded track.
Note that once a recording has been
erased, you cannot retrieve it. Make sure
of the track you are erasing.
1 Keep pressing EDIT for 2 second or
longer while playing the track you
want to erase.
“ ” “Name” flashes in the
display, and the recorder plays the
selected track repeatedly.
2 Press = or + ((•+ on the
remote control) repeatedly until
“ ” “Erase” flashes in the display.
3 Press ENTER.
“Erase?” and “ENTER” appear
alternately in the display.
To cancel erasing, press p or
CANCEL.
To erase a part of a track
Add track marks at the beginning and the
end of the part you want to erase, then
erase the part.
zEditing recorded tracks
You can edit your recordings by adding/
erasing track marks or labeling tracks and
MDs. Premastered MDs cannot be edited.
Notes on editing
•Do not move or jog the recorder while
“EDIT” is flashing in the display.
•You cannot edit tracks on an MD that is
record-protected. Before editing tracks,
close the tab on the side of the MD.
DISPLAY•EDIT•INSERT
(at the bottom)
= +
(•ENTER
p•ENTER
=
(•+
T MARK•CANCEL
EDIT•INSERT
To erase the whole disc
You can quickly erase all the tracks and
data of the MD at the same time.
Note that once a recording has been
erased, you cannot retrieve it. Be sure to
check the contents of the disc you want to
erase.
(•ENTER
DISPLAY•EDIT•INSERT
(at the bottom)
p•CHARGE
p•CHARGE
T MARK•CANCEL
(at the bottom)
= +
T MARK•CANCEL
(at the bottom)
19
Adding a track mark
You can add track marks so that the part
after the new track mark is counted as a
new track.
The track numbers will increase as
follows.
4
1234
1 While playing or pausing an MD,
press T MARK on the recorder at the
point you want to add a mark.
“T. ON” appears in the display, and a
track mark is added. The track
number will increase by one.
To add track marks while
recording
Press T MARK.
Note
T MARK on the remote control does not
function during playback.
12345
Track numbers increase
.
Track marking
T MARK•CANCEL
1 Keep pressing EDIT for 2 seconds or
longer during stop. “ ” “Name”
flashes in the display.
2 Press = or + ((•+ on the
remote control) repeatedly until
“ ” “Erase” flashes in the display.
3 Press ENTER.
“Erase?” and “ENTER” appear
alternately in the display.
To cancel erasing, press p or
CANCEL.
4 Press ENTER again.
“EDIT” flashes in the display, and all
the tracks will be erased.
When erasing is complete, “BLANK”
flashes in the display.
T MARK•CANCEL
EDIT•INSERT
p•ENTER
=
(•+
Bottom
20
Moving recorded tracks
You can change the order of the recorded
tracks.
1234
Before moving
Track A Track B Track C Track D
$
After
moving
Track A Track C Track B Track D
1234
Move track C
from the third to
the second track.
Erasing a track mark
When you record with analog (line) input,
unnecessary track marks may be recorded
where recording level is low. You can
erase a track mark to combine the tracks
before and after the track mark. The track
numbers will change as follows.
1234
4
123
Track numbers decrease
.
Erase a track mark
P•CAPS
T MARK•CANCEL
(at the bottom)
=
1 While playing the track with the track
mark you want to erase, press P to
pause.
2 Find the track mark by pressing =
slightly.
For example, to erase the third track
mark, find the beginning of the third
track. “00:00” appears in the display.
=
T MARK•CANCEL
p•CHARGE
(•ENTER
3 Press T MARK to erase the mark.
“T. OFF” appears in the display. The
track mark is erased and the two
tracks are combined.
z
When you erase a track mark, the name
assigned to the mark are also erased.
P•CAPS
DISPLAY•EDIT•INSERT
(at the bottom)
T MARK•CANCEL
(at the bottom)
= +
21
Labeling recordings
You can name tracks during playback,
discs during stop, and both during
recording. Each name can be as long as
200 letters.
For each disc, you can enter up to 1700
alphanumeric letters during playback or
stop, and 500 alphanumeric letters during
one recording.
Labeling a disc during stop
1 Insert a disc.
To label a disc that is already in the
recorder, press p to stop.
2 Keep pressing EDIT for 2 seconds or
longer.
“ ” “Name” flashes in the
display.
T MARK•CANCEL
VOL +/–
DISPLAY•EDIT•INSERT
MODE•DELETE
p•CHARGE
P•CAPS
1 Keep pressing EDIT for 2 seconds or
longer while playing the track you
want to move.
“ ” “ Name” flashes in the
display and the recorder plays the
selected track repeatedly.
2 Press = or + ((•+ on the
remote control) repeatedly until
“ ” “ Move” flashes in the
display.
3 Press ENTER.
For example above, “003 n” and
“n 003” appear alternately in the
display.
4 Press = or + ((•+ on the
remote control) repeatedly to select
the destination track number.
For example above, “003 n” and
“n 002” appear alternately in the
display.
To cancel moving, press p or
CANCEL.
5 Press ENTER.
The track moves to the selected
destination track.
(•ENTER
VOL•
POSITION
+/–
EDIT•INSERT
DELETE
T MARK•CANCEL
p•ENTER
P•CAPS
= (•+
= +
T MARK•
CANCEL
EDIT•
INSERT
p•ENTER
=
(•+
continued

22
3 Press ENTER.
The track is ready to be labeled.
4 Follow steps 4 to 6 of “Labeling a disc
during stop” above.
Labeling a track or a disc during
recording
1 Keep pressing EDIT for 2 seconds or
longer during recording.
“ ” “Name” flashes in the display.
2 To label a track, press ENTER.
To label a disc, press = or +
((•+ on the remote control)
repeatedly until “ ” “Name”
flashes in the display, then press
ENTER.
3 Follow steps 4 to 6 of “Labeling a disc
during stop” above.
To cancel labeling, press CANCEL.
Available characters
• Capital and small letters of the English
alphabet
• Numbers 0 to 9
• ! " # $ % & ( ) * . ; < = > ?
@ _ ` + – ' , / : _ (space)
To relabel recordings
Follow the steps corresponding to the
labeling method until the disc or track is
ready to be labeled. Enter a new character
over the one you want to change, then
keep pressing ENTER for 2 seconds or
longer.
Notes
•You cannot relabel premastered MDs or
label MDs that have not been recorded.
•The recorder is able to display, but cannot
label using, Japanese “Katakana”
characters.
Labeling a track during playback
1 Insert a disc and play the track you
want to label.
2 Keep pressing EDIT for 2 seconds or
longer.
“ ” “Name” flashes in the
display.
3 Press ENTER.
4 Press = or + ((•+ on the
remote control) repeatedly to select a
letter and press ENTER to enter.
The selected letter stops flashing and
the cursor moves to the next input
position.
5 Repeat step 4 and enter all characters
of the label name.
6 Keep pressing ENTER for 2 seconds
or longer.
The track or disc is labeled.
Press
CAPS
VOL +/–
=/+
INSERT
DELETE
p
CANCEL
To
Switch between capital
letters, small letters, and
marks/numbers.
Move the cursor to the
left or right.
Change the letter to the
one before/next one.
Insert a blank space to
type in a new letter.
Delete a letter and move
back all following letters
to the left.
Cancel labeling.
Cancel labeling.
23
zPower sources
Besides house current, you can use the
recorder on:
– two nickel-cadmium rechargeable
batteries NC-AA (supplied)
– two LR6 (size AA) alkaline batteries
(not supplied)
It is preferable to use the recorder on
house current when recording for a long
time.
Full charging of the completely
discharged rechargeable batteries
takes about 2 hours.
To cancel charging, press CHARGE.
Notes
•Do not charge any other rechargeable
batteries than the supplied or optional Sony
NC-AA nickel cadmium rechargeable
batteries.
•Be sure to use the supplied AC power
adaptor.
•Charging time may vary depending on the
battery condition.
•When a rechargeable battery is charged for
the first time or charged after a long period
of disuse, battery life may be shorter than
usual. Repeat discharging and recharging a
few times. The battery life should return to
normal.
•When the battery life of a fully charged
rechargeable battery becomes about half
the normal life, replace it.
•When carrying the rechargeable batteries,
keep them in the supplied carrying case. It
is dangerous to carry the batteries out of
their case in your pocket or a bag together
with metallic objects such as key rings, as
this may cause a short circuit.
•Remove the rechargeable batteries from the
recorder when they are not to be used for a
long time.
Charging the nickel-
cadmium rechargeable
batteries
Before using the supplied NC-AA nickel
cadmium rechargeable batteries for the
first time, charge it in the recorder.
1 Connect the supplied AC power
adaptor.
2 Insert the rechargeable batteries into
the recorder and close the lid.
AC power adaptor
(supplied)
to a wall outlet
to DC IN 4.5V
3 Press CHARGE.
“Charge” flashes, n appears in the
display, and charging starts.
p•CHARGE
Bottom
24
Battery life
1)
Batteries
Two NC-AA
nickel-
cadmium
rechargeable
batteries
Two LR6
(size AA)
Sony alkaline
dry batteries
Playback
Approx.
5 hours
Approx.
13 hours
1)
The battery life may be shorter due to
operating conditions and the temperature
of the location.
2)
When you record, use fully charged
rechargeable batteries.
3)
Recording time may differ according to the
alkaline batteries.
When to replace/charge the
batteries
When the dry batteries or rechargeable
batteries are weak, flashing b or
“LoBATT” appears in the display.
Replace the dry batteries or charge the
rechargeable batteries.
Notes
•Do not use a new dry battery mixed with
an used one. Do not mix different types of
dry batteries.
•Stop the recorder before replacing batteries.
•When replacing the dry batteries, replace
both batteries with new ones.
•The battery indication shows you when the
batteries should be replaced or recharged.
It does not necessarily reflect the exact
remaining battery power.
•The battery indication of an alkaline battery
may not accurately reflect the remaining
battery power if it has not been used for a
period of time.
Recording
2)
Approx.
3 hours
-----
3)
Using on dry batteries
1 Insert two LR6 (size AA) dry batteries
(not supplied) with correct polarity.
Using on nickel-cadmium
rechargeable batteries
Be sure the rechargeable batteries are
fully charged.
1 Insert two fully charged nickel-
cadmium rechargeable batteries with
correct polarity.
Bottom
Bottom

25
Precautions
On safety
Do not put any foreign objects in the DC
IN 4.5 V jack.
On power sources
• Use house current, nickel-cadmium
rechargeable batteries, two LR6 (size
AA) batteries.
• For use in your house: Use the AC
power adaptor supplied with this
recorder. Do not use any other AC
power adaptor since it may cause the
recorder to malfunction.
• The recorder is not disconnected from
the AC power source (mains) as long
as it is connected to the wall outlet,
even if the recorder itself has been
turned off.
• If you are not going to use this recorder
for a long time, be sure to disconnect
the power supply (AC power adaptor,
dry batteries, rechargeable batteries, or
car battery cord). To remove the AC
power adaptor from the wall outlet,
grasp the adaptor plug itself; never
pull the cord.
On heat build-up
Heat may build up in the recorder if it is
used for an extended period of time. In
this case, leave the recorder turned off
until it cools down.
On installation
• Never use the recorder where it will be
subjected to extremes of light,
temperature, moisture or vibration.
• Never wrap the recorder in anything
when it is being used with the AC
power adaptor. Heat build-up in the
recorder may cause malfunction or
damage.
z
Additional information
On the headphones
Road safety
Do not use headphones while driving,
cycling, or operating any motorized vehicle.
It may create a traffic hazard and is illegal in
many areas. It can also be potentially
dangerous to play your recorder at high
volume while walking, especially at
pedestrian crossings. You should exercise
extreme caution or discontinue use in
potentially hazardous situations.
Preventing hearing damage
Avoid using headphones at high volume.
Hearing experts advise against continuous,
loud and extended play. If you experience a
ringing in your ears, reduce the volume or
discontinue use.
Caring for others
Keep the volume at a moderate level. This
will allow you to hear outside sounds and to
be considerate of the people around you.
On the MiniDisc cartridge
• When carrying or storing the MiniDisc,
keep it in its case.
• Do not break open the shutter.
• Do not place the cartridge where it will
be subject to light, extreme
temperatures, moisture or dust.
On cleaning
• Clean the recorder casing with a soft
cloth slightly moistened with water or
a mild detergent solution. Do not use
any type of abrasive pad, scouring
powder or solvent such as alcohol or
benzene as it may mar the finish of the
casing.
• Wipe the disc cartridge with a dry cloth
to remove dirt.
• Dust on the lens may prevent the unit
from operating properly. Be sure to
close the disc compartment lid after
inserting or ejecting an MD.
Polarity of
the plug
26
Notes on batteries
Incorrect battery usage may lead to
leakage of battery fluid or bursting
batteries. To prevent such accidents,
observe the following precautions:
• Install the + and – poles of the batteries
correctly.
• Do not install new and used batteries
or different kinds of batteries together.
• Do not try to recharge dry batteries.
• When the recorder is not to be used for
a long time, be sure to remove the
batteries.
• If a battery leak should develop,
carefully and thoroughly wipe away
battery fluid from the battery
compartment before inserting new
ones.
Note on mechanical noise
The recorder gives off mechanical noise
while operating, which is caused by the
power-saving system of the recorder and
it is not a problem.
To protect a recorded MD
To record-protect an MD, slide open the
tab at the side of the MD. In this position,
the MD cannot be recorded. To record
again, slide the tab back so the tab is
visible.
If you have any questions or problems
concerning your recorder, please consult
your nearest Sony dealer. (If a trouble
occurred when the disc was in the
recorder, we recommend that the disc be
left in the recorder when you consult your
Sony dealer so that the cause of trouble
may be better understood.)
Note on digital recording
This recorder uses the Serial Copy
Management System, which allows only
first-generation digital copies to be made
from premastered software. You can only
make copies from a home-recorded MD
by using the analog (line out) connections.
CD player, MD
player, etc.
Digital recording
Home-
recorded
MD
Recordable
MD
No
digital
recording
Back of the MD
Record-protect
Tab

27
Troubleshooting
Should any problem persist after you have made these checks, consult your nearest Sony
dealer.
Symptom
The recorder does not
work or works
poorly.
Cause/Solution
• Audio sources may not be securely connected.
b
Disconnect the audio sources once and connect them again
(pages 6, 11).
• The HOLD function is turned on (“HOLD” appears in the display
when you press an operation button on the recorder).
b
Disable HOLD by sliding the HOLD switch in the opposite
direction of the arrow (page 17).
• Moisture has condensed inside the recorder.
b
Take the MD out and leave the recorder in a warm place for
several hours until the moisture evaporates.
• The rechargeable batteries or dry batteries are weak (b or
“LoBATT” flashes).
b
Charge the rechargeable batteries or replace the dry batteries
(pages 23, 24).
• The rechargeable batteries or dry batteries have been installed
incorrectly.
b
Install the batteries correctly (pages 23, 24).
• You pressed a button while the disc indication was rotating
quickly.
b
Wait until the indication rotates slowly.
• When recording digitally from a portable CD player, you did not
use AC power or did not disable the anti-skip function such as
ESP (page 11).
• The analog recording was made using a connecting cord with an
attenuator.
b
Use a connecting cord without an attenuator (page 6).
• The AC power adaptor was unplugged during recording or a
power outage occurred.
• While operating, the recorder received a mechanical shock, too
much static, abnormal power voltage caused by lightning, etc.
b
Restart the operation as follows.
1 Disconnect all the power sources.
2 Leave the recorder for about 30 seconds.
3 Connect the power source.
• The disc is damaged or does not contain proper recording or
editing data.
b
Reinsert the disc. If this fails, rerecord.
continued

28
Symptom
No sound comes
through the
headphones.
An MD is not played
from the first track.
Playback sound skips.
Sound has a lot of
static.
Cannot find the track
marks.
The rechargeable
battery does not start
charging.
The lid does not
open.
Cause/Solution
• The headphones plug is not firmly connected.
b
Plug in the plug of the headphones firmly to the remote
control. Plug in the plug of the remote control firmly to
PHONES/REMOTE.
• Volume is too low.
b
Adjust the volume by pressing VOL +/–.
• AVLS is on.
b
Switch AVLS off (page 16).
• Disc playing stopped before it came to the last track.
b
Press = repeatedly or open and close the lid once to go
back to the beginning of the disc, and restart playing after
checking the track number in the display.
• The recorder is placed where it receives continuous vibration.
b
Put the recorder on a stable place.
• A very short track may cause sound to skip.
• Strong magnetism from a television or such device is interfering
with operation.
b
Move the recorder away from the source of strong
magnetism.
• You pressed P after pressing = or +.
b
Press P before pressing = or +.
• The rechargeable battery has been inserted incorrectly or the AC
power adaptor has been connected incorrectly.
b
Insert the battery correctly or connect the AC power adaptor
correctly.
• The power sources have been disconnected during recording or
editing, or the batteries have been exhausted.
b
Set the power sources again, or replace the exhausted
batteries with new ones.

29
Symptom
“TrFULL” appears
even before the disc
has reached the
maximum recording
time (60 or 74
minutes).
“TrFULL” appears
even before the disc
has reached the
maximum track
number or recording
time.
Track marks cannot
be erased.
The remaining
recording time does
not increase even
after erasing
numerous short
tracks.
The total recorded
time and the
remaining time on the
disc may not total the
maximum recording
time (60 or 74
minutes).
The edited tracks may
exhibit sound
dropout during
search operations.
System limitations
The recording system in your MiniDisc recorder is radically different from those used in
cassette and DAT decks and is characterized by the limitations described below. Note,
however, that these limitations are due to the inherent nature of the MD recording system
itself and not to mechanical causes.
Cause
When 254 tracks have been recorded on the disc, “TrFULL”
appears regardless of the total recorded time. More than 254 tracks
cannot be recorded on the disc. To continue recording, erase
unnecessary tracks.
Repeated recording and erasing may cause fragmentation and
scattering of data. Although those scattered data can be read, each
fragment is counted as a track. In this case, the number of tracks
may reach 254 and further recording is not possible. To continue
recording, erase unnecessary tracks.
When the data of a track is fragmented, the track mark of a
fragment under 12 seconds long cannot be erased. You cannot
combine a track recorded in stereo and a track recorded in
monaural; nor can you combine a track recorded with digital
connection and a track recorded with analog connection.
Tracks of under 12 seconds in length are not counted and so erasing
them may not lead to an increase in the recording time.
Normally, recording is done in minimum units of approximately 2
seconds. When recording is stopped, the last unit of recording
always uses this unit of 2 seconds even if the actual recording is
shorter. Likewise, when recording is restarted after the stop, the
recorder will automatically insert a blank space amounting to 2
seconds before the next recording. (This is to prevent accidental
erasing of a previous track whenever a new recording is started).
Therefore, the actual recording time will decrease whenever a
recording is stopped; a maximum of 6 seconds compared to the
potential recording time for each stop.
The fragmentation of data may cause sound dropout while
searching because the tracks are played in higher speed than
normal playback.

30
Messages
If the following error messages flash in the display window, check the chart below.
Error message
BLANK
ERROR
FULL
EDIT
BUSY
HiDCin
HOLD
LoBATT
MEMORY
Meaning/Remedy
• An MD with no recording on it is inserted.
b Insert a recorded MD.
• The disc is damaged or does not contain proper recording or
editing data.
b Reinsert the disc. If this fails, rerecord.
• There is no more space to record on the disc (less than 12 seconds
available).
b Replace the disc.
• You tried to enter more than 200 letters to label a single track or
disc.
• You tried to enter a total of more than 1700 letters for track or disc
names during playback or stop.
• You tried to enter a total of more than 500 letters for track or disc
names during a single recording.
b Enter the characters within the limit.
• The MD player is recording information (track start and end
position) from the memory to the disk.
b Wait until this process is completed. Do not expose the player
to physical shock, nor disrupt power supply.
• You tried to operate the recorder while it was accessing the
recorded data.
b Wait until the message goes out (in rare cases, it may take 2–3
minutes).
• Voltage of the power supply is too high (The supplied AC power
adaptor is not used).
b Use the supplied AC power adaptor.
• The recorder is locked.
b Slide HOLD against the arrow to unlock the recorder (page 17).
• Batteries are weak.
b Charge the rechargeable batteries or replace the dry batteries
(pages 23, 24).
• You tried to record when there is no indication in the display, with
the recorder placed where it receives continuous vibration.
b Put the recorder on a stable place, and start recording again.
31
Error message
NoCOPY
NoDISC
NO SIG
PbONLY
SAVED
SORRY
TEMP
TrFULL
TrPROT
Meaning/Remedy
• You tried to make a copy from a disc that is protected by the Serial
Copy Management System. You cannot make copies from a
digitally connected source which was itself recorded using digital
connection.
b
Use analog connection instead (page 6).
• You tried to play or record with no disc in the recorder.
b
Insert an MD.
• The recorder could not detect digital input signals.
b
Make sure that the source is connected firmly (page 11).
• You tried to record or edit on a premastered MD (Pb stands for
“playback”.)
b
Insert a recordable MD.
• You tried to record or edit on a MD with the tab in the record-
protect position.
b
Slide the tab back (page 26).
• You tried to erase the track mark at the beginning of the first track.
• You tried to erase a track mark to combine tracks the recorder
cannot combine (a track recorded in stereo and in mono, for
example).
• You tired to press Digital MEGA BASS•AVLS when the LINE OUT
jack is plugged in.
• You tried to press P or T MARK during synchro-recording.
• Heat has built up in the recorder.
b
Let the recorder cool down.
• There is no more space for new data when you are editing the MD.
b
Erase unnecessary tracks (page 18).
• You tried to record or edit on a track that is protected from erasing.
b
Record or edit on other tracks.

32
Specifications
System
Audio playing system
MiniDisc digital audio system
Laser diode properties
Material: GaAlAs
Wavelength: λ = 780 nm
Emission duration: continuous
Laser output: less than 44.6 µW
(This output is the value measured at a
distance of 200 mm from the lens surface on
the optical pick-up block with 7 mm
aperture.)
Recording and playback time
Maximum 74 minutes (MDW-74, stereo
recording)
Maximum 148 minutes (MDW-74, monaural
recording)
Revolutions
400 rpm to 900 rpm (CLV)
Error correction
Advanced Cross Interleave Reed Solomon
Code (ACIRC)
Sampling frequency
44.1 kHz
Sampling rate converter
Input: 32 kHz/44.1 kHz/48 kHz
Coding
Adaptive TRansform Acoustic Coding
(ATRAC)
Modulation system
EFM (Eight to Fourteen Modulation)
Number of channels
2 stereo channels
1 monaural channel
Frequency response
20 to 20,000 Hz ± 3 dB
Wow and Flutter
Below measurable limit
Inputs
MIC (PLUG IN POWER): stereo mini-jack,
0.35–1.38 mV
(OPTICAL) LINE IN: stereo mini-jack with
optical (digital) in
•Line in: 69–194 mV
•Optical (digital) in: wave length 660 nm
Outputs
PHONES/REMOTE: stereo mini-jack,
maximum output level 5 mW+ 5 mW, load
impedance 16 ohm
LINE OUT: stereo mini-jack, 194 mV, load
impedance 10 kilohm or greater
General
Power requirements
Sony AC Power Adaptor (supplied)
connected at the DC IN 4.5 V jack:
120 V AC, 60 Hz (US model)
220–230 V AC, 50/60 Hz (European
model)
230–240 V AC, 50 Hz (UK model)
240 V AC, 50 Hz (Australia and New
Zealand model)
Two nickel-cadmium rechargeable batteries
NC-AA (supplied)
Two LR6 (size AA) alkaline batteries (not
supplied)
Battery operation time
See “Battery life” (page 24)
Dimensions
Approx. 116.8 x 18.5 x 86.1 mm (w/h/d)
(4
5
/8 x
3
/4 x 3
1
/2 in.)
Mass
Approx. 160 g (5.6 oz) the recorder only
Approx. 220 g (7.8 oz) incl. a recordable MD,
and two NC-AA nickel-cadmium
rechargeable batteries
Supplied accessories
Optical cable (1)
AC power adaptor (1)
Headphones with a remote control (1)
NC-AA nickel-cadmium rechargeable
batteries (2)
Rechargeable battery carrying case (1)
33
Optional accessories
NC-AA nickel-cadmium rechargeable
batteries
Optical Cable
POC-151HG, POC-152HG, POC-MZ1,
POC-MZ2, POC-15B, POC-15AB, POC-
DA12SP
Line Cable RK-G129, RK-G136
Stereo Microphones ECM-717, ECM-MS907,
ECM-MS957
Stereo Headphones* MDR-series
Active Speakers SRS-A41, SRS-A91
Recordable MDs MDW-series
MiniDisc Carrying Case CK-MD4
MiniDisc Filing Box CK-MD10
Your dealer may not handle some of the
above listed accessories. Please ask the
dealer for detailed information about the
accessories in your country.
US and foreign patents licensed from Dolby
Laboratories Licensing Corporation.
Design and specifications are subject to
change without notice.
What is an MD?
How MiniDisc works
MiniDisc (MD) comes in two types:
premastered (prerecorded) and
recordable (blank). Premastered MDs,
recorded at music studios, can be played
back almost endlessly. However, they
can't be recorded on or over like cassette
tapes. To record, you must use a
“recordable MD”.
Premastered MDs
Premastered MDs are recorded and
played like regular CDs. A laser beam
focuses on the pits in the surface of the
MD and reflects the information back to
the lens in the recorder. The recorder then
decodes the signals and plays them back
as music.
Recordable MDs
Recordable MDs, which use magneto-
optical (MO) technology, can be recorded
again and again. The laser inside the
recorder applies heat to the MD,
demagnetizing the magnetic layer of the
MD. The recorder then applies a magnetic
field to the layer. This magnetic field
corresponds exactly to the audio signals
generated by the connected source. (The
north and south polarities equate to
digital "1" and "0".) The demagnetized
MD adopts the polarity of the magnetic
field, resulting in a recorded MD.
* Whether you should plug the headphones
directly to PHONES/REMOTE on the main
unit or to a remote control, use only
headphones with stereo mini plugs.
stereo mini plugs
34
User TOC Area
Music Data
How the MiniDisc got so small
The 2.5-inch MiniDisc, encased in a
plastic cartridge that looks like a 3.5-inch
diskette (see illustration above), uses a
new digital audio compression
technology called ATRAC (Adaptive
TRansform Acoustic Coding). To store
more sound in less space, ATRAC extracts
and encodes only those frequency
components actually audible to the
human ear.
Quick Random Access
Like CDs, MDs offer instantaneous
random access to the beginning of any
music track. Premastered MDs are
recorded with location addresses
corresponding to each music selection.
Recordable MDs are manufactured with a
“User TOC Area” to contain the order of
the music. The TOC (Table of Contents)
system is similar to the “directory
management system” of floppy disks. In
other words, starting and ending
addresses for all music tracks recorded on
the disc are stored in this area. This lets
you randomly access the beginning of any
track as soon as you enter the track
number (AMS), as well as label the
location with a track name as you would
a file on a diskette.
Shock-Resistant Memory
One major drawback of optical read
systems is that they can skip or mute
when subjected to vibration. The MD
system resolves this problem by using a
buffer memory that stores audio data.
Contains the order and start/end
points of the music.

35
Looking at the controls
See pages in ( ) for more details.
The recorder
1 Battery compartment (23)
2 MIC (PLUG IN POWER) jack (12)
3 REC (record) switch (7)
4 Display window (14, 16)
5 (OPTICAL) LINE IN jack (6, 11)
6 LINE OUT jack (17)
7 PHONES/REMOTE jack (8)
8 HOLD switch (17)
9 Digital MEGA BASS•AVLS button (at
the bottom) (15, 16)
0 SYNCHRO REC (Synchronized-
recording) switch (at the bottom) (11)
!¡ P (pause)•CAPS button (7, 9, 21)
!™ p (stop)•CHARGE button (7, 9, 23)
!£ ( (play)•ENTER button (7, 9, 18)
!¢ DC IN 4.5V jack
!∞ OPEN switch
!§ VOL (volume) +/– buttons (9, 21)
!¶ =/ + buttons
!• END SEARCH button (7)
!ª T MARK (track mark)•CANCEL
button (at the bottom) (19, 21)
@º MODE•DELETE button (at the
bottom) (13, 15, 21)
@¡ DISPLAY•EDIT•INSERT button (at
the bottom) (14,16,18, 21)
1
!¡
2
3
4
5
6
7
8
9
!º
!™
!£
!¢
!∞
!§
!¶
!•
!ª
@º
@¡
36
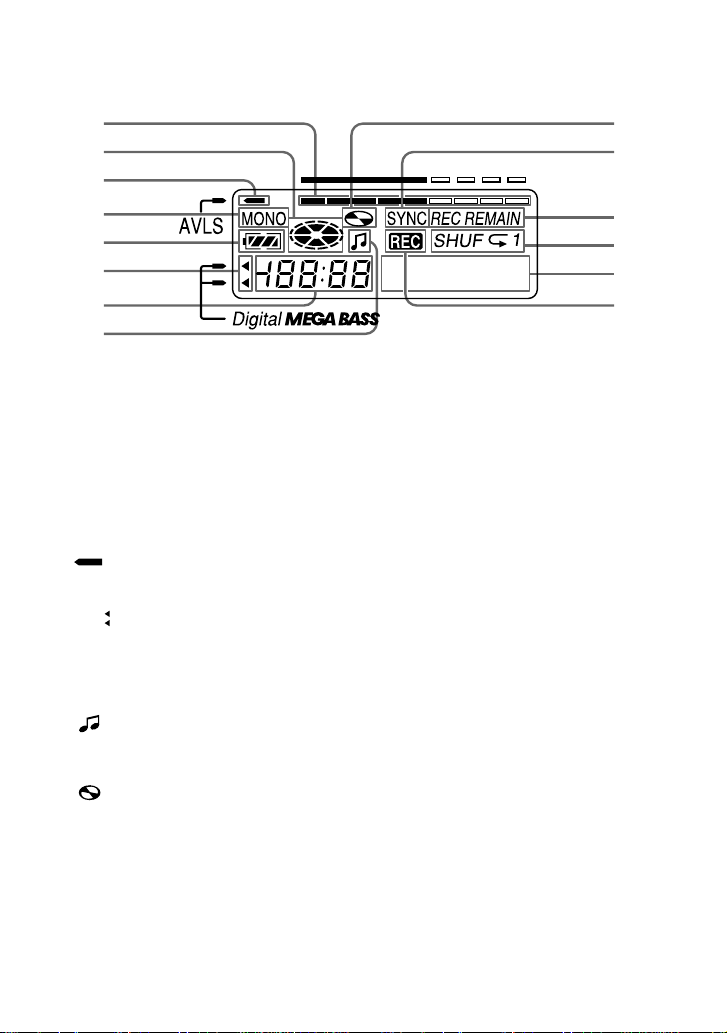
1 Level meter
Shows the level of the MD being
played or recorded.
2 Disc indication
Shows that the disc is rotating for
recording, playing or editing an MD.
3 mark: AVLS indication (16)
4 MONO (monaural) indication
5 Battery indication (23)
6 “ or mark: MEGA BASS indication
(15)
7 Time display (14, 16)
Shows the elapsed time of the track or
MD being recorded or played.
8 mark (18, 21, 22)
Lights up when the track information is
displayed or edited.
9 mark (19, 21, 22)
Lights up when the disc information is
displayed or edited.
!º SYNC (Synchronized-recording)
indication (11)
The display window
!¡ REMAIN/REC REMAIN (remaining
time/tracks) indication (14, 16)
REMAIN lights up along with the
remaining time of the track or disc, or
remaining number of tracks.
REC REMAIN lights up along with
the remaining time available on the
MD for recording.
!™ Play mode indication (15)
Shows the play mode of the MD.
!£ Character information display
Displays the disc and track names,
error messages, track numbers, etc.
!¢ REC indication (7)
Lights up while recording. Flashes
when standing by for recording.
19
!º2
3
4
5
6
7
8
!¡
!™
!£
!¢
37
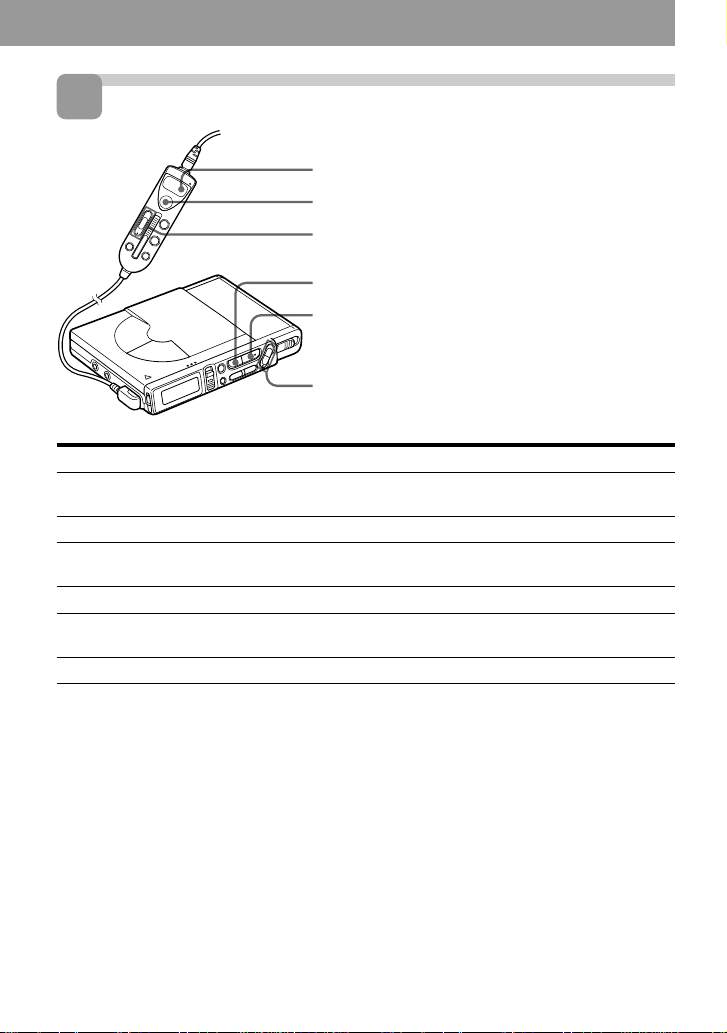
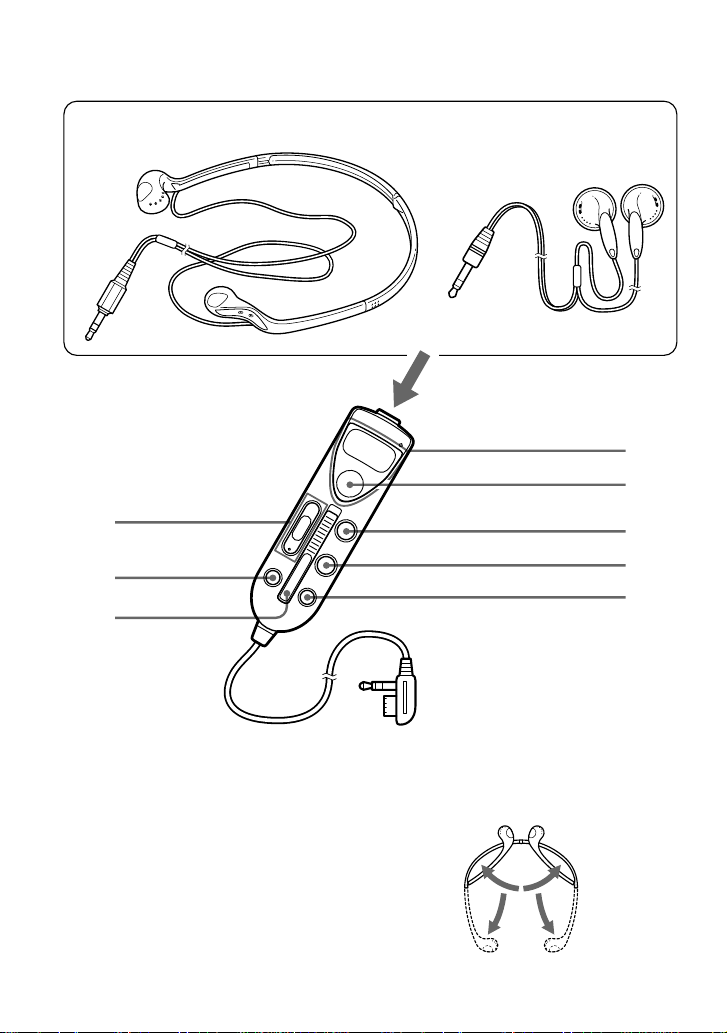
The headphones with a remote control
1 Headphones
Can be replaced with optional
headphones.
2 VOL (volume) •POSITION +/–
button (9, 21)
3 DELETE button (21)
4 HOLD switch (17)
5 = (•+ button
6 p (stop)•ENTER button (7, 9, 18)
7 P (pause)•CAPS button (7, 9, 21)
8 T MARK•CANCEL button (18)
9 EDIT•INSERT button (18, 19, 21)
For customers in the United States
Unfold the supplied headphones as
shown in the illustration below.
US model other models
1
2
5
6
3
4
7
8
9


Sony Corporation Printed in Japan