Documents: Go to download!
- Owner's manual - (English)
- Getting started
- Camera and Gallery
- Settings
- Troubleshooting
Table of contents
User manual Mobile
Getting started
Galaxy S21 5G
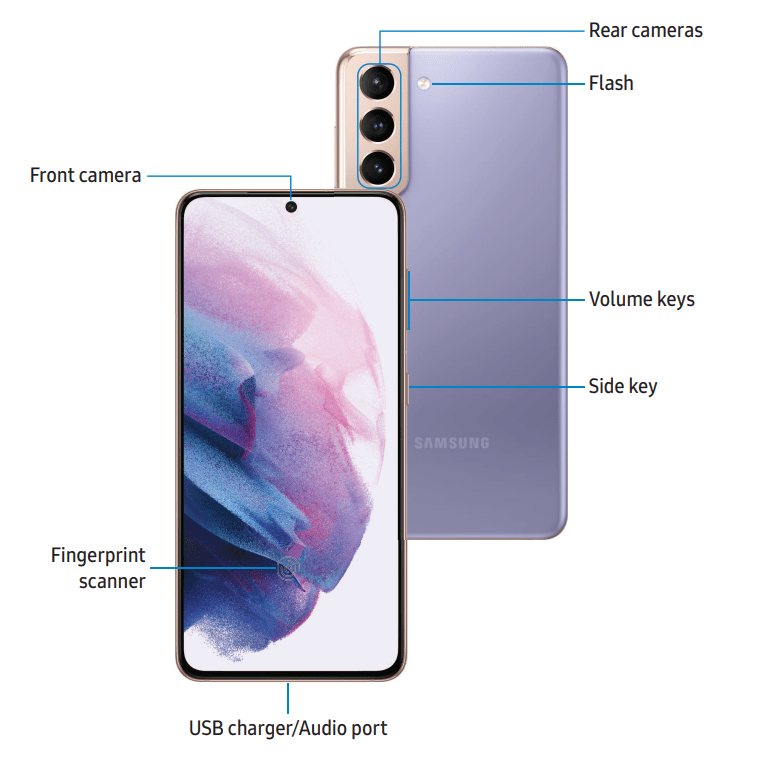
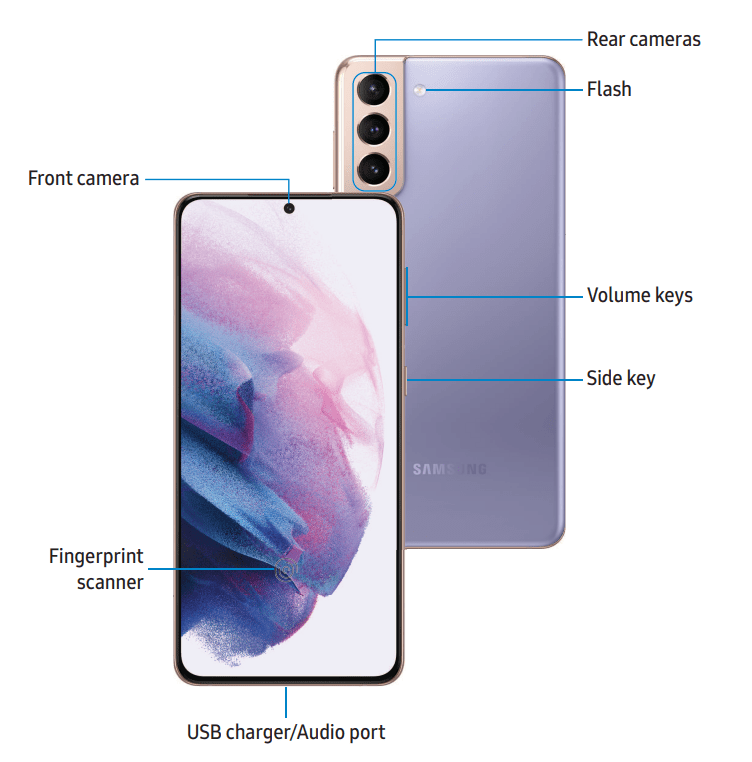
Galaxy S21+ 5G
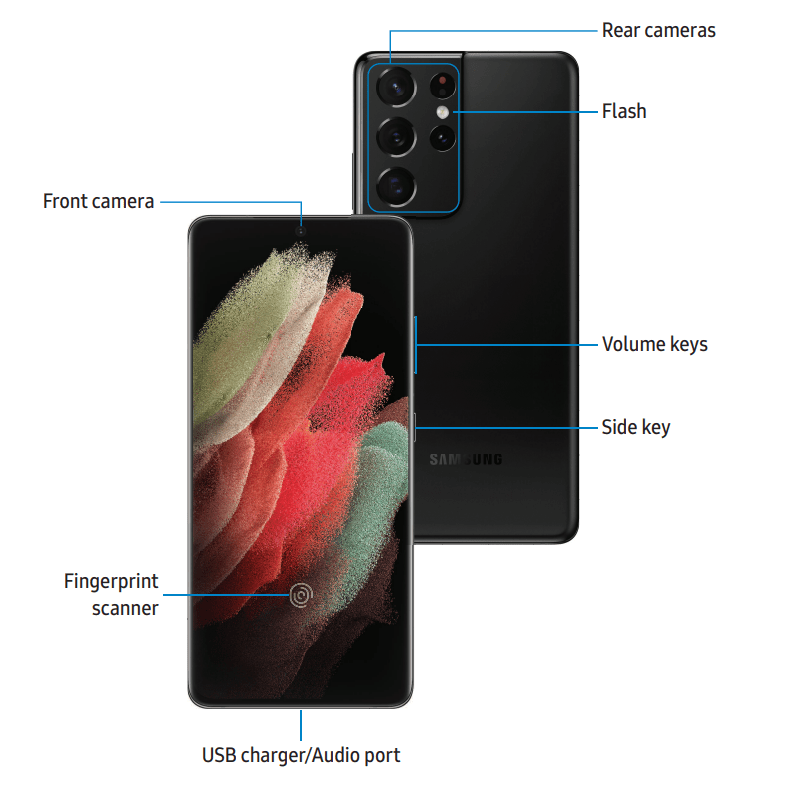
Galaxy S21 Ultra 5G
Set up your device
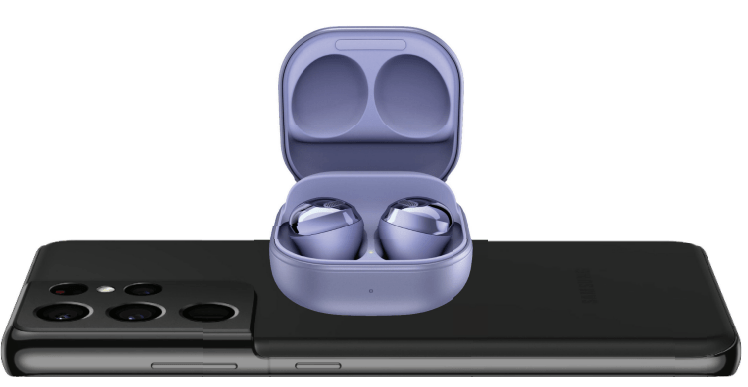
Wireless power sharing: Wirelessly charge your compatible Samsung devices using your phone. Some features are not available while sharing power.
- From Settings, tap
 Battery and device care > Battery > Wireless power sharing.
 - Tap Battery limit and choose a percentage. Once the device you are charging has reached this level of charge, wireless power sharing automatically turns off.
- Tap
 to turn on the charging feature.
 - With the phone face down, place the compatible device on the back of the phone to charge. A notification sound or vibration occurs when charging begins.
 NOTE Wireless power sharing works with most Qi-Certified devices. Requires minimum 30% battery to share. Speed and power efficiency of charge varies by device. May not work with some accessories, covers, or other manufacturer’s devices. If you have trouble connecting or charging is slow, remove any cover from each device.
For best results when using Wireless power sharing, please note:
- Remove any accessories or cover before using the feature. Depending on the type of accessory or cover, Wireless power sharing may not work properly.
- The location of the wireless charging coil may vary by device, so you may need to adjust the placement to make a connection. When charging starts, a notification or vibration will occur, so the notification will help you know you've made a connection.
- Call reception or data services may be affected, depending on your network environment.
- Charging speed or efficiency can vary depending on device condition or surrounding environment.
- Do not use headphones while charging with Wireless power sharing.
Start using your device
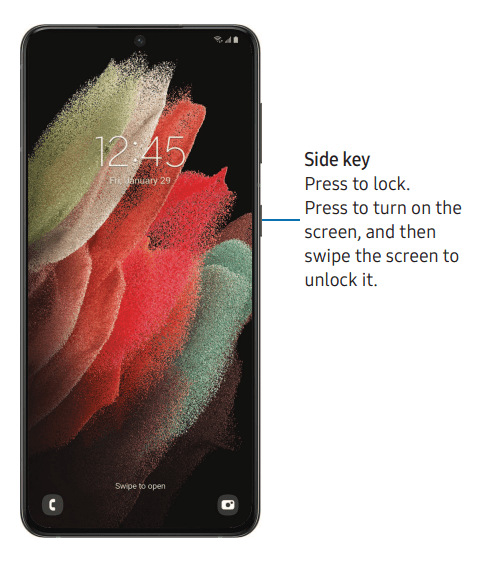
Turn on your device: Use the Side key to turn your device on. Do not use the device if the body is cracked or broken. Use the device only after it has been repaired.
- Press and hold the Side key to turn the device on.
- To turn the device off, press and hold the Side and Volume down keys at the same time, and tap
 Power off. Confirm when prompted.
 - To restart your device, press and hold the Side and Volume down keys at the same time, and tap
 Restart. Confirm when prompted.
- To turn the device off, press and hold the Side and Volume down keys at the same time, and tap
TIP: To learn more about powering off your device from Settings, tap  Advanced features > Side key > How to power off your phone.
Use the Setup Wizard
- The first time you turn your device on, the Setup Wizard guides you through the basics of setting up your device.
- Follow the prompts to choose a default language, connect to a Wi-Fi® network, set up accounts, choose location services, learn about your device’s features, and more.
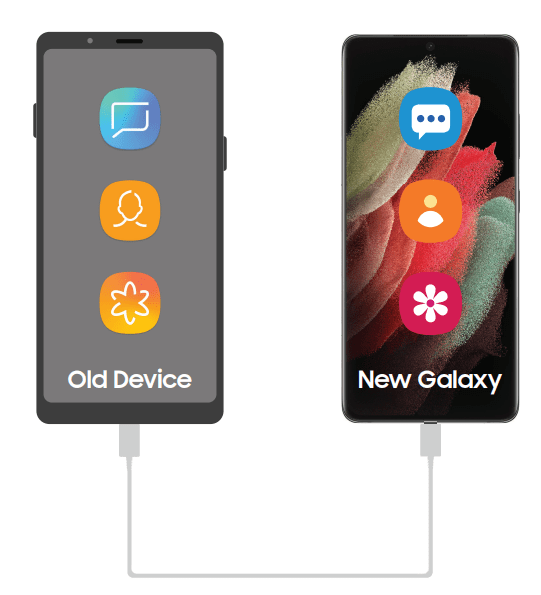
Transfer data from an old device: Use Smart Switch™ to transfer contacts, photos, music, videos, messages, notes, calendars, and more from your old device. Smart Switch can transfer your data via USB cable, Wi-Fi, or computer. Visit samsung.com/us/support/owners/app/smart-switch to learn more.
- From Settings, tap
 Accounts and backup > Bring data from old device.
 - Follow the prompts and select the content to transfer.
Lock or unlock your device: Use your device’s screen lock features to secure your device. By default, the device locks automatically when the screen times out. For more information about screen locks, see Lock screen and security.
Camera and Gallery
You can capture high-quality pictures and videos using the Camera app. Images and videos are stored in the Gallery, where you can view and edit them.
Camera
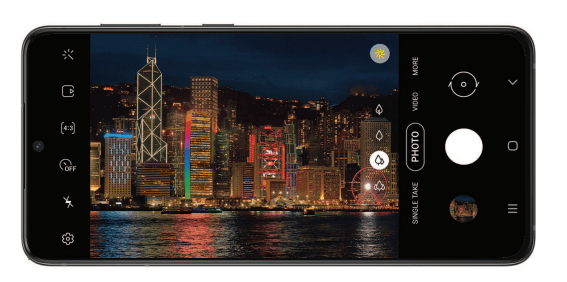
Enjoy a full kit of pro lenses and pro-grade video modes and settings.
- From Apps, tap
 Camera.
TIP If Quick launch is enabled, quickly press the Side key twice to open the Camera app.
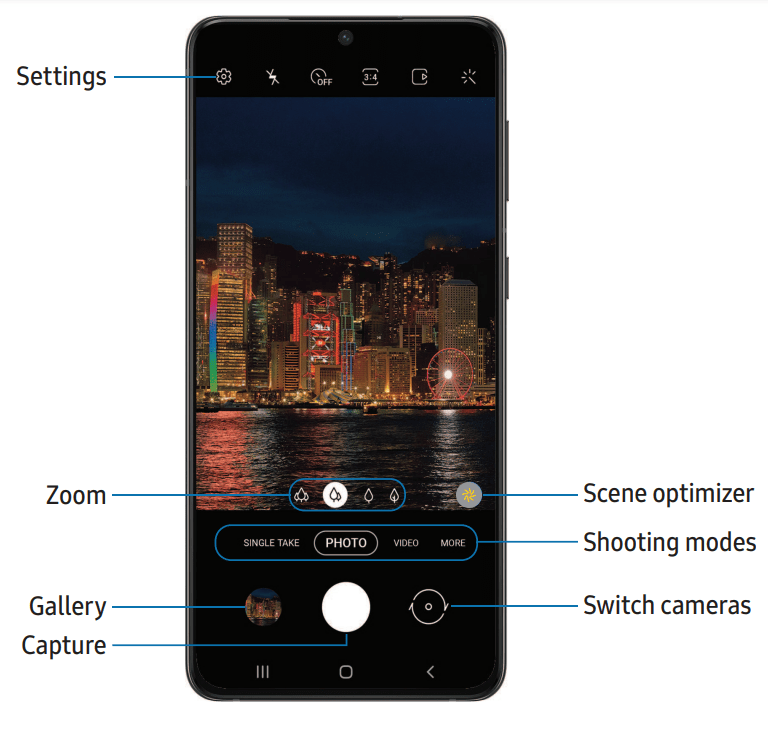
Navigate the camera screen: Take stunning pictures with your device’s front and rear cameras.
- From
 Camera, set up your shot with the following features:
- Tap the screen where you want the camera to focus. – When you tap the screen, a brightness scale appears. Drag the slider to adjust the brightness.
- To quickly switch between the front and rear cameras, swipe the screen up or down.
- To change to a different shooting mode, swipe the screen right or left. To ch
- nge camera settings, tap
 Settings.
- Tap
 Capture.
Configure shooting mode: Allow the camera to determine the ideal mode for your pictures or choose from several shooting modes.
- From
 Camera, swipe the screen right and left to change shooting modes.
- Single take: Capture multiple pictures and video clips from different angles.
- Photo: Allow the camera to determine the ideal settings for pictures.
- Video: Allow the camera to determine the ideal settings for videos.
- More: Choose other available shooting modes. Tap
 Add to drag modes into or out of the shooting modes tray at the bottom of the Camera screen.
- AR Doodle: Enhance videos by adding line drawings or handwriting to your environment. AR Doodle tracks faces and space so they move with you.
- Pro: Manually adjust the ISO sensitivity, exposure value, white balance, and color tone while taking pictures.
- Panorama: Create a linear image by taking pictures in either a horizontal or vertical direction.
- Food: Take pictures that emphasize the vivid colors of food.
- Night: Use this to take photos in low-light conditions, without using the flash.
- Portrait: Adjust the background of your shots for portrait photos.
- Portrait video: Adjust the background of your shots for portrait videos.
- Pro video: Manually adjust the ISO sensitivity, exposure value, white balance, and color tone while recording videos.
- Super slow-mo: Record videos at an extremely high frame rate for viewing in high quality slow motion. You can play a specific section of each video in slow motion after recording it.
- Slow motion: Record videos at a high frame rate for viewing in slow motion.
- Hyperlapse: Create a time lapse video by recording at various frame rates. The frame rate is adjusted depending on the scene being recorded and the movement of the device.
- Director’s view: Access advanced features such as lock onto a subject in view, change between different rear camera lenses, and more.
AR Zone: Access all of your Augmented Reality (AR) features in one place.
- From
 Camera, swipe to More, and then tap AR Zone. The following features are available:
- AR Emoji Camera: Use the camera to create your My Emoji avatar.
- AR Doodle: Enhance videos by adding line drawings or handwriting to your environment. AR Doodle tracks faces and space so they move with you.
- AR Emoji Studio: Use AR tools to create and customize your My Emoji avatar.
- AR Emoji Stickers: Add AR stickers to your My Emoji avatar.
- Deco Pic: Decorate photos or videos in real time with the camera.
Gallery
Go to the Gallery to look at the all the visual media stored on your device. You can view, edit, and manage pictures and videos.
- From Apps, tap
 Gallery.
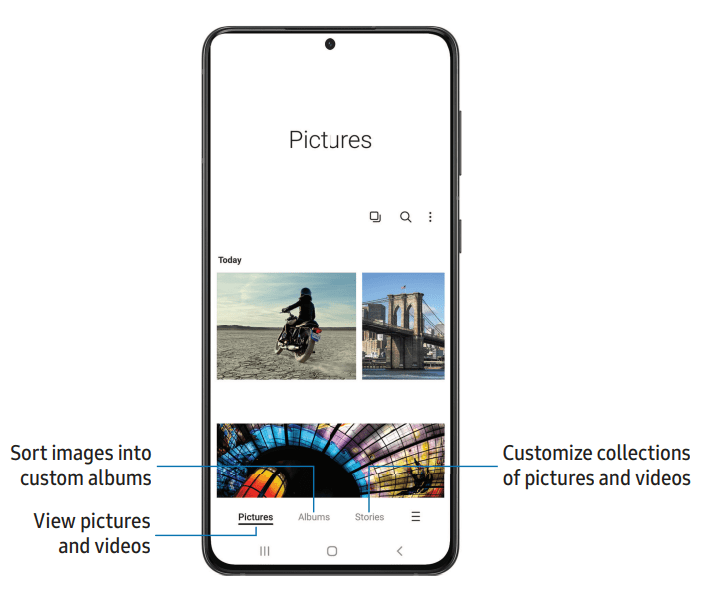
View pictures: Pictures stored on your device are viewable in the Gallery app.
- From
 Gallery, tap Pictures.
 - Tap a picture to view it. Swipe left or right to view other pictures or videos.
- To use Bixby Vision on the current picture, tap Bixby Vision. For more information, see Bixby.
- To mark the picture as a favorite, tap
 Add to Favorites.
 - To access the following features, tap
 More options:
- Details: View and edit information about the picture.
- Set as wallpaper: Set the picture as wallpaper.
- Copy to clipboard: Copy the image to paste in another app.
- Move to Secure Folder: Move the picture to a Secure Folder.
- Print: Send the picture to a connected printer.
Edit pictures: Enhance your pictures using the Gallery's editing tools.
- From
 Gallery, tap Pictures.
 - Tap a picture to view it, and then tap Edit for the following options:
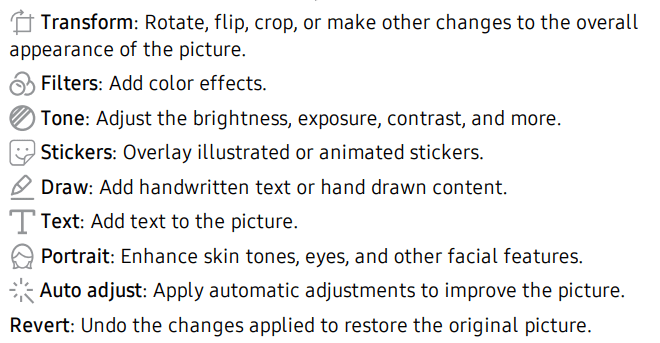
- Tap Save when finished.
Settings
Access Settings
There are a couple of ways to access your device settings.
- From a Home screen, swipe down and tap
 Settings.
 - From Apps, tap
 Settings
Search for Settings: If you are not sure exactly where to find a certain setting, you can search for it.
- From Settings, tap
 Search, and enter keywords.
 - Tap an entry to go to that setting
Connections
Manage connections between your device and a variety of networks and other devices.
Wi-Fi: You can connect your device to a Wi-Fi network to access the Internet without using your mobile data.
- From Settings, tap
 Connections > Wi-Fi, and then tap
  to turn on Wi-Fi and scan for available networks.
 - Tap a network, and enter a password if required.
Connect to a hidden Wi-Fi network: If the Wi-Fi network you want is not listed after a scan, you can still connect to it by entering the information manually. Ask the Wi-Fi network administrator for the name and password before you begin.
- From Settings, tap
 Connections > Wi-Fi, and then tap to turn on Wi-Fi.
 - Tap
 Add network at the bottom of the list.
 - Enter information about the Wi-Fi network:
- Network name: Type the exact name of the network.
- Security: Select a security option from the list, and enter the password if required.
- Advanced: Define other advanced options, such as IP and Proxy settings.
- Tap Save.
TIP: Tap  QR scanner button to connect to a Wi-Fi network by using your device’s camera to scan a QR code.
Advanced Wi-Fi settings: You can configure connections to various types of Wi-Fi networks and hotspots, manage saved networks and look up your device's network addresses. Options may vary by carrier.
- From Settings, tap
 Connections > Wi-Fi, and then tap
  to turn on Wi-Fi. 2
 - Tap
 More options > Advanced.
- Switch to mobile data: When enabled, your device will switch to mobile data whenever the Wi-Fi connection is unstable. When the Wi-Fi signal is strong, it switches back to Wi-Fi.
- Turn on Wi-Fi automatically: Turn on Wi-Fi in frequently-used locations.
- Detect suspicious networks: Get notified when suspicious activity is detected on the current Wi-Fi network.
- Show network quality info: Display network information (such as speed and stability) in the list of available Wi-Fi networks.
- Wi-Fi power saving mode: Enable Wi-Fi traffic analysis to reduce battery usage.
- Network notification/Wi-Fi notifications: Receive notifications when open networks in range are detected.
- Show Wi-Fi pop-up: Alert me that Wi-Fi is available when opening apps.
- Manage networks: View saved Wi-Fi networks and configure whether to auto reconnect to or forget individual networks.
- Wi-Fi control history: View apps that have recently turned your Wi-Fi on or off.
- Hotspot 2.0: Connect automatically to Wi-Fi networks that support Hotspot 2.0.
- Install network certificates: Install authentication certificates.
Wi-Fi Direct:
Wi-Fi Direct uses Wi-Fi to share data between devices.
- From Settings, tap
 Connections > Wi-Fi, and then tap
  to turn on Wi-Fi. 2
 - Tap
 More options > Wi-Fi Direct.
 - Tap a device, and then follow the prompts to connect.
Disconnect from Wi-Fi Direct: Disconnect your device from a Wi-Fi Direct device.
- From Settings, tap
 Connections > Wi-Fi >
  More options > Wi-Fi Direct. Tap a device to disconnect it.
Bluetooth:
You can pair your device to other Bluetooth-enabled devices, like Bluetooth headphones or a Bluetooth-enabled vehicle infotainment system. Once a pairing is created, the devices remember each other and can exchange information without having to enter the passkey again.
- From Settings, tap
 Connections > Bluetooth, and then tap
  to turn on Bluetooth.
 - Tap a device and follow the prompts to connect.
TIP When sharing a file, tap  Bluetooth to use this feature.
Rename a paired device: You can rename a paired device to make it easier to recognize.
- From Settings, tap
 Connections > Bluetooth, and then tap
  to turn on Bluetooth.
 - Tap
 Settings next to the device name, and then tap Rename.
 - Enter a new name, and tap Rename.
Unpair from a Bluetooth device: When you unpair from a Bluetooth device, the two devices no longer recognize each other and you will need to pair with the device again in order to connect to it.
- From Settings, tap
 Connections > Bluetooth, and then tap
  to turn on Bluetooth.
 - Tap
 Settings next to the device, and then tap Unpair.
Advanced options: Additional Bluetooth features are available in the Advanced menu. Options may vary by carrier.
- From Settings, tap
 Connections > Bluetooth.
 - Tap
 More options > Advanced or Advanced for the following options:
- Sync with Samsung Cloud: Sync files transferred through Bluetooth with your Samsung account.
- Phone name: Change the name of your device for Bluetooth connections.
- Received files: View a list of files received using Bluetooth.
- Music Share: Let friends play music on your Bluetooth speaker or headphones.
- Ringtone sync: Use the ringtone set on your device when you receive calls through a connected Bluetooth device.
- Bluetooth control history: View apps that have used Bluetooth recently
Dual audio: You can play audio from your device to two connected Bluetooth audio devices.
- Connect Bluetooth audio devices to your device.
- From the Notification panel, tap Media.
- Under Audio output, tap
 next to each audio device to play audio to them (up to two devices).
Device maintenance
View the status of your device’s battery, storage, and memory. You can also automatically optimize your device’s system resources.
Quick optimization:
The quick optimization feature improves device performance through the following actions:
- Identifying apps that use excessive battery power and clearing unneeded items from memory.
- Deleting unnecessary files and closing apps running in the background.
- Scanning for malware.
To use the quick optimization feature:
- From Settings, tap
 Battery and device care > Optimize now.
Battery:
View how battery power is used for your various device activities.
- From Settings, tap
 Battery and device care > Battery for the following options:
- Usage since last full charge: View your recent battery usage by time, app, and service.
- Power saving mode: Save battery life by turning off Motion smoothness and limiting background network usage, syncing, and location checking. Choose from additional power saving options to save more power when this mode is enabled.
- Background usage limits: View apps that you don’t use often and limit their battery usage. To disable this feature, tap Put unused apps to sleep.
- Wireless power sharing: Enable wireless charging of supported devices with your device’s battery.
- More battery settings:
- Adaptive battery: Limit battery usage for apps that you don’t use often.
- Enhanced processing: Speed up data processing for the most demanding apps and games. This option uses more battery power.
- Show battery percentage: Display the battery charge percentage next to the battery icon on the Status bar.
- Show charging information: Show battery level and estimated time until full when Always On Display is off or not shown.
- Fast charging: Enable or disable fast cable charging when connected to a supported charger.
- Super fast charging: Enable or disable super fast charging when connected to a supported charger.
- Fast wireless charging: Enable or disable fast wireless charging when using a supported charger. To prevent fan noise during wireless charging, disable this option.
Storage:
View your storage capacity and detailed usage by category and file type.
- From Settings, tap
 Battery and device care > Storage.
- Tap a category to view and manage files.
Memory:
Check the amount of available memory. You can close background apps and reduce the amount of memory you are using to speed up your device.
- From Settings, tap
 Battery and device care > Memory. The used and available memory are shown.
- Tap Clean now to free up as much memory as possible.
- Tap View more to view the full list of apps and services using memory. Tap
 to include or exclude these apps and services.
 - Tap Apps not used recently to view apps and services that are included in this group. Tap
 to include or exclude these apps and services.
 - Tap Excluded apps to view a list of apps that have been excluded. Tap
 Add apps to choose apps to exclude from memory usage checks.
Advanced device care options:
Other Device care features are available in the Advanced menu.
- From Settings, tap
 Battery and device care. The following options are available:
 Search: Find panels that are either installed or available to install.
 Care report: View information about the restart history and charging and temperature tips.
 More options:
- Show icon on Apps screen: Display the icon for Device care on the Apps screen.
- Automation: Optimize your device automatically at set times based on your usage patterns.
- Contact us: Contact Samsung support through Samsung members.
- About Device care: View version and license information about the Device care feature.
Language and input:
Configure your device’s language and input settings.
Change the device language: You can add languages to your list and organize them according to preference. If an app does not support your default language, then it will move to the next supported language in your list.
- From Settings, tap
 General management > Language.
 - Tap
 Add language, and select a language from the list.
 - Tap Set as default to change the device language.
- To switch to another language on the list, tap the desired language, and then tap Apply.
Text-to-speech: Configure your Text-to-Speech (TTS) options. TTS is used for various accessibility features, such as Voice Assistant.
- From Settings, tap
 General management > Text-to-speech for options:
- Preferred engine: Choose either the Samsung or Google Text-to-speech engine. Tap
 Settings for options.
 - Language: Set the default speech language.
- Speech rate: Set the speed at which the text is spoken.
- Pitch: Set the pitch of the speech.
- Play: Tap to play a short demonstration of speech synthesis.
- Reset: Reset the speech rate and pitch.
- Preferred engine: Choose either the Samsung or Google Text-to-speech engine. Tap
Keyboard list and default: Change your default keyboard, modify built-in keyboards, and change keyboard settings.
- From Settings, tap
 General management > Keyboard list and default for the following options:
- Default keyboard: Choose a default keyboard for your device’s menus and keyboards.
- Samsung keyboard: Modify settings for the Samsung keyboard.
- Google voice typing: Modify settings for Google Voice input.
- Samsung voice input: Modify settings for Samsung voice input.
- Keyboard button on navigation bar: Enable a button on the Navigation bar to quickly switch between keyboards.
Physical keyboards: Customize options when you have a physical keyboard connected to your device (sold separately).
- From Settings, tap
 General management.
 - Tap Physical keyboard, and then choose an option:
- Show on-screen keyboard: Show the on-screen keyboard while a physical keyboard is also being used.
- Keyboard shortcuts: Show explanations of the keyboard shortcuts on the screen.
- Change language shortcut: Enable or disable language key shortcuts for your physical keyboard.
Mouse and trackpad: Configure pointer speed and button assignments for an optional mouse or trackpad (not included).
- From Settings, tap
 General management > Mouse and trackpad.
- Under Pointer speed, drag the slider to the right to go faster or to the left to go slower.
- Tap Primary mouse button, and choose either Left or Right.
Autofill service: Save time entering information using autofill services.
- From Settings, tap
 General Management.
 - Tap Autofill service to view your selected service.
- Tap
 Settings to customize your service.
 - Tap Autofill service to change your default service.
- Tap
Date and time:
By default, your device receives date and time information from the wireless network. Outside of network coverage, you can set the date and time manually.
- From Settings, tap
 General management > Date and time. The following options are available:
- Automatic date and time: Receive date and time updates from your wireless network. When Automatic date and time is disabled, the following options are available:
- Select time zone: Choose a new time zone.
- Set date: Enter the current date.
- Set time: Enter the current time.
- Use 24-hour format: Set the format for displaying time.
- Automatic date and time: Receive date and time updates from your wireless network. When Automatic date and time is disabled, the following options are available:
Troubleshooting
You can check for software updates and, if necessary, reset services on your device.
Software update
Check for and install available software updates for your device. Options may vary by carrier.
- From Settings, tap Software update for the following options:
- Check for updates: Manually check for software updates.
- Check for software updates: Manually check for software updates.
- Continue update: Resume an update that was interrupted.
- Show software update history: View a list of all software updates on your device.
- Smart updates: Install security updates automatically.
- Use software update assistant: Connect your device to a computer to use the software update assistant tool.
- Download and install: Check for software updates and install if any are available.
- Last update: View information about the installation of the current software.
- Update PRL: Download and install the Preferred Roaming List update.
- Update Profile: Automatically update your user profile information.
- UICC unlock: Enable the SIM slot to use another carrier’s SIM card. Contact your carrier for assistance.
Reset
Reset device and network settings. You can also reset your device to its factory defaults
Reset all settings: You can reset your device to its factory default settings, which resets everything except the security, language, and account settings. Personal data is not affected.
- From Settings, tap
 General management > Reset > Reset all settings.
 - Tap Reset settings, and confirm when prompted.
Reset network settings: You can reset Wi-Fi, mobile data, and Bluetooth settings with Reset network settings.
- From Settings, tap
 General management > Reset > Reset network settings.
 - Tap Reset settings, and confirm when prompted.
Reset accessibility settings: You can reset device accessibility settings. Accessibility settings in downloaded apps and your personal data are not affected.
- From Settings, tap
 General management > Reset > Reset accessibility settings.
 - Tap Reset settings, and confirm when prompted.
Auto restart at set times: Optimize your device by restarting it automatically at set times. Any unsaved data will be lost when the device restarts.
- From Settings, tap
 General management > Reset > Auto restart at set times.
 - Tap
 to activate Auto restart, and then set the following parameters:
- Days: Select the day of the week to automatically restart your device.
- Time: Set the time of day to restart your device.
Factory Data Reset
- You can reset your device to factory defaults, erasing all data from your device.
- This action permanently erases ALL data from the device, including Google or other account settings, system and application data and settings, downloaded applications, as well as your music, photos, videos, and other files.
- When you sign in to a Google Account on your device, Factory Reset Protection (FRP) is activated. This protects your device in the event it is lost or stolen.
- If you reset your device to factory default settings with the FRP feature activated, you must enter the user name and password for a registered Google Account to regain access to the device. You will not be able to access the device without the correct credentials.
- NOTE If you reset your Google Account password, it can take 24 hours for the password reset to sync with all devices registered to the account.
Before resetting your device:
- Verify that the information you want to keep has transferred to your storage area.
- Log in to your Google Account and confirm your user name and password.
To reset your device:
- From Settings, tap
 General management > Reset > Factory data reset.
 - Tap Reset and follow the prompts to perform the reset.
- When the device restarts, follow the prompts to set up your device.
Factory Reset Protection
- When you sign in to a Google Account on your device, Factory Reset Protection (FRP) is activated. FRP prevents other people from using your device if it is reset to factory settings without your permission. For example, if your device is lost or stolen and a factory data reset is performed, only someone with your Google Account username and password can use the device.
- You will not be able to access the device after a factory data reset if you do not have your Google Account username and password.
- CAUTION Before sending your device to Samsung or taking it to a Samsungauthorized service center, remove your Google Account and then perform a factory data reset. For more information, visit samsung.com/us/support/frp.
Enable Factory Reset Protection
- Adding a Google Account to your device automatically activates the FRP security feature.
Disable Factory Reset Protection: To disable FRP, remove all Google Accounts from the device.
- From Settings, tap
 Accounts and backup > Manage accounts > [Google Account].
 - Tap Remove account.
Collect diagnostics
Collect diagnostic data for troubleshooting. Options may vary by carrier.
- From Settings, tap
 General management > Reset > Collect diagnostics. The following options are available to choose:
- Device data collection: Help troubleshoot your device issues.
See other models: Galaxy S21 5G Galaxy S21+ 5G LH98QMNEBGC/XY UE55MU6100KXXU UE75MU6100KXXU
