Note : you can find your dishwasher model number on Carton box label, rating plate and product registration card
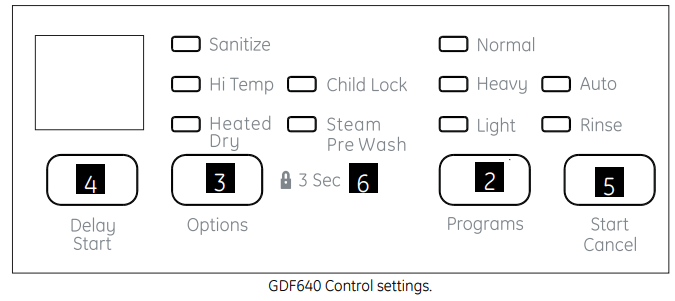
Control Settings
1. Power
Press the POWER button to turn on the unit to be operated. The LED will be displayed when the dishwasher is on.
2. Programs
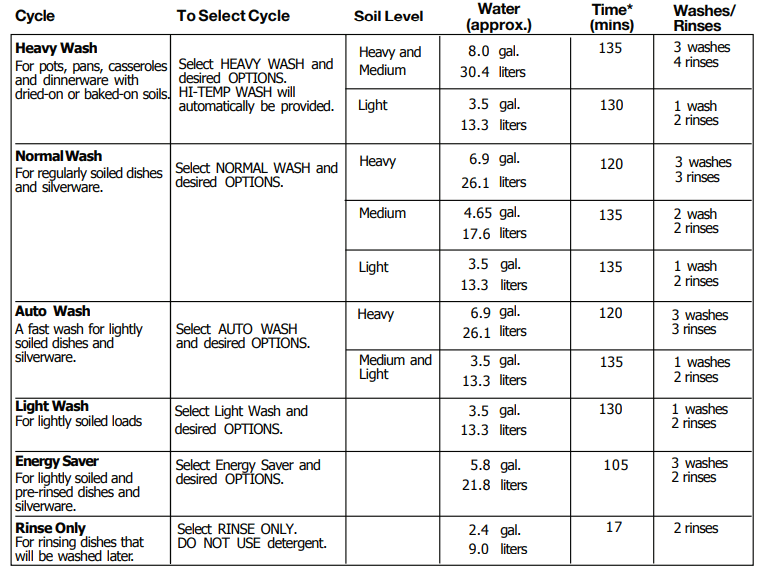
When the dishwasher is turned on, you can press the PROGRAMS button to select the wash cycle. A light on the display will indicate which cycle has been selected.
NOTE : The following information about cycle duration and water consumption are approximate. Results will vary based on various factors, including but not limited to incoming water temperature and pressure as well as soil level.
3. Options
When the wash cycle has been selected, you can choose the option by pressing the “Options” button.
There are three options for “Light” cycle
There are four options for “Normal” cycle", “Auto” cycle", and “Heavy” cycle.
Press the OPTIONS button, “Heated Dry” will be selected;
Press the OPTIONS button twice, the “Heated Dry” and “Sanitize” options will be selected;
Press the OPTIONS button three times, the “Heated Dry” and “Hi Temp” options will be selected.
Press the OPTIONS button four times, the “Steam prewash ” option will be selected.
There is one option for the other wash cycles. When you press the OPTIONS button, the “Heated Dry” option will be selected.
About the options:
SANITIZE
When “Sanitize” option is selected, the temperature of the water will reach 70°C (158°F) max.
Note : it is possible that the 70°C (158°F) max may not be reached if the temperature of the incoming hot water does not meet the suggested temperatures.
HI TEMP
When the “Hi Temp” option is selected, the temperature of the water will be maintained at 60°C (140°F) max.
HEATED DRY
When the “Heated Dry” option is selected, the heater will work during the dry process.
STEAM PREWASH
For use with heavily soiled items, this STEAM option adds 30 minutes to the cycle time. The option is available with"Heavy" " NORMAL" " AUTO" cycle
4. Delay
This option allows you to delay the start of a wash cycle for up to 24 or 2/4/8 hours. When the dishwasher is on, press the DELAY button to choose the number of hours you want to delay the start of the wash cycle. The hours will show in the display window (if equipped) or the corresponding LED will light up
5. Start / Cancel
When the program and options have been selected, make sure the door is closed press the START/ CANCEL button. To stop or reset the wash cycle, press the START/CANCEL button, the dishwasher will stop washing.
6. Child Lock
Press the PROGRAMS and DELAY or buttons for 3 seconds the LOCK light will display on the LCD. No buttons can be operated when the dishwasher controls are locked. To cancel the “Child Lock” option, press the PROGRAMS and DELAY or buttons for 3 seconds, the LOCK light will no longer be shown on the LCD and the dishwasher controls will be unlocked.
Using the dishwasher.
Check the Water Temperature
The entering water should be at least 49°C (120°F) and not more than 65°F (150°F) for effective cleaning and to prevent dish damage. Check the water temperature with a candy or meat thermometer. Turn on the hot water faucet nearest the dishwasher, place the thermometer in a glass and let the water run continuously into the glass until the temperature stops rising.
Use Rinse Agent
Rinse agent removes spots and prevents new film buildup on your dishes, glasses, flatware, cookware and plastic.
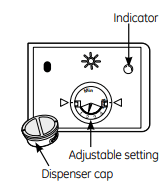
Filling the Dispenser
The rinse agent dispenser holds approximately 100 ml of rinse agent.
Under normal conditions, this will last approximately one month.
Try to keep it full, but do not overfill.
Make sure the dishwasher door is fully open.
Turn the dispenser cap to the left and lift it out.
Add rinse agent until the indicator window looks full.
Clean up any spilled rinse agent with a damp cloth.
Replace the dispenser cap.
Rinse Aid Setting
The amount of rinse agent released into the final wash can be adjusted. The factory setting is at the midpoint. If there are rings of calcium (hard water) spots on dishes, try a higher setting. If you observe foam in the final rinse, try a lower setting.
To adjust the setting
Remove the dispenser cap; then turn the adjuster counterclockwise to increase the amount of rinse agent or clockwise to reduce the amount of rinse agent dispensed.
Dish Preparation Prior to Loading
Scrape off hard soils, bones, toothpicks, skins and seeds.
Remove large quantities of any remaining food.
Remove leafy vegetables, meat, trimmings and excessive amounts of grease or oil.
Remove acidic food soils that can discolor stainless steel.
Proper Use of Detergent
Use only detergent specifically made for use in dishwashers.
Keep your detergent fresh and dry. Don't put detergent into the dispenser until you're ready to wash dishes.
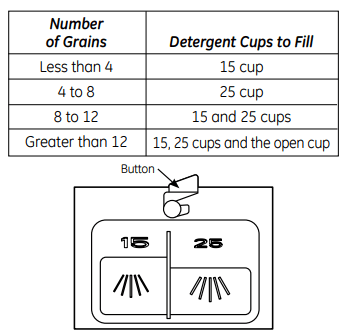
The amount of detergent to use depends on whether your water is hard or soft. With hard water, you need extra detergent. With soft water, you need less detergent.
Protect your dishes and dishwasher by contacting your water department and asking how hard your water is. Twelve or more grains is extremely hard water. A water softener is recommended. Without it, lime can build up in the water valve, which could stick while open and cause flooding. Too much detergent with soft water can cause a permanent cloudiness of glassware, called etching.
Use the information in the table below as a guideline to determine the amount of automatic dishwasher detergent to place in the dispenser.
When using automatic dishwasher detergent tablets, simply place one tablet in the dispenser and close the cover.
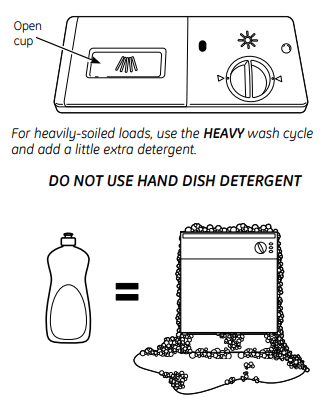
To open the wash cover, press the button and the cover will flip back.
NOTE: Using a detergent that is not specifically designed for dishwashers will cause the dishwasher to fill with suds. During operation, these suds will spill out of the dishwasher vents, covering the kitchen floor and making the floor wet.
Because so many detergent containers look alike, store the dishwasher detergent in a separate space from all other cleaners. Show anyone who may use the dishwasher the correct detergent and where it is stored.
While there will be no lasting damage to the dishwasher, your dishes will not get clean using a dishwashing detergent that is not formulated to work with dishwashers.
Forgot to Add a Dish?
A forgotten dish can be added any time before the main wash.
Open the door slightly to disengage the latch and stop the cycle.
Do not open the door until the water spray action stops. Steam may rise out of the dishwasher.
Add forgotten dishes.
Close the door and push it in to relatch.
Loading the dishwasher racks.
For best dishwashing results, follow these loading guidelines. Features and appearance of racks and silverware baskets may vary from your model.
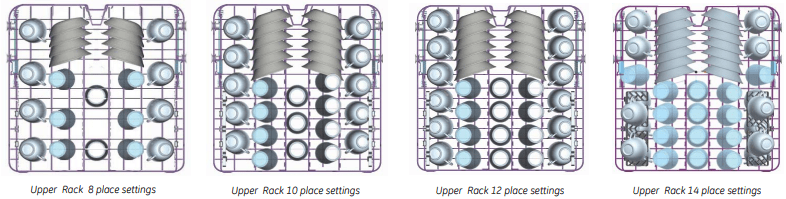
Upper Rack
The upper rack is designed to hold more delicateand lighter dishware such as glasses, coffee and tea cup and saucers, as well as plates, small bowls and shallow pans(as long as they are not too dirty). Position the dishes and cookware so that they do not get moved by the spray of water
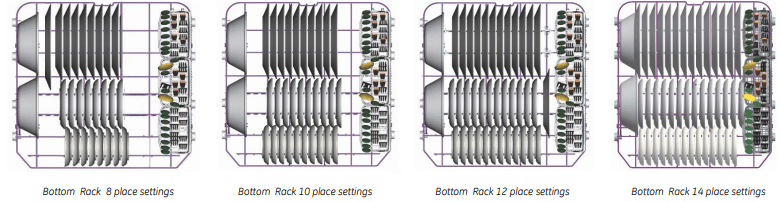
Lower Rack
We recommend that you place large items which aremost difficult to clean into the lower rack: pots, pans, lids, serving dishes and bowls, as shown in the figure to the right. It is preferable to place serving dishes and lids on the side of the racks in order to avoid blocking the rotation of the top spray arm.
Pots, serving bowls, etc, must always be placed top down.
Deep pots should be slanted to allow water to flow out.
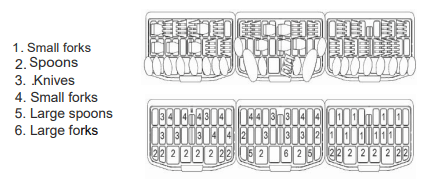
Silverware Basket
Silverware should be placed in the silverware basket with handles at the bottom: If the rack has side baskets, the spoon should be loaded individually into the appropriate slots, Especially long utensils should be placed in the horizontal position at the front of the upper rack.
Caring for the dishwasher.
To clean the control panel, use a lightly dampened cloth, then dry thoroughly. To clean the exterior, use a good appliance polish wax. Never use sharp objects, scouring pads or harsh cleaners on any part of the dishwasher.
Cleaning the Exterior
Cleaning the Door Panel
Before cleaning the front panel, make sure you know what type of panel you have. Refer to the last two letters of your model number. You can locate your model number on the left-hand tub wall just inside the door. If your model number ends with BB or WW, then you have a Painted Door panel. If your model number ends with SS, then you have a Stainless Steel Door panel.
Follow the instructions below for cleaning the door panel for your specific model. Painted Door Panel (model numbers ending in BB–black or WW–white) Use a clean, soft, lightly dampened cloth, then dry thoroughly. You may also use a good appliance wax or polish.
Stainless Steel Door Panel (model numbers ending in SS)
The stainless steel panels can be cleaned with Stainless Steel Magic or a similar product using a clean, soft cloth. Do not use appliance wax, polish, bleach or products containing chlorine on Stainless Steel doors.
You can order Stainless Steel Magic #WX10X15 through GE Parts by calling 800.661.1616.
Do not wipe the dishwasher with a soiled dish cloth or wet towel. These may leave a residue. Do not use scouring pads or powdered cleaners because these products can scratch the finish.
Cleaning the Control Panel
To clean the control panel, use a lightly dampened cloth; then dry thoroughly. Do not use sharp objects, scouring pads or harsh cleaners on the control panel.
Stainless Steel Interior Tub and Inner Door
The stainless steel used to make the dishwasher tub and inner door provides the highest reliability available in a GE dishwasher. If the dishwasher tub or inner door is ever scrached or dented during during normal use, they will not rust or corrode. These surface blemishes will not affect their function or durability
Cleaning the Spray Arms and the Filters
The dishwasher will flush away all normal food soils. However, objects (fruit pits, bones, etc.) may collect in openings and should be removed occasionally to avoid clogging the drain system.
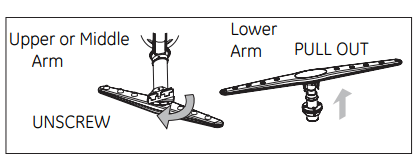
Cleaning the Spray Arms
Because hard water chemicals will clog the spray arm jets and bearings, it is necessary to clean the spray arms regularly. Wash the arms in soapy, warm water and use a soft brush to clean the jets. Replace them after rinsing thoroughly. To remove the upper or middle spray arm , unscrew the nut clockwise. To remove the lower spray arm, pull upward
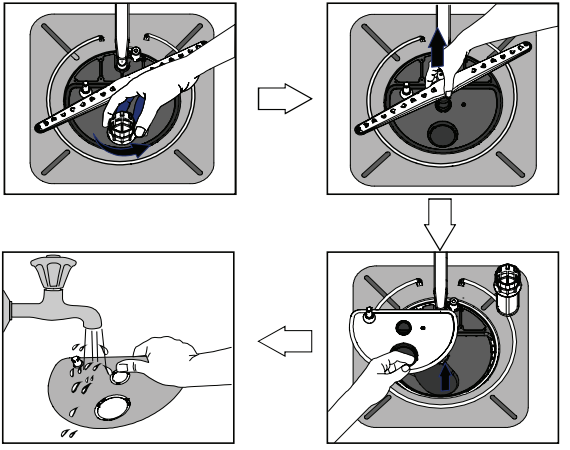
Cleaning the Filters
For best performance and results, the filter assembly must be cleaned once a month. The filter efficiently removes food particles from the wash water, allowing water to be recirculated during the cycle. For this reason, it is a good idea to remove the large food particles trapped in the filter frequently by rinsing the main filter and cup under running water. To remove the filter assembly, follow the 3 steps shown below. To clean the main filter and fine filter, use a cleaning brush. The dishwasher must never be used without the filters. Improper replacement of the filter may reduce the performance level of the appliance and may damage dishes and utensils.
General Care Instructions
Protect Against Freezing
If your dishwasher is left in an unheated place during the winter, ask a service technician to:
Cut off electrical power to the dishwasher. Remove fuses or trip circuit breaker.
Turn off the water supply and disconnect the water inlet line from the water valve.
Drain water from the water inlet line and water valve. (Use a pan to catch the water.)
Reconnect the water inlet line to the water valve.
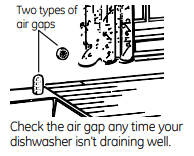
Does Your Dishwasher Have an Air Gap?
An air gap protects your dishwasher against water backing up into it if a drain clogs. The air gap is not a part of the dishwasher. It is not covered by your warranty. Not all plumbing codes require air gaps, so you may not have one.
The air gap is easy to clean.
Turn off the dishwasher and lift off the chrome cover.
Remove the plastic cap and clean with a toothpick.
Troubleshooting Tips
Problem
Possible Causes
What To Do
Noise
Some of the sounds you'll hear are normal
• Detergent cup opening.
• The motor starting during the drying period.
• Water draining out of the tub immediately after you start the dishwasher.
Utensils are not secure in the rack or something small has dropped into the rack
Make sure everything is secured in dishwasher.
Motor hums
• Dishwasher has not been used on a regular basis. If you do not use your dishwasher often, set it to fill and pump out once every week. This will help keep the seal moist.
• Dishwasher control was not advanced properly to the start of the desired cycle. Advance the control to the start of the desired cycle.
Detergent left in dispenser cups
Dishes are blocking the detergent cups
Reposition the dishes.
Water standing in the bottom of the tub
Drain is clogged
• If you have an air gap, clean it.
• Check to see if your kitchen sink is draining well. If not, you may need a plumber.
• If the dishwasher drains into a disposer, run disposer clear.
This is normal
A small amount of clean water around the outlet of the tub bottom at the back of the tub keeps the water seal lubricated.
Suds in the tub
Correct detergent wasn't used
• Use only automatic dishwasher detergents to avoid sudsing.
• To remove suds from the tub, open the dishwasher and let
Rinse agent was spilled
Always wipe up rinse agent spills immediately.
Stained dishwasher parts
Detergent with colorant was used
Some detergents contain colorant (pigment or dyes) that will discolor the tub interior with extended use. Check the detergent cup for signs of any discoloration. If cup is discolored, change to detergent without any colorant.
Some tomato-based foods can stain
Use of the RINSE ONLY cycle after adding the dish to the load can decrease the level of staining.
Dishwasher won't run
Fuse is blown, or the circuit breaker tripped
Replace fuse or reset circuit breaker. Remove any other appliances from the circuit.
Power is turned off
In some installations, the power to the dishwasher is proved through a wall switch, often located next to the disposer switch. Make sure it is on.
Reboot your control
Turn off power to the dishwasher (at circuit breaker or wall switch) for 30 seconds, then turn back on.
Steam
This is normal
Steam comes through the vent during washing, drying and when water is being pumped out.
Beeping at the end of the cycle
This is normal
The dishwasher will beep 4 times (unless interupted) and the CLEAN light will display at the end of the wash cycle.
Dishes and flatware not clean
Low in let water temperature
Make sure inlet water temperature is correct (see page 6).
Water pressure is temporarily low
Turn on a faucet. Is water coming out more slowly than usual? If so, wait until pressure is normal before using your dishwasher.
Air gap is clogged
Clean the air gap.
Improper rack loading
Make sure large dishware does not block the detergent dispenser or the wash arms.
No air gap or high drain loop
Verify that you have an air gap or a high drain loop. Refer to the Installation Instructions.
Filter needs cleaning
The filter assembly must be cleaned regularly to allow the filter to efficiently remove food particles from the wash water. See Cleaning the Filter section on page 1.
Spots and filming on glasses and flatware
Extremely hard water
Use rinse agent to remove spots and prevent new film buildup.
Low in let water temperature
Make sure water temperature is at least 49°C (120°F).
Overloading the dishwasher /Improper loading
Load dishwasher as shown in the Loading the Dishwasher Racks section.
Old or damp powder detergent
Make sure detergent is fresh.
Rinse agent dispenser emptyToo little detergent
If water is extremely hard, a water softener may be required.
Cloudiness on glassware
Combination of soft water andtoo much detergent
This is called etching and is permanent. To prevent this from happening, use less detergent if you have soft water. Wash glassware in the shortest cycle that will get them clean.
Water temperature enteringthe dishwasher exceeds 65°C (150°F)
Lower the water heater temperature.
Black or gray marks on dishes
Aluminum utensils haverubbed against dishes
Remove marks with a mild, abrasive cleaner.
Yellow or brown film on inside surfaces
Tea or coffee stains
Remove the stain by hand, using a solution of 1/2 cup bleach and 3 cups warm water.
An overall yellow or brown film can be caused by iron deposits in water
A special filter in the water supply line is the only way to correct this problem. Contact a water softener company.
White film on inside surfaces
Hard water minerals
To clean the interior, apply dishwasher detergent to a damp sponge. Wear rubber gloves. Do not use any type of cleanser other than dishwasher detergent because it may cause foaming or sudsing.
Dishes don't dry
Low in let water temperature
Make sure inlet water temperature is correct (see page 6).
Rinse agent dispenser is empty
Check the rinse agent dispenser.
Control panel responded to input but dishwasher never filled with water
Door latch may not be properly seated
Make sure the door is firmly closed.
Water vale may be turned off
Make sure water valve (usually located under the sink) is turned on.
Dishwasher beeps once every 15 seconds
This is normal
Close the door after opening it mid-cycle.
This is a reminder that the door has been left open during operation