The external hot water supply MUST NOT exceed 70 deg C
Permissible cold water temperature : 4-25˚C
TT : Appliance complies with the requirement by certification Type Test Mark.
No further backflow protection required for connection to the water supply.
❋ The appearance and specifications may be varied without notice to improve the units quality. ❋ Specifications subject to change by manufacturer.
Care before washing
Before the first washing
Select a cycle (COTTON 60°C, add a half load of detergent) allow the unit to wash without clothing. This will remove residues and water from the drum that may have been left during manufacturing.
Caring before washing
1. Care Labels
Look for a care label on your clothes. This will tell you about the fabric content of your garment and how it should be washed.
2. Sorting
To get the best results, Sort clothes into loads that can be washed with the same wash cycle. Water temperature and spin speed and different fabrics need to be washed in different ways. Always sort dark colors from pale colors and whites. Wash separately as dye and lint transfer can occur causing discoloration of white etc. If possible, do not wash heavily soiled items with lightly soiled one.
Soil (Heavy, Normal, Light) - Separate clothes according to amount of soil. Color (White, Lights, Darks) - Separate white fabrics from colored fabrics. Lint (Lint producers, Collectors) - Wash lint producers and lint collectors separately
3. Caring before loading
Combine large and small items in a load. Load large items first. Large items should not be more than half the total wash load. Do not wash single items. This may cause an out-of-balance load. Add one or two similar items.
Check all pockets to make sure that they are empty. Items such as nails, hair clip, matches, pens, coins and keys can damage both your washer and your clothes.
Close zippers, hooks and strings to make sure that these items don’t snag on other clothes.
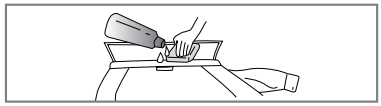
Pre treat dirt and stains by brushing a little detergent dissolved in water onto stains like collars and cuffs to help shift dirt.
Check the folds of the flexible gasket (gray) and remove any small articles,if any.
Check inside of the drum and remove any left items in it for next wash cycle.
Remove any clothing or items on the flexible gasket to prevent clothing and the gasket damages.
Adding detergent and fabric softener
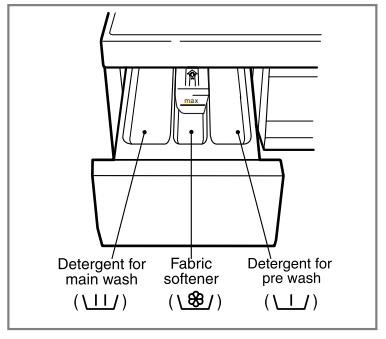
1. The Dispenser Drawer
Main wash only ➔
Pre Wash + Main Wash ➔
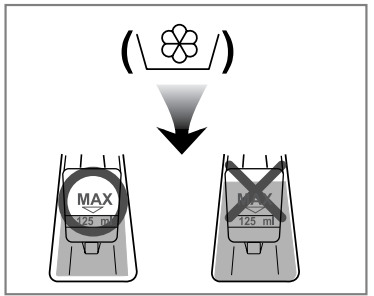
2. Adding Fabric Softener
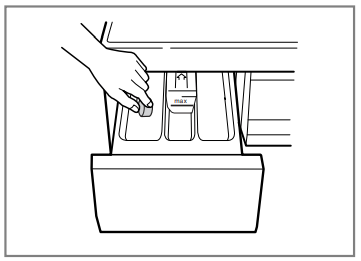
Do not exceed the maximum fill line. Close the dispenser drawer slowly. Overfilling can cause early dispensing of the fabric softener which could stain clothes.
Do not leave the fabric softener in the detergent drawer for more than 2 days. (Fabric softener could harden)
Softener will automatically be added during the last rinse cycle.
Do not open the drawer when water is supplied.
Solvents(benzene, etc) are not allowable.
Note: Do not pour fabric softener directly on the cloths
3. Detergent dosage
The detergent should be used according to the instruction of the detergent manufacture.
If too much detergent is used, too many suds can occur and this will decrease the washing result or cause heavy load to the motor.
Use powder detergent only for the front loading washer.
❇ If suds occur too much, pleas reduce the detergent amount.
Detergent usage may need to be adjusted for water temperature, water hardness, size and soil level of the load. For best results, avoid oversudsing.
4. Water softener
A water softener, such as Anti limescale (Clagon) can be used to cut down on the use of detergent in extremely hard water areas. Dispense according to the amount specified on the packaging. First add detergent and then the water softener.
Use the quantity of detergent as for soft water. ❋ Tips: Full load : according to manufacturer’s recommendation. Part load : 3/4 of the normal amount. Minimum load : 1/2 of full load.
Detergent is flushed from the dispenser at the beginning of the cycle.
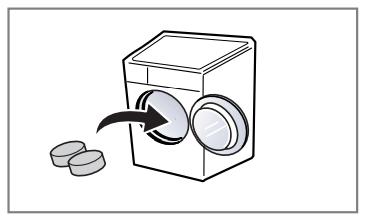
5. Using the Tablets
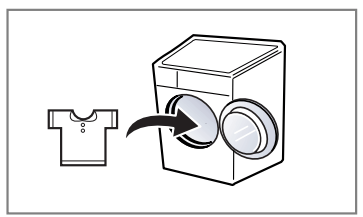
Open the door and Tablets into the drum.
Load the laundry into the drum.
Close the door.
Function
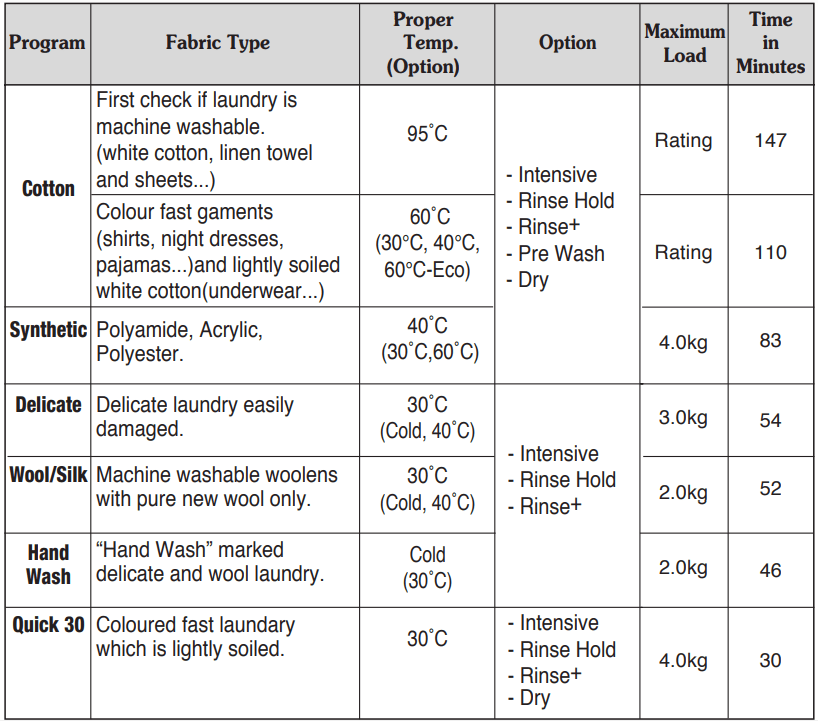
Recommended courses according to the laundry type
❋ Water Temperature : Select the water temperature to the wash cycles. Always follow garment manufacture’s care label or instructions when laundering.
❋ Intensive : When washing full load or heavily soiled laundry, you can increase effectiveness by choosing intensive option.
❋ Program setting with “Intensive” option for test in accordance or in conformity with AS/NZS 2442.2.
❋ Pre Wash : If the laundry is heavily soiled, “Pre Wash” Cotton is recommended. Pre Wash is available in Cotton, Cotton-Eco and Synthetic Program.
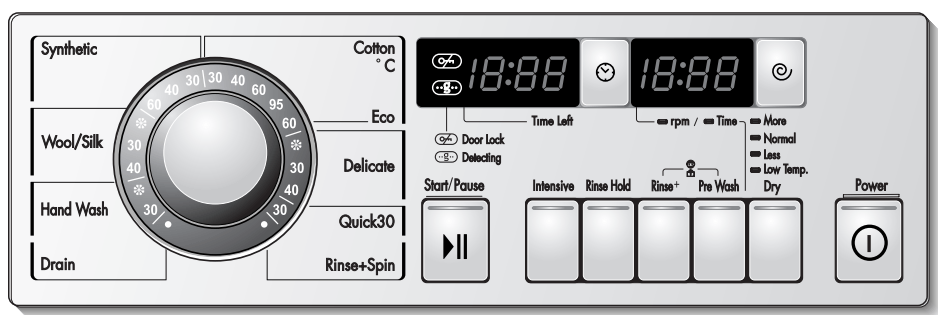
How to use washer
1. Cotton automatically selected upon power on.
Press the Power() button to start.
Press the Start/Pause() button.
Initial conditions
Wash : main wash
Rinse : 3 times
Spin : 1400 rpm
Water temperature : 60˚C
Program : Cotton
2. Manual Selecting
Press the Power() button to start.
Select the conditions which you want to use, by turning the program dial and pressing each button. For selecting the each conditions, please refer to the page17~page23
Press the Start/Pause() button.
Start/Pause
1. Start
This Start/Pause button is used to start wash cycle or pause the wash cycle.
2. Pause
If temporary stop of wash cycle is needed, press the Start/Pause button.
When in Pause, the power is turned off automatically after 4 minutes.
NB. The door will not open before 1 to 2 minutes when Pause is selected, or at the end of the wash cycle.
Power
1. Power
Press the Power button to turn power on and off.
To cancel the Time Delay function, the power button should be pressed.
2. Initial Program
When the Power button is pressed, the washer is ready for Cotton program. And the other initial conditions as follows.
So, if you want to advance into the washing cycle without changing the program, just press the Start/Pause button and then the washer will proceed.
Initial program - Cotton Program / Main wash / Normal Rinse / 1400 rpm / 60˚C
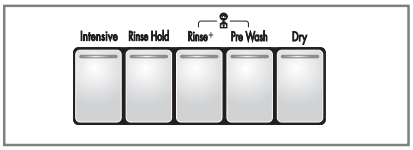
Option
By pressing the Option button, all Option functions may be selected.
Intensive
Rinse Hold
Rinse+
Pre Wash
Dry
1. Intensive
When washing full load or heavily soiled laundry, you can increase effectiveness by choosing intensive option.
By selecting the Intensive option, the wash time may be extended, depending on the program selected.
2. Rinse Hold
Is selected by pressing the Rinse Hold button this function leaves clothes in the machine; suspended in the water after a rinse without entering into spin.
To proceed to a Drain or Spin function after a Rinse hold, select Drain on the program dial or press the Spin selector button to the desired speed, then press the Start/Pause button.
3. Rinse+ Option
By pressing the Option button, all Option functions may be selected. - Intensive - Rinse Hold - Rinse+ - Pre Wash - Dry
For additional rinse which may assist in removing traces of detergent residue.
By selecting Rinse+ function, the rinse time and the rinse water are increased.
4. Pre Wash
If the laundry is heavily soiled, “Pre Wash” course is effective.
Pre Wash is available in Cotton and Synthetic.
5. Dry
When you want to dry, select this button.
Available in Cotton, Cotton-Eco, Synthetic and Quick 30.
Please note that the drying capacity is 4 Kg. Please remove excess clothes from the completed wash before commencing the drying and ensure that the cold water tap is left on.
How to use dry only
Push Power(9) button
Push Dry (7) button and select dry
Push rpm(10) button and select 0 rpm
Push Start/Pause(2) button
The required lamp will light up for identification.
Spin
By pressing the Spin button, the spin speed can be chosen and the LED of rpm is turned on.
Spin only:
Press the Power button.
Set the desired spin speed by pressing the Spin button.
Press the Start/Pause button.
1. Spin selection
Spin Speed is available according to the program as follows.
Synthetic, Wool/Silk, Hand Wash: No Spin - 400 - 600 - 800 - 1000
Delicate: No Spin - 400 - 600 - 800
2. No spin Spin
If no spin is selected, the washer stops after draining water.
Water Temp.
By turning the Program Dial, the water temperature can be selected.
Cold
30˚C / 40˚C / 60˚C / 95˚C
Water temperature can be selected according to the program.
The required temperature lamp will light up for identification. For the more detailed information, please refer to the page15.
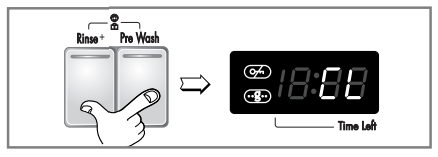
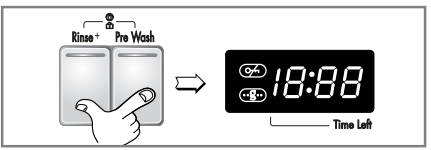
Child Lock
If you choose to lock the buttons on the control assembly to prevent tampering this function may be selected.
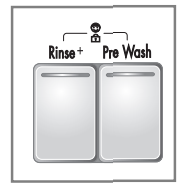
Child Lock can be set by pressing the Rinse+ button and Pre Wash button simultaneously. (About three seconds)
When child lock is set, all buttons are inoperable except for power button.
To deactivate Child Lock system, press Rinse+ and Pre Wash buttons simultaneously again. (About three seconds)
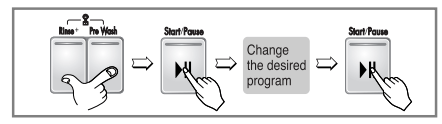
To change to the desired program, whilst in child lock mode.
Press both Rinse+ and Pre Wash together once again. (About three seconds)
Press the Start/Pause button.
Select the desired program and press the Start/Pause button again.
The child lock can be set at any time and it is automatically canceled when operational errors occur.
Dry
NOTE: The maximum drying capacity for this model is 4kg. When loading, please use the maximum drying capacity indicator behind the door as shown below.
Do not overload above the maximum drying capacity indicator. Items must be able to tumble freely.
This washer-dryer’s automatic process from washing to drying can be selected easily.
For most even drying , make sure all articles in the clothes load are similar in material and thickness.
If you open door and remove load before dryer has finished its cycle, remember to press the Start/Pause button.
By pressing the Dry button, you can select
After the end of dry, “” is displayed. By pressing the “Start/Pause” button the program can be ended. If you not press the “Start/Pause” button, the program is ended after about 4 hours. “” Cooling Cycle.
1. Drying Automatic guide
Use your Automatic Cycles to dry most loads. Electronic sensors measures the temperature of the exhaust to increase or decrease drying temperatures for faster reaction time and tighter temperature control.
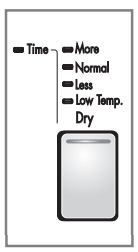
Recommend Automatic drying course for clothes type.
For Synthetics select - Low Temp.
If you want to iron clothes-Less.
For Cottons select - Normal
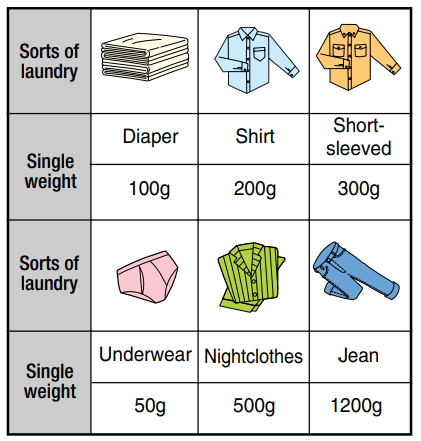
For washable nappies select - More NOTE: The estimated drying time varies from the actual drying time with an Automatic. The type of fabric, size of the load, and the dryness selected, do affect the drying times. ❋ The standard laundry weight which shows how much laundry to put into the washer.
2. Drying time guide
By press the Dry button, the drying time can be selected.
Drying course can last up to 150min. When selecting drying only, drying course will start after spinning. (The spinning time is about 19~26 min.)
These drying times are given as a guide to help you set your dryer for manual drying. Drying times can vary greatly depending on dampness, room temperature and type of fabric and your own experience will be your best guide.
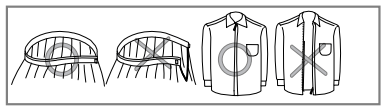
Woolen Articles
Do not tumble dry woolen articles. Pull them to their original shape and dry them flat.
Some woven and loop knit materials may shrinks, by varying amounts, depending on their quality.
Always stretch them out immediately after drying.
Permanent Press and Synthetics
Do not overload your dryer
Take out permanent press articles as soon as the dryer stops to reduce wrinkles.
Fiber or Leather Materials
Always check the manufacture’s instructions.
Baby clothes and Night Gowns
Always check the manufacture’s instructions.
Rubber and Plastics
Do not dry any items made from or containing rubber or plastics, such as:
aprons, bibs, chair covers
curtains and table cloths
bathmats
Fiber glass
Do not dry fiberglass articles in your dryer. Glass particles left in the dryer could be picked up by your clothes the next time you use the dryer and irri tate your skin.
3. Completion of Drying
When drying cycle is completed, “” [Cool Down] is displayed on the Multi display.
The Cool Down is setting automatically when a drying cycle is complete.
When you are not remove a loaf of clothes from the dryer as soon as it stops, wrinkles can form.
The Cool Down operating periodically tumbles, rearranges and fluffs the load to avoid wrinkles without heat for up to 4 hours.
The message will continue to display until the clothes are removed or the Start/Pause button is pressed.
Program
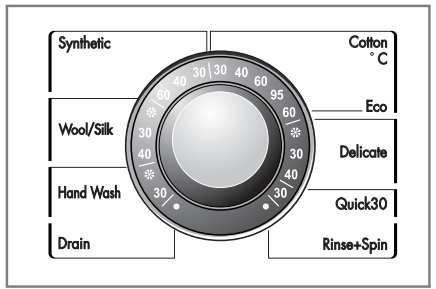
8 programs are available according to the laundry type.
Lamp will light up to indicate selected program.
When Start/Pause button is pressed, the Cotton program is automatically selected.
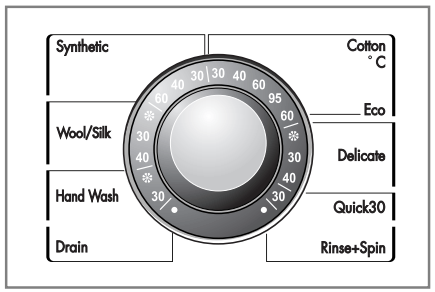
By turning the Program dial, the program is selected in order of “Cotton - Delicate - Quick 30 - Rinse+Spin - Drain - Hand Wash - Wool/Silk - Synthetic”.
Time Delay
1. Time Delay
Preparing washing before starting “Time Delay” - Turn on the water tap. - Load laundry and close the door. - Place the detergent and fabric softener in the drawer.
How to set “Time Delay”
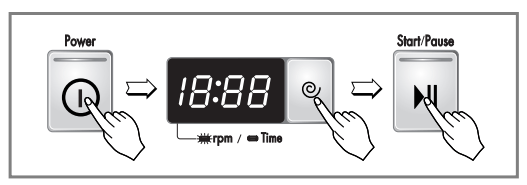
Press Power button.
Turn the Program dial to select the program you require.
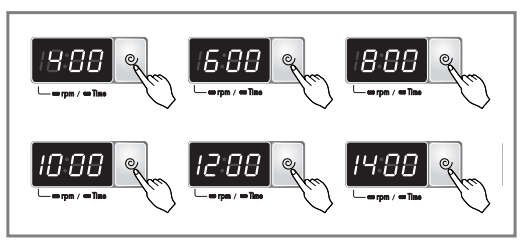
Press Time Delay button and set the desired time.
Press the Start/Pause button. (“:” blinks.)
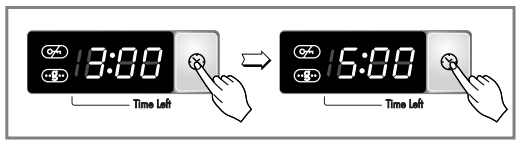
If Time Delay button is pressed, “3:00” is displayed. The maximum delayed time is 19 hours and the minimum time is 3 hours.
Each pressing of the button advances on time delay by one hour.
To cancel the time delay, press the Power button.
Time Delay is ‘expected time’ from the present to the completion of washing cycle or selected process (Wash, Rinse, Spin).
According to the condition of water supply and temperature, the delayed time and the actual washing time may vary.
1. Special function display
When child lock is selected, the “” is displayed.
After the end of dry, “” is displayed.
When time delay is selected, it shows the remaining time to finish the selected program.
2. Self diagnosis display
If the machine encounters a fault during operation, the associated fault will be displayed.
“PE” : Water pressure sensing error “FE” : Problem of overfilling water “dE” : Door is not closed “IE” : Water inlet trouble “0E” : Drainage trouble “UE” : Unbalanced load “tE” : Water temperature trouble “CE” : Over load in motor “LE” : Over load in motor “PF” : The washer experienced a power failure. “dHE” : Dry heater or thermostat trouble.
If these error letters are displayed, please refer to the troubleshooting page28 and follow the guide.
3. Completion of washing
When washing cycle is completed, “End” is displayed.
4. Time left
During washing cycle, the remaining washing time is displayed.
Recommended program by manufacturer.
- Cotton (95˚C) : around 2 hours and 27 minutes - Cotton (60˚C) : around 1 hour and 50 minutes - Synthetic (40°C) : around 1 hour and 23 minutes - Delicate (30°C) : around 54 minutes - Wool/Silk (30°C) : around 52 minutes - Hand Wash (Cold) : around 46 minutes - Quick 30 (30°C) : around 30 minutes - Rinse+ Spin : around 25 minutes - Drain : around 1 minute
The washing time may vary by the amount of laundry, water pressure, water temperature and other washing conditions.
If an unbalanced load is detected or if the suds removing program operates, the wash time may be extended. (Max. increasing time is 45 minutes.)
Maintenance
❋ Before cleaning the washer interior, unplug the electrical power cord to avoid electrical shock to avoid electrical shock hazards.
❋ When disposing of the appliance, cut off the mains cable, and destroy the plug Disable the door lock to prevent young children being trapped inside.
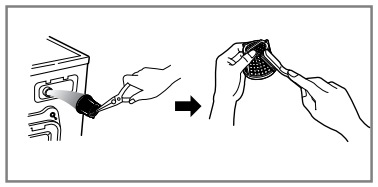
The water inlet filter
"IE" error message will blink on the control panel when water does not enter the detergent drawer.
If water is very hard or contains traces of lime deposit, the water inlet filter may become clogged. It is therefore a good idea to clean it from time to time.
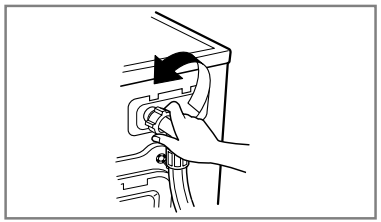
1. Turn off the water tap.
2. Unscrew the water inlet hose.
3. Clean the filter using a hard bristle brush.
4. Tighten up the inlet hose.
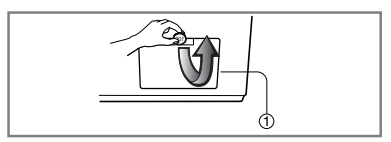
The drain pump filter
❋ The drain filter collects threads and small objects left in the laundry. Check regularly that the filter is clean to ensure smooth running of your machine
CAUTION: First drain using the drain hose and then open the pump filter to remove whatever any threads or objects. Be careful when draining if the water is hot.
❋ Allow the water to cool down before cleaning the drain pump, carrying out emergency emptying or opening the door in an emergency
1. Open the lower cover cap (1) by using a coin. Drain plug (2) to pull out the hose.
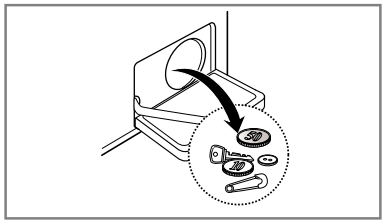
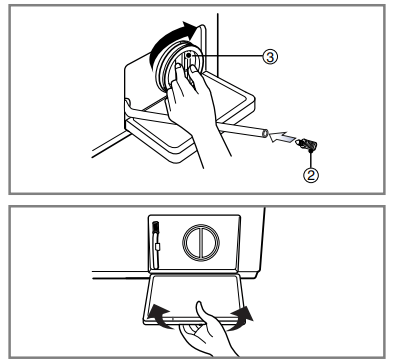
2. Unplug the drain plug (2), allowing the water to flow out. At this time use a vessel to prevent water flowing on to the floor. When water does not flow any more, turn the pump filter (3) open to the left.
3. Remove out any foreign material from the pump filter (3)
4. After cleaning, turn the pump filter () clockwise and insert the drain plug ()to the original place. close the lower cover cap.
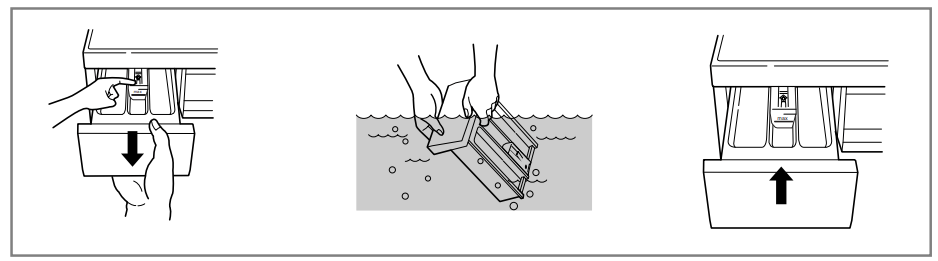
Dispenser drawer
❋ After a while detergents and fabric softeners leave a deposit in the drawer.
It should be cleaned from time to time with a jet of running water.
If necessary it can be removed completely from the machine by pressing the catch downwards and by pulling it out.
To facilitate cleaning, the upper part of the fabric softener compartment can be removed
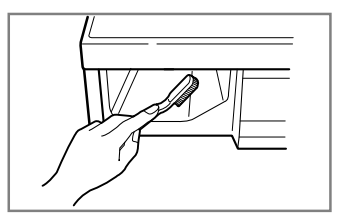
The drawer recess
❋ Detergent can also accumulate inside the recess which should be cleaned occasionally with an old toothbrush.
Once you have finished cleaning, replace the drawer and run a rinse cycle without laundry
The washing drum
If you live in a hard water area, lime scale may continuously build up in places where it cannot be seen and thus not easily removed. Over time the build up of scale clogs appliances, and if it is not kept in check, expensive maintenance or repairs may result.
Although the washing drum is made of Stainless steel, specks of rust can be caused by small metal articles (paper clips, safety pins) which have been left in the drum.
The washing drum should be cleaned from time to time.
If you use descalling agents, dyes or bleaches, make sure they are suitable for washing machine use.
❋ Descaler may contain chemicals that may damage part of your washing machine. ❋ Remove any spots with a stainless steel cleaning agent. ❋ Never use steel wool.
Cleaning your washer
1. Exterior
Proper care of your washer can extend its life. The outside of the machine can be cleaned with warm water and a neutral non abrasive household detergent. Immediately wipe off any spills. Wipe with damp cloth. Try not to hit surface with sharp objects. ❋ IMPORTANT: Do not use methylated spirits, diluents or similar products.
2. Interior
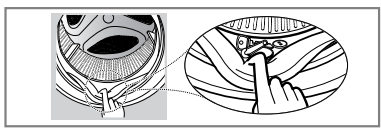
Run washer through a complete cycle using hot water. Repeat process if necessary. Keep the washer door opening, flexible gasket and the door glass dry ➔ Dry around the washer door opening, clean the glass, flexible gasket and door glass, ➔ clean the circulation nozzle upper the gasket with the pin or stick.
NOTE: Remove hard water deposits using only cleaners labeled as washer safe.
Cold condition
If the washer is stored in an area where freezing may occur or moved in freezing temperatures, follow these instructions to prevent damage to the washer:
Turn off water supply tap.
Disconnect hoses from water supply and drain water from hoses.
Plug electrical cord into a properly grounded electrical outlet.
Add 1gallon(3.8L) of nontoxic recreational vehicle(RV) antifreeze into an empty wash drum. Close the door.
Set spin cycle and let washer spin for 1minute to drain out all water. Not all of the RV antifreeze will be expelled.
Unplug electrical power cord, dry the drum interior, and close the door.
Remove dispenser drawer drain and dry excessive water from the compartments.
Store washer in an up right position.
To remove antifreeze from washer after storage, run empty washer through a complete cycle using detergent. Do not add wash load.
Troubleshooting guide
❋ This washing machine is equipped with automatic safety functions which detect and diagnose faults at an early stage and react appropriately. When the machine does not function properly or does not function at all, check the following points before you contact your service provider.
Symptom
Possible Cause
Solution
Rattling and clanking noise
Foreign objects such as coins or safety pins maybe in drum or pump.
Stop washer and check drum and drain filter.
If noise continues after washer is restarted, call your authorised service centre.
Thumping sound
Heavy wash loads may produce a thumping sound. This is usually normal.
If sound continues, washer is probably out of balance. Stop and redistribute wash load.
Vibrating noise
Have all the transit bolts and packing been removed?
Are all the feet resting firmly on the ground?
If not removed during installation. Refer to Installation guide for removing transit bolts.
Wash load may be unevenly distributed in drum. Stop washer and rearrange wash load.
Water leaks.
Fill hoses or drain hose are loose at tap or washer.
House drain pipes are clogged.
There is something between the gasket and the glass.
Check and tighten hose connections.
Unclog drain pipe. Contact plumber if necessary.
Clean the gasket and the glass with the towel.
Over sudsing
Too much detergent or unsuitable detergent may cause excessive foaming which may result in water leaks, and vibration during spin.
Water does not enter washer or it enters slowly
Water supply is not adequate in area.
Water supply tap is not completely open.
Water inlet hose(s) are kinked.
The filter of the inlet hose(s) clogged.
Check another tap in the house.
Fully open tap.
Straighten hose.
Check the filter of the inlet hose.
Water in the washer does not drain or drains slowly.
Drain hose is kinked or clogged.
The drain filter is clogged.
Clean and straighten the drain hose. Clean the drain filter.
Washer does not start
Electrical power cord may not be plugged in or connection may be loose.
House fuse blown, circuit breaker tripped,or a power outage has occurred.
Water supply tap is not turned on.
Make sure plug fits tightly in wall outlet.
Reset circuit breaker or replace fuse. Do not increase fuse capacity.
If problem is a circuit overload, have it corrected by a qualified electrician. Turn on water supply tap.
Washer will not spin
Check that the door is firmly shut.
Close the door and press the Start/Pause button. After pressing the Start/Pause button, it may take a few moments before the clothes washer begins to spin. The door must lock before spin can be achieved.
Door does not open
Once started, the door can not be opened for safety reasons.
Wait one or two minutes before opening the door to give the electric locking mechanism time to release.
Display stuck on 6min left.
This washing machine checks the condition of the clothes at 6min left to evaluate if they are dry or not. If the clothes are not dry, the washing machine will further dry for 30min. The 6min display will then continue to count down after 30min.
Check the weight of clothes. The weight of the clothes should be less then 4kg.
Wash cycle time delayed
It takes time to balance the laundry before the spin cycle
The washing time may vary by the amount of laundry, water pressure, water temperature and other usage conditions.
If the imbalance is detected or if the suds removing program works, the wash time shall be increased.
Stop the wash and pull out the laundry then put it again to untwist
Dry problem
Does not dry
Do not overload.
Check that the washer is draining properly to extract adequate water from the load. Clothes load is too small to tumble property. Add a few towels.
IE
Water supply is not adequate in area
Water supply taps are not completely open.
Water inlet hose(s) are kinked.
The filter of the inlet hose(s) are clogged.
Check another tap in the house. Fully open tap.
Straighten hose(s). Check the filter of the inlet hose(s).
0E
Drain hose is kinked or clogged.
The drain filter is clogged.
Clean and straighten the drain hose. Clean the drain filter.
UE
Load is too small.
Load is out of balance.
The appliance has an unbalance detection and correction system. If individual heavy articles are loaded (ex. bath mat, both robe, etc.), this system may stop spinning or even interrupt the spin cycle altogether.
If the laundry is still too wet at the end of the cycle, add smaller articles of laundry to balance the load and repeat the spin cycle.
Add 1 or 2 similar items to help balance the load. Rearrange load to allow proper spinning
dE
Is the door opened or not completely closed?
Close the door completely.
❋ If “dE” is not released, call for service.
tE
Unplug the power plug and call for service.
FE
Water overfills due to the faulty water valve.
Close the water tap. Unplug the power plug. Call for service
PE
Water level sensor has malfunctioned.
CE
Over load in motor.
LE
Over load in motor.
PF
The washer experienced a power failure.
Restart the cycle.
dHE
Check water supply
Turn the tap on If “dHE” is not released, unplug power plug and call service.


 ) button to start.
 ) button.


 ” is displayed. By pressing the “Start/Pause” button the program can be ended. If you not press the “Start/Pause” button, the program is ended after about 4 hours. “